
Leaderboard


Popular Content
Showing content with the highest reputation on 04/12/24 in all areas
-
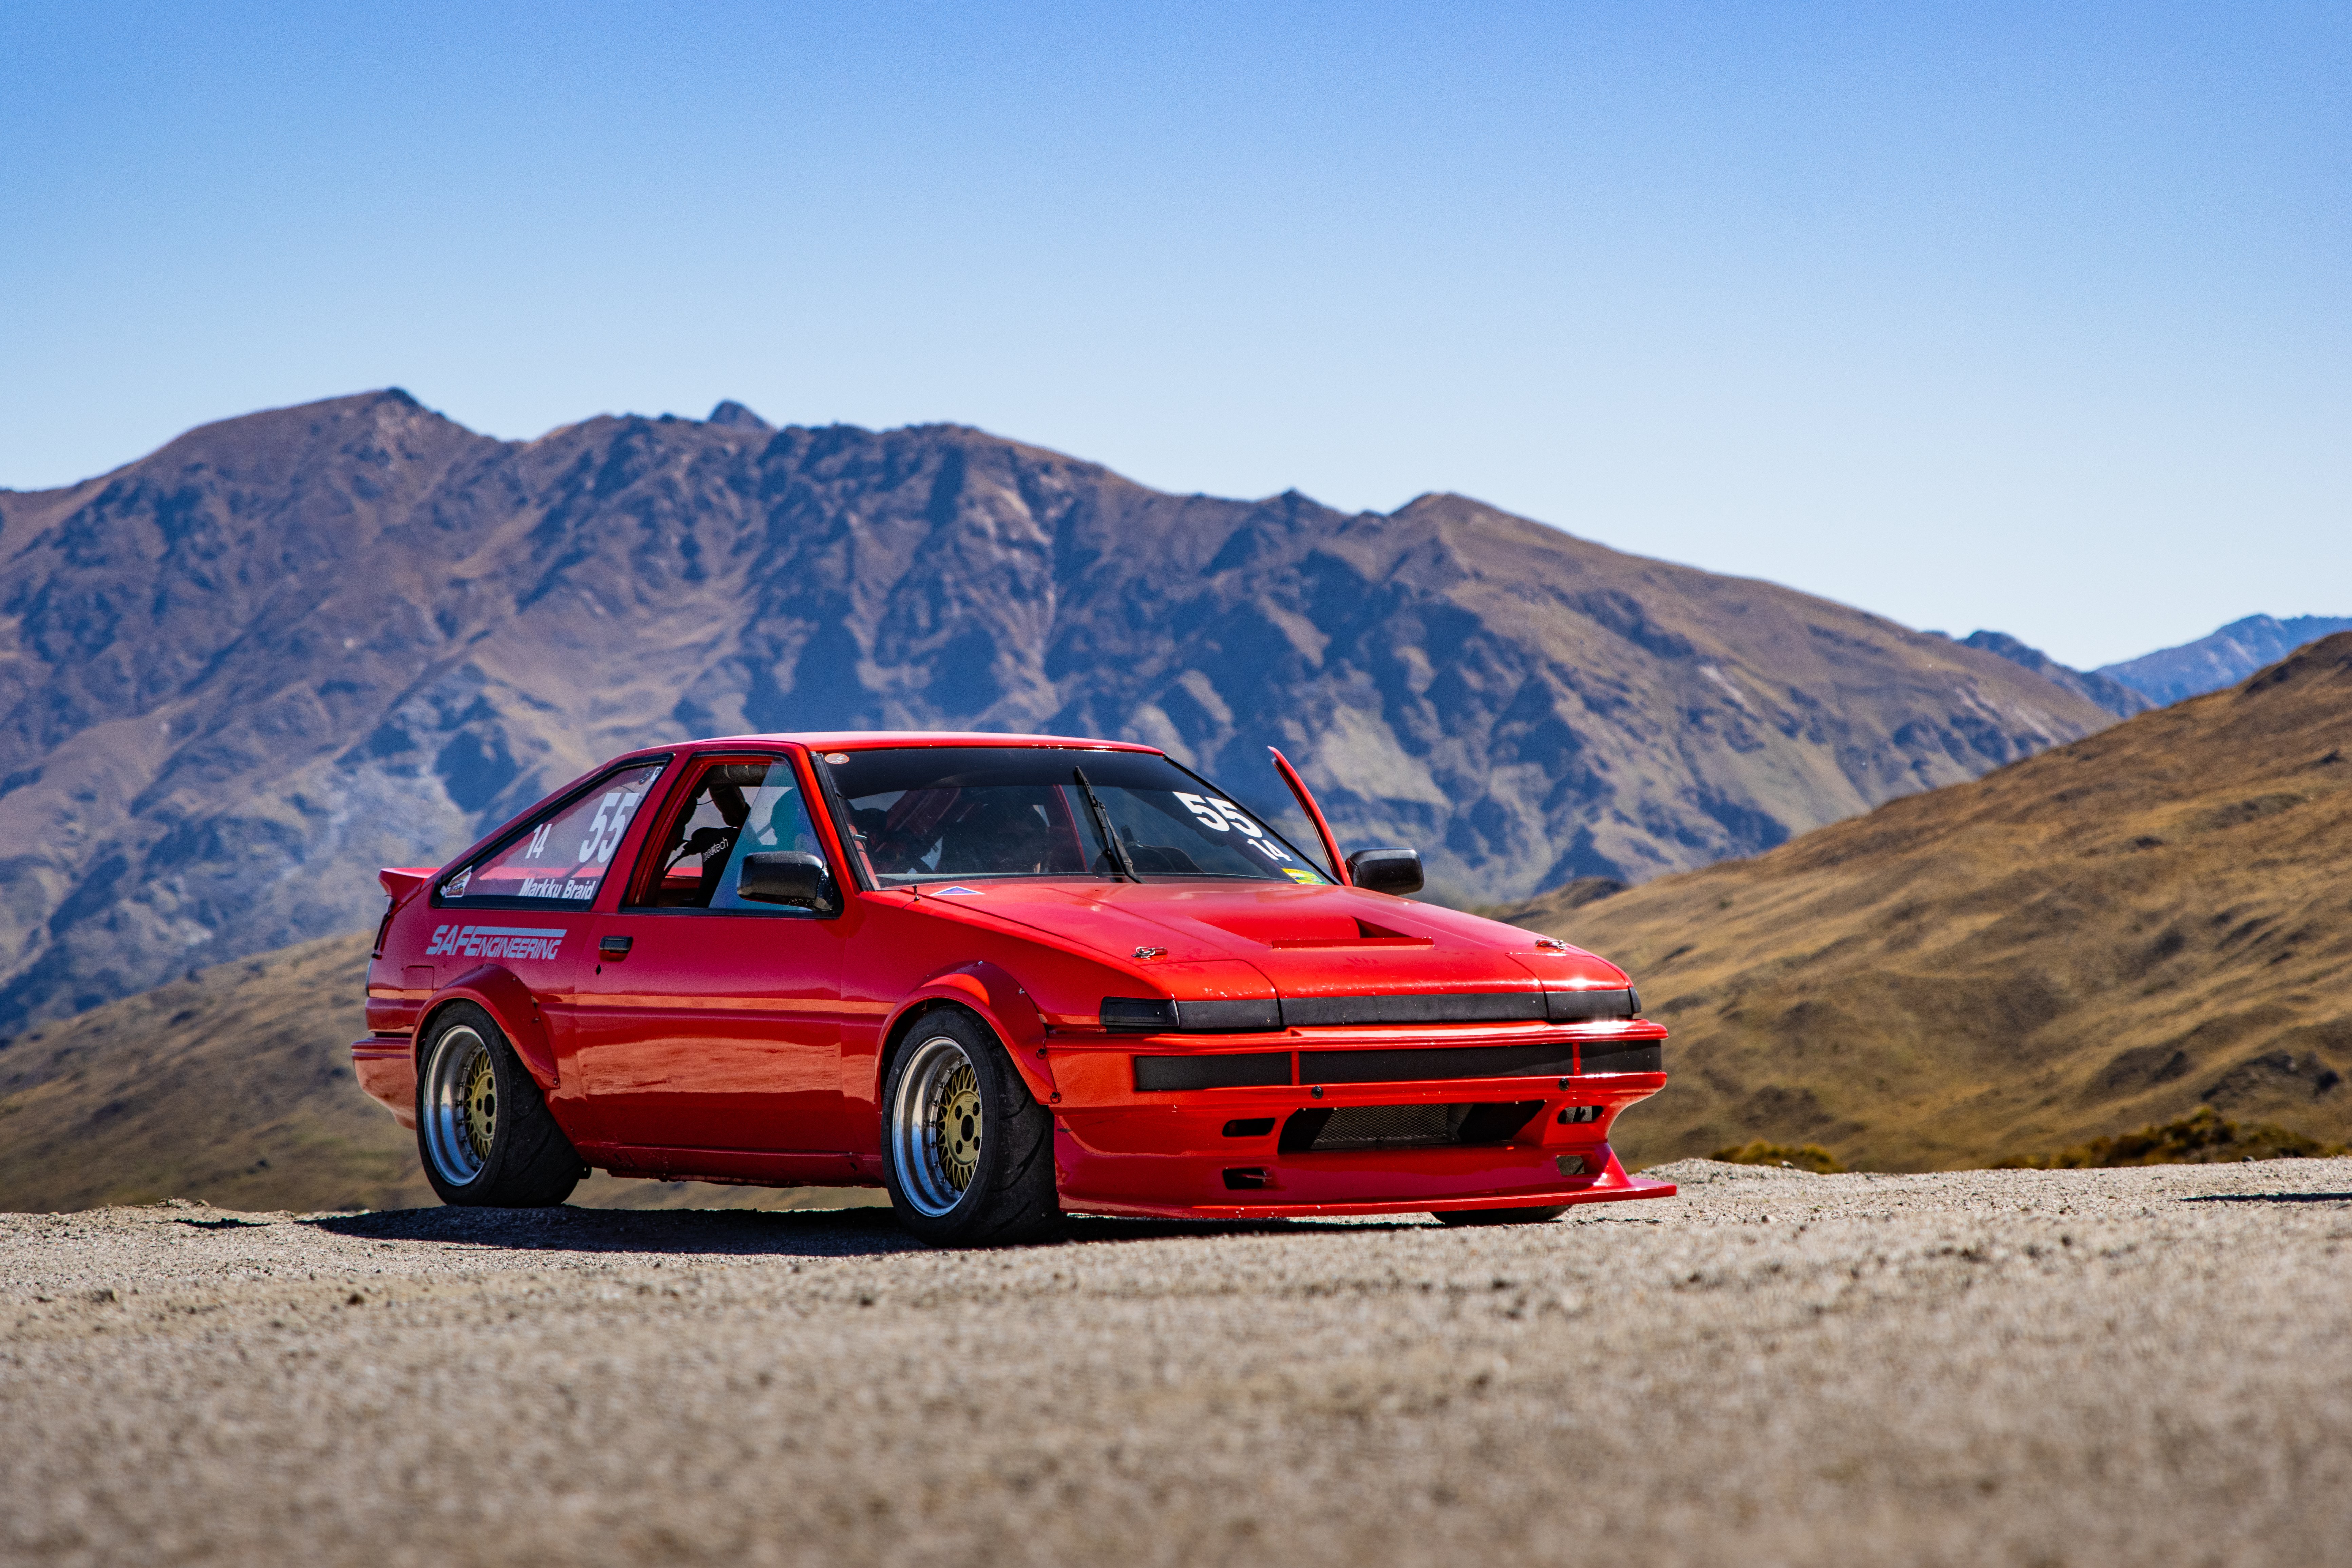
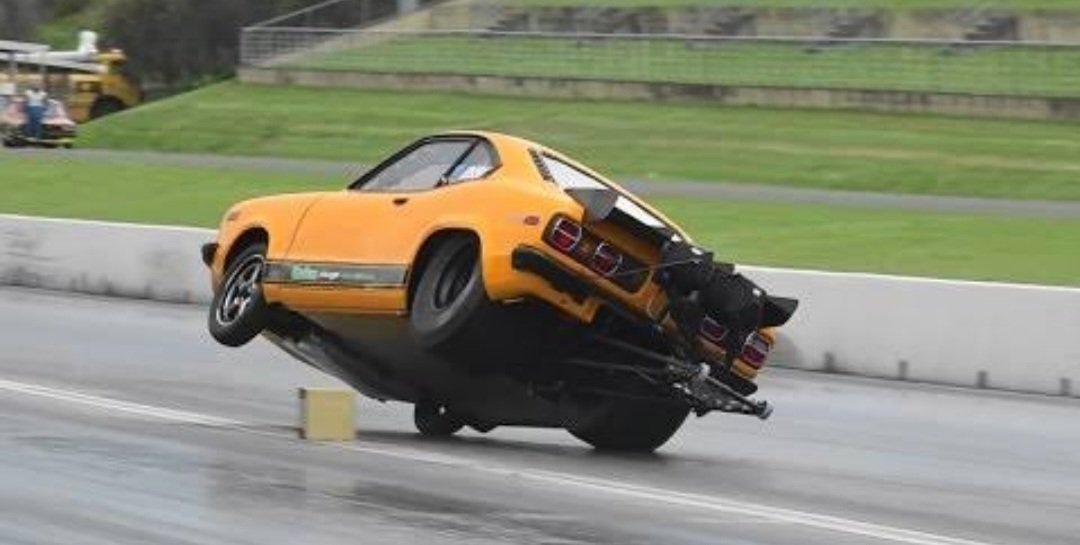
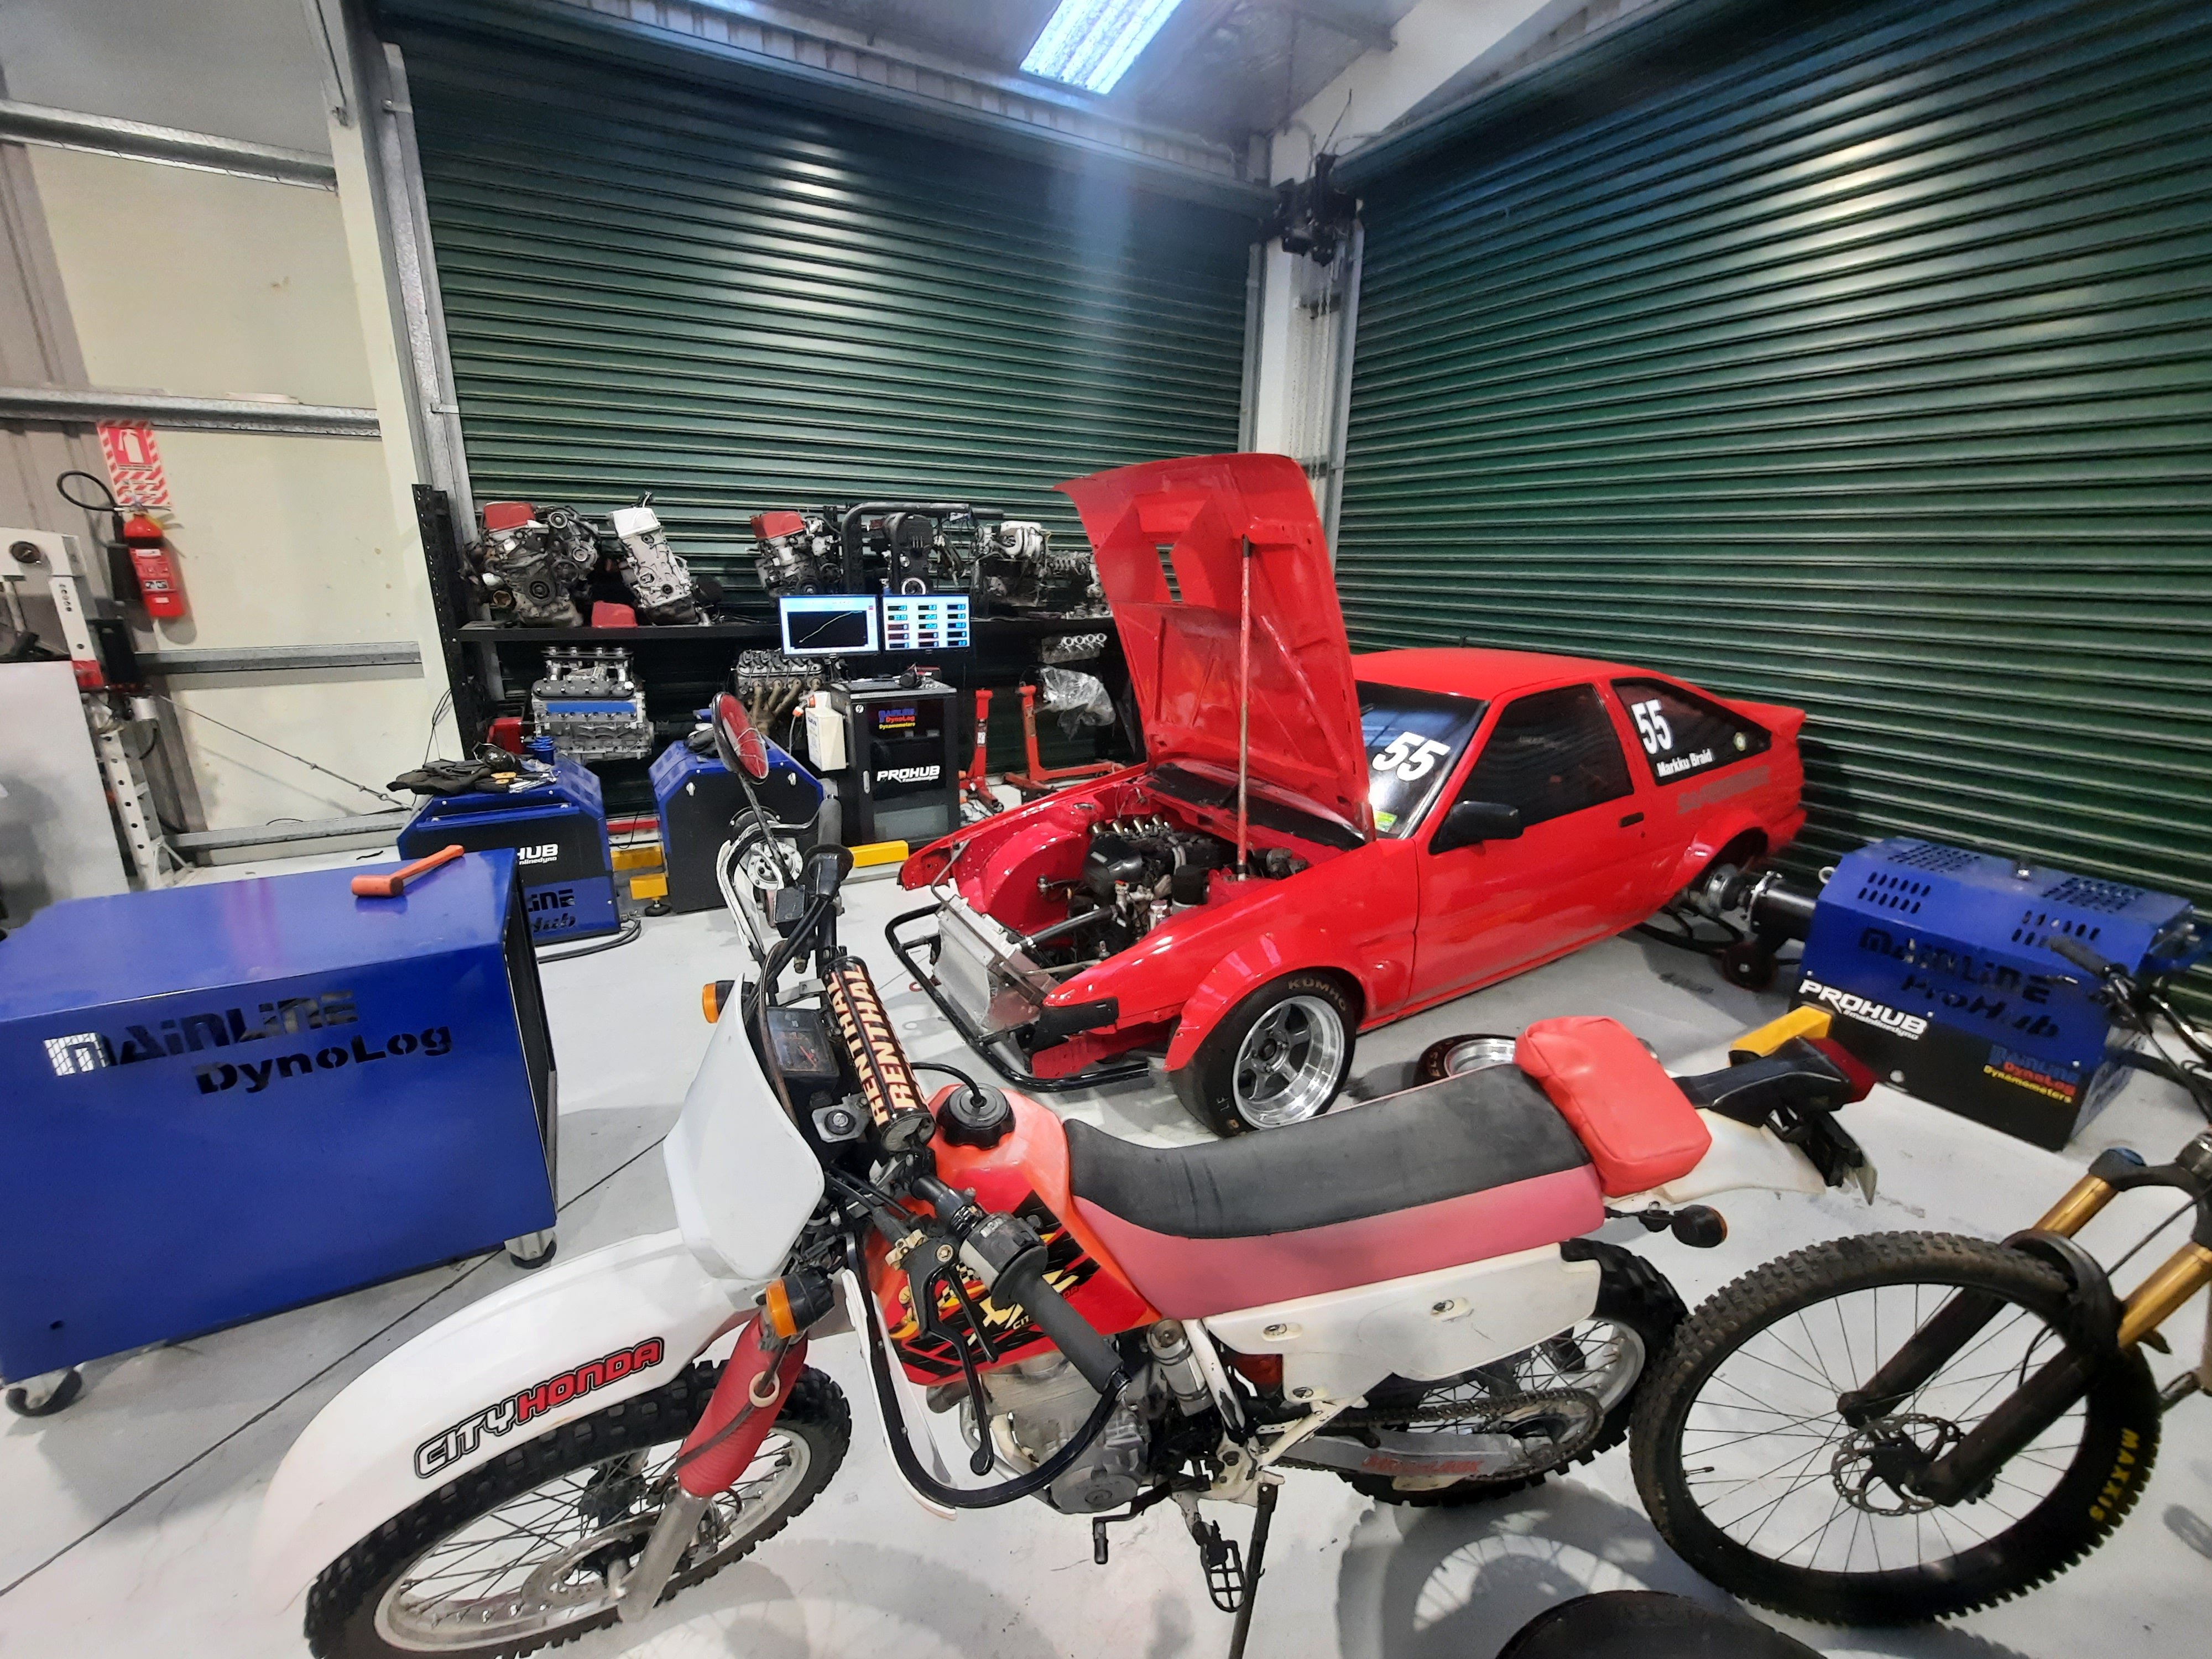
Entered a hillclimb in the weekend. I'll come back to tell the story soon... for now, here's some eye candy.
 28 points
 -
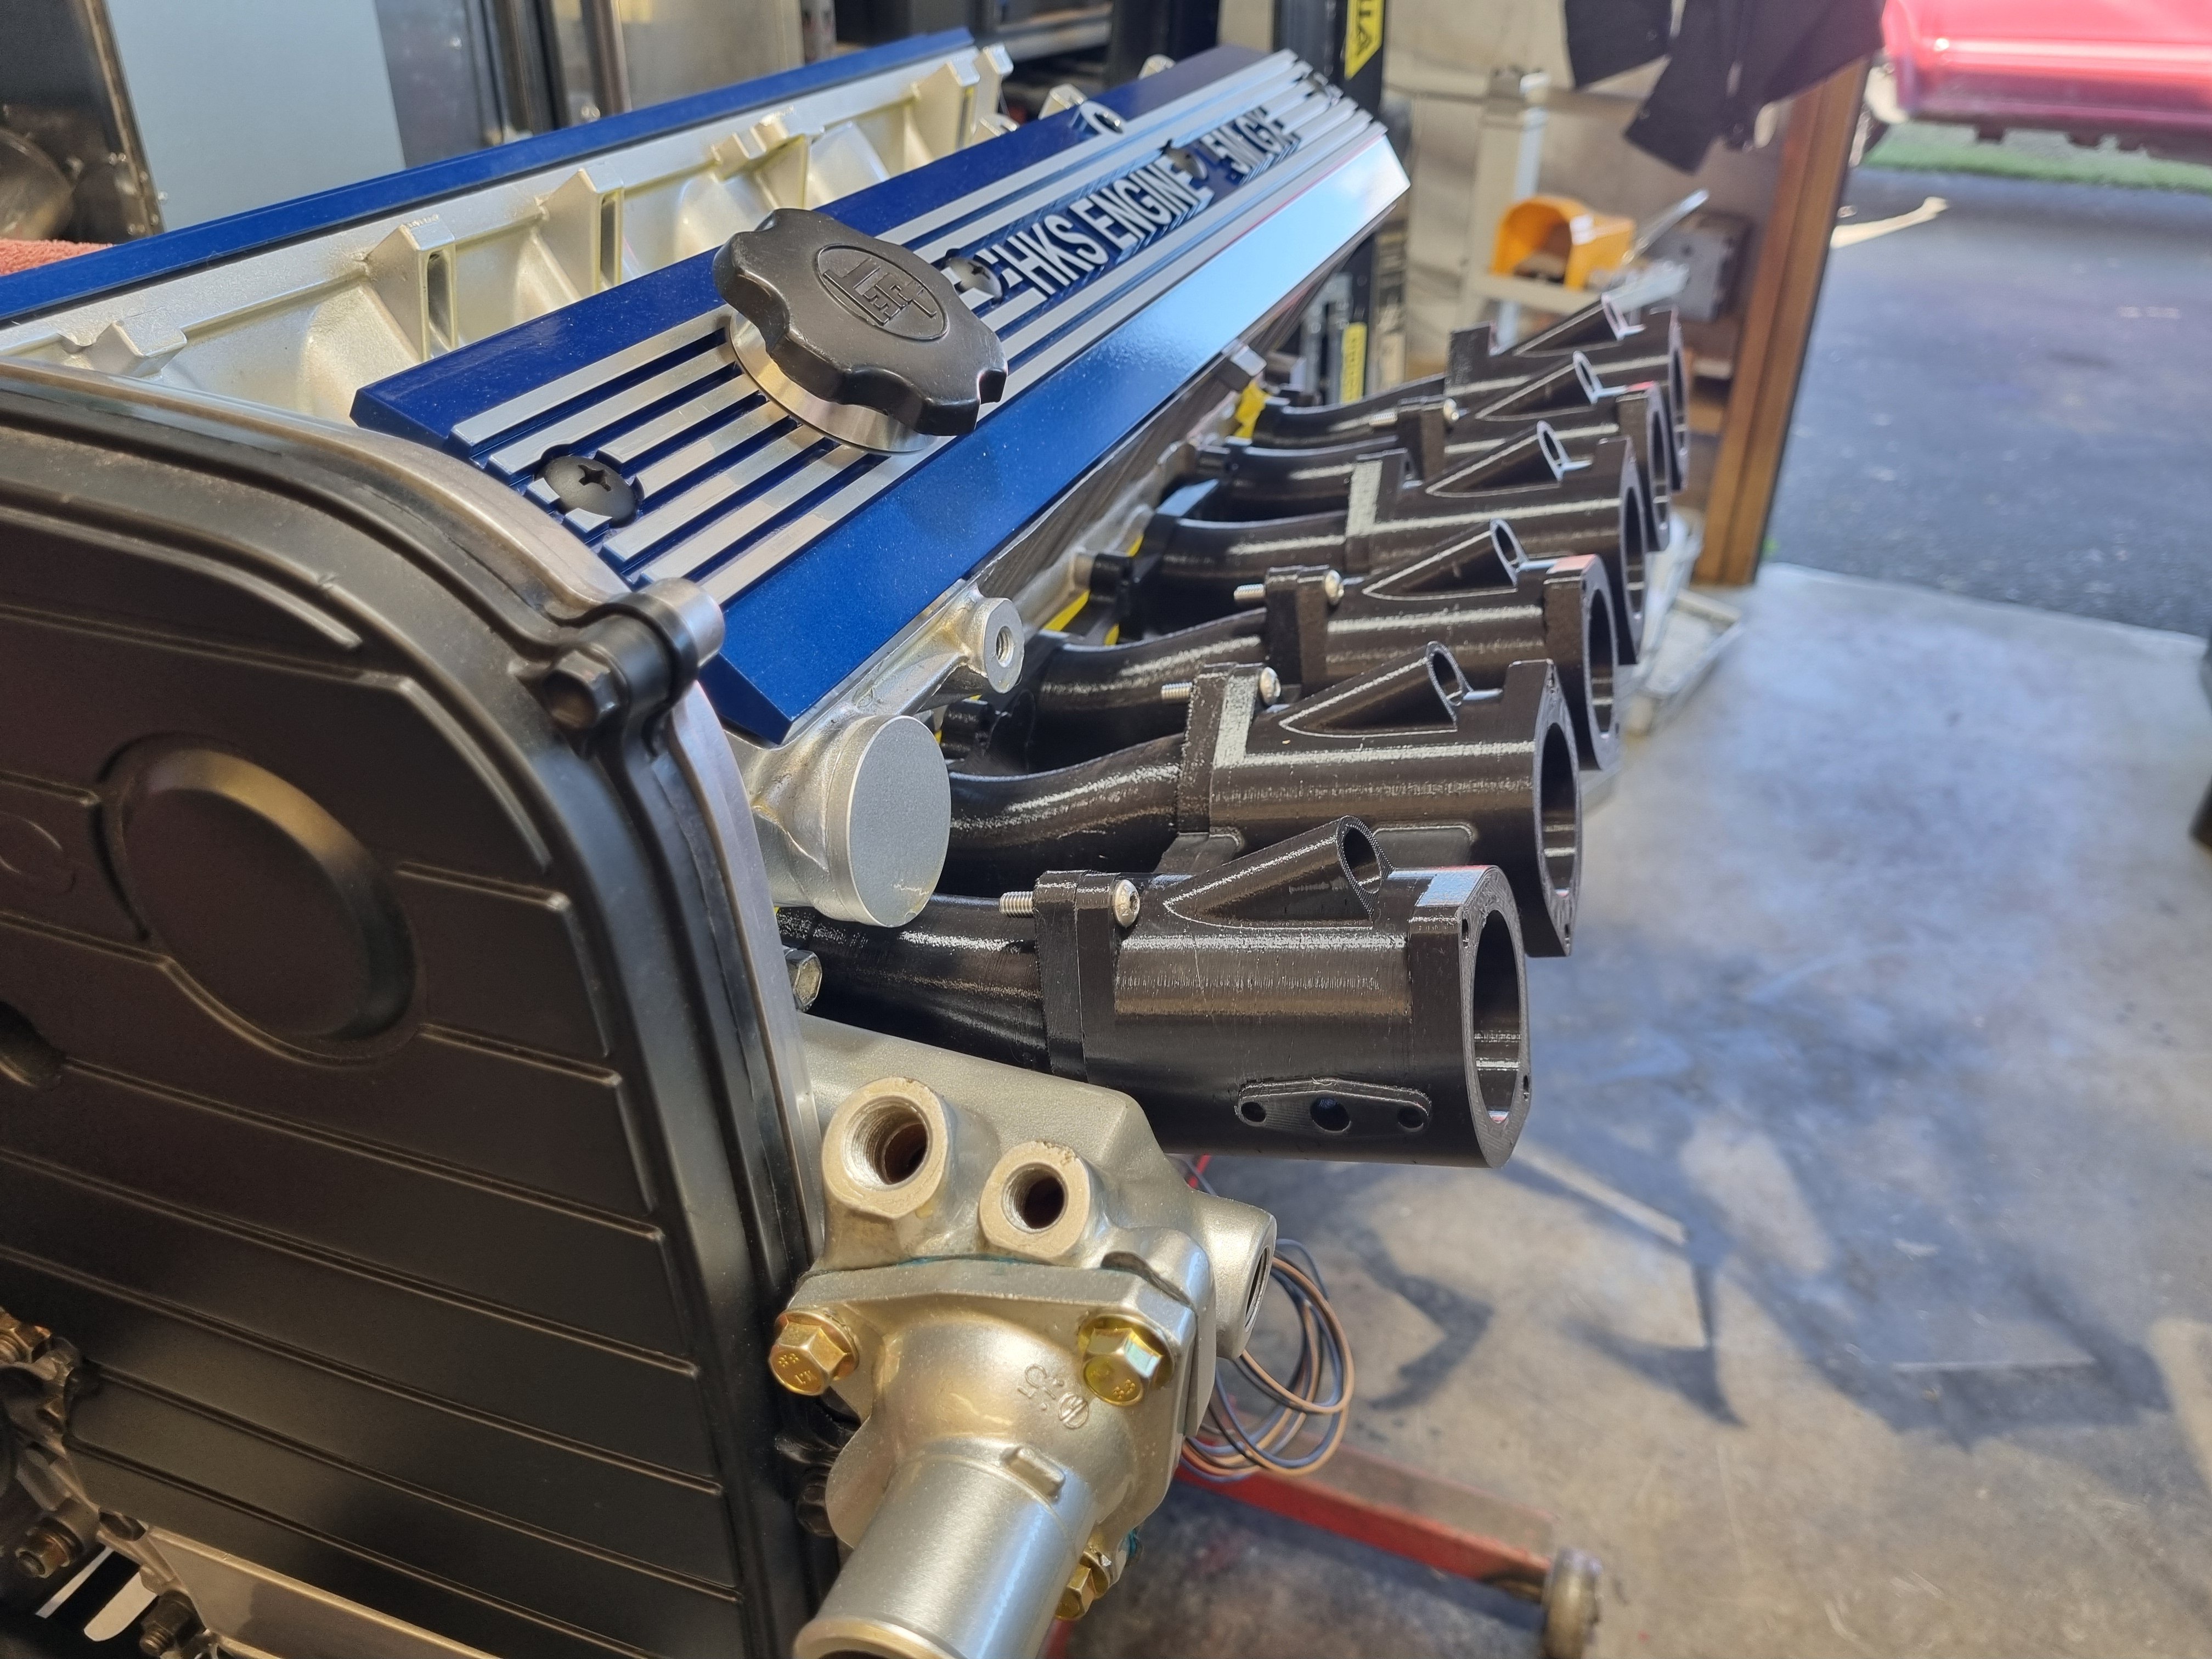
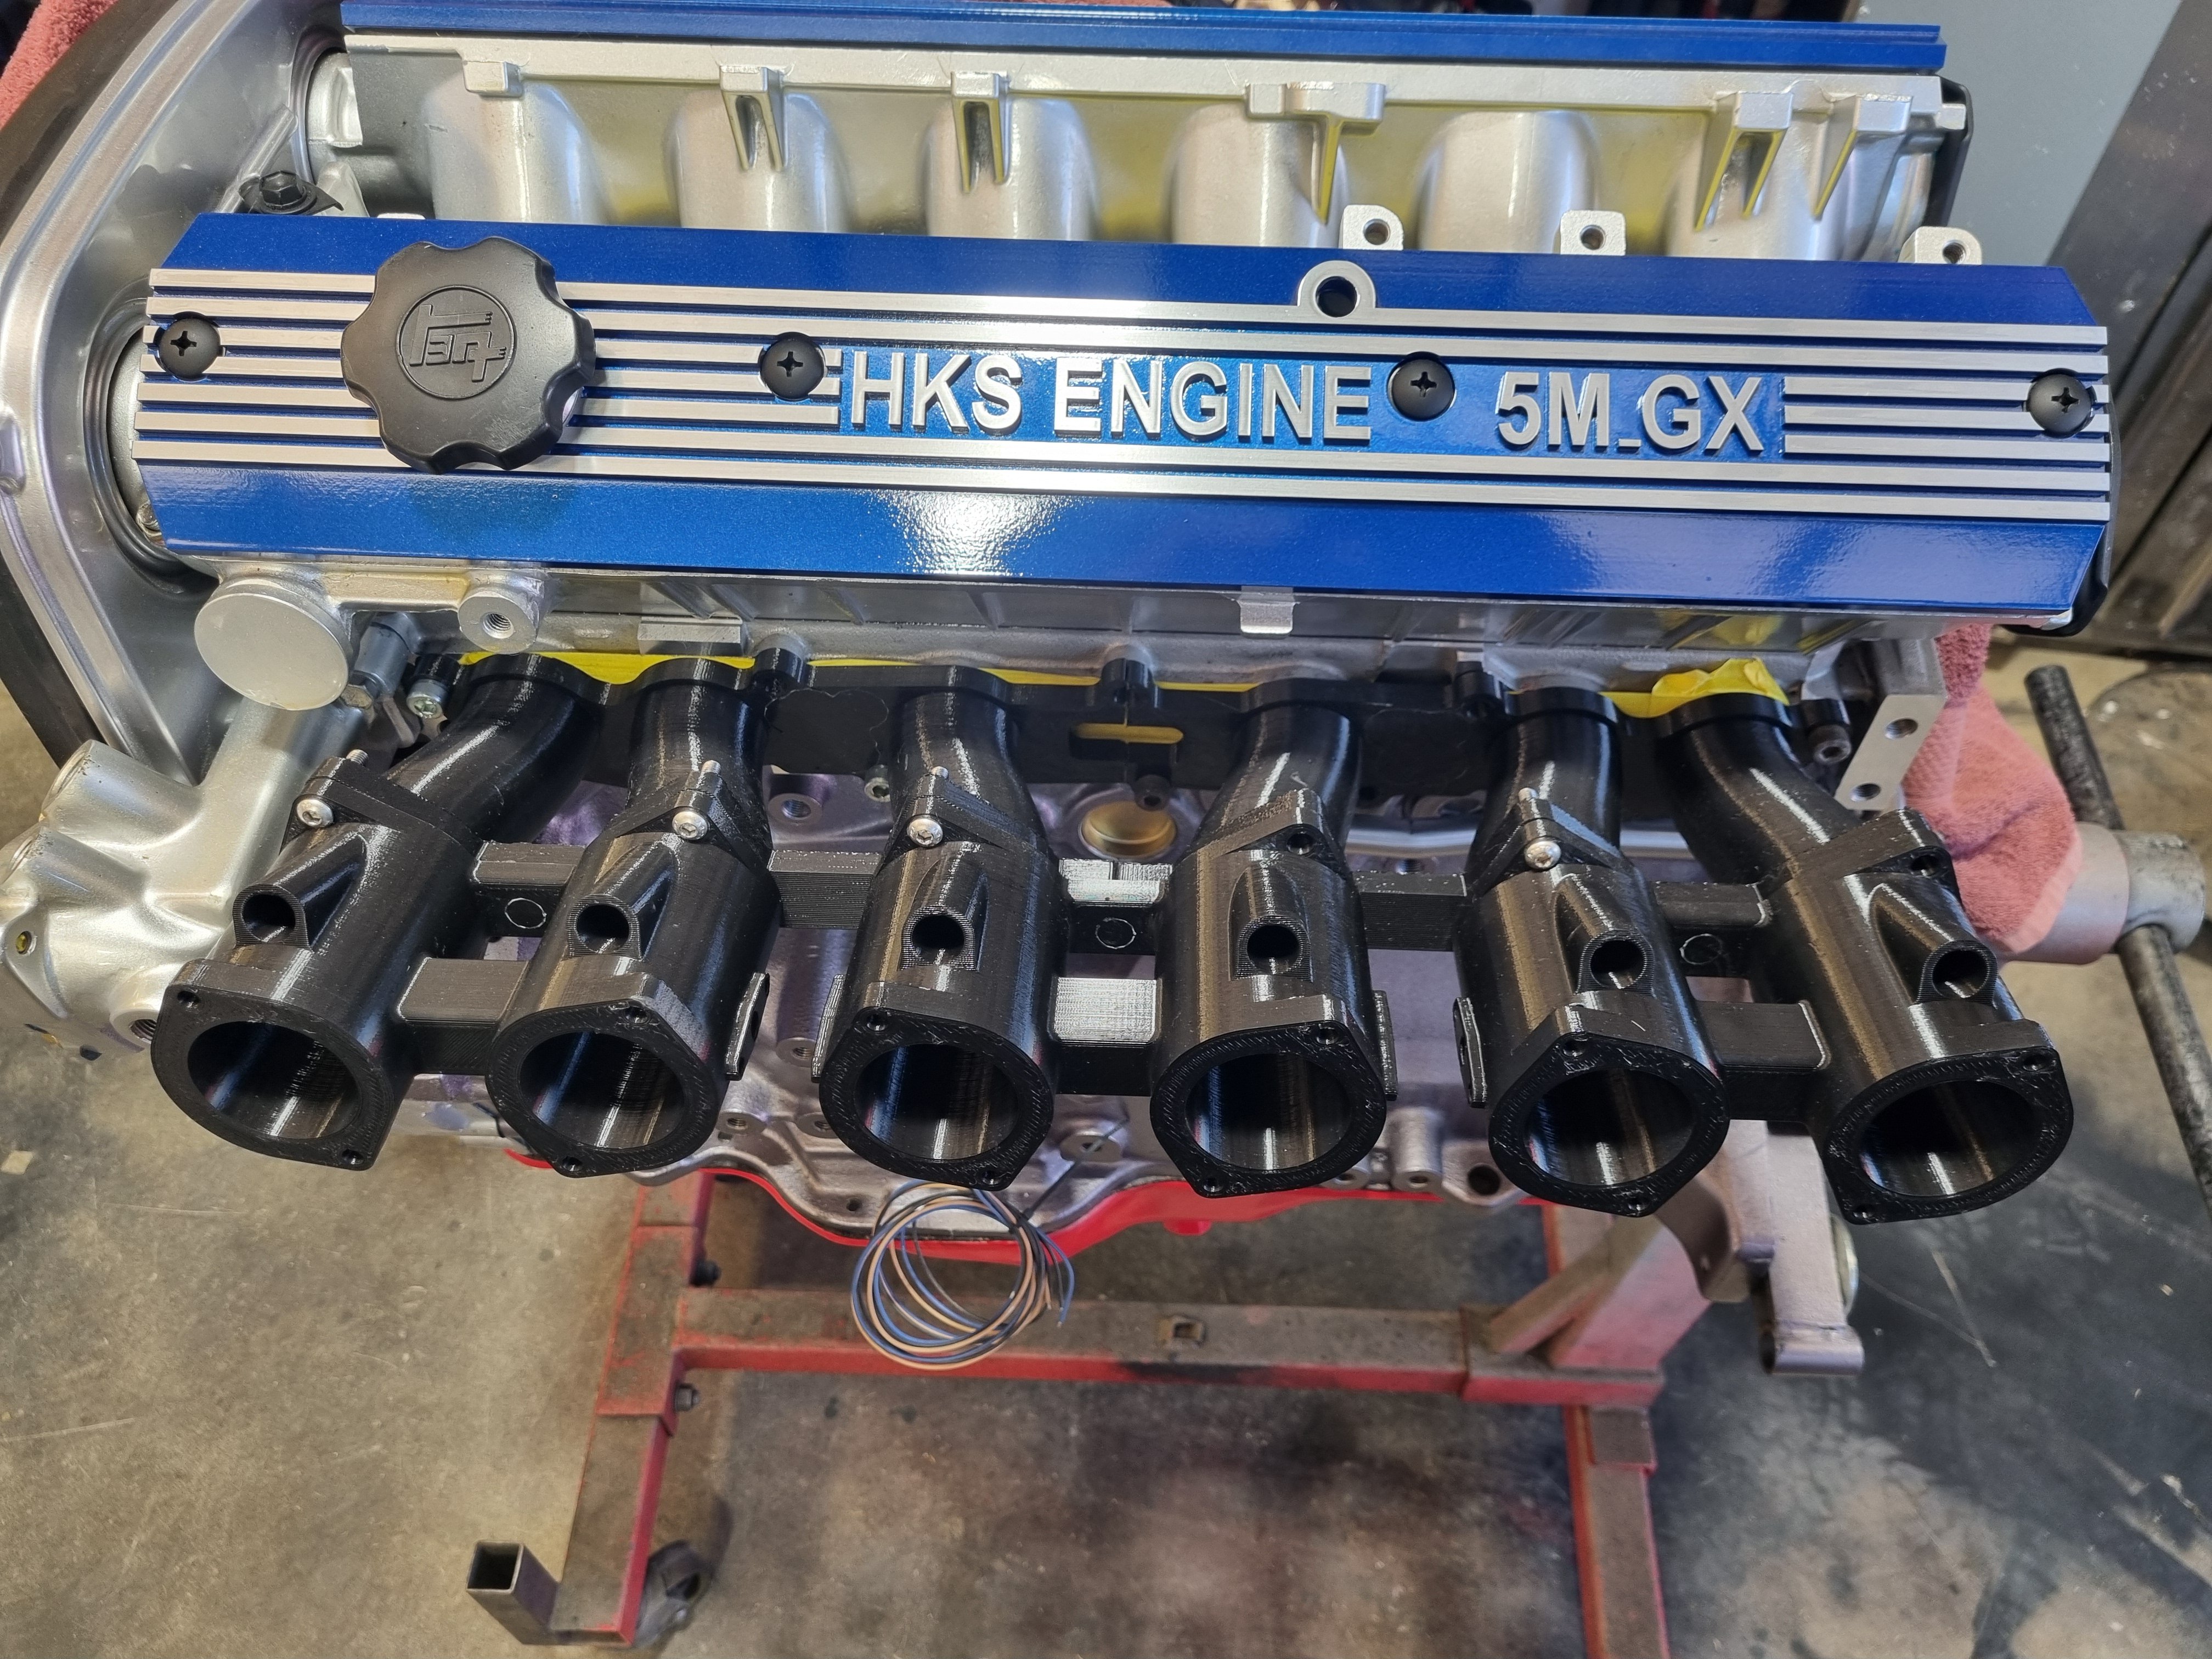
Printed some throttles to get a better idea. It's pretty good, I'll guesstimate how it might work in the engine bay and take it from there.
13 points
-
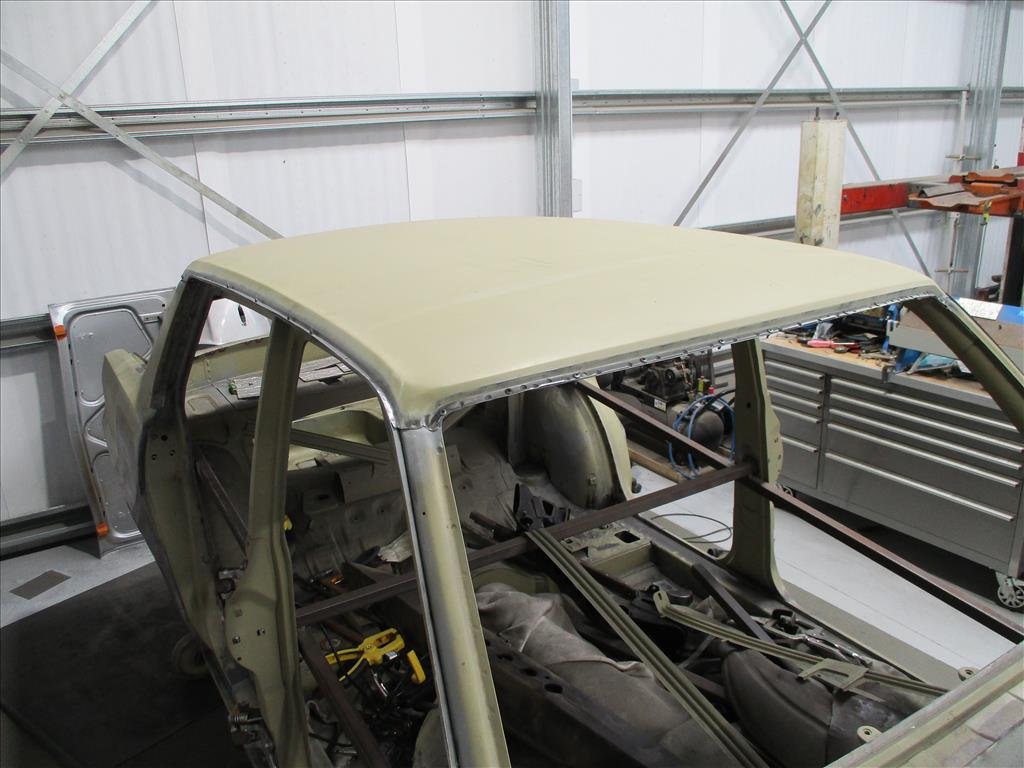
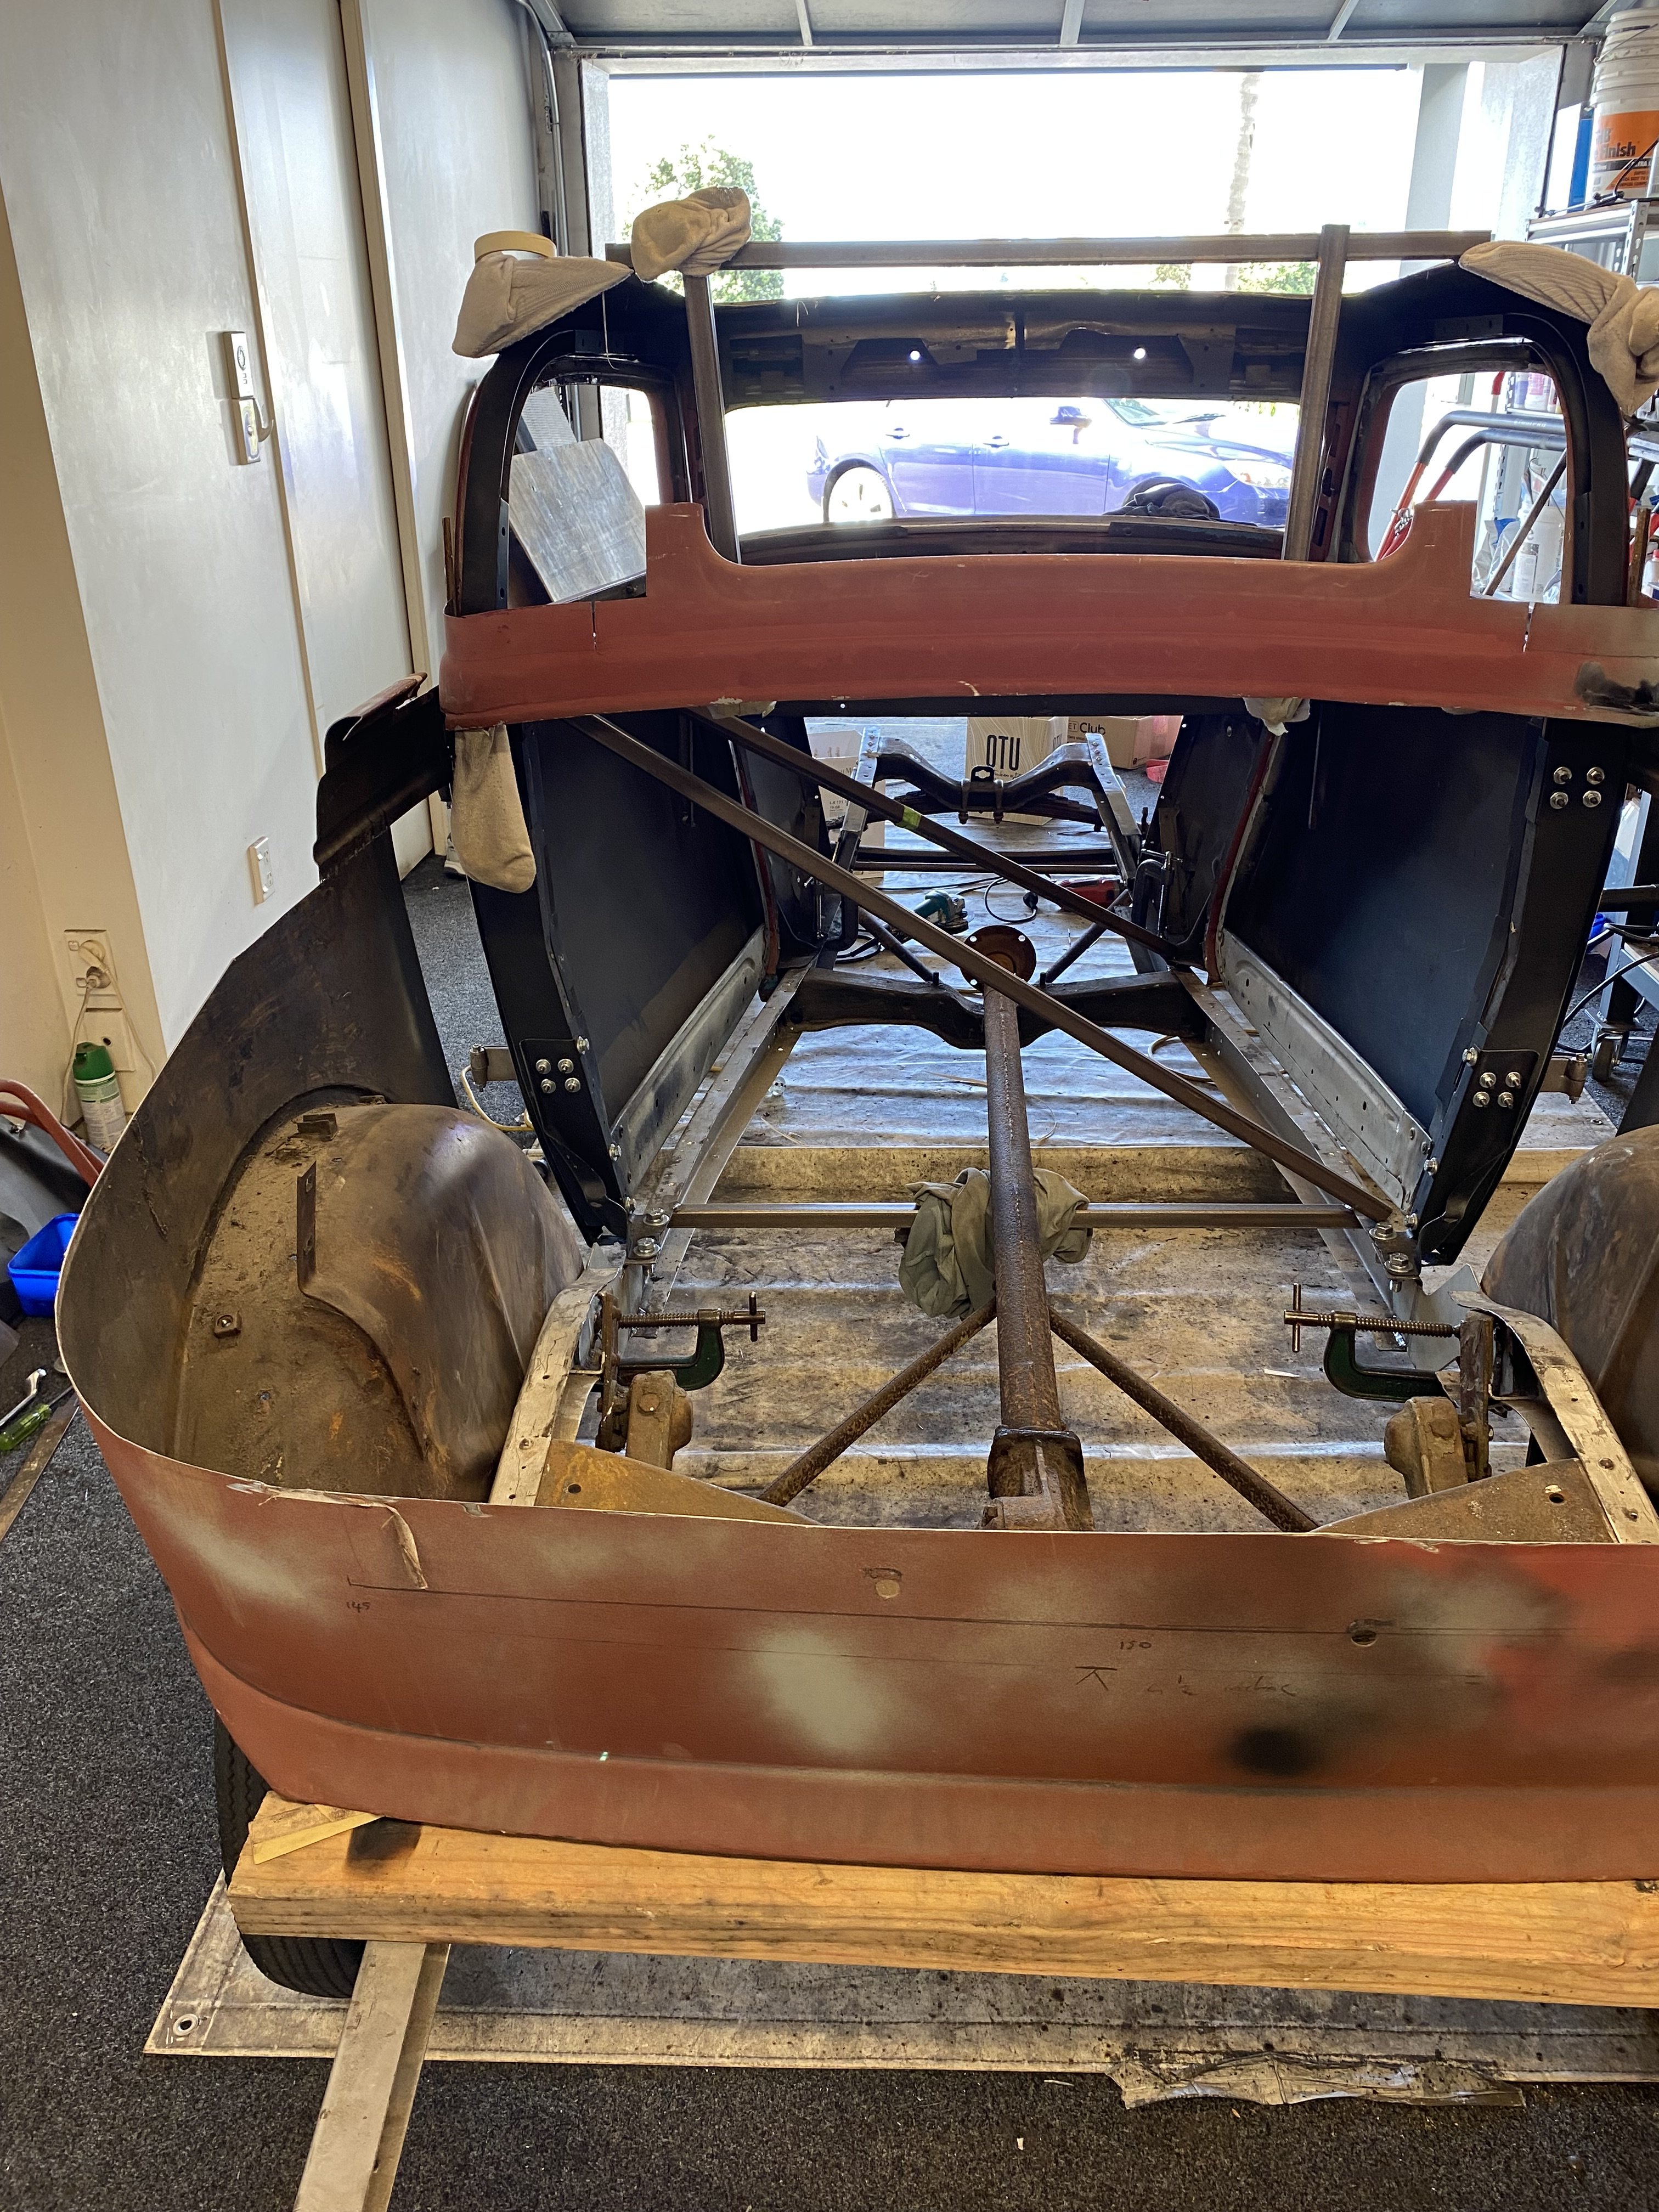
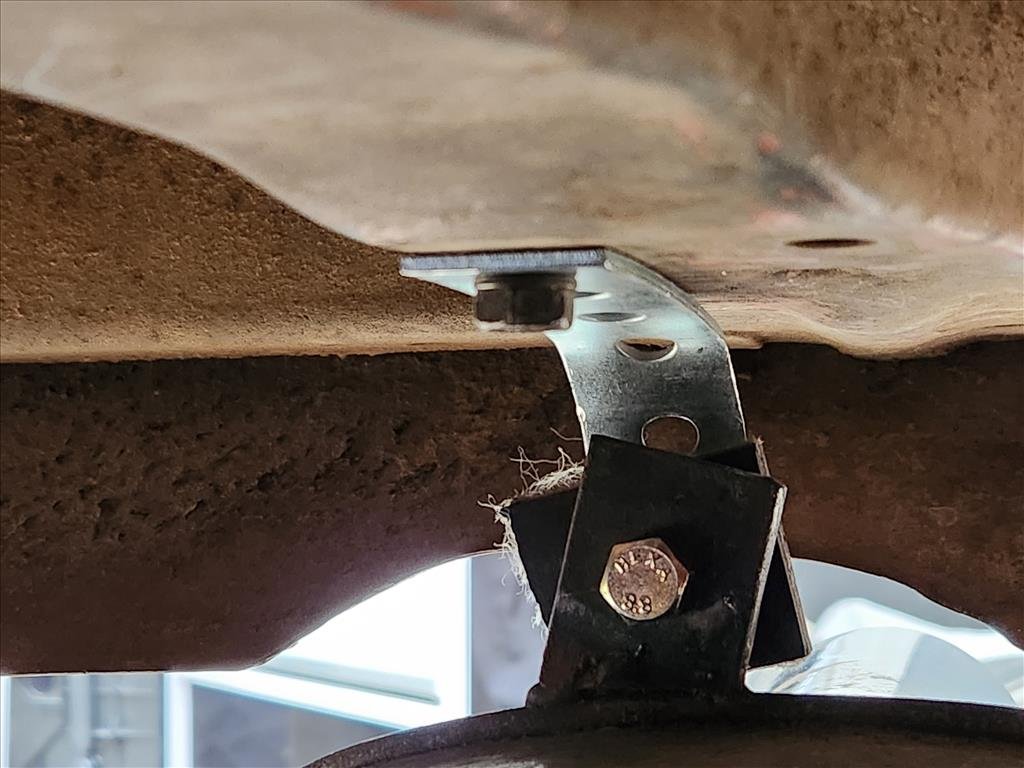
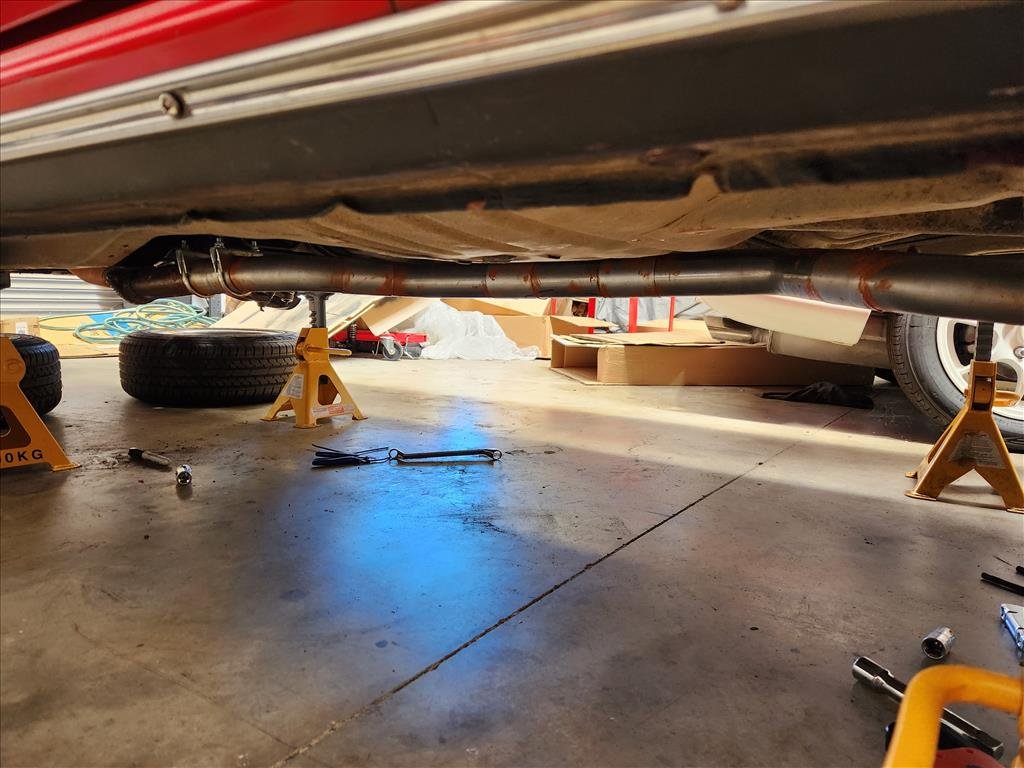
We drilled out the rivets and peeled back the outer layer. Also took out the random screws that Barry only put in one side. (because rivets, and silicone isn't enough). Chisled out the random bracket of which there is only one, that was to hold those side bars on. Cut the box section and peeled everything back and here we are. If you look closely at the pictures you will see a few areas of surface rust that will need some attention. You'll also see the rust hole at the bottom of top of the guard that will need fixing too. It was inevitable with the roof set up the way it was water was going to be trapped somewhere and fester away. But overall, wayyy better than I thought it would be as the rivets didn't make it through to the windscreen frame. From there we turned it into a speedster, as Mokes only have a couple of bolts holding the windscreen on. Means I can sort sandblasting the frame and pulling the window out to shout it a new seal as the old one is pretty cooked (It may even be the original). From there, we got it up on the hoist and had a crack at some of the rust underneath, but that is another story for another day and a whole lot more work. I'm also looking to engage a repair certifier in the South Auckland or Waikato area. As plans have changed a little and I'd like to get this road legal if I could. If anyone has any recommendations of guys that actually answer emails and phones and don't spread themselves thin with too much work and are reasonable when it comes to old cars (not asking for much hey...) Let me know. I can go to them or I have the hoist at the old mans place just out of Pukekohe to get it in the air and have a look etc.10 points
-
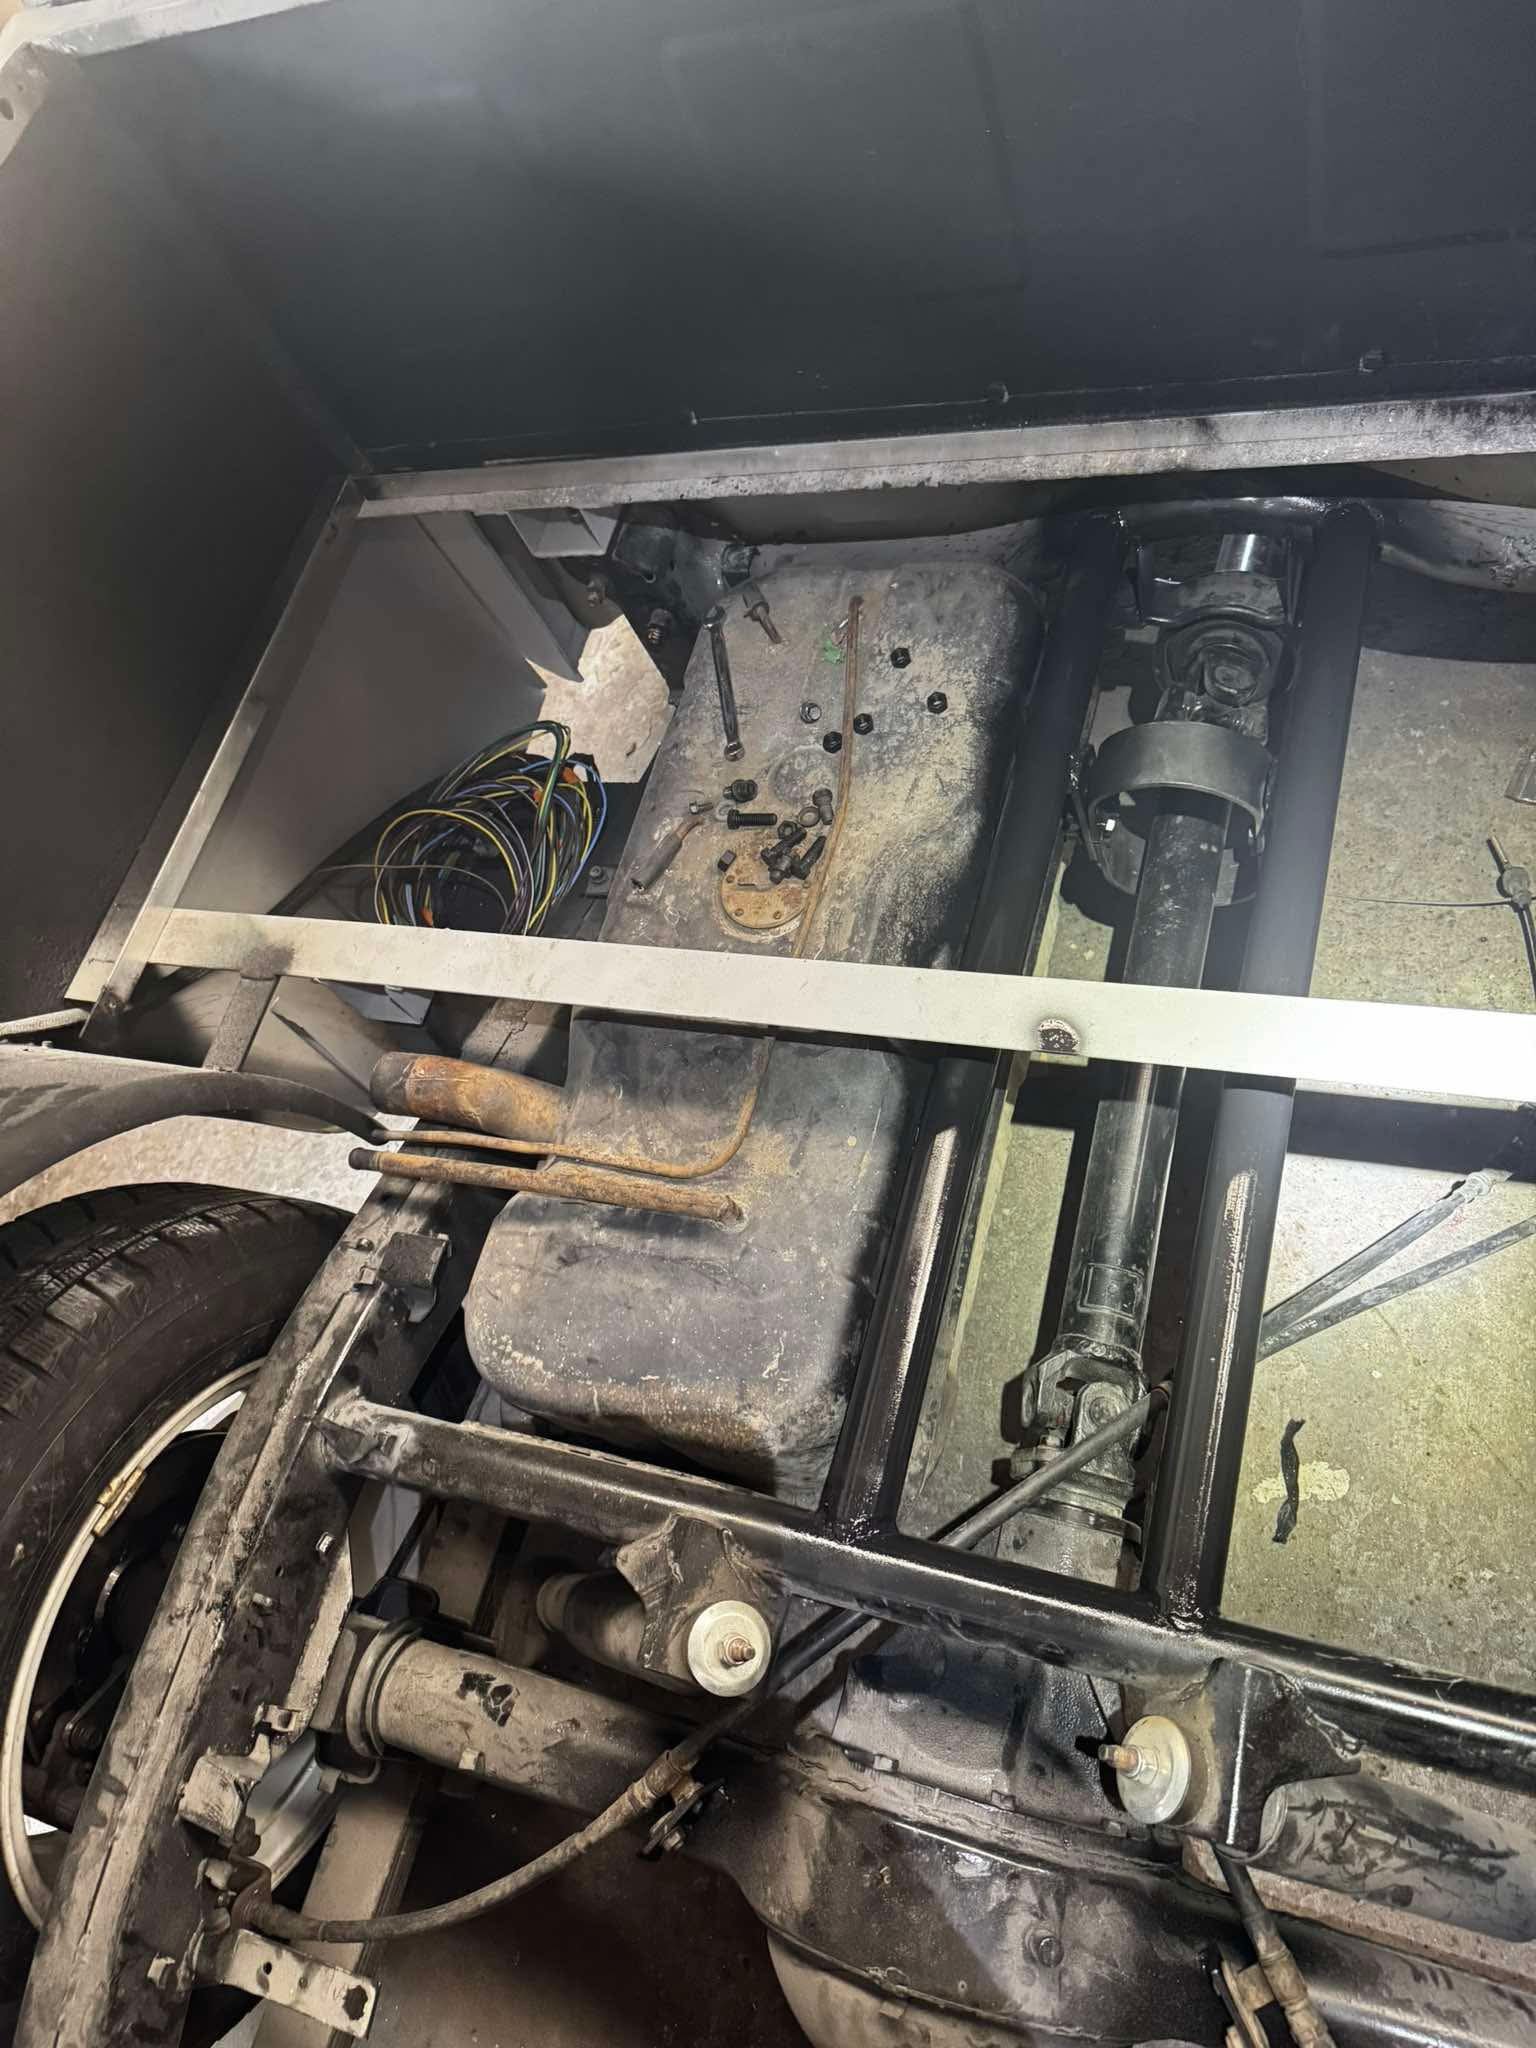
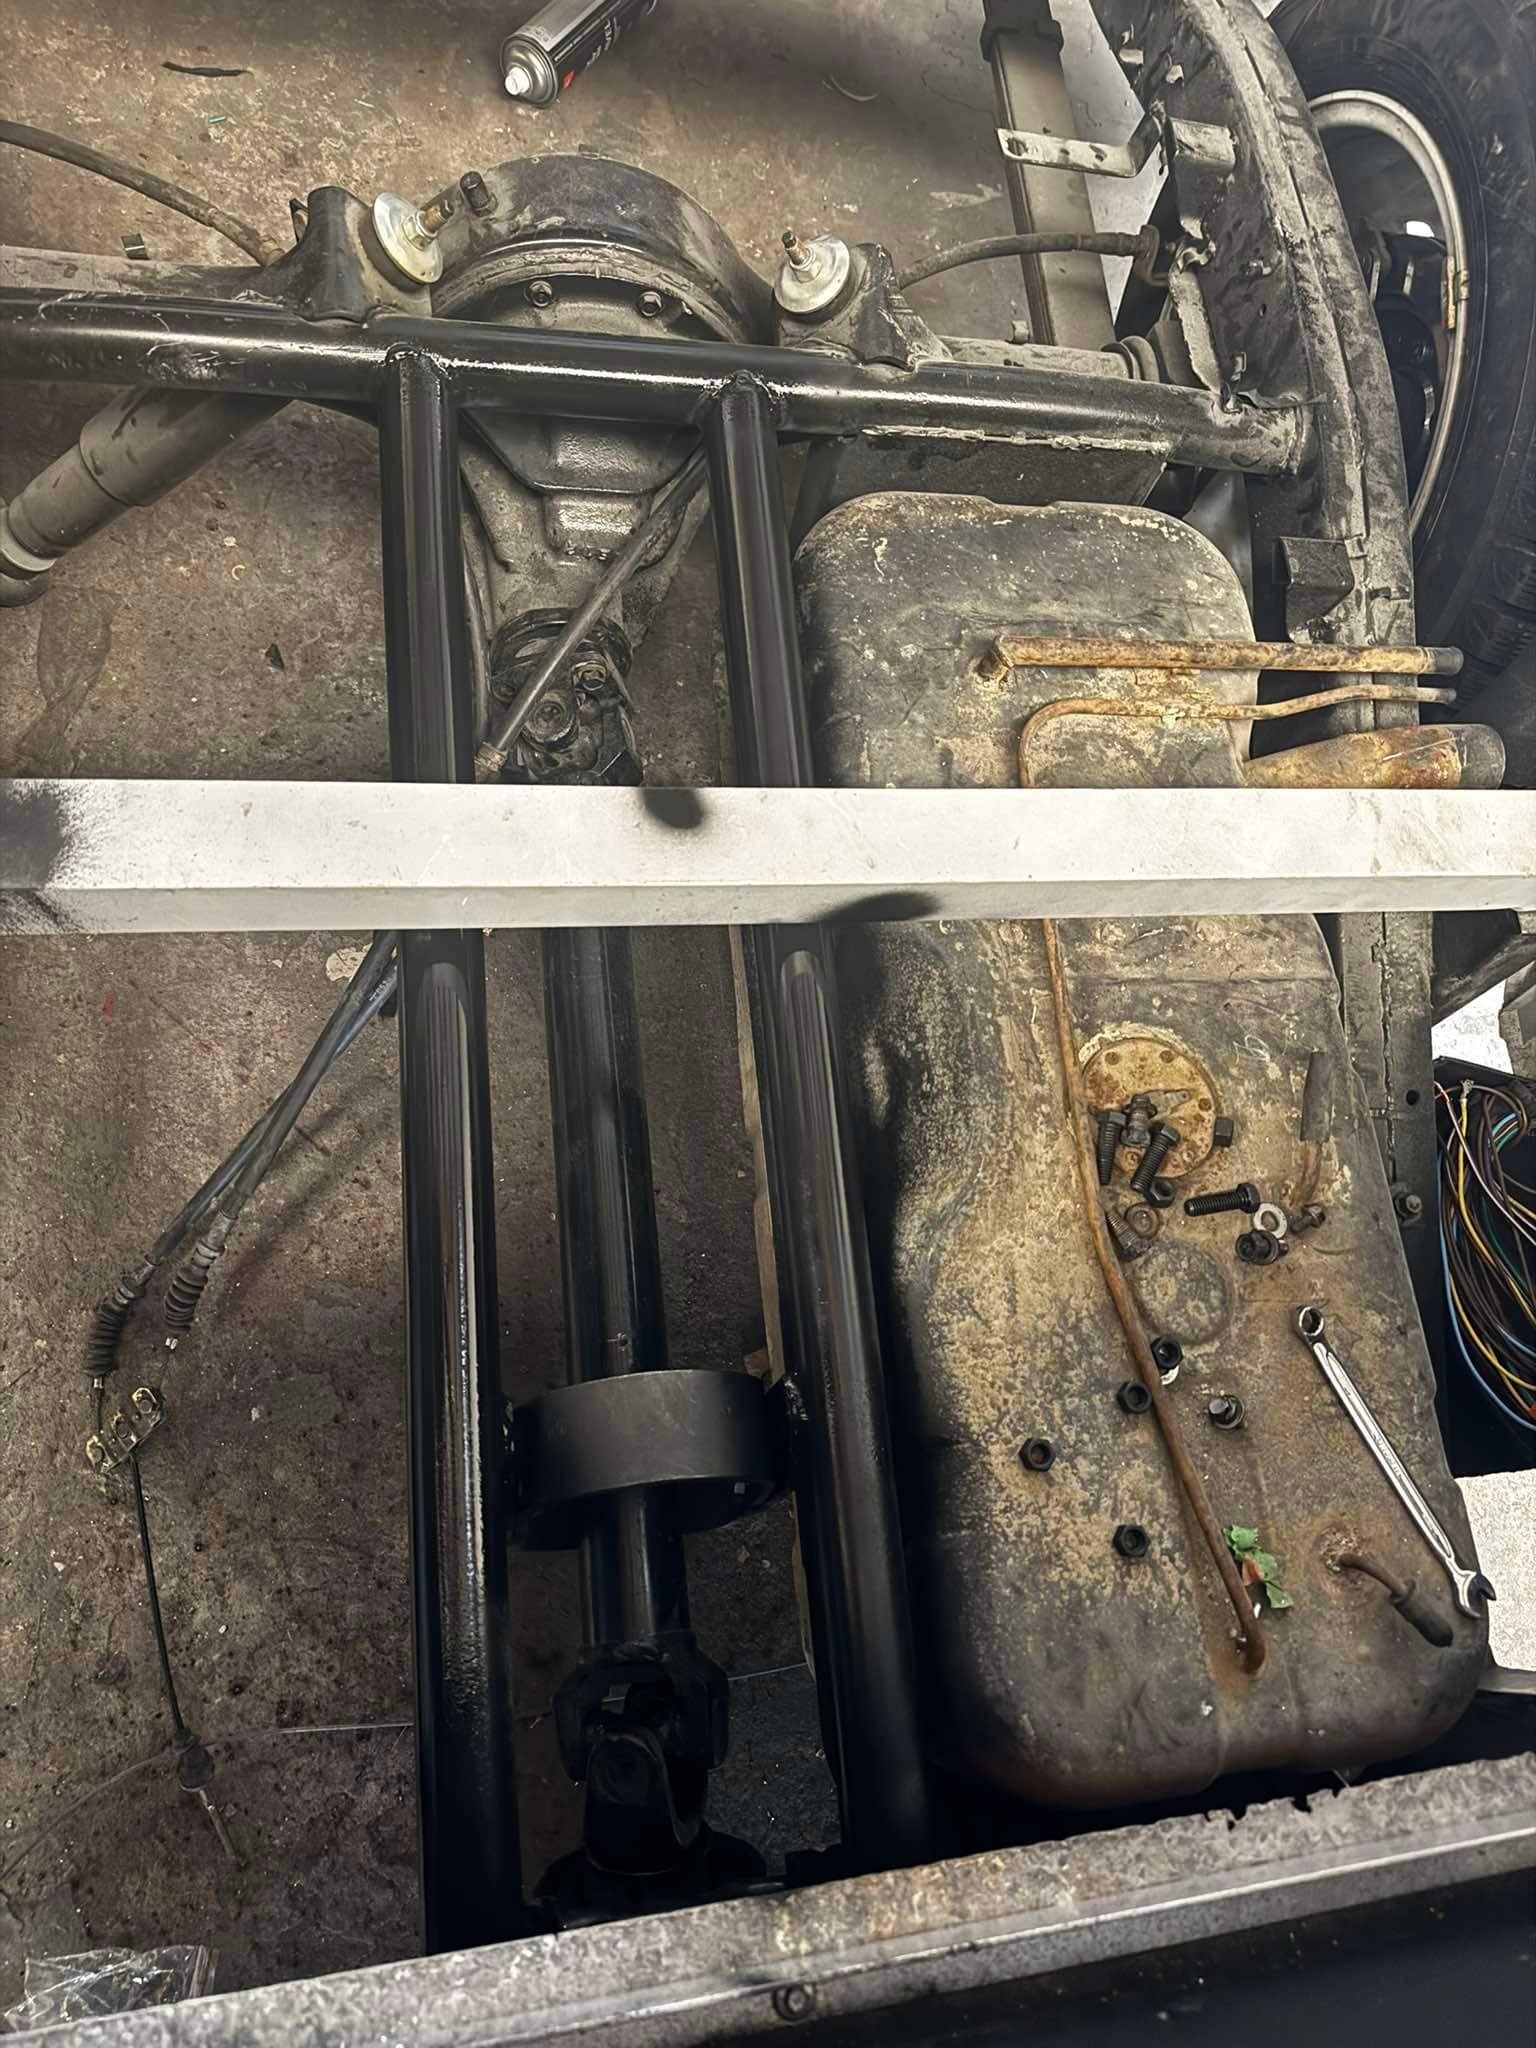
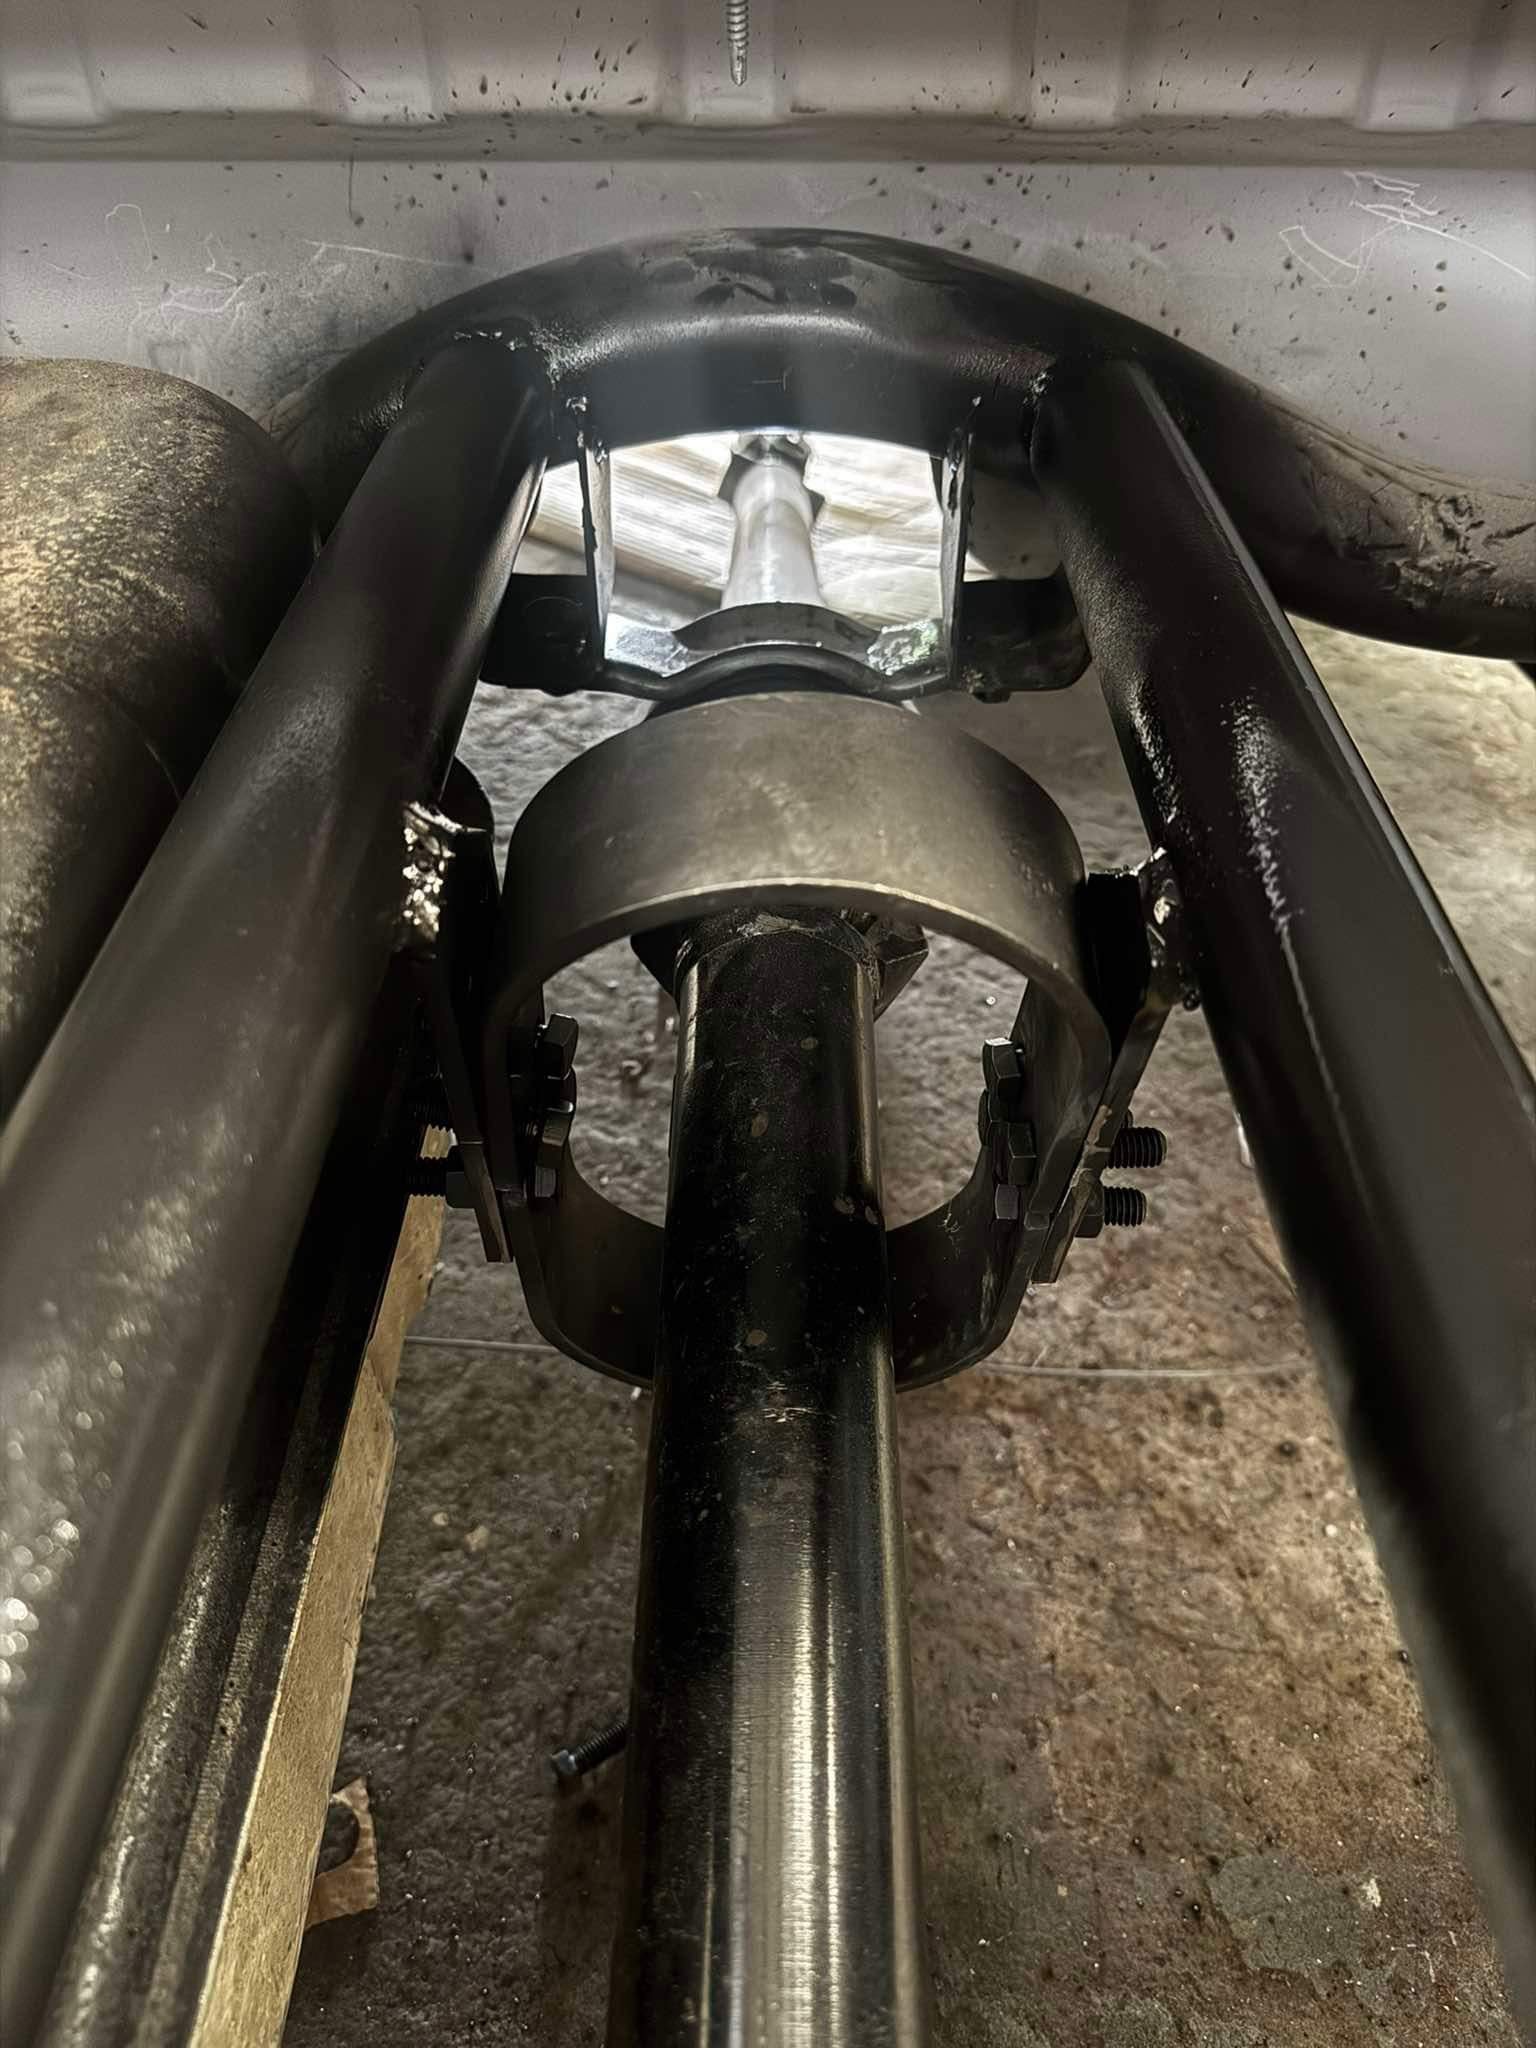
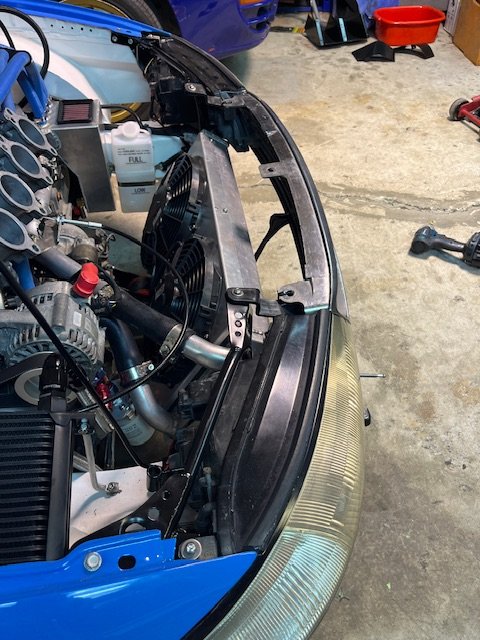
Alright, so another update. Again longer than we thought inbetween updates. Anywho, where I left off last time was at the start of October. I was on the hunt for a shifter and slowly plodding away getting the Mini ready for Mini Nationals in Cambridge over Labour weekend. I managed to pick up a shifter from a guy locally. I also had the guy who built my last engine and gearbox (in the Mini) have a look at my bottom end and gearbox. He said the gearbox is sweet. But the block is junk as a heat mark where the piston melted has gone through to the next bore. Good thing I picked up some spares. But I'll use the crank and rods out of the melted one. So Mini Nationals went well. I think my car was well received. Its my 2nd time entering with me doing the one in Auckland a few years back. Left 6am from Auckland and trundled down. Parked up for the morning for the show. The theme was display from the period of your vehicle. Since most Mini owners are stuck in the 70s, maybe they didn't quite appreciate the 90s decor lol (See also my finished rocker cover racer, which needs a bit more development...) And did the Motorkhana in the afternoon. Managed to muster up a 2nd after some pretty average and rusty driving. It's always slightly intimidating doing a Motorkhana where the only cars are Minis, as its all on the driver and no advantage from having a small, agile car. Time to head back home The next day Mini nationals carried on. But I skipped it and went to the annual Pukekohe Car Club Motorkhana and Autocross at Limestone downs in Port Waikato. I forgot to grab any photos. Managed a 4th overall in the Motorkhana with a pretty soft, peat/sand surface under the grass that cut up super quickly. I also competed in one of the Sports Car Club of Nz Motorkhanas on Tarmac a few weeks back, held over in Glenfield. Where I managed to snag a 3rd overall with the top 6 or so places being Minis both new and old. The reason why I bring up these results, is not to brag. But hopefully once the Moke is done I'll be hunting 1sts. Anyways Back to our scheduled programming.... I met a guy at Mini Nationals who was selling some bits after his build. One of these items was a lightly used Alloy Rad from MED in the UK. They make super nice bits (I have some on the Mini) and the price was right so I took a trip down to Hamilton and grabbed it with some other stuff. The eventual plan is to run this with an e fan on the other side to pull some air through. And last weekend we cracked on with some rust work. I wanted to get rid of the stupid barry spec side window panels that were riveted to the windscreen. I was slightly worried what was underneath as this car has had a few surprises so far.8 points
-
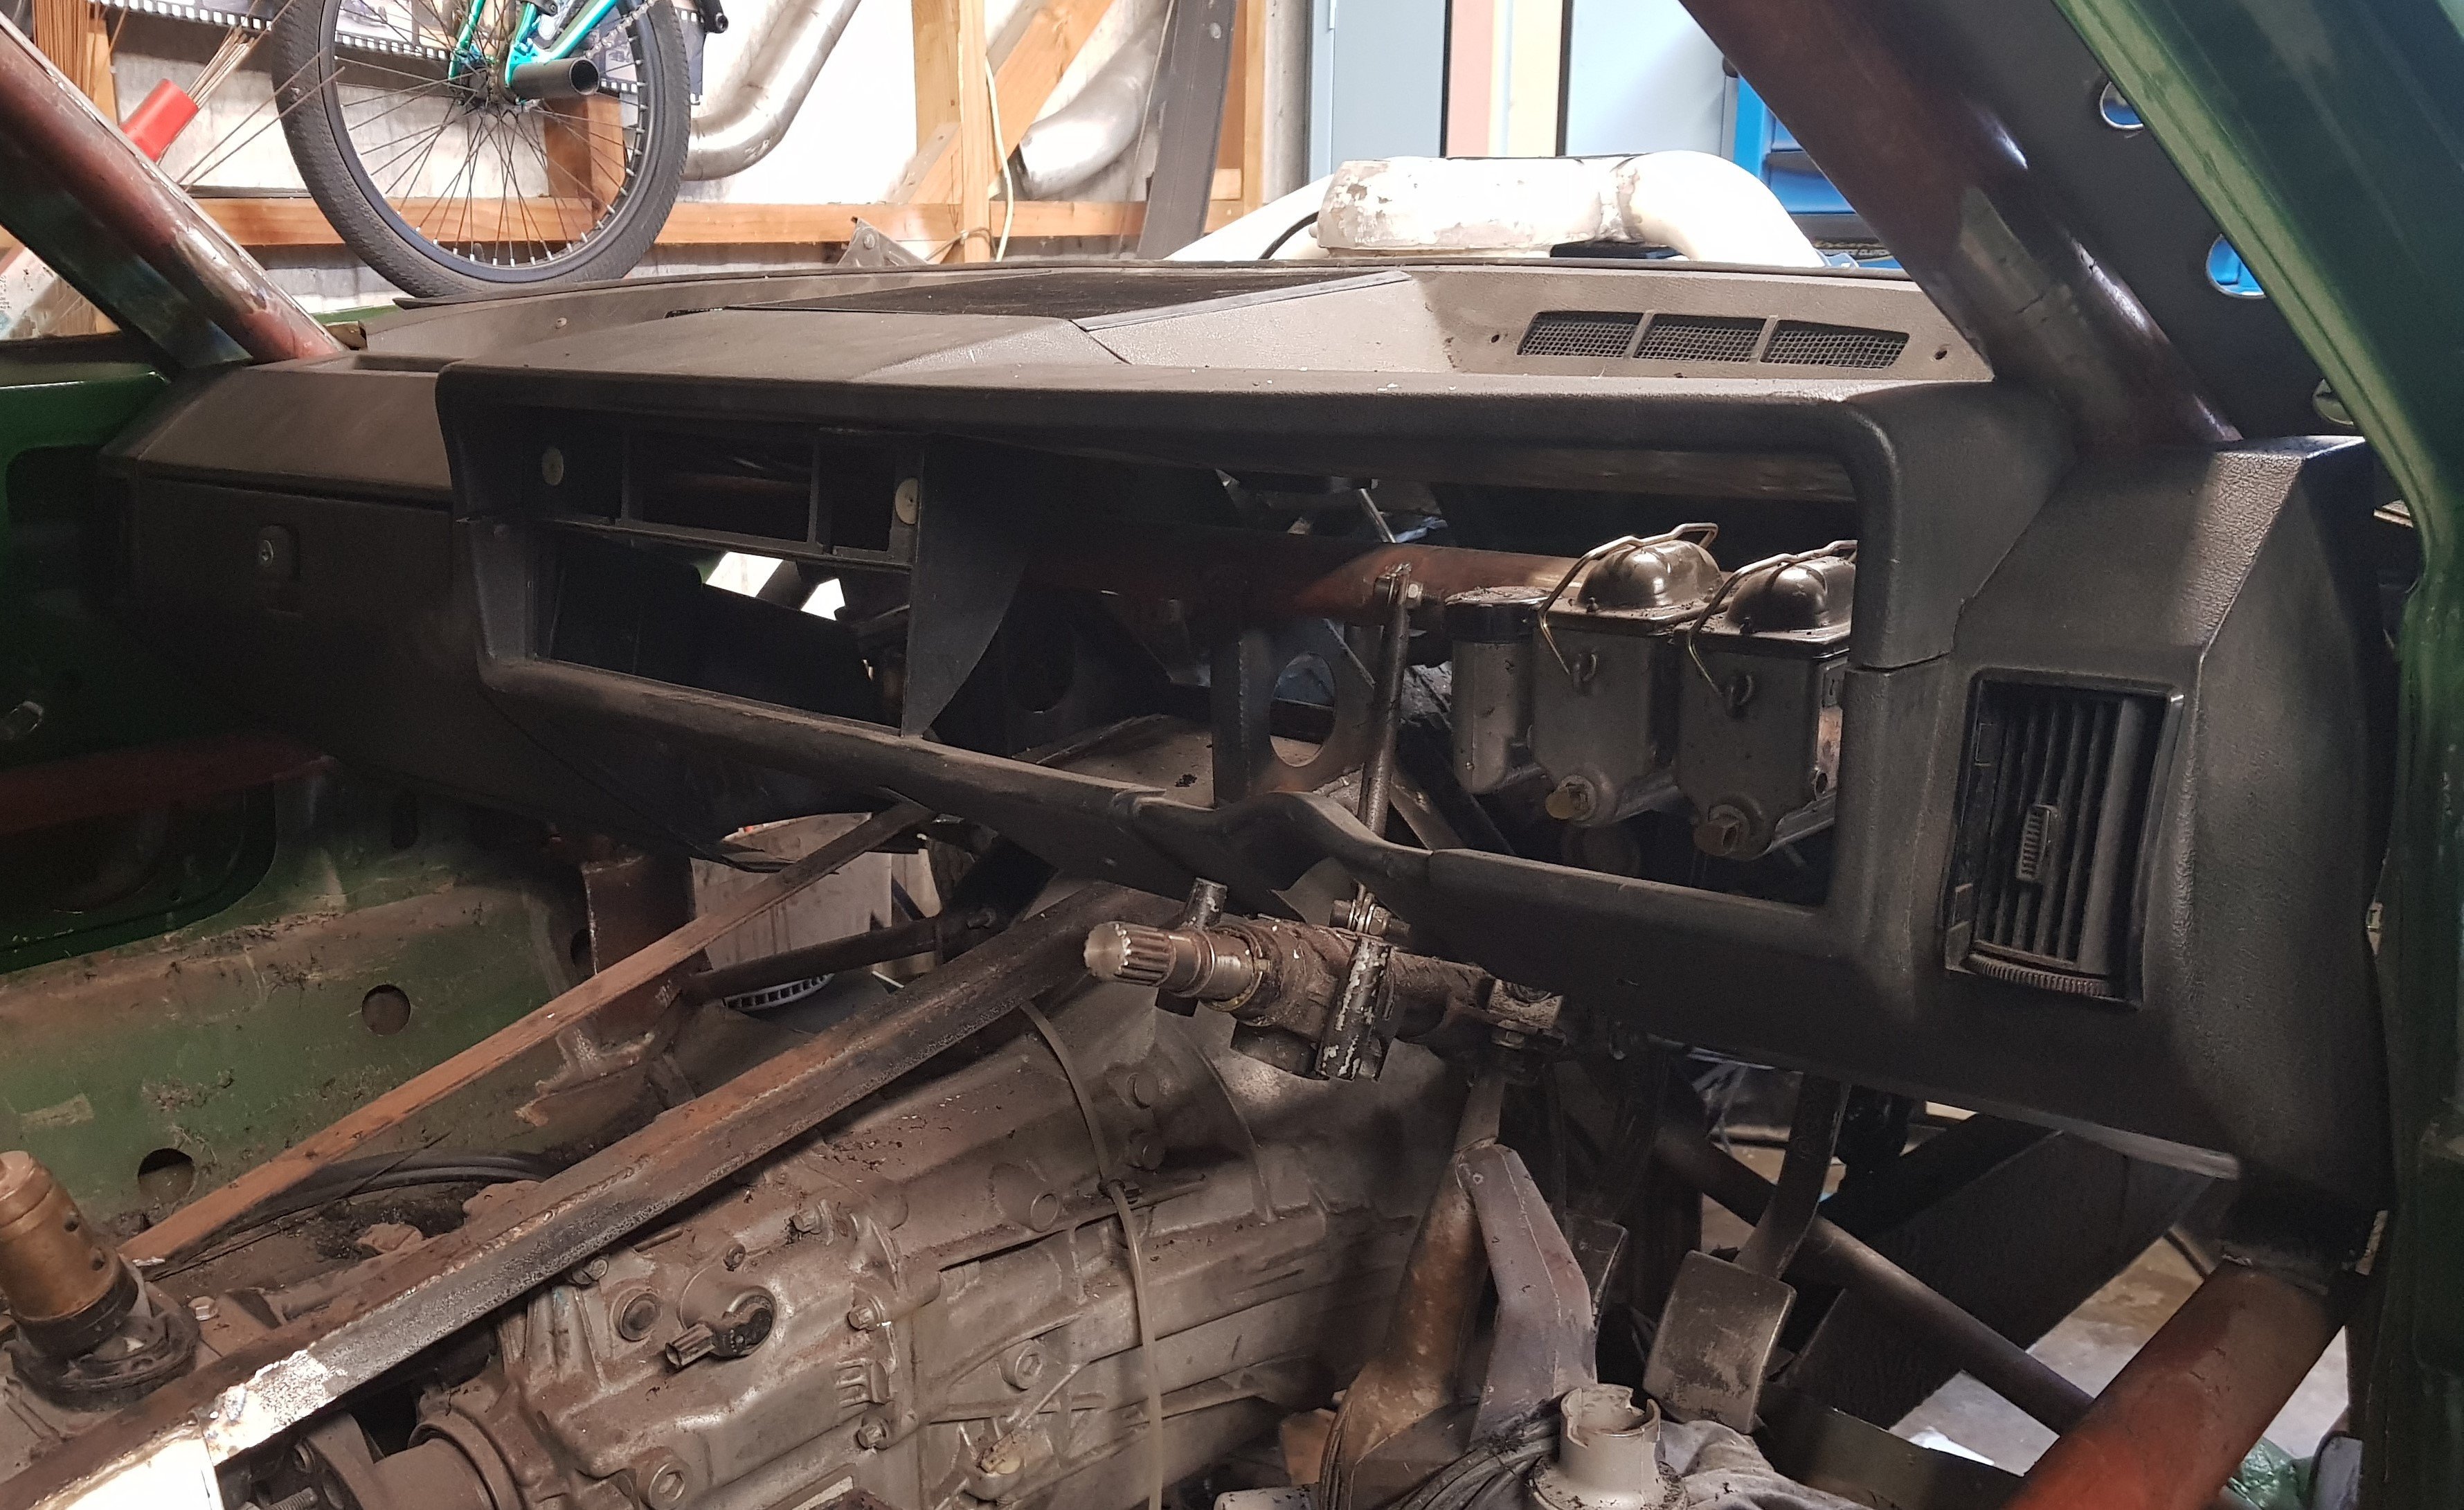
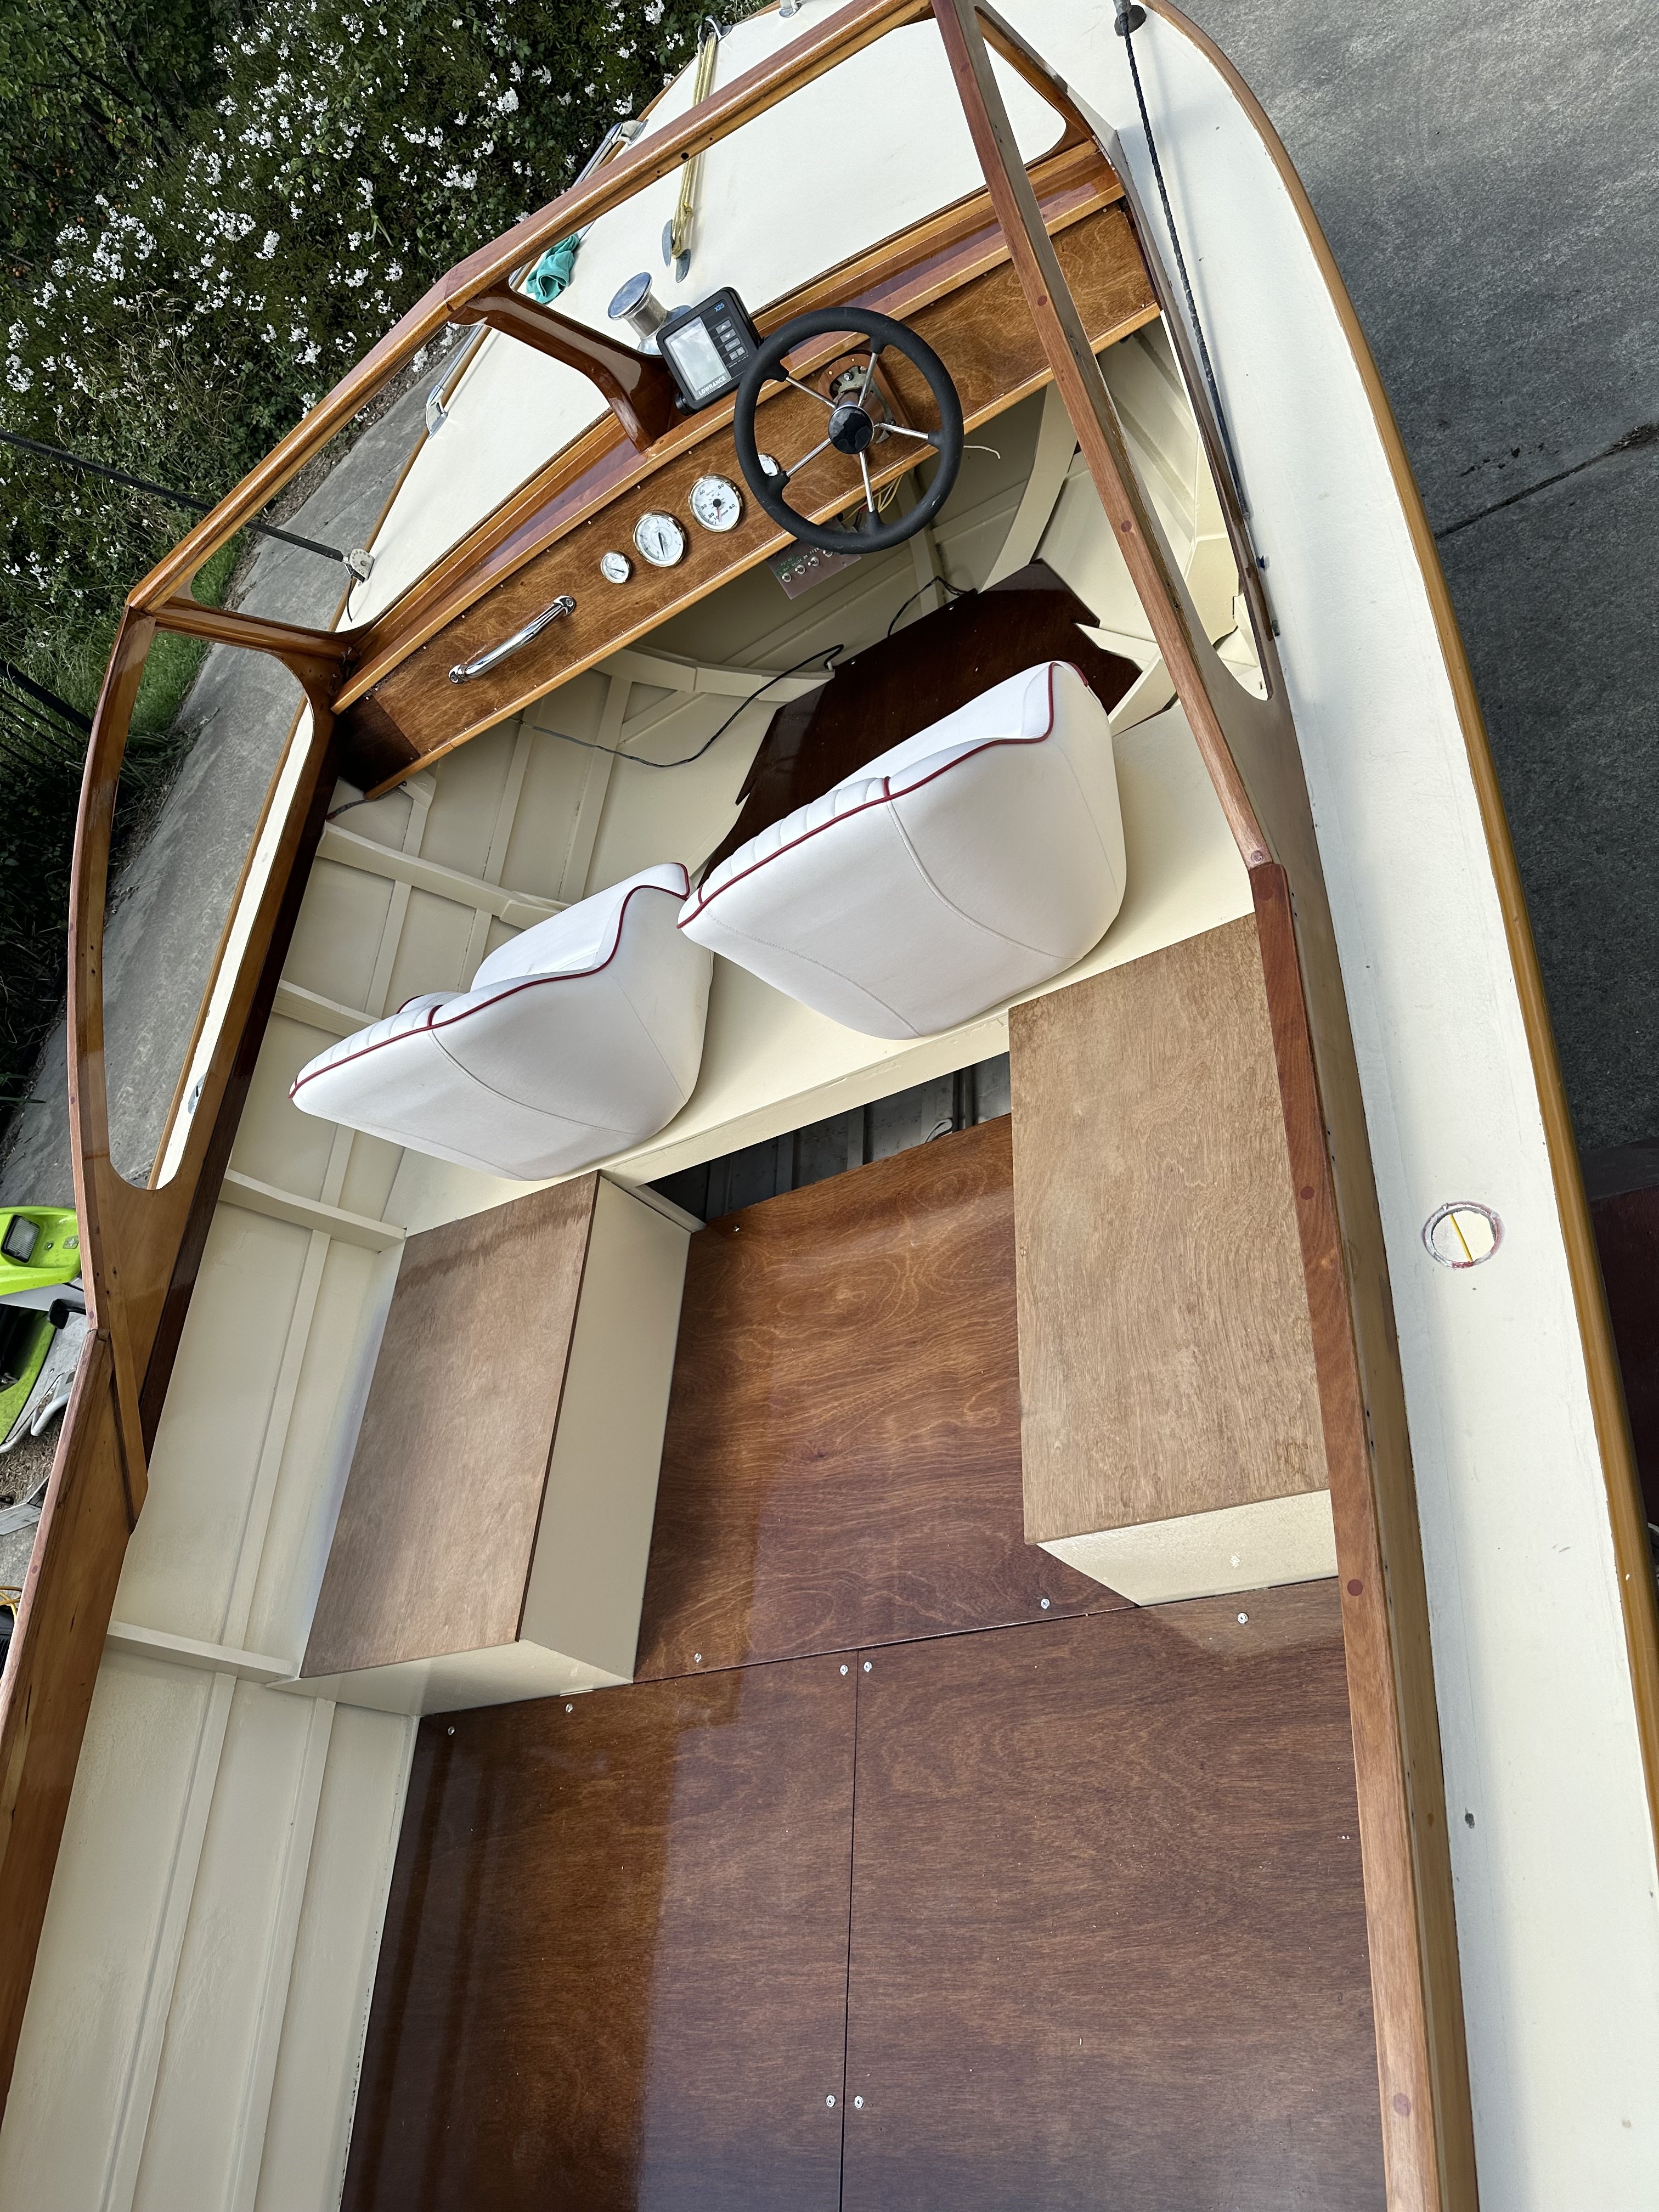
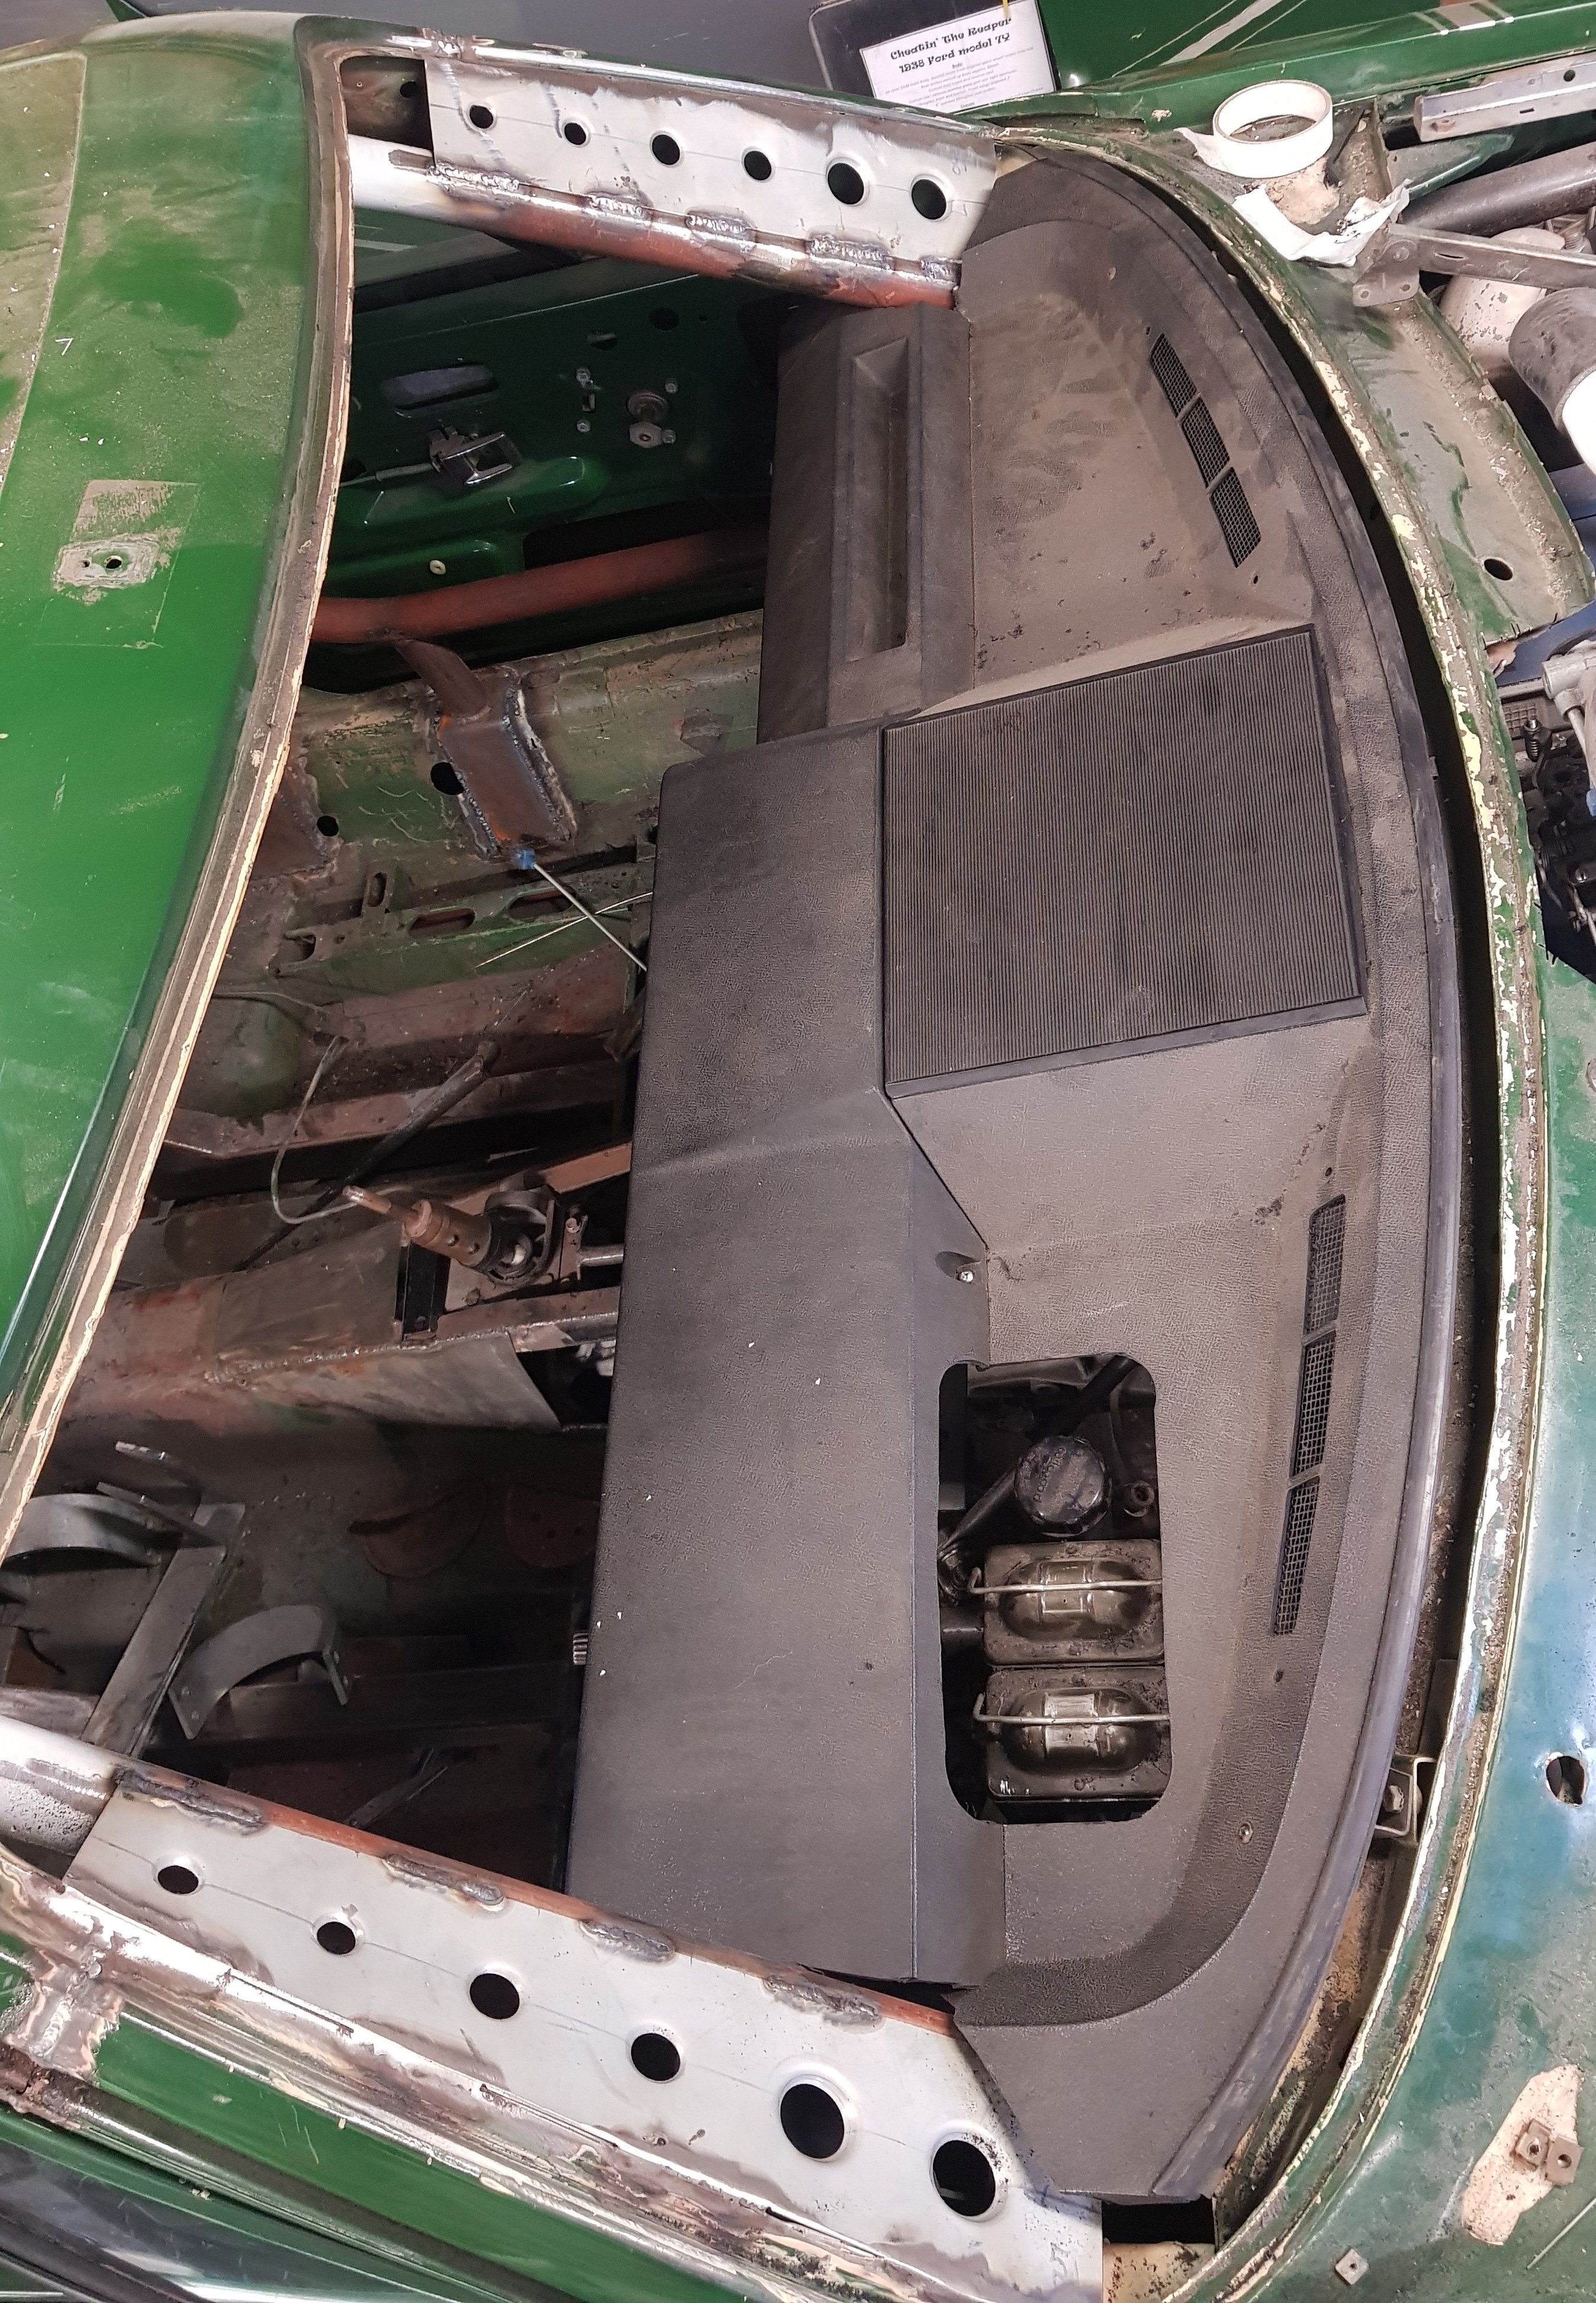
You'll see in the first pic the cut out for the fluid reservoirs: This will be tidied up a bit, and it will have a removable cover over it as I think I'll get horrible reflections in the windscreen. Inside the car all is good. There will be a flat panel with the gauges, warning lights and (some) switches which will cover the whole opening. The dash will need a support in the centre as all of the original brackets were attached to the heater and trans-tunnel but this is already well past the planning stage so may be in the next update.
6 points
-
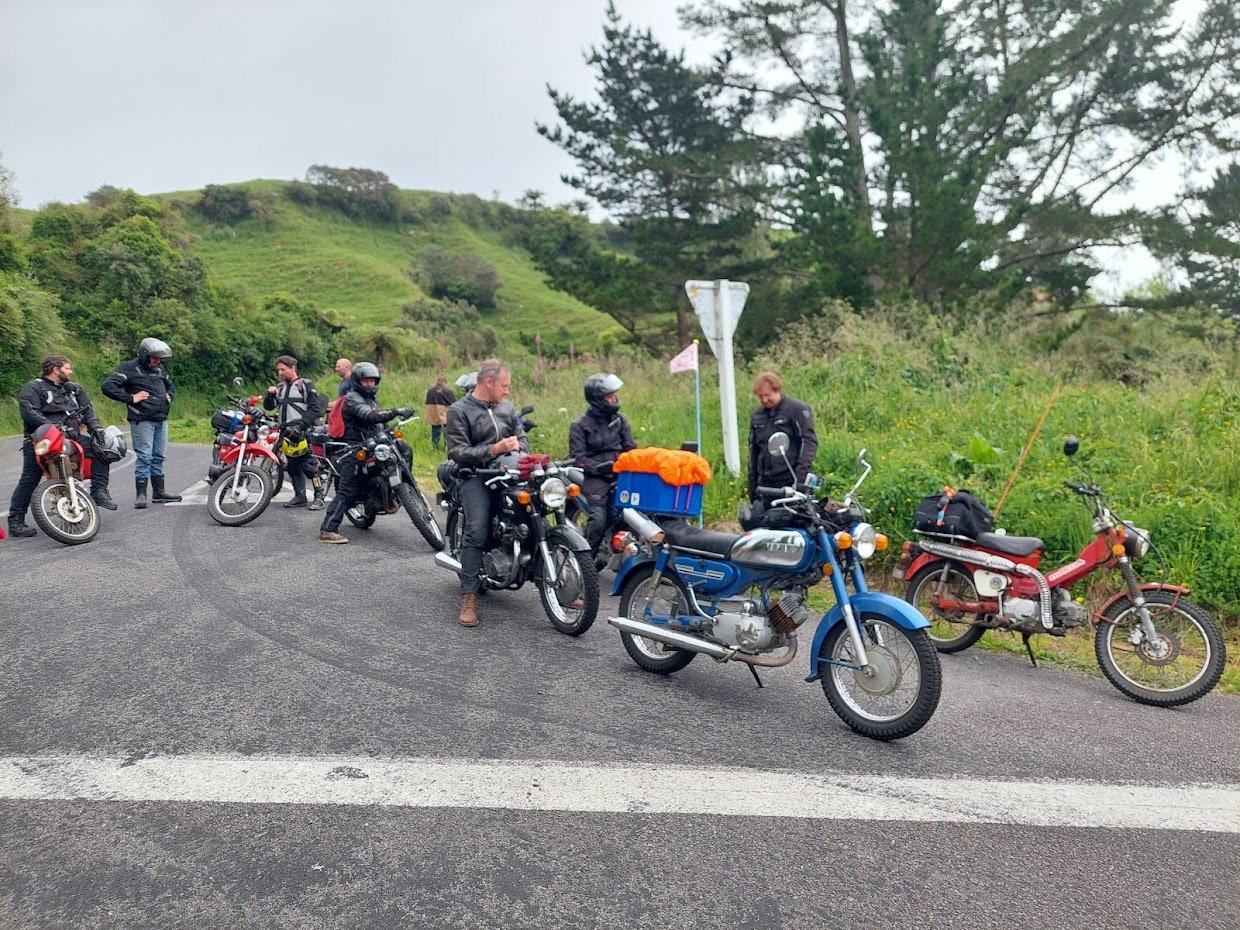
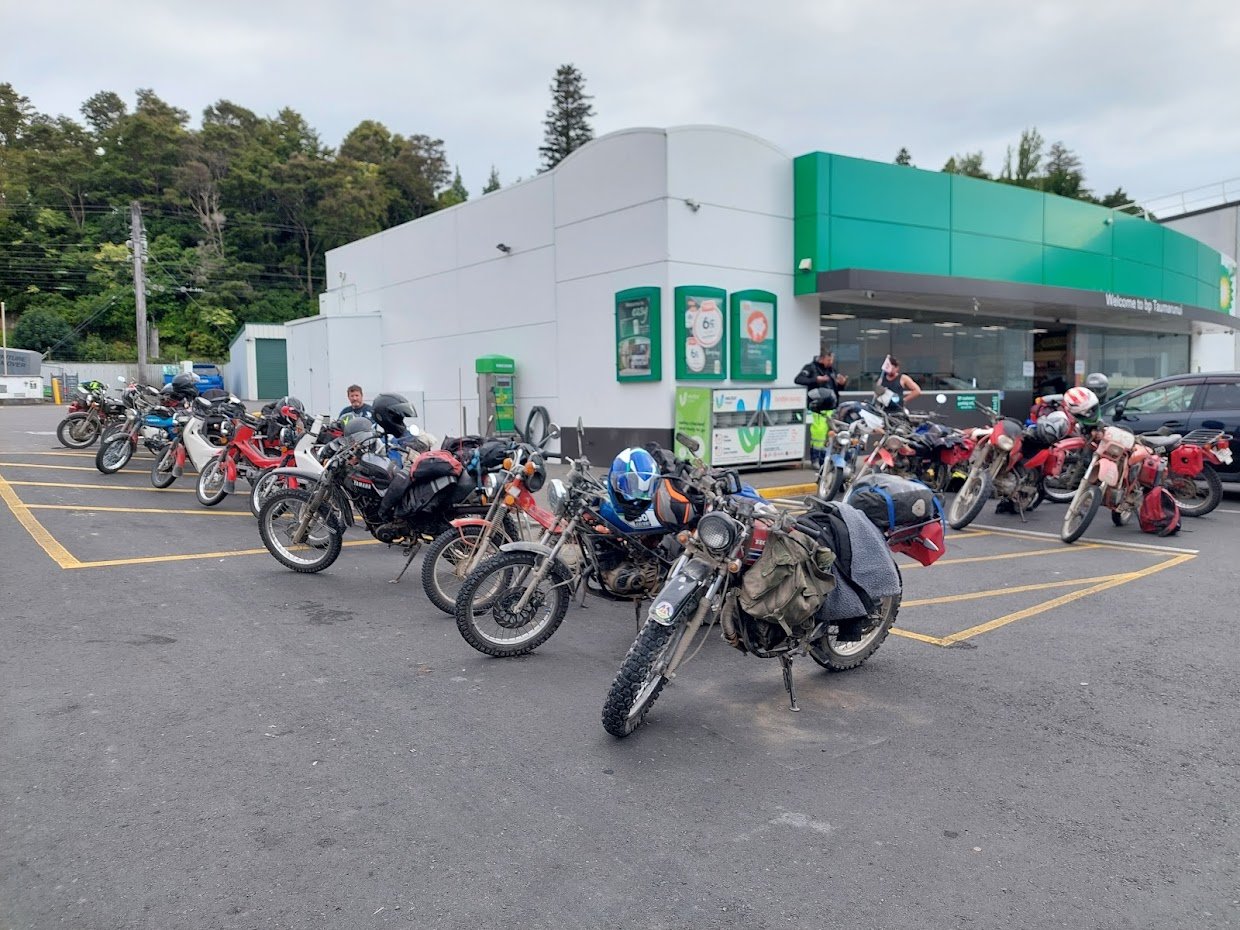
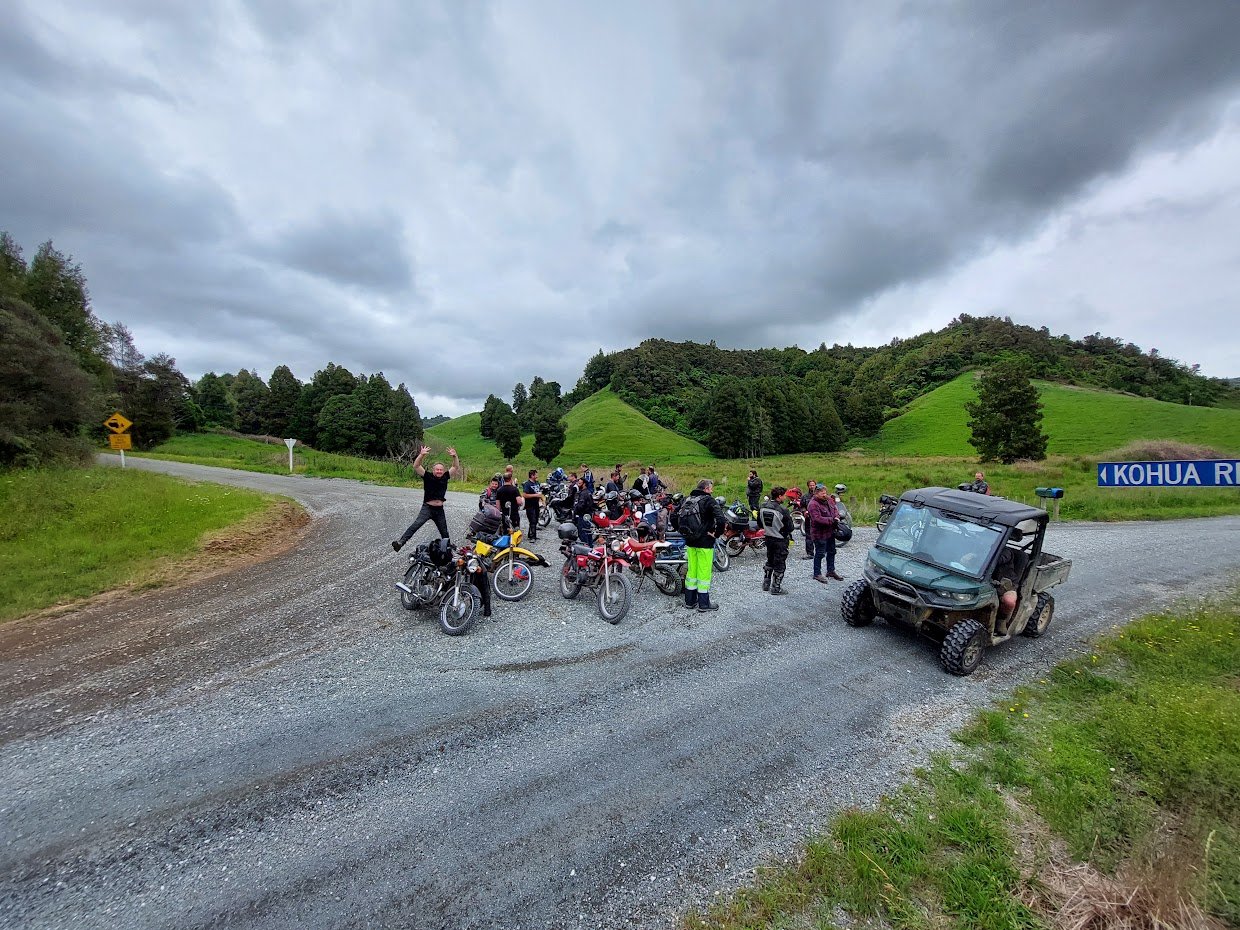
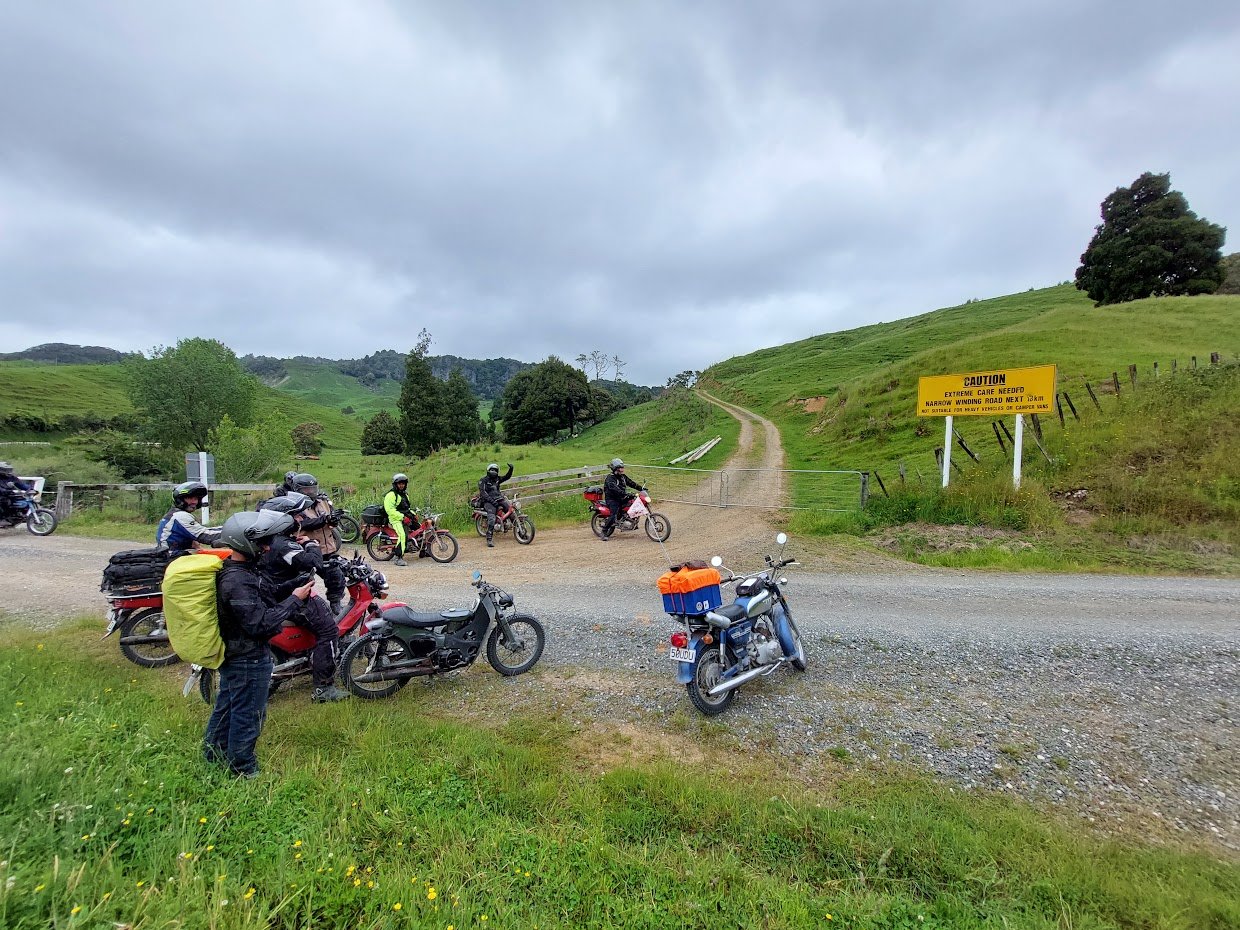
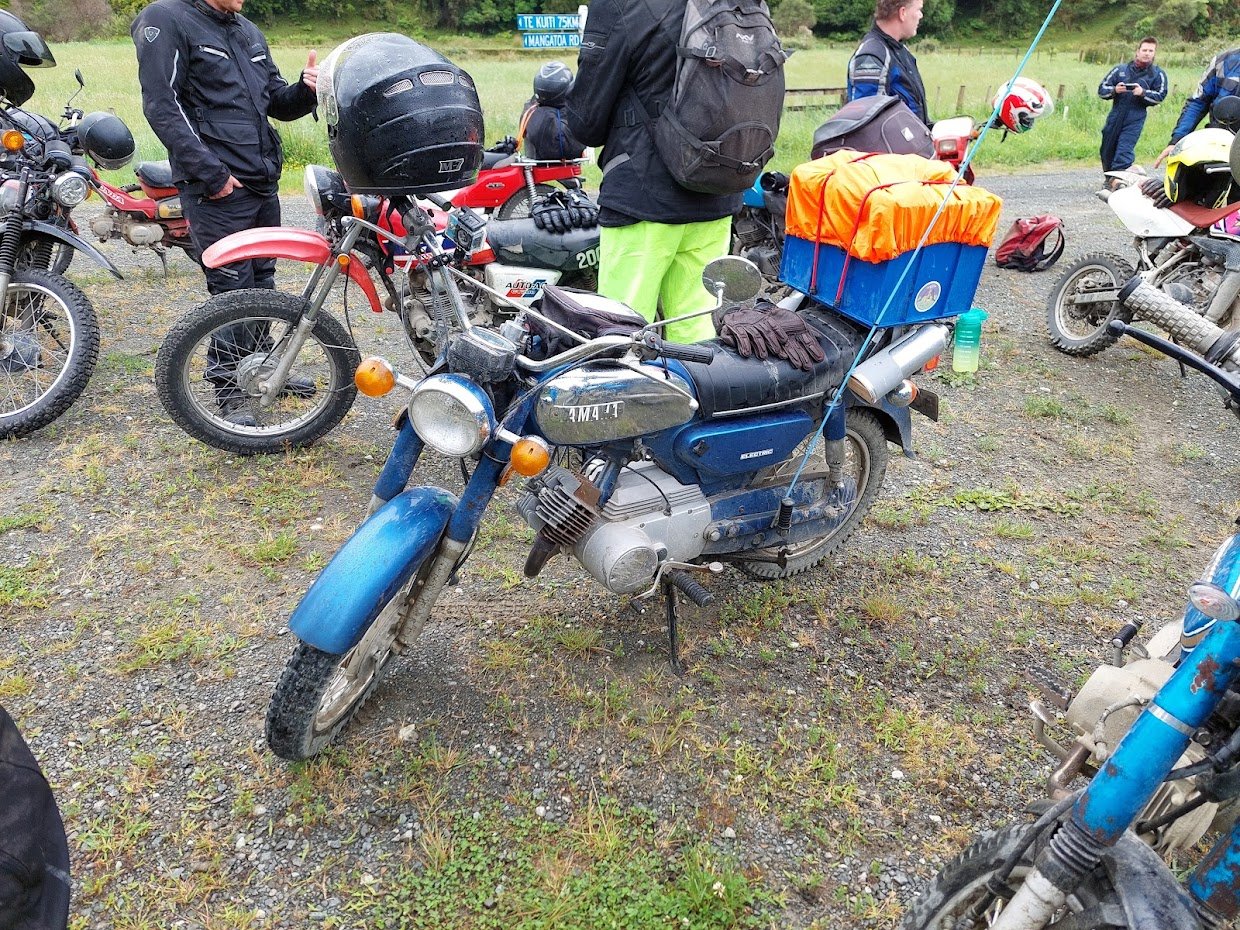
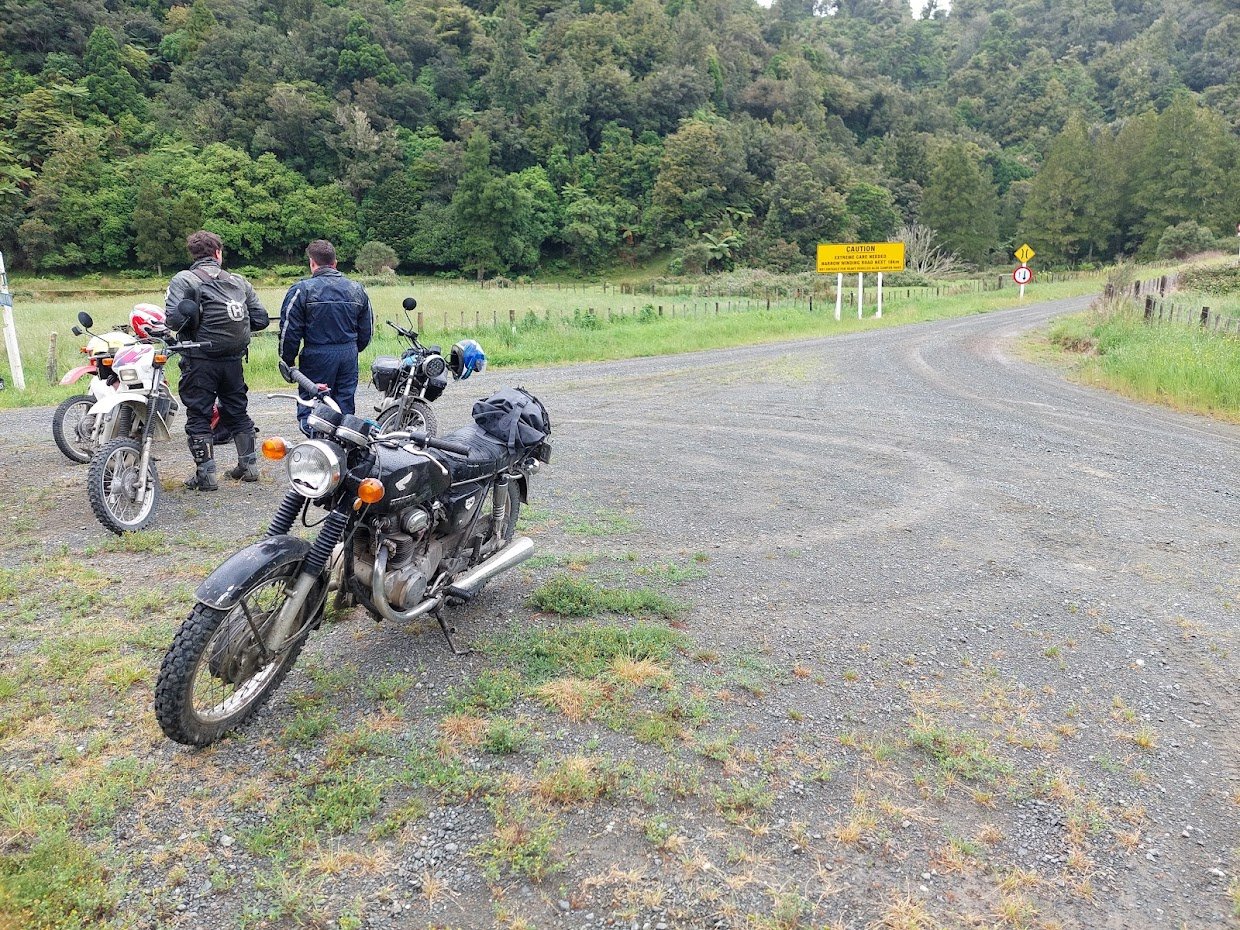
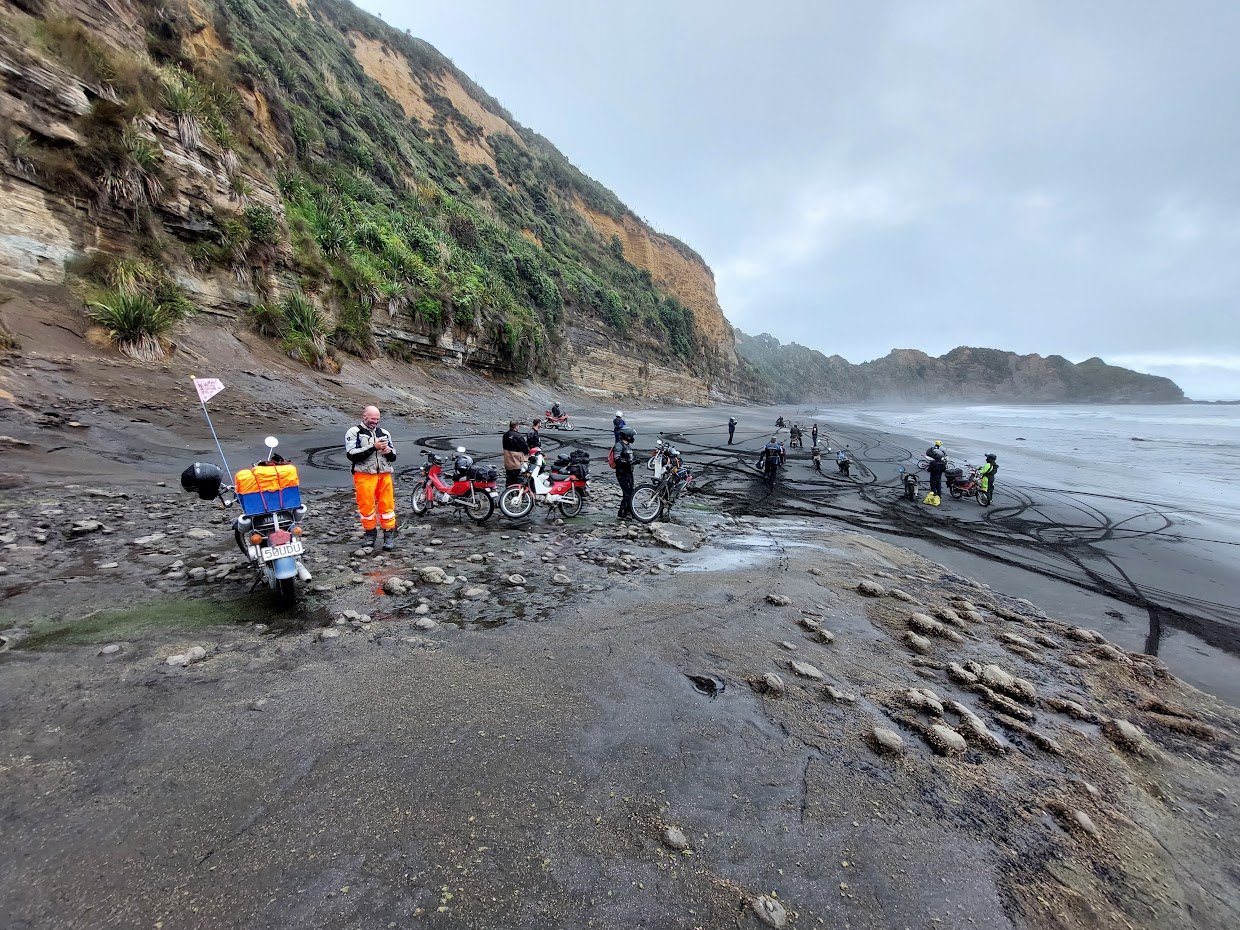
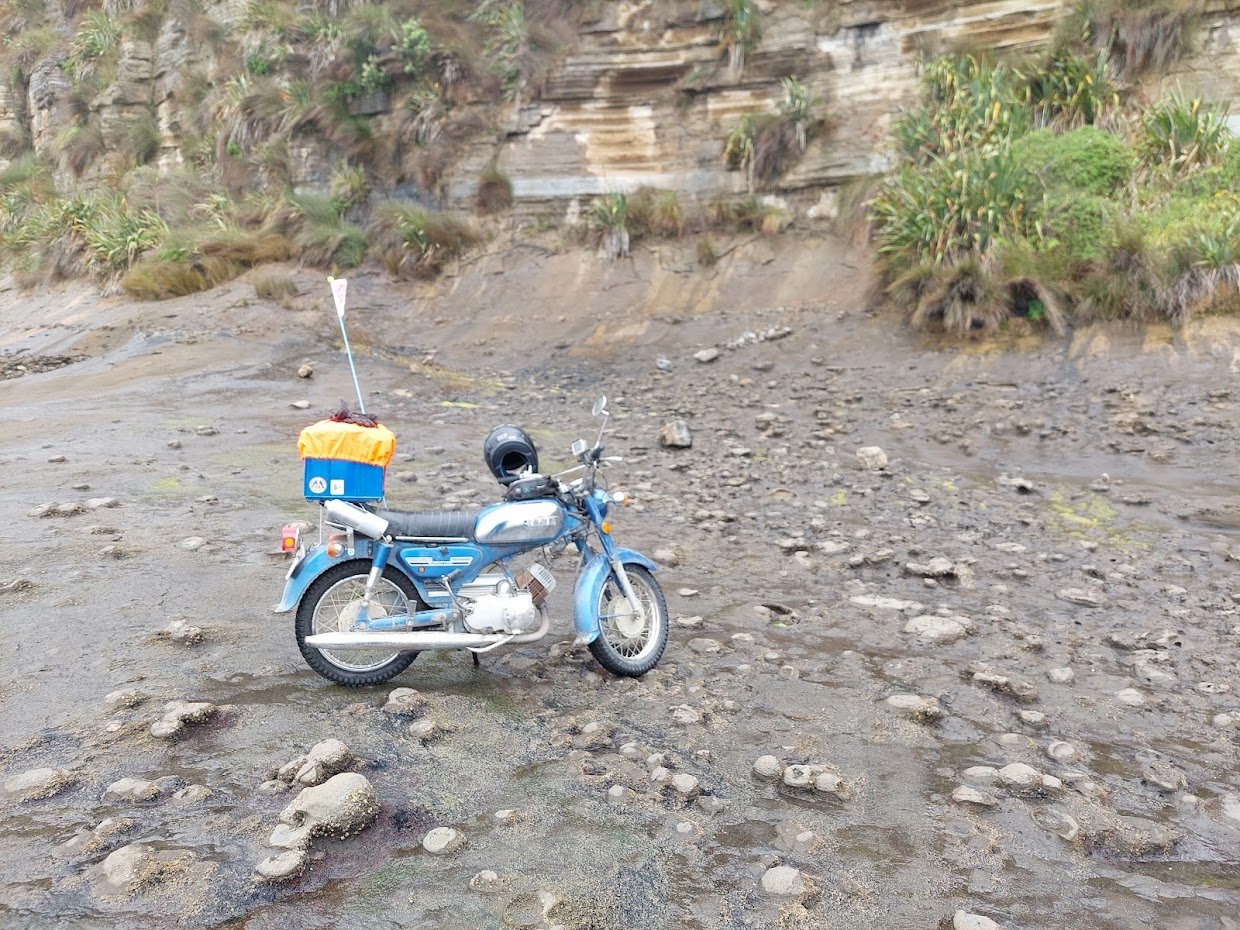
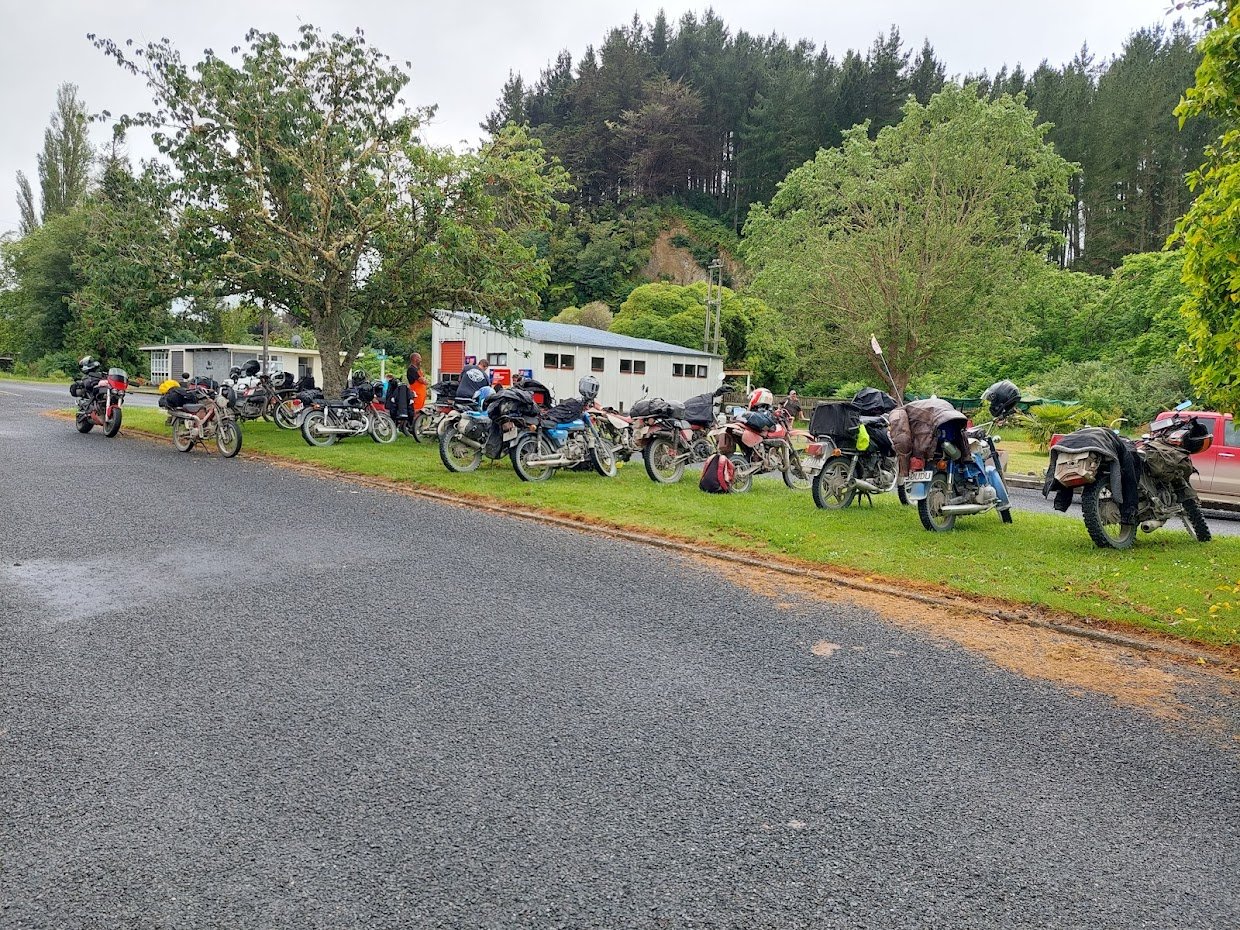
Shit that was good. I'm still at a moderate level of fizz. Thanks all for riding with us and generally being GCs. @johnnyfive passing me up the inside of a corner fully sideways on the gravel when I thought I was at 10/10 race pace was insane! See you all next time wherever that might be.
6 points
-
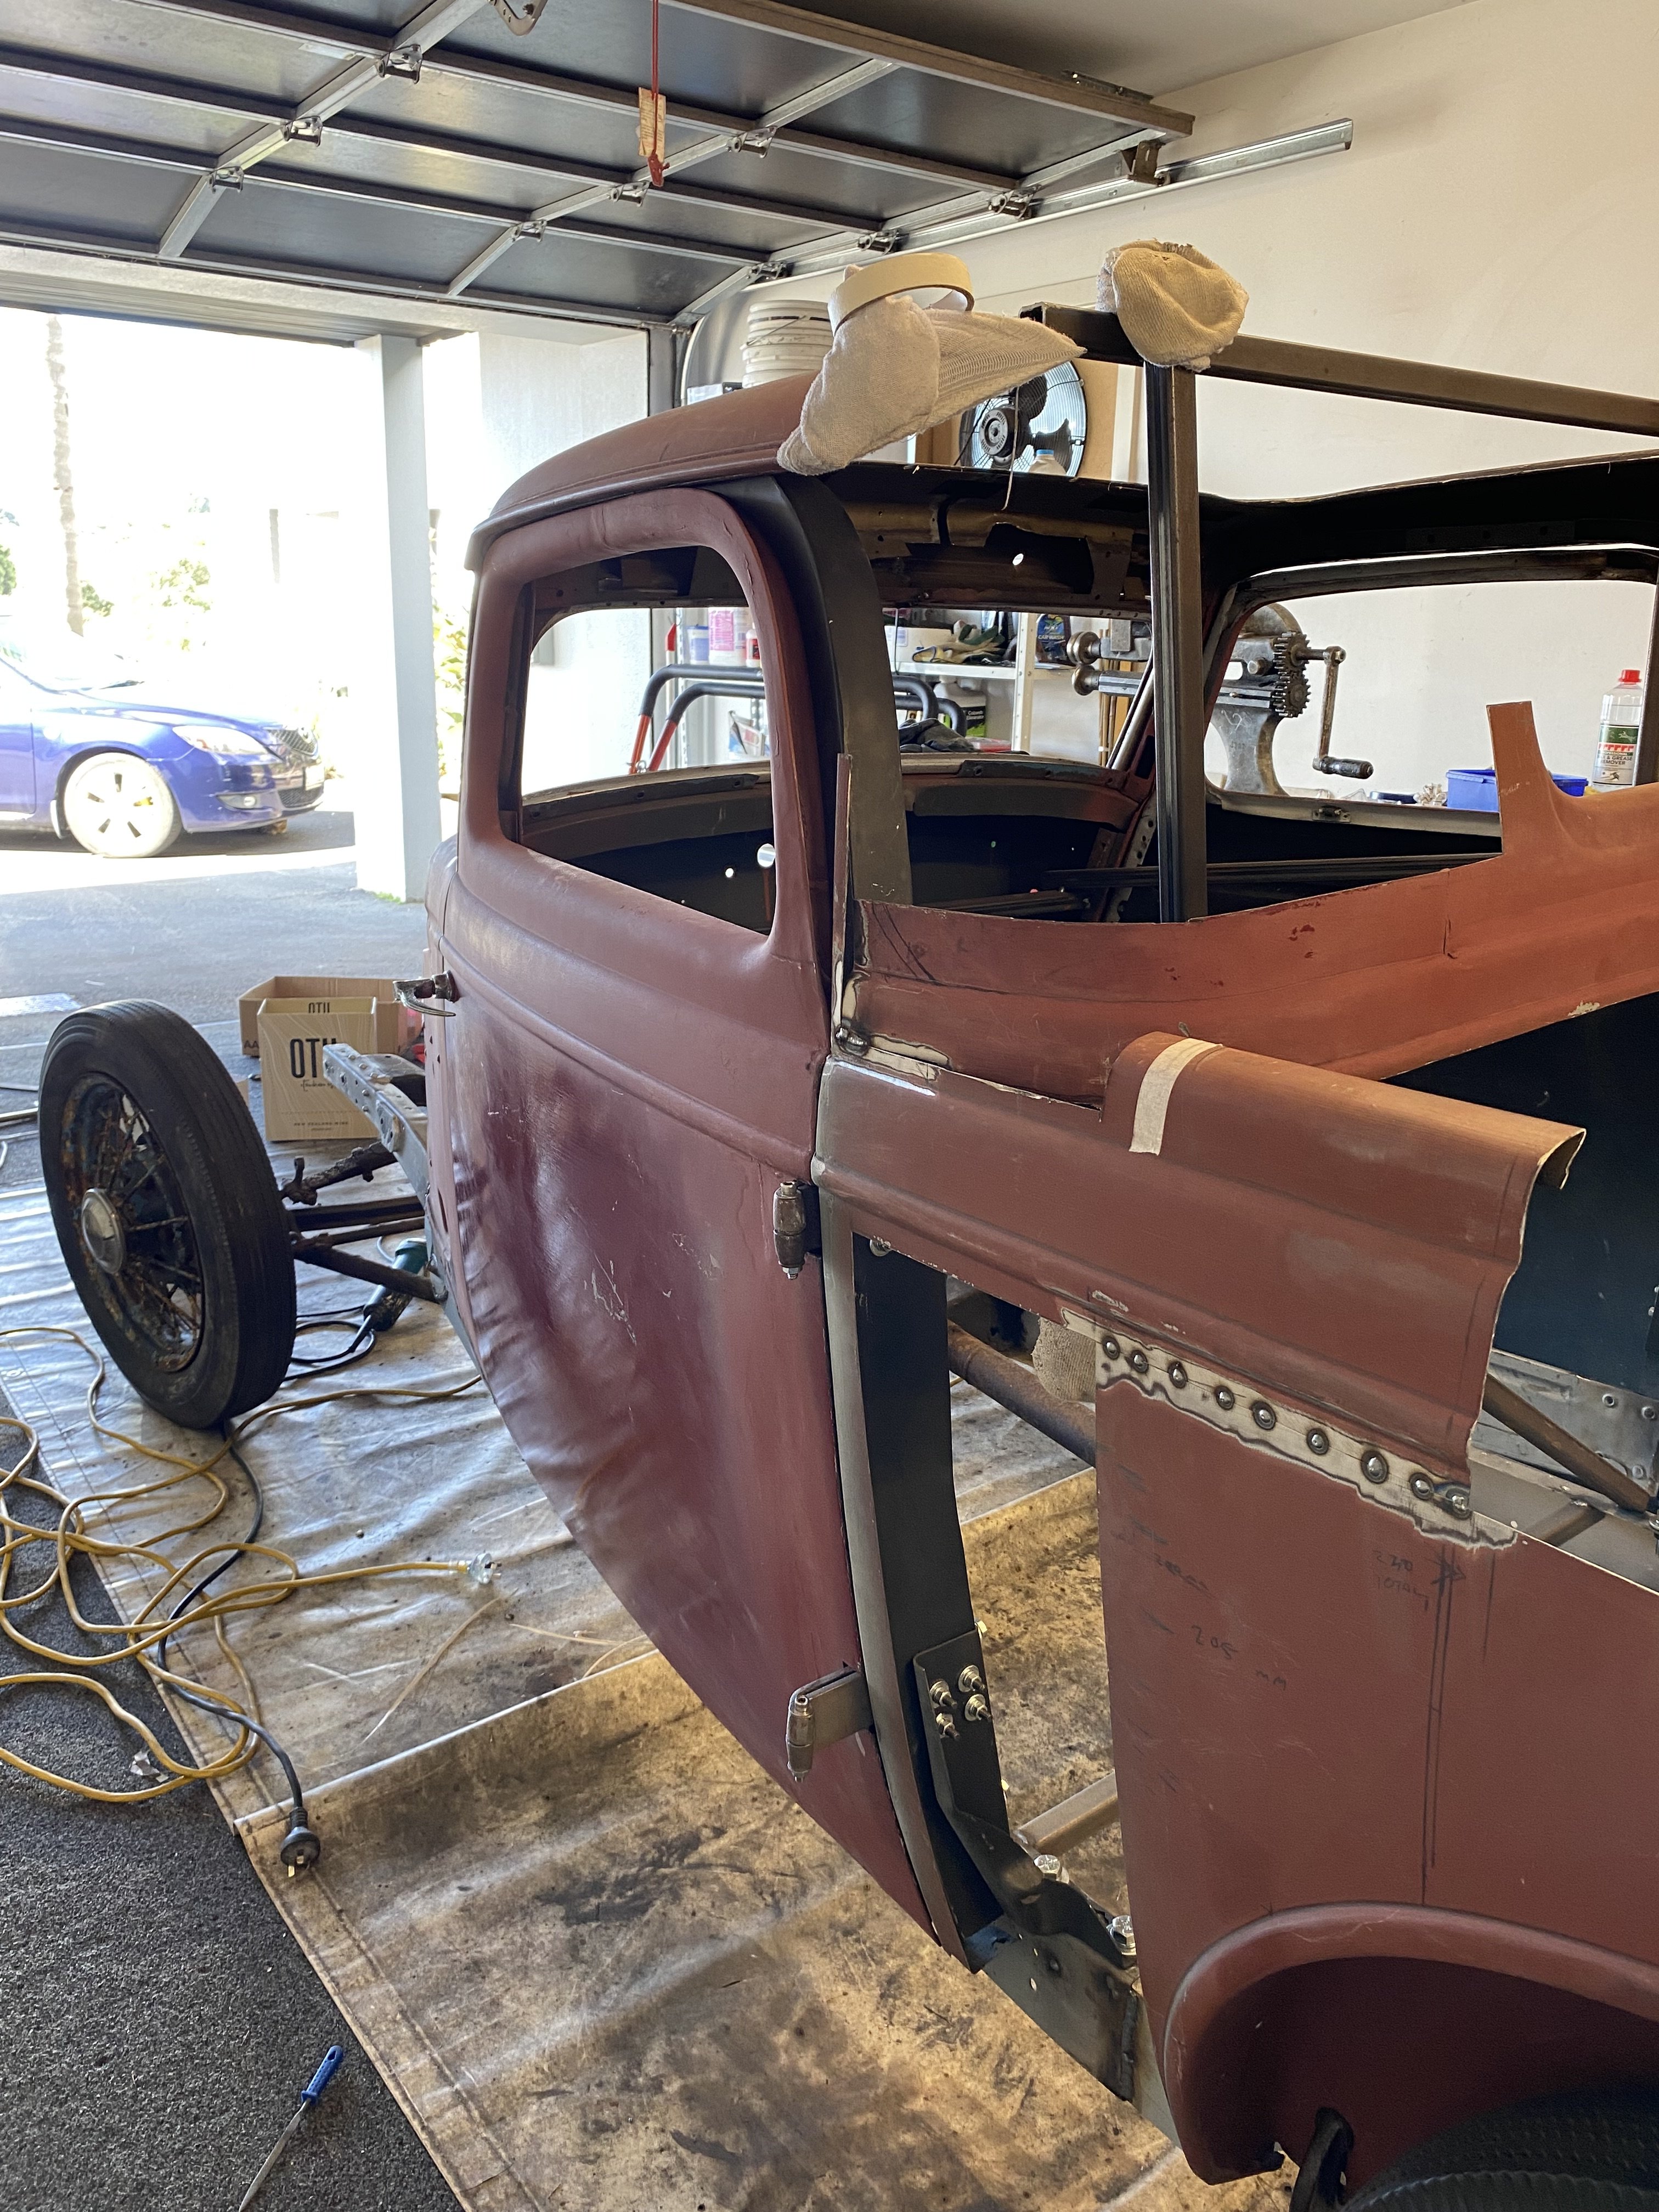
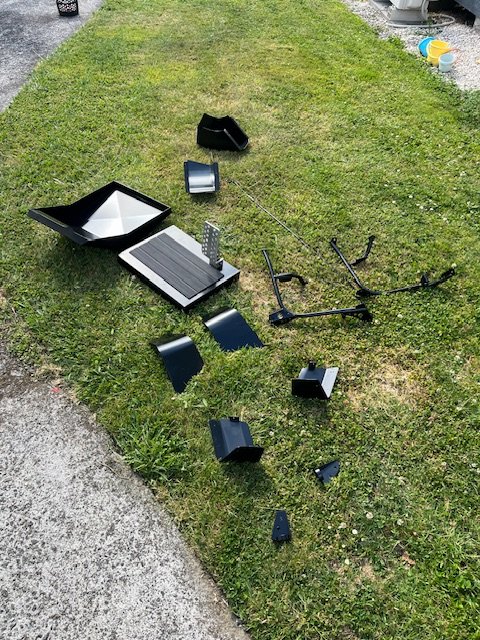
Roof being lined up to get stuck together. Looks like it's coming along nicely. Panel Barry said he was impressed with the reproduction panels for the rear so far which is good to know. Also mentioned car should be all welded up within next couple weeks. We've decided to paint strip the bonnet and doors to see what's hiding underneath. Originally was thinking to dip the whole doors and bonnet and boot but we decided maybe not necessary as the boot is pretty much all good and bonnet isn't super terrible (just around the front edge). Doors have some bog in but cross that bridge when we get there.
6 points
-
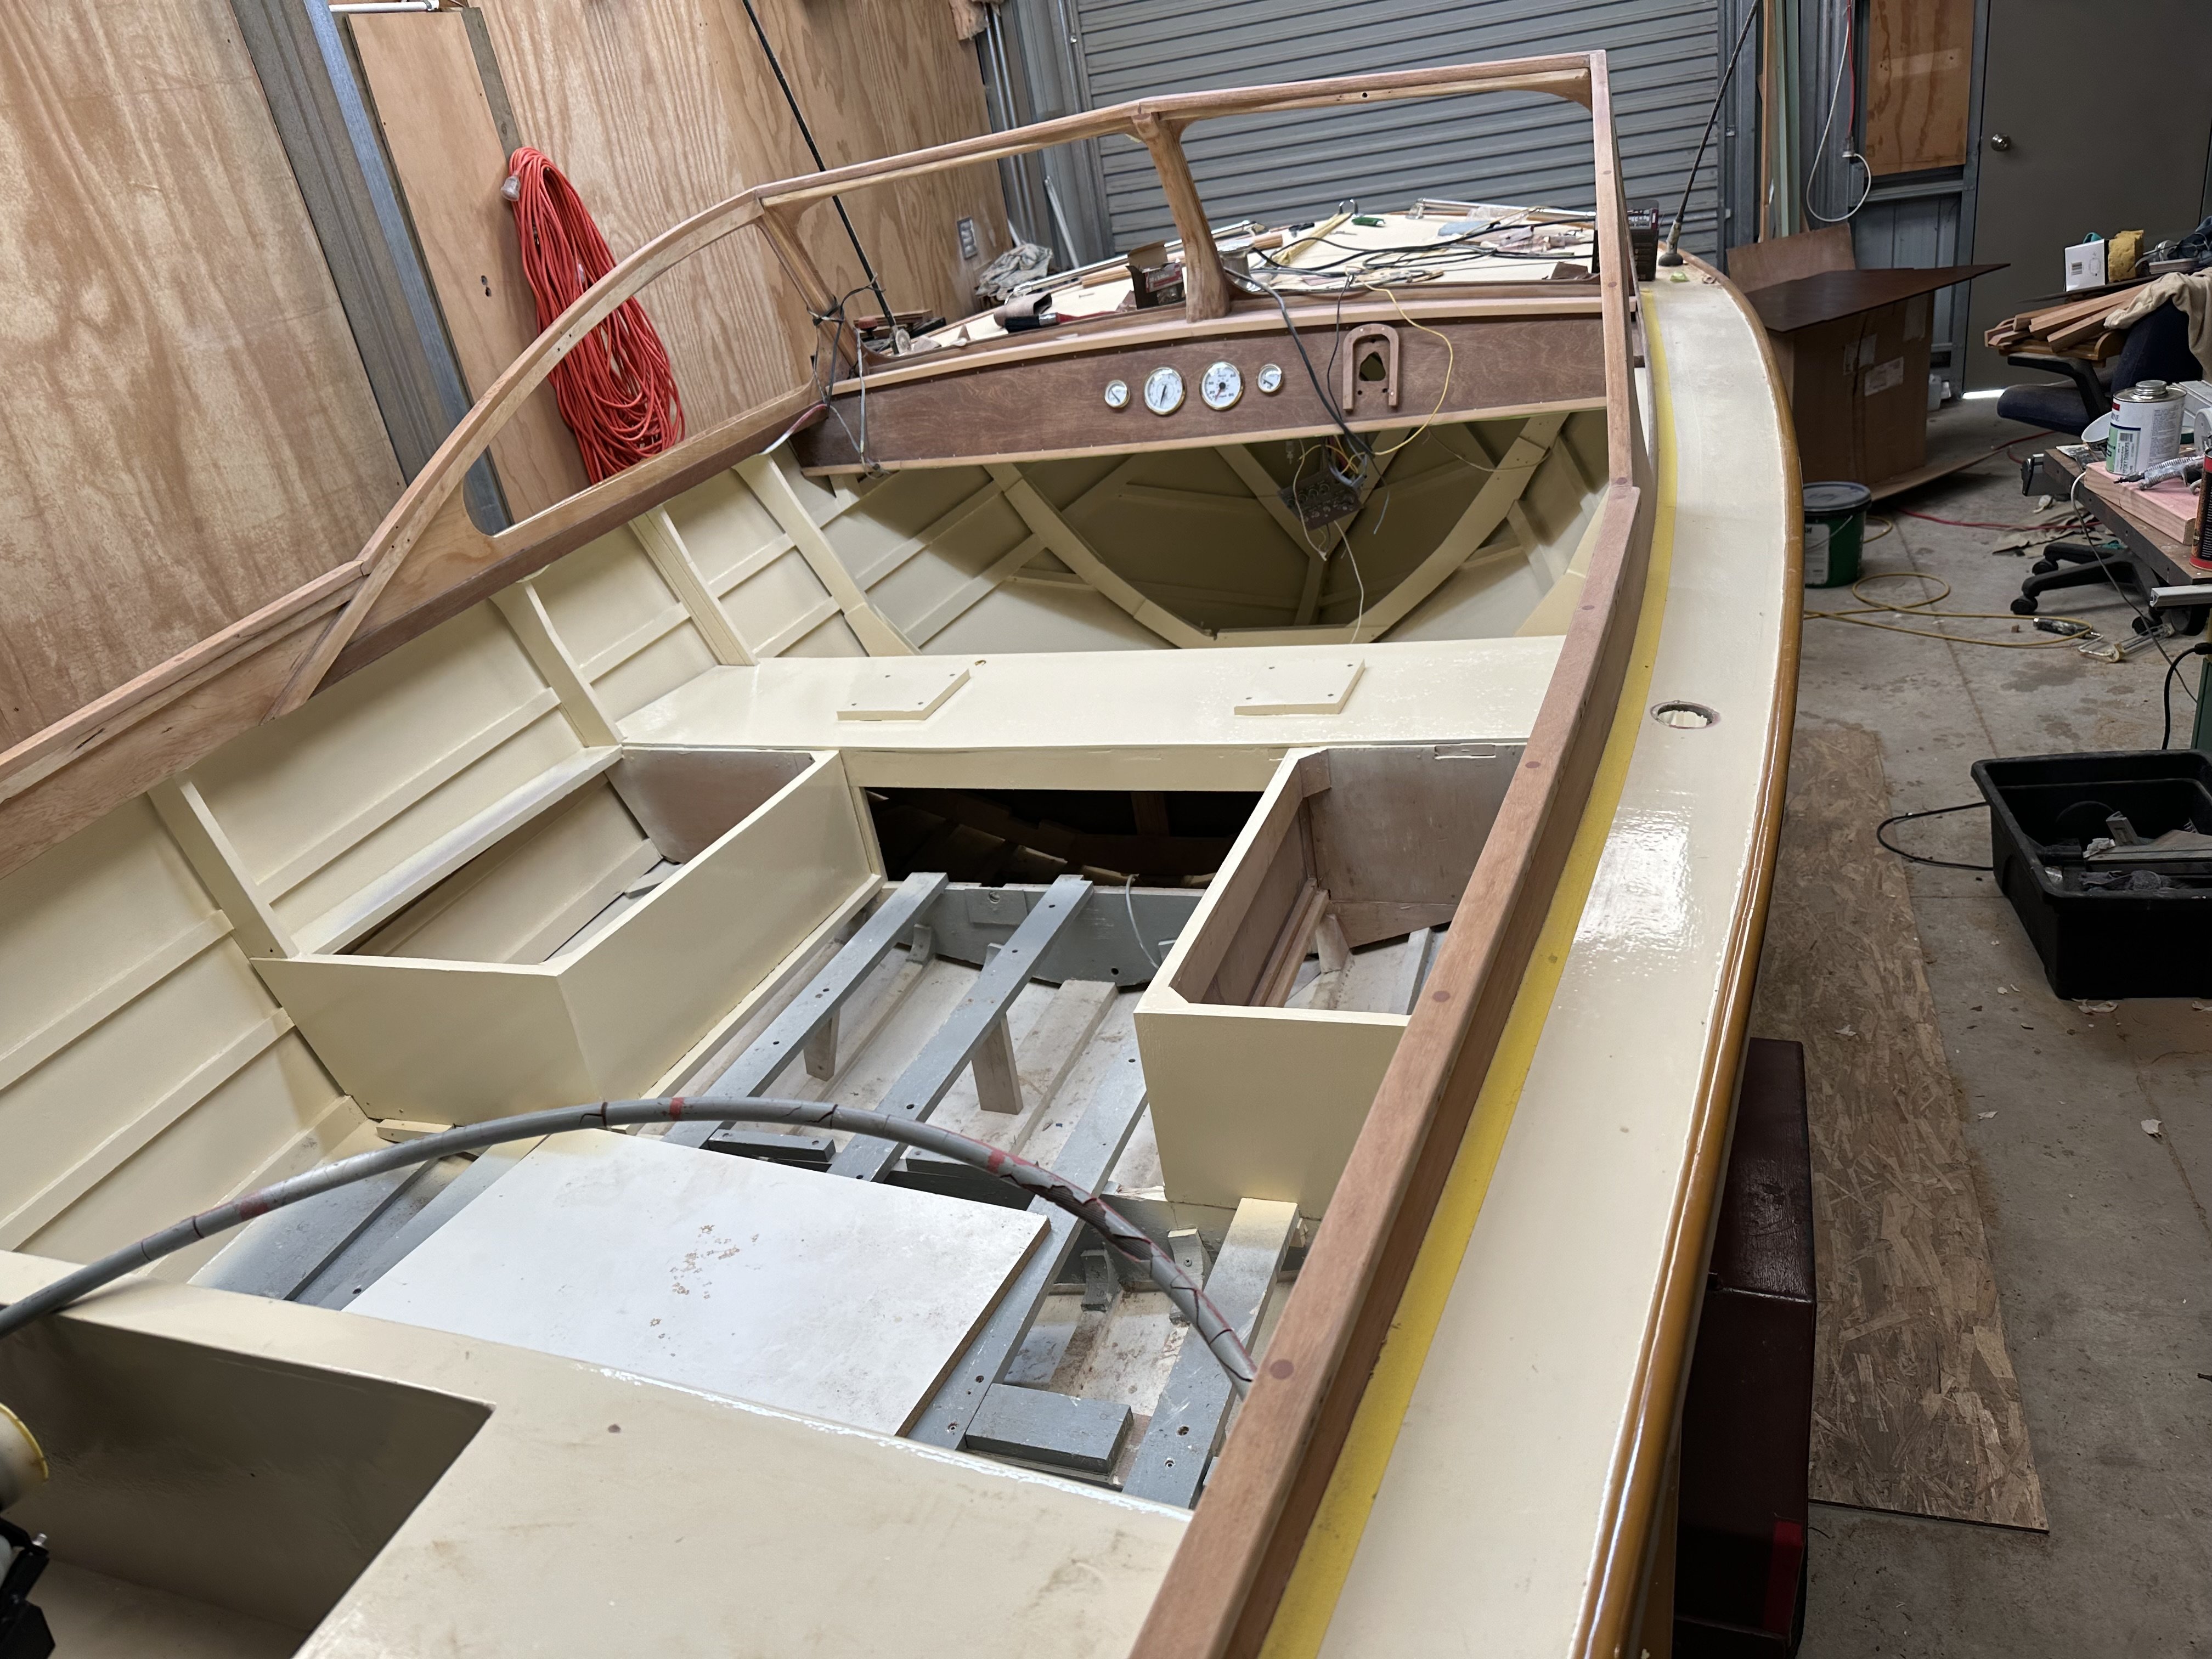
I have the varnish work done now, the floor fitted and seats mounted. The wiring needs sorting so I will get them to sort it out when they fit the engine. I was hoping to fit the windows but ran out of steam. I had my first acquaintance with Covid so I had a couple of days of not being able to do anything. It goes in for it’s engine fit tomorrow.
6 points
-
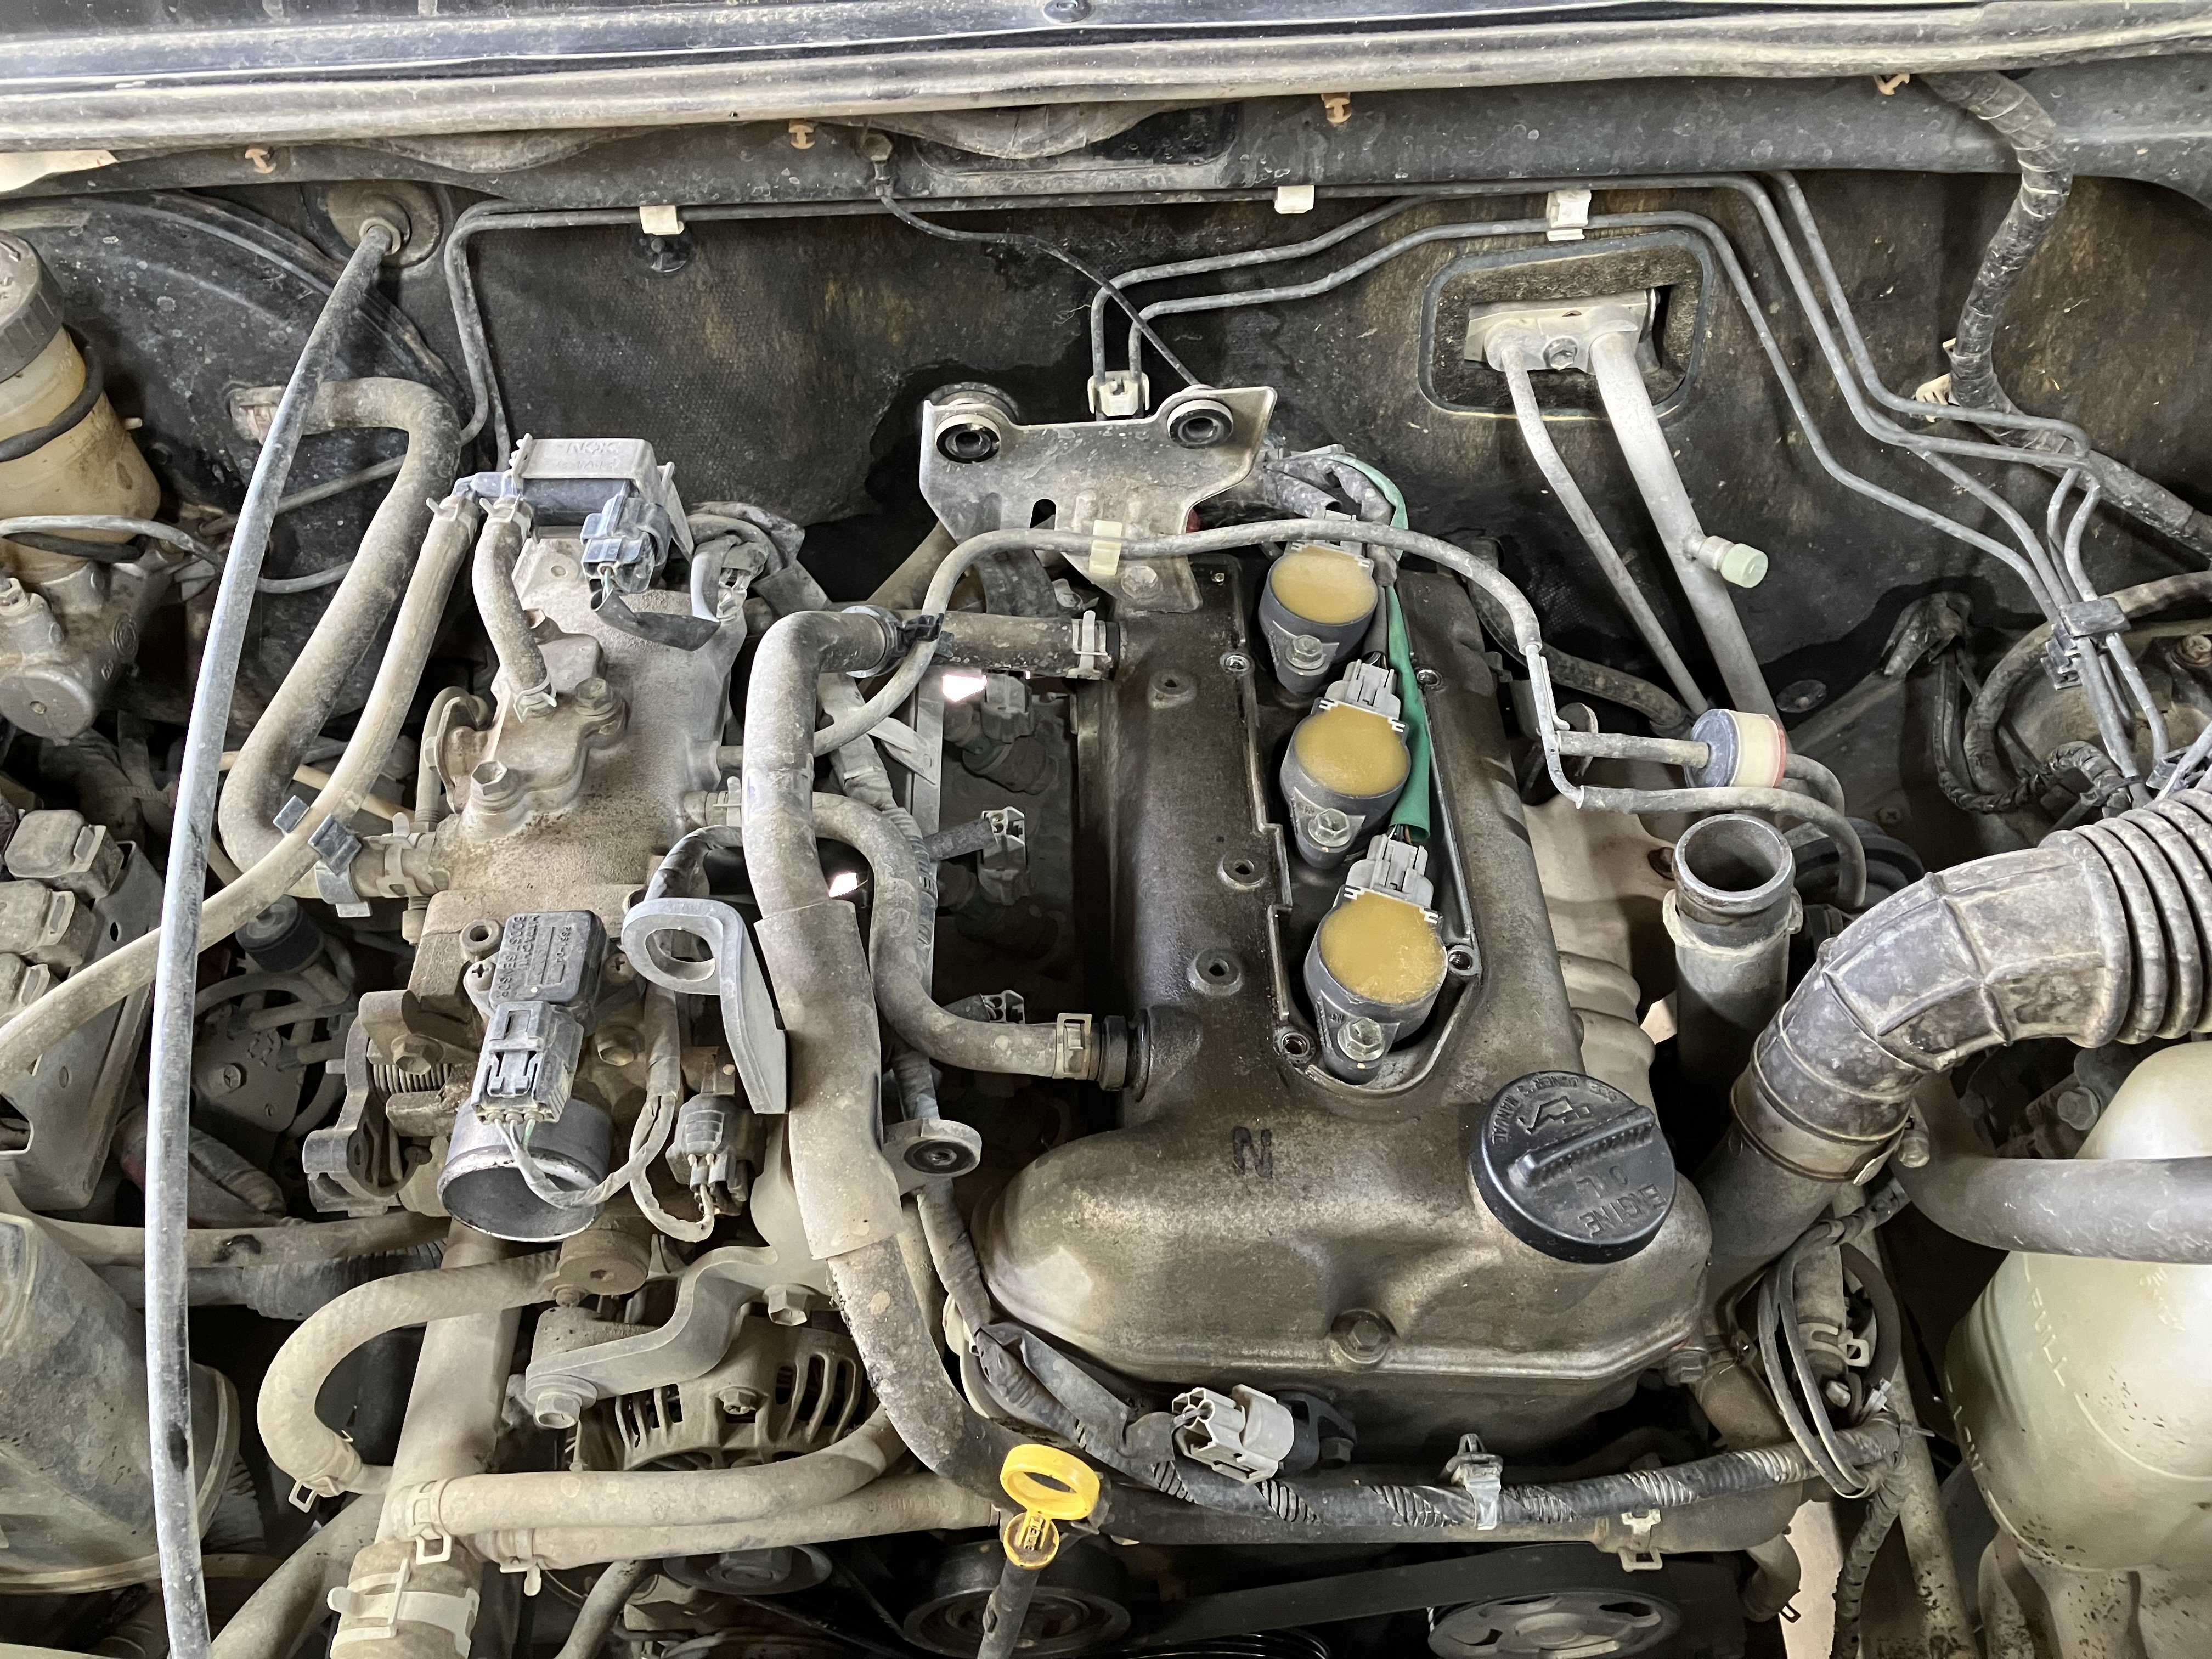
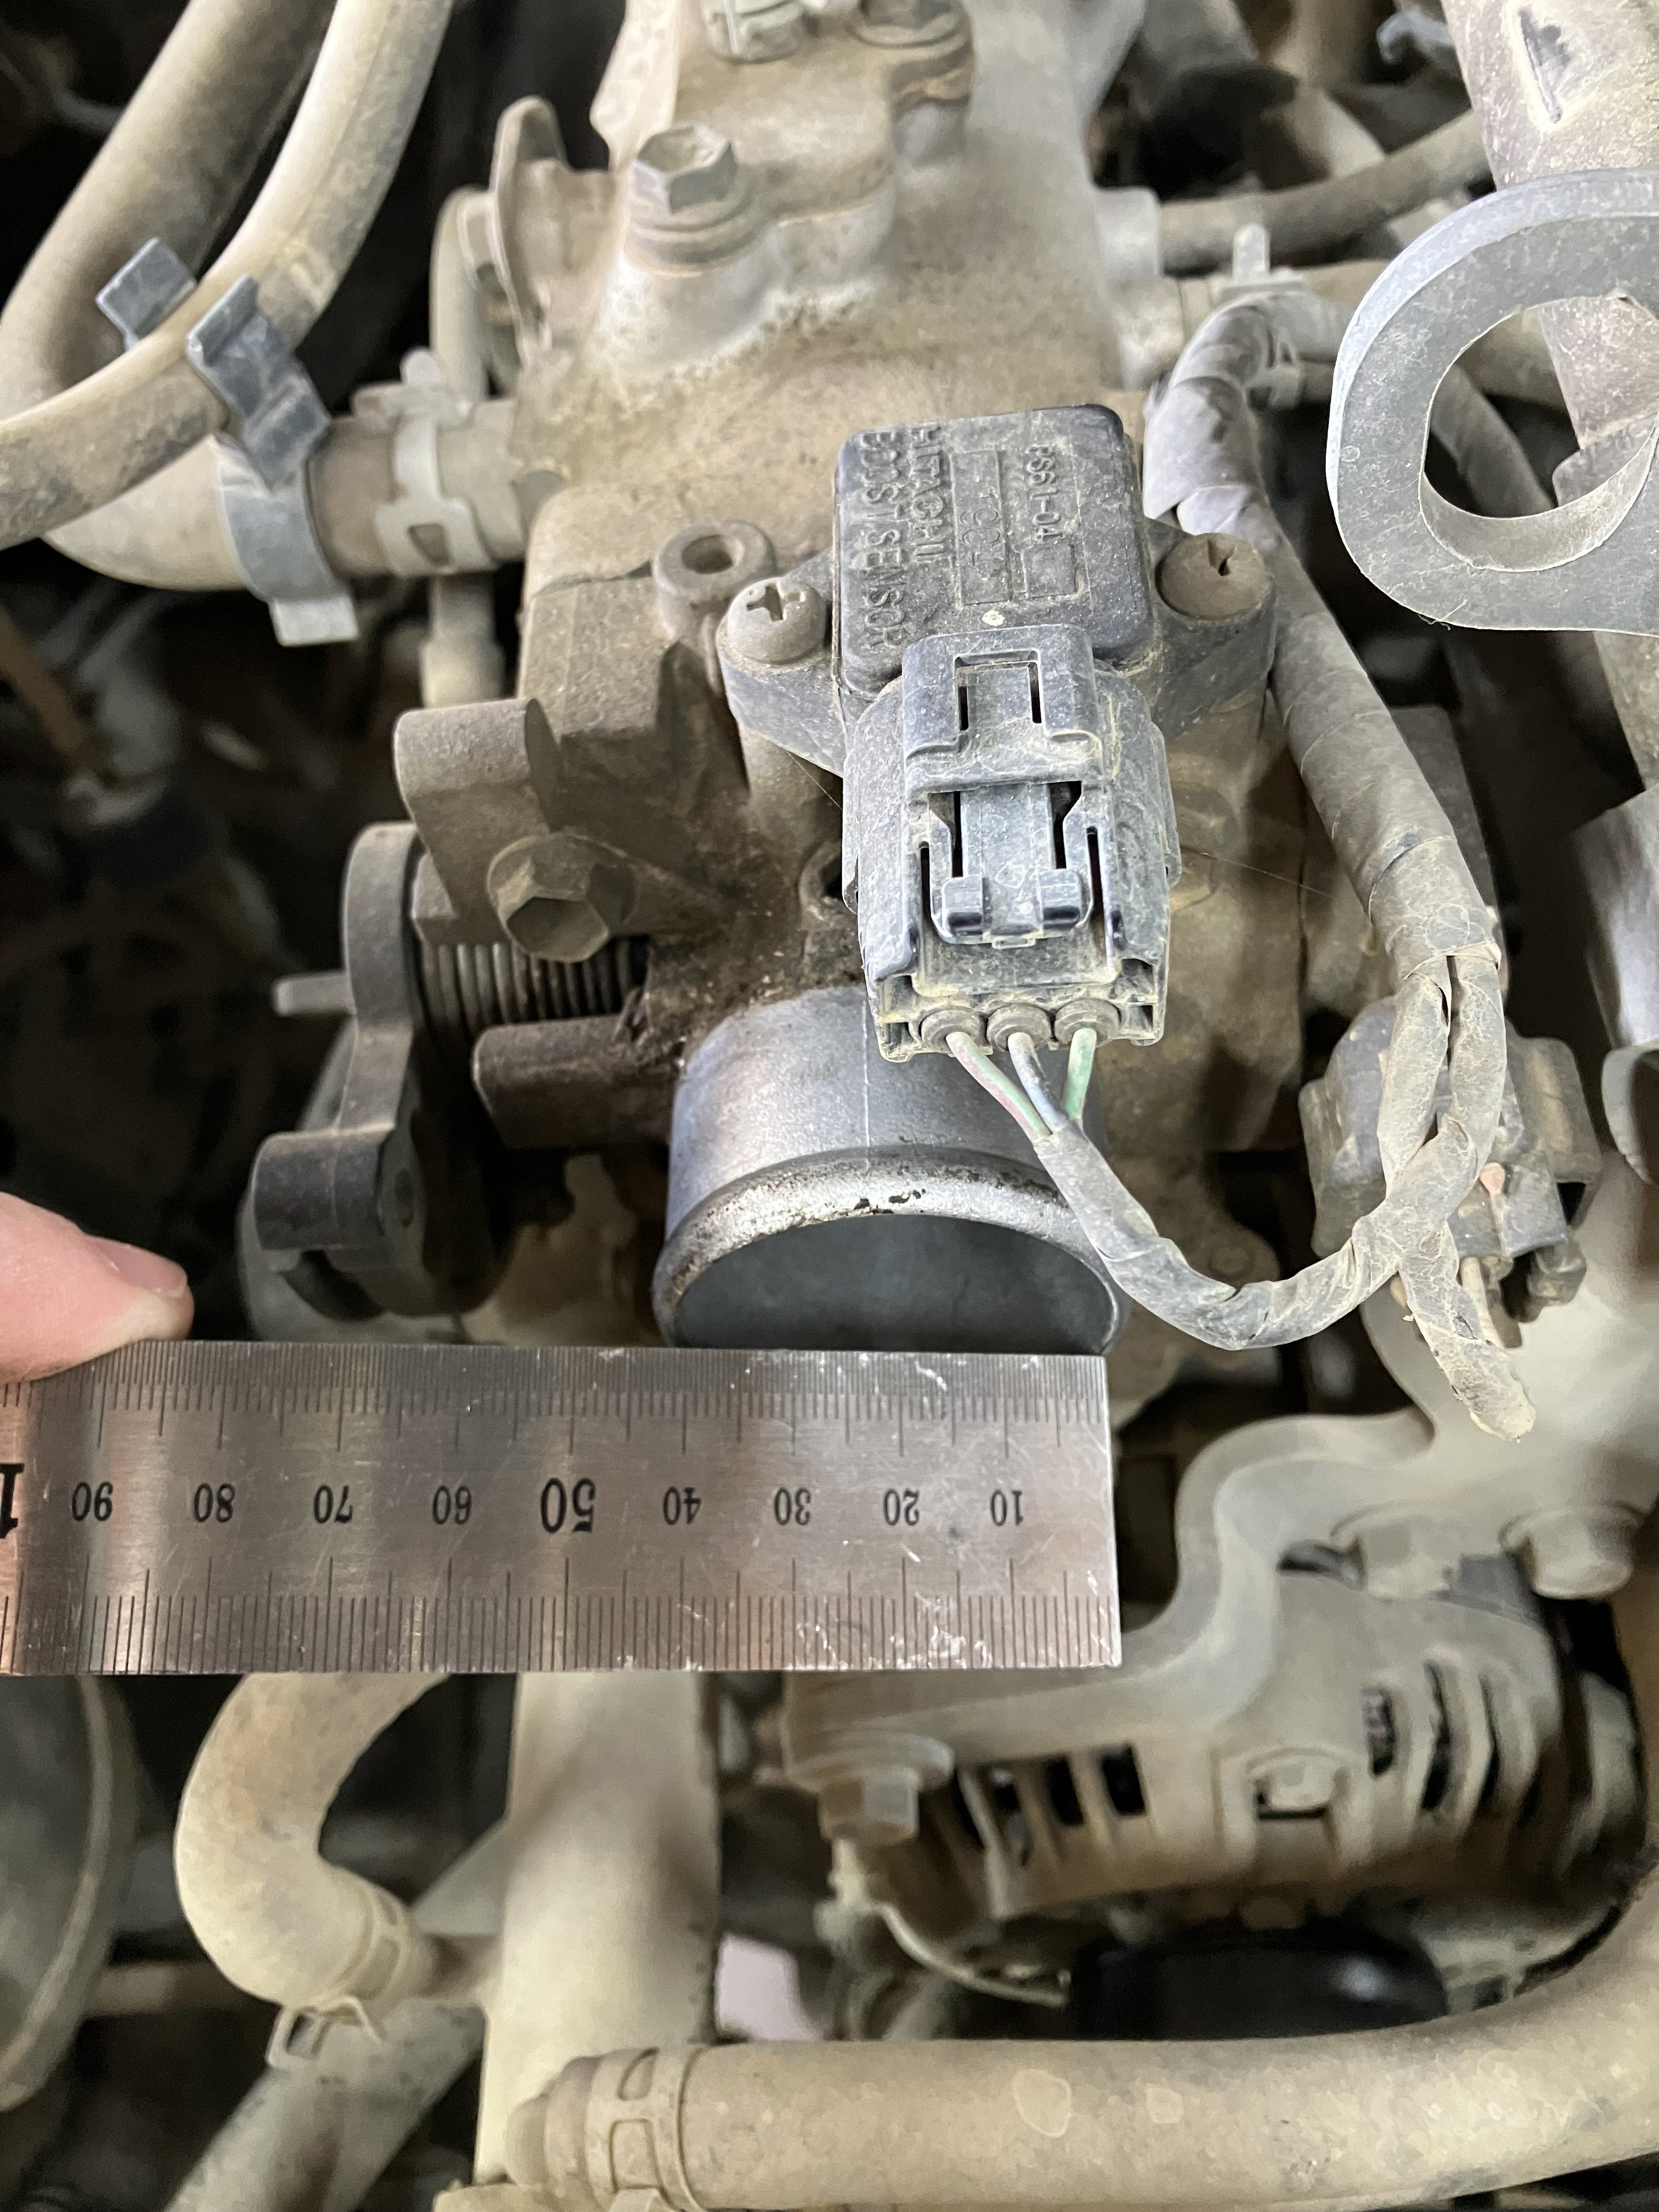
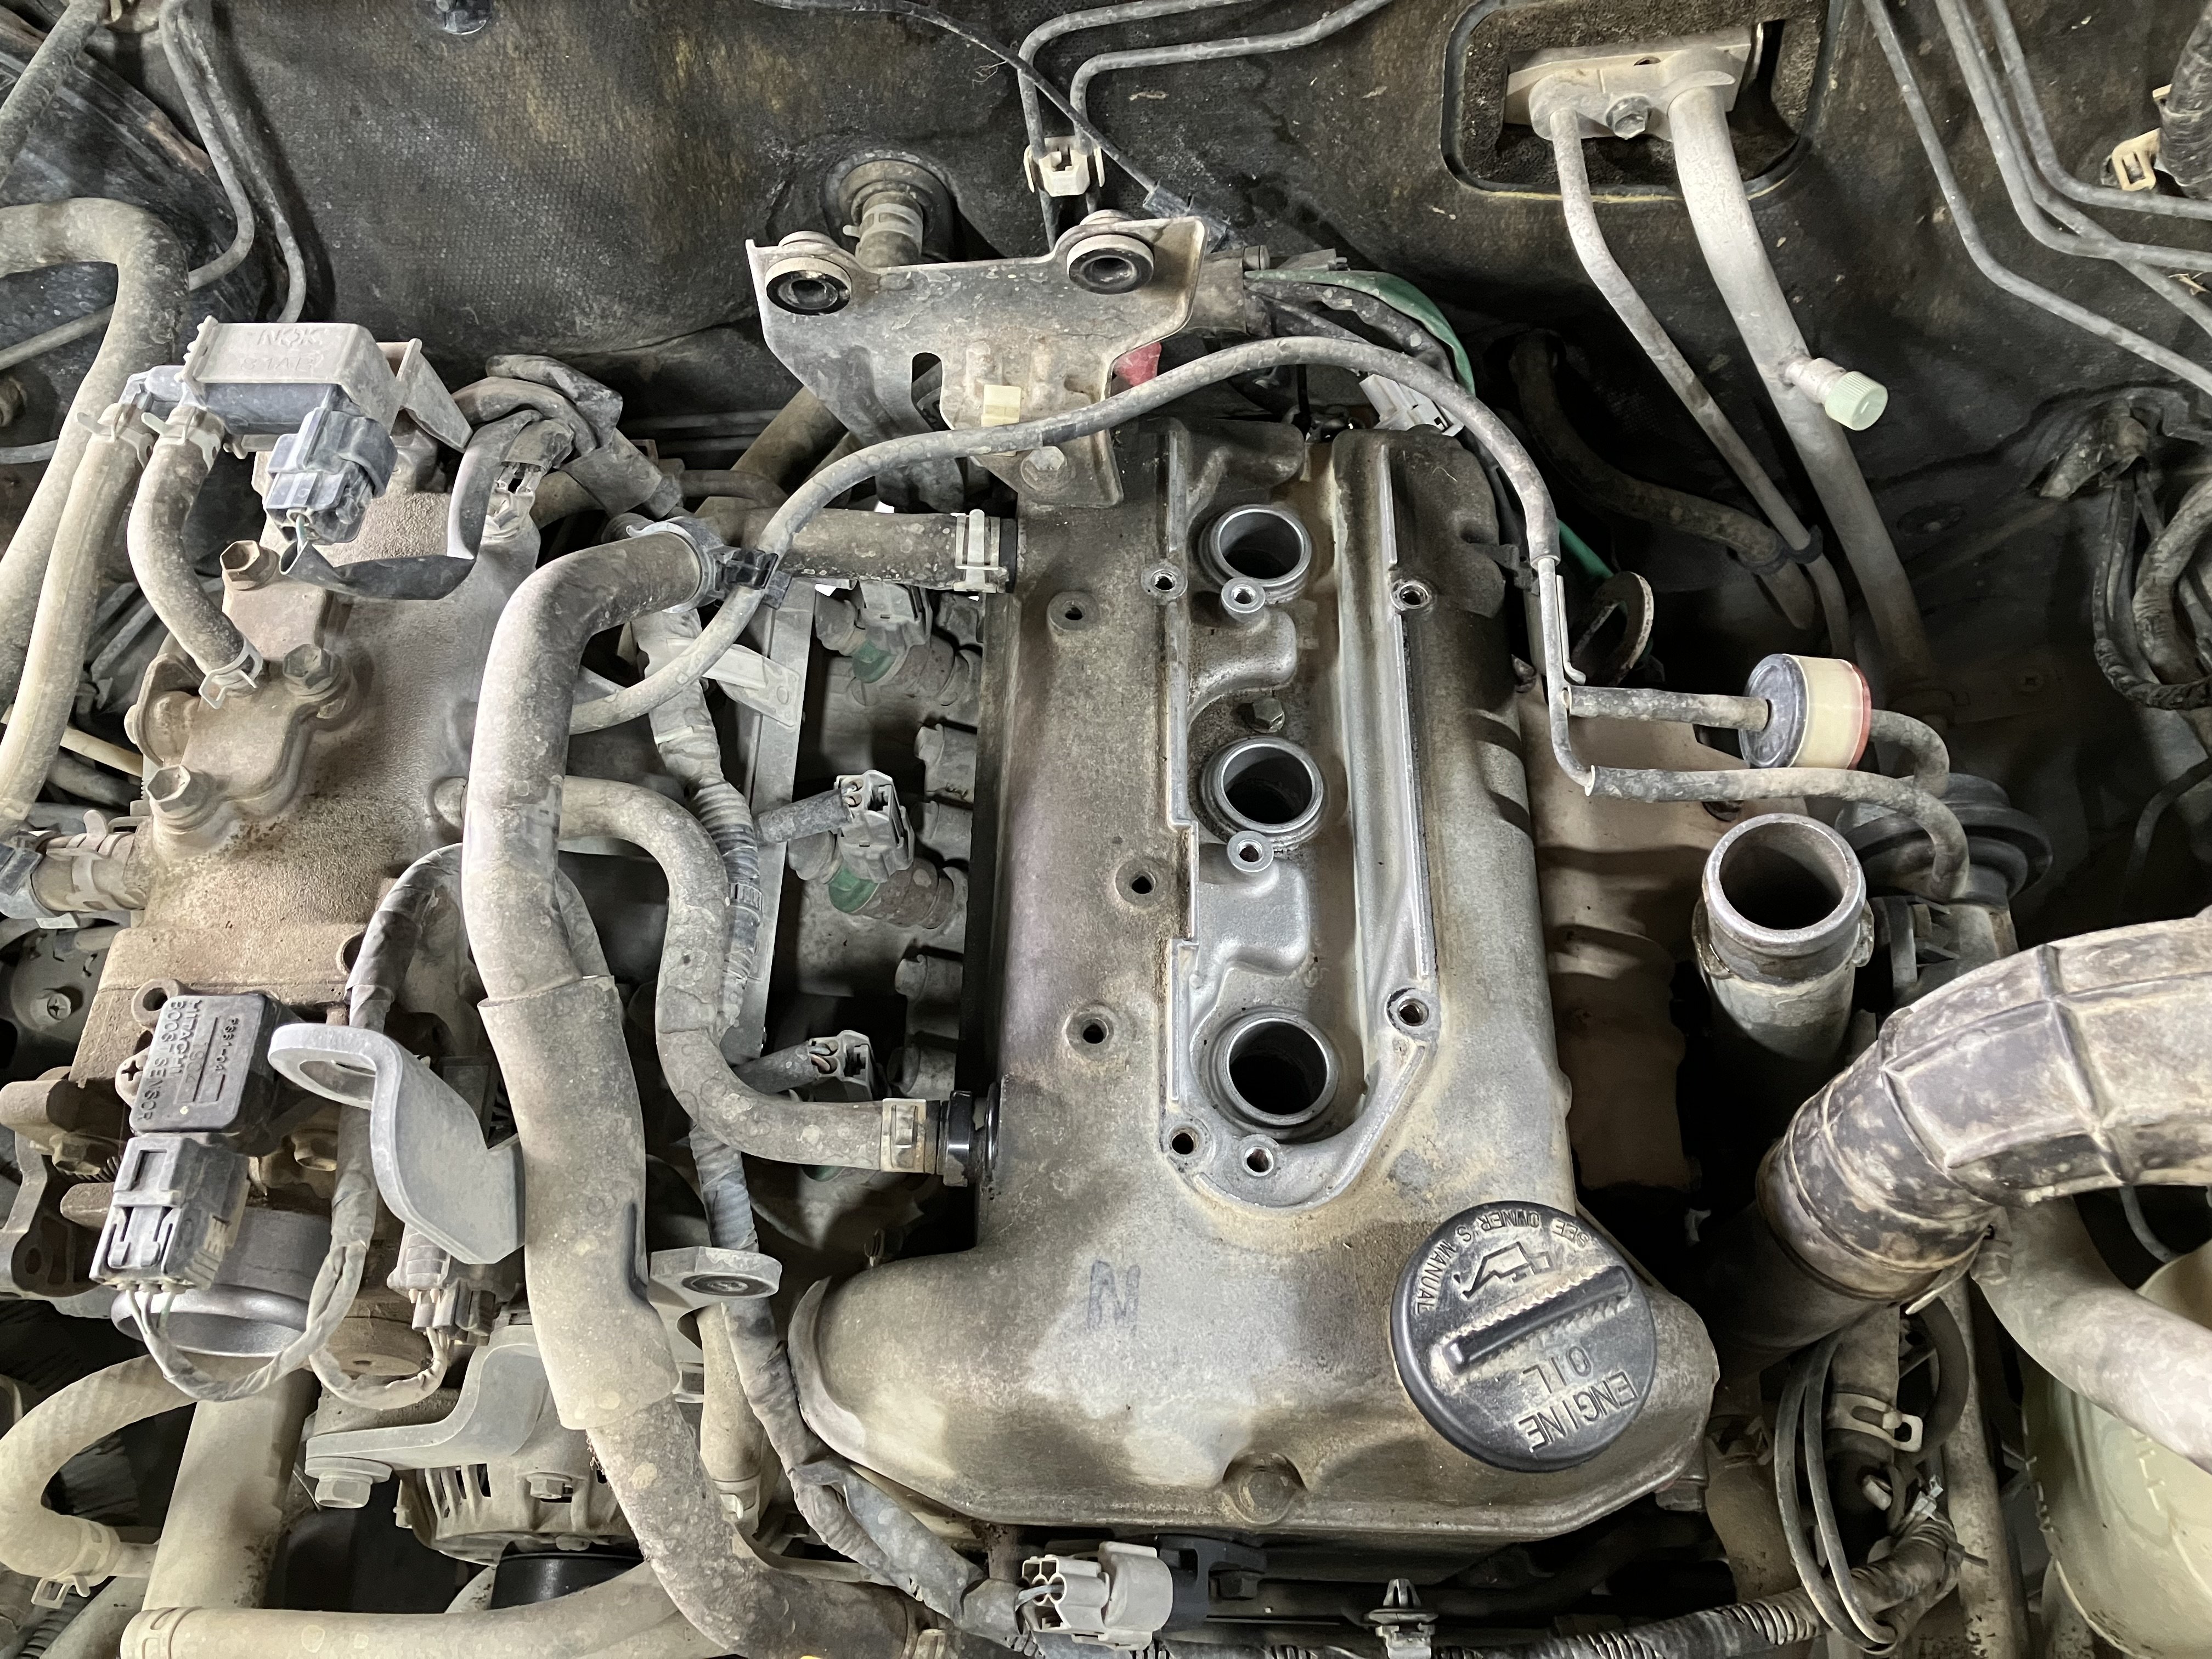
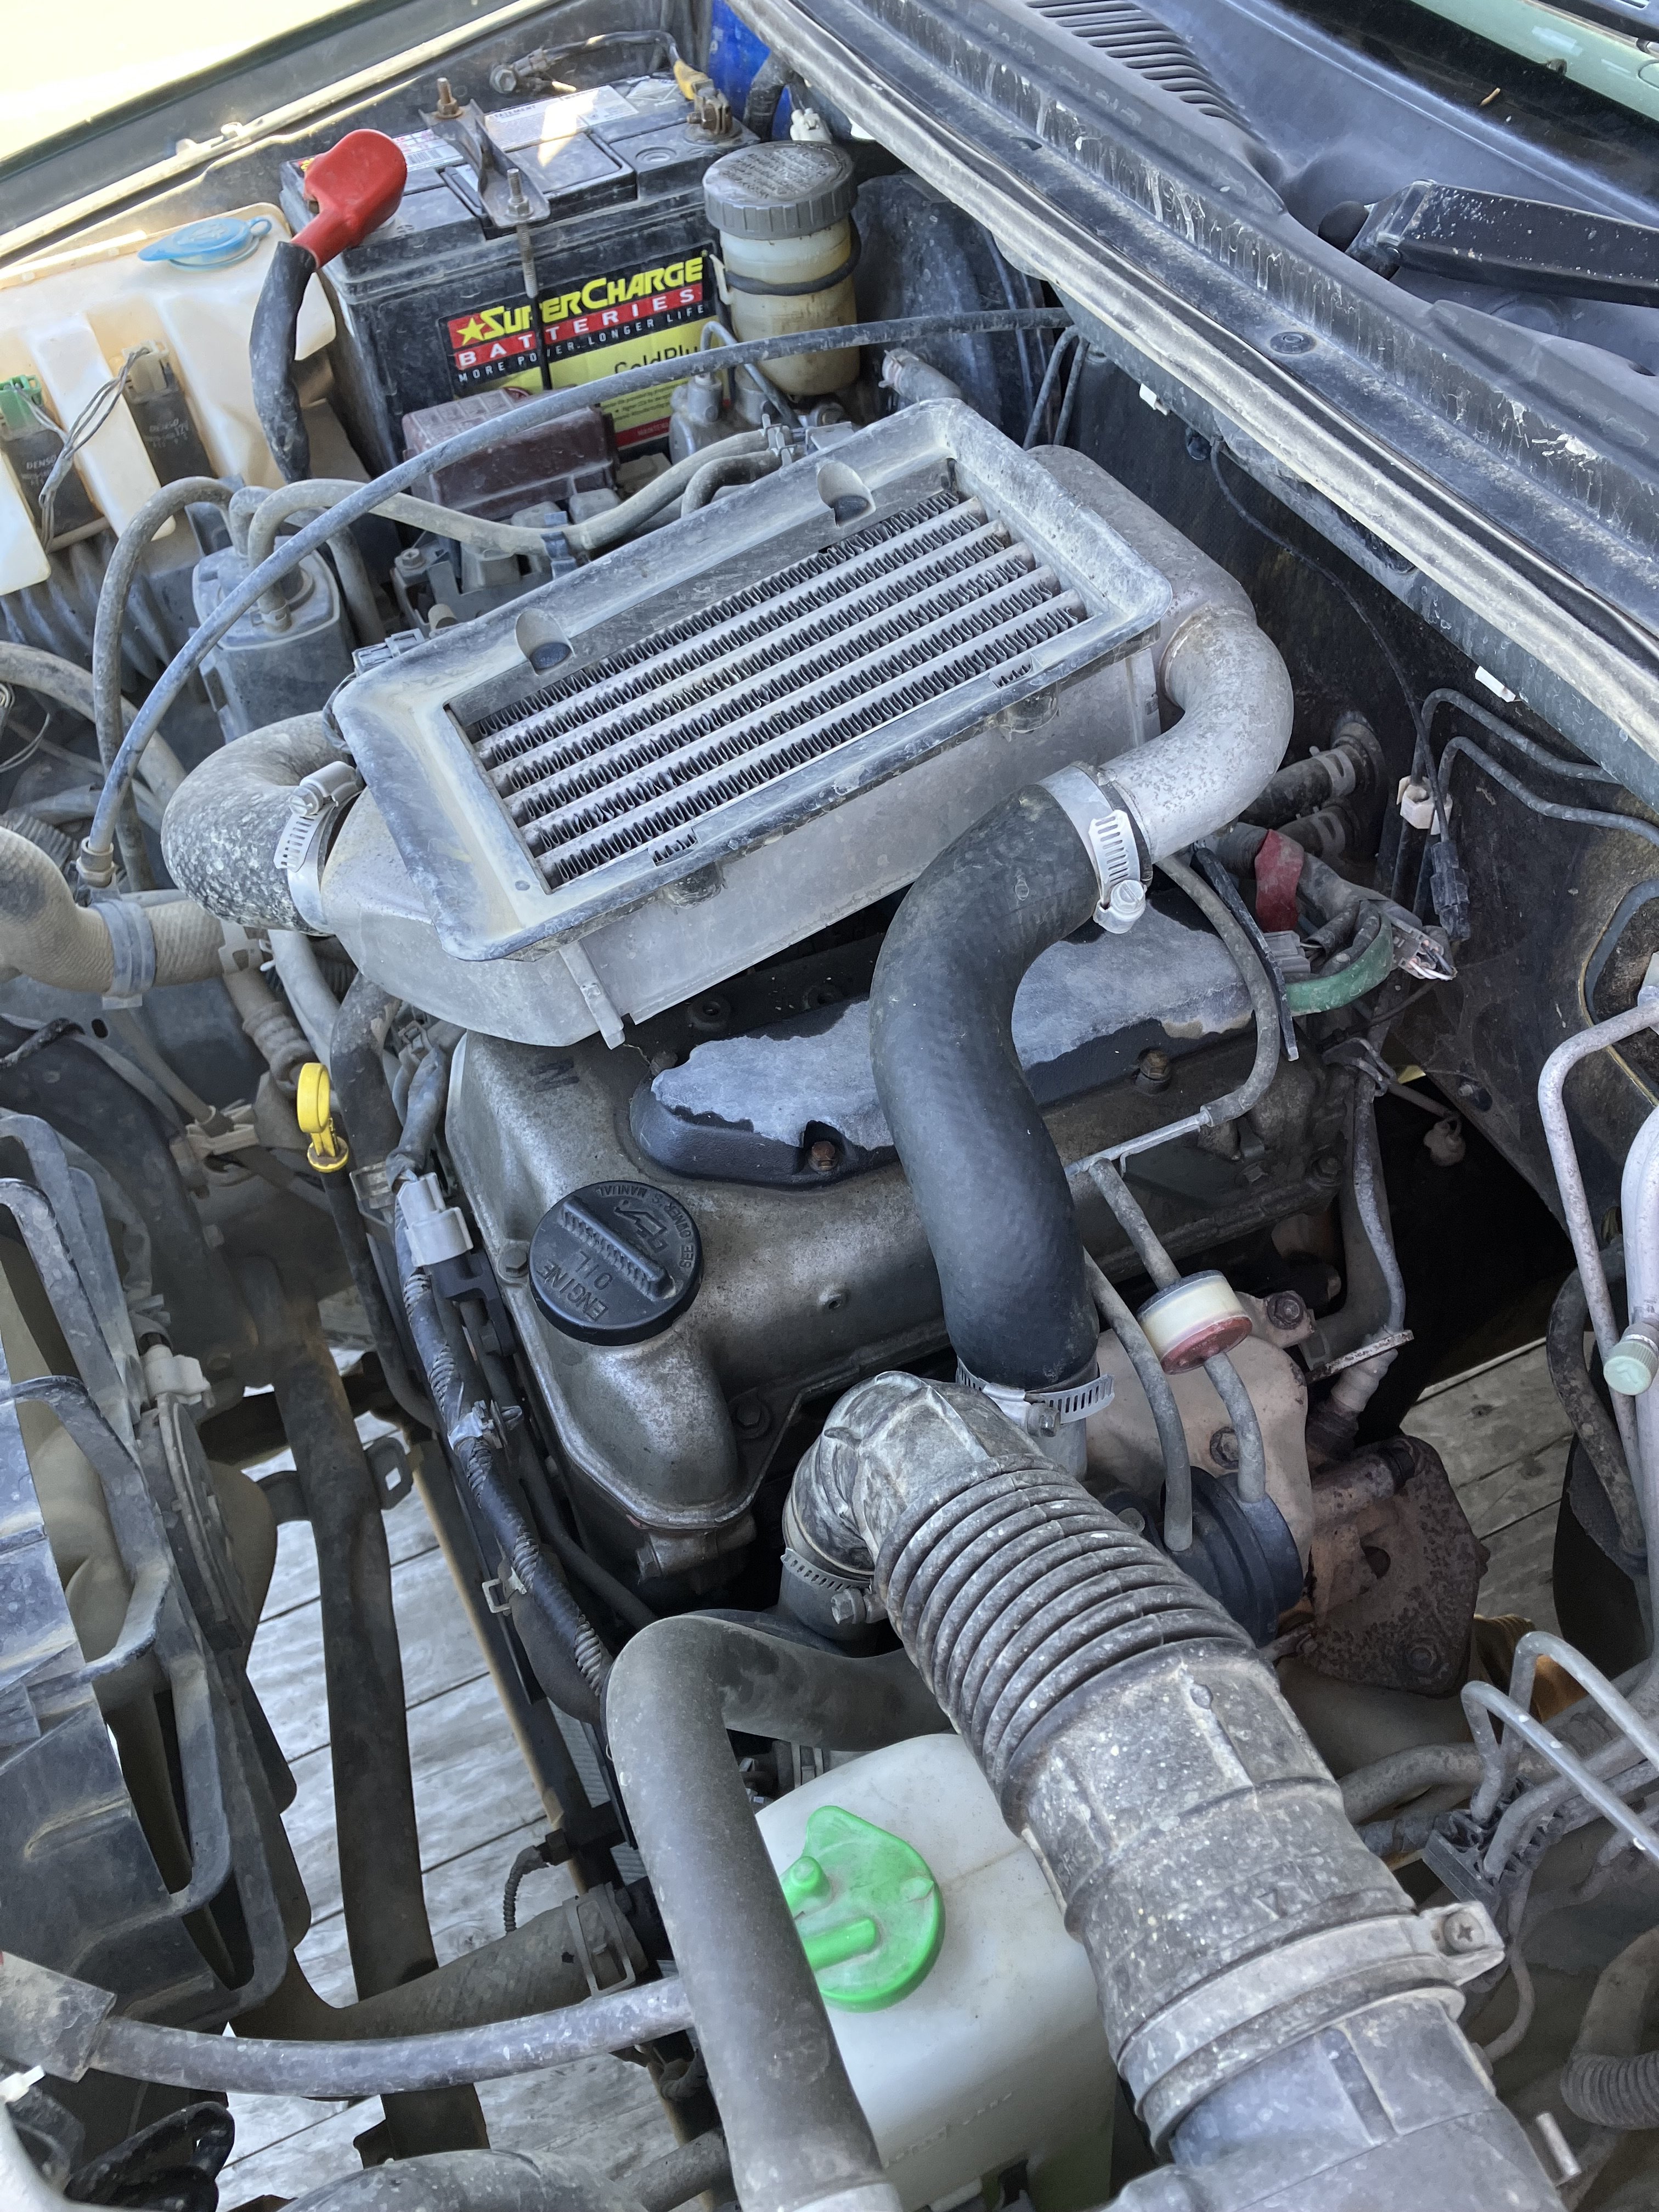
Now it was inside I could muck around with it. First job. I noticed the radio didn't work and the pocket in the second DIN slot wasn't mounted so that should be a quick fix. A loose wire was culprit as to why it wouldn't work. I found two screws to mount the storage pocket properly and reassembled. It's a JDM headunit so only receives one local station and doesn't have bluetooth - but plays CDs okay and also has iPod connectivity via USB so can play Spotify off my iPhone. Second job - while pondering and procrastinating I thought I'd quickly clean up the headlights which were very yellow. Here's the job 50% done for comparison. Last job of the day - why doesn't it start? Intercooler off, coils out, plugs out. Everything is so tiny. Turned it over with plugs out and it was like a water pump - a lot more came out of the bores than I had imagined and I forgot how far it goes under pressure. What's that smell? Petrol. That ain't water. Not sure what was going on but it was a mix with a lot of petrol in it, and it evaporated/flashed off pretty quickly. When I've got it apart I'll clean and check the injectors as well to make sure there isn't a sticky one or some other reason why it may have flooded with petrol. After all that I rewarded myself with a cold beer and thought about what next. Engine out over the holiday break (if not before) and see what is needed. Parts will need to come from Japan but they appear to be readily available. It can sit and wait for now.
6 points
-
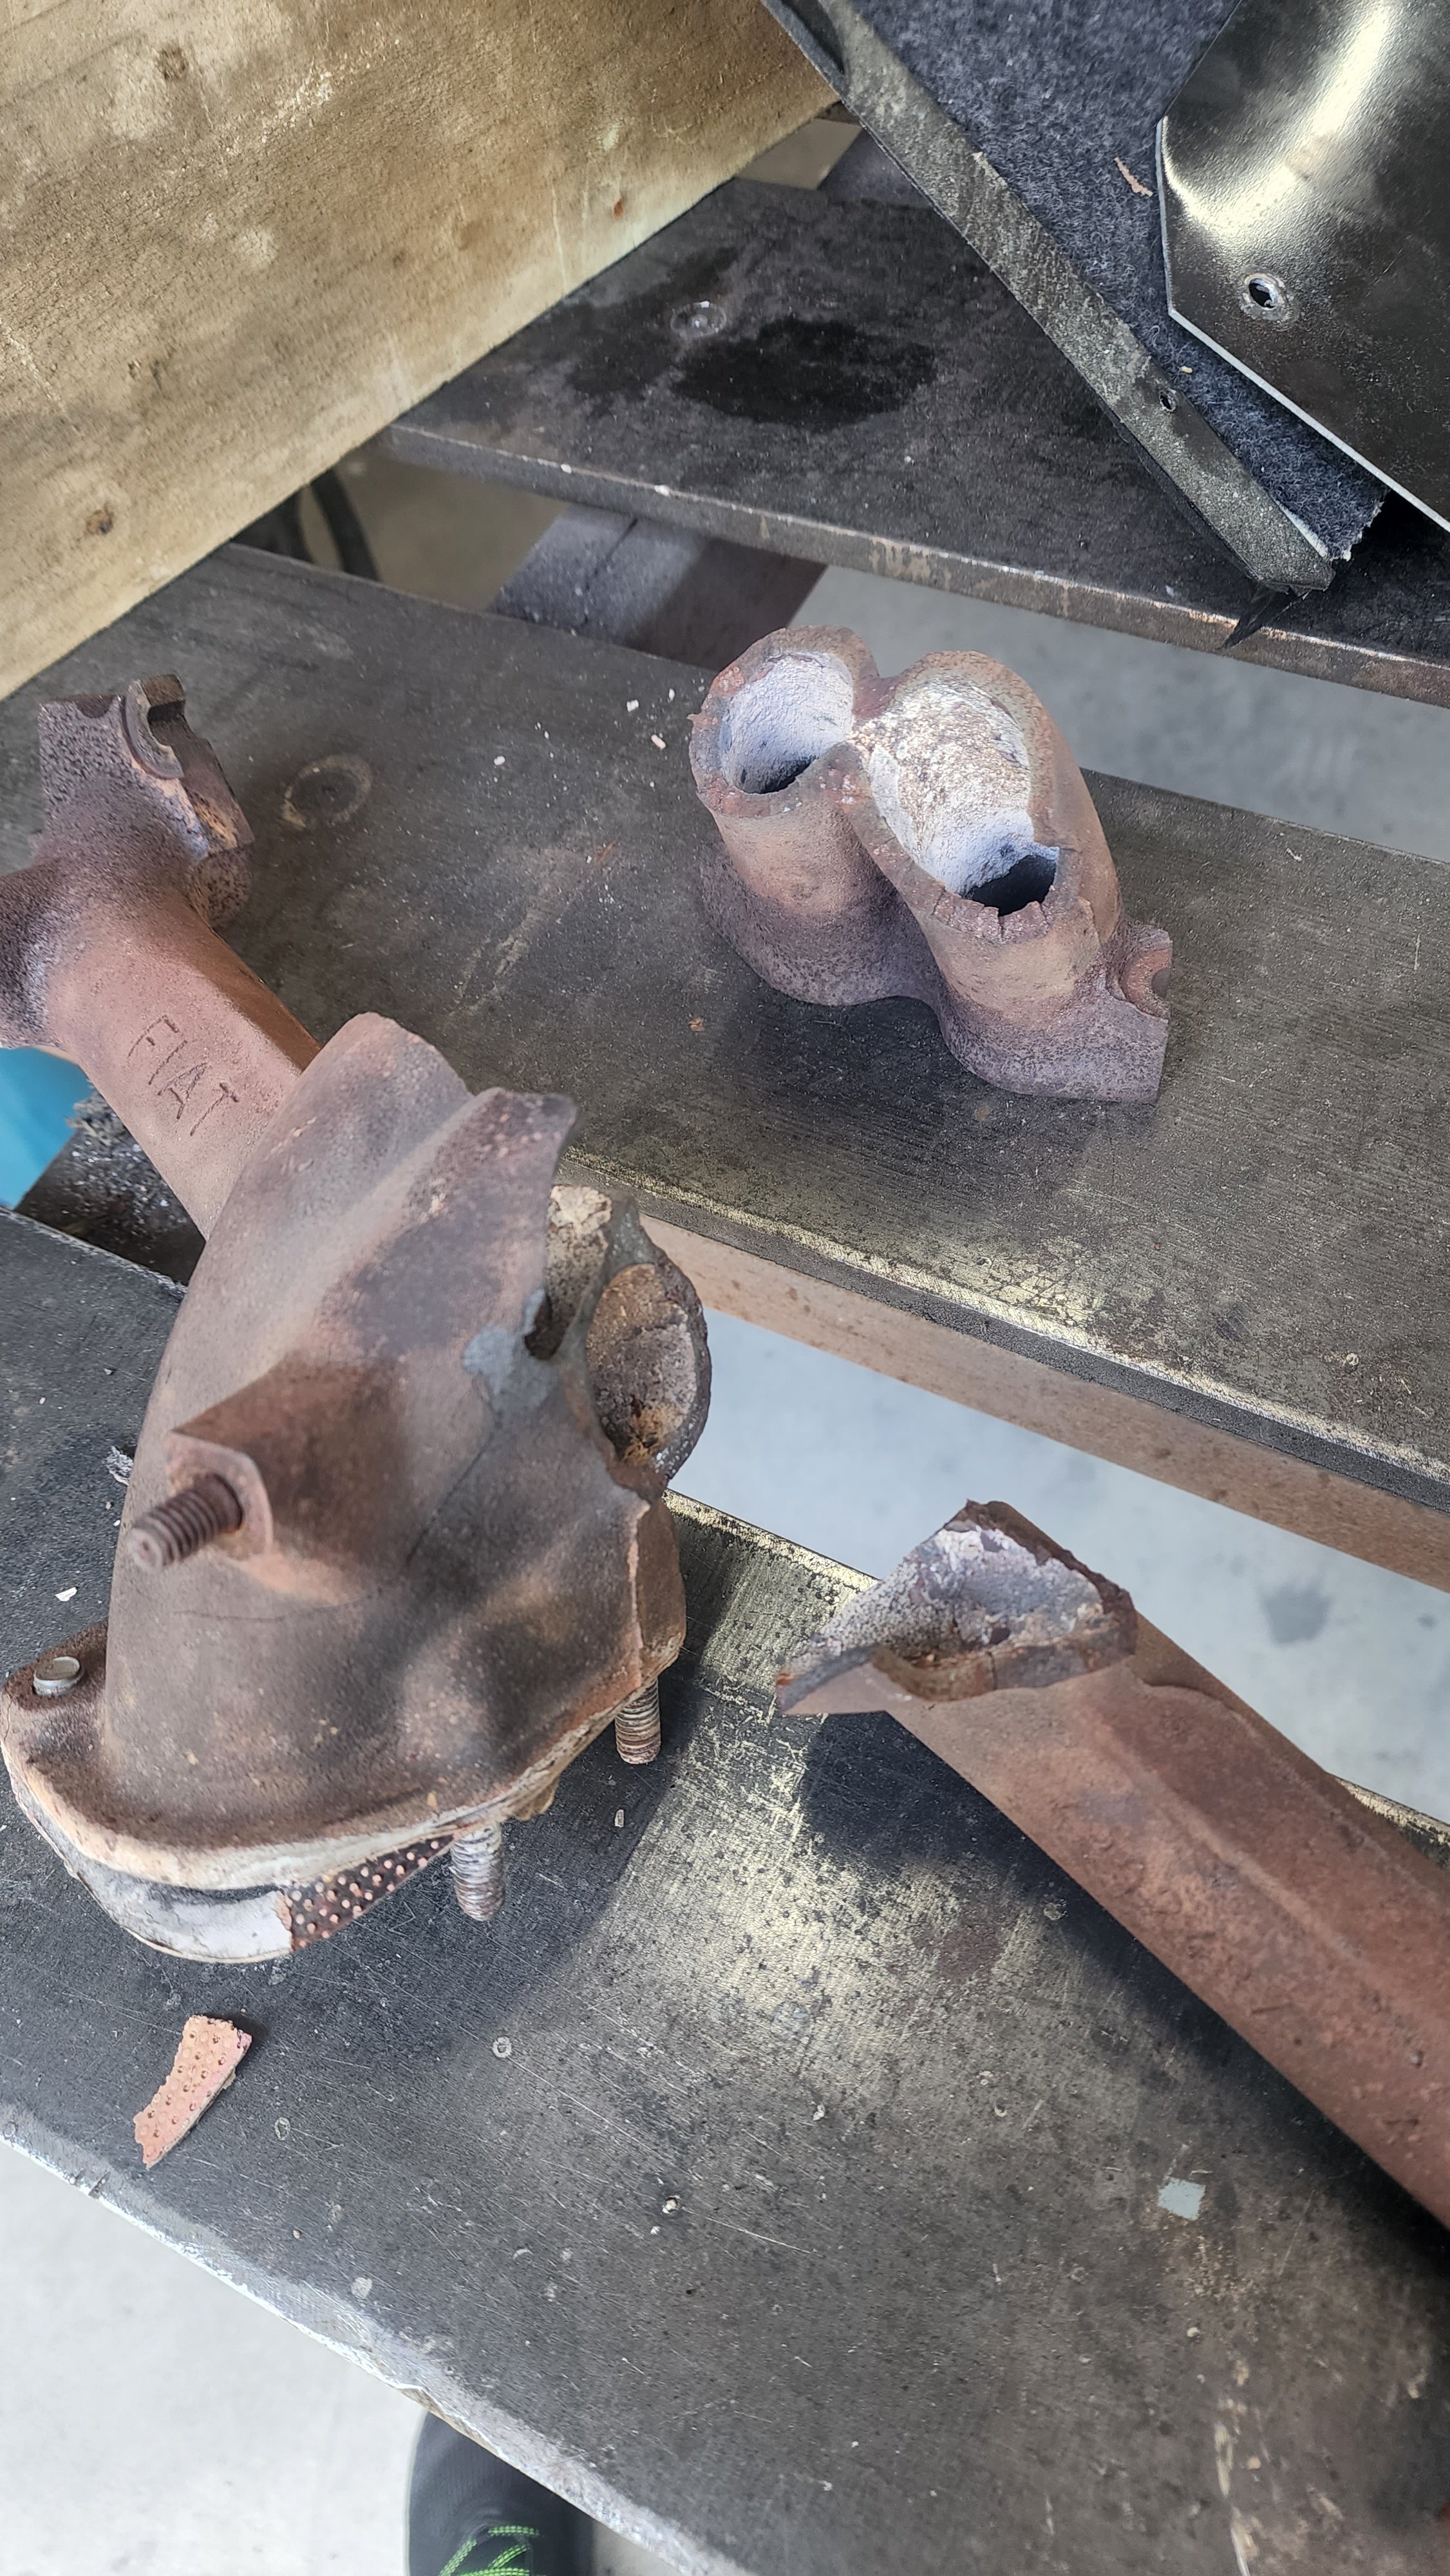
Well thanks to the awesome Dylan I got a new header for Filo, also taking the old one off it pretty much desintigrated into multiple bits and was only being semi held together because it was bolted to the motor check the pics, shit was turbo fucked
4 points
-
4 points
-
Indeed, it was most excellent. Great bunch of chaps and some outstanding roads, bloody top notch work guys. I didn't take many pics, this is about all I got,4 points
-
Opened things up a bit more, tbh it looks pretty good. Altho number 2 is slightly browner than the rest in the head. The cam spins nice and free so its not that, but the with the head off rotating the crank is still ever so slight weirdly variable in turning force. The bores look basically perfect so maybe that means the crank might be bent? Rings broken?Time will tell I guess.3 points
-
Colour on. I did the first yesterday evening and the second this morning. Turned out okay so happy with the result. I also sanded the floor boards and they got the first coat of six marine varnish.
3 points
-
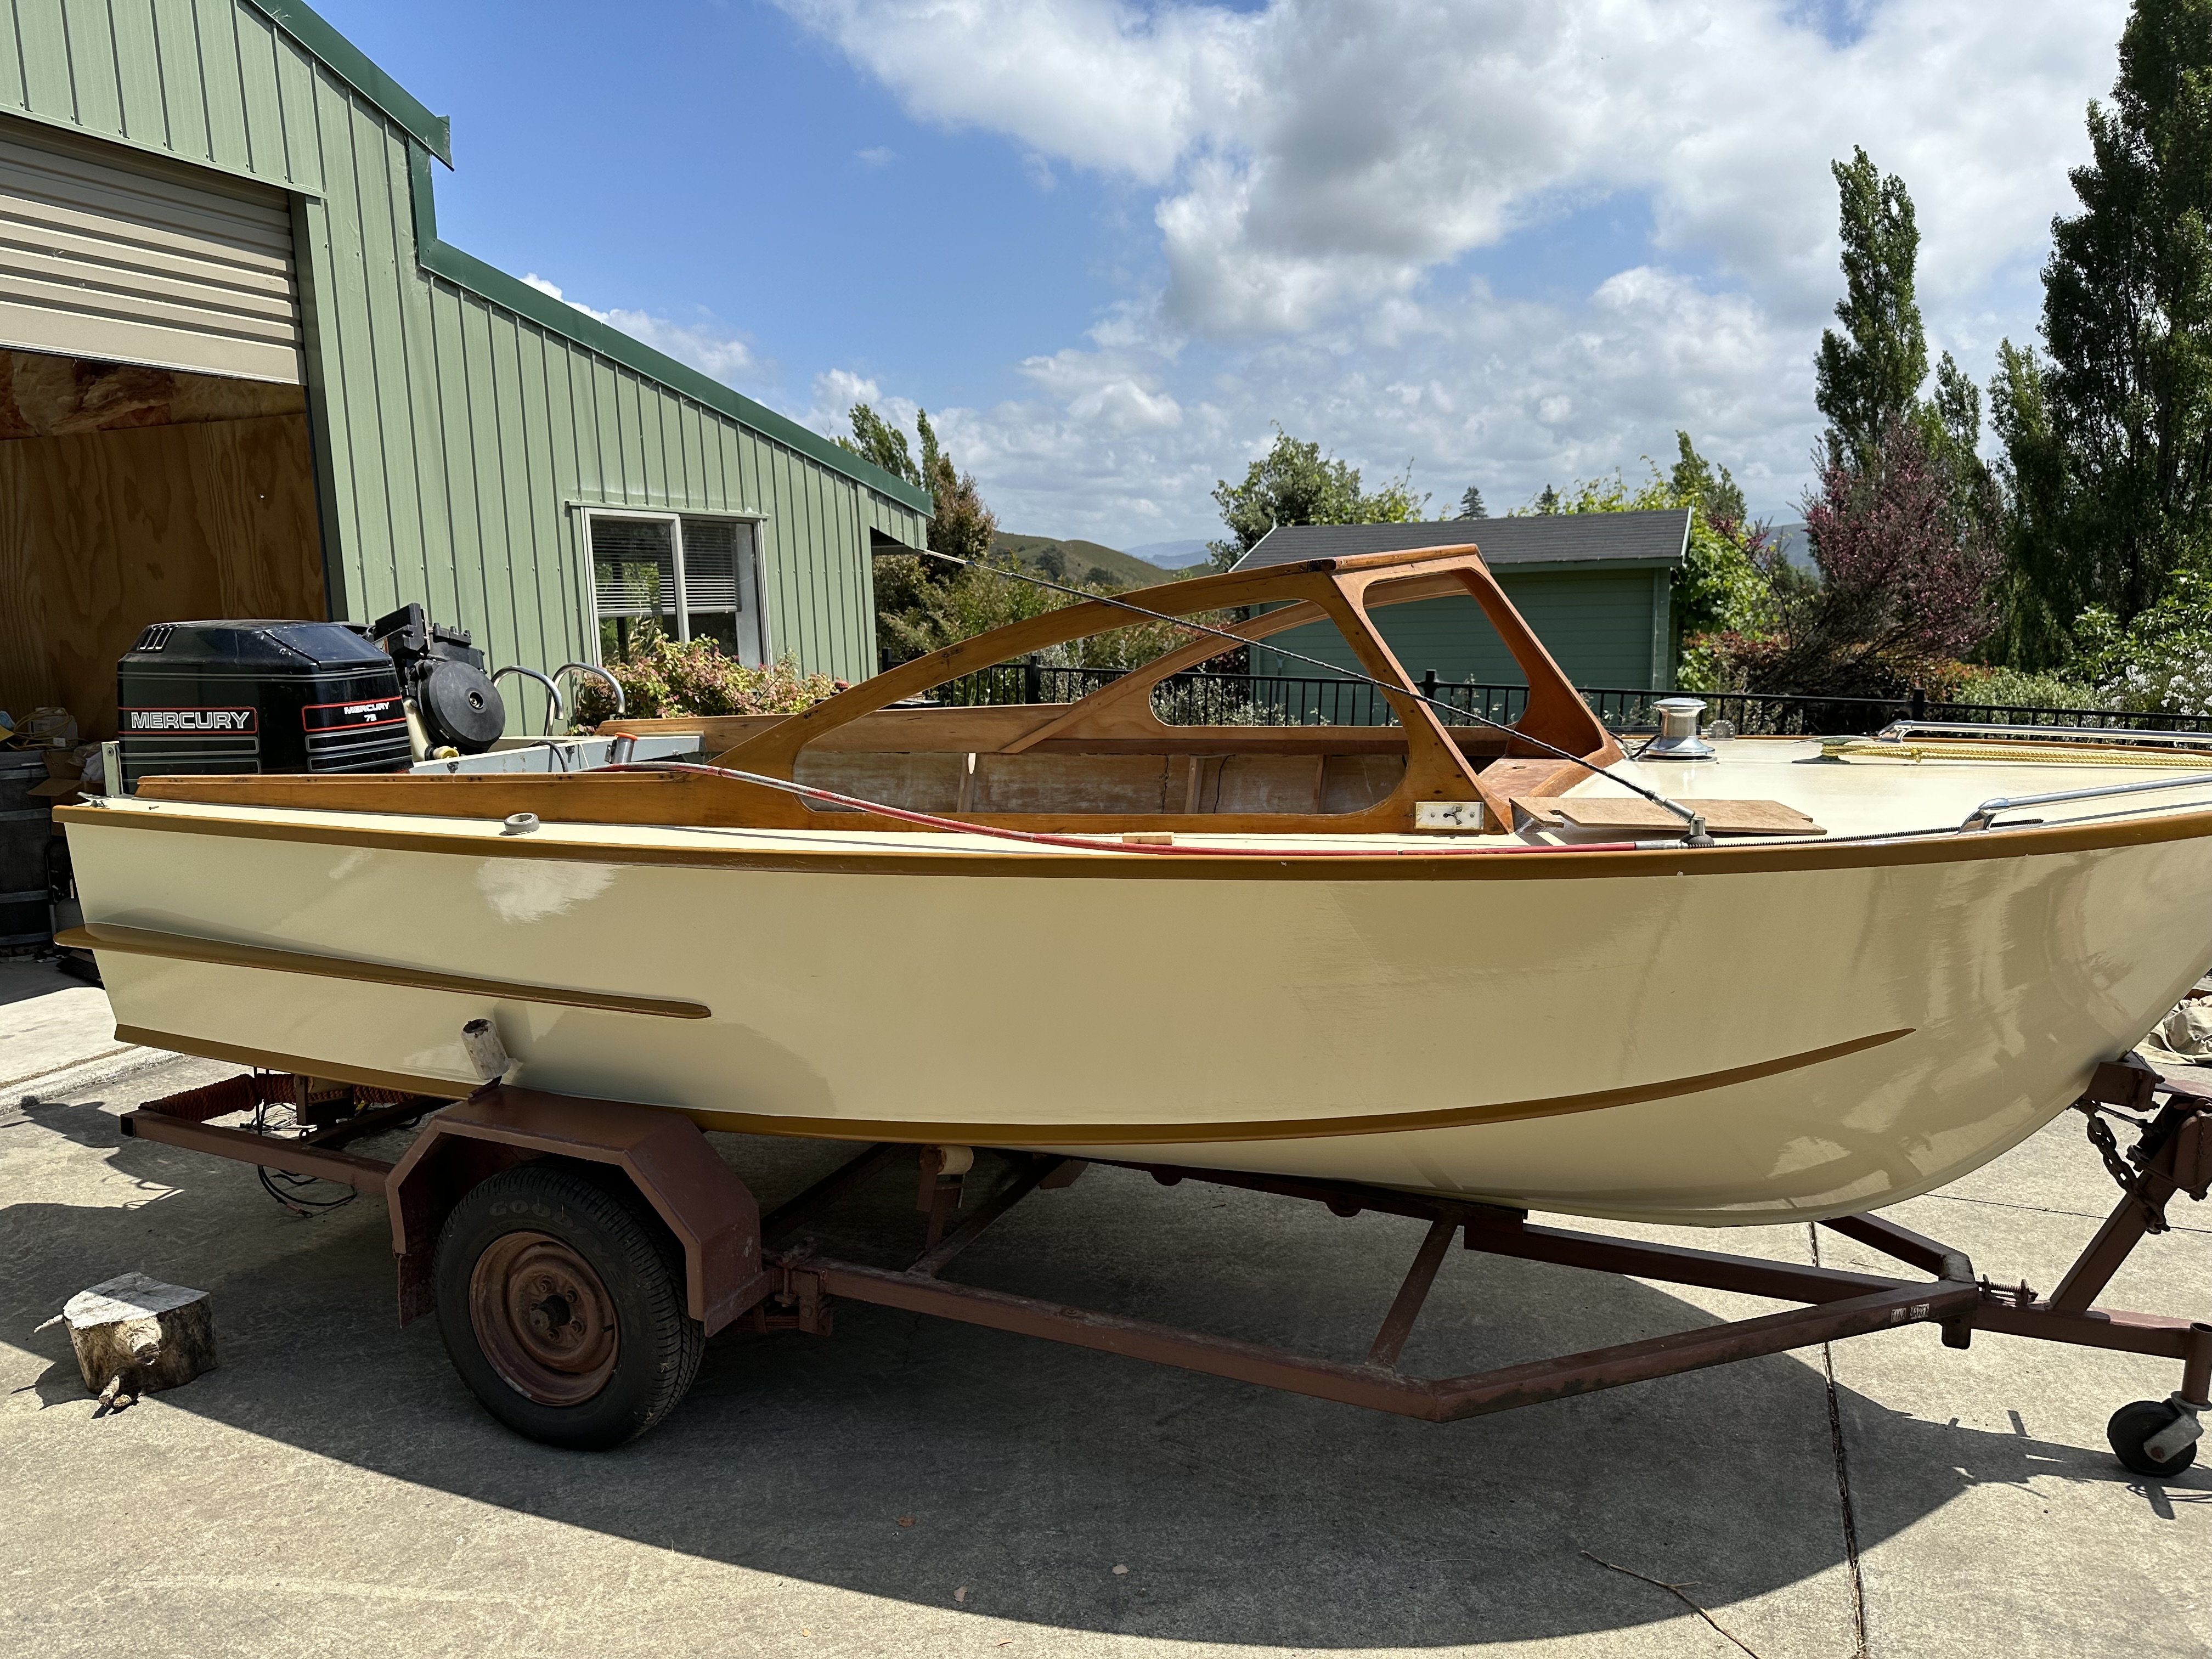
I bought this boat 10 years ago and have never put it in the water. It's still is on its original trailer and has the number 59 on it which I am thinking was when it was built, which seems about right. I bought it from Whitianga, and they had bought it from Gisborne. It had a reasonably new outboard fitted to it at the time which is what they were after. Then I picked up a second hand 75 Merc for it from Gisborne of all places. The exterior of the hull has fresh paint on but the interior was in need of a tidy up so I set about redoing the interior. I got most of the construction done but life got too busy so it sat until now. Anyway, we have decided since the engine has been sitting without use and will probably need a fair bit of work, we will buy a new engine. So, I went down to the local marine dealer who sells Honda outboards and have ordered a 4 stroke 75hp for it. They tell me it doesn't take that much to get these small ply boats to get up and go. I will post up more pics as I go.
2 points
-
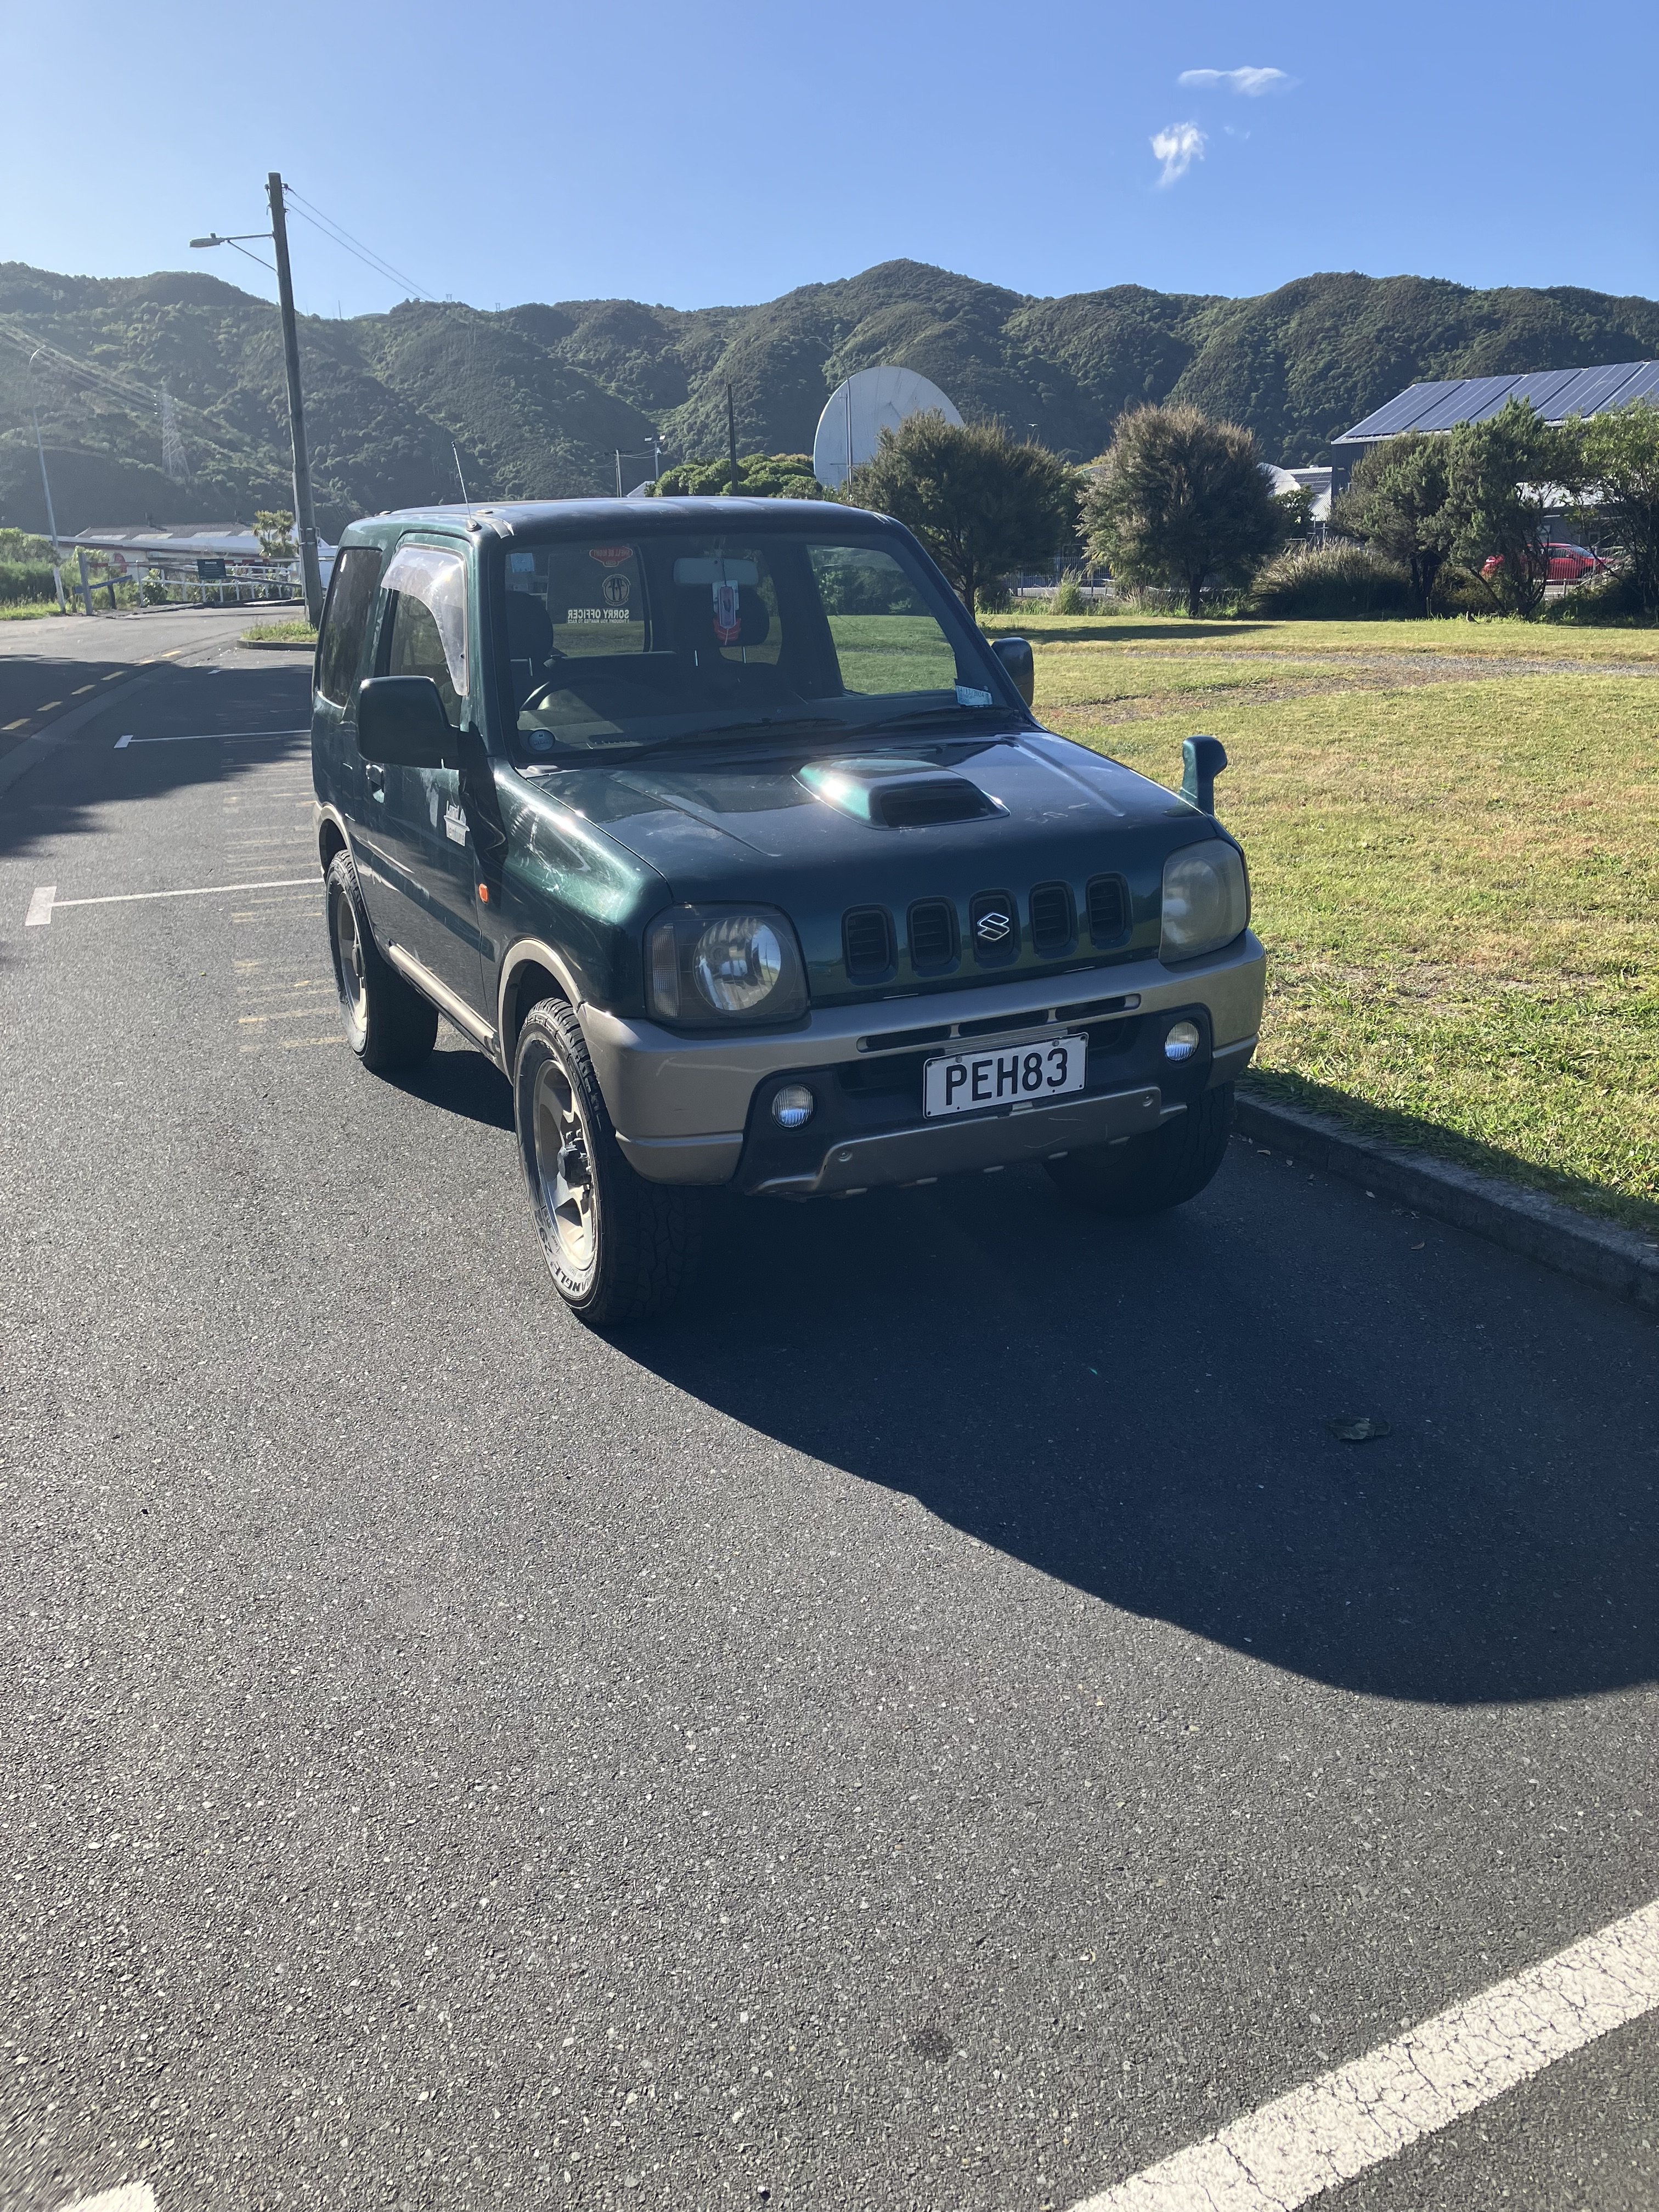
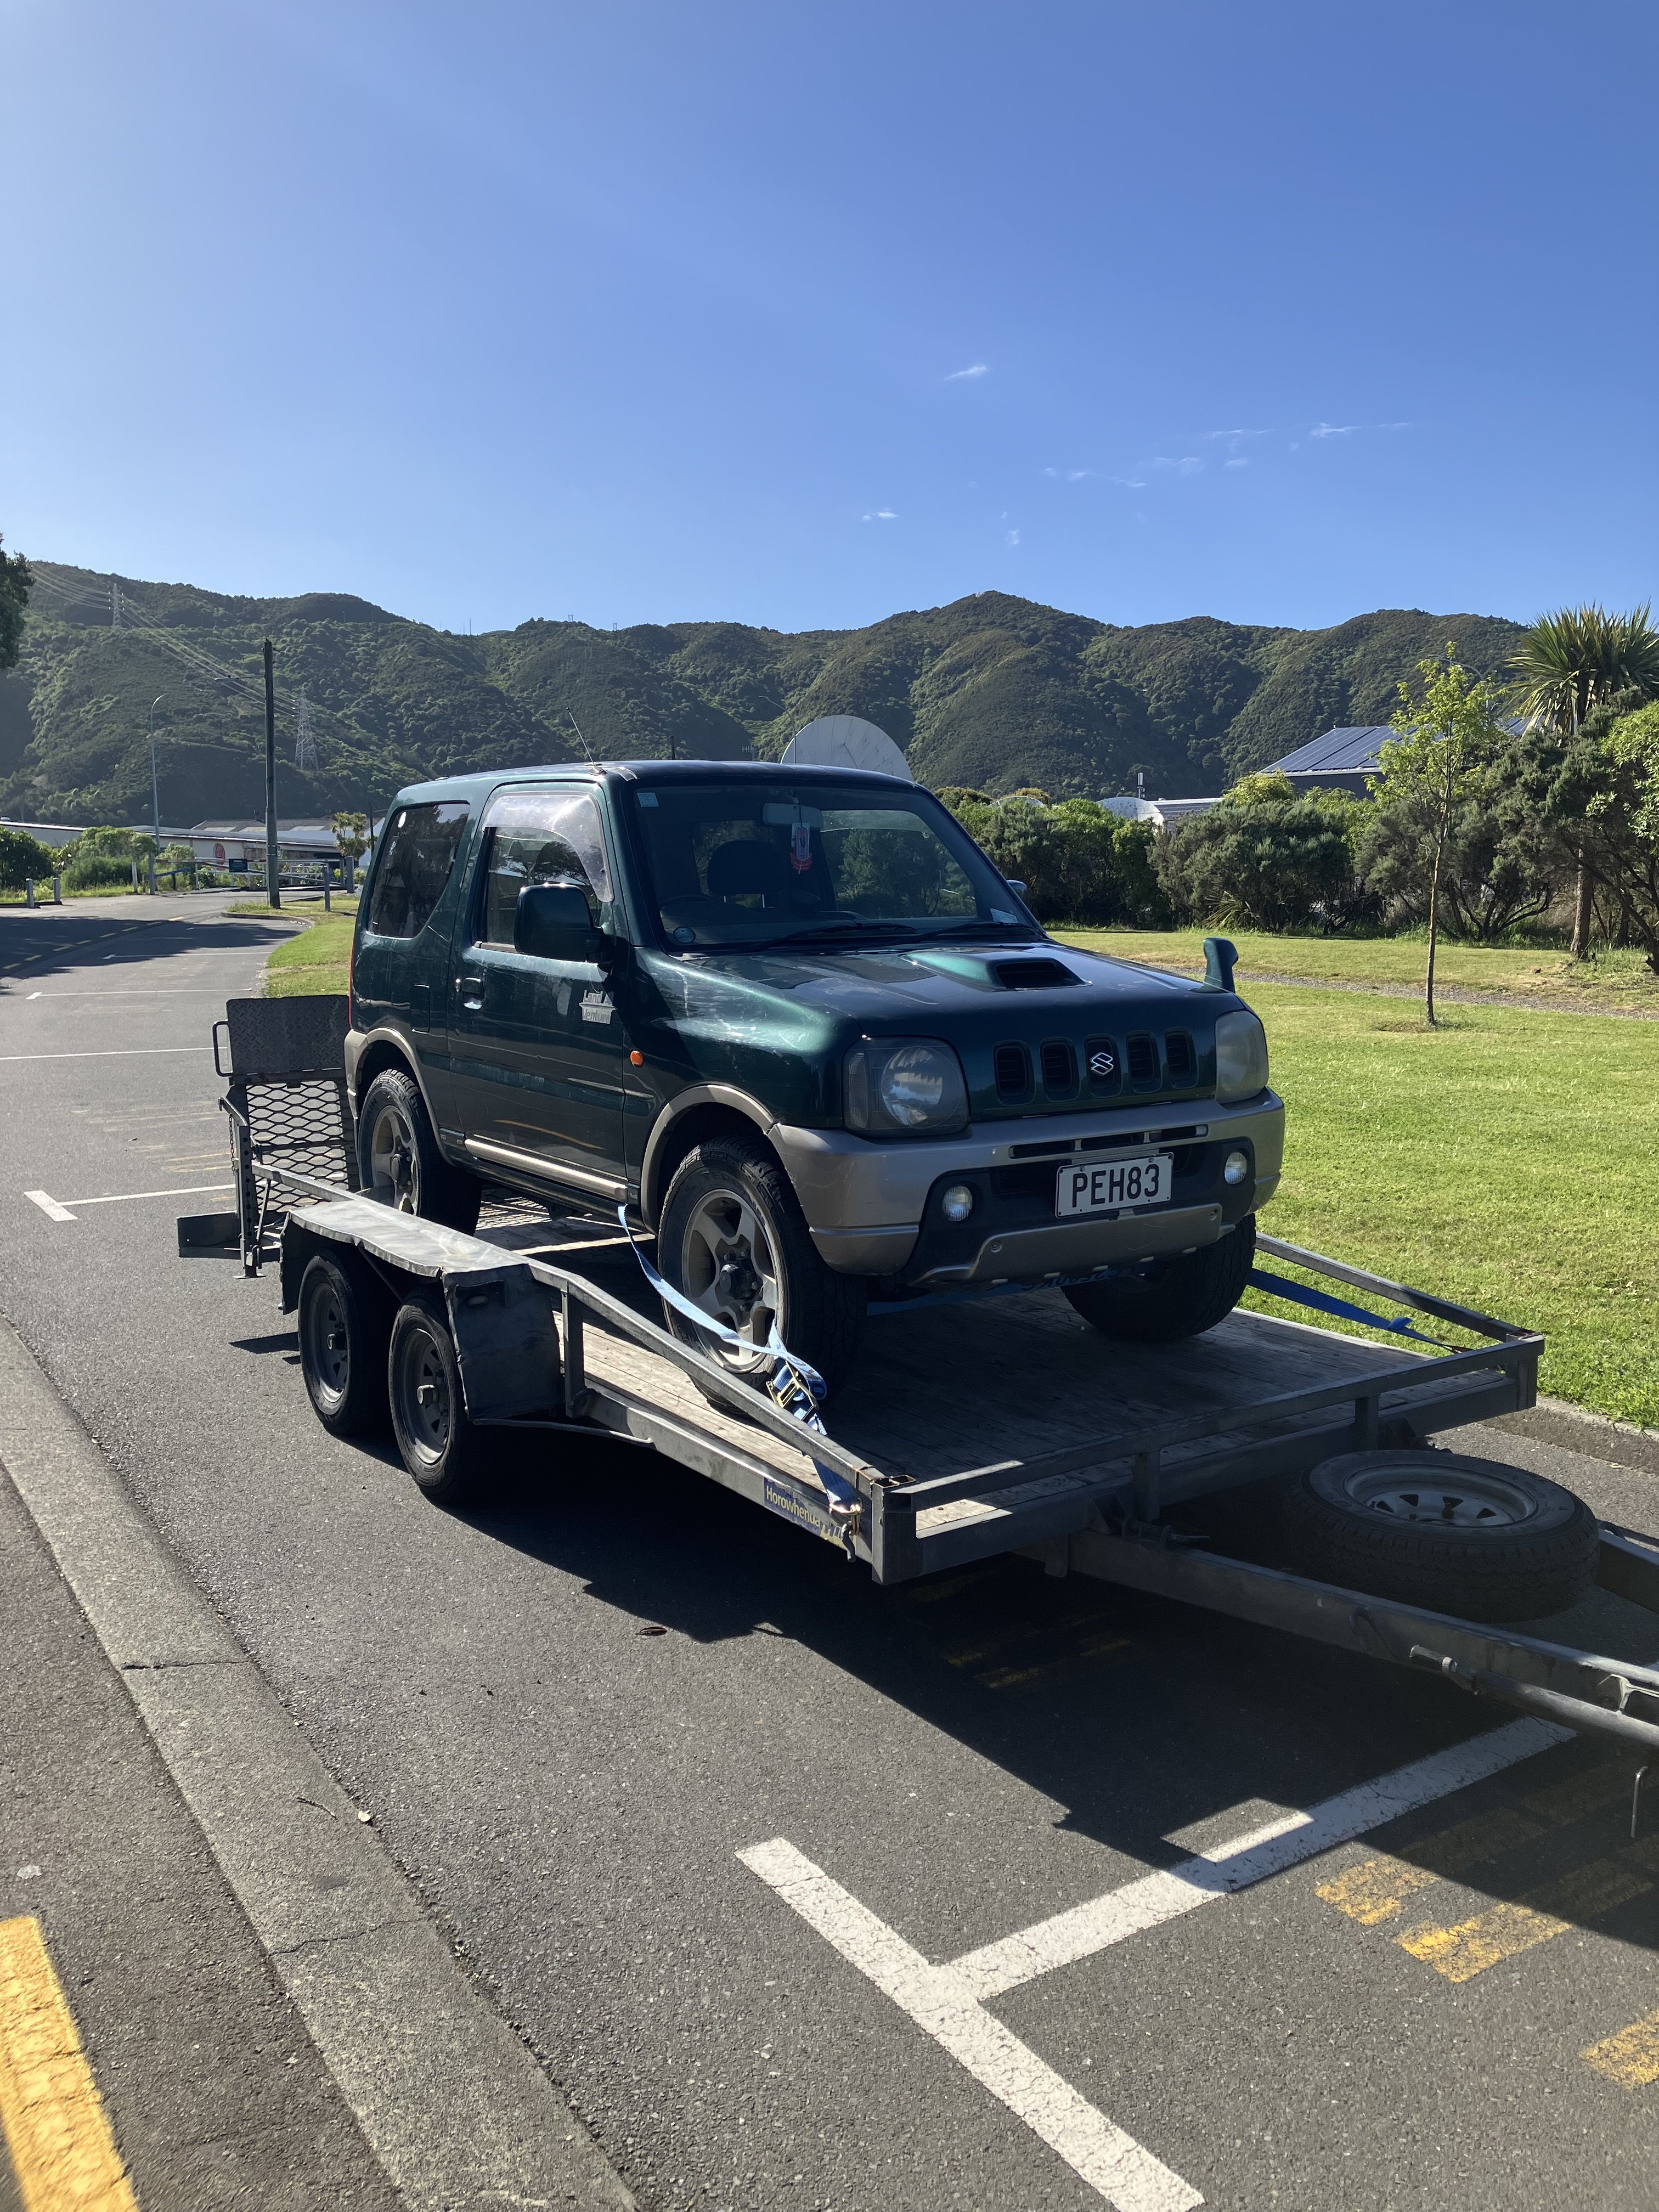
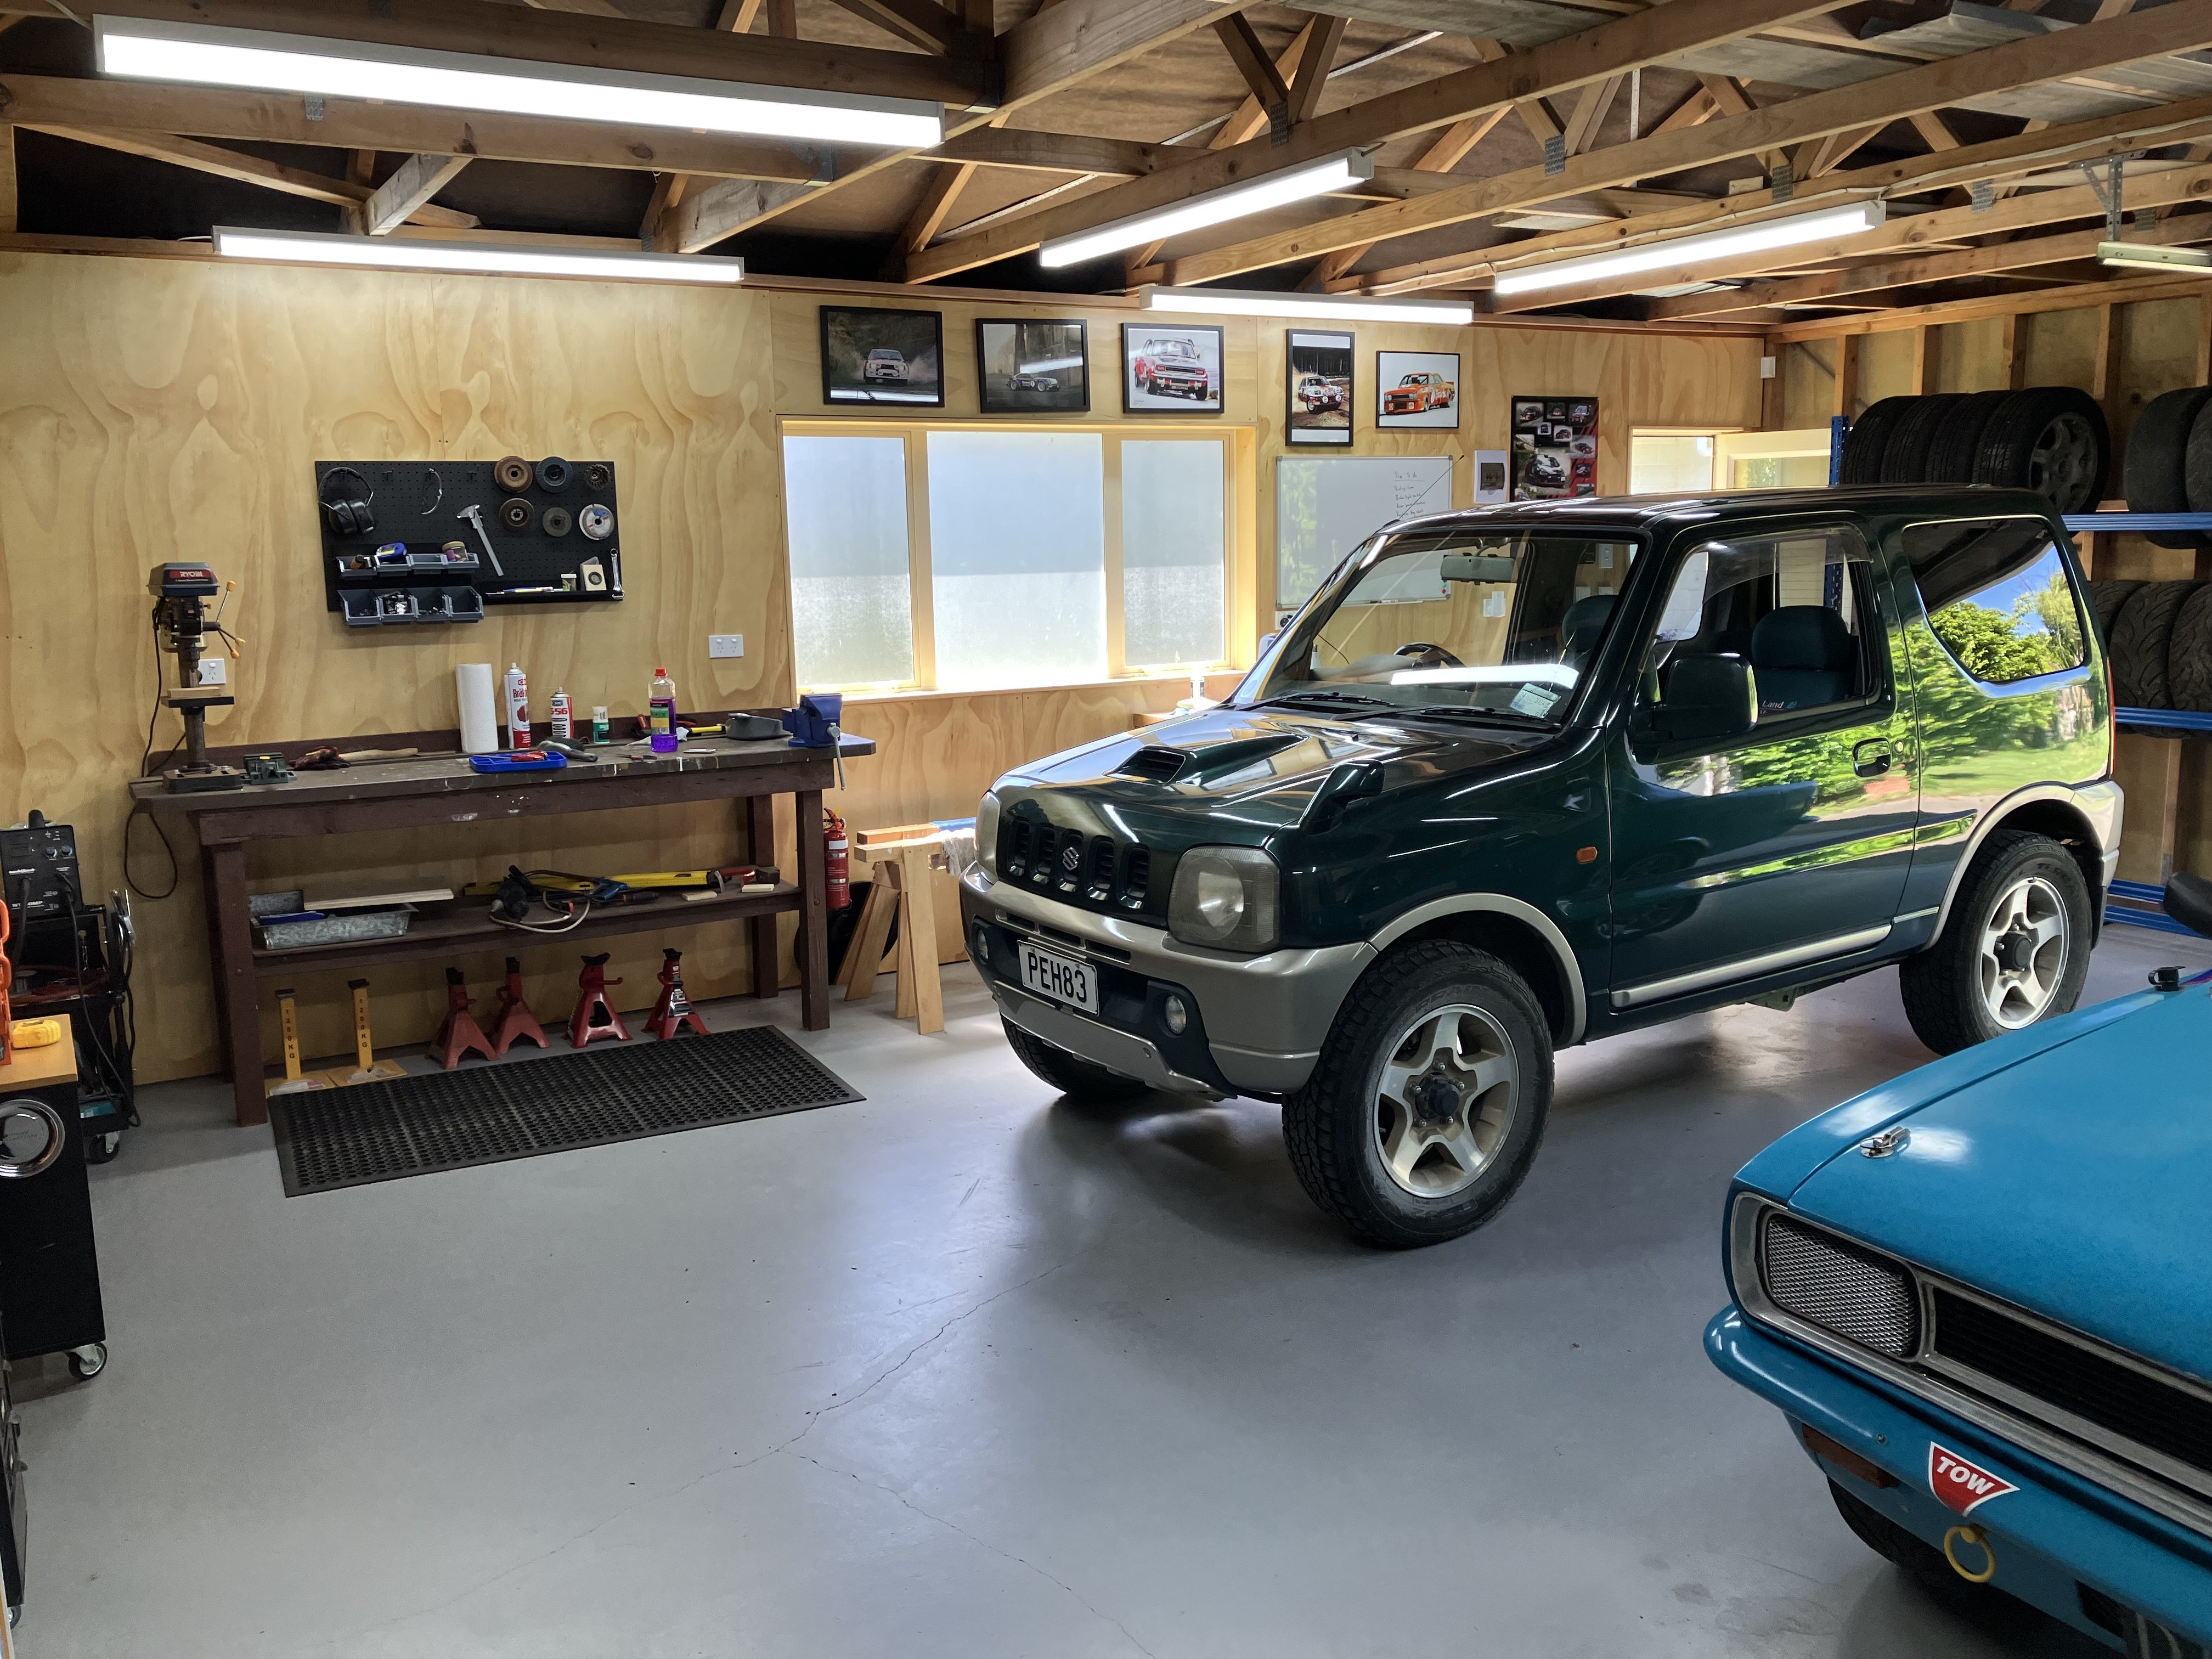
So after many years of wanting a kei car of some sort and also a Jimny, and much exchange of banter and links between myself and my old fleet manager over many years about such vehicles, I became aware of a very cheap kei spec Jimny on Trademe. I thought I'd keep an eye on the auction and see how it went - I didn't need it, but I would be interested for the right price. Anyway, it was pretty rough - seller was pretty honest about the state of it - blown head gasket, cracked windscreen, and it was not in a condition to win any concours events. It was in the top of the South Island so no way I could check it out, but it only came into the country in 2022, and had current reg and wof so I figured it couldn't be too bad. I managed to win the auction for a very sharp price (after a painful '$10 increment every two minutes' bidding war with another bidder). A price sharp enough to justify fixing it or even throwing it in the bin if it was no good. The seller was a GC and managed to hook me up with his mate who was coming over to Wellington and could bring it over on the ferry for me on a trailer. First impressions - pretty rough, the interior was disgusting but overall a solid car. It was definitely BHG with water and clouds coming out of the exhaust so it got driven all of 10 metres onto the trailer. Everything about it is so tiny, especially the engine - a baby 3 cylinder 660cc turbo K6A. According to the internet they produce 47kW so this has now probably replaced my white Viva as being the least powerful car in the fleet. Homeward bound to see what kind of junk I'd managed to buy. Everything needed a decent clean and going over to understand how good or bad it really was. Oh yeah, it also had three different air fresheners hanging from the mirror and a collection of tasteless stickers on the rear winder.
2 points
-
In my last update I mentioned that I was battling with my a/c belts which seem to stretch to the point where I run out of adjustment. I popped one of my usual "advice needed" posts under general car chat and @440bbm suggested that I replace the notched belts that I have been using with a solid belt. I've got one on order which will hopefully pitch up sometime over the next few days. Hopefully that will solve my issue. In other news I've just sold the last of my HiAce automatic gearboxes to a guy in Tassie. Gave it a clean before I wrapped and strapped it and I'll be dropping it off at my local courier depot tomorrow morning. I originally had two autos in stock in case I wanted to go down that path, but I'm happy with my 5 speed manual and these were just taking up valuable storage space. The last one went to Western Australia, so looks like these boxes are sought after items.
2 points
-
Needs one of those tower of power mercs with an engine cowling that looks like a 1950s fridge2 points
-
It was always my intention to use the original TR7 dash panel(s) in the car, but in the time between removing the main panel and trying to refit it, I'd forgotten exactly where it sits. I carefully measured between the bottom of the screen back to the rollcage and cut the holes for the cage to pass through. The problem is that the dash panel does not sit at the bottom of the screen - it sits about 30mm up - so the holes I cut were out. A bit. I had to open up the holes backwards a bit. It doesn't look too bad, nothing that a strip of rubber won't cure.
2 points
-
2 points
-
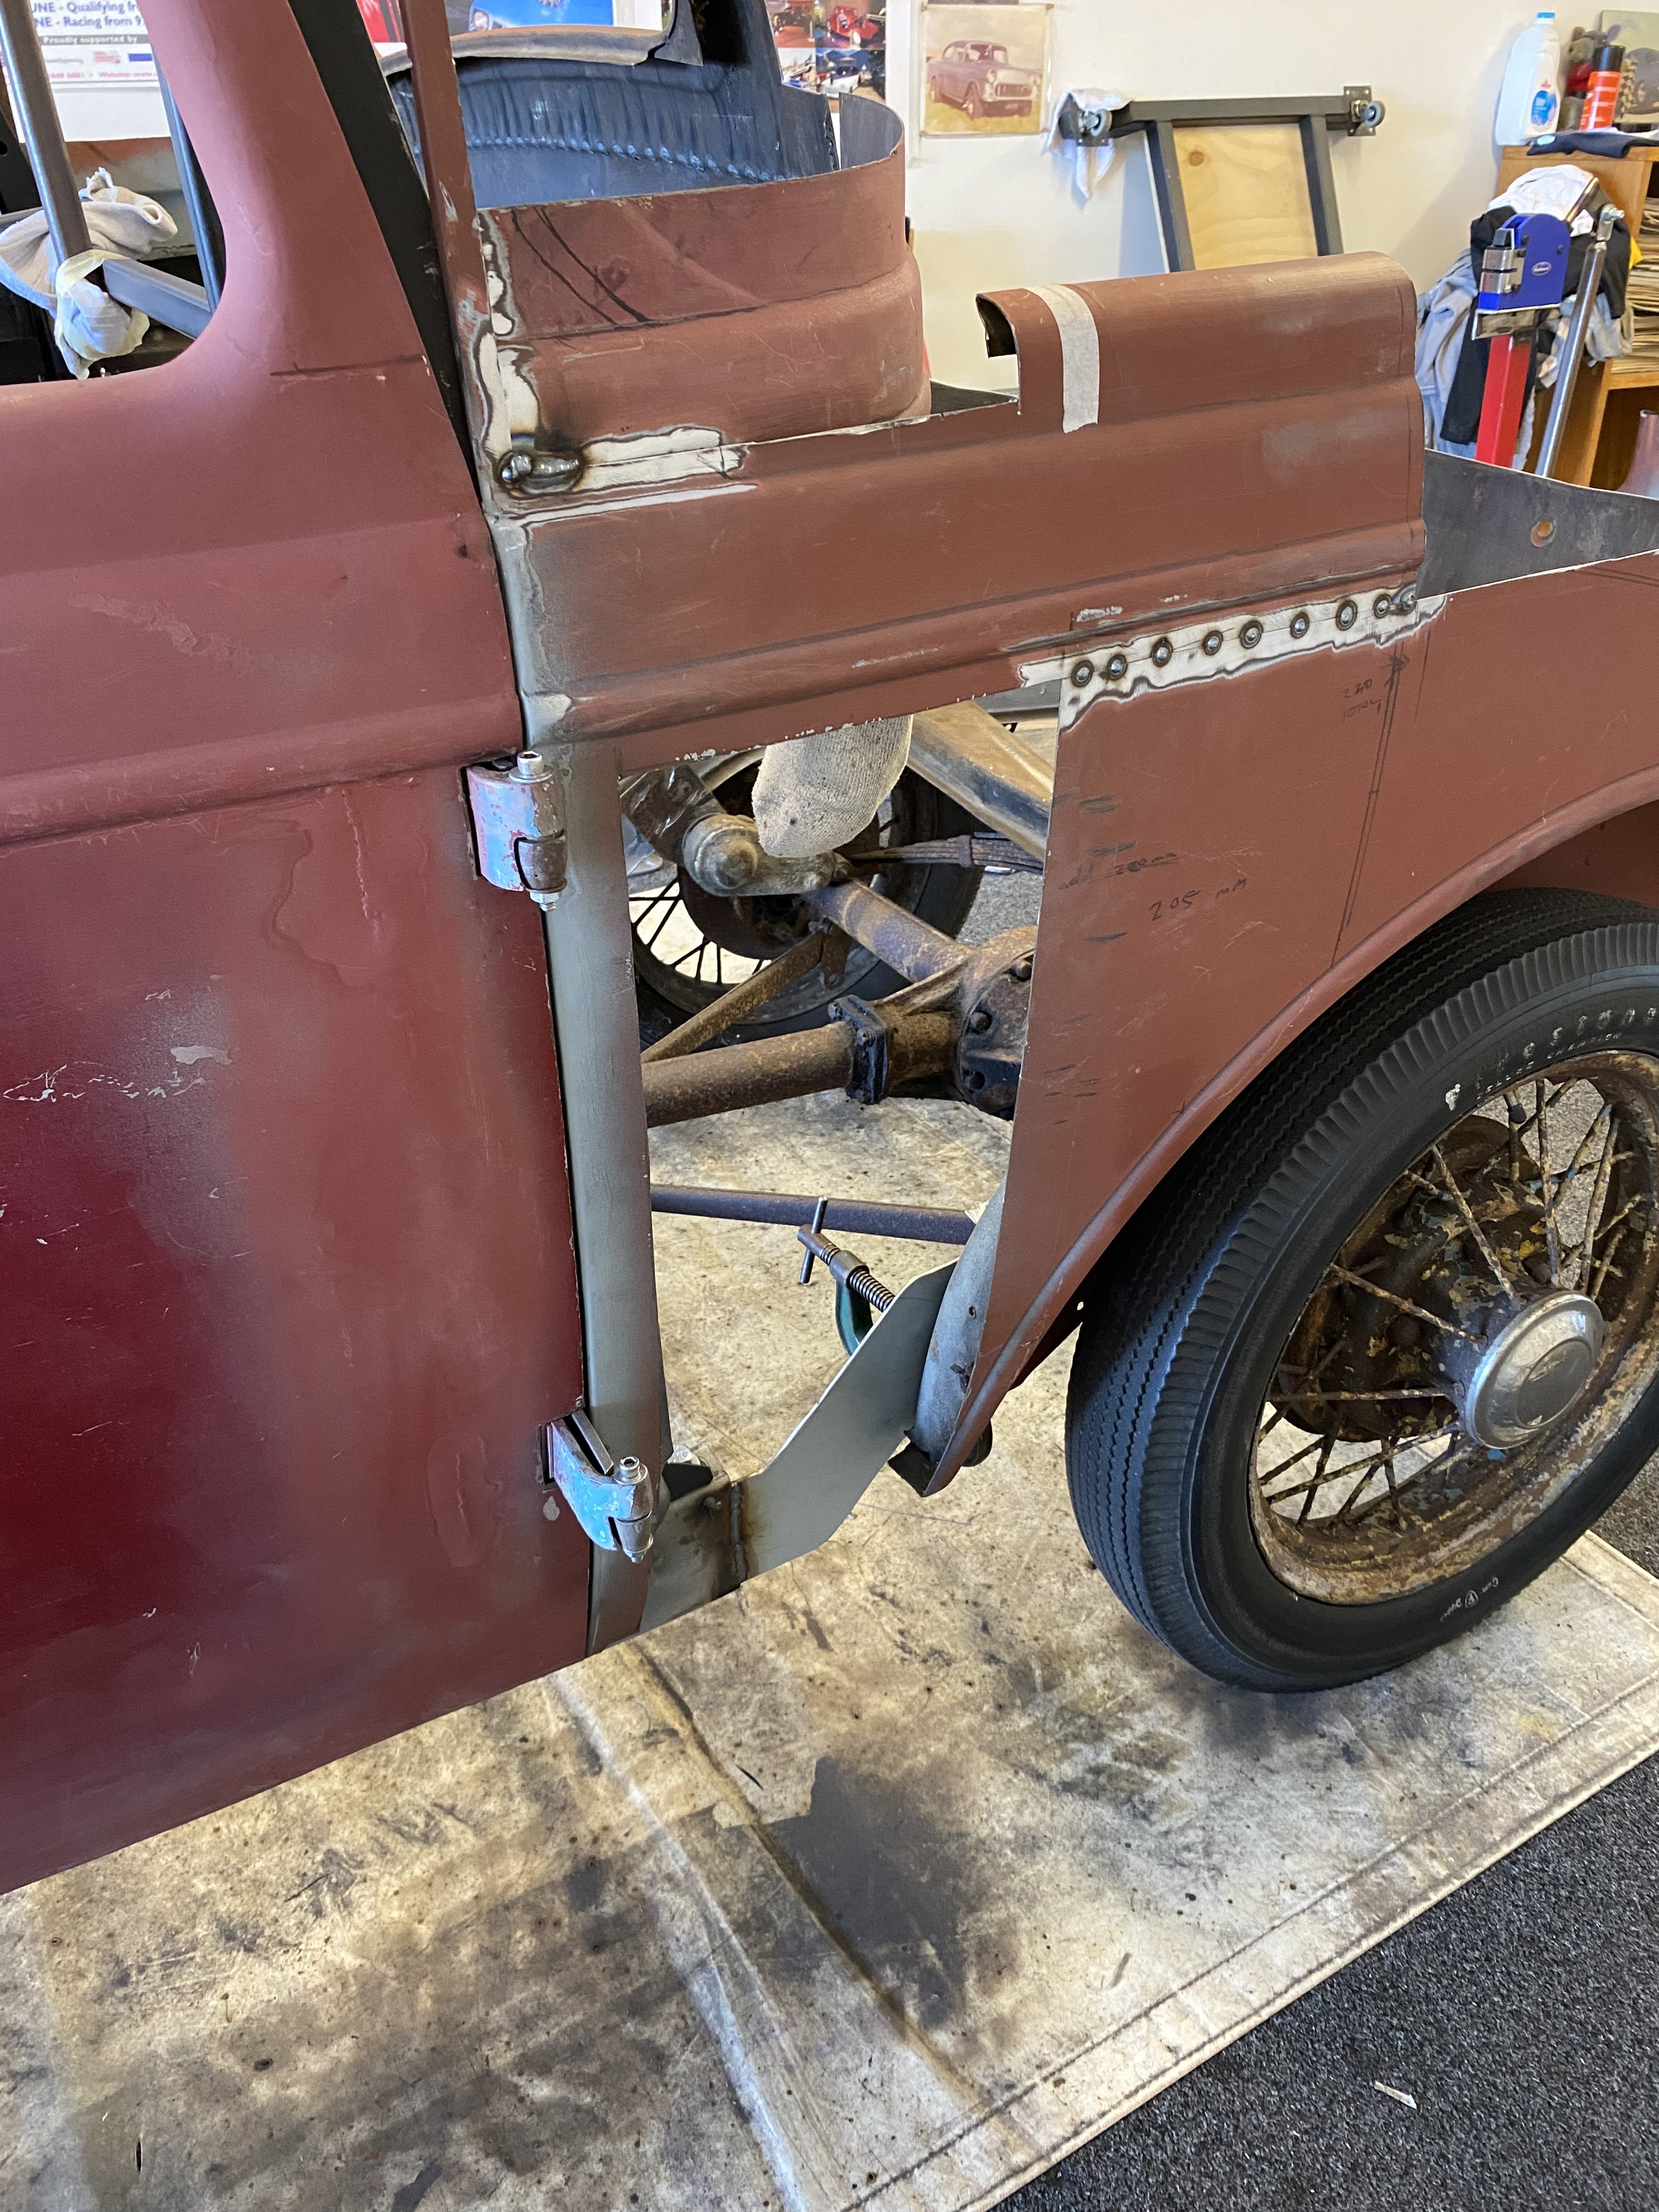
Finally got the rear roof swage line in place and extended the car 205mm. next job is to lock that piece in by welding in the curve of the first bodyline curve above the swage line.
2 points
-
That thing looks like a solid start, they are a breeze to work on. And yeah you'll want to recenter the wheels with it low or they look goofy as. Once you get it down you also might want to trim an inch off the bottom of the rails at the front, there's a section that hangs below the rockers. So yeah I've skinned these cats 2 ways, first time I sectioned the front crossmember and raised the arms up, it worked fine for years. Bag plates on the lower arms and a bit of.messing with steering and you're way. I got scared away from Zs due horror stories. 2nd time I threw plenty of money at it and went porterbuilt both ends with hydroshox, it drives great and I've done a heap of miles in it. The bagged one I had rode ok with bags on the diff and a 4 link. There's plenty of room for long bars which is good for pinion angle stability but you loose triangulation which these things need, the frames are noodles.2 points
-
Well I'm making progress towards getting things going. Firewall isnt finished, or pretty, but if it stops my face catching fire for now, that's a win. Has got a severe case of myspace photo angles here, looks fairly rubbish in person. Posting here before it ends up on @cletus's wall of shame instagram story for being crappy things brought in for cert. Also welded up the engine mounts properly, and reshaped the front of the mounts so they look a bit nicer. Then a few coats of only the finest rattle can black. I'm out of town for work for most of next week, but I'm hoping to get the engine back in and fired up by next weekend.
2 points
-
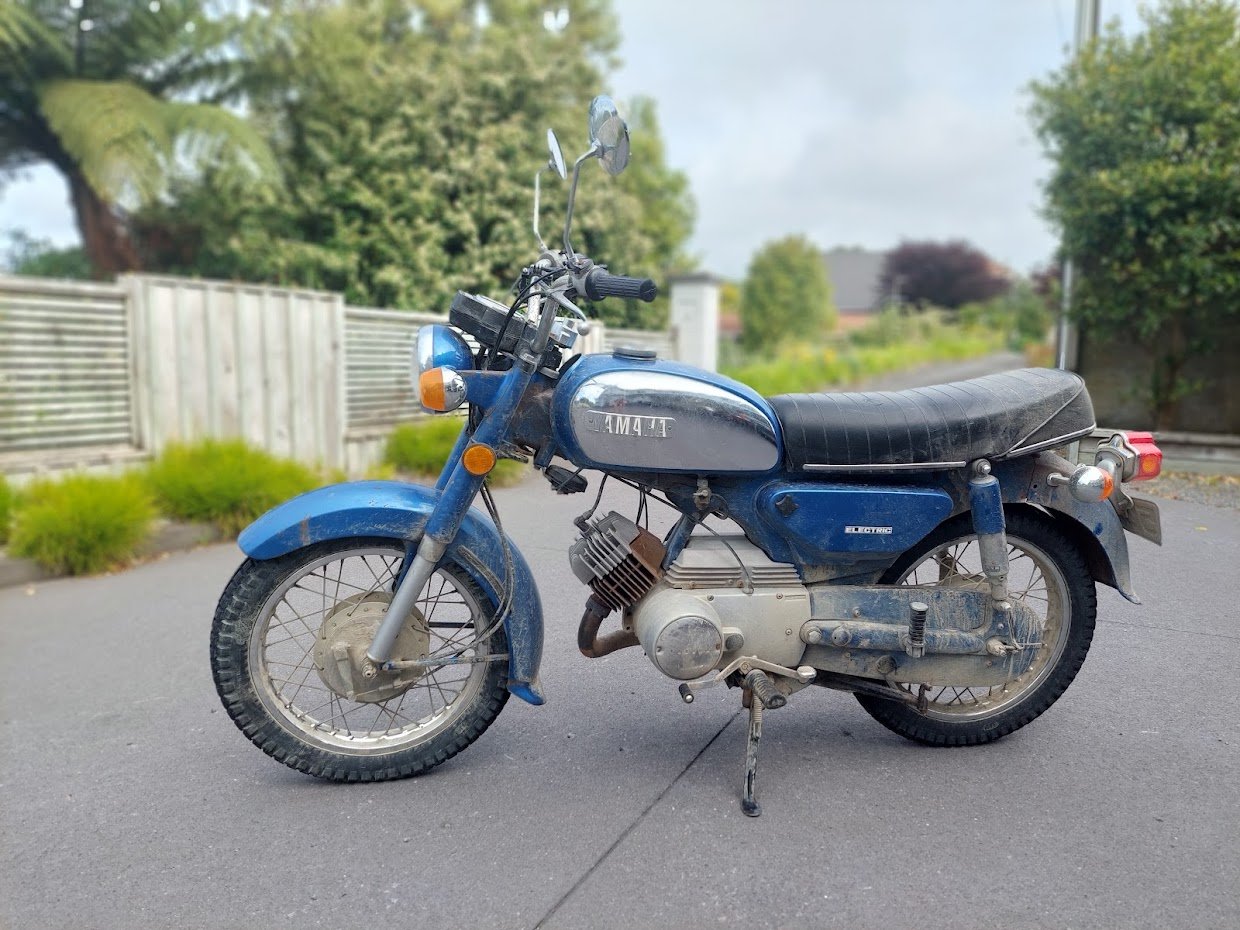
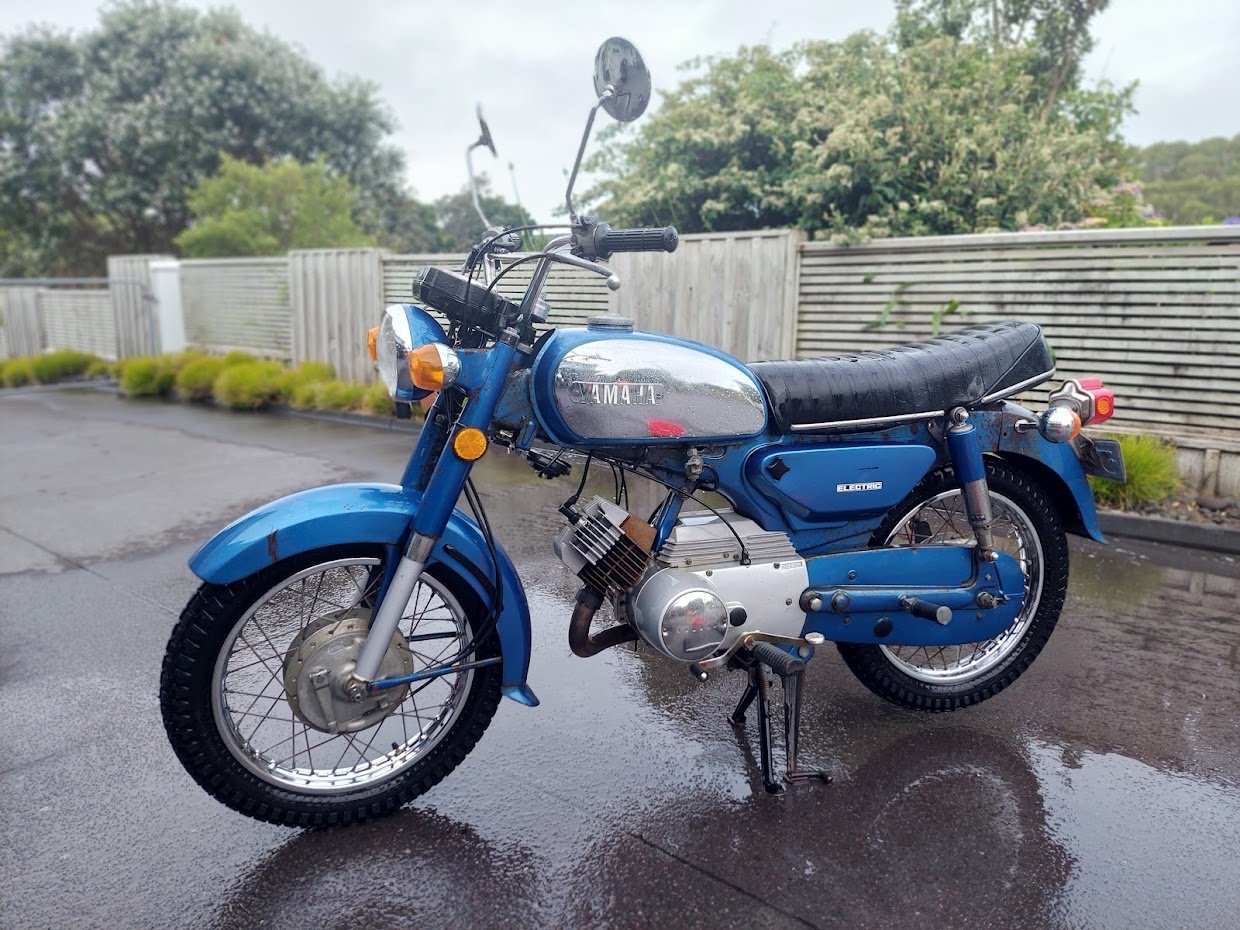
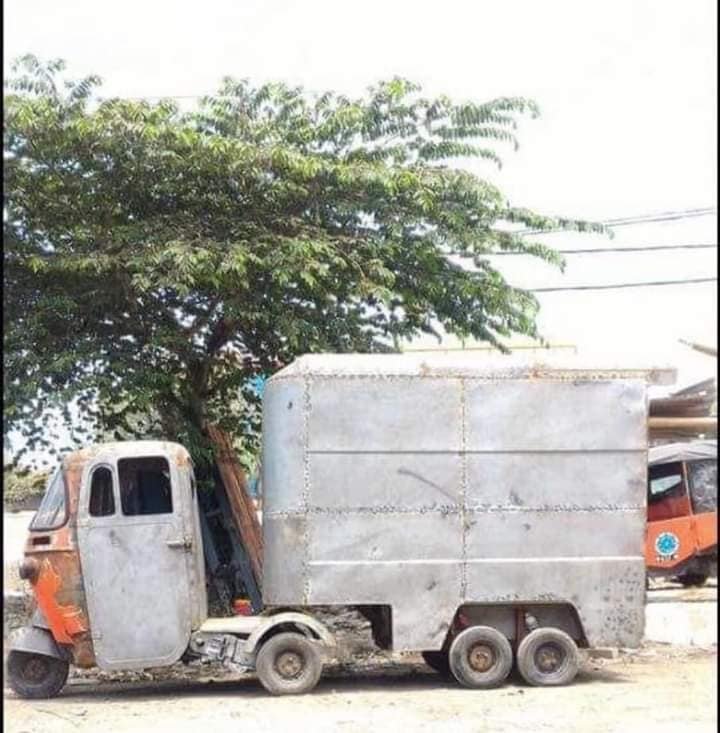
Pull start mechanism underway. Over engineering 101. Much like the original ones. However because I'm using a vespa motor (not an Ape motor) it has e start. So the pull start is just a backup.
2 points
-
I spent the whole afternoon cleaning it. Started by waterblasting and scrubbing the outside, removed all the stickers and other shit from the glass. It actually looked pretty good when it was clean. The inside needed a decent vacuum and scrub of all the plastics. The door cards had spilled drinks, one side had something resembling dried tomato sauce which had dripped down it, the centre consoles, dash and glovebox were also filthy and all got a scrub inside or outside of the car. I really want to pull the seats and carpets out and give it a deep clean, but I'll leave that until it is running again. We pushed it into the shed so I could look into why it wasn't starting. Putting it inside next to my other 'small' car made me realise just how small these really are. If you are space constrained, buy a kei car instead. After all, that's why they exist.
2 points
-
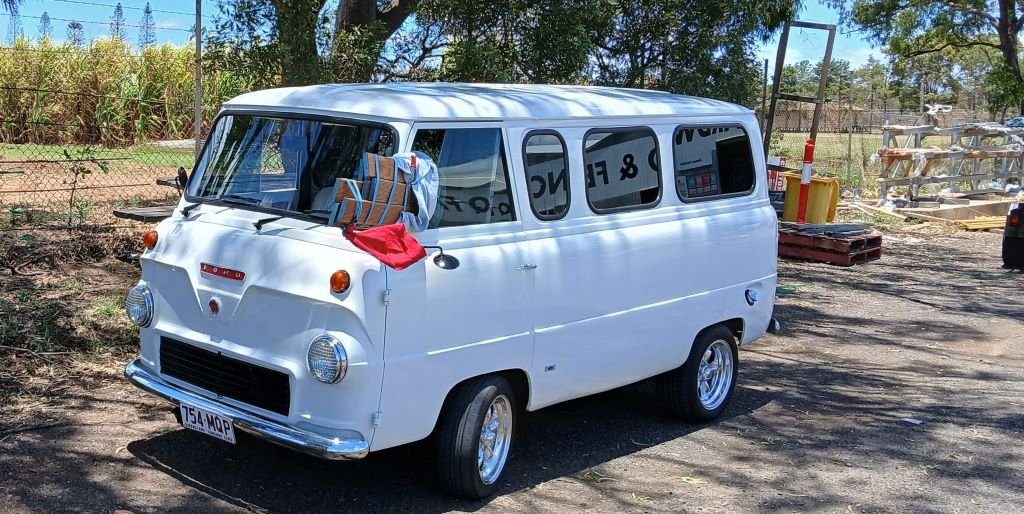
Okay, so the old Thames is still trucking along. I've been doing a heap of town runs to pickup building supplies for a few house related projects that we have on the go at the moment and because the weather is getting really toasty here I've been running the a/c almost constantly which has improved life no end. But, there is something a/c related that is really bugging me at the moment. From day one of the a/c install I've been battling with the compressor drive belt. I keep having to adjust the bloody thing every couple of hundred k's of driving. I'm going to put up a post under general car chat in the hope that I can get some much needed advice on the issue, so I won't bore you with all of the details in this post, but suffice to say the belt usually decides it's time to squeel at the worst possible times meaning I have to drive the rest of the way in sweltering heat. I know that I should just shut up and take a cement pill, but here in the tropics a/c is a must. Anyhoo, photo of the old girl loaded up with timber. Who says you can't fit 4.5 meter long decking planks in a Thames van hey.
2 points
-
Hi All, Been a bit of a lurker on here for ages now. Posting occasionally, but wouldn’t exactly call myself a regular contributor. Anyways this thread is just as much for my own personal recollection as it is to share. So I’ve been pining after a Moke for a while. But before I tell you that story. I have to tell you this story. Introducing my current 1995 Jdm Rover Mini Cooper. I’m the first Nz owner and with the guidance of my old man. We’ve been through it front to back, it’s had a refreshed engine and box, been through all the suspension bushings front and back and as you can see from the photo, had a whole bunch of performance upgrades from Japan and the Uk. I wanted it to be a good all round car. One I can take out on a drive on a nice day, but also hold its own in Motorkhana and Autocross events. Part of buying it was to learn how to work on cars, but also learn how to drive them better too. The old man used to compete in club rallying in the 90s and early 00s. So grew up watching him. So I did just that. I started competing at club events around the Auckland/South Auckland area. Pukekohe Car club (of which I’m a member), Auckland Car club and Sports Car club of New Zealand in the North shore all hold lots of great events. The last 5 or 6 years has seen a lot of learnings for me and my Mini, some varied results (mostly due to the nut behind the wheel) and a heap of fun. Although the hidings I’d been giving it, especially on the grass events (my preference) are starting to take its toll. I smashed off both front flares hitting cones during some true apex hunting moments (lol) this summer just gone. And there are more and more scratches popping up on what was a pretty mint car. Not to mention the long term stress on the shell I’m probably causing…. Basically, it was too nice for the treatment I was giving it. So after stumbling across the “Australian Hay Mini Nationals” one night on YouTube (looks like a seriously good time). And seeing Mokes absolutely dominating the motorkhana event. (The second oldest Australian motor racing event that’s been held at the same venue, behind Bathurst, and one of the largest at over 120 entrants). Makes sense as there were more Mokes sold in Australia and they made them(fixed the poms fk up) over there. Also hearing stories of them being competitive here back in the day, I decided it was time to keep an eye out for one to chip away at as a bit of a project. Problem was. Every one I’d come across was either completely rooted (rusted out floor, bent panels etc etc). Or a restored masterpiece. Which is what I didn’t want and out of my budget. I did find one on a random post in a Facebook group, stashed in an underground carpark in the cbd. But the guy wasn’t willing to sell. Little did I know about two weeks later my calls would be answered on Facebook Marketplace with some brothers clearing out their father’s estate. He had a Moke as part of his random assortment of projects he unfortunately never got round to finishing. So shot down to the property, just outside of Hamilton to take a look. I was set to fly out to Australia later that afternoon for work. So made for a long day…. While I was waiting for my flight I did some research into what I’d actually just bought. As the guy didn’t really know much about it. Only that it had come from up north. I’m guessing it was used on a farm of some sort because of the canopy etc. So what I have is a 1968 (or 9) Austin Mini Moke. It’s the big wheel model which is what I was after. So it has longer rear arms than a normal mini to take 13 inch wheels more comfortably. It was made in Australia. From around 69 or 70 onwards they were made under Leyland Australia and just have a big Moke badge on the front. They were also made in Portugal under licence by Cagiva in the 80s and 90s. Anyway…. My particular example has a bit of rust in the toe board (common place for minis to go) so fixing that will be first port of call. It was originally red so I’m not too worried about losing the yellow paint and painting it green to match the mini. While it’s more or less a rolling shell (But seized brakes etc). The engine is in pieces in the back. Apparently the block was rebuilt and then it never got finished. I need to double check the engine number, but if it is the stock engine, it will be a 998cc and magic wand (pudding stirrer) box. Both, more than likely won’t make their way back into the engine bay. The goal is a more stout A series engine and rod change box (cue evil laugh…) . I’ve already got a good mate interested in the box as a spare for his mini. Also disc brakes, adjustable suspension, some sort of bucket seat, maybe a hydraulic handbrake, and a decent roll bar among other things are on the Wishlist. The rego is dead in the system and for what I was to use the car for (A thrasher) and the extra expense and hassle. I’m not too keen to go through compliance. I’ll get it Motorsport Nz log booked and that should cover me for most events. Anyways sorry about the waffling. You’ll notice that there aren’t too many pictures. That’s because I’m still in Australia for work (posting this from my hotel on my phone, so apologies if it’s not so great) I’m home Saturday morning, then heading down to Hamilton to pick it up that afternoon. More to follow…..1 point
-
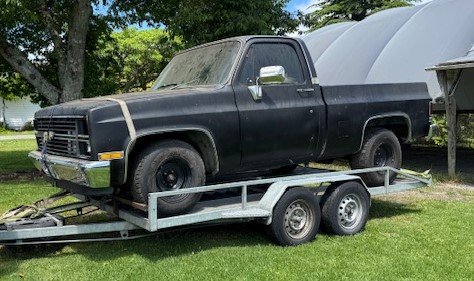
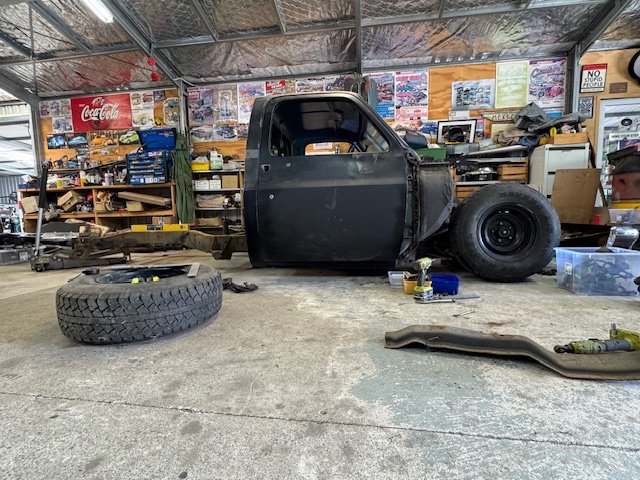
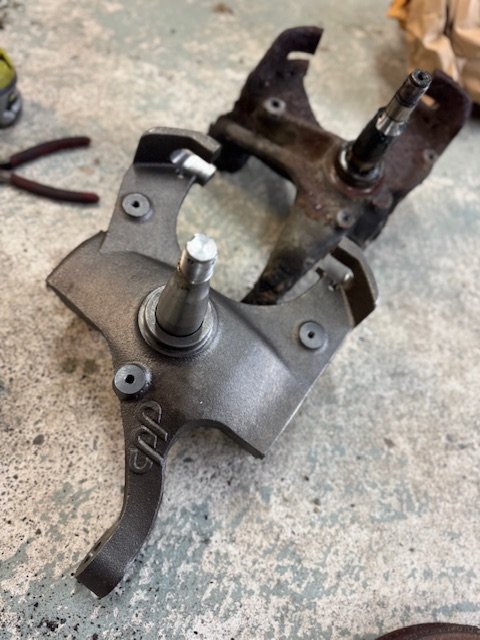
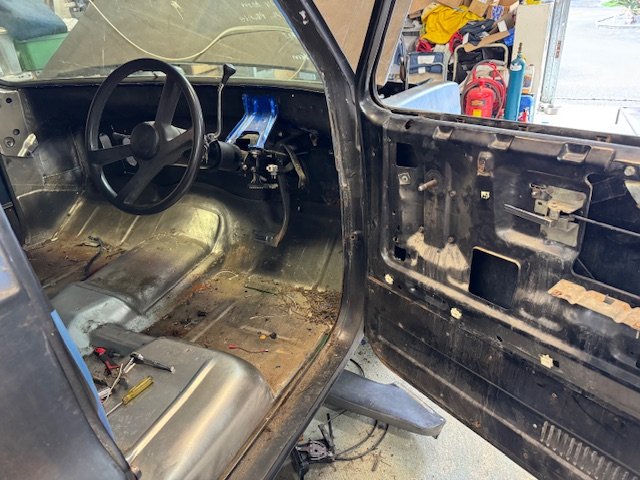
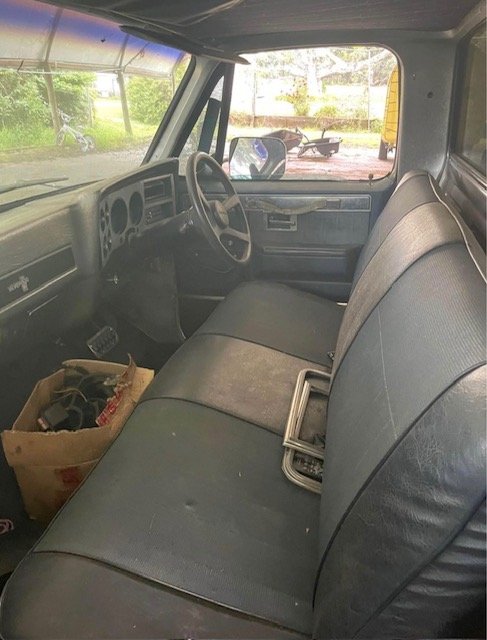
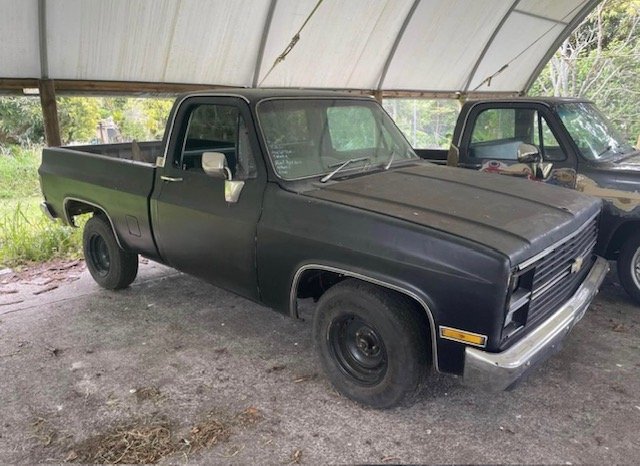
Saw this 1984 C10 Chevrolet on Facebook Marketplace 5 hours away in Tauranga. And had a desire to C notch and bag something. (its actually a 84 GMC High Sierra Classic, diesel) Was priced well with most of it there, pretty much just no engine and trans. The next available weekend, my dad & I shot up and brought it home. Have some Slam Specialties SS7 & Air fittings coming for it. It could do with an LS1 & 4l60e if anyone has one they could let go. Got it stripped down pretty quick to see what I have. Very little rust. Just a decent size hole in the firewall. But that's just an excuse do a shaved firewall. Also missing the hood safety catch/hook if anyone has a spare. Some unused Drop Spindles were on Marketplace in Northland for a bit less than I could get them into the country for. Hard to believe how big and heavy these are. Go them in. The cut springs out. Diff out, and the whole thing a whole lot closer to the ground. C-Notch and a 4 link of some kind to come. I'm think Bags on lower links. Outside of the chassis where the leaf springs were. The front lower A-arms are on the ground. but the Chassis isn't. but a good 40mm?? So it is likely a Frame Z will also be in order to lift the front end up. This could also help in moving the front wheels forward an inch to get them centred in the wheel arches again.
1 point
-
Ladder bars are great for making cars go up on 2 wheels. They don't allow proper articulation, and also give alot of pinion angle change. Definitely junk compared to a 4 bar, and its not much more work to set up a proper link.
1 point
-
What about those linear position sensors like the cheap dro ones for your mill? I'm sure you can get 4-20mA output ones for cheap in any length. Stick em on the side of the actuators and into an arduino with 4x motor outputs. Sorted!1 point
-
Pulled the drivetrain out tonight and pulled the sump off to take a look. I hope my engine stand won't buckle under the strain lols I can't see any wrong in there, the sump is 100% perfectly clear of debris. And everything looks great, no missing chunks of piston or the like. There is however a noticable variation in turning resistance with the plugs out, I am suspecting a slightly bent valve or broken valve spring. I am waiting for a new head gasket and bolts before I get too carried away. Also: so many gearboxes, this isnt even all of them, I have 2 more.1 point
-
Driveshaft hoop is done!! yeow!!! I had a different method mocked up but hated the way it looked. so thought of how to tie everything together to make it strong , as well as being able to mount other stuff off it like the exhaust and handbrake cables. pretty stoked with the outcome and only took about an hour from start to finish. used 2 x 32nb pipe, notched to slot in between both ute crossmember thingys. question now is can the handbrake cables run between the hoop and shaft? I’m guessing no, so I’ll still need to trim down the generic upper hoop so I can run the cables over the top. then once I get a suitable (low profile) handbrake unit, I can get it mounted, drill the hold through the tunnel and get that finalised. she is ready to go to paint too. had an ulphosterer lined up to do the work but he got back to me finally and said he can’t now until March, what a cuntface. guess I’ll tackle this myself now also ordered many bits from Franklin performance to tart up the keg. assembly should go well once it’s back from paint
1 point
-
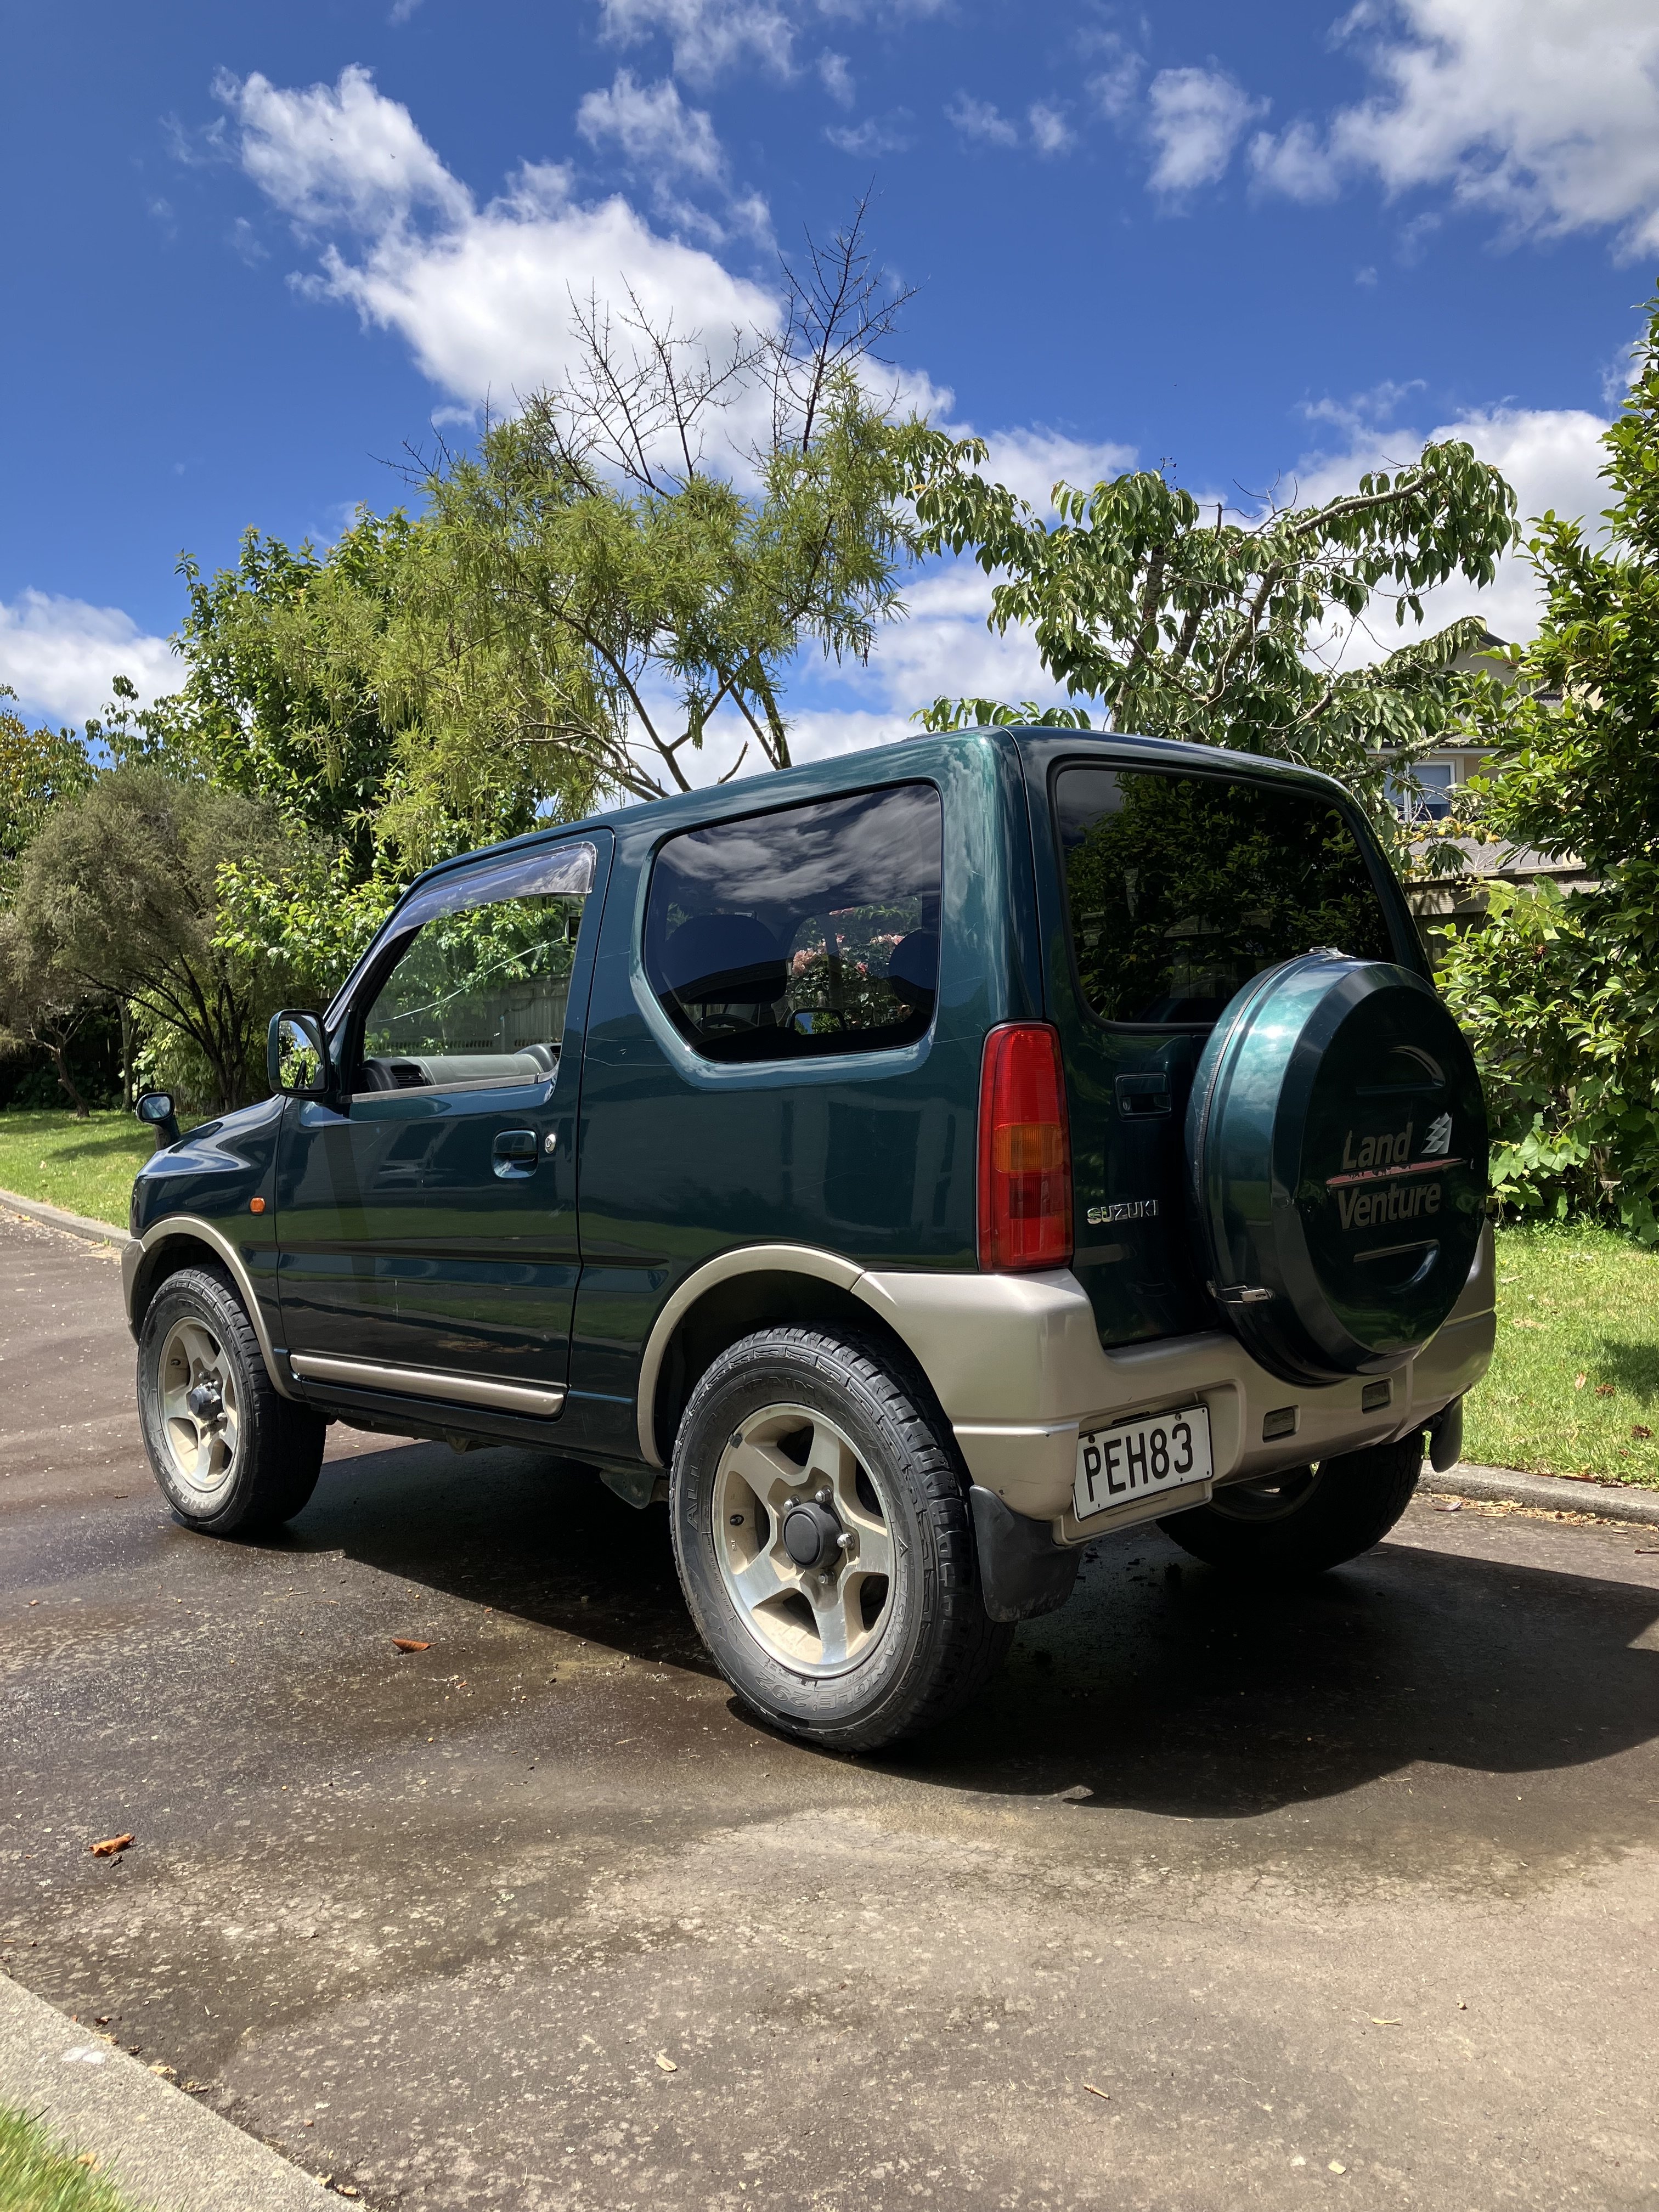
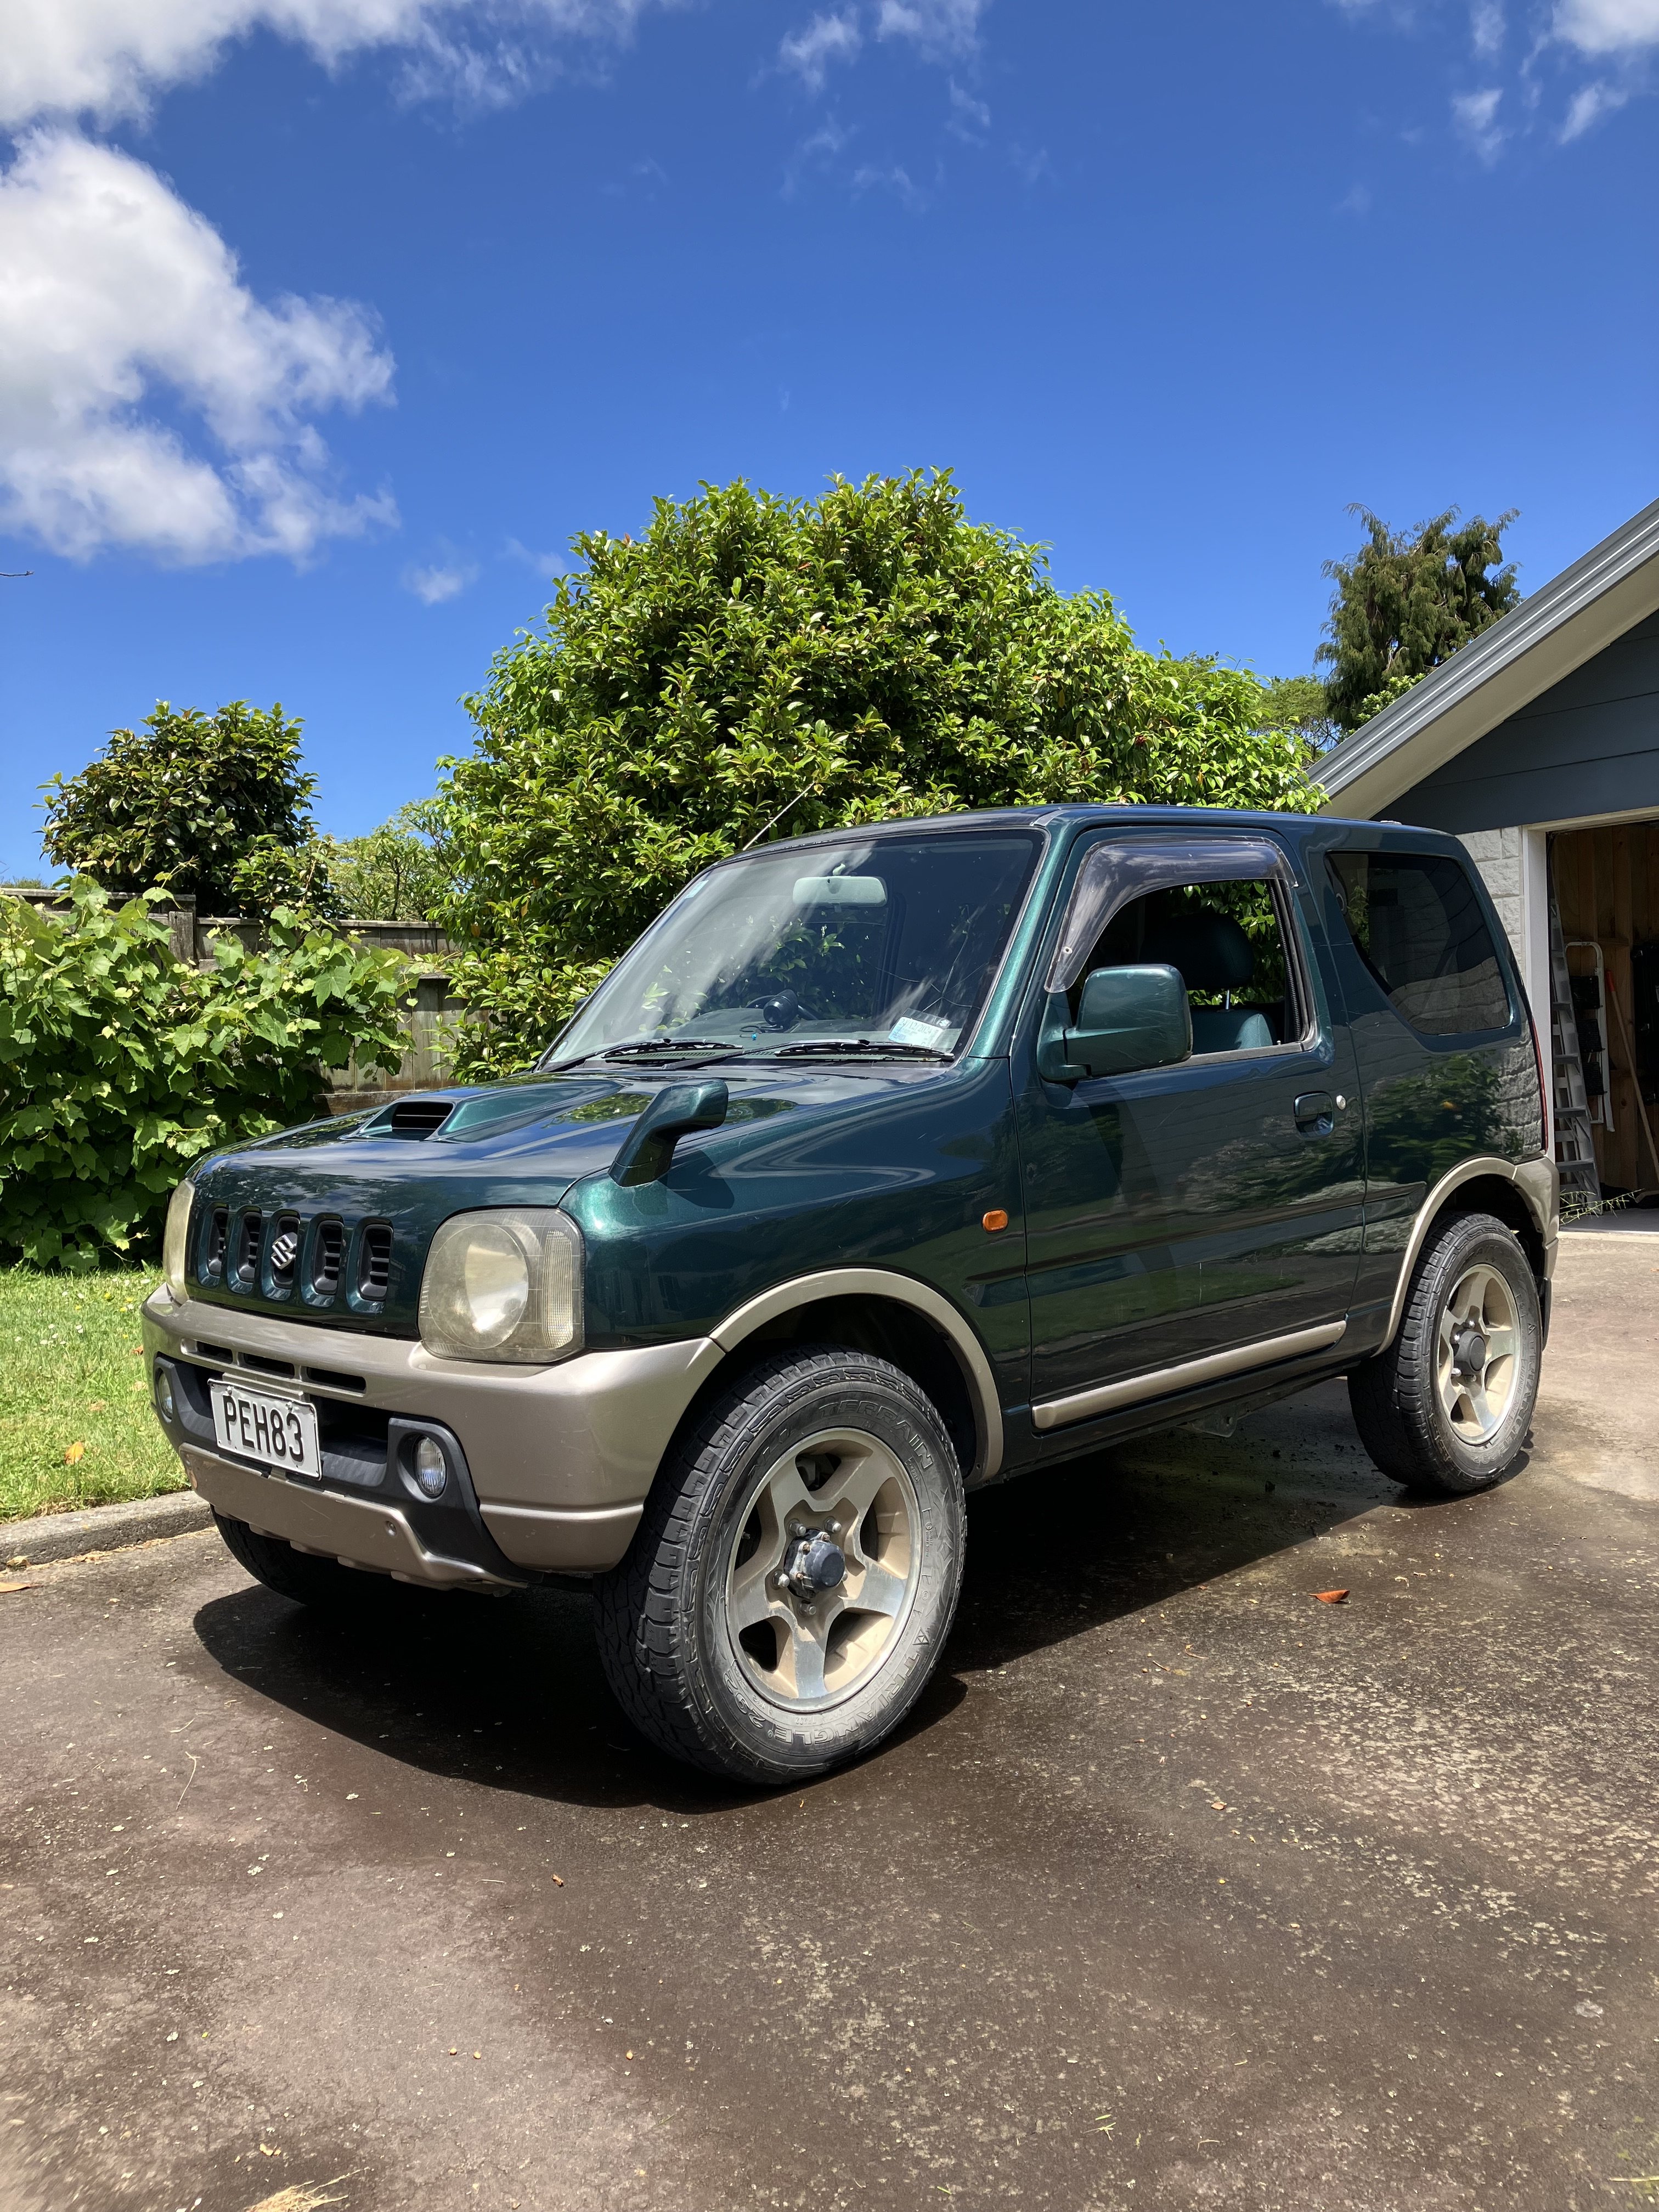
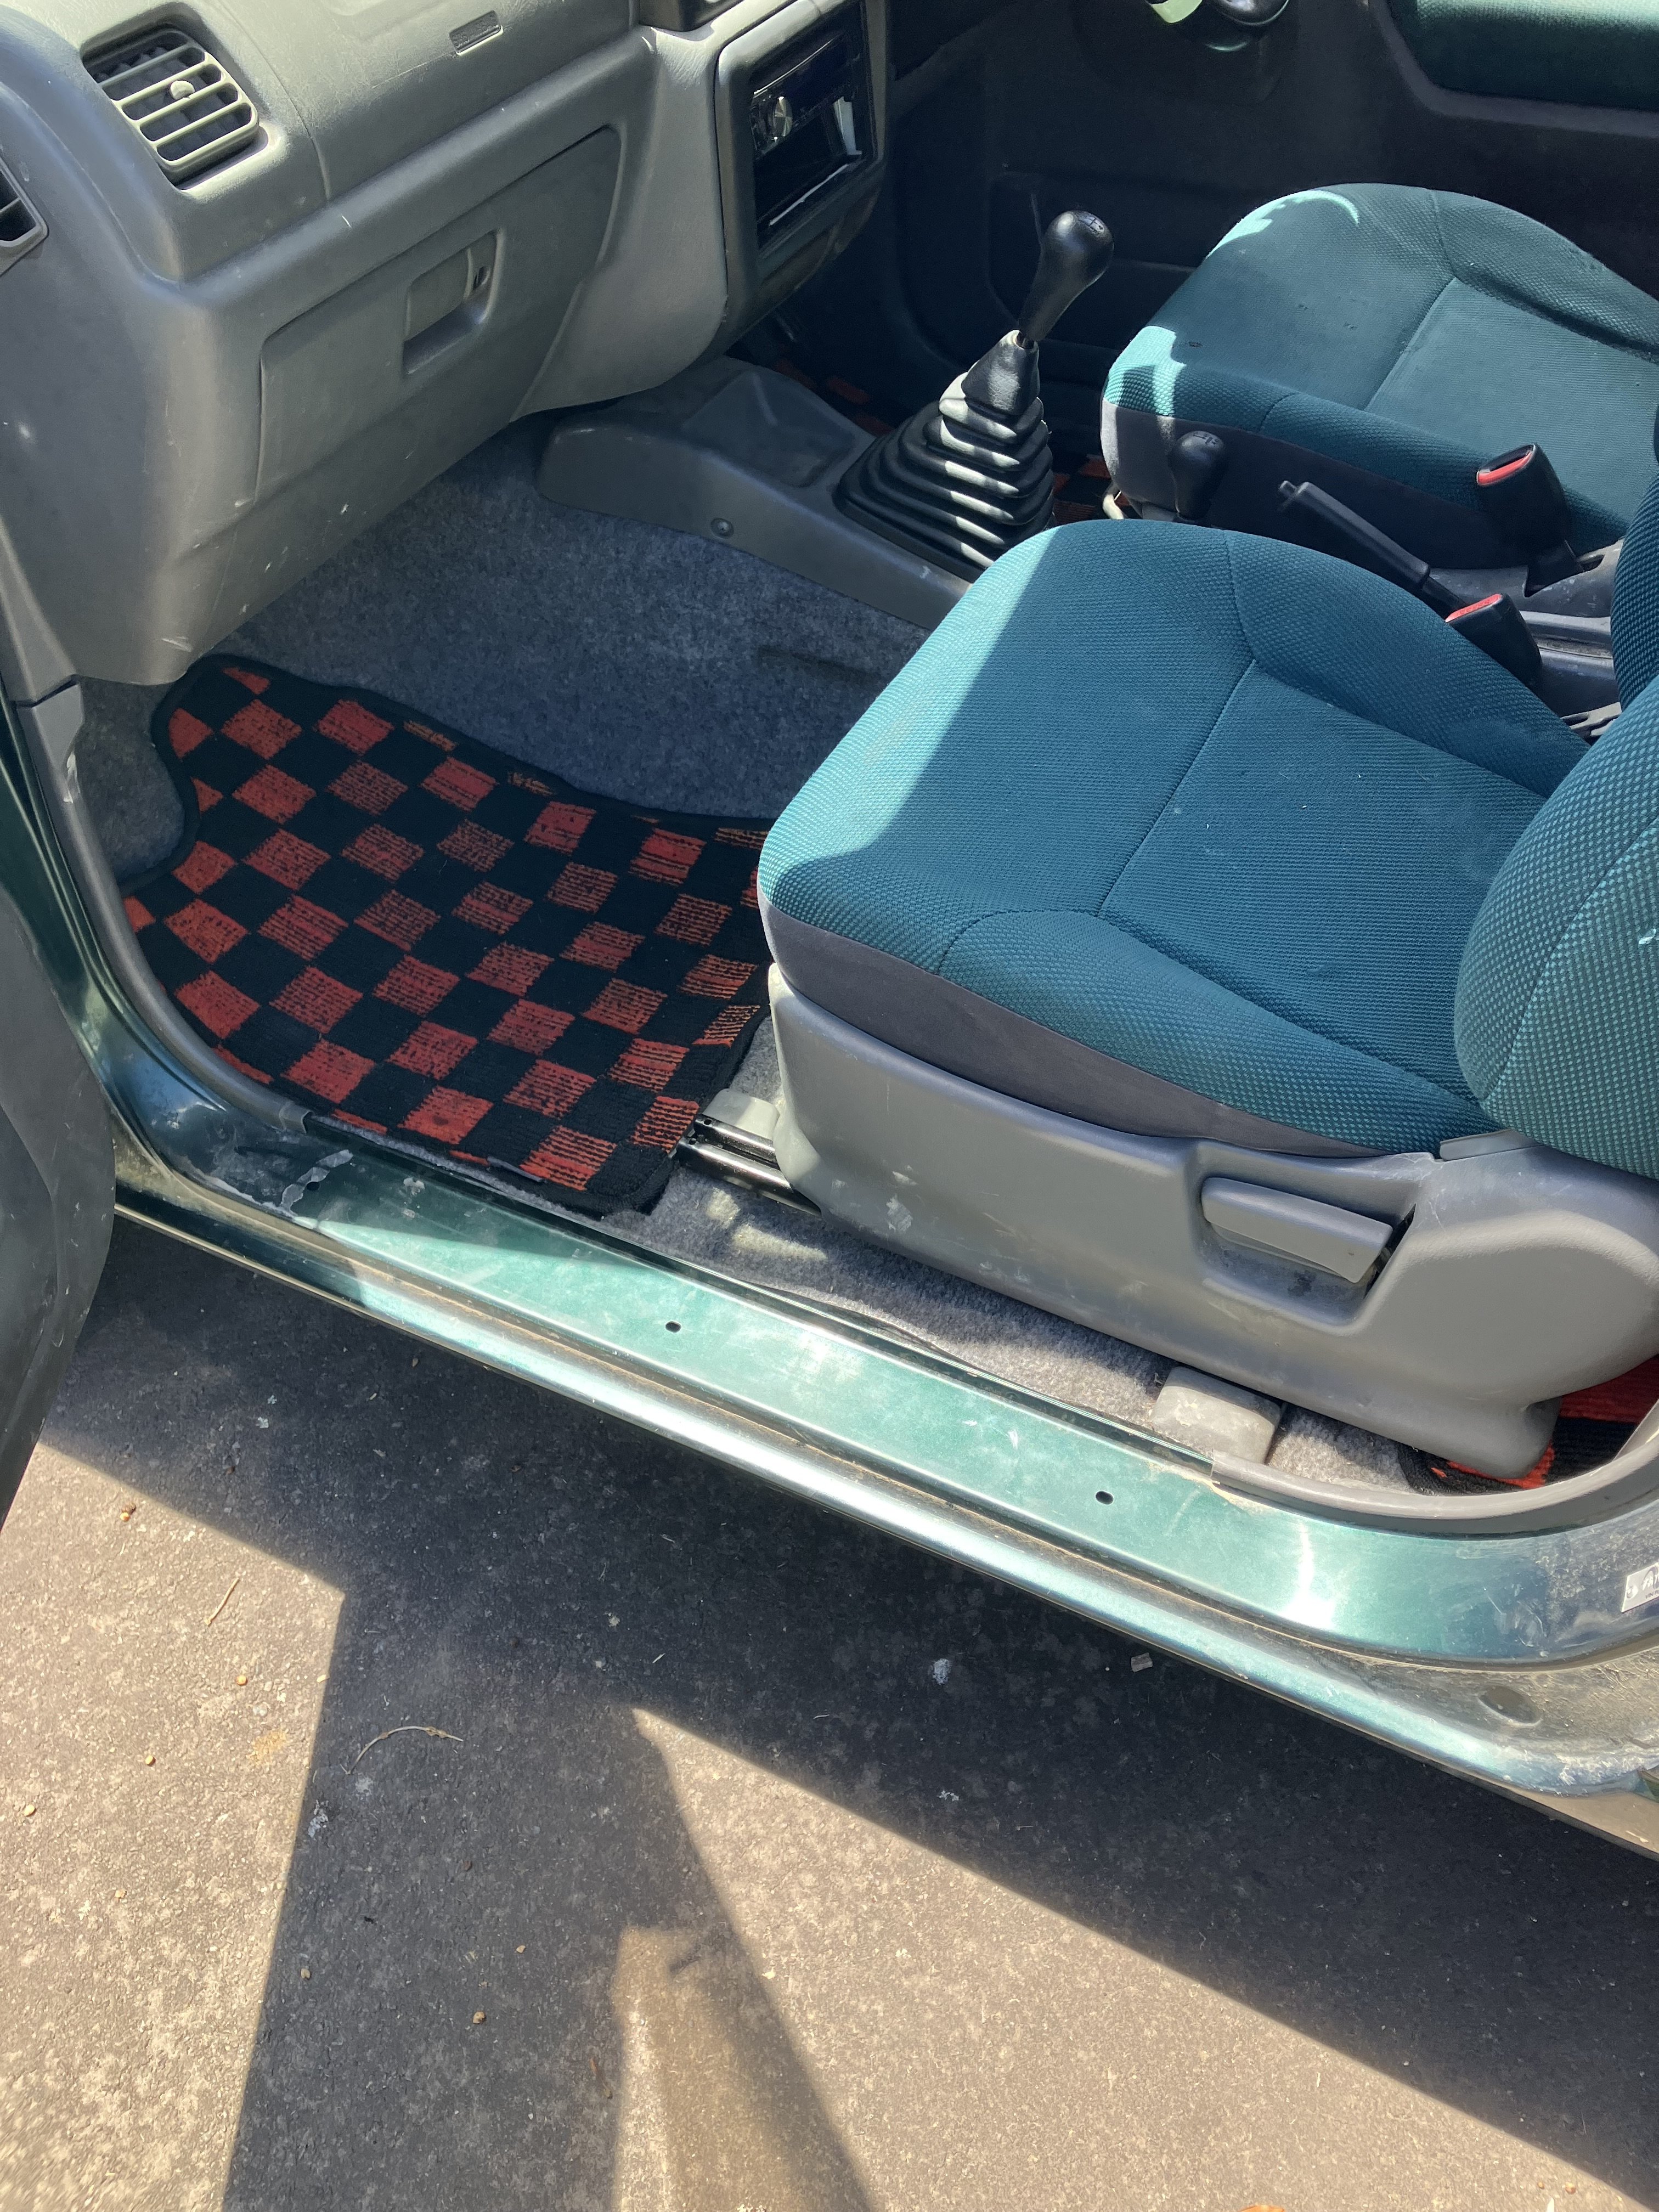
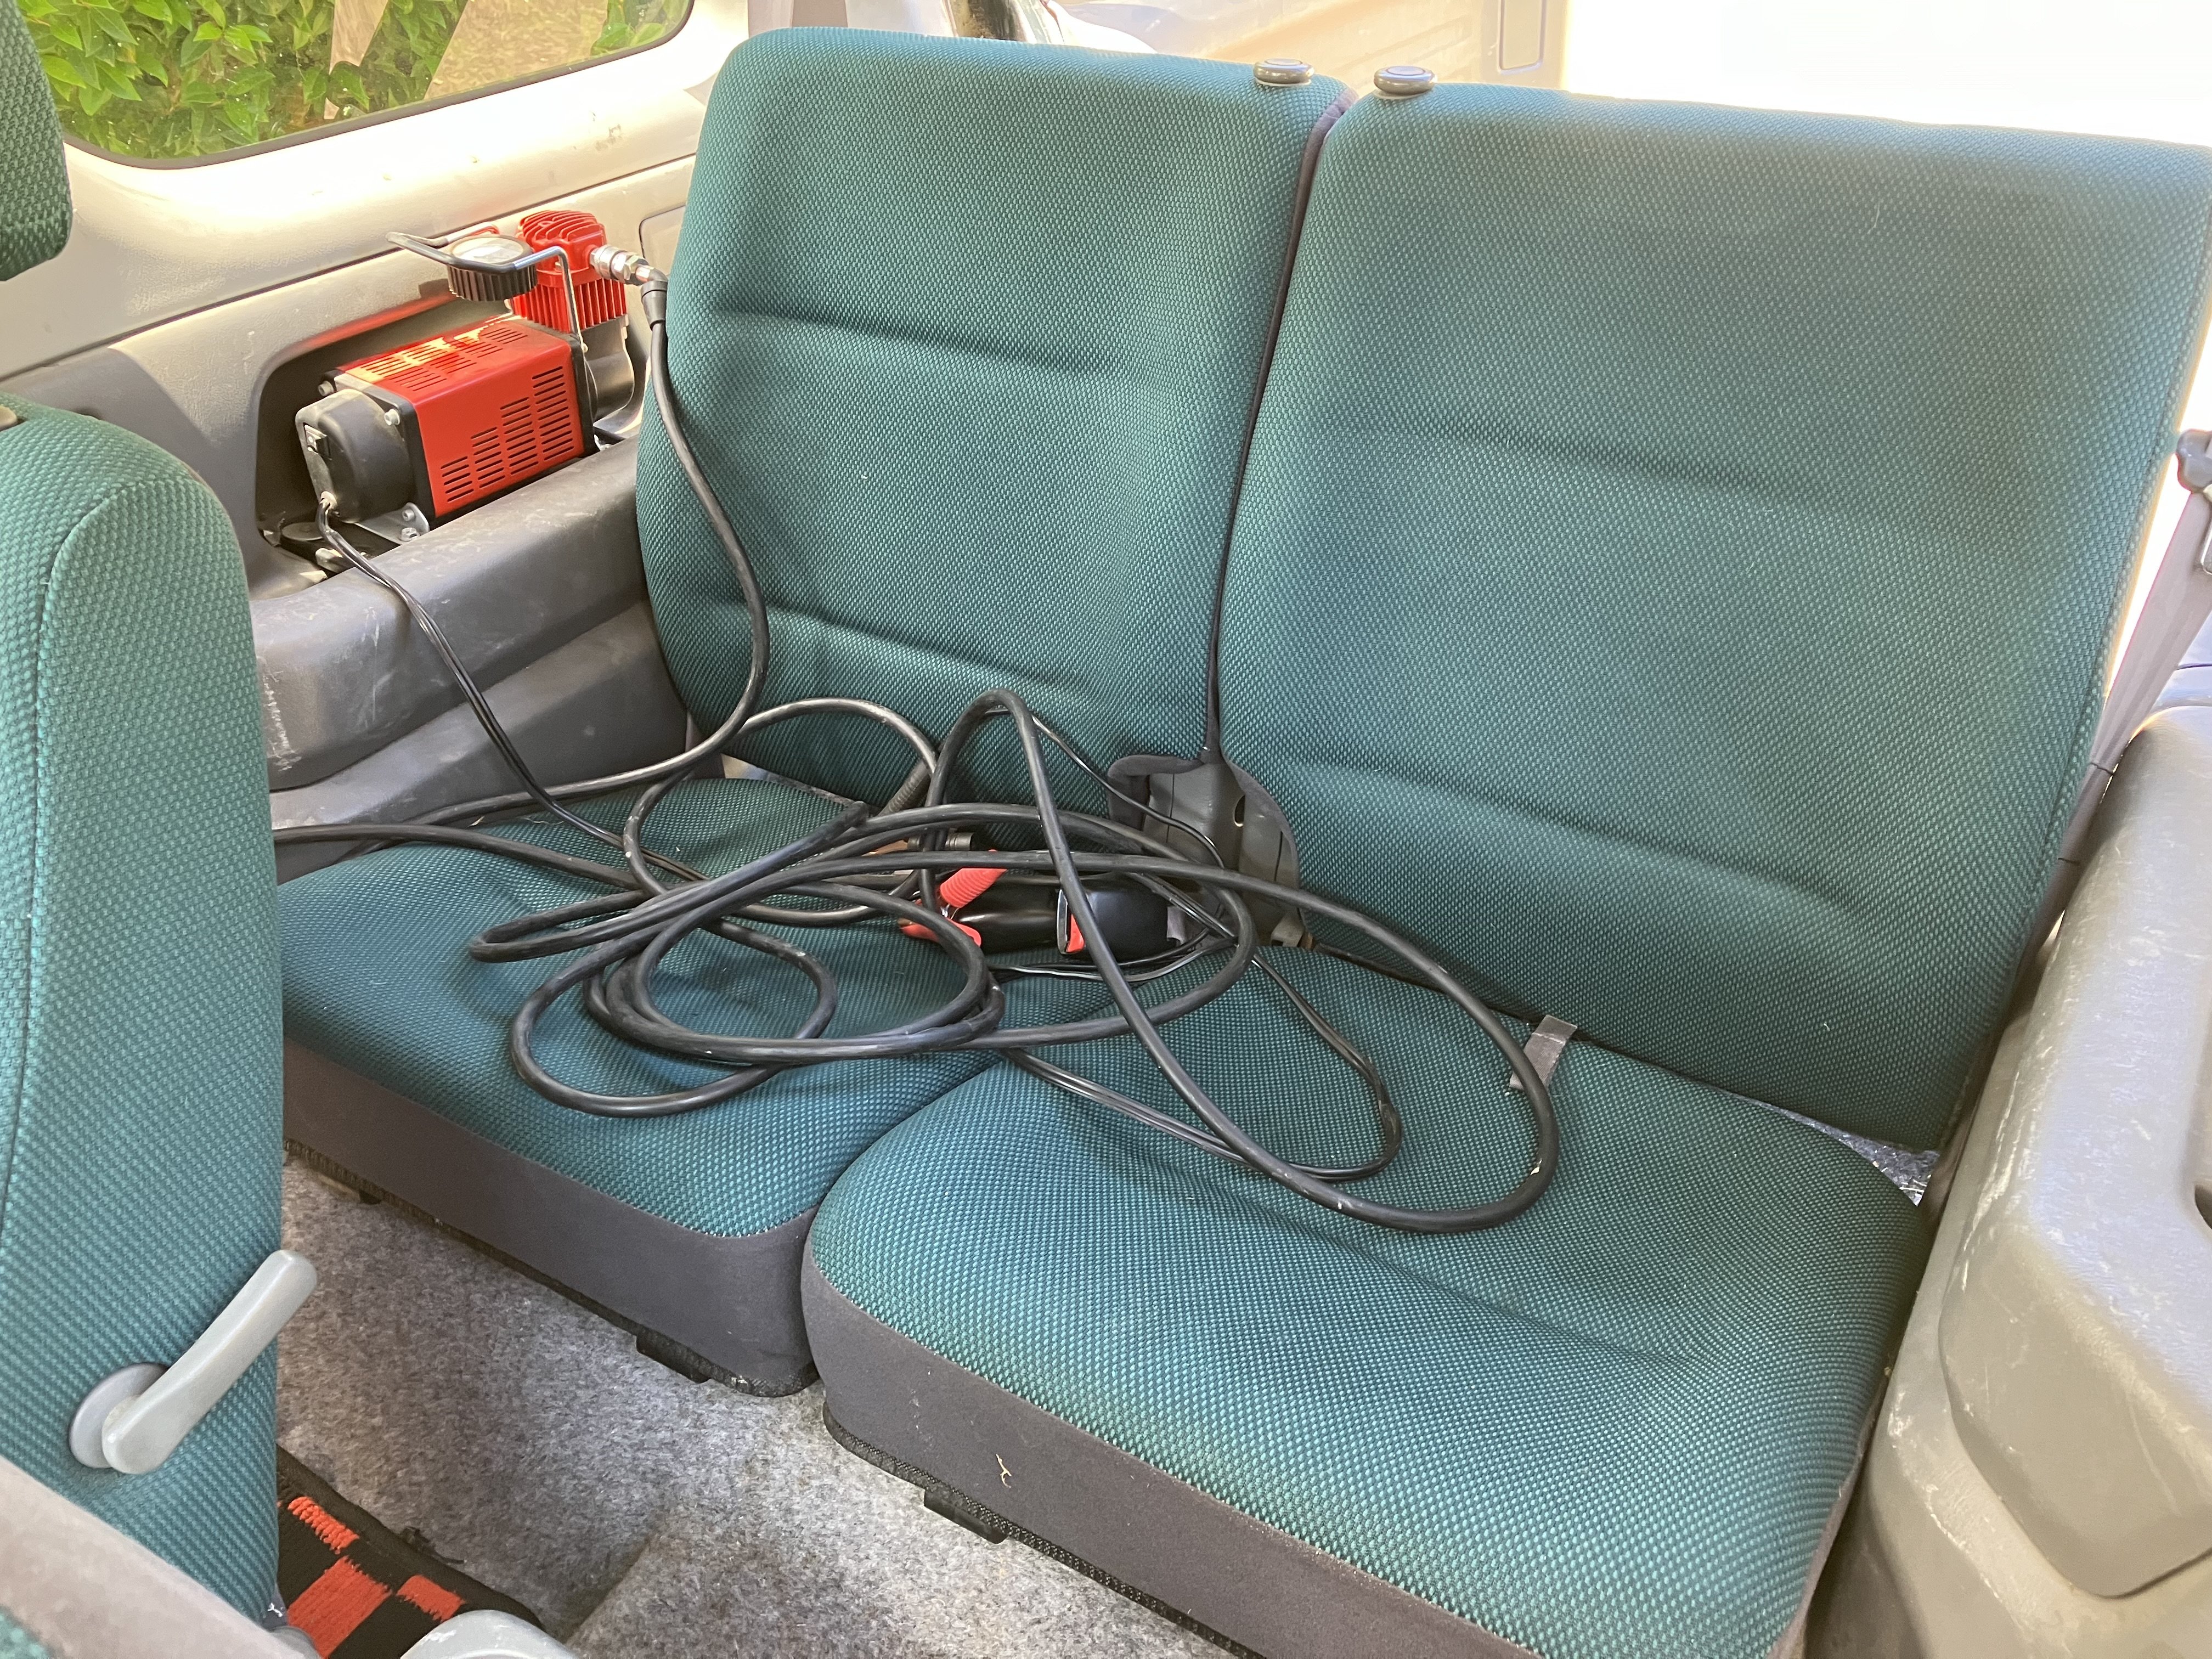
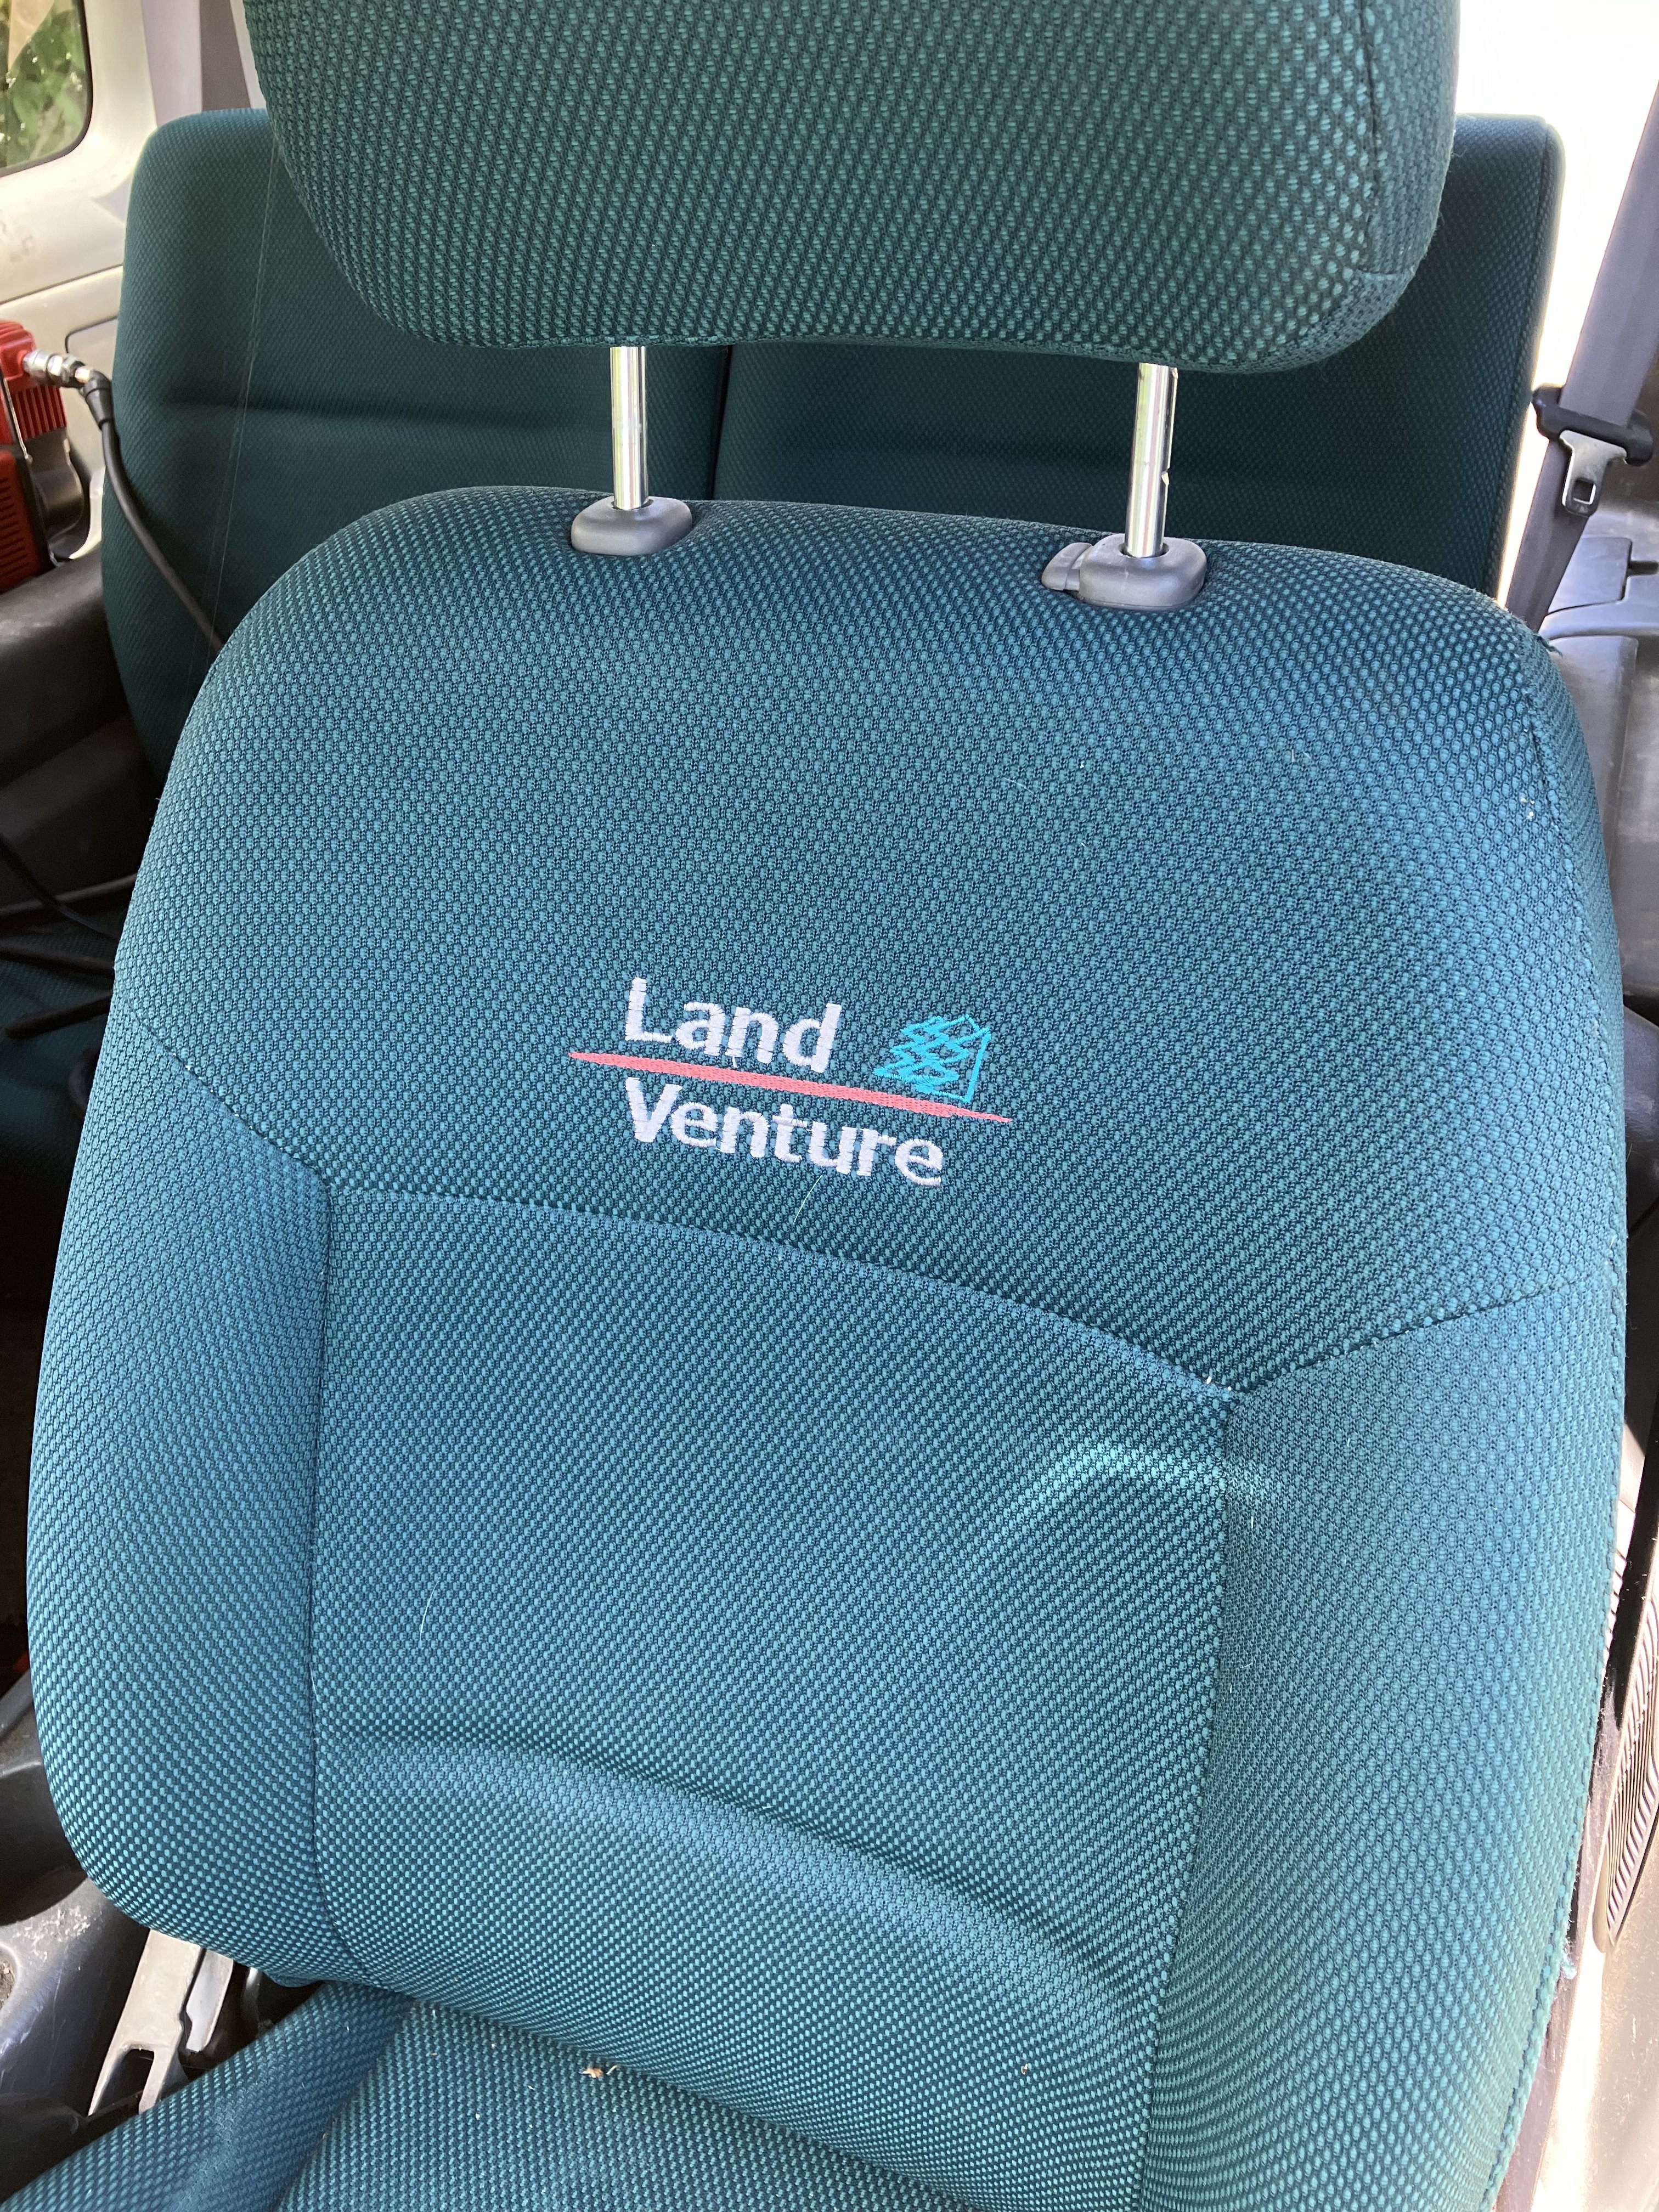
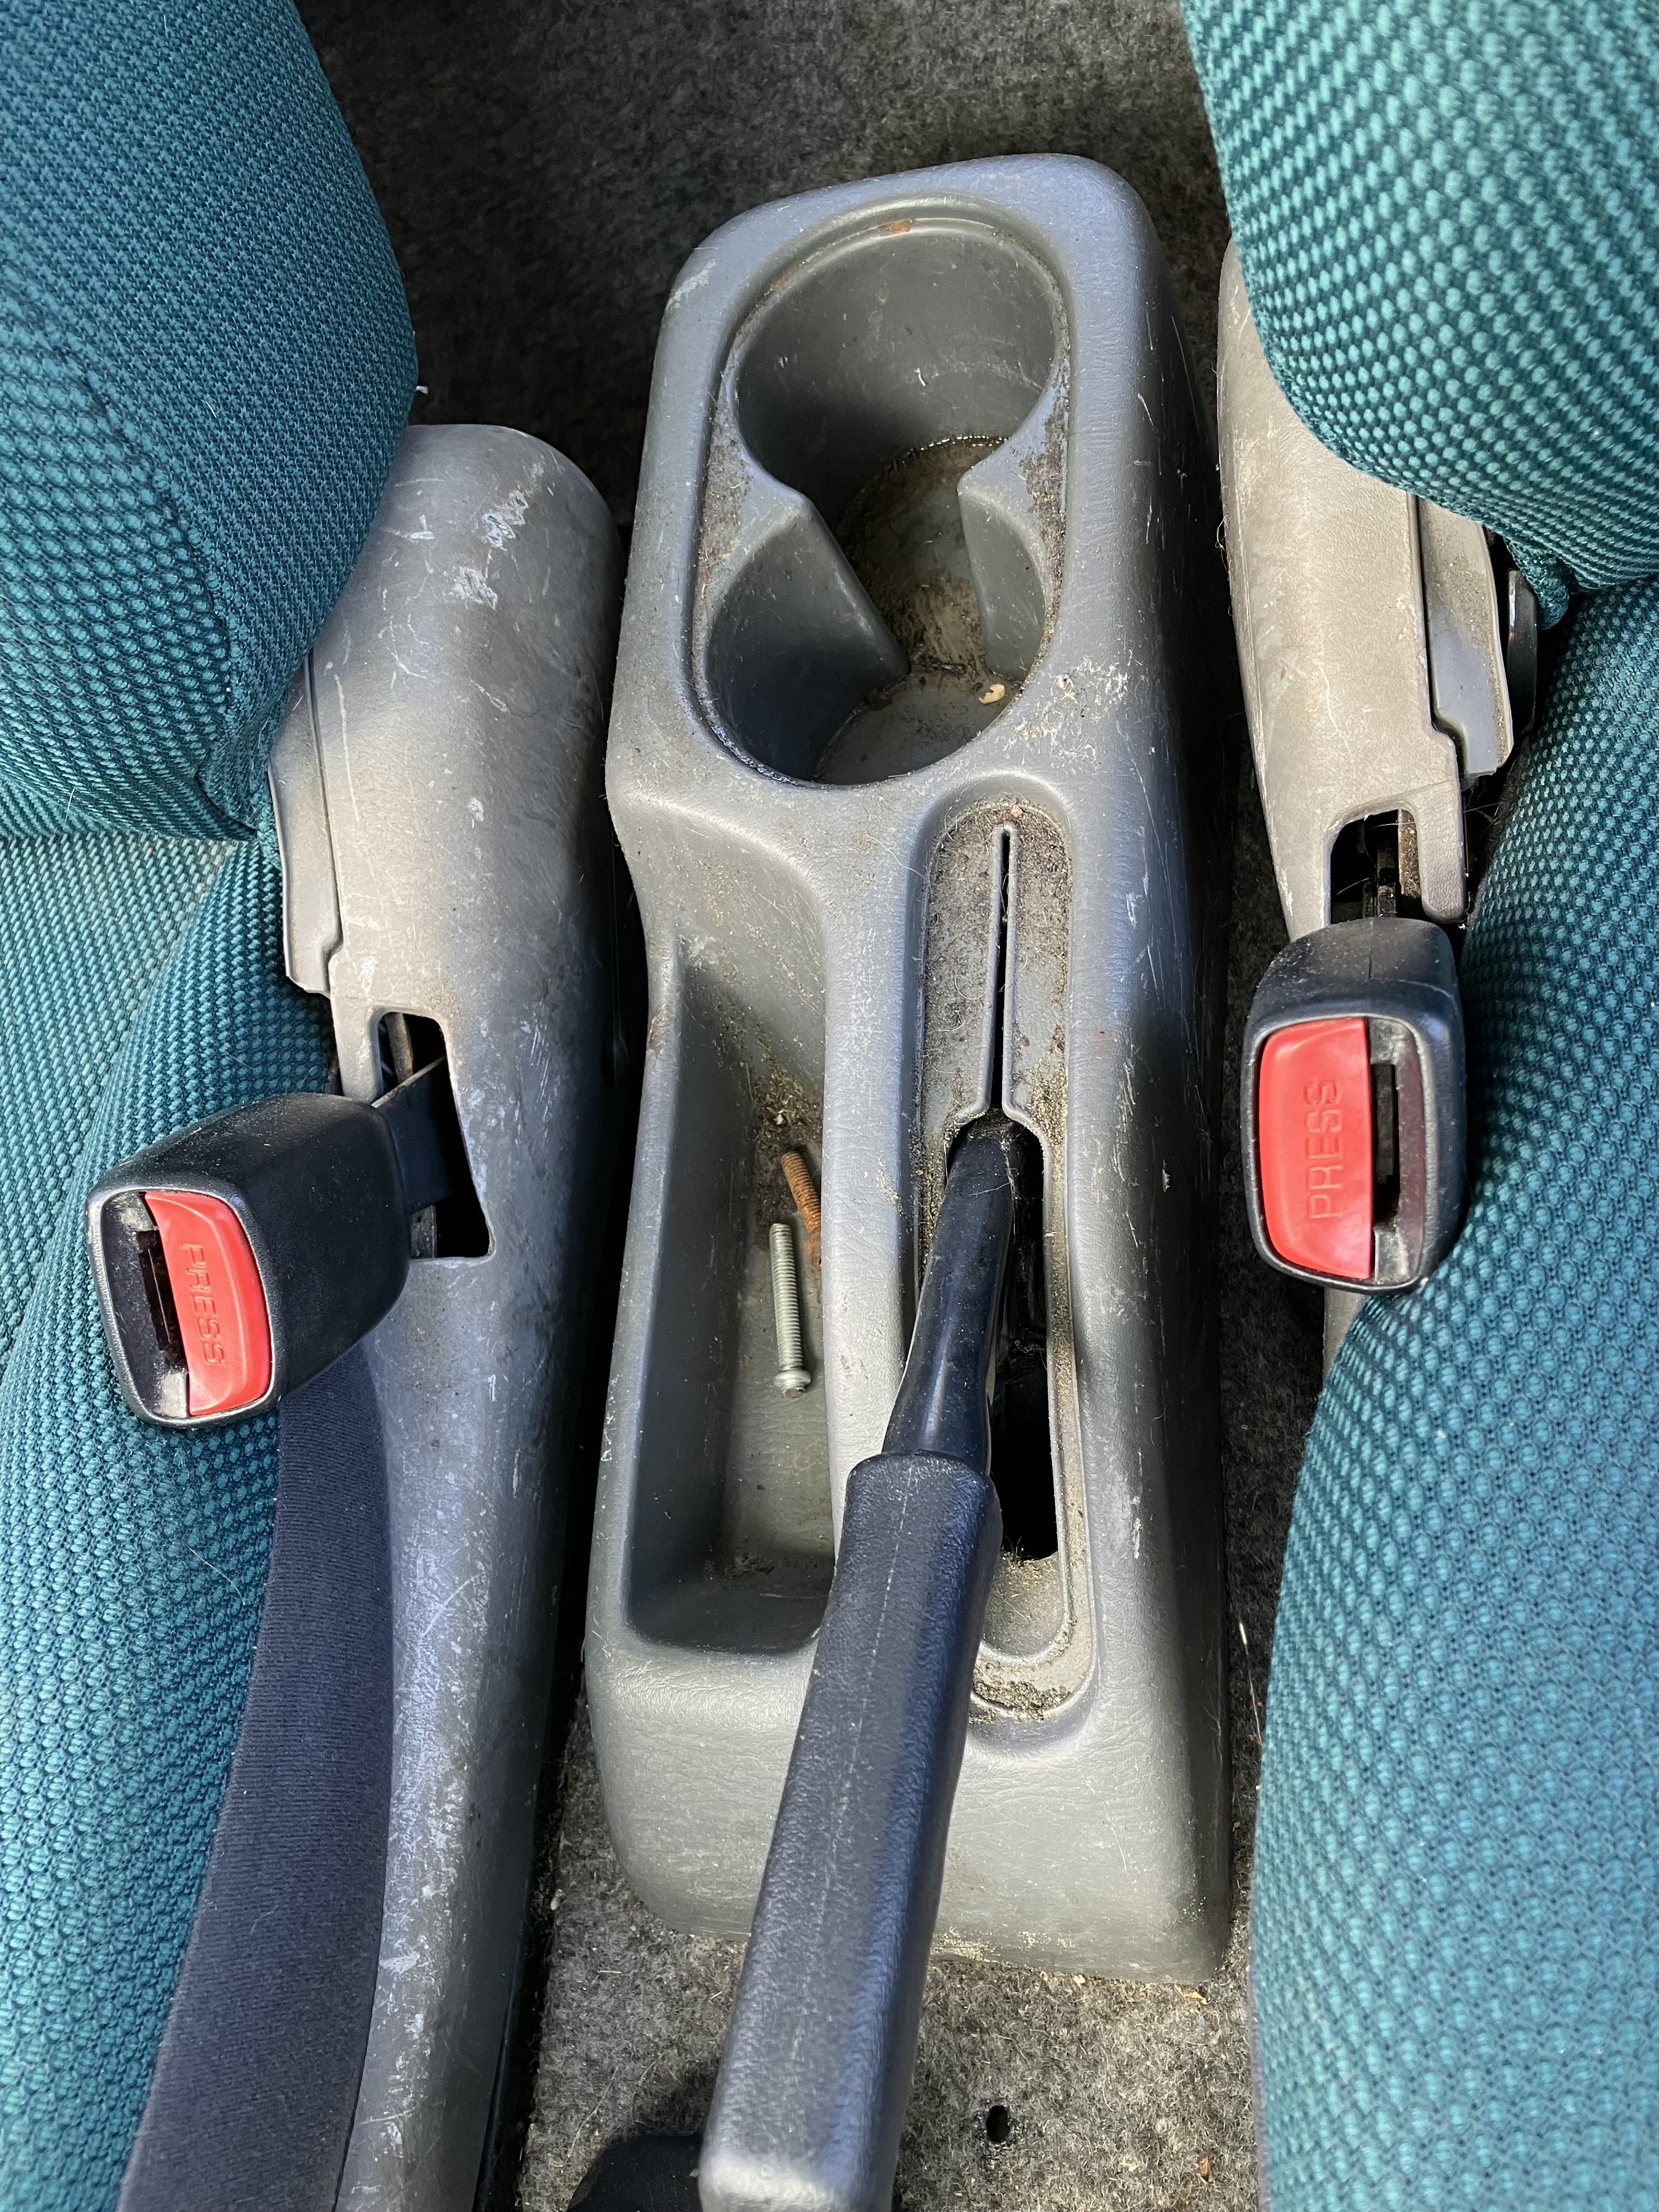
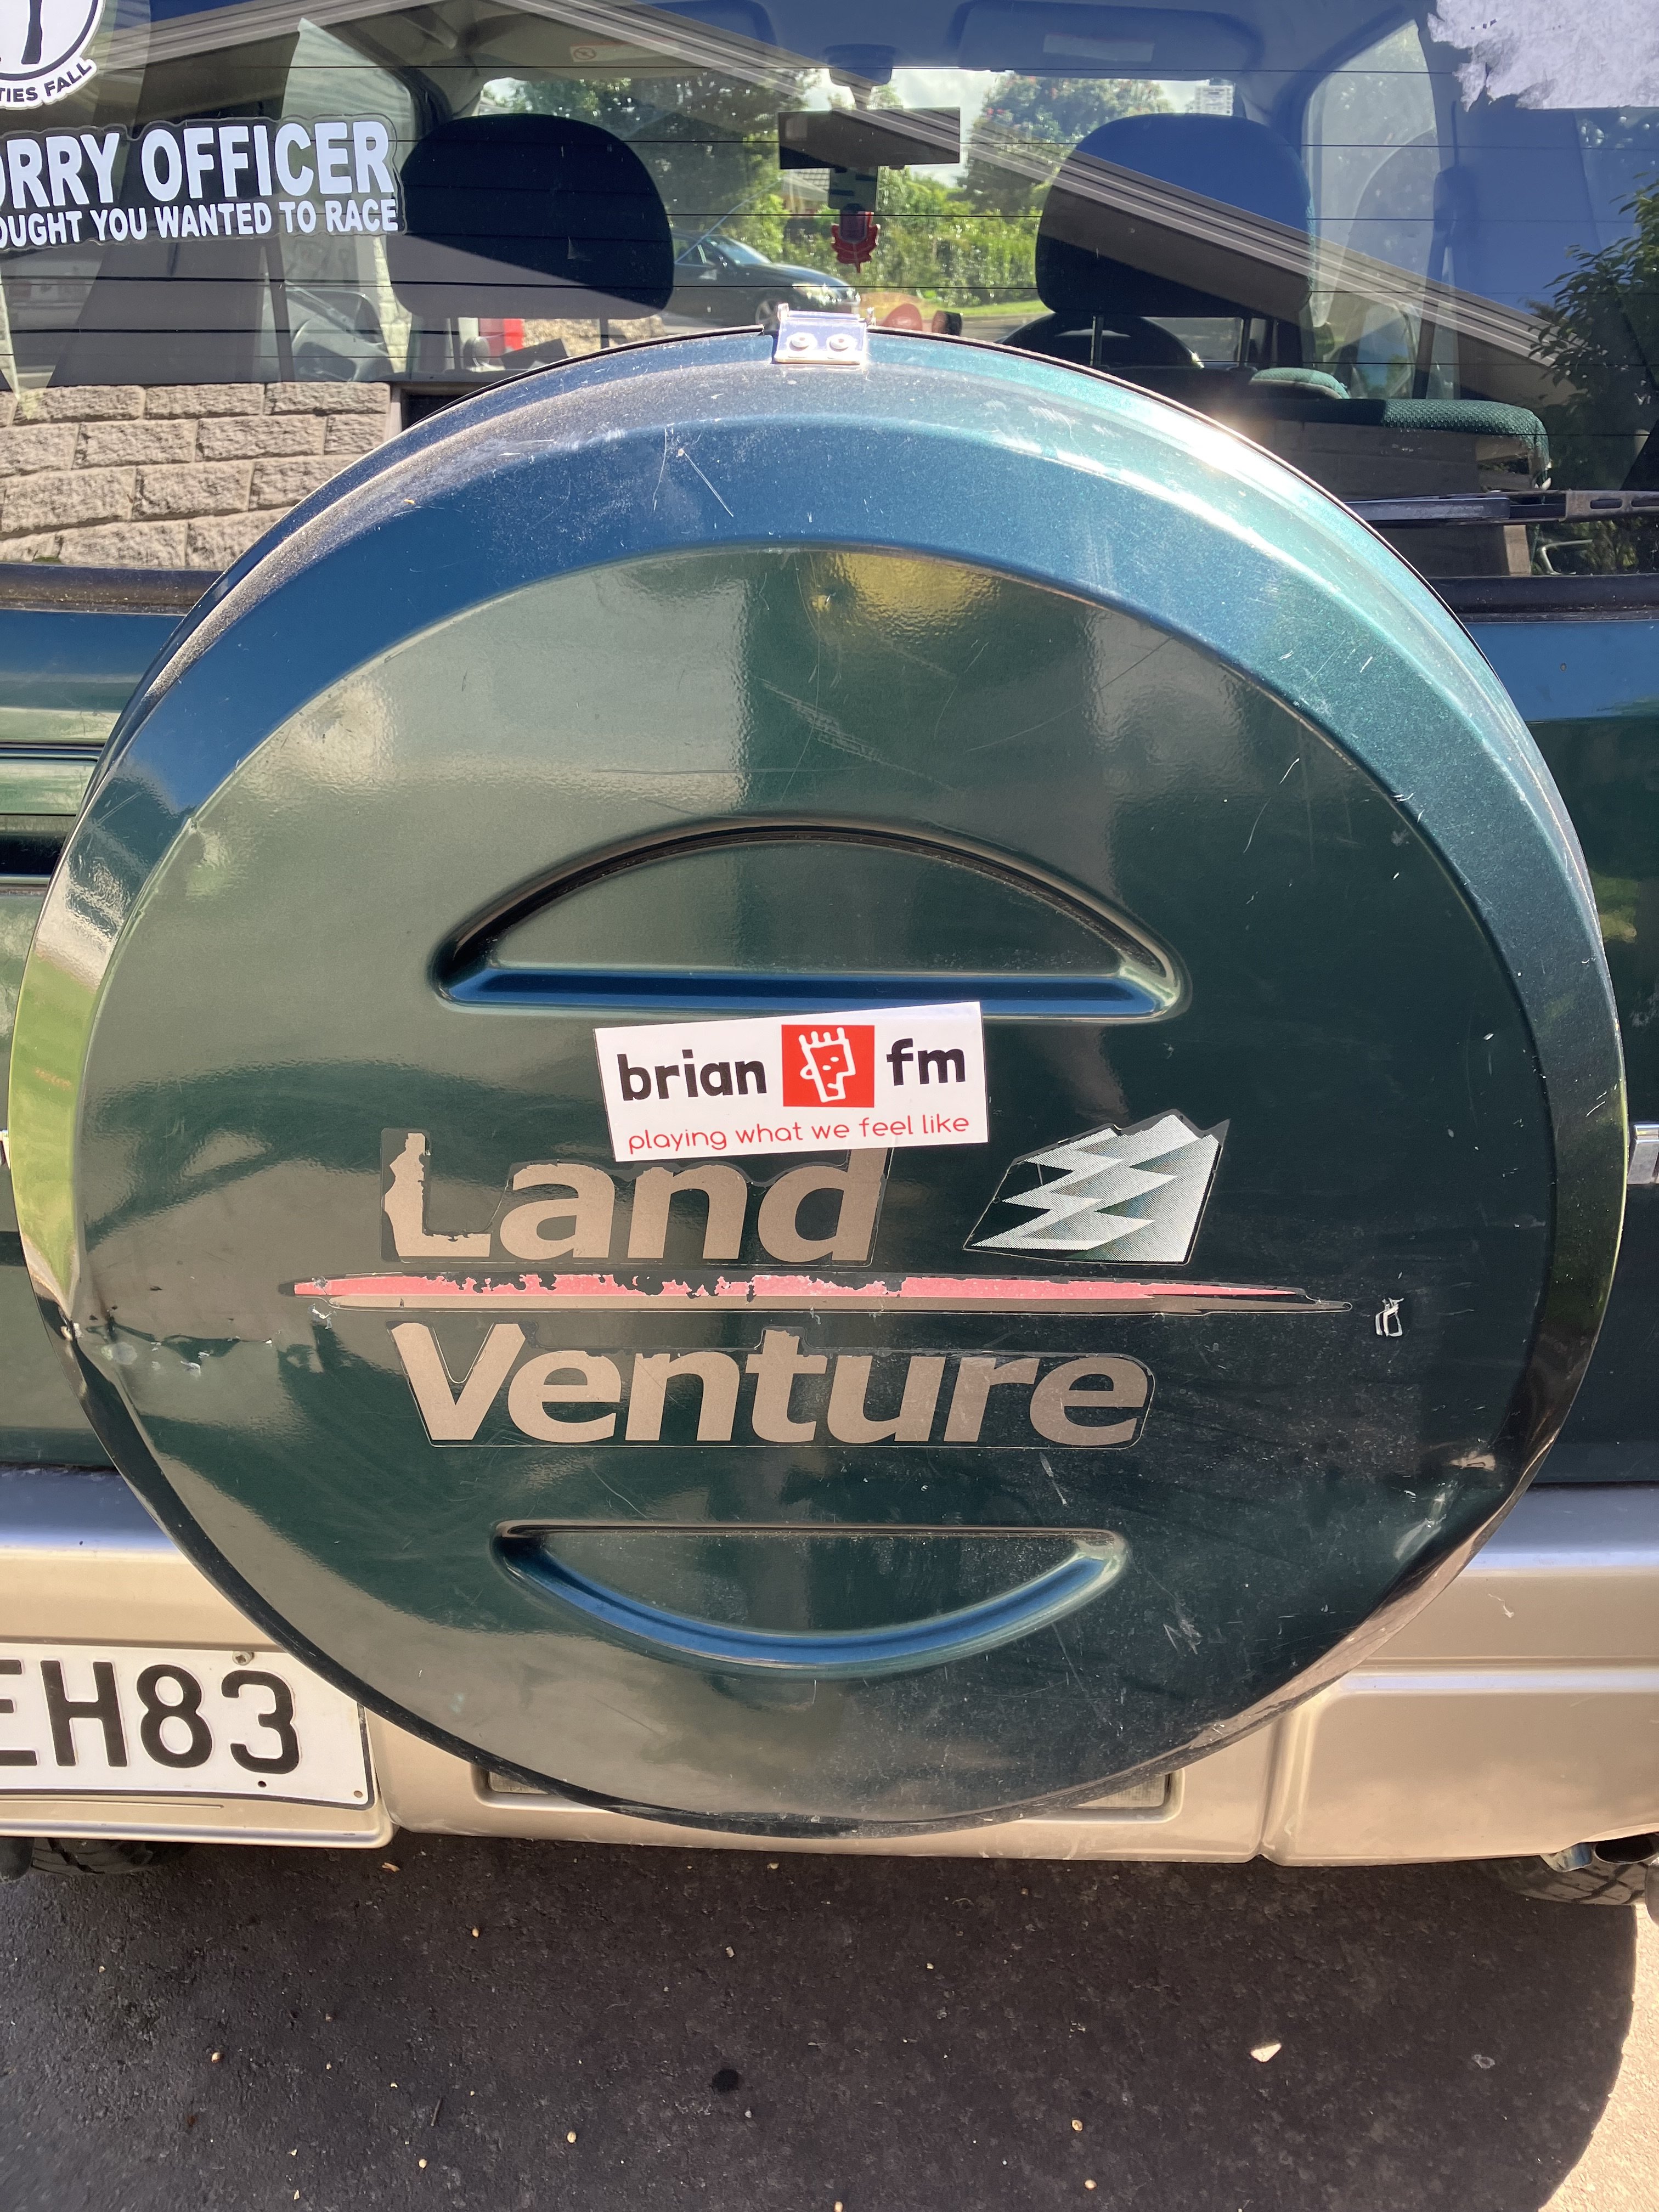
I got it home and unloaded without any problems and dumped it in the driveway. After sorting a few other things that needed doing, I thought I would move it into the workshop and start to clean it up a bit. Problem #1 - it wouldn't start. Despite starting several times already that morning, it did not want to turn over. It wasn't a starter problem and felt like a seized engine so I suspected it may be hydrolocked given how much water was coming out earlier. Cool. It could stay where it was and I'd clean it first. What had I bought? A 2001 Suzuki Jimny 'Land Venture' edition which is some sort of trim spec. It seems to have better wheels than the standard kei spec Jimny, and cool green upholstery. It also has cool checked floor mats. The previous owner must have done some regular offroading because there was the remnants of a CB radio install, extra lighting and also a 12v compressor mounted in the back, and the bodywork was extensively scratched. The bonnet is dented and scratched in a way I can't figure out how they did it, the roof has been resprayed a different shade of green and the original edges have got a lot of sunburn/clear coat failure. The original roof rails have been removed leaving only their sockets. The spare wheel cover is also dented which is a shame but can probably be beaten back into shape. The other feature was an extensive amount of filth everywhere. All the plastics, carpets and seats were disgusting. Exhibit A
1 point
-
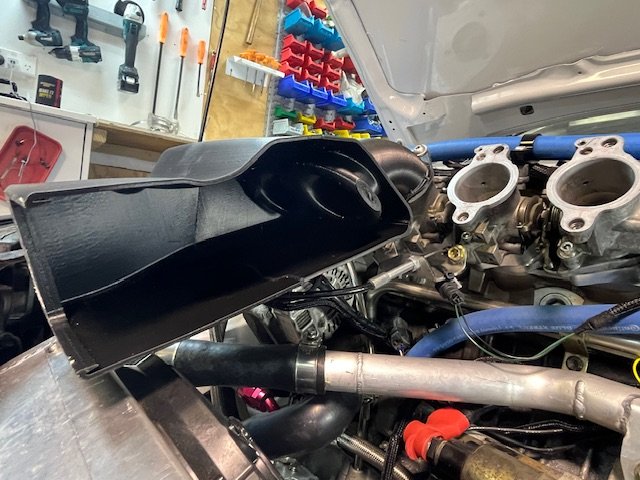
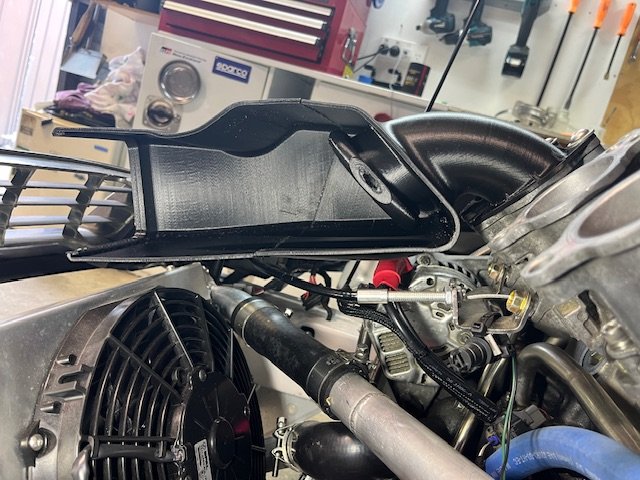
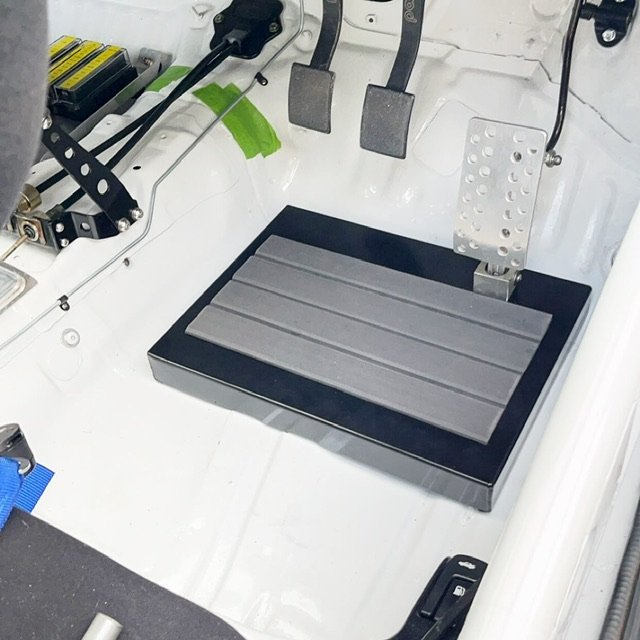
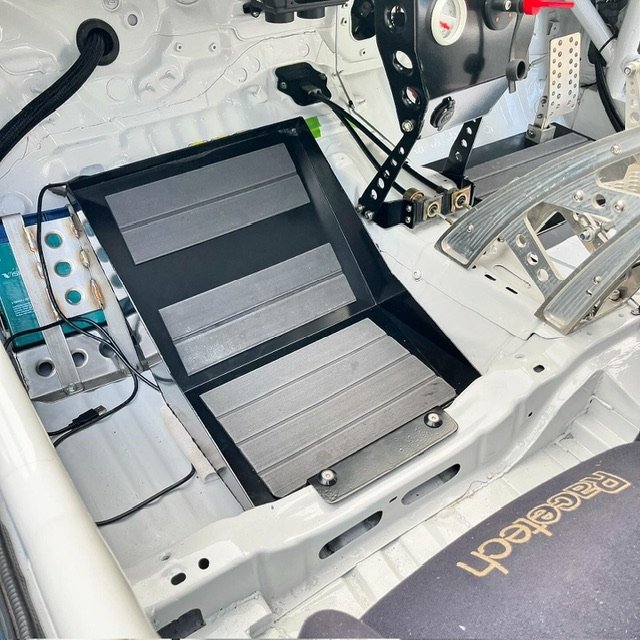
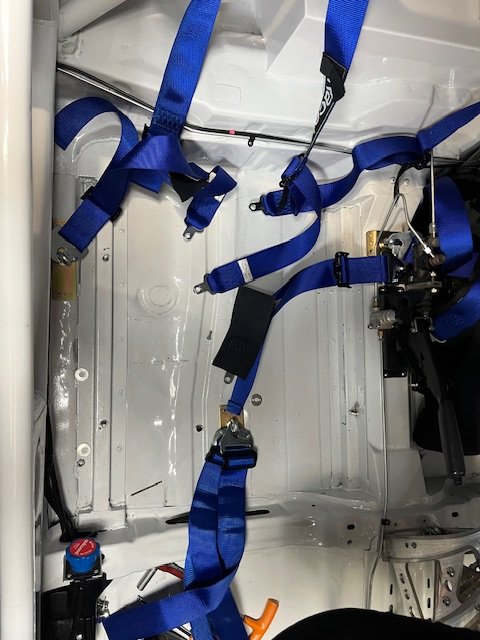
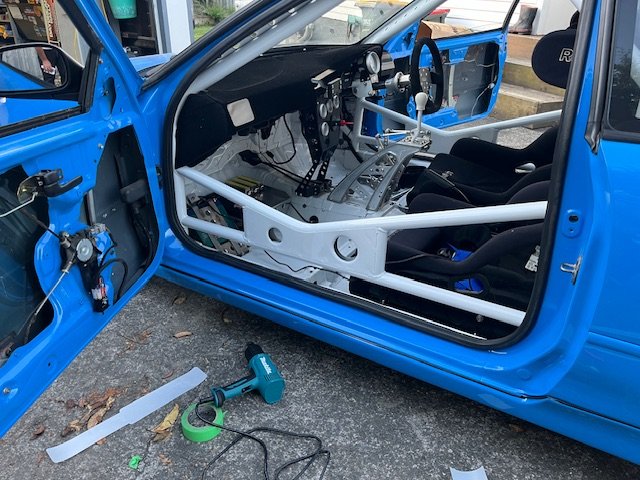
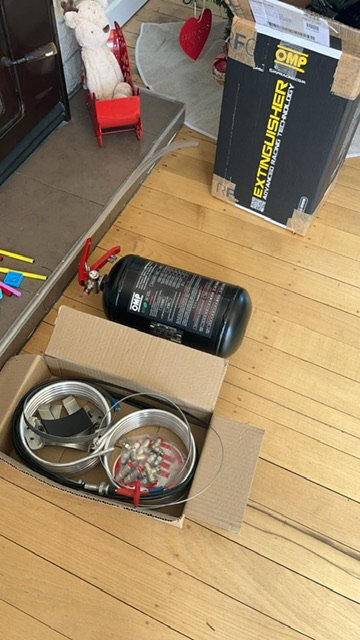
Wow where to start. Lots of little things starting to come together that have been ticking away in the background. First wee job was to apply 3m ppf to all the rollcage members. I knew as soon as I put belts in the car they would be forever chipping the paint. Very satisfying and can hardly notice the film. So next job was to mount seatbelts. I bought a matching set of belts from racetech for passenger seat and started figuring out how to mount these as be schedule A. Was an absolute prick of a job not made any easier by the passenger seat being directly above where the fuel lines run, and the fact that both my seats are slammed so low you can’t even get an eye bolt under them.. because touring car things of course.. Ended up opening a hole in the chassis rail to slide a 40x100mm plate inside for the passenger one. But very stoked to have this done. Have been chipping away at rollcage padding with the hard sfi foam. Quite fiddly to get fitting right and also need to buy some more to finish the job it’s pretty expensive stuff! Sorry no pics because I still haven’t accepted if I’m happy with what I’ve done 😂 Dropped a load of parts off at the powdercoaters. This should hopefully be the last batch and is lots of bits that will make everything look a little more finished. Footplates look sooo good. Used some left over tuff deck EVA foam from a job on the boat. Should be durable and grippy when wet. Headlight support structures look super tidy too and blend into headlight housing well. Also pushed the go button on a plumbed in extinguisher. This will be piece of mind for my over-customised car, particularly around the hot exhaust and fuel systems. It’s a massive job to install these things, so slowly chipping away at it. Last bit of progress has been on the airbox. A friend printed a test piece of my airbox design so I could check geometry and design features. Generally, I’m very happy with it, although I did I get the geometry wrong by 30mm or so. This was an easy way to validate the design so all part of the process. Few changes I want to make to the design; - fix geometry - increase thickness of itb flange to 5-6mm - increase volume. #3 & #4 runners have a lot of extra space underneath. Ideally I’d like to get volume up to 25-30L - incorporate support stays in behind filters to keep shape/hold filters in if I ever create positive pressure in this airbox - Vee the two filter positions maybe 20deg or so to form an air damn in the middle, also encouraging to to flow to the outer corners of the airbox. Should minimise width and maximise filter area. So this is what it looks like currently goddamn it’s going to look sexy once finished, but still a very long way to go!
1 point
-
1 point
-
Aliexpress braided cable sheath works good and has held up fine in UV on the boat. Bit of black heat shrink on each end makes it look nice n tidy1 point
-
It was soooo sick1 point
-
1 point
-
fuck this thing uses some gas1 point
-
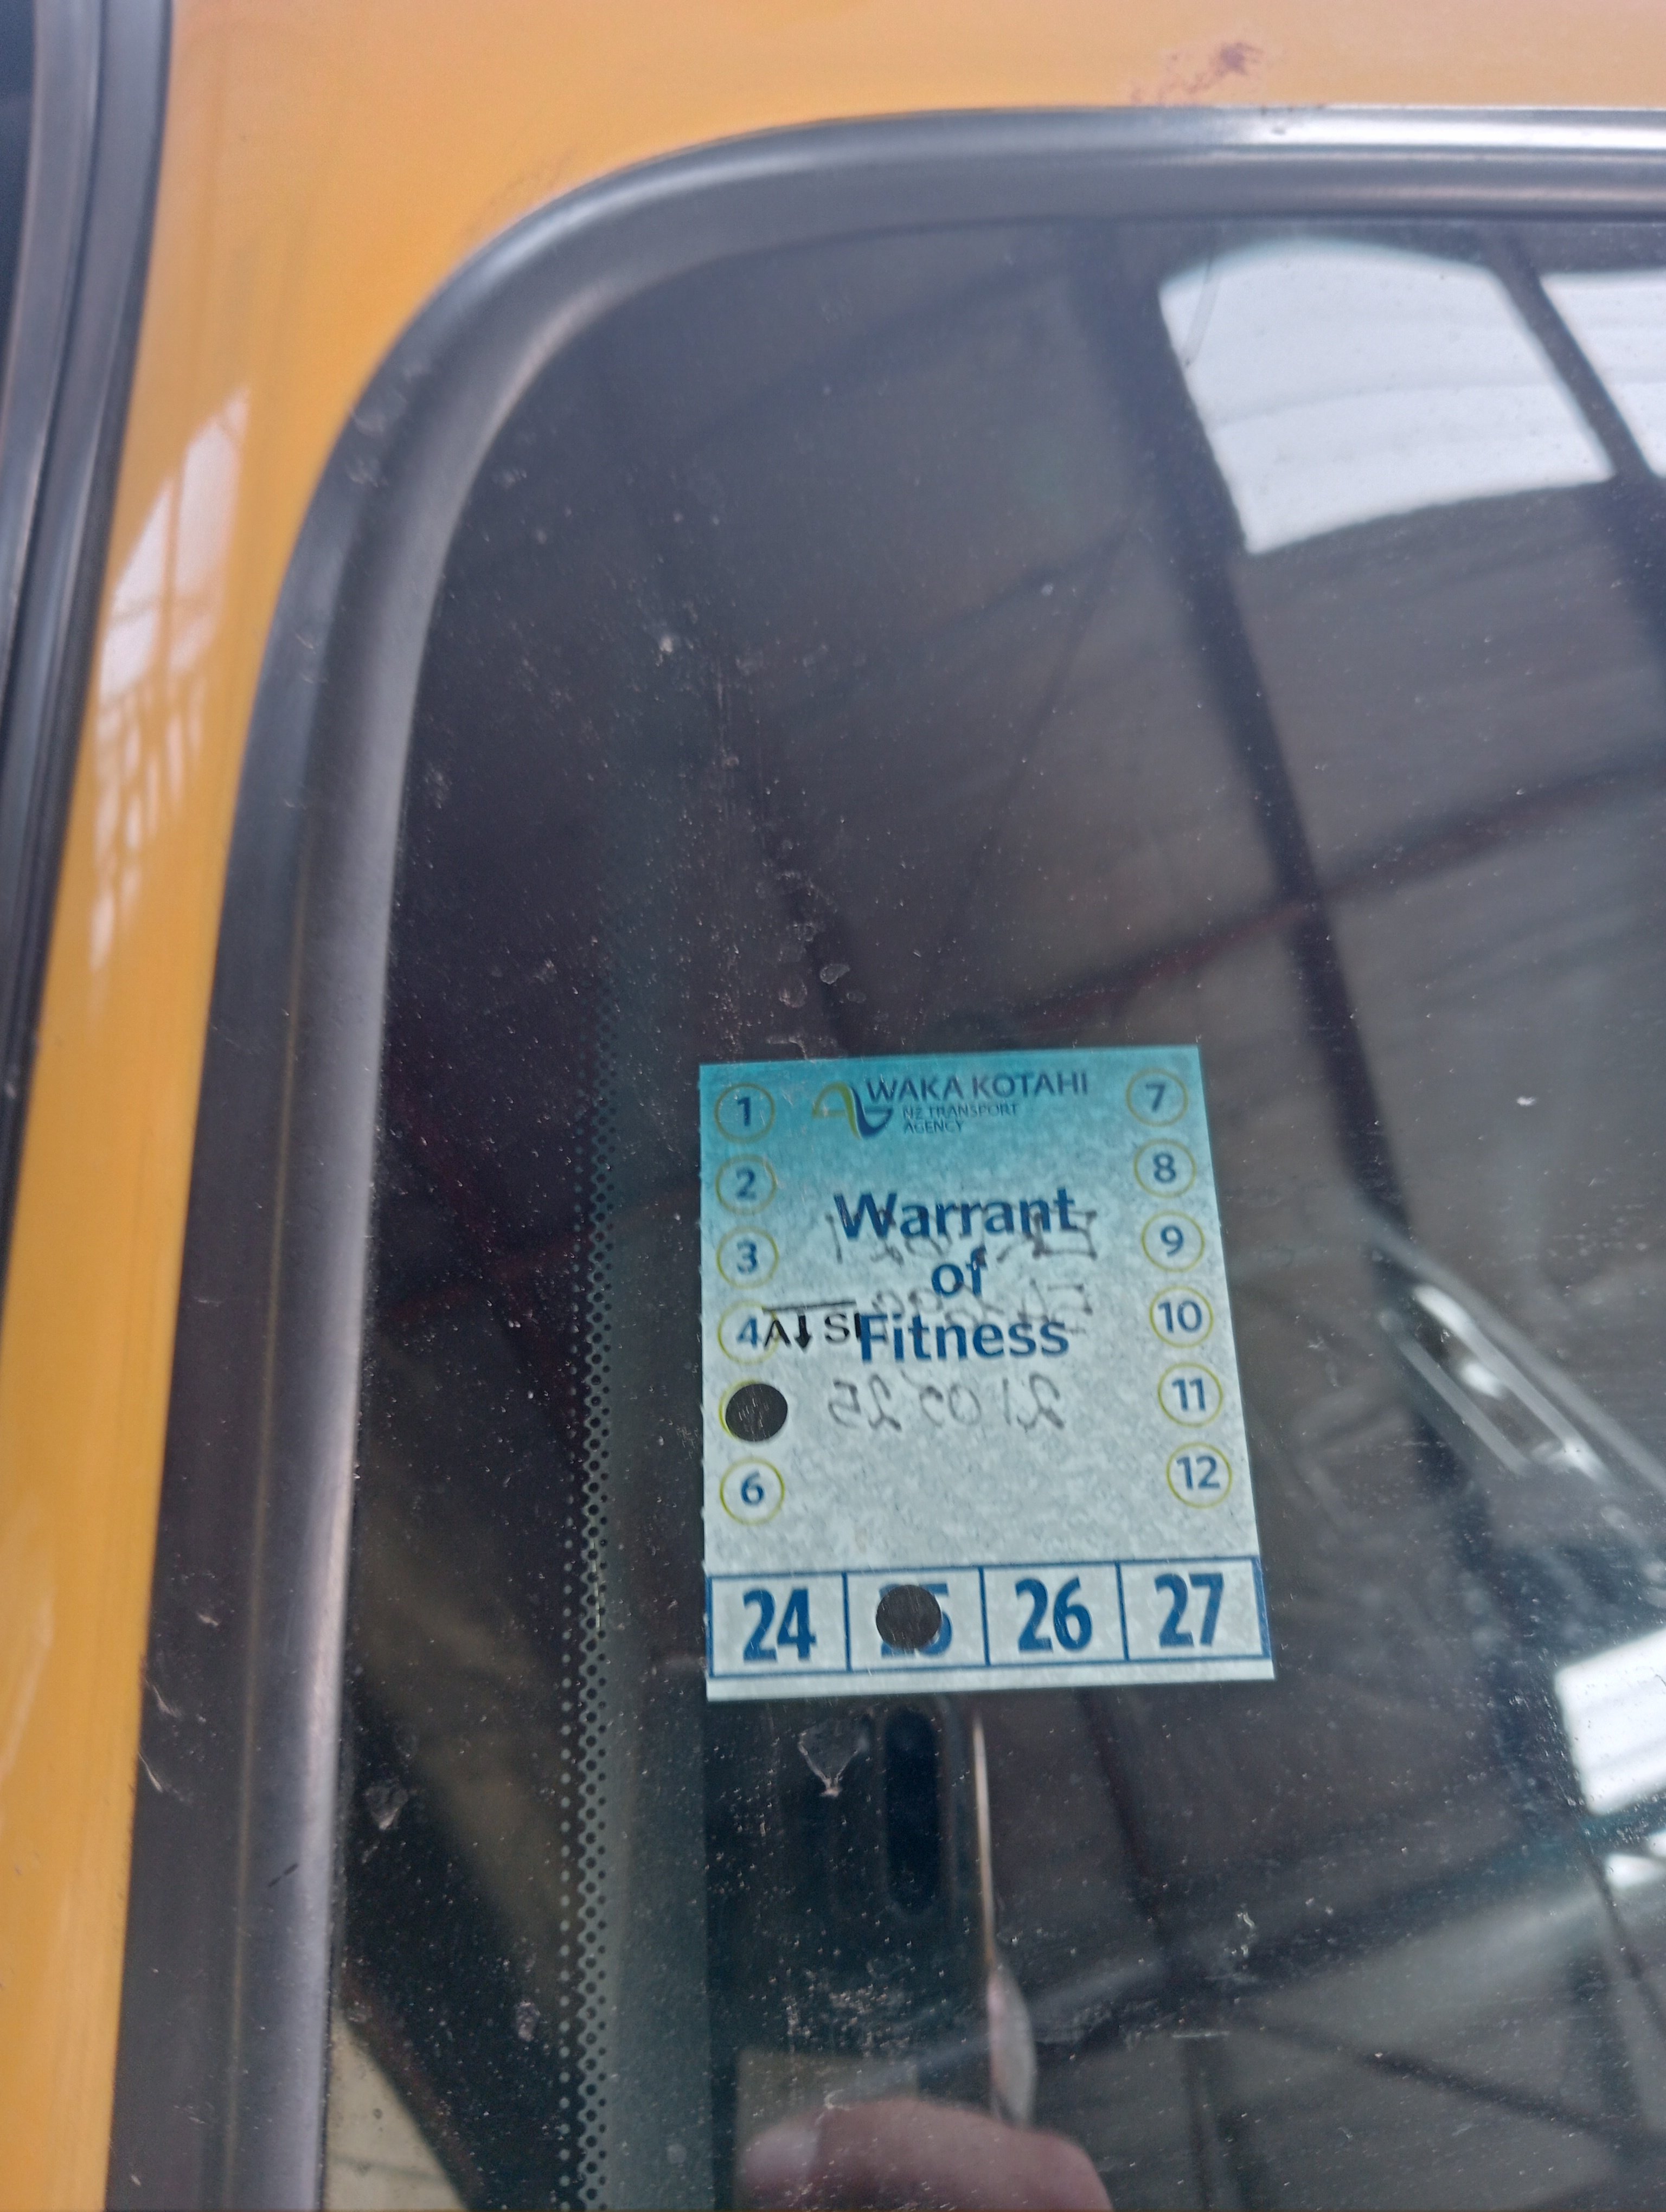
the WOF man actually wanted to stick around for a chat, guess he was a Mazda guy "so what have you got planned for it next?" "I dunno, I guess I'll wait for something else to break" Never had a legal car, this is new territory1 point
-
one small sticker for a man, one giant leap for a man with a rotary
1 point
-
I parted it out, and no one wanted the shell so it got towed away by the wrecker. Done and dusted! Carina will be cool though maybe1 point
-
I made up a new ply panel for the dash and glued it on. A bit more finishing work to do then on with the varnish.
1 point
-
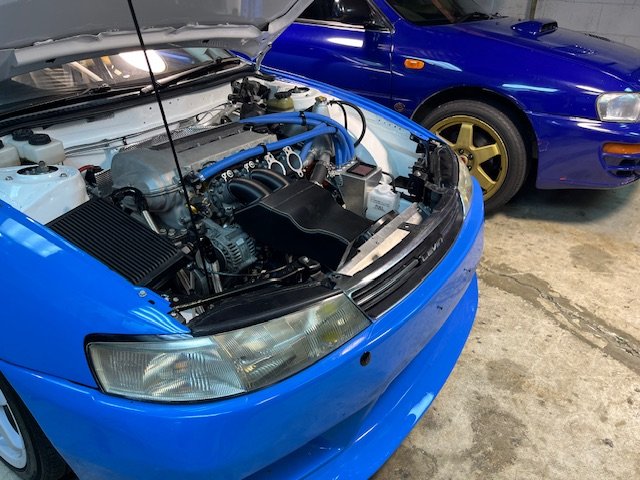
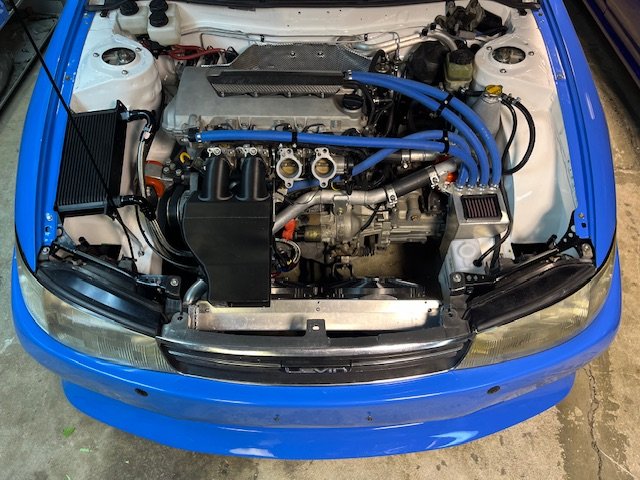
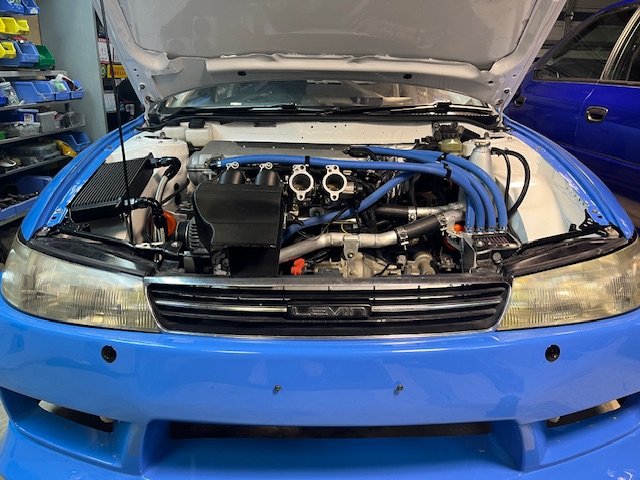
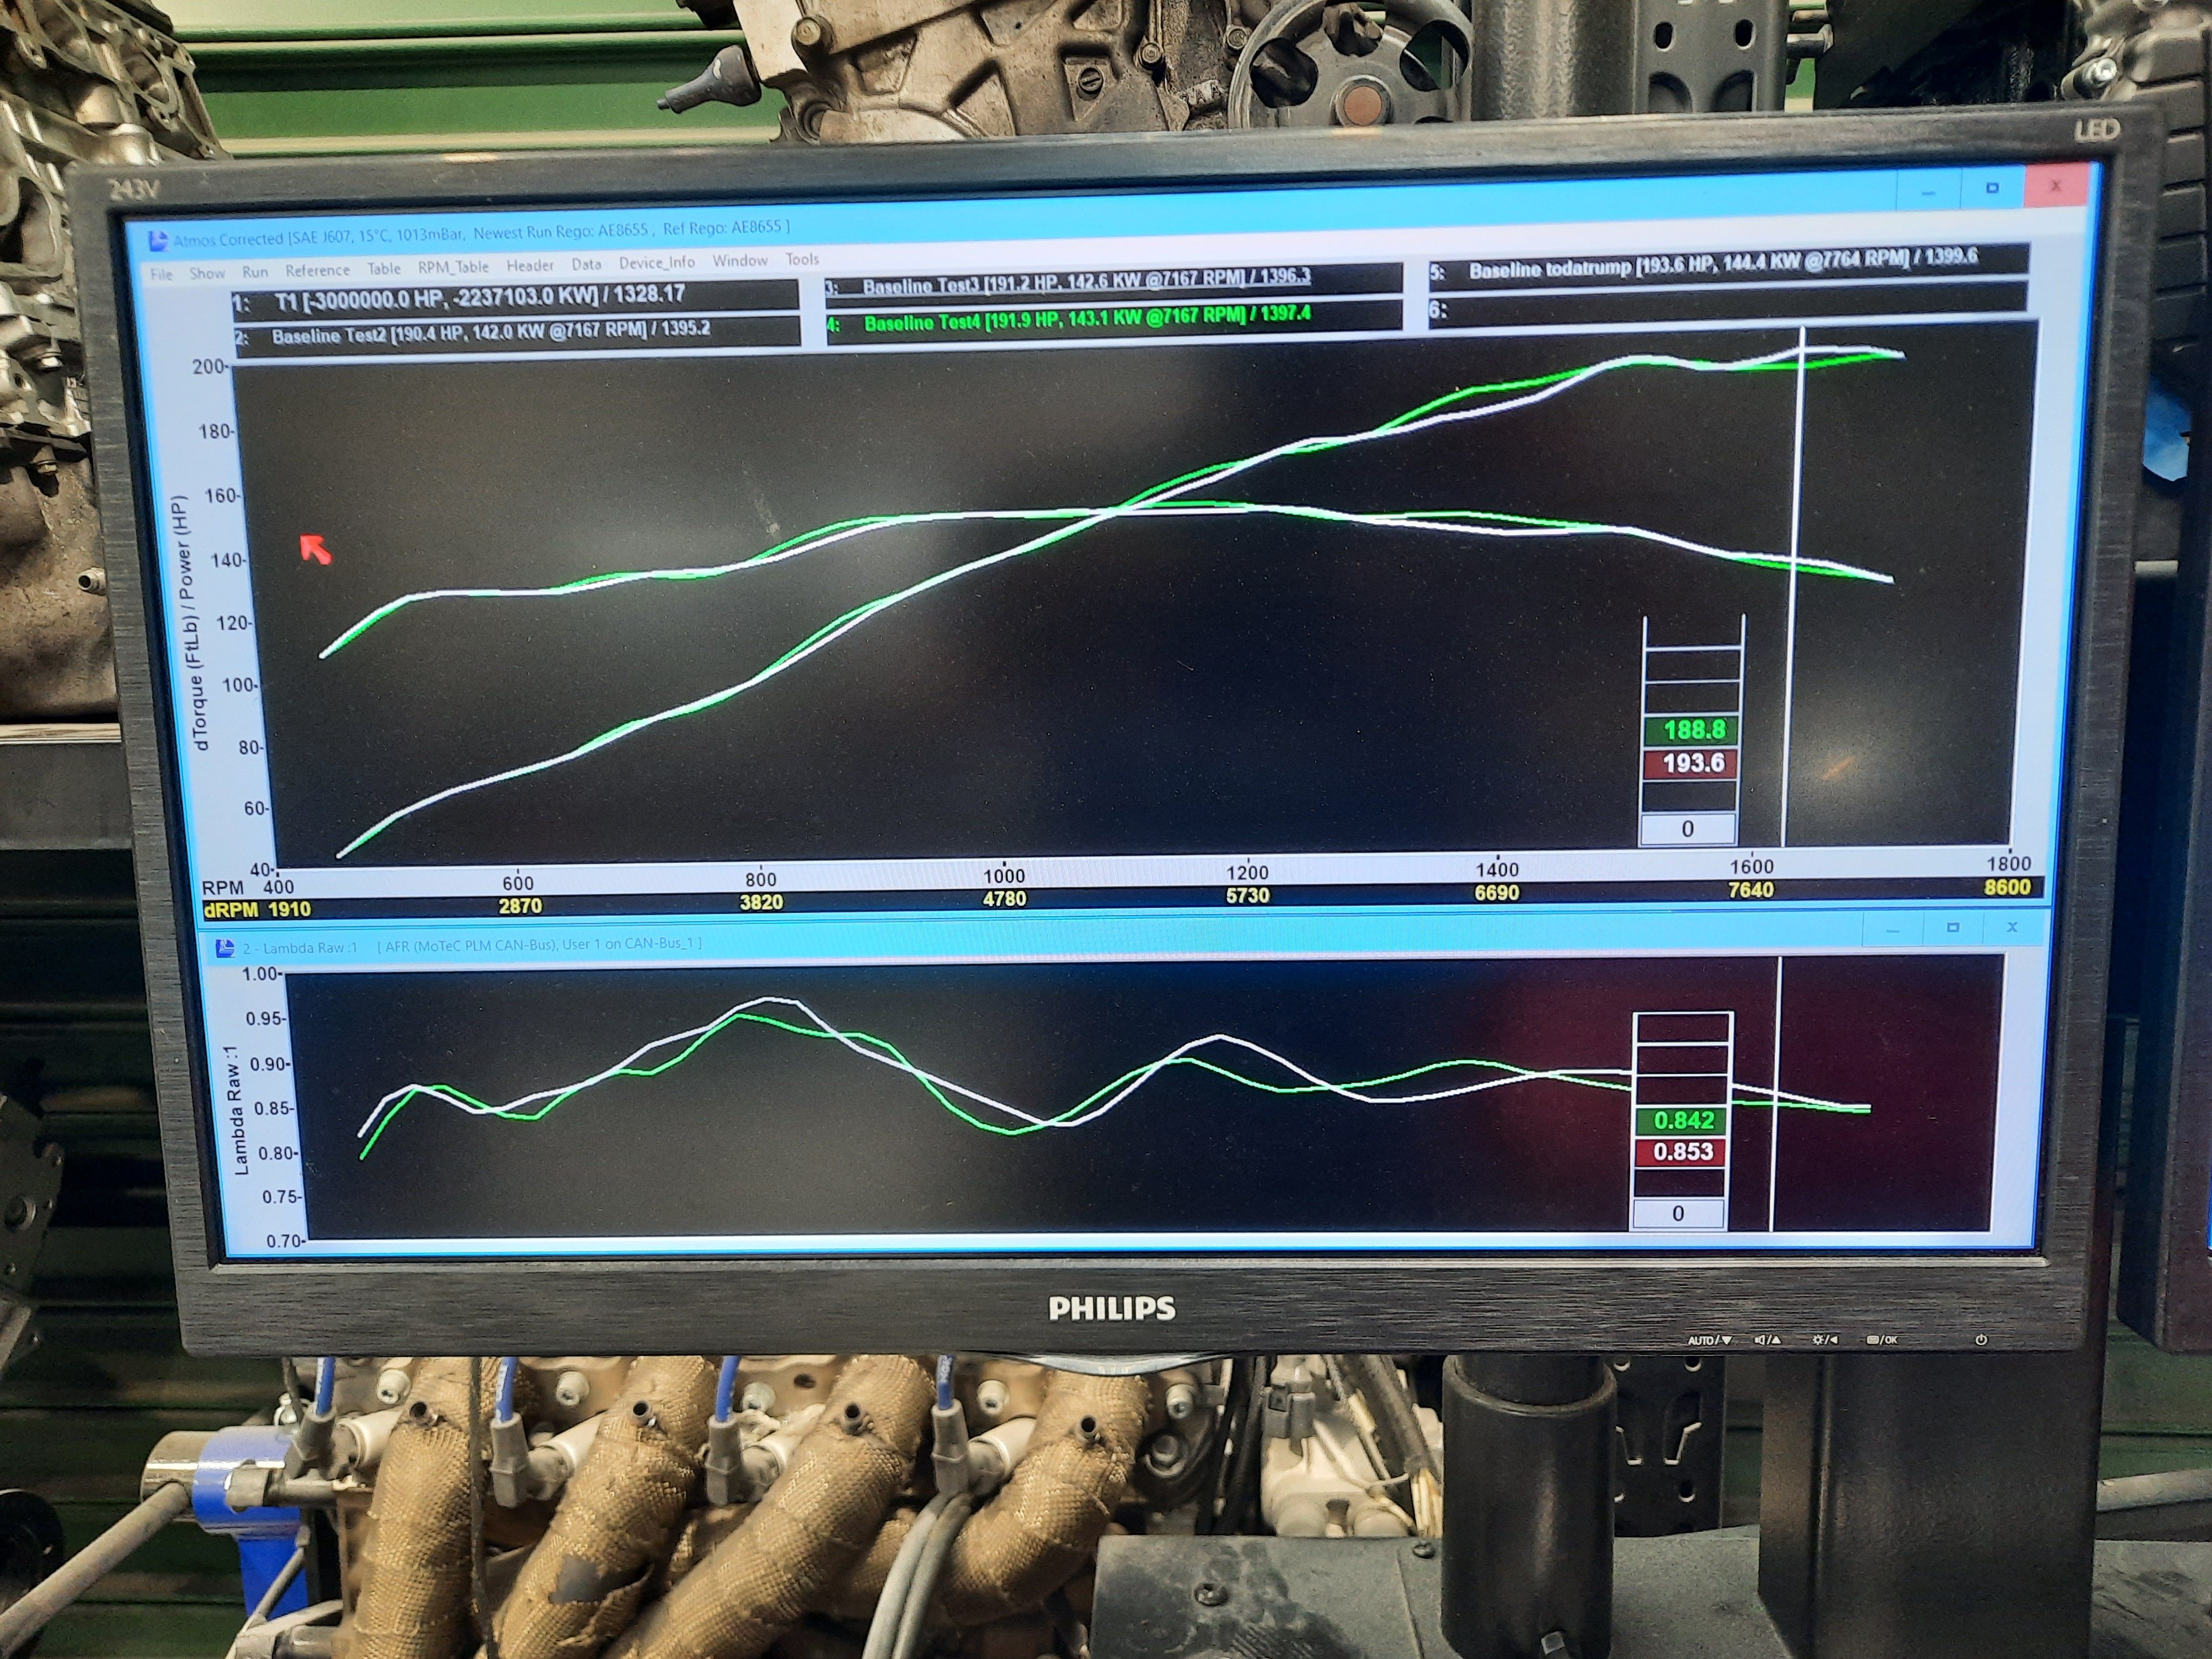
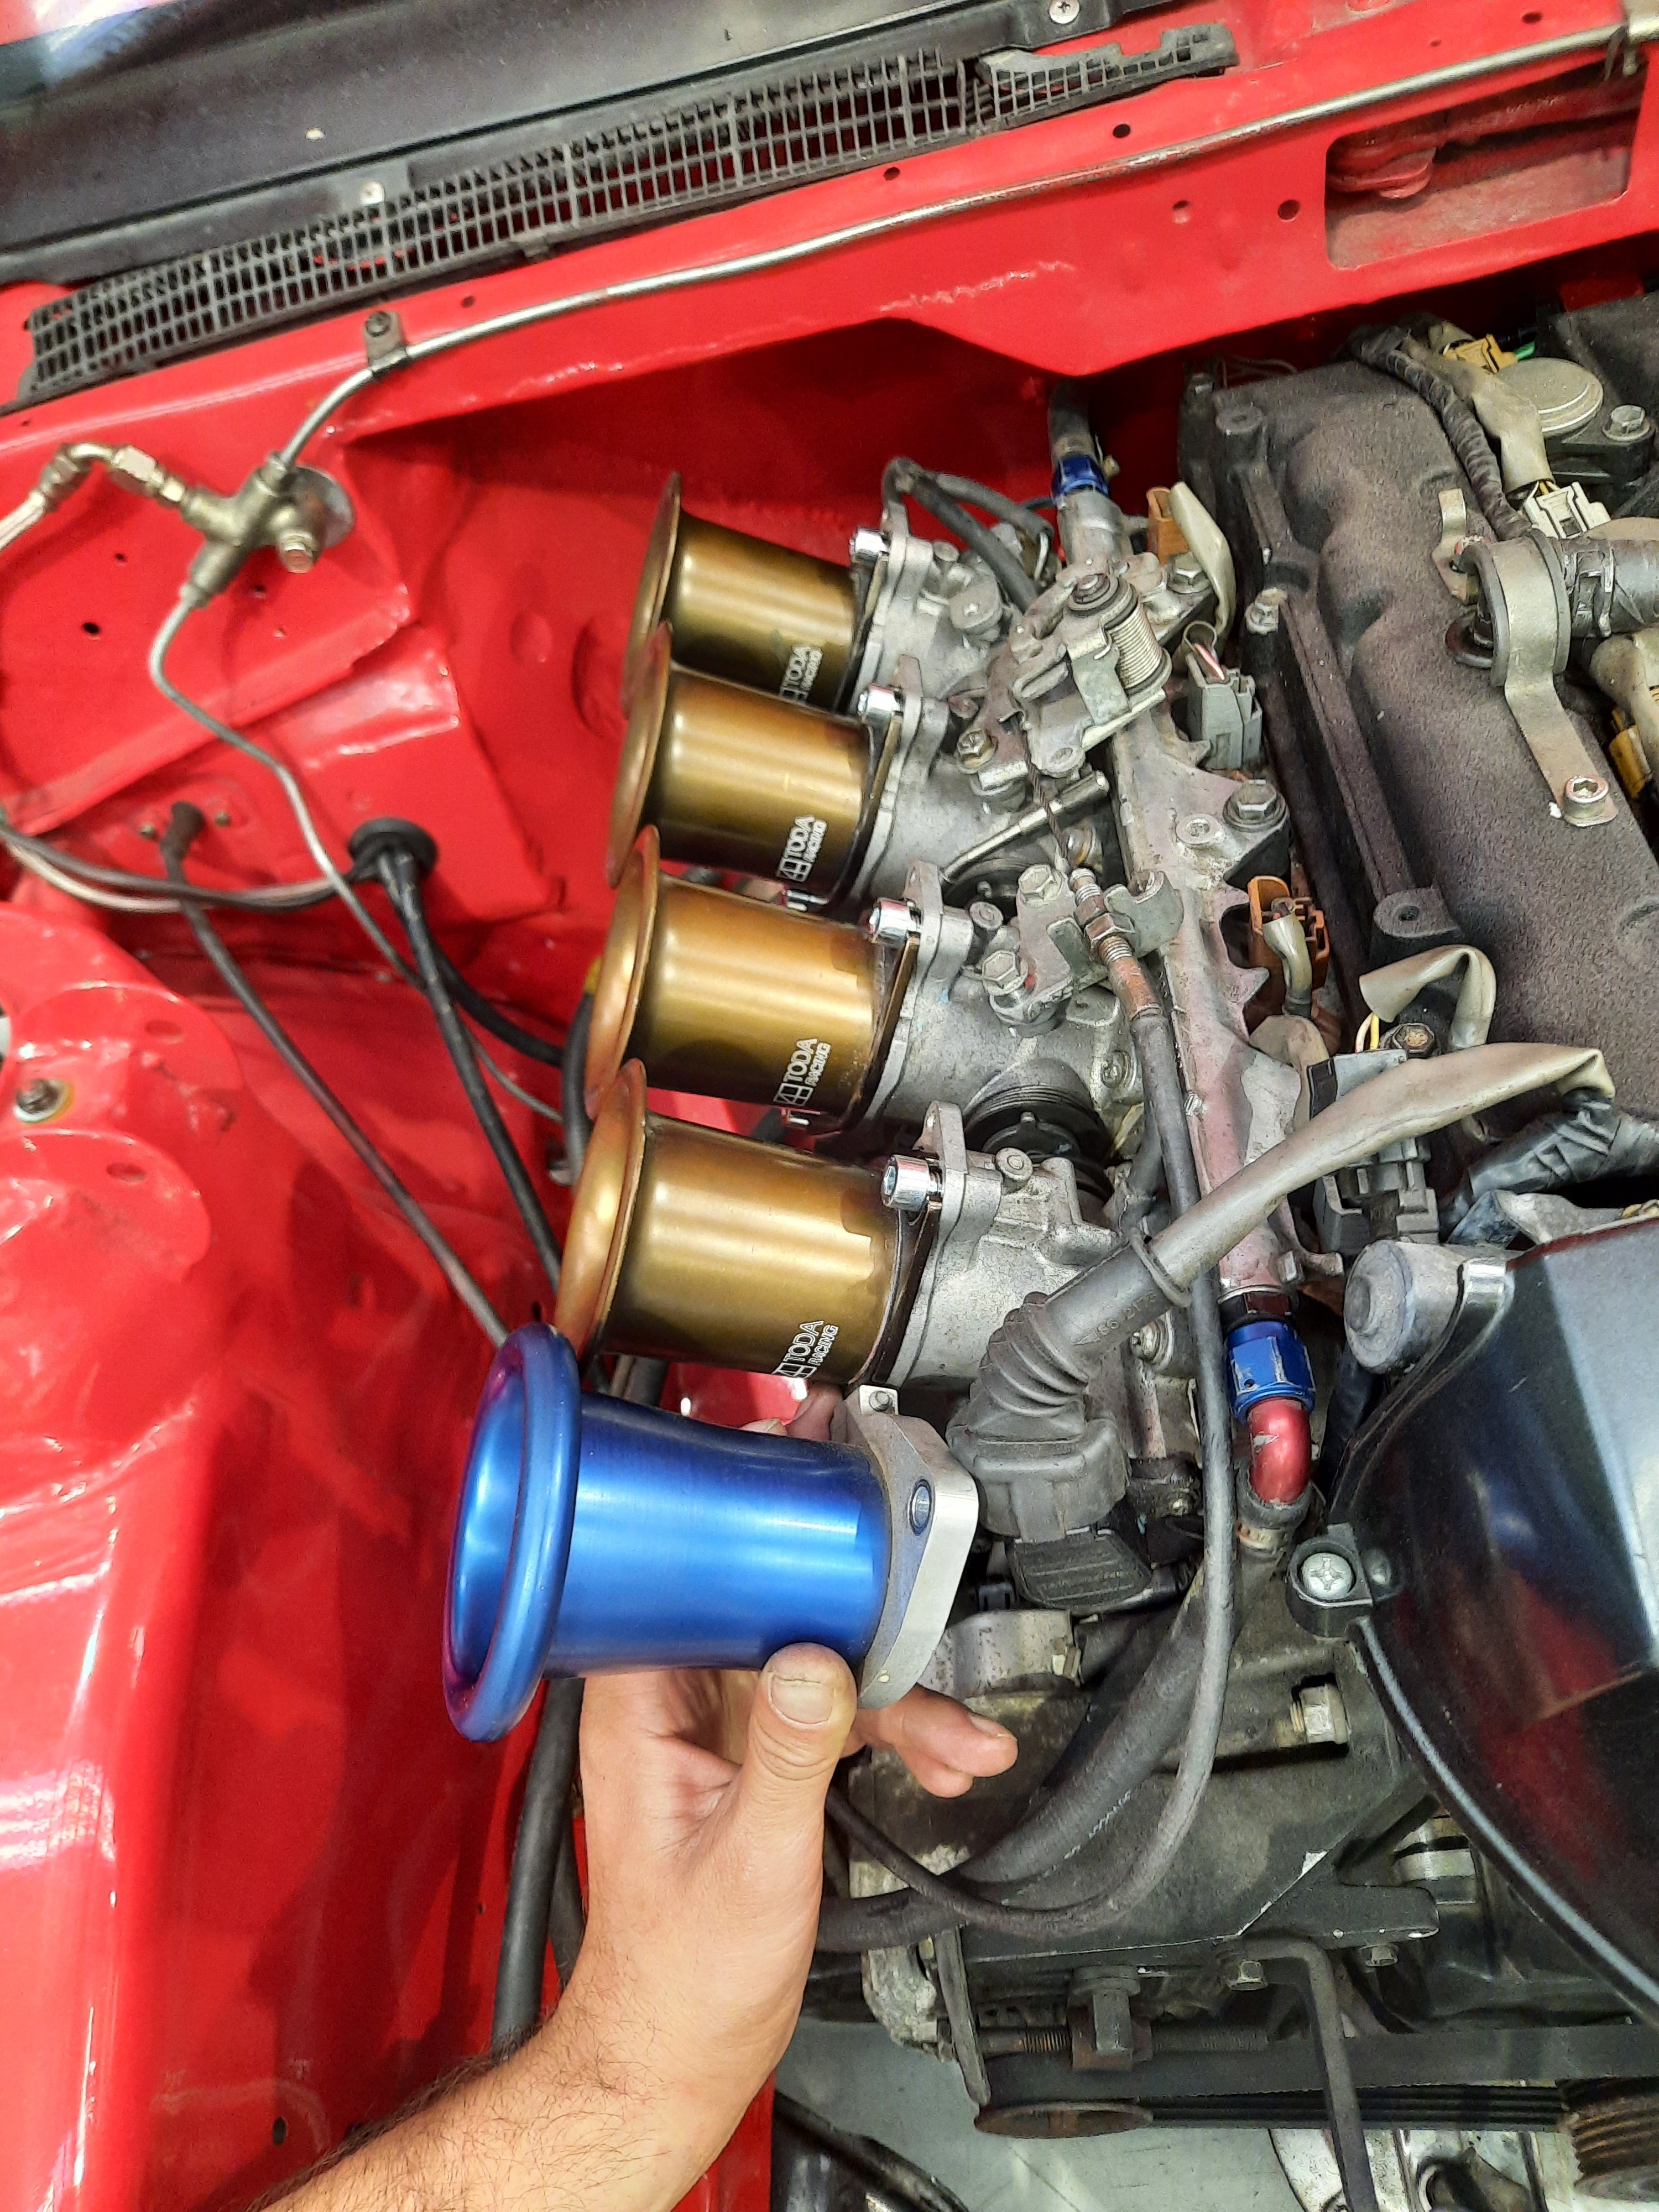
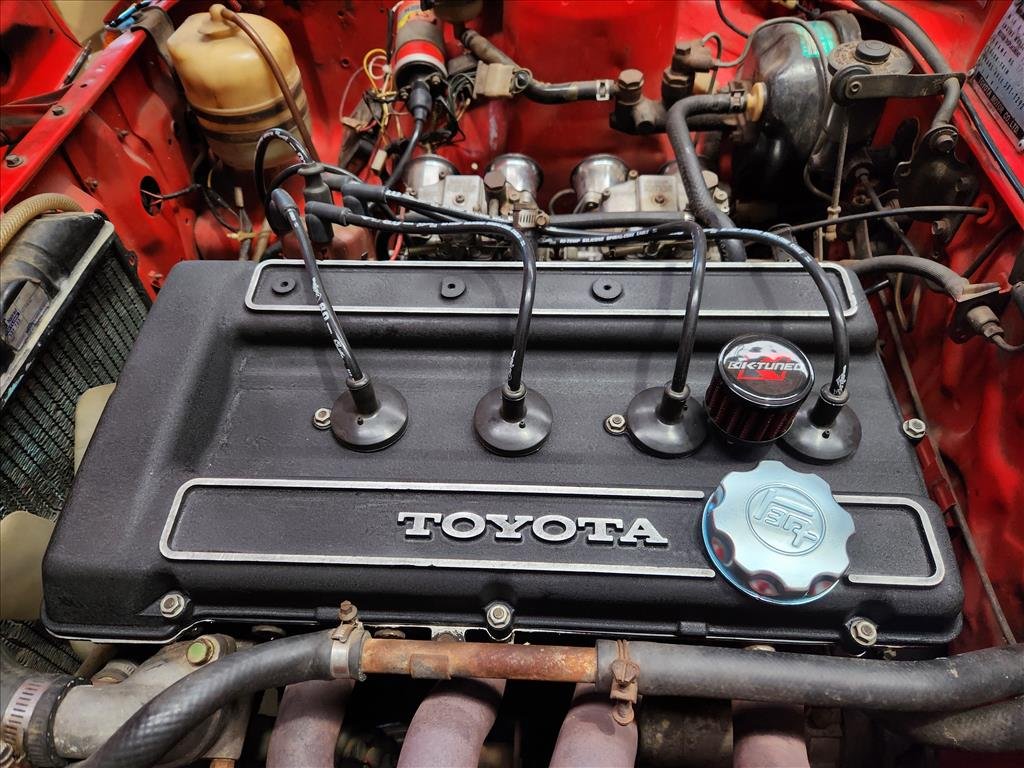
Bolted this thing onto that thing to get a baseline before making a few changes. Gave it a couple of quick runs, then swapped the trumpets from the 95mm blue ones to 75mm bronze just to see what might happen. 95mm trumpets are the green line, 75mm white line. The AFRs are pretty messy and we haven't touched any tuning, just swapped trumpets and ran it again, so maybe the shorter ones will work after some fuelling and VVTi changes? There's a set of 48mm Jenvey ITBs floating around at work and one of the guys has 3D printed a manifold to test. It'll be interesting to see if there's a difference from an extra few mm of throttle plate, and I'll give a few different bell mouths a try at the same time. I'd really like to try 50mm or even 52mm just to see if there's any gains.... will see If I can find a set to try.
1 point
-
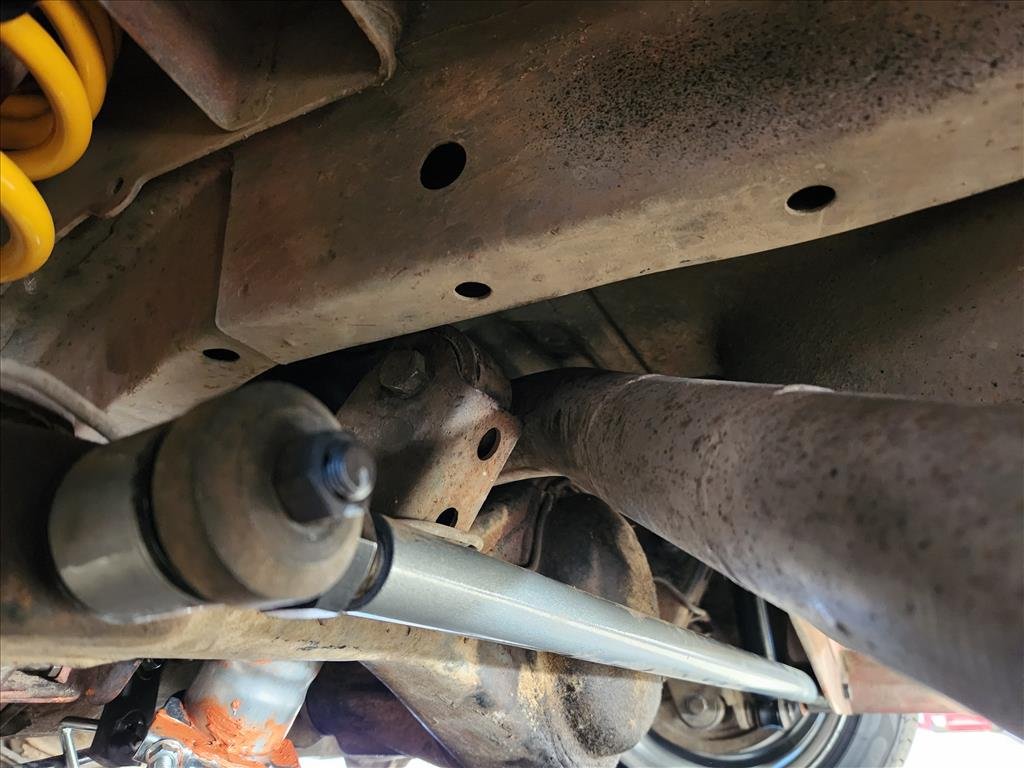
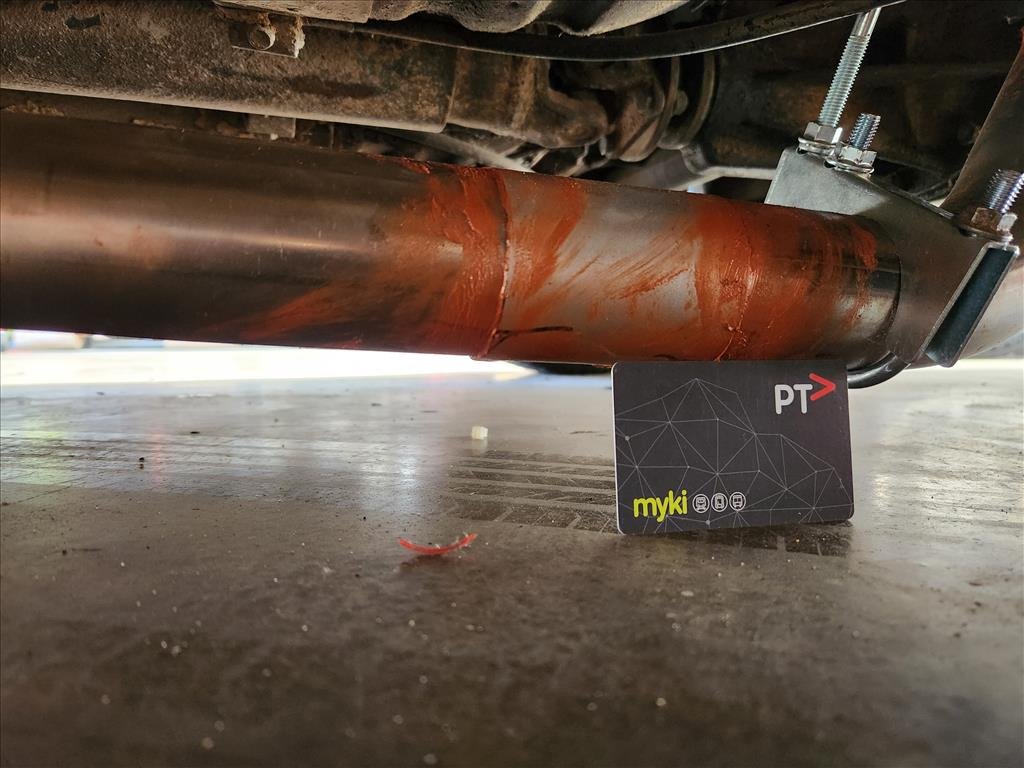
Well my exhaust making lesson comes to an end, but not the way I'd hoped. So after last time's episode about the pipe hitting the floor I decided to get some more bends and put it out the way in the path that the other exhaust took, just without the giant mufflers. So far so good. I also used Australia's entire supply of copper goop which generally worked ok except for the parts where it linked from the old and the new, seemed to leak most there. Turns out the solution was just add more goop. Then I ran the car a bit more on the stands after putting together a slightly better muffler hanging system. All was well so far; even got it to idle a bit better. Once I dropped the car down and.. well not so good. The portion that goes over the diff no longer goes over the diff but now into the diff, and as a result snapped the bolt holding my muffler on so it went on the piss. Additionally the car does not go low on the passenger side because it's stuck on the exhaust. I did also notice when looking at other people's exhausts that mine was routed weirdly over the diff so it's just a disaster all around. I did have an inkling that would happen but I wanted to use that route for two reasons. 1) Had that muffler so tried to reuse it and 2) research suggested people were not keen on the under diff due to the potential difficulty when jacking the car up. It just occurred to me I'm putting the exhaust together with the car already jacked up which means it's already at max droop so point 2 basically moot. There was some legality issue about it as well but clearly that's not really something I'm worried about. So after all this fucking about did I get anything out of it? Maybe 10mm more ground clearance and a lot of noise. I think what I'll do is just pull off that muffler and basically end it at the diff for the time being, just so I can move it around for some sweet instagram photos and then park it forever. I was going to try get this ready for a classic meet in early December but I'm actually going to be in Japan so no need to rush on it. Oh, one good thing though I found a brand new oil cap, so that's nice. Now that crusty water pipe and the K-Tuned filter does my nut in.
1 point
-
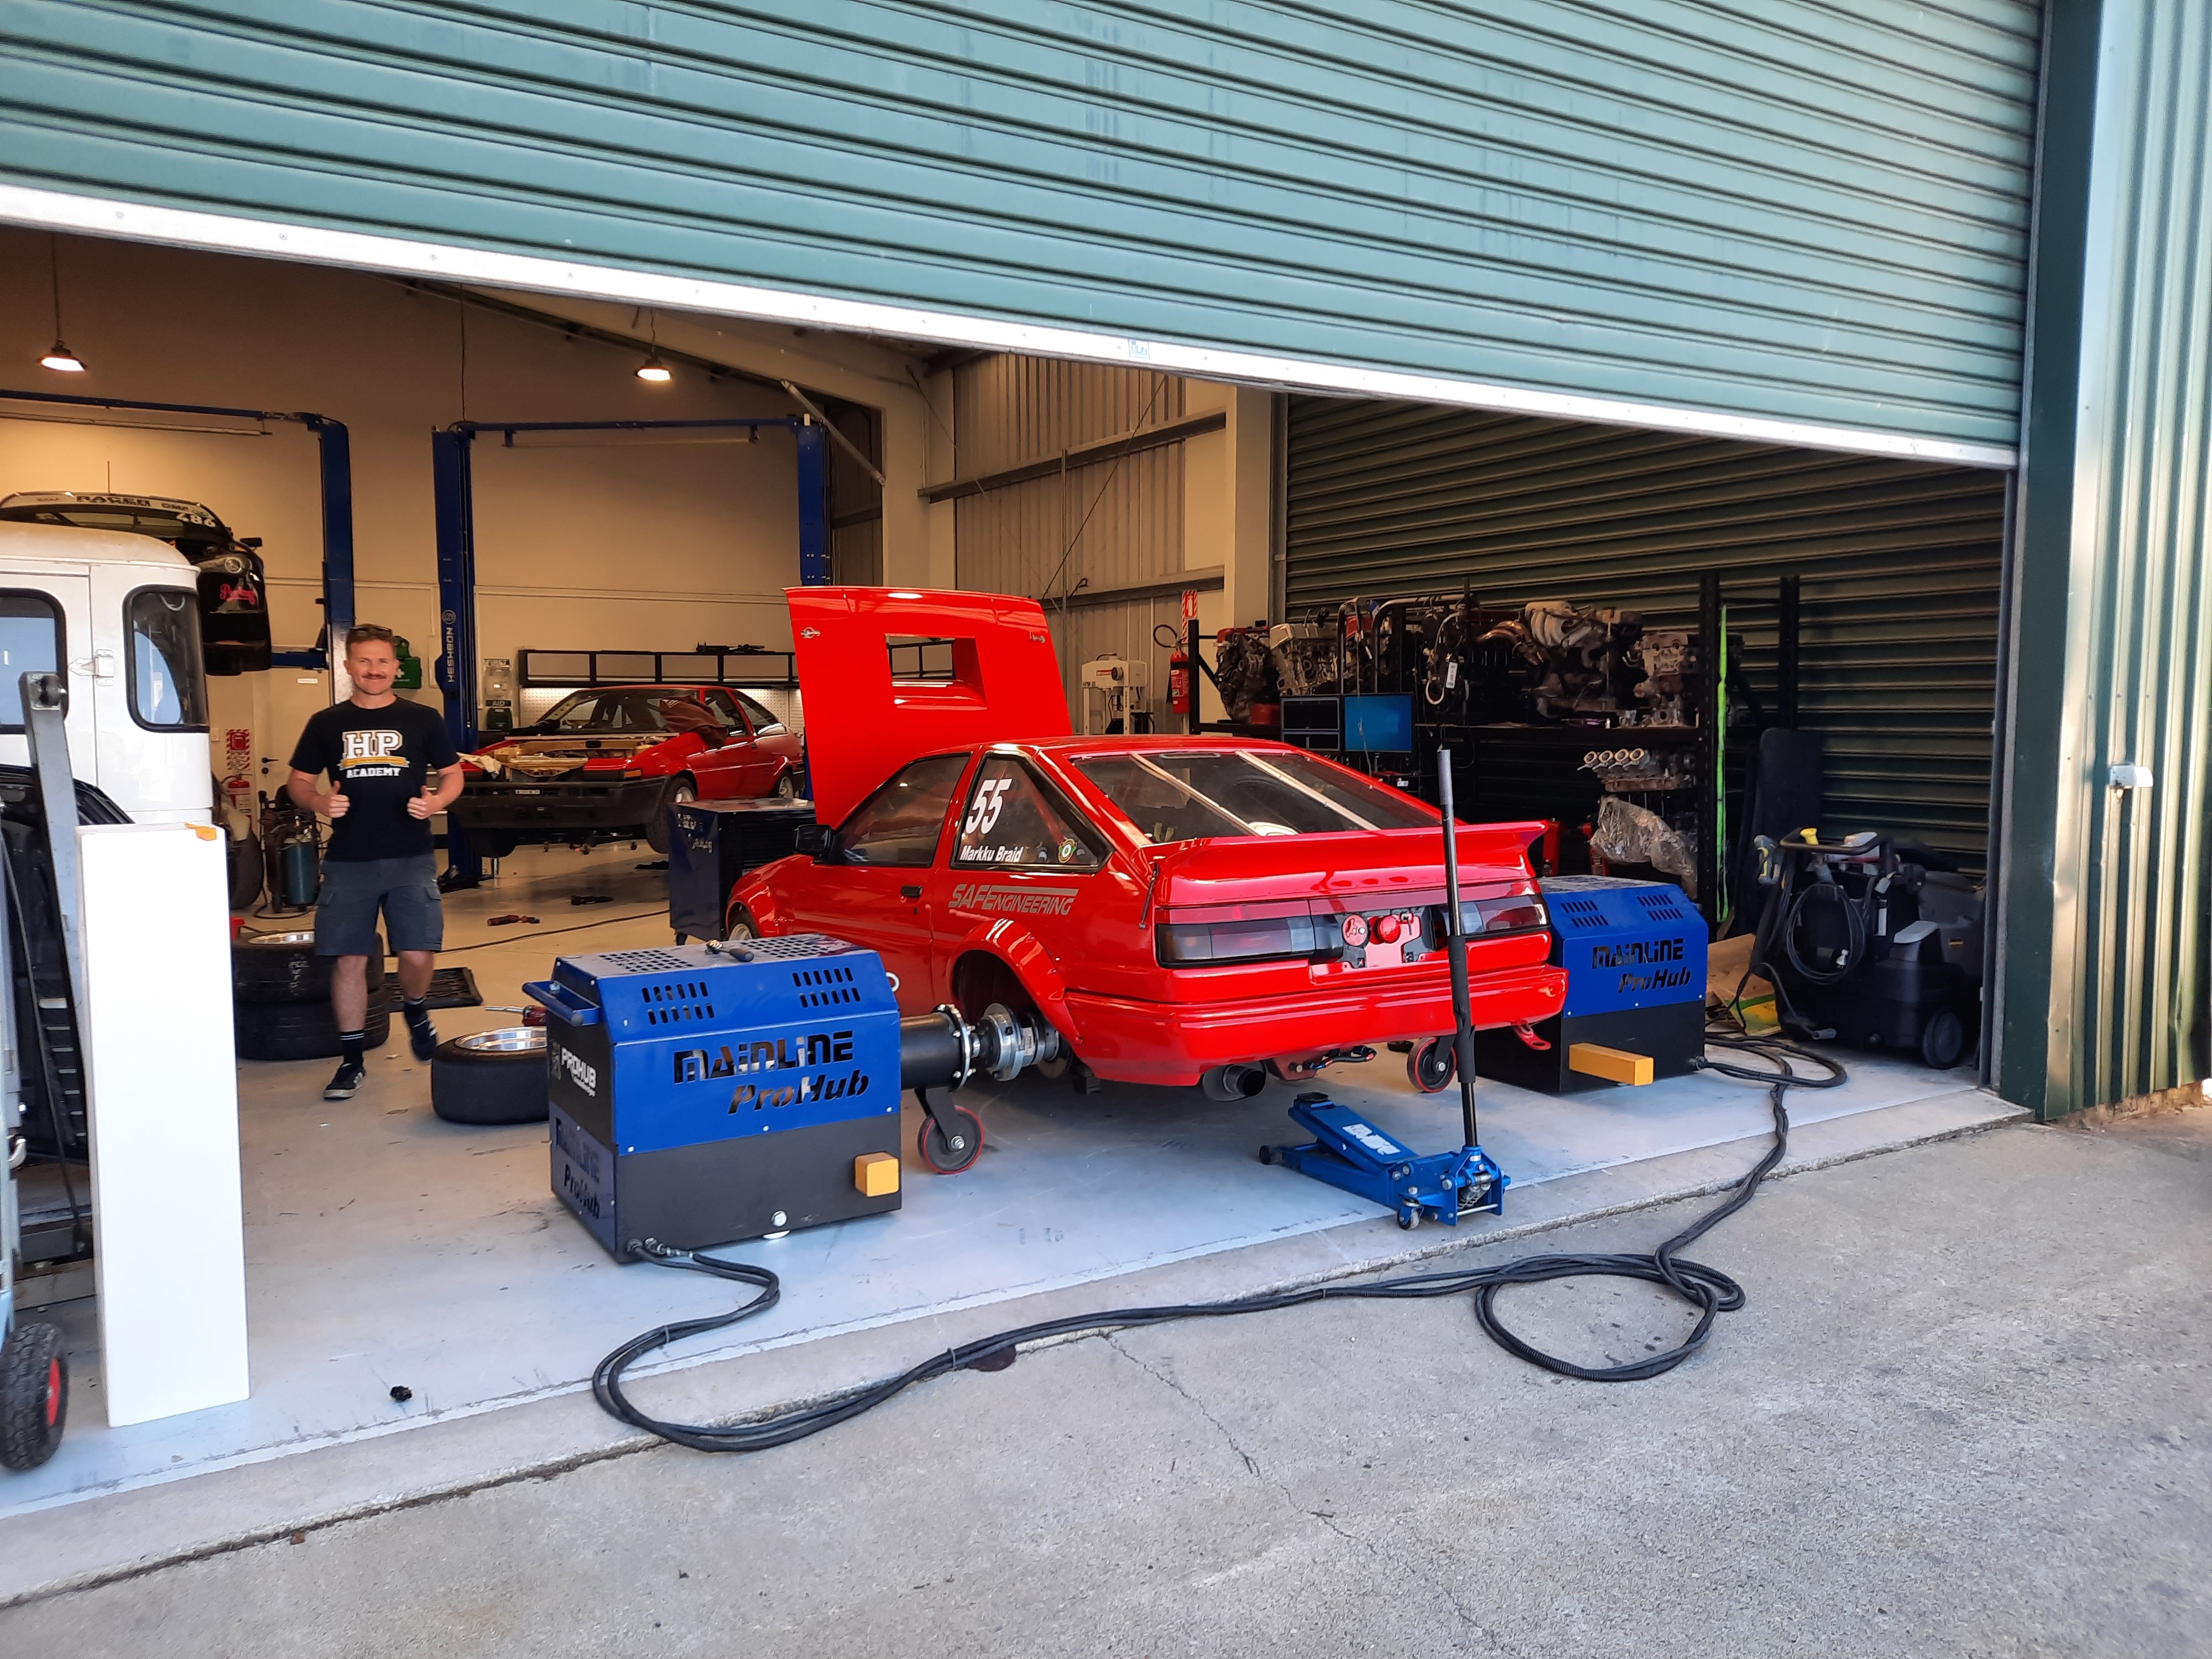
It has a face again! 5 years maybe since it's had these bits fitted up, exciting! Great news is the car has measured up nicely with the engine cradle fitting up perfectly so panel Barry got his measurements done well; as expected. Once again thanks to Jon @ Strange Workshop for facilitating the delivery of those bits needed. Now the big weld up is on, he's started on the rear area plugging up lots of the drill holes, it's gonna be a long and tedious process. In between doing the rear arches and that section he's also been starting on prepping the roof panels and underneath all that for sticking back together. He said he's just finished up with a MK1 Escort race car which was taking away time from mine (which is fine, I'm not in a rush) but reckons will be able to smash a heap of welding out on it in the coming weeks.
1 point
-
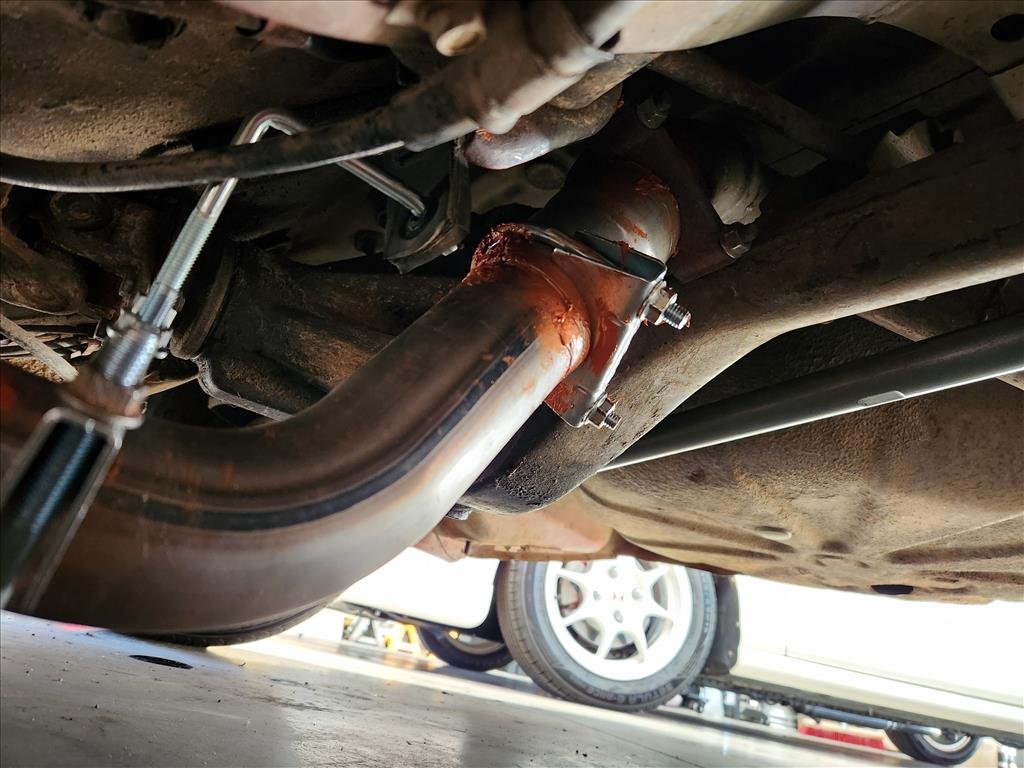
So I only really had one task for the Celica today and that was get the exhaust off. As you would have seen in earlier posts it's a problem now that those huge mufflers are literally about 2cm from the ground. I picked up 1m of 2.25" pipe just to see how that would fit into the equation as I was thinking OK I could replace one of the mufflers at least with that. I was fully prepared to cut this exhaust up as at a cursory glance it looked to be entirely one piece but once I got under the car I found a slip join hidden above the axle which made life considerably easier. Once out I could see what I was dealing with and interestingly parts of the exhaust are 60mm, I was expecting smaller. Kind of moot seeing as there are so many joins and size changes anyway. My initial plan of removing just one muffler looked like it wouldn't really work due to some angles however in a stroke of luck if I removed both of them and run a pipe across it looks like it might just work. I will try to reuse the muffler that's on there as I don't entirely hate it and it already has a somewhat complicated bend but I'll try give it a bit of a spruce up. Then I'll have to see what kind of bend I can use to make it match to the straight pipe up to the front. It looks like the exhaust takes the route it does due to the mufflers so if the mufflers are removed then I'm thinking I can just go straight across and it may be OK.
1 point
-
Today's the first time I've had it outside since I started messing around with the front suspension. I only drove it around the estate parking because not convinced it can actually get out of the driveway as it sits. This is just getting out of my unit. I will say the front suspension is bouncy as fuck, my titties were goin flying everywhere. Might have to tone down the spring a bit more. Love being able to even out the height though, very useful. Didn't notice any immediate rubbing at that height but I didn't take it on the road. I did get some measuring done and have confirmed the new lips for front pair of Longchamps so now they'll be built to match the rears. I think what I'll try to do is cut this muffler out and run a straight pipe slightly larger and clamp it either end like slip joints. See if that works or not. I figure the exhaust can't really get any worse than it is at the moment; looks like 30 muffler shop Barrys have fingered this one. Next problem I have is trying to get it to idle properly. I reckon these carbs are so cooked that air is leaking in from everywhere so it pretty much only idles when it's on choke. I get some new gaskets and give refreshing them sometime in the future. Good news is the gas pedal works well but I think I'll install that other spring back in.
1 point
-
Look at my massive semi I have three more somewhere too. They should be good for the Coronet Peak Hillclimb in November.
1 point


.thumb.jpg.570970b401ac8d26ce9af7c1bf2bd8cd.jpg)


.jpg.6788c72cbbf8d8b8d3ef7034010dbfd7.jpg)


This leaderboard is set to Auckland/GMT+12:00