
Leaderboard


Popular Content
Showing content with the highest reputation on 13/11/24 in all areas
-
We now have a clutch pedal! * edit * Exhaust dropped, flex plate bolts out, couldn't get the front axles out because my crummy pry bar is the wide flat kind and just keeps bending so I gotta go to the hardware store and pick up a better pry bar - hopefully will have some good progress tomorrow.
 11 points
 -
Entered! Now I really gotta push to finalise the reincarnation!
8 points
-
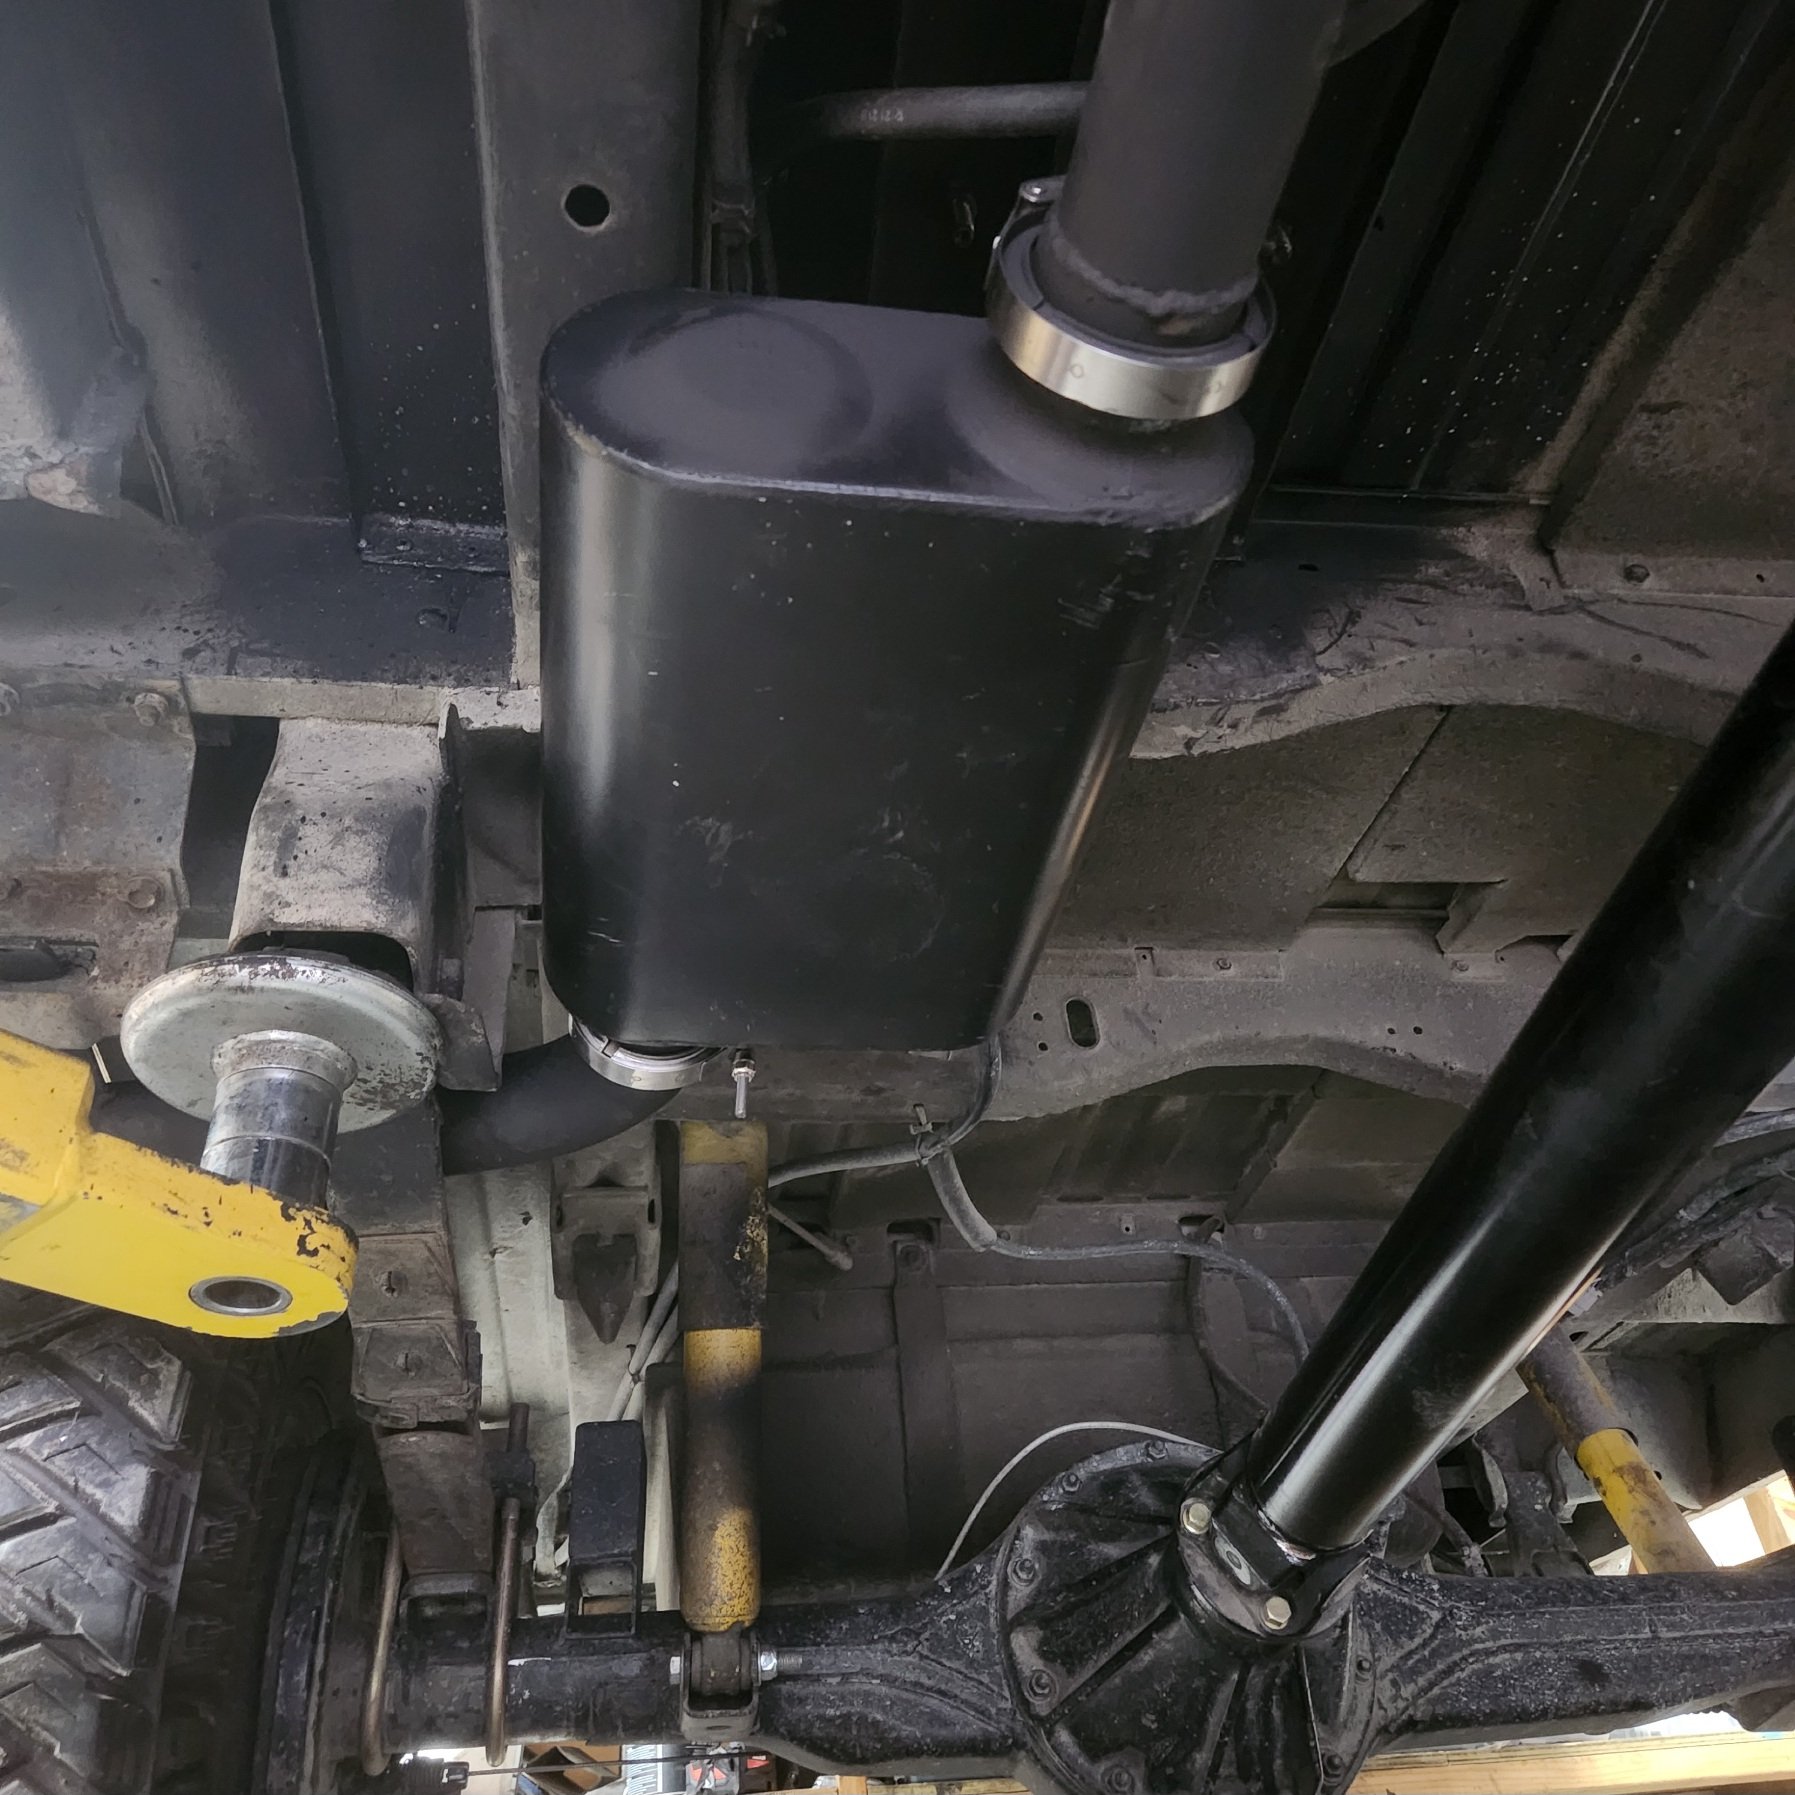
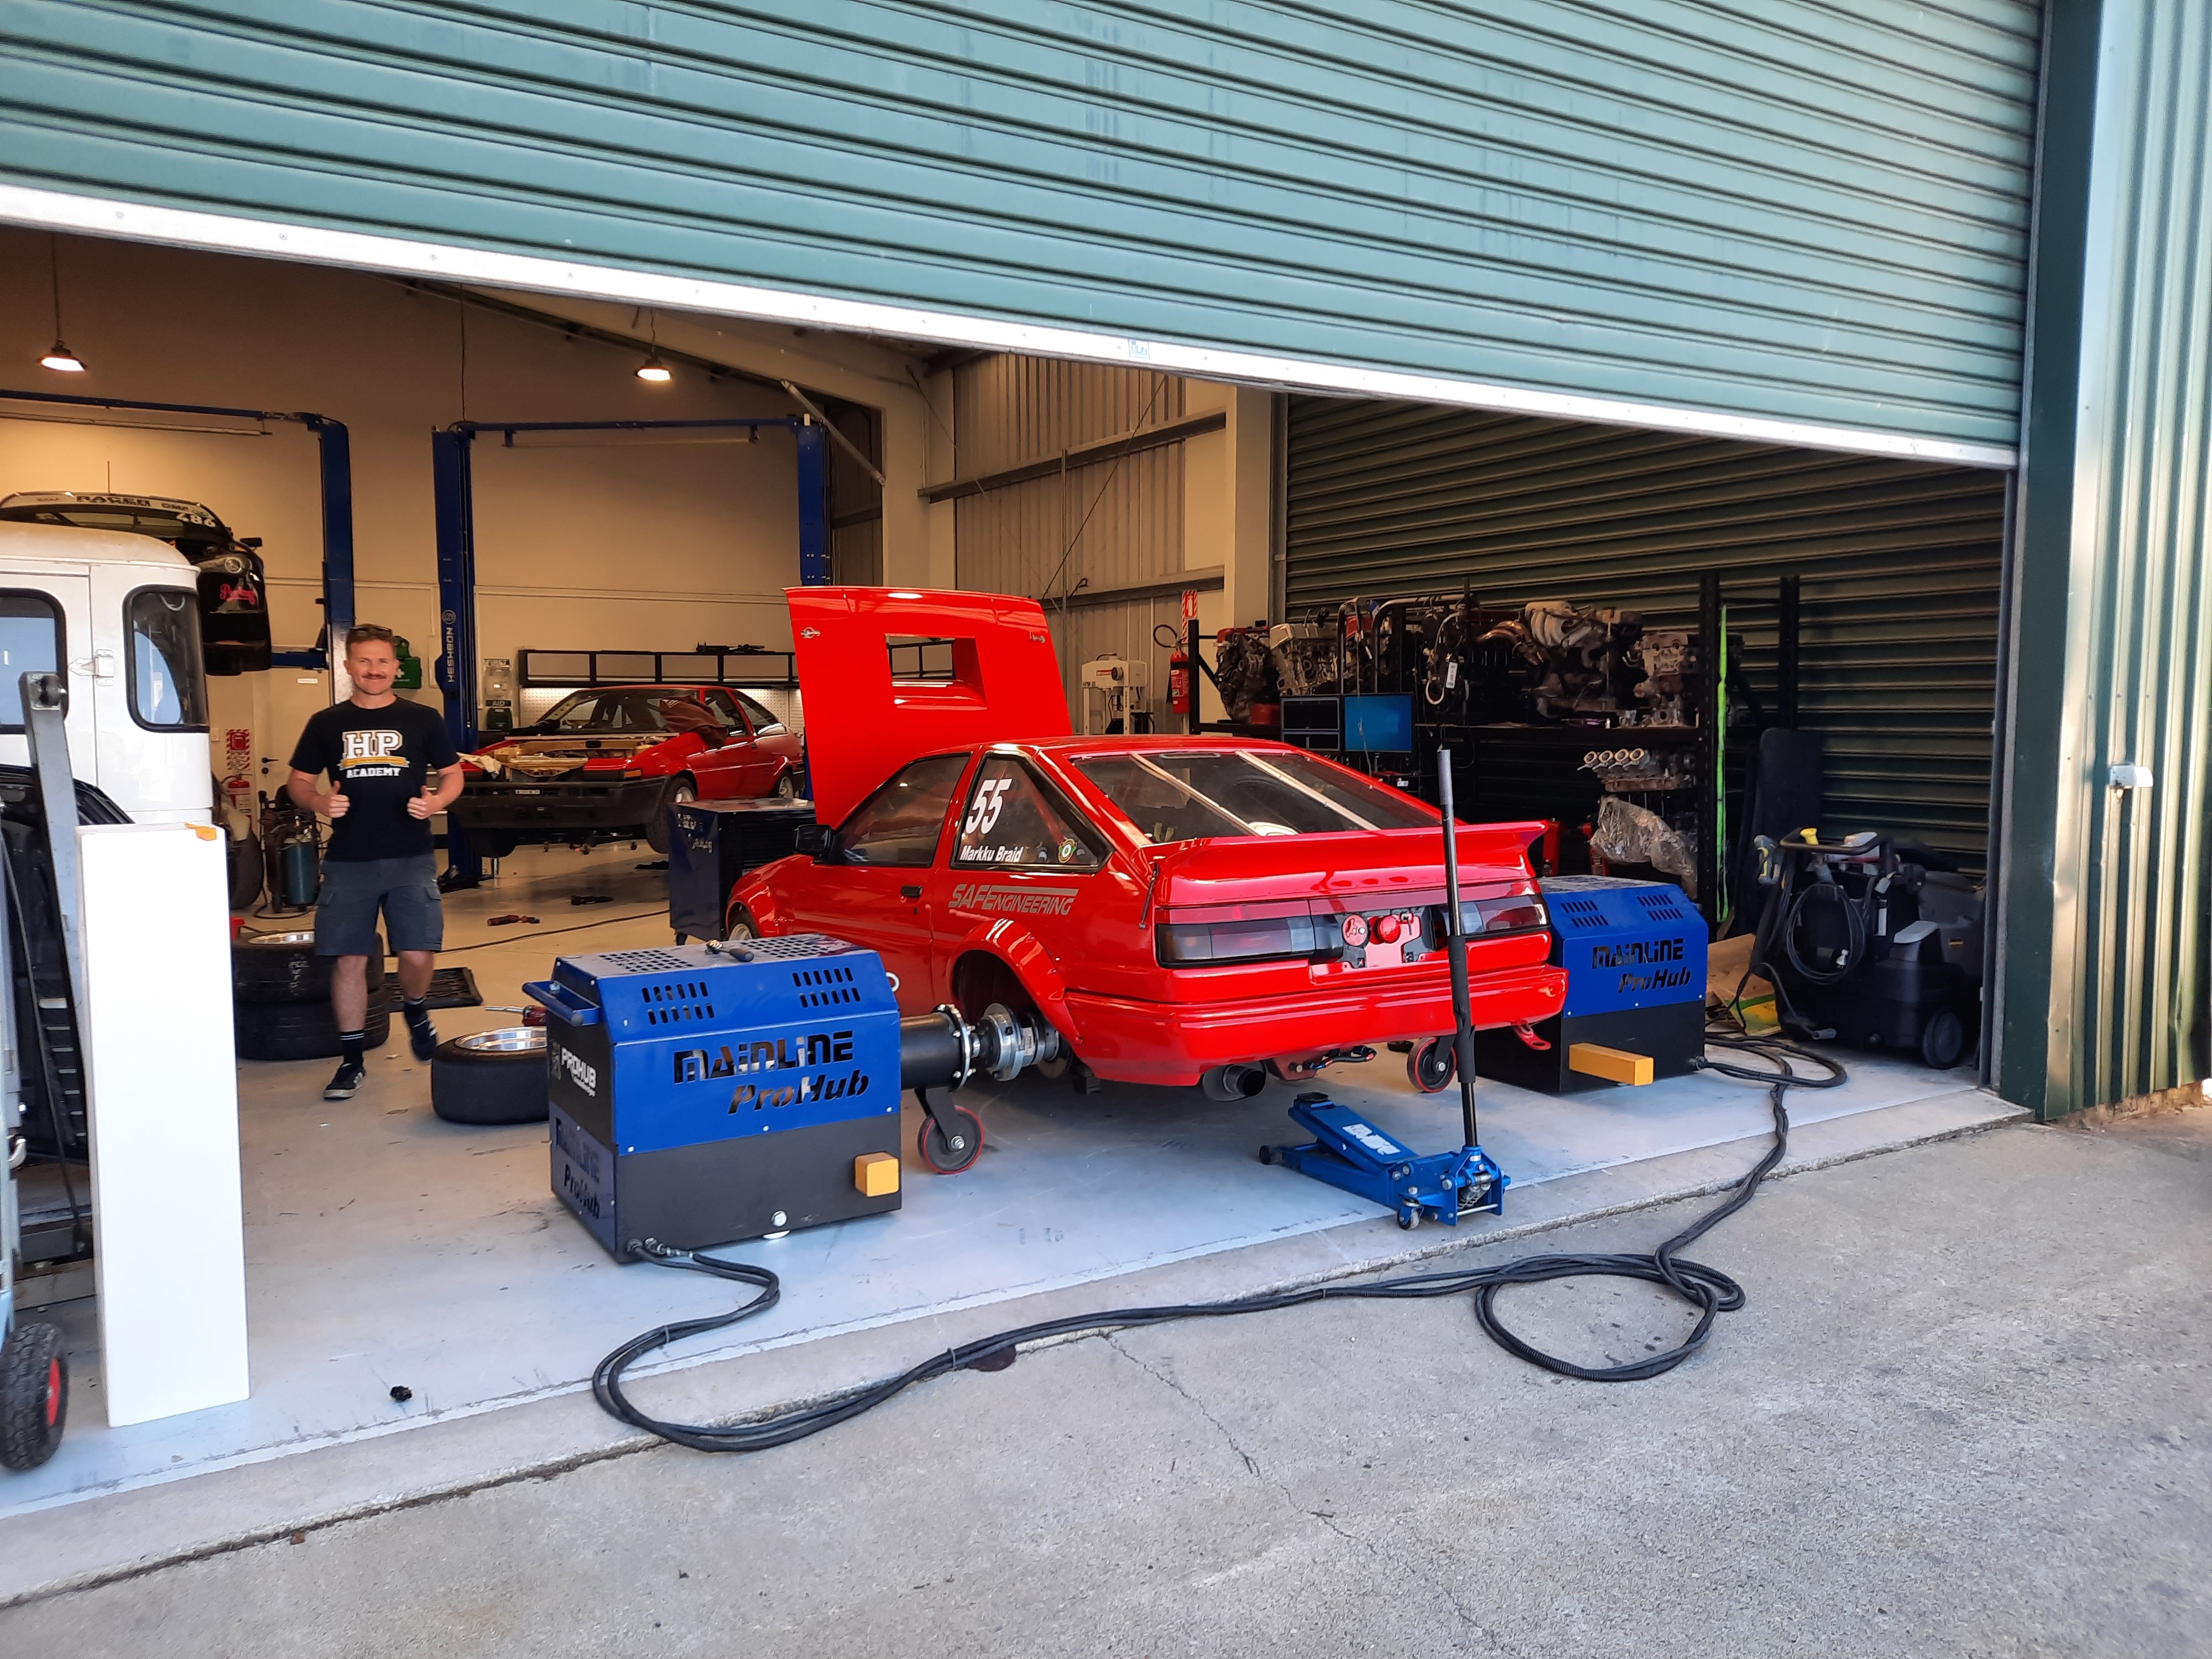
A couple of solid days work and she runs!!!! Mounted fuel tank, plumbed up last of fuel, and water meth systems. wired in pumps, made up throttle cable and mounts, refitted rear brakes and new lines, all fluids done, brakes and clutch bled etc Cranked to get oil pressure up, checked all fuel fittings for leaks then a mate came over with his Microtech handset and punched a few numbers into the computer and I turned the key...... HOLY SHIT - it caught us all unaware!, it literally fired up into a 3000rpm idle on the first 2 second's of cranking, had to scramble to keep it under control. Its angry, I mean real angry!! , once idle came down it just pulsed its head off, instantly we now know I have to solid mount the motor, it was shaking side to side so viciously we had to turn it off to set the idle, couldn't get near it Unfortunately I couldn't take it around the block as we found the new alternator not charging which will just play havoc with the ECU, pretty sure as it doesn't have a dash charge light, we have to wire one in to excite the alternator. It was getting pretty hot too, I had kept the fans wired as per the BP it used to have, but will swap it over from a manual temp sensor to the ECU to be able to set the temp to a lower point so the fans come on earlier, I may look at upgrading them too. Super stoked with only a few things to rectify before tune!
7 points
-
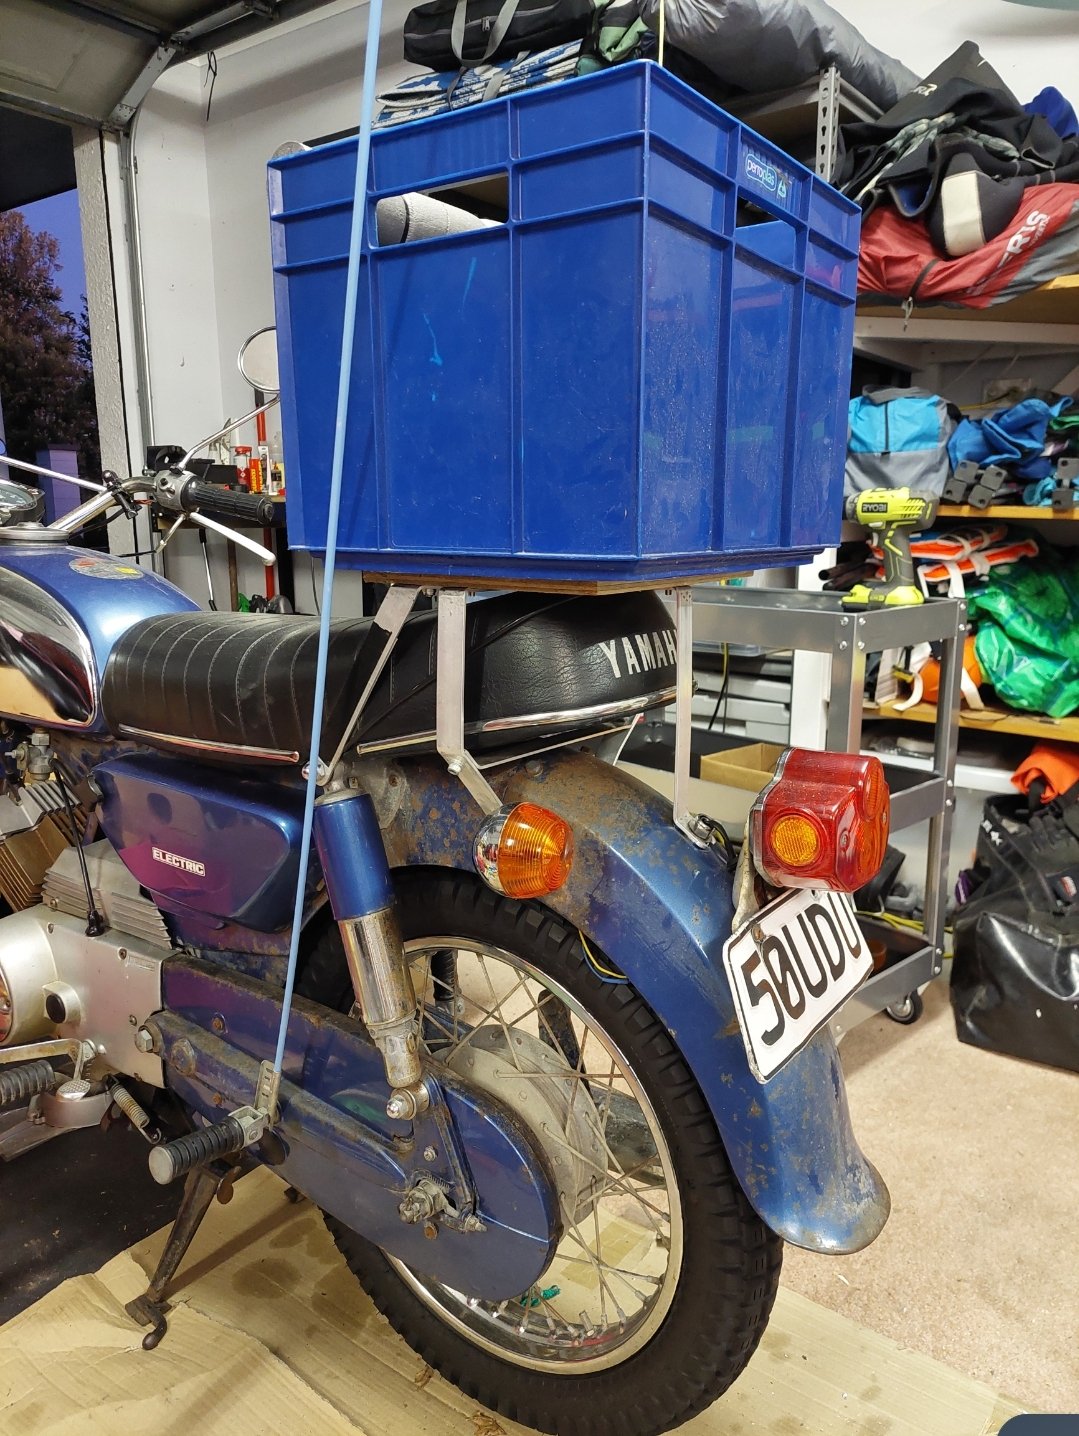
I've added the extra support strut for my rear cargo crate. Hopefully this will survive the first stretch of gravel on the first morning I also scored a sweet flag from marketplace
3 points
-
I got the last couple of cert jobs done. Stupid muffler which actually makes it sound way more pleasant Another run to spotlight for bottom a bottom shelf polyester rug to redo the floor And changed the chev prop valve. I put an adjustable one in as well but didn't end up needing it. These GM ones are a pain in the hoop. It has a flow stop shuttle in it in case of a line breaking which makes bleeding them tricky. Vacuum bleeder wouldn't do it so had to do it slowly on the pedal. But the new one works and the residual pressure valve is doing it's thing too so I kept the 1" bore chev MC in the end. It won't quite lock the front but is stopping good. It has a powerboost unit which hydraulically boost brakes from power steering pump which works a treat. Recheck Thursday , it's steering and braking better so hopefully it'll get through.
3 points
-
Interesting. We'll be using 50mm Jenvey on the K20 at work and also have these 48s for a back-to-back test. I'll ask the guys to make a video about it when we get to that stage. Terry Radbourne from Bourne HPP in the UK said "bigger isn't better" but wouldn't say the size he uses on their K20s over there... Just that he'd found a sweet spot that suits his builds.2 points
-
Yeah dont be afraid to run run bends if need to. long as they arent sharp wont effect power. haven't played with distance to head, in any scientific way anyway. ages ago i swapped from 47mm (blacktop with bigger plates) to 52mm throttles. with length and belmouths the same. was zero difference in power. that was running at around the 150kw mark. Going to throttles too big and loosing power seems like a bit of a sharn to me. can gain power in the bottom end going to a smaller runner. but will loose top end power before that happens. not what you want for race car. I would think the 45's would be starting to get borderline with the power you are making, but maybe ok. those 48's should be plenty big enough step up, they have probably taken the area the throttle plate takes up into consideration, with the 45mm outlet. the roman dave spec bmw bike throttles are the same 48mm plates and 45mm outlet2 points
-
I had a BSA dandy ..nothing but trouble...If I inherited one today ..I would just take it to the dump..2 points
-
Those are some decent numbers. No doubt there is more in it too. We need more sooty merc love here.. the om612 in my farm hack is making about 170kw with the same 320cdi vnt turbo. I wish there was more support for them here in NZ, everyone is too scared to tutu..2 points
-
I'm going to say same as you 14s easy 100mph plus easily I've tried using Torque Pro app a few times and aborting run at 200kph due to a corner coming pant shittingly fast.2 points
-
It's not vital. The book says any modified sections of chassis should be painted for corrosion protection purposes There's actually a new form which should be released shortly to allow unpainted things to be certified and the owner takes responsibility for taking care of corrosion issues I usually tell people it's better to have it finished and painted for the final cert inspection just so it matches the photos, but it's not compulsory2 points
-
Looking at the map again, can we add a side quest, of using the harmonic thrum of two dozen little bikes, to flush that guy and his kids out of the bush?2 points
-
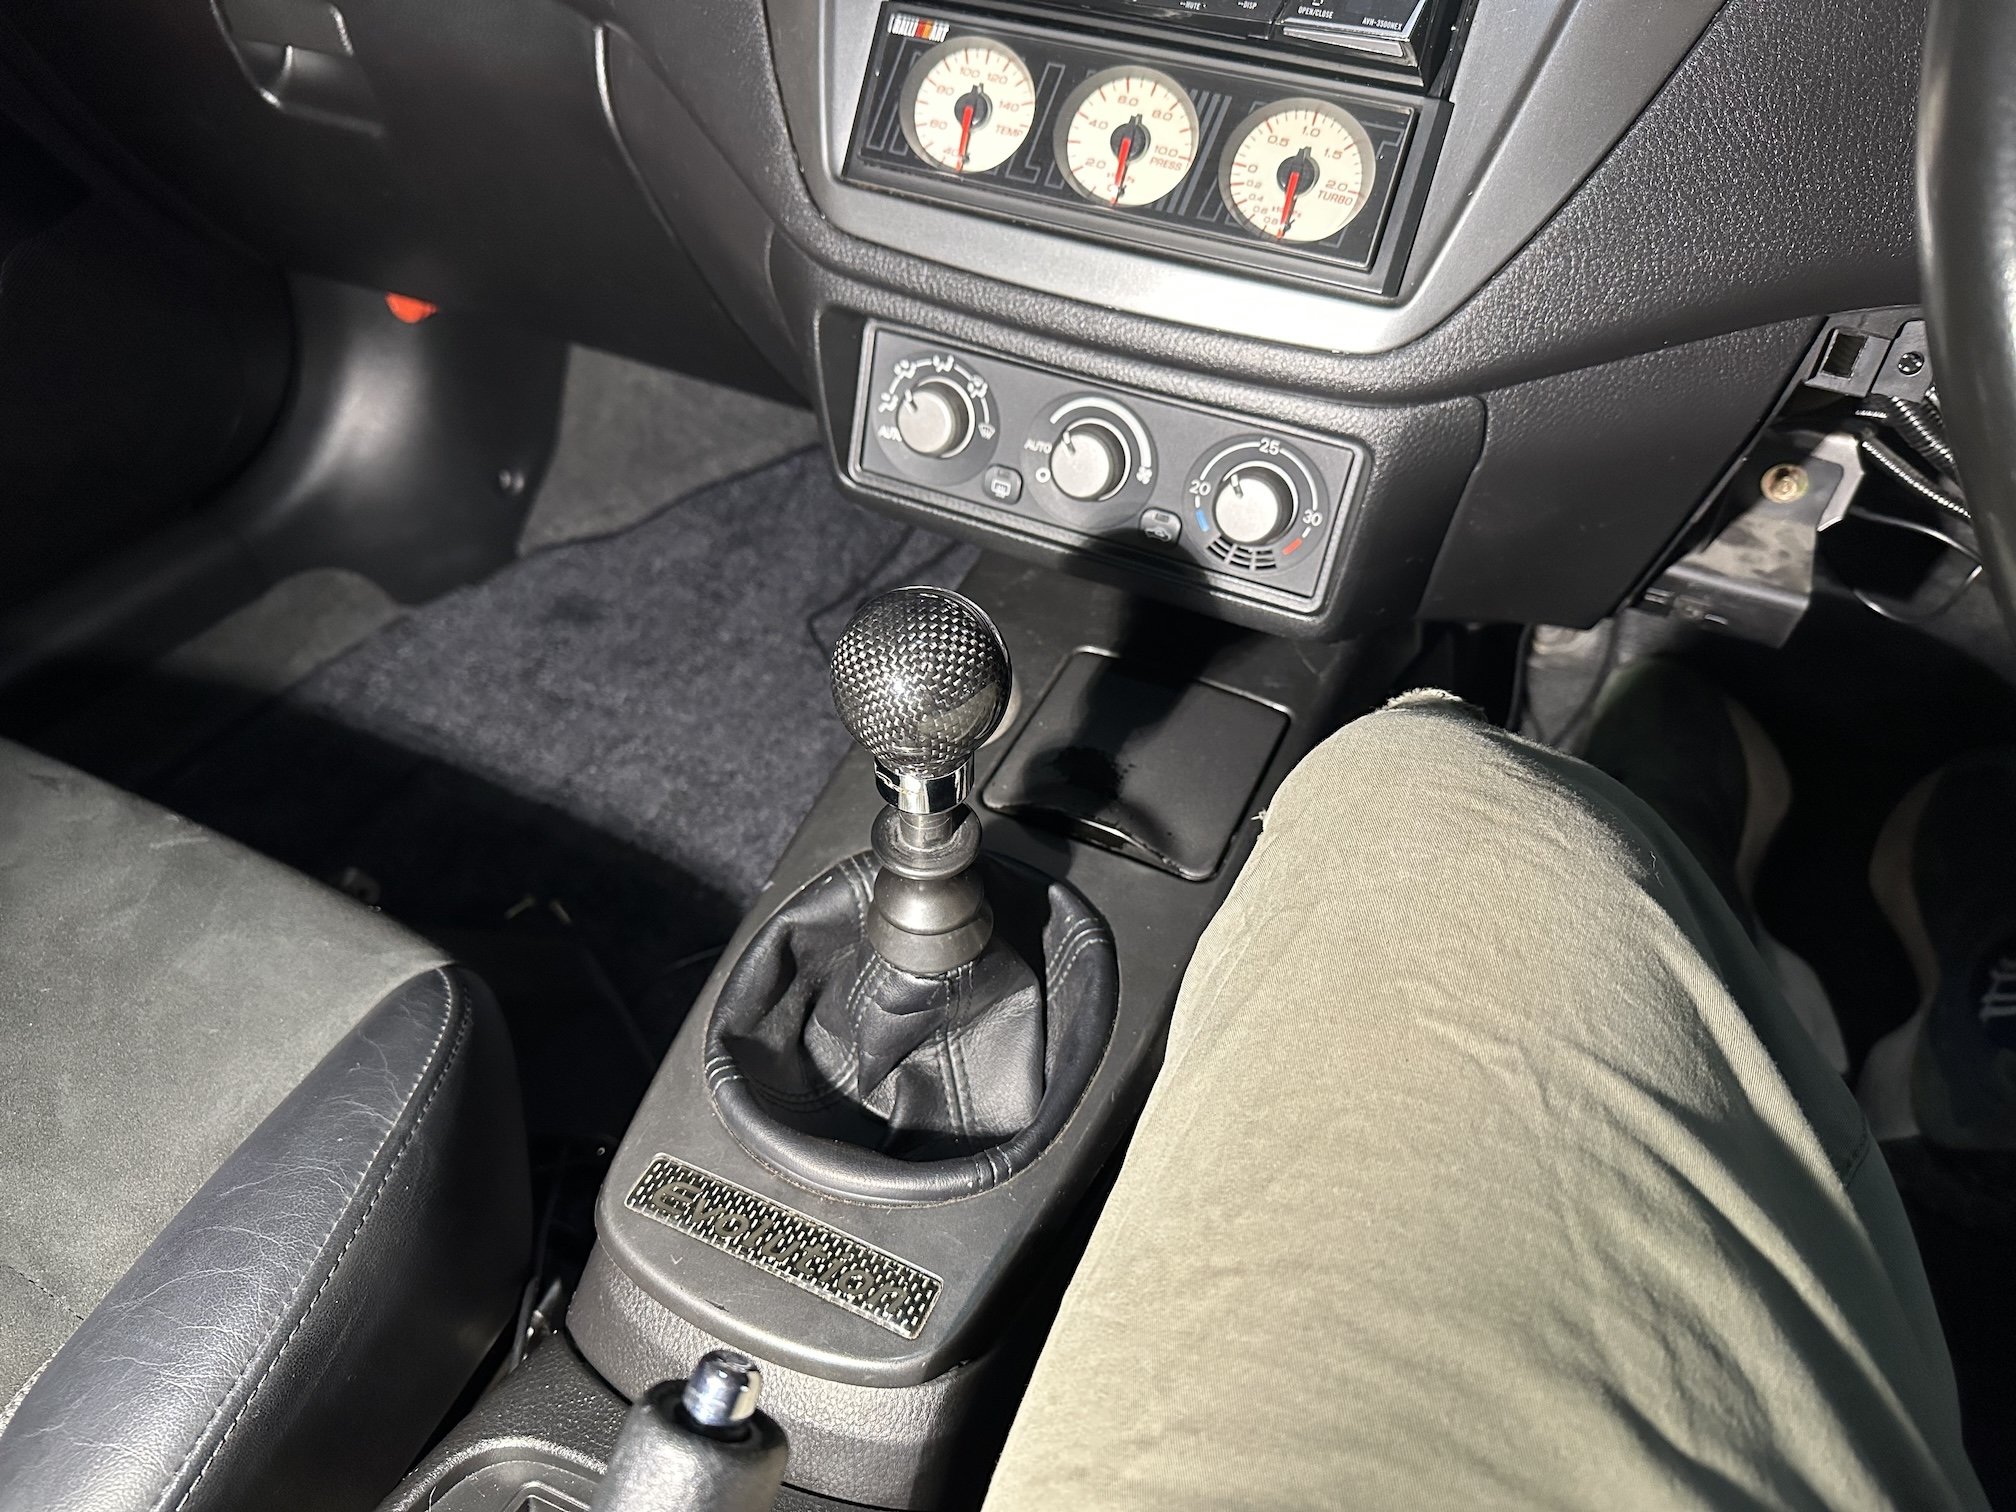
Small update - I temporarily placed the centre console cover and varis CF knob on to motivate me more haha. I still need to paint the cover, and apply new stickers Also turns out there's a little bump on the firewall with a matching recess in the clutch pedal box I can utilise to locate it somewhat close enough
2 points
-
Also I have been test fitting the rear spoiler and the front visor that came with the wagon.
2 points
-
The BSA Dandy. Possibly the worst bike ever built, a massive failure and rightfully despised as a prime example of shoddy engineering, poor build quality, penny-pinching design, and failing to address known issues. Few in number, gross, and only admired by weirdos. I've got 3 of em... 1 complete blue and red one, suitable for restoration/unreliable 2-smoke pesting. 1 green thing with most bits, incl engine, suitable for a frankenbuild. 1 grey frame, mostly there, suitable for parts. So tentative plan is to restore the good'un (painted similar to above), bang a jappa-knees engine in one, and make an electric one. All 3 to be used on one plate, if things ever get that far. (Cant be bothered getting my good one out for pics so here is some background and pics of what they should look like): What is the Dandy? The 70cc Dandy ‘scooterette’ was originally a unit construction, 45x44mm two-stroke single, riding on 15in wheels. It included the scooter virtues of weather protection, some concealed mechanicals – the carburettor was out of sight behind a slotted cover in the crankcase – and a step-through frame. It was female-friendly, and BSA’s publicity invariably featured lady riders in skirts. Its many ingenious features for novices included (to spare footwear) a hand starting lever down on the left, but after a journalist broke a prototype, production models featured a left-side kickstarter. For compactness, the rear swinging-fork was attached to the backward-facing, horizontal engine unit. Brackets joined the crankcase to the right fork’s pivot position on the pressed steel frame, with the single cylinder forming part of that fork. On the nearside, a further steel pressing mounted on the gearbox formed the left fork arm. The front forks were leading link, and the brakes four-inch front and rear. The gearchange was equally innovative, featuring a two-speed pre-selector. Turning the left twistgrip towards you for first, as shown on a metal indicator next to the grip, and nothing happened until you pulled in the clutch, and released it to move away. For second you twisted the grip all the way forward and repeated the procedure, with neutral in the middle. Electrics were via a flywheel mag located in the middle of the crankcase, along with the points. The Dandy weighed in at 115lbs, claimed 130-plus mpg, and had a top speed on test of 33mph. What went wrong? The original design specified a heat-dissipating alloy cylinder with a chrome bore, but the production barrel became cast iron, and hot running meant that piston seizures were far from unknown. However, the real problem was the buried points. To get at them (a common maintenance task in the 50s) you had to remove the rear shocks, the electrical connections and the clutch. Then the bike wouldn't stand up, so you had to 'hang it from the rafters'. On the clutch there’s a set of fingers that engage with the flywheel. You had to separate them and move the flywheel to get at the points. 'It’s a half-day job. The desire to meet advertised costs also meant shortcuts were made (the stand is a bit of bent wire) and none of the known issues were addressed. The concept was sound, but it took the Japanese to do things properly a decade or so later where they revolutionised personal transport and sold millions of small, reliable, cheap runabouts... [TLDR] a good idea, ahead of its time, fucked up by British engineering and cost cutting, so essentially a bloody terrible thing, possibly the worst bike ever built by Britain, hence the attraction...1 point
-
I guess an intetesting datapoint is that if you look at almost any motor that transitions from cable to ethrottle. They end up with bigger throttle(s) As you can just reshape the opening rate to get around drivability issues at low rpm. Where 30% throttle might give you 90% of airflow.1 point
-
ah yep, i was probably remembering what i was gonna die grind them out to.. Smaller intake covering up a bad exhaust side is also a thing. I'd try run smaller header primary's before making the intake smaller.1 point
-
We should probably weld some more stuff to that rack I reckon haha.1 point
-
Hi old man! Just adding my annual singular post contribution to OS1 point
-
loving the progress on this bro, you'll be manuelling around in this in no time!1 point
-
thats fair, a D will limit adjustability to.1 point
-
Correct its just a billet body adapter over a bosch DBW section, @BlownCorona no shim just clamps on the shaft, but there is no way its going to come loose, or slip, the force needed to move throttles is stuff all, if it ever need to make enough force to try slip it you have bigger issues1 point
-
surprisingly, it doesnt apear to have a D shape machined into the shaft, instead it appears they have only fitted a shim in place of the butterfly and rely on clamping force alone. Ofcourse there could be a spline hidden amongst those pixels. perhaps @nobody can shed some light.
1 point
-
10L minimum imo and needs to be heated1 point
-
that $1200 one actually looks to be just a bosch throttle with a (albiet very nice) lever adapter fitted.1 point
-
Wicked, thanks. My instincts keep telling me to go longer after watching your developments. We might need to model some curvy boiz to get an extra 100mm. I'll see if Connor can print some that can be chopped back easily for testing. The Jenvey ITBs we have here are only 48mm, with a 51-45mm taper through the body, so I'm not sure how much better they'll be than blacktop ITBs yet. Have you played with the distance between the head face and throttle butterfly? I'm thinking of mounting the throttles really close to the ports to counteract the size of them (and try to make them act like a 50mm+).1 point
-
The true English motor experience1 point
-
hell yeah brother, thats wild!! Fastest house in the north1 point
-
So many people don't understand this! Trying to explain to customers that cooler is not necessarily better, consistant temperature is the goal.1 point
-
Try an extra 100mm on top of what you have, if you can fit it. then move 20mm at a time either side. vvti can shuffle things a bit. but getting the intake length dialed is still worth it. My long intake (compared to what everyone else runs) still works best, even revving to 10k with vvti See how it moved the bumps up the rpm range with the with the shorter runners. going longer should pull a stronger one thats currently out of reach down the rpm range, try get that to bang on where it wants to naturally make peak power. then use the vvti to hold the peak longer. you will likely find if you only go say 50mm longer than current. it may get worse before it starts to get better1 point
-
1 point
-
I still need to do an engine repower, that or drag a CT from further in the shed1 point
-
Just put 8.11 litres of BP's finest in there this week actually.. not that it needed it. Headed to Berm busters this Saturday for a shake down with a new recruit. That reminds me.. I'll have him fill out a form!1 point
-
Less than 3 weeks to go - get excited. How's everyone's rigs looking? @iwanttobeamole still got last years petrol in there?1 point
-
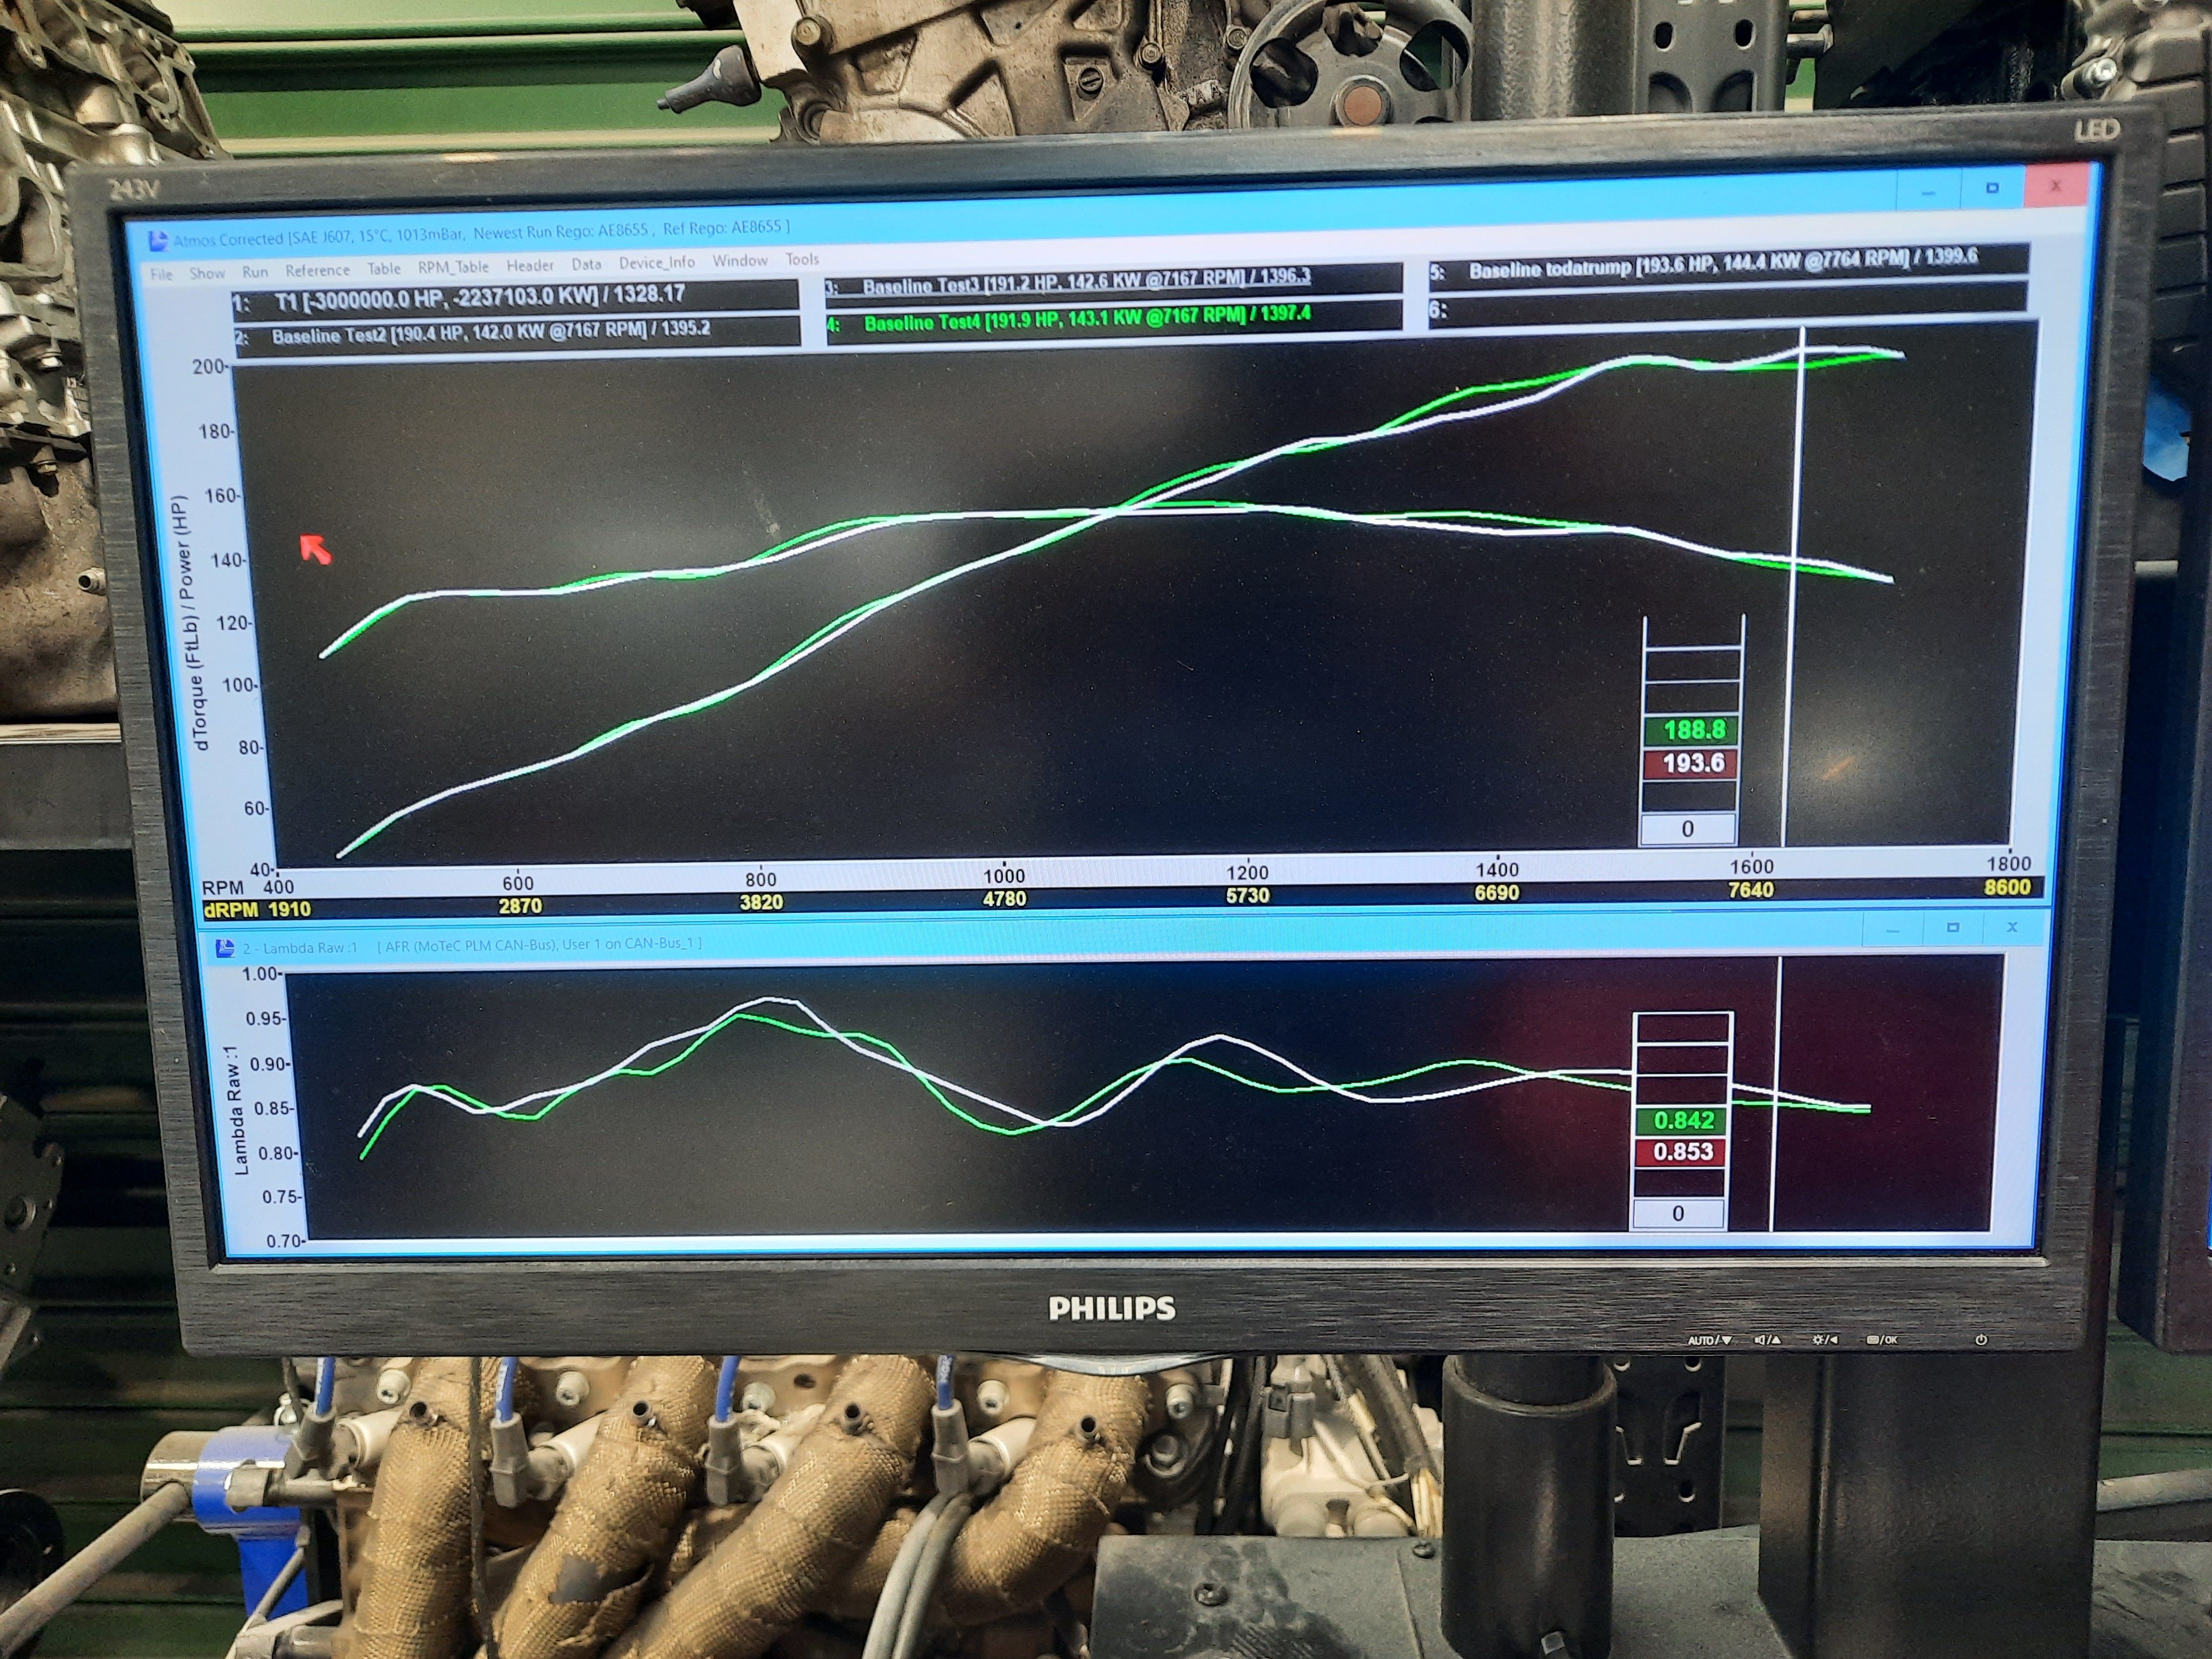
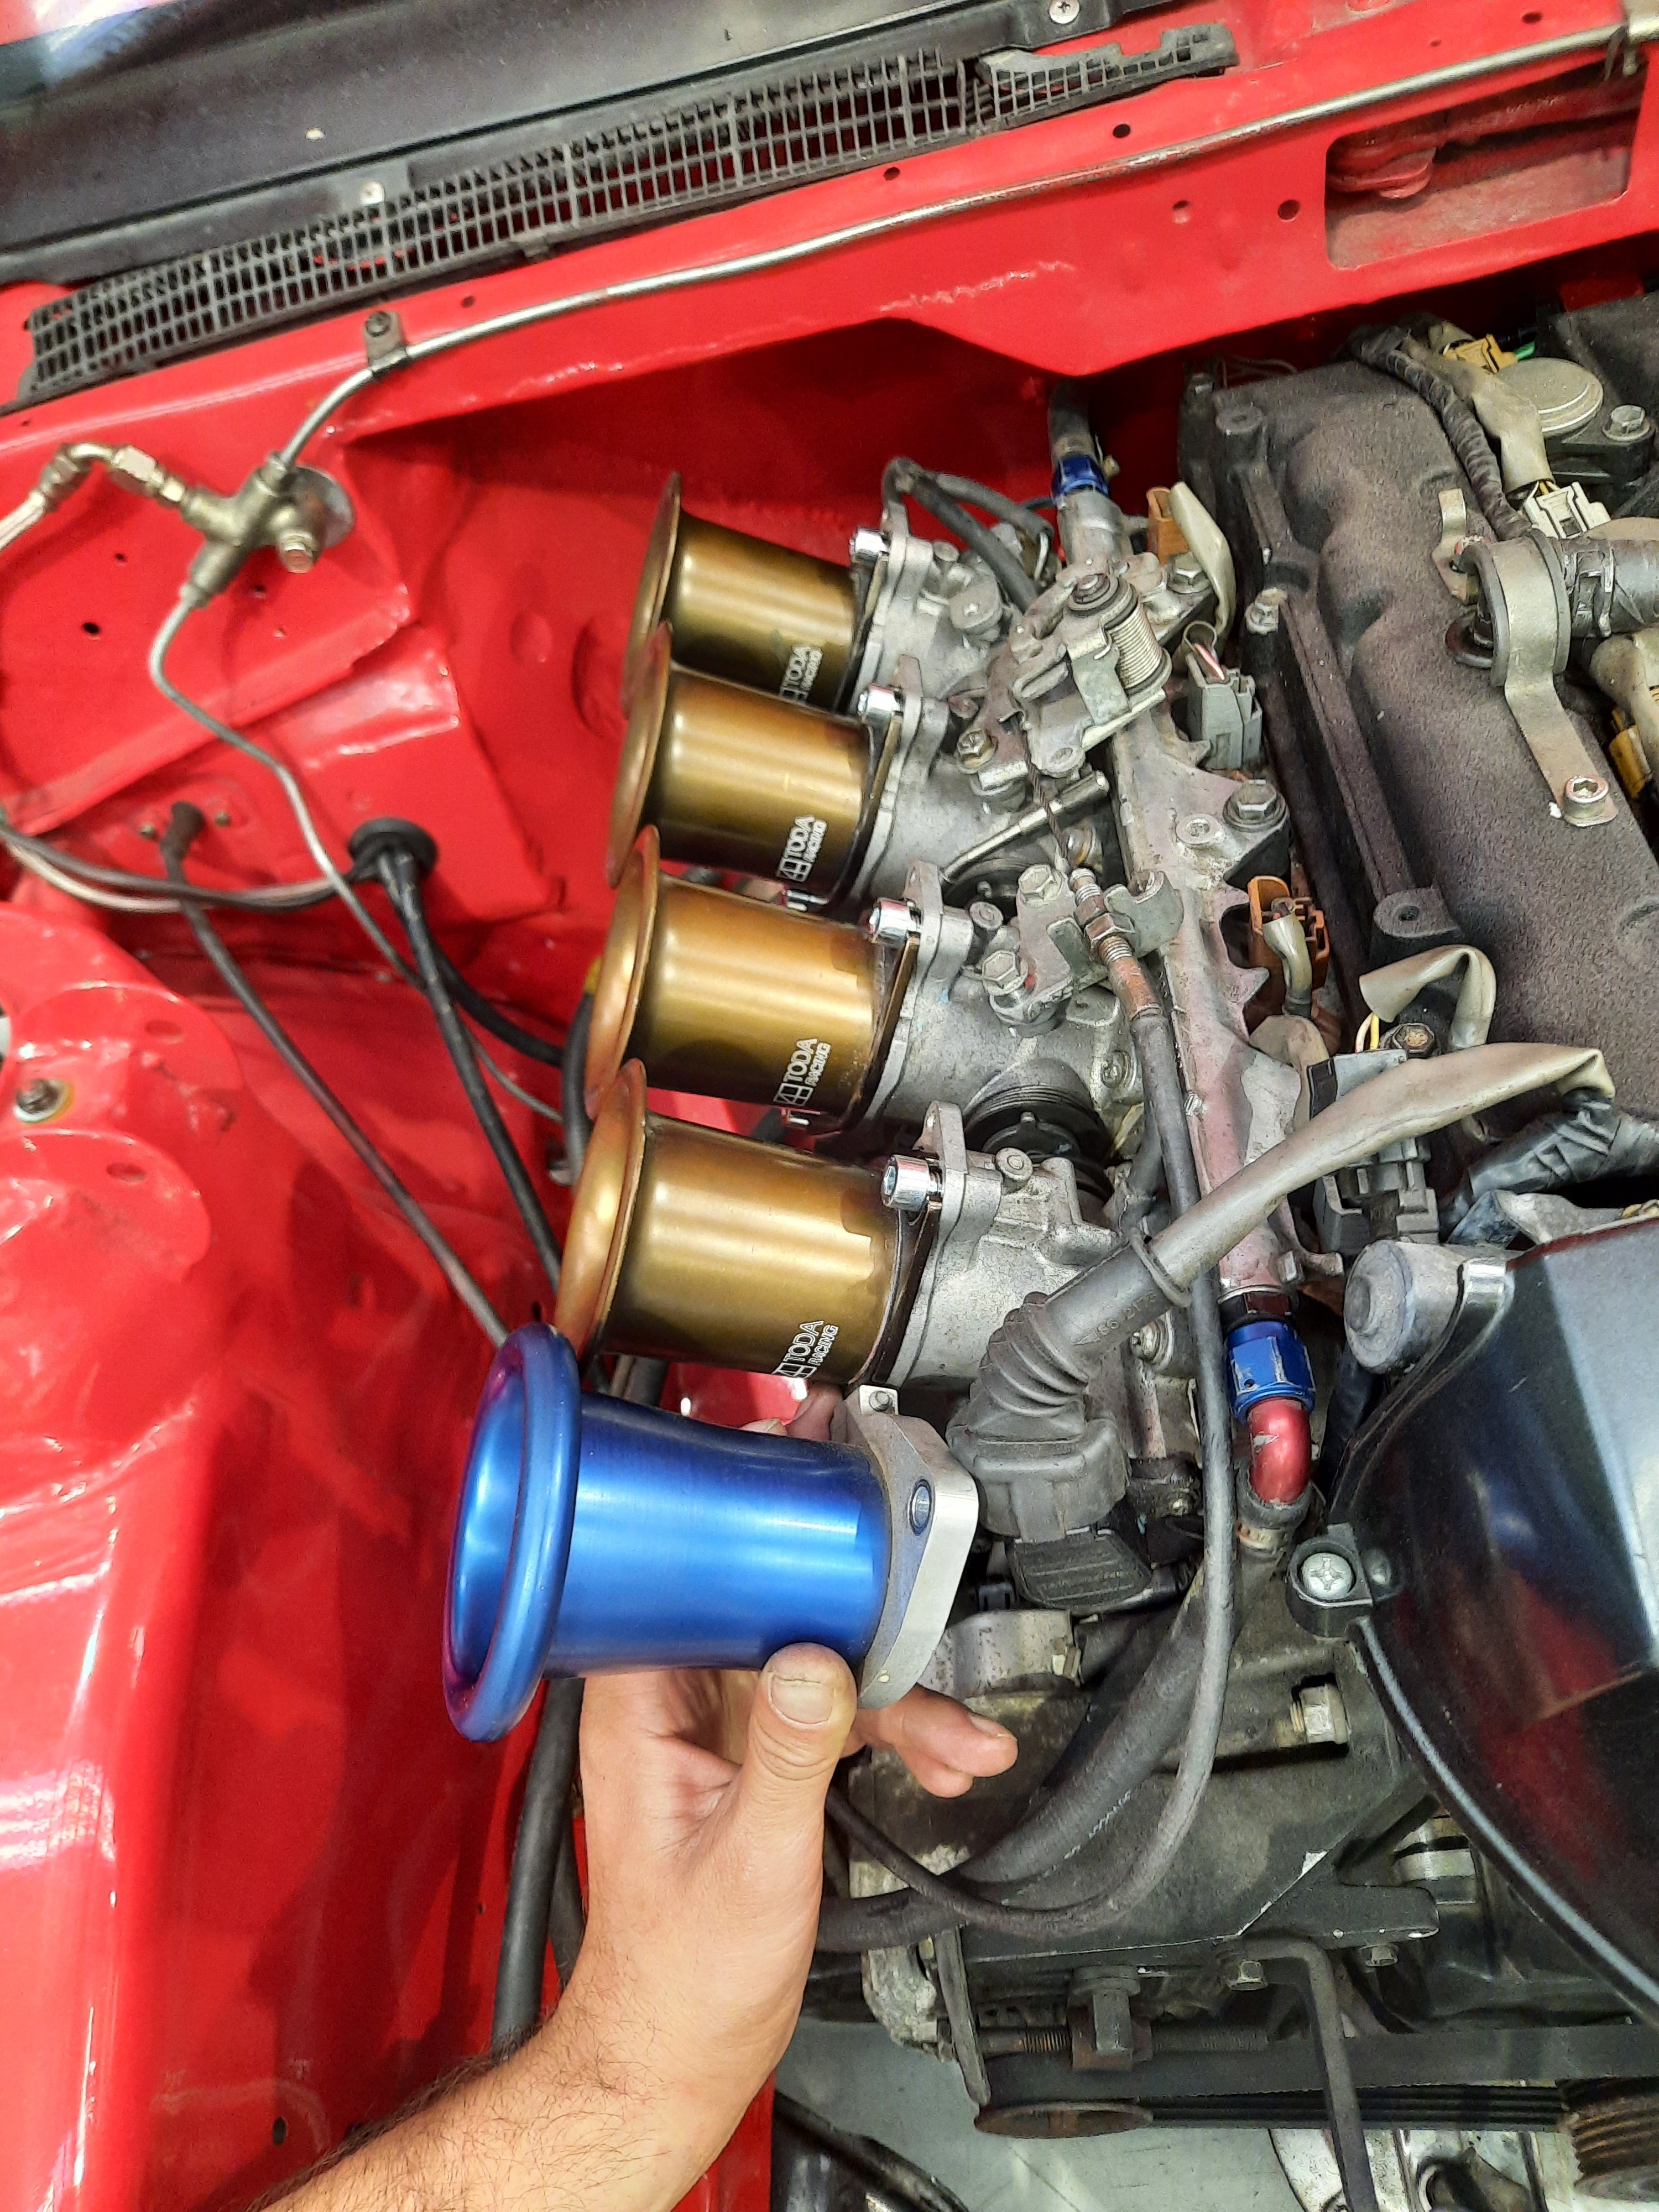
Bolted this thing onto that thing to get a baseline before making a few changes. Gave it a couple of quick runs, then swapped the trumpets from the 95mm blue ones to 75mm bronze just to see what might happen. 95mm trumpets are the green line, 75mm white line. The AFRs are pretty messy and we haven't touched any tuning, just swapped trumpets and ran it again, so maybe the shorter ones will work after some fuelling and VVTi changes? There's a set of 48mm Jenvey ITBs floating around at work and one of the guys has 3D printed a manifold to test. It'll be interesting to see if there's a difference from an extra few mm of throttle plate, and I'll give a few different bell mouths a try at the same time. I'd really like to try 50mm or even 52mm just to see if there's any gains.... will see If I can find a set to try.
1 point
-
Ill just leave this here... https://www.autoreservejaguar.com/jaguar-parts/air-and-fuel-delivery.html/s-type-xj-xf-2-7-diesel-2004-2010-throttle-body-actuator-motor.html Part number: C2S51097 I found the jaguar items long ago and they were pretty new then, I have never used one but it appears as if they have the right number of pins to do what we need it to.1 point
-
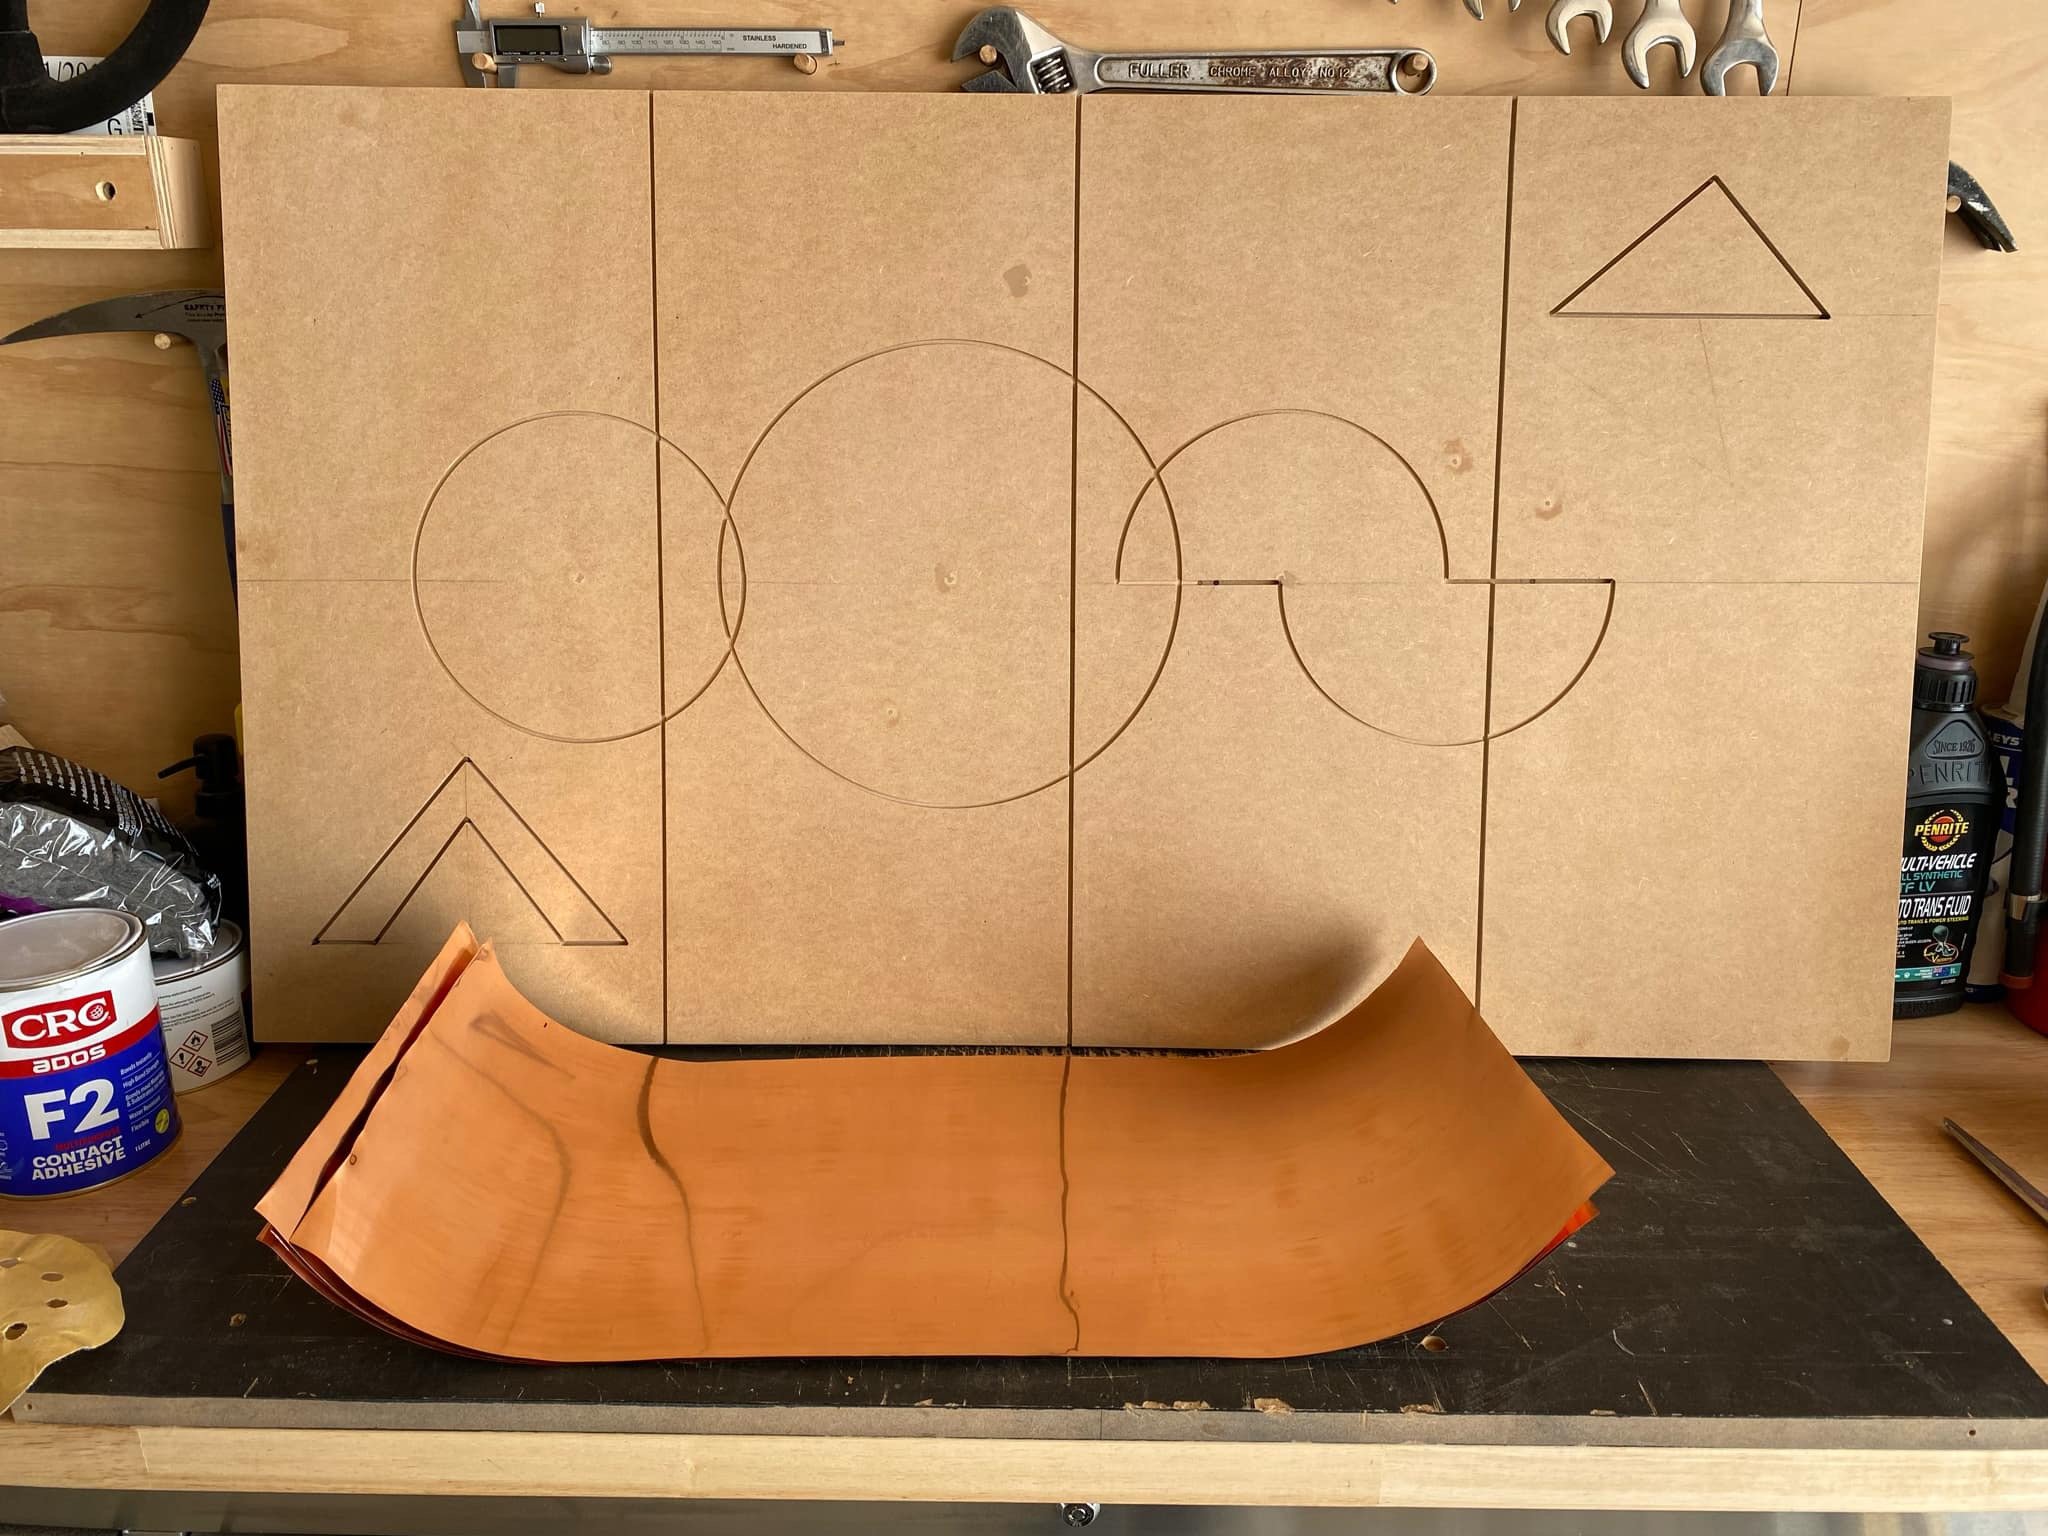
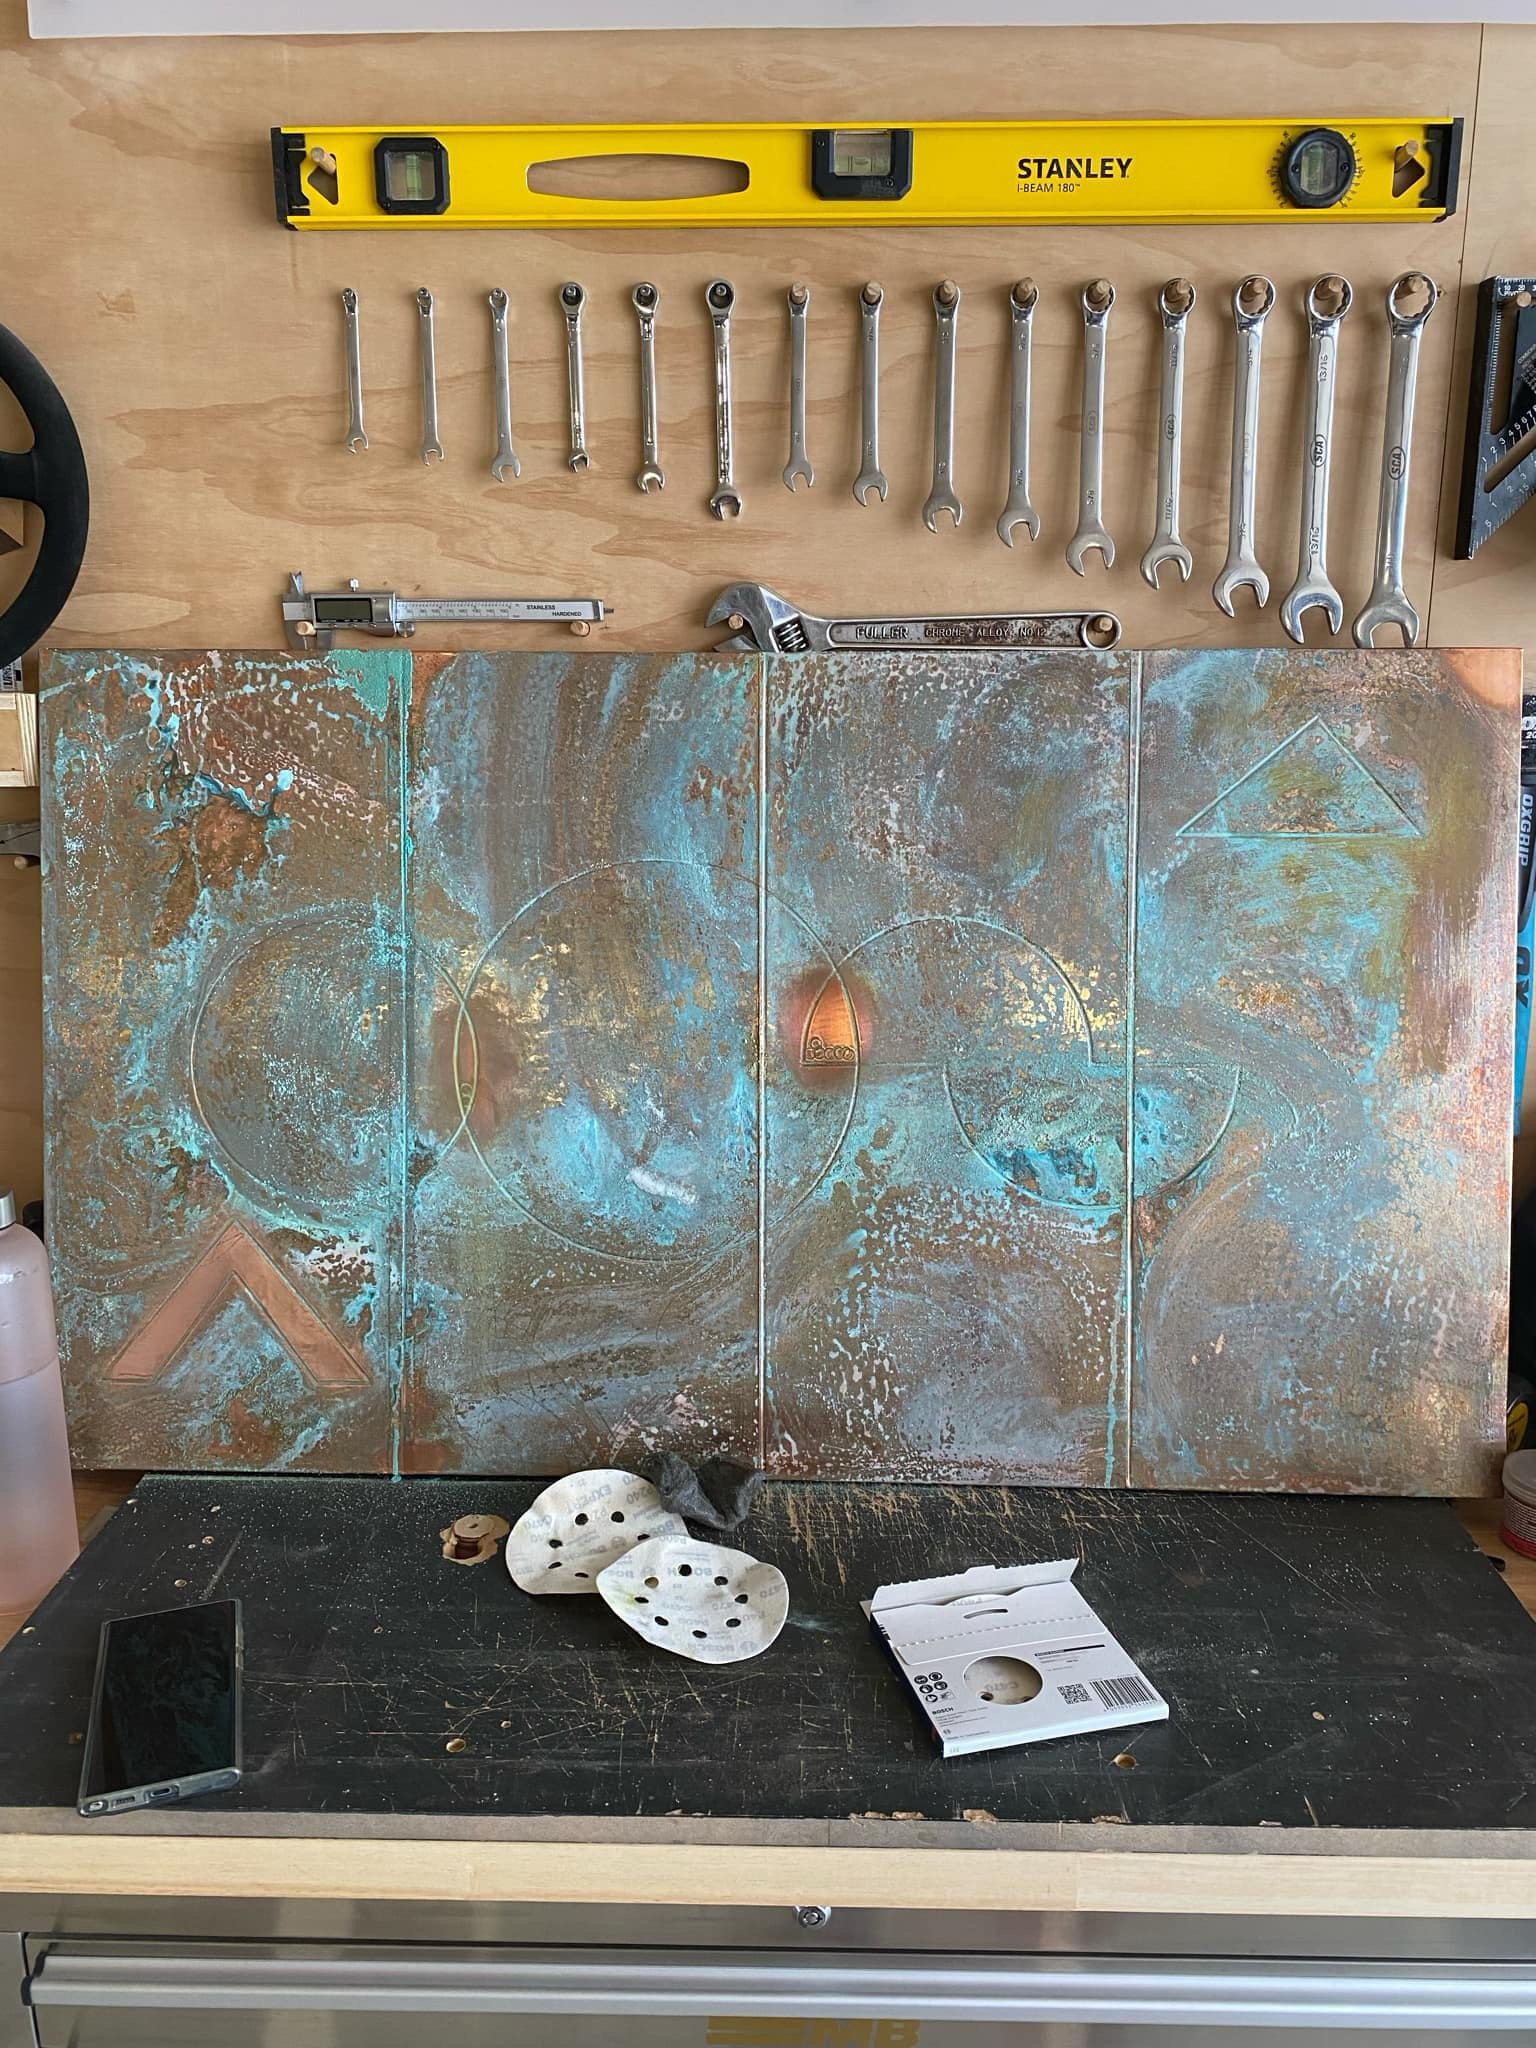
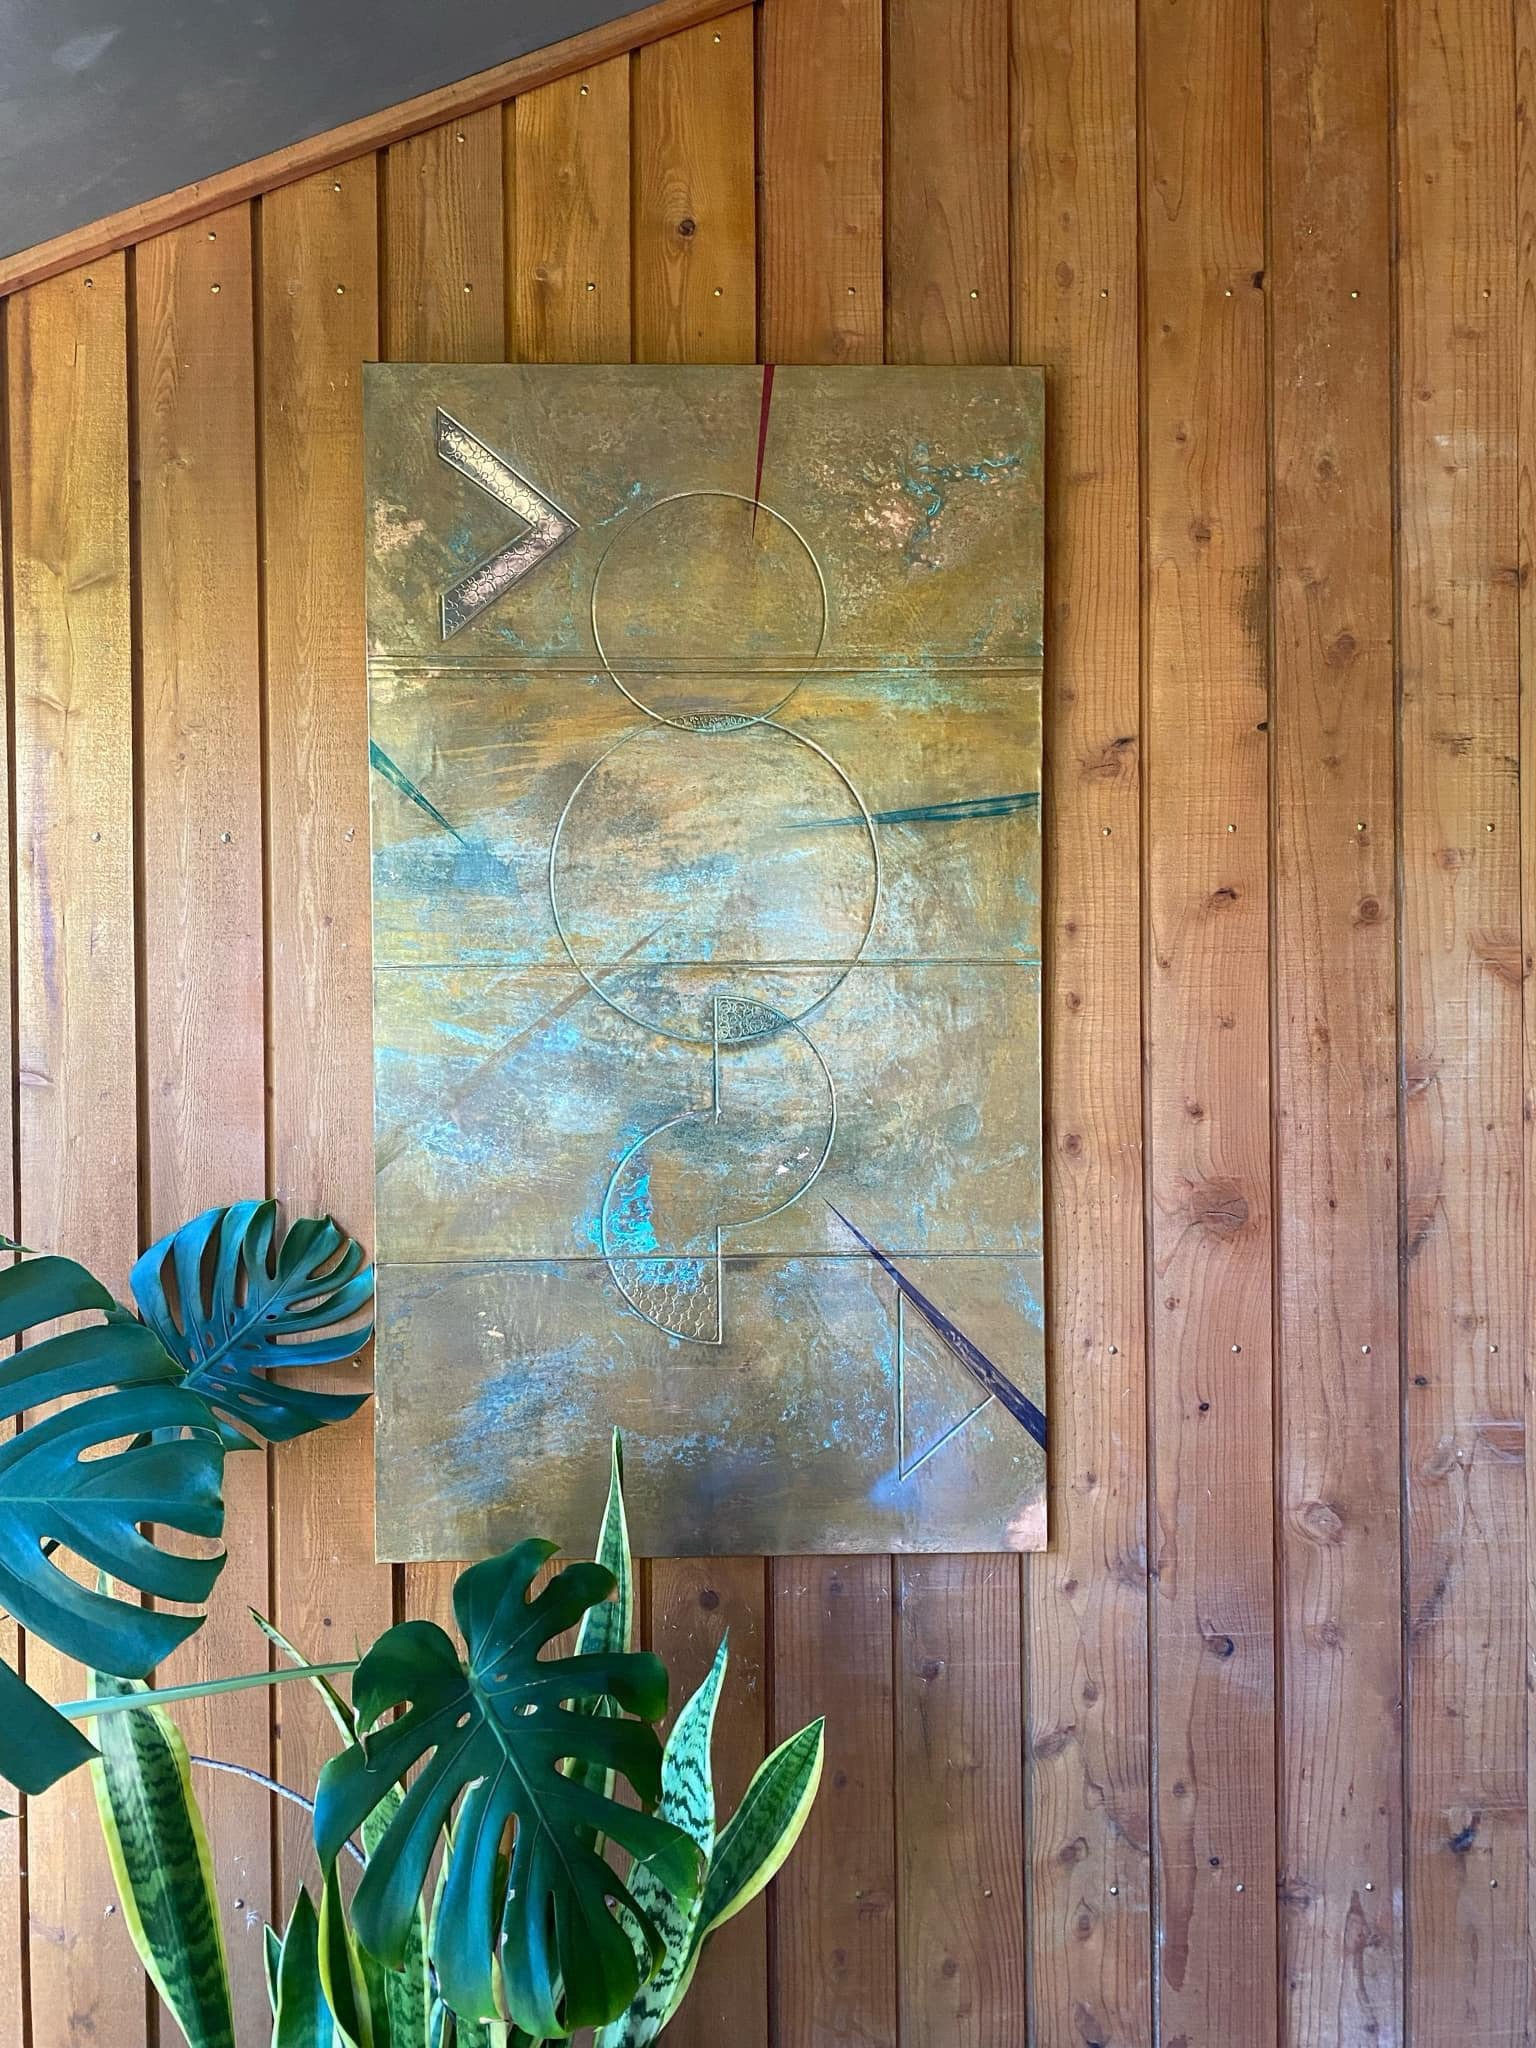
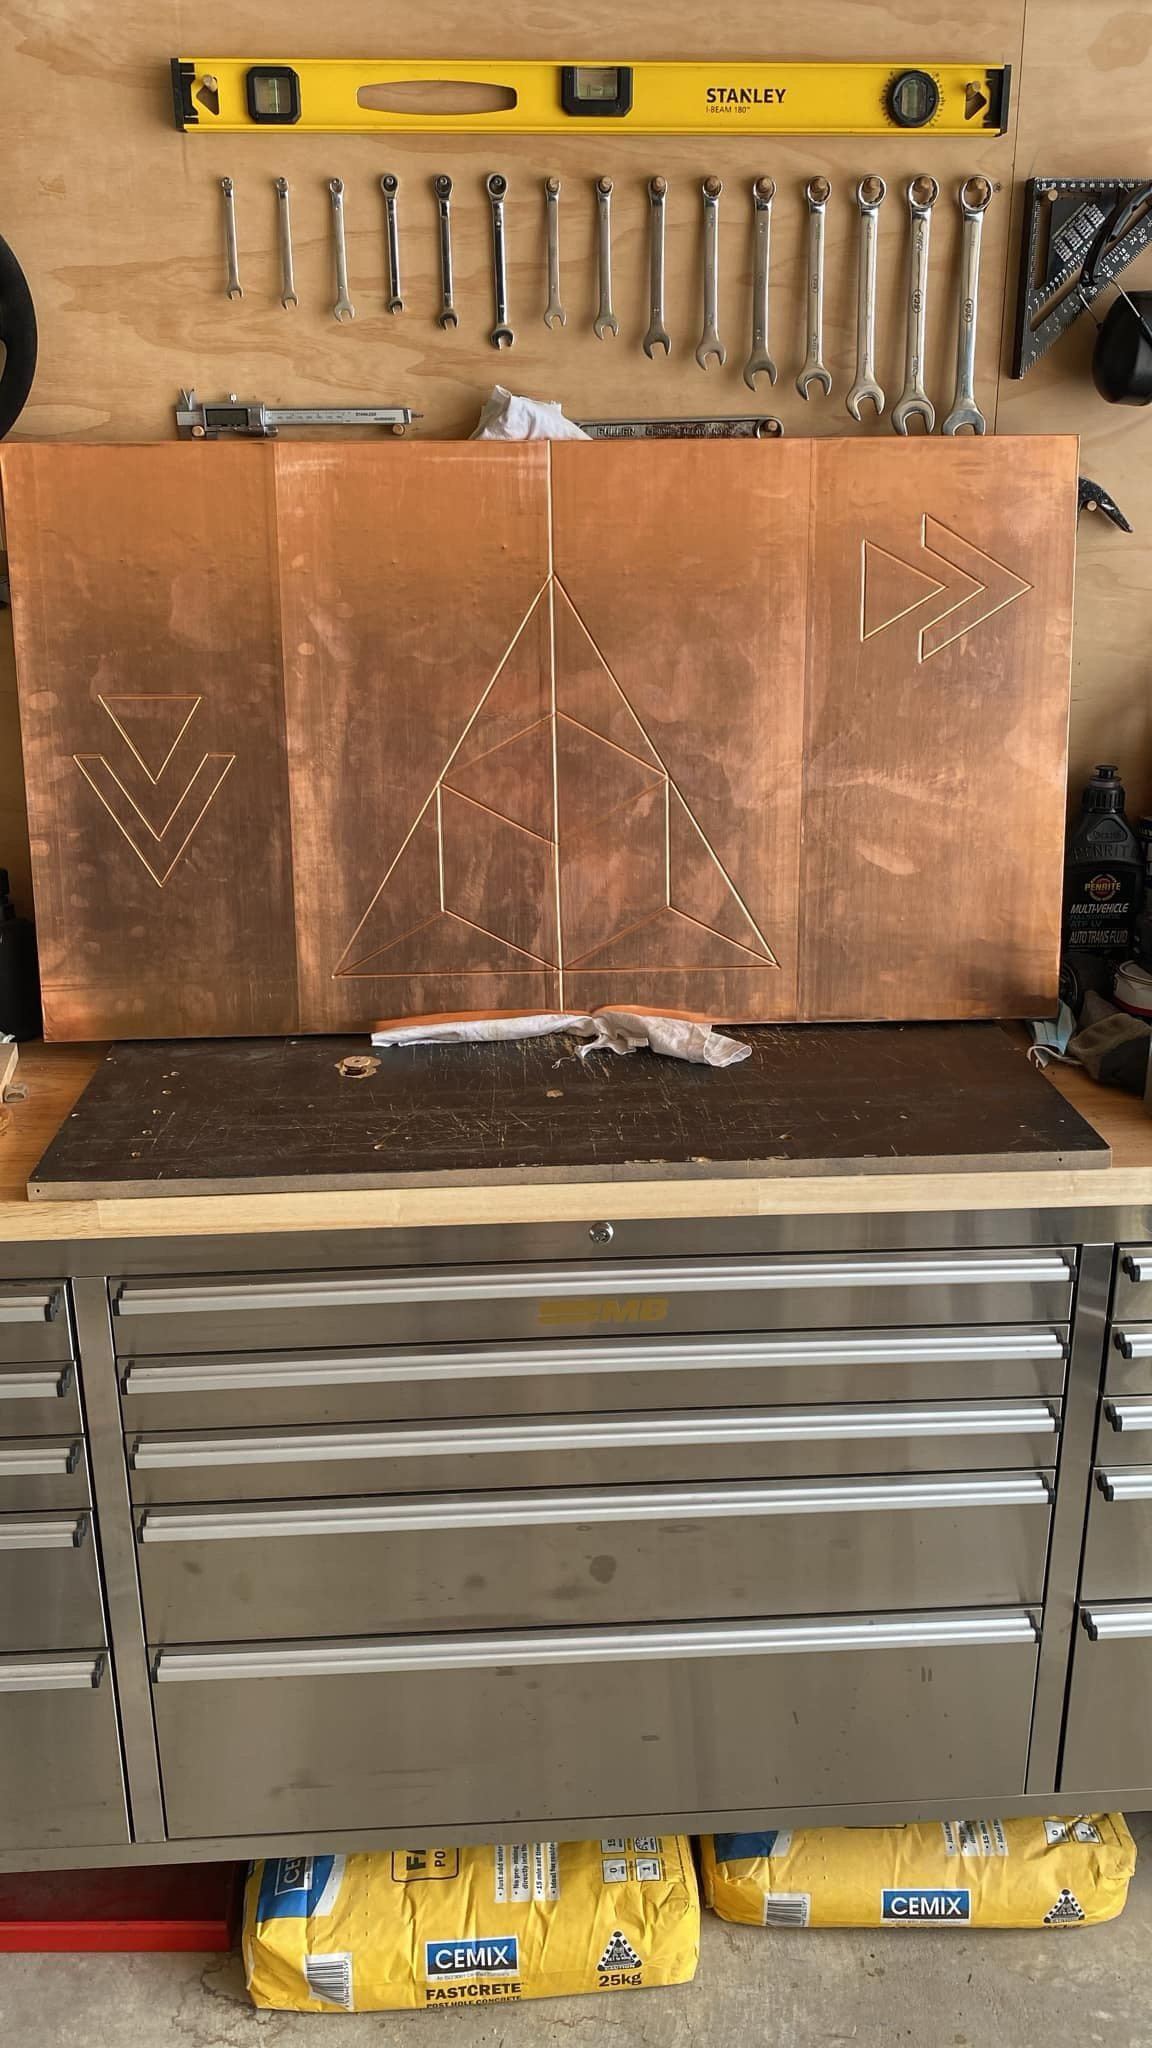
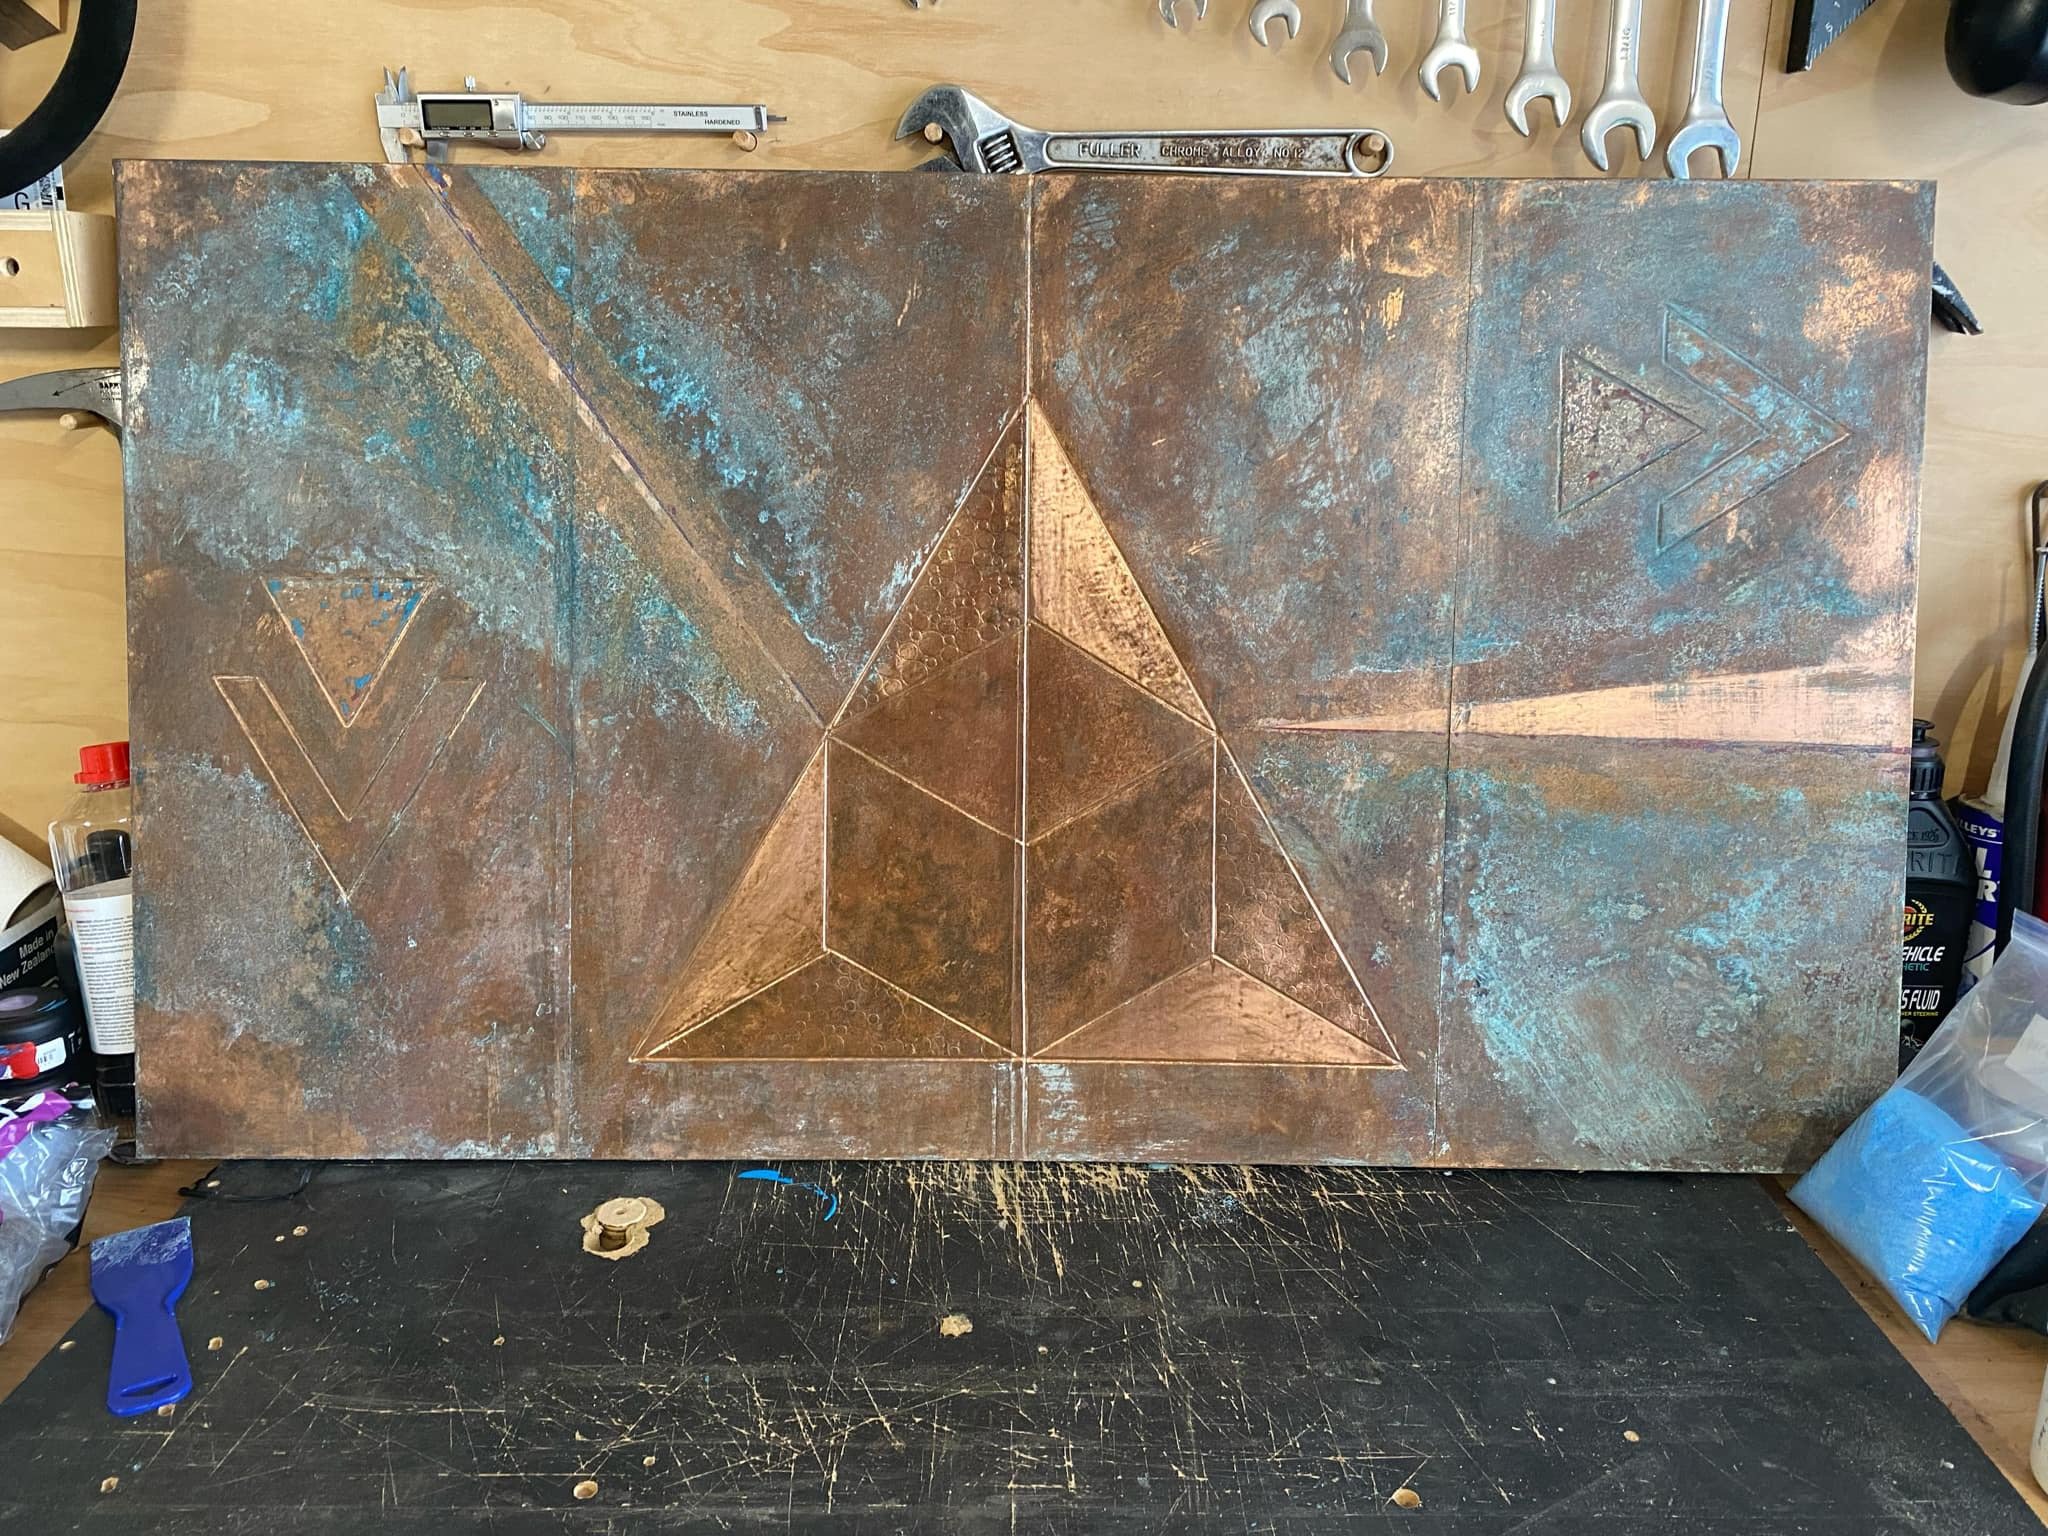
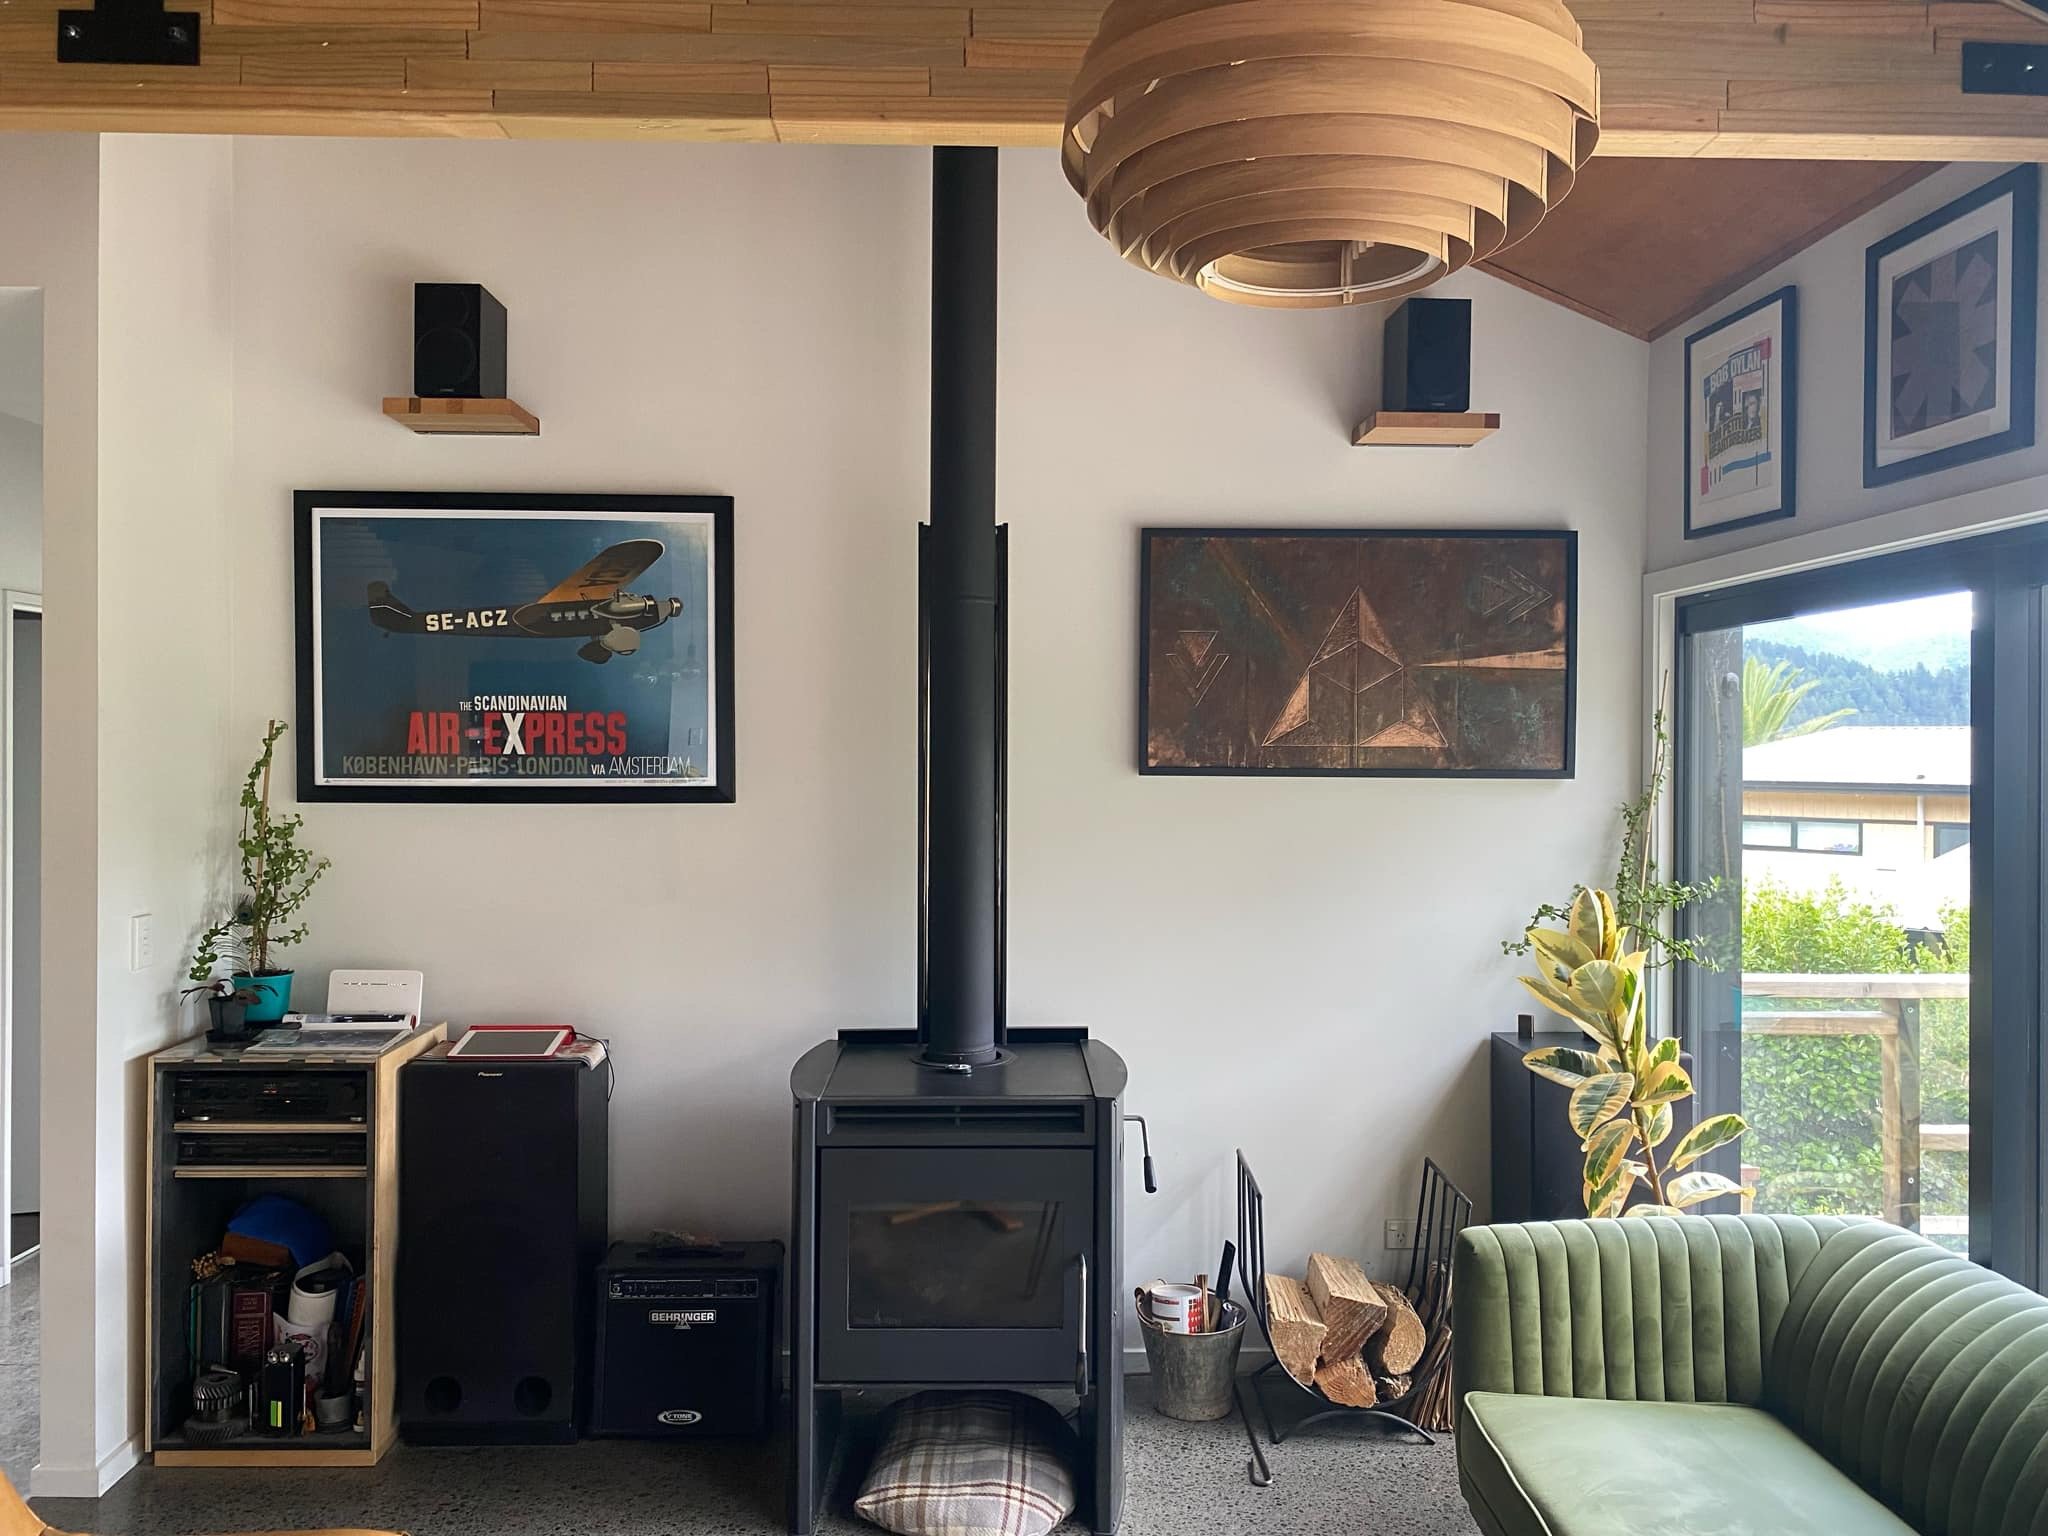
I’ve been experimenting with copper artwork things, same friend who does the veneer patterns showed me some tricks. Pattern router cut into a piece of mdf, copper shim rolled on and then pressed into the grooves. Then discoloured the copper with various chemical reactions. Finished with shellac to seal them up. Went ok for a first go even though I fucked up some of the joins in the copper. Made another one, I’m a fan of geometric stuff so dug the compass out of the pencil case and drew this up. Discoloured this one a bit more, then added some paint and did a final chemical application, sanded and sealed with shellac again. Paid to get it framed, quite happy with it. Up close the colour is more obvious
1 point
-
Interested in this too. Can DBW be set up as a standalone kind of thing? Eg only TPS back to ECU or do you have to have ecu feedback in system........ massive lack of knowledge here.1 point
-
Are you still up for discussions on Gyros?1 point
-
Congratulations! That steering wheel isn't too dissimilar to the optional factory leather wheel
1 point
-
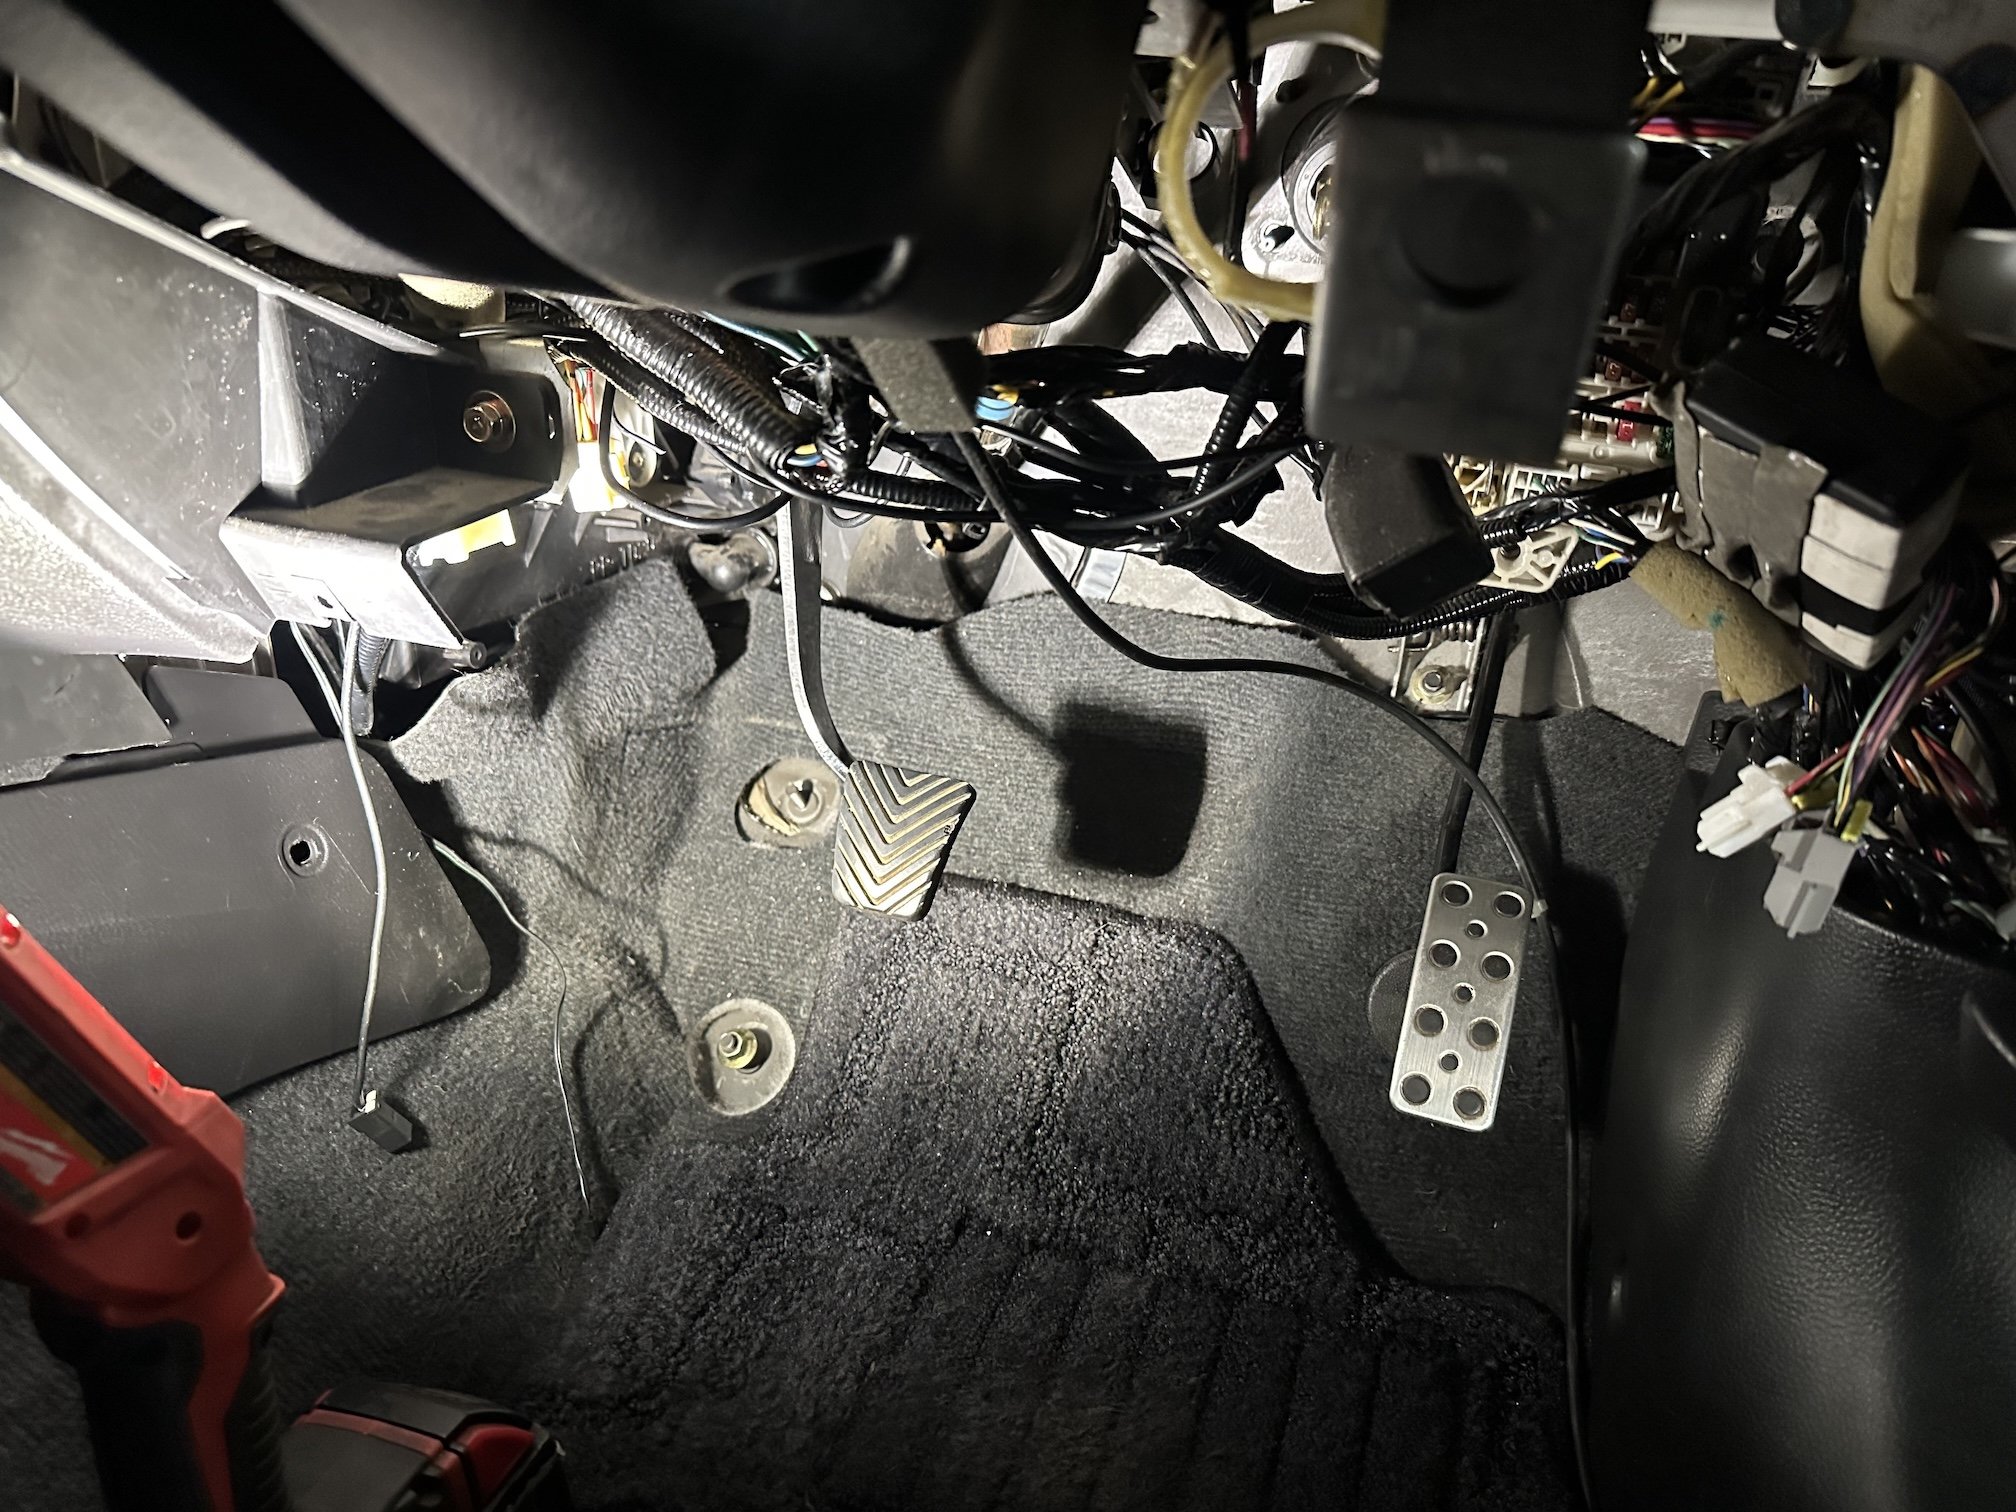
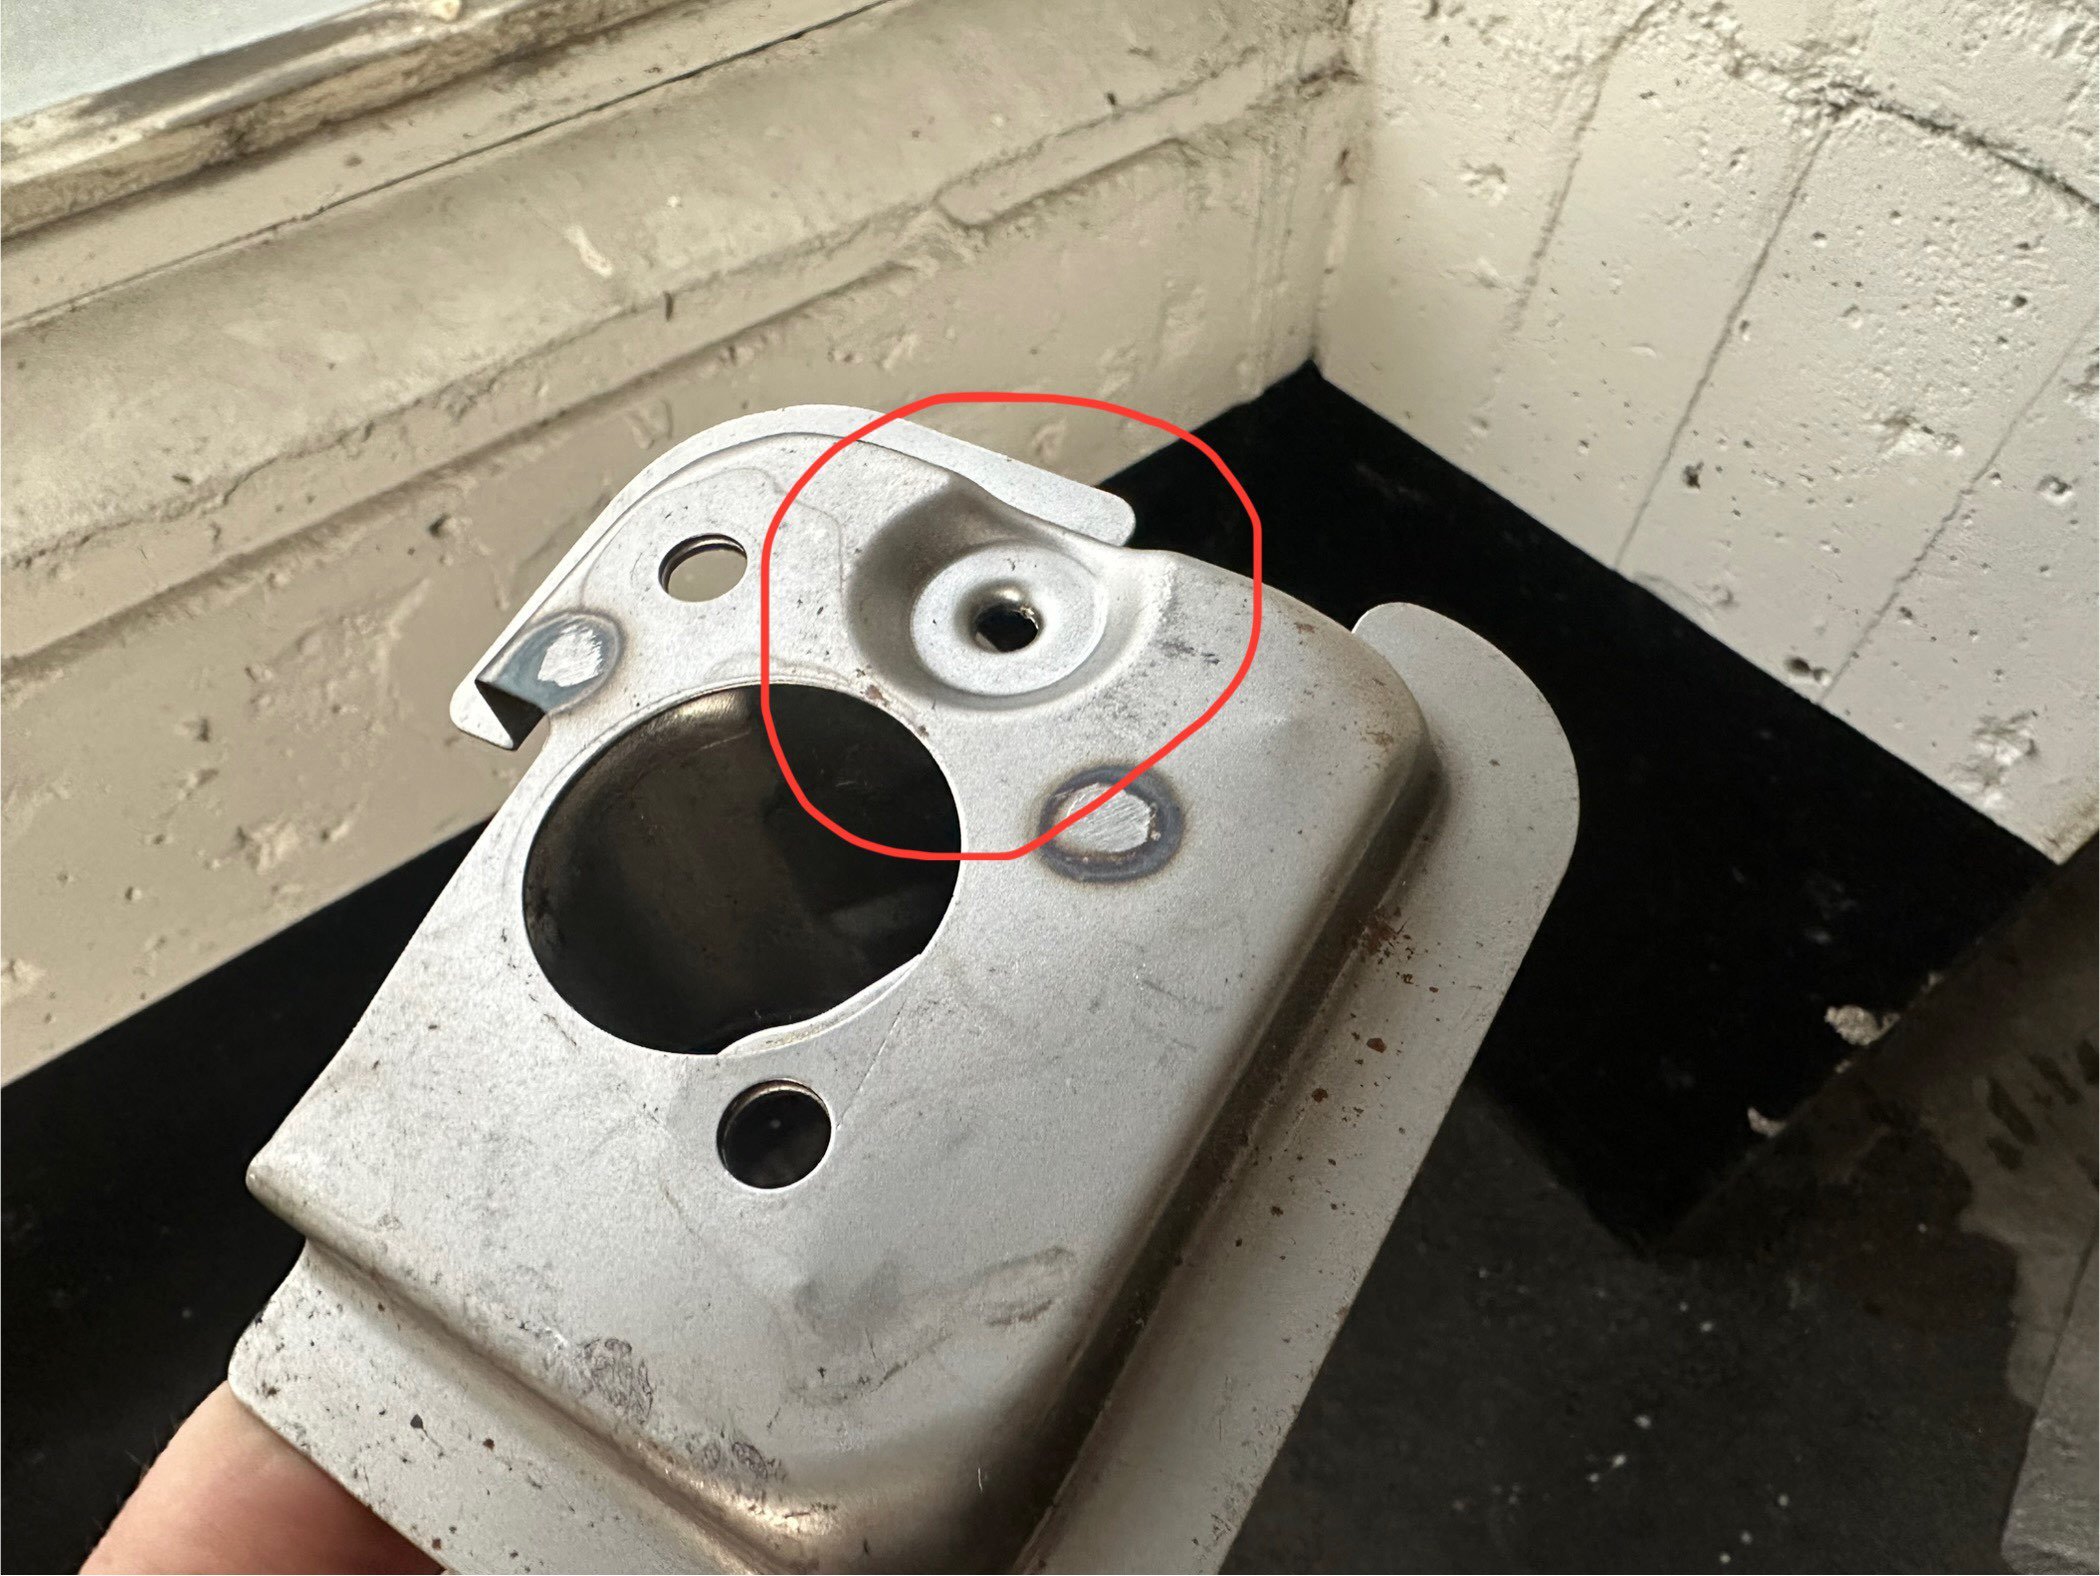
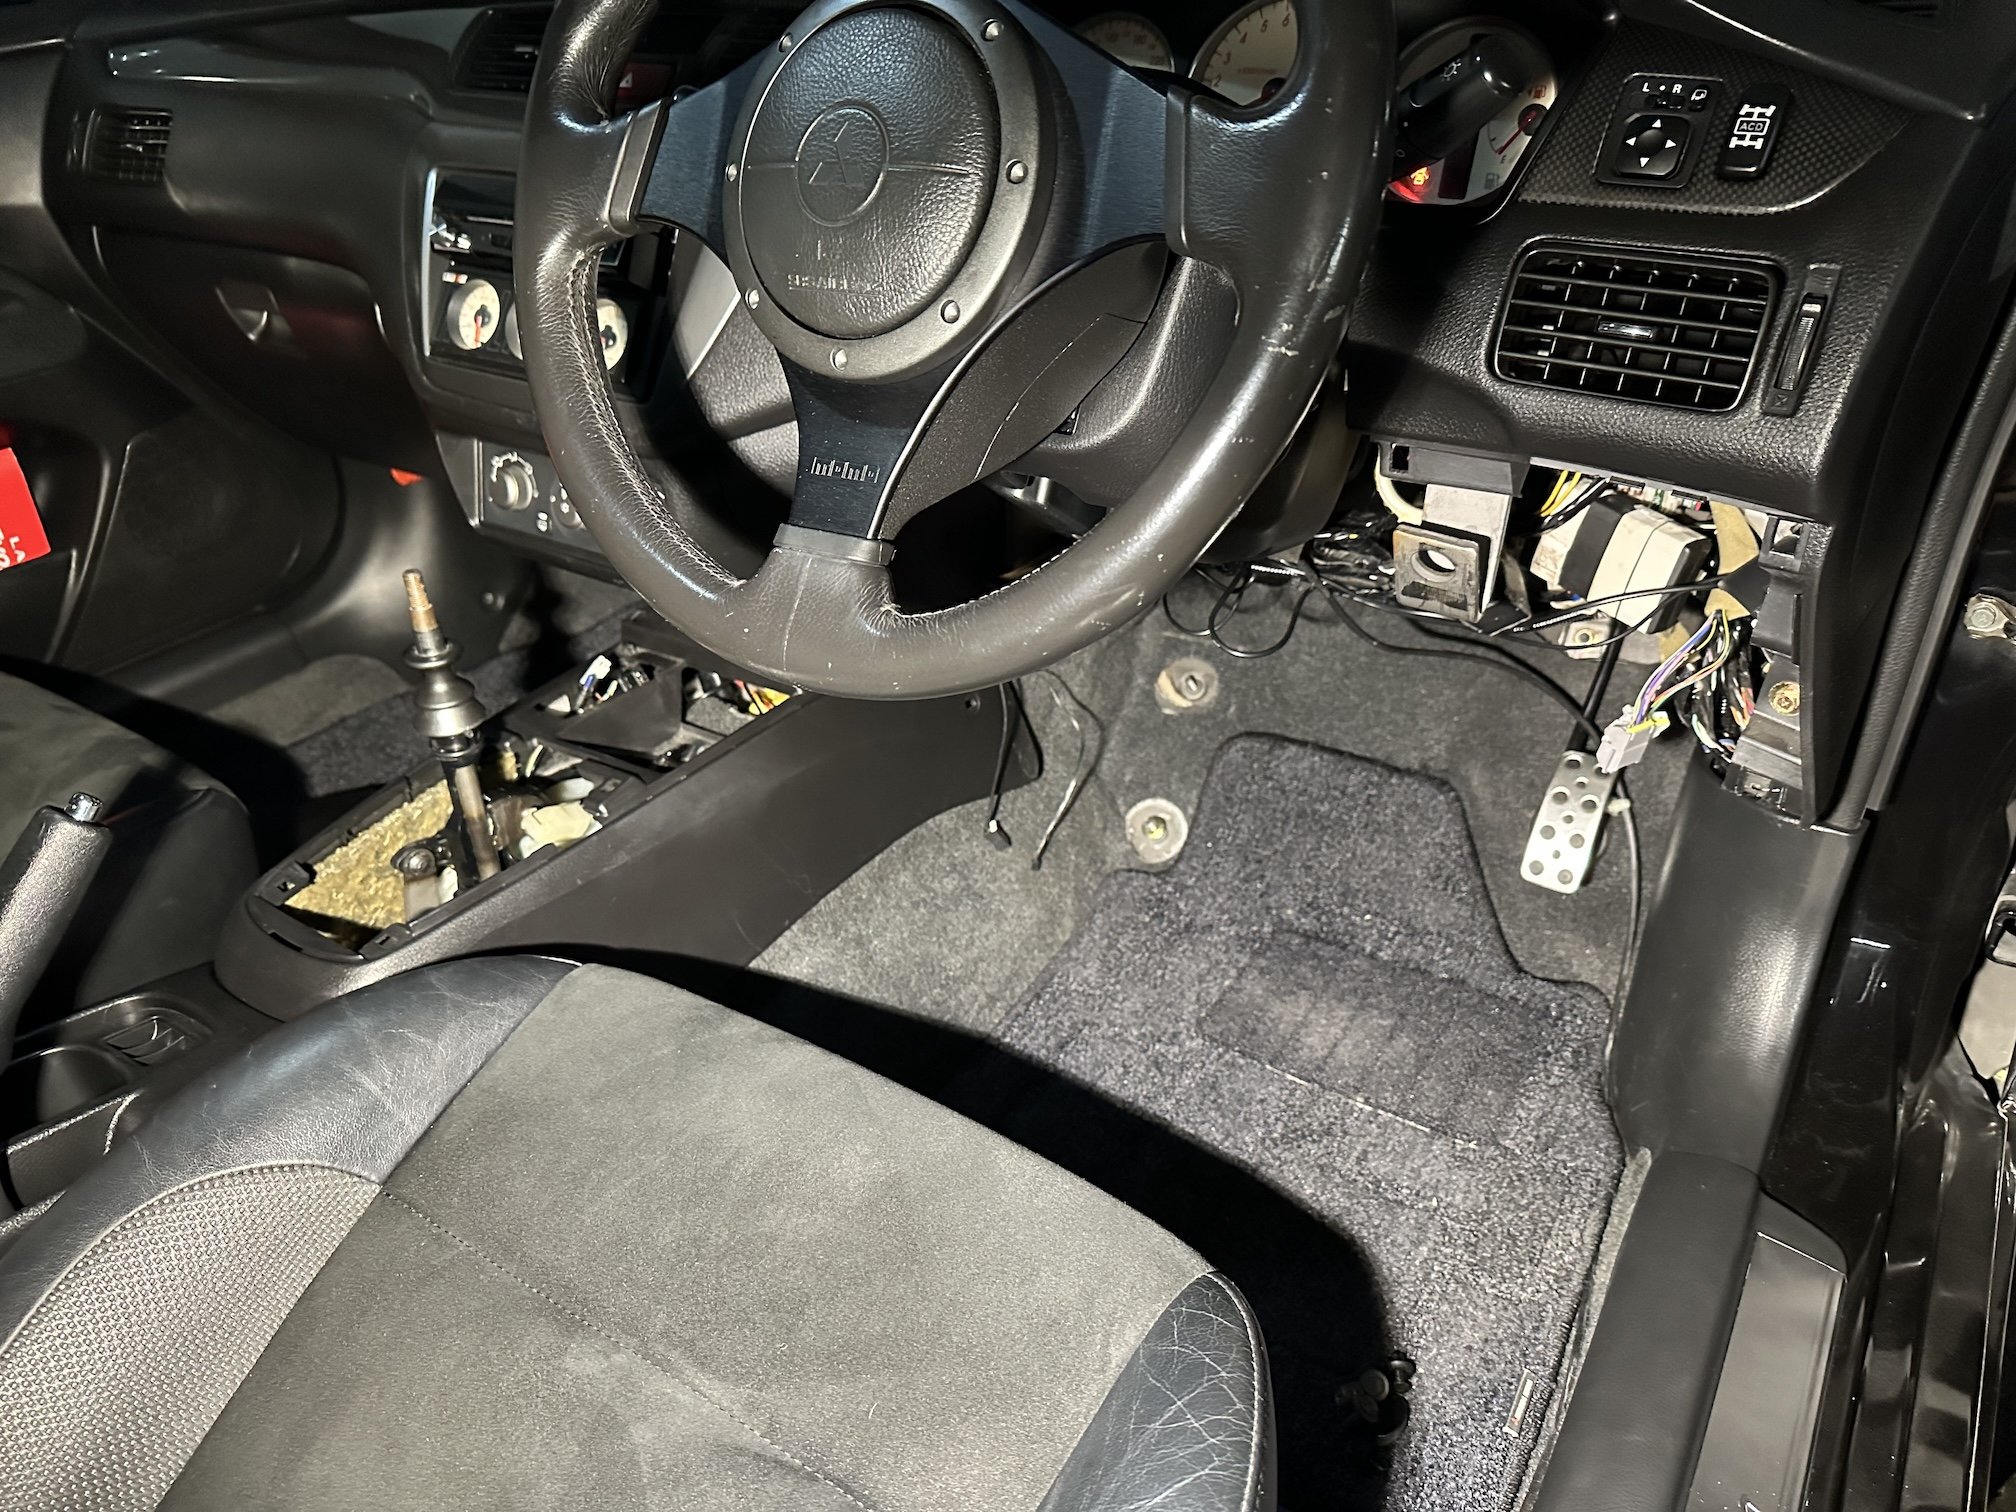
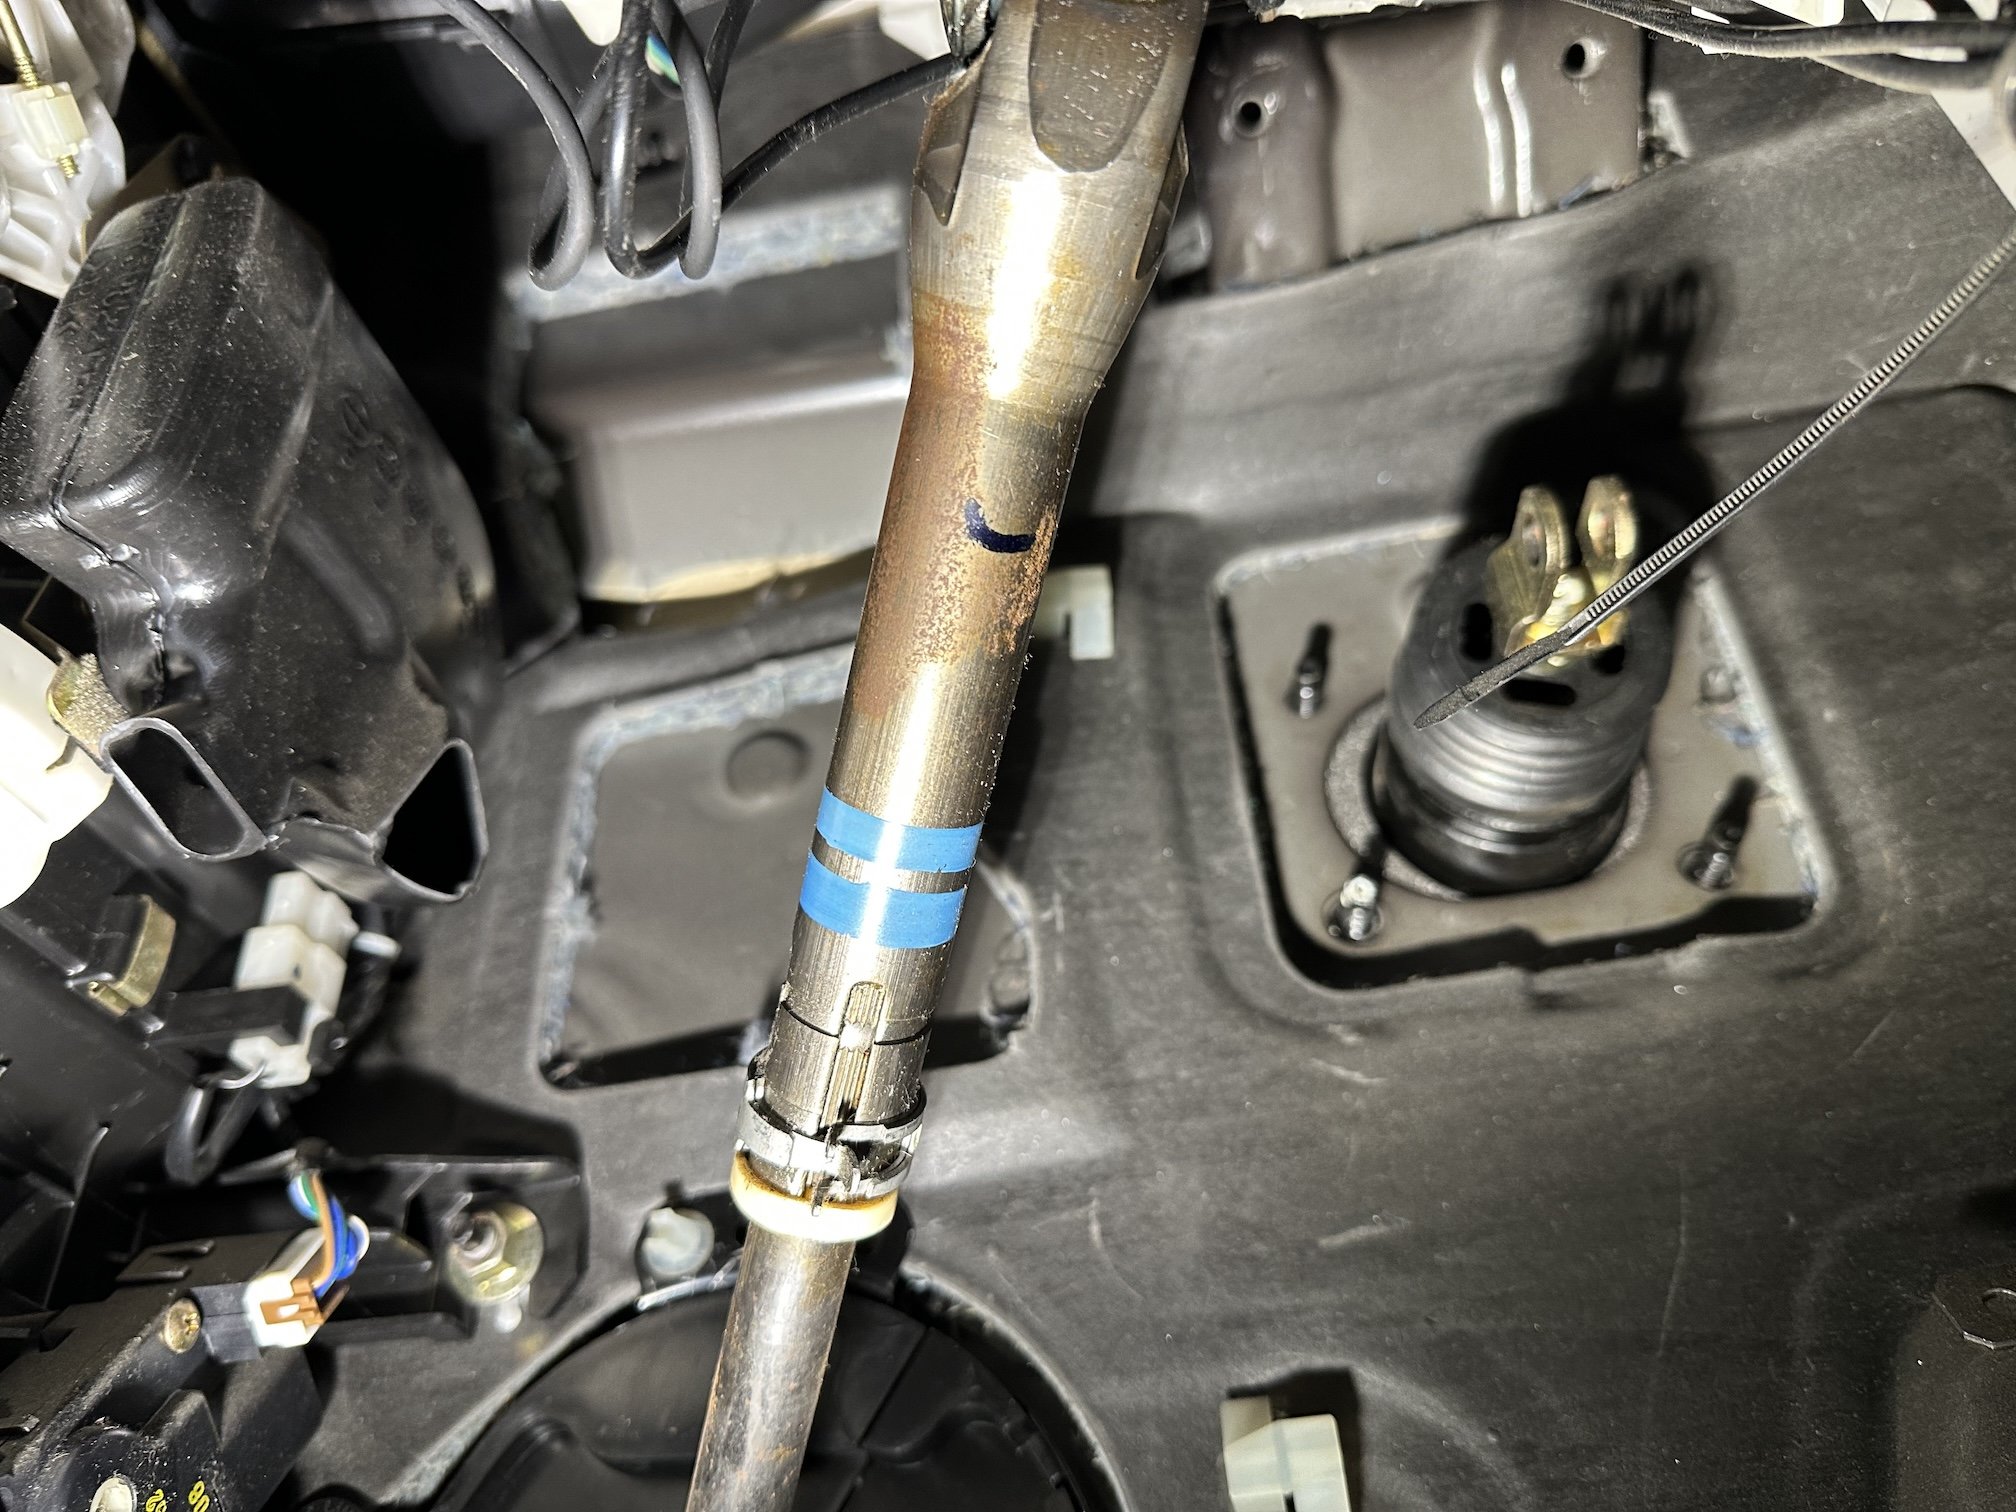
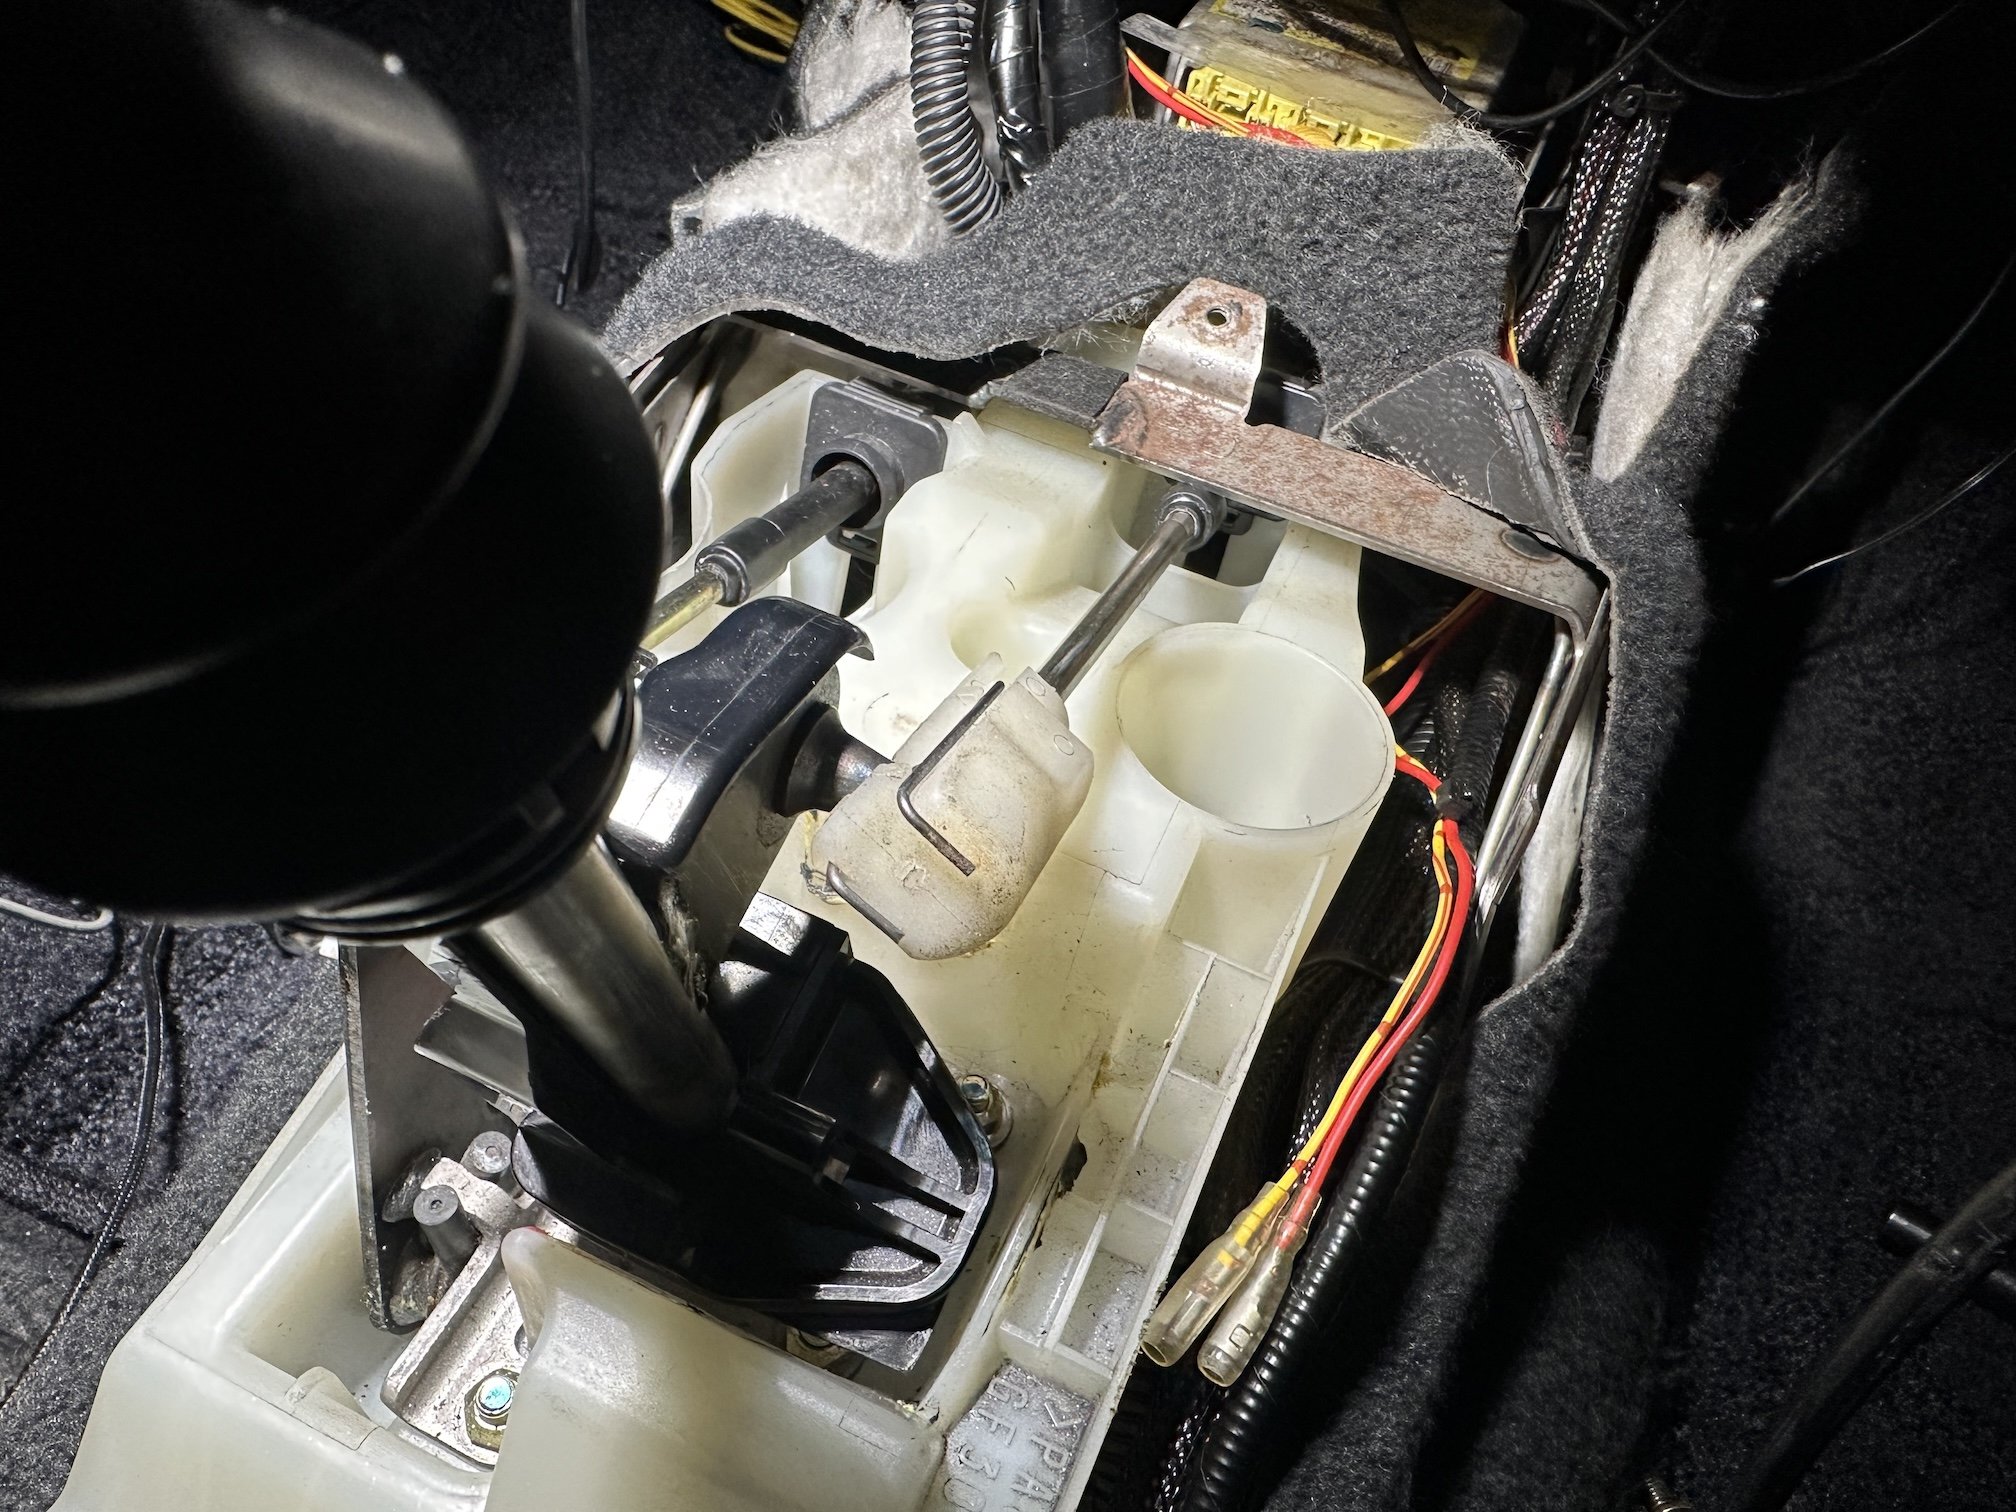
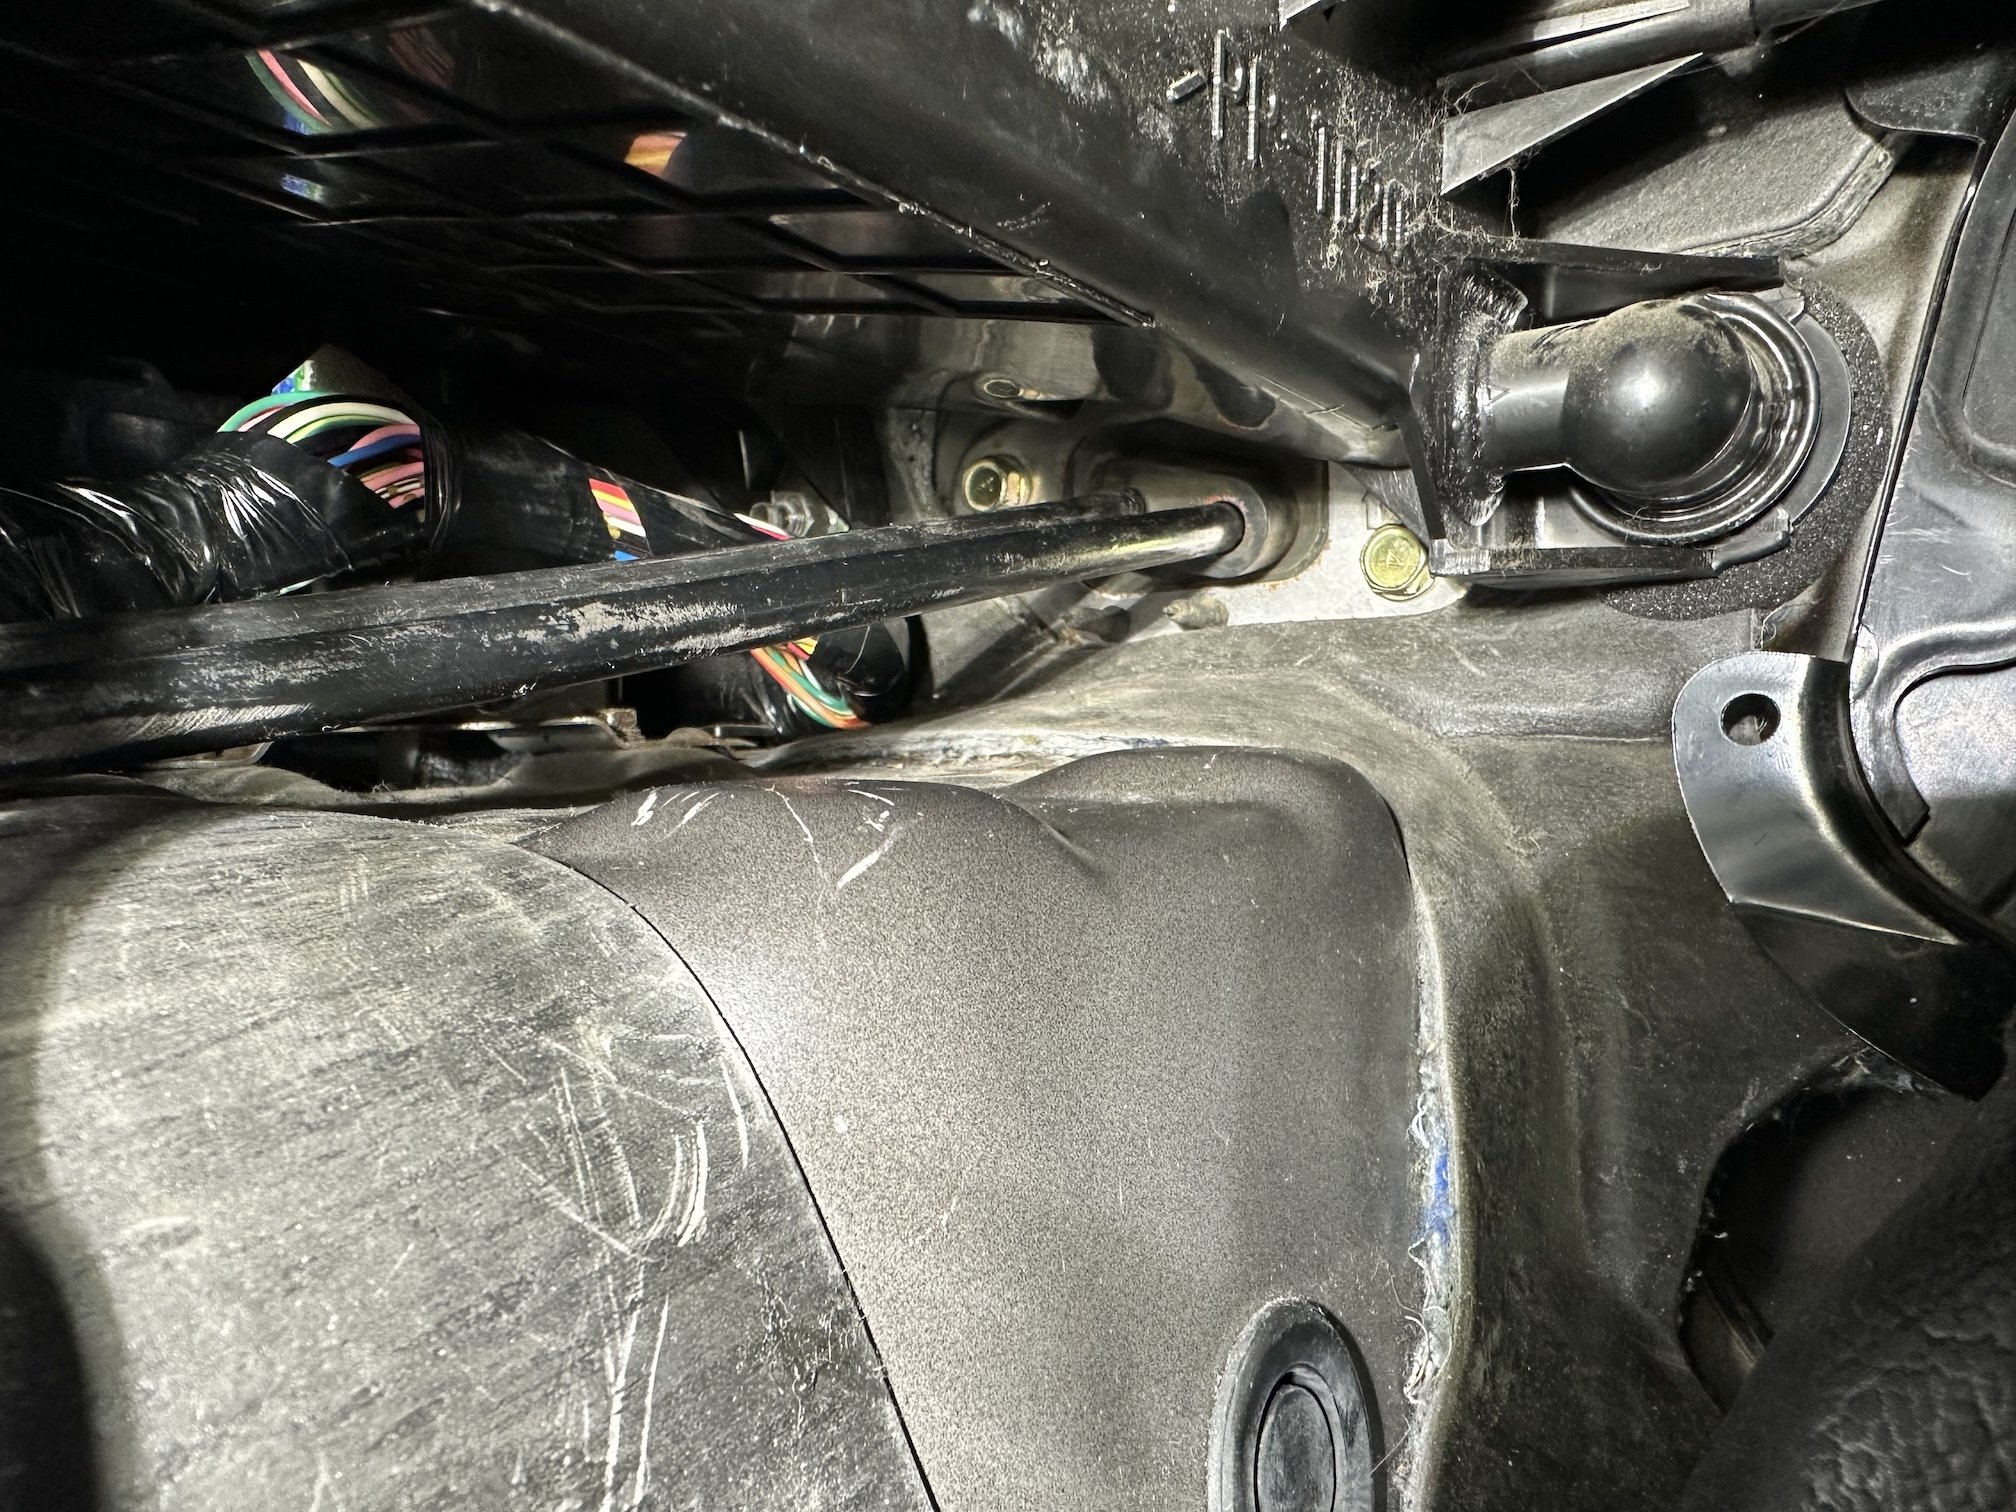
Look ma no pedals! Unlike the Diamante this one doesn't have a template pre-cut into one layer of the firewall so I have to be extra careful where I drill through. You can also see it's missing the reinforcement bracket up top for the clutch pedal like the brake pedal has. I'm still hunting around for this bracket, and I may just wait to drill through the firewall until I get this bracket in and fitted.
1 point
-
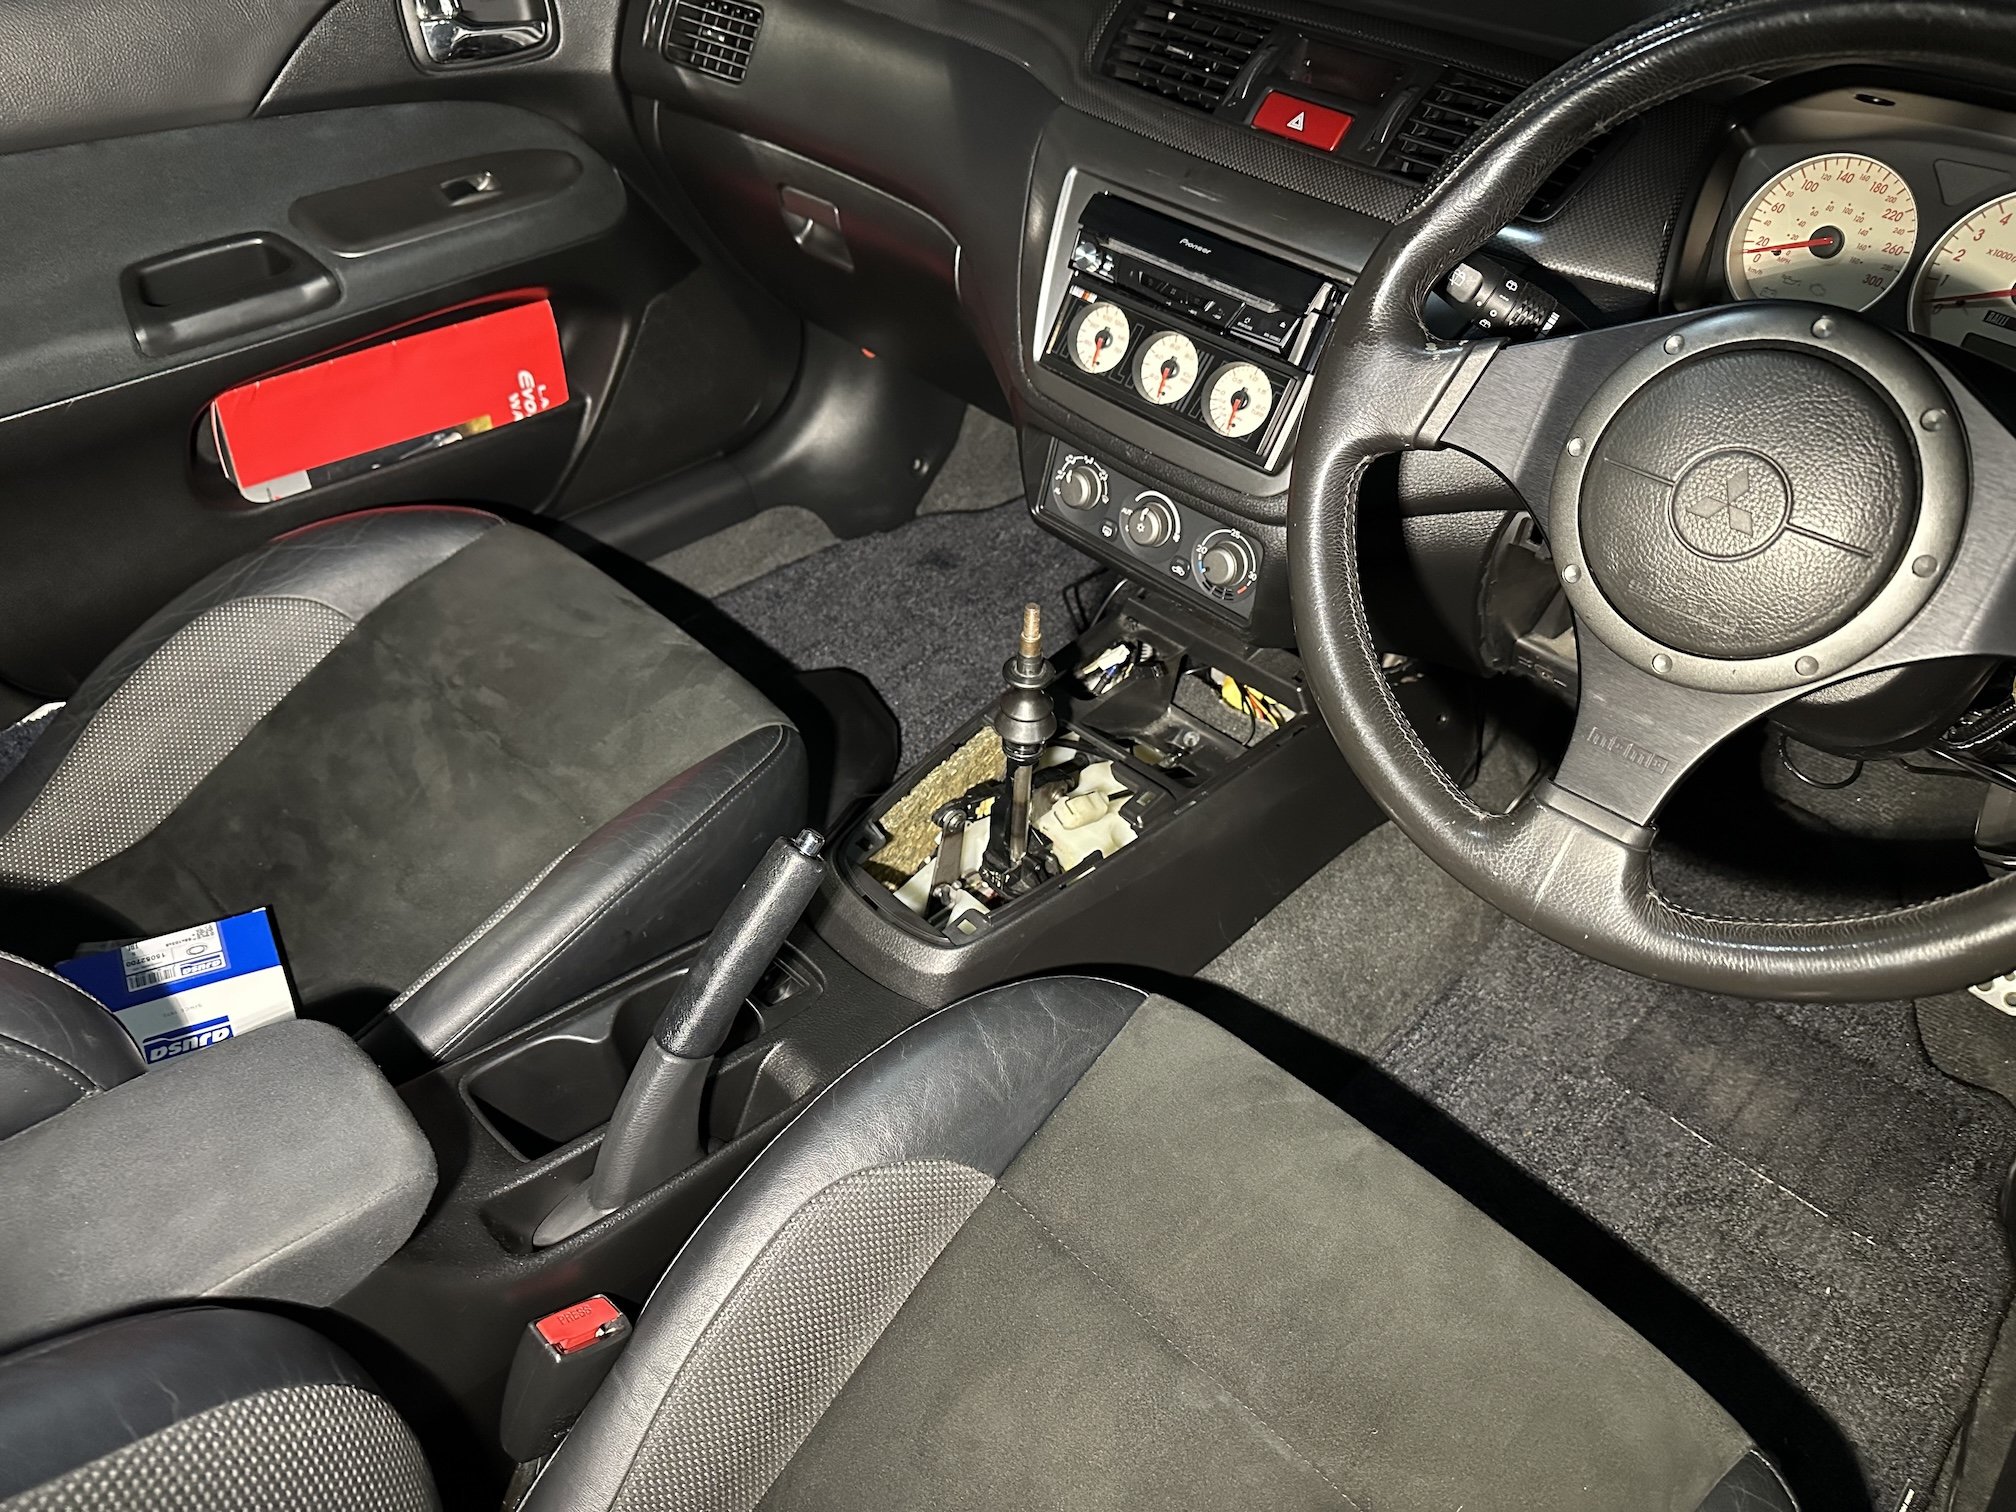
Didn't get as far along today as I had hoped - but I did manage to swap in the manual shifter after cleaning up the 20 year old Japanese crumbs and dirt. I did have a little issue with the centre console mounting bracket interfering with the shifter cable - it seems this bracket is specific to the autos for the 2005 model year, but for the 2006 model year the autos just ran with the same bracket as the manual models. I might be able to find that bracket from a regular plain Jane Lancer at the junk yard - or if I get desperate I could cut a clearance notch into it. The shifter cable firewall flange bracket was a PITA to get buttoned back up to the firewall too - those two bolts were so hard to access going back in. Starting to look more like a manual now
1 point
-
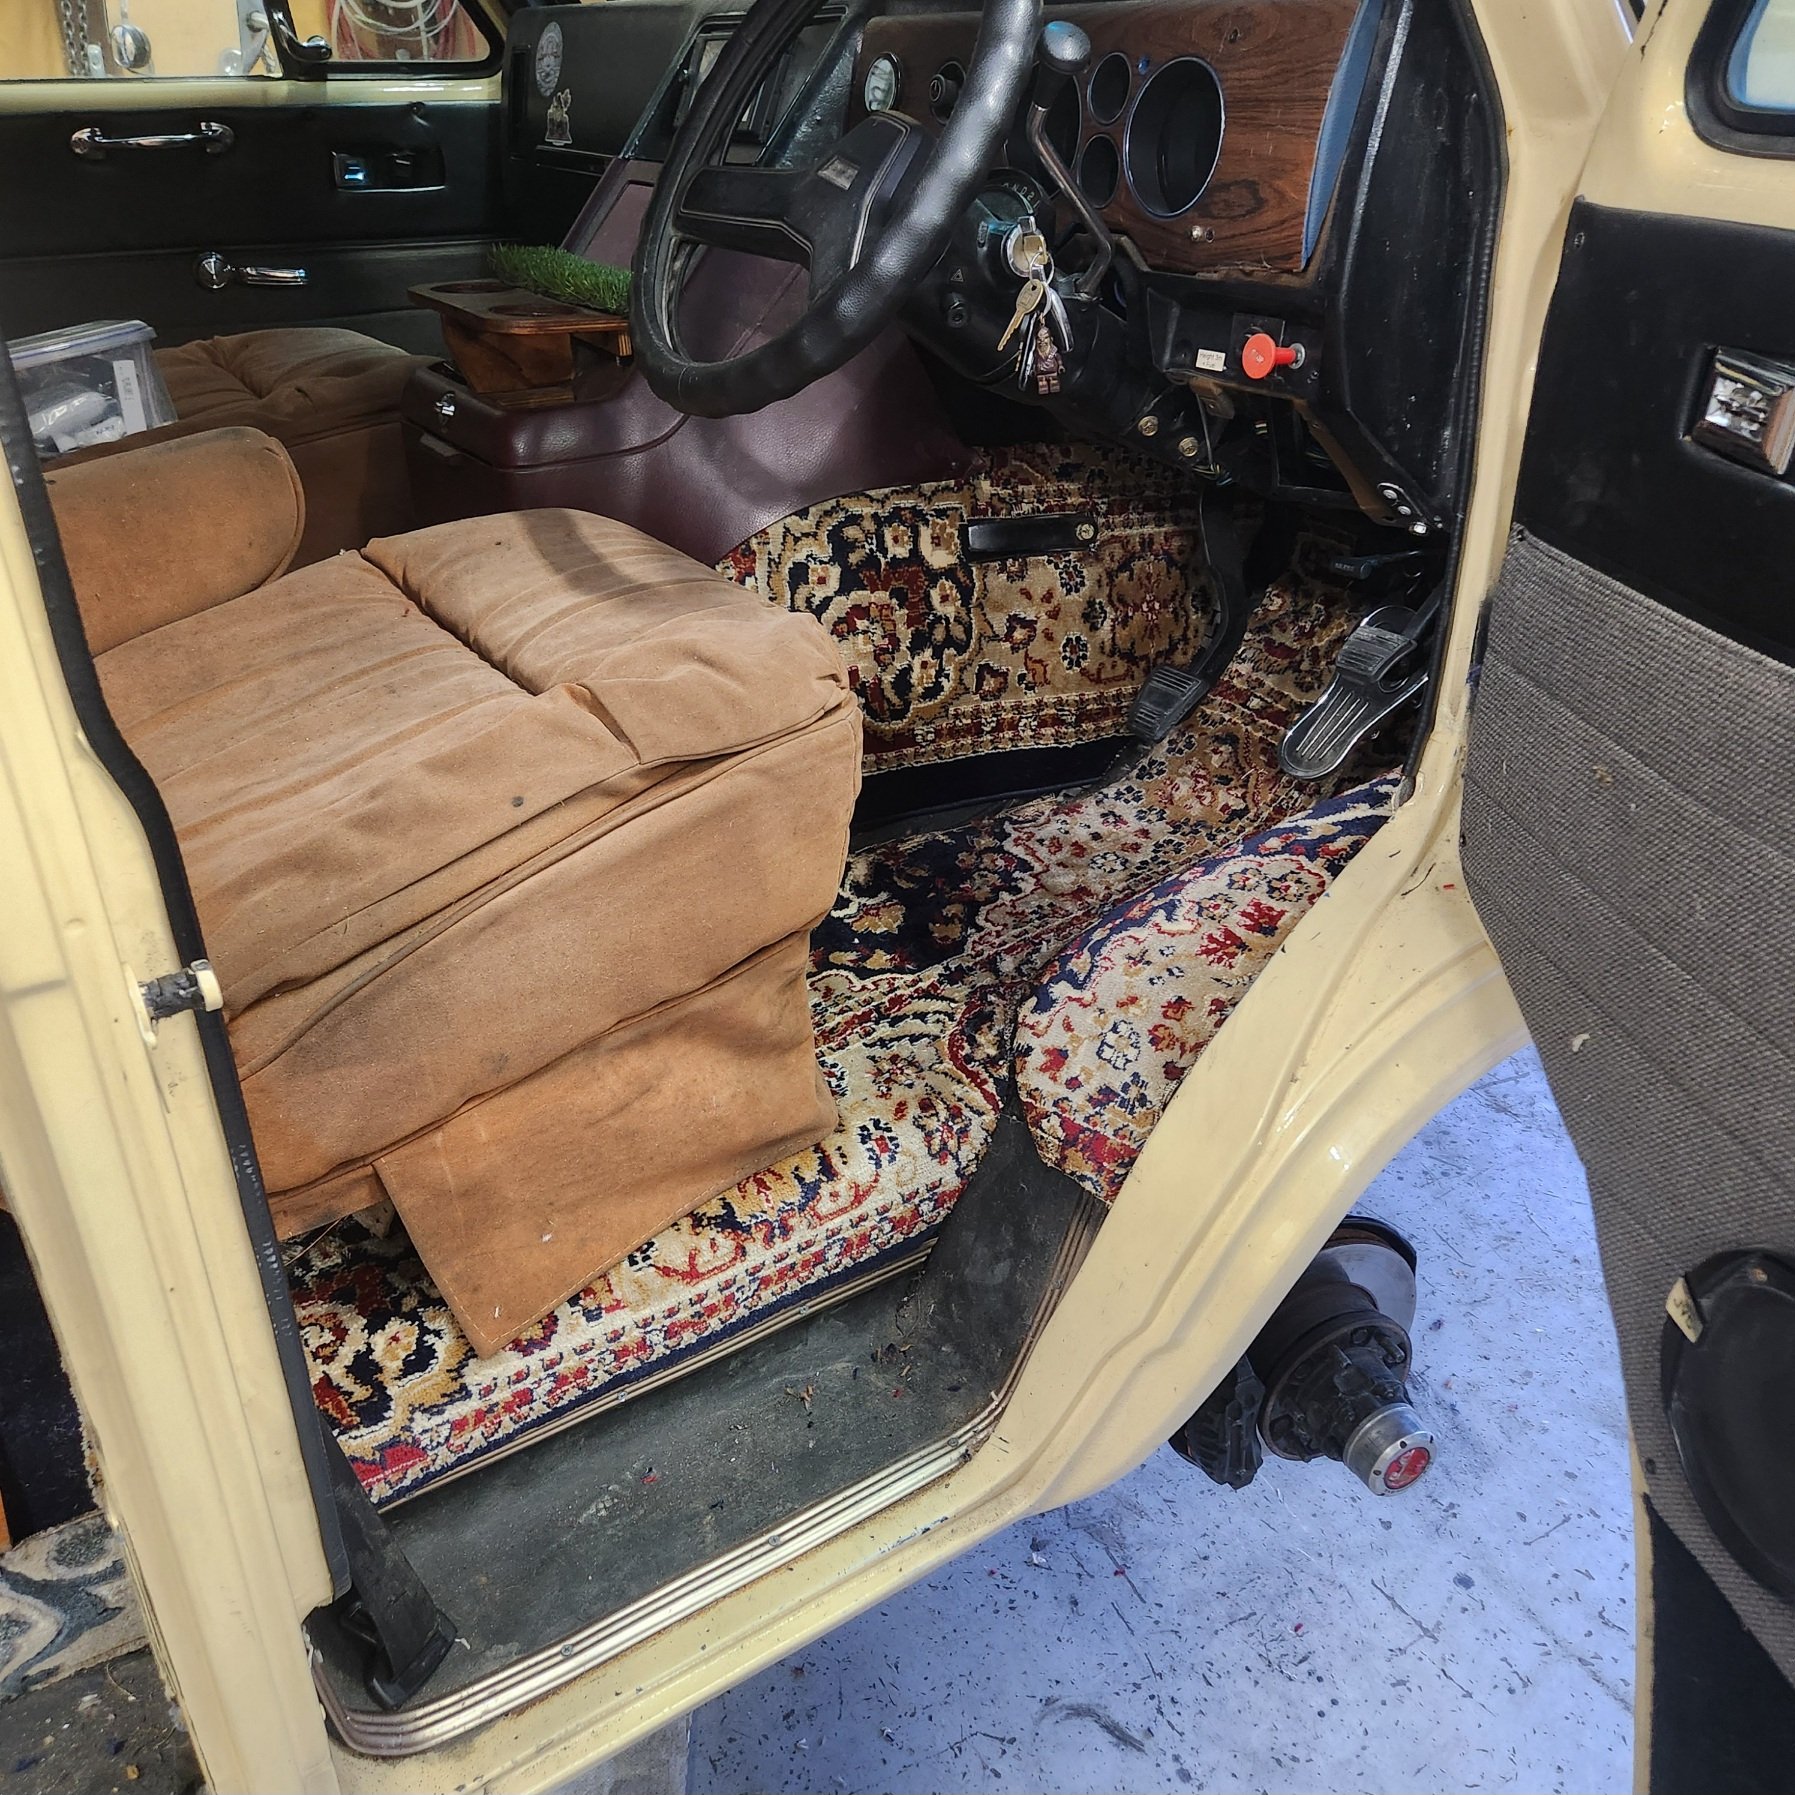
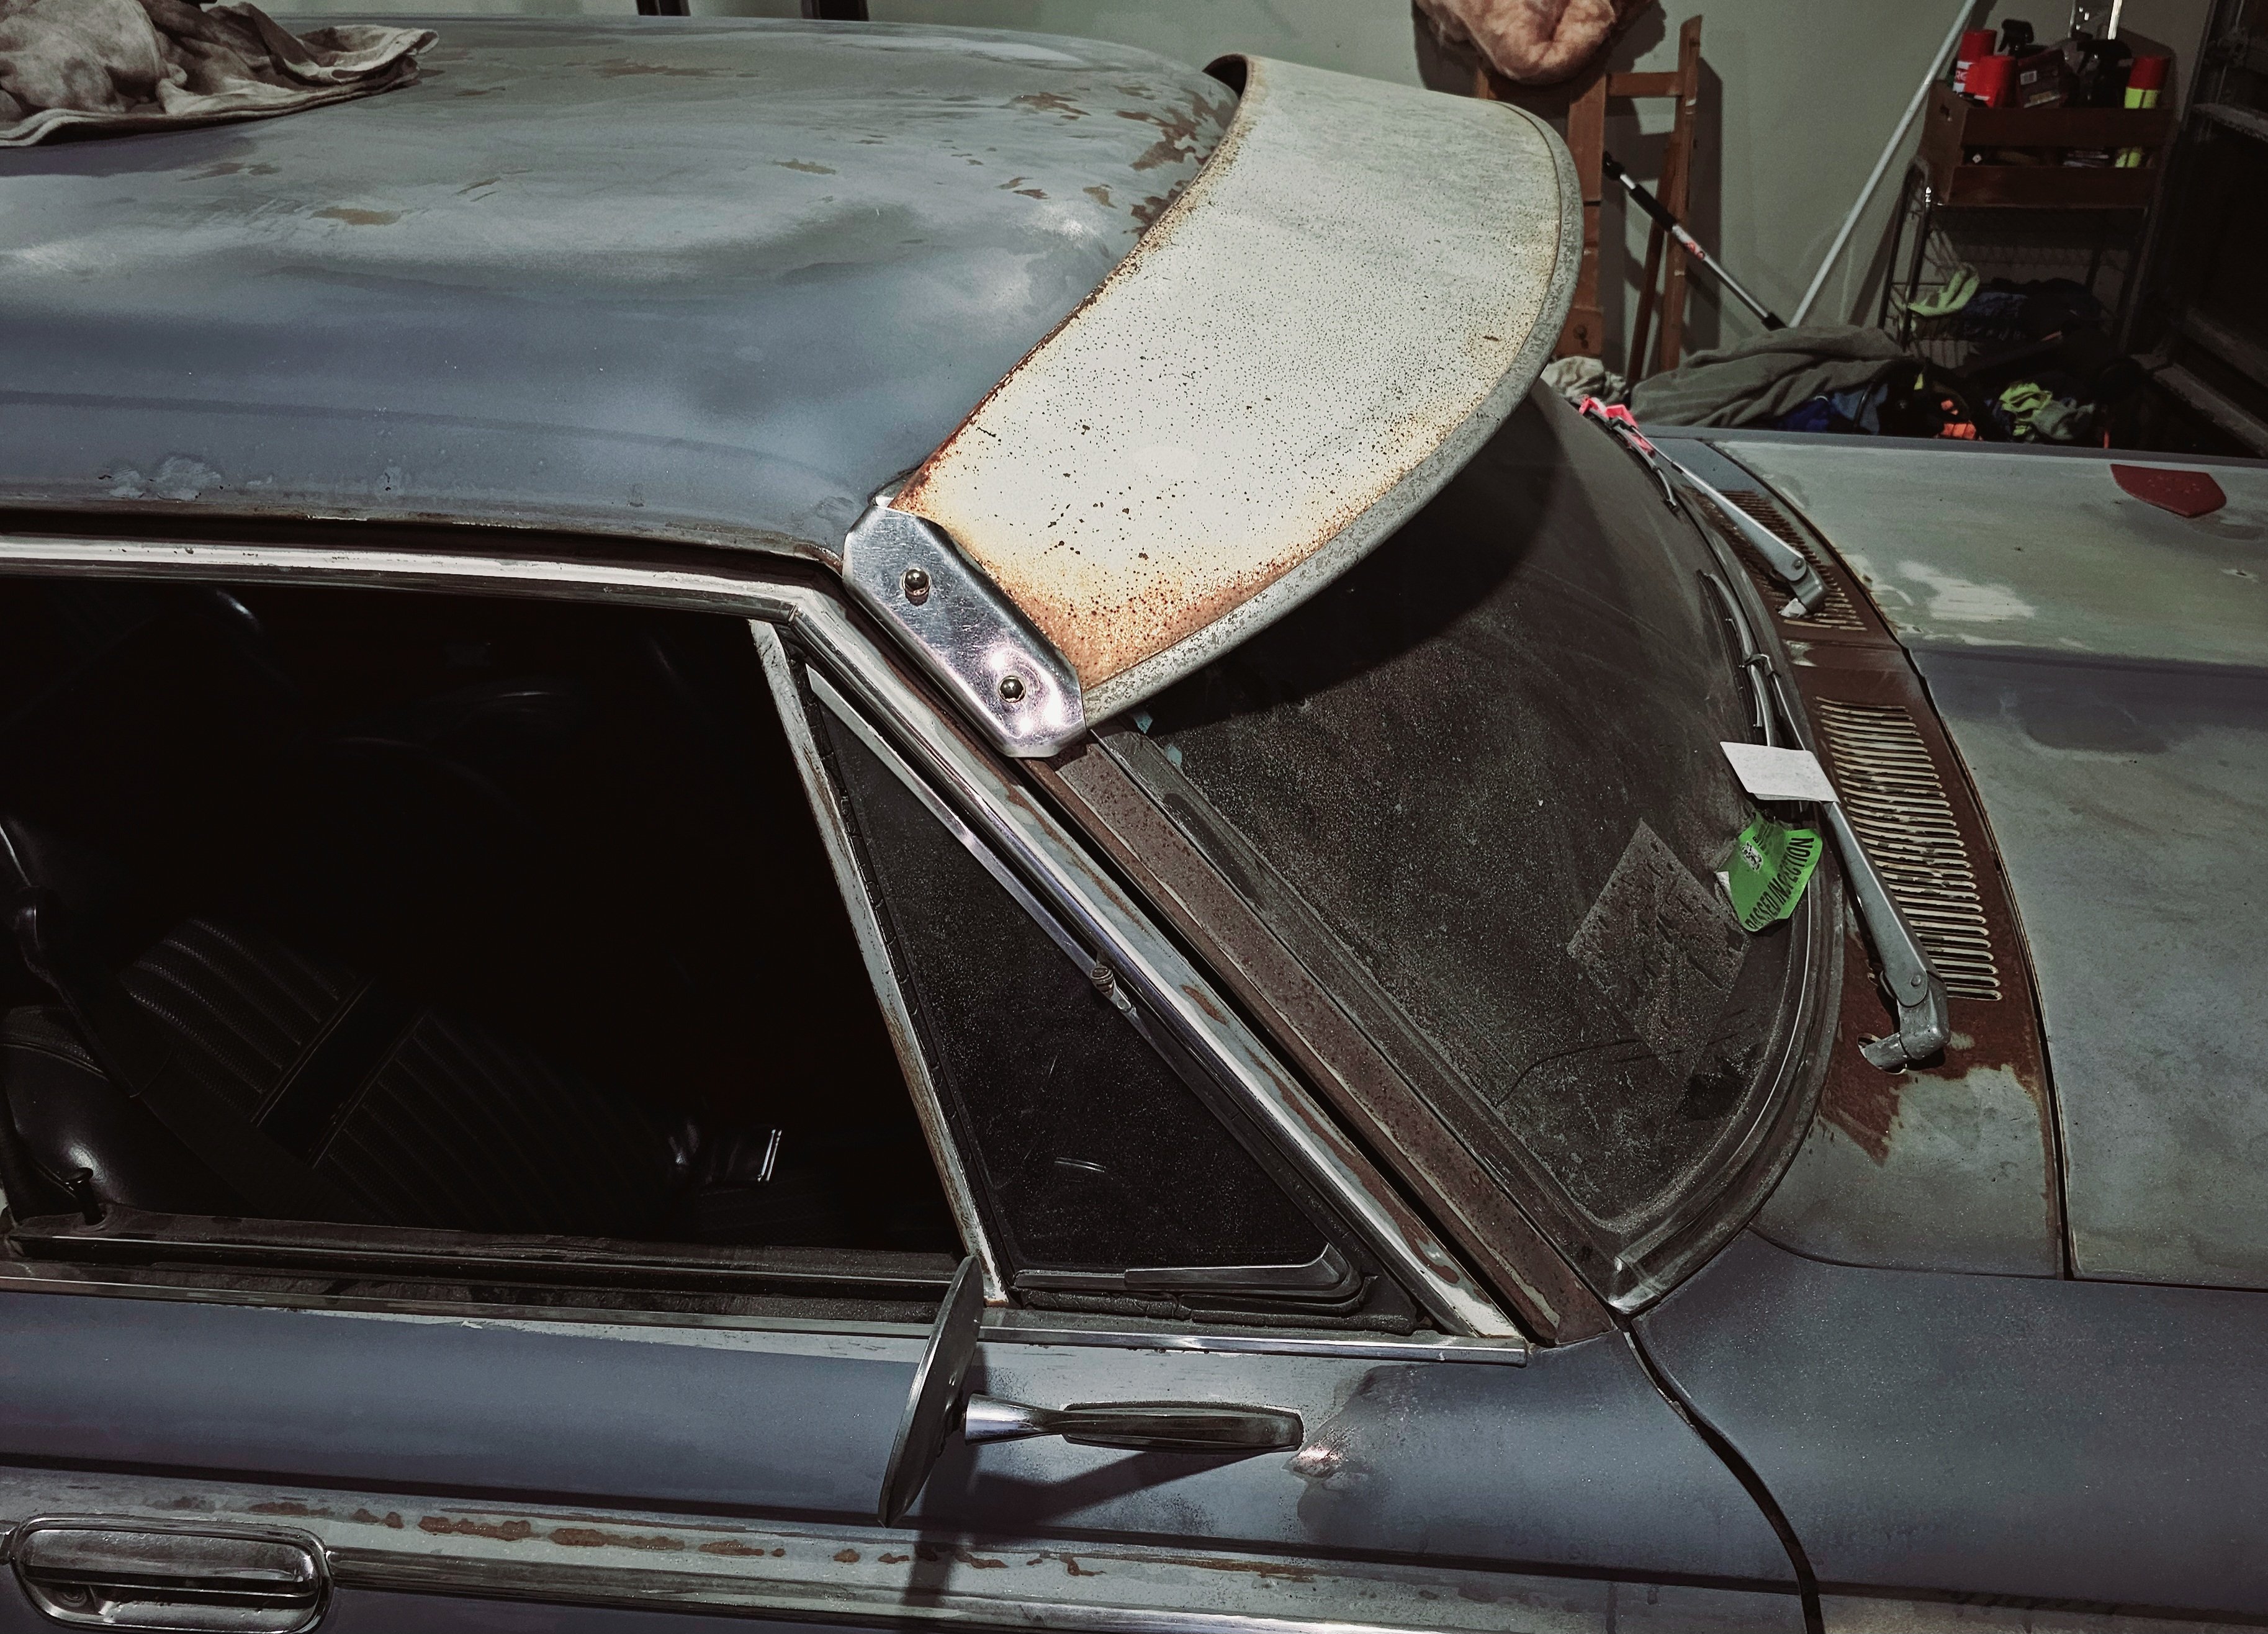
Well, here we are, It's time to try this WOF thing again. After the string alignment, when the rain finally stopped, I took the Marina out for a quick run around the block to see how the alignment was. The steering was dead center, and it was a lot less wayward than it had been, likely due to the new bush in the steering rack. I'll call that a success. All that was left was to wait a couple of weeks for the next booking. This time I booked it with a different workshop, one that I was recommended by a friend in the local Rover club which he had good experience with, and I booked it as a Pre-WOF inspection off the bat (just in case I did need more than the 28 days to fix anything). I wanted to make a good impression, so the day before, I gave the Marina its first real wash, with suds and all. It was dirtier than it looked but it's hard to tell because of the condition of the paint. The wheels gained a bit of a shine though. The Marina did decide to play a great little prank on me though, the day before the WOF check, where it ran on only three cylinders. haha so funny. I checked spark, all good. It didn't clean up when revved, and barely idled. I was starting to get a bit concerned, and then decided to check the carb and noticed the choke jet was out despite the handle being all the way in; the jet had stuck and the carb was over fuelling. I lightly touched it and it snapped back into place and suddenly the engine smoothed out and ran beautifully, as expected. Phew. It stuck again the next morning, so I'll need to sort that out. Yesterday morning, with my wife in the Leaf in tow (two polar opposites of transportation), I drove the Marina the furthest it's been in my ownership and dropped it off at the workshop. Other than once again passing a police officer on the way there, and my wife alerting me to an iffy connection on one of my brake lights (which a quick jiggle of the bulb holder cured), the drive went well. Straight off the bat I got way better vibes from these guys about the Marina, having had a quick chat with the guy there who expressed his interest and enthusiasm towards the car. It makes a big difference when the people you choose to work on your special project actually care about it. There was no waiting around for it this time, and since they were busy I wasn't going to get the car back until the afternoon, so I jumped in the Leaf and after some breakfast and errands, I spent the rest of the day trying to distract myself whilst anxiously waiting for the call. Late in the afternoon the call comes through "your car is all done and ready for collection". Vague. We jump in the Leaf again and shoot down there. As we roll into the carpark, the Marina is just parked out front, looking awesome. As we turn to park next to it I notice something and just about jump out of my skin. There is a sticker on the windscreen. I go in and sure enough, we've done it. After almost 29 years to the day, the Marina has a fresh new WOF on it. All the hard work finally paid off. Soon to be updated The guy from earlier came over and complimented the car, saying how good it was and how good it looked underneath, and wishing me some good cruising over summer. He also clarified a note on the WOF sheet for me, that the bushes on the rear axle reaction arm are perished and will need to be replaced, but that needs to be done before the next WOF. Other than that, we were all good to go. Some strategic tape to cover the gap in the seal, since it was meant to rain. New seal to be fitted. I jumped in, the old girl fired up first turn of the key and off we went. As it's not insured yet, it went straight back into the garage for now. We quickly popped to VTNZ before they closed and renewed the rego, which has been on hold for as long as it has not had a WOF. I was 7 years old when this car was last on the road. It hasn't been on the road for longer than some of my colleagues have been alive. But here it is, back on the road again and ready to do some summer cruising. It's been saved from an uncertain fate where it could've been stripped for parts, chopped up or scrapped. A lot of people wouldn't have bothered to do the work it needed, but back in 2021 when I bought the car, I promised the seller I would get his dads old car back on the road. For a couple of years now I've been holding on to a little treat for the car (and myself), only allowing it to be fitted once the car is road-legal. That time has come. Off came the stock wheel, which is badly cracking and doesn't feel great to hold The boss kit needed a couple of pins for the indicator cancelling fitted, and then it was fitted to the column And my steering wheel of choice was fitted. It's been so long that I can't recall the size now, it's a nice black leather Mountney wheel. Compared to the original wheel it is slightly smaller, but so much thicker And it feels great in the hand It won't be to everyone's tastes, and I couldn't care less. I like it. I wouldn't be a British car owner without some self-deprecating humour too A huge thank you goes out to everyone who has followed along, all the comments and support, and to the people that have helped out with knowledge/advice and parts when needed. There is still plenty to do to it, and it'll have some money spent on upgrades soon, now that it's proven it can get through a WOF. For now though, once the insurance is sorted, I just want to get some Ks on it, give it a shakedown and see what happens.1 point
-
Sorry mate just seen this. Here's some bits I found helpful Cheers
1 point
-
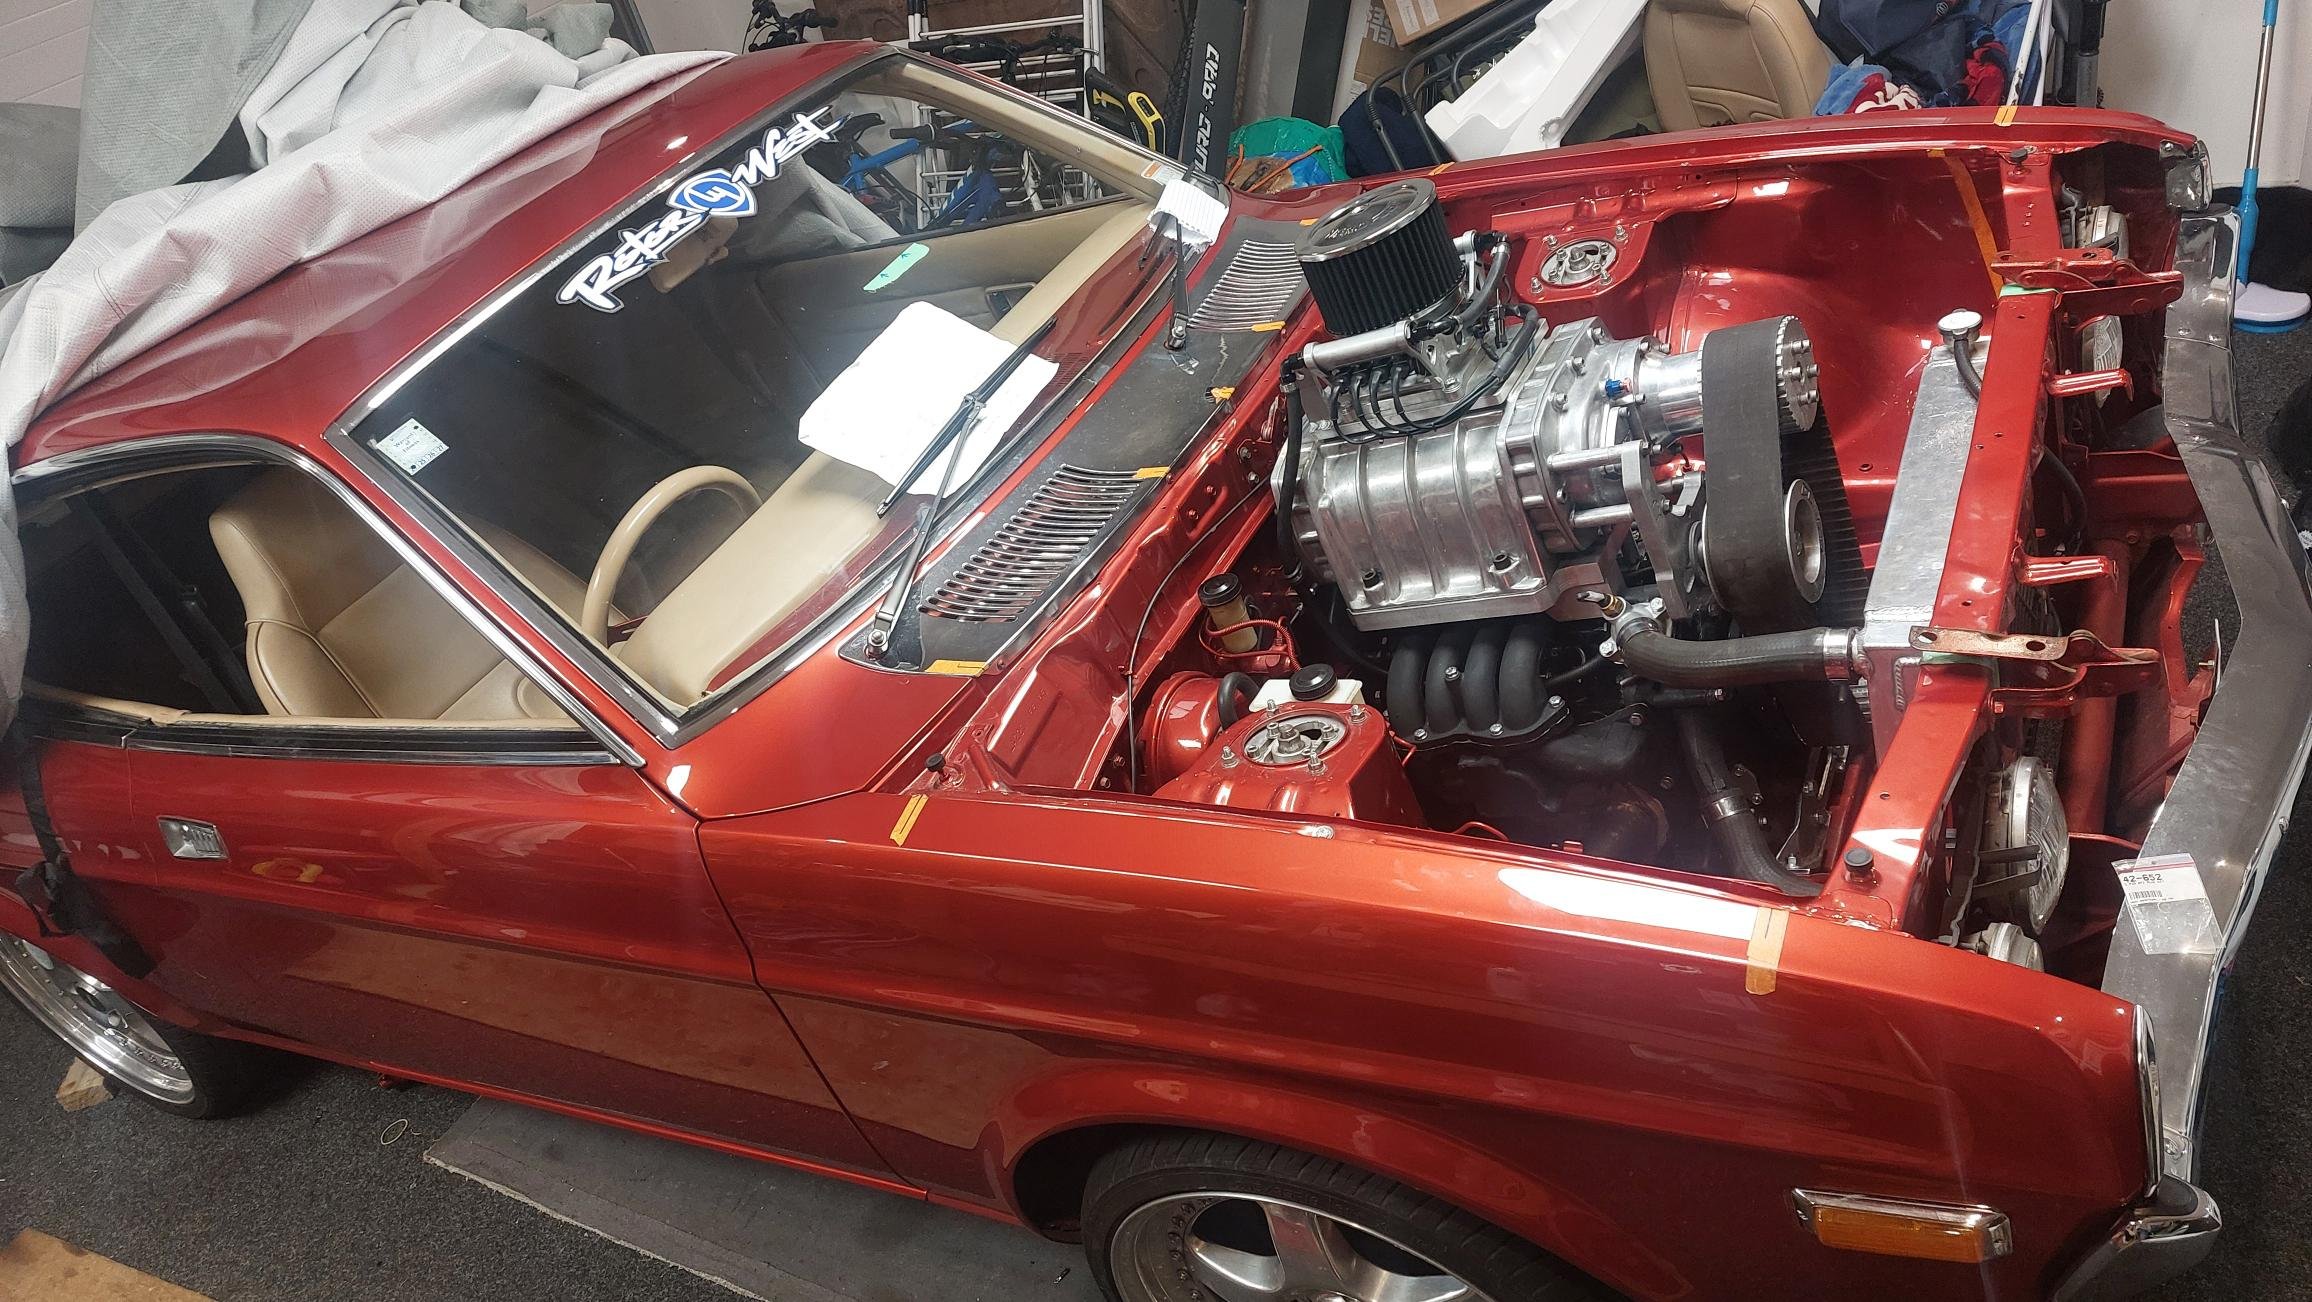
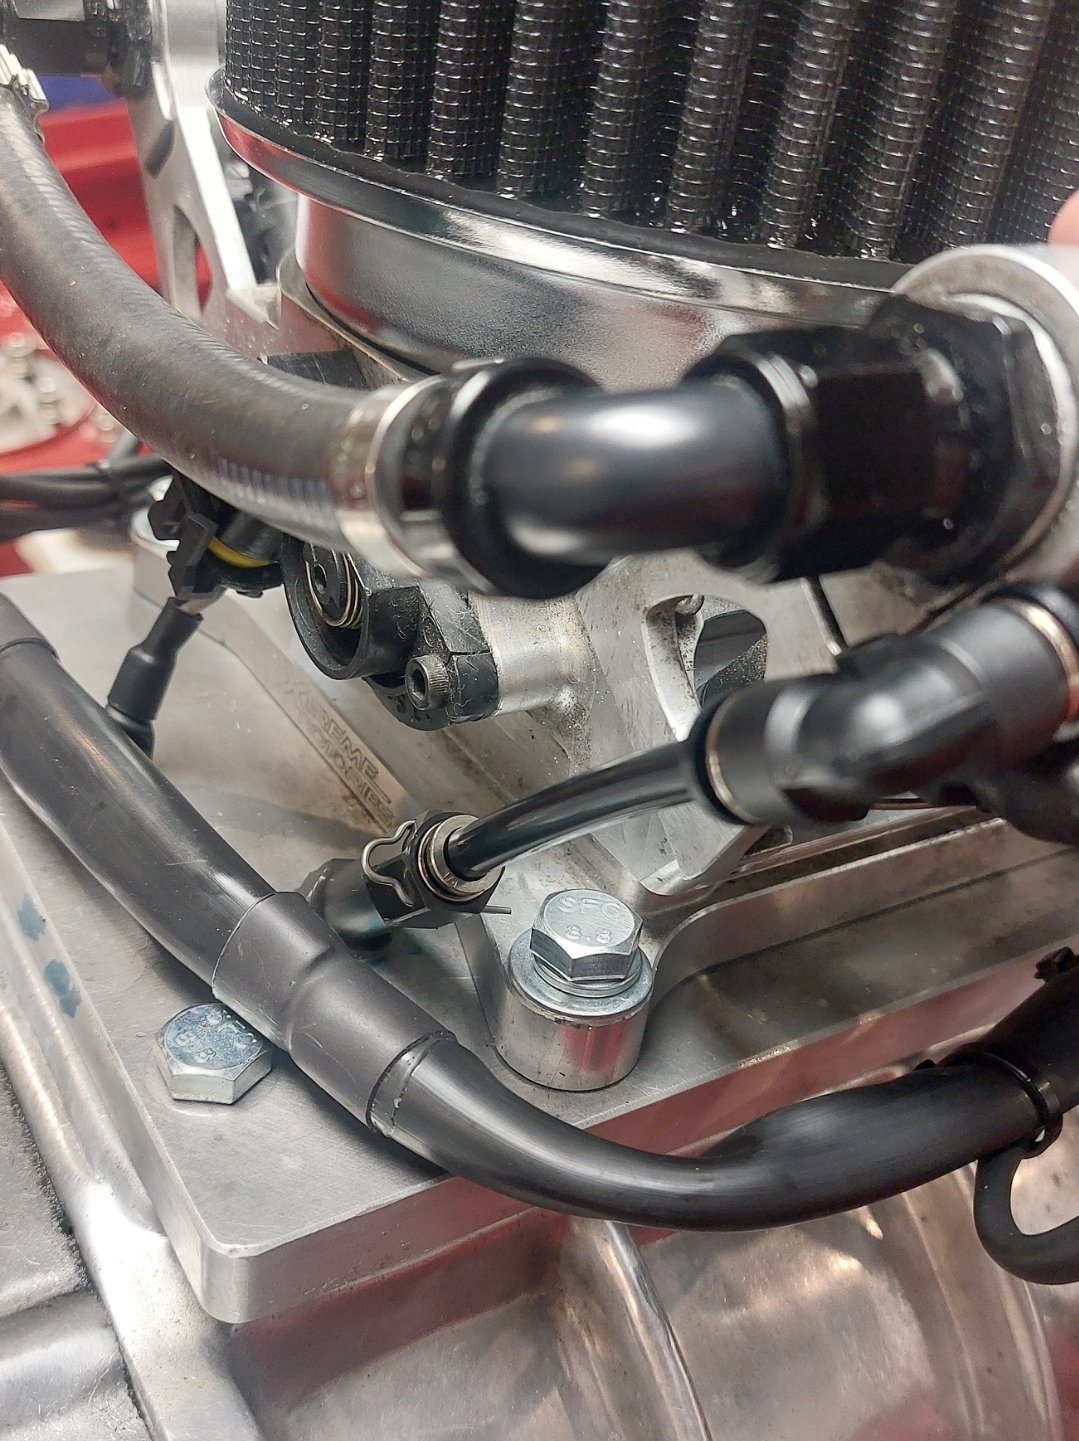
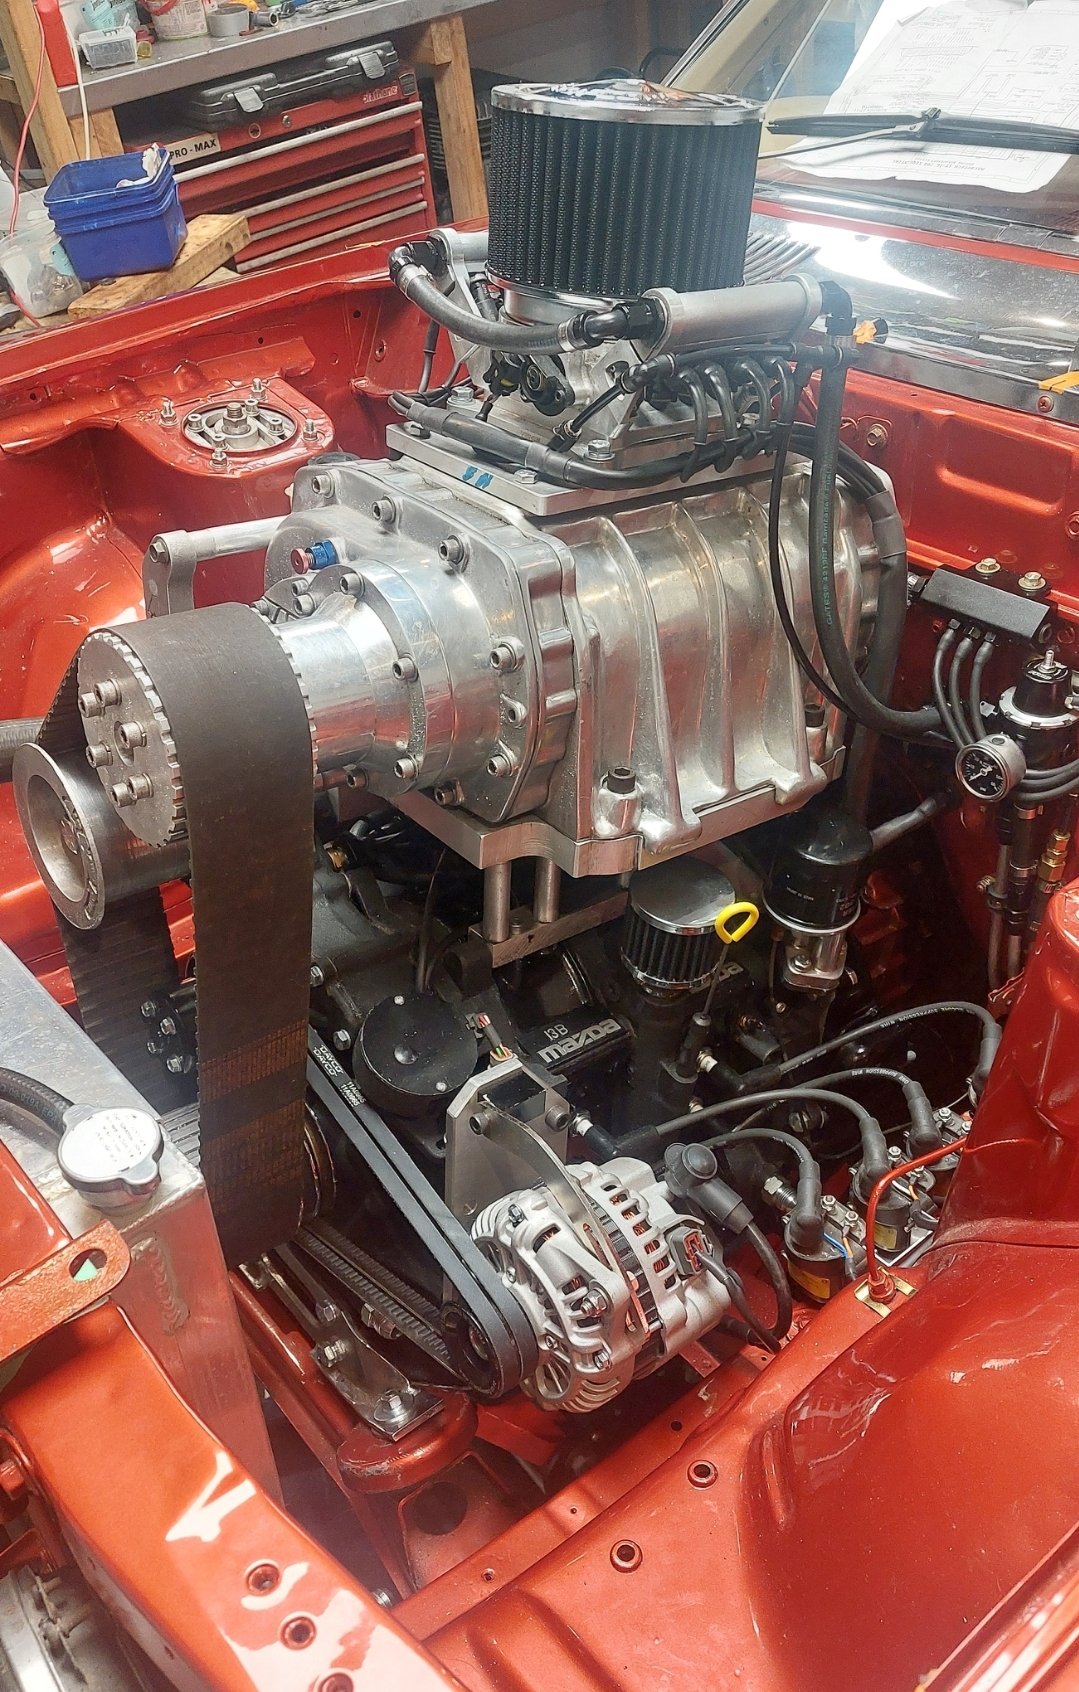
Engine bay 95% done, just need to sort throttle cable, tidy/clamp wiring, fluids and radiator overflow. Decided to run 2x water meth injectors either side of the throttle body, this is to spread the mix right across the vanes to aide in cooling, and also help ensure that both rotors get a dose to help stabilise ignition. One if the injectors is faulty, so also waiting on a warranty replacement for that. Air Filter sorted, although won't pass cert due to height, but I'll sus something come cert day to deal with that.
1 point
-
Any specs to share? For any future sickos working on LD28's1 point
-
So continuing on with the saga. No one really had any cam bolts in stock including a wrecker locally. As I suspected. I made a call to a wrecker out passed Waingaro hot pools and he said he might have a gsxf650/600 i could rip parts off if they worked and I had put up a post on a local fb page and a guy said he had a bandit1250 with spare bolts, so on the way out to Waingaro i stopped in to check the 1250 bolts he had. 10mm to long but I grabbed them anyway along side some dowel pins I was short of and some spares. continued on to the other wreckers and this is what he had for me. Limited tools and borrowed tools from him we cracked into the job. 20 new/second hand cam bolts the right length for $10 and 6 that were too long from the other guy and I think we were ready. Made a trip to malcolms house and the longer ones were able to be shortened with enough thread on them. He used a left hand thread drill bit to get the broken stud out earlier that afternoon. Made a plan to pop around the following night at 730 to finish it off. To which I turned up at 725 and the cam cover was going on and most of the hard work was already done. So I slapped the rest of it together and we had it running and out the door at 9pm Night speed drag wars here we come! Friday came around and we left Hamilton just after 4pm getting to meremere just on 5pm, qued up for tech and paid our fees and our 1st test runs were made at 630pm My first run felt good. Really good to get it out of the way and kill the nerves. 12:557 @ 111.05 might with a reaction time of 0.160 Very happy with that for my first run ever. My second run was 12.7 and the bike bogged a bunch after leaving the line. I'm number 024 for reference. Third test pass and I was asleep on the tree. Old mate on the Harley red lit haha. We then went into dyo and I set mine at 12:38 thinking if I broke out at that I'd be happy to loose breaking out. First round of dyo I won Second round I won 3rd round I had a by Fourth round I broke out massively and went 12:20 Over all coming 4th position in the bikes. Absolutely stoked for my first night/event of drag racing on a bike. Was really great to see the drag scene alive and thriving last night and cool to see this 39 and a half year old bike still able to get out there and do it while been competitive as well. Got to remember as the night gets later my bike will run faster with colder air so I'll have to button off at the end of the strip so I don't break out as bad. Got home and 12:40 am and my trip planner registered that I done 180kms for the night from home. 10/10 will bang again. Next round is on the 15th of November. Stay tuned for more yarns.1 point
-
The Imp has a blacktop 4AGE in the front. It goes extremely well. Imp purists hate it.... you two would probably get on well
1 point
-
Actual work: Threw a couple of hubs in my blast cabinet yesterday, I hadn't used this for ages as my old hobby compressor was too teeny to work, but I had high hopes for my new bigger, belt drive job... But nope, still not enough air to work properly, even tried converting gun to a funnel filled, gravity feed system, with no real joy. Also tried fitting my pressure tank blast system nozzle into the cabinet, which sort of worked, but only in bursts if you kept turning the air off to build pressure. In the end I connected both compressors via a tee fitting and struggled away ineffectively knocking old paint and rust off... And drilled out the rivets of the rear hub as I wouldn't be using this sprocket... Then thought buggrit, and made a jig up to clean up the hubs in the lathe with emery paper, which went much faster... And when both were done I hit them with some durepox. Sadly my white stuff had turned to rubber in the can, which sucks as it's expensive, but I had a new can of light grey... So good to get something done. Now to look at the fun stuff, lacing wheels and inexpertly machining something...1 point
-
Here's some pics of my misery... Bluey... Greeny... and the Grey ghost... (sitting atop a spare CT110 engine) I paid a couple of hundy for the green & grey ones, planning on building a complete bike out of the 2, then the blue/red one came up locally, that is fully complete...1 point


This leaderboard is set to Auckland/GMT+12:00