
Leaderboard


Popular Content
Showing content with the highest reputation on 03/20/24 in all areas
-
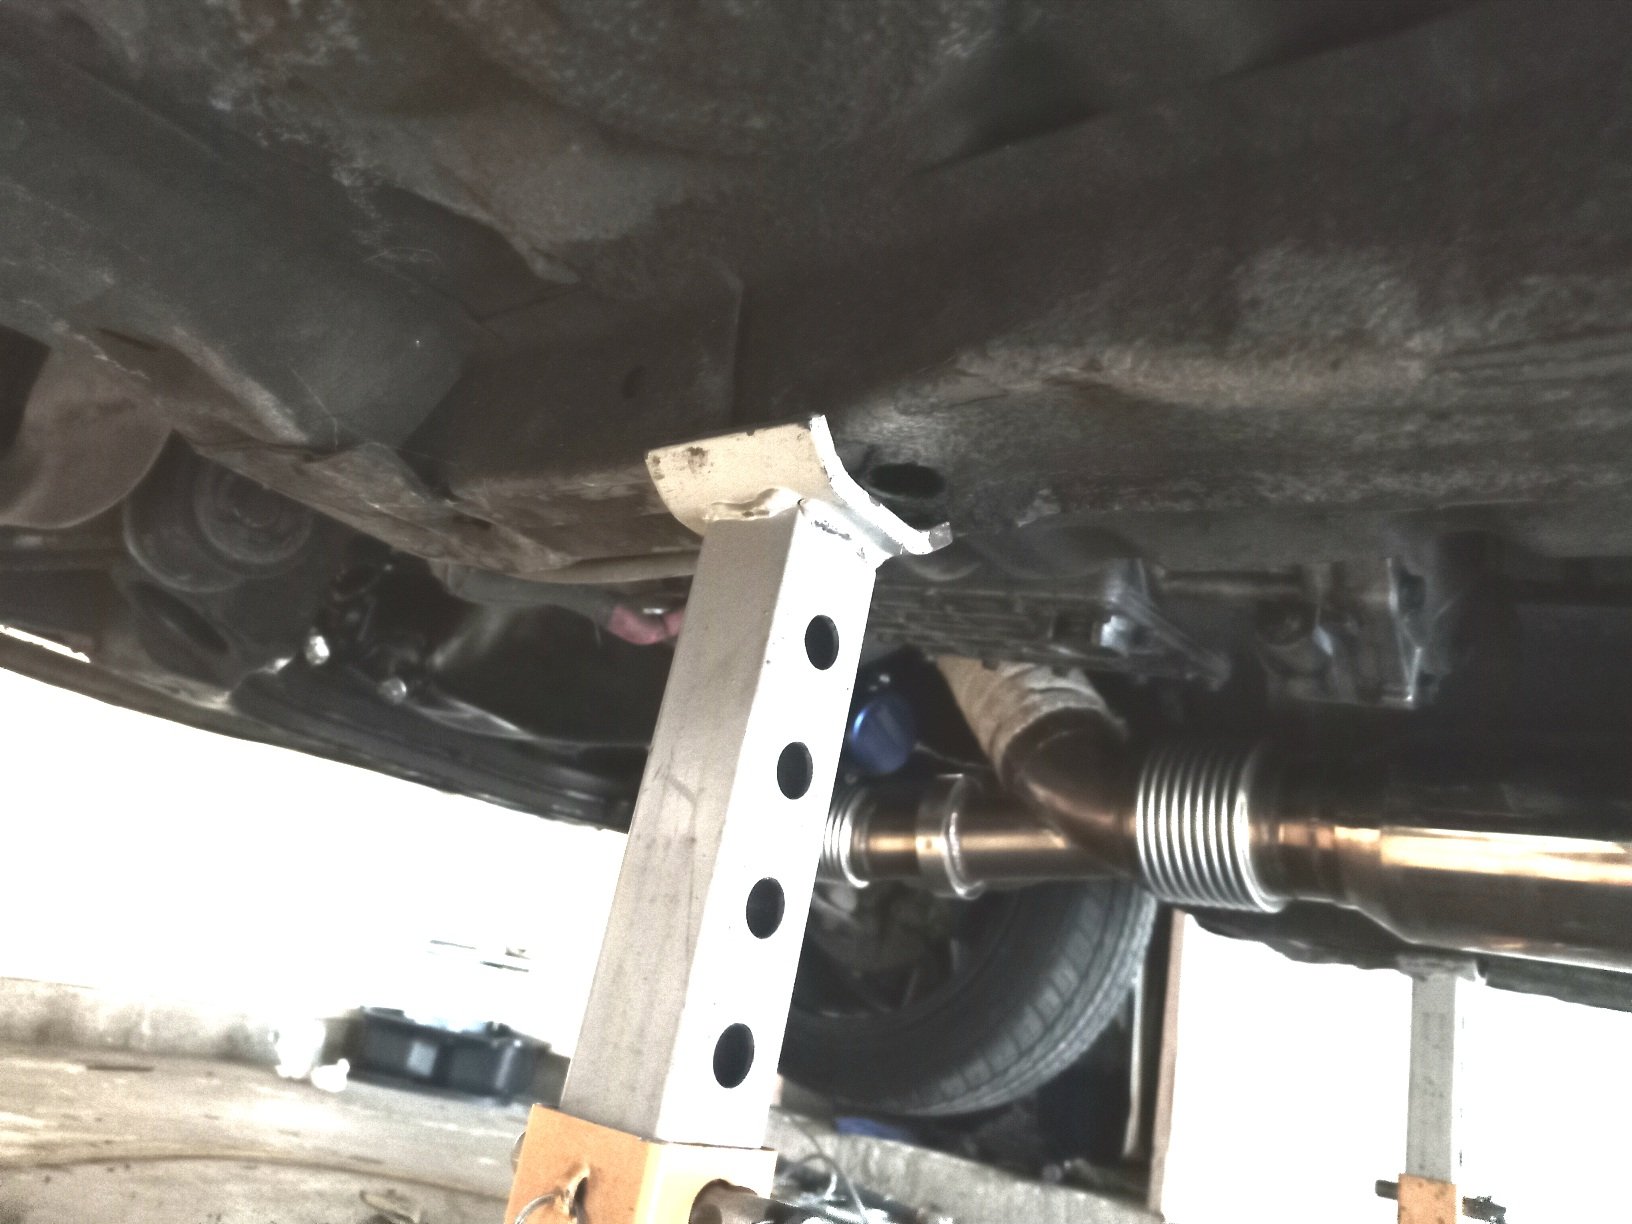
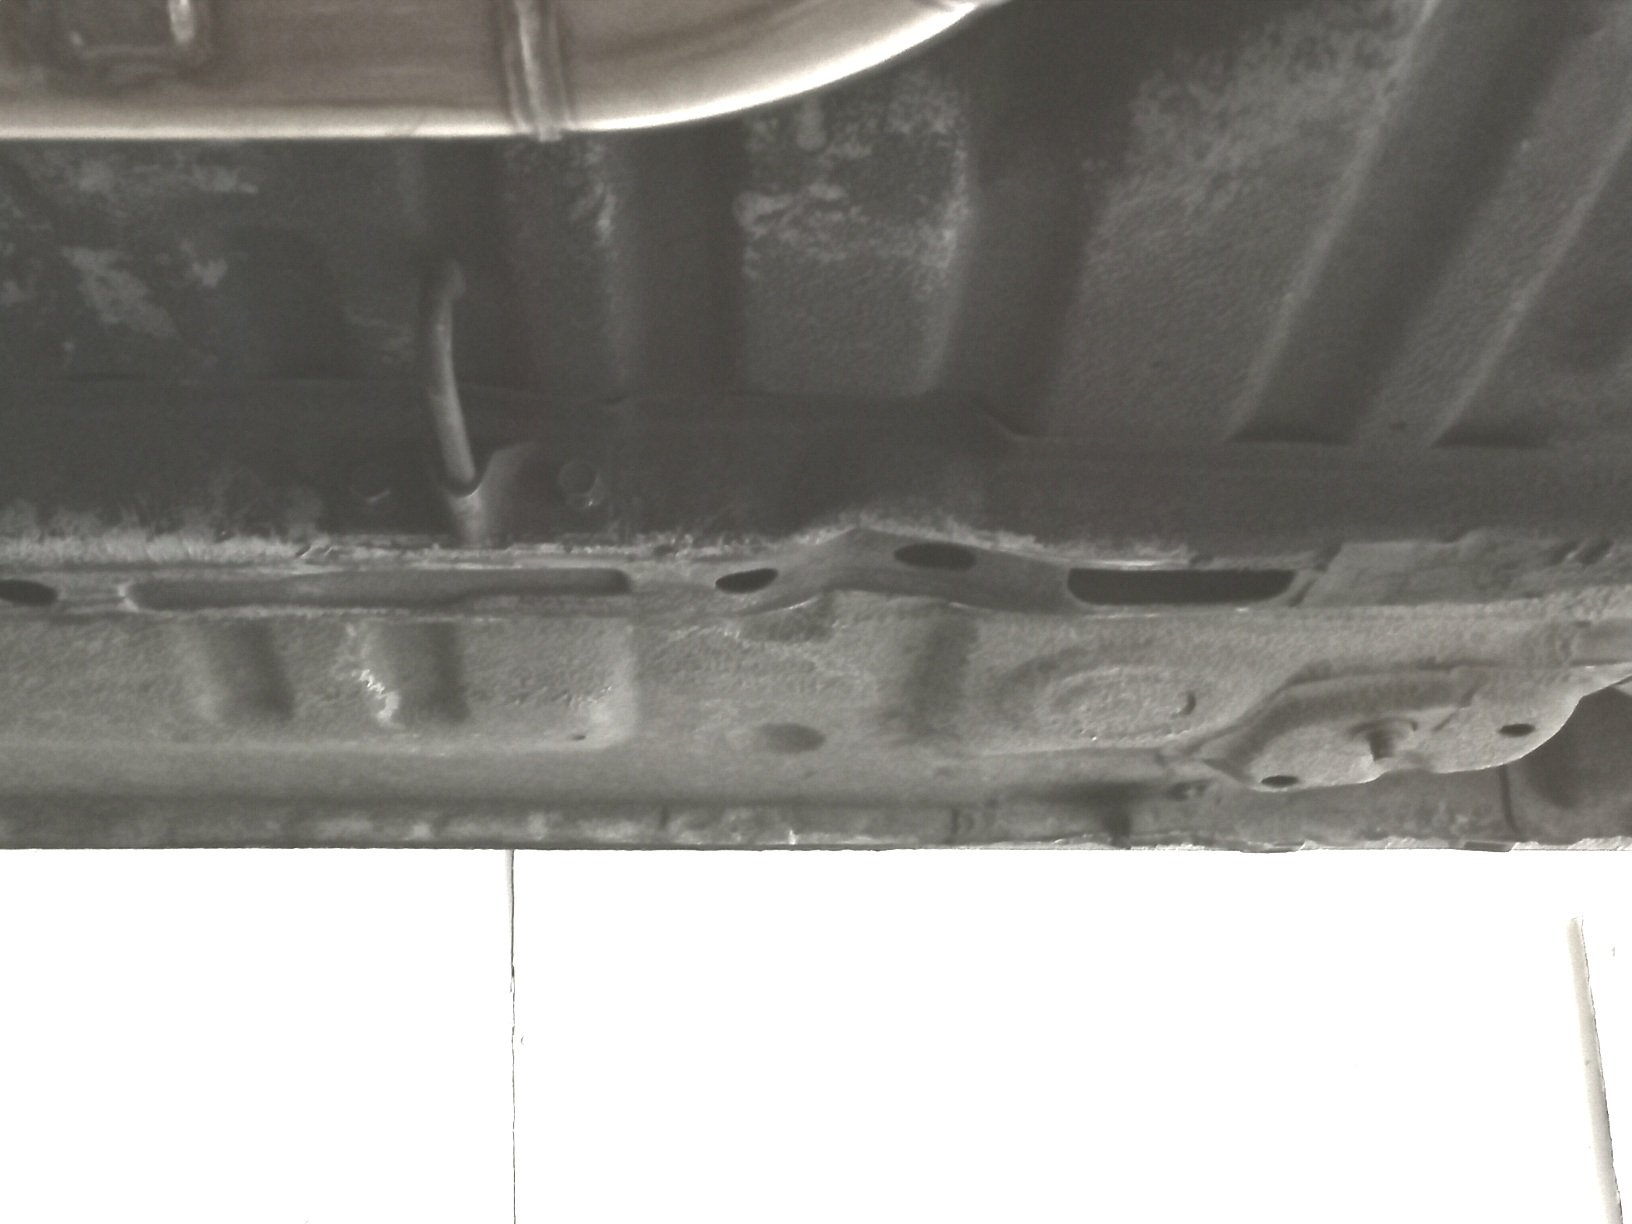
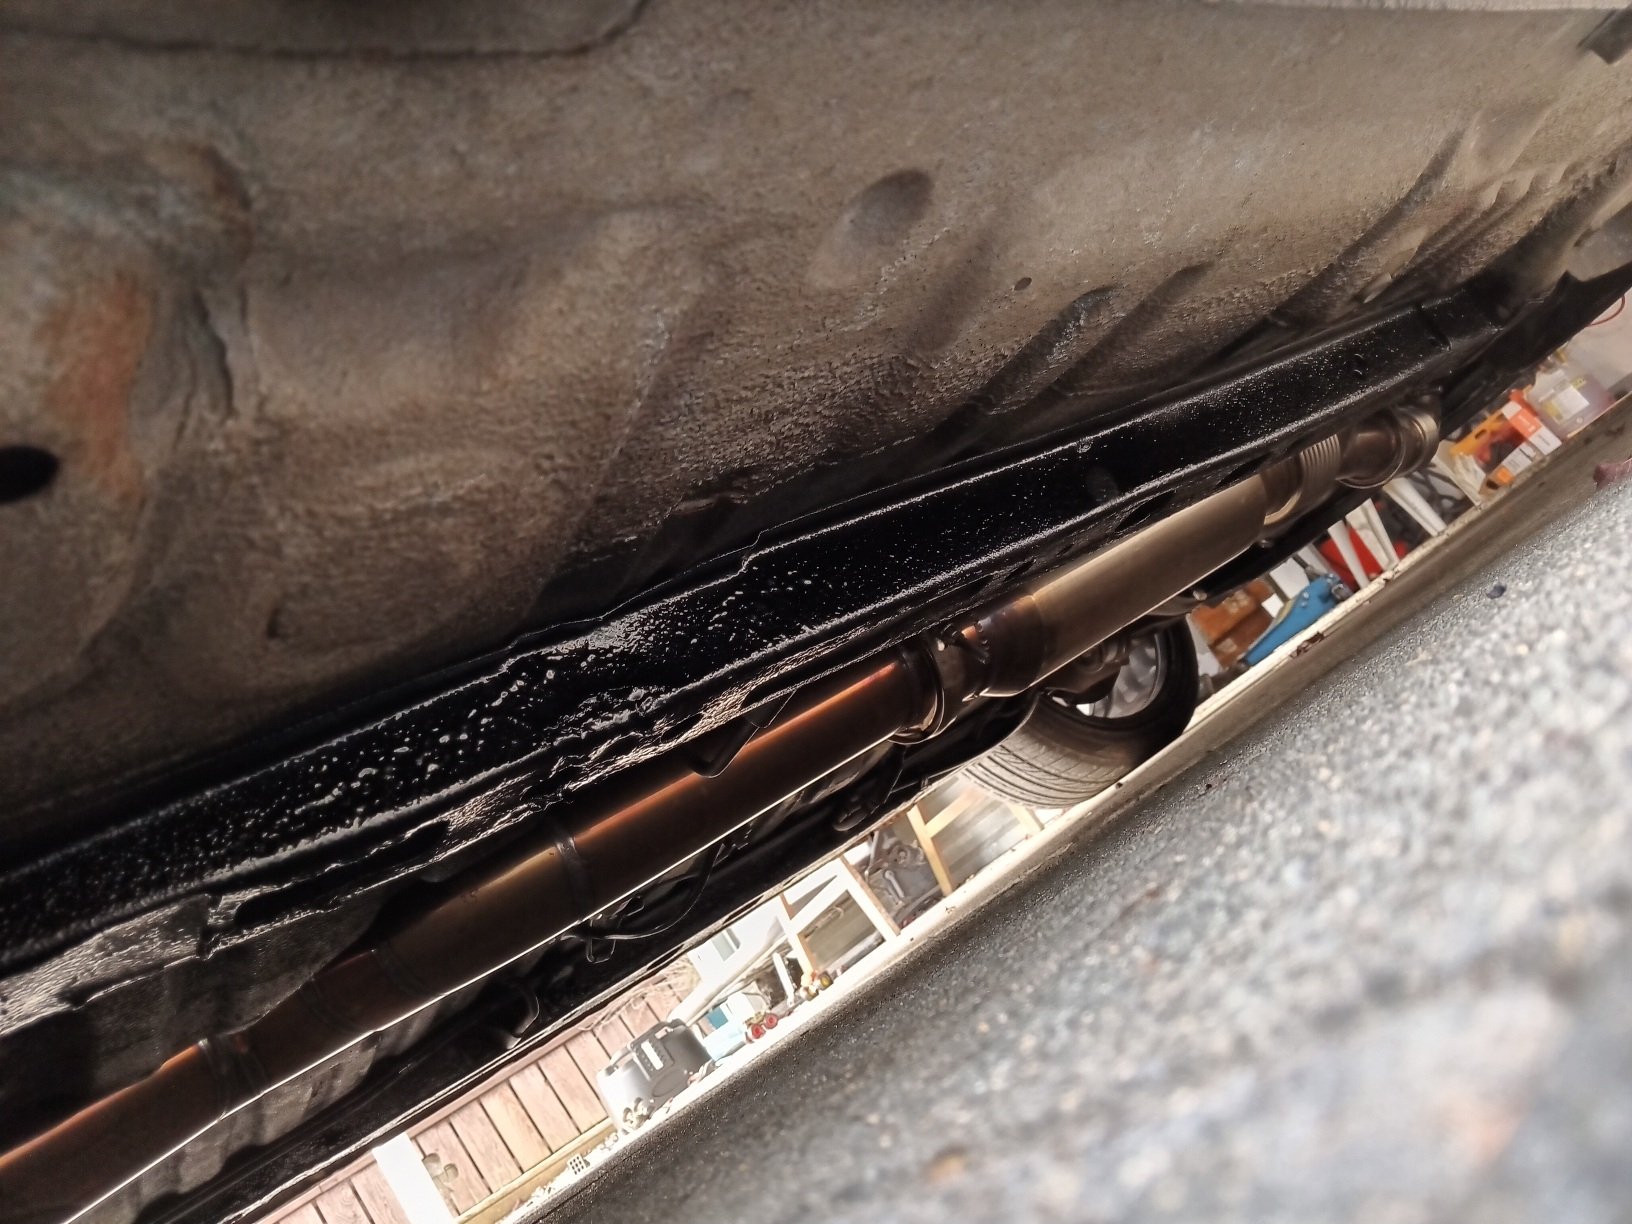
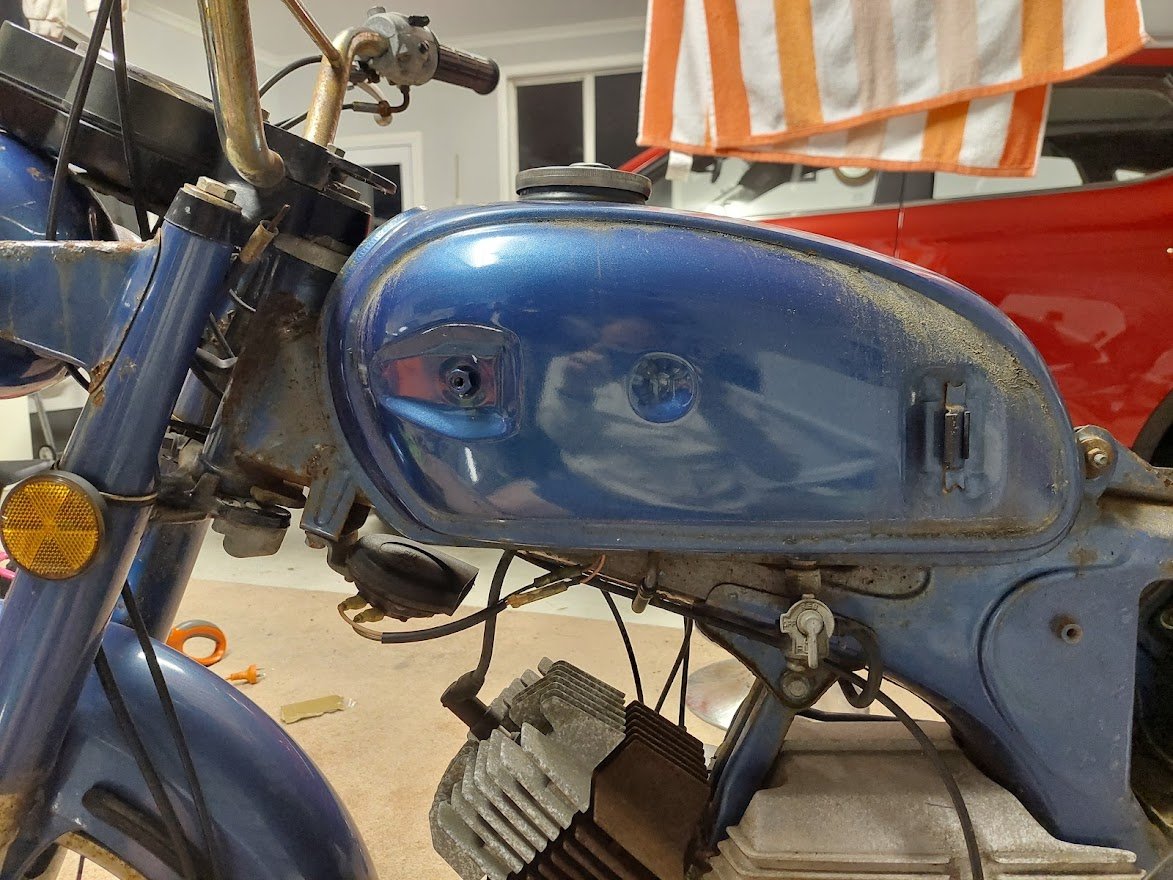
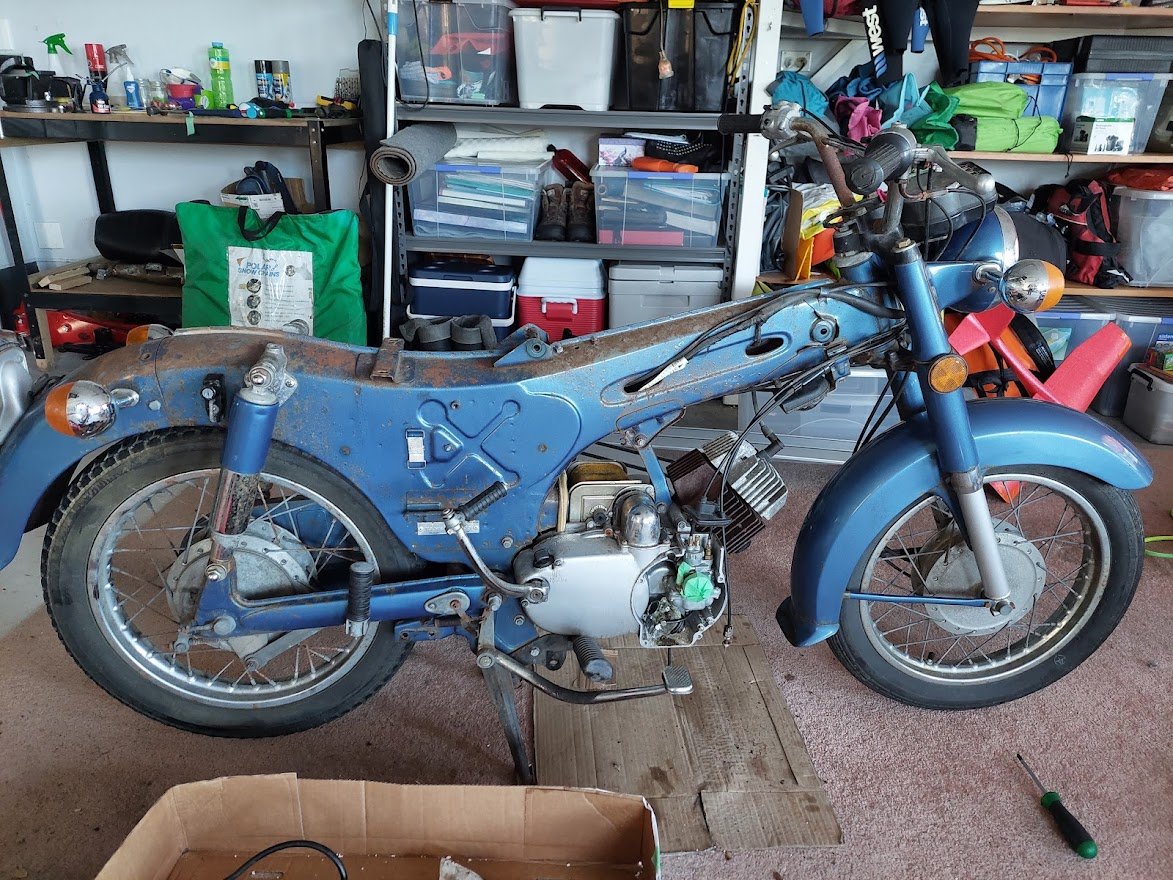
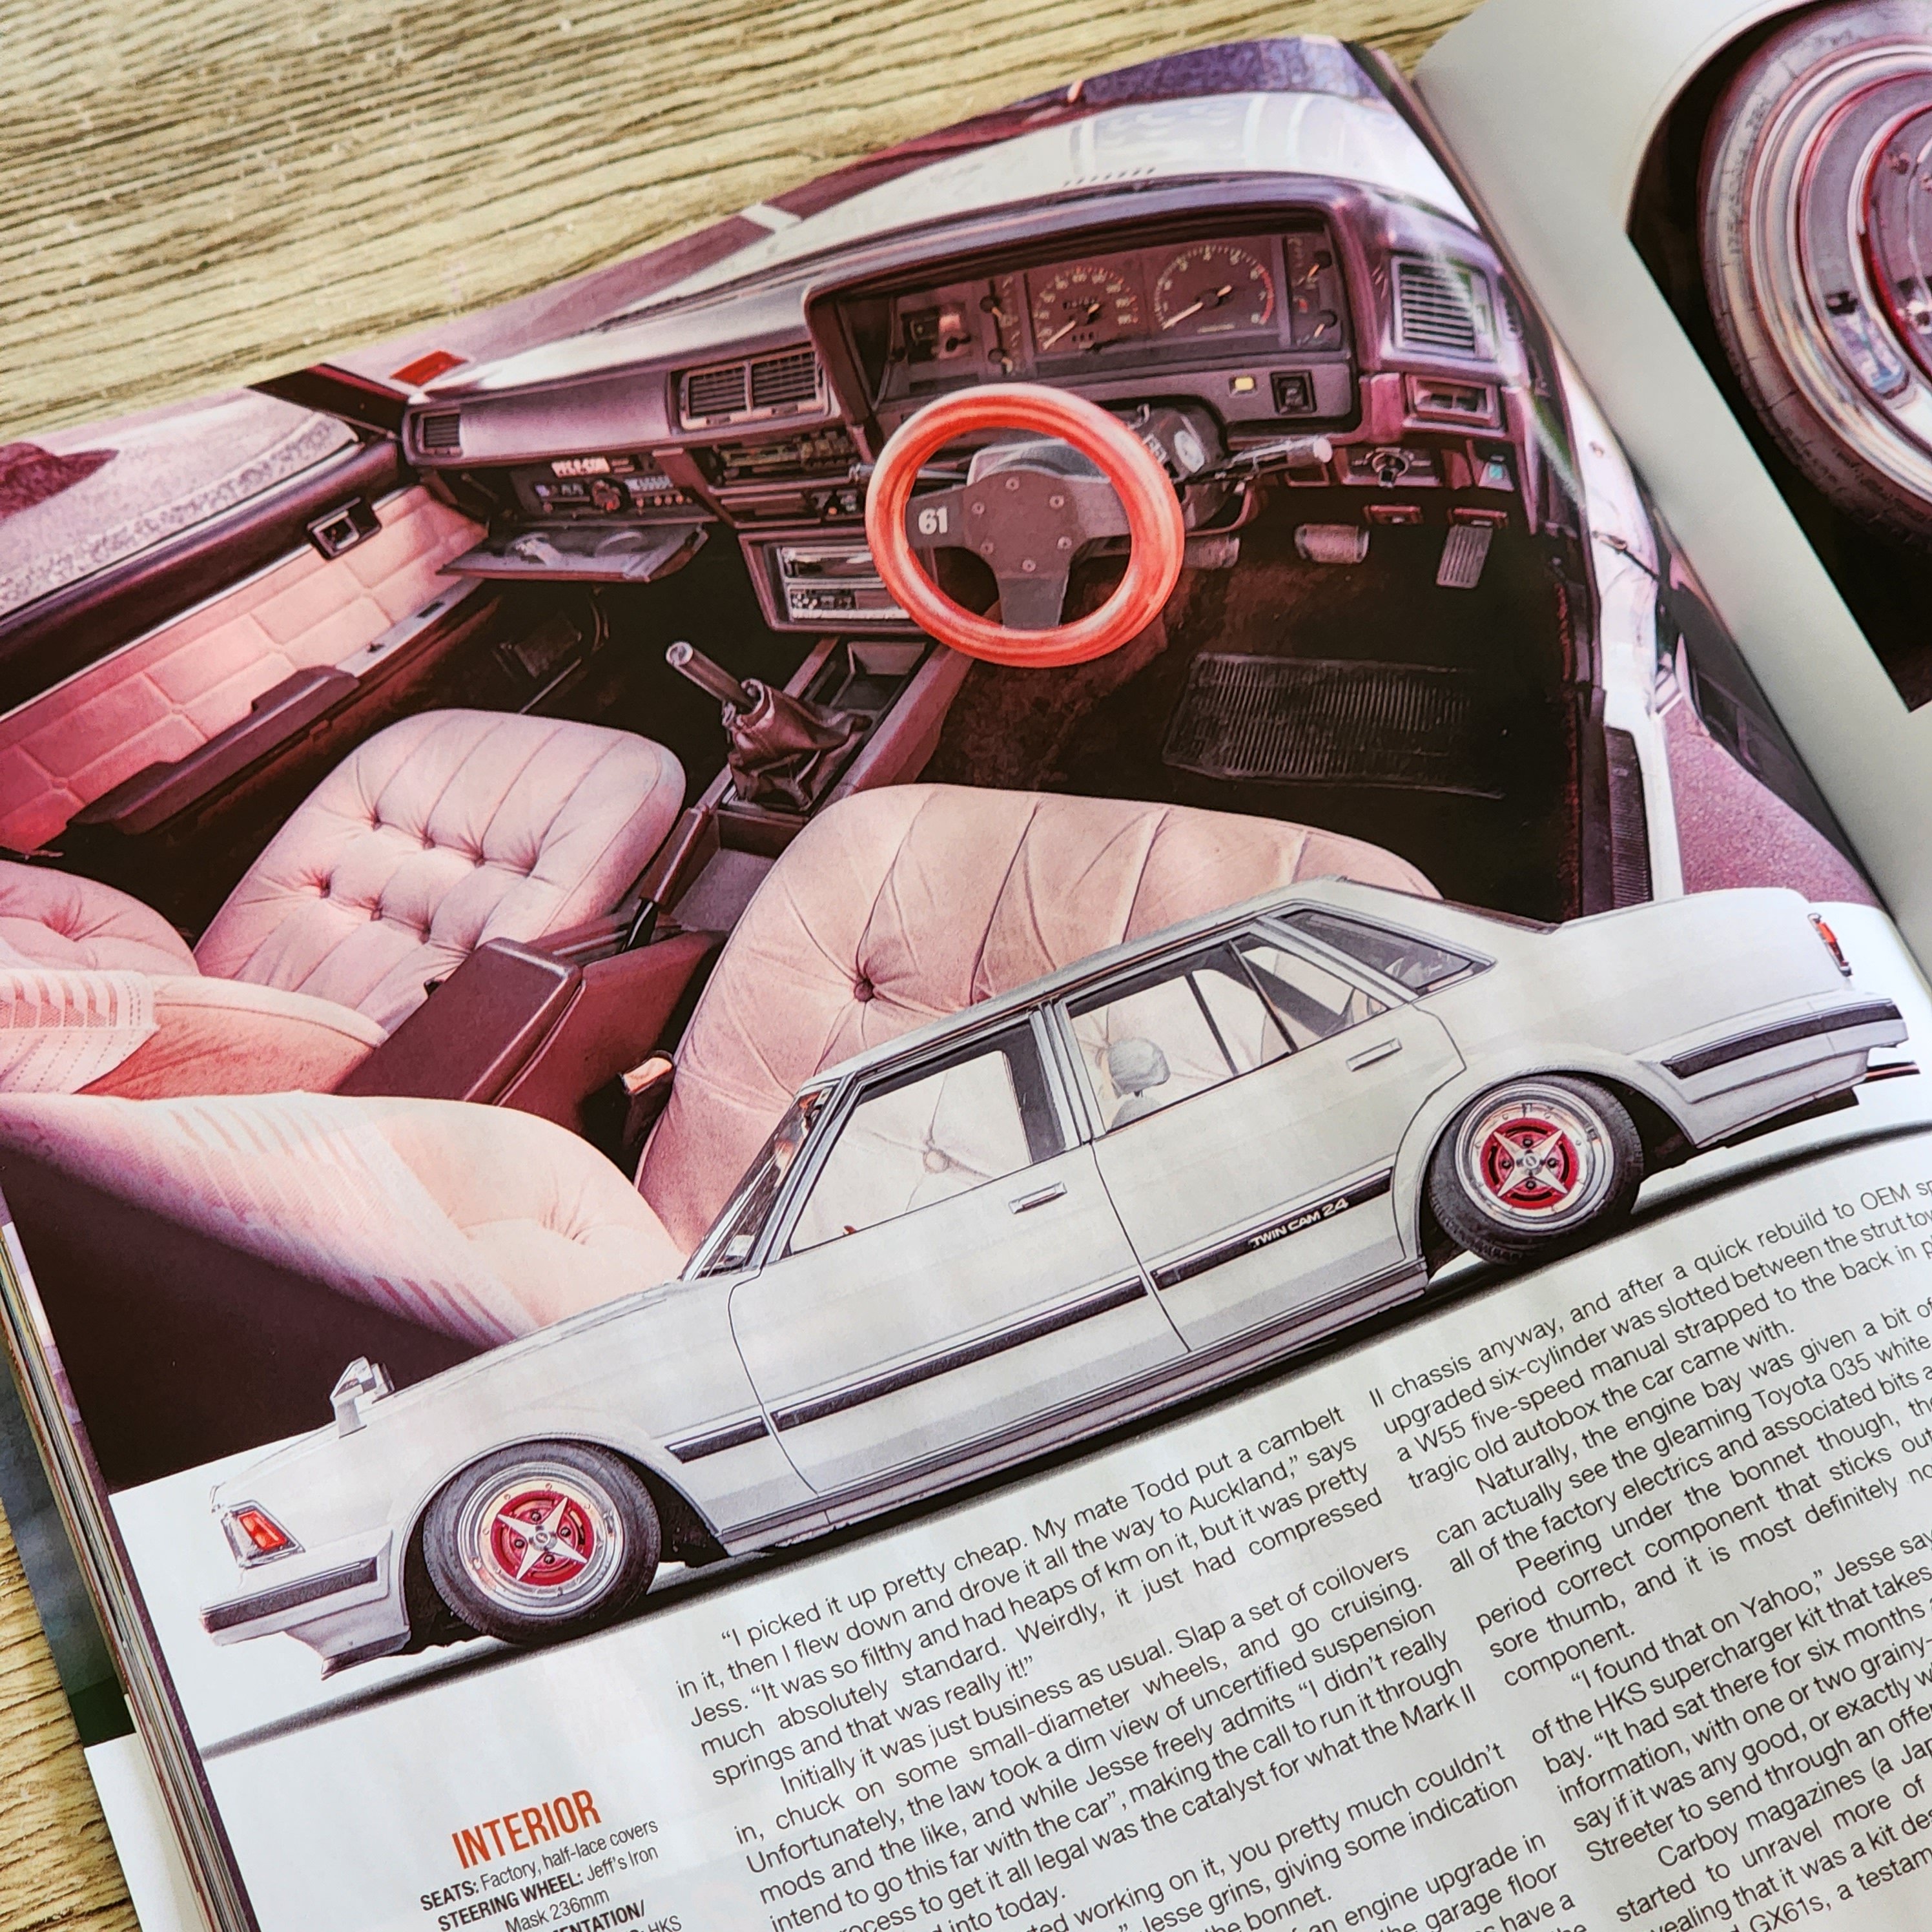
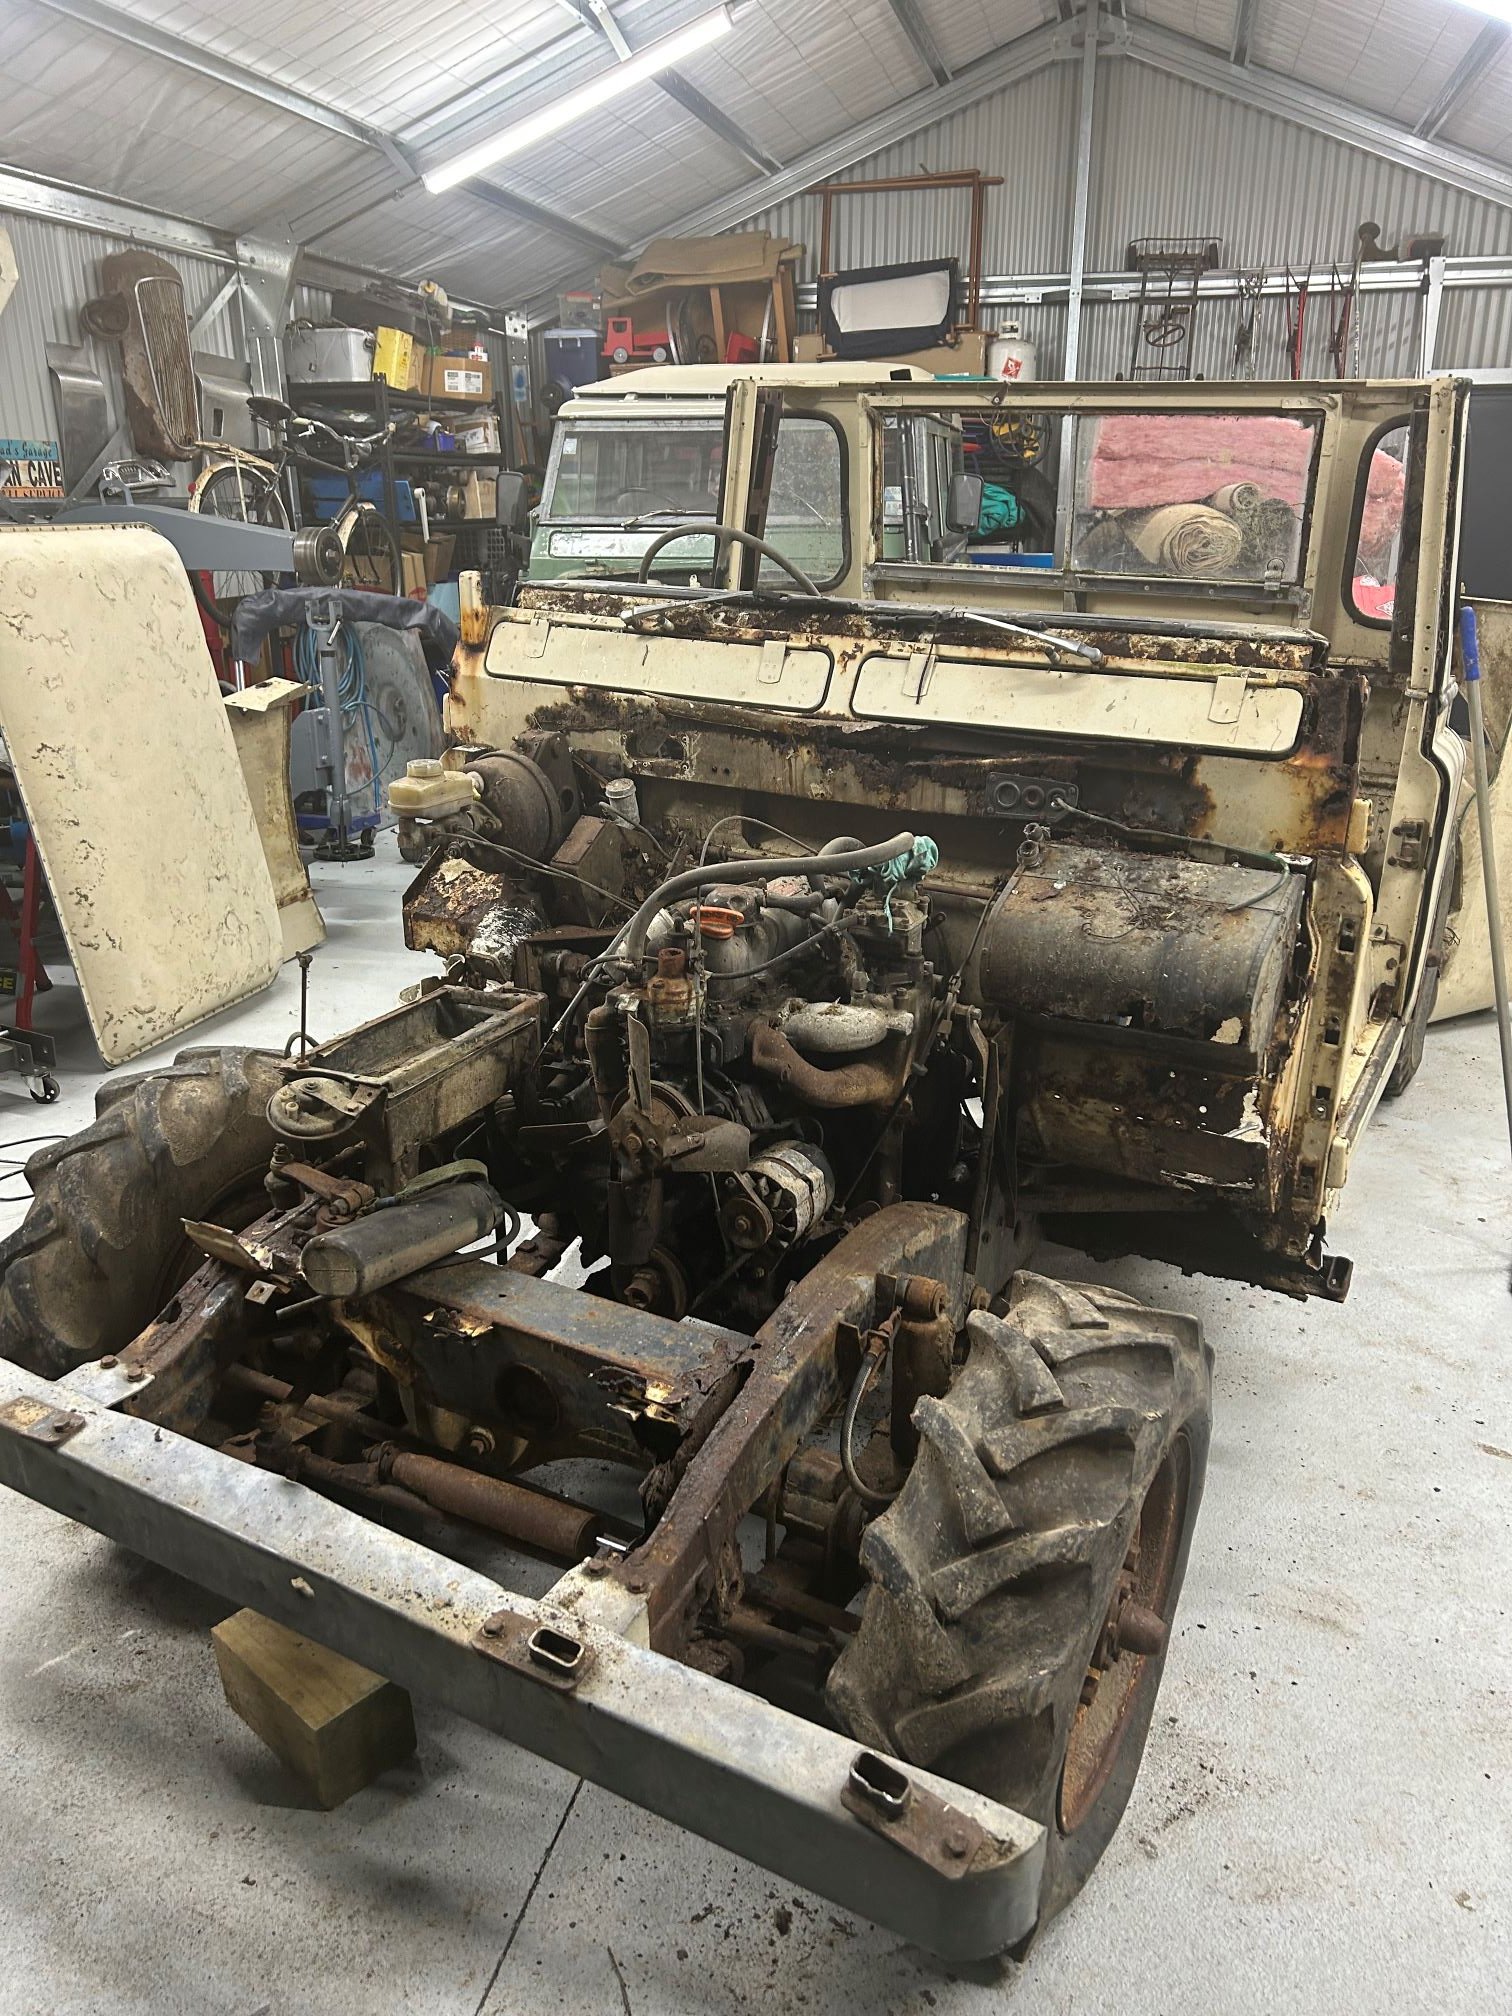
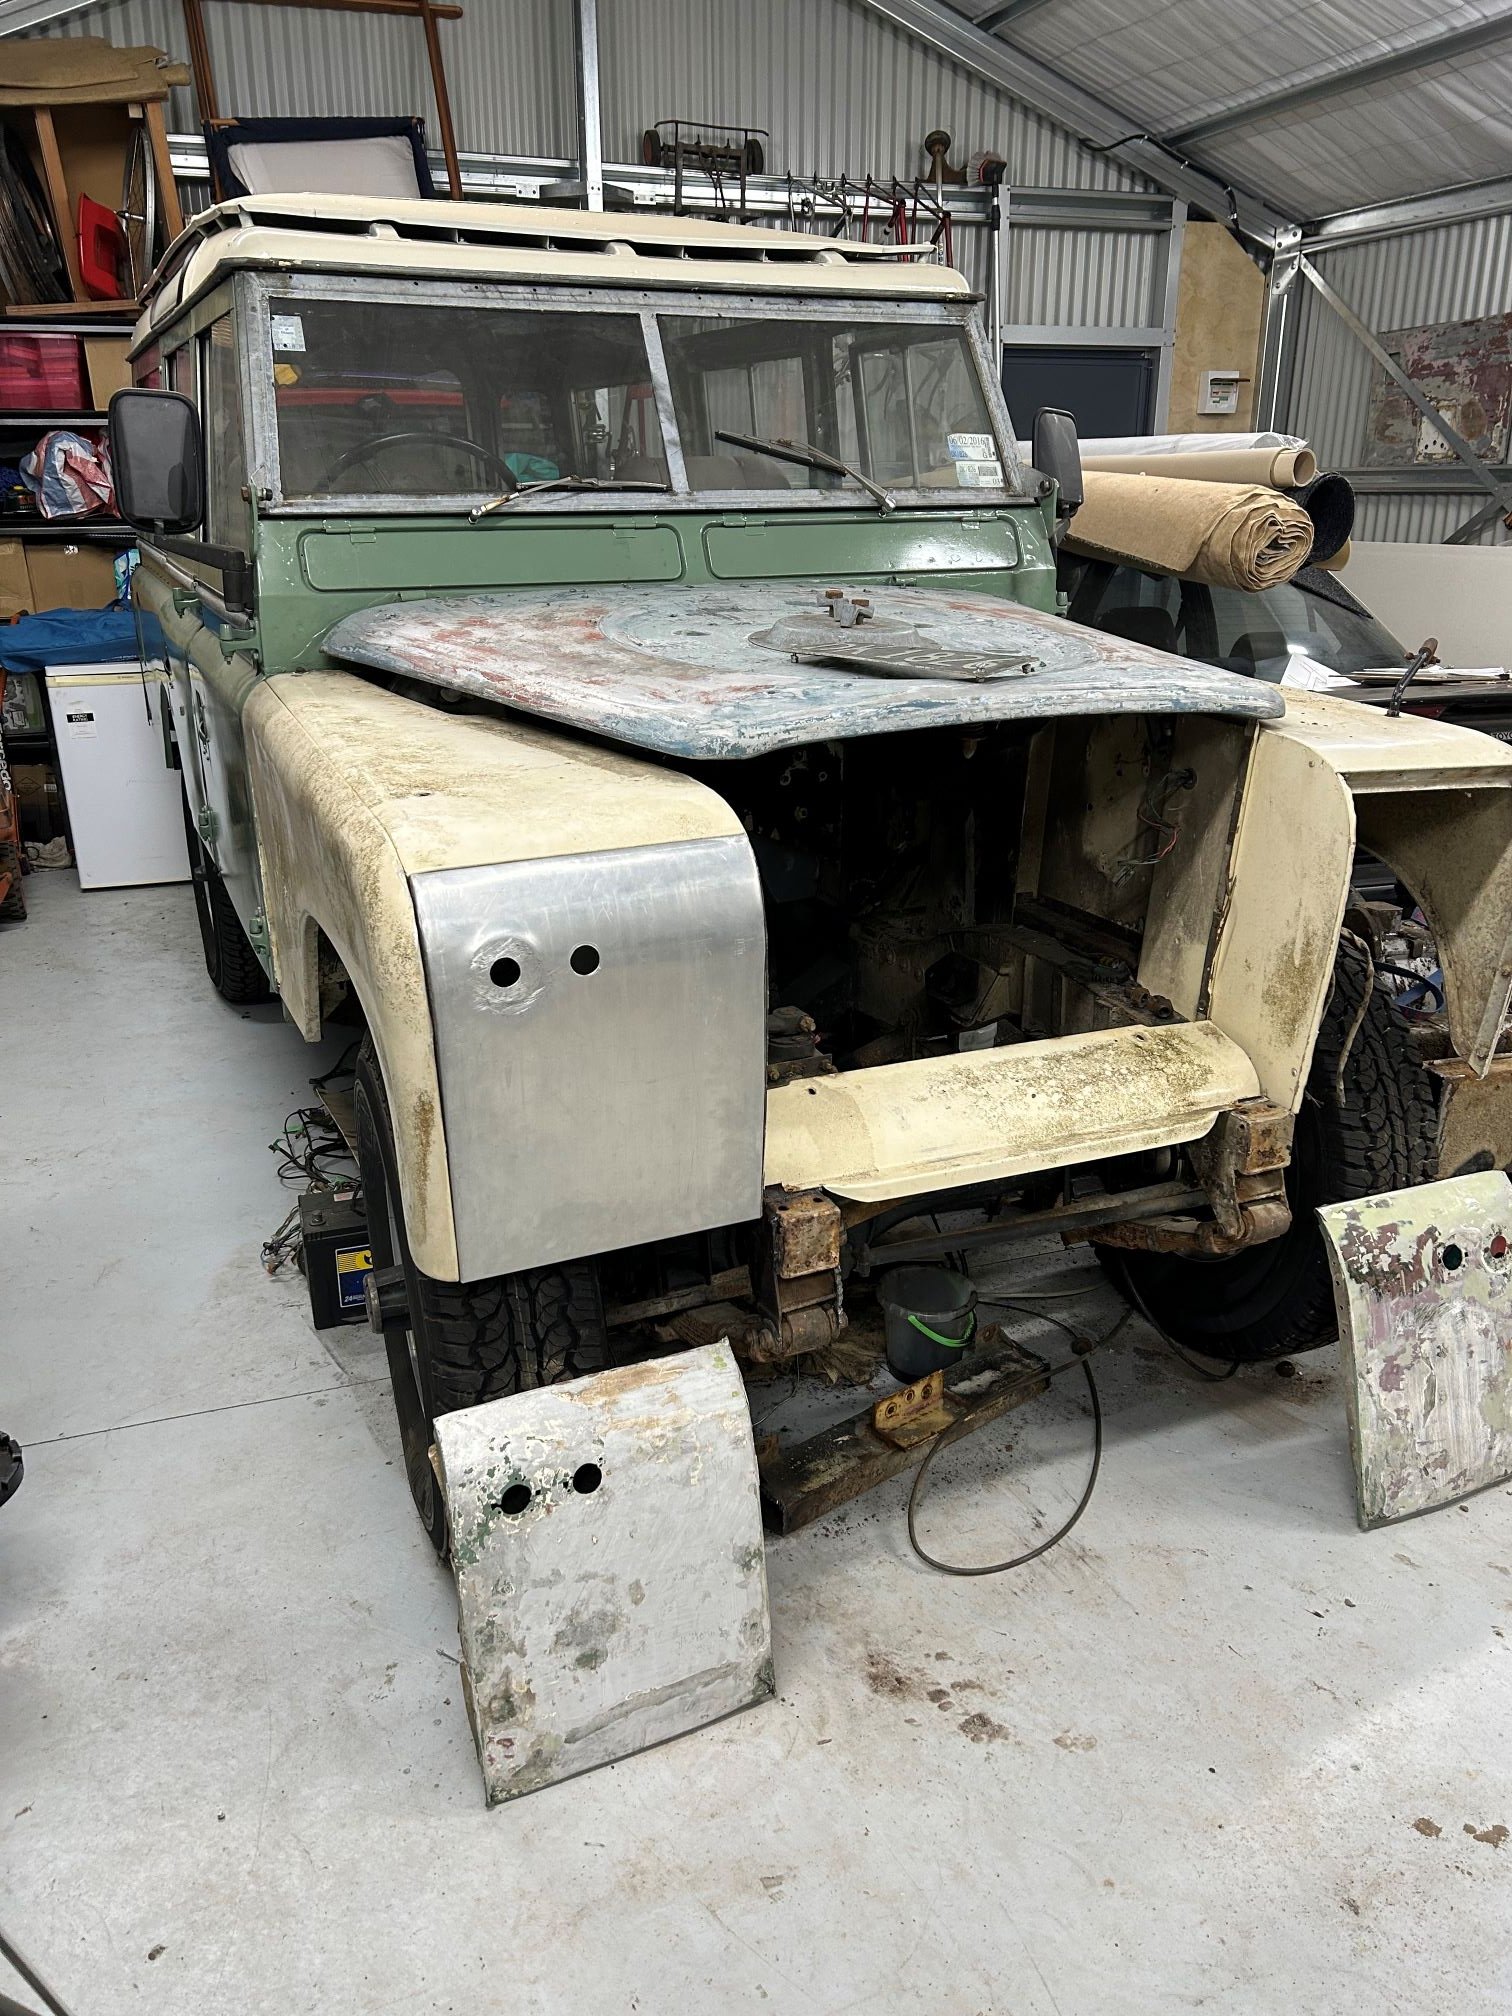
So it turns out when... your daily/operational fun car breaks down and you decide to take on a huge DIY job to fix it that you know eff all about you specifically lay out your mortgage repayment strategy in front of you and truly understand the ramifications of paying off even tiny amounts of principle early in the loan and decide to restructure to get every little spare cent going into it that you can scrounge up you pick up a second job the remaining work on your project car kind of hinges on either a stupid amount of unappealing and tricky skilled labour, or collar-tuggingly large amounts of money to pay for said tricky skilled labour ...things on your project car tend to slow down. But I figured I should post something because otherwise I'll totally forget everything that I've done and I don't want this project to fade away. Before I put all the fuel tank stuff back, I was messing with panels. One of the pre-reqs for the panel work is obviously that it needs to be all stripped back, and I decided (with panelboi's blessing) to do it myself rather than mess around with the local acid dipper or with transport to a more reputable one hours away. The idea is to just pick some reasonable panels, strip them, fit them, and then I've got a clean no-surprises job I can show around and get some better quotes and info on. I test-fit the rear bumper from the original black car and it didn't quite sit right - the panel gap was inconsistent no matter how I fudged the fastenings - no pix unfortunately, so I went with the red's bumper. It fits a whole lot better! Next up is all the front panellage. The two bonnets have their issues so it's really a toss-up, but I opted for the red one as it seemed to be a bit more contained in its damage. Both nose panels are totally fucked so... not sure what I'm doing there just yet. But fitting the nose panel reveals some fun. Uh-oh. Fitting the bonnet and popups makes the problem a bit more obvious. The black ones are just as bad - no pix soz - so it's not just a "different donor car" thing. The frame repairs were done with the fenders and bonnet available, though not the other panels. I need to get in contact with the panelbois to sort out a warranty claim, but the last couple times I tried they didn't pick up or reply. Hopefully this doesn't become a struggle :\ Anyway, forging on. Key and clean. Apply stripper and keep wet with plastic. Create murder scene. Scrape. I probably should have applied more stripper here but newb. The fenders are all pretty crap. The one I've already lightly beaten into shape and stripped and durepox'd is the one that had a minor collision, so you'd think it'd be the worst, but it's actually probably the best one. There's no rust and it's otherwise totally straight. All other fenders... well... So I decided to just keep the fender I've already epoxied, because it's probably easier to bang it into shape than any of the others. The red driver's side fender seemed marginally better than the black one so I went forward with stripping that. I busted out the paint stripping wheel for the grinder to finish it up. I'm not really sure this was a good move - it's nice and shiny, but possibly a bit tricky to spot the imperfections in the panel now? Then the nose panel and popups.. Everything back on. You can see here what I mean about the swirlies making it hard to gauge if things are okay. I'd already taken a sanding block to the driver's side fender in this pic to try and make the flat bits even. As you might be able to tell, there's a fair bit of damage to it... there was quite a bit of bog at the front and the rear of the fender. I think it worked, so I did the rest as well. As you can see, there's a few low spots and dents, but I think they'll hammer flatter without any major headaches, and even if they weren't, they could probably just be straight filler'd without failing. The chunky spot is the part I already knew about - the front corner which had a giant slab of filler applied and has subsequently received a lot of pitting. There's also a spot on the front edge of the bonnet that has numerous rust holes, hidden under a small but deep patch of bog. Honestly, it seems saveable - though I'm also far from an expert here! The pop-ups are fine, no dents. As expected, the nose panel is worse than the surface of the moon. It's probably not worth trying to save and I should just find another one. It's also super easy to dent these to begin with; they're the most natural place to push the car from, and there's almost no structure to them. If I do get a new one I'll try mod some gussets into the back of it. Side quest to put the very first thing I restored on this car back onto it: the fuel pump access panel, which a few years ago was extremely rusty. The CRC black zinc has held up strong . Spot the fasteners and grommets stolen from the red car... Speaking of the red car. It's door time. On both cars, passenger sides have a couple of dings but nothing crazy. Also on both cars, the driver's side is absolute dent and bog city. I have pix but they suck so just hold on till the strippy bit to see what I mean. All the doors also fucking suck at the bottom. So I just went with the black doors since they're both right there, already half-stripped, and the red car is currently sealed from the elements. There's a few holes at the top as well. Annoying, but the rust seems fixable. I completely stripped the doors - which was a massive PITA when it came to the door latch, only removable via black magic / the completely wrong method. The mirror blanking was just gooped in place to fix a broken bracket. Also there was a little protective metal edging strip along the open edge of... just one of the doors? The red doesn't have these. Japanese mod + replaced door? Anyway, it's strippytime. This time I put it on thicker, and did several passes. It made the job a bit easier. The starion makes for a decent workbench... <.< I haven't finished these yet, there's still some bog to remove and then get it all nice and flat. And that's where I'm at. If the panelbois are kind with their warrantying, and the lack of surprises makes the price right, then I might be able to eek something out in this space before we pay off the mortgage :P. If not, I'm buying a welder and the scope of the project shrinks from "like new" to "guy in a garage job but the engine bay looks sweet"...16 points
-
Hey good news I've fixed all the broken image links in this post.... Soon I'll update it on everything me and the wee car have been up to.13 points
-
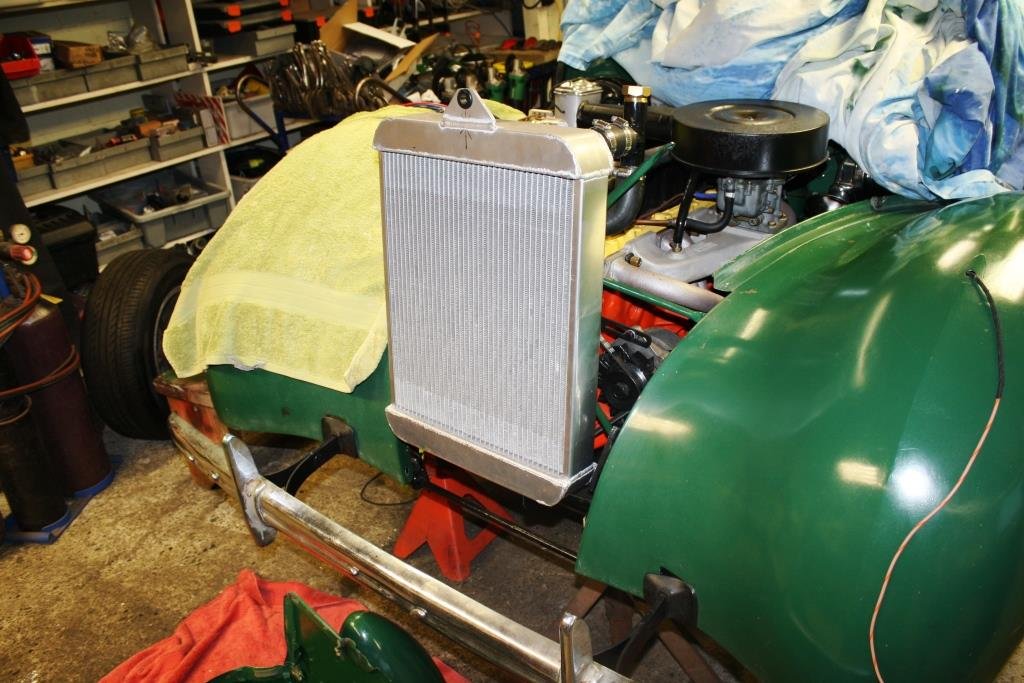
Pulled the tappet cover and sump, all looks well; Printed a new faceplate for the heater mech with the knobs set back a few mm as the cables were pulling it a bit, plus I printed a white insert for the indication to make it tidier, this just got coloured in with permanent marker for the red and blue bits; Clutch arrived; Also my younger self had bodged something for the top engine mount as the original one didnt work with the new engine, this was an unconvincing effort. So I spent some time with the lathe and the welder and made something much nicer with replaceable standard bushings;11 points
-
As per title. I'd love to have something to aim for and look forwards to this winter. Hanmer is always good because cold + bbq + hotpools + frostpot of hell = a good combination. Who's keen?8 points
-
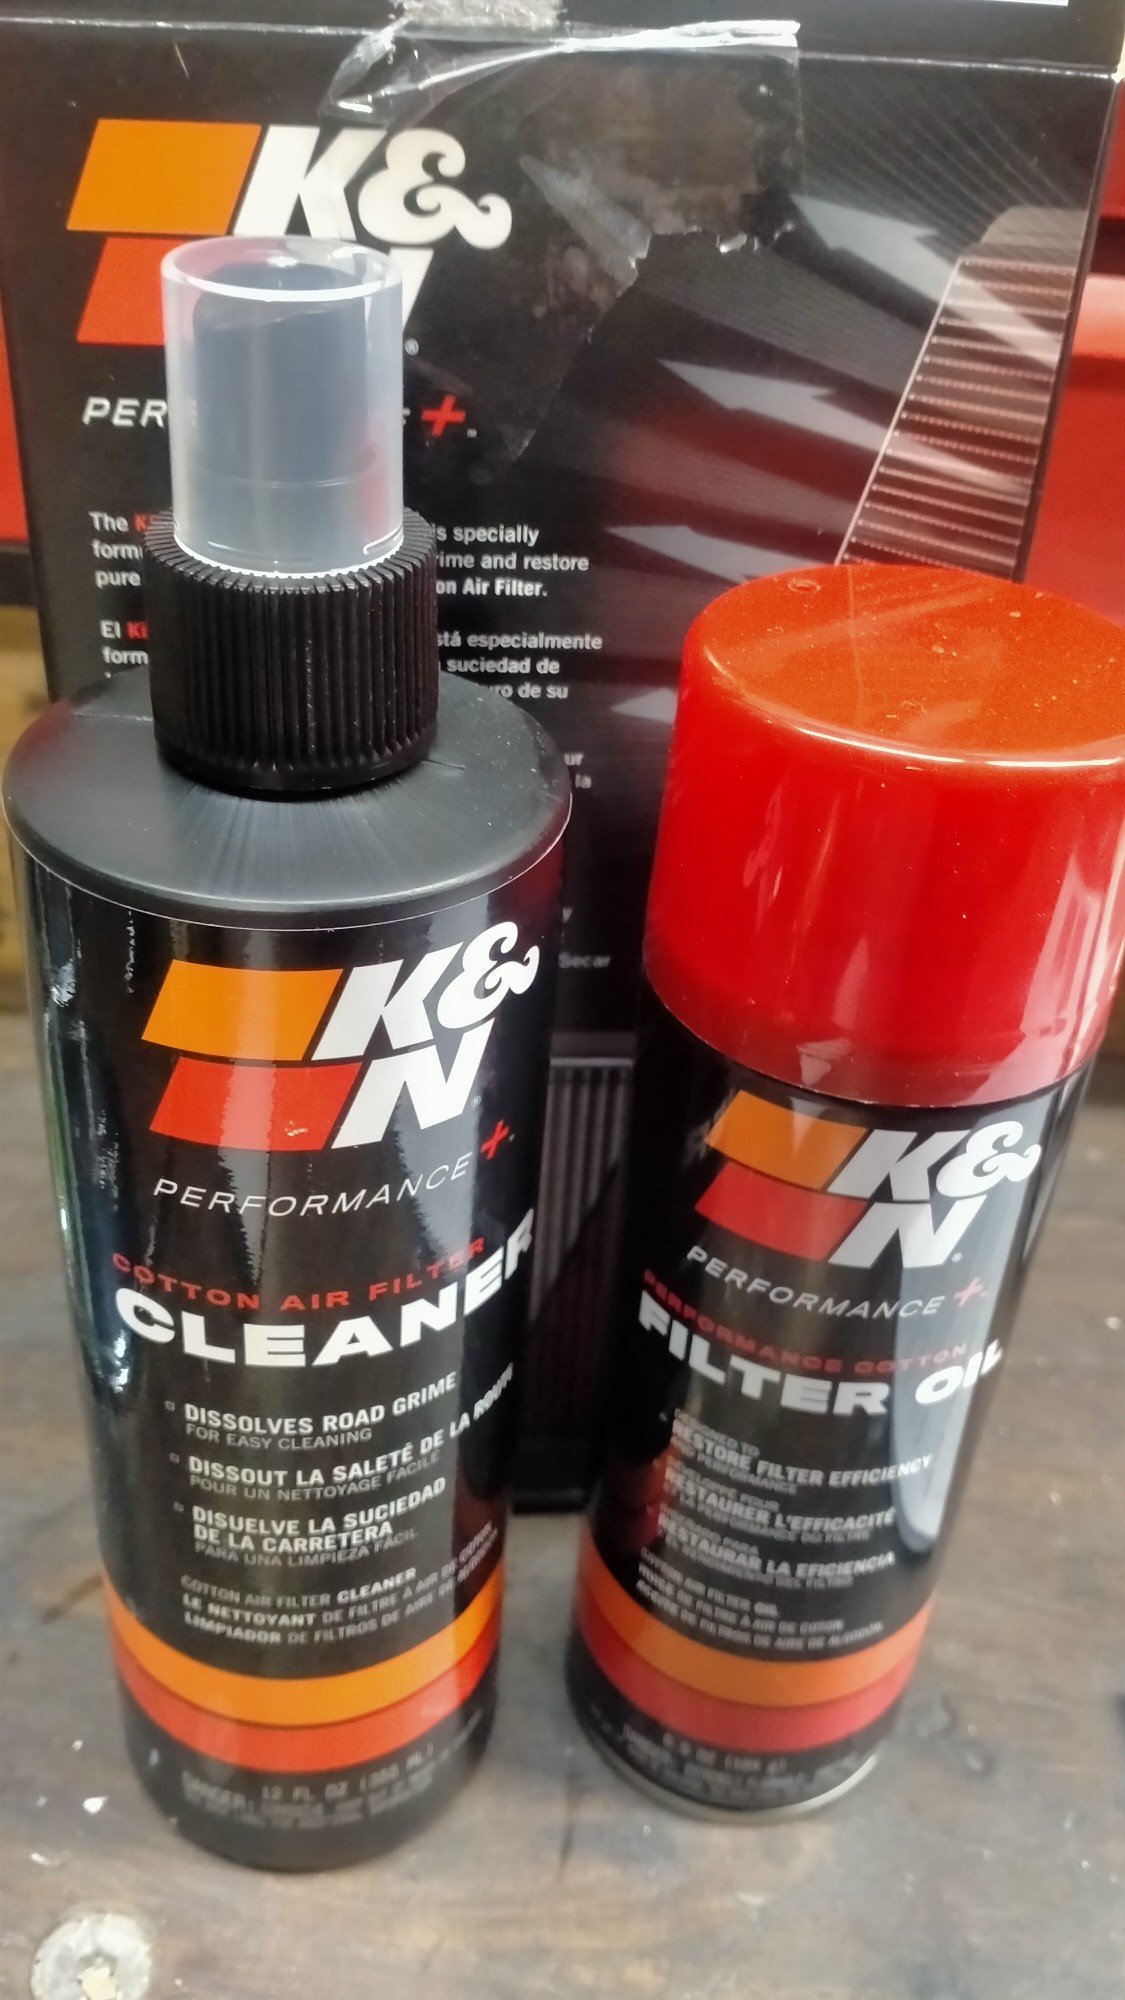
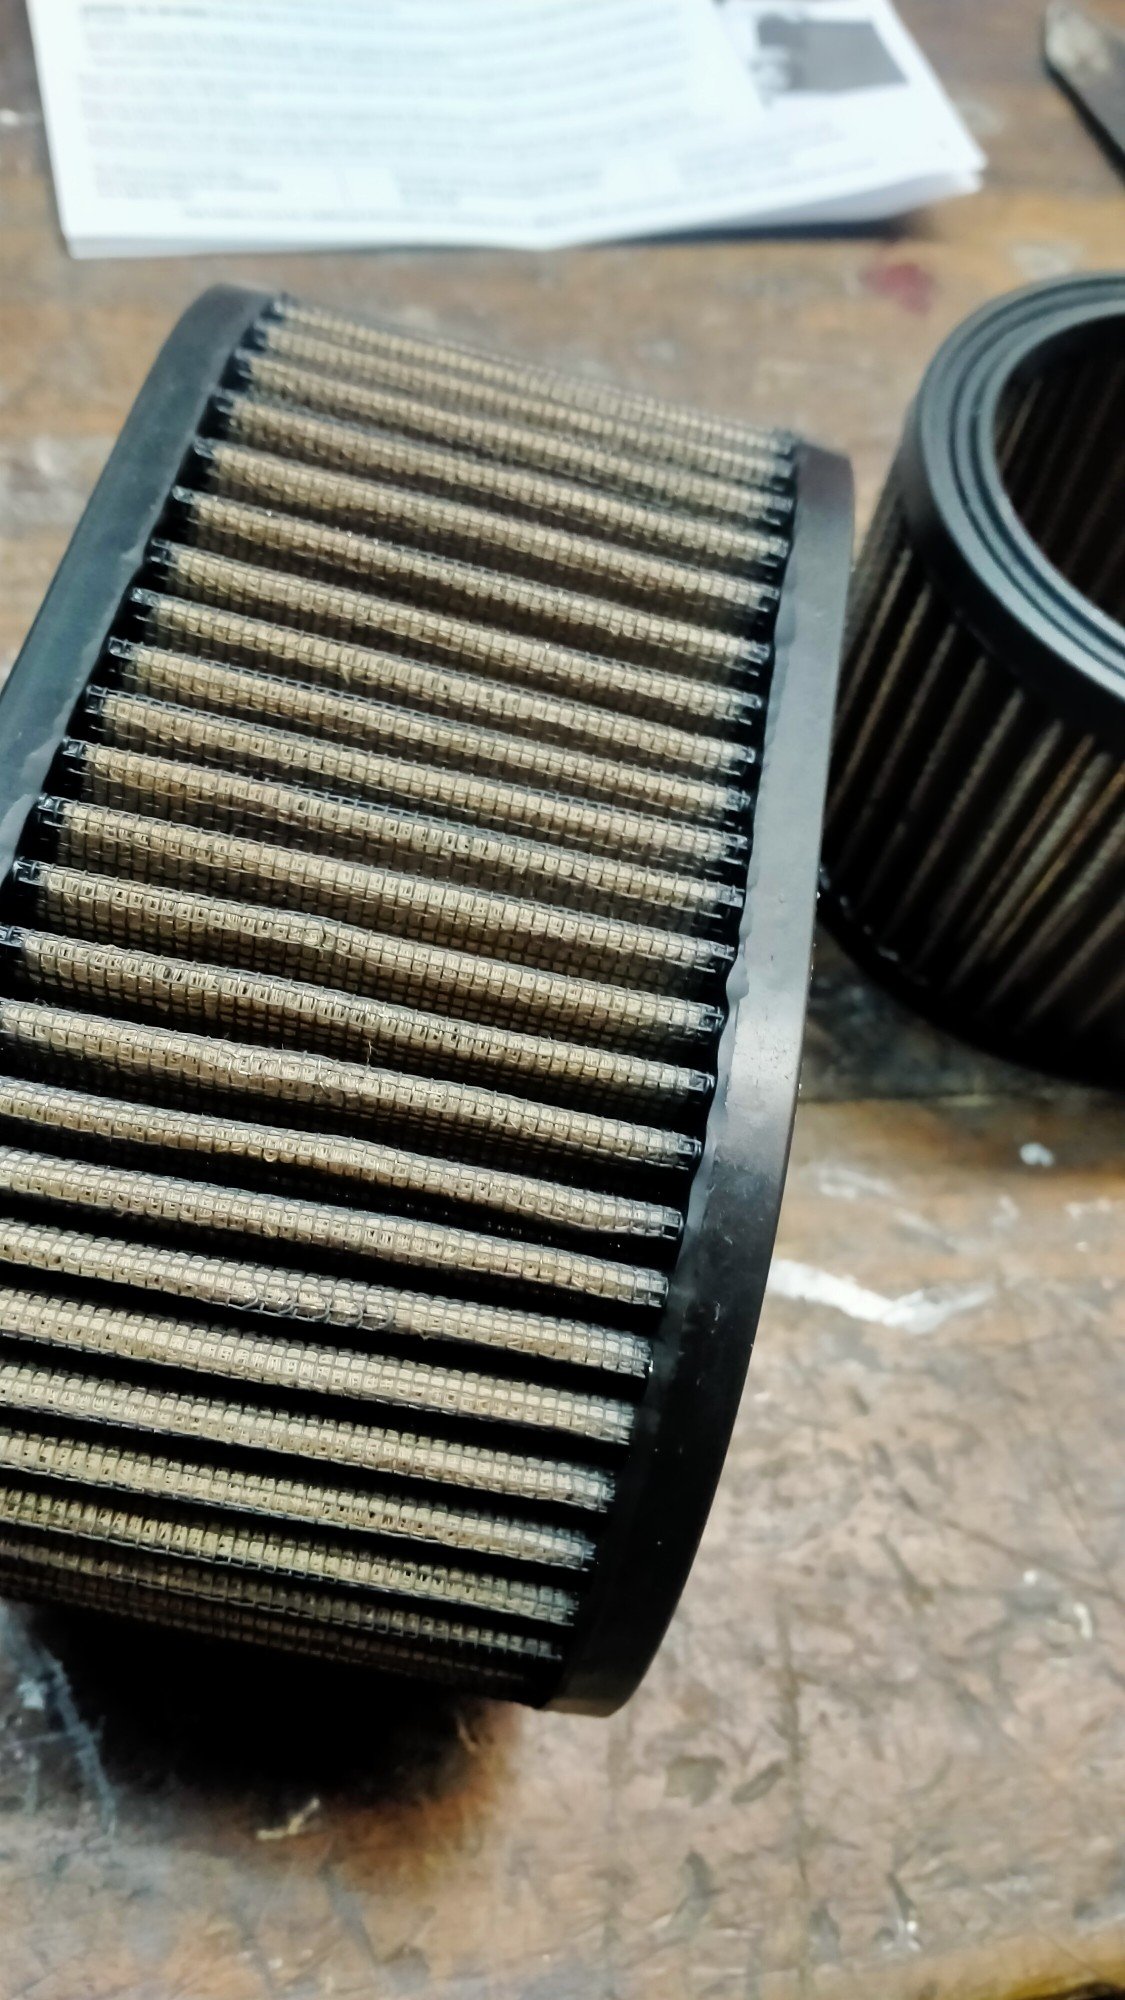
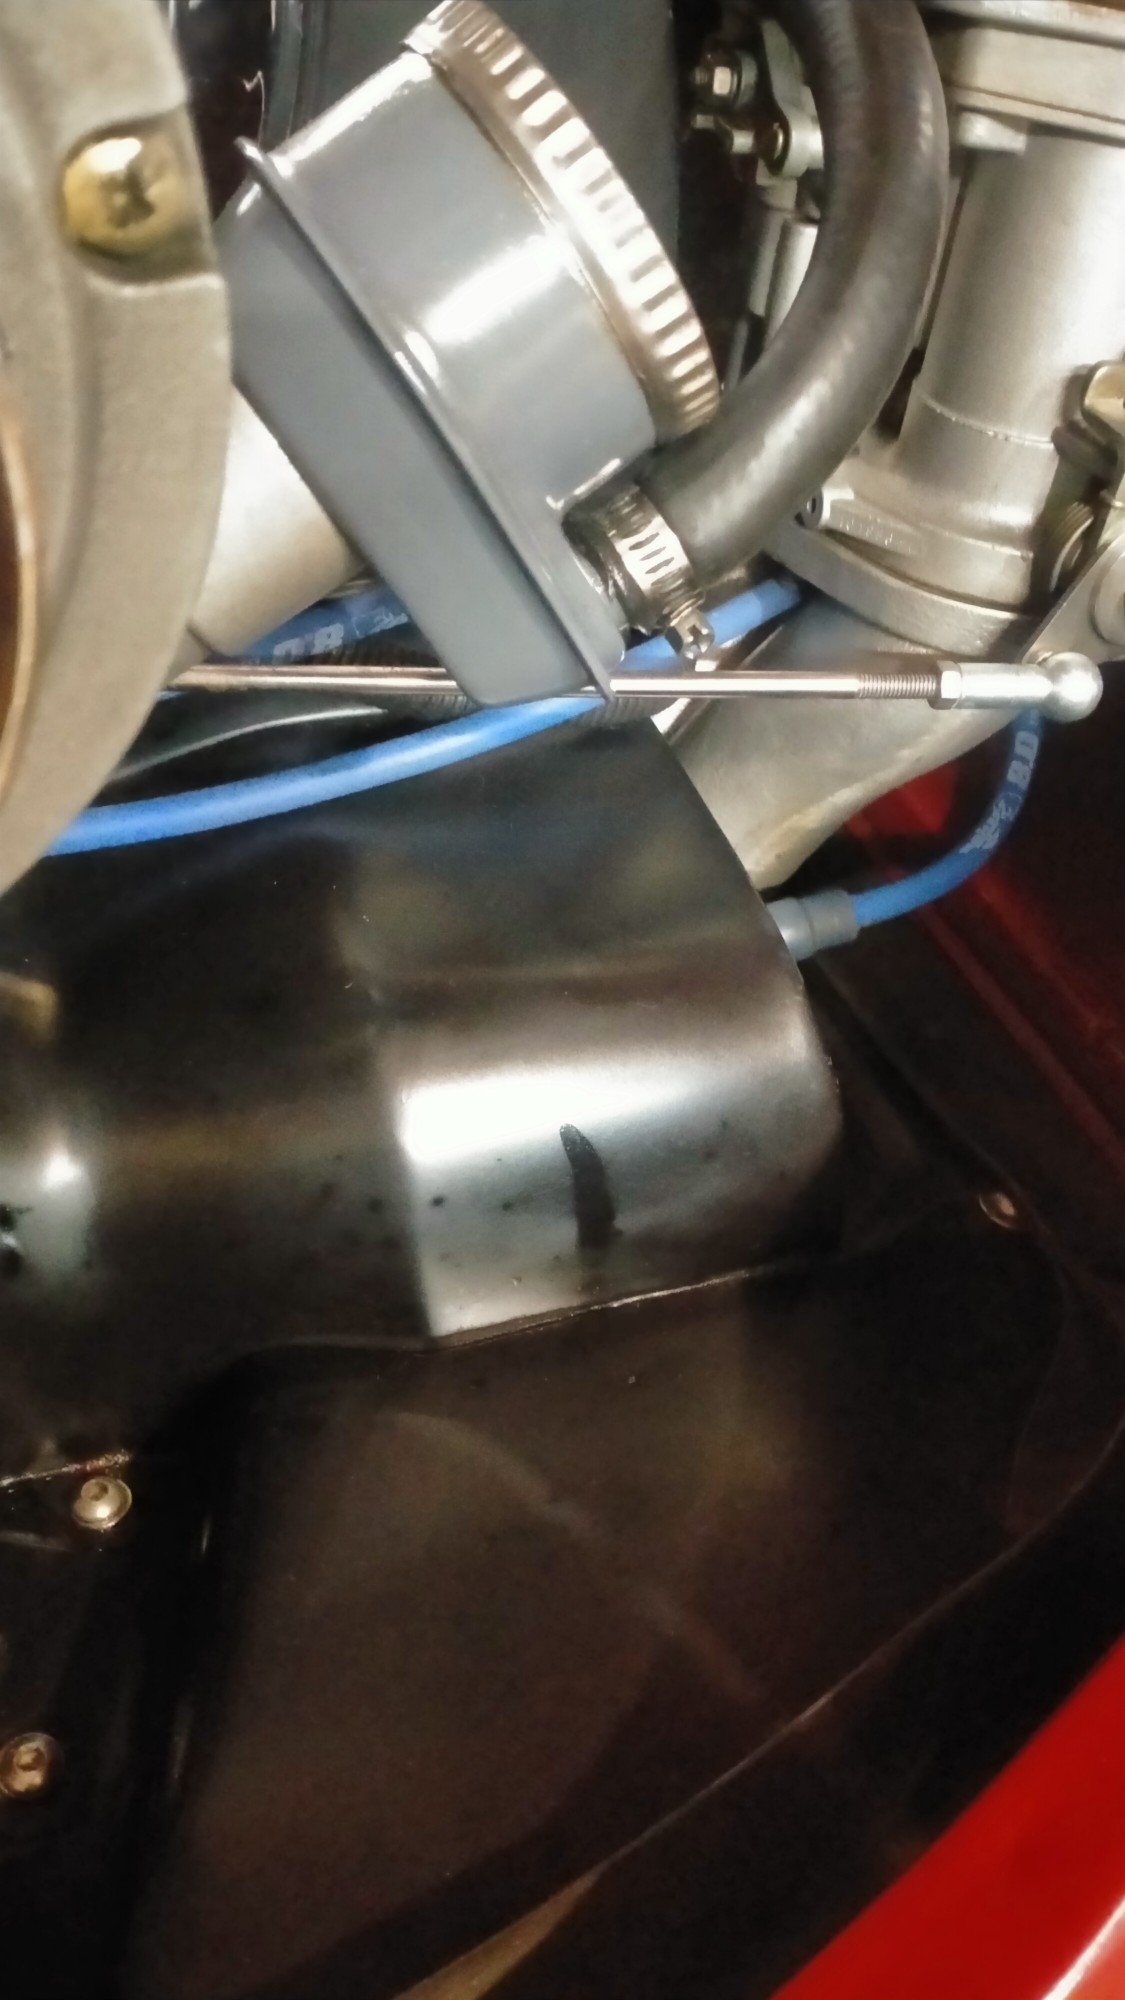
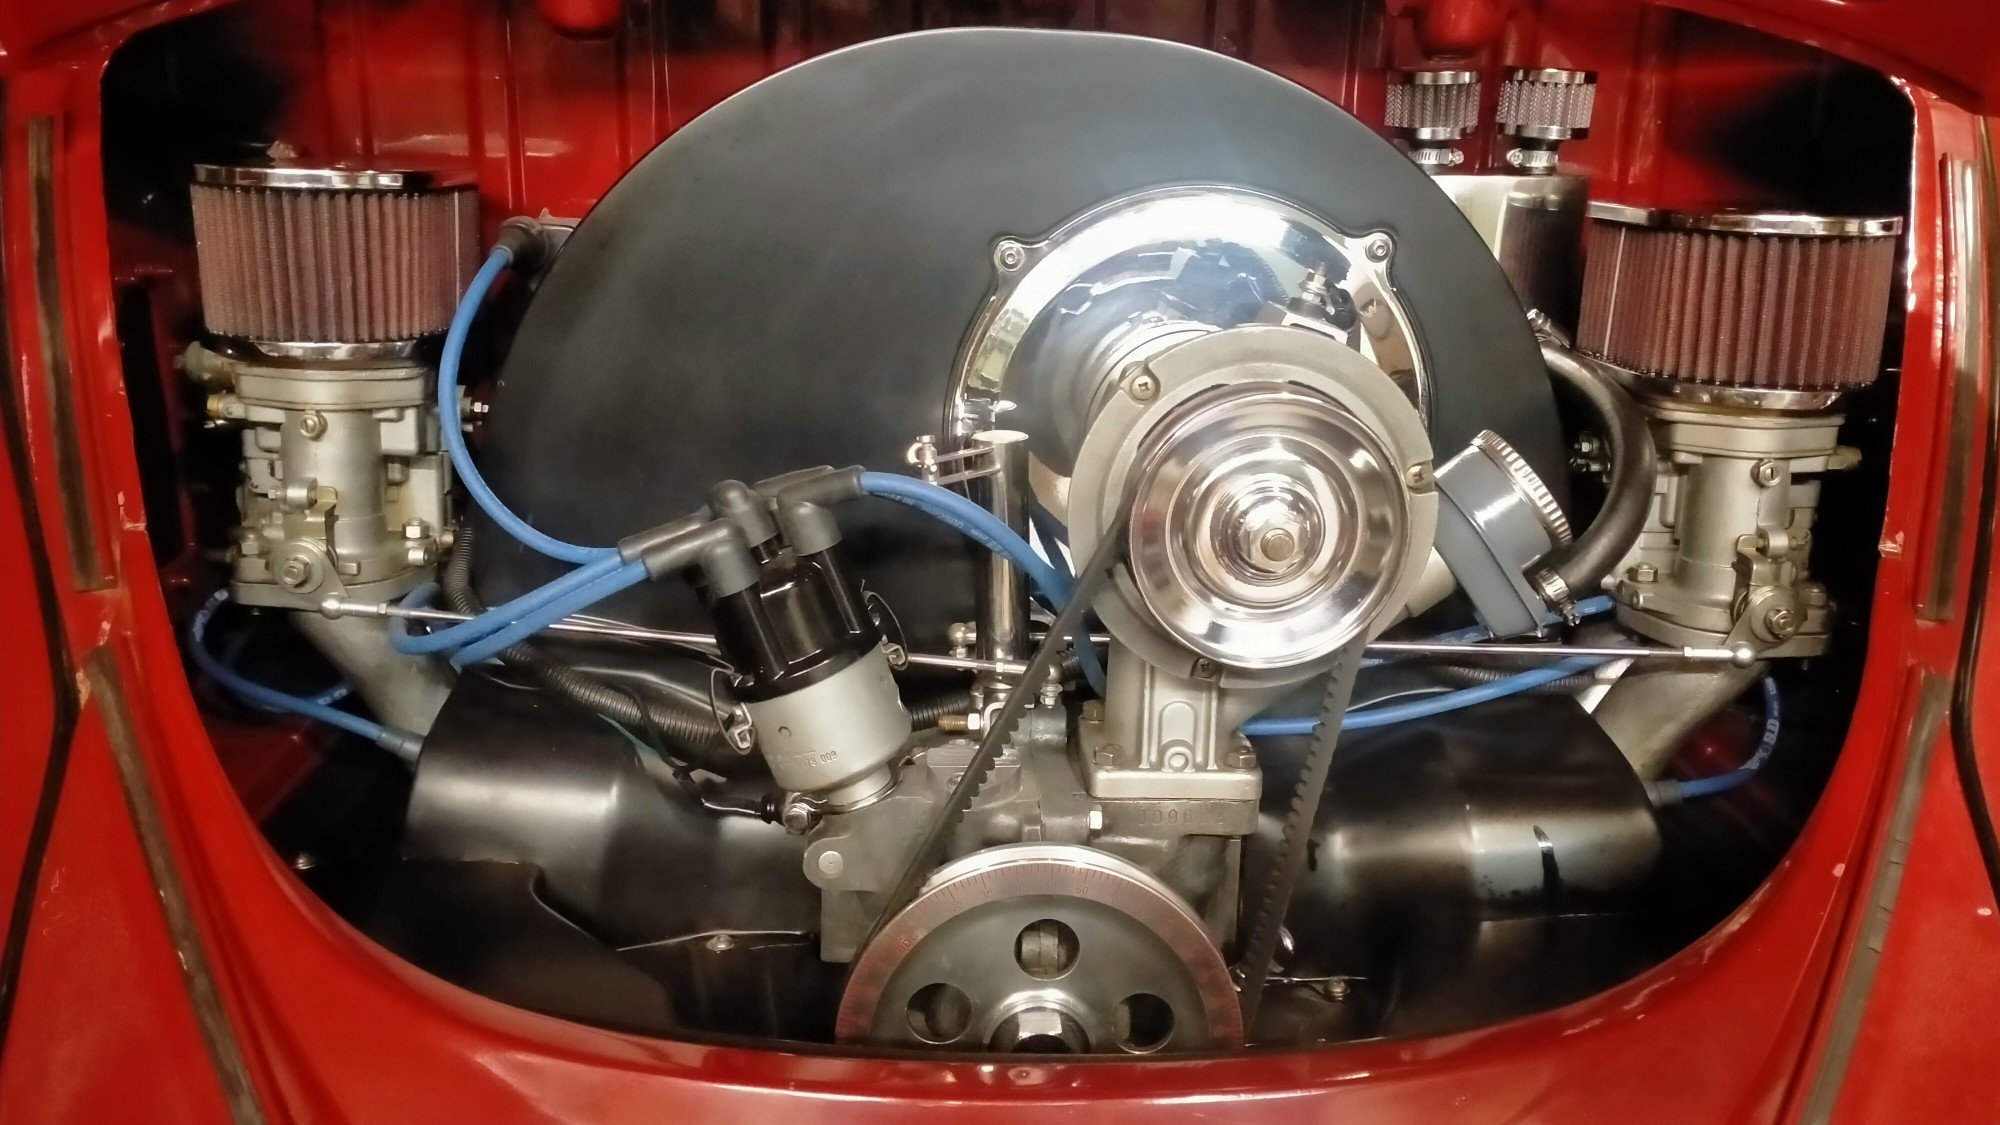
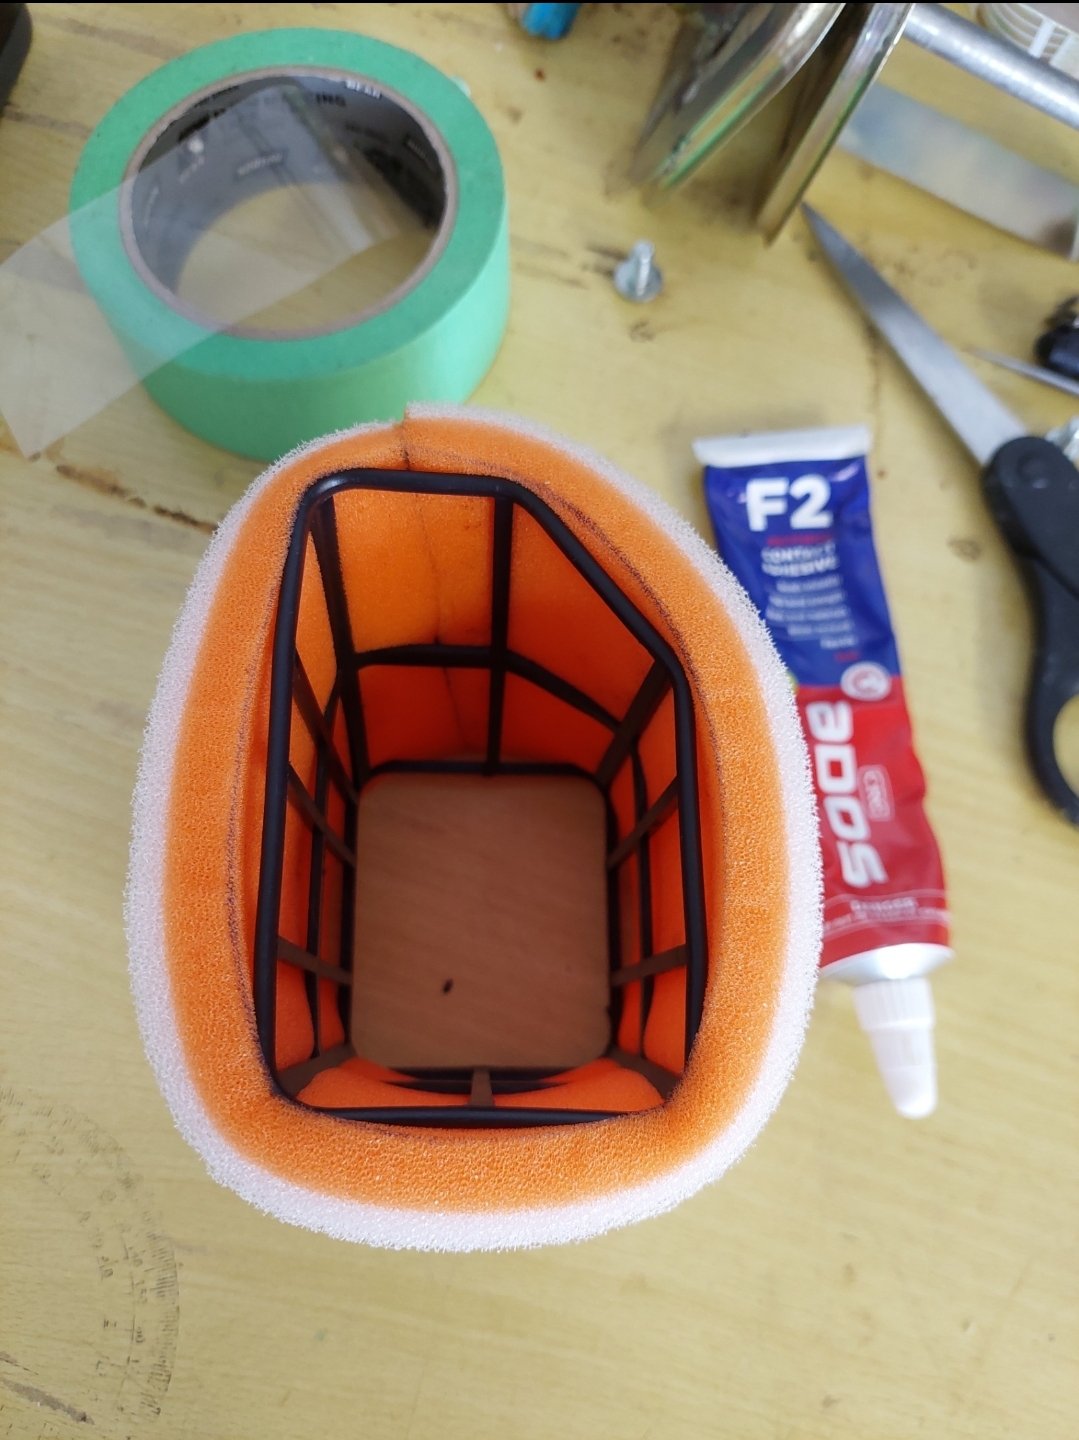
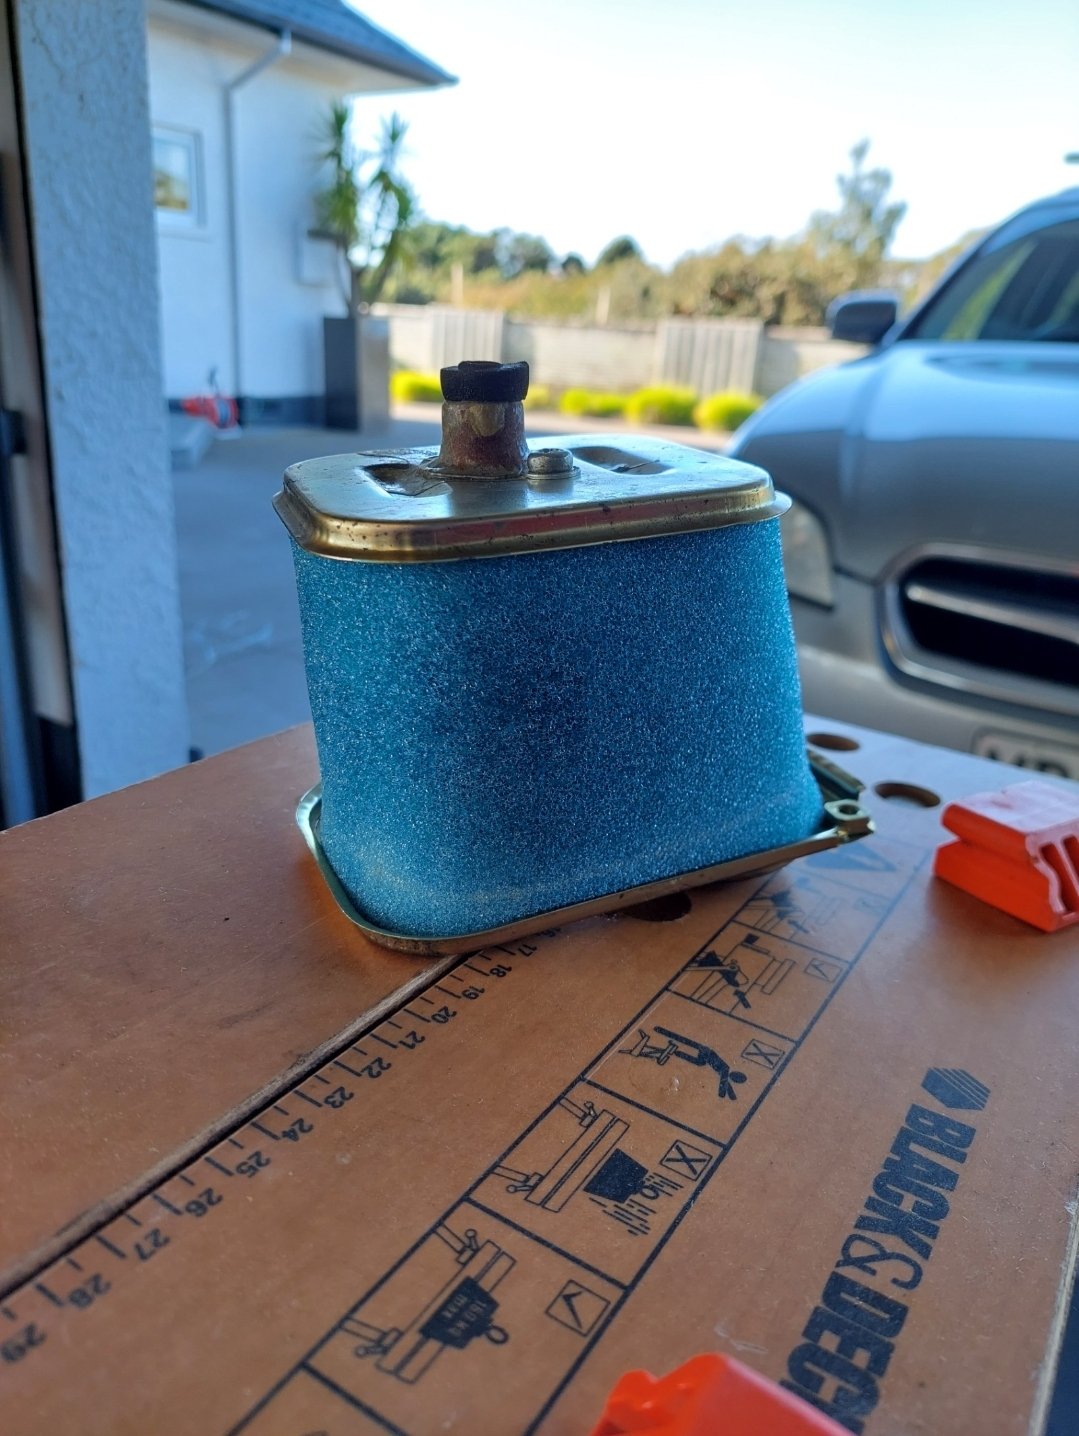
Minor maintenance tasks update. Thought I'd give the air filters a birthday day to protect my newly rebuilt Dells. Cleaning kit is only 40 bucks from ripco/supacrap autos. Stage 1, clean all the nasty. Once dry, stage 2, re-oil and done! Colour match filters. Other thing I've been chasing is this very annoying oil drop from the filler/breather. I wasn't sure exactly were it was getting out from. Pretty sure now it's from the breather hose connection as it's the factory fitting is slightly smaller and doesn't have a barb like the ones I put on the catch can. I had hoped just hooning on the hose clamp would work but no so I'll ad that to the list.
 6 points
 -
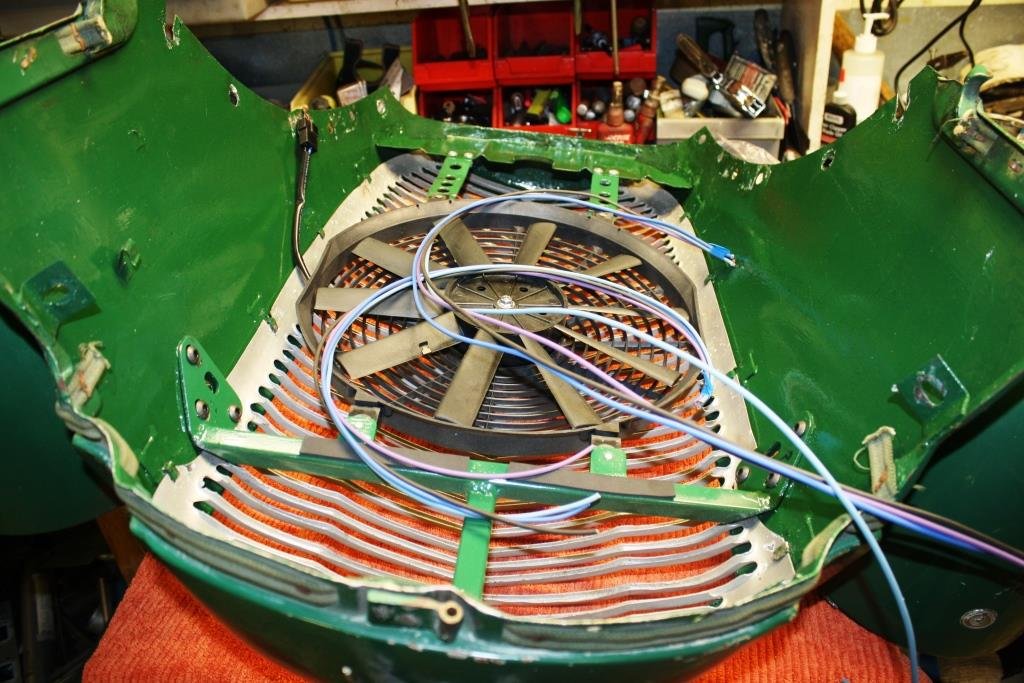
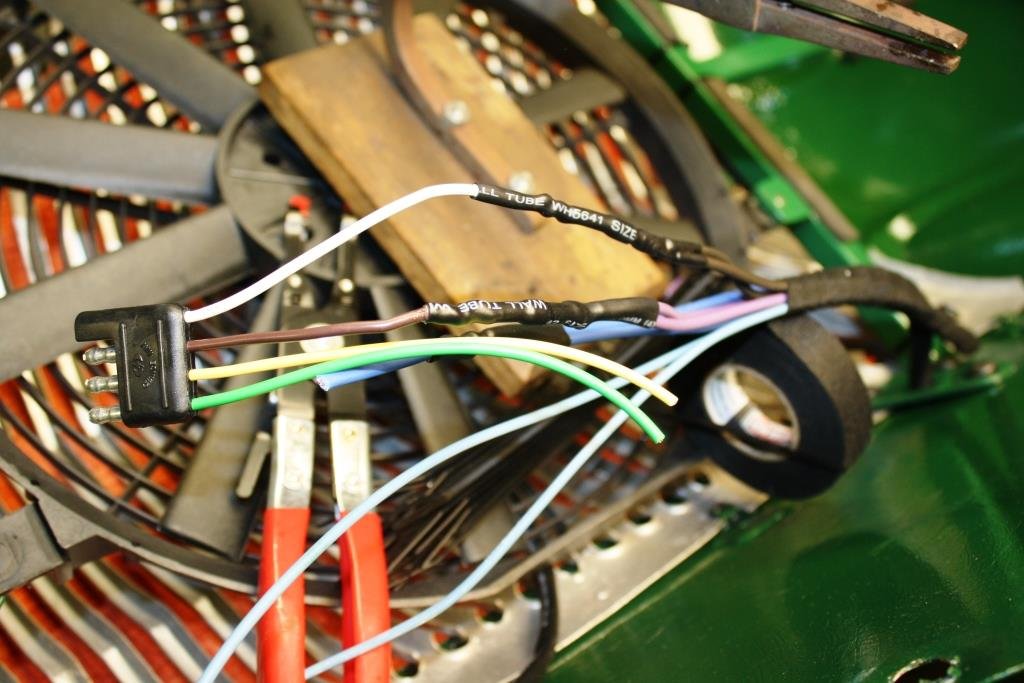
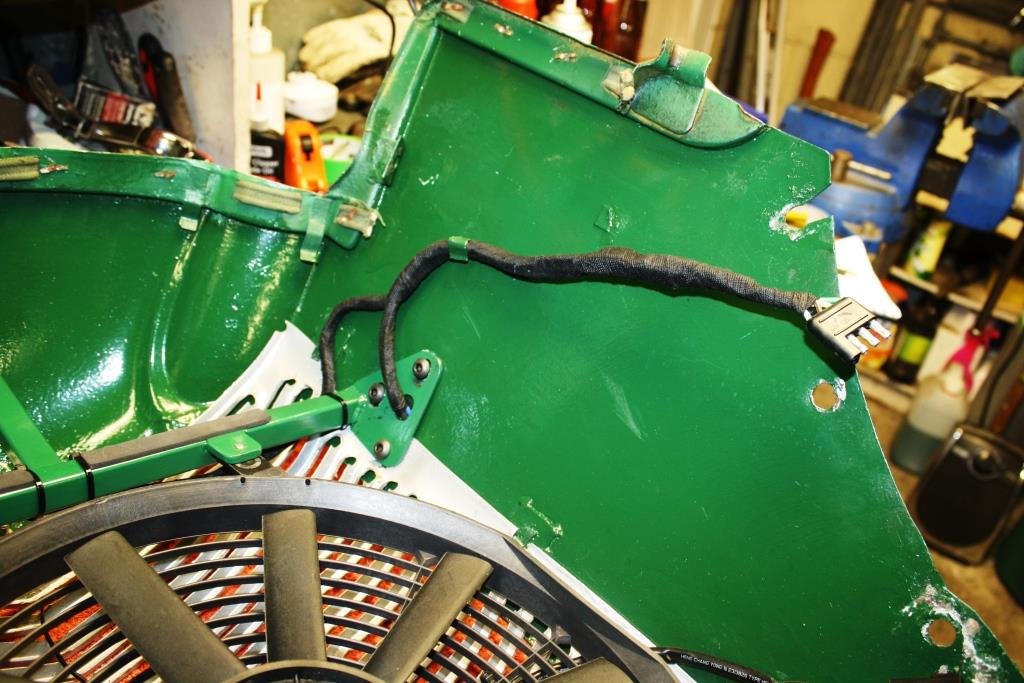
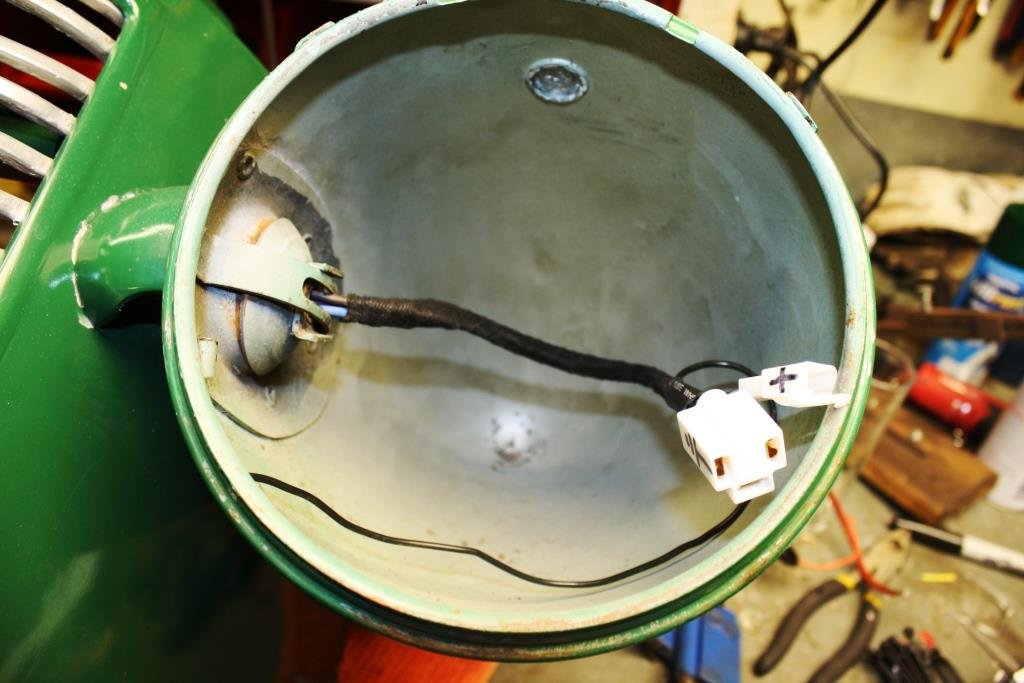
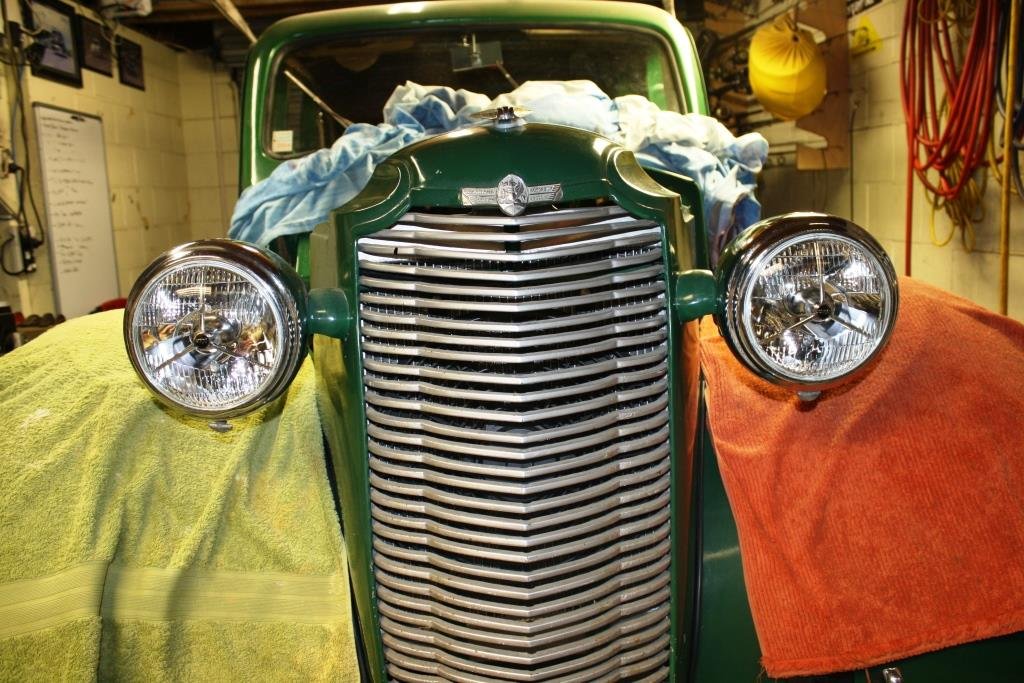
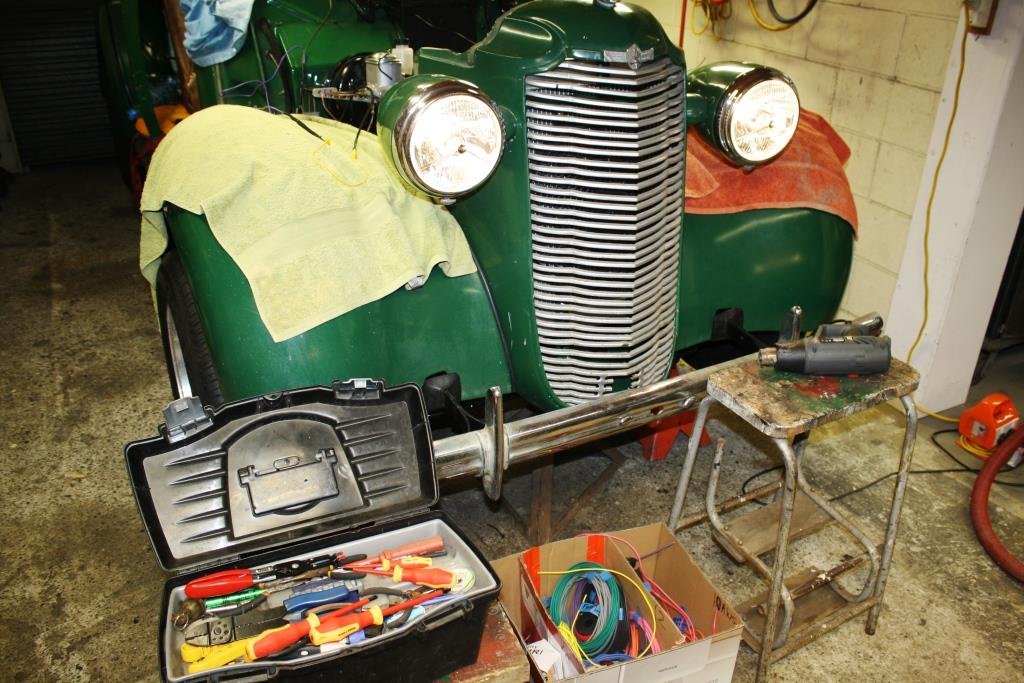
With space in the nose cone so tight the only way to wire the headlights and fan was to take the front off for the umpteenth bloody time….grrr….! So much easier to wire on the bench. Found some heavy connectors to make disassembly easier in the future. Love using the old school fabric wrap. I’d bought a big box of connectors off Banggood for a price that was too good to be true…….. … so I wired up the headlights. I refitted the front………. I installed the gorgeous over-priced P700 headlights…. ……..and started blowing fuses whenever I powered them up! After an evening of uttering nasty horrible words and throwing thinly veiled insults at Rigamortice re the marital status of her parents at her time of inception, while going round and round in circles with a variety of test lights, test probes and multi meters - I discovered the f****** “too good to be true” Bangood connectors were………. You guessed it ‘too good to be F****** true’! After a quick trip to Jaycar the following day, I paid through the nose for the right connectors…and we now have head lights. And as an added bonus they even worked in the dark! So I stuck the bonnet on and discovered it didn’t fit…. I loosened it off and started pulling things into line before re-tightening. Finally, it all fits, (sort of).
5 points
-
Better give this an update... Yes I did find some genuine replacement parts, and so back together it goes with new bearings/syncros etc.... While I have a transfer box I rebuilt for the back end of the conversion I thought it best to rebuild the one I had here. Needed a new set of main bearings (which cost a few $$$) but everything else was in fair condition. Its way easier to assemble vertically on the bench. Though I havent yet gone to the effort to move it off yet.... With that done I need to give the engine a good clean up and external refresh, more soon.
4 points
-
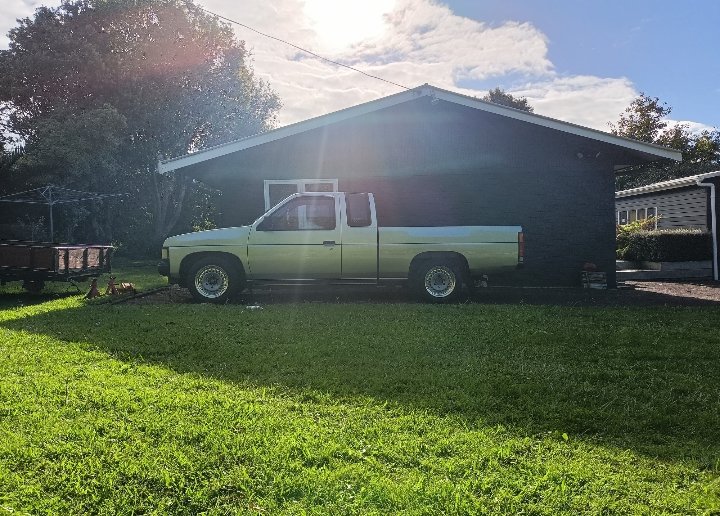
And new shocks all around. 4x4 d21 up front (shorter than the 2wd ones) and Nissan Quest rear shocks in the back which are shorter than the factory ones as well. All bolted straight in and feels as good as a 35 year old truck on bumpstop should feel like ...haha. Front is touching bumps, rear not quite. So need to have a play there.
3 points
-
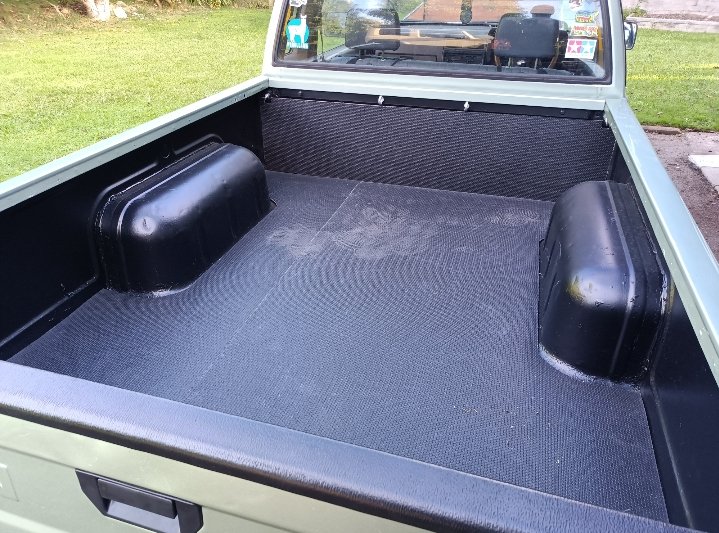
Lowered the front another 20mm or so, shitty pic sorry Added some foam matting to the tray
3 points
-
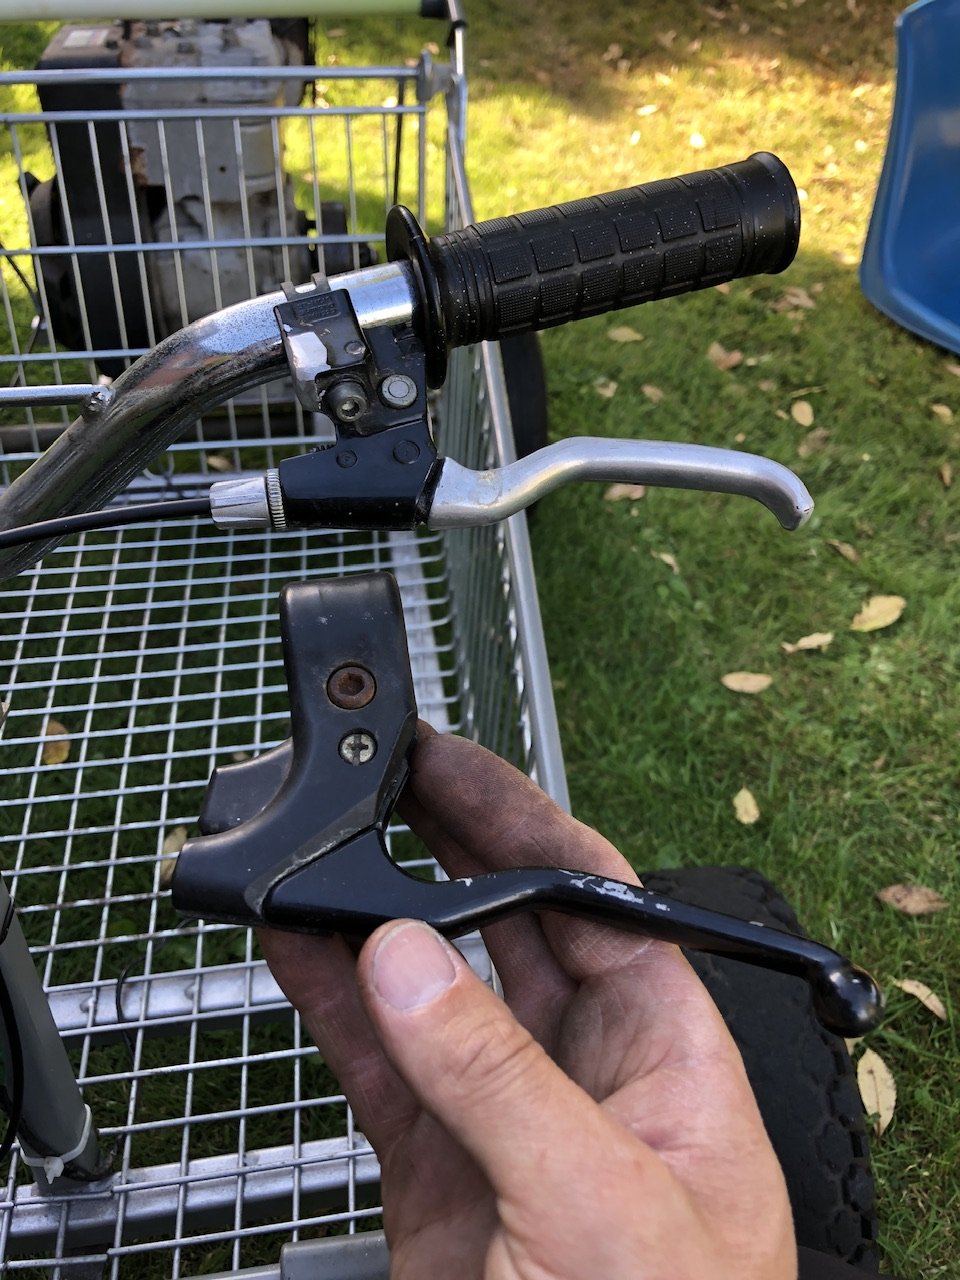
Wow that was a while ago. I went to hook up the brakes and found the little adjuster thingy had gone south on the last joyride. I didn’t have any adjusters in my stash that fitted so chopped up an old mountain bike brake/gear shifter combo. Now I had brakes it was time for more hooning. At this point I’m still sporting a decent exhaust burn on my right hand from the last test runs. So I wedge my hand in hard against the choke/ throttle/ spark plug area and go for gold again, still kneeling in a similar pose to driving a dingy with an outboard. So fun. So fast. So dodgy still. Work mate watching from the roadside reckoned 60 clicks easy. I was catching up on cars real quick and the brakes were only slightly better than the foot dragging on the road option. By the time I pulled back into the workshop I’d cut my hand up fairly bad, blood down the side of the motor. And one knee was sore as fcuk and starting to swell up. All in all a great time was had and received many roadside thumbs up. Glad @xsinclairx wasn’t patrolling the area that day
3 points
-
+1 hanmer West coast will be all rain in winter3 points
-
Out with the old, In with the nucleus.
3 points
-
Well after the last novel length wall of text I'll try to keep this update shorter otherwise I'll never finish the thing. Lots of little jobs starting to pop up on my 'to do' list. Driveshafts. Connecting the scooby shafts to the imp axles. A job I wasn't sure which direction I'd take as there's so many different ideas out there on the nerdnet showing 'the best' way to join shafts. First thing I did was to double check the suspension travel allowed by the stock shock absorbers and then use those datum points to work out if there was any growth in the length of shaft required as the wheel moves through it path up and down. There was minimal amount, like maybe 5mm at the very most. I guessed as much because the stock Imp driveshaft doughnuts dont allow for much sideways travel. I then cut one of my 22mm scooby shafts down in length so I could work out the lengths required with the CV joint in place. This move I soon regretted. I was allowing for plenty of plunge into the CV joints to make sure the whole joint could be removed from the box stub axle with the box pushed sideways when removing the transmission. I was happy with the length and then decided to go visit a local hotrod builder friend for some advise. He's well known about for his many many full scratch builds and has done heaps of driveshafts in his time (a fellow machinist by trade too) I showed him the two ways I was considering doing the join. He showed me a better way. Shrink some bored out yokes cut off from some spare axles. Plenty of meat, will never let go and even if they somehow did loosen and spin they cant come out because there's not enough travel in the CV joint to allow them to. No welding needed. He's run axles done in the same way with some serious big block power and they never let go. Just has to be accurate and luckily its the sort of machining/fitting job I like. But i needed to start with almost full length scooby shafts to do it, of which I was now down on.. Roll eyes and back to the wreckers to see this beauty get pulled from the hedge... Hannah helped me remove the shafts. It was her birthday too so wow, what a treat. She got visit the wreckers and get oily. Got home and the shafts didn't fit my CVs. Bigger diameter end. Really weird because I checked online... ha. It lies. Turns out some late 4wd Leones had even bigger axle ends than the imprezzas. Also odd is that one shaft is 22mm and the other side 24mm, although both the same length. Back to the wreckers. This time I got larger 25mm shafts with the smaller ends from front wheel drive Imprezzas. I grabbed two pairs. Same again, 22mm on one side and 25 on the other. Now I had two of each. Got home and spent some time cleaning them up, outside because petrol fumes. Cleaned up the spare pair of axles in the lathe to make sure I had an accurate clamping spot for the later boring. Good quality steel! I turned them down to less than the 23mm bore size and chopped the yokes off. Made lots of swarf Bored out to bang on 23mm with nice radius. Double checked and triple checked I had my lengths required correct. Chopped the two 25mm scooby shafts down to length and turned a step down on one end of each, a radiused step to stop any stress risers. I went for .0015"~.002" interference. Go online and see the debates between all the barries about what a good shrink fit should be There's many variables as well. I consulted my old faithful machinery's handbook. I wanted it tight, but not stressed. Luckily the axle is of good steel. I also made a sample first, using one of the cut off bits of scooby shaft and some 4340 I machined to the same outer dimensions as the yoke. This way I was able to test how hot I needed to get it to expand enough to drop in place. I'll take this to a local engineers who have a press with a pressure gauge and see how much force it takes to wreck this thing Here's about a one hundredth of a millimetre (iirc) getting removed.. Then things got hot.. photos taken after it was done because I had to move bloody quick! Hannah would grab the torch and I would drop the yoke in place. It was a tense bit of time. If the yokes teetered and grab they'd pull the heat so quick and shrink in place before getting to the shoulder. No removing them without damage and I only had the one pair of spare axles. It went well. I was happy and relieved. The light rust flashing off on one is simply due to that one having been left nearer the front of the workshop to cool down and it was a chilly damp start to the morning. They wired brushed up neat as, got painted with black epoxy and when that was set they had new universal joints fitted. I cant try them on the car until I remove the existing axles from the hubs but it should be fine. Next up was to sort the fuel tank out to suit fuel injection. I brought the blue imp in and checked a few ideas out on what I could do. I don't really have room for a surge tank and I never liked the noise on my Viva from the external fuel pump anyway. Nor did I like the way the fuel in the surge tank heats up. Enter the humble Nissan Micra k11 intank fuel pump and surge container... It actually looked like it was just going to fit into the pressed depression at the bottom of the imp fuel tank.. With enough room to run the imp fuel float sender next to it. Cut a hole.. It fits. I'll cut the bracket off the side at bottom of pic and it'll move sideways a bit more.. Made some metal brackets Welded them in and now I have a cradle that takes two cable ties across the top to secure. I needed a flange.... Made this. Its designed to recess the lid about 10mm below the tank top. I want to keep the tank top as flat as possible. It'll have the usual layer of foam over top but I don't want things sticking up proud when the 'frunk' is being used (cant be tearing those bags of concrete now eh....) Many holes drilled and tapped.. Carefully welded in place. Was a tricky job. Thin steel on the tank that had some sort of (probably poisonous) coating. But happy with result. I made another hole... That takes the sender. Drilled and tapped more holes to suit. Now I needed to get fuel from the outside in and from the inside out. I machined up these in stainless.. Thought of a neat way to hold the little bits together for tacking. Blue tack. Or blue tack tack? welded up.. I made an angled recess into the hatch cover so the fuel hose goes even further below the tank line. Visible in that photo are the cable connections. Again - I needed to get power in. I machined some shouldered fittings in plastic.. Luckily the micra pump so handily just uses a simple connector with 6.3 spade terminals. Under the lid... Tank hard work done. I'll paint bits and cut some gaskets. Speaking of gaskets. One of mine between my oil filter pedestal and the block is weeping oil. Plus one of the bolt heads weeps. Typical. Put a Japanese engine in a British car and turn your back for a minute... I've already drained the oil cleaned it up and ran a smear of paintable sikaflex along it and around the bolt head. I didn't take photos because not really exciting. I'll paint it silver and no one will know. Except you the reader. Next up is the exhaust I think.3 points
-
Aaaaaaannnnddd car is still in the weather outside. But i just found and paid for something i have been looking for since 2005ish..... AN INTERMITTENT WIPER SWITCH!! This may not seem like a big deal but only having a 2 speed wiper switch in rainy reporoa is a problem. And yes while i could have wired in an aftermarket timer that wouldn't have felt right. So long as david from gumtree doesn't let me down.....2 points
-
So keeeeeeeeen! Port and cheese at lake Tennyson plz2 points
-
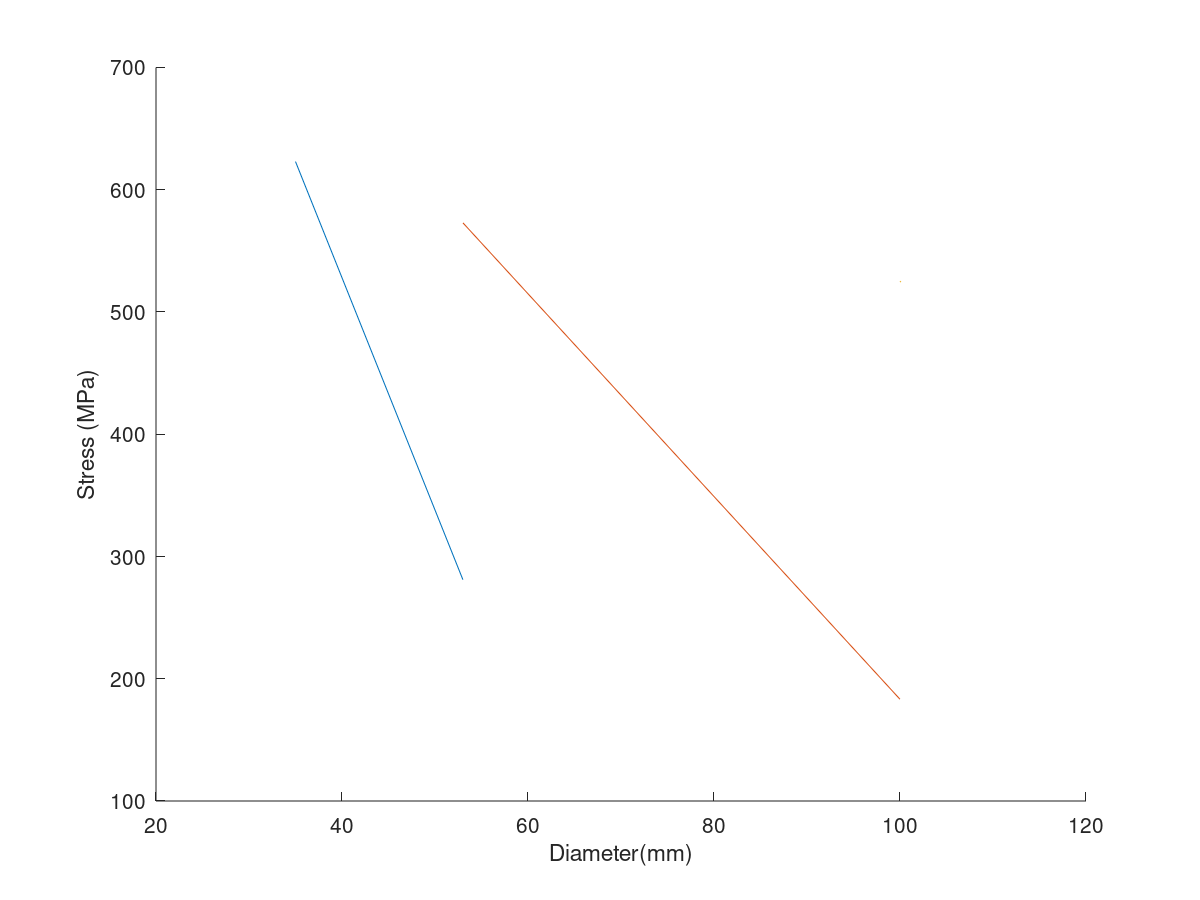
Shrink fits are legit. About 4 or 5 years ago I had to design an extrusion container for making magnesium rods, the container needed to be made of multiple shells of high strength (H13) steel that are shrink fitted together to get enough strength. The shrink fit was used to put something like 600 MPa of compressive stress on the inner liner, giving almost 2000 MPa of pressing capacity. I think it was something like a 0.15mm interference on about a 53 mm diameter sleeve, required temperature difference was about 250 or 300C to get it to all fit together. Was quite stressful as the liner was about 150mm long and had a nitrided surface so any lathe tooling would just bounce right off if it grabbed and needed to be redone.
2 points
-
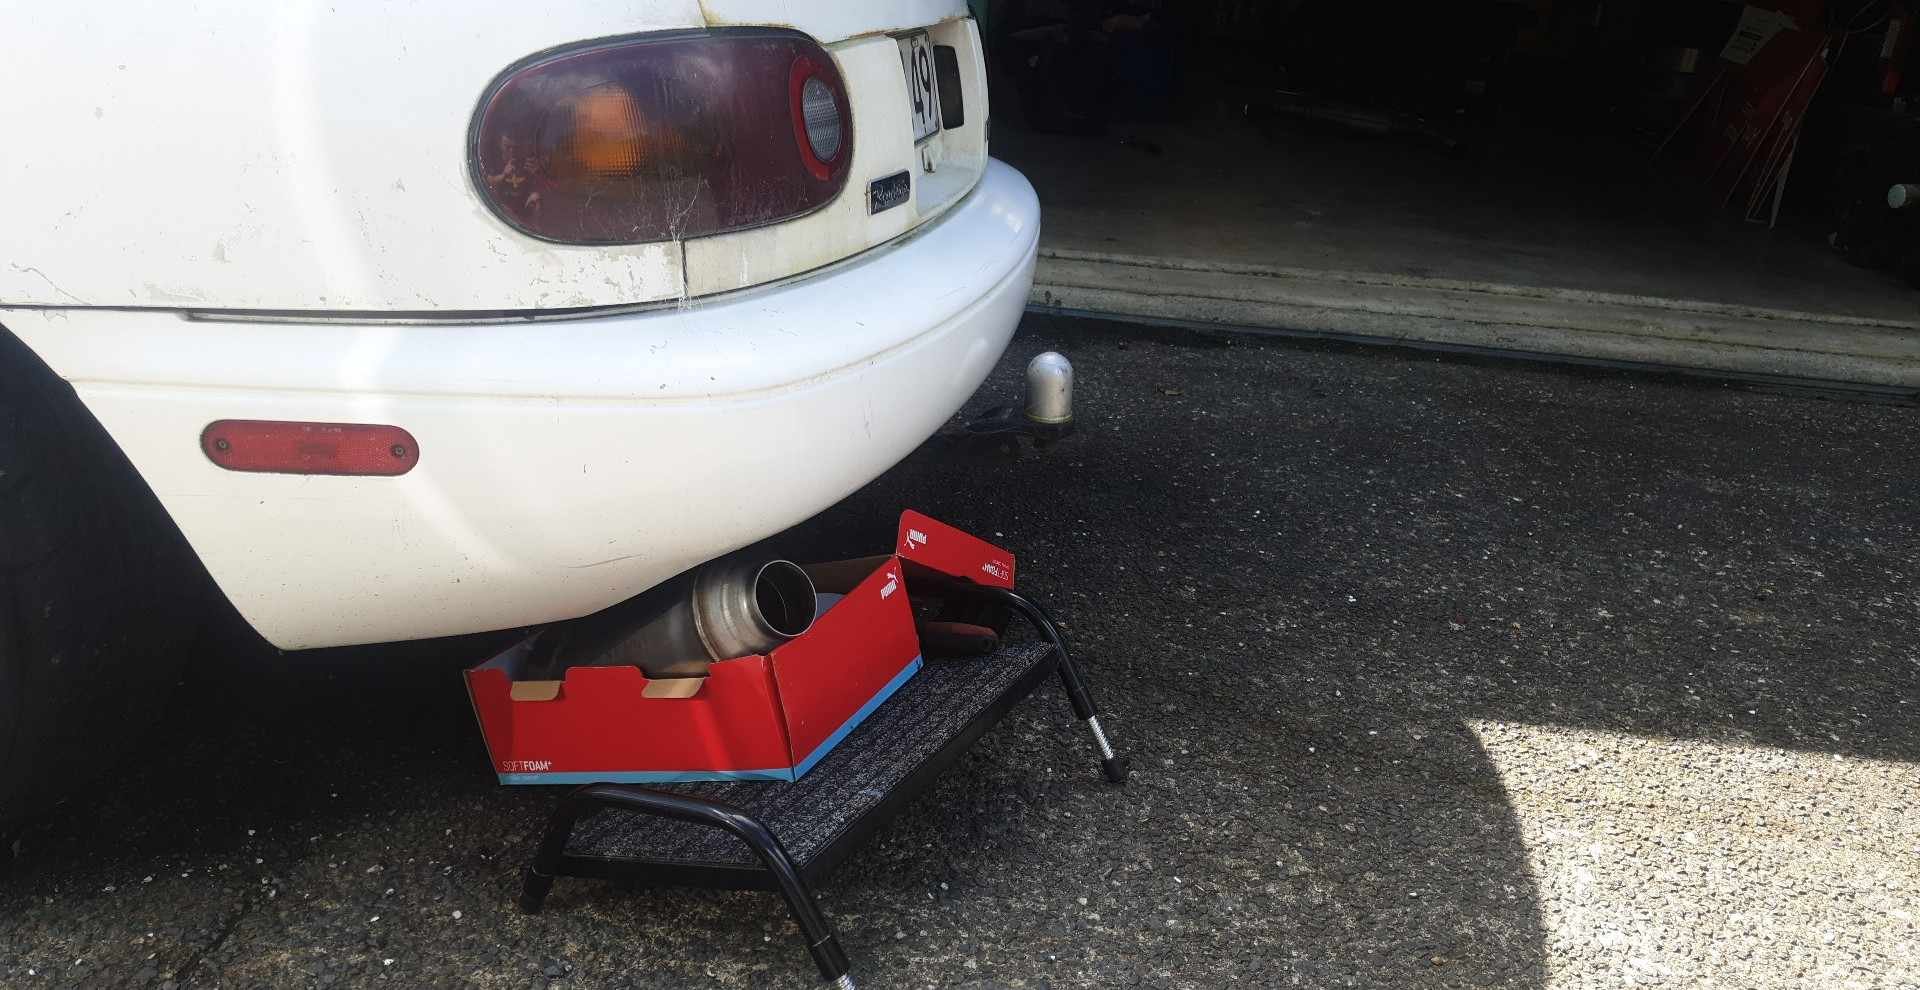
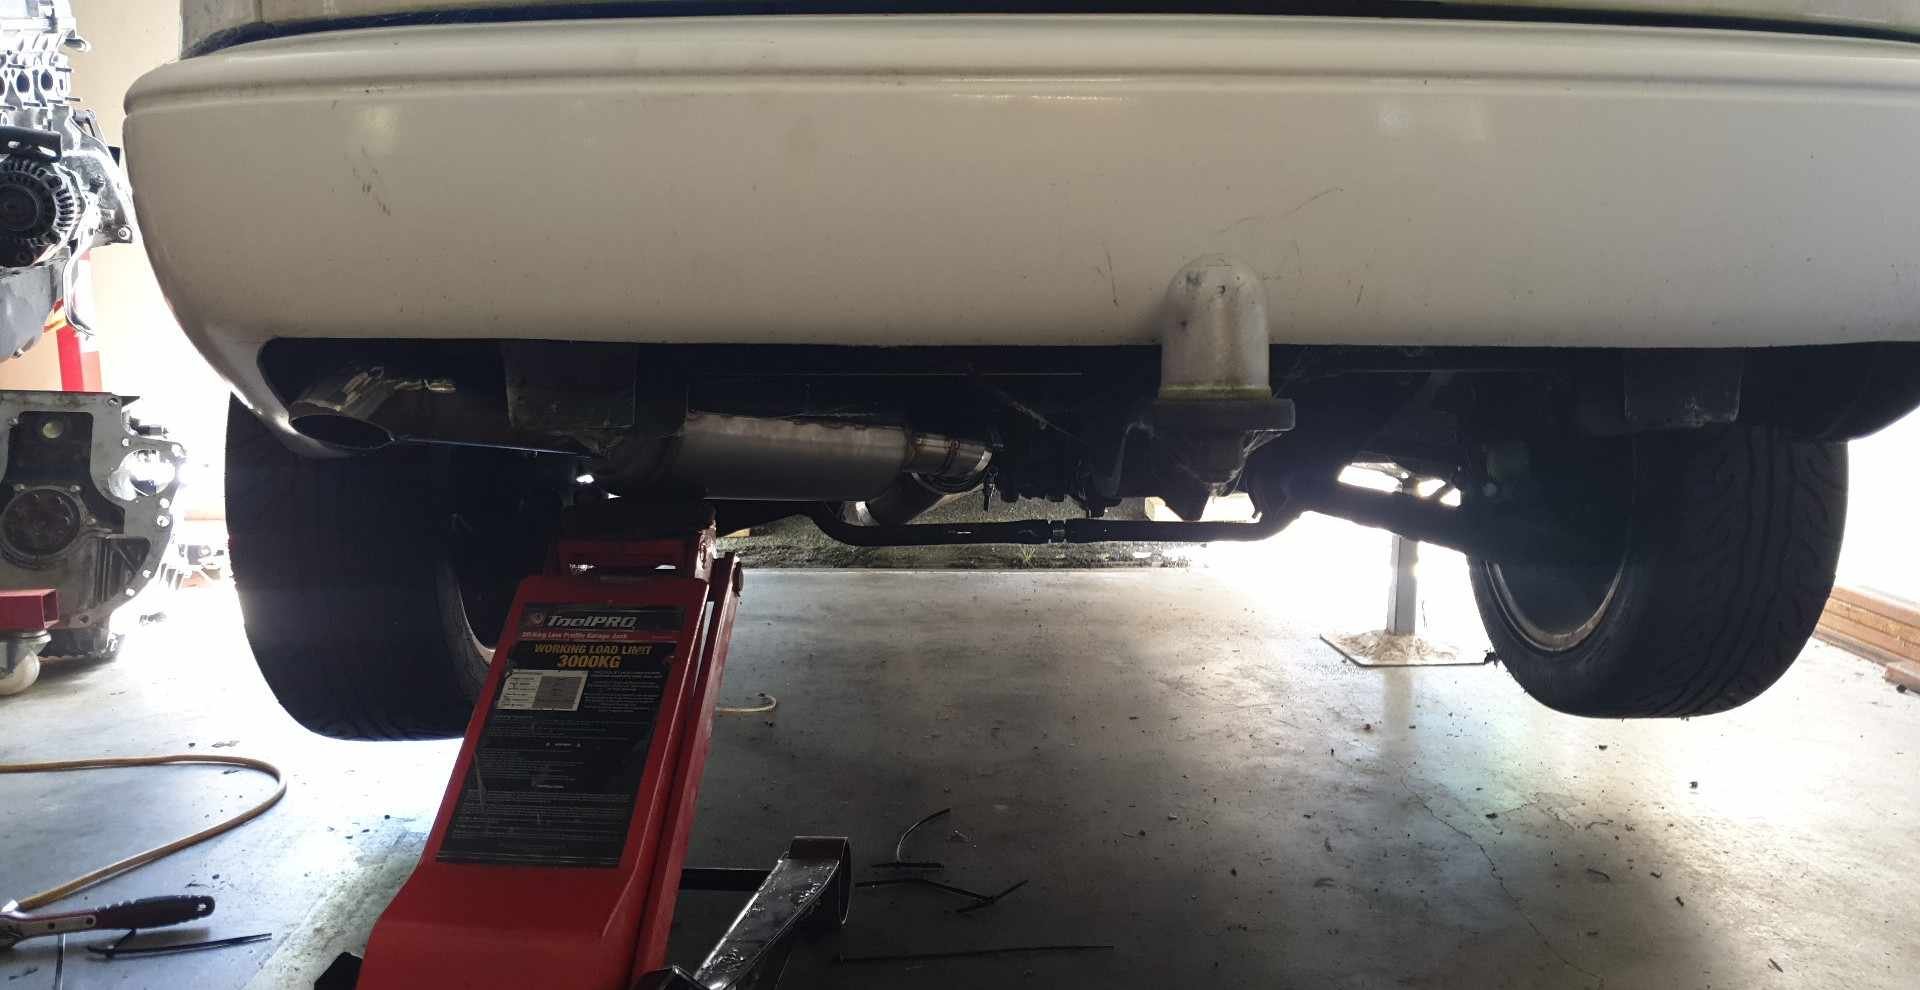
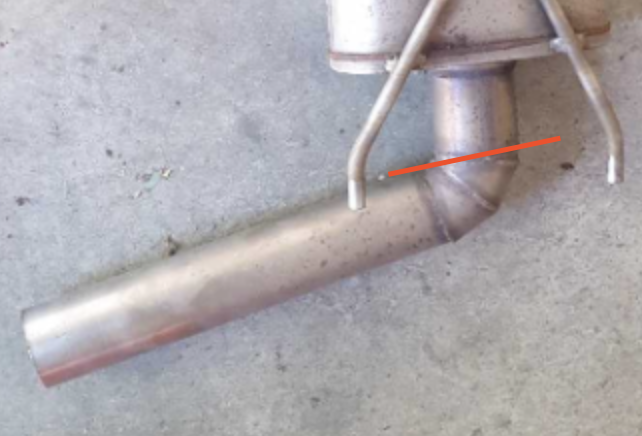
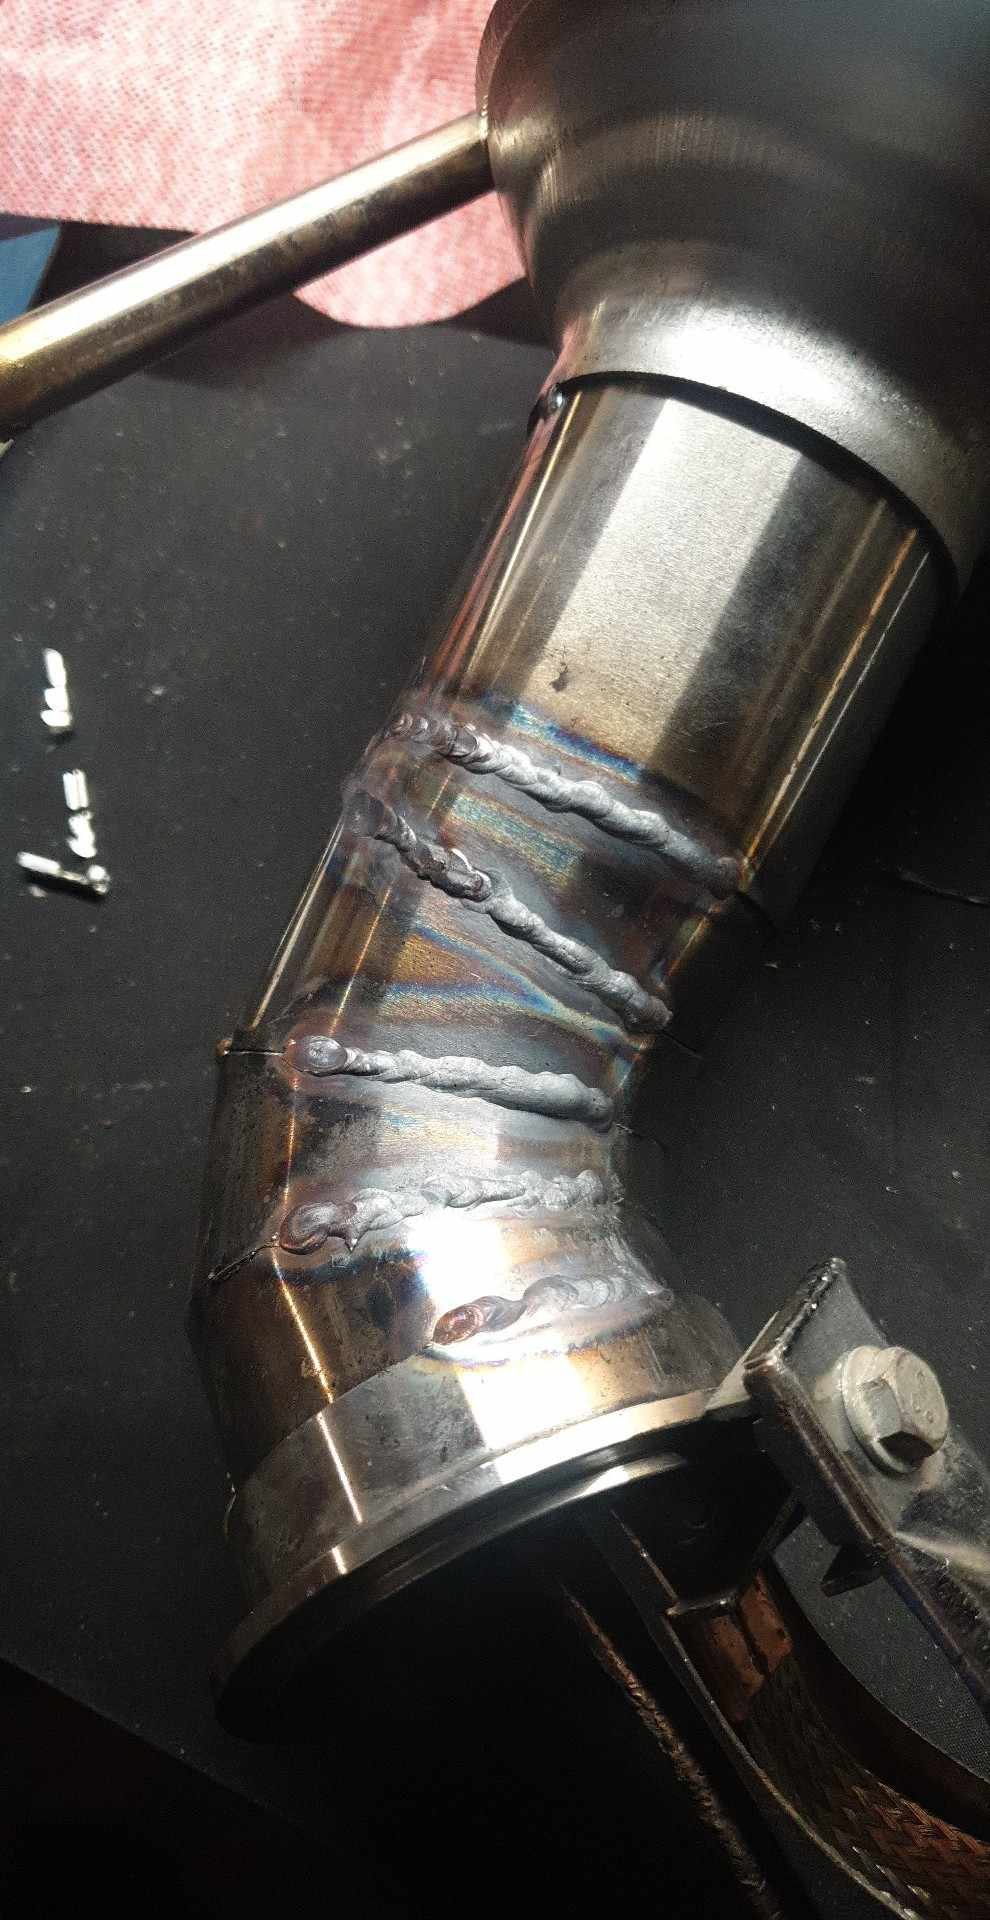
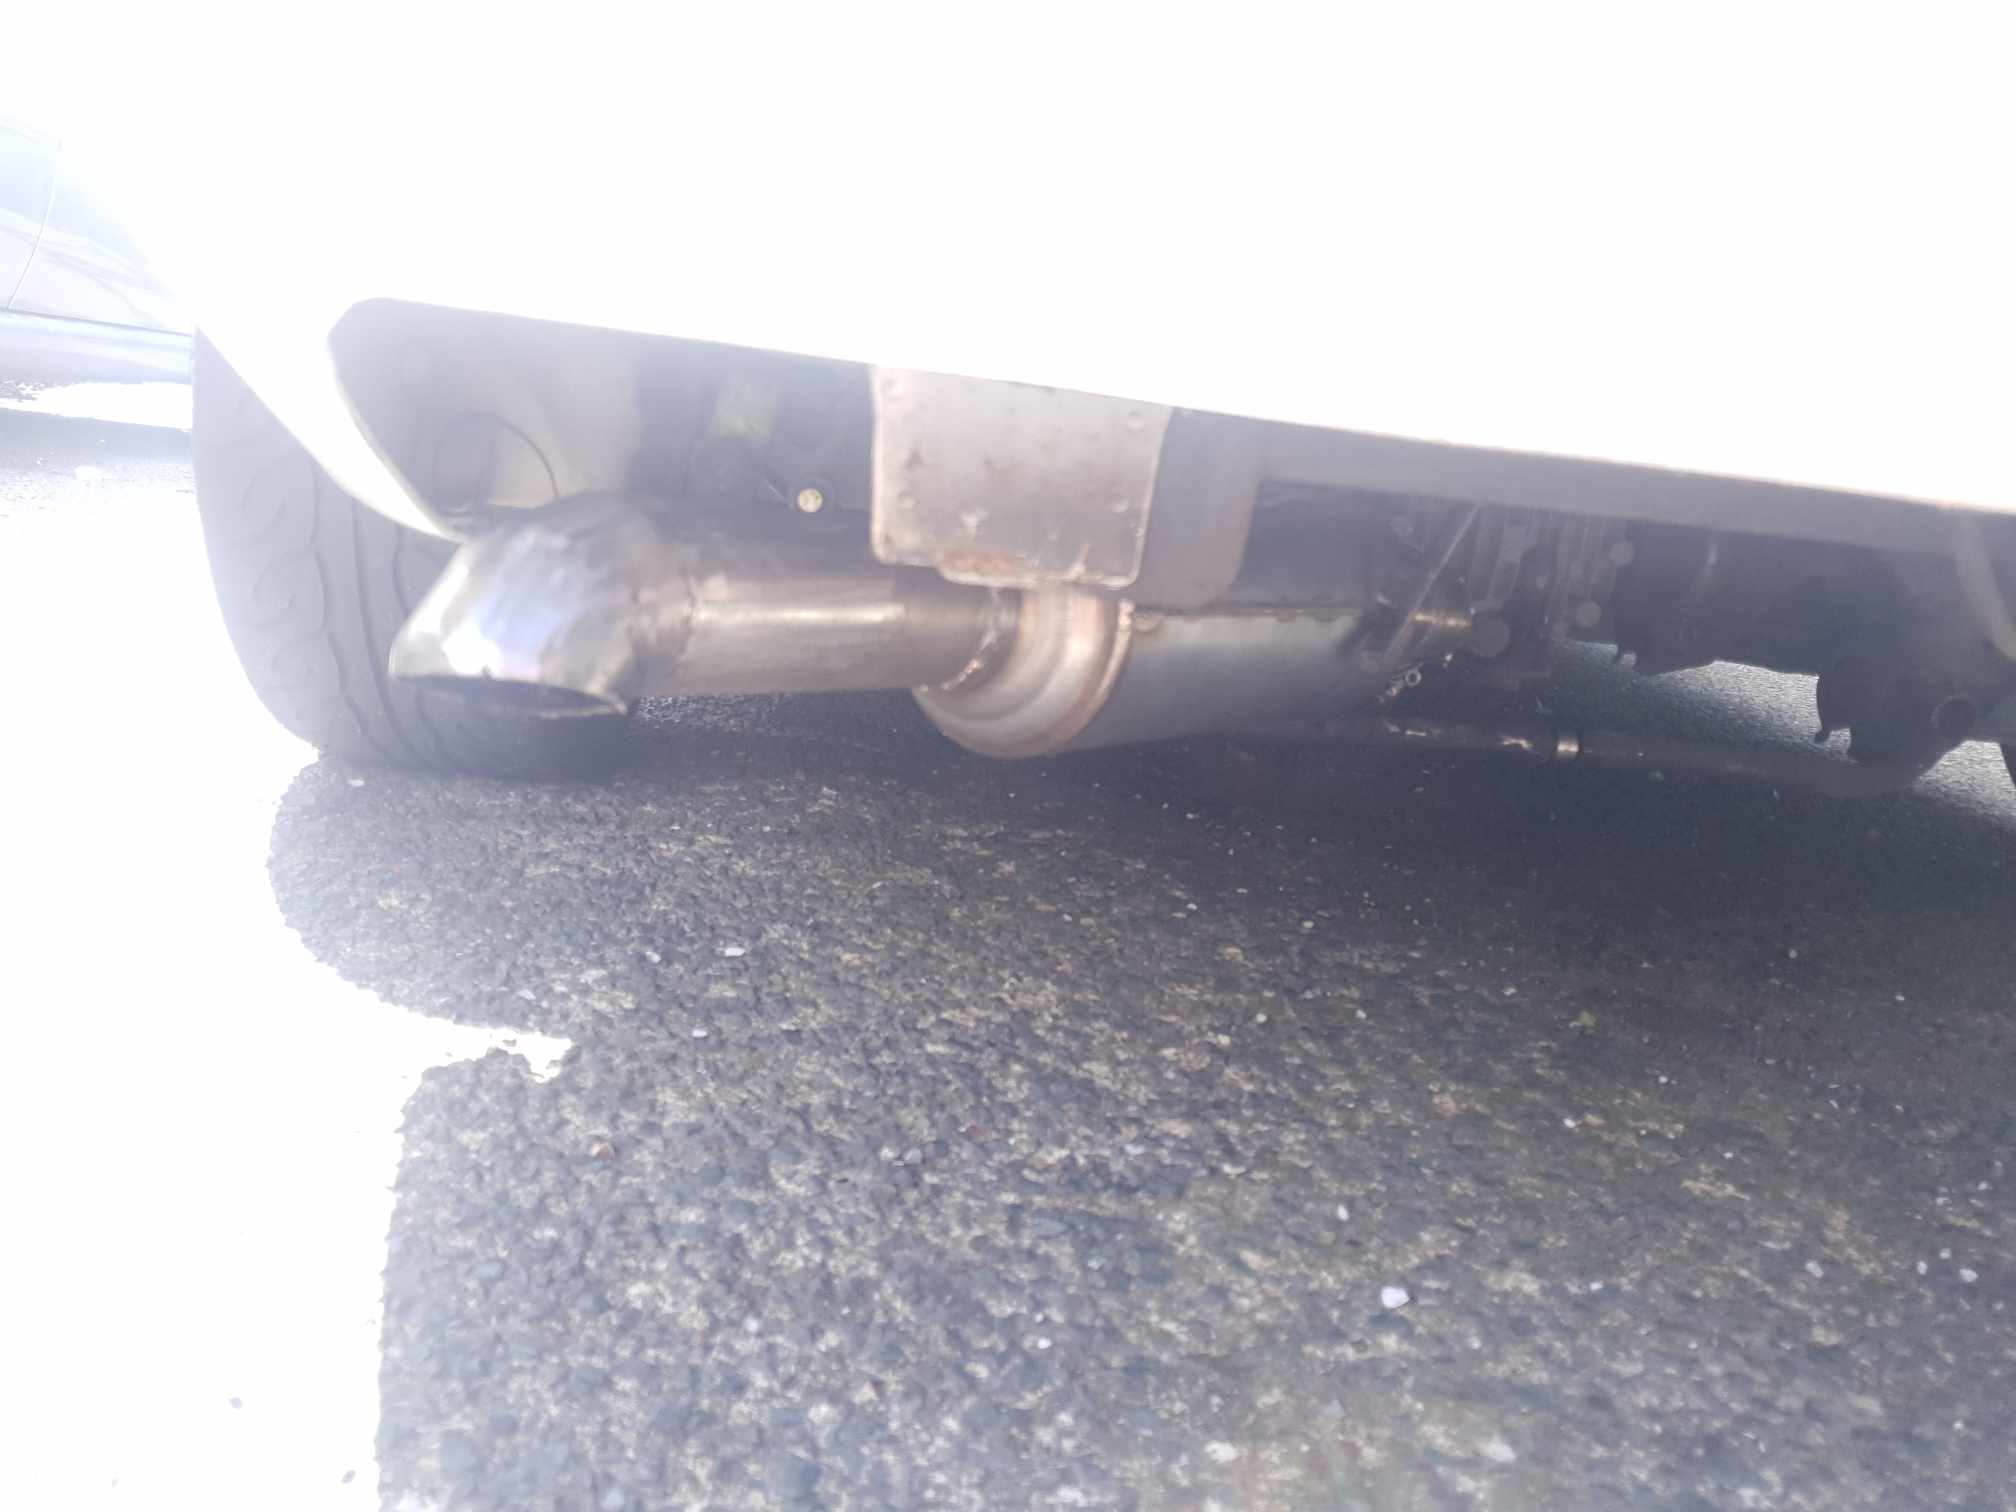
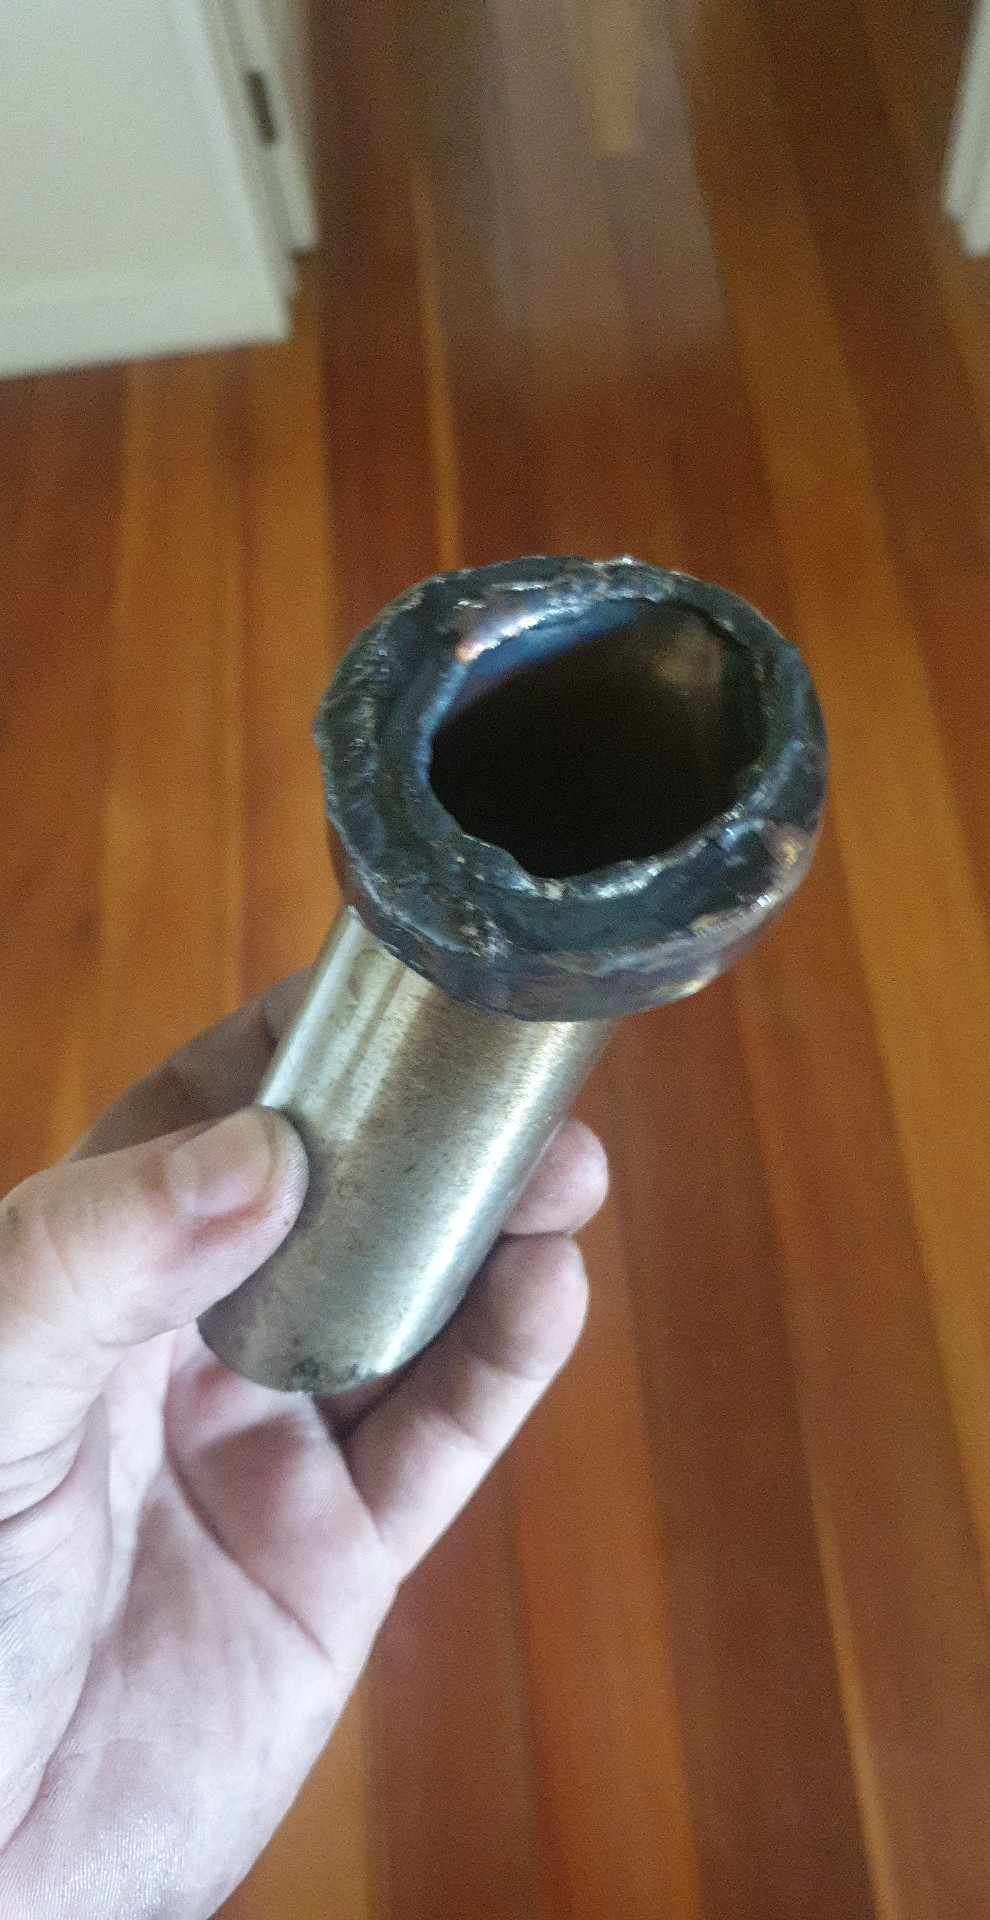
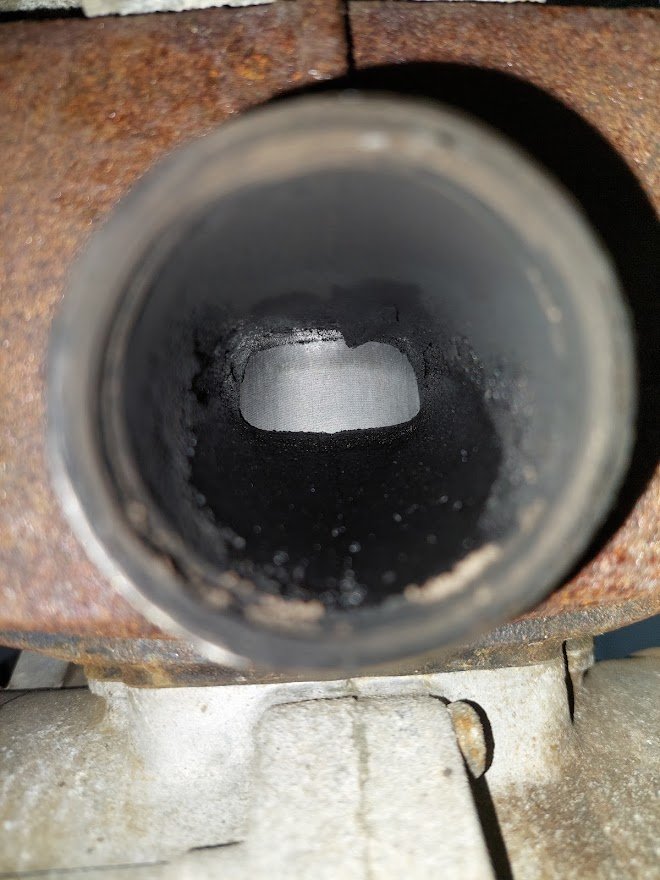
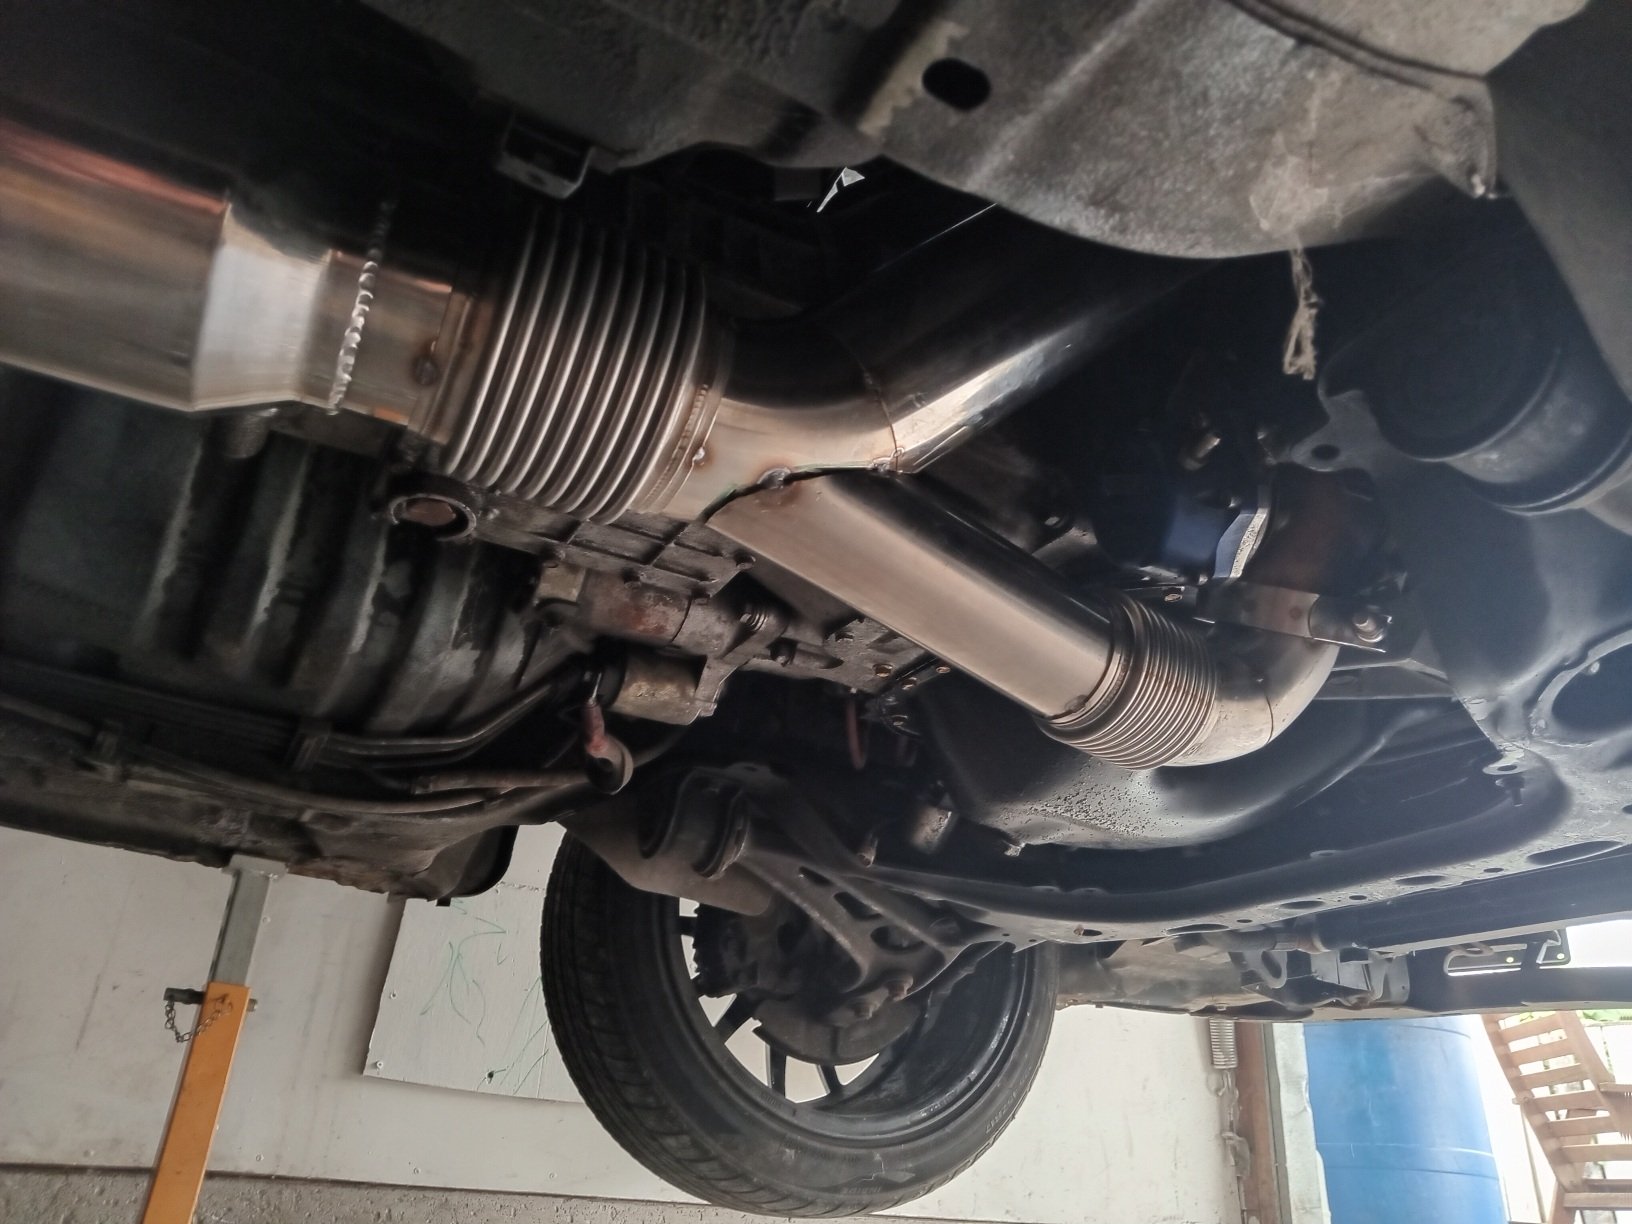
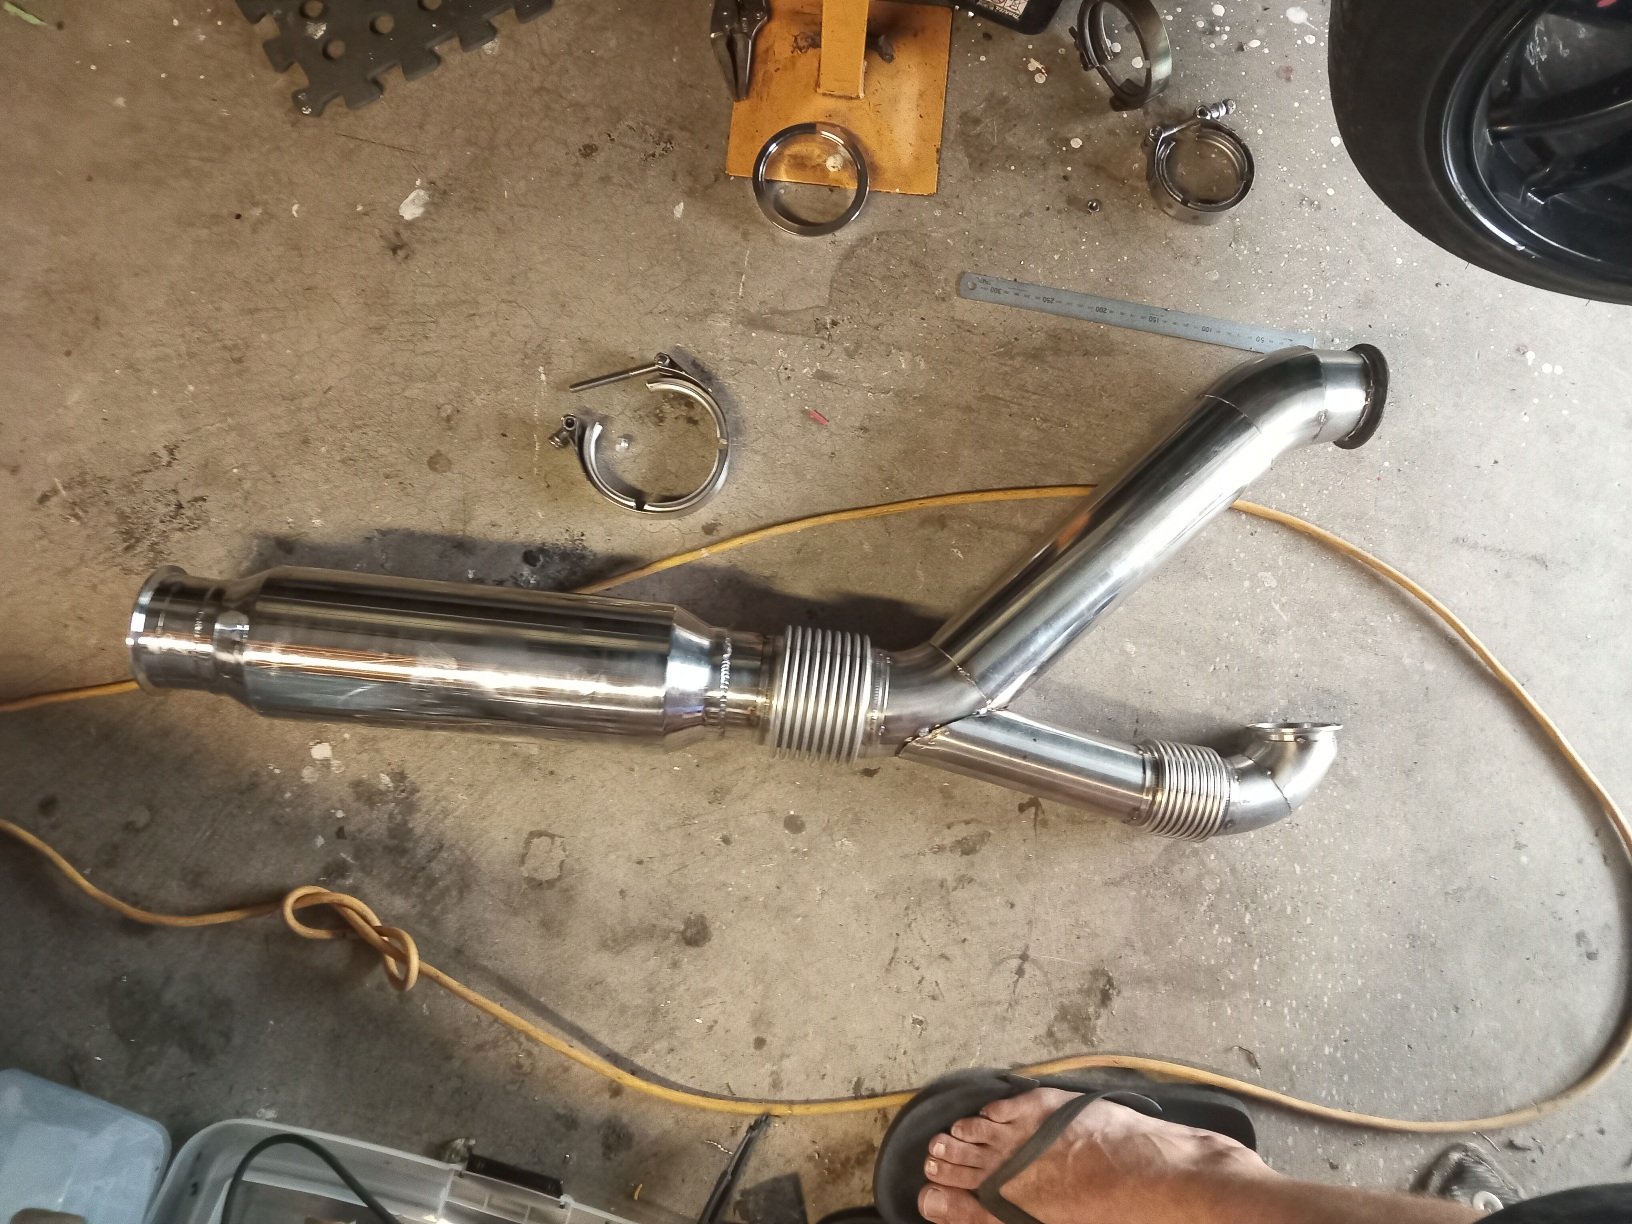
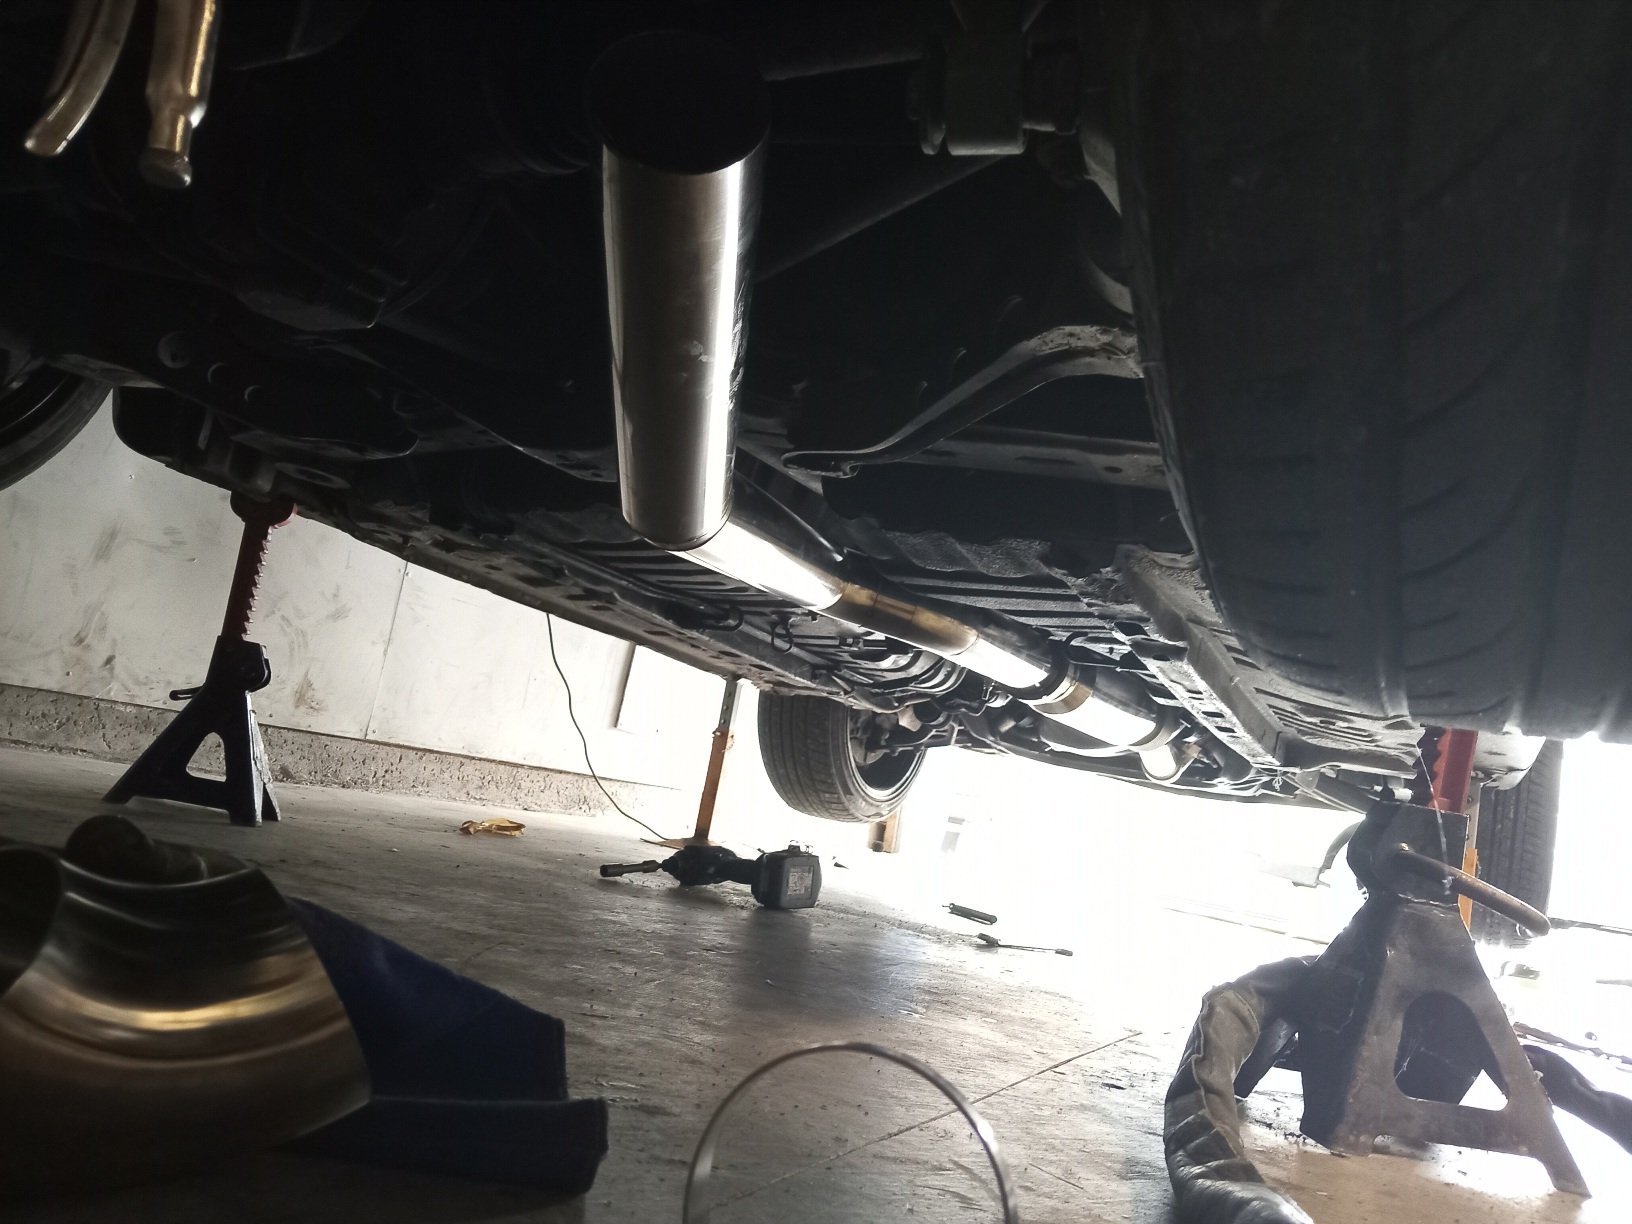
Another few months of nothing and then I decide to sign up for another sccnz motorkhana. At this point it is 10am saturday, and the motorkhana is 10am sunday. Last time I checked, my TPS is falling off, throttle #4 has a vacuum leak from being yanked about when the tps was knocked, and there is maybe a slight misfire. Instead of even opening the engine bay, I decide the exhaust needs more work and I have a muffler just lying about SOOO a plan is formulated... I'm also critically out of stainless filler and argon, but that won't stop me Contemplating new muffler position, was tempted to have it riight out the bumper but I don't hate myself that much. Instead, we tuck the muffler right up underneath the car and do a downturned exhaust tip. At this point I was chopping up the old muffler to save argon. Here is where the downturn tip came from: After procrastinating a fair amount, I get the muffler all tacked and have completely exhausted my argon bottle. Nice, its about 3pm and I'm making dinner for some friends before a comedy show. Make a lasagne then quick trip to bunnings at 5.30 for an argon swap, comedy show and start "welding" again at about 11.30pm. Do I need more gas coverage? Sure. Are my "welds" shit and rushed? You know it. Do they work? To be decided. Midnight:30, job done. Car lost some rasp, gained a LOT of bass. Right at 90Hz at motorway speed, heaps of it. So much bass I was getting a headache, and that was not fun. I figured its about time to actually make the car quiet, so I make a (suss) slip in silencer after the motorkhana. It had to be short and on an angle to be able to get up the downturn exhaust tip, but it does the job. Bass is gone, rasp is gone, car sounds pretty reasonable for once!
2 points
-
If it's all standard steering, and just roll center spacers, bump steer check is not required2 points
-
Some bits from the UK arrived surprisingly quickly, a sump and tappet cover gasket, a boot for the gearshift, suspension bushes etc; I made a battery bracket to suit the most likely battery I found in my stash of many; All those untidy wires are not part of the car you will be pleased to know. I also printed some things; Cos that link for the lock on the passenger side has gone walkies somewhere. And over the last couple of weeks I have been designing and iterating a set of heater controls that I think actually should work. Cool beans. Also I wired up the clock. It works all nice. The clutch couldnt get uprated cos they couldn't find the parts to do it and additionally the man said it looked like that cover springs had been over extended, this might mean it was slipping due to wrong adjustment, so I will order a new standard clutch and see what happens. Also I found another X1/9, and have spoken to the owner, so there might be a very small Nelson X1/9 owners club.2 points
-
Just took this for its maiden voyage. Zero travel in the front . 50 percent of a exhaust. So bumpy and so rowdy. Love it . Still a shit load to do but darn it's a good feeling
2 points
-
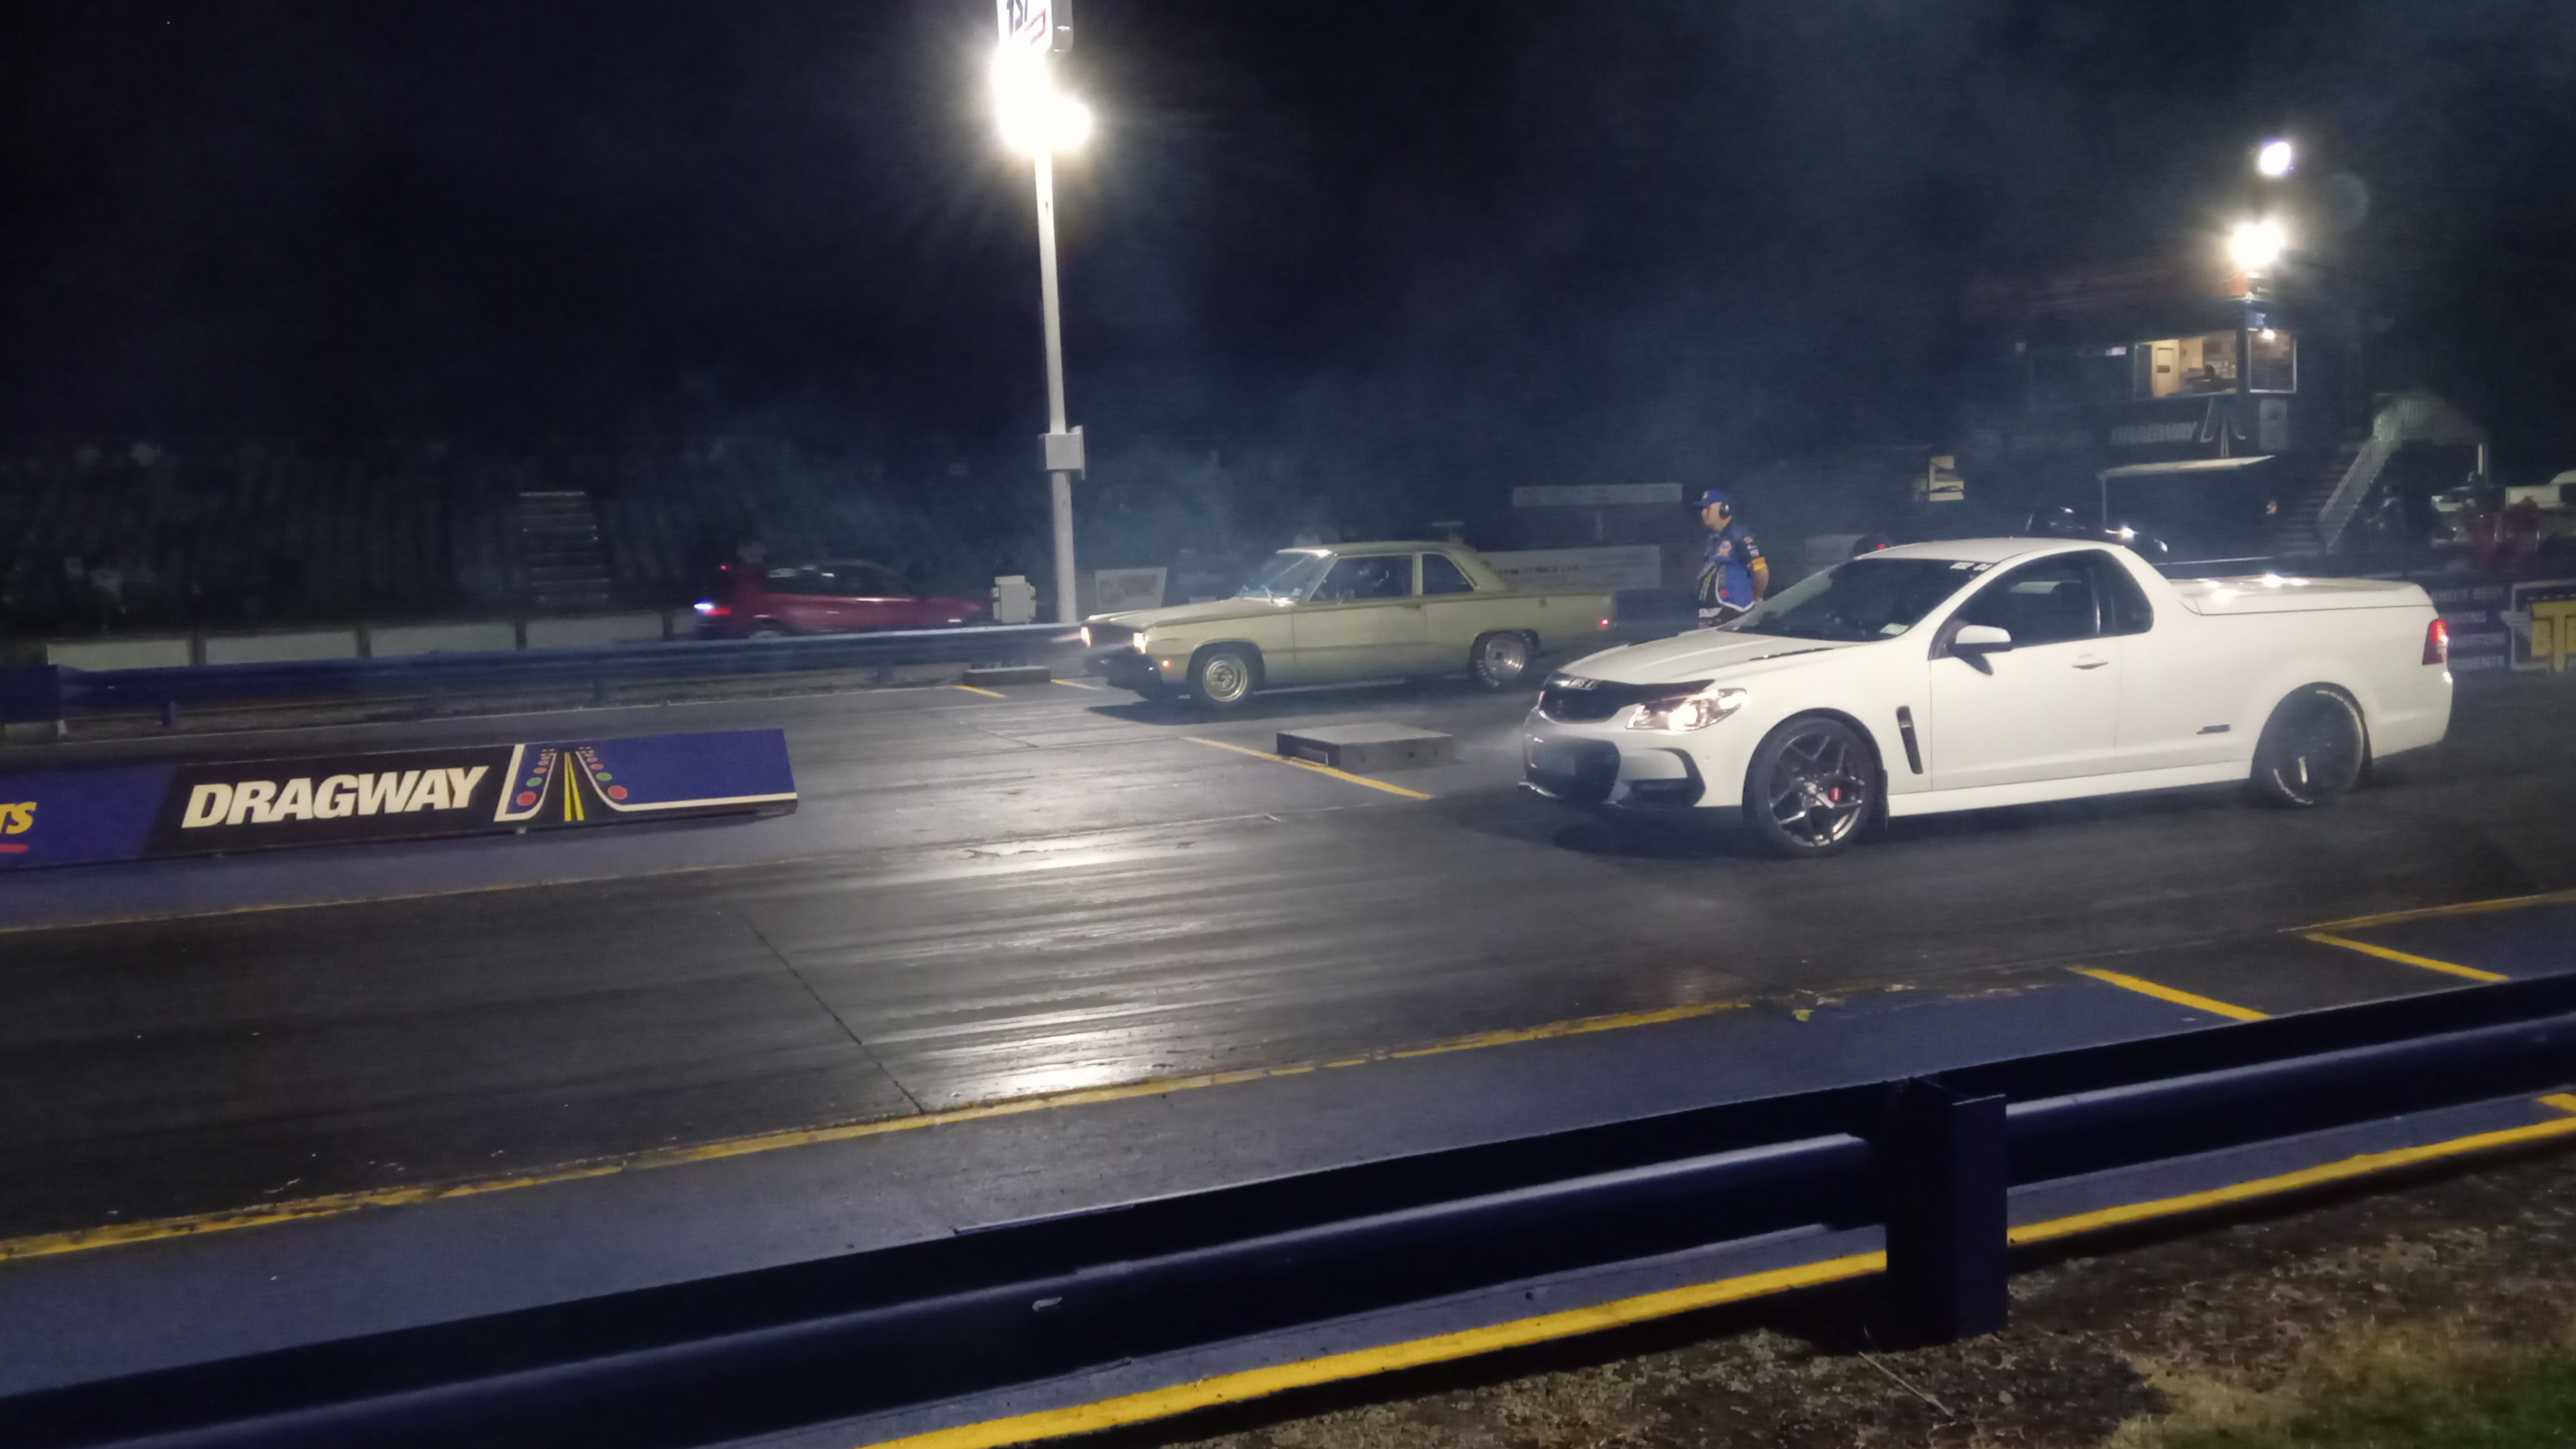
New springs made it more consistent,although slightly slower. Different wheels and muffler off when it did the 11.35 previously 11.5@118 every pass I have turned the 2 step rev limit down slightly as it was having trouble holding on the brake which I can probably fiddle with to improve I'd like to get it down to 11.0 so it's more competitive at the night drags https://m.youtube.com/watch?v=kdfGgT2pKHw&pp=ygUMVW5kZXJjYXJ2aWV3
2 points
-
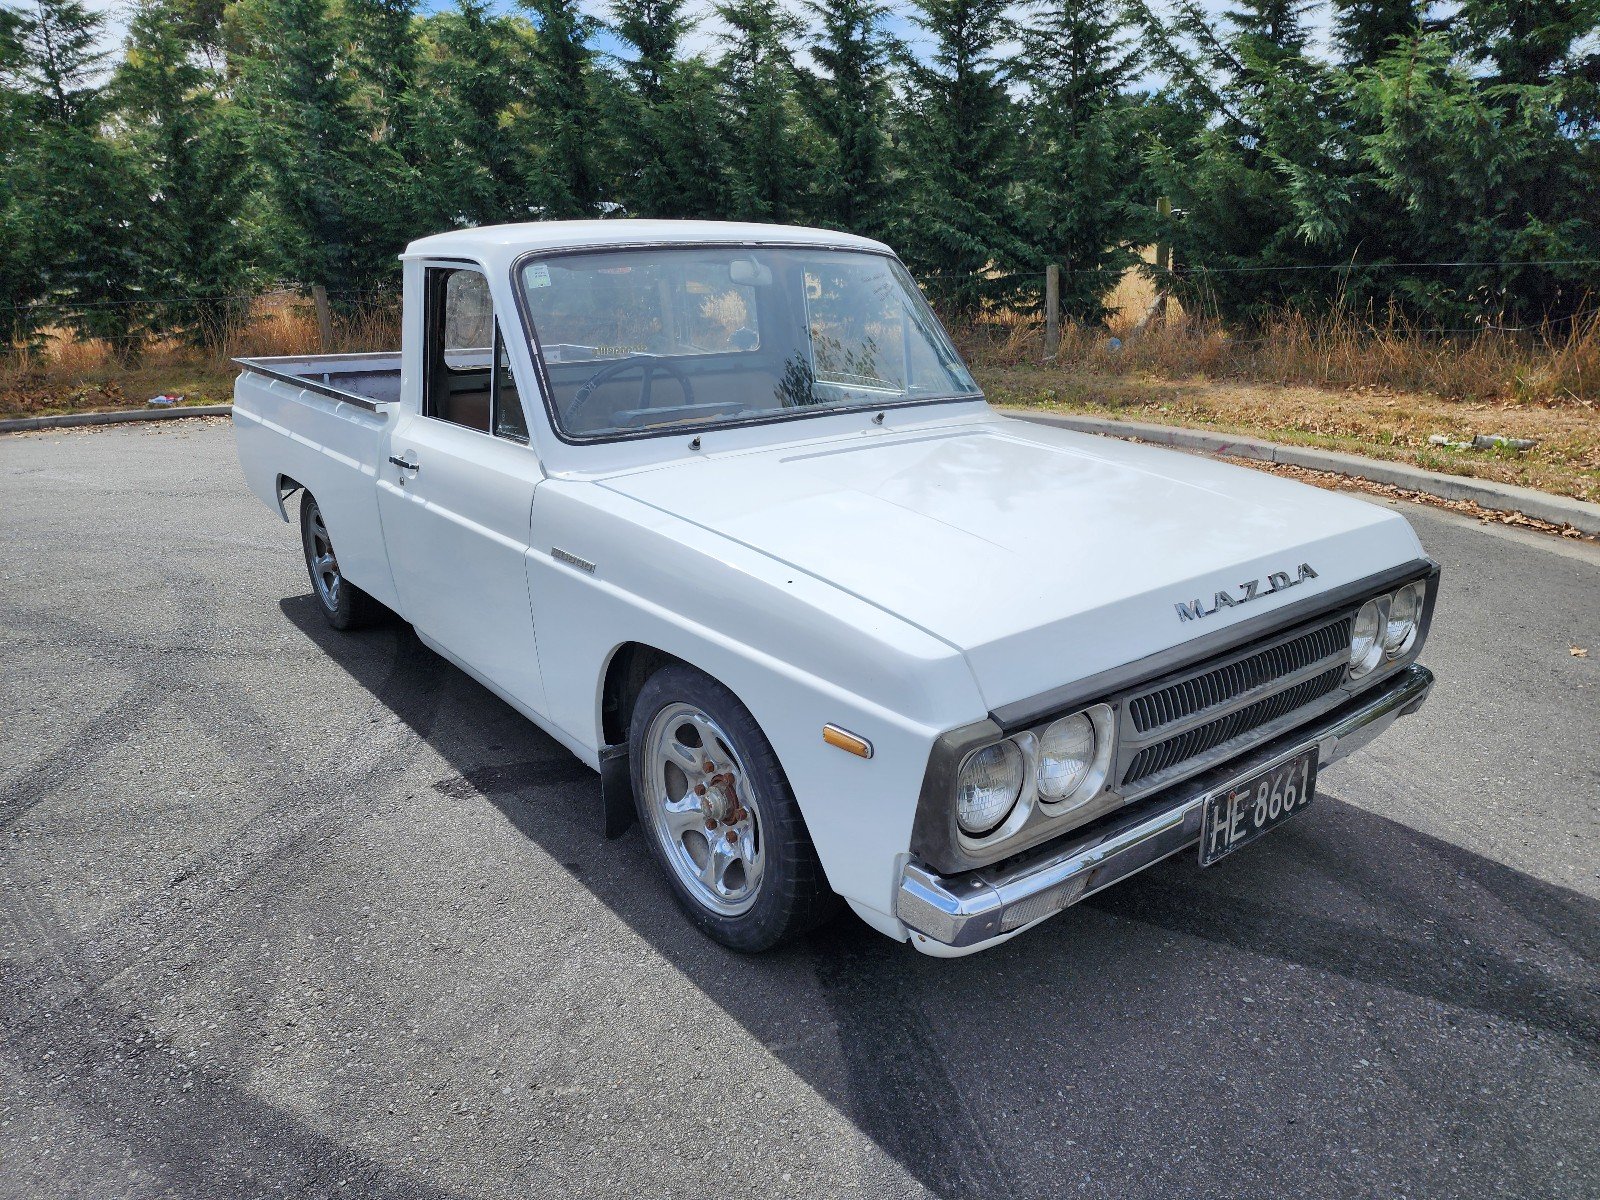
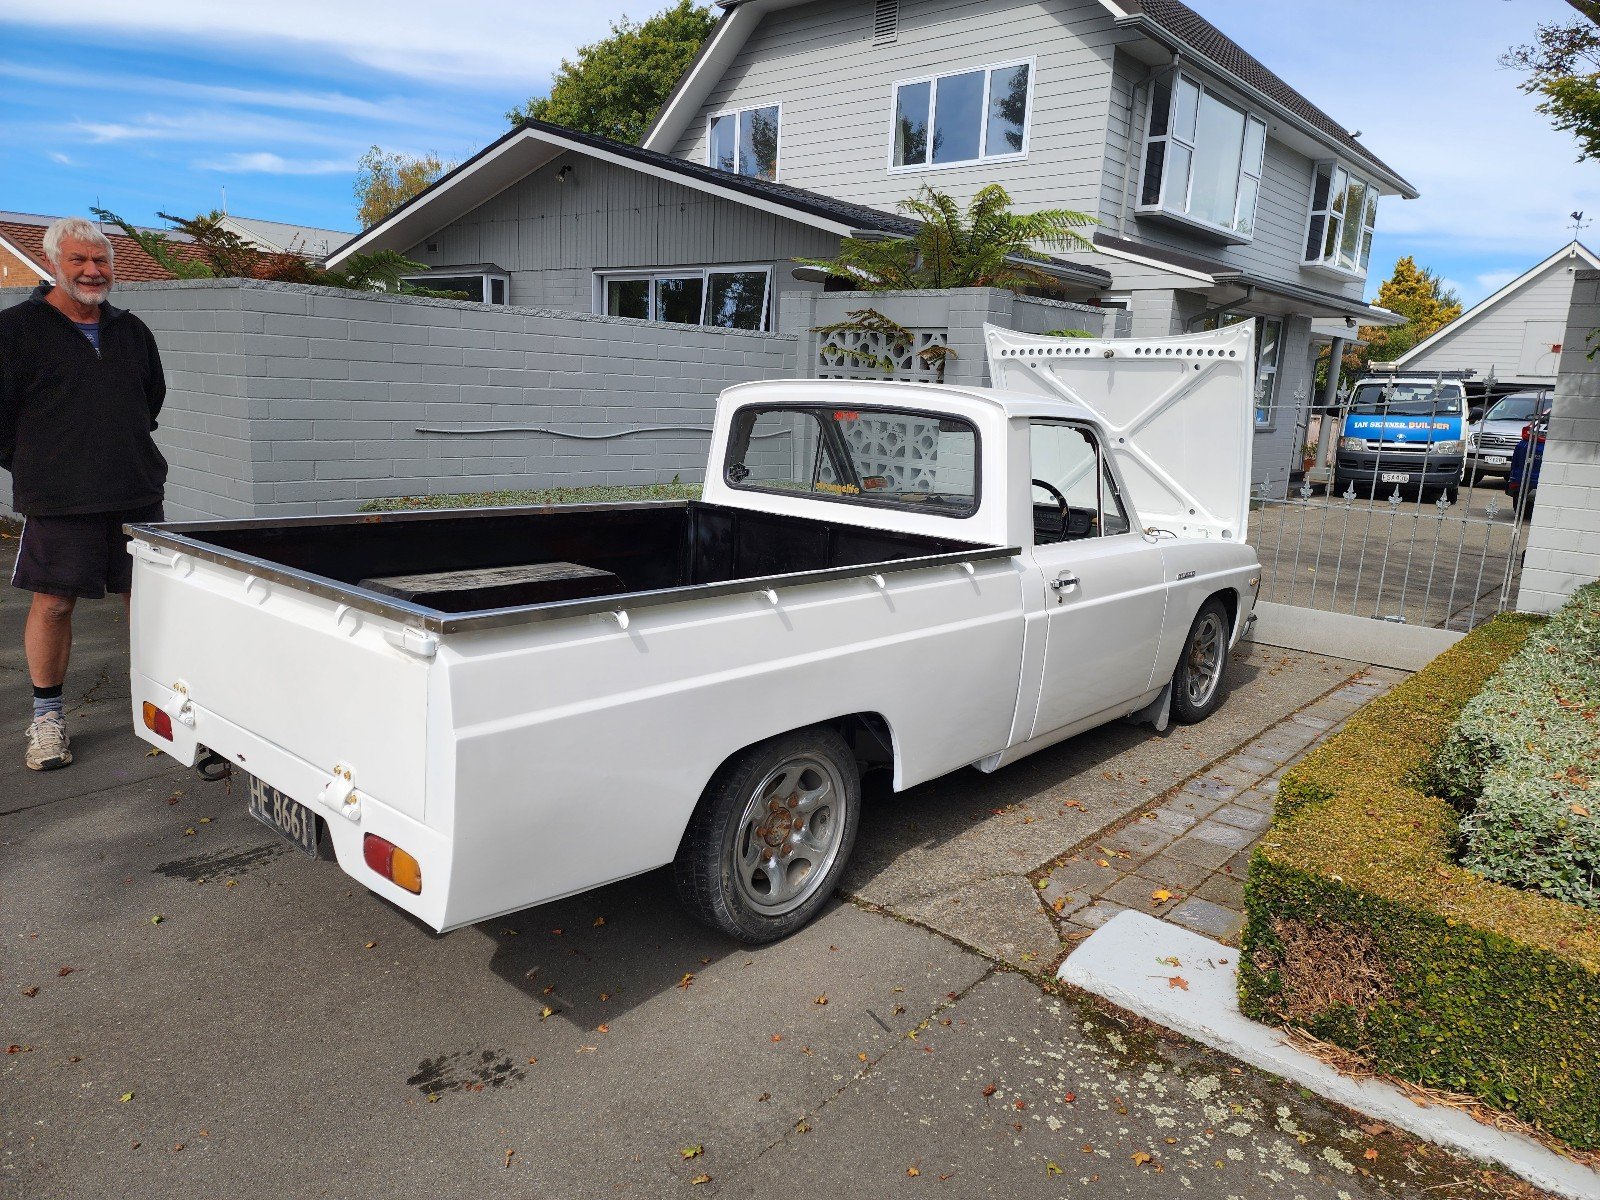
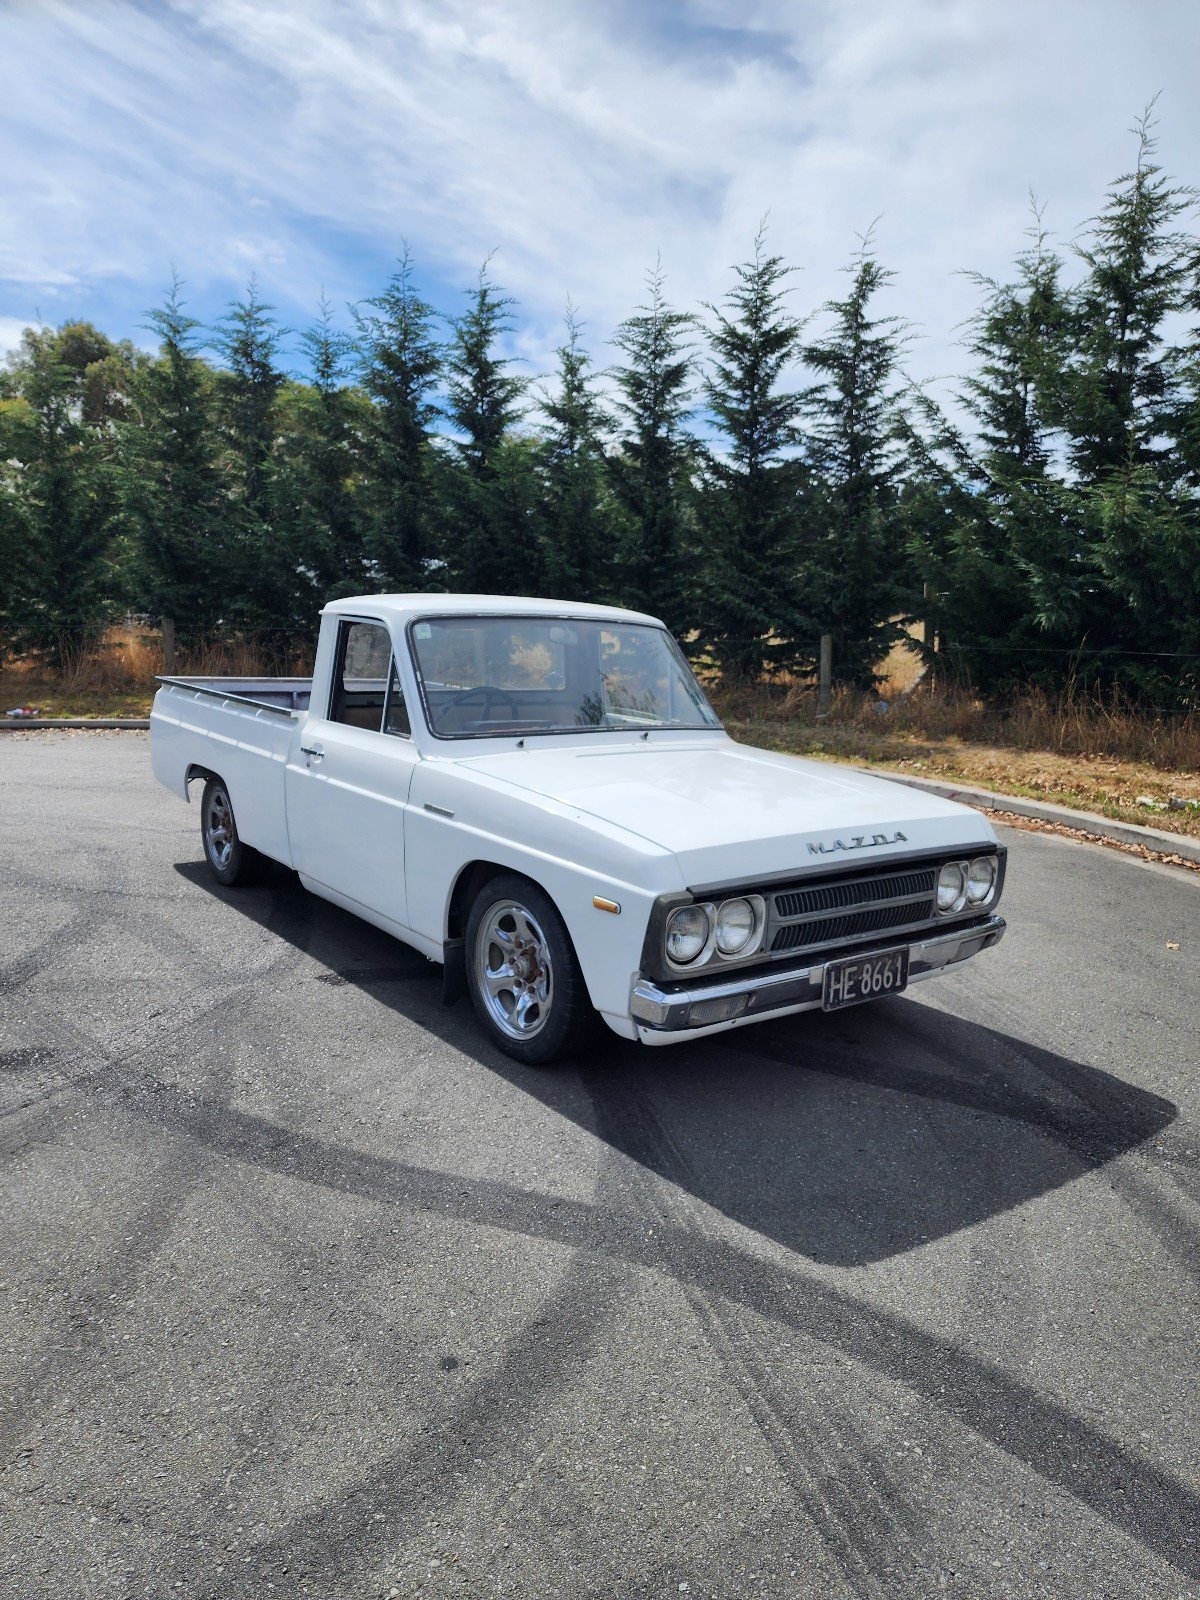
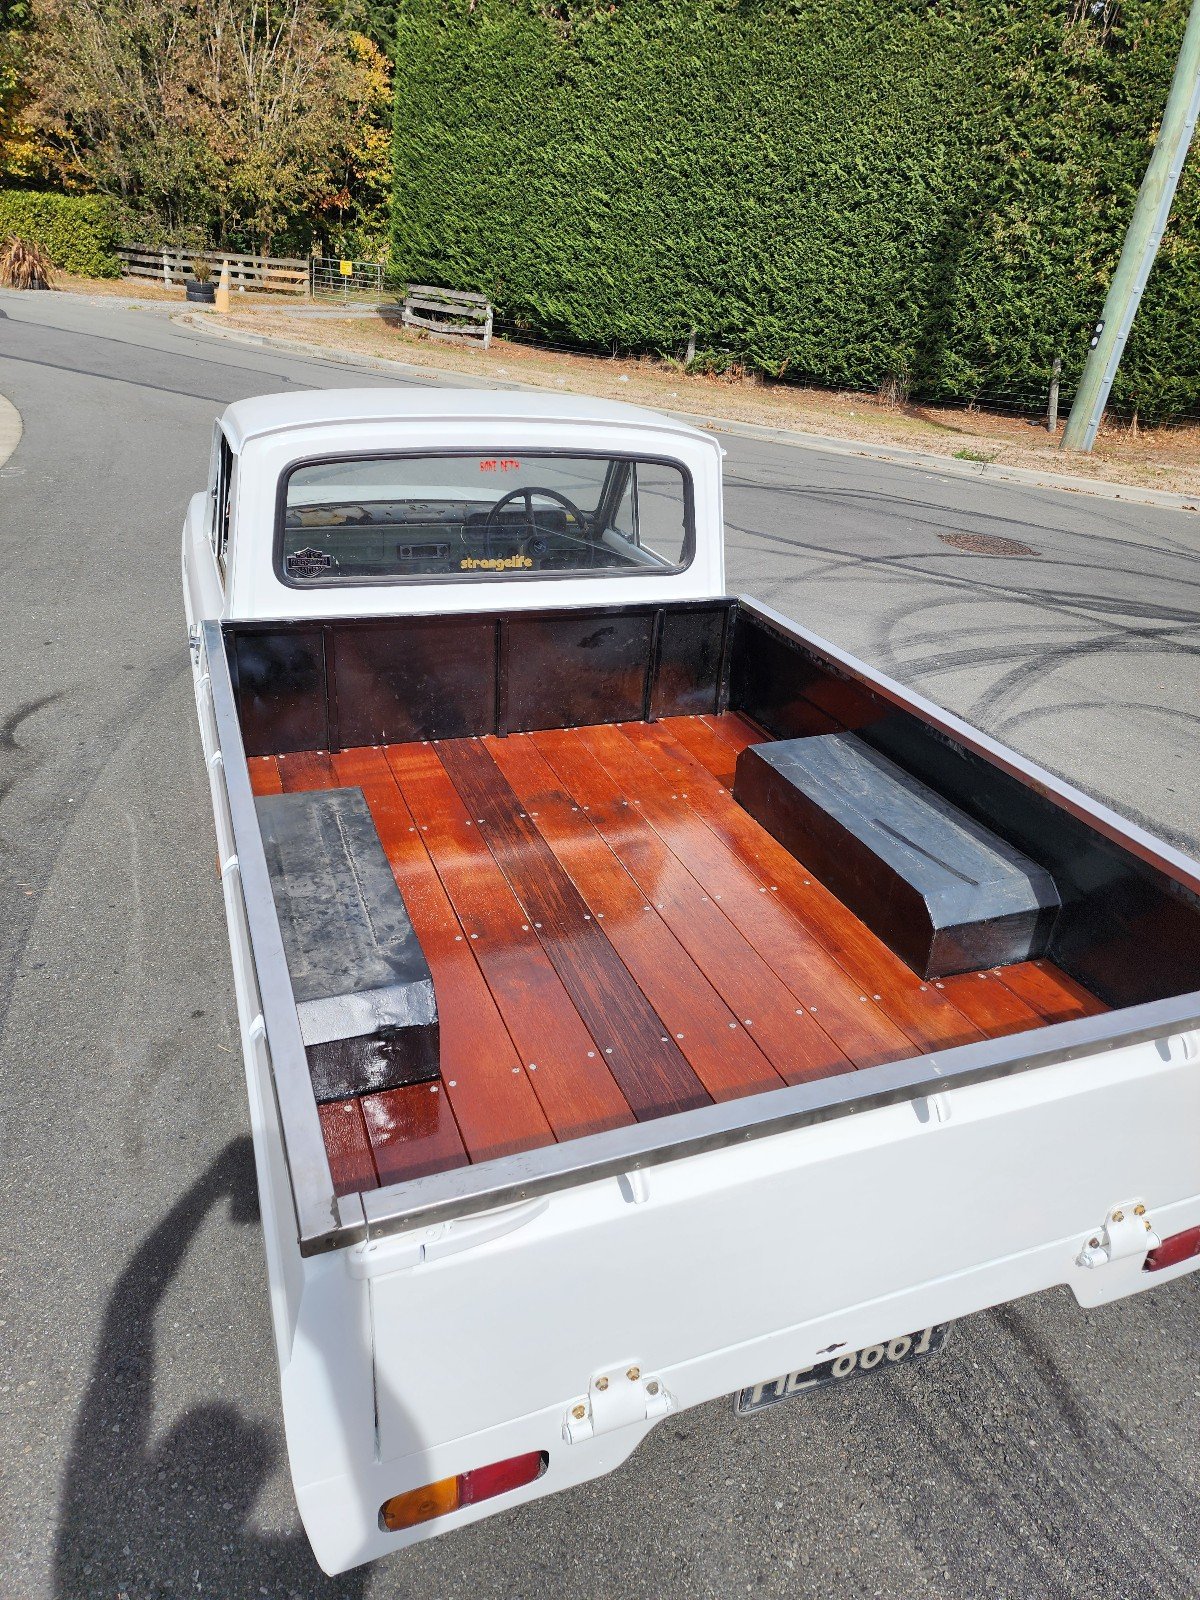
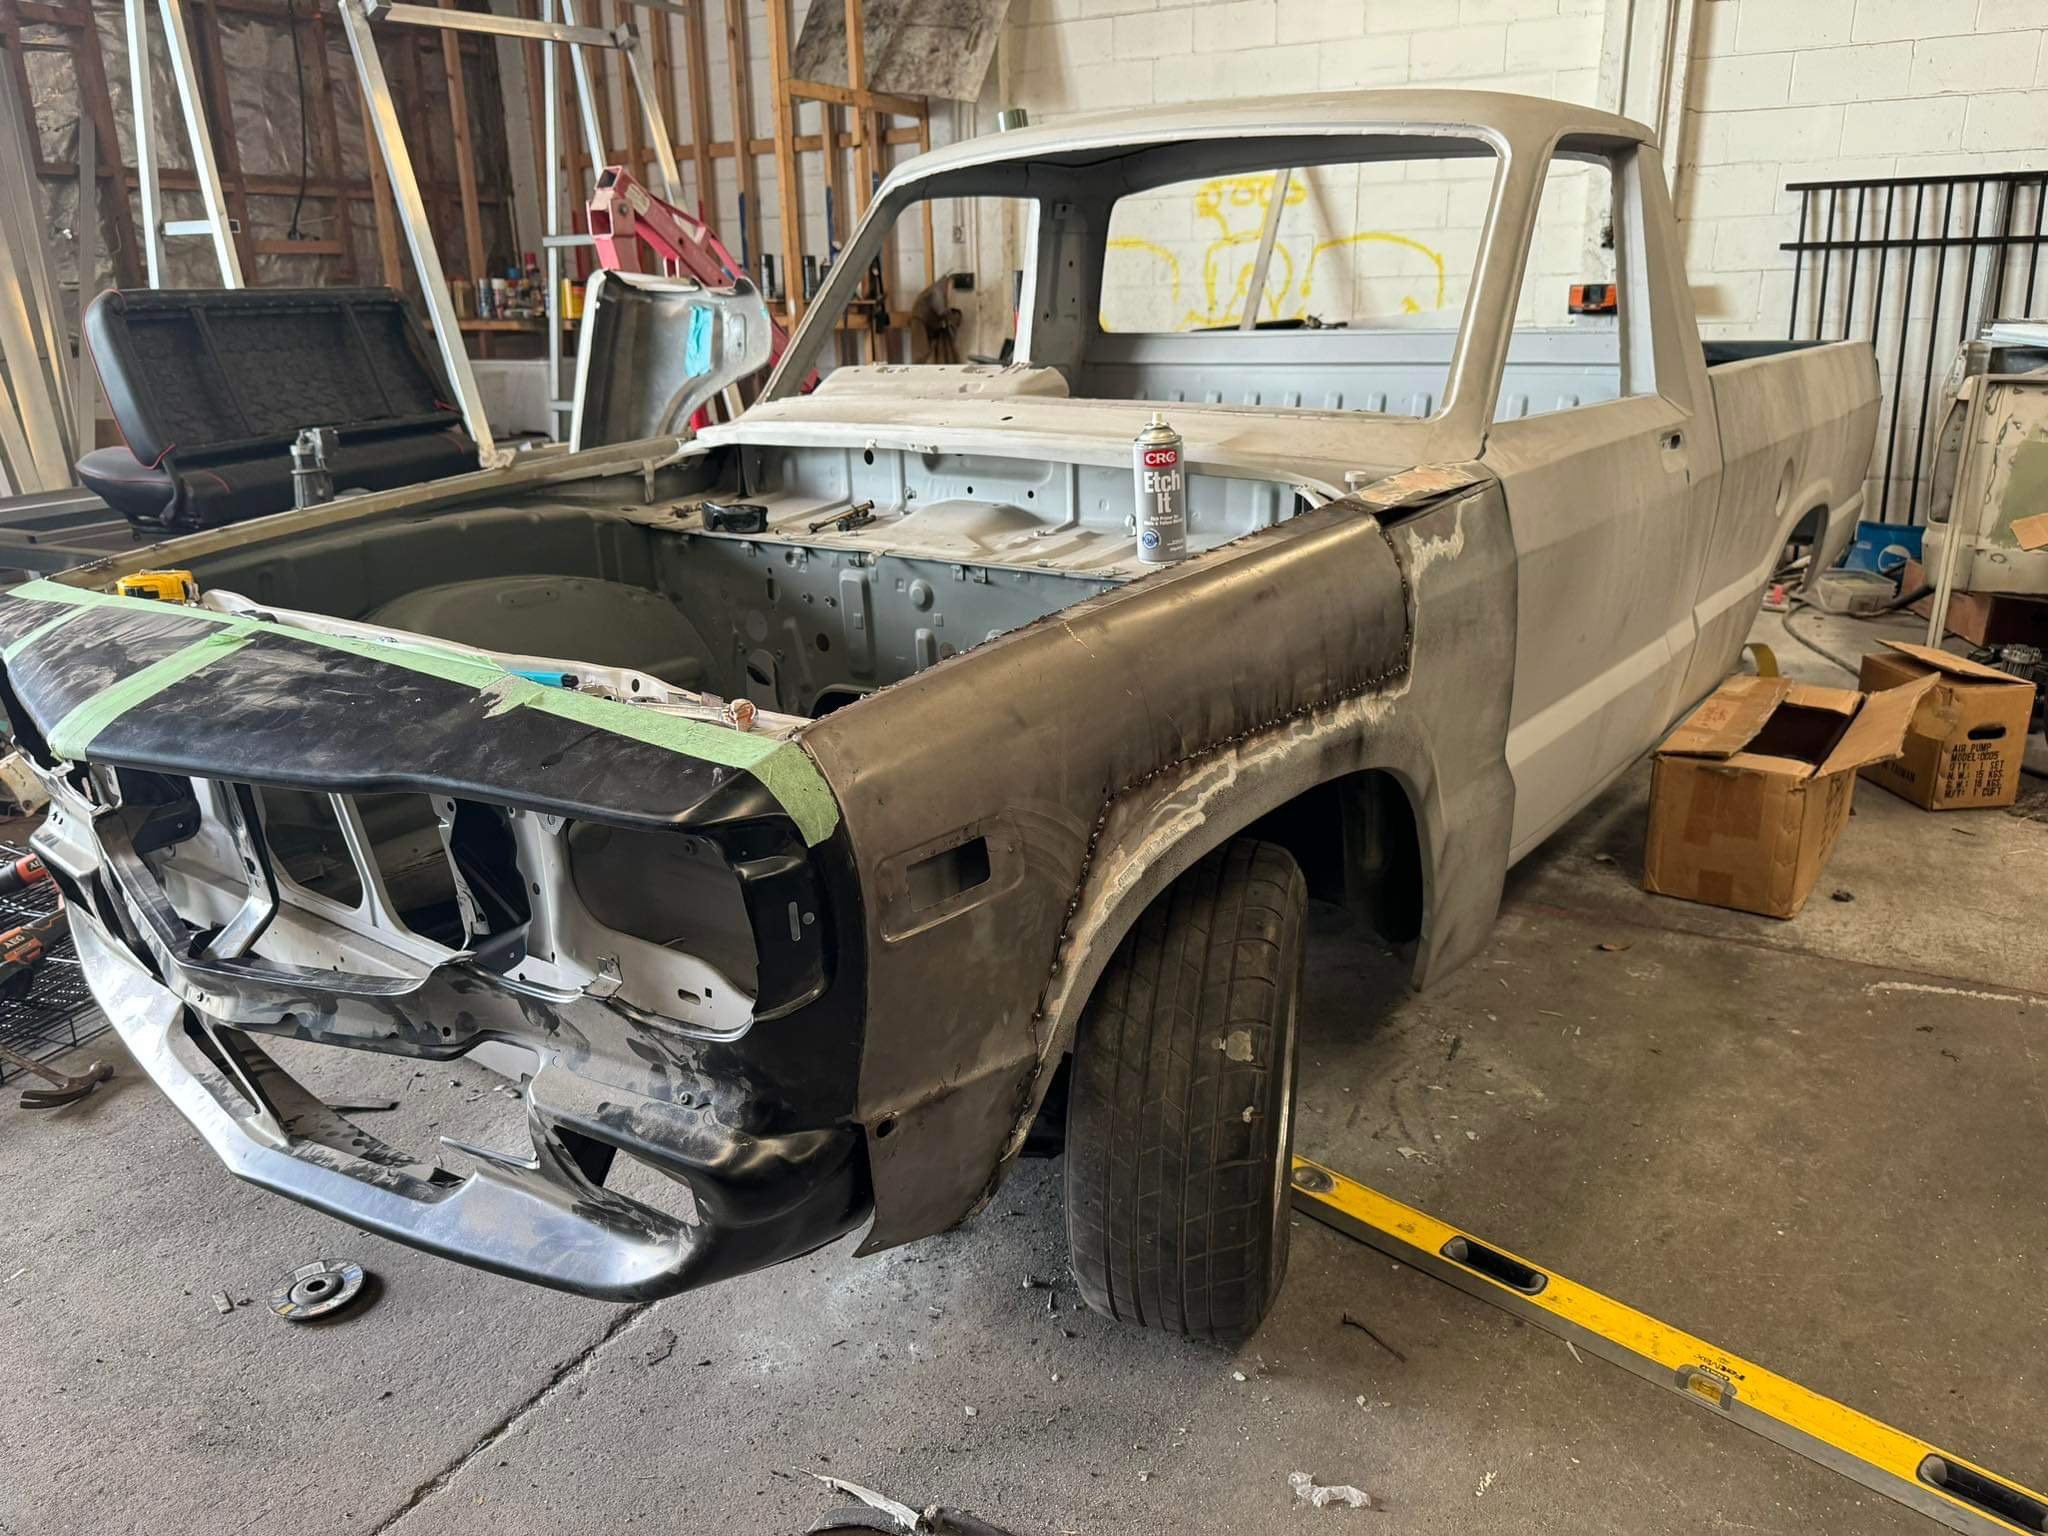
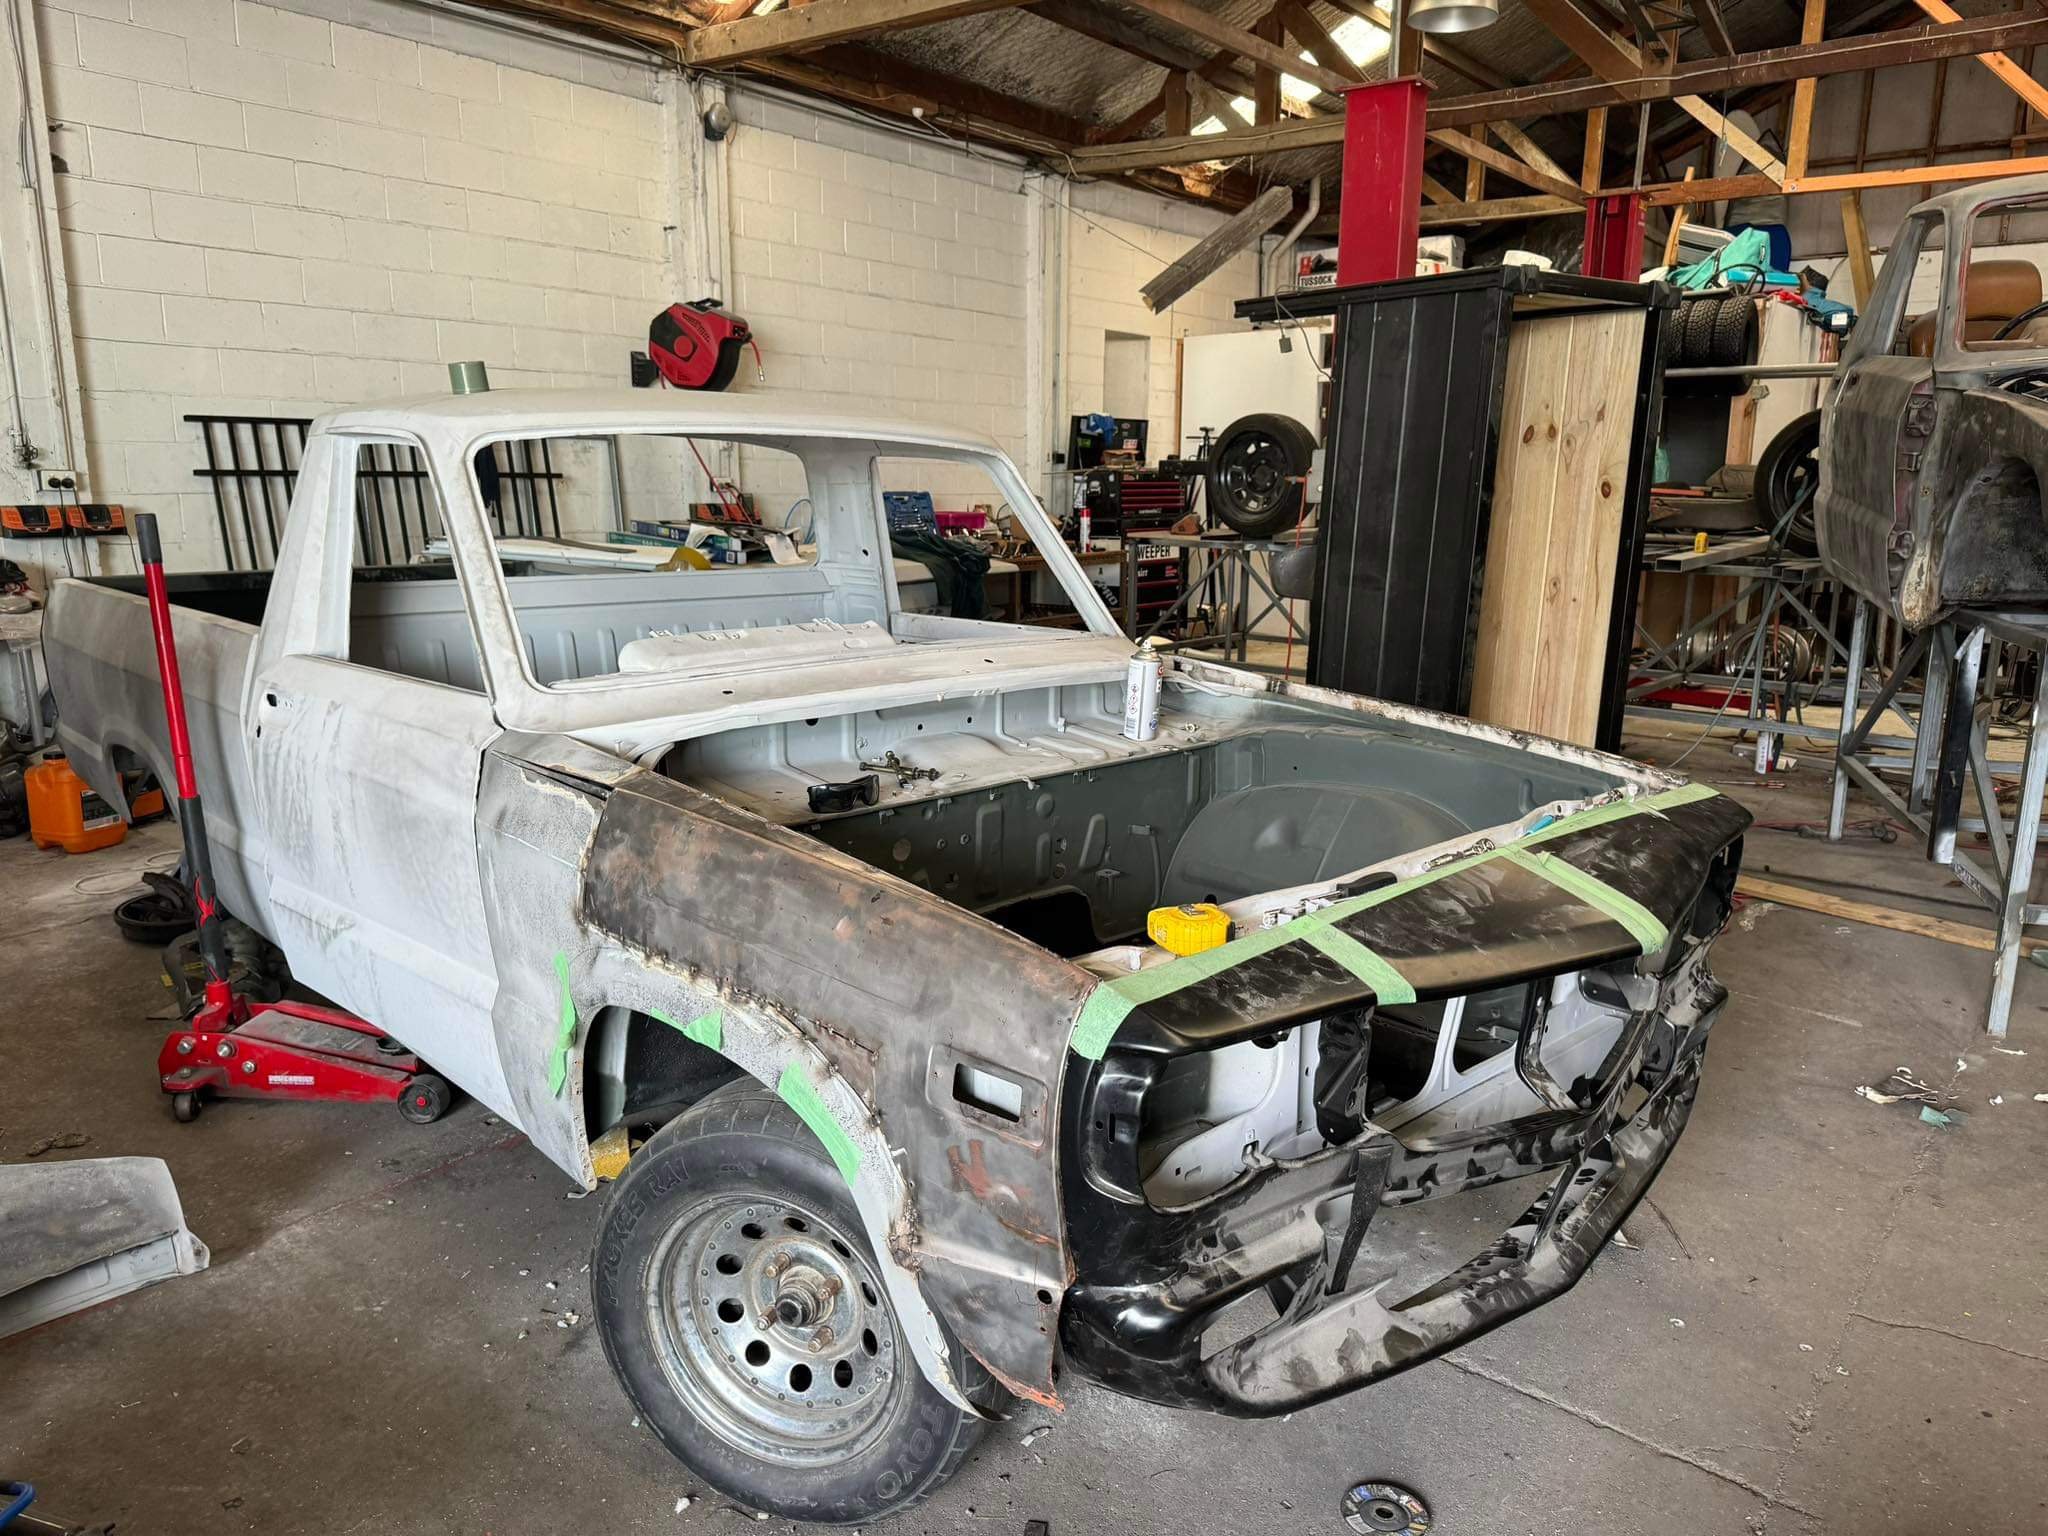
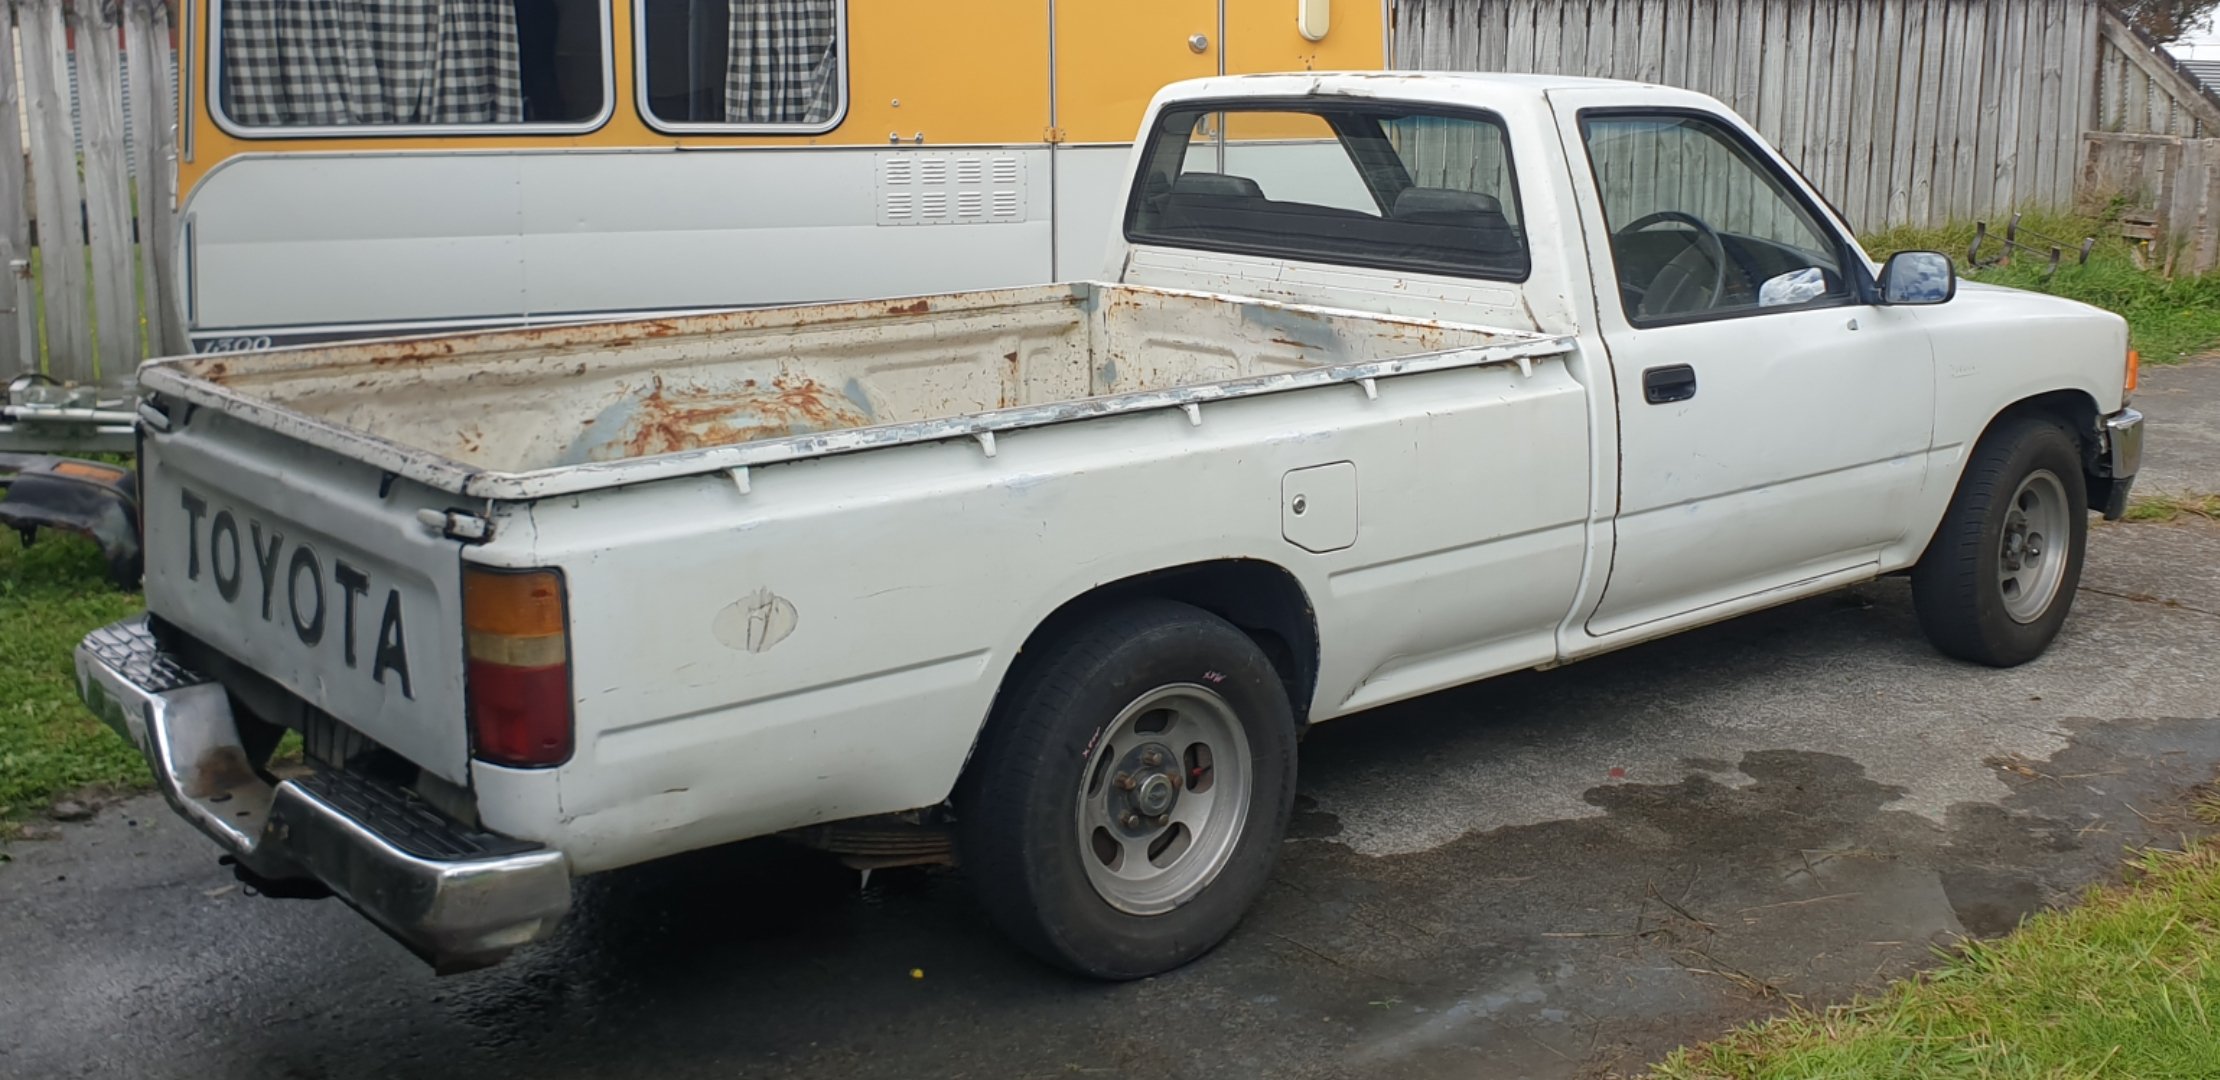
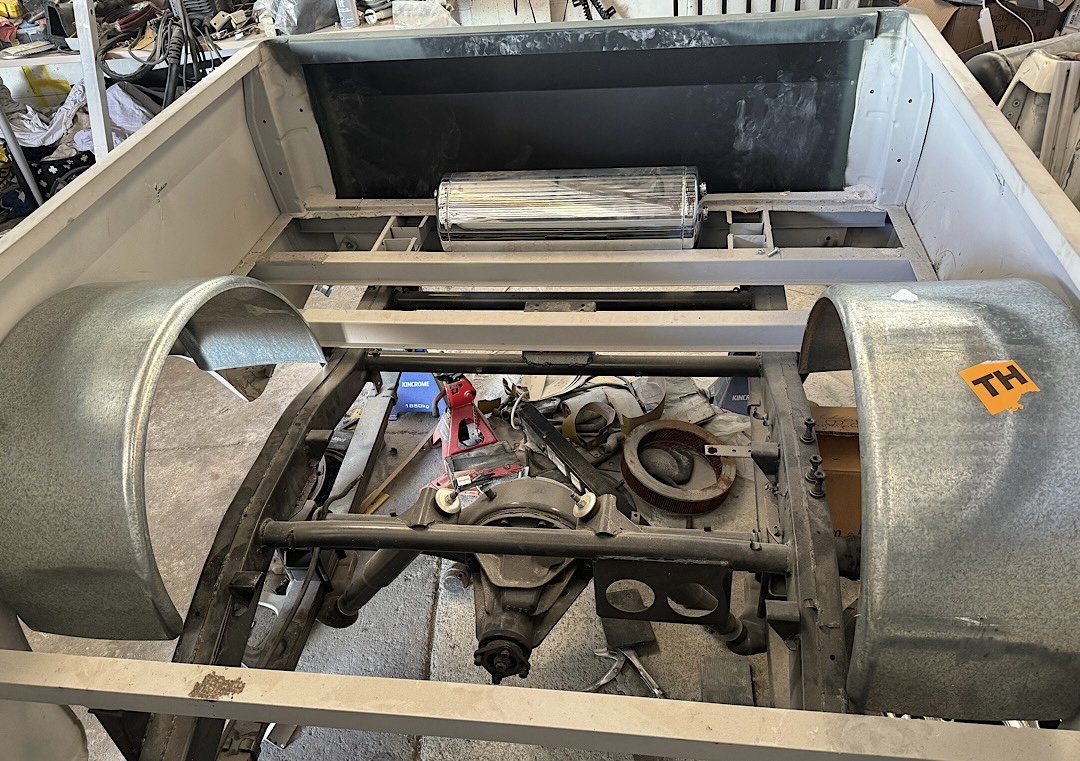
Nosecone is fully mounted, rough guards are on for mock up. this ute seems to be longer than the other ute. Probably built in a different factory as they are 4 years apart from memory.. im glad I chose to use this ute for RX3UTE, it is the same model and spec now.
2 points
-
My chassis rails were a bit pushed in, and most likely would have failed a wof, so i took it to blairs panel repairs, he did an awesome job and even fixed the pinch weld areas that were also bent up, and undercoated it all for a great price and all done in a day, couldnt ask for more really, one less thing to fix on the road to a warrant ..
2 points
-
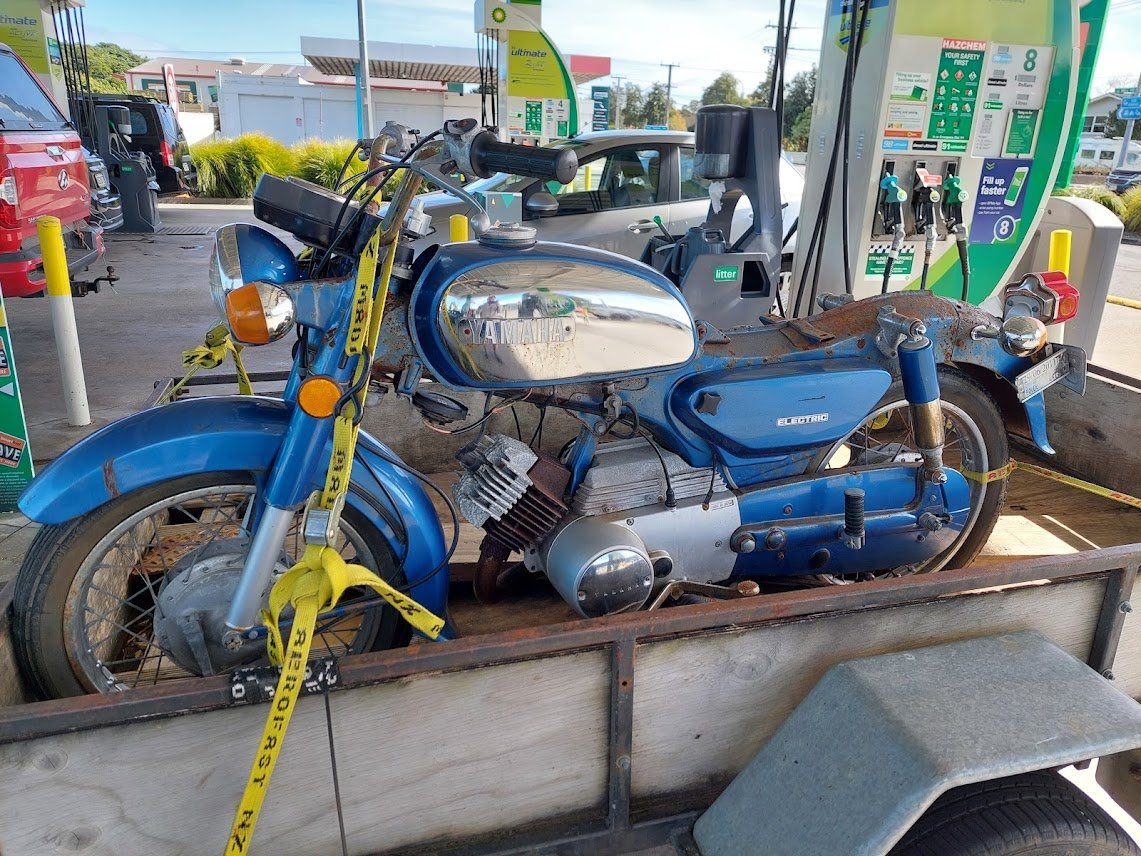
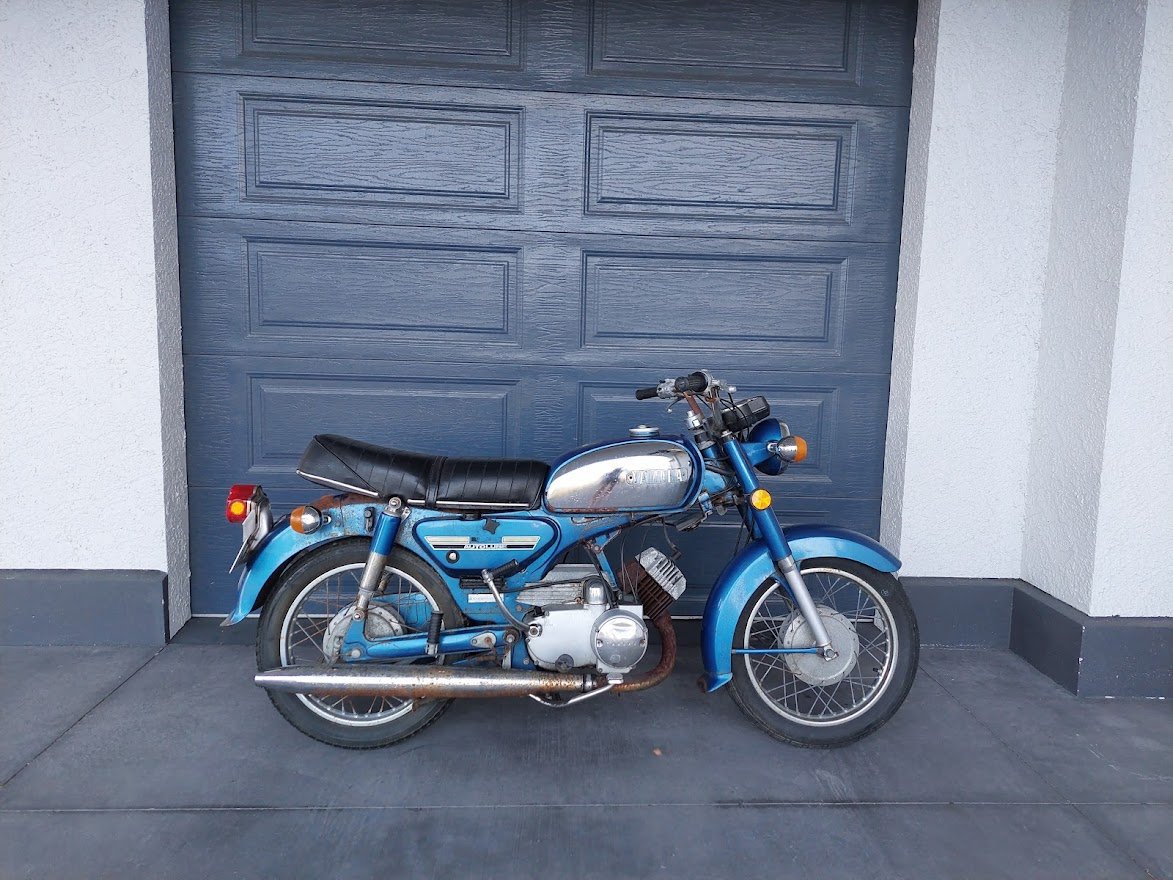
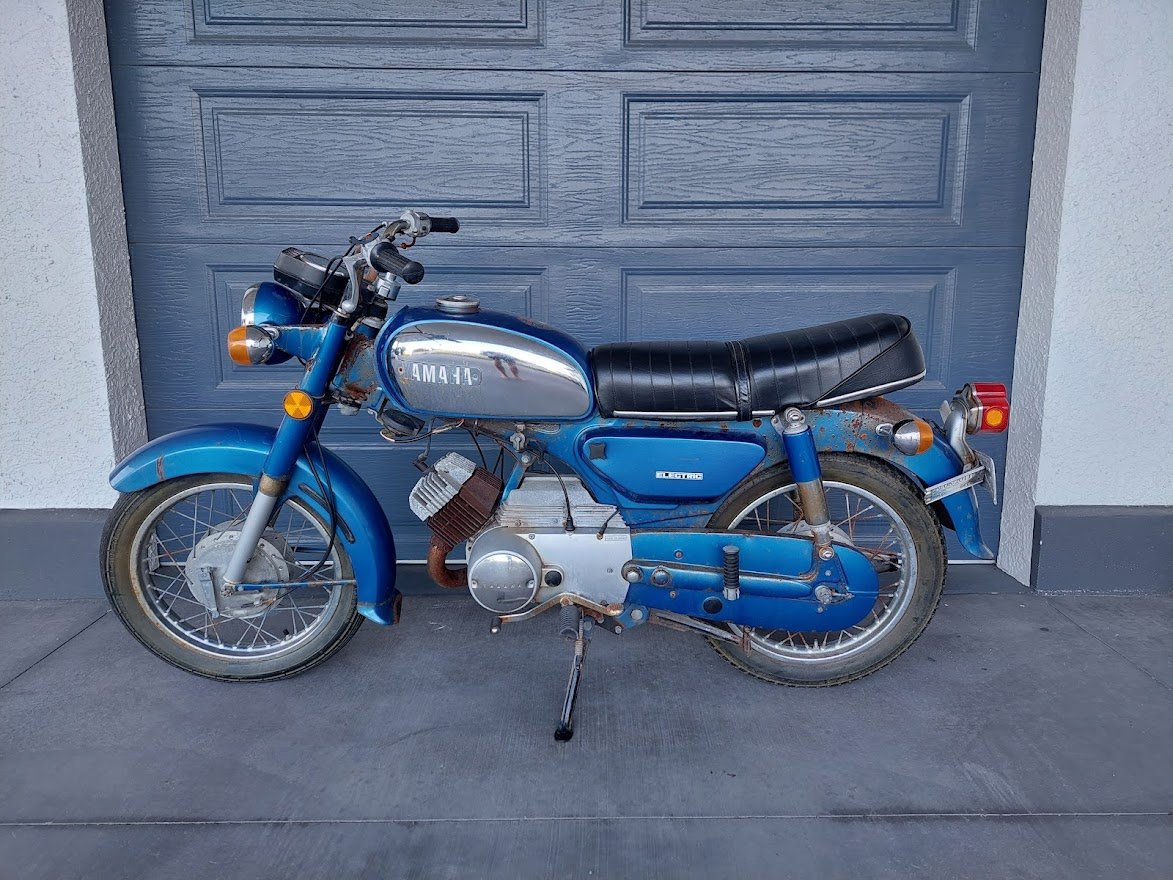
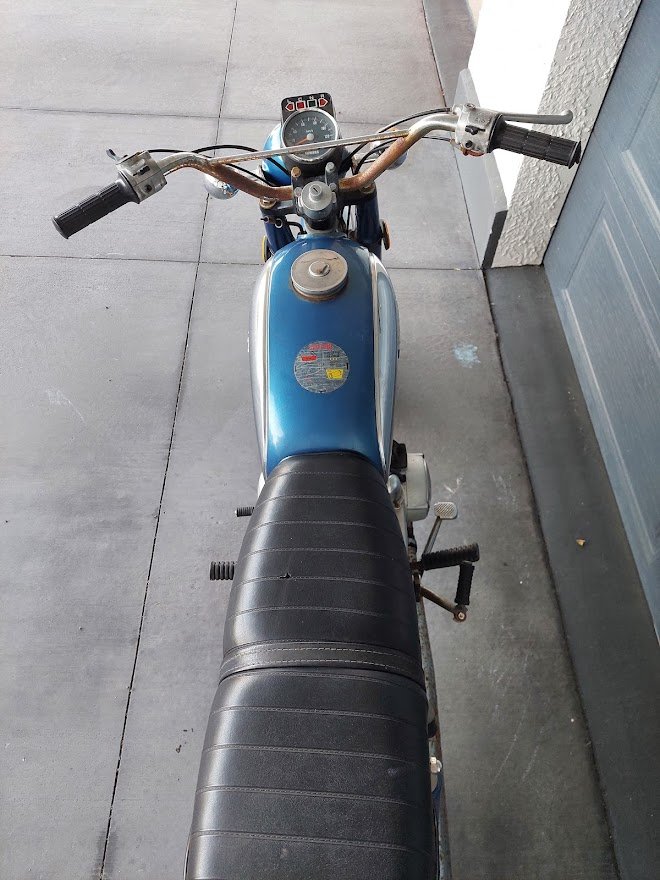
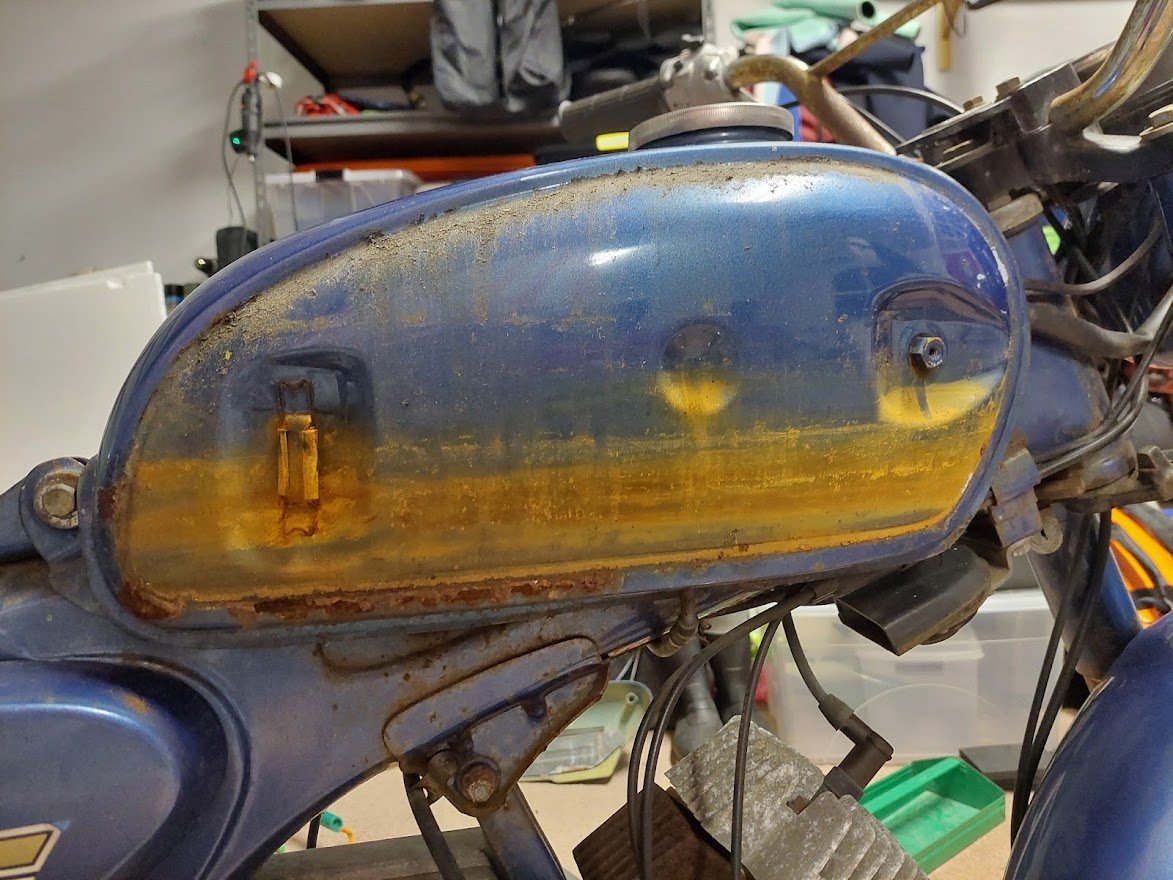
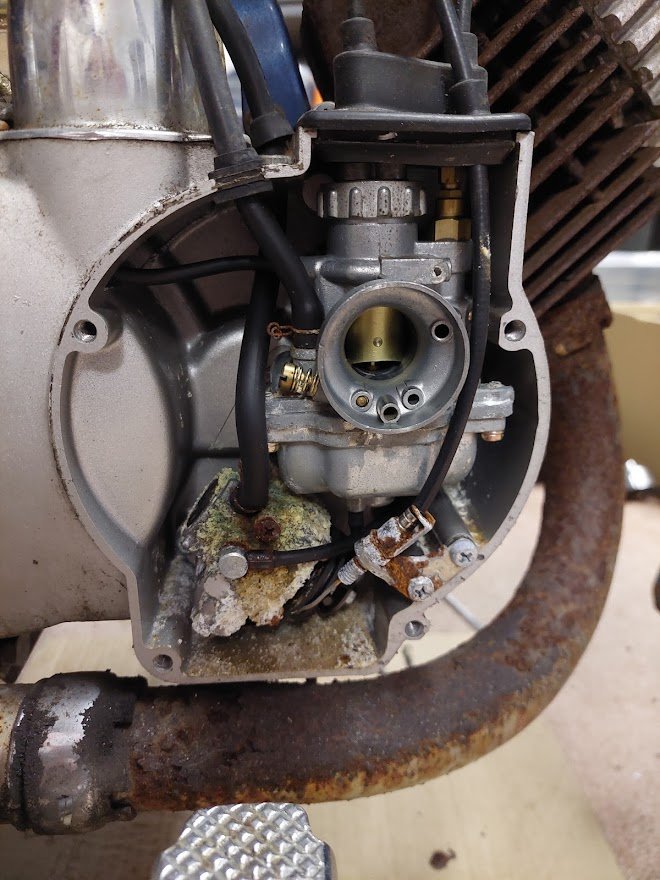
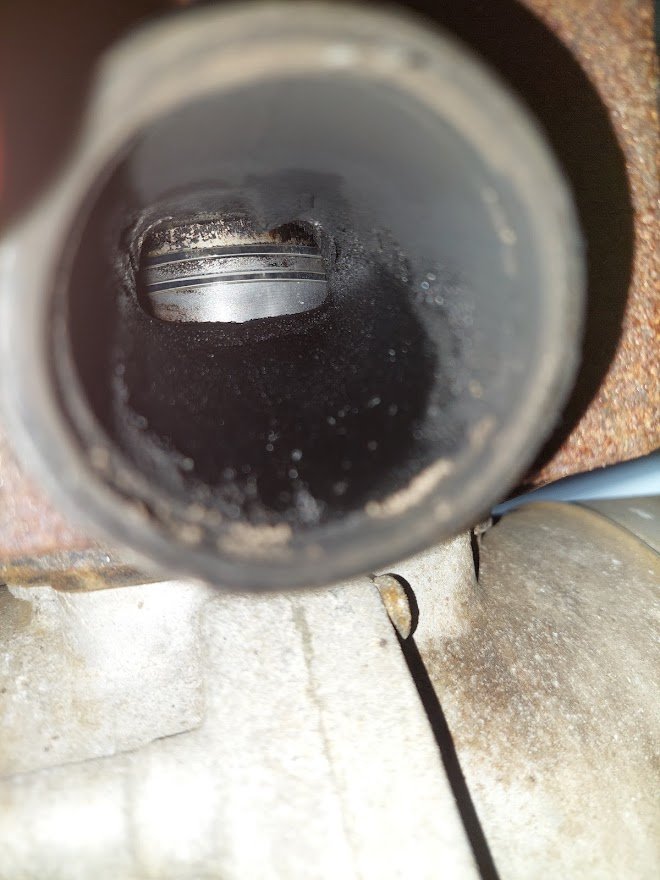
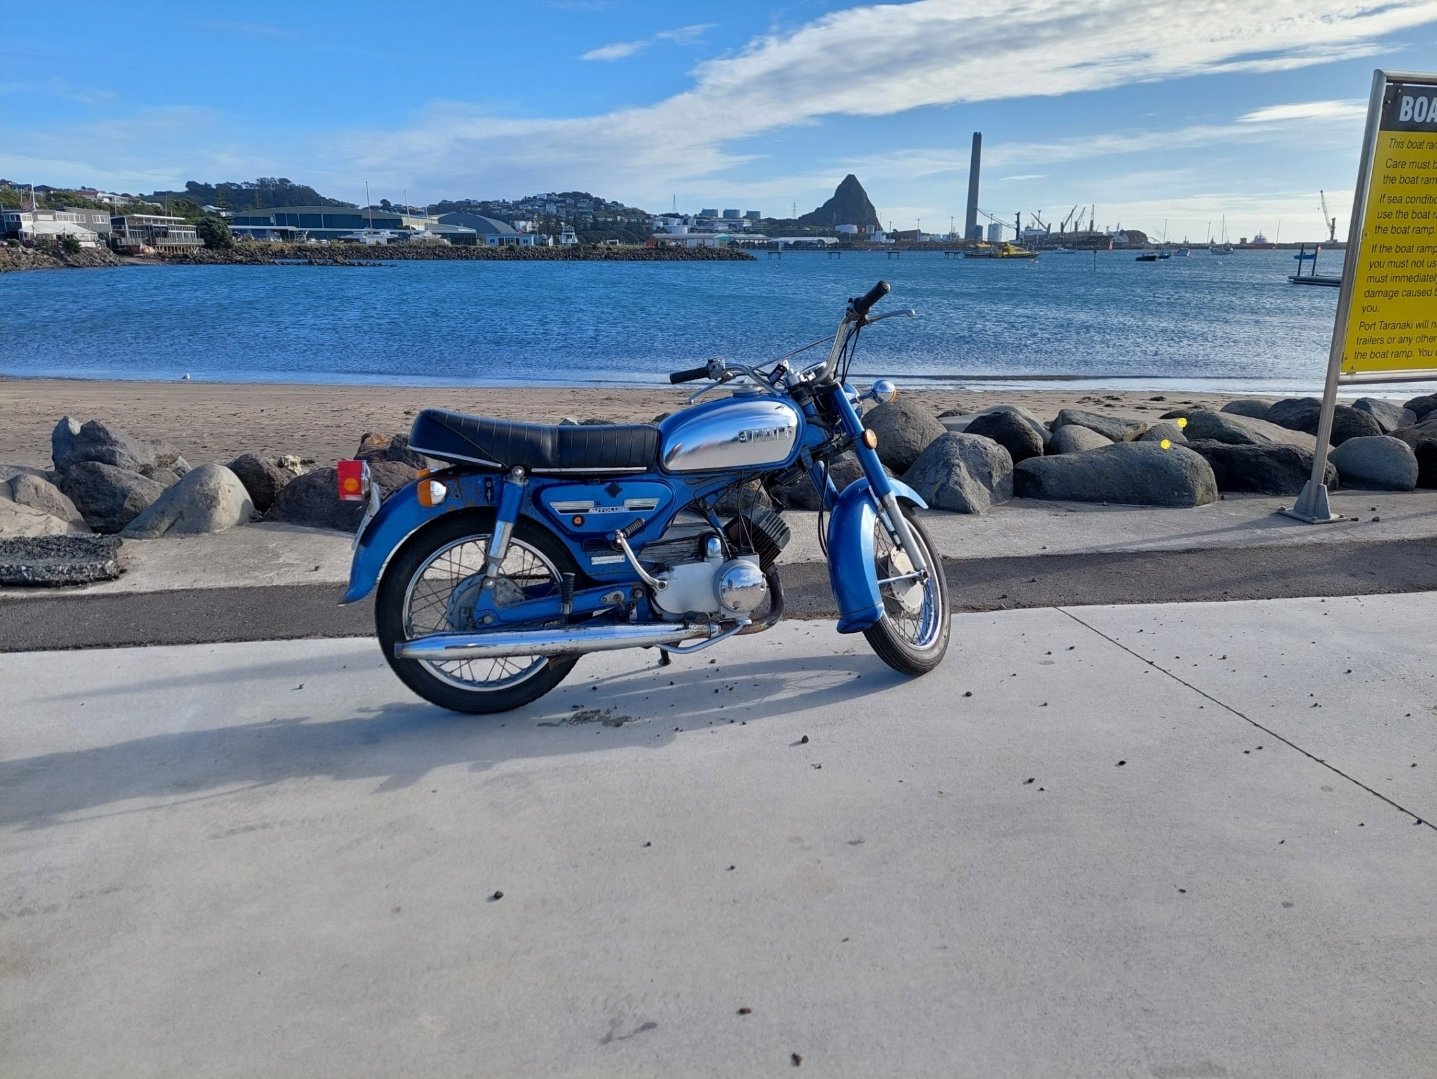
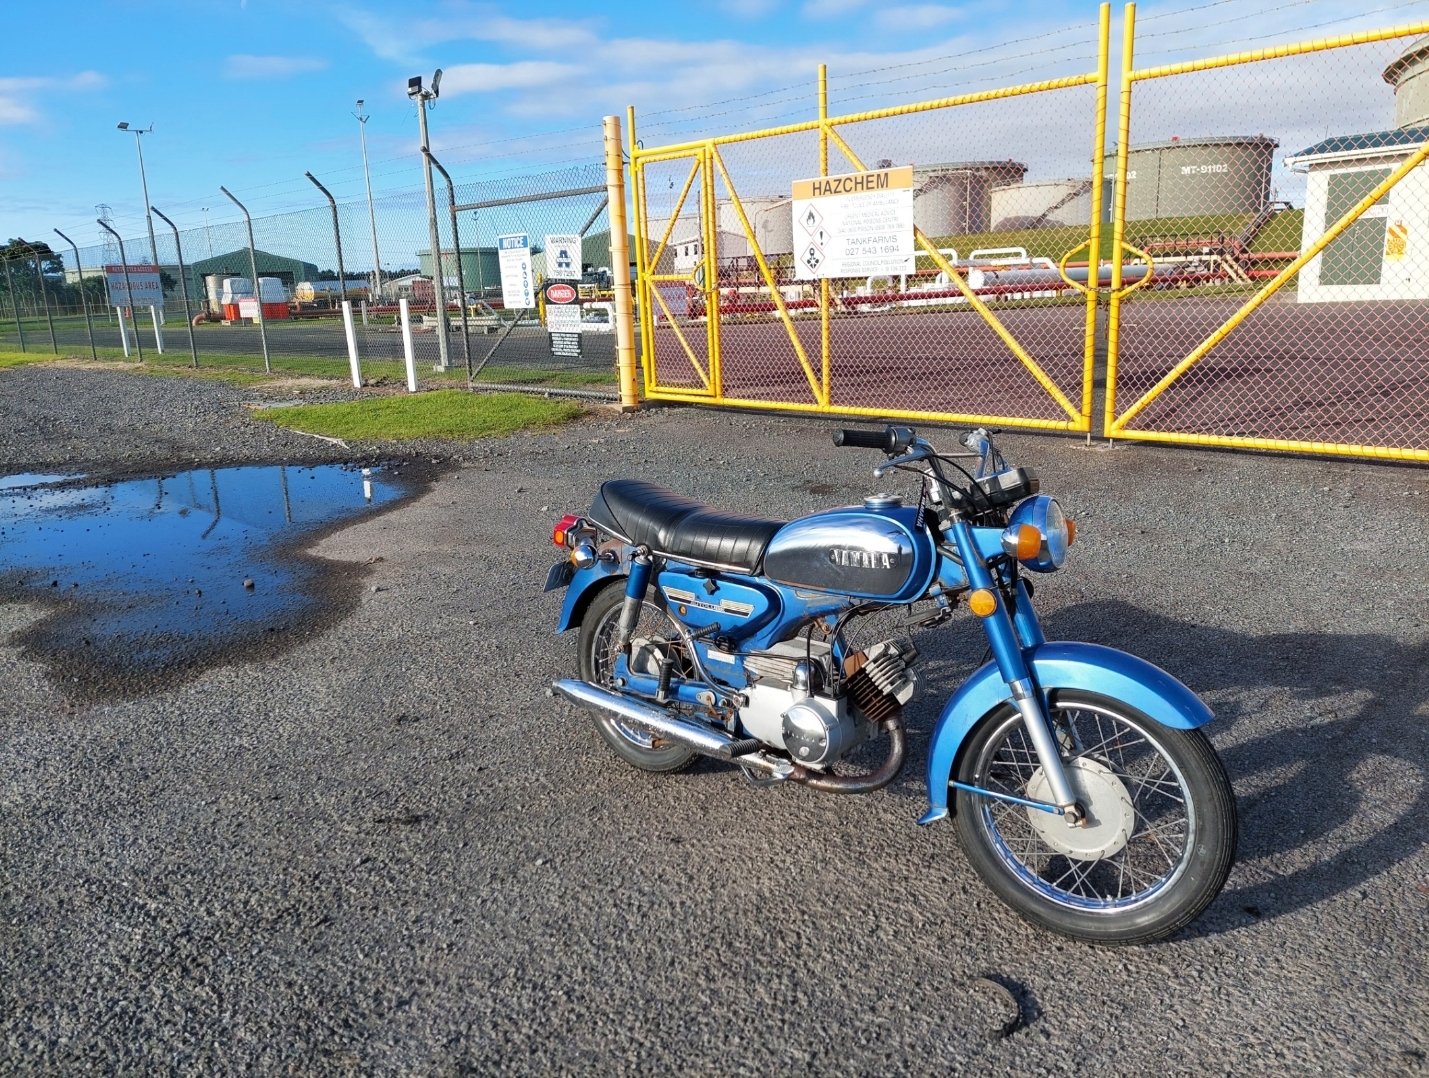
I recently got the urge to get a bike back in the garage and start enjoying that small bike life again. Was browsing up a storm on FB marketplace, trademe etc but everything seemed to be either too fucked, moonbeams or in the South Island. Sitting on the couch one night with the Mrs I got the notification that a 73' YB125 was closing soon. Had a few bids already but was still only $550 or so. Chucked a bid on, few back and forths with someones autobid "just to see how high it might go" and I ended up winning it for $590. Whoops . Supposedly a runner, but has been sitting for a while and the key is lost. Has been registered previously but lapsed. Got in touch with old mate, bike was in Wellington so organised to go down easter friday and pick it up. Borrowed @anglia4's trailer and he decided to come along for the trip too, legend. Early morning hoon down to Welly, bike on the trailer, back to NP by mid afternoon. Got it into the garage and started taking it apart to see what is lurking underneath. Lots of surface rust Grimey build up on autolube pump. Carb looks pretty good inside though? Managed to get the exhaust header off without much trouble. Rings and piston looking good to me so I probably wont bother taking the head or jug off for now. Things to do: I have taken the ignition off and given it to the local locksmith to see if he can cut a new key that fits. The petrol cap has a lock on it too so I haven't been able to get inside that yet to see what state its in. I've taken the petcock off and there's no fuel in there so hopefully no holes. My big idea is that the fuel cap and steering lock and helmet lock were all keyed alike to the ignition but just used 2/3 of the 4 pins (or whatever) so if I can get the ignition key cut then I don't need to bang a screwdriver in and wreck the petrol cap. Worst case there seems to be NOS ignitions with keys and petrol caps on ebay indonesia for acceptable $$ so I will get one of them if no bueno with the locksmith. Fingers crossed he can because I don't really want to wait for Garuda Airmail to be able to ride it properly! I've got a new battery coming too. This model is electric start too which is lush/not in the spirit of old 2T at all . Questions for the hive mind: unsure what I should do (if anything) about the rusty bits. My initial thinking was to do a quick wire brush of all the loose stuff that is out of sight on the frame under the tank, seat etc and then brush on some rust converter to try and slow down/stop whatever is left. Mixed reviews on effectiveness of that stuff though. Would that be worth it or a waste of effort? Better off hitting it with a wire wheel to properly get rid of it then spraycan/brush on some rustkill primer and closest colour matching topcoat?
1 point
-
Here’s the daytime running lights I’ll be fitting: same as what I had before, but this time I’ll spray some 2k clear on them to keep them neat. I like them because I want that mouth breather who’s still half asleep scrolling through tiktok to see me at a roundabout. the major challenge I had was that they have three wires. Red : DRL; Yellow : Indicator, Black : Ground. I previously had given up trying to make the indicators work, and just settled for this method of wiring, courtesy of my good mate and former president of the MR2 nz owners club, Charlie: however for those that like a little more pizzazz, after much head scratching and Coke Zero, I’ve worked it out - a simple 5 pin relay: the electromagnet is controlled by the headlight switch. The relay can be either normally open or closed; for the 87 open pin, I’ve connected a 12v positive that’s only hot from when ignition is on, the red wire from the DRL is spliced into that. The ground is then hooked to the 30 pin, which has the black wire from the DRL spliced into that. The 87a closed pin is left vacant. I’ll have a proper diagram up soon when the headlights are flicked on, the relay is activated and the DRLs no longer work. the indicators just get power from an indicator on their side, and use the same ground as above. shine bright like a diamond With the indicator on and drls on: I was a little frustrated when i saw this, but upon closer inspection, all indicator leds flash, it’s just some led wizardry that it flashes the white leds on and off With headlights on: should be 100% road legal, as wof virms state maximum 2 front pairs of indicators, and the corner ones are more side than front so should be legit did a bit of test fitting just to see where every wire would go, and how the harness might look: shouldn’t be too hard, just a whole lot of planning, fitting etc, I’ll make the indicator harness longer than needed. Removing the bumper should not pull on the wires too much.1 point
-
I was reading somewhere that some large camshafts are constructed with the lobes shrunk fit in place. I'll try find it. Figure it cuts down on material and machining costs a lot when dealing with big items.1 point
-
Yep Im down for Hanmer winter meet !1 point
-
Yep. Gotta commit to something....1 point
-
Wet sanded all the random paint off. Some the rando paint was covering exsposed steel found some rando white in shed though id chuck on amd see if it looks decnt on from a foot away u wudnt knw
1 point
-
Did some more suspension fettling @Snoozin put it in print via nzpc Now looking to sell and onto the next one in garage! Would like 35k on the tomcats 25k on CHEVIOT TURBOS
1 point
-
Plodding continues on the Armoured Recovery vehicle. No modelling time and I'm not feeling it like the HST but will hopefully get painting tomorrow & it'll all be better. Fancy doing the wheels for me, @Indiana_Jones ? /shit pics1 point
-
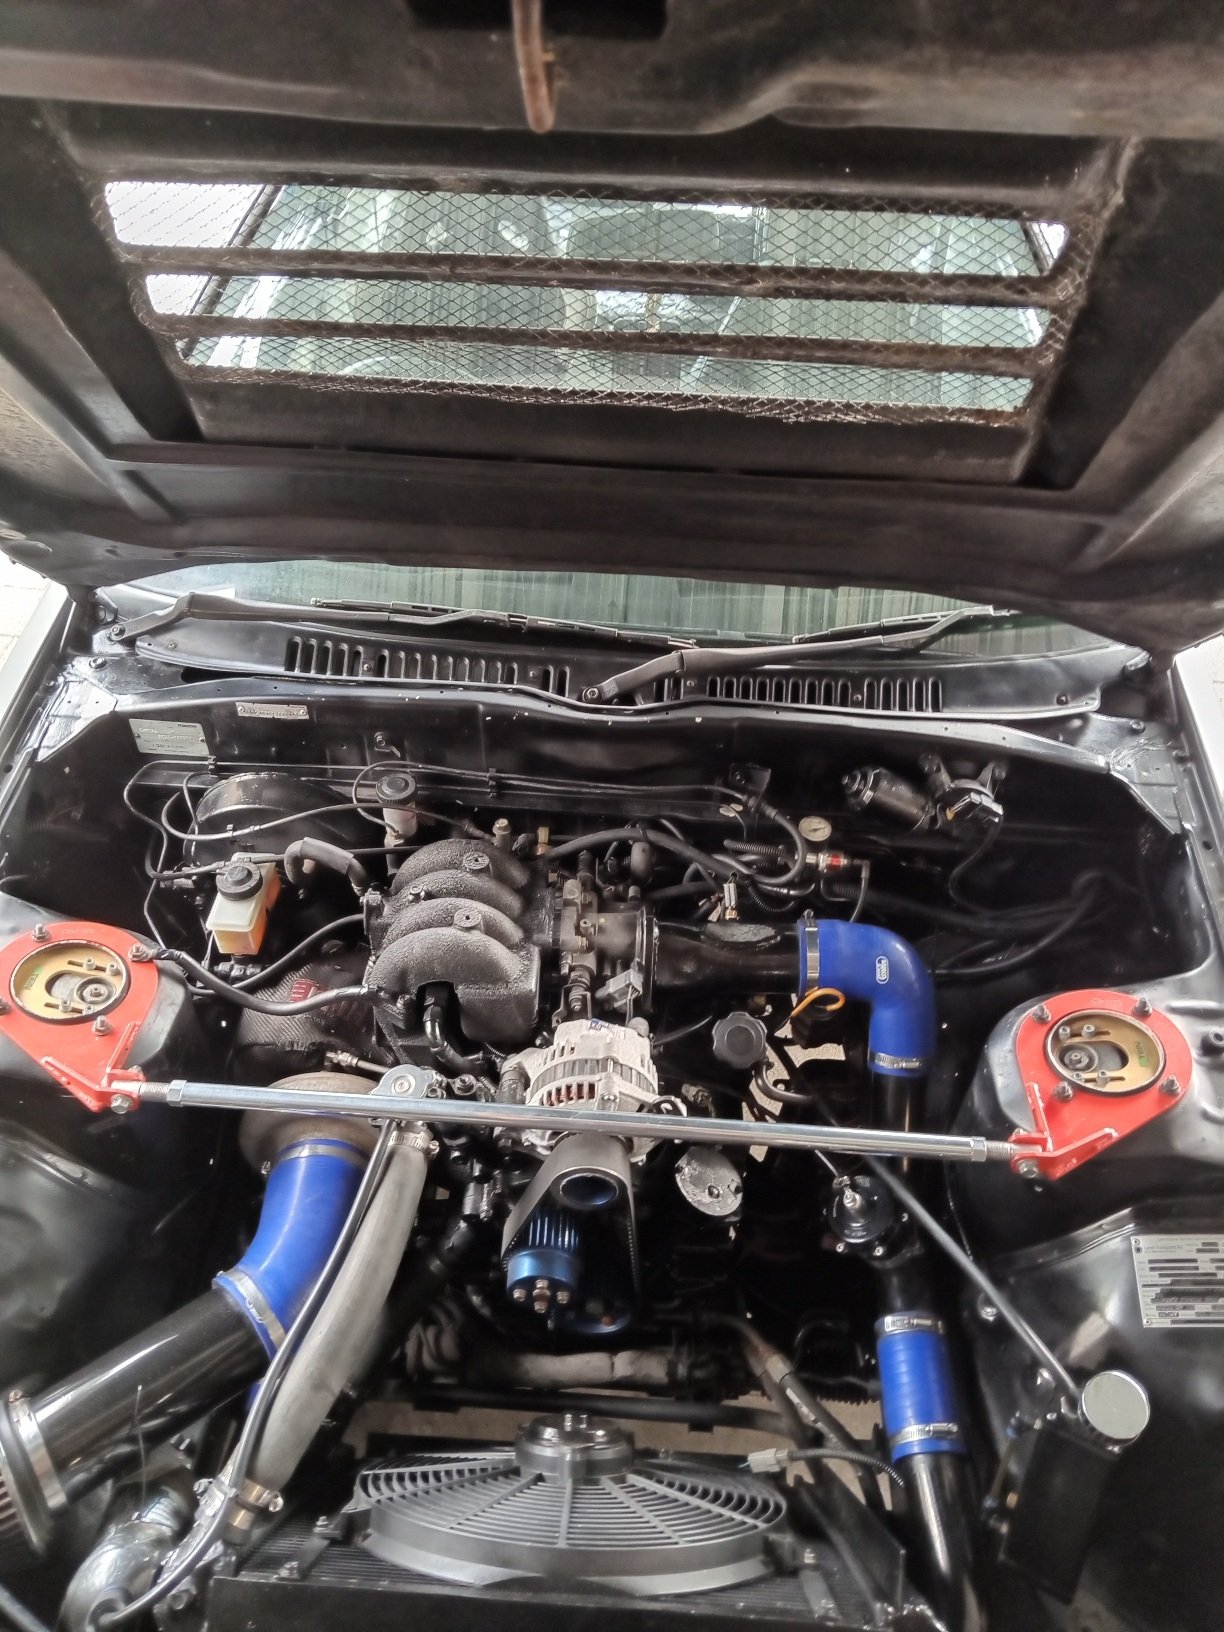
Have also been mucking around in the engine bay, i fixed a bunch of split hoses, put the strut brace back on that came with the spares for this car, cleaned up lots of areas, some paint, cleaned the wheels inside and out, put new tyres on the back took it for a drive and its running good, bit of a miss when it first goes into boost at low revs but im working on sorting that, still lights the tyres up in the dry pretty easily, but they are only 225s on the back ... Hooked up the boost gauge lighting to power so i can read it, and tidied some wiring away, i still need to buy parts for it, but these jobs all help, definitely will have to sort out some paint but i want to get all the parts on and working and warrantable before i do anything like that so excuse the mismatched colours and that haha
1 point
-
Picked up a pair of trailer guards, aka wheel tubs from a solid GC today. just sat them in place where I think they’ll end up, or there abouts. stood back and admired the look, quite like it. still need to trim to fit snug once it’s all decided.
1 point
-
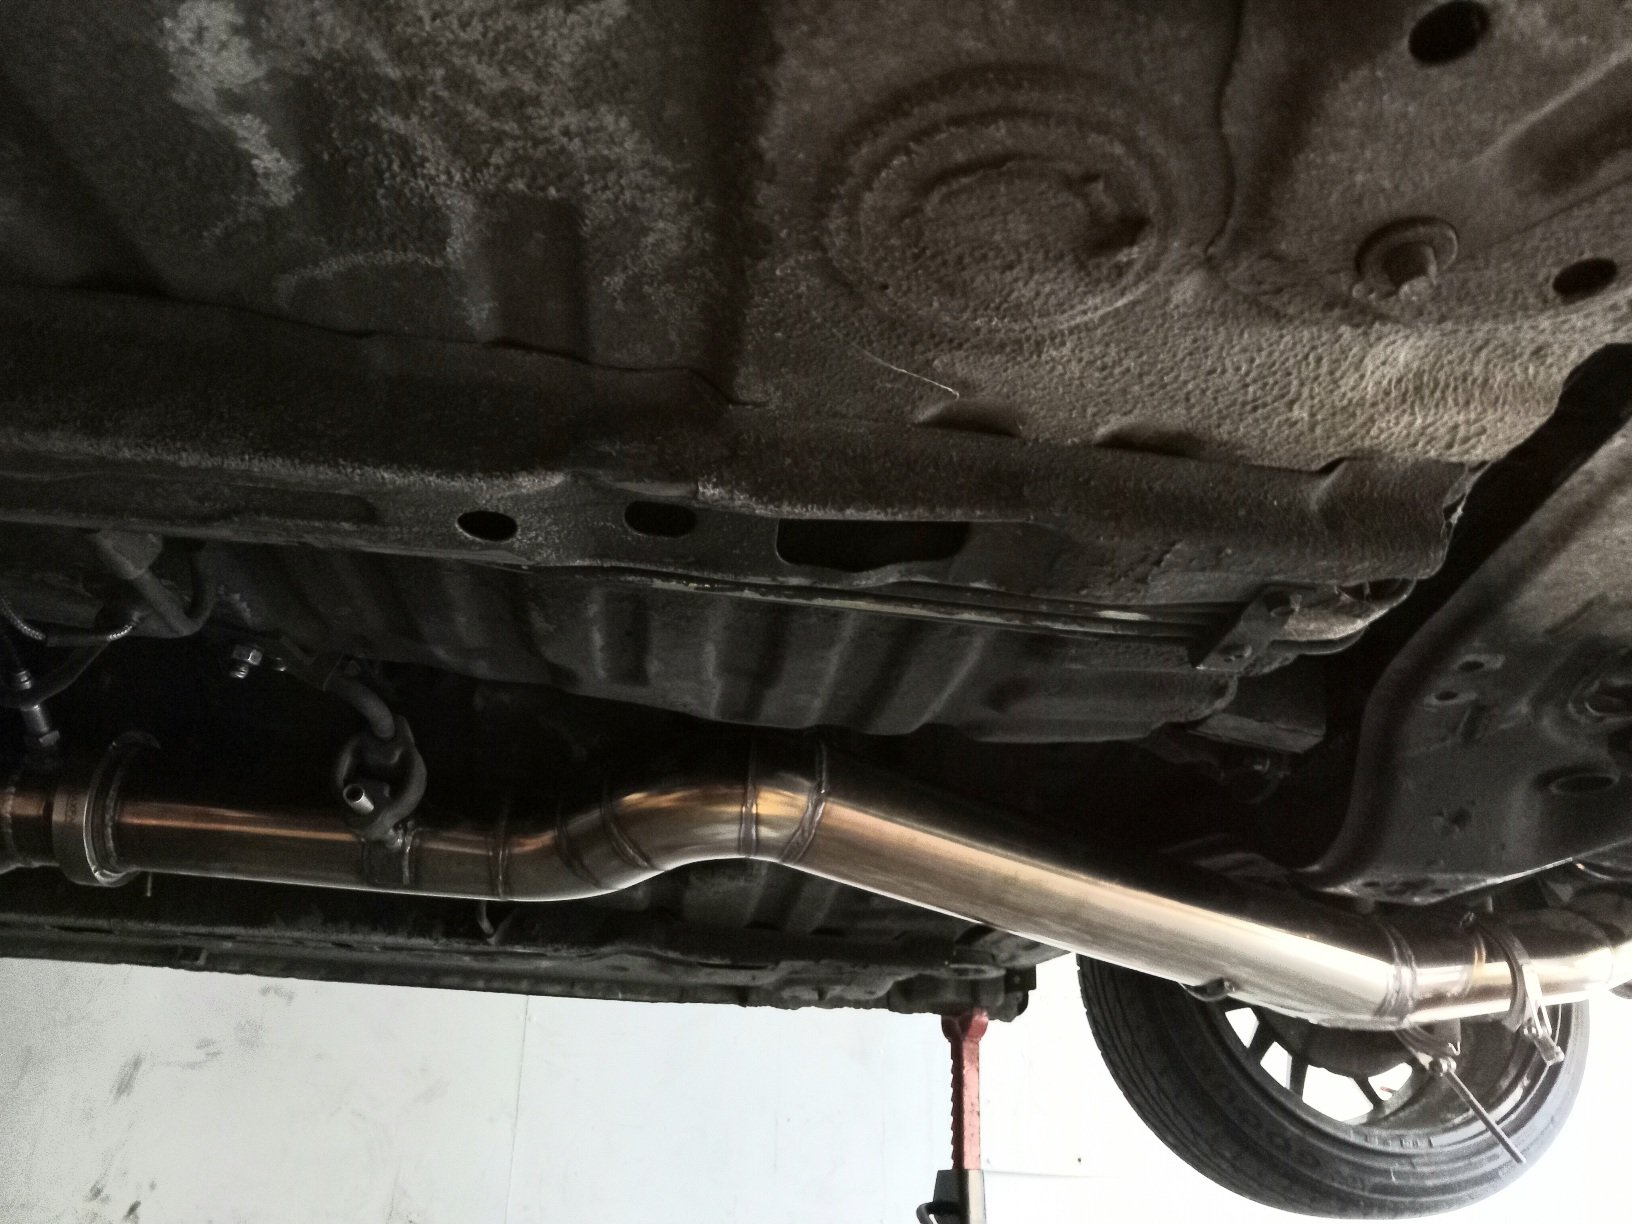
Spent today welding up the 3.5 inch exhaust, got to the diff end, will have to finish muffler up and full weld in couple days, maxfab kit is pretty good quality for 800 or so $ for everything inc resonator vbands, shipping etc. Trying to keep it all flush to bottom of car, the diff area is only place it has to dip down a bit but im happy with it ..
1 point
-
believe it or not, i still have all of these and remain even after every clean up and cull in the shed ive had every few years. One day when im old and grey and retired maybe hahahaha1 point
-
More parts arrived, so with some time up my sleeve this weekend I got cracking on fitting them. There were some checks to do before getting into the "fun" stuff. I had noticed while driving the car to work last week that there was a knock from the front suspension, particularly when turning or going over a bump, so I wanted to spanner check the suspension and make sure everything was tight. I found out last time I needed to jack the car up that my jack didn't fit as the front lip was too low, so I ended up having to drive the car up on a pair of old brake rotors to get some extra clearance. I decided this time it's about time I finally forked out and bought some low-rise ramps to help jack my cars up. A quick trip to Repco got me these They only lift the car 65mm, but it's more than enough to be able to get my jack under and lift the car up onto stands. Way easier than using random bits of wood/junk from the garage. The only thing was that I had to hold a mirror out the window to spot myself, and make sure I didn't drive off the end (not that it would matter, unlike big service ramps, these wouldn't hit anything if you drove off them). Rolling around under the car, everything appeared tight, until I went to check the lower balljoint on the RH swaybar link and noticed it clicked. Looking further into it I could see the top balljoint moving in the shock, causing the clicking noise. It turns out the nut was finger tight, and this was because someone had rounded out the hex in the end used to stop it from turning, so it couldn't be done up tight with a spanner. I whipped the wheel off for more space, and hit it with the rattle gun to great success. Nice and tight, and no more clicking. It pays not to ignore noises. One mod I had been waiting to install was my new-to-me Trust Greddy intercooler. The standard intercooler is tiny But before I installed the new intercooler I wanted to check the intake temps and see how both intercoolers react. With my headunit running native Android I can run TorquePro on it. This allows me to read a bunch of different sensors from the engine, including coolant temp, intake temp and even the factory wideband O2 sensor. Ignore my reflection and ugly layout; the layout is just thrown together quickly to display the most important stuff I will need on the track at a glance. With the standard intercooler, running 14.7psi, and an ambient temp of about 18c, under sustained load, the intake temp would rise quickly and hit about 50c. This would slowly drop back once off boost again. Not great results. The Greddy intercooler is a beast. It includes a new, much bigger shroud on the top, which fits the standard intake hose. Removal of the old intercooler is quite simple. Four (unless you're missing one) clips secure the shroud, two on each side. The intake hose just pulls off the shroud. Remove two hose clamps, one at the front of the intercooler and one under the rear, and then two bolts on the front of the intercooler hold it to a bracket. With those removed, the intercooler pulls free. Side by side with the new intercooler, and it's a slight size difference And in thickness too The previous owner had modified the stock intercooler, with something that Google translates as "processing", which means removing the end tank and insert crushed bits of alloy tube between the core tubes to try and smooth air flow on the hot side of the intercooler It turns out some of these had come free in my intercooler and were sitting in the end tank Thankfully they appear to be accounted for and are on the inlet side of the intercooler, so couldn't really go anywhere The new intercooler just bolts straight into place I noticed when test-fitting the shroud that there was a large gap along the rear edge, where air could just freely escape instead of being forced through the intercooler. I decided to run a bead of non-setting butyl tape along the gap to seal it against the shroud The standard intake and carbon duct work nicely with the new shroud While in the area I also replaced the hose blank where the BOV used to go on the intake pipe, as this was showing signs of cracking and had been weeping breather fumes Now done in the engine bay I moved on to the interior. I had ordered brand new carpet from Japan which arrived the other day, so no time like the present to get it fitted. It arrived in a massive box, which barely fit in the back of the Alto. Thankfully, it weighed nothing. Barely a kilo. The first job was to clear the interior out. Remove the seats, the center console and the scuff plates. The seats come out easily enough. Four torx bolts on each. Slide them to the mid position on the rails, and (un?)recline them forward about 45 degrees. They will then easily fit out the front door openings. Remember to disconnect the connector under them first. I didn't need to remove the back of the rear seat, just the base squab. A sharp tug on each front edge will disengage the front tabs, and then there is a tab on the rear that goes over a hook on the back of the seat belt buckle bracket, you need to push the squab towards the rear of the car to disengage this (or as I did, fold the seat back down, reach under it and lift the tab off the hook by hand). The center console is a pain. The rear half is held in with two bolts into the floor, one under a cover at the rear, and one that is uncovered once the front half of the console is lifted up. The front half is held in place with a screw on each side and is clipped to the rear half. The catch here was that it would be easier to remove the front half completely. To do so you would need to remove the gear knob. Suzuki used a press-fit knob on these, which I couldn't get off. Instead, I undid the four screws that secure the gear boot to the center console, which let me remove the console without the knob or boot attached. There is also a section in front of the gear shifter that needs to be removed. This has one clip on the RH side, and then a quick sharp tug should disengage the clips holding it to the center stack on the dash. With those removed, I set about giving everything a real good clean. I vacuumed up all the excess dust and dirt from the panelbeaters, and then gave everything a quick wipe down with APC and a cloth. From factory, the Alto Works had an underlay under the carpet. I wanted to replicate this without having to buy the pieces from Japan. Thankfully I still had a large part of the roll of underlay from when I did the carpet on my TVR After some quick measuring and some cutting, I had four pieces to fit Some trimming is needed to get them around the seat mounts, but otherwise they just sit in the footwell. Just like factory. Both sides had the same treatment Next, I unboxed the carpet and carefully dumped it in a heap in the back of the car After MUCH faffing about fitting the Monstersport foot rest, and poking holes in my new and expensive carpet, I refit the console and suddenly it looked a bit more like a car again. Don't forget to pass the seat plugs through the carpet! It tucks nicely under all the side trims There were two clips under the drivers seat, one clip under the rear seat, and one screw on clips on the front corners of the carpet. When refitting the front scuff trims I decided to remove all the faux carbon wrap they had on them It may have looked nice when new but was looking a bit tatty and dated now Thankfully once removed it uncovered nice near perfect condition trims. Much nicer (look for it in the below photos). I gave all the seats a quick vacuum as they were all also quite dusty, and then refit them So how does that flash new carpet look? Much better. It's practically a luxury car now. I have a set of carpet mats on their way from Japan, but until they arrive, it is brown paper time. Don't want to get that new carpet dirty now! Driving the car to work today had a few results; Firstly, the suspension knock. Gone. It is one of those things that must have been worse than I noticed because the noise is very conspicuous in its absence now. Secondly, the intercooler. The bigger volume hasn't affected response, if anything, it feels like it spools a bit quicker, maybe less restriction? Temps have dropped. Doing the same sustained high boost pull with similar ambient temps results in a 5-10c decrease in max temp, but the drop when coming off boost was much quicker, it was dropping degrees a second, so it not only cooled the intake charge better but shed the excess heat much quicker. Hopefully that keeps the intake temps in check on the track. Lastly, the carpet. Road noise is significantly decreased, as is exhaust drone on the open road. The exhaust might be more bearable at 100kph now since the car isn't acting as a big echo chamber. The car feels more civilised in general. It's funny how just refitting carpet can make such a big difference in how much of a "car" it feels. A+ changes. Very happy with how the Alto is coming along. It's less a track monster, and more a weekend warrior now, but much nicer to live with.1 point
-
Okay maybe not entirely done. Since the previous hoses leaked everywhere I really wanted to get the high pressure EFI ones redone professionally, so I took them to the same place I went to last time for the ruptured hose in the engine bay. They presented me with two lovely EFI rated hoses <3 The one on the right is the one I care about for now, it goes from the fuel pump to the hard line. The banjo fitting needs copper crush washers and I decided to re-use the ones from the red starion. I gave them a quick go on some sandpaper on each side, heated them up to a stupid degree with a propane torch and quenched in water to anneal them. There's a chance I melted one of them a bit and used the black car's washer. A chance. Then, with difficulty, jammed everything together as hard as I could. The manual I have explains every detail of the fuel system EXCEPT for the fuel pump, which is quite both surprising and annoying. I thought for a lil bit over the next day about testing this. The last time I did this up, it leaked everywhere - mind you I was told bad info on how tight to make it, but still. It was also super easy to access at the time, thanks to it sitting in its L&P bracket instead of sandwiched between a fuel tank and a car. I could have hooked up the loom to a 12v battery and fed the hose into some isopropyl or something, but I don't have anything handy on me to block the other end of the line and create pressure, so in the end I just sent it. The tank's bolts were all underbody coated so I chased them, Then began the arduous task of lifting this asshole into place. It's not that heavy, but "not that heavy" is still too heavy when trying to connect the hard lines up to it without actually bolting the tank in. There's a lot of space for activities when the tank is dropped and I wanted to try and make things easier on myself. However, I couldn't quite get the right angle. The jack was in the way, boxes I used for additional support were in the way, and the EFI line had decent flex but didn't exactly meet perfectly so was a biatch to try and wrangle whilst also wrangling a large unbalanced tank on a jack. In the end I just jacked it all the way up, put some nuts on and dealt with the shitty access. This image does not adequately convey the amount of bullshit it took to get those lines on. Then I used new nylock nuts and washers to get the tank into its new forever home. I really hope I don't have any leaks or I get to do all this in reverse, then forwards again. I'll leave the rubber boot etc for the fuel filler until the body is properly zhuzhed.1 point
-
Playing catchup with this build thread.... The parts truck turned out to be a good buy.... replaced the ignition system, a squirt of oil in the cyl and some fresh fuel and the engine fired mostly right up. Its technically an early, low comp 2.25 for a SII, so matches the era of LR its going into. Likewise pulled the wiring loom out intact and a bunch of other smaller pieces which I'll used. Sliced the rest up with the new plasma cutter for the scrap man. Old running gear (Nissan diesel) has been sold, to a guy who drove down from Blenheim in a S3 no less Decided to use the front guards from this also, as they are uncut and in generally better condition (but still need some crack/dent repairs) The profile of S2 to S3 guards are mostly the same, except for the obvious difference in the front where they put the lights in the guards. Continuing with manufacturing new sections of those areas, its easy enough to cut out the rivets and replace with my new S2 portions. Its a handy swap to make since its getting very hard to find the early S2 guards in good condition, while the rest are a bit more abundant and cheaper. Need to get back into some steel repairs to return this front end to original, then back to mechanical.
1 point
-
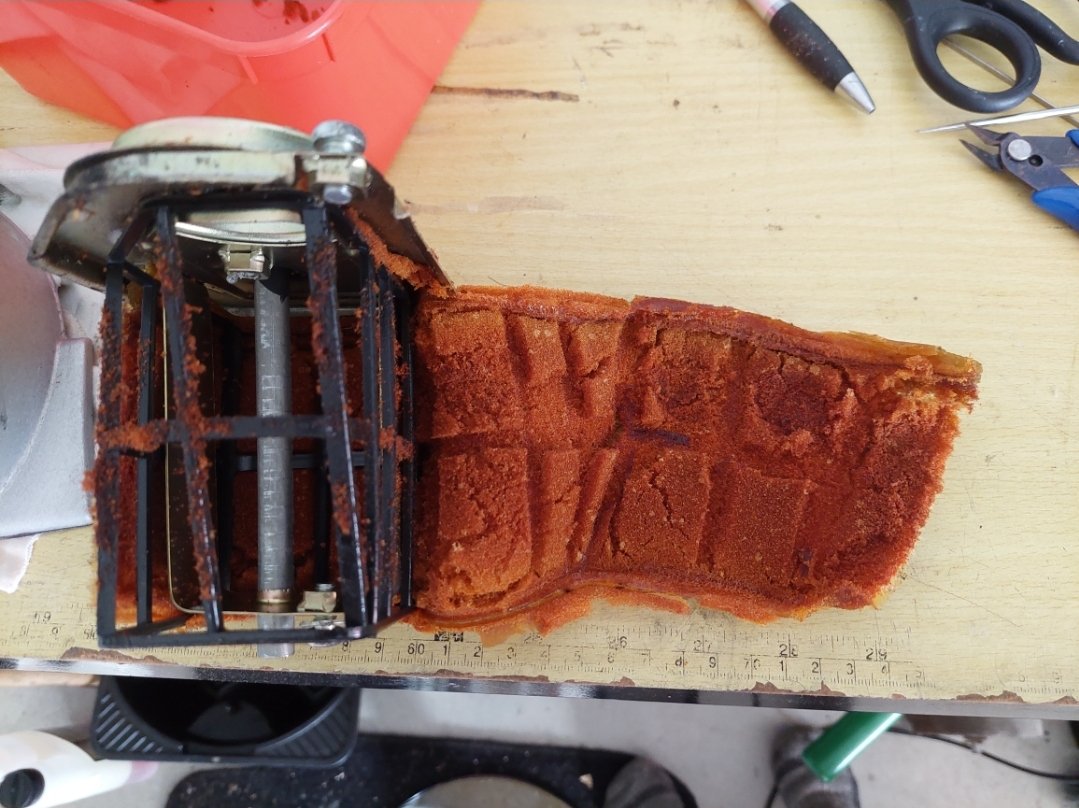
I put everything back together, splashed some oil and petrol around the various tanks and wheeled it out of the garage to go for a first ride. Wouldn’t start :haha: Checked spark (ok), fuel (flowing freely through line from tank), pulled carb and checked jets (all clear, fuel in bowl). Put everything back on again. Lots of kicking, coughed a couple of times, some backfires and eventually it fired up and idled for not very long before dying. More kicking and got it started again, turned up the idle speed screw so it wouldn’t die. Jumped on, rode up the driveway and down the street for a few hundred metres and of course it died when I slowed down to turn around and come back home. Absolutely would not fire this time so I had to do the push of shame home. I suspected electrical problems (likely condenser?) as fuel is there, carb is clean and set to factory specs and the electrics are 50 years old. It looked like quite a bit of pitting on the points surfaces so maybe the condenser wasn’t condensing properly and it was arcing across the points gap instead? I sanded the points smooth and reset the gap.There is f-all info on the YB125 on the internet for parts numbers etc so for anyone from the future looking for a YB125 condenser, the RD250/350/400 part 1A0-81625-10 is close enough to be correct. Capacitance, size, mounting and spade connector is identical, just the lead is a few cm shorter but still fits ok without stretching and too tight.. I got one from eBay from a seller in France. New plug, new condenser, fingers crossed? The muffler - header gasket was missing and the header/barrel gasket was pretty beat up. There was quite a bit of exhaust leaking out from the muffler joint. Again, nothing online that I could find for a “YB125 muffler gasket” and the part for its more common predecessor YA-6 is NLA everywhere. I did some measuring and trawling through other yamaha parts and the stock replacement for 70s XS500/XS650 371-14714-03 looks identical. These appear to be readily available which is nice. Order from PlenterNZ arrived with one of each, fitted the header pipe back on and tightened everything up. The air cleaner foam has gone rank and started disintegrating. Again stock replacements don't exist online that I could find so rather than making the engine inhale chunks of foam I ordered a replacement sheet of filter foam and cut to size and glued together to fit the cleaner housing. Oiled up and reinstalled. Everything back together and started up 3rd kick! Fiddled with the air screw and idle adjuster to get it sitting at 1200 rpm as per shop manual, checked with a cheap AliExpress hour meter/tacho. Its happy as. Took it out for a decent ride around NP, went great. Brakes are quite rubbish but work, got up to 80kph on the flat without speedtuck. Neutral top gearbox is wack, I have to think about each shift but I'm sure I'll get used to it. Got props from an old lady walking her dog when I stopped for a photo "now that's a proper motorbike" Time for more riding to see what else breaks before I start the re-registration process.
1 point
-
Yeah pretty funny, I was so confused at first when it just turned and opened with no loud cracking or popping noises! It's not all plain sailing, stay tuned for the next update...1 point
-
Not really an update but this thing is going pretty well so far, I've put 8000km on it (more actually as the speedo/odo wasn't working for at least 500km as we couldn't initially get it to read a pulse from the speed sensor - a moderately long story but it's working mint now). So what's been happening? I entered this in 4&Rotary Nats show, because I wanted to tick that box really, nothing more, nothing less. So myself and @oftensideways made the trip up, both trailered - in my case now wanting to get it all grubby due to spending hours cleaning and sprtizing. As it turned out, this was the weekend those hectic rains came in and hit Auckland, so we drove up in generally garbage conditions, and the car was coated in a thick film of schmutz when I got theire (engine bay included) which meant a hurried cleaning mission to get it ready. I reckon we presented pretty well though! KP61 4nR 2023 Show1-2-Edit by Richard Opie, on Flickr KP61 4nR 2023 Show1-5-Edit by Richard Opie, on Flickr KP61 4nR 2023 Show1-3-Edit by Richard Opie, on Flickr KP61 4nR 2023 Show1-11-Edit by Richard Opie, on Flickr Lots of sweet car yarns and hangs ensured throughout the following day, and when prizegiving rolled in I was pretty humbled to receive the Best Toyota trophy, against what I think were some pretty wild cars (Supercharged LS KE70, a big power JZX100 dripping in all the lush Japanese parts etc). So when I got home I wiped it down and took a few pics - note the addition of the limited edition Momo Heritage Prototipo, with a TRD horn button I've been hoarding for some time. This is likely as good as the car will ever look. KP61 Orakei Rd-219-Edit by Richard Opie, on Flickr KP61 Orakei Rd-230-Edit by Richard Opie, on Flickr KP61 Orakei Rd-44-Edit by Richard Opie, on Flickr KP61 Orakei Rd-48-Edit by Richard Opie, on Flickr KP61 Orakei Rd-111-Edit by Richard Opie, on Flickr KP61 Orakei Rd-147-Edit by Richard Opie, on Flickr KP61 Orakei Rd-144-Edit by Richard Opie, on Flickr KP61 Orakei Rd-137-Edit by Richard Opie, on Flickr KP61 Orakei Rd-158-Edit by Richard Opie, on Flickr KP61 Orakei Rd-172-Edit by Richard Opie, on Flickr KP61 Orakei Rd-175-Edit by Richard Opie, on Flickr KP61 Orakei Rd-218-Edit by Richard Opie, on Flickr KP61 Orakei Rd-89-Edit by Richard Opie, on Flickr KP61 Orakei Rd-239-Edit by Richard Opie, on Flickr KP61 Orakei Rd-102-Edit by Richard Opie, on Flickr1 point
-
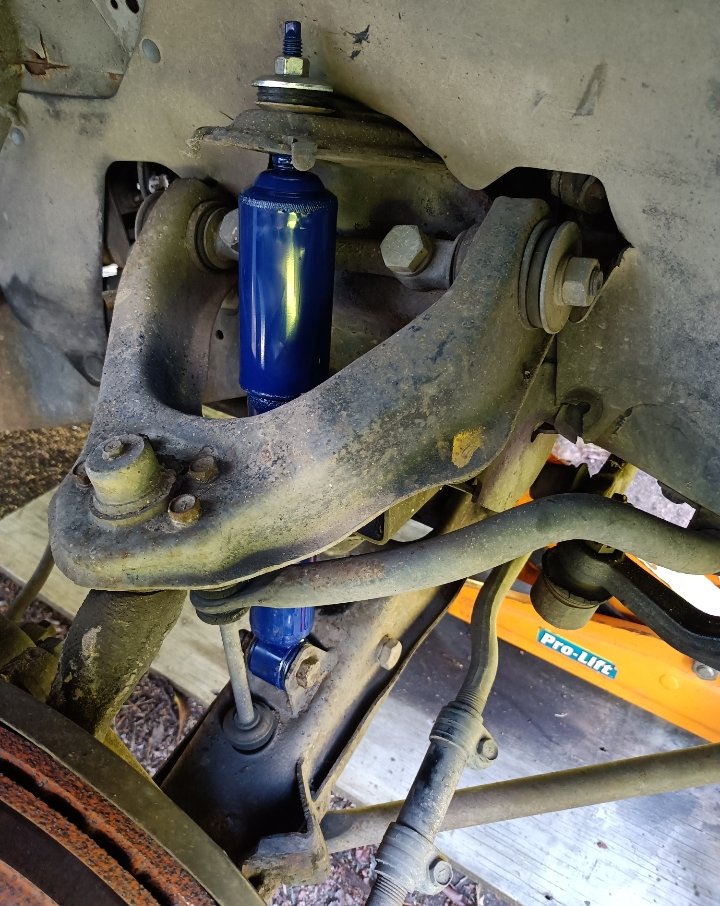
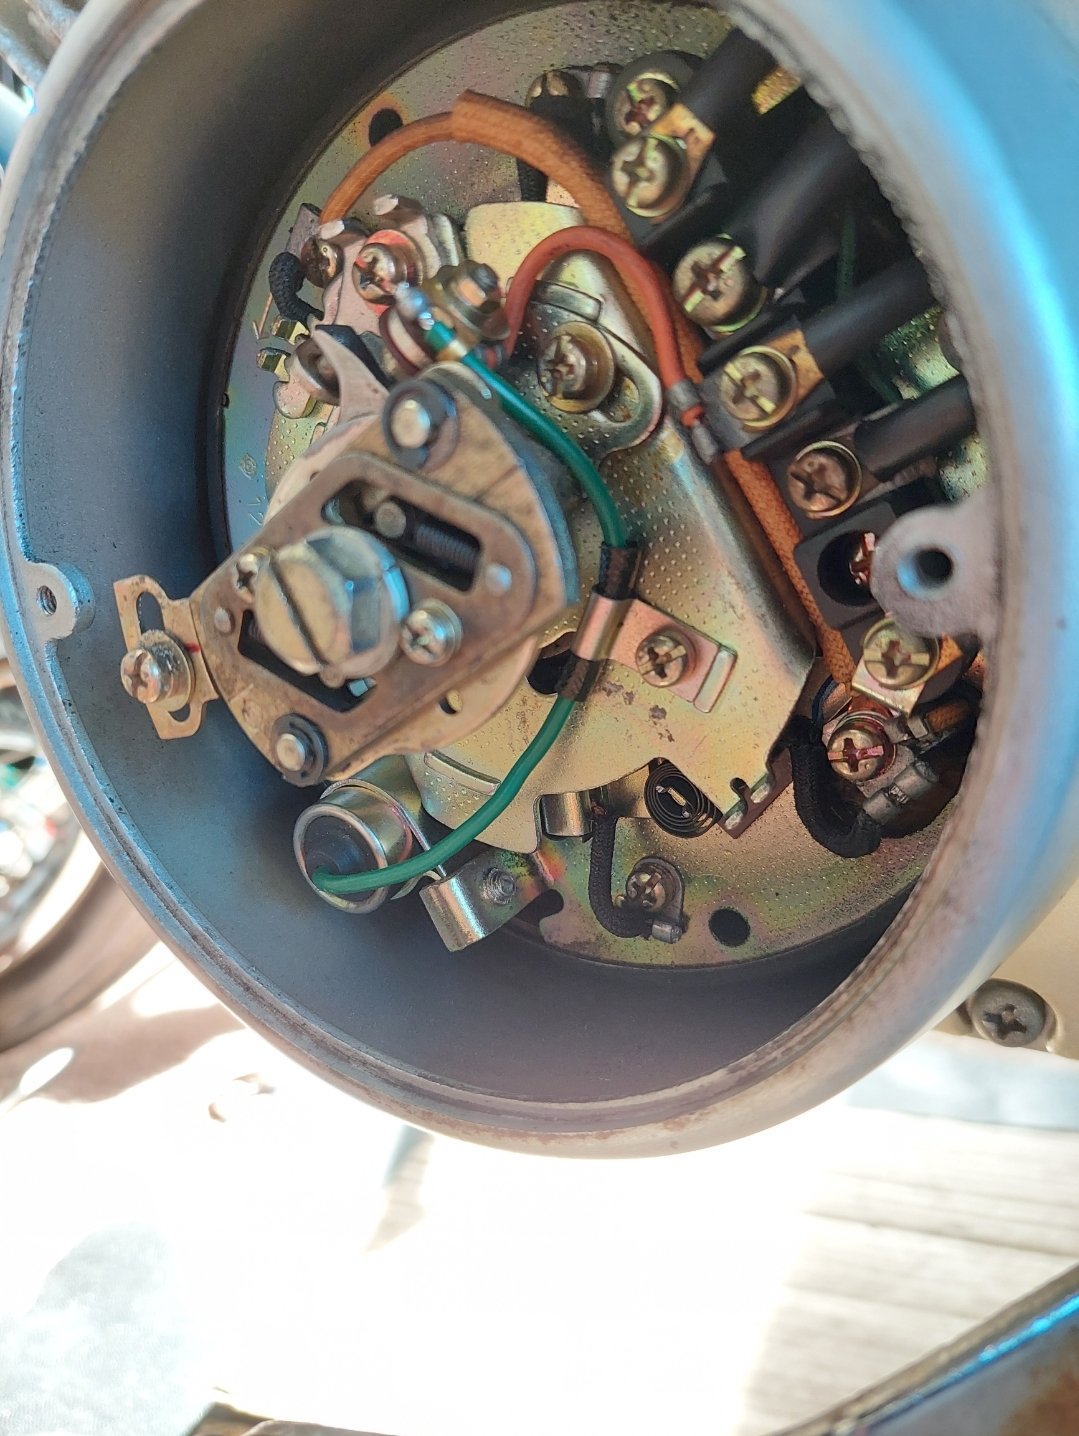
The starion uses a steering gear box, none of this new/old rack business. This is mine. It's heavy. It was disgustin so I've made thorough use of degreaser by this point. Unfortunately this nuked the graphic on the little riveted plate but oh well. It also spills fluid everywhere, no matter how much I remove there's always more left. That said, it doesn't seem to leak despite the positions I've left it in since cleaning it months ago. Here's red's box. It seems okay too. But let's make sure I don't have to switch to it. I checked the runout backlash of my pitman arm and it was within spec. I'd read a rebuild guide and it just seemed like a lot of faff. I have a seal kit, but if this doesn't leak and is within spec, why spend effort and mental space rebuilding it? That's what lazy Tom rationalised anyway. So, and forgive me for the shortcut, but I decided to mask it up and just give it a quick coat of rattle paint. If it needs rebuilding down the line I can just paint it properly then. Since everything else down there is shiny I decided against the flat black etch primer and instead used the remains of my CRC black zinc, which seems to do quite well on rusty surfaces (which this has a few patches of). Buuuuut After repositioning it for the final coat of paint I noticed 1. there isn't enough paint left in the can 2. some fluid was seeping from somewhere (not the open holes) So... FINE IT'S FINE I'M FINE I'm using this wonderful guide to rebuild the box. First step, and hardest step, is to remove the pitman arm. At first I tried with my gear puller but without fail it would just slip off. The arms wouldn't go all the way in so I did some grinding and filing to slim them down a little to fit. It's a cheap gear puller so I won't be mad if it breaks. You can see the extra leverage this gives me - the arm in the back is unmodified in this pic: However even with this glorious contact it'd still just slip off. I tried everything including trimming the arms such that the very tips make sharp contact right up against the shaft but even that would let go. I don't really know if this is a failing of the tool (or me I hope), I think it was just really well seated. In fact the threaded shaft of the puller was mangling its tip just from being pressed in so hard. I've been putting off working on the car because the garage turns into an oven in this upper hutt summer and this long weekend was scheduled to be a bit less hot, so I bit the bullet and bought an actual pitman arm puller for twice the price I could have gotten it online. It took some trial and error - in the pic above, after a bunch of 17mm-in-a-box-section-leverage, the left arm of the puller slipped off... and kept slipping off. I ended up fixing this by swapping arm sides. This worked because the tool is poorly made - the bolt isn't exactly on centre and so pulls on a slight angle. After a while of worrying if I was going to tear the vise of the bench my 17mm-in-a-box-section's crescent started slipping. The puller's other flaw is that the head doesn't let me get the 12-pointy end onto it or a socket so I figured my next step was to grind it so I could. However I tried my other 17mm and it had just enough of the right stuff - one more half turn and the pitman arm flew across the garage. I then made a bunch of measurements and marks and set about continuing disassembly. It's supposed to be easy from here. No explicit pics of the marks themselves but you'll see them in some of the pics to follow. First the top cover's jam nut comes off - making sure the adjustment screw doesn't move - just I can take a measurement once the first jam nut is off. Same with the jam nut on the side cover. I have no other tool here other than a pipe wrench but fortunately not much effort is required. With the final measurement taken (side cover to body) I can take the top cover and main shaft out... ... and 33 roller bearing pins once the main shaft is out ... ... and the side cover, piston and screw shaft out next ... not pictured but I also slid off the piston (really satisfying motion) and removed the screwed-down pipe which hides a bunch of ball bearings. Now I have to separate the side cover's, uh, cover. I again have nothing for this so I made some out of angle iron and some nuts and bolts. Each side of the piston has 2 shims and a thrust bearing. Also there are seals EVERYWHERE Fully disassembled. So of course I have to paint it again. I decided to strip all the CRC black to make sure I was Doing It Right. However a night in evaporust (which isn't normally kind to paint) and even my heavy duty stripper struggled. Hell even sandblasting was taking ages. I ended up taking a full morning just slogging at these parts to get them bare, then put them in evaporust to get rid of what rust was there. There were spots of black paint left but nothing worth bothering with. Reassembly time. Seals! I used fresh power steering fluid to lube things but I guess I could have re-used the old stuff. The big screw nut needed a seal driven and then the bearing pressed back in, using fresh bacon fat to lubricate everything, then the shims + thrust bearing on that side of the piston held in with dabs of grease. Seals for days in the piston housing Then the piston shaft can go back into its housing, and the gland nut can go back on. Reassemble to 20 leg pints. My jerry rigged method was to measure 10 finches (why not 12? shrug) from the torque point and install a small bolt there. Then my 10 finches of leverage takes up of the 16.7 leg pints, so I set the torque wrench to the remaining 3.7 leg pints... I also had a spanner underneath because I drilled the hole too large and my tiny washered bolt kept slipping. After twerking down I backed off and re-installed to spec... or at least, the state it was when I started, as verified by the markings and measurements I'd made at the start. Next up is to fiddle with some balls. The piston has 23 or 26 or something of the little guys that I guess have some hydraulic function as well as providing a moving bearing surface for the piston. It's incredible engineering. All but 7 of the balls are gingerly fed into the piston such that they slot into the groove of the shaft - well one side of it anyway, got to be careful they don't go the wrong way, and there's a bunch of wriggling the piston to massage everything and complicate the situation. Once up to the final 7 balls, I greased them up to hold them in place in the tube. Then sandwiched the tube together and installed. I think I did this right but holy crap do I hope I didn't put a ball down the wrong way. :X The other cover's inside gets more seals (of course) and also the 33 bearing pins get greased into place. I then fed the screw in and restored it to its correct measured position and jammed nutted it into place. Then I installed the piston shaft in and torqued it down. Phew, glad that's done because one of the seals really wanted to pinch and doing that again would suuuuuck Oh fuck the piston's upside down. ... that's better ... Also oh no, I forgot to attach the main shaft to the screw :\. So I undid that as well and reinstalled with the shaft in place. Was wondering where the hell that step went. The main shaft slipped easily into place then I installed the pitman arm. Tell you what, putting it back on is a lot easier than taking it off. It works! I decided to paint it all as one complete unit, we'll see how that decision turns out to be a pain in the arse tomorrow. I'll also check the play just to make sure I didn't break anything.1 point
-
The rear subframe is no longer leaning up in the hallway in the house! I moved it to next to the car and added new diff mounts and the mounting brackets I hadn't yet attached. Then with difficulty attached the diff, making sure to line up the locating pins. I should also note that I'm lubing bolts with grease and torquing wrenching as I go - coming back where I think something may have moved. Attaching the torque tube raised an issue: the new rubber makes it a bit too tall for the bolts. Wrangling a clamp fortunately compressed them enough to get one nut started which compresses it down for the other nut to go on after the clamp is removed. Lots of wrangling by the way - struggled to get the correct placement of things that didn't block the bolt or nut, and I also had to start with the bolts in otherwise the holes wouldn't line up quite right. The subframe was light enough for me to reasonably carry, and the diff was unwieldy but also OK. But there's no chance I can carry their combined weight. I shuffled the subframe into place on cardboard and tried a bunch of different things to try and lift it evenly into place on my own but nothing quite worked. There's two big boi mounts at the front and some smaller pairs at the back that all have to line up. At one point I almost tipped over the car by temporarily lifting it onto a wonky piece of wood to brace it while I lowered the rear jacks (nfi what I was thinking) then realising that (a) I couldn't let it go and (b) couldn't knock the wood away from where I was standing, so I was just left there holding a car in my hands :|. I got out of my predicament by rocking the car over to make the wood fall then bringing it back and blindly lowering it back onto the stands. I felt like I was 90% there so figured bringing in girlface would solve it easy... but I was actually more like 20% of the way there :P. The pair of us managed to get it on with much wailing and gnashing of teeth. In very brief summary: - Bottomed out the rear stands to reduce the amount we needed to travel - Angrily levered the subframe into place with our boots and steadily blocked it up further and further until the front mounts were located - Jacked the rear up and jostled until the rear bolts located - Finger tightened bolts on the rear - Jacked the front up and finger tightened those - Bring everything home now that it's all actually in place The rear hubs were now itching to go on, but I wasn't sure what order to do them in. Mount hub, then strut? Attach strut to hub, then mount? I tried the former first. Greased up the big boi bolt and aligned it such that the pin bolt can go in and keep it in place. The powdercoating made the latter step a bit of a pain. Then I got stumped. It didn't seem like there was any easy way to get the strut on. Rather than restart I just decided to try the other way on the other side. I attached the strut to the right hub then girlface and I lifted it all into place and secured the strut (temporarily). However the arm had to travel a fair ways so I decided to go back and play with the left side. On the left, I instead attached the strut first. I also detached the sway bar to give the arm more movement. Then I was able to manipulate the hub and arm such that the strut was able to slide into place, assisted by a jack. Going back to the other side, I undid the sway bar there and was able to just push down the arm and attach the hub. Honestly easier, however there was a bit more fiddling with the pin bolt. So to answer my own question, both methods are fine. I reattached the sway bar, added the retaining bolt for the struts and torqued everything down. The hub's bolts need torquing to spec so I haven't put the drive shafts in yet, as I need access to those bolts. I'll try putting the wheels on but I suspect I'll need to buy some angle iron or something to create the leverage I need, it's something stupid like 190 foot pints.1 point
-
Yeah nah, every weekend has been jam-packed with activities so far. Anyway I threw some steering stuff together and loosely attached it all to the car, using up annoying nuts and bolts in the process. Now it's blocked waiting on the steering gear box - have barely touched it and it's less important than the hard lines so... I guess I should stop putting that off... They've got some manky brackets which at the least I want to refurb. The lines themselves seem okay but could look less grotty I suppose. I dragged the plating kit back out and flailed at it until it did what I wanted it to do, which includes some misplaced bolts scavenged from red car. I'm surprised how much I've forgotten already. Not my best work but it'll do. The zinc anodes had some weeeeiiiiird schmoo dribbling from the stainless hangers by the end of it... what the heck! I separated the hard lines out and then threw a wire wheel at one of them. Nothing much happened, so I decided whatever let's just smooth them up a little bit with some sandpaper. At this point I'm assuming that they're stainless steel and they've just gotten a little discoloured so am not worried about exposing fresh material. But as I scuffed away I noticed that it wasn't too labourious to expose nice shiny stuff... so I moved up a couple grits and went to town. I mentioned what I was doing in passing to my mate and he asked "what are you doing about replacing the passivated coating?"... doh. They're not stainless and I've polished one back to bare steel. I thought about a few options - just trying clear coat, some combinations of different coatings, taking the plunge into making my own hardlines, getting someone else to do it.. and decided to just put some rust preventative on and then colour with the etch black. First step, art installation. Second step, POR-15 rust-preventative - two coats. Third step, off camera, paint the plastic brackets black with etch. Fourth step, wrestle these god damn things back into line and hold with plastic brackets. Fifth step, two coats of colorpak black etch primer, shifting the plastic brackets between coats. Et viola - ready to go back on. Started raiding boxes to see what other bits of hard line needs restoring - which I'll do later - and found a sneaky bag of missed hardware. Doh. Anyway I got the lines on, and what I'm now going to show you is the end result of a bunch of pain. These things were an absolute bitch to get into place. First, there's three different kinds of brackets. And some of the plastic brackets don't anchor to anything. I had to go under the red car to figure out exactly what went where - also to salvage yet another misplaced bolt. Second, the lines themselves have been jostled enough to be slightly bent out of shape in places. However paradoxically they absolutely resist being bent intentionally. They're also all slightly different and I had to go back and forth between photos endlessly to figure out the exact correct position of each little line such that they didn't cascade and suck on some other bracket. Third, the bolts holding in the brackets usually resisted finding their threads... and every bracket that goes on makes subsequent ones harder to fit and the lines harder to wrangle. But I got there in the end :). Now I can tackle putting the rear subframe back in, which so far has had its own challenges. I'm not super happy with the black etch so far, wrangling the lines scratched it back to the rust preventative in a few places just from things like sliding the plastic brackets along them. I scuffed and degreased after rust preventativing so I don't think it's a me thing. Eh, we'll see how it goes.1 point
-
Delightfully devilish! That'll be the last batch. I'll re-assemble with the old gas shocks for the initial rebuild, see where things sit and decide what to do from there. Hopefully Red has better shocks, I haven't touched that yet. Either way those struts will be cleaned and painted by me, I could get them disassembled then powder coated but that seems like putting the cart before the stallion... which I've already done by having the springs etc painted but whatever Speaking of powder coating, I did a whoopsie with the first batch. The steering drag link is meant to have boots. I didn't know that, and once the link went through the oven, some hidden schmoo schmoo'd out... A facebooker got me set on the right path, turns out this sort of thing is bread and butter for power steering repair services. It's hard to know what you don't know but relieving when problems turn out to have simple solutions. I shipped mine down to HBI Engineering in Christchurch - and it turns out they'd just repaired another starion drag link the week prior! I just got it back last week and it looks flash. Can't even tell where the cuts happened. In Stella news, I trundled the doors and fenders over to them while they were waiting for the frame rails - they need them to assist with the re-alignment and there was some warping in one of the rear panels from the blasting. I didn't take any pics but they're making progress on the rust patches and have started the fairing process <31 point
-
Red's back home after her dentistry. The shop welded a bar to the frame for ease of carrying - but under-estimated the weight of the car. Took them 4 guys to get it on the trailer, fortunately I was able to round up some neighbours and it got off the trailer a lot easier. The towie wasn't too happy about the surprise of towing a 2-wheeled car, which I feel awful about. He still gave me his frequent flyer rate though so I guess it wasn't too bad. The frame rails are now at the blasters, then they'll tack them on Stella, send it off for a proper body alignment, and finally get it back and properly weld it all in.1 point
-
Frameland is progressing slowly but steadily. The crew took out red's NA engine and I got it home. This was a misunderstanding on my part, they wanted to check it out and asked that I bring red over to inspect, so I did - but I didn't realise they were expecting me to ultimately take the engine out. However I worked out in the end that this was half because they knew I could do it and it would save me money. The cost and faff of transporting the car back home, taking the engine out, then transporting the car back wasn't appealing so I asked what they could do. In the end they were able to drop the engine without any fuss. I could have saved a little money if I'd removed it from the start but gotta just roll with the punches. Doh. I was under the impression that the drive shafts for auto and manual were the same but I guess not. Some more work to do when it's manual swap time. Oh well... They were happy with what they saw with red's frame rails so are proceeding with the original plan of transferring over to Stella. They've already taken the frames out of stella - apparently this was a huge pain in the arse as the previous repairs were mig'd in so they couldn't just drill out the spot welds, but it's done. They also took the front off as it makes things easier in the long run, and the previous work looked terrible. Some tidy-up still to go but progress is progress! They were well underway removing red's front and frames out when I was there as well. Seeing progress on the shell after a year of nothingness is glorious.1 point
-
Once all I'd finished enough of the rear subframe hardware I assembled what I could to offload my brain. I bought a bunch of stuff from rockauto last year and it's finally time to crack out the rear link bar bushings! ... only to find out that they're proably a little too tall thanks to an extra-protrudy nipple, there's a little slop once assembled in the subframe that might come out from torquing but I decided to be prudent and visit BNT for some alternative poly. Dark blue is new. The rockauto kit was also missing a bushing washer thingy on each side, so I quickly blasted and plated it - one advantage of having a kit right there! I wanted to assemble ASAP so I didn't passivate it, I just gave it a quick buff and put it on. I also gave an exhaust hanger vibration thingy that attaches to the subframe a quick blast and spray. A split second on the buffing wheel really brings the appearance of the rubber back to life too. All arms, bushings and bolts greased fitted and torqued to spec... where applicable. I also have new torque tube bushings which re-use the metal from the old ones, so I burnt off all the old rubber then blasted, plated and passivated the metal. I uhh, had to talk to MKS to figure out how they went back together - but they're back together Lightly fingered into place for now until I'm ready to attach the diff/tube. I also ordered in some new diff mounts from MKS... ... and I won't order anything else from him any time soon... I'm leaving the diff and torque tube off for now for ease of manoeuvrability. The rear hubs aren't back from the powder coaters yet but I'll also be leaving them off for the same reason. What a load off my brain though! It's tricky going through a bag of bolts, pawing through year-old photo albums and figuring out where shit goes.1 point
-
Plating's going well - I figured some stuff out. My anode connections suck and my old theory is wrong. My theory is bullshit. It'll keep plating no matter what. When the amps are 0, something else in the circuit is bad. I thought it was the job itself, but it turns out the main failure vector is the connection to the anode itself. I found this out when I noticed that bumping the stainless wires would often create sparks and little puffs of steam if wet. The stainless steel wire tends to not want to conduct with the aluminium rod, I'm not exactly sure what it doesn't like but there's a fair amount of salt that builds up on the rods? Idk. I regularly cleaned off the rods every few batches but after figuring this out I make sure the connection points on the anodes are scuffed, and I pay attention to the voltage. No matter the job, 0.8v seems to be the sweet spot - so first I hand-smoosh the anode wires into the hanging rod to ensure a proper metal-to-metal connection on all four anodes. It's surprising how important this is because the voltage on the power supply usually noticeably dips after each anode jostle - indicating that I've improved the circuit such that it doesn't need as much voltage to push my desired amps. After the jostling I adjust the amps on the PSU until the voltage is 0.8v, which always makes the amps line up with my napkin maths, hence why I reckon it's the sweet spot. I also put additional alligator clips onto the rods and wires to help out but I'm pretty sure they get a bit fucky as well. How could this be improved? A lot of the DIY solutions have only part of the anode submerged and an alligator clip or similar attached to the non-submerged part of the anode. I reckon this would eliminate a lot of the problem - something to note when/if I need to get some more zinc, I could try go for some big long strips or something. I accidentally fixed the black passivate clouding issue. I use an immersion heater + bain-marie to heat the black passivate and the lacquer to 30C which is within the ideal range of both substances. One very cold day I forgot to turn the heater on until the zinc plating was done so I got impatient and just tried to get it as warm as I could. I estimate I got it to about 23-24C (still within range). The resulting parts came out almost perfect - no clouding at all, and the temp was the only difference. So I set the immersion heater temp to 23C and since then have had perfect results. No clouding at all! I have no idea why this is the case as the ideal temp for the passivate goes all the way up to the early 30's??? I also don't know if it's the black passivate or the lacquer that is the issue - I'm guessing the lacquer actually as it seems like it's the most likely thing to result in a cloudy finish... Here's a comparison of some 30C and 23C passivated parts... I've gotten better at bulk plating. I find that if I just string up a huge chain of parts by wrapping a single long strand of wire, and connect it to the rod at both ends (maybe with some suspension wire if it's too much), I can plate a lot of stuff at once without sacrificing quality. The jane kits guy said not to crowd the bath but doing it this way I've had no issues! To compare: It took me over a month to get all of the rear subframe hardware done. It only took 6 batches to get the front suspension and steering hardware done, less than a week. The pile grows! This pile is actually missing half of the rear subframe hardware as I started assembling stuff... and has grown a bit since I took the pic too. I won't be re-doing any of the cloudy stuff because (1) it's purely superficial (2) I'm being anal enough and (3) the remaining hardware is much higher priority to clean up!1 point


This leaderboard is set to Auckland/GMT+12:00