
Leaderboard


Popular Content
Showing content with the highest reputation on 02/28/24 in all areas
-
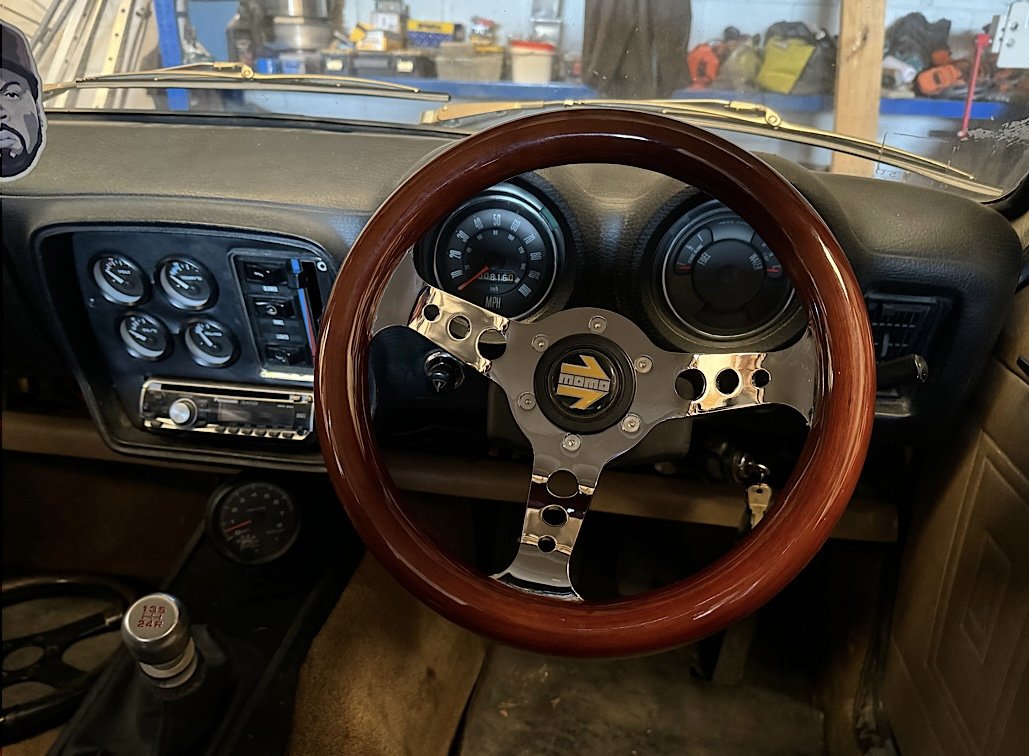
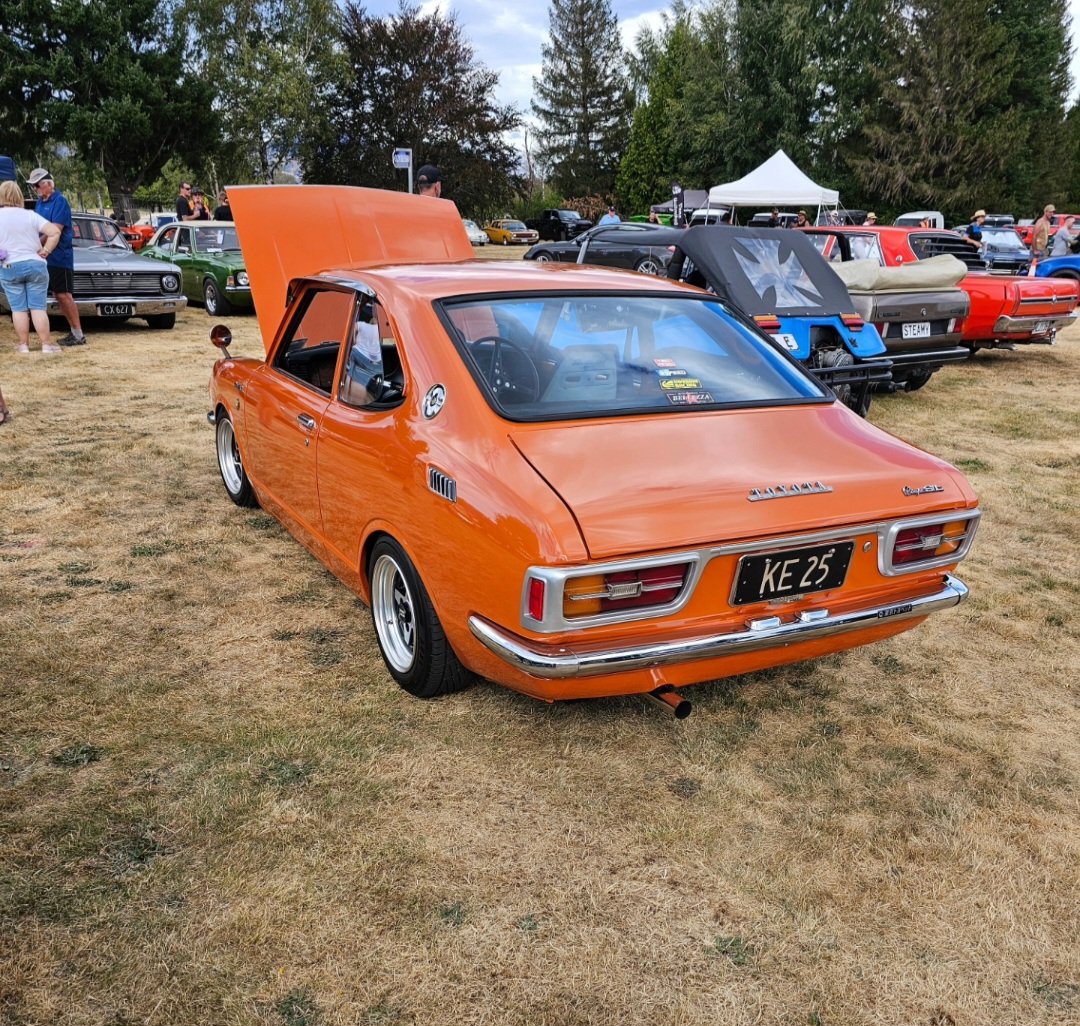
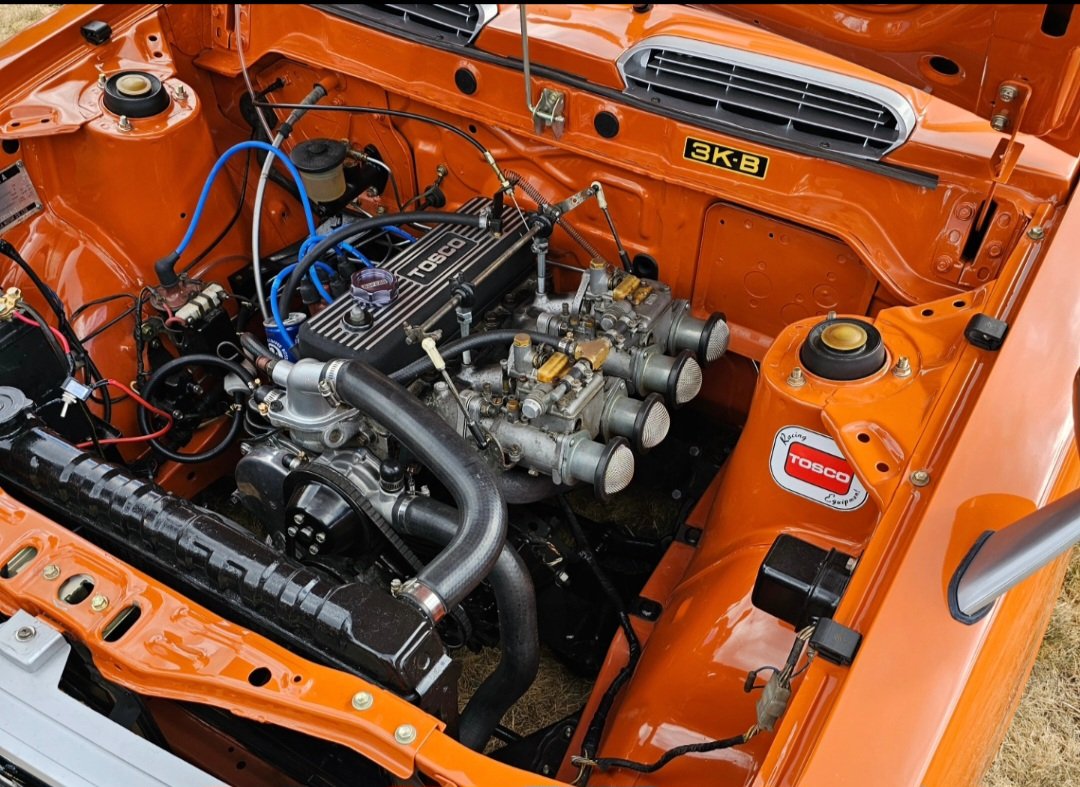
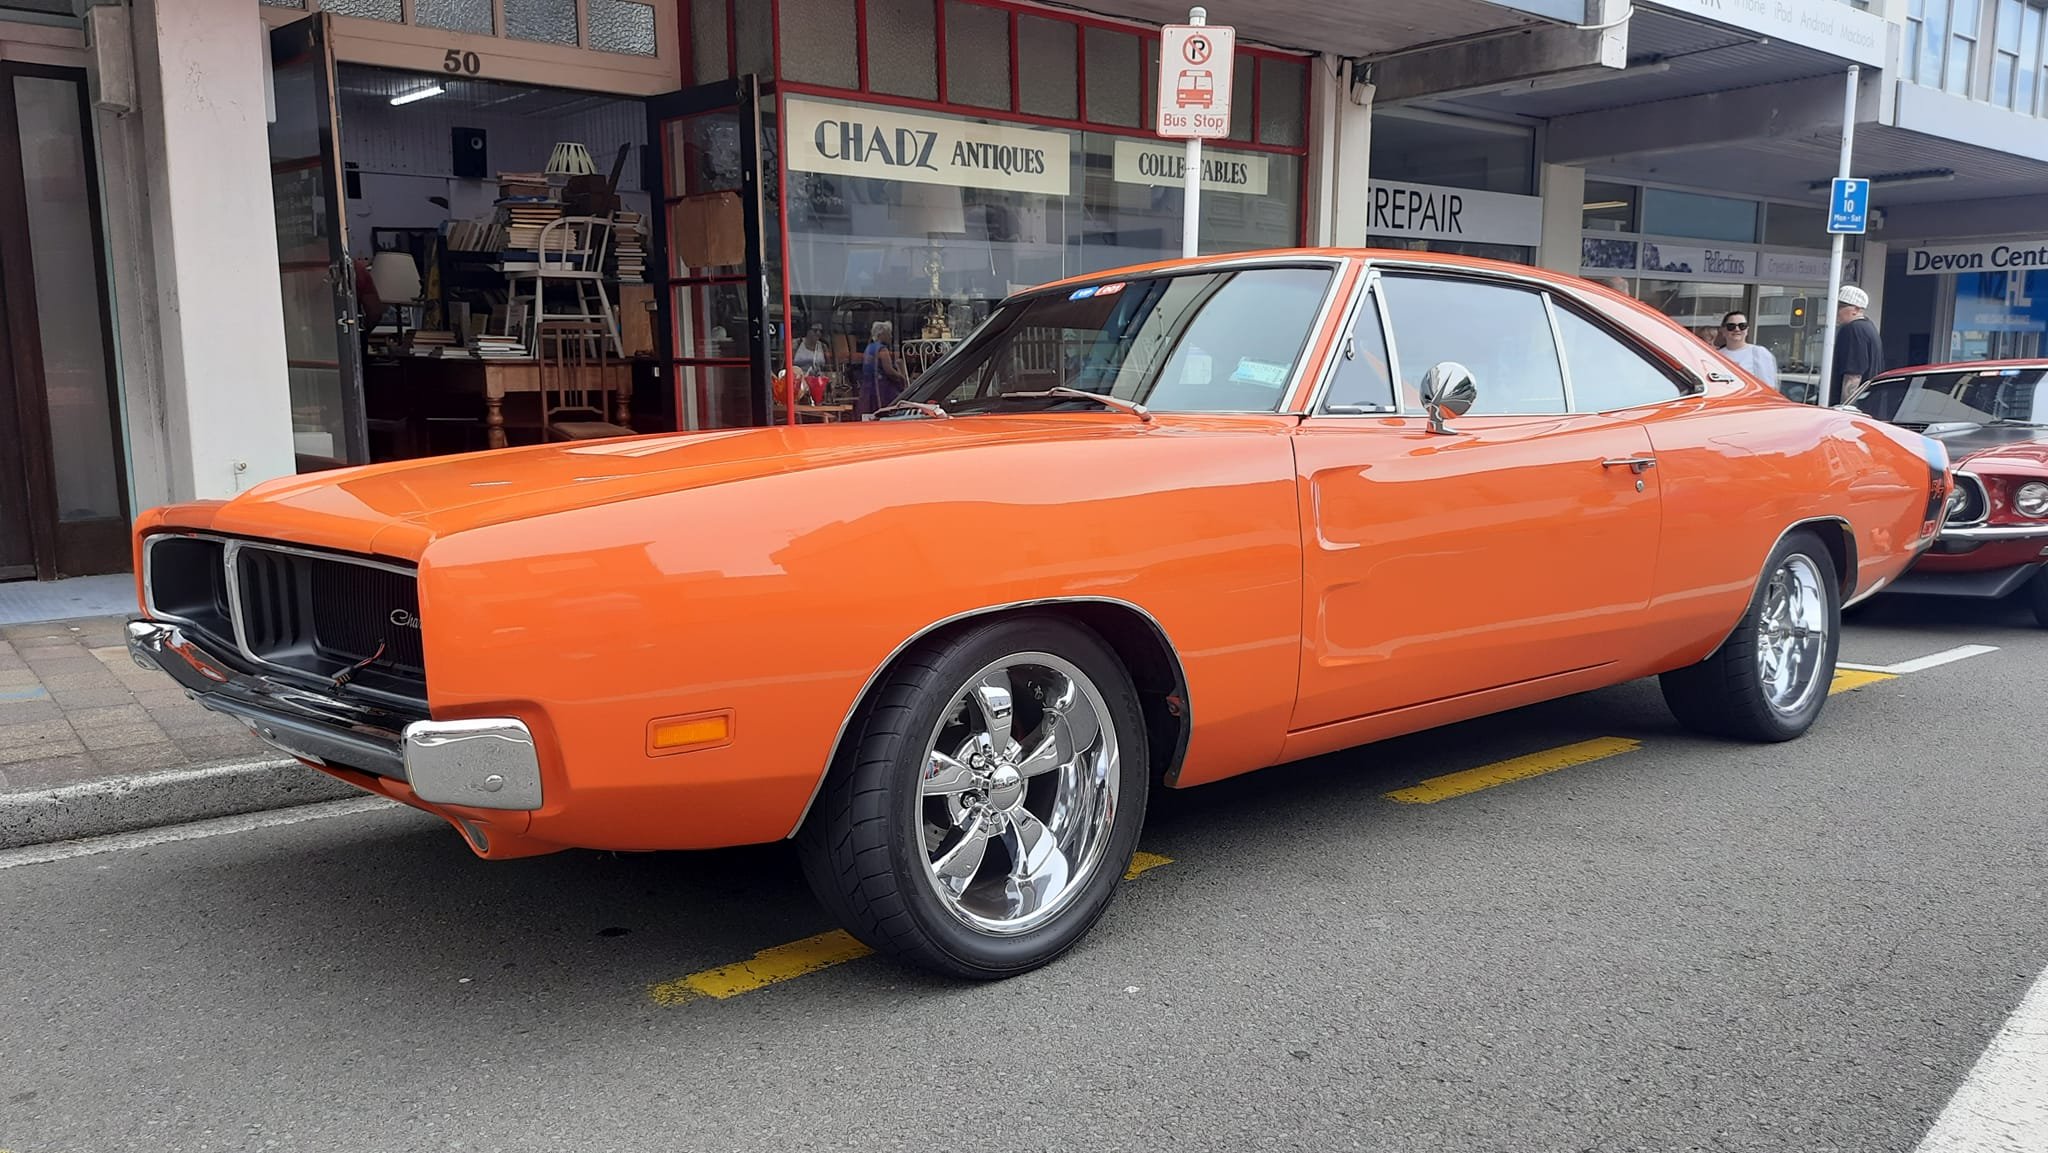
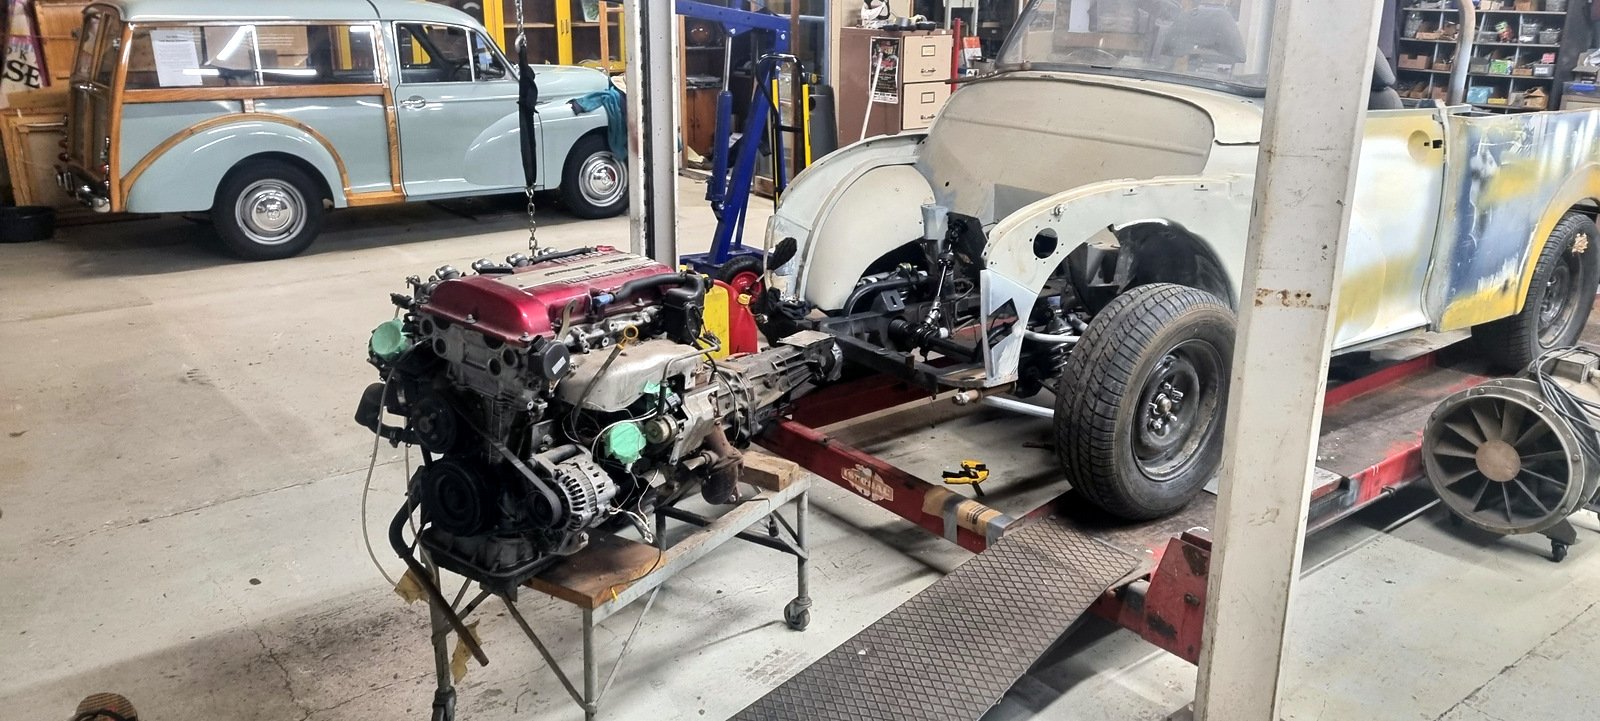
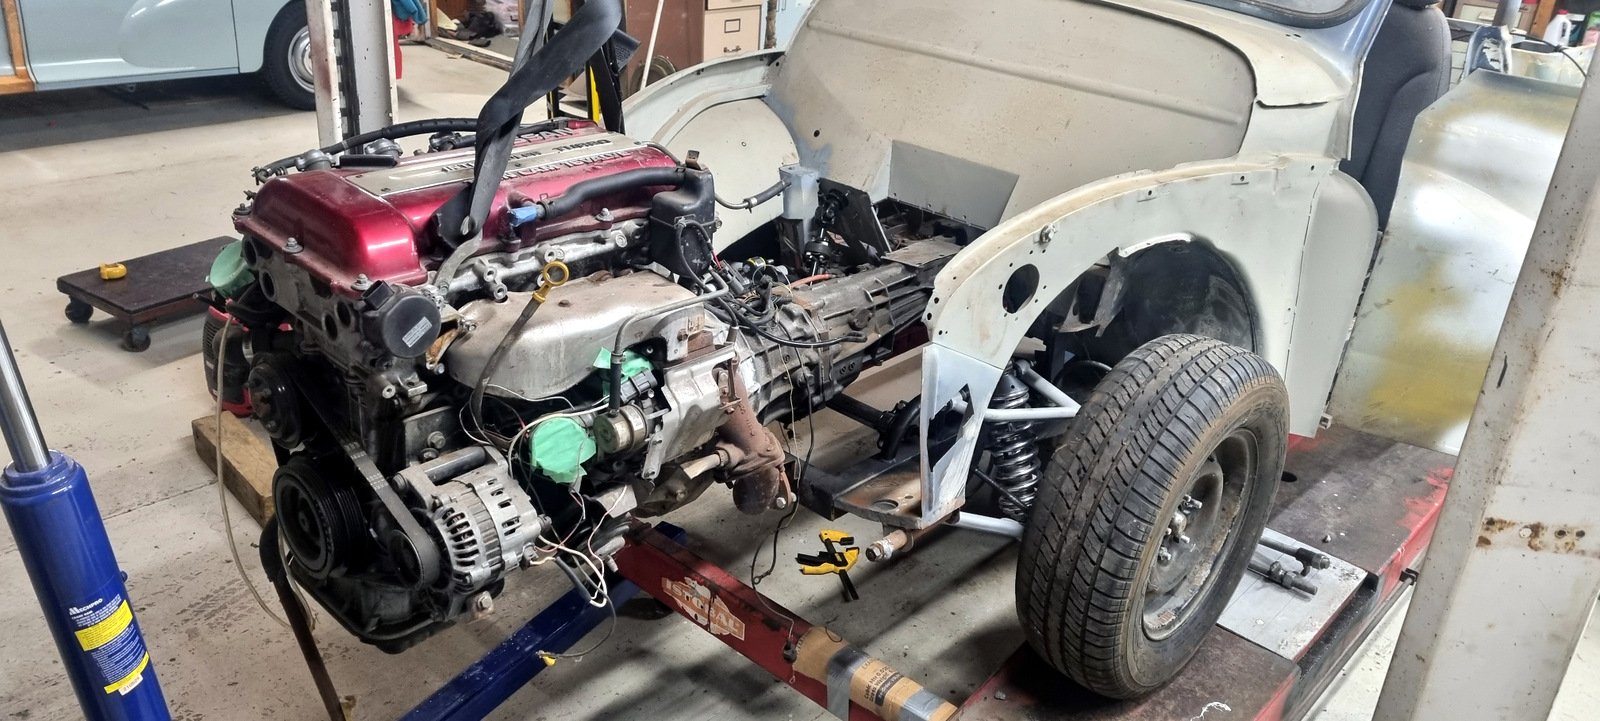
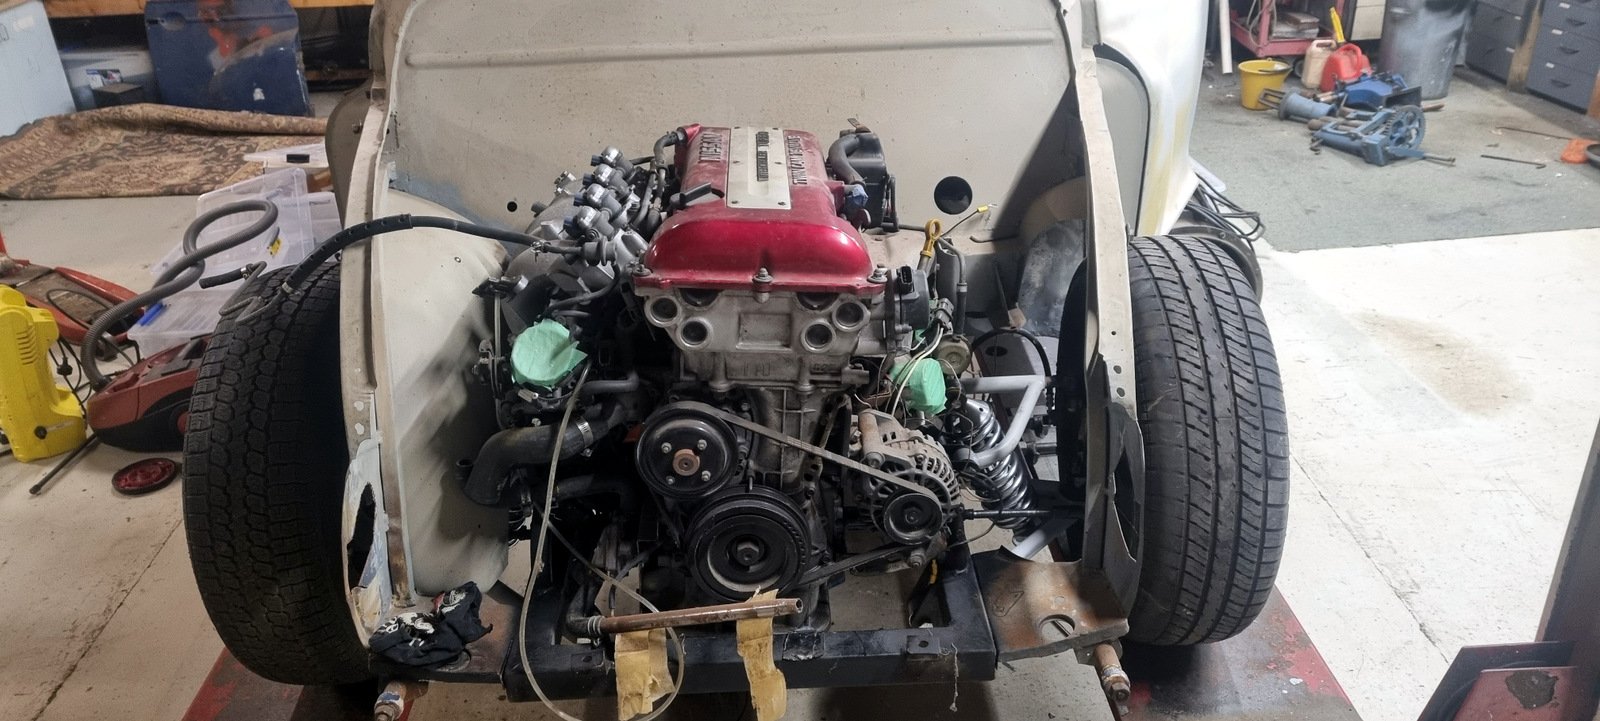
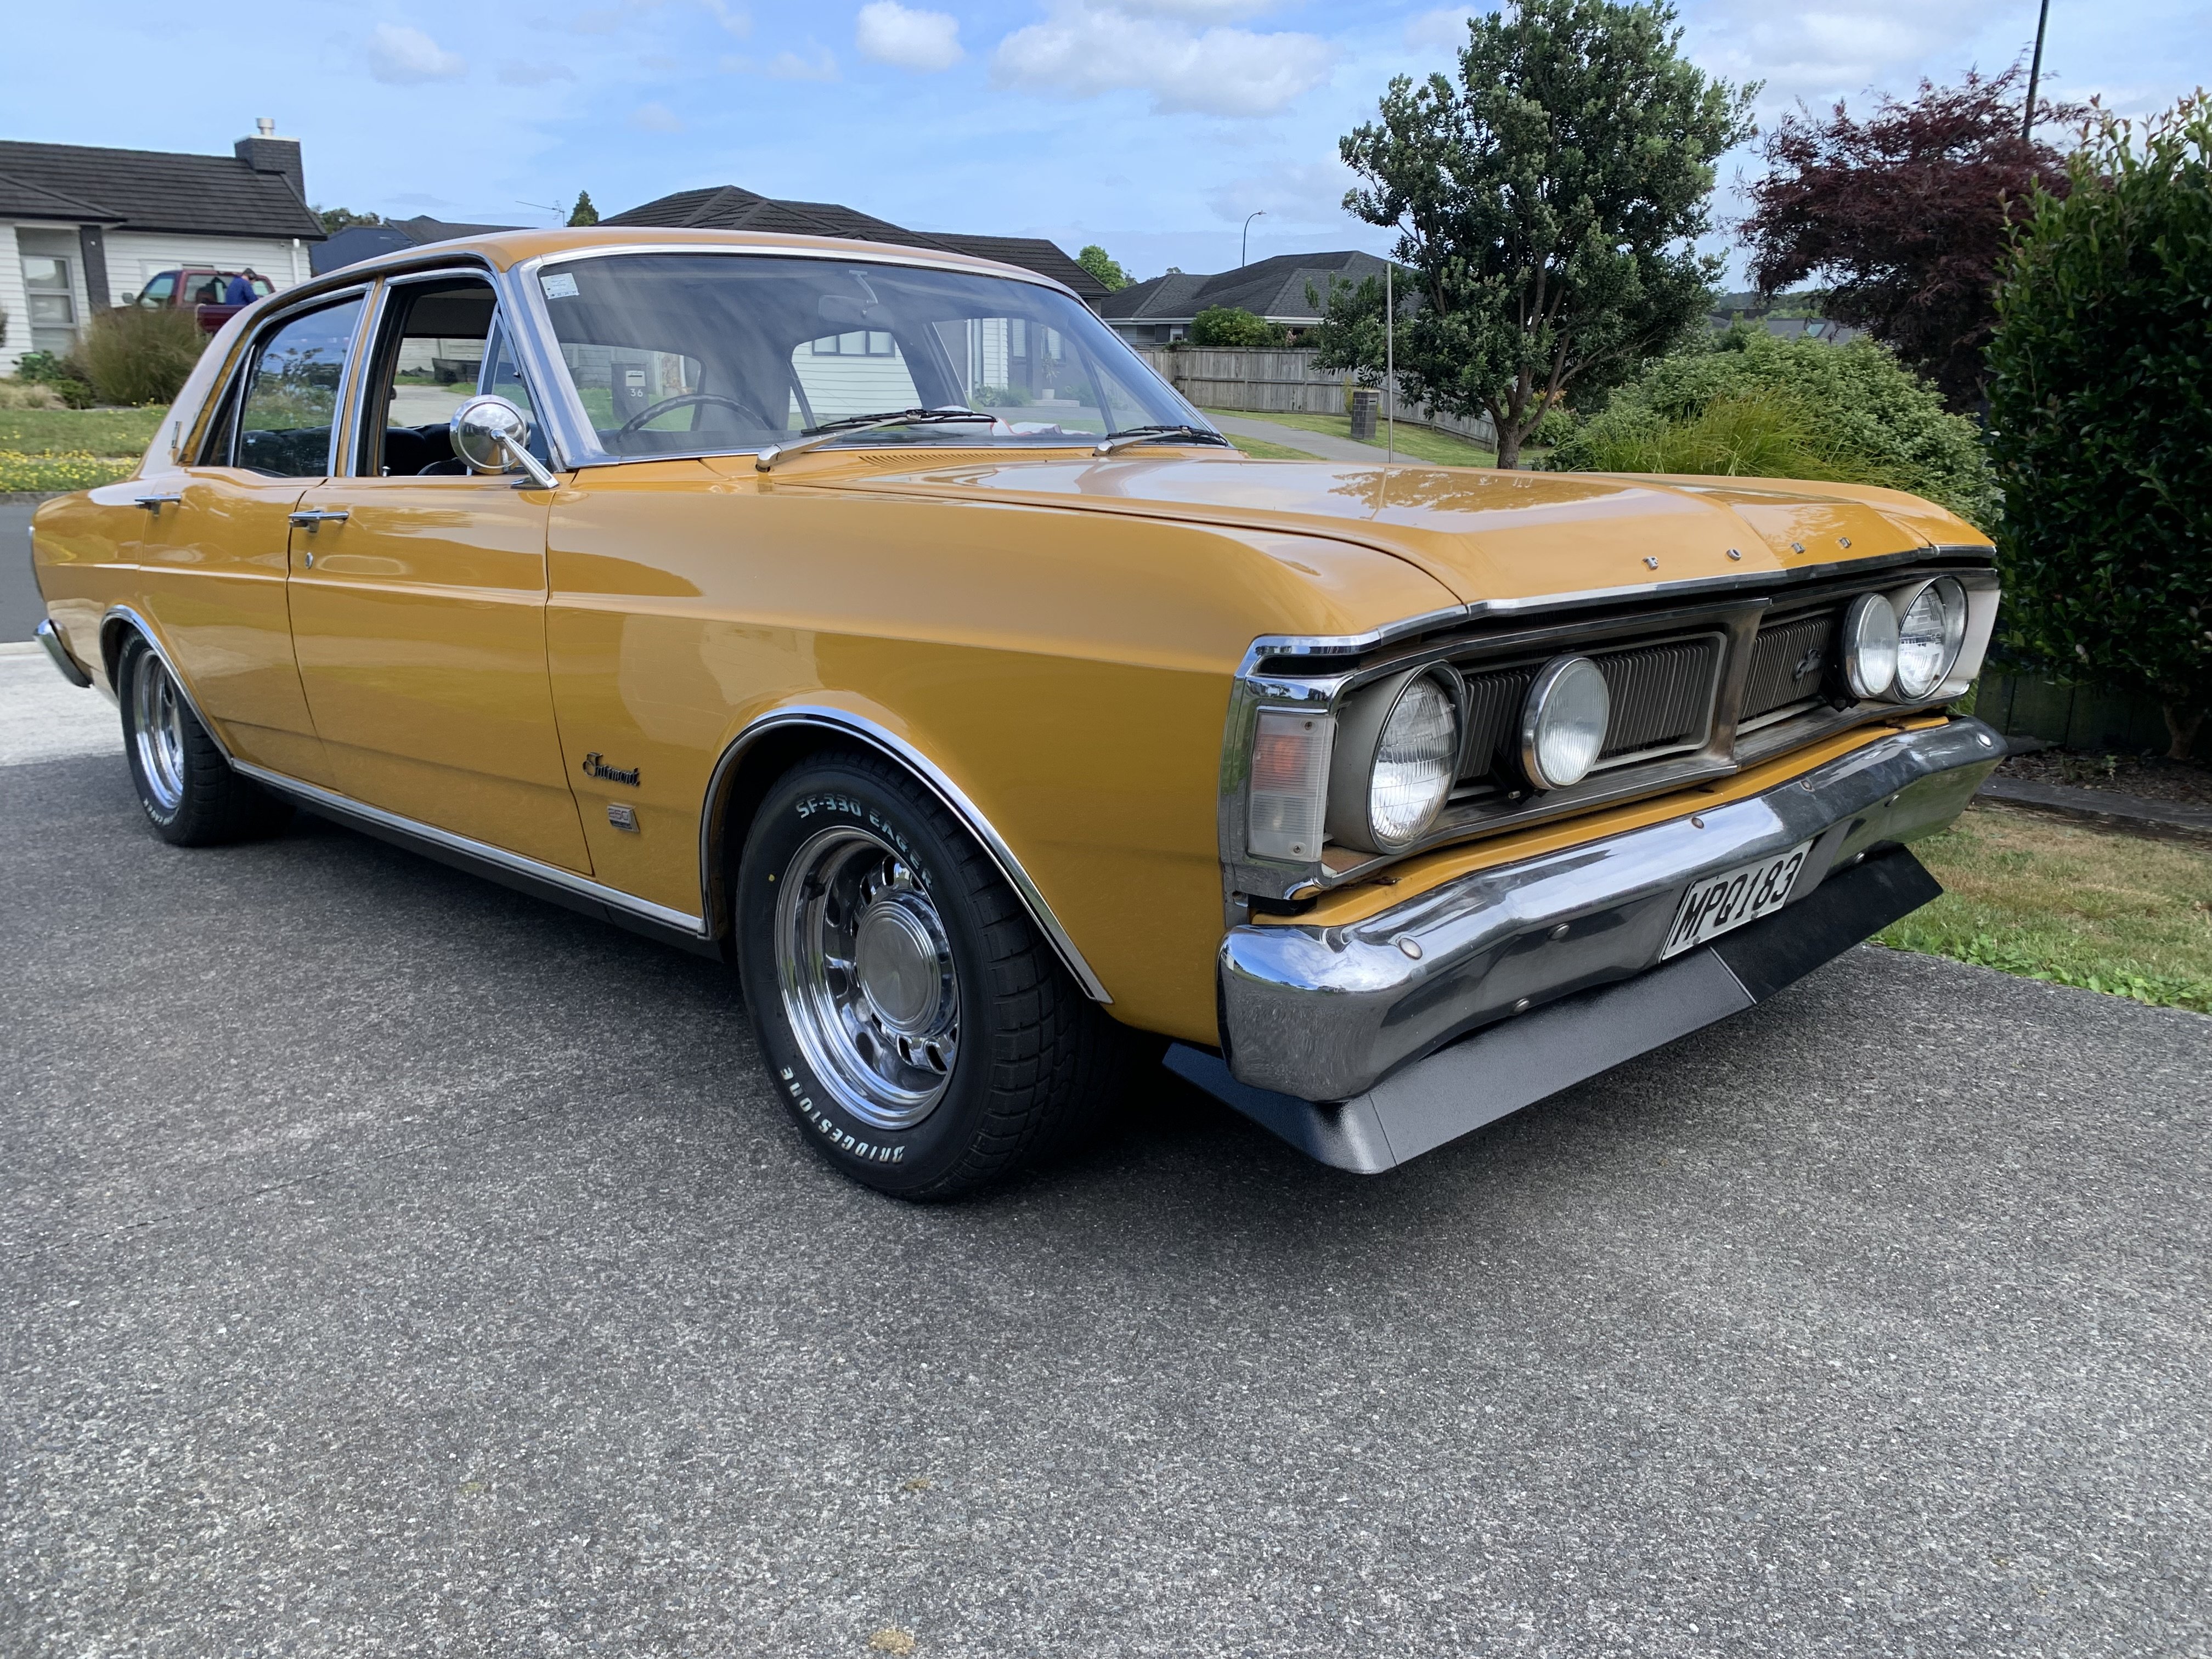
Got back from Japan with my little UP Garage purchase. fitted it as soon as I got to the shop this morning. Dayyyyyyyyyyyyyyyymmmmmmmm
 12 points
 -
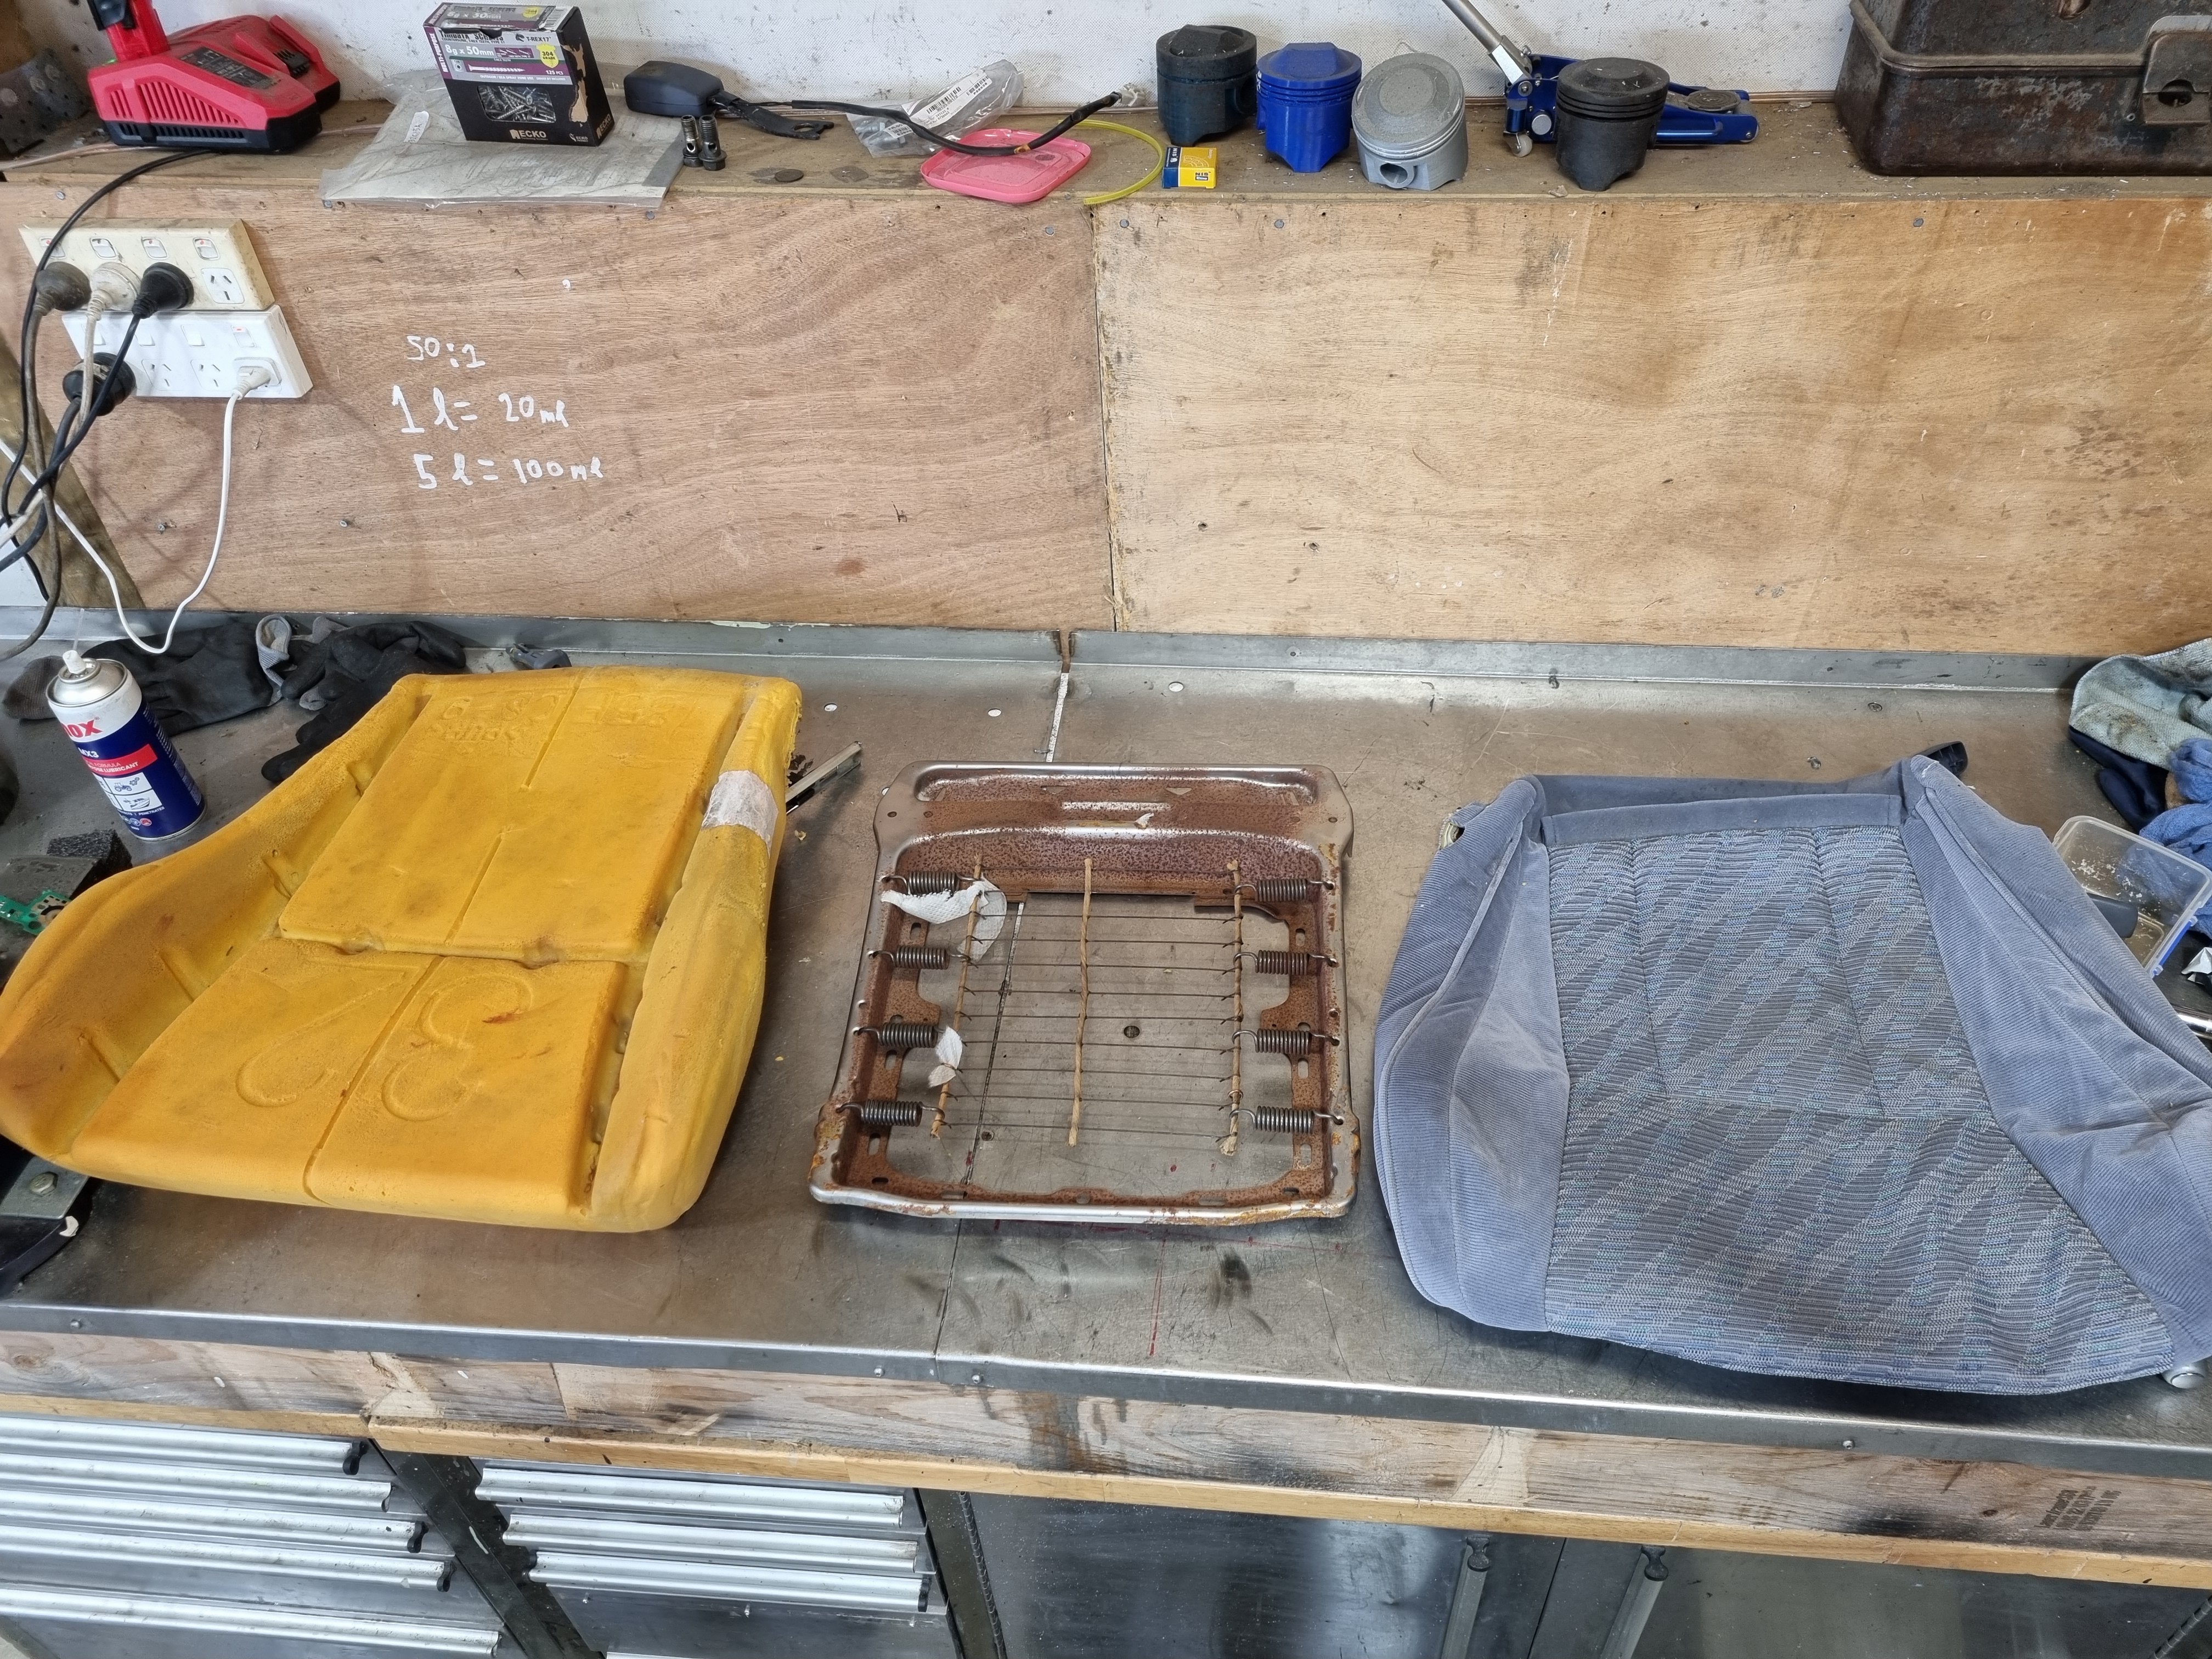
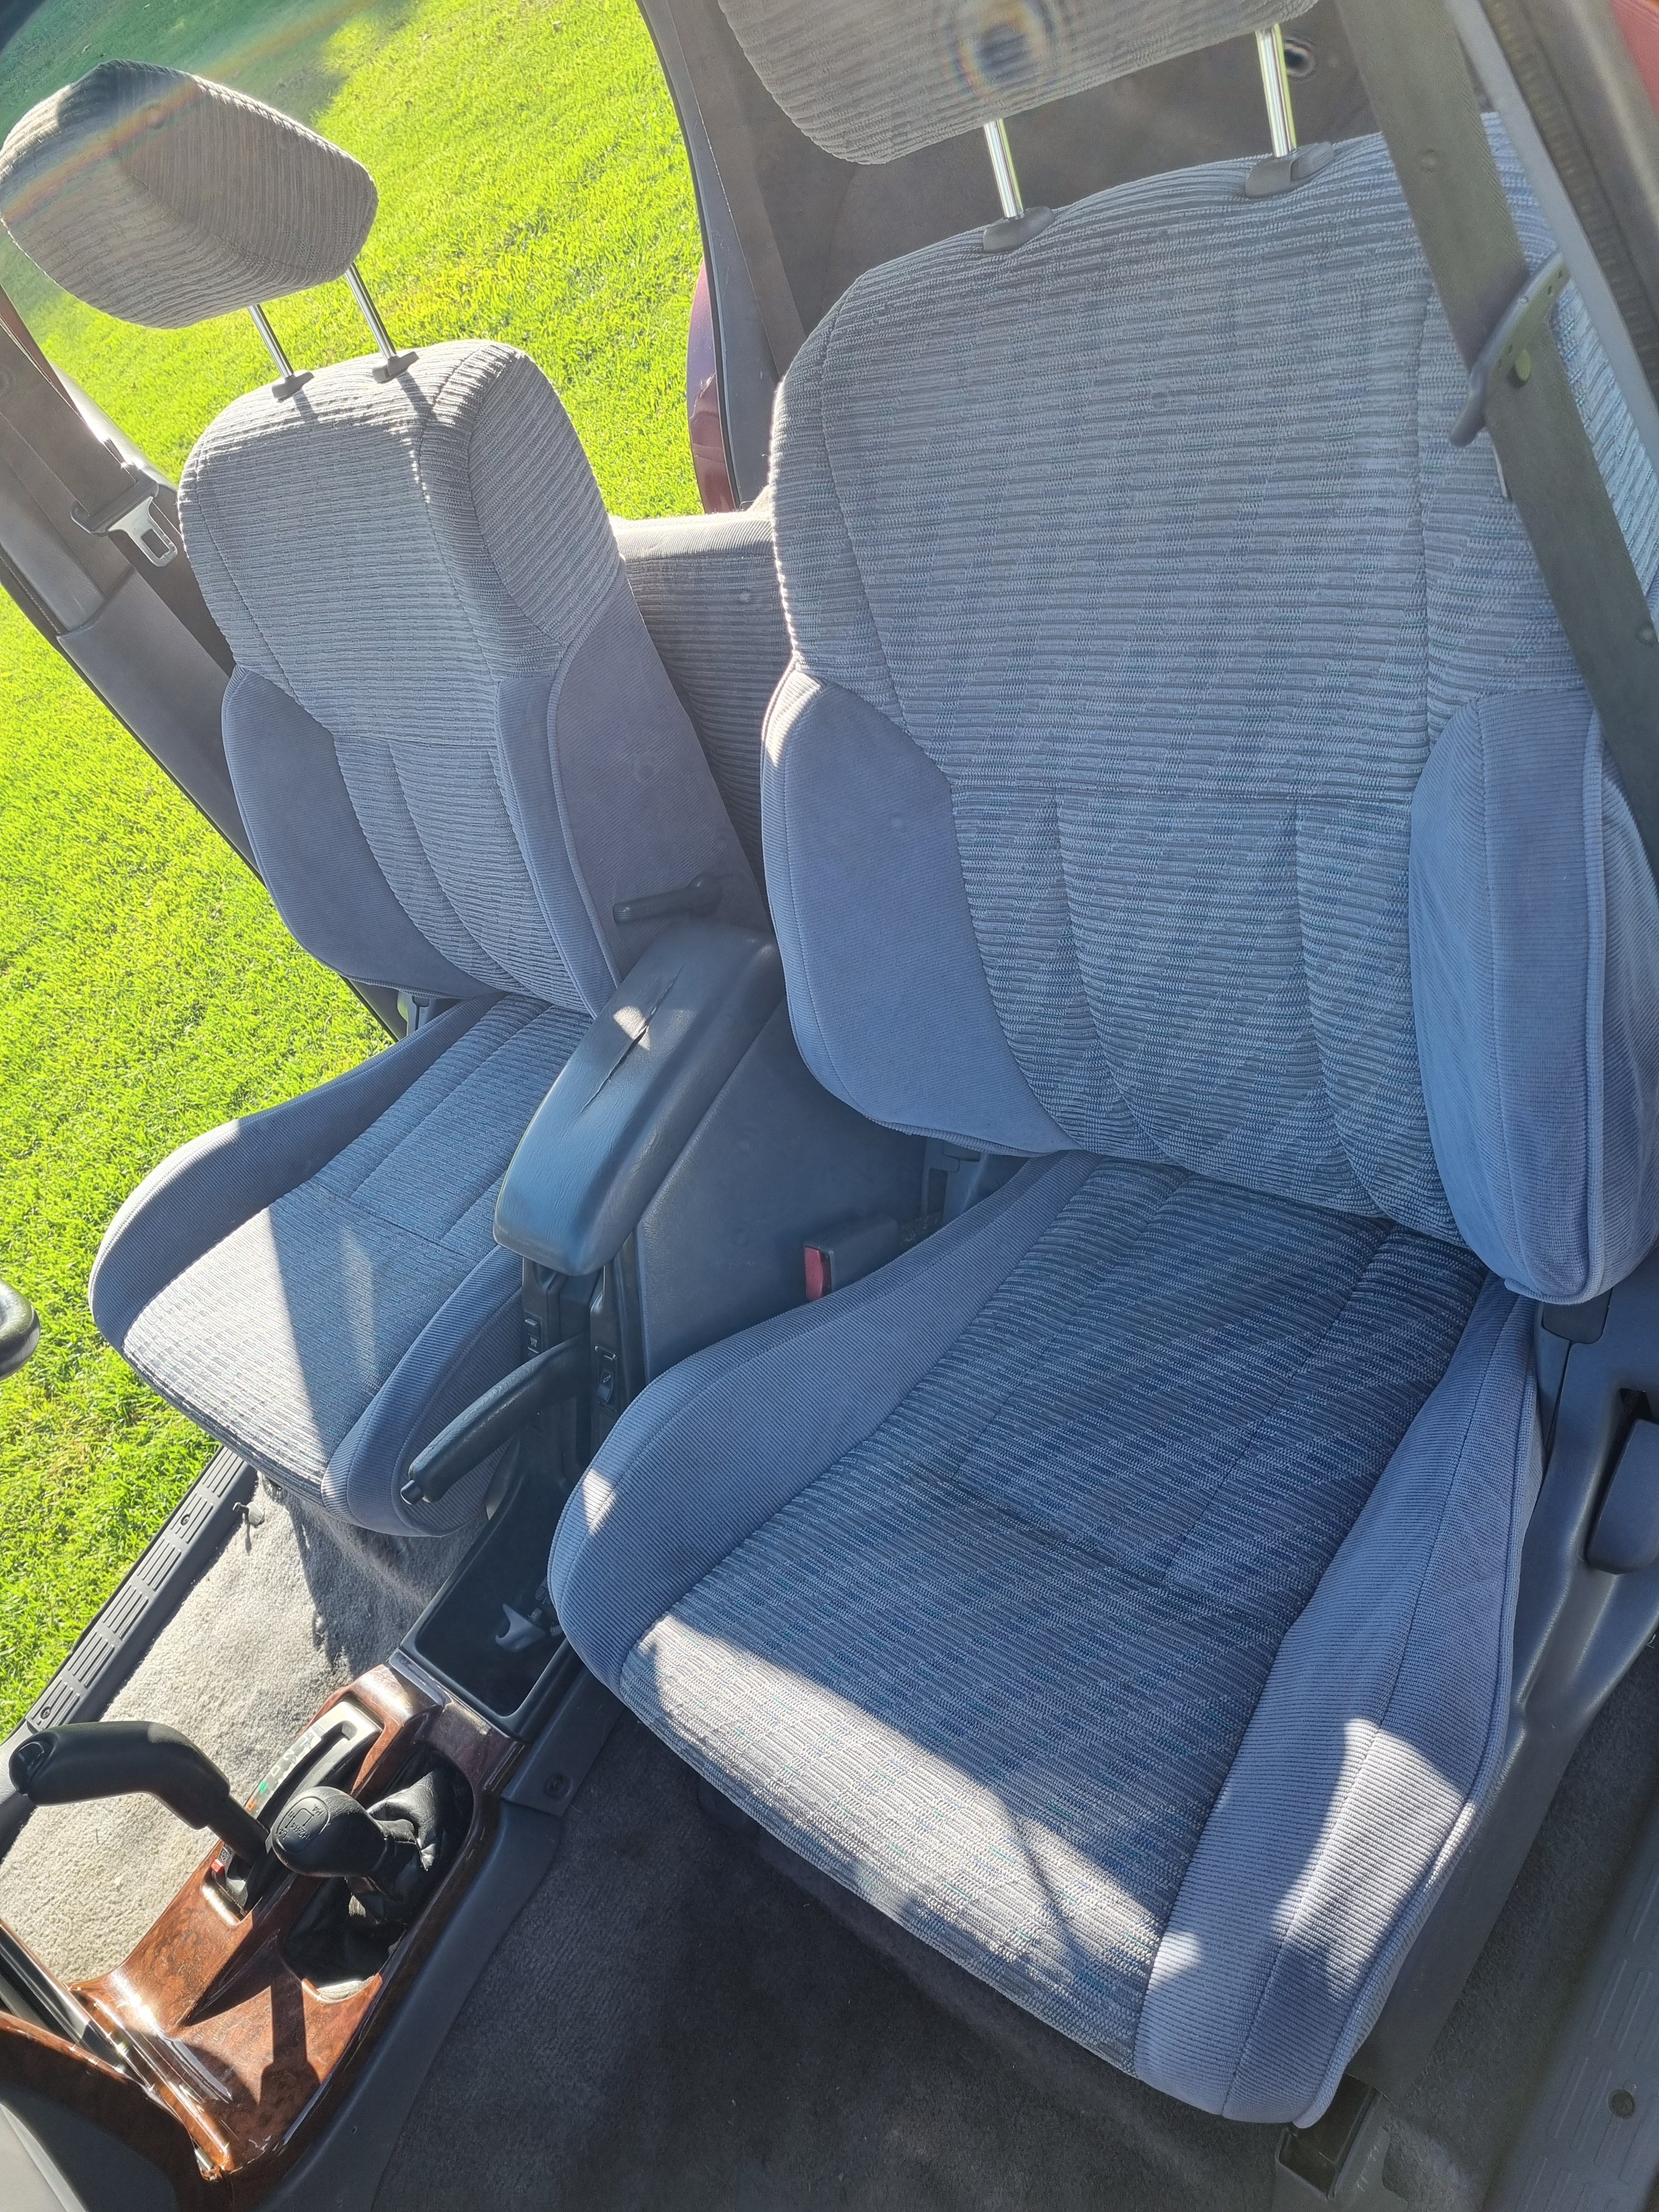
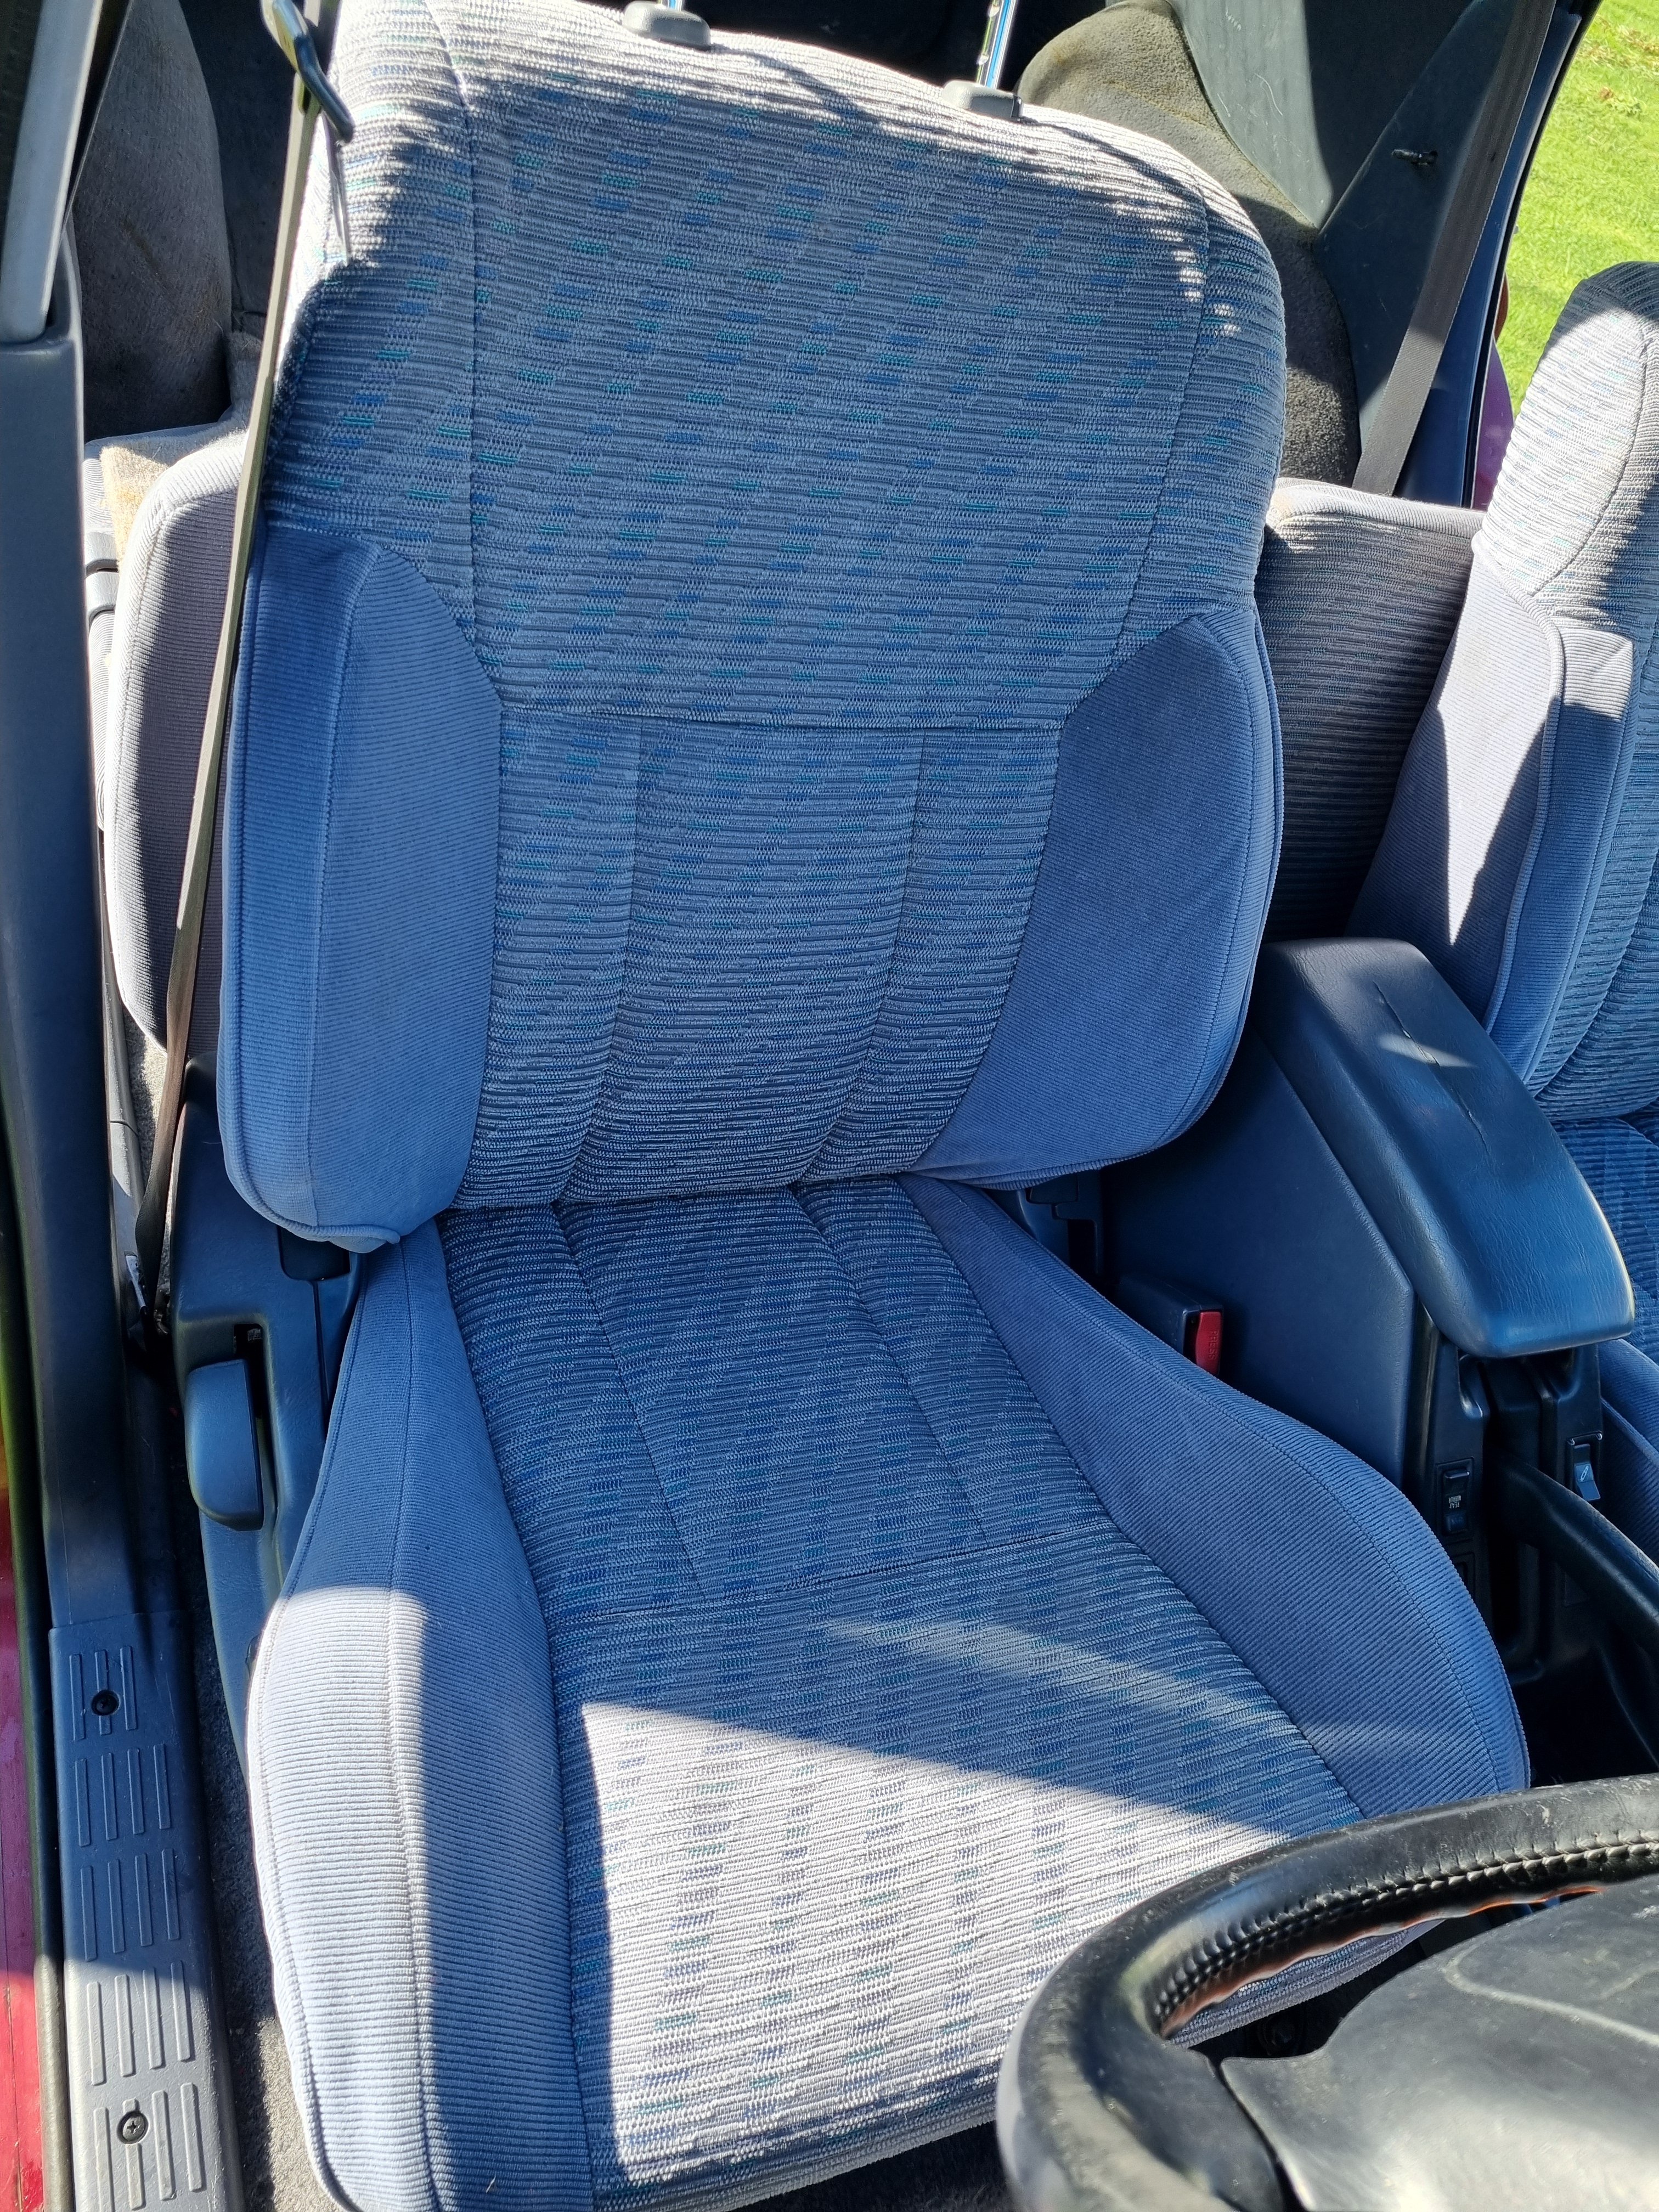
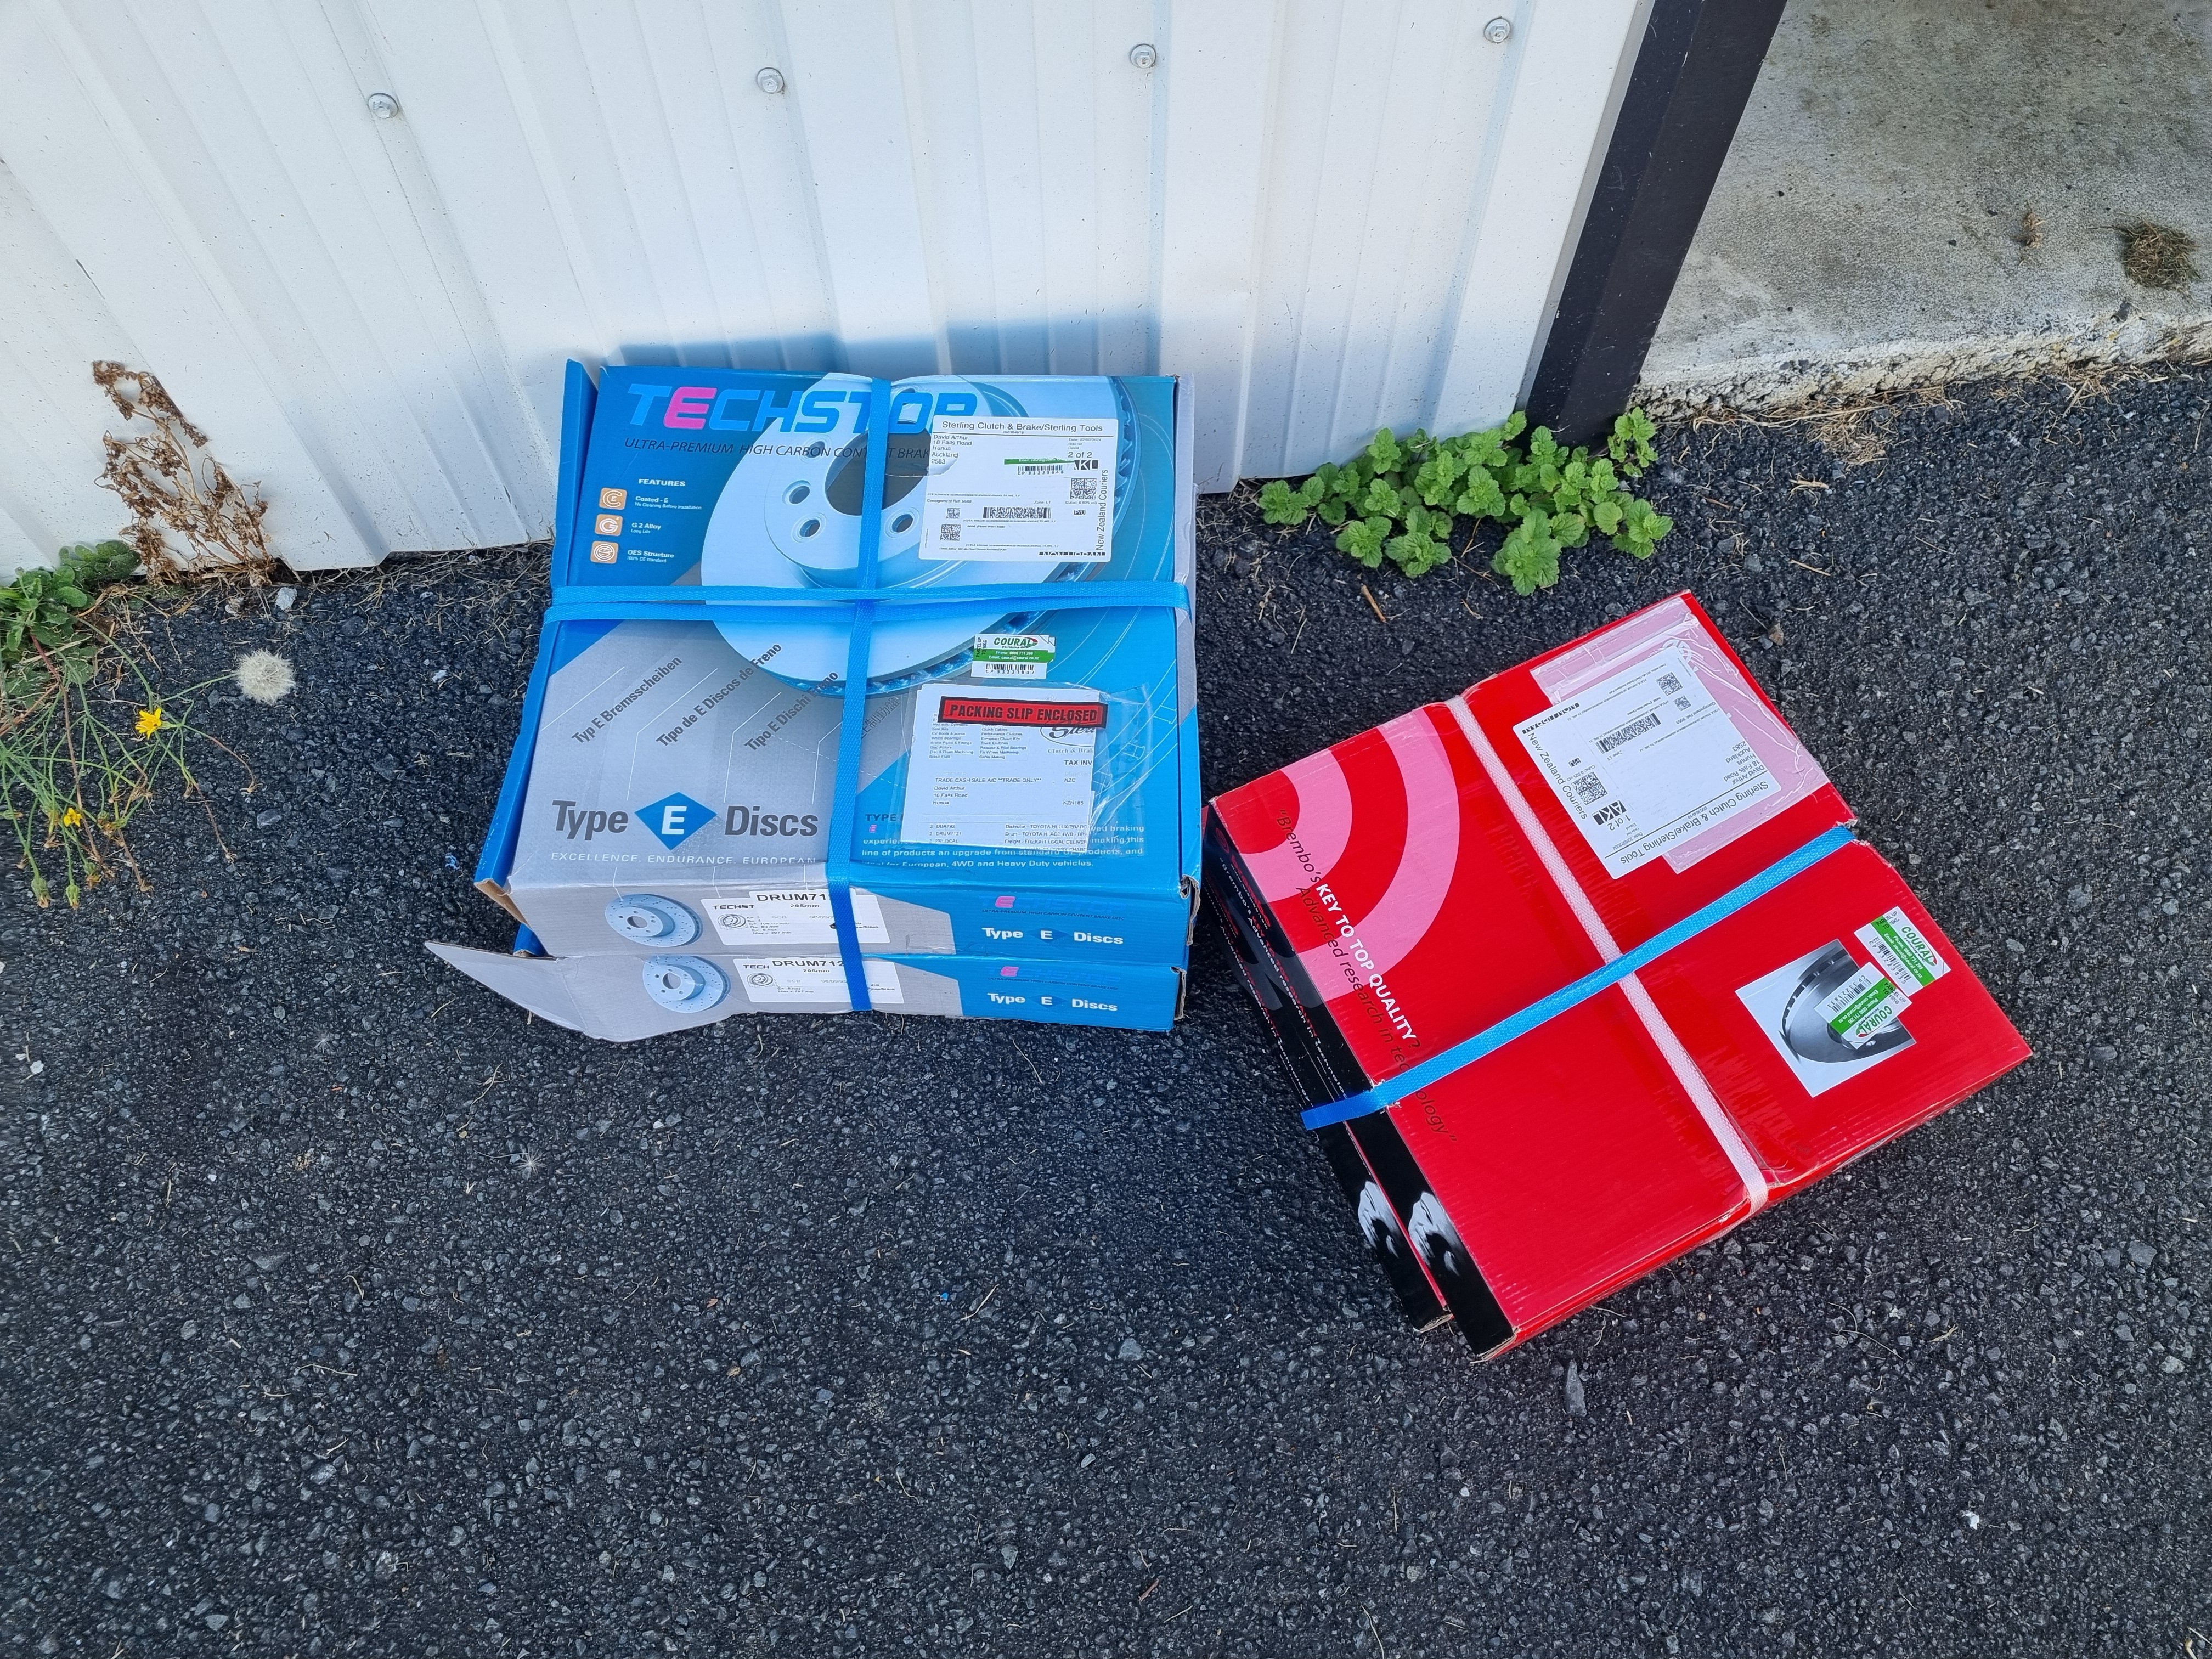
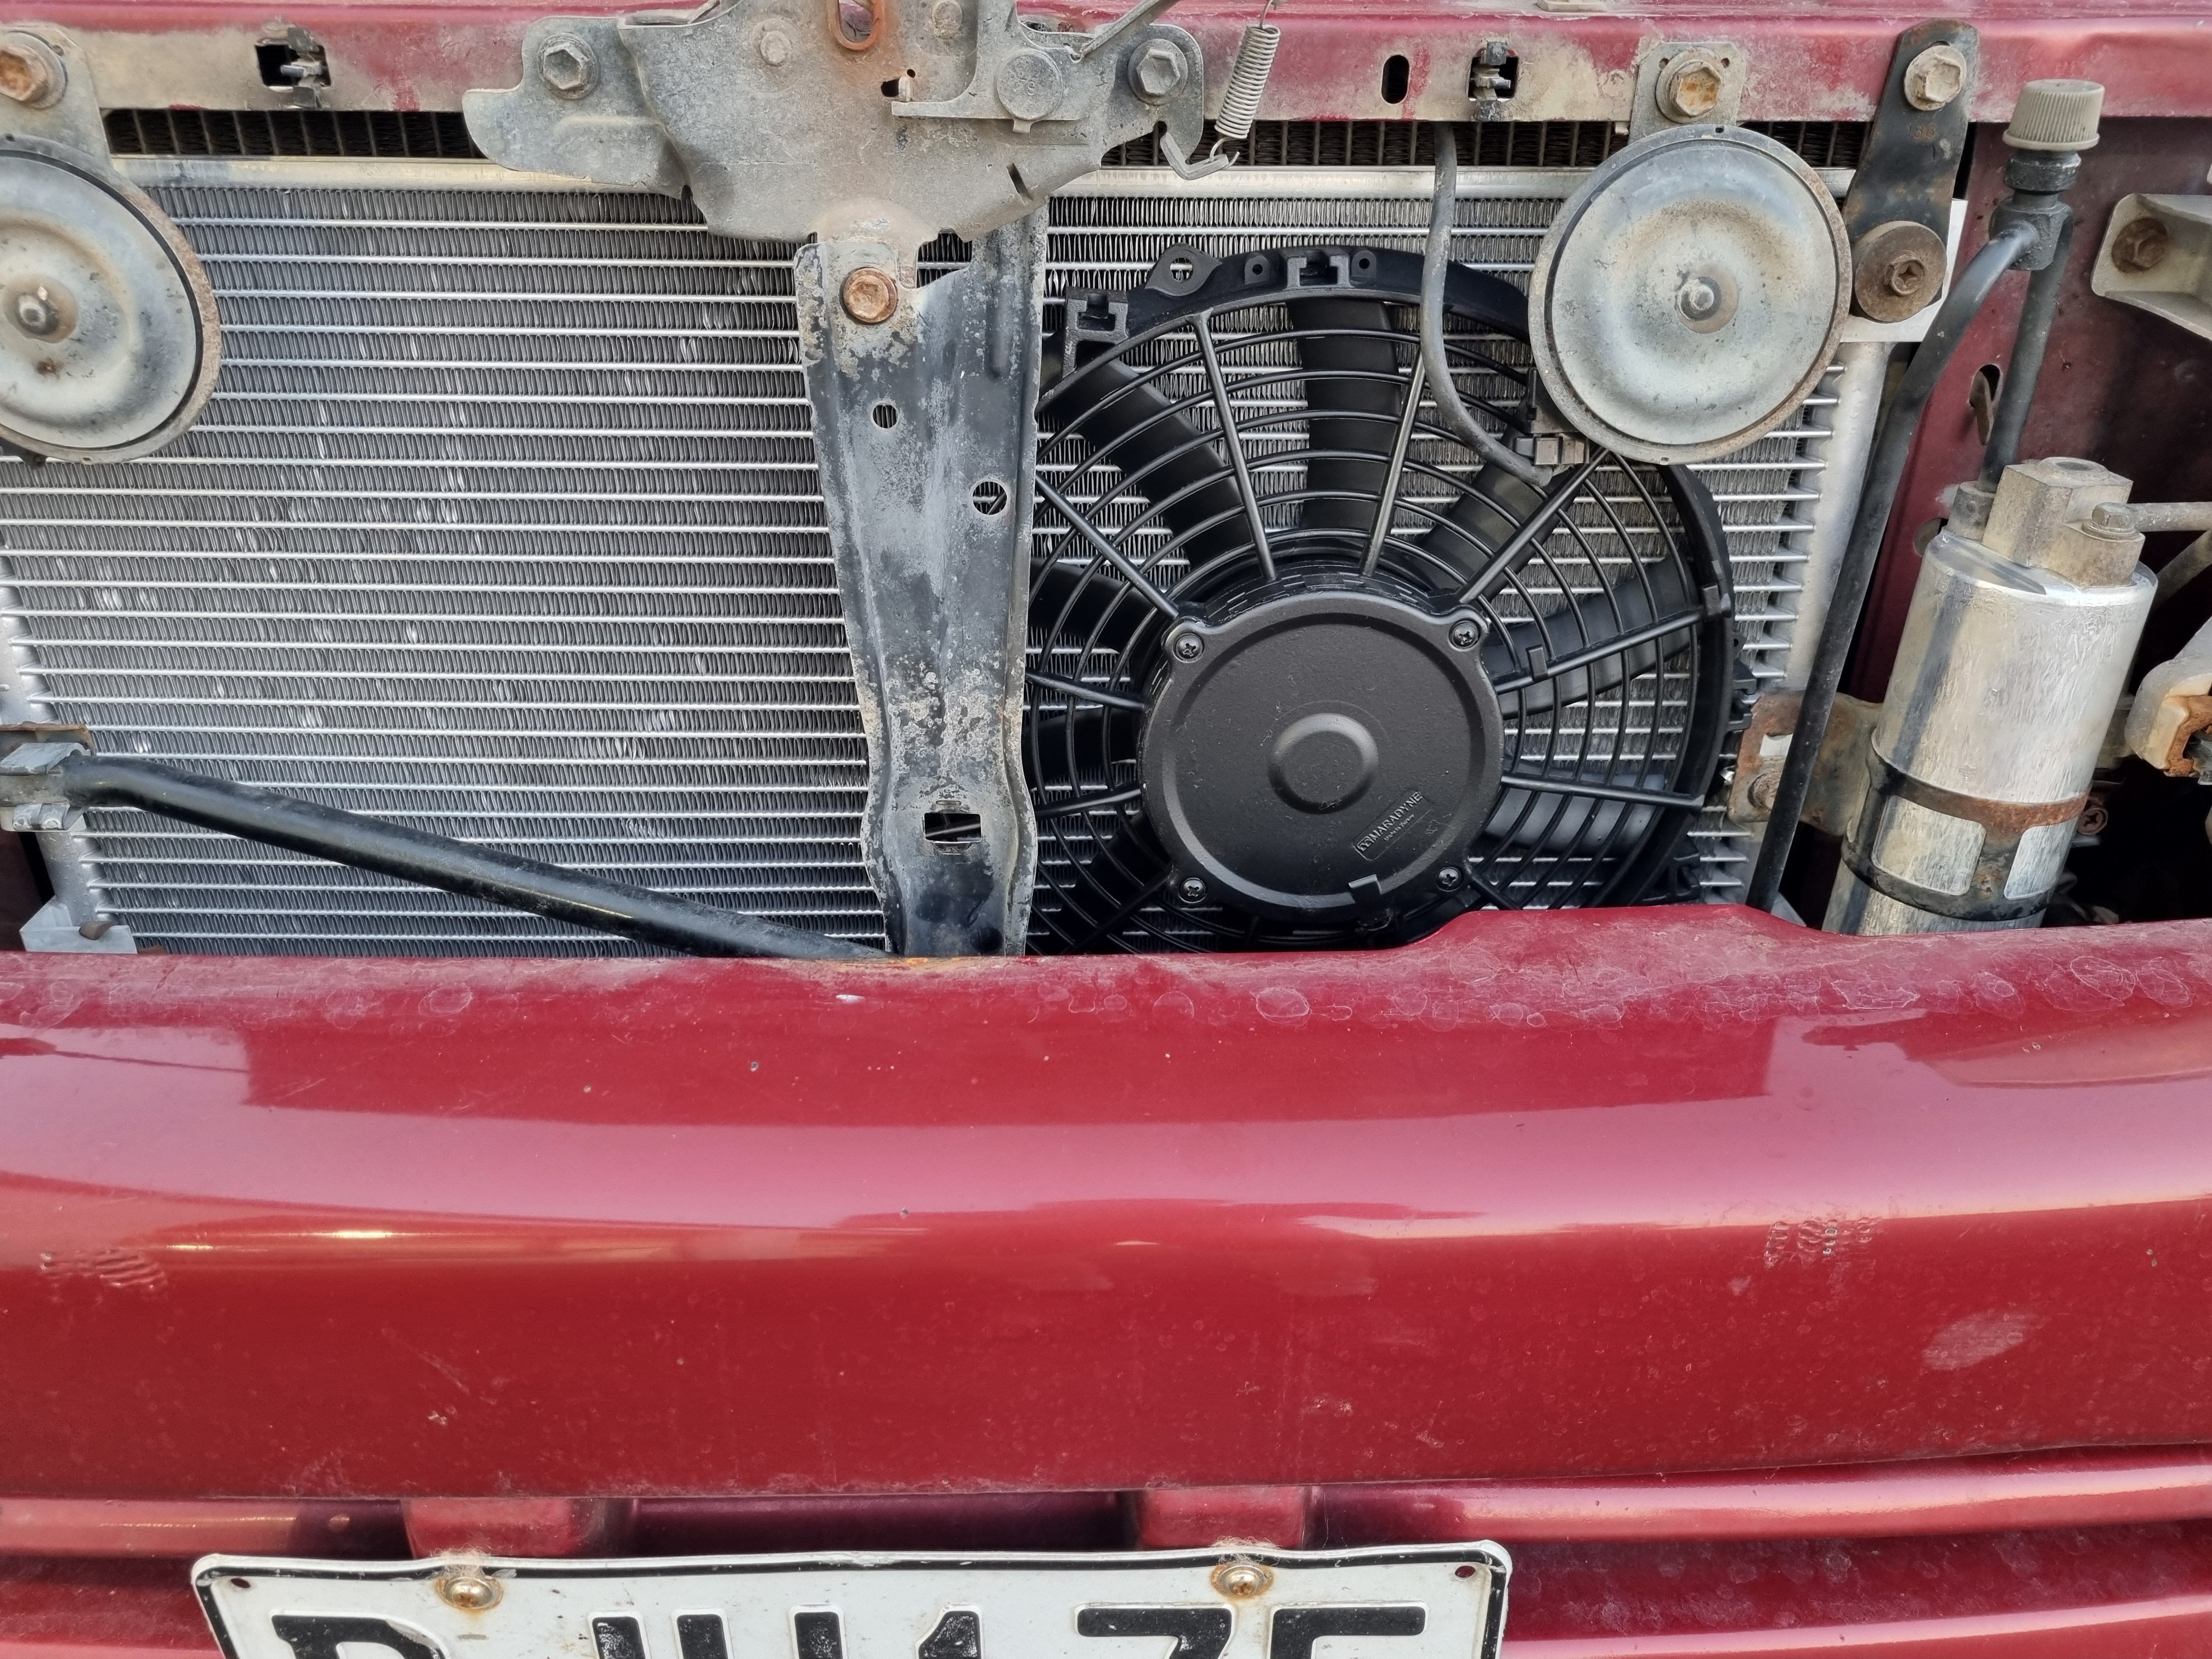
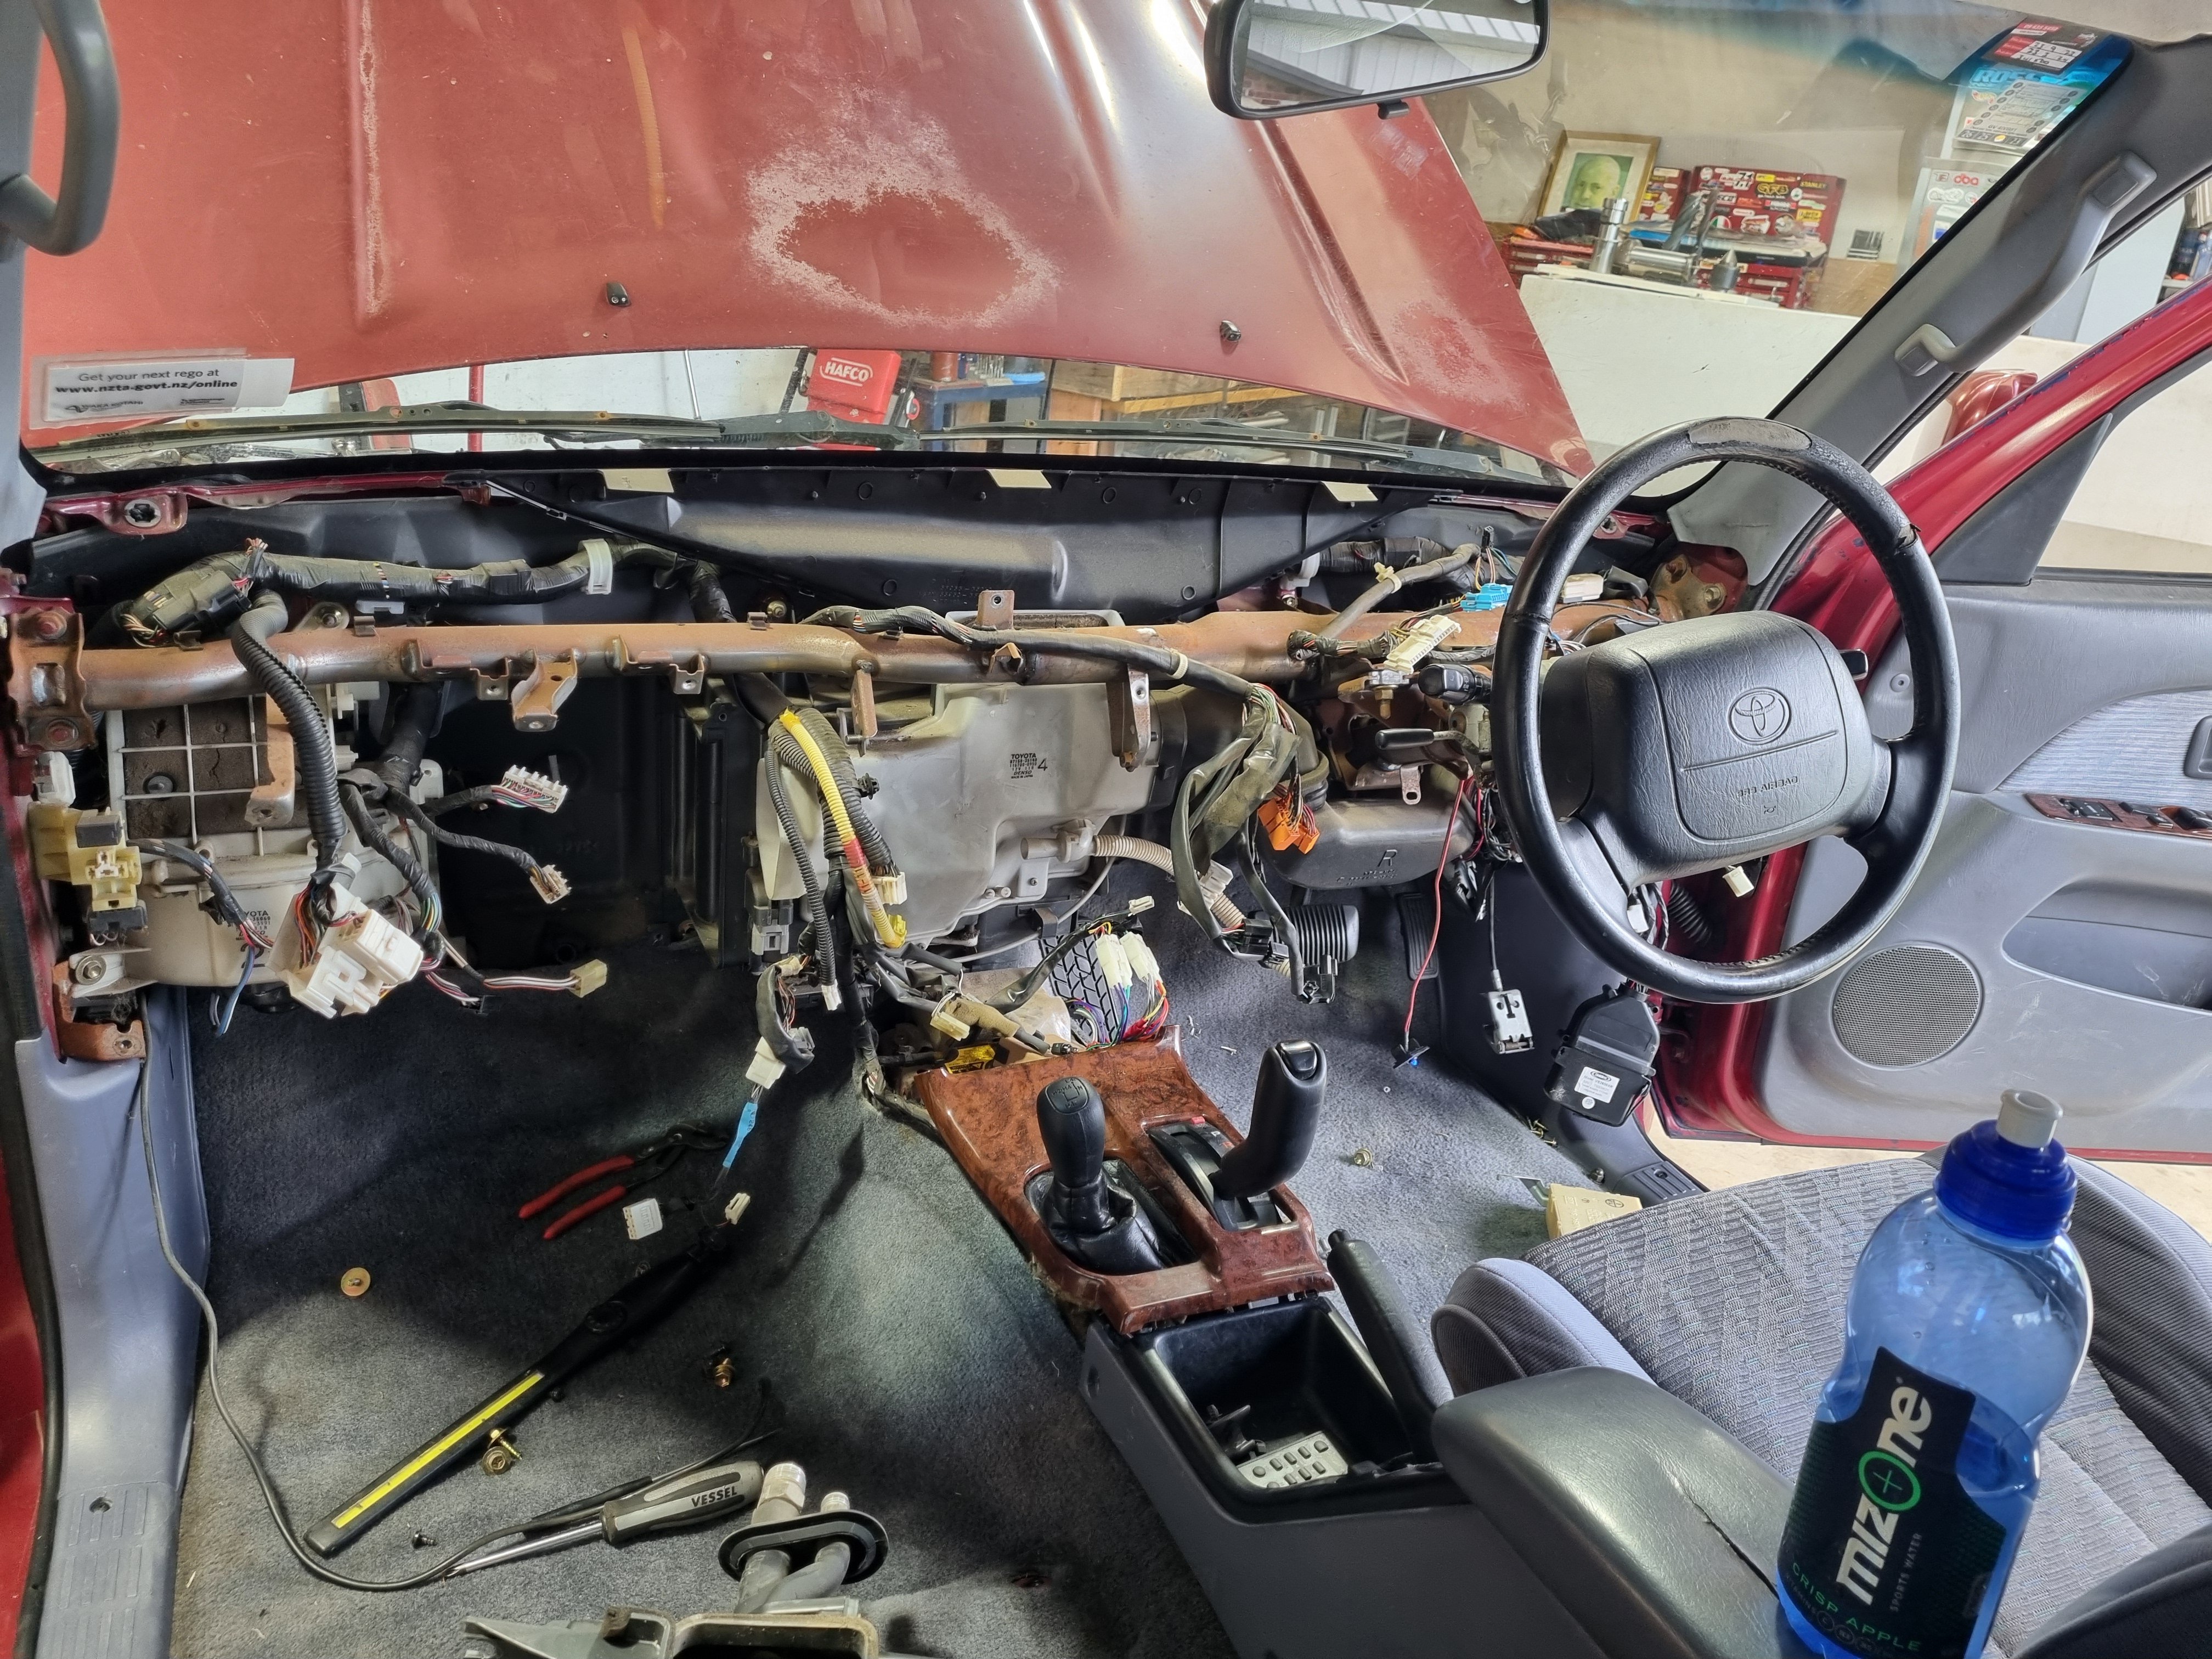
The seats actually came out looking quite good. So I put them back together and put them back in the truck. Fuck, so much more comfort. And now both seats have adjustable lumber support. Then I fitted a cooling fan I had to the AC condenser. I made a bracket and it's in there pretty good. I made up the wiring loom for it but it got dark so I'll fit it tomorrow. Also I bought new discs and drums for it.
9 points
-
Hanmer car show
6 points
-
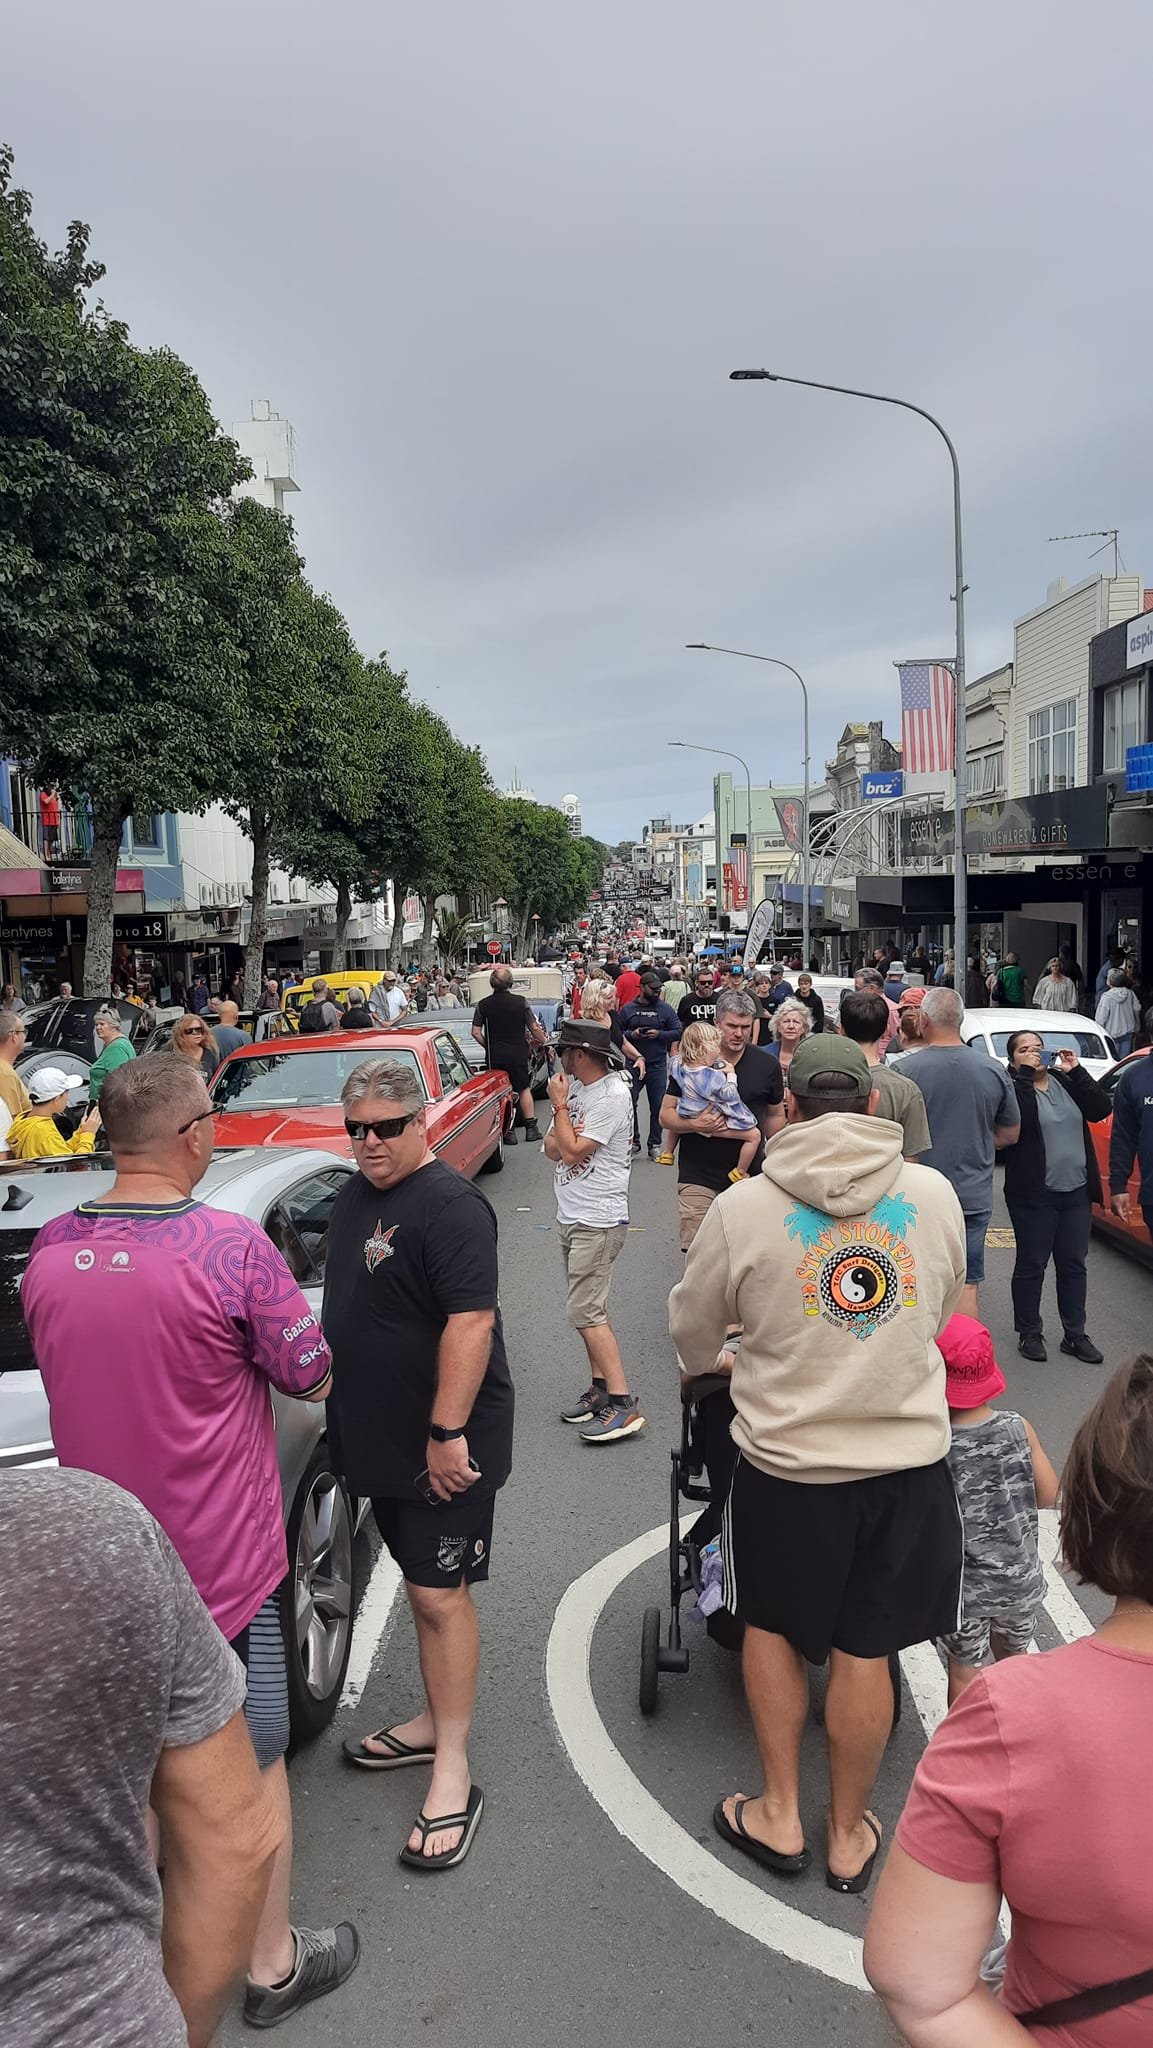
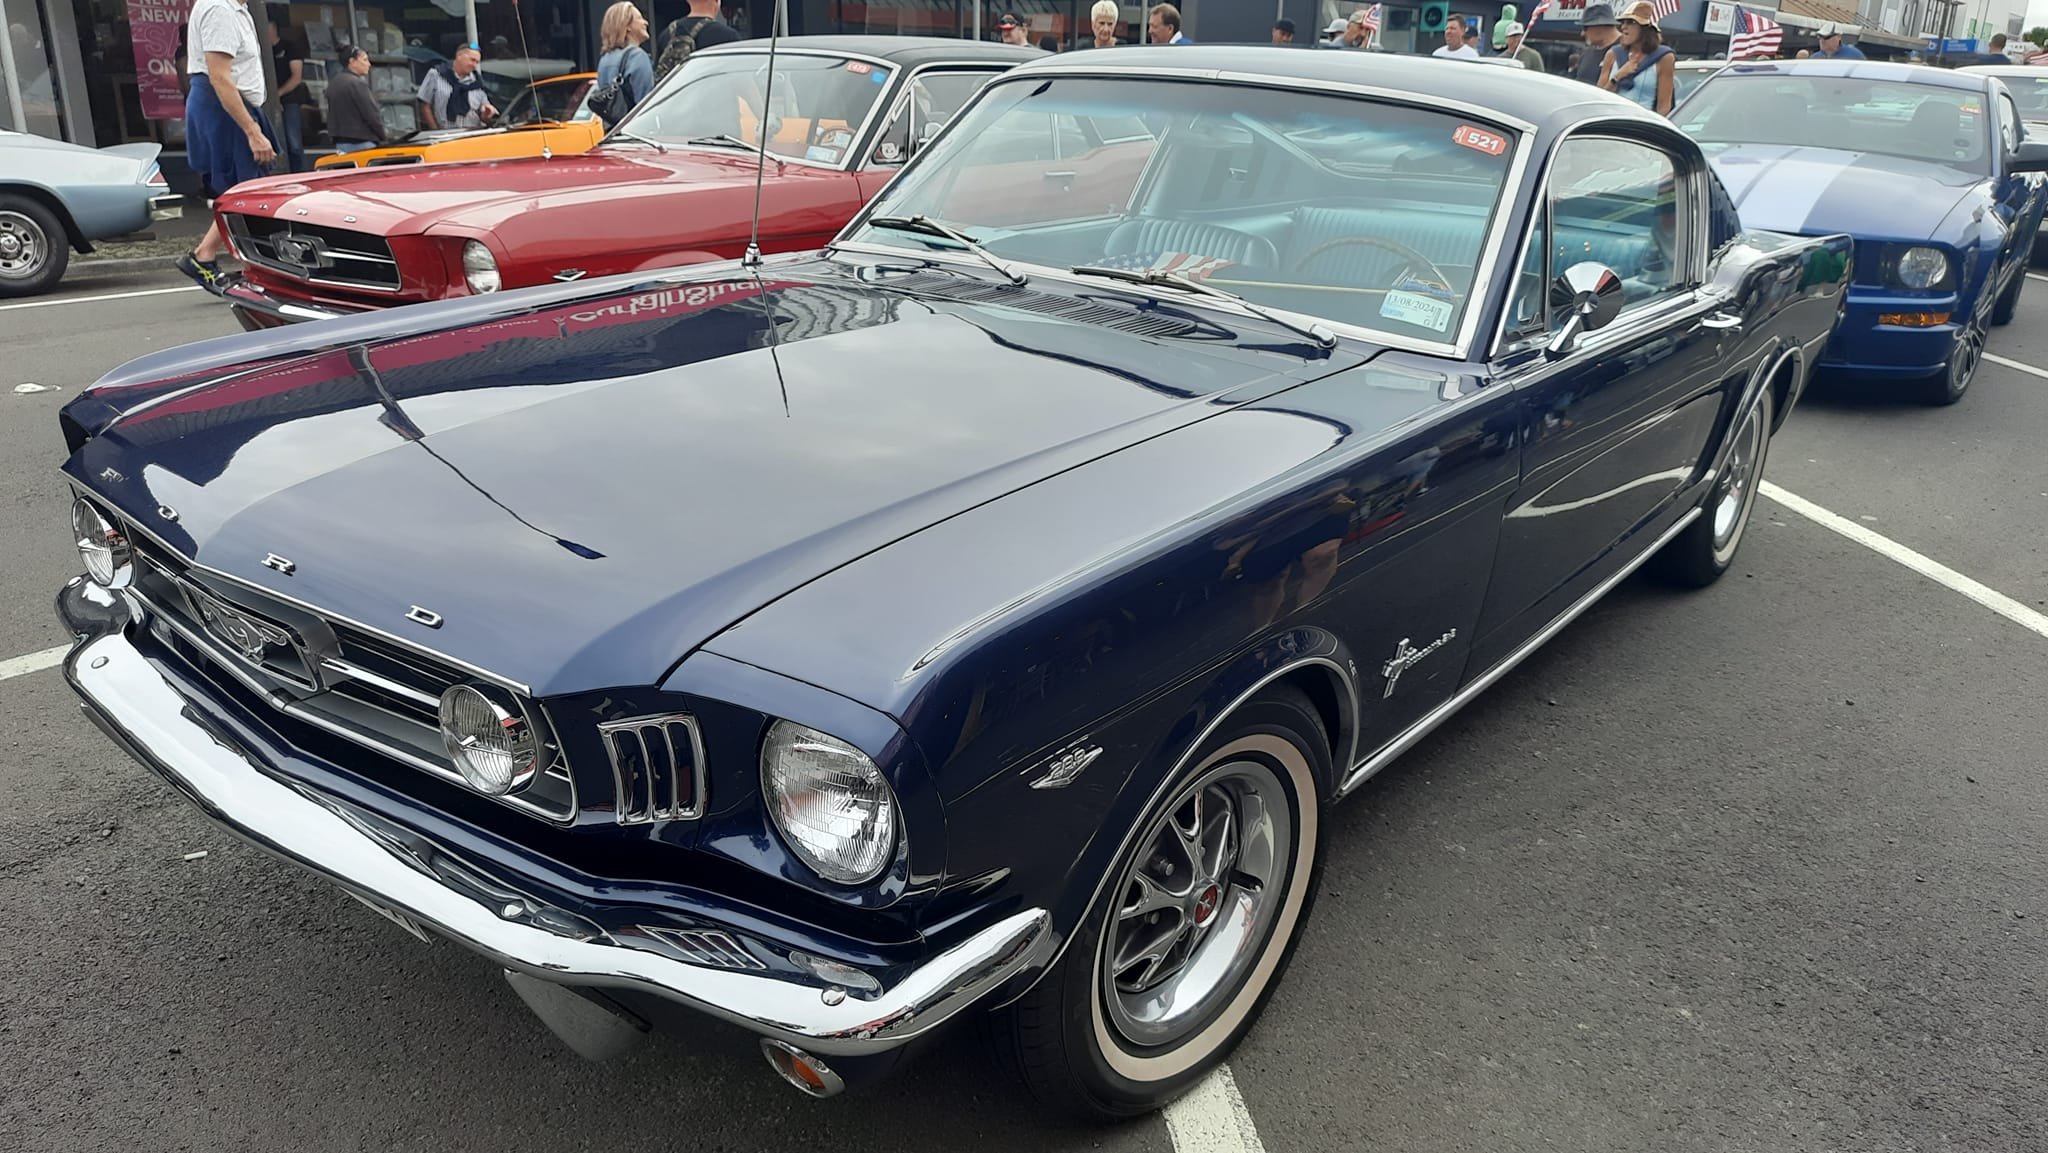
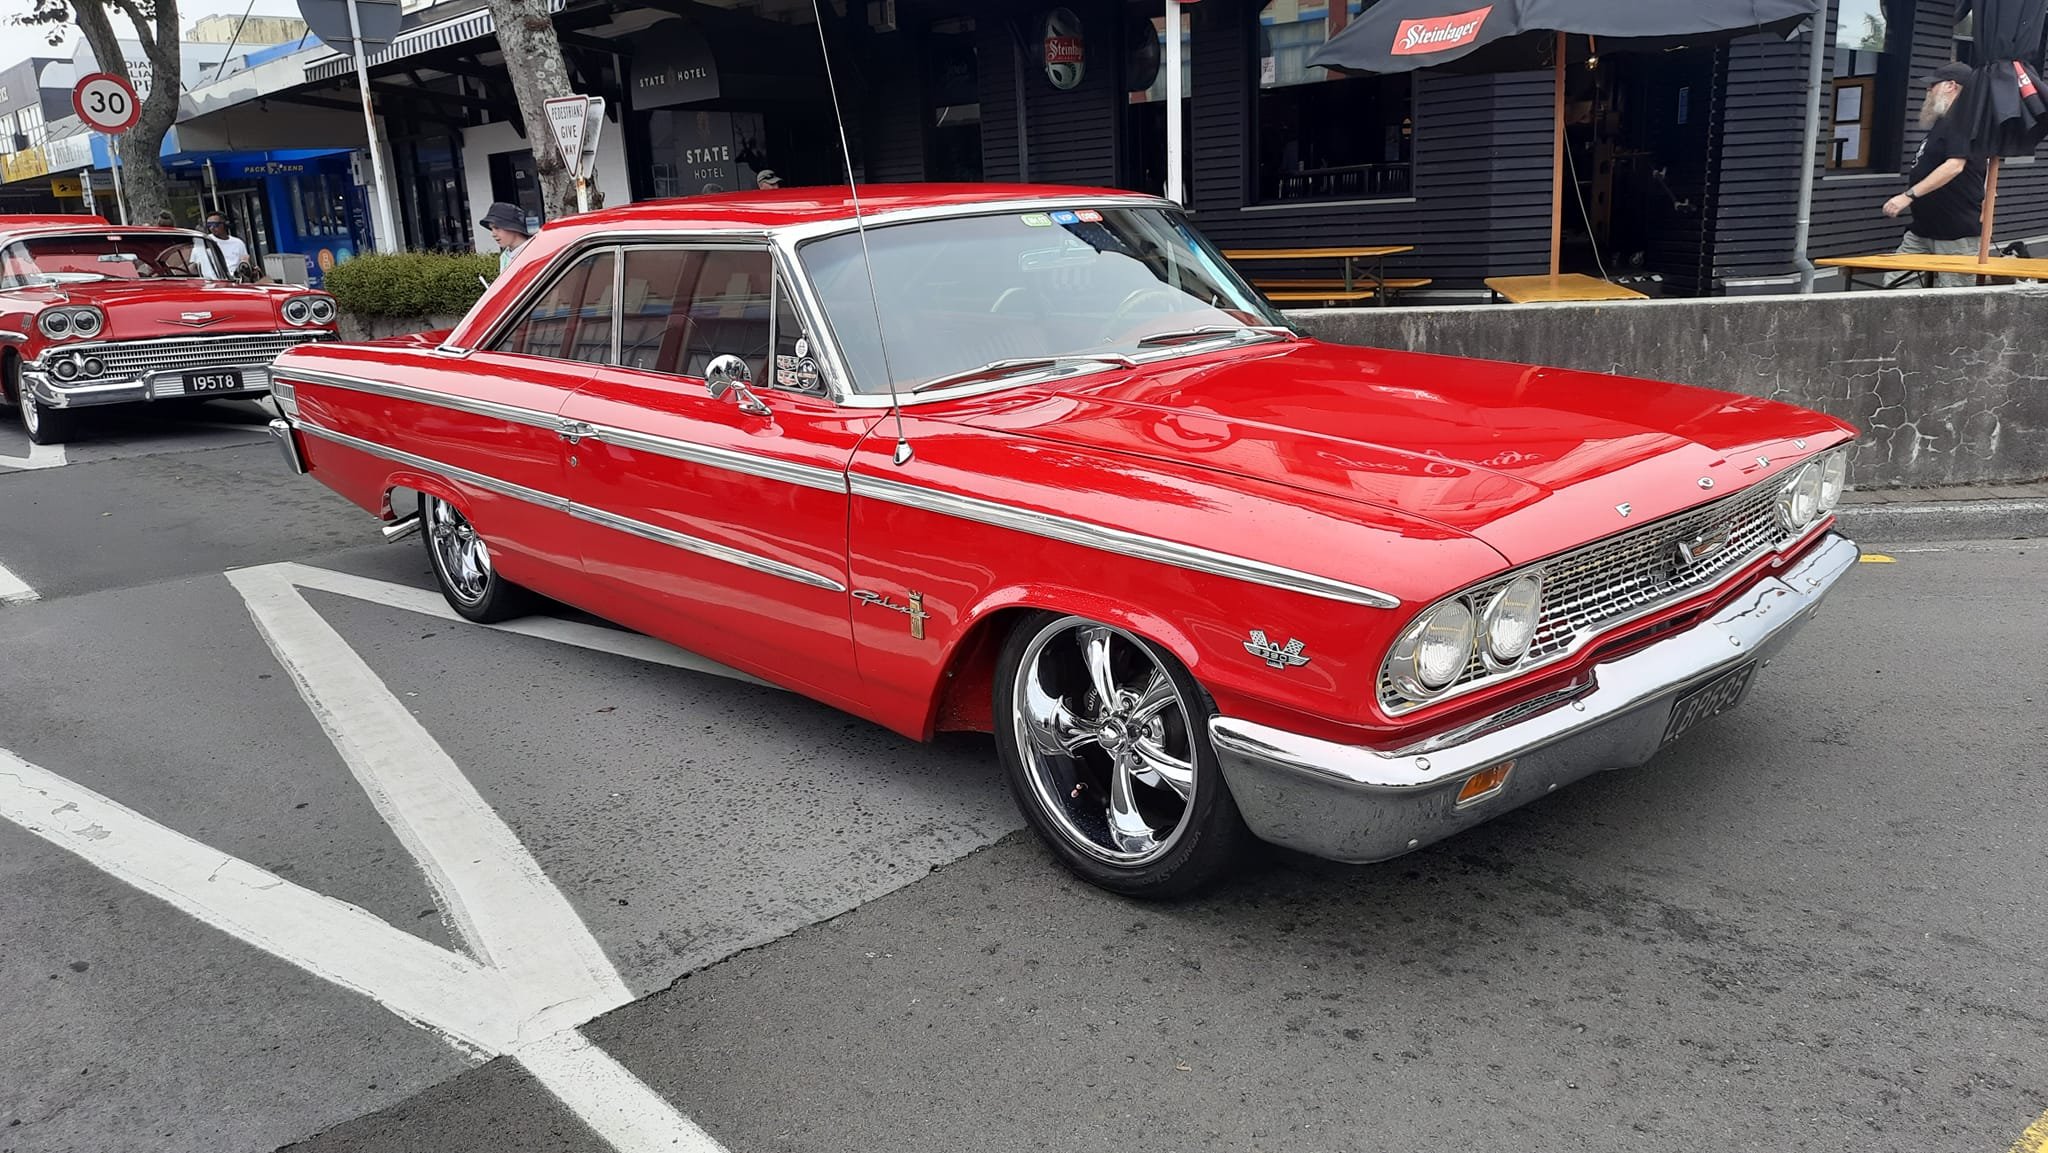
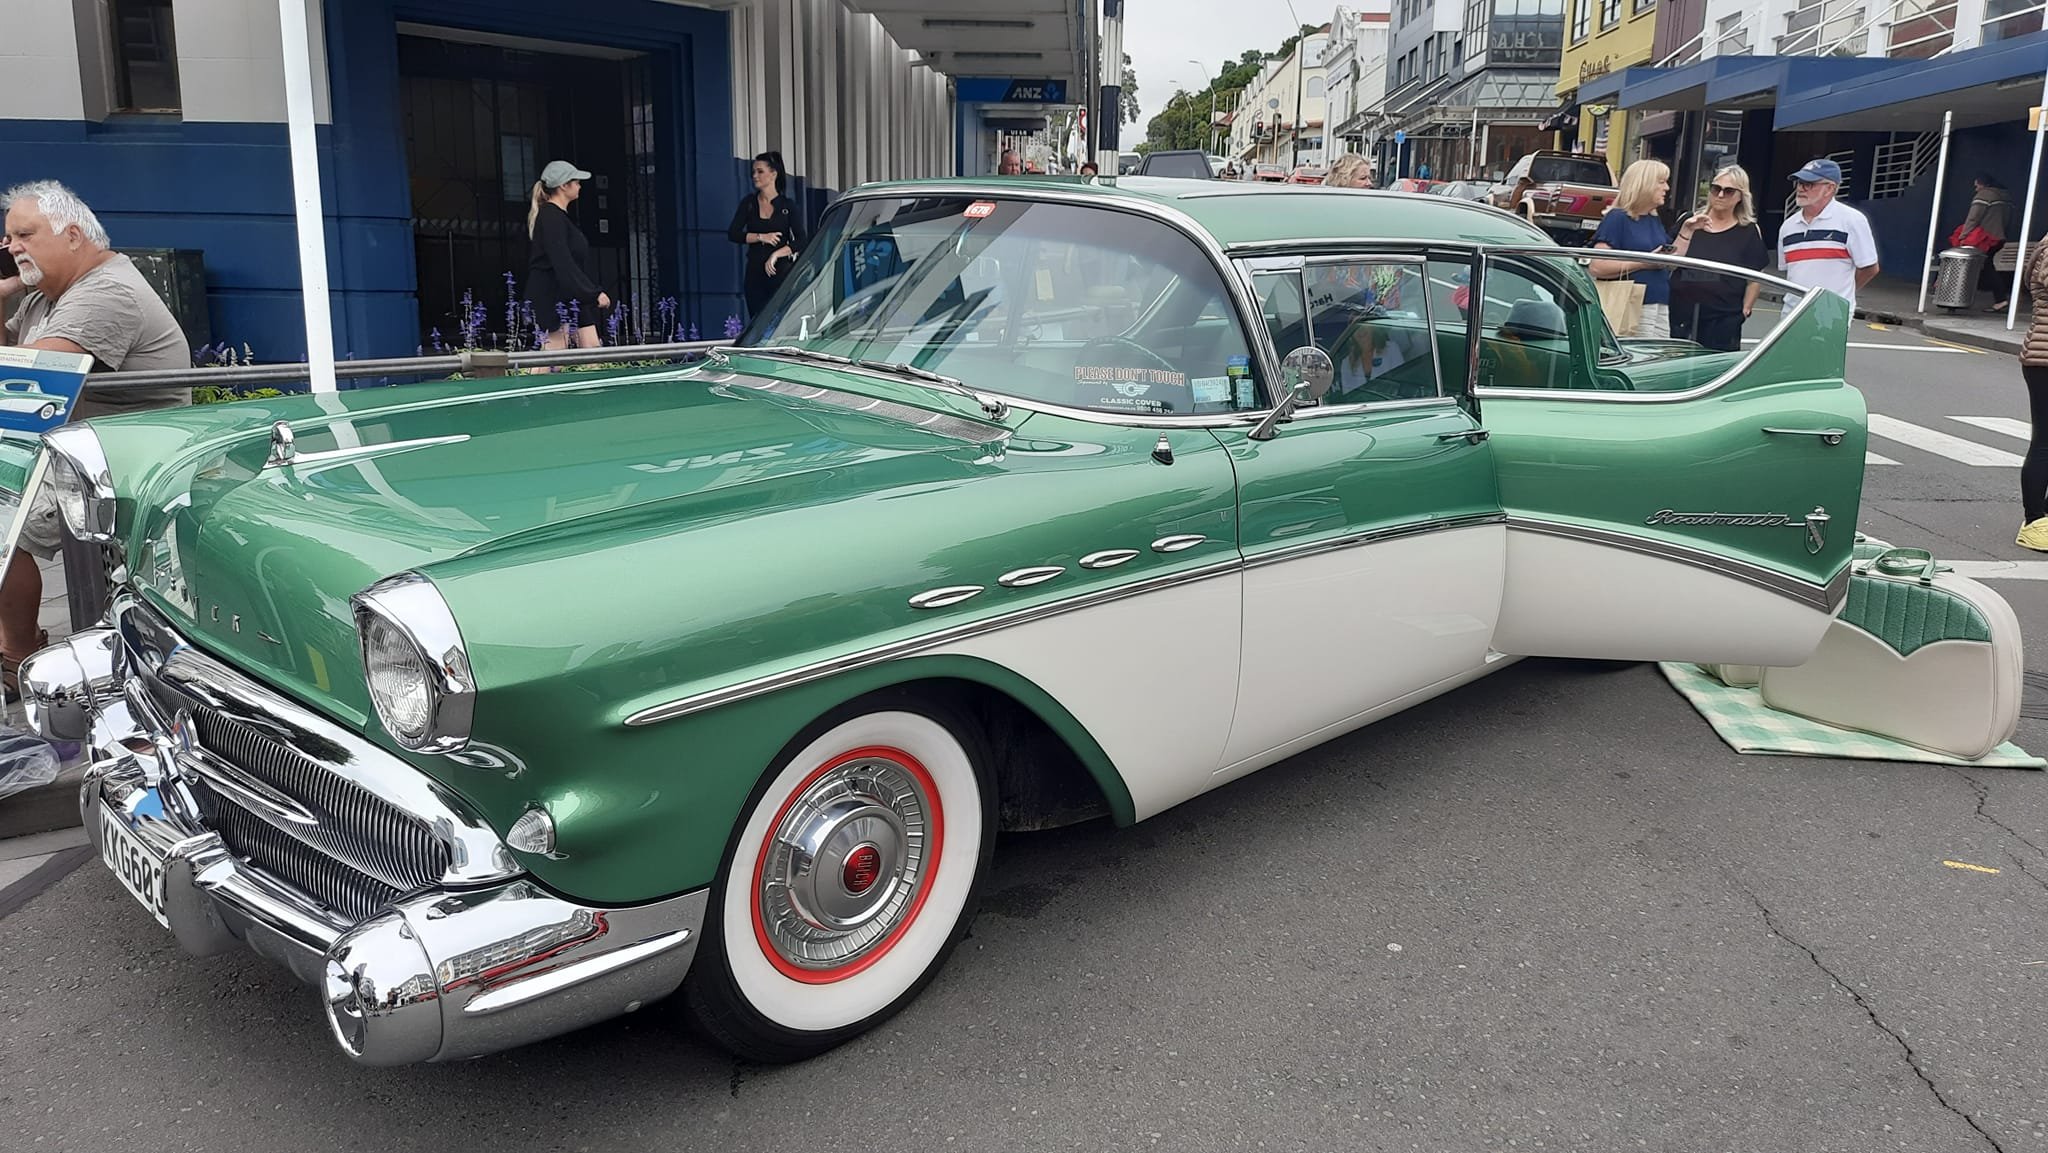
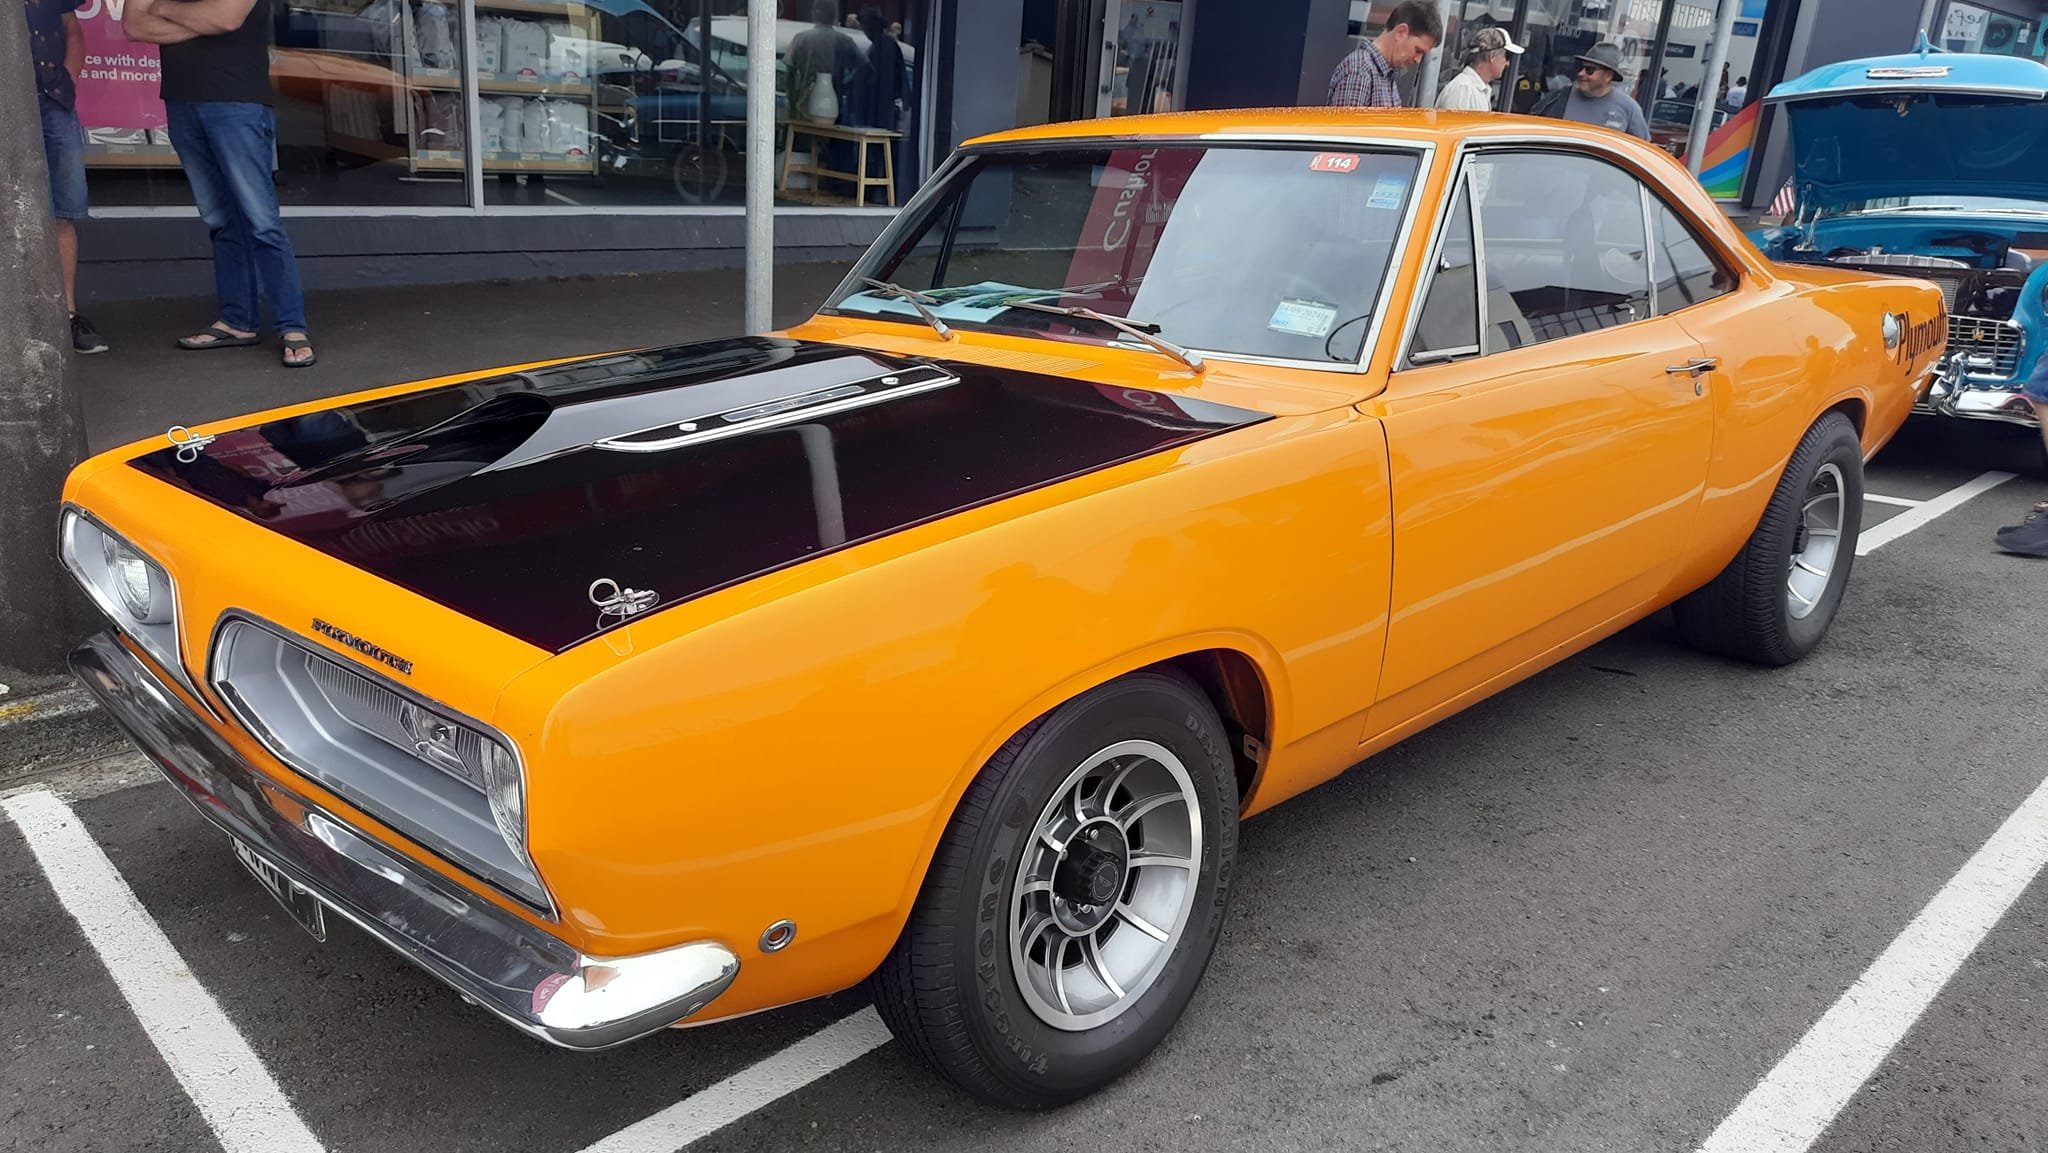
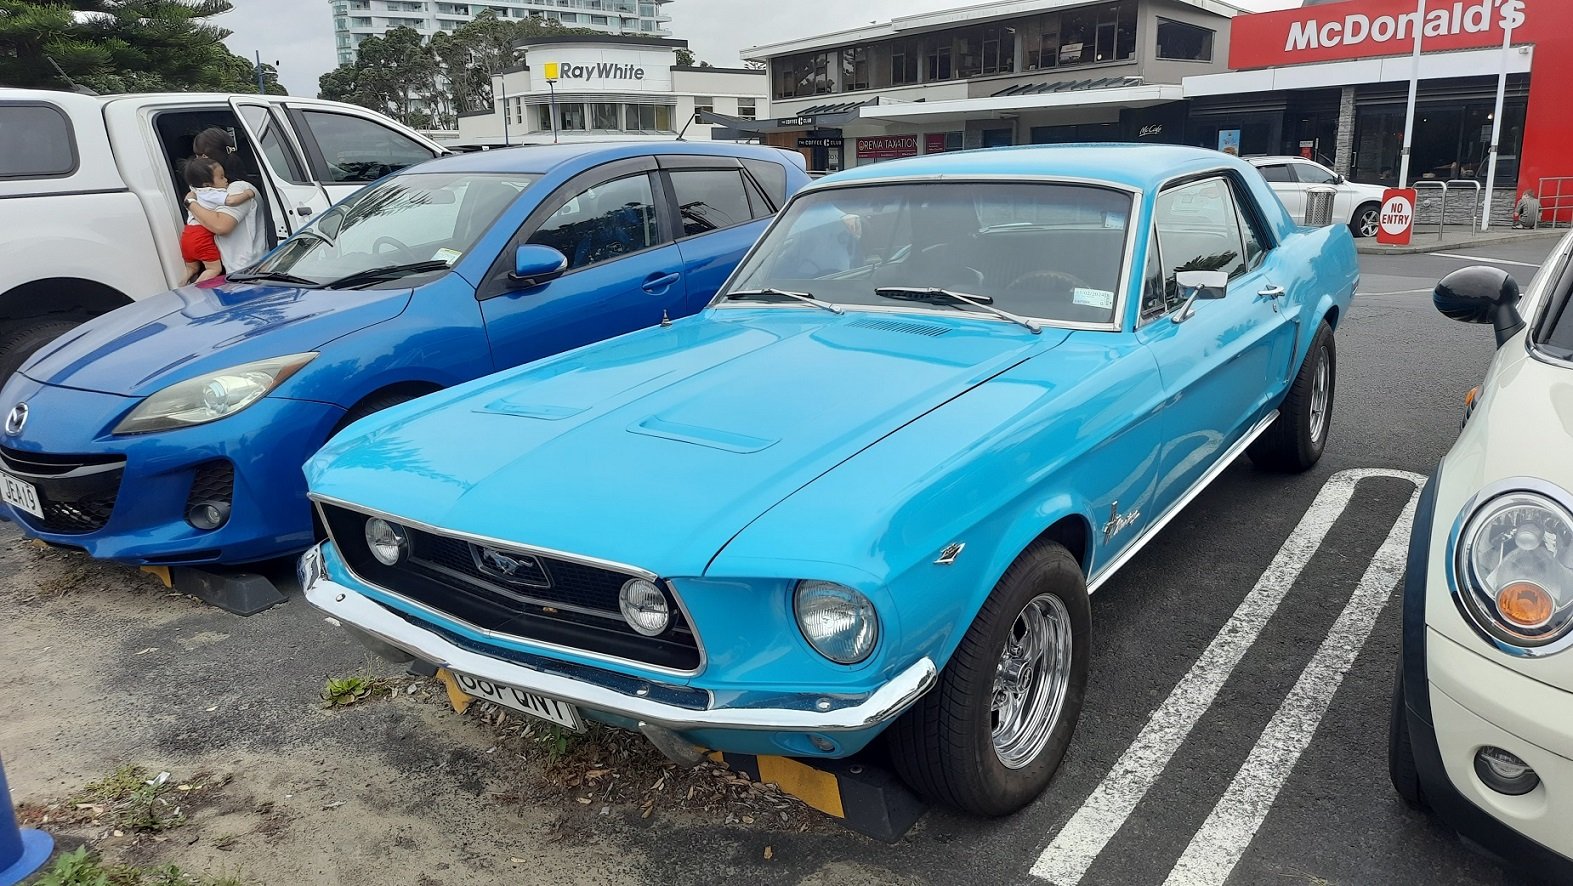
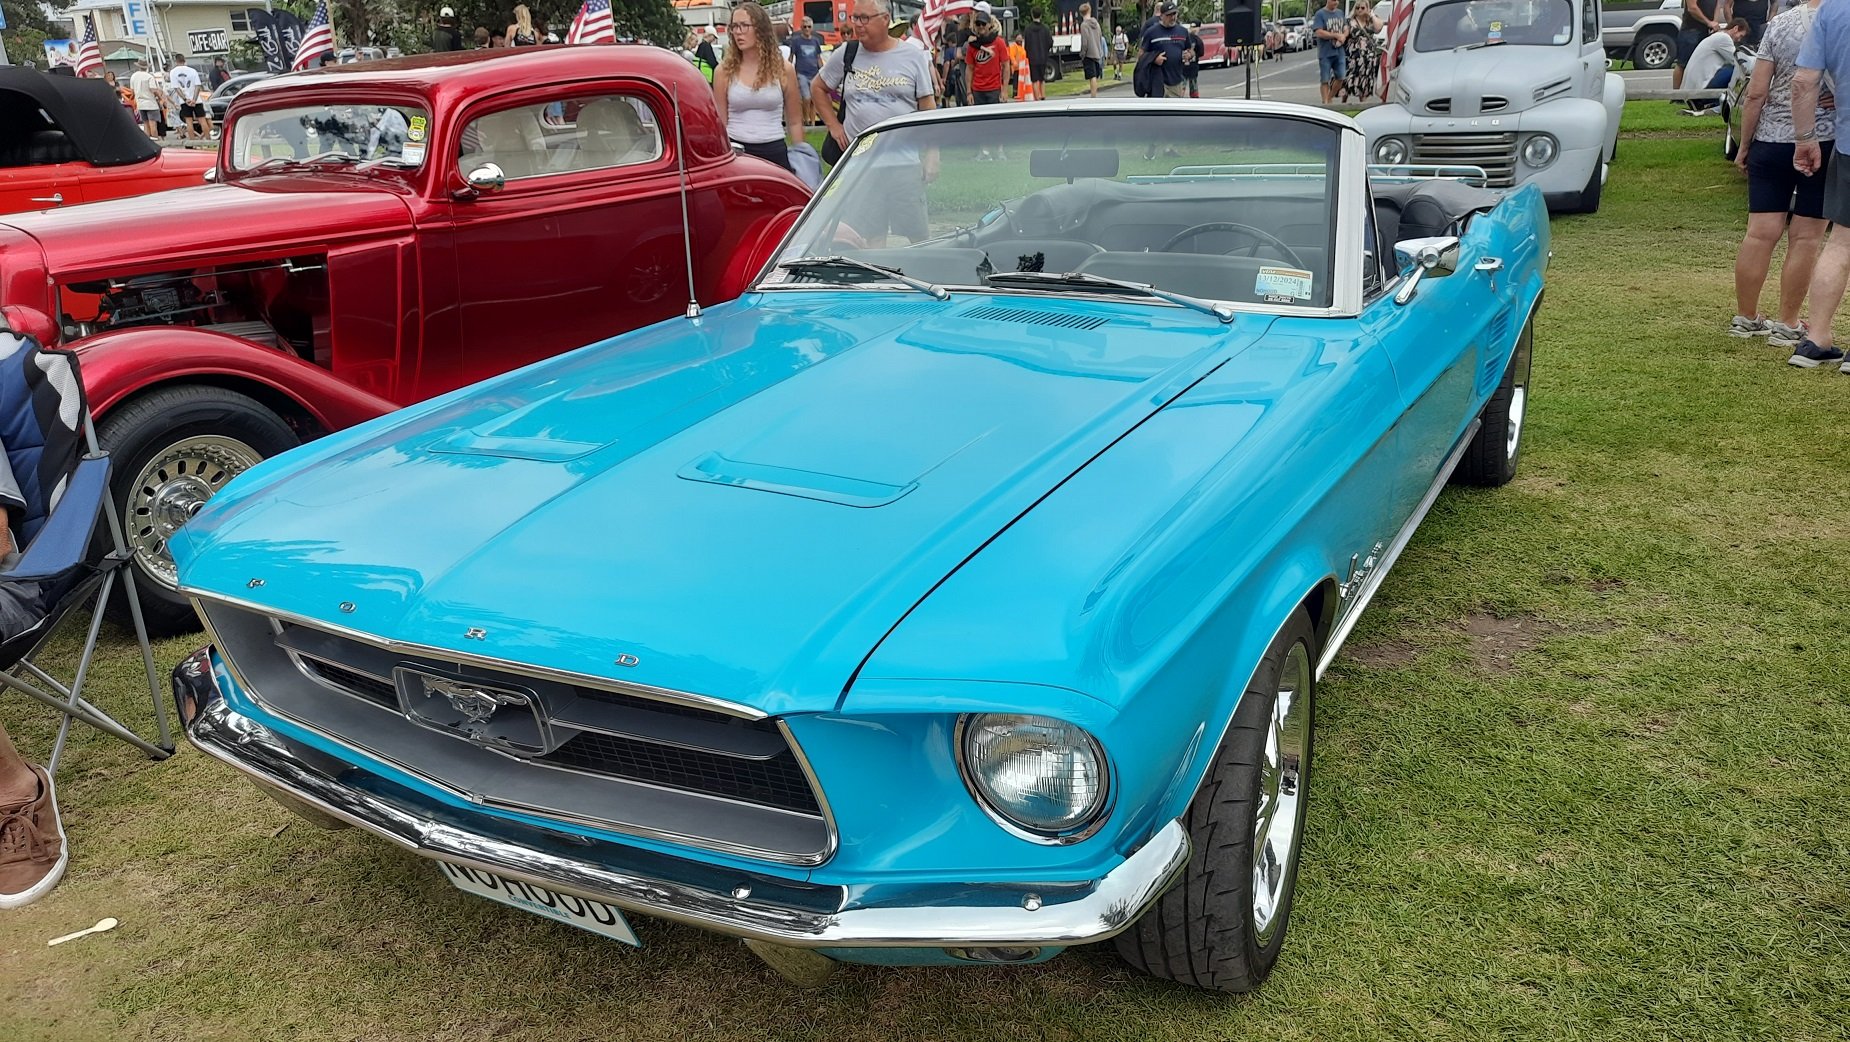
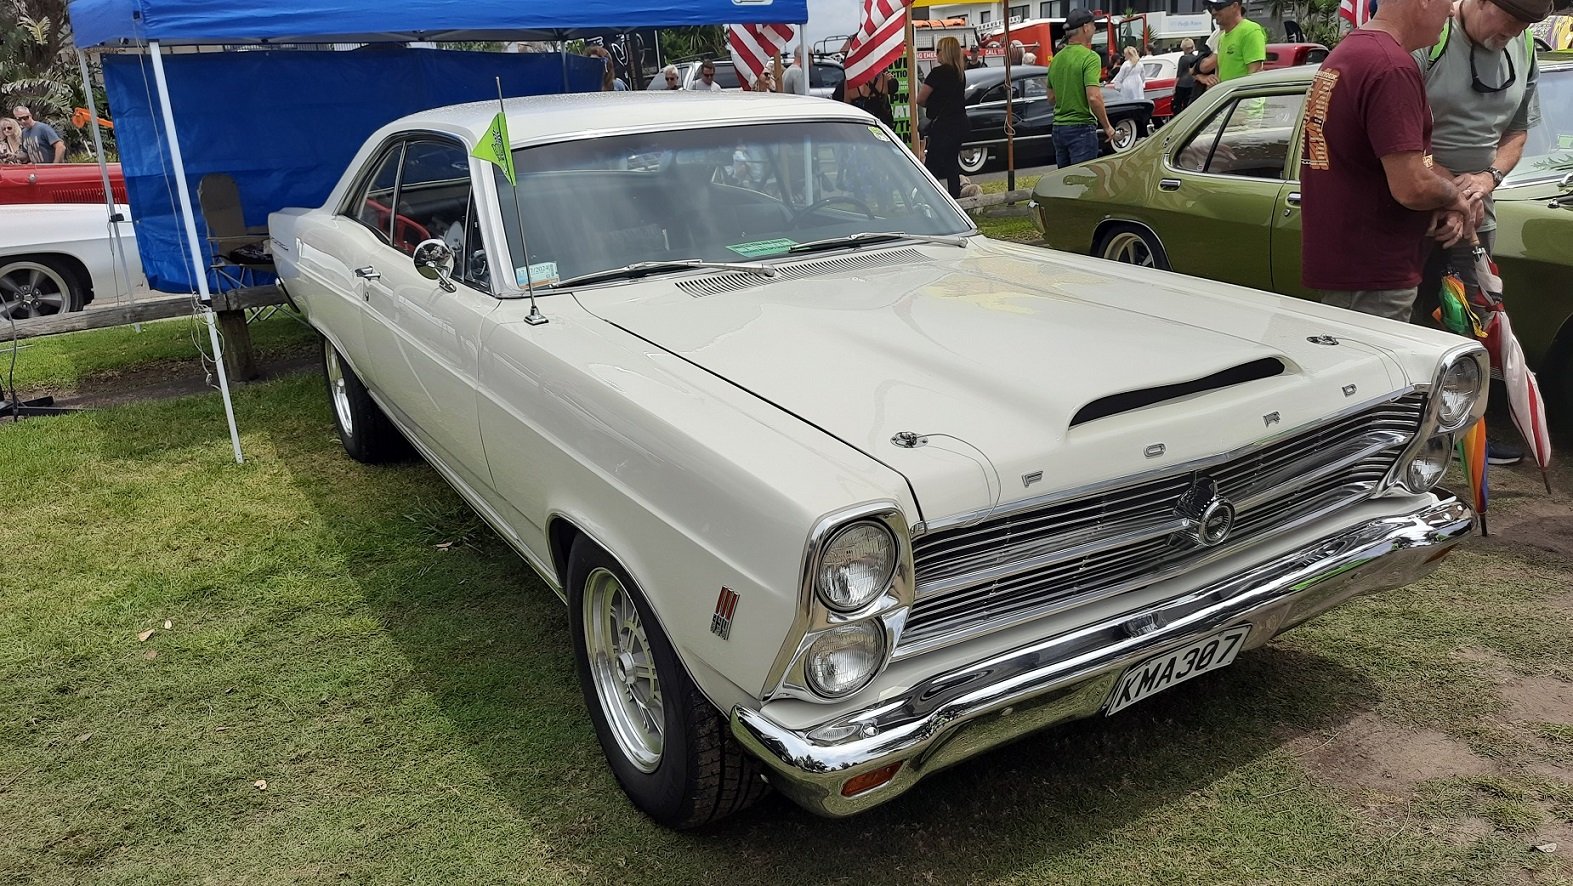
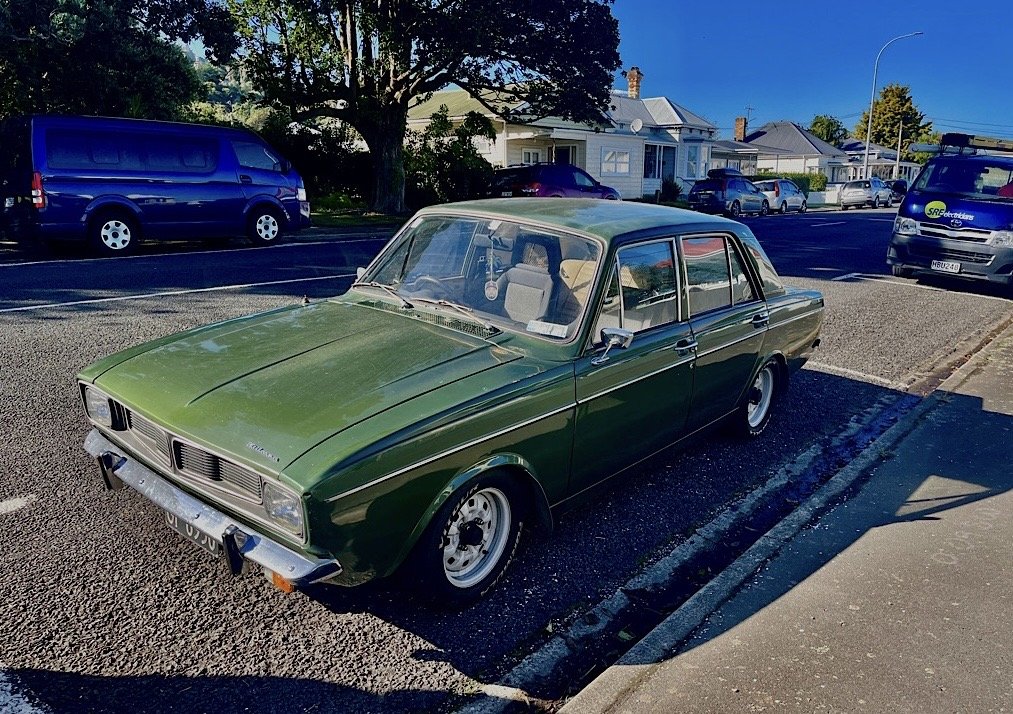
Americarna day 2 (for us at least) and the cars were all parked up on the main street. Heaps more people around but still plenty of room to move and look at cars I'm pretty sure this on is an original GT Nice galaxy. I should have taken a picture of the chev in the background, turned out to be a mate. Imaculate everything and 600hp 510. I quite like the notch back Barracudas We headed home on the Sunday after a false (non)start. Not sure what drained the battery but I didn't even get a click. To make it worse I had spent 3 days trying to charge my jump kit to no avail so it was worthless as well. Luckily a local had some leads just up the road so he drove home to get them and came back to give us a jump. Good bugger. I was a bit nervous stopping at the servo a few minutes up the road but it started first pull. Lucky. Enjoyed the scenery on the way home and used the quarter windows for ventilation rather than the main ones. Quite a bit better on the fumes front. Still some work to do but when is there not? I might give it a rest for a while but I think the steering will need to be sorted before the next big road trip.
6 points
-
I've got a kit of my Chevy in the stash, maybe it should be next on the list. Kind of fancy doing it as it was after it had finished the Alaska Highway & was just a yellow maintenance truck.5 points
-
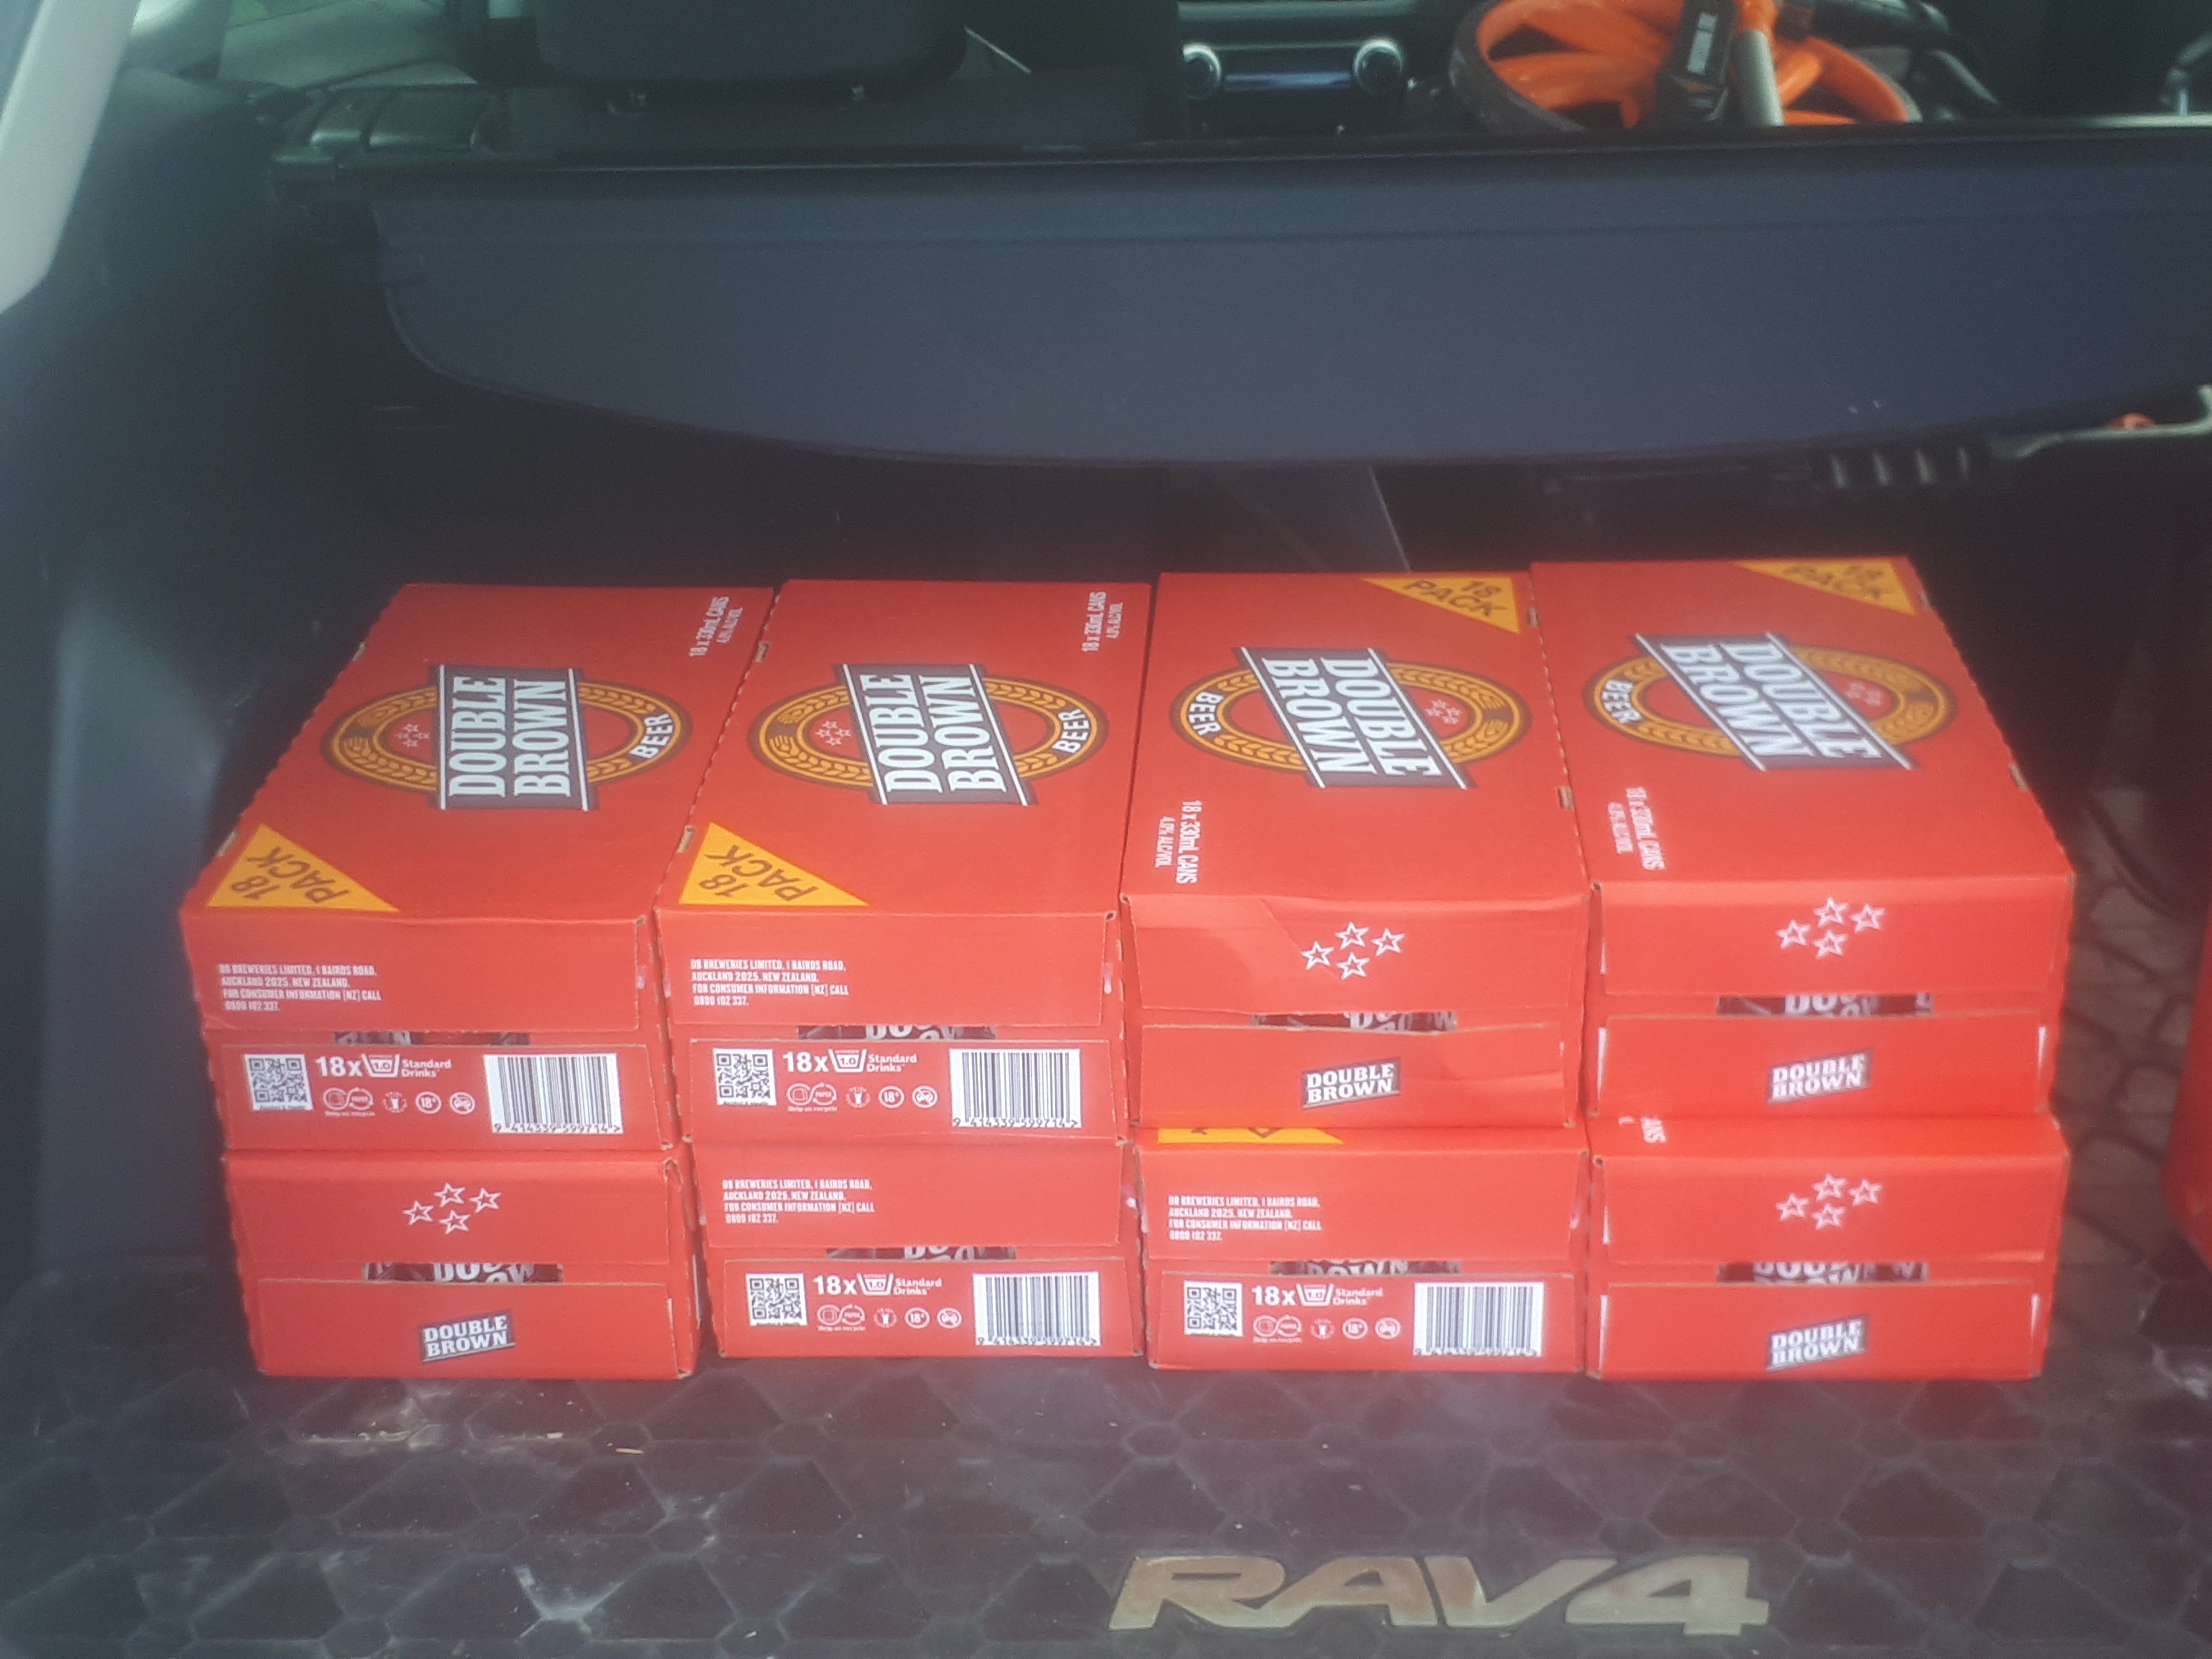
Refreshments procured!
4 points
-
Drive it everyday because it only. Takes 35mph to outrun your troubles Funniest part of driving the commer was taking 1.5 light cycles to get across the terapa rd traffic lights, even with a running start4 points
-
They want plates to be mounted right way up so the smart cameras can read them. A lot of trailers have them sideways because there’s no where else to put them.3 points
-
Took bike for a shakedown run up the road, surged and popped a bit. Shone a light inside the tank.... well that is coming off again. Removed and drained tank and carby. I really really really need to build a shelter for the bikes. Under the trees isn't waterproof enough apparently.
3 points
-
Nothing went bang, 3% average gain overall and a bunch in the midrange. Will upload pics and vids when I get home. Stock airbox is worth 3kw up top so I'll have to look into butchering it or making something more free flowing3 points
-
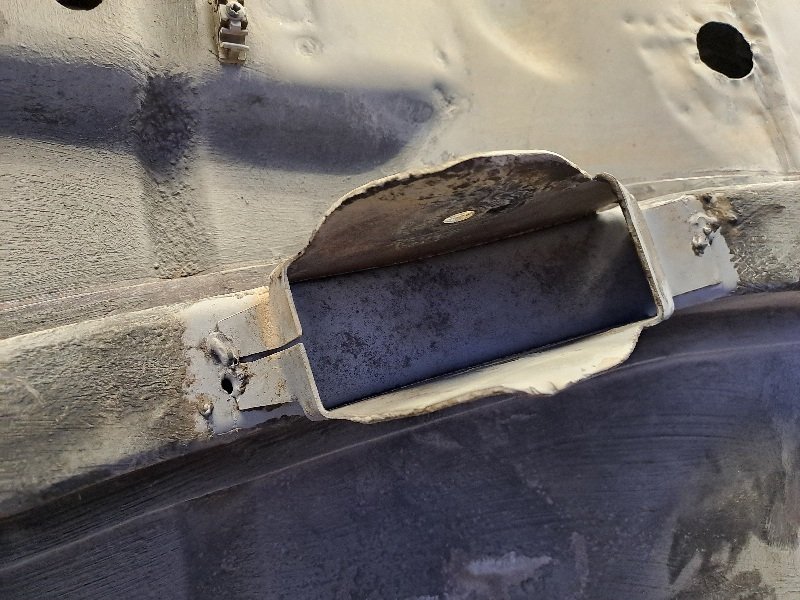
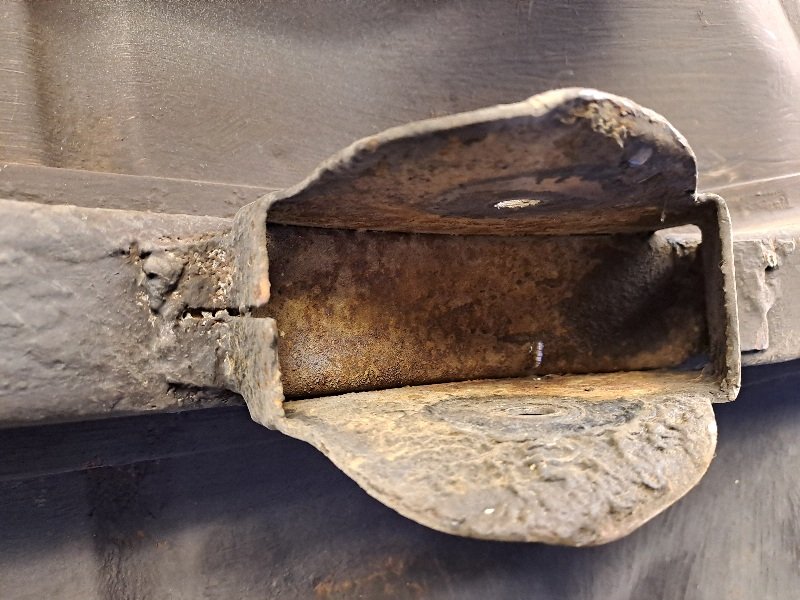
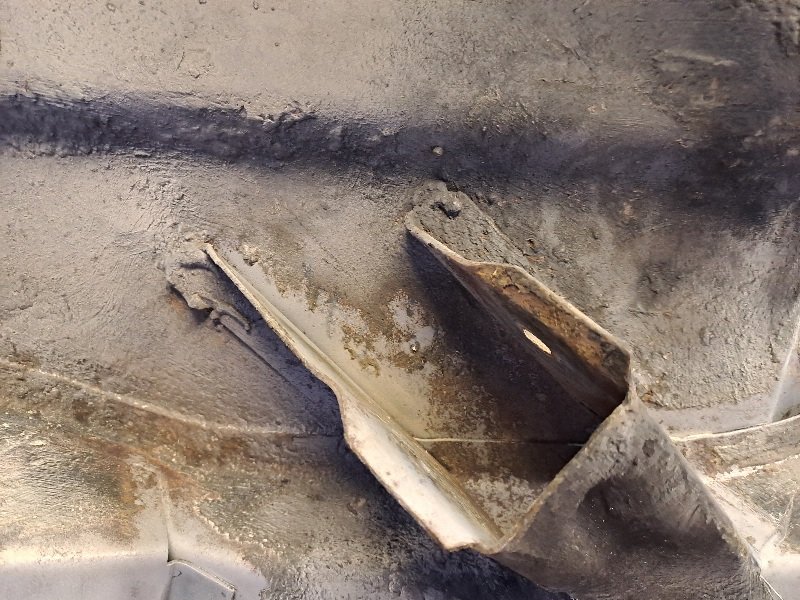
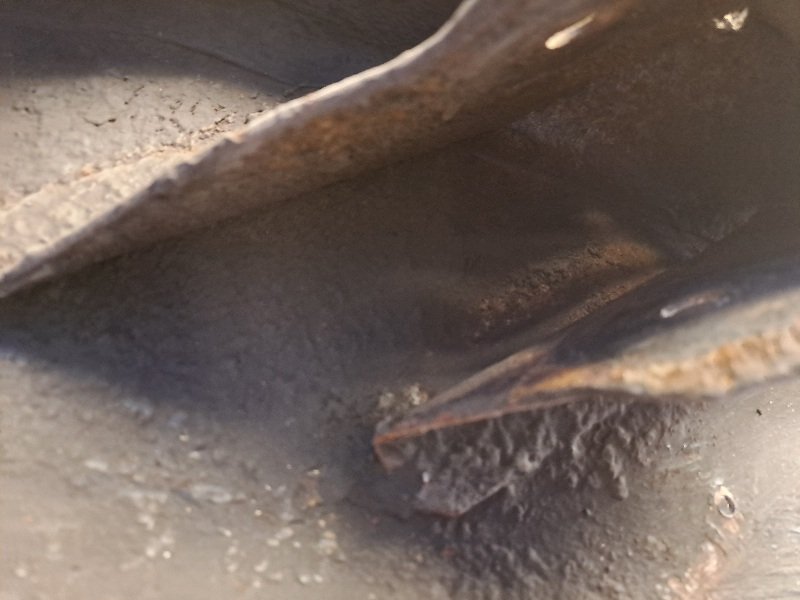
Finally got round to fixing the exhaust leak on my Outback. I use flux core, I know it’s bad, but I’m a beginner and outside of this I’ve only done a few patch repairs and a few classes on mig. but this serves as important practice with the welder and grinder as I’m definitely gonna fab something up for my 4AFE to breathe a bit easier. bird poop it on. I found it hard with the thin old dirty metal. grinder and paint make me the welder I ain’t This got chopped end result Even the muffler was rusty near where the tip joins it, but it wasn’t a leak, just an outer skin. Upon first drive it sounded a bit too raspy poos but must have done a thing cos it came right after a minute or two of driving. I also might have chopped the rear bit 10-15mm too short as it touches the rear subframe. May have to massage it with a hammer.3 points
-
Gave the orthia a oil change and quick look over, have dyno booked for tomorrow afternoon. Will be curious to see how the B16a intake cam and new headers compare to the old setup.3 points
-
Thought I had a pic!
2 points
-
Intake noises sound good (imo) with the vortex / 3d printed intake And final power run. Pretty happy with how the exhaust sounds, first time I've heard it from outside the car Solid red was old tune, dotted green is B16a intake cam with timing optimised. Dotted blue is the doort tube. So the factory airbox/filter is a 3kw drop I'm pretty happy with the midrange gains just from a cam swap. Final numbers were 107.8 fwkw @6905 rpm and 165.7 talks @6072 rpm. Tuned on 95. Static compression ratio should be 10.23:1 with the B18 head (vs stock 9.6:1 with the original non vtec head)2 points
-
If you had two of them you could perhaps do the other as it is now.2 points
-
That's pretty cool. Buy it, put it in the shed & take it for a drive maybe twice a year...2 points
-
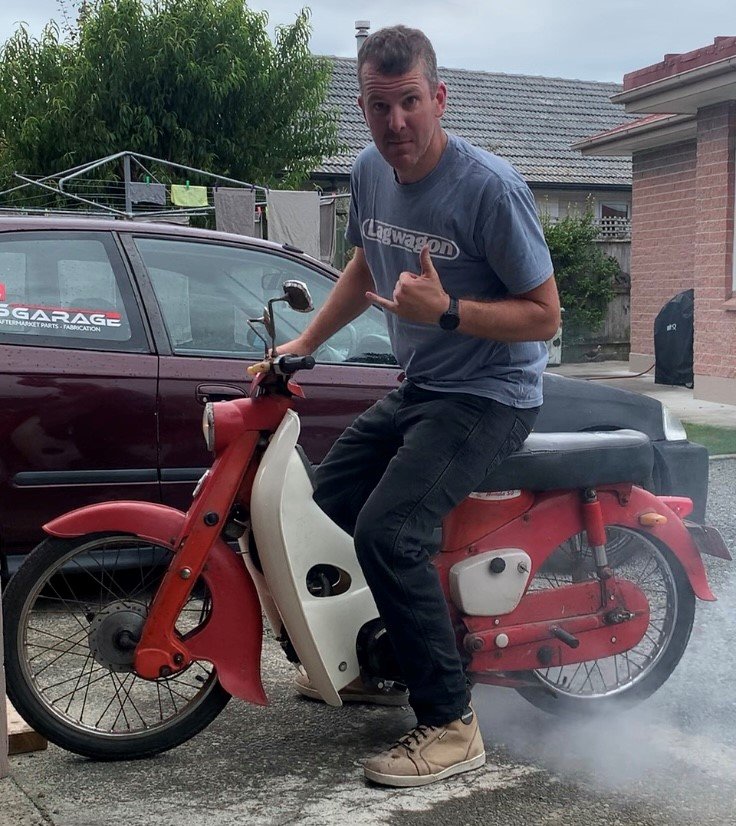
I'm quite looking forward to riding a bike with suspension this weekend after cutting around on my slammed out C102 for the past week. It wasn't much fun on gravel, but does skids with a bit of perseverance, haha.
2 points
-
I was told underseal can contain asbestos ( which google confirms). I have always used heat to soften it and scrap it off. Then used petrol to clean the residue off. I have been told Kerosine is better.2 points
-
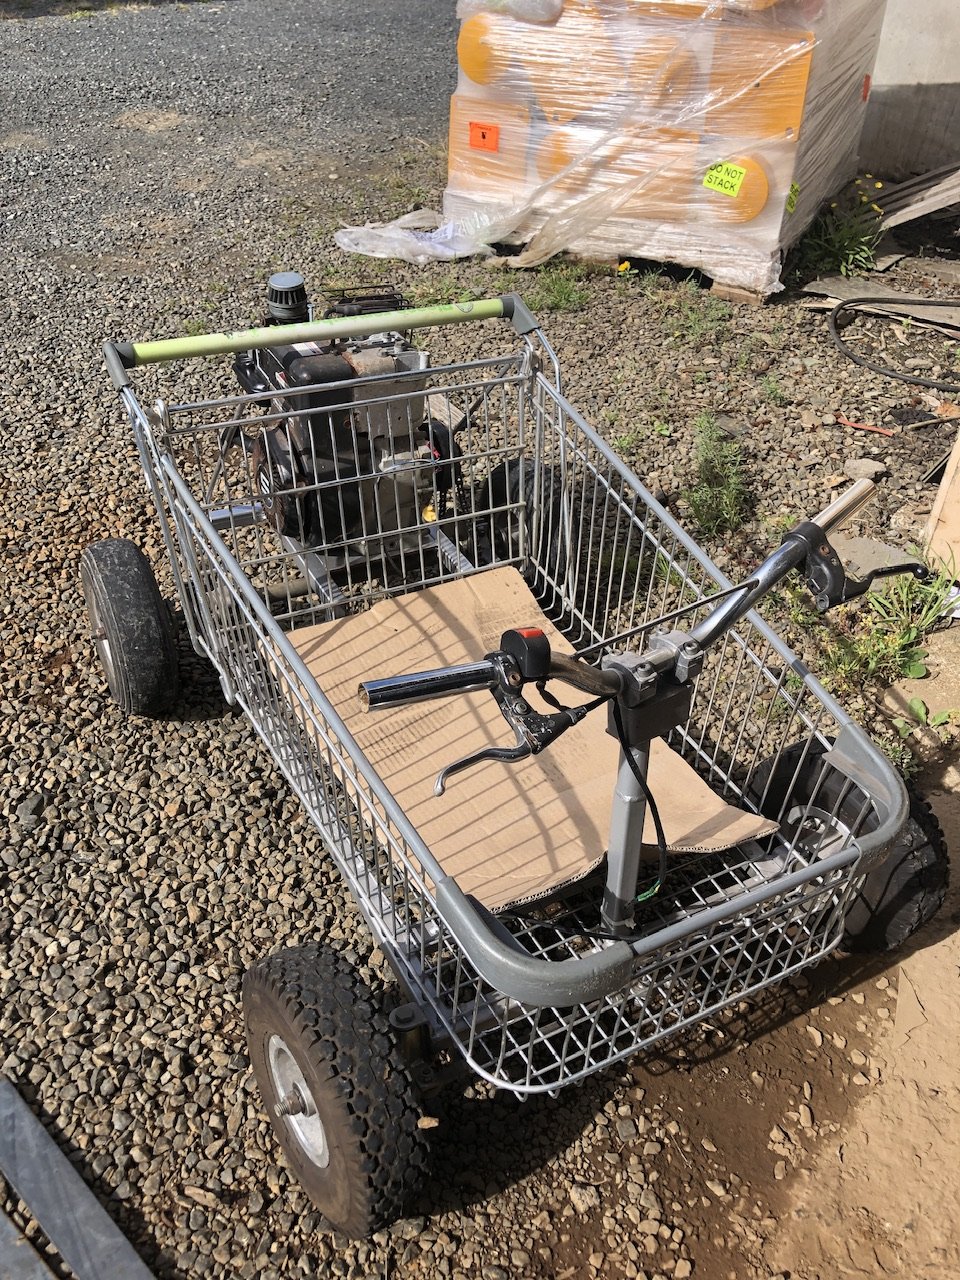
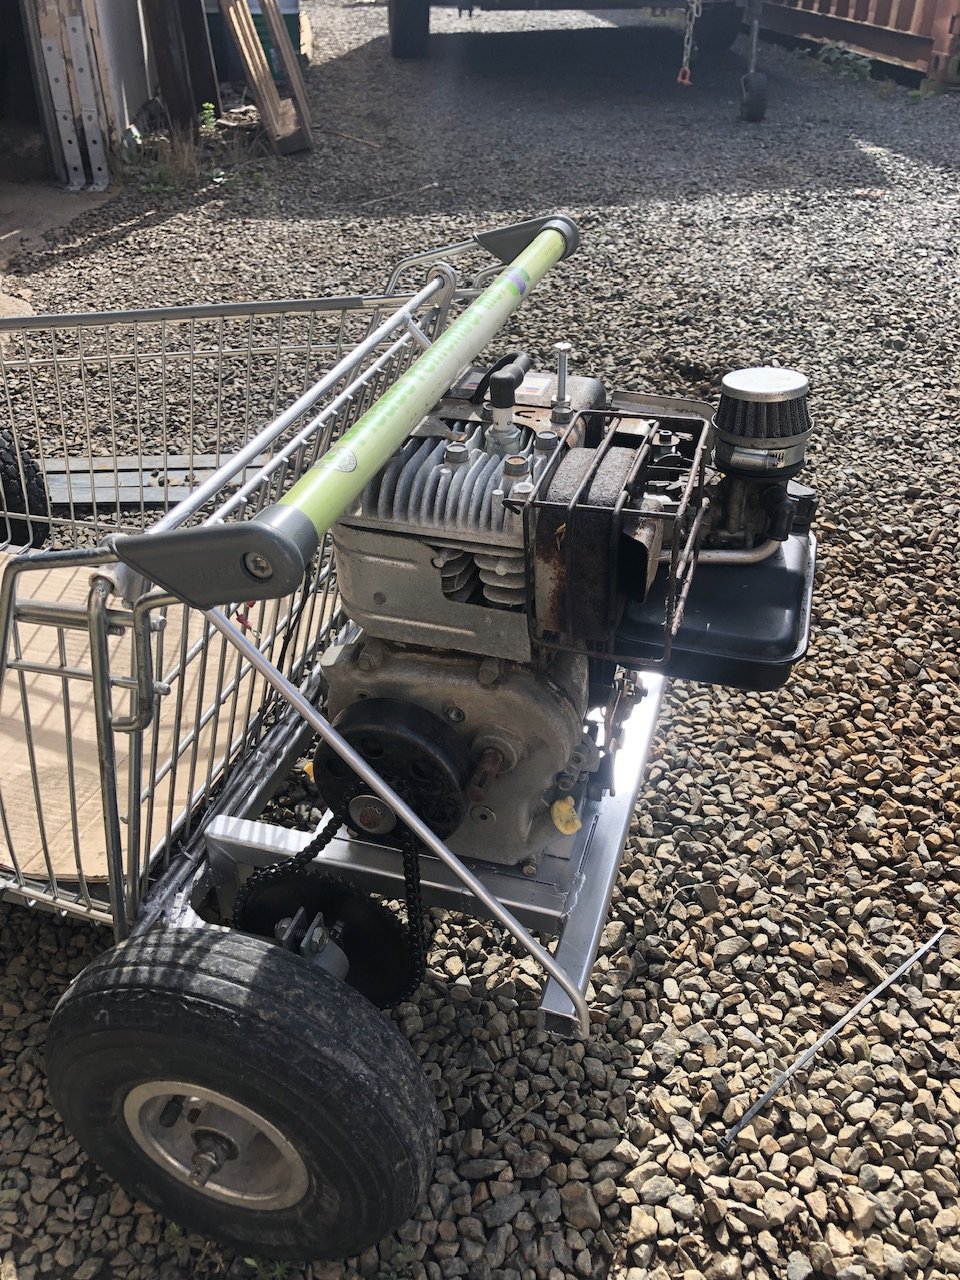
This has been sitting at work awaiting some love. The boy had water polo practice early this morning so I had some spare time at work. Chucked the chain on and started it up. A little squirt of gas and it shot across the workshop. Sweet as I’ll jump in and try it up and down the side street. Holey shit it hooks up fast and does an easy 50 clicks. At this point I see the errors in my actions. I’m kneeling and steering with one hand. The other hand is on carb throttle duties. I have no brakes hooked up and it free wheels with the clutch. No engine braking what so ever. So I’m now doing 50 plus kph, kneeling on one knee while the other leg gets thrown out onto the road for desperate braking. It works, just. So I rinse and repeat a few more times because it’s great fun and why not. Anyway, I didn’t die. Did just go and buy some long cables though to get some brakes and proper throttle set up. Pics as hooned.
2 points
-
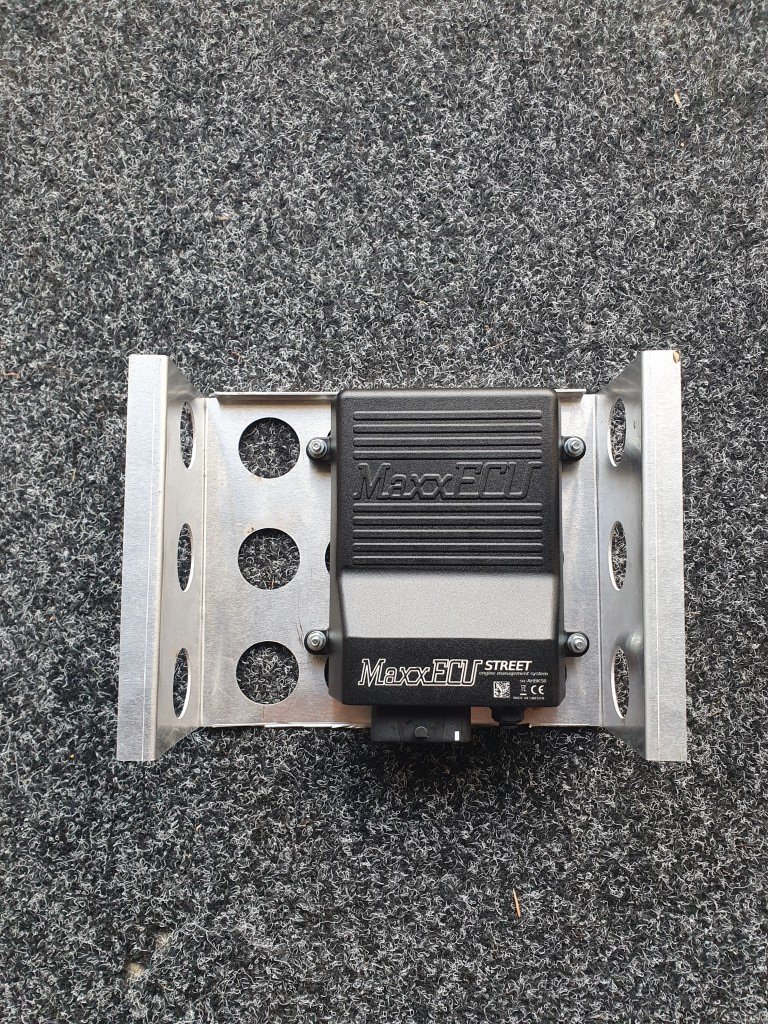
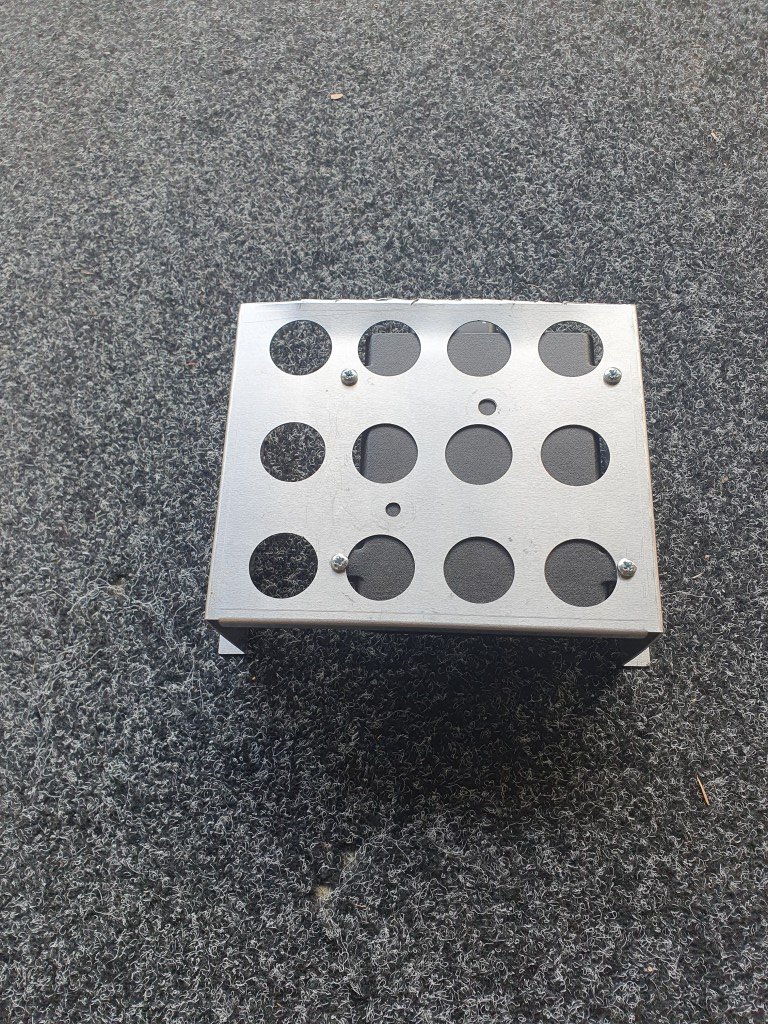
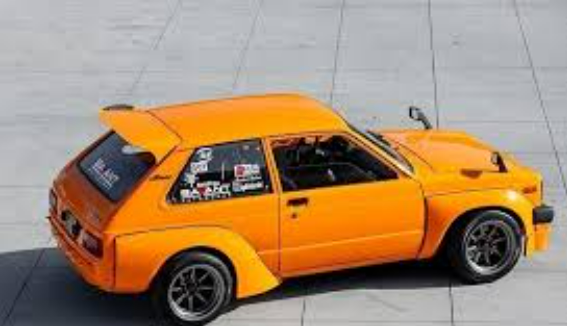
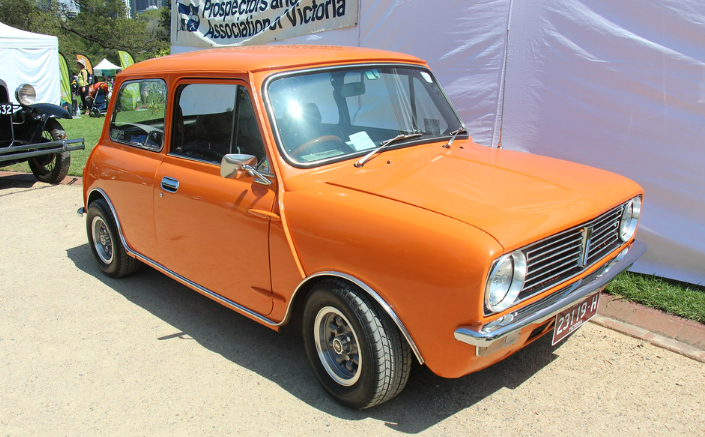
This build was never supposed to make it to a "next page", oh well. ECU mount which will be tucked up behind the glovebox/footwell. Needs some rubber isolating washers and fixings. REVISED, now attached to the back of the glovebox for even more space saving. Its got a nice locking plug but also needs to get the vacuum feed with minimal kinks to the MAP sensor from the vacuum block. Also its nice and close for the wideband as the wideband plugs into the ECU. The plug is bigger than the actual sensor so the cover plate for the gear lever hole will have a wideband sensor sized hole with a grommet. Working on a mild wire tuck, battery all wired up and will be unnoticeable once carpet is in again. Other than that, motivation is at an all time low so updates will be slow. Turns out getting married is quite expensive so not sure if the KP will be driveable this year. The Mini is currently in for a small birthday, new tyres and a once over. Working towards paint. I think a nice orange for both cars eventually would be nice. Inspo:
2 points
-
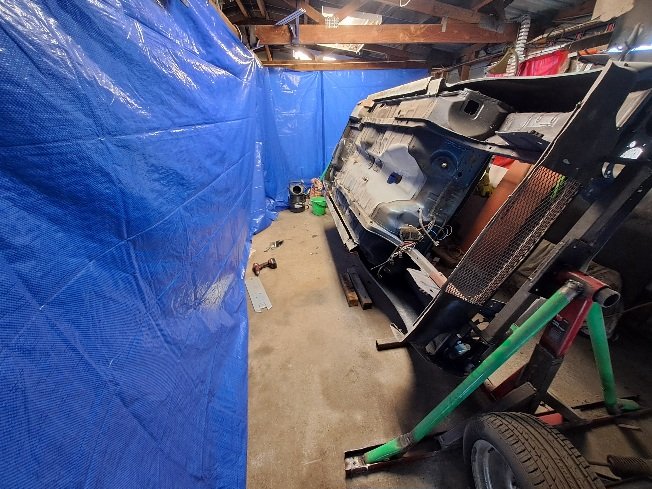
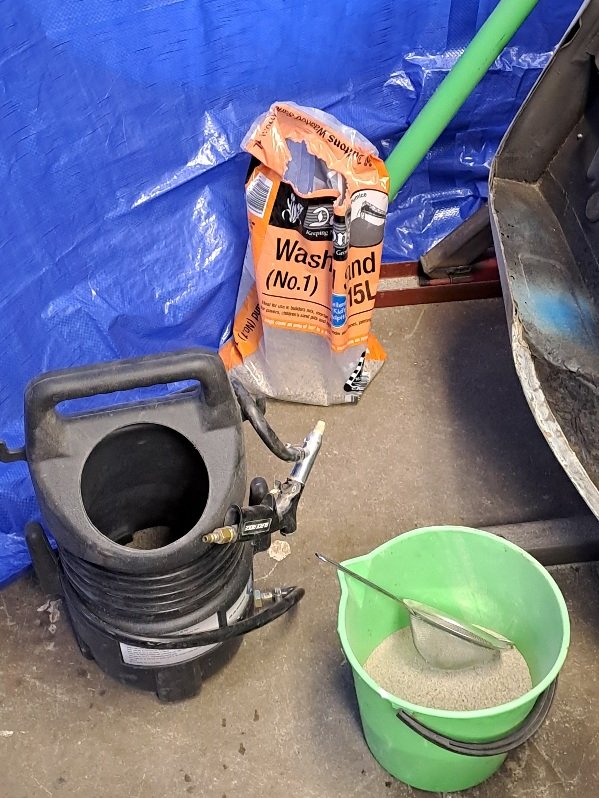
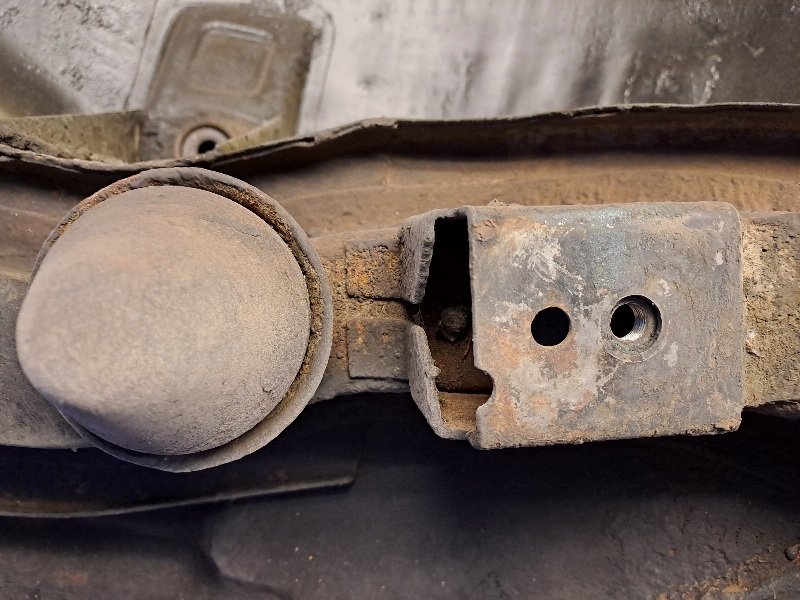
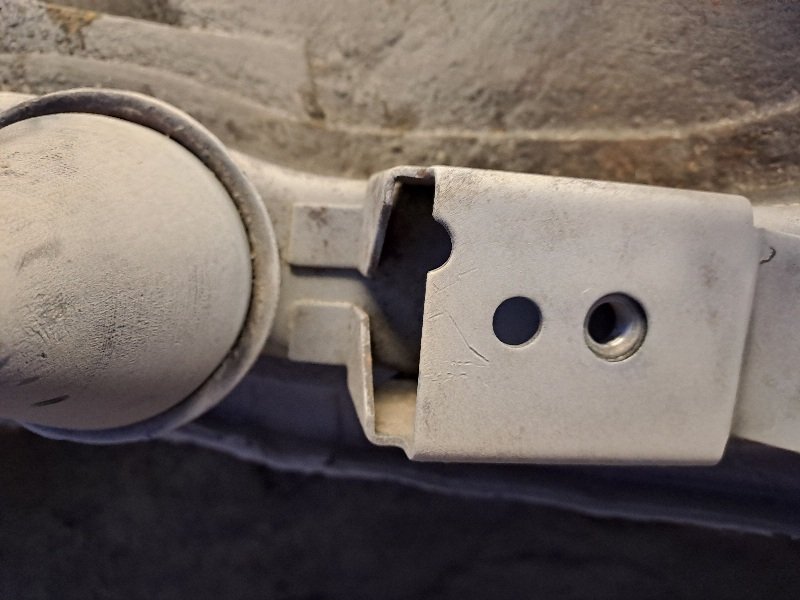
So time to attack the underside so I looked into how to do this. Acid dipping was going to be 1st option a place nearby but that was no longer around and closest place was tauranga with a 6 month wait? Next plan was sand blasting, the entire shell quoted was 3k so out of my budget. I decided to just go cheap and learn along the way. I first got a sandblaster unit from super cheap. For sand I bought a 10kg bag from bunnings. I fired up compressor and it was a fail. Sand would not flow, it was damp... adding water to it was a worse idea it blocked it entirely. I undid hose and blew it out. So wet sand and water was a no go. Dry sand only. Tipped the entire bag out on clean concrete floor to dry, then sifted it into bucket ready for launch. I then made slight increases to the diameter for sand input and the air hole. Since this stuff goes everywhere I put a tarp up and wore a mask and welding helmet for protection. Had the fan blowing dust outside and got cracking into it. These are the 2 sides as a comparison, check out the horrid welds? These are factory or before my time...
2 points
-
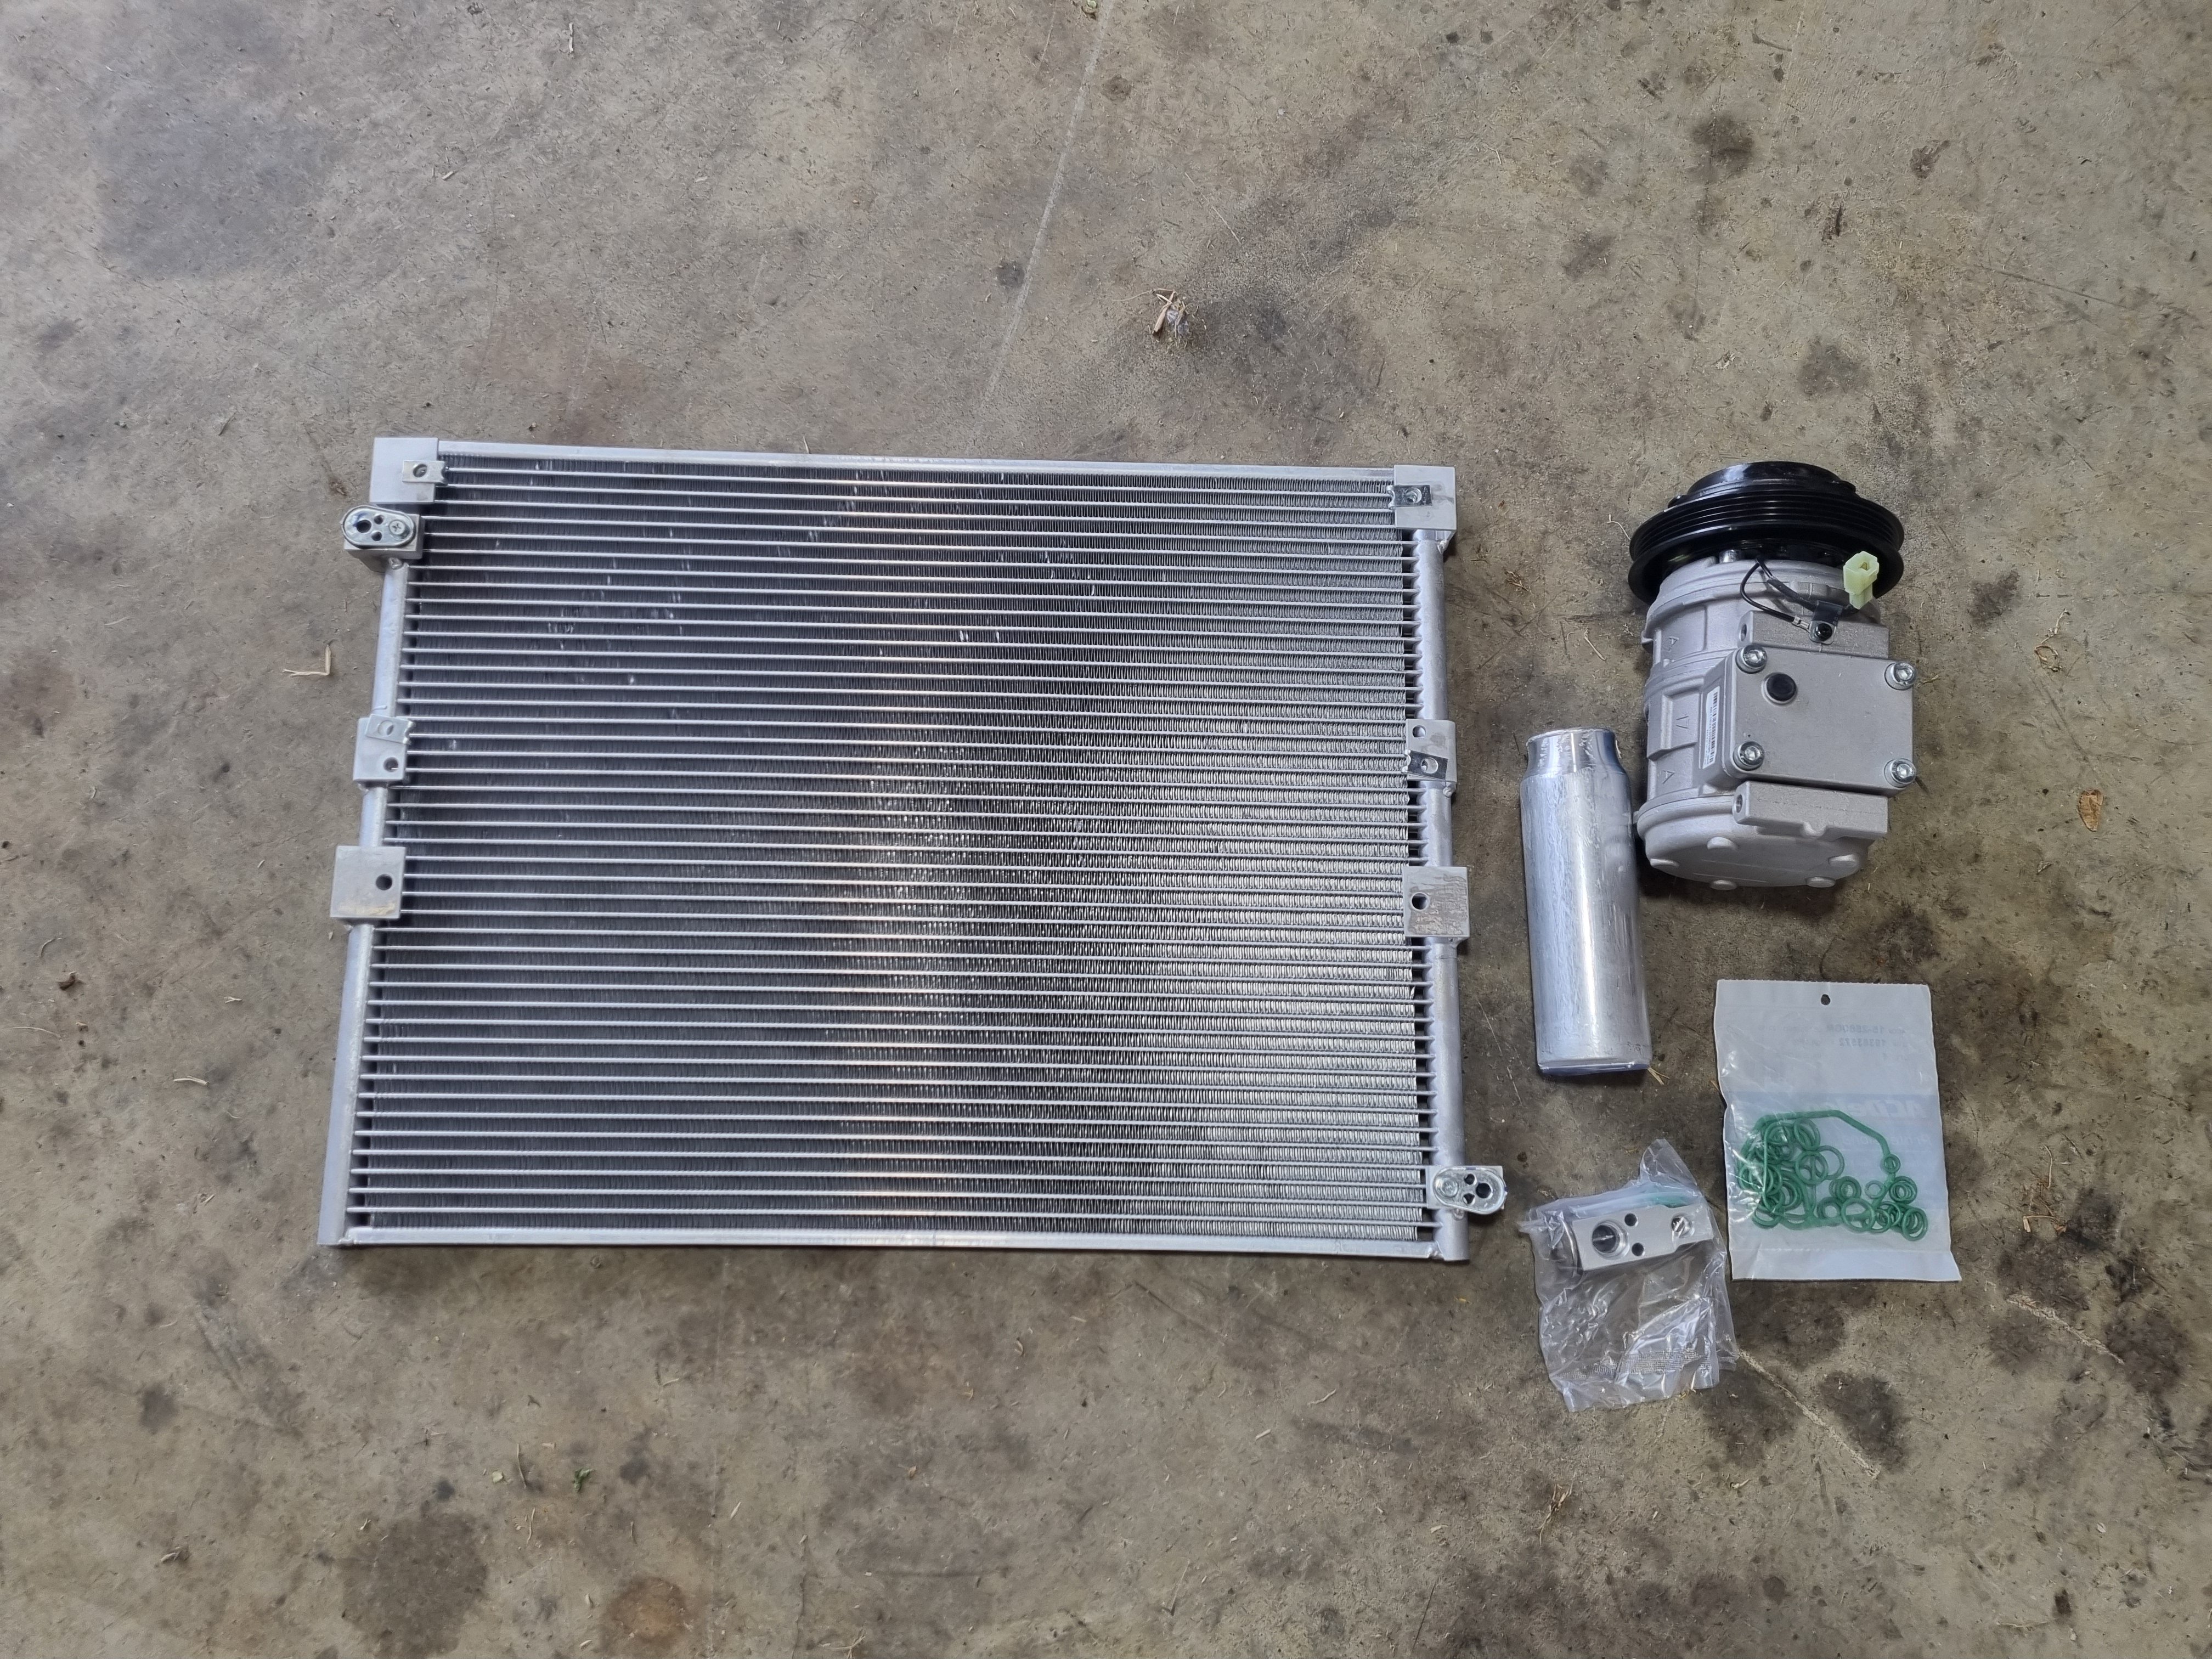
New AC system. As previously I bought one of everything from rock auto. Then I installed it. It was quite the job to get the TX valve out but yea whatever. I still have to fit a fan to the condenser, factory they don't have one which doesn't do the rest of the system a lot of good and is the reason why the TX valves shit themselves.
2 points
-
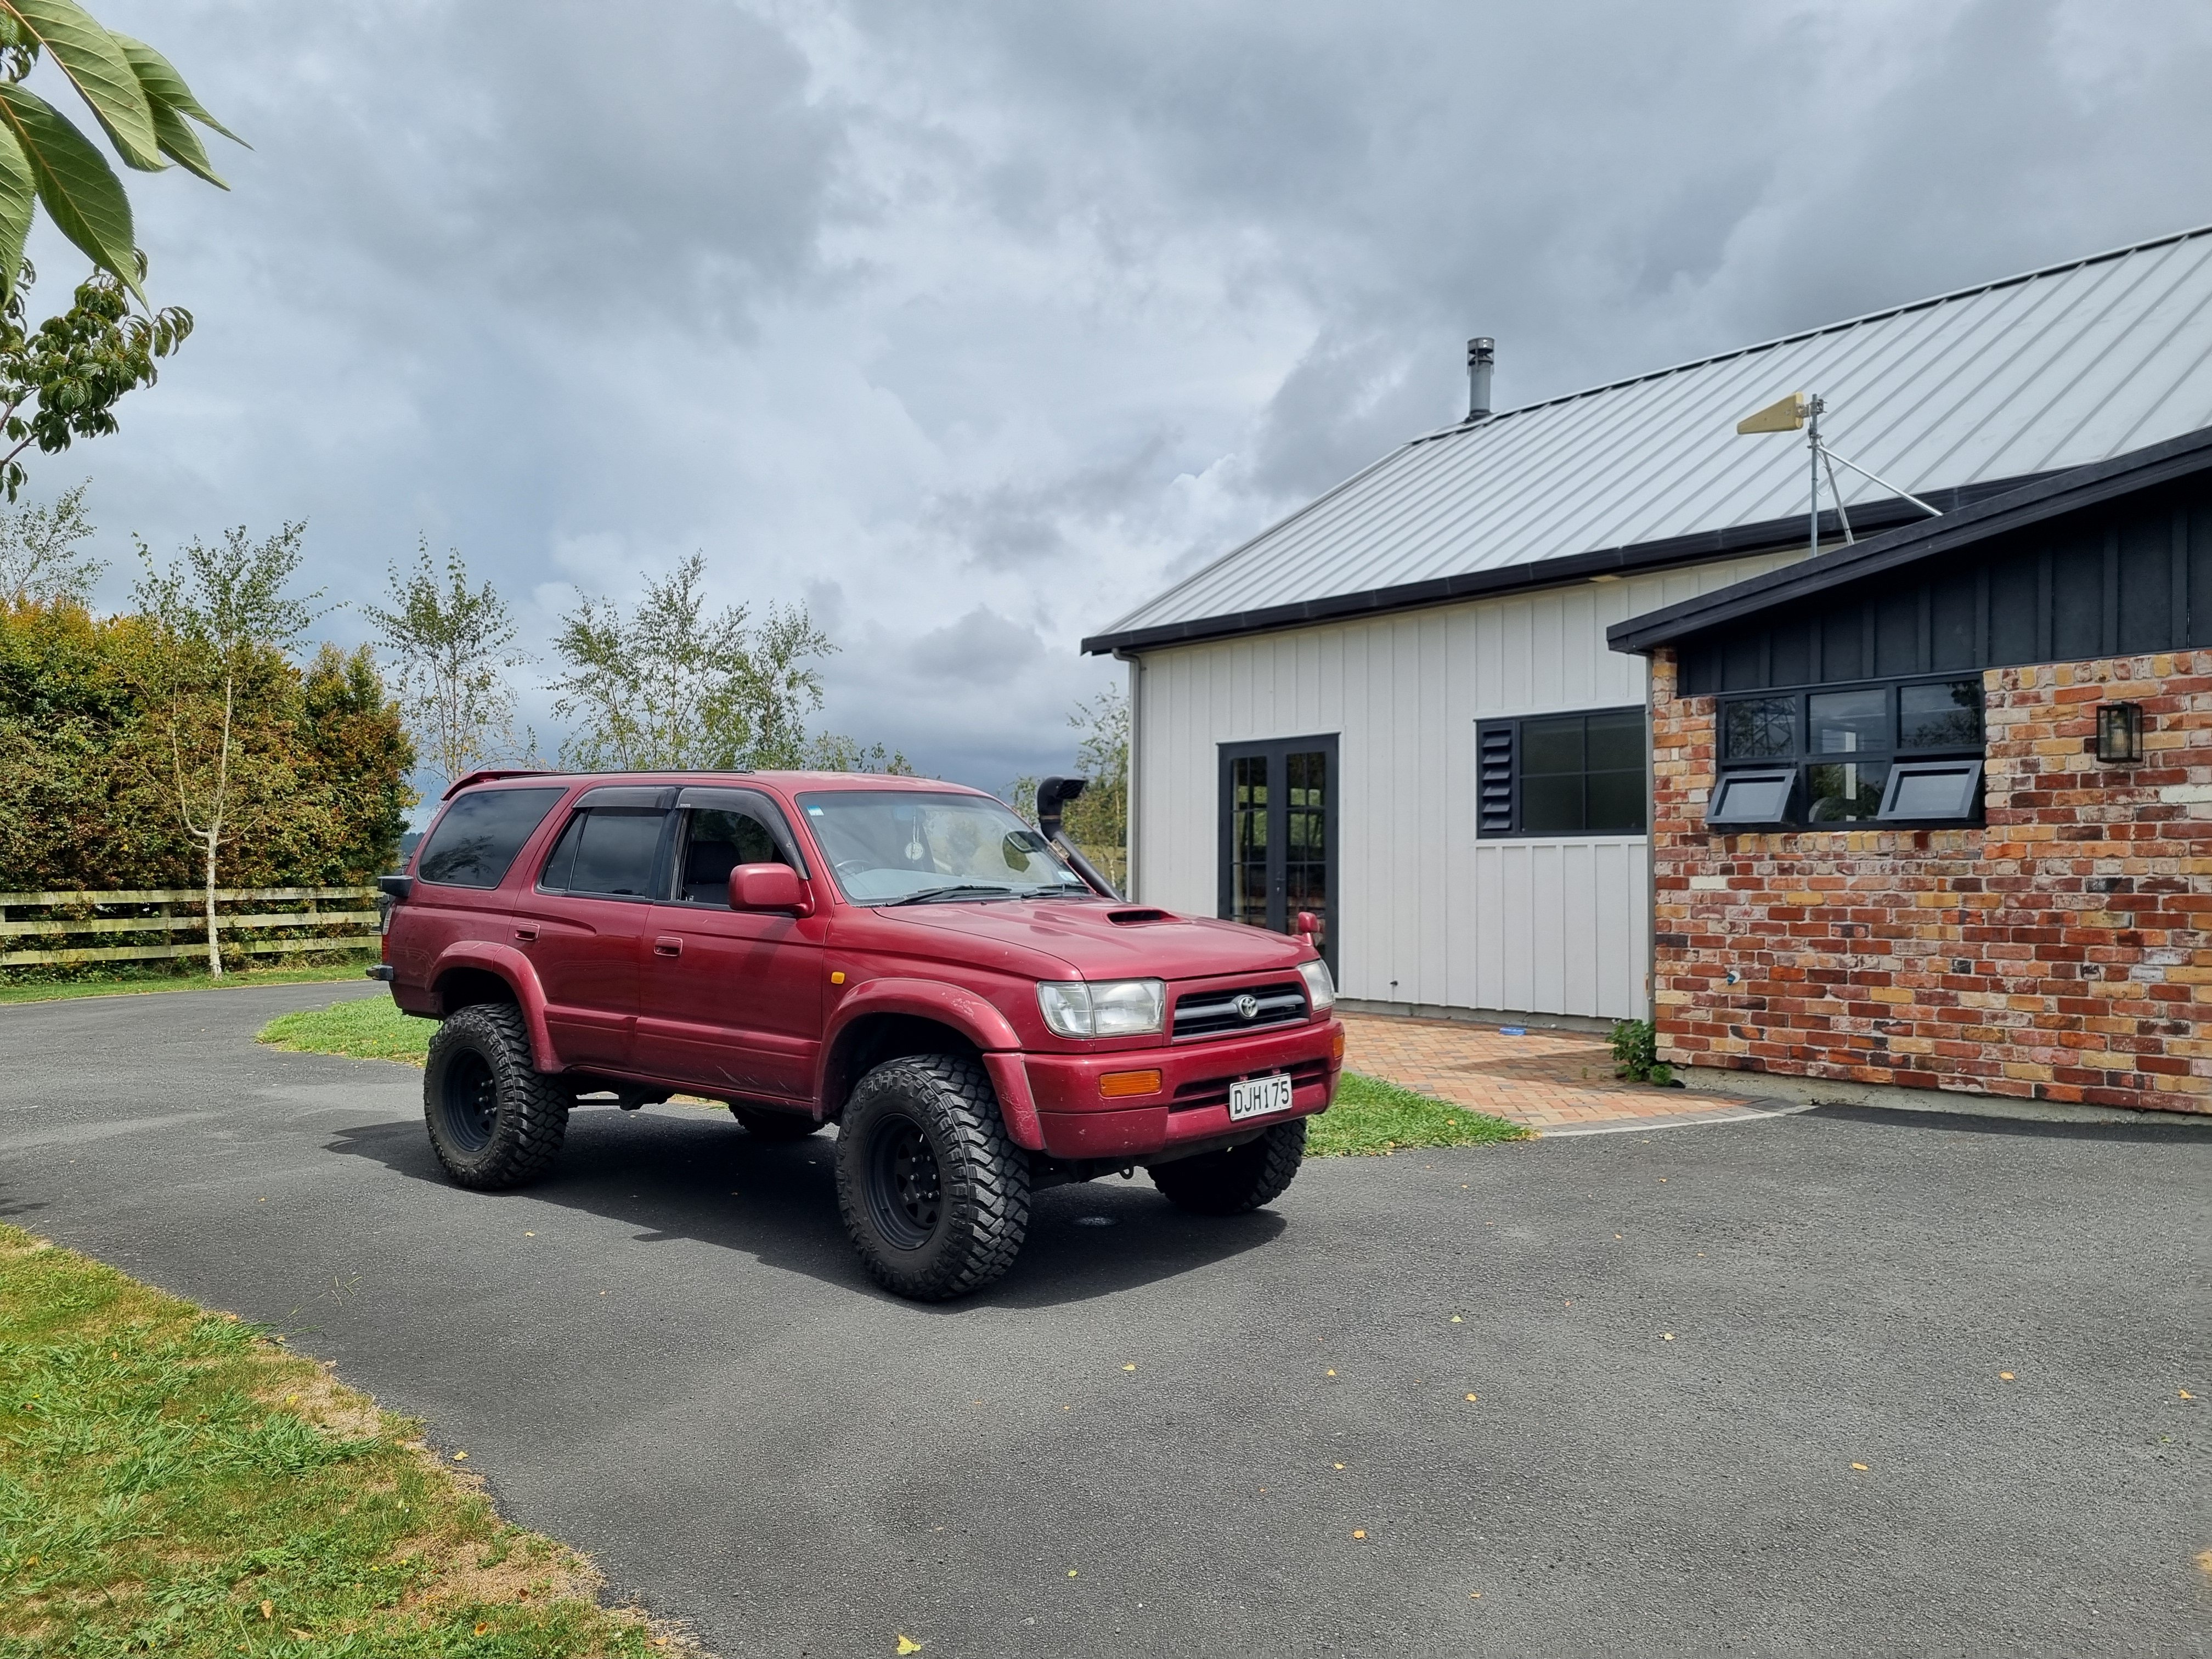
I needed something to get building materials and generally haul shit around with. I had an 80 series when I built our last house and it was invaluable for getting shit done, should have never sold it... Anyway, life story, get to the point. My new truck is a KZN185 96 hilux surf, turbo diesel. It's done 340ks which is up there but I've had a few toyotas with high Ks and it doesn't seem to affect them to much. This truck drives really nicely, even with the big tyres it doesn't seem to have that shaking vibration thing that modern rangers etc have.
1 point
-
The soft drink, water and beer adds up to 90kgs!1 point
-
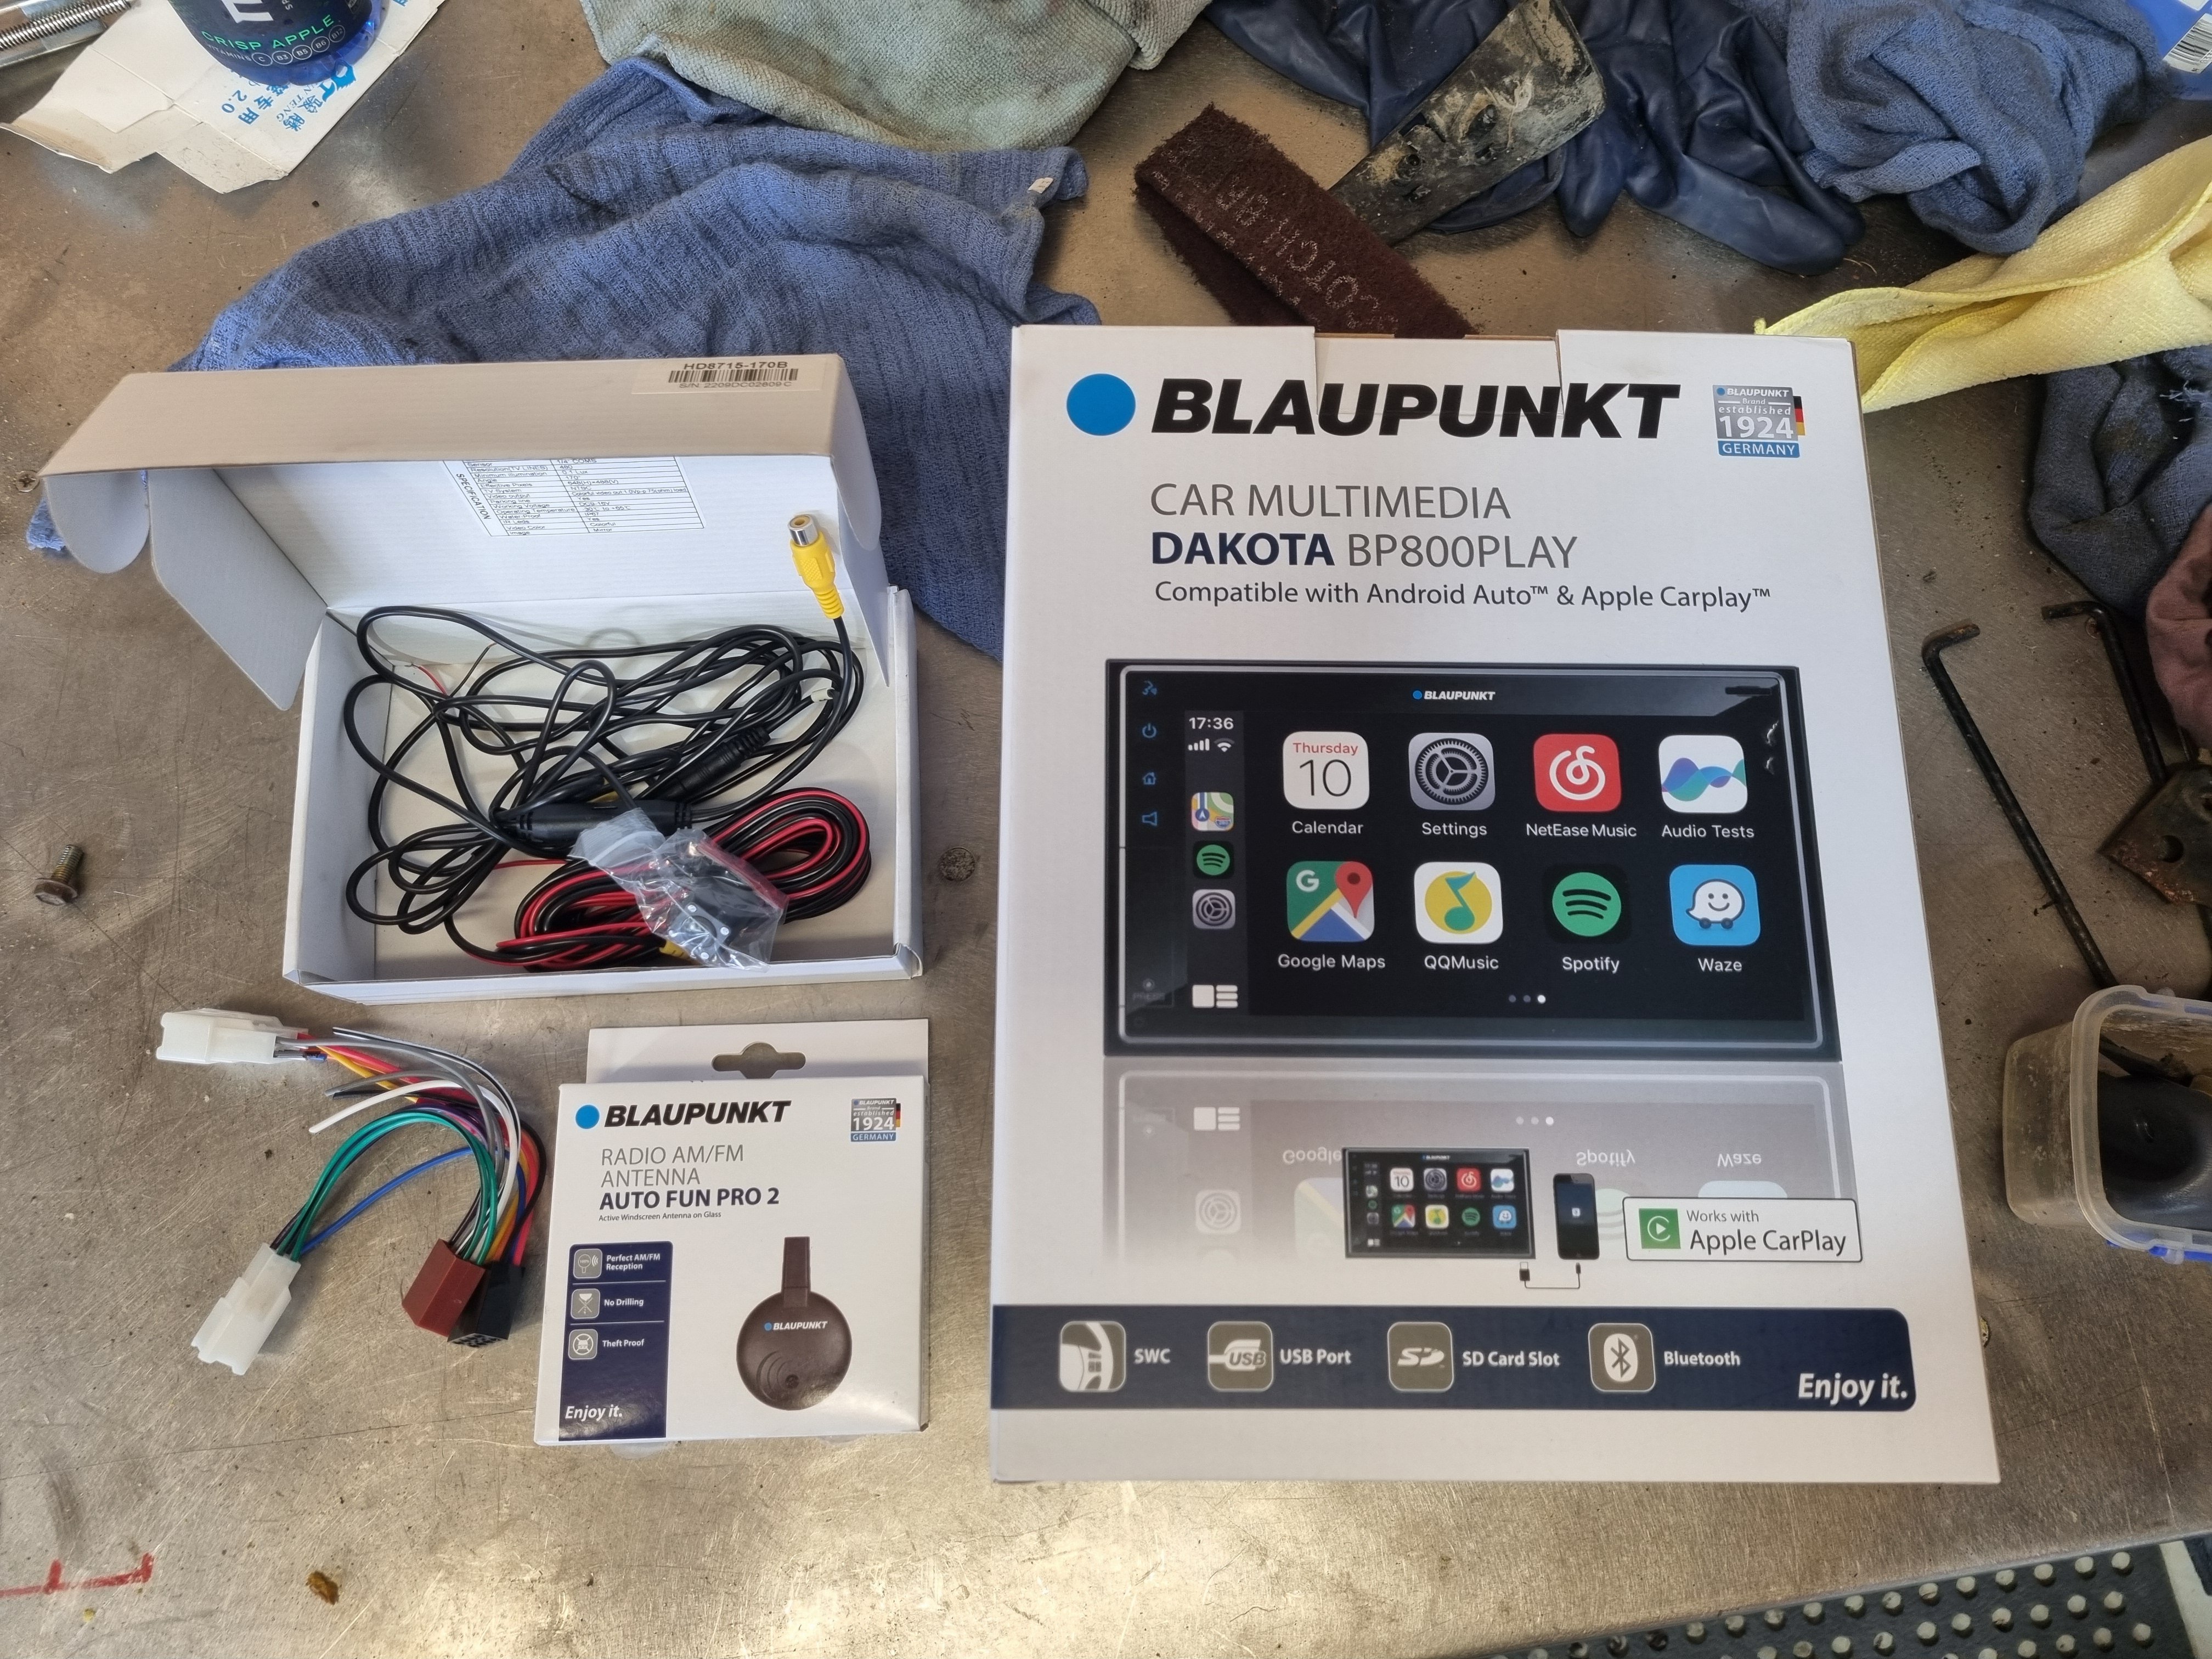
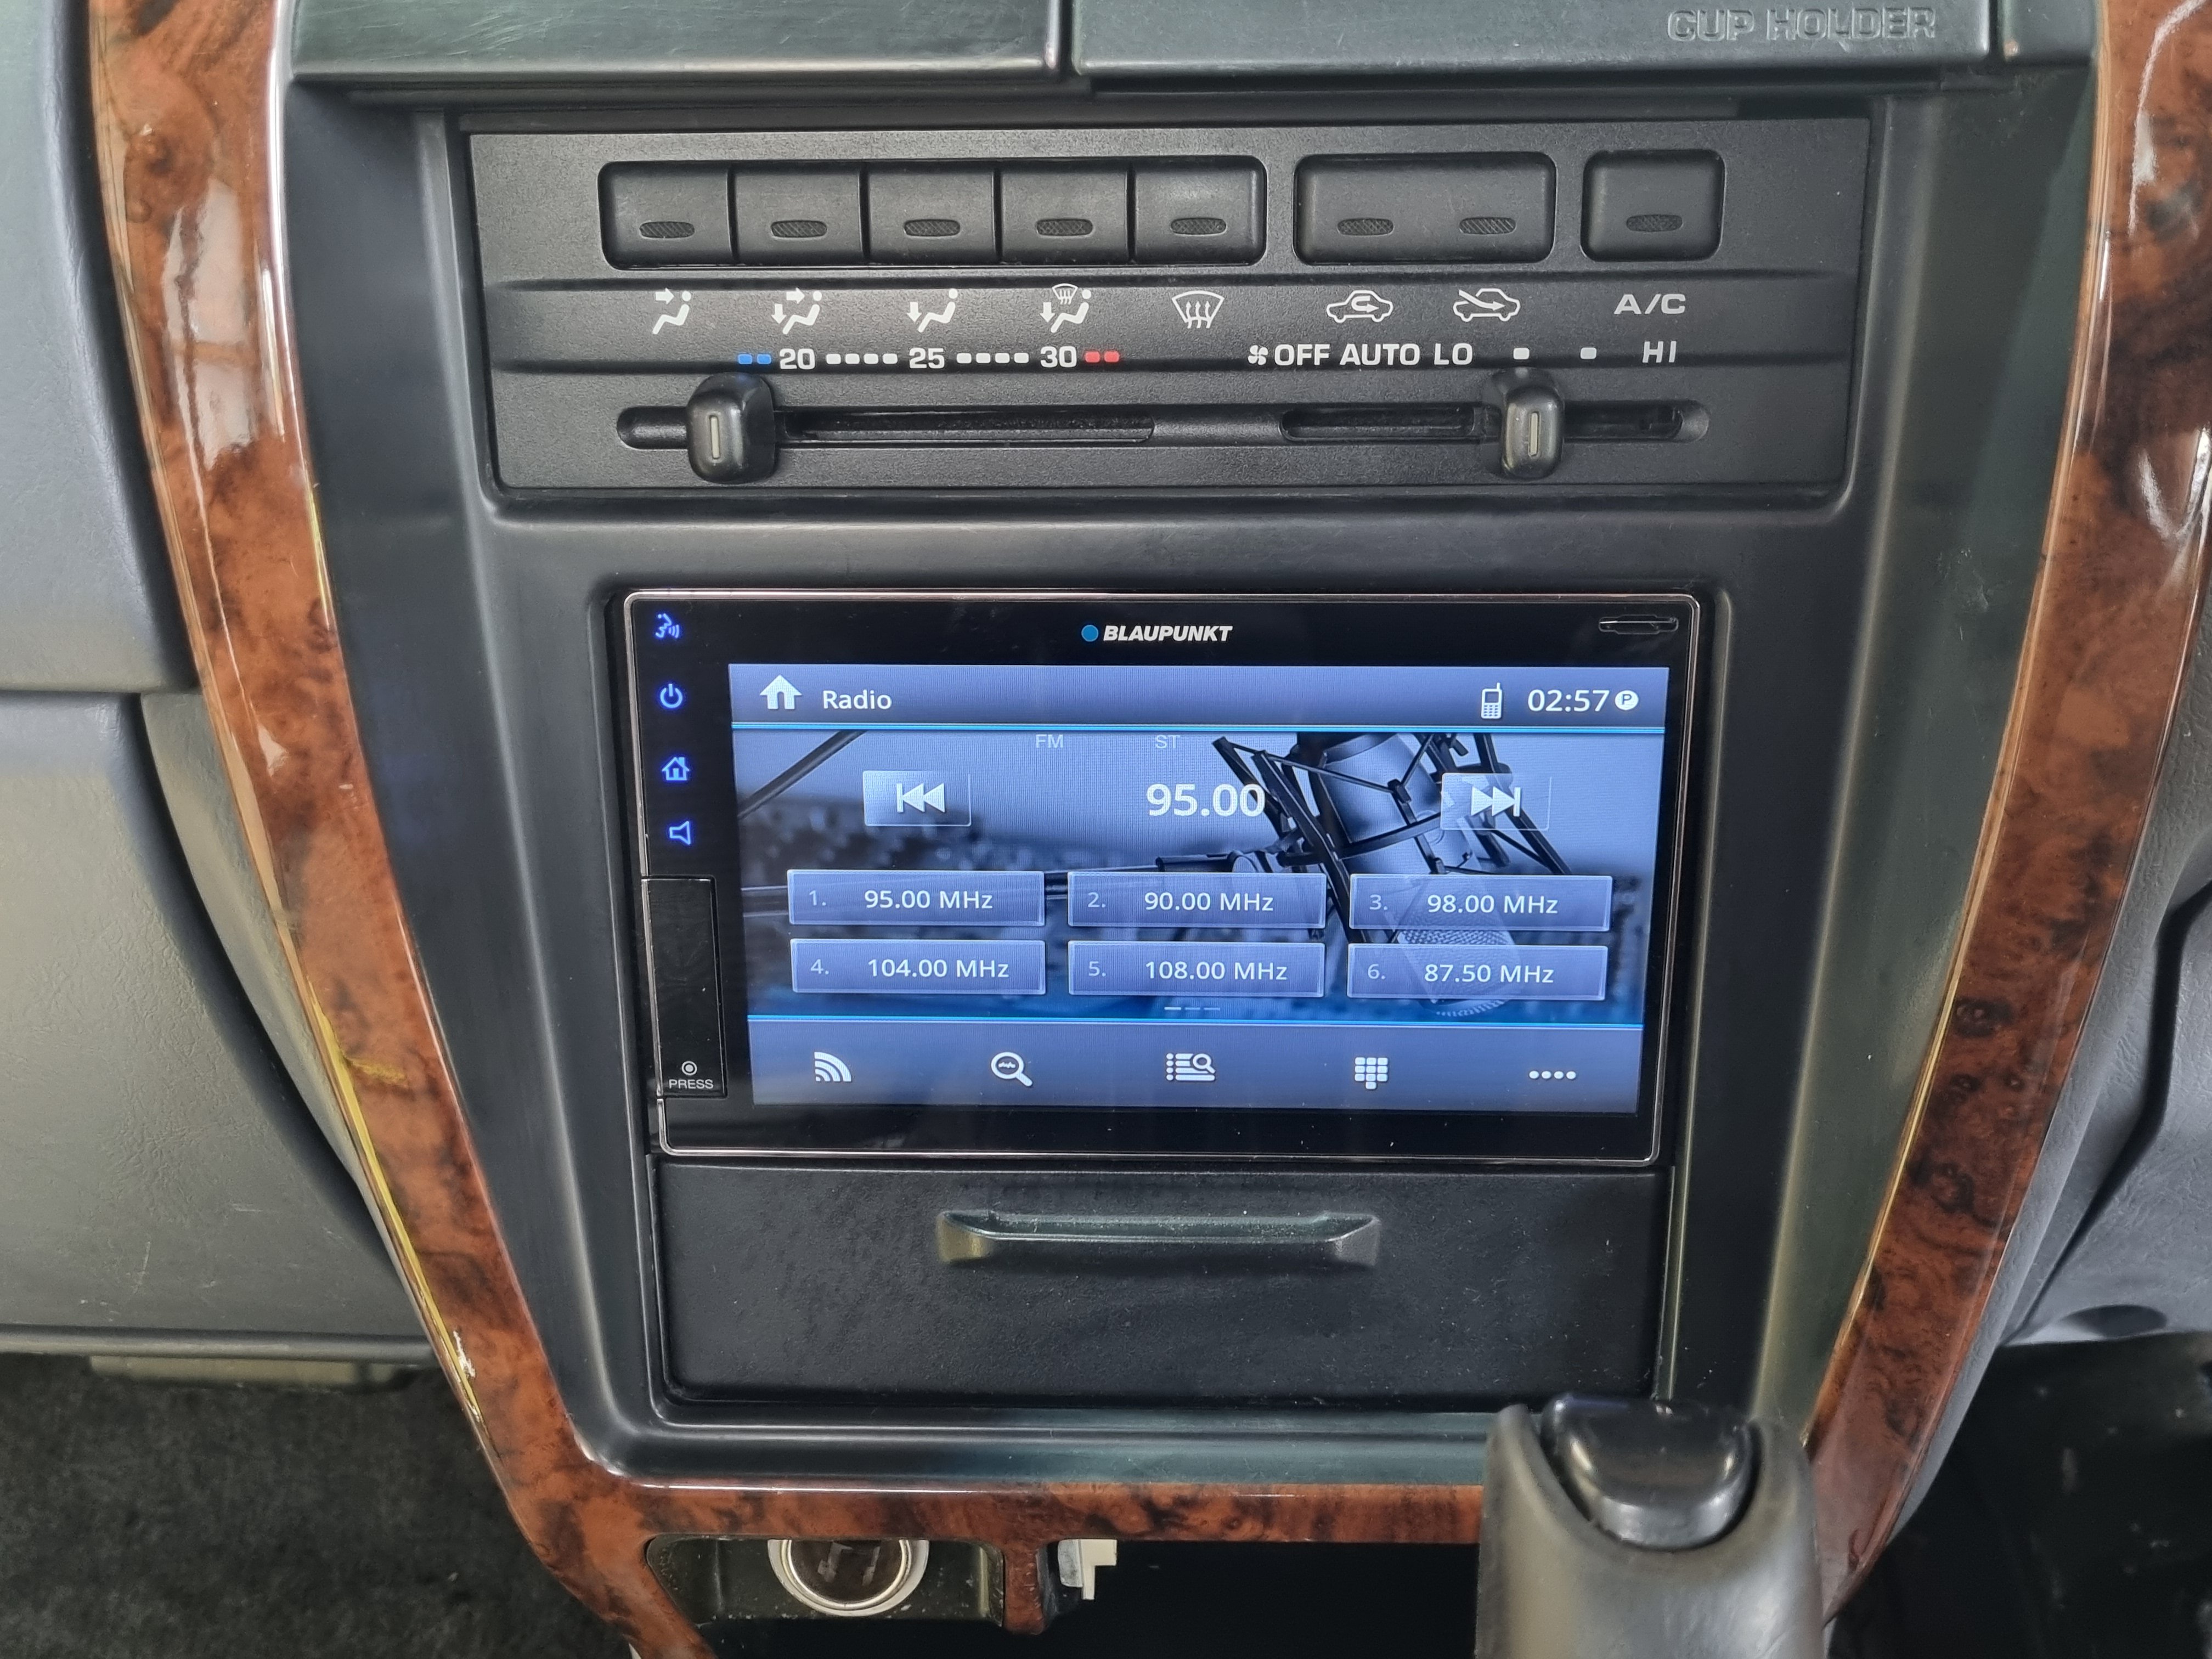
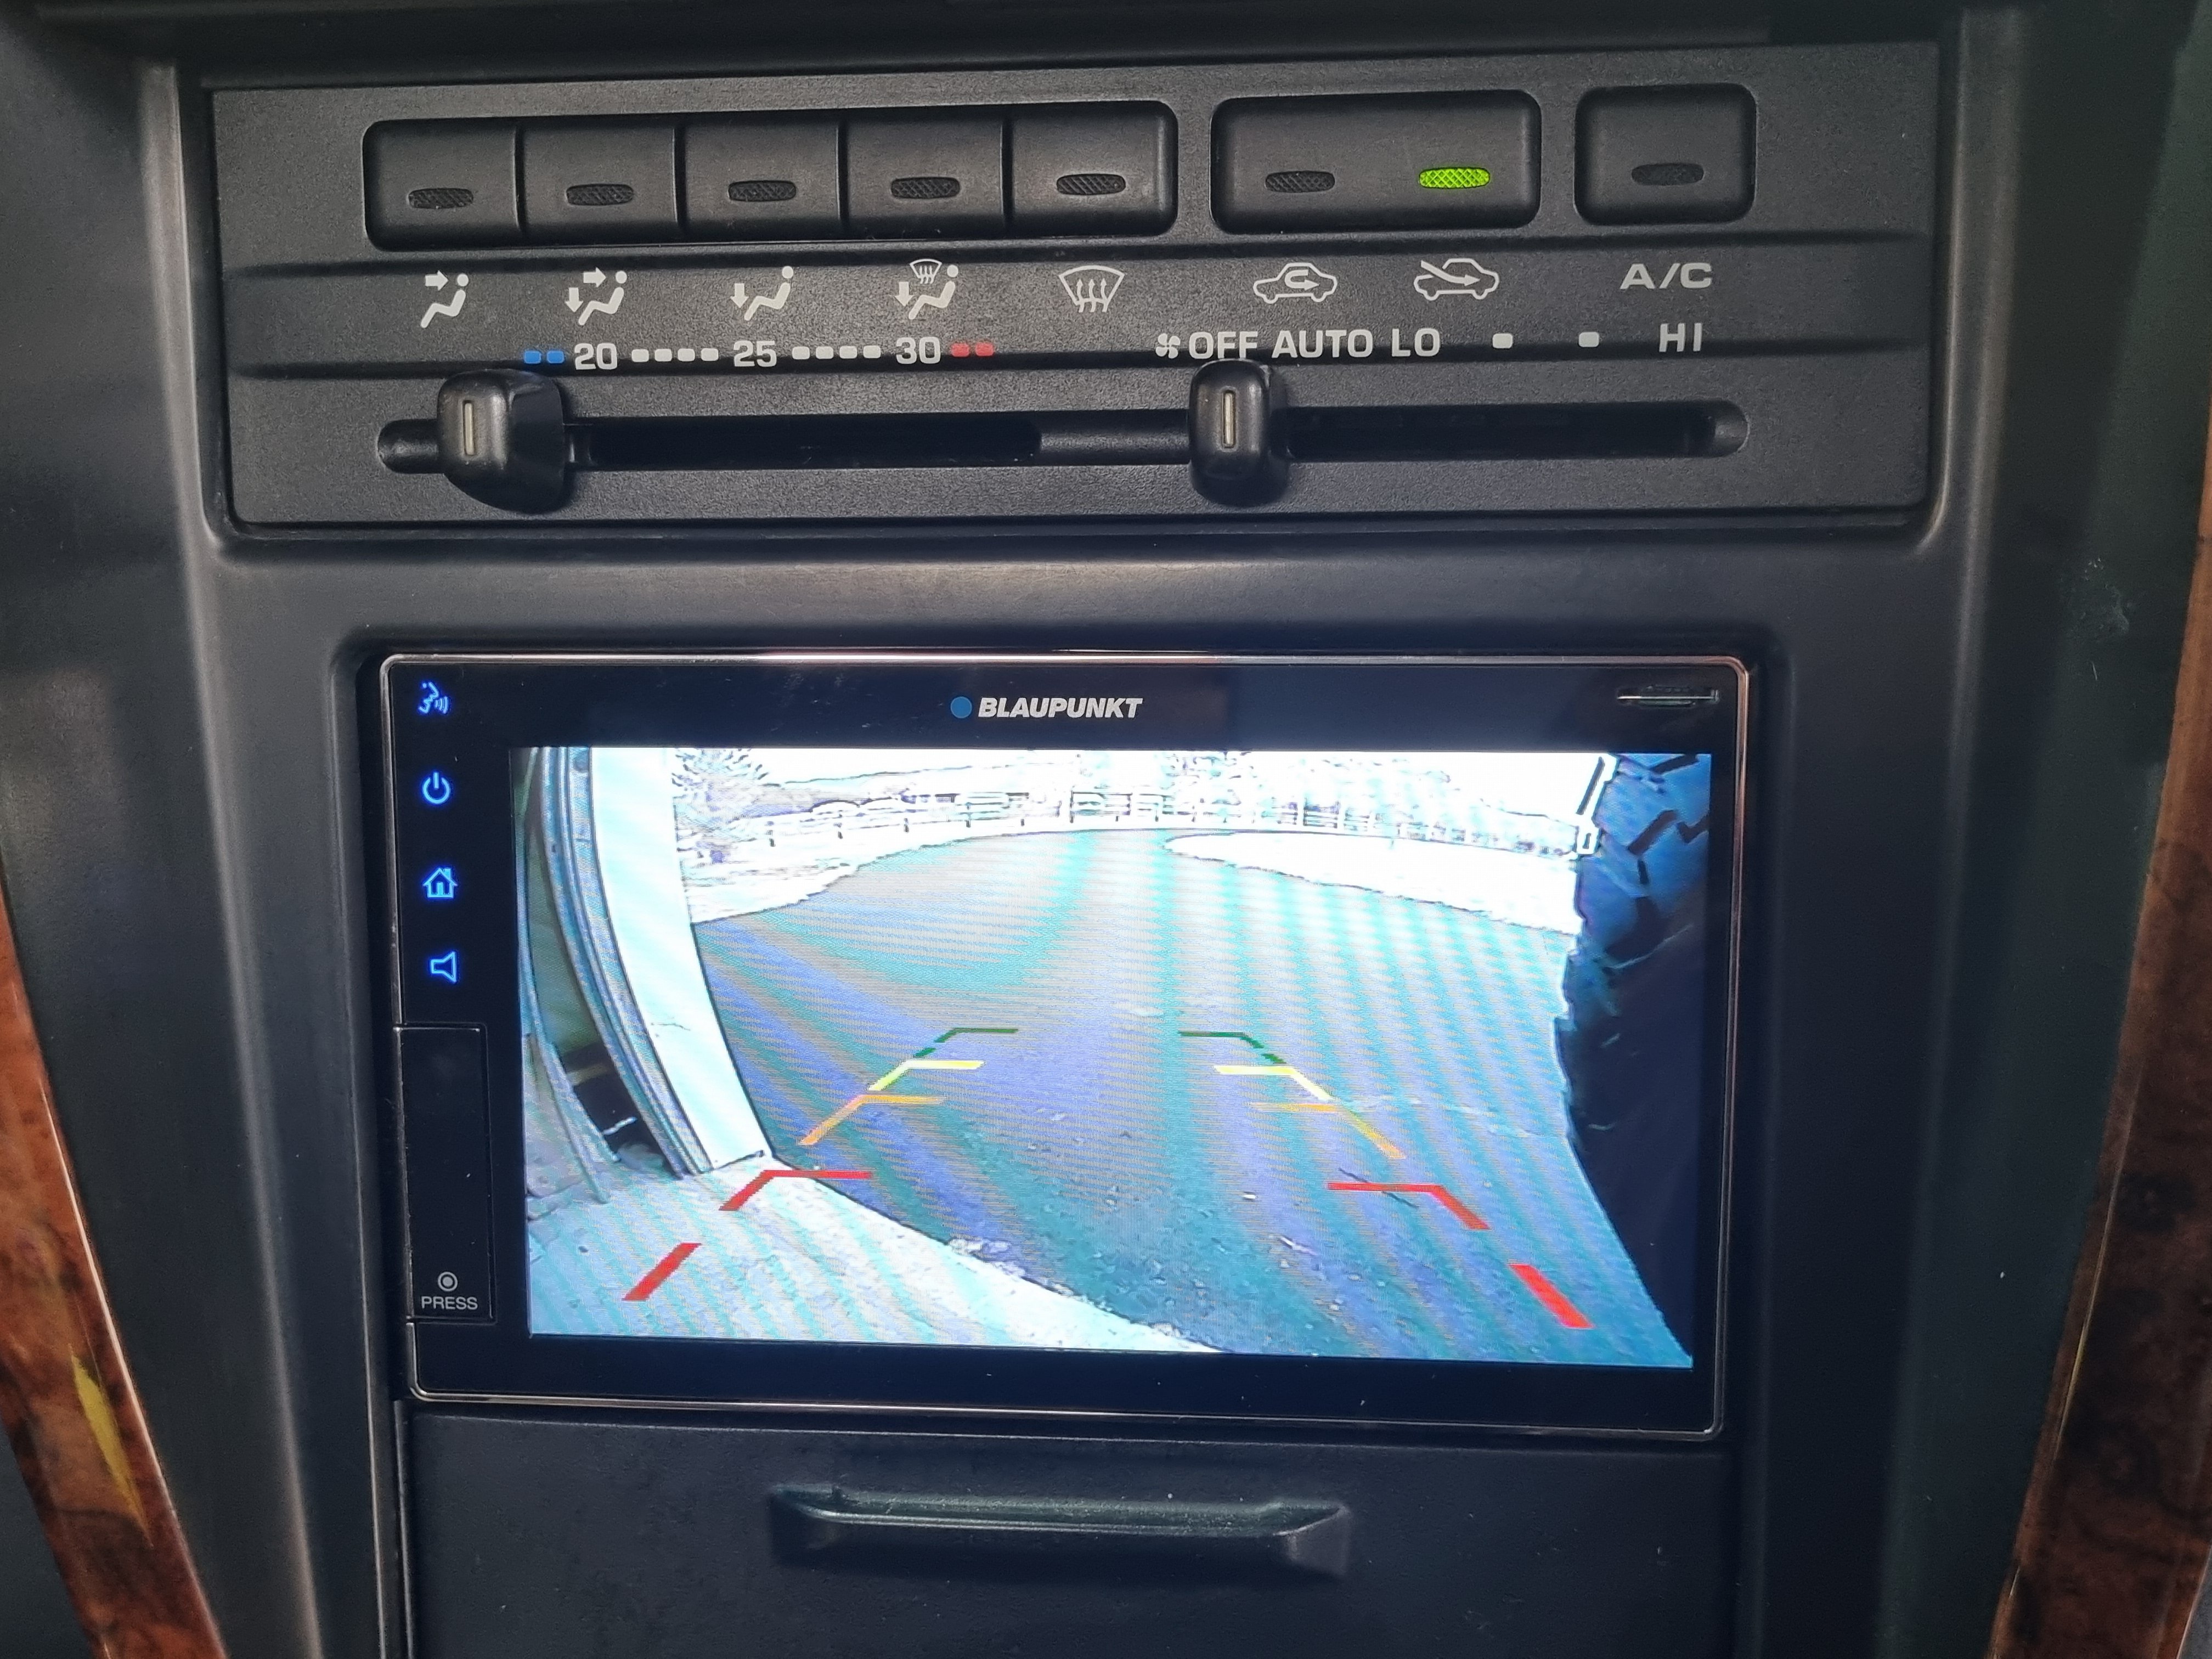
Also fitted a new radio. The one in it had FM and CD player. And nothing else. Yip yip new radio. Nick the sparky found this thing on special so it was cheap enough. Also fitted a reverse camera which was quite the job getting the cables into the rear door. By some fluke it works.
1 point
-
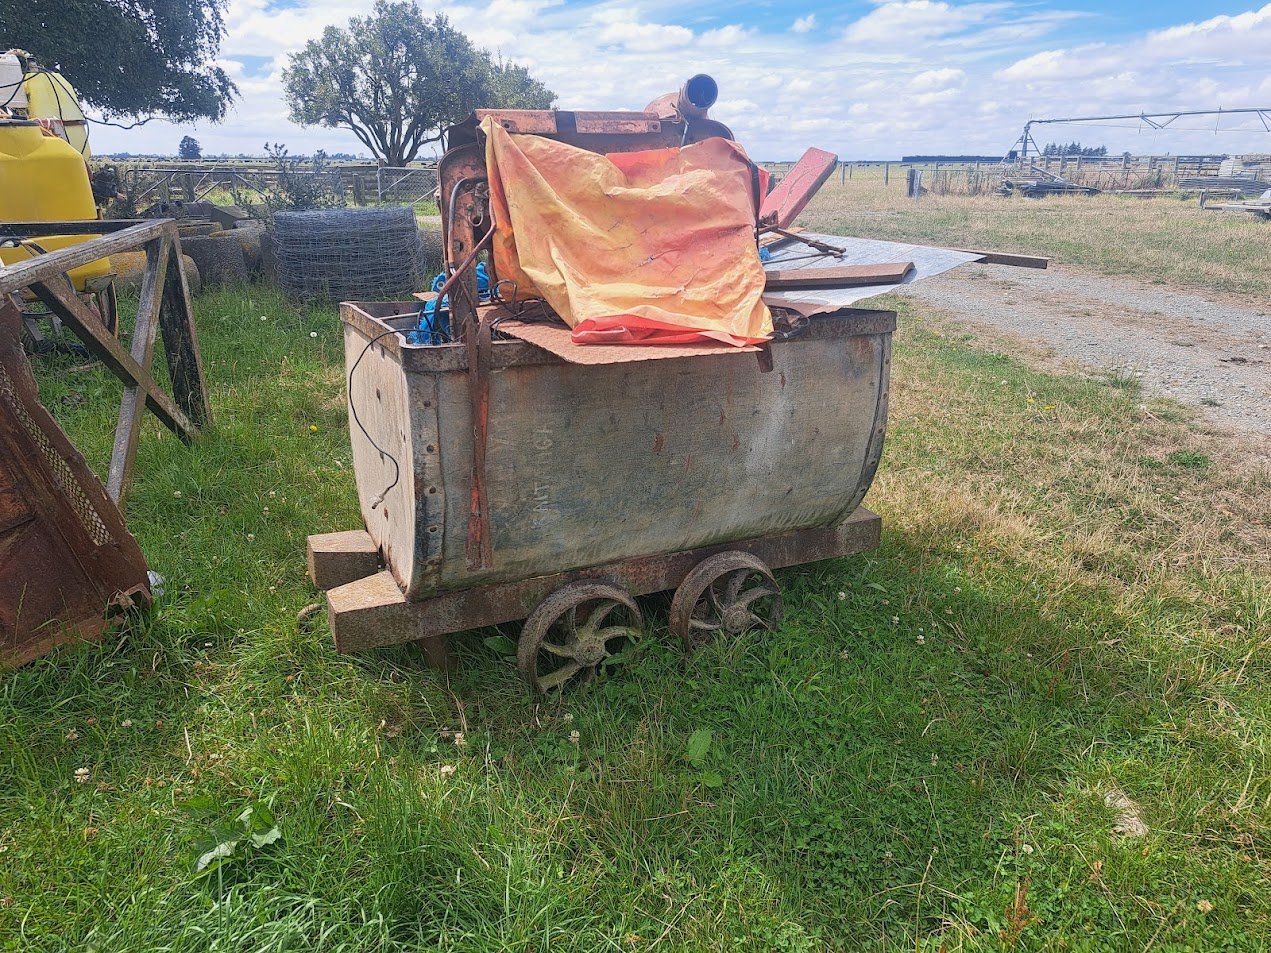
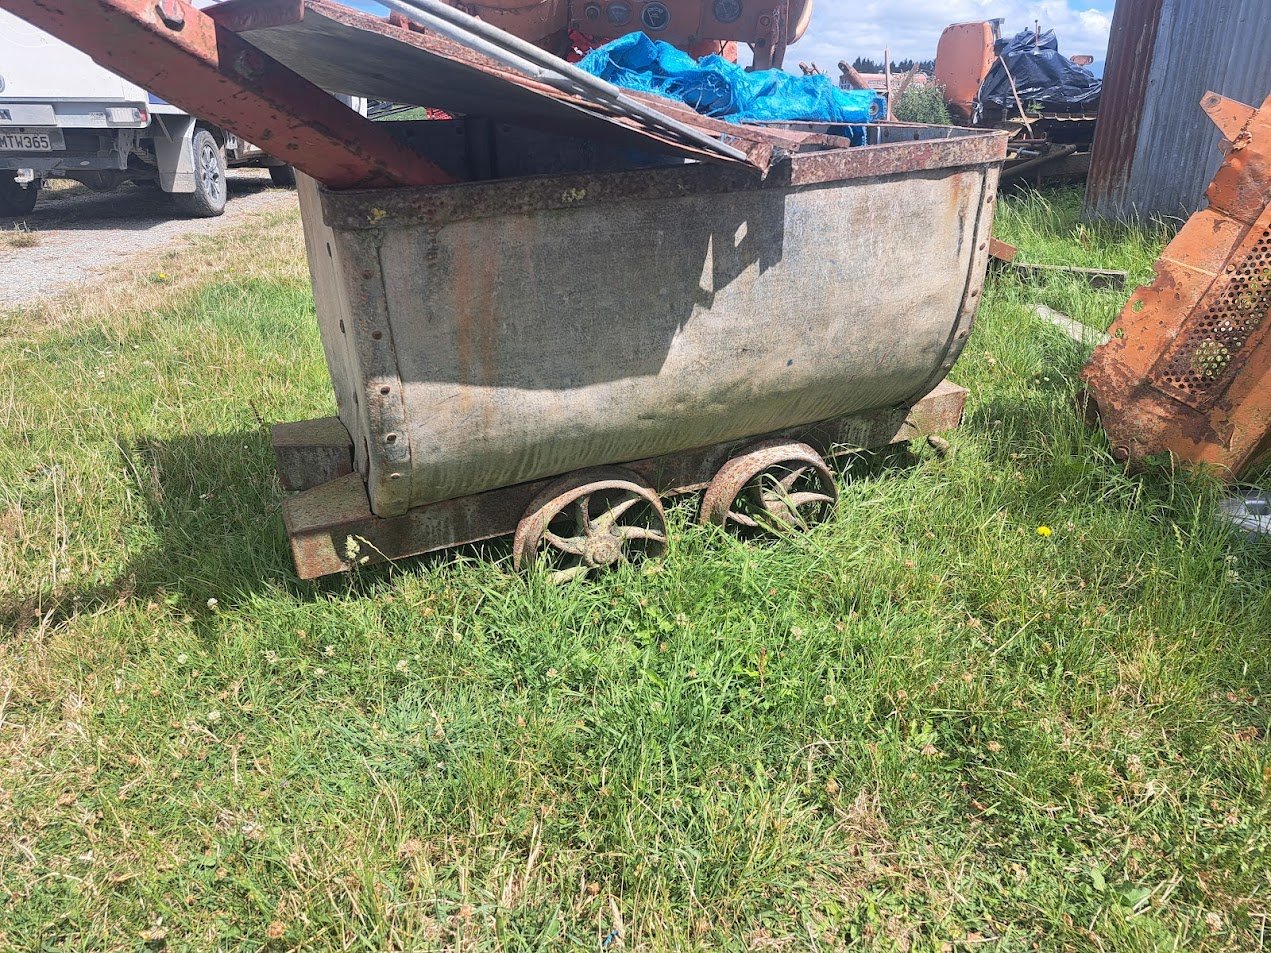
I there's an old mine cart on a farm I go to occasionally, probably same size. Next time I'm there I'll take some pics. Near Methven, Canterbury.1 point
-
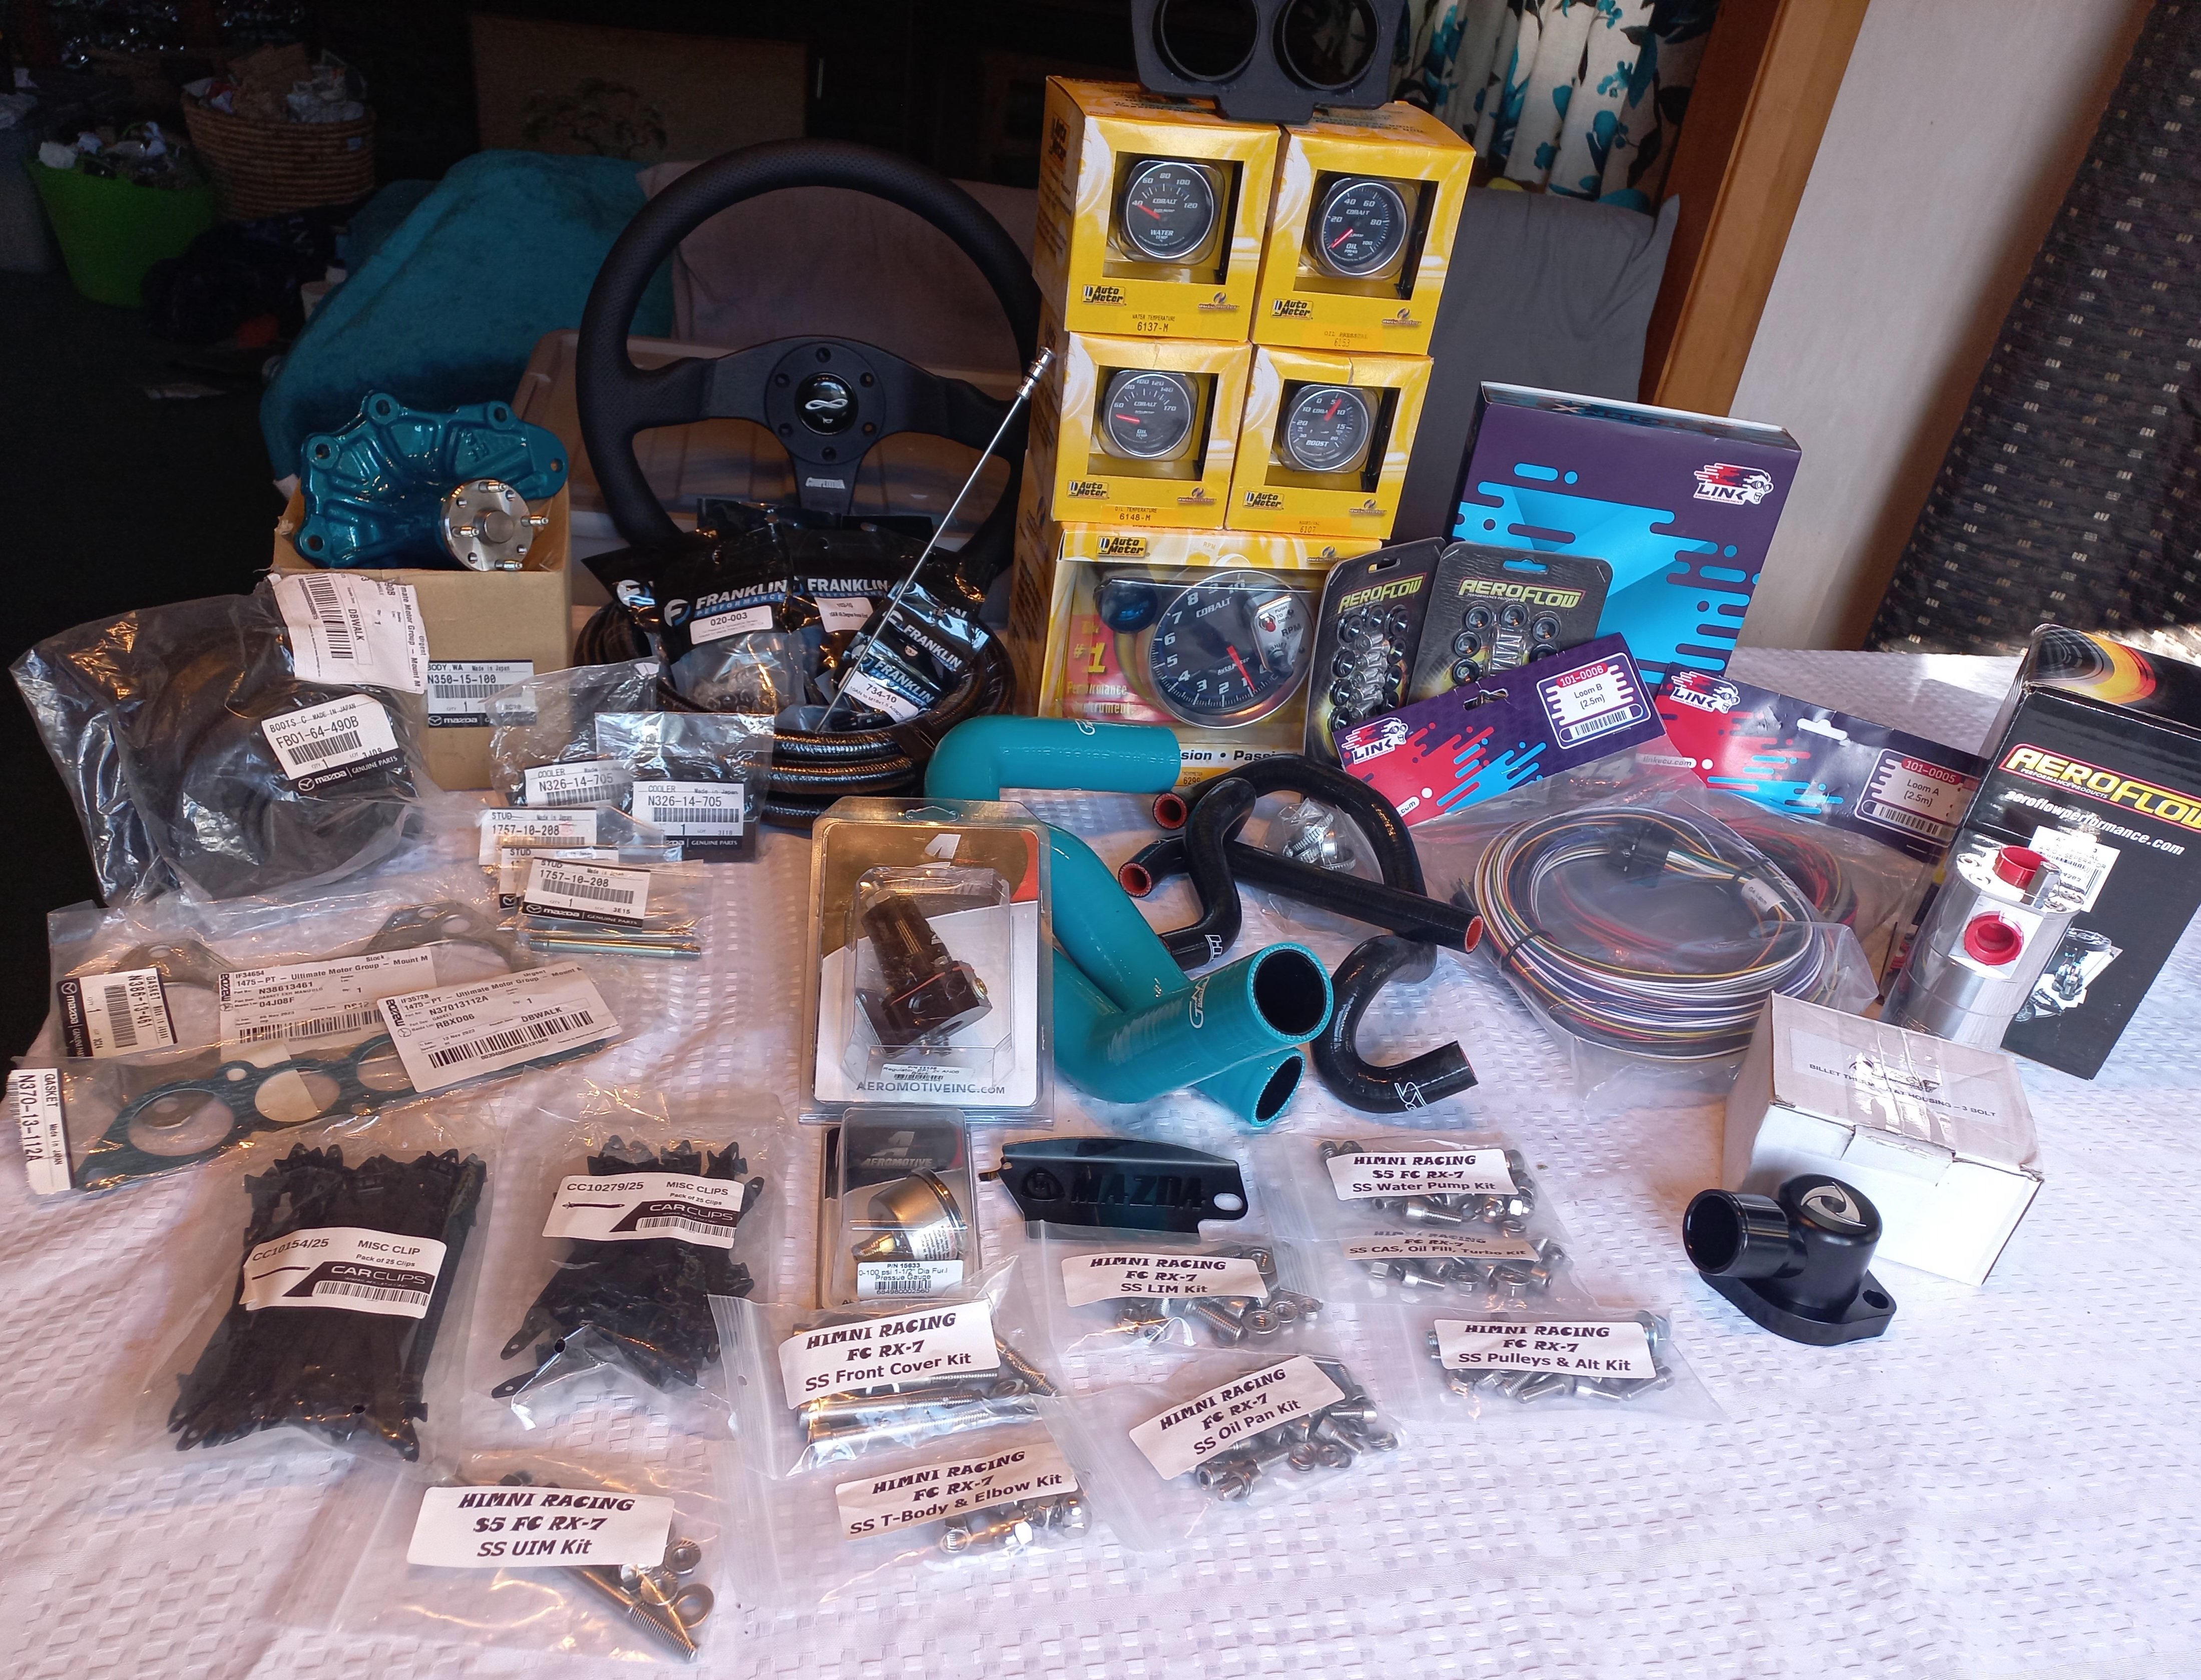
Whilst waiting for builder to start the keg build, I been buying a looot of parts. He started the rotors last week (all new side seals need clearancing x12) then he onto stacking. Bought the 'infini' momo centre cap so many years ago..got the wheel to suit now, Infini was the top spec JDM version of the FC but also badged to the BF mazdas of the day? Mazda OEM, Franklin, Aeroflow,Link,Pac,..try my best to use only kiwi sourced stuff, but the US & AU has supplied a few trinkets that only they do...example is 3D printed gauge holder ontop of the gauges, deletes the ashtray flap which has never been used.. Currently in contact with Vinny fab in chch for some bespoke items further on the build. Anyways, pics of stuff from the bin..
1 point
-
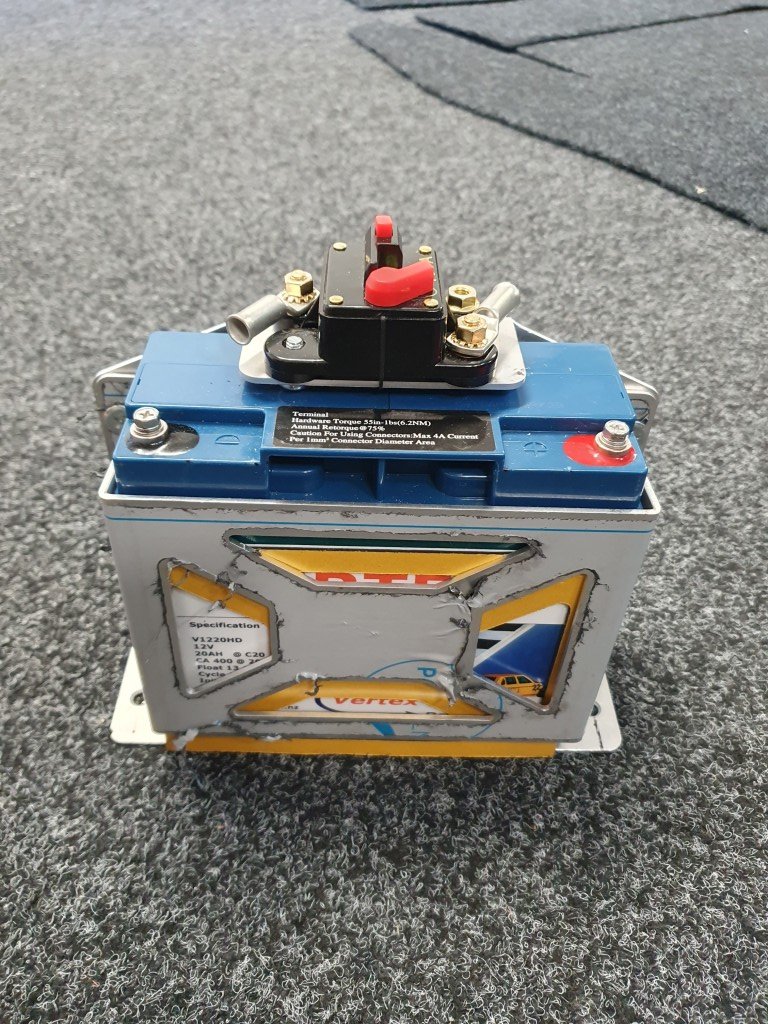
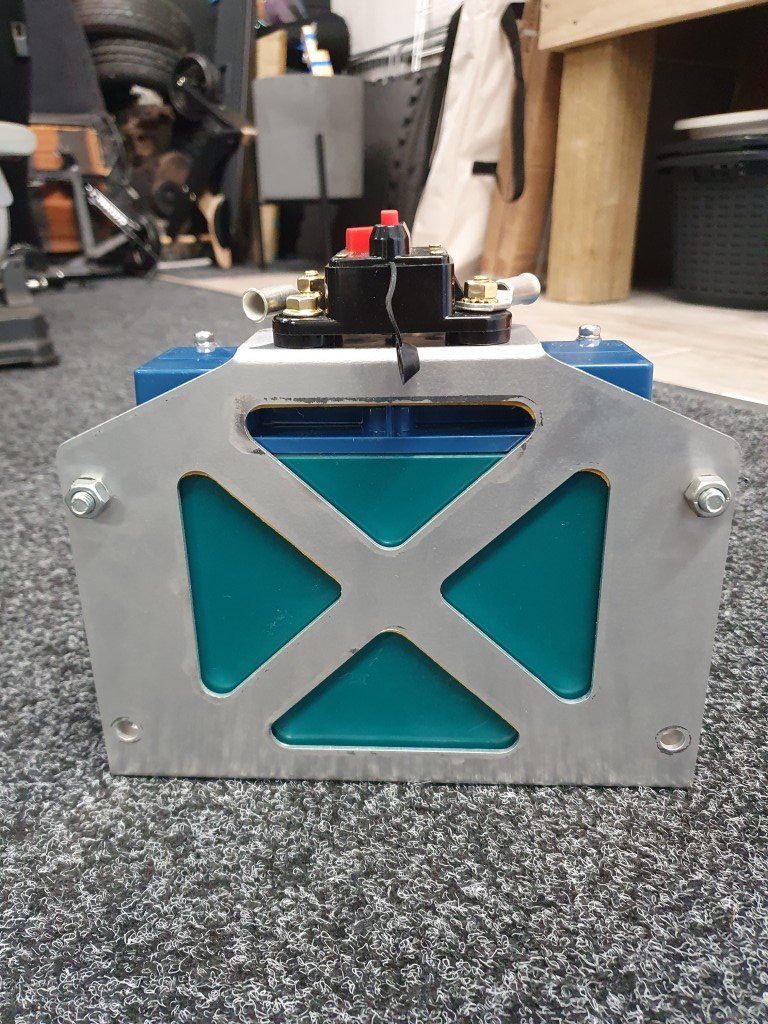
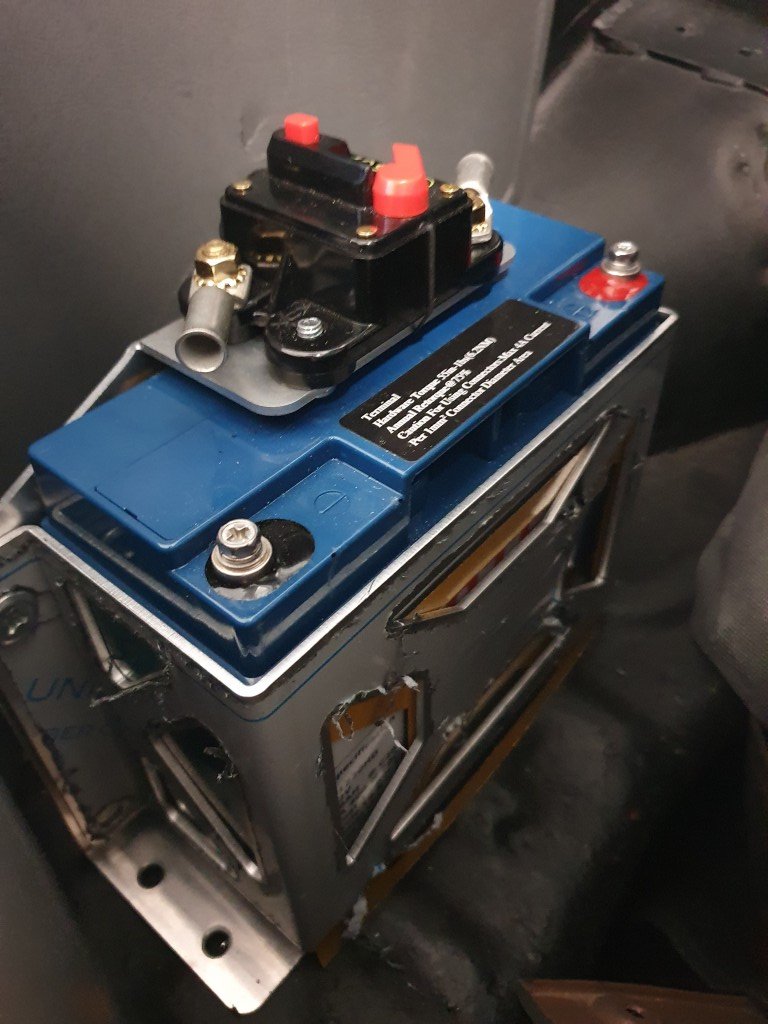
Battery box with breaker mount. Need better fixings for the battery mount but works for now. I managed to get the breaker JUST to fit on the top bracket, probably a couple of threads welded on would be best to hold it down. Currently the dome head fastener has a slight protrusion into the battery zone which I don't like. The bracket I got with the battery has been repurposed to mount the ECU. This one was a lucky find for cheap off marketplace. PC680 sized mounts WILL fit a Vertex battery easily. Note, there is a thick rubber gasket layer between the battery and battery bracket.
1 point
-
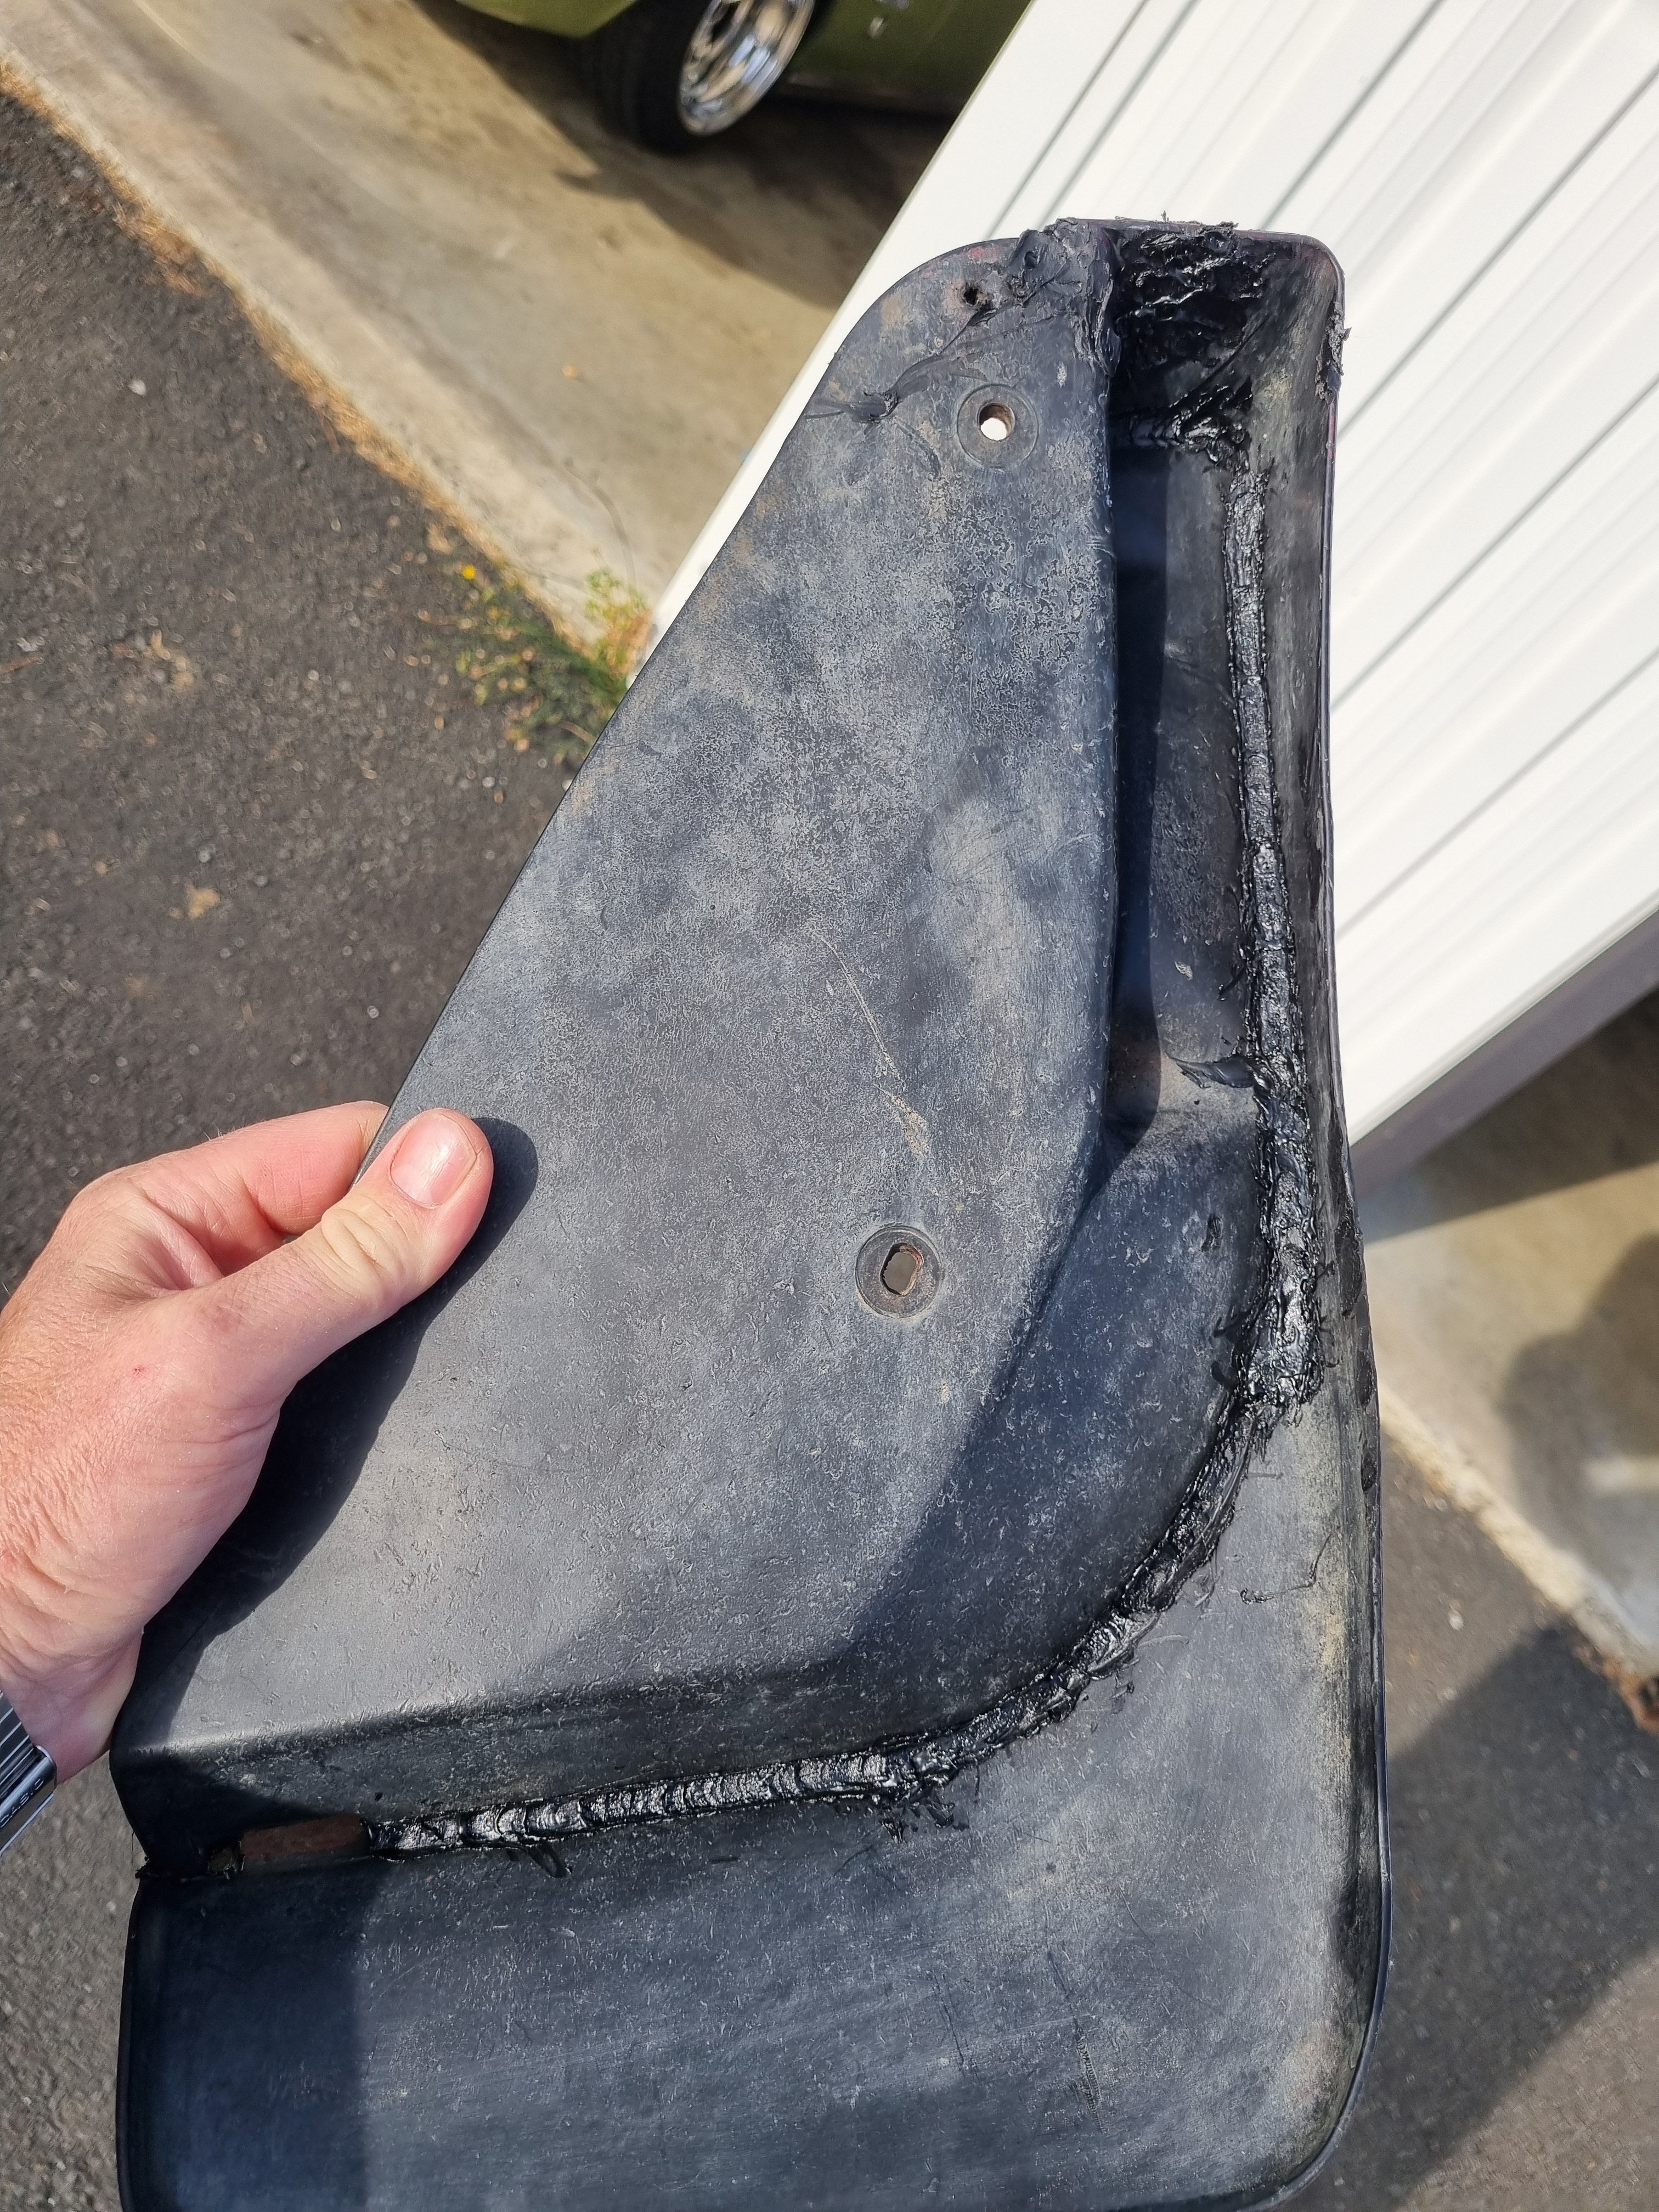
Also shit I forgot to mention that I put the rear bumper back on. This was harder then it sounds but basically I pulled all the brackets apart, soaked them in evoporust for a few days then painted them all. I beat most of the dents out of the side bits and then bolted it all back in. One of the mud flaps was broken in two so I welded it beck together with a soldering iron using cable ties for welding rod. Is it good as new? No. Will it last a thousand years? Also no But it's back on the truck and works until it doesn't so I'm calling it a win.
1 point
-
Well that's the end of this era, departed as it arrived into my life. Back down to just the one bike, well, sort of anyway. Something else is sitting in the wings that's been waiting for me to pick up for a number of years.
1 point
-
so i done some digging and some searching around with the rims. wasn't having any luck with finding one so the next step was to look at different swing arms to either modify or try fit in the rear of the bike. a Suzuki gs1200ss swing arm popped up for sale in tga. i have a mate local to me that has one, so i shot around to his house with my stock swing arm and got some rough measurements to see if it would work to modify and the common consensus was that its probably going to be the best option to make a swing arm work. so i hit the buy now and had @Mop Head pick it up for me. had a few people concerned that it wasn't going to work and that it was going to be a rather large thing to undertake but i didn't really have many other options if i wanted to fit this 5.5 rear wheel in. and after some comparisons and some measurements the 1200ss swing arm is rather larger and stronger. factory swing arm is 60.2mm tall and 3.2mm thick the suzuki gs1200ss swing arm is 74.9mm and it is 5.2mm thick time to chop it up. gotta trim it down a little bit on the width as well and removed the twin shock mounts off time to get more precise with the measurements chucked them in the mill and @Kimjon showed me how to do some things then we needed to cut some space for the rear shock like the stock swing arm. got it looking like this and i took them home to get them welded up and to do some more measurements cleaned my work bench and got busy again. worked out where the center of the swing arm is and done some basic math and made some brackets. factory mounts trace some out and draw them a bit of grinding and a stepped drill bit later and thats one side all sorted. the bottom side now, kim had already cut these out while i was doing other stuff at his house one day. i trimmed them to shape and chucked them in the bender (vice) and got to shaping them up and making them fit kind of a before and an after well during that time i did go to @flyingbricks house and steel this lathe to re make those peaces that go in the top of the mounts. we some how made the center hole to big. i reached out to josh to see if he could weld these up for me but some times he replies way to slow and often has stuff going on in his own life. so i also reached out to @Rhyscar to see if he wouldn't mind doing some welding for me. he said to pop over and we could run through it see if it was possible. next images can tell if you if it was or wasn't so happy with it. back out at kims again while i adulted with my daughter at my toes. time to try make this fit in. hey thats close enough, lets put the seats and plastics on before i go to see how it looks blue tooth chain but we still got a fair few things to do. daughter loves granddad garys motorcycle so she wanted to sit on her seat. and we are now up to speed a bit more. huge thanks to those who have helped out so much so far and kim for letting me keep it in his shed and use all his tools1 point
-
Say Aaaaaah
1 point
-
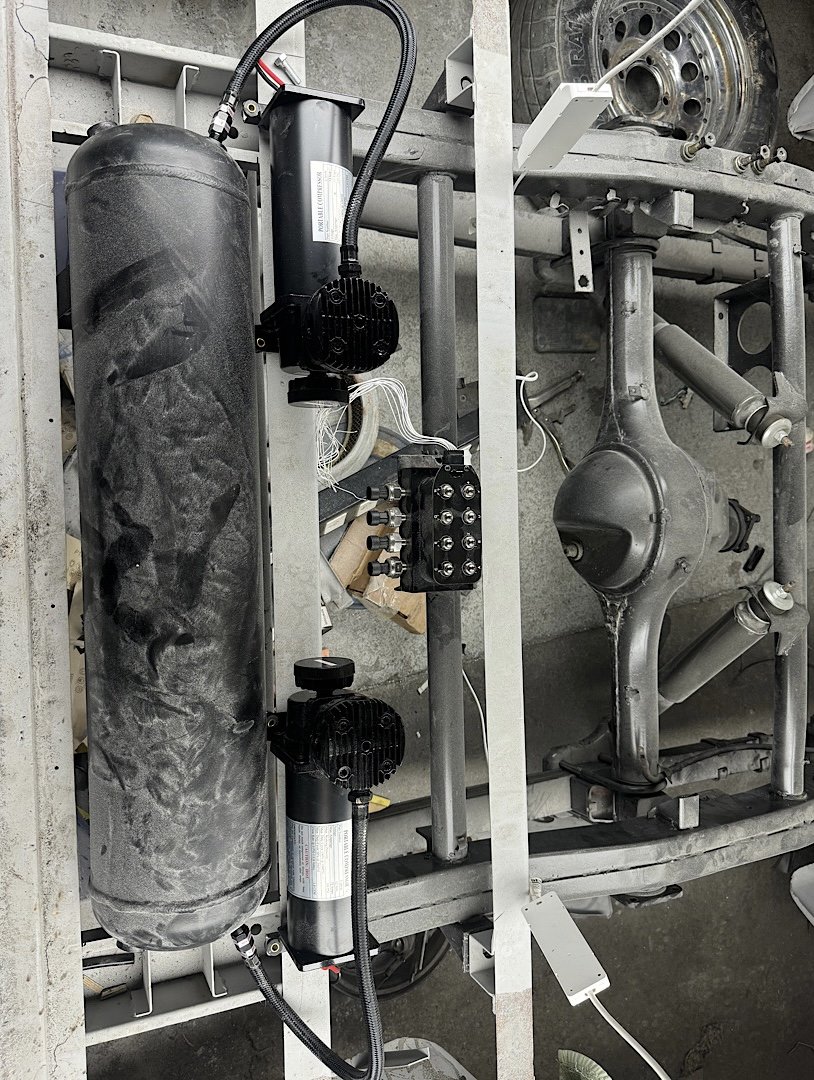
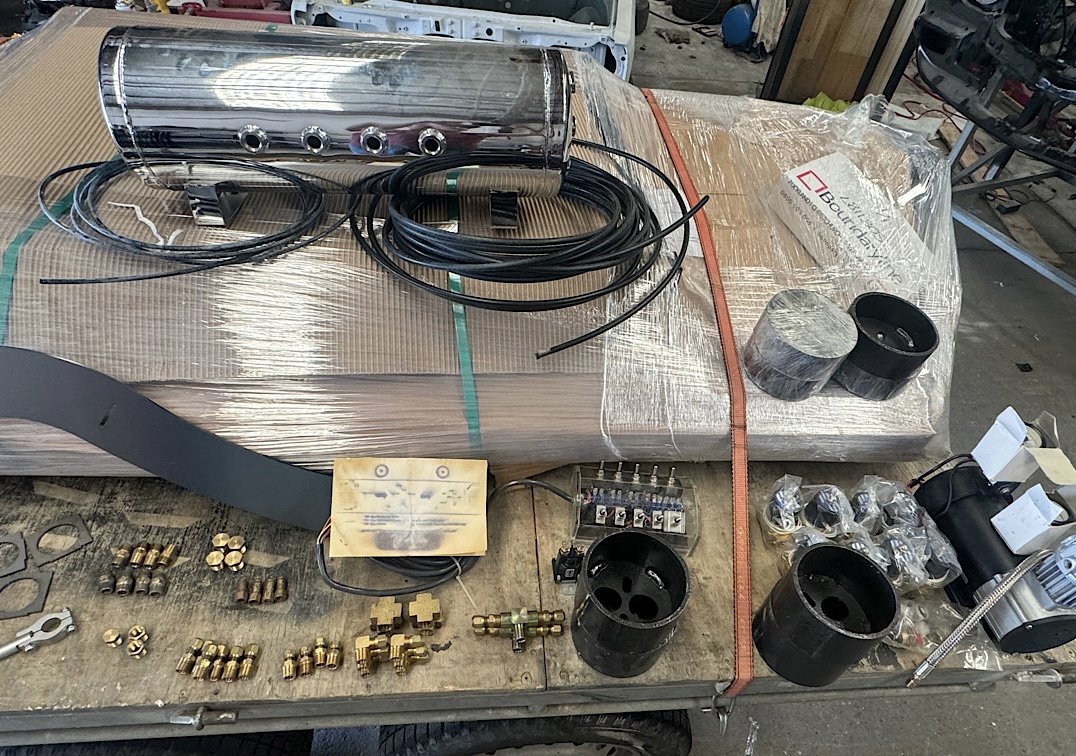
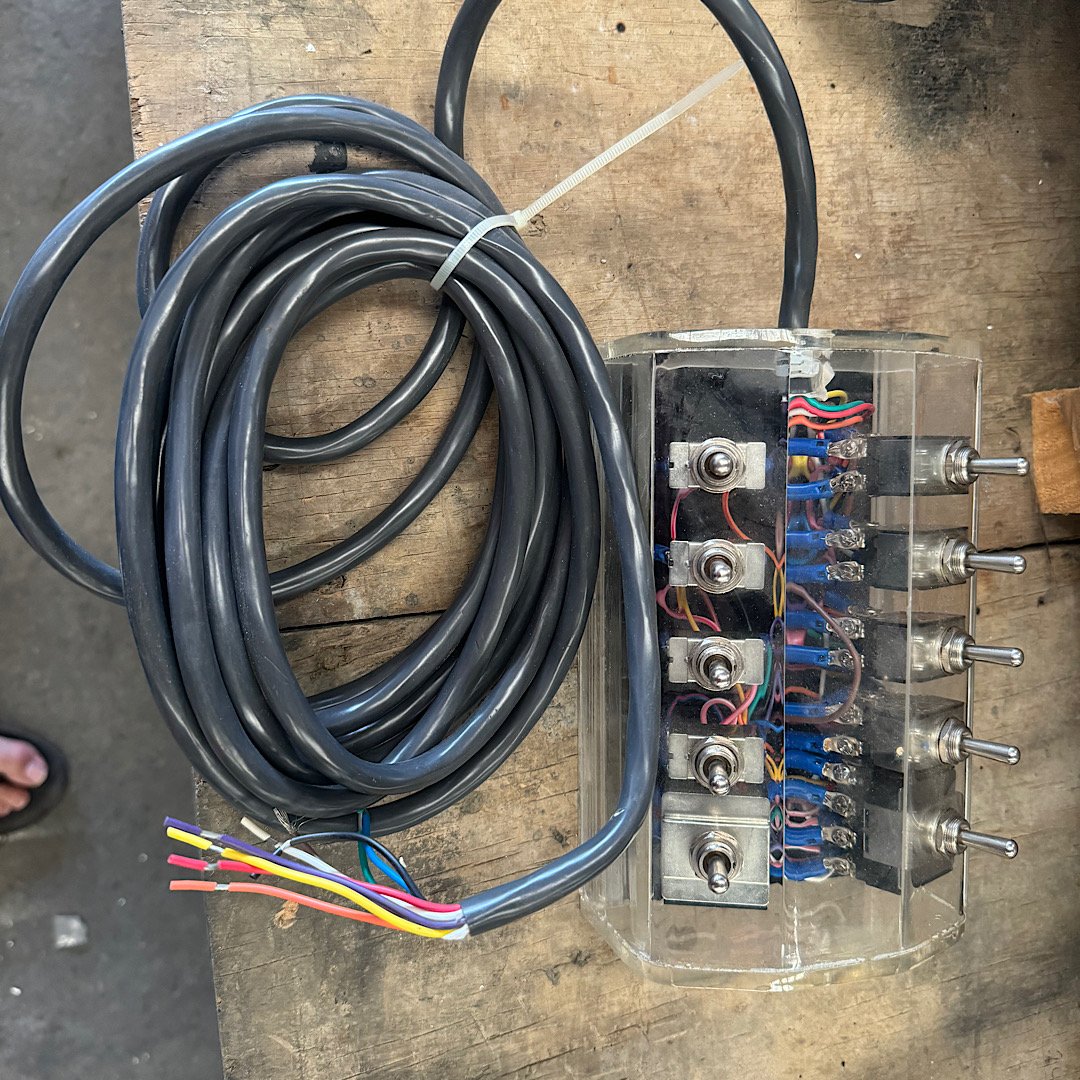
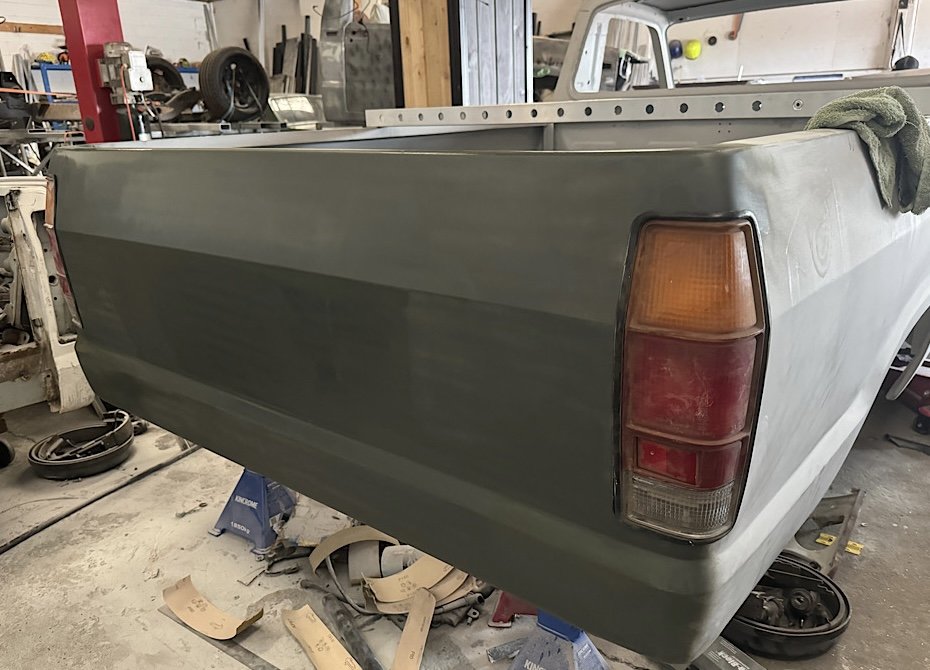
Not much of an update really. i ended up ordering a set of air ride nz’s notch kit that he had in stock. Listed as an 8” notch. i roughly sat one side in place, I figure it allows for a 70/80mm bump stop on the diff in this position. Had a play around with the air system layout on the other ute. It will all sit below the deck floor. And each compressor will have a water trap before the tank. the valve block can mount to the factory spare wheel mount. Looks quite good like that however, a deal came up on marketplace that I thought was pretty good. A “showtime” bag fitting kit for $250. this included everything in the photo below. Chrome 9 port tank, pressure switch, compressor, 2 gauges, solenoid, 10 switch controller, 3/8” and 1/4” air line, 8 x 3/8” bag solenoids, a bunch of air line fittings and a full set of bag mounts (cup type). I will use these solenoids, fittings, airline and tank. i won’t use the switch block and compressor, gauges and upper bag cups. this means my valve block, switch panel will be redundant ( this is a full kit minus bags). I can potentially buy 4 more bags to make another full kit (single pump). the air management system I will use is an air command air8000 system that has 8 presets with a digital display. i only need to figure out a way to lock out the system while it’s driving. maybe a wheel speed sensor somehow, this will be wired through the air8000 alarm circuit which locks the system when set/armed. I’m sure that will work. i slapped the tail lights in the tray for max visual, so stoked. Just need to finalise that concave line now. i fly out to Japan in 4 days, so nothing else will happen until after nats. i would like to hunt down a nice steering wheel while im over there.
1 point
-
1 point
-
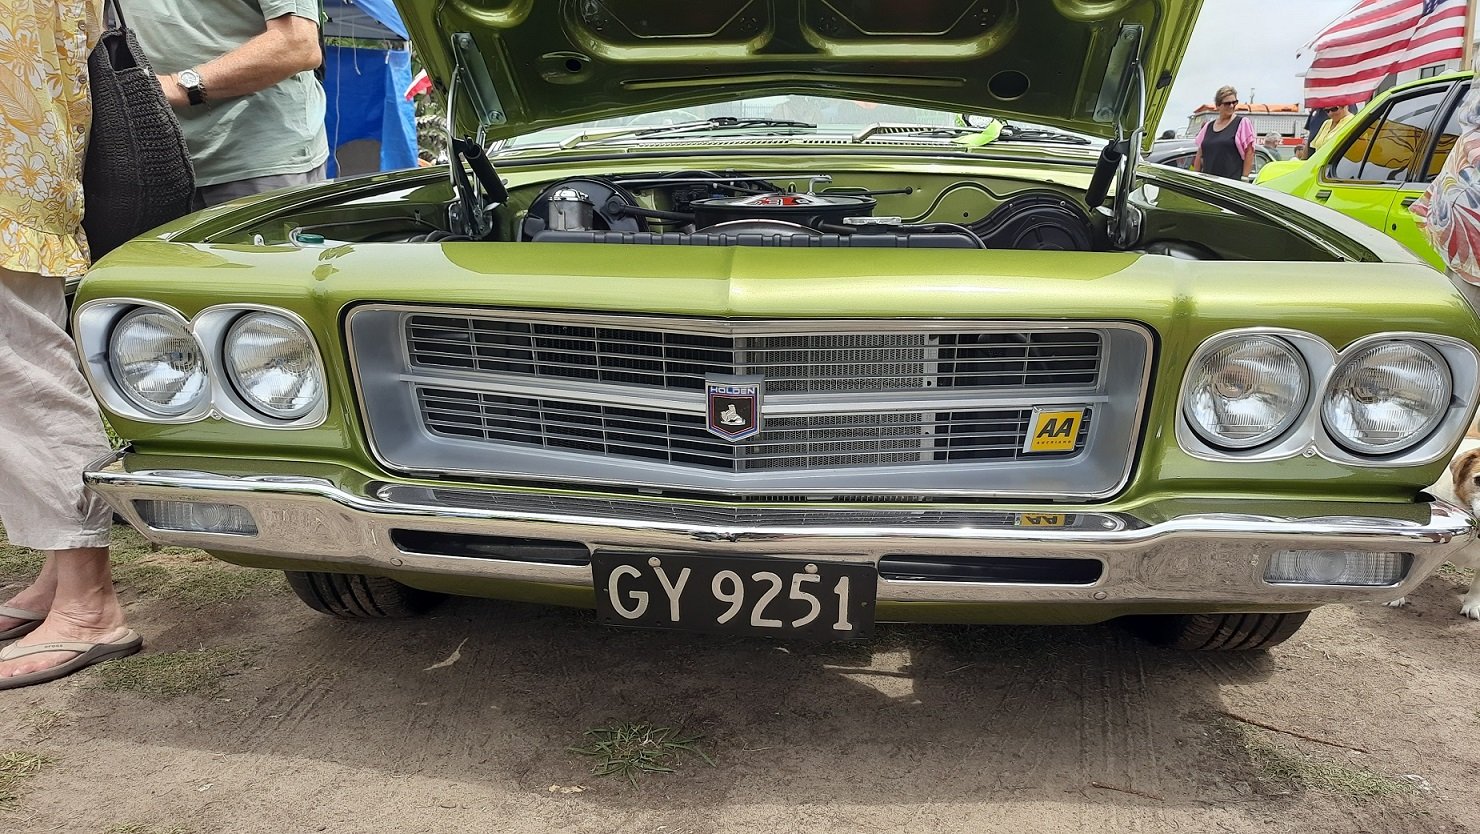
Got the wheel bearings replaced along with the rear shocks and bushes, and front brake pads. Apparently both bearings were toast so both should have failed a warrant so I'm glad I planned to do both sides anyway. Got The warrant and headed to Orewa for the Rodders Beach Fest. The bearings must have been FUBAR as it seemed to be a lot more steady around 60MPH, the rear suspension was much better as well. Didn't sound like an old trailer any more. Found the Mustangs older topless brother I asked about the colour and they said it was painted by a previous owner around 1992 in a Chevy colour that has been brightened up a bit. Ours was imported in 1991 so maybe some guy imported 2 cars and painted both to match. I'm always partial to an XD as well And I like a good fairlane. One of the few American classics that would get me out of the Mustang And I found this nice HQ Premier with a 253. I like the double lights but the nerd in me thinks the coolest part is the AA badge.
1 point
-
Ready for wof??? Hmm will see tomorrow. booked in at the local workshop. all lights are working no rust brakes bled and it stops, eventually lol top of the roof sits lower than the top of the well side of the ute. She’s a mission to climb out of now that I’m getting older haha
1 point
-
Brother, be forewarned! You are teetering of the precipice of the ultimate Barry rabbithole. But its okay, ive been down there, so you dont have to. Some years ago, i repowered my childhood go kart with a 5hp briggs. In my research, i discovered a forum, dedicated to these engines. The Wisconsin Karting federation have a class just for them. I did some reading, and learned a lot. Firstly, mine had a thread in the exhaust port. Reportedly they go better with the pipe screwed in. (The ex port diameter is too large for optimal performance) naturally the shape where the pipe ends (inside the block) is also critical. They were all about a threaded sleeve that screwed into the ex port to narrow it down. (This may, or may not be "class legal" for the stock engine class. Theres also an optimum length for the pipe too. (Seeing as its just a straight pipe, its not hard to make) my memory isnt what it once was, but it was 12" or 14". There are two types of 5hp blocks. The cast iron sleeve ( industrial motor) and the full alloy "cool bore" block. The alloy bore motor needs a piston which has been hard chromed. Otherwise the two soft metals gall each other. Theres also two varieties of side cover. one has a bearing, and th other the crank shaft just runs on the aluminium casting. The greatest weakness is the lubrication system. Theyre splash fed. Theres a sheet metal "dipper" bolted to the conrod cap bolts. This splashes the oil up to where its needed. Reportedly at apporox 4000rpms, this breaks off. And shortly there after the conrod snaps in two. And you get a window in the front of the block. (They say you can change the parts, and use pop rivits and RTV to make the block go another roound) Better parts have the dipper cast into the rod cap. Believe it or not, there is (or at least was) untold aftermarket parts available. Wiesco pistons, carrillo rods, brand name camshafts. You can even get aftermarket billet blocks. (I think theyre called blockzilla 3?) Now im sure youre only interested is the basic stuff to begin with. Firstly that pipe is a negligable cost improvement. And as tempting as it might be, dont shave the head. The air speed is highest up near the roof of the chamber. Skimming the head to try bump compression will hurt the flow. Looking at the block with the head off, youll see an "eyebrow" between the valves and the cylinder. You can grind with down the cylinder wall, almost to where the top ring sits at TDC. Again the air speed is low down here, but its a free mod for moar power.1 point
-
She’s Finished!!!! I’ve finally finished a project. certified, wof’d and registered. last legal for the last Hanmeet, so it’s been a while.
1 point
-
Well boys!! It drives, and boy does it drive. handles great, smooth acceleration. so stoked. no driving vid, no co-pilots available. made up 50mm blocks from 50x50x5 shs. booked in for an alignment on Thursday. just need a cert now1 point
-
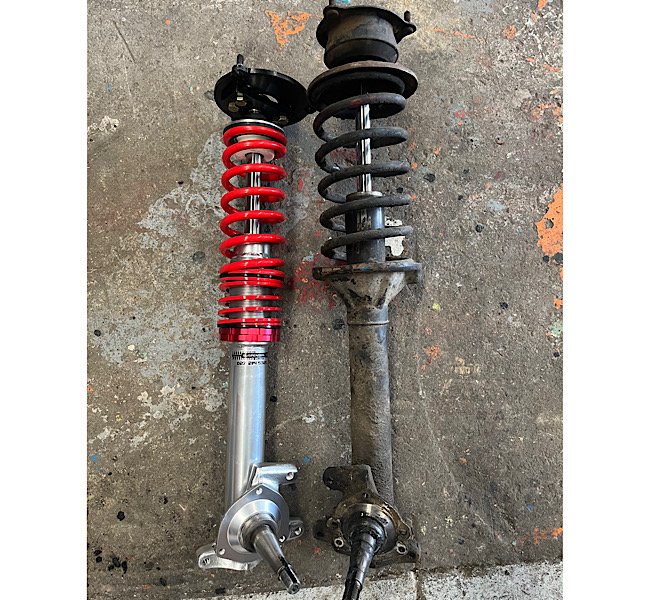
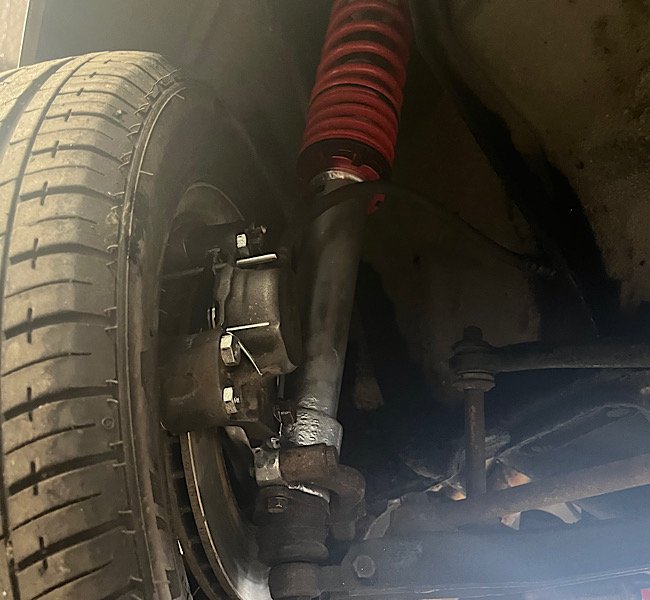
Picked up the new mystery gearbox. chucked it all back together this morning. then got a call from Chris @suspension tech, struts are ready. they look pretty swanky. only thing left to do now is do all the fluids and test the box out. And tune it
1 point
-
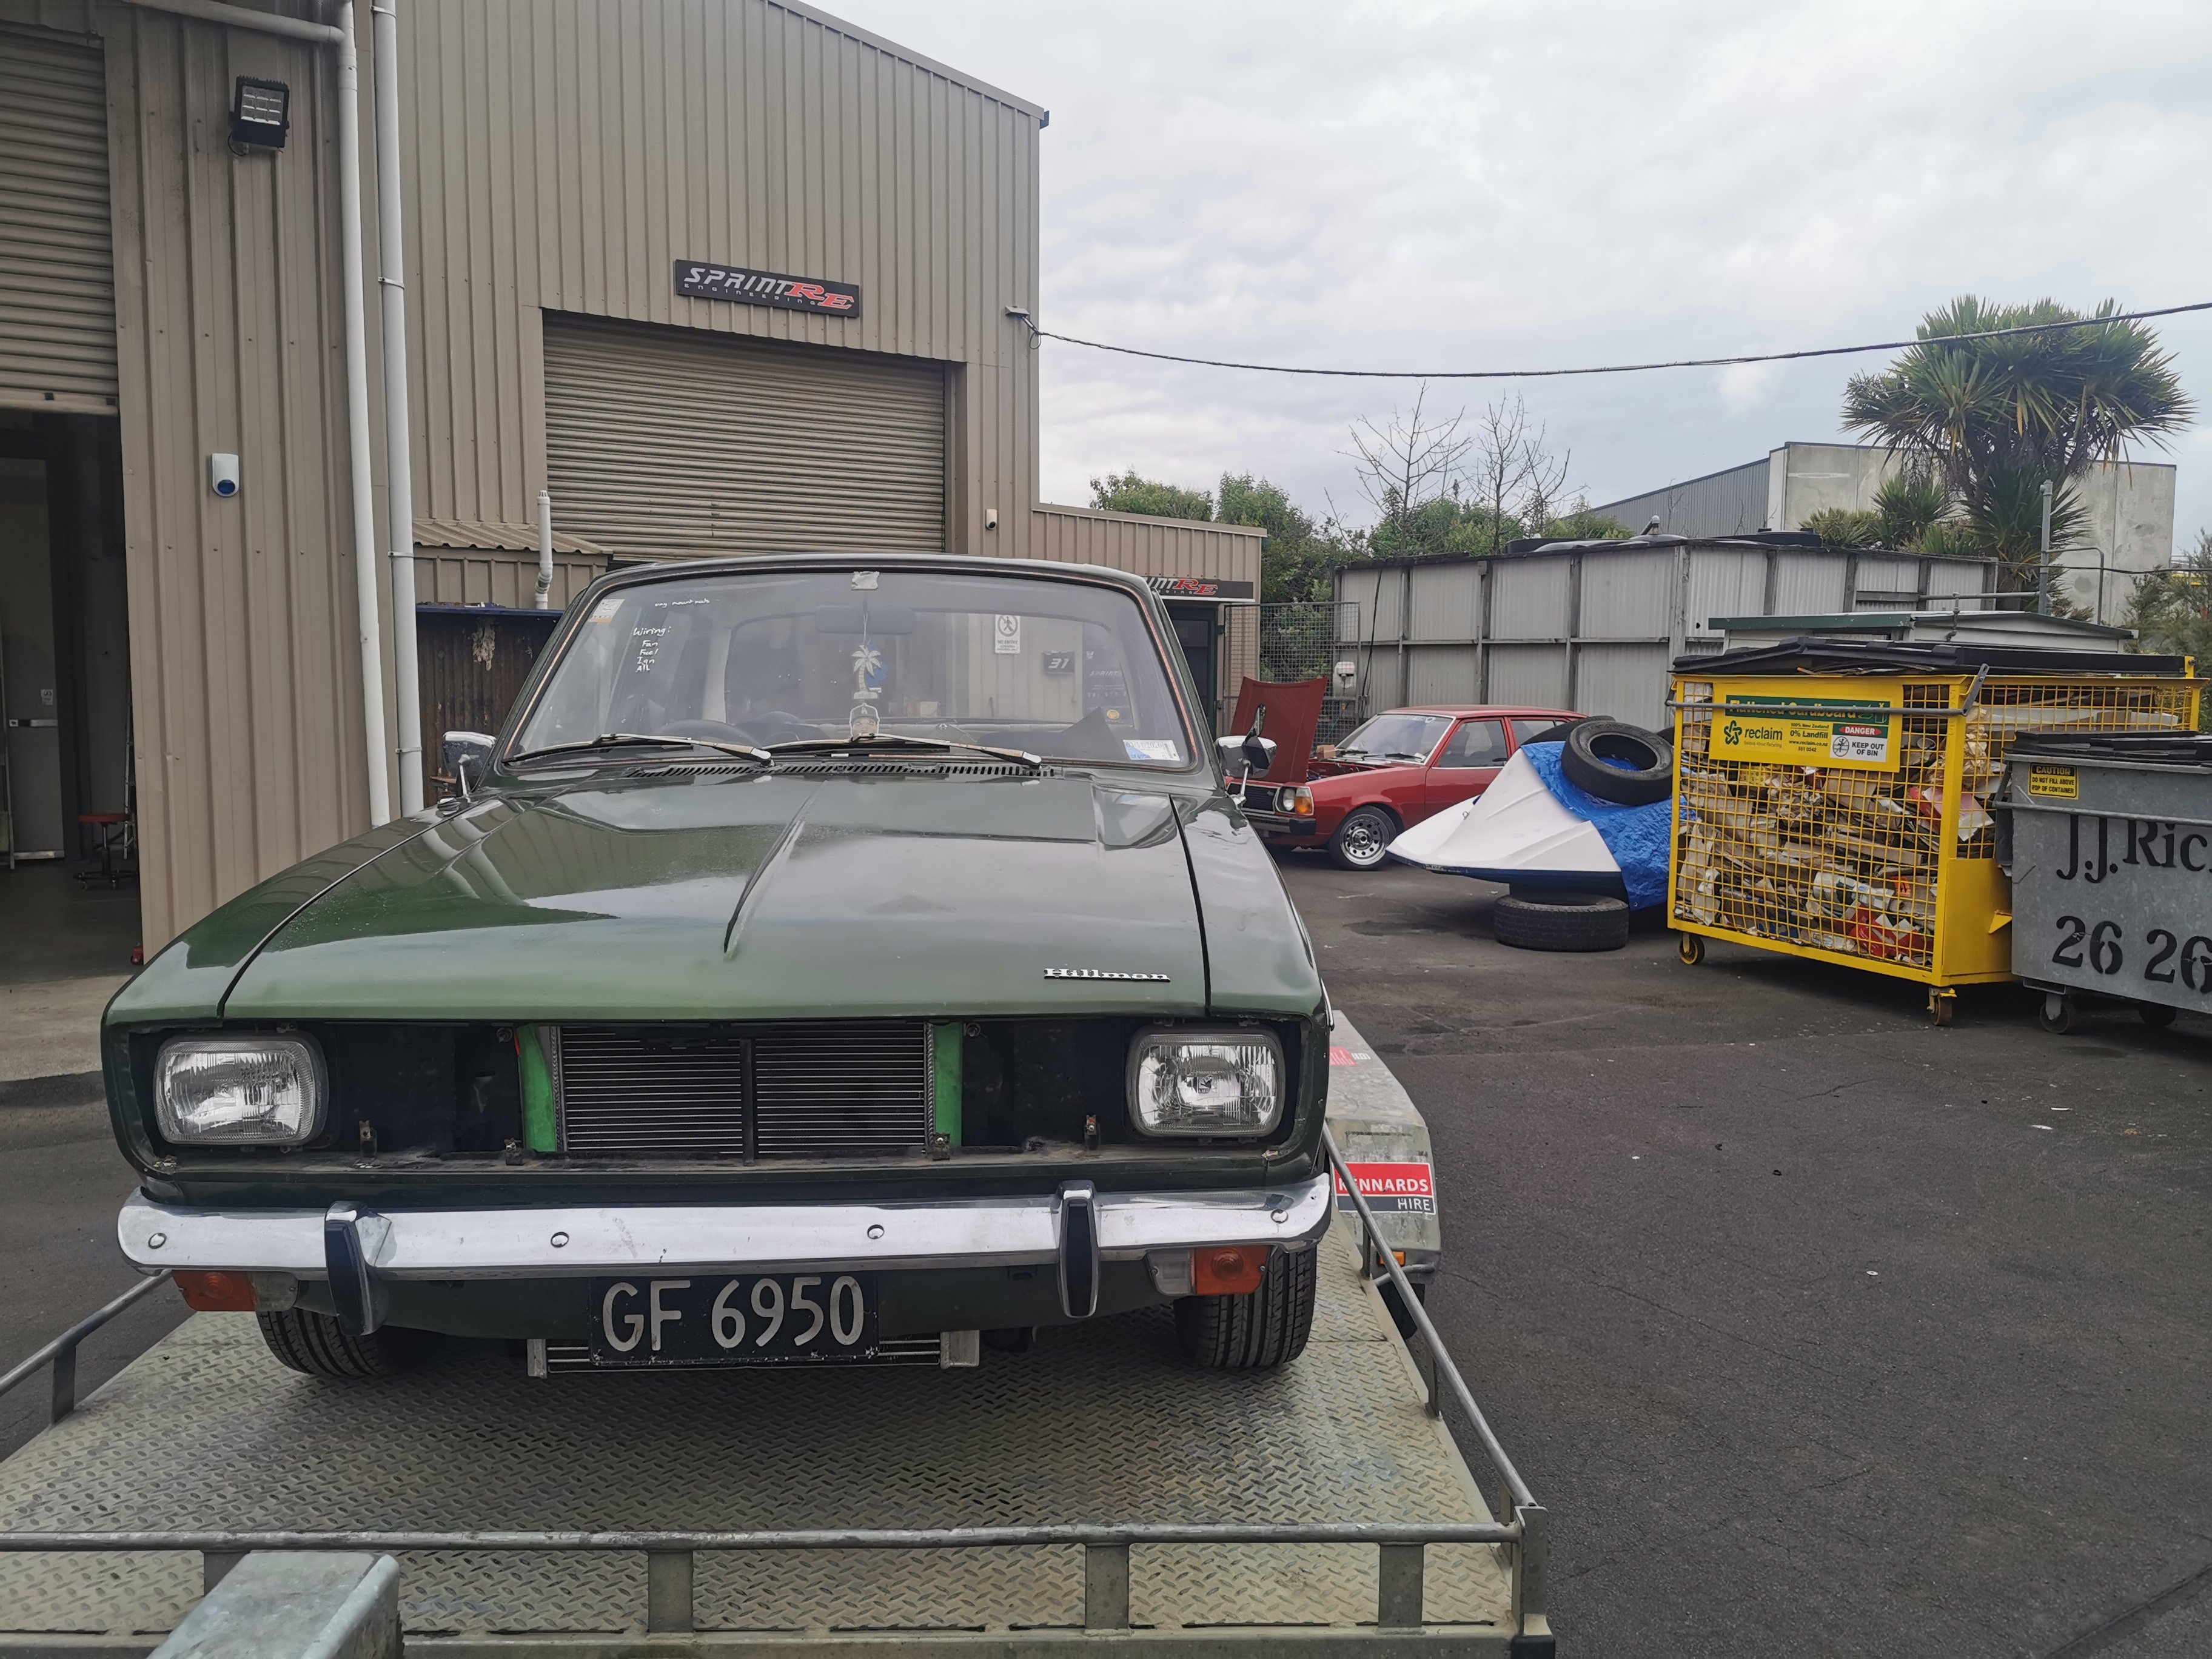
Bloody glad I sent it in to Sprint RE. Theyr mounting the seats for me and uncovered some cracking around the original mounts.. Not cool. So we made a plan, and then they spoke with Clint about the new mount plates etc. Totally stoked with their service. Quite funny, it turns out that I've known Jason from Sprint RE from back in the day when I built RX3UTE and my rotor van. I did my entire rotor van conversion in Jason's workshop in 1 day, drive in drive out, that was 18 years ago. Small world life..1 point
-
Just went for a little "sprint" down the road. Dropped the old girl off to Sprint RE in Waiuku to get the last bits tidied up, and a tune. Fit the seats and get comp test.. Fingers crossed she's all good..
1 point
-
I'm just gonna leave this here........ New intake day.. IDA for max brap. Found that all 3 of the ignition modules I have are duds... Great I found a xf Falcon one I had lying around from the stockcar, wired that up to the leading circuit.. Got sparkles on the leading plugs.. So will need to source a 2nd module now. So if any of you good folk happen to have any 4 pin ignition modules I would be keen to trade chats. And In other news for the red car, I have obtained a few parts for this build. Originally picked up a 1.6 zetec for it, however not being able to source a T9 box I have dissolved that idea in exchanged for a better set up.. Was originally planning on another 12a build, but flat peakers expect too much for junk parts, so I'll keep the mint housings as spares for the greeny. I will start a separate build thread for the red car I think as its taking a very different path than the green machine.
1 point
-
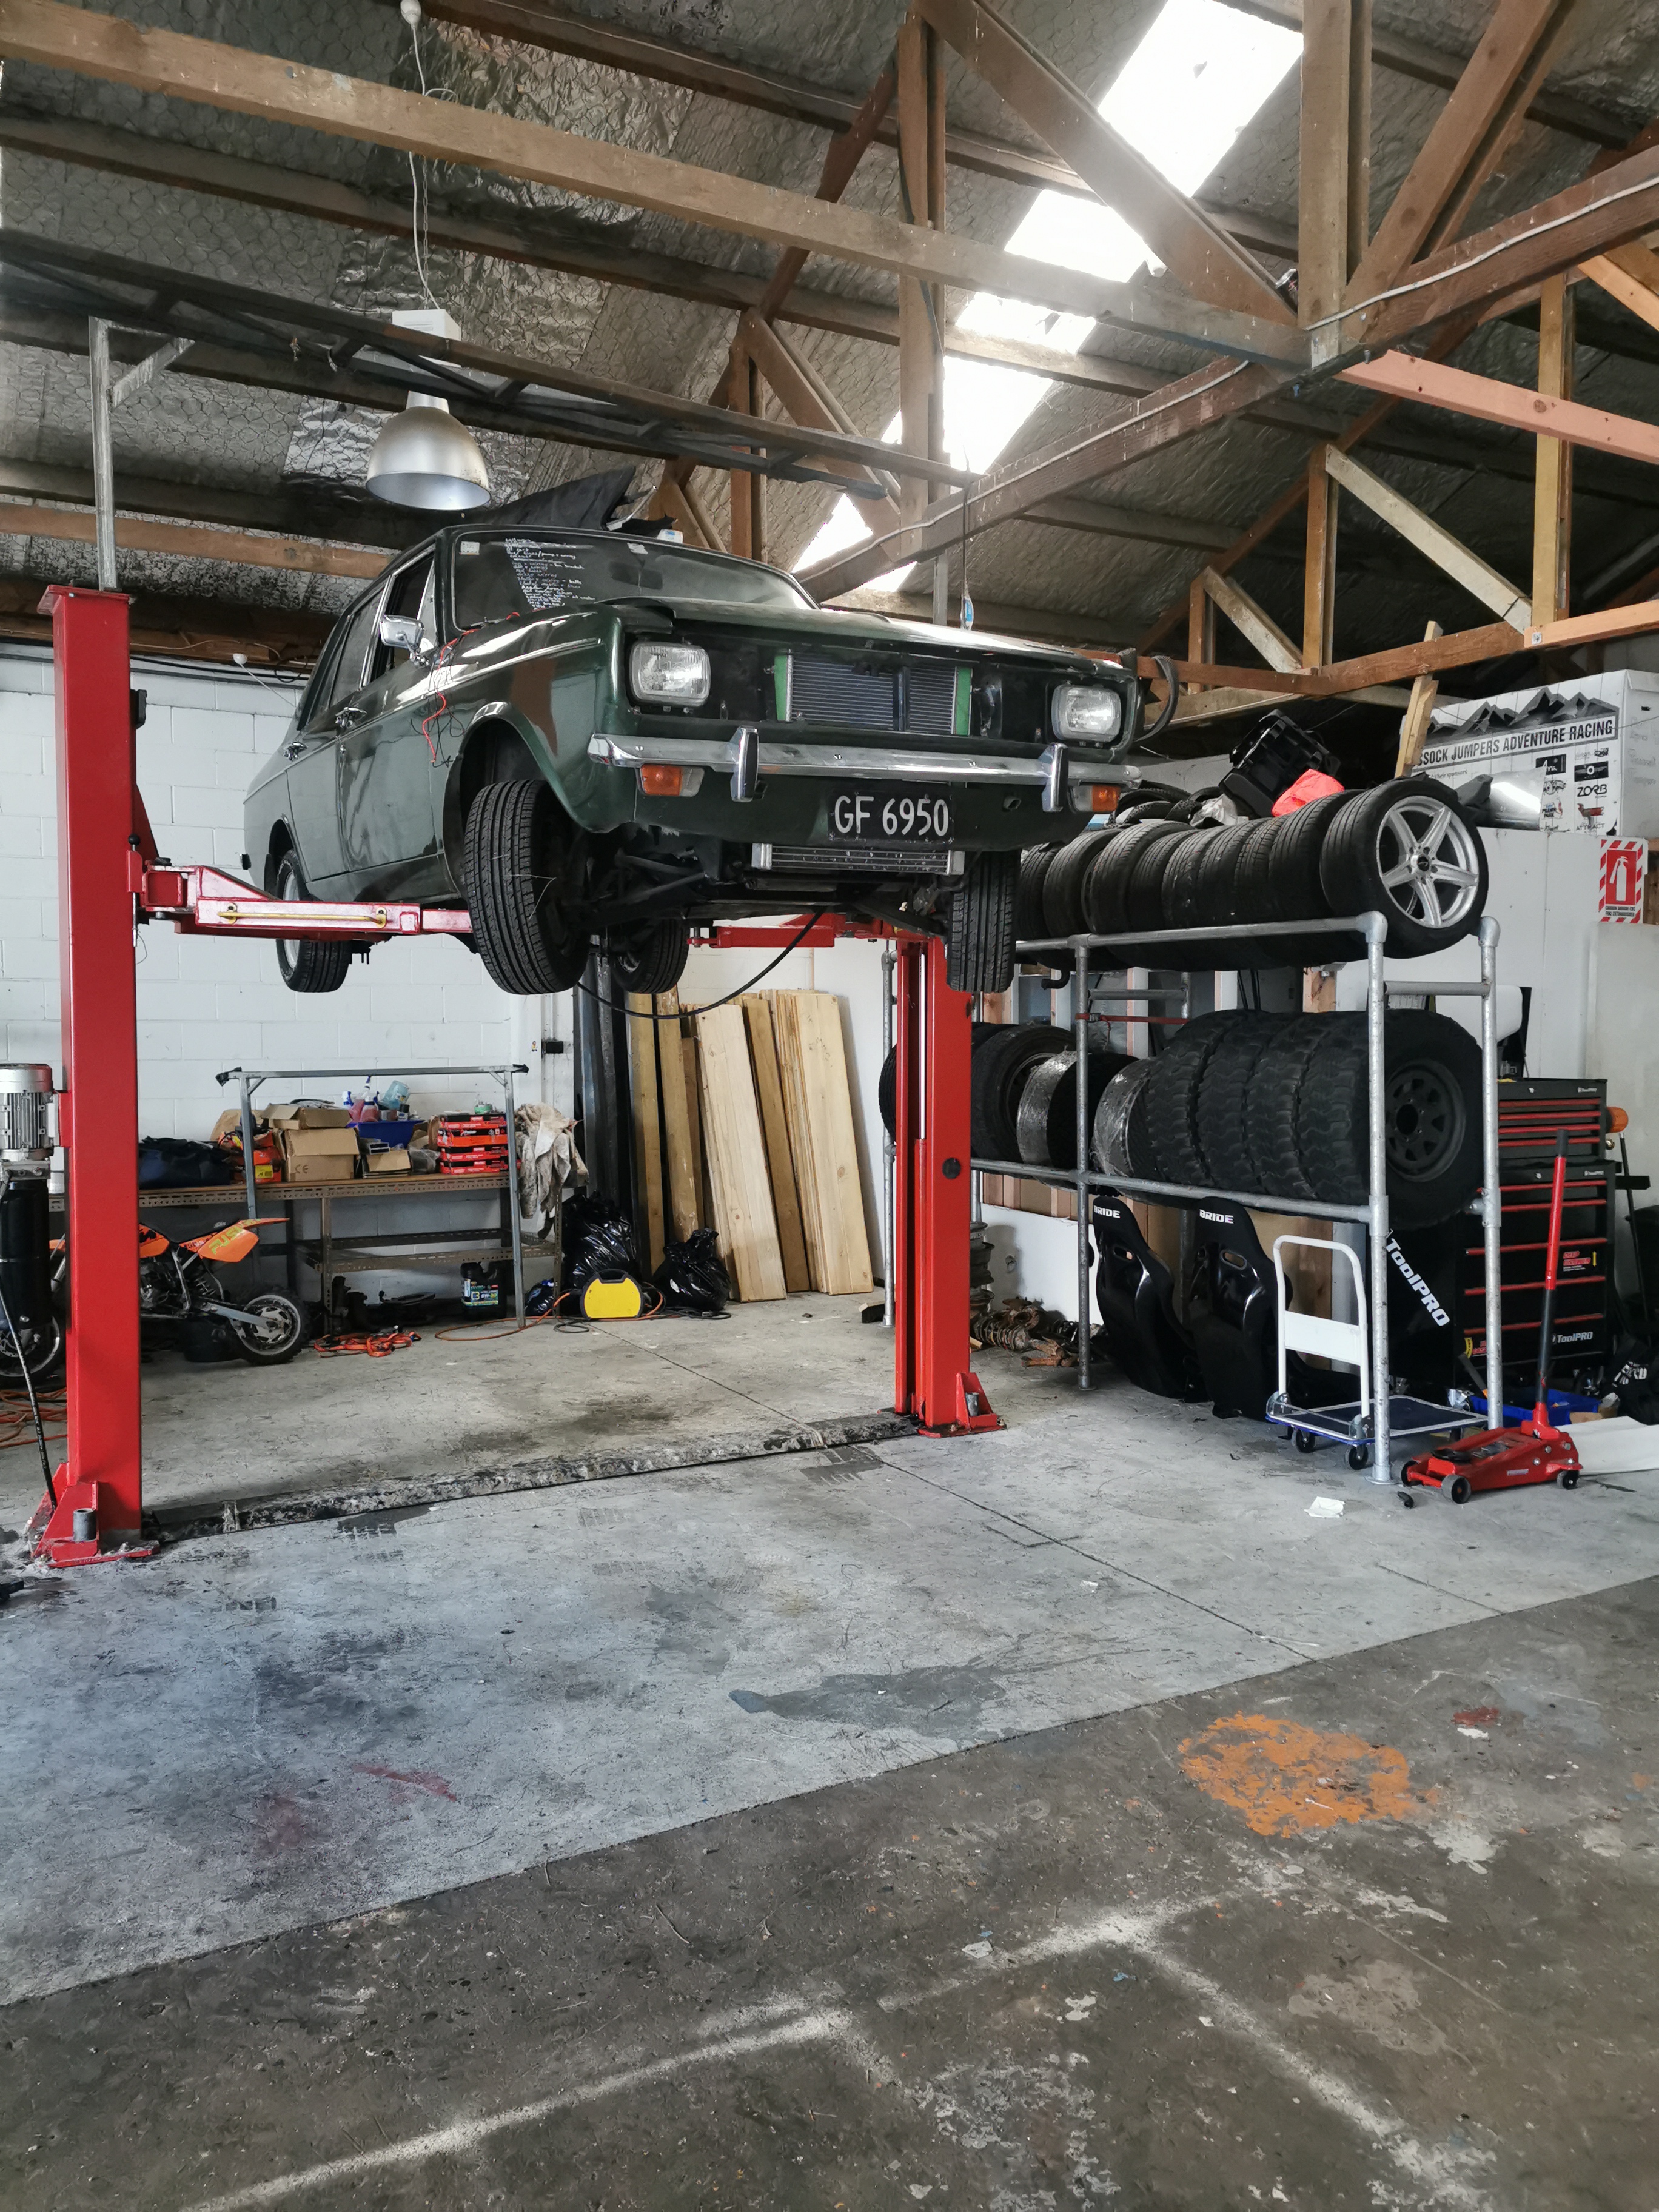
Hoist.... Engage Finally got the hoist up and running, built a tyre rack. Looked under the car, she is mint as under there, not a hint of rust.. 50 years of British oil leaks did its trick
1 point
-
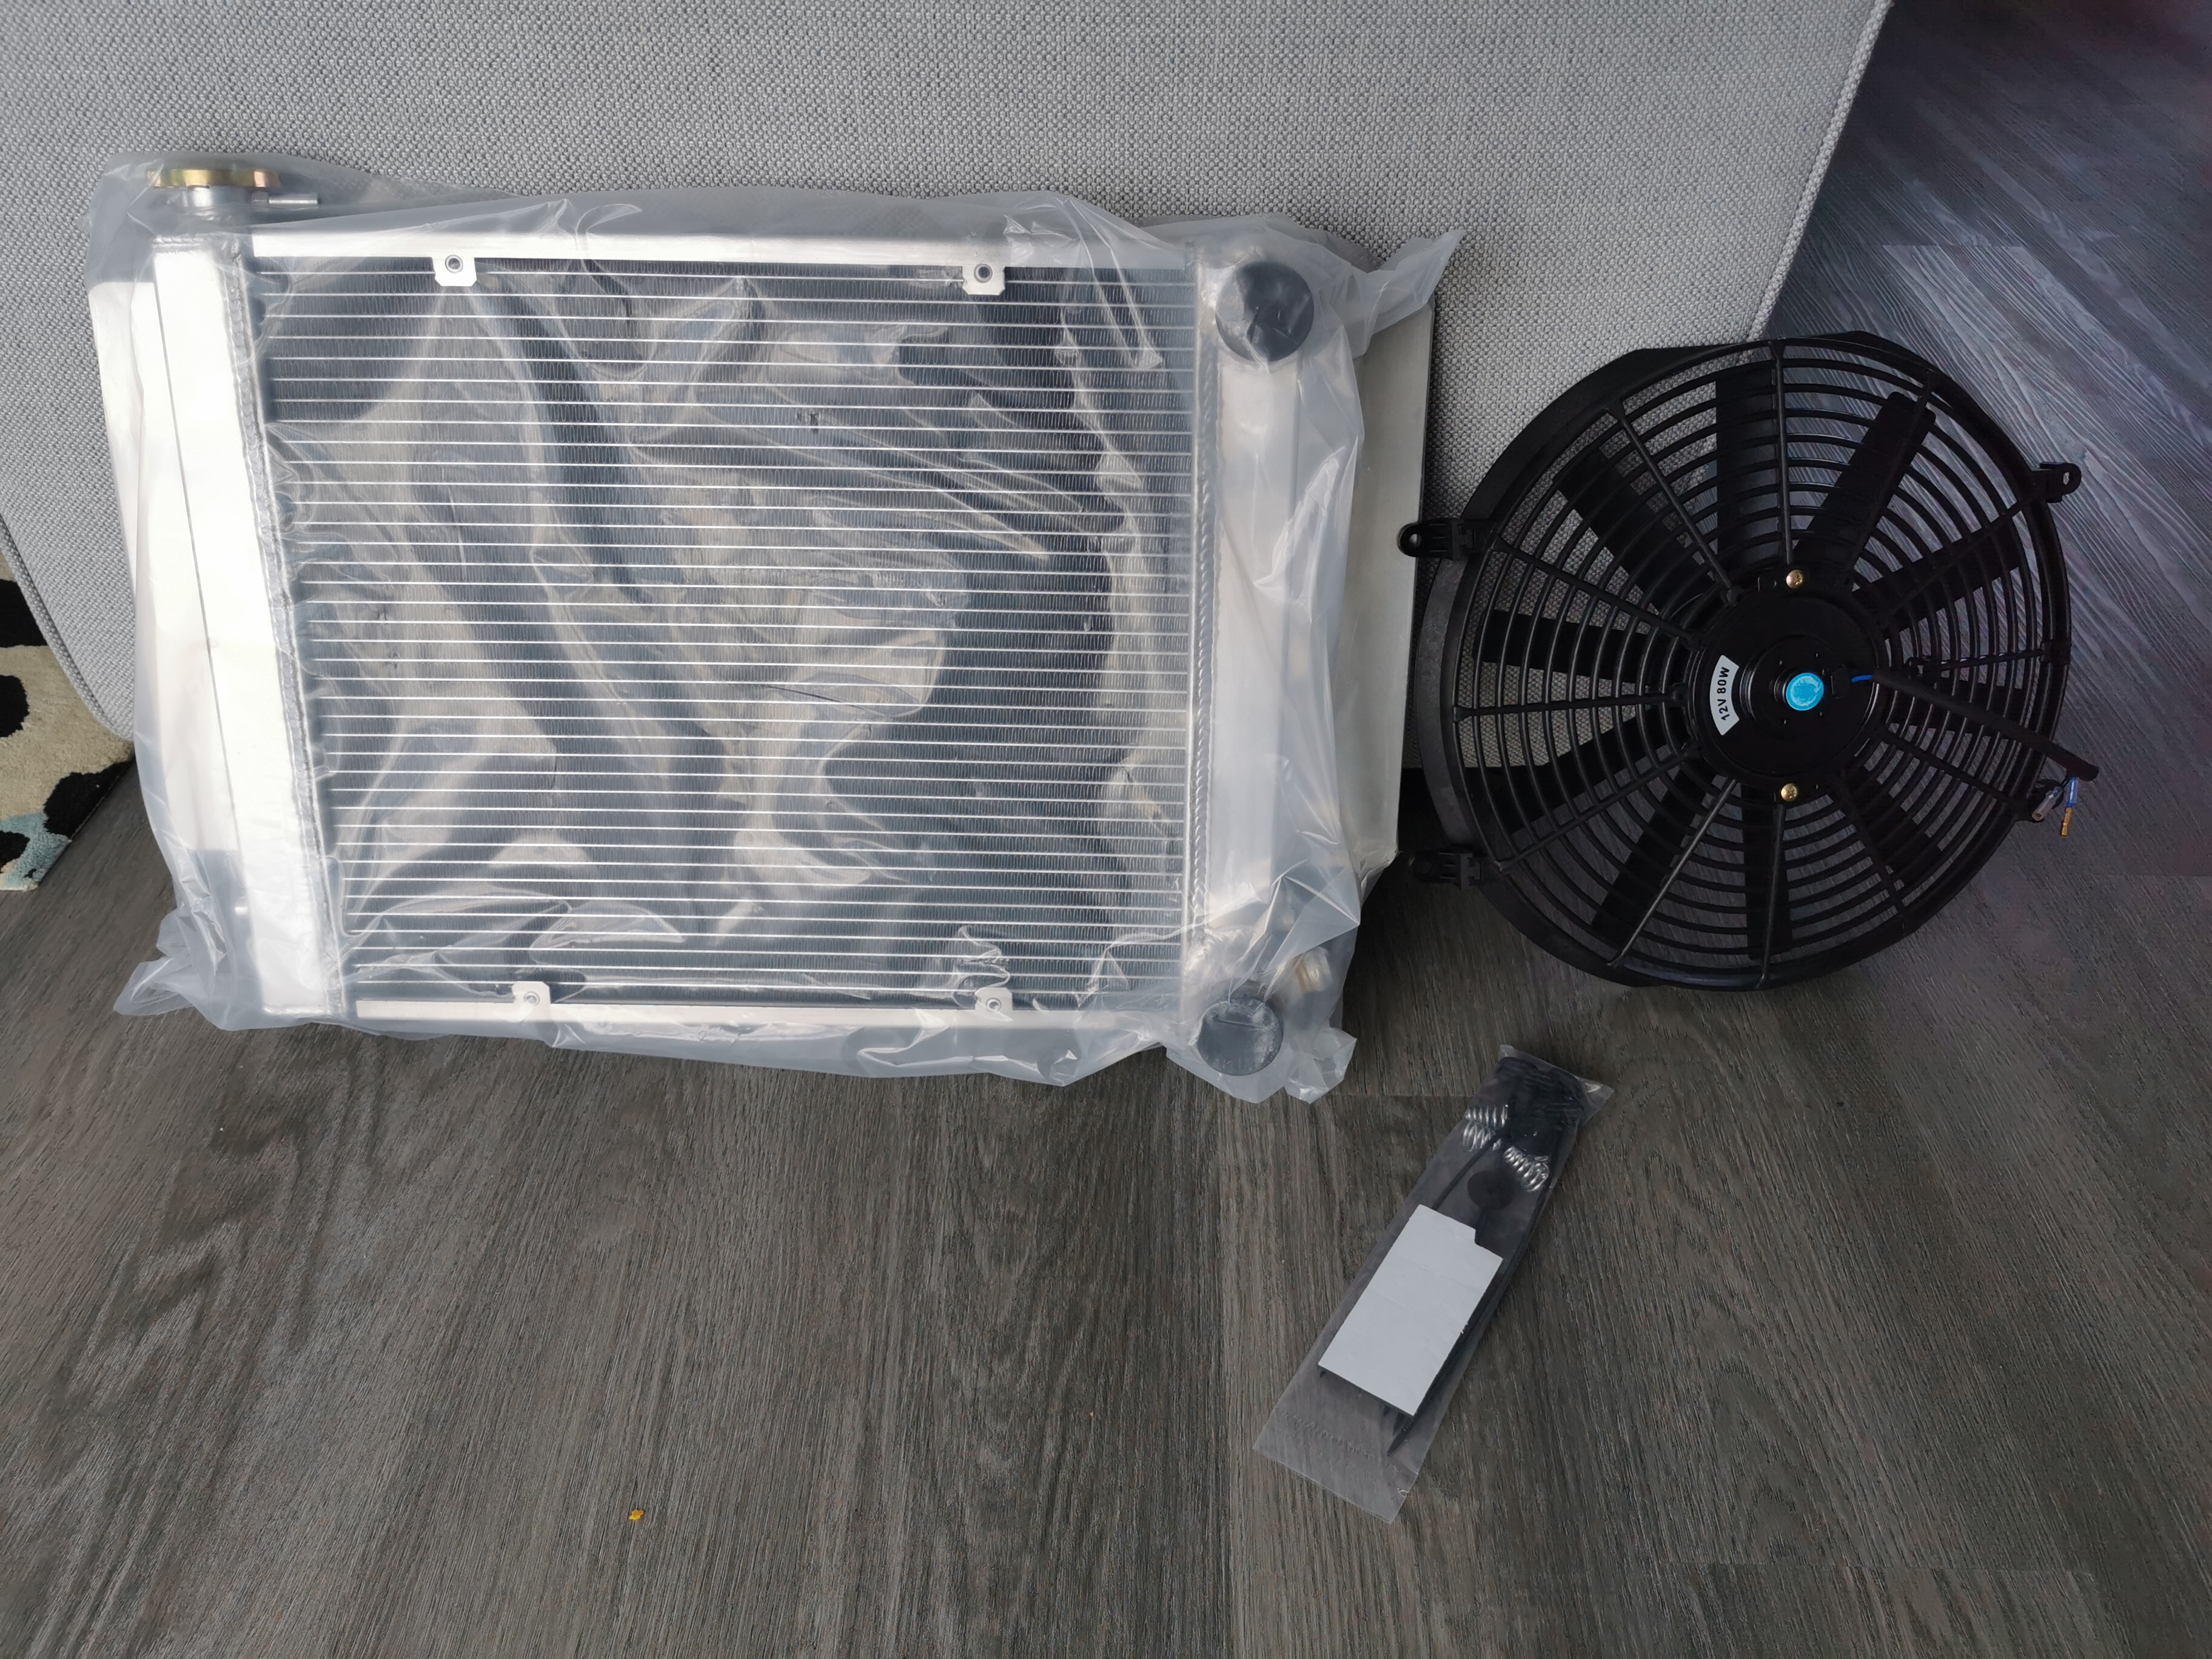
Ooooooh pretty parts have arrived Nice new alloy radiator and thermo fan..
1 point
-
Started making up my headers today... Picked up a flange plate from m&m racing.. A 2" mandrel multi and a 2 1/2" multi from tbl... Got a 18" resonator, dumpy and flexi on its way... This header is 1.5hr in the making... Most of that was just head scratching to clear the pitman arm on full lock. Stoked with it so far. Gotta pick up a 2 into 1 collector today to finish it off.1 point
-
Thanks man, great to hear! I've got no previous experience in racing so totally starting with the basics, have already learnt a hell of a lot in the short space of owning this car though! Totally agree with what you're saying, I'm literally relying on my 'experience' of hooning around backroads so I'm just trying to get clued on racing lines and braking points as I go. Good to hear there's some potential but I definitely agree some advice from a more experienced driver would go a long way. Would be great to have someone come out with me at a trackday but unfortunately I'm not allowed to take passengers without a cage. Have joined the Canterbury Car Club now so I'll have a yarn with some of the members and see if I can go out with someone at the end of an event when the track's empty, even just going for a lap in someone else's car would be pretty helpful. Cheers for the input, great motivation to get it back on the track!1 point
-
I'm enjoying you thread immensely. After 25 plus years of building and co-driving race cars it makes me want to stop running our currently overly complex high-tech sponsored car and get back to basics and start all over again. (What I'm really saying is your enthusiasm makes me feel bloody old! ). Watching the in car video's you're making some very obvious mistakes that result in your car controll being jerky & indecisive rather than the smooth but aggressive driving technique that makes a car run fast. I'm picking you've got great potential as a 'peddler' (your time at Levels confirms that) but you're at the stage when you need track time with an experienced person in the passenger seat teaching you the basics and pushing you very hard to be decisive, and in controll. If you were in Auckland I'd be volunteering my services, I'm by no means an expert but I have had the privilege of working beside some very experienced drivers over the years and can see how easy it would be to tweak your driving skills up to the next level. Try your local car cub or even just approach people on track day and ask them if they know of anyone who can come out for a few laps and give you some pointers. Look out for teams using track-days for car testing, you'll find most are approachable, (as you've probably already discovered petrol heads are a friendly bunch). Please don't take my post as being condescending, I'm just an old bugger with a bad habit of calling a spade a f***ing shovel. I'm also impressed with what you're doing. Cheers, Simon.1 point
-
Rebuilding the gearbox is relatively easy especially if your only doing bearings. Pull the end cap off, take to gearbox shop and get them to pull reverse and 5th gear off the end of the shaft as they require very particular gear pullers to get them off without damaging them. Normally costs a few beers. Pull shifter linkages and mechanism out next (4x bolts where shifter shaft goes in). Pretty sure from here the casing can be split once you undo the one bolt on the front of the gearbox housing - someone correct me if I'm wrong but there's something funny about that one bolt iirc. Pretty easy to pull shafts out and press/pull bearings out of the housings. Can buy a lsd brand new from Toyota around $450 for a standard one or $1250 for a TRD plate type diff. (mark can confirm pricing) Bearings seem to be about $100/ea but Def worth replacing including diff bearings. Just remember to use feeler gauges to measure tolerances between gears/synchros before pulling apart so you don't put the gears back on too tight. You'll need to replace to circlip under 5th gear also when it goes back together these are a one use only circlip. Memory is a bit hazy been 5 years since I rebuilt my old c56. Found a manual online and gave it a go with no precious experience wasn't too hard at all. I highly recommend a TRD diff you won't regret it helps the handling of the car so much. Also Kaaz and cusco do similarly priced diffs too, Kaaz being slightly better quality imo but slightly more expensive too1 point
-
I have cleaned all the engine parts and ordered piston rod bearings and a ring set from bowden engine parts. Complete paints has made a spray can with the original engine color for me. Suvic is gone grind my crankshaft as soon if I have the bearings. The main bearings probably have to come from fleebay. I still have to sort out the seals. Back in the original color: Back in the original color: A box with clean parts. I have to make a detailed photo of the Flash logo on the cover and somehow reproduce it. Nice clean parts: The gearbox looks mint. I am not gone open it up, but leave it as it is.1 point


.thumb.jpg.570970b401ac8d26ce9af7c1bf2bd8cd.jpg)


This leaderboard is set to Auckland/GMT+12:00