
Leaderboard

.thumb.jpeg.384ff72c8d2b0ee0d34a7bdedb55bdcf.jpeg)


Popular Content
Showing content with the highest reputation on 02/19/24 in all areas
-
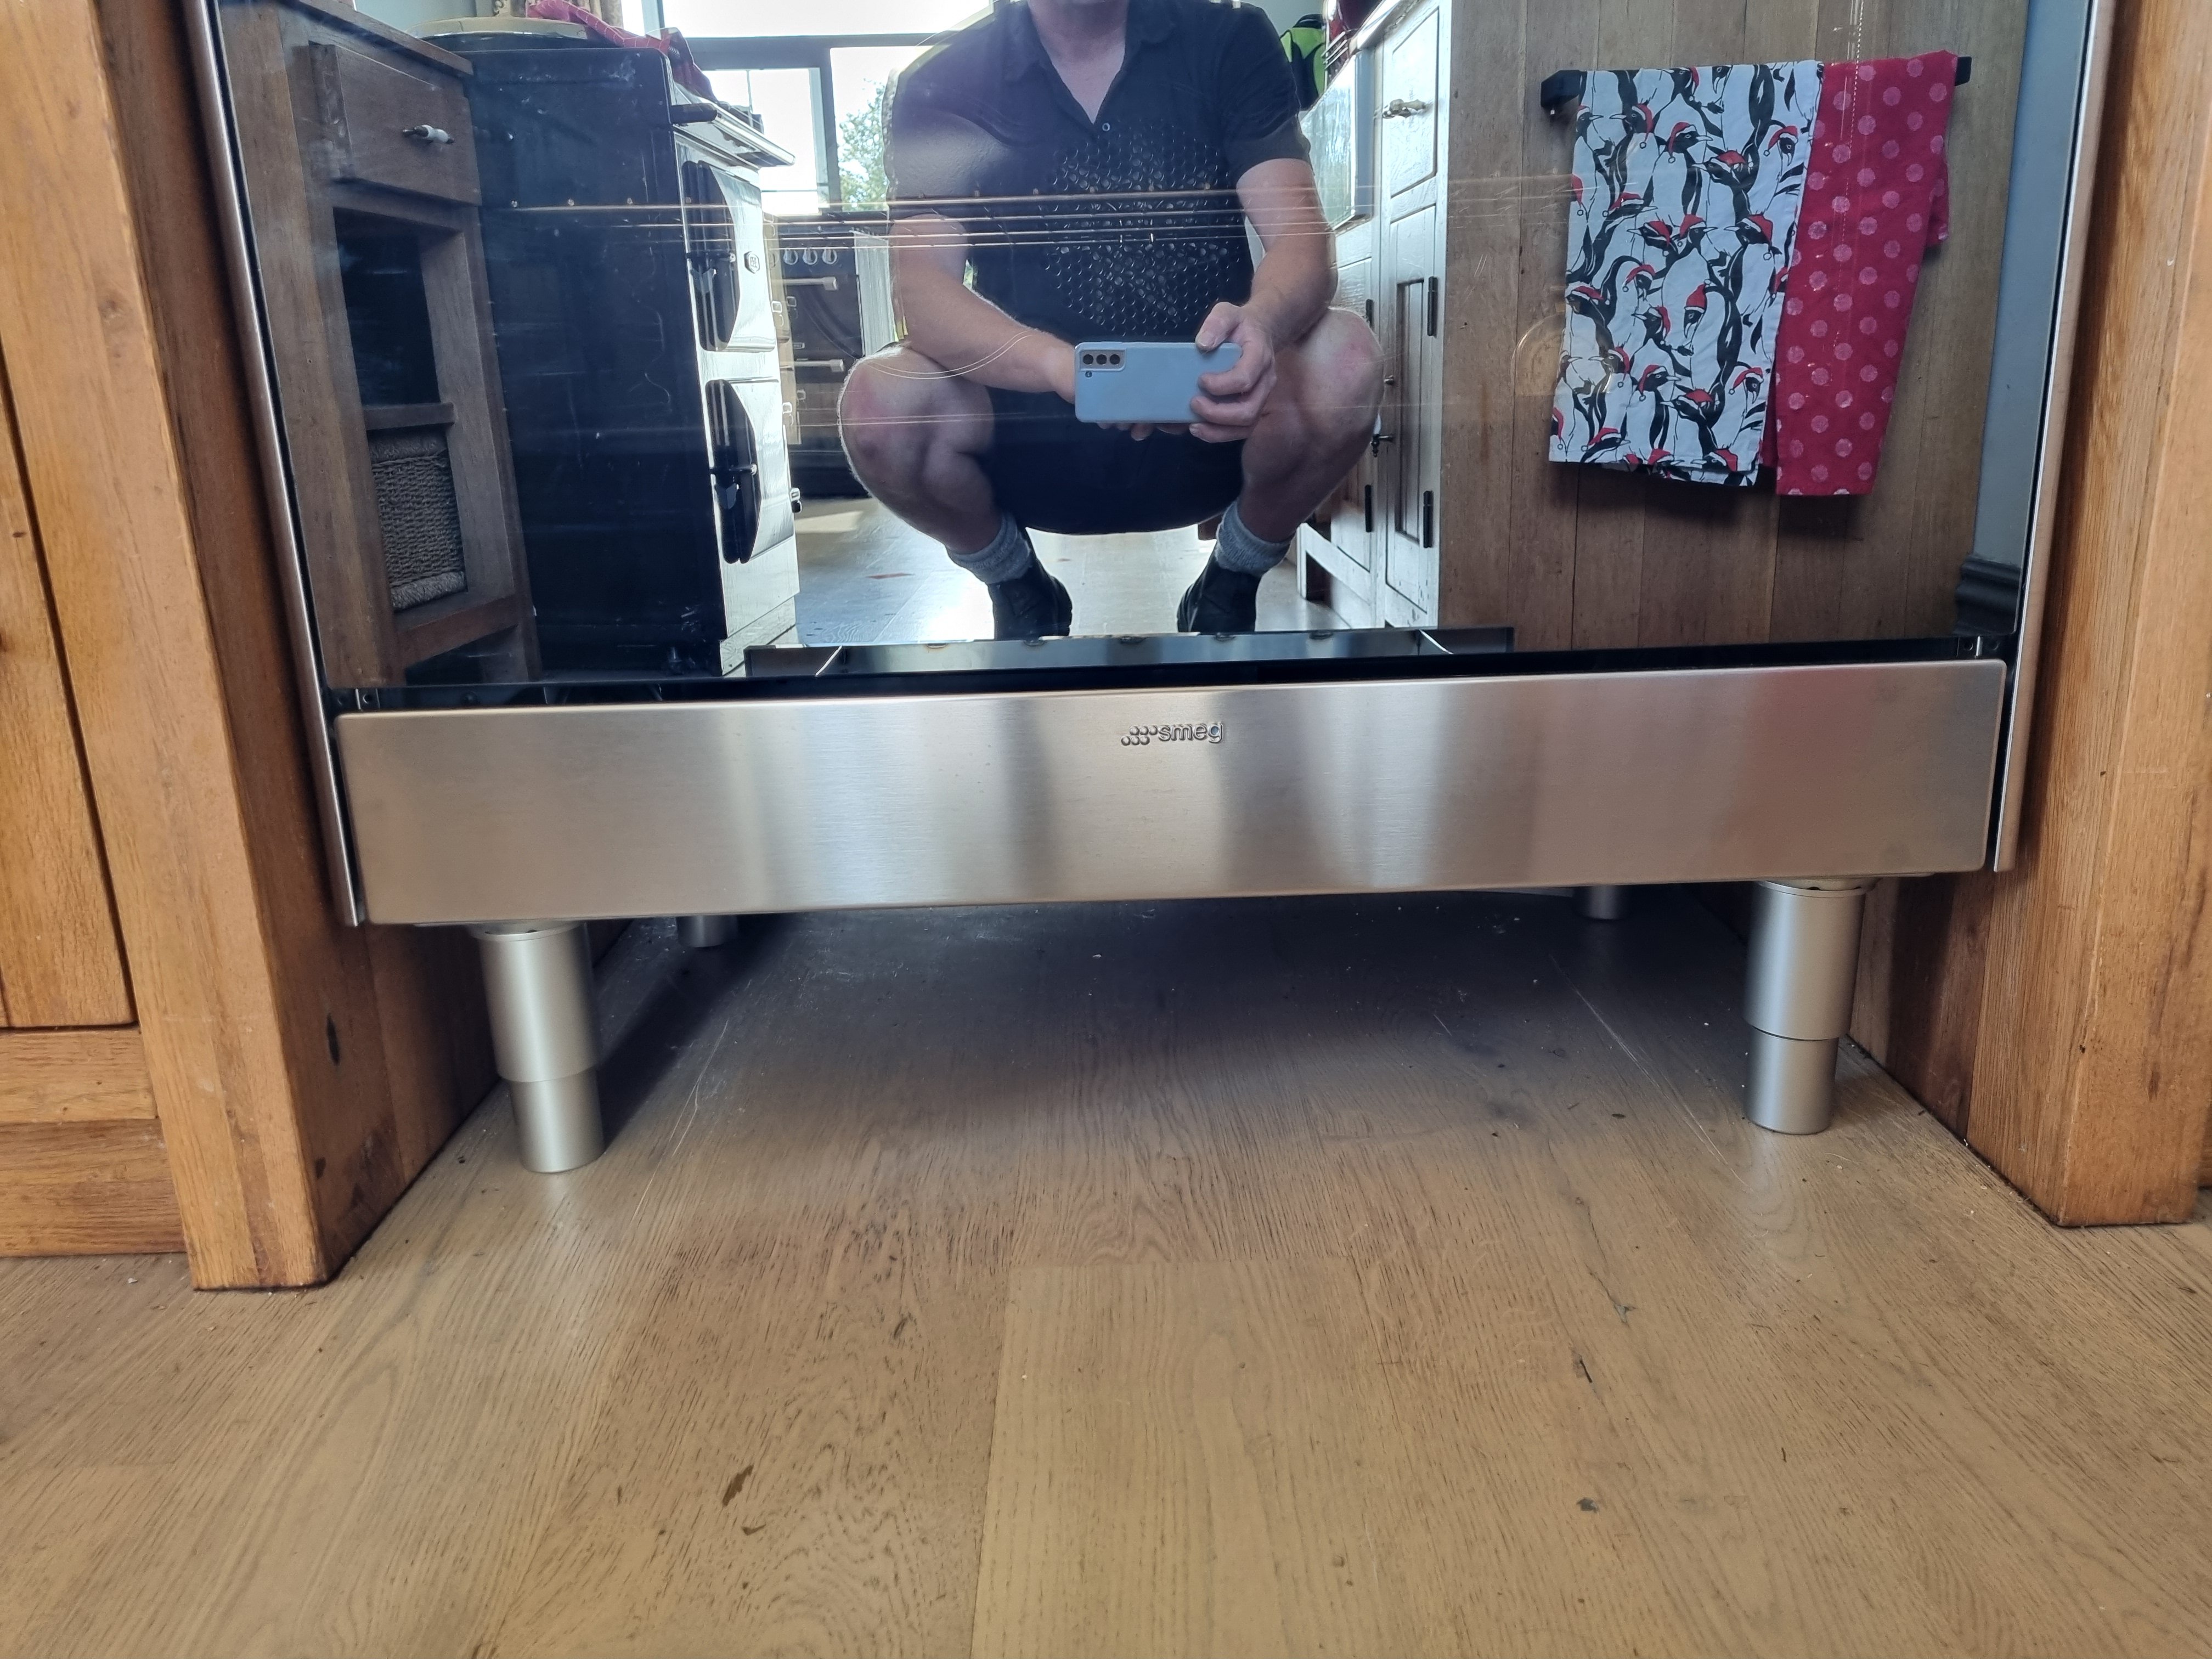
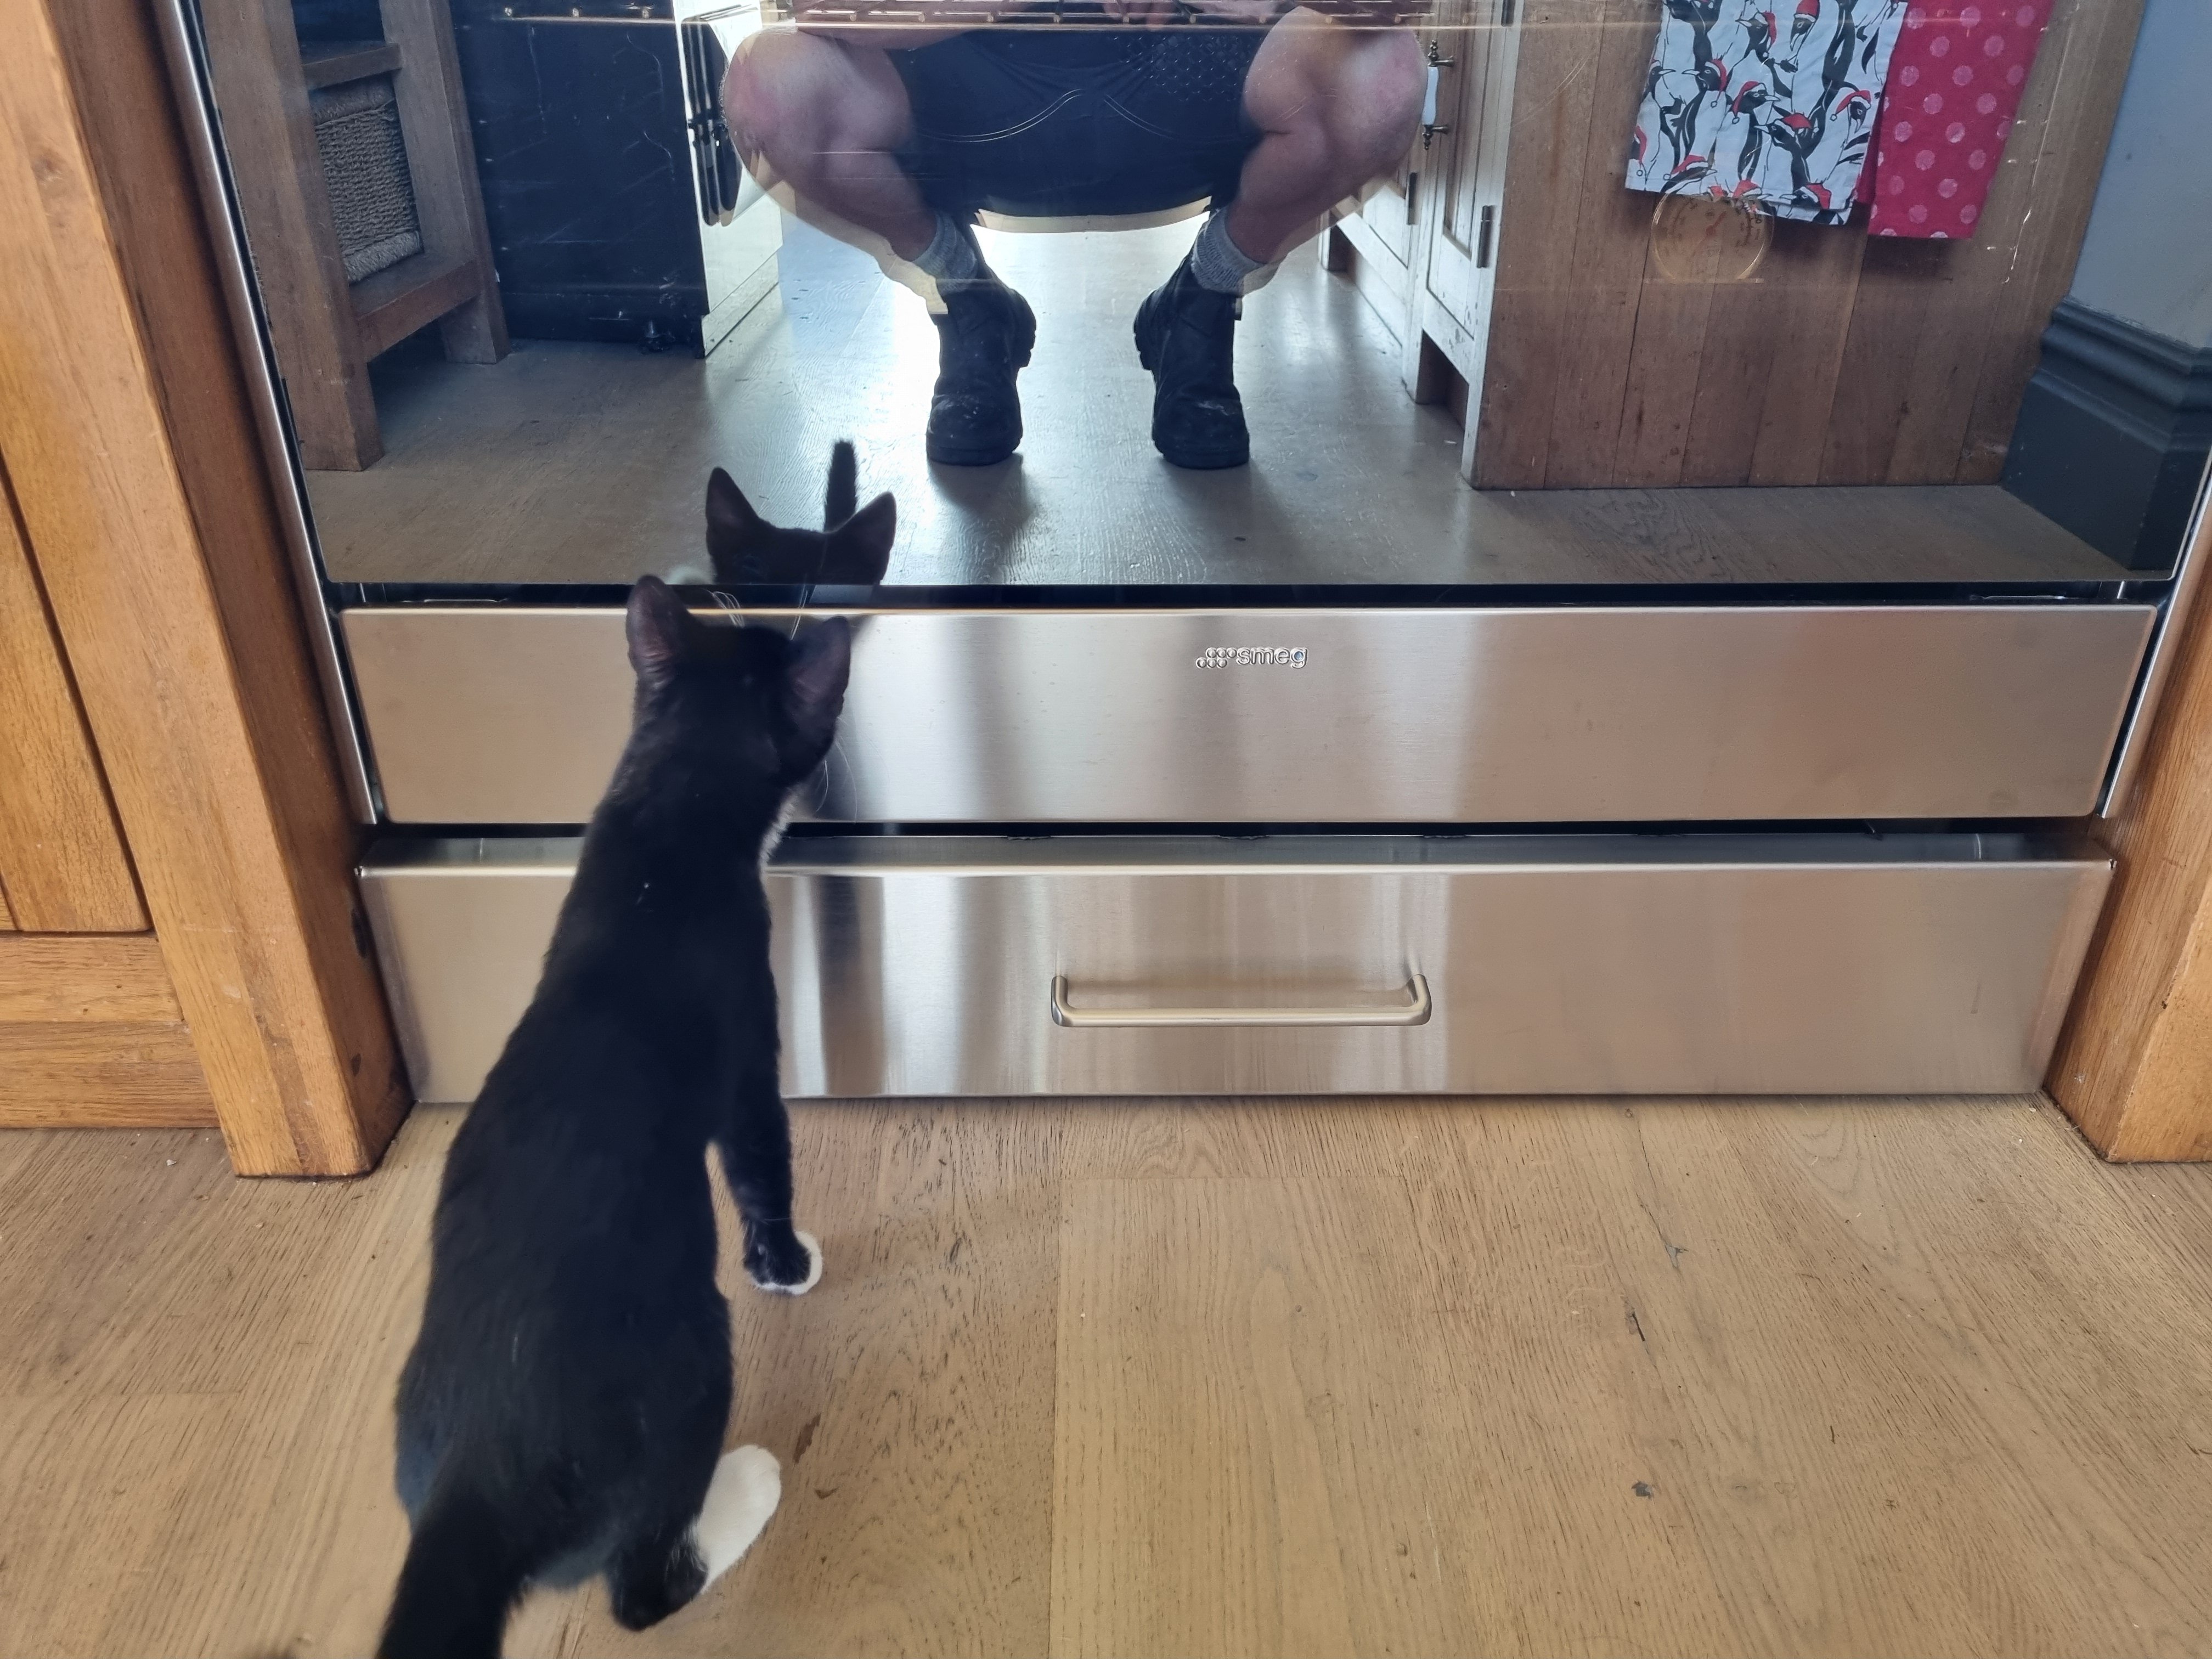
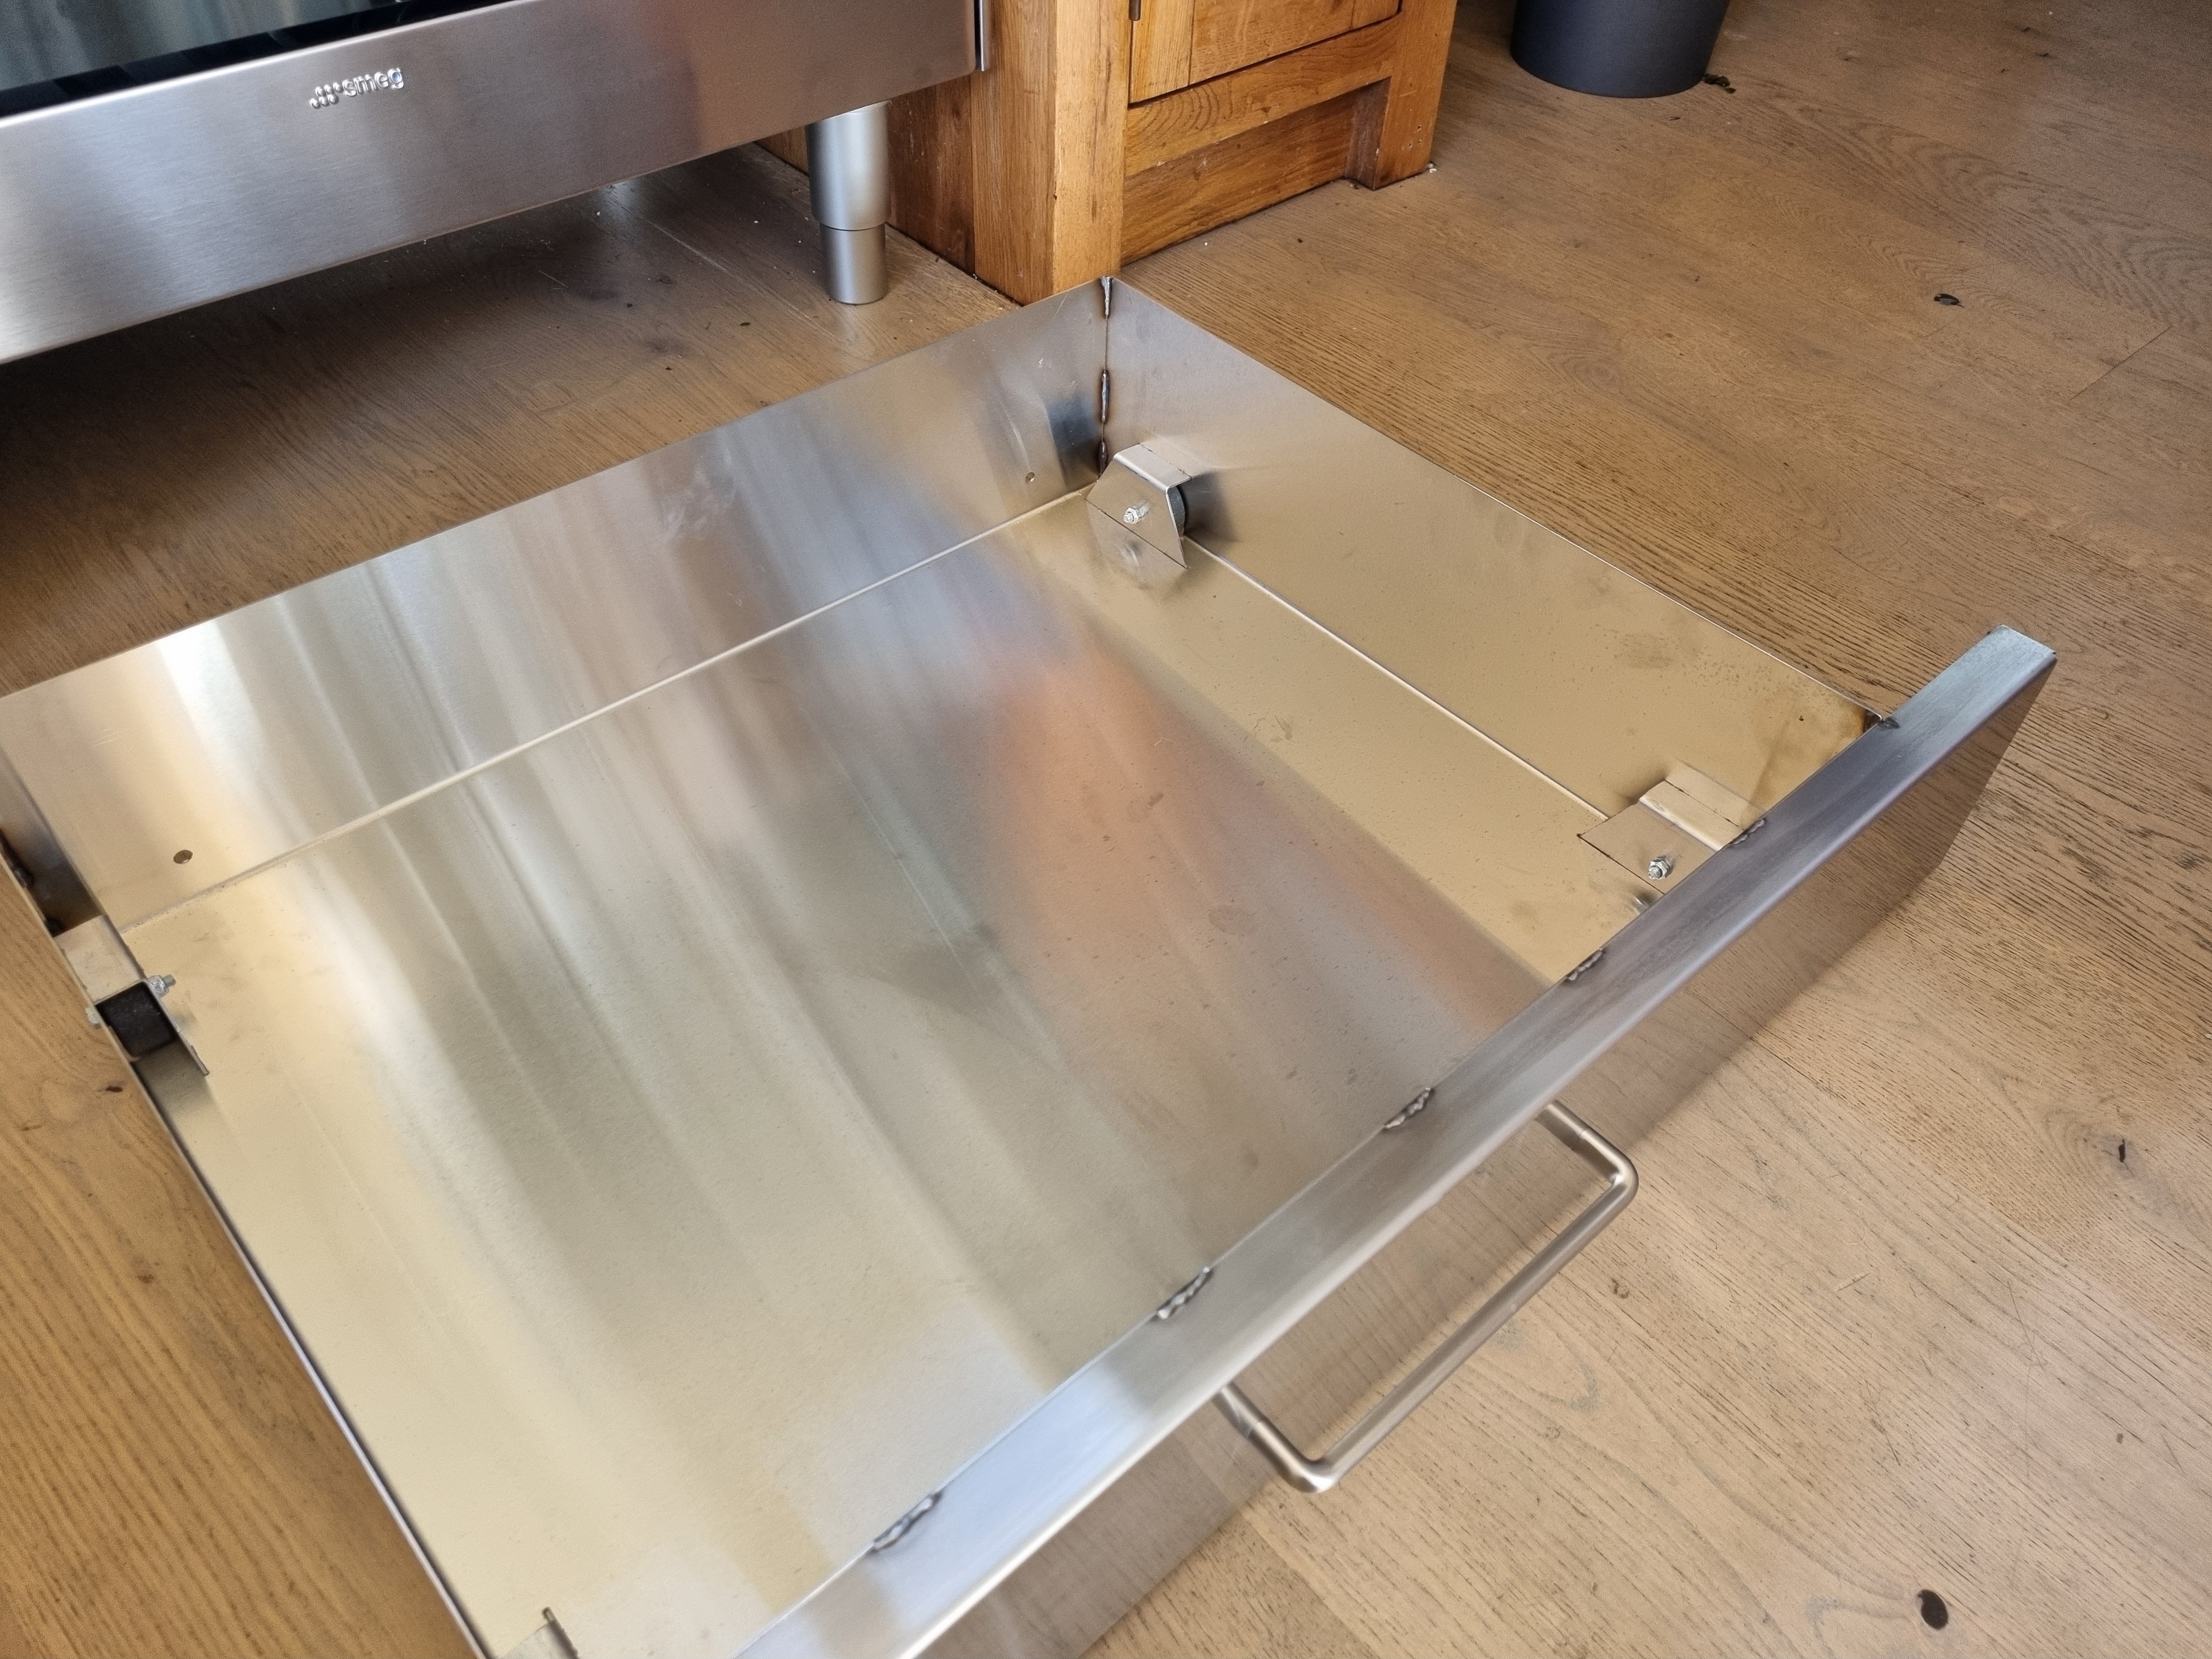
Our new oven came with a huge waste of space under it so I drew up a drawer with wheels on the corners and I got it cut and folded. Then I welded it together. Its designed so the wheel brackets slot into the sides and base but it doesn't need welding, that way I can change the wheels if I ever need to.
 19 points
 -
In January 2024 I suddenly needed somewhere to live in a hurry ... so I figured on building something small out of scraps of building materials I already had.. There's no power, water, sewer on the property, but 10 days ago we got most of the driveway in. I'm the kind of guy who thinks a fair bit before I act, so after some further thought most of the scrap timber/plumbing/etc. I had available got pushed to one side as they just weren't going to work. Queue more invoices for better timber (plus freight) I think this project will take until spring 2024 to be weathertight. Shipping delays and huge freight expenses will add to the timeframe and budget. For example I have $500 of under concrete insulation here at the port. The freight bill for that insulation alone was $1,200. The proposed dwelling will be single bedroom and about 60m2 I always start very well but never finish anything. Let's see what happens this time.15 points
-
Finished ! Much enjoyed, will trade again. /pics Chur12 points
-
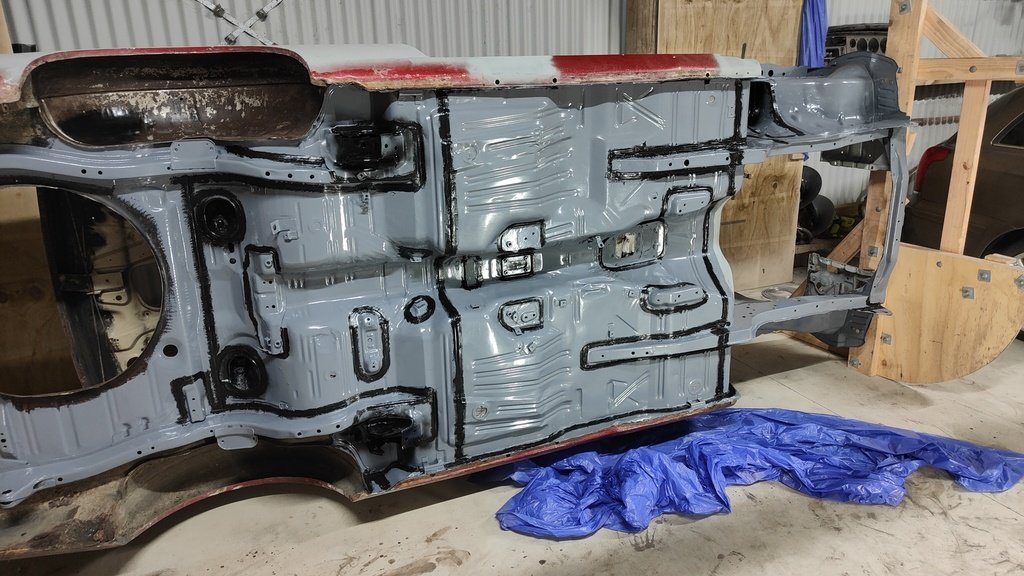
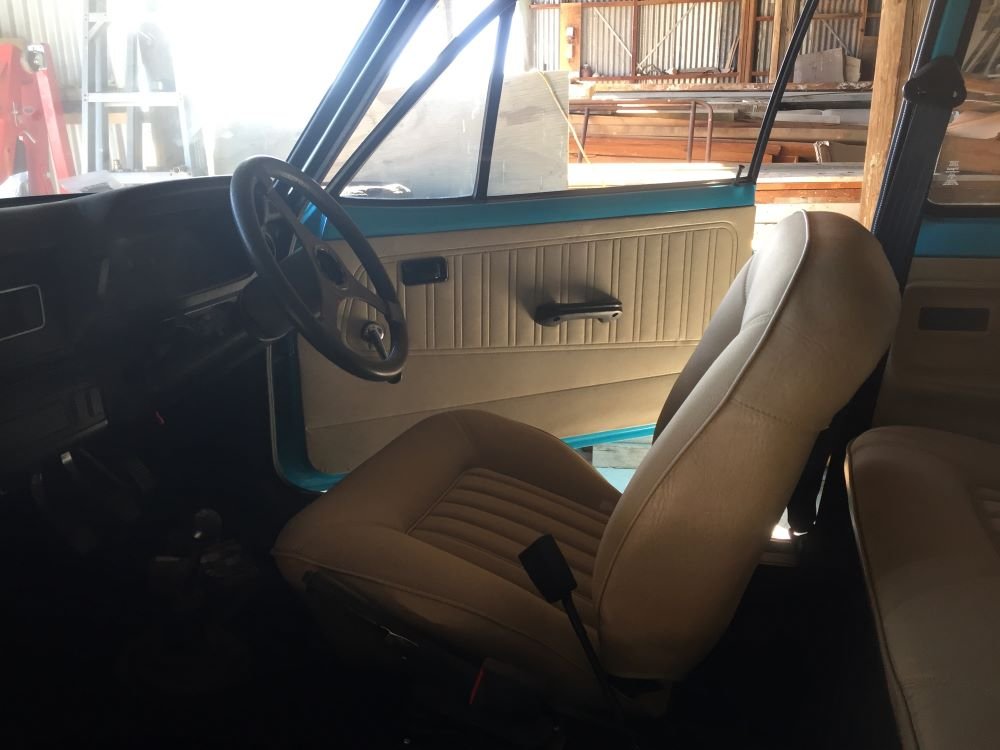
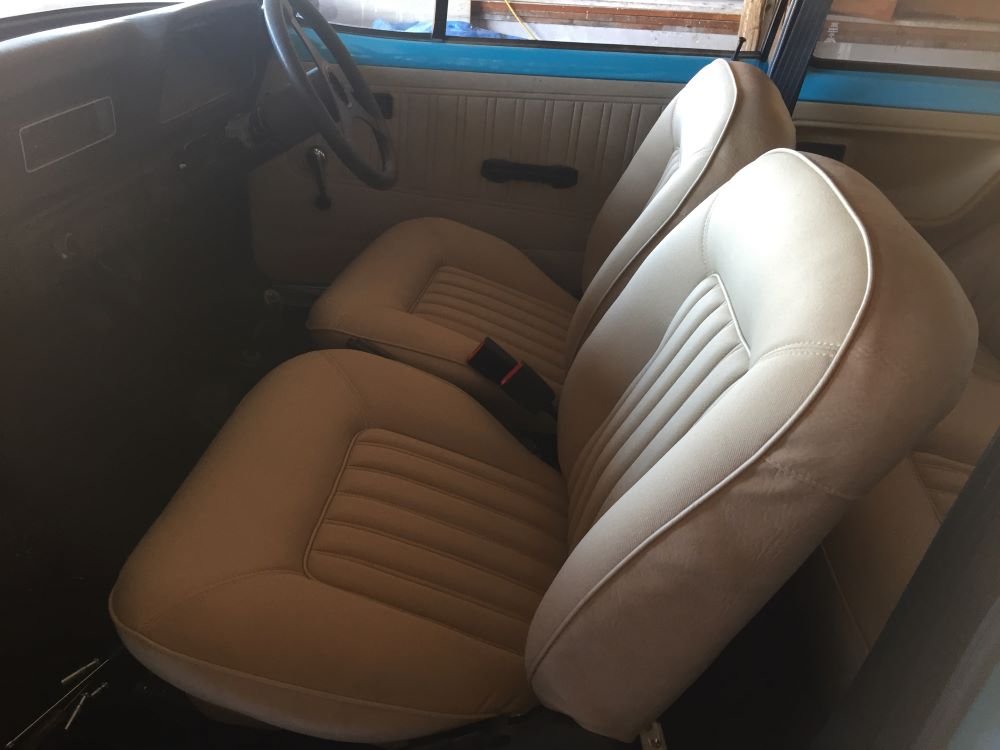
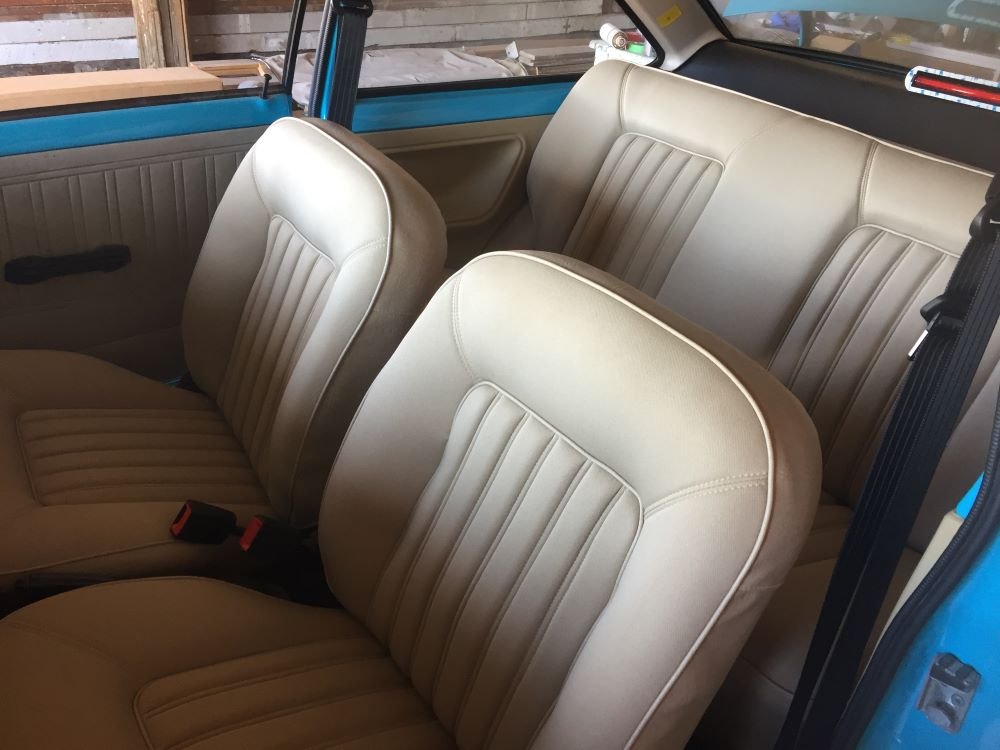
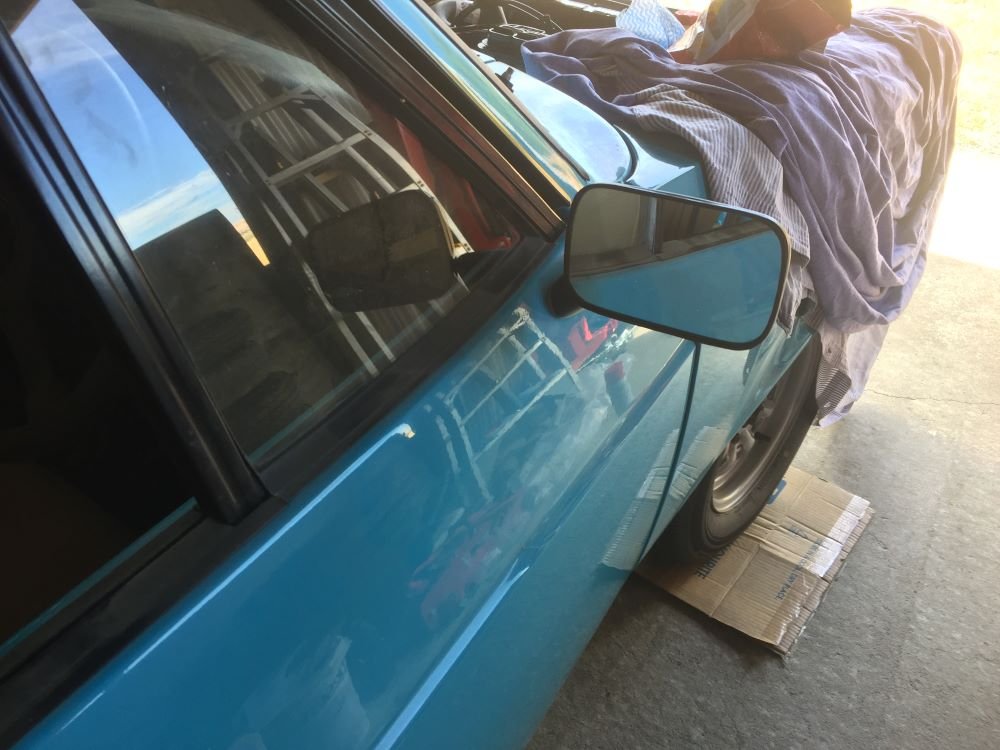
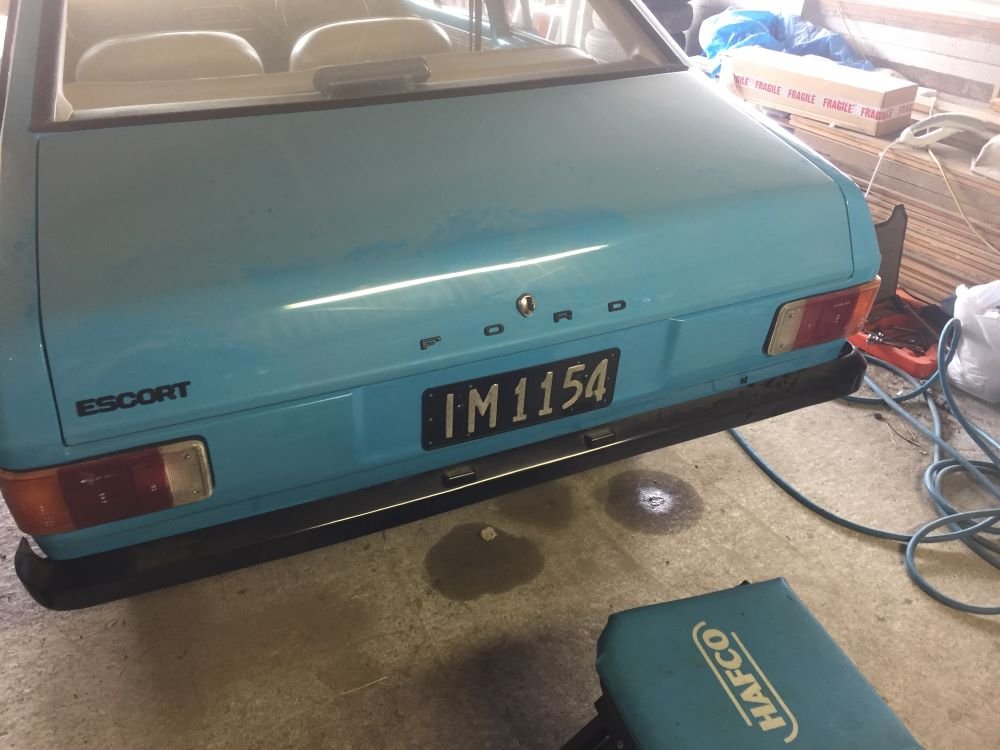
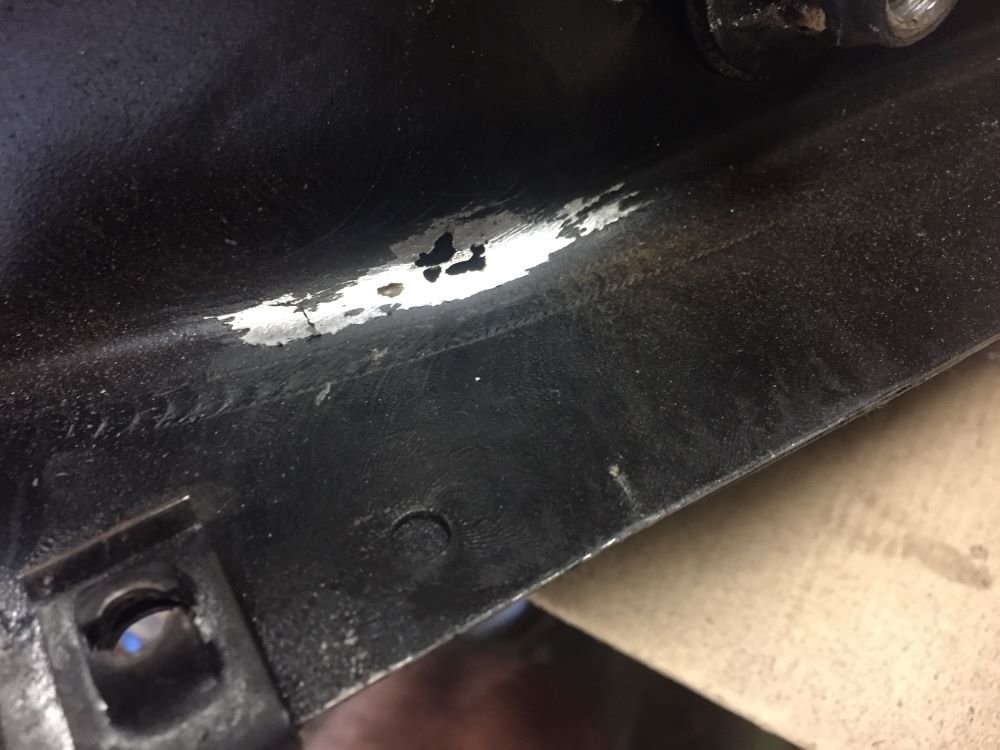
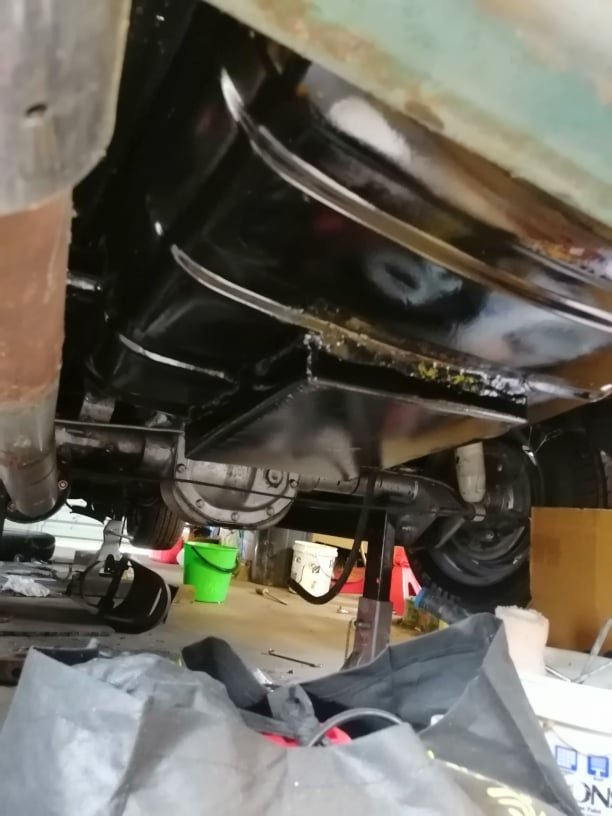
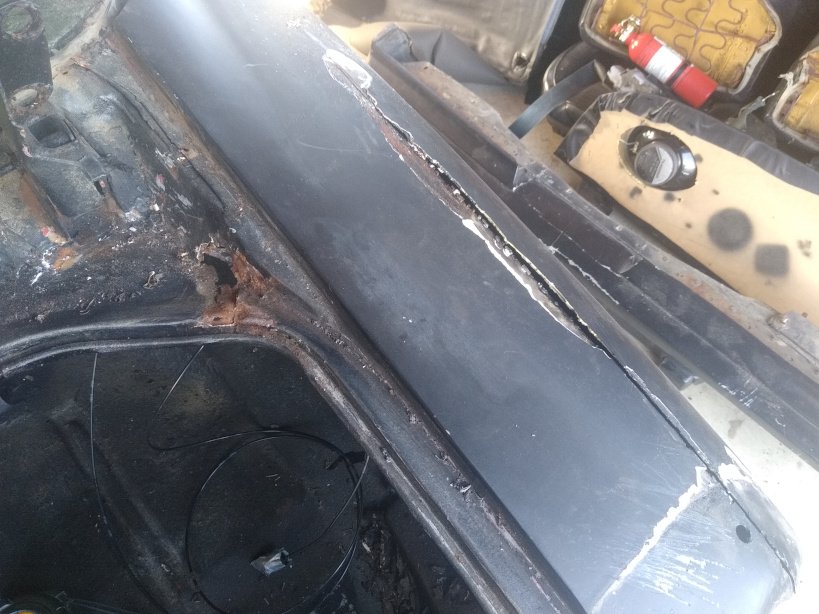
Spent Friday night going over the seam with some sealer, this stuff is a shit to work with but should stop some unwanted moisture and eventual rust. Also painted a few areas that wont have undercoat. Surprised these cars never came with factory seam sealer on the underside, would have saved a heap of them from rusting away.
11 points
-
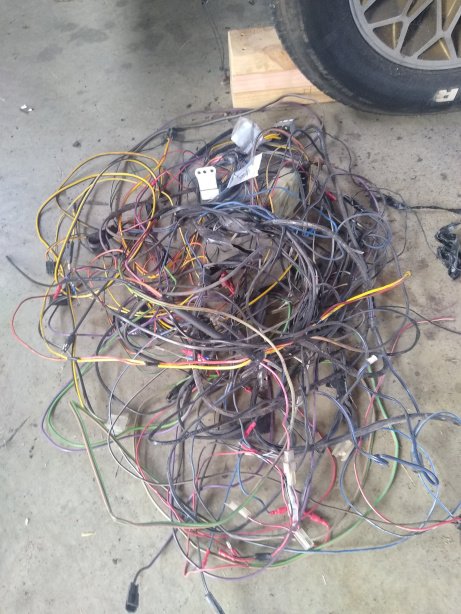
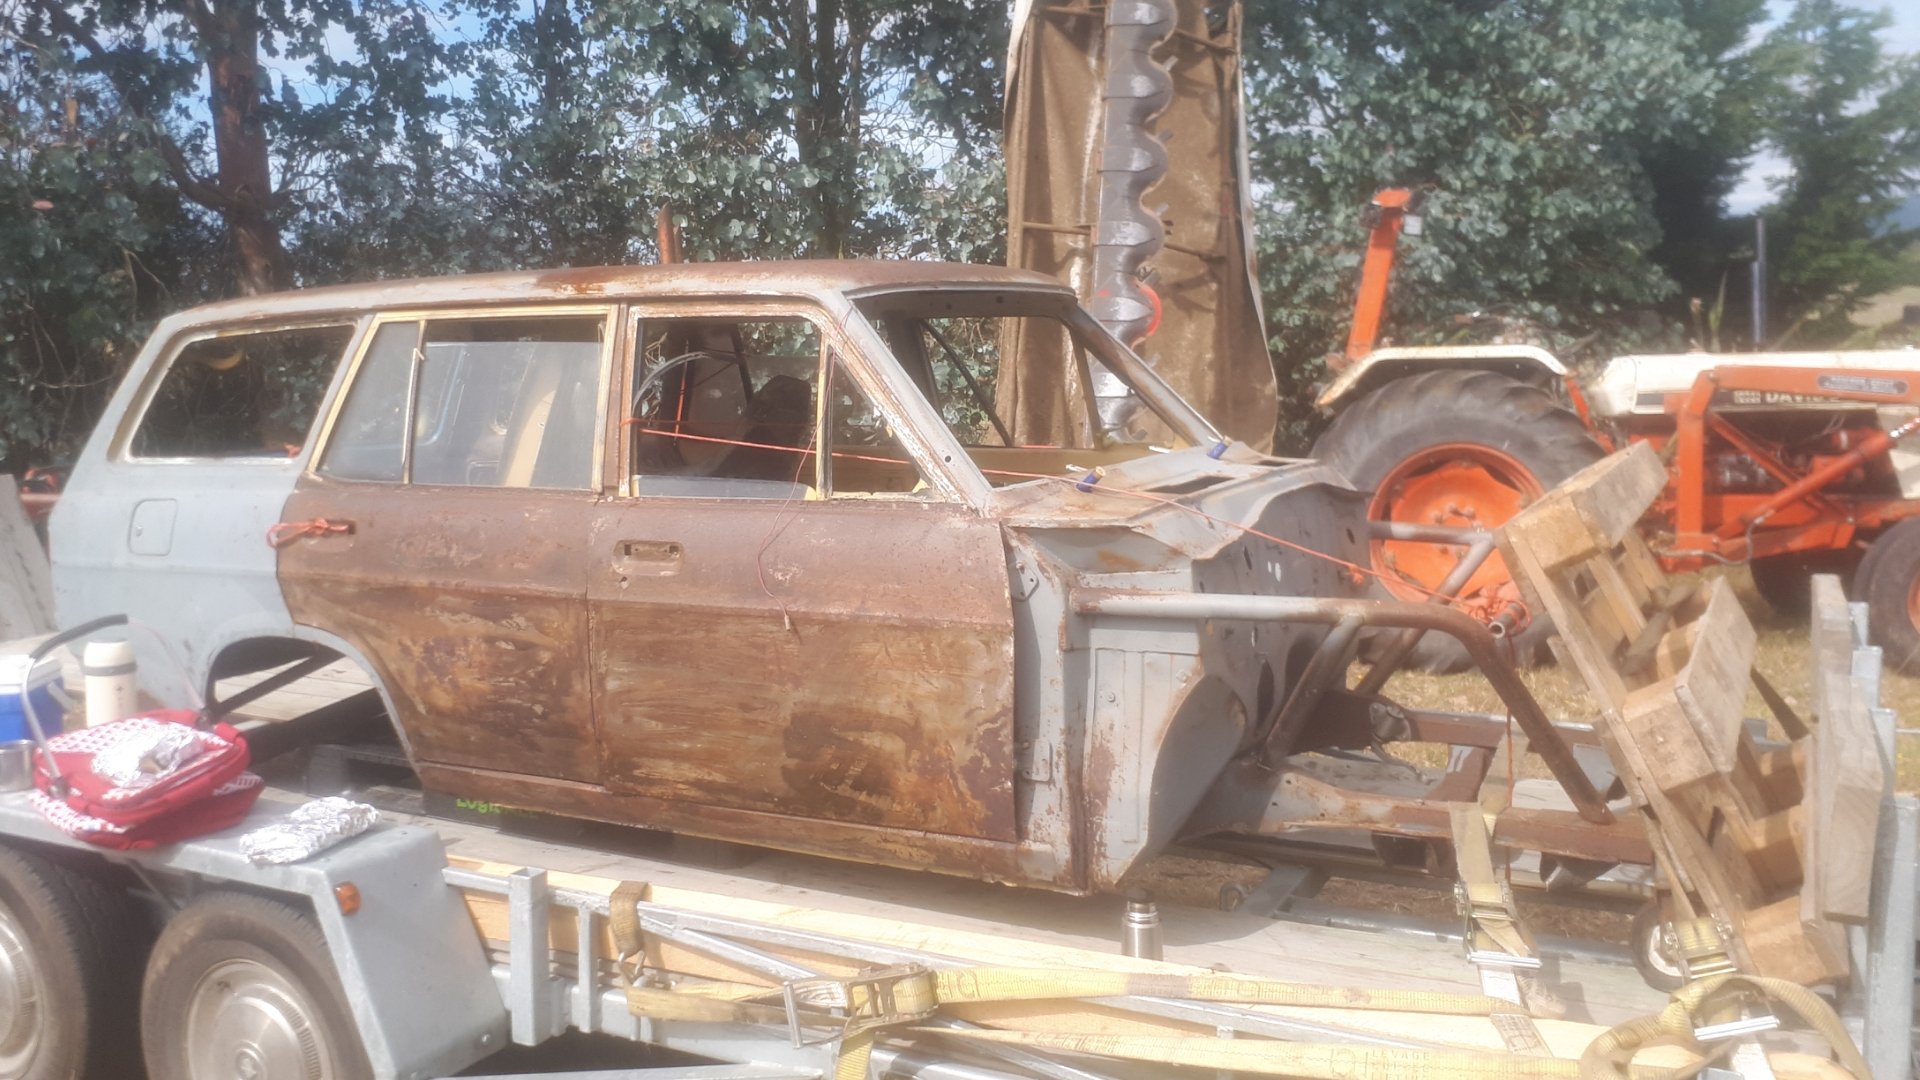
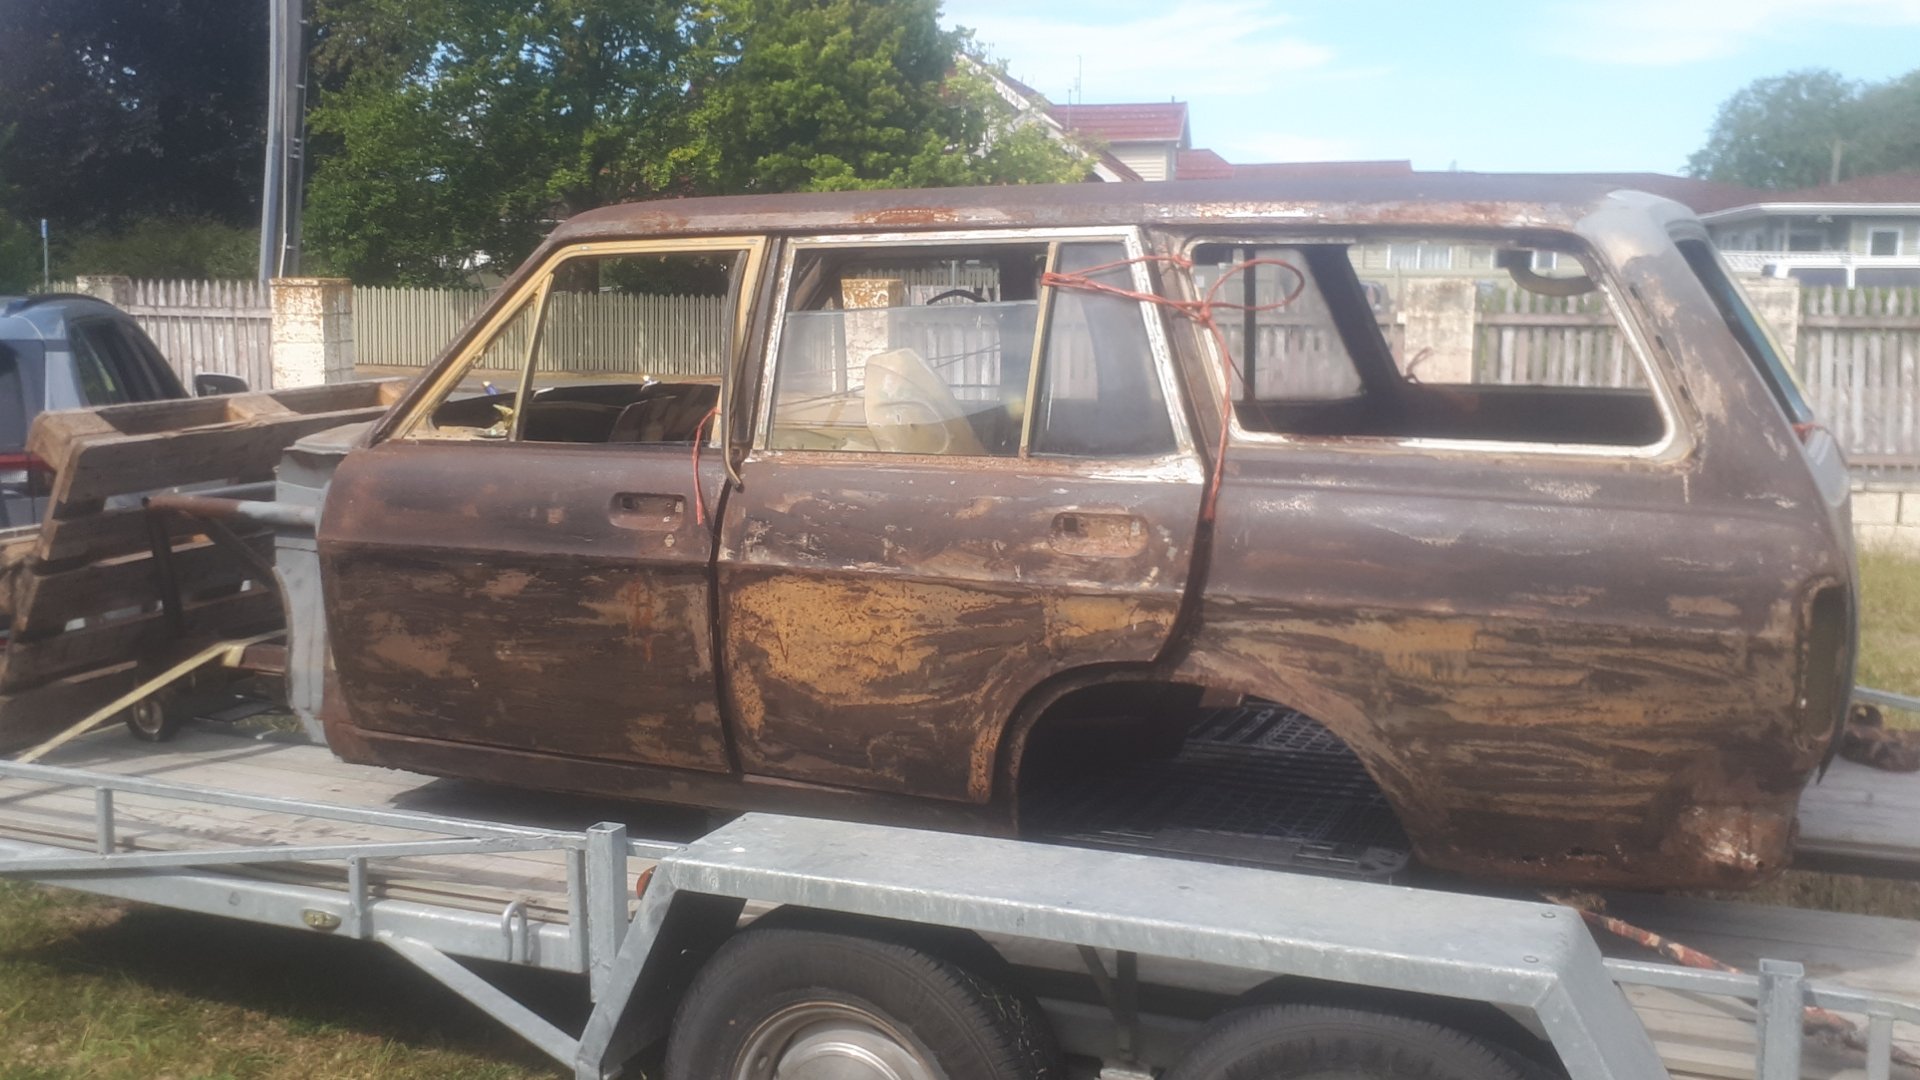
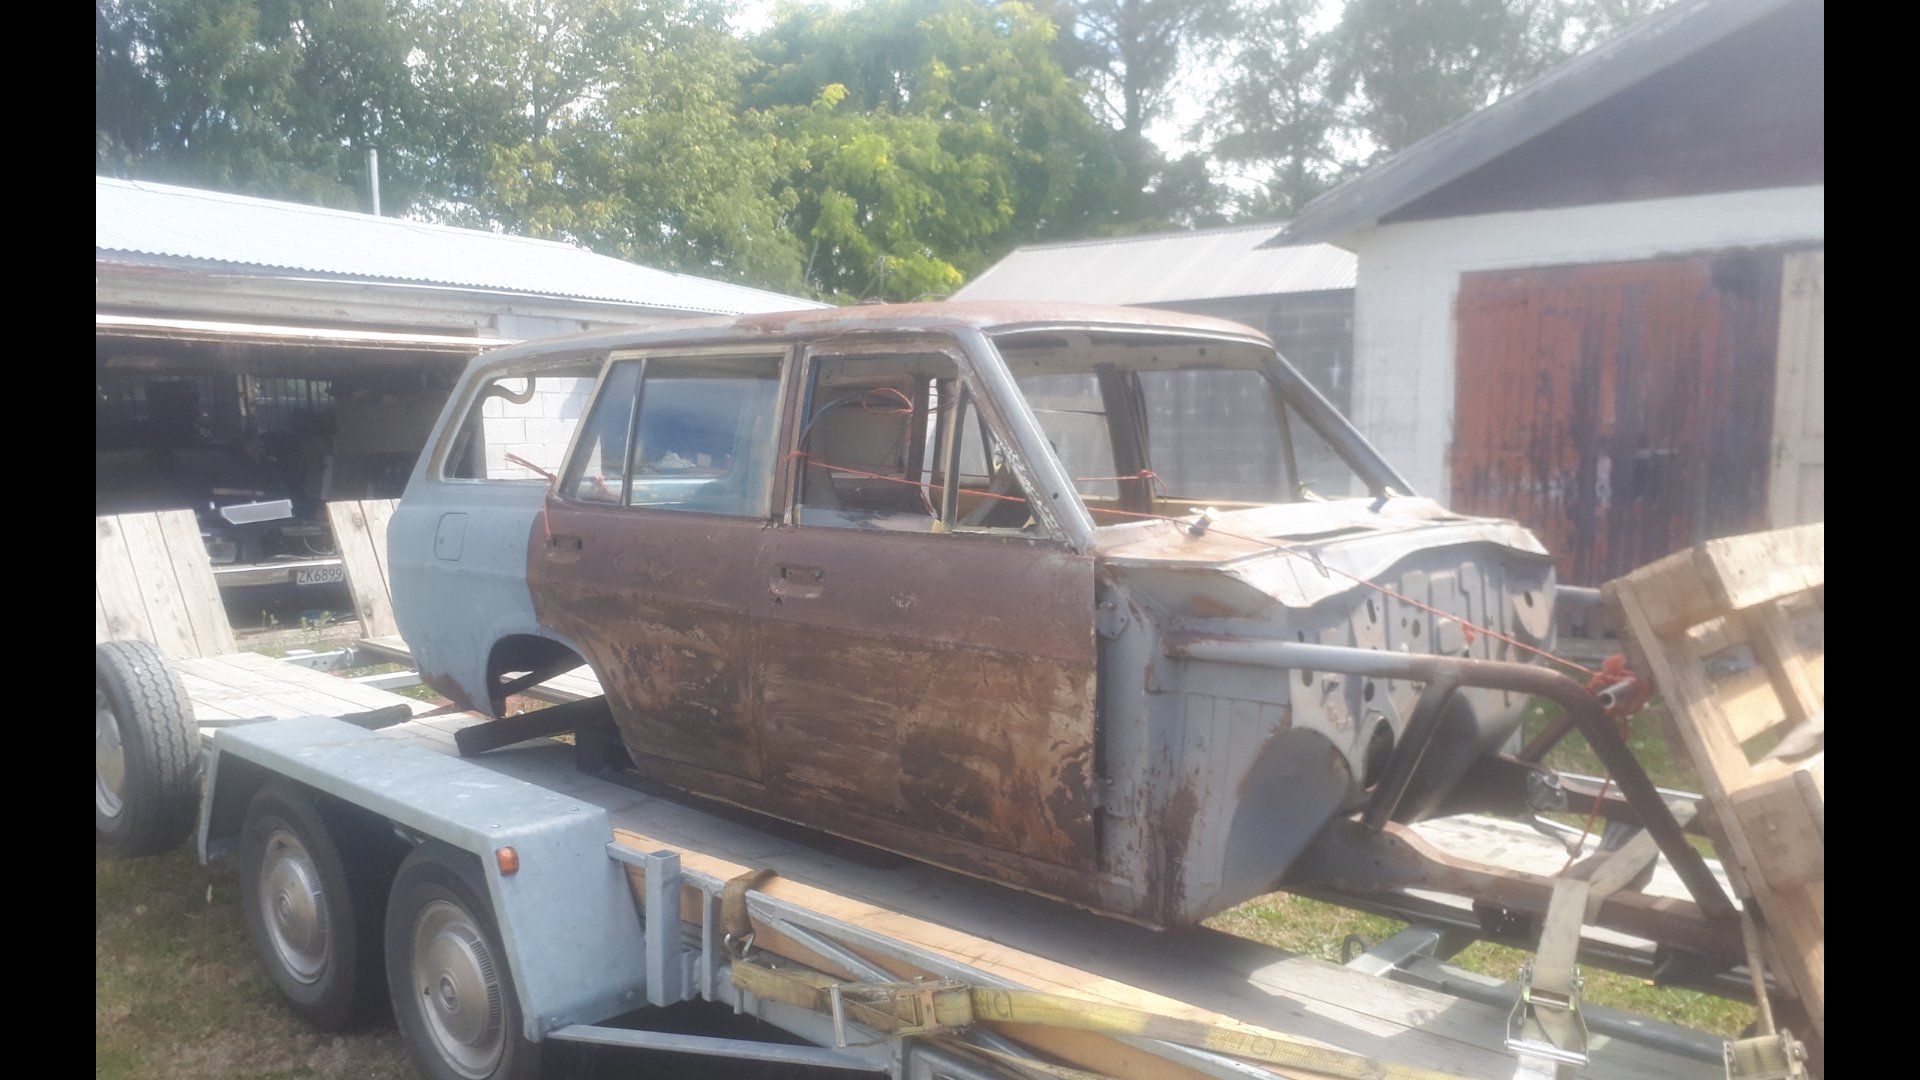
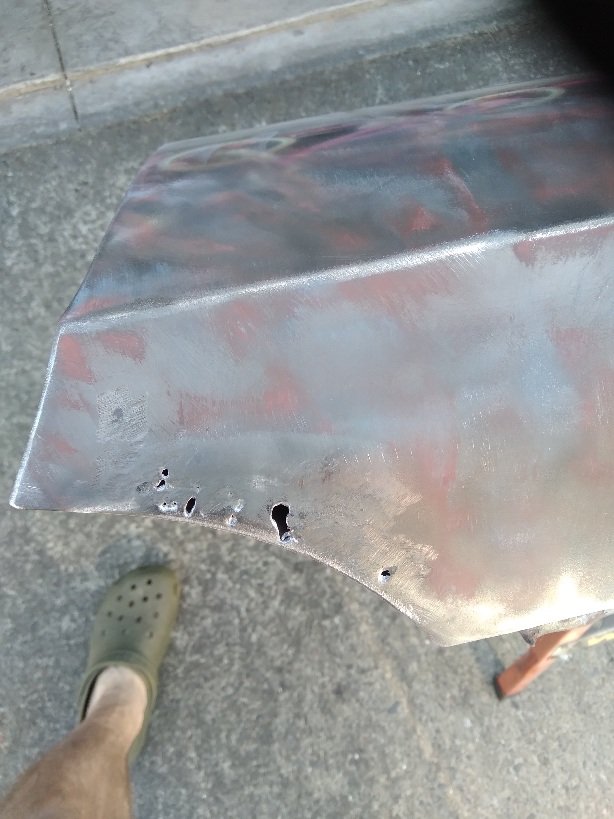
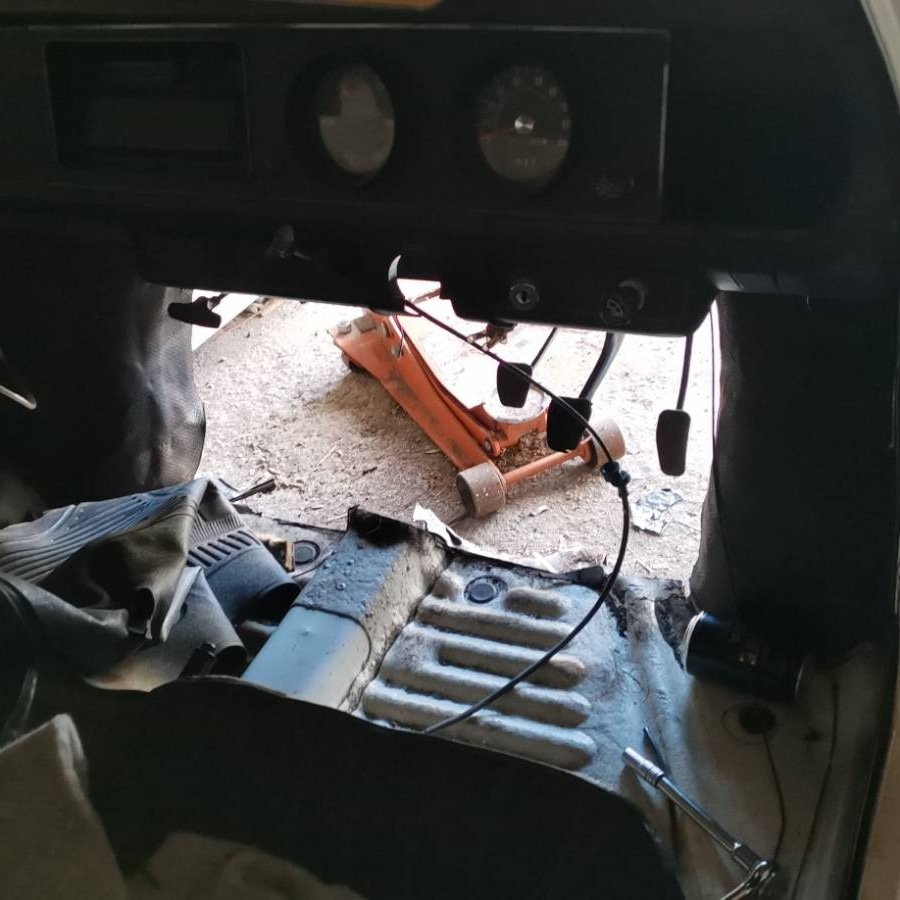
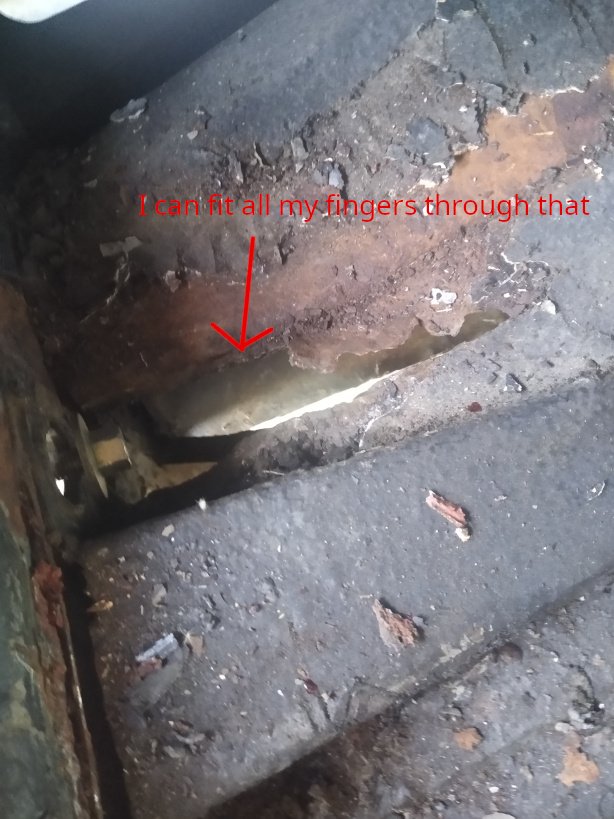
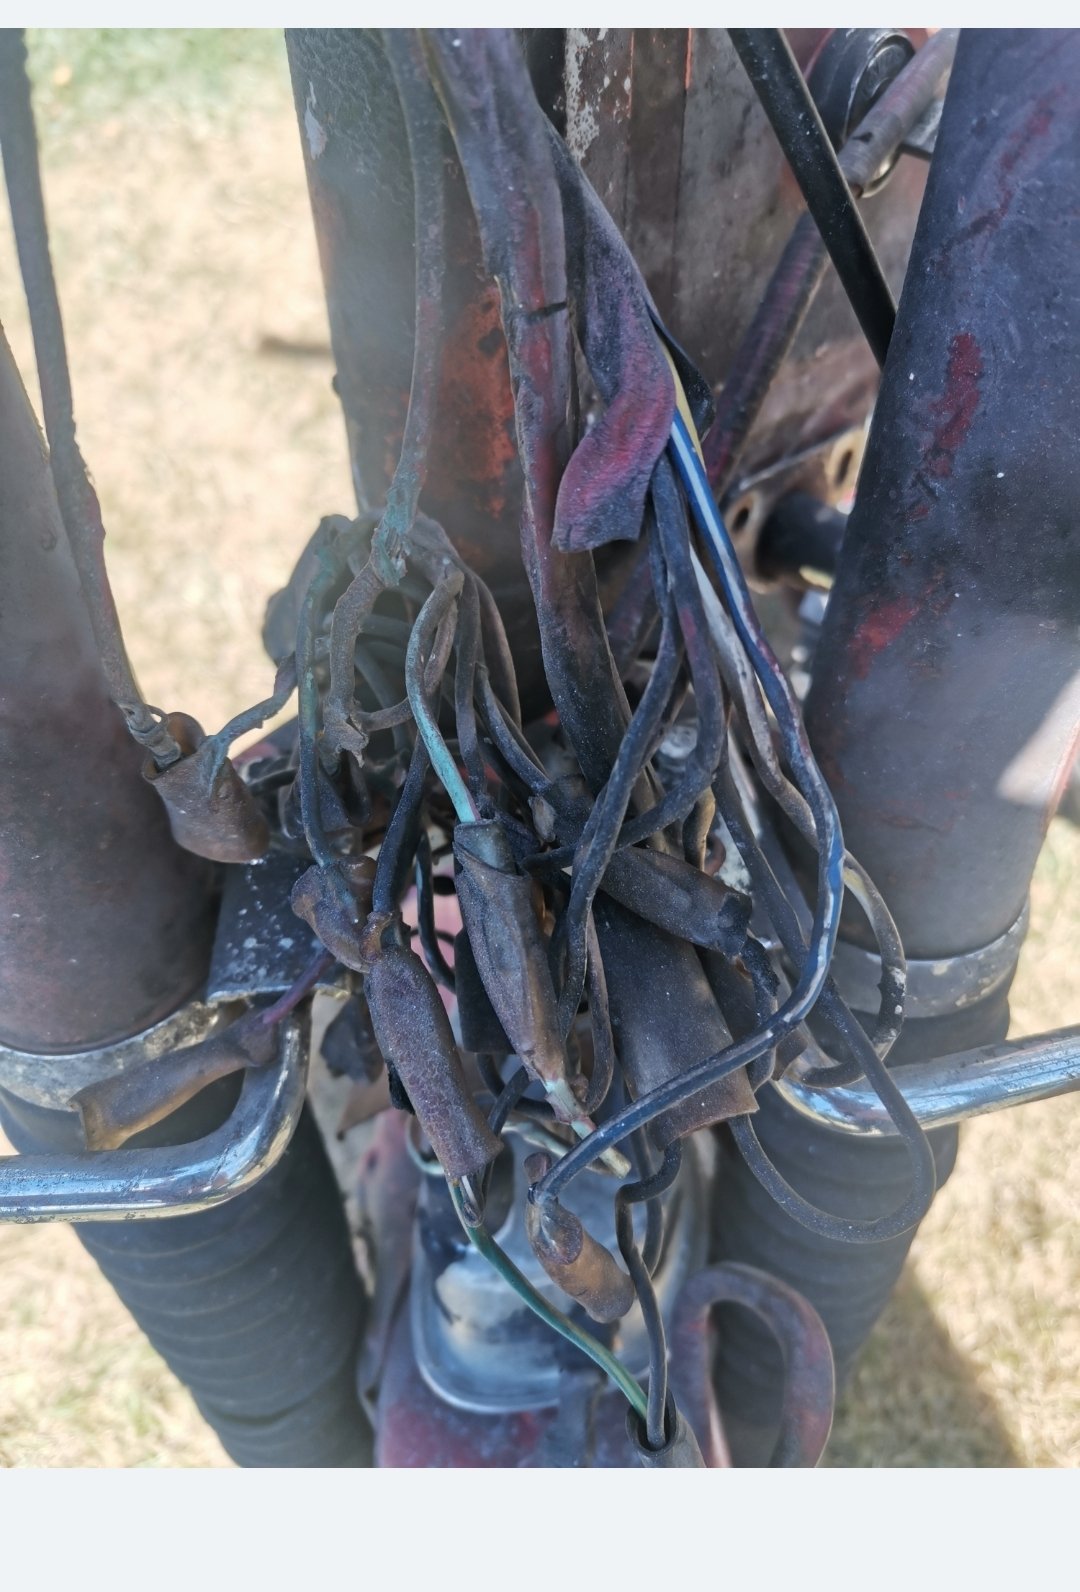
After more summer holidayin' some progress got made. Using some old guitar strings and longer 0.75mm galv wire, son-shine and I managed to get the front and rear windscreens out without cracking them. Huzzah for that because I don't even want to imagine the cost of glass for an older car like this. Found some rust holes in the rear window channels but the front's good. We emptied then removed the fuel tank, fuel pump and then some garnish like wheel flares, door electrical boots, and all the redundant electrical wires that weren't bound up with the main harness wrap. I'm pretty sure the car will start without this large mess of cables, he said hopefully. Then it was stripping time. I'm daunted by a bare metal restore but it's the only way to be sure, play it by ear I guess. I started at the back and boot where the rust is the worst, managed to find some steel under it all. After I've found out the extent of the rust I'll get onto patching in new metal.
11 points
-
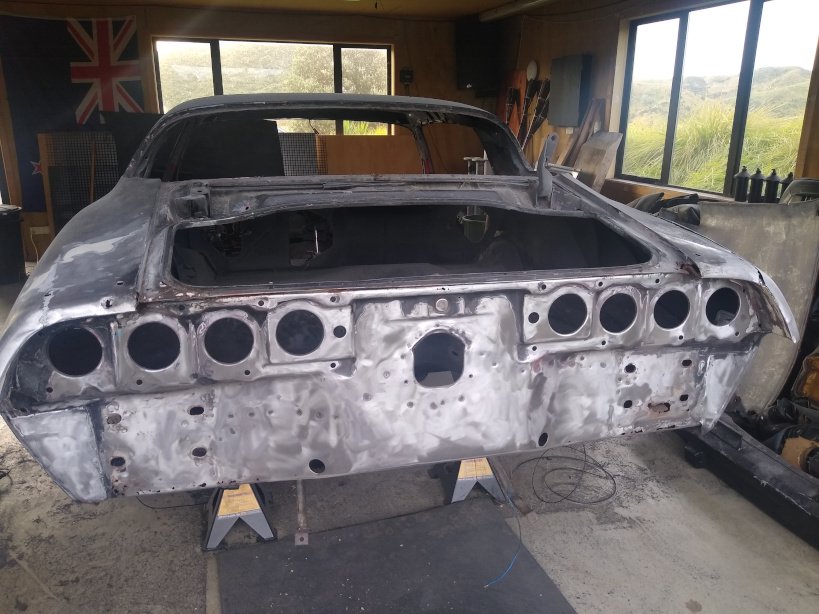
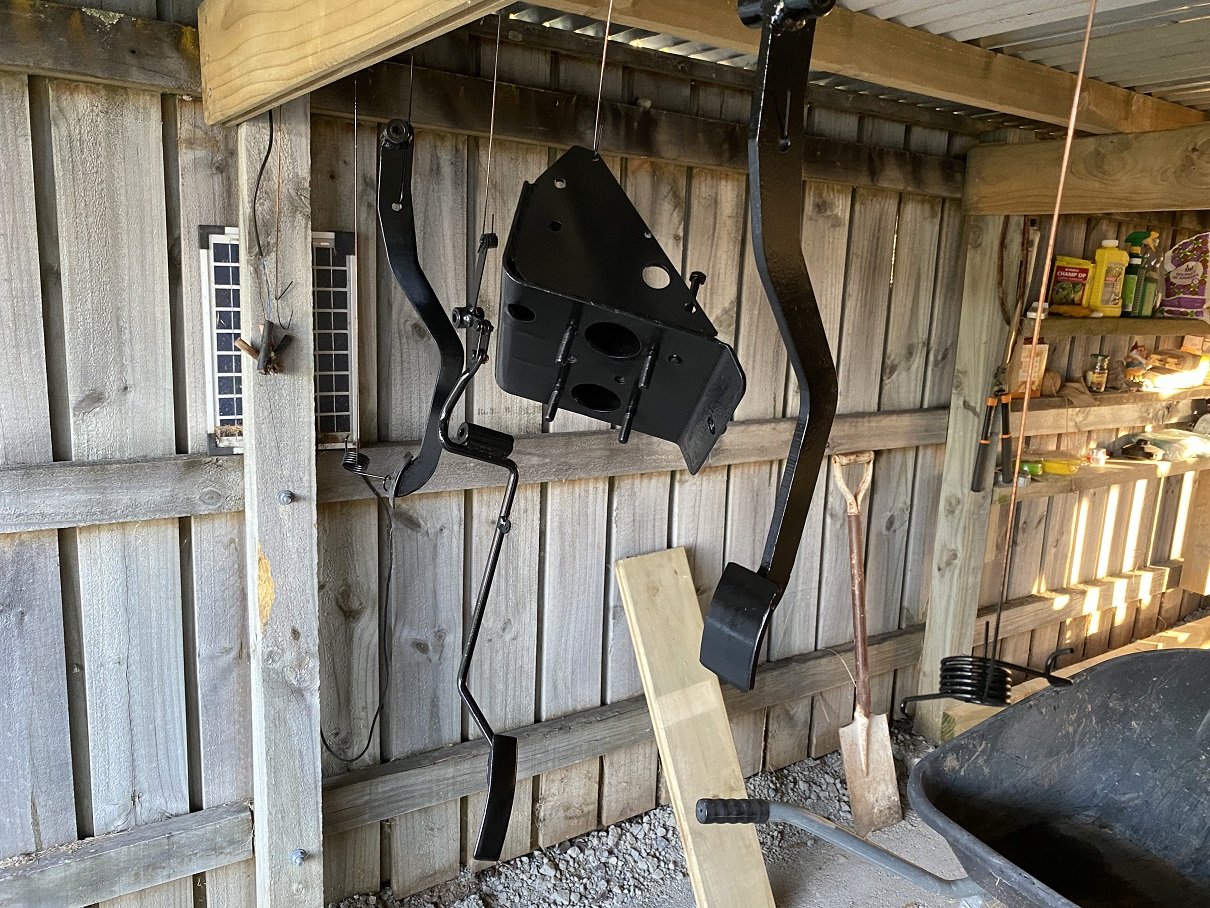
The Scimitar has swapped places with the Starlet into the garage because I wanted to roll around underneath and gravel floor makes that suck. The chassis looks good, couldn't find anything but minor surface rust. YAY! The car is an auto but a manual pedal box came with it. It was gross, so I stripped off the hideous green paint and rust in the sand blaster. Also tried one of the smaller nozzles on the gun. 300% more effective! Wish I'd thought of it ages ago. Paint it black. Made a template from the pedal box for the clutch master cylinder hole. The auto/manual pedal box is basically identical, but on the auto, one of the side plates is not there. The auto one does have the clutch hole too, there's just no studs. Then drilled the extra hole. The fibreglass is about 10mm thick here! I'll epoxy paint the whole area here to amalgamate any worn... fraying fibreglass. I had to remove the remote brake servo to get the drill in. I'm going to assume the remote servo wasn't doing much because the diaphragm part was half full of brake fluid. I sand blasted all the oxidation off the aluminium anyway. AFAIK, the early scimitar used the same size master cylinders for the brake and clutch. So I can probably use the old brake master for the clutch master, assuming it's rebuildable and find an appropriately sized dual circuit brake master(YES, it was SINGLE CIRCUIT BRAKES!) to go in it's place. Possibly using the remote servo on the front circuit(if it can be rebuilt that is).
9 points
-
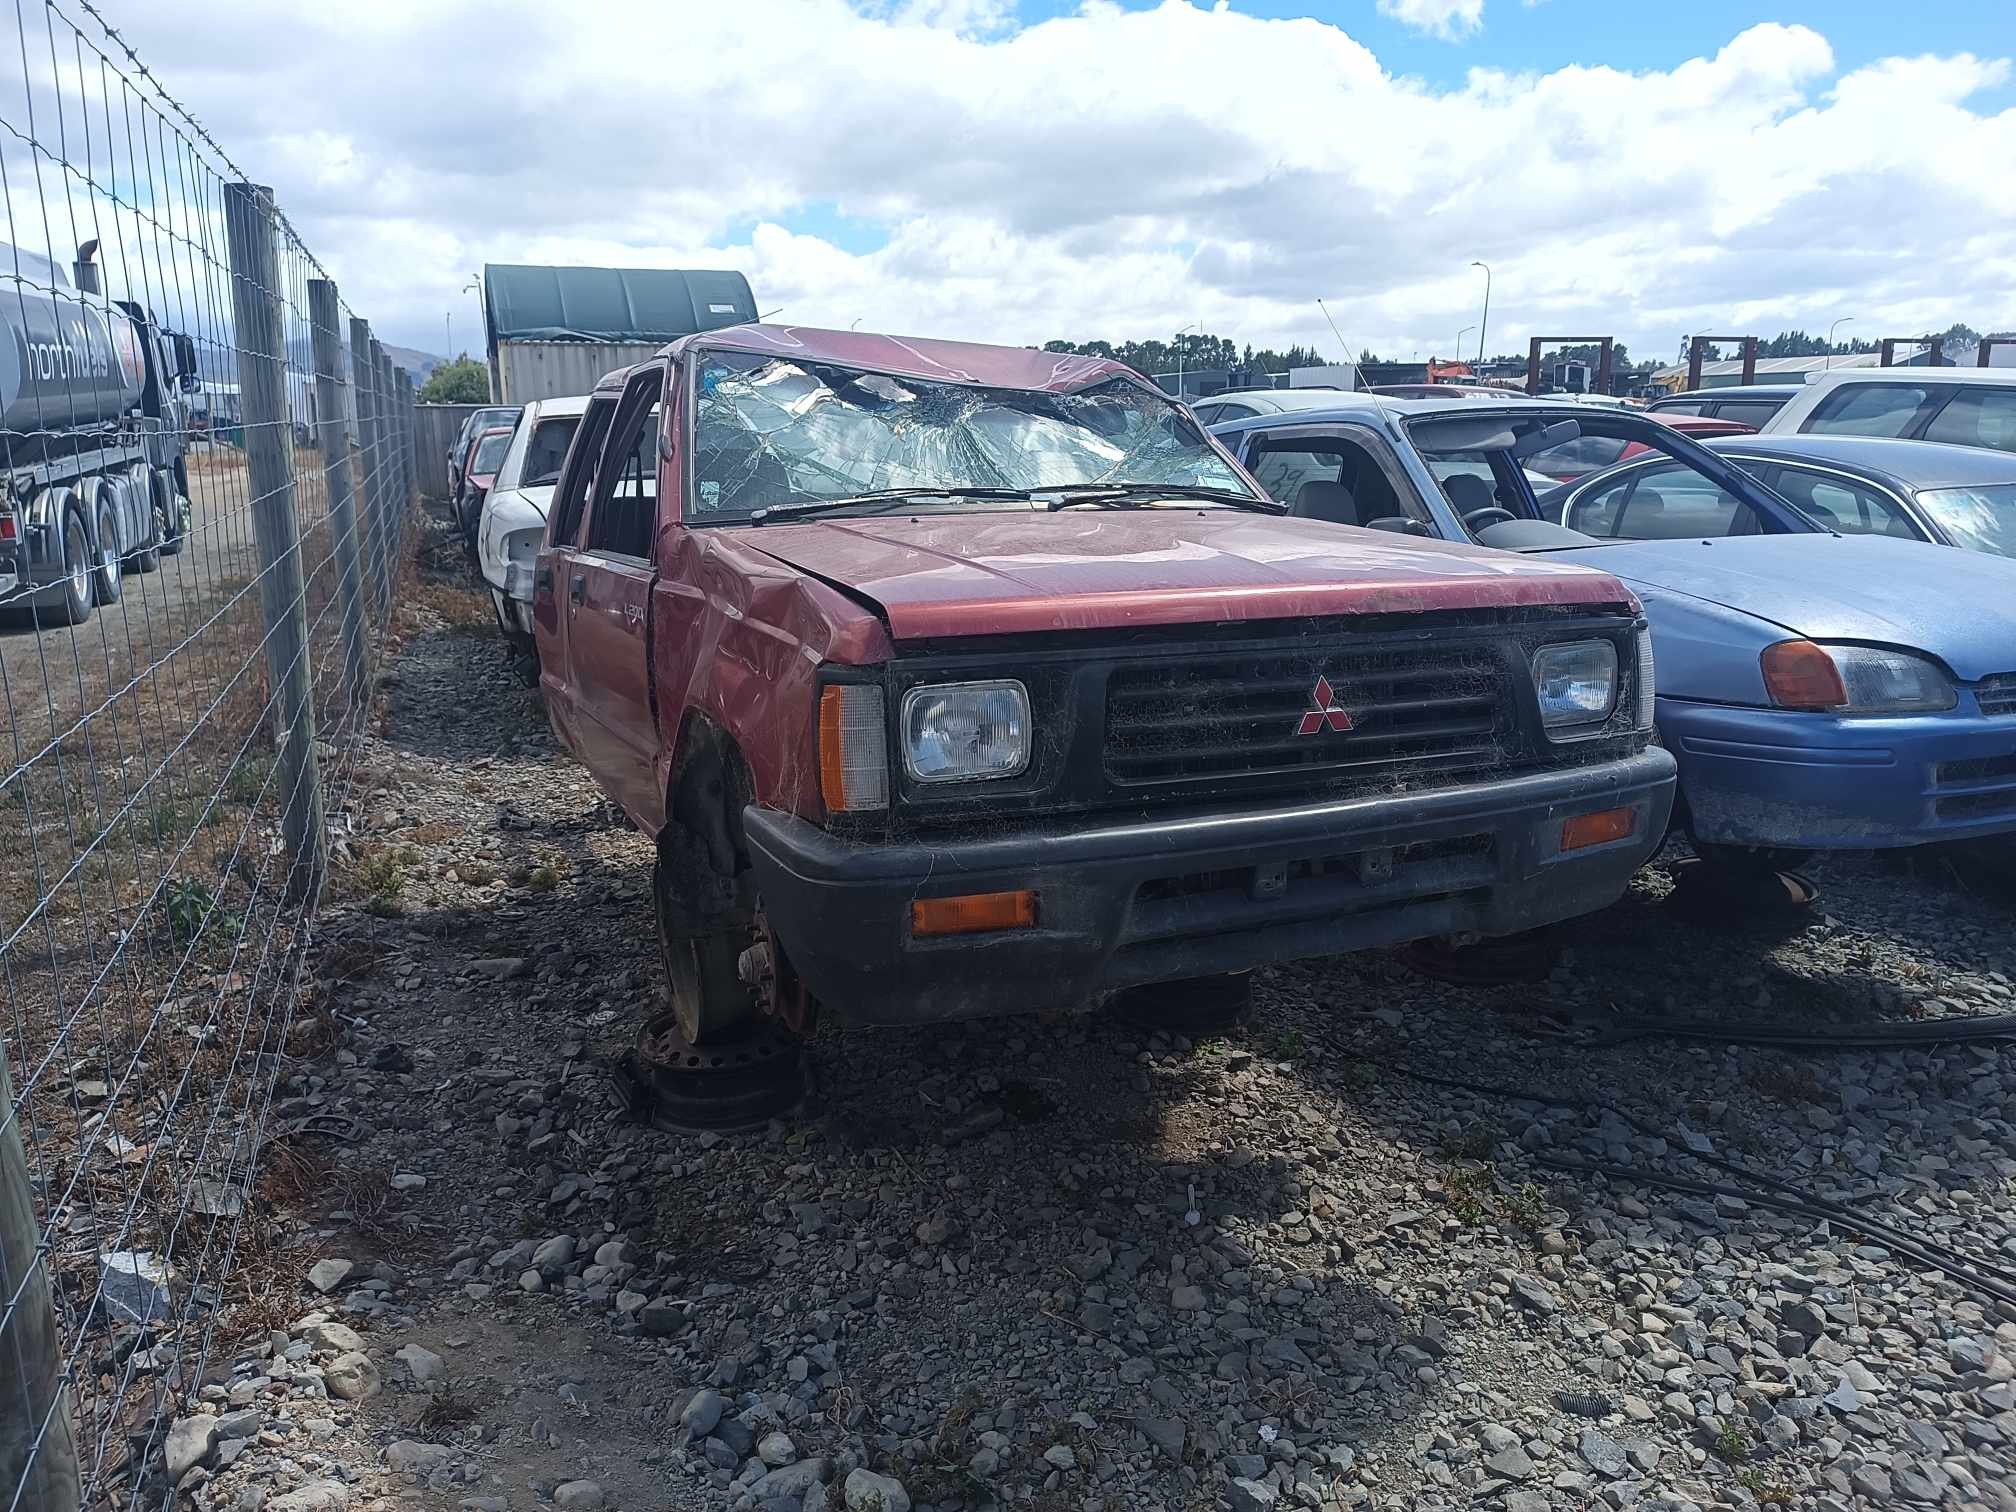
The WOF booked in for this morning had to get shit canned due to a faulty power steering pump. It always was a little noisy but after a blat yesterday afternoon to the lake it got worse and worse until I had to nurse it home making an awful screech. Determined to make it to the WOF I slackened off the belt and tried to limp into town. It made it about 2 mins before the belt let go. Lucky I wasn't far from home as without it I had no water pump or alternator. Looking online I couldn't find a similar one as they all had serpentine belt pulleys. The only one that looked similar was a 1986 Pajero and that was from some dodgy overseas site. So at lunch I went to take in the power steering pump to get mailed off to be rebuilt and thought I'd pop into the wreckers to see if they had any mitsi's. They happened to have an L200 diesel all the way up the back which by a stroke of good luck had the same pump. A quick trip to get a new belt at Repco and pick up some fluid. Installed the pump and it took a while to bleed but is now full with no noises or bubbles. Hoping I can retake the WOF tomorrow but will need to ring first thing. Until the pump shat itself it was quite a fun ride. The fuel gauge is a little all over the shop but reasonably accurate. I'll have to set the trip meter though I imagine. The gearing in it is perfect and it is quite zippy compared to the Chev which is a slug.
7 points
-
She's touch wider than what Honda built I think
5 points
-
So been a minute since I've been posting on this one, still at it, however as the saying goes life gets in the way During lockdown I fiddled with fuel system and retro fitted the old tank with a drop in system from a toyota of similar Era as the engine, this way it can have more room in boot and remove surge tank clutter...
5 points
-
Just slowly picking off jobs as time allows. Fitted the carpet and cut all holes for seats, seeatbelts, gear stick, brake handle. Installed gearstick and rubber gaiter. Next put in seatbelts and also fitted door cards. All looking pretty good. Next in was the seats which took a while as quite hard to line up holes I had cut in carpet. Starting to look like a new car. Next put badges and number plate on rear also mirrors on doors. Time to put some petrol in the tank in anticipation of startup but it all ended up on the ground. Didn't see that coming and had to take tank out to find hole. Rust never sleeps. Luckly had another tank which I checked more carefully. Cleaned, painted and installed. No leaks Result Project Discussion https://oldschool.co.nz/index.php?/topic/84912-petes-mk2-escort-1600-sports/page/3/#comment-2618039
5 points
-
So I started on the body. Did some CAD modeling, And then started hacking into 18mm ply, Then I took the old temporary seat and floor off, and made a new seat etc. I then started screwing everything together, And where it's at now, The back corners are meant to be rounded, but that's too hard for an amateur woodworker like myself. The floor and firewall will stay on the chassis, and the rest of the body will lift off. The bonnet and front mudguards will be the hardest part to do, but I have ideas, will find out soon if they will work. Oh and I decided to make it a BJ/FJ land cruiser (maybe it should be an EJ?) because the kids cousin has a Jeep already, and because I'm forcing them to like Toyotas, because not doing so would basically be child abuse. Regards, VG.5 points
-
Today i pulled an 11.5 hour mish to go collect this thing. Loading cars that dont roll can be tricky. But it went better than expected. Came with a lot of tidy parts. But theres also a fair bit missing. (Including plates and tag) (the old rego number is etched into the window though. And it comes up in car jam. Theres been more work done to the undercarriage than i expected. Has a full C notch done. And the mounting points for the 4 link look to be there. Theres also lots of extra stiffening done to the floor. And fuck all rust. (For a datsun) it also came with (but not pictured) front guards and bonnet. These have been tack welded together. (The guy was planning a flip front)
5 points
-
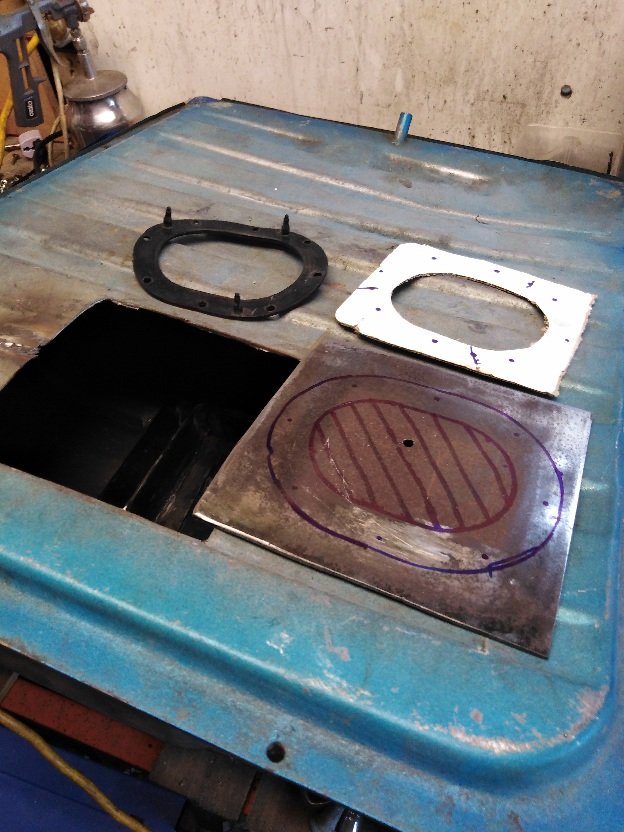
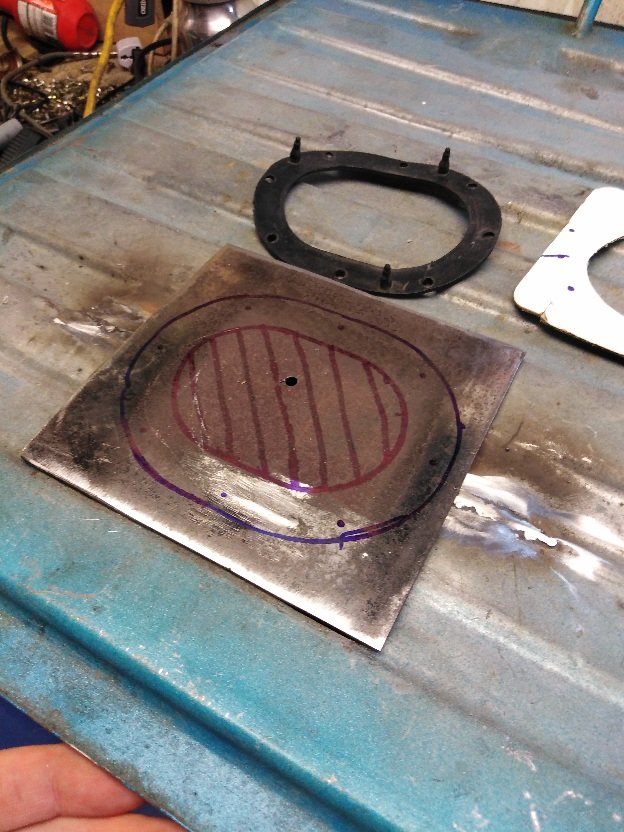
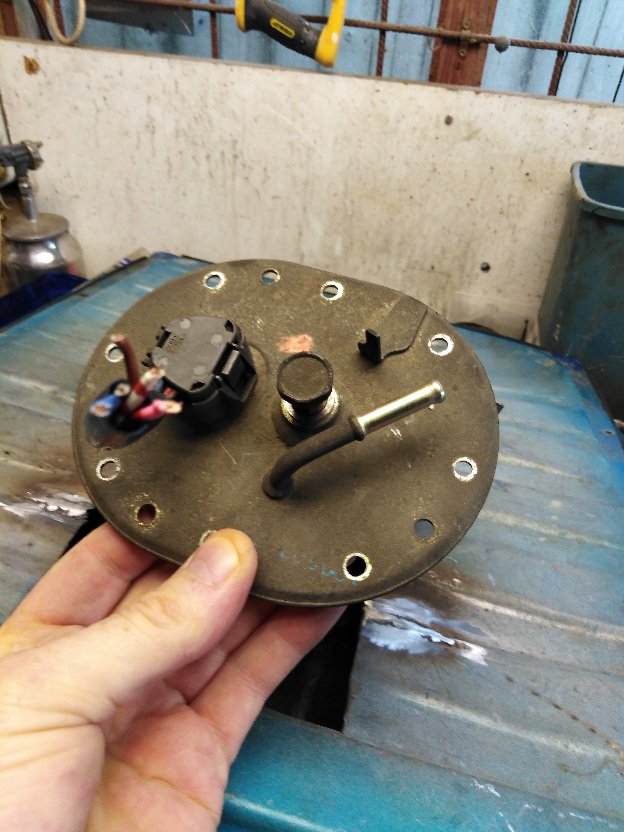
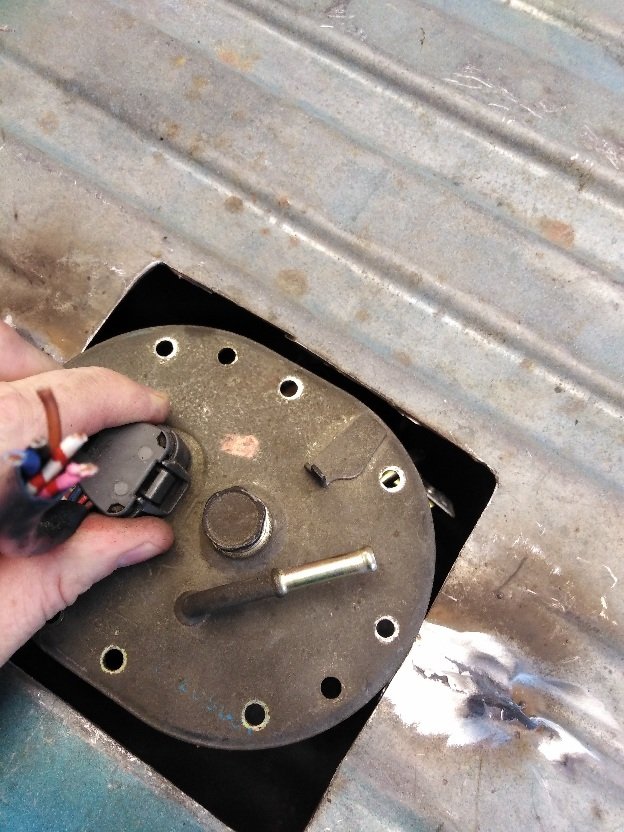
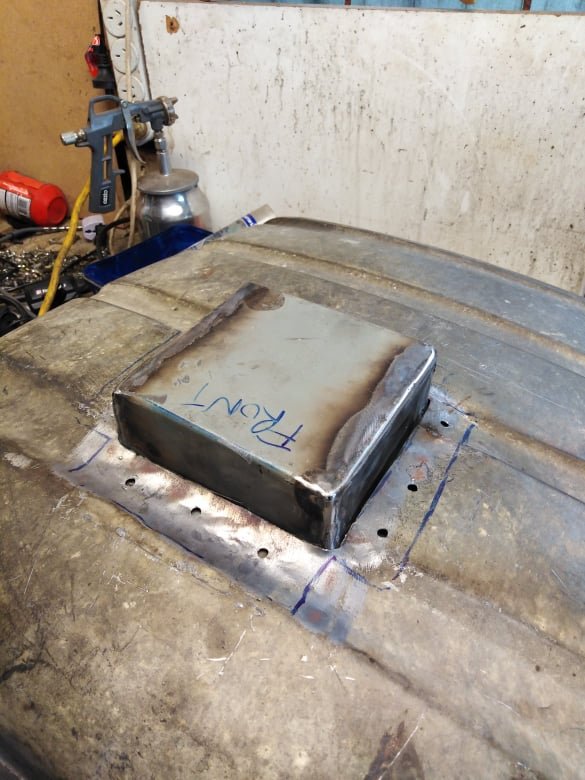
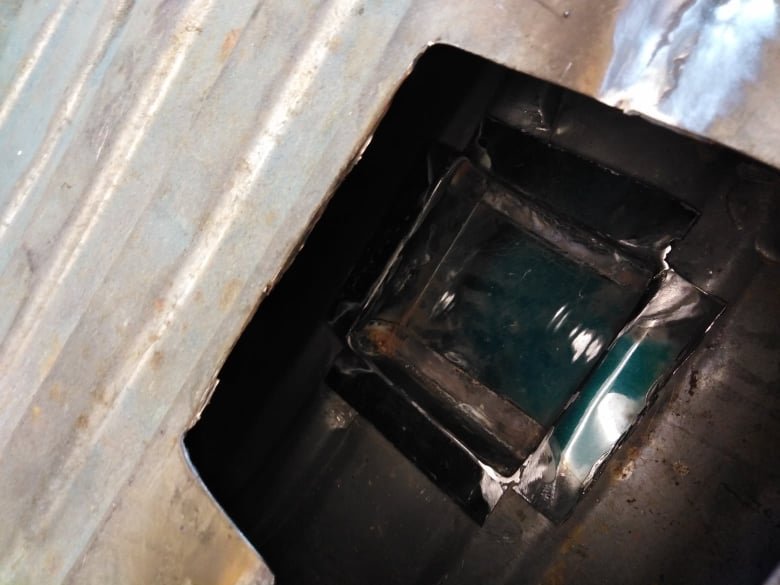
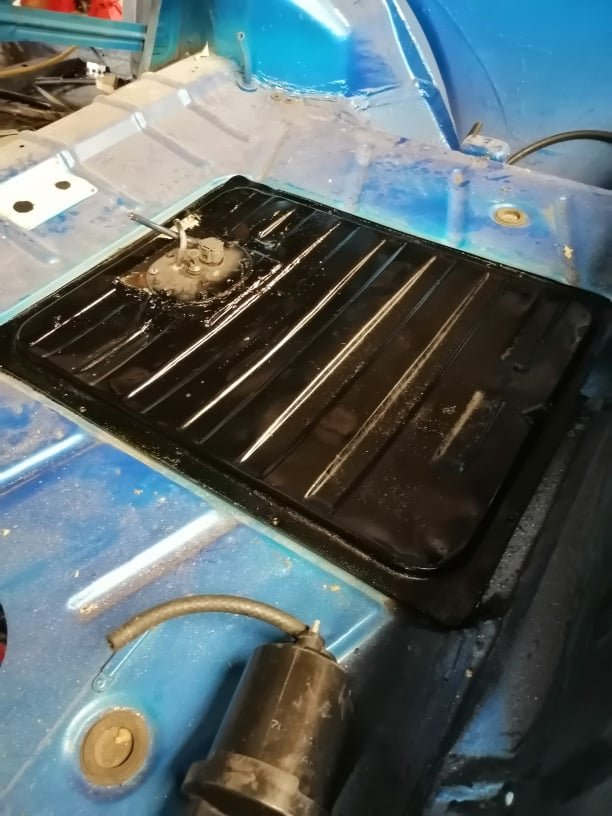
Also I needed a baffle for cornering so it would not suffer if it gets peddled hard. Since the sender unit was too tall the next step was to create a recess on the bottom side of the tank. I still trimmed the sender down but also needed about 50 mm for an area for fuel to be readily available. After getting it close took it to radiator shop and they welded it up blocked off a few holes and then I painted insides with fuel tank paint as best as possible to stop further rust
4 points
-
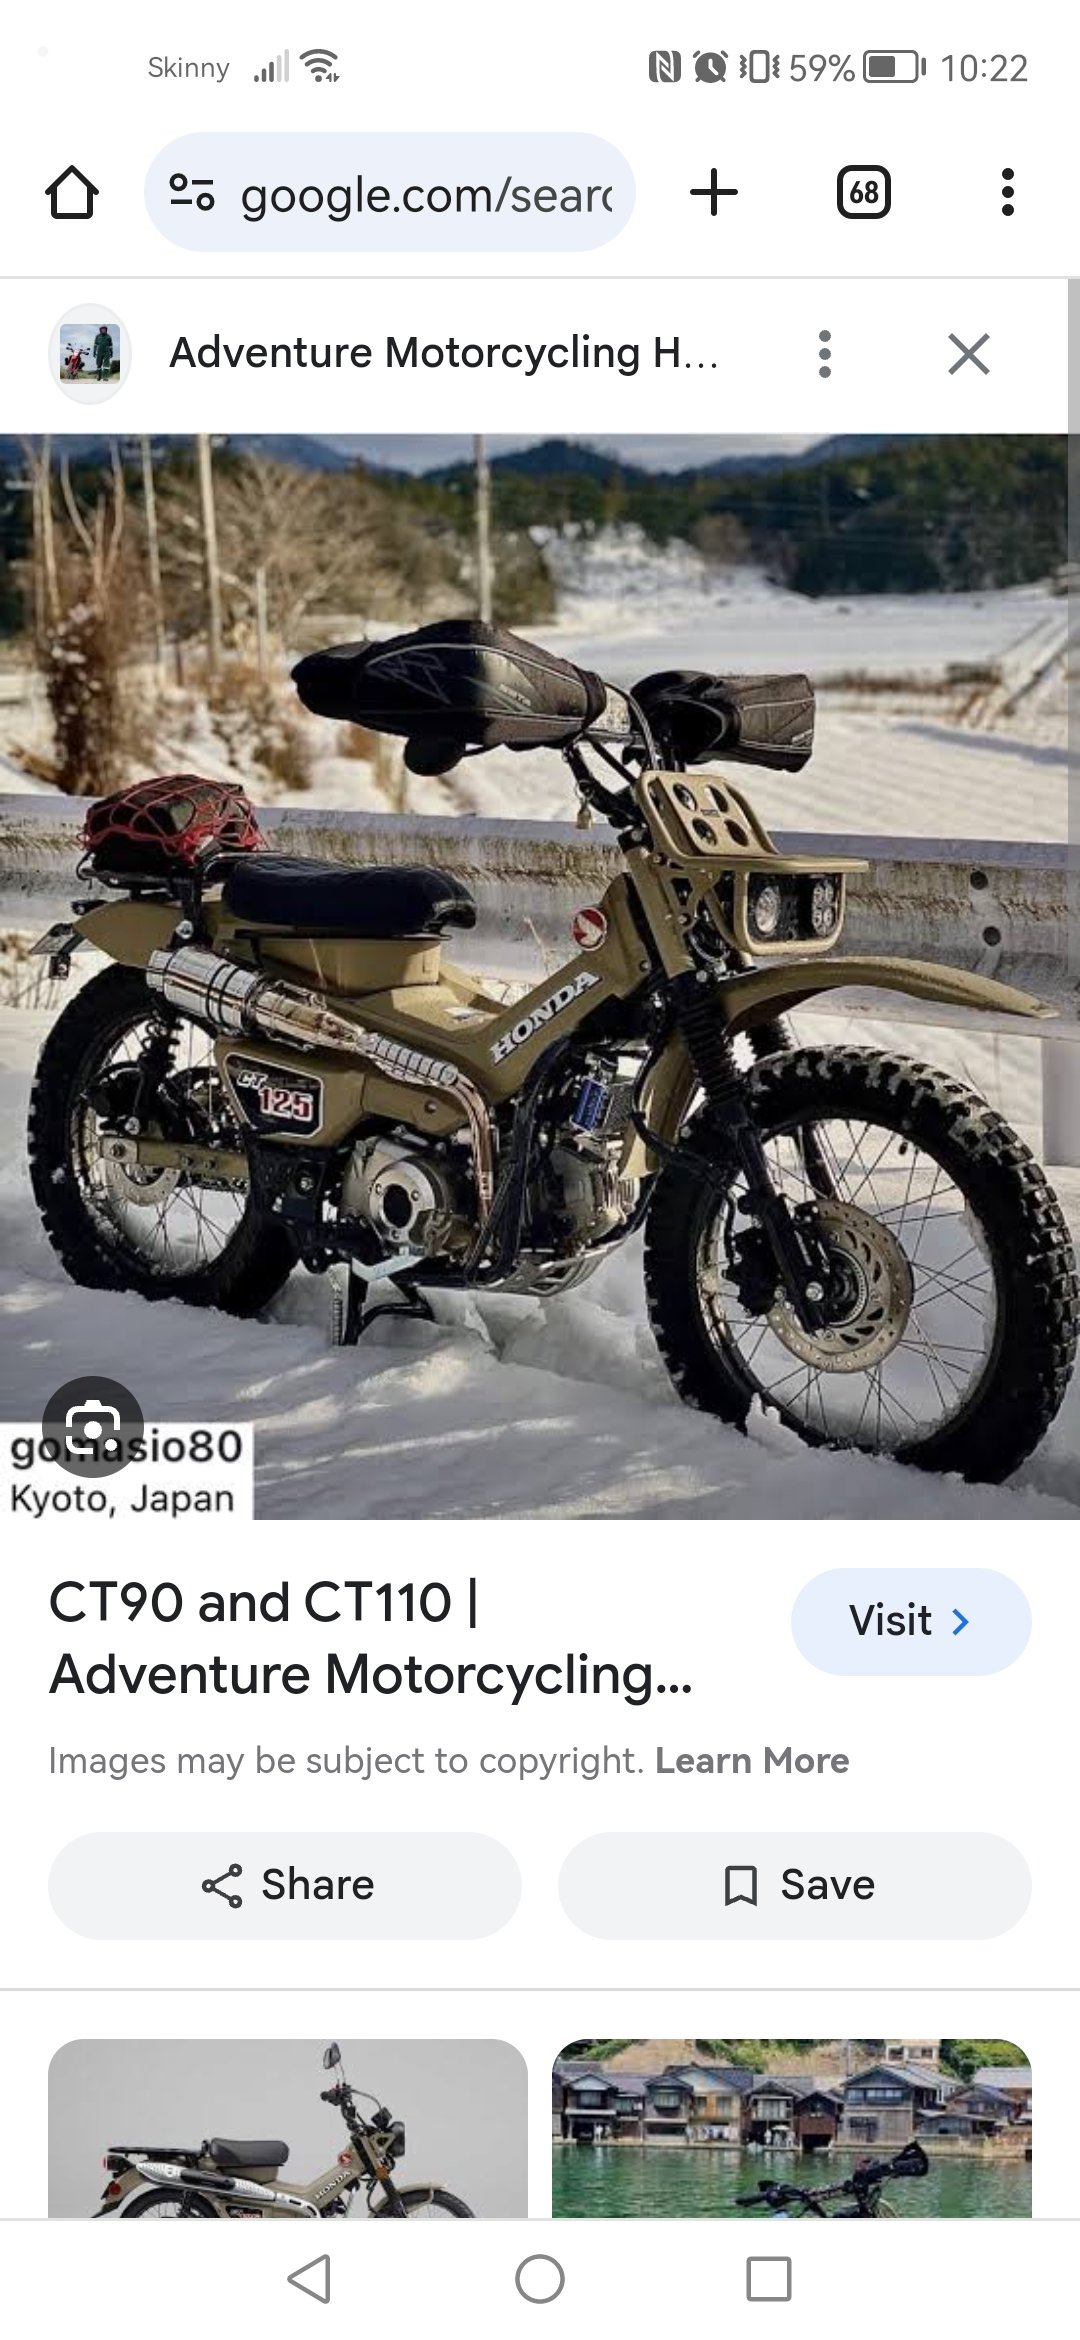
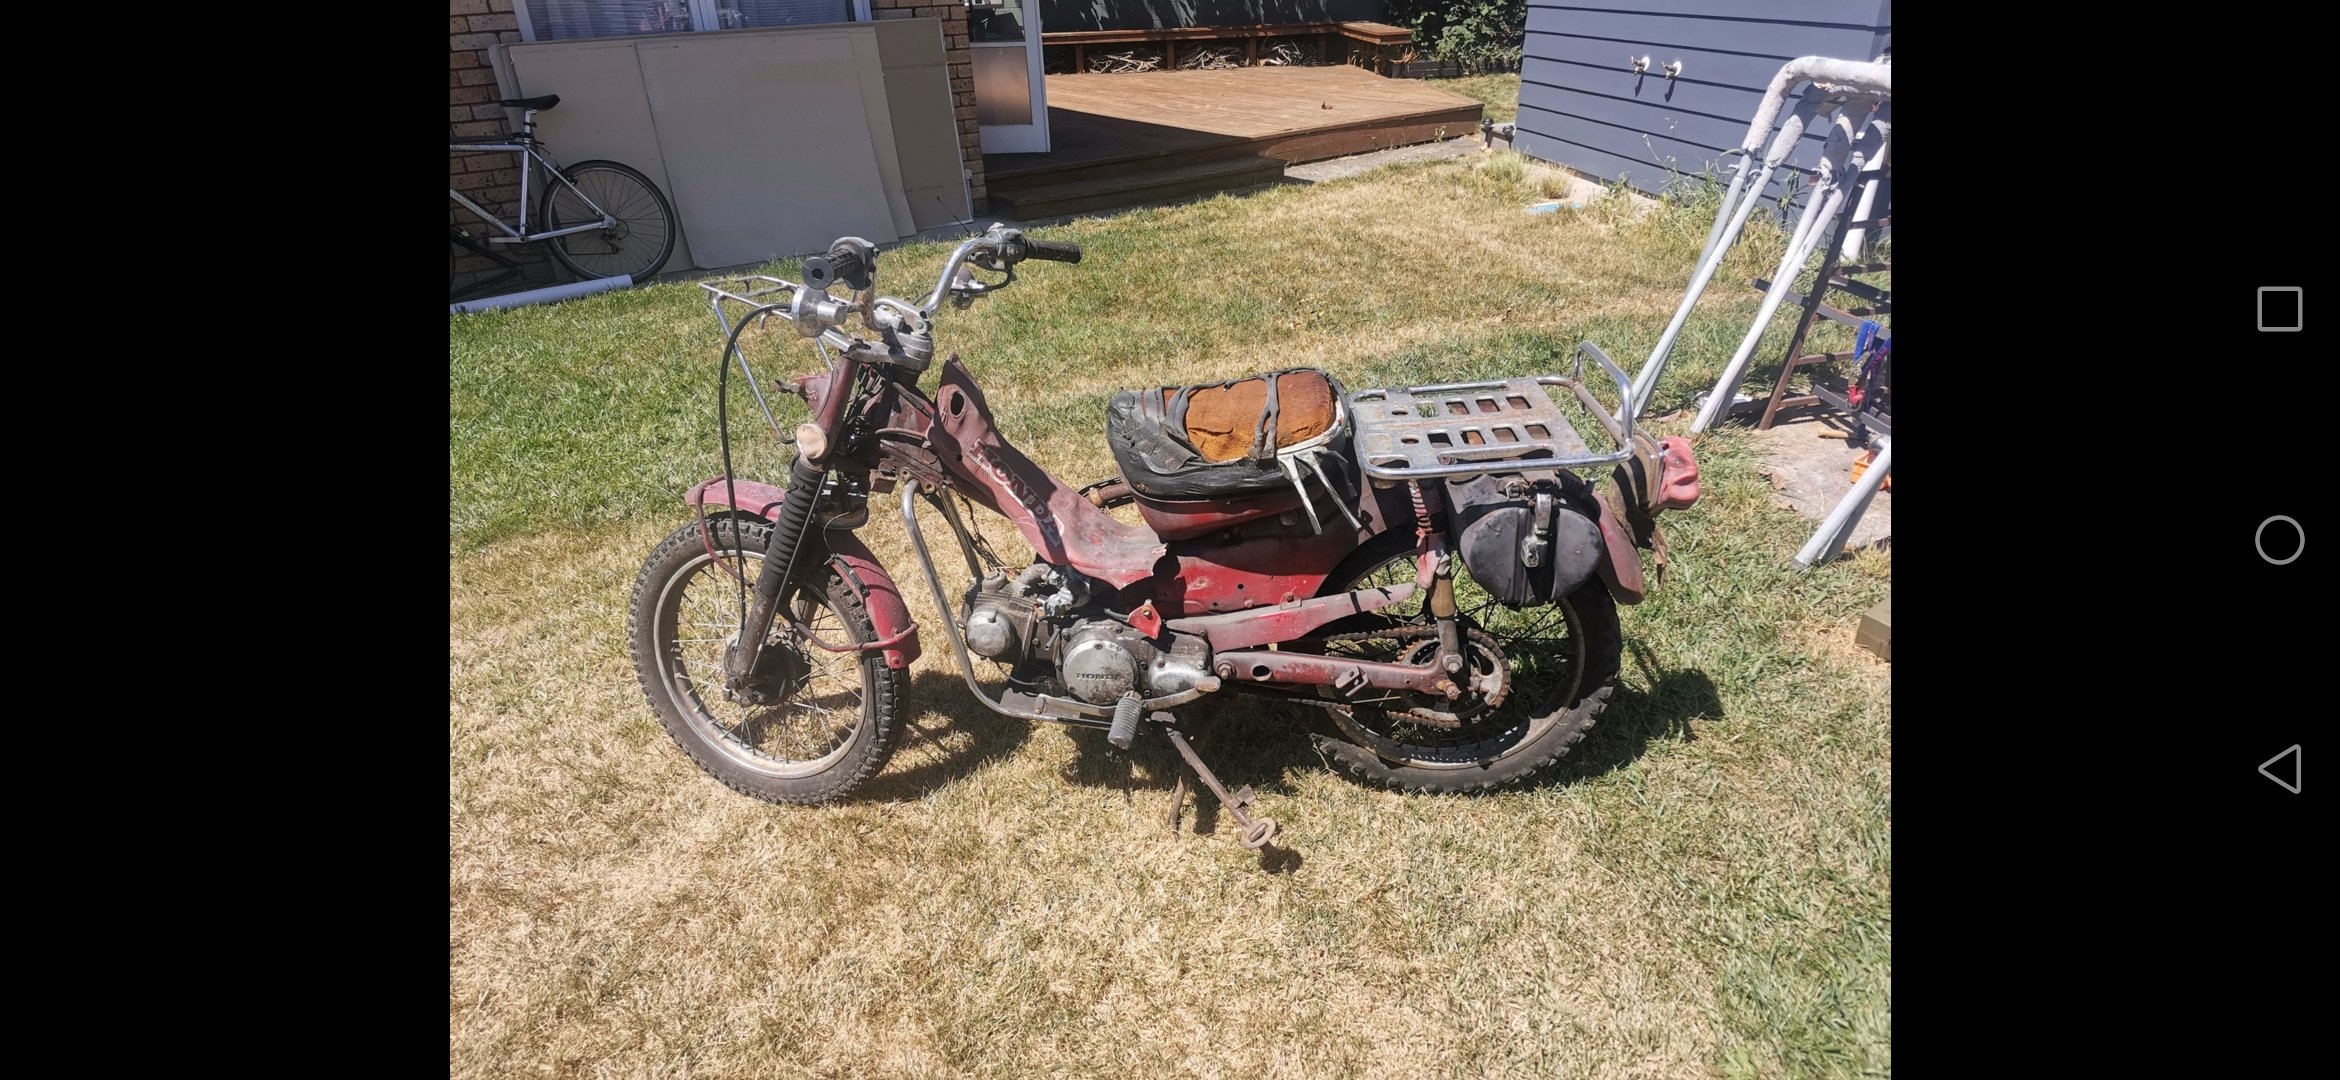
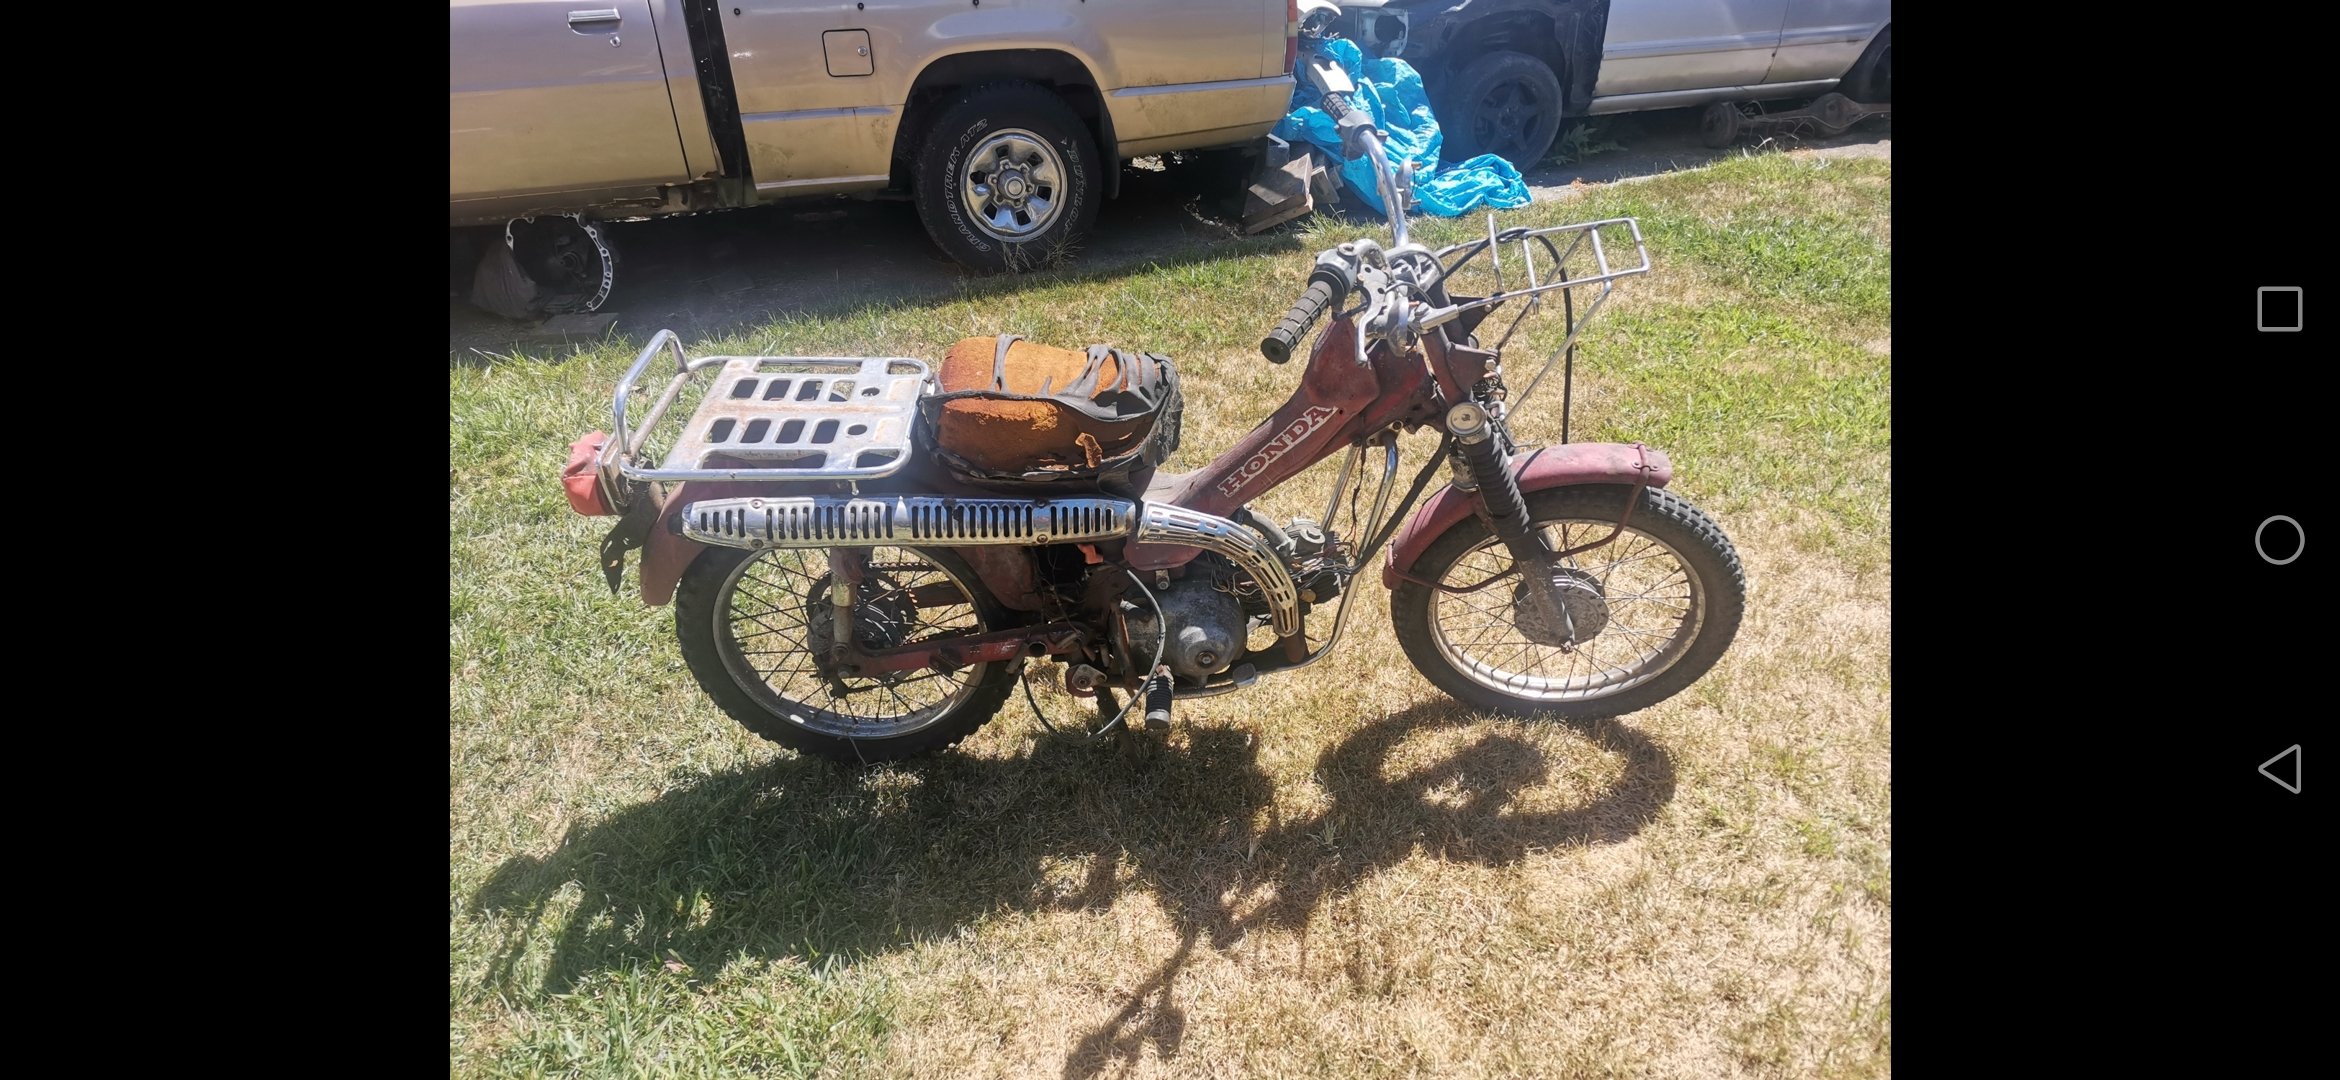
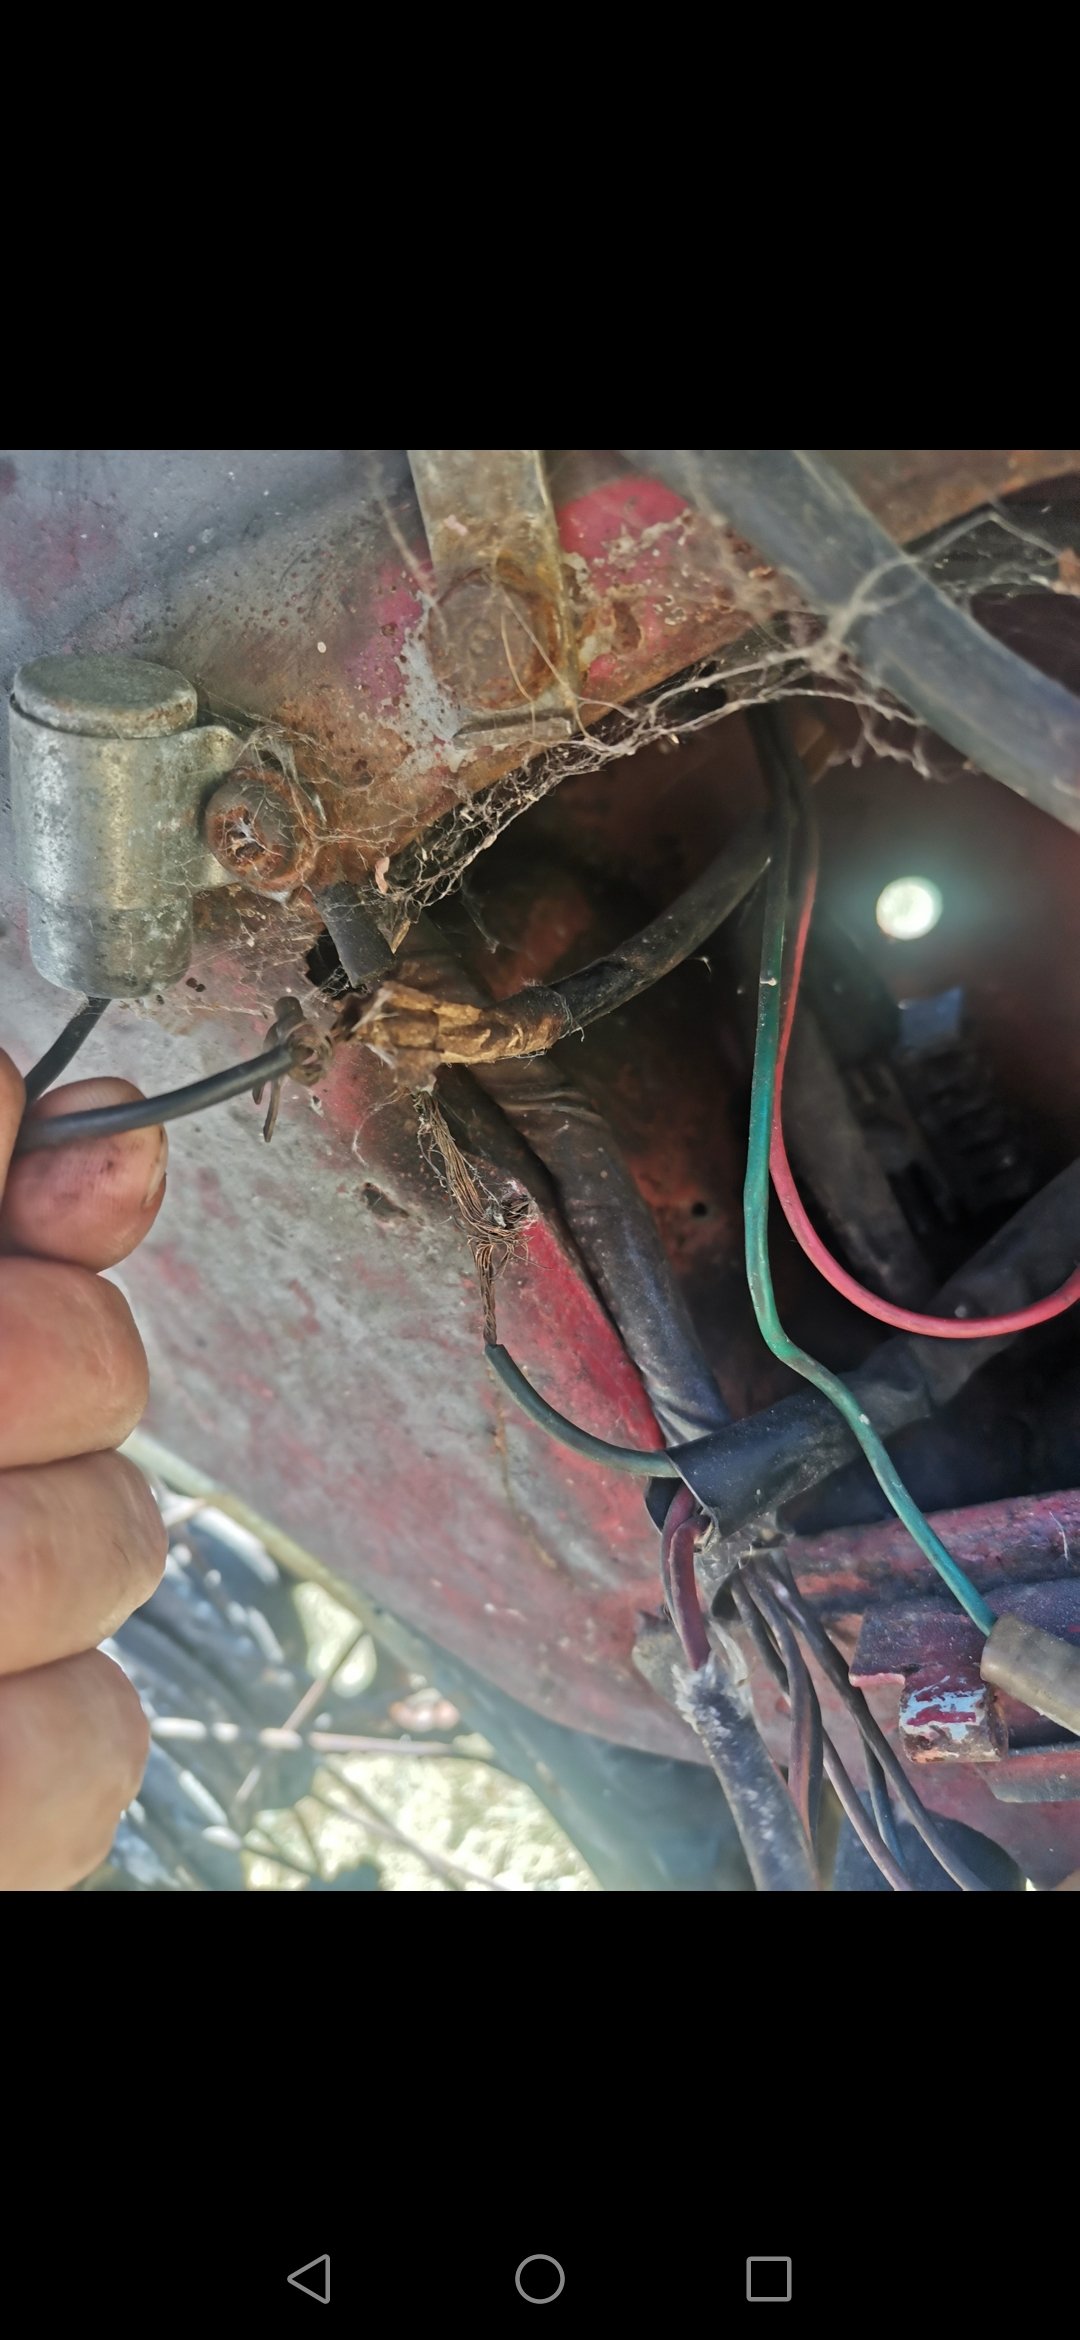
This has been sitting out in the way for the last year or so, so I'm keen to have that not be. Today I removed anything too melted to use. Pulled the loom and it's currently in my ultrasonic cleaner getting a hot wash. Most of the front is melted through, so I'm expecting to remake it. On that note, I'm going to get rid of everything except for the ign circuit, headlamp, and a tail marker light. The switches are partially melted, so this makes sense to me. It's missing the rear indicators and the front lenses melted off. Speedo melted, glass shattered, and the cable is broken. So delete that too. My plan is a stripped down, mostly stock bodied trail/hunting bike (I. E what this originally was made for I guess) Something like these for inspiration
4 points
-
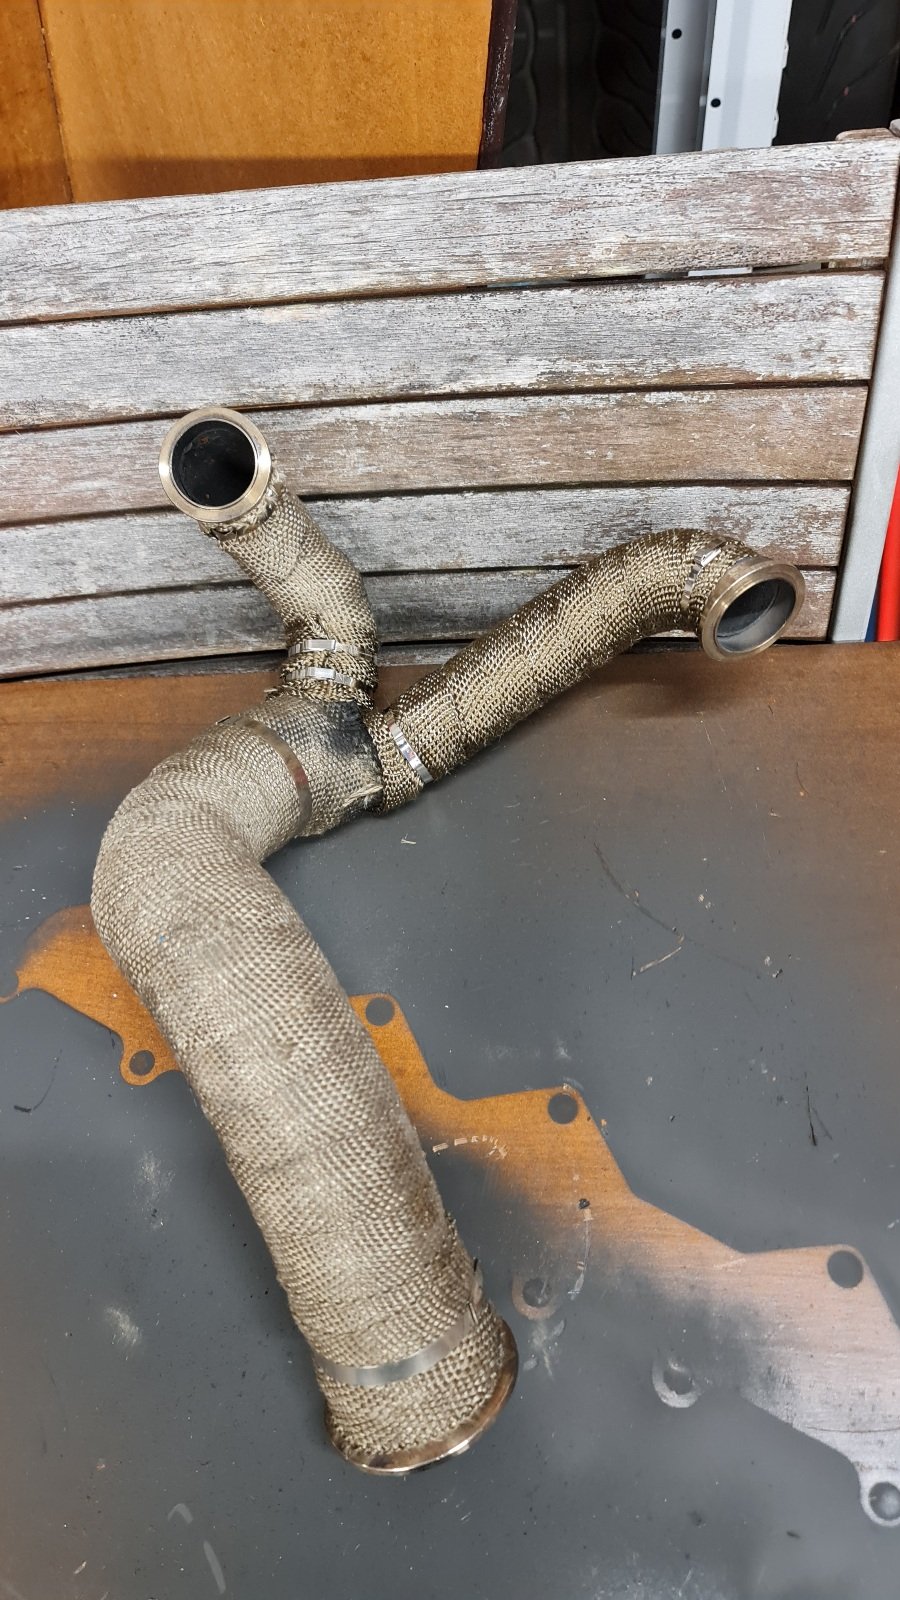
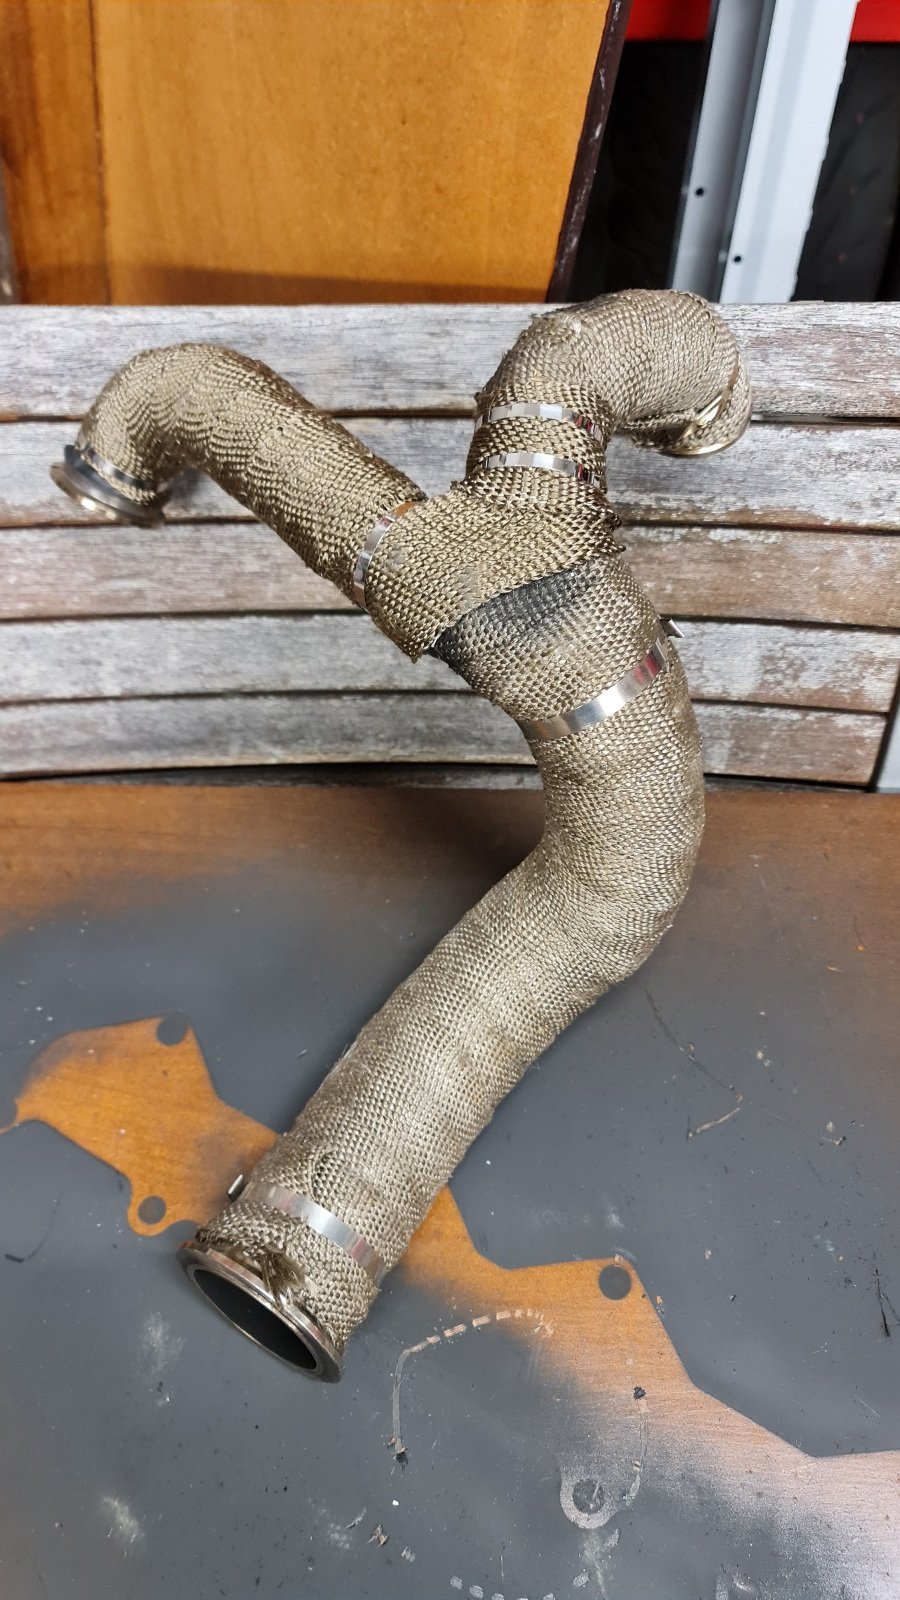
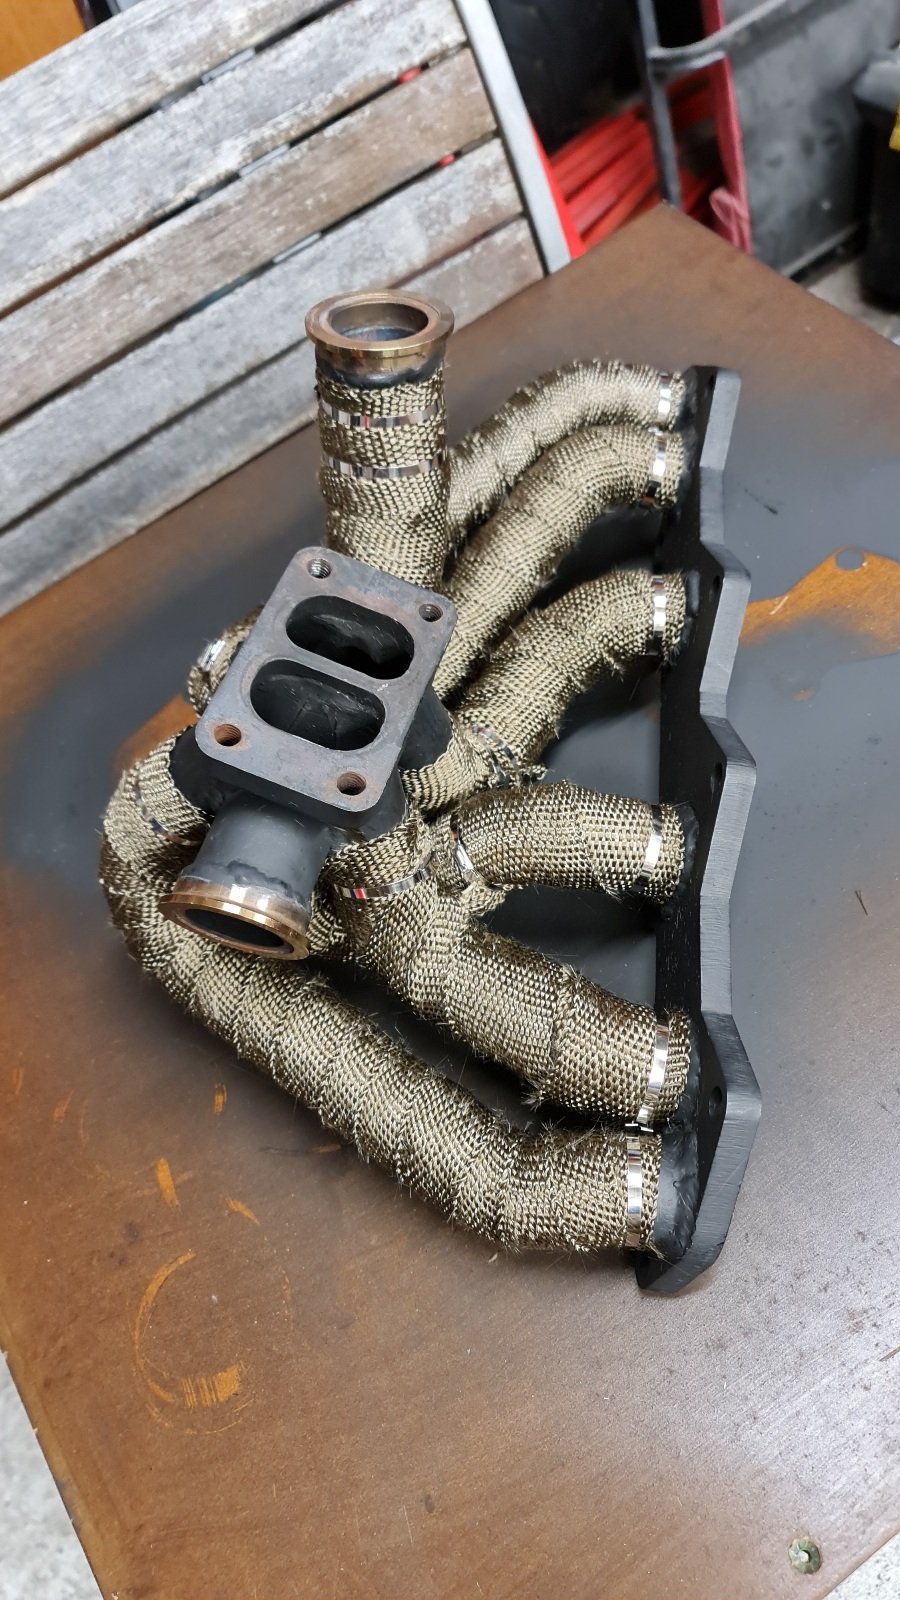
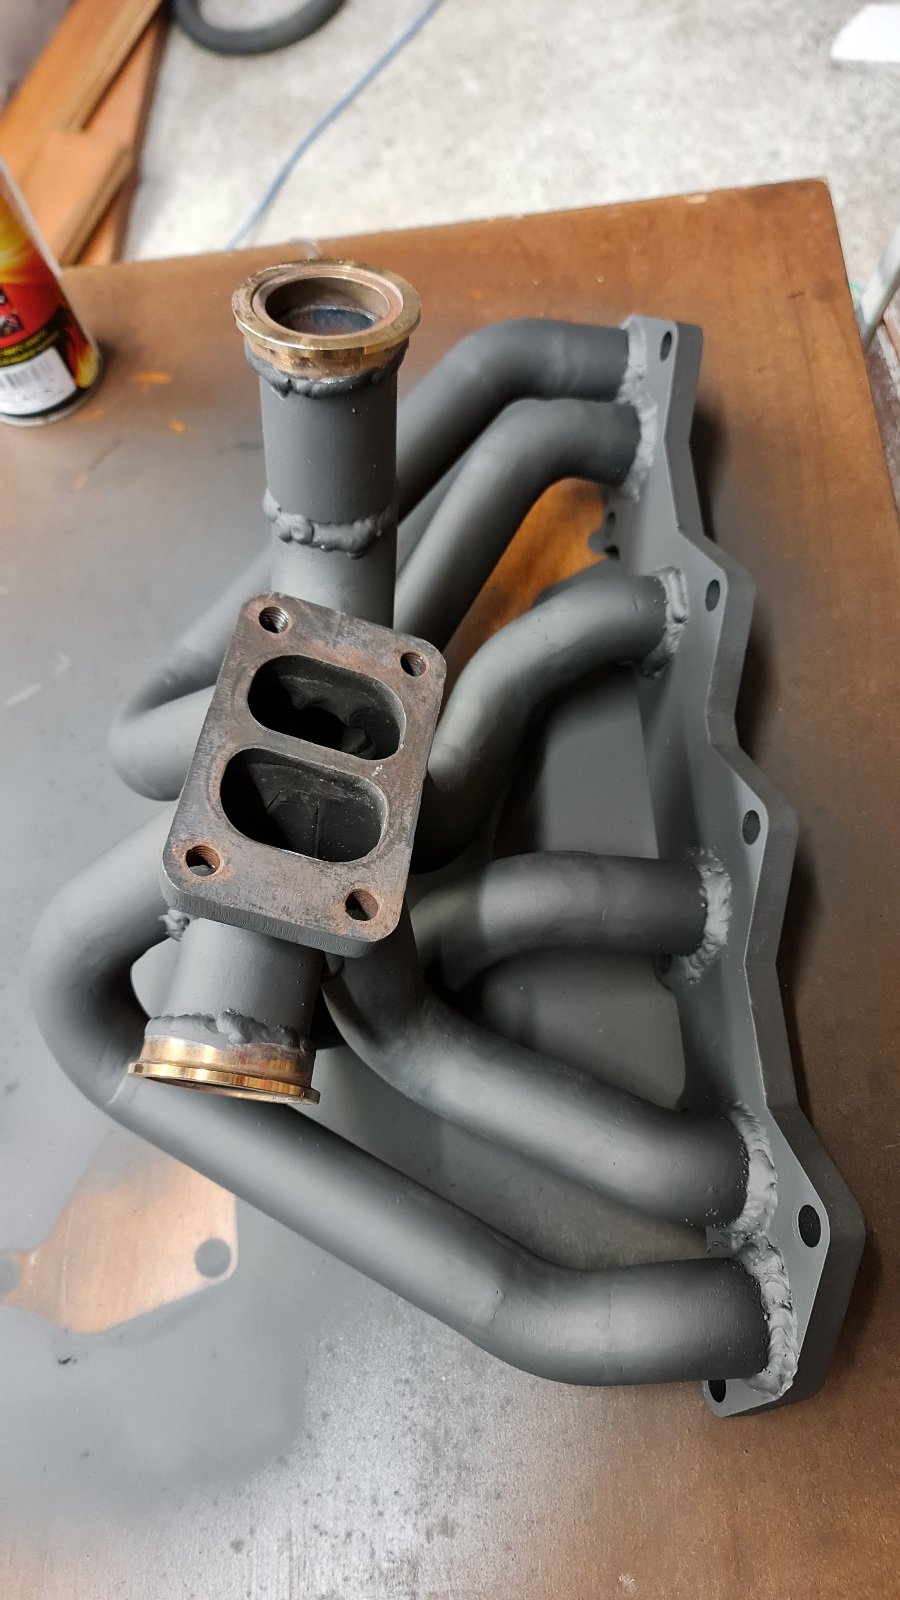
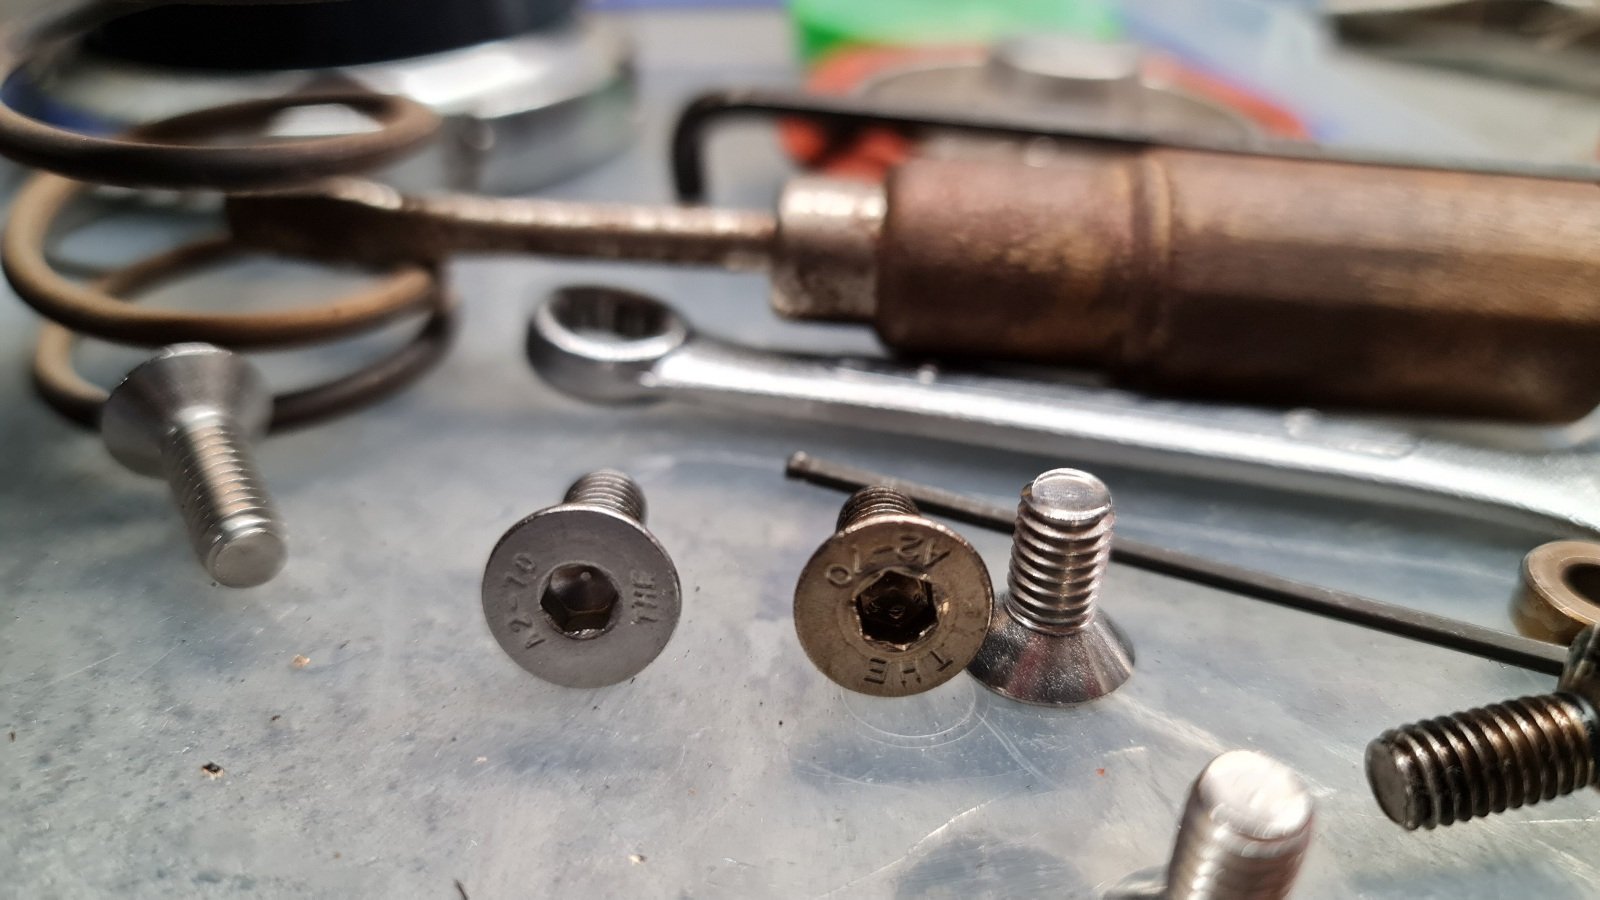
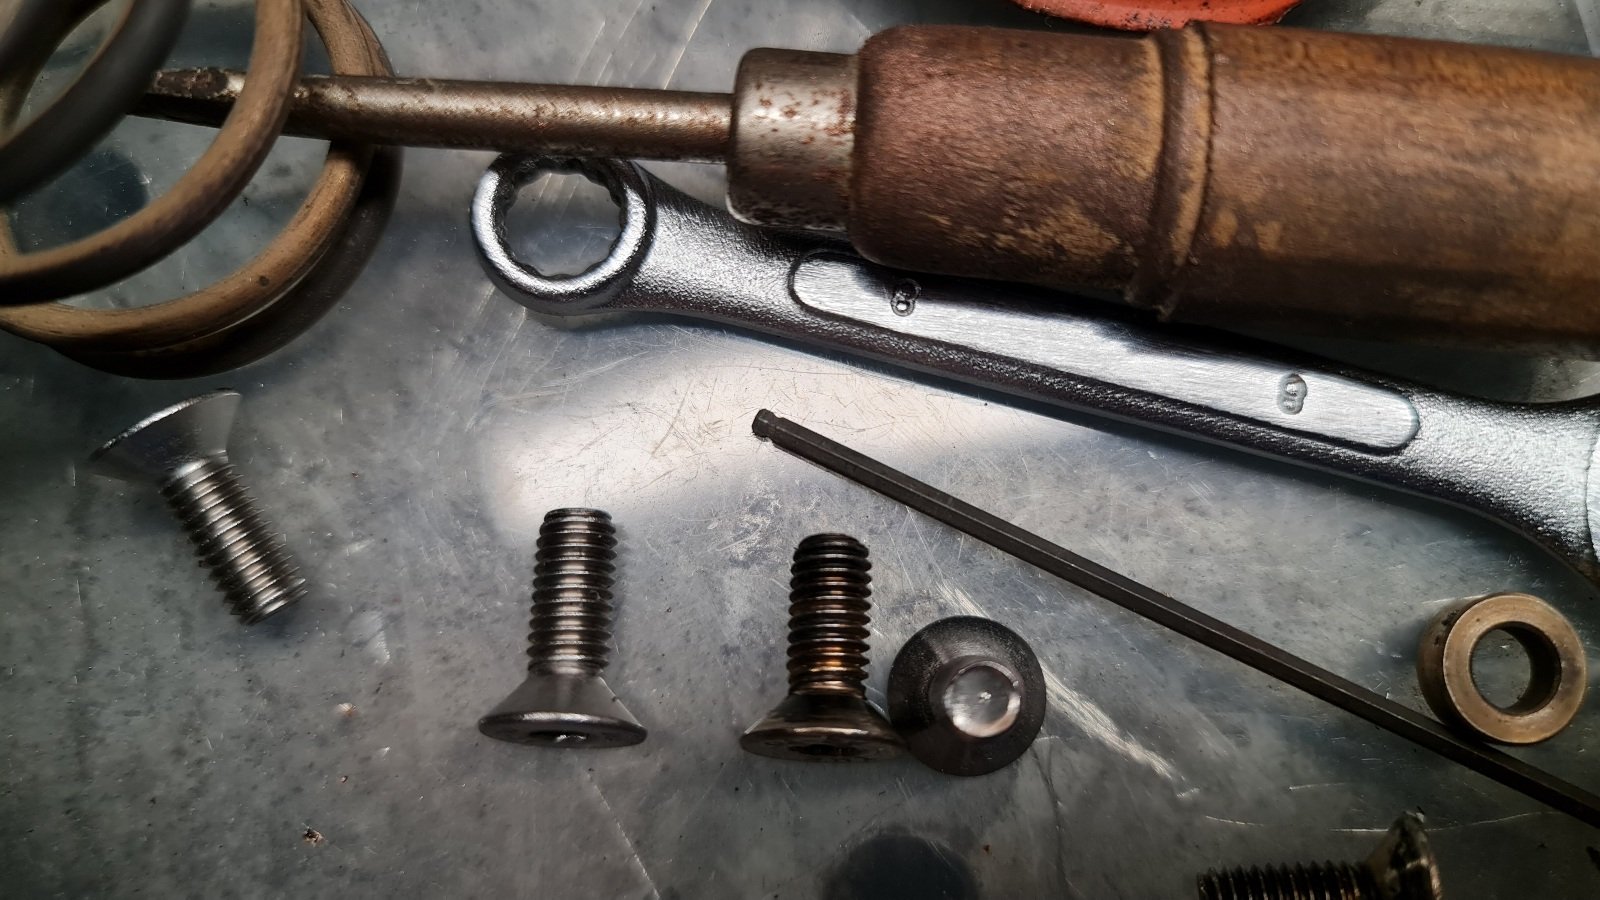
Found the right screws at Anzor, same head taper, allen size, 'THE' manufacturer and same 304 stainless. 16mm long, so maybe 1.5mm longer than the originals but they don't bottom out so work fine: Repainted the manifold: Decided to heat wrap the manifold, not too worried about rust since its thick wall stuff: Back on the engine: Also painted and wrapped the wastegate outlet to dump y piece:
4 points
-
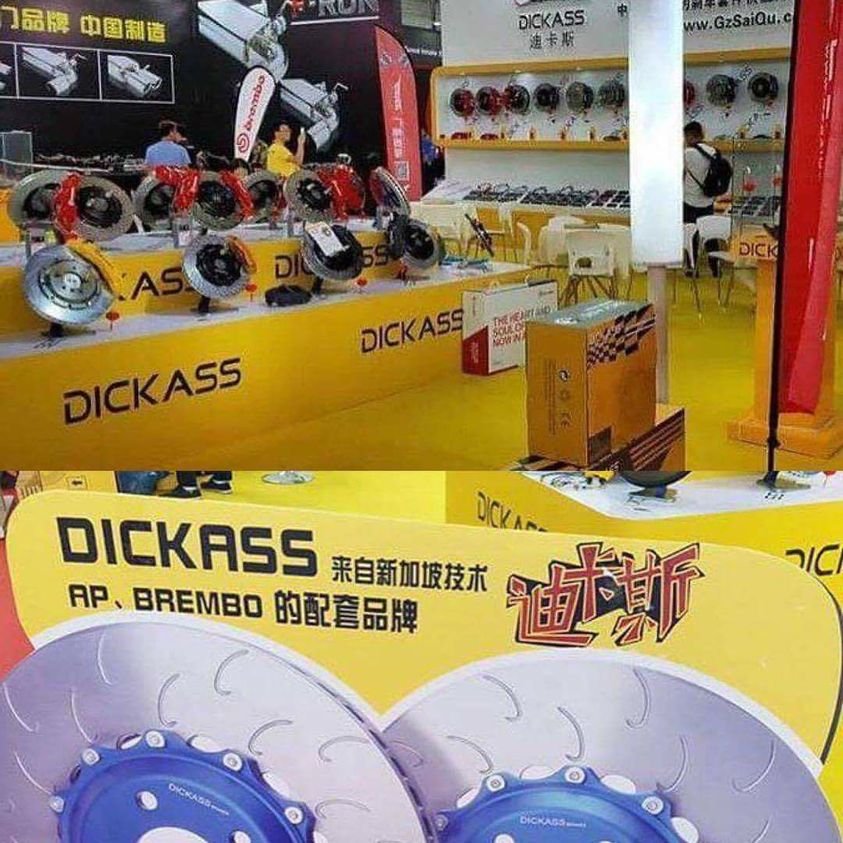
A good rule of thumb is if the manufacturer won't even put their name on the product= bad4 points
-
Found alittle rust hole and the panel is pretty lumpy and uneven. I will be smoothing it out with my hammer and dolly but it's only the front half by the bumper that is uneven. Pretty stoked with how good it is really.
4 points
-
Turns out the mechanical fan does a better job with the new water pump.
3 points
-
Oldschool Nats Chathams 2026. Entry Fee: Building materials carried on as hand luggage.3 points
-
What an intro!3 points
-
Dunno about other certifiers, but I wouldn't cert them3 points
-
End of weekend engine bay shot. Made a nifty heat shield for the firewall to keep the important stuff like brake masters and fuel hoses from melting. Rocker cover is off getting a parts wash to get all the swarf out from drilling breather holes out. Sump needs to same treatment after I added an oil temp sensor hole.
3 points
-
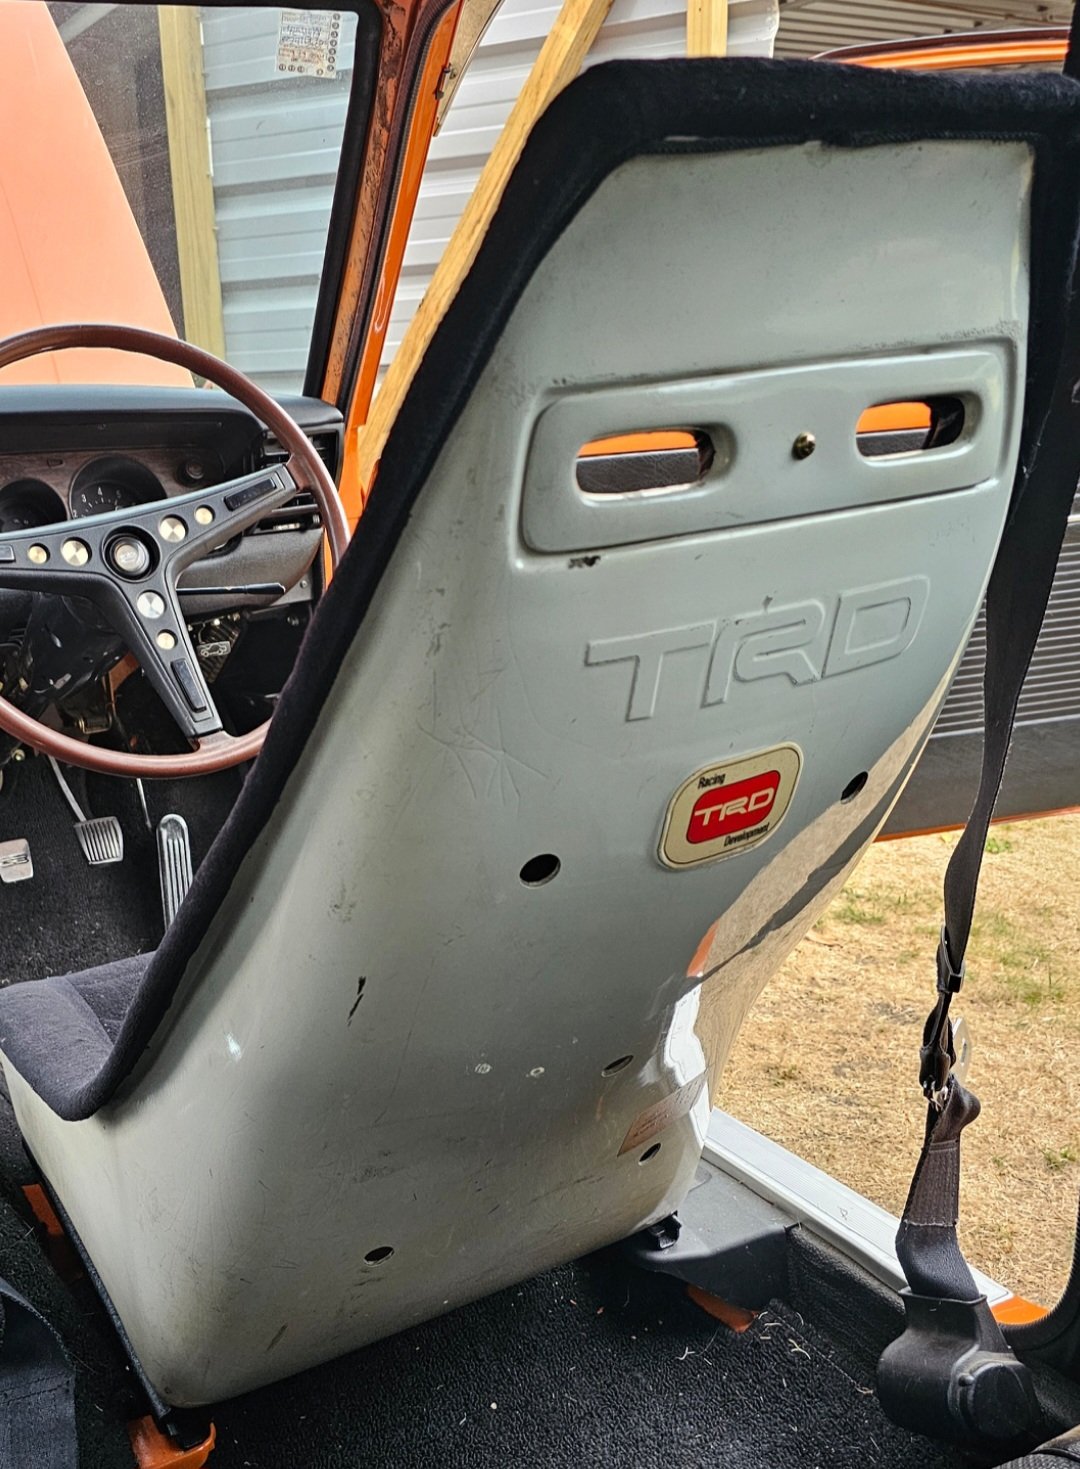
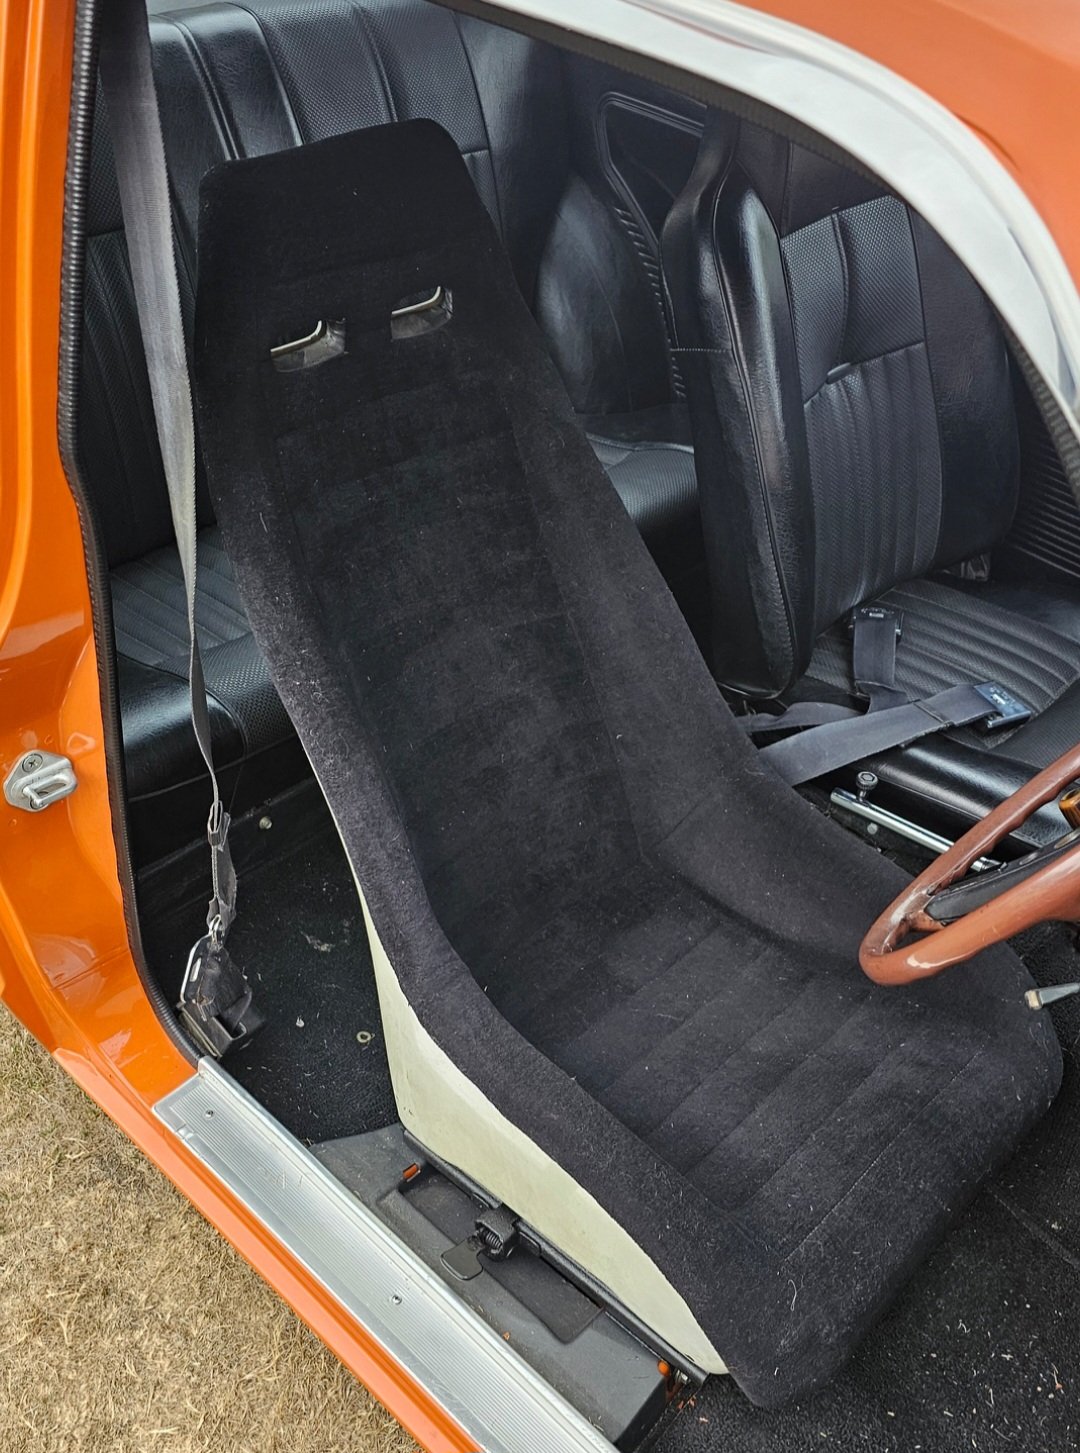
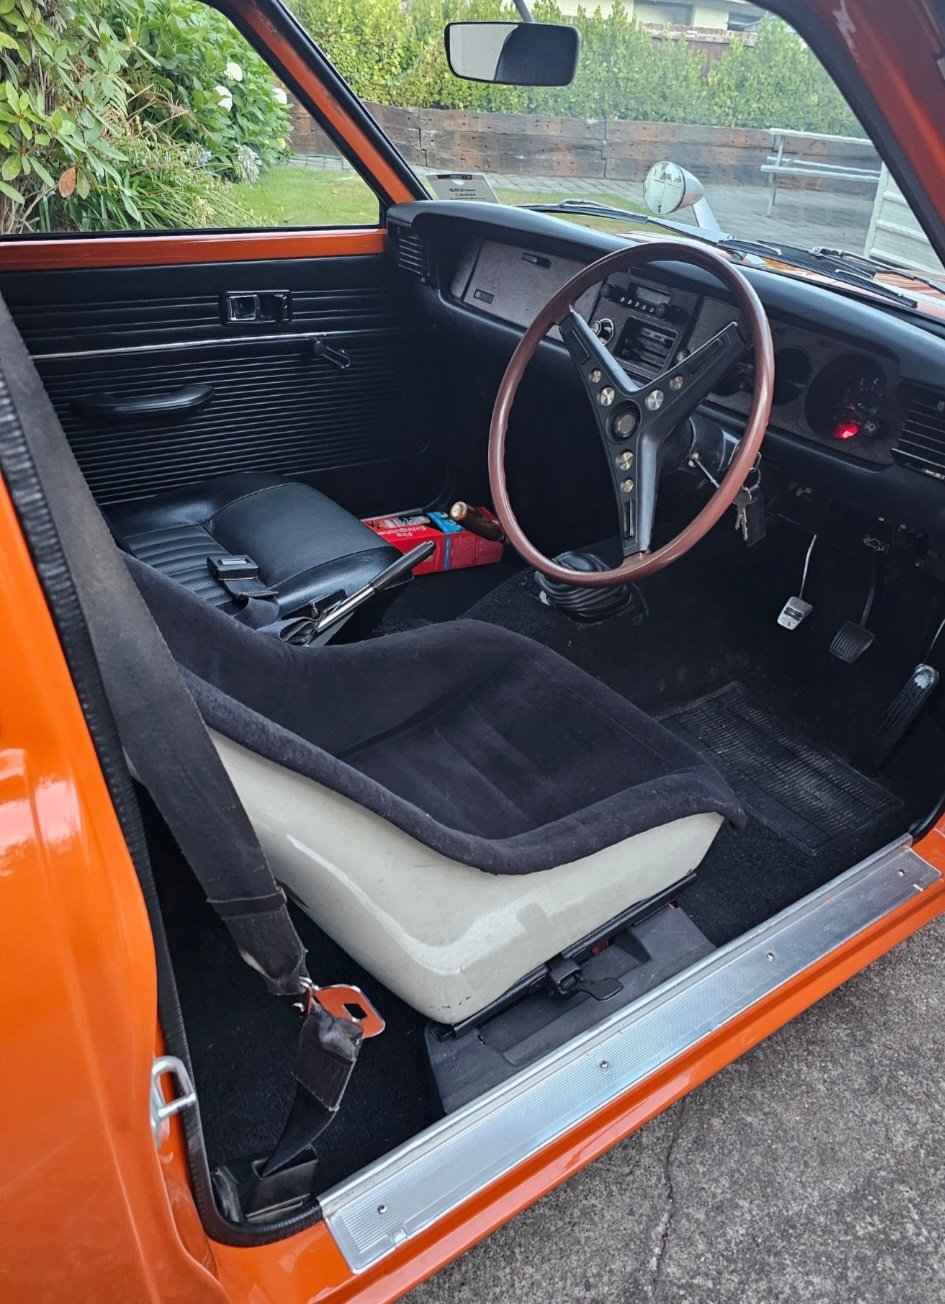
1970/80s trd bucket seat on factory ke25 seat rails
3 points
-
My cousin did some wheeling and dealing and brought this home one day. In exchange for taking away some Morris minor parts, this was thrown on top to keep them from blowing off the trailer. It's all there, I even have the bits that melted off into puddles on the ground. Story is the barn burnt down, this was in thr shed next to the barn, so although it got pretty hot, it wasn't ever on fire itself. Cousin put a new carb on for some reason, and got it going, it went up the tanker track, made a bang, and didn't run since I dunno yet if there's any plastic gears in the engine, but it kicks over and all the compression shoots out the exhaust flange Probably this mess has something to do with that
2 points
-
So ages ago I got an old mobility scooter, with the intention of convert it into a mini Willy's jeep that my kids can blast around in. The donor vehicle was this beauty, in working condition but with no batts. I borrowed some old batteries from my BIL, but they were well past it, so had to invest in a good set, not sure on the range yet, but it will be decent with a couple of 50ah's in there. I then half assedly rearranged it to have a steering wheel from a ride on, and lowered the seat so the kids could drive it. I also fitted a foot pedal accelerator. It was like this for more than a year or so I guess. Then recently I decided I better actually work on making it into the jeep it was meant to be, before the kids get too old. So I did quite a bit of chassis modification to get the batteries back a bit (mainly so there's room for my feet to fit in) I also fitted new black tyres, as the old fronts were rooted. I then widened the front track 80mm to match the rear, not sure why they made the front skinnier to begin with tbh. Then I started work on repositioning the steering to one side. I used bearings and pressed steel housing I already had, and got a couple of sprockets to reduce the steering speed by half, to make it a bit easier to turn with the smaller steering wheel. The center hub slides to tension the chain. The shitty pressed steel housings didn't like having the leverage of the long steering shaft on them, and bent, so I machined up a hub to replace them, it's mint as now. I then whipped up a crappy temporary floor and seat (not finished in pic) so the kids can drive it while I build the body, which is the next mission. Regards, VG.2 points
-
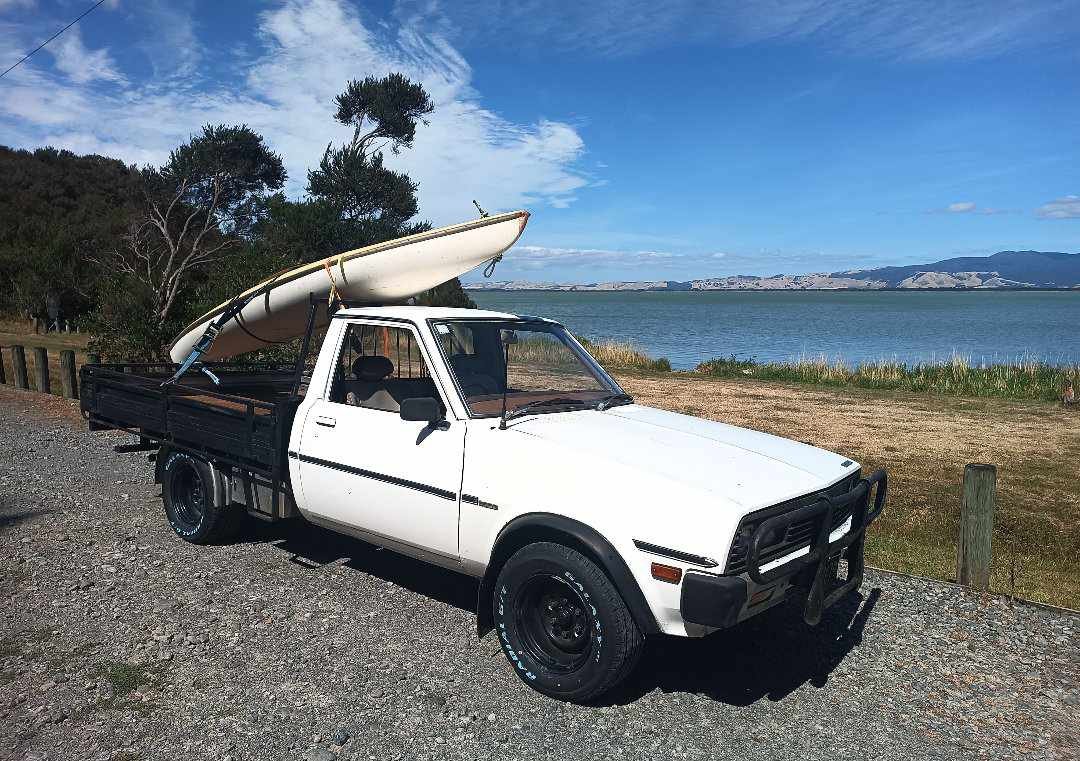
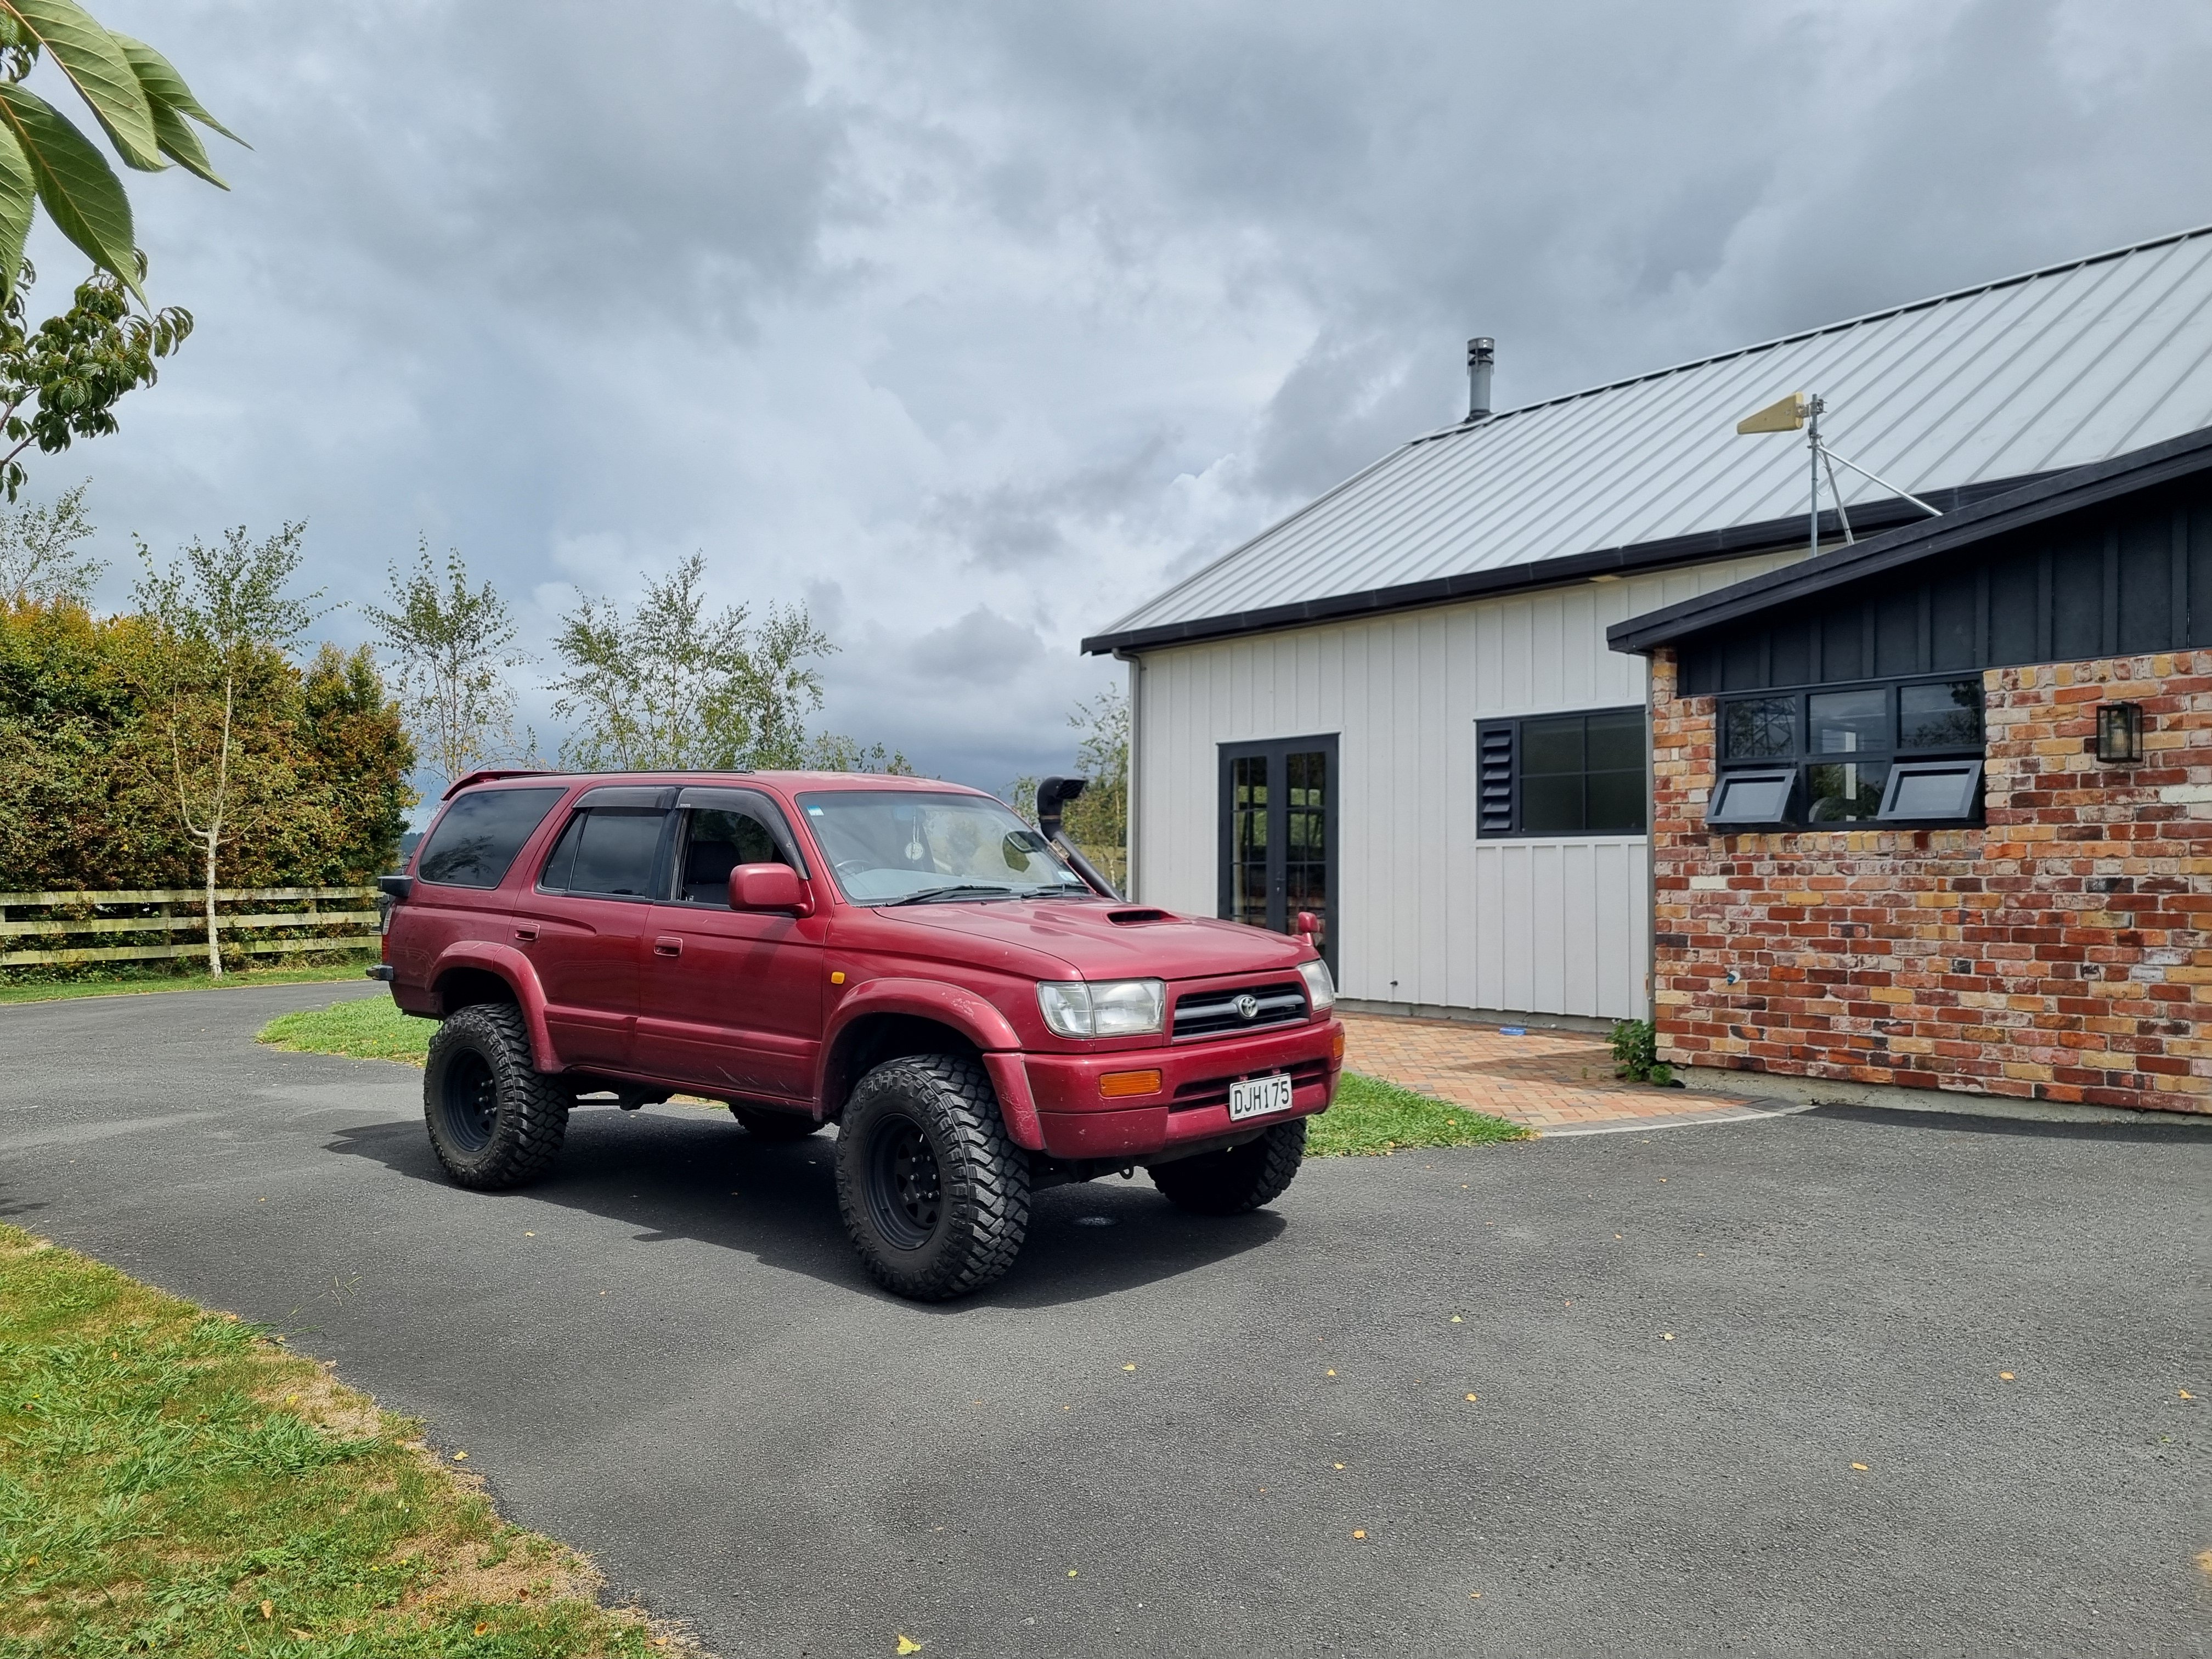
I needed something to get building materials and generally haul shit around with. I had an 80 series when I built our last house and it was invaluable for getting shit done, should have never sold it... Anyway, life story, get to the point. My new truck is a KZN185 96 hilux surf, turbo diesel. It's done 340ks which is up there but I've had a few toyotas with high Ks and it doesn't seem to affect them to much. This truck drives really nicely, even with the big tyres it doesn't seem to have that shaking vibration thing that modern rangers etc have.
2 points
-
New wheels (13x5 from CA Accord)
2 points
-
Cut cut cut
2 points
-
Hot-mix would cost all of the millions Corbie. I could probably do it cheaper in concrete TBH... but I'm happy enough with the crushed schist we've been laying over the last couple of weeks We were very fortunate to buy the property as land here is very, very hard to get. It's a little over 24ha with half a kilometre of sandy beach to the north and another half kilometre of semi-tidal lagoon edge to the south. It's an 'oldschool' title from the late 1800s so I own down to the high tide mark on both bodies of water. TBH I've never walked to the lagoon side of the property. It's a low lying wetland which will just need to stay like that for now. Today we collected timber, rebar and underfloor insulation from the port. Tomorrow I need to go to work to pay for some of it. Ha2 points
-
Some digging indicates it's a 1976 model TRAIL 50 Which is great because BEING A TRAIL 50 makes it easy to go on small bike rides The front all melted off
2 points
-
Buyer beware.2 points
-
Well, if I was called maxpeedingrods I wouldn't put my name on things either.2 points
-
That’s a helluva drive. But what a spot! Have you thought about buying a “double wide”, some pontoons and couple of big outboards and just sailing across?2 points
-
Also new glow plugs, they have a habit of snapping the tip off and banging around inside the cylinder..2 points
-
Looking forward to seeing this on Grand Designs Chatham Islands.2 points
-
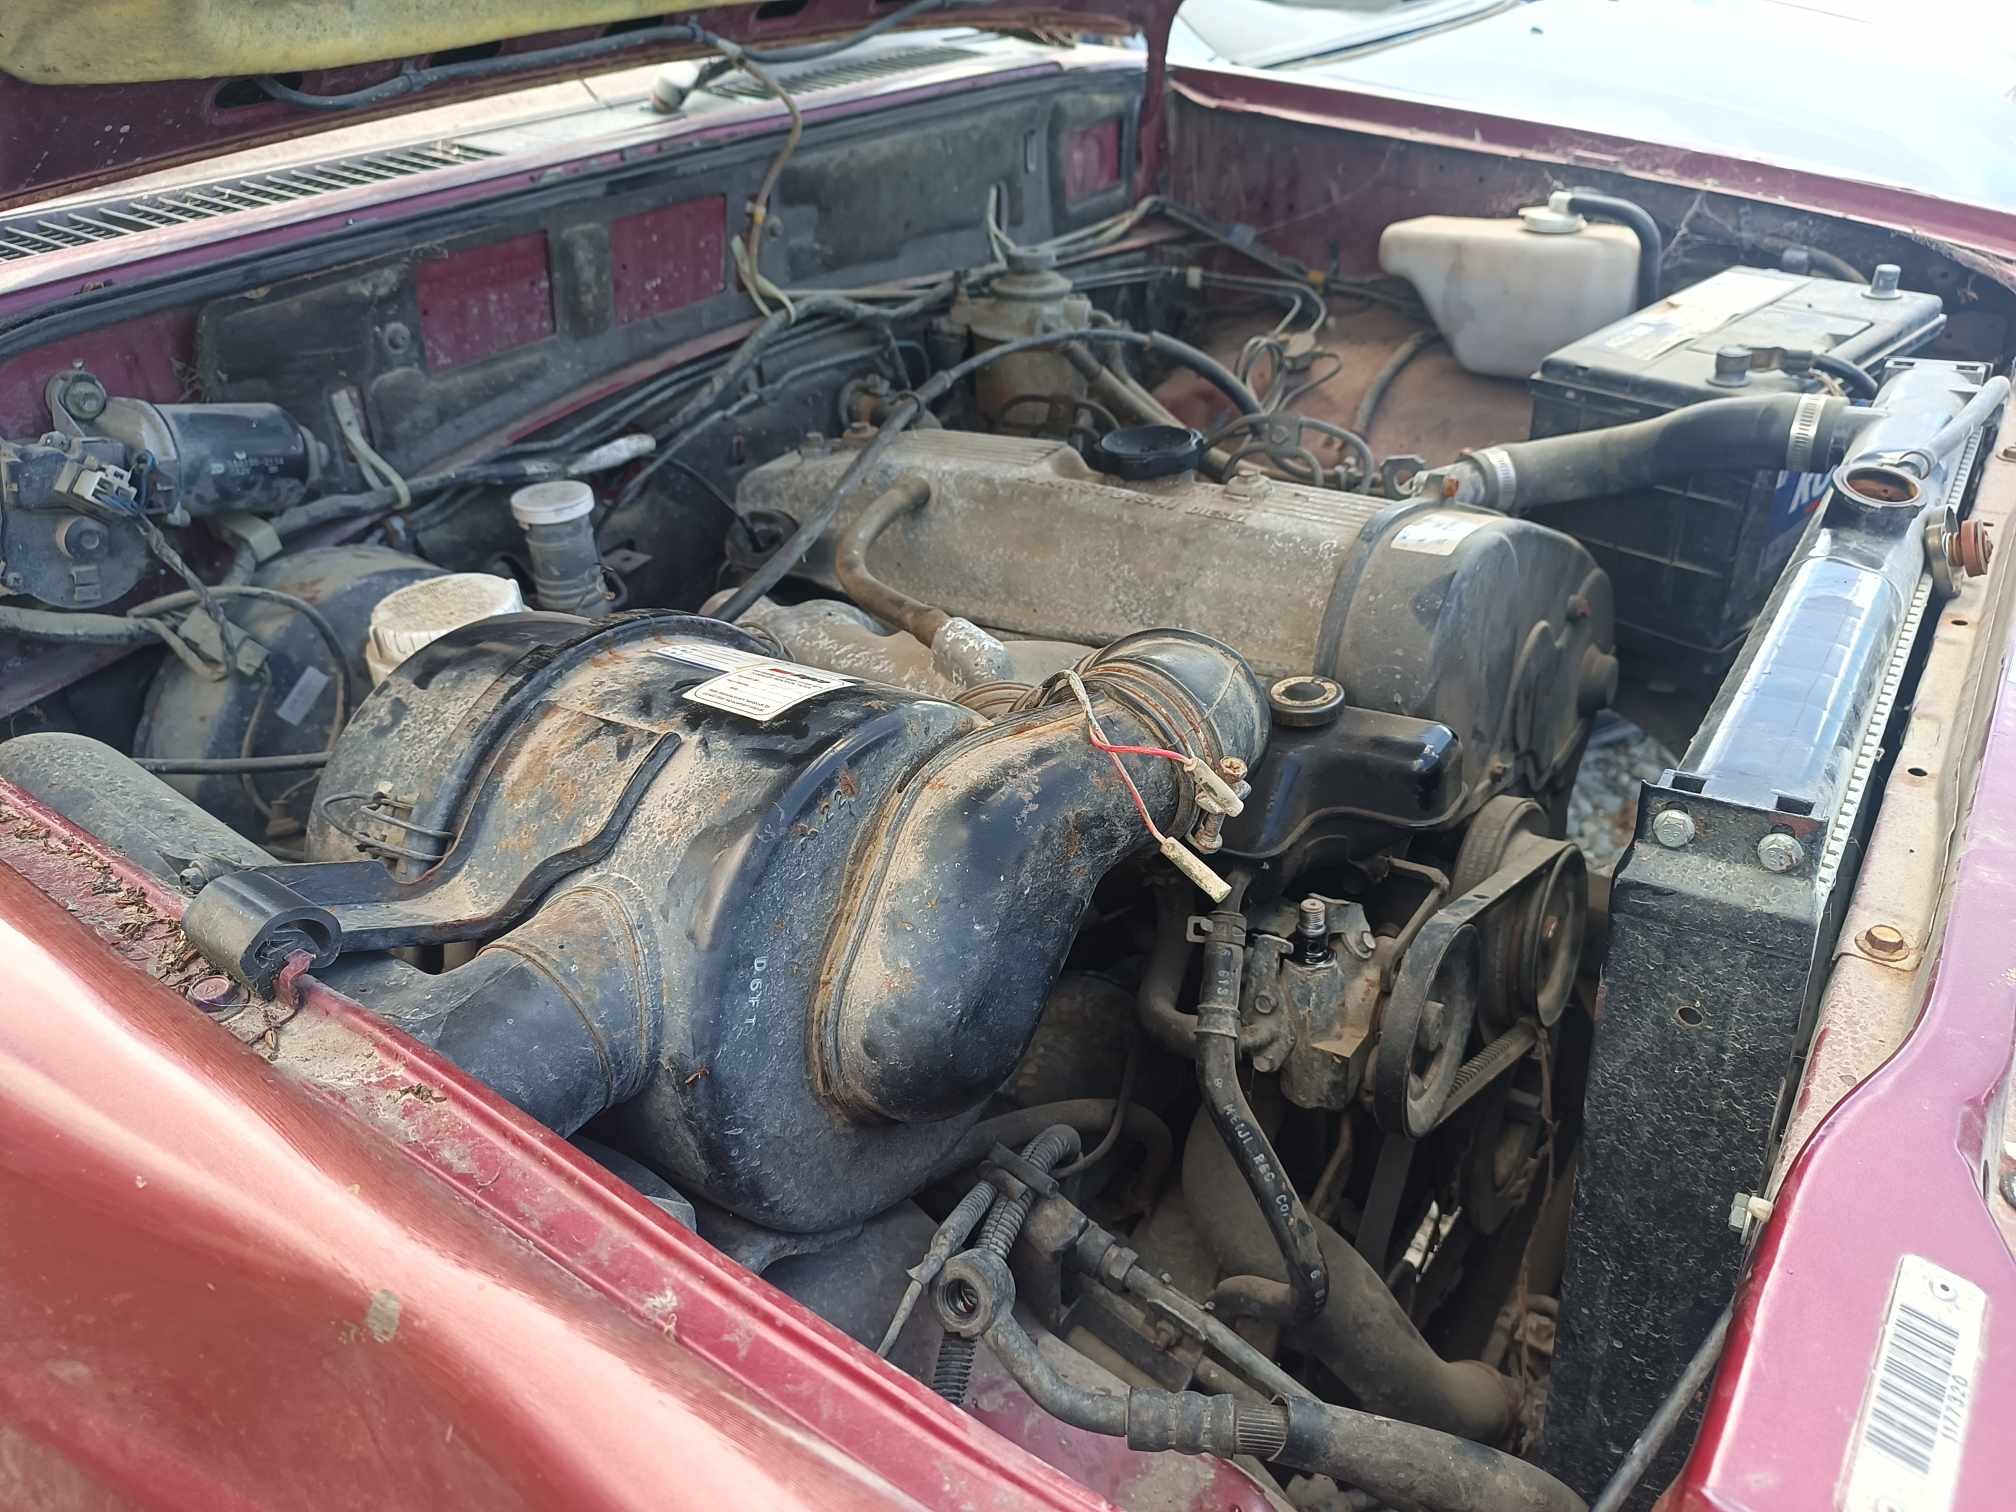
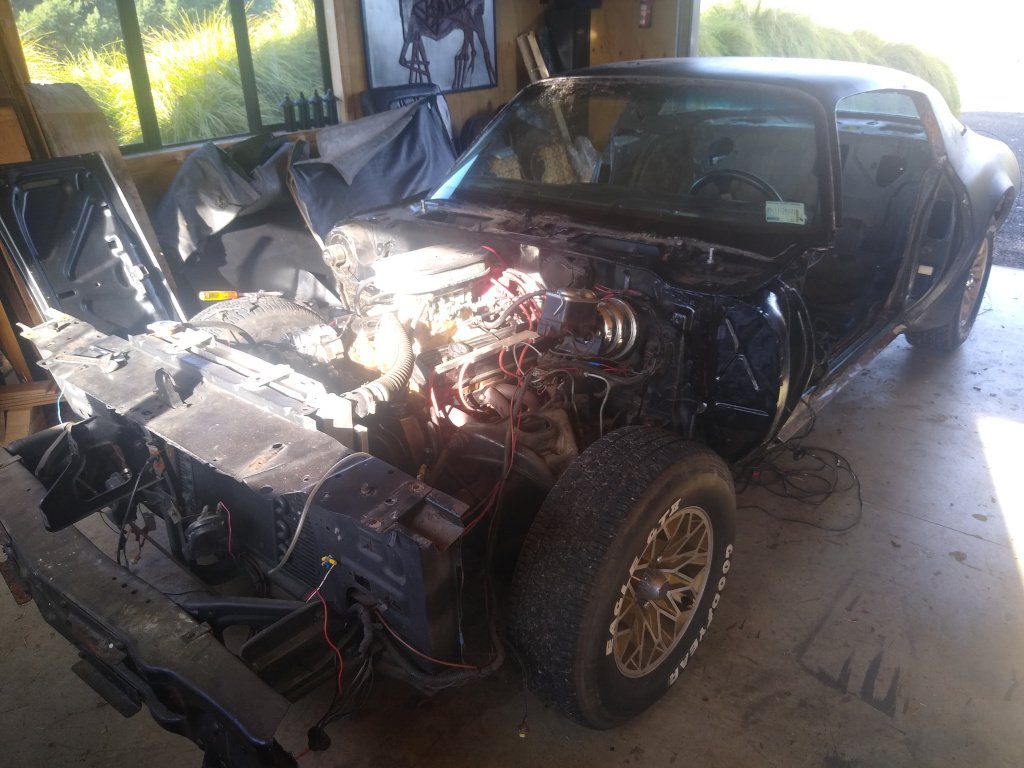
Oops. I was just going to post a li'l update since things have slowed down while I wait for stuff, but I now realise I forgot to share some stuff. We disassembled the engine. It's otherwise fine really. The oil pump housing halves look fine fortunately, no scoring or anything. The pump gears themselves are impregnated with bearing material, they still turn inside each other without much resistance but without a reference I don't know if they're meant to be smoother ;). The block's journals aren't happy. You can feel the scoring on two of them, one is particularly gougey and definitely would need a grind, if it can be saved at all. At the time we were unsure if we could just use as-is but since then I've been learning some stuff from HP Academy and uh yeah that wouldn't fly I've dropped the block off to some reconditioners in welly. They asked for the rest of the rotating assembly so I slapped the caps on in 5 minutes in what I hoped was the right order (it wasn't) and went over there with Andrew. One of the first things Engineman asked was "want us to try save the crank?" We just assumed it was toast because of the overheating discolouration. I mean maybe it is, but if these guys can save the crank then that pays for the cost of saving the block! It's great to have "good news" dangled in front of me for once! That said it could easily just go in the other direction if the block can't be saved. Engineman didn't seem too bothered about the damage, but said it might be a PITA due to one side being aluminium and the other side (caps) being steel. We'll see what he says, this is a blocker for plans going forward because if we have to buy a block then it's probably cheaper to buy a whole new engine (which isn't cheap!). A brief diversion into engine swaps. A swift turbo engine swap would be nice, but honestly one of the fun characteristics of this car is its little 0.6 litre engine which somehow manages to make this little thing hurtle around faster than it should be able to. I wouldn't hate a K6A or something in there (if it could fit...), but it's a lot of fun to have this little angry thing make its noises and confuse people when the bonnet is up. ANYWAY. Here's all the bits strewn about. Consolation prize: expensive aftermarket coils. I have since sorted out the mess a bit. Andrew cut open the oil filter I'd put on the car after it had arrived from Japan, the one attached to the engine when it started quacking, and yeah, sparklies. No surprises there. It looked like a pain in the arse but in the absence of anything to do I picked up the saw afterwards and sent it on the old filter that was on the car when it arrived in NZ. Here's @kws's hands modelling for us. Oh my. Okay Heckies So uh yeah I bought a lemon. Kelv cheekily admitted that he was glad that I'd won the car. Fair. That said, I'm strangely not mad. Nor am I put off the car. I just want to fix it and get back in it. That's got to be worth something to find out about your relationship with your daily driver. More importantly it tells me two things 1. I didn't break my car. 2. The question of "how did I break my car?" is no longer present. On the surface this seems like a shrug of a point to make, but it's much deeper than that. If I didn't find this out I'd probably never be comfortable driving this car hard again - or possibly any car. Maybe that's why I'm not mad.2 points
-
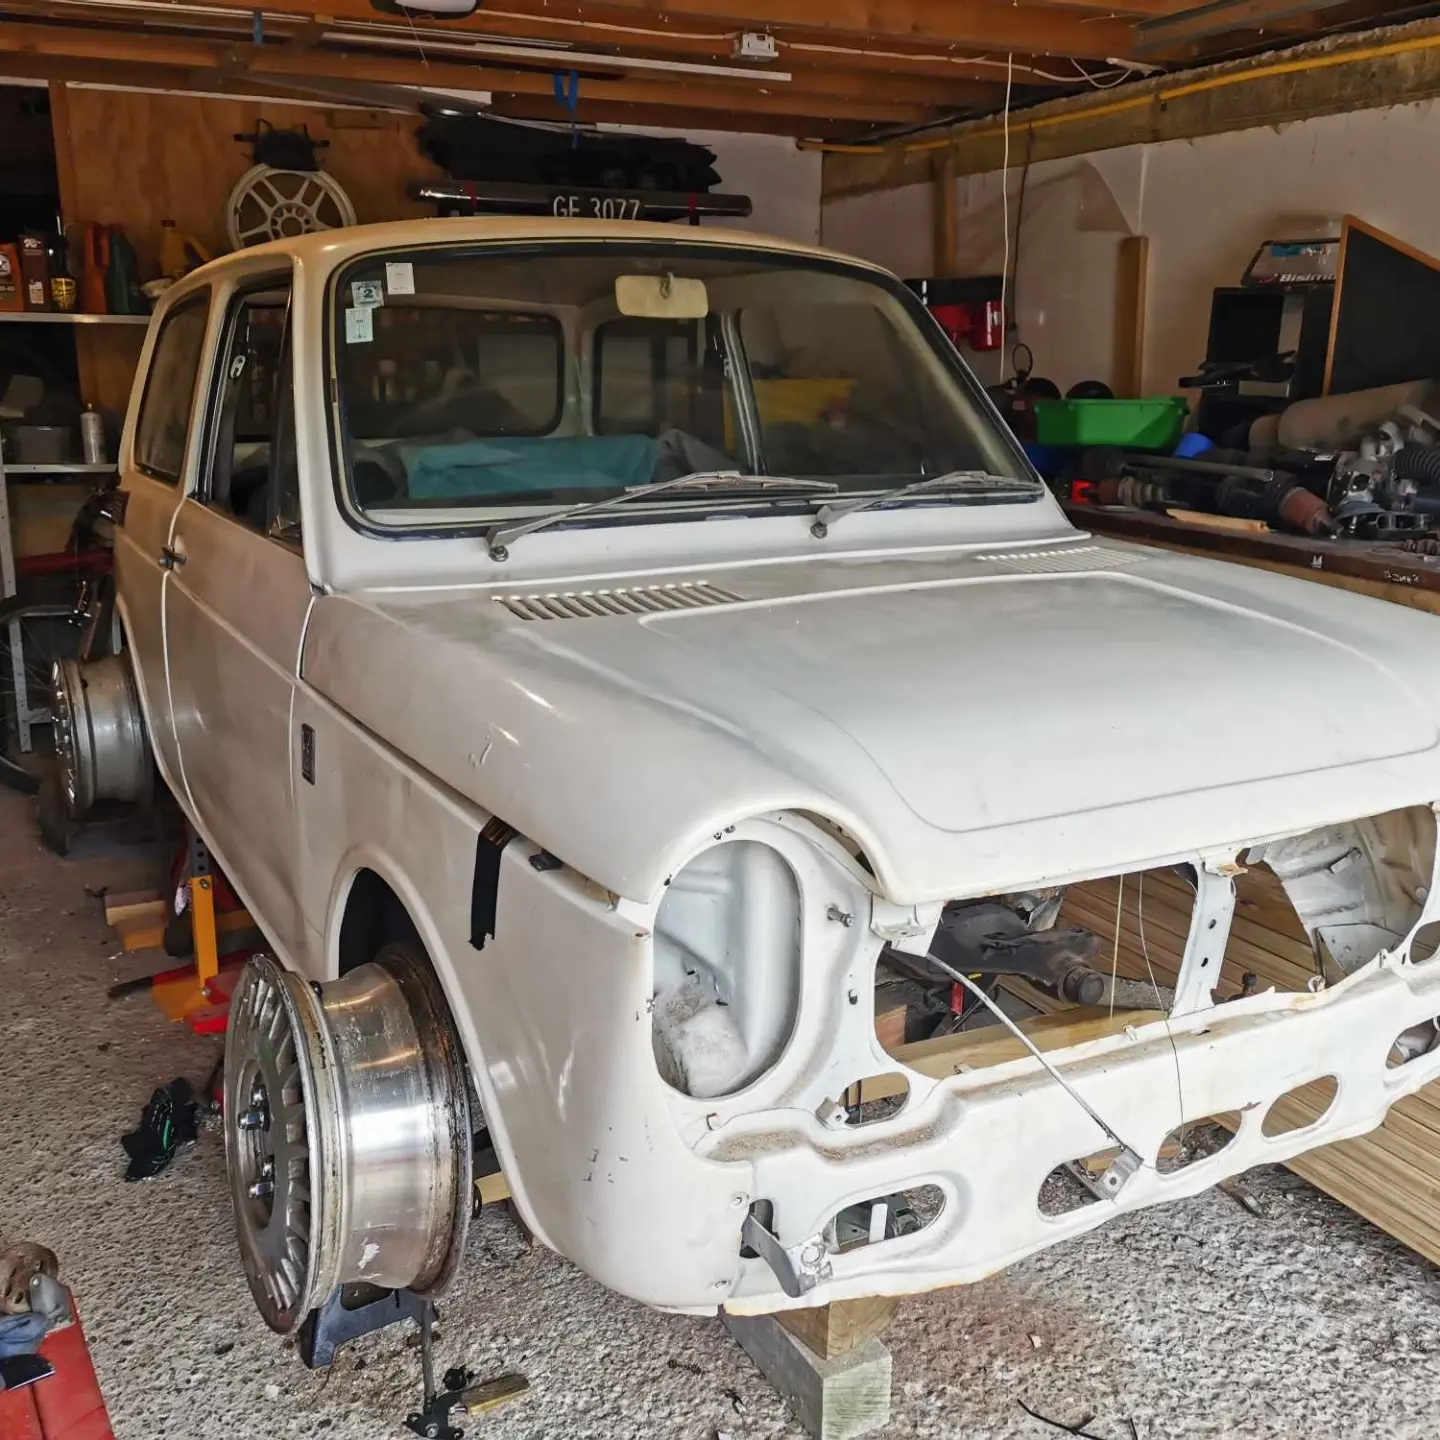
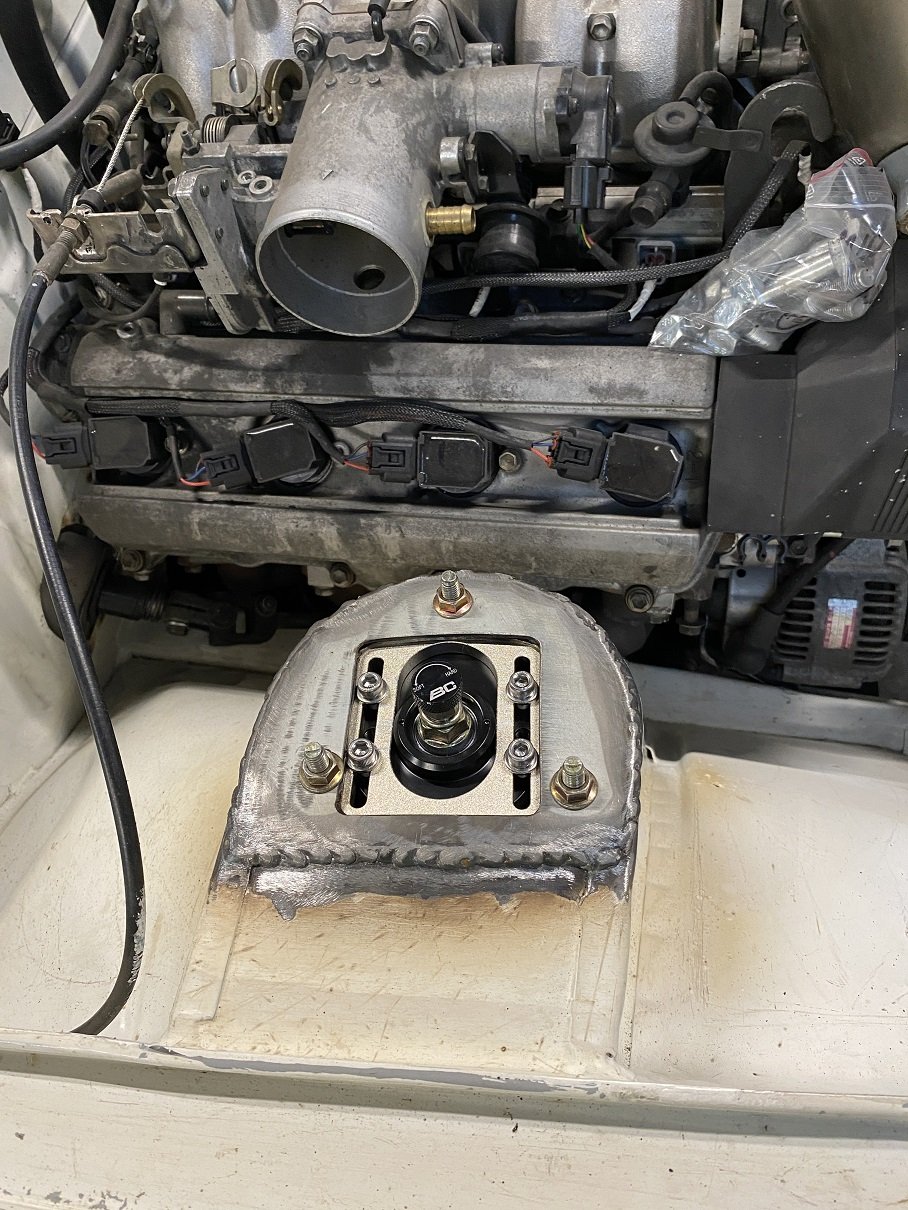
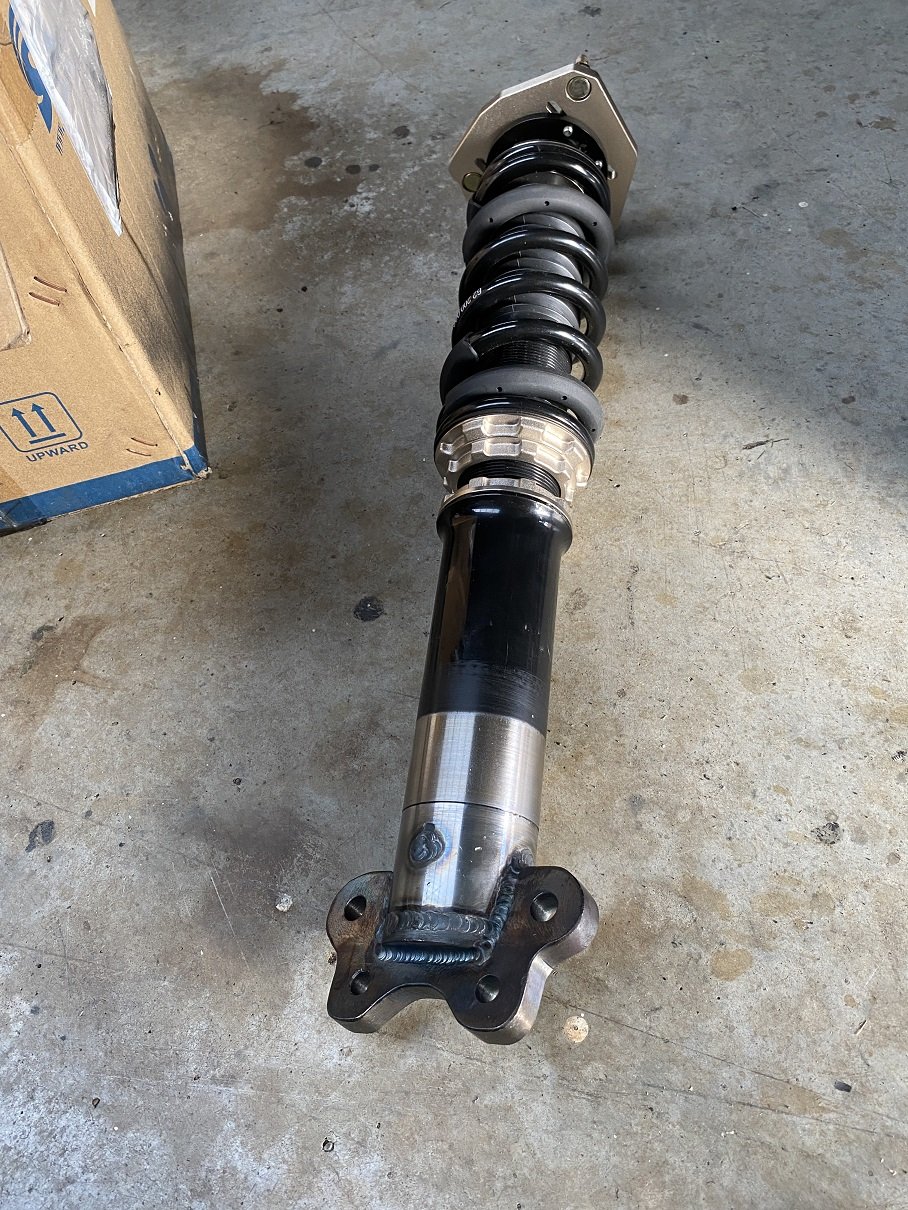
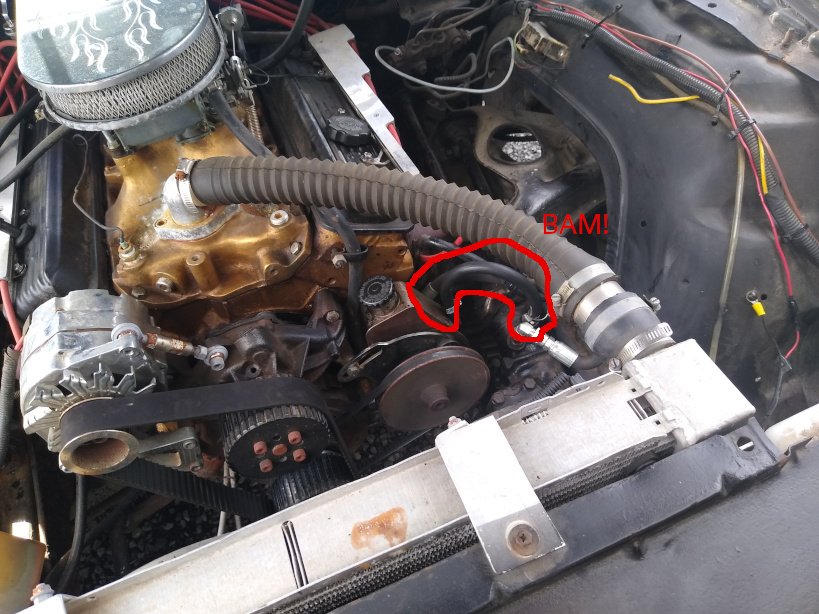
I sent in my design approval forms for the LVVTA Technical Advisory Committee in late Dec. Their next meeting wasn't until Jan. Late Jan. At the end of Jan it was posted back to me and the design was approved. So THE NEXT DAY I went to may certifier's favourite welderm Graeme Kidd in Upper Hutt. A couple of weeks later, he'd done it. AS SOON AS I got in the gate at home. I put them in the lathe and sanded off the burnt sticker and powdercoat. They still need to get NDT tested in Wingate. Graeme says it's a crack test. But I could not wait to try fit them. I had already modified the top plates and the strut towers the previous week. Using a straight edge and the angle thingy in my phone, it's got 0 deg camber at ride height with plenty of adjustment in both directions. They ended up 10mm shorter when installed than I'd calculated. So that's a bonus, the adjustment won't be totally bottomed out at ride height. On it's own wheels and suspension! I can push it around! It's 10mm lower at the front here than the back. I may raise it up that 10mm so there's a bit more travel. The springs are 6kg I think. I was expecting them to be WAY too hard, but If I bounce on the guard it doesn't feel massively stiff. The engine needs to come back out now so I can redo the engine mounts on the chassis in thicker steel like the cert man said. And to weld in the lower steering column mount. I should paint the exhaust manifold while it's out, it's getting surface rust on it. And one of the front split rims has a leak, so the tyre needs to come off to redo the sealant.
2 points
-
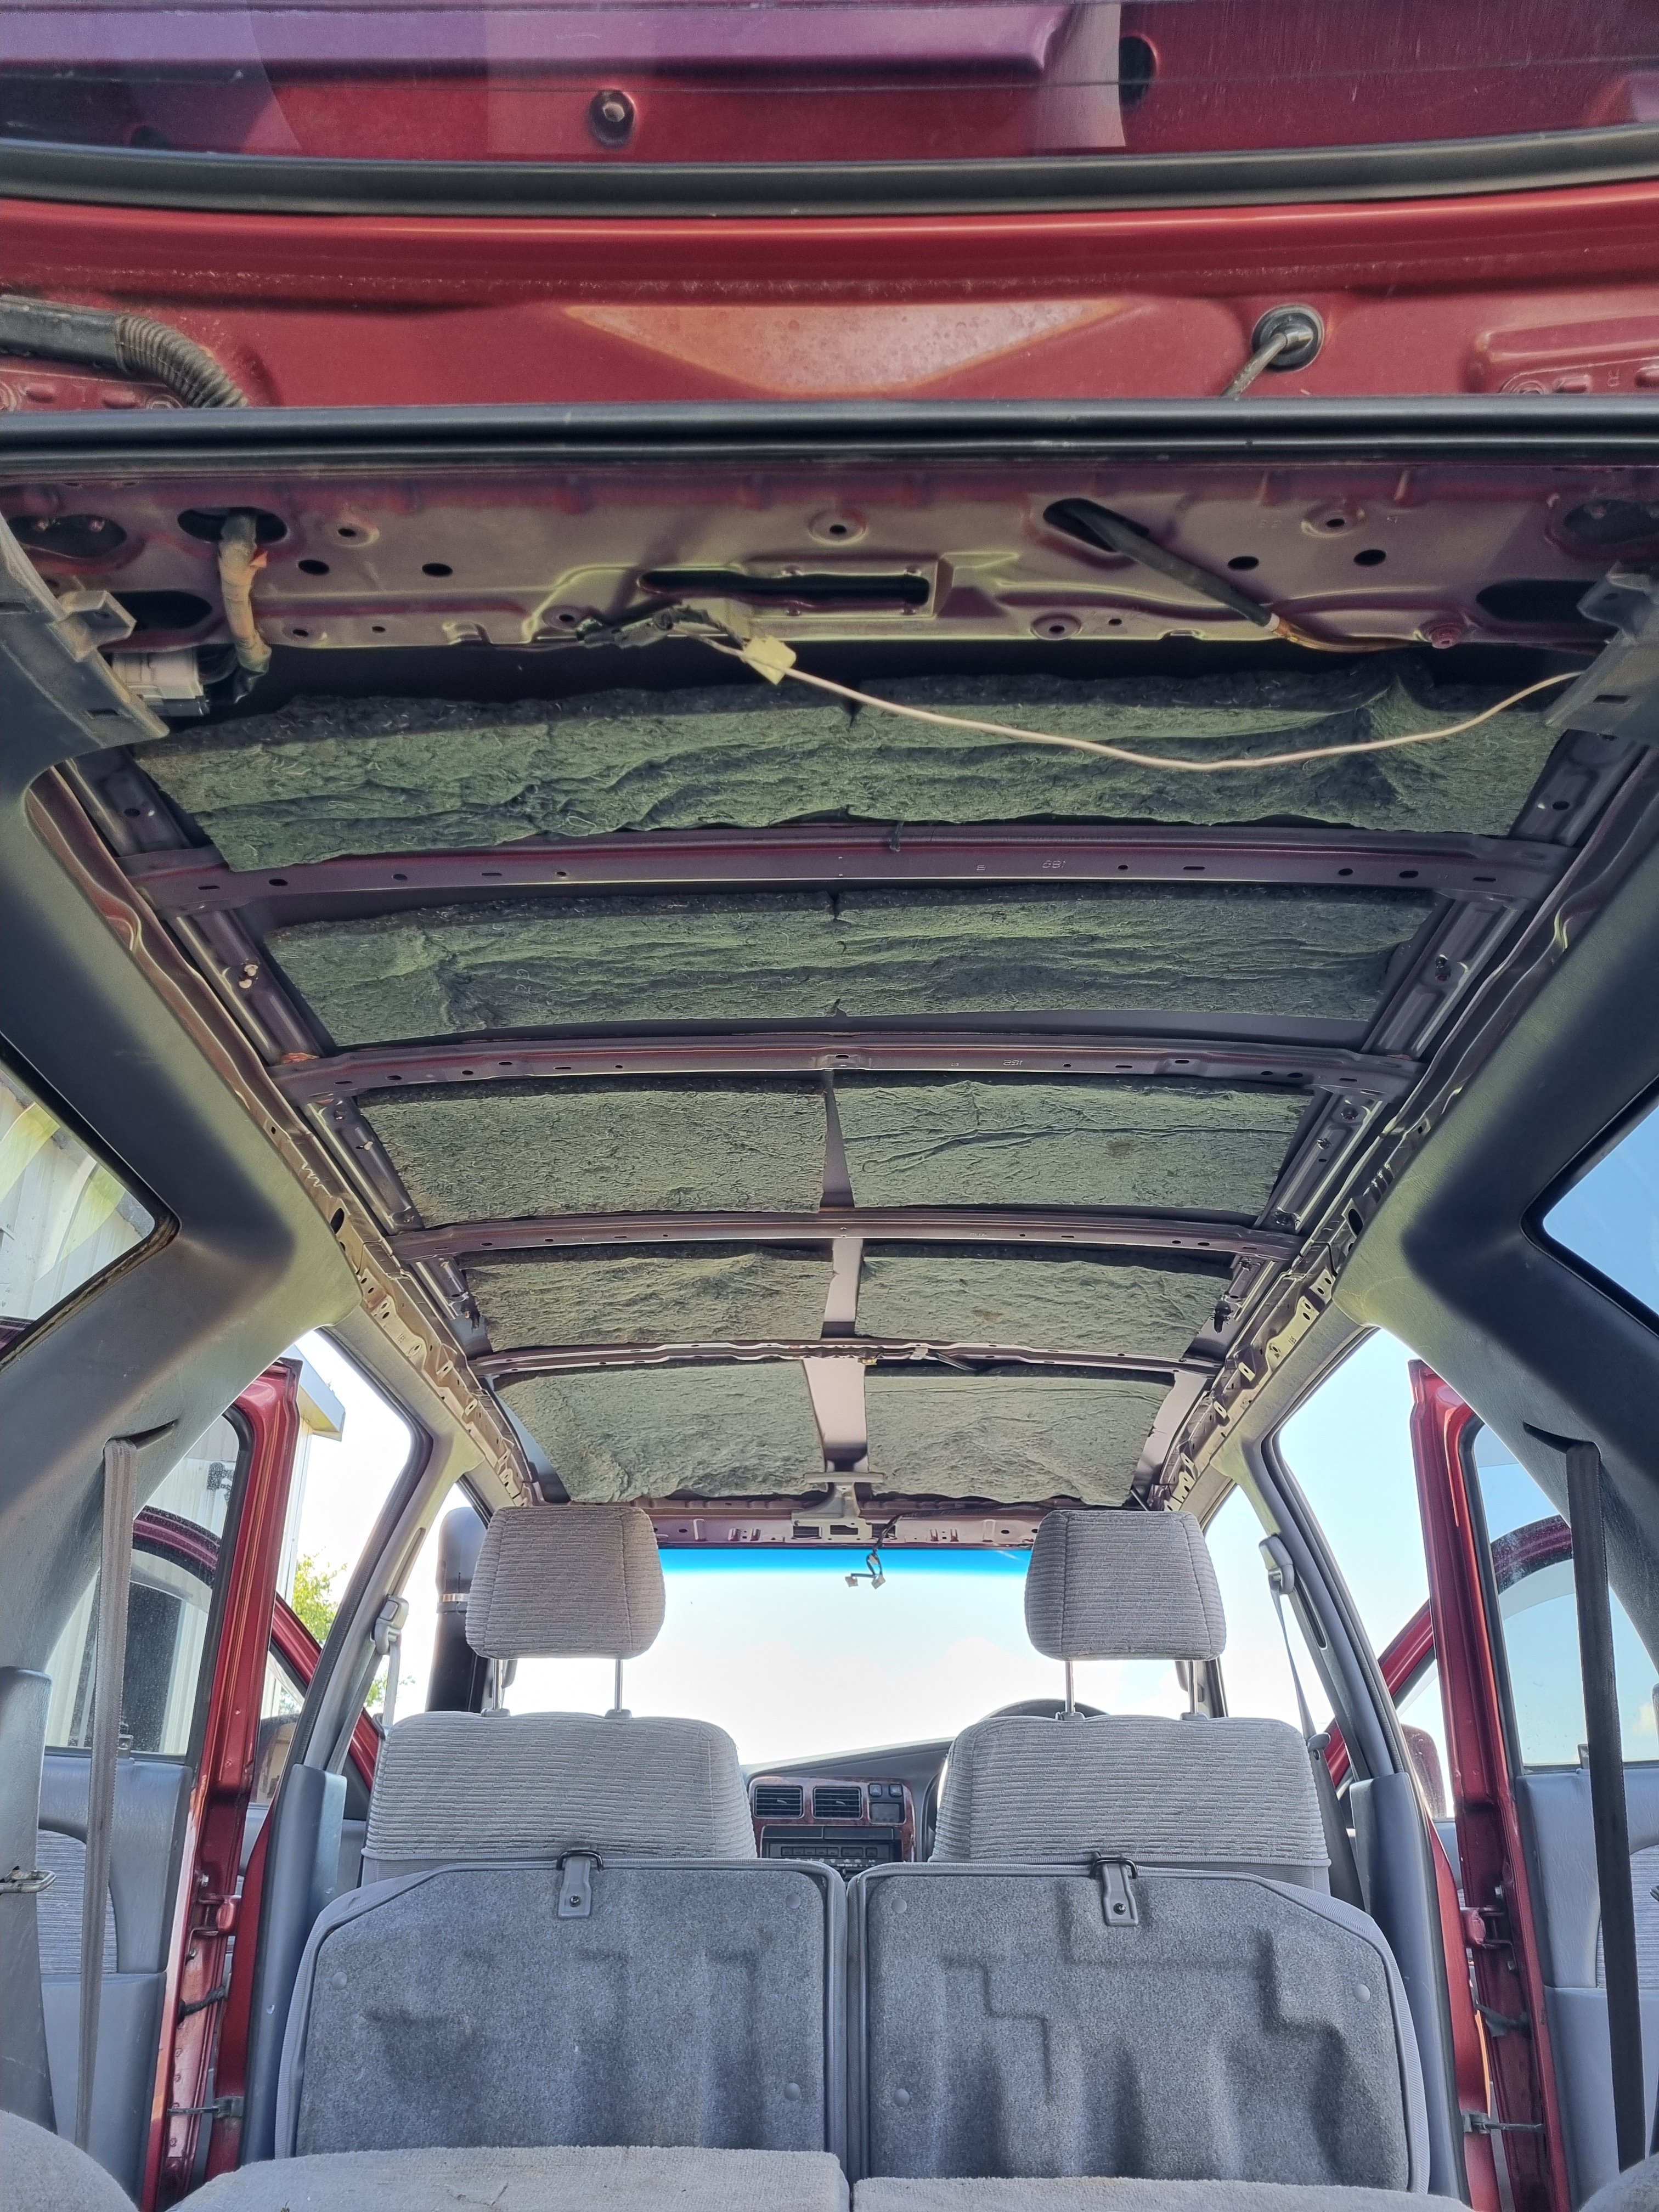
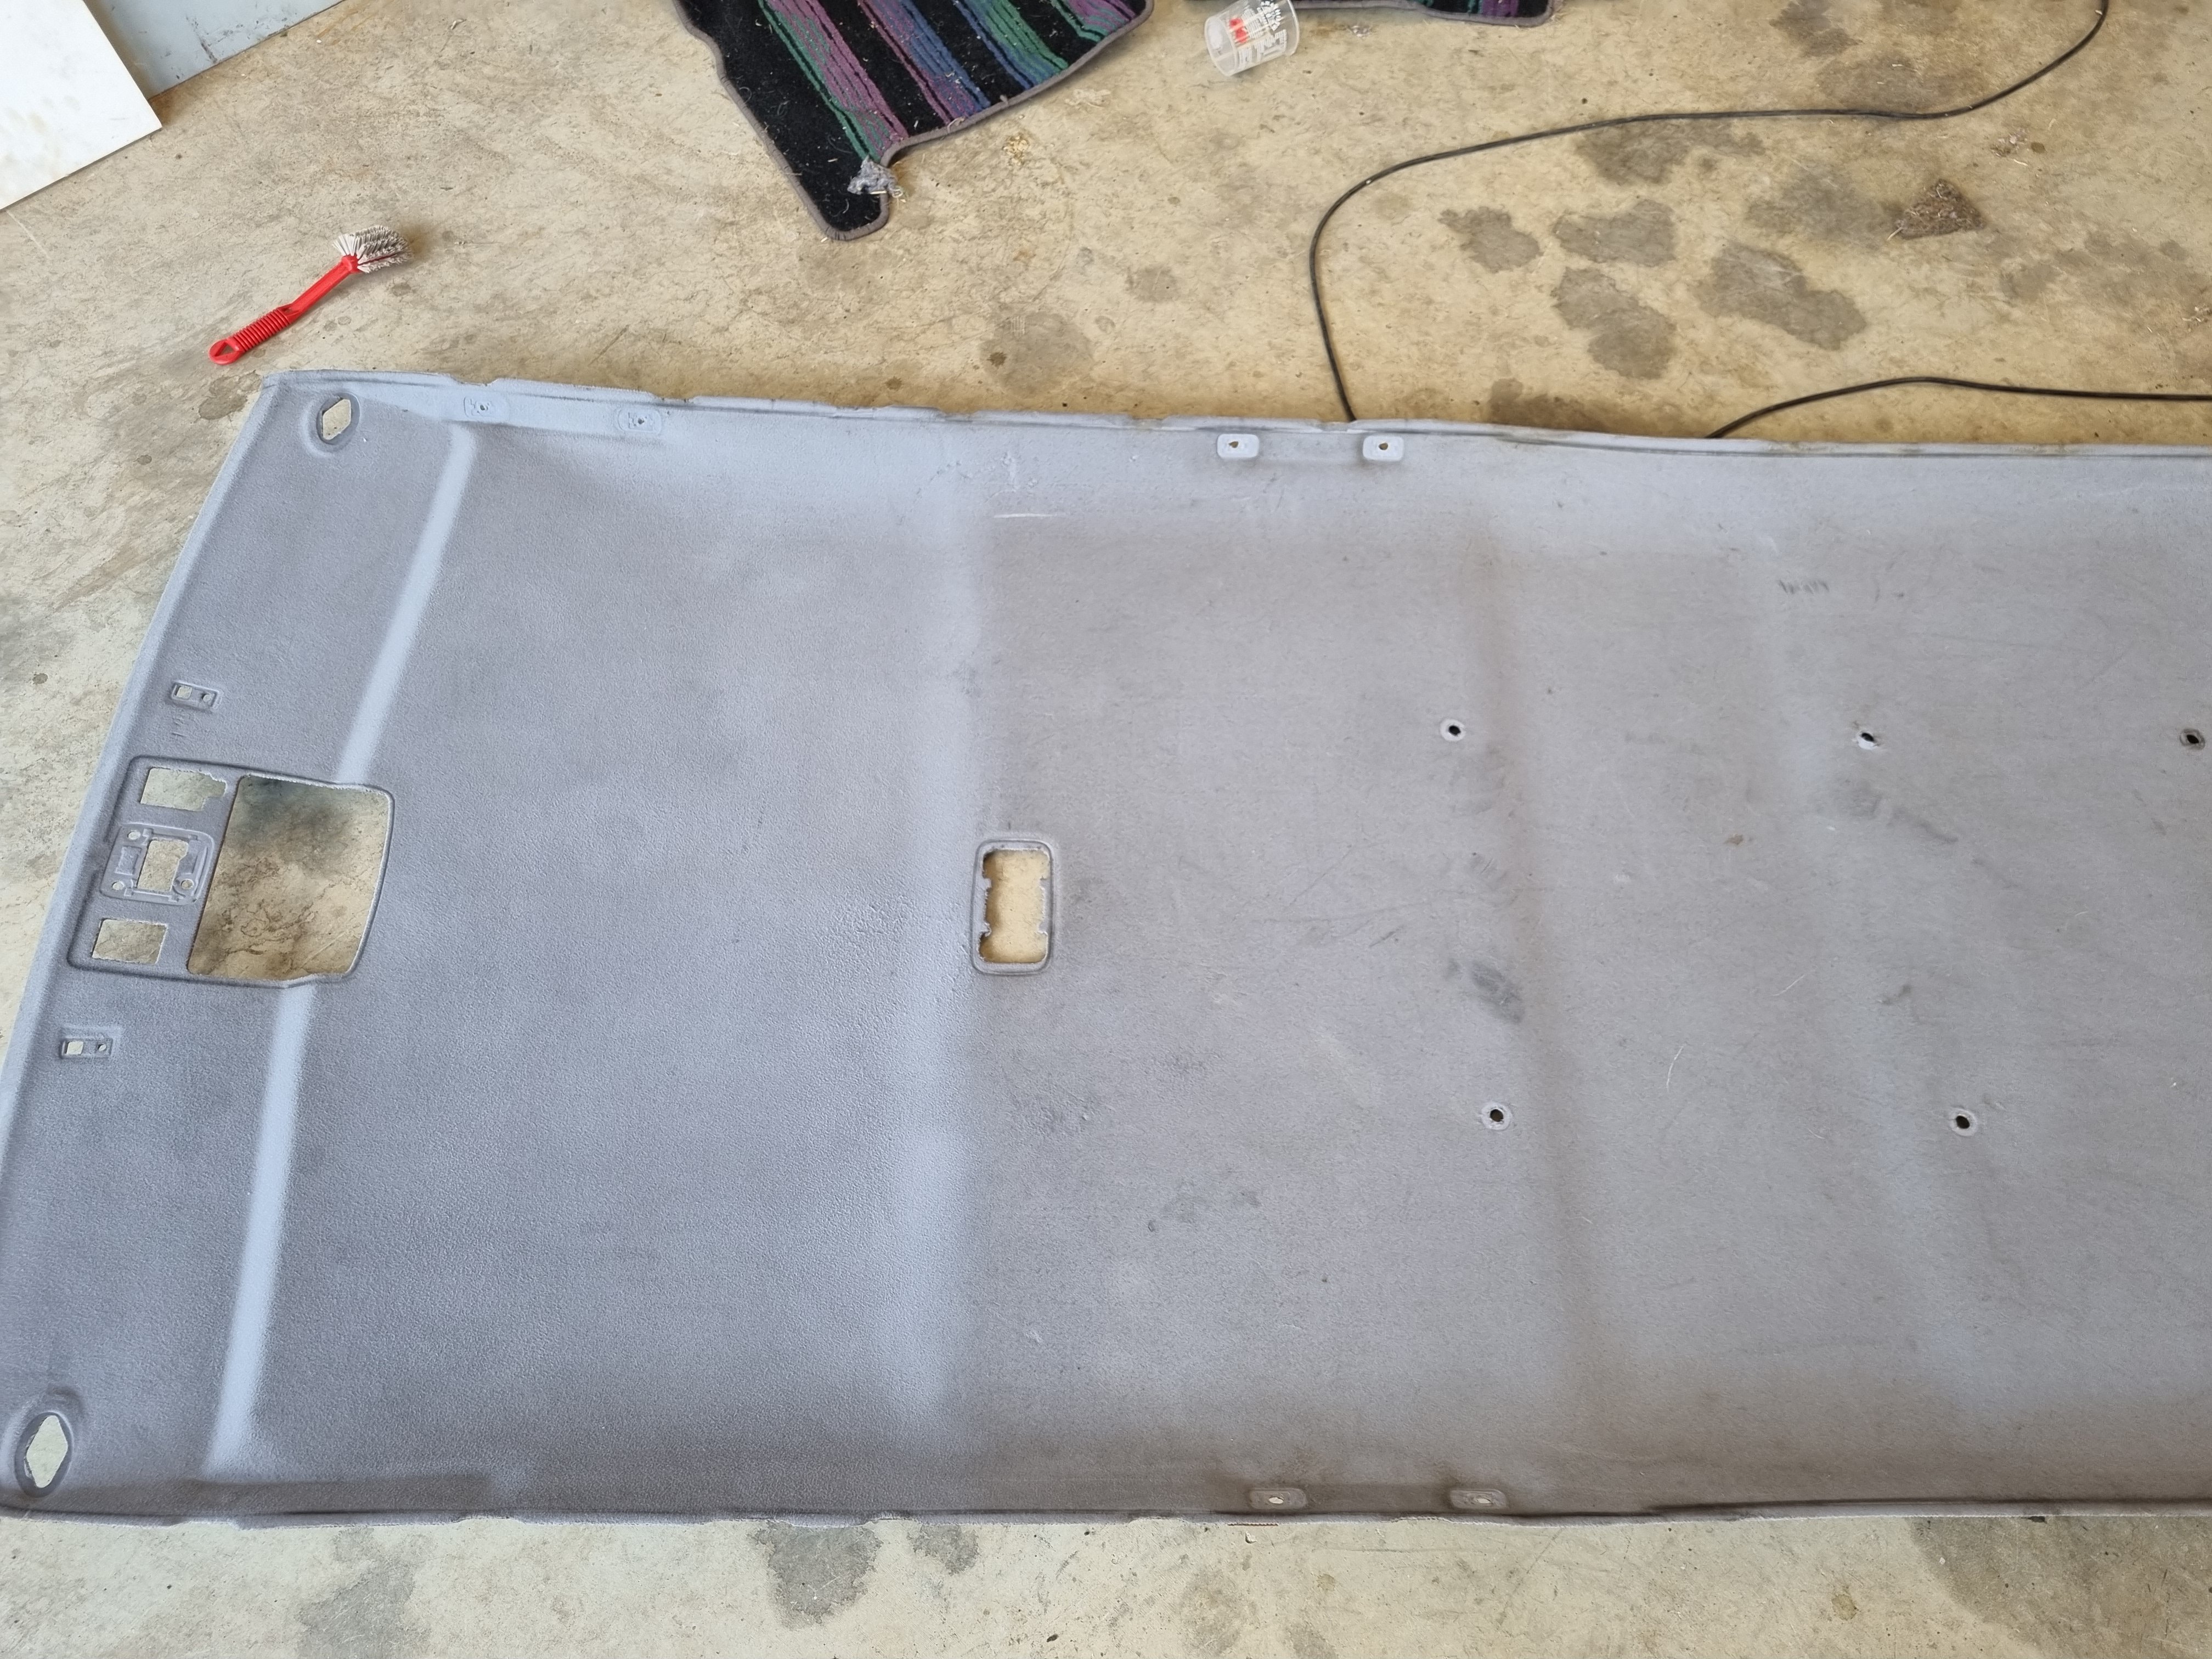
So, what am I going to do to it? First thing I did was clean it because it was fucking gross. Think used chewing gum in the door pockets, center console full of dried moldy coke, at least a full medium fries down the side of the seat and LOTS of dog fur. I took the whole interior out, including the headliner, and scrubbed it. The front seats are pretty bad and I'm trying to buy some others because they're so gross I don't think cleaning them will do much. One of the seat mount captive nuts was broken so I made up a plate with a nut and welded it in.
2 points
-
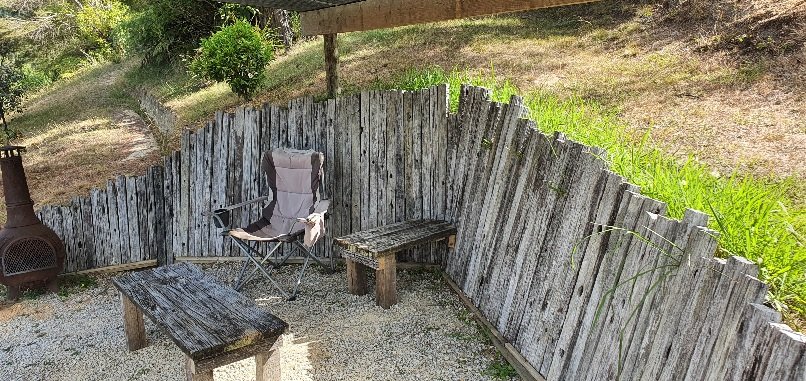
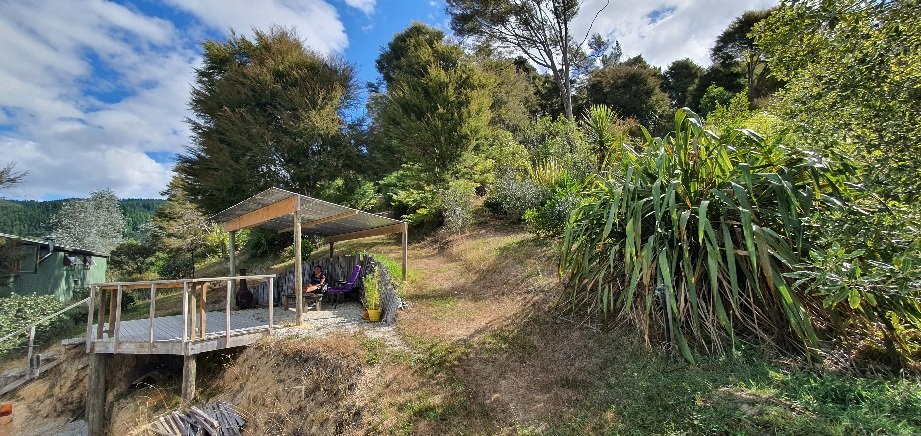
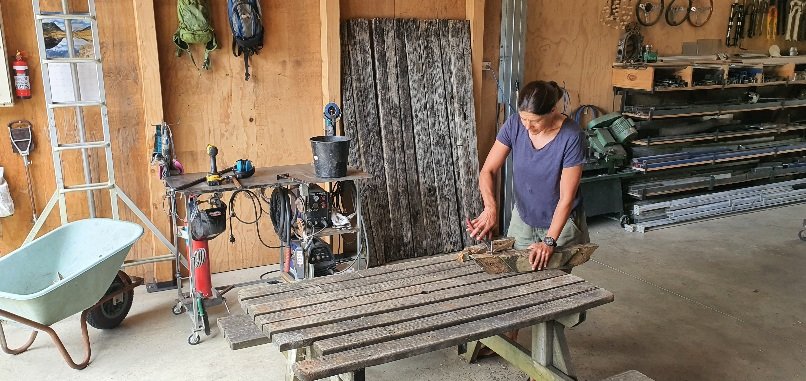
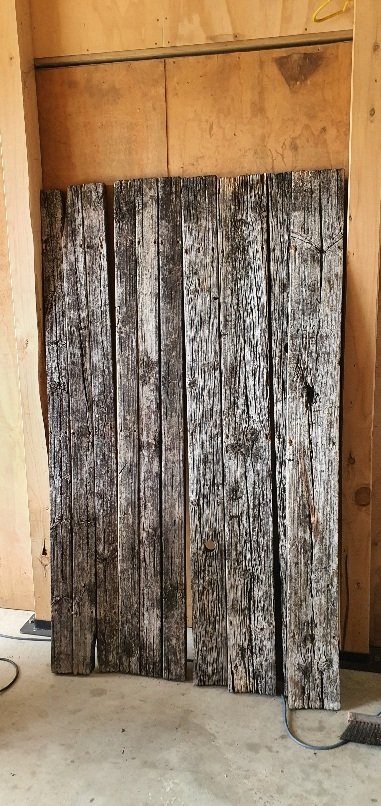
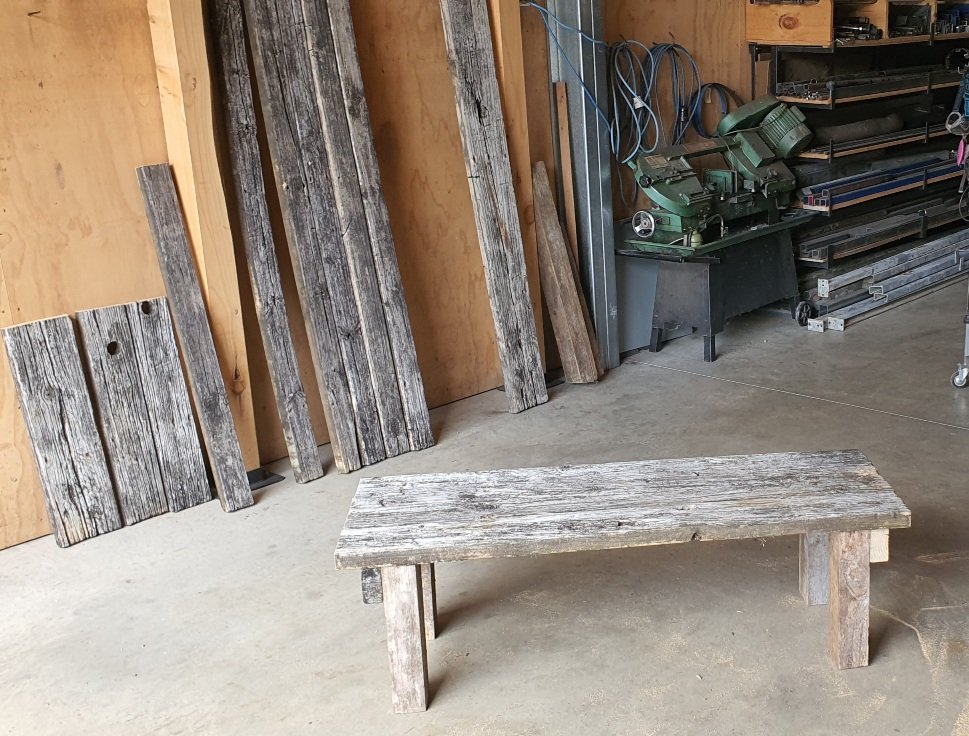
Couldn't stop there. Need a place for coffee mugs.. It's a nice little spot now. We are owed a whole load of macrocarpa from a customer so will soon build bench seating along the back.
2 points
-
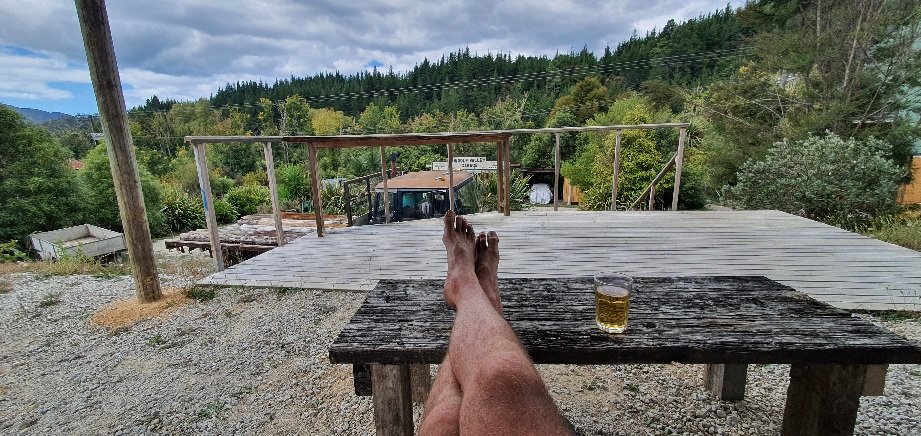
Had this old picnic table for 10 years, was given to us by friends at a campground so it's proper old, bowed, rustic and full of engravings from lots of campers over the decades. But heavy, in the way and not used by us so we chopped it up this arvo. (using our other younger table as today's bench)..
2 points
-
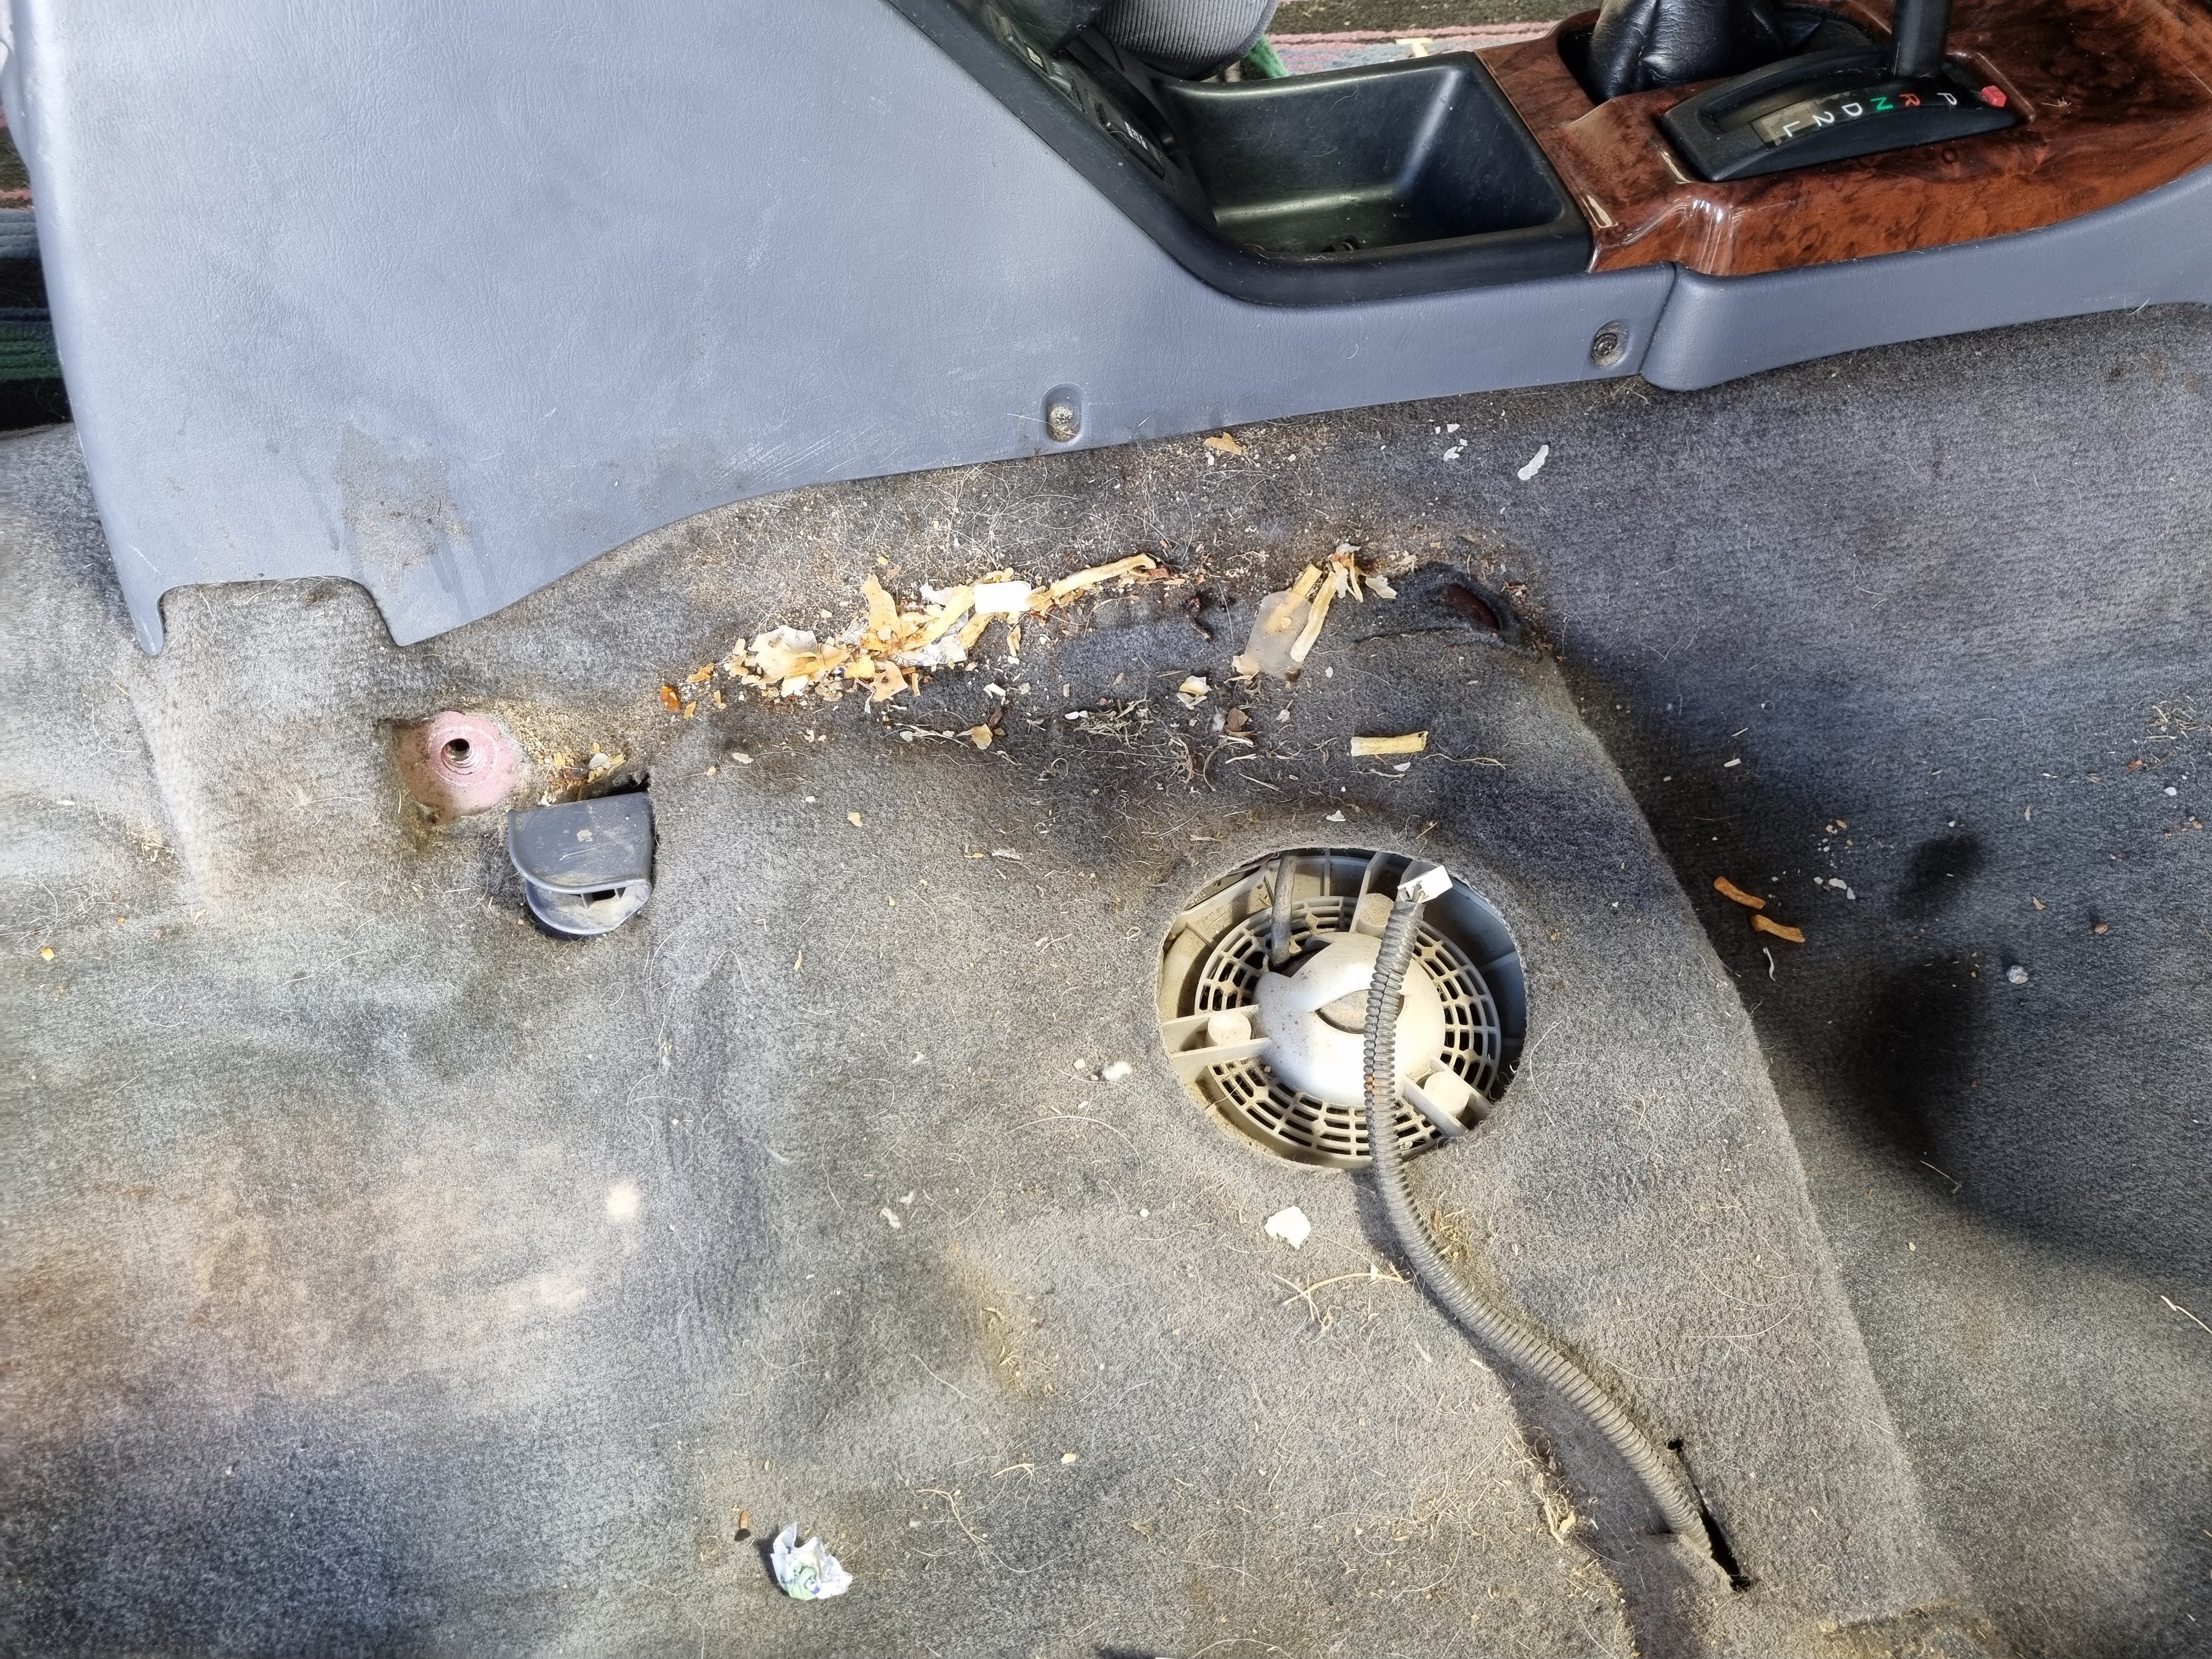
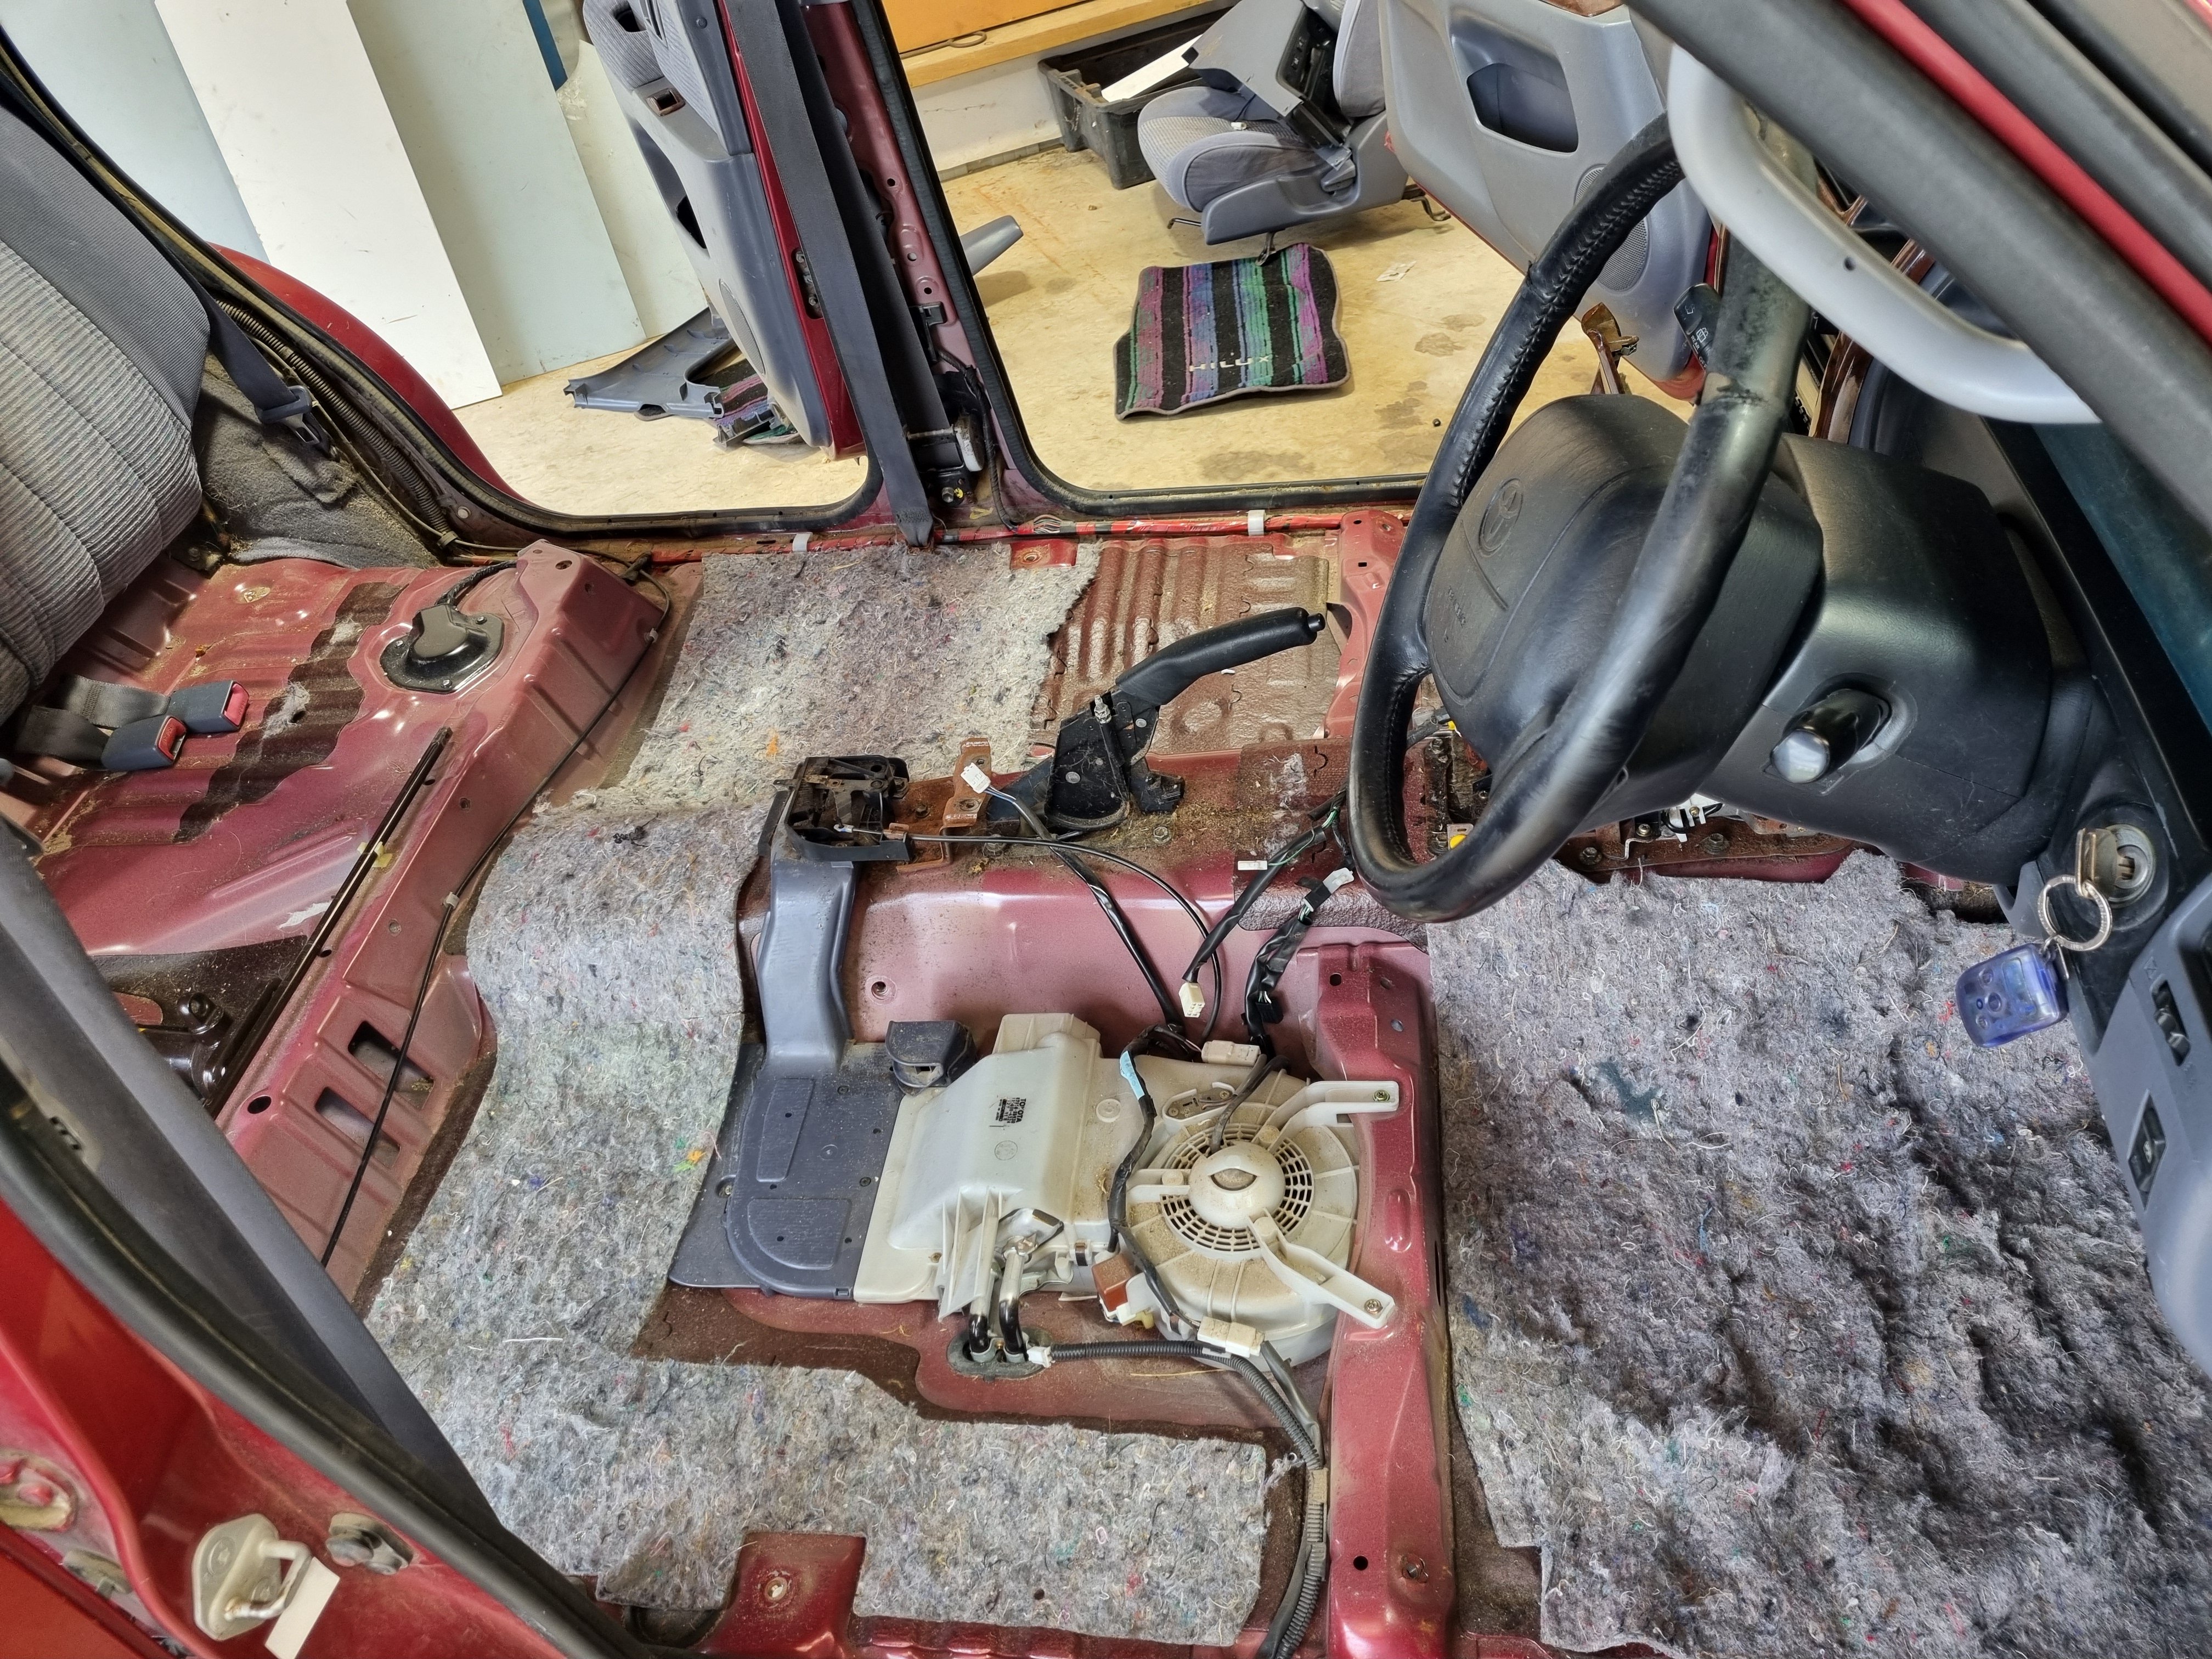
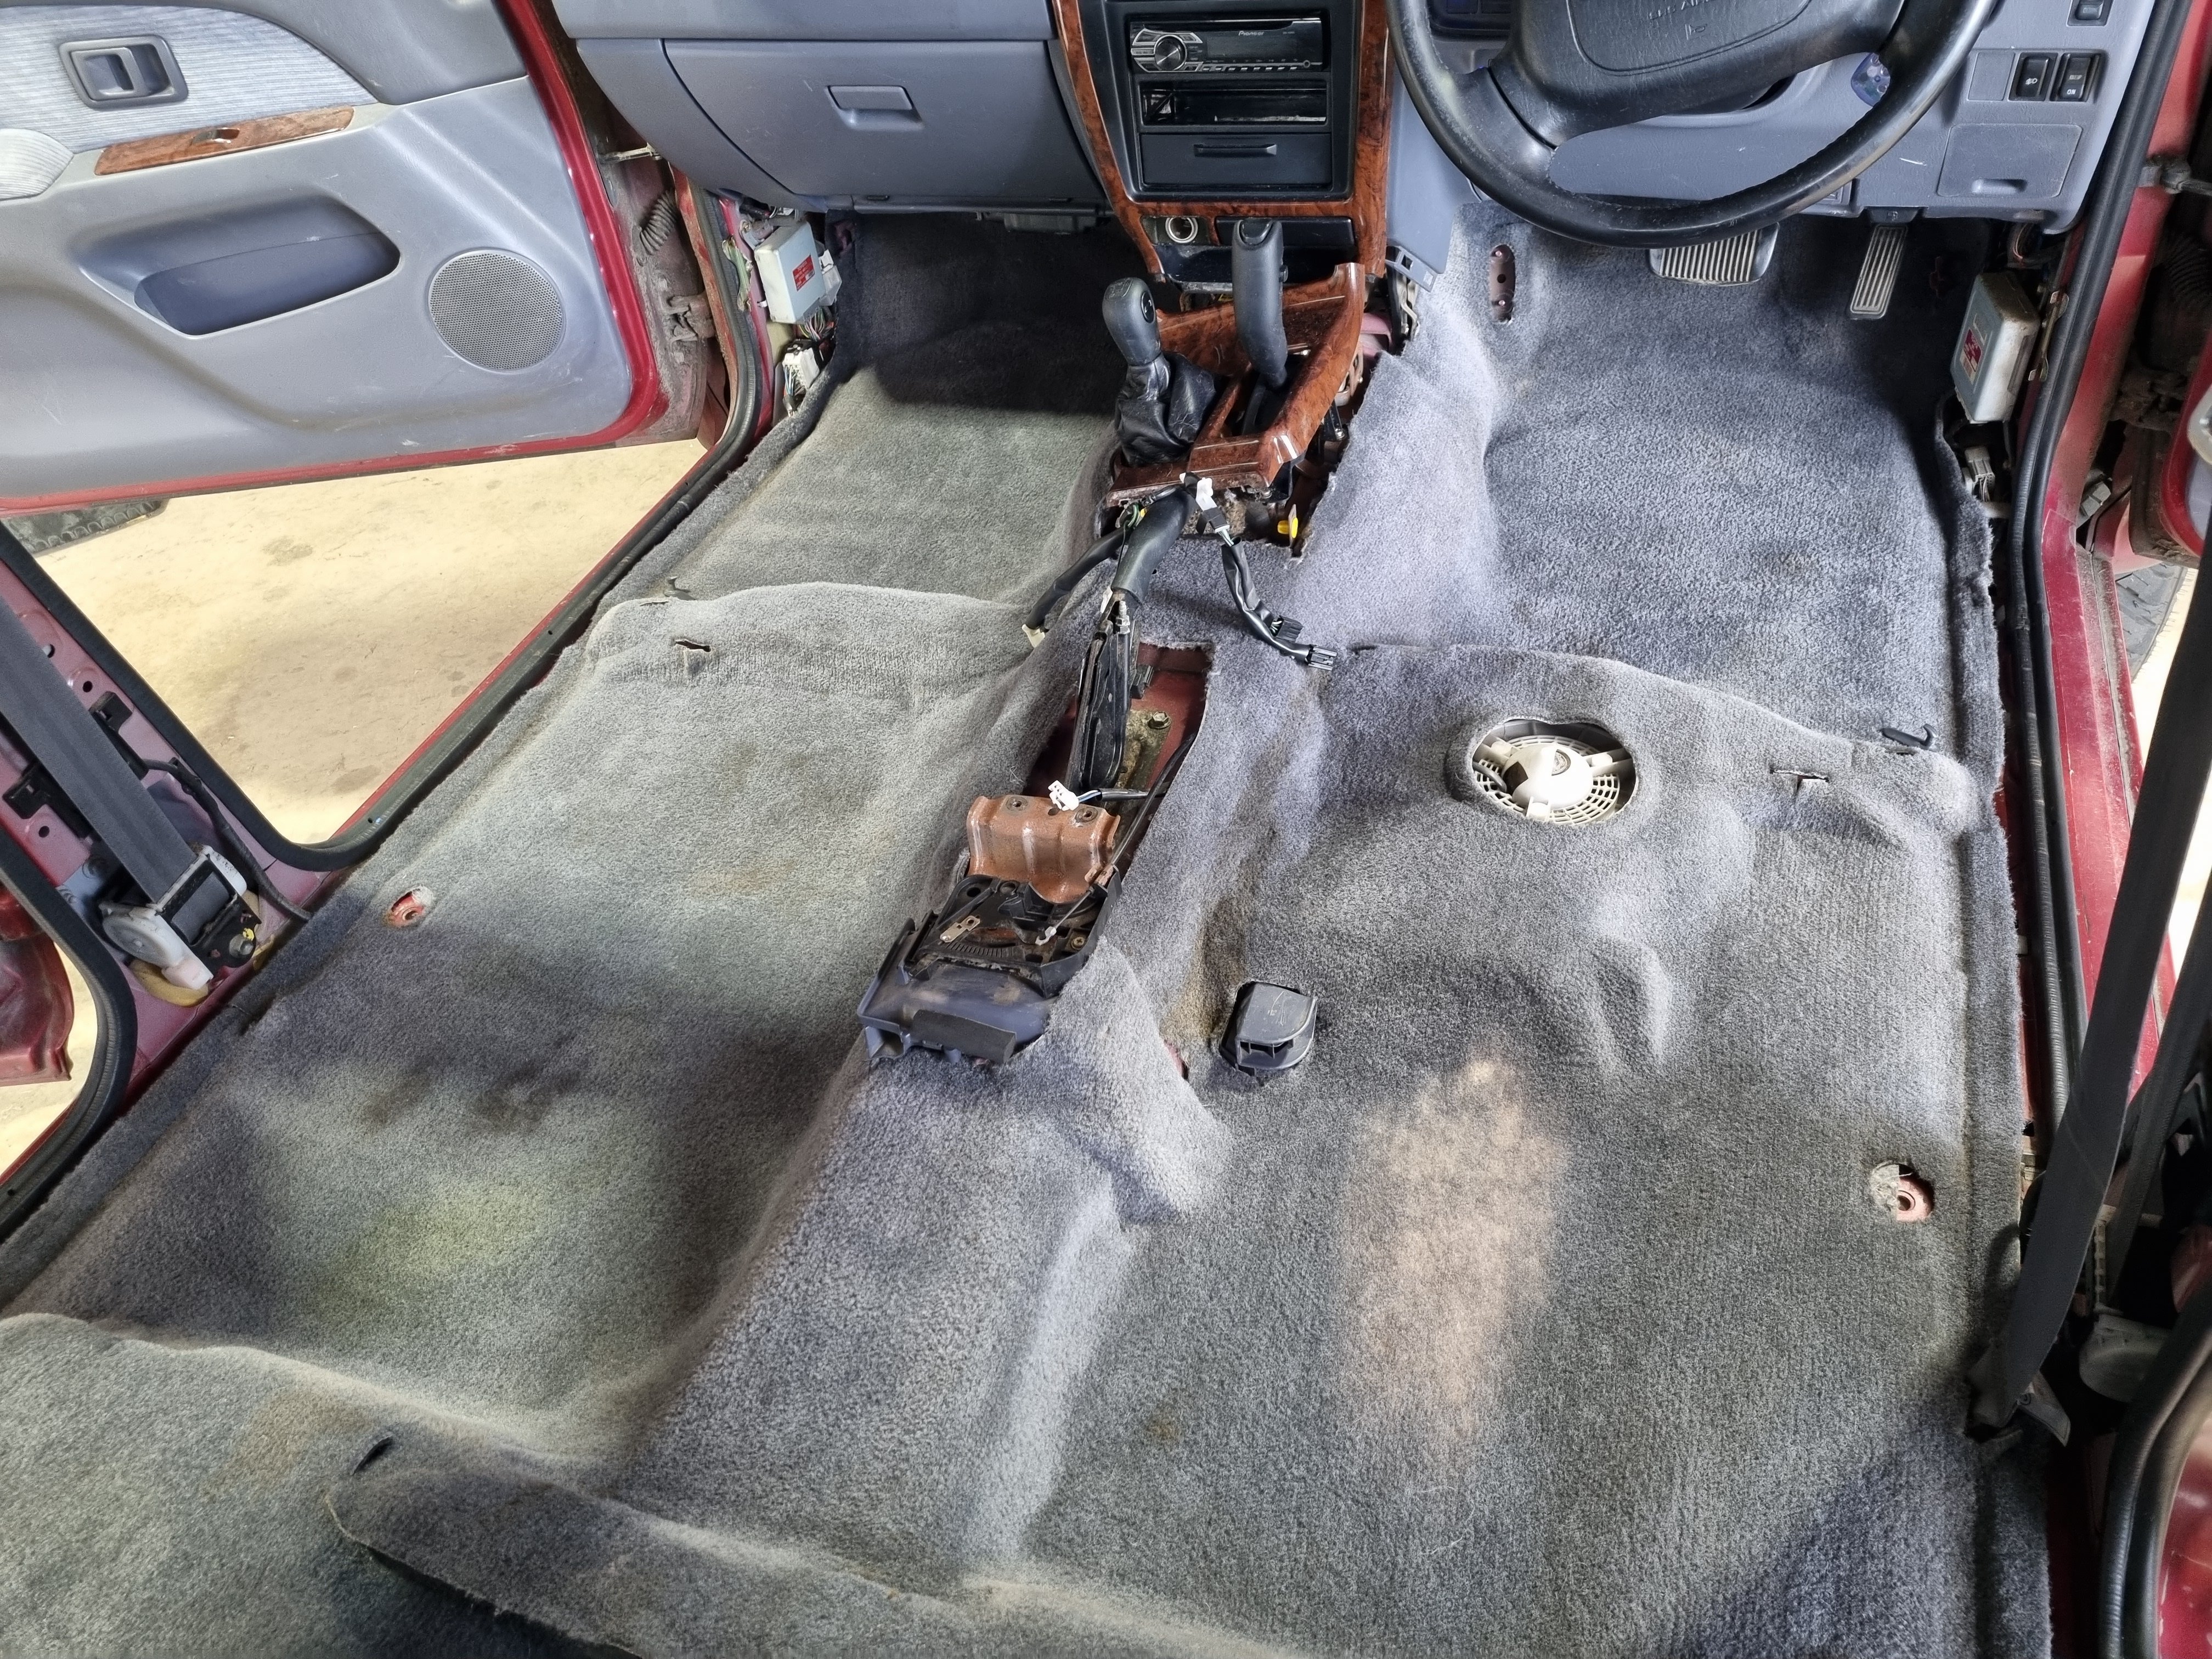
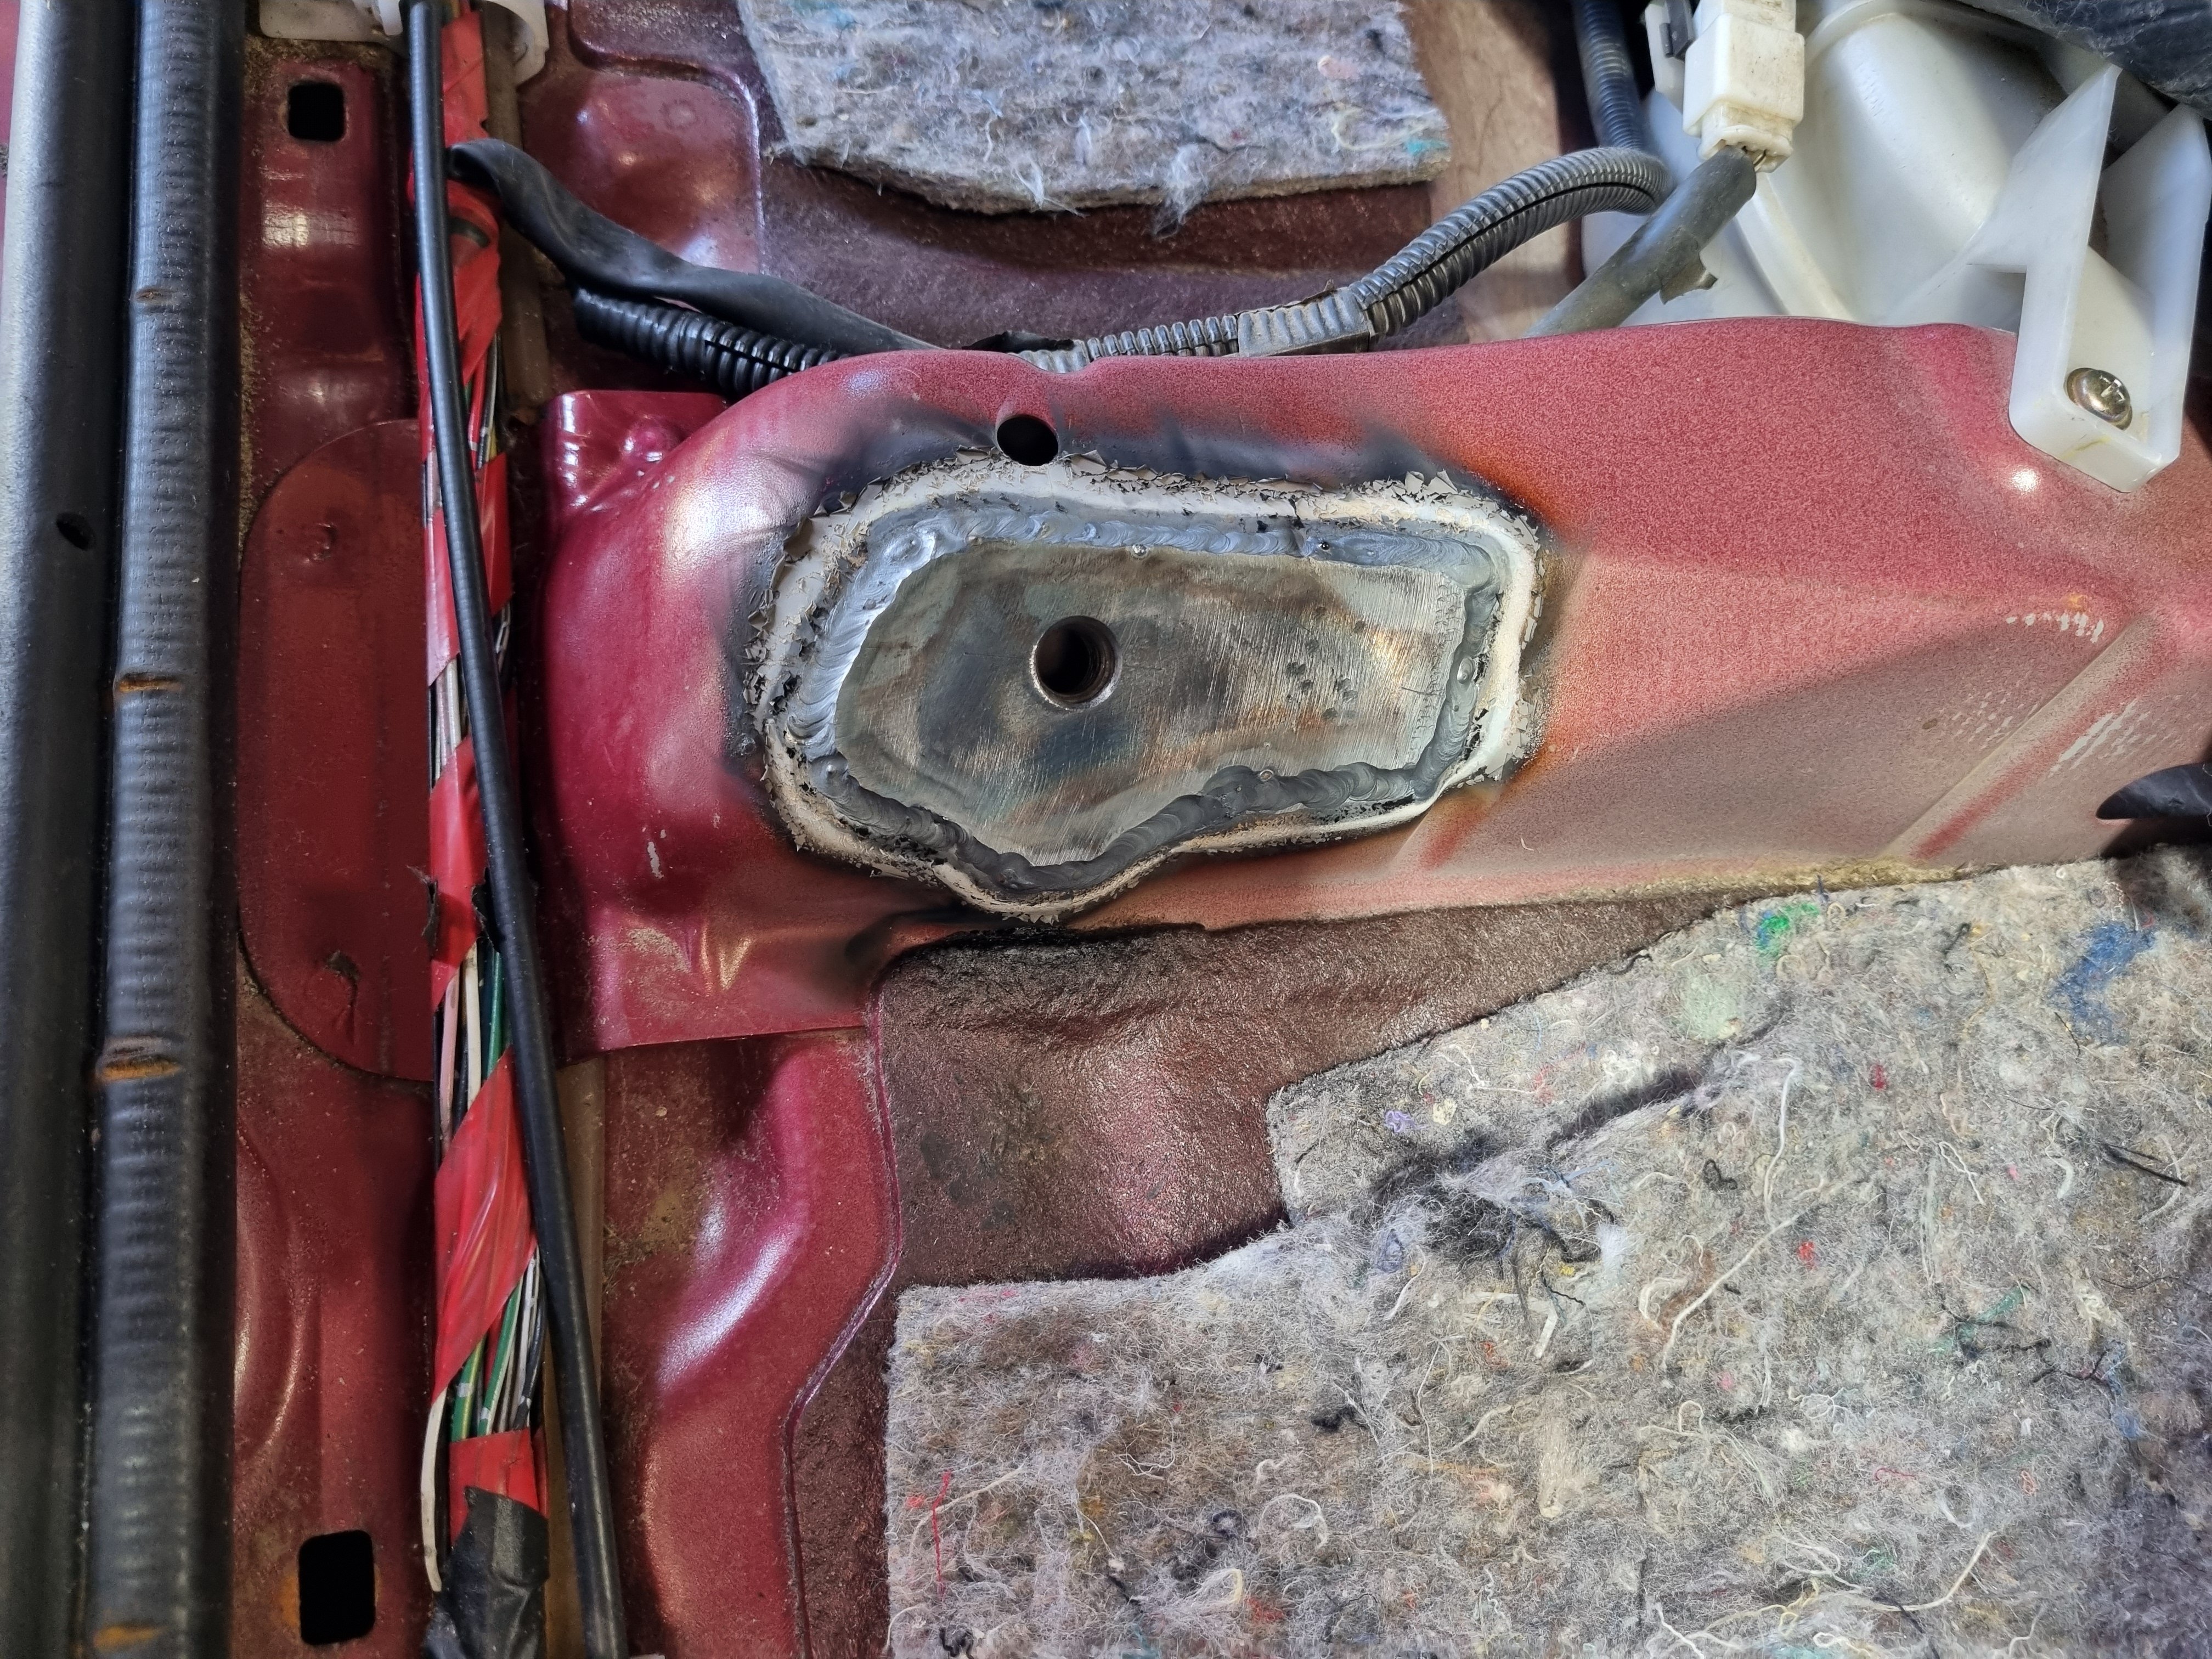
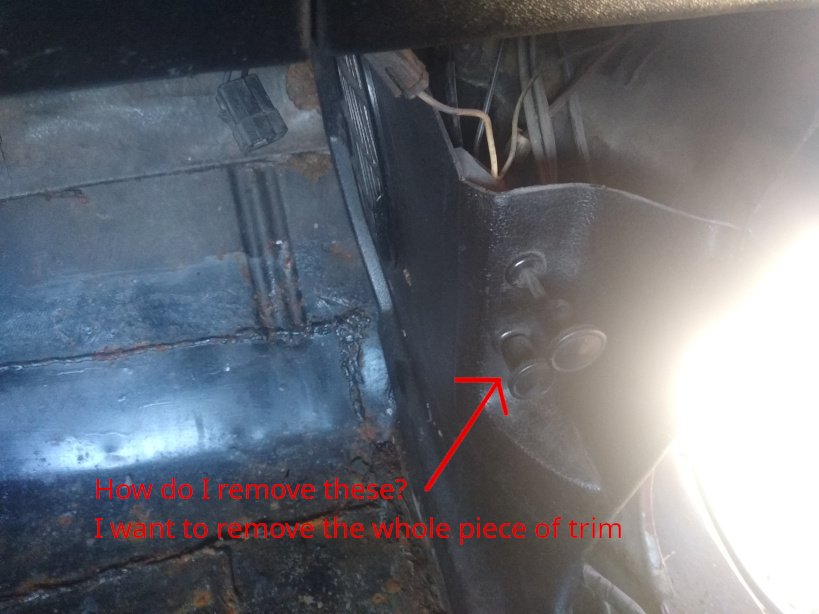
The next step was the small nudge of the passenger's side door to bring it up by about 15mm. To get at the hinges I needed to take off the fender. To take off the fender I need to take off the bonnet and front bumper. So this was scheduled to be started and finished over the Auckland anniversary long-weekend, sounds achievable. Here's where the whole situation started getting away from me... The door also needed a new lock barrel as it was seized preventing the door from being locked. So I'll just take the glass off first I thought, gosh that took a while. Then I found some rust in the door skin, then some more on the A-pillar. By the end of the long weekend I have everything off it inside and out. Well, not the dashboard yet. Also there is a little panel in the front seat in the footwell, it has cables for opening the air vents, how do I remove this? If anyone's reading this and knows what this panel is called, and how it might be removed I'd love to know. I'm thinking I have to take the dash out to get access to the cables that need to be disconnected. Might as well take the dashboard out and fix the cracks in the vinyl, otherwise it'll feel left out by my ever expanding plans to restore everything else I come into contact with. The only downer was finding out that the boot was not in fact a boot but was actually an art installation created by a famous sculpturer who worked exclusively in the medium of bog. I dug out a solid piece of bog that was about the size and thickness of my hand. I'm not too worried about this though (because I've never done car body repair before) as I do have plenty of welding time under my belt. Now to watch a vid on how to remove a gas tank without exploding. I had roped my 14yo son in to help out all 3 days and it was probably the best experiences I've ever had with him. We spent 6+ hours each day ripping out parts, watching instructional youtube clips, bagging and tagging parts while making up increasingly esoteric names for parts we couldn't describe adequately.
2 points
-
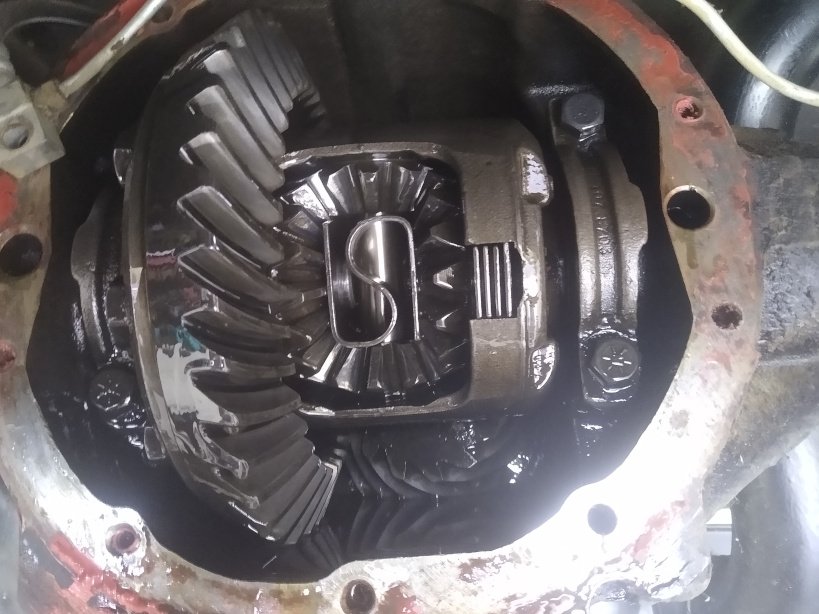
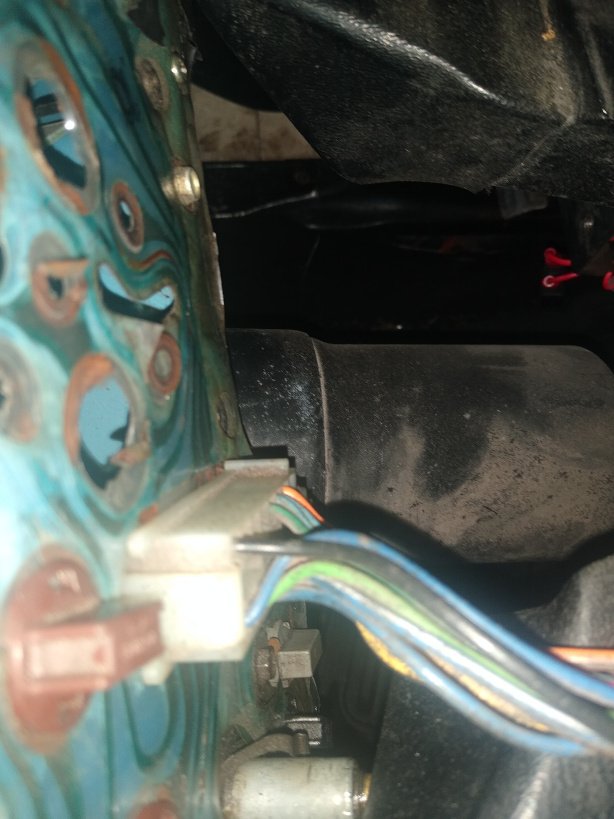
Got some quick wins with the WOF progress Brake pedal was stiff because brake booster wasn't getting any vacuum. I got lucky with this one, it only needed a $6 brake booster check valve to be replaced Power steering was leaking from the low-pressure hose. Bizarrely the existing hose was made from two separate bits of aged flexible hose with a metal pipe in between them and then wrapped in many rusty hose clamps. Threw that all away and replaced with a single piece of new hose Axle bearings replaced. Ordered the parts from rockauto, bought a slide hammer from trademe and got into it. Rockauto sent me a used part but promptly sent a new one after I notified them. Great service. While doing the work I rotated the wheels a bit and the spider gears escaped from the carrier. Was going insane trying to put it back together before I realised that I had to move the Z-clip in the middle as that'd moved too. Speedo cable wasn't attached to the gauge which made for a quick fix. While doing that, saw that the printed circuit fabric(?) at the back of the speedo/tach cluster was in a terrible state. Burnt out tracks and rough handling apparent. FIxed up a bit and found a bad ground which was stopping the cabin/dash back lights from lighting
2 points
-
Finally a car worth showing people! Just picked this up yesterday as a weekend car. Can't believe how tidy it is, especially inside! Hoping to tidy up the paint, stiffen things up a little with Cup suspension, maybe build a cold air box. Oh and find some nice light 15x7s for it, maybe Enkei RP01s1 point
-
And the backend is a little crisp
1 point
-
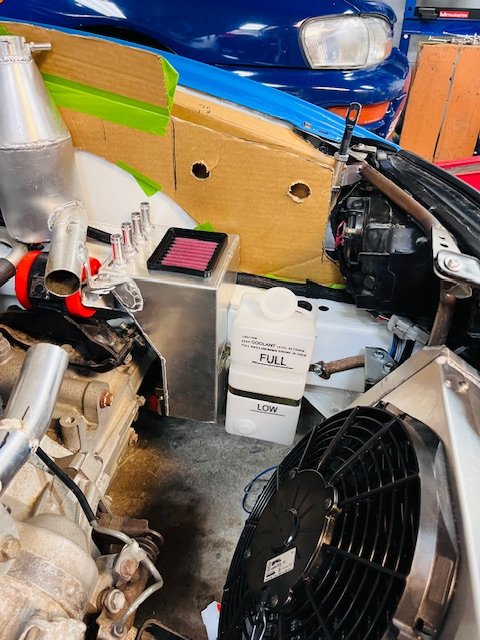
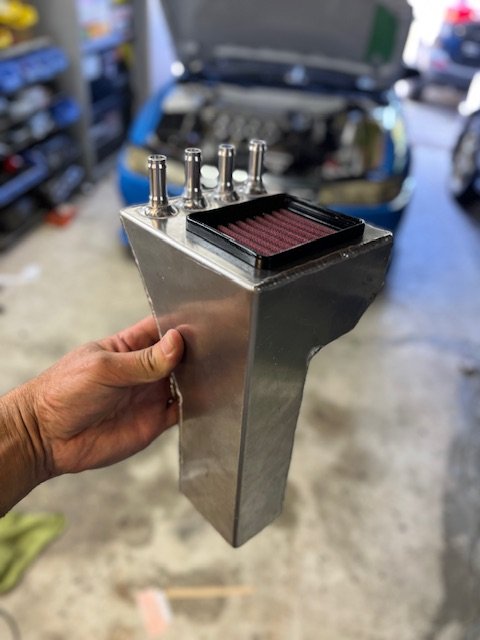
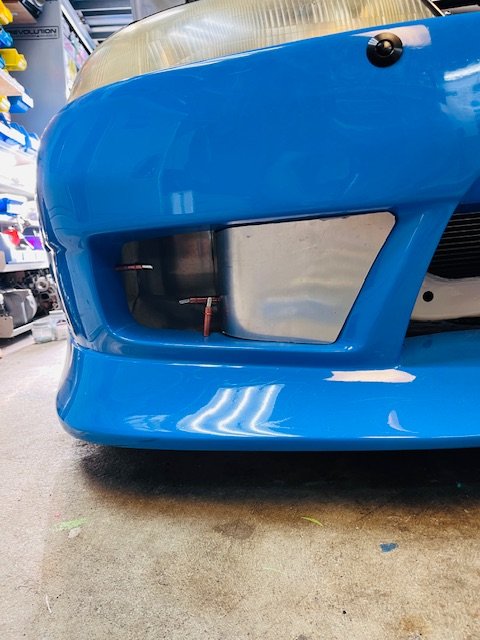
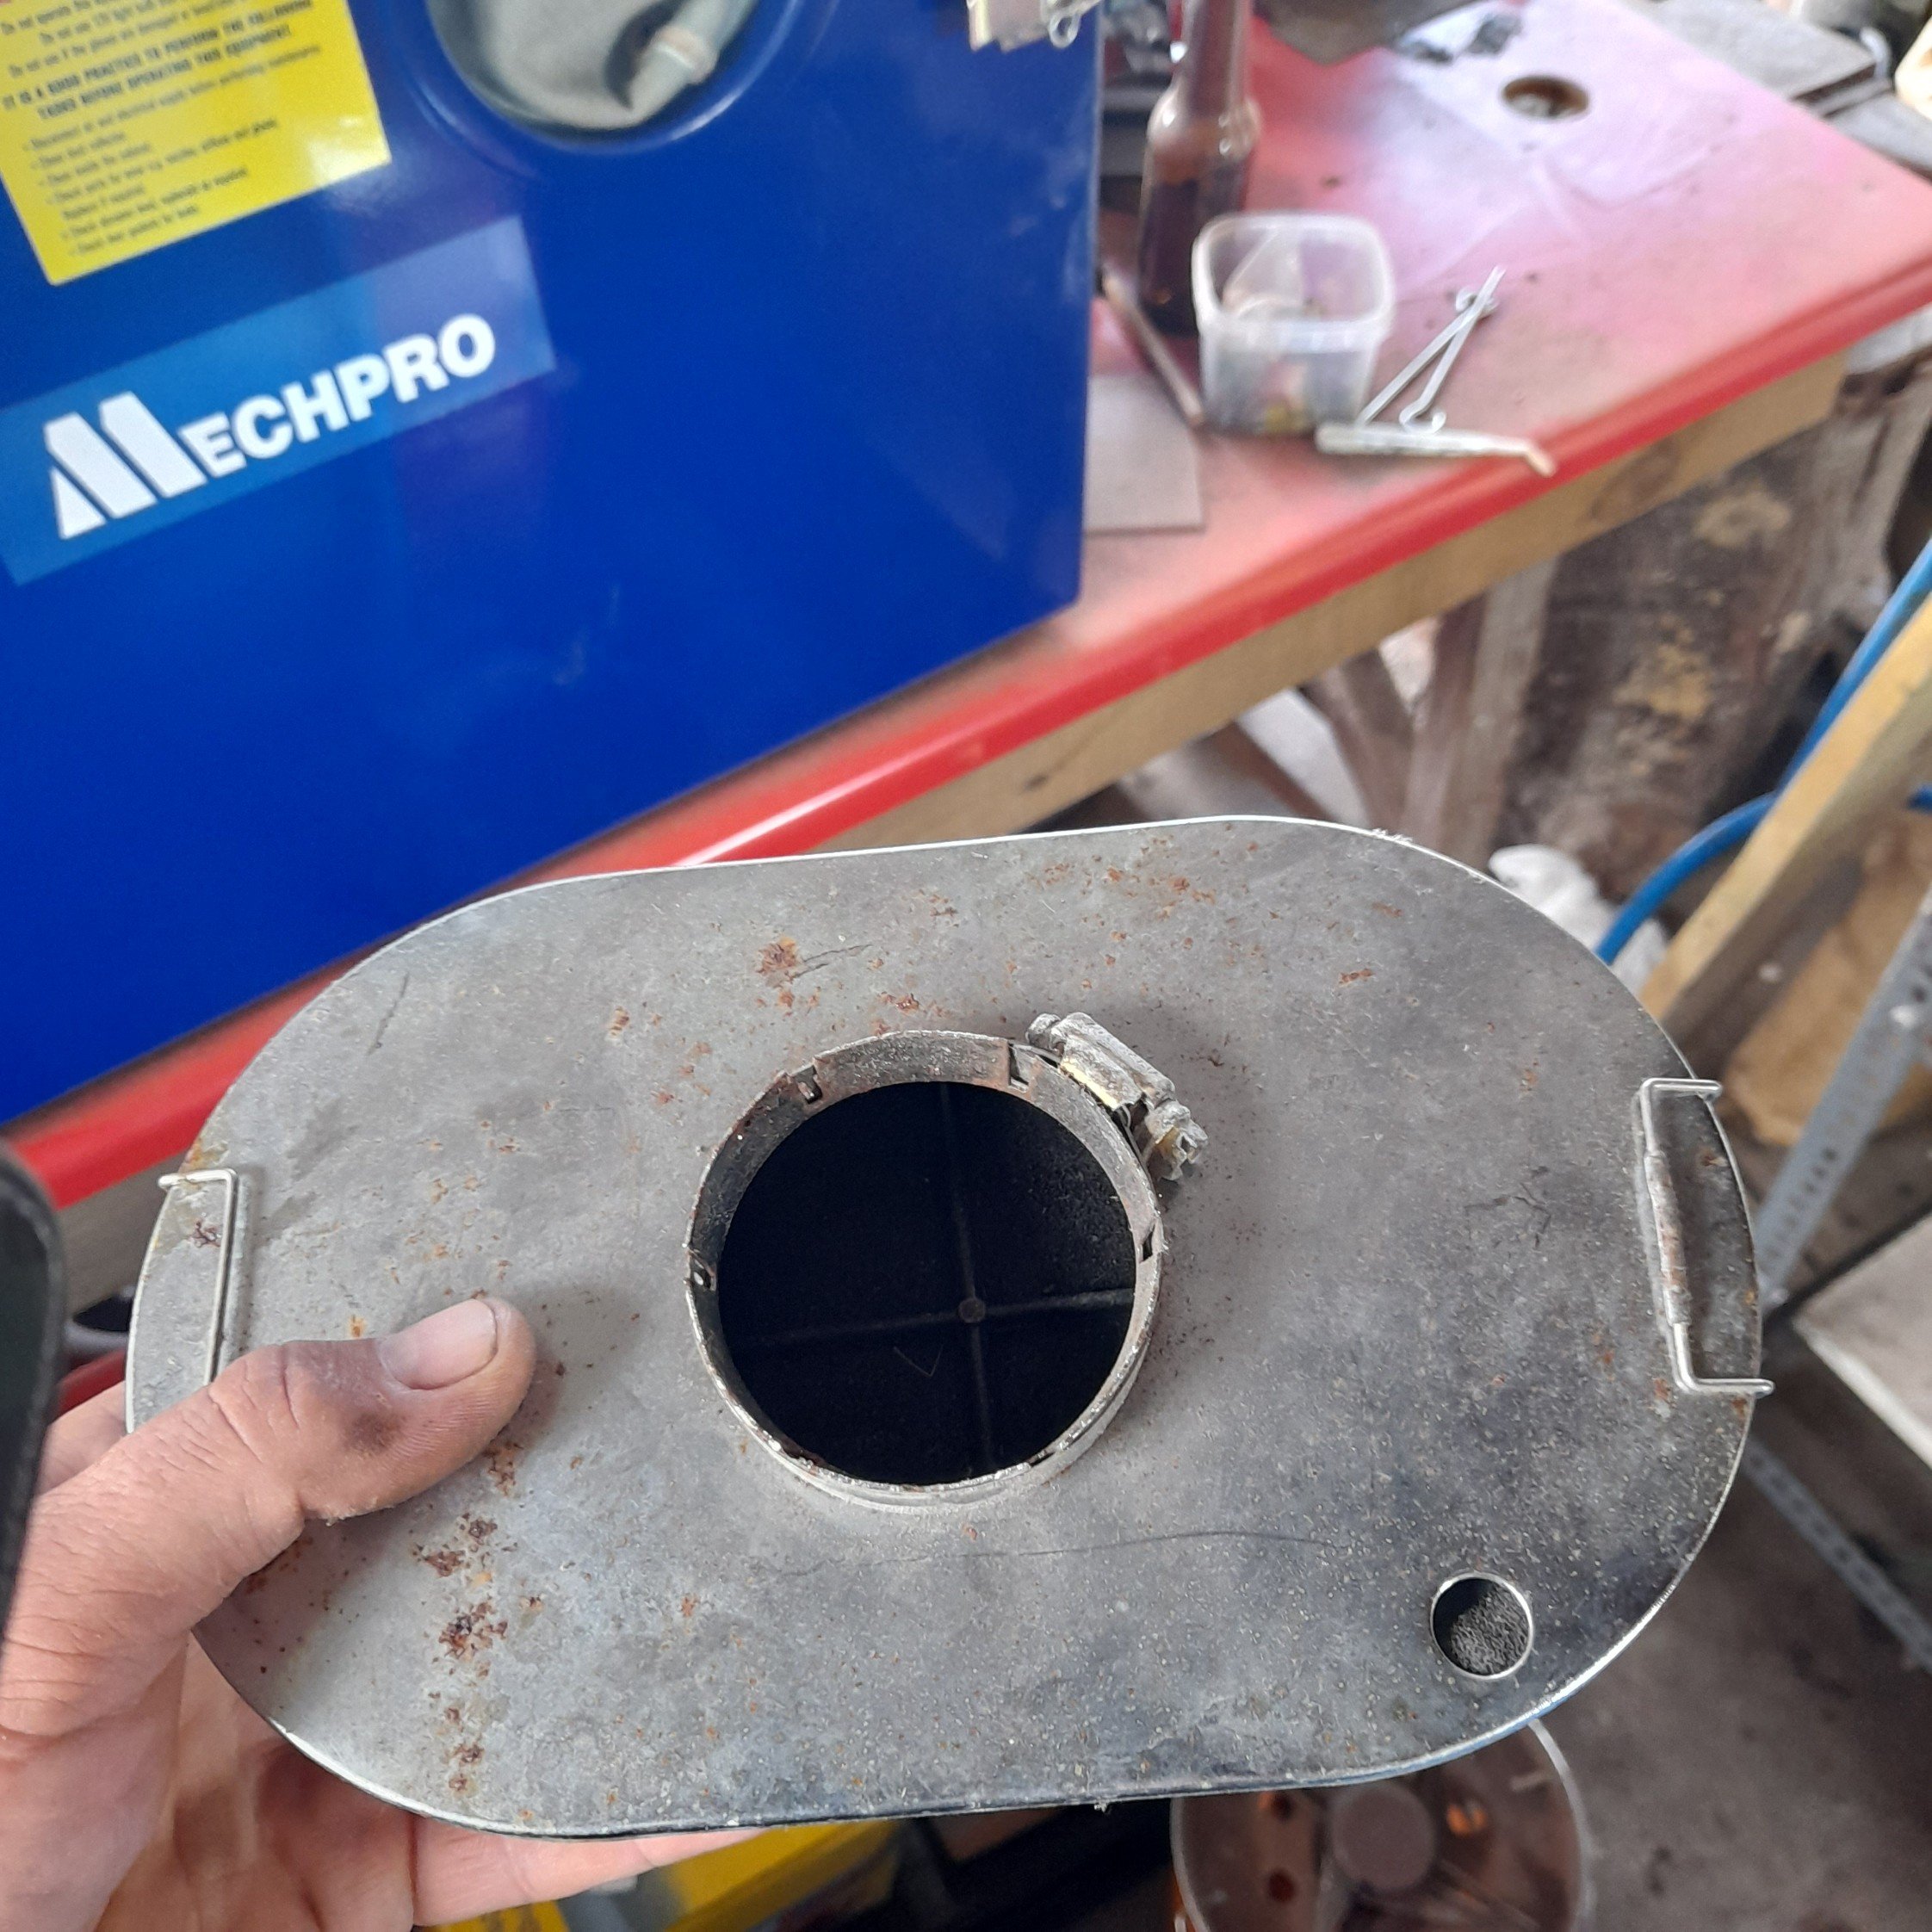
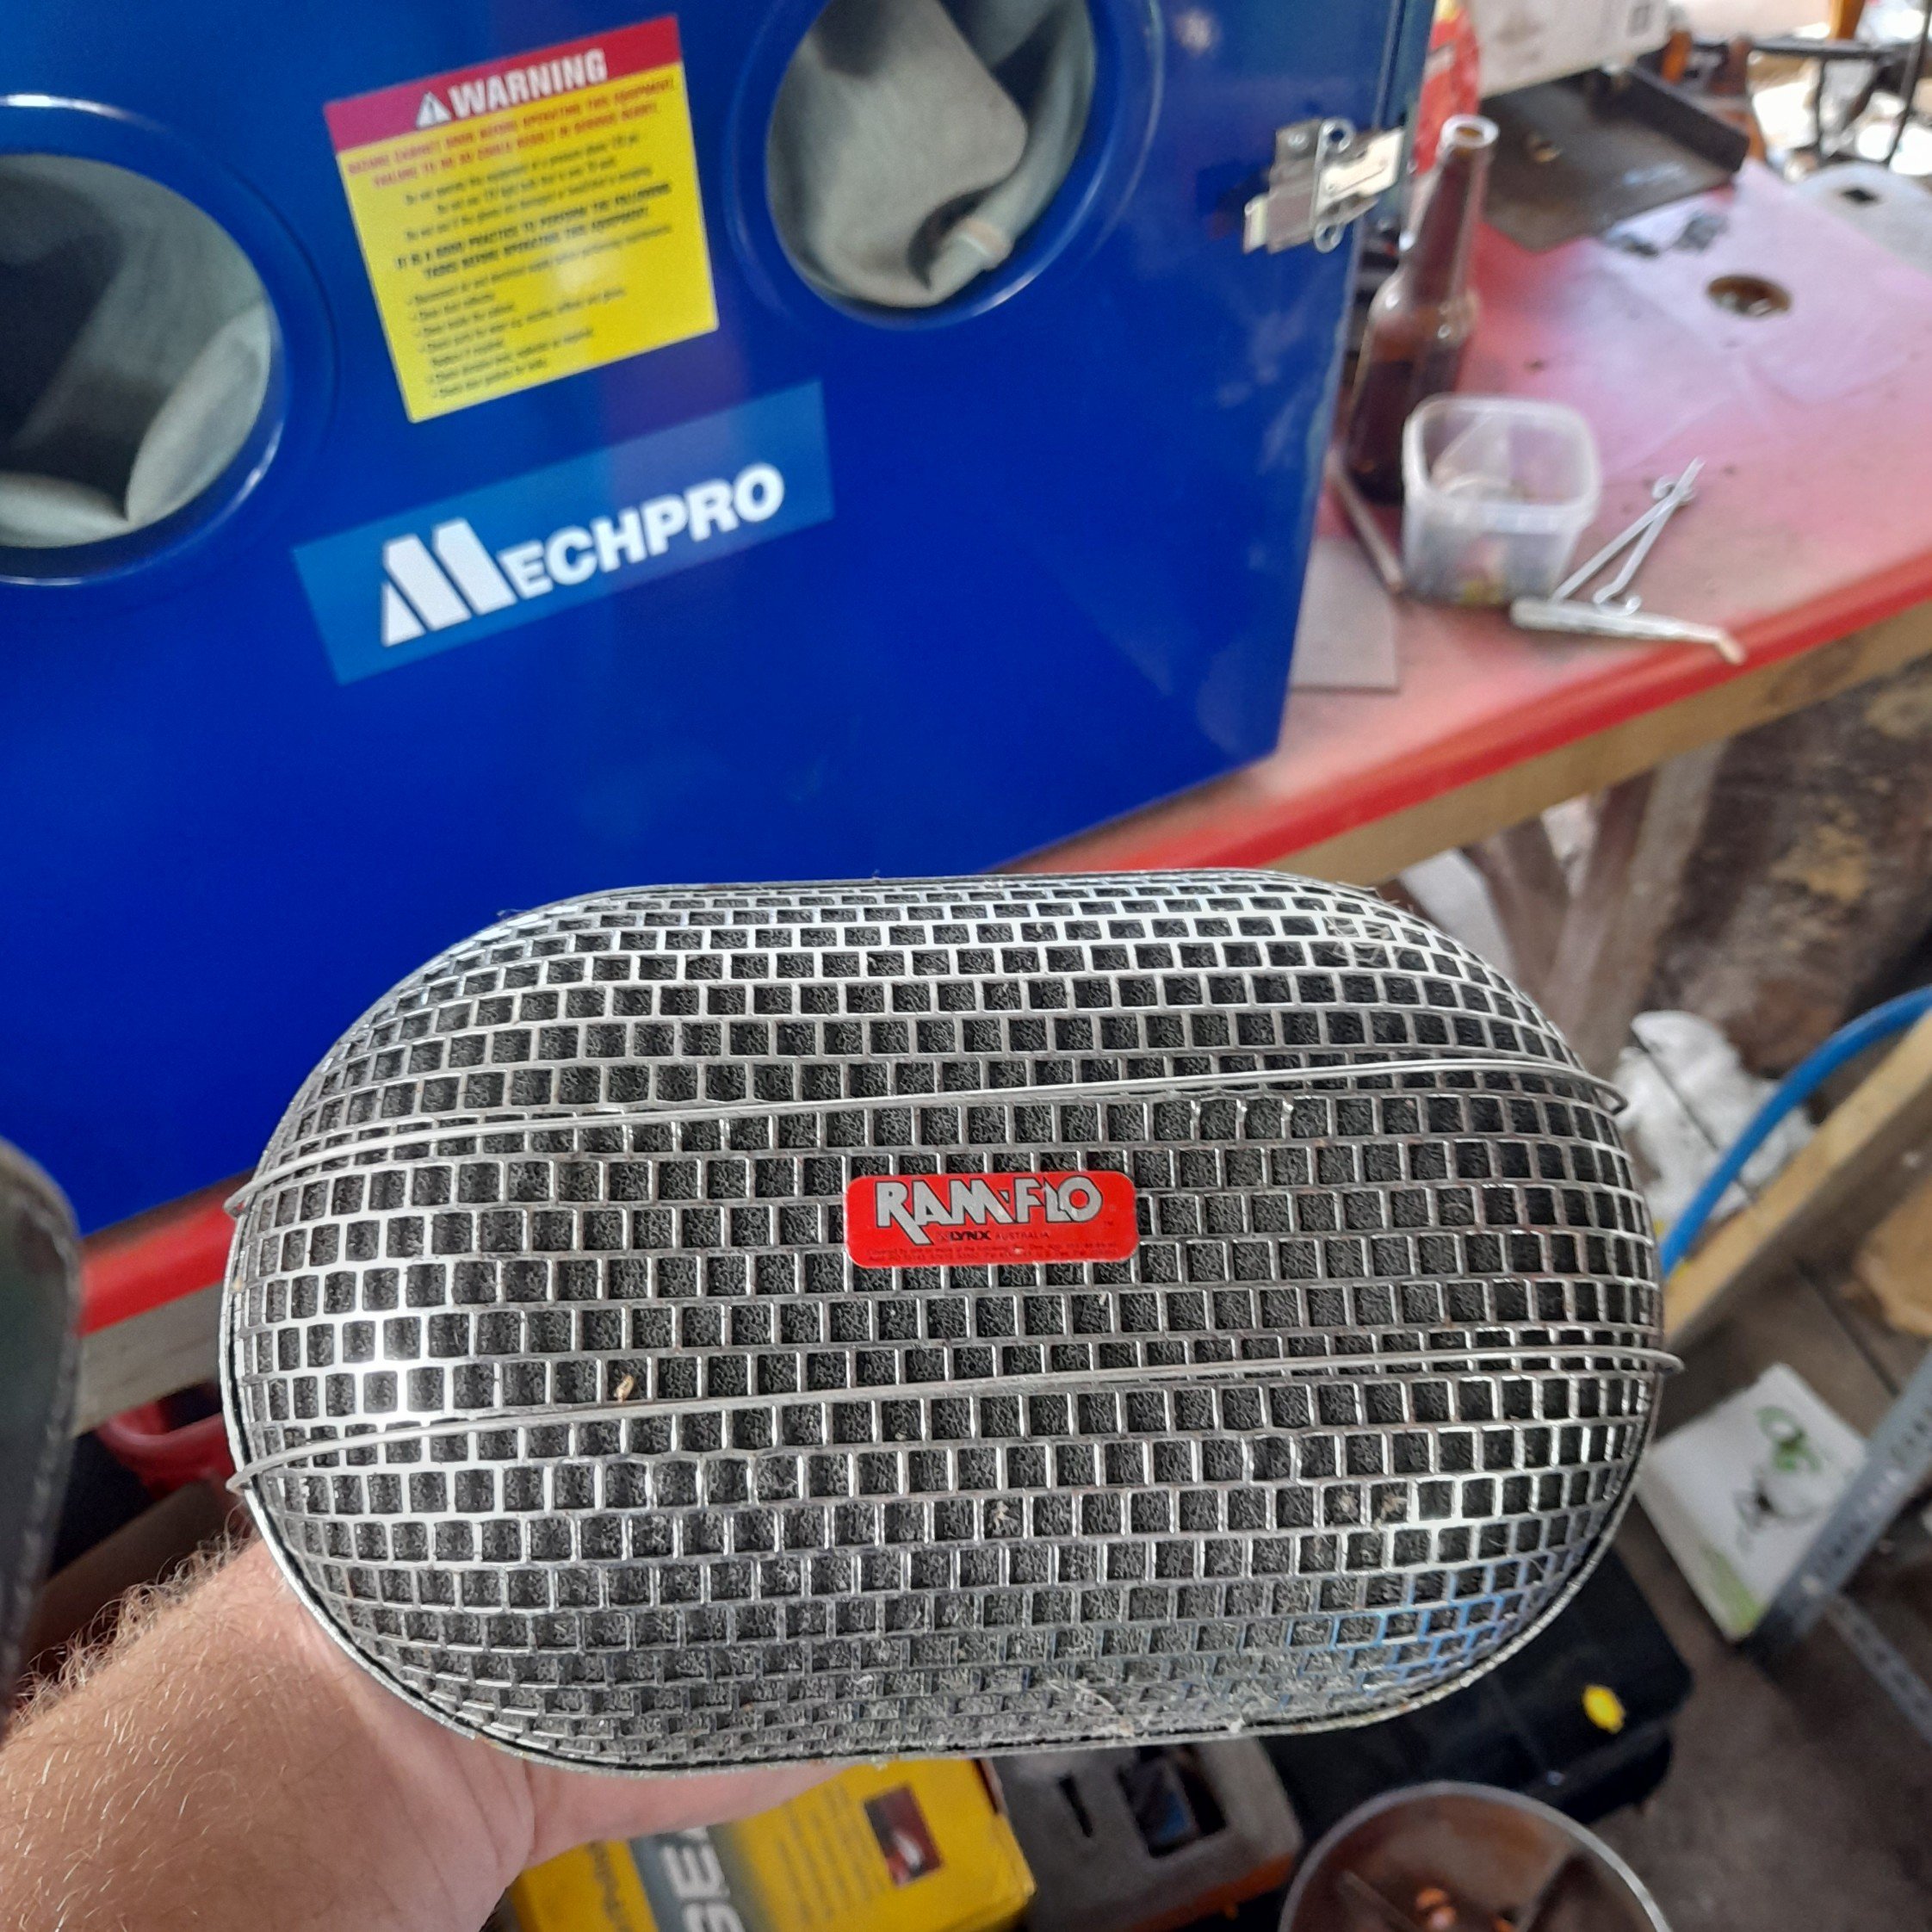
Getting a few loose ends of jobs tidied up before I tackle the last big job - extractors. Starting to look like a complete car. Catch can finished up. Internal baffle, tiny K&N filter from a BMW bike, drain tap in bottom so you don’t need to remove to empty!! Fits very well in the allotted space finished up radiator and swirl pot pipework (pending rubber hose) also finally finished the front bumper side ducting (radiator to come but that’s big job/non important to start the thing) Keep moving forward
1 point
-
How thoughtful was Toyota to fan force the drivers farts directly at the rear passengers??1 point
-
Wow this muffler is super quiet. Amazing how much it’s changed the sound and volume considering this muffler has only a 2” piece at the front that opens to baffle and the rest is straight through. Got quite a different Subaru growl to it now too. It’s a different car to drive at open road speeds now.1 point
-
This is just the worst Congrats Looks like the sparkplugs have been kept well oiled1 point
-
Well yeah But nah Not sure what i ran this one on, possibly my falcon when it had the single barrel stromberg? Or i swapped the weber base with one of the guys and got this in return. Oh well, best be ordering a new one next week. Already loving how much freeer the engine feels, haven't messed with timing yet just warmed it up and set mixture by ear. When i get back to work i will play some more, but for now ooohhh boy i forgot how the old webers sound with no airbox.
1 point


.thumb.jpeg.cba3dbd83fd850104bccdf9537a099b9.jpeg)


This leaderboard is set to Auckland/GMT+12:00