
Leaderboard


Popular Content
Showing content with the highest reputation on 05/21/23 in Posts
-
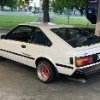
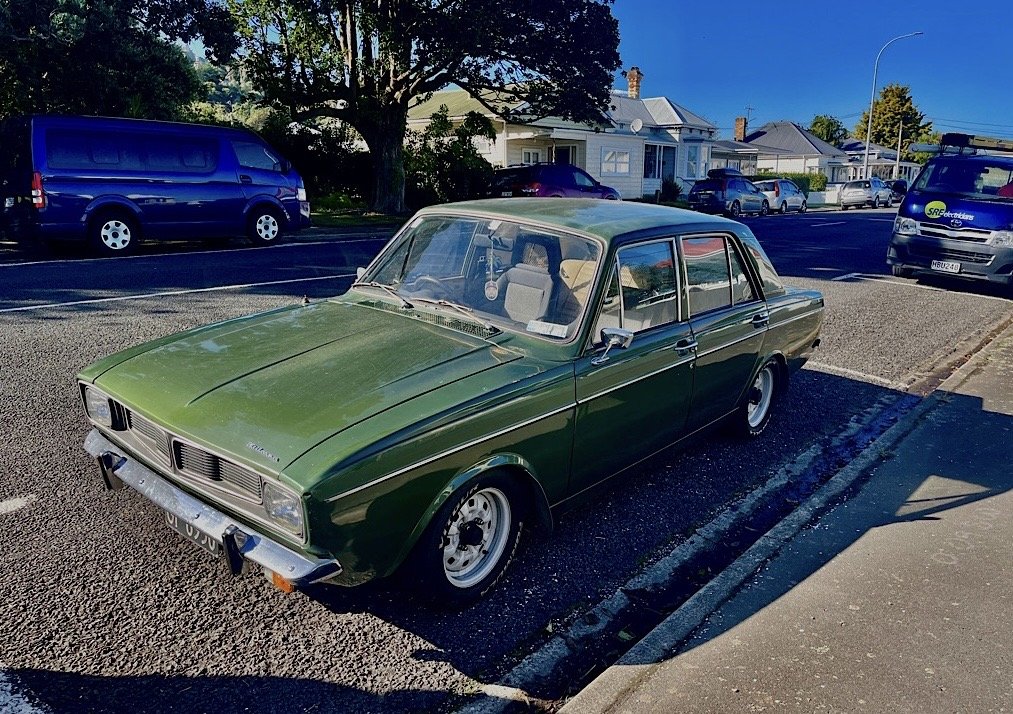
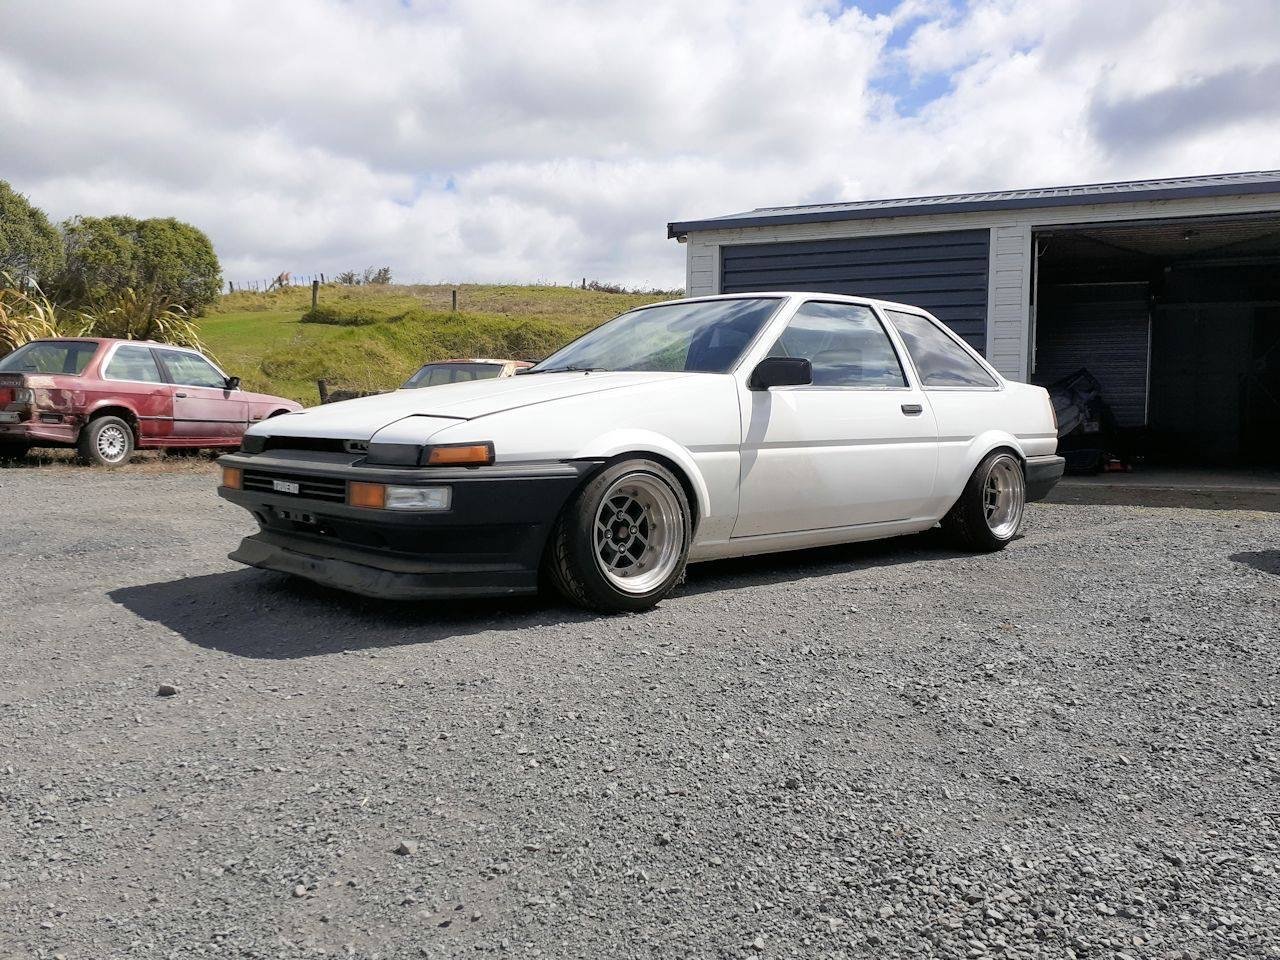
Cars currently living in Feilding while we are away in New Plymouth till January 2024 (thanks @Flauski for housing my whip). Recent purchases are some Recaro seats and @Jeffs_Emporium steering wheel. Upcoming event at Manfeild in June with the Circle Jerk crew. I'm lucky enough to be able to drive to and from the track so nice and easy. Drove it from Welly to Feilding at the start of the year with zero issues and max smiles. Pic from Foxton.
 20 points
 -
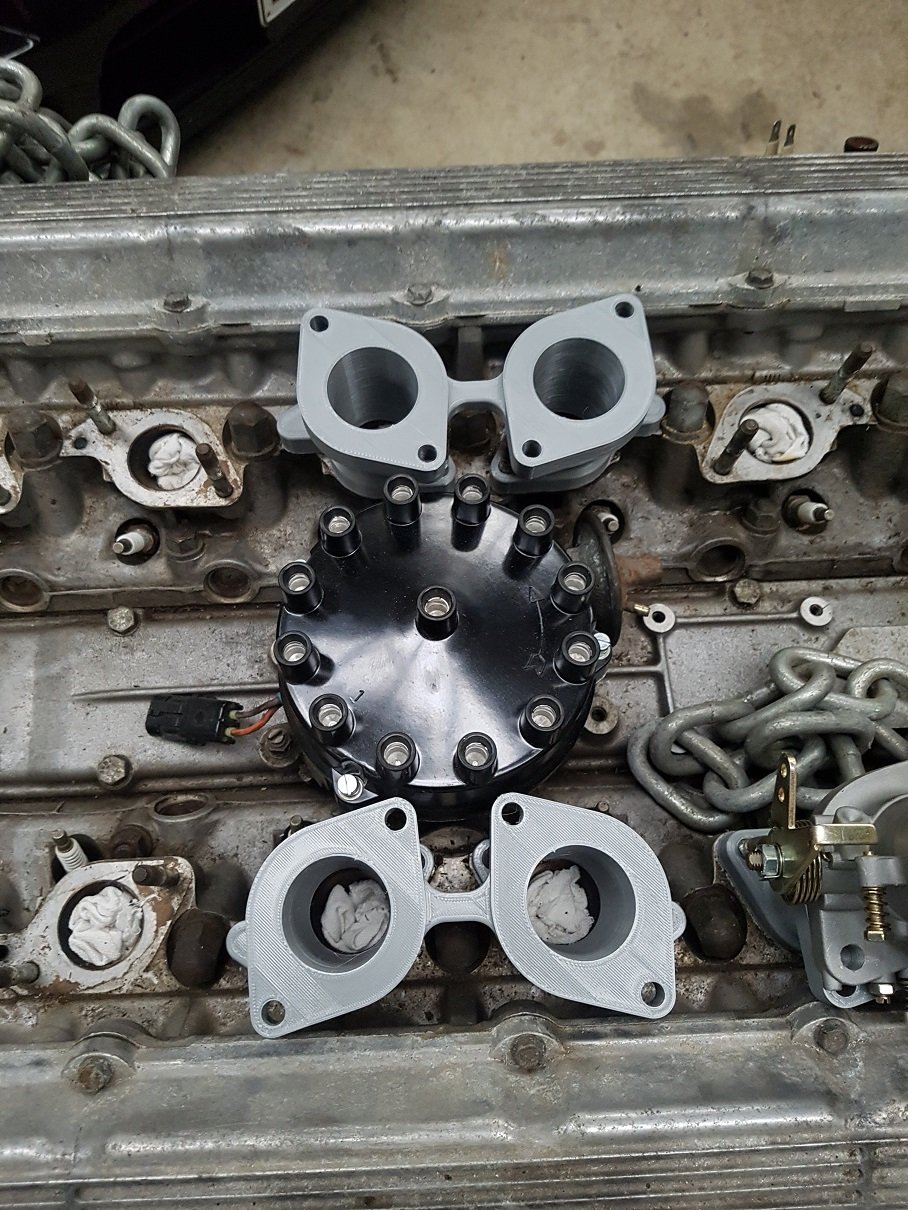
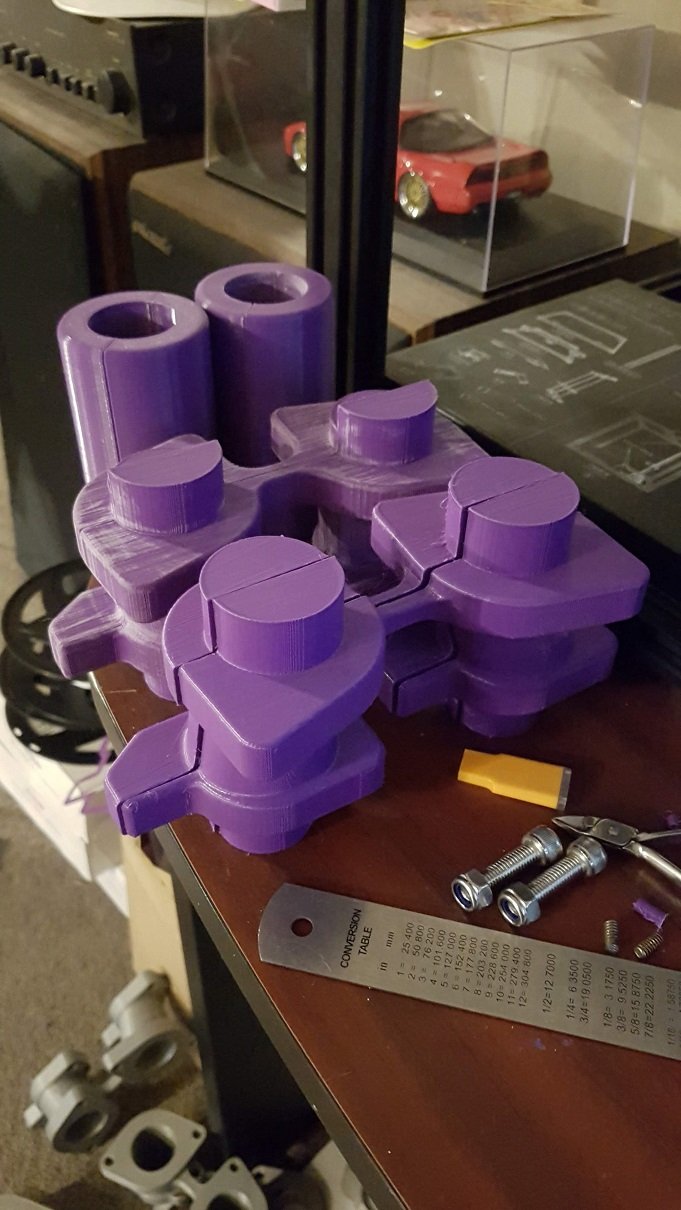
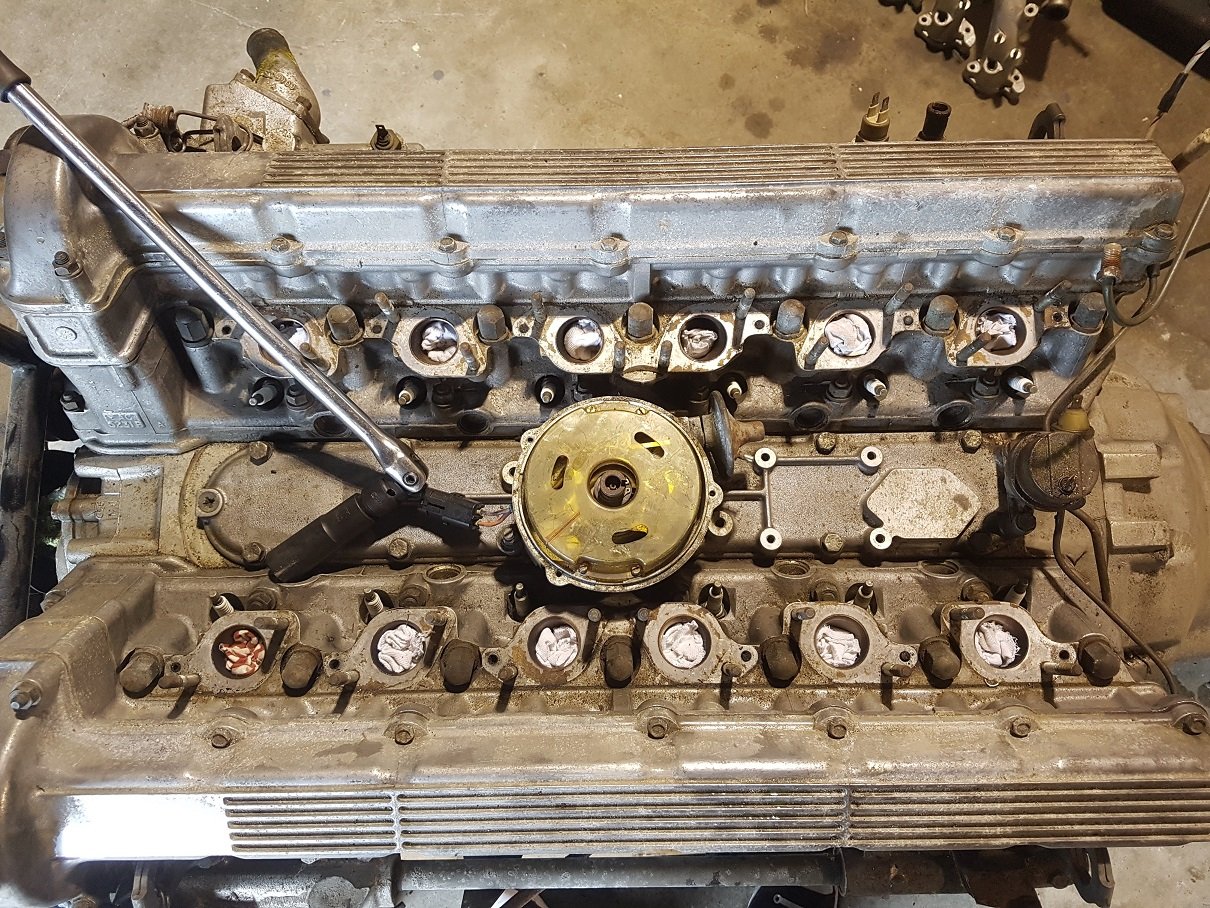
Final test fit is success, fully clear dizzy cap and everything. Ideal. Next step, print the actual patterns to make molds from. Might start this week!
18 points
-
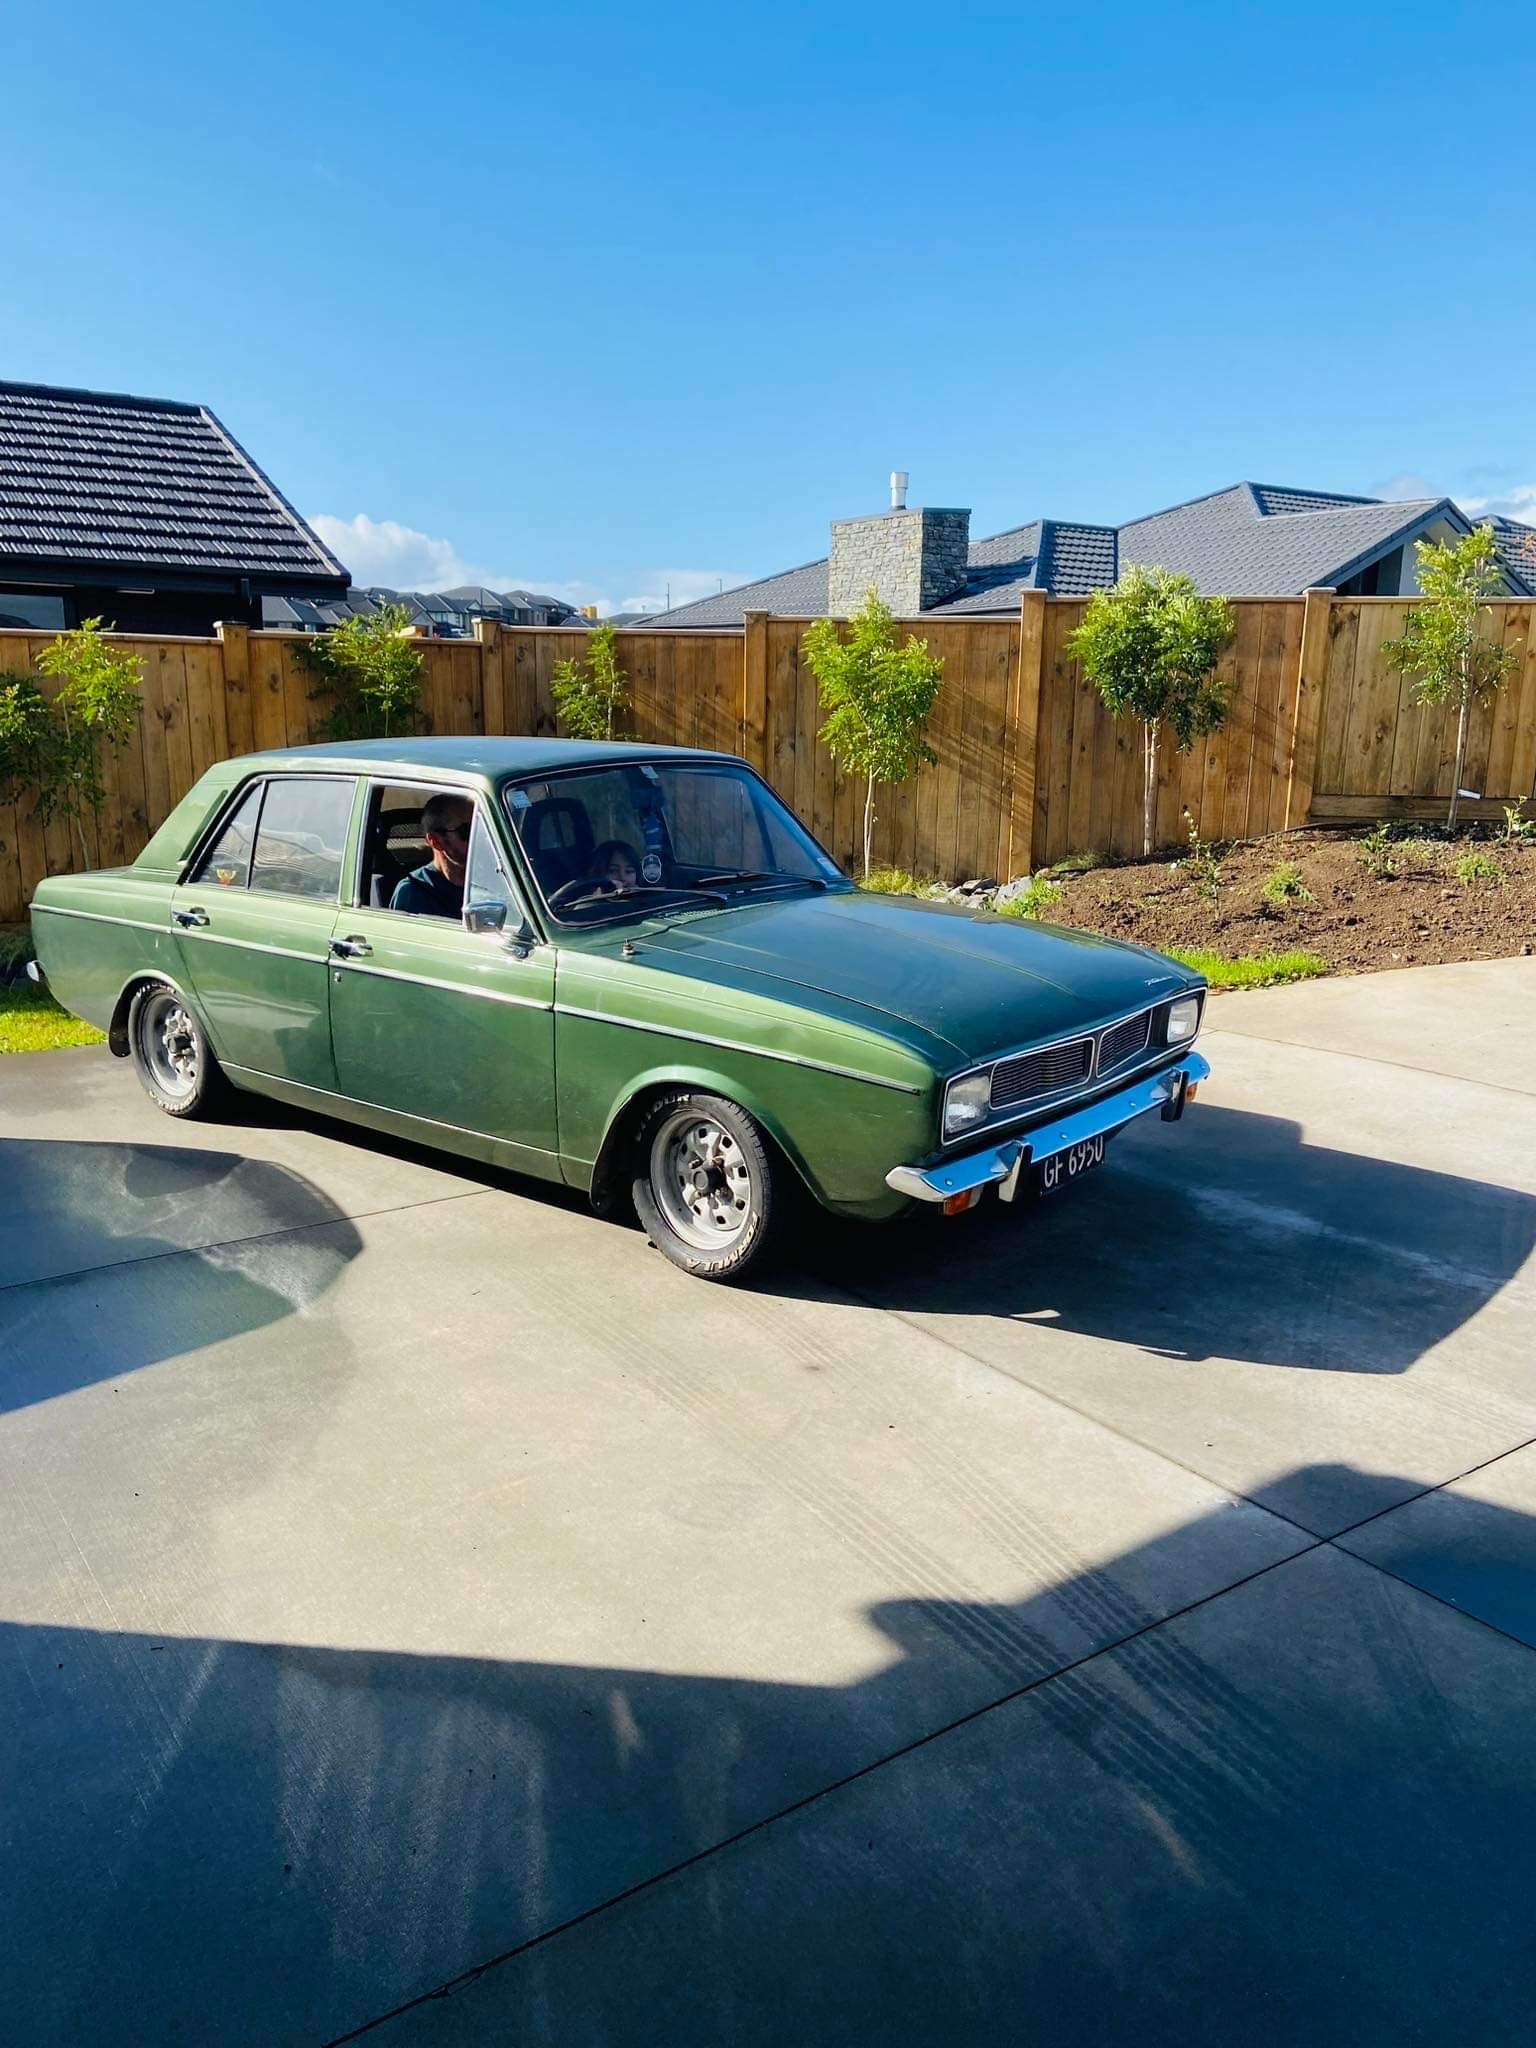
Sunday drives have been so much fun
13 points
-
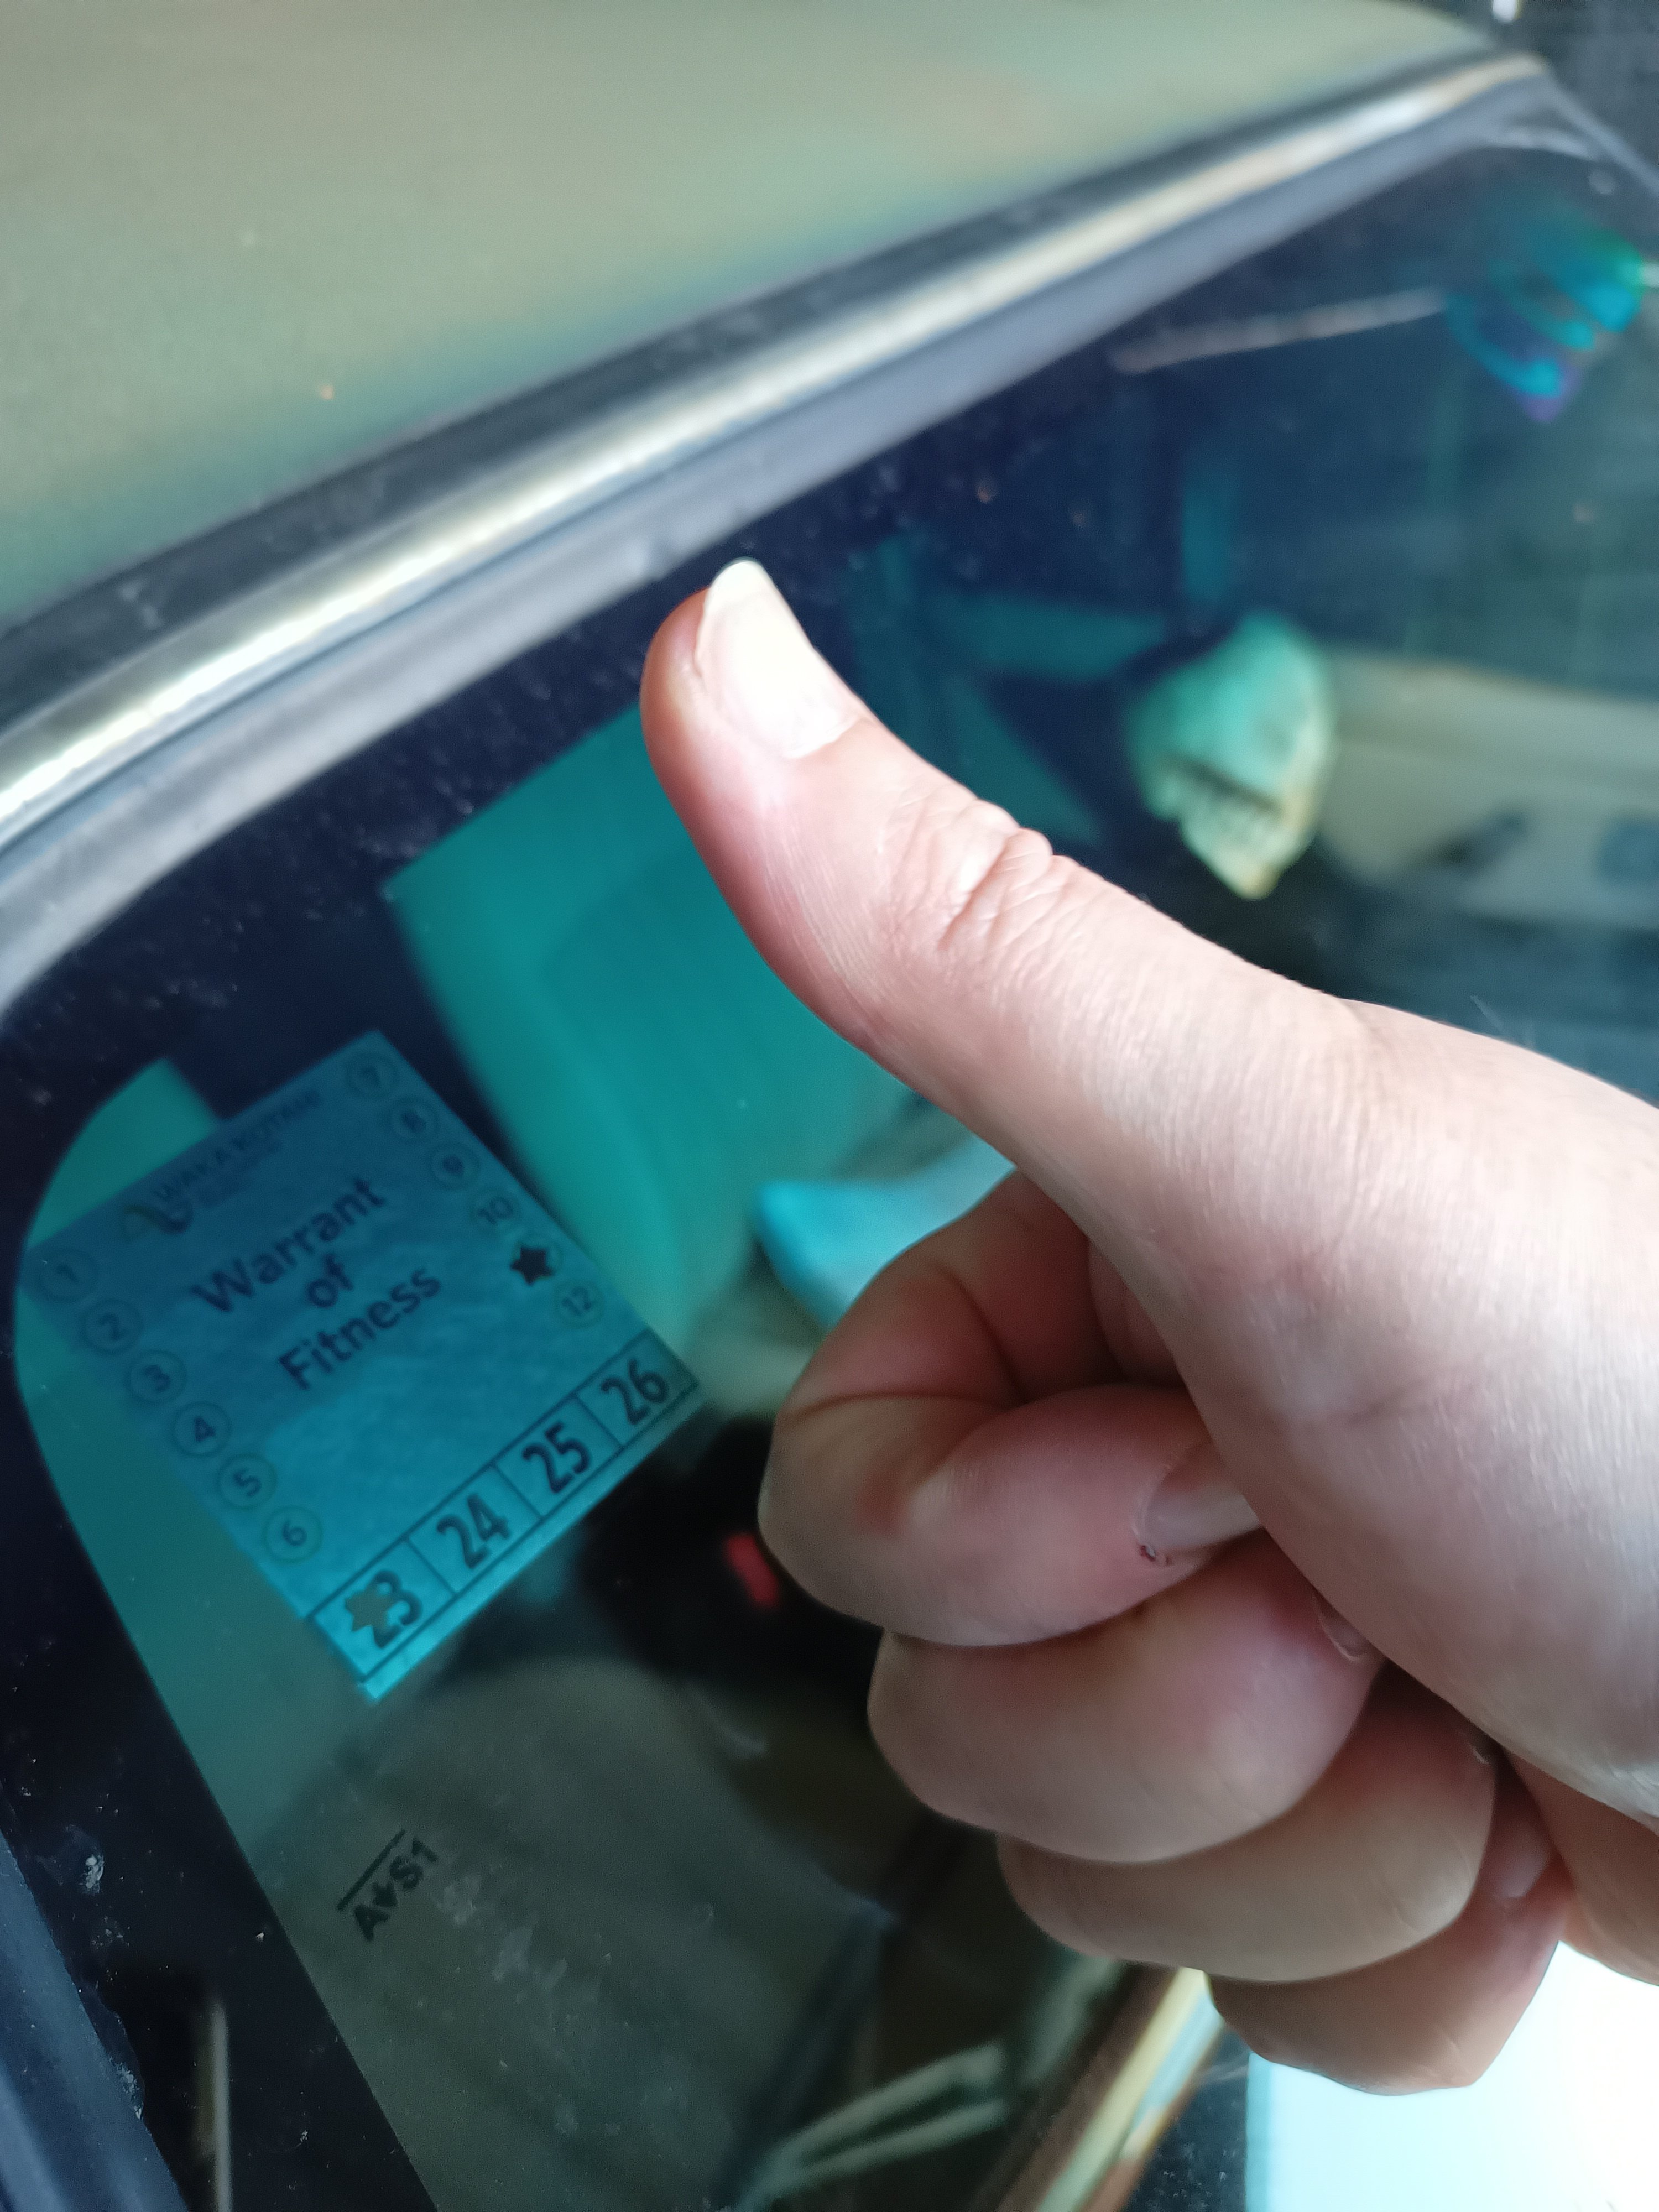
She’s Finished!!!! I’ve finally finished a project. certified, wof’d and registered. last legal for the last Hanmeet, so it’s been a while.
8 points
-
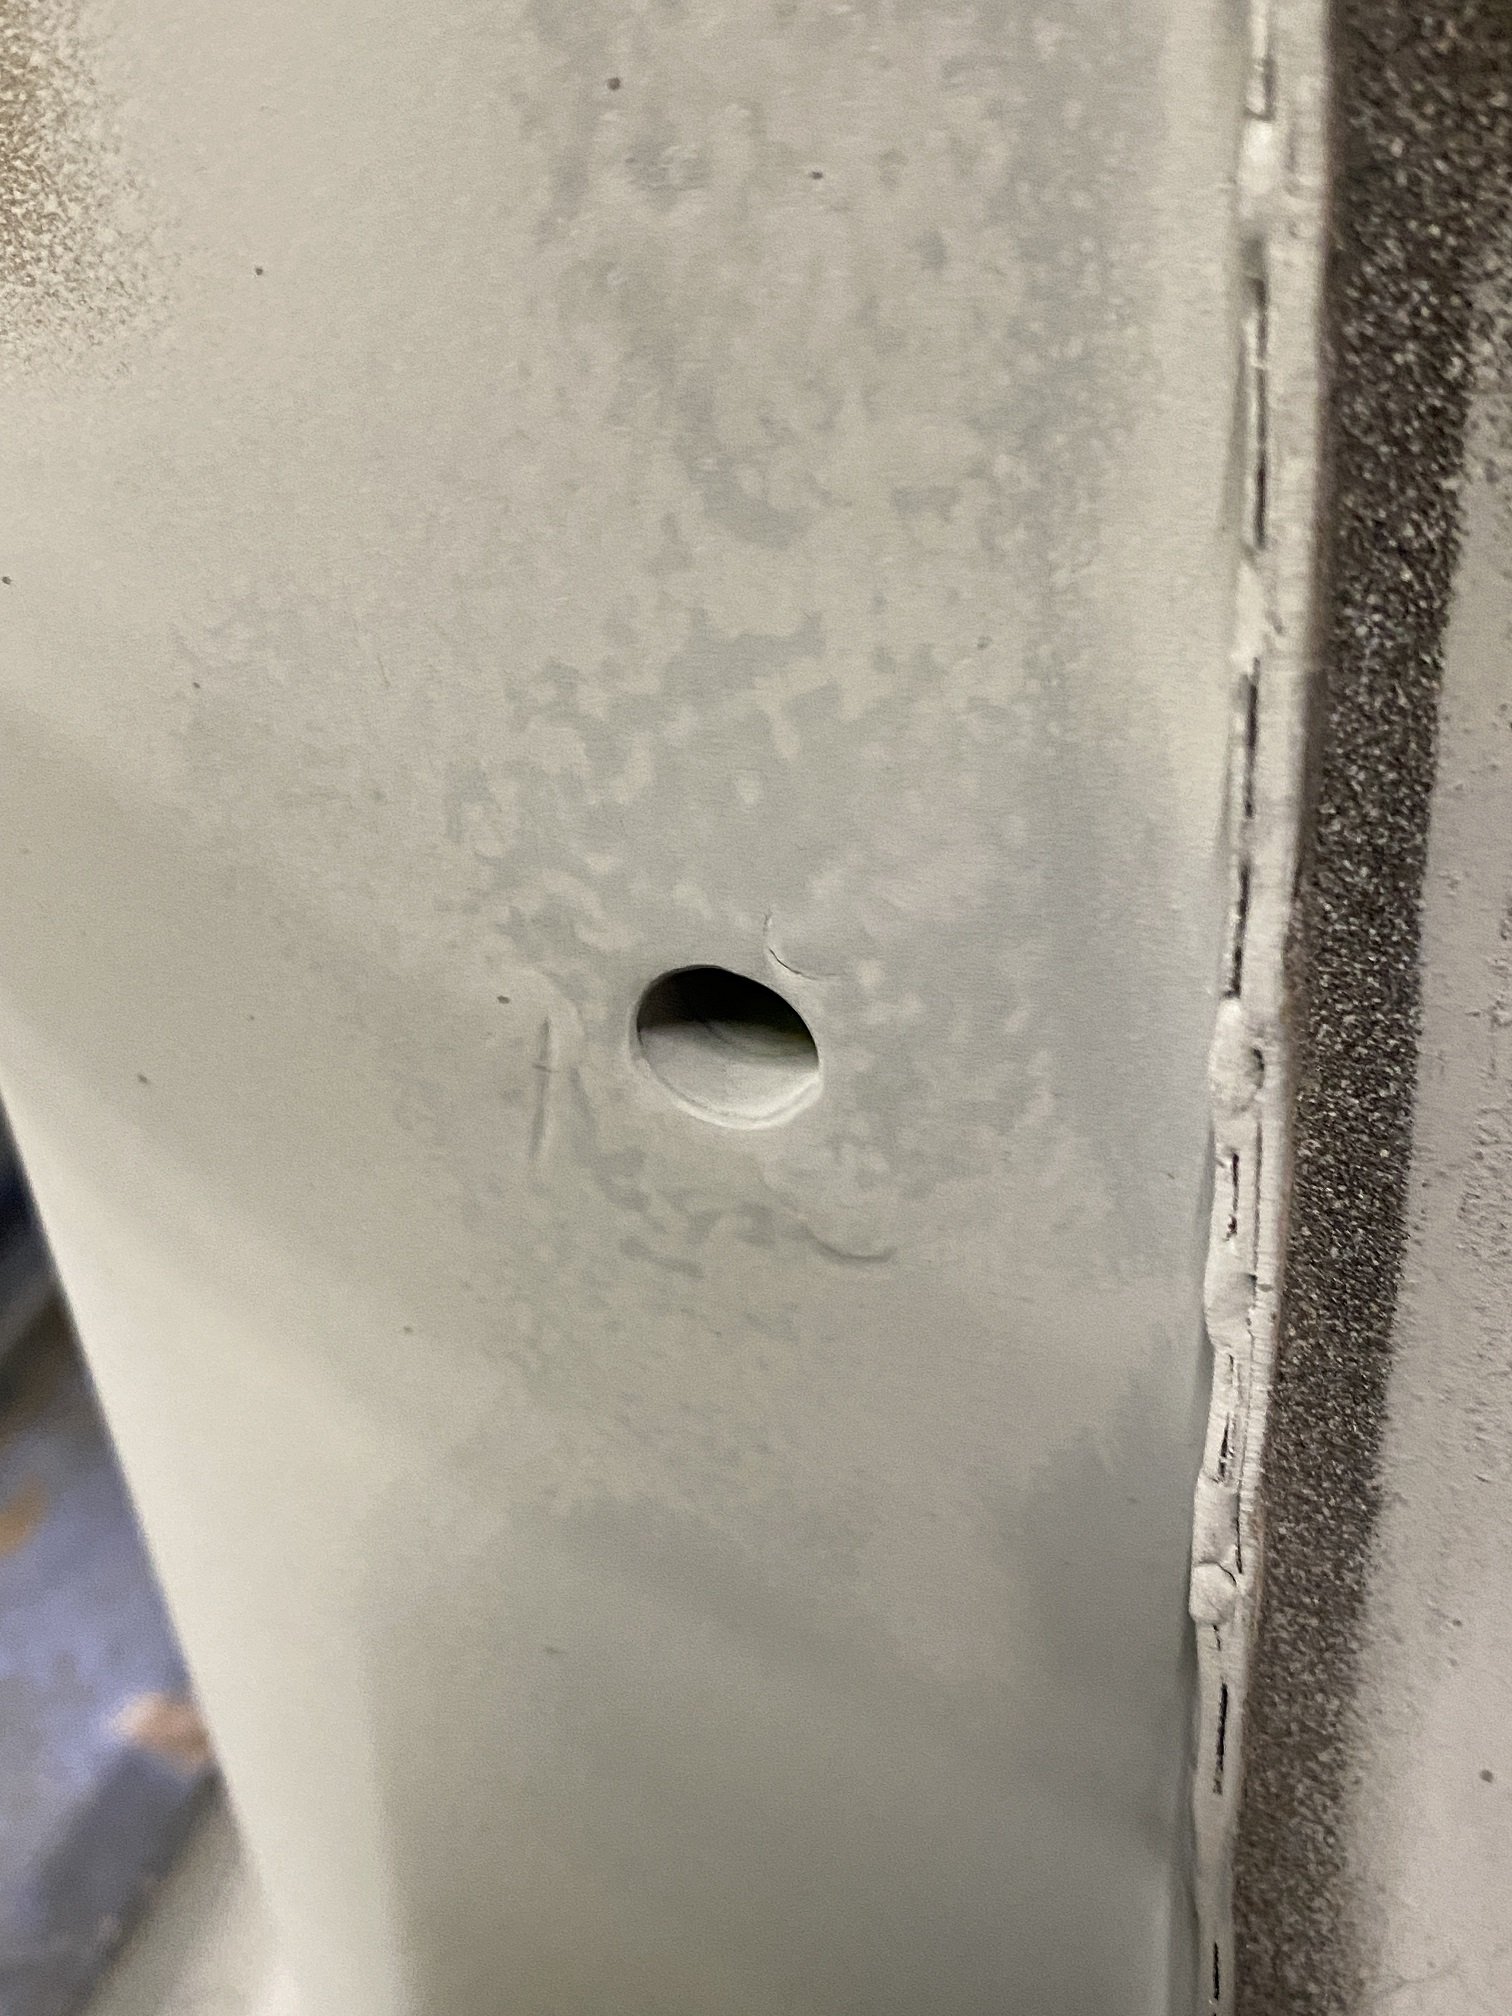
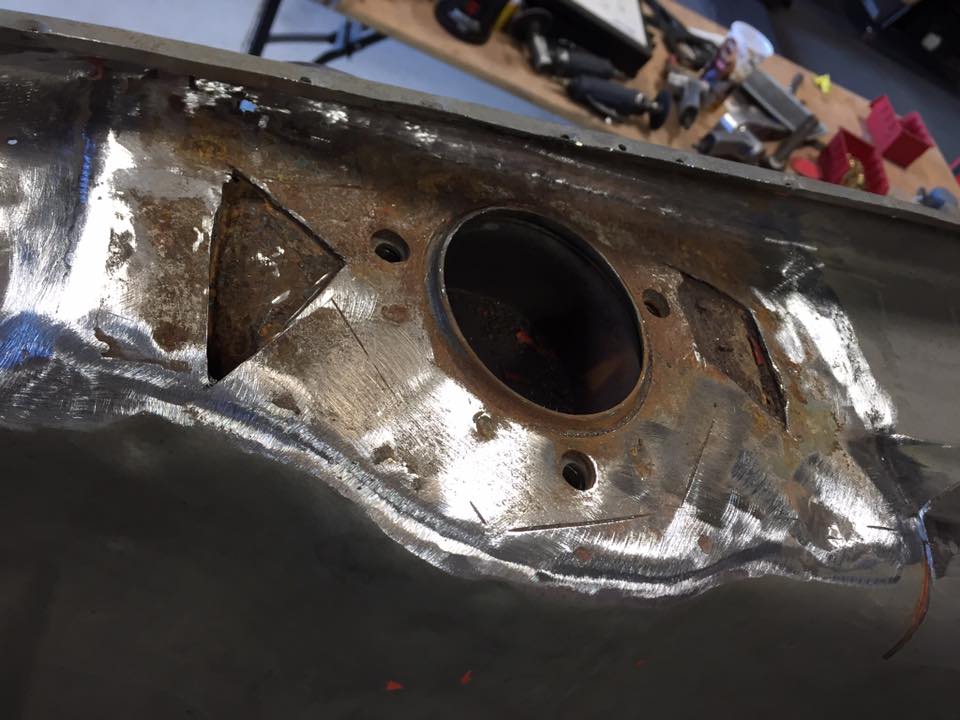
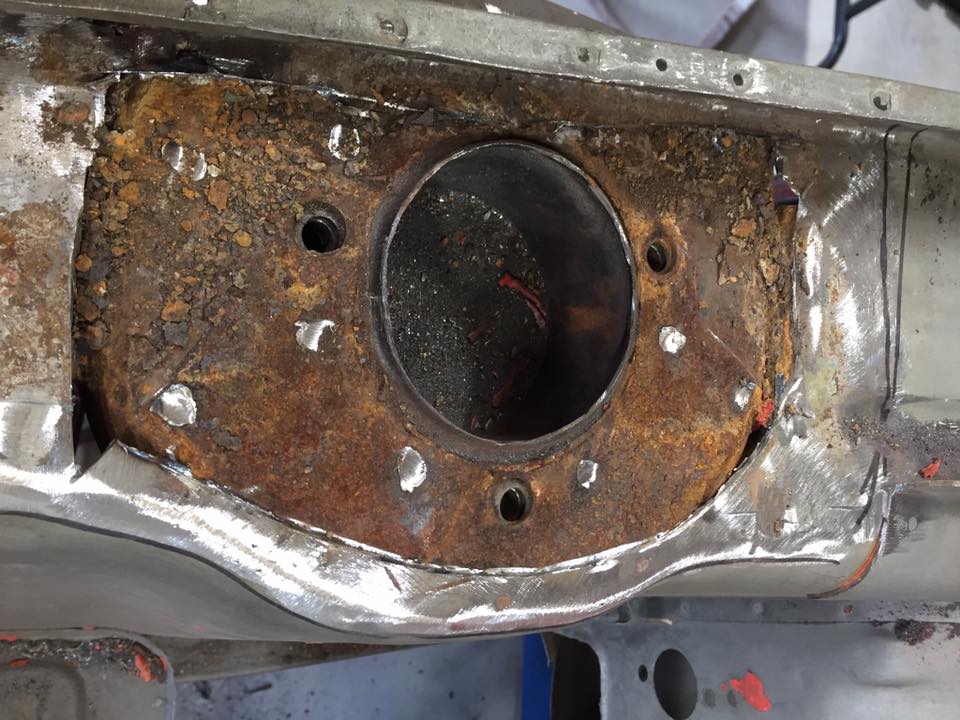
I made the 7mm spacer and tacked it in so it stays there.
7 points
-
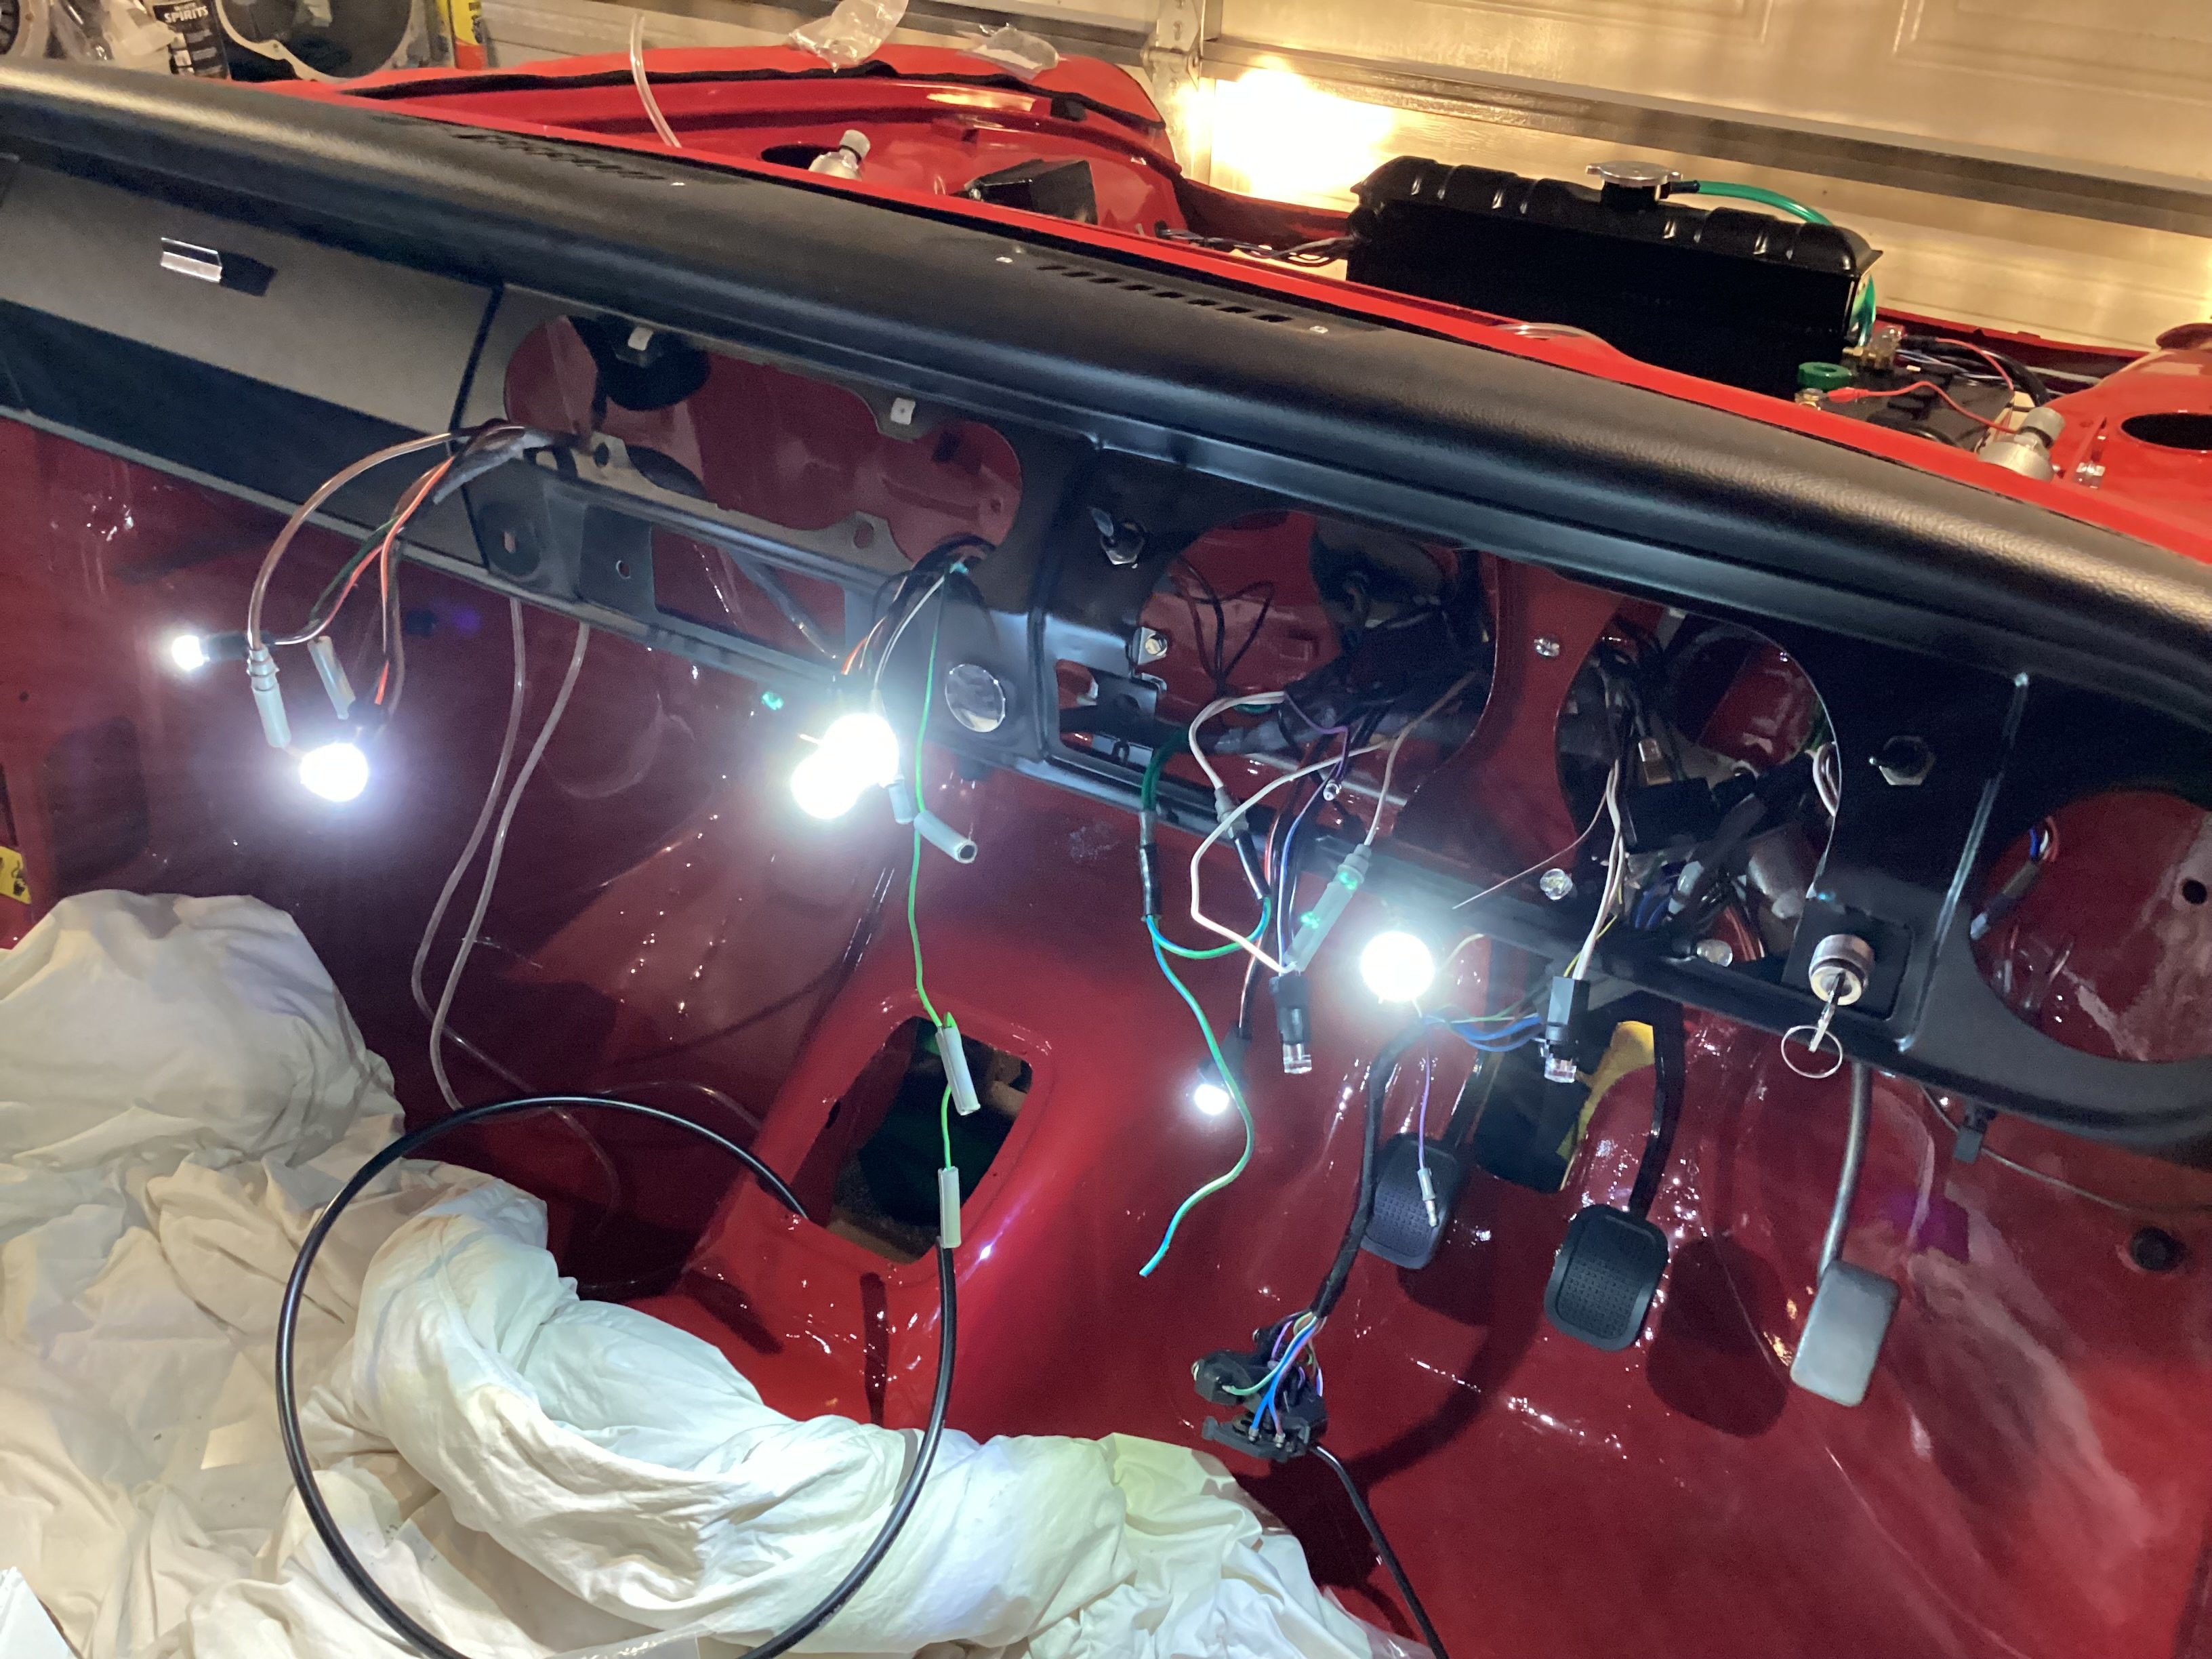
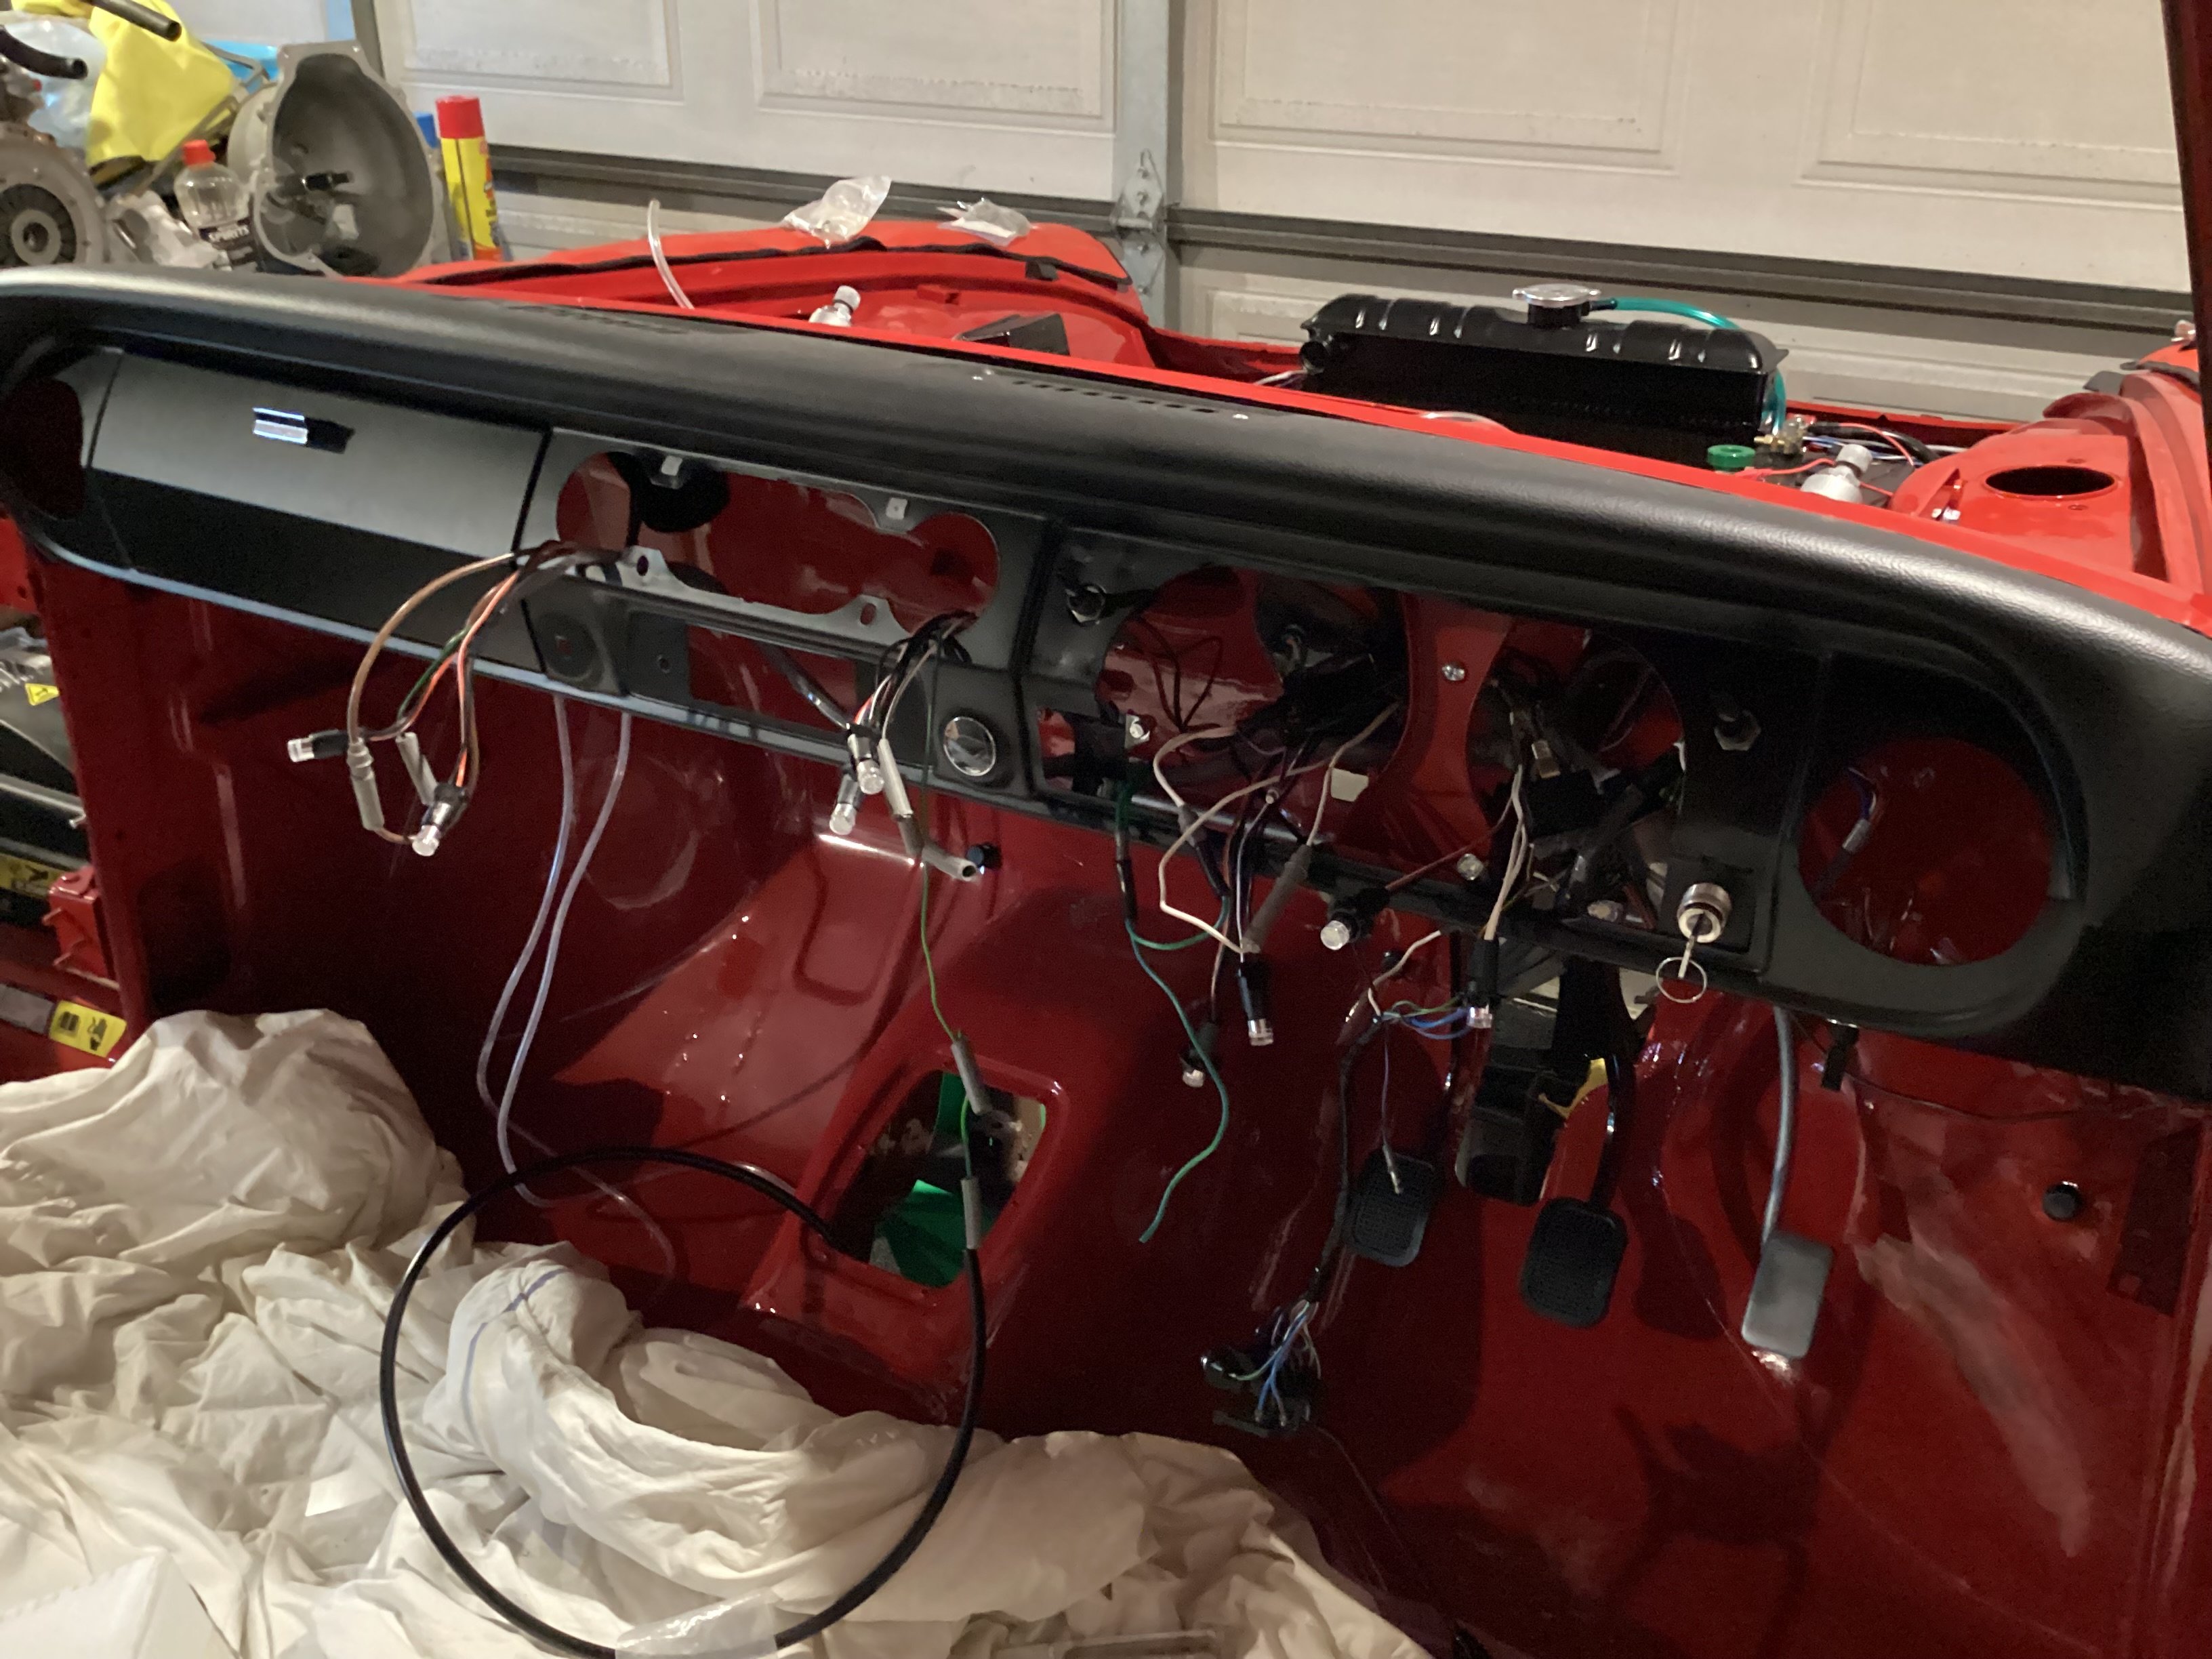
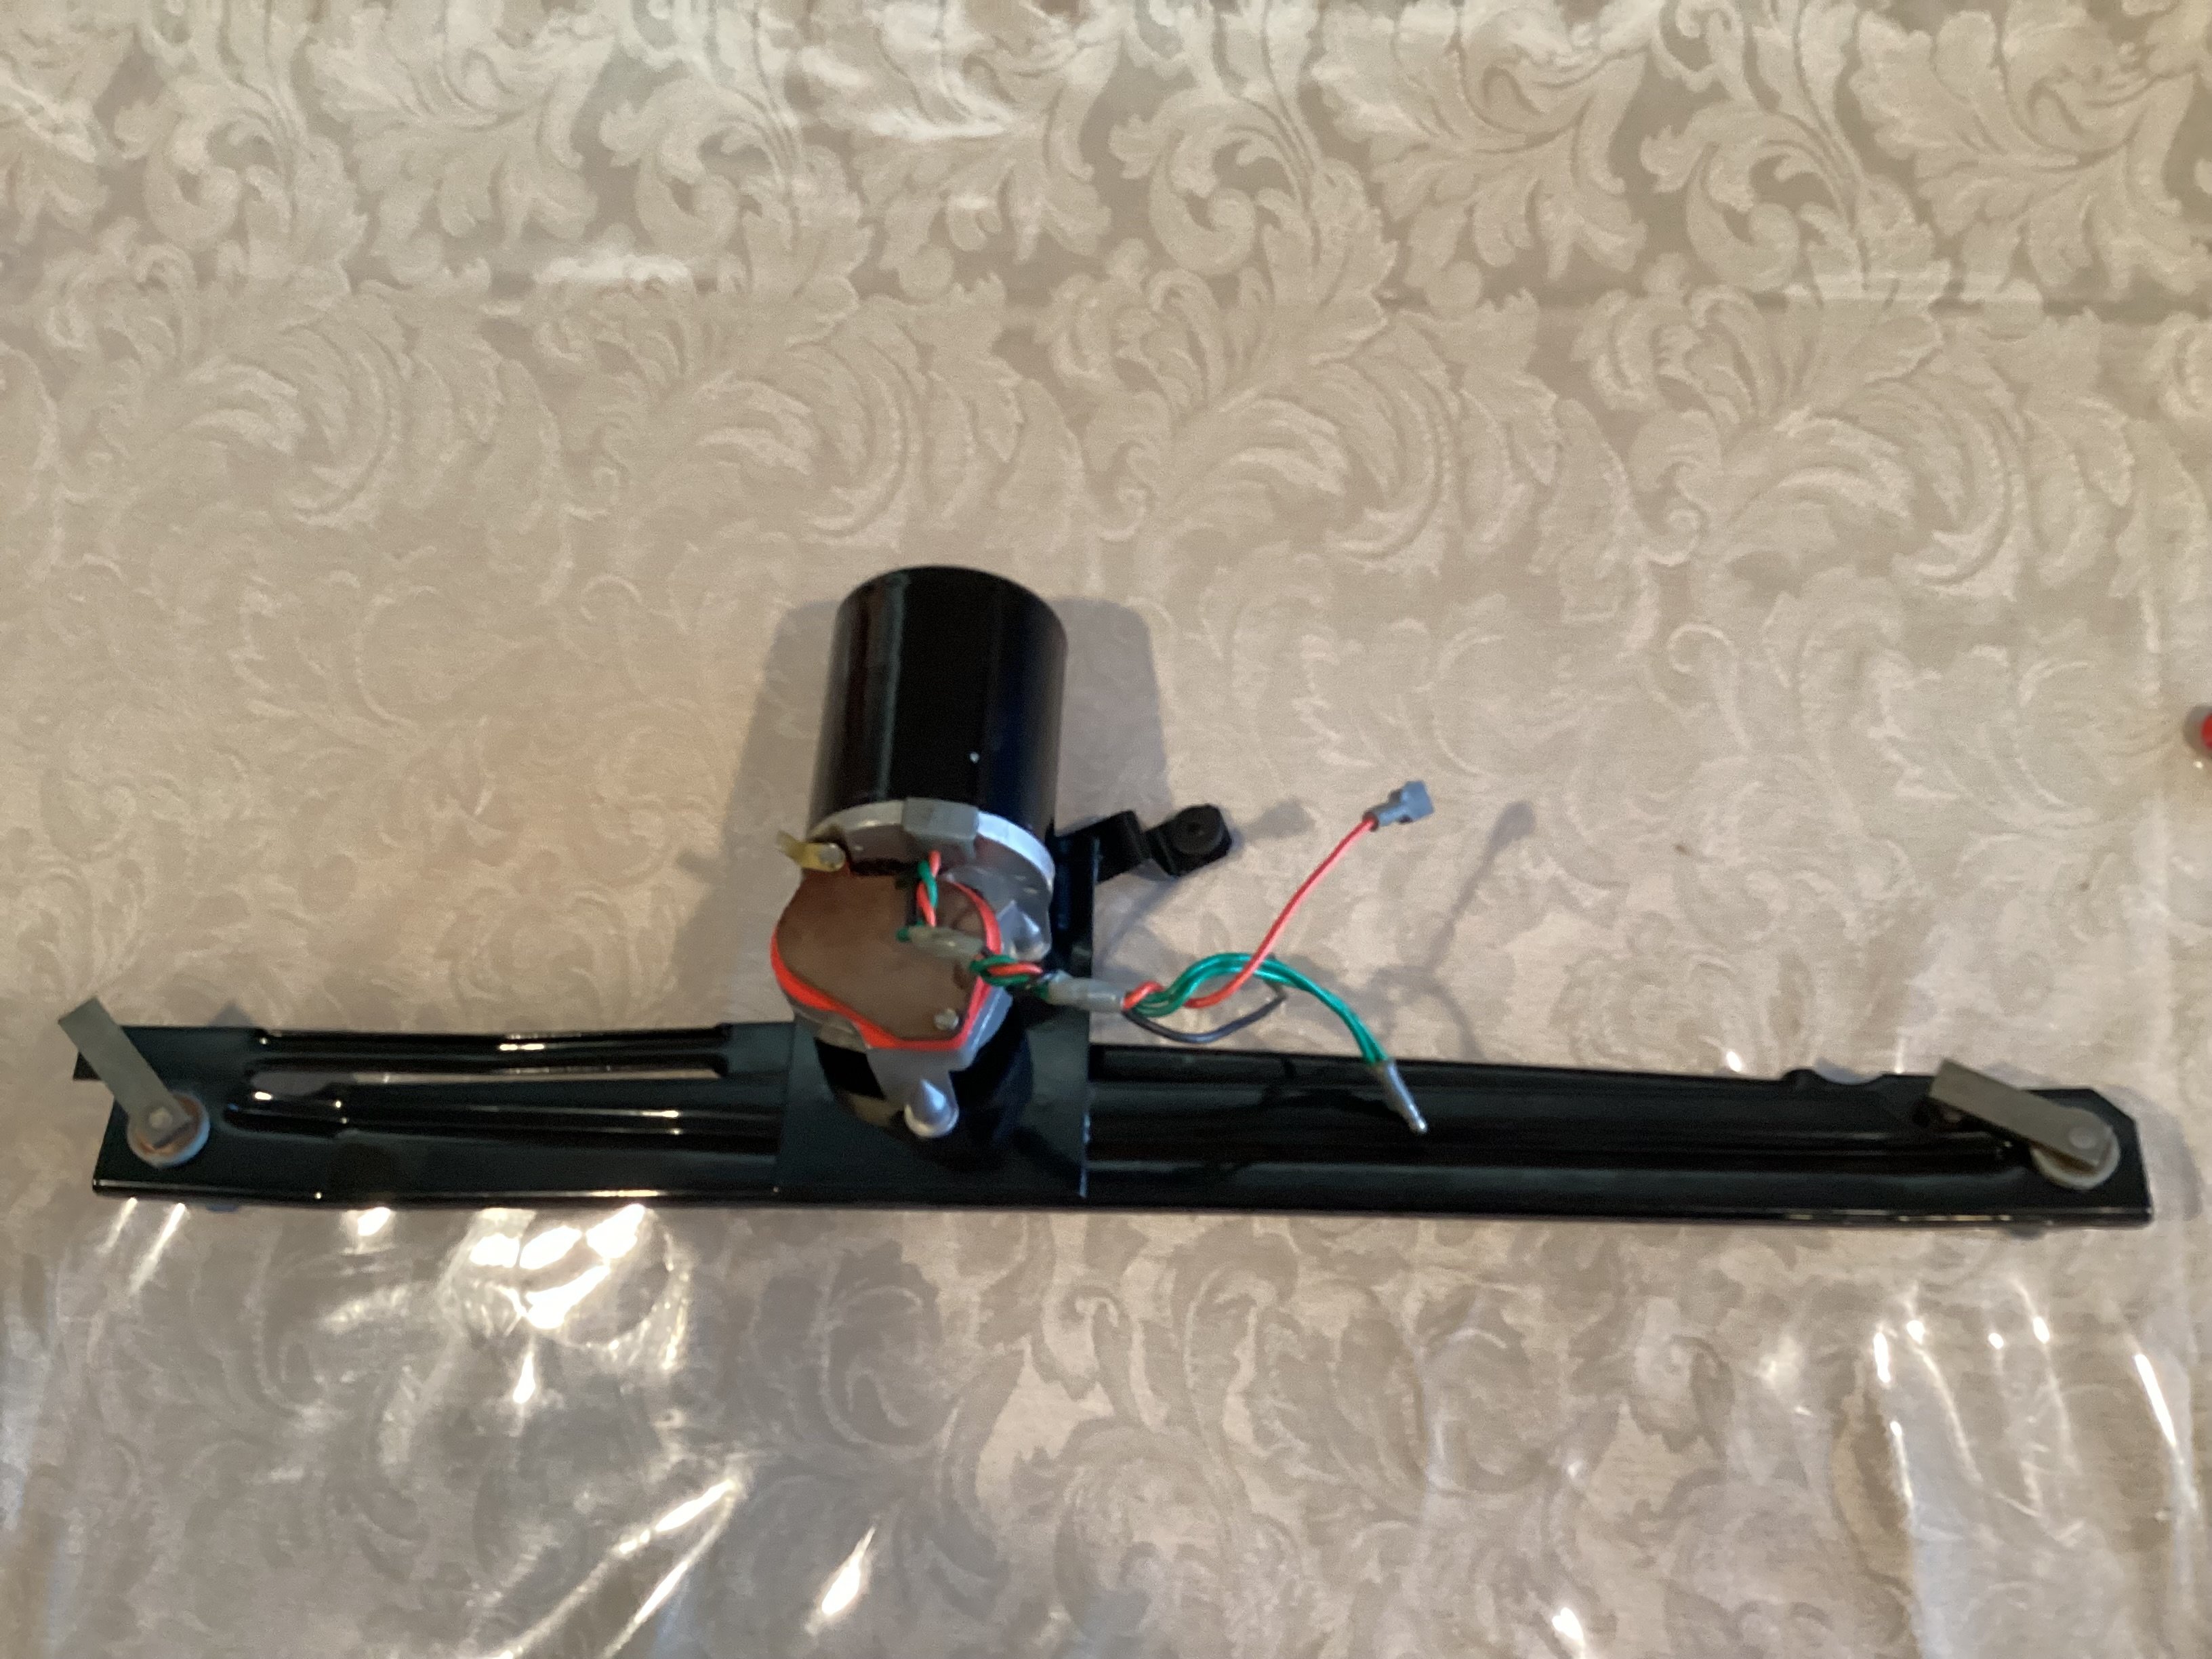
Been getting stuck in to get it finished.Got all the wiring hooked up and lights are all working. Going with LED bulbs to reduce the current on the loom. Rebuilt the wiper motor
6 points
-
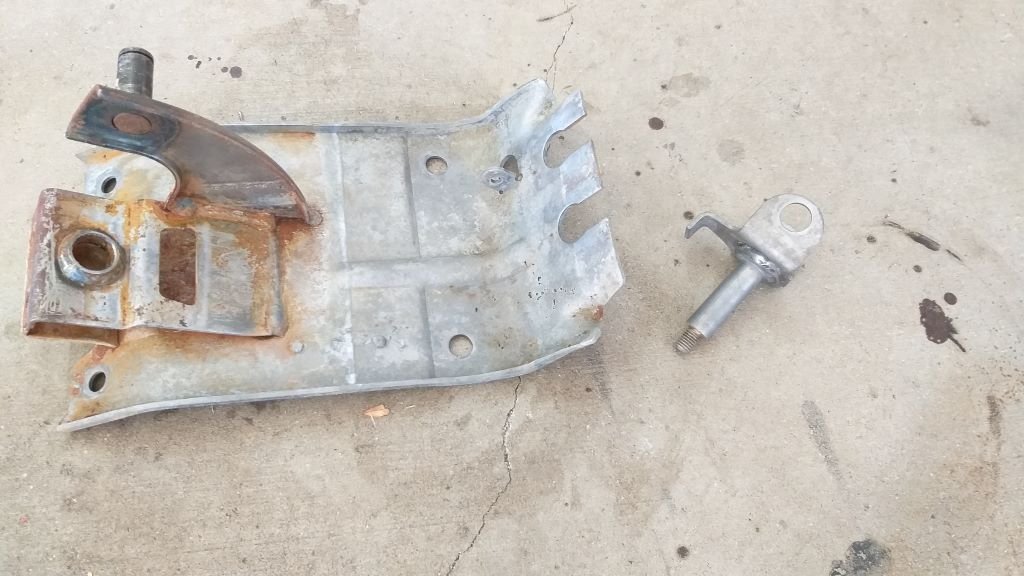
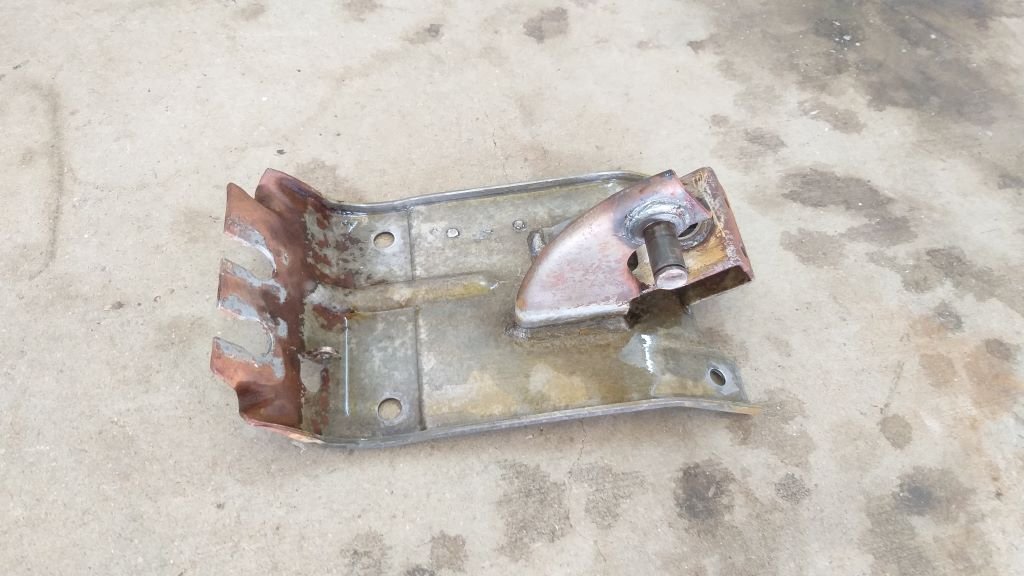
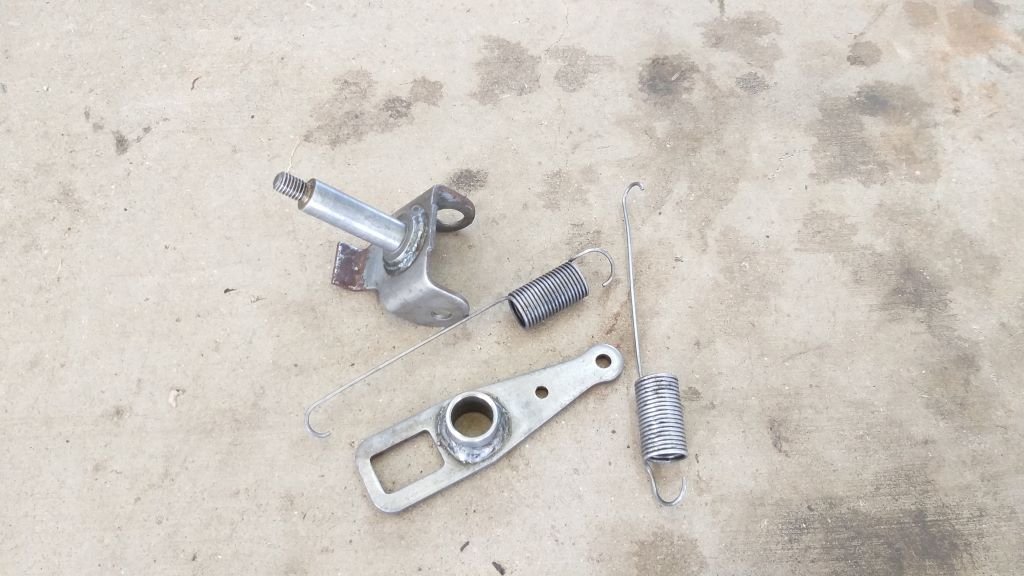
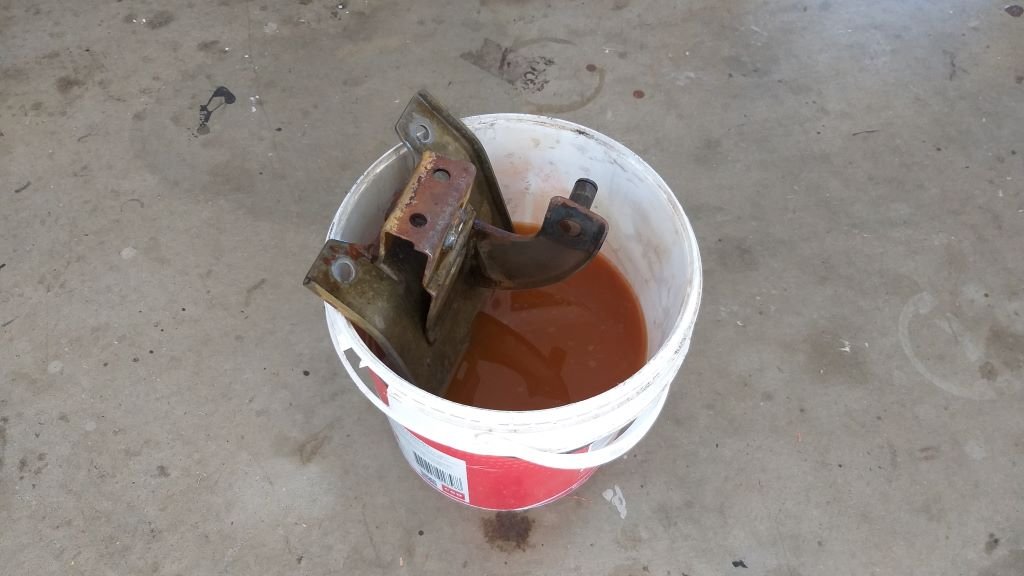
First thing this morning I pulled the gear selector base plate and pivot pin out of the vinegar bucket. Front end of base plate is looking mint as is the pivot pin. I've put the other end of the base plate back in the bucket and hopefully that will sort out the last of the rust.
5 points
-
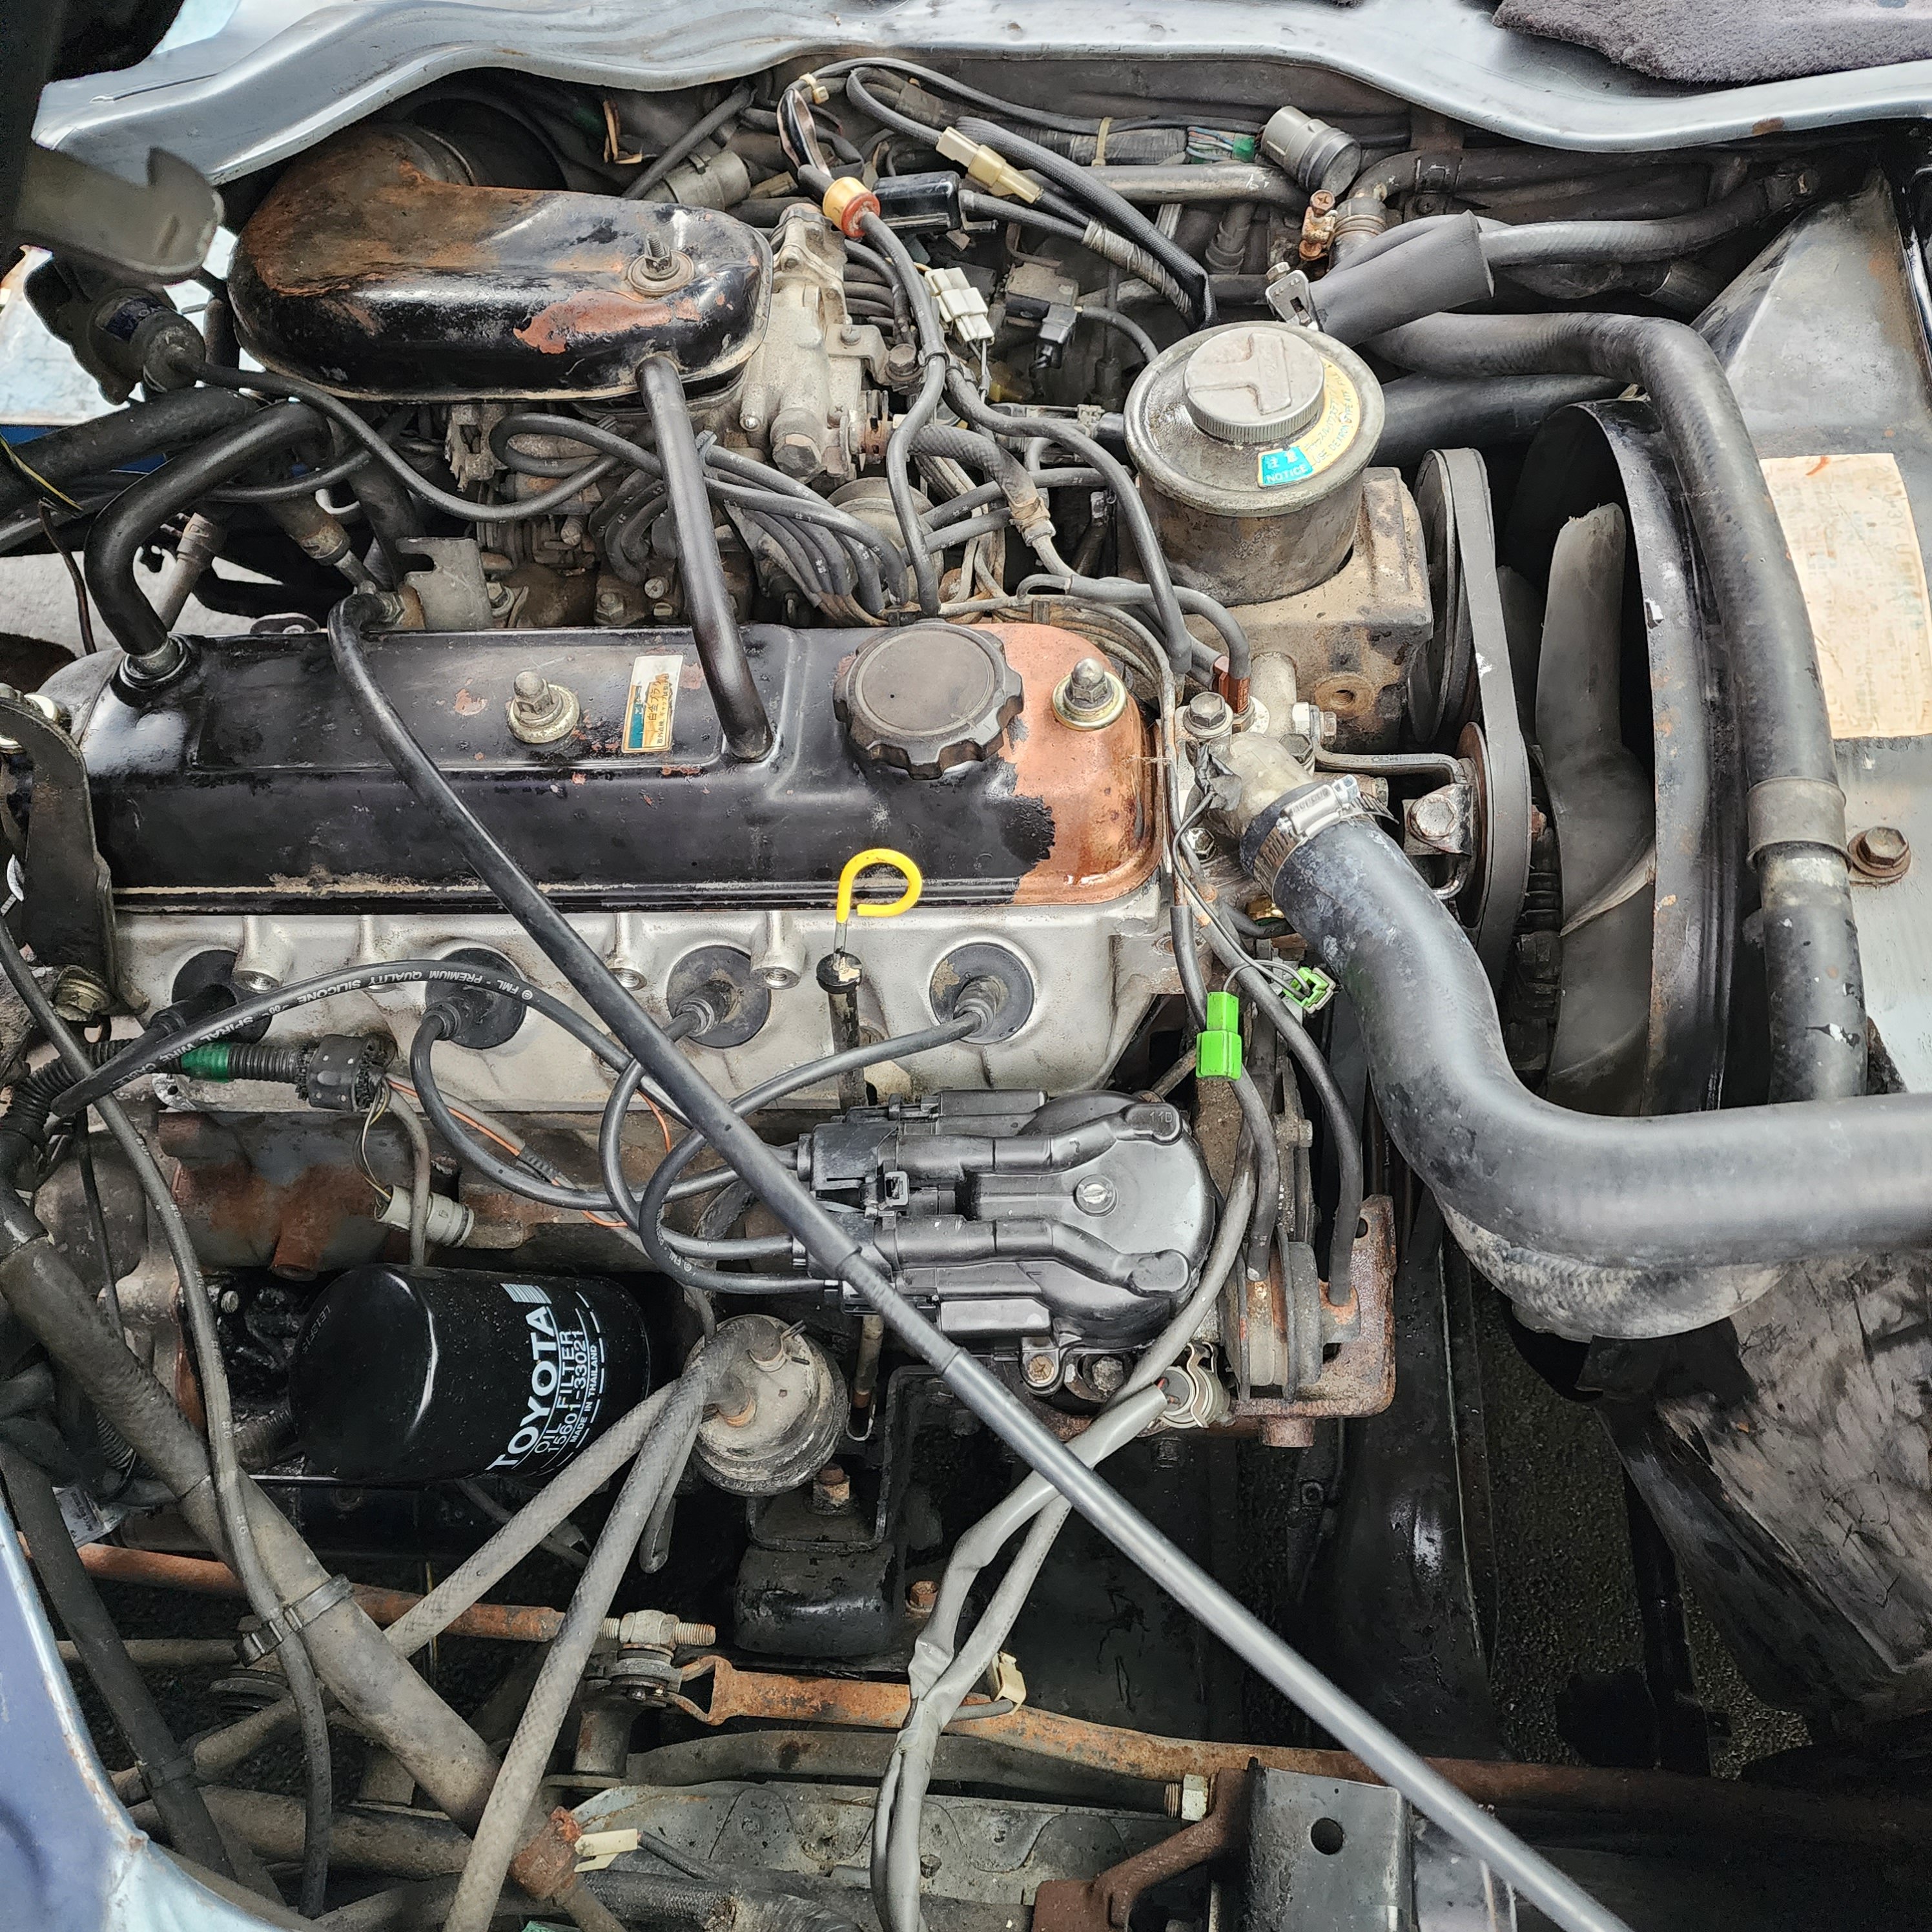
Got this back up and running yesterday Still looks like a heap of shit. Seems to be holding all of its fluids. Picked up the dash cluster yesterday and plugged it back it and still no tacho or temp which is pretty gutting after a $457 bill. I'd replaced the temp sensor on engine, all three radiator hoses and thermostat for a high flow option while I was there. Will run it for a week or so and flush cooling system a few times before putting actual coolant in.
5 points
-
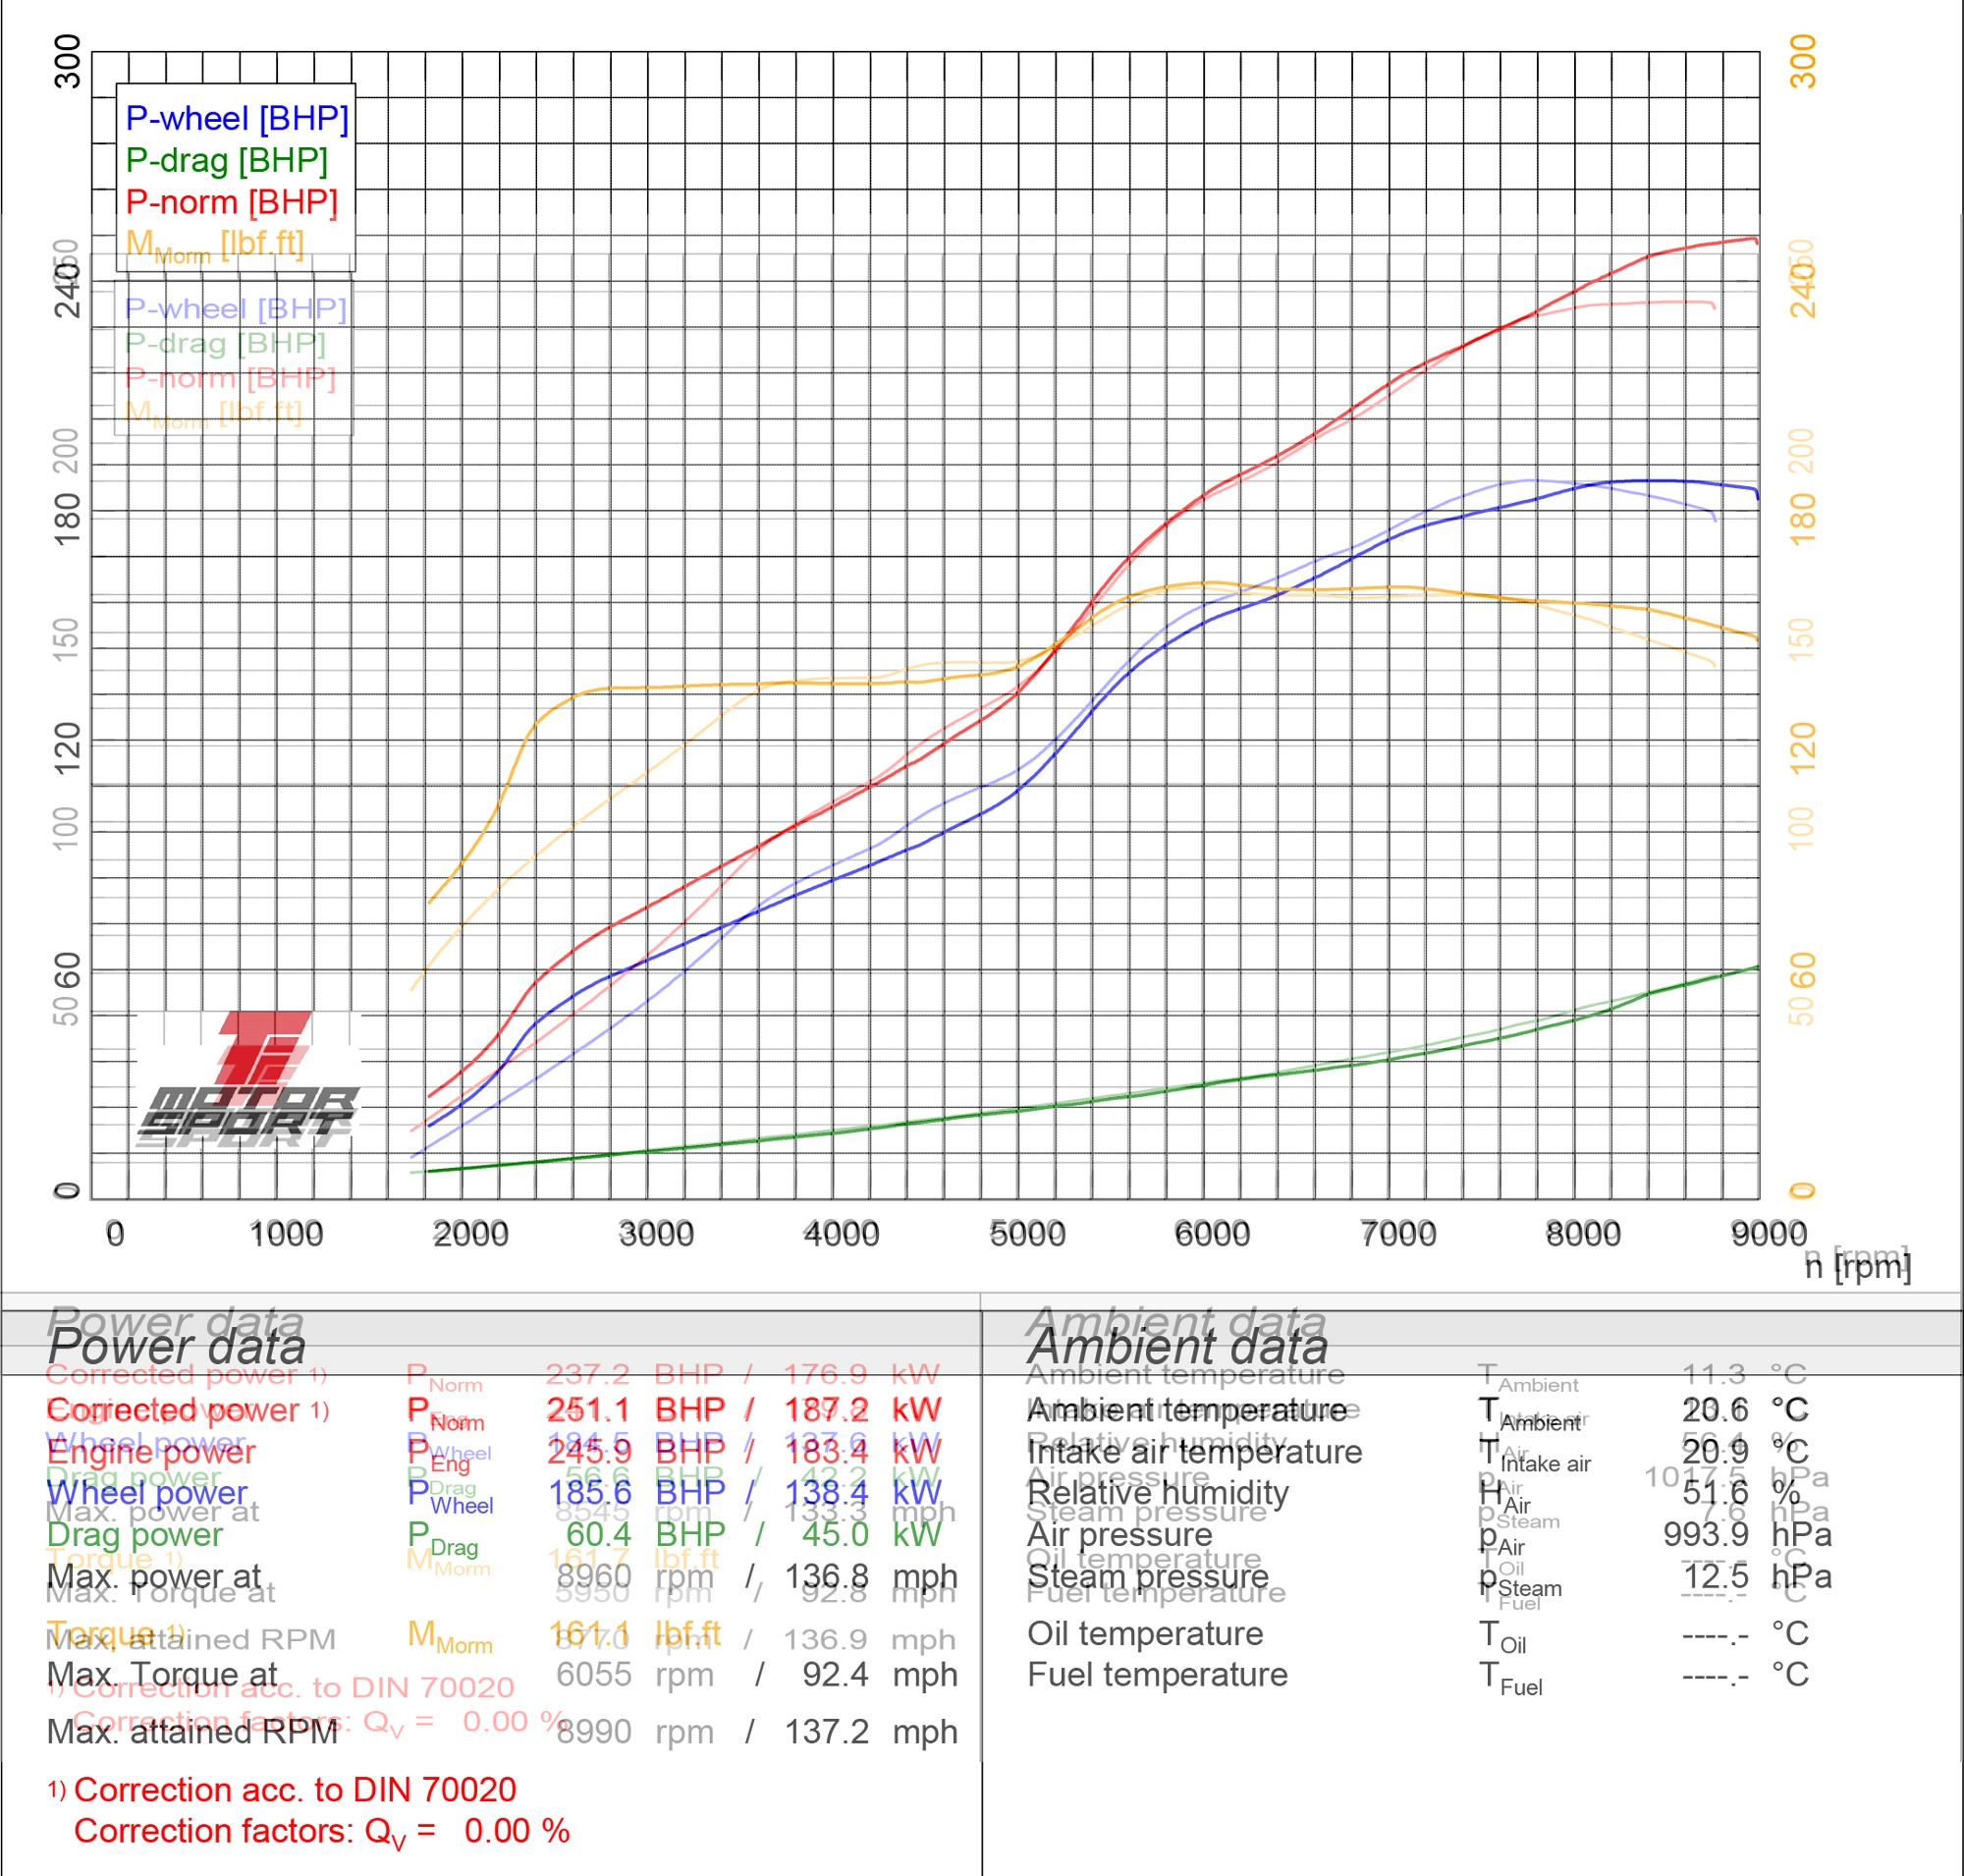
Okay soooo They had 184.5 wheel horsepower. Then fitted ITB, and now they have 185.6 wheel horsepower. So a 1.1 horsepower gain in real life. But they now for some reason have 60.4 horsepower drivetrain loss instead of 56.6 horsepower drivetrain loss. Did someone pour sand in the gearbox when doing ITB swap? haha. This is why I hate "at engine" power figures.4 points
-
New loom. Couple of mistakes in it but supplier is sending a couple of patches. The old loom had been butchered and had a meltdown on the underdash loom on the high beam light circuit so just decided safer to go new4 points
-
Around that time these arrived in the mail from elite wheels in chch: Standard 12" steelies widened from a 4j to a phat 7j. 145/70 is the smallest r12 tyre available in the country, so that's the goal. here's when I released they wouldn't be an easy fit: shout out to mag n turbo petone 145/70 on 7j achieved. Looks mint with the chrome ring and center cap added. big fan of the wide steelie look. plus where else can you find a 12x7 4x100 wheel with this offset? The lip pokes out heaps with the chrome trim on after gently massaging the guards for a couple hours it looked like this: pretty stoked with how it came out. and that's pretty much where I am with it today. This weekend I'll tidy some things up, sort out the lower engine support, get a battery for it and take it for a spin. I've got my carpenter flattie making a parcel shelf for me so the pioneers will be in soon. plenty more that needs to be done to it, so stay tuned peace4 points
-
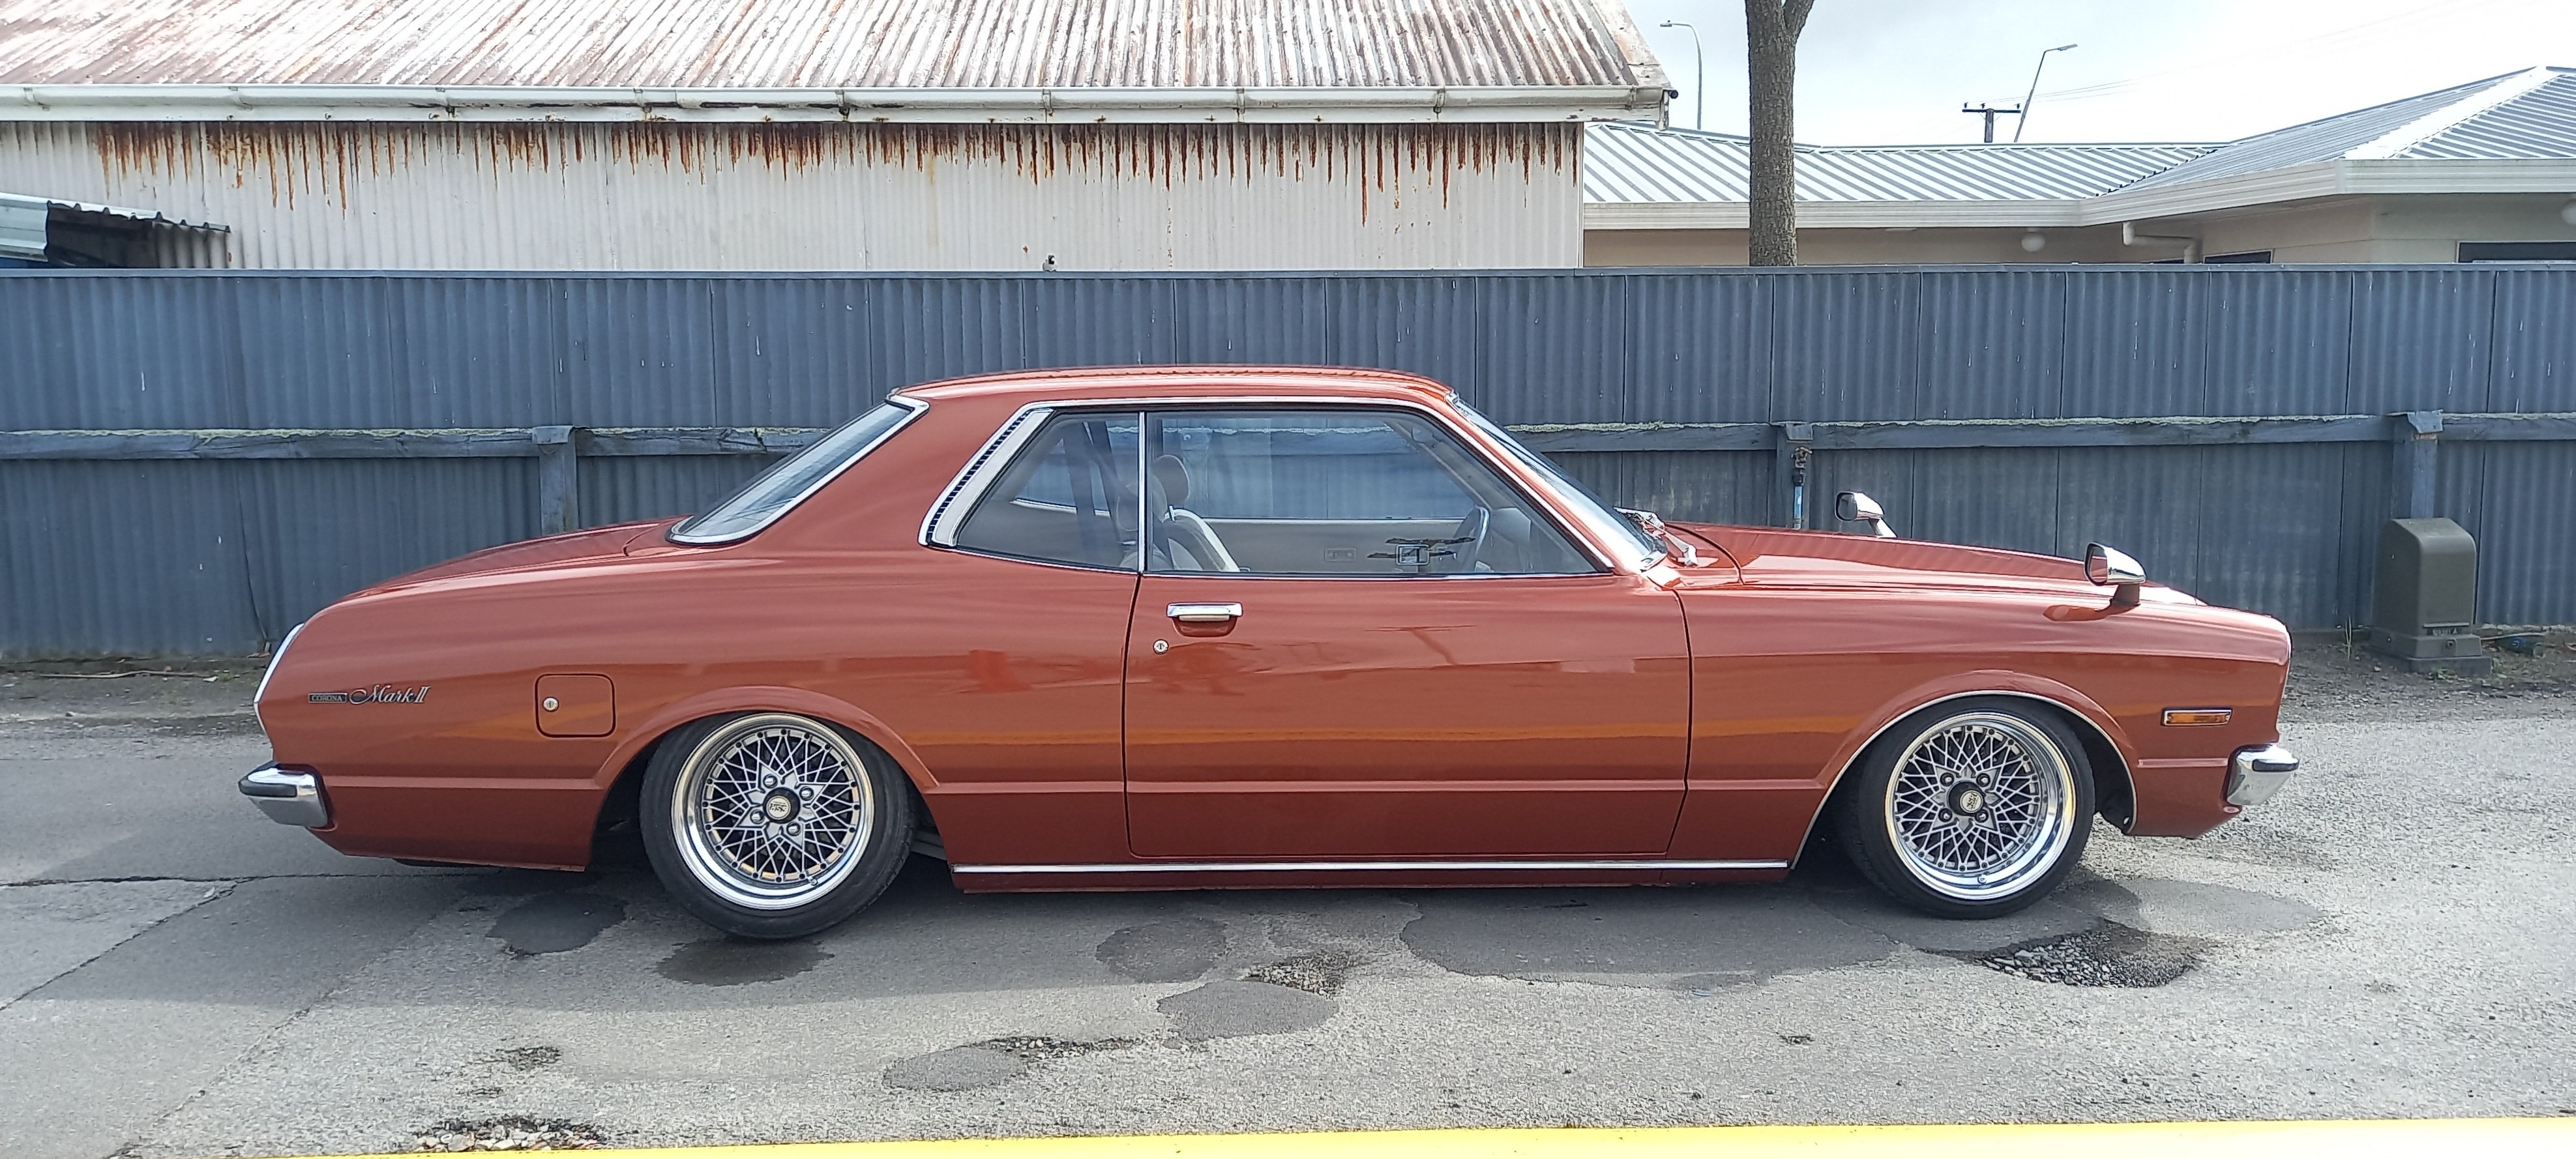
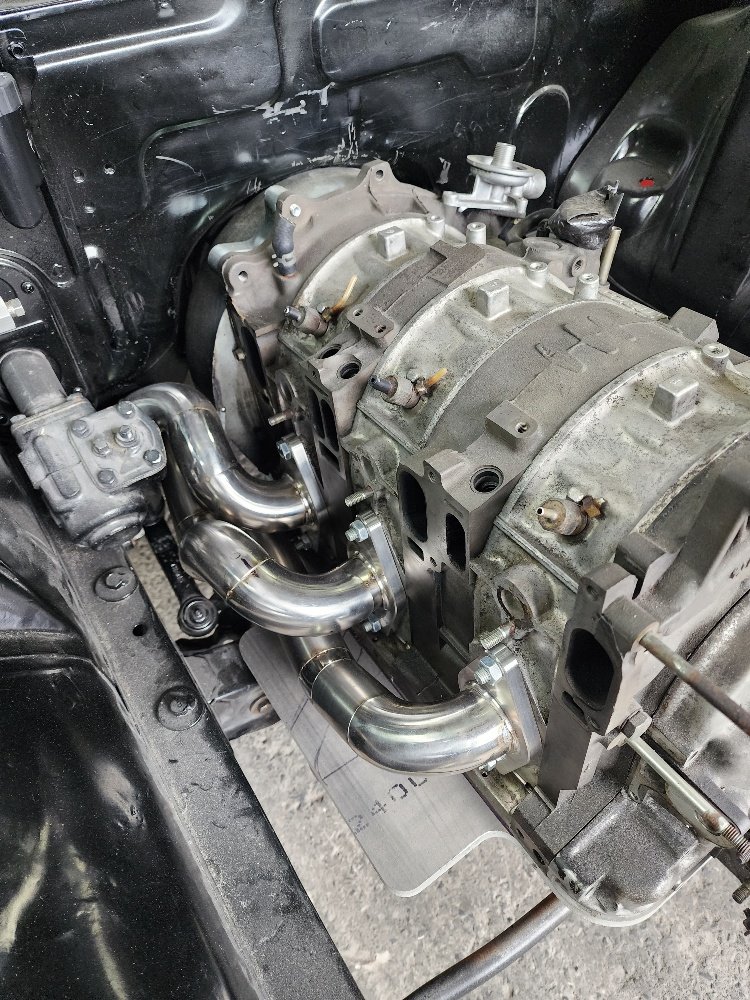
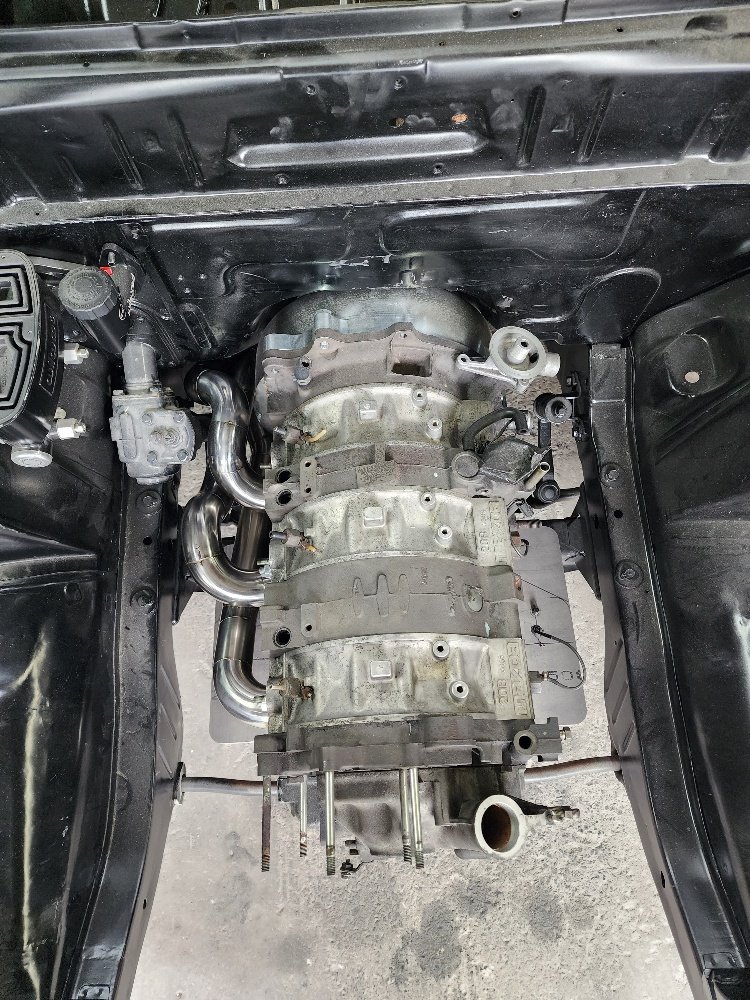
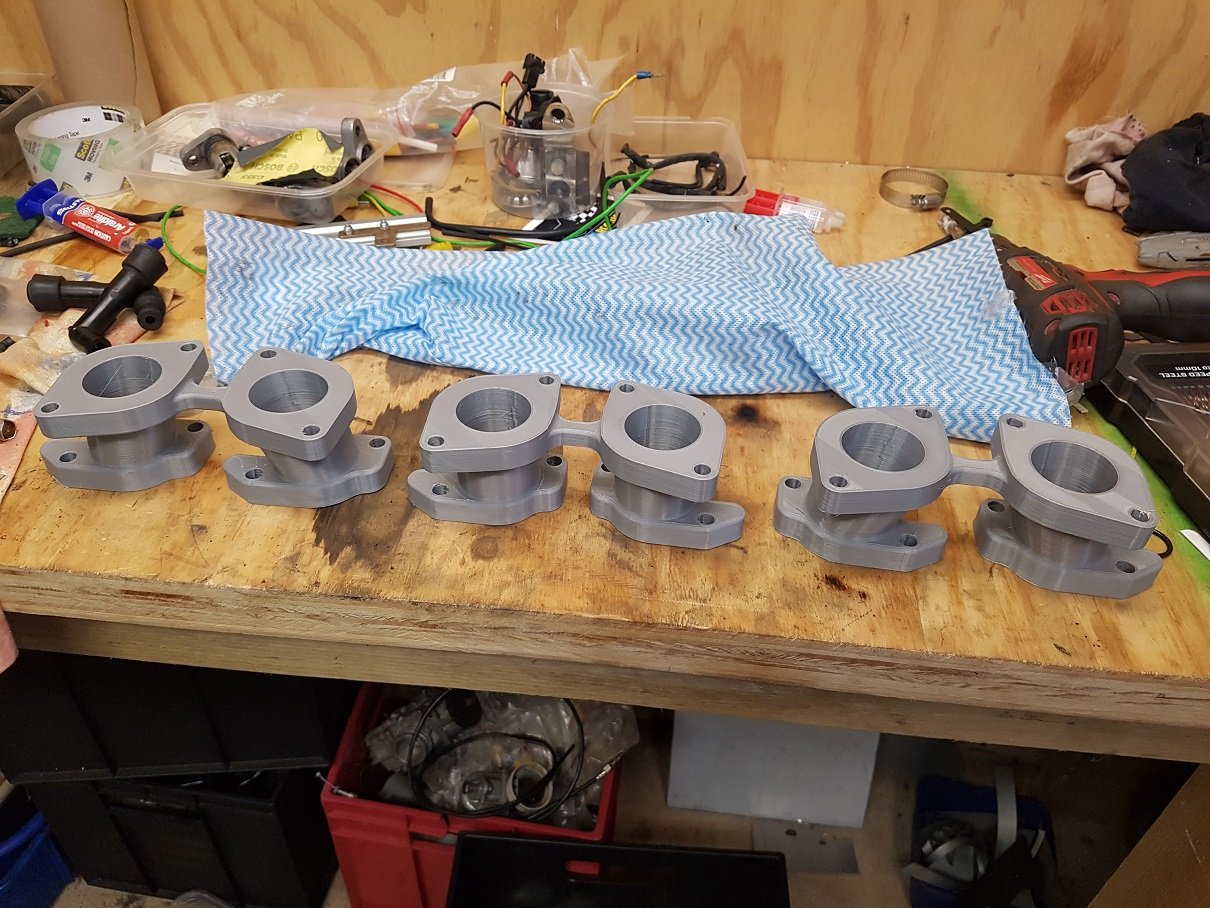
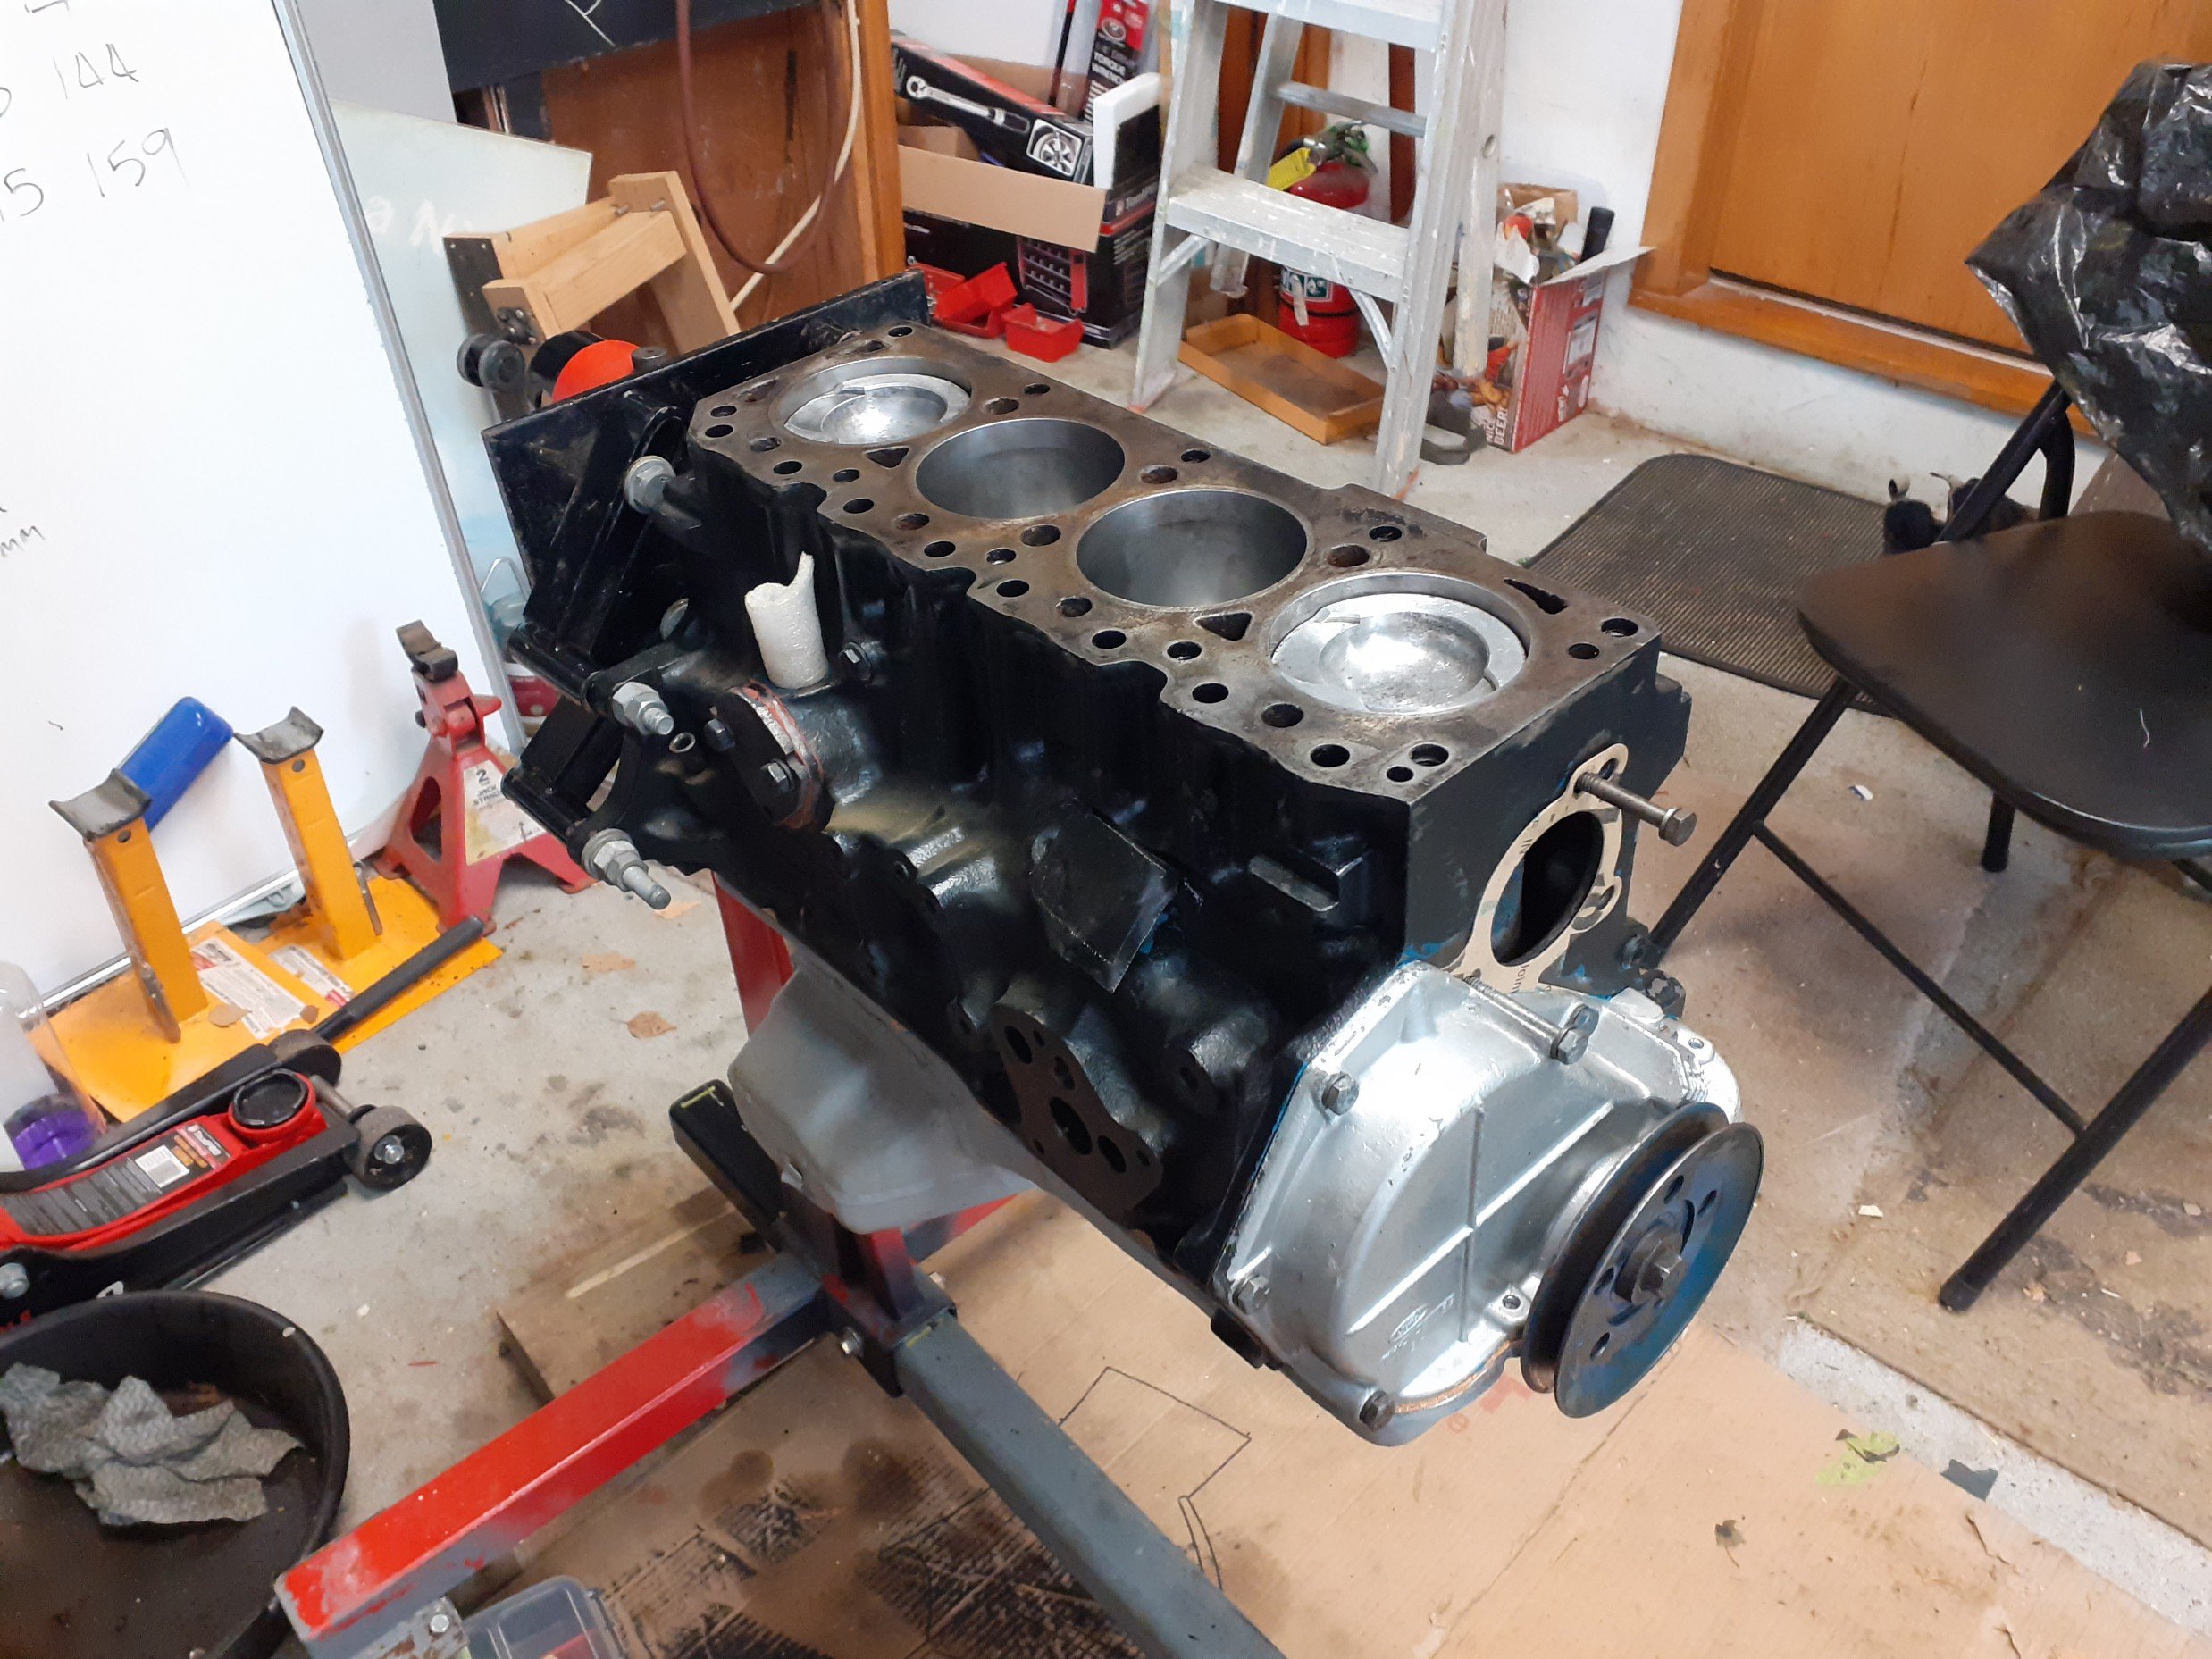
United at last: Final test fit of the latest design of manifolds. Looks good, except my womble self got the top flanges around the wrong way. Derp. Actual final print done waiting till i'm with the engine next for final test fit before is start getting ready to cast.
4 points
-
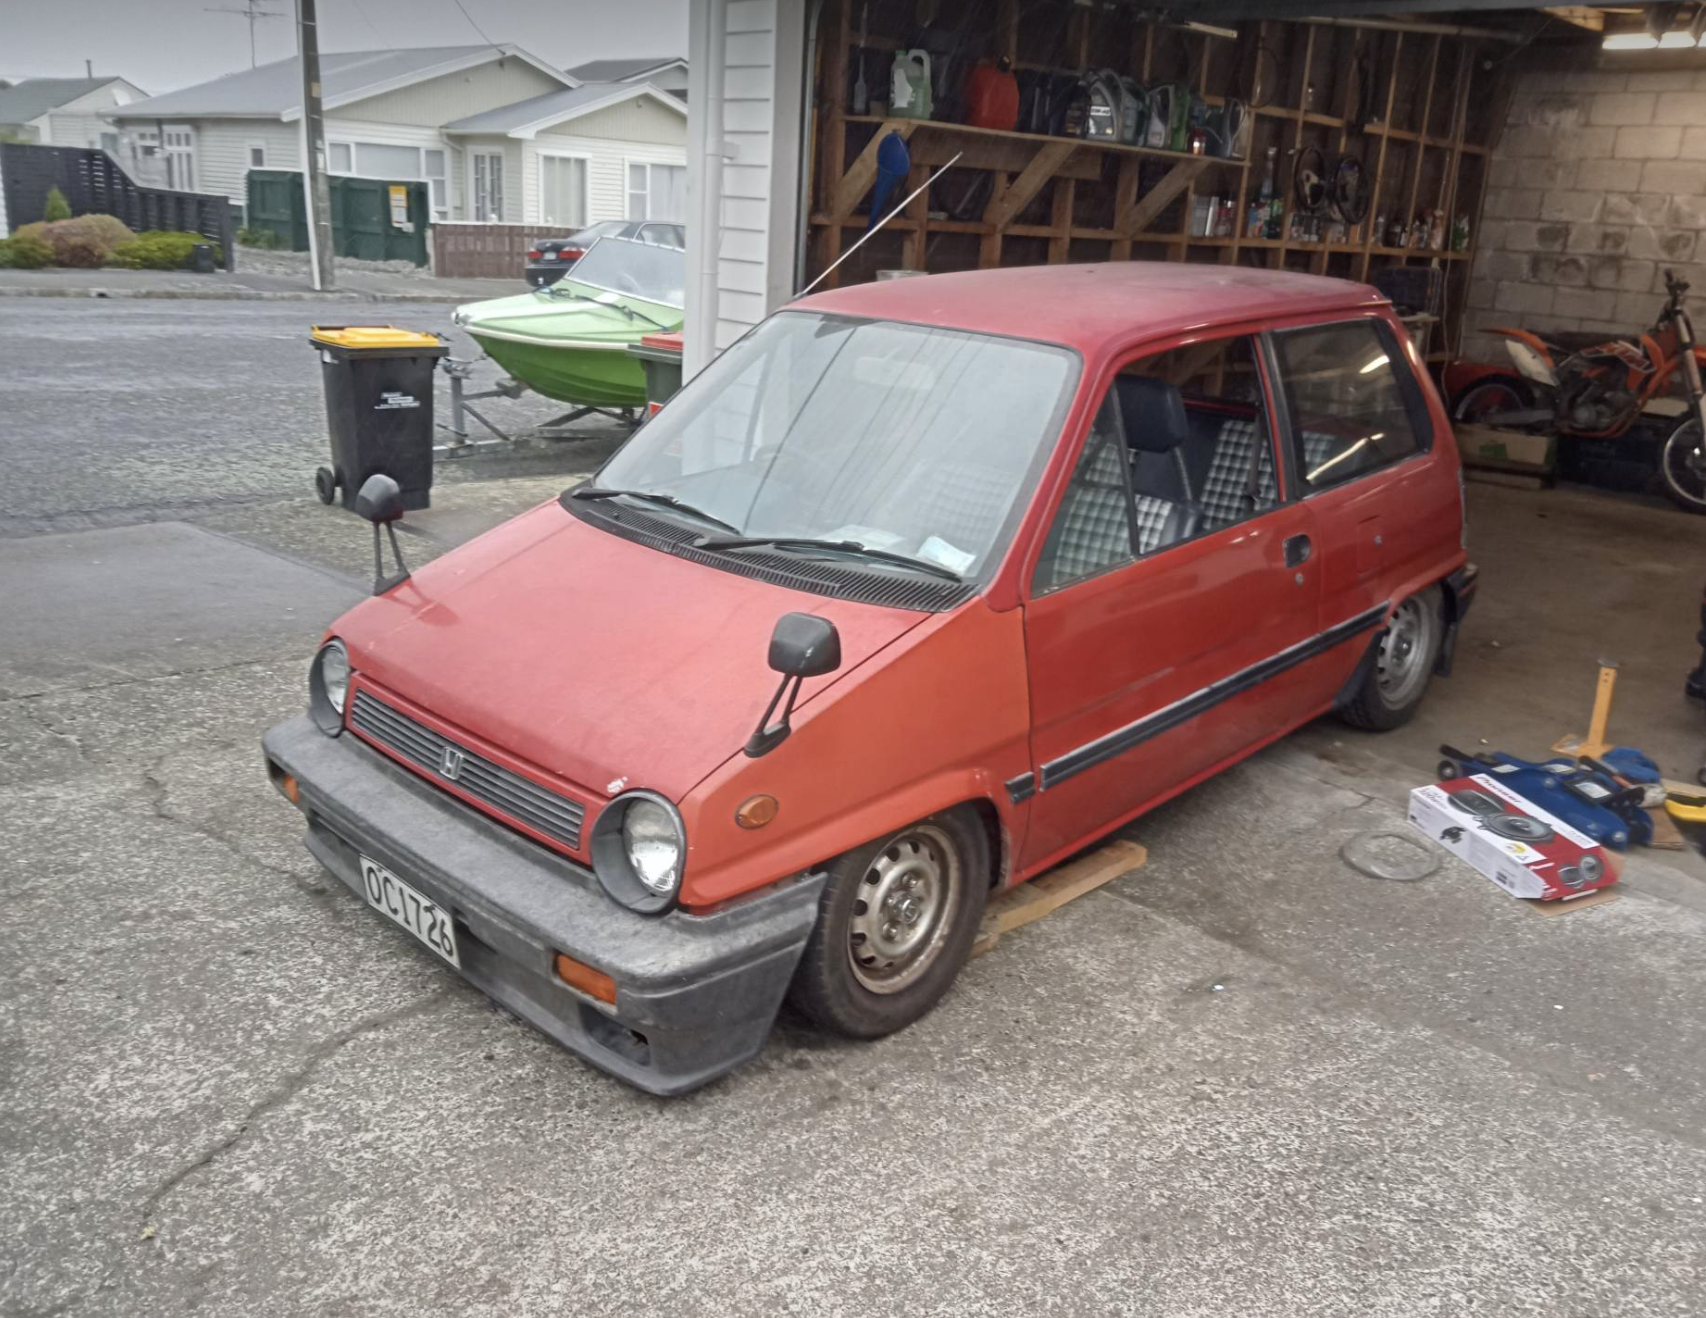
Waiting on intake but ended up booking the wiring in and will deal with any changes as they come. Ventured out to Autofest in feilding a few weeks ago with the family. Witnessed the Holden catch fire during the Friday track cruising session which was wild especially having my kids in the car. Cruised to and from the event with my boys and enjoyed being able to just do what ever. Gave skid lane a nudge with max revs and little smoke. Cars going so well and looked the part with addition on fender mirrors. We are moving to New Plymouth at the start of next year for 12 months so unsure what il do with this. Still not legal, still don't care.
4 points
-
As above, I have been looking at some of the stuff they post. as been playing with a k24. They quote all these different gains in bhp, but the wheel hp on the same graph says something different. also mega driveline losses. Ive roughly overlaid the graphs blue is the wheel hp. red "engine" power. light lines stock intake, dark itb. Looking at the wheel power. the stock intake manifold would be a quicker car. unless you could run between 8000 & 9000 rpm the whole time. even then wouldnt be anything in it. Why, The itb's will probably flow more. but the runners are way to short to make any jam over the whole rev range. stock inlet will be running out of flow and or slightly too long to make power at 9k ITB's only work good if you dial in the runner length and have the flow to go with it. Seems to be super common with K series stuff. even the factory inlets. They are too short with big runners. or long with small runners. I think those itb's you have will be a touch on the small side. possibly ok. but can get away with over sizing the intake a bit. not so much under sizing it. if make the runners small enough to gain in the bottom end (talking rpm you will never use in circuit car) will lose top end. if a bit too big, not much happens. not trying to lecture you, just wouldn't be fun to have to do it twice if you didn't have to. This is the intake i just made for k24. Big long runners. gains everywhere over RBC honda inlet. which is spose to make more peak power that the stock ep3 one they compared the itbs too.
3 points
-
Tacho has been working previously dizzy is putting out a signal, im going to try lift some of the pins on the plug on back of dash tomorrow, I had some temp gauge movement pulling plug out slightly so maybe they've been flattened over time. In some better news I managed to get both sunroof and moonroof to completely open and close. Found no rust around the opening of the bigger one surprisingly its all on the removable panel, the front one has some around the edge I'll need to drop that cartridge out. Someone's definitely been there before with nuts missing here and there3 points
-
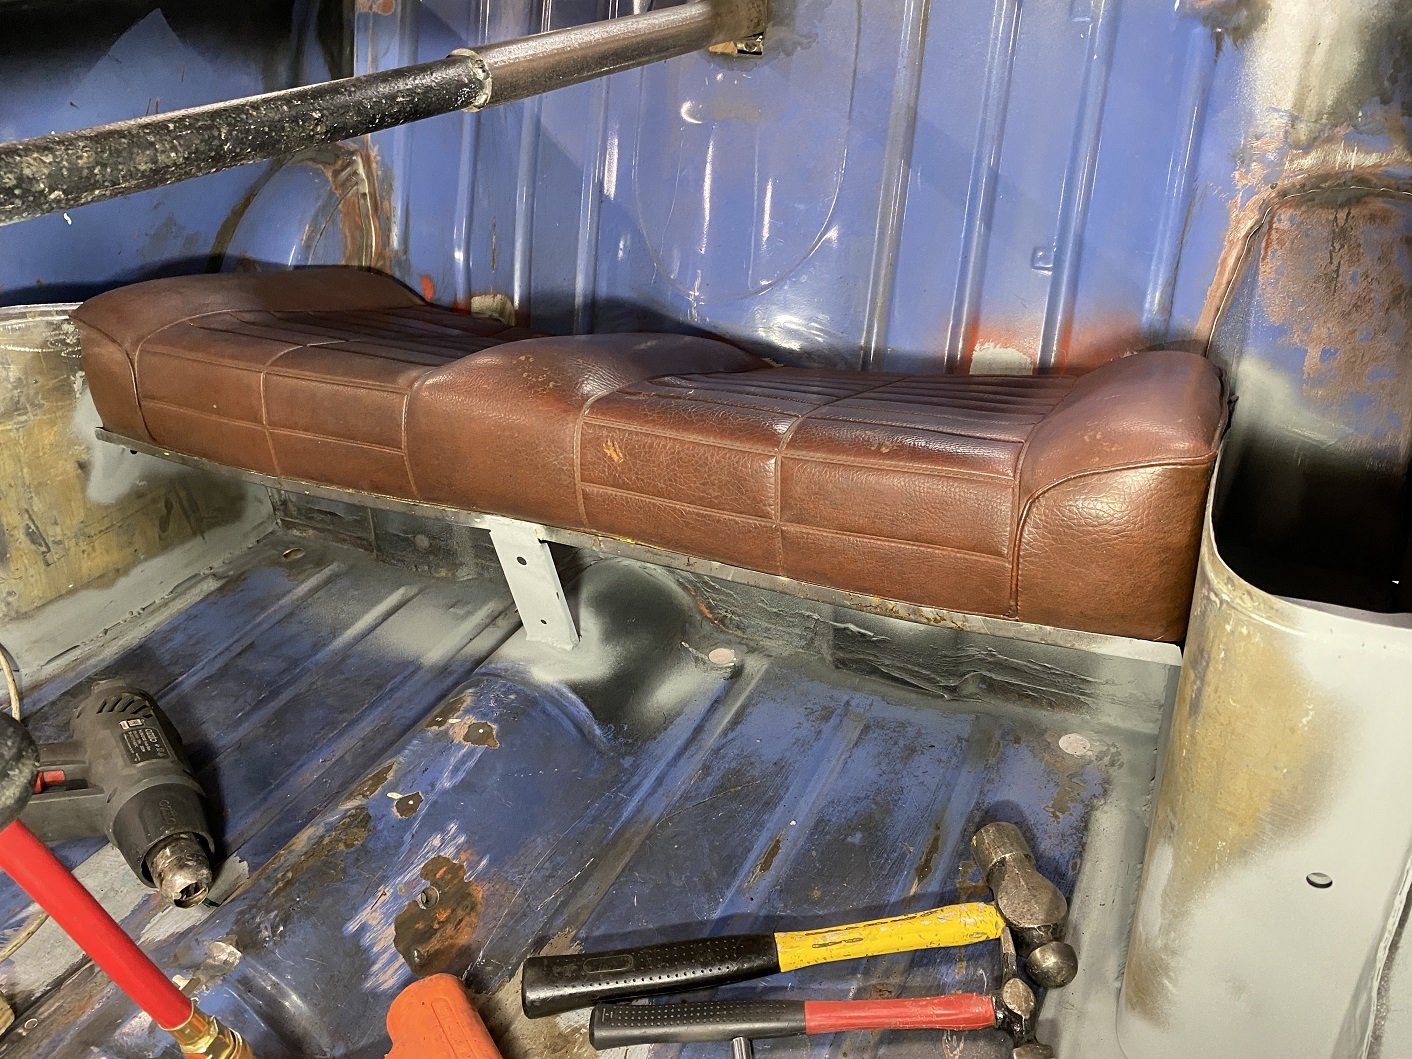
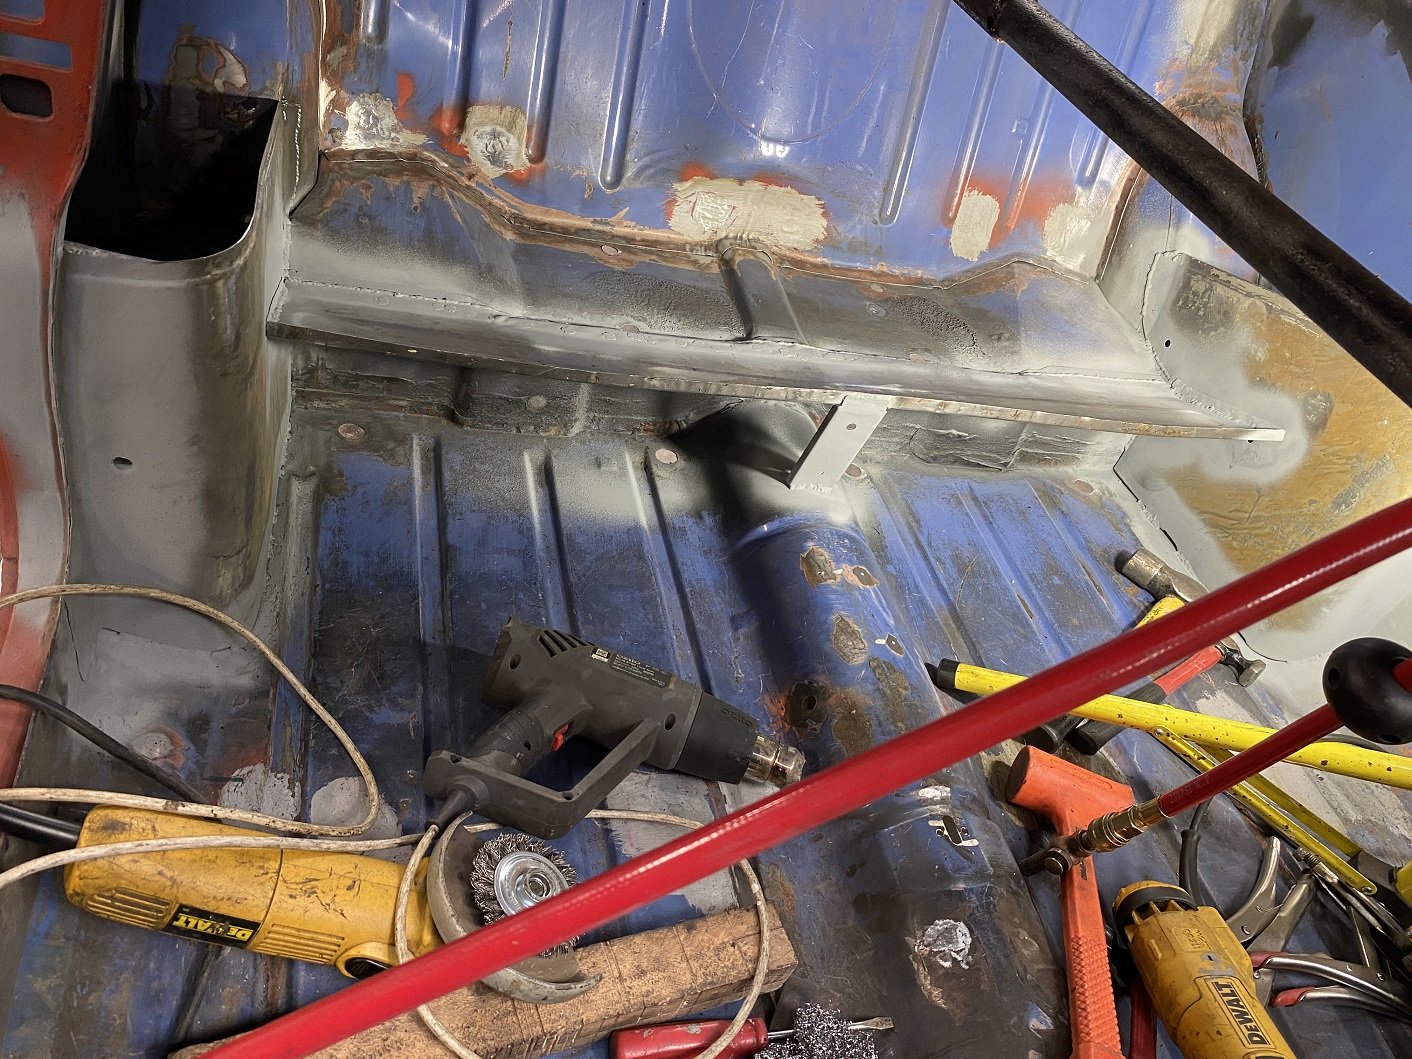
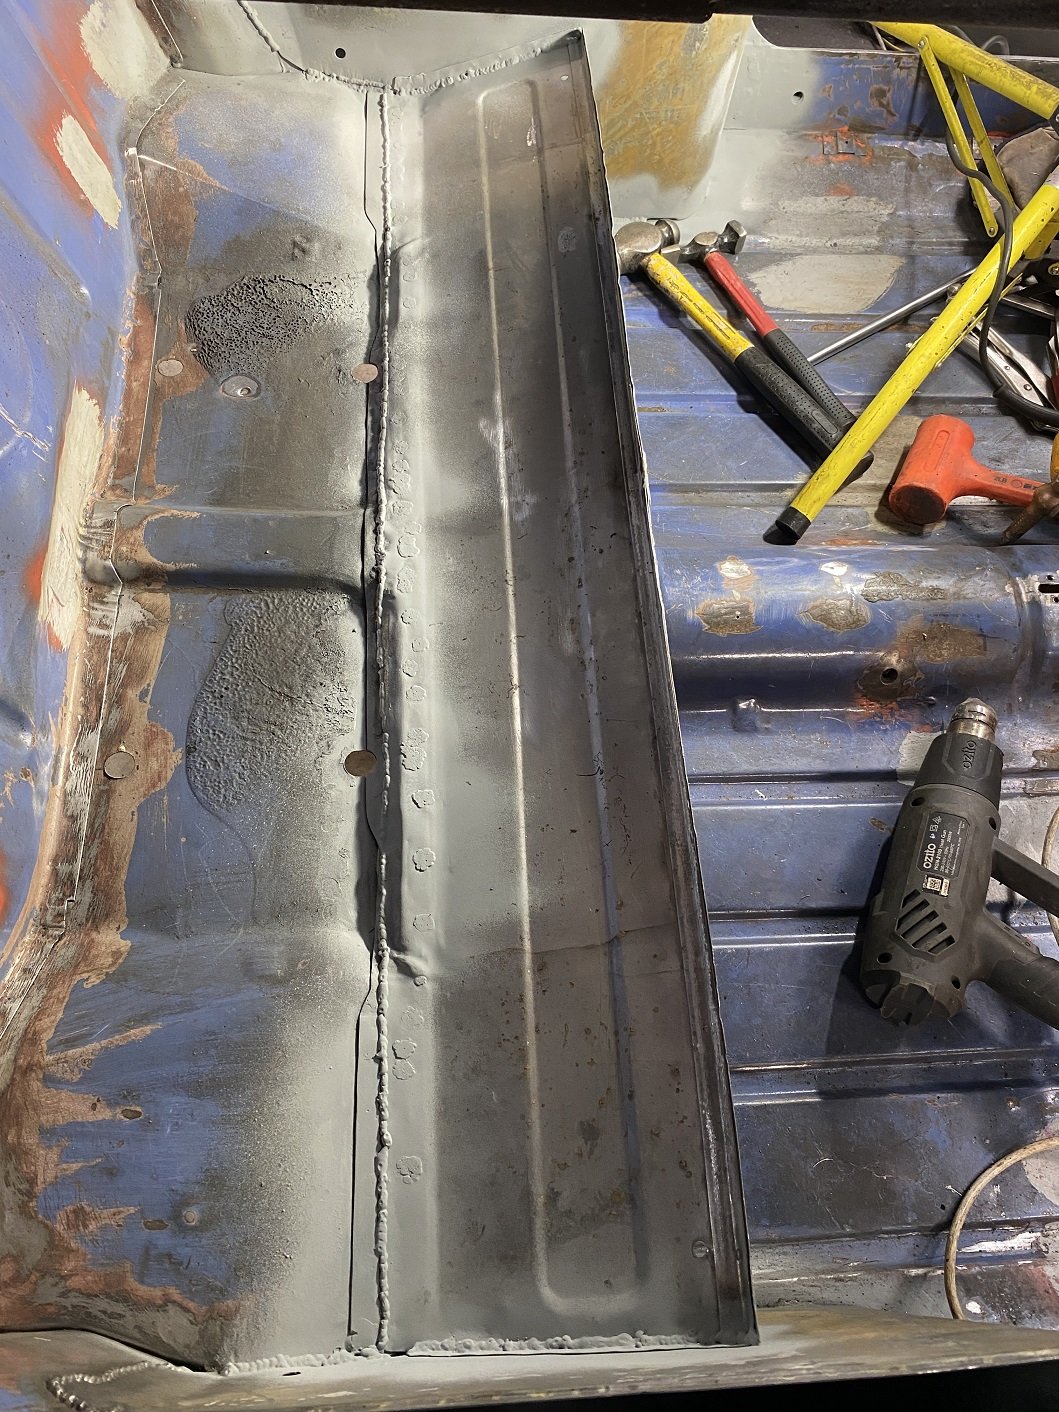
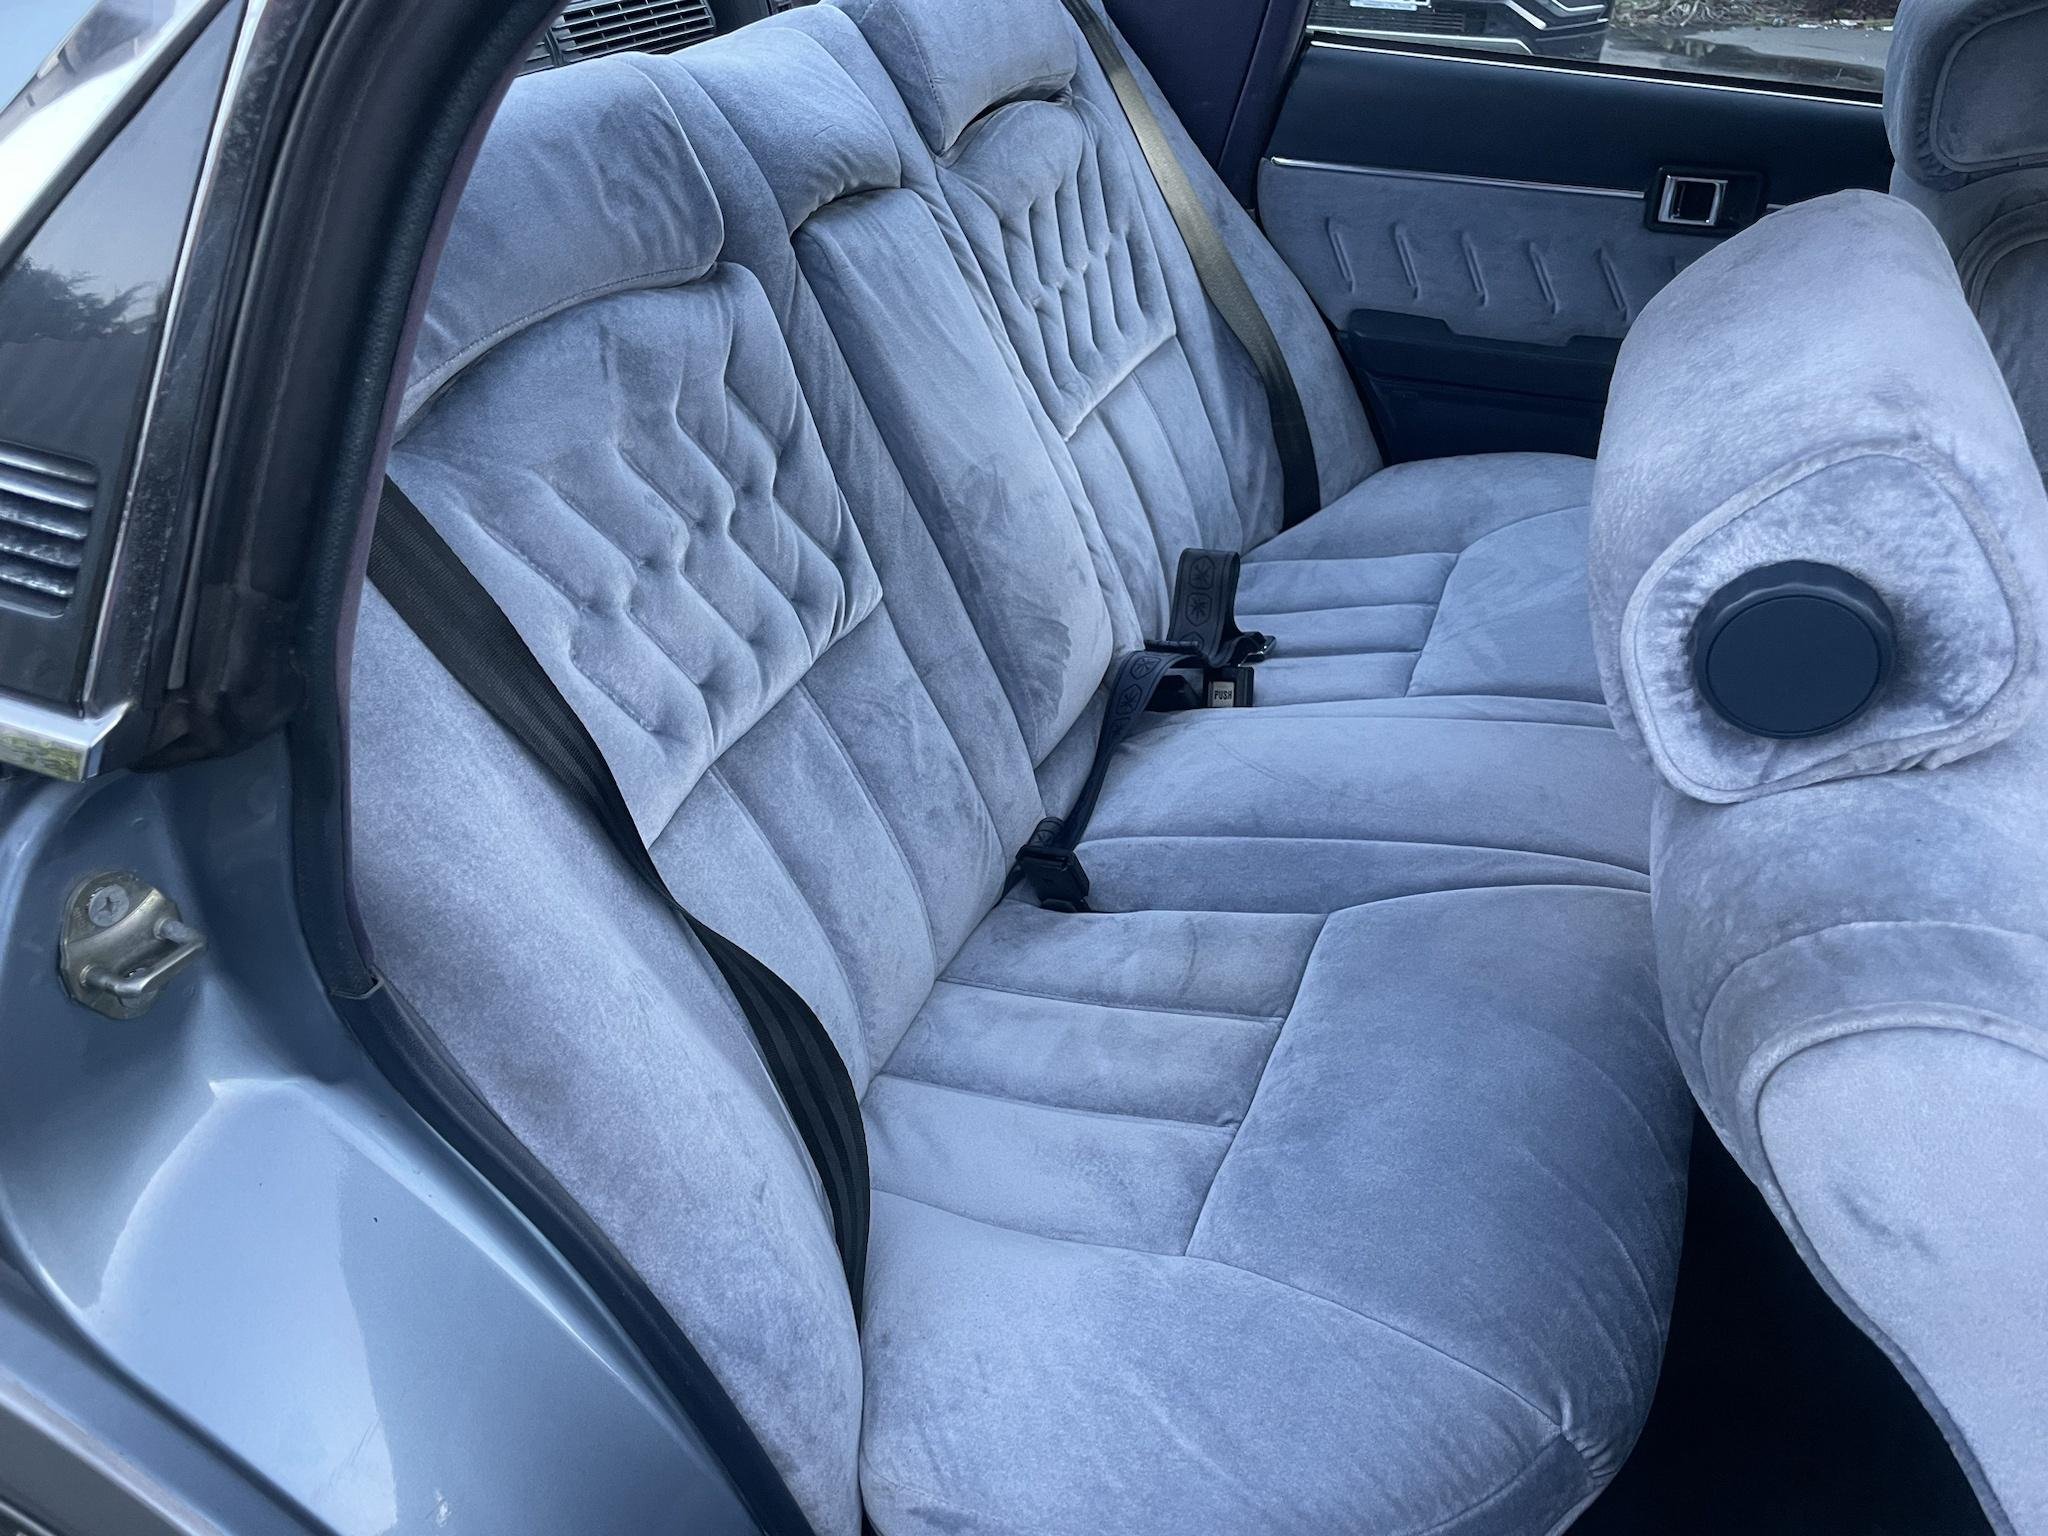
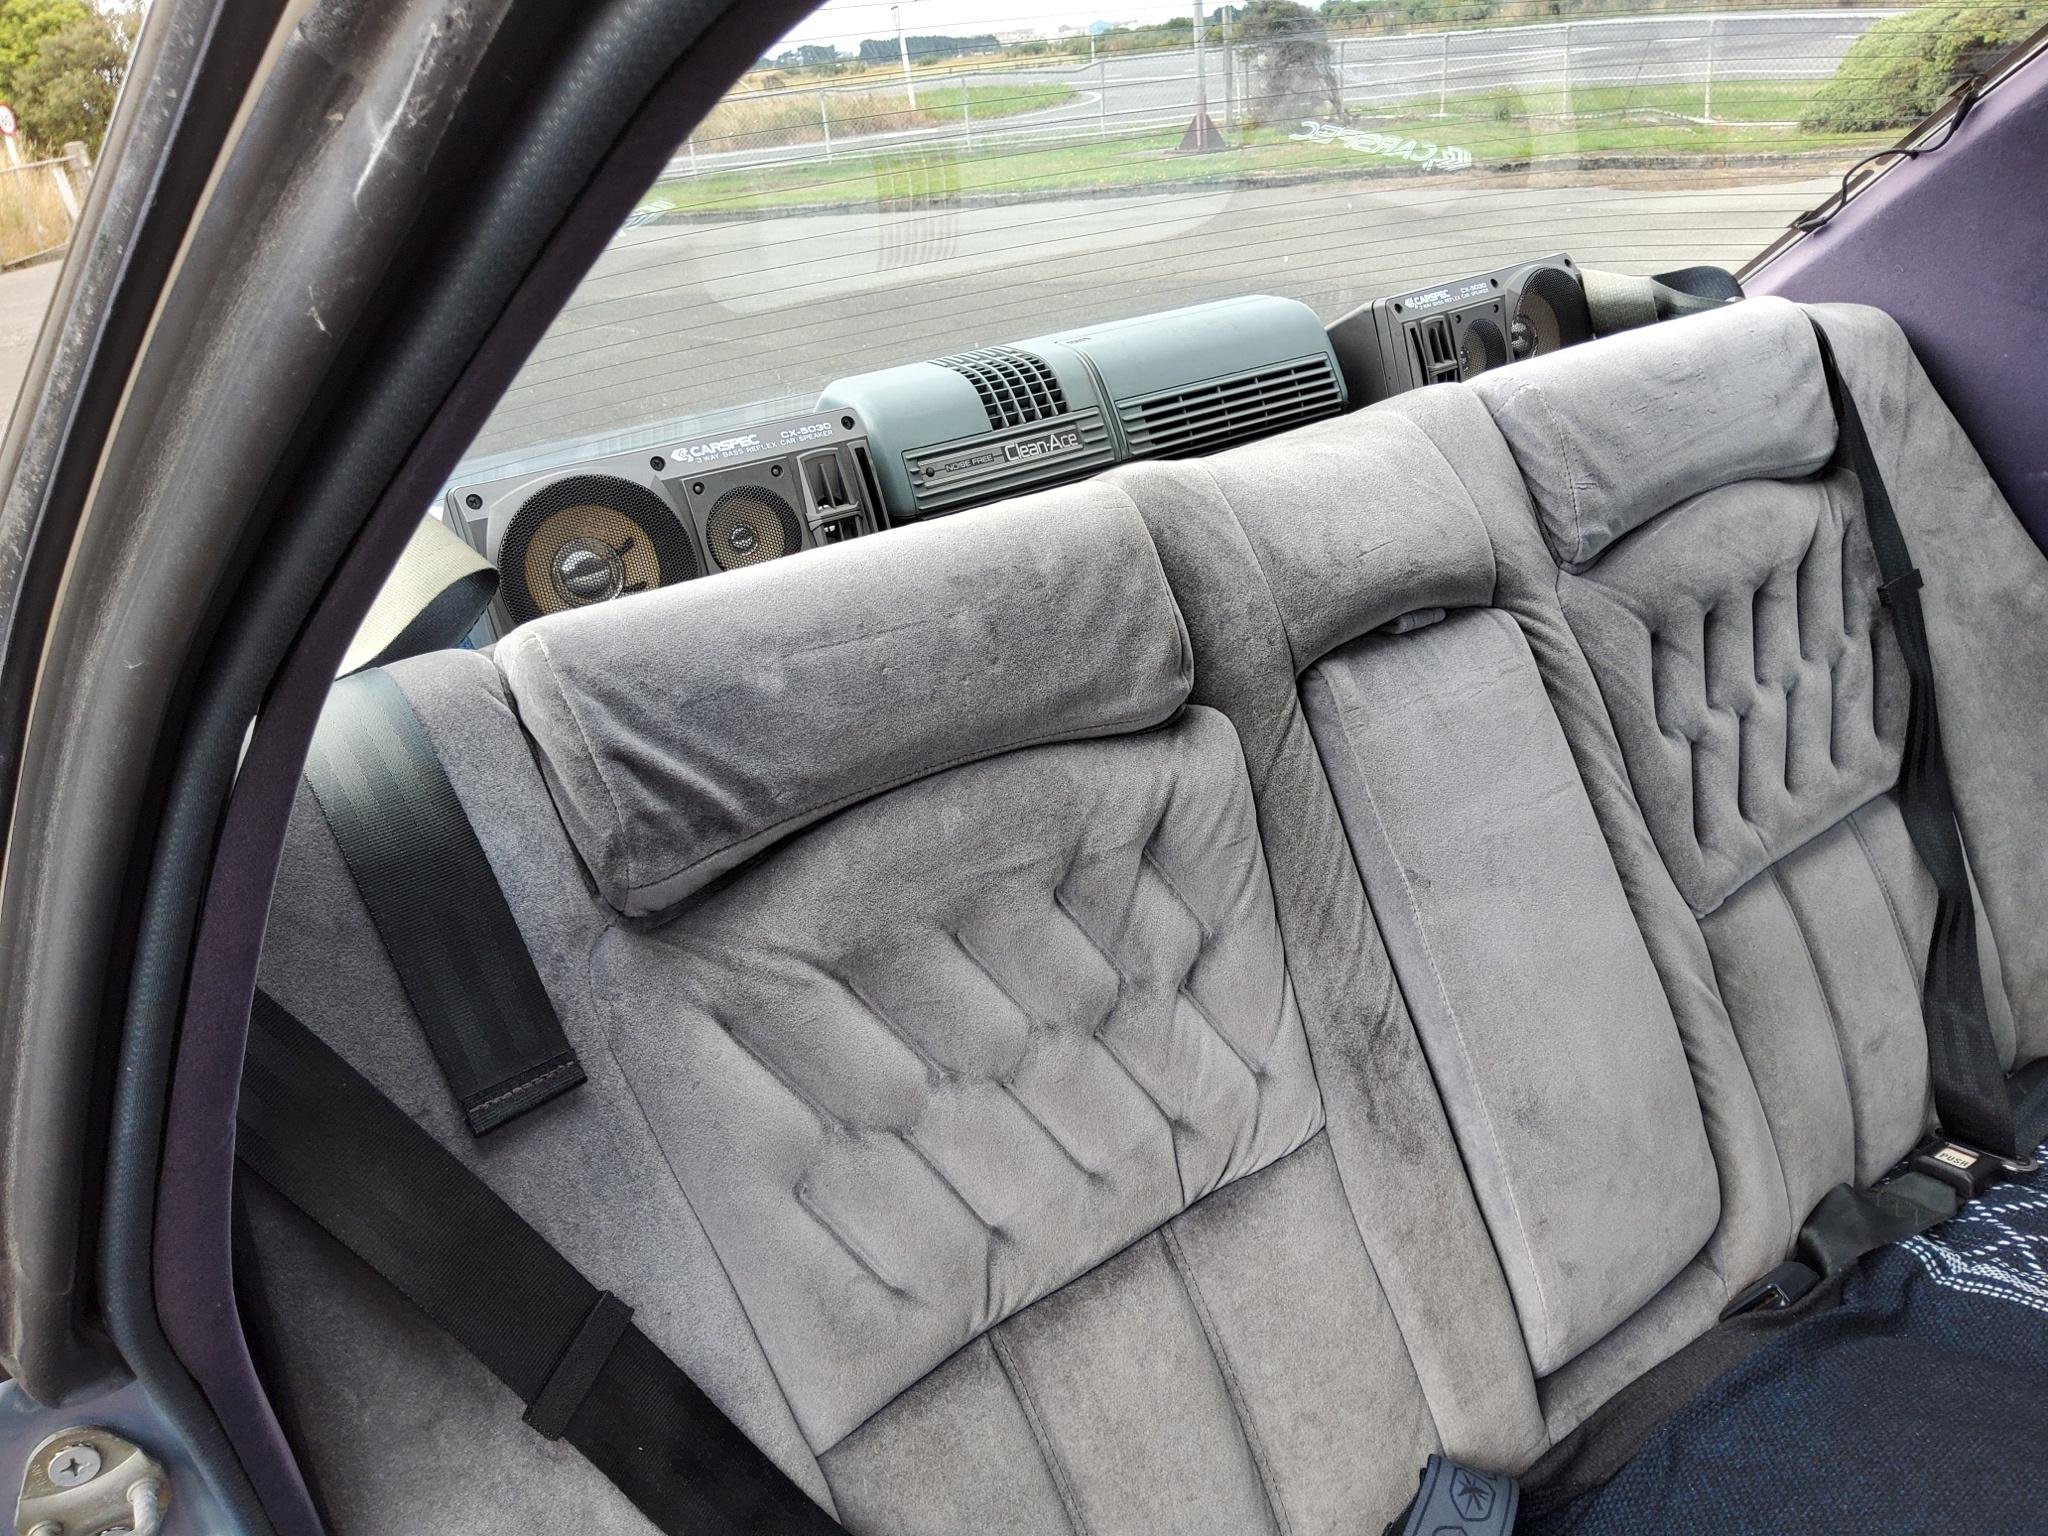
It has a rear seat again. Like a REAL car! And a seat base still fits!
3 points
-
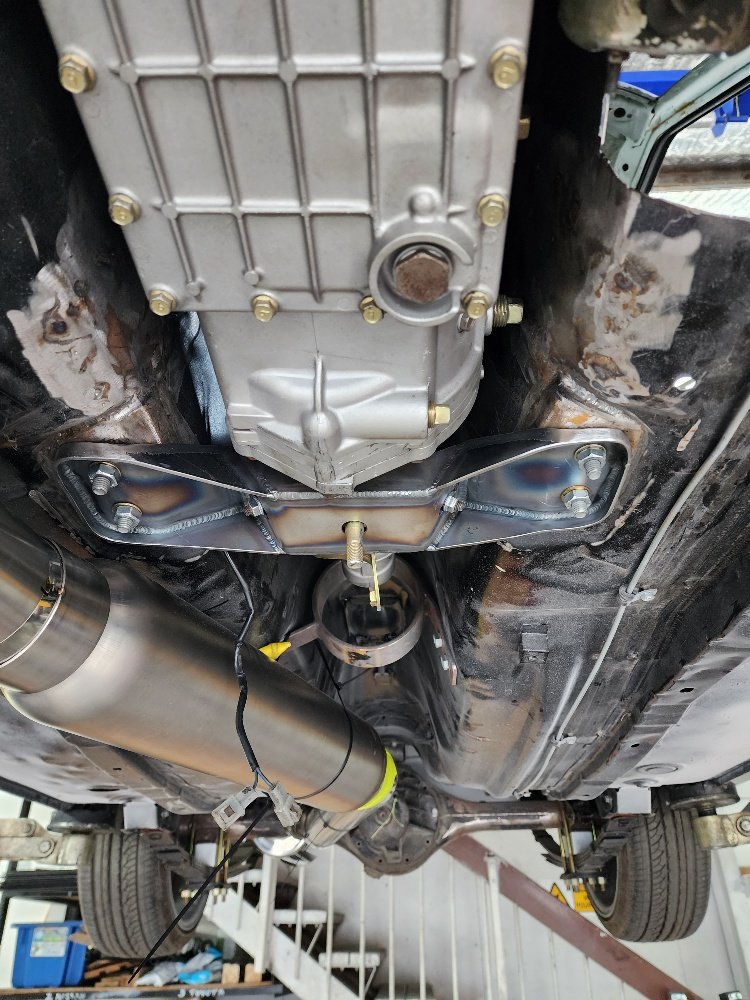
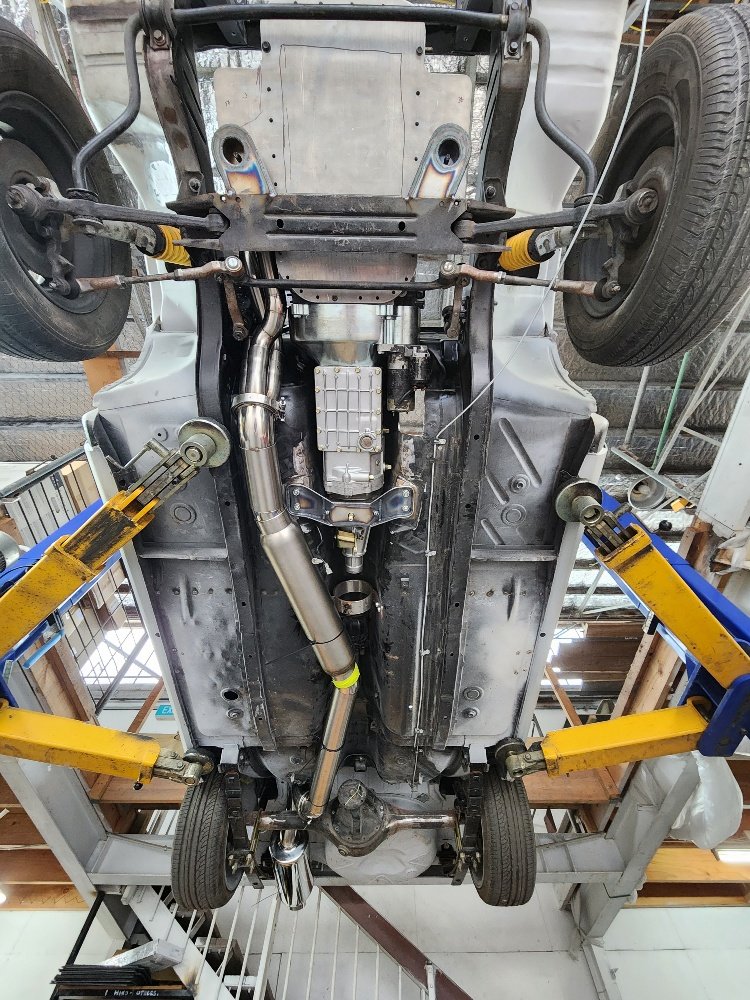
Managed to get back into the fab shop this week check on progress, Has been a bit of progress Mounts all done, headers and exhaust tacked up, battery box and washer bottle made up, Shes a tight squeeze but all going to fit just. Still a fair bit to go to finish off this stage but progress is good!
3 points
-
Yeah it is the factory dash. Quote was 95+ if they couldn't repair it and 395+ if they could so I'll see where I stand since it's not operational still2 points
-
The punishing ride home afterwards would be the worst2 points
-
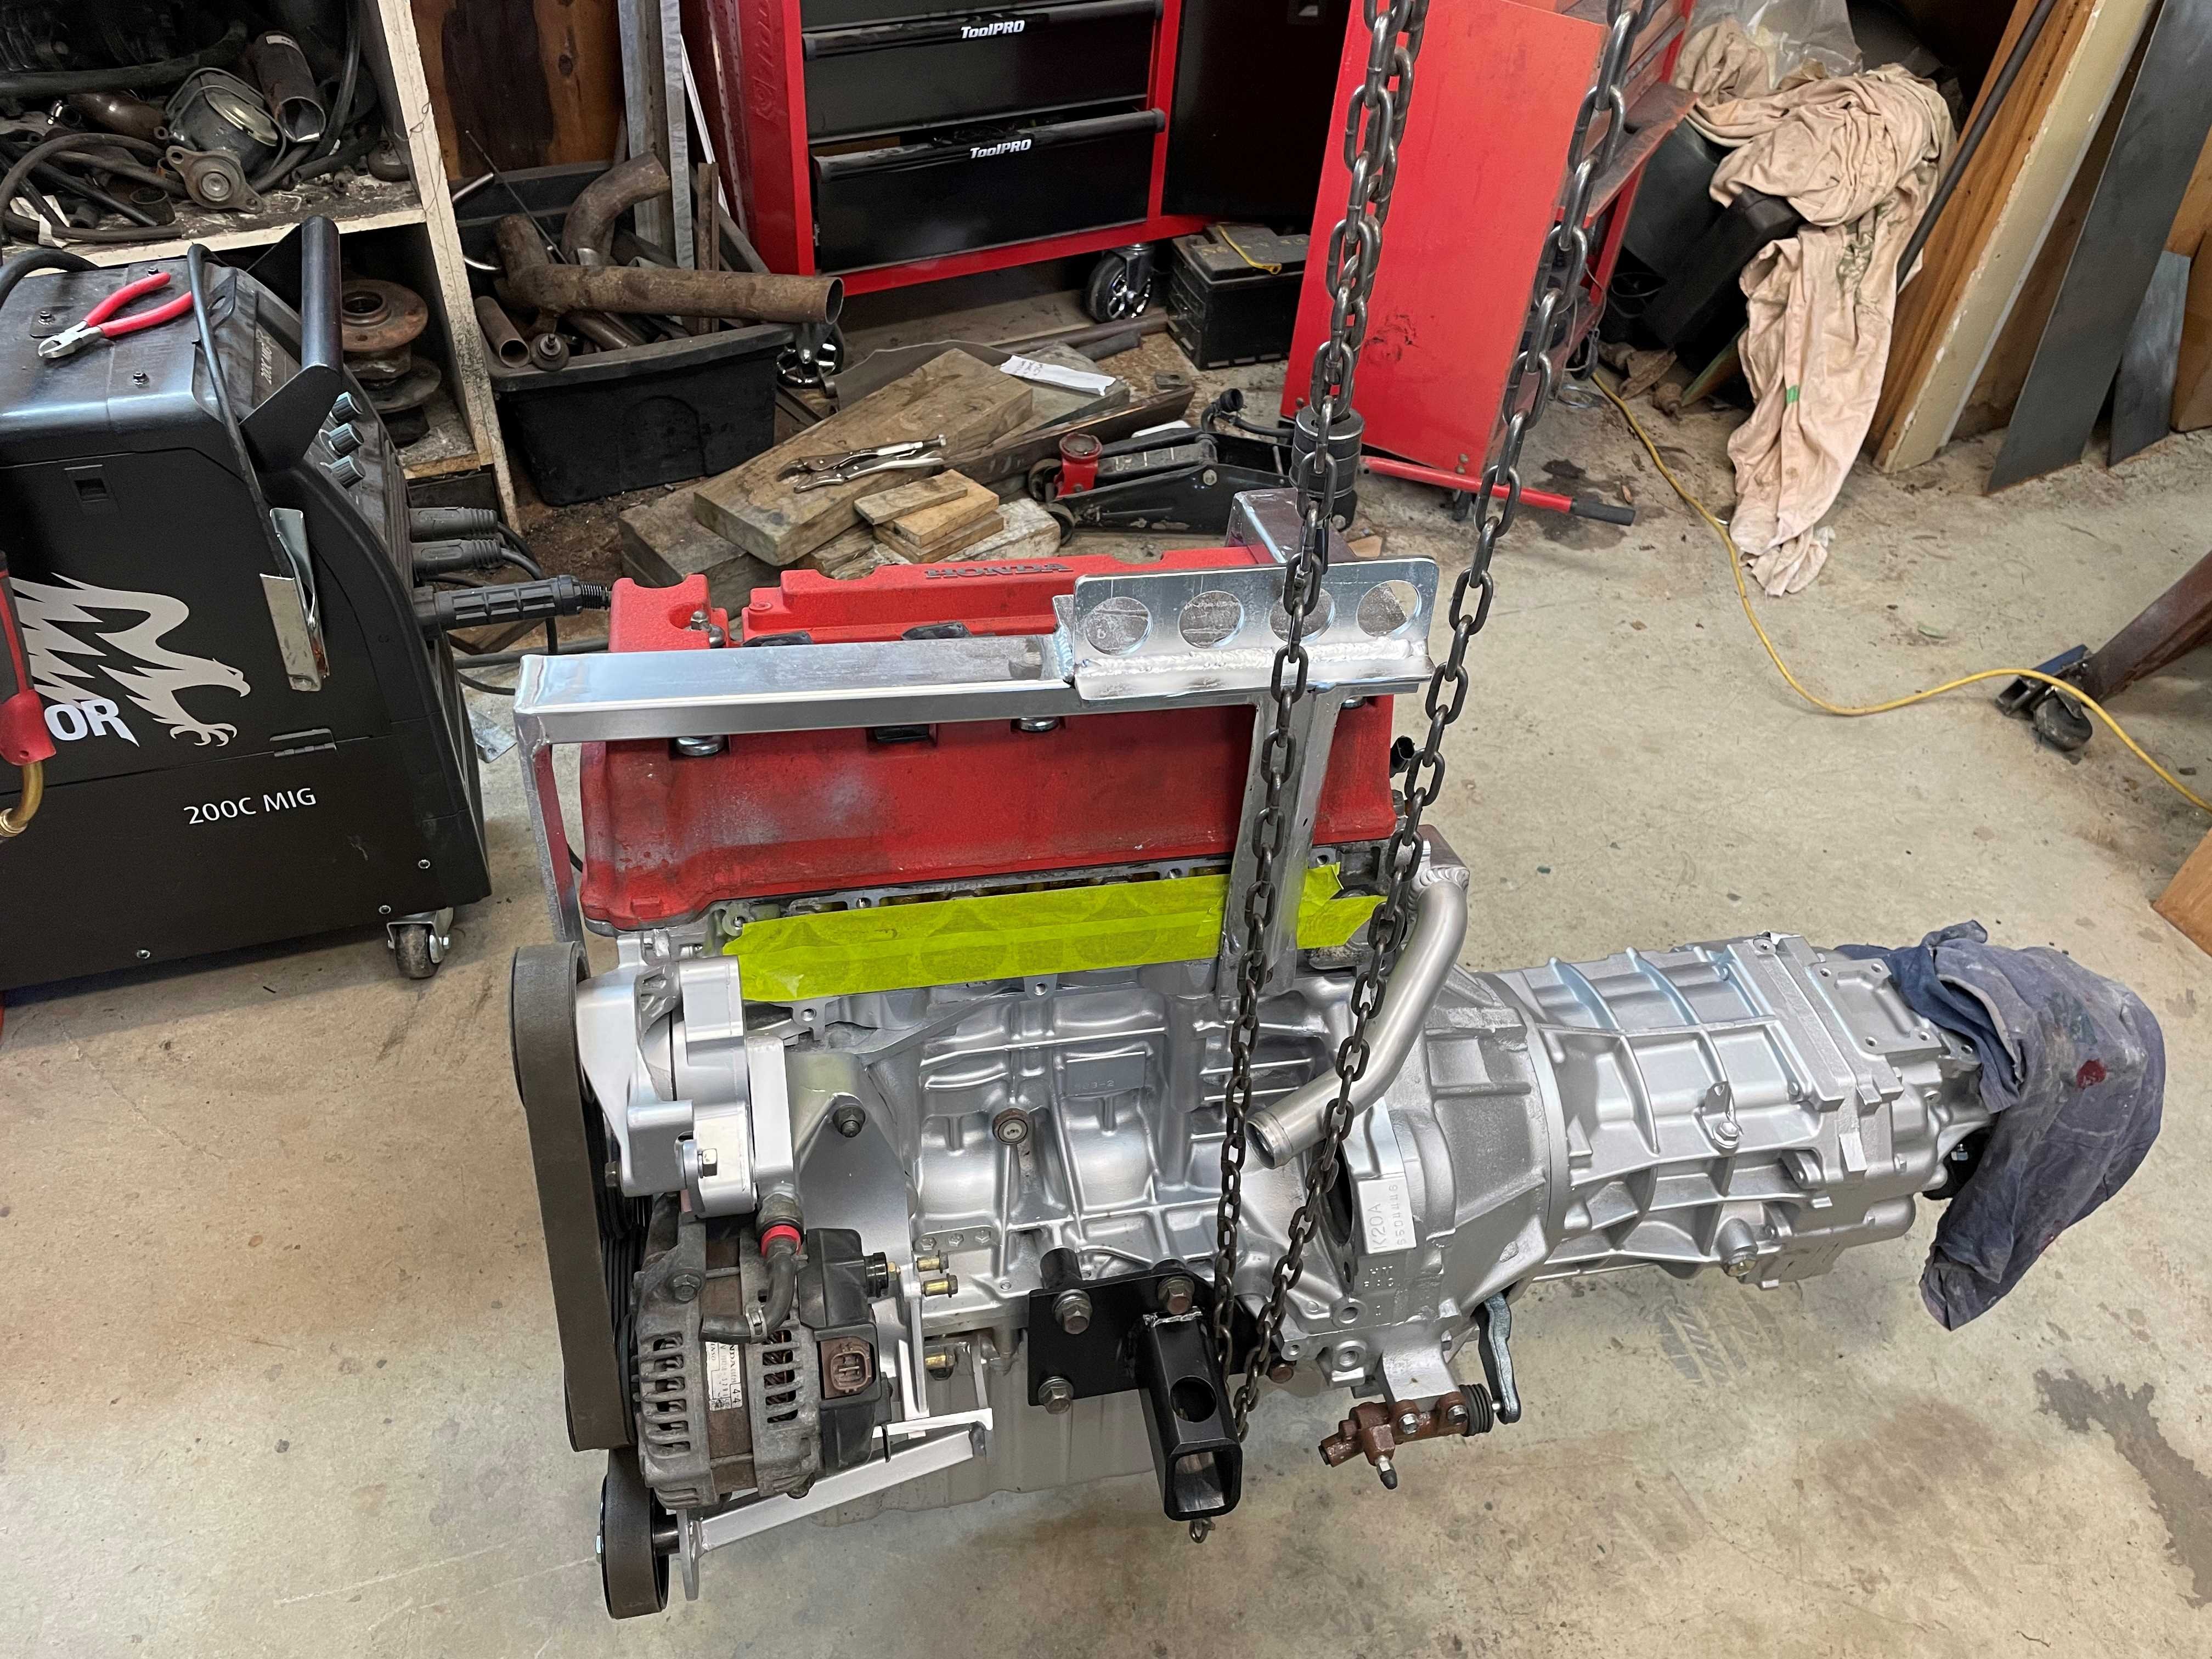
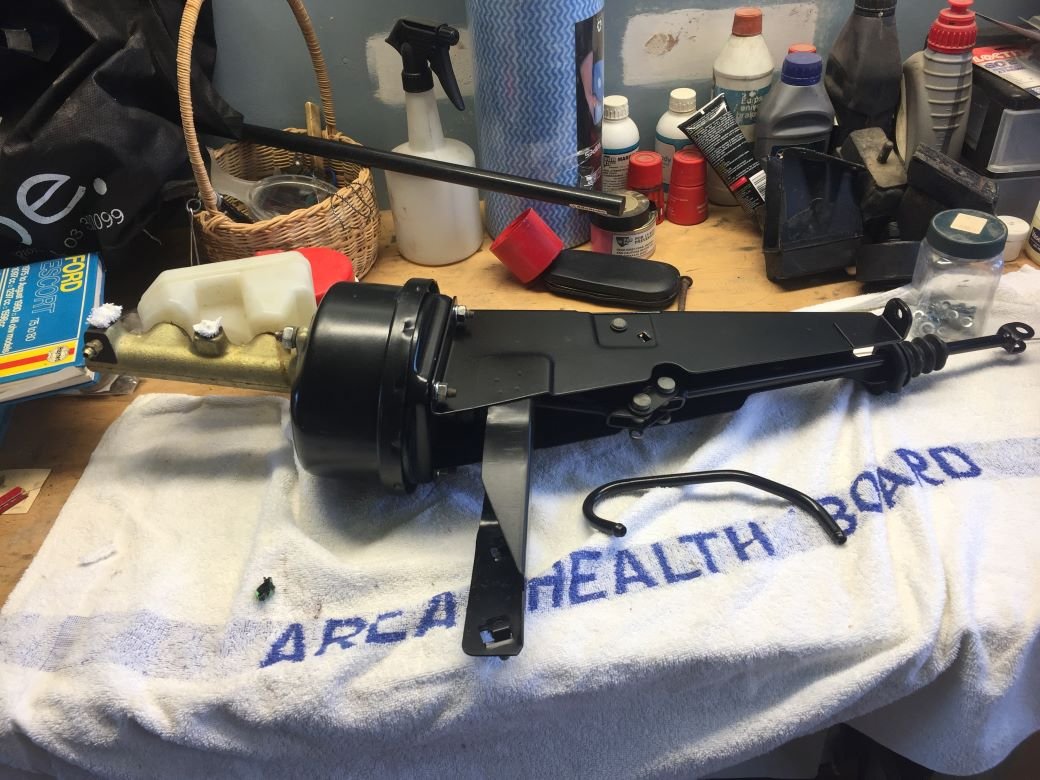
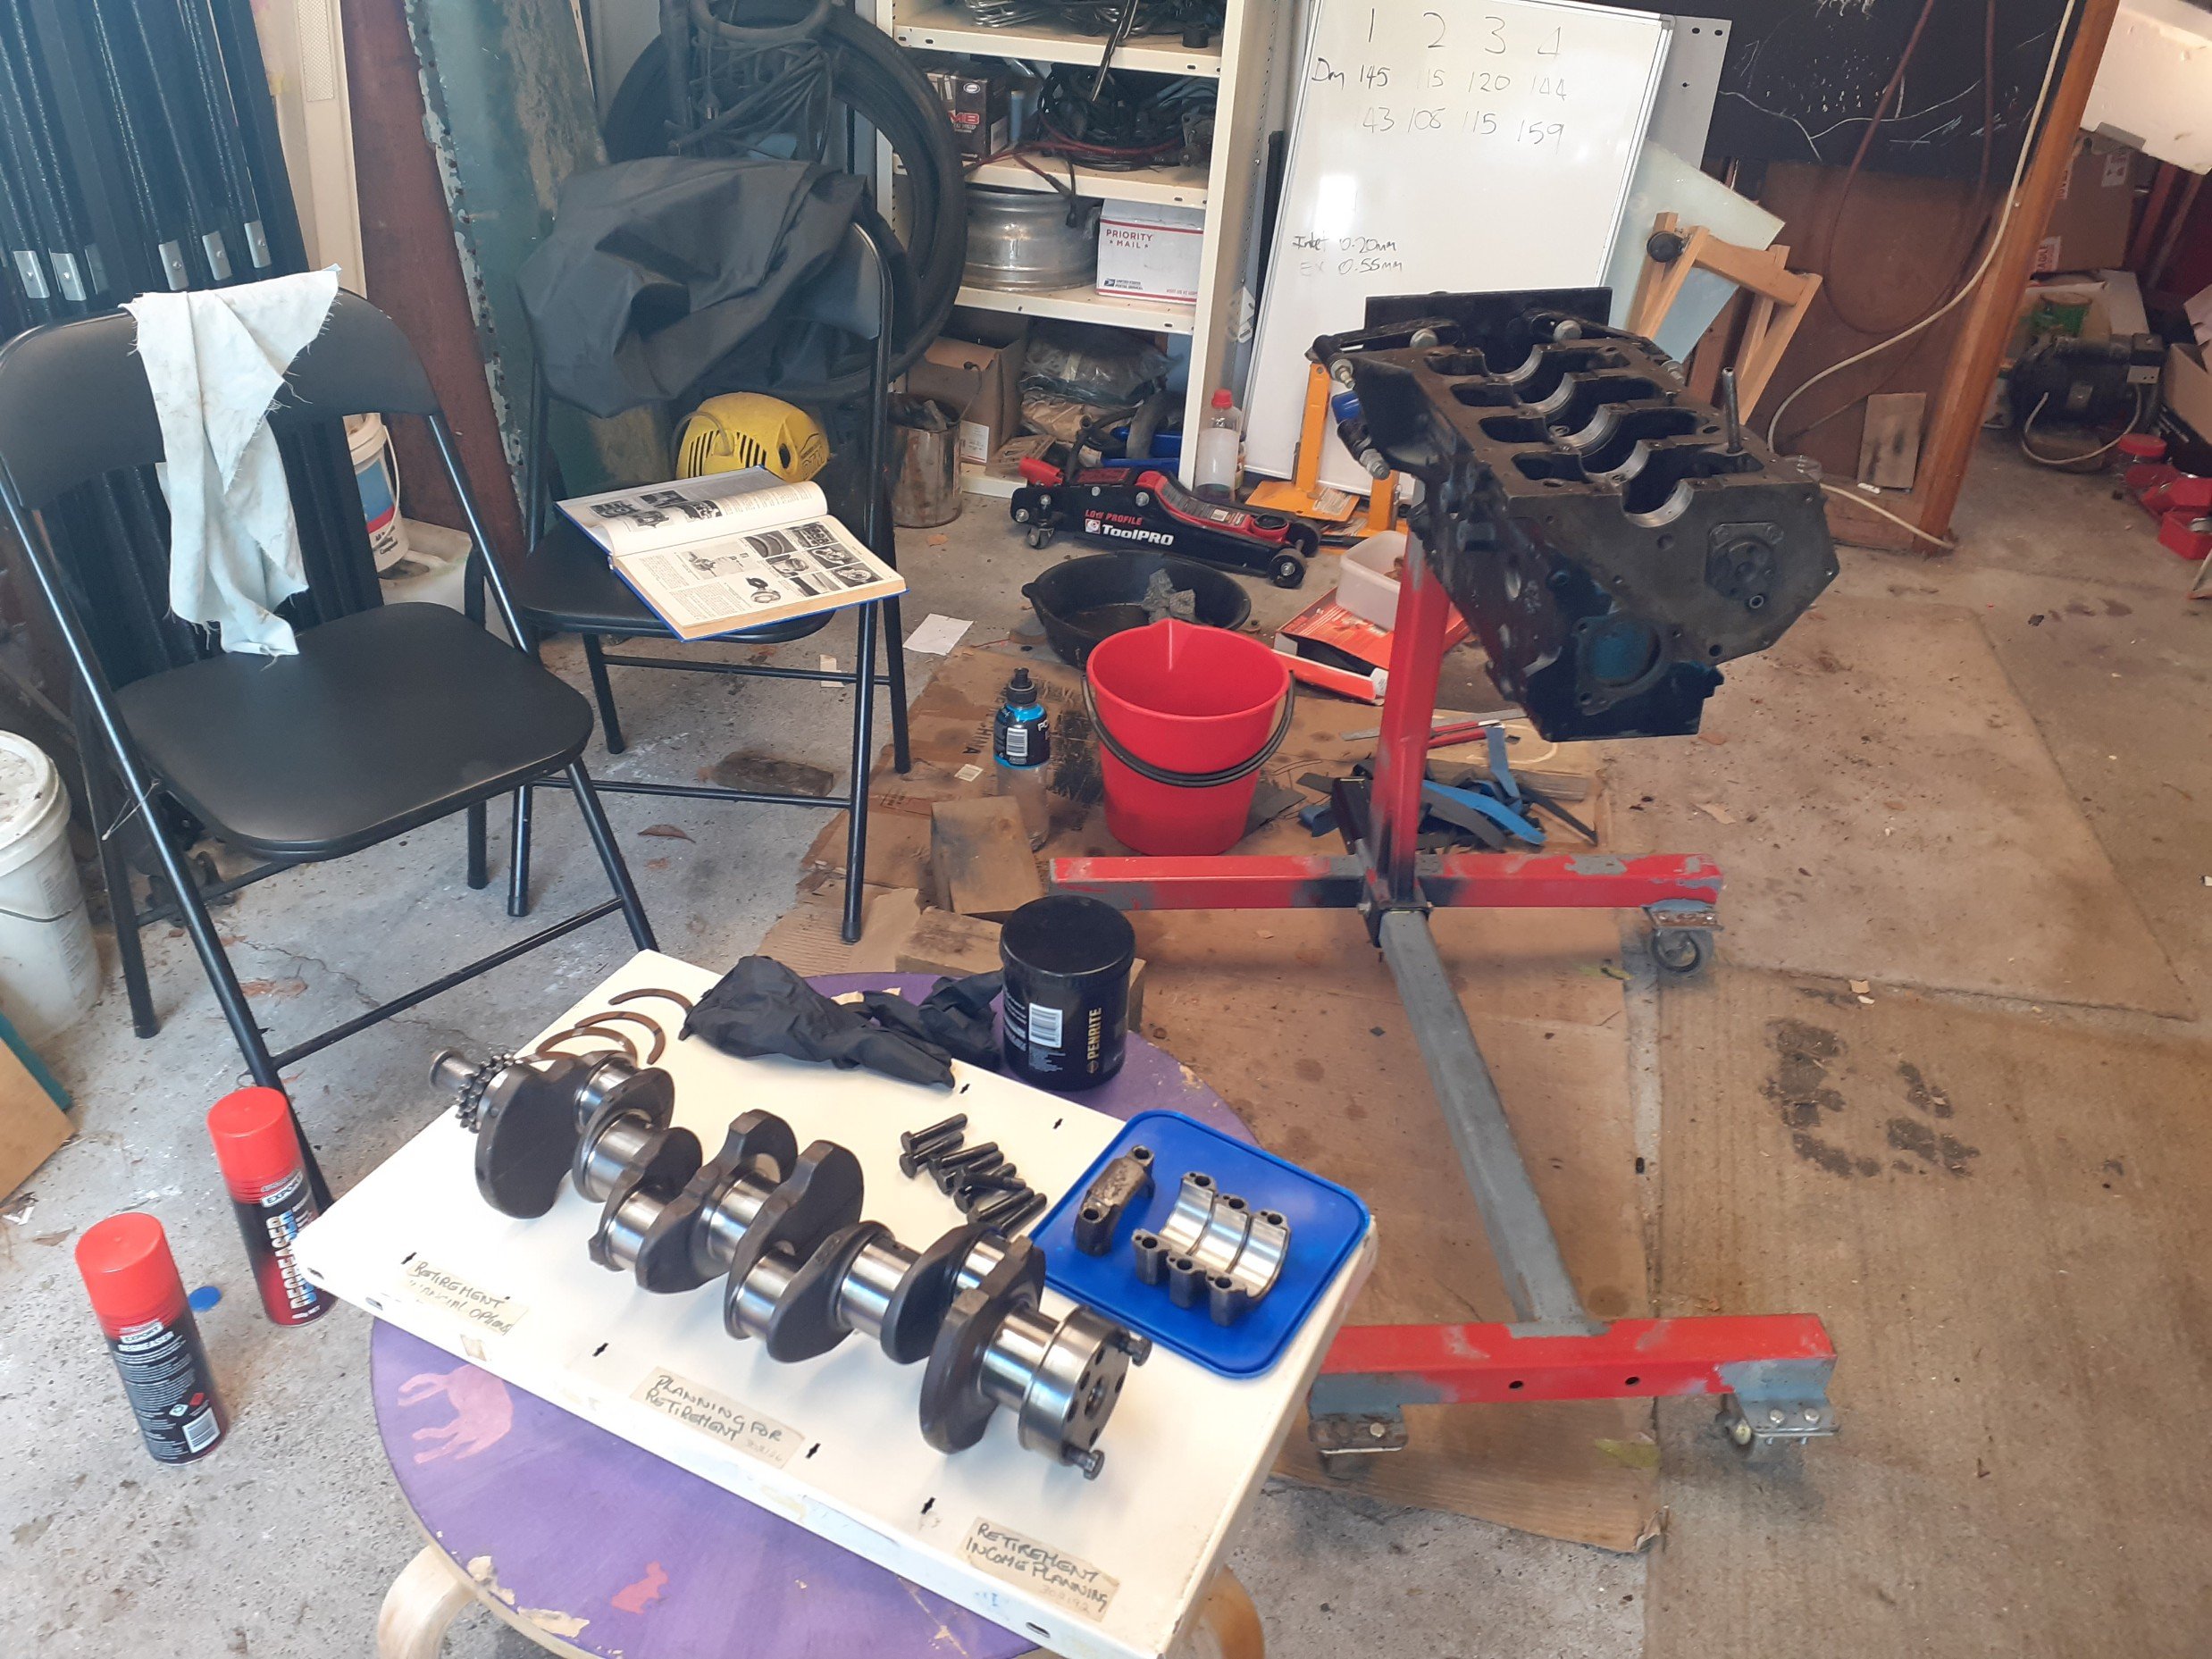
I spent most of today making a bracket that bolts to the engine so I can lift the engine and gearbox up nice and level. All calculations were done using the rule of thumb and the eyechromitor. I plan on getting the car up high enough to roll it under the car with the front X member removed and lifting it up into position. It's just a bit big to be able to drop it in from the top. So the next thing to do is find some axle stands that are tall enough to get the car to the height I need which is quite high. If I can't find anything I will have to make some or some other way of doing it.
2 points
-
Kicked the day off by pulling the gear selector bits out of the vinegar bath. Gave them a quick rinse in warm water and they are looking lots better. The base plate is back in a vinegar bucket to do the front part that hasn't been in the solution yet. I also dropped in the pivot pin as the flat end is still looking a bit crusty.
2 points
-
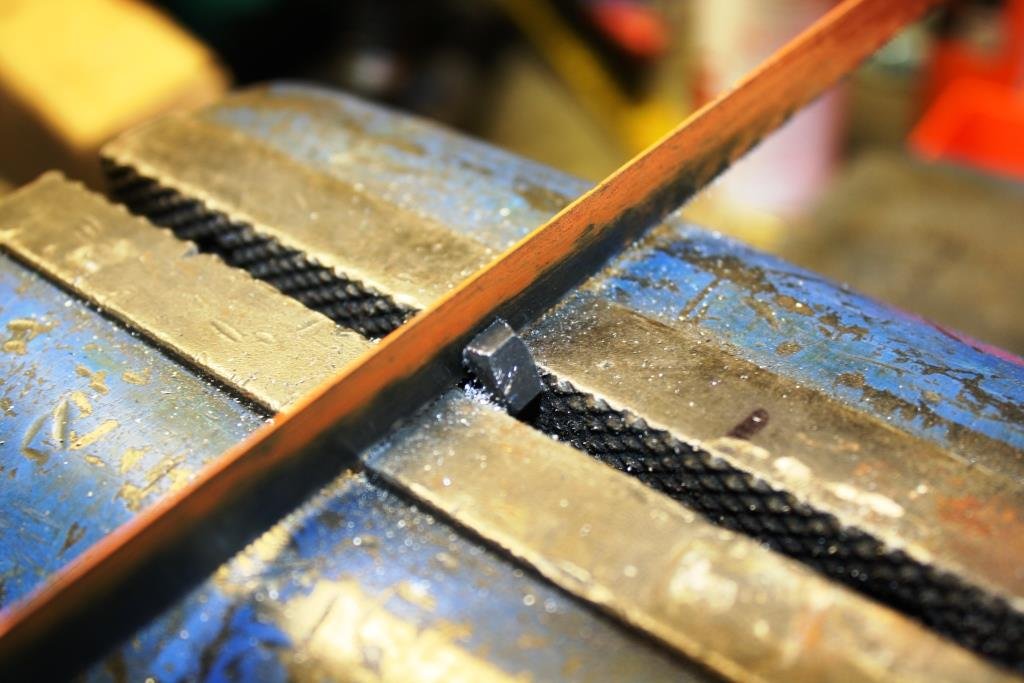
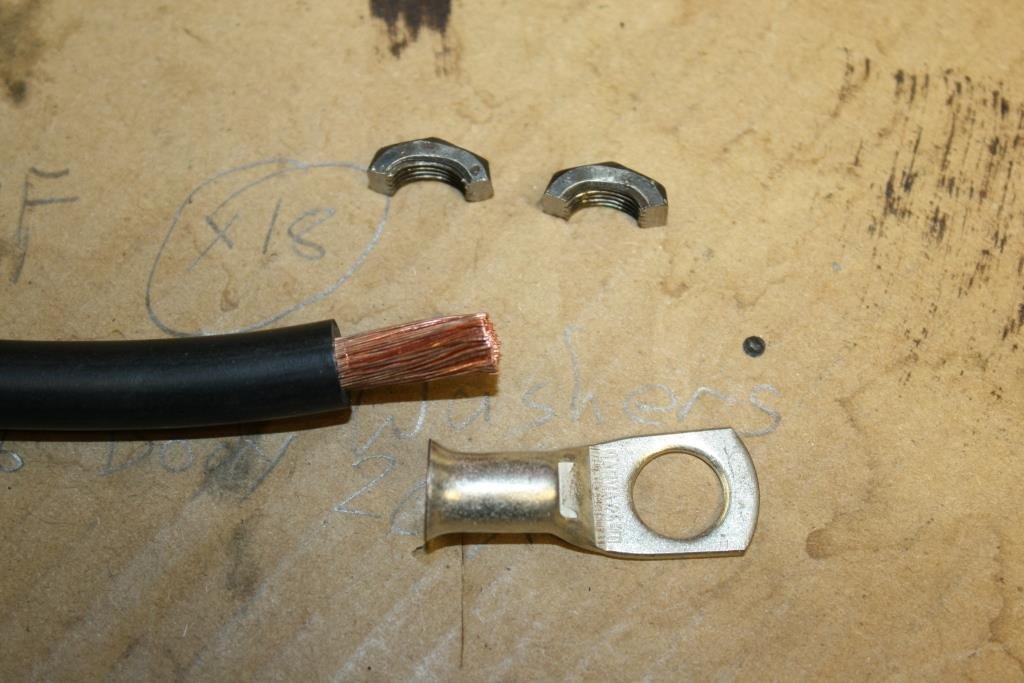
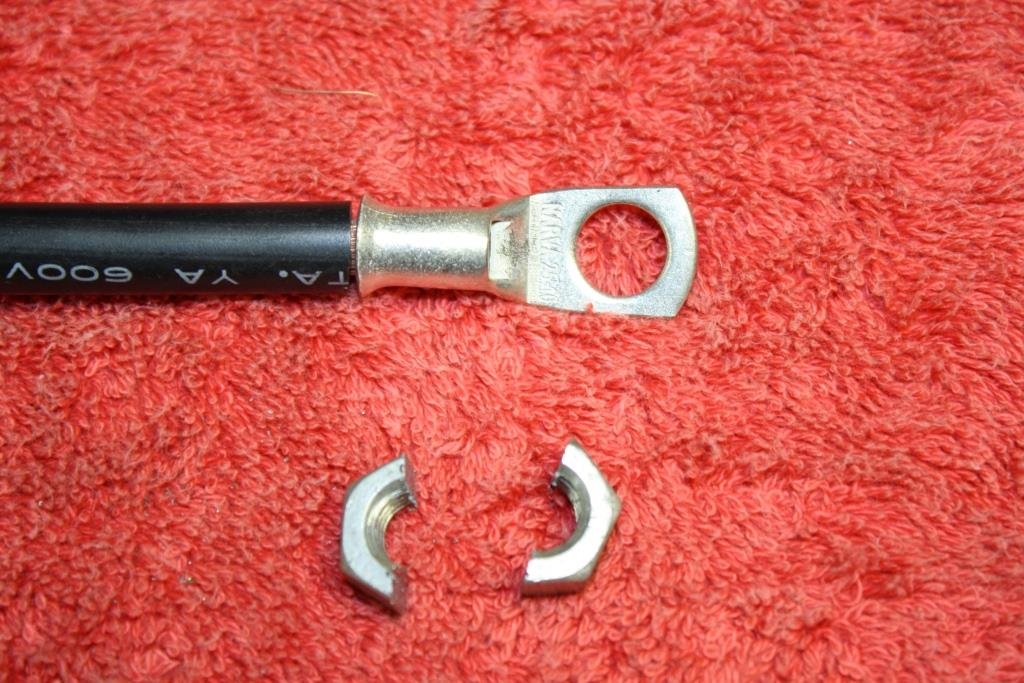
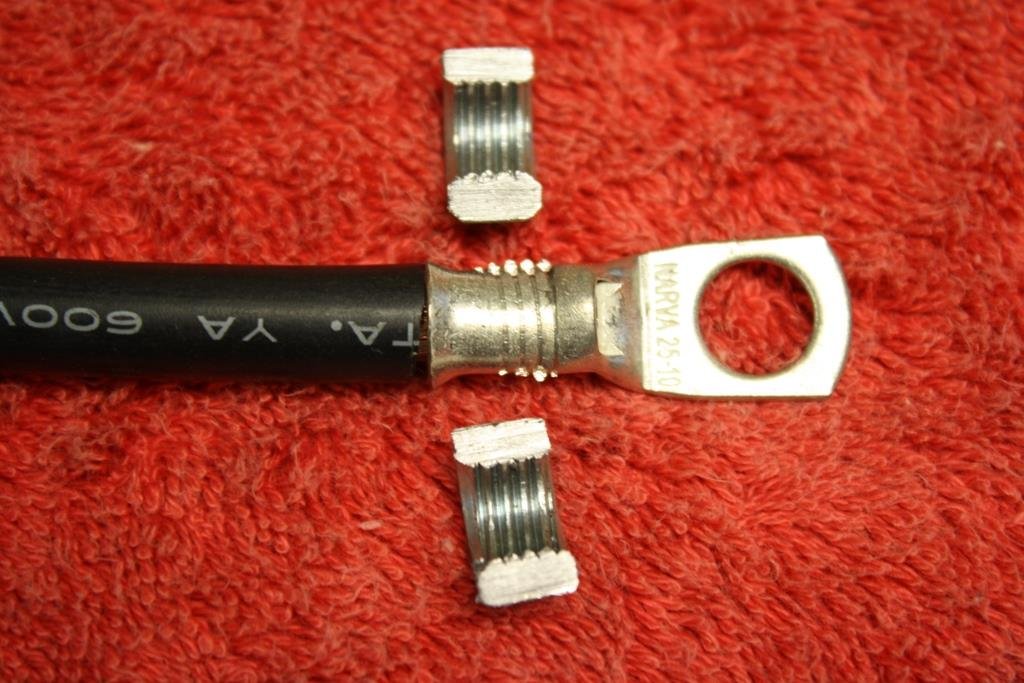
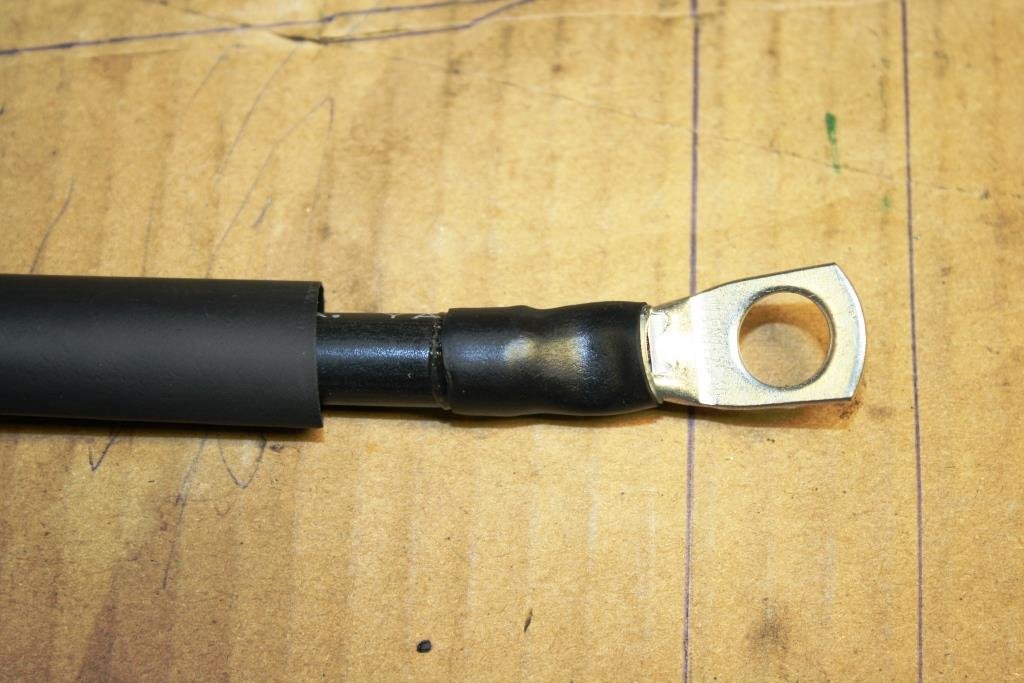
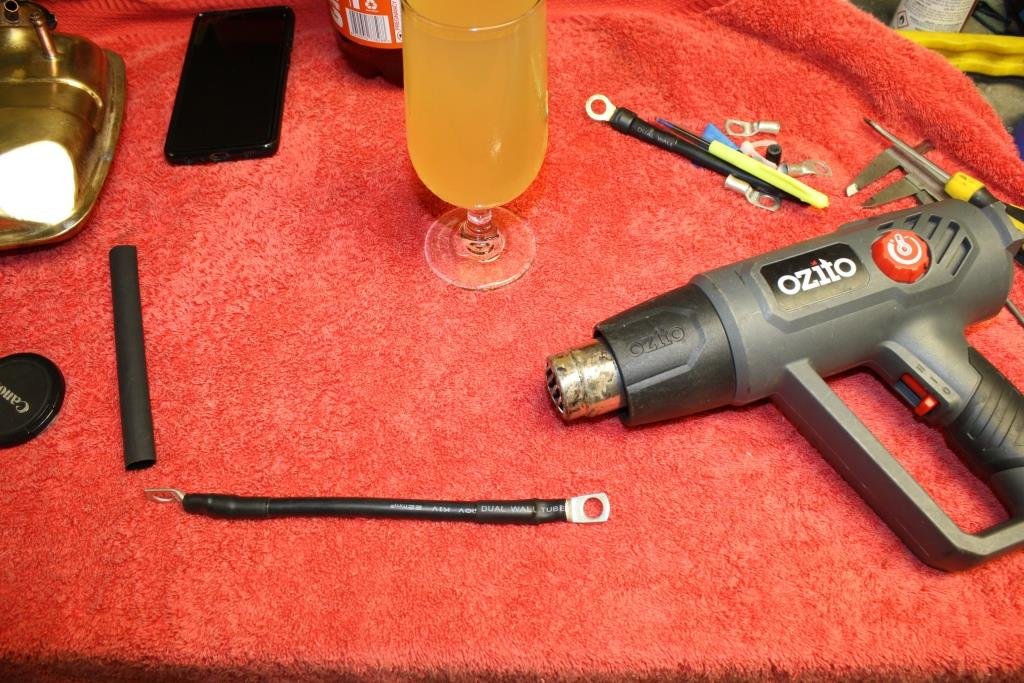
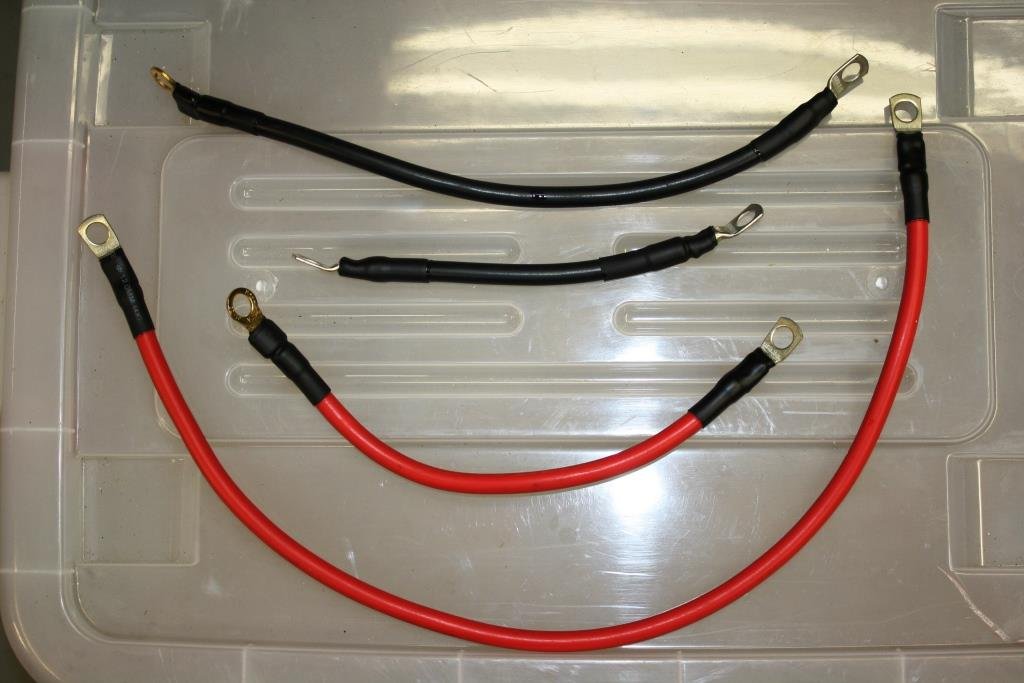
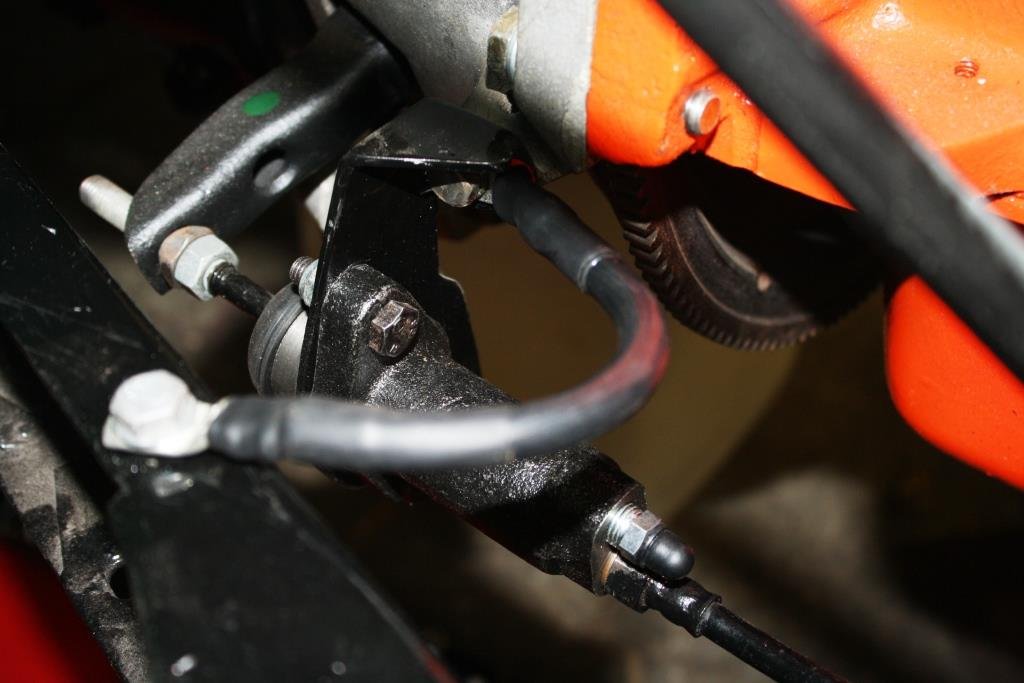
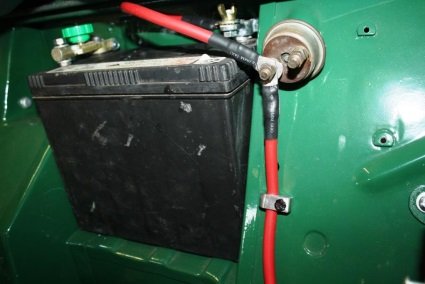
Having been born with short arms and deep pockets I’ve always tried to do as many jobs as I can myself, rather than buying of the shelf items or paying someone else to do it. Up until recently I’ve always made up my own starter cables by soldering the lugs on as oppose to crimping. Of late I’ve come to the conclusion that that the capillary action of the solder can make it harder for the lead to bend close the lug making it more prone to failure. Not having the correct crimping tool and being too tight to buy one may I present…. Starter Cable Crimping for Tight Bastards 101 Find a nut slightly smaller than the terminal and cut it in half. Strip the wire…. Tape the two half nuts around the terminal…. Slide the exposed wire back into the terminal and squeeze the living daylights out of it in an old vice to crimp. I than give it an additional tap with a punch (optional)... And then two layers of heat shrink with glue lining…. Yes it is thirsty work...... Made up a bunch of them…(Hick!). And fitted them up to the old girl.
2 points
-
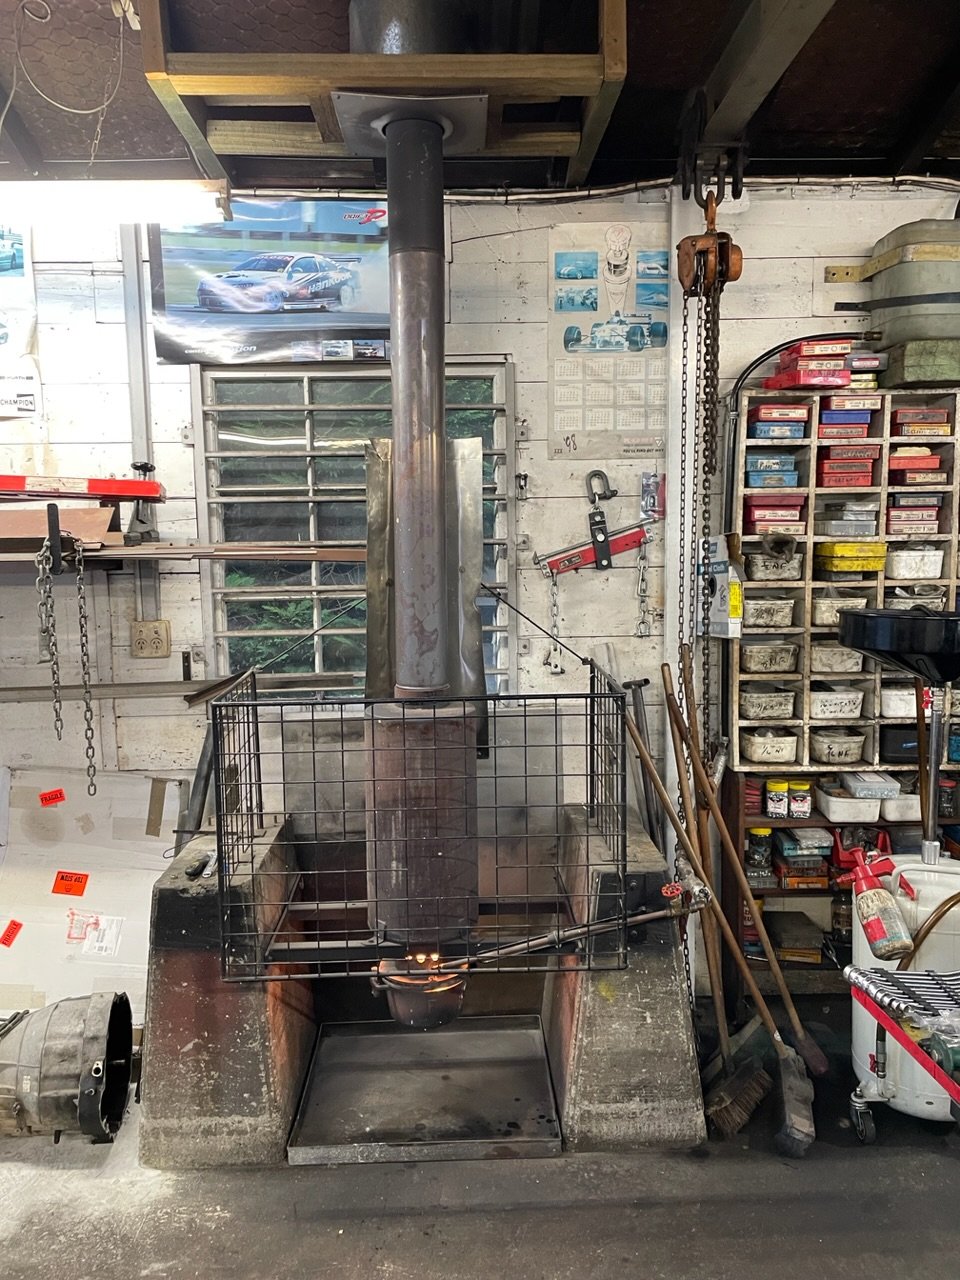
Not built by me, but here’s the waste oil burner at work. Goes hard for what it is.
2 points
-
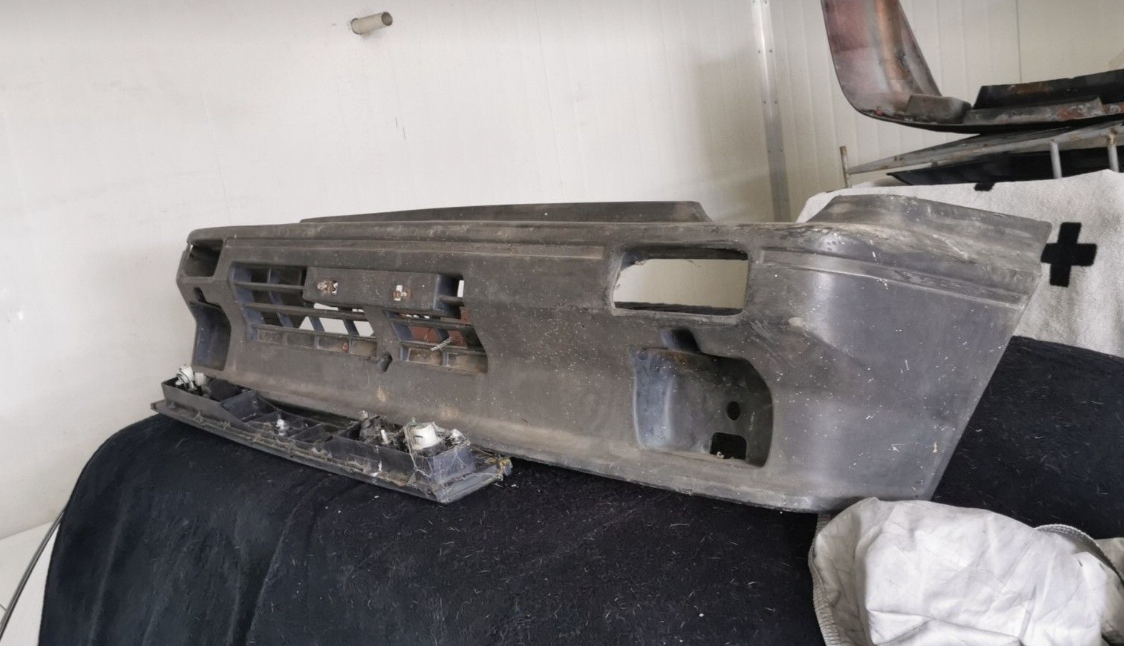
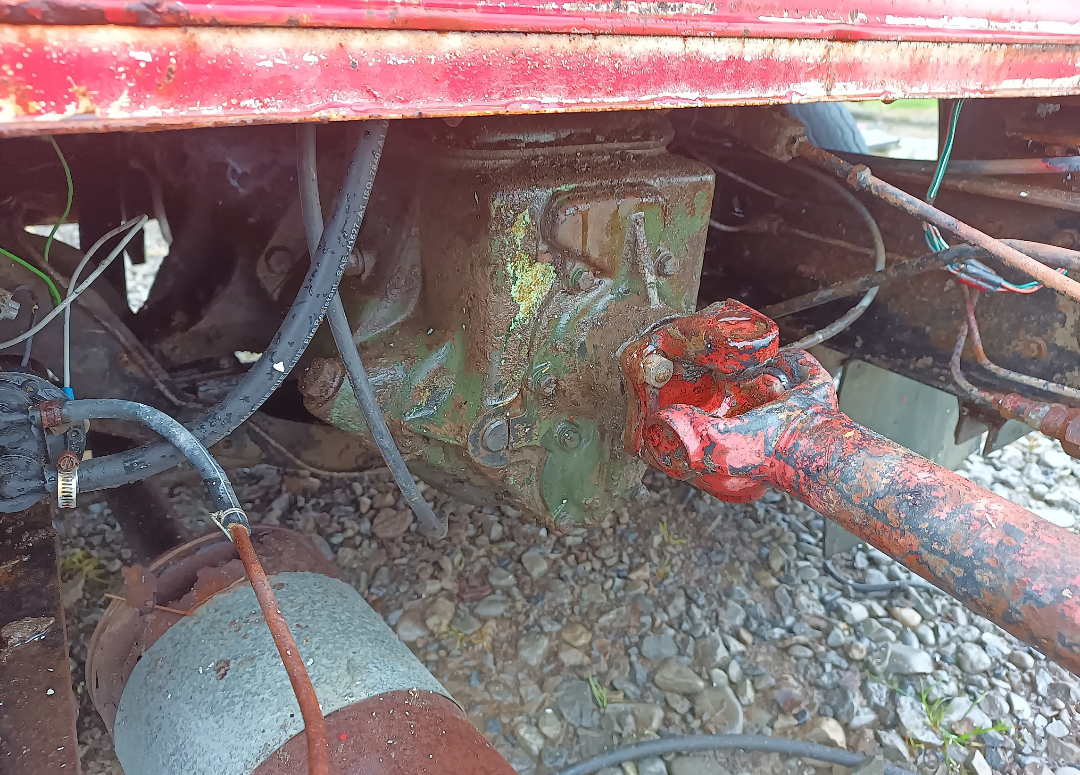
Final result with the turbo bumper on: no longer nana spec. unfortunately it is practically sitting on the lower engine support, so that will need to be re-engineered at some point.
2 points
-
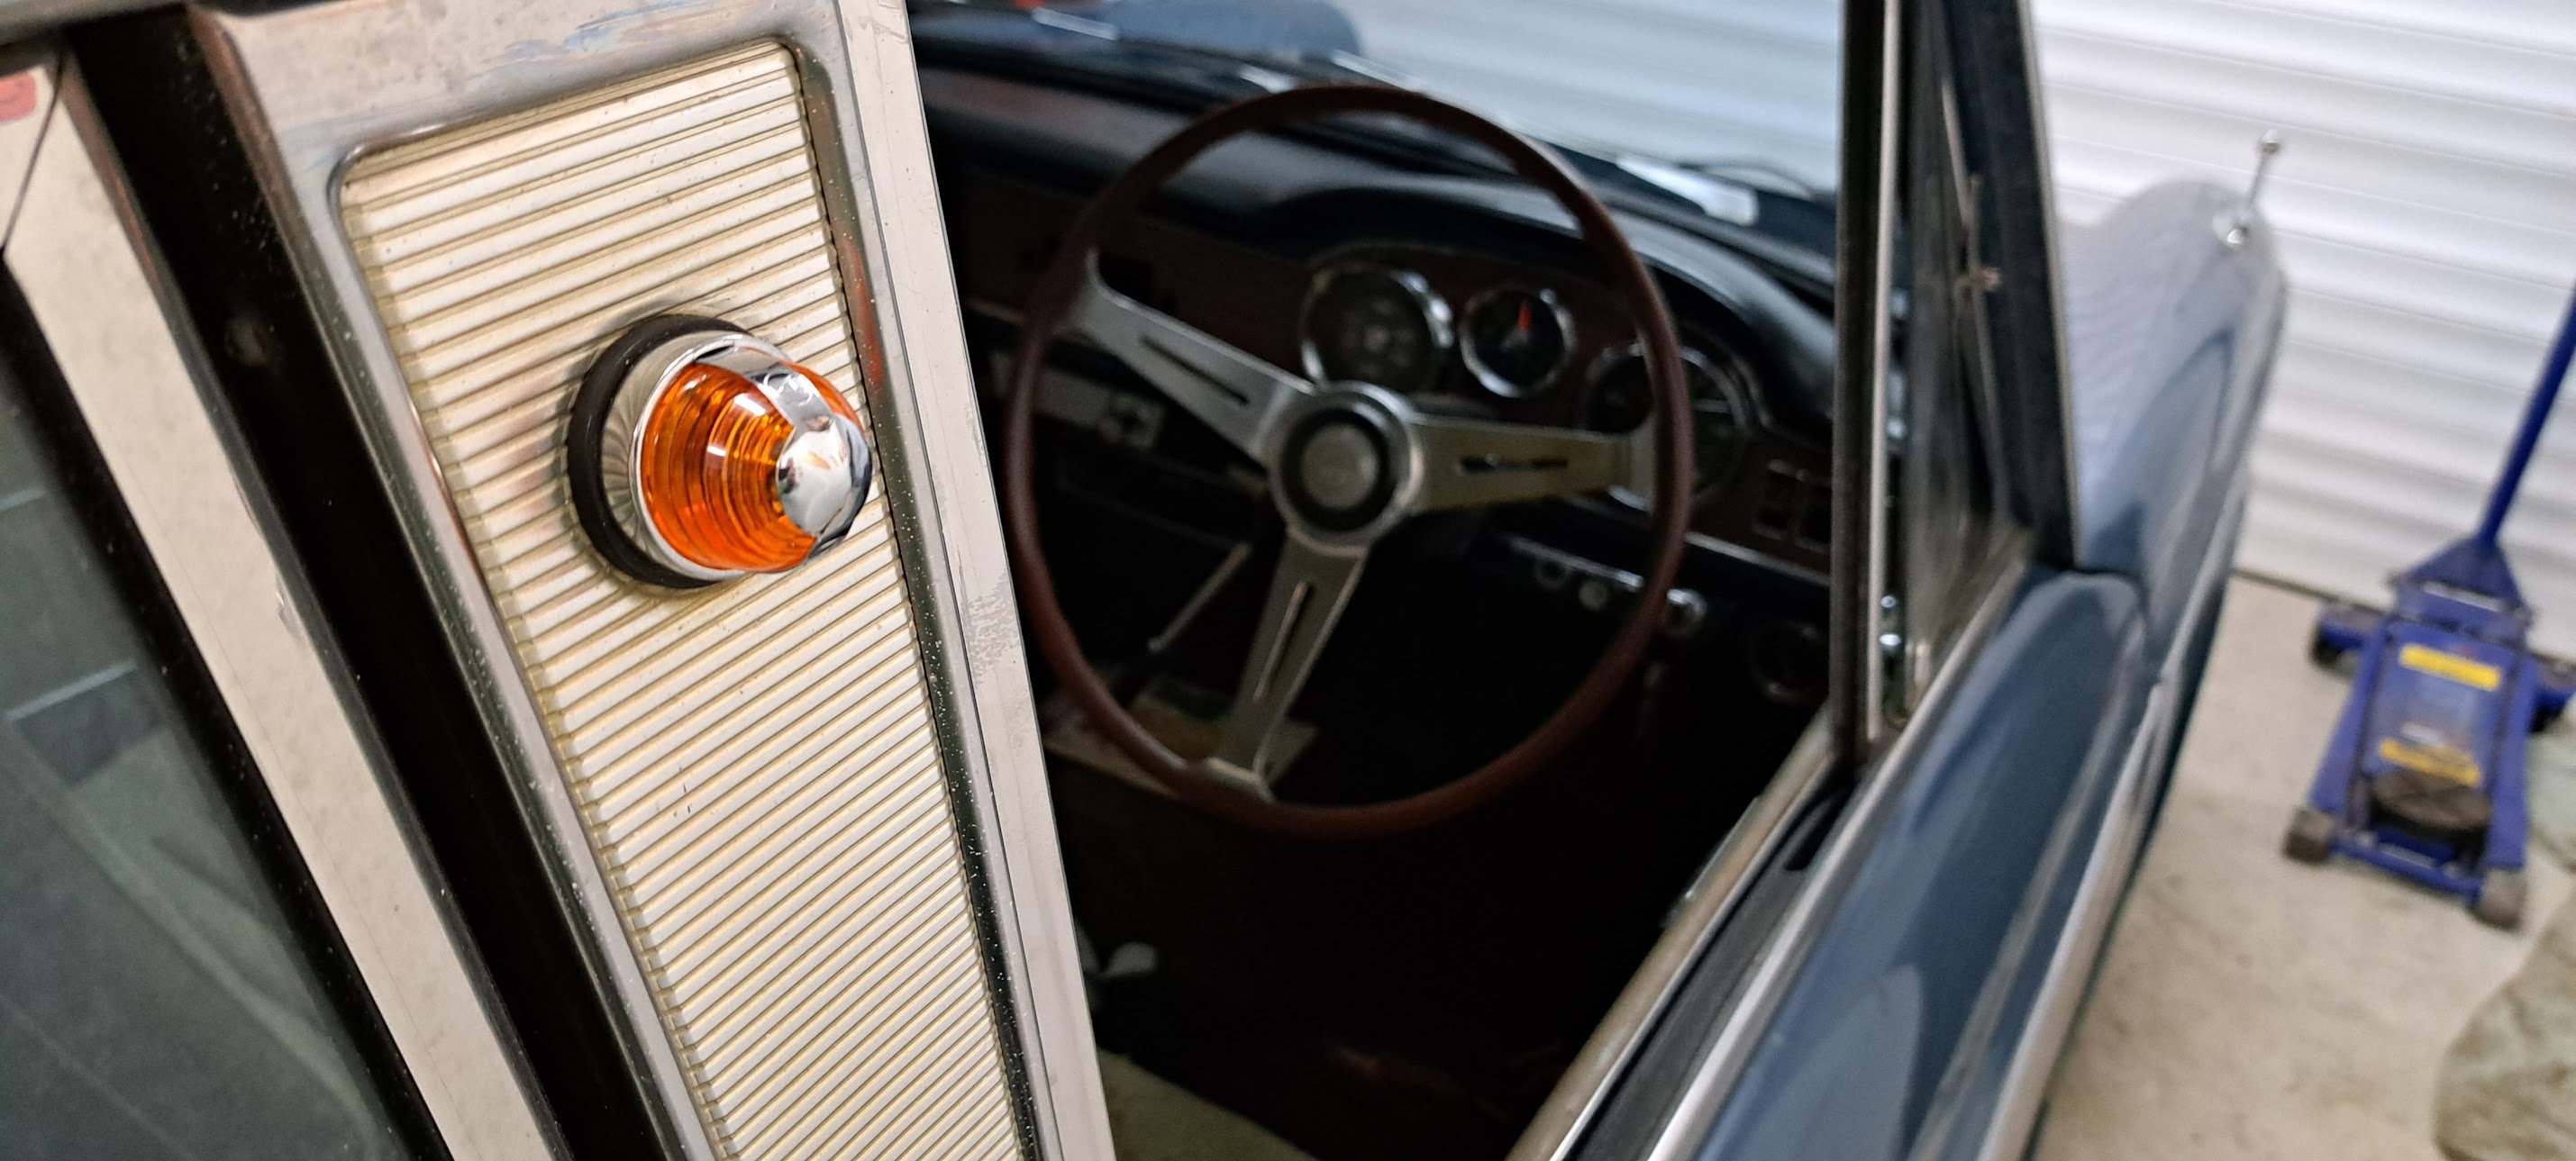
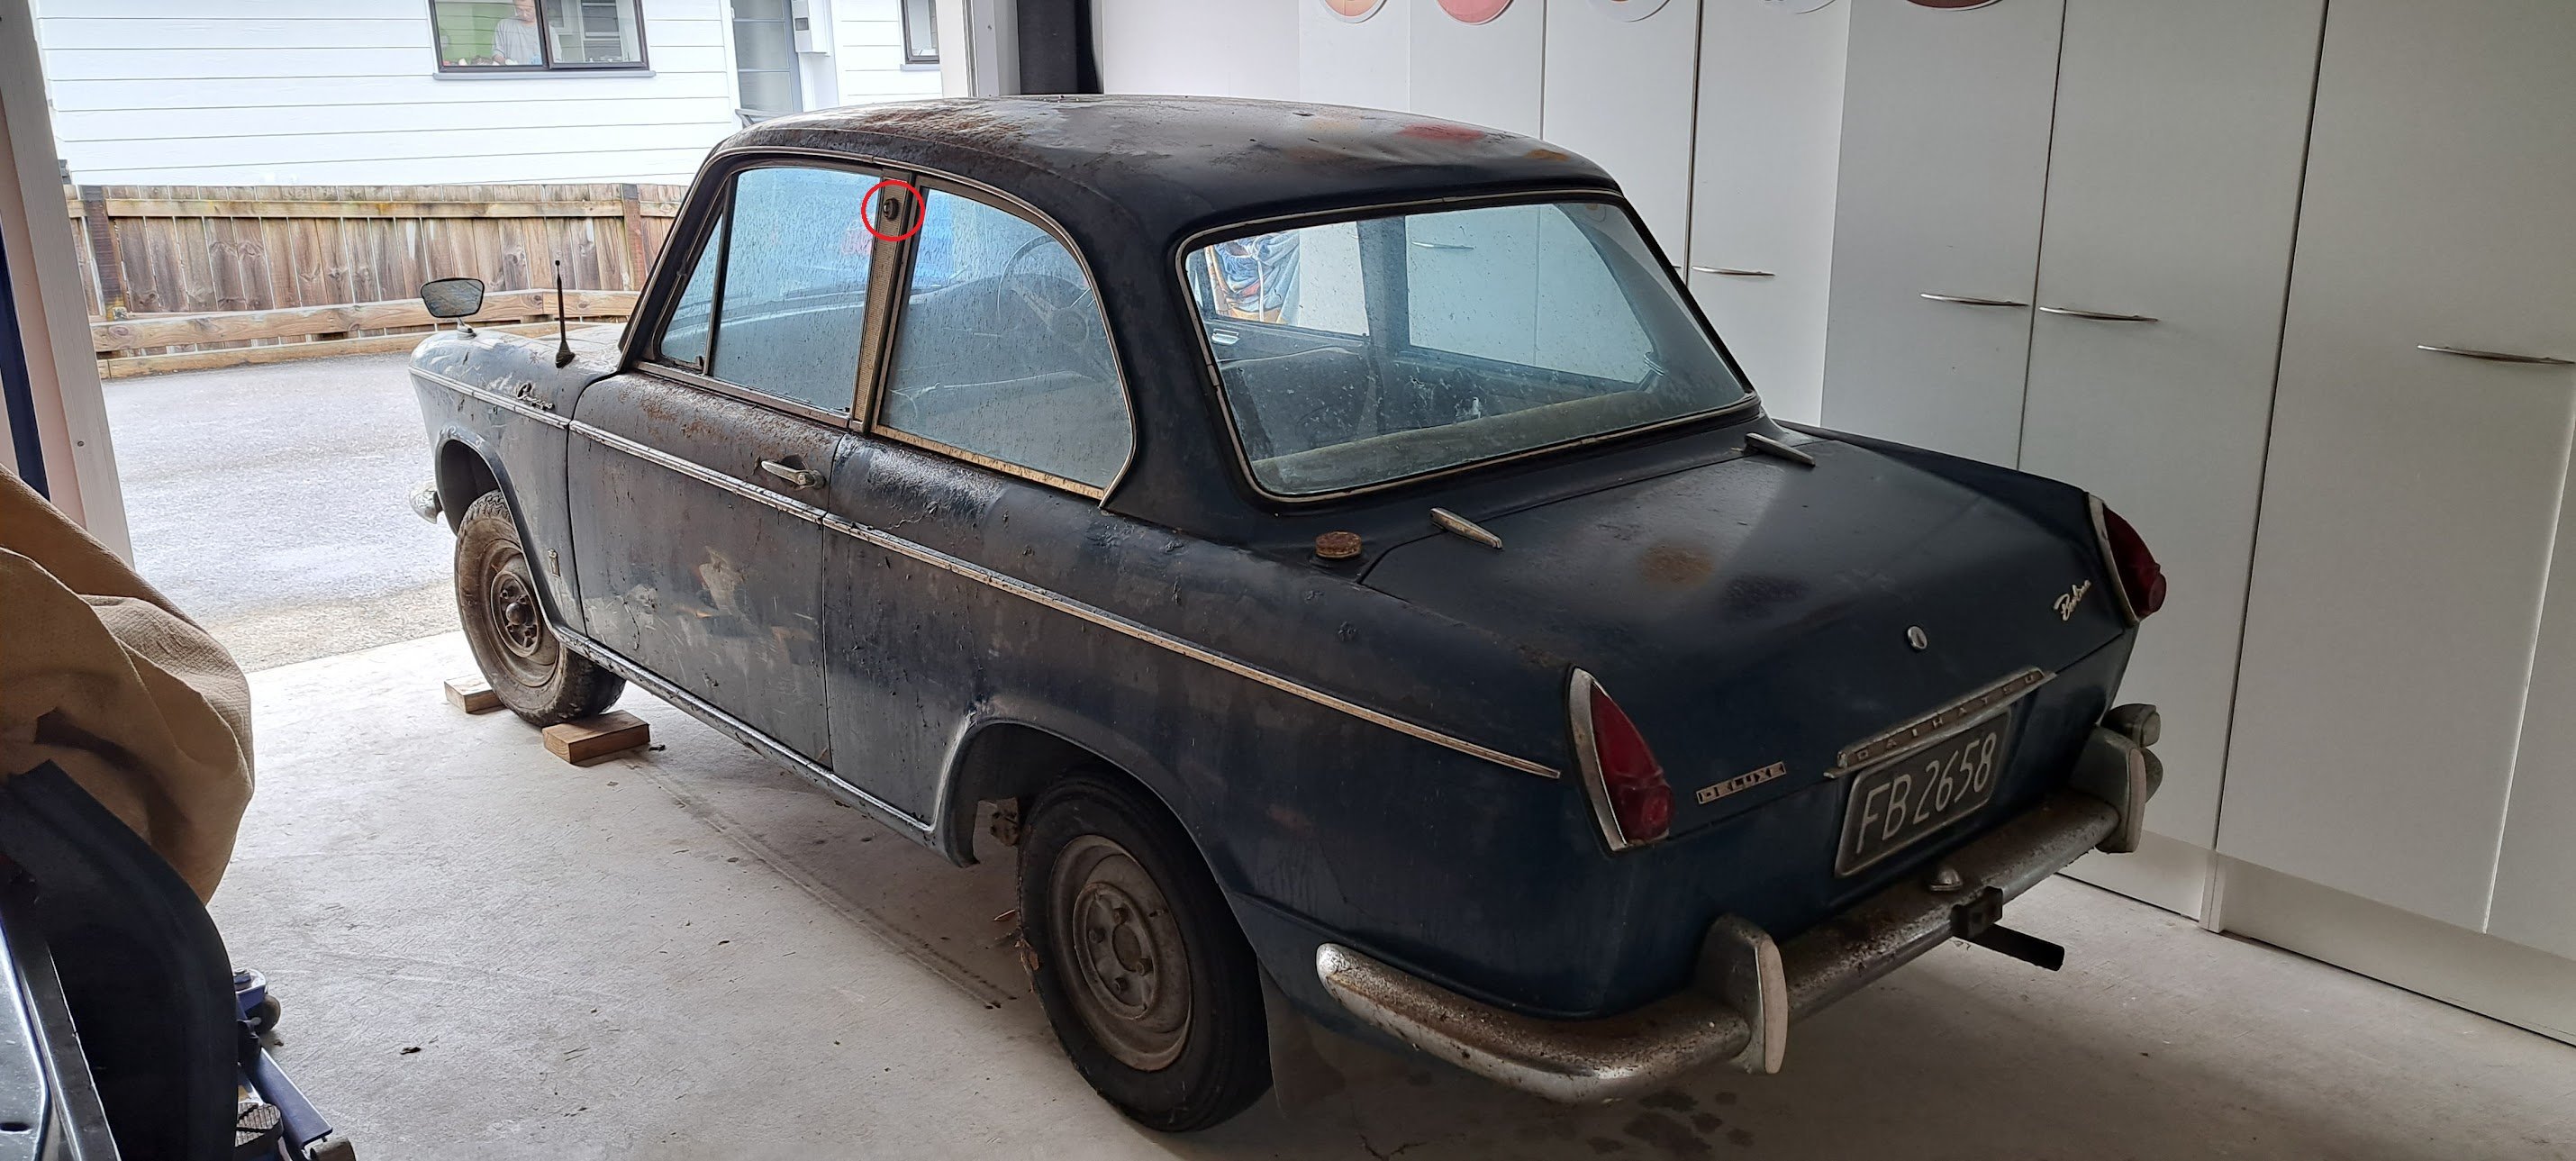
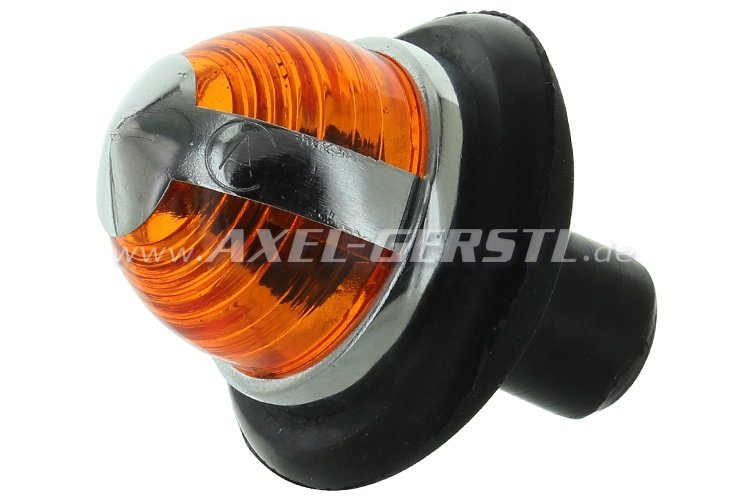
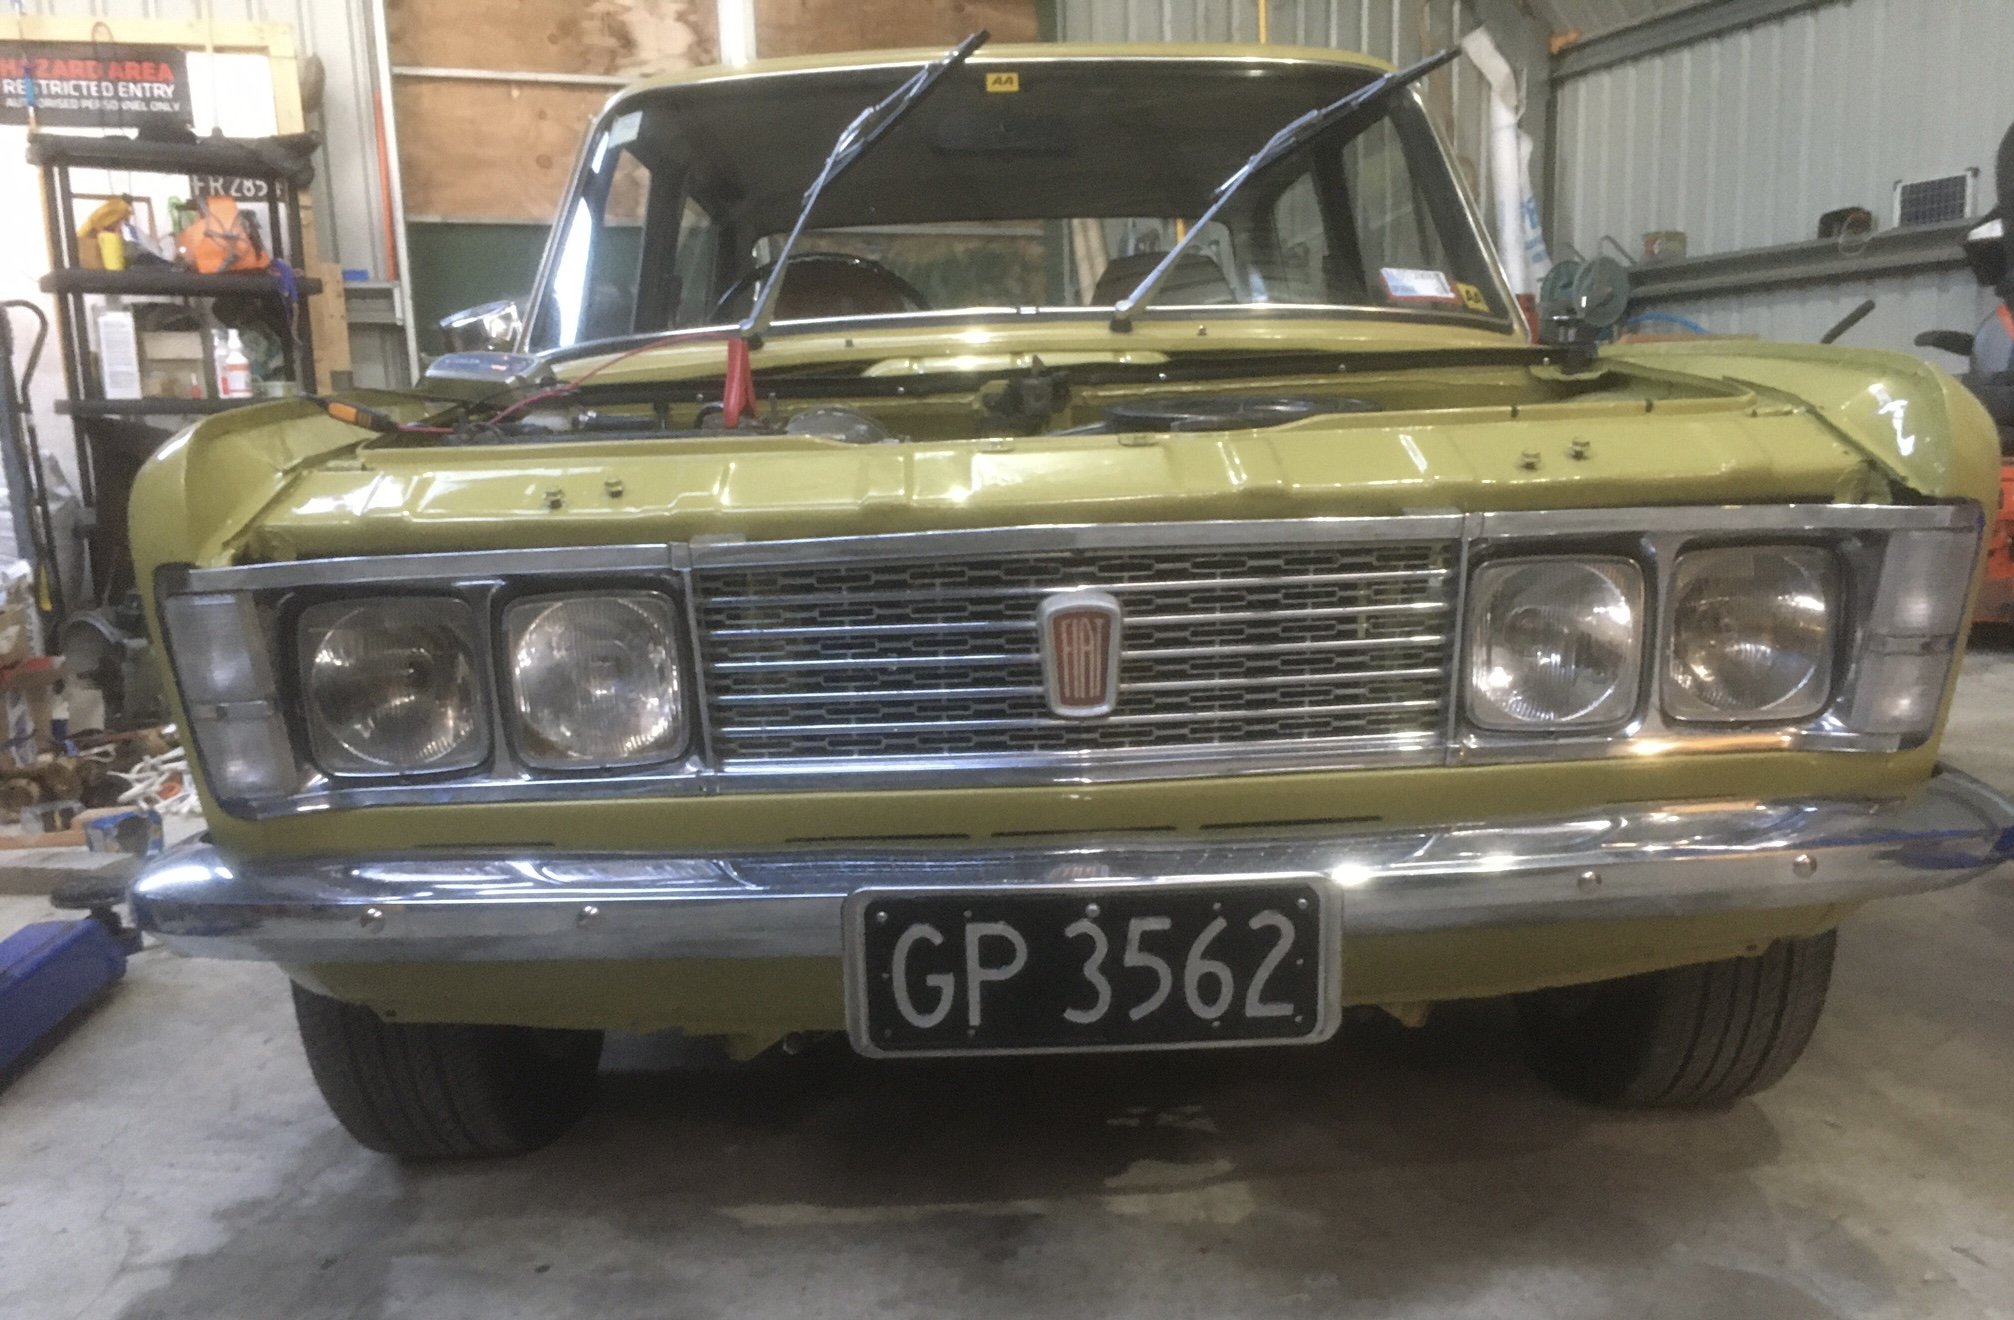
Front suspension and brakes all complete and its back on the ground. Almost ready to add brake fluid and give it real brakes for the 1st time in 45 years engine pistons .. waiting... waiting... waiting... The little side "trafficator" lenses were missing and I spent a great many spare minutes looking through the entire internets for replacements... I finally unearthed an Italian company selling replica Fiat 600 indicator lenses almost the same as the originals. A pair ordered and duly arrived today and were instantly fitted to the original bases ... so happy with this result
2 points
-
Got the car home and unloaded it, first thing first was to clean up the interior which looks like it hadn’t had a clean since it was new. after a good water blast and bissell, with some other chemicals the difference is unreal. got really pedantic with it and cleaned the floor under the carpet, still happy to see no rust. other boring stuff like polishing the car trying to make the paint look as good as it can while I’m waiting for my savings to grow and parts go arrive. it came with a really cool old TRD gearknob that he said it had been in the car since he owned it Thats about it all Caught up, working on finding another pair of SSR mk3 for the rear but i want original lips 9j A type which is proving difficult but OEM lips are so much nicer, also saving for an airbag setup because im too old for low cars now. If anyone has a good 1gge kicking around it would be great too.
2 points
-
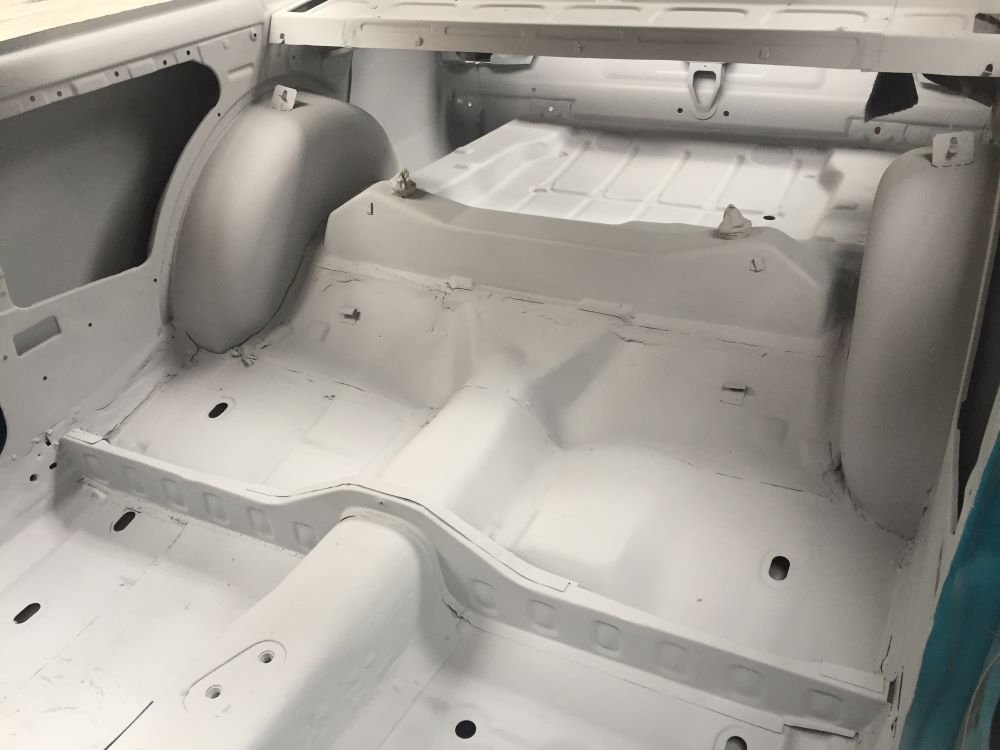
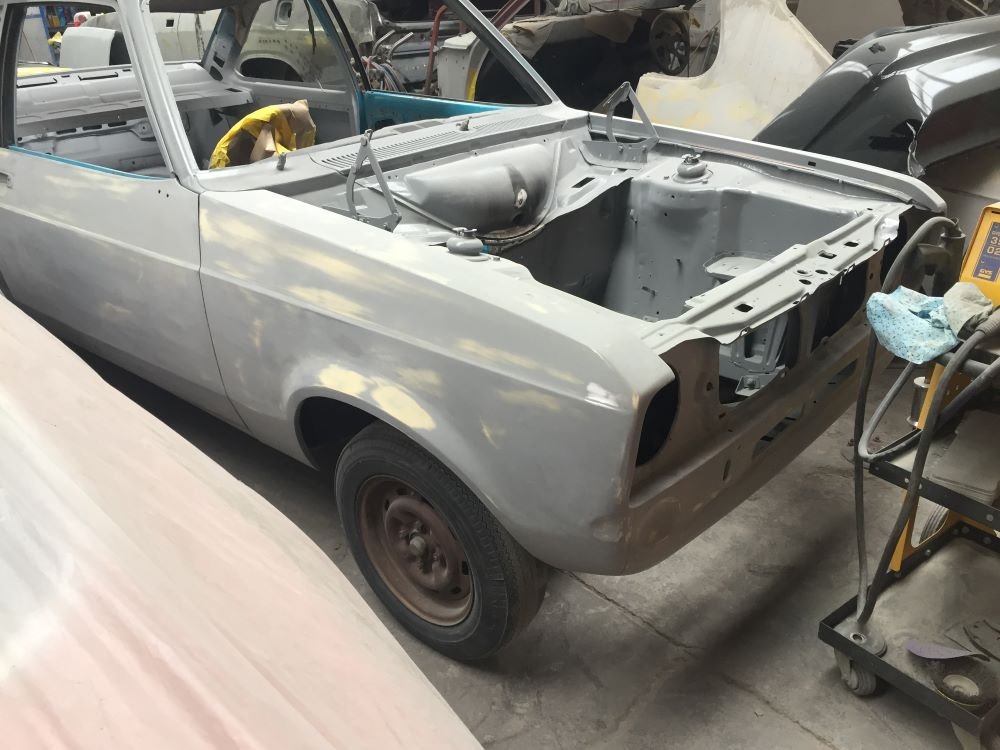
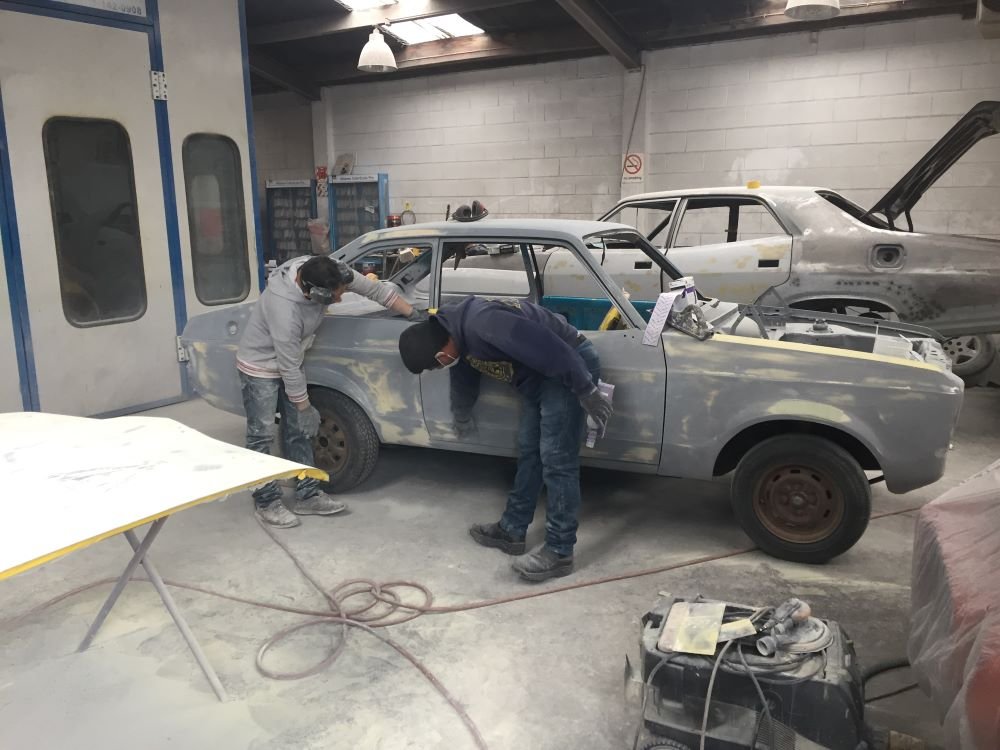
Body work nearly finished. Small repair to heater bowl done. Still some work to do on passenger door which is not closing properly after having roll pins replaced. May have had some impact damage in the past. Have also had the colour matched for final paint colour before all original colour was covered up with primer. Getting closer to paint booth all the time. At home have been going over parts and getting ready for reasembly and also decided that my open shed needed to be closed in for when car comes home so working on that. Project Discussion https://oldschool.co.nz/index.php?/topic/84912-petes-mk2-escort-1600-sports/
2 points
-
Last bit of the recent puzzle is the suspension, which started probably a year ago. I always had custom springs and a nice uprated Whiteline swaybay up front, but never really got around to doing anything with the dampers. Now that I've gone 4 link, I decided to coilover the rear and find some suitably good front shocks to match. I spent countless nights measuring and making spreadsheets. I looked into rear coilovers from T3, Fortune Auto and others, and fronts from GAZ, Bilstein, Koni, Avo, Spax, etc. Nothing really seemed to be exactly as I wanted it. So I figured fuck it and decided to go custom. Looking around, I first called MCA but I didn't get the feeling that they would really put in the effort I needed for my setup. Then, while asking @Truenotch what he'd done for his race car, he mentioned Shockworks over in Aussie. I gave them a call and got a real good vibe from them. They were stoked on my project and keen to help, so I got together all the details they needed, including the corner weights of a stock Gemini as seen a few posts above and waited. And waited. And waited. And waited... I'm still waiting. But now I'm in Melbourne waiting for the Grand Prix to start. So I figure I'm close enough to go out to their shop and give them a kick up the bum. I coax my sister into borrowing a friend's car and driving me out into the Dandenong ranges which is where they are located. I'm glad I did this, because it really lit the fire and not long later, here we are: Looking damn fine. And now I can finally set off the next season of my Rube Goldberg machine which should see the car back in with Tim at ShoresNZ to finish the diff and coilover conversion and then hopefully off to the paint shop! The last new bit for the suspension is a Whiteline swaybar for the rear. The car never came with a rear bar so this should be a good upgrade. I borrowed an AE86 one from @slacker.cam to mock it up and it fit good, so I bought one:
2 points
-
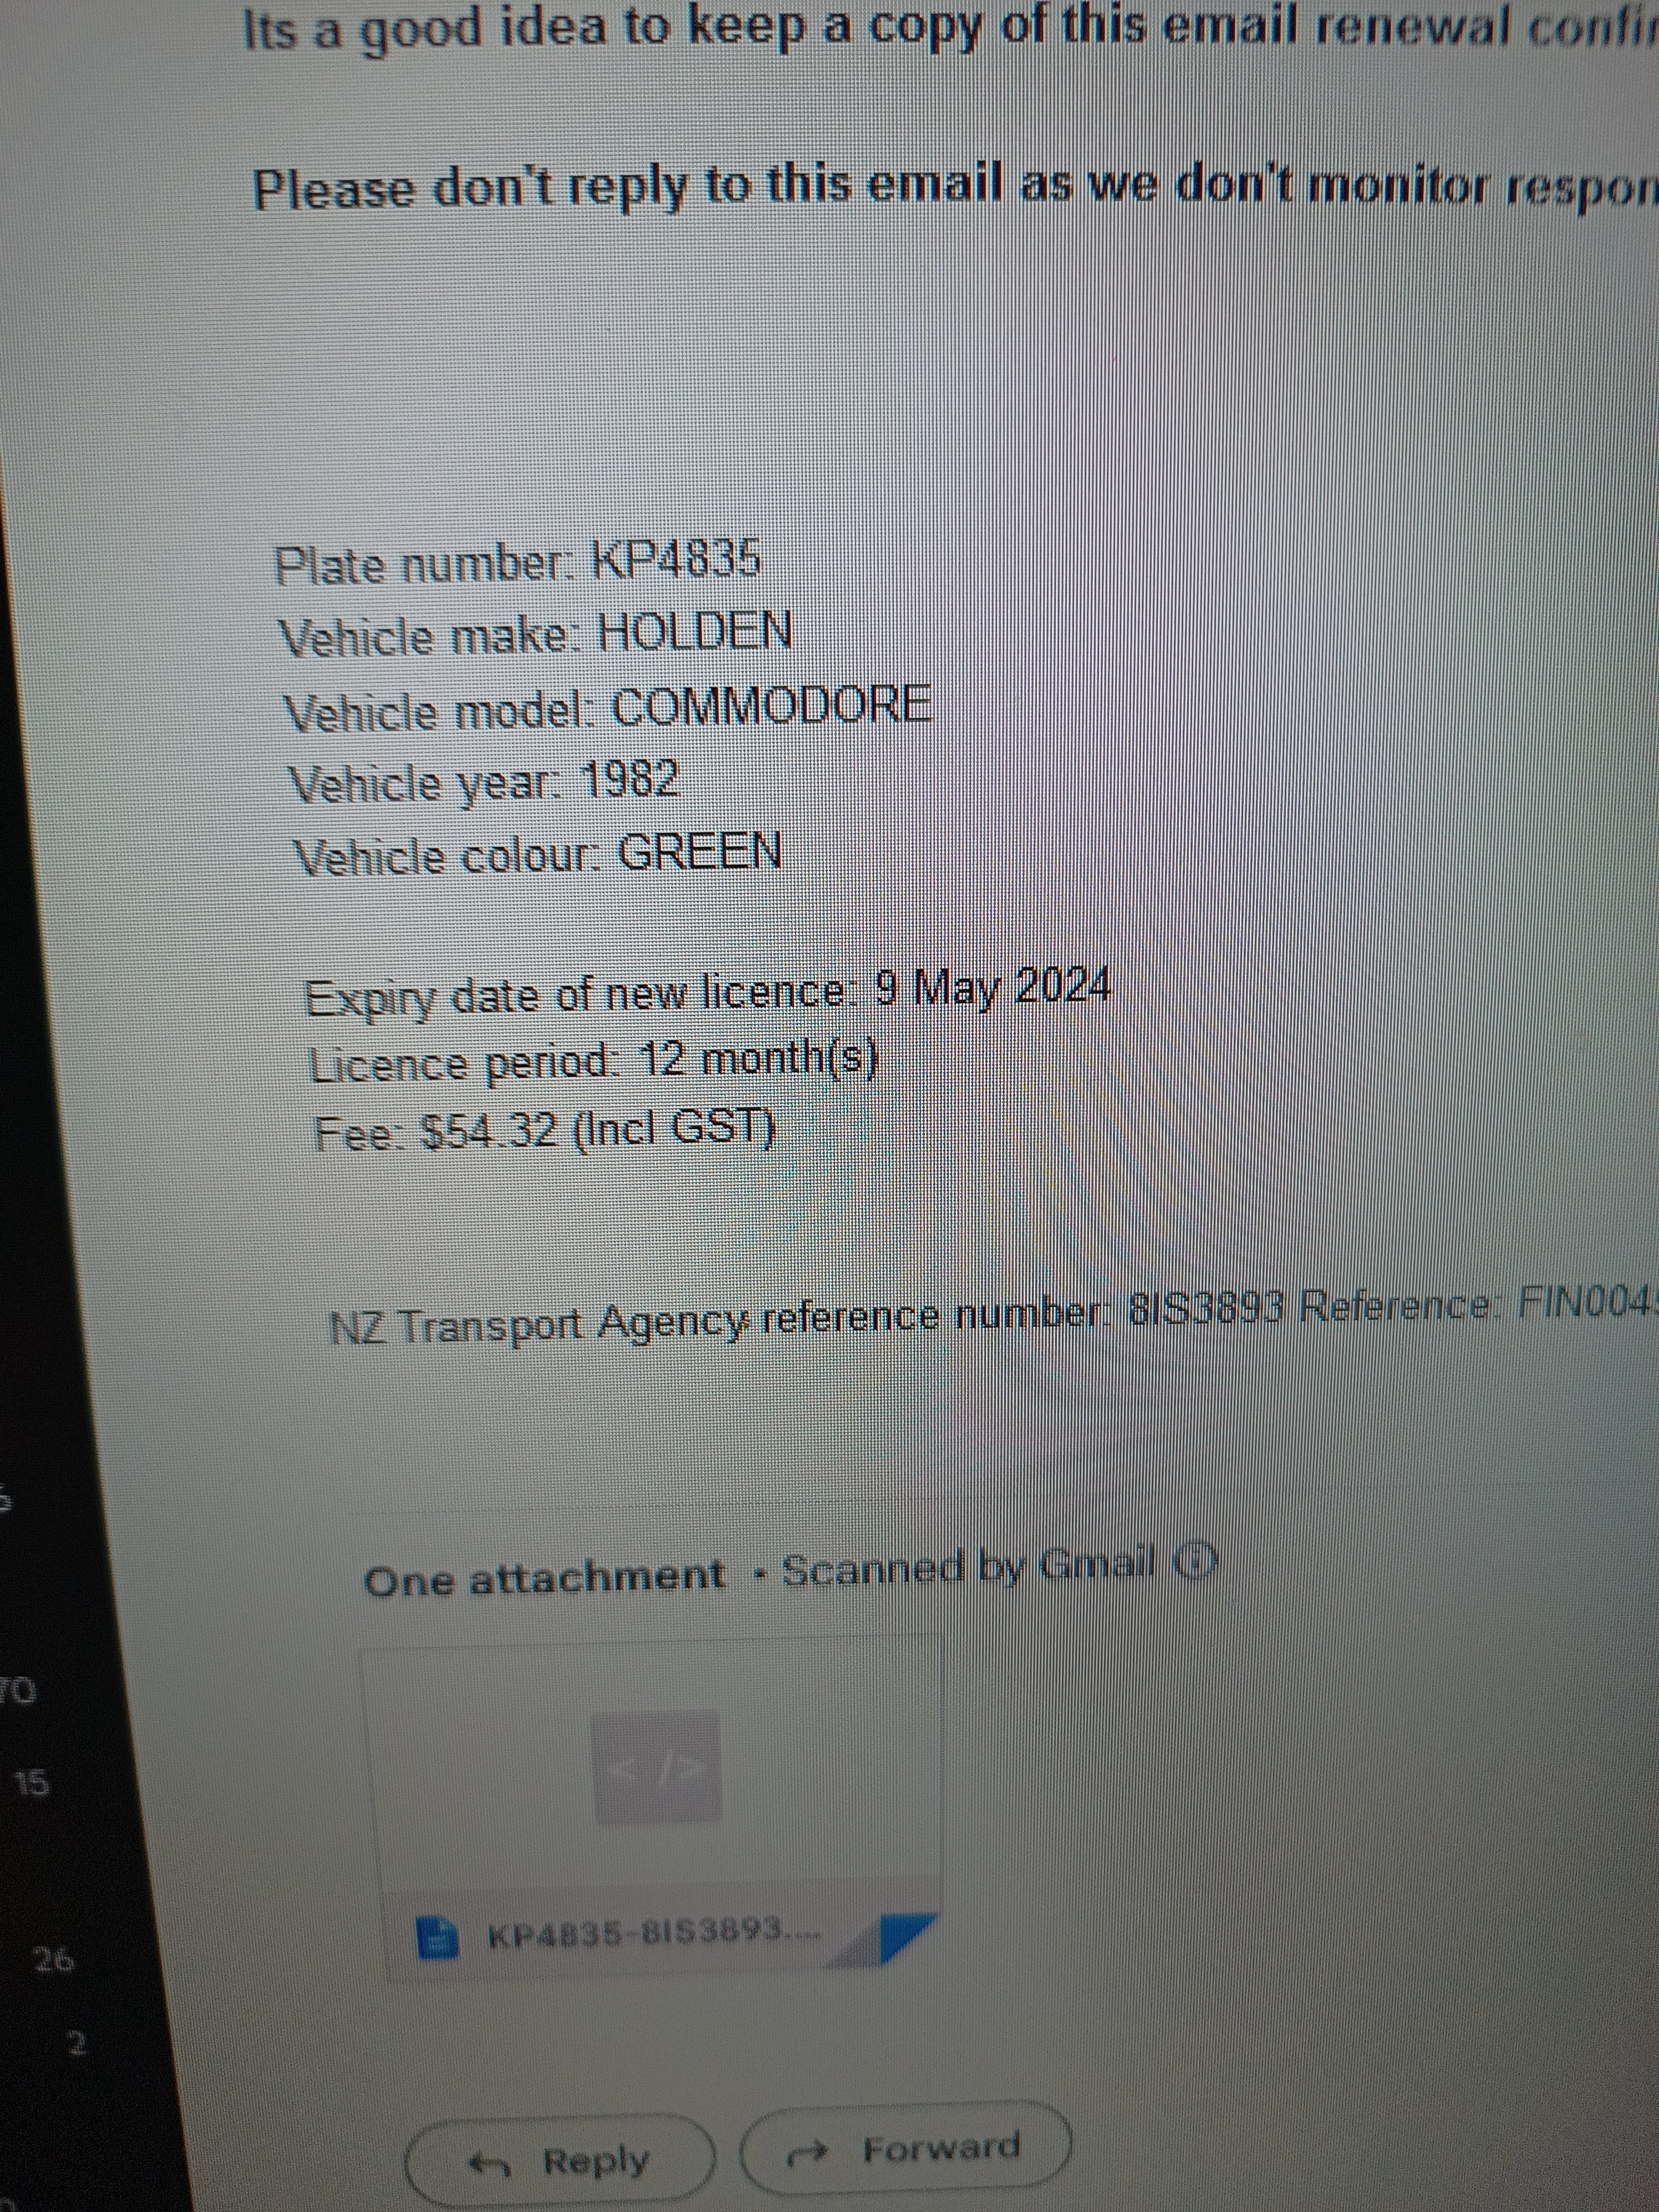
Legal beagle and classic car rego, lets GOOOOOOO OH SHIT YES
2 points
-
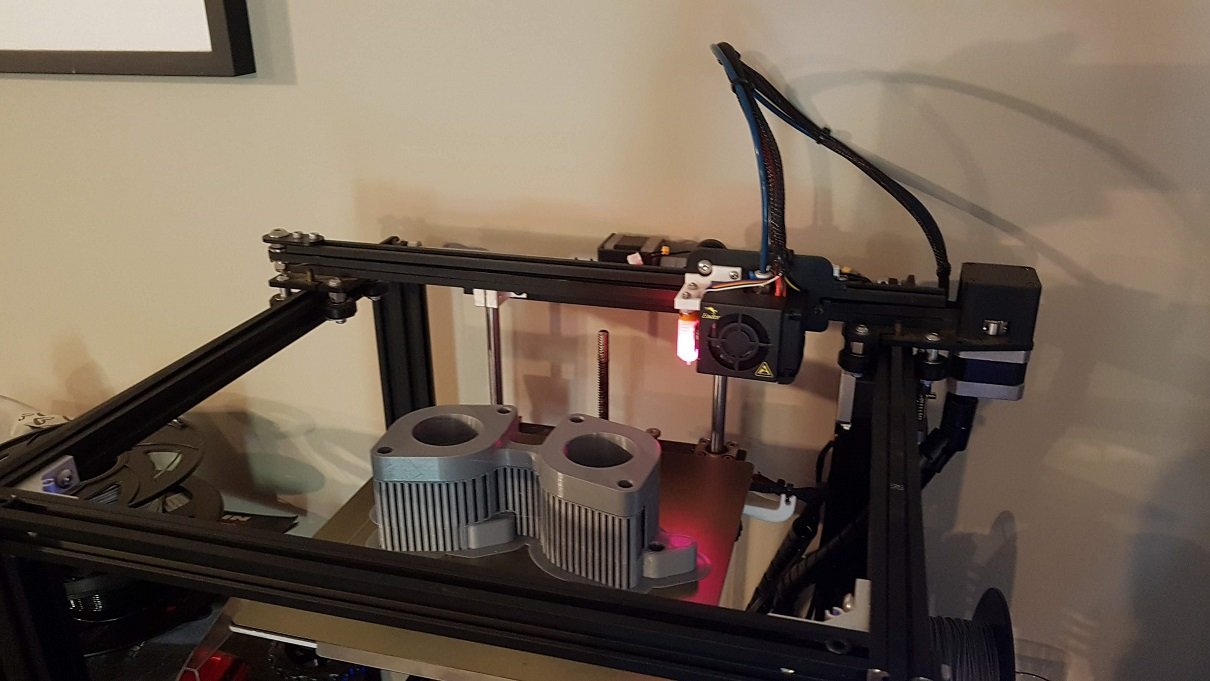
The plan is to have a crack at backyard sand casting. I don't have the tools to do any lost foam casting, which is a bummer, as this seems to make the best quality parts. Sand casting also kinda determines the shape of the manifolds too, as they need to be split-able with no overhangs or inverse surfaces so they can be withdrawn from the sand. So created some patterns, and some core molds and printed them out (at 1.2% larger as from my research, this seems to be a decent number for aluminium shrinkage). Need to give them a good sand and some thick coats of paint to get them silky smooth. But they look like they should work? I have no idea what I'm doing now. Do I get them cast at a foundry? Is this expensive? Will they laugh at me? Or do I build my own LPG furnace? Or do I buy an electric aliexpress furnace? Then I have to mill and drill the castings... I don't have a mill. So yeah, maybe I should just buy some manifolds eh? Wish I could just print them out of something and roll that. Is that at all possible?
2 points
-
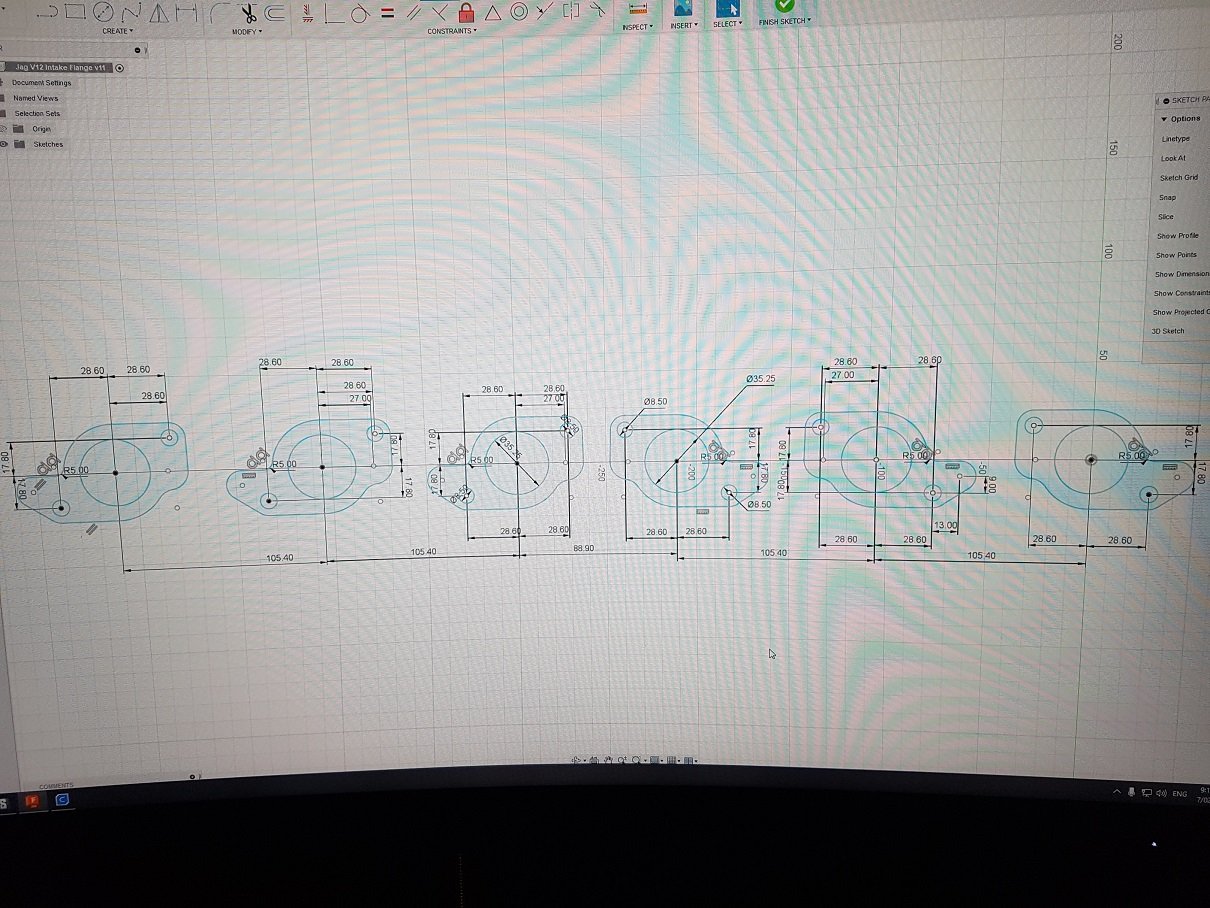
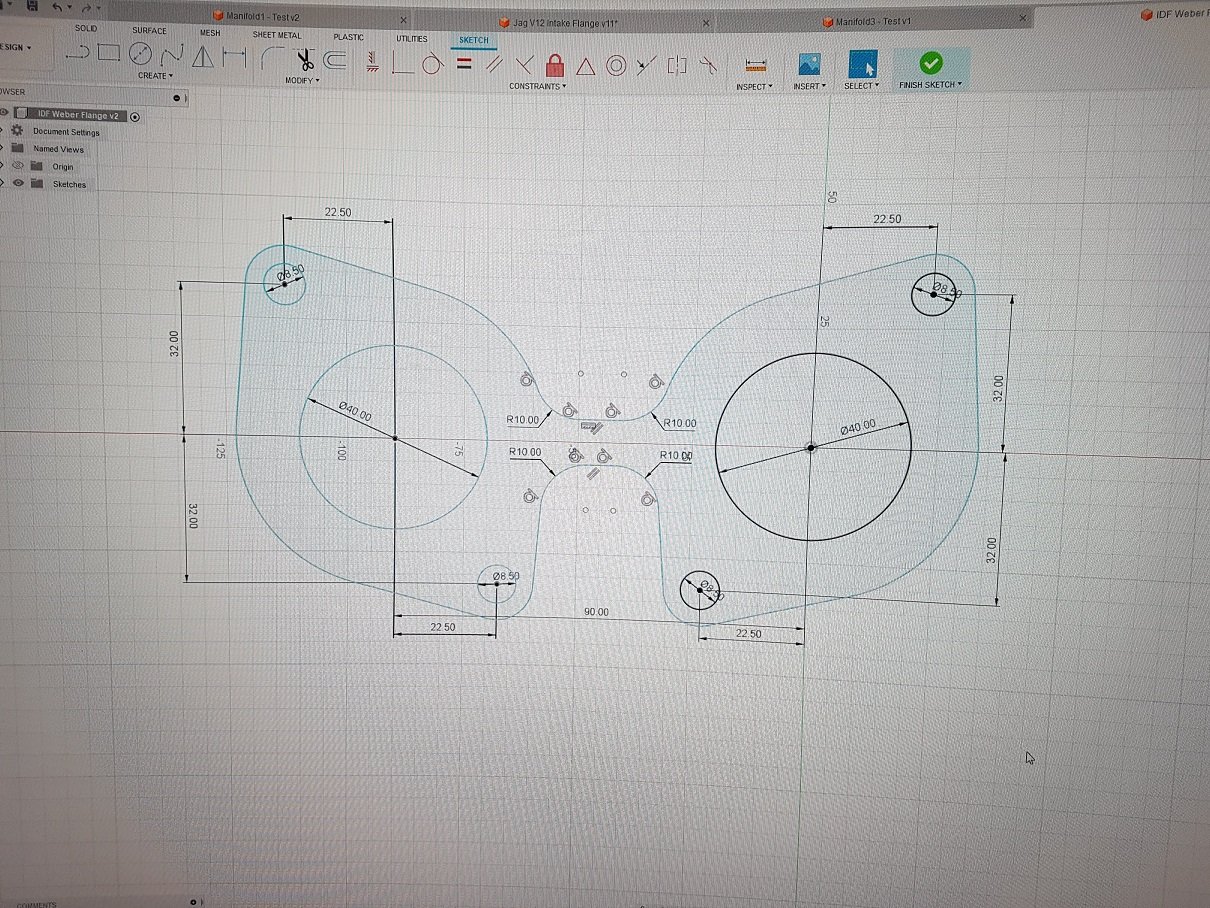
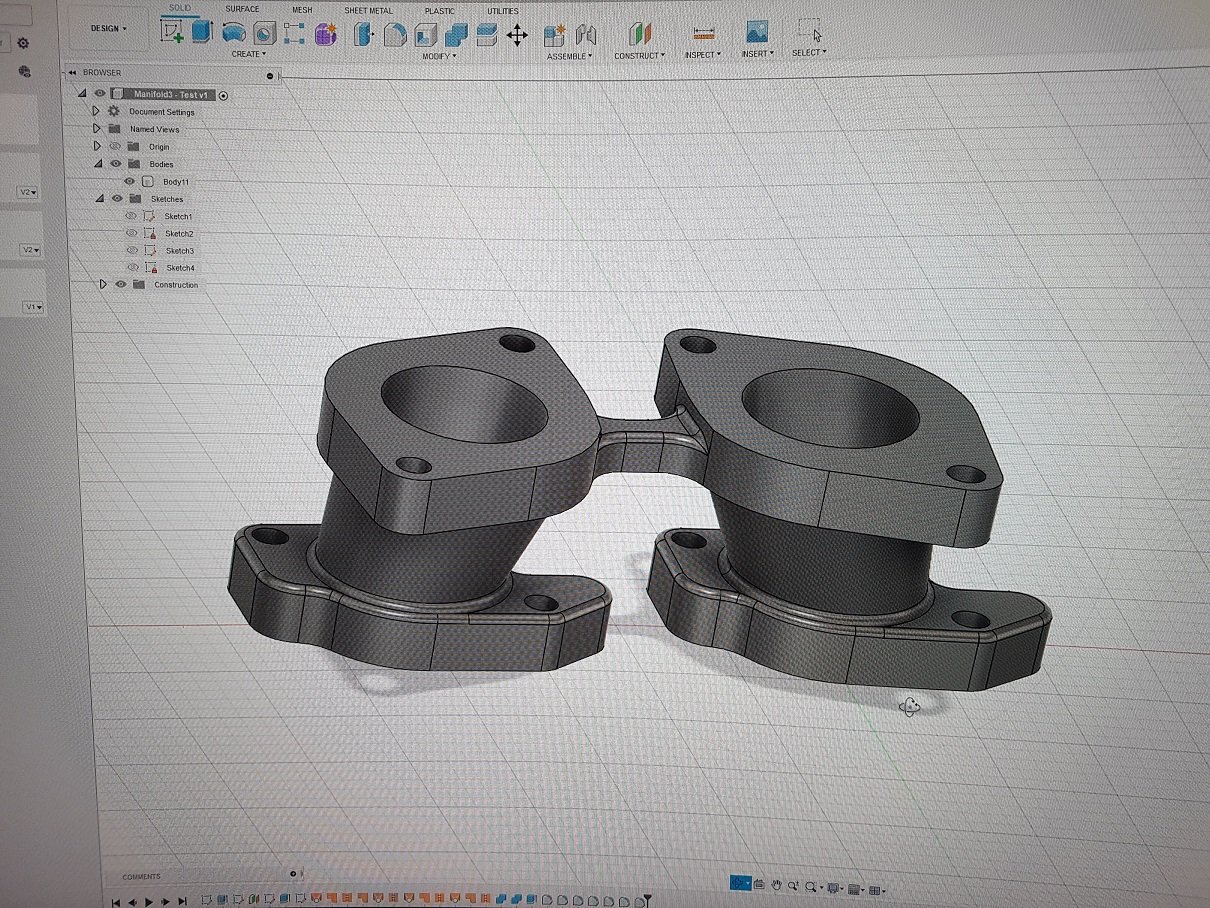
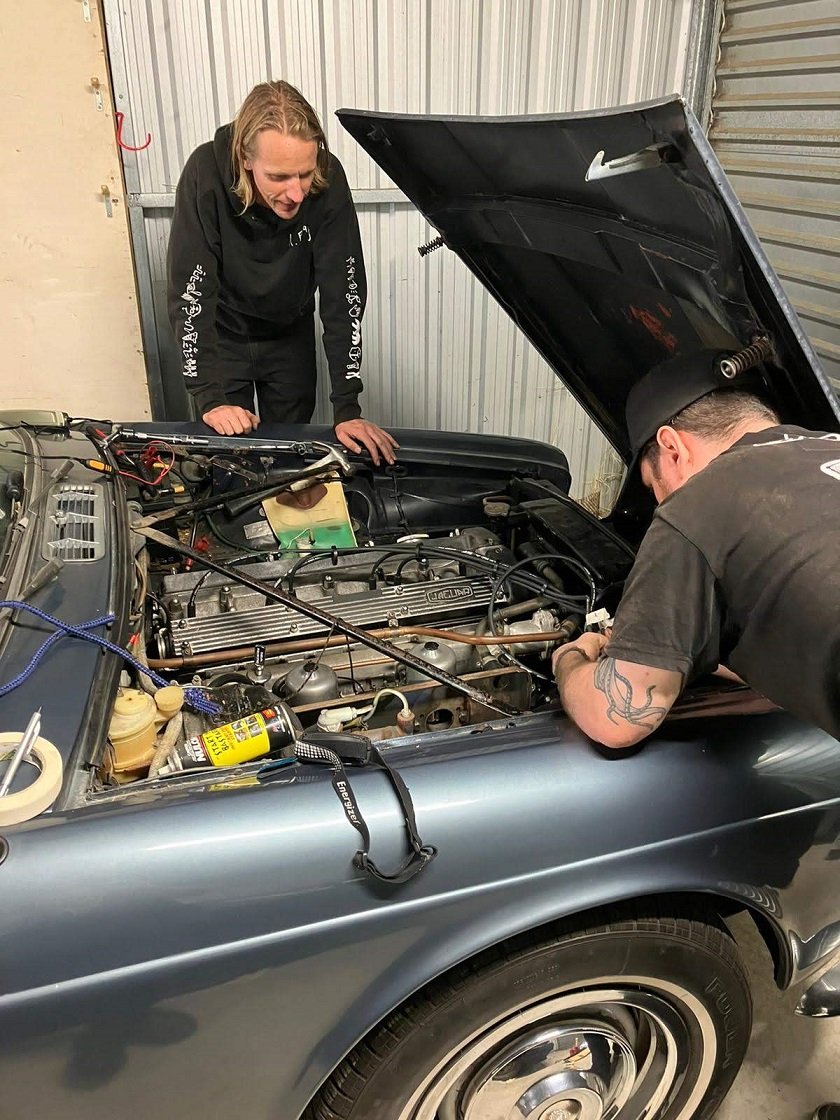
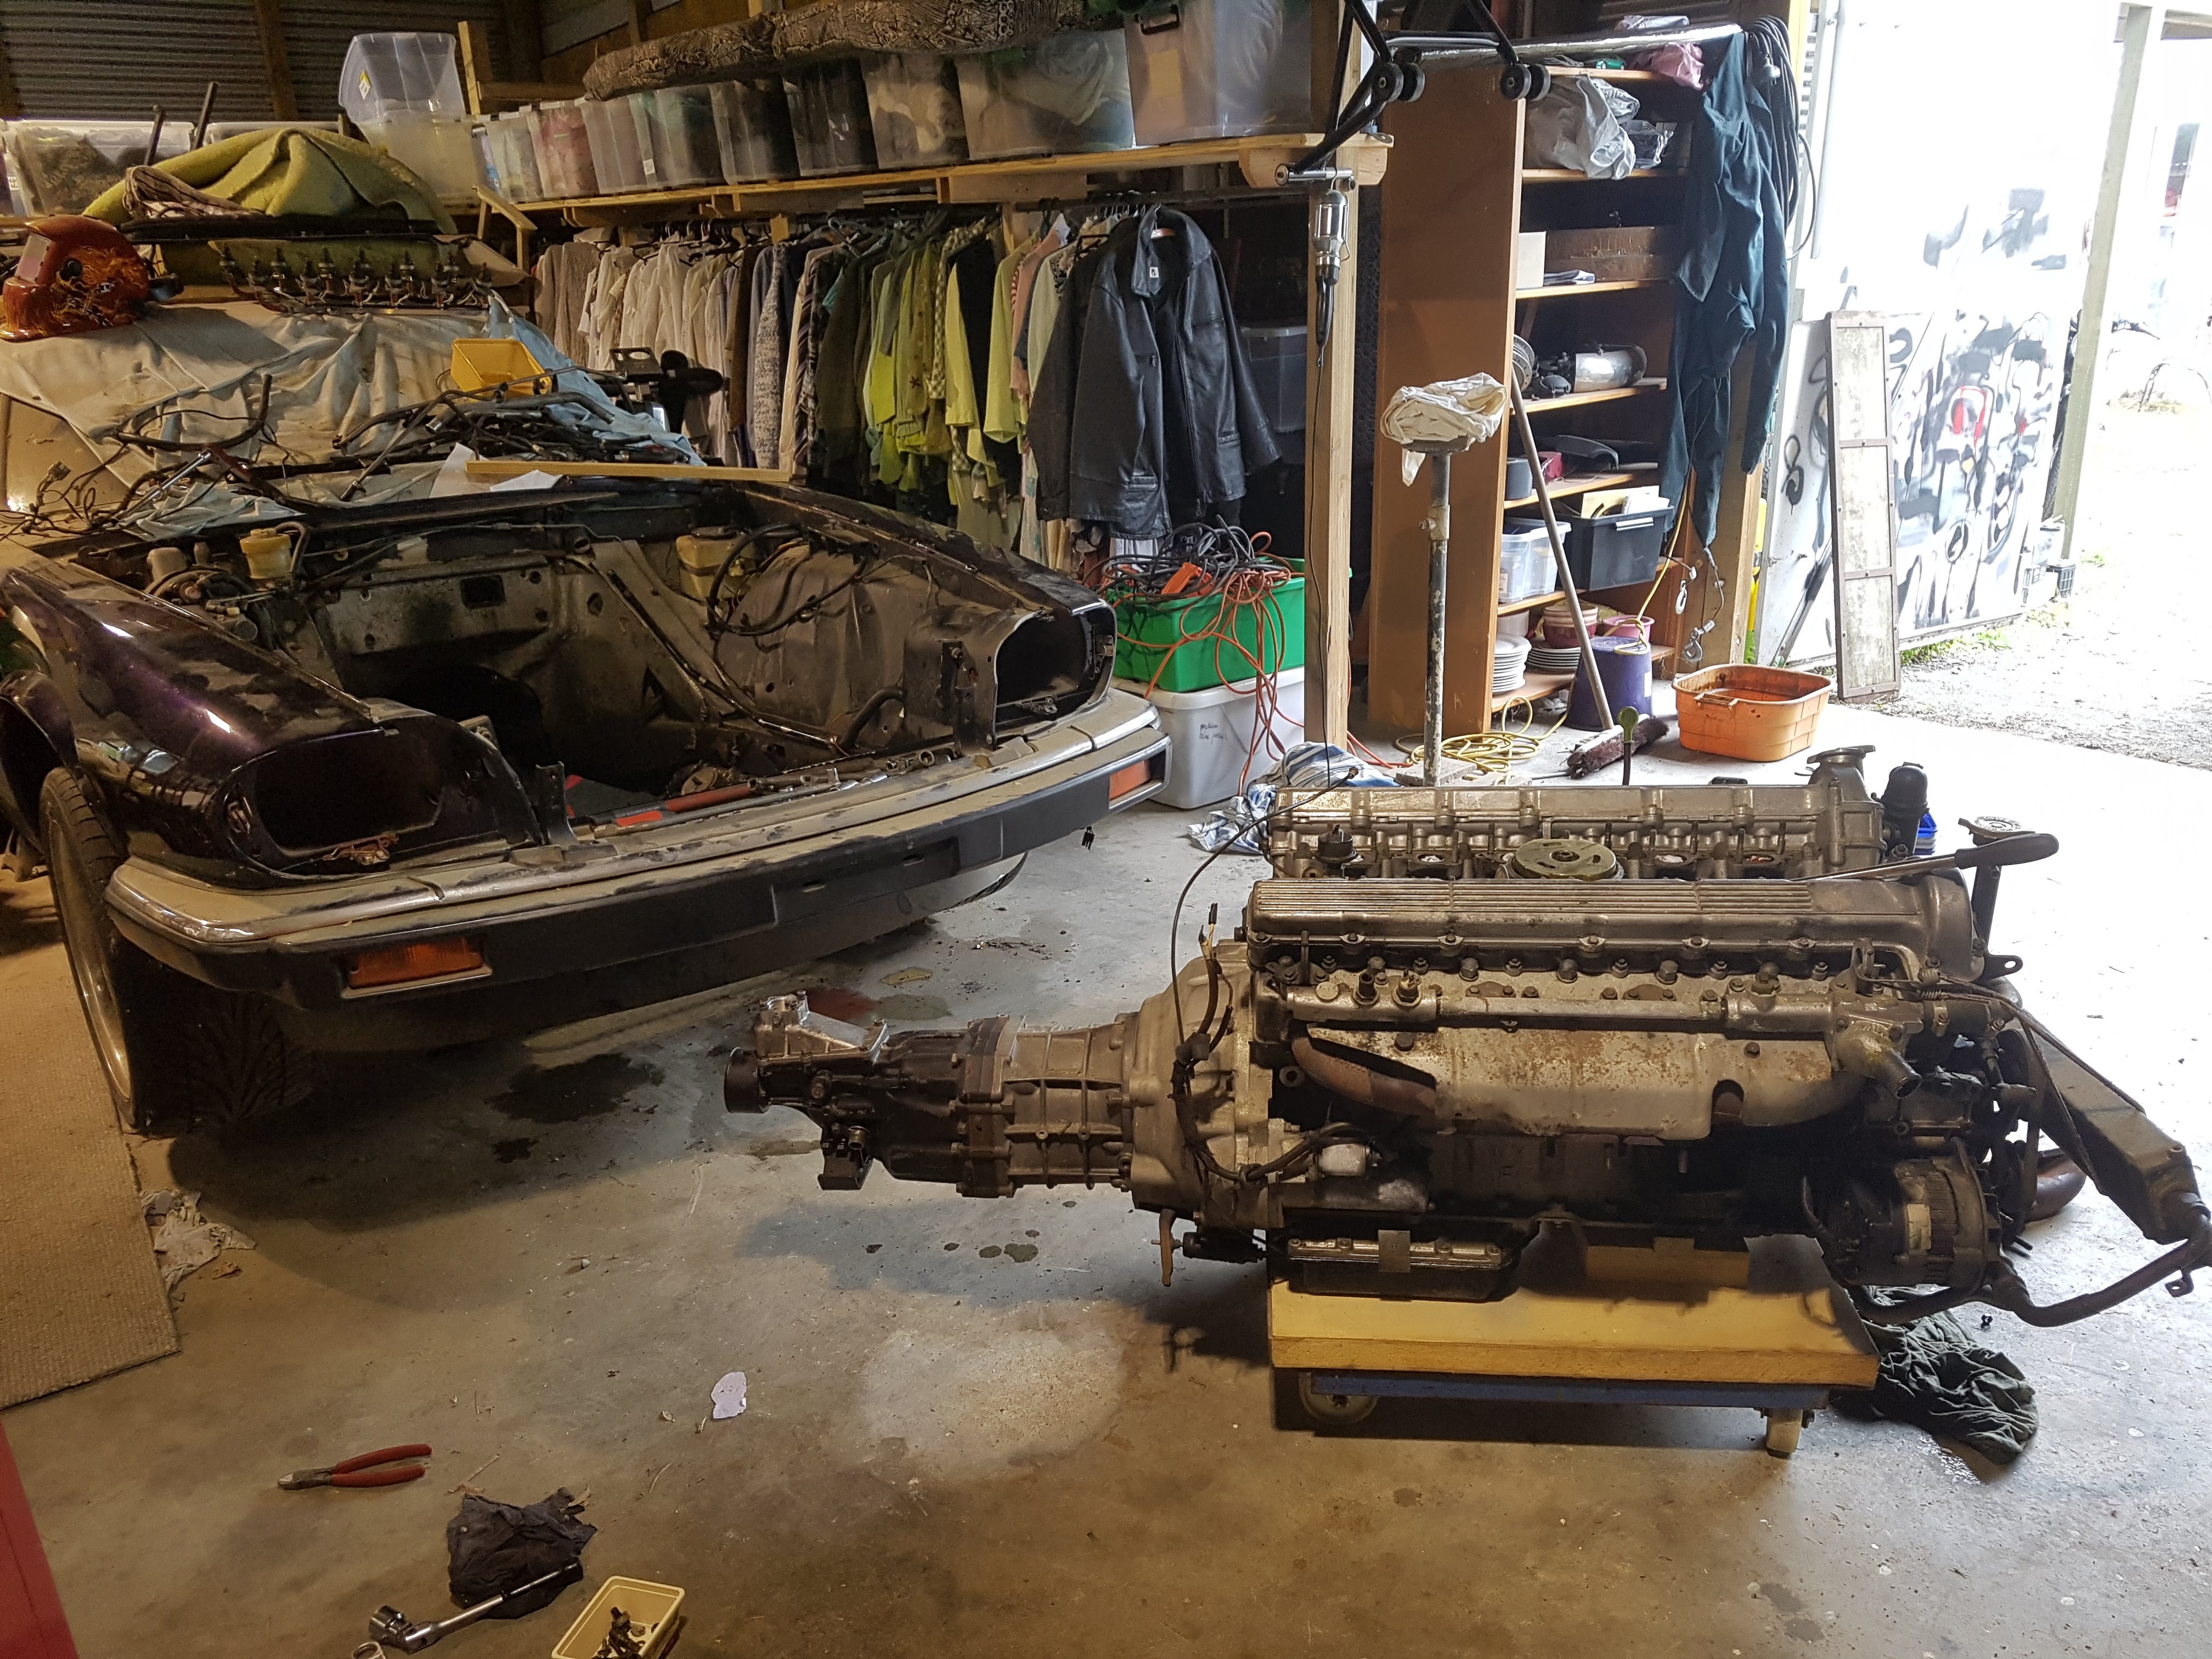
So there are 2 things I need to get this v12 running again. 1 - Ignition. Hmm, after doing a bit of research, it looks like the HE v12 (the one i've got) runs a stand alone ignition system. The distributor has a hall effect sensor, and there is an ignition amplifier that acts as electronic points. This is Ideal. The dizzy has centrifugal advance and vacuum advance built in. No computers required. An added bonus is that the ignition is a standard GM affair (hidden in a lucas box) so they're 6 bux from rock auto! Should be easy and reliable. Excellent. I had a spare dizzy and set this up on the bench to switch a LED. Worked a charm and a mini rave ensued. The next thing I need is fuel. All XJSs were fuel injected. I had the fuel injection gear, but not a computer. My initial attempts with the XJS using a LINK LEM 3 were not very successfull, and felt out of character with a 70s car. I'm dead set on carbs! I don't car about economy, or chasing power, this car just needs to sound cool at WOT. The e-types and the early xj12s came with quad stromburgs. Although this was a proven setup, they are not renown for sounding wild. So that rules that out. Looks like its gonna have to be 6 downdraft webers! You can buy manifolds for them, but a set costing more than the series 1 donor car, I don't think so Tim. Being very inspired by @Roman rapid cad and fab stuff with his echo build, I wanted to learn fusion 360 and try and cad some up. Coupled with the fact that @DAD had lent me his 3d printer while he was tripping around the south island in his mobile palace, this meant i could do some cad and fab of my own! Some flange measurements, some frustrations, and plenty of hours in fusion 360 and i had something that bloody well looks like a manifold! I'll be dipped, It was actually fun AND rewarding! So I printed a "bank" for mockups: They didn't fit. hah. I'd based my measurements of a flange i'd found online. All the holes lined up perfect, but the head bolts in the middle fouled on the base flanges. So after a few tweaks, i finally had a base flange that sat down properly! oooh yeah. The engine is in Masterton, an hour and a half drive away, so I can't just do quick checks to avoid fuckups like this. Ah well, its all entertainment at the end of the day.
2 points
-
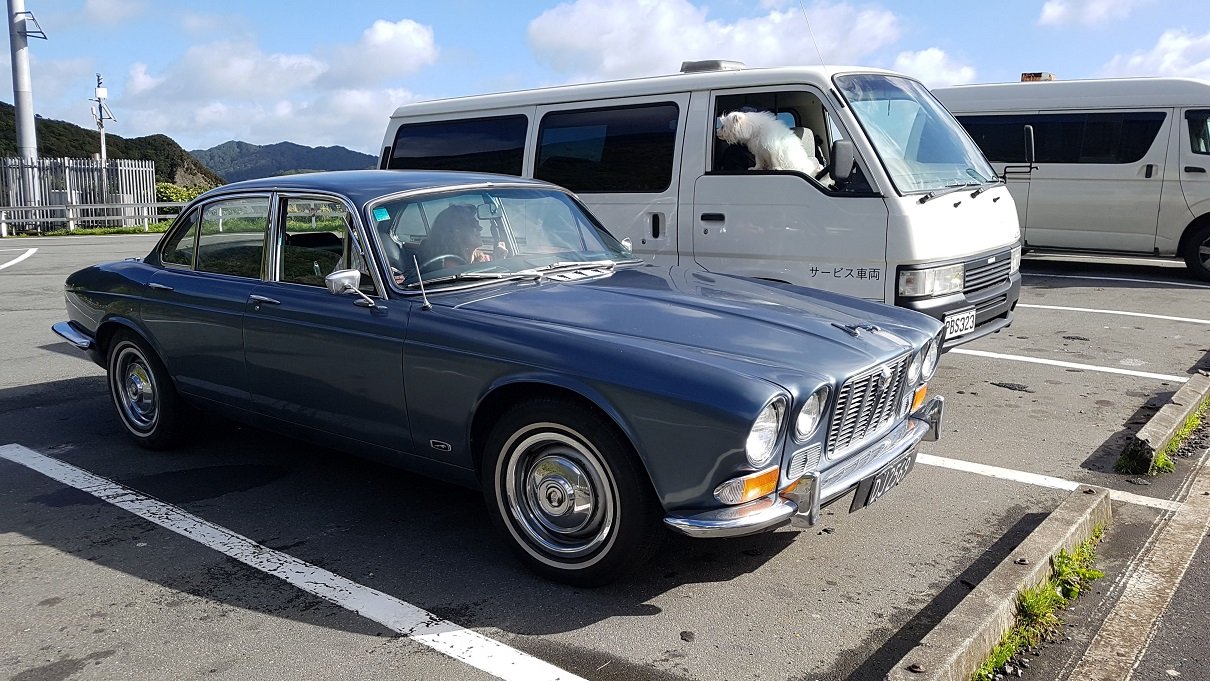
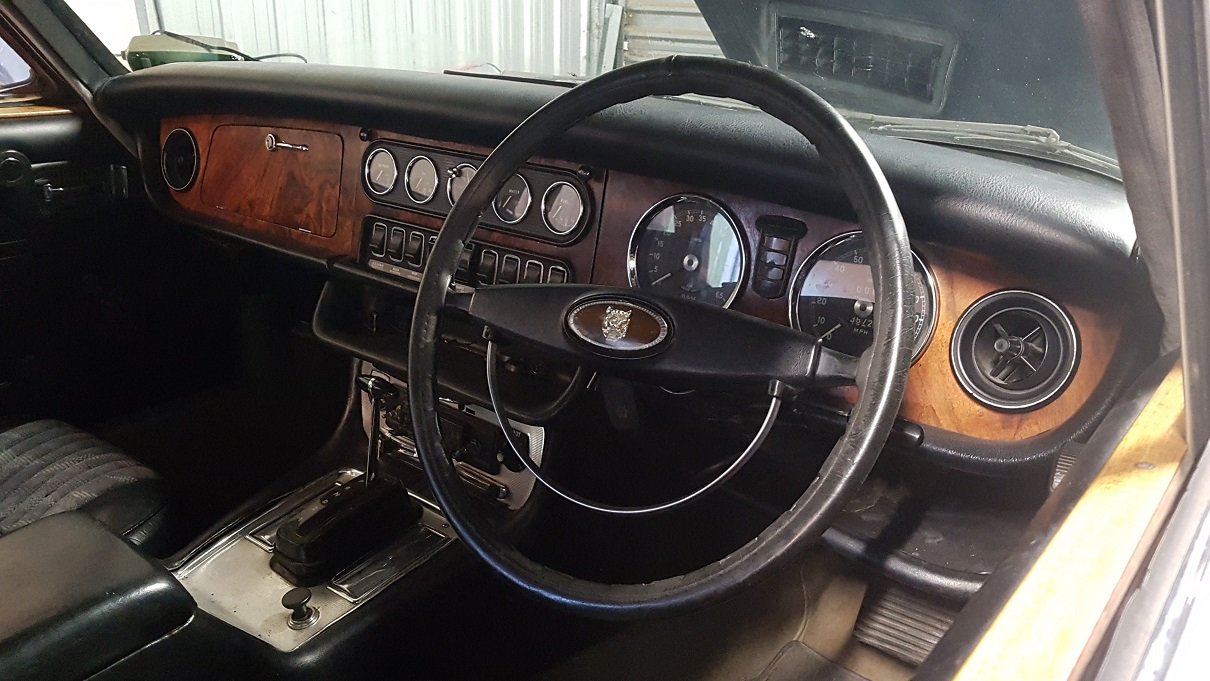
So, I kinda ruined the xjs. 19 year old me didn't know what I was doing. Live and learn etc. However, 19 year old me still had some good thoughts. Manual v12! So previous me has spent a fair packet on all the spendy stuff and present day me has been left with a good condition v12, a good condition w57 gearbox, a lightweight alloy flywheel and a custom commodore/hilux hybrid clutch setup. Cool. Now I just need a good (more complete) car to put it in. Have been keeping my eyes out for a series 1 XJ6 for a couple of years now. But never pulled the trigger as they had always gone for way more than I wanted to pay. Plus my million other projects always were higher priority. Janurary this year, I spotted a tidy looking 1970 S1 on facebook down in Timaru. Went down to hang out the that vampire Kyteler and we had a look on the way back from the airport. It looked pretty decent, completely rust free, and reg on hold. Had the povo spec 2.8 in it, perfect as I'd be ripping it out anyways. The dude was really keen to sell it and kept messaging me for the next couple of days, I caved and lowballed him and he said yes. So we enlisted @vivaspeed's help, and did a school night mish up to Timaru to go and get it. The next couple of days, KY and myself tinkered with it to get it running and driving. Fuck she's a slug with the 2.8. Ah well, its not staying. We got it to drivable, but it had no park brake (the auto P) and no hand brake. Plus brakes were a bit spongy. Inboard rear makes it a PITA to work on. So it wasn't quite up to a WOF and a drive north. However, we did cut some laps of the block. It lived in Michael's shed for a few months until I could afford to ship it up north. Got it to Wellington and then drove it to my lockup in Masterton to await its transplant. Drove pretty well, though seriously underpowered. How cool is the dash on the series ones!
2 points
-
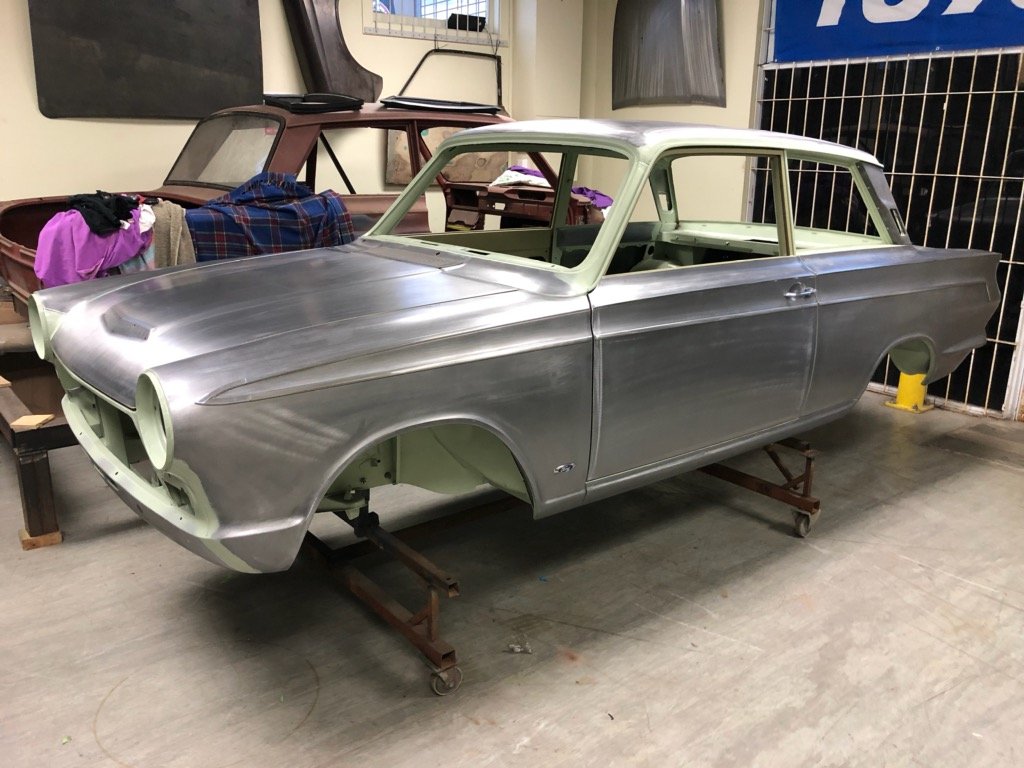
I got the rest painted on Saturday morning. Half sick and fully fumed out it was bloody hard to see what was happening but luckily it’s not all streaky, lol. Again, the ground coat went on fucking gravy, topcoat thick. I slapped some bumper paint on, spray bombed half of the trims + scuttle and grille.. they had faded from the3 year stint out in the sun. Number plates totally weren’t sprayed and sanded back. Also welded a stainless tailpipe on, visually made a big difference. still have to flat and buff it some time, tint the tail-lights & install the new rare spares outer door glass weather strips.. what’s left of the factory ones are as hard as plastic2 points
-
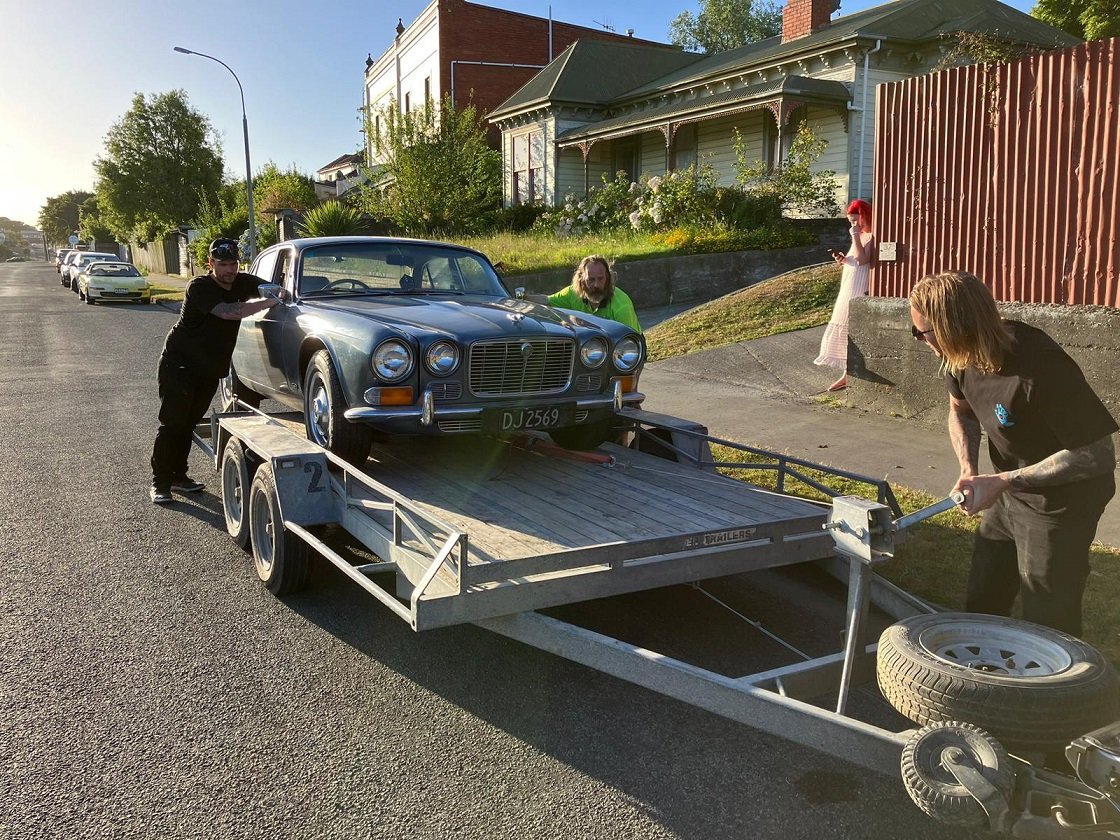
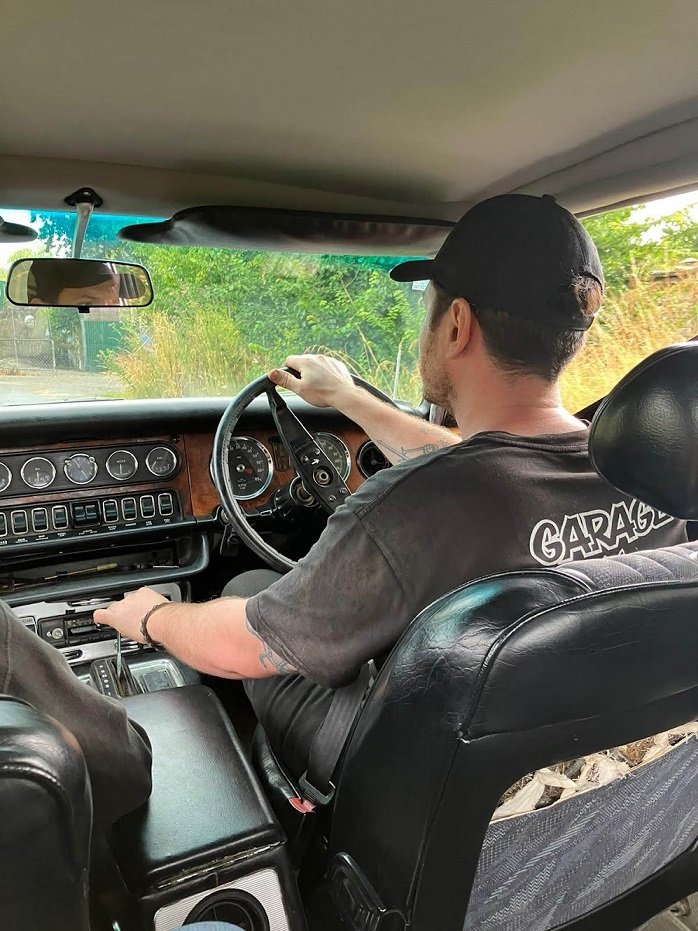
It was a big day today... Still got a bit to do but like they say, good things take time. Thanks again to the amazing and beautiful souls @Seedy Al and @Goat for their hard work while I stood there and took photos. Without them and their assistance, I would have struggled to get it over the line. Oh yeah, it may have driven under its own power and I drove it across town to it at home for the first time in 7 years...2 points
-
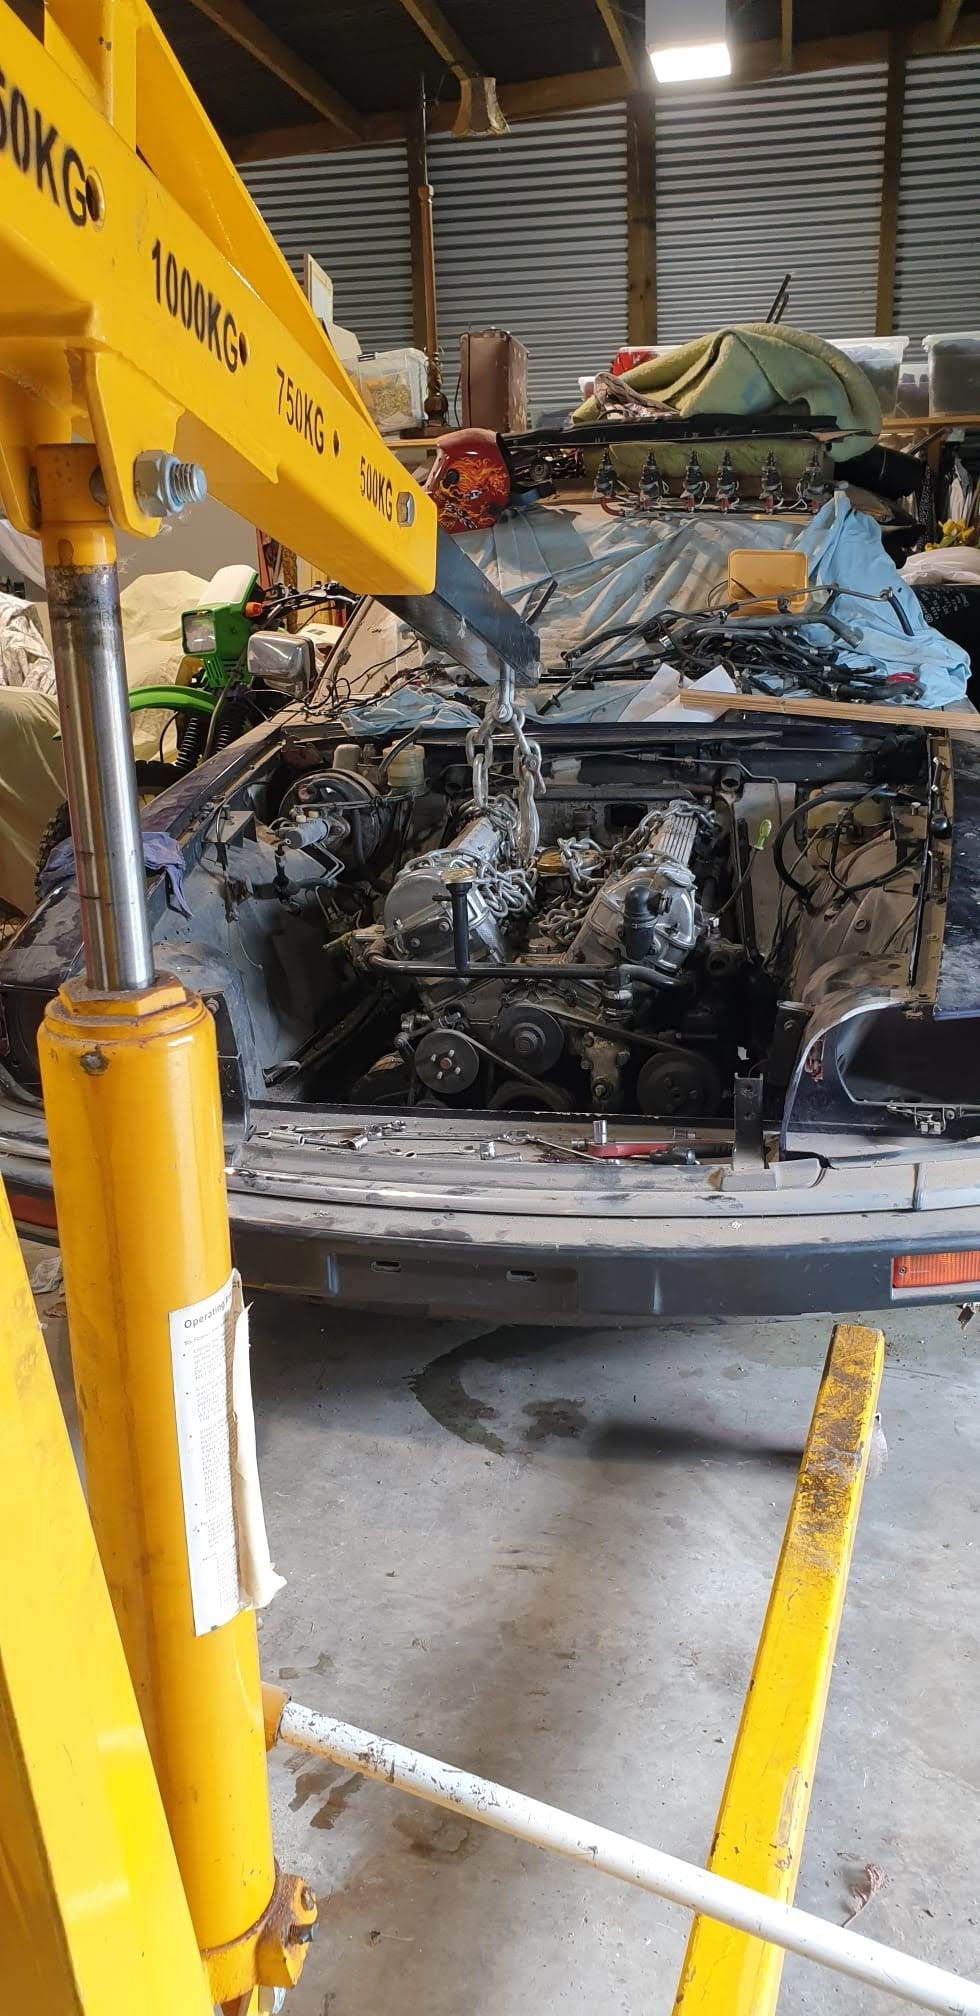
Seeing I've had this car for a little over 20 years now! Some 14 years after the last post in this thread, a thing happened: She's a big unit thats for sure. Makes a W58 look like a k40! Some things are happening and have been happening. Wasn't gonna post anything up until i'd got through most of the build. But here is a bit of a sneak peek for the jag foamers on this forum Will save up some progress before any more posts. Never got Jags out of my system. So getting back amongst it after more than 20 years of pining.
2 points
-
The last club day of the season (I was out in first round so not worried about points) was coming up and it was looking wet So I thought it would be a good opportunity to get the the car out for another shakedown of the new wiring, and get some experience in the wet (I've never driven in the wet). So first time out on a wet track in qualifying, i put it on pole... Race 1 Turns out it goes really good in the wet. Allowing me to take my first win by 30s over 2nd place (he sand bagged a bit after he accidently hit pit limiter and saw me race off into the distance). I managed a 1:42.5 which is I'm absolutely stoked with, that's only 7s off my dry time, and there was a little more in it (and that's with no changes from current dry setup). Also it confirmed that things like the wipers, lights and demisting (not running any, instead I'm using the heat from exhaust + radiator) all worked as expected. The wet's i ran are 4 year old ex Michelin TRS, and are absolutely amazing, it really was like driving in the dry, they are super soft and it shows as another competitor who is normally slightly faster in dry then me had older harder different brand wets and was 12s off my time. But also the weight of the car and it's handling characteristics show it's driveable/chuckable nature. Race 2 Race 2 was a handicap race and I was 60s behind first pack, unfortunately the guy who came 2nd place in 1st race was 15s in front of me, and he picked his pace up to match mine, i did manage to get within 9s of him on a damp track (rain had stopped). I came out of the day actually feeling excited to potentially race in the wet in the future, where as before I was very nervous, so that's also a massive win. ITBS Interestingly enough Tegiwa have just come out with some Jenvey ITB's to fit an EP3, they are very heavily compromised to fit in the engine bay, but do have some dyno charts. Check out the dyno results and see what you think about the results and claims... https://www.tegiwaimports.com/blog/?p=6297 Before: After: Let me know your thoughts in my discussion thread here:1 point
-
Kinda yes, there seems to be no widespread industry standard for V band clamps, i've found plenty of variance in both size and contour from different suppliers additionally some size off the band, some off the tube.1 point
-
Yup that’s it. they hold up fine in rally cars even after cartwheeling down a bank. the weld on tabs are good, allows you to move the seat inline with the steering wheel if it’s on the piss from the factory1 point
-
Cheers for the offer - but enjoying burning lots of wood right now. I'd have to suss out a separate spot for one in the future though! Then collect more oil/service more of the locals cars.1 point
-
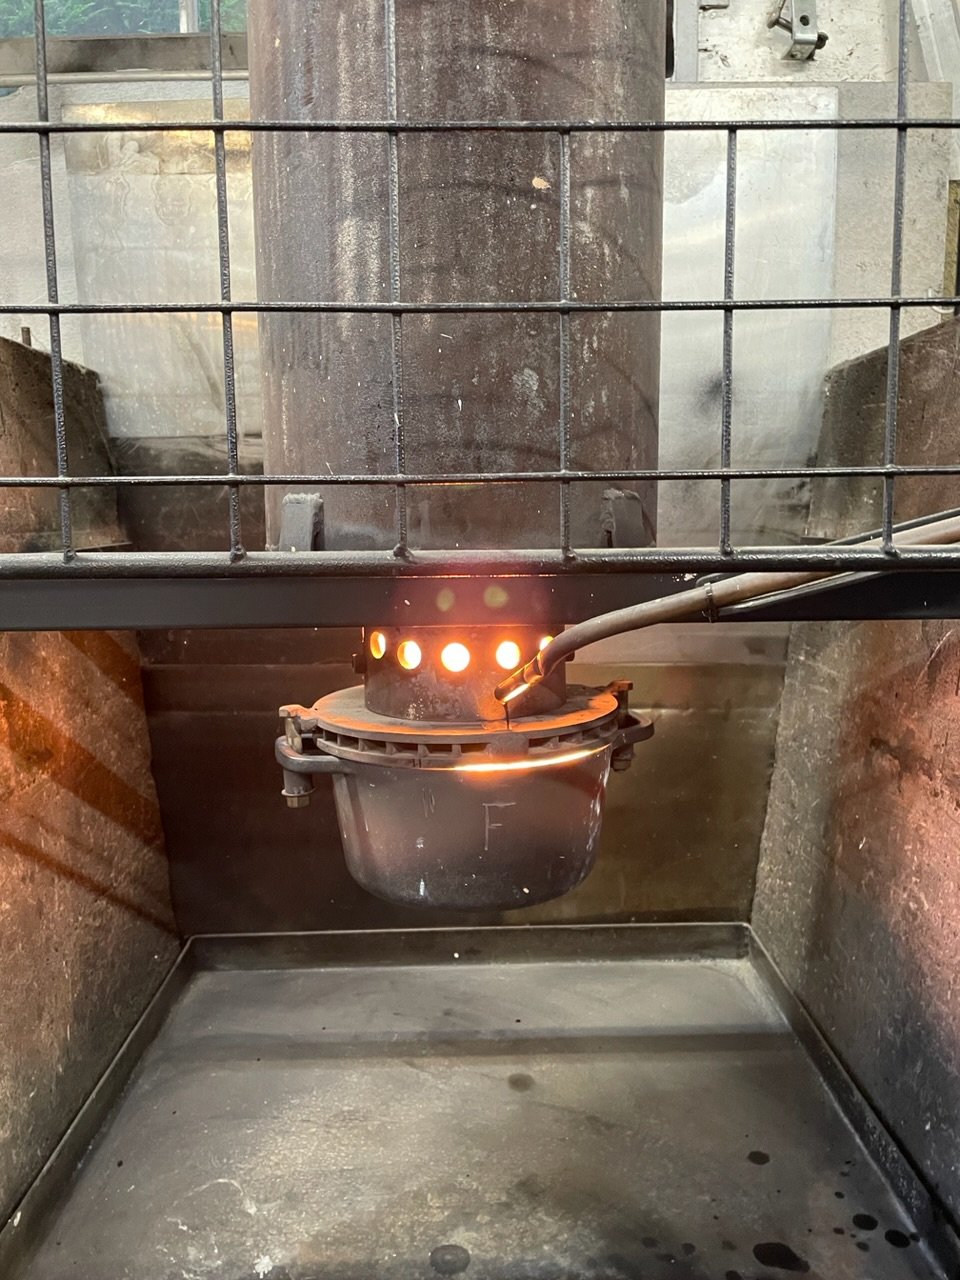
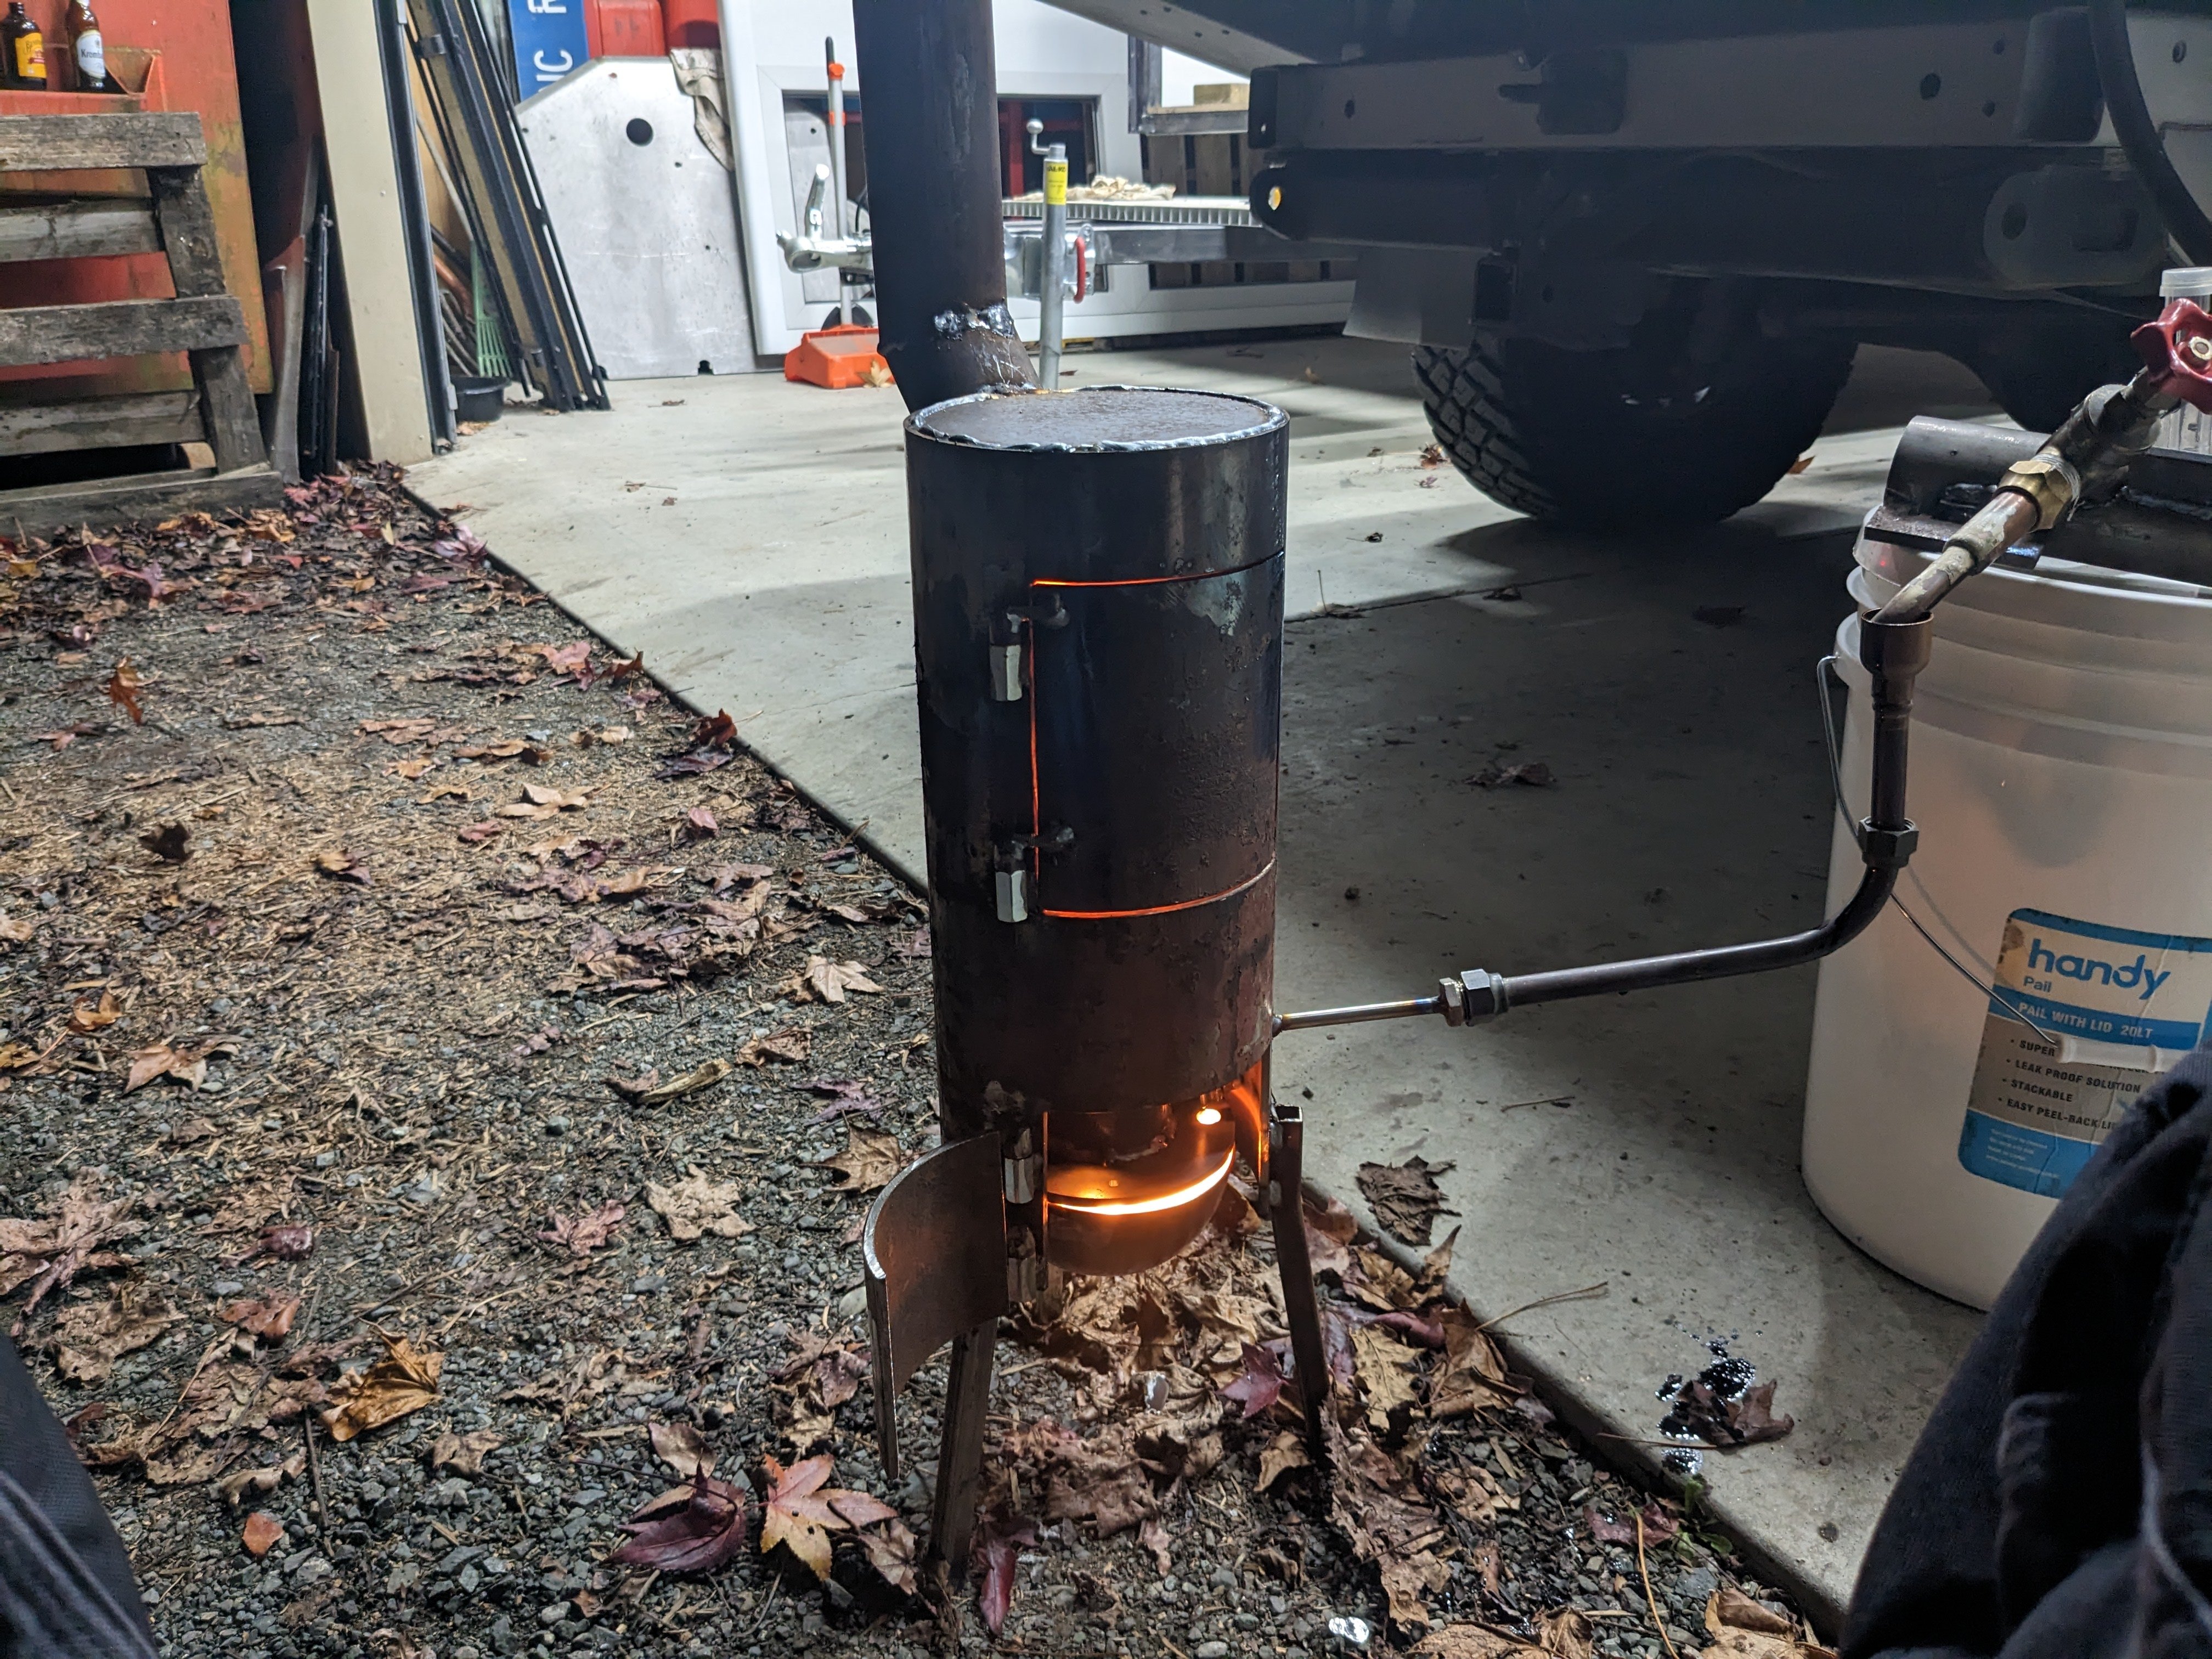
That fdm has killer tone I hear.... More side projects, this time a wee waste oil heater; First run tonight, started cranking once I put a 2.5m chimney on it. Edit; it seems that wee feed pipe is limiting the crank though, I'll chuck something bigger in there and see if I can get it glowing.
1 point
-
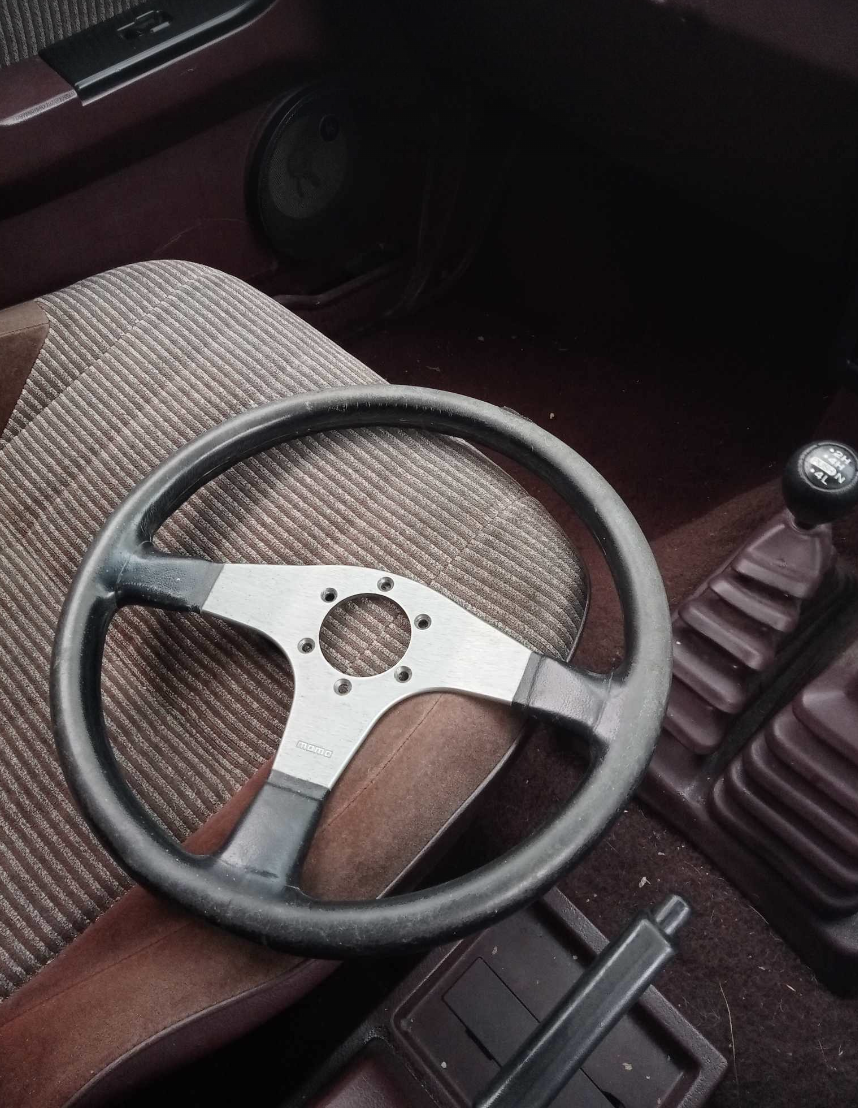
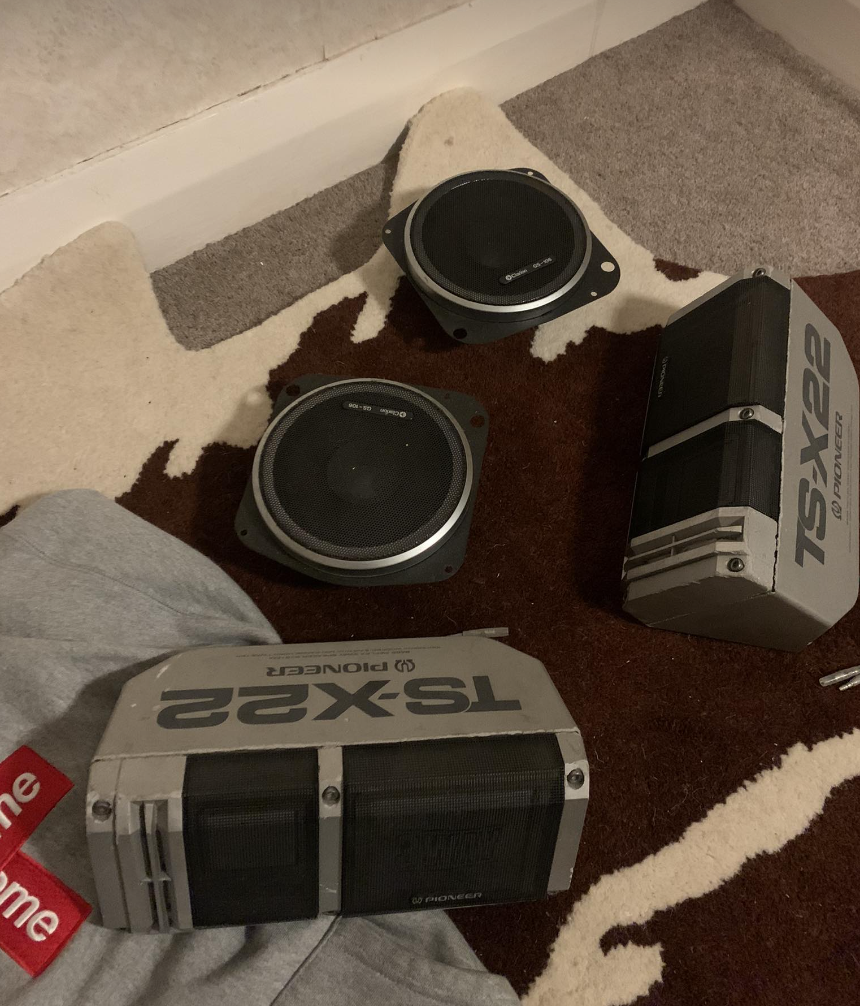
I picked up a few bits for it: Old momo (stamped '91), t1 bumper and fog lights which I didn't get a picture of, and some period sounds. The pioneers are from @Jeffs_Emporium on facebook.
1 point
-
1 point
-
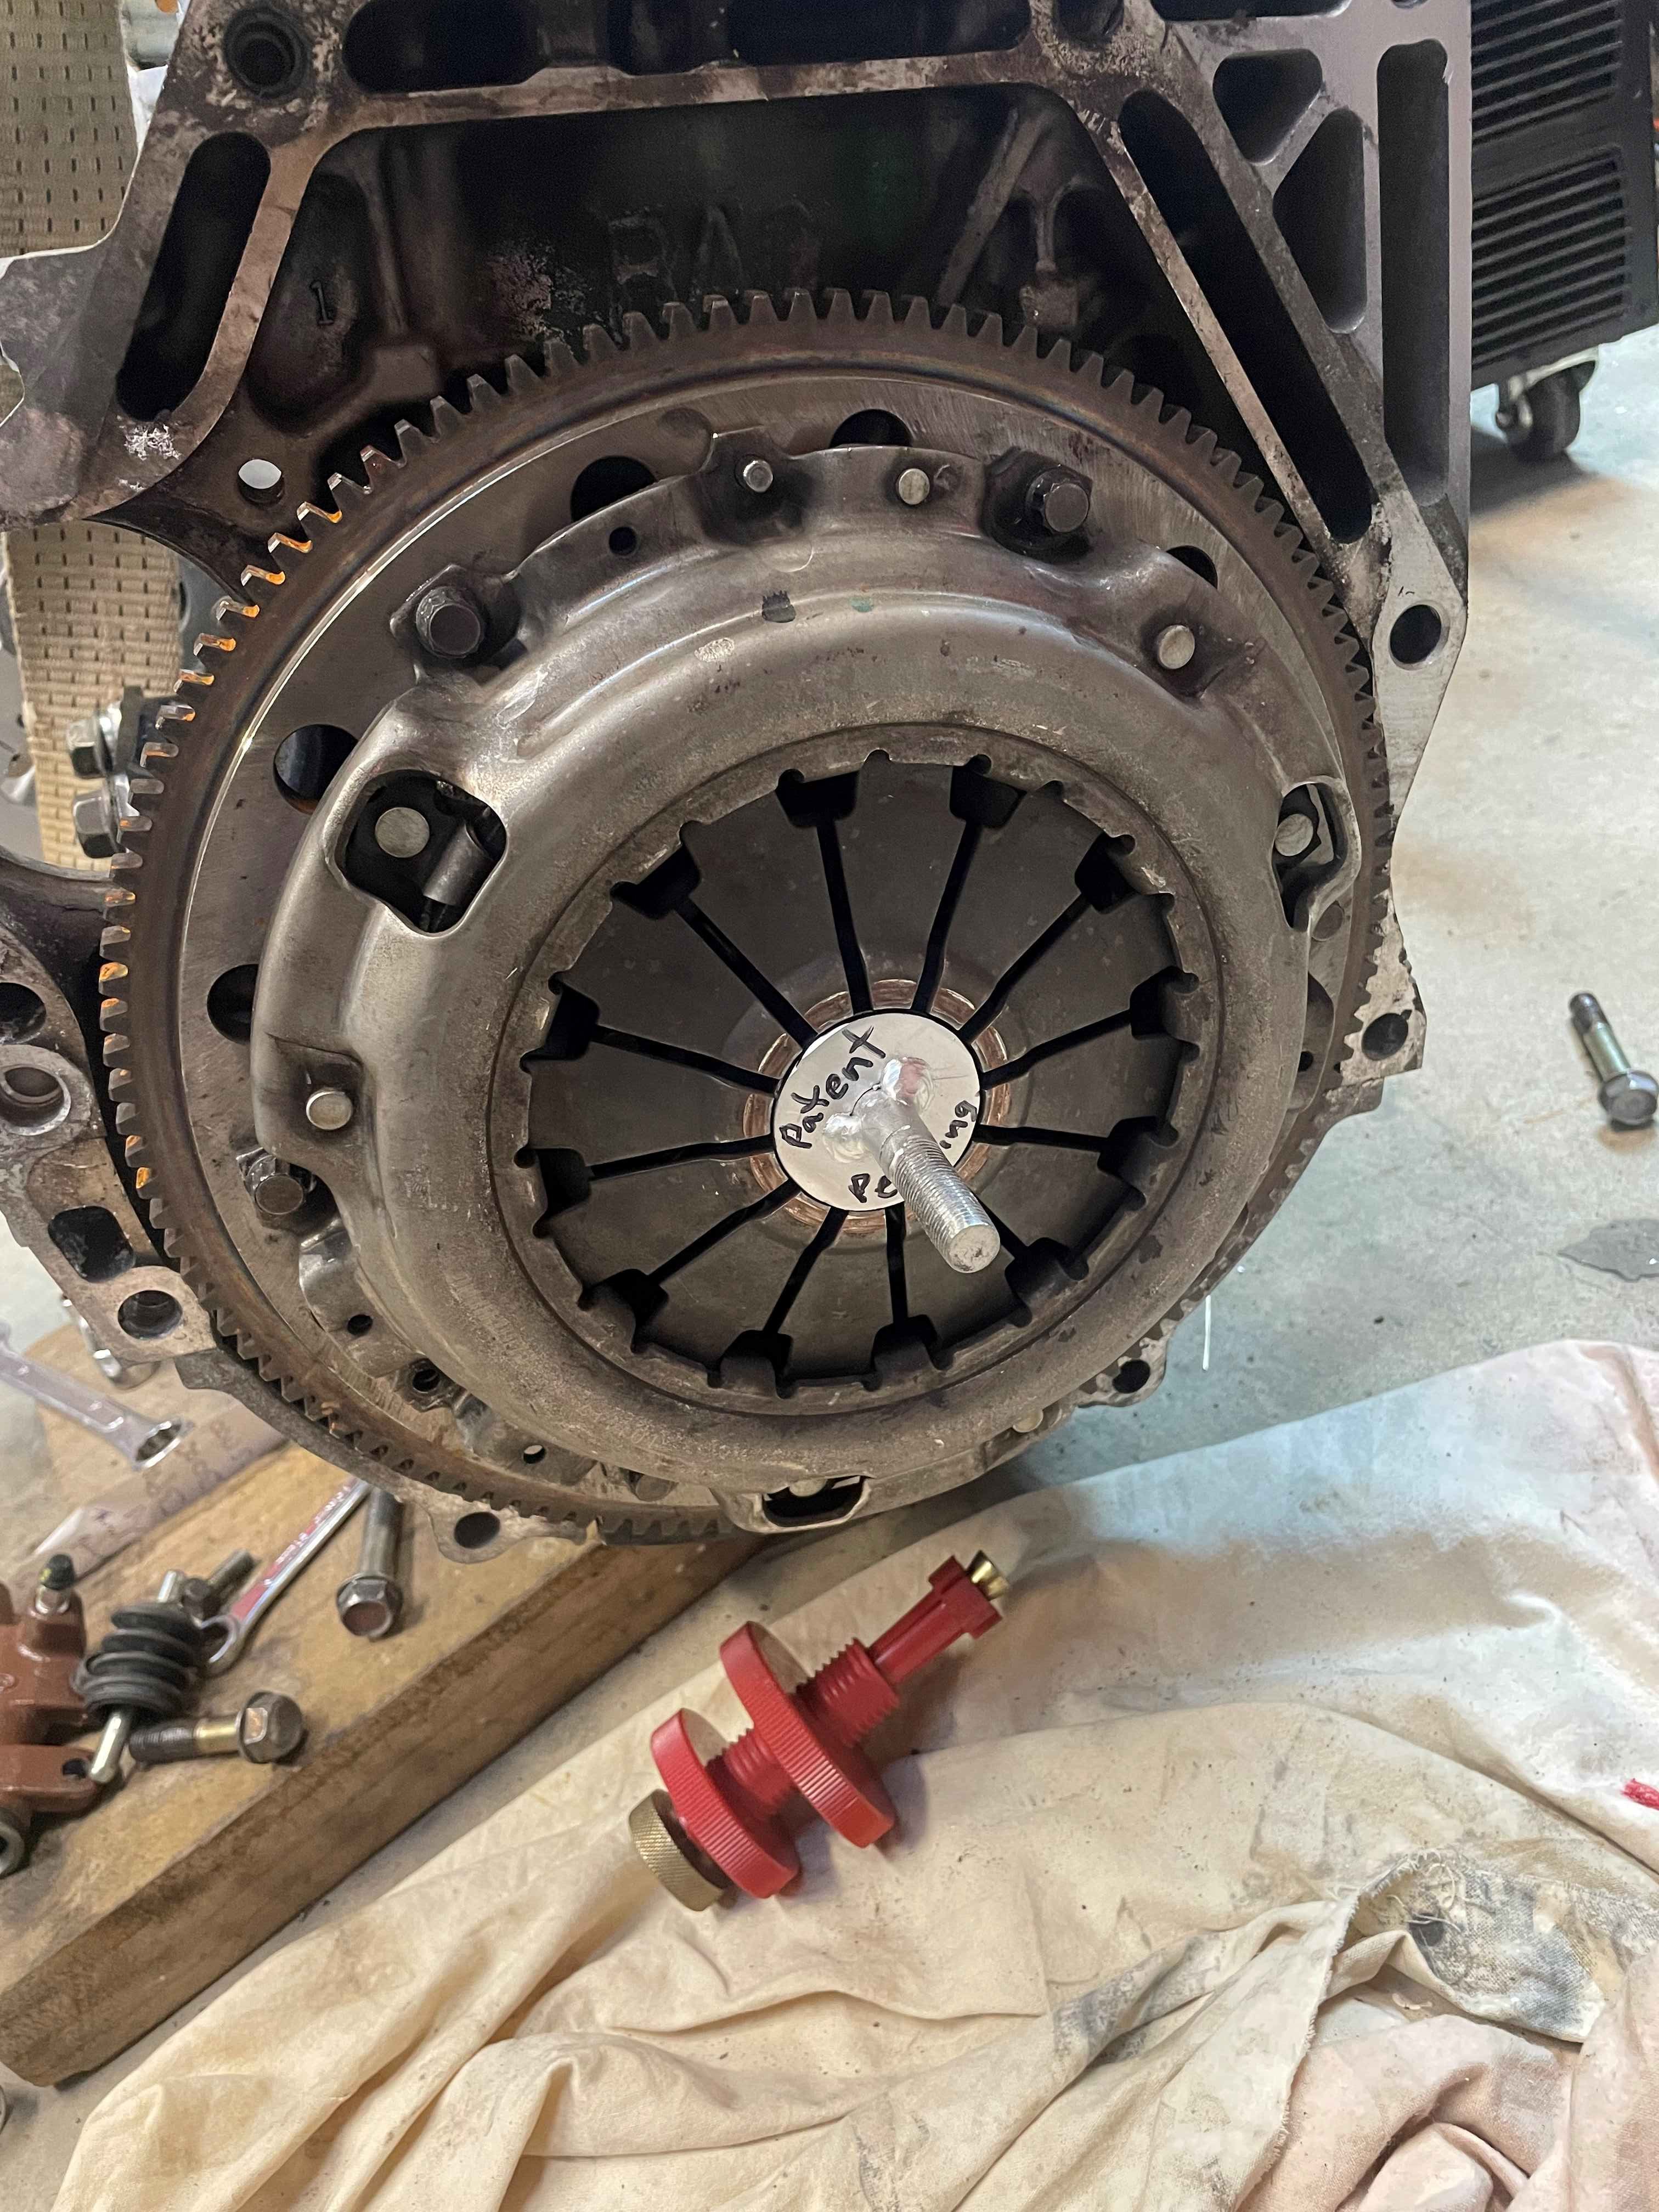
I was hoping I would be able to buy a plastic dummy spline for a Toyota from Repco but they only really had one of those stupid plastic red things that I already had, which is about as much use as you know what. So I made my own. The petrol heads god must have been in a good mood yesterday because I had everything I needed to make something, without having to do bugger all to it to make it the correct size. It worked as well as the gearbox slipped into place without a single expletive said. I had to get a wire clip to hold the clutch fork to the bearing carrier and there were none in the country and getting one from Japan would take at least 6 weeks I was told. The local Toyota gave me a complete bearing and carrier for trade which was still a heavy price to pay for a clip but at least 50% of retail. lesson to oneself when buying parts get everything. Also as to the previous post when I thought the clutch fork was too close to the slave cyl. The reason being I didn't have the clutch plate in. Once the pressure plate clamps down on the clutch plate the fingers move in and that gives the required room for the slave cyl push rod. Something you don't really notice until you need to. If I had made alignment tool to start with I would have had the plate in place. Never mind at least I kept my sanity.
1 point
-
Is making a massive loop to the middle of nowhere not normal? All my roadtrips end up that way.1 point
-
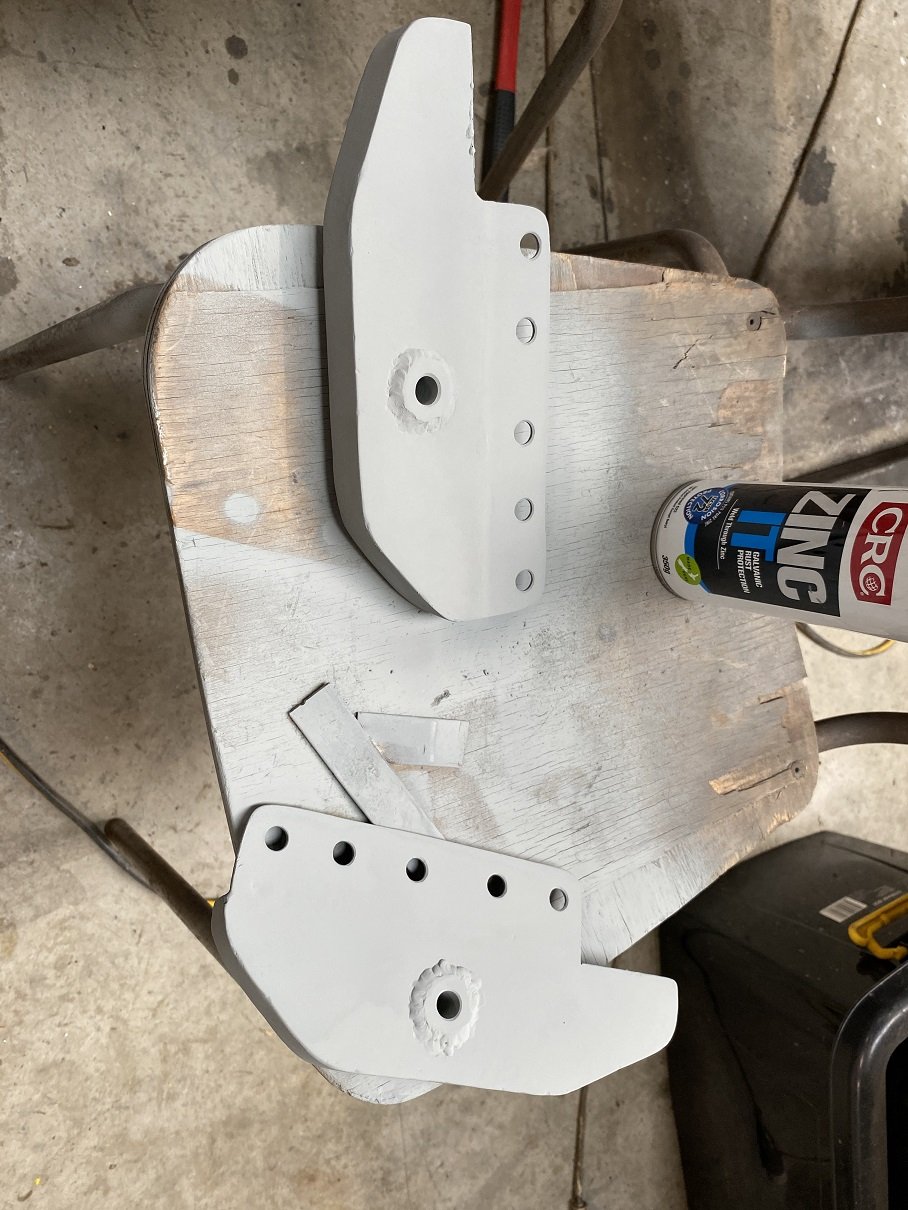
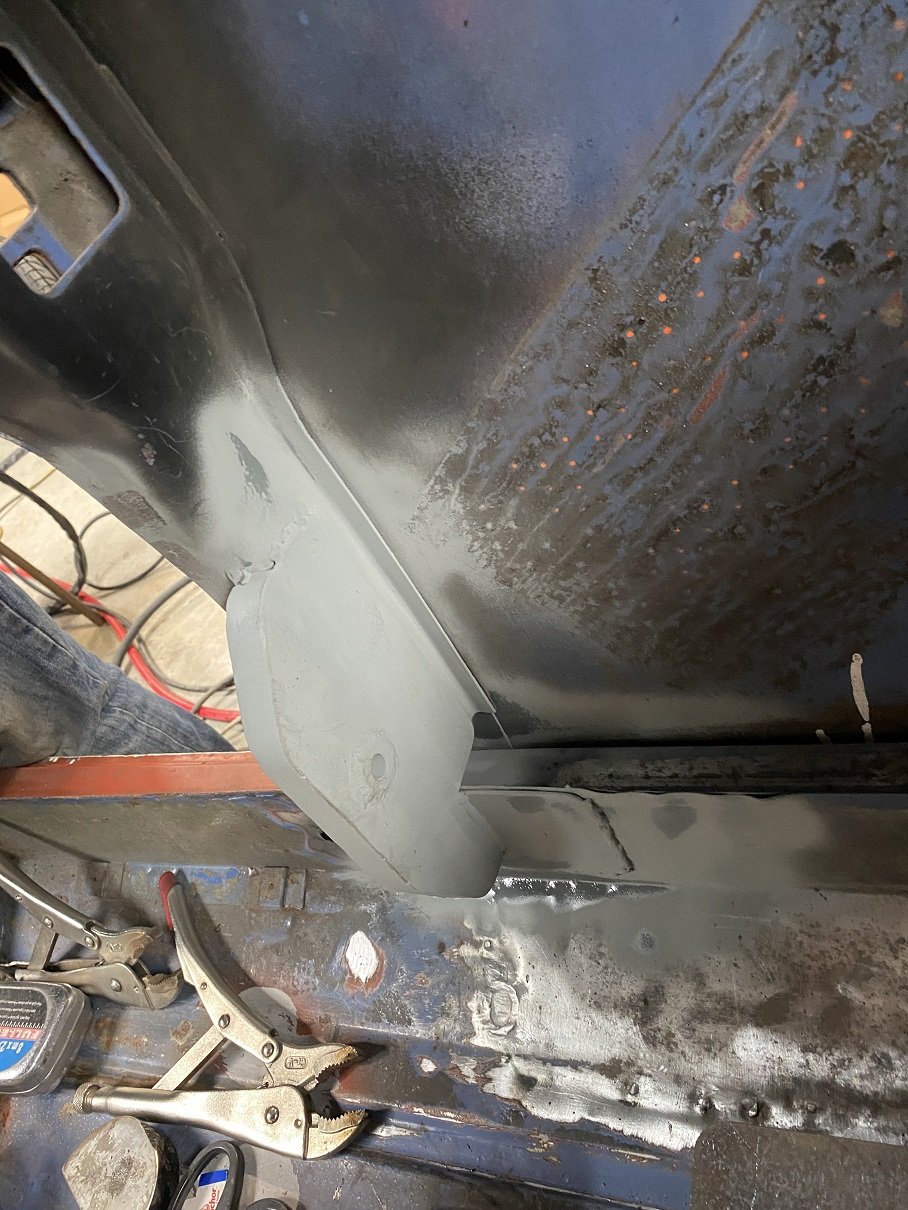
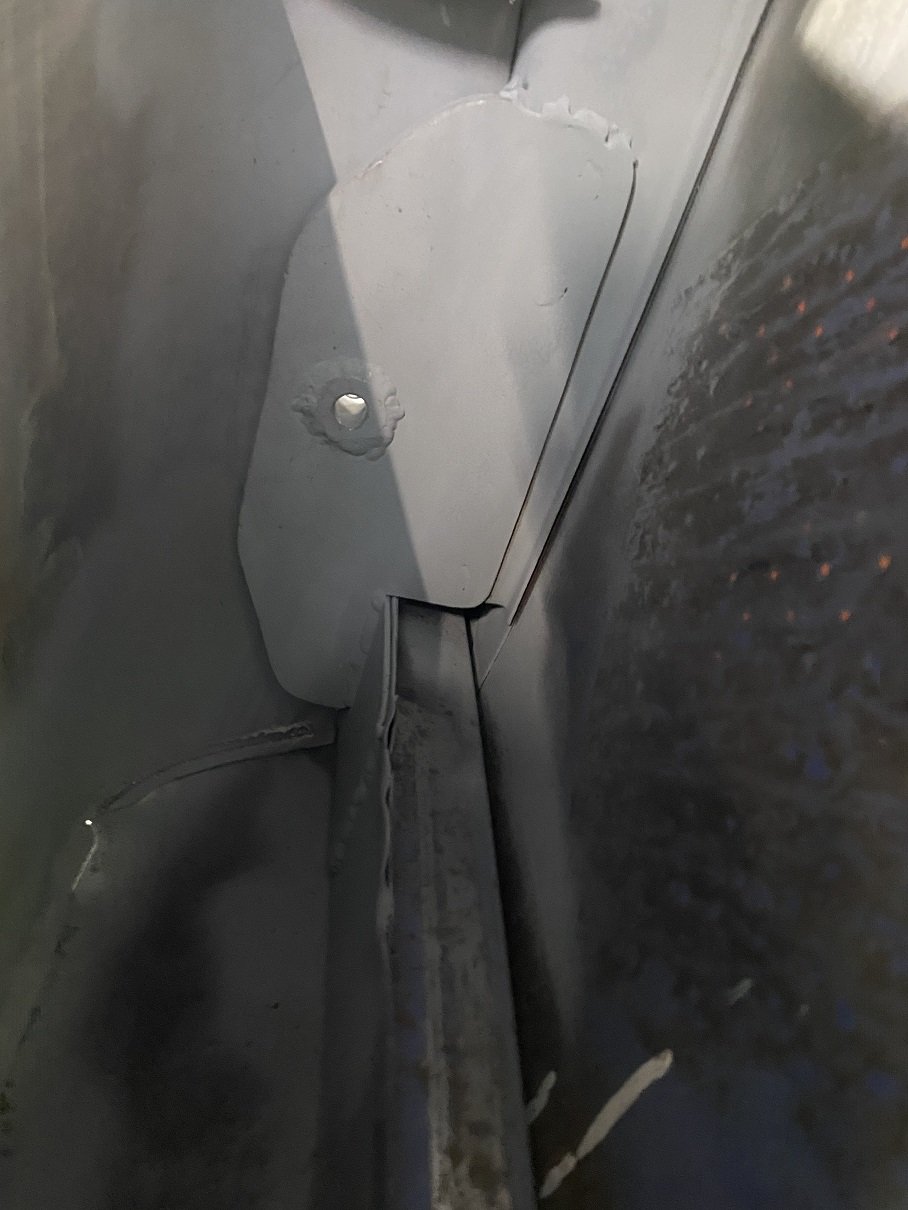
Before I could weld the companion boxes in I needed to sort out a mount for the seatbelt reel. The companion boxes came from a MK3 which had static belts so there is no mount for the reel. MK4 onwards had a mount like an inverted bathtub that was spot welded only to the sheet metal of the companion box. It always seemed a bit weak to me. My mounts might be a bit over-engineered. 2.5mm thick, the crush "tube" is 25mm round bar. It's spot welded to the b-pillar and welded to the inner sill with a reinforcing plate.
1 point
-
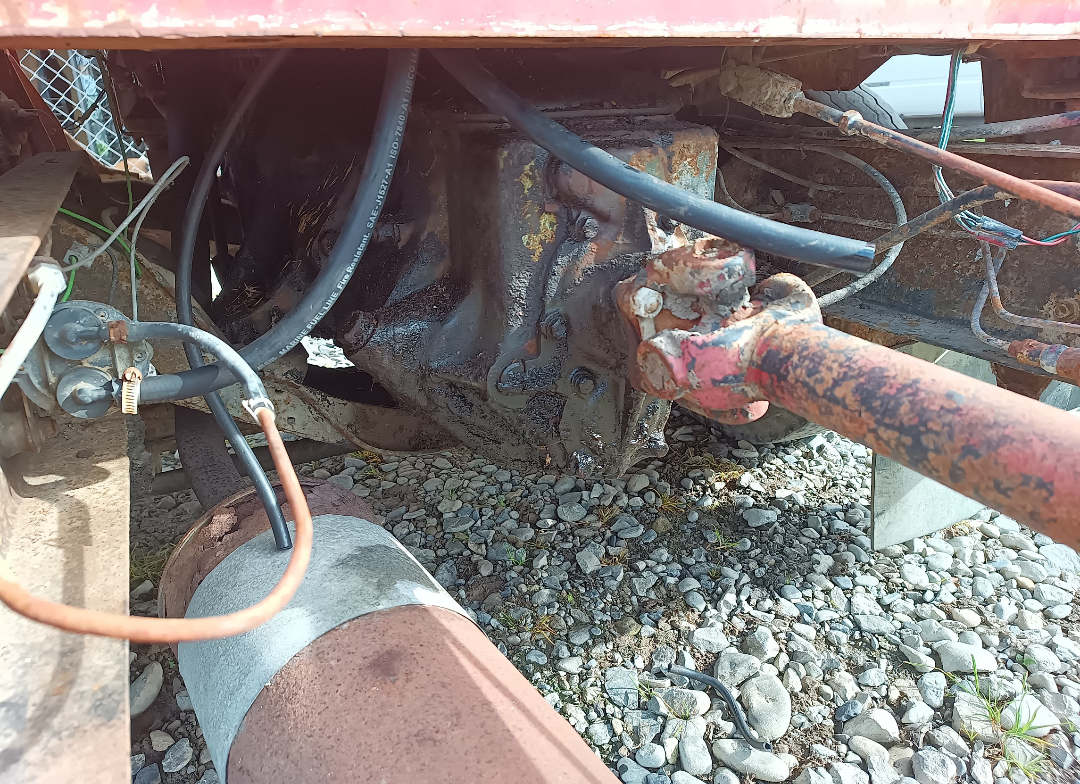
Also the diff has to be swapped. After the power wash and the engine dried off I took it for a drive down the road. First gear is unusable like most light trucks but 4th feels like 2nd. I thought the diff was 4.5:1 but It's in the 6 or 7's. It's able to easily take off in 4th! I might look into a GMC or 9" swap as loads of ratios and easily enough to convert to dual wheels with off the shelf bits. I couldn't be bothered to stuff around with an overdrive conversion. Although the gearbox is green which was news to me. Another thing I have to do is move the shifter. Quite impressive that you scrape your knucks going to second as well as up to third. Not to mention it's behind you so have to find it.
1 point
-
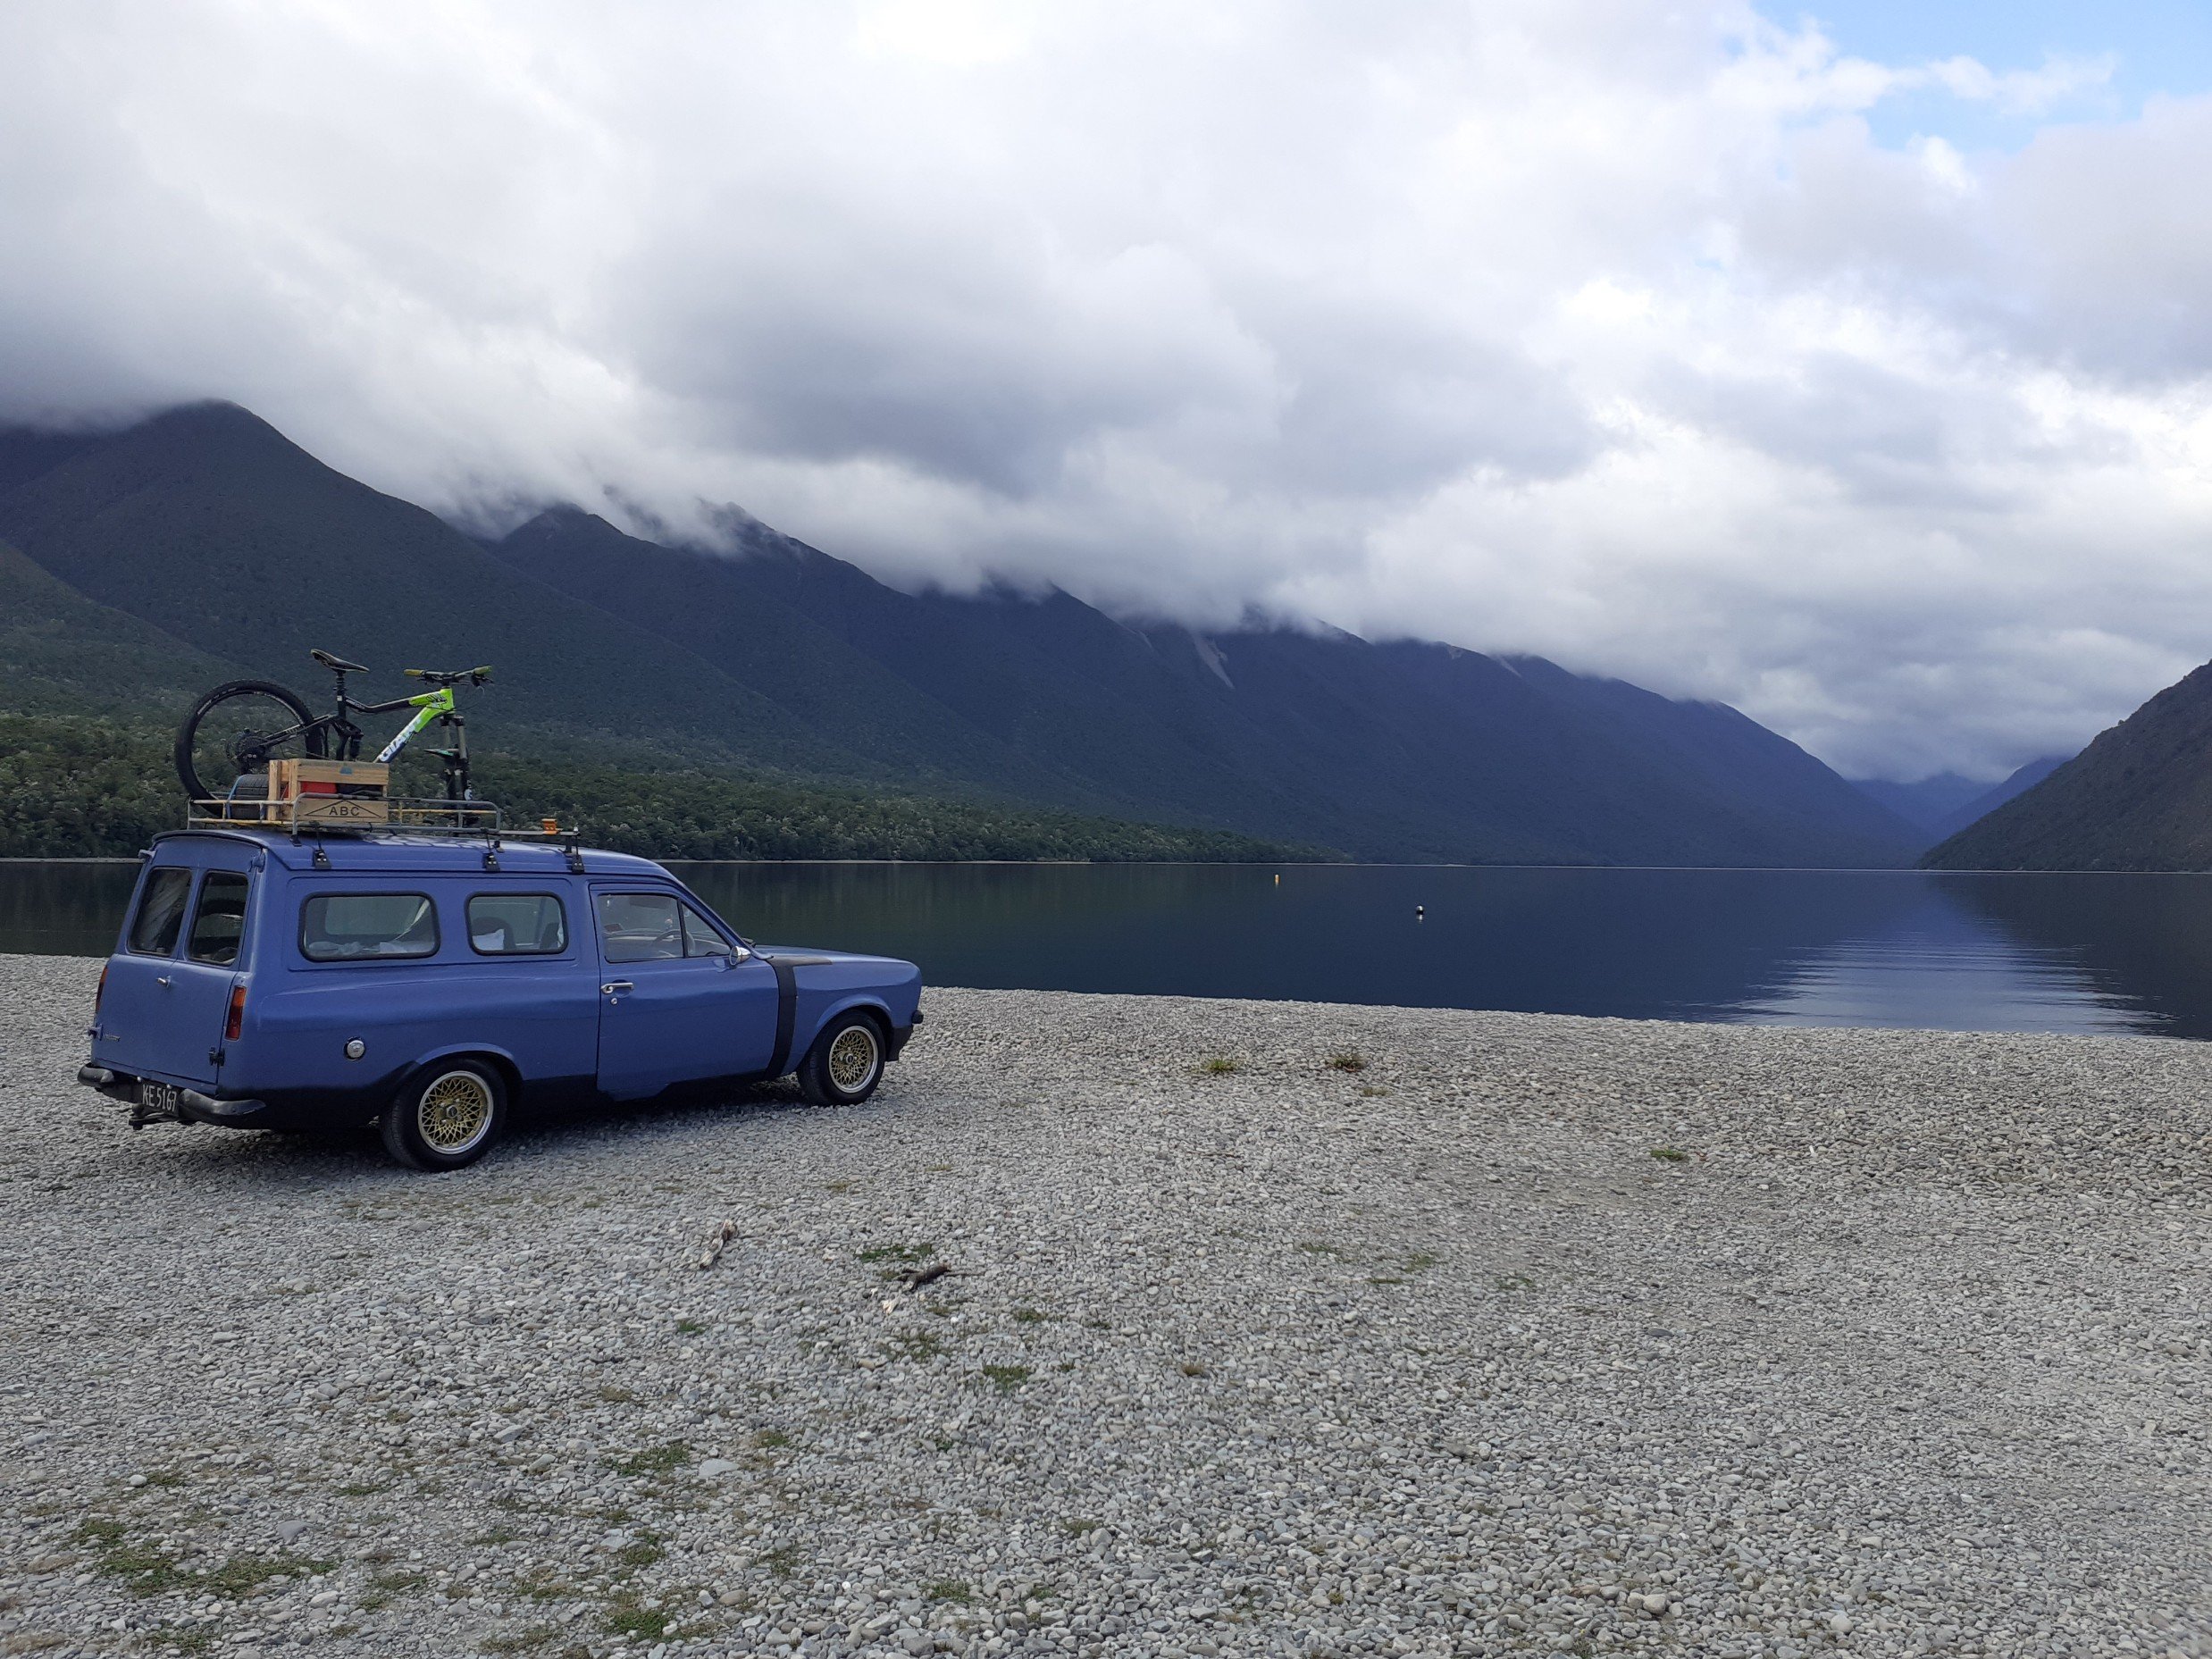
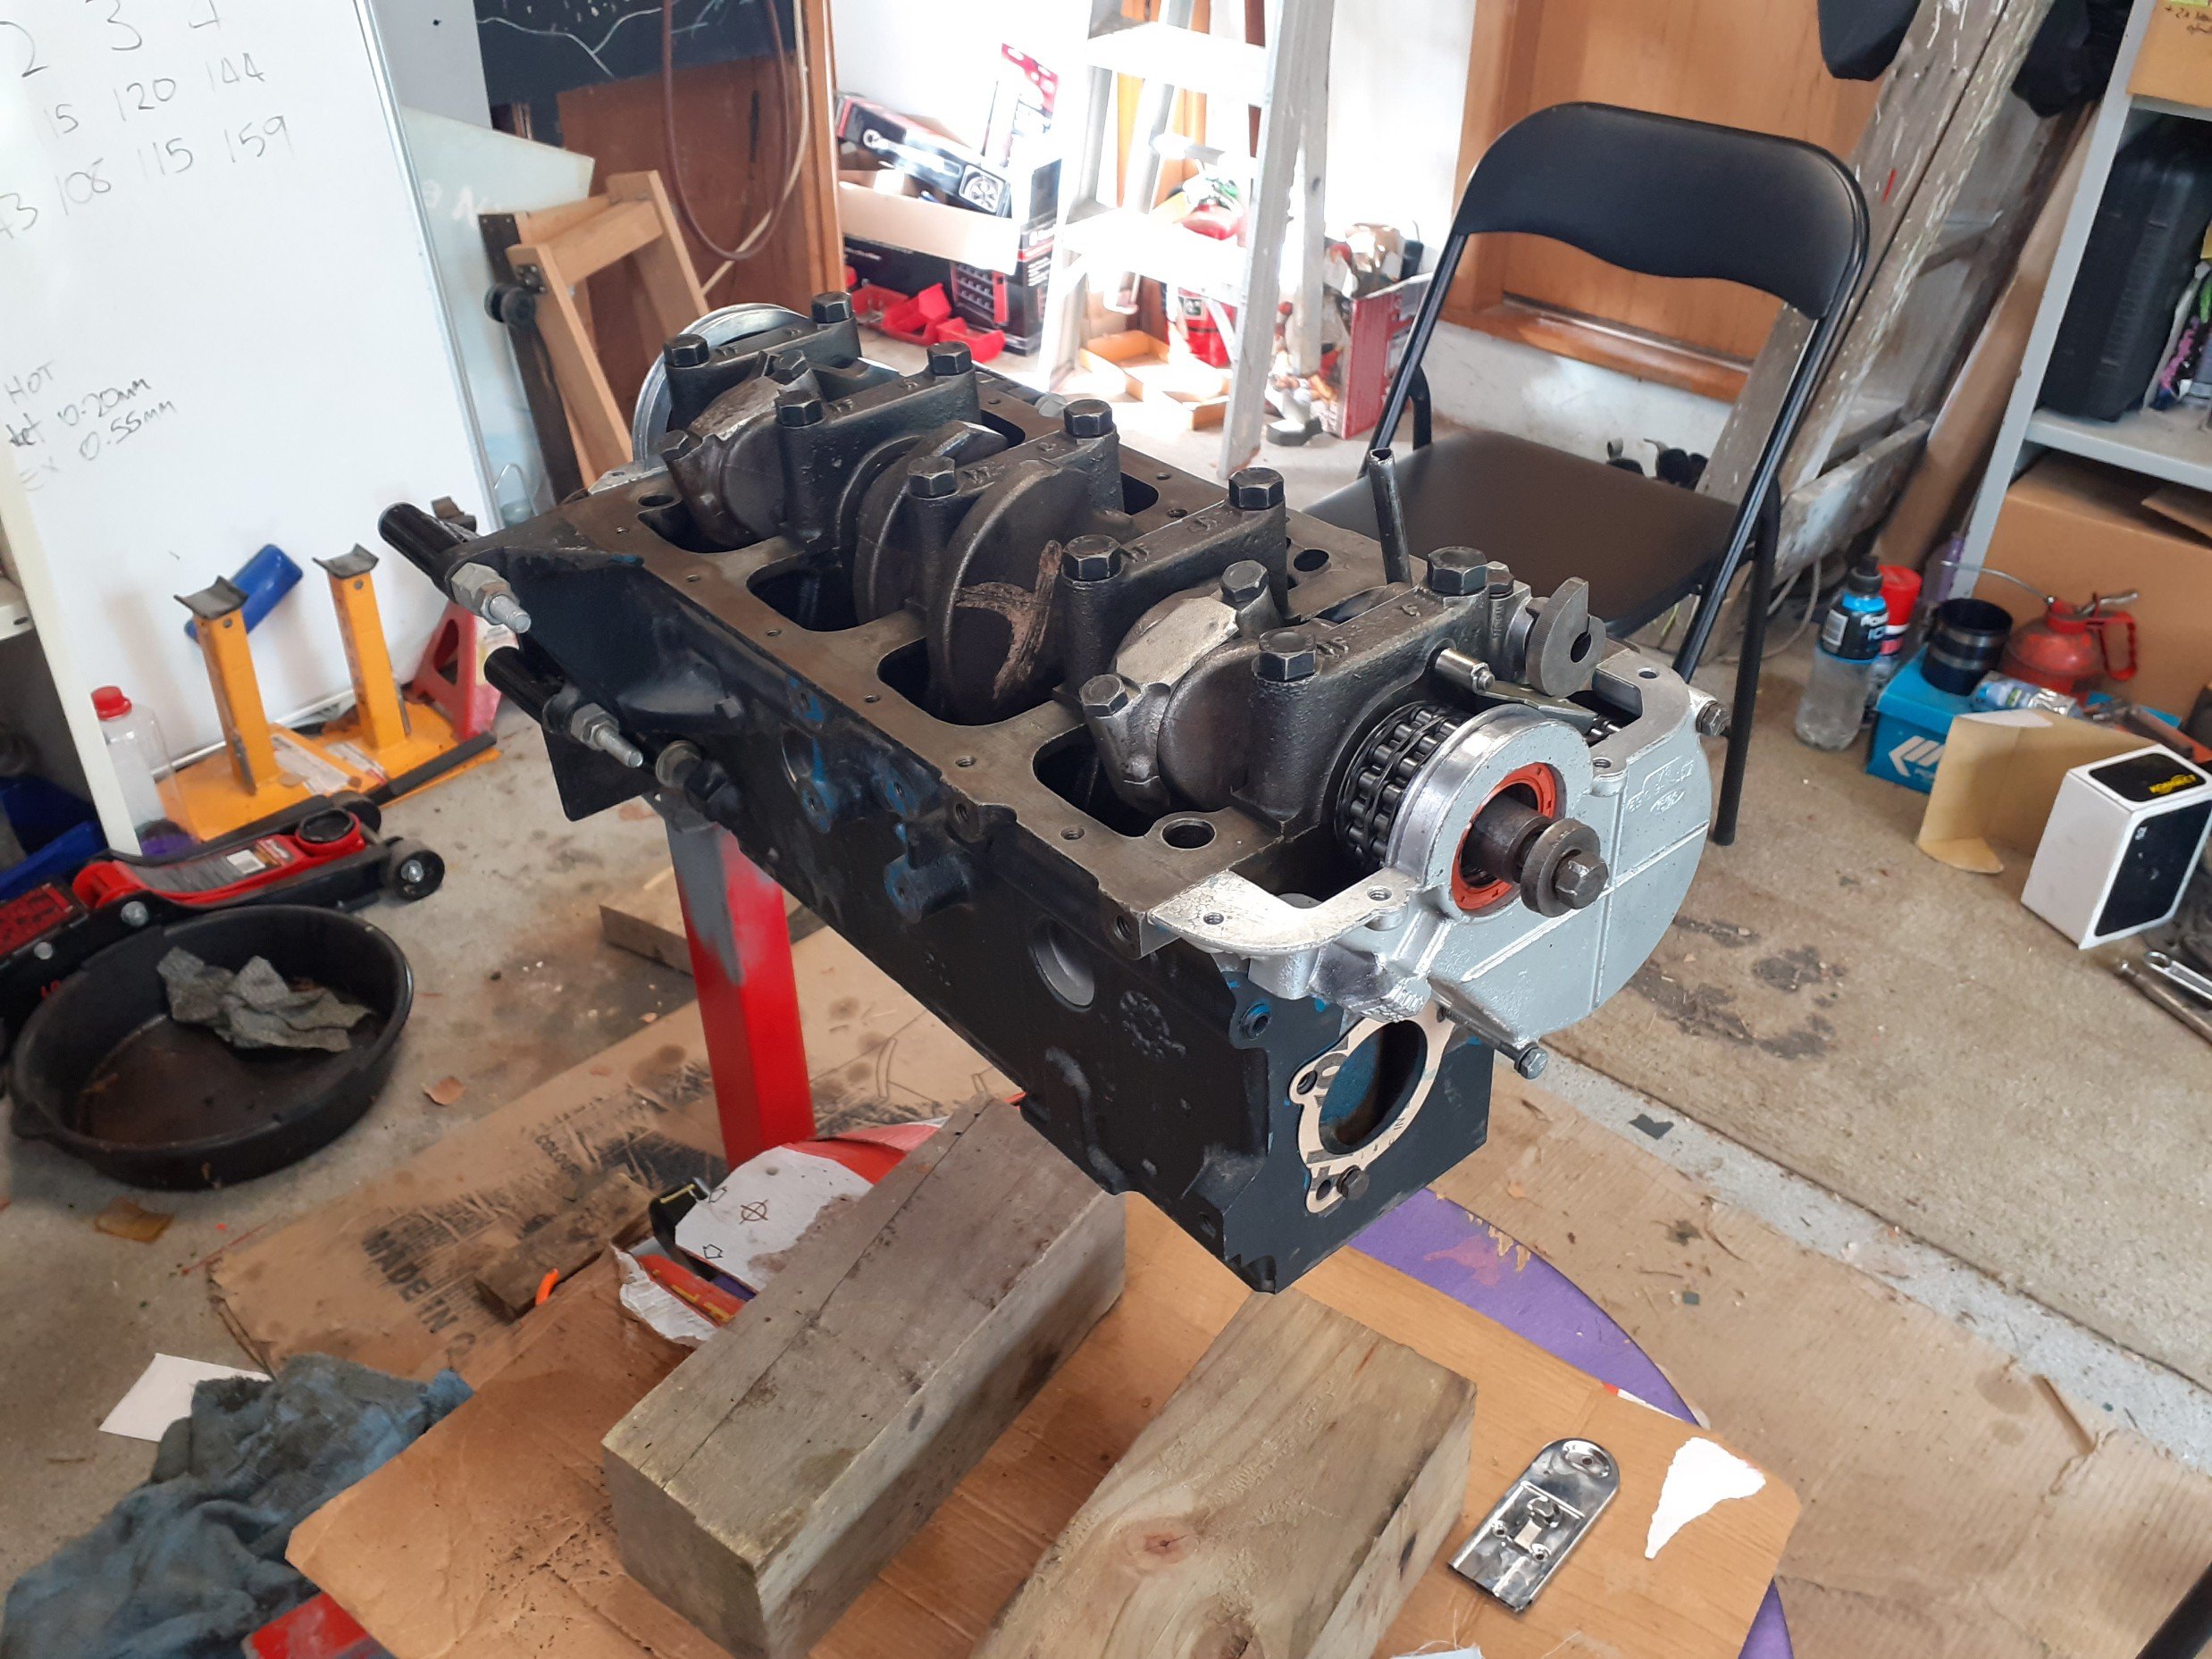
Took this down to nats, had a ball. Went down a few days earlier and took my bike. Camped out at rarangi the first night and then went down to st Arnaud before Nelson and marahau. Was concerned about heading over the takaka hill but it was sweet, didn't get warm or anything. 1,000km trouble free motoring. Started work on the spare motor for this. 691m block, 1600, +60 1300 pistons, lightened and balanced rods, crank has had work on it, gt cam, new cam followers, double timing chain and the modified head. Won't be installed anytime soon as there's a few other things on the go first.
1 point
-
A water pump pulley turned up. It is the wrong one, made for an 1800. It fits well enough to run the engine, it just pushes the belt alignment out by about a belt width. Good enough for tutuing about with. The correct one is apparently on the way with a return courier bag for the wrong one, so can’t complain too hard. Anyway, noisy tappet was very apparent so while I still had the shim kit I went over them all again. Success! Quiet tappets, good oil flow etc. I got the boss to help me bleed the brakes which took ages. No end of air bubbles but we got there in the end using nearly a litre of fluid! One thing confused me though, it has a dual remote reservoir as it’s a dual circuit master. The fluid only went down in the rear reservoir for all 4 brakes?….They seem to be working well though. There was a horror moment when I walked into the shed this morning and found a large puddle of water under the car. It was dripping down the bell housing area so I immediately thought the worst and assumed the steel water jacket cover was leaking which is only accessible by splitting the engine and gearbox. Big whew when I saw it was the heater return line on the firewall! All fixed now. Then I took it for a hoon to get the fluids hot. Goes well, clutch is all good (higher pedal effort than I remember but it’s a new cable so might loosen up?) Brakes as I said work nicely, but there is a horrible driveline vibration that starts up at around 70k’s. Almost certainly the driveshaft which I have maybe put back on 180 degrees out…Finished the day by putting his face back on. I have no high beams and a blinker repeater is out, so plenty to sort yet.
1 point
-
Ready for paint. The panel journey has ended and the quality is just outstanding. Thanks Greg at R3 Fabrications.
1 point
-
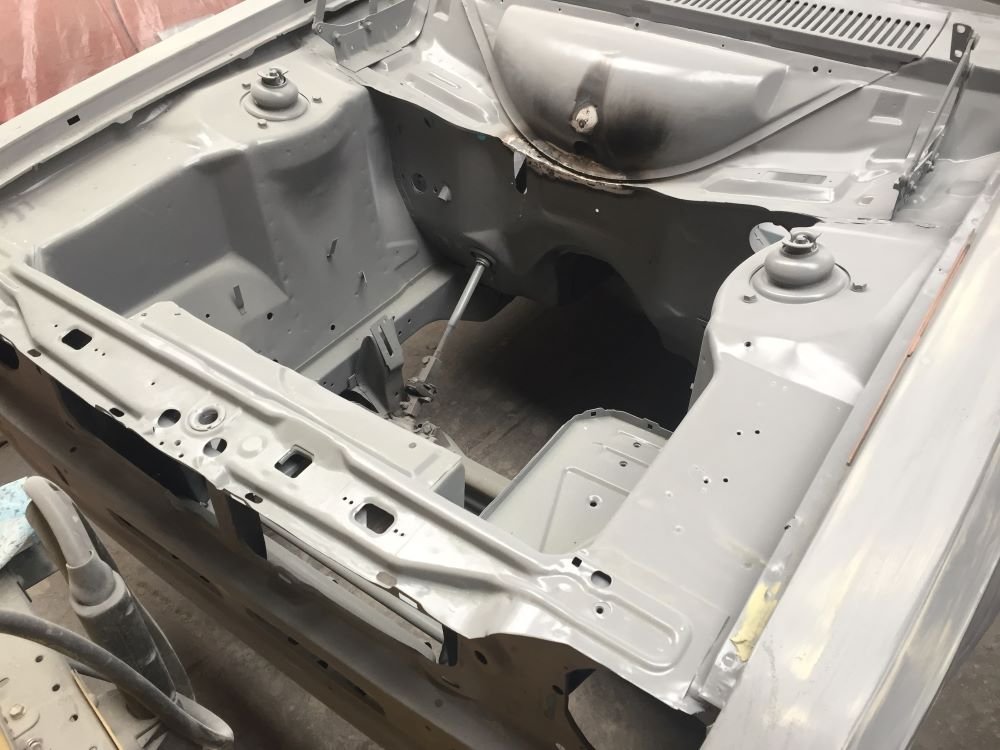
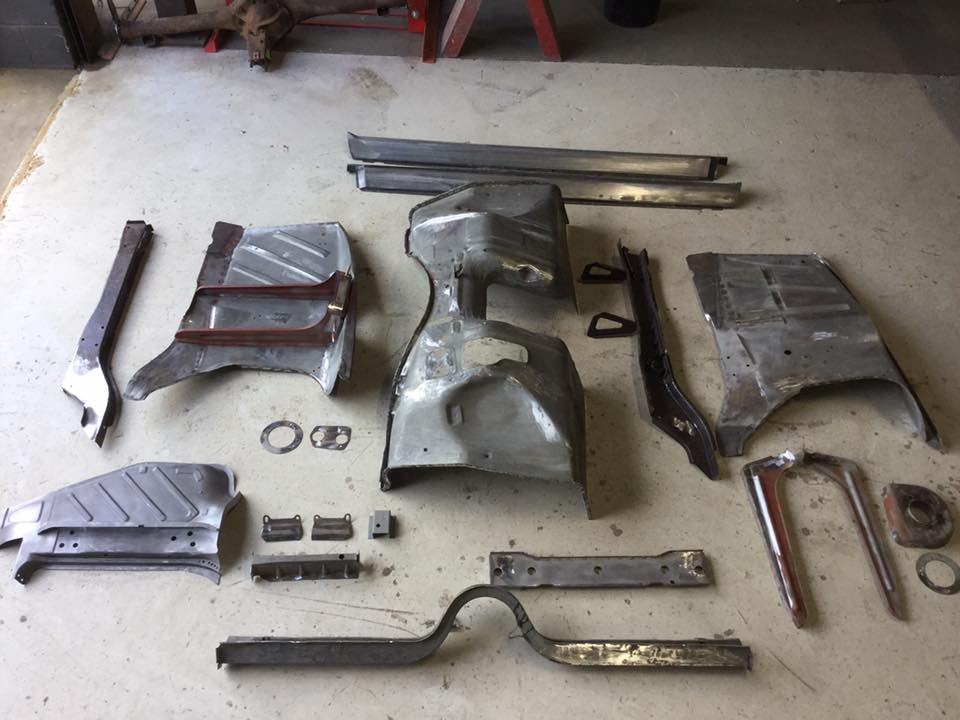
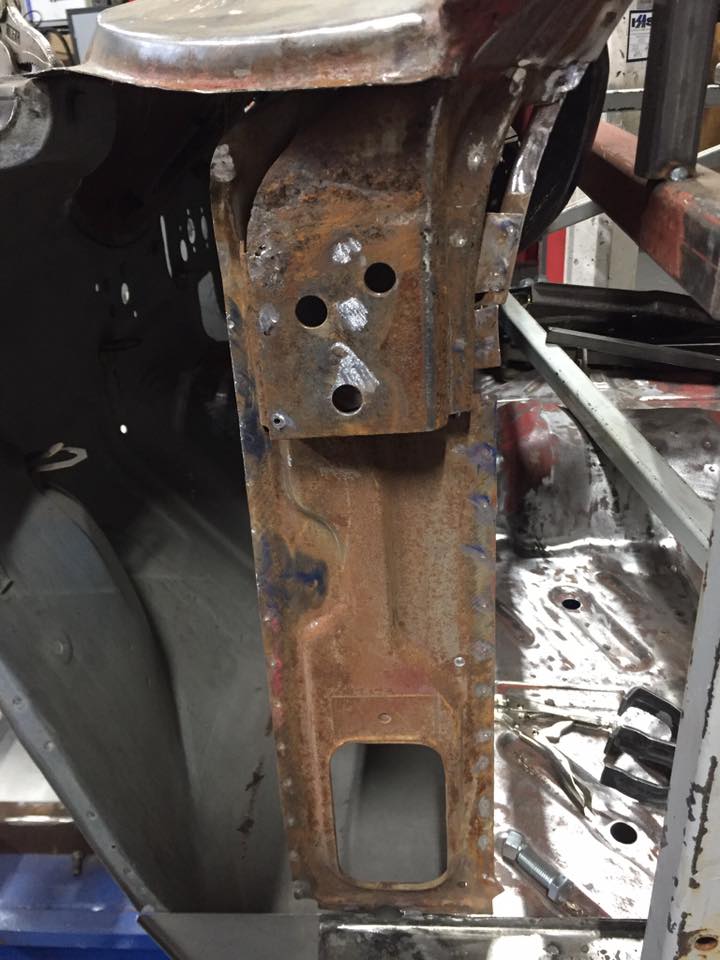
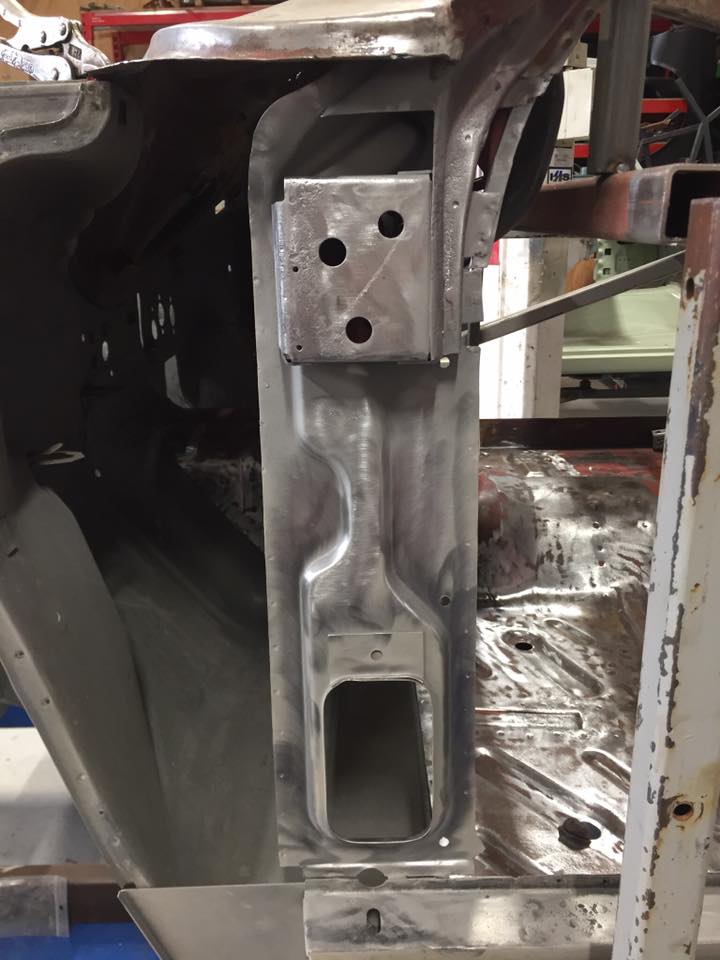
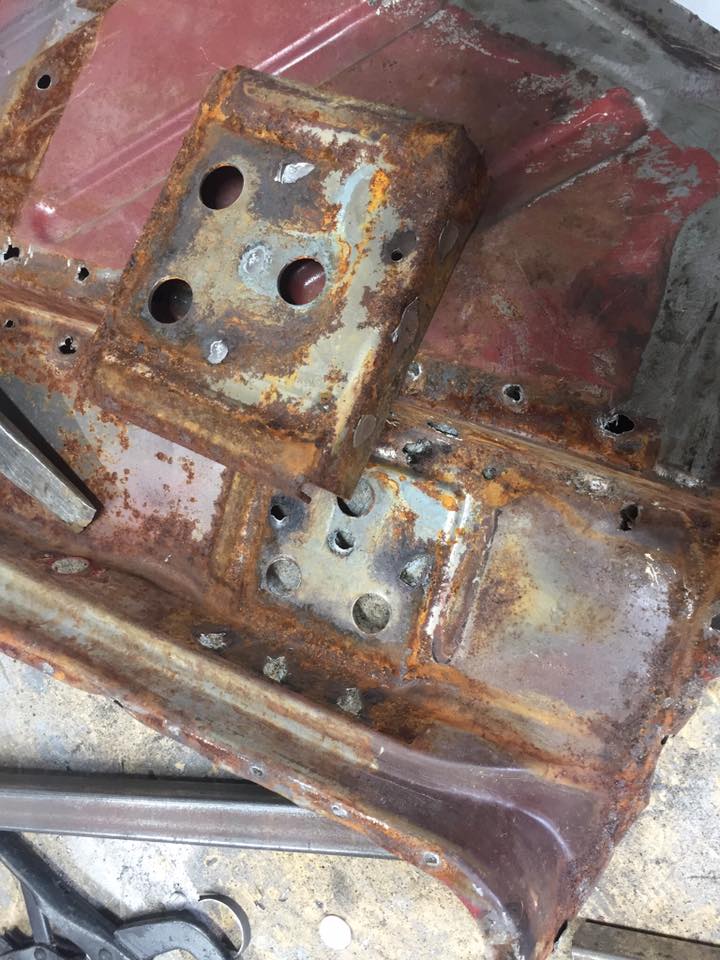
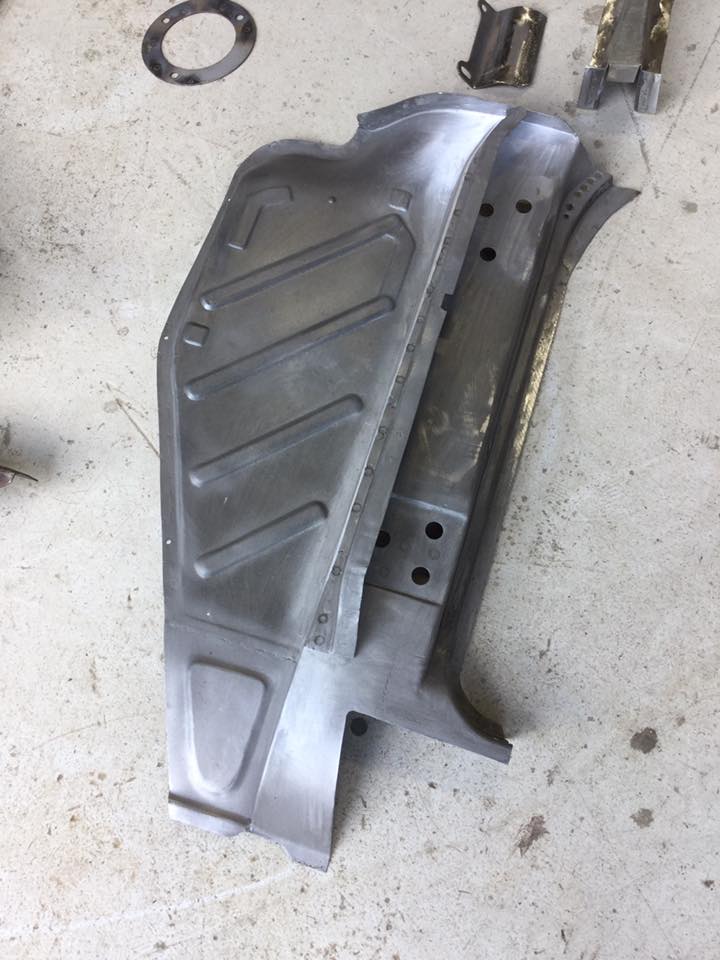
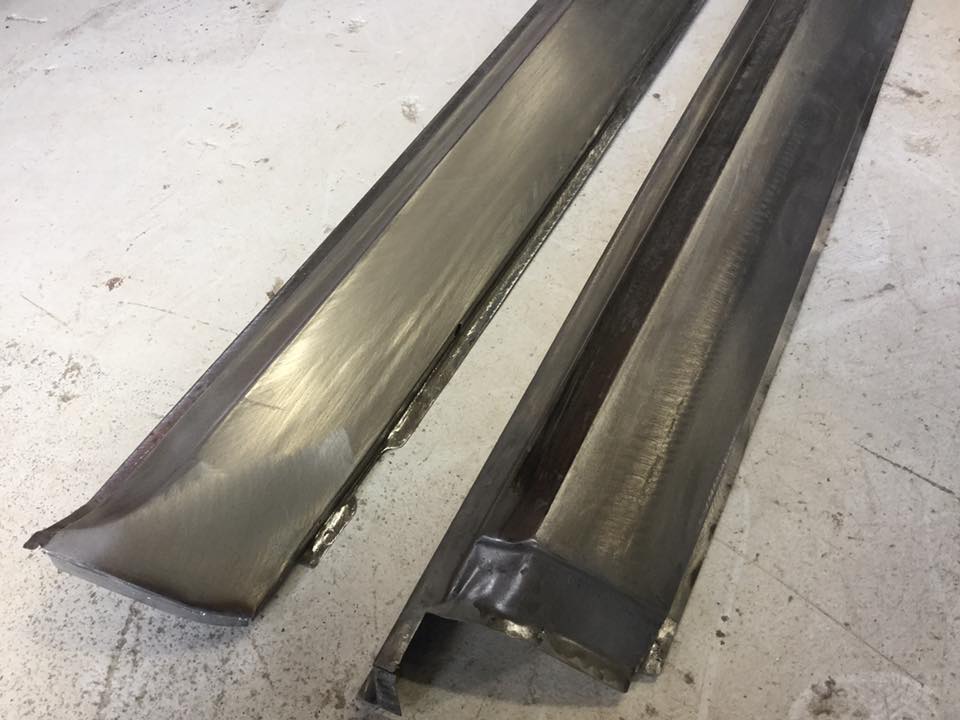
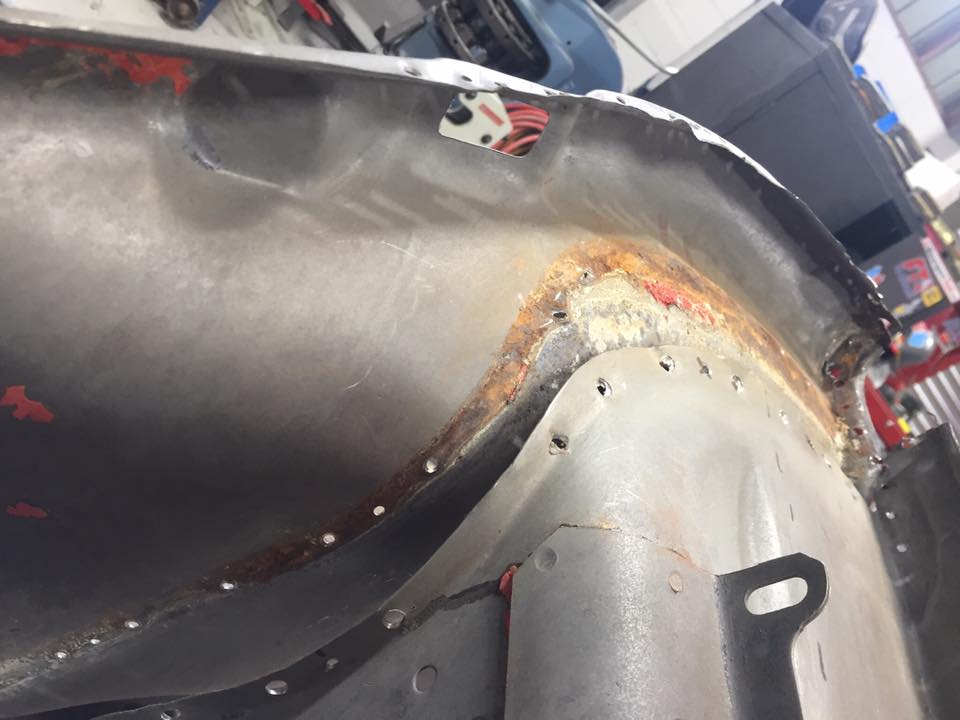
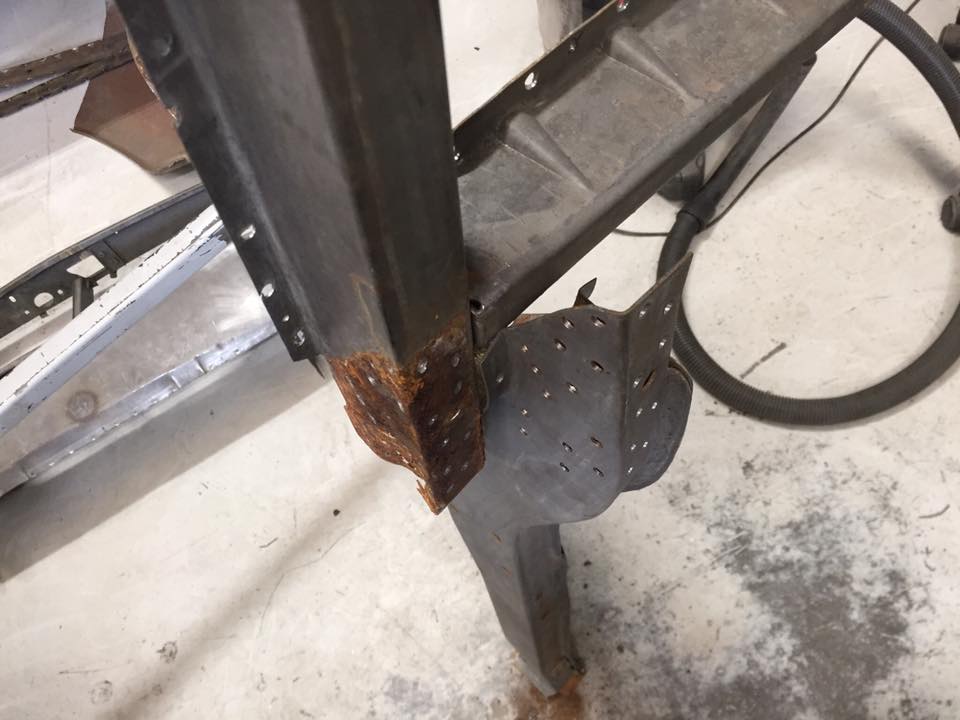
Excellent progress happening on the front end. All stripped and ready to go to the blasters and then the big reassembly. Everything as far as possible will be spot welded as per original and all internal cavities treated so it won't ever rust again in my lifetime. One of the A pillars was still all factory untreated steel inside from 50 years ago. No wonder they all used to rust bigtime. Sills are all done and come from the 4 door we chopped up ages ago. These have been modified with the correct 2 Door drains etc so exactly as per original. Also the repro underwing kits turned out to be pretty average, they would be fine for a race car, so fortunately the originals with a bit of cleanup have come out mint. Bloody annoying you pay big bucks for repro panels and they turn out to be a shit fit and need lots of rework to get anywhere near fitting.
1 point


.thumb.jpg.b5aa15b7d5c7bde2c277b6e7cda7e7f8.jpg)


.thumb.jpg.570970b401ac8d26ce9af7c1bf2bd8cd.jpg)


This leaderboard is set to Auckland/GMT+12:00