
Leaderboard


Popular Content
Showing content with the highest reputation on 02/16/19 in Posts
-
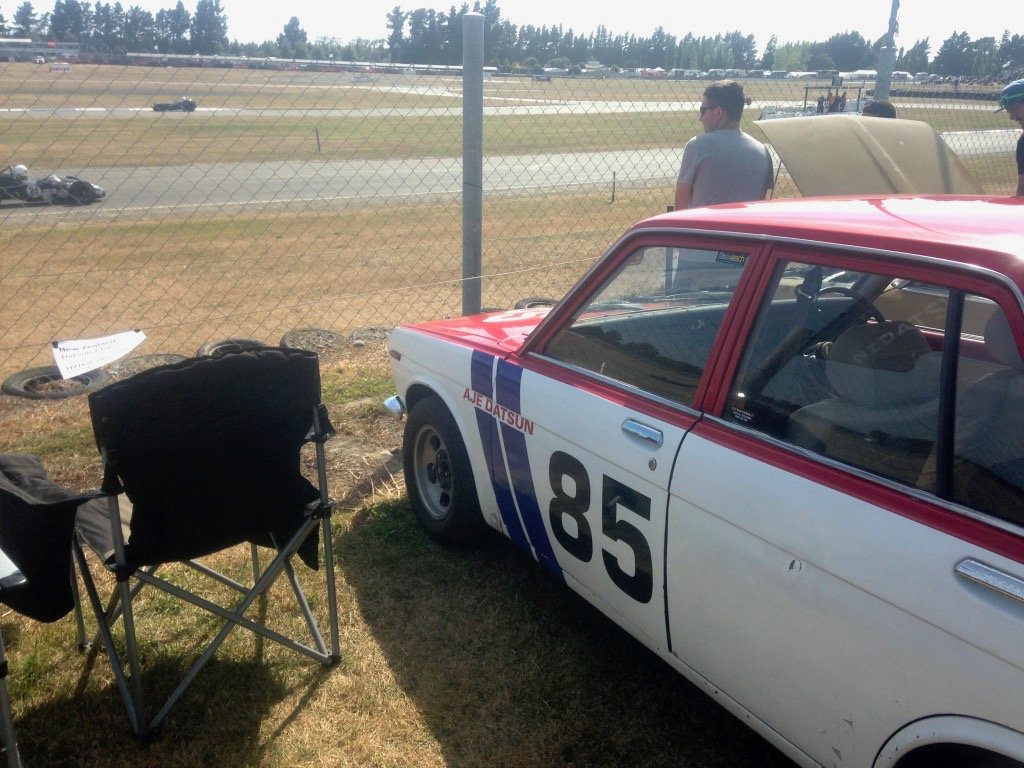
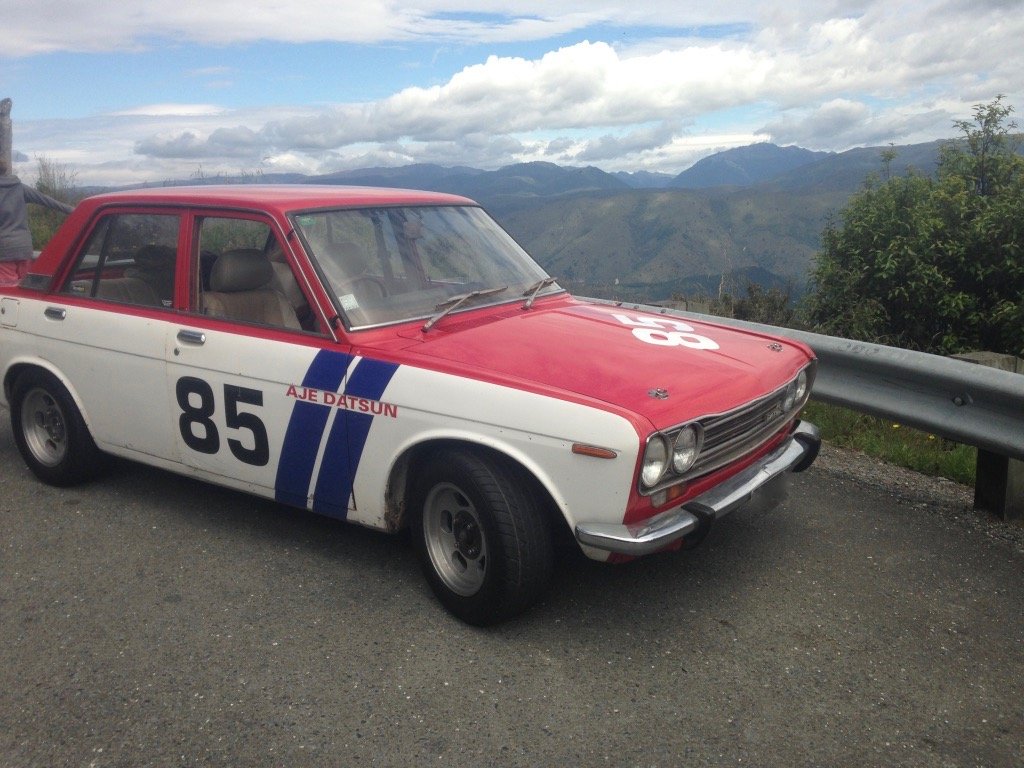
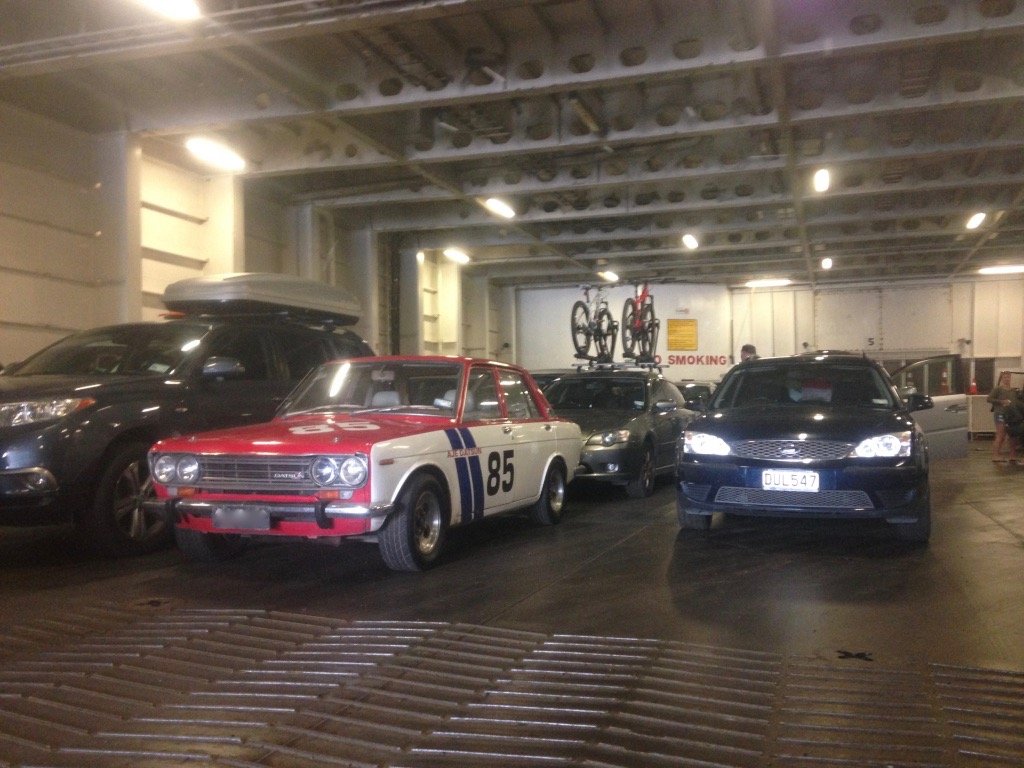
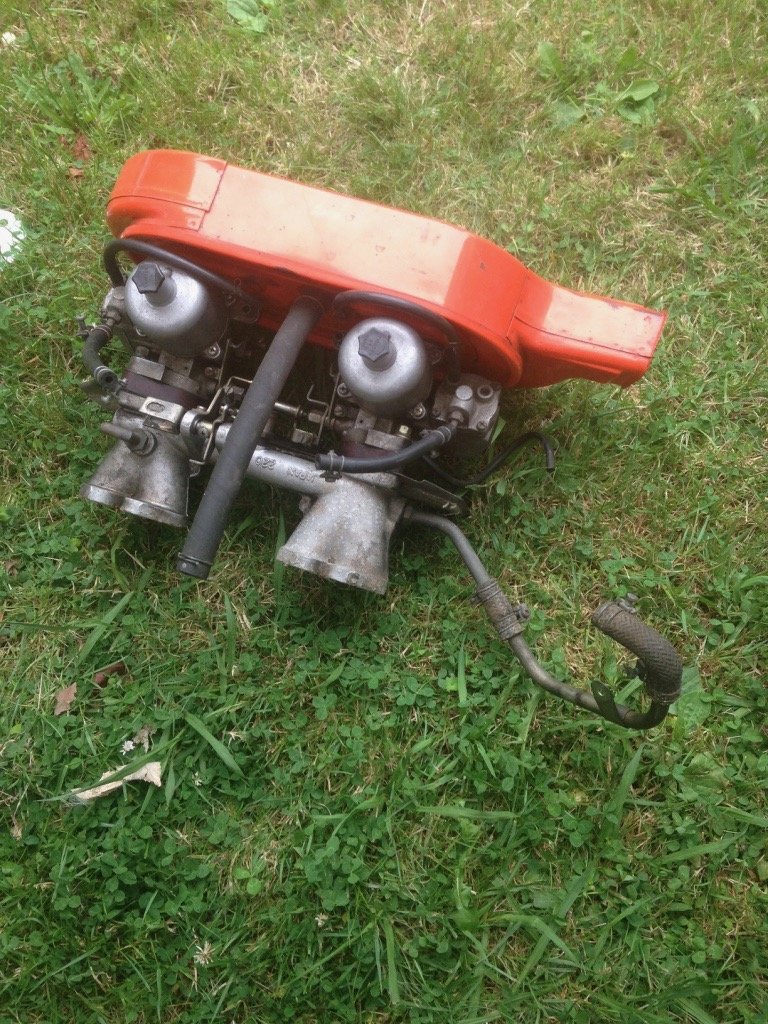
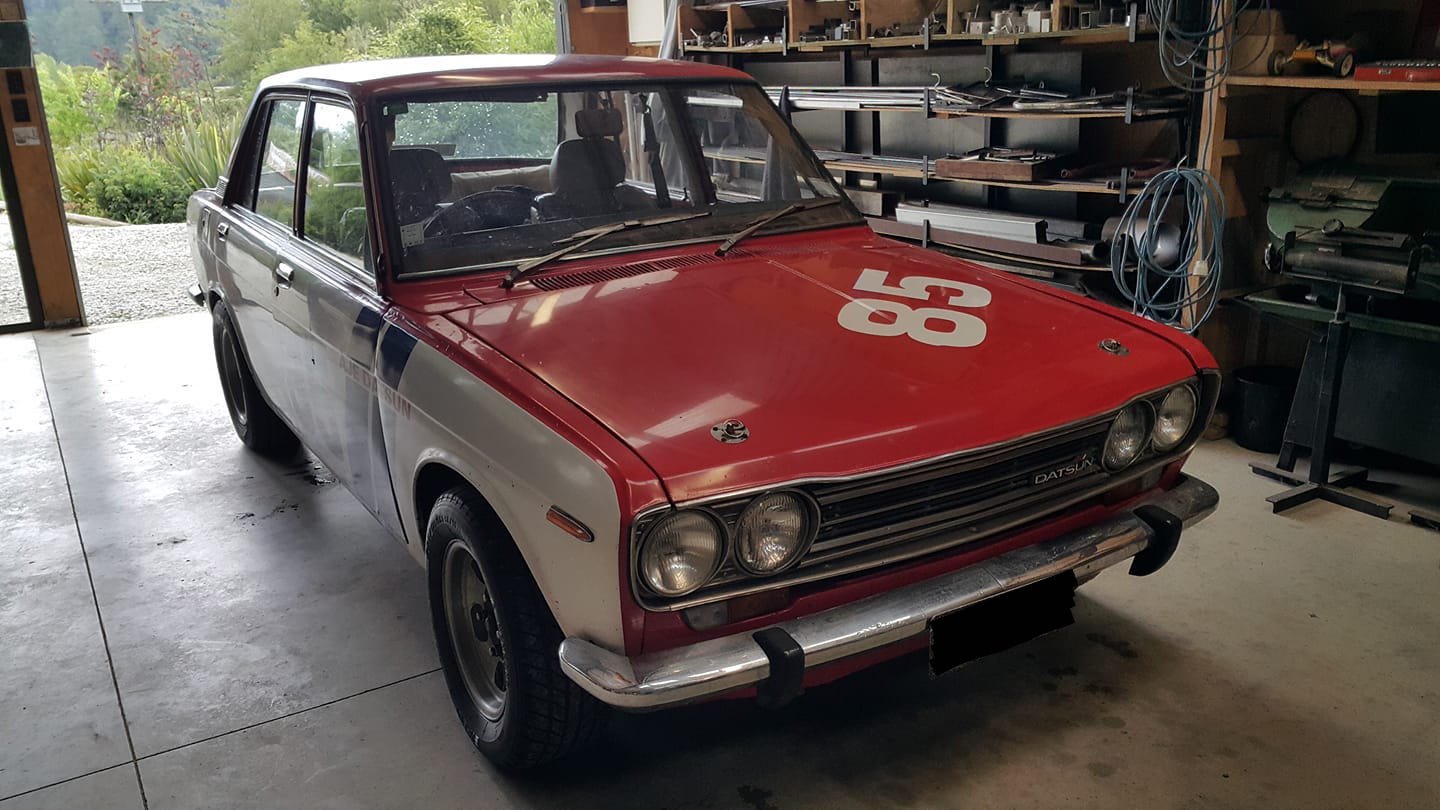
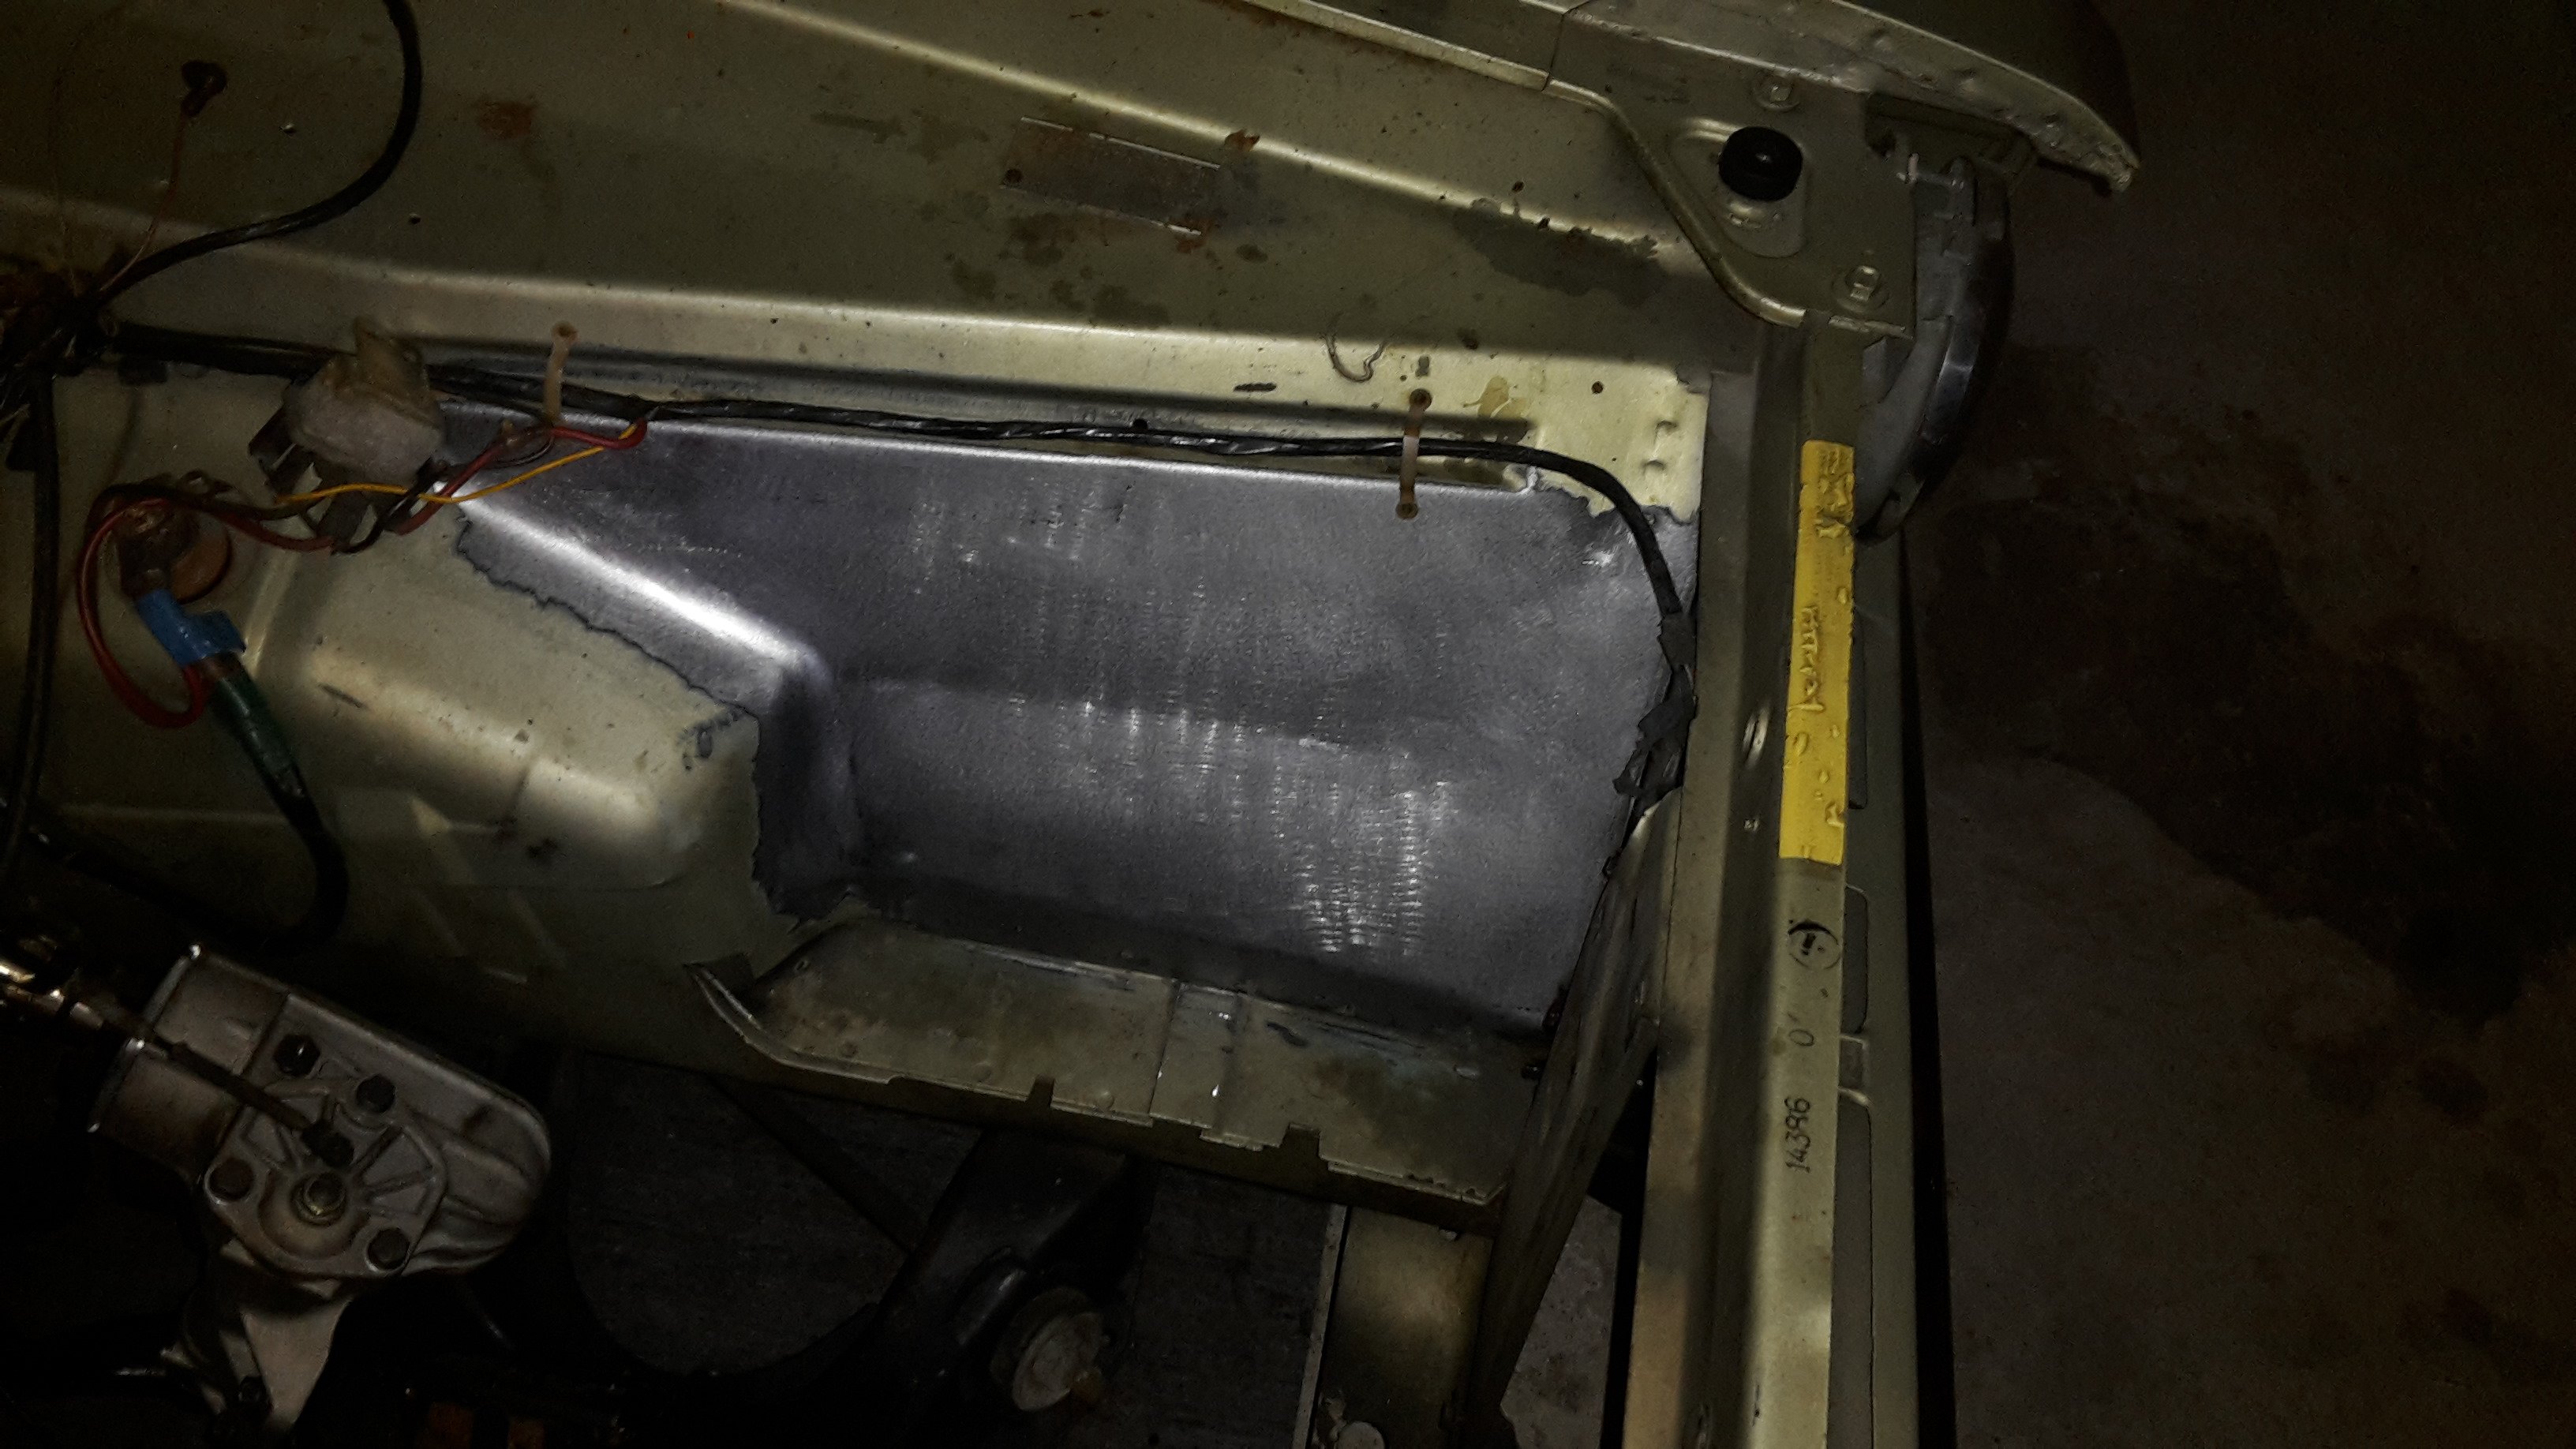
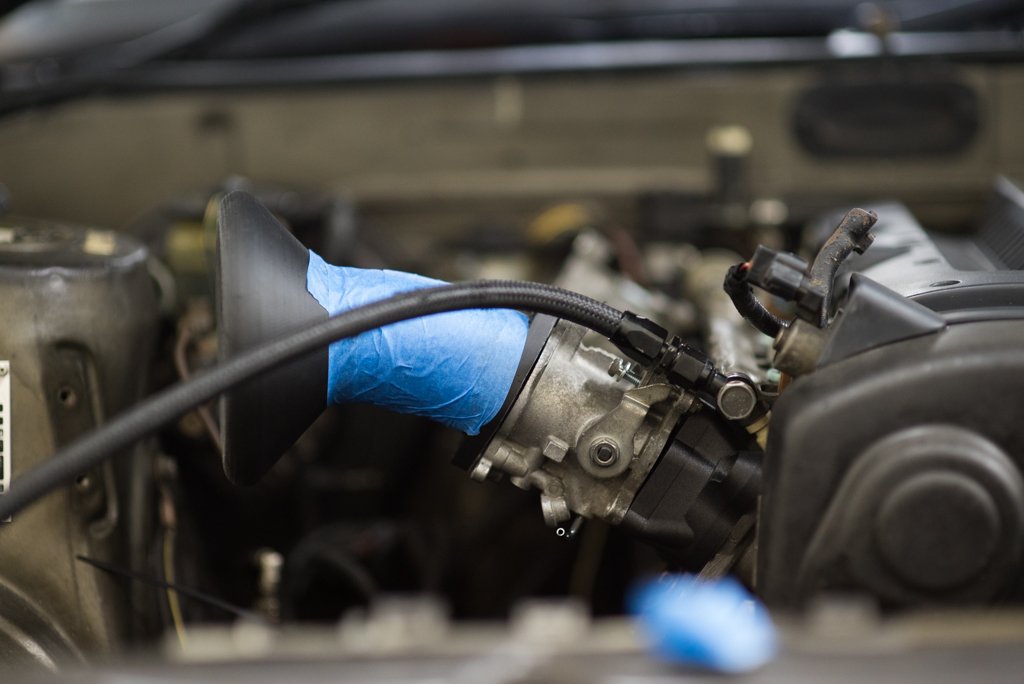
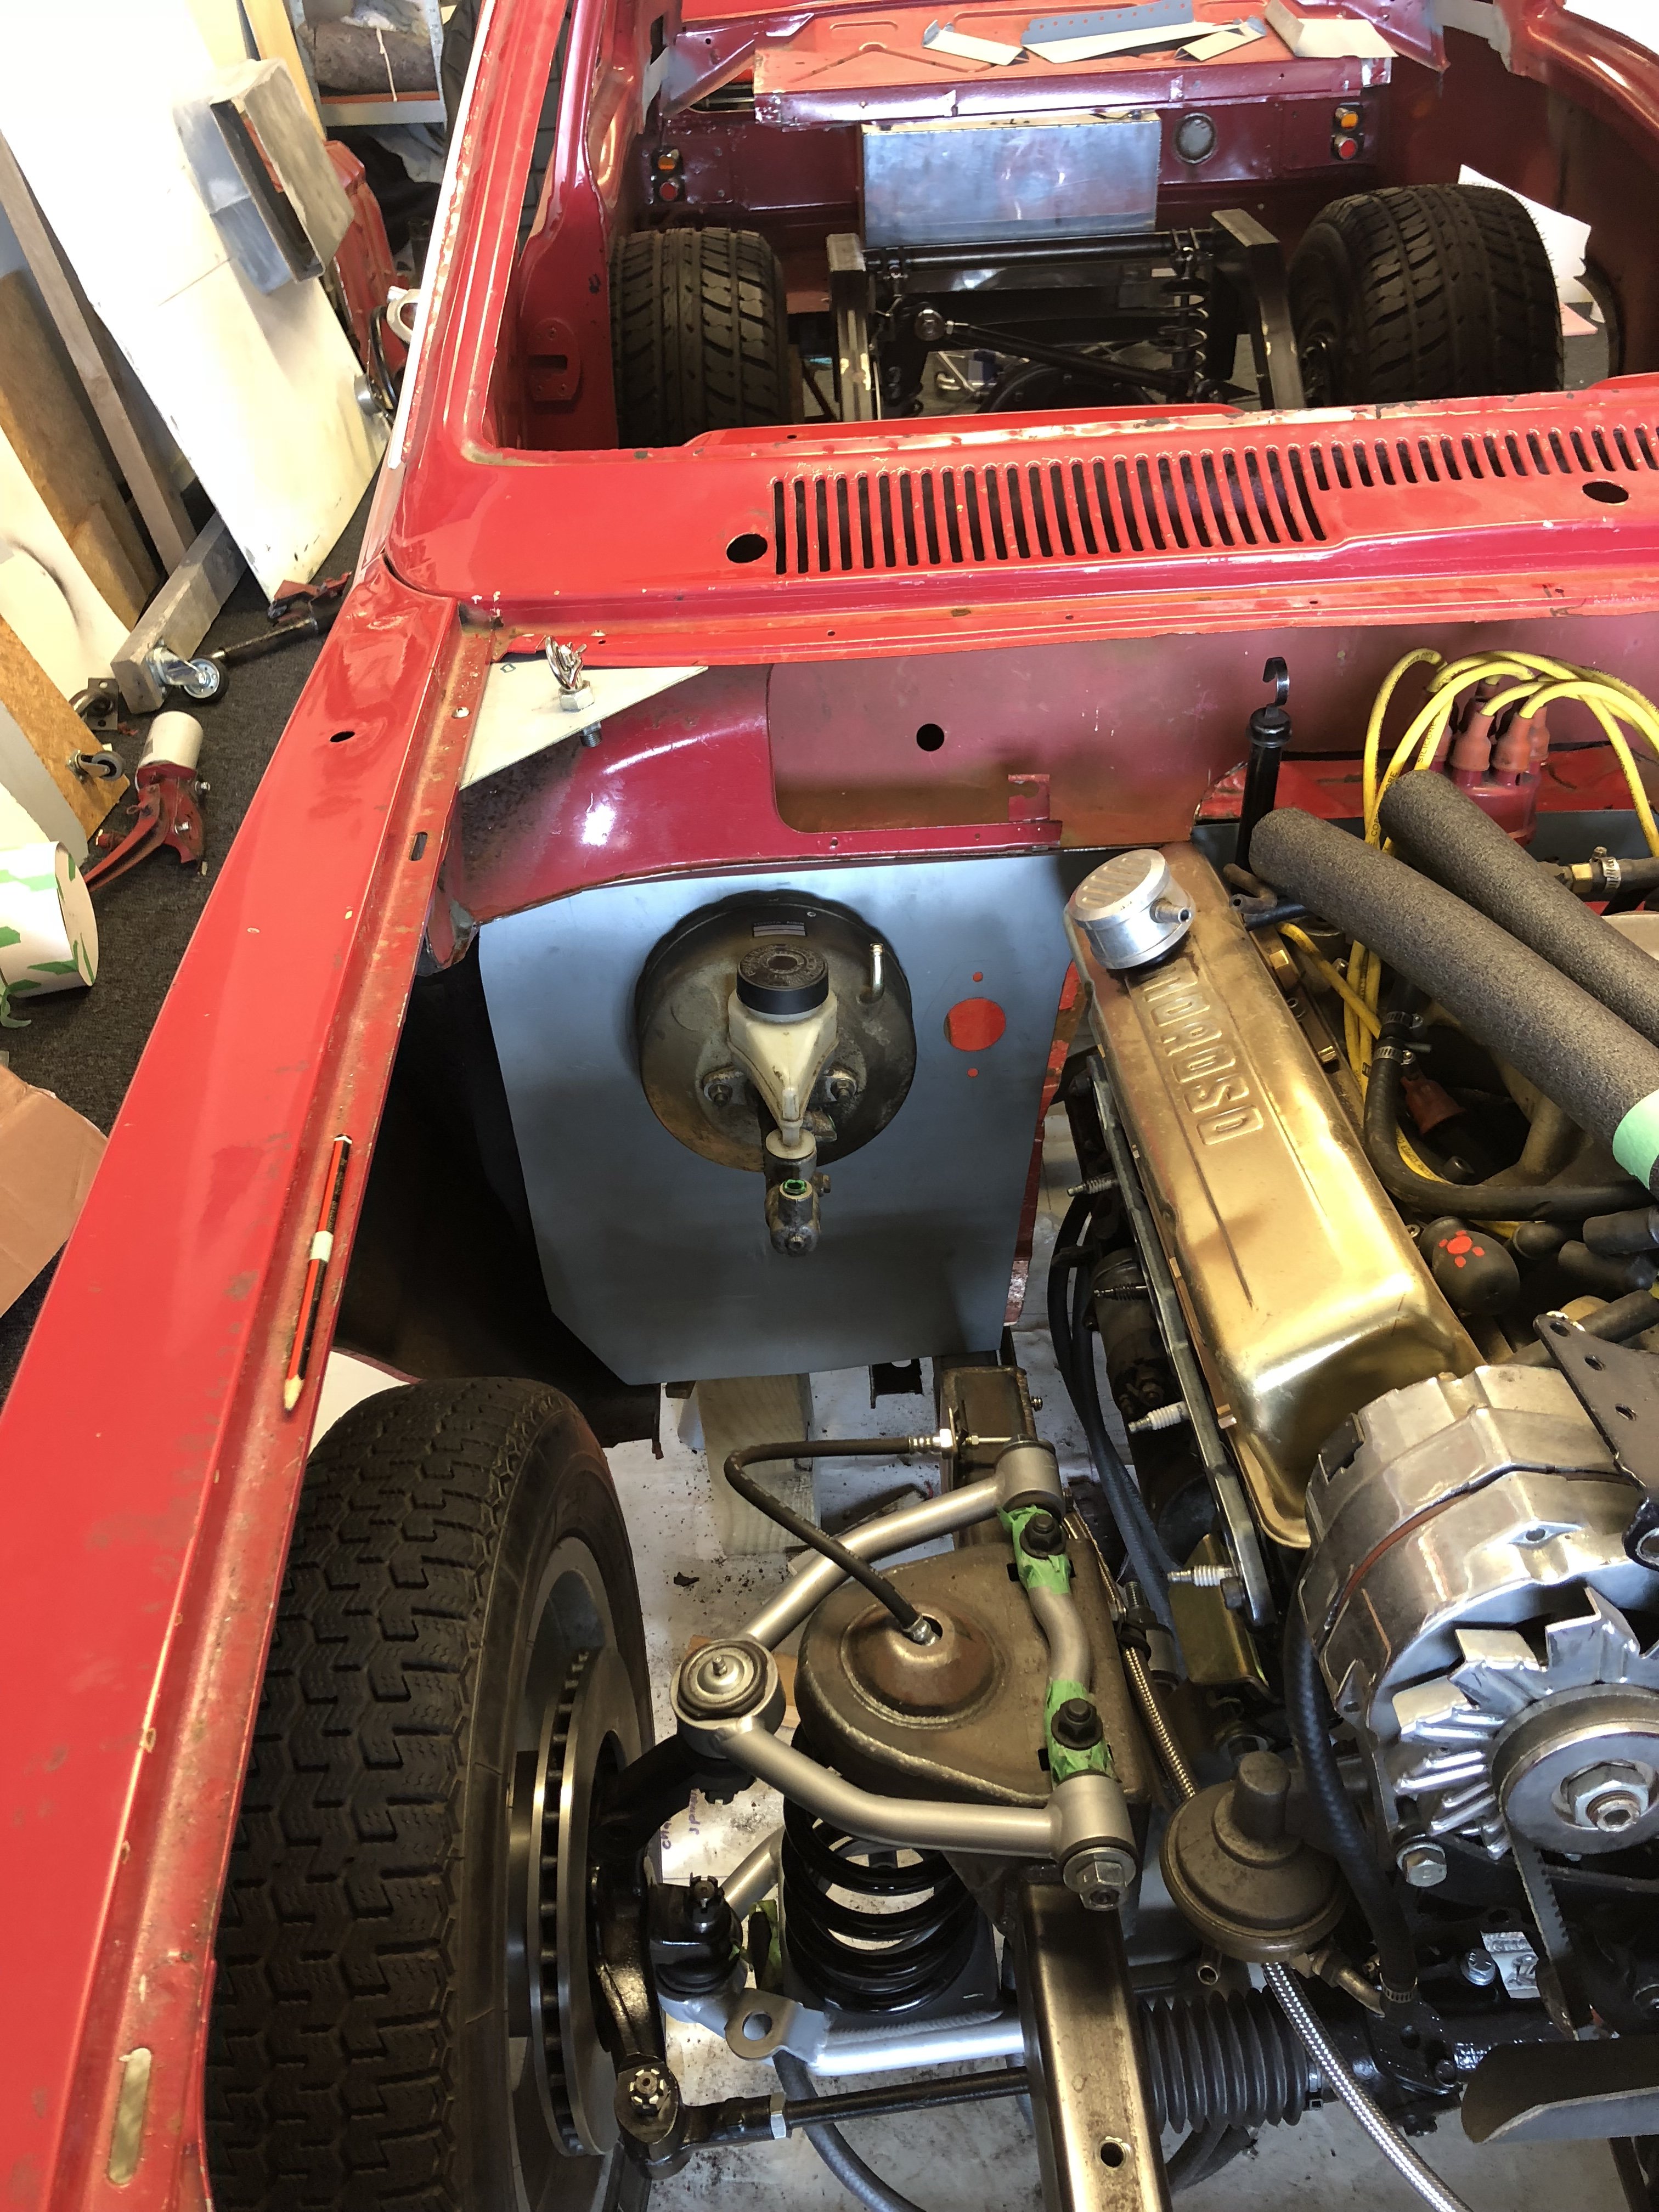
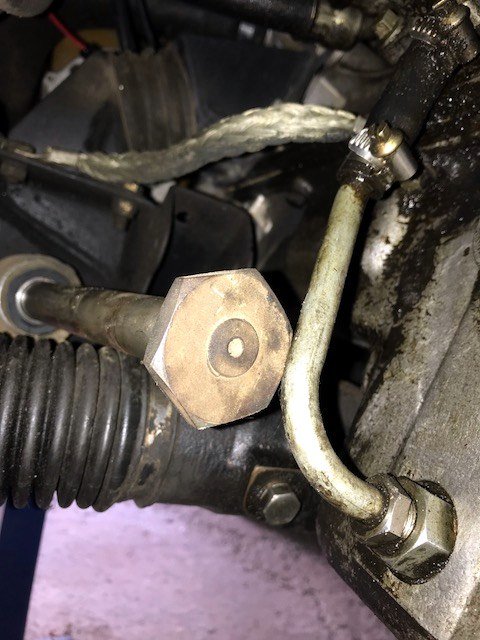
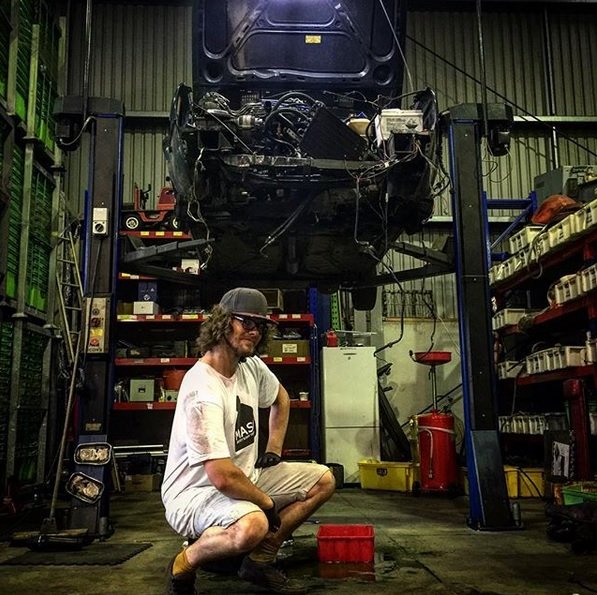
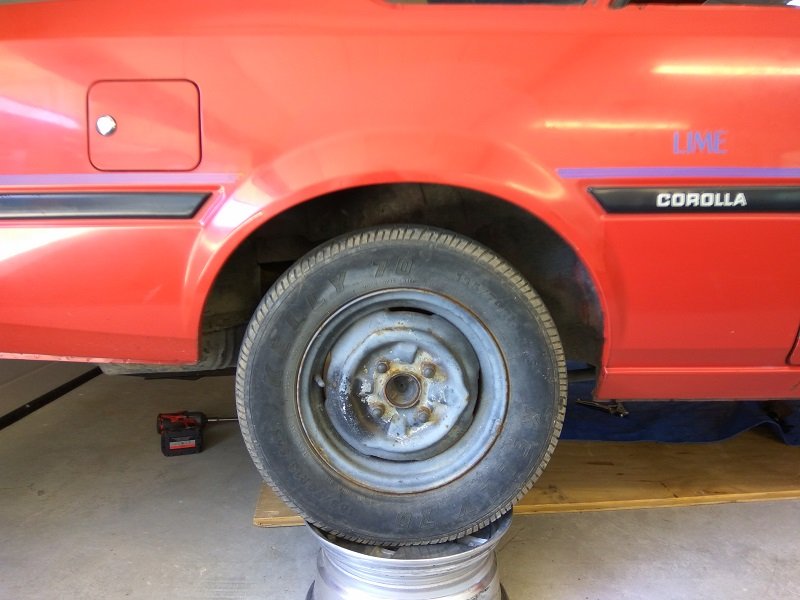
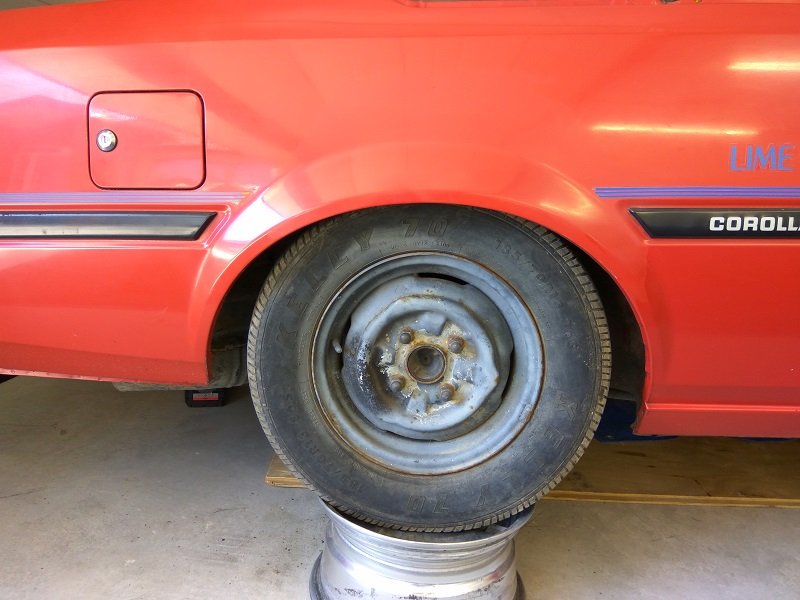
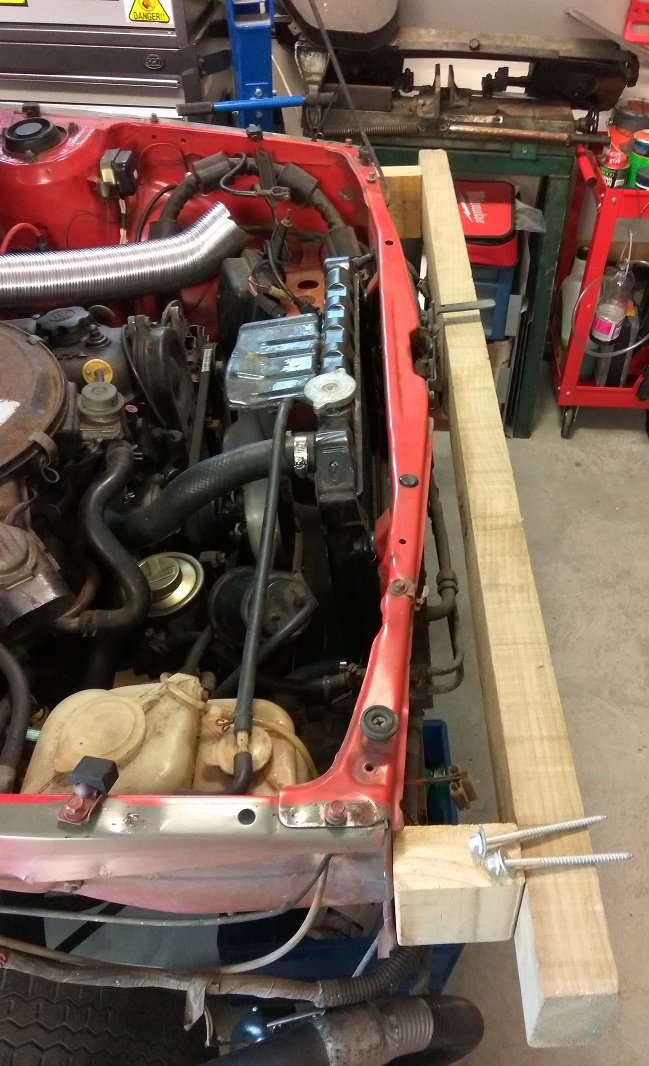
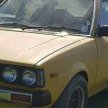
Enough backstory, now for the car. As mentioned, I picked it up over the Christmas break from the family home up north, being that it has been used sporadically I put aside a few days to go over every nut and bolt to be sure the trip back to Christchurch would be uneventful. First up, a few small jobs... Sort the petrol smell: The original rubber joiner had given up years ago meaning the tank couldn't be filled past halfway, a crowd in the west island have reproduced them so out with old, in with the new Then came a tune of the engine, I had been nervous about this as i've never touched SU style carbs, turns out they're easy, plus my learning was made faster by having a full set spare to look at. The engine also has a mysterious click from about #2 or 3, I have adjusted the valves but it still doesn't change, oddly it comes and goes, is mildly engine temp dependant and there is good compression on all four, for sure something that will need more digging..... The eagle eyed 510 spotters will notice the brake master setup is not correct, having be swapped out for a different style for race duties. for now I will run with these until I get the original rebuilt and cleaned up. With mechanicals looking ready for a drive I moved onto the interior, how about the stolen dashboard you say? well as luck would have it, a history of writing off Datsuns racing had left my father with just enough bits to kit the car out as required, he even produced a full set of badges that I now have tucked away awaiting some modern technology for reproduction. The carpet was very much in fine race spec consisting of two or three coats of red paint, in order to prevent my girlfriend from running off halfway back I needed something to muffle the road noise, once again the family parts warehouse presented a front carpet in the most delightful shade of poo brown, matched with carefully positioned black mats to cover the tears a more suitable environment to conversation was produced. Yup, white interior, far better suited to summer! With everything packed and a torn bit of envelope to suppress the steering wheel vibration we headed south, we both held our breath over the Cook strait as the Datsun met salt air and stumbled on start up leaving the ferry, incidentally some muppet had forgotten to fully set the distributor after resetting the timing and had come loose, sorting that we drove on to Marahau for a bbq with Alex and Hannah. On stern advice we reluctantly drove over the Takaka hill, well actually I have been fizzing to do this for a long time and boy was it fun, even with 50km speed restrictions and road works its gotta be one of the best drives in the country polished off with an epic view. And that dumps us back home nice and safe. So plans from here? I was planning on a full restoration beginning this winter, the paintwork is pretty rough from being done for the track but i'm just enjoying driving it too much to take it off the road for any considerable time, there are a few things to start with: The engine tick, it may just be me but I want to dig further just in case I have a side draft manifold and throttle bodies, efi was also on the plans, but SU's just drive so nice and the fuel economy is pretty reasonable. Replace a broken shaft spring on the rear carb - this is causing the idle to not fully drop occasionally, no biggie, but sometimes irritating. Complete the CAD models of the badges and get some replicas made, this way I don't have to cry if they fall off/get broken. Get around to picking up a 5 speed or fit the 3.5 diff in the shed, 3500rpm cruise is a tad loud for my increasing age! Repair the split dash, irritates me a bunch looking at it Paint up a few potential rust spots. Actually decide what colour the carpets should be and source new front and rear Polish up the chrome Clean up the wheels Source new window rubbers so the window trims can be installed. While the list is long of potential performance upgrades, I'm not keen on going too far from factory with it and any modifications that can't be reverted to factory are off limits. Long term it really does need a repaint, but the BRE colours are growing on me and the aged look is reflective of why I brought it, for driving!
 17 points
 -
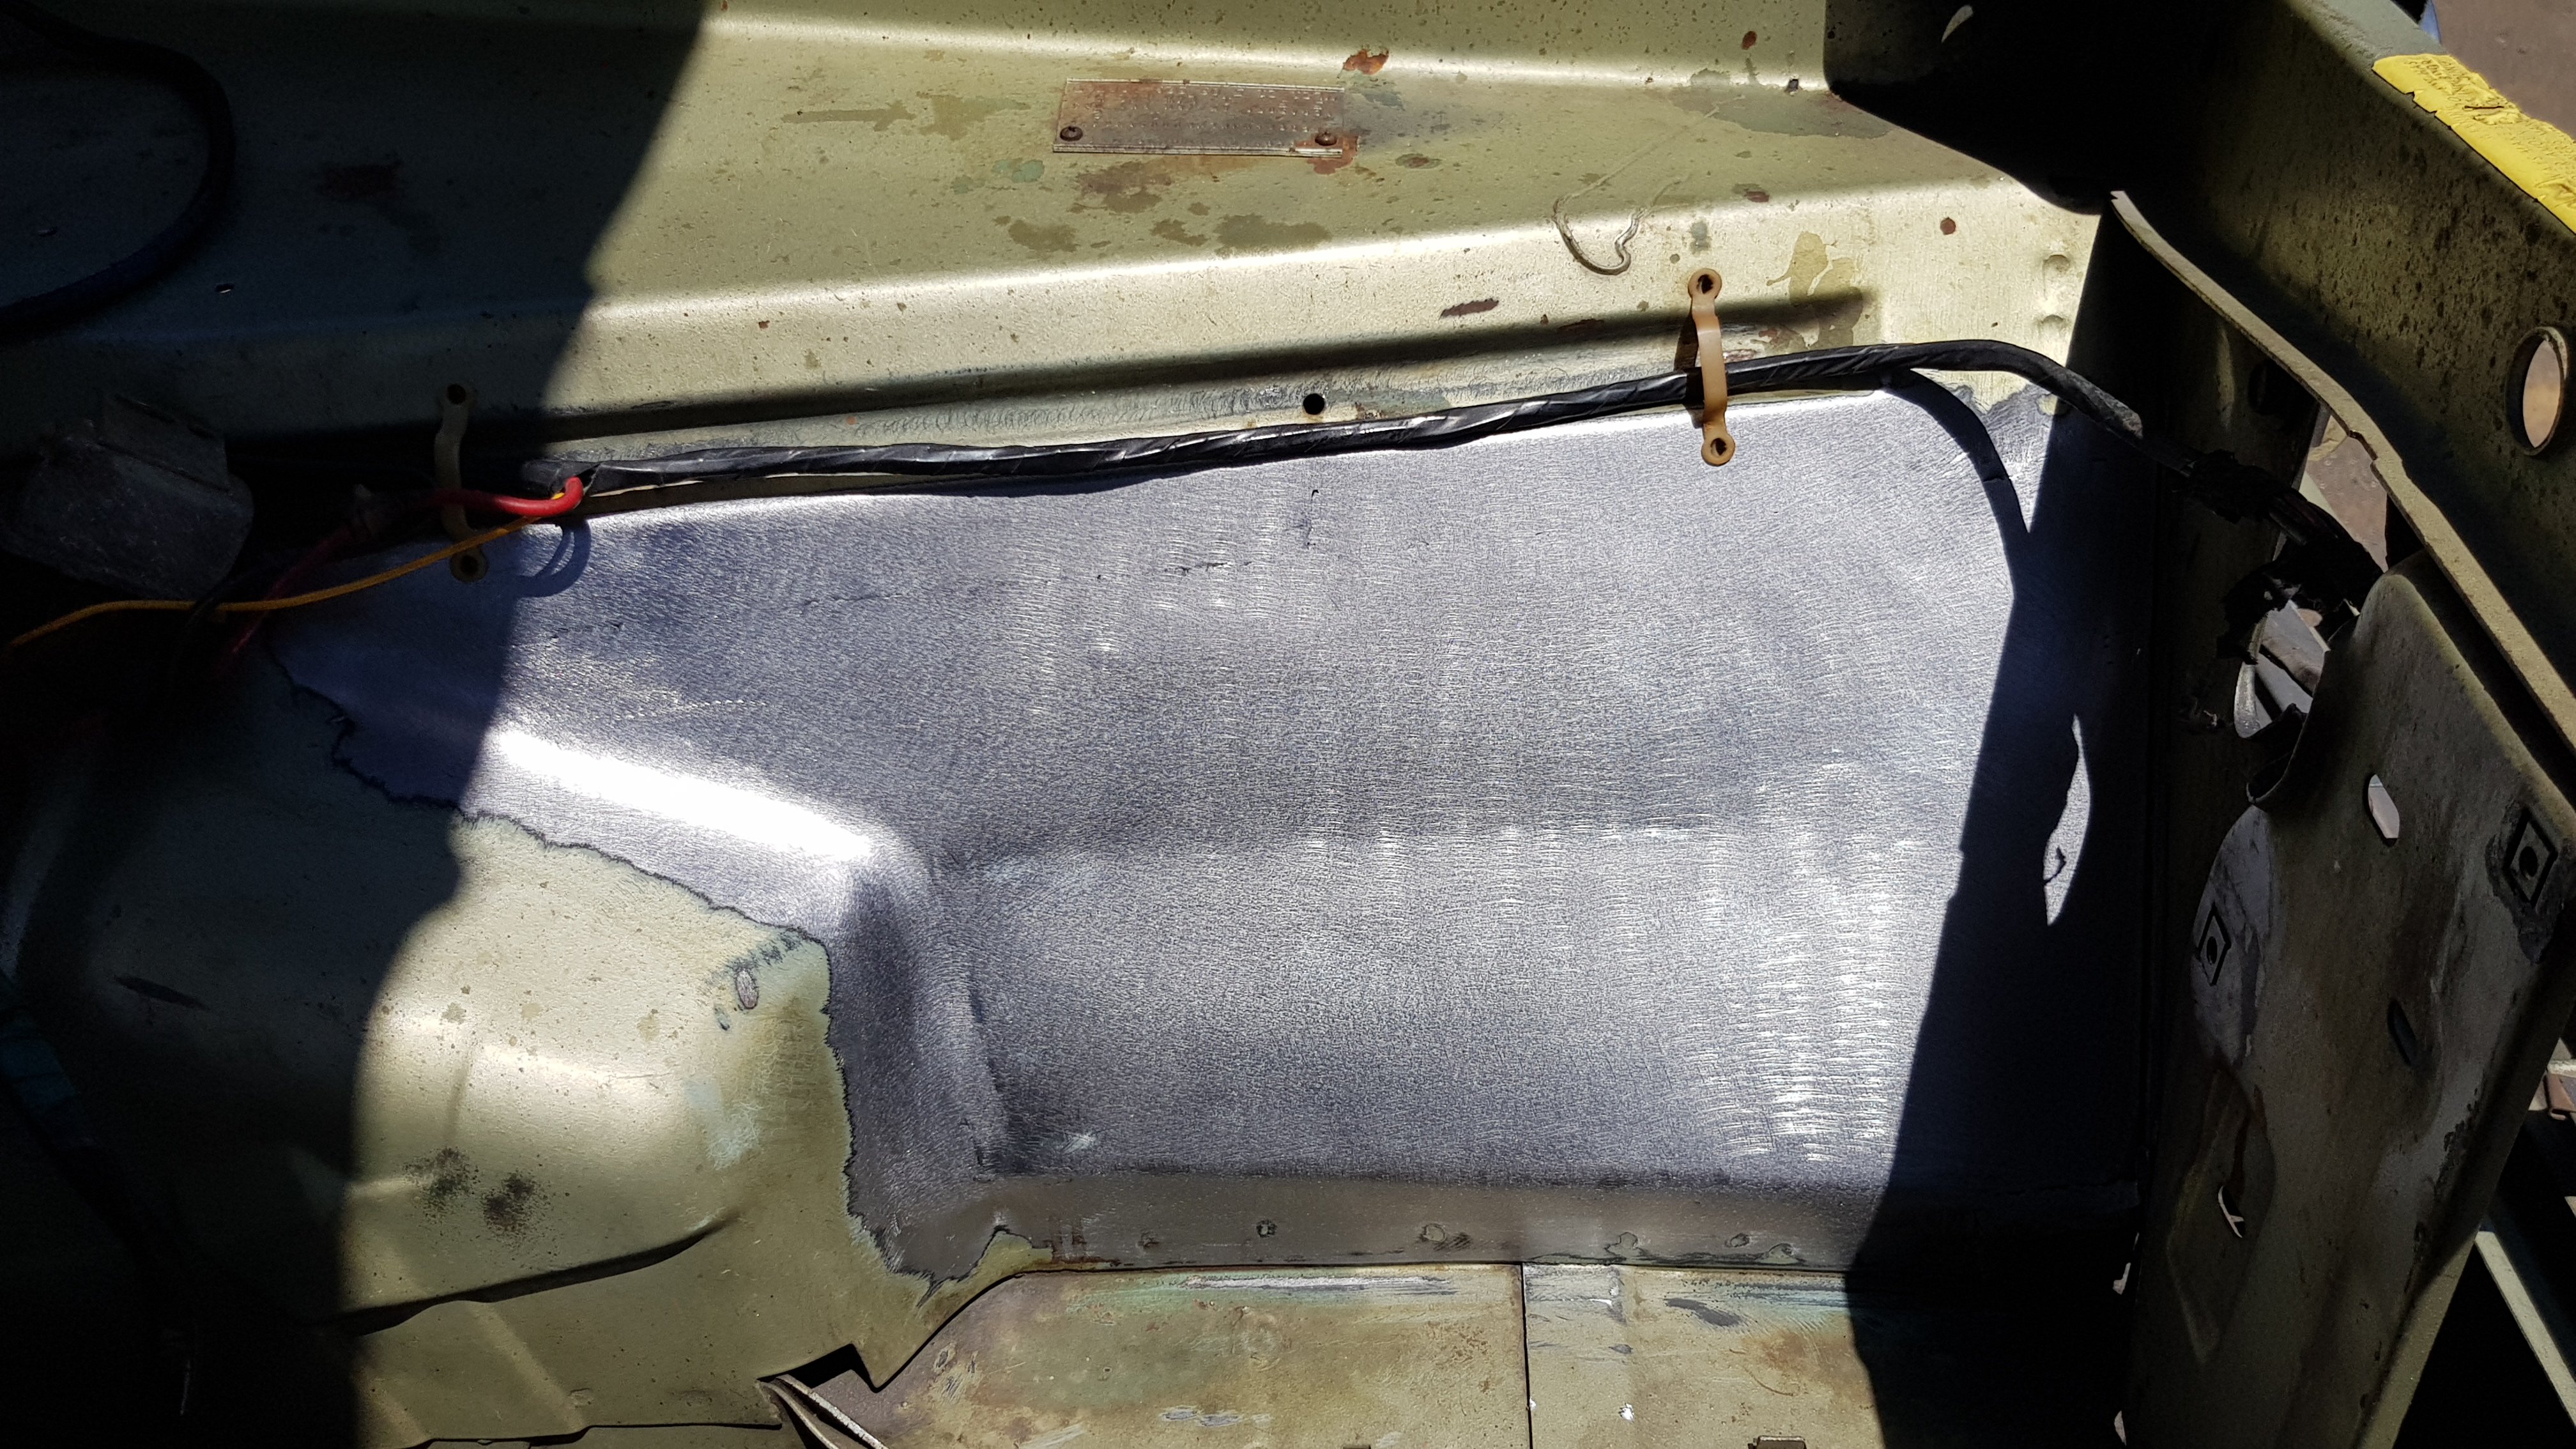
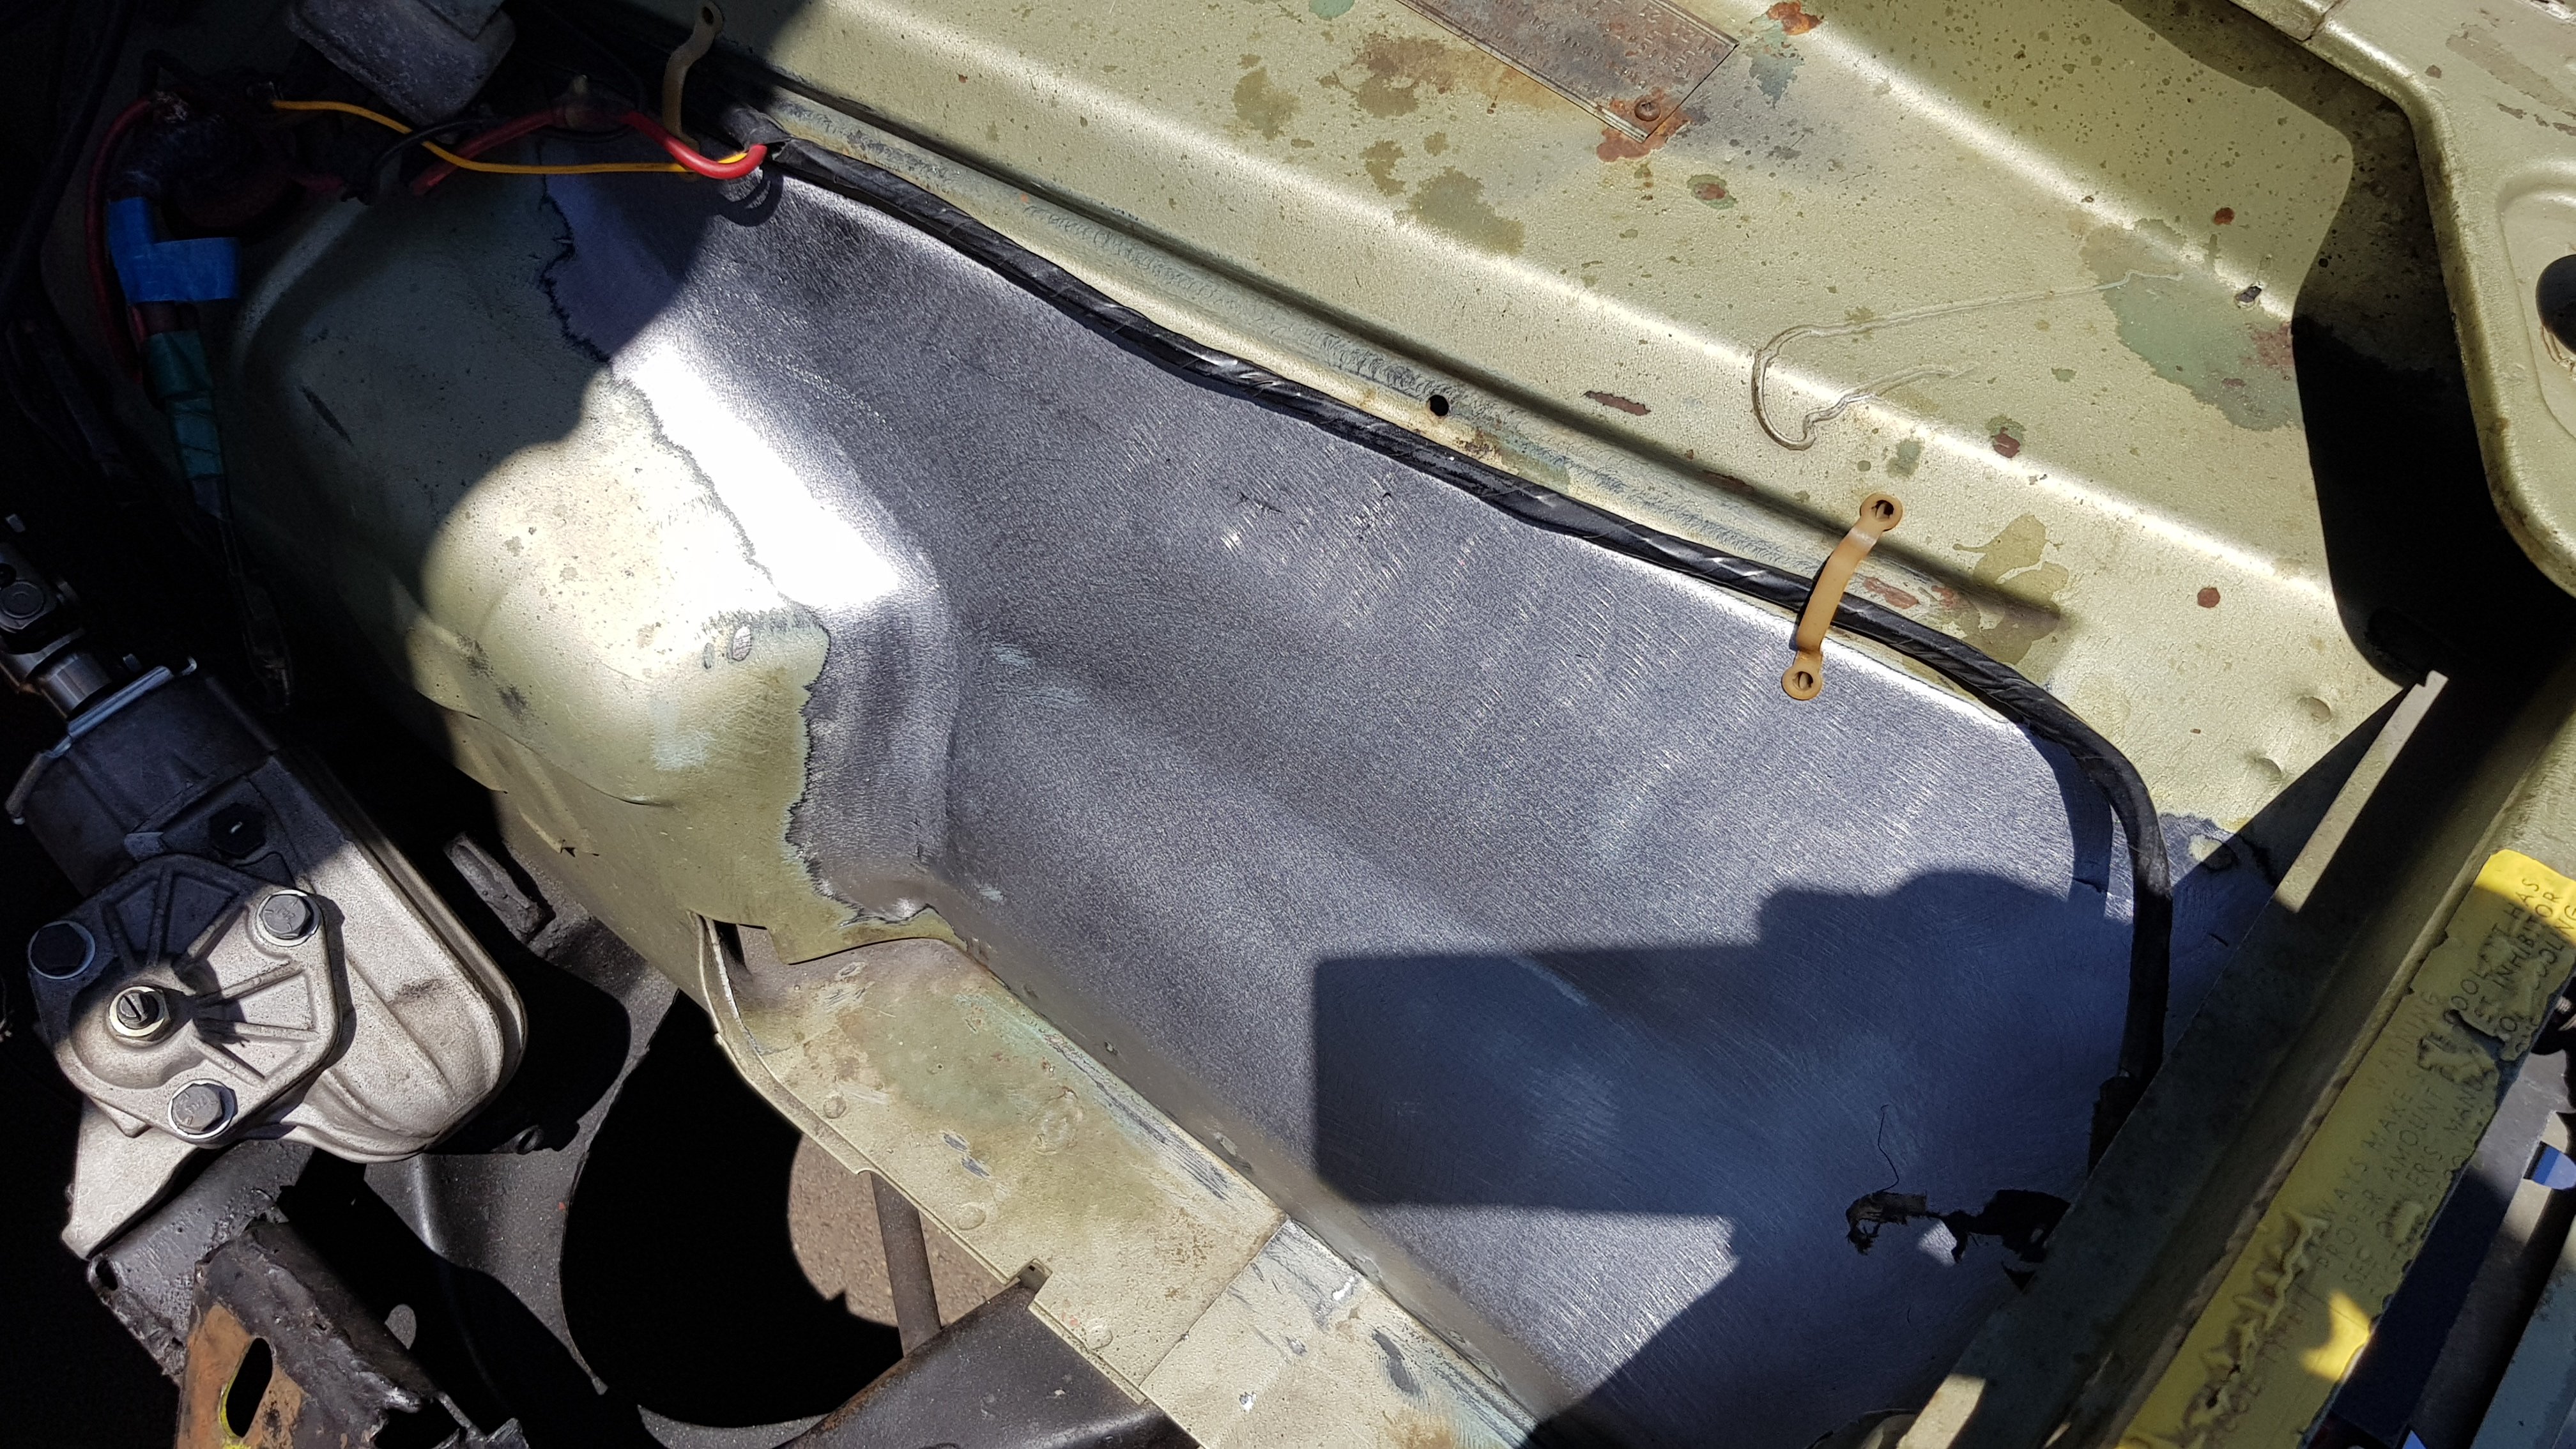
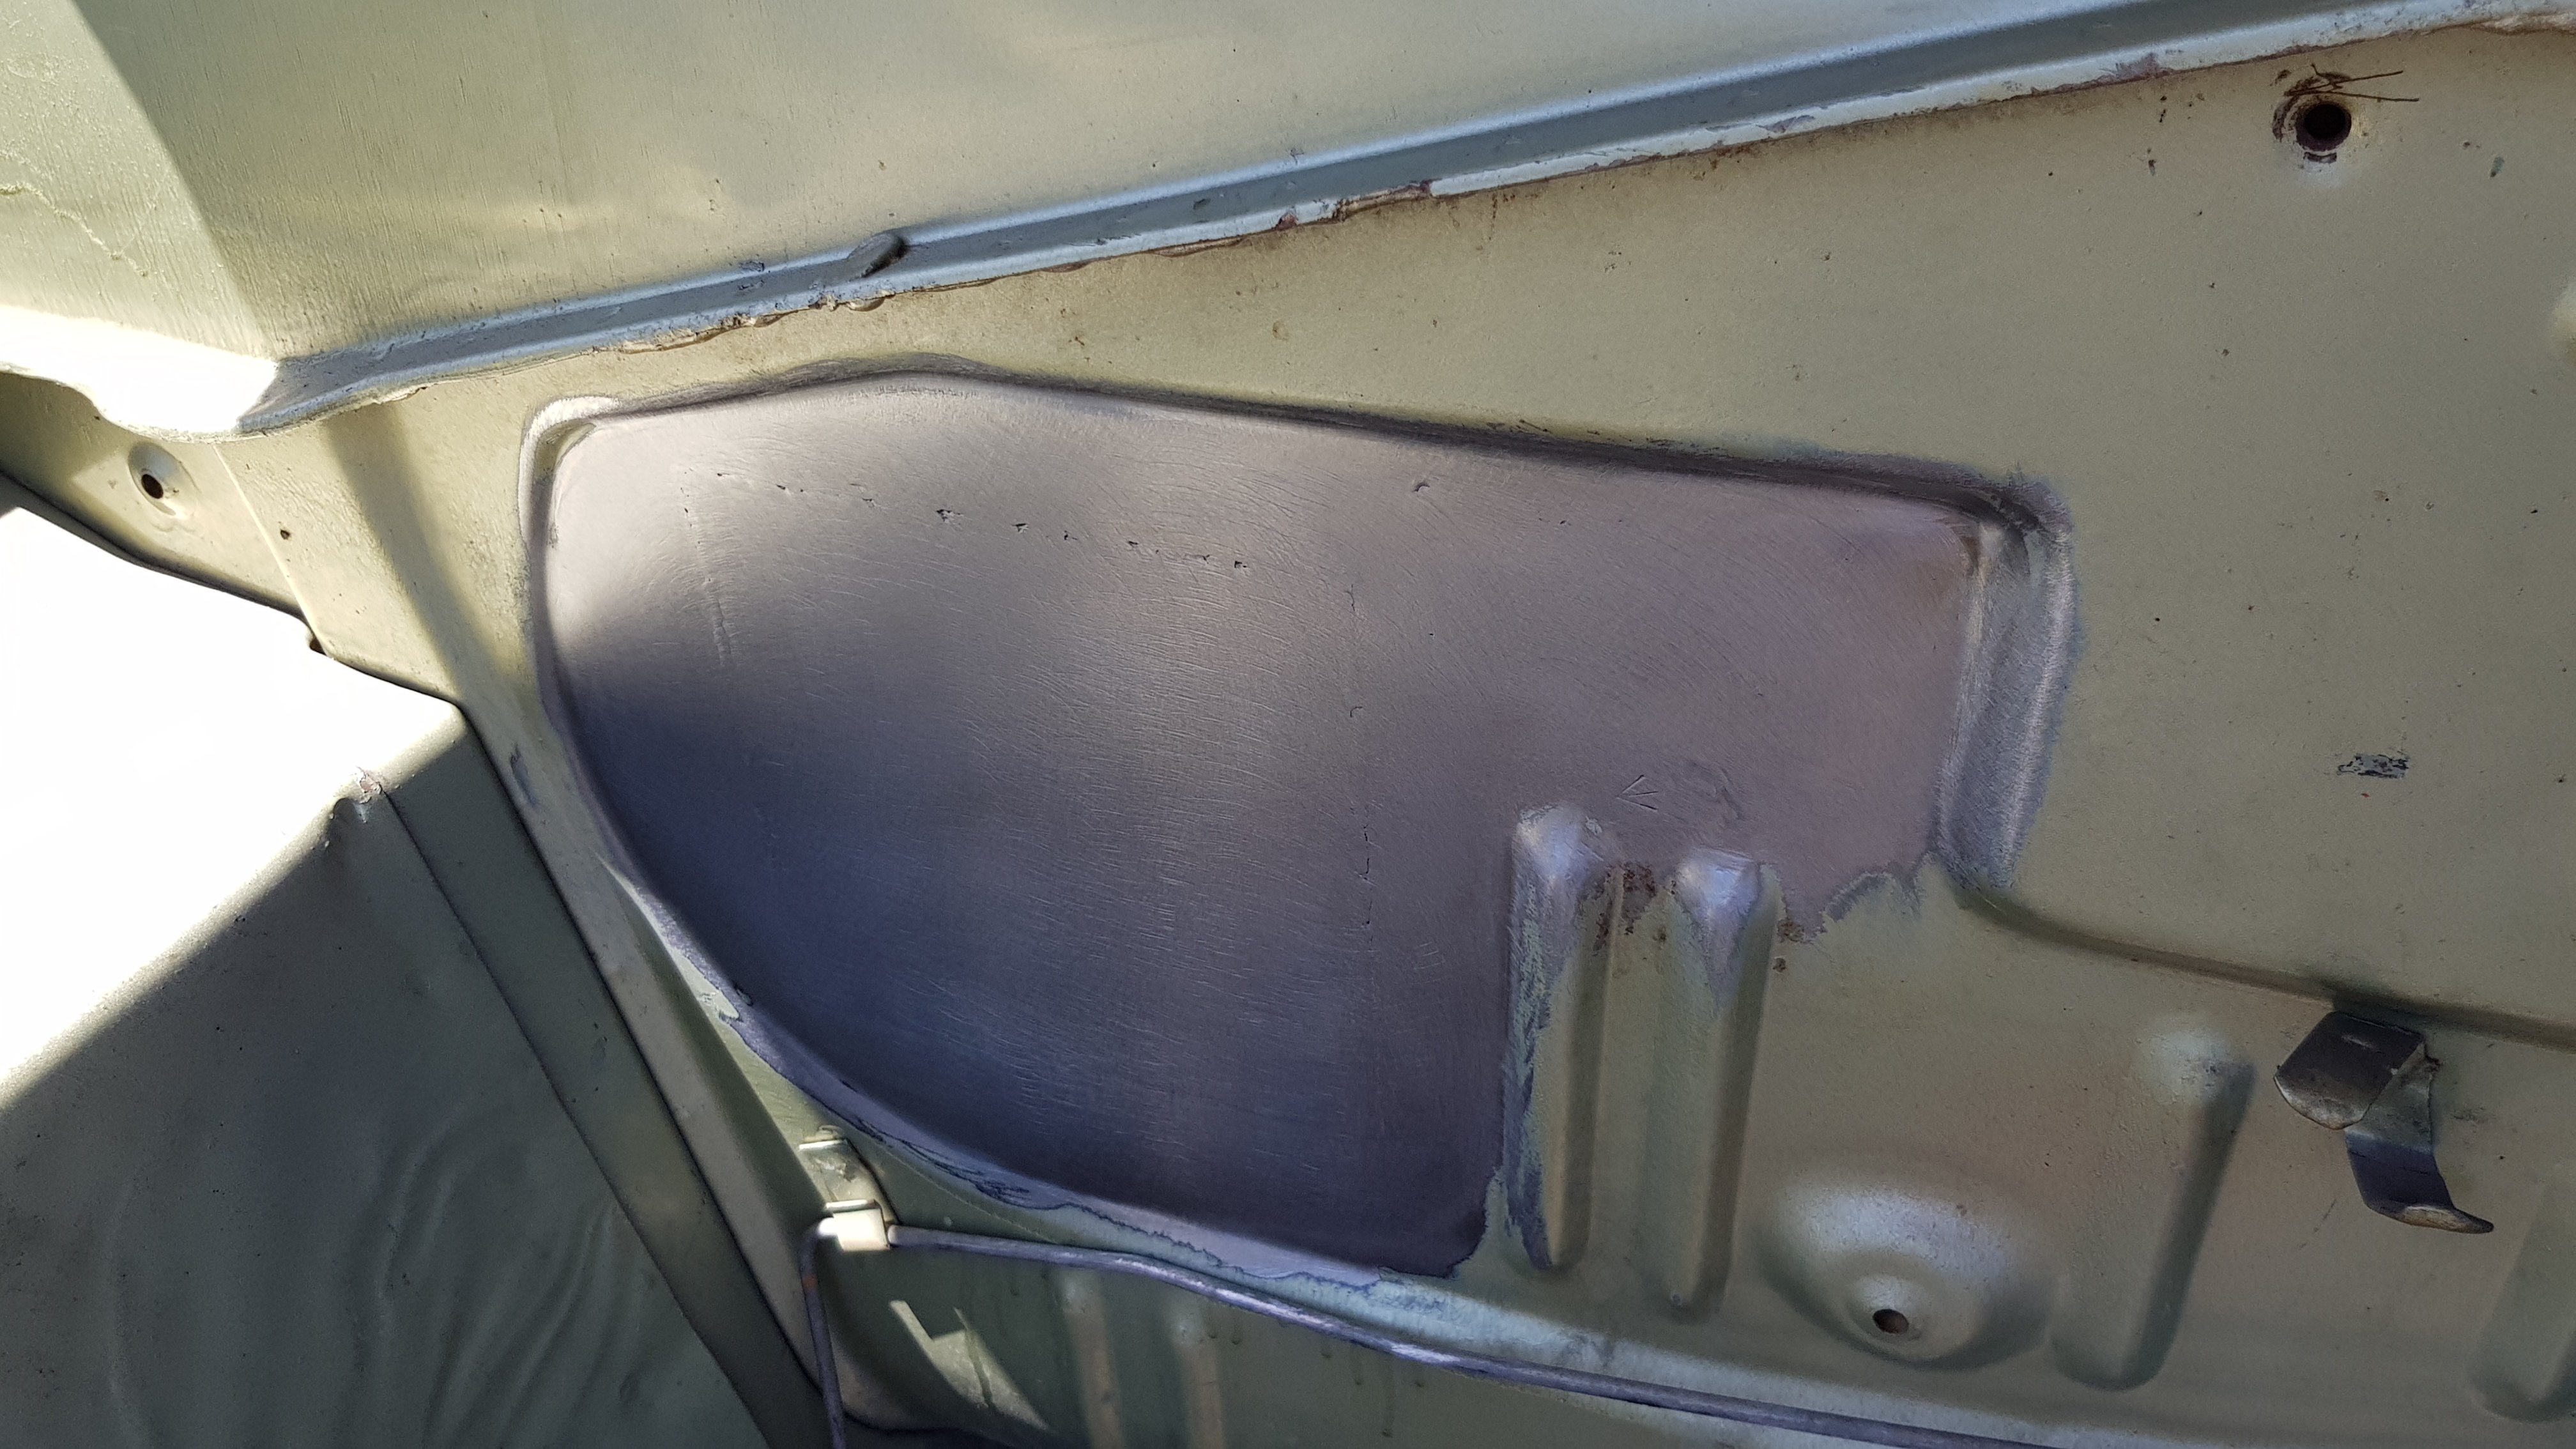
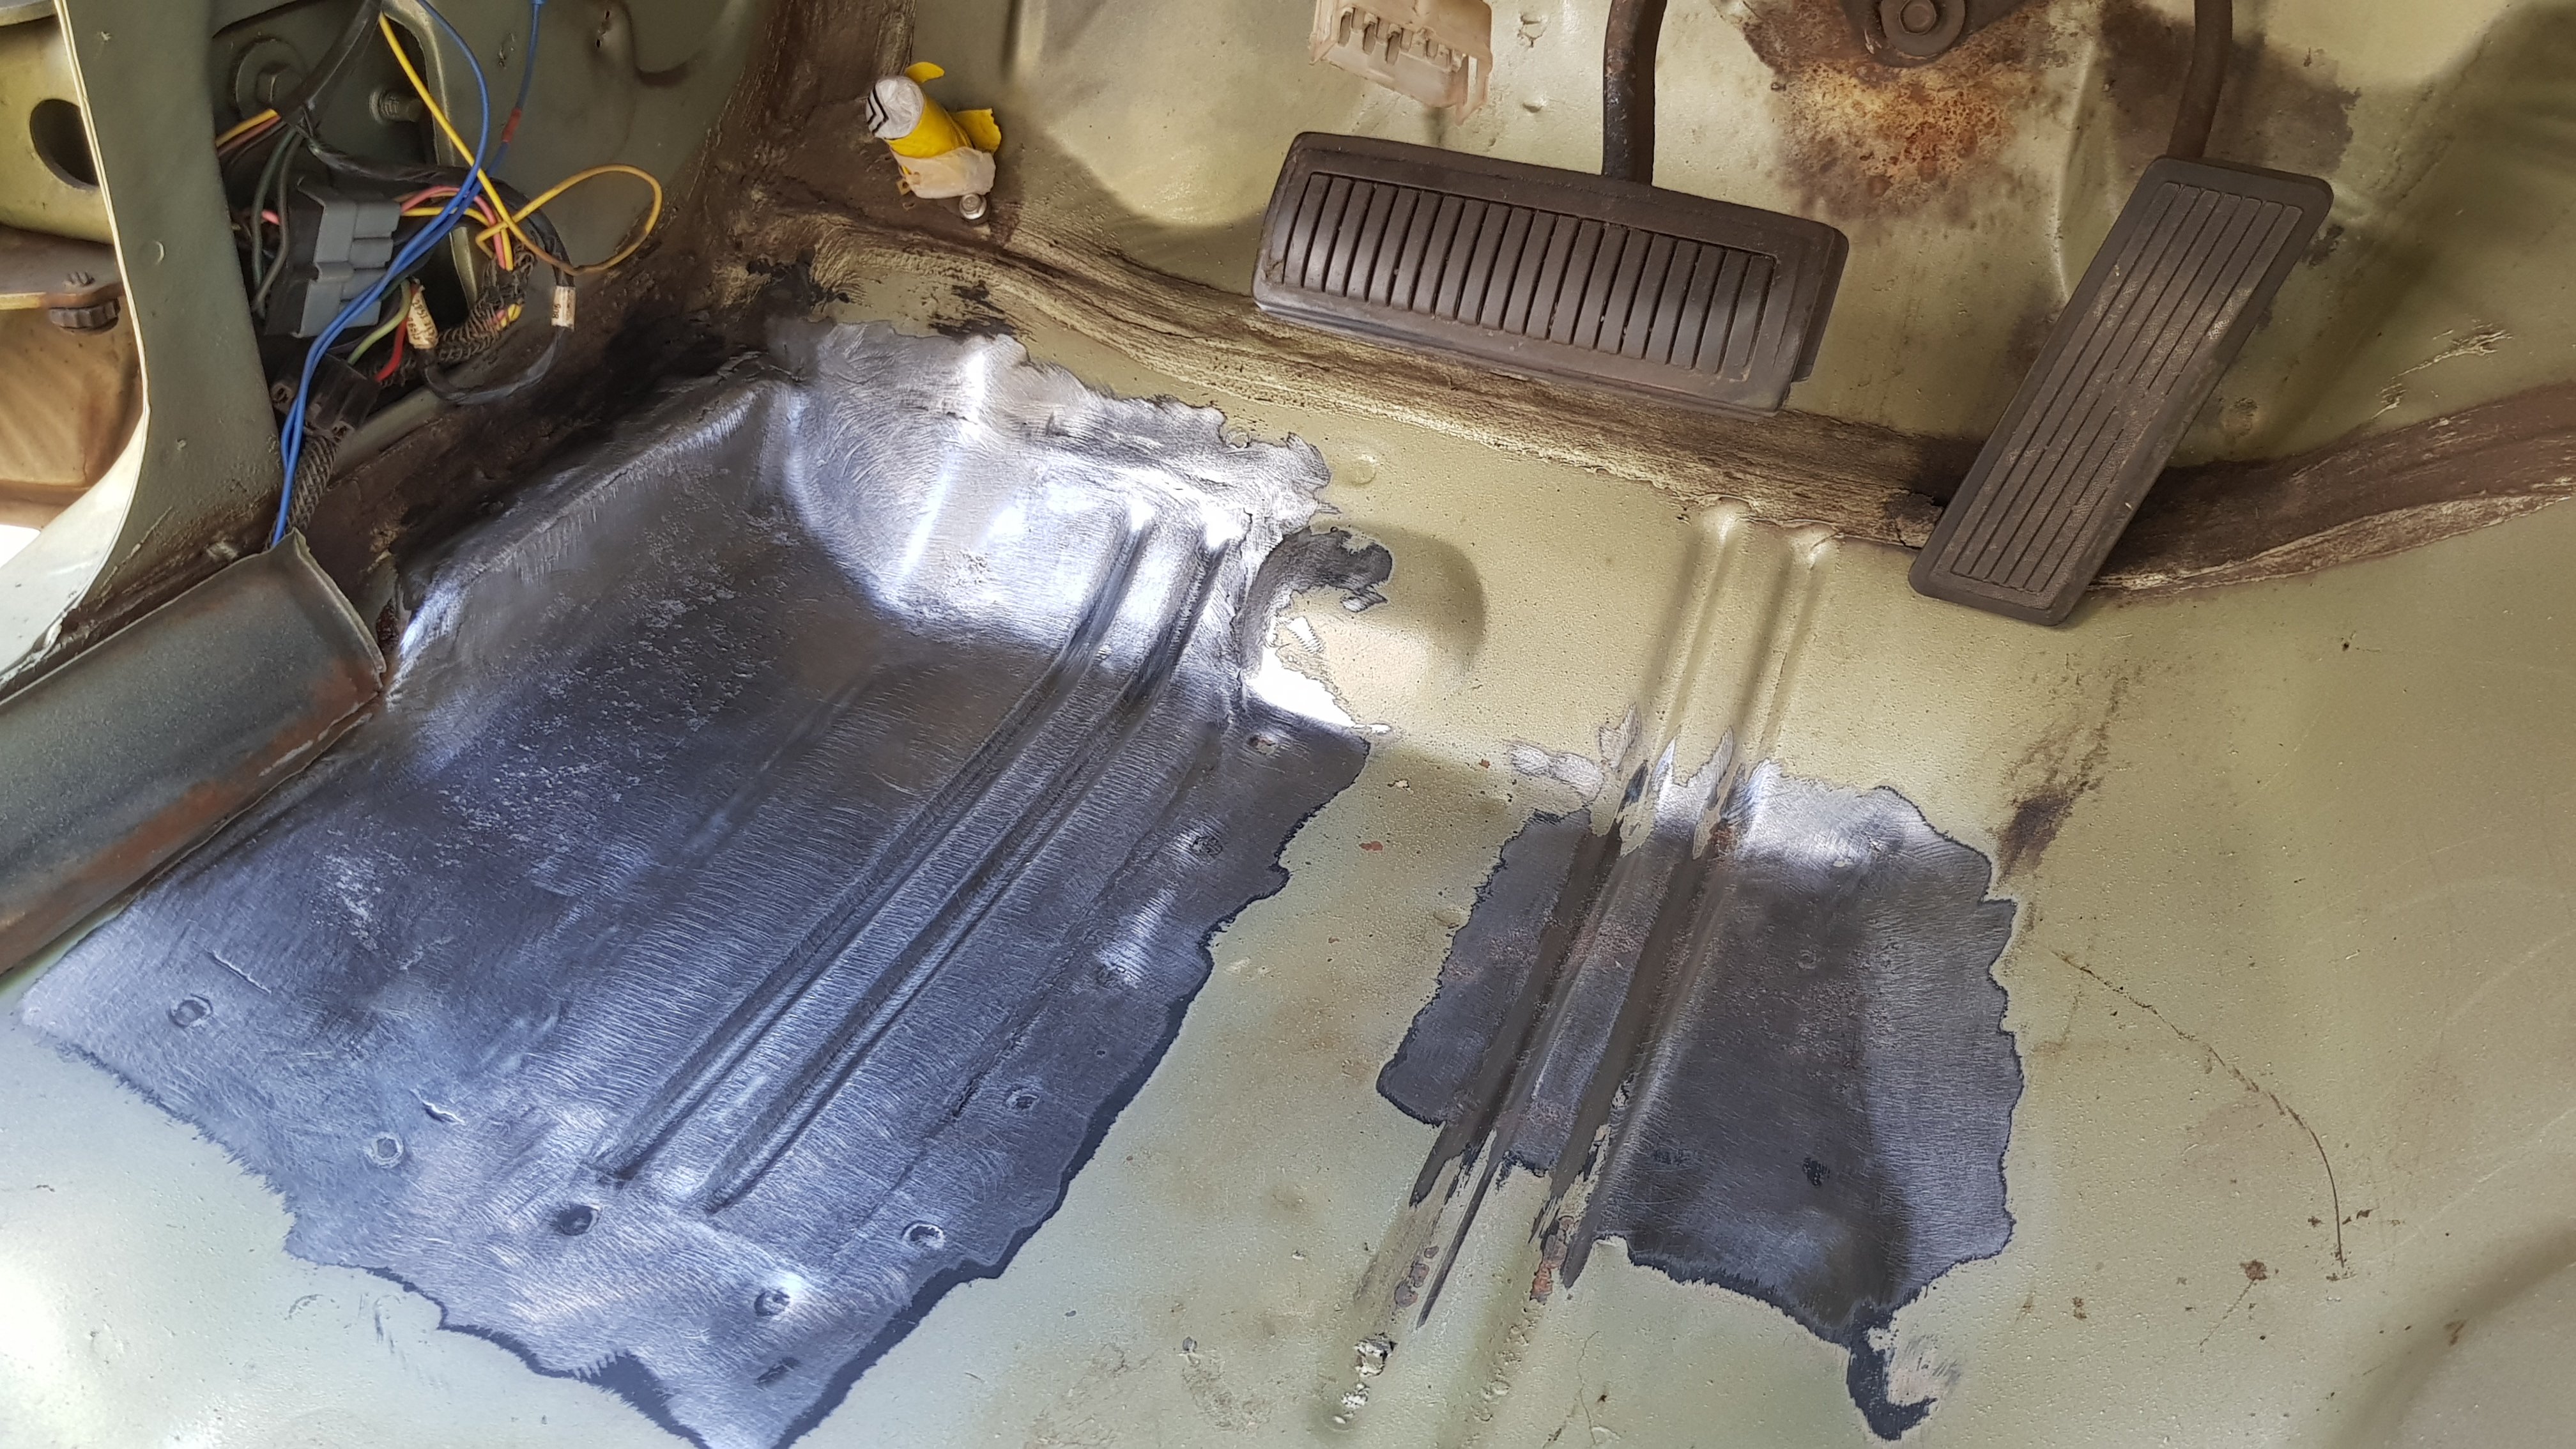
Matt sent me some better pics of when he was doing the floor and stuff
12 points
-
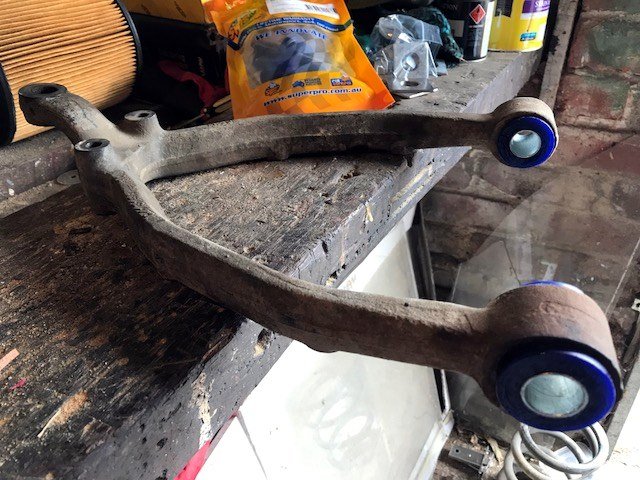
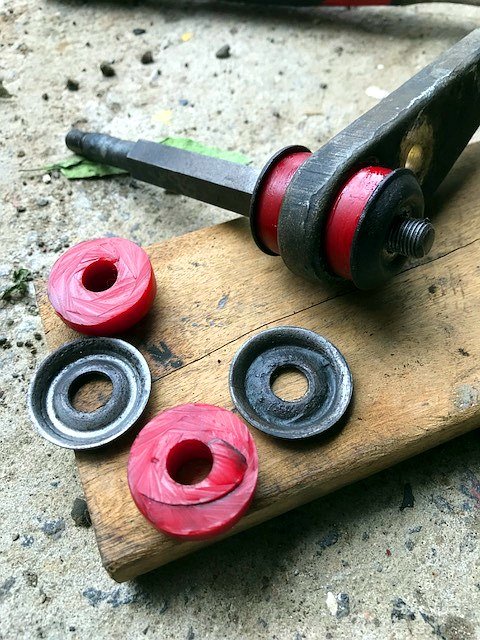
Oh I forgot to mention a while back that I managed to get my Mum to do a spot of sanding to when she visited. I doubt she would have lasted log though but I think she did like the fact she had a trapped audience to waffle on to while she did sand... However- that was obviously before paint. Now we are right into the fun jobs of piecing back together the big kitset. The trickiest thing is trying not to get too carried away with cleaning things but it always does seem such a shame to put messy, rusty or dirty items onto a clean shell. I think in the future I'll try to stick to ratty cars like the Viva wagon. Saves time when things can be messy So yeah.. cleaning things. First the bumpers. I straightened both as best I could and Hannah then cleaned the backs and painted the surface rust in Por15... I then trial fitted the front but once bolted up it was slightly wonky. I ended up having to whip up a bending tool to straighten out the slightly bent mounting points... All straightened I mounted the bumper and stood back to admire the first bit of bling... We then hauled in the other two Imps and went over them like a team of car stripping Piranhas and removed all the last morsels of useful bits... With bits removed they then needed cleaning. Hannah quite enjoys these jobs and did a stirling job of making things all shiny again... I filled the roofline and inner wings over the rear arches with cavity wax. Much more enjoyable this time round then the first time I ever used some back in Blighty on my Rx3, in winter on a very cold day. This time round it flowed perfectly... Together we fitted the head lining we removed from Imp 3- the one rescued from Christchurch. Its a bit discoloured around the edges where the contact adhesive that the original factory worker had brushed in place has stained it right through. Not much we could do with that. But its rip free, pulled up nice and tight and looks better then nothing. Its in keeping with a 54 year old car... I then made a engine cover stay. Because the cover is fiberglass and had no mounting points for a stay I had added some before painting along with a suitable point on the car with them further apart then the standard imp placement to take away extra leverage over a flexible f/glass lid. Now to connect the dots. I had a rough Idea of what I was going to make when I added the mounts and just went with it. I had a piece of stainless the right size and used a plastic knob from an old broken cafetiere I had stashed in my bin of 'might be useful one day' bits. I bent the stainless rod in such a way that when the lid is opened it slides up and drops over a stainless bolt then cant go further. To drop the lid you have to lift the knob slightly- this way a gust of wind cant lift it and make it drop. It works sweet as!... Next big job was to get the wee car back on its wheels because I had some work coming in that required the hoist. I refitted all the suspension and luckily had collected 4 decent shock absorbers with good shafts. However the springs were going to be too long. I'd happily pay the $200 for some Montie Carlo springs. For those not aware they are the popular lowering spring set for Imps that most people fit. However the freight costs for a set to NZ is too much for me to cope with and anyway- I have 3 full sets of springs I can play with for free. I like free. So out with the Makita... After doing a heck of a lot of web browsing I deduced that one coil off the front and half off the back would be a good starting point. Totally aware that I'd be raising the effective spring rate I reckoned this would still be OK. The car is going to be a touch heavier all round anyway but too much extra stiffness to the coils without adding extra damping would be no good. I definitely cant afford new posh dampers at this point so I played it safe... I then heated the cut ends up with the Tig in several zones, flattening the coil as I did. This worked well- the heat didn't travel very far. Its not optimum. Optimum was what I used to do back in the day when I spent 3 months of my apprenticeship working for a Blacksmith resetting leaf springs and shortening coils etc. But I dont have big furnace at my disposal nowadays so Makita it is Then cut the ends flat and they came up sweet. It will be really interesting to see how it sits on these and this I wont know until the car is fully built up to full weight. I reassembled the struts and finally I was able to fit the minilight wheels from the racecar on and lower the Imp to the ground. Ooooooohhhhh. I dont know when this car was last rolling but I suspect it was a very long time ago! It felt so good to roll it away from the hoist, stand back and admire it. Plenty of premium positive camber to come out as the weight piles on. I'll soon be ordering some better sized new tyres and getting them onto the rims. While the car is off the hoist Hannah can continue assembling interior bits and I'll be attending to some work on other peoples cars.8 points
-
Friday update. Dropped car off at certifier the day before Waitangi day. The car only got pulled up on the way the rear brake hoses were run. (I guessed it would fail on this). Everything else was sweet. The certifier was so happy with the way it was done he brought forward the Compliance check which was done last Friday. Compliance guy had a slightly bigger list but nothing major. - Align headlights - RH wheel rubbing (center steering rack) - Bride seat fouling on seatbelt stalk (there is some adjustment to clear this) - Repair gouge on inside of LF wheel So in short nothing major! Seeing as I'm back in full swing at work I gave the guys at the cert place the go ahead to remedy everything but the wheel. I dropped this off to a trusted repairer yesterday and should get it back next week. So depending on how long it takes for the cert plate to arrive the car should be all legal within the next couple of weeks, happy days! Goal of making Toyotafest this year is looking good.
6 points
-
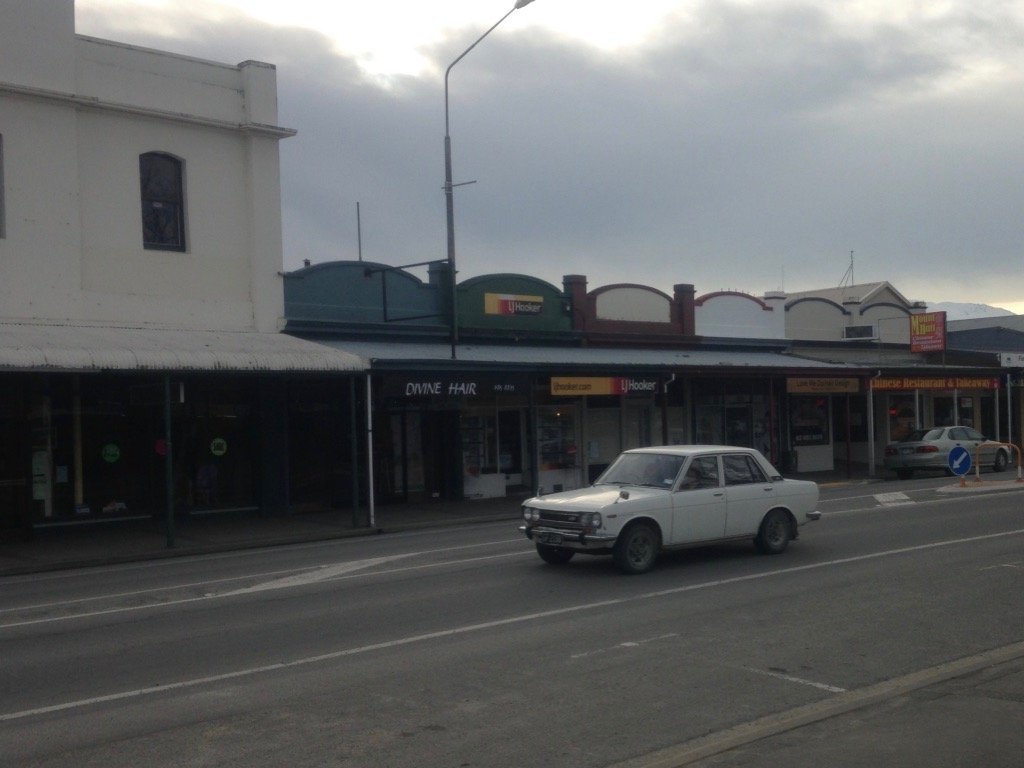
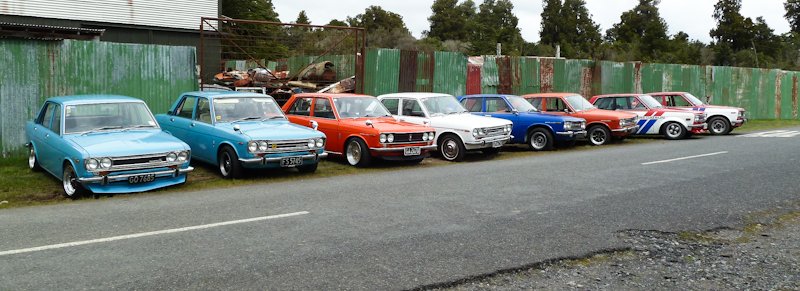
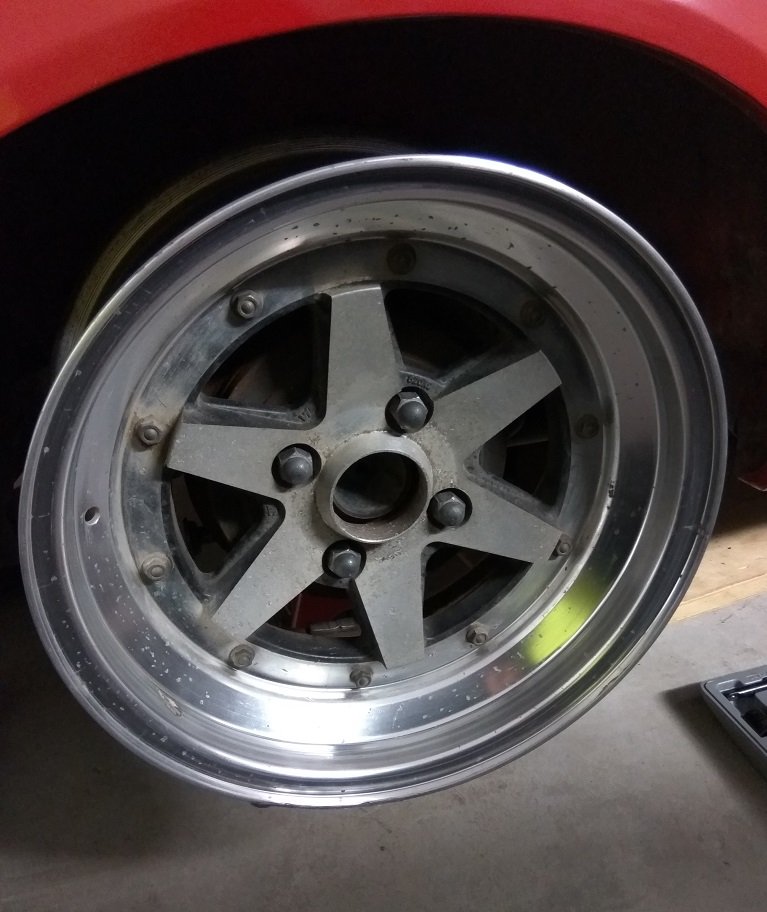
This car has been a long time in the making acquiring, but being the descendant of an original Datsun foamer, it could be said it was my destiny..... The car being a 1972 Datsun 1600sss, the back story? well, take a seat..... 20 years ago the car in question was owned by a young man in Palmerston North, being an easy target it was stolen and taken on a joyride, thankfully once they had had their thrills it was abandoned to be recovered by the boys in blue, but the good luck didn't last, while in impound some scrots jumped the fence and stripped her of all the fancy sss interior, with the badges, steering wheel and dash board gone, there was not much left to identify it as the performance upgrade intended by the factory. Being the Datsun man he is, when my father got word of it being up for grabs he beelined for the impound yard for a nosey, even though the interior had been stripped, the body was in fairly good shape and for a price that we'd all love to pay now, he loaded it onto a trailer and tucked it up under a tarp in the back lawn. At this stage he had a standard 1600 set up as a track car for competing in classic classes at Manfield & car club sprints, but with a teenage family, i'm sure restoration of the sss was still a long way off. Here's a younger me in the 1600 race car in the early 2000s during a carclub motorkhana, most likely the first time I drove a 1600 too! Somewhere in the mid 2000s the race car got close and personal with the tyre wall at the end of the back straight at Manfield, coming out very much second best a donor shell was required, with the sss being in pretty good shape it was quickly fitted out with all the bits and went on to serve race duties for a number of years, thankfully my father realised that sss body shells were getting hard to find and so when a standard shell popped up cheap, he brought that to convert to a more modern safety standard and the sss was reunited with standard parts and retired to weekend road duties. As all this unfolded, I left home, traveled the world, invested heavily in Ladas, eventually to settle in the Datsun capital of NZ, Christchurch. Two years ago the stars aligned on a SAR training exercise and while stocking up on pies in Fairlie, I spotted this wee beaut Sparking a deep down affection I followed it around the corner to where it stopped and of course I started chatting with the owner, turned out its been in their family for quite some time, and the lovely lady informed me that there was a Datsun club and that they had nationals on in Ohakune, even better was that year's theme, 50 years of the 510! Looking at dates they lined up and before I knew it I was hitching a ride north with our very own Datsun barry Runamuck to meet my father and other 510 foamers from around NZ. After a weekend driving around the central plateau I was convinced I needed a 1600 in my life and a plan was struck to purchase a dereg but complete vehicle that was tucked away, sadly after discussion with panelbeaters over the required rust work for re-vin the costs looked a bit daunting for my current plans. A few months later my father slipped up and offered the road legal sss to me, I rapidly agreed before he could back down, only downside was I had no leave left and a work schedule needing much attention, this meant I had to wait until Christmas break to pick up the car! For now it's late, but I shall dig out some more pics and tell more about the car itself and the mini and major plans ahead. Discussion thread here:
4 points
-
They'd probably accept garden hose going by the trailers I see on the road. Perhaps just sleeve it in some electrical duct so it can't rub?3 points
-
Haha, funny you say that, many years ago my father wanted a 125, turned out they were too expensive for him and he had to settle for a 1600....3 points
-
It's the little things like this that make the difference to this food trailer. Not just a traditional caravan shape but style as well. I payed a visit to Boss Powdercoating and dropped my rims off to get cleaned up. Once they were done i headed to The Bling Company and had my white wall tyres fitted. The before and after is unbelievably good. Before after shot ow @Geophy3 points
-
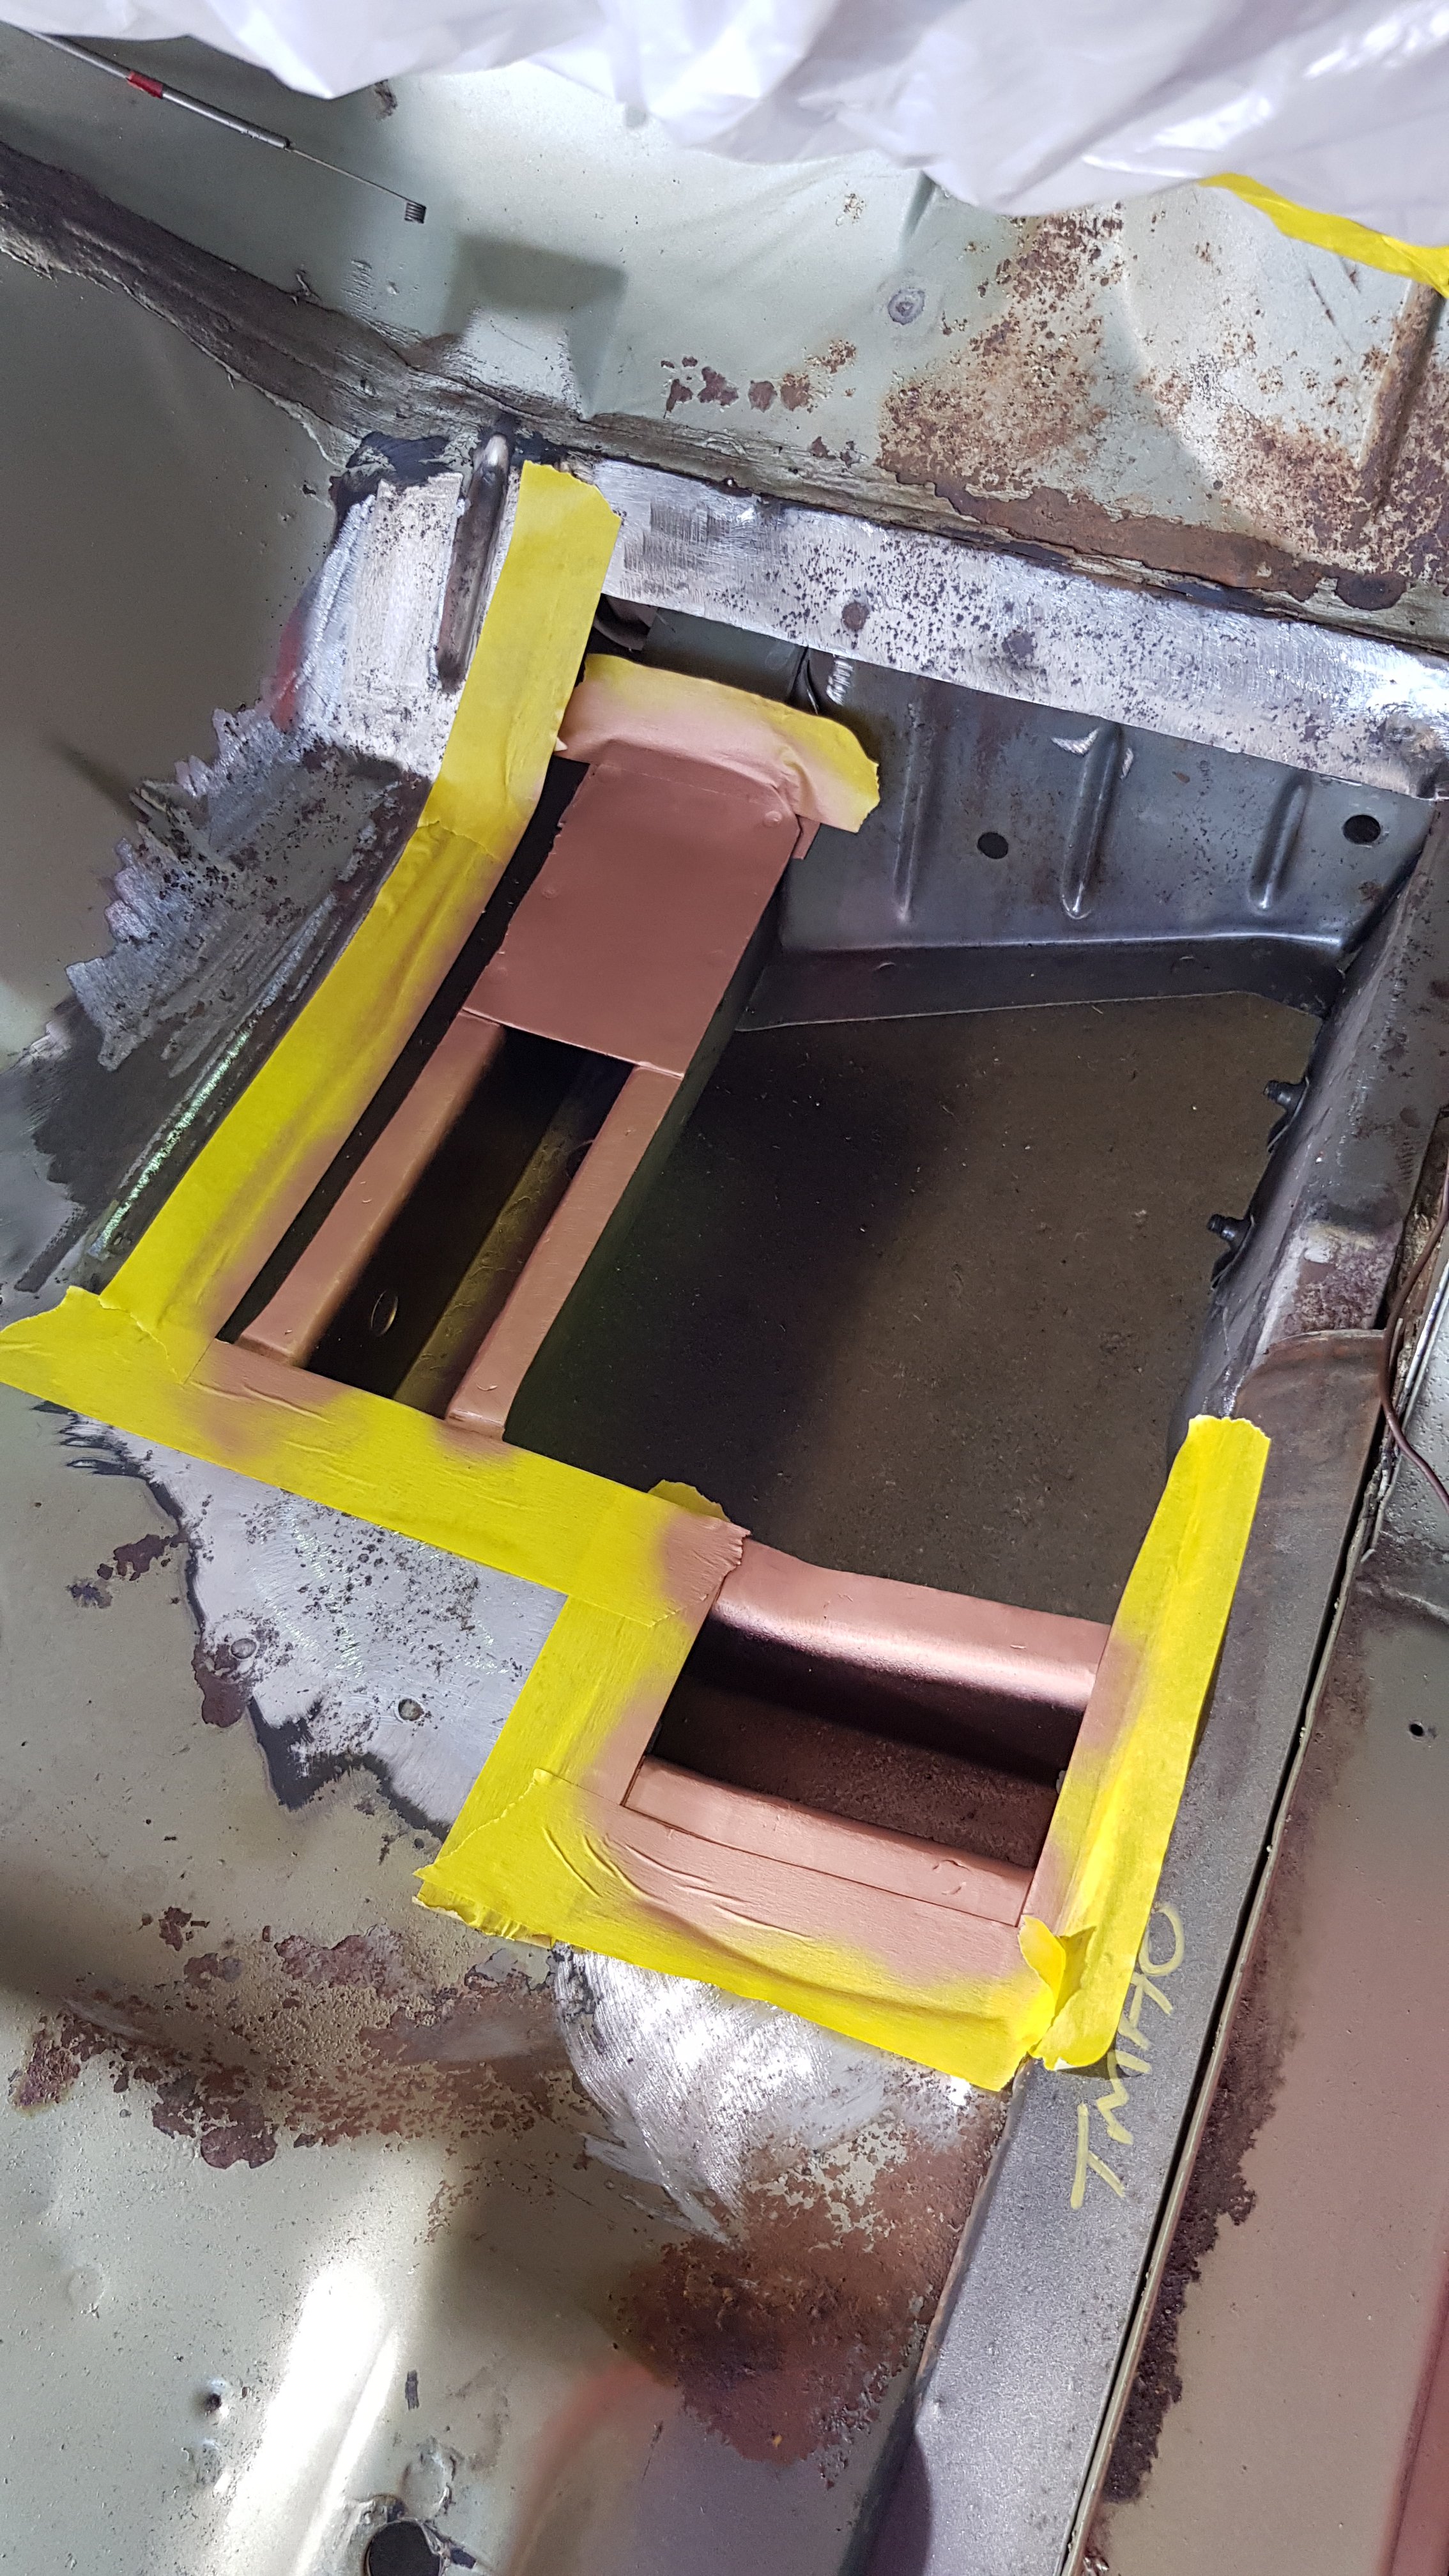
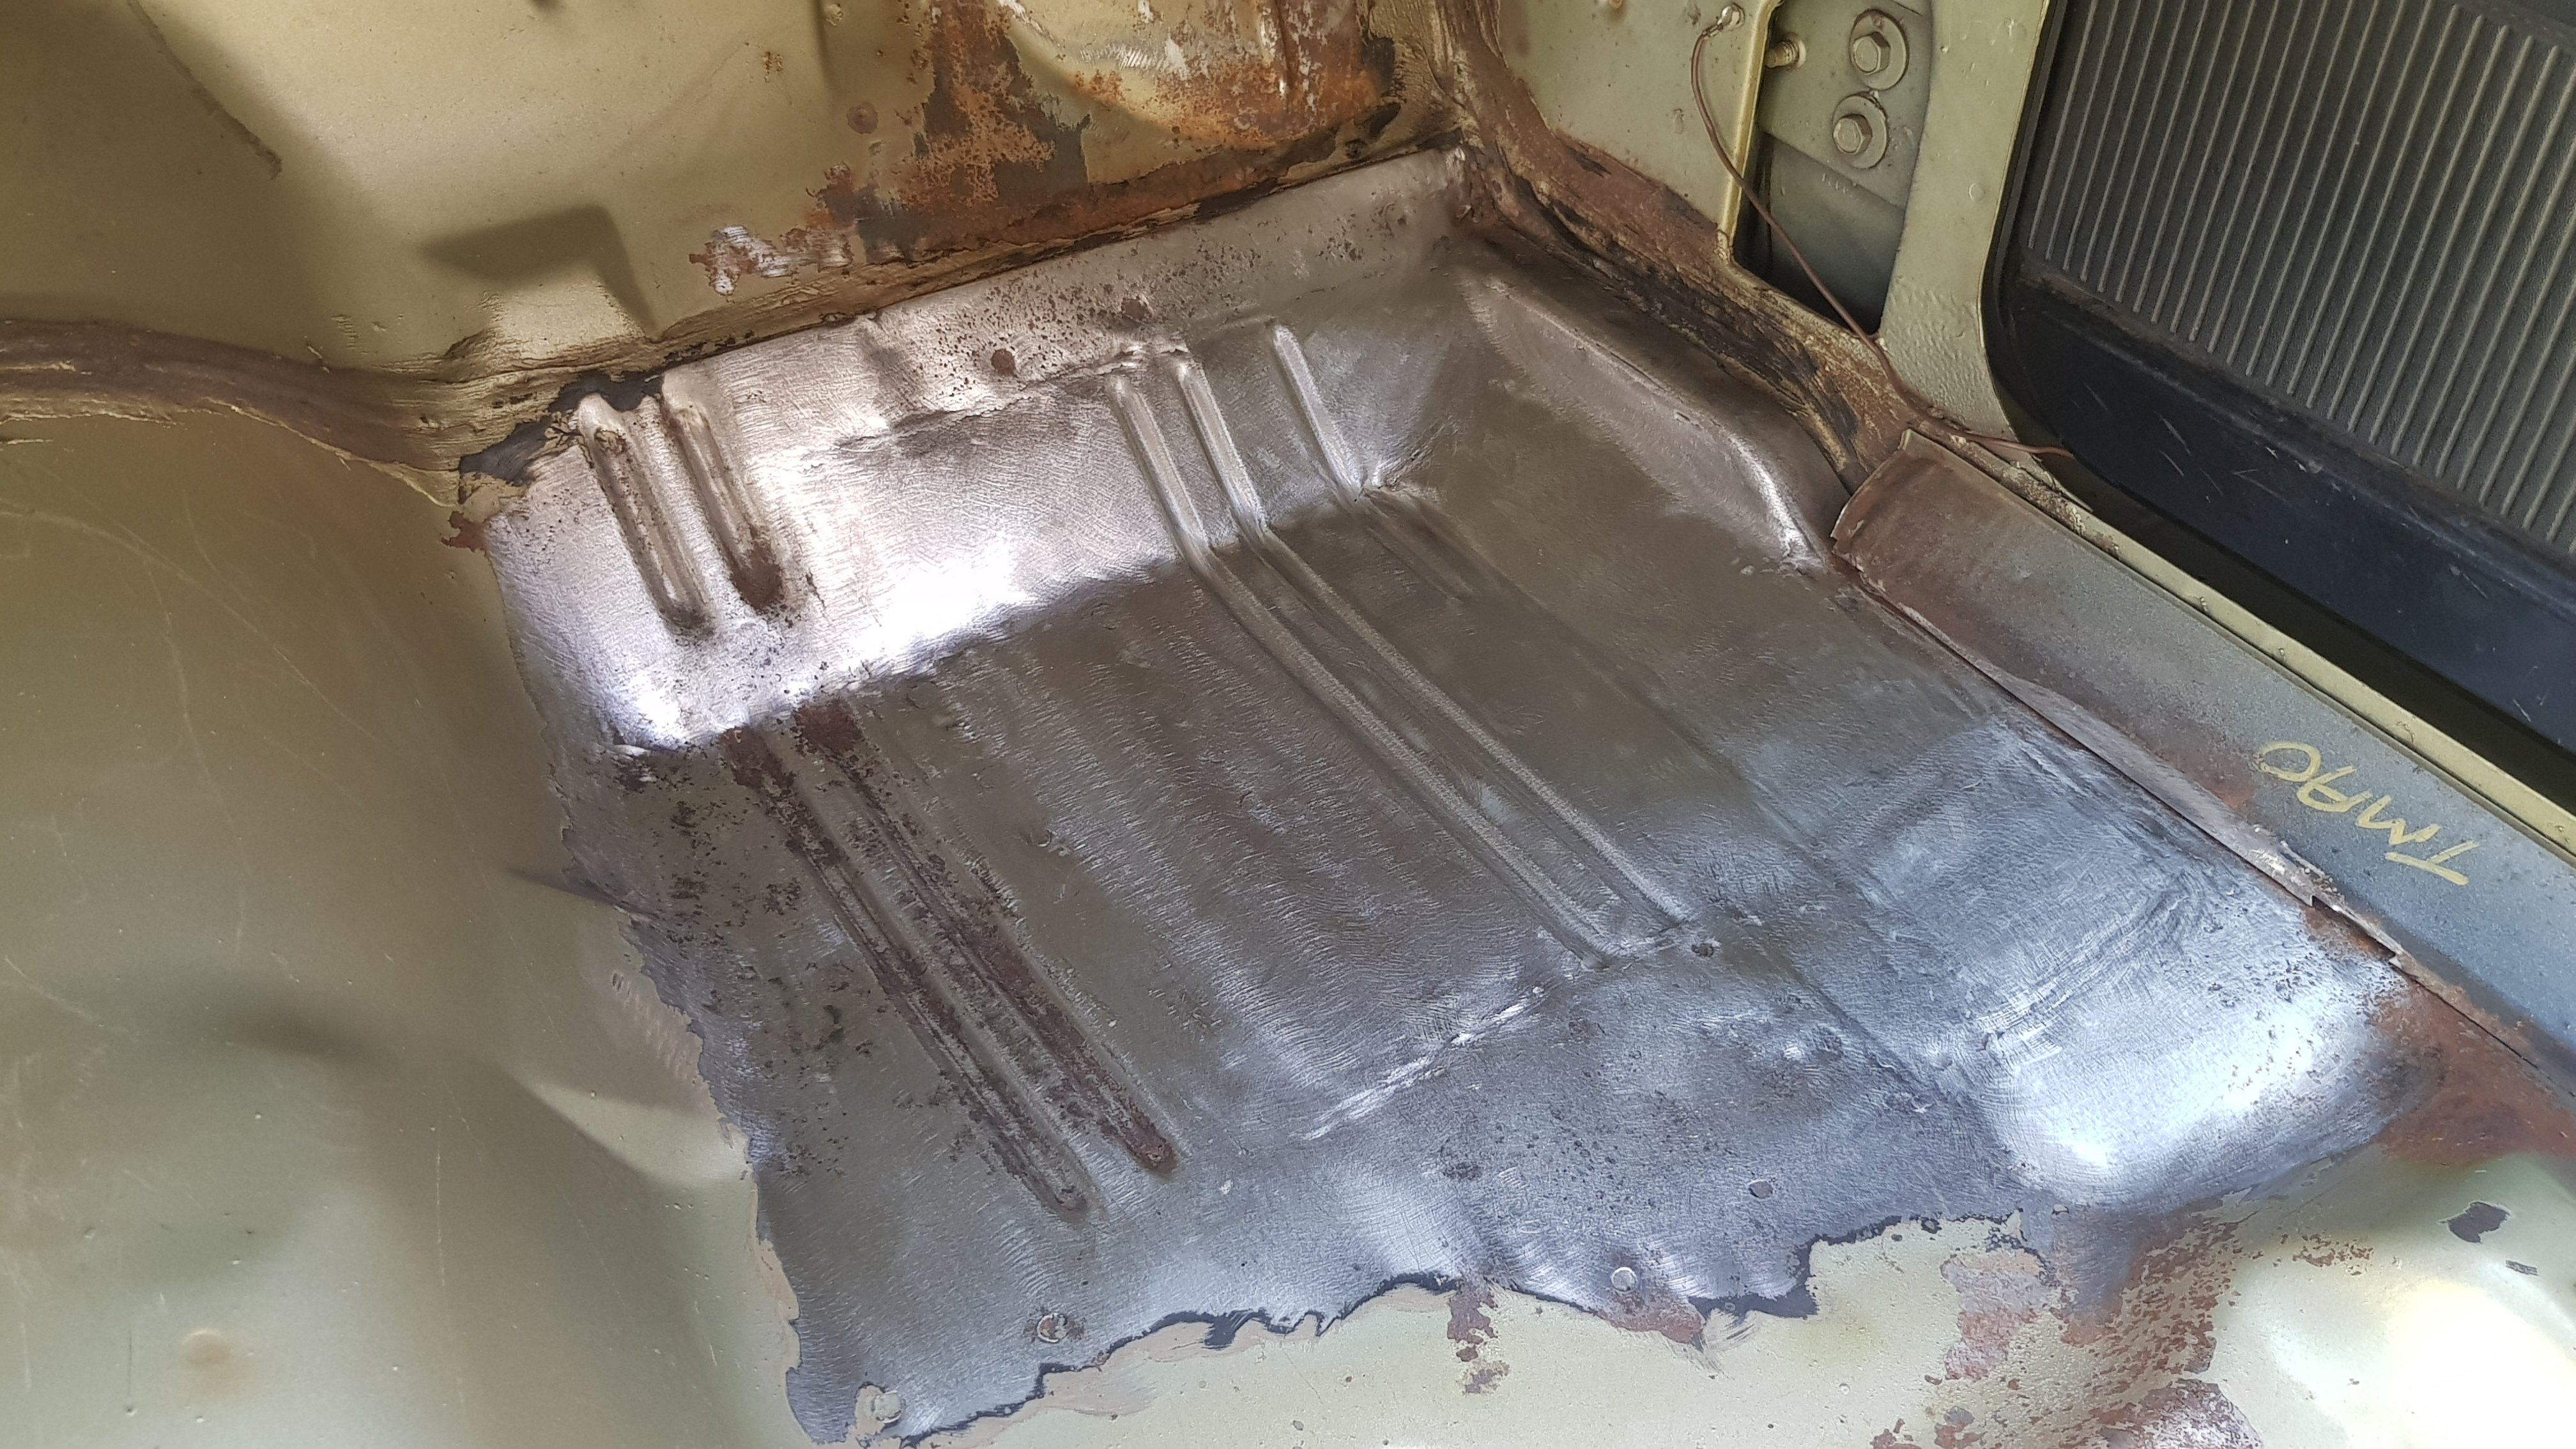
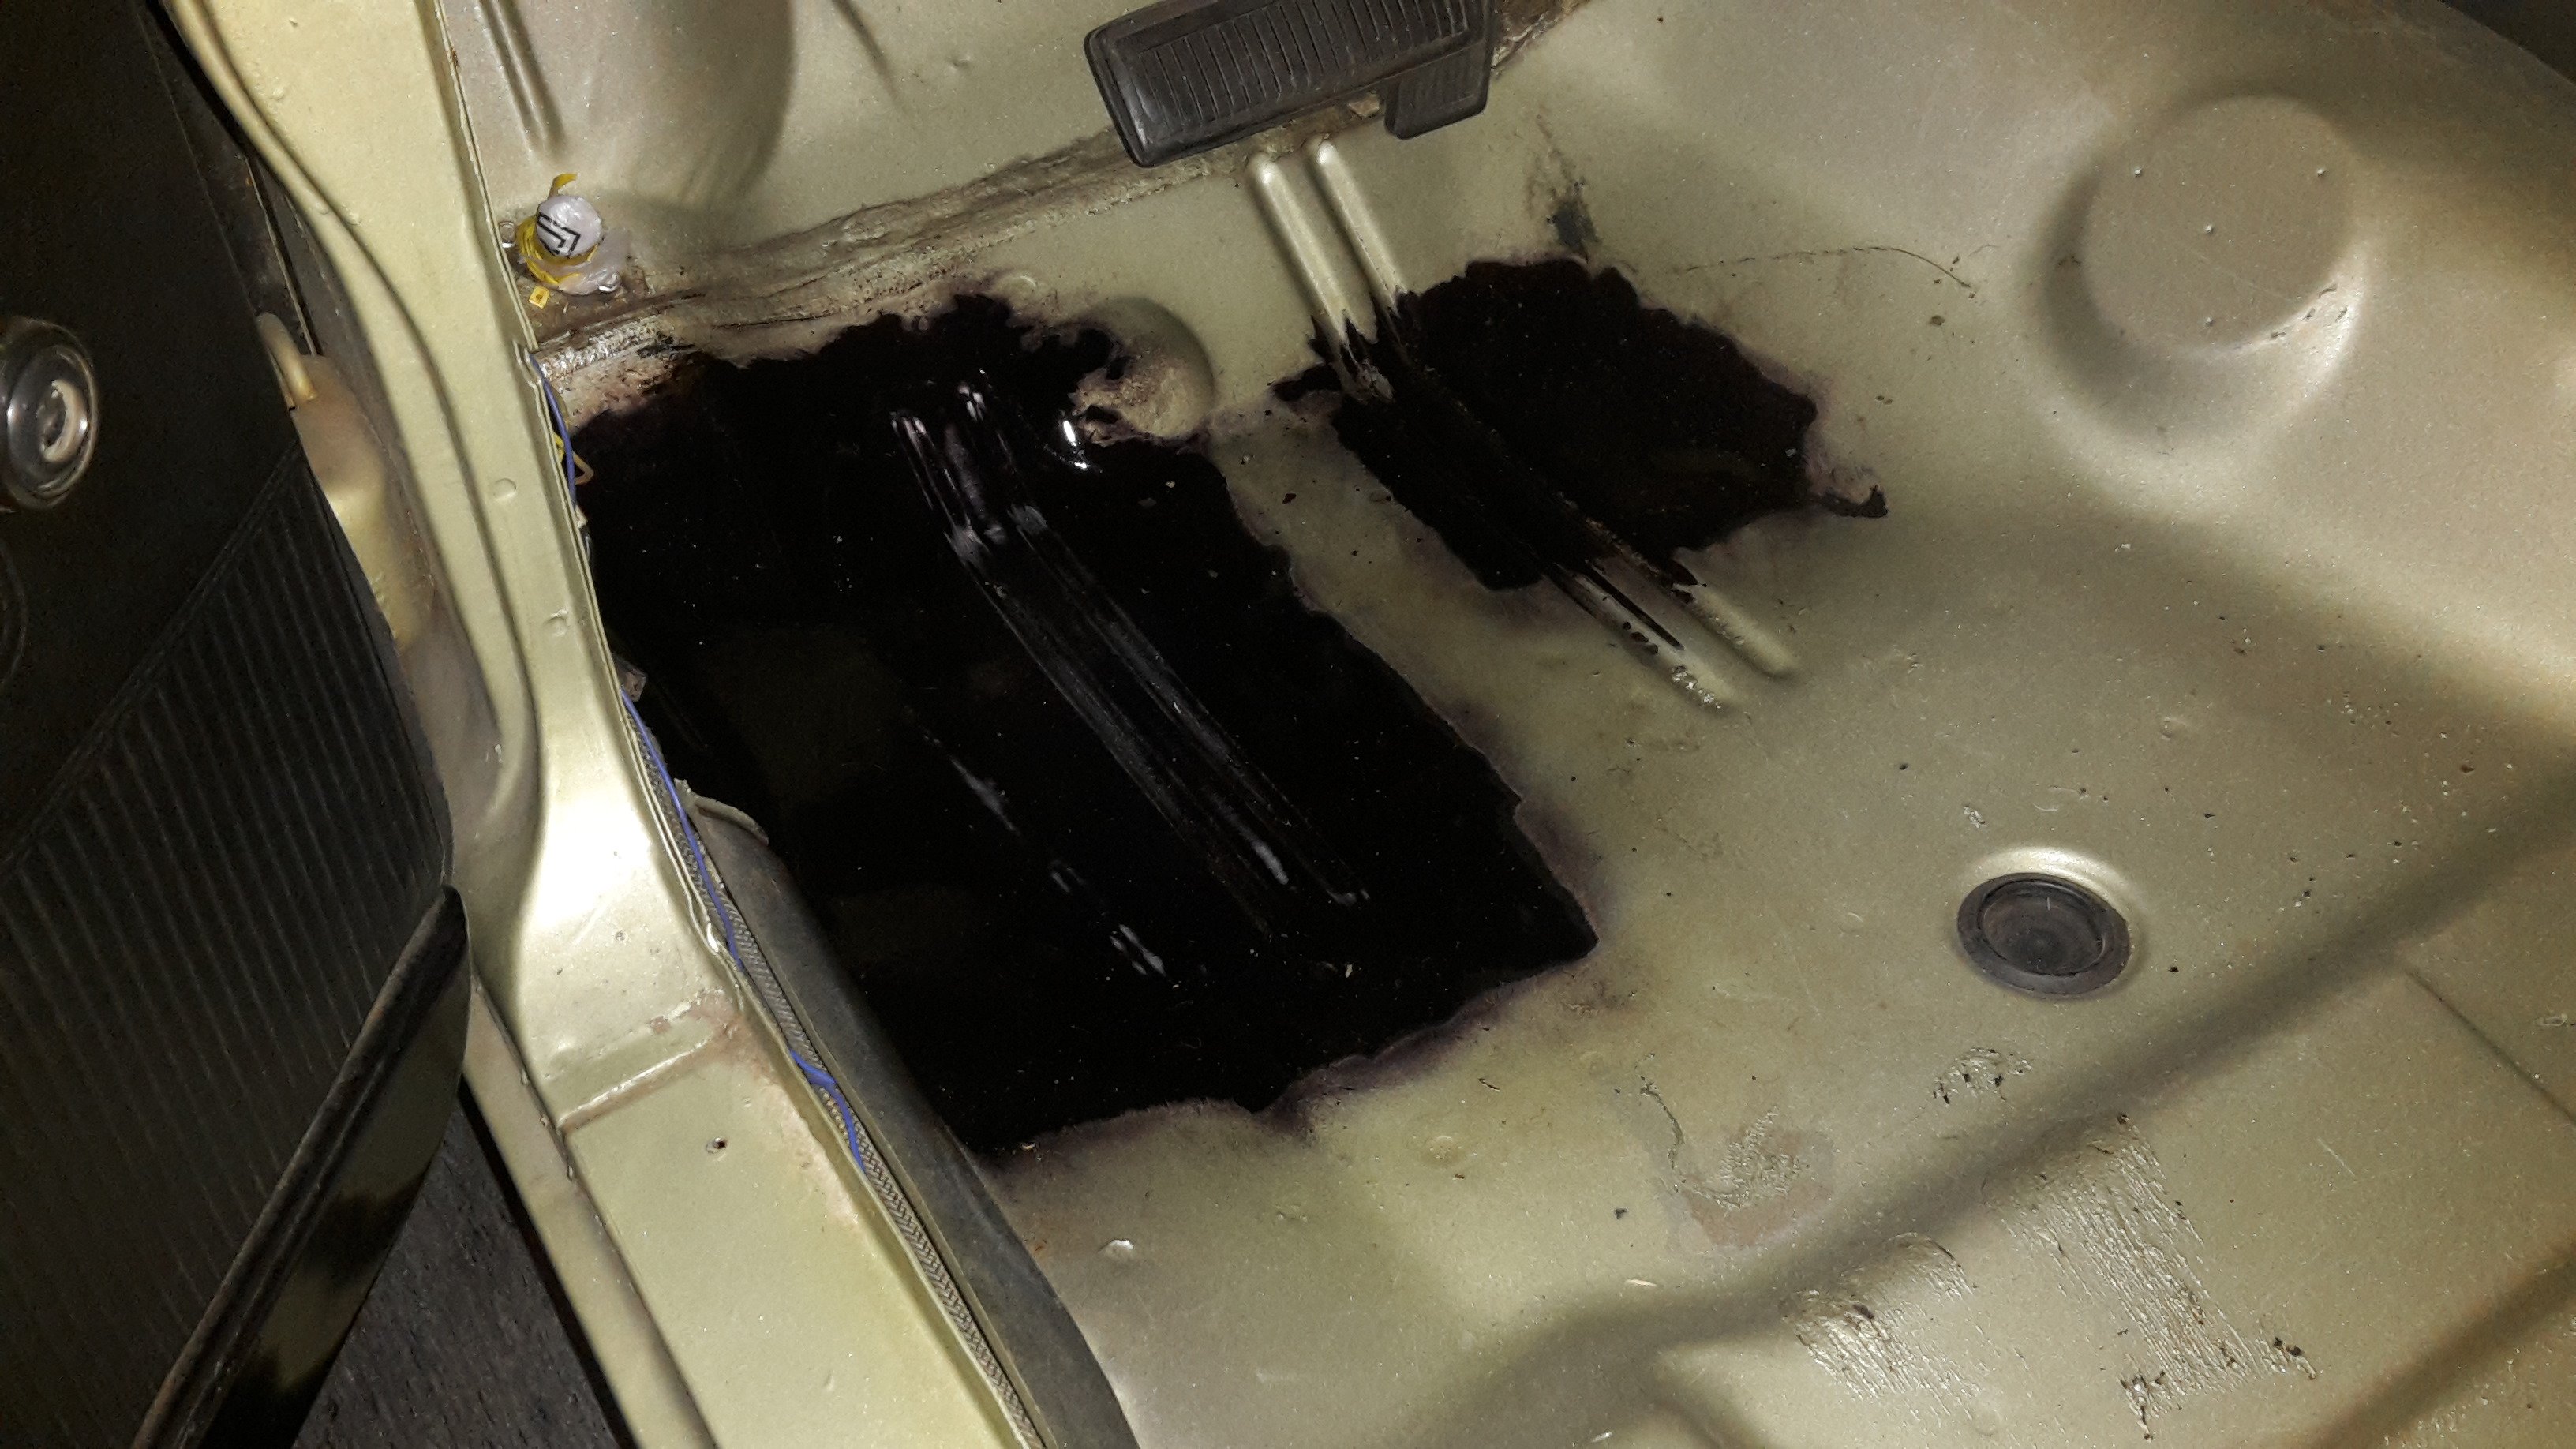
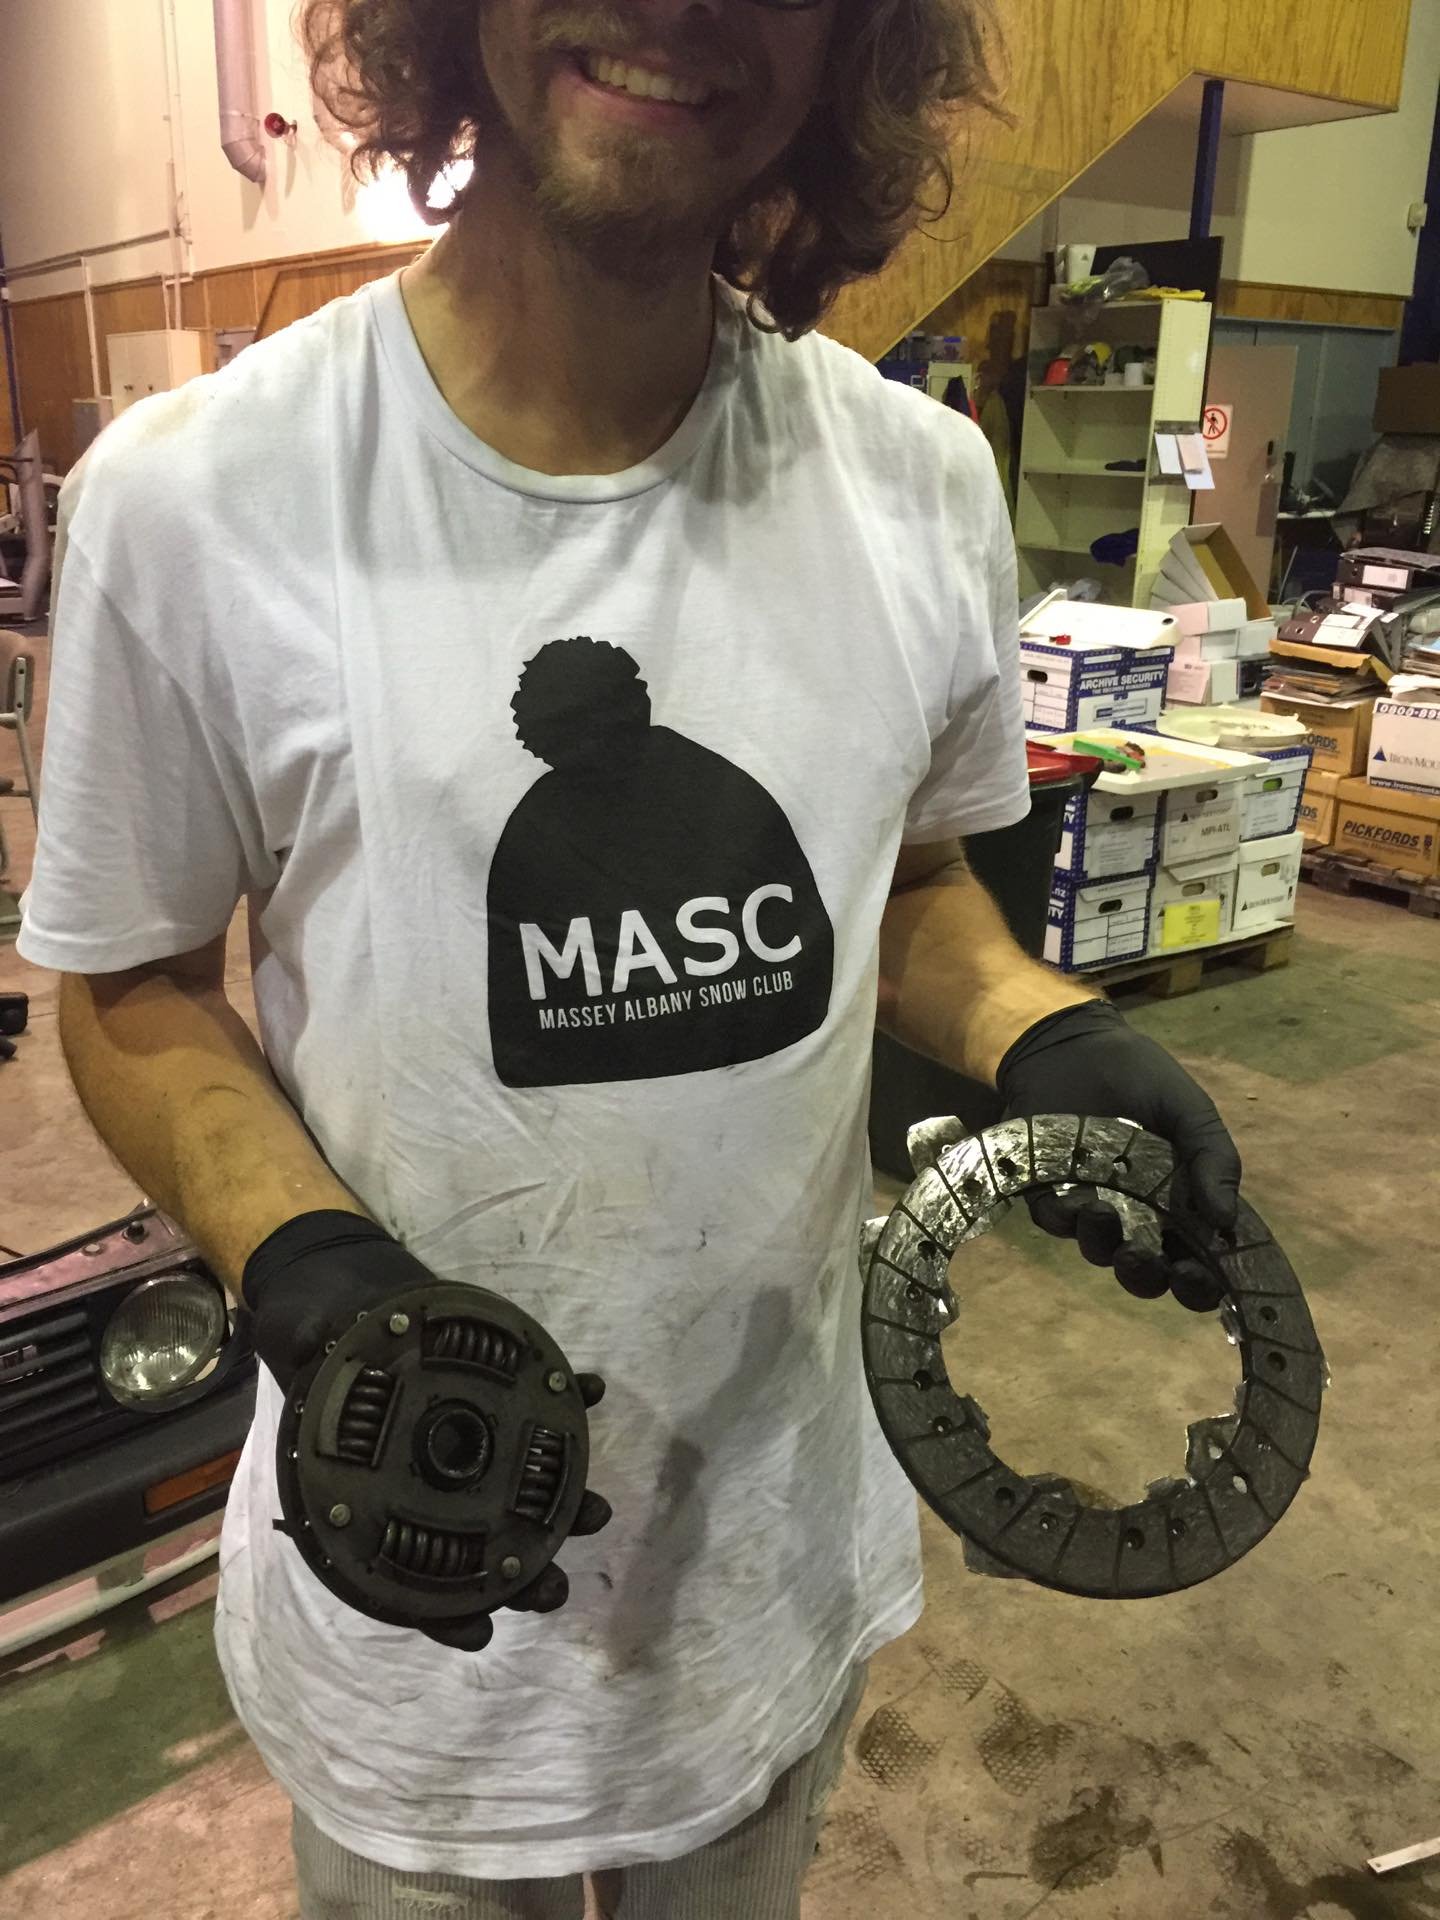
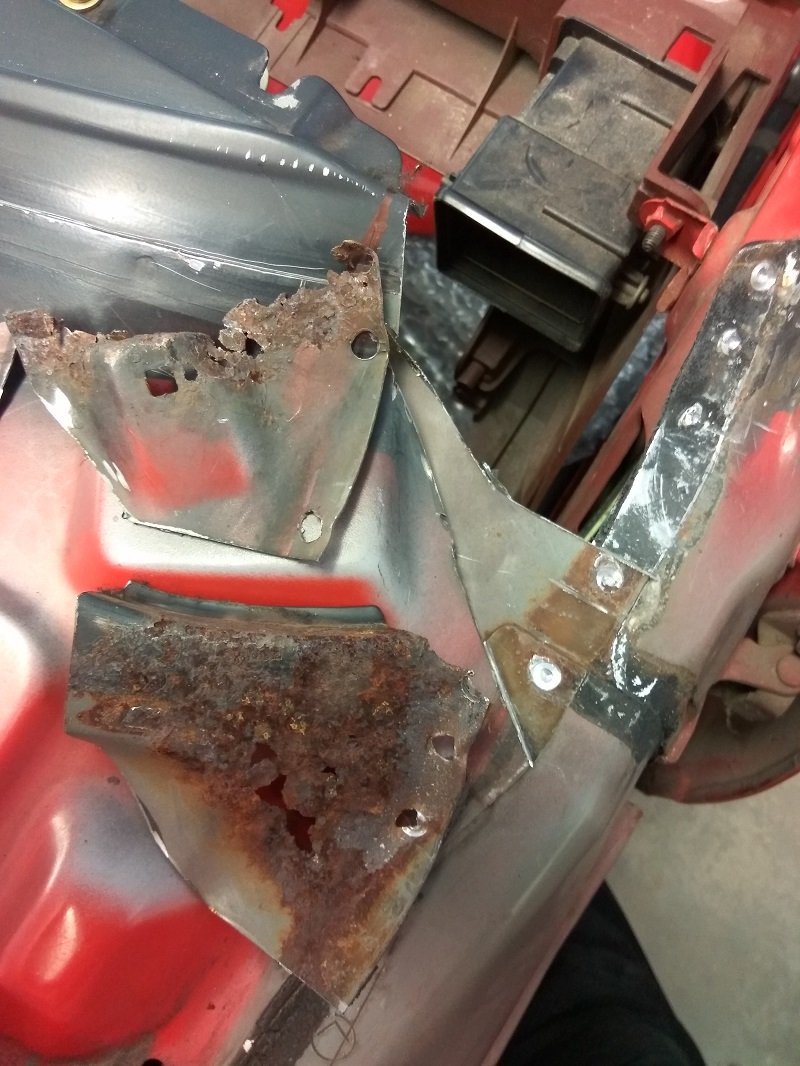
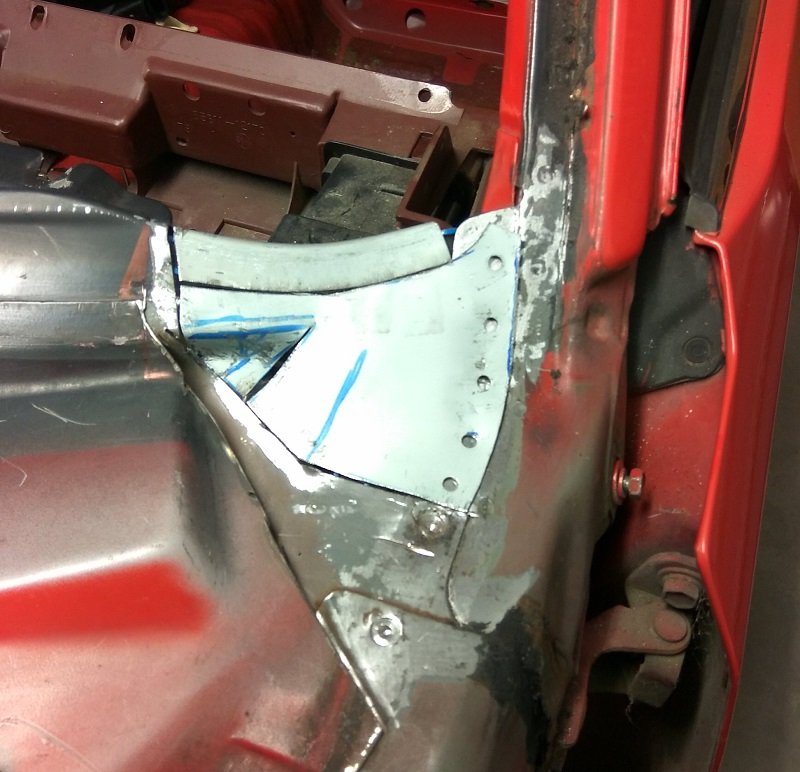
Some more progress. One thing I have learned from the job I do, is sometimes it's better to pay for someone to do stuff instead of having a go and making a hash of it myself. Both front floor pans had some rust on the top side which I don't have the skill, gear, or patience to do a nice job of. @RXFORD/ Matt at tin tricks in east tamaki is a friend of mine, he picked it up and fixed the floors, while it was there he deleted the heater motor and hose holes in the firewall and made a new part of the inner guard which gets rid of an ugly bit where the battery box used to live, and made it match the other side. My photos are a bit ham but I'm stoked with how it turned out
3 points
-
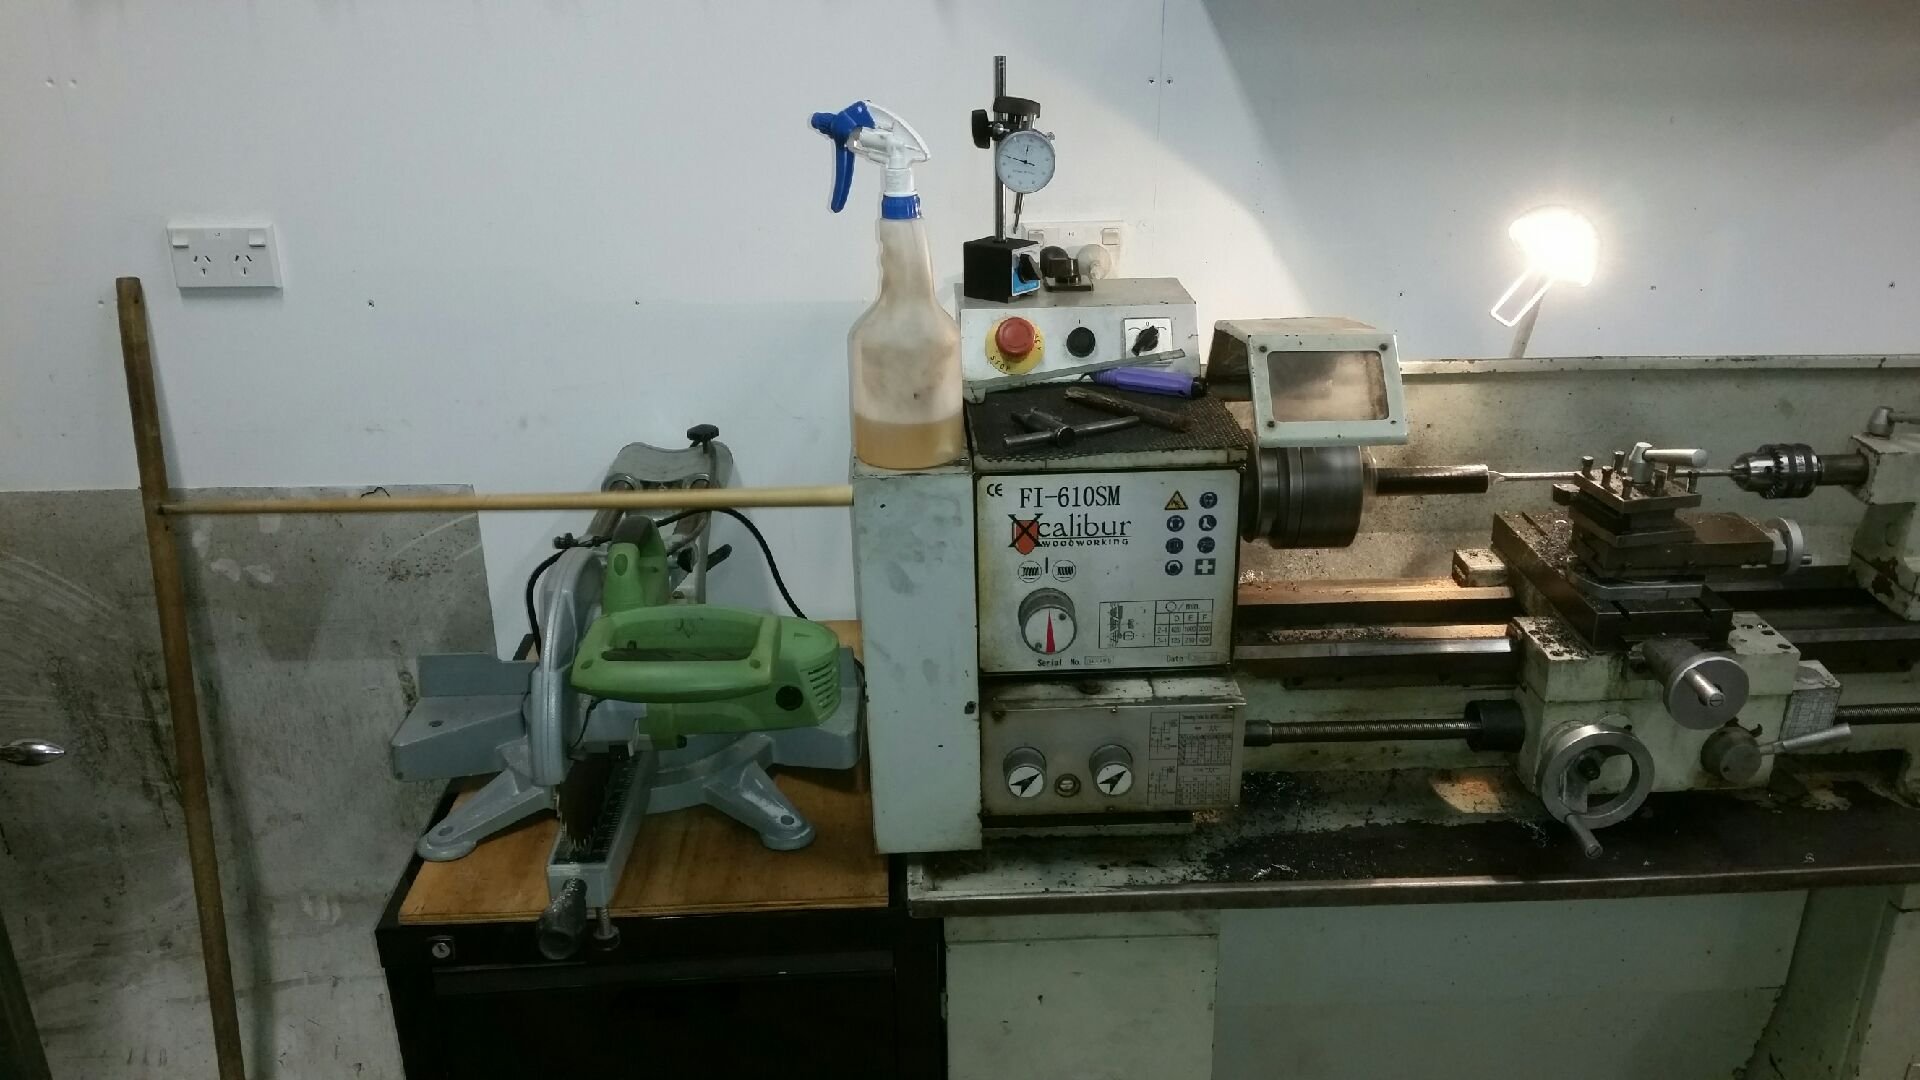
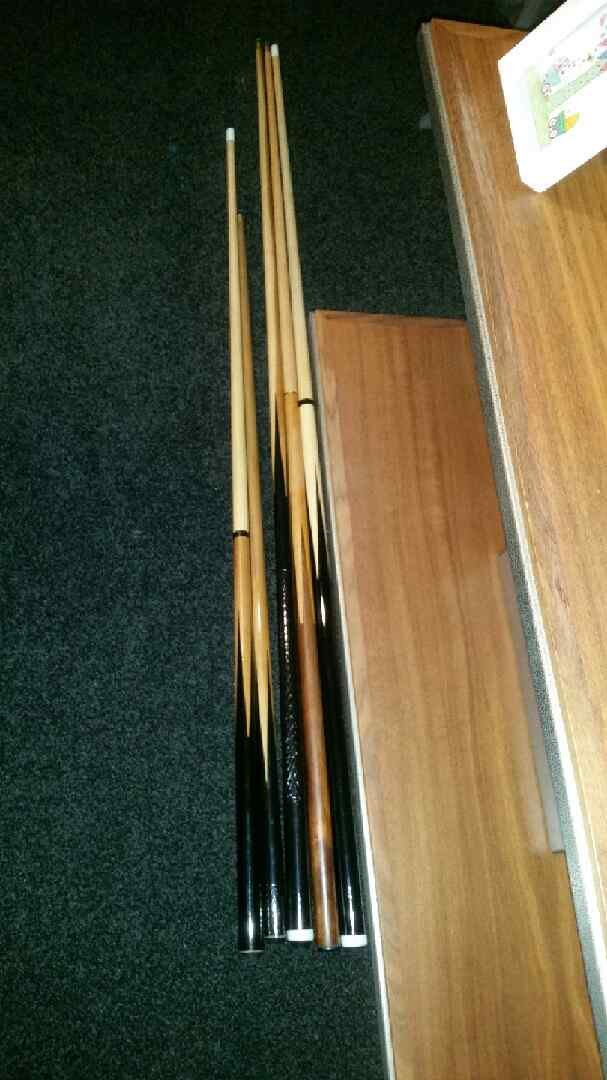
I was lucky enough to get a pool table. It's a childhood dream come true and despite not really having a big enough house to put it in, we do have a spare lounge that has no real purpose...so that's now my pool room (let's call it "a work in progress") Now there's one end of the table where the wall is a tad too close. Solution ...cut the cues down, or build a bigger house??? Okay, for now I think I'll just cut the cues down. Cue loaded in lathe. Boring a hole to stick the weight back into the butt of the cue. And there we have it. 2x shorties, 3x tall timber. Next on list is to make a pool cue rack and a sexy pool table light box thingy like the pubs have hanging above the tables.
2 points
-
P clip it inside the a-frame. Much easier to fix when it gets whacked and broken off at the master cylinder2 points
-
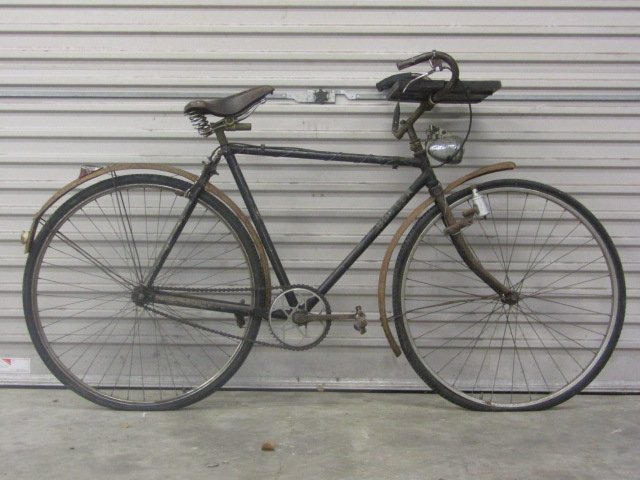
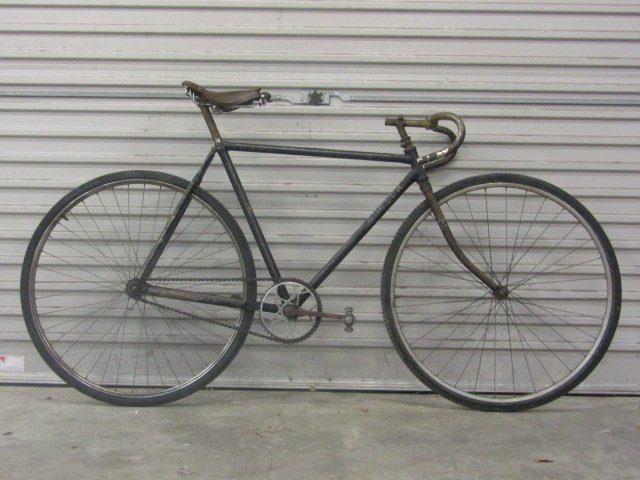
A couple of pics of an old bike I found on Trade Me recently. Crappy old Roadster with flat tyres? Nope! BSA Track Bike from the teens or 20s, with an awesome BSA Adjustable stem and original paint! Pine!
2 points
-
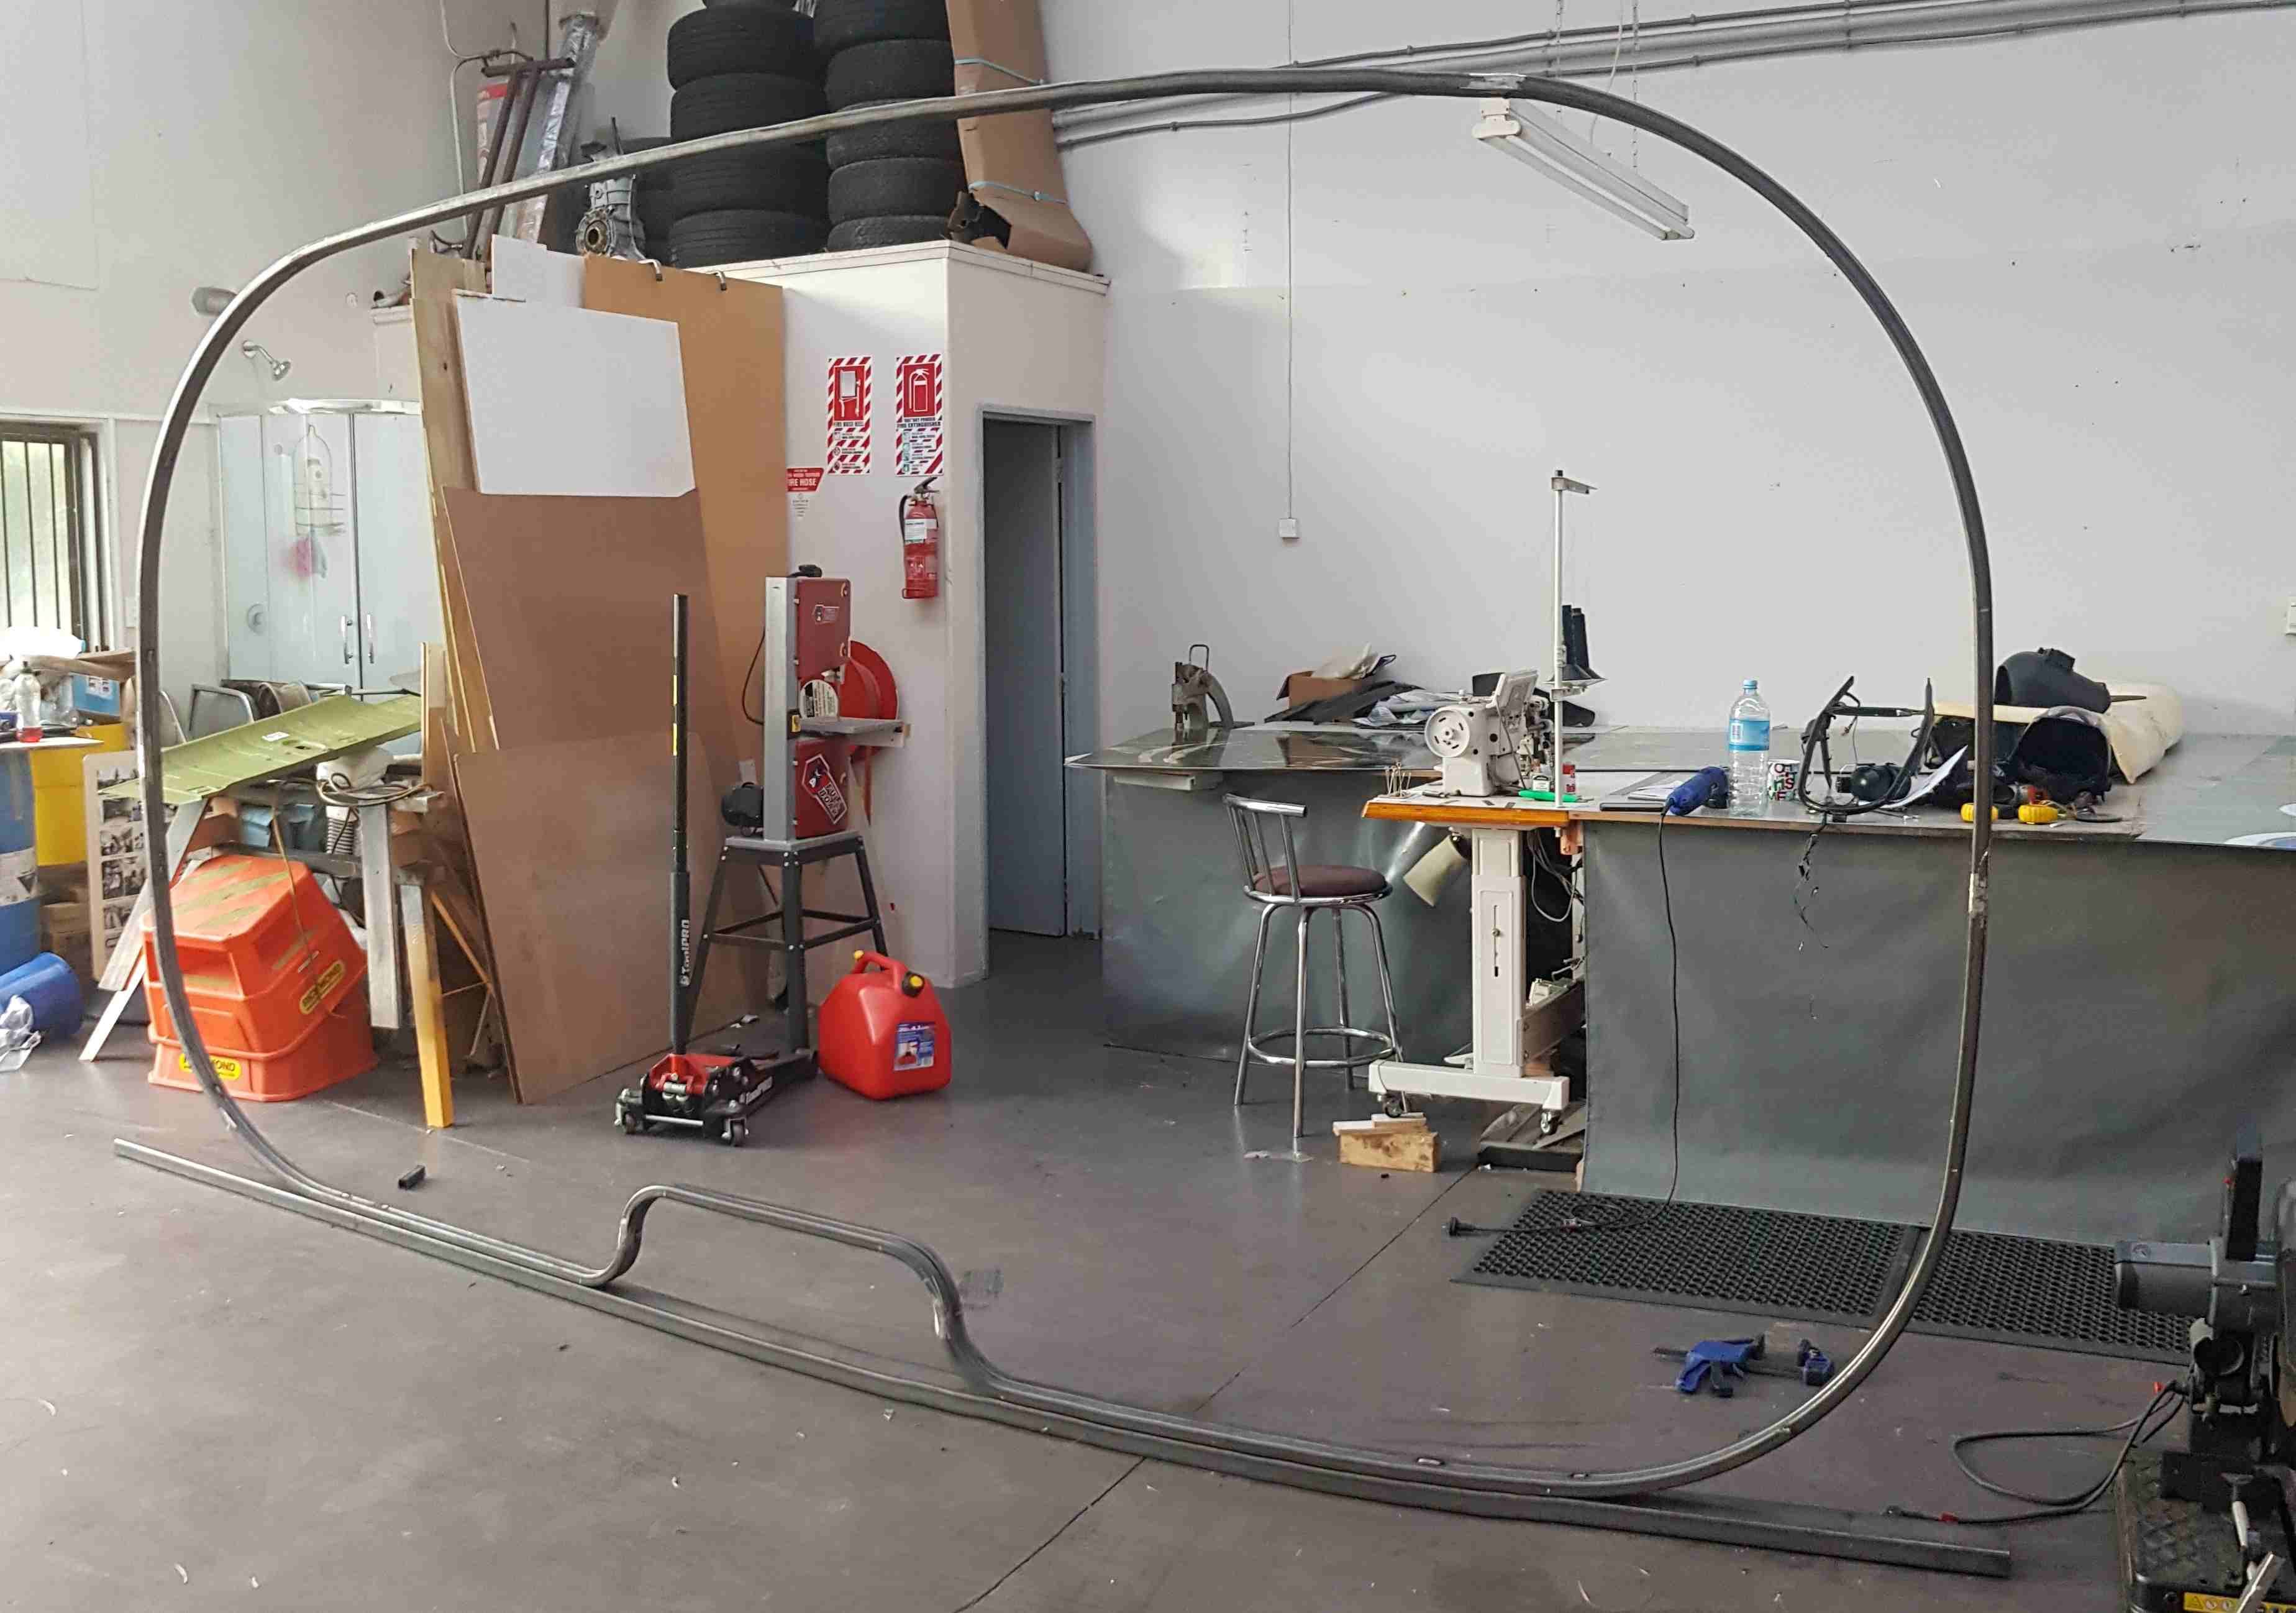
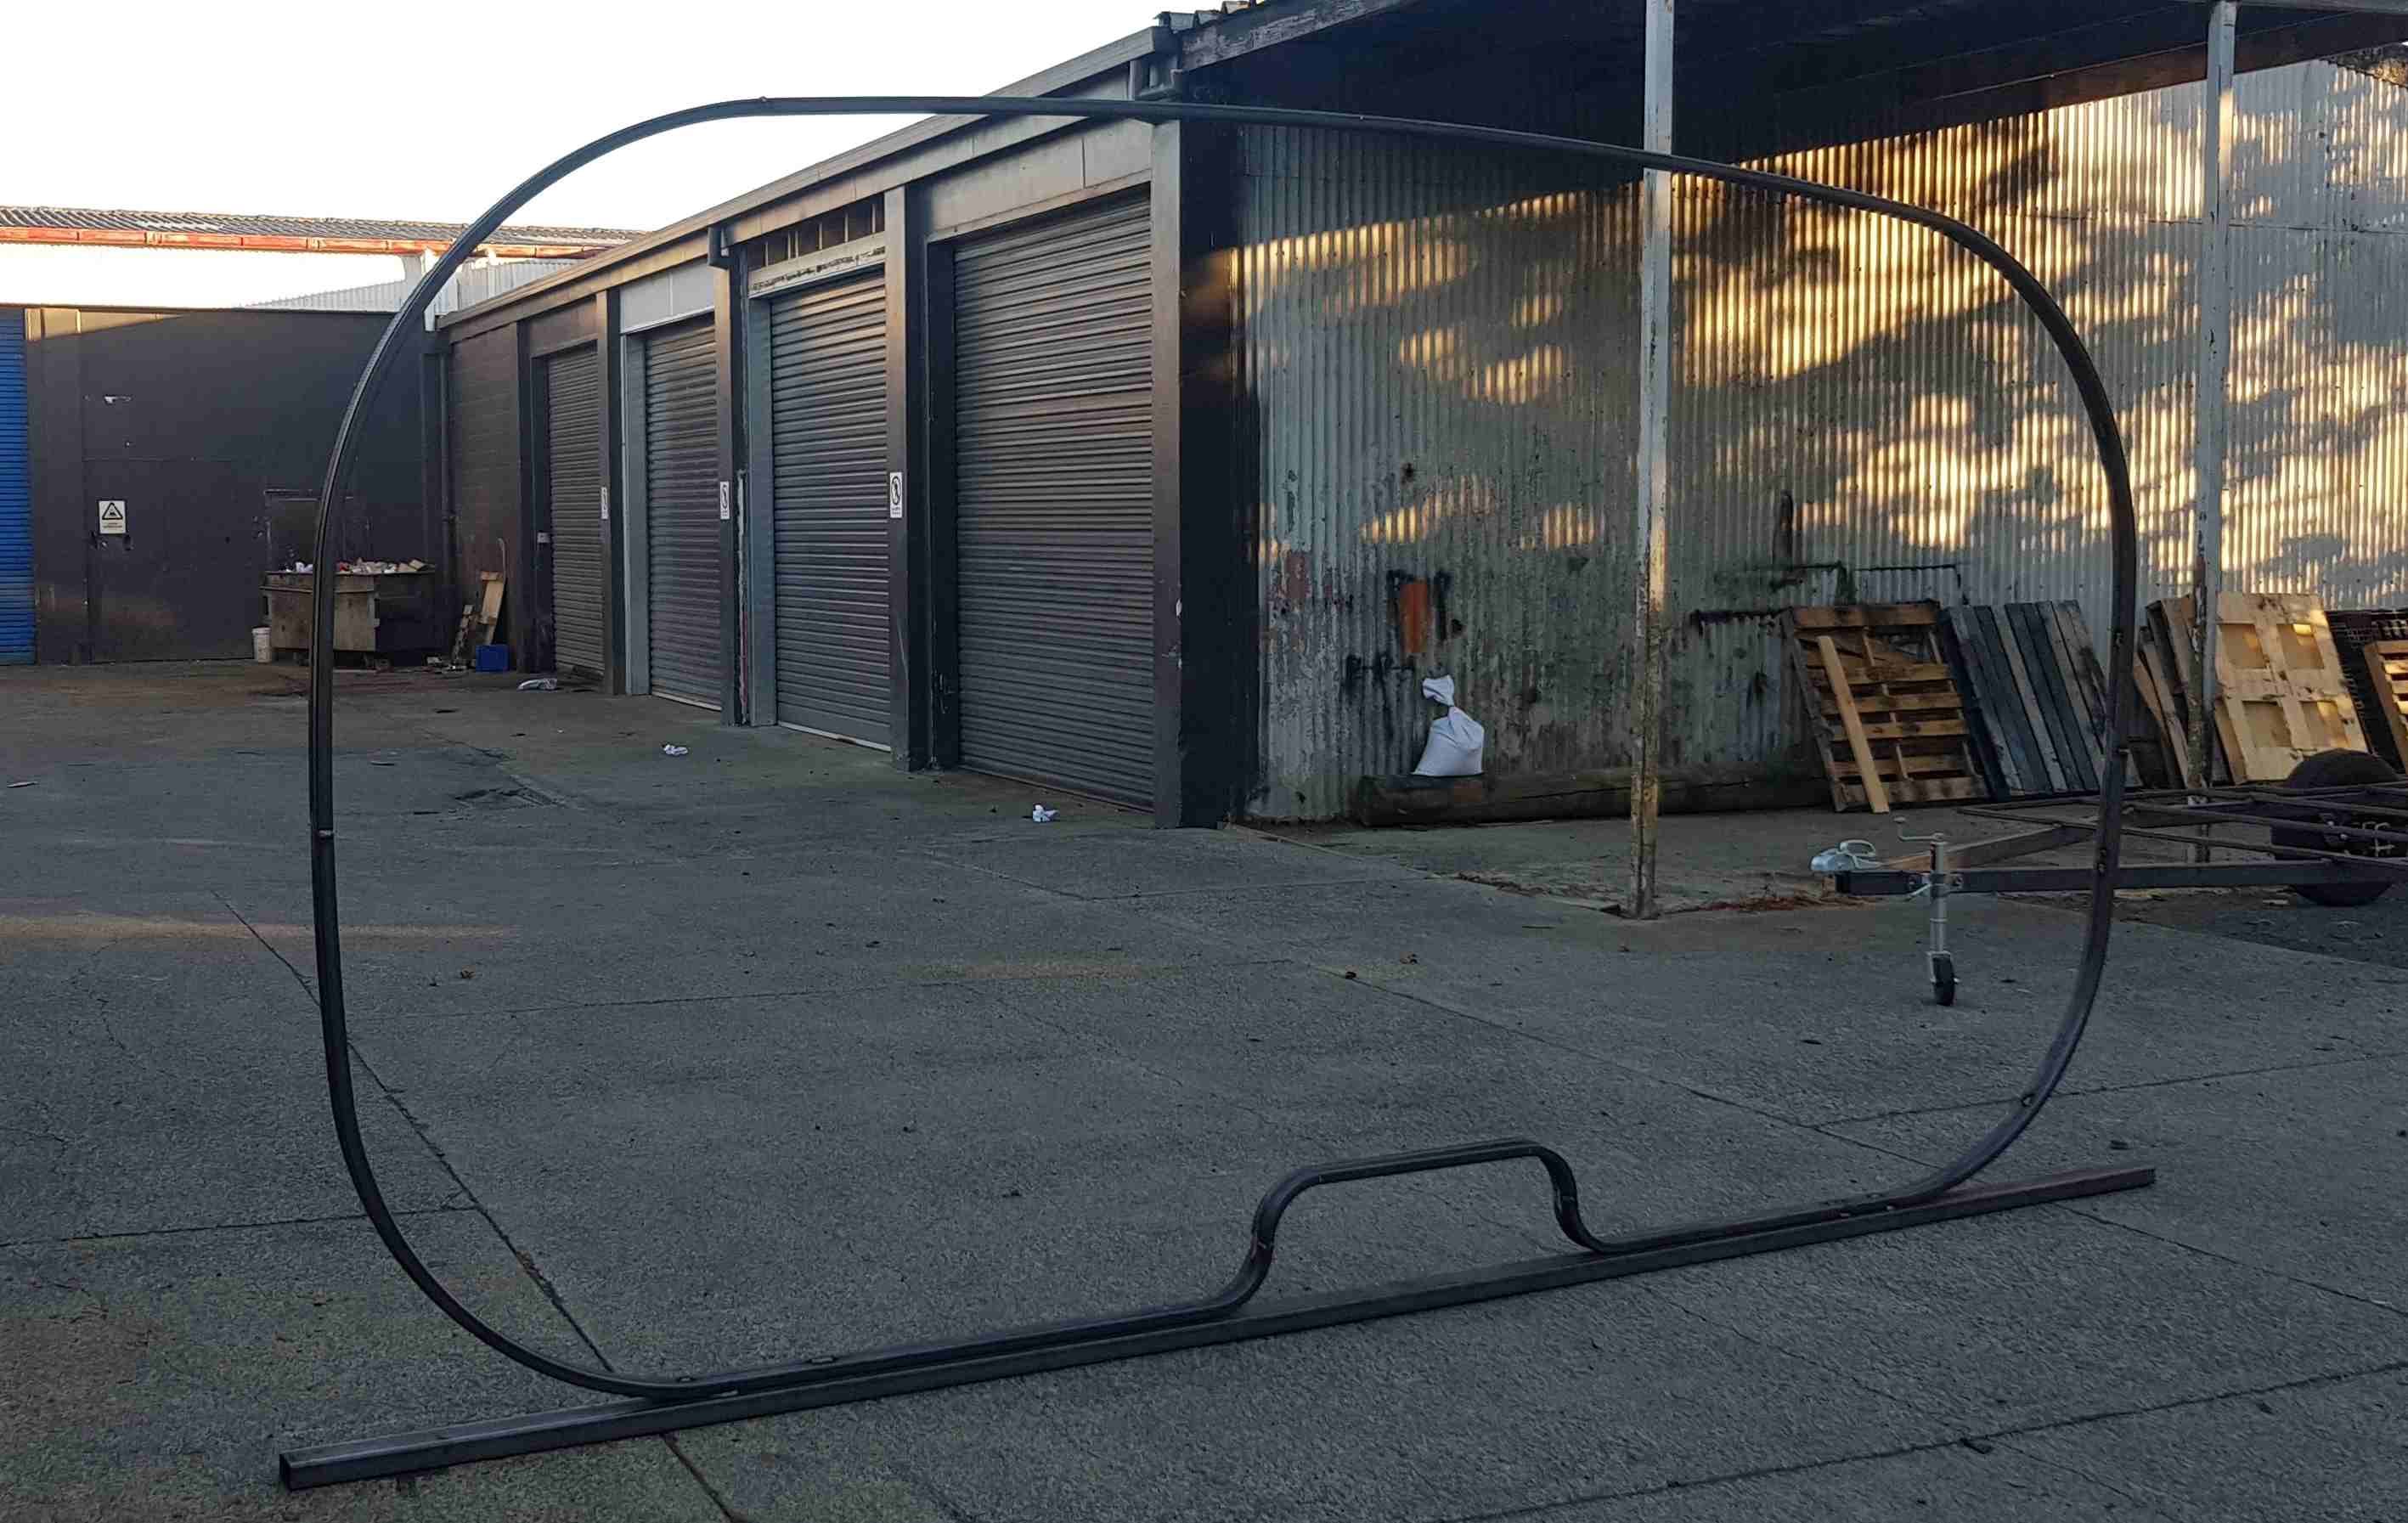
Oh shit yeah. Main hoops all done. Had to cut about 250mm out of the height but fuck yeah. This is the two hoops welded together, ready for some structure.
2 points
-
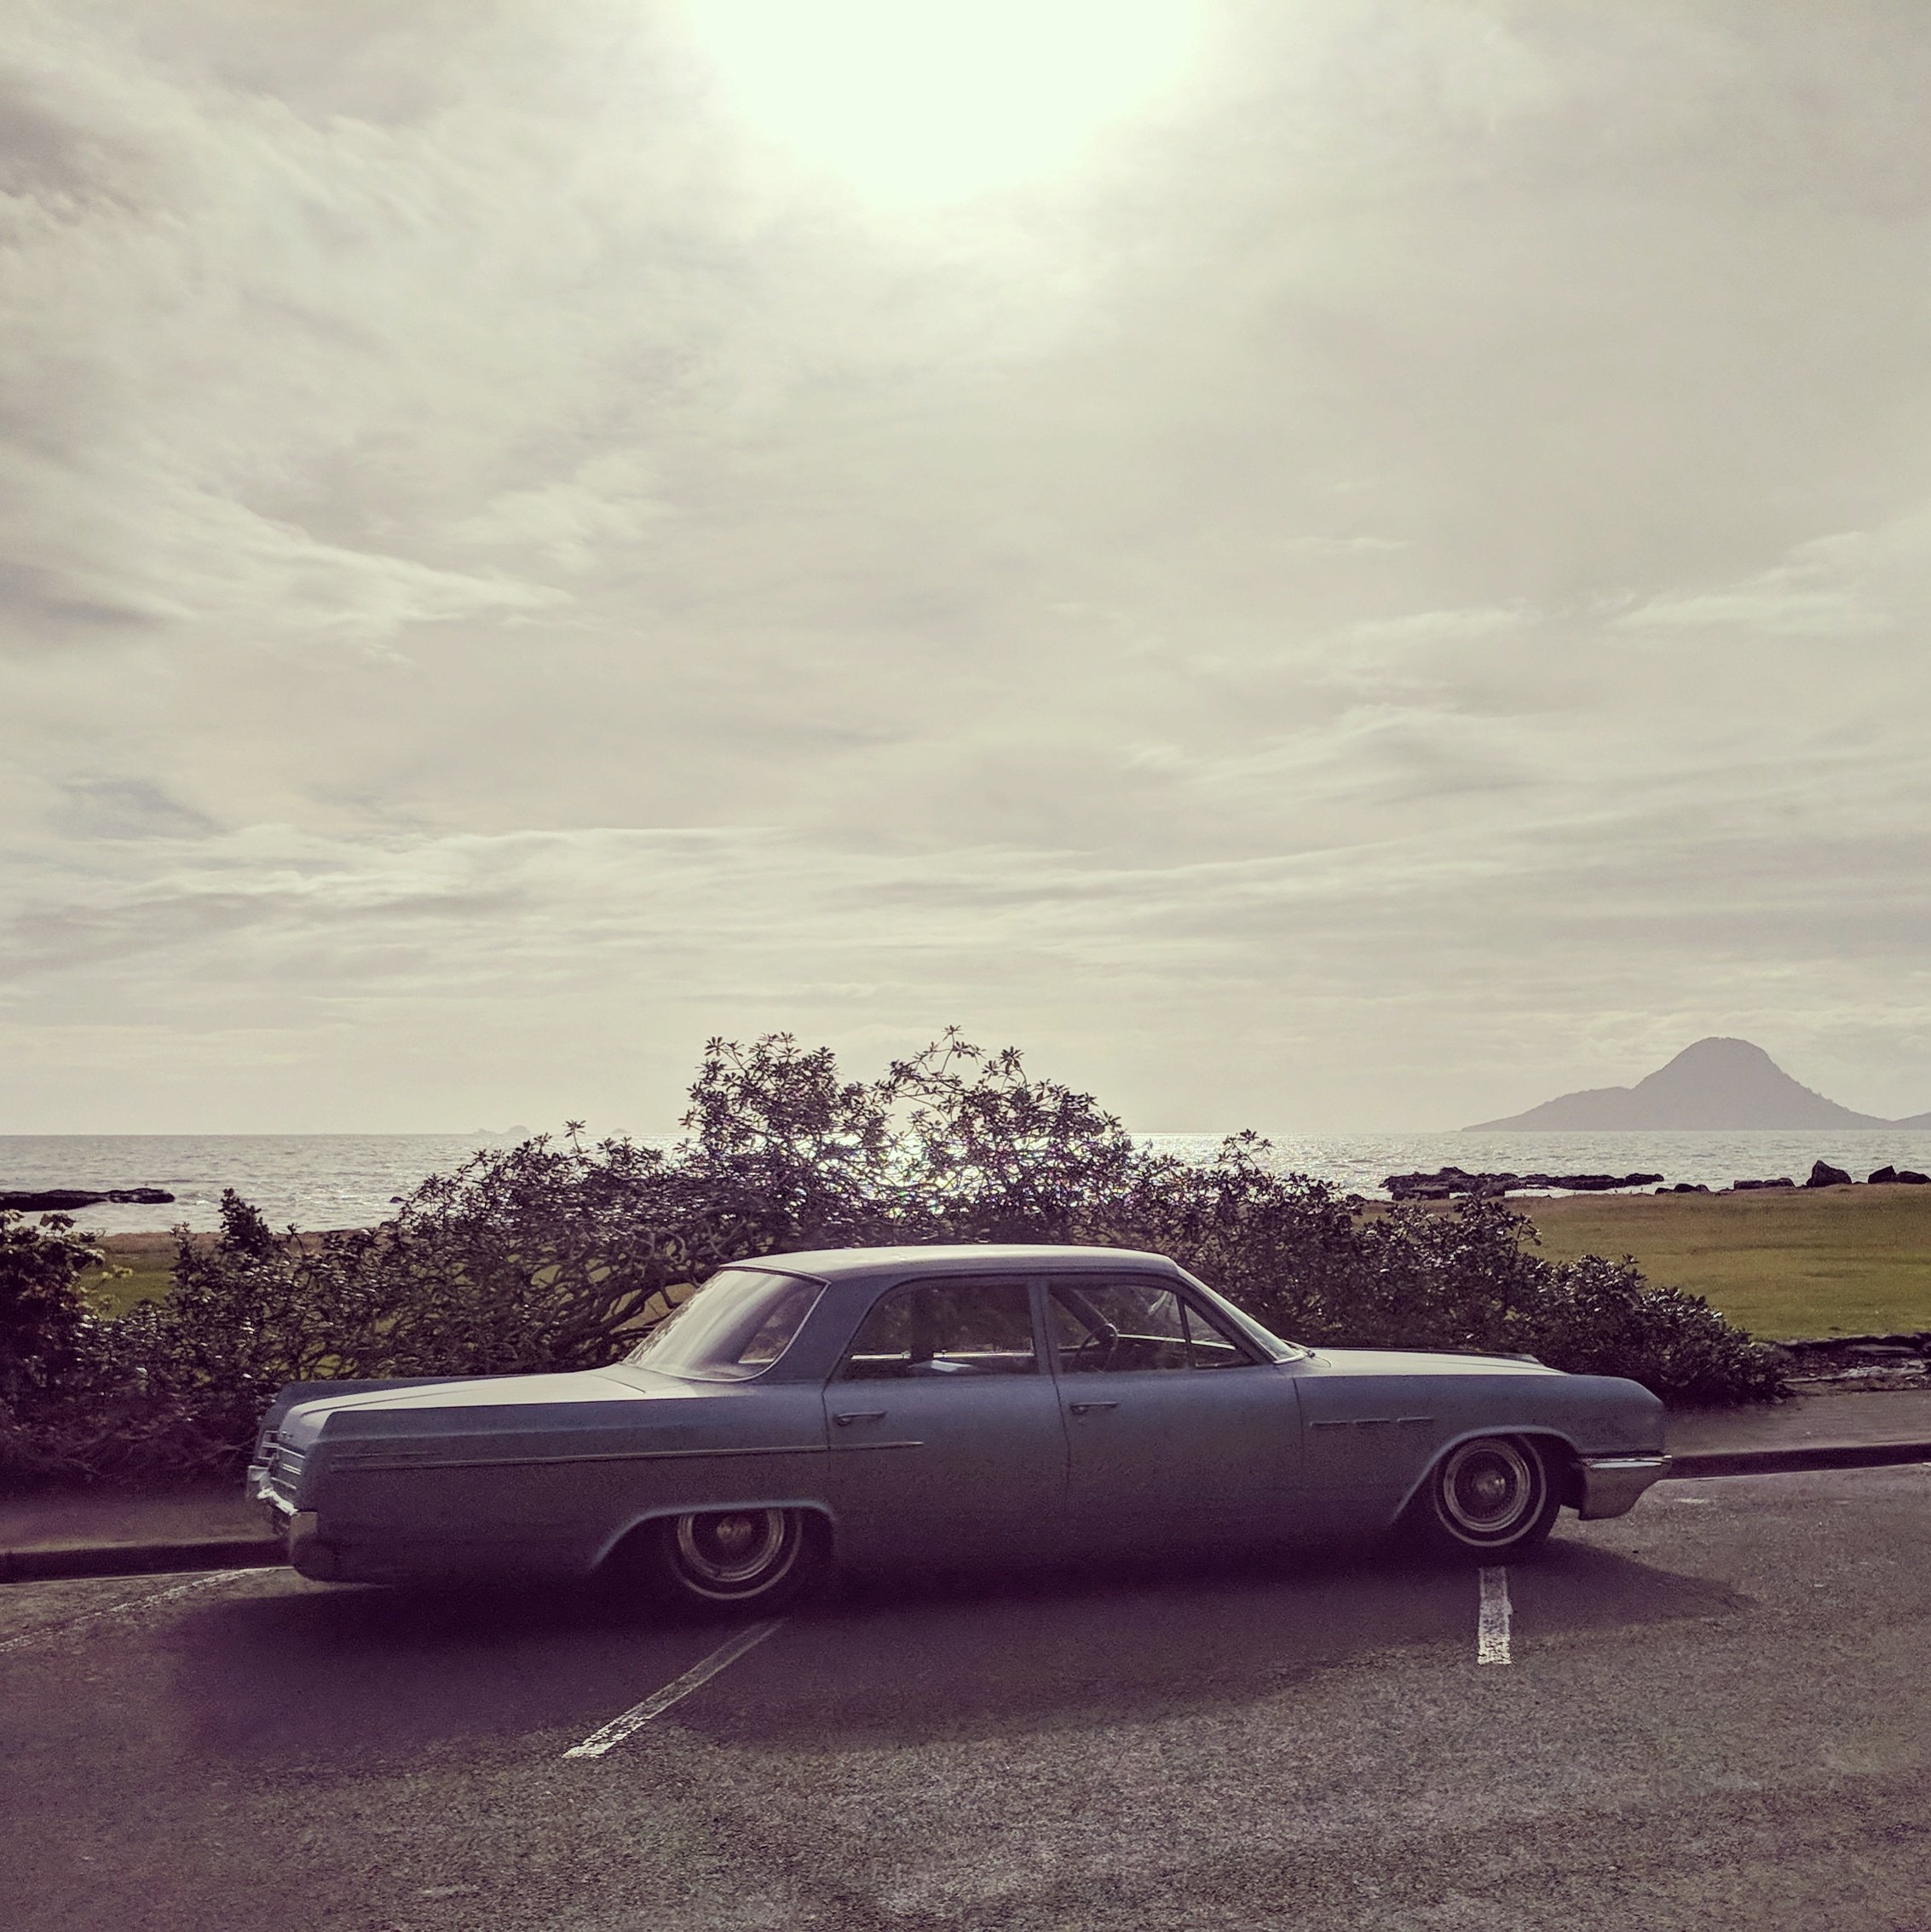
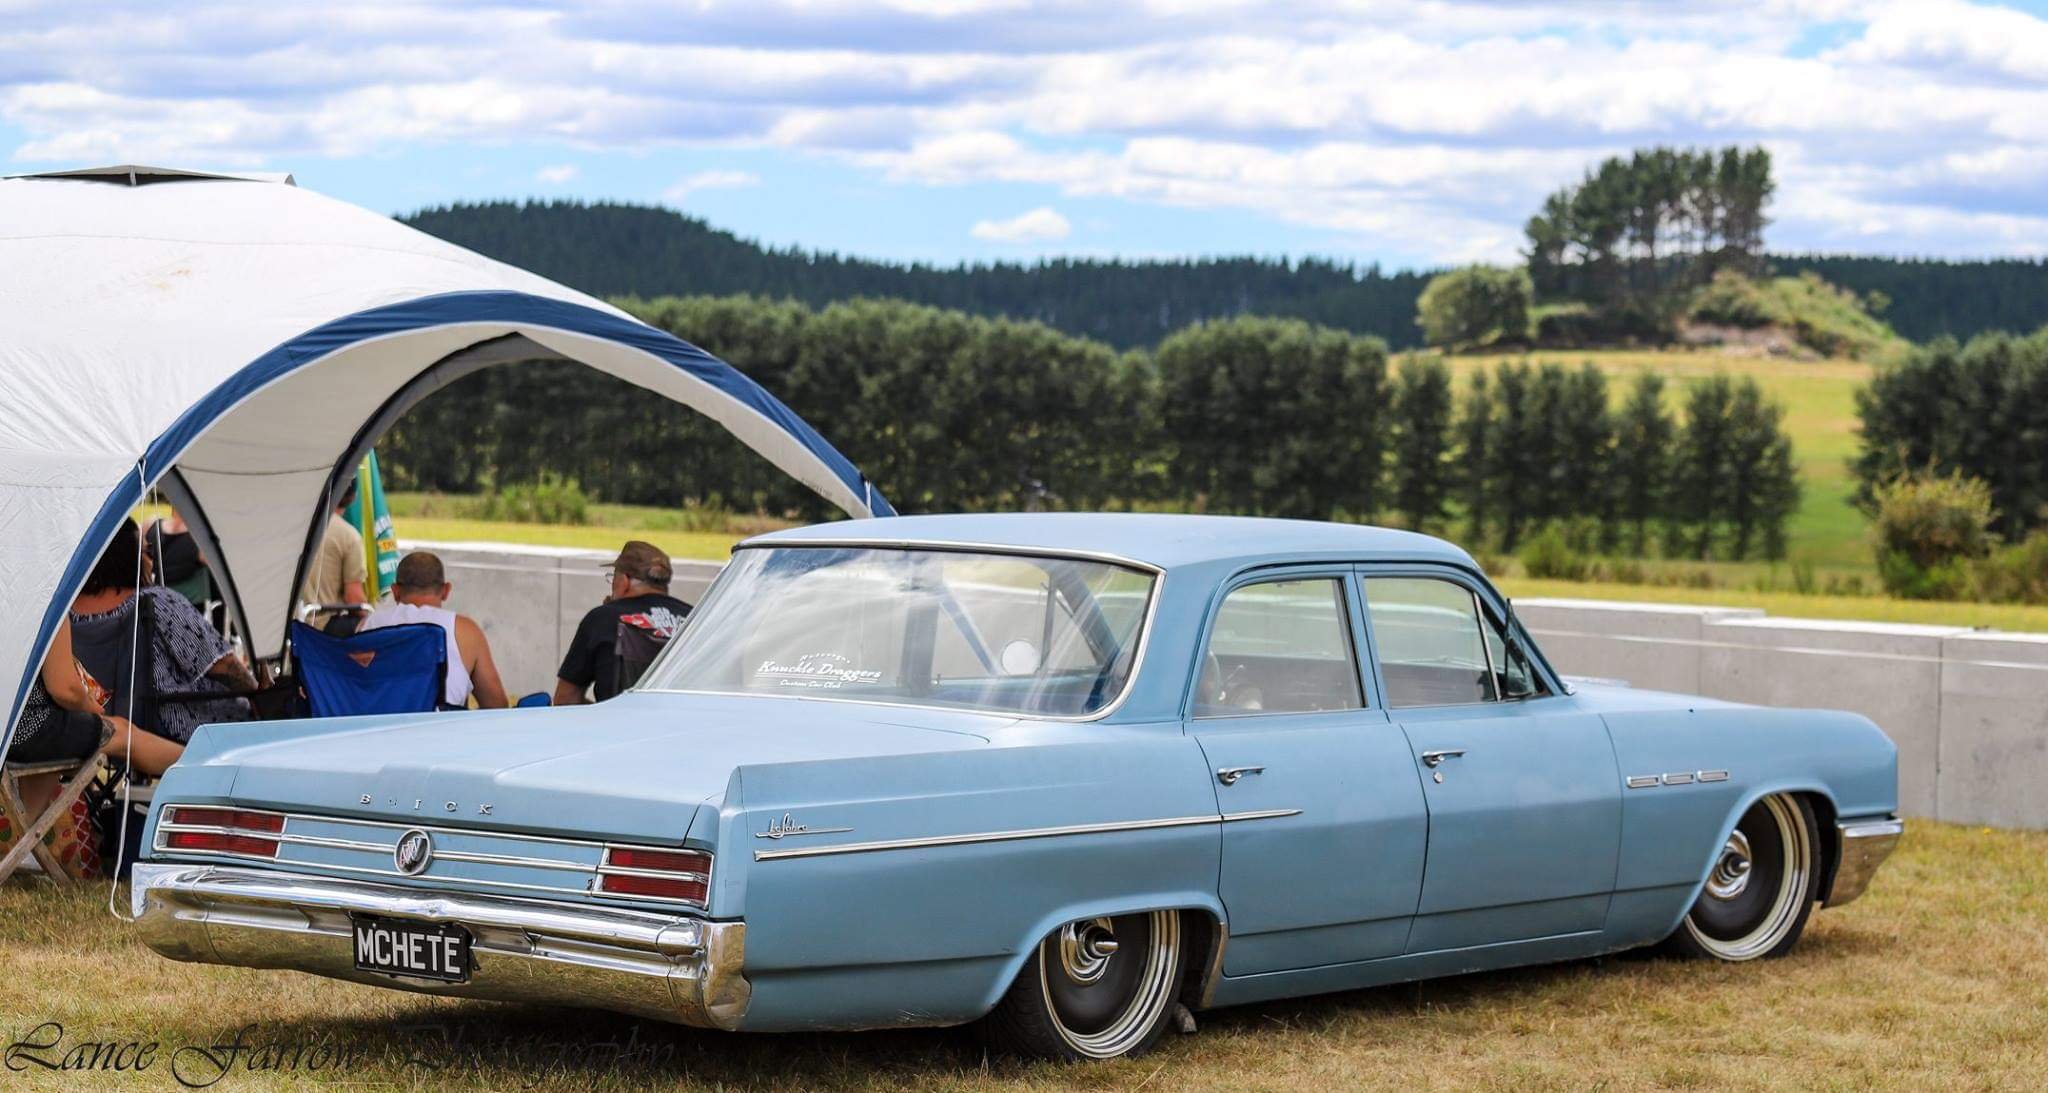
Had a blast in this so far, travelled many miles. Huntly Burnouts, WRCC Spring fling, Rocket open day, Tokoroa drags. Heading to Rebel Roundup this weekend Accuair is the business, Highly recommend. Get into it. I like the stock hubcaps but wanted options. A mate of mine had some Detroit's on an earlier Buick Super, but he didn't like them. So I chucked them on to see if they would suit. I think they look pretty cool, so deal was struck.
2 points
-
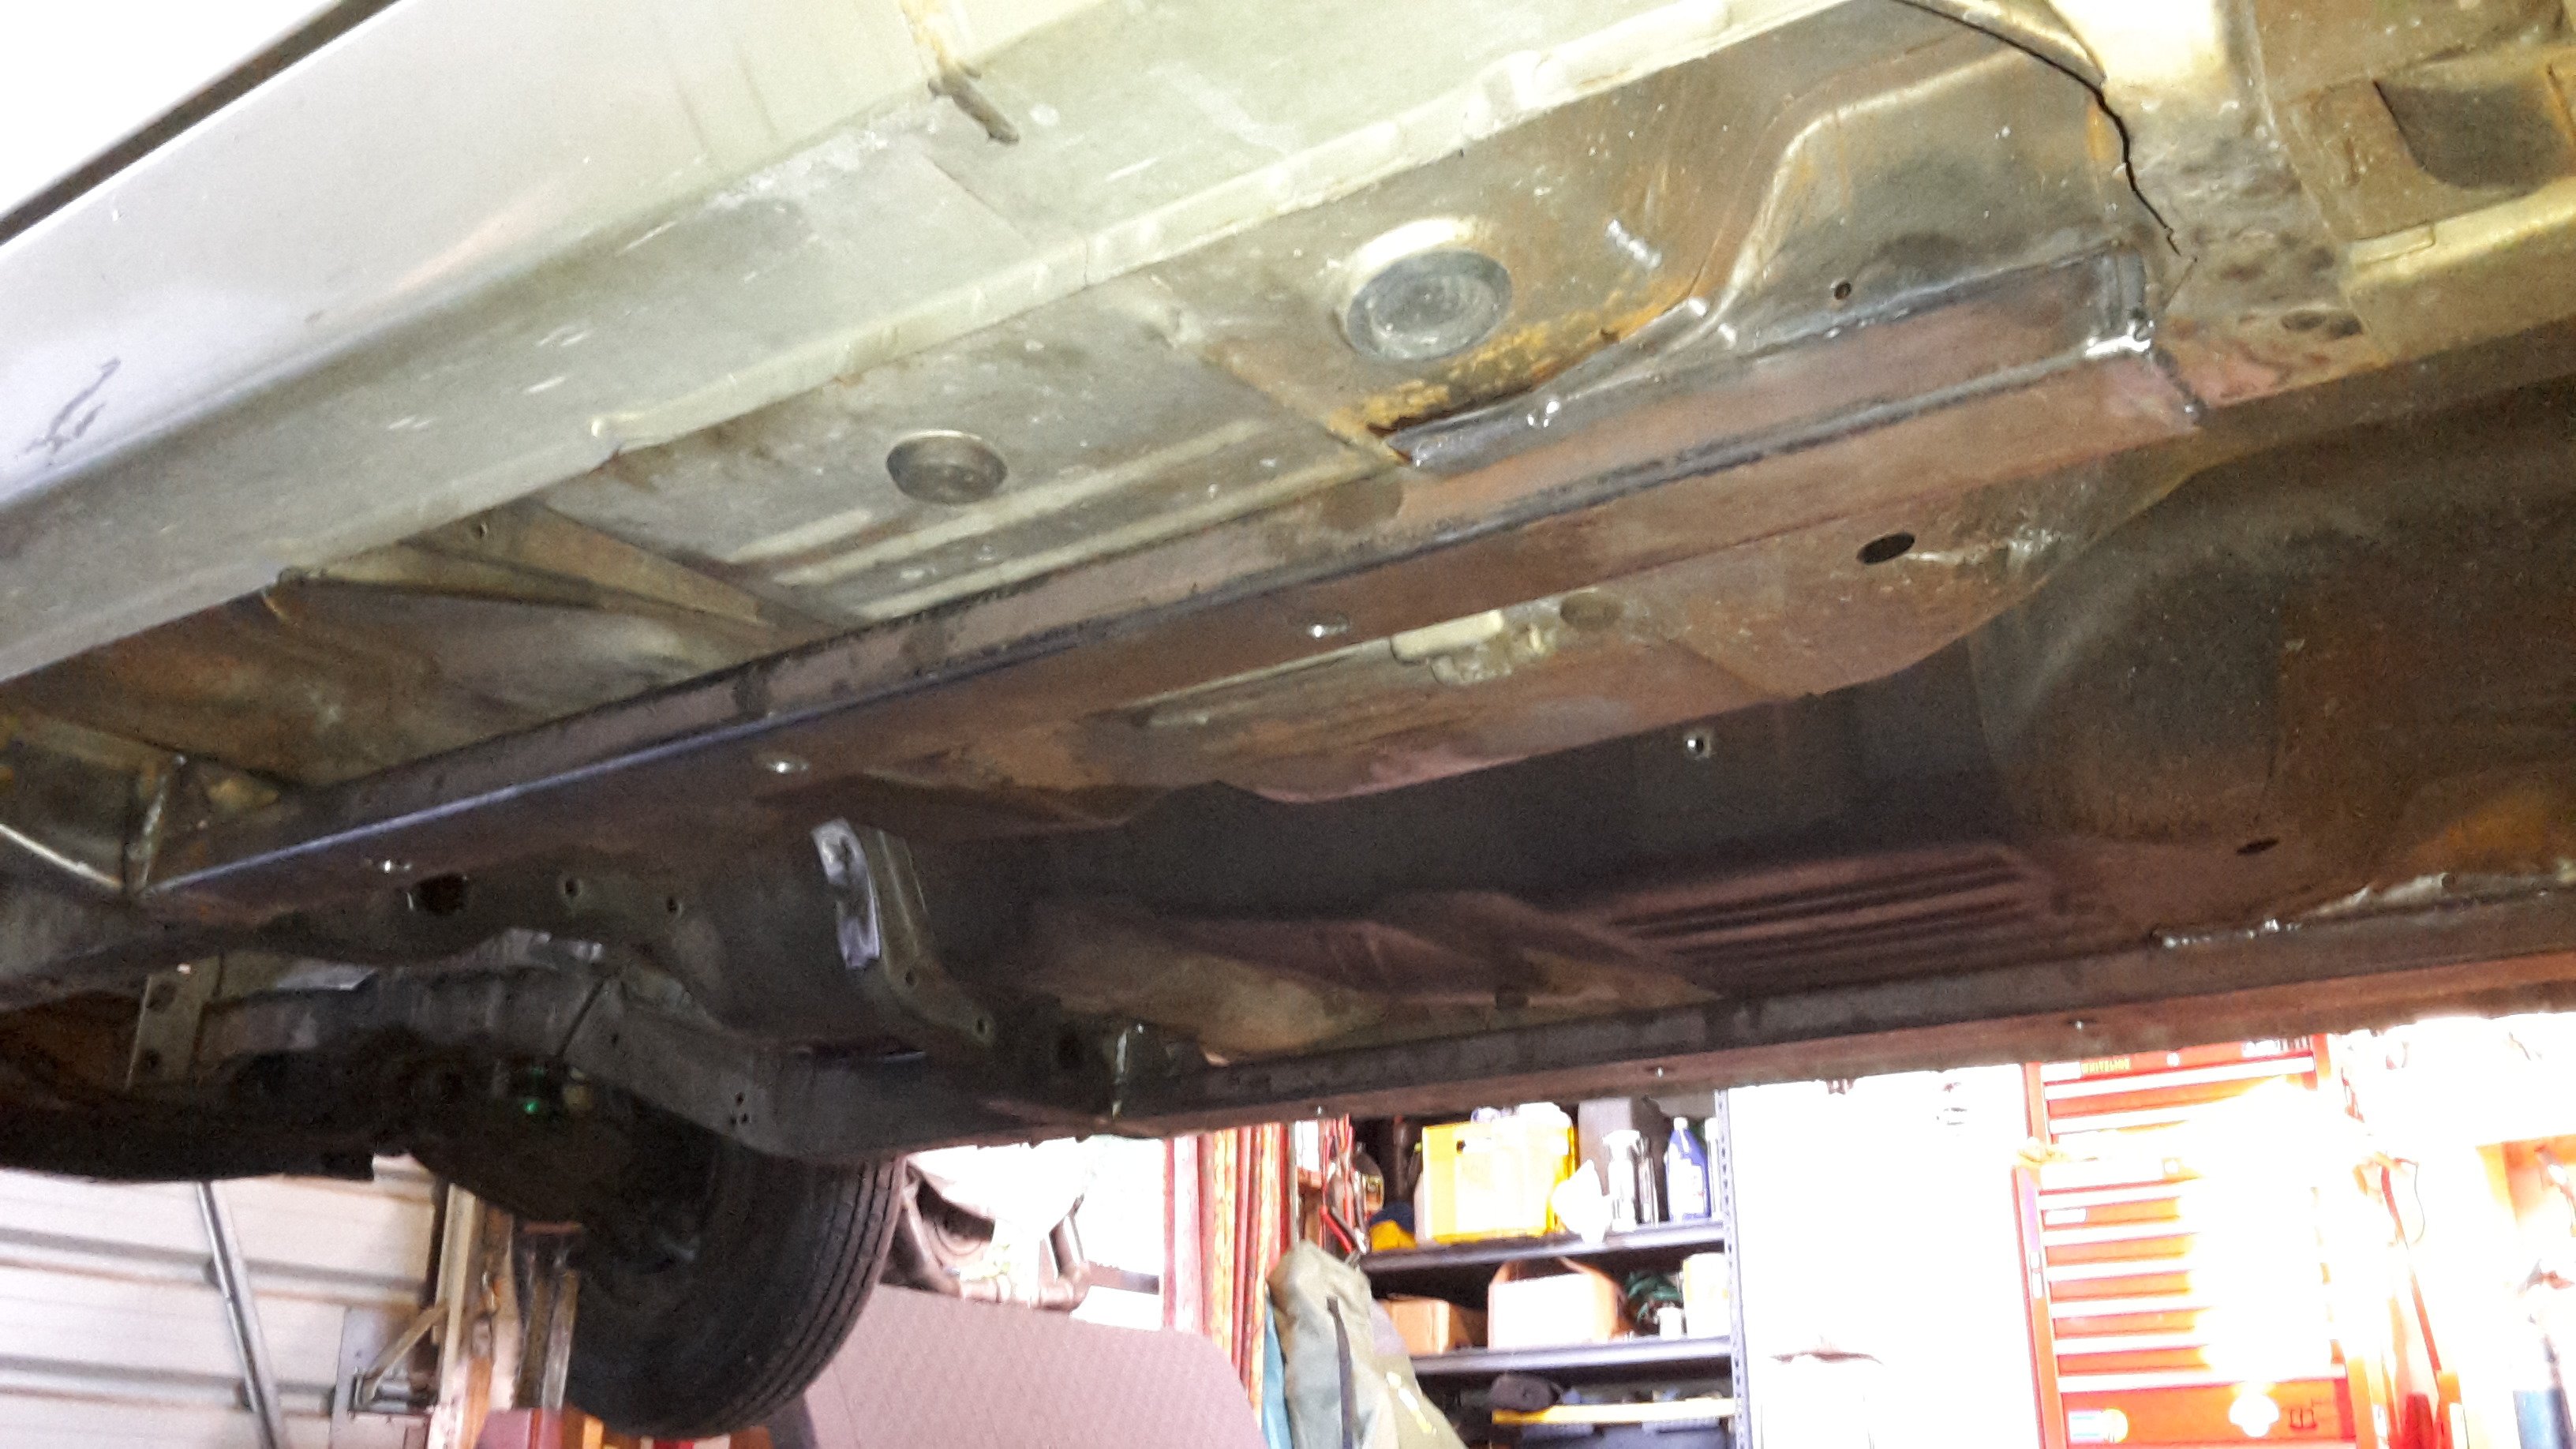
Made some subframe connectors out of some 75x40x3 rhs and glued them in
2 points
-
I just couldn't help myself but take this photo... Having fun stripping remaining bits from the other two Imps, cleaning and painting bits and generally playing about with what is a big model car. Proper update soon.2 points
-
Some months later. . . Handle bars. Made, finished today. Panther gussets made in 3mm and milled down to 1.8mm because I couldn't buy 1.8mm Chromoly plate. Jigged and welded into place. Mock up picture because I was feeling proud. View from the drivers seat. Also 26x1.75 Gum Wall tyres on their way, Pantha stickers purchased, chrome, paint anodizing, and other 80s spec bling to follow.2 points
-
I meant to log this build while it was happening, but life sort of got in the way. Still, it’s a work in progress, so all is not lost… I bought an old ironhead sporty a couple of years ago, just because it was local, the numbers matched and it had live plates. No real attraction for the things, more a case of buy it, patch it up and see how it goes. If it was as horrible as they say, I’d just flick it on… Then I thought of Café’ing it, for a laugh, as it seemed the most unsuitable bike as a base, so I chiselled off all the eagles, dropped the front end 8” and fabricated a few bits and pieces while sorting out decades of neglect. A year or two later and I’ve fallen for the oily old thing, and now she’s 40 and rego is a realistic cost I’m using her more often, so some more work is on the cards… As I got her, mercifully there were no tassels… Front end drop… Tank mock-up… Seat and tail piece trial… Mechanical/wiring work… Getting there… And pretty much in current form…1 point
-
I'm thinking about sleeving it in garden hose inside the draw bar.1 point
-
All going well, I might get to bring a different car this time/probably still bring the wagon1 point
-
It's back at the upstairs carpark behind the Ellerslie Burgerfuel. Enough regulars have disappeared that we now seem to be sneaking under the radar of that nearby resident / maybe he can't hear us over the 6-lane motorway across the street....1 point
-
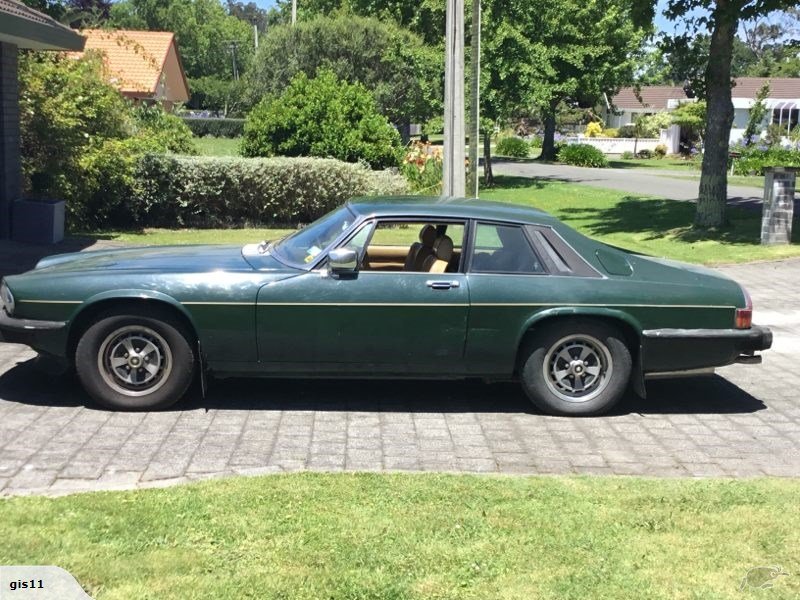
Didja buy it? I see it's no longer listed, although there's always the newer green one in Northland for $6.5k. The autocar buyers guide has this very "Jag owner" advice: "Check for misfires on the V12 by holding a bank note over the exhaust pipes and watching for uneven fluttering." You might also want to test the cigarette lighter by rolling up a bank note and attempting to smoke it.1 point
-
At this stage I am just going to do a day trip down to Teretonga. I am away the next week up North so an only squeeze in the day. Would be keen to catch up with anyone who is planning to head along. $30 for some time on the track or $10 for show and shine. Seems like a cheap day out at the races to me.1 point
-
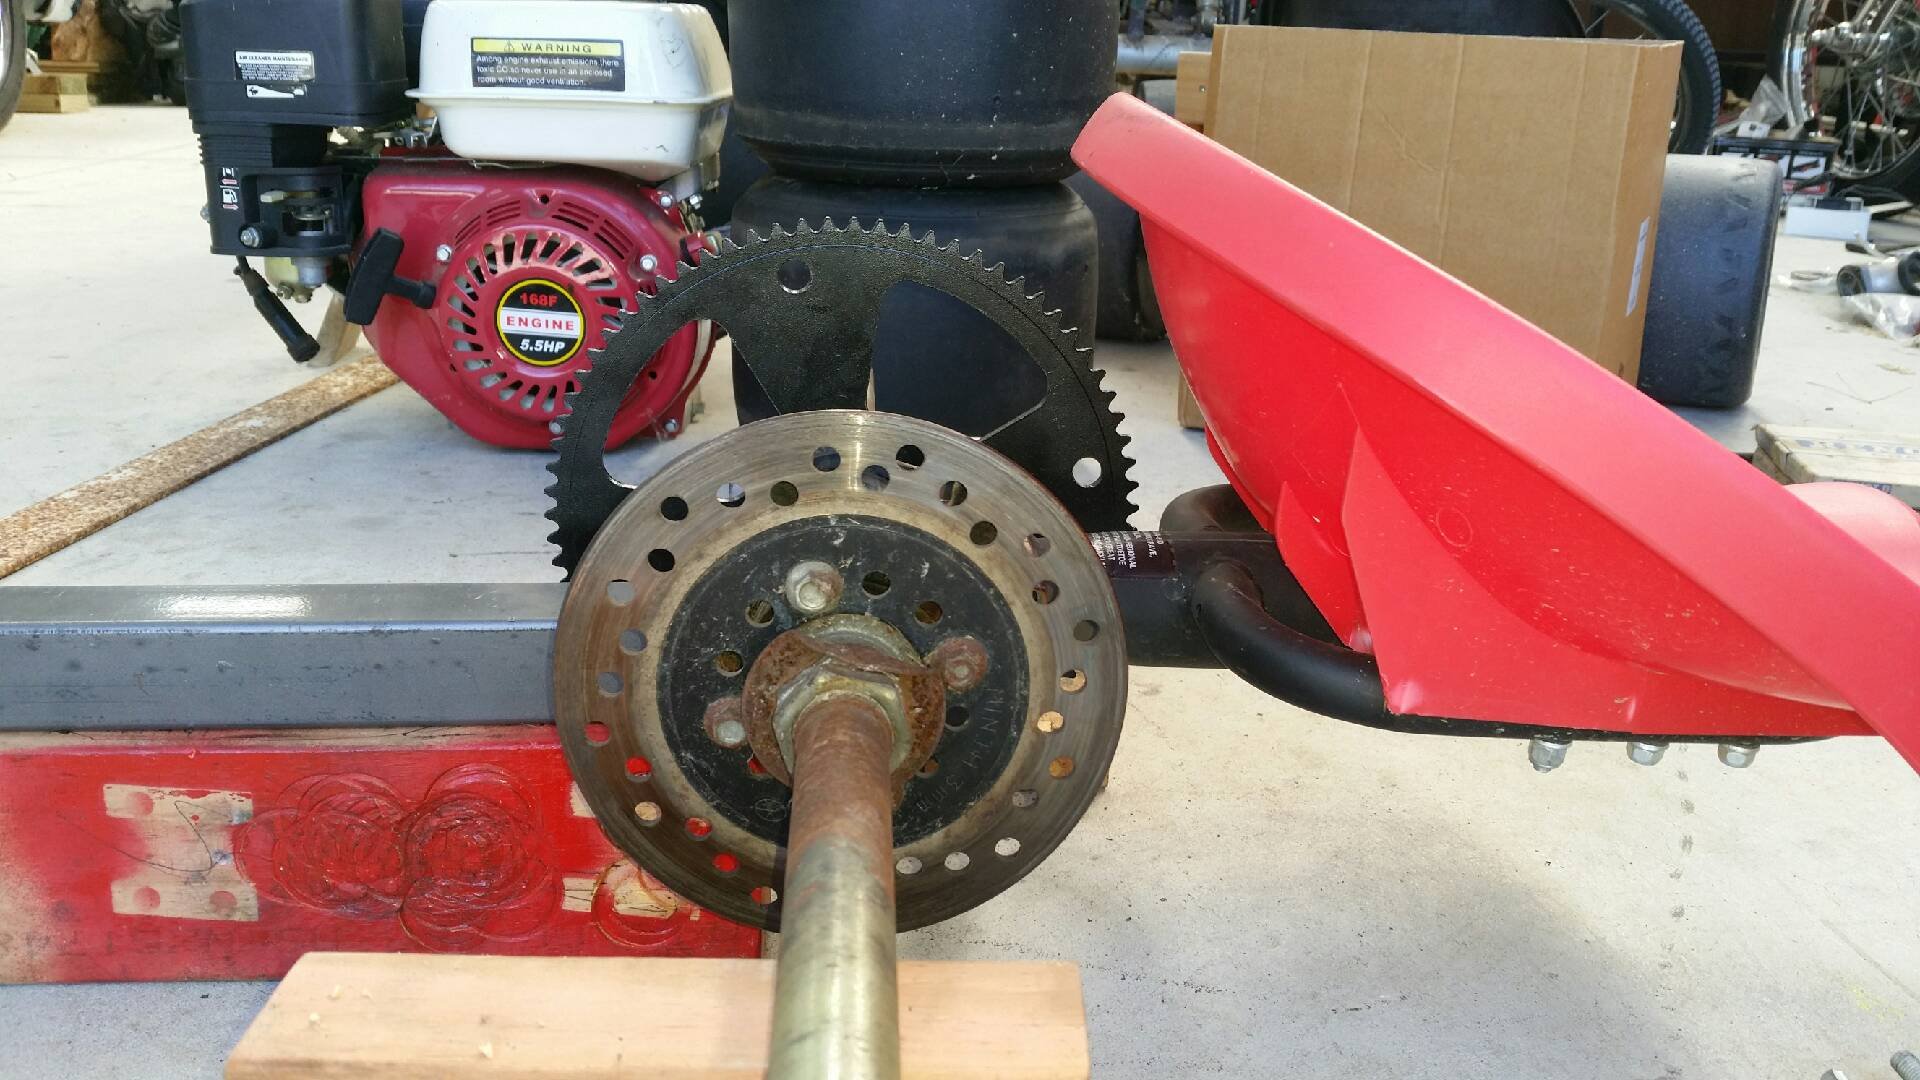
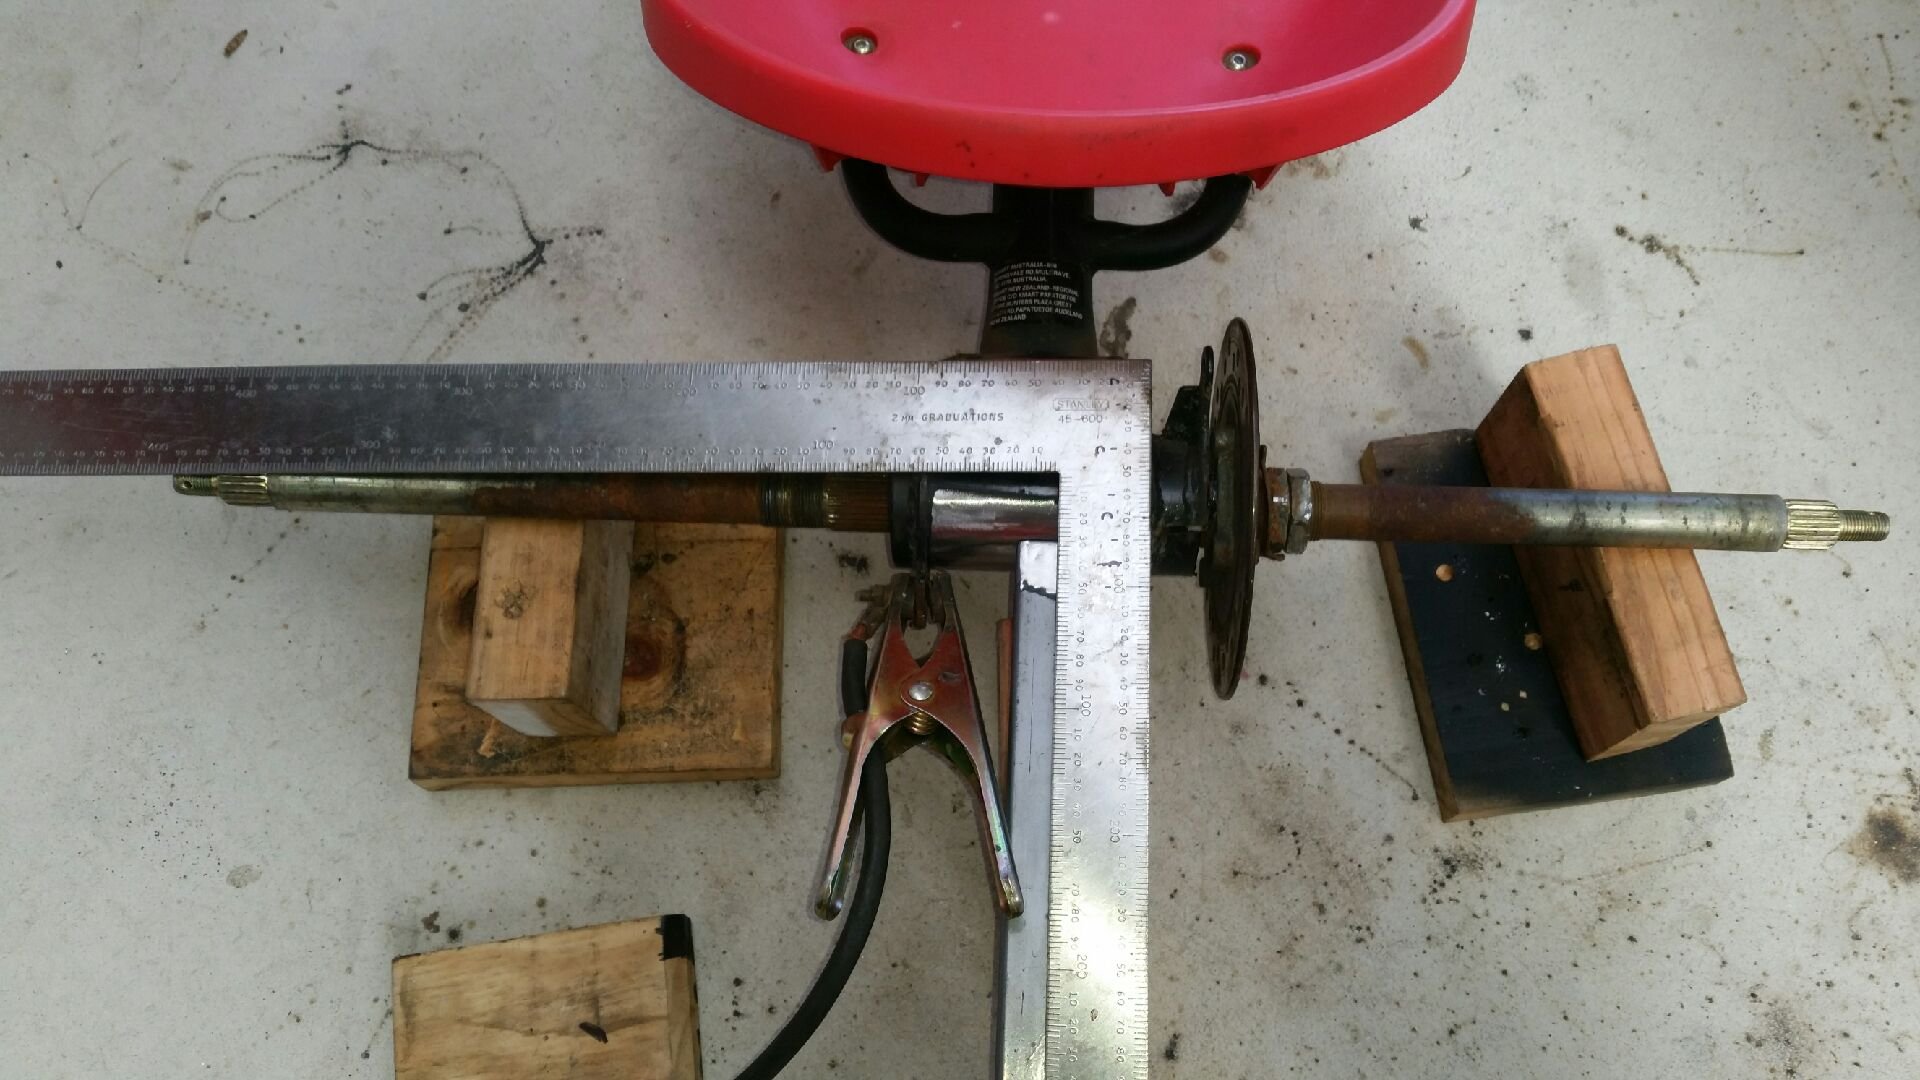
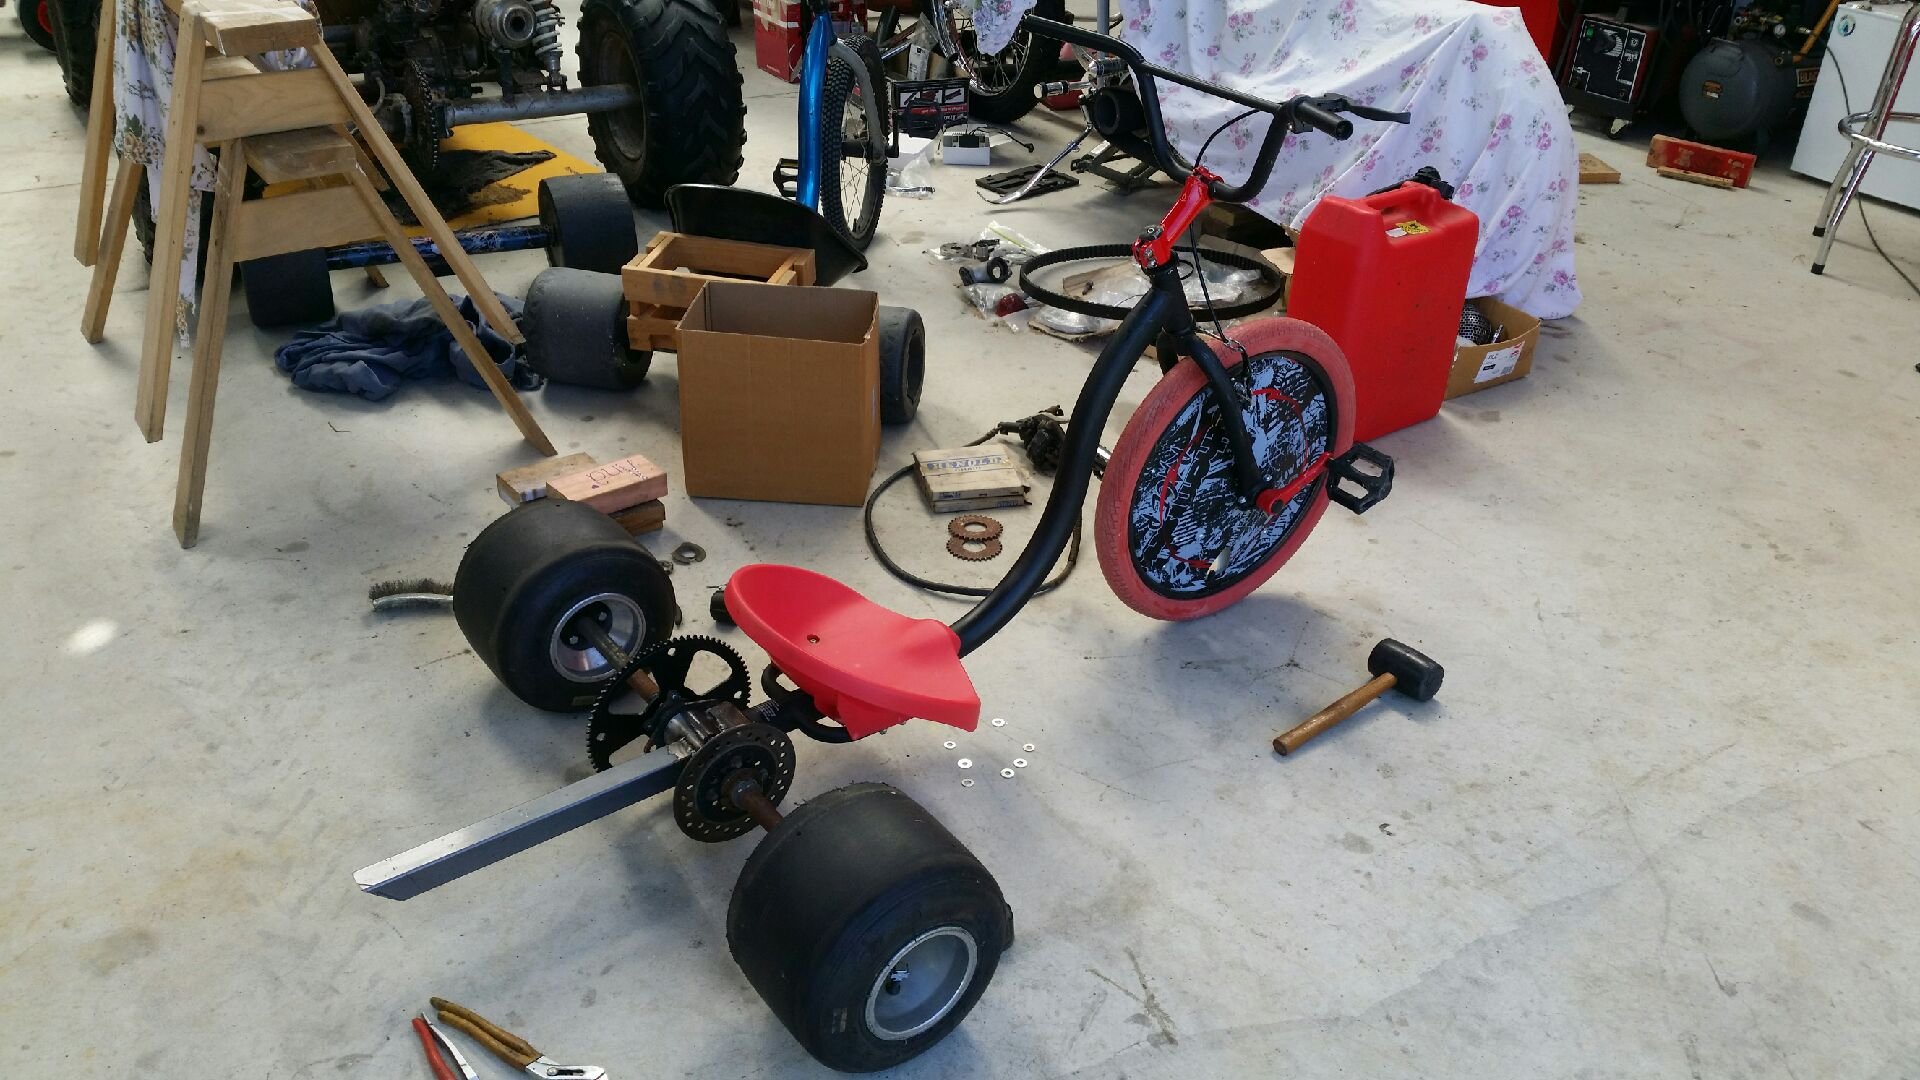
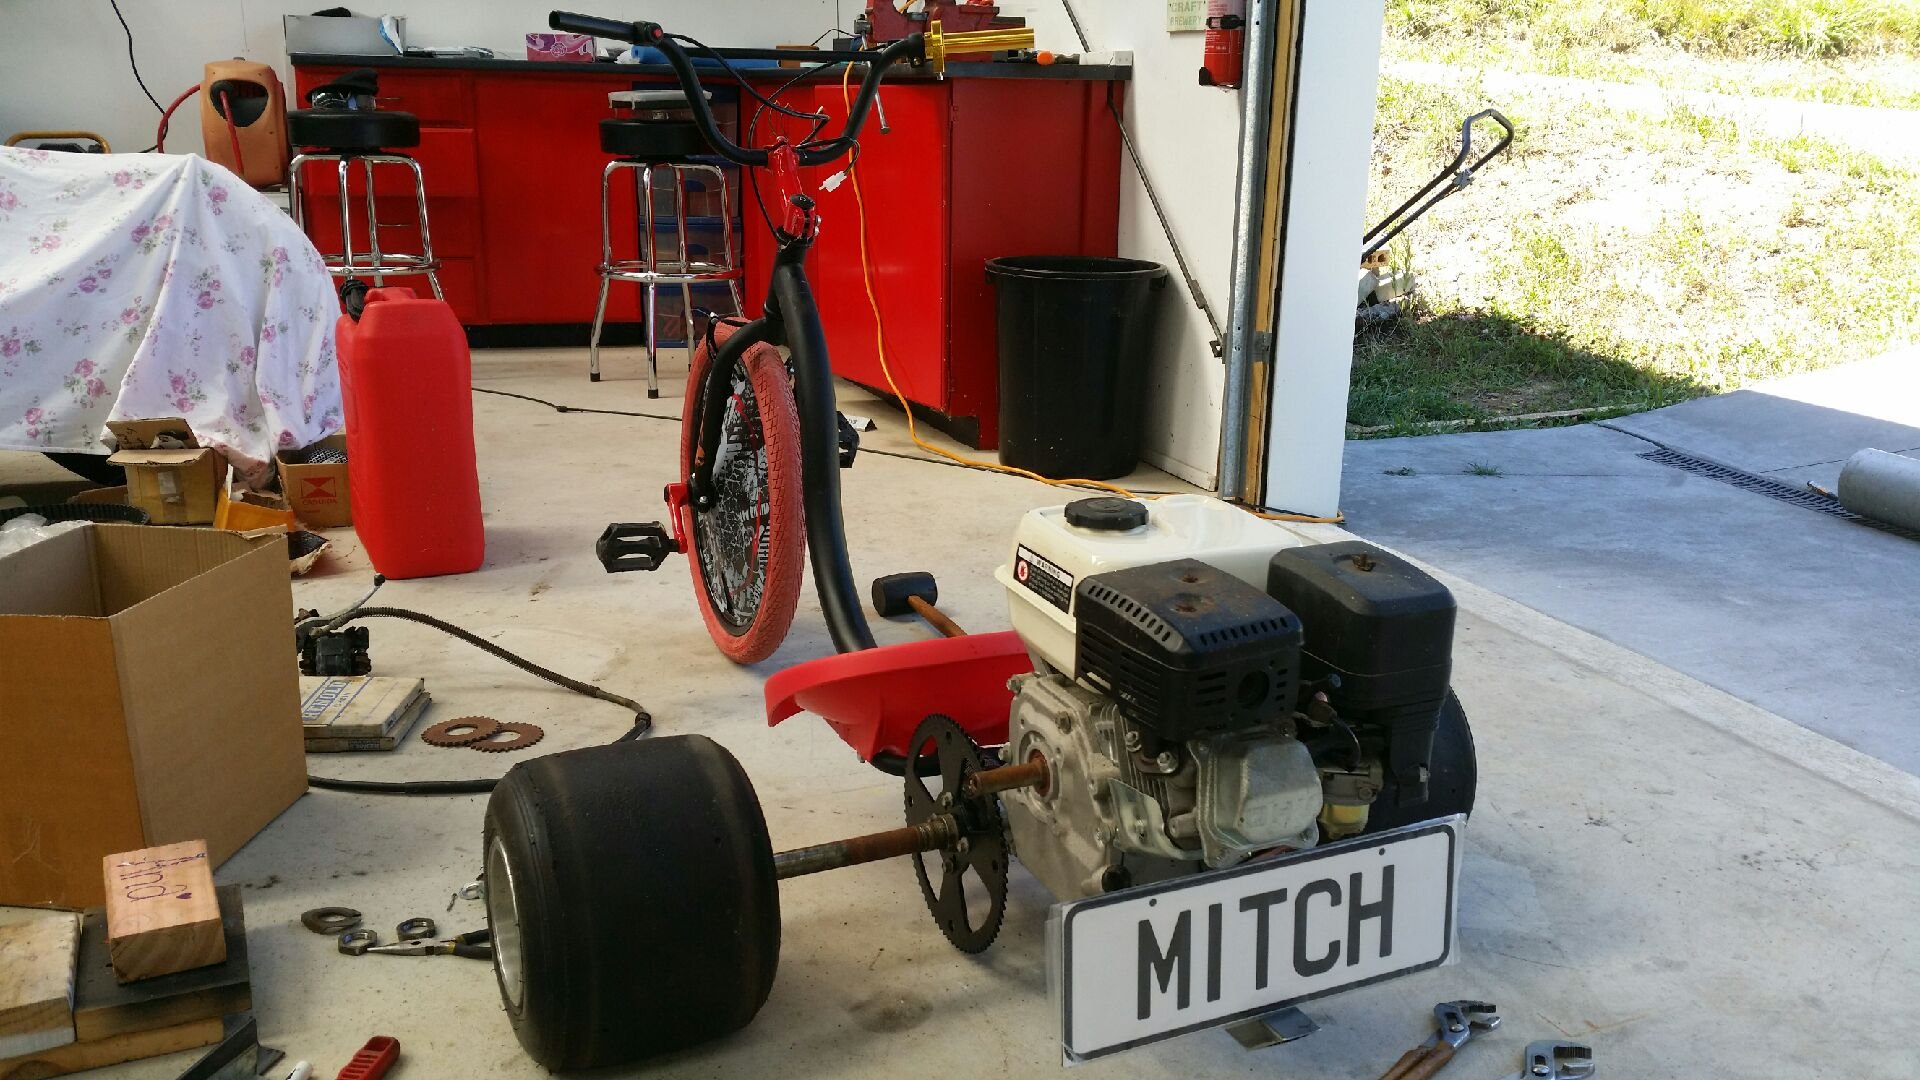
Neighbours will hate me...but got up early and got a fair bit done this morning. Sprocket swapped out for larger one. Looks simple but a fair amount of lathe work and milling was required. Engine mounts welded on. And wheel hub turned down and milled to fit, from 4 stud to 3 stud to match gokart hubs. And further mocked up for inspiration. Not done yet, but very close. Need a few cheap ebay parts to arrive to complete.
1 point
-
Thanks Mate. It is a great leap forward. I'm pretty slack about updating the build thread. Lots of half finished bits that only need a small push to get finished. I promise to do some more regular updates, it is pretty close. Put it together, get @cletus to certify and get it registered. Easy, should be done in no time!1 point
-
Agree on both counts. Had an initially intermittent tick on my Cressida from the gasket/1 point
-
I really think you need to keep those racing colours Engine tick- exhaust gasket? I had that on the samurai.1 point
-
Basically an Italian FJ.1 point
-
That would be a 'No.'1 point
-
Maaate, this is the best update yet!! You must be so pumped to have it all painted. Well done man, can’t wait to see more updates and the wagon finished1 point
-
Yeah sorry @yoeddynz not much has been happening with this lately, been pouring all my money into this stupid v3000 and trying to finally get the green l300 legal. So yeah nothing to report sorry guys! It lives at home now though. Have a picture.1 point
-
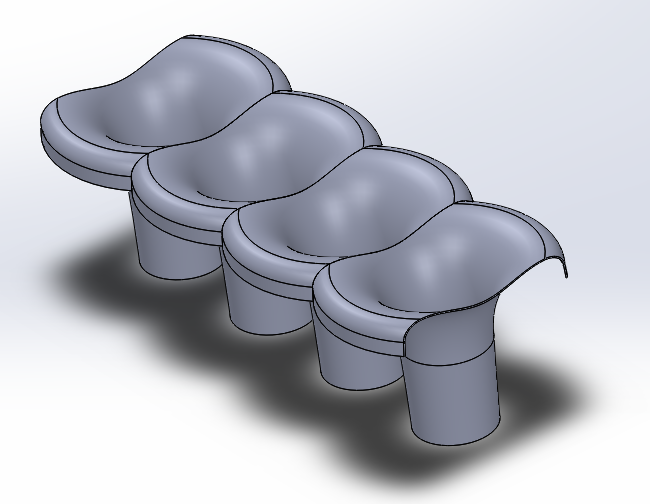
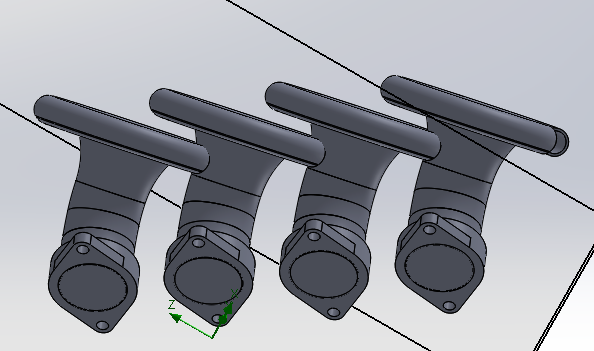
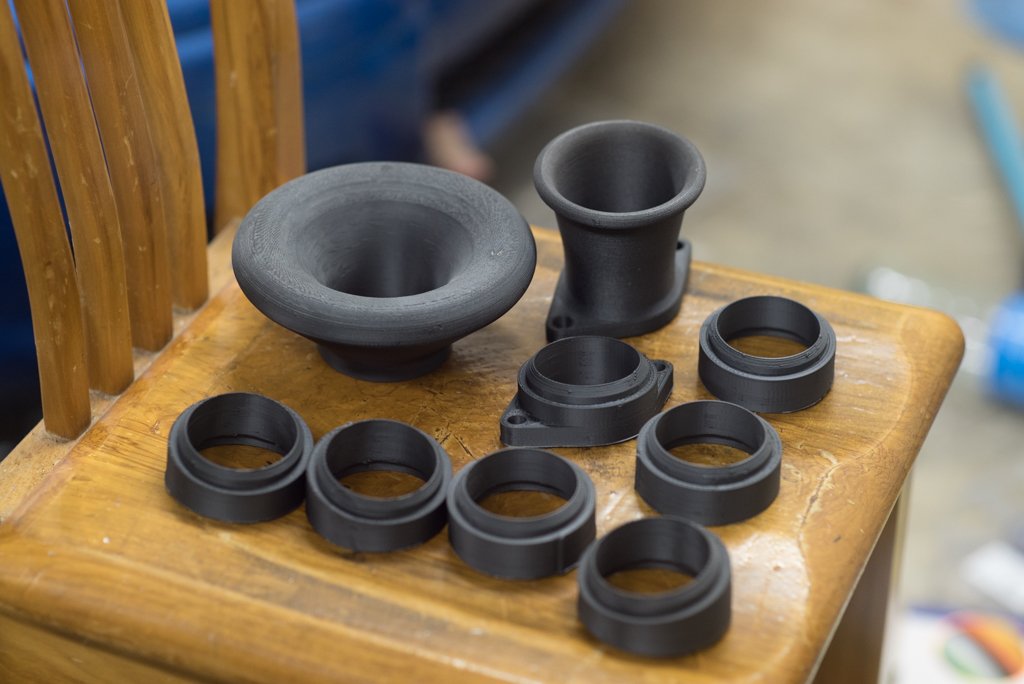
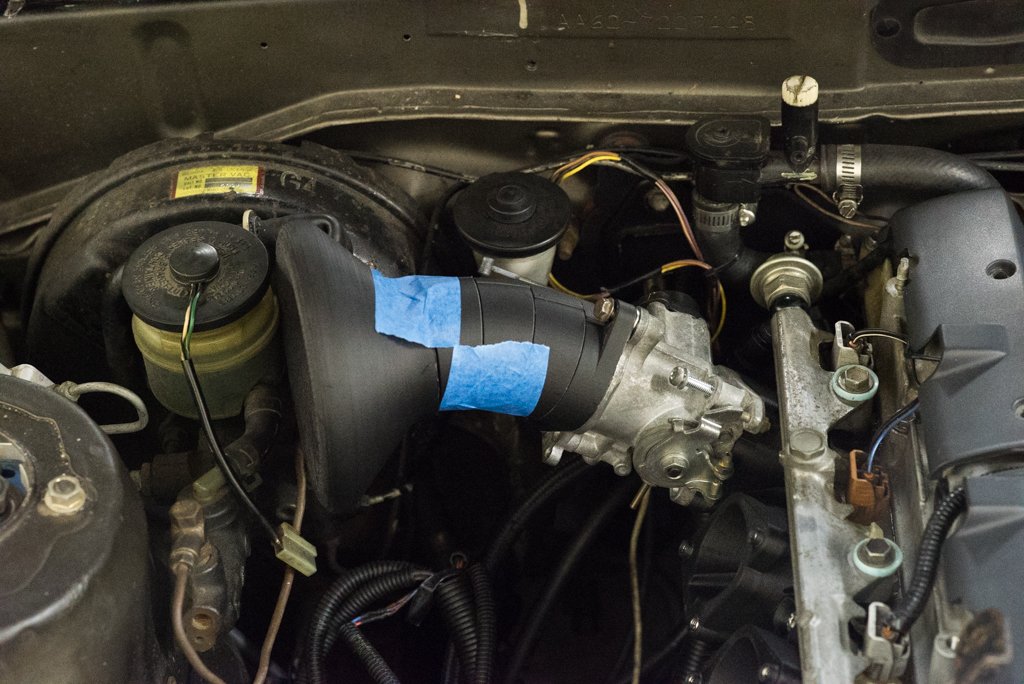
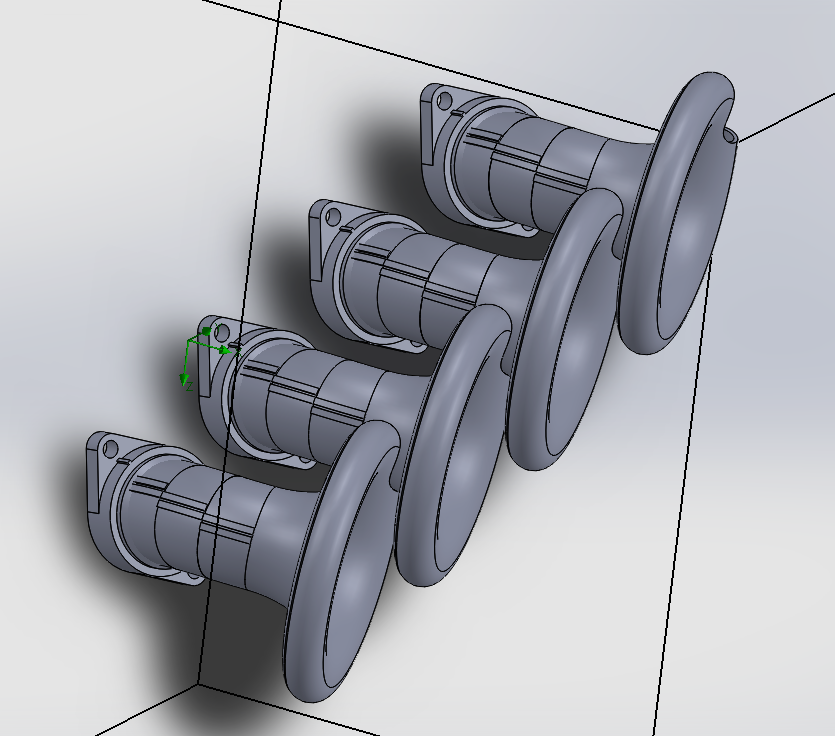
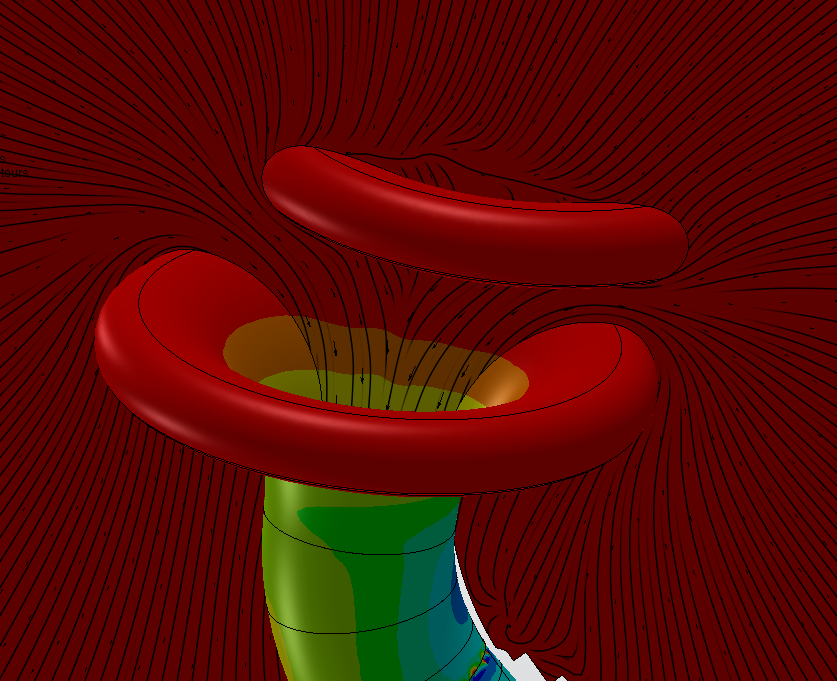
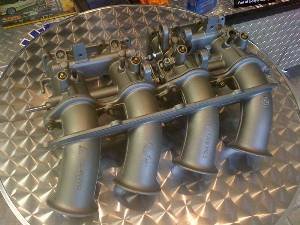
Soooooo for a while now I've had an obsession with getting a "proper" bellmouth geometry on something. I successfully made a big one for the big single throttle but I really need a different radiator arrangement to make it work so its been on the back burner. But the geometry to give completely straight flow is massively massive compared to what is usually used, so its a problem when you have 4x throttles close together. With the space that is available, you have to trim down the sides of each trumpet by this much to fit 4 alongside each other. (Obviously dont need to trim front or rear but lazy modelling) So it looks like you lose most of the useful area of the bell... And looks like it would be prone to "stealing" air and maybe fuel from adjacent cylinders? Not so good. Probably better just having a smaller radius on each. Either way, I printed out a full sized bellmouth (without trimmed sides) so I can size it up in the engine bay. As it turns out that thanks to having a brake booster I've got zero room for a trumpet this big anyway on the rear and hitting the bonnet on the front will be a problem too. I've seen those cool kits where people have all of those parts you can clip together to help build an exhaust manifold. So I thought I'd try the same thing here but for an intake. So printed some parts so I can try some combos for a single runner. Base piece, a bell, 3 x straight 20mm sections and 3 x 10 degree sections. Also pictured is the bellmouth provided with the ITB kit, for an indication on how rediculous the bigger one is haha. Unlike those fancy exhaust kits though mine doesnt actually clip together because aint nobody got time for that. Also, turns out printing the straight ones was a waste of time as there's not even enough room for just the bends. Neither front or rear really fits. pooz. So I'm reprinting the bend parts with 15 degrees per segment and a bit tighter radius to see how much that helps. Based on what looks like will fit though, tipping the trumpets slightly towards the front of the engine bay is actually pretty cool because it allows more useful bellmouth area per runner. A lot more! Most of the air comes from around the sides rather than straight ahead so will be interesting to see how this goes. The question is, is the efficiency gain of the big bell worth the efficiency loss from the bend. And is the bend worth the extra runner length gained. And does any of this make a difference when you're trying to wheeze through a 45mm throttle. And the biggest question of all, will I actually finish making any of this? Some preliminary nerding seems to look like the bellmouth partially shrouding the entrance shouldnt be an issue so long as there's a bit of gap. The colour scale on this, red is 101.3kpa and green is 101.0kpa so pretty minimal loss hopefully EDIT: Just found what the factory BMW S14 engine runners look like, makes me feel like I might be on the right track. Even if the big bellmouth isnt necessary, perhaps there is a real life benefit to having them staggered to allow more clear air around each runner than you can get with straight pipes that are butted up to each other.
1 point
-
@Raizer dropped me off a couple of gy6 motors from his hoard. I was wondering if the wheel would clear the case and it does which i'mm happy with Chucked the pile of parts roughly together1 point
-
Haven’t posted for awhile but finally got the firewall all cut out. went to pick a part and found a 82 corolla booster and pedal assembly..couldn’t believe how compact it was..should give me enough clearance for the headers.I was going to run it un boosted but definately is a bonus. my girls bought me an alloy radiator for a v8 hk holden and it fits perfect in there. mate I sold my Chevy nova to gave me a free gas tank as he had three laying around the garage( he said he’s a collector but horder is probably more like it.) any way was a great gift..will weld 2x2 alloy box under it to lift it up to clear rear chassis rails.
1 point
-
You mean XJ-S, this one here? https://www.trademe.co.nz/motors/used-cars/jaguar/auction-1935049799.htm A British racing green coupe with tan leather and a V12 for under $4k. In a couple of hours you could have it looking a lot nicer (from a distance) than in the photos. That pre-HE V12 is meant to be the thirstiest engine in the world, but you can fix that for more than $4k with manual conversion kits or Chev V8 conversion kits depending on what shape the V12 is in. You should absolutely purchase that rough, underused V12 XJ-S which has no history, no WOF and no reg, and then you should bring it to oldschool Nats. This would make you the grandmaster lunatic.
1 point
-
I restored this Hotwheels D Type for one of my boys. It turned out so well we made a "custom" display stand for it and all.1 point
-
So, ain't used this much in the last year and a half, infact it's been sat in the shed the last seven months. Thought I better start using it, so I charged the battery, gave it a quick clean, and obtained a WOF. This morning I felt semi motivated, so set about fixing a few things that have annoyed me for ages. Since I got it back on the road about six years ago, the fuel gauge hasn't read correctly/won't show over 2/3rds full. I whipped out the sender (luckily it has an inspection hatch for the sender) and held the float lever against it's full stop, it still wouldn't show over 2/3rds full. I then opened the little box on the sender, and it seemed the wire coil is wearing out, and the little arm that rubs against it wasn't contacting properly, so I gave the little arm a tweak. I teasted it and it now reads darn bloody close to full, not perfect, but much closerer. Next I pissed around with the hatch latch, as the hatch has never sat down on it's stoppers properly, and kinda sits on the latch mechanism. Managed to free the latch and adjust it, and by hoki, it now shuts nice and toight, which has the awesome side effects of not letting exhaust stank in, and has banished about 78% of the rattles in the car, huzzah! The other thing I did a while back was modify my catch can, it used to be empty, so did a shit job at taking oil mist out of the air, so it's now full of steel wool and fancy shapes, and let's no oil mist out at all, rippa. I have some fittings to connect it to the back of the filter plate, so next time the plates out, I'll slap that in. Next on the list, is to give it a rangi tune up, as it runs ridiculously rich, so I'll have to acquire the bro in law, so he can muck round with that. I still haven't sent the rims away to be fixed, fucks sake VG. P.S. I really like driving this car.1 point
-
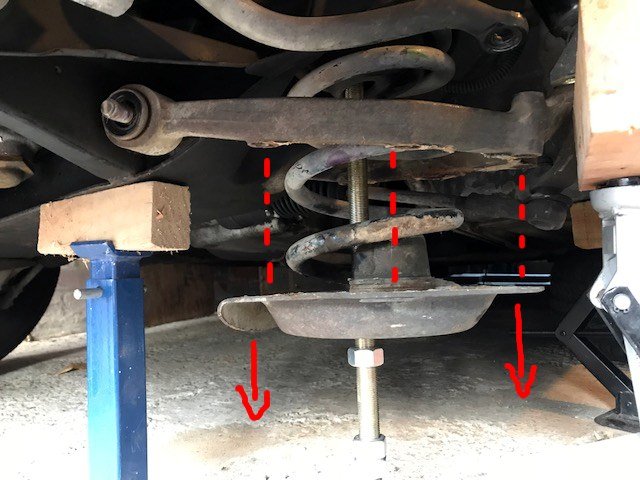
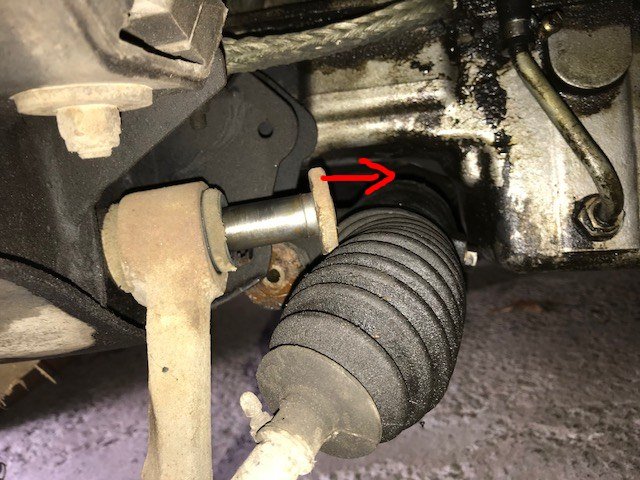
Go go gadget homemade spring compressor! If you're also a Kiwi nutjob, you too can get high tensile fine threaded rod by bolting on down to Steelmasters. It takes all year to raise and lower the spring pan, but it works. =\ Next, remove the fulcrum shaft to get the lower wishbone off. It hits the steering rack (already lowered a bit in this photo): That's kind of understandable / forgiveable, but this (below) is a bit retarded: That pipe is in the way by just a few mm. Haynes would probably tell me to take the engine out to resolve it, but I just used violence. I finally had the lower wishbone out, and the bushes were better than they had initially looked. It was only the upper control arm bushes which had definite wear. Oh well. Replace anyway. When reassembling the suspension, you've got to try to align the spring pan with this wishbone (while it's under twisting force from the compressed spring) so you can bolt them back together. This is not a fun game, so you think "I'll go out and buy some long bolts to use as guide studs while compressing the spring." Unfortunately: Stupid imperial car. I did not realise the implications of this prior to purchase. While putting everything back together, I had a look at these red sway bar end link bushes which were fitted to the car when I bought it. I think they're the wrong part which has just been hacked to size. The flat cut surface facing upwards in this photo sits against the cupped washer, which looks like it's designed to accept a specially contoured bush and to hold it in place as the suspension moves. The result is that the bushes get pushed out of position. I shall order new ones and hope for a better fit. Meantime I reinstalled them and took the Jag camping up north, a 470km round trip (via SH16 because corners). Using the A/C and the loud pedal I averaged 12l/100km. I believe I could feel the improvement to the front end on occasion, but the feel of the rear still reminds me of old timey race car footage. I'm trying to practice different approaches to cornering than I used to use in my light FWD Alfa 33, because there's a good chance I am the problem. =) At the campground the Jag was parked right in view of our gazebo and I confess to admiring it all day. What silly thread pitches? What total loss cooling system? I even got a thumbs up from a farmer as I wooshed home in my conspicuous consumptionmobile.
1 point
-
OK so I was thinking I was not far from painting the shell when I realised my repairs to the rear guard behind the drivers door had a slight bulge, maybe 5mm outwards in relation to the edge of the door shuts. A classic case of working up close and not standing back to look at the complete picture. It showed up worse when I sat the door in place. I thought I had taken a photo but alas no- trust me when I say it would have done my head in noting it each time I looked down the flank. This panel had been badly bashed in at some point we had popped it out. But obviously too far sadly I never realised until now. I tried beating it back in but no luck. It had been previously repaired by someone else and was full of lots of sharp dents. So this happened... Following that I did a super careful replacement of the steel, butt welded in, with very slow careful welding so not to warp anything. In pictures... It turned out great. I still needed a skim of filler to get it spot on but considering what it was like prior I'm happy with it now. It lines up really well with the door... I then gave this and most of the rest of the shell another coat in primer, smoothed it all back with 400. Oh yawn. Helps having beer and loud Reggae playing. Hannah just loved sanding... With the sanding done I then preceded to turn the workshop into something resembling a Smurf murder house. If there was a song to be played afterwards it would have been this... https://www.youtube.com/watch?v=68ugkg9RePc We masked it all up and I painted the door jams, door backs, engine bay, interior, frunk, door bins etc. Next day, re- masked the shell and painted the rest. On the first days painting it was so hot at 34 degrees... The following day time I started as early as I could but it was still about 28. Luckily a very dry heat. Not fun in all the gear... I never really considered how far the blue mist would travel. It covered everything. Great fun. Now we have a blue floor which luckily is slowly going to wear off I think. I hope. After it was finished I shut the doors and let it bake in the oven that was the shed, drank a cold beer and went to the beach for a long swim. Here is a blue Imp. Its very similar to an original Imp colour I like so I went with this. Not sure of the name of the colour. Its very bright and changes from a mint blue to a aqua blue in different light. I'm so relieved to have finished the painting. It'll need a flat back to get rid of the orange peel and shine so it looks more like a original paint job. But I'm going to ignore that job until after the car is road legal. Enough body work and painting!!!! Its time to bring the other Imps inside and play musical chairs with all the various parts. Pick the nicest bits and reassemble one car from them all... It certainly is a fair bit better then when we first looked at this shell a year ago and I'm pretty stoked to be at this point in the restoration1 point
-
Here was one of the bad things 18 year old me must have done, possibly not bolt the gearbox on correctly... (i drove it for close to a year) so could have come loose but either way I was asking my friend if he could see the clutch cable moving, he cracked up laughing, saying that the cable was moving but the gearbox was pushing itself off the engine!
1 point
-
The Imp is finally all painted, after first sorting out a bulge in a panel. It looks great and I'm stoked with the colour. I'll do a proper update soon. But in the meantime here's a quick peek at the colour. But which one is it?...1 point
-
Head cleaned up very nicely with a bit of a diy parts cleaning bin and some elbow grease. A fresh selection of parts from the UK, i struggled to find new valves anywhere else. The old 8v lump removed, made for a good paper weight. Took me so long to get this out maybe a couple of days. Having had the new engine in and out a couple of times now for clutch replacement etc, i reckon i could do a full removal in a couple of hours. Struggled with breaking the cam gear, could not figure out why the engine would not turn over and then the cam gear would snap its tooth off. Turned out to be bent cams, which set me back a long time cause trying to find another set was proving a mission. Found some new Cams in the end and it all went back together nicely.1 point
-
Update. I hate paint prep. I could never be a car painter. Ugggghhh- so boring. Sand, fill, sand, fill, sand... luckily I have a belt sander... (Joke) Then cover the whole lot in white filler primer and spot all the bits I missed. FFS.... In between all the filling and sanding I did a few other bits. Just to take a break from sanding really but also because these jobs are ones I cant do once its painted. The engine lid (bonnet at back?) I'll be using is the fiberglass item from the race car. It fits OK and is very light plus its the much nicer looking sport item with extra vents. However it was fitted to the race car on pedestals and held down with sprung latches (I dont know the proper term for these so I just made some names up) I wanted it to fit like an original lid so I had glue some steel brackets to it. Plus it sat flat along the front edge so an extra bit of steel welded between the brackets with a curve set in would fix that issue. I welded some m6 bolts in so making captive studs. The job in photos... Brackets bolted to hinges and ready for glue.... Lid glued on and taped in place over night... It works! Yay... Now to hold it down with original style handles. I had a set of handles on one spare lid and some working latches on another. I cut things up, broke rusty bits, oiled this, wire brushed that, ground this, drilled that and other fettling until I had some working bits I could glue onto the F/glass lid. Photos of the process... Again leaving for a few hours until the glue set (which btw is Sellys 'The One' adhesive and sealer which is really good stuff for all sorts Of jobs I have found) and once I fitted the handles in place they worked a treat. Panel gaps are ok too for a F/glass lid... Part of the body prep was spraying Resene Industrial 440 epoxy primer over a few bare steel parts and the roof. I sprayed the fan assembly and radiator shroud while I was at it. Looked much better for some quick spraying and will be nice and durable... Then back to sanding. Finally I had it at a point where I could slap some primer on. It took a long time to sort the side out that had the massive cave in and dents. Its still not perfect and never will be. The bonnet too- given I had rebuilt most of the complicated front edge in steel I was not surprised that it needed a skim of filler and its still not perfect. Show car it wont be... Now this was to be the first time I have used 2 pack paint. I have previously painted cars in single pack acrylic (lacquer?) and they've come up OK but not very durable. Shane who owns the paint shop, Custom Colors, next door to where I used to work, gave me some advice and helped sort me out the right stuff for the job. This stuff is nasty and I was not going to risk breathing in vapours filled with all sorts of crap for the sake of painting an Imp. So I bought a decent full face mask and an air feed kit. I also splashed out and spent big monies on a Hvlp spray gun too! $60 at Supercheap in a sale. It'll do the job fine for the amount of work I'll be doing. I appreciate the lovelyness of all the Devilbiss and Iwata guns but not the $500 plus price tags. Also- big thanks goes out to the friendly helpful fella, Mort, at Patersons paint supplies in Nelson. So to the paint booth. Well actually to the workshop in which I had thrown some sheets over the pushbikes, strung some clothesline across the width from which hung some the doors and bonnet and shuffled things about so not to trip over whilst waddling about in my stormtrooper white coveralls making Darth Vader sounds from within my airfed mask. Its summer so I am pretty much always barefoot as is the way in NZ. However in order to not end up with primer covered tootsies I wore some old socks. I dusted everything down this morning and swept the place out, blew the car down. I opened the roller doors to an exact amount to allow just enough flow to pull the mist out (which did not work...) and preceded to very carefully and patiently clog my spray gun up. Some paint ended up on the car though. It was certainly a big lesson. This paint, a heavy primer, certainly goes off quick in the pot and at first I had not thinned it down enough. Combined with a 1.4mm tip size more suited for thinner top coats and I ended up making a mess of my bench as I frantically cleaned out the gun, tipped away one pot of paint, cursed a bit (a lot), turned the music up, and got back to spluttering my primer all over the place. I got there in the end, muttering to myself the whole time 'not to worry..its only the primer stage' and the car now looks resplendent in white. Amazing how a lovely coat of uniform colour makes something look so much neater. Also amazing how a lovely coat of primer shows up all the little pits, chips, dents, edges. Fcuk. On with the sanding. Luckily there is really only one part that I don't like which is on the horizontal swage line near the 'big dent job'. Its too flat and needs the edge building up with a bit more filler... But screw that for now. I cleaned the gun, turned the lights off and went out for a bike ride.1 point
-
Crikey its hot here! Perfect time to spend hours in a workshop filling and sanding then, with the occasional bike ride and swim to keep my sanity. I don't really get too excited about paintwork. In fact- really posh paint jobs, all shiny and bling just dont suit old cars imo. But I realise that if I want to sell this car down the line (to fund the Viva project etc) then its going to need to look nice. But going back a week from now I finished a few tiny welding jobs and added some much needed seatbelt mounting points. This car being a really early one only had diagonal belts and the positioning was horrible along with mounting points that were only holes through thin panel steel. I welded long sections of 20x10 fms inside the A pillars for the top mounts and then some plates to the floor and inner sill in all the appropriate size steel and nuts. I also cut and shut the rear seat base frame so it would clear the radiator pipe tunnel.. I then had to sort out the removable rear valance/cross member. I have three to use. The race car one was hacked about and rusty. A spare one I'd collected from the Christchurch Imp graveyard was rusty and dented. The original one from this shell was just rusty. I chose that one. I started by cutting out the unneeded and quite heavy original engine mount part. Then rebuilt it all, removing the rot, adding in a length folded steel along the width to support a small bit of box section. Why? Well because I like bicycles and I like to travel to places for nice bike rides and why would I choose to do such a thing in a boring modern car! Much more fun to go on road trips to biking places in a interesting old car... So, just like on my Rx3 and my previous Viva I added a mounting point for custom made bike racks to suit each car. For this Imp though I wanted something that will be hidden by the number plate when not in use. I'll make a basic rack to suit. Then together Hannah and I painted this and any other remaining bare steel with industrial 440 epoxy primer. It already started looking better... Now back to that filling and sanding. Its been a week of many 30 degree days here, often hotter at mid day. According to our thermometer yesterday was 34 ! Our place is like suntrap and we don't get the wind that even our neighbours over the road get. Great for winter but can get very hot in summer. Luckily the workshop faces directly north to the sun and with both doors open we get good light and a gentle enough breeze through to keep it from turning into too much of an intense oven. Plus it takes the filler dust out! Inside the 'not so hot' oven... Still a yucky job and to stop giving up I have to keep reminding myself that 'a good paint job is 95% preparation' etc etc. Yawn. pffff. I'll report back in a week or two, broken and covered in dust.1 point
-
Haven't done bugger all on this recently. Had been trying to source some cert happy 14" wheels, but that didn't happen. Wheels held the build up a little bit as I needed them to start working out other things that will happen later. Anyway, some pics of the limited progress since last update. "Built" a frame to straighten out the headlight area of the front. Didn't take too long with a handful of long tek screws, to get it much closer to the right shape. Happy enough with the results, so that will get a primer / paint later on. Amazingly complicated alignment tool: Previous to that I had removed the rusty A pillar section shown earlier. Before, with the two layers removed. After, with one section made up, i'll make the top section when I have this one welded in and epoxy primered up. Then weld that over the top, epoxy, paint. Meanwhile, this turned up, with a friend another day. And unwrapped Wheel specs: SSR XR-4 Longchamps, 15x7-1(x2) and 15x7+11(x2). Lost count of the hours spent browsing Yahoo to find a set or even a pair that matched the offsets I measured I wanted. Well worth the time in the end, but it did drive me half insane, finally finding some, only to be outbid by twice my budget. Nothing super wide or dished, but they will sit well on the car I feel, and I can wrap them in damn good tyres. Similar dish on the rear to my 14x7.5-1, but with 10 times the number of tyres available, an easy choice in the end. I also removed some unnecessary weight from the rear of the car, to help sort the ride height. Shocks and springs, overrated. Before: After: I will be home alone for the whole Xmas break, so will be aiming to get the car completely back together (for now) with all of the rust cut out and replaced with new steel. Epoxied up and some red spray cans to tidy up the repairs. Then I can start the next stage which will get quite expensive, rather quickly. Until then, let me know what i've done wrong here.
1 point
-
Ahhh old faithful, I built this thing, owned her for 10yrs. Good motivation photo lol1 point
-
Glad it all came through for ya man. You buying this meant I didn't have to. So thanks. Ps: make this happen please.1 point
-
Finally, a good sunny morning for some photos. The first two are my bike with a 16" Cub that the kids ride from time to time. @d.p.n.s1 point
-
So nearly four years after mentioning it and well over four years after coming up with the idea. Here it is! FINISHED! I took it for a quick ride up the road, it feels awesome, taught, light, and responsive. I'll take some better photos of it in the sun over the weekend. *Pine*1 point
-
Shit vid of me making a cunt of myself at Nats track day.1 point


.jpg.f987d0351014b1d90f87d960f0793792.jpg)


.thumb.jpeg.384ff72c8d2b0ee0d34a7bdedb55bdcf.jpeg)
This leaderboard is set to Auckland/GMT+12:00