
Leaderboard


Popular Content
Showing content with the highest reputation on 05/22/16 in all areas
-
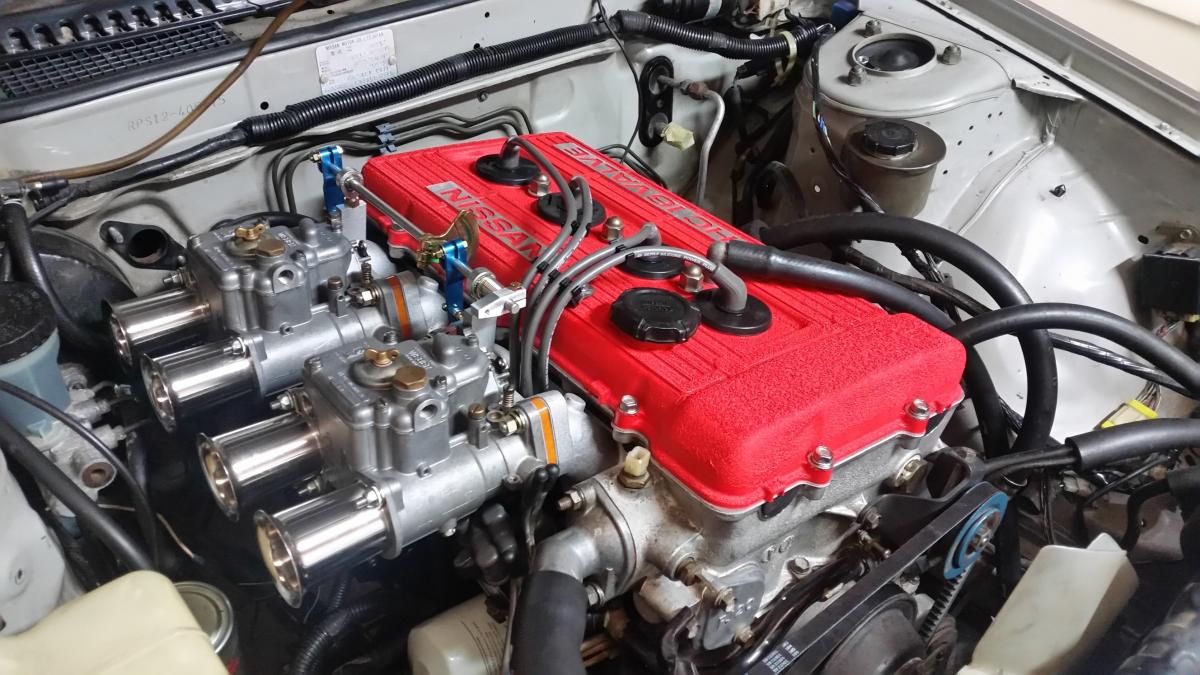
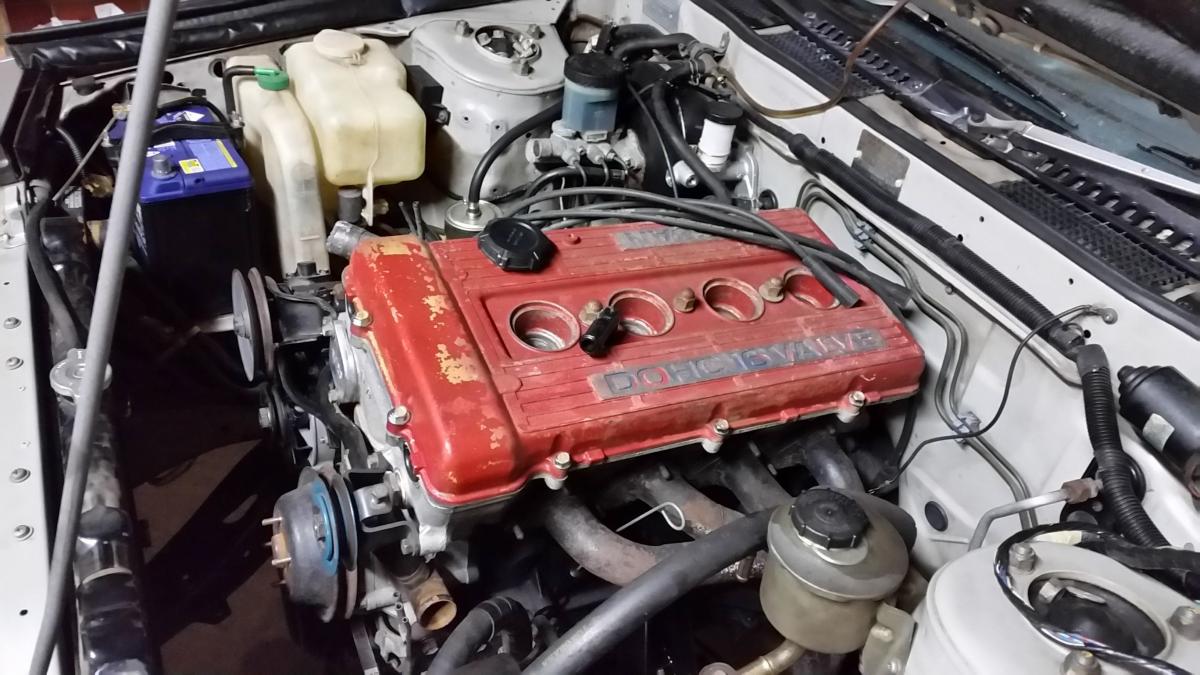
One more. Symphony in motion. The eagle eyed will notice i painted my rocker cover with wrinkle red - not quite the correct shade but looks better than before. Also got some new ignition leads from Japan and a new starter motor from rock auto of all places! My S12 clutch master has no clearance so i need to fit a R33 clutch master (they are shorter) Currently making the datsun 1600 FJ conversion exhaust headers fit my car.
 12 points
 -
Quick update and might be bit of a surprise! Now wearing a pair of genuine Weber 45 DCOE carbs
10 points
-
Final update - unless I find the VHS tape of these beasts running. After I had it complete we had a weekend of fun on the farm with two others just like this one. It went very well handled good - got great bite on the dirt - when launching from a standing start it would pop the left front wheel off the ground! Two mishaps though - my girlfriend (now wife) took it for a spin (literally) and removed 20M of the boundary fence and nose down in a water race - it was pretty exciting on wet grass! We pulled it out of there bent the bumper back off the wheel and fixed the fence all good only a bit of hurt pride and sore knee where the ignition key on the dash got it. Funnily enough I was talking the the old neighbour a while ago and he still remembers this happening - it was in the 90's! The other thing of note was that I learnt that Bedford diff's are not strong - but not in the way you might think - it broke the axle off outside the bearing and of course the wheel fell off causing the passenger riding in the back to somersault off, apparently he landed on his feet. After that I replaced that diff with a Transit one - the heavy duty type with floating axles - and had no further problems. Drove the thing lots and lots after that, places you cannot go now - rivers, beaches etc. One memorable trip down the Waipara river from the SH1 to the sea and back. Never let me down - I learn't that towing it into a Nor'wester up hill to Kirwee with my L series Turbo Subaru was not a good idea - BHG on the Subaru! So I picked up a cheap and very rust HQ Ute with a 253 in it - not a real V8 one though which made a much better tow vehicle. I will just leave this here - not long before I sold it due to family and lack of place to store it - I still miss it! Thats me and GuyWithAviators when he was just two years old! buggy0027 points
-
This afternoon, after ferrying the sheepers down to Hamilton I set about modifying the dash cluster to accomodate my new instruments - yes that's right, I did a thing on this myself. IMG_4941 by Richard Opie, on Flickr Starting point was this factory flat front KP61 tacho dash cluster - I wanted to cut up one of these rare, hard to find examples because it meant I could install the tacho I wanted and still retain the OEM fuel gauge and temp (temp not so much of an issue but anyway) which you'll note are included in a combination gauge on the non-tacho cluster that my car came with. IMG_4961 by Richard Opie, on Flickr On the speed side, I wanted to install this Stack ST3801 speedo - it reads an optimistic 260km/h so I'm sure further developments will be needed to ensure I can take this car off the clock. IMG_4963 by Richard Opie, on Flickr For keeping an eye on revs, I have always wanted to pop a Stack tacho into a car - these remind me of watching the start-up montages of Bathurst years past, you know the one... the grand marshal instructs 'drivers start your engines,' then you get a montage of Larry, Brocky, Tricky Dicky et al. pressing the go buttons and more than one Stack tacho leaping into life as the engine fired. Anyway, I wanted that. You'll note the instruments don't match. Weird yes, I dunno. But I have a stack (lol) of other auxiliary gauges I am using which match the speedo in terms of bezel design, but the tach is the odd one out in the Stack range. Anyway I digress.... IMG_4988 by Richard Opie, on Flickr When you try to fit the gauges into the cluster, this happens. The speedo is slightly too large in both bezel and body diameter, and both of them foul on mouldings behind them. IMG_4959 by Richard Opie, on Flickr This is why. There's all sorts of annoying bits of plastic and shit going on behind the instruments. Suffice to say, it needed to GTFO so I went and invested in a variable speed Dremel and some tool bits for it. IMG_4997 by Richard Opie, on Flickr And then I started mangling. IMG_5006 by Richard Opie, on Flickr Until eventually, I had carefully hacked the back of each side out and they were roughly (literally!) ready to accept their new instrument overlords. IMG_5026 by Richard Opie, on Flickr The tacho fit into the fascia perfectly as it was - you'll note in this shot, there is a flat on the bottom of the aperture for the speedo. That needed to be ground out circular to accept the main body of the gauge, but the bezel itself was still too large to fit in the supplied space. IMG_5055 by Richard Opie, on Flickr So I did what any sane person would do, and employed my newly acquired Dremel skills of precision destruction to chop the bottom off the speedo. Which ended up being more than just the bezel. But it worked a treat - this is just after the initial cut, and some sanding with a fine sanding drum at a low speed finished it off nicely, but I think it might be prudent to fill it with urethane or something similar just to stop any dust getting in. IMG_5050 by Richard Opie, on Flickr Went over the edges of the gaping chasms I'd created with a burr to tidy them all up, radius the corners and remove any sharp edges. IMG_5066 by Richard Opie, on Flickr Then secured each of the instruments into it's new home! I won't be able to reinstate the clear plastic cover over over these two - they sit proud of the mating surface for that cover, but also the fact the instruments have lenses of their own means it results in some weird/annoying reflections. I only need to cover the temp and fuel gauges, so will sort out some kind of clear plastic to glue over the top of them and it should nestle nicely in the factory location. Thanks for looking! Discussion in signature if you want to yarn about it.7 points
-
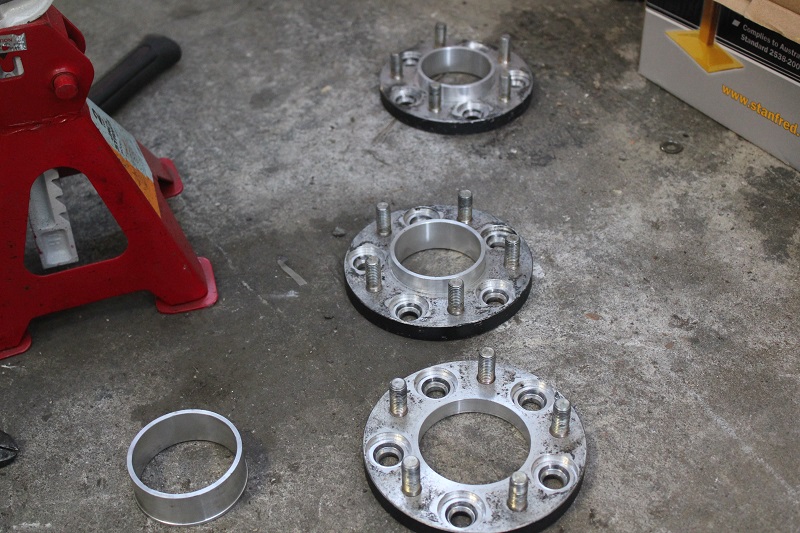
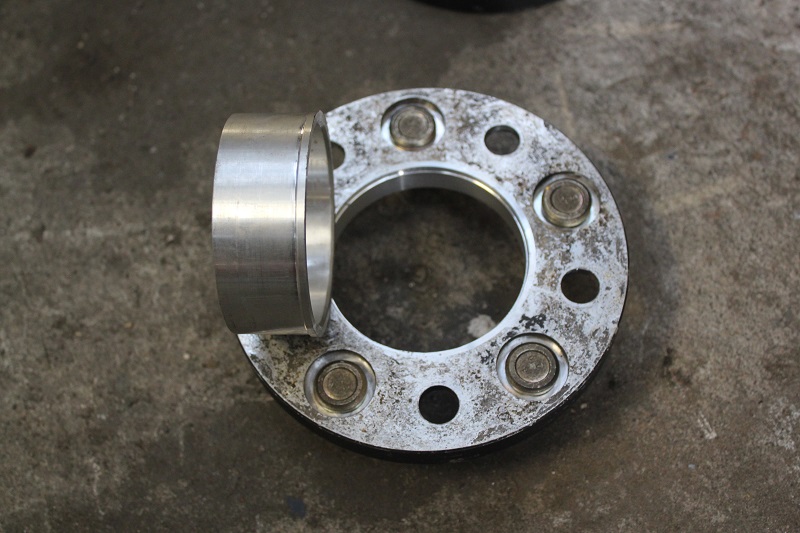
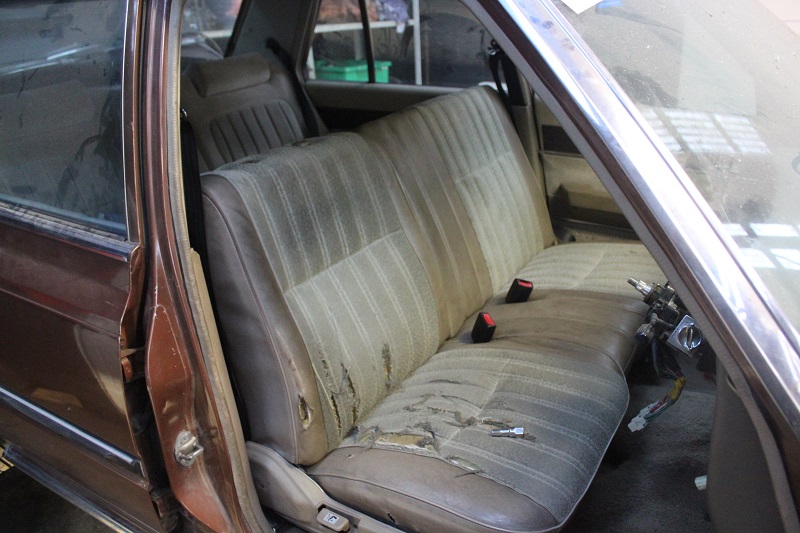
wow, had a super fucking massive day on this. longest day I have spent on this car in a very long time Super rapped mega thanks to beaver too, who came over in the afternoon to try rid him self of a hang over, managed to get a lot further than I had hoped for thanks to him So today, got the carpet in, bench seat in, seat belts in. had to put the diff head back in, lacking an LSD for now, as having issues finding one. Also put the lowered springs and shortend shocks in the back, worried about bump to clearance so will have to see how that goes I guess. Steelies engineering modified my bolt on spacers, as they had no locating rings on them. As always manu did a fucking amazing job, and now I know I don't have to worry about such things for the cert. Also, have decided to paint the chassis and inner guards in the engine bay, just to tidy things up. Wasn't really looking forward to taking the guards etc off as re=running wiring looked like it would be a cunt. Turns out, beaver found out the inner guards come out without having to remove the gaurds them selves. so I'm happy about that. Anyway, some sort of pictures. So yeah, next step. water blast engine bay bits, chassis etc so I can paint chassis, then motor can go in. YAY!
5 points
-
Got a WoF on this the other day, expires at the end of April 2019! Also started boxing in the draw bar for more storage, which it definitly needs now that I sold my van today ( ) so all the camping stuff from it ended up in this. Errrm, yeah. we might need to travel a bit lighter now I already cut down the sink (mrs wears contacts so its a prereq) just need to fit the 20l water container up and under some how some way (keep coming up with funky ass shit. like every single day). I think it will work ok if i strap it up like a fuel tank filled via the filler with a drain tap on it. So drawbar storage - this is made partly from the bed from the just sold van, which was made from the false floor of the van we had before that and partly from left over 18mm ply from the Blimp trailer me and Euron8 made. See it WILL come in handy one day! Will probably stick some lino on the inside of this just cause. Heavy stuff (like a 12v battery for a stereo, lights and phone charger), jack and such will need to go in the false floor of the van itself, to minimise load on teh tongue, so this really only for light stuff like wetties and whatever. I will fashion a special stick of the appropriate lenght to allow it to sit level as a bench top as well. Closed up the awkward gaps at the sides with the old mud flaps from the van, should also assist with aero as the front is pretty much dead flat otherwise, and ive at least boxed out the massive 'air intake'. The flaps mean its also not fully air tight to help vent the battery a wee bit, but it will only be charged at home on the charger so that shouldnt be to much of an issue I will try to get the spare up underneath once ive figured out the water situation, and put a bike rack where the spare mount is currently on the front i reckon. Just need to go somewhere in it now!3 points
-
Want something I can take on off-road adventures, and you can't have to many bikes. Thinking some Scrambler / flat tracker styled bike. But not really to worried about looks, just want a reliable & capable sett-up. No fun breaking down in the jungle. Hi I'm Russell and I have a question, it goes a little something like this: CG110 & CG125 part compatibility, 110's don't seem near as common as the 125's. So getting 125 stuff is significantly easier, are the motors identical apart from the cc? Does anyone know if this 125 clutch pack / basket would fit in a 110 model? http://www.ebay.com/itm/Motorcycle-Motorbike-5-Plates-Manual-Engine-Motor-Clutch-Assembly-for-CG125-/401001094637?hash=item5d5d871ded:g:du0AAOSw0HVWBTz62 points
-
After a long wait to get some more shielding gas from BOC, and dealing with life, I finally have the gas tank back together. It took a few 'touch ups' with the welder to get it fully sealed on all the seams - I tested with some meths rather petrol (too likely to boom) or water (rust!) this time. Plating only burned off in the HAZ so hopefully this will work out better in the long run than bare steel. I won't refit it for now. Also cleaned up the inner guard from the front guard. Needs some work, but not too bad.2 points
-
Myself and Sentra Dave spent some time getting some data on ID1000s tonight. This was interesting because it's the first time I've measured some injectors which actually do come with some reliable deadtime info. For better or worse my results were very similar to the provided figures, we were running a slightly different pressure compared to listed data though. Unfortunately we found that the Link G4 does not appear to have a minimum pulsewdith setting, or a short pulsewidth adder table, so some of the extra lengths we went to by running lots of tests could have perhaps been streamlined a bit. (Sorry to chew up your afternoon Dave...) It was still interesting though and good to rule out the injector behaviour as contributing to idle issues etc. Also the injector behaviour was pretty good anyway. They were clocking in at 938cc @ 39psi / 13.6 volts. Nice and linear down to about 2-2.2ms but below that you really need the PW adder table as there's quite an agressive "knee" and then it drops off pretty quickly. This gives me some confidence that my method is pretty good, and it will work well in other cases when injectors are being used where accurate deadtime information just simply isnt available.2 points
-
Another day in on the car today. Joe and I finished prepping it for the paint shop on Thursday and I dropped it off this afternoon. List of jobs to do are: - Clean up White Paint Front Screen Surround Rear Screen Surround Sunroof Hole Parcel Shelf Boot Spotlight brackets Wiper Holes - Paint all trim bits Satin Black Front Panel Around Side Windows Tops of Doors Dash and inside A Pillar Bumpers & Handles Fuel Tank & Cap It should all be done by next weekend so fingers crossed... Once that was done, we spent a couple of hours this afternoon cleaning up all the glass so it's ready to go with the new headlining and complete rubber kit. Method was: 1.) Scraper to remove Silicone / Black Paint over-spray / General Crap 2.) Meths to remove sticky crap left from tints and more general crap 3.) Glass cleaner and news paper All screens came up looking mint, very happy.2 points
-
Km48 acquired!2 points
-
I've been using this thing a bit and really enjoying it It had a black patch on the passenger side where the previous owner had a repair done, but it was never painted properly and the filler was lifting so I've been working on that lately. Been hampered a bit with shit weather though...2 points
-
still no word from the insurance company as to whats going on but i should hear next week. the flares turned up and they are premo. really well made and they will fit really well. and for some reason i bought some new tyres 2016-05-21_02-14-10 by sheepers, on Flickr2 points
-
Been chipping away at this thing so getting the small jobs out of the way. I now have a Link G4 storm and my intake has been started so should be be back soon.2 points
-
Overnight parts from japan (well not really), 20/30 mm lowering springs Chucked them in tonight, looks to sits about the same as before but should settle a bit so will recheck in a few weeks and trim to suit. they have an extra flat wind/are somewhat progressive so will be a much nicer fit even when trimmed.2 points
-
And for oil pressure warning I normally do a lamp in conjunction with a loud as pizo buzzer. Lamps are good but when on track your looking where your going not at dash. So an audible alarm seems to work best. Just have an argument so it dosent come on when motor not running as it gets annoying when turning ignition on. Say alarm inactivate below 100 rpm. If you drive it directly from link output youll need a resistor across the alarm to pull the output down as the transistor will leak and youll have an annoying hum going on.2 points
-
Here it is nearly finished, after this it made some bull bars for the front and fitted a towbar to the back - then just drove it whenever I could. cars098 cars097 cars096 For those interested in old trucks - the front bumper was taken off a 50's Dennis truck (ex council rubbish truck) seen in the background of the picture of me sitting in it.2 points
-
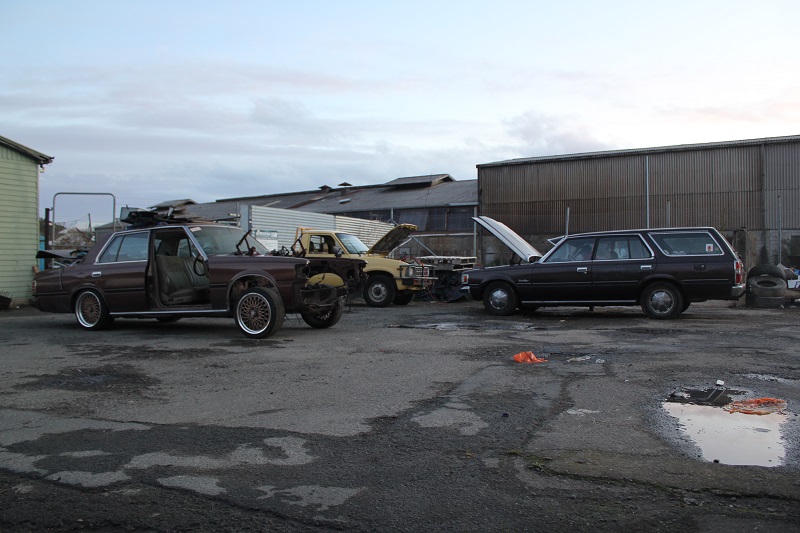
So, thought I better get myself a classic Japanese car awhile back, because new german daily driver cars are boring me lately. Was looking at old Toyotas and Datsuns etc but I decided it had to be a 70's or 80's 2 door coupe of some kind in the end. Pop up head lights would be a bonus. Got thinking about my S12 RX Silvia CA18ET notch back I owned back in the early noughties and thought hmm, that was a pretty cool, cheap fun car. Anyway started looking around in Australia and realised these things just are not about. Luckily I got a lead on a car that was not even advertised and found this : Original one lady owner Nissan Gazelle S12 , The main reason I bought this particular one, other than the fact its so clean is because it has a R180 IRS disk brake rear end and they are quite rare here, most of these sold new in Australia came with drum brake live axle rear set ups and I was not too keen on that. It has factory AC that still works, power steer etc. Really original car, factory head unit still fitted and all that stuff! Pretty hard to find in this kind of condition these days, I mean it is 30 years old! When I got it, seat covers and window shades had been fitted its whole life until now, so the interior has survived really well. Only downside to the whole deal is that its a CA20E. Automatic. Yuck I know. But at least it's been cared for and never thrashed. The Automatic can jog on though, I plan a manual conversion very shortly.1 point
-
Amy took some rad B&W pics free upload image1 point
-
Trailer has been stealing most of my car time, but also been waiting on a couple of things. When i went to bleed the rear brakes after taking the shots above, one of the lines that joins the caliper halves together had a leak, i though it was some grit in the threads or the flare being over tightened, but no. Anyway, all back together now with new lines (shoulda got them made up first time around) Also pickup up a Civic Radiator from Zebra when i picked up the trailer to try, and it JUST fits. Dont look at my janky extened pulley! The nose of the waterpump shaft is only 45mm from the radiator and is pretty much bang in the middle of it This is all so i could remove the noisy, hp sapping and unreliable electromagnetic fan. It also has a shroud so might even suck some air though the radiator instead of just mixing the air in the engine bay with an assortment of fingers. I may swap it out for a bigger pusher fan on the other side eventually. Just need a top (and probably a bottom) hose so i can run it for longer than a few minutes, which i need to do when i use this to pull the spare car from its pit on the lawn. Next job is to clean up and refit the towbar to do just that.1 point
-
next meet up. 15th June1 point
-
Don't be this guy! http://www.hotrod.com/news/1605-hot-rod-service-bulletin-no-one-is-impressed-by-your-cars-and-coffee-burnoutplease-quit-ruining-it-for-everyone/?sm_id=social_aumohotrodsshub_default_20160520_61823776&adbid=10153459871907540&adbpl=fb&adbpr=136015275391 point
-
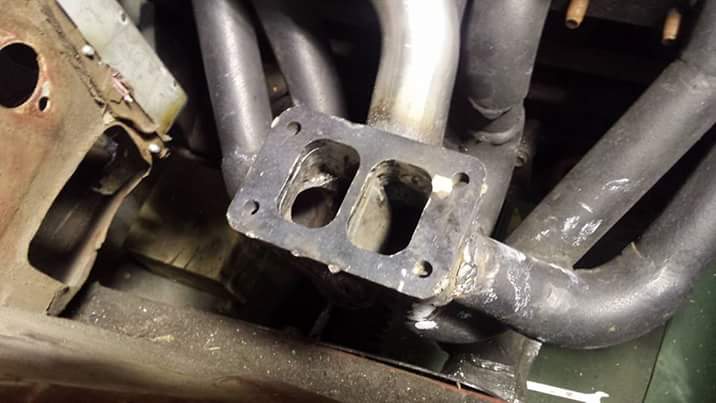
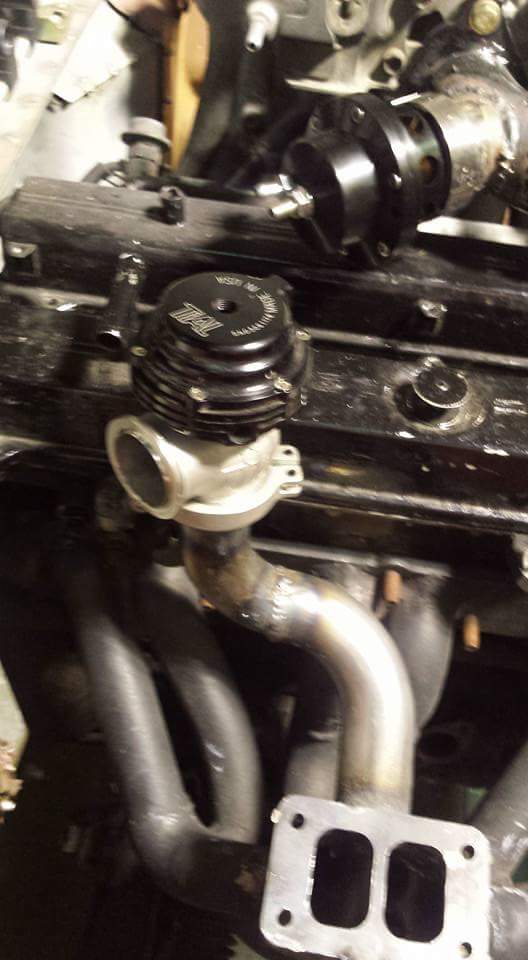
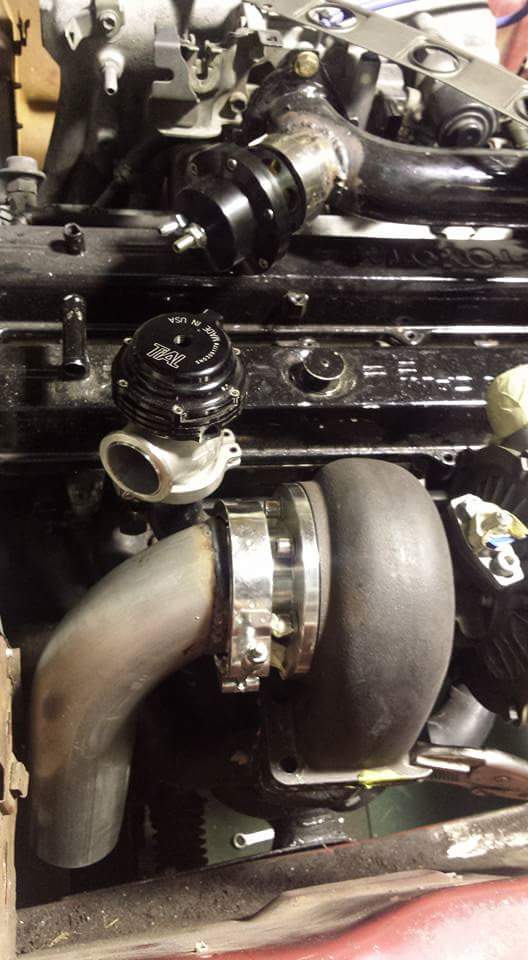
Been a wee bit slow at work so I took the manifold and a spear head to work to finished some things. Finally finished turning the manifold into divided pulse to match the turbo. Bought a new waste gate and mounted it in pretty much the only place I could. Now just need to make a small pipe from the waste gate to the dump pipe.......thinks are getting tight now.
1 point
-
Had a mate with a 12a powered one. The most scared I've ever been in a vehicle1 point
-
Tang, de sprang.1 point
-
Ebay does.1 point
-
Roman, as much as I like your mspaint graphs and general ramblings about fuel economy, can you please start directing your energy and time towards something useful, such as making more power, reducing laptimes, or increasing the efficiency of turning tyres into smoke etc? Lubs Rookiedave1 point
-
If you want results that are decent and last you have to put some work in. Start with sanding, depends how bad it is but you can usually start at 600 (sometimes lower) and work your way up, then finish with any decent car polish, if you can take them off the car and use a DA and paint cutting compound it saves lots of labour. The clear coat is a good idea as the UV protection of the plastic is completely gone if you clean these up with abrasives, you really want to use 2k clear and cut that smooth also. Or instead of clear-coat you can just keep them waxed and polished with your car cleaning routine. SOme are fucked on the inside also if they have been leaking so you may need to pull them apart to sort that1 point
-
I saw Mikuni use this stuff on Faceballs Sorry for stealing your pics Brad1 point
-
Yes use fine sandpaper then polish. You'll need to clear coat them in a clear that is uv resistant otherwise they will go cloudy again.1 point
-
Toothpaste works all good.1 point
-
Autosol make a specific clear plastic polish, I've used the metal polish and it works but eventually goes cloudy again..1 point
-
Jif on a coarse rag, old jeans or something, can follow up with some plastic polish on a soft cloth. Wax after.1 point
-
Used to just cut and polish my merc, lots of kits on trademe , some with uv protectant? To help them stay clear for longer apparently. there was also a company that would clear coat them and warranty it for a few years but was pricey (cheaper than merc headlights tho)1 point
-
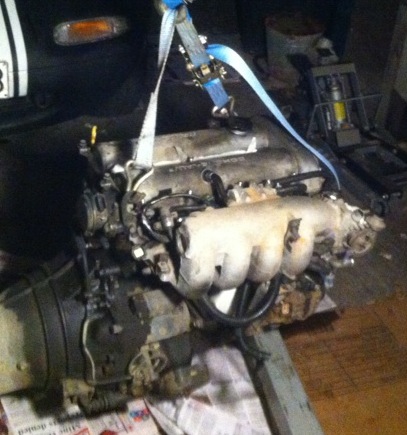
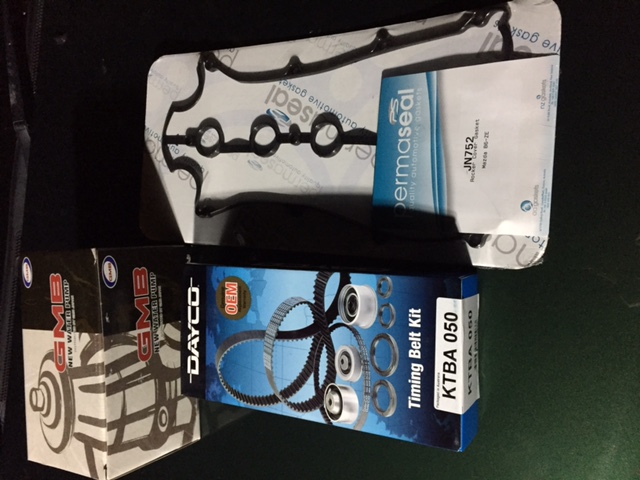
the fella I am acquiring the mx5 engine from has sent me this photo of the motor pulled from the car just the wiring loom to come out and split the bellhousing from gearbox then its ready to go. got bit excited and brought some goodies to give the b6 a spruce up when it arrives, also thinking of rewiring the non engine side of the loom while I'm sorting out the mx5 loom to suit by putting in a new fuse box ect, give the lighting side of things some relays.
1 point
-
The last one was sans cellular coverage. It's a refreshing change cunts not stroking their screens at every chance tbh.1 point
-
More importantly, when are you lowering it?1 point
-
Onto the more exciting stuff. Got the AC mounted and the power steer pump etc. Pretty much dummied up the whole lot and dropped it in one go. I had a few problems with the DR30 inlet manifold taking up a lot of room in the S12 engine bay. People said they fit ok - they dont... So I had to remove it and re think the situation.
1 point
-
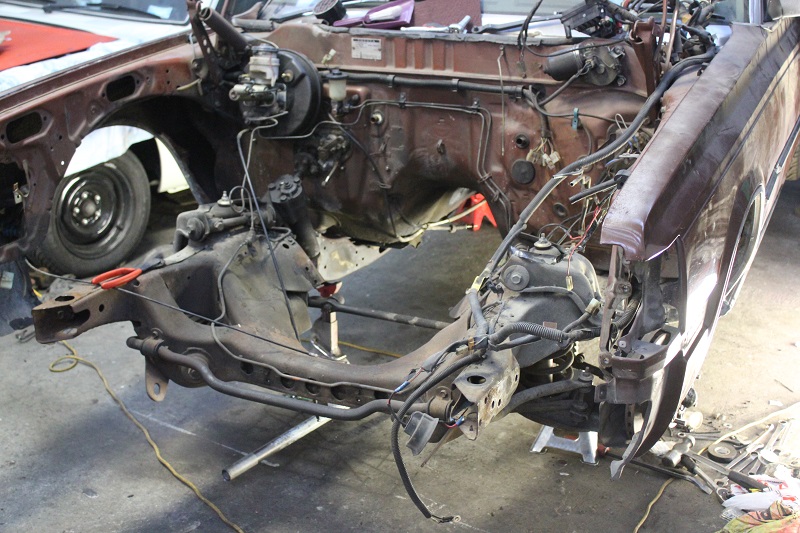
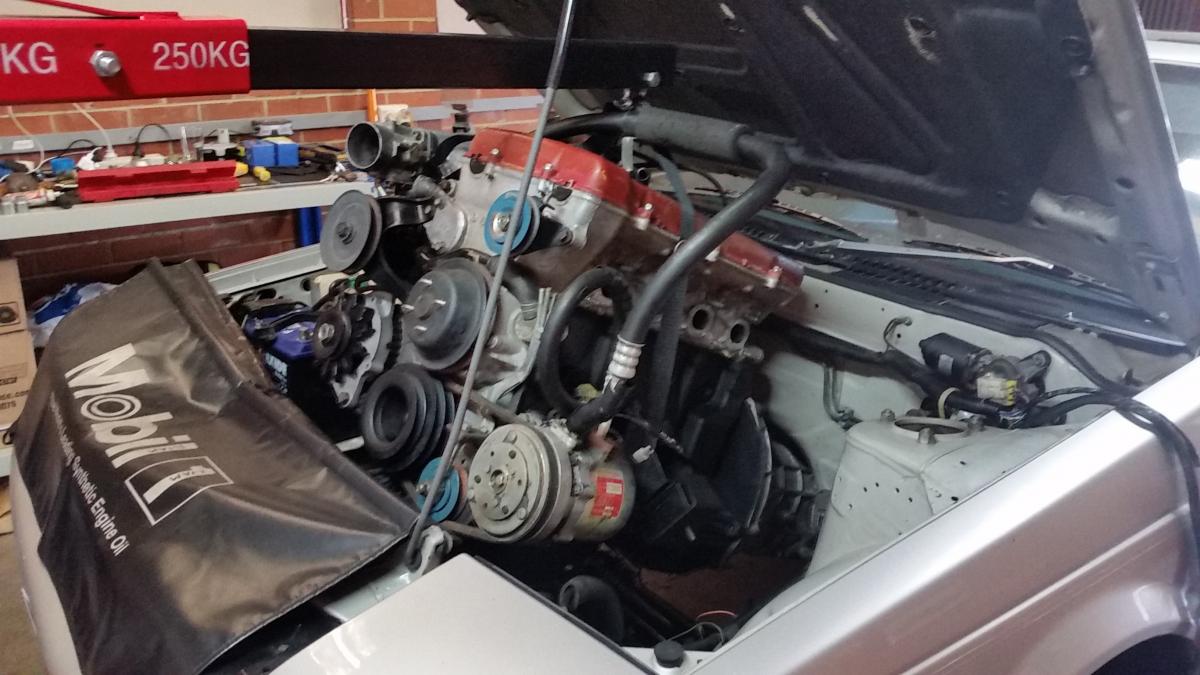
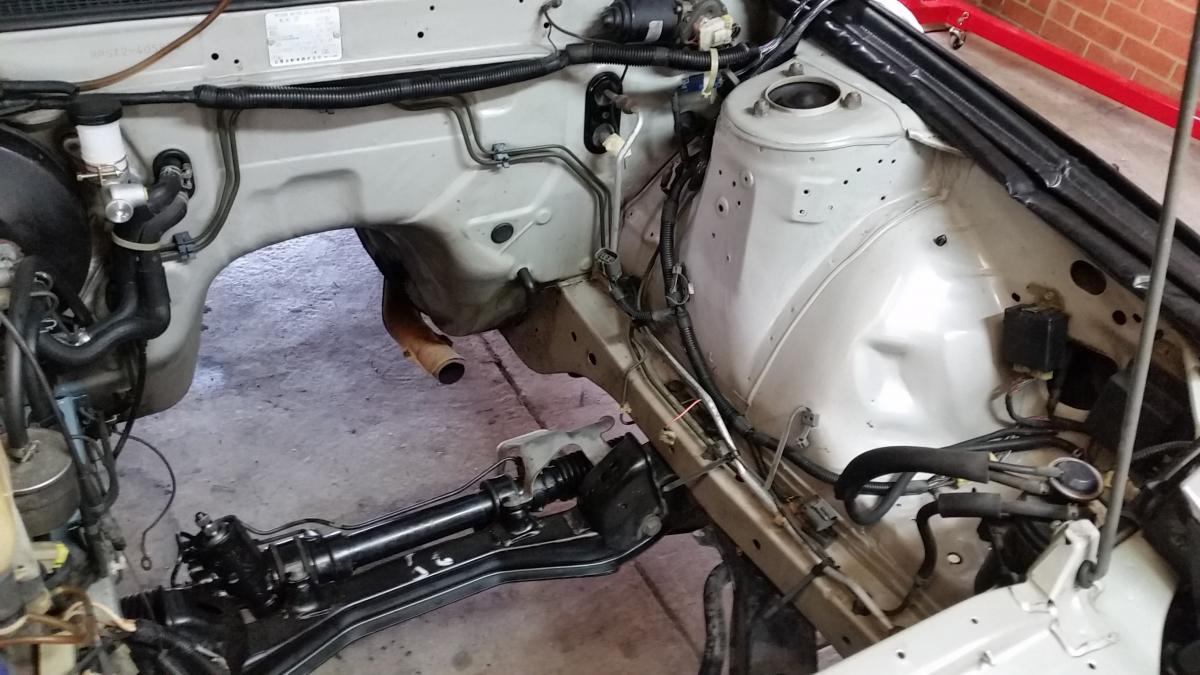
So I have been pretty busy doing work on this as much as possible! Knocked up a set of mounts to fit the FJ20 into the CA20 cross member, as they dont actually bolt up like people say they do. The cross members are definitely different, although only very slightly but enough to cause headaches when trying to fit the engine properly and level / square. These mounts sit the FJ sump level with the CA20 cross member but still allow me to just close the original bonnet without having to use an RS-X Bonnet bulge. Pretty happy it clears, will show later how close everything is and I had to do a few things a bit different as you will see. Cleaned the engine bay up, came out quite good actually under all the 30 years worth of grubbyness. I got the steering rack rebuilt as it was leaking a bit around the seals. An ideal time to do so while I am in there - no pesky engine in the way!
1 point
-
An actual update! Surprised how easy this was, not perfect ( a few small bubbles) but only took an hour from woah to go (pulled the panel off the car to make life easier) and looks a million times better. cheap too! Its just cheap stuff ($8/m for a 40cm strip) but at that price I dont care if it fades overtime or whatever Excuse the potato photos Discussion //oldschool.co.nz/index.php?/topic/41006-beavers-87-gloria-wagon/page-41 point
-
Belated, but part two of the trip to Sheeper Garage Pty. Co. Ltd Inc. included the smashing together of a gearbox crossmember to hold the T50 in where the K40 used to live. Project_KP61_4AGE (1347) by Richard Opie, on Flickr Project_KP61_4AGE (1330) by Richard Opie, on Flickr You can see the pickup points for the original crossmember, and the gearbox mount on the trans itself pretty easy. So we need to make that, bolt up to over there.... Project_KP61_4AGE (1320) by Richard Opie, on Flickr By the time I arrived Sheepers had already fashioned up a jig of sorts and started on the modifications to the TE71 crossmember that came with the gearbox. The mount points on the KP floorpan are at different heights, so the new pieces needed to accomodate this. Project_KP61_4AGE (1314) by Richard Opie, on Flickr Project_KP61_4AGE (1299) by Richard Opie, on Flickr Then the extensions/whatever were glued onto the crossmember. I quite enjoy taking photos of welding... Project_KP61_4AGE (1155) by Richard Opie, on Flickr Project_KP61_4AGE (1207) by Richard Opie, on Flickr Project_KP61_4AGE (1189) by Richard Opie, on Flickr Then simply chop up some pieces of steel for gussets, weld the gussets to the crossmember, and after finishing one side it should look something as per the example above. Project_KP61_4AGE (1180) by Richard Opie, on Flickr Project_KP61_4AGE (1167) by Richard Opie, on Flickr This was the other side being checked for size before final welding. Project_KP61_4AGE (1144) by Richard Opie, on Flickr Then once it's all stuck firmly together, the end result after a few hours work was this fine looking specimen here. Solid as a rock. Project_KP61_4AGE (1120) by Richard Opie, on Flickr Engine and gearbox is firmly mounted! This crossmember will get some further strengthening but for now all is super! Thanks again Sheeper!!! Thanks for reading.1 point
-
Put the front back together this evening and fitted my latest wheel acquisition, 13x7 Watanabe Falcon Turbo. See Steeb, I got "turbo's." The wheels are brand spankers - never been fitted to a car and date stamped with August 1980. IMG_7085 by Richard Opie, on Flickr1 point
-
Brendan Duncker, of Niteparts/Convert Motorsport notoriety kindly agreed to build a set of his super nice headers for me. These are a 4-1 type, 38.1mm diameter primary (I haven't got the lengths yet but will be getting this info) with his own collector and a V-band flange for connection to the exhaust. They are gorgeous things and I am extremely happy with them. 2015-12-20_06-39-01 by Richard Opie, on Flickr Sorry, only a phone shot for now but will elaborate further when I pop together some more photos of all the garbage I have been accumulating for the car for the next update on SH. Thanks for looking!1 point
-
Heaps and heaps of rad parts have been arriving lately, and I'll get around to that and Imma let myself finsh but today these: IMG_8241 by Richard Opie, on Flickr Enkei Dish, 13x7 -2 offset. IMG_8248 by Richard Opie, on Flickr They have a heap of clearance for the Wilwoods - they are in great shape as far as bends or kerb damage is concerned but are heavily oxidised. A blast and a polish will sort it... IMG_8251 by Richard Opie, on Flickr I think they're wonderful. Differentiated from the popular Cheviot or Aunger versions with it's raised area around the PCD versus the flat depression the usual Tridens have. IMG_8233 by Richard Opie, on Flickr Next, I'm going to remove the rear bumper. I've bought a tub of T-Bucket bog, will hopefully crack into that this weekend and next week I'll look out for a roll of camo fabric and drop my doorcards into Greg. Thanks for looking.1 point
-
Today, was a good day. To summarise. No barking from the dog. IMG_2329 by Richard Opie, on Flickr No smog. IMG_2343 by Richard Opie, on Flickr Bex cooked a breakfast featuring zero bacon. IMG_2378 by Richard Opie, on Flickr Went to $hort Dog's house, they was watching Yo MTV Raps. IMG_2392 by Richard Opie, on Flickr Rolled a seven, seven-eleven, seven-eleven and picked up the subsequent cash flow. IMG_2429 by Richard Opie, on Flickr Took another sip of the potion and hit the four-trumpet motion. IMG_2487 by Richard Opie, on Flickr No helicopter looking for murder, purchased fat burger at around 2am. IMG_2482 by Richard Opie, on Flickr Today I didn't even have to use my AK - instead we installed a four-age. IMG_2463 by Richard Opie, on Flickr1 point
-
Buying a house and becoming settled in has put a slight halt on progress, but anyway here's a couple of inconsequential additions to the car. With help from a mate, we got a direct line to Hayashi in Japan and ordered a set of center caps - 73mm center bore and 60mm height for any trainspotters out there. Finished off the wheels beautifully! IMG_1481 by Richard Opie, on Flickr IMG_1494 by Richard Opie, on Flickr Then I obtained a nametag for the car. Surprised it was still available, yeah I know they cost obscene amounts that can be used for actual useful/cool things but fuck it. IMG_1460 by Richard Opie, on Flickr IMG_1503 by Richard Opie, on Flickr Lastly, a bit of a keepsake from Hayashi, a 15x10" Street CR in 1:5 scale form, meaning it measures 3x2"... complete in a scale carton, with a scale Hayashi sticker to boot! IMG_1520 by Richard Opie, on Flickr Thanks for being nosy! I promise next update will incorporate some proper progress.1 point
-
Hard on the heels of the 175/50/13 failure, I bought a set of 175/60/13 Yokohama A539. Now order is restored, and (I think) it looks really good. Plan is to add a TRD style hatch spoiler, I think it should have a proper little Japanese street hooner vibe about it! IMG_6862 by Richard Opie, on Flickr IMG_6868 by Richard Opie, on Flickr Much more snug in the guards, closed up the guard gap. Added some camber to the front end and clearance is plenty! IMG_6874 by Richard Opie, on Flickr IMG_6877 by Richard Opie, on Flickr Hoonable. Thanks for looking!1 point
-
Painted the wheels, fitted the tyres and to be fair it looks awful. Fronts too wide, tyres too small, ride too high. Nothing looks right about it at all. IMG_6858 by Richard Opie, on Flickr IMG_6848 by Richard Opie, on Flickr IMG_6838 by Richard Opie, on Flickr1 point
-
Ok so over the week, the stubs received the tick from the NDT guys (recommend X-Ray Laboratories on Leonard Rd, Penrose for this kind of work if you need it, very fast turnaround and a good price) and then I ambled across to Clint and received a frowny cert-man approval for them after examination and photos. So, then they got painted in gloss black and reunited with their shocks. I didn't take any pictures of that finished article because I was pretty excited and impatient to put them in the car. So here's this. IMG_3138 by Richard Opie, on Flickr IMG_3160 by Richard Opie, on Flickr IMG_3170 by Richard Opie, on Flickr Oh and the Streets are now polished and with Levi for a dab of paint between the spokes and on the inner barrels. Plenty of room in a single piece 13" wheel vs the 3 piece for the brakes too. IMG_3205 by Richard Opie, on Flickr IMG_3218 by Richard Opie, on Flickr Cheers for having a nosy, if you want to discuss anything the link is below!1 point
-
It is assembled, new brake hardlines made up. All that's left are brake pads and the clips to hold the flexible lines in place. IMG_1855 by Richard Opie, on Flickr IMG_1878 by Richard Opie, on Flickr IMG_1863 by Richard Opie, on Flickr That, my friends is the exercise in doing things the hard way. But pretty stoked it's sussed. IMG_1900 by Richard Opie, on Flickr IMG_1910 by Richard Opie, on Flickr Had some of the fasteners and suchlike for the ITB's plated in the last batch I had done, so I thought it would be rude not to pop all the bits on the motor for a little bit of motivation. It's not going to take too much effort to get this thing clean enough to eat off, that's a couple of jobs down the list at this stage though! Thanks for looking1 point


This leaderboard is set to Auckland/GMT+12:00