
Leaderboard


Popular Content
Showing content with the highest reputation on 04/24/16 in all areas
-
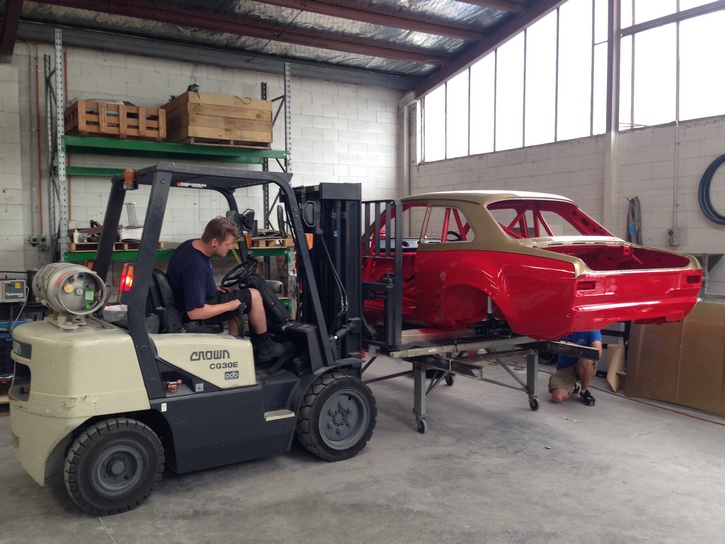
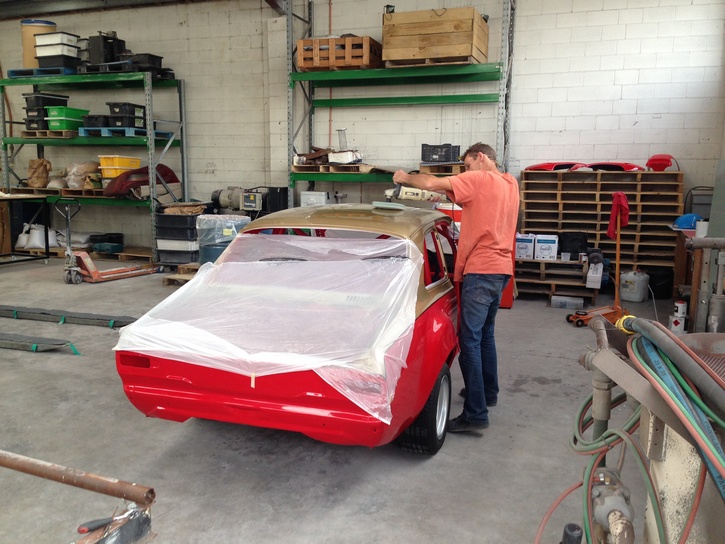
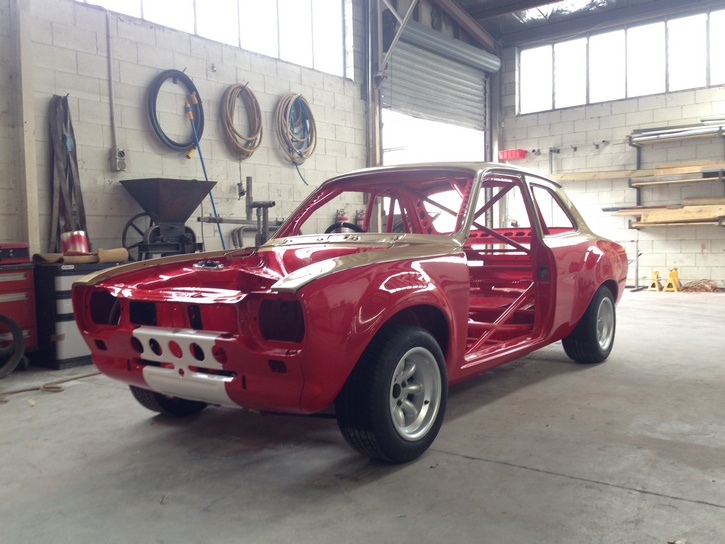
today i was woken up at 6.30 and i couldn't go back to sleep so i got stuck into this early. lots of this, 2016-04-23_08-49-05 by sheepers, on Flickr resulted in me getting the motor and box out and pulling the box apart. i think i might have found the problem. 2016-04-23_12-32-38 by sheepers, on Flickr 2016-04-23_12-32-46 by sheepers, on Flickr 2016-04-23_12-33-02 by sheepers, on Flickr11 points
-
Got a bunch of photos coming up soon.10 points
-
today i did a bit of stuffing about. nothing major just lots of little bits. so this car now features, a throttle pedal sun visors a rear view mirror with a switch dealio for night time driving arm rests actually connected to the doors fully functioning brakes (still have air in them i think but they work super duper) non fucked indicator, windscreen wiper and light switch stalk things that aren't covered in paint a new steering wheel (the "twin cam turbo" one i had on my blue car ages ago) a horn that works probably some other thing I've forgotten. and then i drove it around a bit. it goes exactly like a normal car that you get in and drive about without any hassle, i would happily drive it to Wellington tomorrow and I'm 100% sure it would make the trip without raising a sweat. i have no idea what a 2TG is supposed to go like I've never driven any others but this one seems to go OK. I'm going to ask Mike to take it for a hoon and see what he thinks. 2016-04-23_10-24-23 by sheepers, on Flickr8 points
-
7 points
-
Another great meet. Thanks everyone, keep up the good work! Pics7 points
-
I made some progress on getting this back on the the ground, and a little closer to it as well. I got the leaves reset 2 inches lower by an onery old codger out in Glen Eden (deepest west Auckland) who cooks them in a diesel fired forge in a corrugated iron shed out the back of his house. Top stuff. about 3 days later i picked them up and i also needed a couple of shackle bushes as they were shagged out. Luckily these take 125 (and Fiat Dino) sized bushes so they are easy to find. I also got the wee handbrake shoes relined and new hard lines made up for the diff as well, and a new diff pinion nut, pinion seal, and axle seals. I was a bit worried about the new pinion nut messing up the bearing preload as it was a different depth and new nylon (the old one i could turn off by hand so i dind trust it was in the right place when i removed it either) but i figured so long as the diff felt right and i didnt exceed 200ft/lb doing it up i wouldnt further crush the crush washer and it would be ok. Fingies crossed i guess! Shiney! Anyway, spent the day connecting stuff up and etc and finally got it back on the ground to see where we ended up Pretty happy with that!6 points
-
Pushrods arrived and looks like I did the maths right... Chucked them in some solvent for a clean and soaked the new lifters in clean oil... And gave rockers and polylocks a clean too, I wasn't sure I had to do this but didn't know if they had a grease coat or not, certainly a lot of crud came off... And once blown out and dried I gave them a coating of fresh oil and all ready to go in. Would have done it this arvo but wife has gone to netball so I'm doing family duties. Heads are all torqued up and next step is installing rockers and setting valve lash... Might get some time tomorrow, we'll see how things go...6 points
-
A bit more progress on this. Got some tyres fitted to the TURBO's Got a jockey wheel, fitted the doors and tore off the old purple and ripped tints Picked up a sweet matching Cruiser at the op shop in Taupo, and retinted the windows Made a bad ass friend Need some proper shank nuts for the rims and some number plate lights and a bit of a wiring tidy up and its good to go to see my friendly WoF man, then Van-cessories6 points
-
Coming to a caffeine and classics near you (if you live in Auckand..)6 points
-
So it turns out I'm not very good at keeping project threads up to date. Or using reliable image hosts (facebook? What was I thinking?!). Also can't seem to find the edit button, so the above posts will have to stay as-is for now. I'll try and give a bit of info on the direction the little KP has taken over the past 14 months. May well have missed out some major bits, so please comment in discussion thread if I've missed anything vital! Plenty of stumbling blocks in what I naively assumed would be a reasonably easy project, so hopefully some good points come out that will be useful for others. Bear in mind my only real previous projects were stripping a Saxo for track days and modifying my MR2 with new seats, chopped springs and banded steels... SO! Yes, got some Work Equip 01's from Beaver Shod them in rubber and got them bolted on. Arch gap present to an alarming degree, but this was imminently pre-nats '15 and I owned a socket set and some screwdrivers. Plus I was a little busy trying to get some shonky twin 40 DHLA Dell'ortos running. Had never tuned a carb in my life at this point. Eventually gave up on the rubbish linkage and bought a nice Mangoletsi one from Europe which helped balancing and throttle travel adjustment immensely. Seriously recommend these. Miracle of miracles, I got the car running pretty nicely on the crabs. New exhaust had turned up the previous day and didn't need to change the tune too much. Would cold start okay, idle happily, keep a sensible temp (I think, lol Toyota gauges) and over my (whole) 30 minute test drive was happy throughout the rev range and emitted plenty of doorts. Oh, this was the night before Nats, sweet. Nats started wonderfully, did a 4 hour burn up to Taupo after work the night before, stayed the night there, then set off for a further 4 hours to Coromandel the following morning. Cold starting an over-carbed 4k with a loud exhaust in a motel car park at 6am is a fun game. Got stuck behind a boat trailer on the wiggly Coromandel coastal road for about 40 minutes, meant a lot of partial throttle compared with the all-or-nothing it had been getting up to that point, and that's when I noticed something wasn't right. A bit of hesitancy coming out of corners, a little coughing. Quickly developed to a bigger problem... Plugs were coked to hell. I knew it was rich (safe, bruh), so cleaned them up and set off again. Better, but quickly buggered itself again. Noticed fuel pouring out of the rear carb, forming nice little fuelly waterfalls from the trumpets. Damn. Pulled the carb apart at Beaver's parents place, looked to be a float issue, the pivot for the float had broken and been bodged with a bit of wire at some point. Had worked for a while but the pissing fuel was almost certainly down to that. Abandoned the KP there, it would get shipped back thanks to AA plus (win), and I'd have a fun nats tagging along with Sparkle and Goat. When I finally got it home, I swapped the original carb and some fresh plugs on to see if it would run. No luck, barely ran on a couple of cylinders, rough as fuck. Suspect overfuelling on 3 and 4 had washed the bores or something? Oh well. Was thinking of getting a 5k anyway. 5ks were about $500 at this point for a runner. Not bad. Could rebuild carbs (arguably better suited to a 1.5 than a 1.3 anyway) and swap them over to the BIG BLOCK. Bought one! Oops. Looks like it needs a decat too. Mate back home made me a keyring to celebrate this new direction: Dragged the little green paperweight to Goat's workshop, and things started happening. Massive shout-out to Goat at this point, couldn't have gone any further with the car without his help. There are definite downsides to moving to a new country and not knowing anyone, but one of the major upsides is meeting ultimate GCs that are willing to help out at any point. 4k took about 15 nanoseconds to remove. Pulled off the 4age loom and sent it to that chap on trademe what chops wires. Meanwhile, fitted the SQ engineering waterline and dizzy relocation kits to get things more latitudinal than longitudinal. Lovely quality kits with pimp CNC, nice fittings etc. Shame its all covered up by 20 year old plastics but whatev's. I'd also picked up an A-series bellhousing pattern k50 gearbox to fit the 4age. Transferred the shifter and tailhousing from the starlet k50 so it'd line up with gbox mount, prop, gearstick hole etc. Handy. Got the engine and box sitting in the bay on trademe-special mounts (damn it Jim, I'm a vet, not a fabricator) but ran into a slight snag. The capped off dizzy mount was interfering with the firewall and the heater matrix pipes. Modified the mounting points and moved the engine forward 20mm, and got one of the heater matrix pipes brazed on a little further outboard, and this just about sorted it. Still tight, but no longer interference fit. Obviously this also changed the position of the gearbox, but that would be a problem for another day. Noticed at this point that the clutch cable locator on the gearbox had been chopped off by some enterprising dick somewhere along the line. Ballz. Was having second thoughts about using a k50 behind the XTREME POWER 9000 of the blacktop at this point anyway. Suppose a bracket wouldn't be too hard to fab. Oops^2. T50 is about the same length as a k50, handy. Also came with a beefier and longer corolla prop. The KP prop was too short, (we moved the engine forward 20mm, remember), so I had the corolla prop shortened and balanced to fit. While I was at the engineers shop I had them braze a second, wider pipe into the fuel tank pickup. Now using the wide one as the feed to my Carter low pressure lift pump. This sends the fuel forward through 8mm aluminium lines I routed alongside the 6mm factory ones. When it gets to the engine bay it deposits it into an Ali-Express-Special surge tank with an integrated Bosch 044 that supplies the fuel rail. Return from the surge tank runs through the narrower diameter factory fuel lines and back into the tank through the original (narrow) pickup. Seems to work quite well! Hopefully not all too noisy when the exhaust is on, we'll see. Starting to look pretty good in there now I reckon. One of the big differences between T50 and K50 boxes is the T50 is hydraulic clutch rather than cable. Came at this from a few angles; ended up buying an ae86 master and slave cylinder, as well as some nice braided clutch line, but didn't want to bugger around with the pedalbox too much. A lot of the modified ones out there looked a bit compromised, with big flex forces on the pedal where bits of steel bar had been tacked on to get it actuating the MC. Bought a pedalbox from an EG civic for super cheapz on trademe and the separate clutch pedal actually looks like a promising alternative. The other route seemed to be to fit a Wilwood pedalbox or similar, like Snoozin' is doing for his. Pimp, but didn't want to rush down that route just yet. I'm 6'2" and was worried that a floor mount pedalbox would sit closer to the drivers seat than the factory one, and I already struggle to get my gangly legs wedged in. Hmm. At this point, Nats '16 happened, shotgunned my way around for a stress-free time this year. Found a clone in Horopito, poor thing. Was having a chat with Beaver, Manu, Goat, Ned and Cam, and one of them suggested a cable fork conversion kit from a company in Ireland. Ideal! Some googling revealed that FLOS.IE was the company that did them. GCs to deal with and did me a discount for sending a k50 donor fork for them to molest into one of these: Got myself a Christmas present, an N2 style aluminium rear wing. Nicely modelled here by a goat majestically sunning itself in it's natural habitat: Flippity flip I hate wiring. Spent ages trying to work out why engine was turning over but not firing. Had spark but no injector pulse. Finally found this absolute treasure trove of 4age wiring goodness. Had to re-wire my fuel cutoff relay circuits to incorporate the ECU starter trigger like so: et voila! Much relief. A bit of rust to sort in the heater channel, so loom came back out for now (also to solder and wrap properly, rather than the twist-and-tapes that you can see in the video...) Gave the exhaust bits and bobs a tidy up. It's a 20v manifold (not sure what make, but the bolt spacing is 20v specific), and my original 2" system. What now? Oh yeah, lows. Got some other bling from T3, these are just lovely. Fitted up well (though they sent the wrong bolts with the RCAs). Gave the dust shields and calipers a bit of a spruce before shifting them onto the shiny legs. Have since swapped the brake lines out for some pimp gold (don't judge me) Hel stainless steel braided ones. Don't trust 32 year old brake lines too much, and while it was all apart... No pics unfortunately. As for the rear, figured a good low spring/short travel adjustable damper combo would be the way to go. Integrated shock/coilover units are available, but didn't want to go to the lengths of reinforcing turrets/axle spindle etc, at least not yet. If I eventually go T-series rear end that'll be the time for those fun and games. Seems some people use mk2 escort rear dampers as their short travel shock of choice. With the amount of competition options available for them I thought that'd be a sound choice, so got some GAZ (English company, played with some of their stuff before I came over here) 38-way adjustable shocks for the rear. Should be enough adjustability to get it riding well I hope! Expecting to have to modify the Cobra springs to get them low enough. We'll see. Current ultimate racecar spec as stands: Chassis: Stock kp61 Sprint body T3 adjustable front coilovers Cobra superlow rear springs GAZ adjustable dampers (mk2 escort) Hel braided SS brake lines 13x7 Work Equip 01s A-series to K-series engine mounts Battery relocated to boot. Engine: Stock 4AGE 20v blacktop from a Levin SQ engineering waterline kit SQ engineering Dizzy kit T3 100mm velocity stacks 4-1 20v manifold (unknown brand) with 2" custom exhaust. 1G-GE high torque starter with Niteparts spacer kit Simplified loom Carter Lift pump/engine bay surge tank/Bosch 044 EFI pump setup AE86 radiator Transmission: T50 20-spline FLOS.IE T50 clutch cable conversion kit Exedy 220mm clutch Shortened corolla driveshaft Stock U-code rear end Plans: Sort small rust patches in rain channel Make up gearbox mount Make up driveshaft loop Fit O2 sensor and flanges to exhaust manifold Fit rad and pipes Cert Doorts Other stuff I can't think of right now.5 points
-
Day 3: I think the Minis are starting to become suspicious.5 points
-
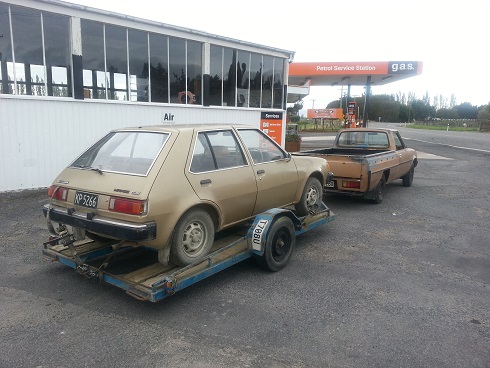
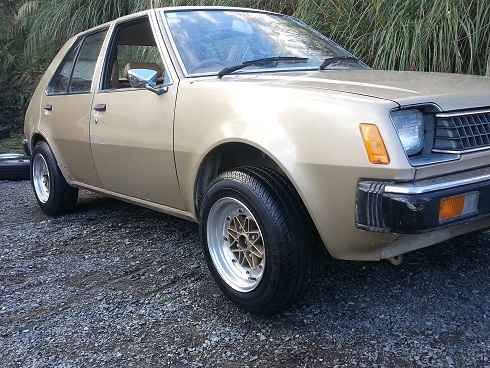
Picked up this little beast cheap off trademe with automatic issues. Turned up to pick it up and it was a lot tidier than it appeared in the pictures. The lady i got it from is the 2nd owner with her mum having bought it new in 1982. Trailer it home and set about flushing the automatic transmission. Old fluid looked nice and burnt so new fluid and filter went it. Started her up and left her to warm up. Came back , jumped in and put her in drive and off she went with no slipping or funny sounds anymore!! Success. The little car went straight through her wof once I replaced the tail light and is now one of my dailies. Also tried on my Equips but they are far too wide at the front. Stick out about an inch and a half. Will upload more photos soon
 4 points
 -
more of this, 2016-04-24_10-11-19 by sheepers, on Flickr resulted in more progress. namely fixing the ever shit handbrake mounting plate. celicas came from the factory with this bit fucked. I've never seen one that wasn't rooted. anywho, i welded some bits of flat bar into the floor to give it some strength and stop the handbrake from coming out of the floor. 2016-04-24_11-26-35 by sheepers, on Flickr 2016-04-24_11-28-28 by sheepers, on Flickr 2016-04-24_01-15-49 by sheepers, on Flickr there was also a massive hole cut in the floor for some reason so i made a panel that i can then attach a boot to to cover it up. 2016-04-24_05-10-57 by sheepers, on Flickr the other things i did today include welding up a small hole in the exhaust, cutting the rear muffler off to see how it sounded (loud, very loud) and changing the oil in the gearbox. yes, i changed the oil in the gearbox. i replaced the air that had previously been used to lubricate the gears with oil which has been a massive step forward in shift feel and quietness. i recommend oil in gearboxes, not air.4 points
-
Took the day off yesterday and missioned it all back together, scraped off the piston tops, changed the oil and filter etc. Started straight away so I got it up to temp then reset all the valve clearances as this needs to be done hot. All was basically fine except for a chuff in the exhaust where I had split it and a bit of a hesitation when accelerating, I thought this might mean the carbs needed a balance, but then I remembered that I had adjusted the points gap when I was troubleshooting the problem. So today I sealed the exhaust and reset the timing, it is good as gold now. Dizzy has one of those sweet knobs to fine tune the timing without having to crack the clamp, which is superior. Should be good for another 100000k now.4 points
-
3 points
-
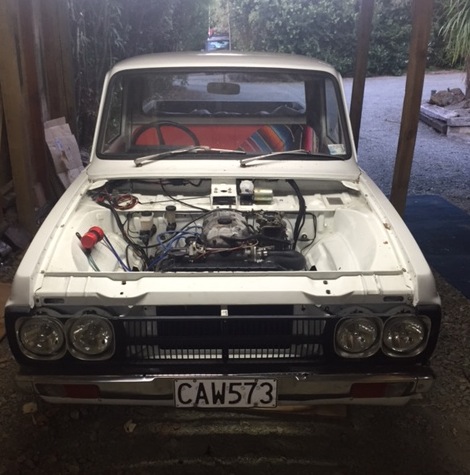
pretty happy, today i got it running with the MA engine and its not smokey, no strange noises from the engine and no strange noise from gearbox/clutch….. success. took it for a small drive around the block but not very far as it needs a fan belt to drive the water pump as the old one won't fit as MA has a different alt set-up and a different water pump pulley. so off to get a belt tomorrow and bolt the bonnet back on then proper test drive
3 points
-
Went and had a gander at this and put a deposit on it about a month ago, and finally organised myself to go get it yesterday. Formerly owned by ESKIN8R who i think originally chopped it up and put it together and then Zebra Dude, who got it painted and sorted the draw bar etc. //oldschool.co.nz/index.php?/topic/26688-zebra-dudes-esky-van-trailer/ (photos are down) I knew i was in the right place! (you will know their works by the trail of bodies) Needed the lights wiring up, + some beers and Ben didnt finish till 6, so by the time it was ready to roll it was pretty late! Ran the gauntlet no troubles at all, and tows well, will go even better with some weight in it. I also managed to convince Ben to through in some schwweeeet rims. In case you are not a wheel aficiondo, they are * 13 x 6JJ * CHEVIOT * TURBO * Anyway today started getting into it, cut down the roofies from the van ( ) hung a gas bottle from a handy attachment and pondered on how to cram a LWB sized vans worth of camping stuff into half an Escort... Solution - Make the small thing bigger with Extentions! Roll * 13 x 6JJ * CHEVIOT * TURBO * to entice only the hottest classiest babes into the stabbin cabin. Need to buy some hardware to mount the doors then start thinking about the interior. Its basically going to be a bedroom for the boy + bathroom and kitchen that I can tow with the 2300, 125 or my daily2 points
-
So after my bust on the 180sx wiper motor I did a bit more research and found that majority of Datsuns of similar vintage shared (or 95%) the same wiper motor. There are some Honda ones you can use and various other things but mint16 on NZ Datsun had some 510 motors for sale so I contacted him and picked up two of those. You can see they're almost identical except the centre linkage shaft is longer on the Hakosuka one. I took apart/cut the plugs off and ran some quick bench testing. With old cars it's always better to have more spares than less and it's a good thing too as one of the motors was not as good as the other. One was better than my current one though so I used the not so good one as a sacrifice so I could take it apart without concern and learn about how it all works. What I learnt initially was how much of a huge pain in the ass these bushes can be, and how much of an idiot they make you feel like.. that is until you work out/research how to get them to stay in their sprung houses. Then you feel like an even bigger idiot, albeit an enlightened one. This motor (which was the best of the lot) looked like it had some moisture inside it sometime in the past. Nonetheless it worked OK so after giving it a little clean up I re-used that part. My main quandry was how to get the linkage shaft out and move it from the hako motor to the 510 one. I tried for ages to remove a washer on the outside to pull it out but then thought I'd see if it were possible to remove it from the inside, jackpot! Once this cover is removed you're faced with this. Pretty straight forward system. Simply remove that nut, couple of washers and the park position thing and a circlip then you can see this. Just lightly knock out the centre shaft and it pops out the other side. Easily enough to reverse the procedure with the hako shaft. Better look at the size difference. Bigger is better huehuehuehue Taking the advice of many, I also tried to lube up this linkage area. I couldn't for the life of me get the washer clip thing off the top but it was quite stiff to move around. I did clean it up and gunked it as best as possible and it definitely made it move more freely. So after putting it all back together it's not a major improvement but definitely an improvement. Also for some reason the park no longer works despite wiring being the same, the motor just seems to run continually so perhaps something isn't quite exactly the same. Anyway, don't need that so I've not plugged that in for now. I think definitely for a proper decent upgrade the Honda motor could be the way to go, but I learnt a bunch from this so I consider it a win win. I also learnt that I need a new battery and a trickle charger.2 points
-
Also, flickr album for those who like it sharpppp https://www.flickr.com/photos/92011807@N03/?2 points
-
im fucked if i know how they did that. TBH if they hadn't they would have gotten away so I'm happy as larry that they did that. as I've been working on the car I've noticed a few other things that have been damaged so ill add them to the list. nothing major but i aint gonna be footing the bill for it. its a good feeling to know that the scum that stole it will be paying for it all, maybe 10$ a week out of their dole for the next zillion years but i don't care. the insurance company will never give up taking money from them until they have paid. lol.2 points
-
All the way though this project I've been conscious of being overwhelmed with the size of the task at hand, attacking one mini project at a time, ticking them off, moving on to the next one. Looking though my photobucket the other day I noticed how few of the photos actually look anything like a car, just red,brown, grey metal shapes, every now and then it's great for the motivation to mock up a few panels, sit back with a beer and bong, and picture the day it's all back together and rolling the streets again. photoshop is also great for this. hell yeah.2 points
-
Yeah, not wrong about the joy factor - it's a sweet drive!1 point
-
yeah lush photos, looks good with the wet tbh. nice lineup with you cam and alistair, Ed. Is that dave sentras 626?1 point
-
ol dry one in the box sheepers eh1 point
-
Got the car started today. My friend has the first start video so will post when I have that off him. All that's left to do is: Bleed clutch and brakes Hook up one final coolant hose I forgot to do Wire in electric fan I'm planning to drive it home tomorrow, will try get some videos of it driving.1 point
-
Both are home bud. 7 is stored safely waiting for something to happen but no one including me knows what yet. 2 is happily on the road - took the first drive on the road last week for a shakedown and happy to say nothing fell off! Also managed to get out to caffeine and classics today to enjoy the heavy rain and low turn out1 point
-
Old melty Opie. It was pretty rainy. Good half hour towards the end where it was sweet1 point
-
Rain rain go away. Il go again some other day1 point
-
8:45am at yours?1 point
-
LOL, at 47 you're not supposed to agree with me!1 point
-
Well team In taking it up to the Alps for the weekend with felixx junior Pics to come1 point
-
Make sure you double wrap ur dong it's Hamilton1 point
-
Considering I live only 5 minutes’ drive away in Milford I've got no excuse not to turn up for a look. (Sadly only in Mrs sr2's modern 'Mazdabator'). Until now I've never been brave enough to throw aside any concerns I have re personal safety and actually meet a group of psychotic Oldschool members en-masse. (I did however meet SOHC and it only confirmed my worst suspicions). Look out for a stunningly handsome old bald prick, wearing plastic sandals with socks, a raincoat with the bottoms cut out of the pockets dribbling out of the corner of his mouth because there's a girl's school next door to Smales Farm! (If I'm being pursued by two gentlemen wearing white dust coats carrying a strait jacket I've never seen them before in my life). Cheers, Simon (sr2)1 point
-
also because i have no idea how to plan anything i bought these flares. $_57-2 by sheepers, on Flickr $_57 by sheepers, on Flickr1 point
-
Lapped the valves in last night;1 point
-
Mow-one knows.1 point
-
I got my injector test rig up and running. Interesting results from an initial muck around. Running at 12v and ~71psi Method: Run the injector for 6000 events at 6ms. Then run it for 12000 events at 3ms Then 24,000 events at 1.5ms spray, etc etc rinse repeat. If the injector flowed 100% perfectly with no deadtime, it would fill the container to the same level each time. But it doesnt because of injector dead time and non linearity at low openings. The only thing I could find to measure with is a rainfall gauge, so my units are in mm rainfall per square meter. Dont judge me Looks like the injector is probably reasonably linear until down to ~3.9ms, so I'll get some more data points around this region so then doing some conversions and blah blah, the line on this graph, where it crosses to zero shows you what the deadtime is for the linear flow section of the injector (large openings) So just under 1ms deadtime, the value currently in my ECU was 0.79ms so 20% inaccurate. What is interesting though is that my injector wont flow anything at all when running at 1.5ms 2ms is fine though, so at some point in between is where it just stops flowing at all. So again, currently the settings in the ECU currently are way wrong. Currently if my car tried to idle or crank at 1.5ms, the ECU would try to run at this setting and it wouldnt get any fuel. My short pulse width adder table (which is supposed to compensate for this) is prepopulated with some values but they're junk too. I promise I will buy a decent graduated cylinder so I can get some accurate measurements in some better units than mm rainfall hahaha. There's a big difference though that's easy to see though, at 9ms the tube fills it right to the top, at 2m/s it will only be a quarter full. Looking through some logs my car idles on the primary injectors at somewhere just under or over 2ms, so it's right in the shit spot. No wonder it's been hard to get the fuel right there. I reckon once I pick a fuel pressure that I want to run, and run this same procedure at varying voltages. The autotune, temp compensations, idle, closed loop etc etc will all work way better.1 point
-
i have a 65 year old wiper motor thats never been touched in my minor. so dont discredit it just because its got a few years1 point
-
HOW TO: TRD spec your beams oil pan Back in the day, TRD made a bunch of parts for the beams engine but they're mostly discontinued. Which is no real loss as they all cost zillions so no one bought them. One product that they made though is a TRD oil pan, which was essentially mildly modified standard one. So here's what they did (Thanks to CelicaRA45 for the info) Step 1: Lower the oil pickup deeper in the pan with a spacer. (4mm thick from memory) You need a 2nd spacer of same thickness for the brace on the pickup obviously. (NOTE: Not reccomended mod if you think you're likely to smash your pan into the ground, removed mine ages ago for this reason) Step 2: The front left corner of the sump, for some reason, has a section where under hard braking the oil can flow back out the top of the oil pan: Soooo bash the bejesus out of this, to seal the gap like so: Step 3: The other place where oil can flow up out of the pan, is the dip stick hole. So you want to fit a pipe that extends down into the pan pretty much to the bottom (just need to leave enough gap so that oil can reach its level when the car is stationary) and then extend the pipe upwards as far as it can go without hitting the underside of the alloy part of the sump. Cant remember exact measurements for this but it's pretty self explanatory Step 4: Clean the heck out of everything so there's no oil at all. Then, with some Toyota Seal packing Black run a bead around the perimeter of the pan to fill any small gaps, then give it a smear down into the gap so that it fills up any potential leaks. I mention Toyota Seal Packing Black in particular, because it's Wizard Magic stuff. Expensive - But awesome. If you're gonna use some other gunk then dont bother with this step. It's money well spent for the comfort of knowing that my sump isnt going to leak... ever. That's it! Reassemble it all and enjoy some high G cornering without blowing your shit up. Still need to make a bash gaurd, but I'm at least back in action as soon as I bother buying some oil and topping it back up.1 point
-
Just before leaving taupo I bashed the front of my car into the ground (again) Drove home okay, but figure it's time to sort this out properly. Pulled the sump off, looks pretty bad... AND THEN WHAT THE FUCK IS A SCREW DRIVER DOING IN MY SUMP?! Couldnt believe my eyes when I saw that, must have been there for a long time So perhaps I've fixed an engine rattle as well... I've got a spare oil pan to fit, big thanks to Pe-arce foe this. But I'm hesitant to do so without coming up with a better way of protecting it, I certainly dont want to do the same thing again. I'm thinking some slightly harder springs up front will help. Raise ride height a little and reduce travel a little. Then come up with some sort of bash gaurd.1 point
-
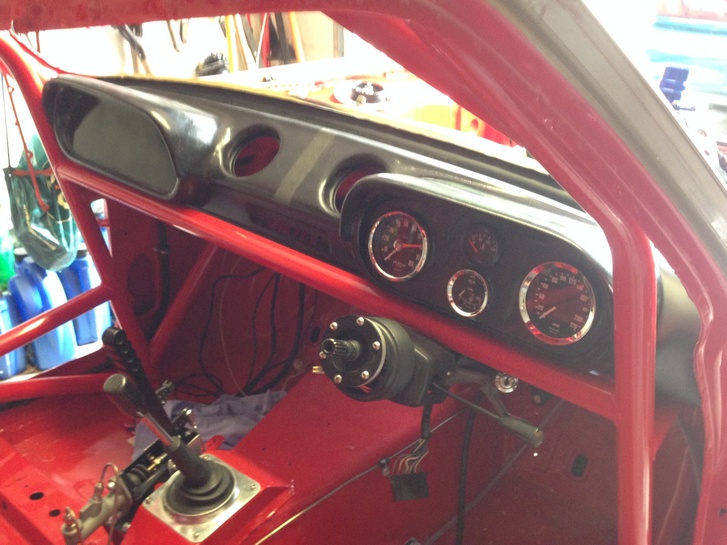
Finally Splashed out and bought my Smiths Gauge Cluster Marking it out to replicate a works style dash Smiths Water temp is still on its way will swap out the VDO for Smiths one shortly Now time to wire it all up
1 point
-
Slowly chipping away at this. Drive shaft now made. Engine bay almost ready to paint. got a pair of seats, will get them re-covered sometime.
1 point
-
I might have a problem..... clearly not enough BMW's1 point
-
I finally moved the last of the parts into my shed, mostly engine blocks and heads, 3 engines worth...! These I got off the truck by the sparta method, now they sit in the dirt amongst a pile of kindling that was a pallet lol. The engine design is interesting, a lot of metal and sod all cylinder; Rockers; Looks kindof like a dohc; Big ass exhaust ports, apparently the head was tweaked by Harry Westlake; But weird ass semi siamesed intake ports; IT"S A HEMI MOTHERFUCKER1 point
-
Diff , Suspension and Steering all back in Almost time to go down on all four Bit of a buff up
1 point
-
So the steering ram started getting flaky again, plus as discussed previously the thing was banging like a $5 whore, so i thought I would sort that shit out once and for all. Basically the pin that stops the joint rotating inside the ram needed a serious upgrade. I reckoned this could all happen without removing the ram from the car, so I jacked it up and went to work; All dissasembled. That hole is where the pin goes, but it normally fits from the inside. I drilled it out to 8mm so i could fit the pin from the outside and replace it easily should it go to pot again. To that end I made this; That looks the shit to me. I started to reassemble it all and at this point fucked up quite badly by somehow getting the two ball bearings stuck inside the joint in the wrong place. It was full of grease and the little fuckers did not want to come out. So I then had to remove the ram which I did rapidly and in a quiet rage. It did make the fitting up a lot easier once I got the balls out; If it gets loose again I can replace it with everything in place. So that done I chucked it all back together. It feels good now, much more direct and the power steering is not quite as light as before which is an improvement. Its all good. The old girl easily keeps up in open road traffic, and hustles along surprisingly well in the twisties once you get used to the feel of it. I passed my neighbour in his new Singer Vogue at serious speed the other day on the way back from the beach, it was fast enough for my wife to be yelling at me, so probably around 125km/h lol.1 point
-
Hi people, I would like to title this post: The success of rubber and the failure of man. Last trackday at Taupo - I only got a handful of laps and managed a 1:56 which is a new personal best! So I knew the car had some more time in it with a bit more practice. This thursday just gone, I gave it another attempt. With some better lines, I managed to scrub a whole extra second off my time, I was super chuffed with that! One of the differences to last time though, is more negative camber in the front (going from 0, to -2 degrees) So the car was feeling great, the initial turn in was superb. I was feeling suuper confident, doing some kamakaze runs into the sweeper which I overcooked a few times trying to brake too late... And then for the first time at a trackday this happened... Woops! I had a huge lockup, and flat spotted my front left tire down past the tread level. It felt like I was driving on a cube, not ideal. So off I go to the local tire shop. "Hi, do you have any 205/50/15?" "Sorry dont stock these" "wtf? Shit." "Try the place around the corner" Off to the second place, same answer... nothing in stock.... shit shit shit. until... "Oh, I've got some second hand semi slicks though" "Go on" "Two R888s for $60 fitted" "Done deal!!" Frigging amazing! So I get them fitted on the front wheels, then smug face back to the track. After running out of people to smugface to while telling my story, head back out... Very mindful that I'd have a lot more grip up front but still the same out back... So I wound out a bunch of the rear bias. Out on track... Holy shit! Sector times keep tumbling and tumbling, GPS is showing going faster and faster through sectors. Life is good I had a few... err.... incidents while getting used to the different grip level Getting more confident on the brakes... Sector times dropping like crazy... And theeeennnn.... Smoke coming from the front left, brake fluid smell and a knocking noise... shit I hope this isnt the wheel hitting the caliper or something. Back to the pits... I take the wheel off, and all is well. What made that noise and smoke then? Oh... Oh fffs. GNNARRRRR! My first experience with semis, over in about an hour because I noobed the braking again. All smugness instantly erased from my face haha. My fastest lap was only 0.2 seconds quicker than road tires, because it was hard to string a whole lap together without having the rear of the car come loose with the grip imbalance. Regardless, I was absolutely fizzing about how well the car ran. The 8000+ rpm rev limit now has just brought the car alive. I called it a day, and headed back down to the tire shop with my tail between my legs. Feeling like an absolute noob for wrecking the tires they fitted about an hour ago. "So, ahhh... I wrecked one of the tires, my bad. Do you have anything like a 195 or 185 that I could get home on? Just a normal road tire" "Yeah I think we've got some 185s here, same deal as before... $60 fitted" "done deal!" While he was taking the semis off, he said "Oh yep, this one is flat spotted pretty bad! Leave this one with me, and take one of these others so you've still got a good pair" Holy crap, could an experience with a tire shop possibly get any better? So with my car amazingly intact, and a decent pair of second hand R888s in the boot. I head off for another 2 days of tootling around the central North Island, as pictured below. Smashed through a few tanks of gas, with the engine running like an absolute dream. Ran 90% of the time with cruise control on, and enjoyed the scenery. I made it back to Auckland in one peice with no major issues. Best trackday experience ever! Big thanks to Tom / Testament for helping me out over the weekend.1 point
-
After 3 months of shipping and customs etc..it is finally here...! First mod, Modgies and Eagers Not sure they will stay on but they were spare and I had nothing better to do1 point
-
You mean like ?????? Because that would be RACIST1 point
-
Tunnel's all done. got the sedan back home now to get the drive shaft made up then can go back for exhaust.1 point


This leaderboard is set to Auckland/GMT+12:00