
Leaderboard


Popular Content
Showing content with the highest reputation on 12/09/15 in all areas
-
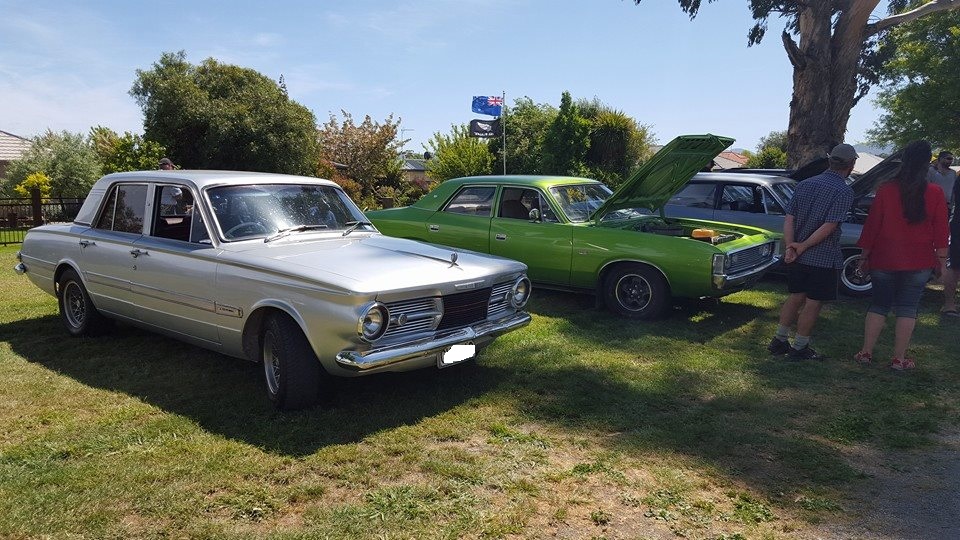
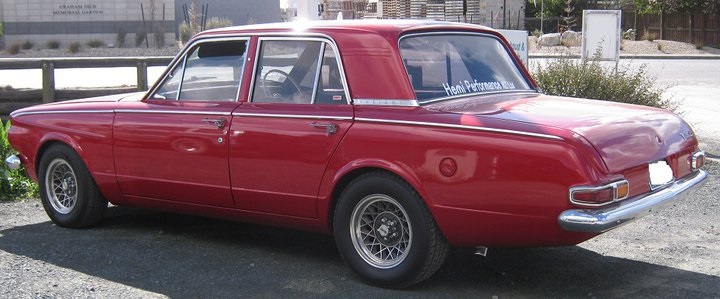
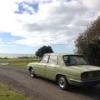
my 1965 AP6 Regal at the last Mopars in the South gathering - Blenheim - owned it for 10 years now, needs work but don't want it off the road got another AP6 shell as back up if body swap required but im greedy and I want to V8 the spare The Red one was the 1964 AP5 - 318 I used to have. VC Wagon on the trolley getting glass blasted after panel work
 13 points
 -
8 points
-
bit of bog and we're good. well, its not finished yet but its pretty close, just got the sides to finish off yet but the top is all done. 2015-12-08_08-14-01 by sheepers, on Flickr 2015-12-08_08-14-10 by sheepers, on Flickr 2015-12-08_08-14-21 by sheepers, on Flickr6 points
-
long night was long. 2015-12-09_09-10-54 by sheepers, on Flickr not prefect yet but its getting there. i reckon ill block this back with 180 and then maybe 1 more coat of primer.5 points
-
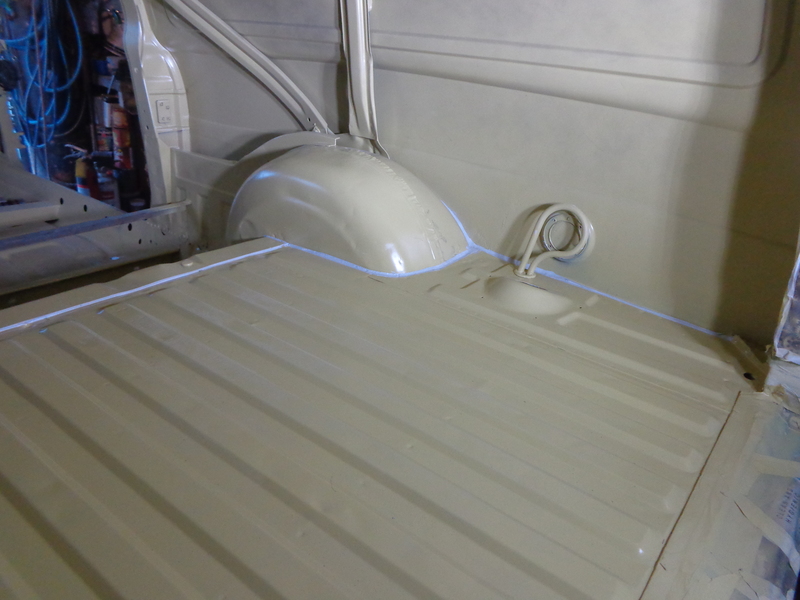
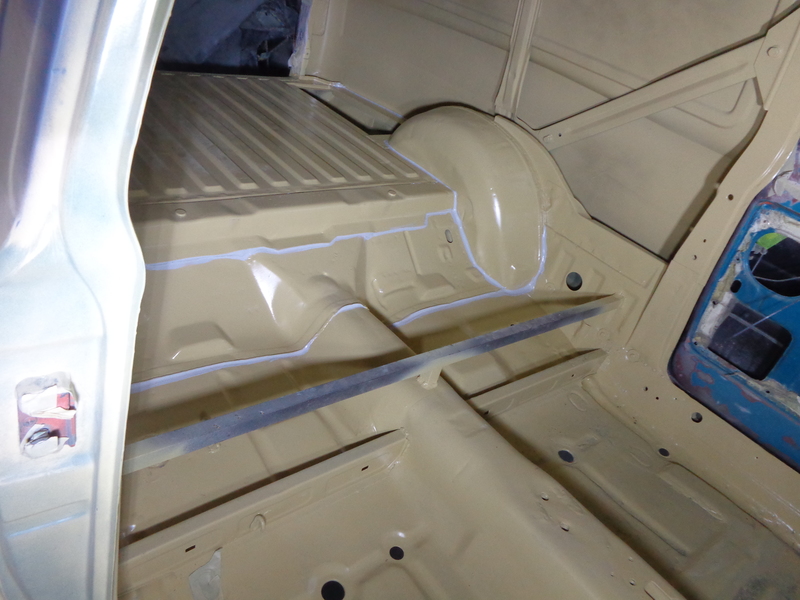
Threw down some seam sealer, glued the floor to the sides (Yes this is how it was done in the factory) and also put some on the under side of the rear flares/lip. Shit job to get under there and do it, especially with the diff still in. If the clear 2k sealer I sprayed throughout the van last week didnt get it, this seam sealer sure will.
5 points
-
Couple more pics, need to tighten the seat up a bit Also, credit due to Polecat for a very last minute "can you build this stainless thingy" with crap drawings on paper and little notice, cheers!5 points
-
I finally found some time to make some bench seats and get it all home. We had 20 people sitting at it for lunch on Saturday. It was awesome5 points
-
I bought all three bicycles. MJF you can have them for what I paid, I only grabbed them all to save them.4 points
-
Pretty much done, went for a blast around the carpark at work, it's a weird sensation... nothing ... nothing... moving ... woah hang on!4 points
-
Bit of progress made this arvo! First tip, remove the plastic bungs in the inlet if you want them not to melt in the oven. Engine bay coming together nicely. Before and after pics to show.3 points
-
Arse end needs to be raised a bit and going to have to modify the tension strut kit in the front some more to pull the wheels forward in the arch then trim the arch to clear the wheels. Otherwise fronts will have to go back to 9s. \ \ \3 points
-
clad the alloy enclosure in tweed with suitcase corners and roll picnic blanket round fuel tank?3 points
-
Bit the bullet and cut off the neck tube. It was the wrong diameter, I was gonna sleeve it and use different sized bearings but after measuring it I found the ID was quite elliptical. So decided to make a jig to do it all properly. Getting a new neck tube lathed up out of some hollow bar. Got some alloy spacers the right diameter to hold the neck tube square on some threaded rod. Will be fully adjustable as I doubt this is the last bike I'll build. When completed the jig will be available to borrow by anyone who's not a dick3 points
-
Made it out of the garage, under its own steam, no less. Many thanks to me ol' m8 Nathan who gave me a hand and forum user 666DAN for helping me swap slave cylinder and forum user AllTorque for taking time to give me his assurance i had set up clutch master cylinder correctly, and give me his condolences for owning a British car. and OS gc's who suggested the clutch would be seized, Yall were bang on. Drove it to the gas station, pumped tyres up, drove home. It was magical I need some pictures of the car when it's not just sitting in my driveway...3 points
-
A while ago I picked this POS up from PStar The reminants of a 1952 Rudge Sports, which had clearly been residing in a scrap heap for a while I even had people chasing me down the street to insult my new purchase Perfect I stripped off what remained of the accessories A front guard, basket mount, bell bracket, and a broken front brake - I wont be needing those Installed Cork grips Vintage brooks saddle and seatpost replaced bottom bracket spindle Hammered bent stem into shape filed out the drop outs for new track wheelset sakae cranks and toe clips Now it looks like this 2 points
-
link : //oldschool.co.nz/index.php?/topic/51101-ap6chick-1965-ap6/ WICKED!!!!!!!!!!!!!!!! ive seen photos of your wagon on the mopars in the south group. keen to see more of the wagon.2 points
-
Yes, these are not in the correct location but they totally ARE in the correct location because you sicko's may not look in the "For Sale" part and I want you to get your eyes on these. I spied two twentys down the scrappies one is pretty rotton one is pretty sweet If you're after something else to do during the xmas break, pick both these up and make one lovely one. PM for deeets I'm not selling em but I'll point you in the right direction.2 points
-
So apparently, two years ago, I was getting this ready for a revin and cert. Well, that moist certainly has not happened, as I do keep changing my mind a tad on how far I want to go with this car. So I have been looking at buying another wagon, as wag nats is coming up in just under two months, and I need something And then, Like a bat out of hell, old Nathan puts up an Meu engine with factory clutch stuff etc. boom, that's my ticket. So out the 2jz is coming, and in is going a factory engine, so I can atleast attempt the shit out of trying to get a revin, and worry about cert on an engine and slam etc at a later time. So the plan, get car to my lock up, remove front, bumper, rad support etc remove 2jz, carefully remove and label wiring, remove 2jz bell housing, fit m motor stealing a bunch of shit off my crown sedan (is going to be my saving grace) jack it back up to factory, and attempt a revin at the very start of next year. I have a fuck load to do in reality So I'm planning on getting wagon down to garage before Monday next week (going camping this weekend) start on above list, picking up engine on sunday the 20th, so should give me a bit of time to get it in there, get an exhaust sorted out etc. I would like to have the car ready for engine fit by the 20th if possible, including having the suspention jacked to shit again. Just reminded me, I need to find some factory wheels or tires....... Anyway, so that's whats happening heres some silly pics from last time I abused this thing2 points
-
So this turned up at work today; I rang the dude who owns it a couple of days ago because of this; There is a complete parts car plus basically another cars worth of parts, engine tranny etc. The dude selling it wanted a bit much money (for what I actually need right now) even though it is maybe worth what he is asking. He is prepared to deliver it from Takaka, so yea probably worth it. However the brown car dude is happy to go halvsies in all that, and i have plenty of room to store it all, so we are basically land banking it. The car was a runner and got driven from blenheim before being partially dismantled. It looks pretty solid but has no reg. I may just flick it on as a project, depends if I can find what i need in the parts bins. That is all.2 points
-
https://www.facebook.com/andrew.balme/videos/65322936602/2 points
-
My OCD got the better of me...2 points
-
i hope this is a video of one bakelite spec cavalero spinning up with a 'hzhzhzhzhzhzhzhzhz' and a pile of vaguely steaming black dust slowly building up2 points
-
It worked out quite useful actually, it locks the frame into place and acts as a tiny rollbar2 points
-
i cut a hole and filed it square, i found a piece of tail light on the road and filed it square, glued it in the hole and it looked ok, never failed W.o.F. Never made my own lenses yet though.2 points
-
Love wooden outdoor furniture, and homebuilt > store bought. Also shit what a view!2 points
-
wont affect geometry as that is dictated by the position of the pivot points, ie the top strut bearing and lower ball joint2 points
-
and then i painted it. got rid of all the shit that was on the roof jut to make sure there was no nasties hiding under there. found a couple of patches of bog straight on the steel that were rusting so i got rid of that. then, paint. 2015-12-06_12-33-39 by sheepers, on Flickr 2015-12-06_01-26-47 by sheepers, on Flickr 2015-12-06_01-26-57 by sheepers, on Flickr 2015-12-06_01-27-06 by sheepers, on Flickr2 points
-
2015-12-05_01-56-19 by sheepers, on Flickr 2015-12-05_01-55-59 by sheepers, on Flickr 2015-12-05_01-55-44 by sheepers, on Flickr 2015-12-05_01-55-35 by sheepers, on Flickr 2015-12-05_01-55-28 by sheepers, on Flickr 2015-12-05_01-55-19 by sheepers, on Flickr 2015-12-05_01-55-03 by sheepers, on Flickr 2015-12-05_01-54-54 by sheepers, on Flickr2 points
-
So instead of getting my ap5 wagon going for wagon nats i went and did this instead Brought myself a 1968 VW Beetle. so thats a few pictures of it. few things in mind that i want to do like widen the rear wheels about 3 inches and also get a bigger tyre so the speedo isn't 10 mph out so i can get more smiles per mile. find some low back seats are on the list to find along side a few more things buy a scotch bright and get the silly symbol off the side so i can then put my business logo on the side (midnight upholstery) and also fix my bonnet/boot latch (the front compartment/trunk) i have mannaged to yea shut it this morning and now cant open it. massive face palm!!!! as for that il keep you updated and post some more stuff and better photos later today but 1st thing to fix is how to get into the trunk so i can fill it up with gas later duscussion here //oldschool.co.nz/index.php?/topic/46740-64-valiants-68-vw-beetle/1 point
-
Keen. Wouldn't mind having a yarn and perving at some SD1 goodness. The Rover is on the backburner for a while as I sort a few more things on the Triumph, then WoF the Morris Minor. Rover is 3rd in the queue, please hold etc..1 point
-
pm in1 point
-
seriously considering this!1 point
-
This is so bloody wild !! Great work1 point
-
http://www.pedparts.co.uk/blog/sports-exhaust-testing-50cc-and-70cc-sports-mopeds-part-one Read this blog mate is base upon the Piaggio 50cc 2 stroke but its got some wicked insights into what rpms the engine should be running at make decent power with the expansion chamber.1 point
-
This is awesome and I'm going to steal a whole lot of ideas for my C90. Whereabouts did you get the seat and racing boy shocks from? Also can I grab some more details on the disc brake - I could be keen if I could mash them in some forks I have which I hope will fit my frame.. First question - what size axle does the hub take?1 point
-
Ill find a video of a burnout I did in mine. Its probably not nearly as good as I remember.1 point
-
More burnouts tbh1 point
-
So the moral off the story is don't let it sit around. Drive drive drive.1 point
-
Shouldn't be a problem for me to have a look. Could also likely store it for a short time if the need arose (have picked up and stored cars for a few OS members over the years)1 point
-
https://www.youtube.com/watch?v=dugz8rMYdw4 The noise in the second run is my lower chrome strip having un-clipped itself at the front1 point
-
oh jesus. What've I done? Blake hooked me up with the dealz on this. 1953 series one 80". 80s are apparently super SUPER rare now, and this one's an ex army one which is pretty cool. His mate Dazza's old man has had this in his backyard for about 20 years. last wof was 1995/96? anyways, sorted a deal and collected it tonight. left a trailer of rust from wanganui (literally, this thing is rainin' rust from teh chassis) everything's fucked. engine is a 186 holden that'd had a full rebuild and covered about 6000miles on CNG before parked. Run a few times since then but whatevz Pretty much that's all I want from it. Will do a few bits and pieces on it then slot it into the 109 when I get to the end of the clutch in that thing's life (slips a little now and then now so will prolly be toward winter next year) has widened steels and super lush (albeit perished a little) 750-16 crossply wranglers. must've been some super rowdy tyres back in the day. hilarious!1 point
-
nothing new here just a photo of a valiant in a container i have got myself a welder now so i may start playing around with this turd and try get a wof on it now that the vw is going.1 point
-
heh, weirdly enough it was pretty much only a trot for the 205, with a few spots of minerals here and there too. It's not fast on a track by any means but give it a bit of road like that and it's amazingly casual to drive quickly. I've been thinking of flicking that thing but when you drive it on a road like that it reminds me why I have it in the shed. I think I used about $15 of gas for the whole day too. such economy. Love that loop road. There's an extension you can do (instead of turning left at the Tee to come into apiti, turn right) which links through to Rangiwahia. Can go through to Mangaweka or back down to Kimbolton. Another great set of roads. We did that loop with the french forum a few years ago mid winter. I didn't have a french mobile so took my old man's 1000cc mini and was working seriously hard to keep the pack at a fun pace (I was leading). We were driving amongst snow lined roads and all. So awesome! Glad all you jokers enjoyed. I'm not good at organising stuff, and I don't always catch up with everyone that comes along but I really love showing people around the backroads of my home region. There's some damn good roads, beautiful scenery and great 'left to rot' sights to be seen on plenty of backroads. I'll start planning the next one now1 point
-
I accidentally opened your build thread Neal.1 point
-
I cant stop looking at it on the drive, I love it. It has already laid waste to my crisp clean concrete.1 point
-
Aliexpress lights seem all good! There only on loose to have a look at them, but should work nicely! And decided to try get the exhaust sorted finally, so took the pipe and engine down to Pit Stop (not that many places open on a Saturday). The chick there quoted "$100 to $150" for the 2 welds, I put my engine back in the car and bid her good day! Found a place in the subdivision where a guy was welding up a logging truck exhaust in the yard, so I stopped and asked him about it, 15 minutes later it was all tig'd up Asked him how much, "if you've got $10 in you wallet it's $10, otherwise free", as I didn't have any cash on me I went and got him a box of beer which he was rather happy with lol. Showed him my fuel tank when I dropped the beer off, reckons "it's fucked and not worth fucking with" But then said it'd take him 30min to draw up one on the computer and fuck all time to weld it and as he's got a pile of 1mm stainless sheet left over from a job, so I'm getting a computer designed, water jet cut, SS tank for next to nothing!!1 point
-
I decided i needed more space for stuff (tools, jacks, strops, ect), so I decided to make a box. Im really bad with taking photos as I go, I tend to just keep doing things and only remember when im nearing completion. Anyway I started by making 3x of these. Theyre shaped to fit under the deck between the cab and rear wheel. 2 were welded together to make the box, with the other destined to become the lid/door. I wanted them to match the deck, but im also on a super tight budget as im supposed to be saving every dollar for a worldwide expedition next year. The solution was to cut up the numerous pallets we have sitting out the back of our workshop, technically im being a responsible kiwi, not a stingy scrooge. With coat of stain, a little black paint and a few study bolts, this was the result. It looks a little average right now, but when mixed with slam, I think it will really look sweet! DISCLAIMER: I may run this over within the following week. If my welds dont blow out, my carpentry surely will! Converse //oldschool.co.nz/index.php?/topic/48611-gomaxgos-b1600-yarn/1 point
-
Well they're on the ute now. Leaves will be out in the weekend to be reset, it desperately needs some low! The front wheels poke out a little. Im not really sure what my best option is here, theres no room to move the center for more + offset, and im not keen to run those rubber universal fender extenders. Option #1 - Roll the shit out of them? The bodys already dented a rusty so could definitely pull off a rough guard look Option #2 - Some wide flares of another truck that will suit the later model guards? Option #3 - ??????? Give me your guard thoughts! http://oldschool.co....gos-b1600-yarn/1 point
-
It's been a while. Haven't done much to the car. But.. I did this..
1 point
-
Few pics from the above show... Ditched the headlight covers after they fell off! Have to re-attach them betterer! Heaps of pics from the show here! http://southernaussiemuscle.co.nz/Event_Pages/150328_Muscle_Mania.html1 point


This leaderboard is set to Auckland/GMT+12:00