
Leaderboard


Popular Content
Showing content with the highest reputation on 08/05/15 in all areas
-
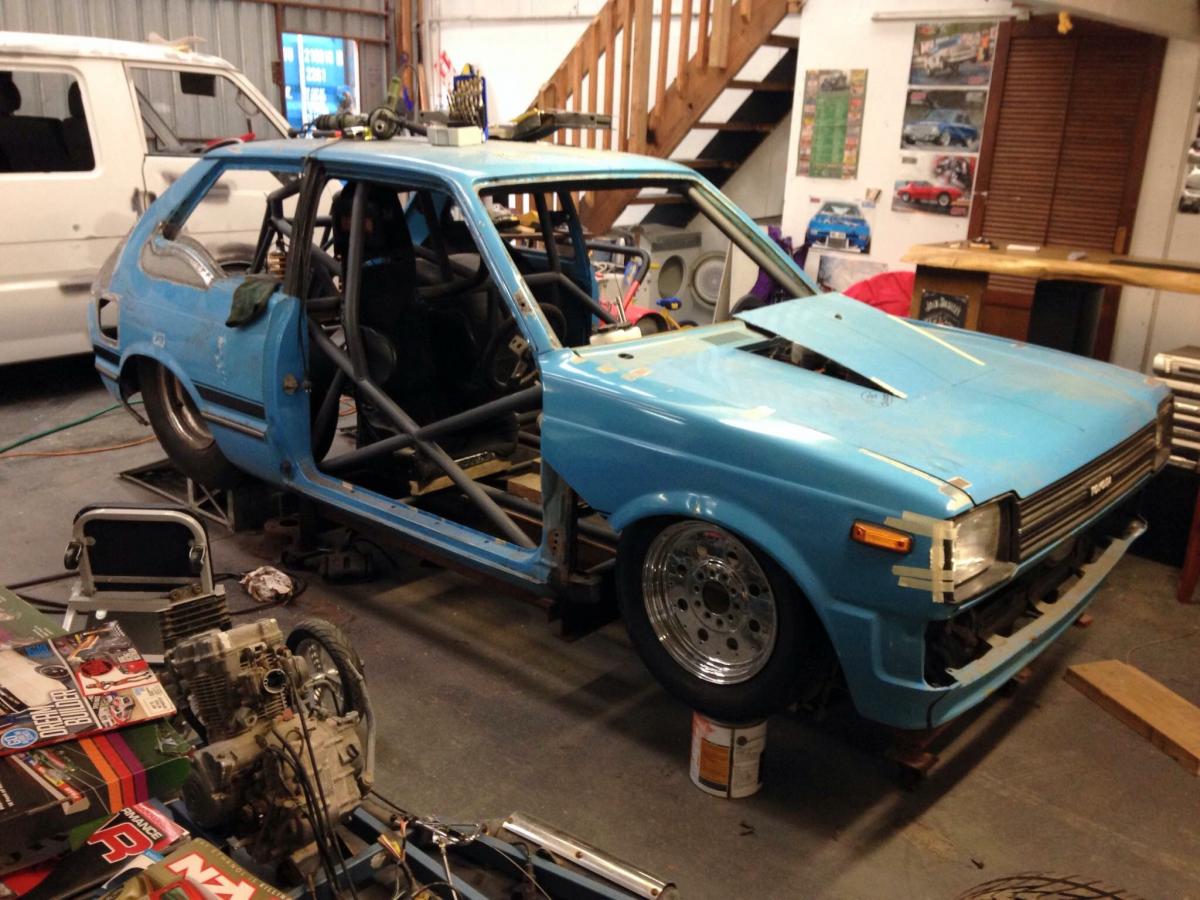
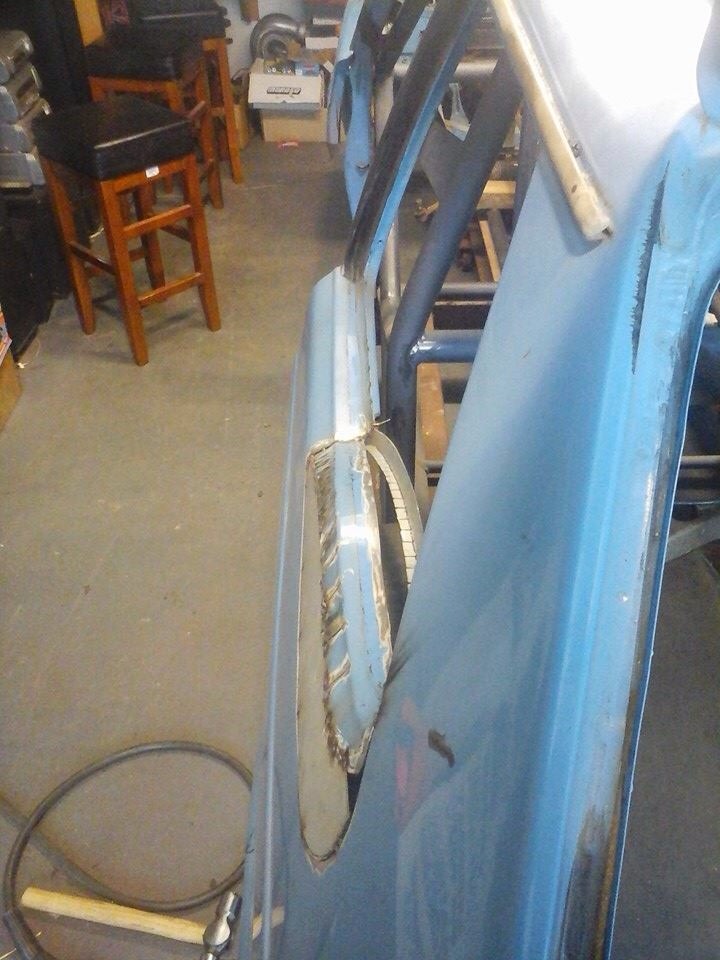
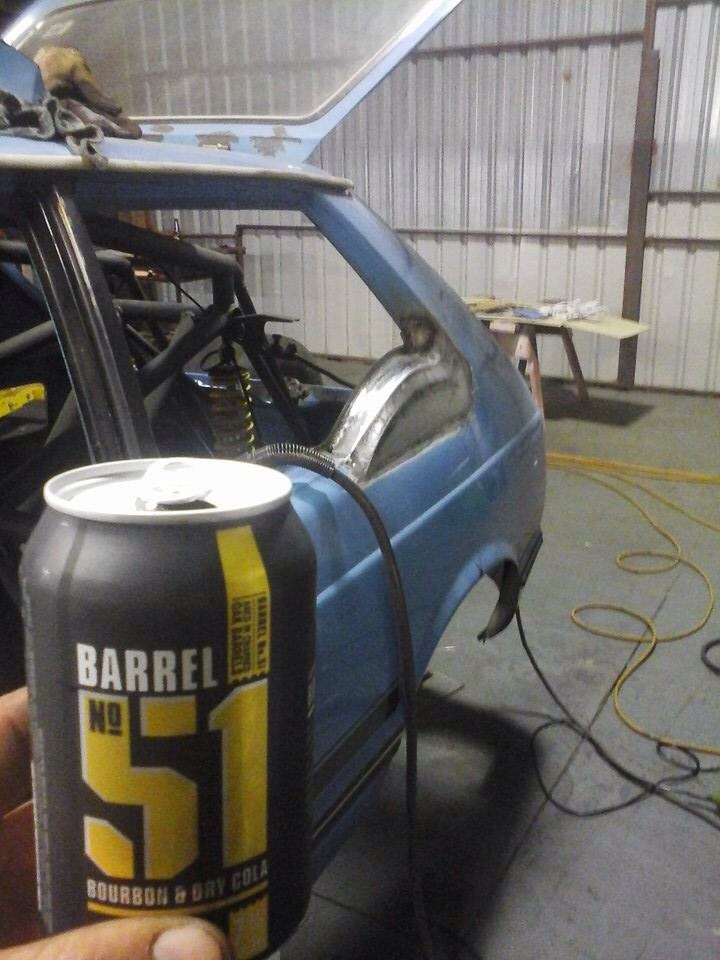
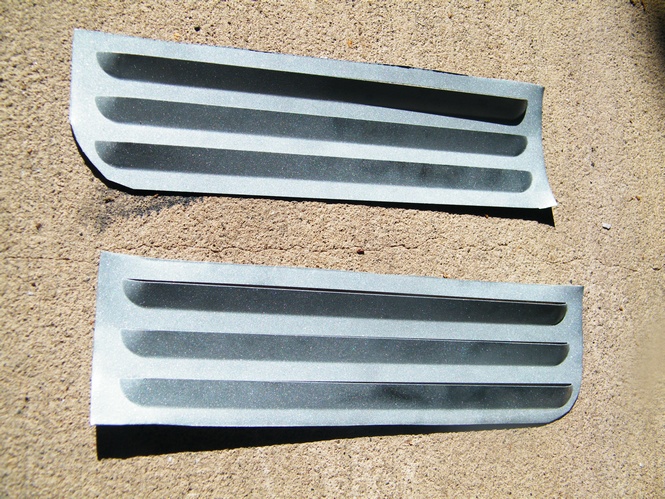
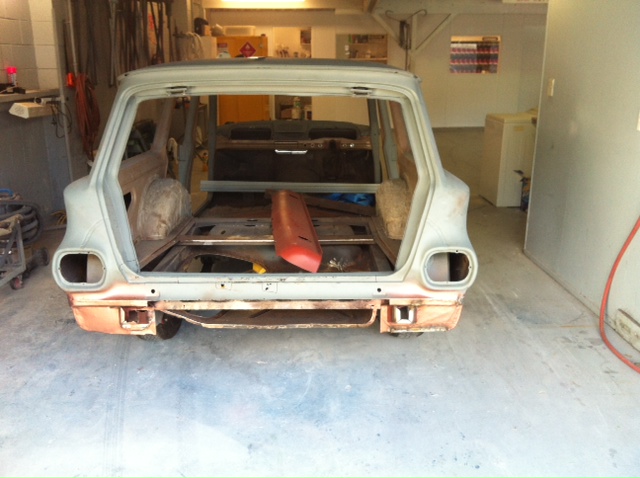
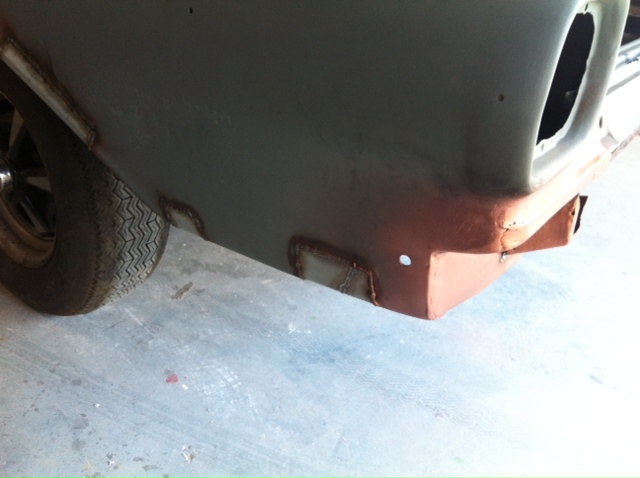
Today in pictures. With some text. So I finished welding up the floor and inner sill then tidied up some other frilly bits in there near the front. There are more little holes in the floor here and there but I will leave all the little bits for later once the big yucky stuff is done. This mudguard... I normally don't like them. But it seems to tie in well with the car in that utilitarian sort of way. So I carefully removed it. Then I cut away what was left of the outer sill.. Here's a bit of the sill.. ..and here is most of the sill... I was hoping that more of the top of the outside face of the sill would be solid but upon closer inspection it look like this wagon has had a replacement sill already. You can just make out on this section I cut off where they had blended the new sill in just below the corner and then ground it back. So I cut the sill top back further and will butt weld the new sill on the top face. Speaking of butt welding... this is my preferred method for all joins where ever possible. My several reasons why.. Firstly - it means that there will never be a overlap of steel. No matter what you seal it with its always a place where rust will begin because moisture creeps. Even if one uses a seam sealer its not perfect because usually one panel is corroded and if sealed up against another fresh bit of panel it can still continue to corrode. If you butt weld panels together you can prep them properly both sides and paint them properly. The join will last. No collection point. Secondly- both panels are flush so once the weld is ground back you get a neat flat surface that should hopefully require the bare minimum of filler (if one is bothered). Butt welding is a lot trickier especially with one panel usually being thinner and rusty. But if the welder is set up just right then by carefully zapping the join and getting just the right heat in the weld will go right through and create a good solid join.I like to see the weld coming through the other side. If the steel is thick enough, like say 0.8 ~1mm, then a very small gap will fuse together with the wire melting in and leaving very little proud. If I do have to do a lap joint somewhere I will always have the overlap facing down so moisture cant enter from above. However if its done without the use of a Joggler to put a step in one panel so the panel faces end up flush I think it always looks a bit messy plus will need more filler to smooth it off. I suppose it all just depends on what the repair is for and how much bother one wants to take. Areas that get the most moisture and you want to last I reckon it makes sense to avoid any extra traps. Enough blabbing. Photos. I was also foolishly hoping the lowest parts on the inner sills would be ok to re-use. I started to grind back what was left of the outer and it was shit. So I just cut the lot off back to good solid steel and welded in fresh sheet. This actually took less time then it would have to try to clean up what was there. Here's what I chopped off.. New steel in place.. Now onto folding up some new sill outers. I can only do 600mm at a time so I had to take time and try to do each half evenly so they would match. I had made a little gauge based off the old sill as a pattern. The sills turned out OK. Not as neat as if I had some rollers because you can see the gentle ridges where I did all the little folds. But they'll most likely get covered with underseal and hell- look at the rest of the car... Folding.. Cut, bend, tweak and generally shape the front end where I will be rebuilding the bottom of the A pillar.. Oh shit- is that the time? Decide I need to eat but on a roll so just quickly bbq some sausages and drink some beer.. Treat the inside of the sills while I can.. This is pretty much where I'm up to now... Hopefully the other side wont be as bad but I am expecting it will be.16 points
-
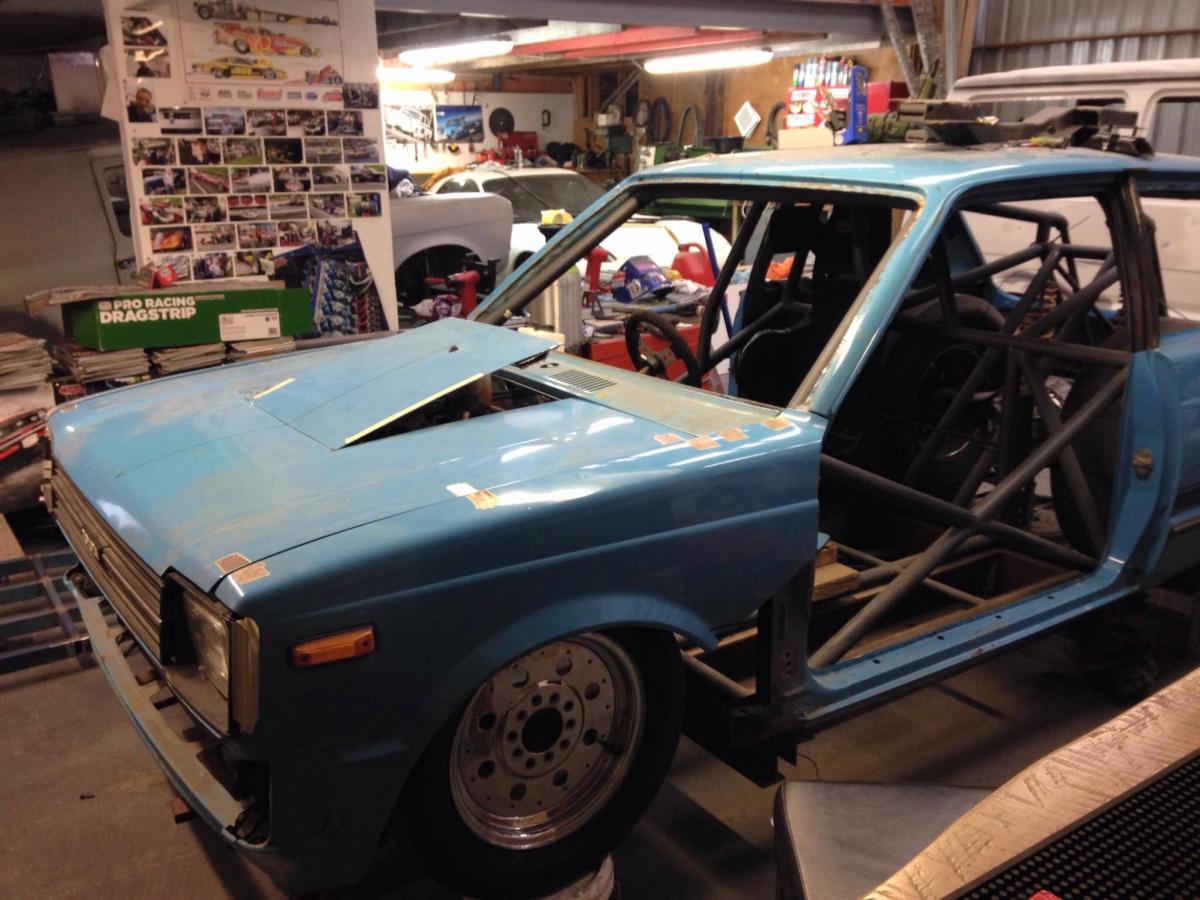
After 3 years of searching for a nice Datsun 1200 project I found this coupe that came up for sale down in chch. After seeing it on TM I quickly got hold of the owner through Facebook. Thankfully he didn't realise that he had set the listing as an auction, everyone interested in it had to email him, which he didn't realise until the morning after I contacted him when he saw the 40 odd emails from people wanting to buy it . After putting a deposit into the guys account, I brought some flights for 2 weeks time to chch. The car had been sitting for at-least 10 years and had no current WOF so I figured the owner would need a few weeks to sort out any issues. My friend and I flew down on a Saturday morning and meet the owner at the Airport with the coupe on his trailer. The car was better than what I expected, at this stage I had no idea that it had an A12 GX motor and a H165 ute diff so I was beyond stoked to find this out. Anyway here's some pics! \ \ \ \ \ Overall I'm pretty happy with it, the body has hardly any rust and is reasonably straight. It currently has an a12 GX motor with twin dellortos, 5 speed and a h165 ute diff. Discussion Thread13 points
-
I bought this radio about 2 years ago with the intention of replacing the non-working radio innards with something more modern. It has sat pretty much untouched until today. I have bought a few things during that time for the conversion like a TA2020 amp and a couple rotary switches, I already had the component speakers so will use them. I also picked up a little bluetooth unit, which works quite well. In order to use the amps 12V supply as well as avoiding ground loop issues I have a dc-dc isolating converter which will knock the voltage down to 5v. This will help keep cords to a minimum which is good as it's such a nice looking radio, there will still be a 3.5mm jack in the back though. After gluing the base up as it was coming apart slightly, first up today was getting the speakers mounted, I used some old mdf speaker mounts I made for a different project long ago and screwed them in using little brackets. Then I made a plate for the rotary switches and amp volume dial to secure to. Luckily the old knobs fit the new switches so they will be reused. Tomorrow I'll hopefully do a bit of wiring and make a support for the amp and the old radio dial I intend to put back in.11 points
-
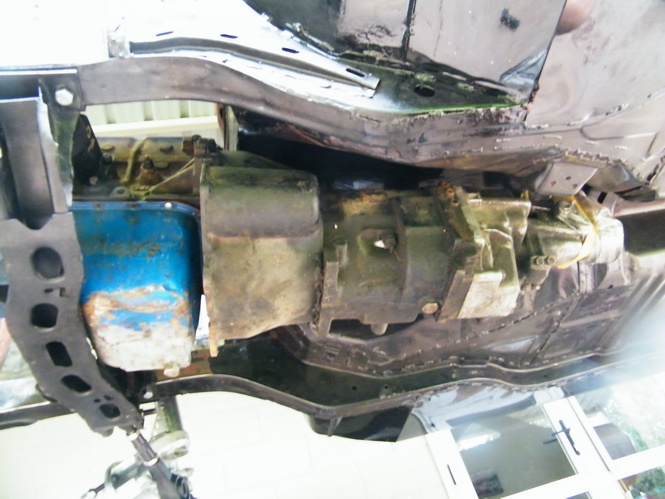
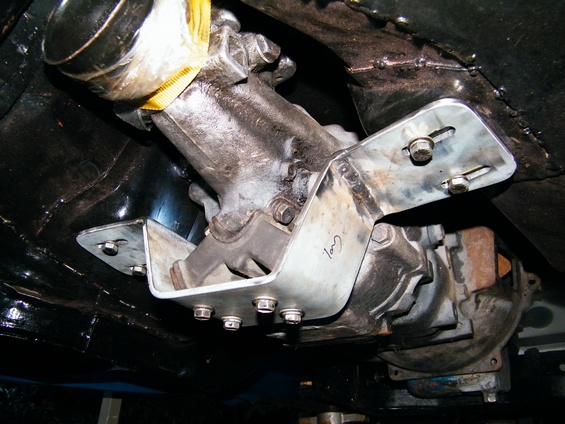
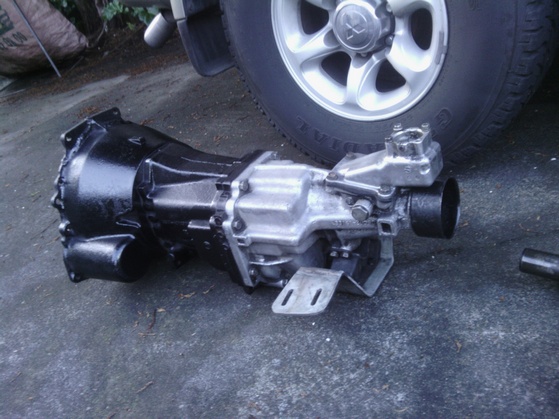
Trial fit of the Pinto engine W50 gearbox test fit made up a crossmember
 6 points
 -
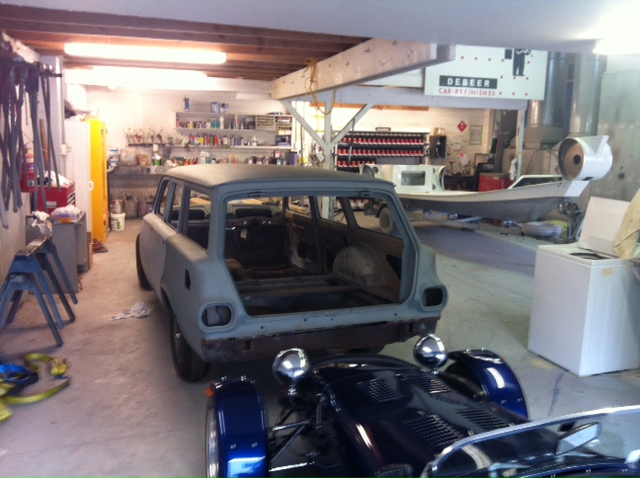
trial panel fit. everything looks pretty good. i haven't lined everything up perfectly, more fitting things close to where they should be so i can see if i can get it right without any major surgery. looks like its all going to come together without to much hassle which is nice. the only issue really is the bottom of the passengers door where it meets the front guard. its to far out so i might have to elongate the holes in the hinge to get it to sit in better. everything else looks pretty good, gaps and flatness across the joints looks workable from here. what to do next? probably do the bonnet and fix the hinges because they're fucked. Untitled by sheepers, on Flickr5 points
-
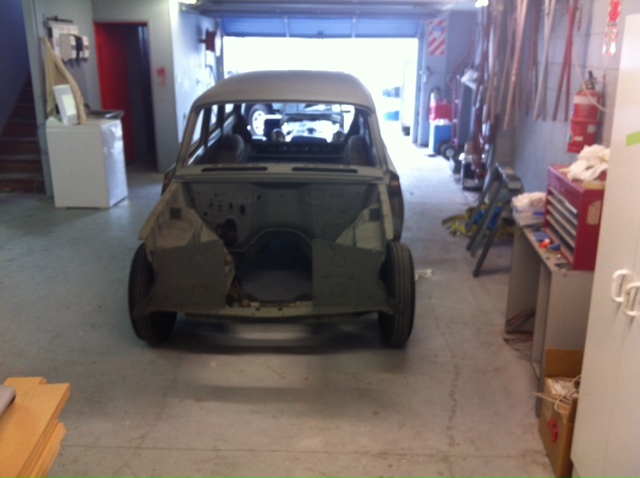
This is how its looking so far
5 points
-
To the best of my knowledge (and bourbon ravaged memory!) both the MkIIA & MkIIB Powerstop boosters came with either 5/8” or 3/4” bore sizes. They both share the same size control valve so the crack pressure is the same but with the increase in boost at 41.9 % the difference is significant. They are not difficult to rebuild although the rocker/poppet control valve makes them somewhat quirky & different to your average Hydrovac booste, (I used to teach staff how to overhaul them and other boosters in the early 80’s at APPCO Brake & Clutch). I’m not overly familiar with the 65 Snipe but I’m making the assumption it has boosted front disk brakes and no assistance on the rear drums? With the 3/4” Powerstop being suitable for a full boosted drum/drum setup fitted to the Snipe you’ll end up with far less assistance and far too much rear bias – very handy for chucking the rear out under brakes to get it sideways (it’s a blokes thing!) but a little scary on the motorway in the wet. Your options are limited to rebuilding the existing booster (kits available on eBay) or fitting an Aussie BPR VH40, (avoid the temptation of the more commonly available VH44 as it has a 5/8 slave and a smaller vacuum diaphragm). Hope this helps, great project and feel free to ask for more advice. If you were closer to Auck. I’d say bring both boosters and a 6 pack to the Milford man cave and see what we can do.4 points
-
Also bought a R32 GTR front lip through Alex/Moonlight racing. My inspiration4 points
-
Here is the requested video of the electric start. Have been riding this to uni a bit which is easily the highlight of my day. I am also continuing to improve aspects of the bike but it is great being able to ride it in between. I put a new front tyre on as the tube was beginning to bulge through the old perished one. Next on the list is new brake pads as the brakes are pretty marginal and other minor boring wiring stuff to sort. This will probably be the last update on the project as I consider it pretty much done, kind of glad to be honest as this bike has definitely been a bit of a challenge. Big thanks to all the guys who helped out along the way, especially Kempy for helping me with the electrical side of things, if it wasn't for you this bike would still be sitting in the corner of the shed in pieces. mmmm what to do with my spare time now?3 points
-
Alrighty so I've got a wee bit of an update. So these shiny new parts arrived in the mail from the US of A. Clockwise from top left: gasket, dough hook, trim band, motor brushes, flat beater. Forgot to take a photo of them out of the packaging... Also got some food safe grease: End cap with the dent filled with poly filler and sanded down: Top sanded, masked and ready for priming: Base prepped for paint: Base primed: And painted. I went for a high gloss, bright red, which I think will suit it. Top painted. This was shortly before I ruined it...I left it 24 hours to dry, and went to pull the masking off to see what it looked like without it, and it noticed that the paint had bunched up a bit where I lifted it. I think the outside paint was dry, but the layer underneath was still a bit soft. This resulted in much swearing and meant the whole thing had to be sanded/paint stripped back down, then repainted. Worth it though to try and get a decent finish. End cap painted. I think for a rattle can job the paint finish turned out quite well: While I'm here, for anyone planning on doing some rattle can spray painting, do yourself a huge favour and get one of these. For those like me that hadn't seen one before, its a plastic gun grip that attaches to the top of a standard paint can. It cost $7.50 from Mitre 10 and it's one of the best tools I own...it makes it so much easier to control - no more tired trigger finger on larger jobs and better control of direction too. That's all for now. I finished painting the last bits tonight, so I'll give them a few days to cure and hopefully they will be good for assembly on the weekend.2 points
-
Damn that is some good info right there^ !!! I know who I'll be asking next time I have brake questions!2 points
-
yeah, I was thinking Honda S2000 or MX5. actually maybe just hang the MG panels on top of one these cars, rust and drive train sorted!2 points
-
253 and trimatic. They're lying next to the car.2 points
-
Beams 3s is reasonably tall standing up straight. Might be too tall for bonnet line. My vote is chuck a rotor in it2 points
-
Rustang, there is no other option you sick bastard. Will be there on two wheels all going well.2 points
-
chuk a rb40 falcon enjin in it cuz2 points
-
Stupid work, always getting in the way.....2 points
-
I'm still struggling with the concept of someone cutting up Viva's to make theirs more valuable - WTF? It's not like they will ever be all that valuable anyway. Nice work on evicting the rust monster though.2 points
-
Rustang please.2 points
-
Hmm now do I bring my Cordia too, or pull out the stops and bring the Rustang?2 points
-
Bought some Enkei RPF1s in 18x9 +35 and 18x10 +38. I was a little worried I may have fucked up the offsets and thought 18" might be a little large but I'm pretty happy with the fitment. Looks pretty sweet in person so can't wait to get it sitting on the ground again. Just need to massage the lips a little to get it to fit 255/35 in the rear and 225/35 up front Slowly getting there. Fully focused on the car now after a pretty messy few months.2 points
-
2 points
-
Two weeks of MK2's Part 1: To start the wild ride, I accidentally won an auction for SSR Mk2s. I was sure that I would be outbid, and placed the bid as a reminder to myself about the auction, but sure enough after 10,000,000,000 refreshes nobody outbid me and suddenly I owned these awesome wheels... in Japan. With a huge thanks to Jesse Streeter we discussed the cheapest option of around an 8 week delivery so while I was thinking of clever ways to hide their arrival through employing Karl, these sneaky sneakers were on their way for an earlier 6 week delivery. Down low, too slow Found some neat centre caps, and spent a few hours cleaning them up and snapping the rusty bolts out of the wheels. Part two: After 3.5 years (and many assignments relating to marketing motorsport events in NZ) I got to take place in Davidson Graduation Mk2. The super special thank you must go to Rodney for flying down to see me walk briskly across Aotea stage. RX3, Mk2 graduation, Mk2 wheels, Ari Catenen Part three: Really was no better way to celebrate leaving education then to go to Japan, for my Mk2 visit. rot808 and I are off on our Asian Adventure, hopefully finding our way to all the RX3 brothers and cousins. To be continued... Pics will be on my flickr (8:08 Photography) https://www.flickr.com/photos/motoreligion or instagram (theamyable)2 points
-
Hi Guys, I have already started a discussion thread with information on what i'm planning so I decided to get this one started so I can throw up some pictures of the vehicle and the progress.1 point
-
Towards the end of last year I decided I wanted a 4WD for the summer for surf missions and camping trips. My heart was set on a 1st Gen Toyota Surf, but finding one that was still somewhat tidy and reliable turned out to be nearly impossible. That's when I spotted this 1991 Prado for sale: It was a 2.4 auto that had just clicked over 300,000kms but there was just something about it. I knew it was a risky purchase but the price was good and the owner assured me it had been well maintained and they had never had an issue with it. As it turned out the guy was a compulsive liar (confirmed by many other buyers) and the moment I hit the motorway the temp gauge started rising. Then as it started to get dark I realized the headlights basically didn't work and caused the volt gauge to drop to nearly nothing. I made a stop at my mates place in Silverdale where we swapped the radiator cap for a higher pressure newer item and topped up the water. Then we noticed the engine earth strap wasn't connected so we bolted that up which got the lights going. The rest of the trip was pretty stressful but thankfully no more issues. The next day at home I took dad for a ride and we drove through a little mud and got stuck, only to find the 4WD wouldn't engage. I spent a few hours diagnosing and found the A/C had been removed (years ago) and the vacuum lines never reconnected, so again a relatively easy fix. We managed to use it for about 3 weeks before it got even les reliable and I got fed up with the gutless diesel...1 point
-
At .7" (I suspect it's probably 3/4" i.e. .75") the MG booster will have less boost but more fluid displacement than the original smaller 5/8" booster. The good news is that with the booster being connected to both front and rear axels you will not alter the front/rear bias. Hook it up and give it a go, you'll need to give it a "little more jandal" when you hit the brakes but you just may get away with it. Let us know how it goes.1 point
-
bit of a disaster over the weekend, drove this most of the way back from auckland to christchurch. got to huntly and it was really apparent that something was wrong. if RPMS dropped bellow 3000, then the thing would hardly fire a cylinder. pulled over and checked over everything, couldnt really find anything wrong at all, so concluded something must have gone wrong with the ECU. it was getting on and id make fuck all progress to wellington where i was supposed to stay the night before boarding the ferry to christchurch. so i made the call to quickly revert the loom back to points ignition and not running from the ecu. unfortunatly my dizzy had been locked up to suit the megasquirt, so i had no choice but to set it for a static ignition of about 20BTDC which i knew would destroy power and fuel economy, which it did, it also made it run pretty average and splutter alot. the problem only went away for about 50kms, and when i pulled over again, i pulled all the coil and associated gear off and went about testing everything, eventually i discovered the fucking points gap had closed up just enough to cause the issues. i didnt even consider these, as i only just replaced them last week, mustnt have done them up tight enough. by now it was fucking late in the day, so i made the rookie mistake of not reverting back to the ecu and just carried on trouble free to wellington. i found, about 140km out of christchurch, that this splutering and miss fireing was causing the carbs to flood up quite bad, and soaking the filters in gas. and finally on quite a steep uphill pull, the car finally spluttered a spark out the intake and ignited one of the K&N filters, (picked because of the foam filters reputation of catching fire ha!) and instantly the car died on two cylinders and i pull over, only to find a small fire puffing away on the filter, i was able to blow it out with my breath so not too bad, but its totally fucked two slides, and the pieces the slides fit in to, and probably damages most other plastic parts. so im not on the hunt for somewhere where i can find the slides and carriers for a set of Mikuni BST40s pretty gutted as this had been running absolutely beautifully for the past two weeks. and all because of that points gap and a few rushed decisions. but its nothing terminal. and hopefully the damage was only done to the two carbs, thought ill tear down all 4 and probably throw rebuild kits at them anyway. discuss my fuckups - //oldschool.co.nz/index.php?/topic/30375-flibois-1971-toyota-corona/page-5?hl=%20fliboi1 point
-
Will take some rough measurements of the Beams 3S and see if it's going to be a lost cause. I will install a rotor, on each front hub for braking purposes but no wankel engine. I might even look at the 4AGE route but they are getting pretty old and expensive for what they are. Any other relatively compact rear wheel drive four cylinder options out there? Starfires and Pintos have already been discussed, as has the 2ZZ.1 point
-
Not even kidding btw1 point
-
ahhh I only just saw this... did you still need a tow rig? take my van and drive it off the tip face with your rubbish if you like1 point
-
You will be greatly missed my friend ! I'll scrap some pedals just for you1 point
-
As usual, I'm going to have to go with Kahneal on this one.1 point
-
Theres no replacement for displacement1 point
-
Sadly I wont be working on this the next two days as some paying work has come on. Got ta take the monies when I can. But hopefully back onto working on this friday or saturday!1 point
-
Sort of a update but yeah Went and saw Joe Kyle today an started talking about a rb24det with him an he said its fairly straight forward an quite a lot cheaper than what i had thought it would be from reading forums an what not. He also tried to persuade me to go 25det lel but i kindly turned it down reason being is theyre not as rev happy as a 20 an theyre prone to going pop a lot quicker, even though the 20det head isnt that good with providing decent flow compared to the 25 or 26det/t roughly around 3.5k-4k if i take the engine out my self an put it back in which isnt a hard task OR just go fully forged 20det for around 2.5k-3k 25det is only 1.8k-2.5k but dont really want to go that route even though every other person i know is telling me to not waste my money on a 20 an doing it up to make decent power figures what are your guys/gals thoughts on this ! ? !1 point
-
Turns out the suspected rust hole in the C-pillar vent wasn't actually a rust hole, but instead a patch of grime-encrusted flaking clearcoat. Quite relieved actually. The clearcoat will need to be removed then reapplied in that area, ahead of the final repair cert inspection. My opinion of the car's quality has improved considerably from my initial assessment. Discuss: //oldschool.co.nz/index.php?/topic/49412-80s-kid-part-ii-eds-aw11-sc-chit-chat/1 point
-
Wow. This thread reminds me why I've always been drawn to old shit. You obviously have lots of smarts about these modern machines Zac. I would be holding my head, and rocking back and forth in the corner by now......1 point
-
Yeah reason is that ur current wof guy is a giant fuckface1 point
-
Speaking from experience of myself on sparkles drive this thing does good burnouts, even with flat tyres. We pumped it up, but it's stuffed. Thing runs pretty good, just watch out for the sticky throttle cable, sparkle wound up in the fence / bushes because of it.1 point
-
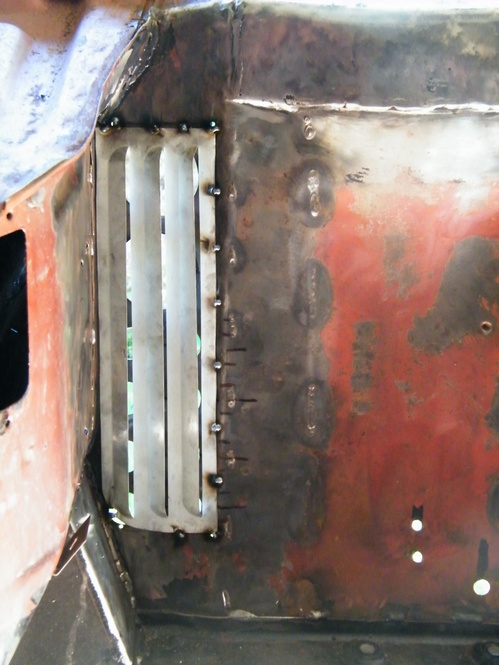
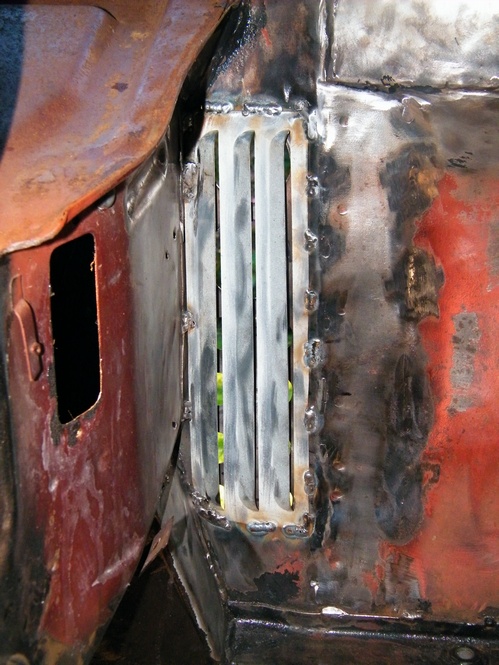
Vents to remove hot air from the engine bay
1 point
-
just go take your misses and new child somewhere to test drive a car with a tow bar. They will be like, oh family man, good job. then do your tip run, then take it back and tell them you want something that can tow a trailer better.1 point
-
Yea I am now the proud owner an very big thanks to zebra dude for all the help still new to the classic car scene1 point
-
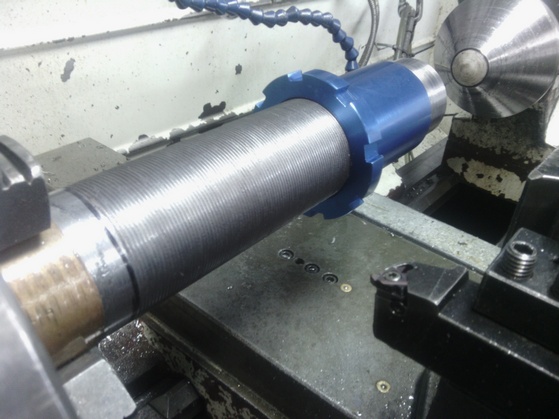
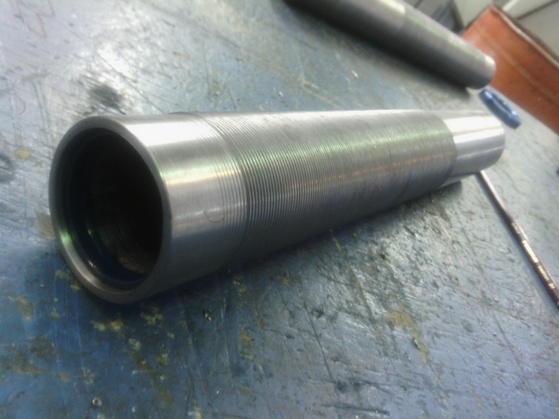
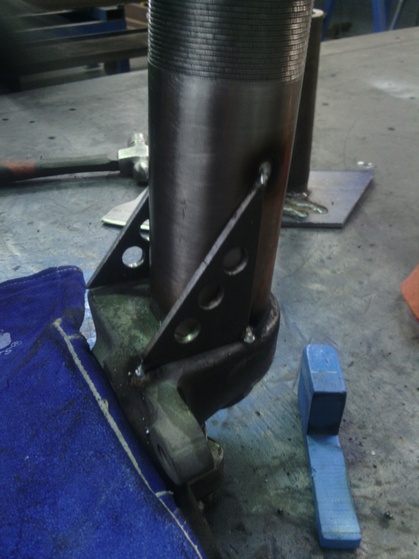
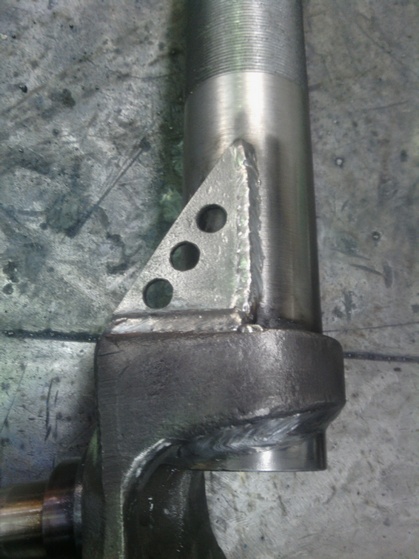
Test nut fits Ready to drop into the stub axle Groove cut for wiper seal A subject of much debate
1 point
-
Small progress, I picked up some new disc rotors and wheel bearings from Supercheap last week. I picked them up today after getting 6mm machined off the discs and all being well, will fit with the HQ calipers I found. While I was out and about I stopped in to the panel shop to check on progress. Most of the work has gone on under the back of the car so photos don't show much. I got given the hurry up to procure the commodore fuel tank and boot floor. Time for a trip to Zebra Dudes wreaking yard. Just realised that the car is in the same spot from when I dropped it off. Last time I saw it, it was up on the hoist. So much better for working underneath.
1 point
-
I have some bad news about this. After almost 2.5 years of pretty much completely reliable service, the Auto gearbox has decided to retire. This car has far outlived it's cost and I'll always be grateful for how well it run. But, unfortunately, it looks like I will be calling Zebra this afternoon. Just kidding. Picked up a manual conversion last night for it, once my Mk2 is going I'll be making a start on that. Just picked a bad time to happen but that seems to be how life goes.1 point
-
I swung by the Panel Shop to get a couple of photos to prove that the car has moved. Time to get the bonnet and front panels stripped of the should be shiny bits and off to be blasted. I keep forgetting how small these cars really are, especially now there is some space around it. Lastly I have bought a modified chip for the VT 5litre I have to go in from a Guy named Tony off trademe. The big thing is the chip has the VATS disabled. The tune should take the motor close to HSV specs. This should be fun, 190 Kw in a car that weighs 1200 kg with 215 tyres on the back..
1 point
-
Decided the low life wasn't for me, would rather drive my car hard. So I raised it and got some decent sized tyres. Found an Mtech 1 steering wheel and got offered a full set of Mtech vinyl seats and door cards at a price I couldn't refuse, so got those and put them in. Now it's like this: Plans for now are to just drive it. Using it at the moment while I do yet another engine swap on my mk2 Golf (with make a thread shortly). Eventually I want to do either an m30 or m50 turbo with manual gearbox of course, but that will be long term. If I'm fortunate enough I might be able to do an S motor or M88, we'll see what life has in store. Right now I need to fix the fact that it's using way too much fuel, around 15-16 liters per 100km. I've checked everything and reset the throttle cable, tps, idle mixture screw etc as someone had messed with all that but it hasn't improved it. Need to see what's going on there. But it's been going reliably for the 2 years I've owned it and for how much I paid for it, it's far outlived it's cost so I hope I can do something cool with it.1 point
-
Right, steering wheel sorted, many thanks Shakotom (and Chikon8) If anyone has a spare horn attachment ring thing laying about I would be supremely grateful for it! Also, finally tracked down the pic I knew I had of my mum's old one of these bad boys.. excuse hurried deletion of my little sister, she has issues with internet having pictures of her I'm fairly certain this is the appropriate colour scheme for mine also... now them wheels... Also holy crap those fender mirrors (actually the door mirrors too) are freakin' rad!1 point
-
this is the billet supercharger manifold all finished. well, needs a bit of fettling here and there but as you can see its pretty much there. Untitled by sheepers-ra28, on Flickr Untitled by sheepers-ra28, on Flickr Untitled by sheepers-ra28, on Flickr Untitled by sheepers-ra28, on Flickr Untitled by sheepers-ra28, on Flickr1 point
-
Okay, I lied. Here's an update. The guy who did 11/12ths of the rust put me onto some of his pics. I'll try get some more when his photobucket account stops being gay, and I can retrieve them.1 point


This leaderboard is set to Auckland/GMT+12:00