
Leaderboard


Popular Content
Showing content with the highest reputation on 04/09/15 in all areas
-
Just recently purchased this beauty off trademe from Auckland Had 73crownwagon & 64 valiant check it out for us at BeachHop and it they said it was all good so we purchased it. Then Denham & Peter picked it up for us on the following wednesday and then went over the van to make sure it was up to the big drive back to Christchurch. Cant thank Denham enough for sorting it all out including picking me up from the airport on sunday . Hit the road about 2pm with my buddy Vety who just brought a 06 Feilder wagon and we started our journey home. Took a few hundred Ks to get used to the Left hook. arrived in Welington to catch the 2.30 am ferry at midnight then boarded and crashed out in the sleeper cabins and woke up 6am when we arrived in picton. Carried on thru to Blenheim to have breakfast with my folks then back on the road for christchurch. 1080km later and $360 in gas and we are super stoked. The Van is super tidy with only a couple small rust bubbles at top of windscreen and a couple on the bottom of the doors Interior has been re trimmed when it arrived in NZ in 2010 when the late Ewan Gilmour brought it in. heaps of paperwork with it which looks like we are the 4th owners of the van ,3rd kiwi owners. The paperwork says its a 351 V8, C6 Auto but the guy i brought it off seems to think its a 302. Will look into it when i get underneath. We have 70s styling in mind for the interior and some factory spec stripes on the outside and some lake pipes.30 points
-
got 10's but 255/60/15 would not fit maori boys at the tyre shop told me they could jump through the gap between the bead and the rim so will keep eye out for some 26x10.5's or 275/50/15s I got 8s as well though so I got them put on those haven't cut the tubs yet (it is imminent) but I could shove it this far, maybe has 10mm left to the top of the wheel tub but fouling on some other junk (which is gonna get cut out anyway) will probably be sitting axle housing on frame rail at this height then tried a 235/60/14 definitely C Notch time17 points
-
More of the worlds most exciting updates! So good to go for re-check (I hope). Toe in was waaaaaaaay out of whack, all sorted. Have had to have slighlty positve cmber (0.5 deg) to be within spec. Cert man said OK to dial a bit of negative in at a later date. So next and last job is to take a day off work to take it back in!5 points
-
Had to add a few words to your post as they appeared to be missing and it didn't make much sense. You certainly didn't misspell torch, that would be far too obvious.4 points
-
I vote do a burnout. it won't matter if the car is high or low because you ain't gonna see shit anyway due to the copious amounts of burnout gas.4 points
-
Took some pics the other day: Yep, still a Civic. Photos taken at the Sign of the Bellbird in the Port Hills above Christchurch.4 points
-
I feel you should inspect the back of your van with a blacklight and report your findings3 points
-
Yeah the thinking mans decision, its where you think "why the fuck did I cut my car up instead of getting it going"3 points
-
I will be quite happy sitting on my sofa if I can have it at this height3 points
-
believe me i would like to slam it that much, but I also bought all this shit and don't want to throw it away since it's pretty much worthless to sell on trademe/wherever and I want the car running sooner rather than later. and despite what rookie says oh you can weld up a back half chassis kit in a day it's all very easy for him to say.......I appreciate it's not technically that hard (the cutting and welding etc.) but the measuring and the number of decisions to be made are what i see and taking time if you want to ensure there is no fuckup. I look at what I need to do and using the parts I have and seam welding up the factory mounts seems far more straightforward. yes it will be a bit high on the taller tyres but on the smaller tyres with a c-notch it should be pretty slammed for a silly american car but still at a certable height. PS that lovely starlet is a cheating toyota/nissan with factory channelled body and is at an uncertable height no doubt/irrelphant3 points
-
made a bit and patched the inner. Untitled by sheepers-ra28, on Flickr then i made the patch for the outer. i need to get it as close to perfect as i could because i can't weld it in yet. the inner lip is rusty so i need to split the skins and repair it before i can weld this piece in. so this part won't get welded in until after the lip is stretched so i need to use it as a template to make sure I've got the bottom of the guard the right shape, hence needing it to be as close as possible. anywho I'm happy with the shape of it so ill move on to the next bit now. Untitled by sheepers-ra28, on Flickr3 points
-
i did a bit more tonight but only an hour or so because i wanted to watch top gear. so the drivers side sill was a disaster of fucked up mongrelisation which i cut off. iside i found mystery and woe. and a comb. Untitled by sheepers-ra28, on Flickr Untitled by sheepers-ra28, on Flickr thats the shit that came out of the sill. i reckon its never been cleaned out and that pile of garbage has been building in there since it was new. the thing that really boils my piss about how this thing has been repaired in the past is that it must have been pretty good on the whole with a little bit of rust but not to bad. why do i say this? because when you get rid of the awful repairs and the rust that should have been removed the last time round you find that the car is actually in very good condition. this is inside the sill once i cut the hammered in bit off. its better than my blue car looked. Untitled by sheepers-ra28, on Flickr so anyway i folded a new piece for the sill and began fitting it but didn't get to far with it. ill carry on tomorrow night. Untitled by sheepers-ra28, on Flickr2 points
-
Not currently working as I got laid off so until I find another job the HR30 has been getting alot of attention! Decided not to use the Trust manifold as it sits the turbo a bit too low for my liking since I am using a Holset and they require alot of oil and big drains, it leaves stuff all height/angle for a good return. Using a ported factory manifold, its cast steel as opposed to iron so alot easier to weld, pre heated it a bit before welding just to make sure. Root pass etc etc, done by Mig. Have bought a Turbosmart progate 50mm vband to be used: The ugly piece of shit grill has also been removed and will be replaced with a S1 DR30 grill from yahoo auctions: New hotness:2 points
-
Sherie. Gross.2 points
-
Just throw the cat in the ceiling lol2 points
-
Just ignore everything Dave says. Car would be done by now Xo2 points
-
Well seeing it is the morning, and I am bright eyed and bushy tailed; Having both a super charger and a turbo in your engine bay and not compounding them is like having two playmates in your bed and then pulling yourself off in the bathroom.2 points
-
Oh. This also happened on the weekend. Gone.2 points
-
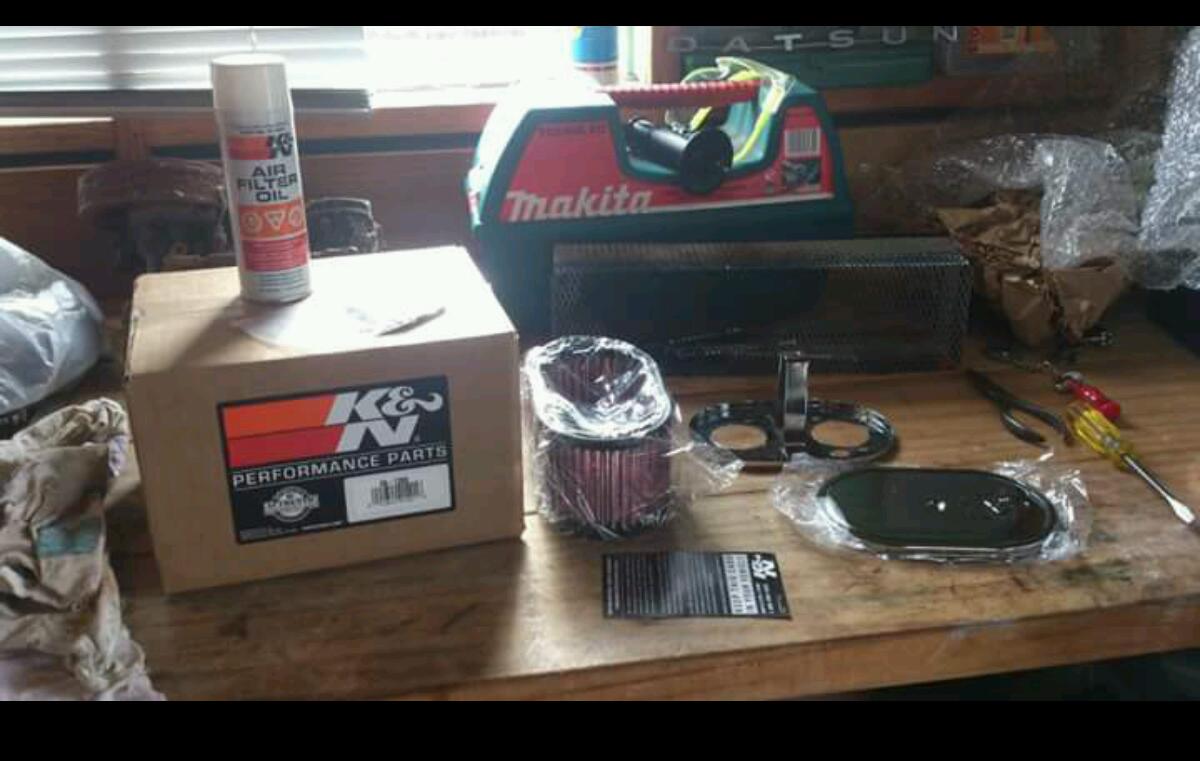
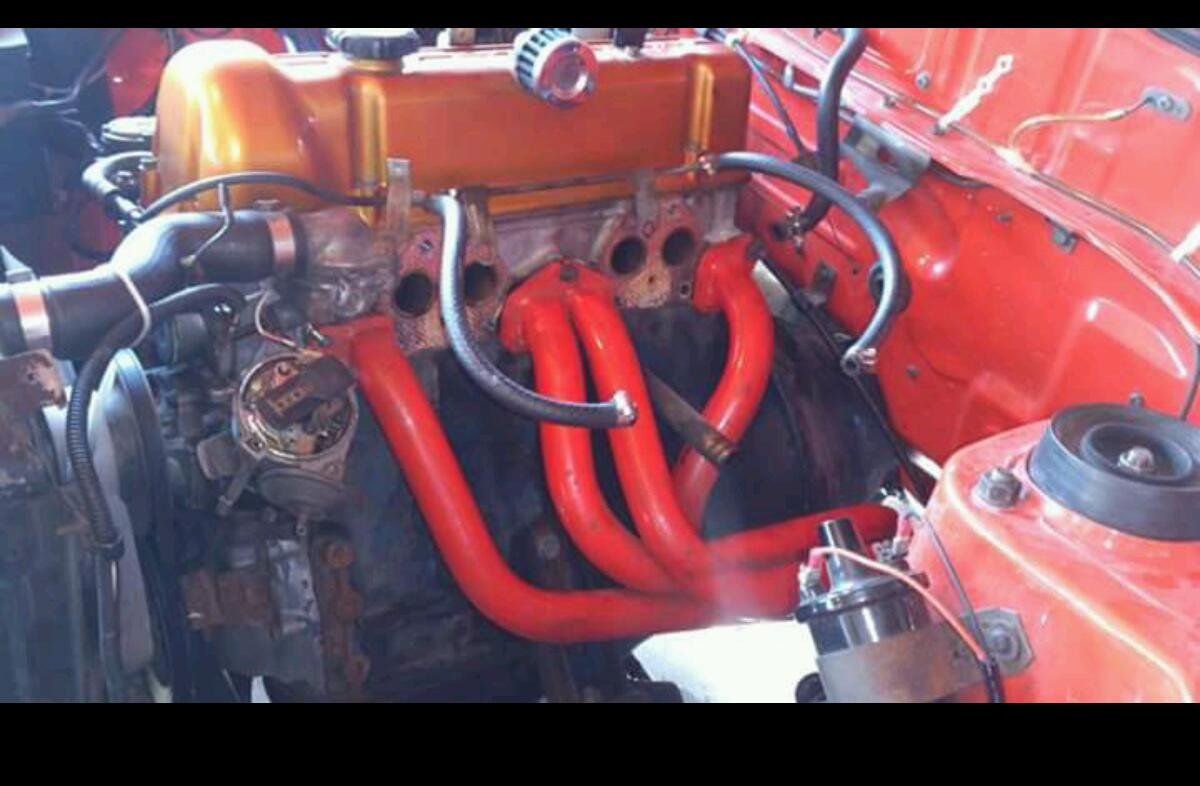
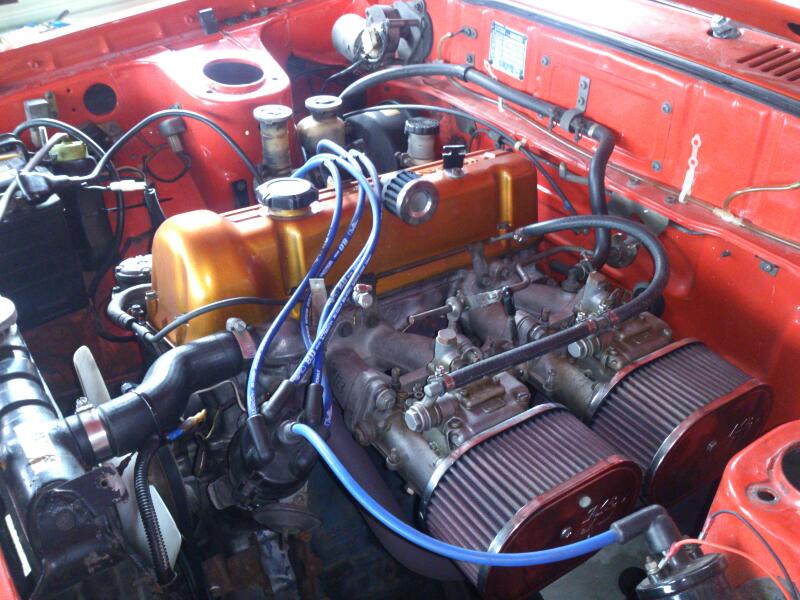
Obviously new air filters were in order so i went with k and ns coz thy look pretty cool and flow very well, while i was at it i thought why not finally get some extractors aswell? So i did and the sound is getting more and more awesome.
 2 points
 -
Count me in, I have no idea what Illegal piece of shit I'm going to turn up to this one in, because currently nothing runs and the Oxford is still sulking from the last attempt to use it!2 points
-
Whoops, been a bit slack in updating this build! Sorry about that. Recent work that has been done: Installed the Gymkhana shocks (pictured on the previous page) and Cheddas extended top hats. The shocks give a much firmer ride than factory - it's possibly a bit too firm given the earthquake ruined roads over here, but the car handles pretty well which is good. Unfortunately I didn't realise that the top hat bushes needed to be lubed, so they squeak and rattle and carry on, generally making a nuisance of themselves. Something I'll have to rectify. In other news, the car has been in to Honda here in Christchurch for a fairly extensive load of maintenance work: New water pump and seals New cam belt and cam seals New clutch, pressure plate, release bearing etc Rear main seal Valve stem seals Plugs and leads Miscellaneous other belts, various seals etc. Dropped in to pick it up again last week and had a lively conversation with the shop guys, who said everyone in the team had enjoyed having it in the shop as there are guys who've been working in the shop for a long time and remember these being around They ended up putting their most experienced guy on the job - he's usually held back for the more complicated diagnostics work, but as it happens he enjoyed doing the work and wouldn't let anyone else near it!2 points
-
I've got a golden flexplate? I think these guys need to torque to eachother now Hey there D Don't want Mr. D's nose getting dirty or out of joint so make sure that crank spigot is clean And happily ever after (well I hope so!)2 points
-
In the light of day/my eyes the goggles do nothing!2 points
-
1 point
-
I have already inspected the back of this van. Not that closely though.1 point
-
Lol who wants to re-do the rear end in the future? I only joined in because the rear end setup is like the most important part of a drag car (ask any drag racing Barry) I would want it adjustable in every way possible from the get go and at least close to the right geometry when its at a road-going height? not much to ask while the whole arse is almost cut out. Yes shit is more expensive and will take more time, dunno if you have seen the rest of the build but that seems like a recurring theme? Sit down with rookie and see if he can actually help and go from there. I am speeno-never-finishes-projects and that is my story.1 point
-
Or graded it with your splitter.1 point
-
CO2 is not bad at all, for thick fab work over a couple mm who cares get whatever. I do mostly panel work and the welds are better to work with a hammer when I use argoshield, that's about all I can add. Costs me about $100-$130 to fill my D size bottle and I've had to do it twice in 3 years. Can't comment on gas pressures and how much volume you get, I just pay money and use it.1 point
-
Spencer, who never finishes any of his own projects because he overcomplicates things and gives up... Is telling you to take the most complicated, difficult and expensive option. Rookie, who notoriously undersells how long things take or how difficult they are, wants to cut your car in half just before gapping it overseas. Do you want to get it running and have some fun, or scope creep your finish line a few more years into the future? Keep the 4 link even if it aint great, or do whatever seems like it will help you get this up and running.1 point
-
Well actually Rookie, you can get better results with a sequential twin charge system than a compound setup on a petrol engine, as compound is far less efficient and generally unnecessary as there's only so much boost you can run before things start popping. Diesel is a different story as you can force feed them as much air as you like, however the efficiency still comes into play. Sequential won't require as much intercooling and has less parasitic loss up top as once the turbo takes over the supercharger is just freespinning, or you could have it on a clutch like the SC12/14s and shut it off entirely when not in use. Or you could do away with both an run a shittonne of NOS instead.1 point
-
We are ganging up on him; that is how the best decisions get made hahahaha1 point
-
Yeah these things are easy to say when it's not your car though.1 point
-
I can't help but feel if your going to read threads on OS that may upset you....maybe you shouldn't bring your friends you know......shoutie rookie..... Sarcastic rookie. Or maybe tonight go to bed before 9 pm so you get a good sleep and wake up bright eyed and bushie tailed feeling good about the world. OK buddie1 point
-
i could totally see chris being the squeamish one and getting Tara to clean it out she totally wears the pants in that relationship (still love you chris)1 point
-
I remember when you didn't wan't to tub this Tom, peer pressure is the best.1 point
-
Mean chop this thing to bits.1 point
-
1 point
-
1 point
-
sick Yearly update time. So I got it all back together in a mad rush because I moved house. Painted the fire wall, front Subframe and so on, put all the suspension back in with new pivot bushes and shit so its all hunky dory then drove to my new place and parked it in the back of the garage. Fitted a Rad overflow and a catch can Then did this... finally, basically shifted all the gauges, added a smiths 8k tach, made a stainless thing the same shape as the old dash. made a new dash, swore a lot, covered it in leather, swore some more while putting all in, drank a lot of beer.1 point
-
Went down to the in my mates Mk5. Absolutely loved this! So much character. I should've brought down my Mk2.1 point
-
I had a look around this at VW nats and didn't click that you were on here! Man it looks sweet in person1 point
-
Gore meet, Sunday 19th April Joining up with a guy running 'Mates Car Cruise' on the third Sunday of every month, and heading down to Gore. Will be visiting the Mandeville Aviation Museum and then have lunch at The Moth (part of the museum?). Then we'll head to Pioneer Park. Meet at the Dunedin Ice Stadium carpark between 9-10 am, with a 10am sharp departure.1 point
-
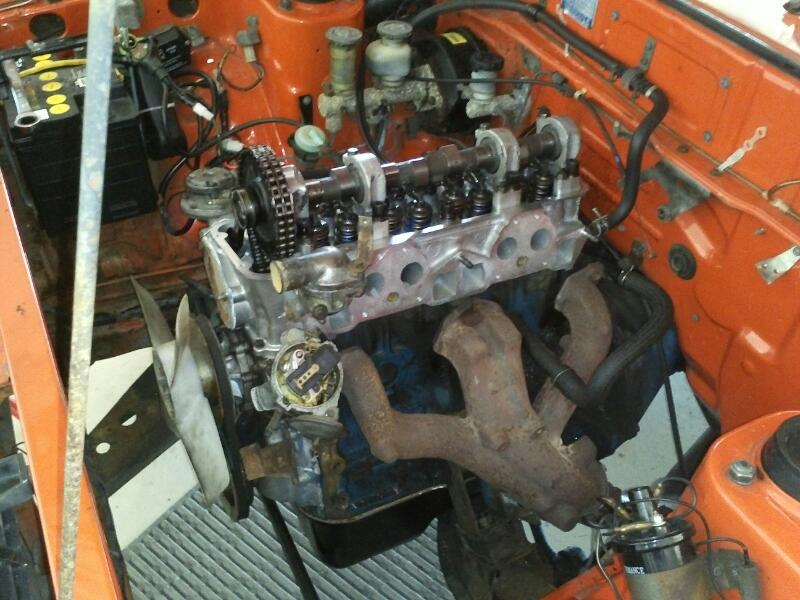
So the pieces went back together and i had myself a sweet sounding new engine to run in feel free to discuss i love feedback //oldschool.co.nz/index.php?/topic/47808-monsta01s-1979-datsun-160j-sss-discussion/ A lil bit of painting rocker cover also happened in this time
1 point
-
also some other crap to add to the oh i should show you guys this stuff1 point
-
I'll be there! Name a date.1 point
-
I'm not sure how the pros do it but here's how i made bumps in steel if you're interested. step 1 - own three cars that all need floor repairs. step 2 - read the internet needed a floor panel for the wagon. measure up, choose swage positions and mark out. testing. using a 1200mm foot guillotine and 1200mm finger folder, both in ok condition. i made two folds in the steel both the same way, then bent the sheet back to 'straight'. it bent between the two folds, giving me the bump. close enough is good enough do em all the same as above in the folder use the folder to clamp the swages at the outer edges flat. sheet warped like a pringle. not sure if you're allowed to do this with a folder. the warp is because the outer border of the panel is larger than the inner area, as i've shrunk the inner area by using up material to make the swages. the outer needs to be shrunk to compensate. shrinking - heat it up, cool it quickly with water/wet rag. hammer flat, trim down to size. soft hammer on anvil - didnt want to thin the steel any, which would do the opposite of shrinking. did both sides. shrink again, hammer flat again. encouraging the swages to be more how i like. hammers, bits of scrap, as you see. anvil, saw horses etc. quick squirt of flat black and a check to see if it's working: trim again, finish up and couple of mild folds down the edges to encourage the edges into straight. in place - still a bit of a warp, but metal hot glue will hold it right. well it's no chip foose but good enough to fill a hole in a 50 yr old floor. thought i'd write it up cos it was surprisingly easy and yall may need to do similar next wof! last time i was cutting and welding the ends of the swages and they were all over the show. turns out patience, fire and hammers were the key. Talk about it here1 point
-
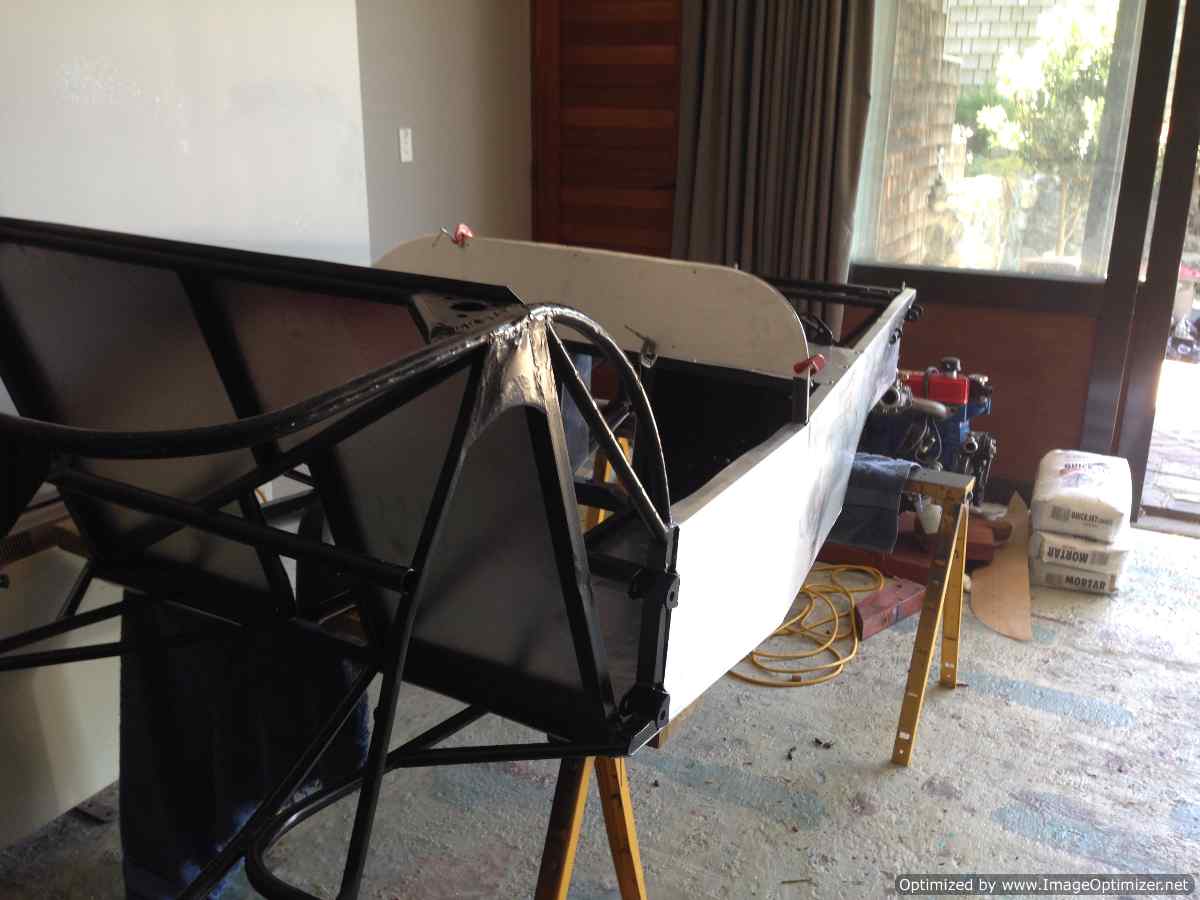
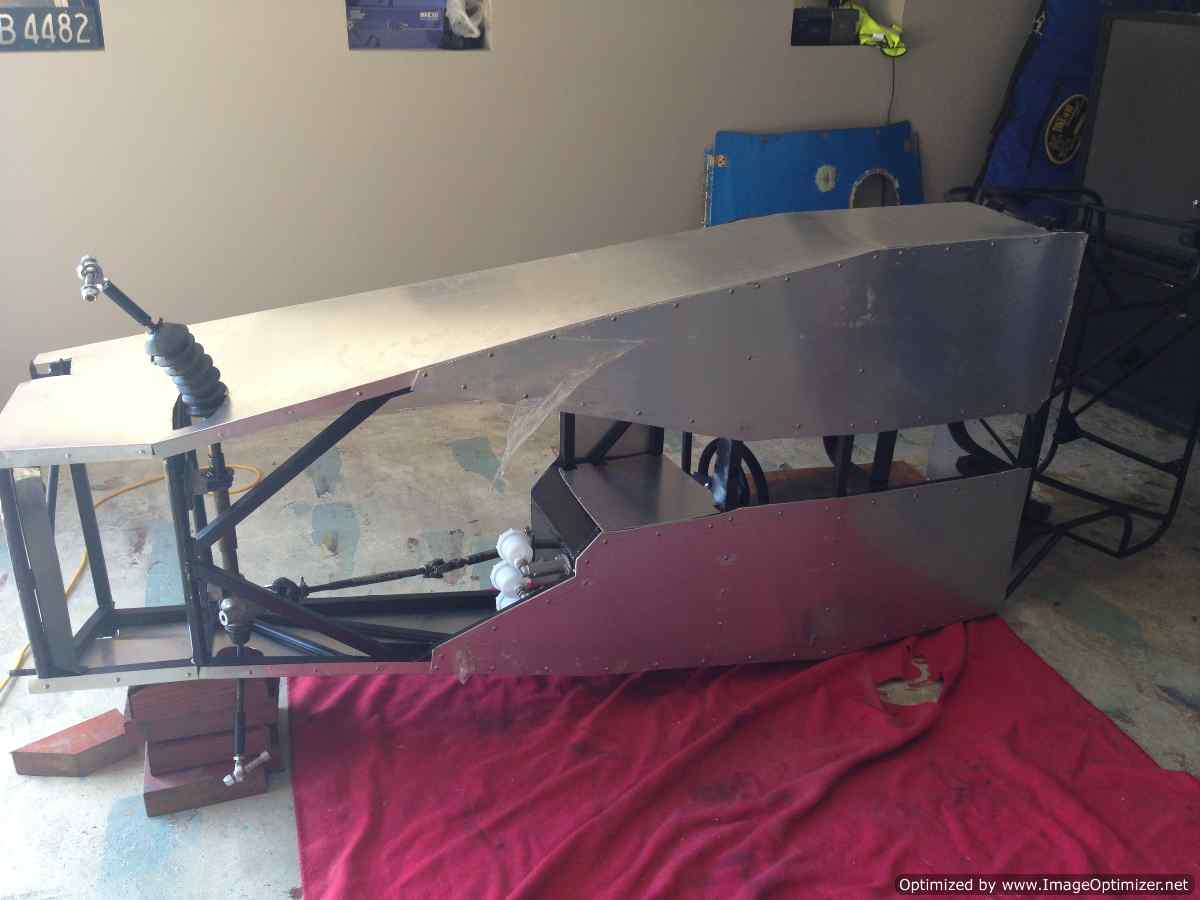
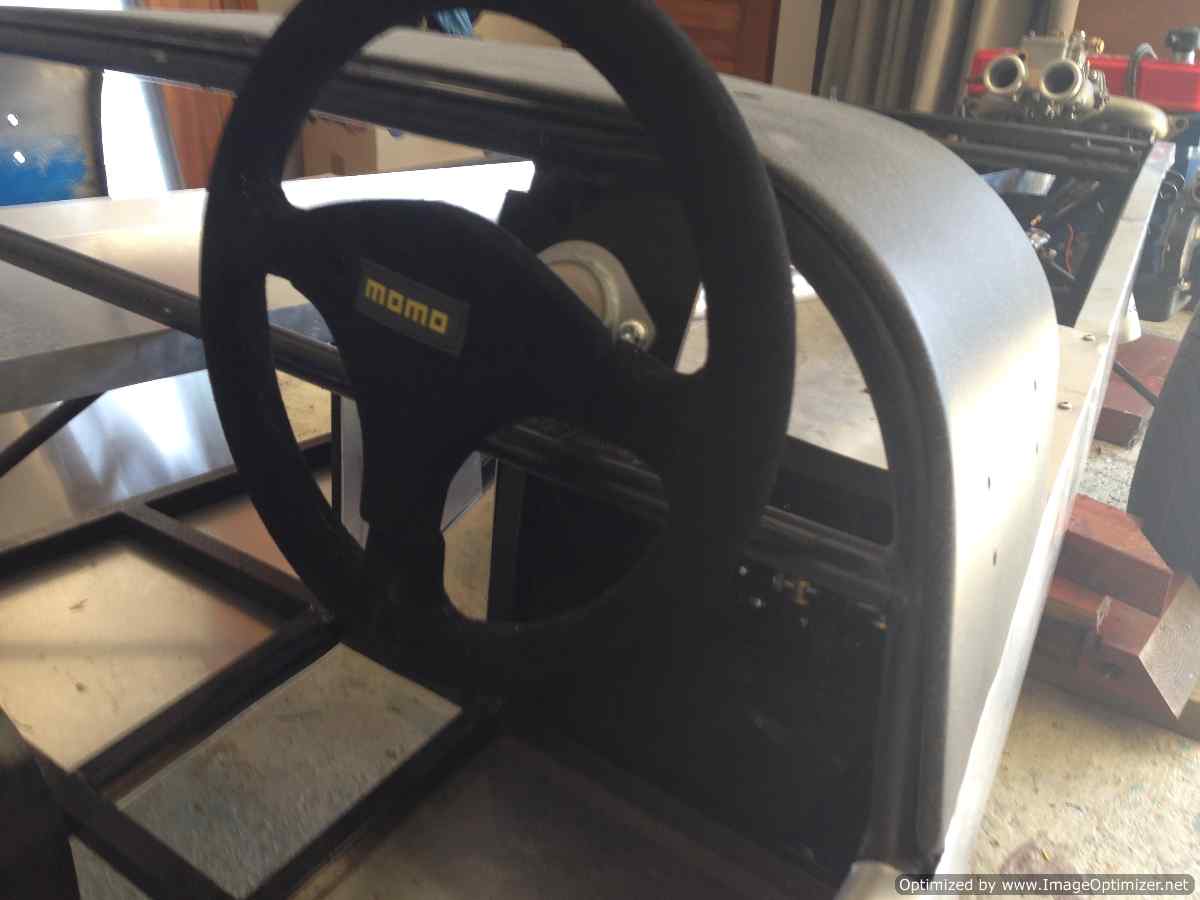
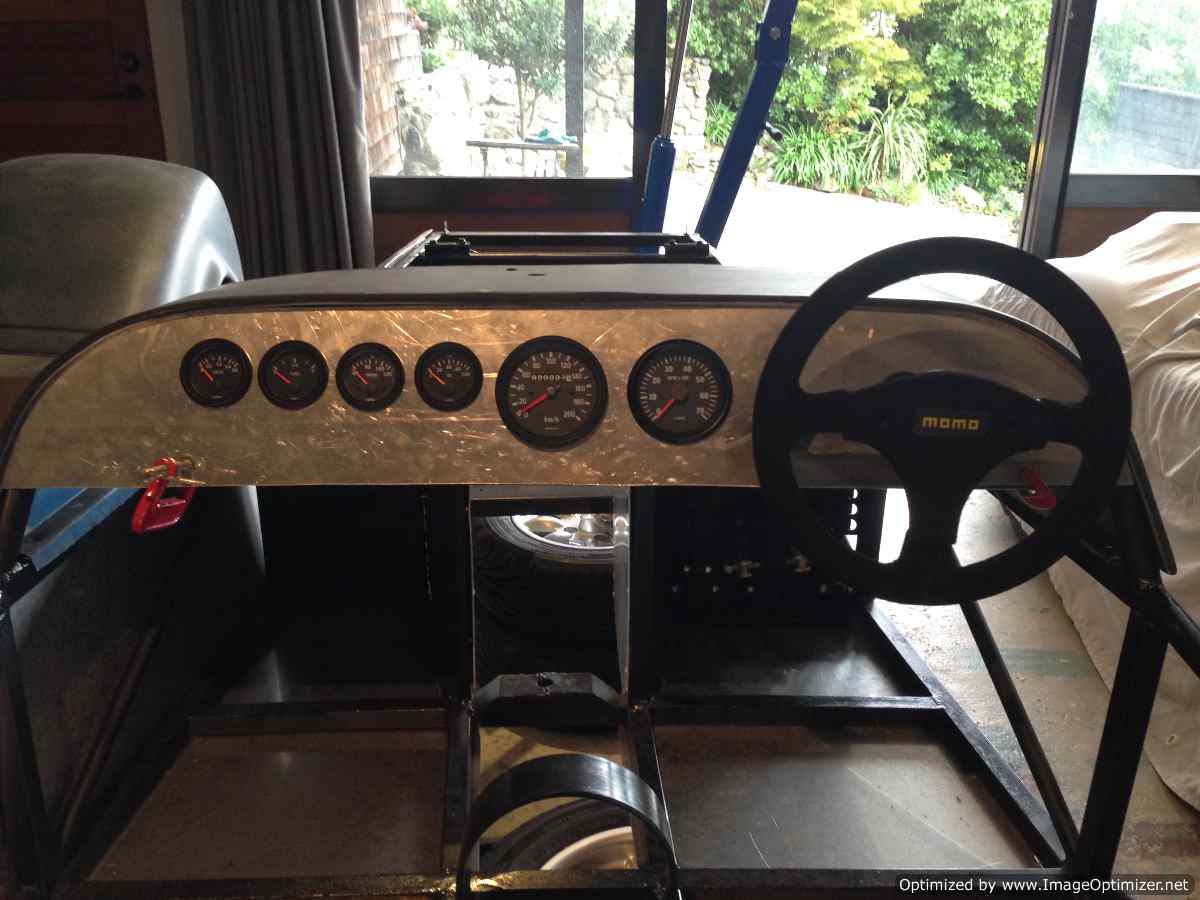
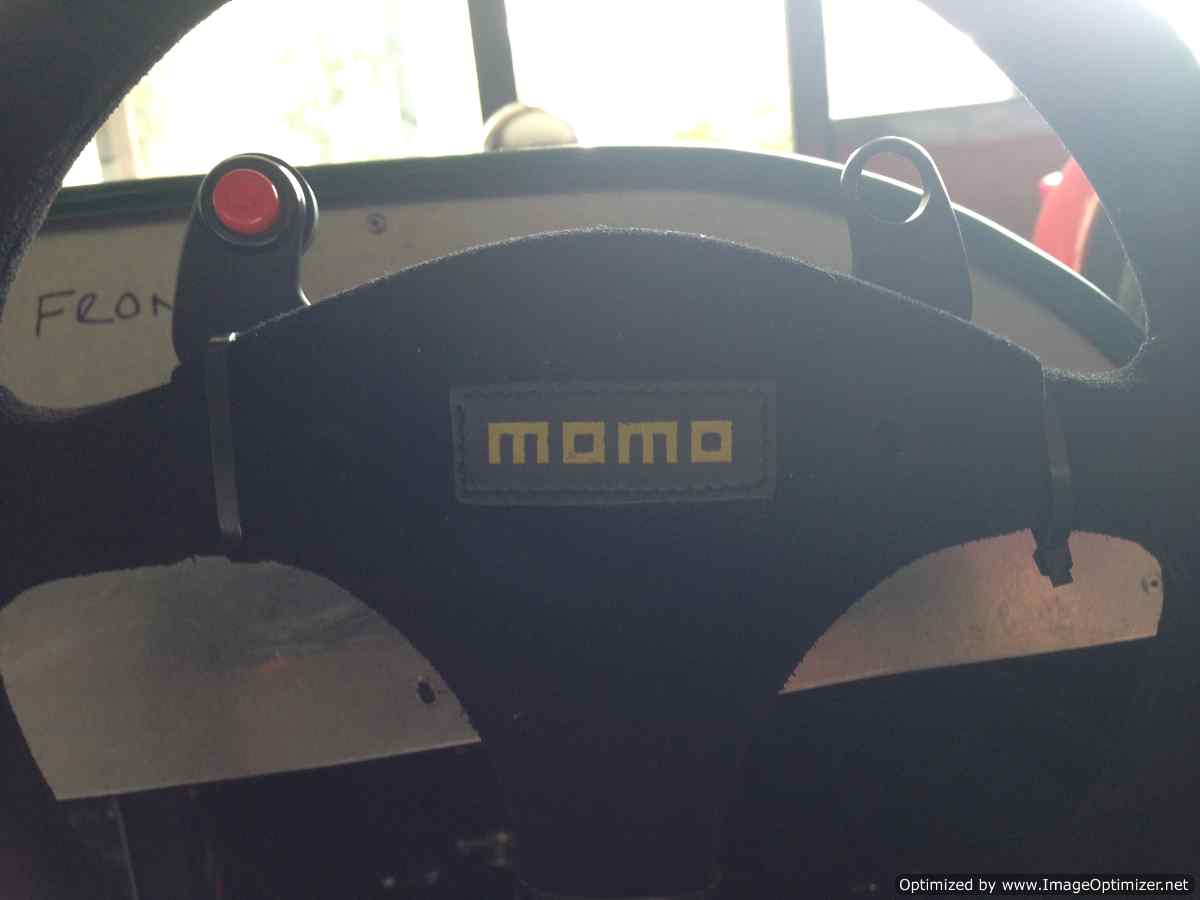
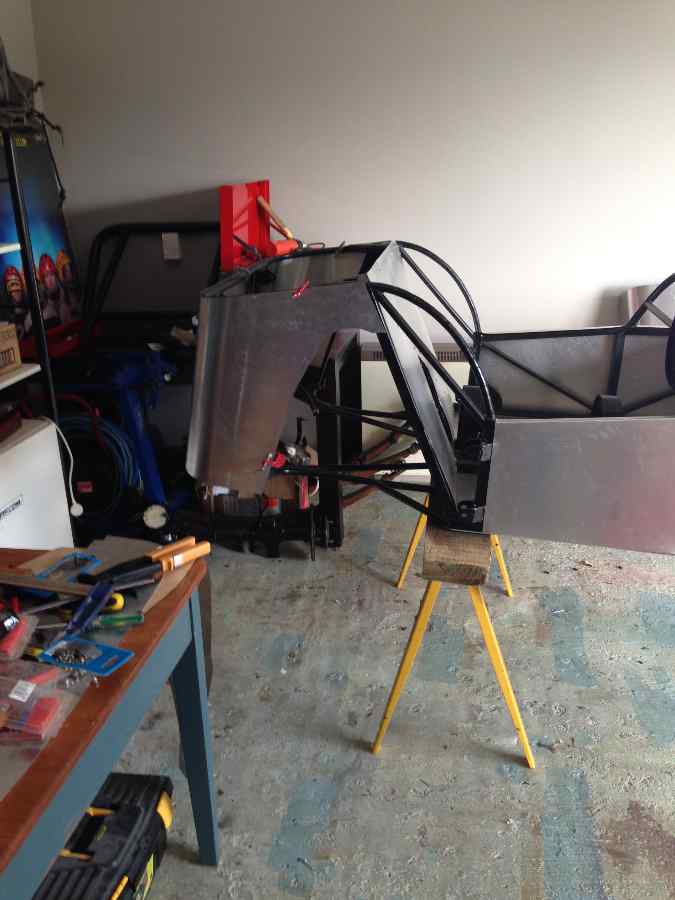
Another day off, so more posting to be done. Slowly catching up to where I'm at currently Bit more panel work completed. As mentioned by some other members rivets are all good, especially for holding the panels down tight so a few have gone in, just in lesser numbers than previously. Also like the ability to remove the panels by undoing screws seeing as it is a hand build car and of course there will be issues, so easy removal is a must. Both sides skinned, ability to turn it over is pretty convenient but it is getting a bit heavier at this stage. Still manageable with 2 people. Cutting the holes for the steering rack was a terrifying process. Had to attack it with a holesaw and hope. Enjoying the plate in the background. Everyone will try tell me it isn't a real one... then they see my spotty- and have to think a little harder. Don't know if I've mentioned previously but the rego has been on hold for over 20 years. Which is beyond awesome. Supposedly I should be able to just register and then get a wof... somehow I don't think it will be that simple. Minor modifications have been made but it's fairly similar to the original. Any thoughts on this are appreciated. I'm aware of cert requirements for things that have been changed like engines etc. Put the steering wheel in and scuttle on for a test fit- wheel is very small but couldn't be much bigger due to space. Apologies for the shite photo Then some more fun stuff, drilling out the dash for gauges. Way more enjoyable than sheet metal in my opinion Came out pretty good. The minor gauges are Vthree- got them for a good price and they look fine, pretty sure they're made by the same people who do VDO but don't quote me, the speedo is a Pricol mechanical and a VDO tacho. The dash is pretty small so fitting all the switches was a bit of a pain, and the key of course. Naturally I forgot about the horn and hi low dip switch so I've had to go too soon jr style and mount them on a button plate behind the steering wheel. Not really keeping with the classic look but then again I'm secretly enjoying it. Then I fitted the rear panel for drilling, this was going to be painted so I couldn't fix it in place That is all, as always comments are appreciated- and regarding the cert issue (if I need it at all). //oldschool.co.nz/index.php?/topic/46798-hkm400s-1969-lotus-7-series-3/ Ta
1 point
-
Hi guys, I need to open some DXF files, just to look at them, I don't need to muck about with them or anything, is there a simple/free program I can D/L so that I can view them? CHEERS!1 point
-
so it's all done, bar some tidying up... have taken it for a proper drive this morning, and probably barely used more the 1/8th throttle, it feels fast... pretty pleased1 point
-
also 150lb/in springs are just like the ones in campylobacters wank chariot1 point


.thumb.jpeg.384ff72c8d2b0ee0d34a7bdedb55bdcf.jpeg)

This leaderboard is set to Auckland/GMT+12:00