
Leaderboard

.thumb.jpeg.384ff72c8d2b0ee0d34a7bdedb55bdcf.jpeg)


Popular Content
Showing content with the highest reputation on 03/13/24 in all areas
-
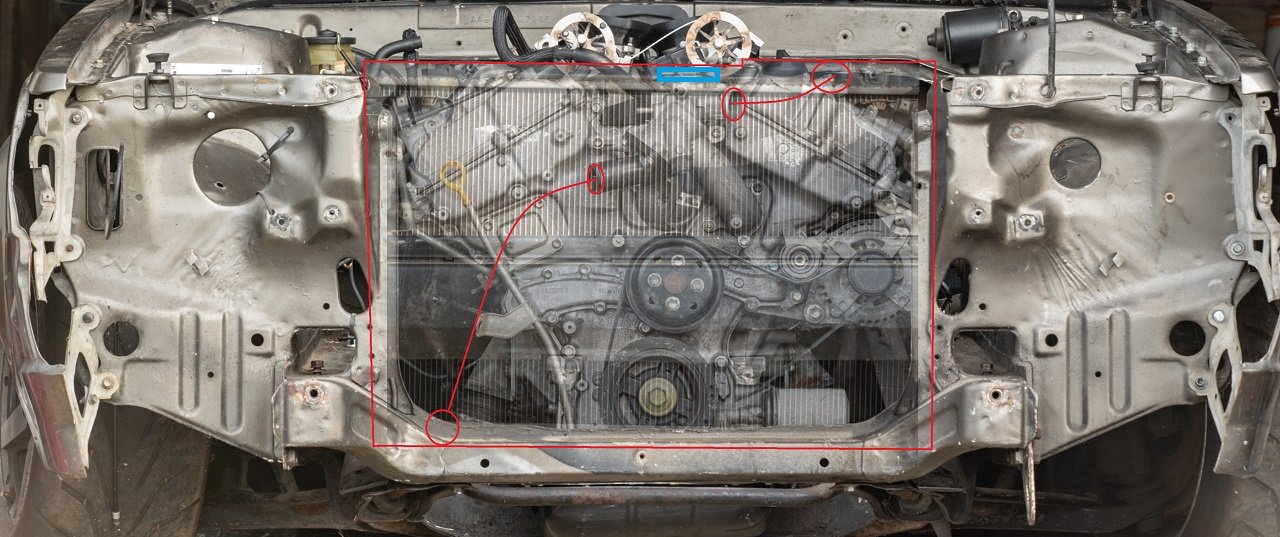
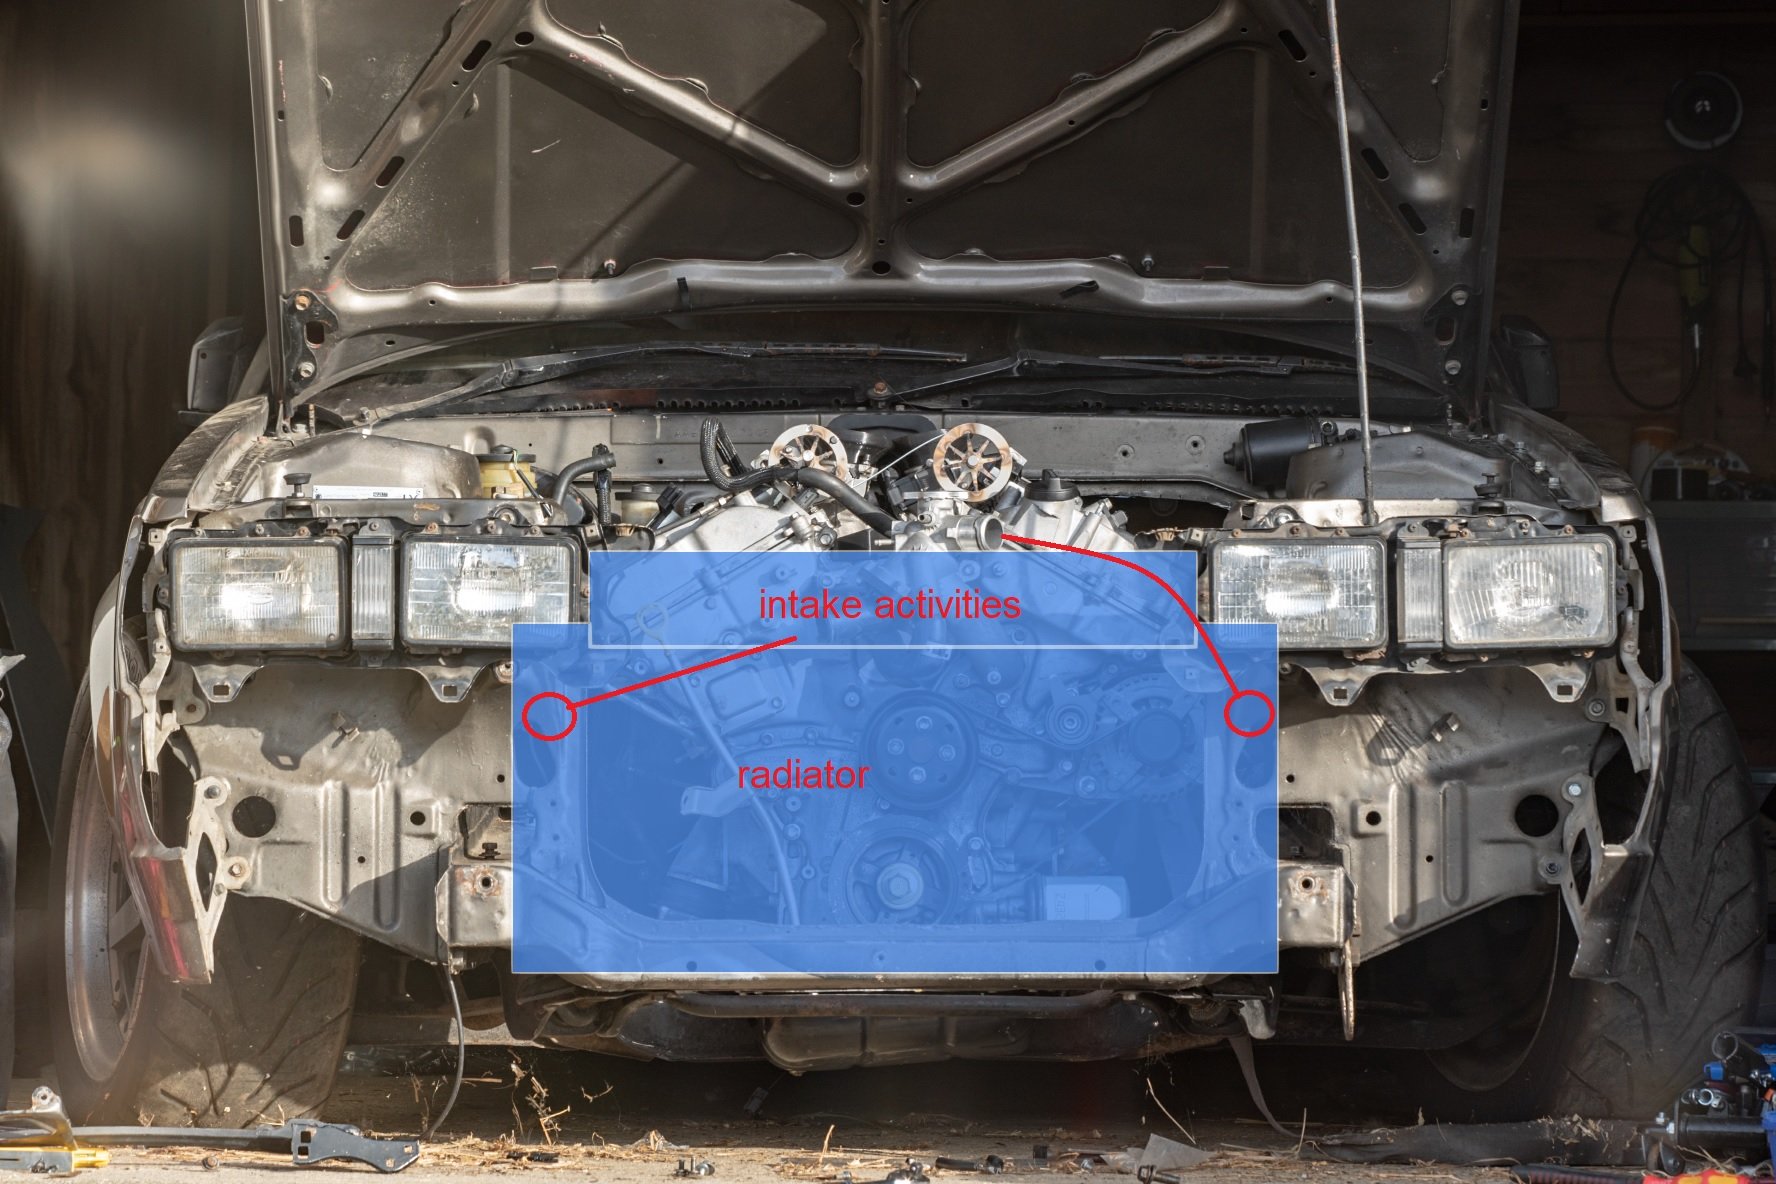
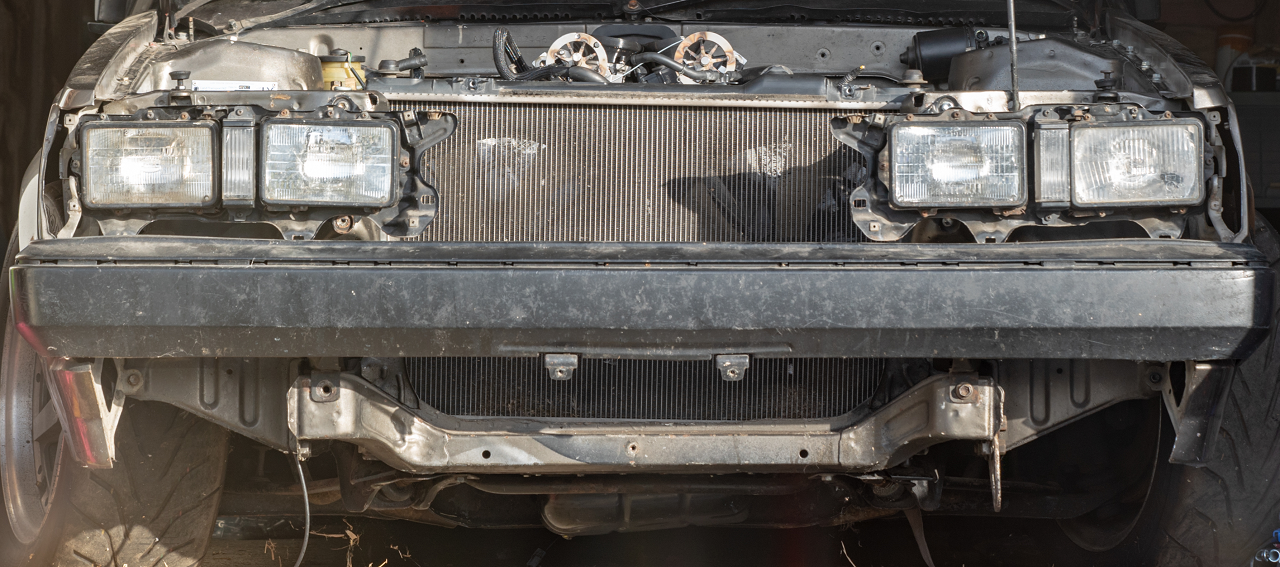
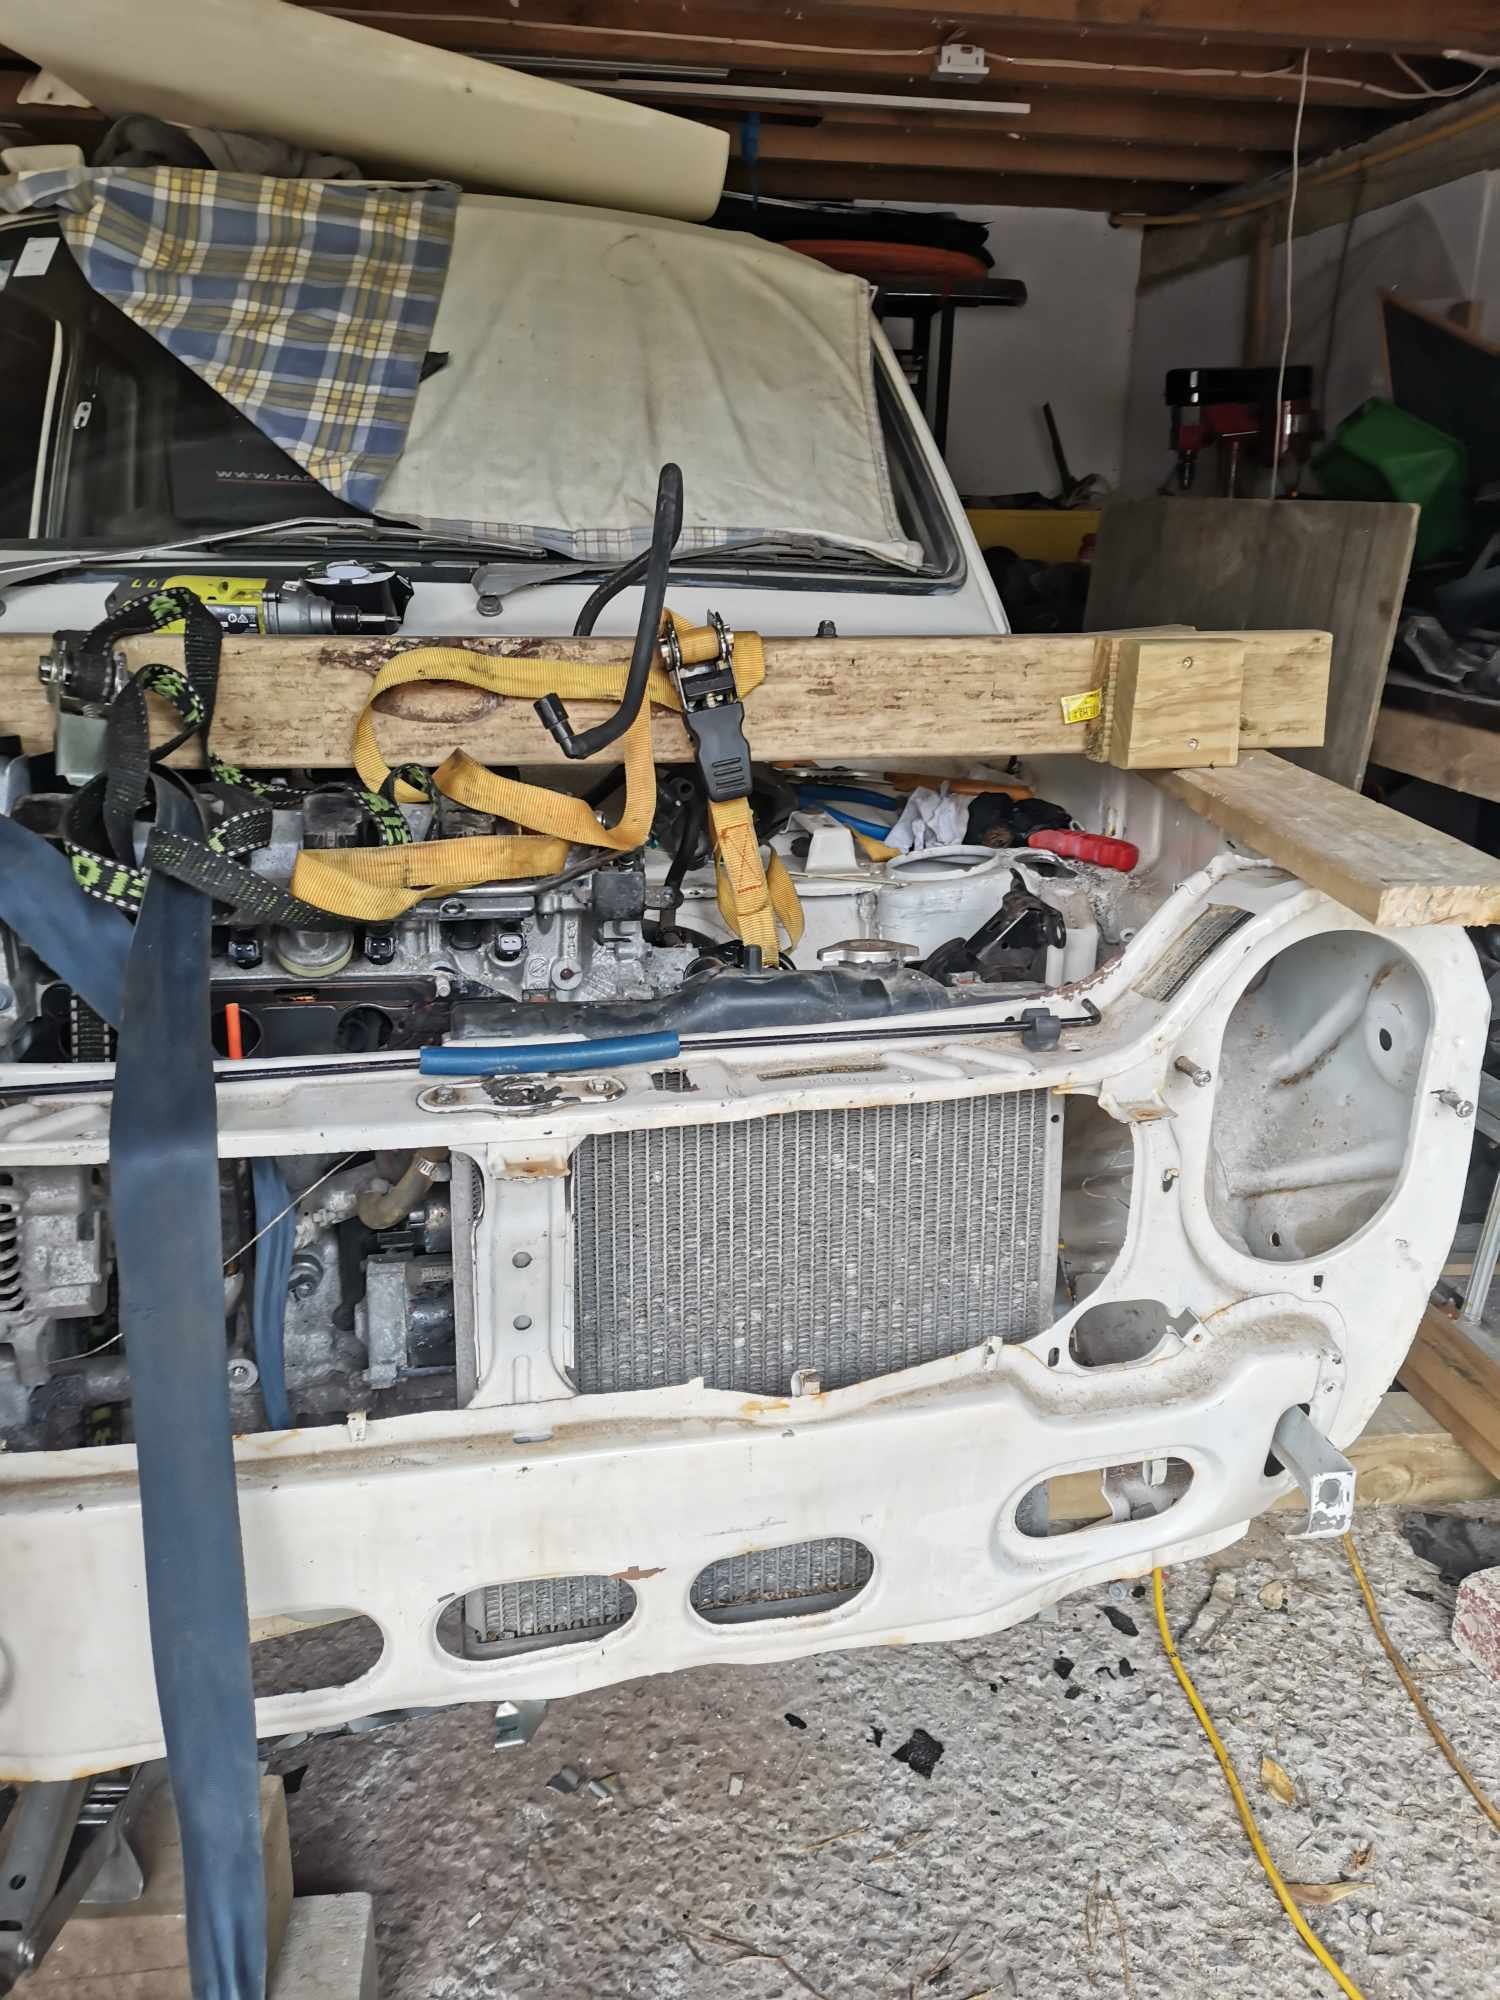
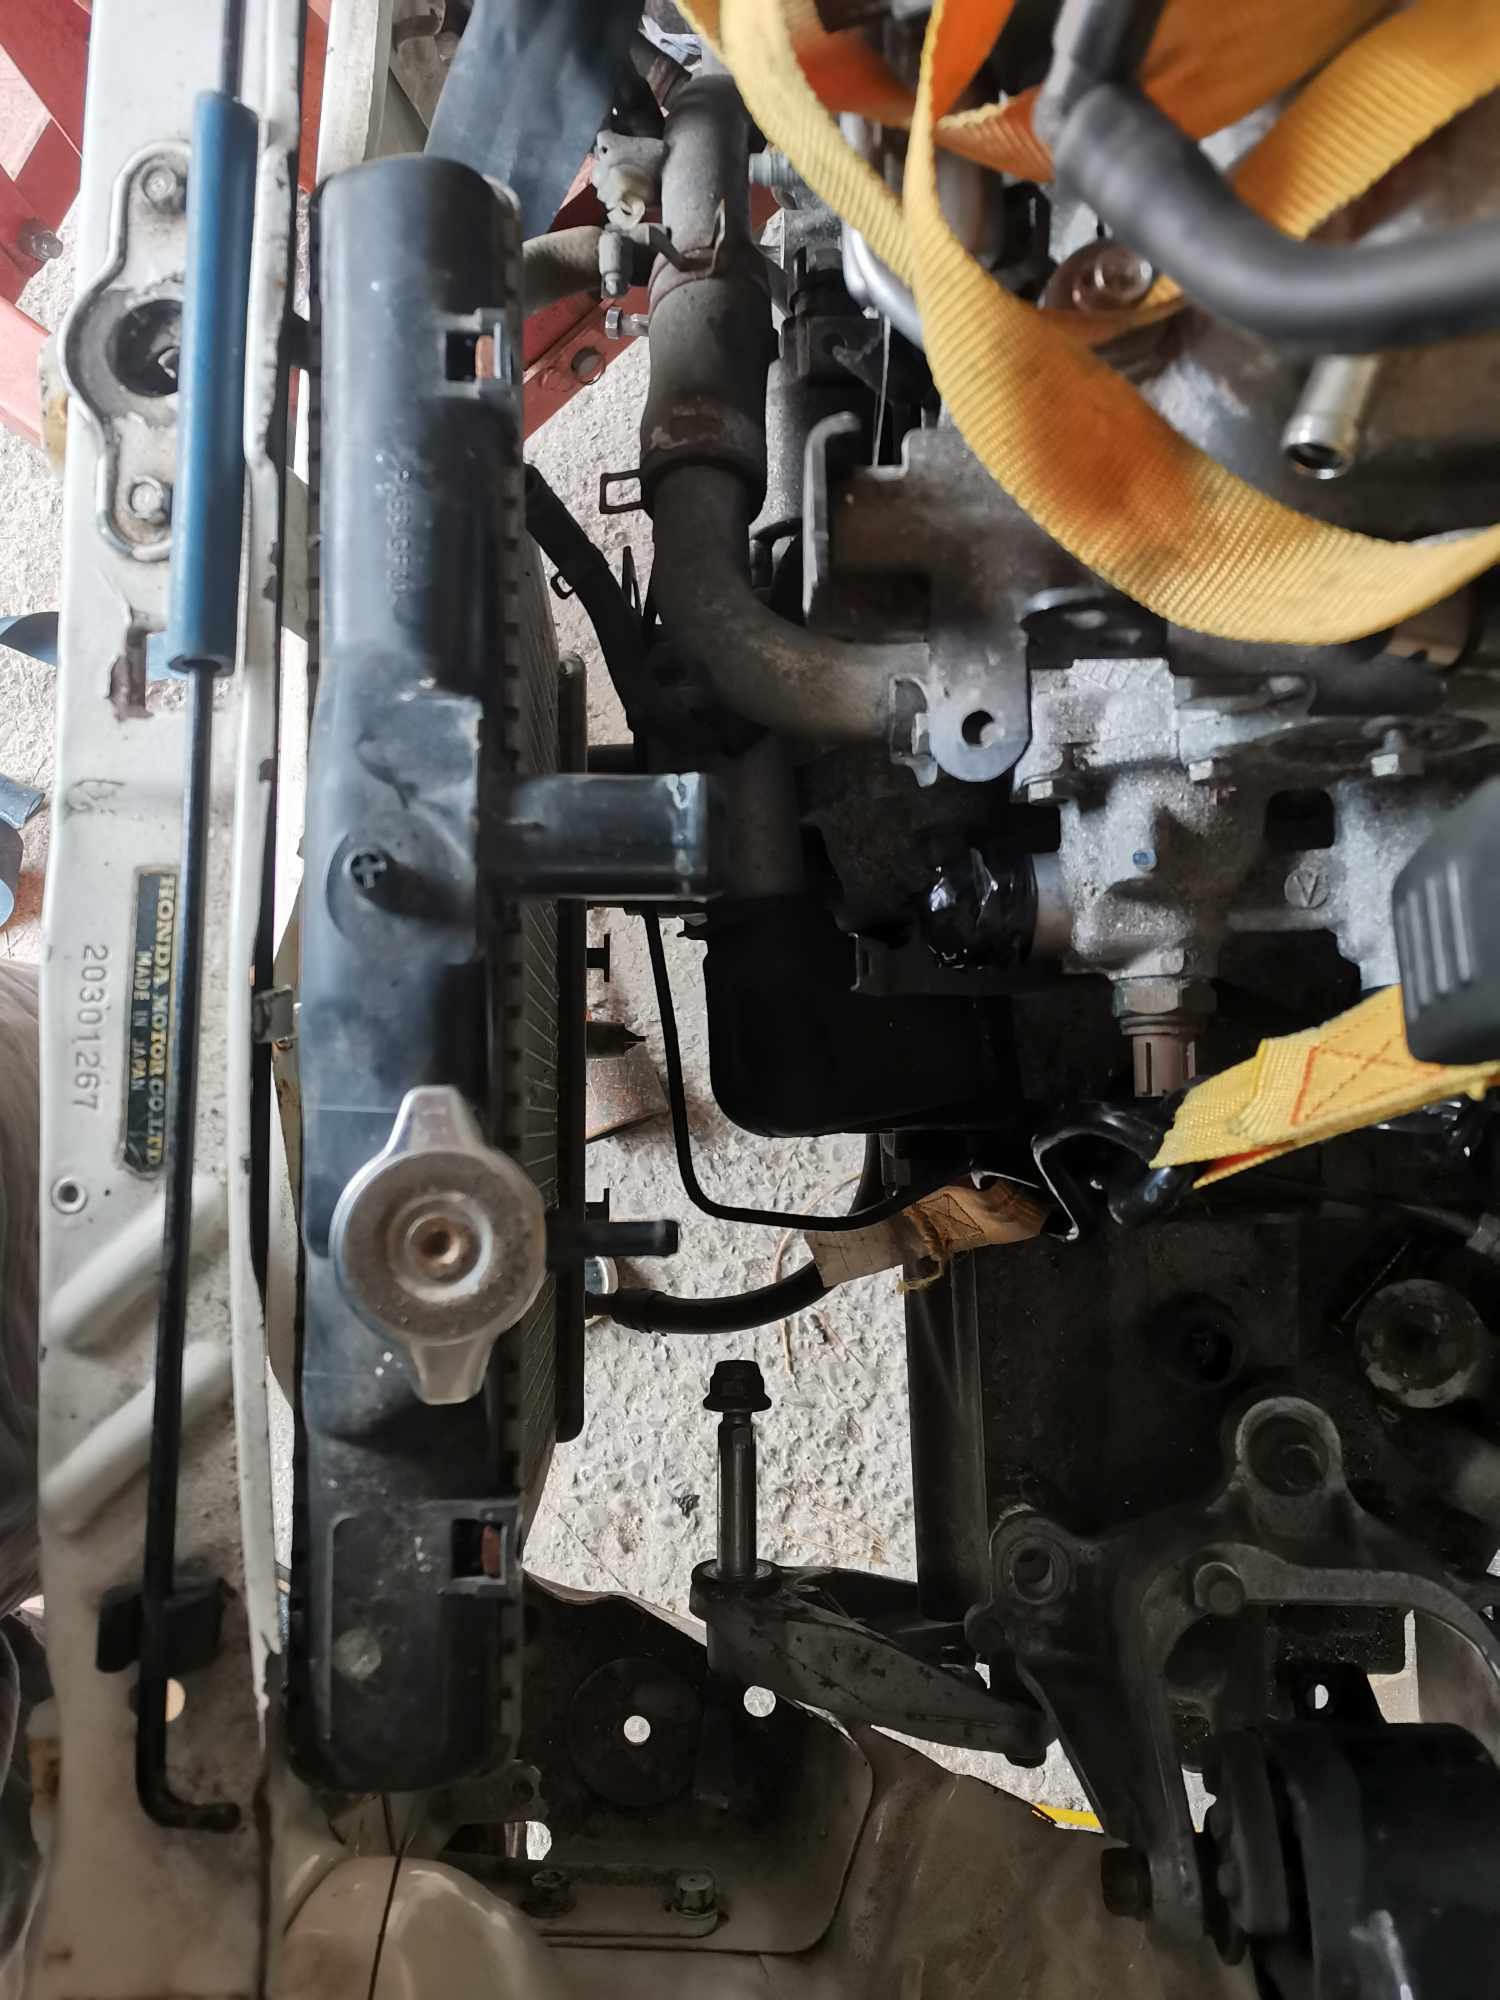
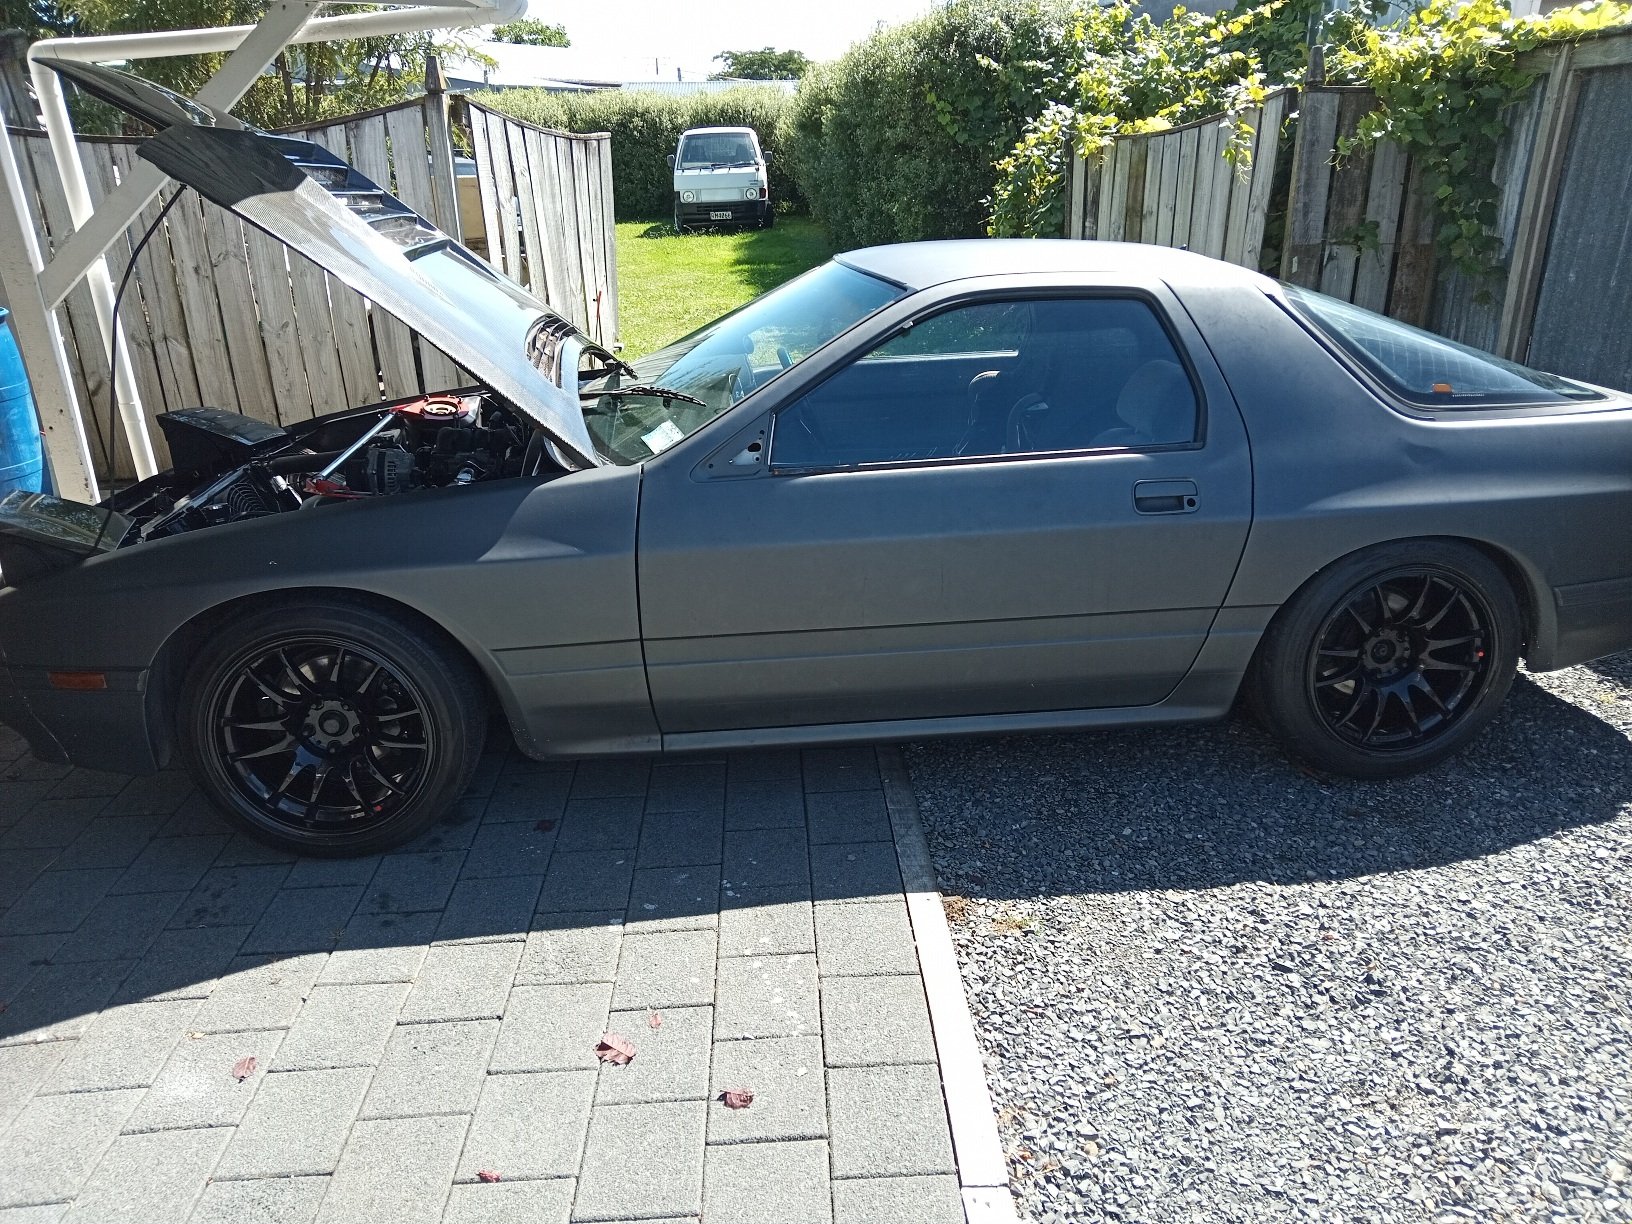
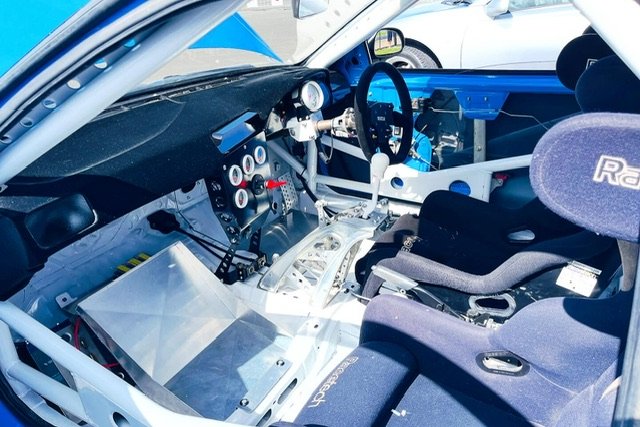
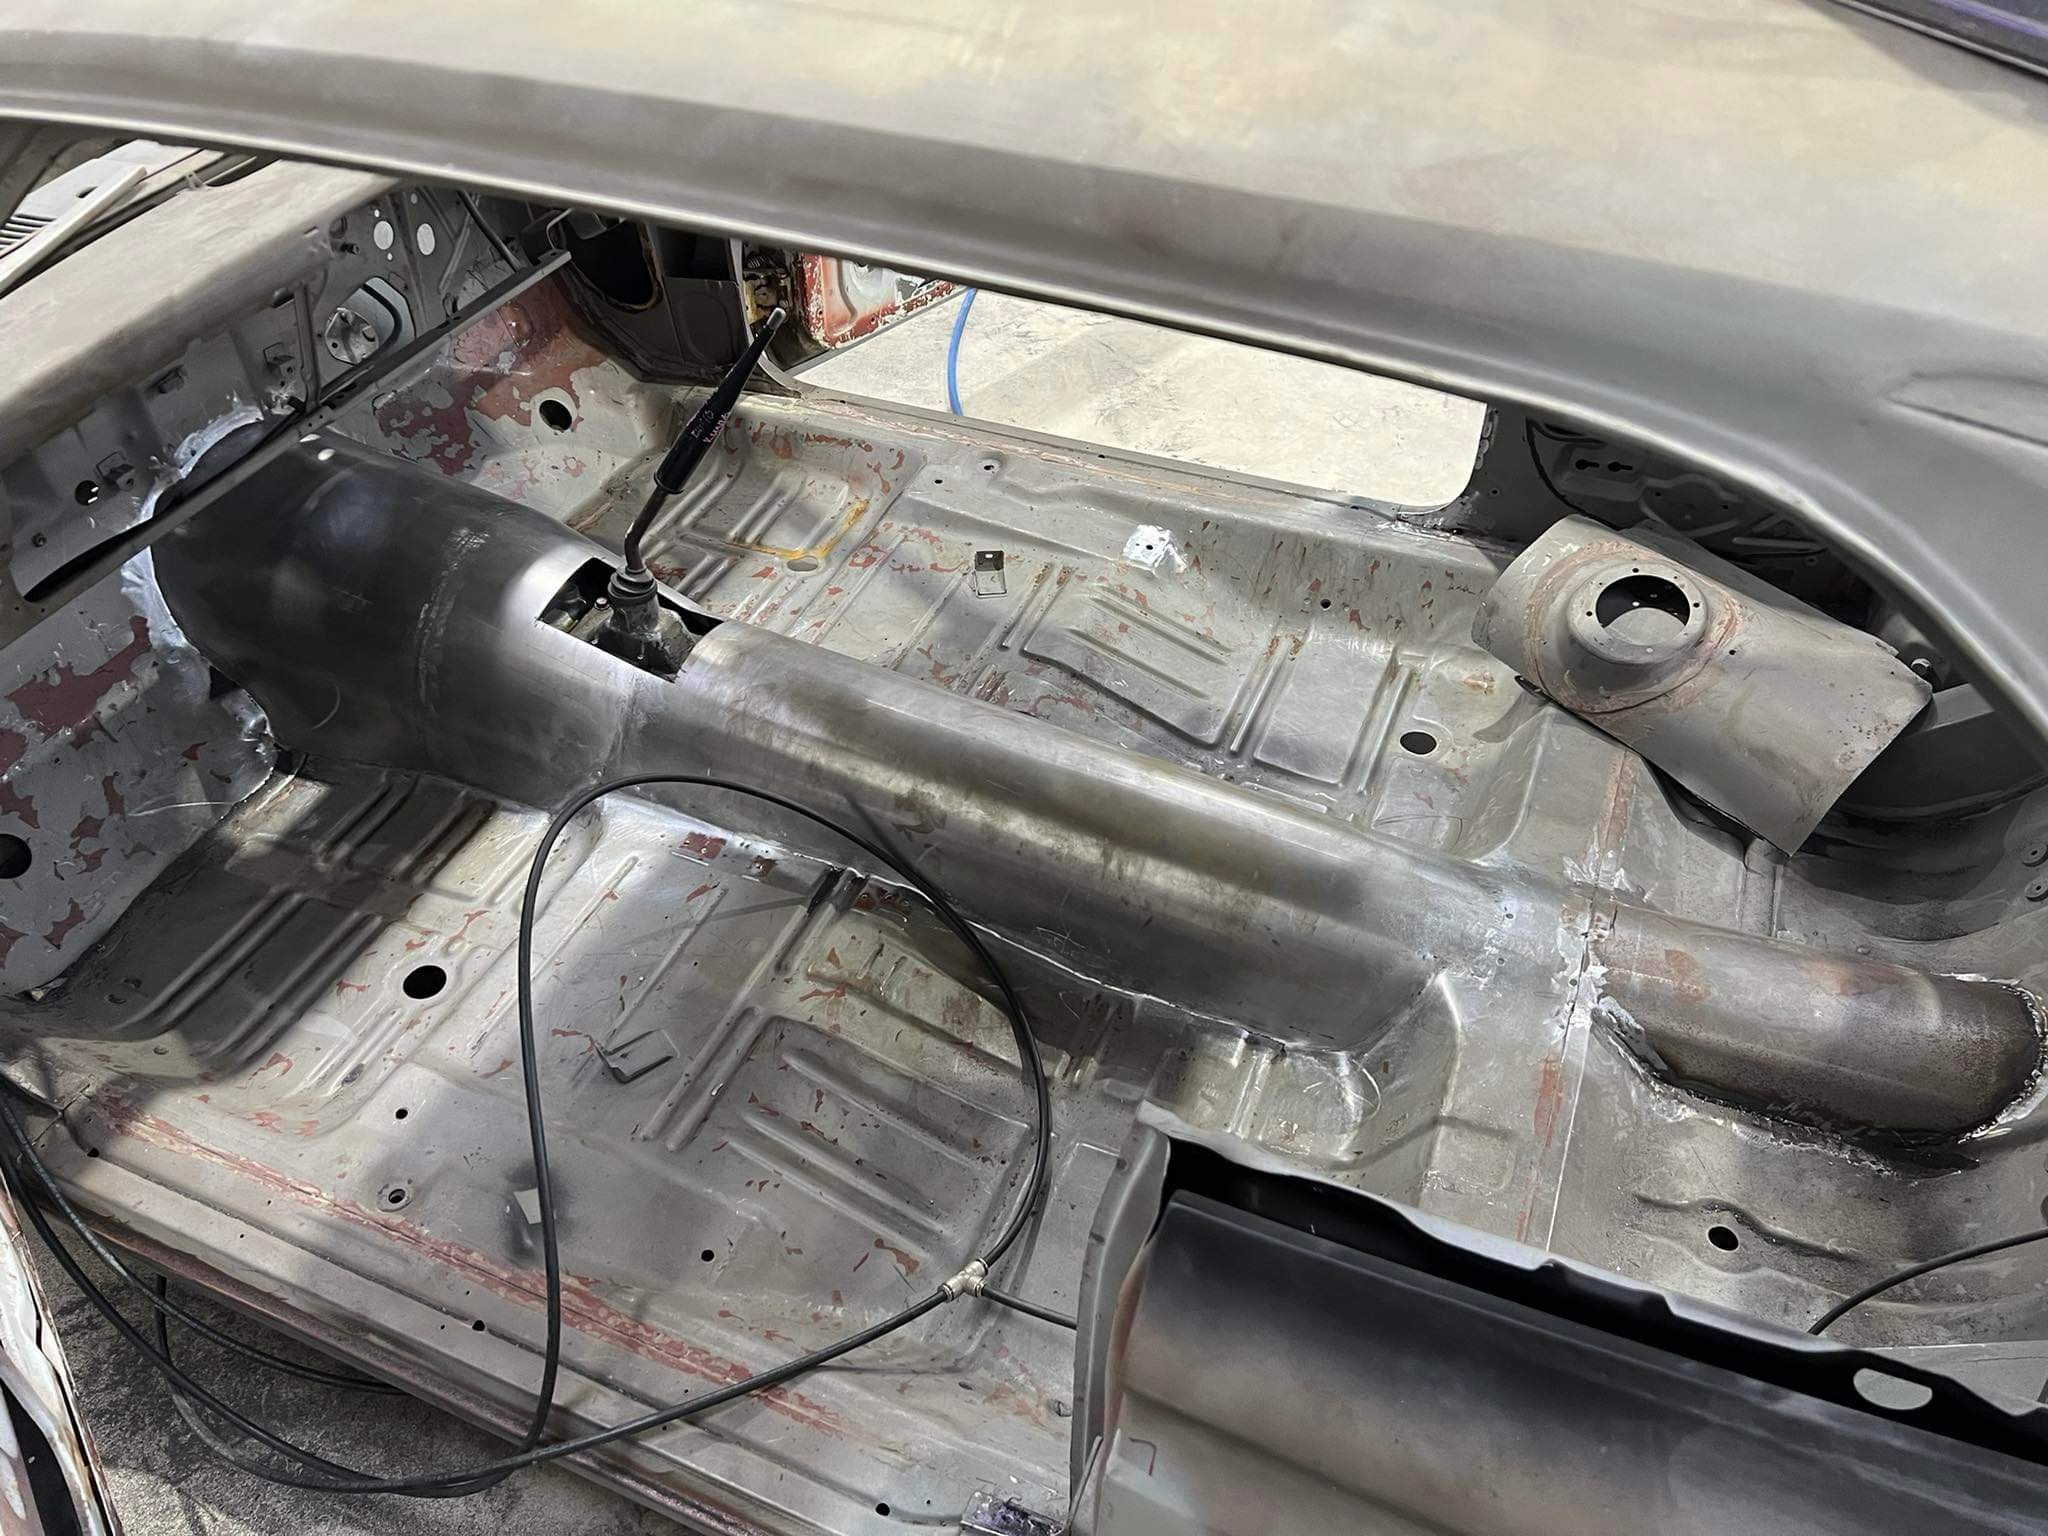
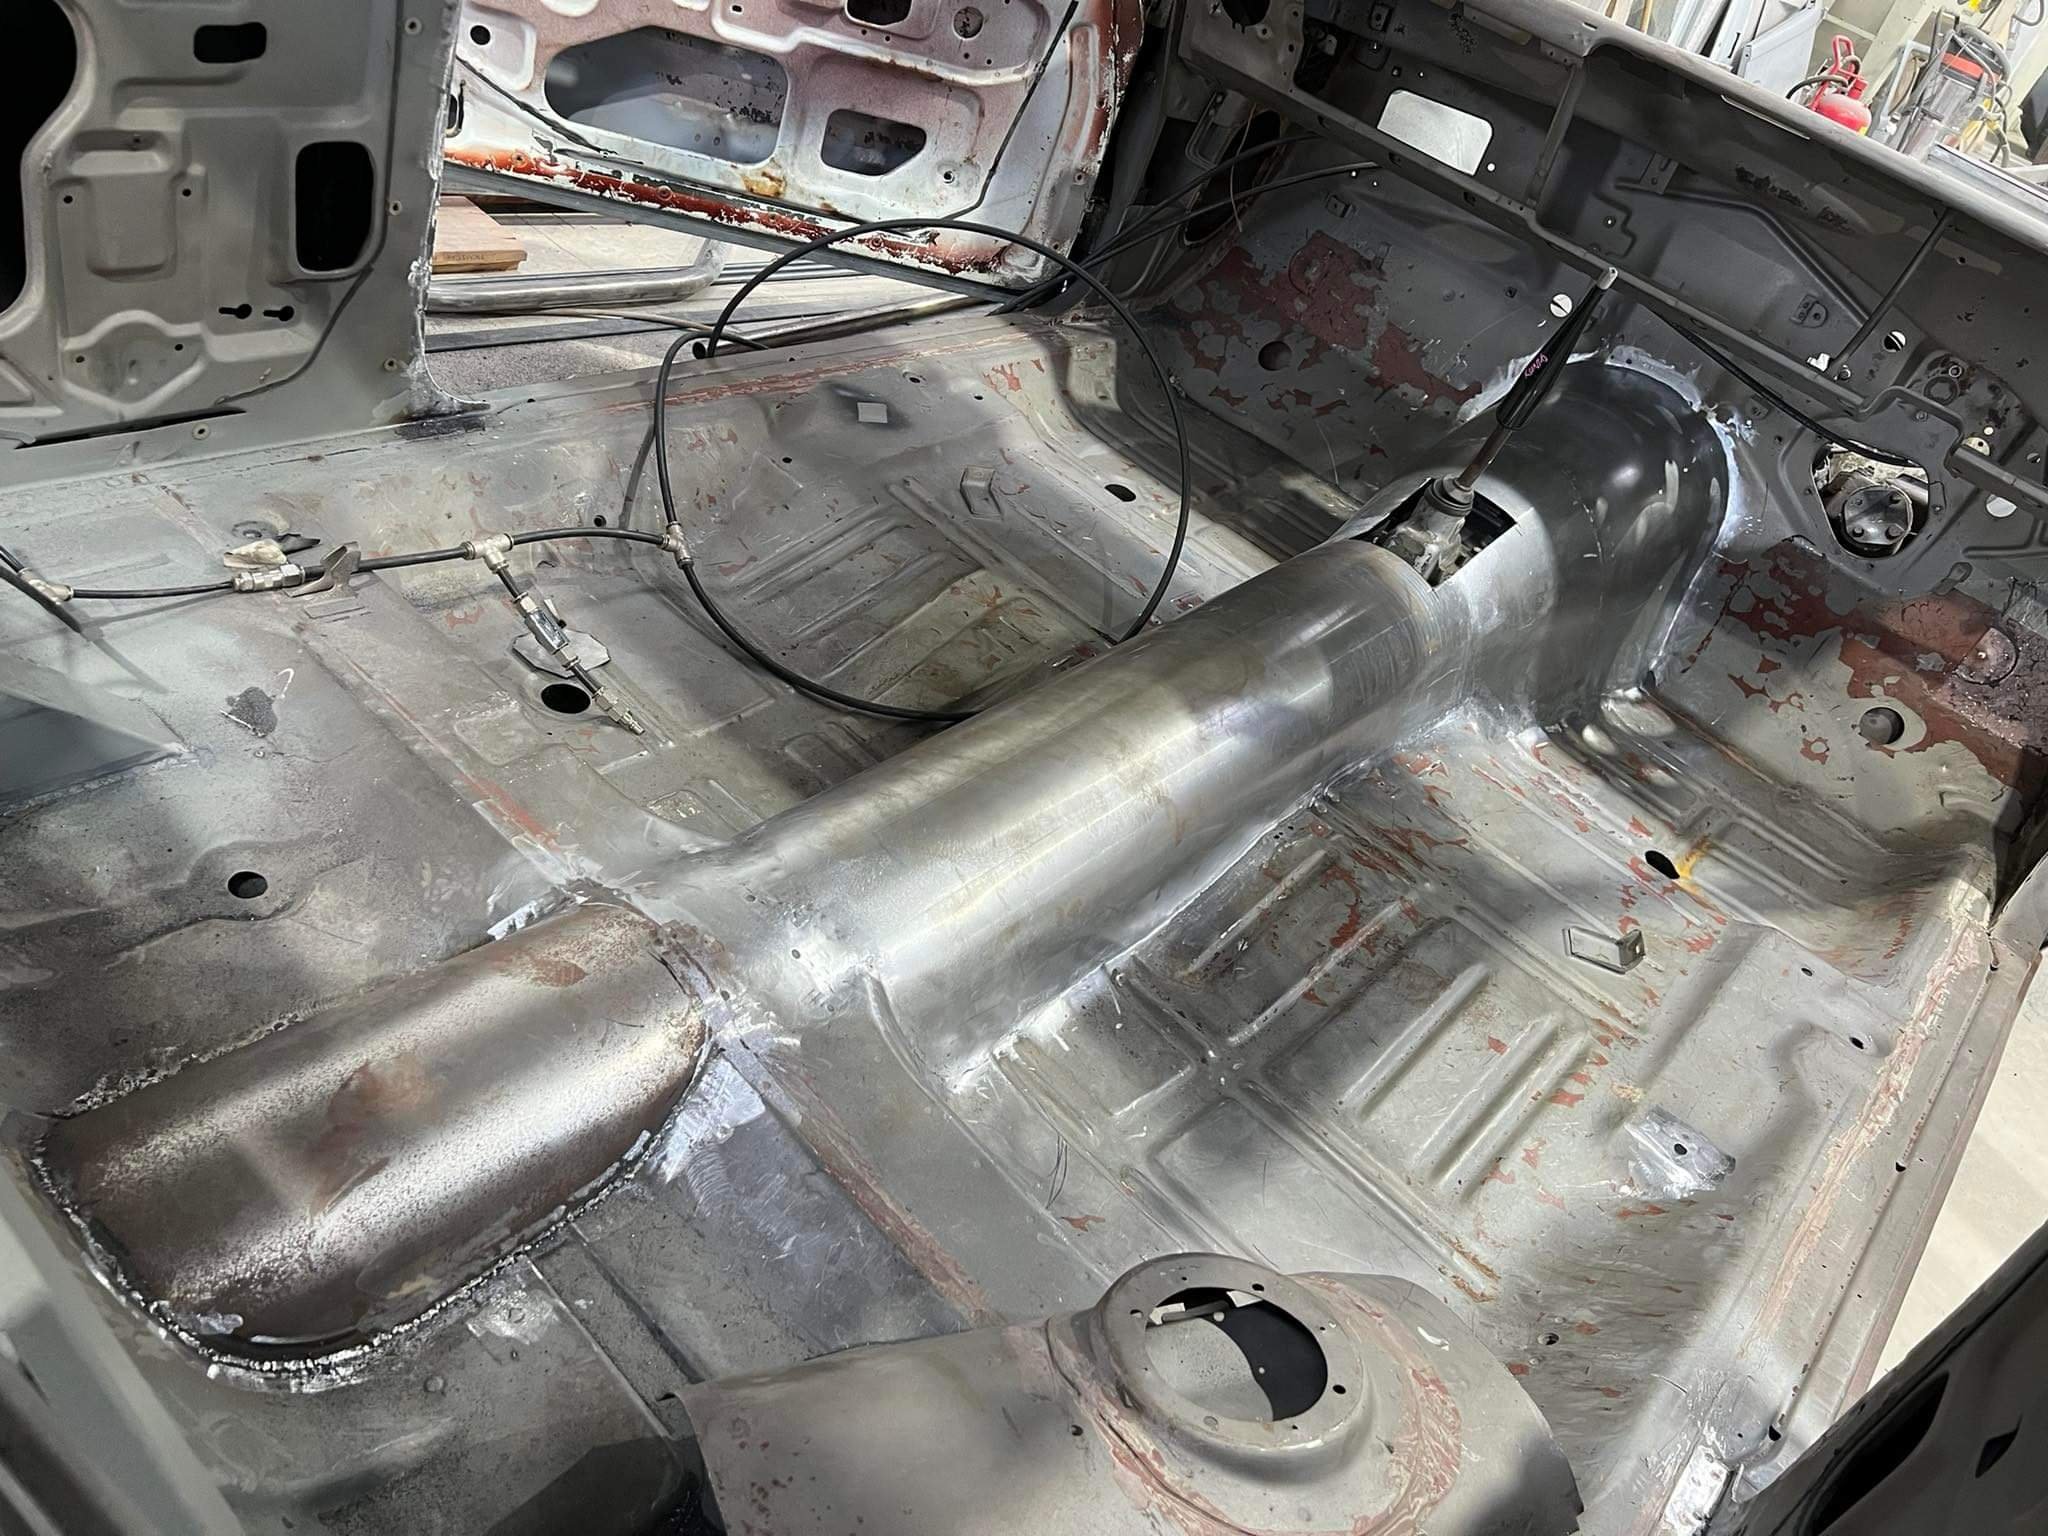
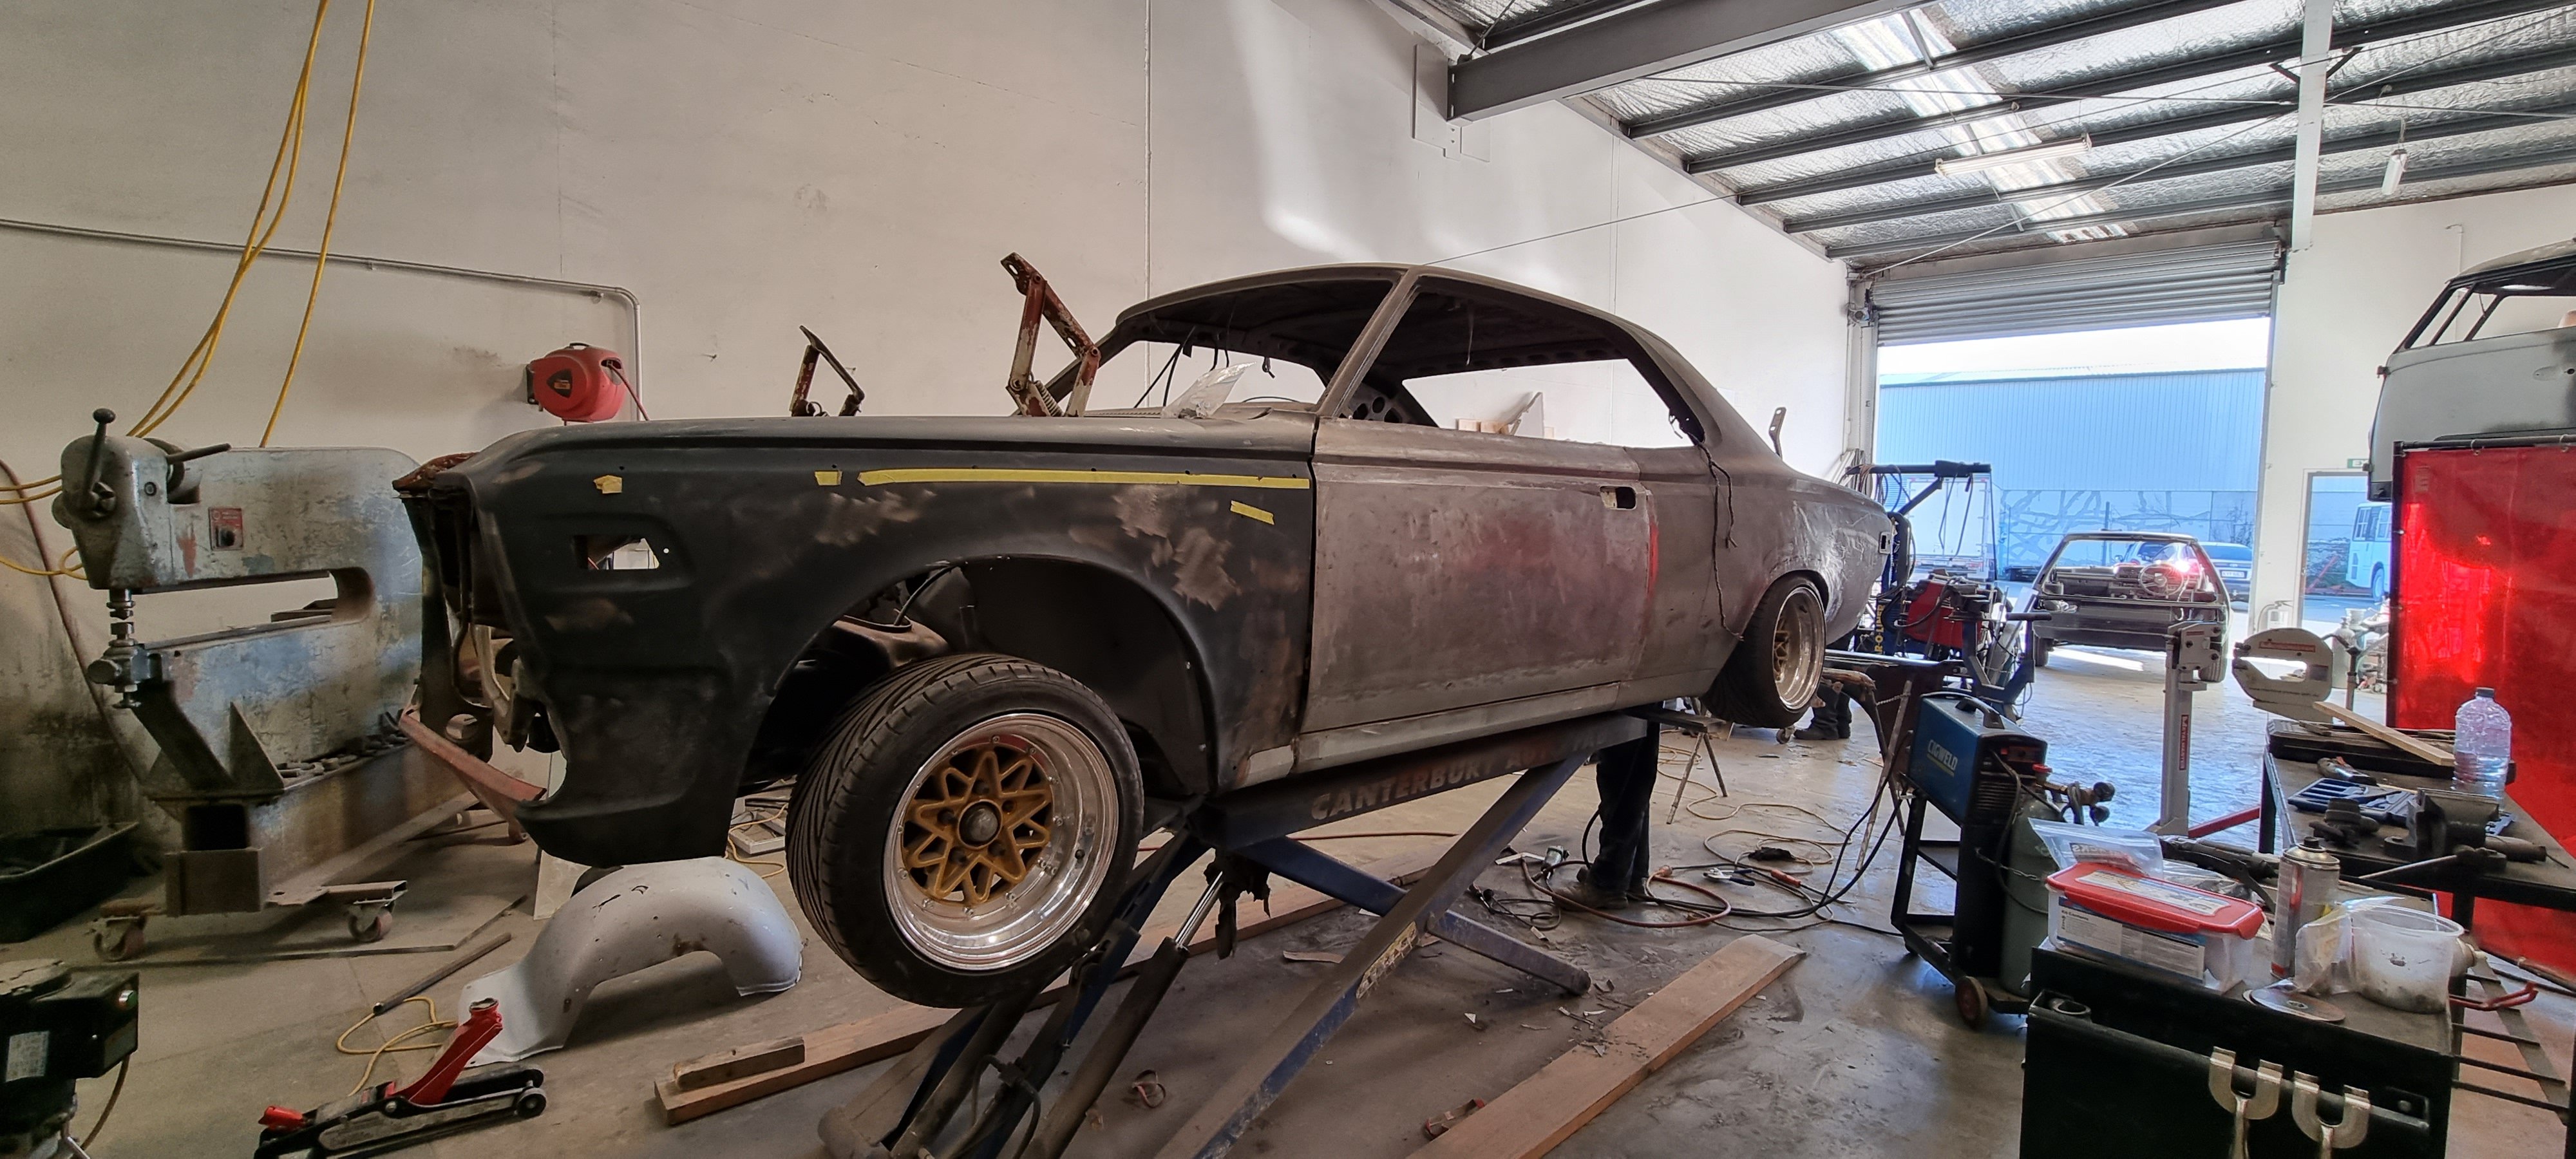
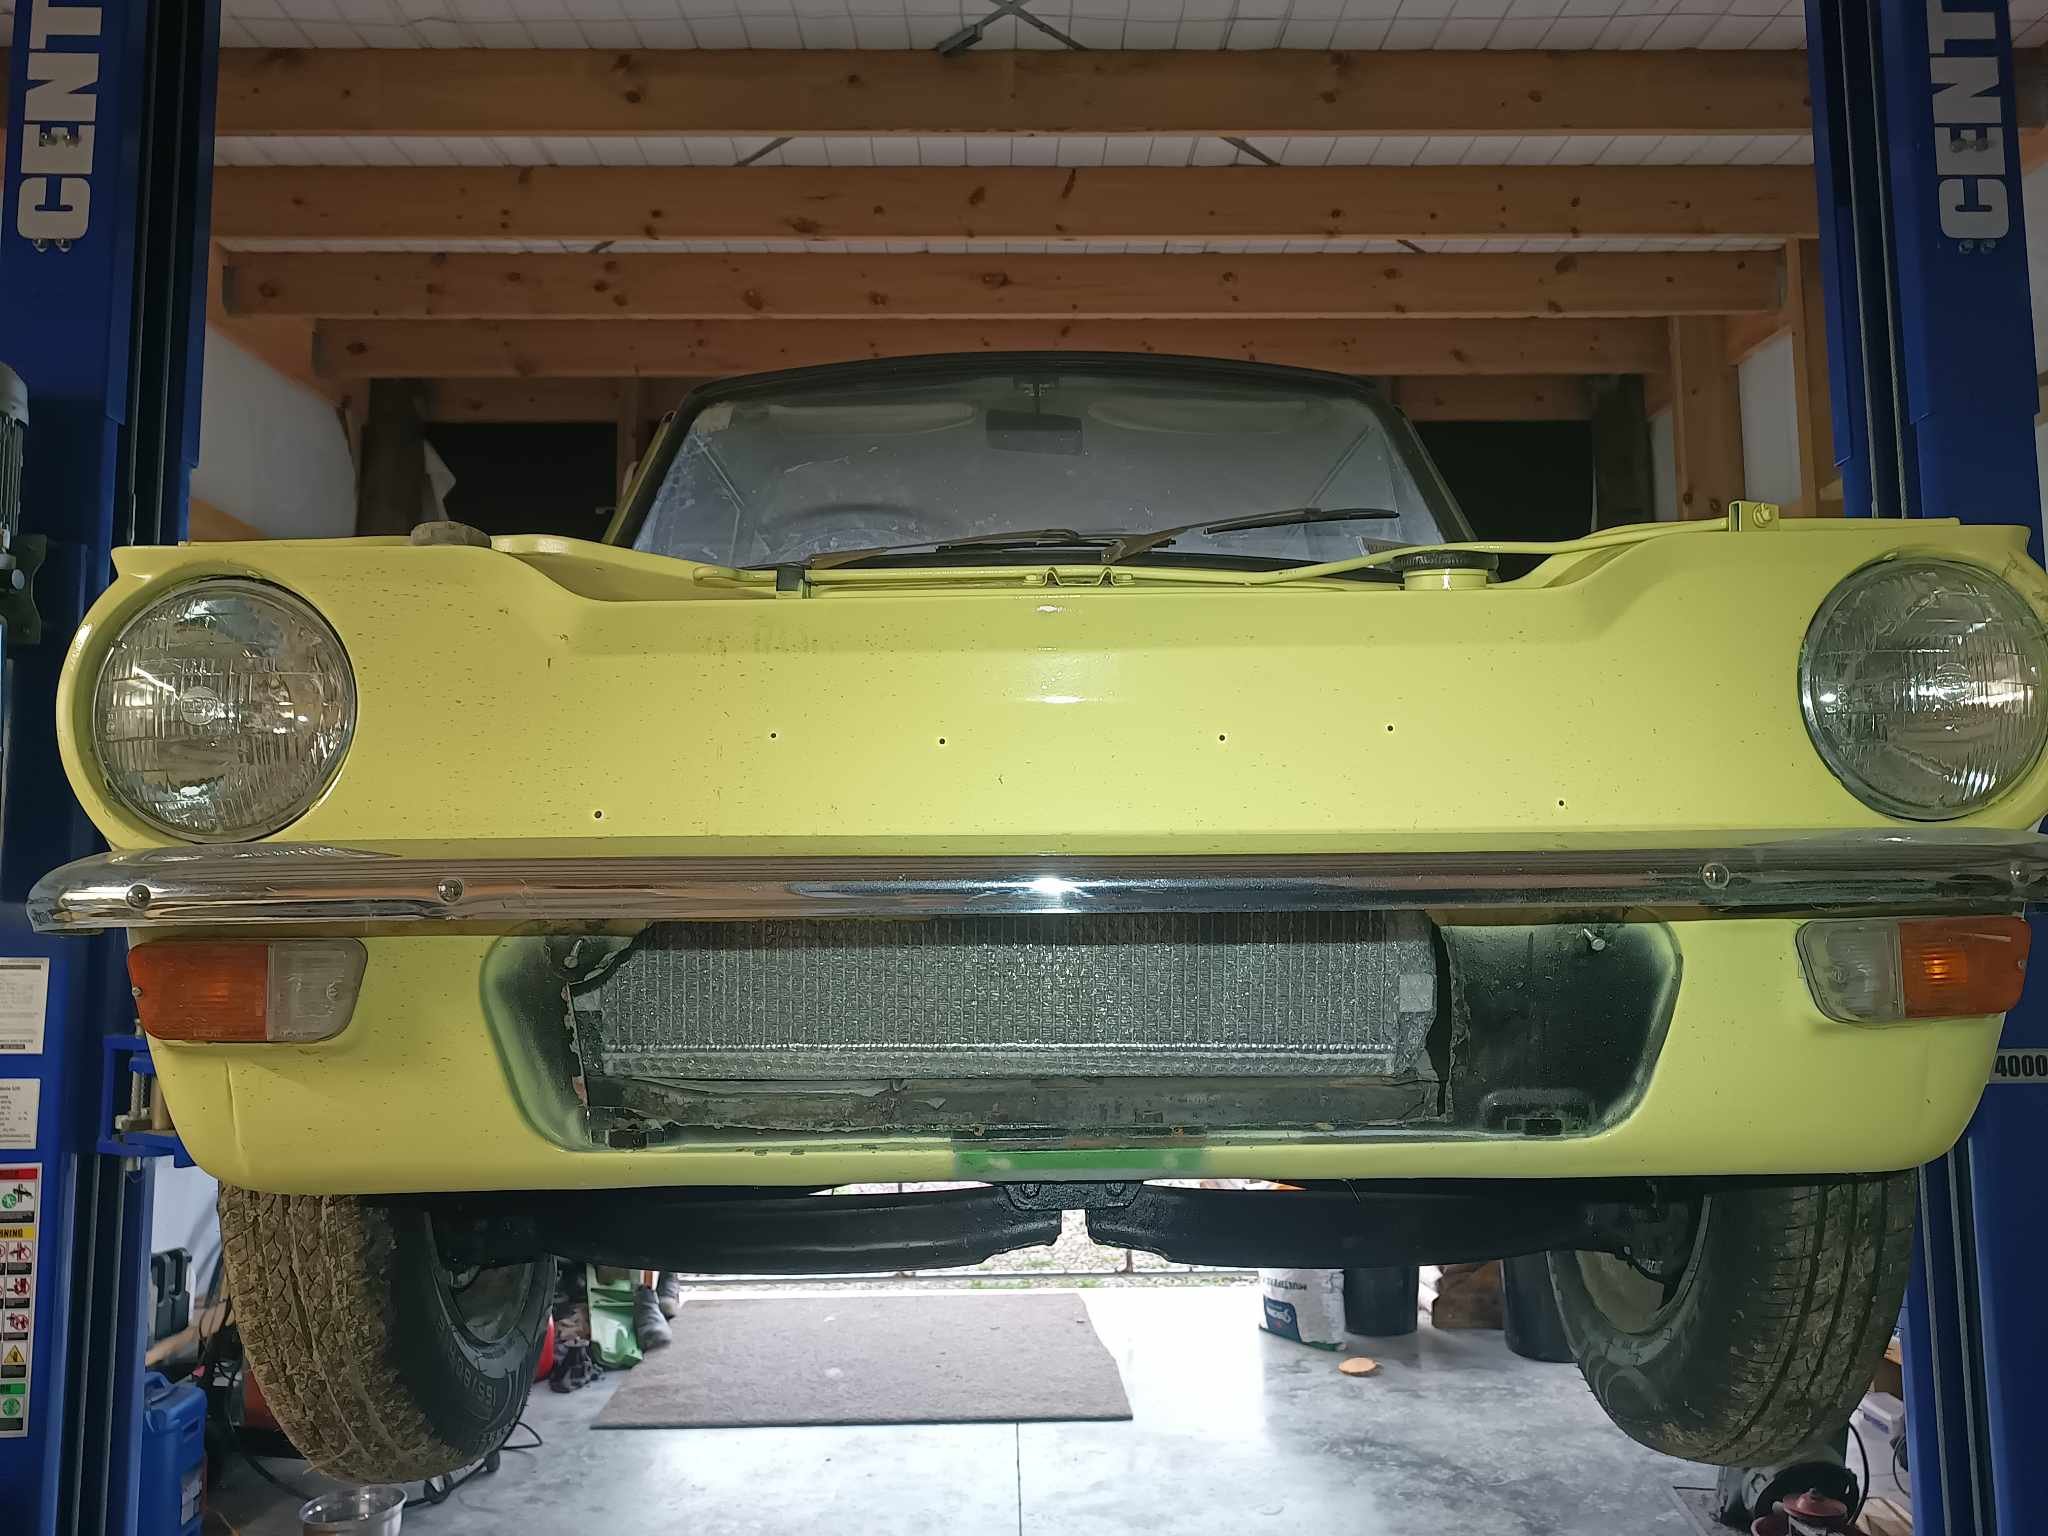
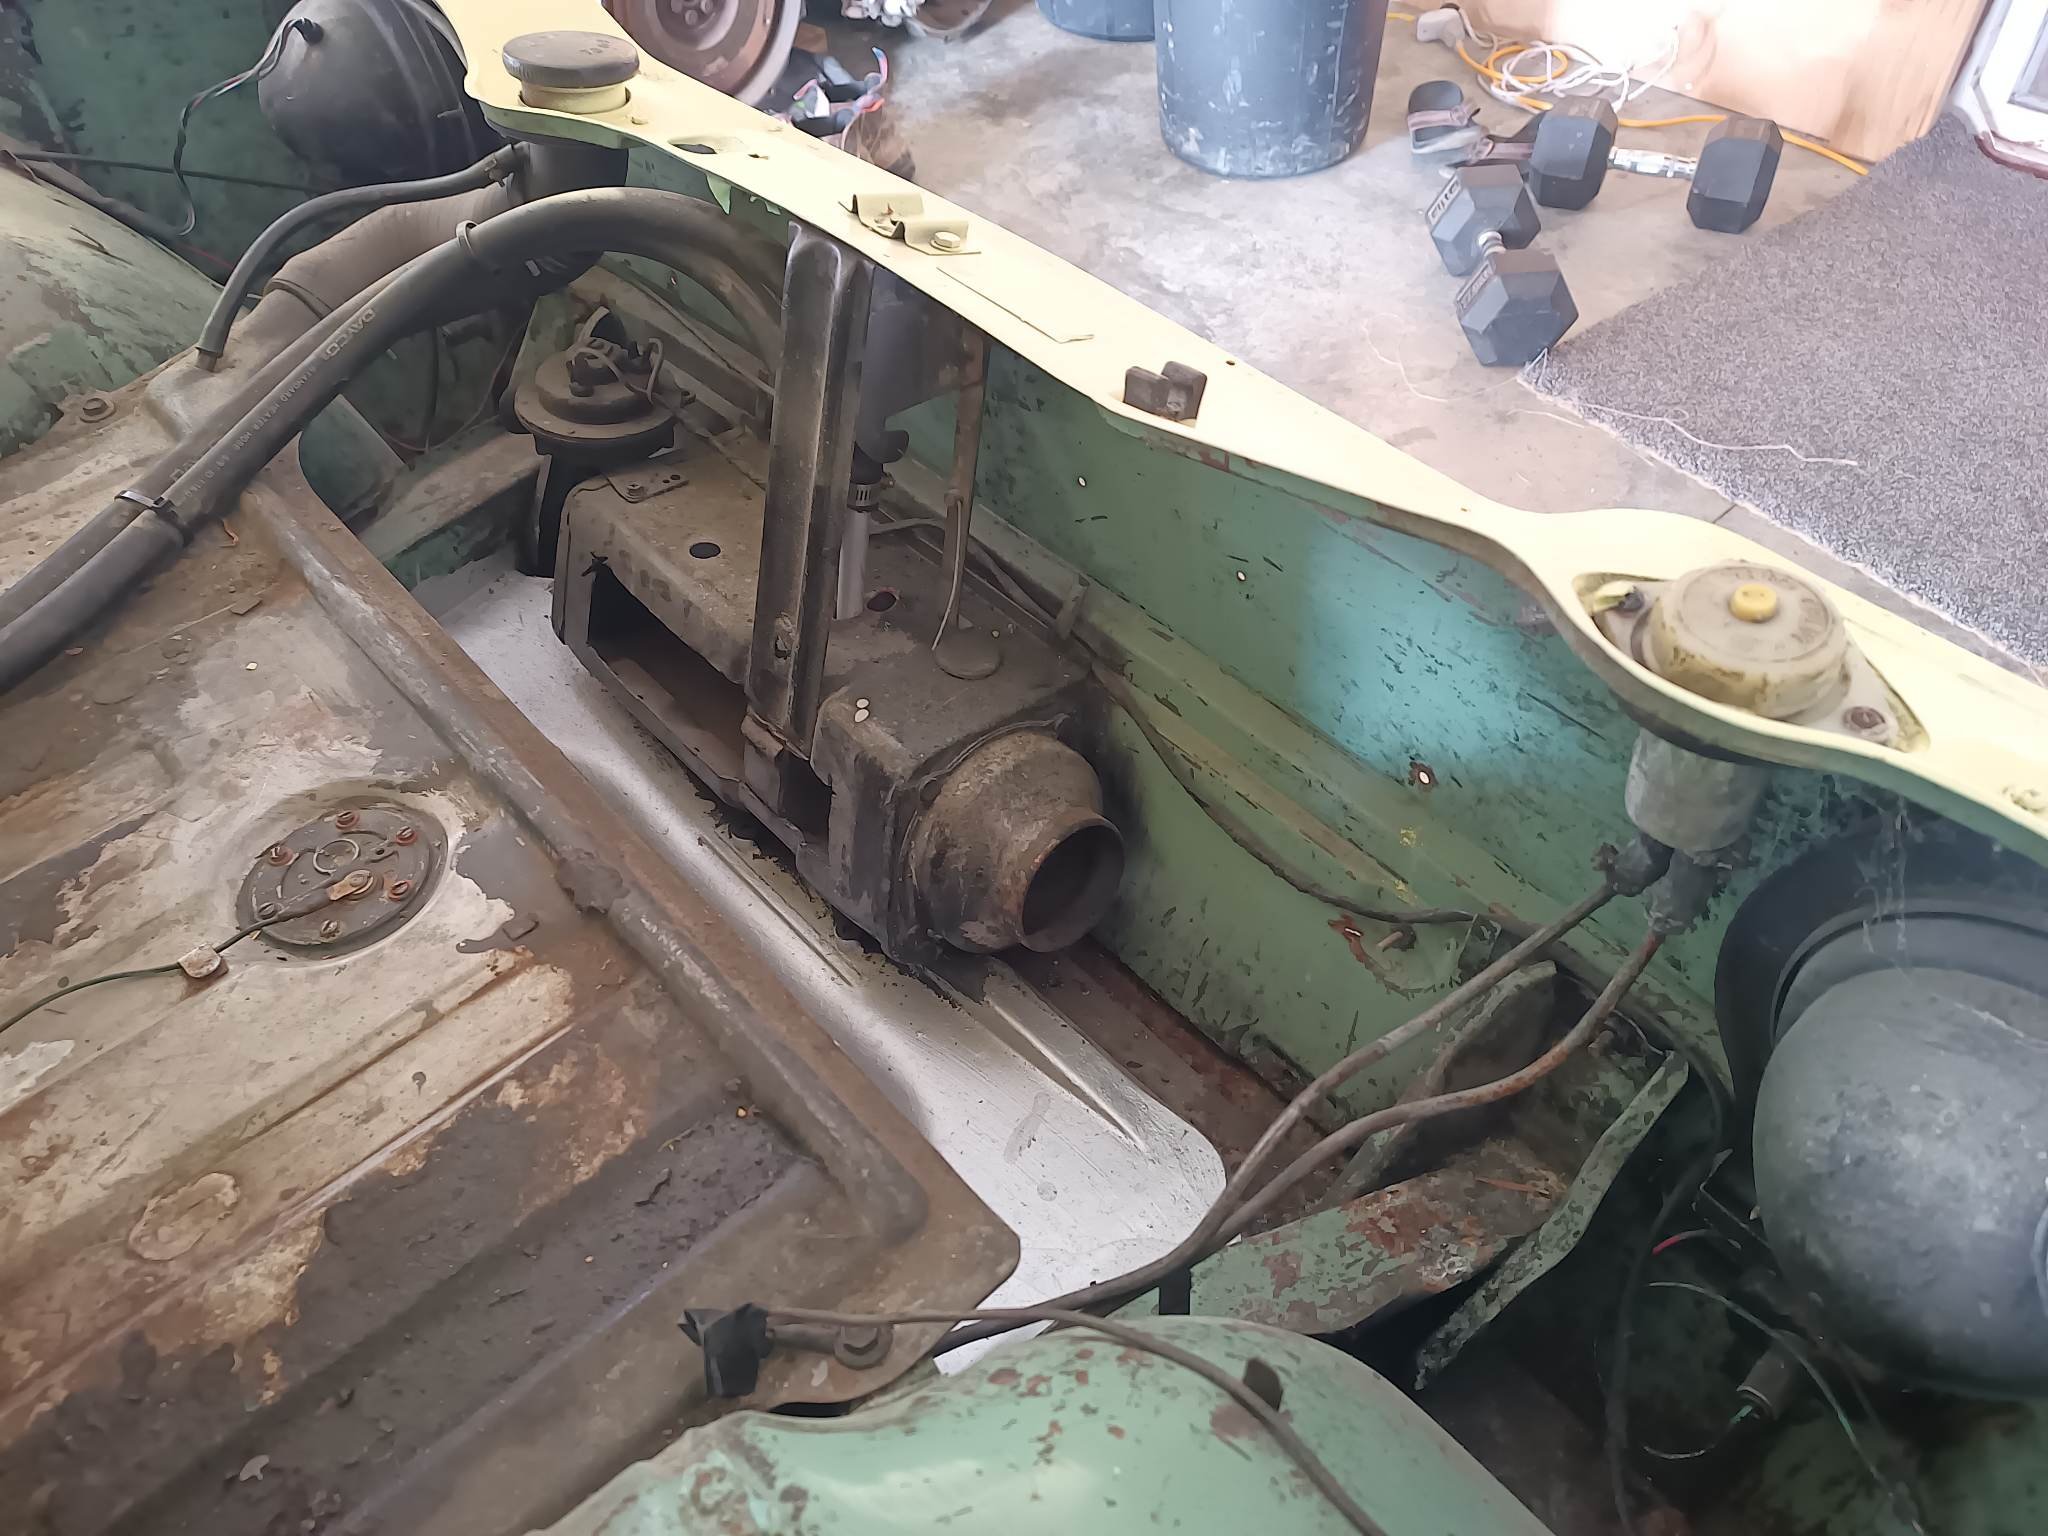
Radiator situation I've got the Mark X radiator in there currently, and although it made everything nice in a lot of ways in the back of my brain I know it's just not going to work quite right. As the top pipe sits too high. You can see it sits a little higher than the top crossmember too, and this isnt on any mounts yet. Just sitting hard against the bottom. The motor's radiator cap (in blue) sits a little lower than the radiator, and the top hose to the radiator flows uphill towards the radiator. All bad news for ever trying to bleed the air out of this thing. Another issue is that I'd love to have a front facing intake airbox that goes through to the front grill, like a lot of the BTCC type cars have. The best option I've found for a low, wide, twin core radiator that doesnt have a radiator cap (and does have an air bleed) is from an SW20 MR2. Being so much shorter, I can dedicate all of the front grill area for the intake. And they're a common upgrade item for MR2s, so cheap and plentiful. The radiator is 5mm wider than my chassis rails, but the end tanks are alloy and on the sides. So will just need a little slice and reweld to fit at the bottom. If I dedicate the top grill to doort noises, then I dont have a huge amount of frontal area for the radiator coming in from just underneath the bumper. Possibly need to remove the bonnet catch as well, but I'd prefer to keep it over having bonnet pins or whatever. This is a rough approximation of how much space I've got for each thing Red is intake stuff, blue radiator stuff, white is the open area that the radiator can get air through. So a lot of the radiator area will be fairly useless if hard mounted against the front of the car, as it wont get any air flow. so I'll try mount it as far back as I can towards the engine. All of this stuff is a bit off topic to my path towards getting the engine fired up, but I've been working on that too. Last night cut the fuel rails a bit shorter, so there's more room at the back. for the fuel dampers without hitting the body. Then also had the underside of the rails milled down so the throttle linkages dont hit the rail anymore. So that's just about all finished once I've retapped the ends and remade the AN lines to suit.
 16 points
 -
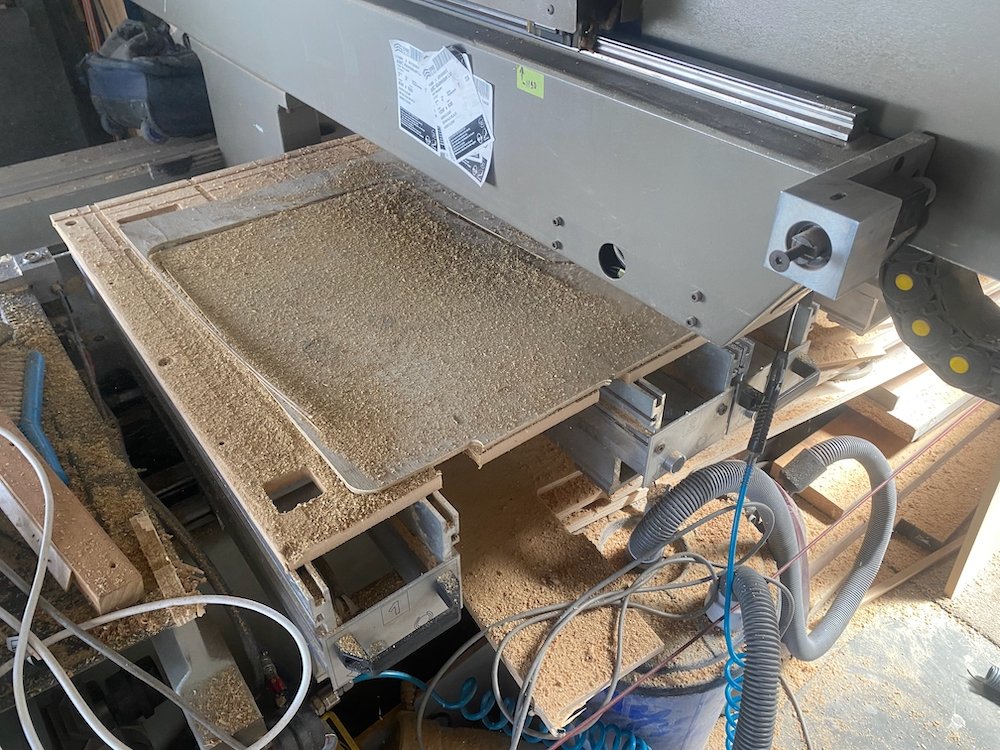
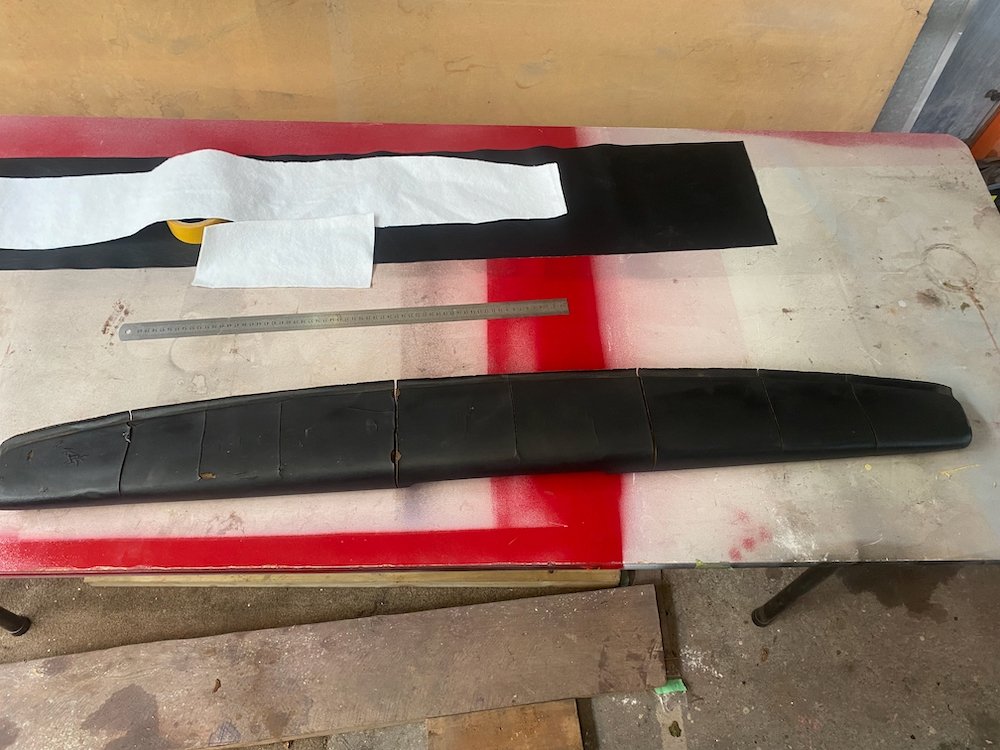
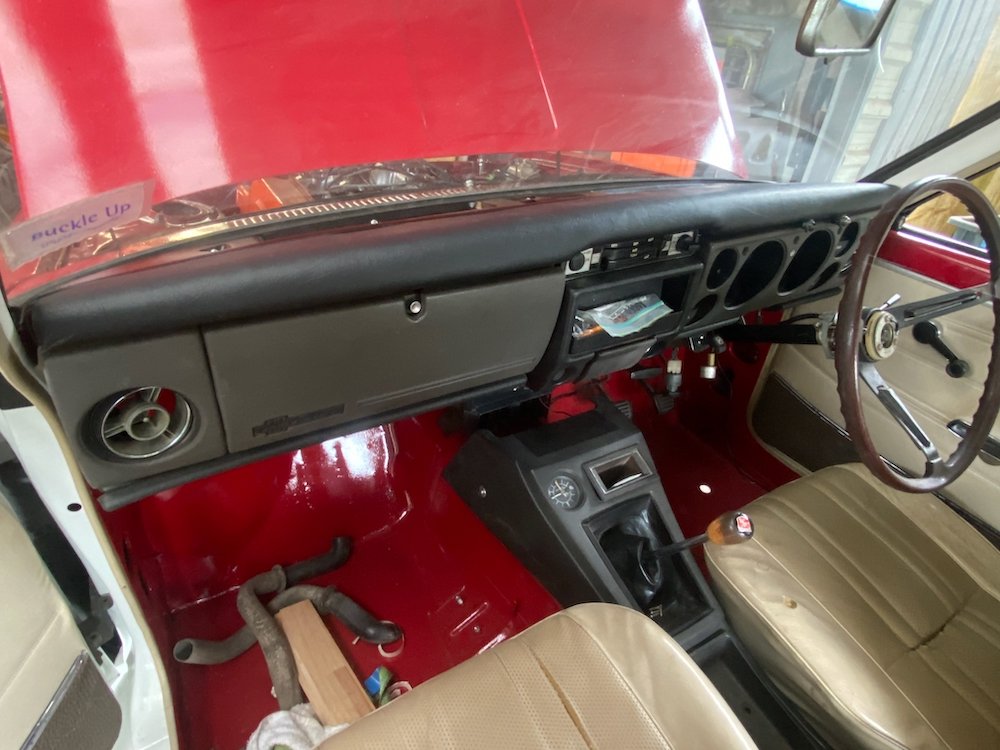
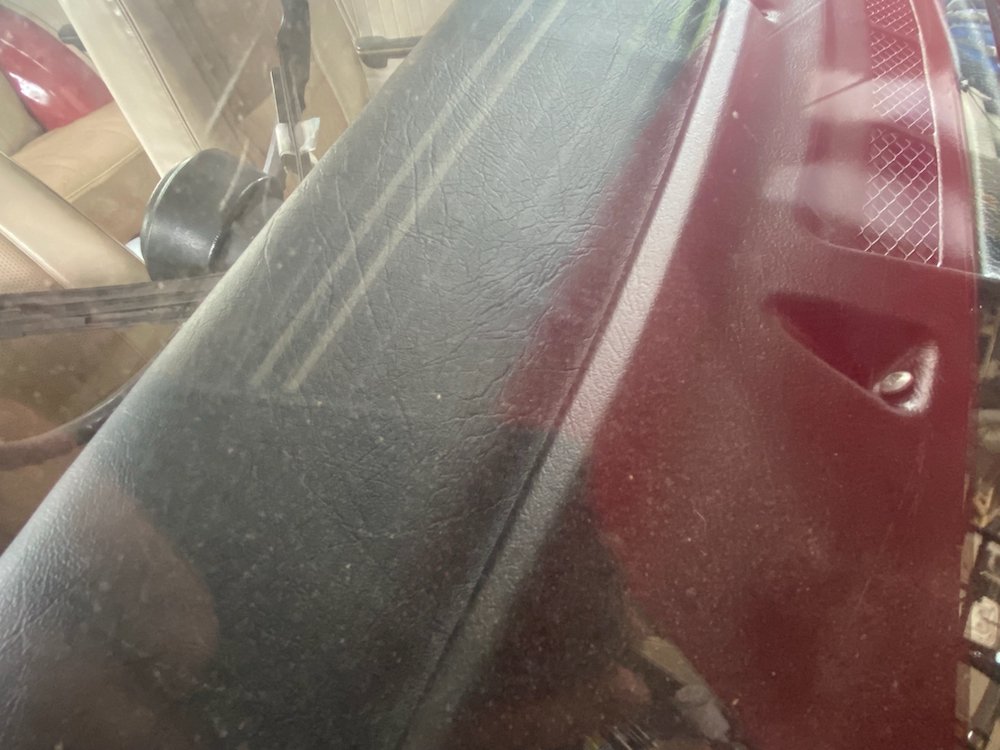
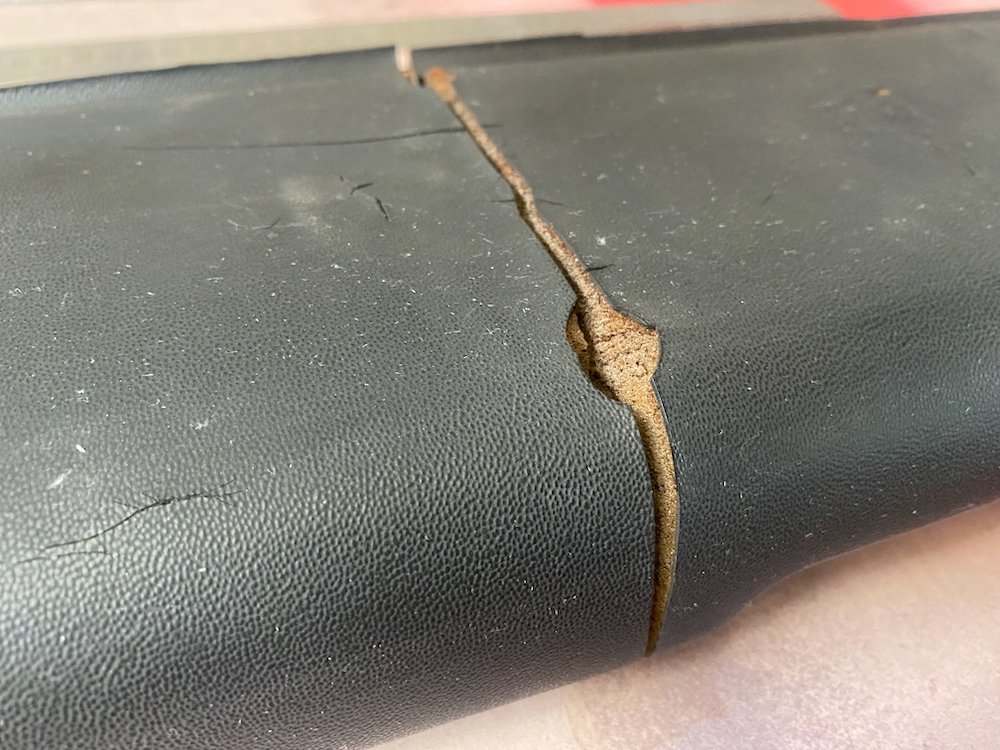
Interior polishing: Like most 50yo cars, the dashpad had cracked up pretty bad, long term i'd like to throw the check book at it, but in a budget friendly manner I called on my lovely GF and her knowledge of spotlight. We trimmed off the worst highpoints and double sided taped a layer of tablecloth liner to the pad, the idea here was the padding would hide the worst of the cracking once the vinyl leather was stretched over This was put on with the bare minimum of contact adhesive to keep the dashpad in close to original shape if needed for proper restoration further down the track. Finish result blends in well, of course the corners are a bit messy, but far nicer to look at than the old pad. Haven't been able to make a firm decision on the carpets but had an idea Chomp out some 7mm marine ply on the cnc, wrap in carpet offcuts from the 4wd.... Floormats that don't shuffle around.
11 points
-
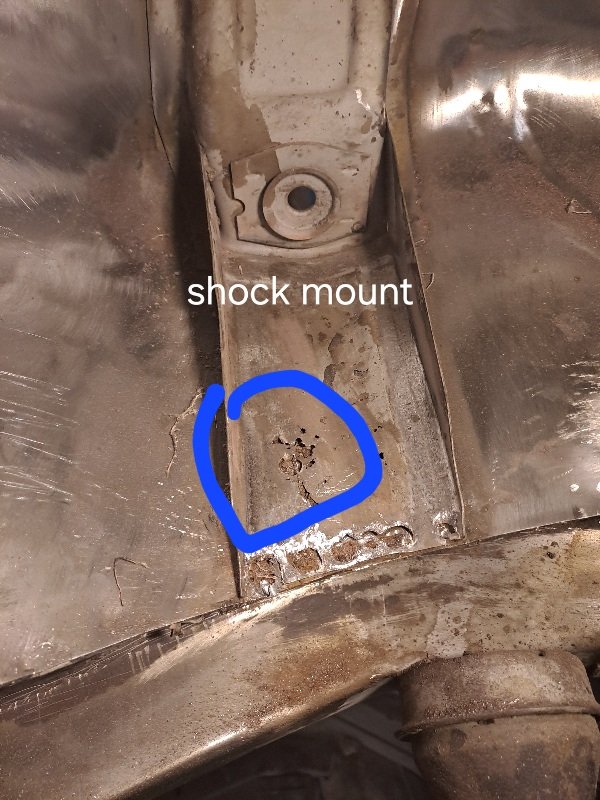
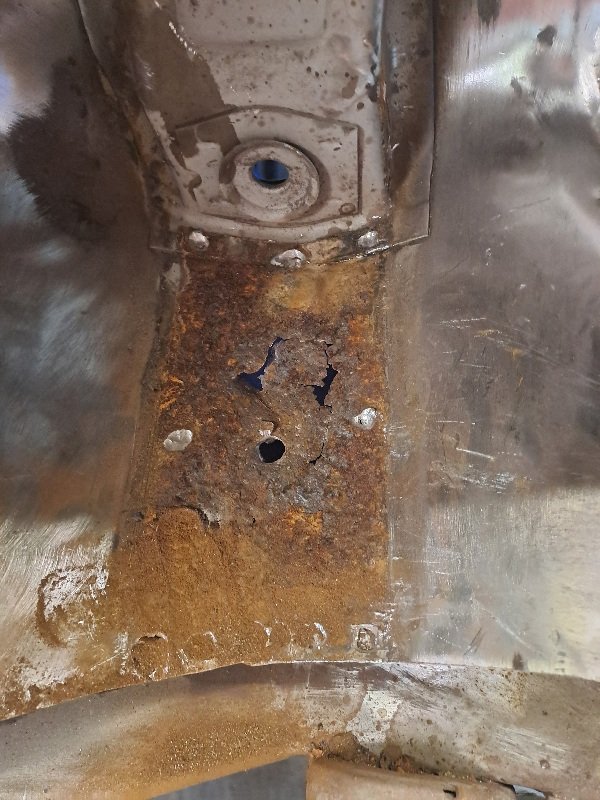
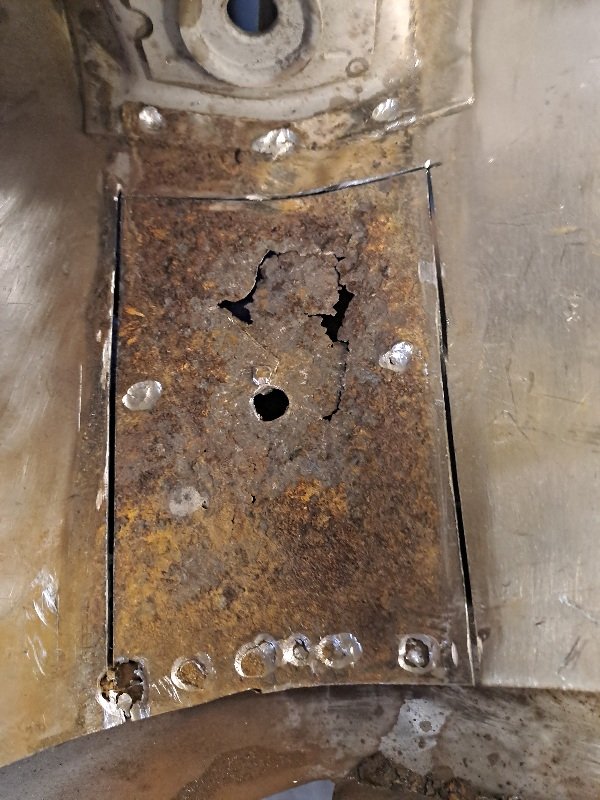
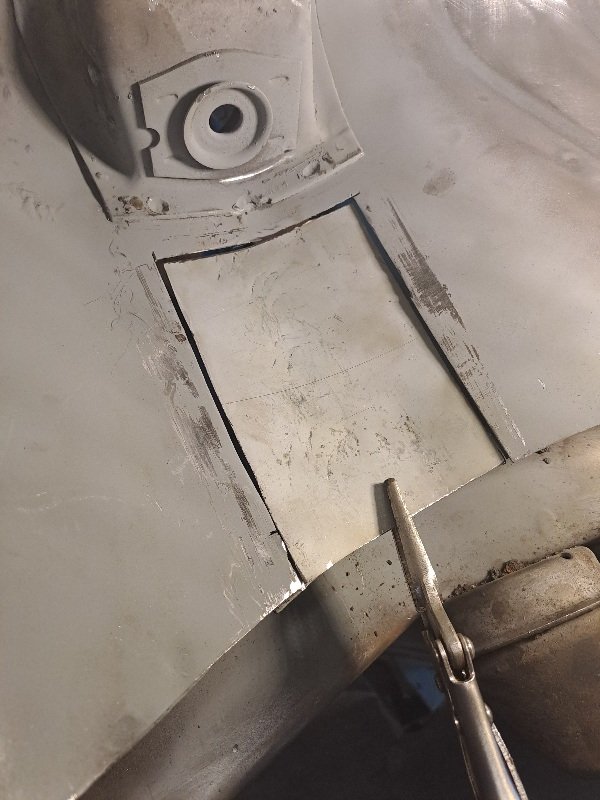
So chipping away I've found that having the options to sand blast the nooks n crannys works well and reduces the amount of dust and sand everywhere. On surfaces with underseal the petrol and rag method seems to be most effective. Followed by wire wheel or strip disk. I've started to tackle drivers real wheel well in this episode.
9 points
-
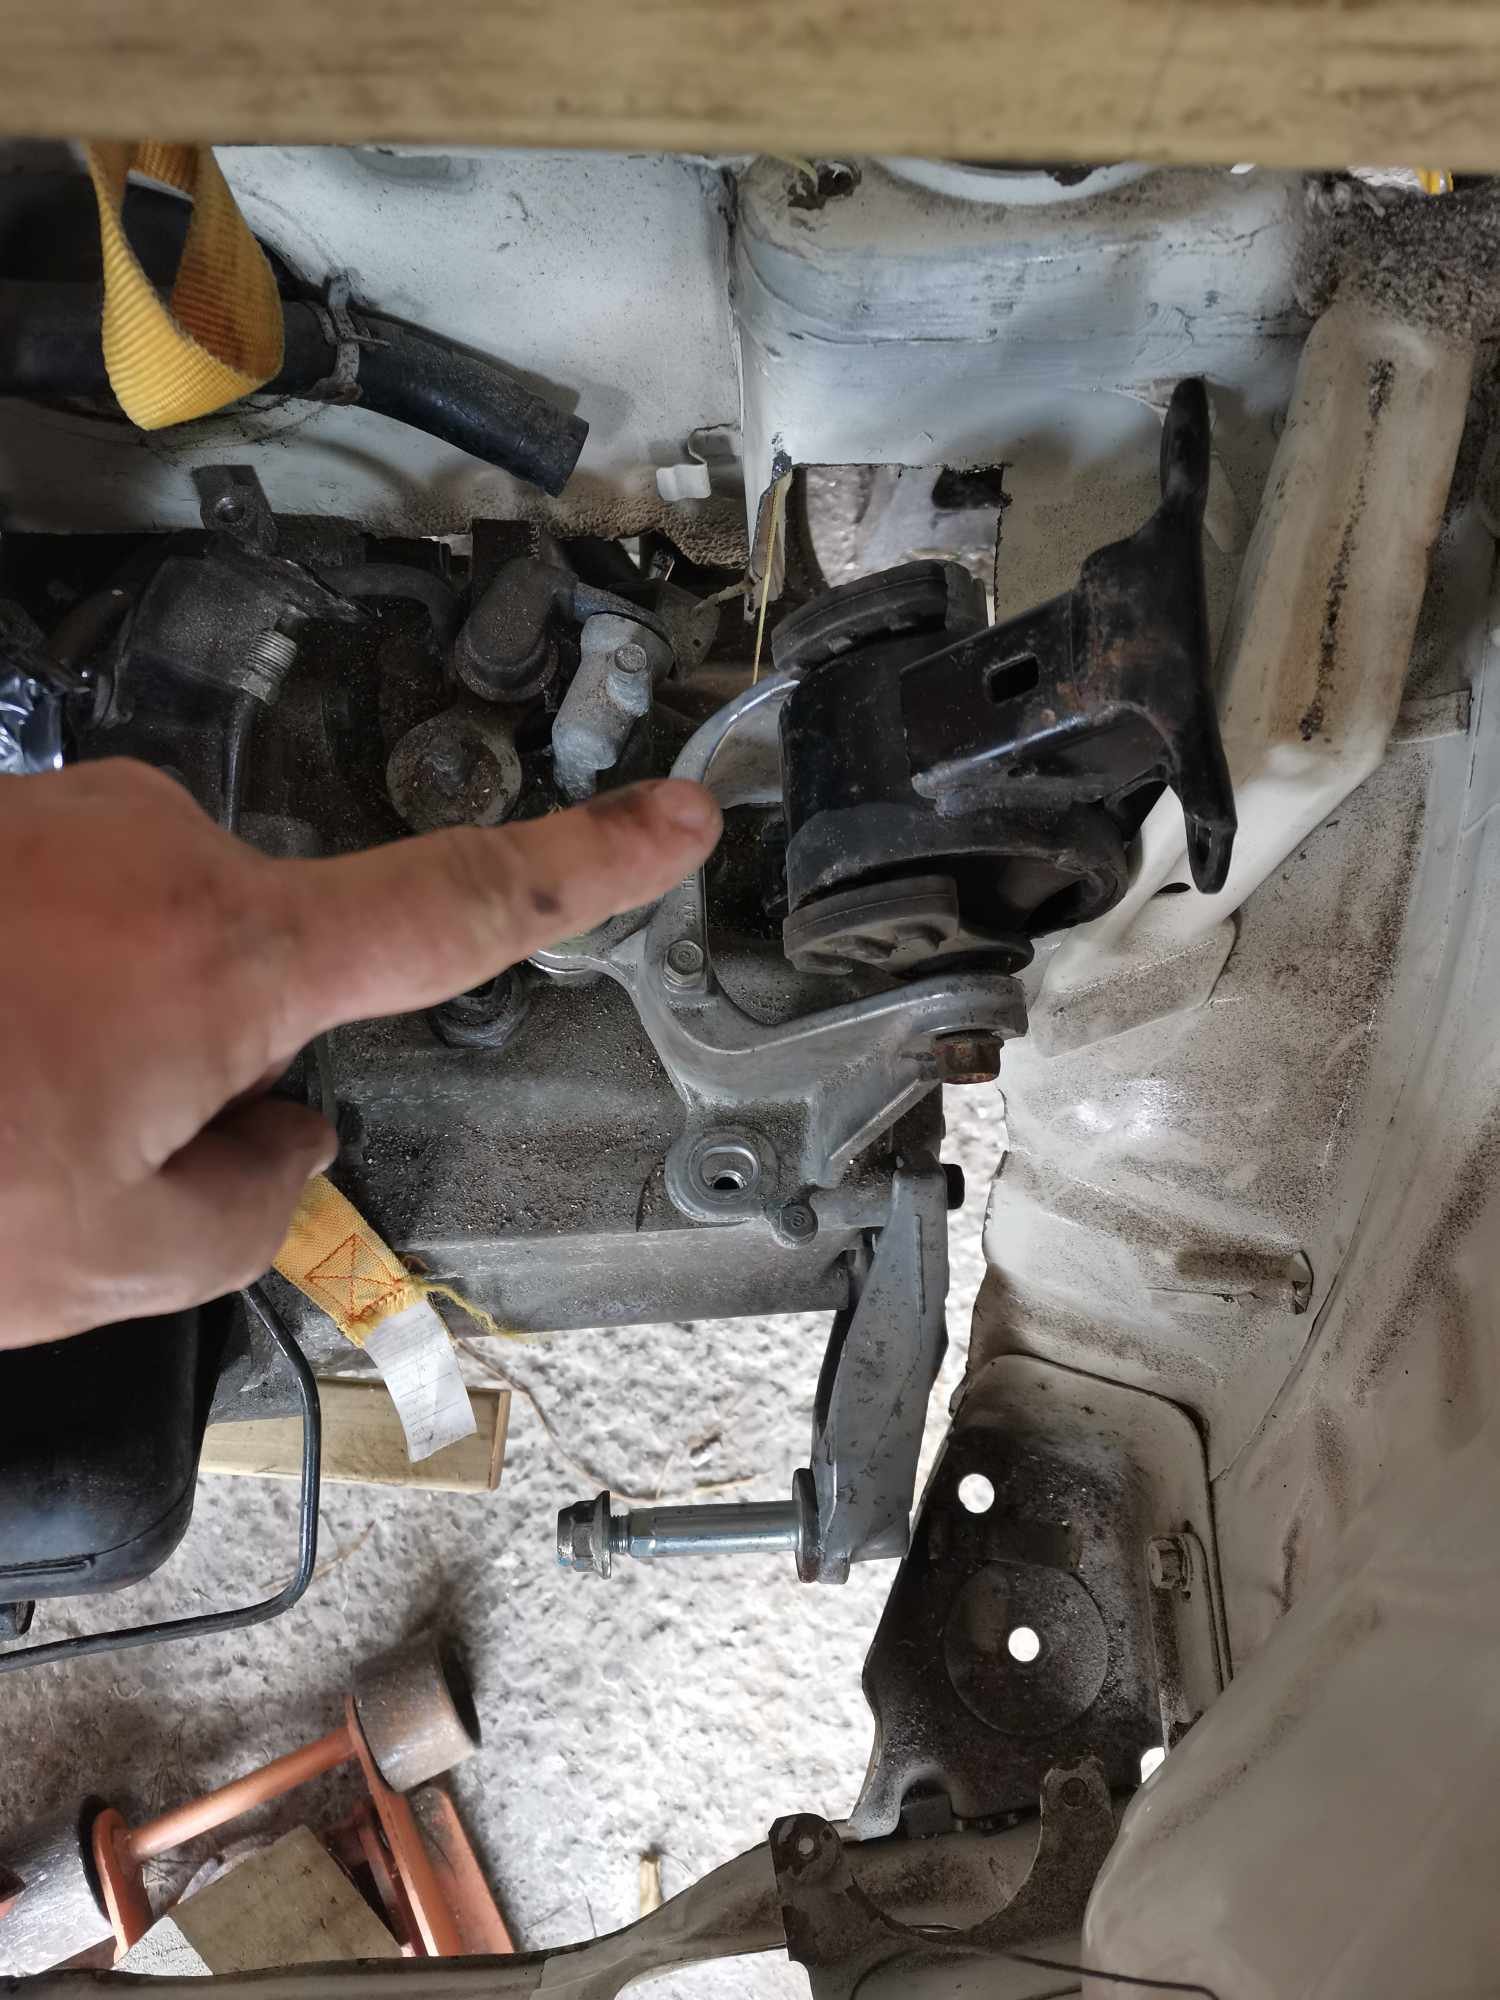
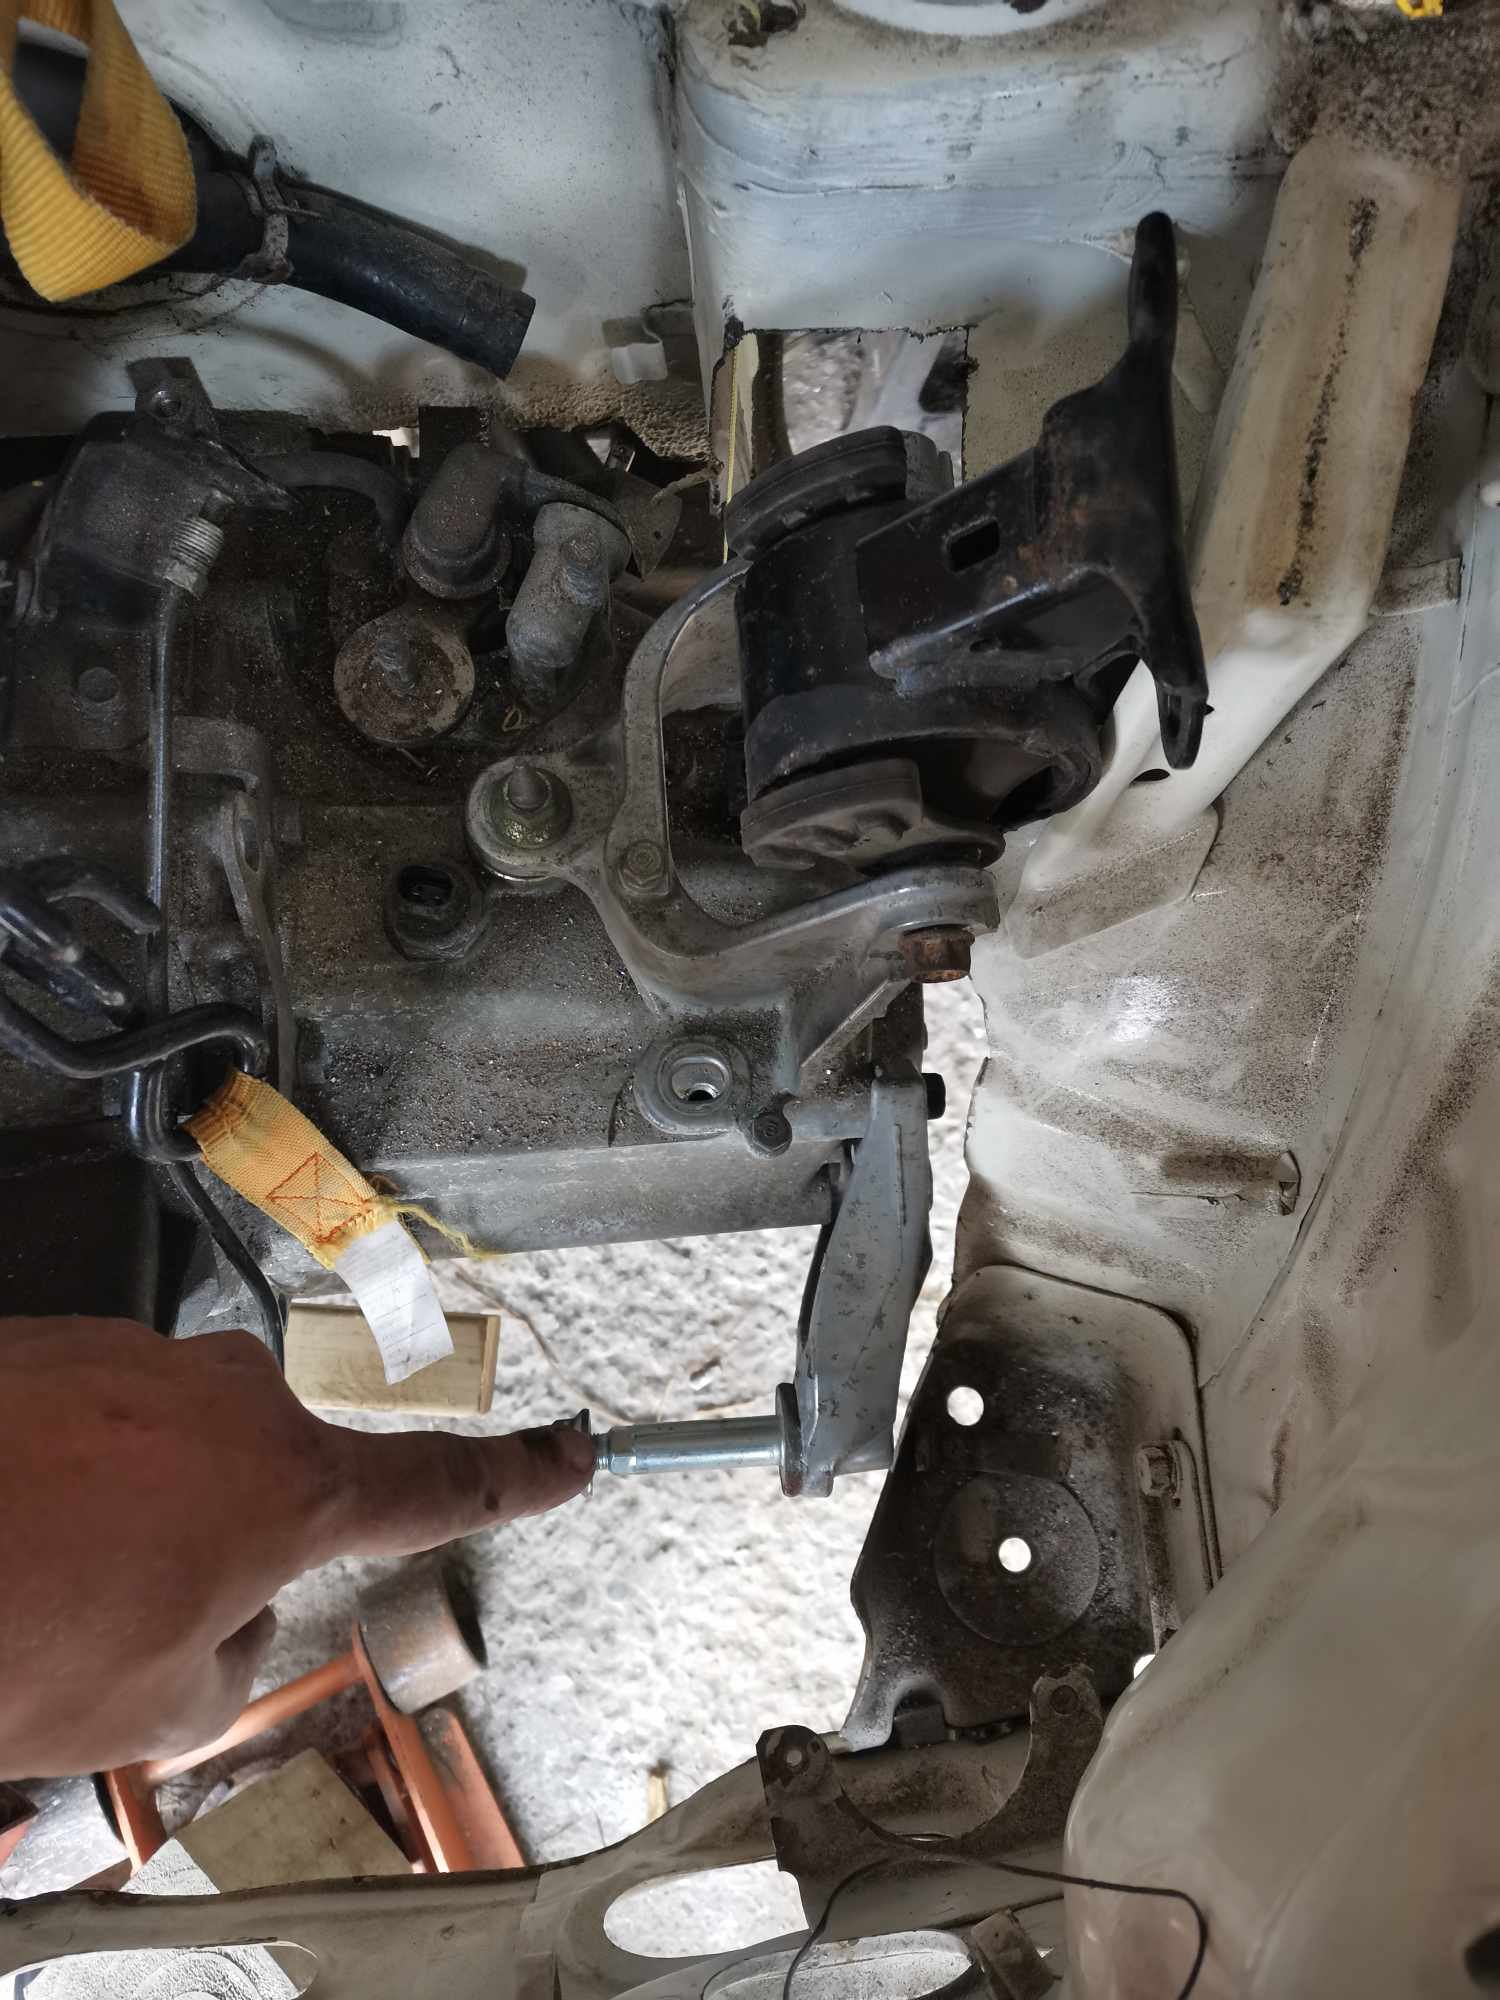
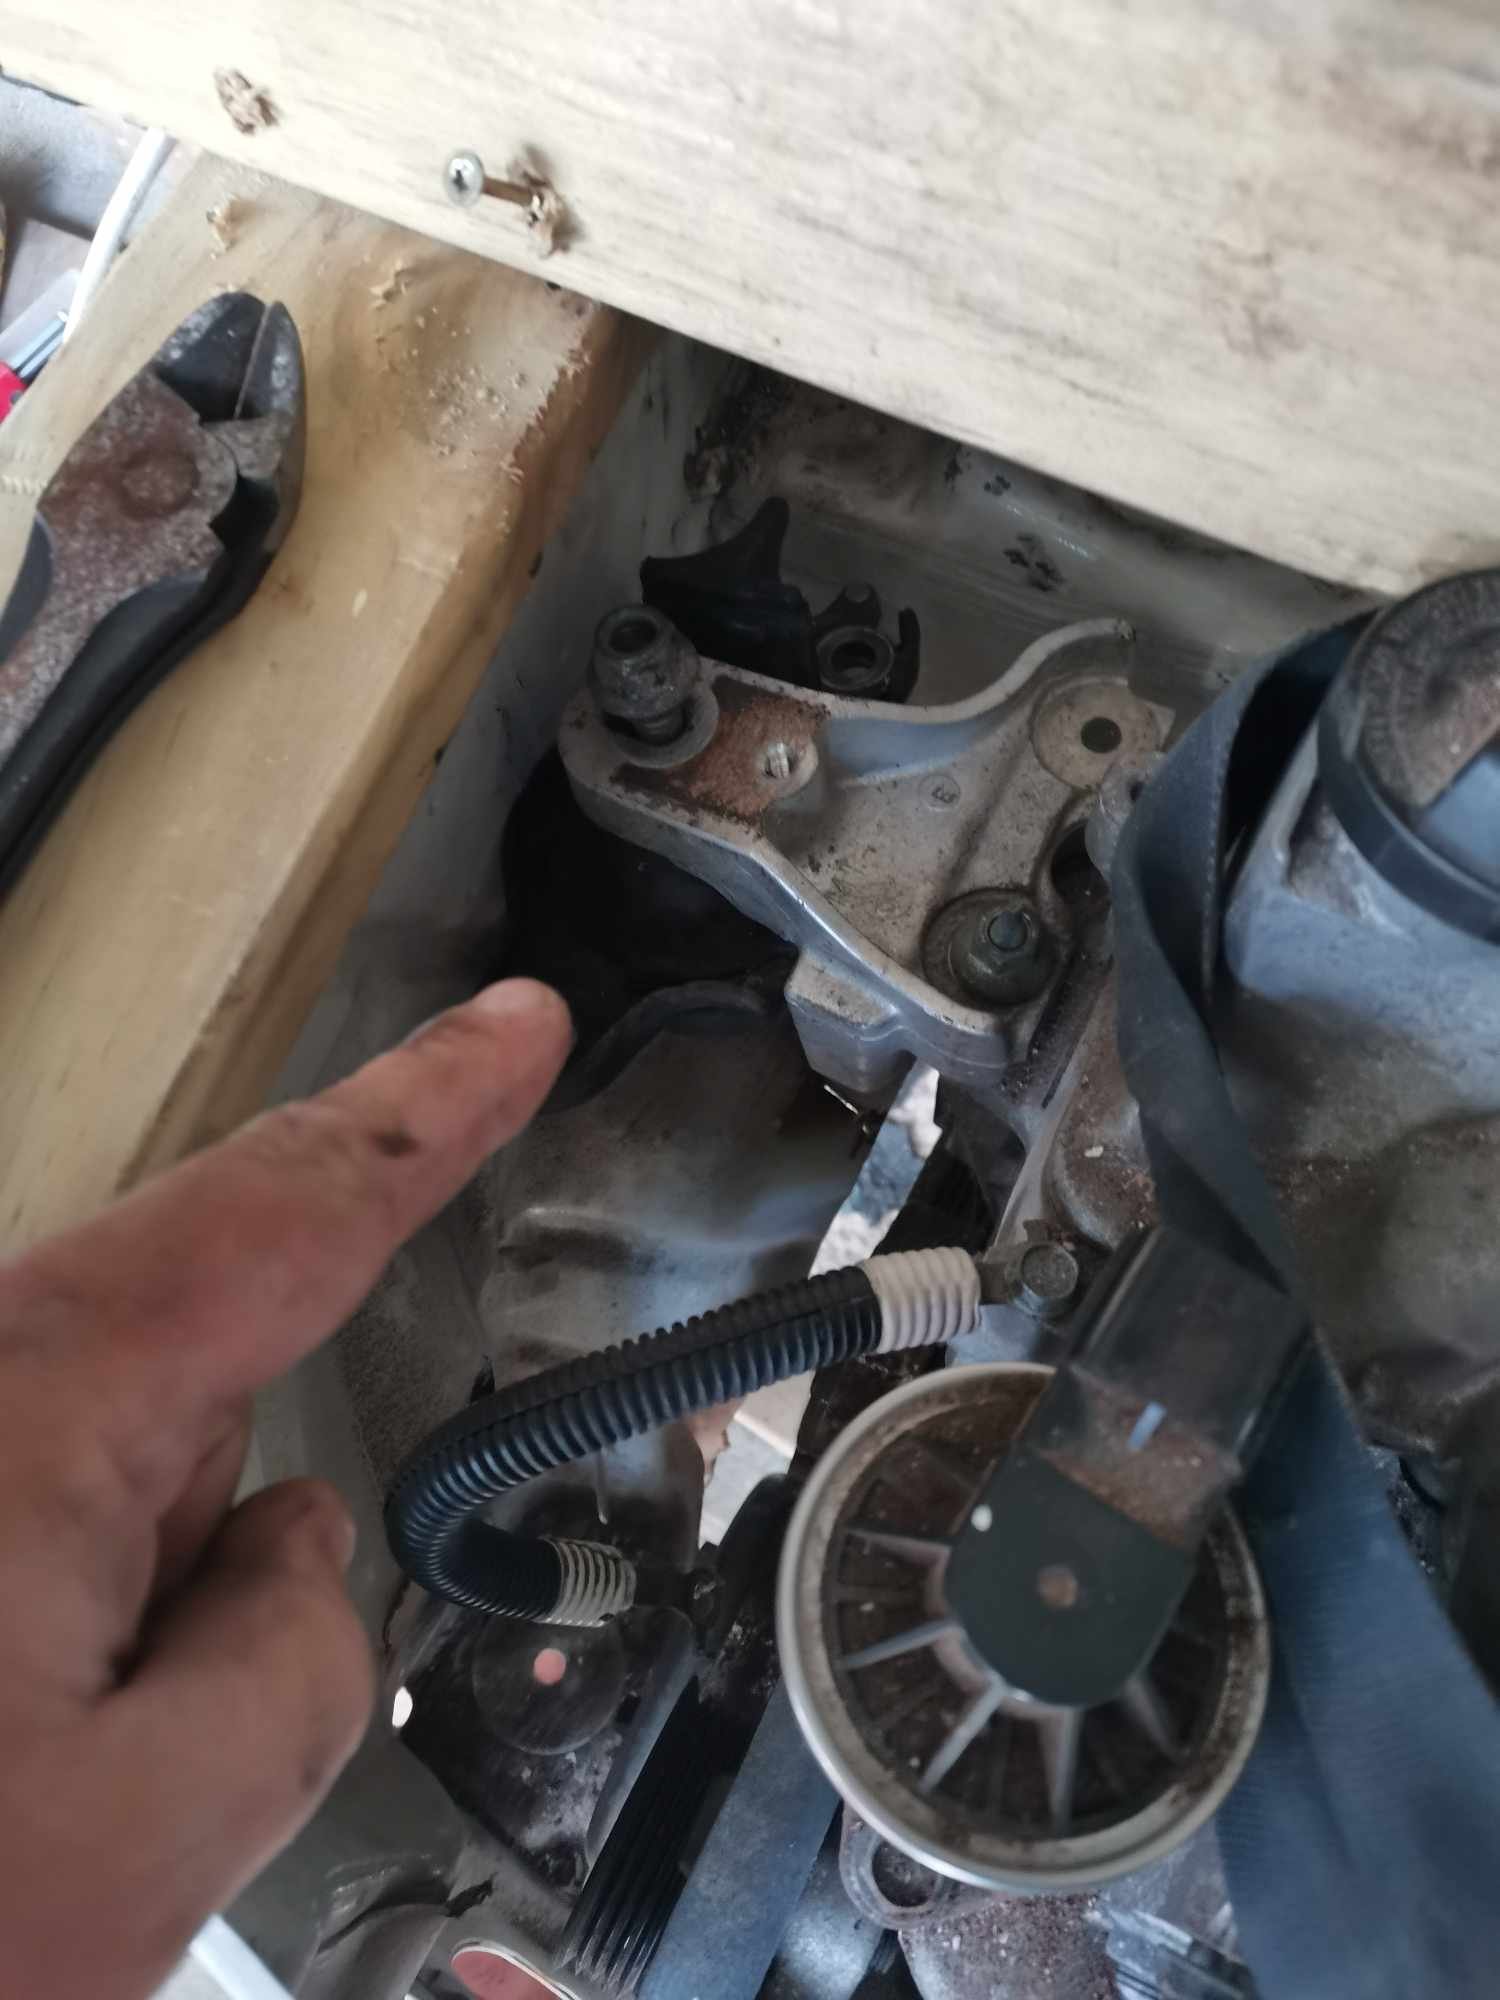
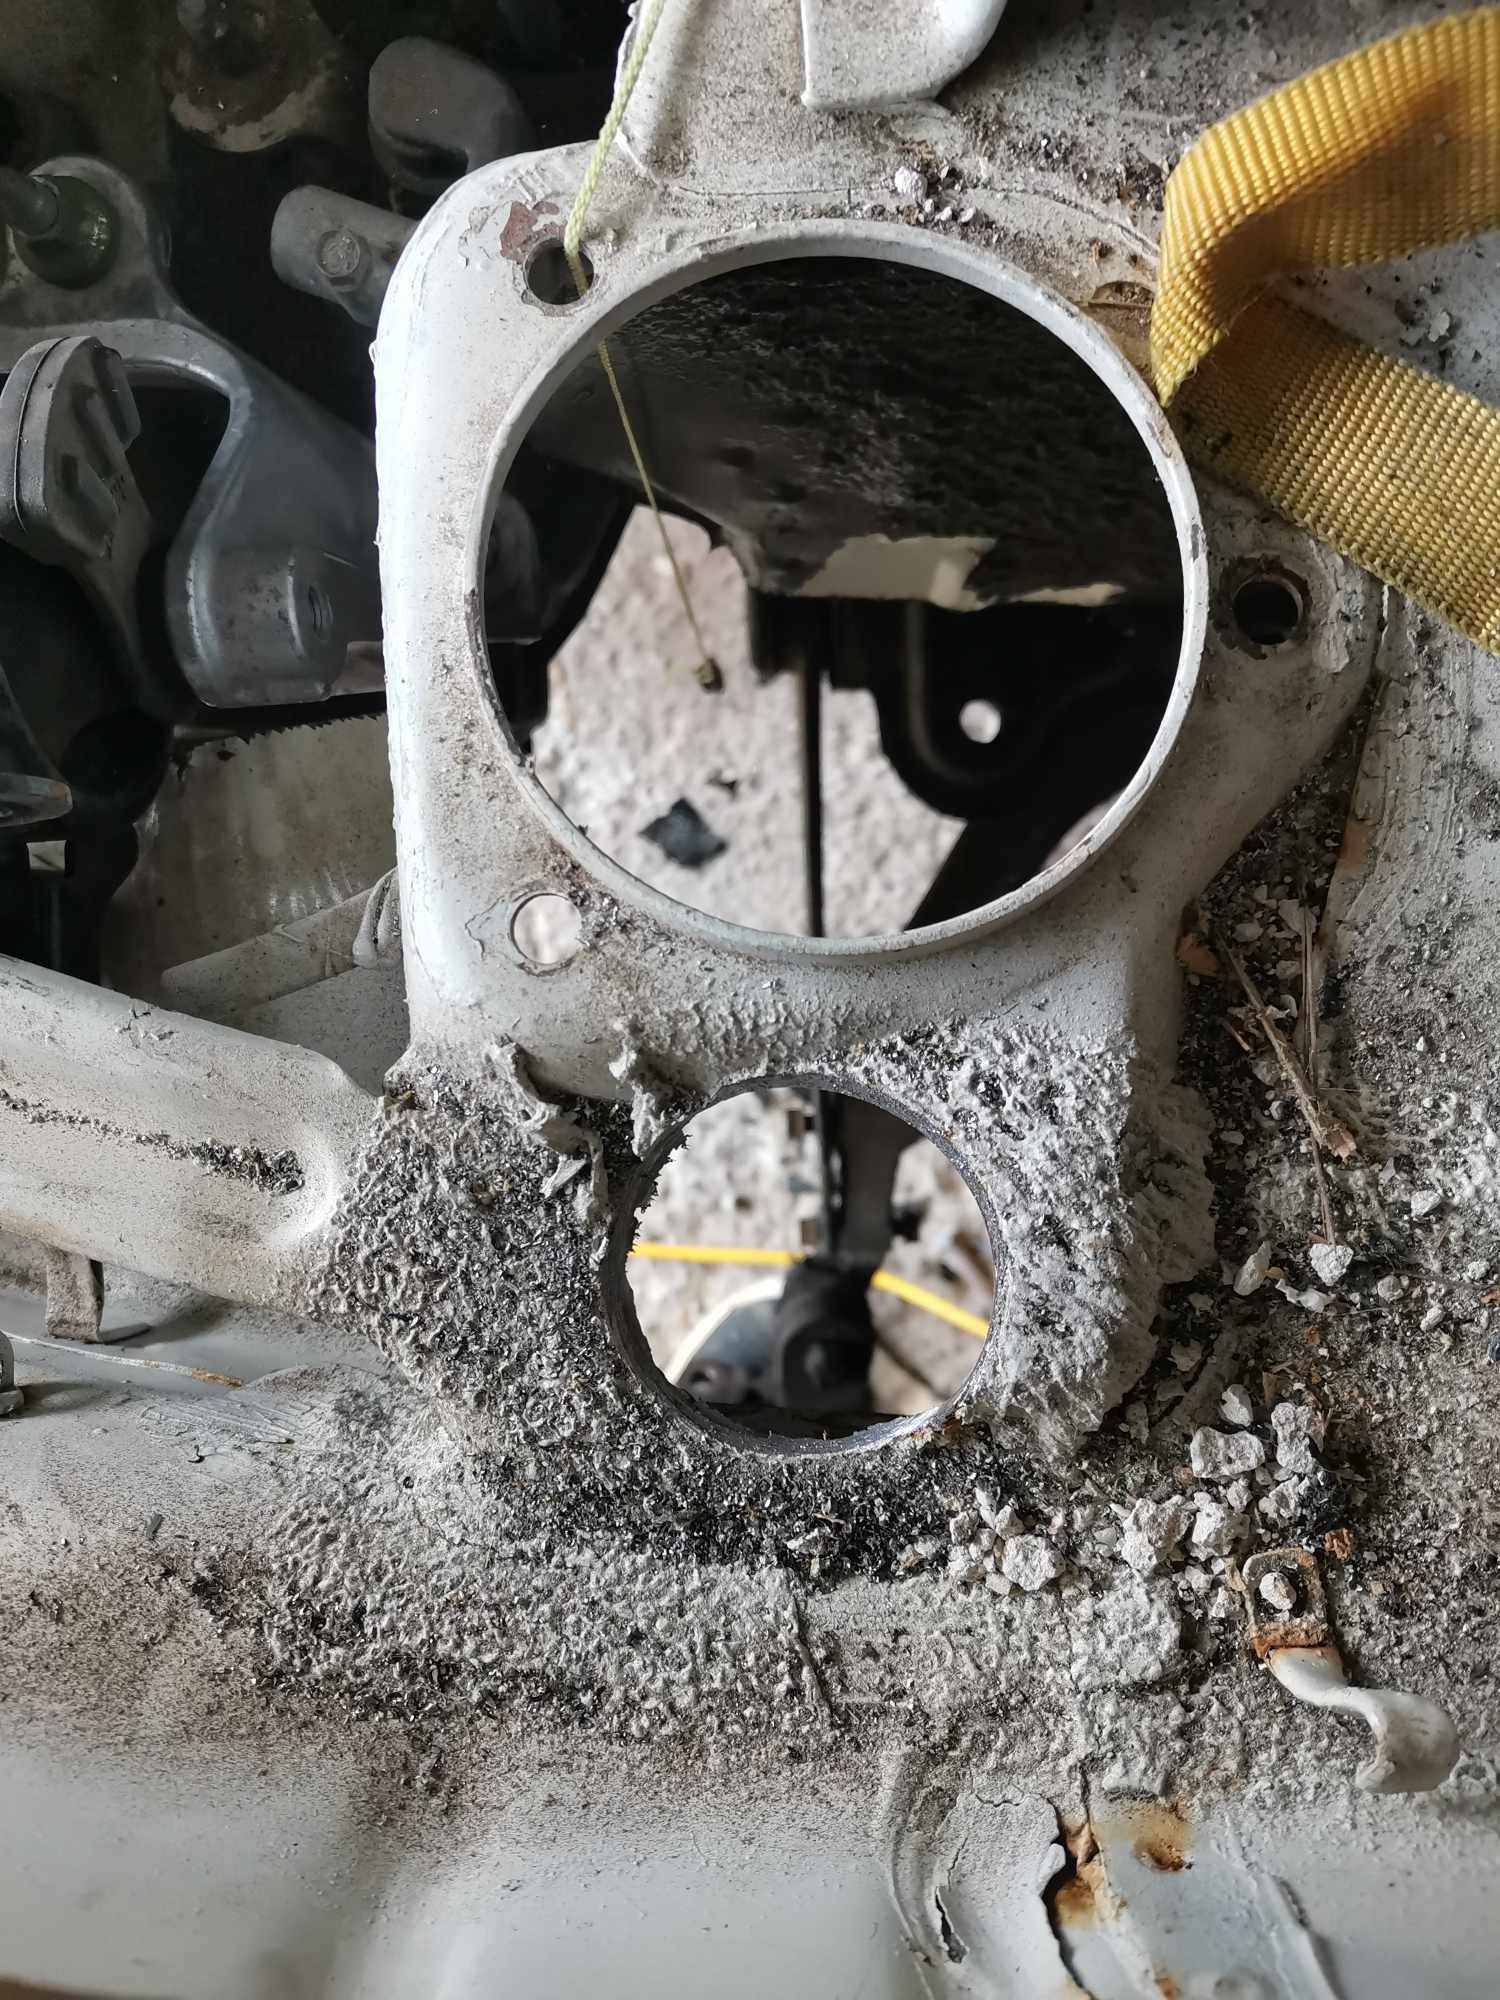
Fitting on factory mounts to see where they kinda land. Gearbox mount mostly fits. The mounting to the box bracket needs to be spaced up 20mm at least. Lots left on threads This bracket is reversed 180, used to point outwards, but this solution looks promising for a front mount Engine side looks half OK, needs a little clearancing with Mr hammer, might look for other options though. EG civic half size seems to fit vertically. Outlets ideally need flipping. Top needs to be to the bottom of the picture and bottom needs to be in the middle. Wondering if I can flip an alloy radiator and swap the fill neck... Hole in strut tower temp drilled so I can line up the evuk 7 shock on passenger side. Next up is steering rack, passenger knuckle and maybe drive shafts? Still keen if someone wants to come have a nosey in Wellington, I'm quite over my head here but continuing on regardless Discust below, https://oldschool.co.nz/index.php?/topic/49007-sirges-1972-honda-n360/
7 points
-
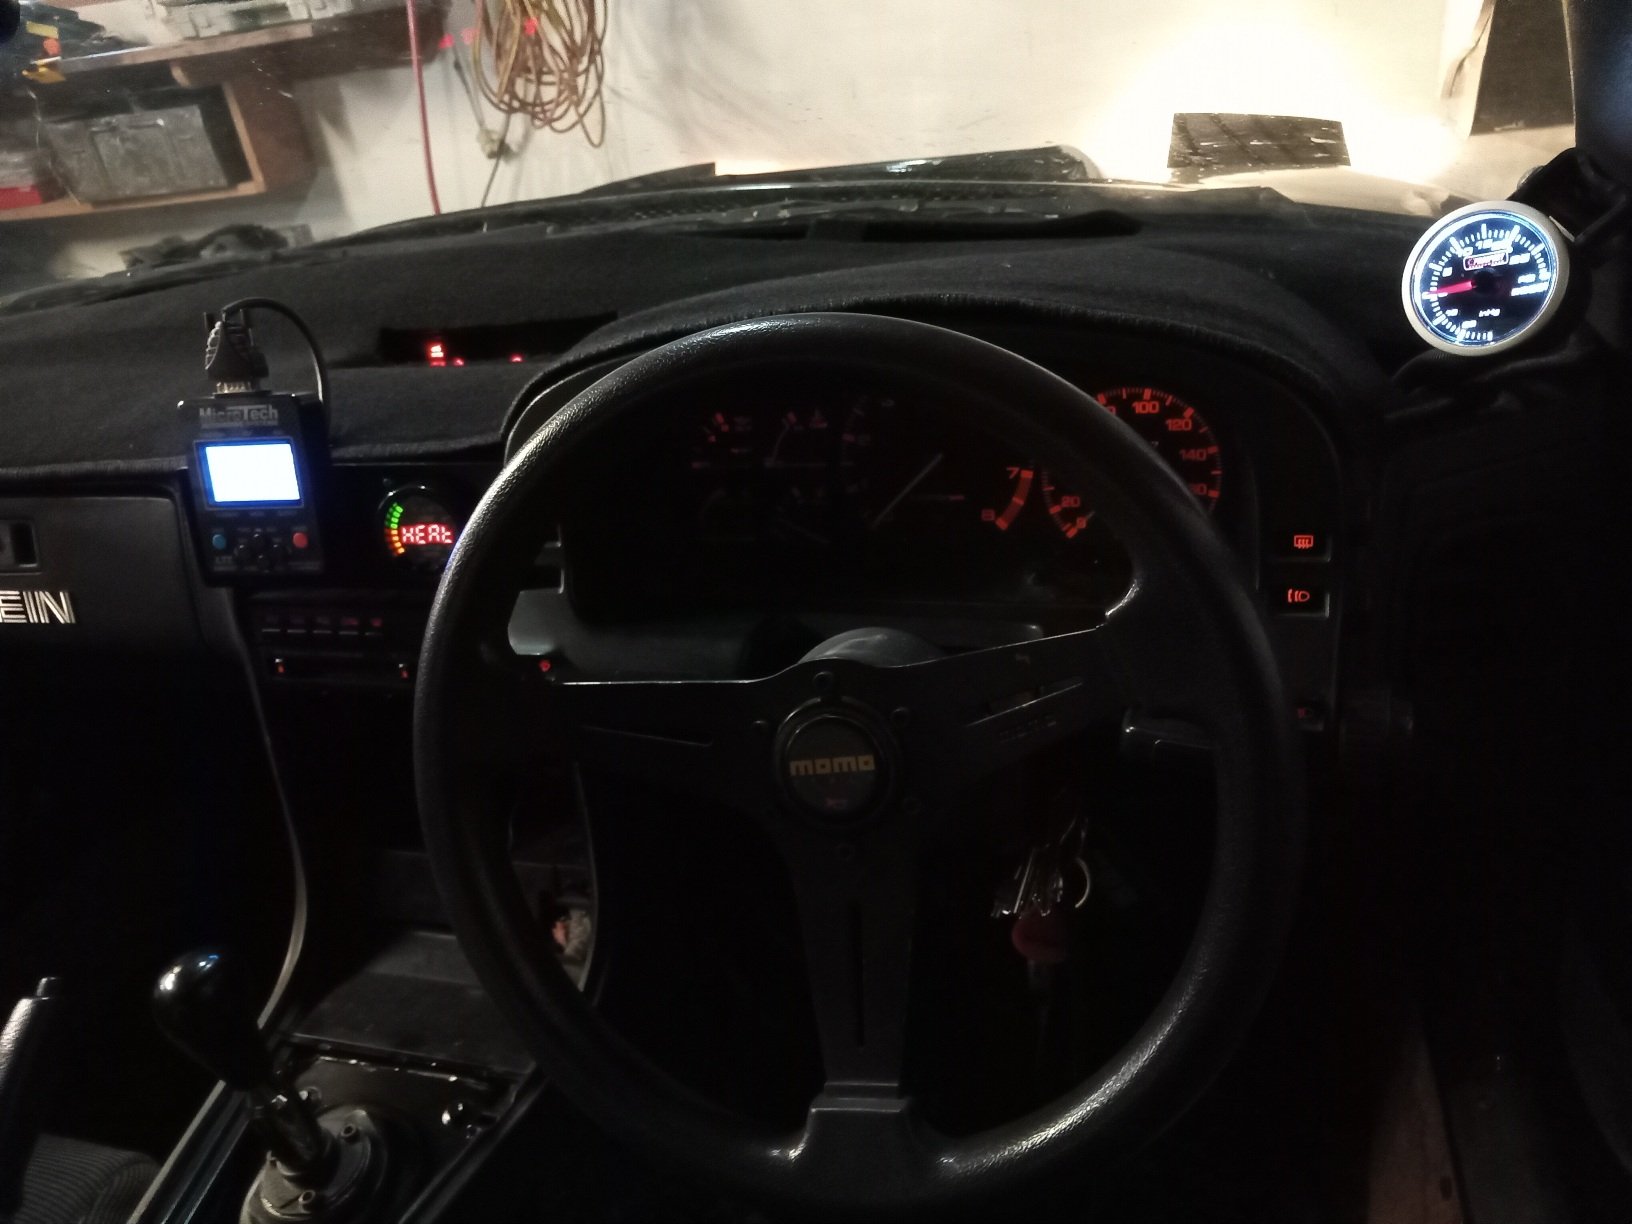
I modelled and printed some door card clips which as always gives me the deepest pleasure. These worked pretty well after some tweaks. These are not exact copies and are designed so they are easier to print, but functionally they are sweet. The drivers side window winder mech was deeply wrong, the wire tension adjustment was maxed out, hacked and the maxed out again, but the wire was still as loose as fuck and while it kindof worked it made horrible grindy noises. This came from the barrel where the wire was straddling grooves cos it was so loose. It was all down in a difficult to reach place, and those mechanisms are notoriously cunty to pull out and put back. Amazing that I got a bollock into that shot as well. The passenger side was sweet and the wire connection looks like this; After a bit of thought and dicking around trying to take slack out of the wire a genius idea came to me; I routed the wire like that through both lift points, which took up enough slack that I could tension the mech properly. Another 1/4 hr of contortion with a torch, phone and screwdriver and I had the wire slipped back into its rightful track. It works perfectly again, yay!5 points
-
na stuff doesnt need that much cooling, especially since your engine is a giant aluminum thing to start with. Also half the time peoples cooling problems, is all the stuff jammed up behind the radiator. if air cant get out, its not going to go through3 points
-
So massive then3 points
-
I've blown up shitloads of Bosch 4.2 and 4.9 sensors, so changed to the 14point7 Spartan controller, with the LSU-ADV sensor. It lasted the entire lifespan of the echo without blowing up a single sensor, and was running it "hot" on cold starts as well. (As it's designed to be more compatible with cold starts than 4.2 or 4.9) Compared to, I think my record with a 4.2 or 4.9 sensor for worst lifespan was that one lasted 3 days.3 points
-
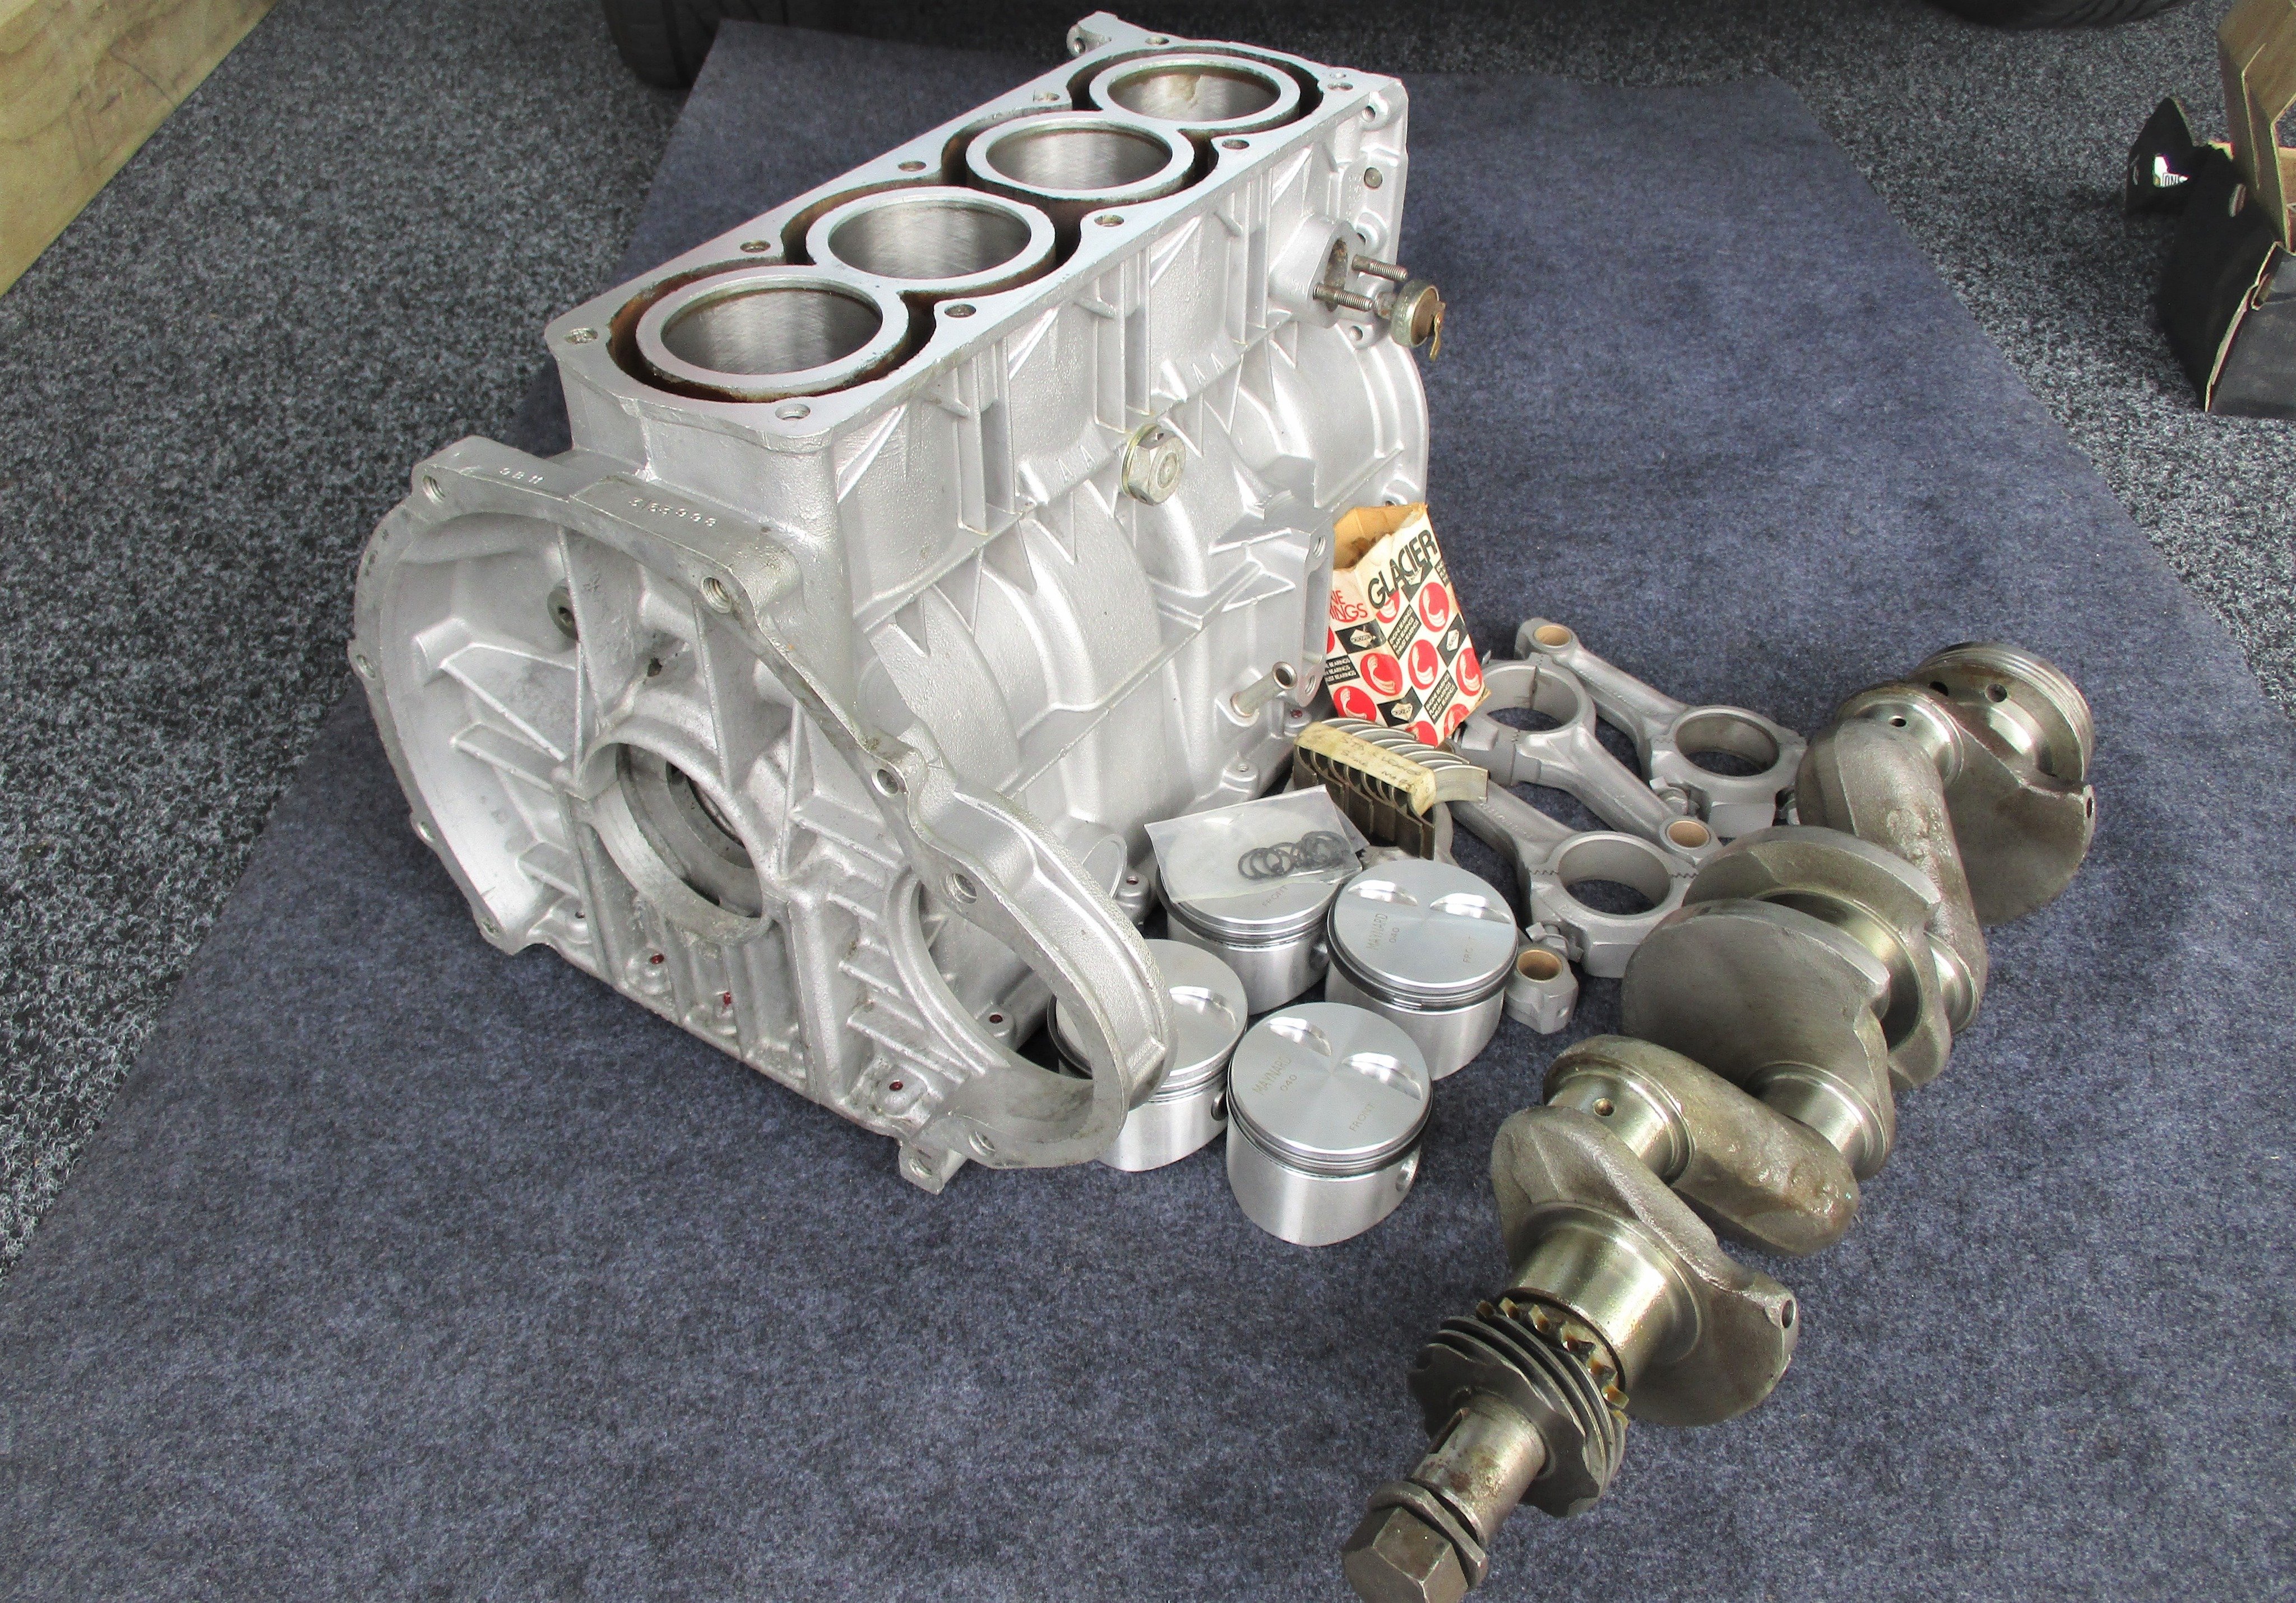
I made one rev to the moon, but I never actually got it making decent power, and the vibrations kept wrecking shit.3 points
-
3 points
-
Update on the stug
3 points
-
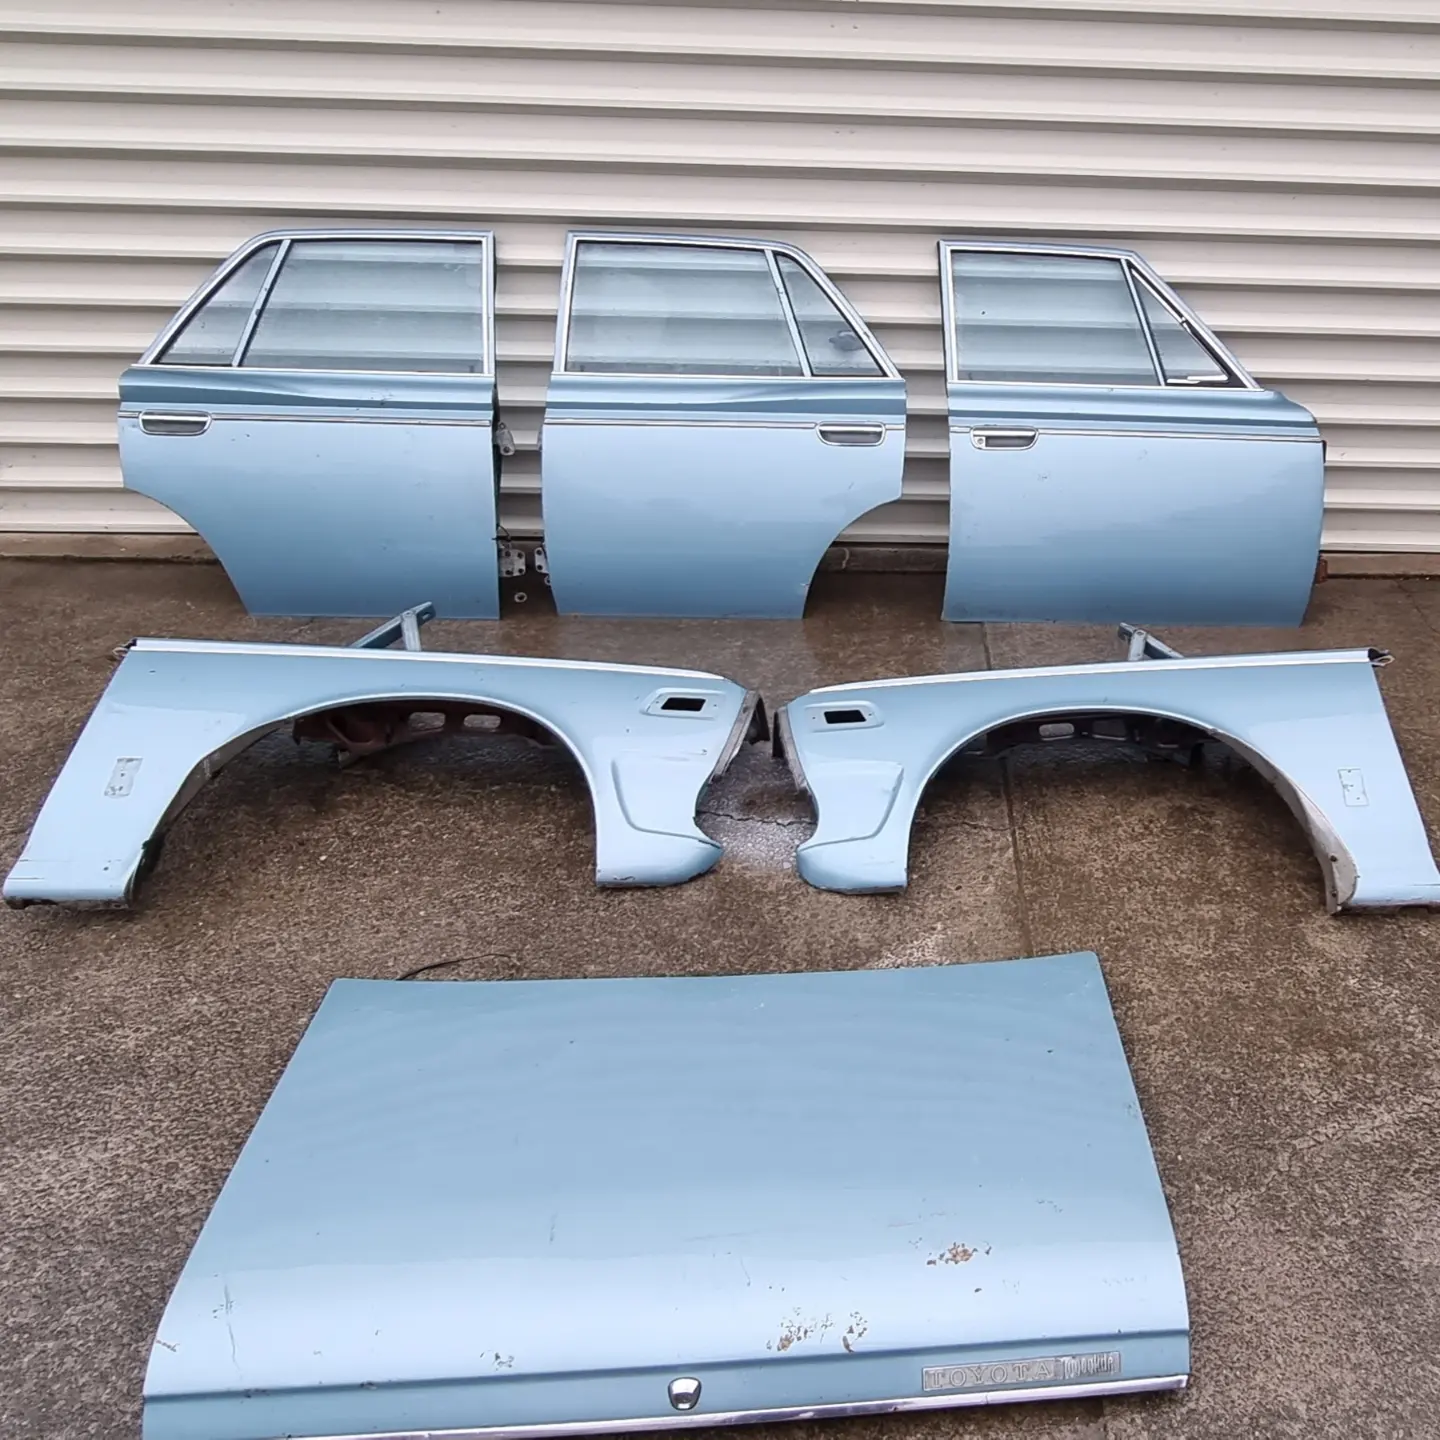
Im still thinking about this once in a while. Tracked down a less fucked right front guard. It was up welles ways. @Goat kindly let me use his house as a freight forward depot. The seller dropped it off, and a mate who was passing by collected it the next day. Picked it up tonight. Defo needs a wee bit of work. But i can buy the inner and outer bottoms off the shelf from Automotive Panel Craft in Oz. Thanks to @Classicdat for lugging it south for me too!
3 points
-
Bolted more shit on. I thought I had better reassemble the doors and check their function before chucking them on, and shortly I noticed that this little tit on the door latch had broken off, which would mean I would have to unlock the passenger side and reach over to unlock the drivers. See that tit on the diecast part? This actuates the lock from the door key; Commence bodging And it worked! I was quietly pleased with that as those latches are pretty much unobtainium these days Then I realised that I was trying to use the passenger latch in the drivers side, so that was all a waste of time. Except that the boot and engine cover latch levers are in the shut off of the passenger door. So actually it will be pretty useful to be able unlock the passenger side to get to those. I seem to recall this not working previously. So fuck all left to do really; Windscreen Box on and engine in Final wiring connections in the engine bay once the engine is in Passenger door Boot and engine cover Carb tune I am assuming the brakes will probably need rebuilding, we will just have to see. And whatever other fuckery arises.3 points
-
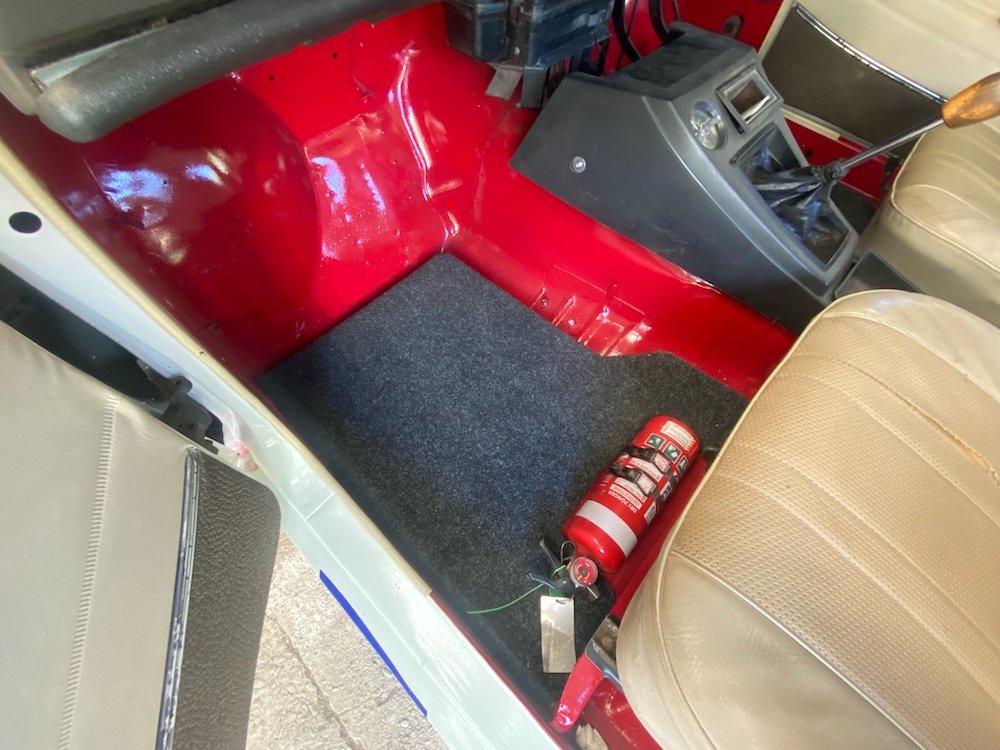
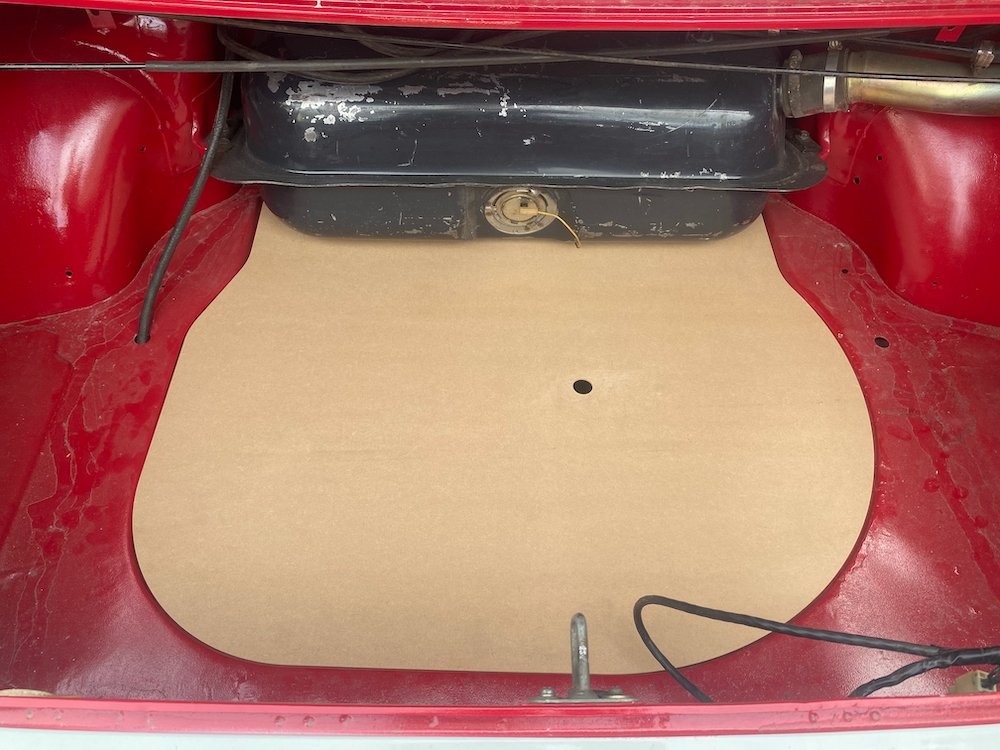
Was out in the shed again today so had a quick measure up and fed the cnc some mdf Quite happy with how much nicer the boot looks with the spare covered, motivates me a bit more to suss some carpet etc. From factory there were a few more trim panels in the boot, hopefully have a set on the way to copy, its something i've never seen before so looking forward to it!
2 points
-
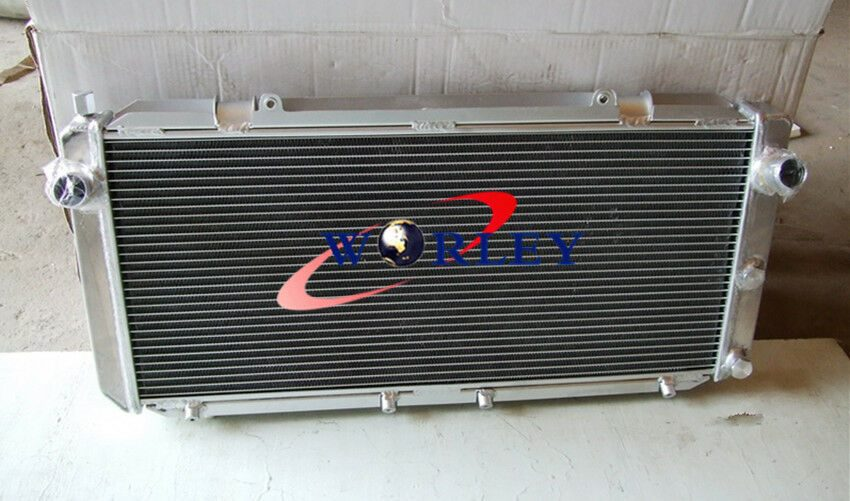
Yeah I hear you, and I am focused on getting this from current its current state to a running motor/car ASAP with no fucking around on non essentials. (Can do that iteratively once it's going, like echo. thats the fun part) As I want to know how well my engine scheme is going to pan out! So the seemingly easiest way would have been to keep the Altezza radiator that I already had - but the pipe sizes are wrong, and the pipe locations dont really work either. I was hoping the Mark X setup would just tick off all of these boxes, just have to remake some top and bottom mounts. But it's actually only as thin as the Altezza radiator (16mm) and the hoses didnt really fit too well since the radiator and engine heights dont match relative positions to factory. Bottom mounts will be easy, but the top ones tricky because it's tall. But once mounted it's going to be even taller, and I suspect it will hit the bonnet. So my thinking here is actually to NOT waste my time, rather than to dilly dally with unimportant stuff. So I'm cutting my losses and ironically going to SW20 parts haha. To get the motor running I dont need an air intake at all, and I dont need any radiator ducting. So I'll bang the radiator in there, work out the mounts, work out the pipes, then fill the damn thing up. This new radiator is 40m thick core as well, so hopefully zero cooling issues if I can get some air to it. This SW20 radiator was $220 delivered so meets the cheap and cheerful criteria!2 points
-
Crazy idea here.... Run what you have, and see what happens. Don't waste energy theorising on what might happen, and over-complicating things. This was the Echo's charm, cheap, cheerful and iterative. I also know that your name is David and you're incapable of not over-thinking the whole process2 points
-
Do you have room to angle rad fwd (move bottom edge rear wards)2 points
-
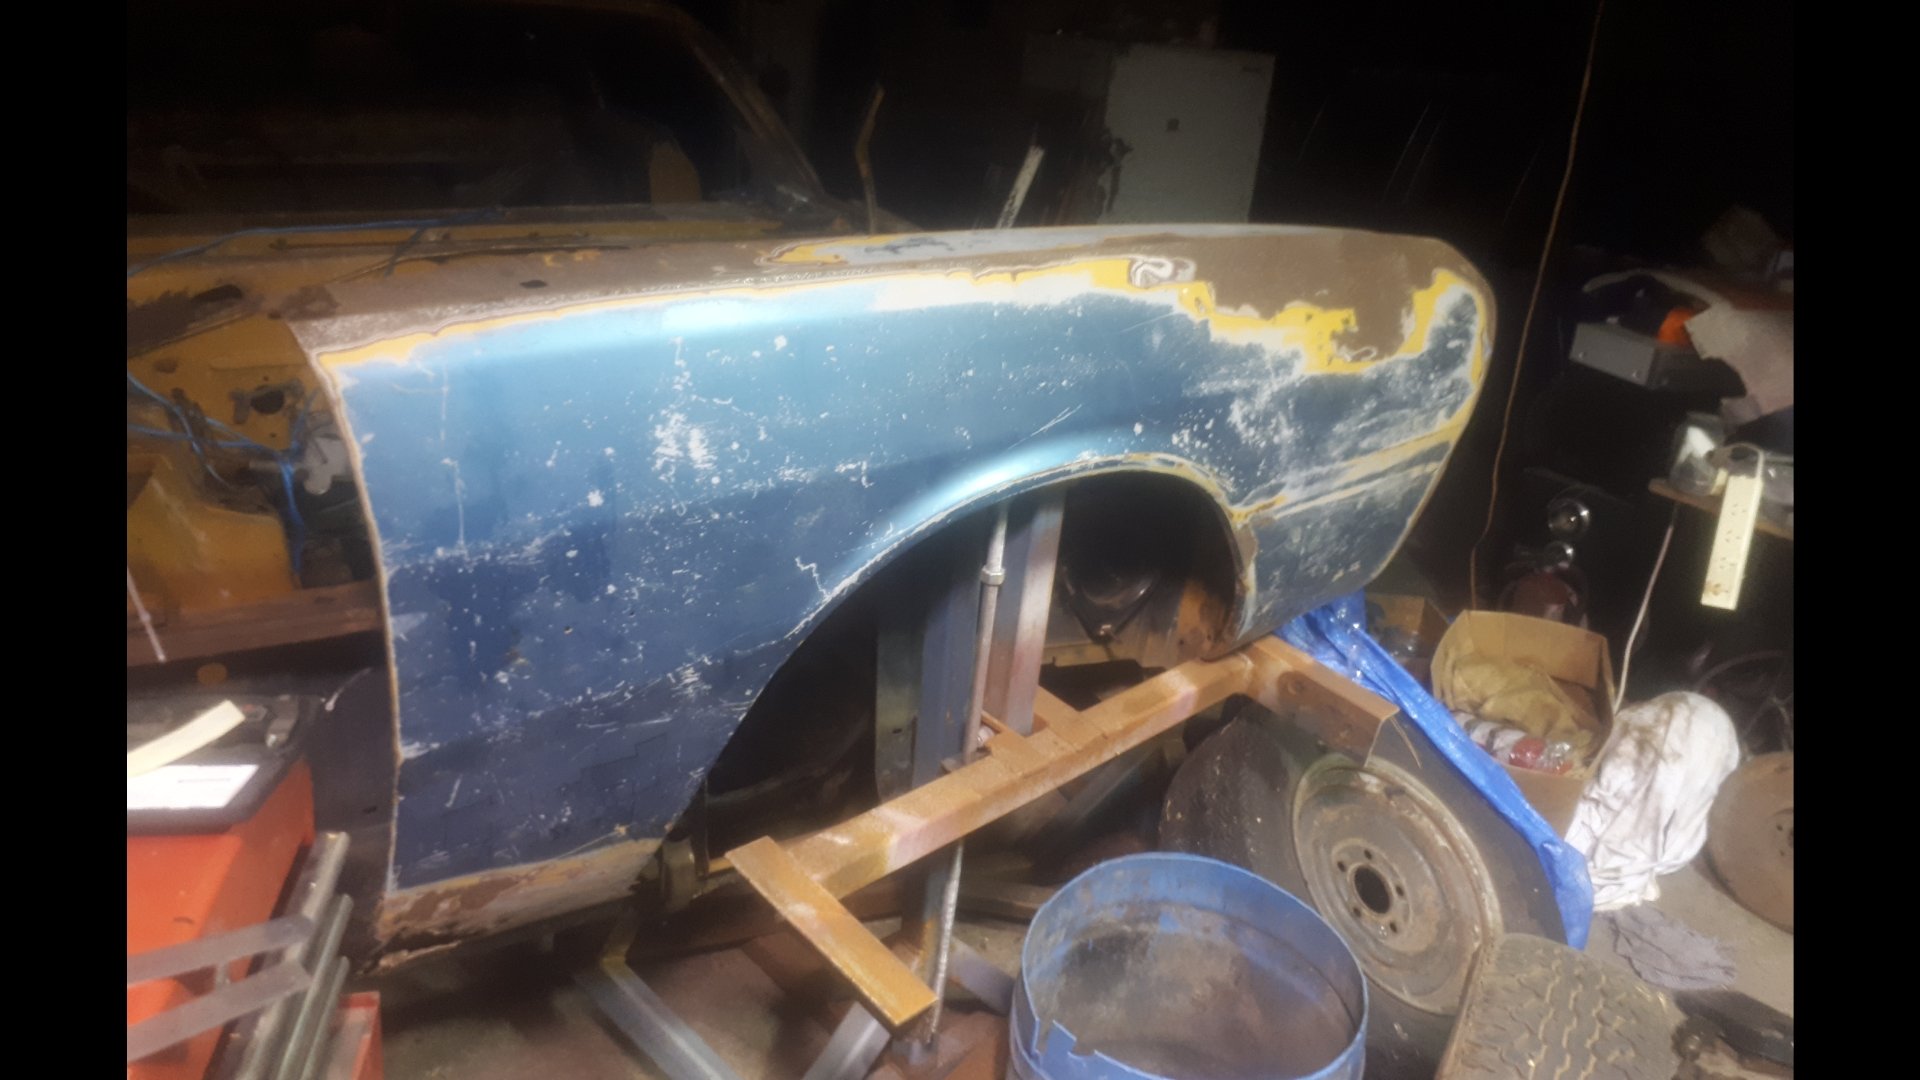
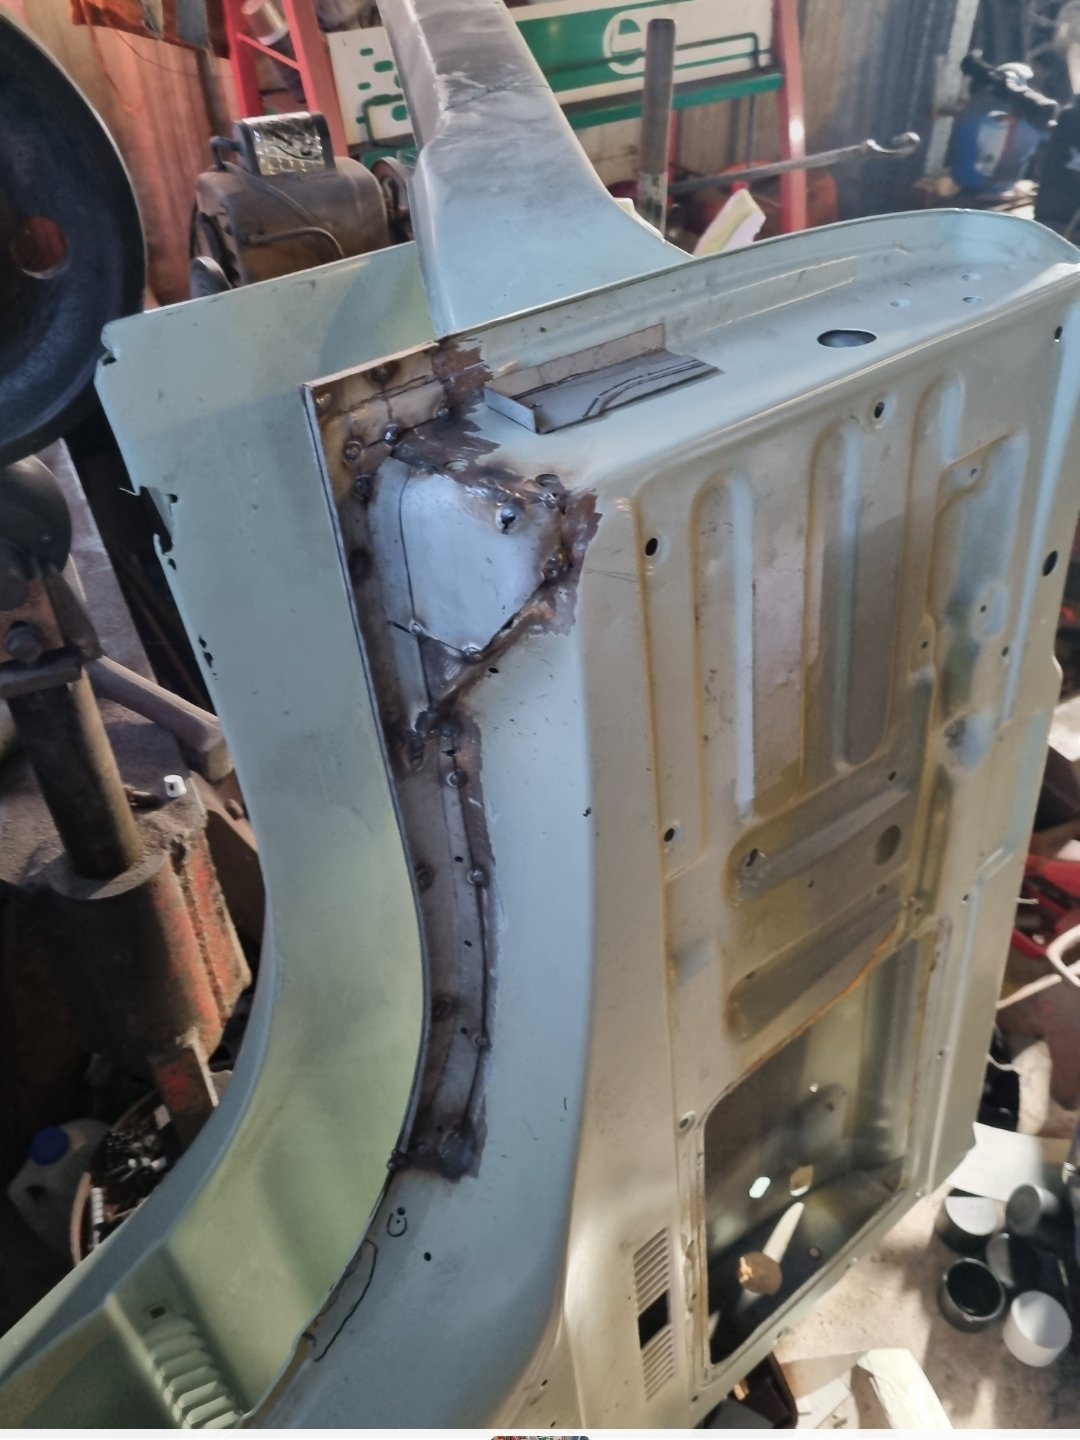
I had planned to have to weld in the front portion of the yellow guard because I deemed the panel damage beyond my skill to repair. The step thing on the corner had been totally flattened by someone else's previous attempt. I had a go at it myself maybe a year or so ago. But then the other day, I thought I'd have one more go, if I fucked it up I could still weld in the other panel. So I just hit it much harder... I think it's acceptable now, I reshaped the step and didn't fuck up the two... ridge line things. Should only need minimal filler. I also trimmed the doner front panels so I could trial fit them. This car had run into something and pushed in the front panels, folding over the lower front seam. I was unable to get the panels the budge with a slide hammer, so I decided I'd use the front panels from the yellow one, which were surprisingly rust free, unlike the rest of the yellow car. Front panels look like there will be no issues fitting them. I'm not ready to weld the panel back in, I still need to prep behind it for epoxy.
2 points
-
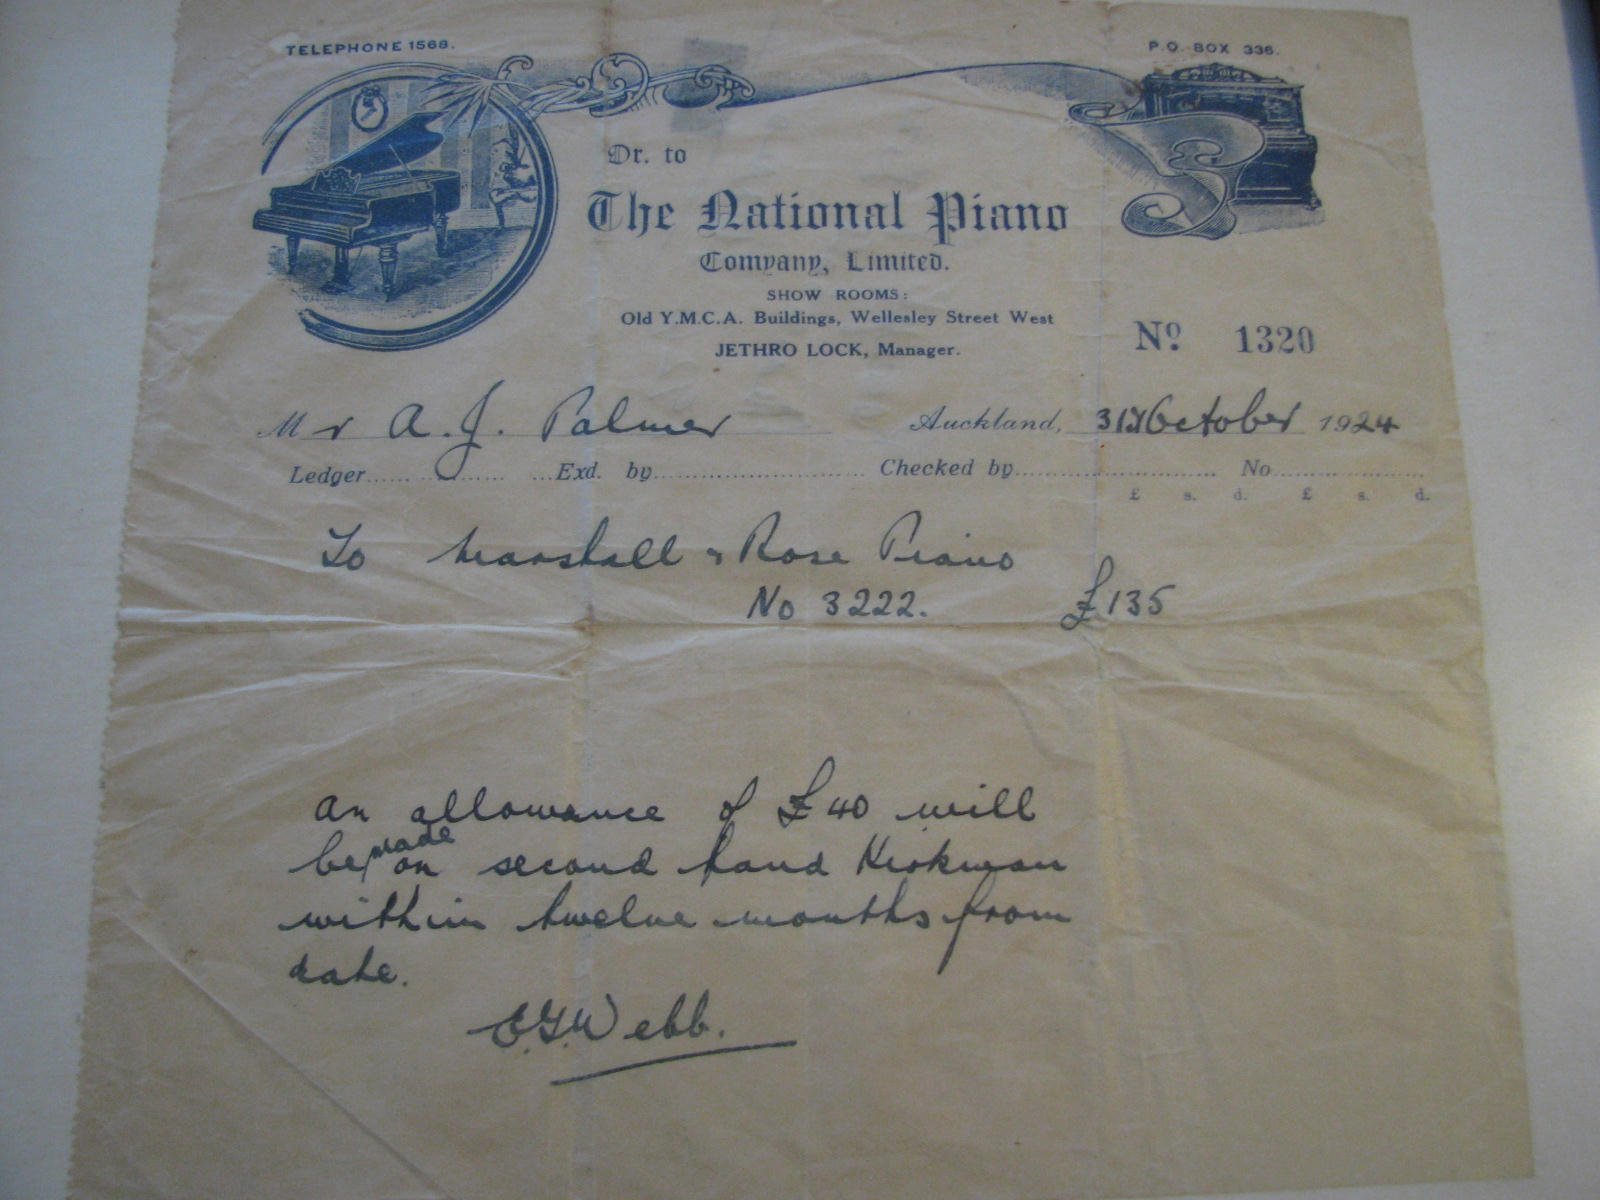
Uh-oh, it's time. This thread will be long and tedious and you probably shouldn't read it. Eventually there may be some videos but I need to bury them behind off-putting Barry stories. Four score and nineteen years ago, before the internet, computers, CDs, cassettes, before NZ switched to decimal currency, before TV, vinyl, WW2, the Great Depression, the popularisation of radio, before the majority of NZ families owned a car or even had electricity in the home, it was still the golden age of the piano. My great grandfather on my mother's side had just upgraded to a shiny new British piano (Japanese pianos weren't a thing yet, and German pianos had fallen out of favour in recent years for some reason). Somehow the receipt from that piano purchase survives to this day: More recently we also unearthed this photo of Great Granddad playing said piano: OK, so he's only "playing" the piano using a push-up pianola. These were a mechanical contraption that sat externally in front of the piano, somehow read scrolls of music via pneumatics and played the piano keys the same way a human would. A human was still required to power the device by pumping foot pedals, and then to take credit for the performance. They could also adjust things like volume and tempo on the fly via hand-operated sliders. Here's a random photo of a push-up pianola being used with a grand piano: When you think about it, this is a ridiculous amount of complexity, weight, cost, physical space, maintenance, effort etc just to reproduce music. Anyway, although using a pianola doesn't qualify one as a musician, my grandmother told me that Great Granddad would put a great deal of focus into adding expression via the pianola's levers. She recalled one instance where he finished a performance and heard applause coming from outside his window - someone walking down the street had stopped to listen. That's it, that's the highlight of the first part of this piano's life. From there, the piano's life was presumably pretty standard - a lot of sitting in the corner. My great grandfather had six children and the piano wound up with his youngest, my grandmother. Possibly the earliest memories of my life are of visiting my grandparents' house, where the piano sat in a back room down the hall. I would go down there, bash on the keys randomly, come up with a convoluted name for my amazing impromptu composition, then head to the front room where the adults would be talking and try to get their attention: "Did you hear that? It was called... um....um...." (invariably I had forgotten the name of my composition by then) The piano then passed to my parents while I was still young, possibly because my dad (who isn't from the piano's side of the family) showed some interest. Here's a top tip for any parents of young children: Tell the kid that if they go to bed early without any fuss like a good boy, their dad will play them a song on the piano as they fall asleep. This will mess them up for life. So I inherited the piano when I got my first house. Here it is at my place ten years ago, with a duvet jammed behind it: It's a Marshall & Rose upright, made in London in 1922 (best guess based on the serial number). That manufacturing date should have given it long enough to take a slow boat to NZ prior to its purchase here in '24. In car terms, you could liken this piano to something like a Rover P6 - an above-entry-level product, manufactured by a still-independent British company who would later be swallowed up by a conglomerate and produce less-unique products until the conglomerate went out of business for British reasons. Just as Rover would outsource the odd driveline component (a transmission here, an engine there), this piano uses a complete action assembly (the internal moving parts) from an outside supplier. The candleholders are aftermarket accessories which I added - basically they're the piano equivalent of fitting a roof rack and an external spare tyre to your P6 to make it look more 'classic car'. The piano's finished in burr walnut veneer hidden under darkened old varnish. Believe it or not I cannot find another exactly the same online. My plans for this thread are: to bore you all silly by rambling about piano stuff to document my project to record ten songs to celebrate the centenary of the piano's purchase. I've picked one song from every decade of the piano's existence (judge's decision is final and no correspondence will be entered into), and I plan to record one a month between January and October of 2024. Whether I find time to achieve this, let alone in video format, and whether I go through with making the results public, time will tell. The goal is that January will be the 1920s song, February the 1930s etc, and I will regret this very much.
1 point
-
MR2 Overall size: 770mm x 308mm x 42mm Core Size: 670mm x 308mm x 42mm Inlet & Outlet size 32mm https://www.redlineperformance.co.nz/product/to-suit-toyota-mr2-sw20-radiator/ GT86 Core size: 355mm x 650mm x 42mm. https://www.fenixcooling.co.nz/collections/performance-radiators/products/toy8877fa42m?variant=411724464801 point
-
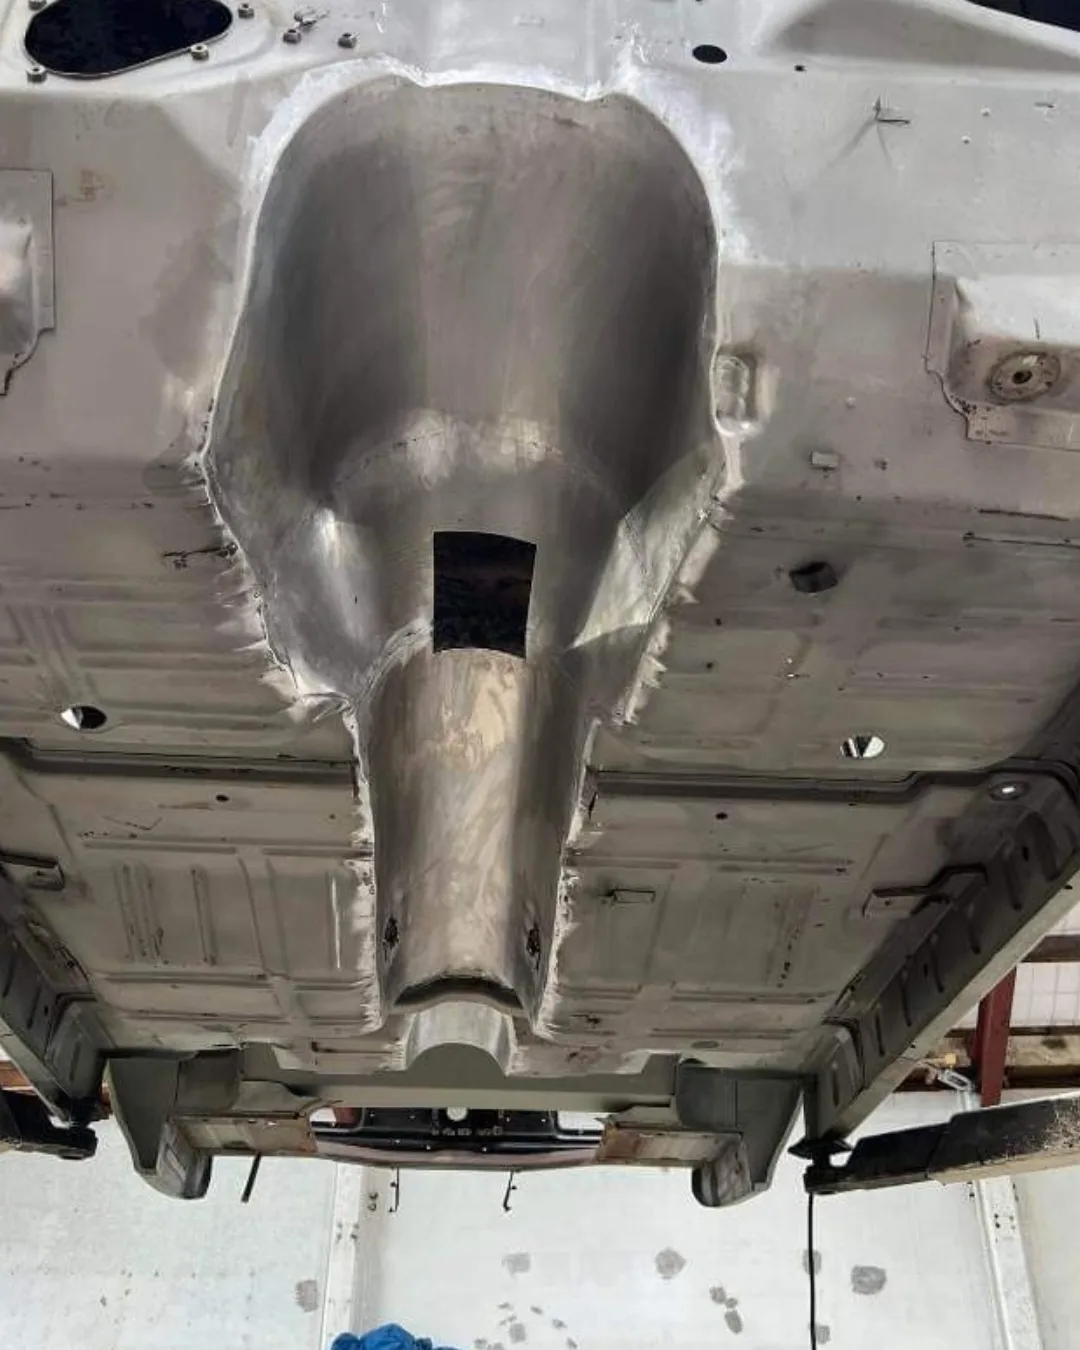
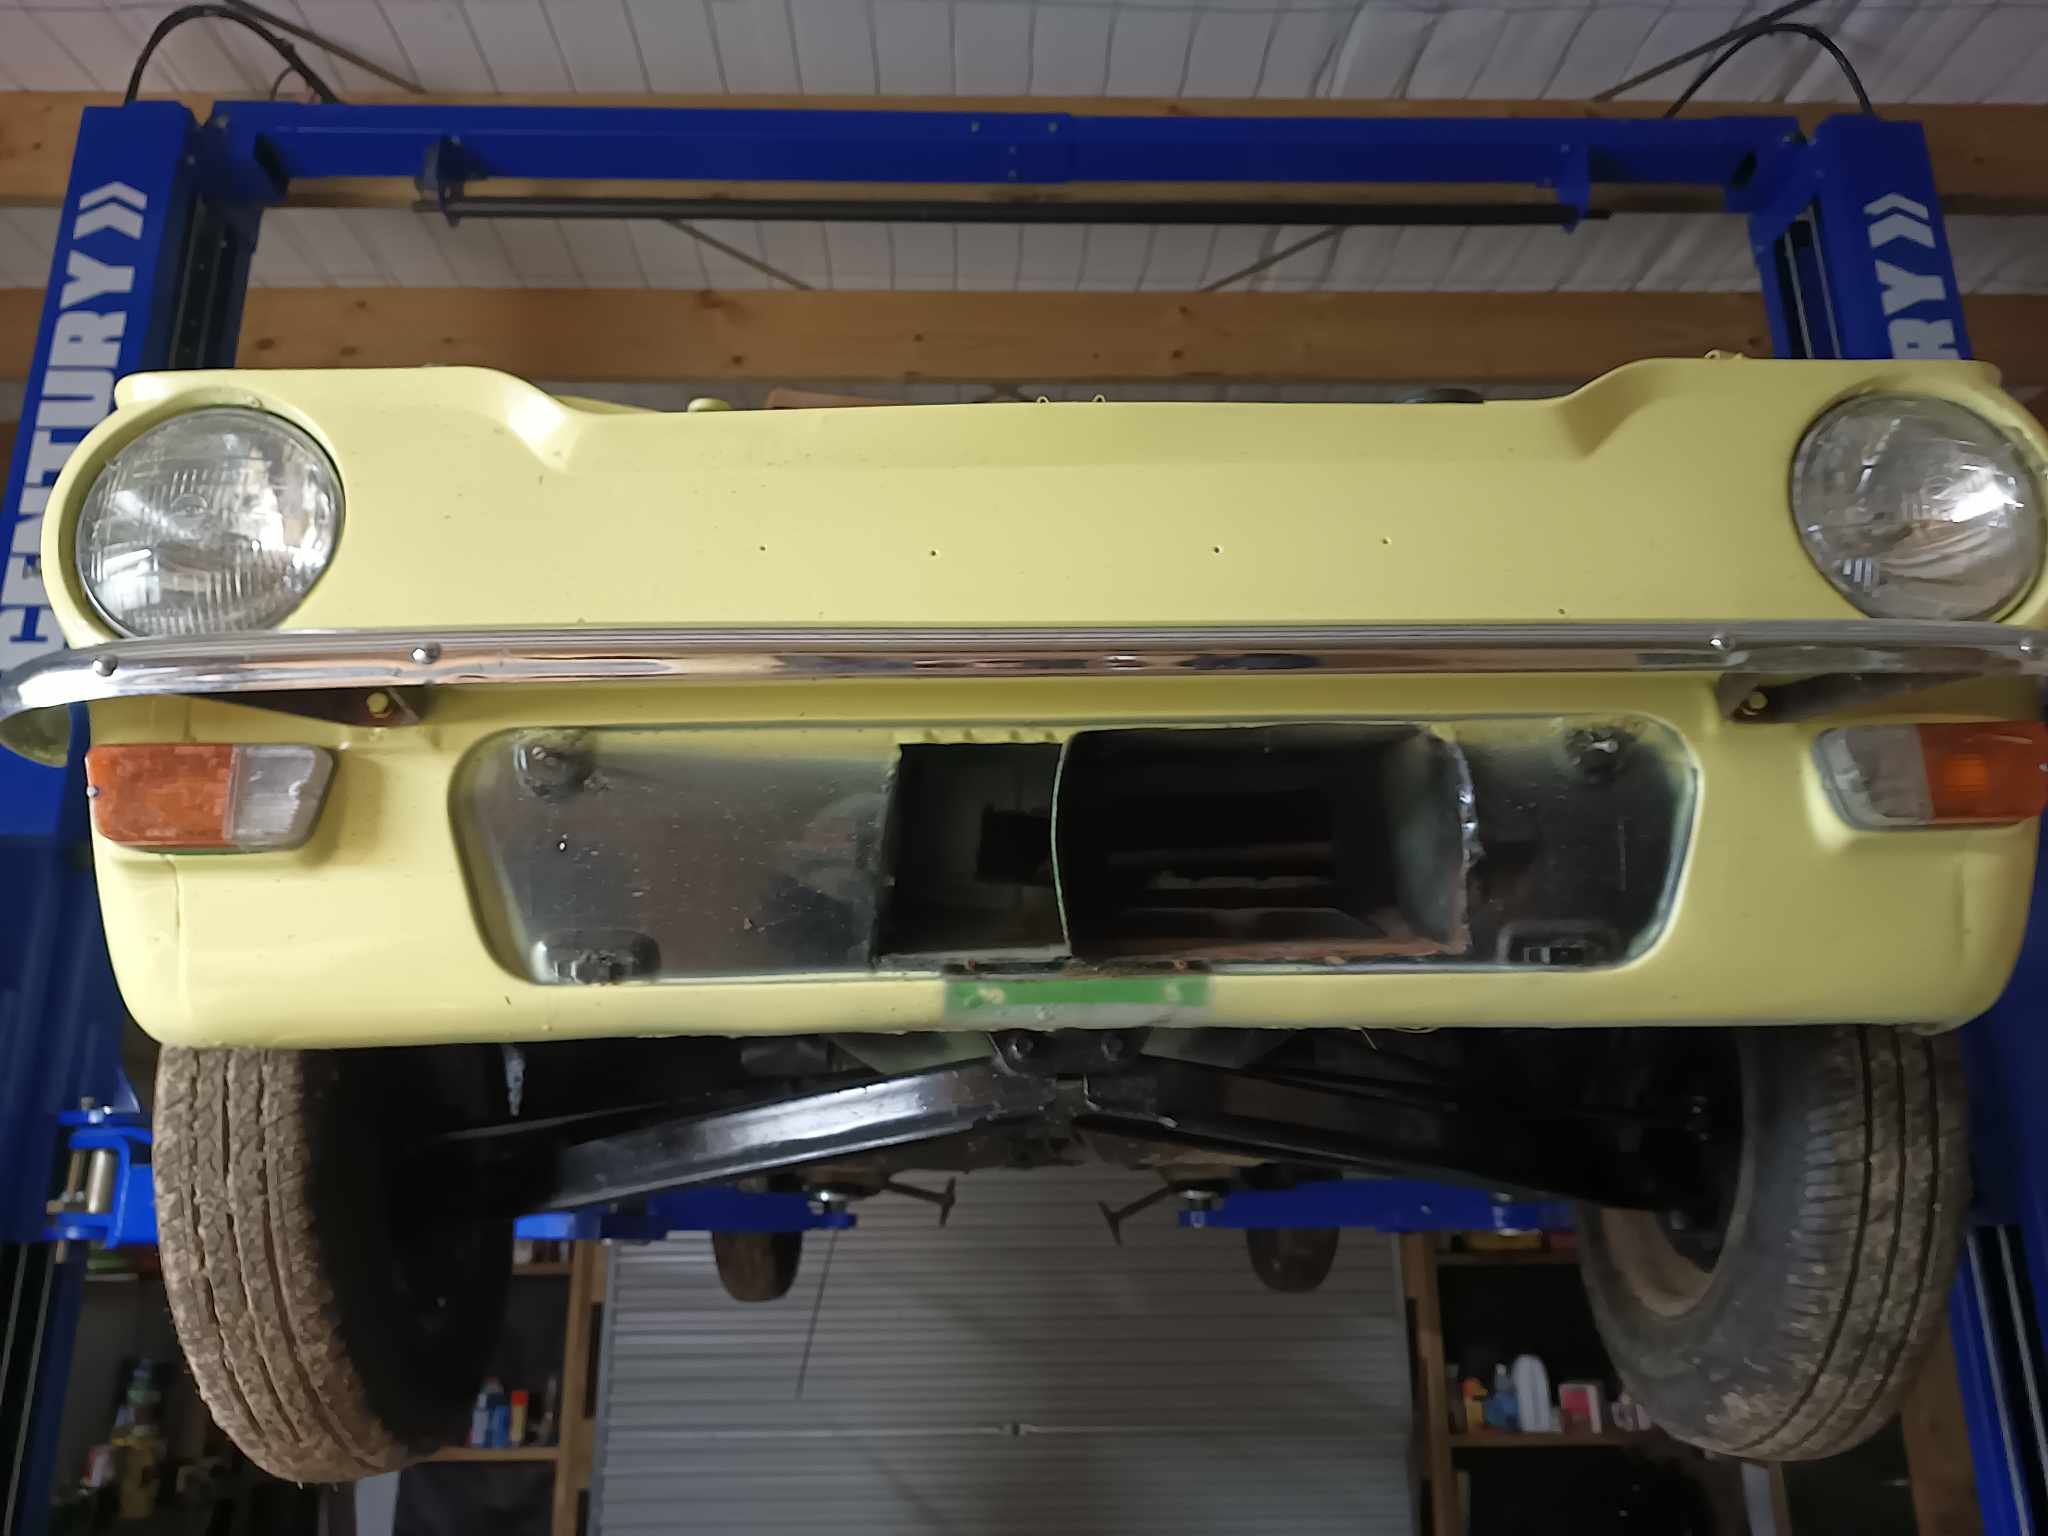
I think the general idea is that the faster you are going, the less air intake area you need for your radiator size. A lot of the time attack cars have tiny little holes for the radiator. Total lower grill entry area is 77542mm2 . Equivalent area to a 315mm circle. 57081mm2 for the upper grill entry. Equivalent area to a 270mm diameter circle. The front valance sits quite high on this car, but it's really hard to add something to the front to lower it that doesnt look like absolute shit. I very much do not like this style of front on this era car: This below though can look cool though but it's hard to get it right, often looks gumby when someone fits one that isnt wide enough or the right shape for the car. May also be incompatible with my rural driveway haha.
1 point
-
For exhaust, I removed a stainless adrenalin R off my RX4 as I couldn't stand the sound it made, horrible tinny and had a resonance at a certain RPM that just drilled into my head. Not a fan. I had a custom "Manawatu mufflers" mild steel boiler made to suit the space available, huge difference, really nice deep sound, slightly quieter, way happier.1 point
-
What have you done to your TF @SOHC1 point
-
Have done a few very short rides on this bad boy, and its running pretty damn good. Its quite nice to ride also, which is a bonus. At nats I did a 75km trip from nats HQ to a museum in Cambridge, and just to be safe, I decided to re-fill it before departing for nats HQ on the return trip. It went onto reserve in the middle of the road in front of the service station, which was a bit of a surprise, as I was told it would do 200km on a tank (6L) but had only managed 75ish. That's around 8L/100km, which isn't great. J5's bike which is very similar, and was pulling the same speeds, and is only 15cc smaller in capacity, used just over half as much from memory, so somethings not quite right. Its defiantly running rich, and often smells a bit gasey, but I cant find gas leaking out anywhere. Will dropping the needle make a noticeable difference? Cant really think of anything else to check/change? I did manage to hit the metric ton in a two lane flat express way race with J5 though, so that's a new PB. Also also, a person on TM who confirmed they had both racks I need, then ghosted me super hard when I tried to buy them. BUT I mentioned to a customer that I yarn to about shit old bikes, what I was after, said his best mate apparently has at least 6x CT200's laying around, so he is actively trying to source the racks for me, excite. Pic4fred: Regards, VG.1 point
-
"If ye don't tek yer meat, ye can't tune any piano! How can ye tune yer piano if ye don't tek yer meat?" I have a tuning hammer that I bought online, and I could probably do an OK job with the aid of an app, but I'll save that for when I move out of Auckland to where there aren't any tuners. Until then, I know I cannae match fahrty yeers of expeerience in any wee, shepe or farrim. Barglaralarrum.1 point
-
These 2 absolute fucking legends (and Josh) making it possible. Feeding and watering the troops as well as the odd rescue where required. Even taught this old dog a thing about Old School values, rescuing the Subaru fools. Top effort fellas, you're fucking awesome
1 point
-
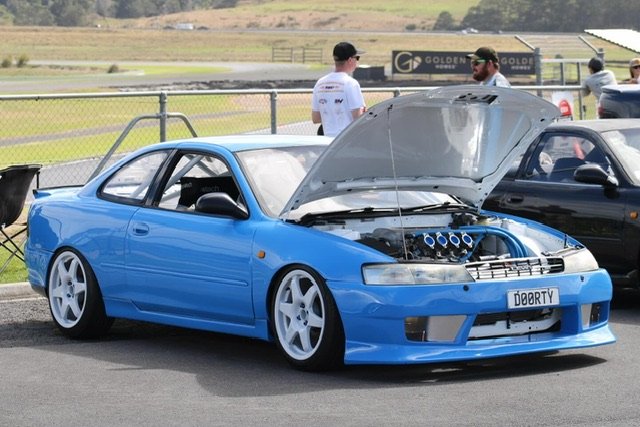
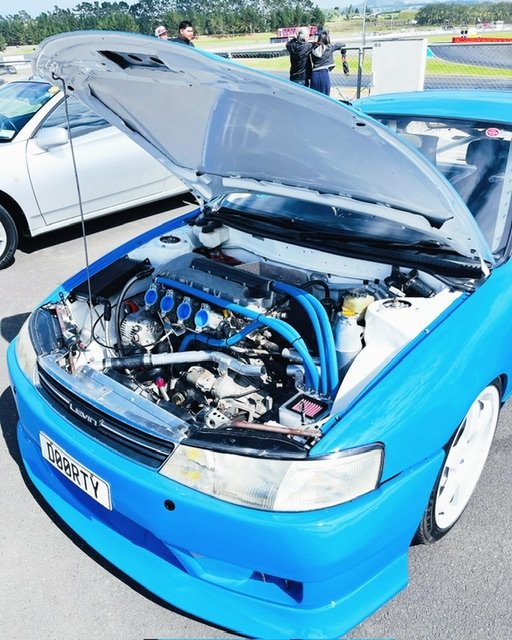
Have also been mucking around in the engine bay, i fixed a bunch of split hoses, put the strut brace back on that came with the spares for this car, cleaned up lots of areas, some paint, cleaned the wheels inside and out, put new tyres on the back took it for a drive and its running good, bit of a miss when it first goes into boost at low revs but im working on sorting that, still lights the tyres up in the dry pretty easily, but they are only 225s on the back ... Hooked up the boost gauge lighting to power so i can read it, and tidied some wiring away, i still need to buy parts for it, but these jobs all help, definitely will have to sort out some paint but i want to get all the parts on and working and warrantable before i do anything like that so excuse the mismatched colours and that haha
1 point
-
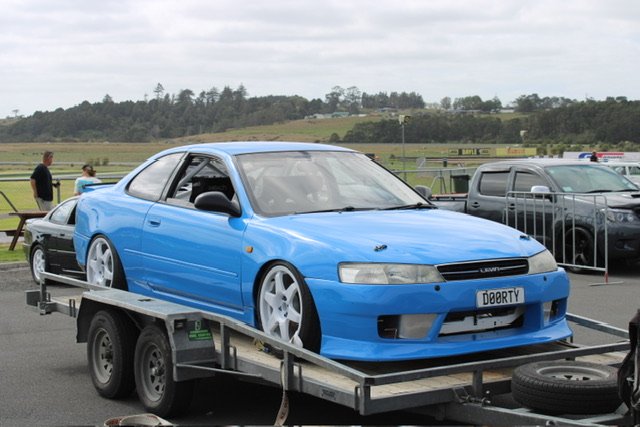
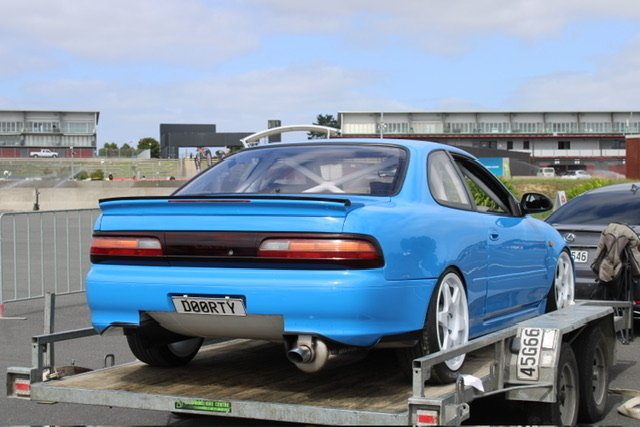
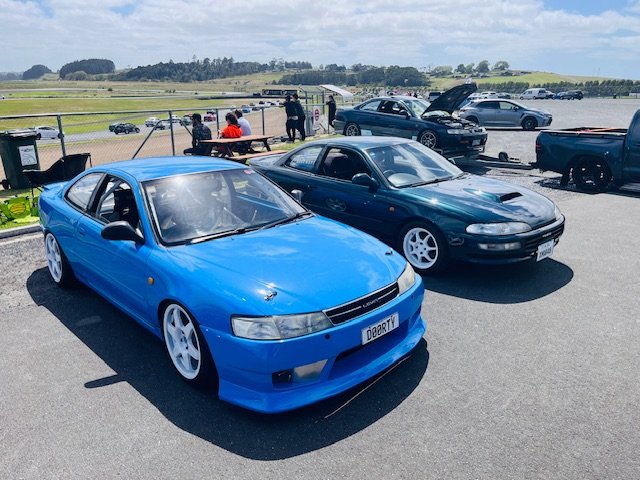
A few snaps from Toyotafest. If anyone got some feel free to share as well. Great to get the car out and chat to lots of people about it. Lots of motivation to finish it now! Trailer queen for first and last time hopefully Finley loved it too
1 point
-
Came in to work a bit early tonight and steam cleaned the CT. That chain lube goes everywhere!! All ready for the next lot of abuse.
1 point
-
More pics. Also, I only have 7 original plug leads and they are not flash, and one oddball. I'm really struggling to find replacements that fit and would appreciate any Intel on sourcing something suitable. Amayama list but no stock.. wondering if maybe I could butcher some 7M leads perhaps?
1 point
-
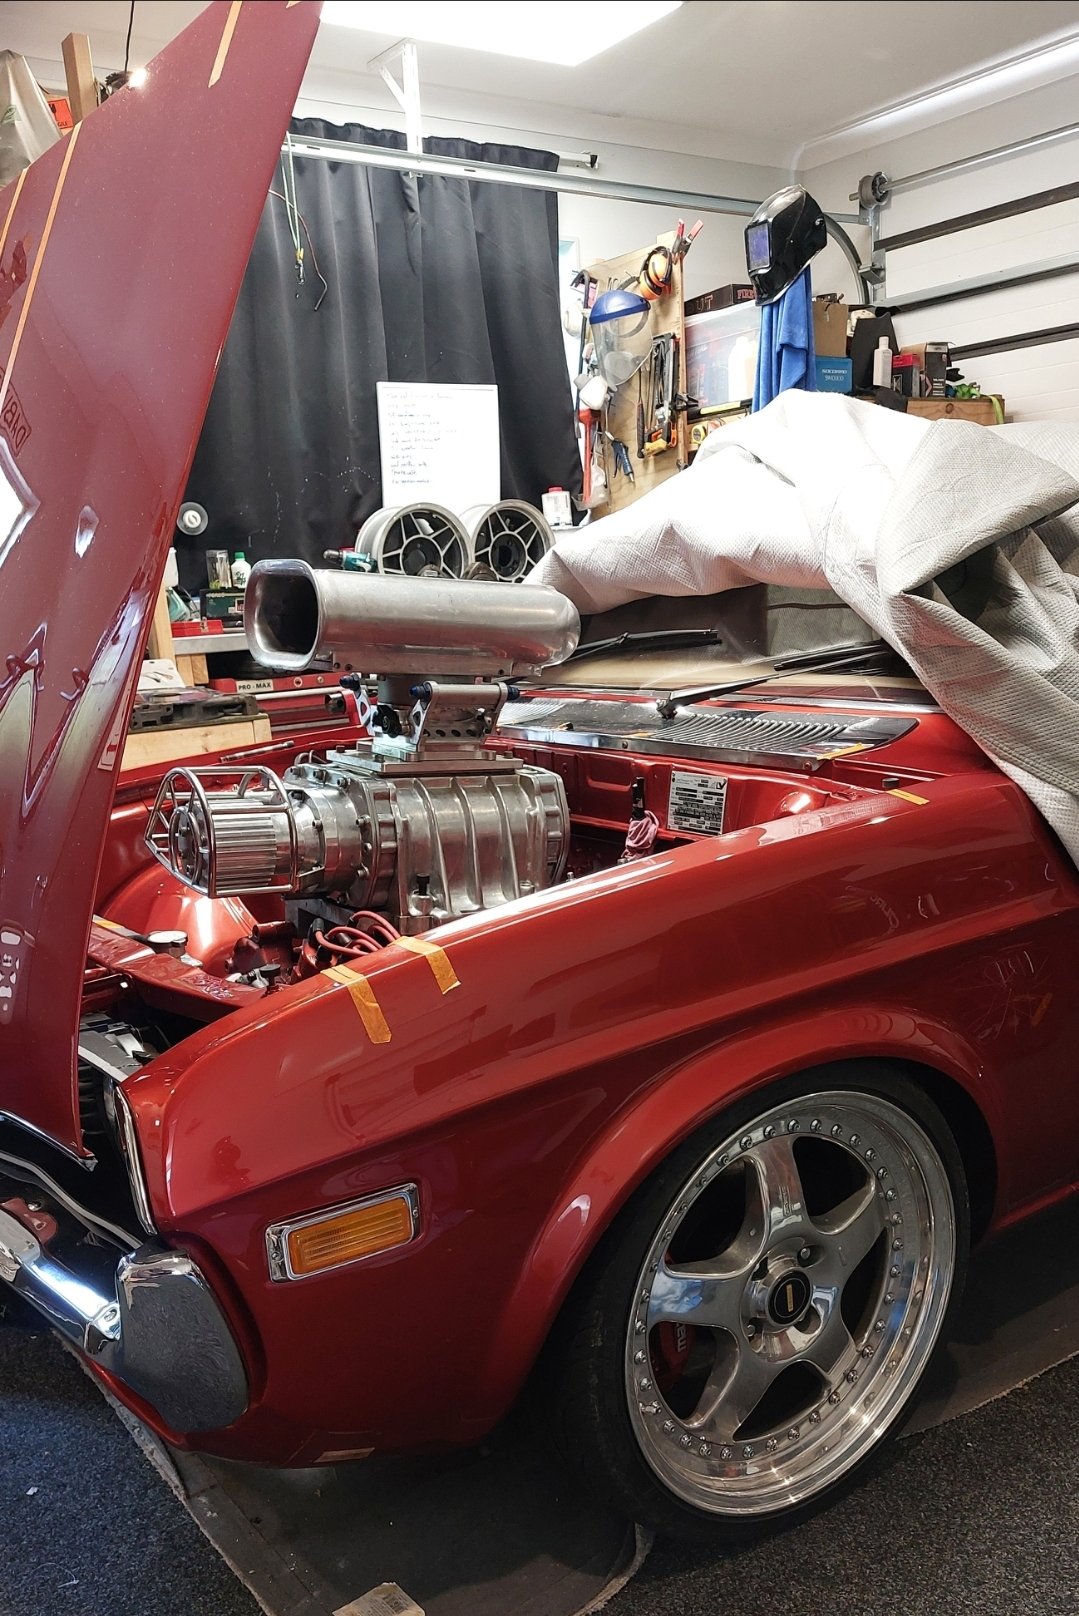
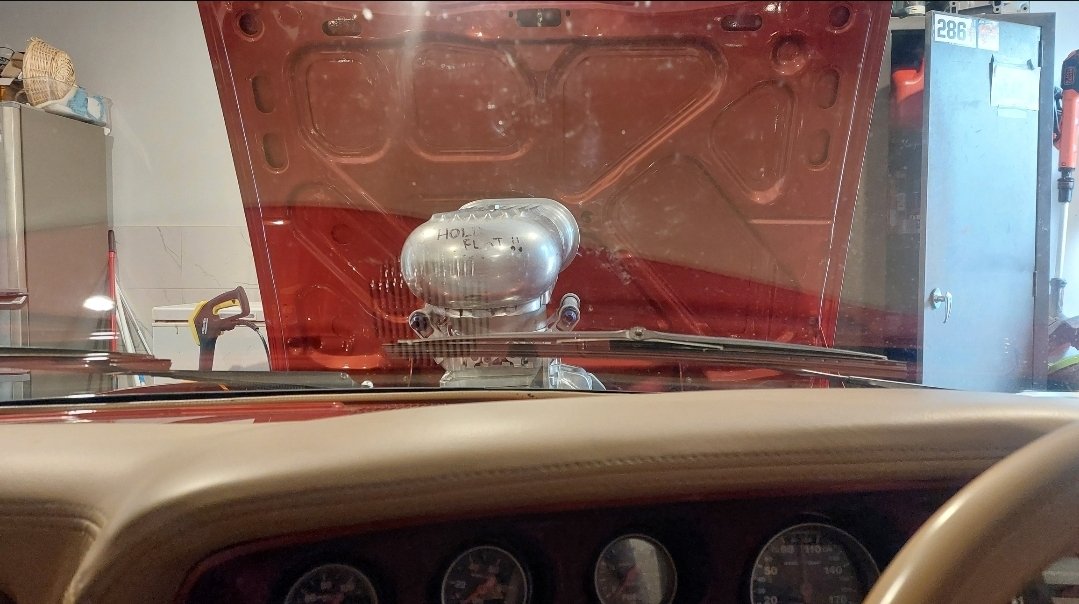
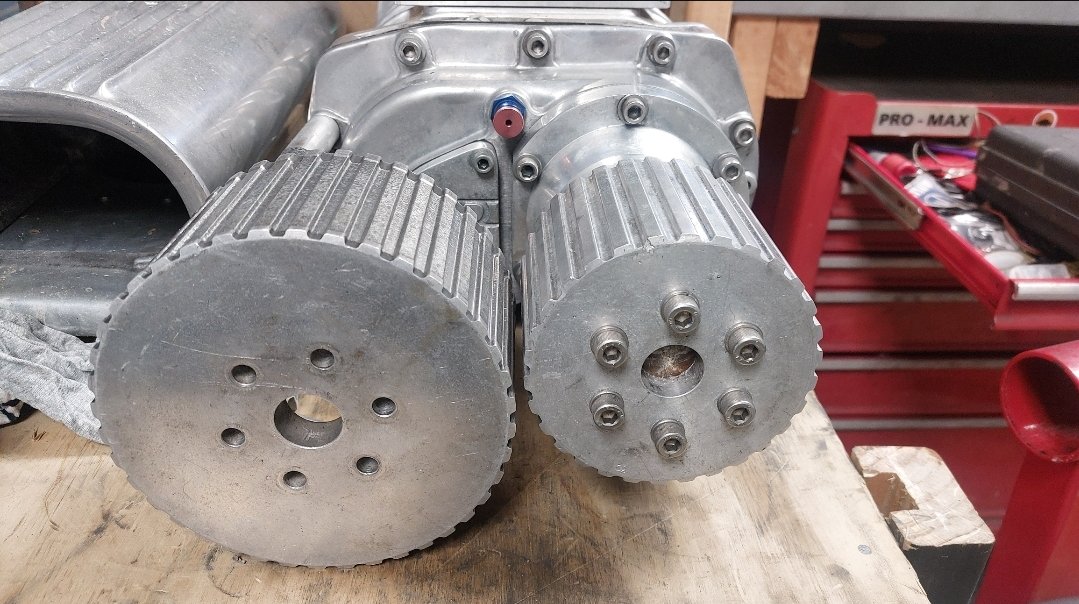
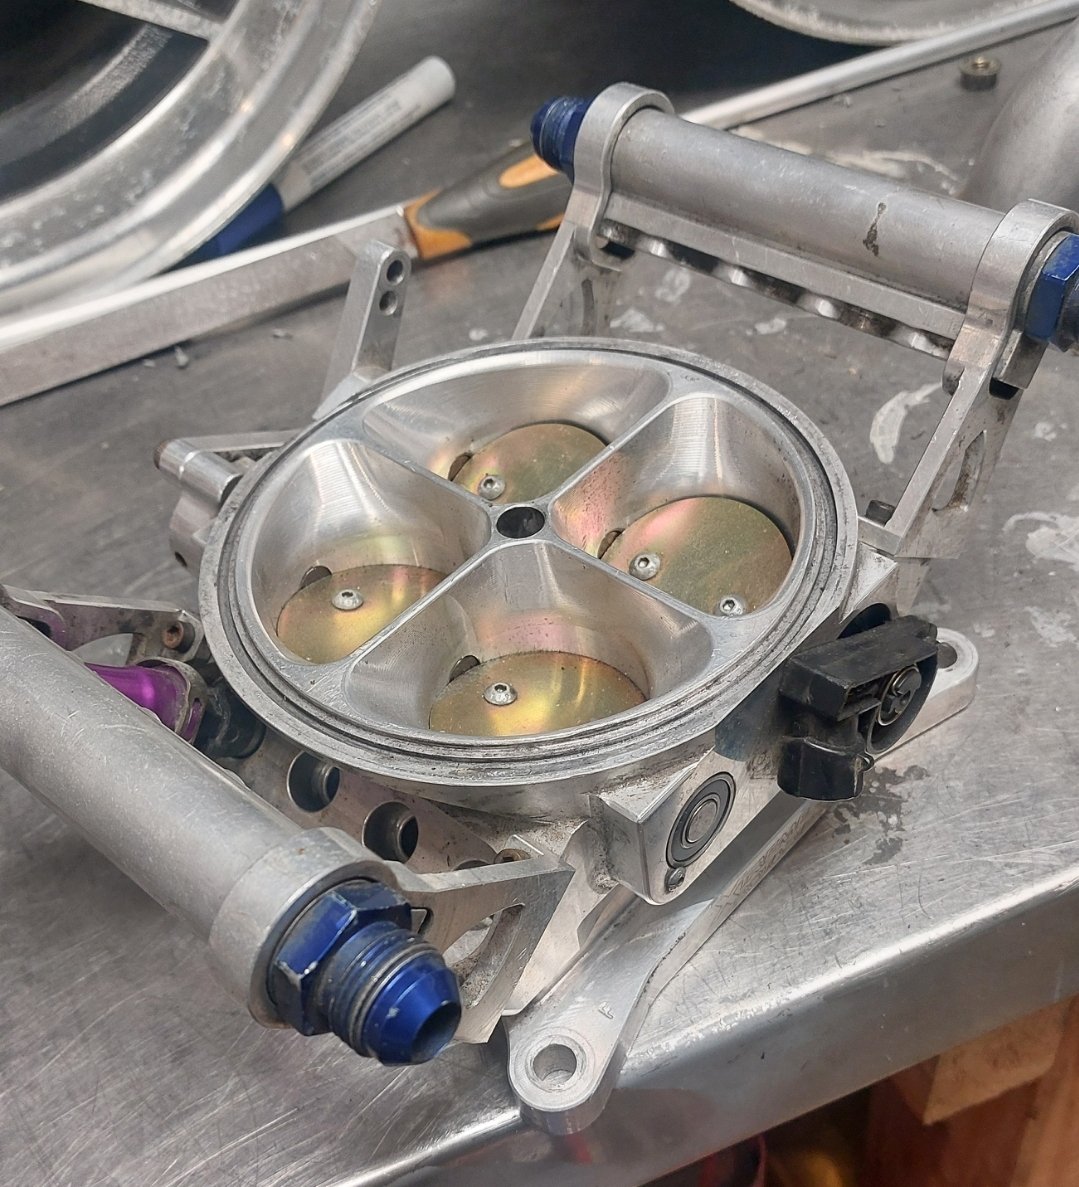
Sold the ROTECH BP, but before I whip it out, have dummy mounted the blower to check cut lines for the bonnet, so I can put a massive hole in it. 40 vs 30 tooth (1to 1) pulley, Unfortunately I'll have to run the under driven pulley to get it through cert which is only 7-8 psi. The small pulley will be double that, but intake temps will skyrocket, and I won't have enough money to get car legal as well as work on cooling. Water meth will be on the cards, as is maybe Water to air intercooler. I'll just focus on redesigning the intake, building a fresh new block, setting up EFI and a host of other items before I worry about decent power. Also that scoop won't pass, so I need to find a low profile solution for air filtration into the Xtreme rotaries 1200cfm 8 injector throttle body., I'll only need to run 4x 1000cc injectors for what I'm doing
1 point
-
I took a set of worn re003 off my e39 wagon that were fitted in 2012. They were just as grippy as the new ones1 point
-
1 point
-
1 point
-
1 point
-
1 point
-
Some notes for myself: Tacho wire snapped off Rear rad needs a fan Pops out of gear on deceleration No reverse Leaking from input shaft Needs heavier return springs on carbs 3500rpms at 60mph Lovely that it's going hard but I think the engine is too much for the little box. Shame the ea71 that is in it doesnt share the same bellhousing pattern as the ea81 to vw adapter I have.1 point
-
What you can't see off camera is with these thermo fans on I'm doing a Marilyn Monroe over a subway grate impersonation.
1 point
-
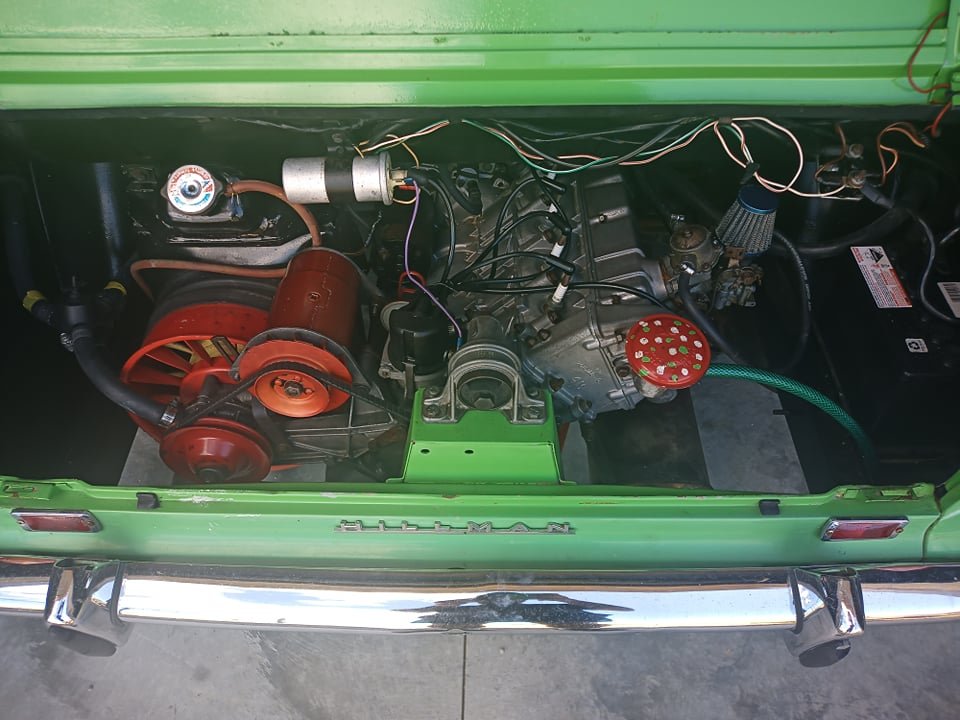
Whilst waiting for some wiring parts I couldnt help myself and rigged up some temp wiring to get it to start. Sounds fantastic and a shit load better than an Imp engine. Clutch doesnt work and it creeps in neutral so Ill have to do some bleeding and adjusting on the fork. It was hailing when I took this vid but in person it sounds so nice. So next on the agenda is the clutch and getting a hose into the engine to flush out the crud before installing the rear radiator.1 point
-
Nee springs on the rear as well as new widened rally wheels fitted. The sump is awfully low. I might look for a spare to modify.
1 point
-
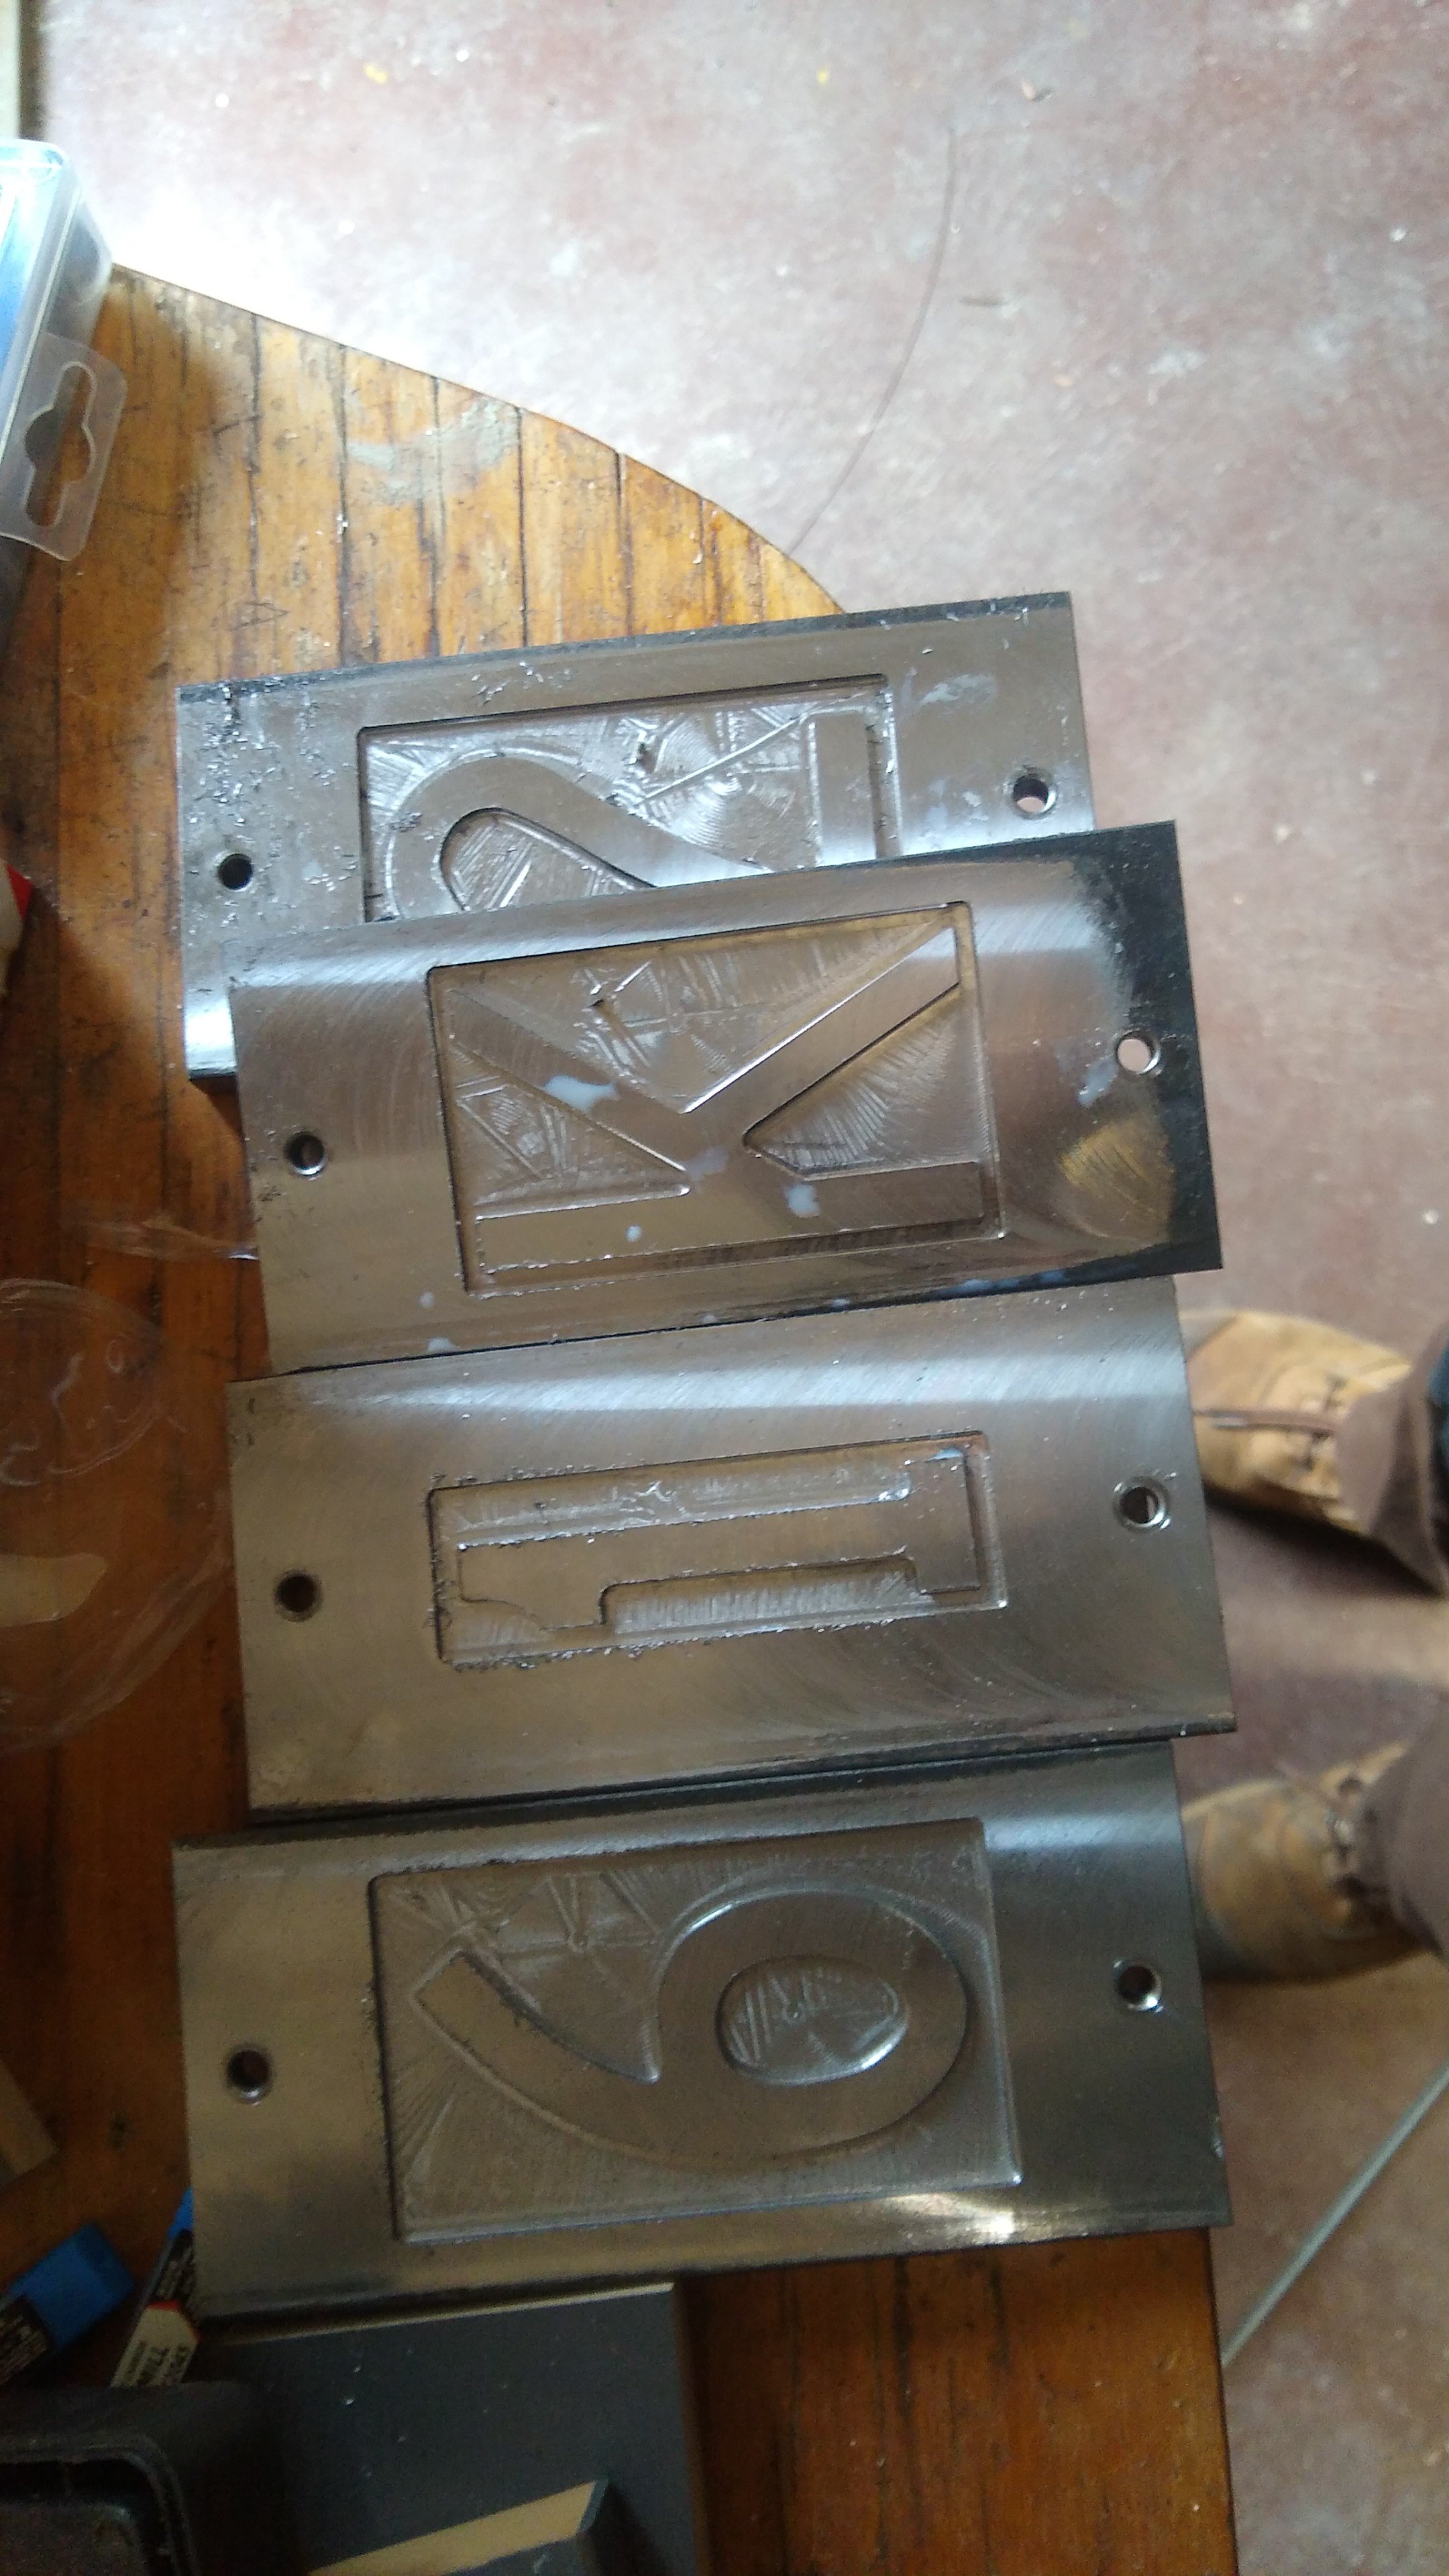
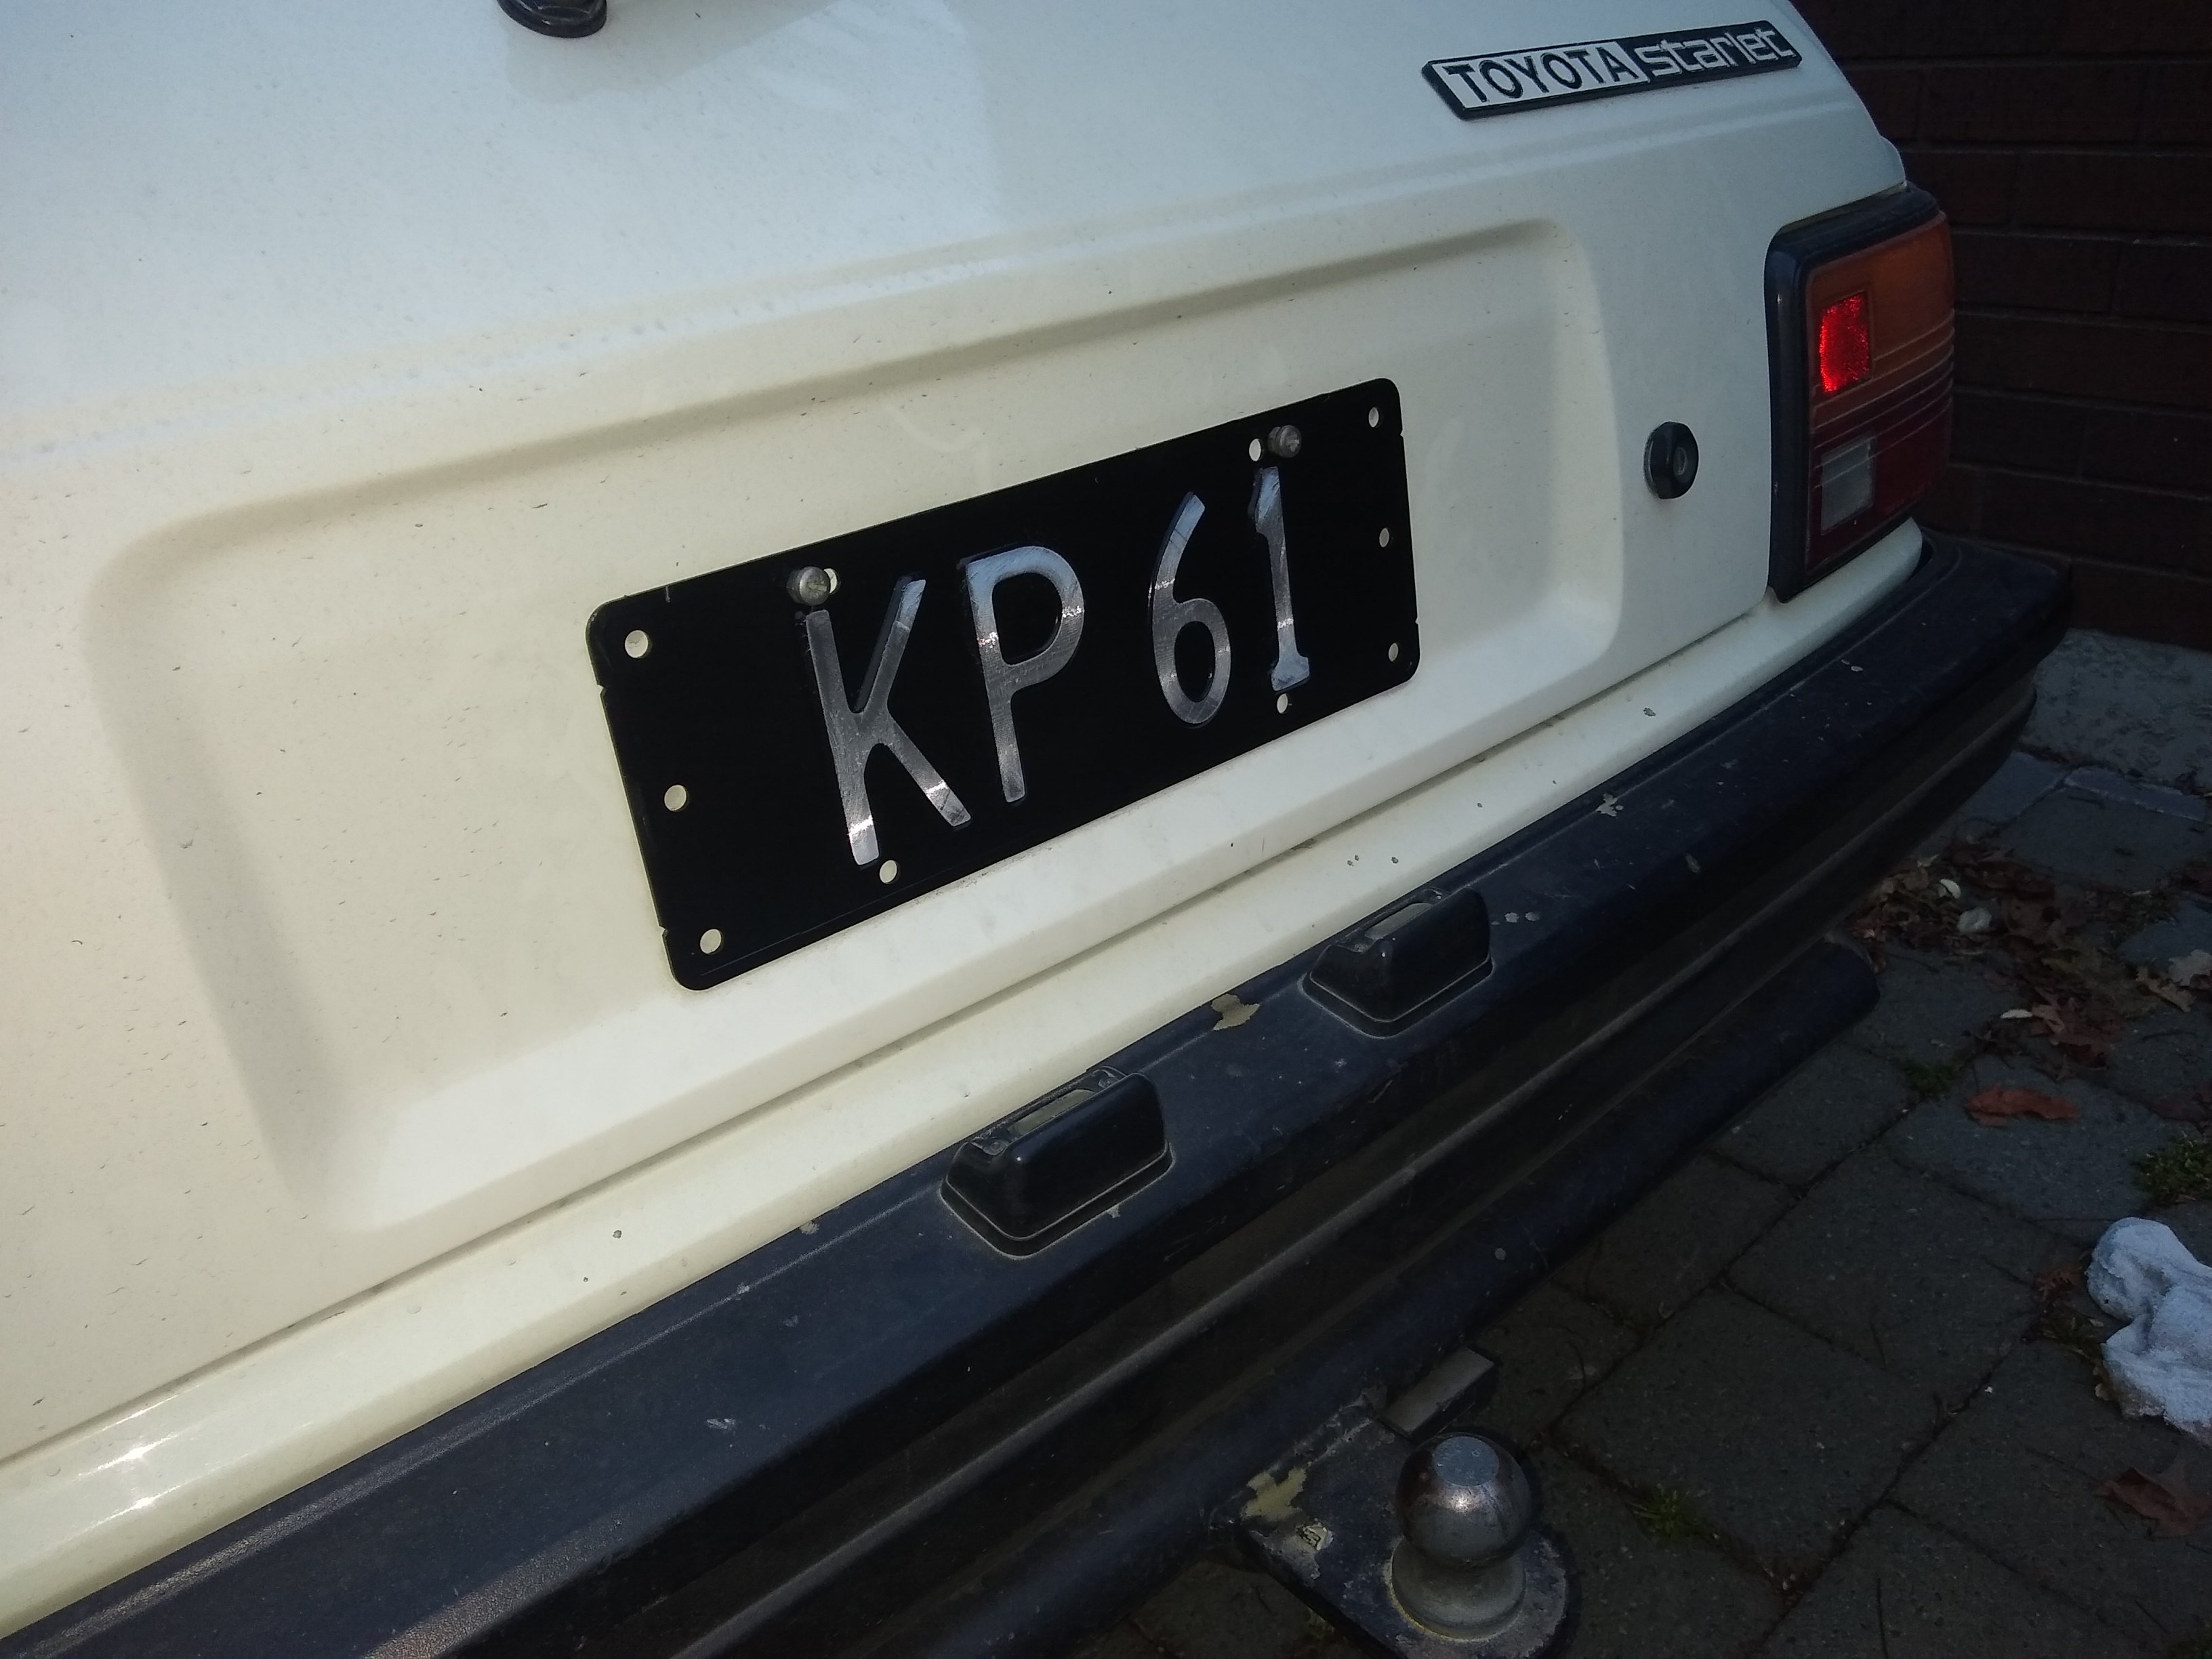
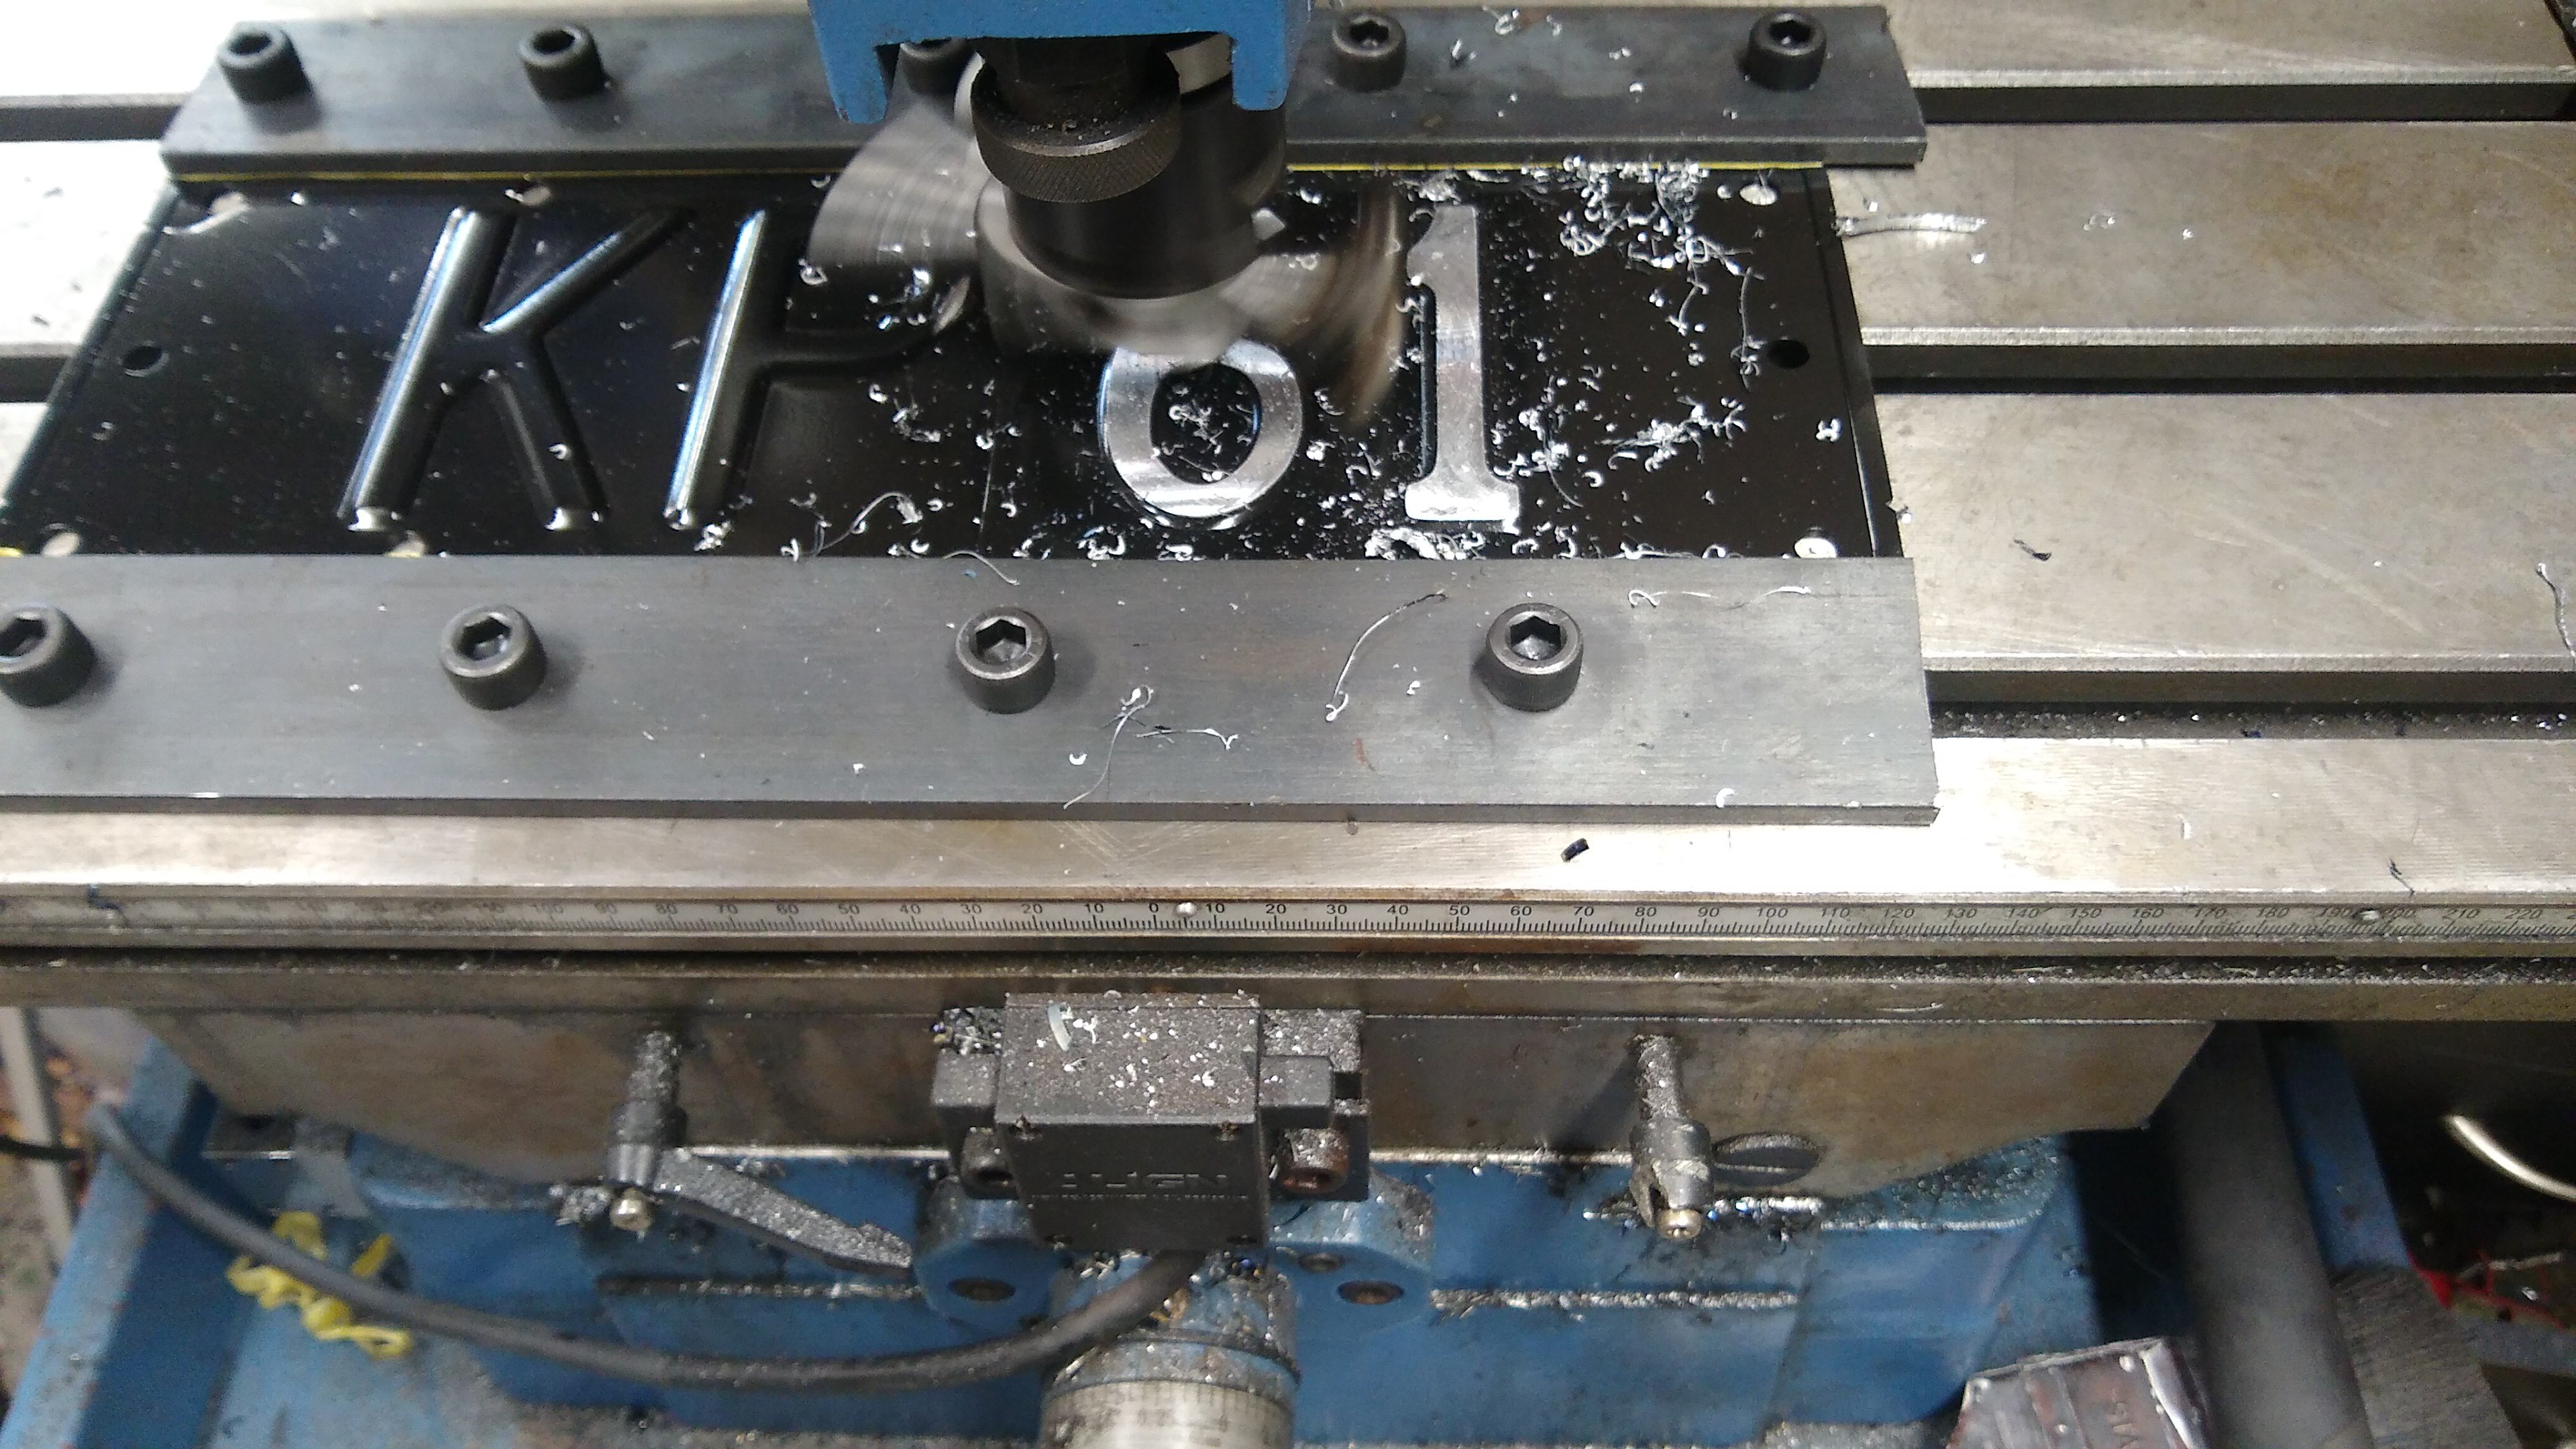
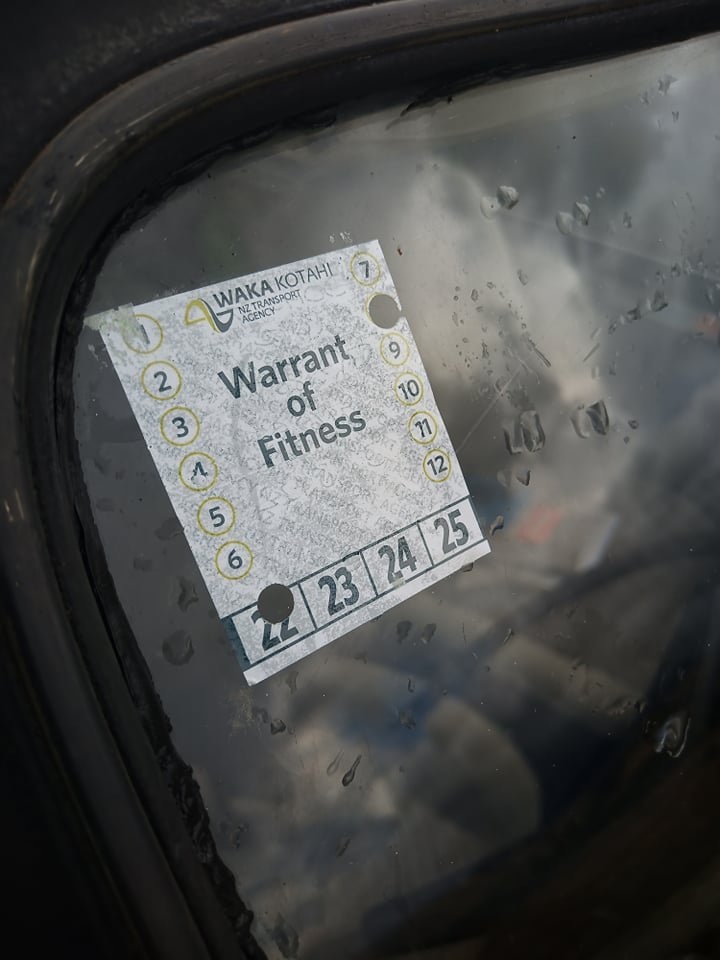
Got back from Auckland yesterday and started work on making more plate dies this morning. First set off the press today were for this. I'm too used to the old spacing so these look wrong to me. I will put them through the dishwasher tomorrow evening to age them. Next up is wof prep
1 point
-
So the new radiator arrived and it looks pretty schmick. It is a bit thinner than I thought it would be but that's not the end of the world. I havent decided if I'm putting a heater in it yet or not so have some Y fittings with individual taps the same size as the original heater lines off the manifold. So I could run it to an auxiliary radiator in the back in summer and a heater in winter. Or just the aux rad. See how I feel. Future winter me will be pissed off if I don't put in a heater box inside. I was going to just use the bottom fresh air vent box hole thingy for the radiator but half of it will get nothing. So I might punch a couple of 2" holes where the badge used to sit above the bumper bar to get more airflow in. I might sleep on that one. The bonnet is punched full of louvres so that should get the air out. I have to purchase some sheetmetal anyway so might look at some ducting and a mini scoop where the number plate is to help direct airflow into it. Here are some before and during pics. The rad is off to starboard as the fuel filler hose is in the way.
1 point
-
So this morning at about 5am I started on the engine removal process. Thankfully in an imp it isn't too hard. I have it held in by a couple bolts presently so it can just sit there for a few days so I'm not tripping over it every five seconds. Check out the forbidden caramel topping. So I'm not in this situation again I'm converting to a front mounted radiator. I've always hated the Imp water pump too so both are getting the boot. I have ordered a davies craig pump. Interestingly it was cheaper from Speed Science in NZ than it was from Davies Craig themselves. I still had to get the correct fittings from them still. Unlike Mr Fancy Pants with his pipes under the floor I'll be using the auxiliary rad pipes I already lost half the skin on my knuckles feeding through the bodywork cavities. Problem was that it was a proof of concept hose line I had laying around (it worked) and I should really replace them with new stuff. That will be the suckiest job that ever sucked. I've had to do it on three Imps now and all three jobs I remember clearly for how shit it was. Another job I wanted to do was prep and paint the parts I didn't get to paint. I'll start with the bonnet area as that is the grubbiest and also I need to get the grinder out due to a radiator going in there. Of which I am having a custom one build by A1 Cooling. Interesting to see how it comes out. I really need to sell this Imp but am approaching (likely past) the point of no return fiscally so I might as well do it properly so it can last another 60 years. The next thing on the agenda to sort out is to add louvres to the bonnet. I don't want to cut out the bottom part which I have done in the past as I want to angle the radiator with a slight forward lean so the hot air can escape out the top. There will be a lot of cutting and welding in there however. Might take the fuel tank out first however. Could get a little sparky.
1 point
-
Ok managed to source an engine. Looks to be in pretty good condition. Next on the agenda is to rip out the old one!
1 point
-
I fired up the Imp this morning to go and get some bread from the shops. As per usual I was hit on by a couple of boomers and the Imp performed flawlessly. I did notice that the WOF is due next month and I don't think I could be bothered renewing it. I know it will pass but I simply don't drive it enough. Time to put this thread on hold for a while whilst I clear out some more pressing projects. I already have a new motorbike engine for it (VTX1300 V-twin Honda) but frankly it works perfectly fine as it is. I always thought I'd blow the engine but in the thousand or so miles I have put on it over the last year it really hasn't skipped a beat on the road. The fuel economy is criminally good. Anyway, please enjoy a couple of pics before it goes for a long sleep and thanks for stopping by.1 point
-
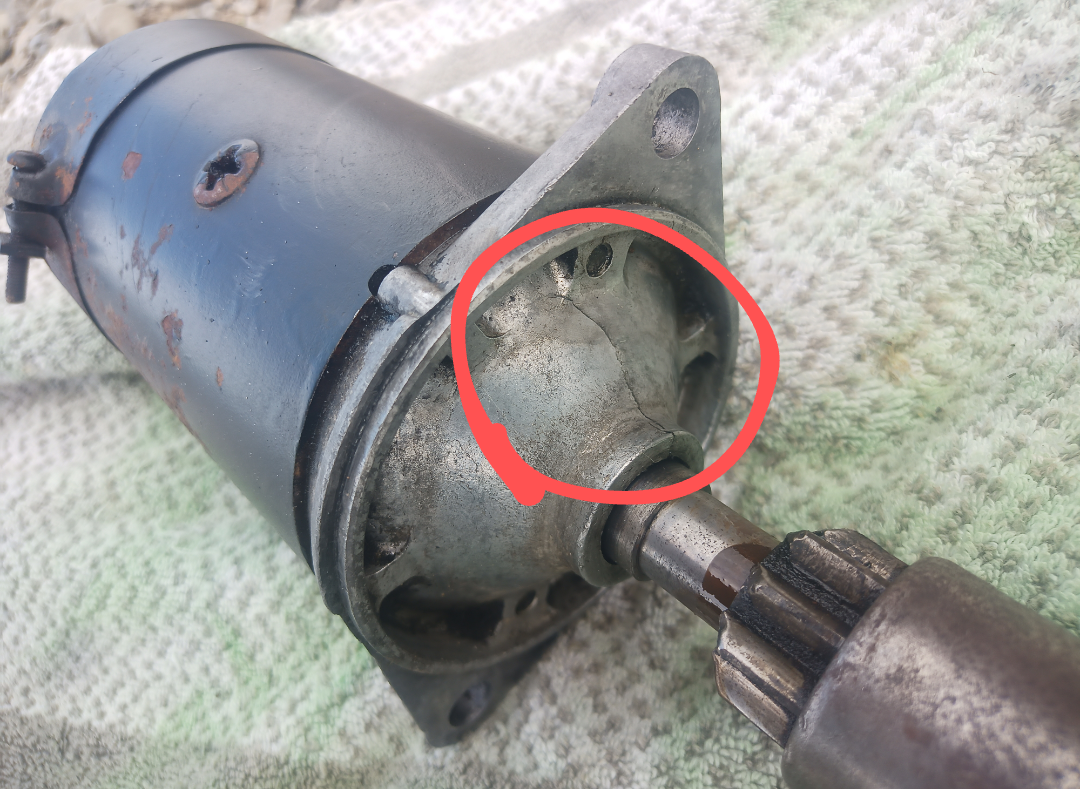
Changed the solenoid with a spare I had in the parts bin and nothing doing. So took out the starter and it has a nasty crack on the case. Time to find a new one. Also spent a couple hours sanding off the topcoat. Starting with 360 grit and work my way back up. Few weeks left to go on that one just to get back to where I started which is nice. Lots of imperfections to tidy up along the way so not all bad. I do have other projects I really would rather be doing however.
1 point
-
Hmmmm... After fixing that loose nut on the fuel pump the fuel pump no longer works. It came with a spare one so I'll go through the dance of swapping that over and fixing the oil leak at the same time. If that doesn't work I'll convert to electric. I'll do anything to avoid actually checking I have fuel in the tank I guess.1 point
-
1 point
-
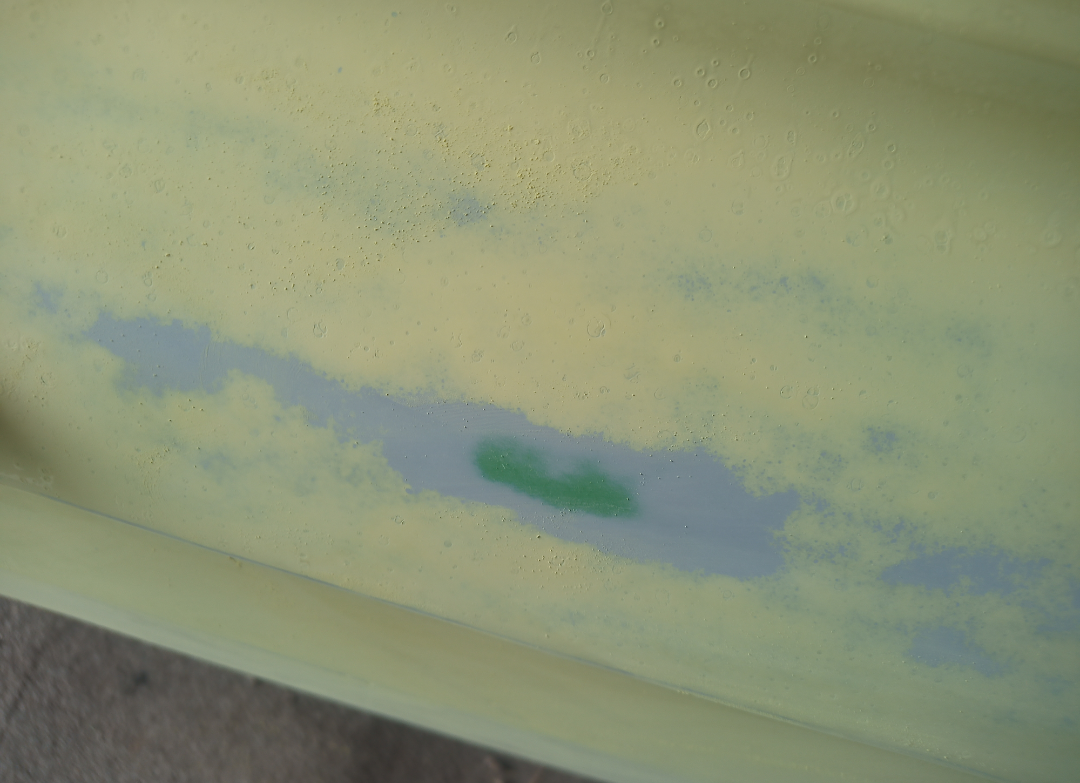
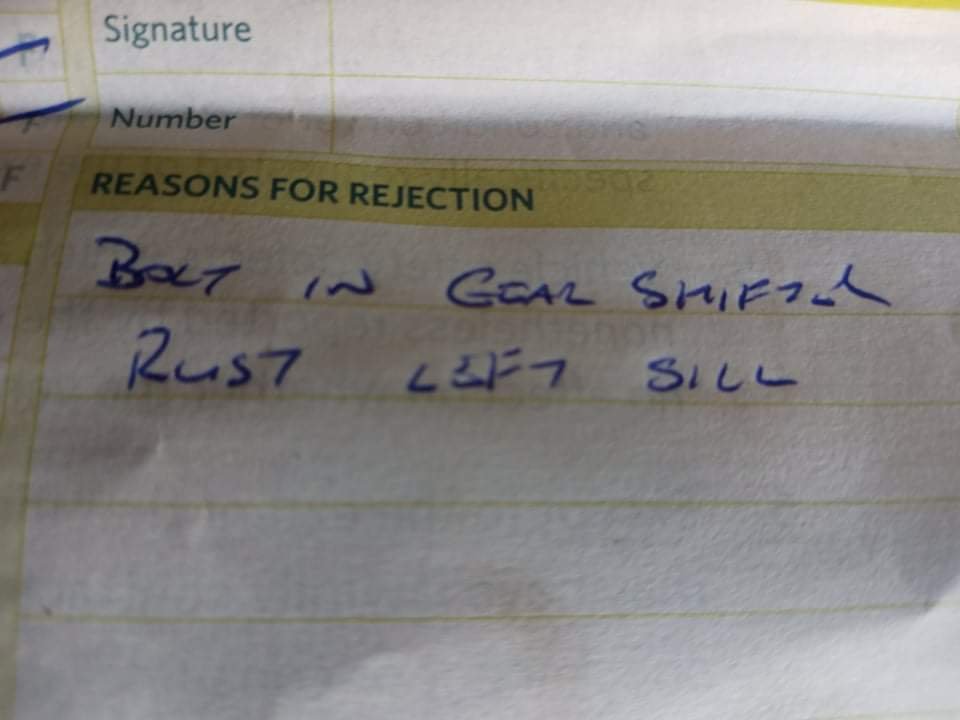
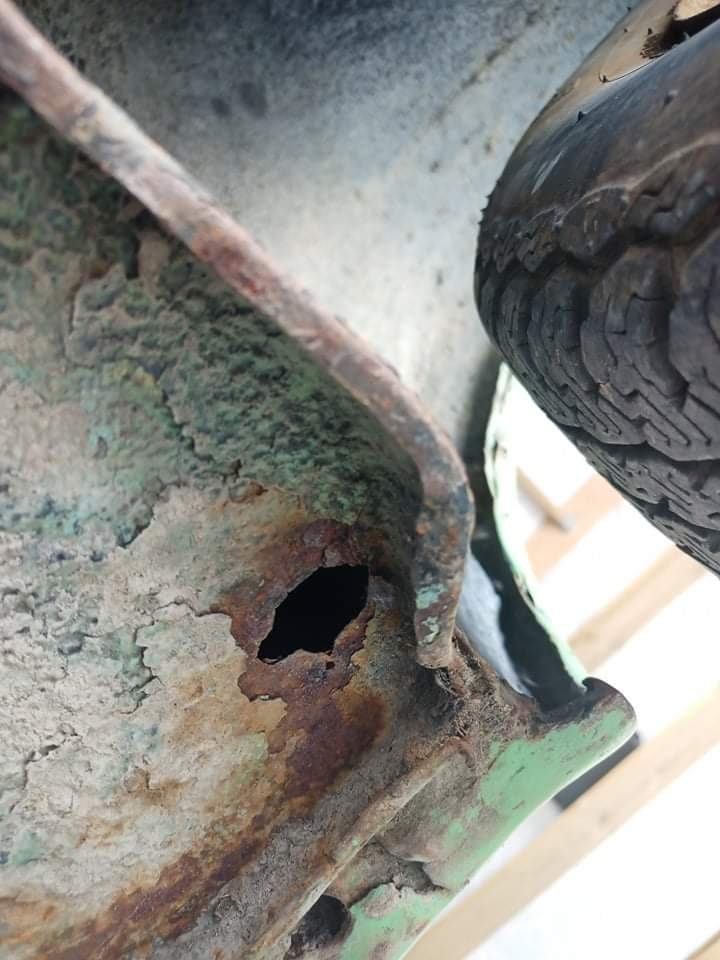
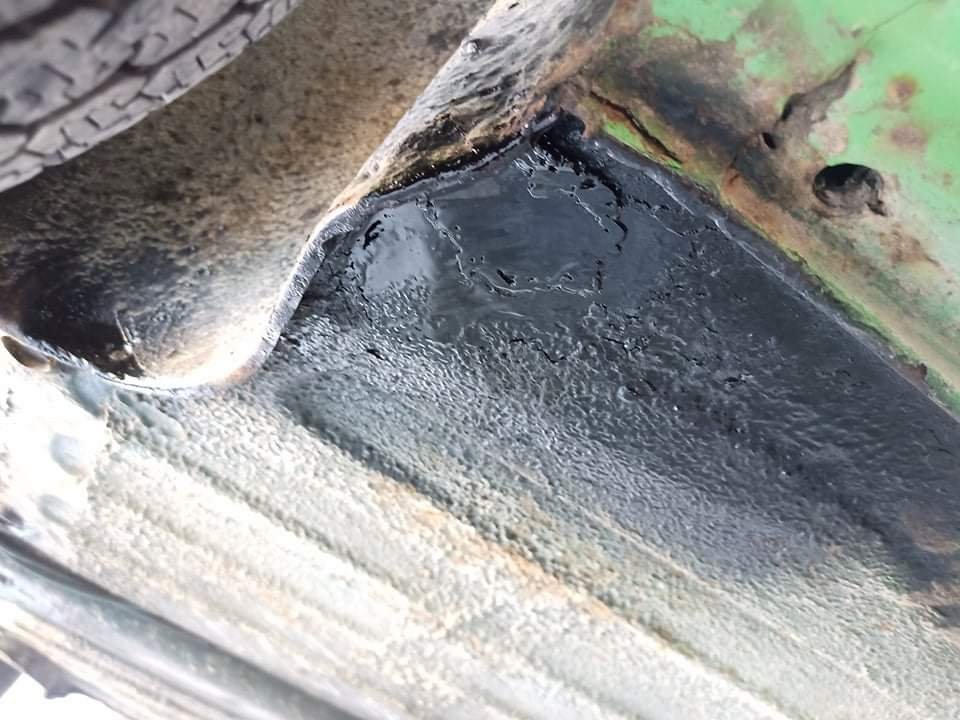
So all done and ready to go back for a re-check. The sill hole looks to be rusted from the inside out. So I widened the hole a little to get a wire brush in there and the vacuum to sort out the worst of it. I then washed it with some phosphoric acid and then pumped it to the gills full of por15. A bit of scrap steel and electric glue and job jobbed. The bolt I just zipped up one two three. Ill head back tomorrow afternoon all going well.
1 point
-
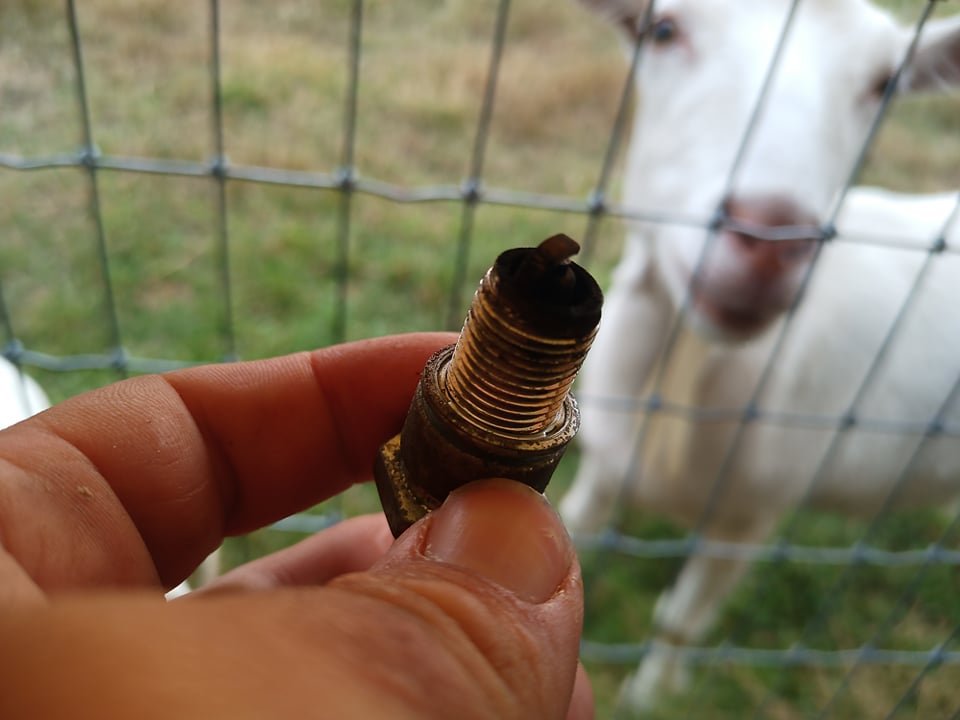
I'll try and book it in for a pre wof inspection and let that dictate the project. Hopefully not too much as I have a shedload of work to do on the Chev this year. There is some rust in the wings of the Imp which hopefully isn't all bog and it is in desperate need of a repaint. I'll probably keep it green but just a little more subtle. It does have a hard starting issue which after pulling a plug seems a likely culprit. Hopefully an easy fix. There is a little hesitation issue when I put my foot down I'm hoping is related to the plugs but I'll soon find out when I do the switcharoo. Might do a compression test at the same time. Being an imp I won't take it on any decent drives on a warm day until I have a temp gauge installed. I'm also going to give Silverdale radiators a buzz this week for an auxiliary front radiator as it already has the plumbing in place. One of the worst jobs I have ever done on any car was feeding those through the body so might as well make the most of it.
1 point


.thumb.jpeg.e0a4bff61111e0c8c7396950fcc94da1.jpeg)


This leaderboard is set to Auckland/GMT+12:00