
Leaderboard


Popular Content
Showing content with the highest reputation on 04/20/21 in Posts
-
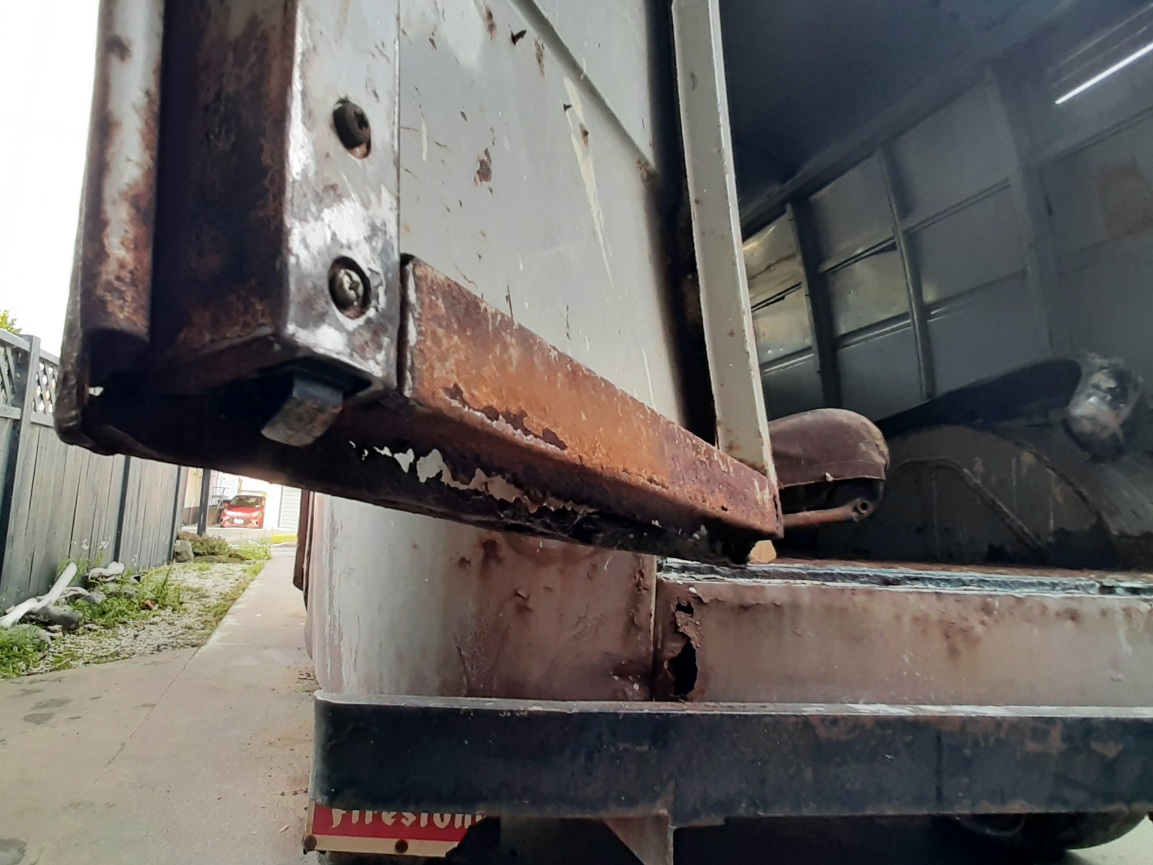
Finished and loaded up. Probably the most expensive and elaborate way to lower an El Camino! Looks like we'll see how good these bump stops are!22 points
-
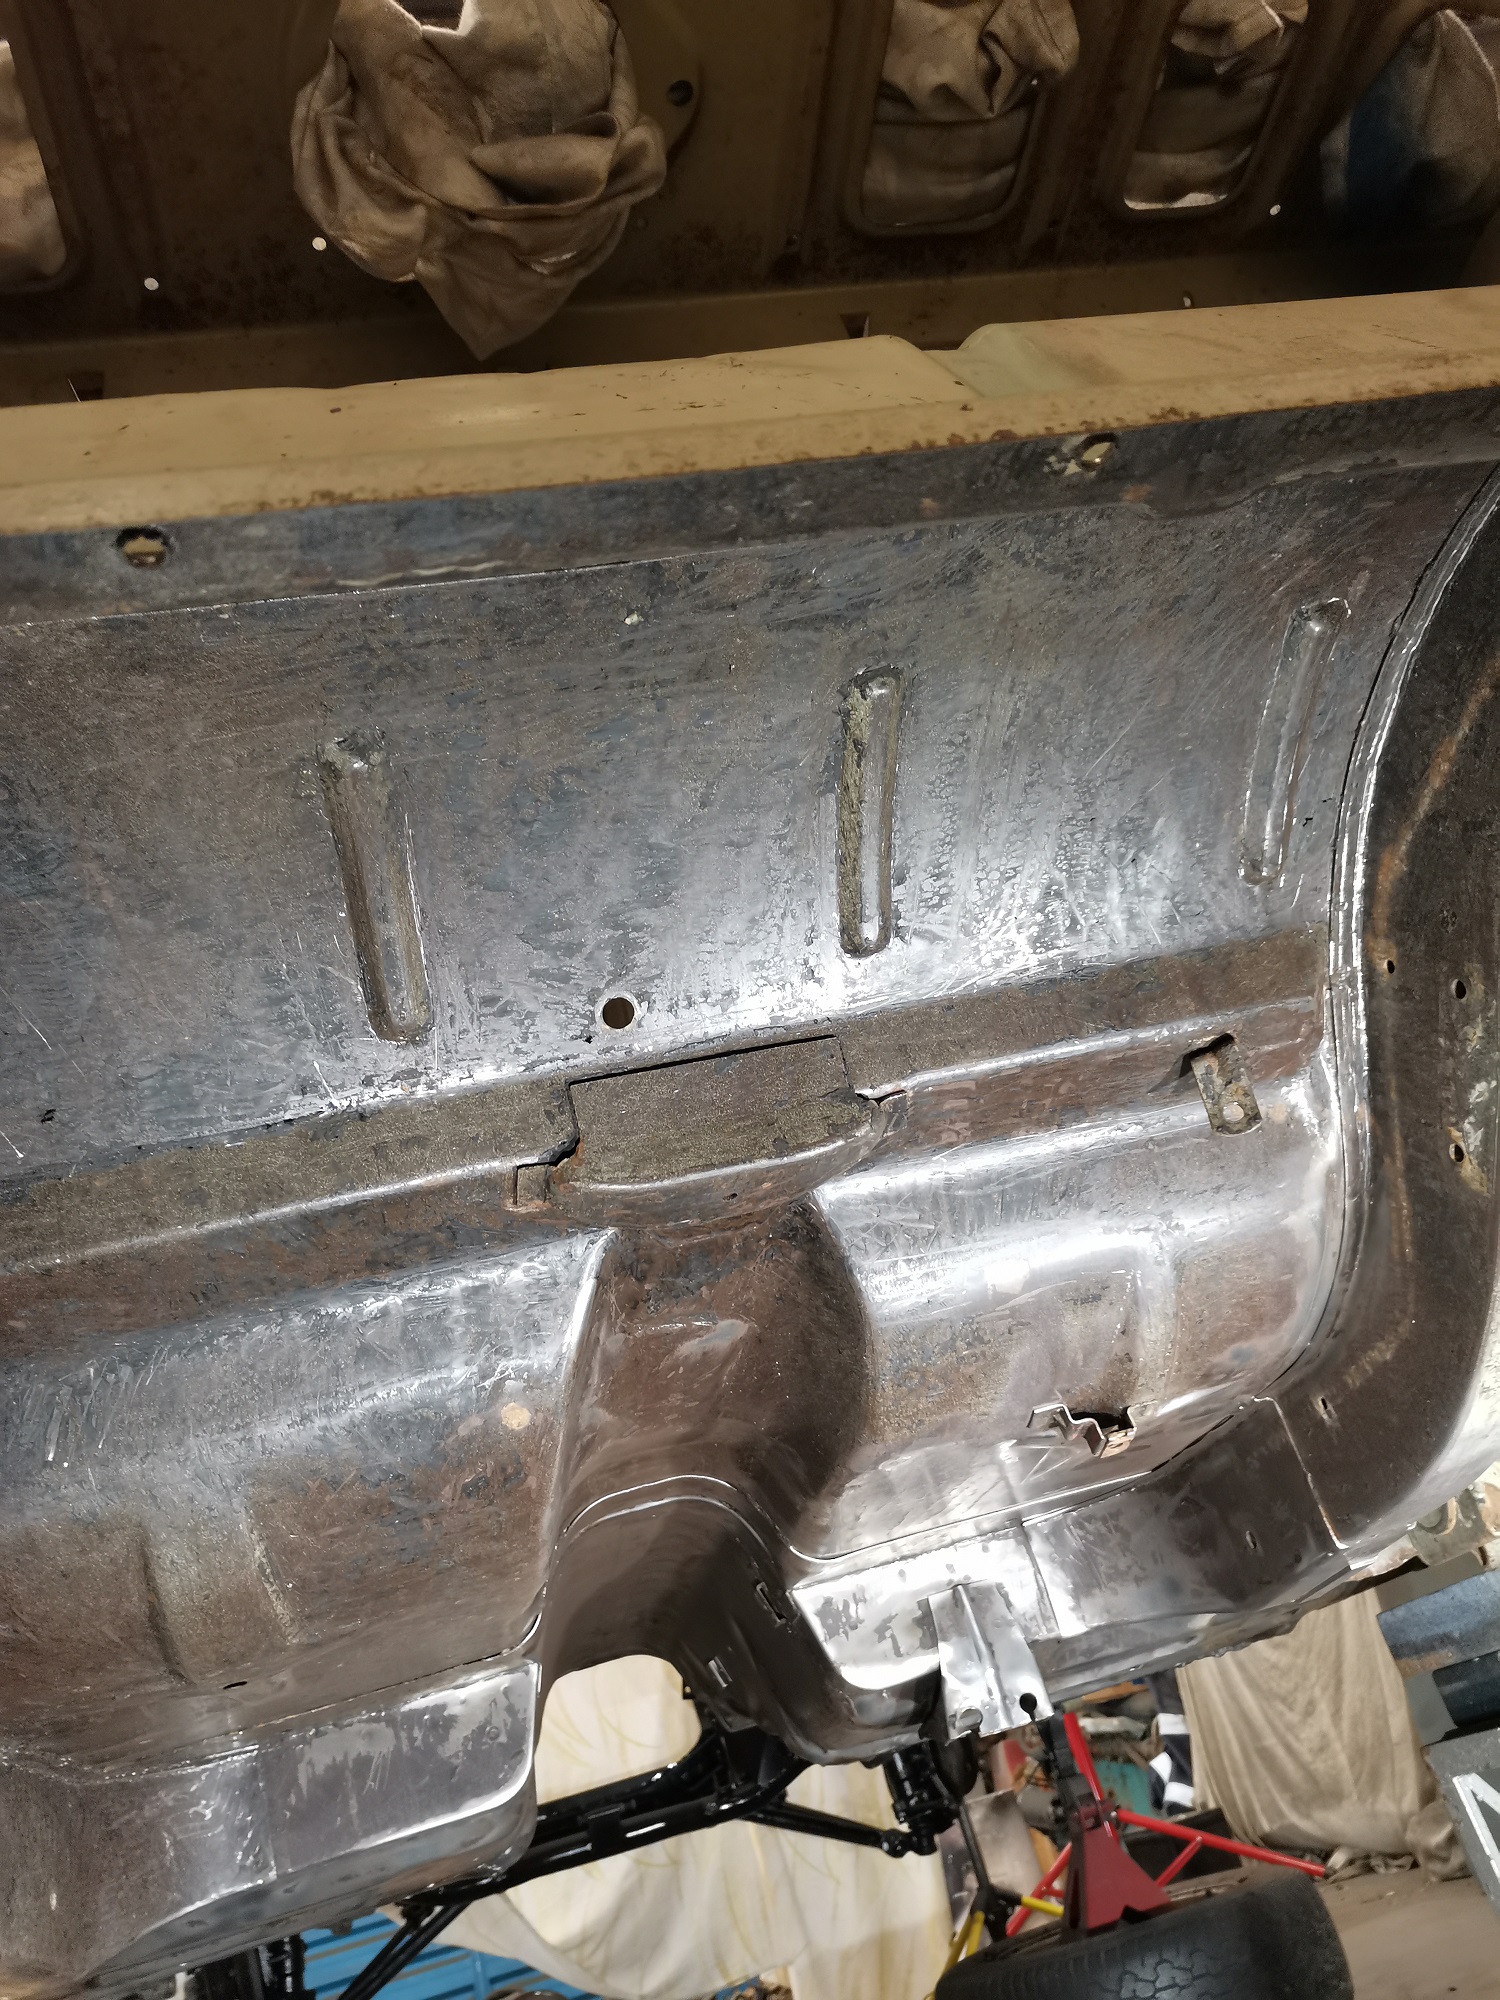
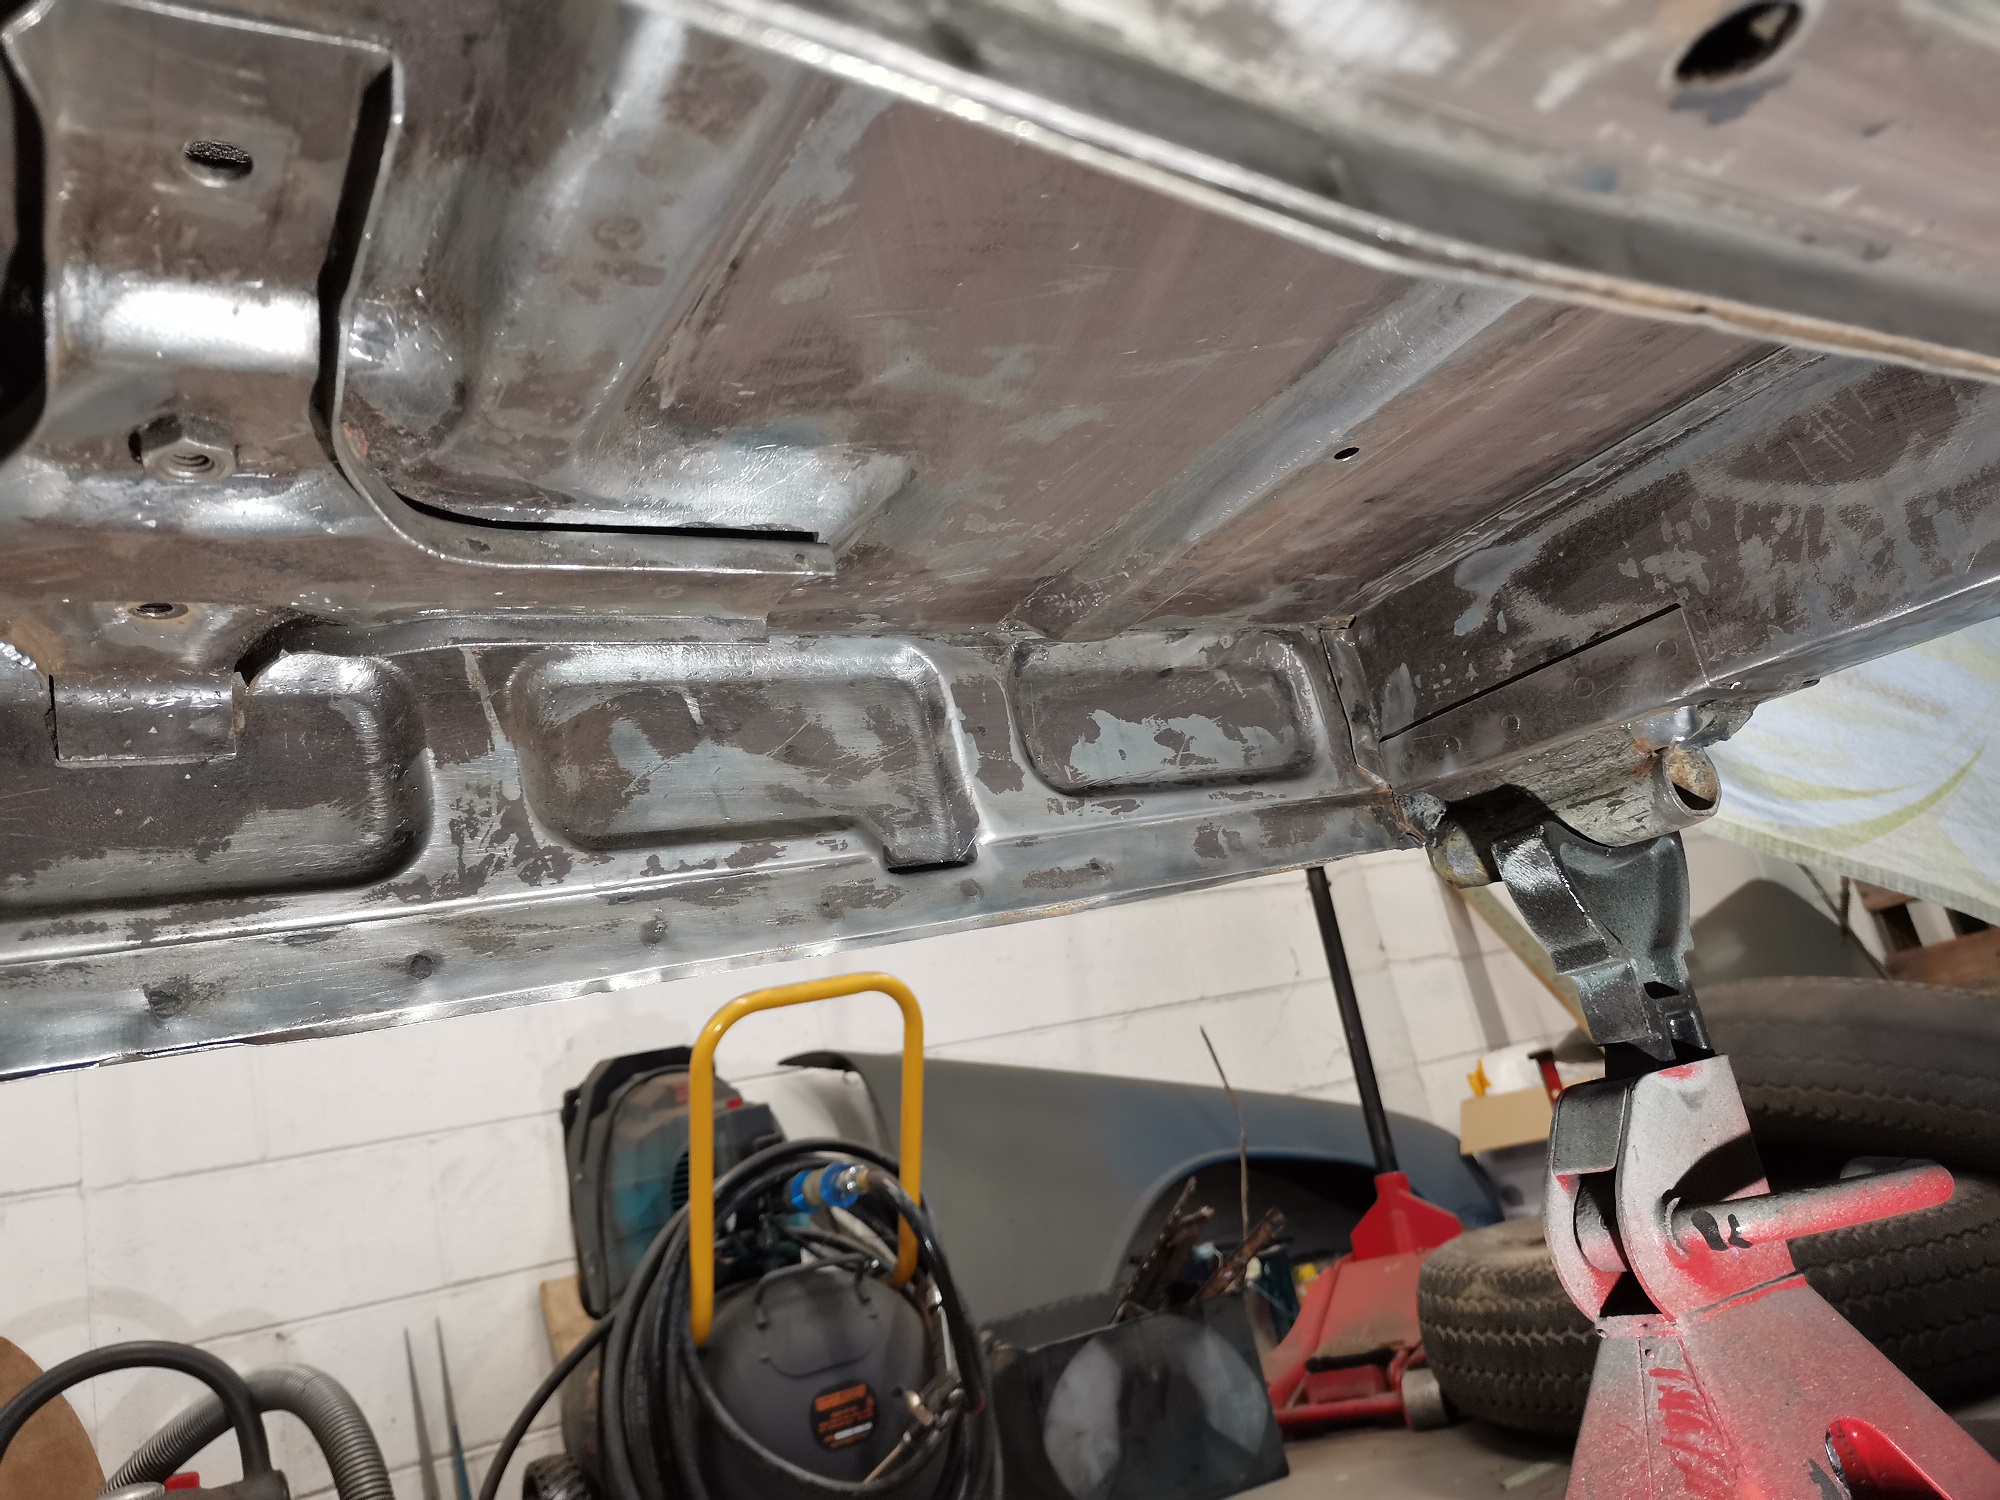
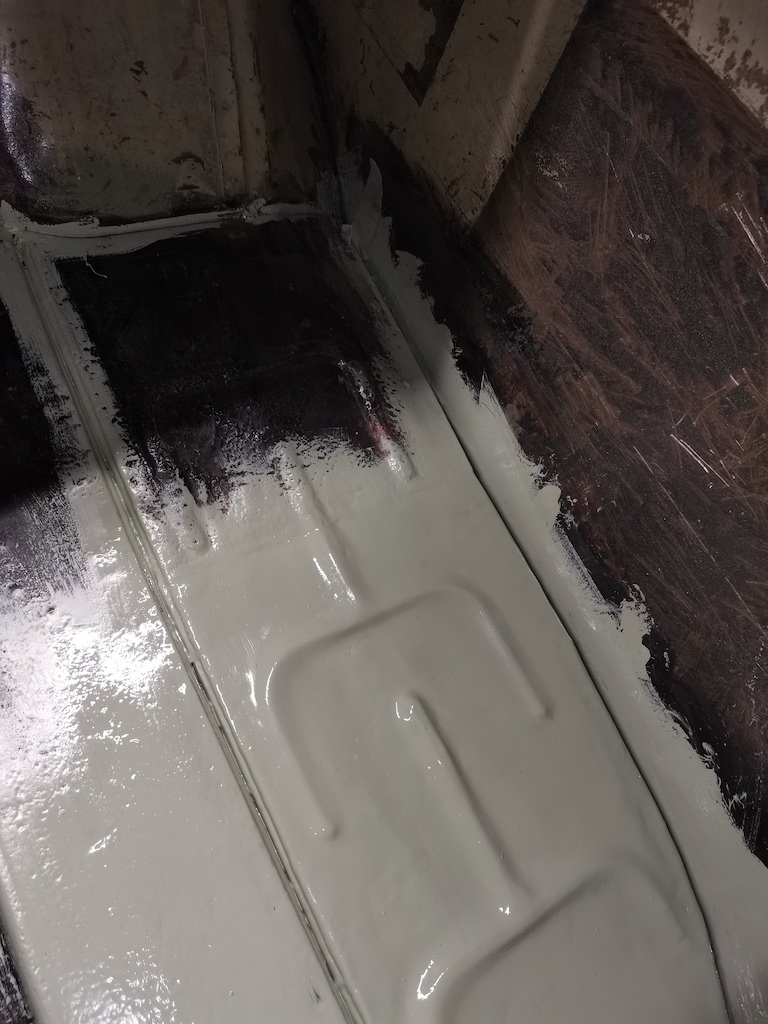
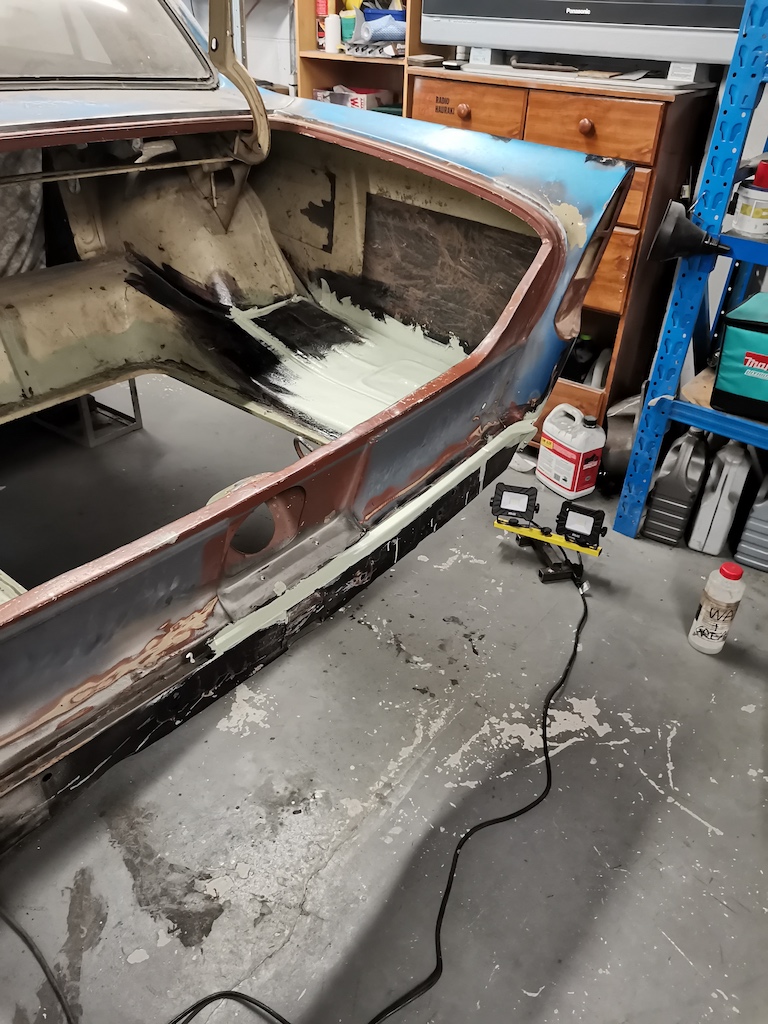
Finished removing the underseal. What a shit job, lying under the car scraping with a chisel. Only a bit of surface rust, cleaned up no worries with a strip disc and wire brush. Gave it a coat of Brunox, scuffed up with scotchbrite and brush painted with epoxy primer. Not mint, but good enough for the underside. Just need to move the stands and do the same for the jacking points now. Getting the fuel tank dipped and lined, rear brake cylinders sleeved at the moment. Next, I will tidy up and paint the diff and fuel tank.
 15 points
 -
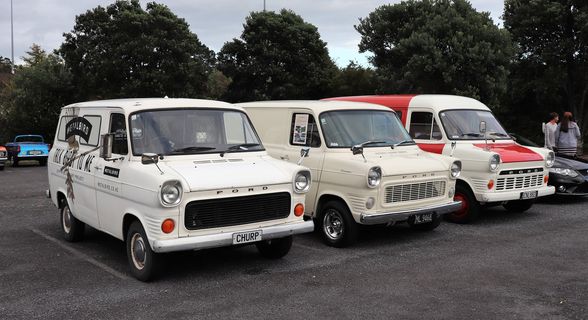
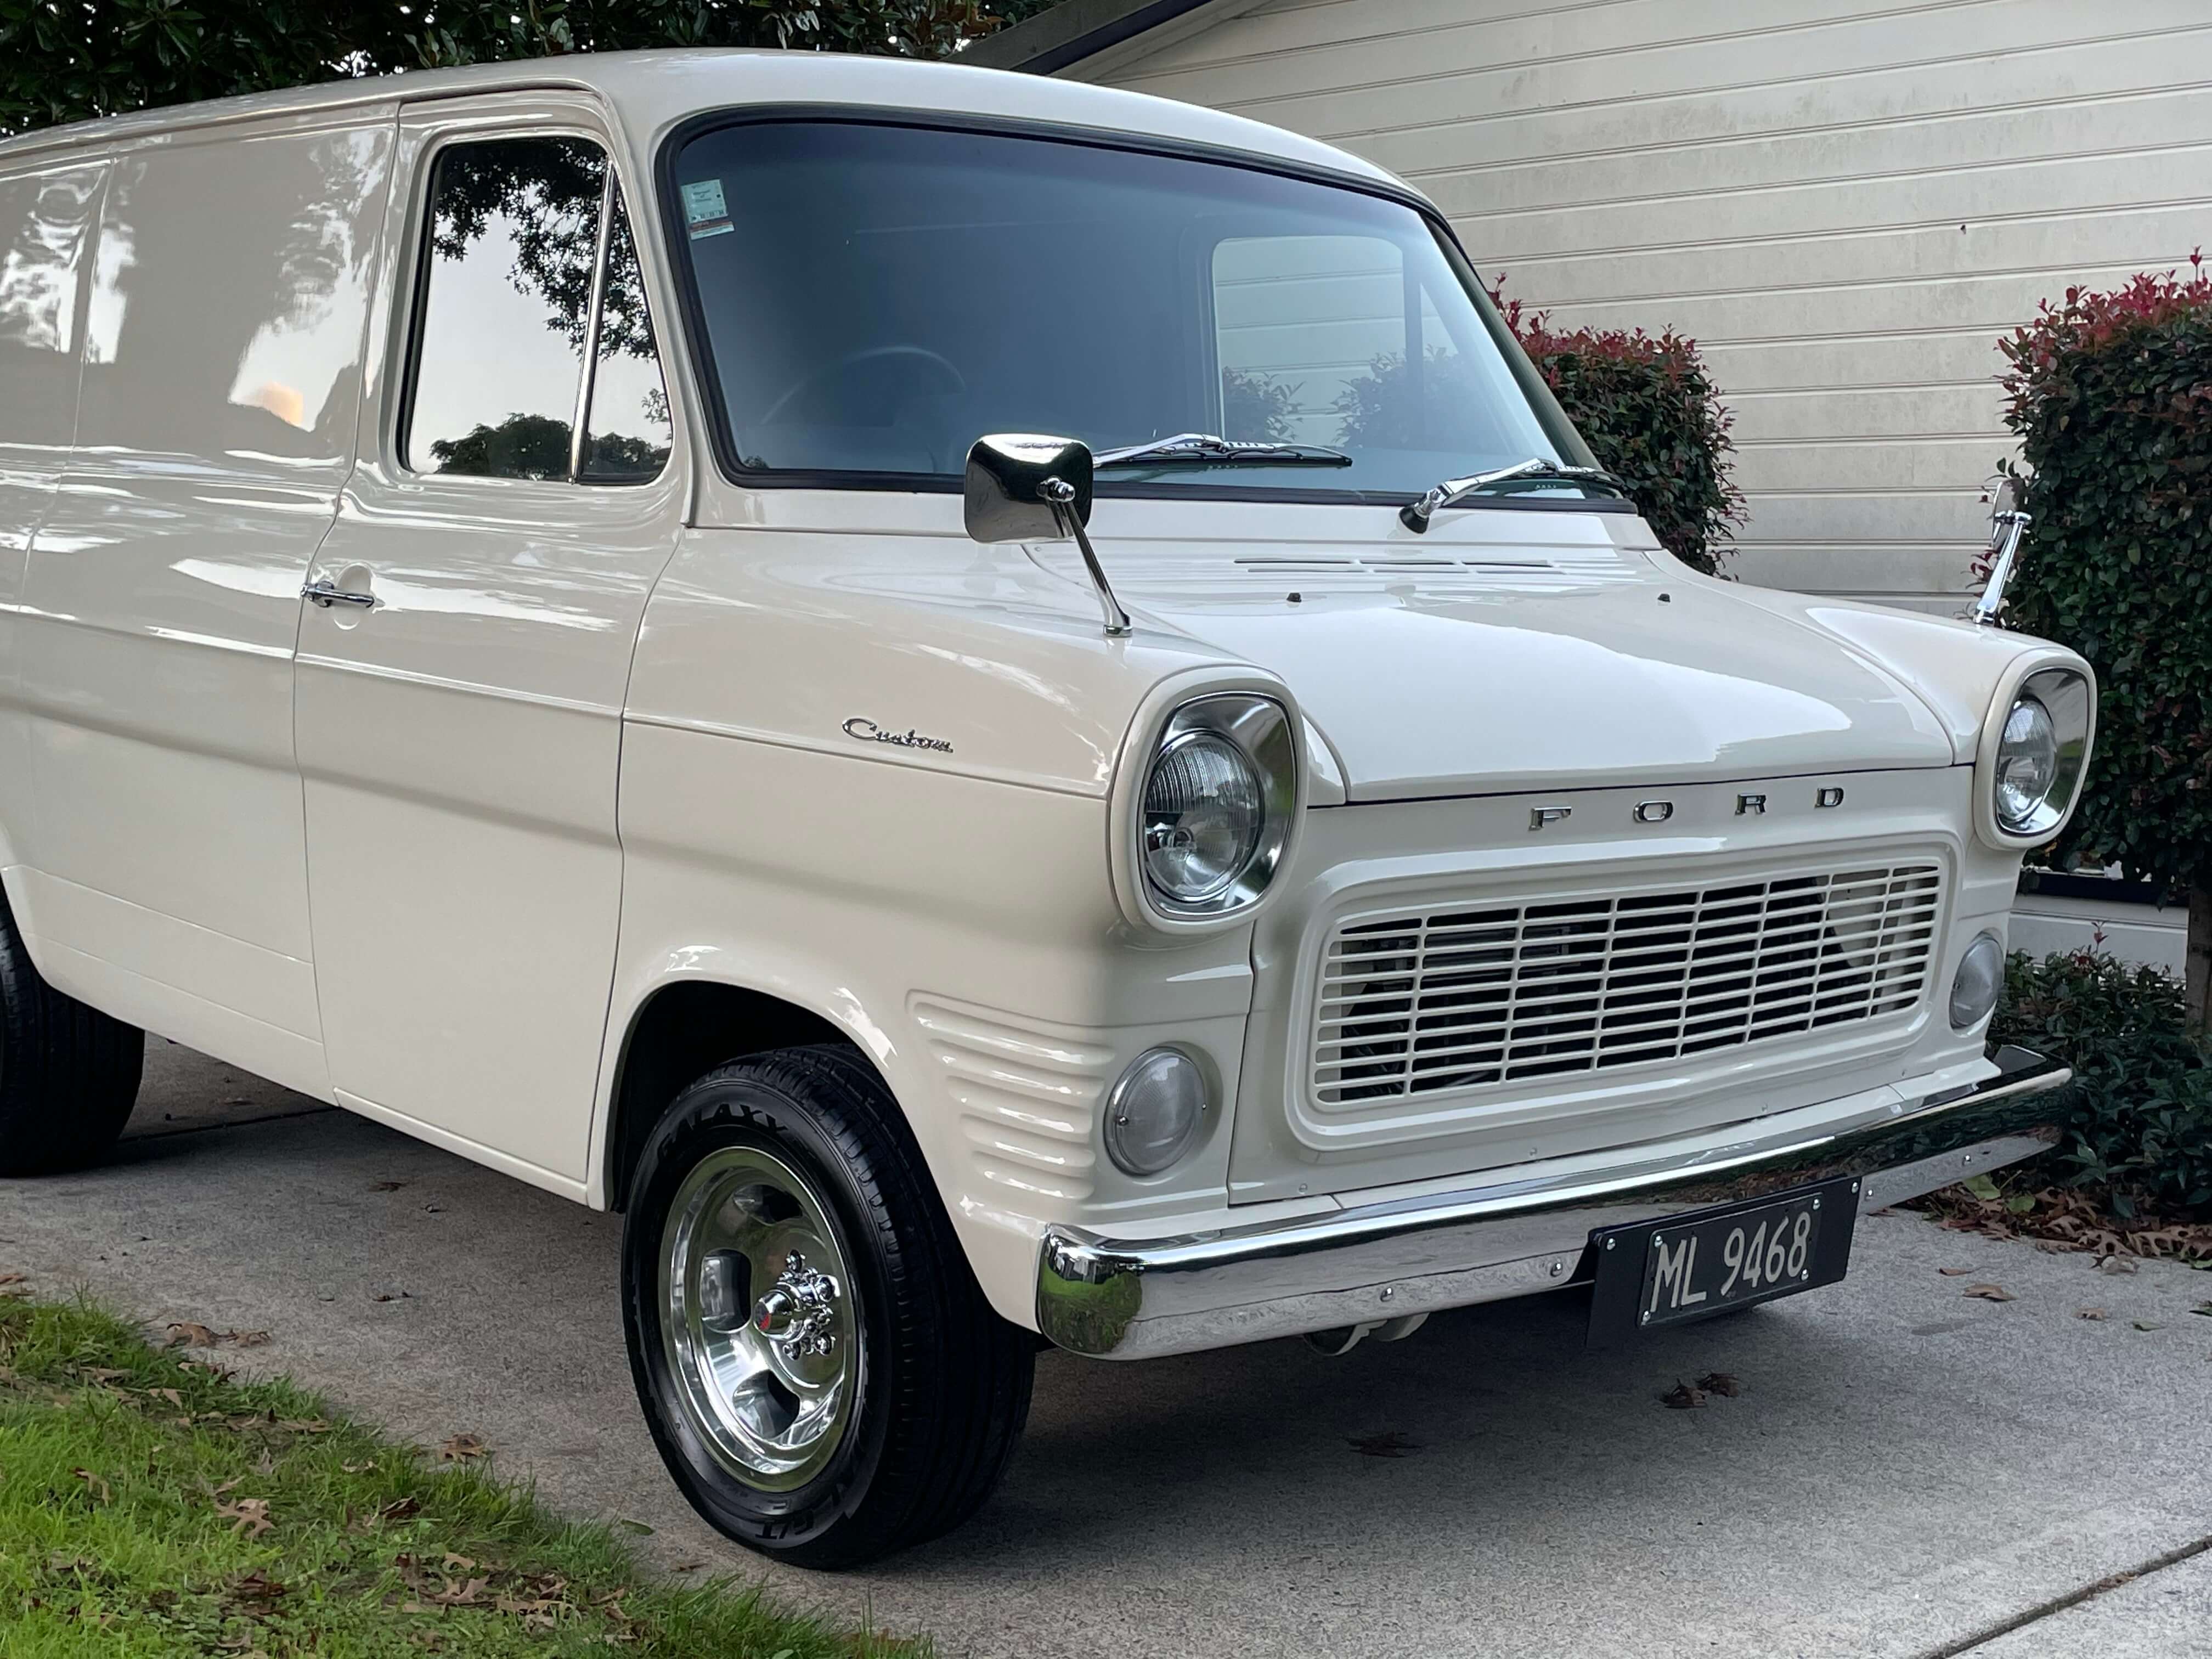
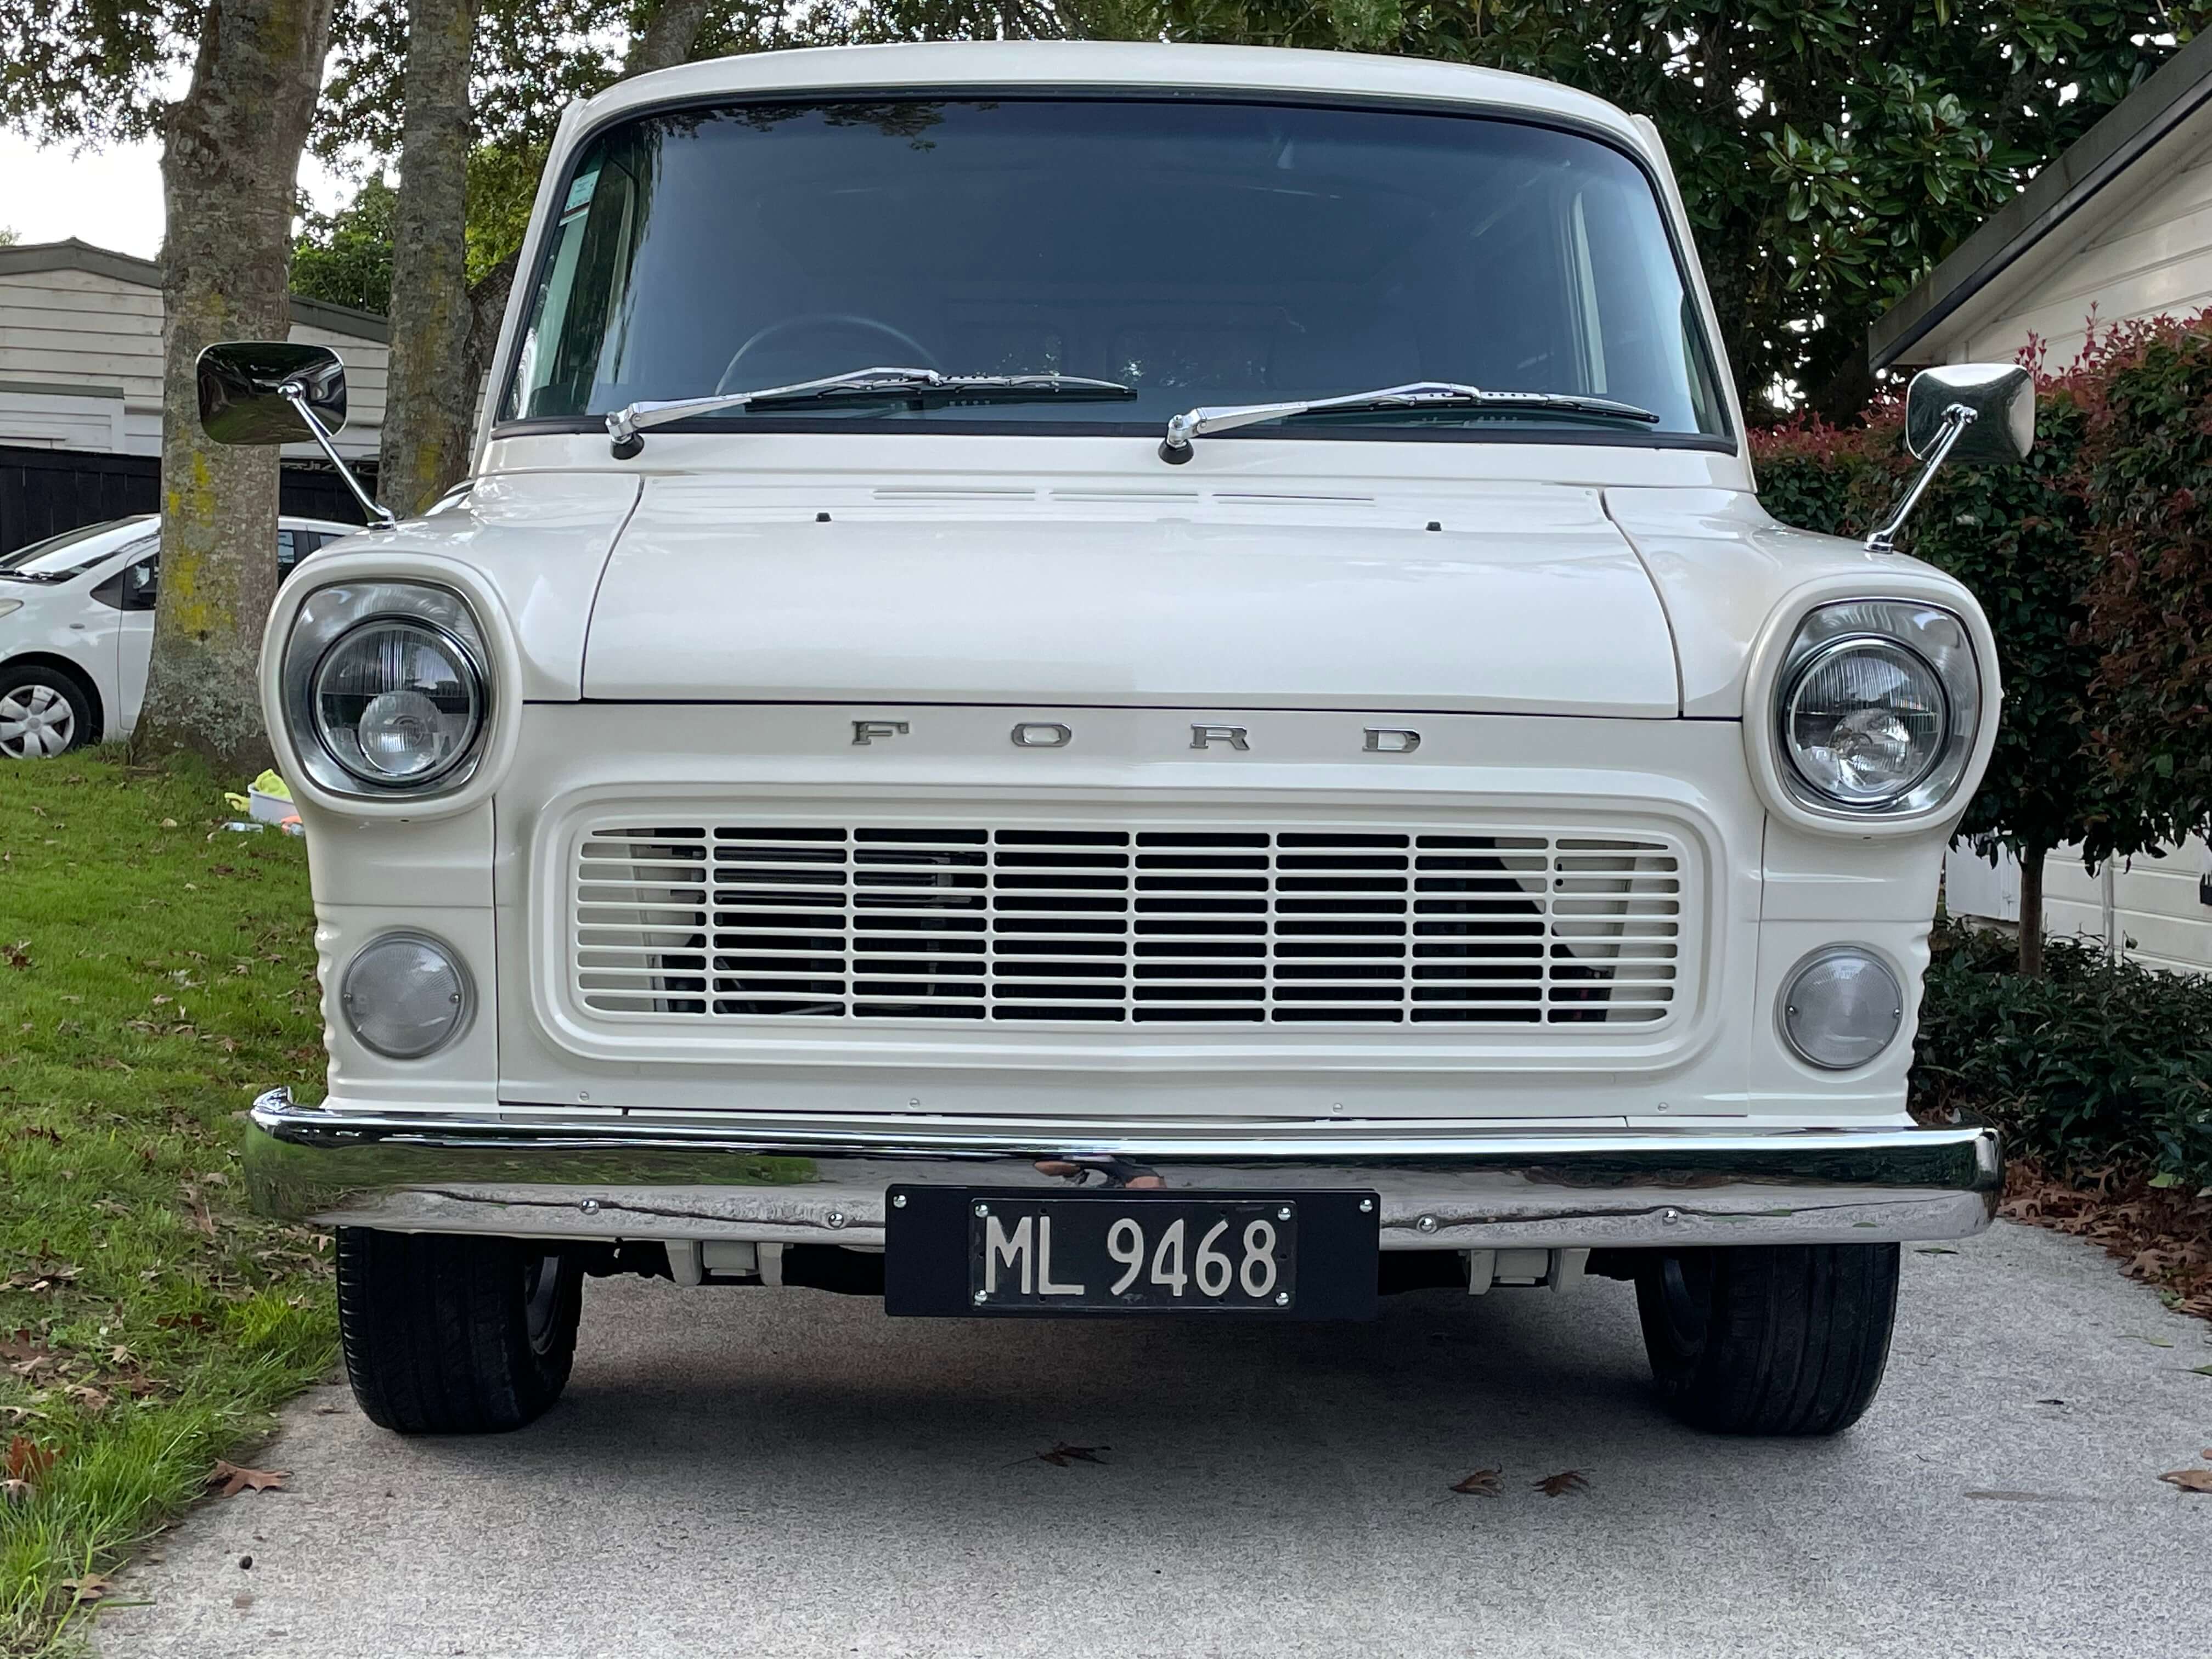
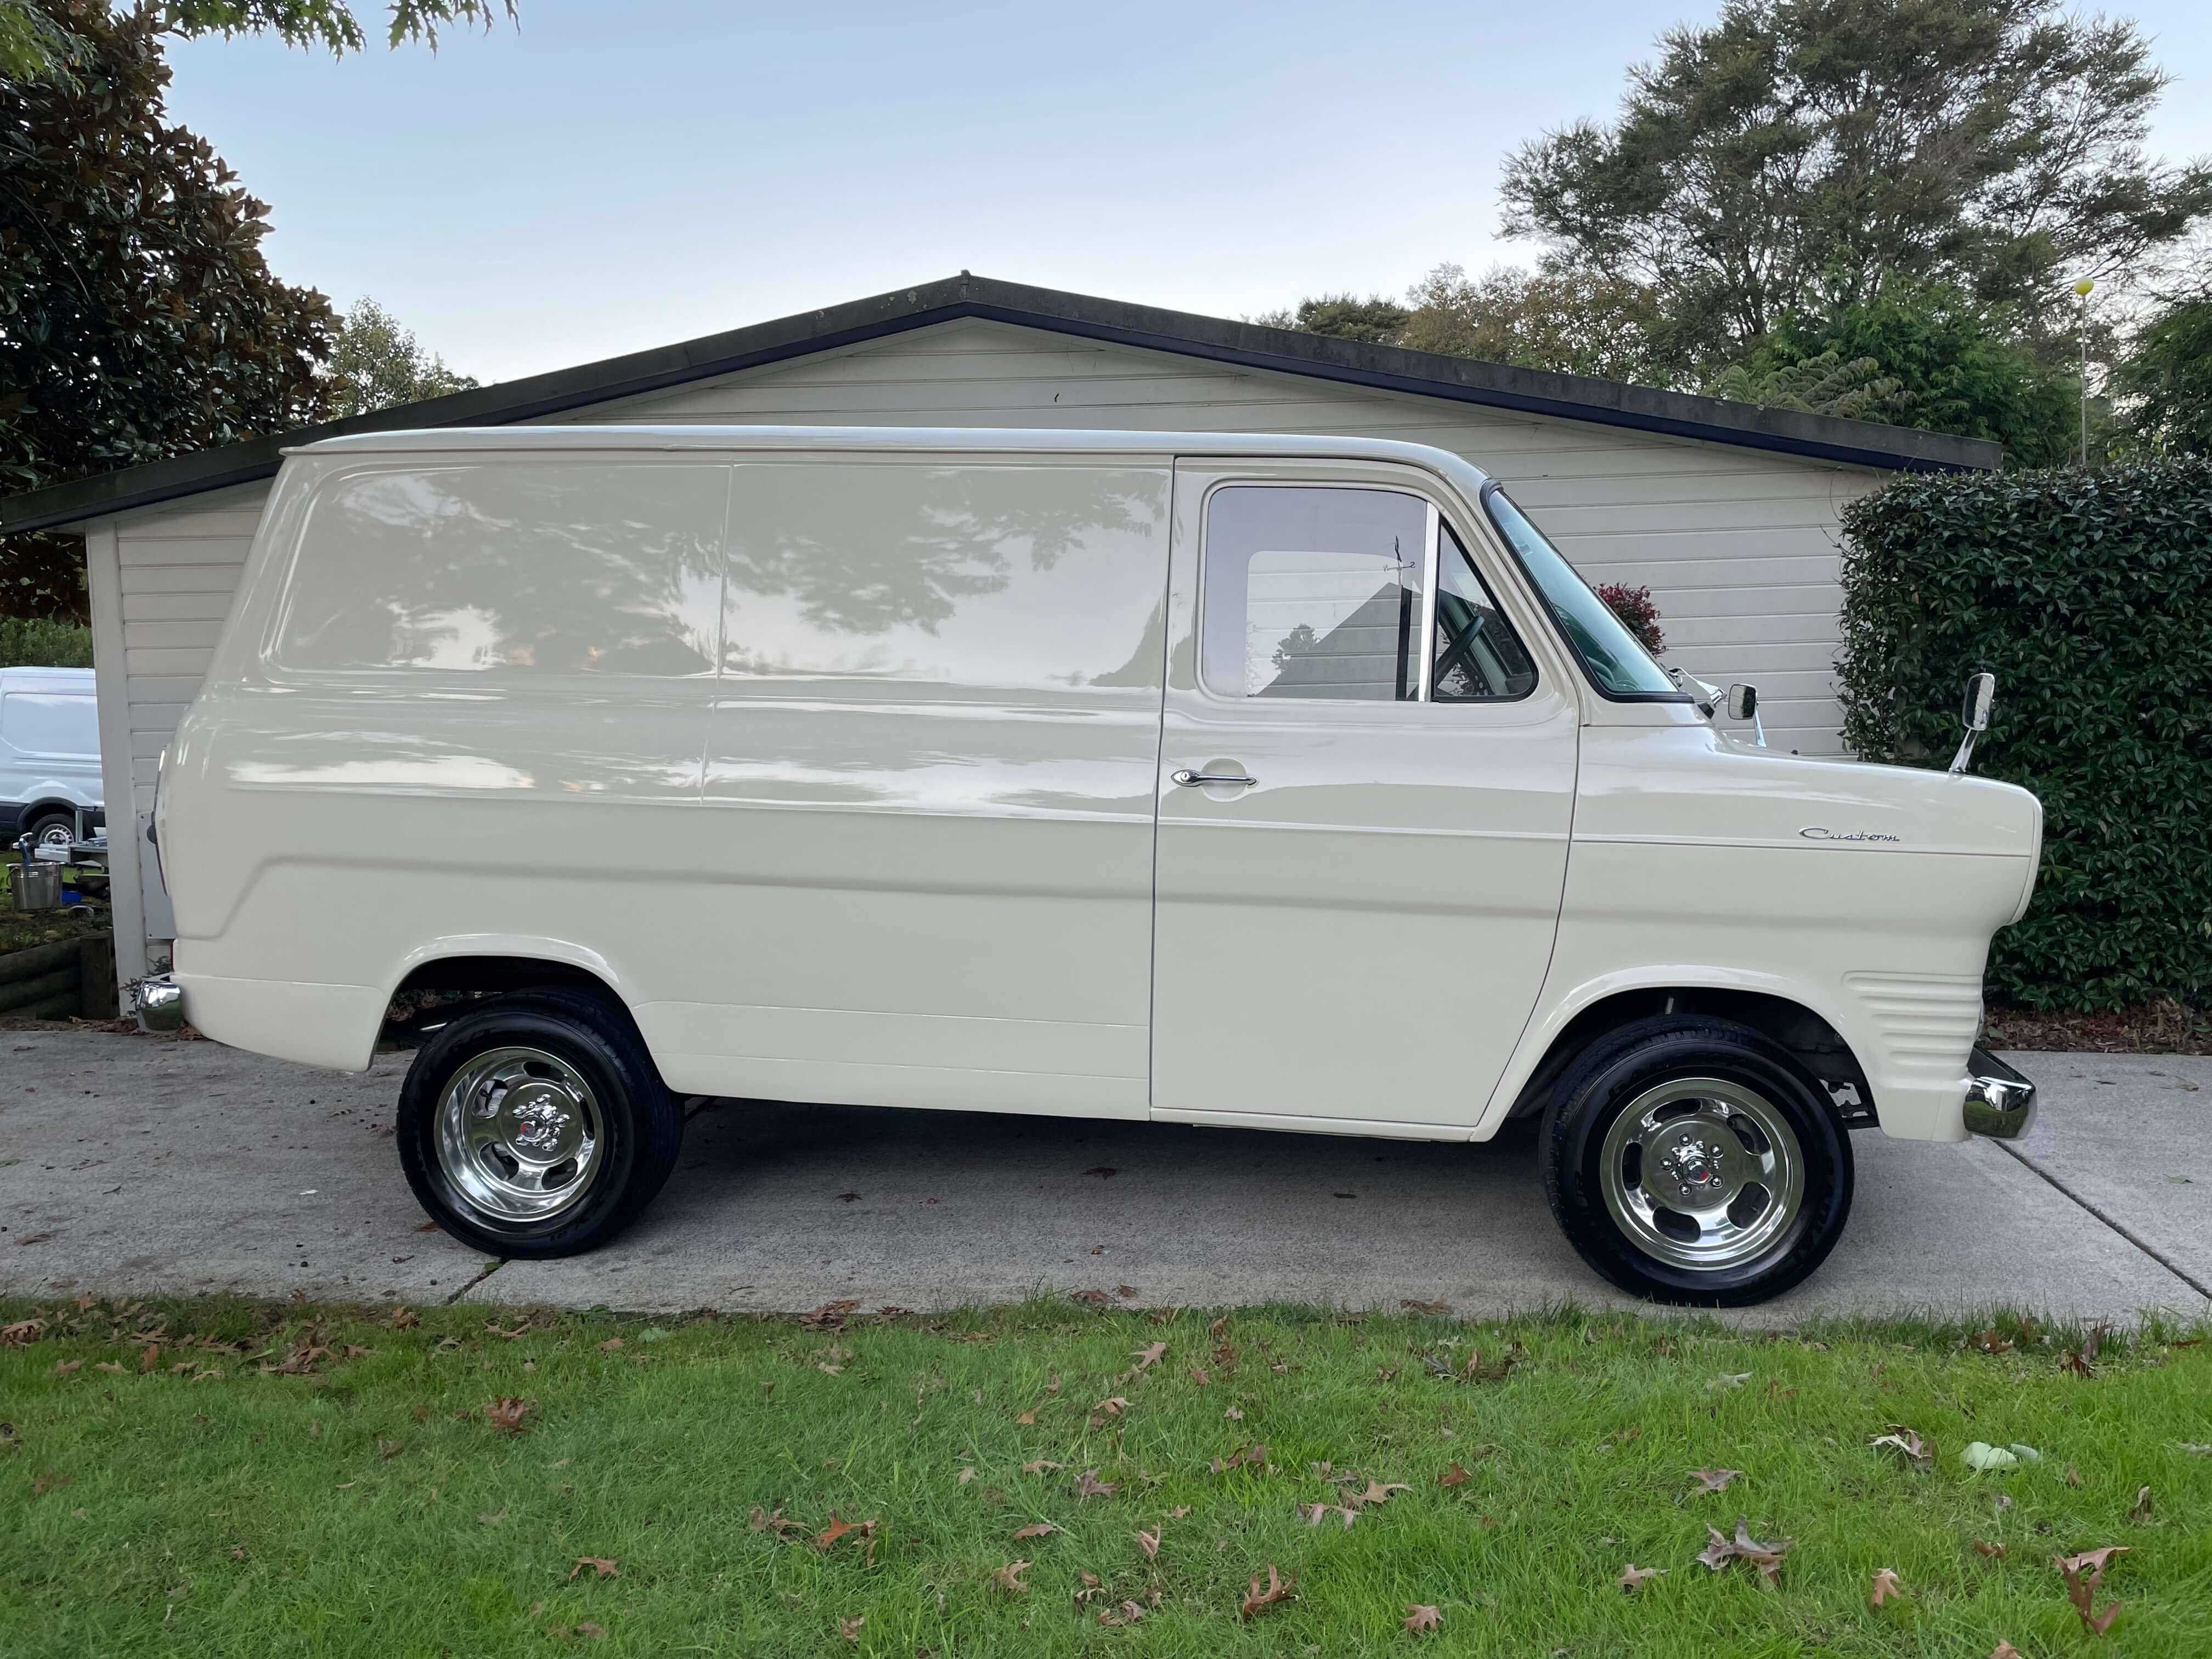
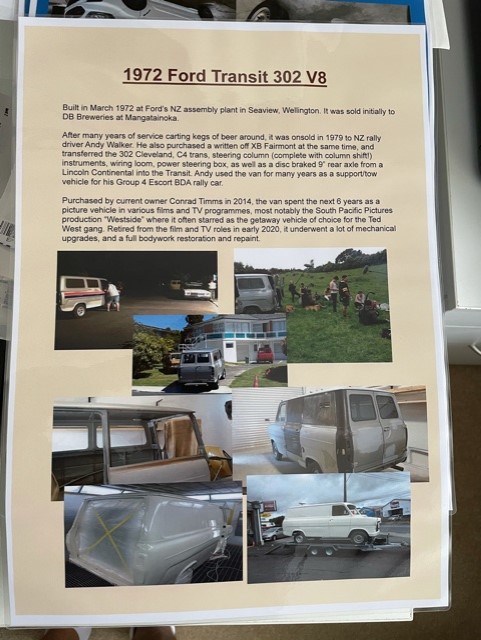
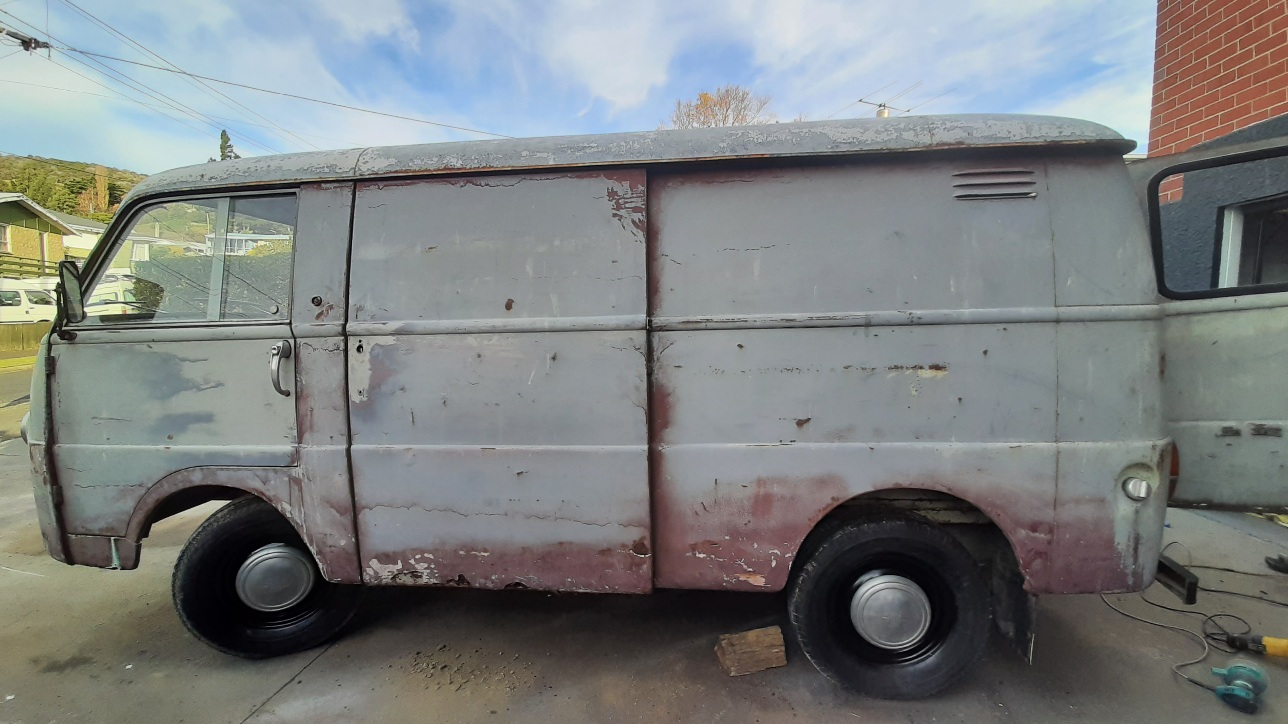
a few more pics......... Browndog's 1972 V8 Transit - Page 3 - Project Discussion - oldschool.co.nz
14 points
-
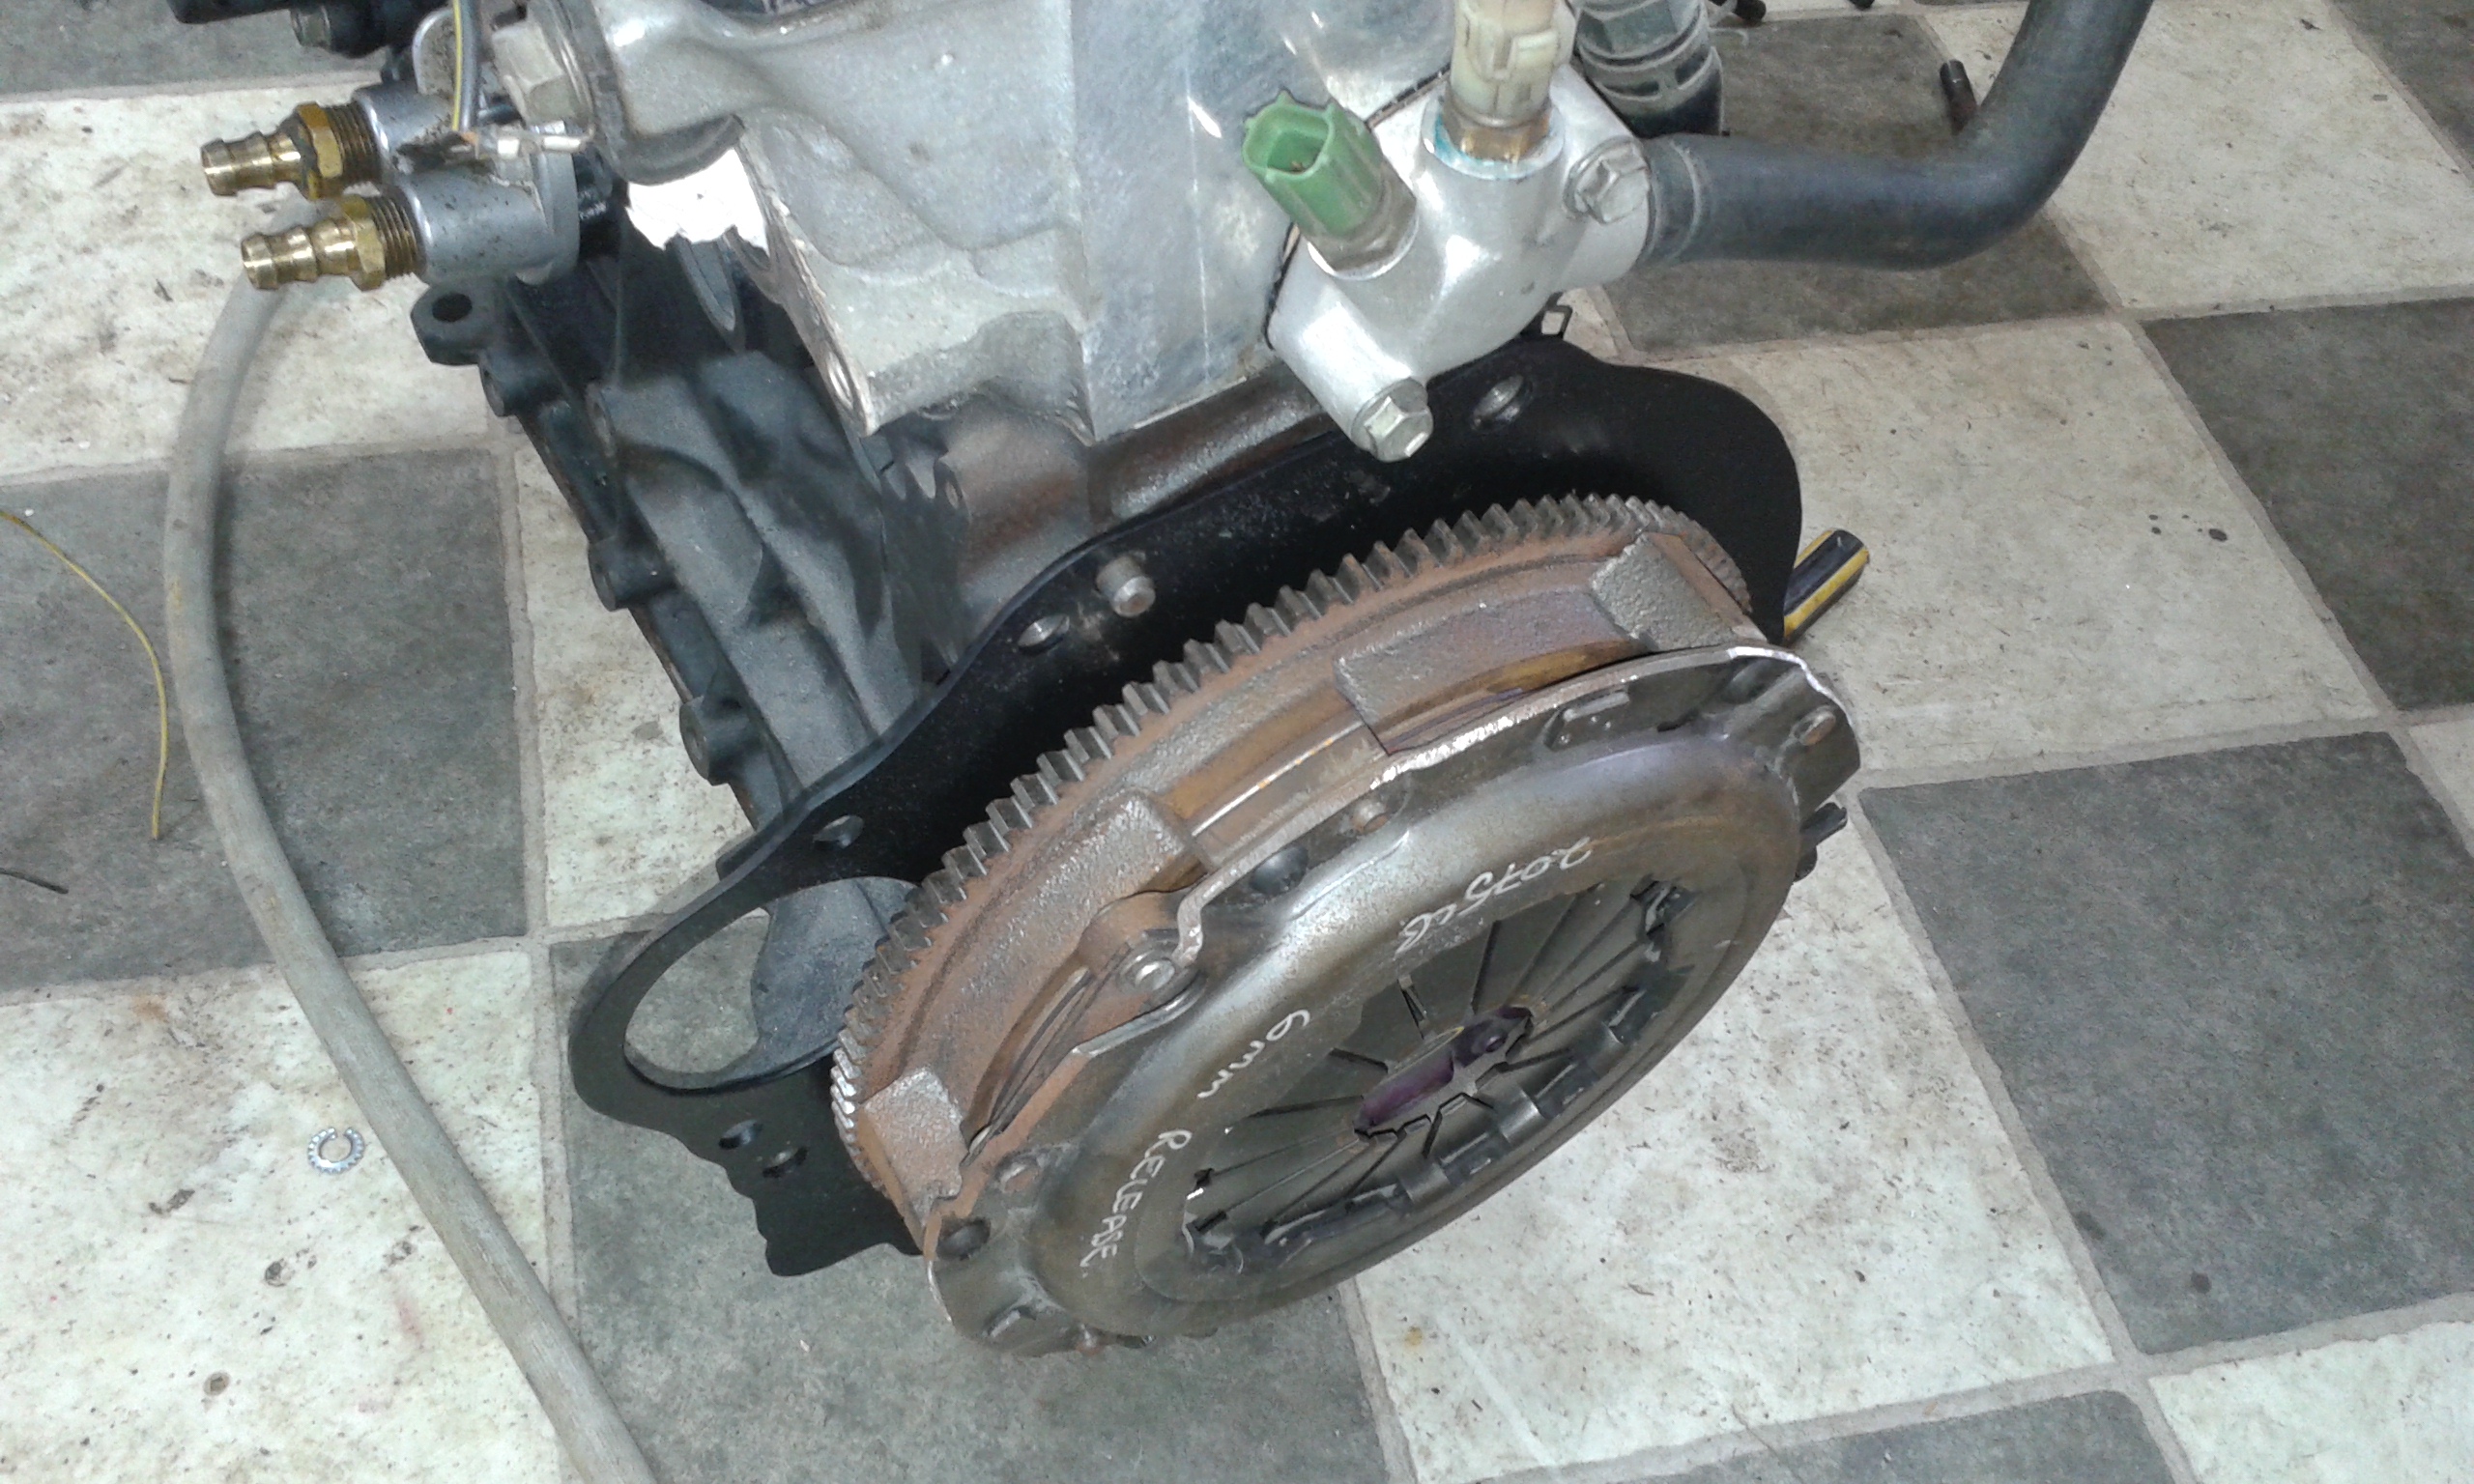
Finally, it's been a long time in the making, but for the first time in many years the Marina has brakes. In the previous post, I refurbed and reassembled the rear brakes, but in the meantime I had also been working on the rest of the system. Unfortunately, things like this take time and money, both of which are a sticking point for me at the moment (mainly time, I'm waiting over a month for parts from the UK). Even further back I started to strip the front calipers, which after some creative work with my compressor, I managed to do. First, I reinstalled the old pads, with a pry bar between them and used that to restrict the movement of the pistons, whilst pressurising the caliper and tapping the caliper body with a hammer. Eventually the pistons moved a little, but what made the biggest movement was using a punch and hammer to drive the piston out of the bore. Obviously, this is super destructive, so don't do this to pistons you want to keep (but pistons you want to keep shouldn't be stuck like these) Out came one piston, along with a lot of sludge This allowed me to slip the old piston back in after greasing it up, and using it to block the bore, and drive just the other piston out. I tried clamps, but there wasn't enough space with what I had, so ended up using a hose clamp to keep the piston from moving. It worked a treat, and I ended up getting all four pistons out of the calipers in this way. Now, before I go further, heed my warnings. Playing with hydraulics, compressed air, and brake fluid, is a dangerous game. Make sure you wear all your PPE. If it's not the crushing force of a piston flying out, it could be pressured brake fluid spraying into your face. I should know, at one point when forcing 100+psi into the caliper I ended up with a fine mist of brake fluid spraying into my face. Thankfully I had safety glasses on, which stopped me from taking an eyeful of brake fluid and being blind, but it still wasn't pleasant. I have now upgraded to a full face shield for work like this. As well as spraying my face, I didn't realise the fluid had travelled a meter or so behind me and ended up on the front of the Honda. Unfortunately, this sat on the paint and headlight overnight. The paint seems to have survived with only some minor marking, but the headlight has stained badly and will need replacing. So yes, take care of yourself and your surroundings. ALWAYS wear the correct PPE. Also remember that plain old water neutralises brake fluid, so that should be the go-to for cleaning it off. Hydraulics are dangerous, if you aren't confident in what you are doing, seek professional support for the job. Anyway, moving on, this is why the pistons were stuck. Deep corrosion. After scrubbing the calipers in the parts washer, they spent a couple of days in the Evaporust bath to remove the rust. They aren't perfect, and I probably should have painted them, but at the end of the day they are clean, internally rust-free and won't be seen behind the wheels. I purchased a seal kit to suit the Girling Type 14 calipers as used on the Spitfire, PN GRK5005, which worked a treat. These Girlock calipers are almost an exact copy of the Girlings. In went the piston seals, with lots of rubber grease. Make sure these sit flat, and arent twisted or pinched. Next it's piston time. The pistons I used are once again from a Girling Type 14, PN 516212. These are slightly different where the dust boot sits. The Girlock pistons don't have a retaining groove, just a lip. The Girlings have a recessed groove. I figure since the seals I'm using are for the Girling, the Girlings pistons will be just fine (and to note, the old Girlock seals are visually the same). The overall dimensions of the piston are the same. Girling on the left, Girlock on the right. The Girling piston had a much bigger lead in chamfer, which helps during assembly. Pressing the pistons in was easy enough by hand. Lots of rubber grease, place it square and press it in with fingertips. Once it seats a bit, I used a long spanner over the face of the piston to push down evenly with both hands (one hand on each side of the caliper). It should go in with minimal force. The dust boot is a prick. The inner lip sits in the piston recess, the outer lip just rests on the lip around the piston bore. A retaining ring holds it in place by friction. Getting this ring in place, without it pulling the boot off, took a few tries. I found the easiest way to do it was to line the ends of the ring up so they are touching (spreading the ring open), and working from the back (opposite the open end of the ring) work it around the boot, holding it in place whilst you stretch the open ends of the ring into place. It's hard to describe, and do, but will make sense after a few tries. Two calipers with new seals, pistons and boots. I cleaned up the bleed nipples, making sure they were clear (they weren't), and refit the hard pipes. That's the calipers done. Next in the firing line was the front rotors. I measured them a while ago and they came out as more or less new thickness, and have no lips. I feel like they were replaced not long before the car was laid up. Because of this, I don't want to replace them, that would be a damn waste. I was going to just send it, and use the pads to scrape the rust off them when it drives, but thought better of that when I had a good look. Crusty. The best thing in this case was to remove the hub and rotor, and send the rotors off to be skimmed. Before removing the hubs, I measured the runout in them. There should be 0.0245 - 0.1270mm play. This is to allow the bearings to expand when they warm up in use. Too tight and they will bind and fail. Too loose and they will wobble about and fail. Well, the Lh side had this much play 0.185mm play. Quite a bit above the maximum allowable. I'm getting an awful lot of use out of my dial indicator with these old cars! The RH side had zero play, not a thing. So both sides were set wrong. Glad I looked. The LH side split pin was.... split. It's missing a whole leg, and was only sitting in place. It also pays to loosen the rotor bolts whilst the hub is on the car, just in case you need to stop it spinning. The rattle gun did this with no effort. With the hub nut removed, the whole lot comes off pretty easily. The stub axle looks in good shape if a bit dirty. One hub with rotor. As a matter of course I bought a wheel bearing kit, as the old grease looked horrible, and there were signs of wear on the outer bearing races. The outer bearing was an LM11949 and the inner was L44649. The back of the rotor looks worse than the front Unlike the TVR, the rotors on the Marina came off easily with only minimal tapping with a hammer. I drove the old outer races out with a hammer and punch and gave the hub a good clean in the parts washer. The rotors were sent away to be machined and came back looking good. They could've skimmed a little more off, but I'm sure the pads will scrub them clean in no time. Before the rotor goes back on, the new bearings were pressed into the hub. The new bearings. The new race was pressed in with the old race, and a deep socket The rotor was loosely attached. Note the markings on the hub reminding me the rotor bolts aren't torqued. This can only be done on the car, using a long pry bar to lock the hub from spinning. The bearings were packed and fitted, along with a new seal. Before fitting the hub, I quickly swapped the old blocked front hoses for the new ones. These are Land Rover hoses, PN BR0764 And on goes the hub. Set to the correct runout With the caps and calipers fitted Both hubs had the rotor bolts torqued down, so the markings were removed The last few pieces of the puzzle were the master cylinder (which I sent off to be resleeved and rekitted), a new brake pipe from the master cylinder (since I damaged the old one removing it. A friend helped make a new one), and new pad fitting kit (in transit from the UK). The brake master and clutch slave I sent away to be resleeved came back looking lovely. Nice new stainless bores, as well as a good cleanup. Won't have to worry about these rusting up again. Of course, I couldn't just fit the nice clean cylinder to the rubbish looking firewall plate, so that got a wire brush and a coat of paint. It's hard to believe it's the same master cylinder, and the same cap. I cleaned and used Araldite to fix the crack in the cap. The pedals got new clevis pins, since the old ones had seen their share of work! And finally, the brake light switch was tested Which revealed that it didn't work. The switch is easy enough to strip, these tabs on the side need to be pressed to remove the bottom of the unit and pull the guts out How this switch works confused me for a bit. When you remove the top from the bottom, it actually moves where the internal contact is, and if you don't spot it during disassembly it can be confusing. It got to the point I purchased a cheap replacement so I could work out how it's assembled. This is whats inside the switch, and how it came apart As it turns out, as seen on this replacement switch, the U shaped contact goes under the two legs. It's a Normally Closed switch, so it makes a circuit when the switch is released. When the brake pedal is pressed it's releasing the switch, which makes the circuit, otherwise normally it's pressed in, which moves the U shaped contact away from the two legs. The spring sits under the U shaped contact which pushes it up. The replacement switch was a bit cheap, so instead I cleaned up the contacts of the old one and reassembled it. It takes some fiddling to keep the contact under the two legs whilst you slip the base in to the top housing, but it can be done. A test shows that when pressed, the circuit is broken And released, it makes the circuit The original Lucas Australia switch lives to fight another day. The pad fitting kit finally arrived today, so I fitted the NOS pads, new shims and new pins. It's a bit of a pain with new pads and new thickness rotors, its all very tight, but it's there. I then drew fluid through with a vacuum bleeder, until all three bleed nipples had clean fluid coming through. Then it was back to the old one-man bleeder to finish the job. The brake pedal is now firm, with good travel. The rear adjusters have adjusted up (can hear the shoes slightly dragging the drum), and the hand brake is working. Everything needs a good bedding in, but for now, everything is doing what it should, and there seems to be no leaks. I don't know when it last had brakes, but it may not have been in this millennium. Now all I'm waiting on is a clutch master cylinder, which is en route from the UK, and a drive shaft that will be on its way to me tomorrow from down south. Once they arrive, we should be good for a trip up the driveway. Excite.12 points
-
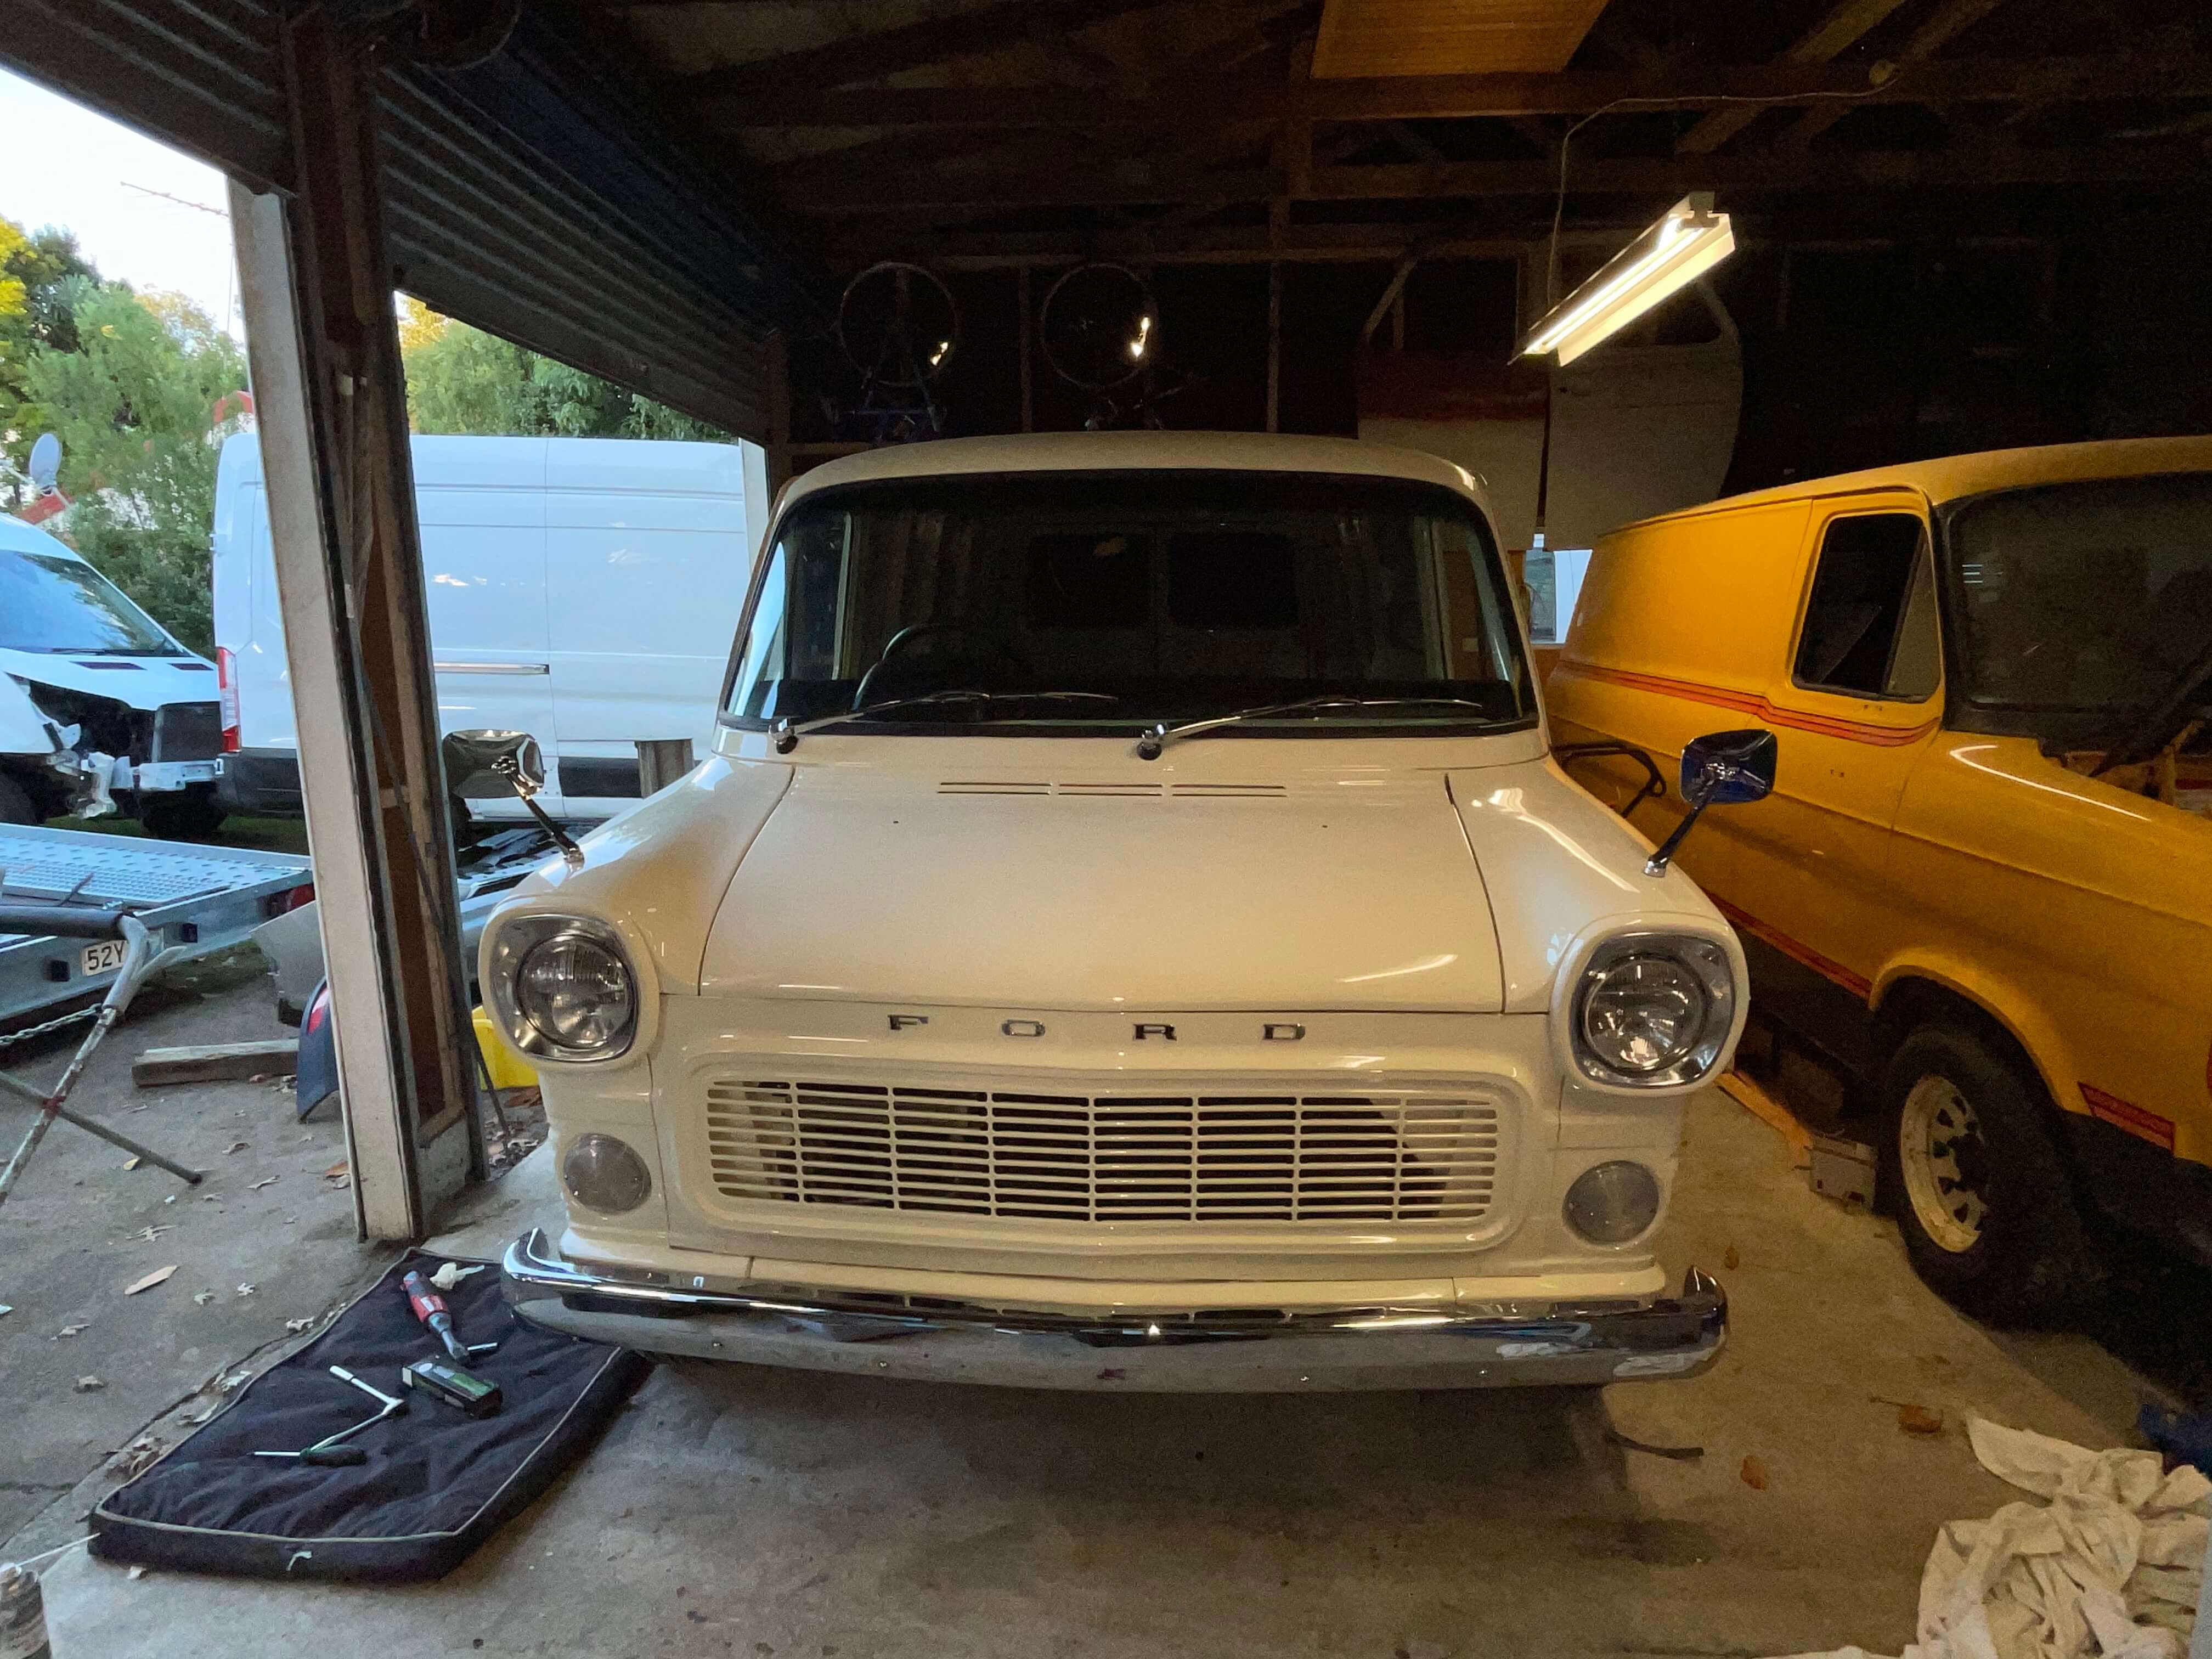
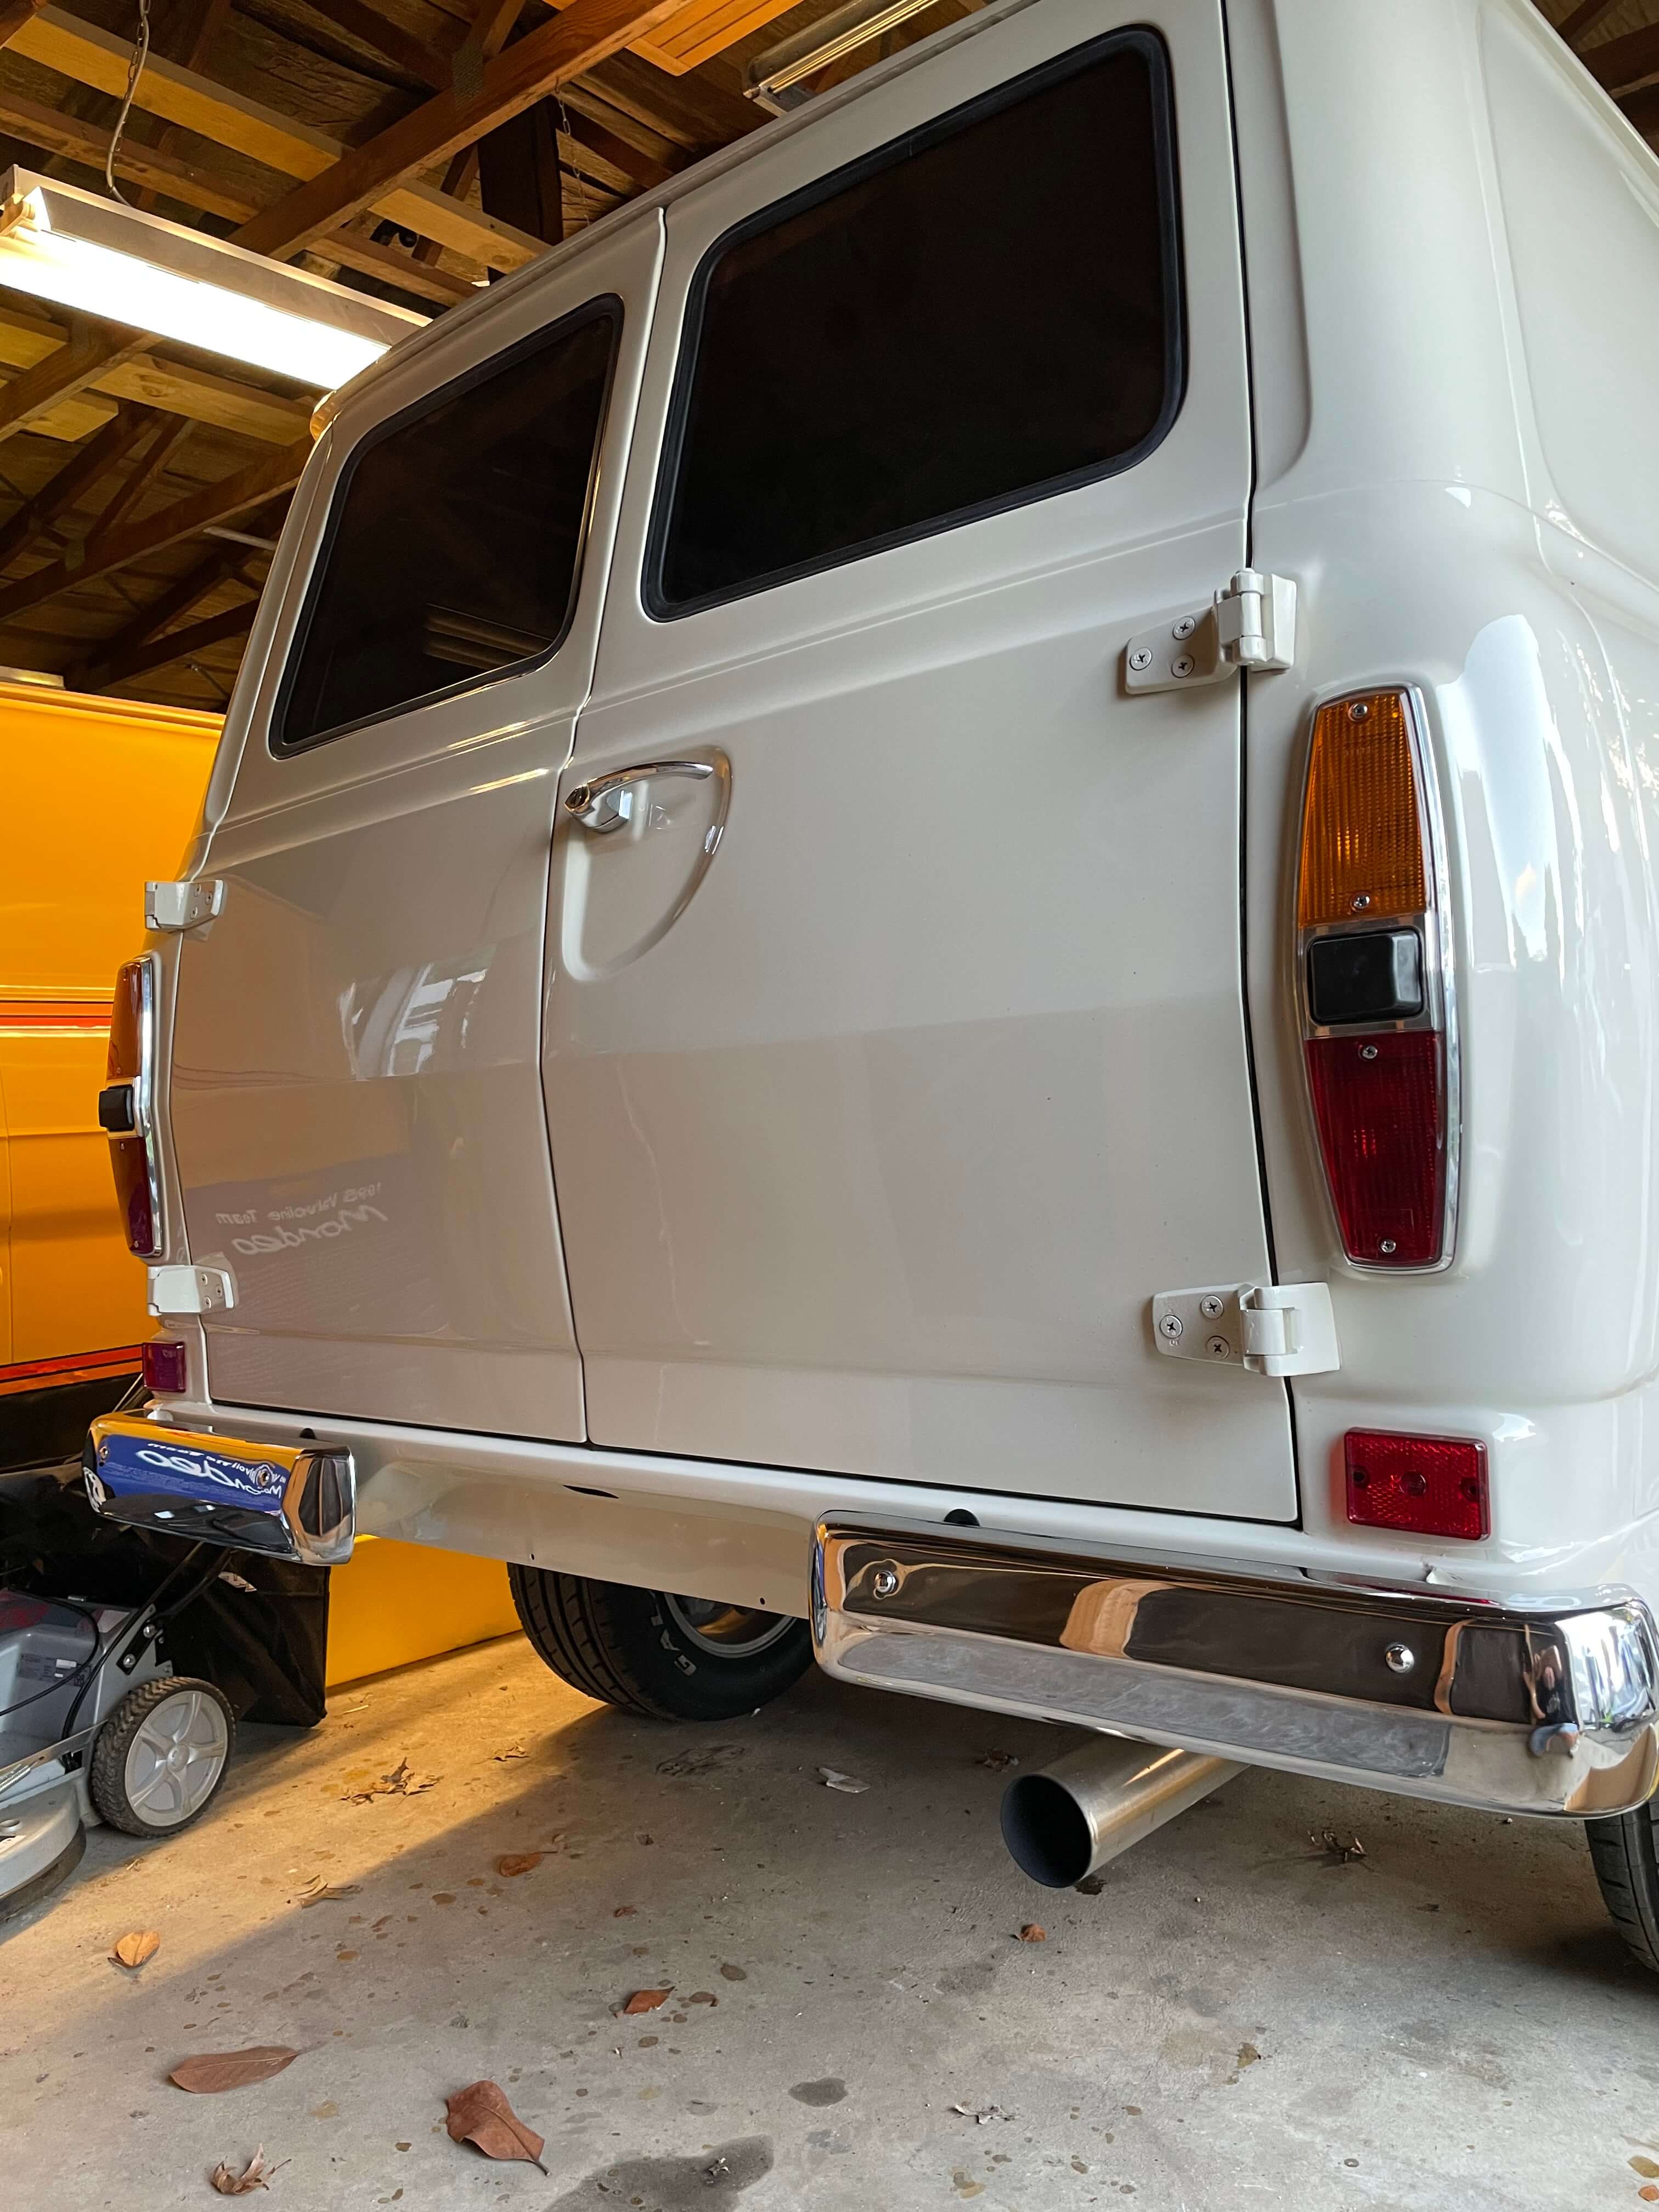
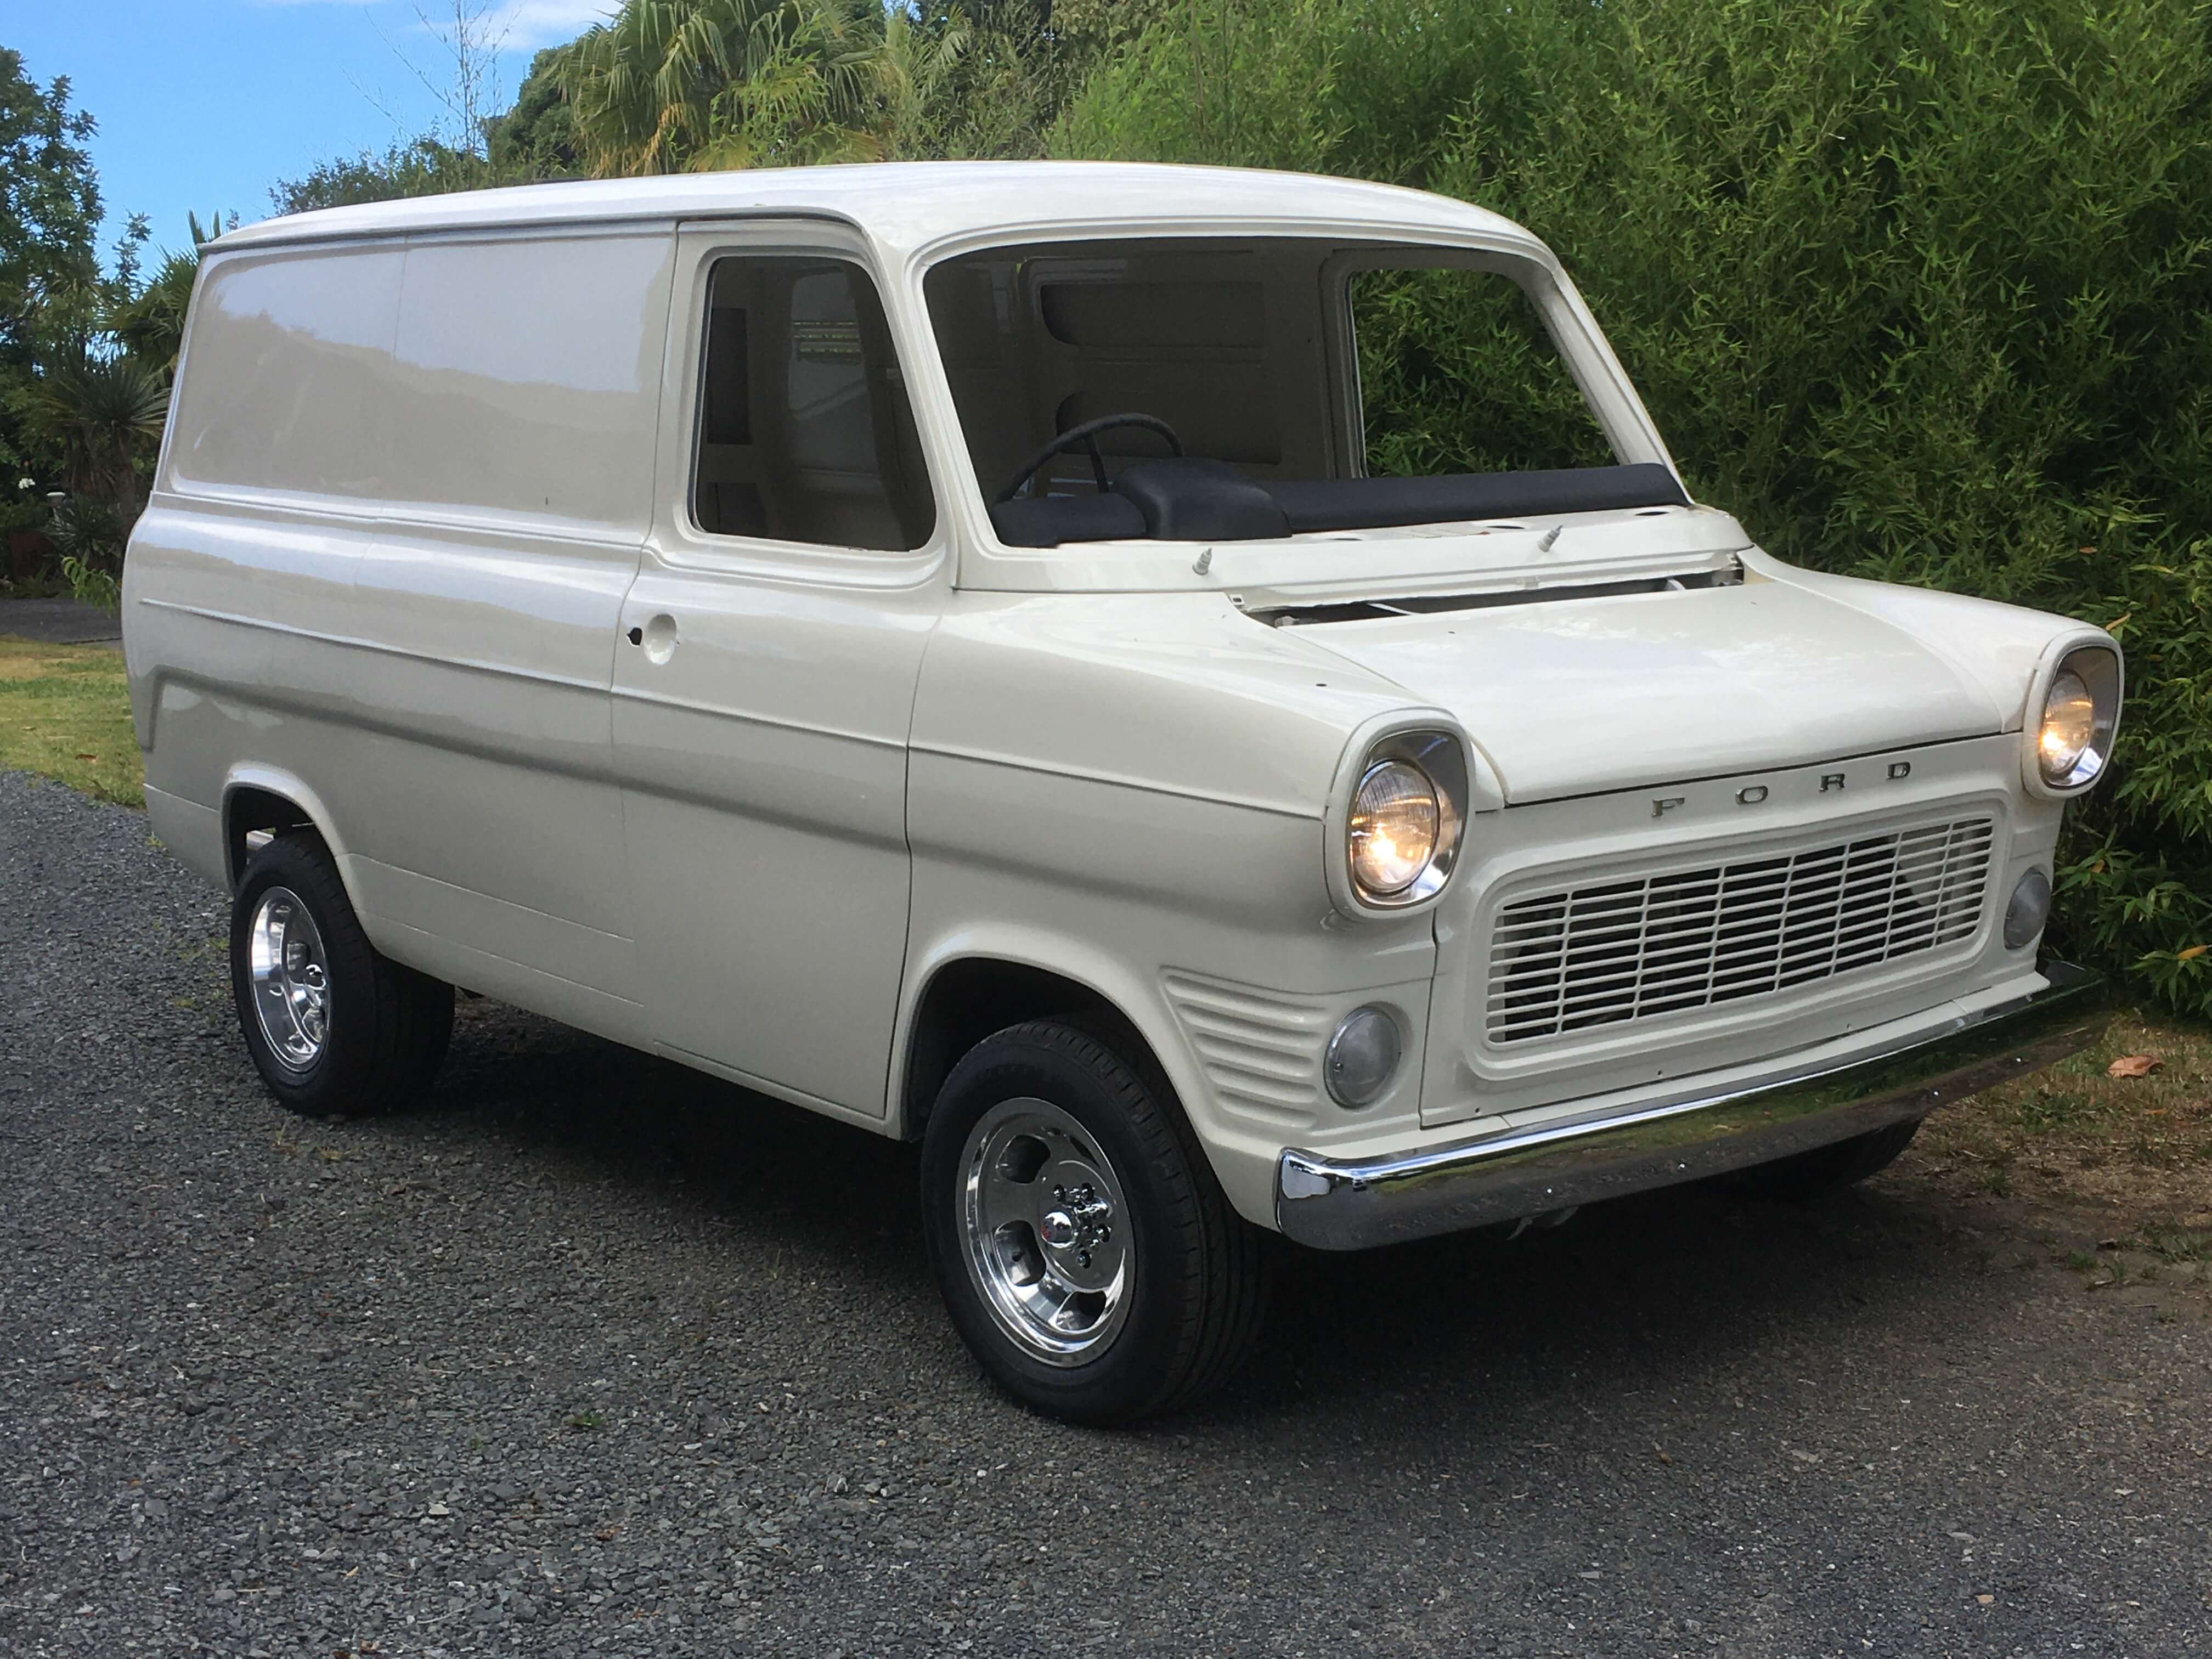
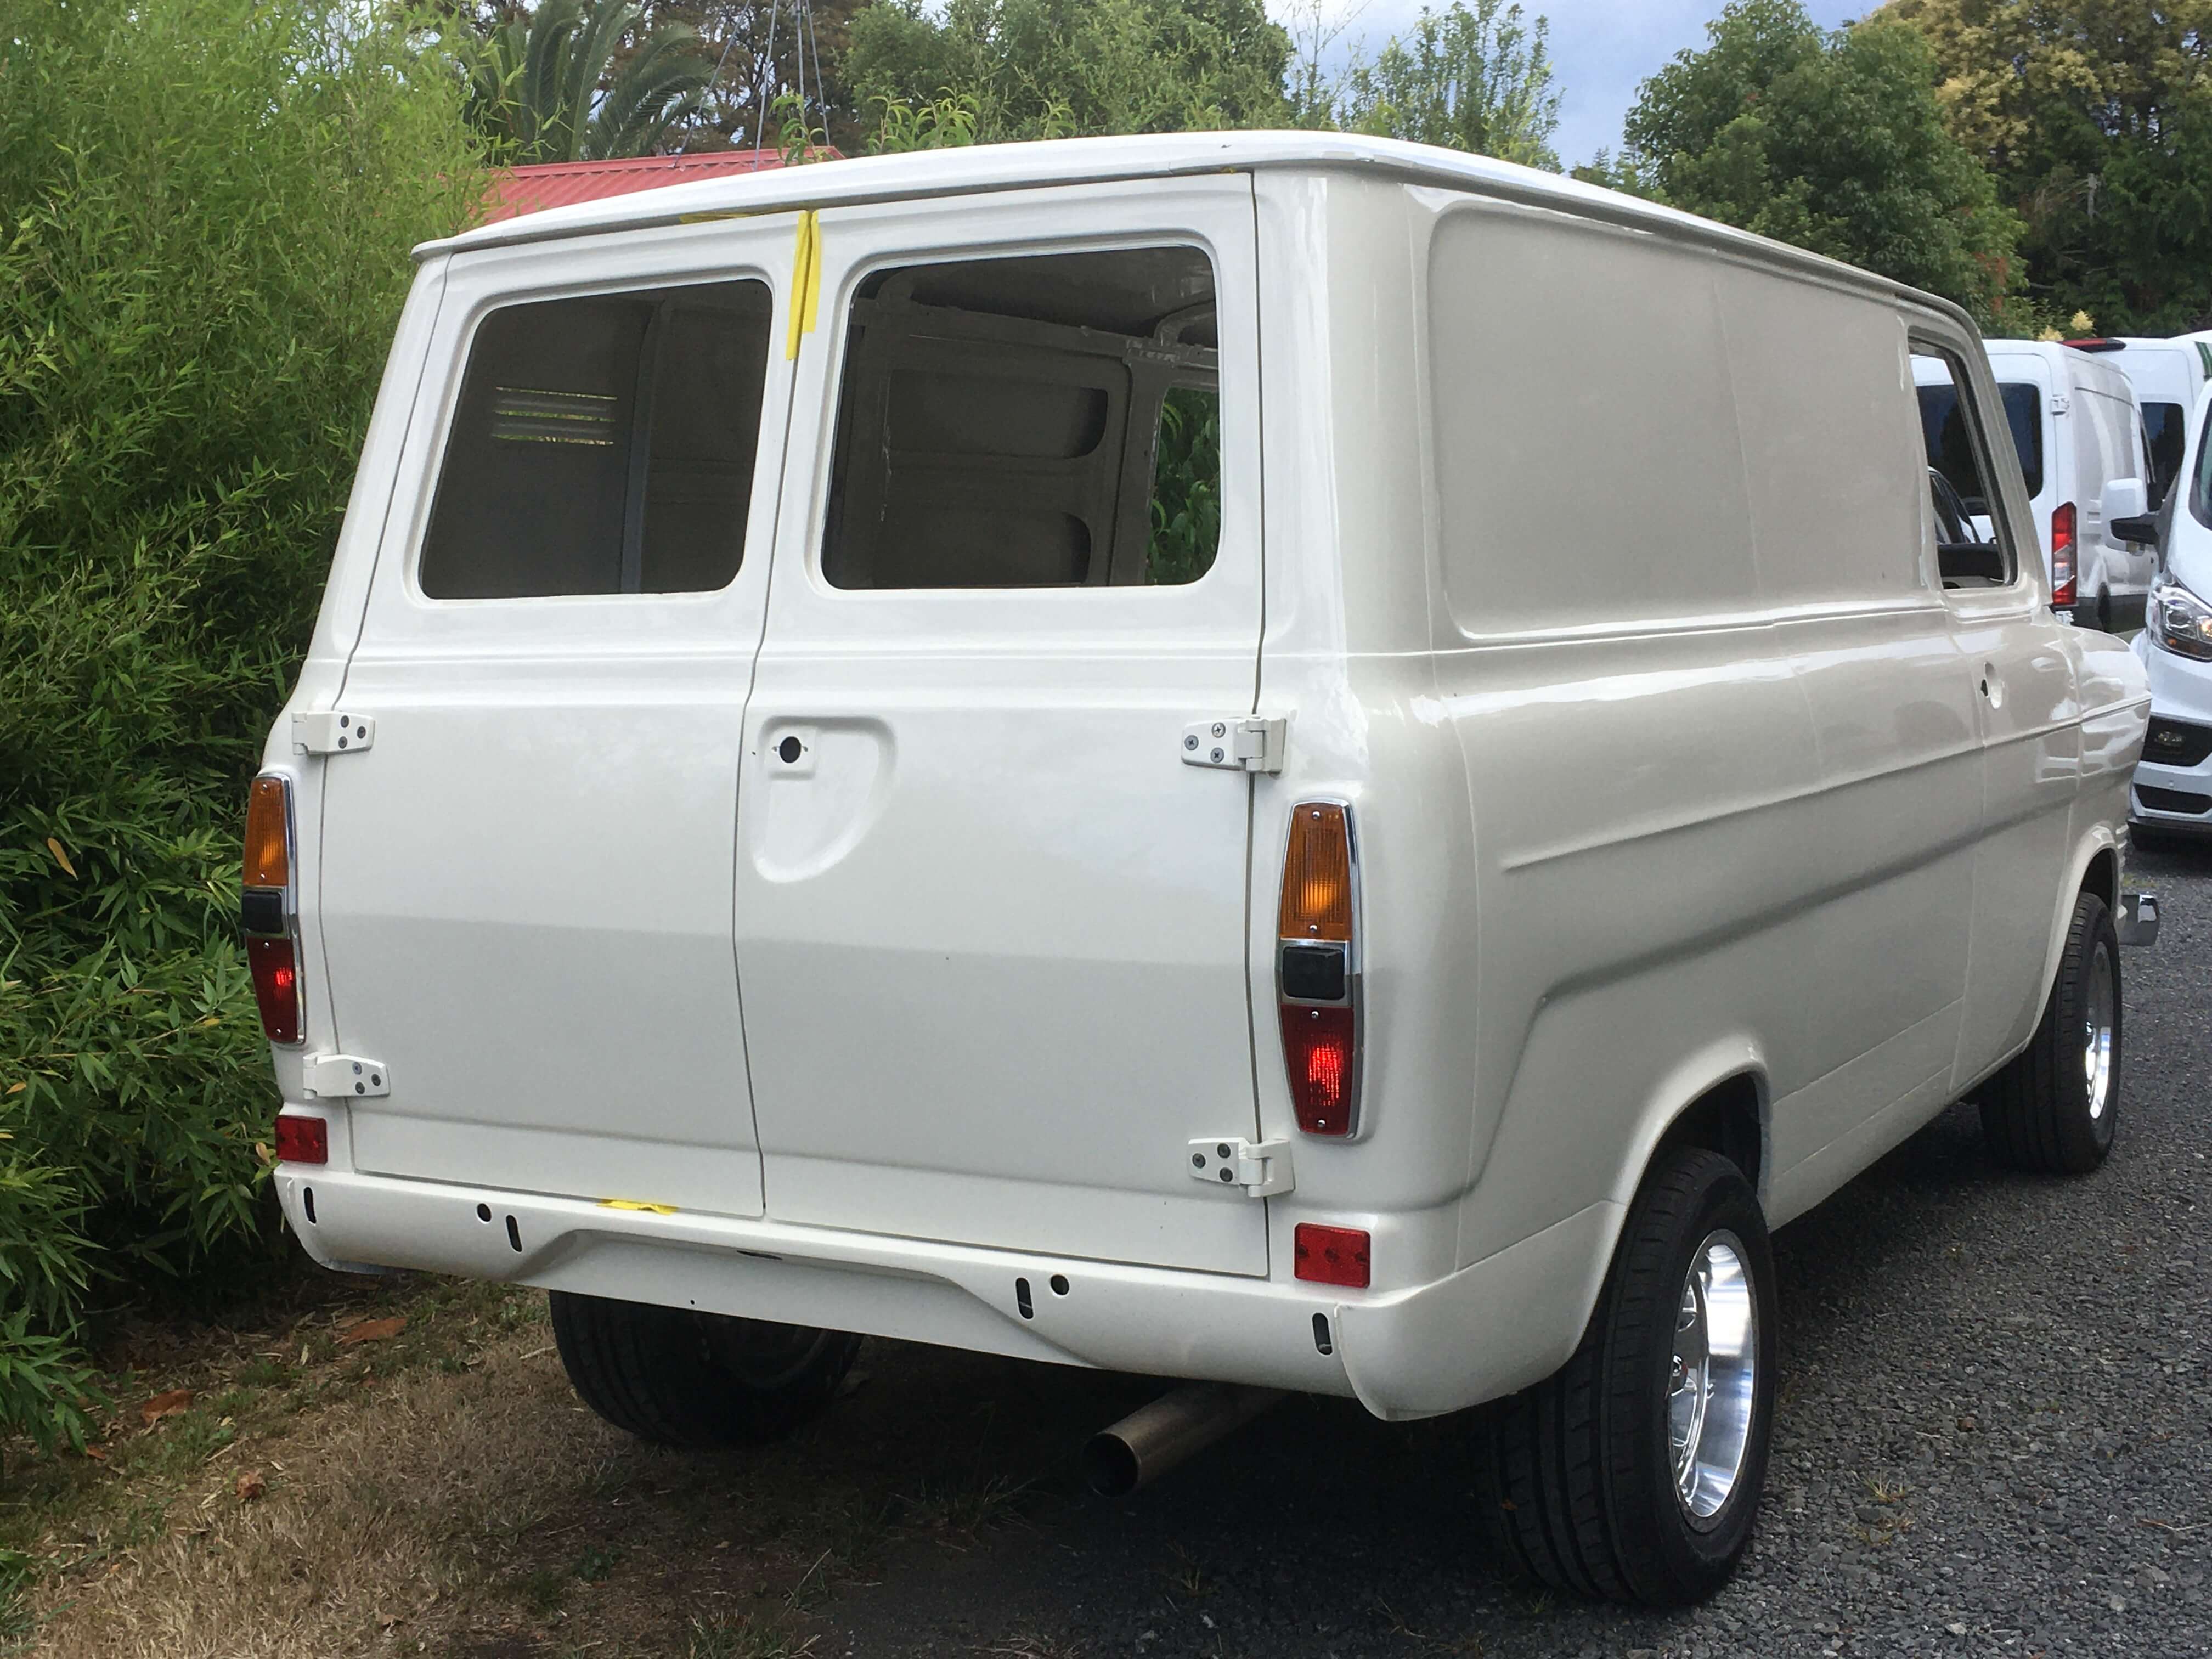
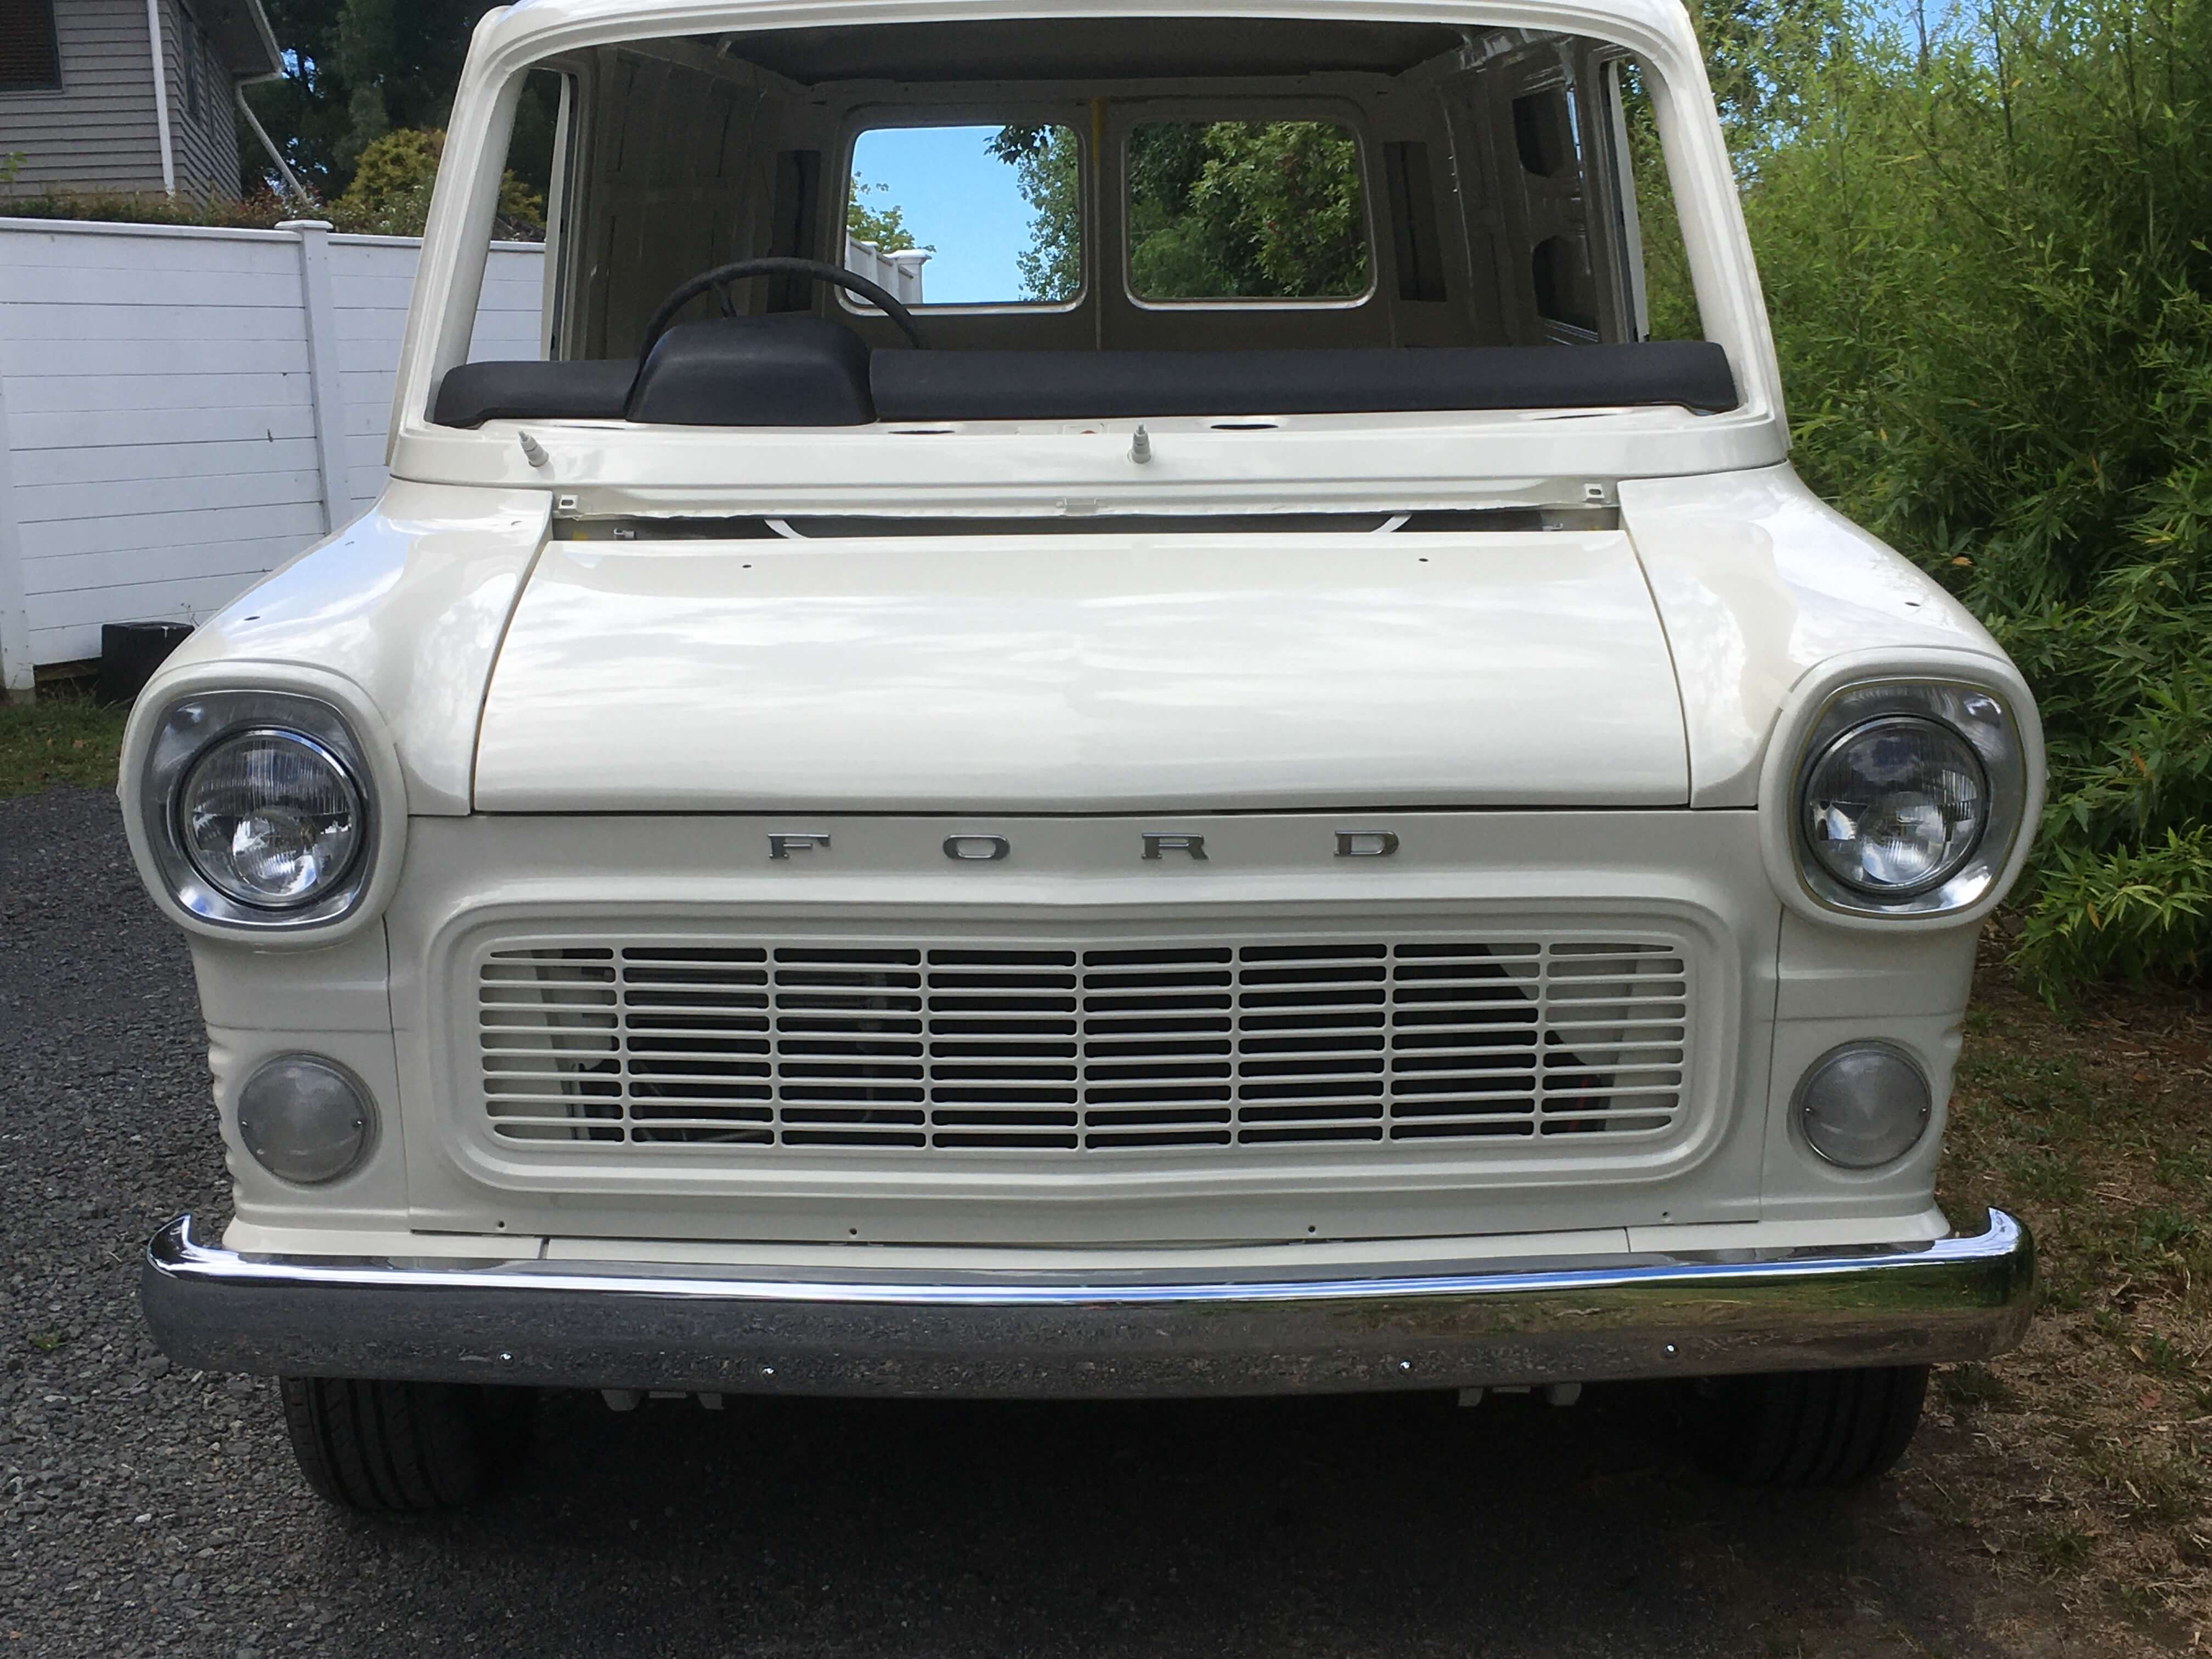
completed last week, and took it to the Auckland All Ford Day on Sunday Browndog's 1972 V8 Transit - Page 3 - Project Discussion - oldschool.co.nz
10 points
-
Got it down without dropping it or injuring myself! Been a productive weekend. Just need to add some walls and pack some extra sand around the areas im worried about. Then will be good to go to the foundry!7 points
-
If you read the tech forum you'll know I was trying to figure out where I could score a drive-by-wire throttle and pedal without having to pay over $500 for new Bosch motorsport units. On the weekend I went to Pick-A-Part to look for some rear calipers, but ended up finding exactly what I needed for the throttle setup. Turns out that almost every Euro from 2000 onwards has the right setup - the 68mm Bosch throttlebody. There are a few variations in them as some have water passages, etc, so I ended up removing about 4 or 5 before I found one I liked, which came from a Volvo V50 (2004-2012). It has no water lines and is pretty tidy. I wanted to get the pedal from the V50 too, but with the seat in the way and unmovable due to lack of power I couldn't get up under the dash properly to remove the bolts. Instead I found one from a an earlier (2000-2007) V70. It's made by Hella but looks suspiciously like the Bosch unit of the same era. I'm pretty sure the V50's pedal was a Hella also, so I am assuming these should work well together. Like the throttlebodies, there were quite a few pedal options from different euro cars, especially VWs, but some had weird mounting patterns etc. I took this one mostly because of how similar it looked to the Bosch unit, with the plastic lattice bracing in the arm, rather than a thin metal arm. The plan is to get a Link G4X Xtreme or Fury to run these.
6 points
-
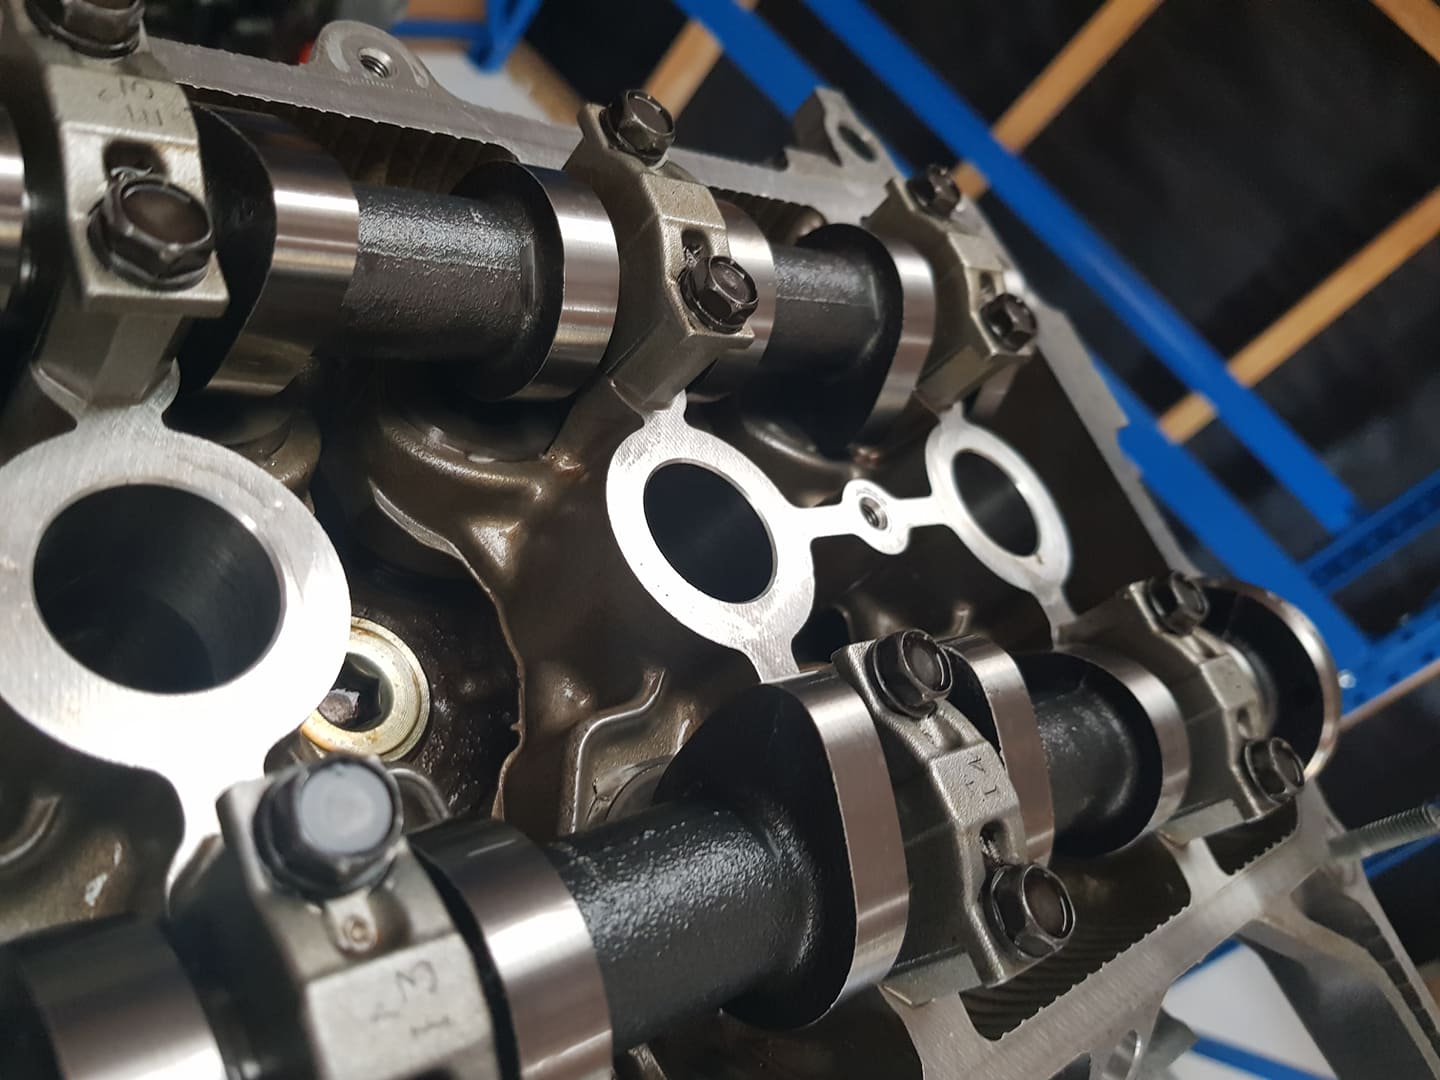
All assembled. Quite a mission. Not my best work but I'm learning a lot. Total is about 380kg. Now I need to make a pallet and tie it all together well enough so that when it’s tipped over to horizontal it doesn’t shift around.5 points
-
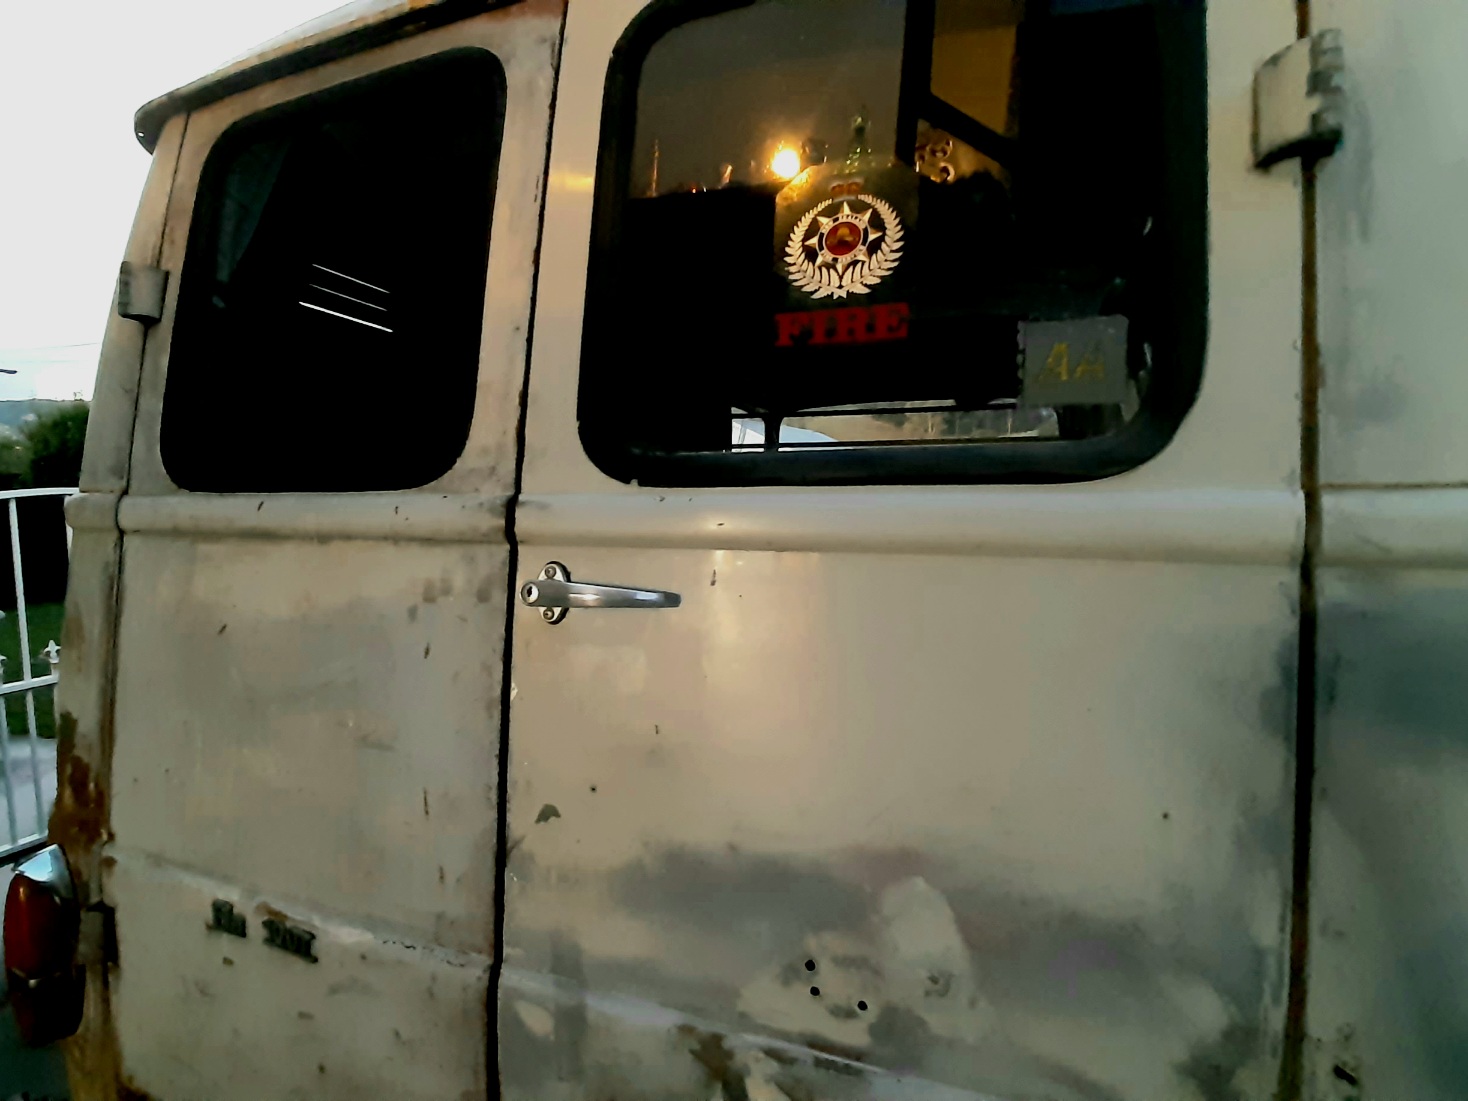
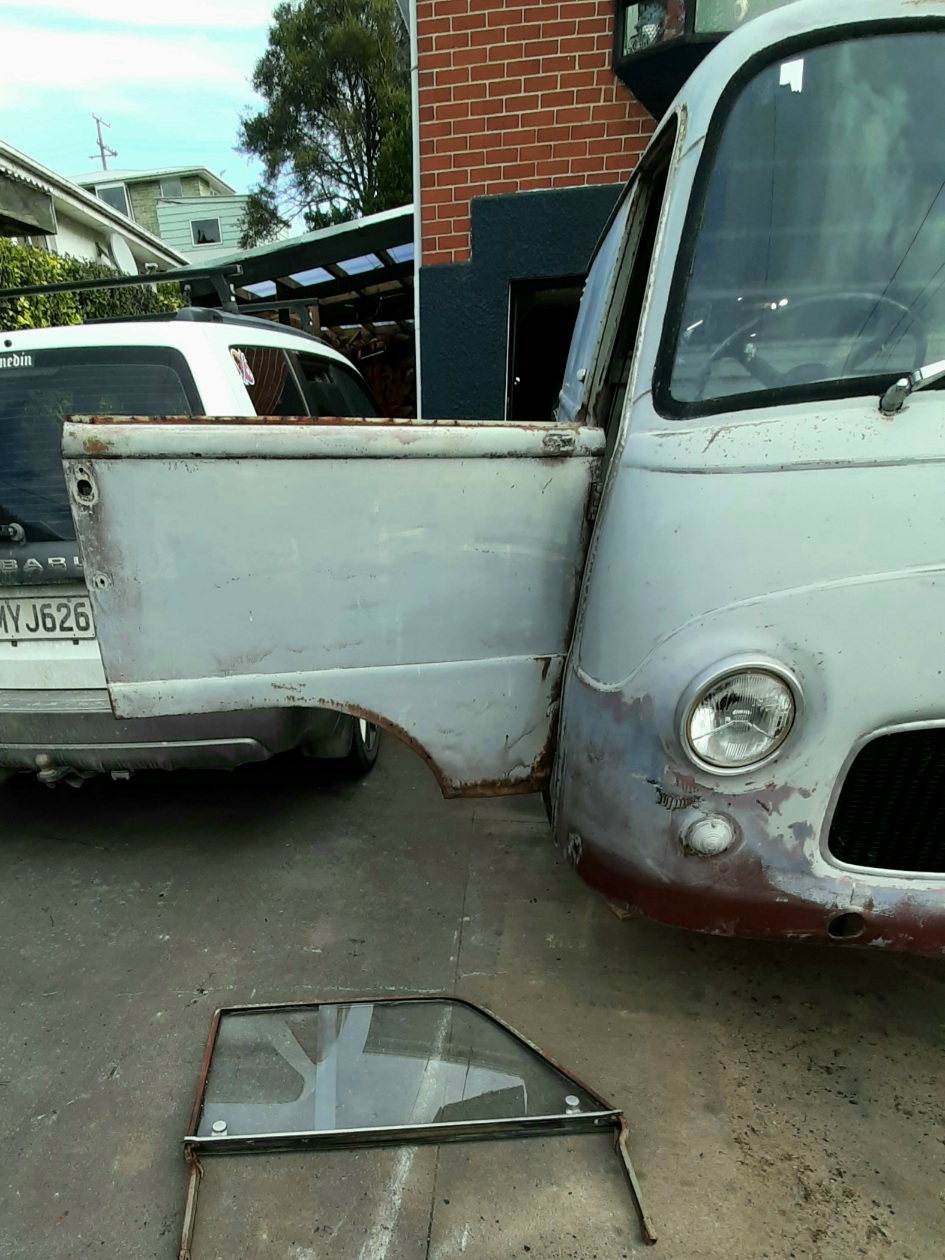
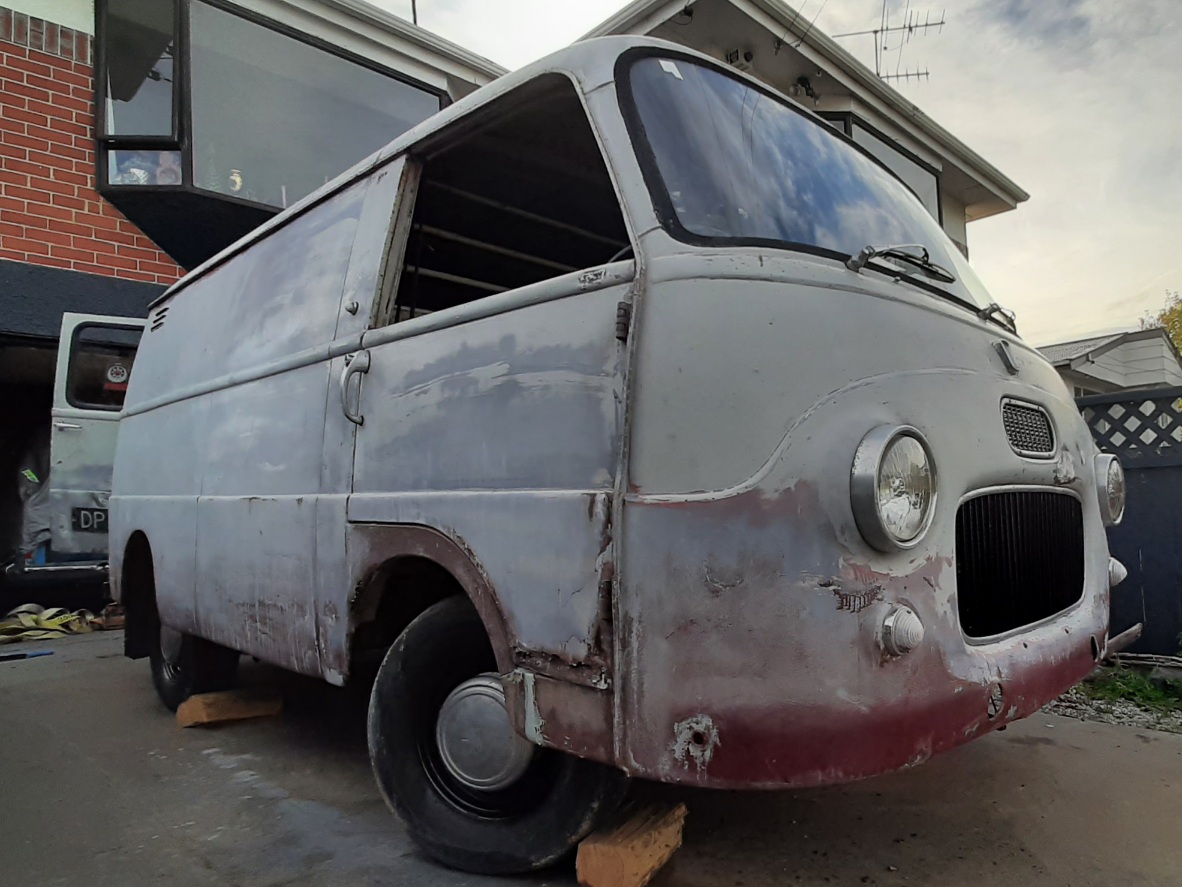
yes it did. I put a little poster on each of the side windows telling its life story, and I think a lot of people enjoy that. I was walking past at one point and overheard one guy say to his friend "it's the Westside van!" World famous in Noo Zulland!
4 points
-
The need is that it makes the job a hell of a lot easier when you have the fluid behind the seals to create the pressure required to pump it through. Dry seals don't seal very well and it can take a bloody long time to get going. A fresh rebuild is different because you have presumably used fluid or rubber grease during assembly and is not comparible to a cylinder that has been sitting on a shelf for six years. There have been times I have regretted not bench bleeding a cylinder first. There have also been times they work near on straight away. I usually just dump some juice in the top and pump it till it jizzes all over the floor and that works good enough to bolt on.3 points
-
That's only because no-one from OS turns up anyway. Doesn't seem to be a huge desire from OS people regardless of the format, and that's fine. We don't have enough people to run our own, so rely on others (this was the same when they were at burger fuel, OS was the minority of people).The number of people who actually use OS as a means of communication/regularly check on what's happening is so small that organizing an event on here doesn't reach more than 5 people so its of minimal value. If someone wants to step up and organize things then please do. Tank @ CJC has been pushing pretty hard and keeping the flame alive and is more than happy to work with us, but even he has noted that hardly anyone turns up from OS, so again, it kind of fizzles out. Coming into winter as well, its hard to get people excited. I unofficially took over when Marku went south but that wasn't a conscious effort. To be brutally honest I have minimal desire to get involved in organizing things (so sue me) but will turn up when I can. If someone wants to take charge and push hard then please do. Nothing wrong with people having other priorities in life. Peace out.3 points
-
All the bits ready to go together.3 points
-
Nothing too wrong with the merc engine, but you've got my attention, what stage cam would you recommend for the drillport?2 points
-
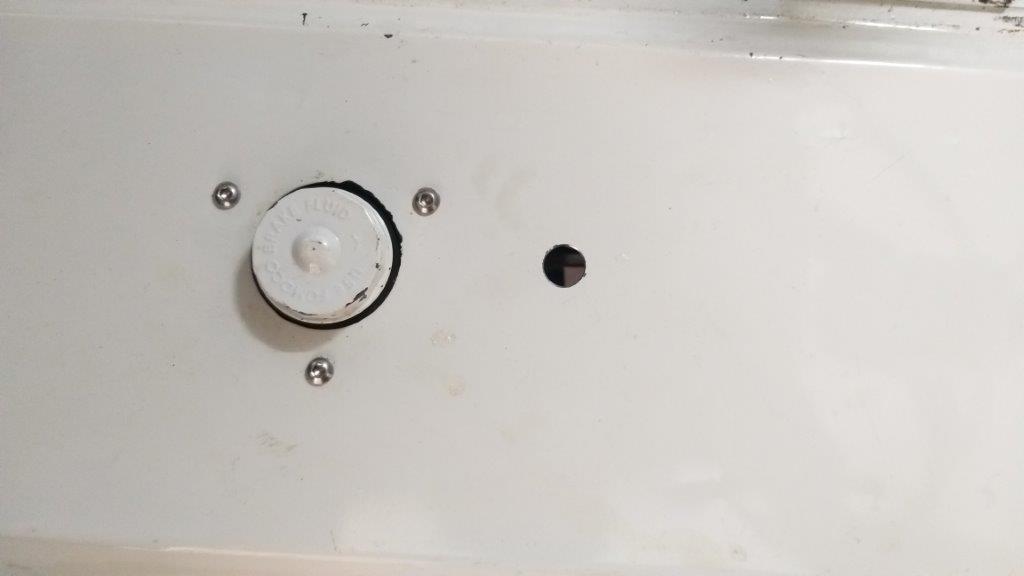
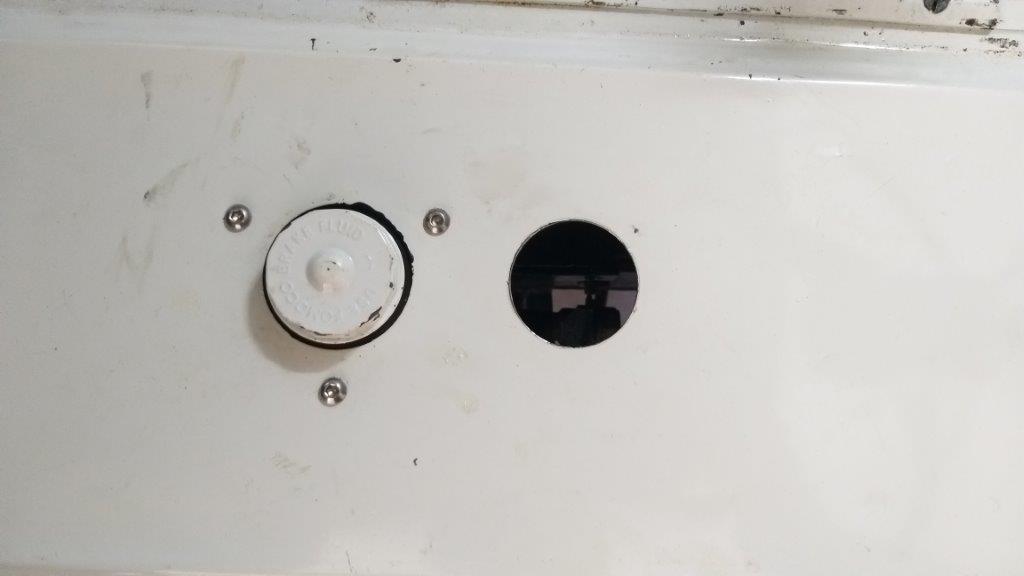
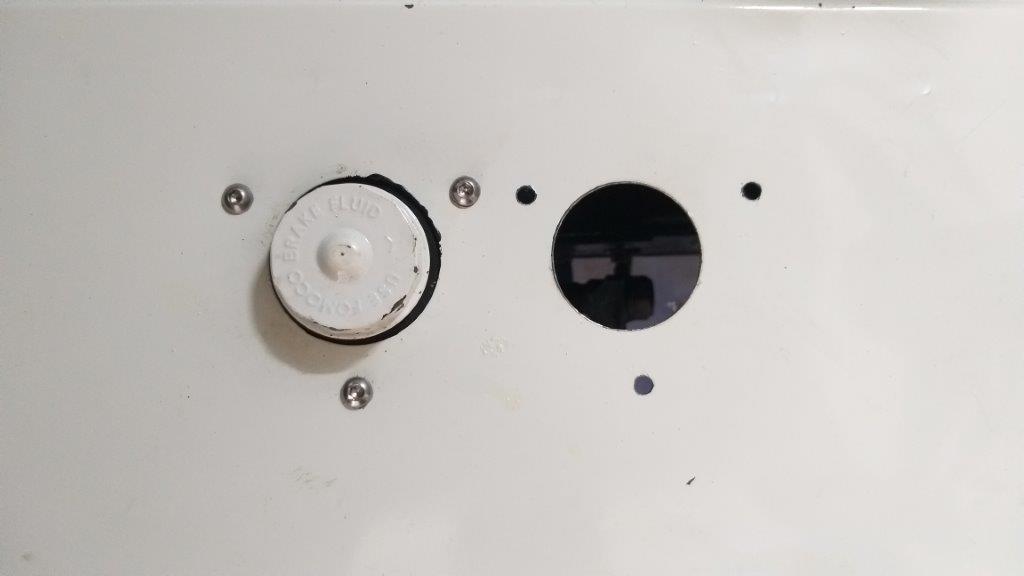
Today I took the bull by the balls and poked a ruddy great hole in the sheet metal under the drivers seat for the additional brake fluid reservoir. Started with a 15 mm pilot hole which is the size of the bolt on my 50 mm chassis punch. The chassis punch made short work of the cab floor and I then poked the 3 smaller mounting holes for the bracket. I cleaned and painted the second hand mounting bracket that I got in from the UK and gave the new reservoir a few coats of satin black to match the existing one. I've ordered 2 meters of 3/8 EPDM fluid reservoir tube which should be more than enough to plumb the dual reservoirs to the brake master cylinder.
2 points
-
I needed to bench bleed the new starlet one before it would work properly. I think I just used some M10 fine pitch bolts in the outlet ports, slightly cracked loose so that the air could get past but not a huge amount of the brake fluid.2 points
-
From memory I've only bothered to bench bleed once or twice ever, regular old "pump it up hold it down " bleeding has always worked for me2 points
-
Usual bench bleed method is to make some short pipes that screw into the outlets and go into the reservoir below the fluid level so you pump fluid around and around until you get air bubbles out of the cylinder2 points
-
Yes- I agree with Bart on this one. It just makes sooooo much sense to ditch the Austin/Merc engine and fit a beer keg.2 points
-
oh yeah this was no dig or anything at anyone just a assumption on what was happening with current situations and replying to kims post. I personally was happy to help with the meets myself and let Marku know when talking to him but he didnt want me doing them anymore and made that pretty clear. myself with the new born i haven't really been attending as my life has changed a bit and other things come first these days. I remember when os was doing them at the base it was just 5-7 people around one table at burger fuel, hasn't really been a big number thing from when i started going to the monthly meets myself, but when we opened it up to public and had a regular location and date we seemed to drag more out due to larger interests and different vehicles to gander at. I'll keep watching for events and locations to see if i can attend them when time is available.2 points
-
My girl came through with more rock auto goodies! New fuel sender and radius rod bushes. I opted for the sender that has a built in return line in case I go EFI down the line. I stripped the loom out and and pulled the Dash after work too. Nothing broke
2 points
-
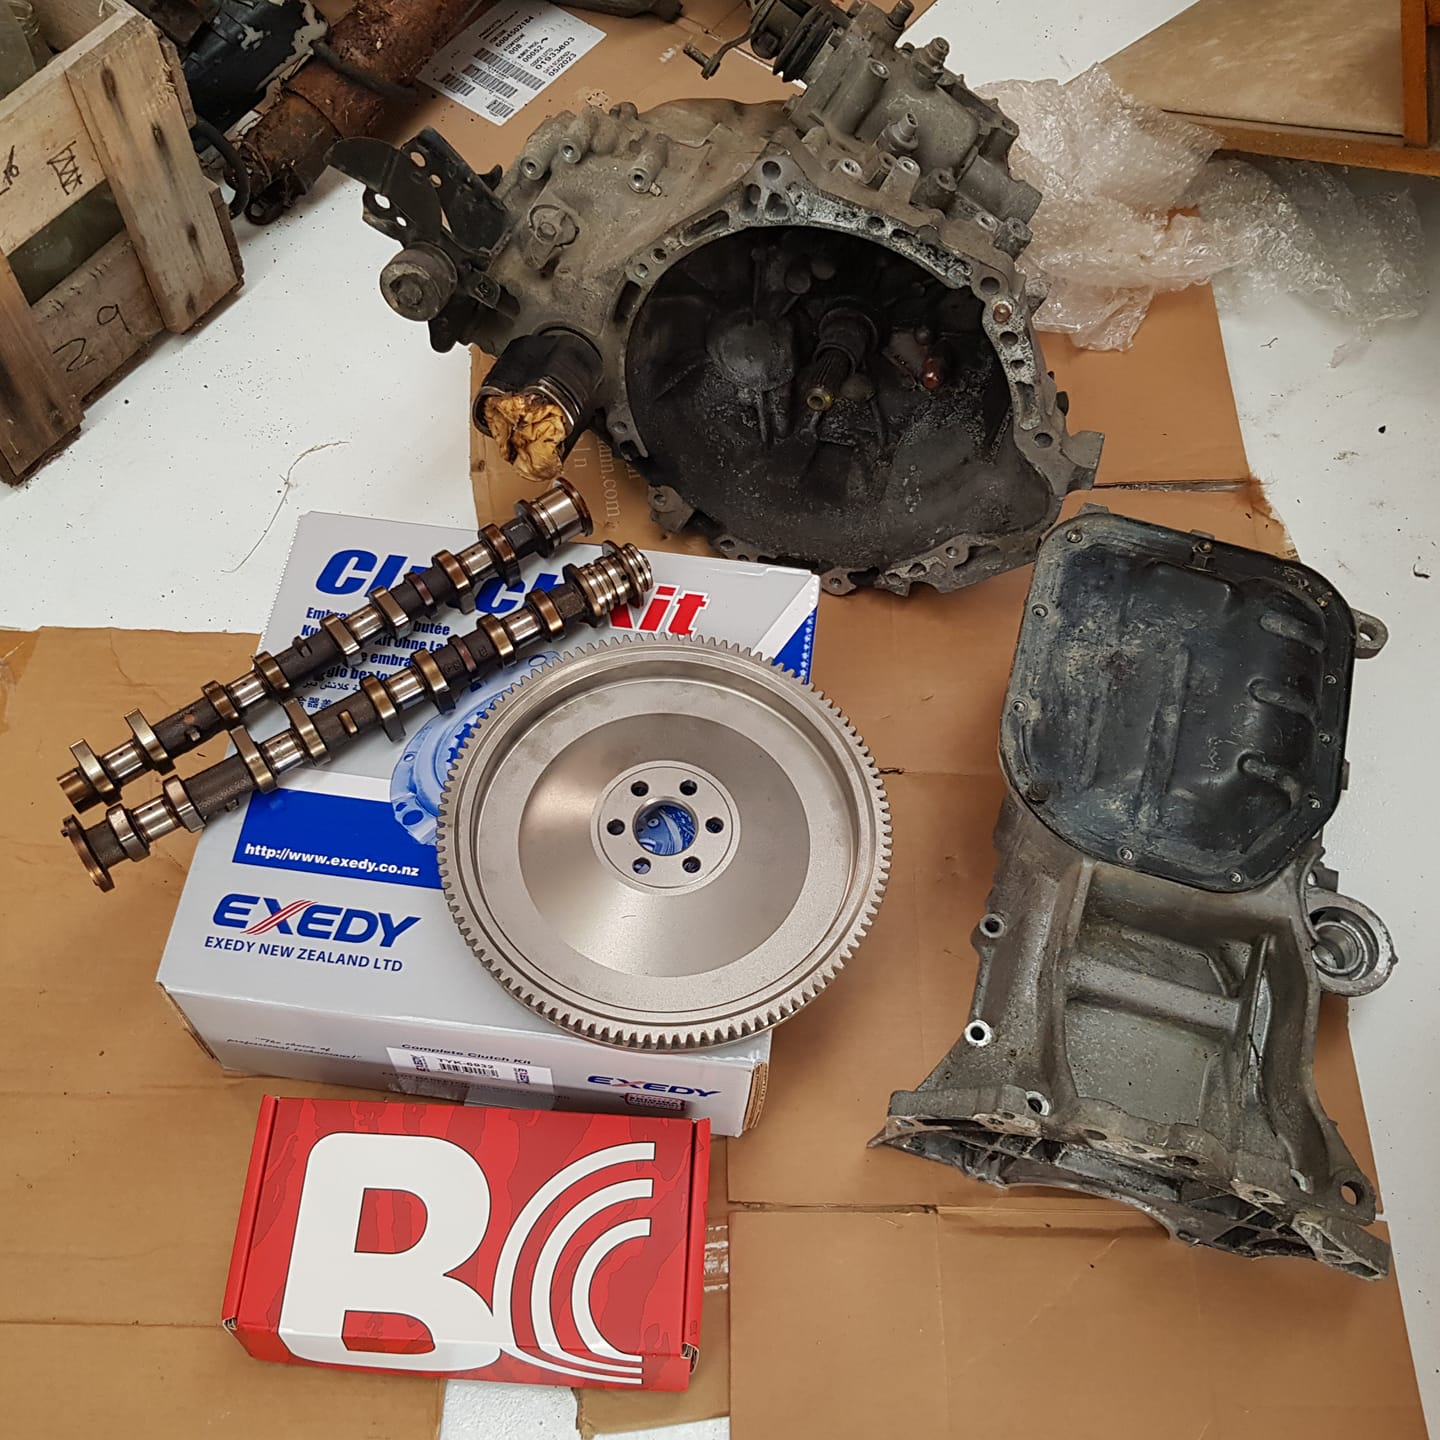
I found a diagram, it looks like the water return is internal in the block rather than an external pipe like on 3S etc. So the two main external lines are just the heater circuit. However yes there's all sorts of complicated shit going on apart from just a heater! Cams arrived today, and it's bloody exciting - I've never had non standard cams in anything before. Since an Echo is basically a more modern iteration of a Starlet, I shall keep with the established nomenclature and call this a 3/4 race cam. I hope it goes hard for what it is. Not sure if these will work without pinging gilliez though. I need a set of feeler gauges to check the clearances to the buckets, then order new buckets if needed as these are shimless (Prius race car technology) They've got numbers on the underside of the bucket that tells you the thickness, so that's handy. So might be able to scab some from pick a part. I think it's safe to jizz the sump back on properly, as the only thing left that I could risk dropping down an oil gallery at this stage is a head bolt washer. (will quote myself later when I do exactly this) I've well and truly spent all of my car money for the month, so might be a few weeks till more progress. I need to get my 3d printer back in the shed so I can mock up some brackets for alternator and hopefully the PS pump too. If the PS pump isnt going to work, I'll get a single row accessory pulley from an NCP91 instead as it's presumably a little bit lighter.
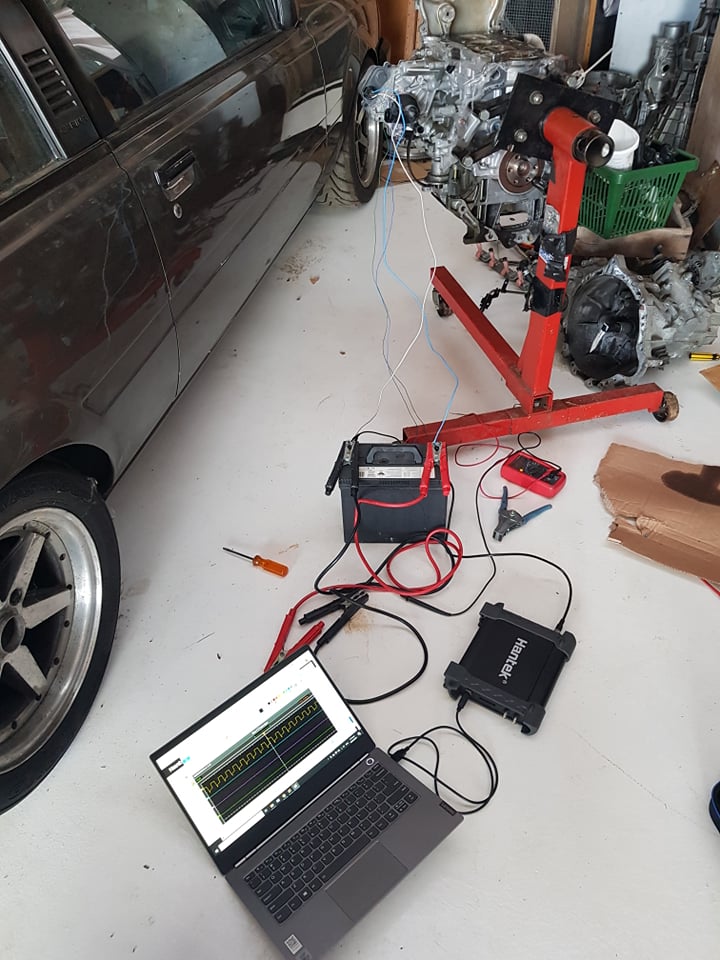
2 points
-
Figured out the EWP and got it working easy as. It's just 2 high current wires for 12v supply and earth. Then one is a pull to ground PWM signal to control pump speed. Then the other is a square wave pump speed signal which you can feed back to the ECU. (which is what I was hoping for) So you can tell if its jammed or stopped working before the motor overheats! Cool. It's got a failsafe so a high duty cycle on the pwm signal slows the pump down - So if there's no signal, it runs at full speed. Trying to work out the water line situation though, I'm not sure if there's a water bypass for if the thermostat is closed. What looks like a bypass hose also looks like a heater line. But if that's the case, no flow through heater core if the heater line is shut. There's also an extra heater sized water outlet on the exhaust side of the motor, which isnt there on the normal motor. Hmm. Might have to try find an engine manual that shows how it's supposed to go. Finally used my Aliexpress spec USB oscilloscope for something. I also got my head back from the engine shop with the new valve springs fitted, $75 saved me about 100 swear words and 10 hours so a good deal. Hopefully cams here on Monday.
2 points
-
I thought it was time for an update. Been a bit busy on other things, so the Mk1 has not had a lot of attention lately. But just cracked into it a week or two ago, and it is nearing completion now. Lots of NOS parts being fitted, which is always fun. A few pics to show the progress.
2 points
-
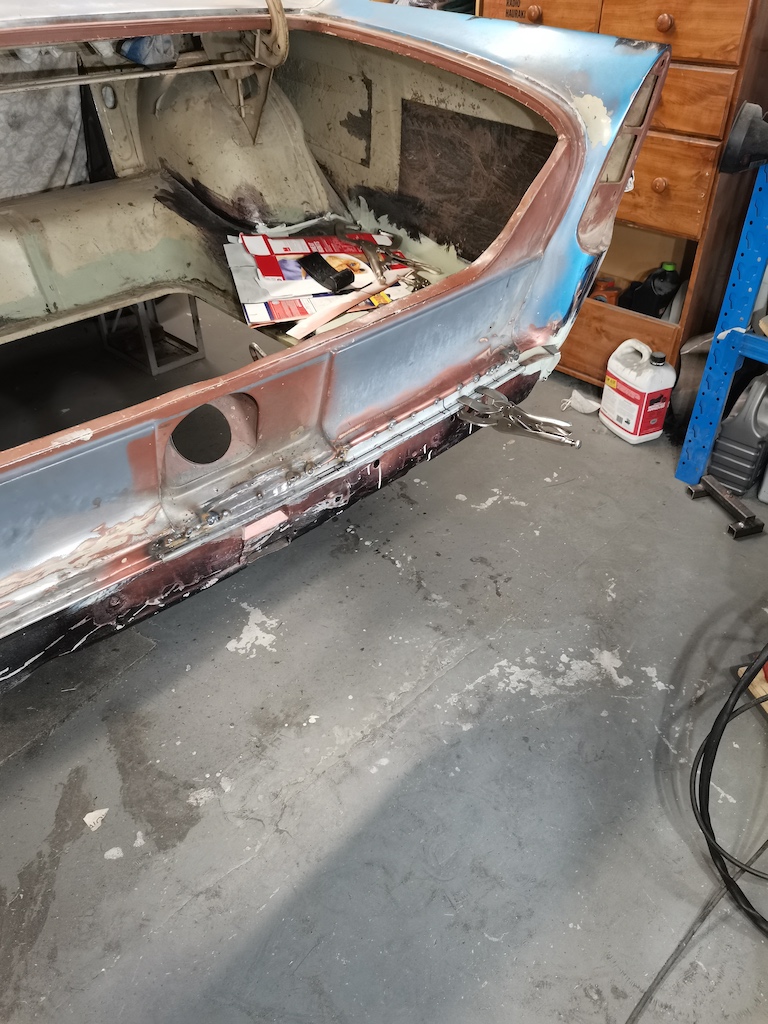
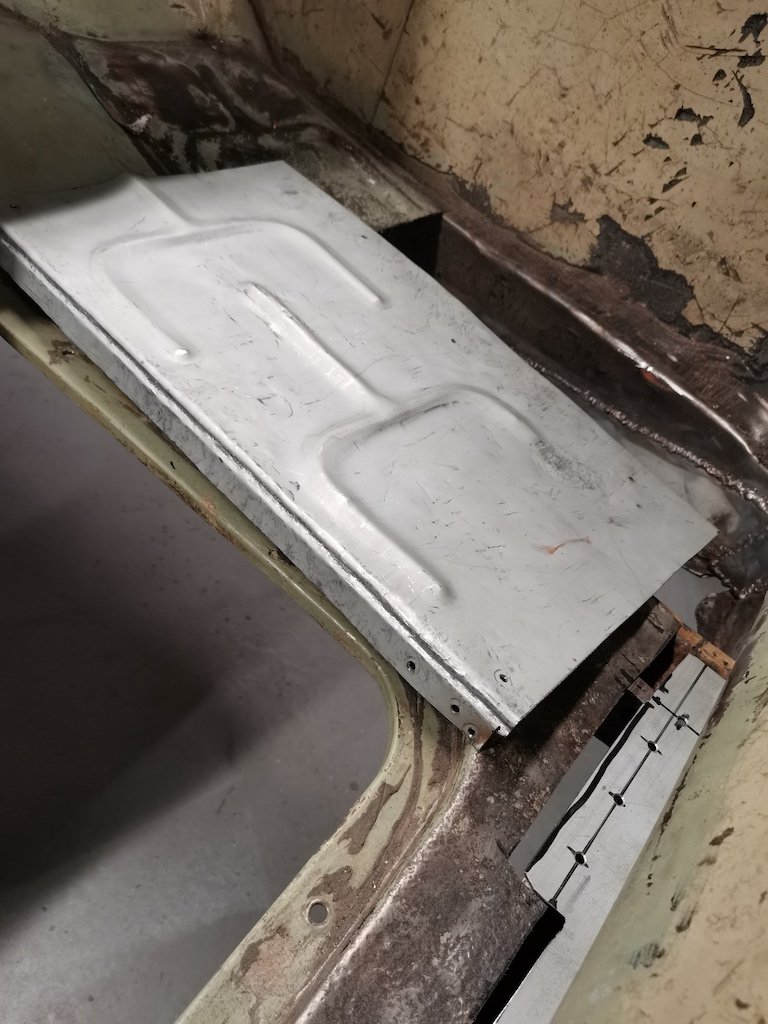
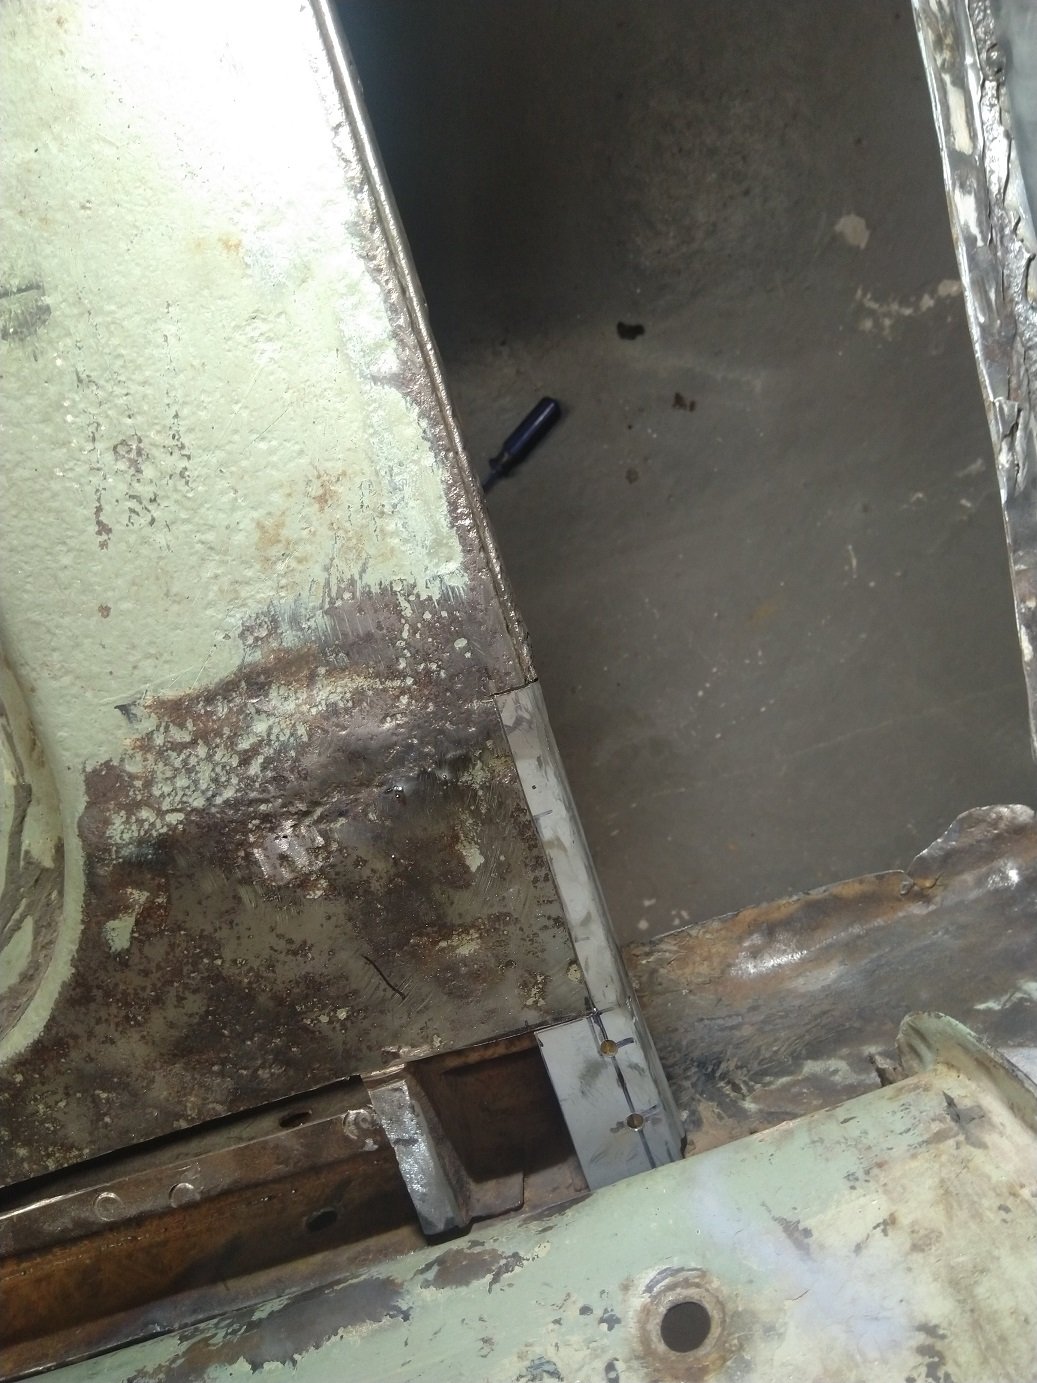
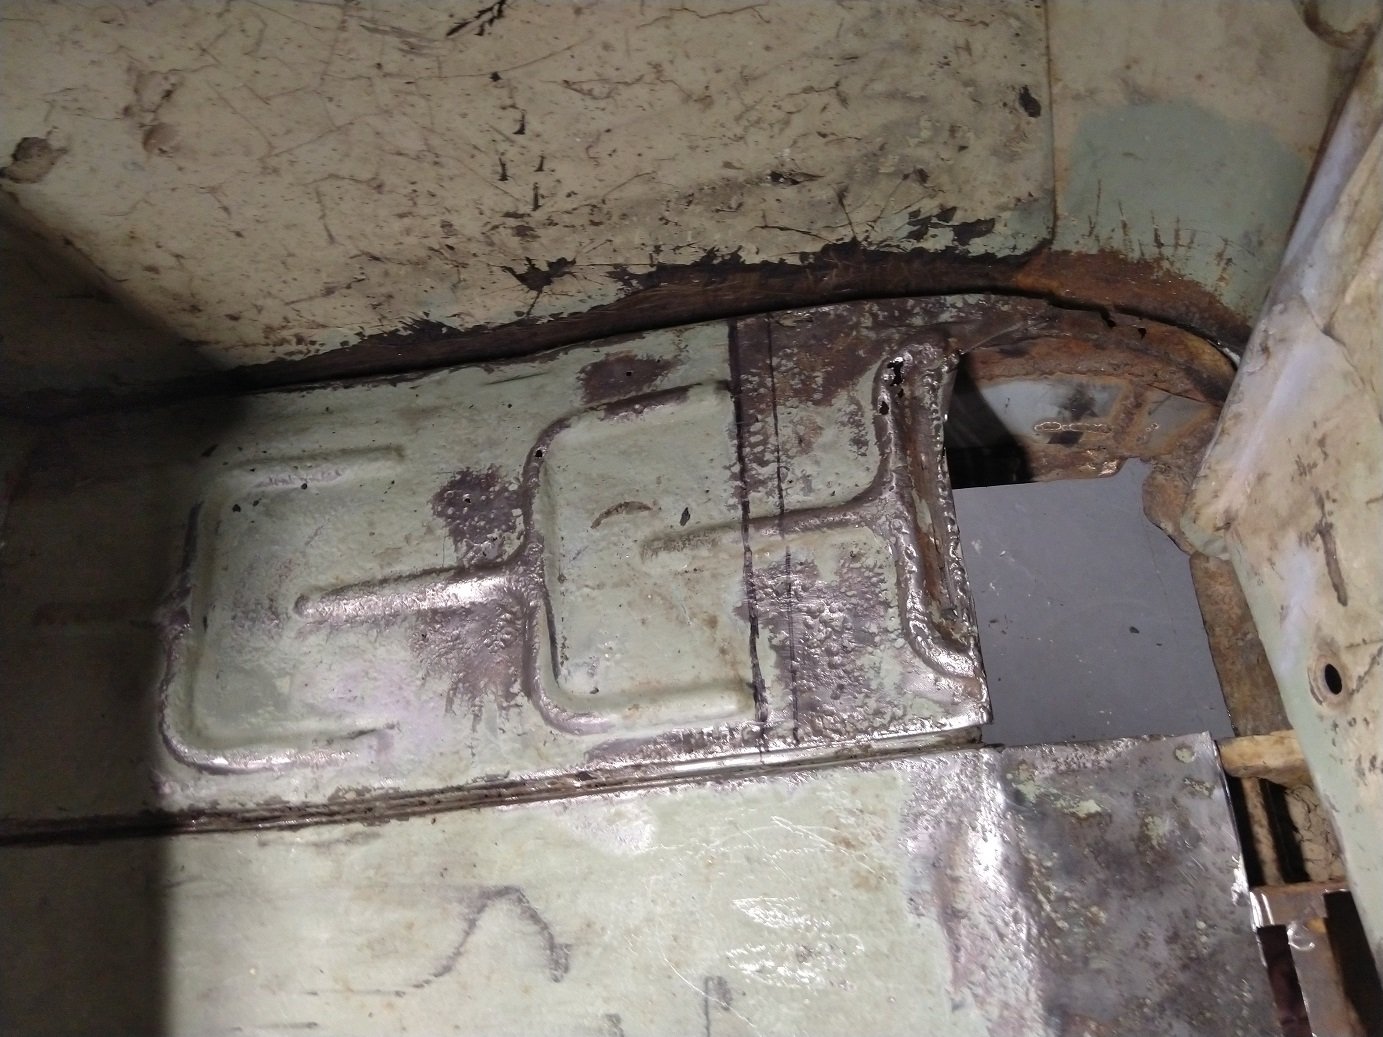
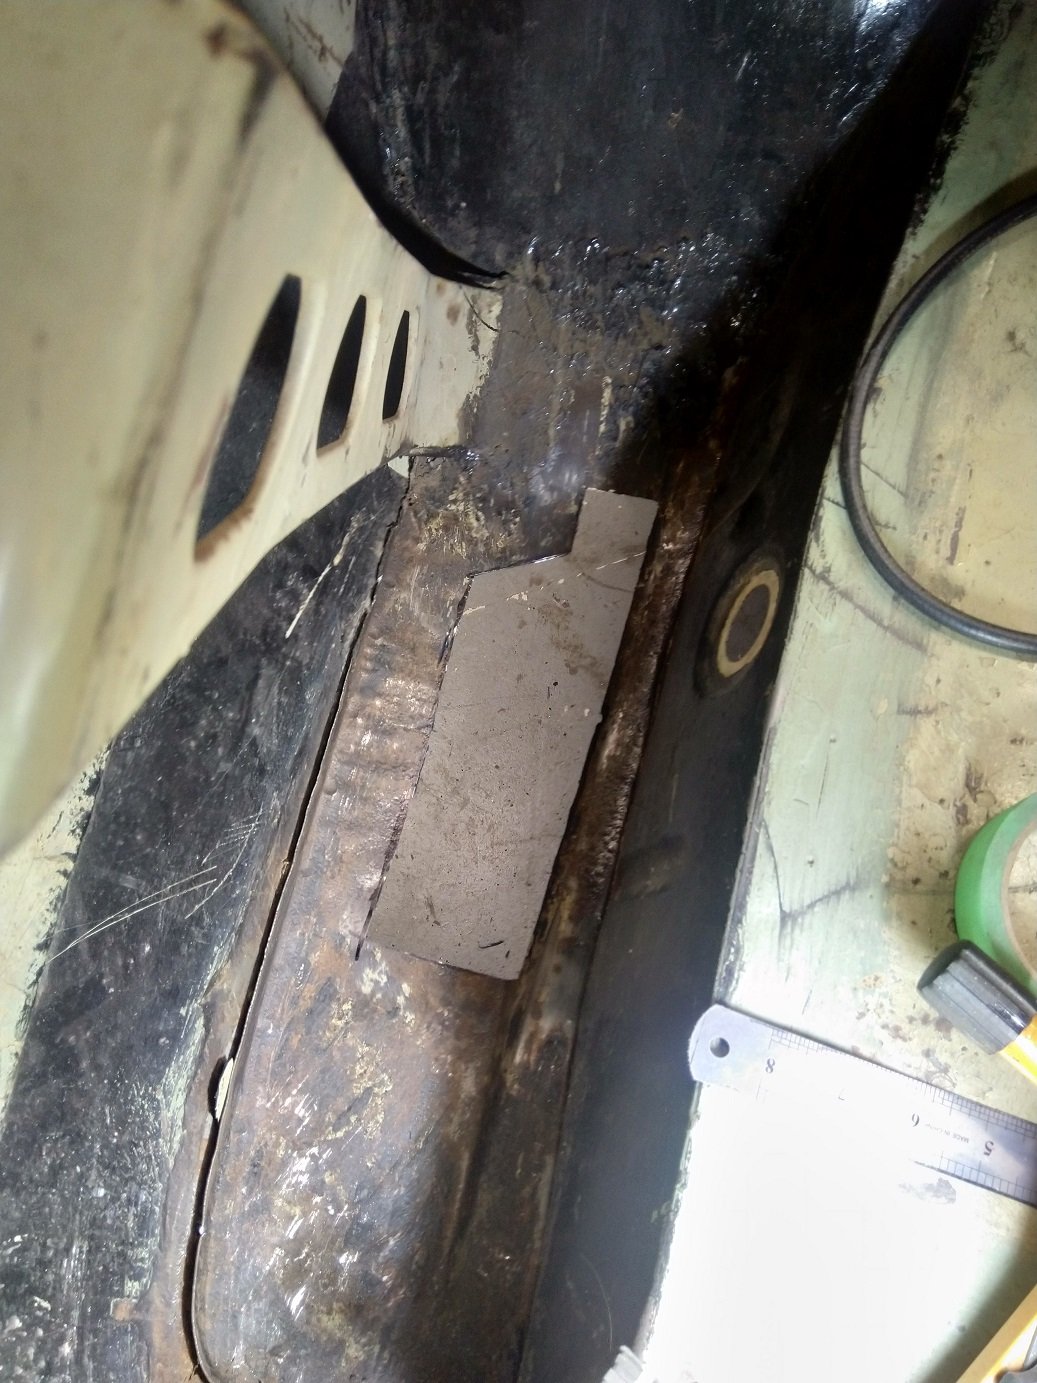
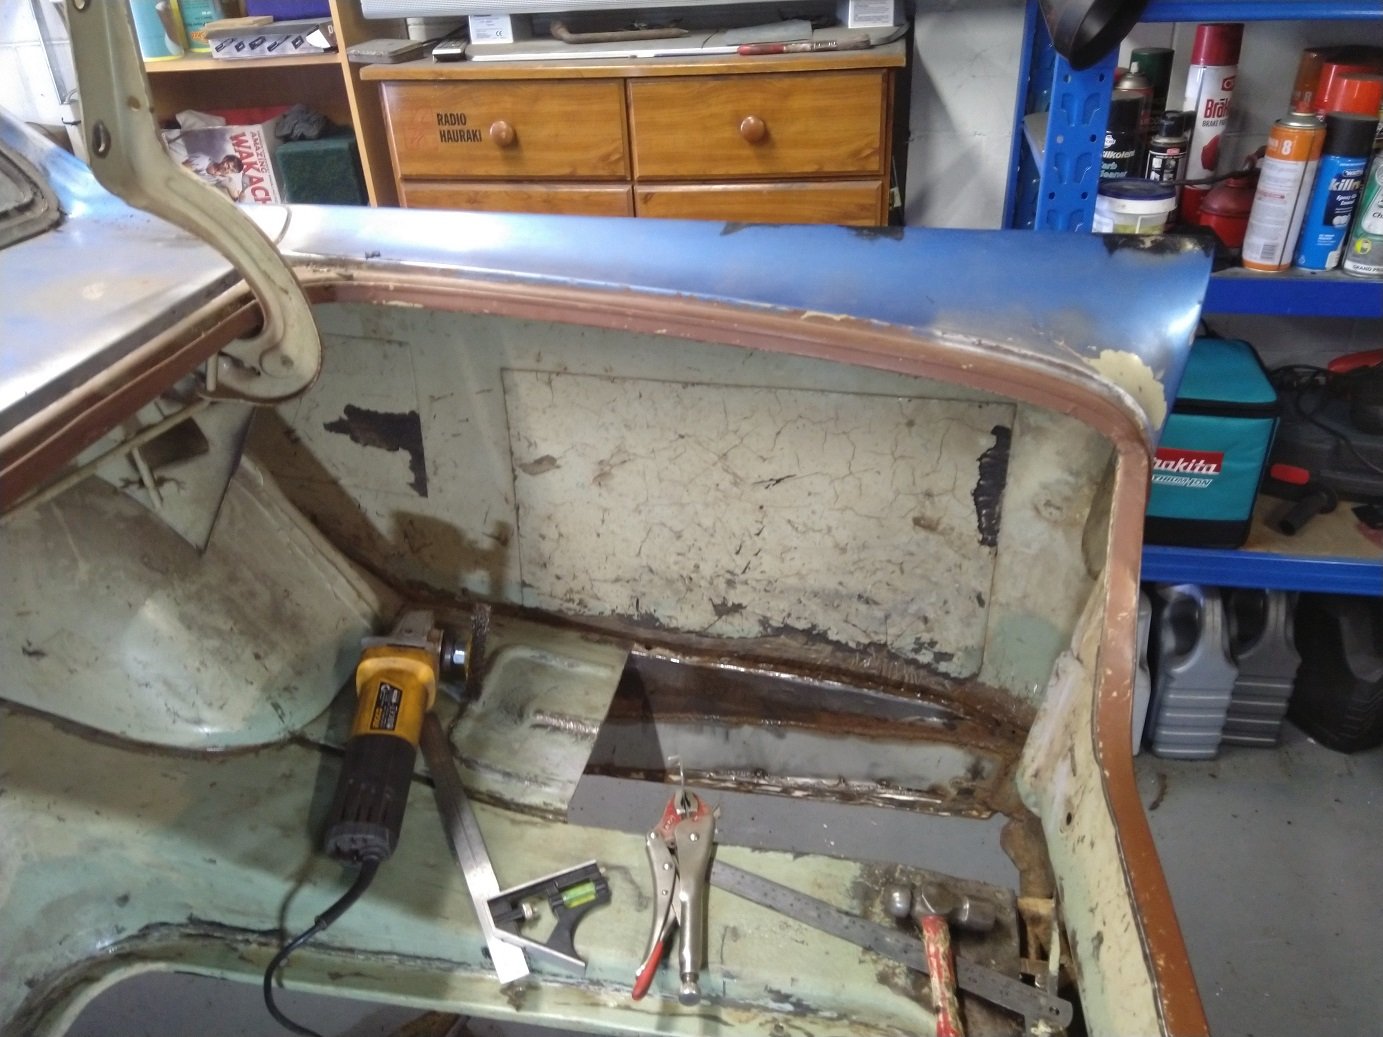
Slowly but surely getting on top of the rust. Got the boot floor patches all welded in and painted with epoxy. Been working on getting the outer edge sorted. Wasn't keen to section the whole length to get the curve right. Got myself a shrinker/stretcher which made things much easier. My first attempt was to make a jig which had the right curve, bend a right angle then hammer to form a profile. Results weren't great, so back to square one. Cut, bent and welded some box tubing to get a curve the same as the boot. Welded and clamped on the bent and stretched angle, hammered flat. I butt and plug welded it on. Now just working through smoothing out the welds with a flap disc and power file.
2 points
-
I spent a few hours today bolting on some parts; lots of NOS parts which I have been collecting for this project. Headlights temporarily fitted, new bezels, bumpers, clear front indicators, tail lights and rear reflectors. The headlights I bought a few years ago are an interesting thing for trainspotters like myself; a pair of Cibie Biodes. Invented in the late 1960's, before the H4 dual filament halogen bulb was invented, they take 2x H1 halogen bulbs. There is a separate reflector in the lower part of the headlight (which you can see) that is the high beam, and the upper bulb, which has a shroud and is not visible is the low beam. These were the choice of works rally teams in the late 1960's and early 1970's such as Ford Escort, Porsche 911 and Mini Coopers. Although very old technology, they are still give off an extremely good light output, even by todays standards. I was quite lucky to find these, they are extremely rare and sell for ridiculous money on Ebay.
2 points
-
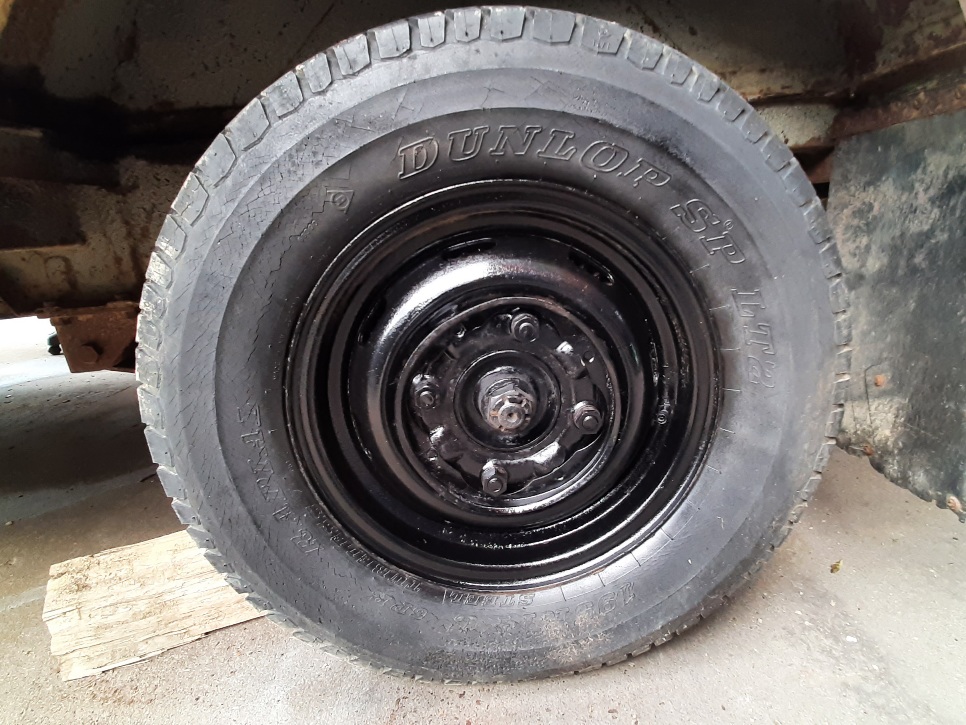
Got the spare tyre well sorted. Working on making up a patch for the boot floor. Made a template out of some rebar and plywood, used my hydraulic press to form the steel. Came up fairly well. Next step was to bend up the edge, I used two bits of EA welded together to make the basic shape, then hammered using a bit of flat bar.
2 points
-
Many years ago, about 14 years or so, I bought a car off a friend so I could learn to drive and get myself to work. It cost me $400 with reg and wof, and was awesome. That car was a 1976 Morris Marina 1.8 SUPER. It was green ("Spanish Olive"), and it was damn near immaculate at the time. The only issue was that it drank about as much oil as it did petrol and the second gear synchro was slow. I thrashed that for a while, but eventually the Japanese bug bit and I sold it when I picked up a dirt cheap N/A BFMR Familia. I sold it to a young kid who wanted it to learn in like I did, but it was soon sold again and as far as I know its been sitting in a barn since. Rego on hold, but probably a pile of dust. Being the complete sicko that I am, despite owning many cars, and bringing a few other classic Brits back from the dead, I've always pined for another Marina. Hell, my Wife tried to buy my old Marina back a few years ago, but that fell on its face for various reasons. I figured if I can't get the old green machine back, the next best thing would be to keep an eye out for the ultimate version, the coupe. Coupes are rare. Well, Marinas, in general, are rare thanks to the (misguided) unpopularity of them, but coupes are just something you never see. Before I went and looked at a wrecked Twin Carb (TC) coupe in a field over Xmas, I hadn't seen one in person. The coupe in the field I ended up passing on because of its location (middle of nowhere; expensive to get a truck to pick it up), and the fact someone had pinched the plates and tags from it (probably to rebirth another Marina that had a dead rego) and it couldn't legally be put on the road again. If it's still available I might end up buying it for parts, we'll see. Anyway, back to the story at hand. The other day I had a PM from a fellow Old School forum member that knew I was looking for a coupe, letting me know there was one just listed on Facebook Marketplace. Sure enough, there it was. That's the one and only photo on the listing (and it's not a TC), but that didn't matter to me. I got in touch with the seller and within an hour of being listed, we had agreed to a sale and it was mine. The next day seller sent me more photos showing the current condition. The worst bit (that the seller knows of), the rust in the sill And the AUS spec OHC 1750cc E-Series single carb power house. As the story goes, the sellers dad has had the car for years, and the father and son started to restore the car to former glory. Unfortunately, the father passed away and the car has been in limbo since. The seller was happy to hear that I intend on returning the car to the road and undertaking a restoration of sorts. It may not go back to completely original, but I'm not going to chop it up and hot rod it. I have no doubt the car will be a hell of a lot of work and a lot of money. The first job is to even get it here, as it's currently across the Cook Strait in Blenheim and I'm in Wellington. Not far as the crow flies, but a large body of water that can only be crossed by plane or boat blocks it. A truck is arranged to pick it up at the end of next week, and then I'll get to see what the heck I've got myself into. This particular car is a little interesting just in the fact that's its an NZ Built, Aus spec car, meaning it gets the E-Series Over Head Cam engine, instead of the A or B series pushrod engines the UK cars have, but also has various bits of local content such as brakes, suspension and interior. Decoding the VIN it appears to be a Deluxe spec, with the 4 speed manual. The plan is to sell the TVR to make space and money, get the Marina going and stopping, and then cut out the rust. New sill panels are available off Trademe, so will replace the whole sill, and cut out any other rust I find. Once its solid, going and stopping, then its just a case of taking it for a WOF inspection to see where I'm at. What happens after that depends if I can get hold of the TC in the field. Oh, did I mention the rego is on hold? Well, it is, and its been off the road for almost 25 years. This will be the oldest save of any I've had before. The cool thing is that the rego is super optimistic... Yeah, its a "Sports Car", just like the TVR. I dont think anyone has called a Marina that before. I've started collecting things that might be important, such as an original BLMC workshop manual, in original Marina branded binder Ideally, I'd love to get this on the road, tidy up the interior, repaint the exterior (original paint, which I think is Bold As Brass yellow, or a different colour...?) and then rebuild and fit the twin carb engine from the field car to it. I need to have the car in my hot little hands first and see what it needs and what it's missing. I could be over my head in rust issues yet, who knows. We'll see soon enough. Discuss here1 point
-
Cheers guys, yip same boat. Juggling life, work, kids etc and when the stars align will go to these when I can. I went to a couple of events at burger fuel, but yeah, the struggle is real...1 point
-
Thanks for that, will chuck it in and try with bleeder first. A good plan A, and leaves a plan B as you say. Really don't want brake fluid everywhere as it's a tight spot to try clean up.1 point
-
Is bench bleeding necessary? I've always just sucked fluid through with a vacuum bleeder (cheap hand pump type), haven't had an issue.1 point
-
Thanks. I am using PPG Epotec 408 primer1 point
-
It's interesting how a lot of modern engines have gone away from hydraulic lifters. Harder wearing surfaces, less thermal expansion and better oil technology means there's much less need for them.1 point
-
Swapped this in today for a new (full) one. Cost $425 incl. Eziswap Gas. G size. Argonshield. For those that were wondering what it cost to refill the large size. I'm usually in and out of that shop when I change a bottle but today I found myself in the new welders section looking at all the new stuff. Gawd! Need to stay outta this thread.
1 point
-
Structural stainless frames etc normally mig uses a different gas mix - Stainsheild. And stainless wire. Pipe or dairy etc or anything pretty - tig with argon for the gas.1 point
-
Oh man, I had a catch up. Saw the rust and was like omg... And then super happy to see you fix it and get it all back together ASAP. Well done!1 point
-
Sprayed some black rust remover and metal restorer on the rims. Massive stud pattern. Ill take the drums off to look at the brakes another day. Im sure they are juuust fiiine. Cop mode. Put the rear doors back together and straightened a few things out and did a bit more sanding. They are still busted but now they open and close nicely. Pulled the front door apart to get the inner latch out. Safari! Some percussive maintenance needed where the limit strap had bent in the door flange and the door now opens and closes lovely.
1 point
-
Another great days boating with @johnnyfive and @keltik. We did the Waimana and upper Whakatane river, and had a go at this little stream, Was surprised I made it that far tbh. Did a little bit of damage to the boat, but nothing major. Keltiks vid of the incident, It was quite a ride. All in all a good hoon, would hoon again, A++.1 point
-
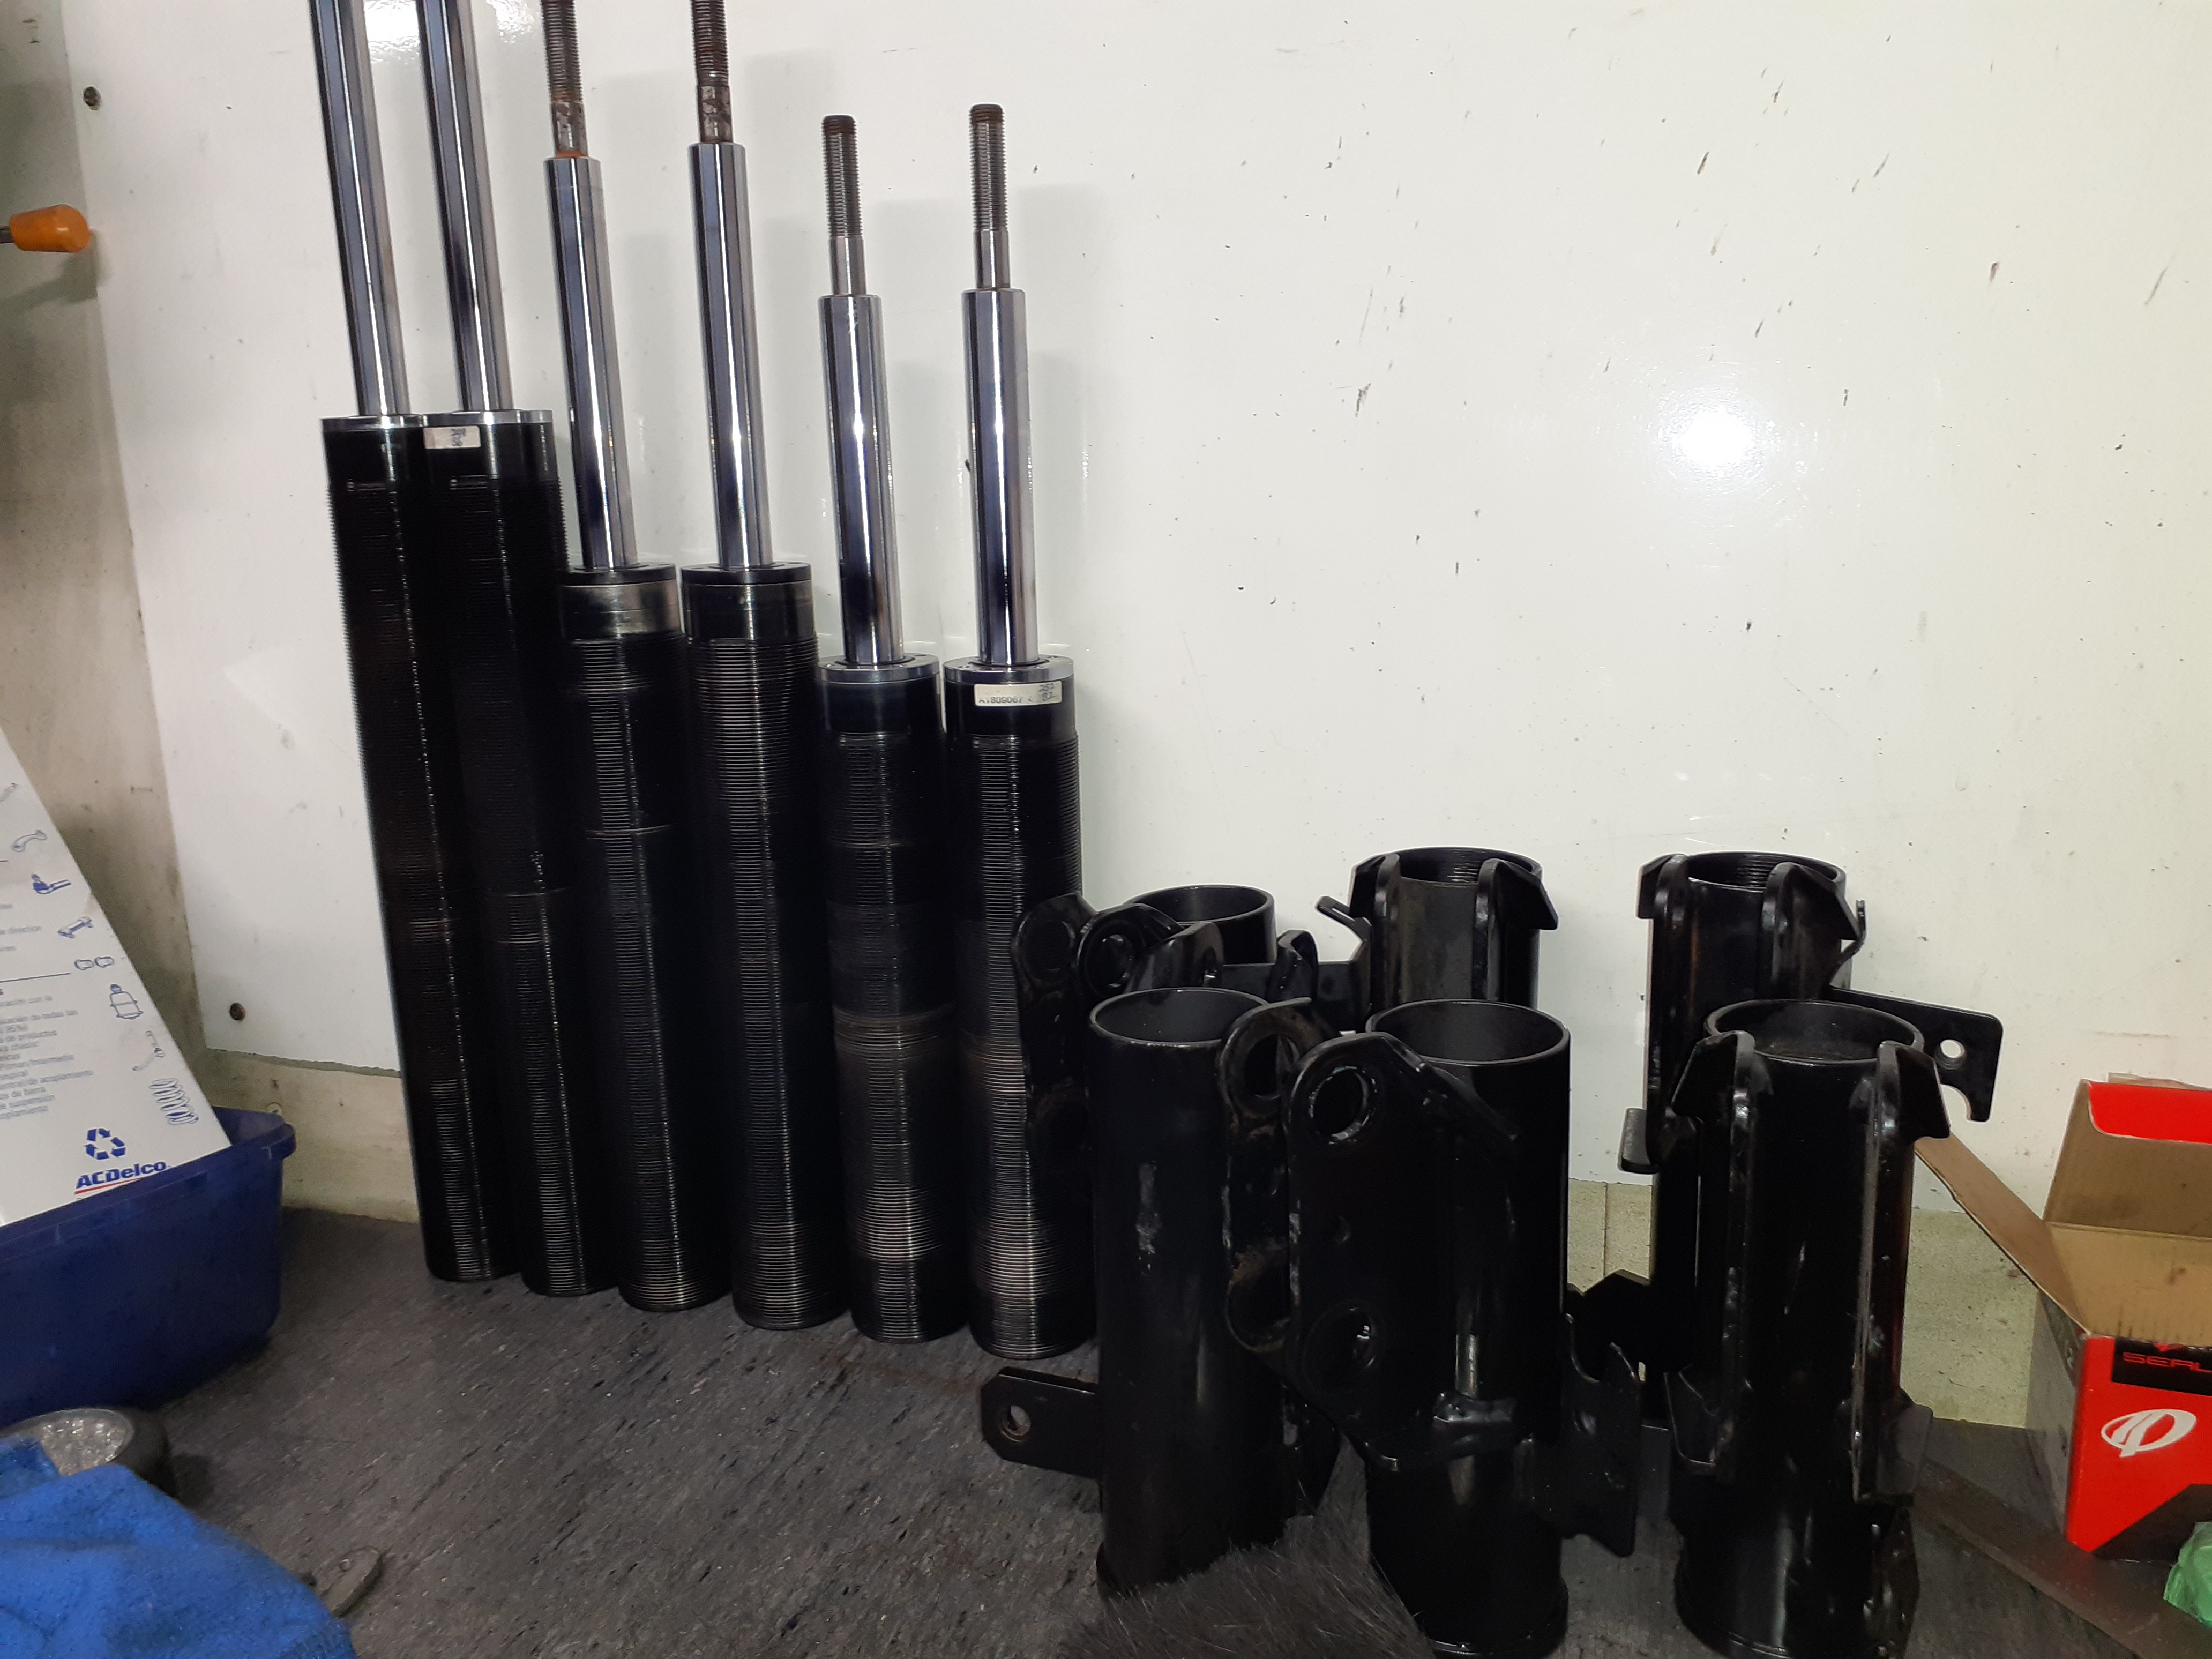
And rummaged in my box of coilovers , I've got a plan to make some rear shocks for it The biggest problem with the usual axle flip (the diff housing gets put on top of the spring instead of underneath) is shock angles- they are on a big angle factory, then when it gets lowered 6 inches the shocks end up on stupid angles and dont do anything so the big lump of a diff flops around all over the place The best driving slammed ones, have the shock brackets moved to straighten them up, and decent shocks so they actually have some hope of controlling all the unsprung weight I've got 3 pairs of adjustable damping shocks with the same threads so I'll figure out the best length and make some top and bottom mounts
1 point
-
My new work car arrived, and it's by far the nicest car I've ever "owned". Some fun gimmicks like paddle shift, cruise control, decent power etc etc its a turbo deeez that goes hard 4 wot it iz It doesnt even rattle or anything. Amazing. Really nice on long work trips, which I do a lot of. However obviously the best part of all this, and why it's in this post. Is that this now means my Echo has been released from its daily driving obligations, so I can start on drivetrain swap soon. Time for a full blown big block fuck around! I've still got the engine in storage up at my Dads, but have collected most of the necessary other bits. Also because I am a financially reckless man-child I have also ordered some JUN cams, fuck you bank account
1 point
-
One thing I love about buying old and neglected cars is getting all the electrics working again. The Marina is no different. Much like the Mini and the TVR there were a few things that weren't working. None of the lights work, the wiper motor is disconnected, the washer motor doesn't work and the horn is silent. Basically, anything that is electric, didn't work. Before jumping into the wiring I had to fix one thing thats been bugging me. The boot latch and lock. When the car arrived the boot was tied down with string because the boot lock had been removed and was missing. As it turned out, the boot lock was there, in bits, scattered throughout the boot. I found all the bits and using the workshop manual figured out how it all went together and damn, even the existing key works. I did a couple of test fits to make sure the lock was complete and would work, hoping I wouldn't permanently lock the boot closed. The actual latch assembly was completely seized and would not latch. Soaking it for a bit in CRC seems to have done the trick and it latches and unlatches nicely now. Digging through the icecream containers of stuff that came with the car turned up two of the three bolts that secure the latch, so I refitted it. And BAM, the boot lid shuts, and even opens again with the key. Flash. You only get that kinda luxury with the Deluxe. The lock action is simplicity in its self. The key barrel turns the plastic cam and the cam acts directly on the release tab on the latch, pushing it across and popping the lid. The cam is sprung to return the key to center when released. There is no internal release, so as the car came with a spare key for the locks, I've taken that off the keyring and located it somewhere safe, just in case. Now, back to the task at hand. Wiring. My first port of call was to look at the headlights and see if we had power going to them. I removed the grille surround and sealed beam headlight. Well yes, there was power there, but something wasn't right. There should be about 12.8V there.... Little bit of a voltage drop. Moving back inside, whilst checking the indicator/dip switch, I noticed this purple while hanging down, connected to nothing. It turns out this is for the horn. Well that will explain why it doesn't work. This is the same issue Tess had with her washer jets. The wire just flexes every time the stalk is moved and eventually snaps. After removing the steering wheel, disconnecting the wiring and removing the switch assembly I carefully disassembled it. Once you remove the metal plate, this is all the gubbins inside it. Be careful though, there are a couple of ping-fuckkits in here. The three arrows indicate the three items of interest. These are little plastic mushrooms resting on top of springs. Under the one on the right is a small metal bar. Don't loose these. Once you know where everything came from, gut it. This is where the wire should join to; that little scrappy bit of bare wire above the purple/black wire. To fix this you strip the broken wire back, knock the indicator stalk out of the white block, and refit the block back onto the spline of the stalk with the wire jammed in between the block and stalk. It's dumb. Some creativity (and abuse of cheap tools) was employed to knock the stalk out without damaging the block. DO NOT STRESS THE CIRCULAR EARS. I used a very fine punch to knock the stalk through Jam the wire in, line it up (the correct way around) and hammer the block carefully back into place. It all sounds too easy, doesn't it? Well yes, I just touched one of the ears after knocking it into place and the ear fell off, rendering the whole stalk useless. Not to worry, a broken stalk assembly from a Princess came with the car. The high beam wouldn't latch, so I couldn't use the whole assembly, but I could strip it and harvest it for parts to make one good from the two. It turns out despite being the same part number the two stalks are slightly different. They probably work the same, but the difference was enough for me to use the original Marina as the base for the repair. One of the changes though was to the exact issue the original stalk failed for; the wire now loops from the other side of the block and is supported when in place. BL obviously knew it was a problem. This is why this stalk wouldn't latch. The center part on this is where the latching is done, it was broken off this stalk. This is the Marina one for comparison After some more bashing with hammers I finally had a good stalk, now all I needed to do was to join the wires again I soldered the wires back together and fed it all through the base again. The base got a good clean and the contacts cleaned up with a fibreglass brush. To aid reassembly I rigged a box to support the assembly and keep it steady whilst I put the bits into the base Lots of dielectric grease was used during assembly, both to lubricate the movement and to keep everything in place. Don't forget to polish the bar that bridges the indicator terminals. I spun this up in a drill and used the fibreglass brush to polish it. Once reassembled, making sure everything stays in place, the high/low beam contacts got a clean and grease. These were really oxidised. Now I suddenly had front park lights, and a horn! What a solid toot it makes too. No headlights, tail lights or dash lights through. I noticed when the headlight switch was moved from park to the main beam the park lights would turn off. Something wasn't happy. I pulled the headlight switch out and disassembled it. This was very dirty. Lots of corrosion, old grease and even some serious pitting on the sliding plate. The contacts and sliding plate were thoroughly cleaned and polished with the fibreglass brush. You can see the pitting at the top of the sliding plate. I refitted the plate upside down with that wear at the bottom, meaning the contact points are on nice fresh solid metal now. Reconnecting the switch and now the headlights work. One of the sealed beam bulbs has a blown low beam so a temporary H4 was used to test. High beam worked too The action on the refurbished switches is lovely. A nice firm click. A+ would refurbish again. The taillights were a bit more of a pain. First I wanted to remove the trailer plug that had been screwed into the rear panel (ugh), so had to strip back a whole bunch of old insulation tape, which revealed to me that old mate Twist-N-Tape had been here. So many twisted wires and so much old sticky tape. Glad to see the plug gone though. It was an eyesore. I'll weld the holes up and refit the MORRIS badge in the center where it belongs. With that mess tidied up and a ground reconnected we had tail lights. Once I cleaned up the bulb holder, which was very rusty, I even had a number plate light. It amuses me that it's just a single, unprotected little bare bulb. Seems to do an OK job though. Unfortunately no real improvement on the indicators though. They still flash sporadically and the rear ones are very dim. I find it strange there are dual filament bulb holders fitted for the indicators in the rear though; standard fitment or a bodge? I think the flasher relay might be poked, so will replace that and see how we go from there. The interior light didn't miss out on the fun, I replaced the non-functioning bulb with a warm white LED. The light is literally crumbling away from age, but it still works when set to ON, but not on the DOOR setting. I'll look into that if I can find a good replacement light. In the meantime, the warm white LED looks nice and should reduce load. I reconditioned the dash light switch too. This was full of old crusty grease and corrosion. The sliding plate cleaned up well And then there was light. I even gave the dials a quick clean to make them pop. Both levels of dimness work. The high beam indicator works, but I may have to change to an LED bulb so I can actually see it. They look pretty good in the dark. I love the simplicity of a 70s British dashboard. None of the light pollution current cars have. Takes me back to driving the original Marina. The wipers and washer still don't work. I'm not sure if the wiper motor is good or not as even connecting it does nothing, so I'll try feeding some power into it and see if it comes to life or not. The washer motor is completely dead and feeding power into it does nothing. I suspect it probably rusted internally. The last job for the day was to fit the new ignition leads that arrived. These leads were bought as a kit that also suits Allegros, Maxis, MGBs, Minis and Land Rovers among other things. Almost anything British and 4 pot it seems. It fit perfectly. Crusty old leads Nice new leads Red is sporty. Makes the engine faster. Speaking of, I had to check that the leads were doing their job, so started and ran the car up for a bit. I connected the throttle cable again, so now I have control over revs from inside the car, but sadly the cable is stuffed and binds so will need a new one. The first cold start of the day wasn't bad either. Start on full choke, a few turns and it kicks into life. Easy. I ran the car long enough to see the temp gauge start to climb. This indicates that the gauge and sender are both working, which is good. I also noticed looking at the photos that the fuel level changes between ignition on and off, so it seems like the fuel sender might be working too. I'll need more fuel to test that. The engine keeps on running happily. I'm really pleased with it. After the initial issues trying to start up, it seems to be freeing up and starts easier now. Progress is going to slow for a bit now. I've come to a point where either lots of time, money or both will be needed, so will wait until the TVR is moved on before I get stuck in proper.1 point
-
What more is there to say? It's not even the weekend yet and already the achievement is unlocked. I popped down to the garage this morning not so much to work on the car, but to test the theory that adding a ground to the starter might help. It didn't, but having the battery in the car again also allowed me to check clearance for the battery and order the Marina its own one. NS60SMF, the same as the TVR but with the terminals swapped. After cranking a few times the poor jump pack just couldn't keep up, so I resorted to hooking the Corolla up with jump leads and giving it a boost. This did help it crank a bit faster, but it didn't matter, it still wouldn't kick into life. I had the genius idea of checking the points in the distributor using a method I saw on Youtube at one point. Turn the ignition to ON, and then use a screwdriver to open and close the points. If they spark, it's good. If they don't, no good. Mine didn't spark. A small file was used to clean both sides of the points and sure enough, now I had a big healthy spark between the points. That might do it. The very first time I cranked it after cleaning the points, this happened. It coughed. It didn't start, but it coughed. You can tell because the start disengaged (as it does when these old engines cough or start). It was close. Some more Start Ya Bastard down its throat, and magic happened. It started. Off the road for 25 years, last started about 10 years ago. After a few more coughs and splutters, it finally started and ran. Not very well, but it idled. The throttle is zip-tied half open and the choke was wide open. I think it was running off fresh fuel as there is fuel in the float bowl now, so the fuel pump is working (despite the fuel filter looking empty). I drained the tank yesterday of its 8L or so of super old varnish smelling dinosaur juice and topped up with some fresh new 98 octane. It blew a whole bunch of junk out of the exhaust when it started. Big chunks of rust. I'm happy with that. It needs new leads, and probably a whole carb rebuild, but I know it runs and the oil pressure light even went out. It's a win.1 point
-
Here I was, Monday night, sitting watching a movie with my Wife when suddenly I get a text message... "I'll deliver the Morris off tonight about 9:30". A few days ahead of schedule, awesome! I wasn't expecting the car to be picked up until late this week, but with the potential for chaos due to the latest Covid19 level change and risk of the Ferry being booked out or cancelled, my job was pushed forward and here we are. Sure enough, a couple of hours of completely cool, calm and collected waiting... I hear a truck pull up and calmly walk outside to greet Brent. Of course it was pouring down with rain and pitch black, but that didn't matter. It was Marina time. "Movers Of Fine Automobiles" - Yup, not wrong there! One of the many good things about Brent is that he is very experienced and has the right gear. When I asked if he might be able to winch the car straight into the garage he barely flinched; of course he could. He backed the truck up to the drive And then just laid the whole deck down my steep driveway, meaning the car only had to be winched off the deck and then down about two meters of the drive before it was in the garage. So easy. Better than pushing it with flat tyres and no brakes. And then I got a first look at what I had. Brent scared me a little when he asked if there was no engine in it! Of course there was! it's just, small. Meet Alex, the 73 Morris Marina Coupe. We had a good chat about cars, and he had a look over the TVR we pushed off the truck 18 months ago, which attended its second British Car Day just the day before. After bidding Brent farewell, I had a poke around. The interior was full of bits that had been removed from the car, and the seats aren't bolted down. Unfortunately between the leaking windscreen seal and the window partly down, the interior was a bit wet and stinks of old wet stuff. The boot was tied down (as requested) as the boot lock is missing Overall it doesn't seem that bad. There is rust, and its a shame there is so much shitty primer over the existing paint, but it looks fixable. Of course, having the two Brits in the garage I had to take a photo. I'm aiming for the most "interesting" two-car garage in the neighbourhood. I think I win. I was going to leave it until the next day but curiosity got the better of me. What was in the boot? Goodies. That's what. More parts that had been removed from the car, the spare wheel, and a bunch of old spares like a carb, inlet/exhaust manifold, starter, and alternator. I then tucked the cars away for the night and dreamt of bashing Marinas around the back roads, like the good old days. The next day I got stuck into pulling the parts out and seeing what was in it, and what I'm missing. I also needed to get the parts in the footwell out of the water that was sitting in there. The good news is that most of the big stuff is there. All the wheel trims appear in good shape, and the air box, RH outer door handle and window winder can be reused. There were also a couple of strange items in there too, like this Lucas Electronic Ignition box of magic. I'd love to know more about it but nothing comes up on google. It has three wires on one side, and a toggle switch and led on the other. There was also this "HOT SPOT engine water heater" that plugs into mains. Obviously, its to preheat the coolant, but I haven't come across one of these in NZ before. It's generally not cold enough here for them, but they are common in the likes of Europe. I did find a curious pair of paving slabs under the driver's seat though. They aren't high enough to touch the seat, so they aren't "support", but now I'm concerned about what's under them. My wife thinks its a big spider. The boot has a whole bunch of treasure in it. Icecream containers of... stuff. Some of it has come off this car, like the badges, which all seem to be present and correct (too many if anything), but also a whole lot of random screws, bits of metal, plastic etc. I'm sure some of it will make sense. The big box in the boot was made of wood and had been carefully built to fit around the wheel arch. It's full of all the heavy stuff. Most of it is quite rusty, so probably useless, but I might be able to refurb some bits if needed. One thing I didn't expect to find was the two exterior mirrors. The reflective coating on one has failed, but the other doesn't seem too bad. Both need a good clean, but it would be awesome to refurbish and retain these mirrors. I'd love to know more about these mirrors if anyone has come across them before. The only marking is this on the back; DR. Having cleaned some of the muck out, and knowing that I wasn't going to be eaten by spiders, I jumped aboard, onto the wobbly unbolted seat, and plonked myself behind the wheel for the first time. The driving position is... interesting. As mentioned in the HubNut review of a MK1 Marina, the steering wheel isn't flat. It's centered in front of the driver, but the LH side is closer to the driver than the RH side. It's subtle, but noticeable. Just part of its charm. The clutch is seized solid, and the brake pedal goes to the floor, so there is some work to do there. The throttle is actuating the carb, but the pedal seems to sit low and has little travel. Once I was done with sitting and making brum brum noises I assessed what else was going on with the dash. The gear knob is in good condition, and the gearbox although a bit vague goes into all gears OK. No doubt there will be a bush I can replace. The cluster is partly disconnected and the center dash speaker is currently hiding behind it. The old gutter mount antenna is sitting on the dash. Like most, the dash plastics have aged and cracked. Other than the missing corners on the ash tray it's quite minor though. No factory fit radio here. The driver's door card is awol, so I'll need to source, or make, a new one. The passenger's side is a custom fibreboard job. The linkages have been bent from people trying to open the door, since the exterior handle has been removed. The RH door has quite a bit of play in the top hinge, so I'll need to weld in a tube to address that wear. Both little vent windows open and latch though, which is awesome. Can't wait to drive with these open. The top hinge on the RH side has a bit of play in it but seems secure. It'll probably vibrate in the wind or something. They need a damn good clean, but the gauges look good. 91,137 original KM. Note it is a KM speedo too, being NZ New and Aus spec. Unfortunately the longer I poked around, the worse it got. The front floors have had some creative patching with plates and rivets, and there are some holes showing in the driver's side, so both floors will have chunks cut out and new metal welded in. In the big scheme of things, thats easy to do. The harder to fix rust will be this little section in the B-Pillar on the LH side, which will require the window to be removed There is also rust under the bottom of the rear window, so that will need to be removed too (and the front windscreen needs a new seal, so I'll probably remove all the glass) The boot has its fair share of rust too, thanks to various leaks and traps. The bottom of both rear quarters are showing bubbling, as is the rear valance panel. Those will be a pain to fix, but the lip for the boot seal is probably the worst, I don't think there will be a lip once I remove the seal. The obvious rust is really the LH sill. Its the whole way along, so definitely a whole sill panel, but shouldn't be too bad to do, hopefully. I haven't had a poke around under the car yet, but from what I could see kneeling on the ground, it looks vaguely ok. Its got to be done, so wherever the rust is, it will be fixed. At the end of the day though, for a 48 year old car that's been off the road for almost half that, it's doing pretty well. Much better than it would be had it lived in the UK, no doubt. The last thing I did before packing up for the day and letting the car dry out, was to trial fit some of the badges and check I had them all. It appears I do, even if a couple of the holes have been filled. There should be another MARINA badge on the Lh side of the boot lid, but currently there is a just a large dent filled with cracking off bog, so I'll need to bash that back out first. Looking at the primer all over the car, I suspect it's painted straight over the yellow. Its also had another respray at some point, because there is a ton of yellow overspray, and things like brake lines in the engine bay have been painted. I'll want to clean all that paint off the various bits it shouldn't be on. Since the paint is a mess I suspect it will be going to bare metal at some point, or very close to it. I'm still in two minds if I paint it myself, or outsource it to someone with more skill than me (but also more cost). I'll see how I go once all the good metal has been glued in. This will be a slow project, initially. All my money is tied up in the TVR and Corolla, so the only progress here will be things that don't cost money. I do want to get the engine started soon, just to see what condition that's in, but I need to source an oil filter first. Oh, and if you're wondering about the name earlier, yes, the Marina is called Alex. We've been working on names for it since I bought it, but nothing really stuck. Alex comes from Alexandra, which according to the paperwork I found in the car, was the town the previous owner had the car re-registered in back in 1995. Unfortunately, the paperwork doesn't mention why the car was re-registered, but what I can tell is that it has done 1400km since it was re-registered back in 1995, and hasn't had a warrant inspection since. I've reached out to the seller to see if he knows the back story of why his dad re-registered it, and then it never got used again. Once again, a HUGE Thank You to Brent at Classic Towing. He never fails to impress. If you need a car moved anywhere in NZ, give him a bell.1 point
-
Well, in a shock turn of events this arrived today. Didn't even know it had been picked up until Brent messaged me saying he was a couple hours away from delivery. Wasn't expecting it until the end of the week. Once again Brent from Classic Towing is a legend. Laid the bed of the truck flat down my steep driveway and winched the car straight into the garage. Its going to be a TON of work, but it seems like a decent solid base to start with. Found the re-rego documents from 1995 in the car, and its been owned by the family since at least then. "Movers of fine automobiles" - Damn right1 point
-
Kept going until I had chopped out most of the rust, got a few holes now. Also slowly been working through scraping off the underseal. Slow, shitty job but starting to make some good progress. A multi-tool with a scraper attachment makes the flat bits a lot faster and easier.
1 point
-
we in the vain of preempting all the problem parts ..i fitted a new coil pack and 8mm leads to go with the new plugs..(the old leads and coil pack hasnt failed YET so i put them in the spare parts box i have under the spare wheel for breakdowns lol) there is a thing that i actually hate and thats the rear wheel tuck ..they should have moved the axle out or gave it wider wheels...the front isnt to bad but i will do something with at somepoint .. as for the rear they have been racing and rallying these things for years so you can get parts and people have figured out interchangeable parts ..so i got a set of axles mounts from a ford puma sent out from the uk and its a bolt on and all the st170 parts bolt onto that and it moves the rear wheels out 20mm each side......much better
1 point
-
I cleaned the gauze filter up as best as it would come. It's still a bit crusty in a few spots but I didn't want to get too aggressive as the gauze already looks pretty thin in spots. The rubber seal also looks to be in serviceable condition. I'll use them both for now, but I have reached out to Sandy who runs the UK based 400E Owners Club to see if he has replacements available. I gave the bowl and the housing a bit of a tickle and put everything together again and I'm pretty happy with the result. The threaded output fitting attaches to a rubber hose that will feed the Toyota carby via the mechanical fuel pump, so all pretty straight forward. The only thing that still worries me is that the HiAce fuel pump has a second outlet which I traced out on the HiAce and it seems to be a tank return pipe of some sort. Since the Thames tank doesn't have a return I'll need to plumb one in somehow. I need to drop the fuel tank when I paint the chassis, so I'll figure the return out then and I'll give the whole tank a birthday at the same time. Thanks for reading.
1 point
-
I picked up the handbrake rod from my mate Brenton this morning. He was able to glue the stainless steel reverse threaded rod to the original mild steel Thames rod for me, so I'm a really happy camper. I'll give it a lick of satin black when I paint the chassis so it doesn't look so blingy, but for now I'll tick the handbrake off the "to do" list.
1 point
-
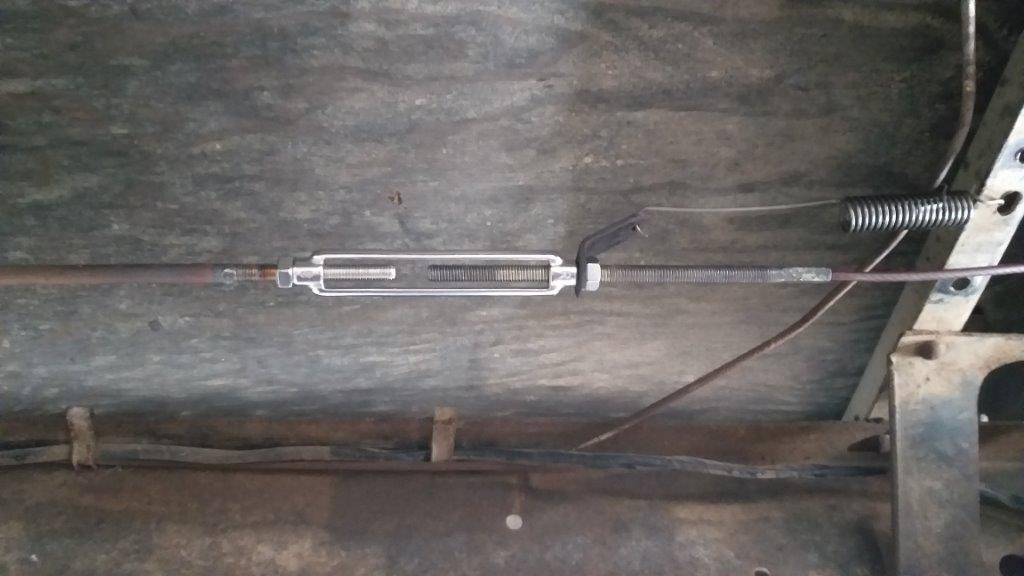
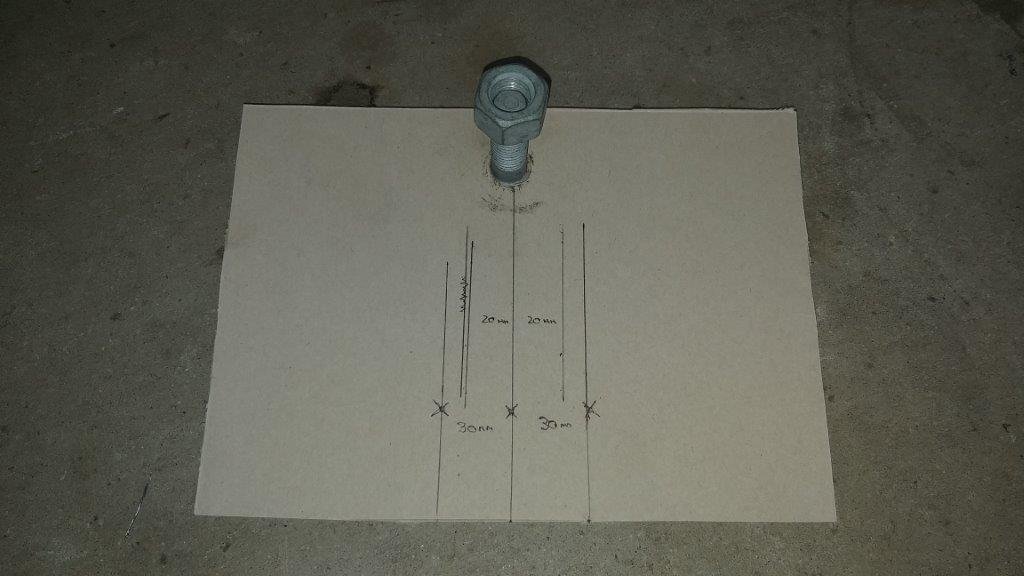
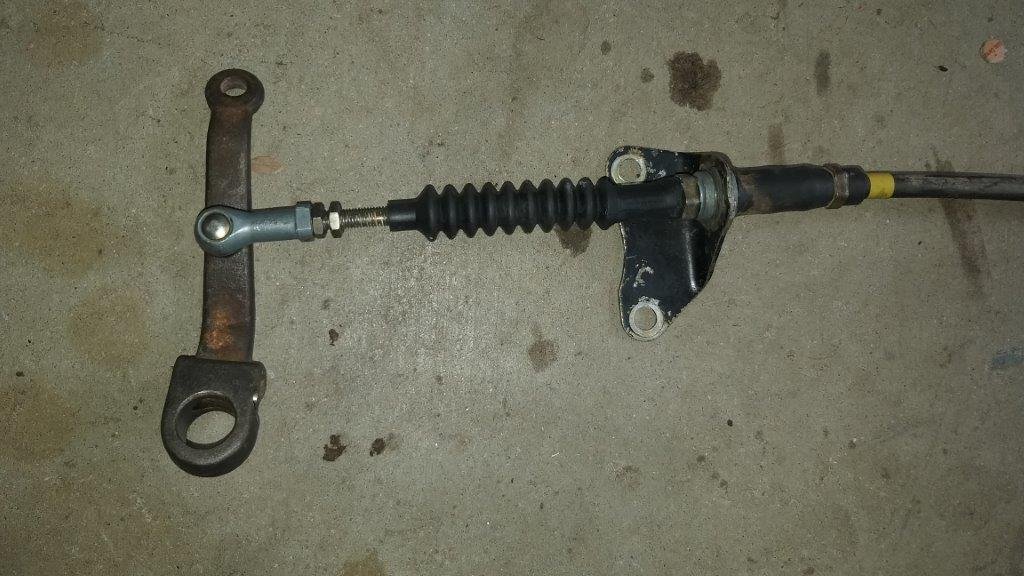
I had a cup of tea with an extra spoon of sugar as my cable related findings had caused a bit of a shock, and I then went for a quick lie down under the Thames. Now my old Mum used to have a saying that she would often wheel out during my youth. I can still hear her saying in her broad Scots accent "Fools rush in where angels fear to tread". Lying on my back I figured now was as good a time as any to put that saying into practice. So I quickly pulled the gear shift arm off my mock up gearbox and made up a rough little chart depicting the swing of the arm on some cardboard. Rough as guts but you get the idea. I figured I would try to work out the ideal cable mounting point that would give me sufficient travel to match what I think I can achieve at the column. Did some quick calcs and then poked a hole closer to the pivot point. Chucked on the Starwagon cable with the little ball joint. Even the bracket on the Starwagon cable looked promising. I refitted the gearbox arm and temporarily clamped the little bracket in place and gave the loose end of the cable a quick tug. Lo and behold the selector moved. I had to tweak the position of the bracket a little, but I quickly managed to get the lever moving forward and backward perfectly. The force needed on the cable doesn't feel excessive, so I may be in with a good chance here. I did a quick measurement on the cable and I've managed to reduce the throw to 20 mm either way. A total of 40mm is well within the movement specs of the Starwagon cable and should work for the front lever too. I just hope that the shift pattern won't be too short up at the column stalk. I'll need to confirm that early in the new week when I get the column back. So all in all not a bad result for a quick bodge job.
1 point
-
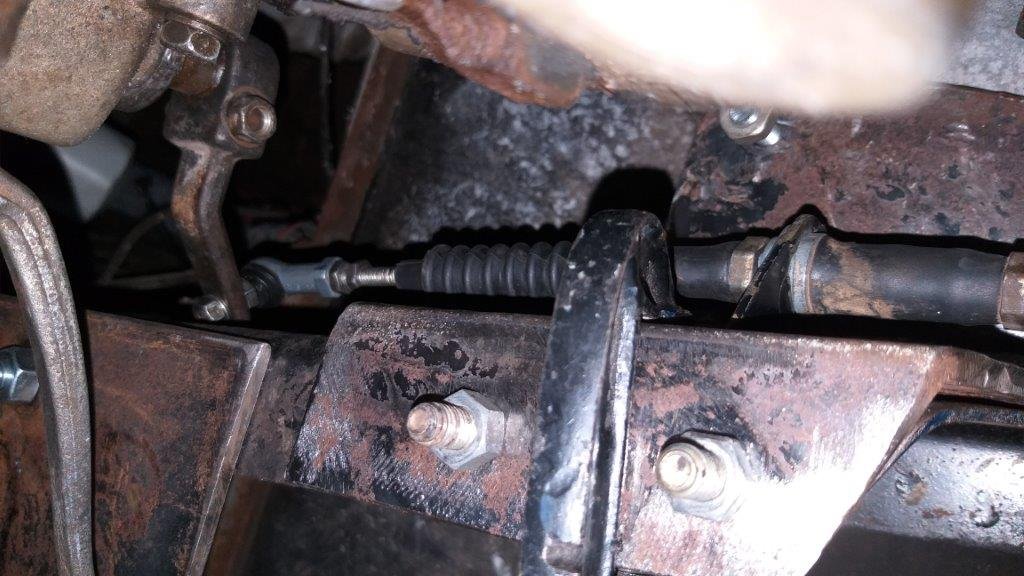
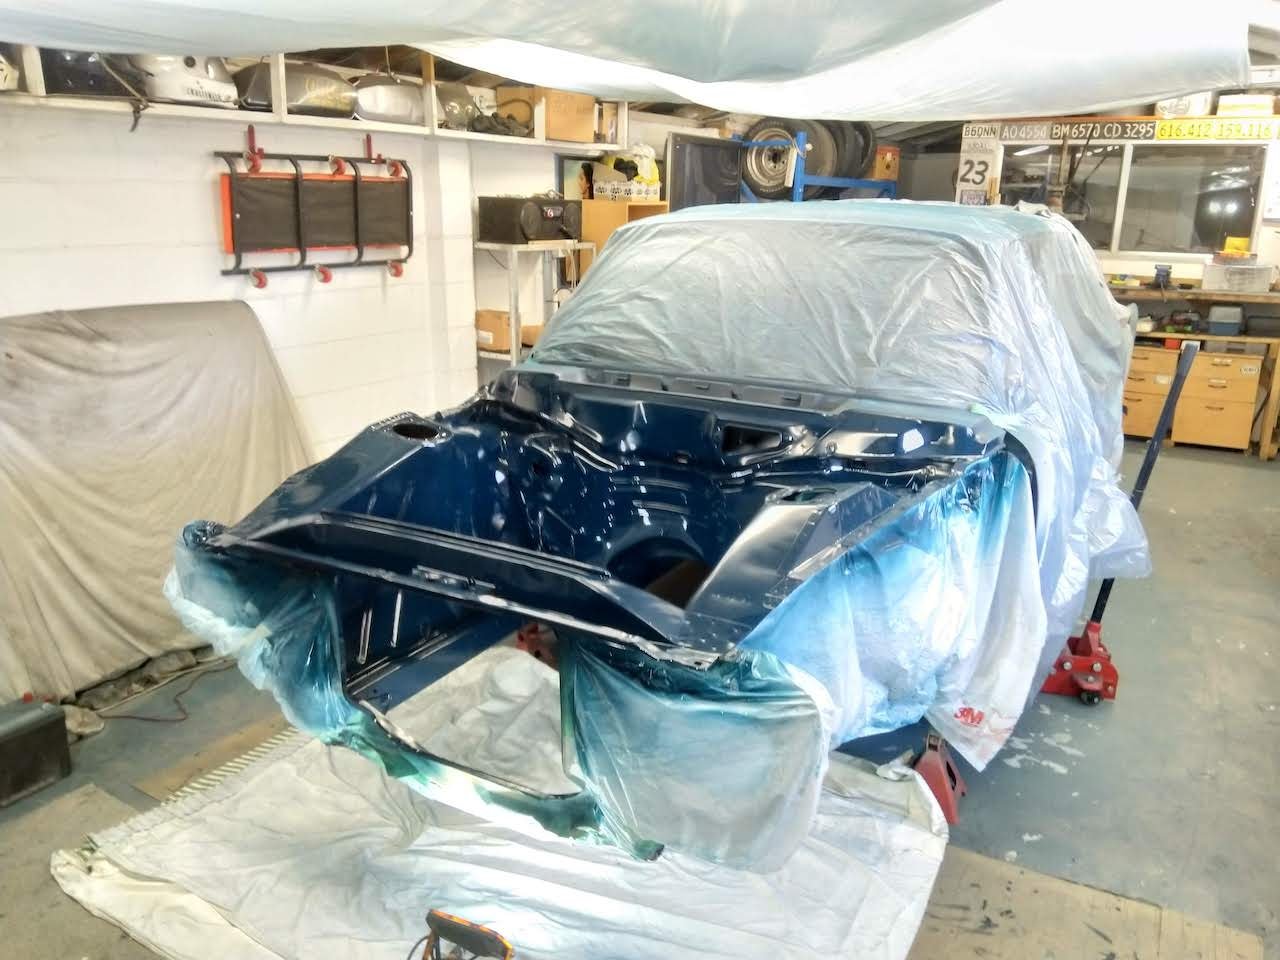
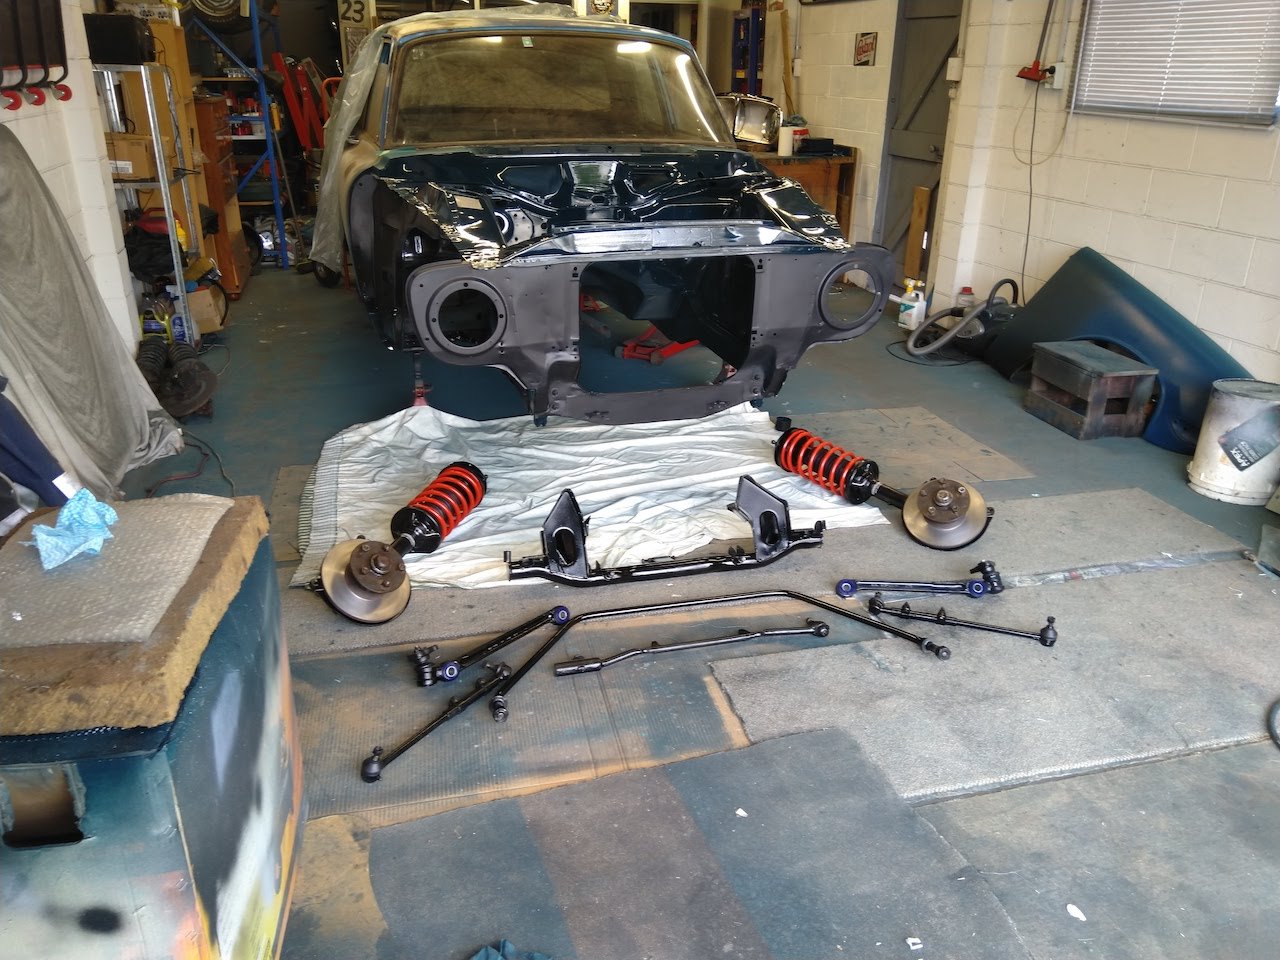
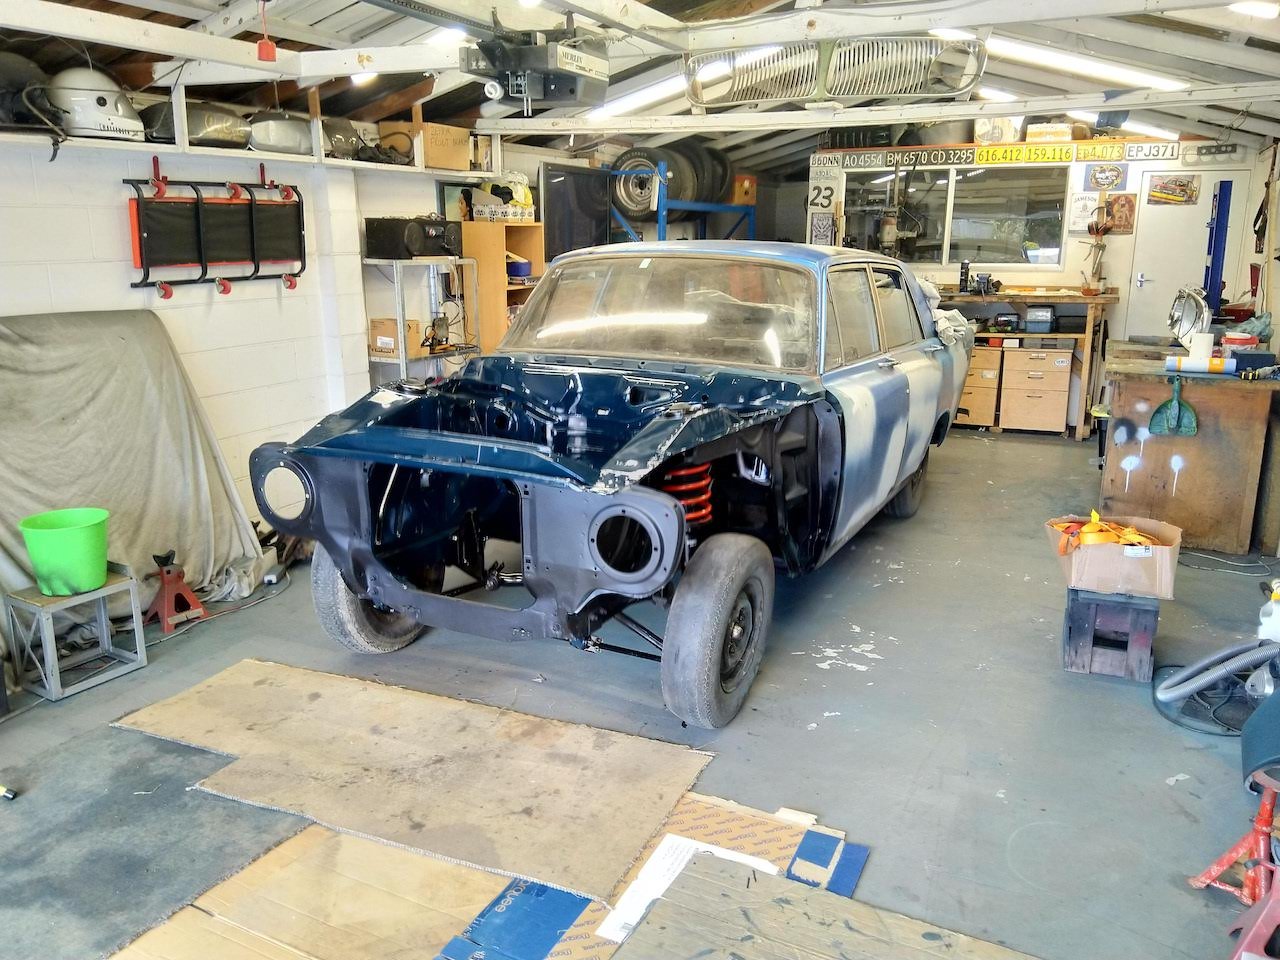
Got the engine bay and front grille into colour I've reassembled the front suspension, car kinda rolls now. No steering components yet. Next plan is to pull the diff and exhaust and start to tidy up under the car.
1 point


.jpg.17ebde8f49fd174880921c24419dc04a.jpg)


.thumb.jpeg.384ff72c8d2b0ee0d34a7bdedb55bdcf.jpeg)


.jpg.cee73f1cff0f54b6d44964c94ee7fc4c.jpg)


This leaderboard is set to Auckland/GMT+12:00