
Leaderboard


Popular Content
Showing content with the highest reputation on 08/08/15 in all areas
-
Well as I thought- today dawned nice and sunny after a bit of rain overnight. But rain was due. But so sunny it was I just had to go for a bike ride rather than work on the car. Halfway up Takaka hill it turned really bloody foul and I got soaked. Should have just worked on the car... So I got an afternoons worth of work in. I welded up the top of the sill then ground it down flat. This is the most tedious bit to do. Grinding. It took almost two thirds of an entire pitch black album to get everything down neat enough to leave. Next up was rebuilding the bottom of the A pillar but before finally welding it in place I fixed this little hole so any flakes/splatter etc would drop down the A pillar and I could clean it out. I used the Dremel. I got into using these on the rx3 and they are invaluable for small repairs. I use little reinforced 40mm cutoff wheels that actually last quite well given what they do. Cheaper to buy them on line from ebay rather than at M10 etc. I use a piece of cardboard, rub it over the edges of the hole, cut out impression, trace onto steel and quick easy fill in patch for odd shaped holes. I also drilled a drain/access hole before final welding allowing clean up of burrs and swarf. Once the sill end/A pillar bottom was welded up I painted it with epoxy mastic. This area will get all sorts of crap thrown at it so will get penetrating wax sprayed in there too. I made a new wing bottom to replace the dodgy original. I wont weld it in till tomorrow once epoxy is dry. Finally tonight I cut open the very rear section of sill where there was rust holes through the outer and it was pretty good in there. Evidence of wax or something sprayed in from above near where the rear seat sides would be. But for some small holes on the inner sill end its all solid good thick steel. Much relief. I treated it and will paint it tomorrow before making a new lid. Ill repair these holes from the other side later on when car is on the hoist. By then It was only about 4 degrees in the shed, the wood burner was going in the housetruck so the decision was easy. Back at this tomorrow. I will not be enticed out on the bike again..for a while..12 points
-
got the adaptor plate made. a mate of mine made it for me at his shop because we are so busy at work at the moment that i can't get on a machine to make anything. 20150807_162523 by sheepers, on Flickr only small problem is that some idiot modeled it with the superdupercharger flange upside down so its wrong. it fits the superdupercharger and it fits the manifold but not at the same time. idiot. now i have to ask my mate to make me another one because I'm a moran.7 points
-
Having a bit of fun with the bead blaster and polishing machine. Gauges polished, tested and back in place.
 6 points
 -
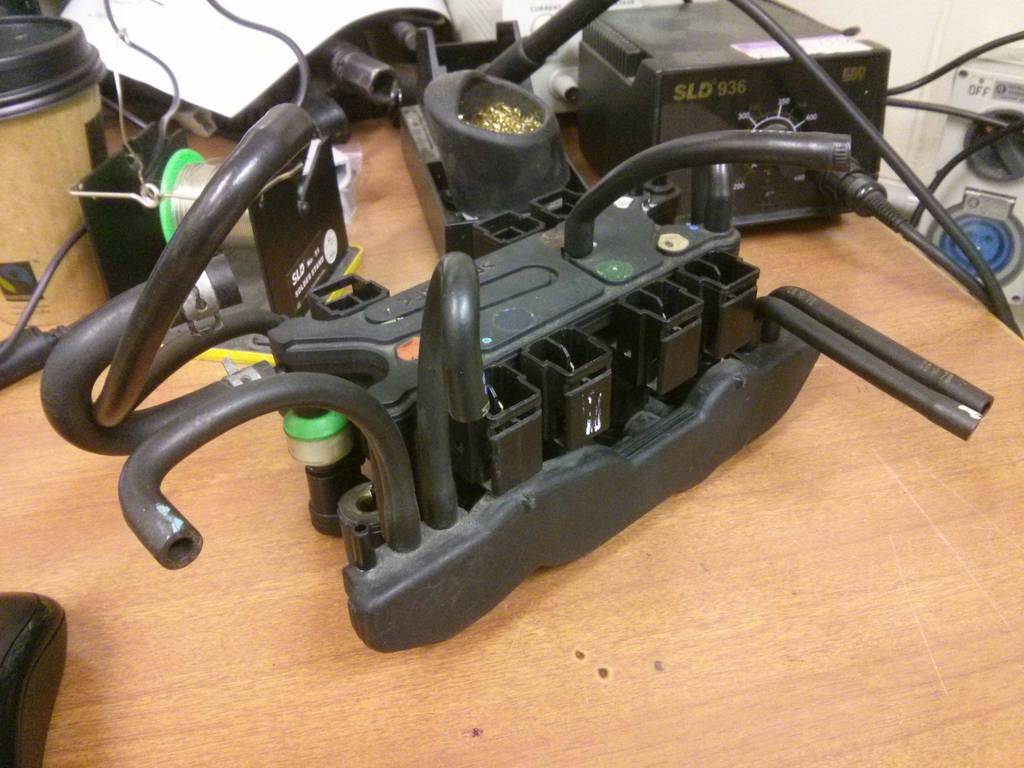
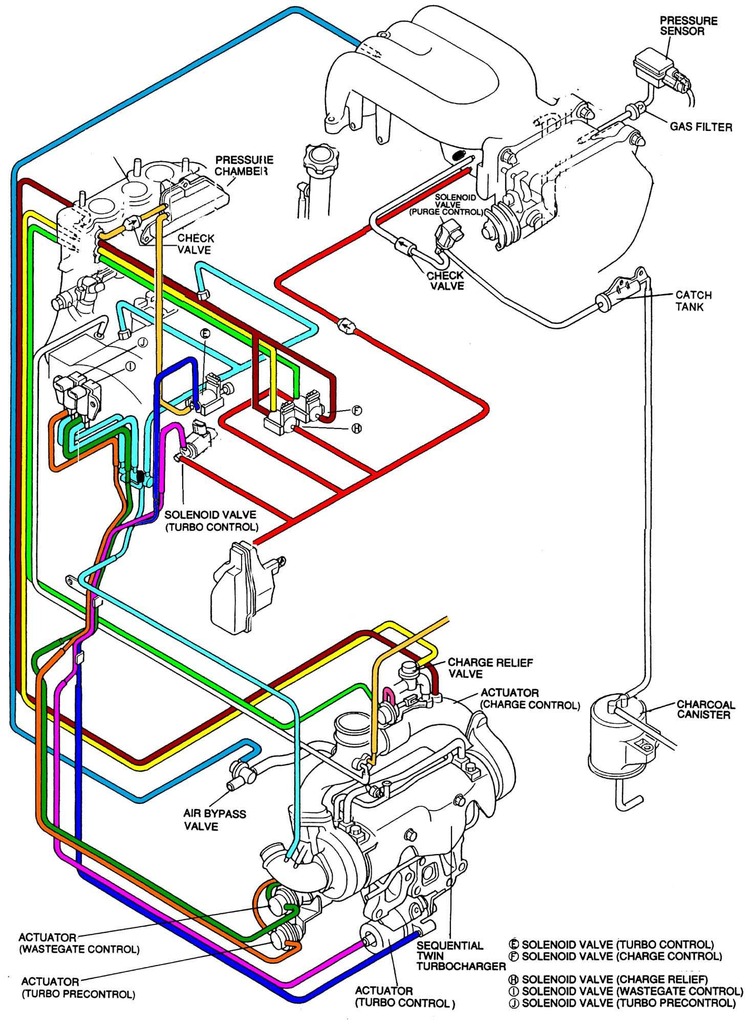
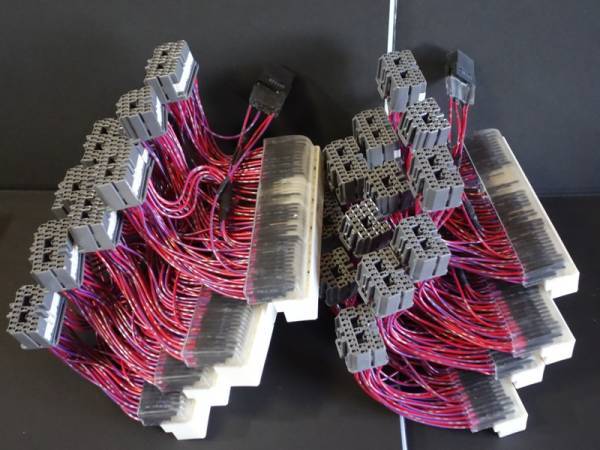
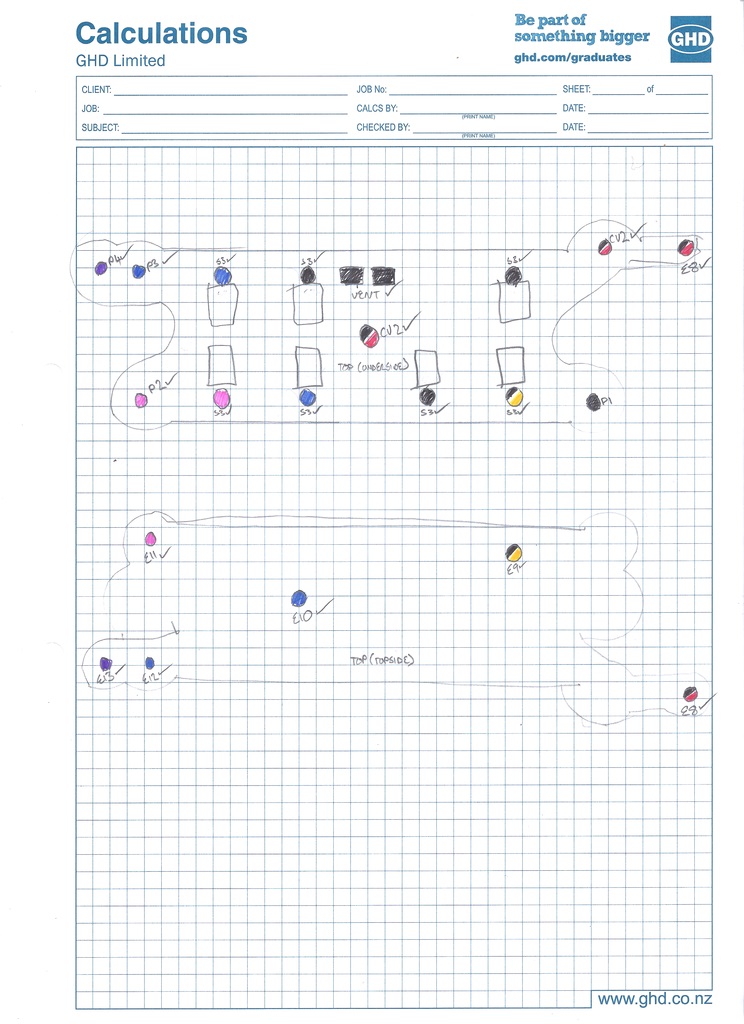
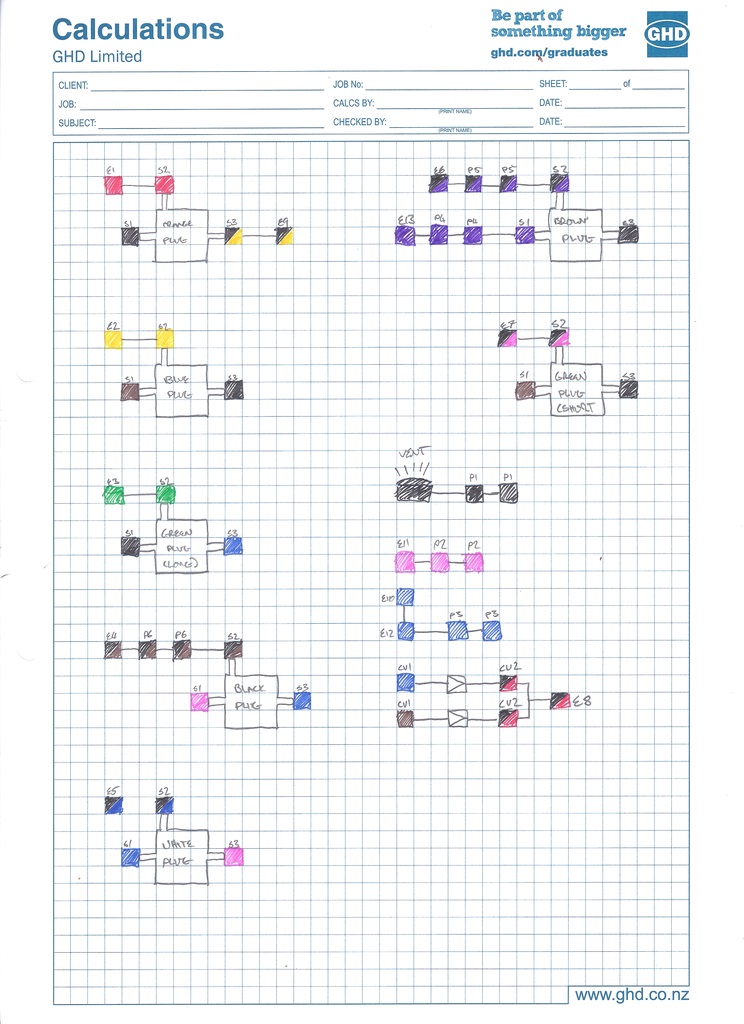
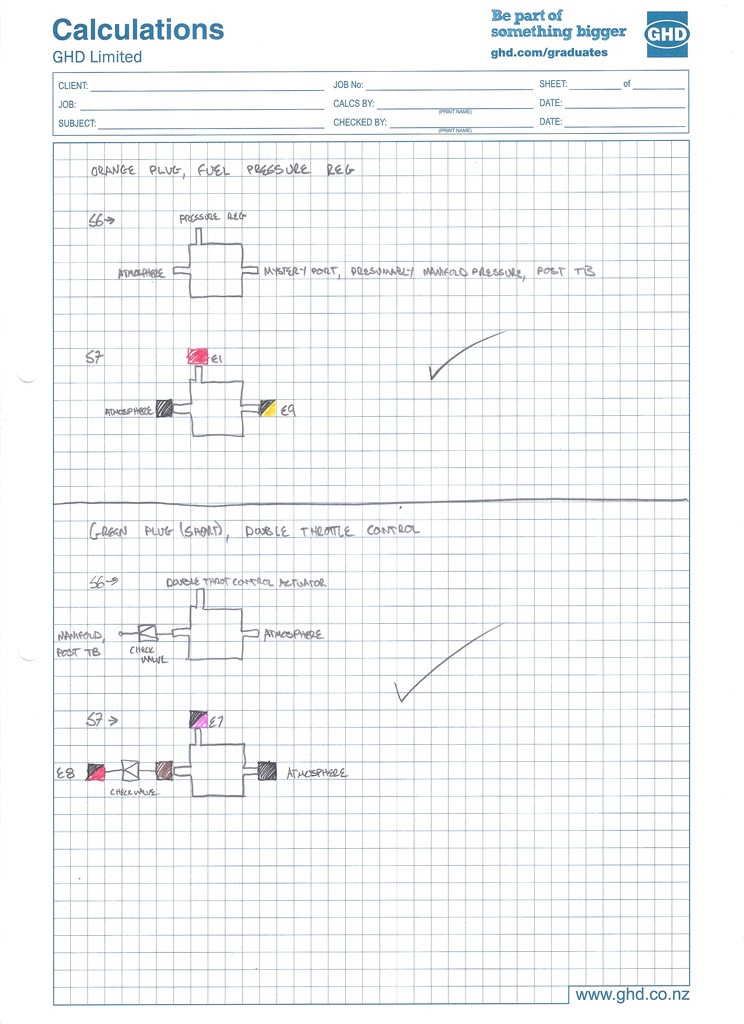
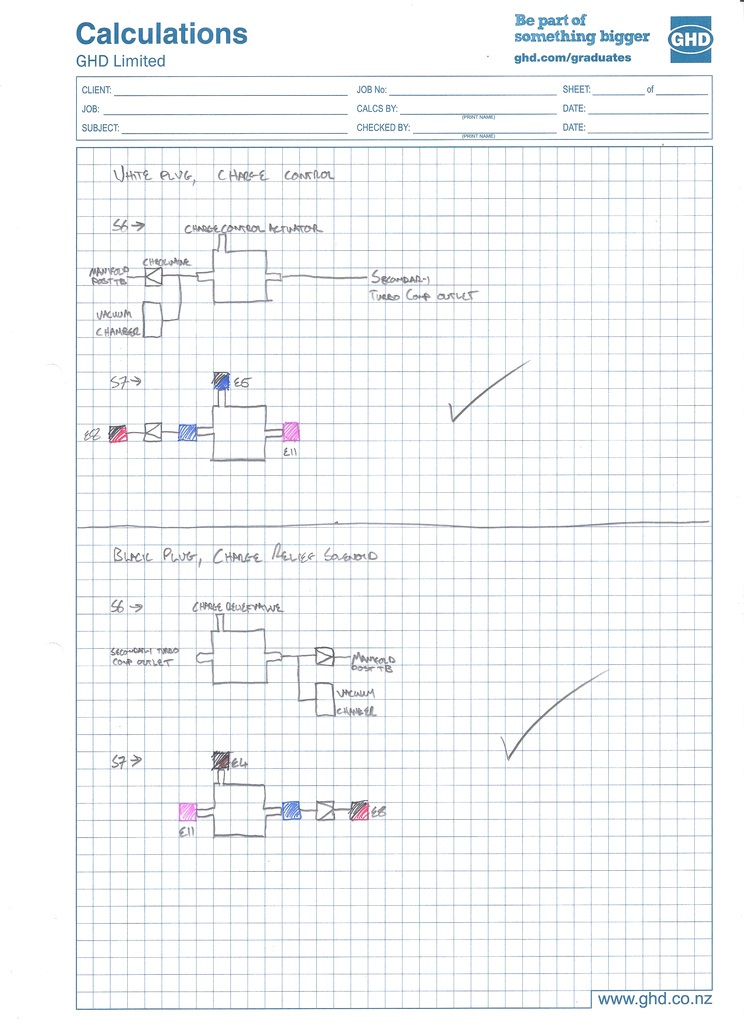
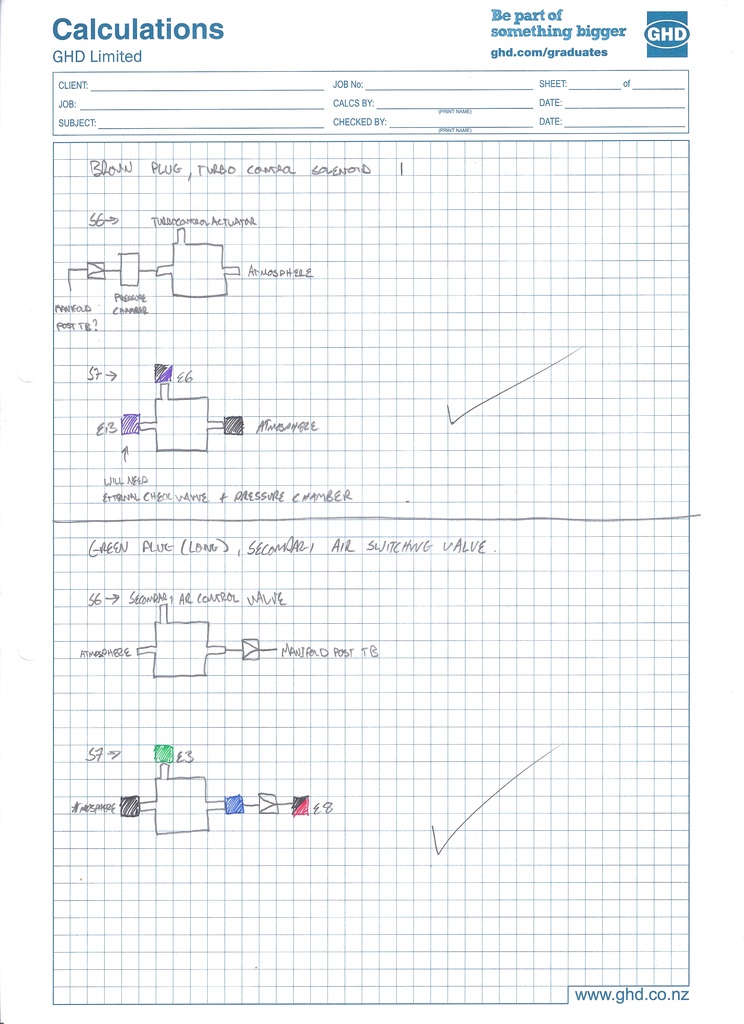
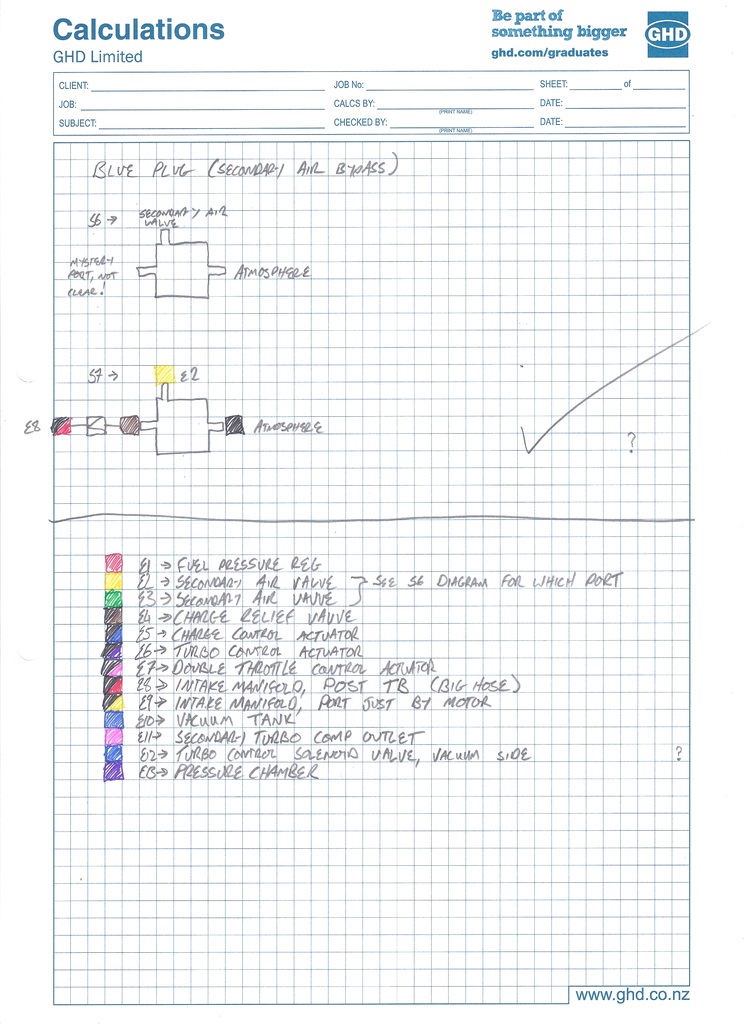
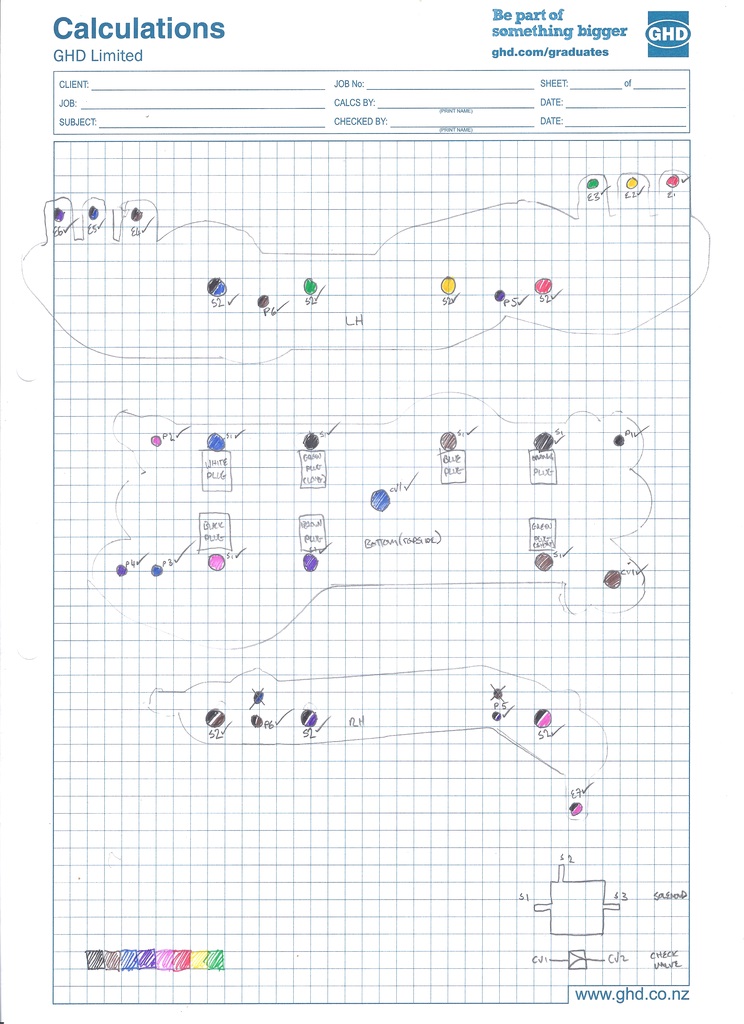
Just a warning about this update, It contains much, much tedium, but also a pretty decent level of winning. Also, no, I don't work at GHD, it was just a pad I found floating around at Uni. With removing the upper intake manifold, I also removed the vacuum block. Anyone that's had anything to do with the vacuum systems on FD RX7's before is bound to tell you horror stories. They certainly are relatively complicated compared to other vehicles. There is some pretty good information available on how the systems work for a Series 6, as they were released in the US, and the USDM service manuals are easy to find. This generation has what's called the 'rats-nest', which is a rack of three way solenoid valves, all connected to various actuators and sources via individual vacuum tubes and a manifold of metal tubes, see exhibit A: Apparently this system, after removal of all emissions related malarkey, can be reduced down to this: Wow, that looks a whole heap better. Still not great, but certainly better. I should do that, right? One catch. On the Series 7 and above, the 'rats-nest' rack of solenoids was replaced by a much more aesthetically pleasing integrated plastic manifold design: As the Series 7 and up RX7's were never sold in the US, I haven't been able to find any FSM data on this update. In fact, finding ANY info on it whatsoever seems to be pretty tricky. This makes it a bit hard to figure out what to put where to simplify it, or indeed check it's correct in the first place! The series 7 update also included an ECU update to 16bit processors, and a change in header plug design. Now, because I'm an internet weapon (this is not true), I've been browsing Yahoo Japan a bit looking for interesting FD parts and gathering info. I stumbled across these: Harnesses for plugging a 16bit ecu into an earlier 8bit car. Iiiiiiiiiiiiiiiinteresting. To my mind, this means that the vacuum systems must be functionally the same (or at least very very similar). Excellent, so hopefully this means that I can relate the available Series 6 data to the Series 7 unit, get money, power and bitches (in that order). I need more info on the integrated vacuum manifold. Luckily, I happen to have one, HUZZAH! EURON8 is a bloody good bugger, and sent me some pics detailing how they come apart, and it really is easy to pop them open. There are a couple of valves missing from that photo. That is actually a second hand unit I bought from trademe as it had a broken nipple on the plastic manifold, so was pretty much useless except for parts. With a bit of tubing, and a bit of time, I mapped out where all the passages go, which gave me this: And this: And this: And all of these: I was able to match up what each solenoid valve in the block did by looking at what colour plug went to it, and tracing this wire back to the ECU header plug, as the pinout for that (which is an internet resource, not from a FSM, but seems to be holding up reliably) tells you what's up. I was then able to compare the vacuum routing of the corresponding valve on the Series 6 FSM info, and determine if it would work the same in the Series 7 manifold black, and where to hook lines too, etc. A couple of tricky spots though, the Series 6 has a few more valves than the 7, and figuring out what they kept, and what they got rid of took a bit of noodling. The Series 7 has no EGR, so I knew this valve wasn't going to be in the manifold, it turns out they moved the Charge Relief valve, which was mounted external to the 'rats-nest' on the Series 6, into the manifold in the Series 7. Other differences from the USDM Series 6 spec are the lack of a Port Air Bypass Valve and Split Air Bypass Valve. Wicked, more valves to not worry about. I also noticed that the wiring colours from the USDM Series 6 manual match up to the JDM Series 7 I have, as long as you look at it logically and don't take anything verbatim. I was thrown by there only being one output wire from the ECU for two valves, both called 'Turbo Control'. One of these valves is fed pressure, and one is fed vacuum (both from tanks, via check valves, so both conditions can exist at the same time). The valves apply pressure and vacuum to either side of the turbo control actuator diaphragm, giving it more grunt without having to increase it's area. Cool. Two of the valves in the manifold block on my car were stuffed, and these matched up to the error codes the ECU was throwing. Good to know that error reporting system works. So, that's allowed me to map out how the vacuum block works, and where to connect each of the 'E' (External) ports on it too, and hopefully get the system working at some stage in the none too distant future . I'll try and get it up and running as it is, without removing any of the emissions gear, If I strike any issues I'll look at simplifying the system. I might tidy up all the info at some stage, as It could help out anyone else with a mis-behaving series 7 or 8, but that can wait till my car is back together .
5 points
-
Thought i would update this project thread abit. is about 18 months ago now that it got painted on the road etc At that time i was still currently in high school with no job but had holiday jobs etc so i pissed around getting quotes etc and ended up with 5 grand and 6 grand quote figures and was way out of my budget and then i thought why not just do it myself with some assistant from a painter/panelbeater who had done his trade 50 odd years ago so it started with just a basic respray but quickly got out of hand At this point it seem like we had been sanding for years as we had been using wet and dry the whole time but once i had done a full strip down except the bonnet it appeared it had some minor rust in different places than my mates one so we did a few rust repairs on the roof the doors on the bottoms behind the blackplastic covers etc unfortunately i didnt get any photos while it was in primer but on arrival after work i found it was painted cheers to my old man in a big workshop with wet floors roller doors up with big extractor fan by roller door etc we ended up getting a mint finish when applying the paint but when it came to applying the clear coat my old man hadn't sprayed clear in 20 odd years we had ended up with the wrong lighting while applying and lack of experience it ended with sand and dust in the clear and runs in the clear.but i was amazed at the final product and others said aswell of the job done in a dirty old high stud workshop off the gun finish. then went and got my dashed recovered and painted because it was cracked and falling to pieces cheers to dashboard restorations out west for the mint job after about 3 or 4 months of assembly it ended up like this with a clean sheet wof also!4 points
-
Something a bit different n hope admin approve althoughs this bends some of the usual criteria. Dont worry Ill post photos up once finished (Hopefully in time for Hanmer) On Monday the 3rd of August I purchased a fine older vehicle in the idea of a project for hanmer, Baring in mind I'm not a mechanic I think I've bitten off a bit much but with the time counting I've got 19Days 21hrs to go till my 9AM depature time for the best weekend of festivities known to man. List of repairs for said beast 6 Rust repairs Panel beating Prepping Painting Rear brakes Blown head gasket Complete reaasembly of the shitbox New wheels Lowered Anything else it fails legalities on. For those who care ill keep this post updated the best I can, will accept questions if people want to try guess the car.3 points
-
Picked up a pair of SSR Star Sharks in Taupo thanks to kp_james for bringing them. They're 13x6's with I think +11 offset. Gave them a polish and they came up quite nice. I have another pair on there way from Japan, which should hopefully arrive soon. Will the current 175/70 tyres look alright on them? Or would it be better with some lower profile ones? Got a 4K from James as well. I am keen to rebuild it and get a bit more power out of it, but I don't really know where to start, so any suggestions on what to do? //oldschool.co.nz/index.php?/topic/48889-matts-81-kp60-starlet-discussion/3 points
-
aint done much today. i cut some holes in the boot lid frame so i can get the cavity wax nozzle in there and blast that shit everywhere. also i put so much paint in it the other day that when i turned it upside down paint started running out of the seams, 3 days latter. you can see it in the picture on the left. must be a fair amount of paint sloshing about in there which i s good. 20150808_154015 by sheepers, on Flickr3 points
-
So a bit of a team meeting was held with my brother, some mates and myself. A decision had to be made between cutting my losses, repairing what I had and hoping it didn't still go "POP", or spending some more money and upgrading the motor. We all agreed a 1UZFE was the only logical option when it came to value for money and reliablility. So a few calls were made to check on the legalities of the swap and track down a motor and trans combo. We were told it would be very easy to certify but that the office that prints the Cert. Plates would be shutting for the summer in 6 weeks so if we wanted it legal for Christmas (the reason for purchasing it in the first place) we would need to pull finger. A couple of days later my new motor and box showed up from Osaka Auto Parts, it's a 2nd Gen setup from an LS400. We tore the old diesel out the first weekend and mated the V8 up to the Prado trans and started mocking up the engine mounts. This is what we came up with. So it begins... Front of truck mostly stripped New chassis mount welded in place New engine mount ready to bolt up The two together Engine in the hole More to come...3 points
-
WELL THEN, I constructed a manometer, and attempted to balance me quads. The manometer in question looks like this, I hooked them up and they worked well, but very slowly. I put ATF in them, and it was too thick to transfer in a timely fashion, so I watered the ATF down with turps, and that worked a treat. What it showed me was number one was sucking like no ones business. I fucked around with everything over the course of many, many, many hours, and no matter what I did, number one still had waaaay more vacs. So I pretty much gave up trying to balance them at this point, but it annoys me that they are not equal, so I will revisit this problem soon. After that, me and the bro-in-law went to give the old girl a bit of a tune up. I then found that the hole (under the bung) I put in the exhaust for the oxy sensor was sweet as for the factory sensor, but 3mm too small for the body of the wide band, so I had to take the headers off and file out the hole. Then we spent hours and hours trying to get the old Link system working on one of our lap tops. In the end we had to run a VM with XP to get that going. Then we found the serial cable was being a dick, so had to get another. After all that we ran out of time. So months later, we finally got around to having a go at it tonight. The tune was all over the place, but especially lean in the early 3000-4500 RPM range. The whole map was on the lean side, where it used to be very slightly rich. Since it was tuned in 2007, it has had 3 different intakes, and as many different exhaust set ups, so that's to be expected I guess. We smoothed the tune out a lot, and it runs a shit ton better/smoother than before. Plan is to sort out the vacuum imbalance issue, re flash the ECU (as its got a few weird bugs) and then have it dyno tuned again, as i'm pretty happy with the intake/exhaust now. I guess the latest exhaust set up must be working, if its leaned it out as much as it has, so that's neat. Feel much better I know its not leaning out anymore, hopefully i'll get to some track days now! Regards, V "NZDM" G.3 points
-
Negative. What kills the 30's is either revving them too high 7k tops (I normally limit them at 6800) Their bottom ends being are way out of balance and a rather large harmonic vibration will slowly chew the bearings out. Detonation because you told the tuner you want a dyno sheet that says 500 hp so he'll push it right to the edge to get it there. Biggest thing with any motor especially as you start to make more power is having it built properly. This means having the entire rotating assembly balanced including rods and pistons. This is a rather time consuming process. The ole mate who throws a twin cam head on a pick a part bottom end has not built a motor he has merely bolted 2 things together. Their oil pumps are rubbish as are the drives from factory. We have shattered pumps before. A good oil pump and modification to the crank is required for full engagement. Their sumps are rubbish it will run the bottom end dry very quickly at high g corners. Ive tuned quite a few RB's from 20dets to 30dets. Its common to believe that you make more power with higher boost levels this is incorrect normally you can get away with lower boost levels as it allows you keep the egt's consistent and let you wind more timing into them. We will almost always make more power at 14-16 psi boost than the 18-20psi people often wank on about.3 points
-
So I bought my Century last year as a Christmas present to myself... Have always been into Jap Barges, owned plenty of Crowns, and two Nissan Presidents over the years. I live in Australia but it resides here in NZ for when I visit home. I had intentions of doing up a 1984 Crown wagon GS126 that I had bought earlier but realised that being back only a few times a year, makes this very very difficult, so sold it to Bogangeof ...this allows me to drag out the Century and give it some attention. The Century is immaculate with 46,000km , even the interior smells new, one is the more desirable VG45 (long wheel base model) I bought it sight unseen and flew back at Christmas to pick it up, drove it down from Auckland to the Naki, Old school 4.0 pushrod V8 means this isn't a fast car but a great cruiser and will accumulate speed without you realising, just sails along. It also generates a massive amount of interest, if you are going chuck in petrol allow for an extra 15mins to talk to strangers who will try to guess what it is, and where it's from. What I have done so far is remove the massive CRT TV and VCR, retro cool but was bulky and uncomfortable to drive with it, and left no where to put your left arm. By the way in the VCR player was a video of The Godfather...dubbed in Japanese (no lie). I also found some paperwork in the door map pouch that is in Japanese with some English, suggests that the car was used as a Municipality car In Tokyo and as recently as 2011. The leather is totally unmarked and softer and more comfortable than the leather in my Lexus '06 LS430. I also imported a 15" factory alloys set from Japan earlier this year (Alloys were fitted instead of the Hubcaps after late '91). Bought some Michelins Tyres and I reckon makes the car look much much better, and certainly handles better. I want to keep the car 100% stock, so this and tinting the windows are as much as it gets. The struts that hold up the heavy as hell bonnet and boot lid I had regassed, nothing more annoying than being hit on the head. The Air con blows cold both front and back, but it does have small issues i'm going to fix: really would like to get my hands on a wiring diagram and drop it into the Auto Electricians... There seems to be some fuse or short as: The electric quarter windows work fine only two of the actual door windows do. The dealers tried to fix the windows themselves, and butchered the left rear window motor (I'll have to get on Yahoo Japan and order some more). The interior lights don't work The digital dash trip meter don't hold memory, so everytime the car is turned off they reset The digital clock and the stereo are also out, apparently these were working fine just before the car was sent over here from Japan, so need to do some trouble shooting. The TEMS doesn't work either - no lights on the dash and it is failing to soak up corrugations resulting in a thunk everytime you hit a pothole, anyone a TEMS expert?? i'm not sure whether to bother to fix the TEMS, or just replace to normal struts (apparently not too difficult with these things) but the most important thing from my point of view is that the ride is soft and dreamy as you would expect from this luxo barge behemoth. I am also keen to buy a GZG50 V12 century, I drove one when in Japan last and they are beasts, let me know if you come across one for sale here in NZ otherwise i'm going to import one (It can sit in the garage next to the VG45 as I wait for it to be old enough to get compliance)...2 points
-
Whatever you do, don't build one of these .... and definitely don't stick a comfy little seat between it and the work you went out into the shed to undertake You will find your arse being drawn towards the seat while you start to look for a jobs you can do sitting down. Then fuck it - you just sit down anyway and enjoy the heat This free heat. You sit amused, slightly amazed even. How can a simple flame burn with the intensity of a blast furnace with no fuckin power cord? Physics and ummmm other shit you knowingly nod. Fuck off Johnny - youtube more like it, lol. As you heat up a wry grin creeps across your dial ... that smug look one gets when they know that they have done something ... accomplished something that flies in the face of every fucking power company and probably council. You have made a source of free heat that runs friggin hot, extremely clean on stuff most have to pay to get taken away. Scrap metal, grinder and an old arc welder ... I fucking luv it!2 points
-
WHERE: Smales Farm, Auckland WHEN: 10am till 1pm. WHAT TO BRING: All cars are welcome. This has proved to be a popular event and there can often be over 300 cars in attendance. Everything from V8's to Rotaries. Hot Rods to Vintage. Euro to Japanese. Everything. What tends to happen now, is that most people show up by 9:30 if you want a spot in the front car park, as this is usually pretty full by 10:00am, although with an average of over 300 cars a month now, parking in the back car park is usually sweet, as this is often pretty full too. It also makes it easier for groups to park together. It is not unusual for people to cruise to a local eatery afterwards.2 points
-
So, Ive been hovering at the peripheries Filbee you c*nt. I thought I'd chime in with a brief history of the old girl as a bit of background for those following. As you may have guessed, I am the former owner of said Super Snipe, she is a 1965 Series 5a, the 5b being the last snipe and the end of the humber make in 1967 when sold to Chrysler. The 5b's are basically the same with every last option from the parts bin (and series 1-4 have a different roof and single carb among other features). This is approximately the 60th car I have onwned in my life, and by far and away the best (many escorts, KP starlets and a mk3 zephyr to name but a few). She is neither entirely pretty, nor fast, nor does she pull the ladies (under 30...mostly as Dyl mentioned it is a magnet for retired old men), but purchased on whim some 7 odd years ago after being curious about them and having passed up a silver series 5 with red interior, i thought bugger it. It came up repeatedly on TM and kept closing without selling, the asking price of $1200 and location gore. I ended up getting her for $1k (2009 i believe). She had not seen the light of day for 16 years and was deregistered, I brought from the 2nd owner, who had owned for those 16 years and had covered approximately 300 miles in that time (Filbs has all this documentation, the service history from new etc etc, he probably hasnt even looked at it!). The first owner purchased it new in 65 in Invercargill, and she was built on the Todd motors assembly line in Wellington, like many old things on this forum I'm sure. At the time you had to have overseas funds to purchase cars, so this generally meant you had to have proper money, and these things were proper money. Your choices were a Bentley, Rolls, Jag or one of these. Having driven Jags (cant speak for the others) these are in my eyes a better car. So this particular example sports the borg-warner DG250 series transmission option being a BW type35) without overdrive (unfortunately - however there are a few of these still around), its essentially a hybrid manual/auto and you will notice this when you drive it Dyl, she has engine braking! It also leaks like nothing else, despite having had all new external seals and about 3 trans-pan gaskets.. She also has Power steering, many cigarette lighters and map/reading lights, the picnic trays, a fuel light, much body deadening and soundproofing (1600kg!!), twin 175 strombergs, electric washers and 2-speed wipers, and the proud honour of being the first british car with twin headlights. Much of which adds up to a well-sorted luxo-barge of its day. Almost everything still works, aside from the smiths clock, which will surprise no-one. The instruments are Jager, I think same as Jag, as are many other bits and bobs throughout. She will cruise comfortably at 120 as Dylan mentioned, and the ton is no problem whatsoever, it is like a barely controllable cloud at such speed (only done once just to see).. She will not break traction though, she is not that kind of girl. So I got the old girl with 113miles on the clock from memory, and it was my daily hack for about 3 years until the trans dumped its shit all over the road one day. It was a supremely reliable daily driver, in fact after getting the thing legal when first purchased, I drove took it to 100km/h for its first time in 16 years on the way to the Coromandel from Chch, without missing a beat covering nearly 3000k in the first outing! I covered 15000 miles in my tenure, and the lsit of repairs/maintenance over that time is fairly extensive. To get her back on the road she required a fair amount of rust work; inner wheel arches, floor, inner sills, outriggers, lower quarters inner and outer, boot floor, and also part of the front valence to be remade. I did all except the front valence which I had a skilled old dude sort (I was once a panelbeater, but this bit required someone with grey hair and an english wheel). Other bits done were a rebuilt p/s ram, rebuilt booster (as per above troubles), new brake hoses, rebuilt front callipers and a few bulbs from memory. Over the ensuing years she received new rear gas shocks (landrover ones were the only thing they could find to fit), rebuilt carbs (still leaking!), front wheel bearings, and many indicator flashers.. In about 2011, the rear trans seal blew so I parked her for about 2 years. Late 2012, I pulled the motor and box, sent the box off for a reseal and pulled the pants off the motor, which still looked like the day it was built so just cleaned out the sump and oil pickup and gave the motor a coat of paint, threw new gaskets everywhere and put it all back together. Never used oil or water so I saw no need to do anything else. Before the motor and box went back in the bay was blasted and painted also. She was put back on the road in time for a mates wedding http://markharris.co.nz/wedding-paula-jay/ and then back to service she went. Had some wiring redone in the rear about that time too. In the last two years shes been in mostly regular service. The kingpins and a-arm bushes were done last year ($2k!) and early this year I picked up a parts car which had a brand new radiator, the radio, indicator stalk, full set of new seatbelts and many other small bits. Sold that for what I paid.. I also did driveshaft uni's and diff seals/gaskets this year too. Much to my partners disgust Dylan got his way, after a small amount of hounding and I relinquished ownership this year. I expect this will now be my south island car (now an Aucklander) and having covered another 700-odd miles over xmas with my 2 under-3 sons in tow, I can attest to the practicality of this car. In fact, once again this was our only car for about 2 months early this year due to someone writing off our wagon, needless to say she performed the task without fuss. Thats my waffle, Im sure I have many other facts stored away, but I know its in good hands and when circumstances allow I will probably get another rootes-group car, they are well under-rated. Look forward to the slam Filbee. Jones.2 points
-
2 points
-
Evening Everyone, Today i got up to all sorts and the pics will reflect that. I also dropped my AE86 Powersteering crossmember to Spire Fabrication in Kapiti last week to do the mod that Sheepers has done. 40mm box tubing at either end and had it cut down on the ends to fit my chassis rails. I pick that up next week so im looking forward to getting that back and bolted into the chassis. The box tubing is to help drop the JZ down a bit as it is a really tall engine and it also helps sort the suspension geometry as well. Love this bottom radiator support. The more i look the worse it is. Massive steel plate on the front and underneath there is another steel plate and heaps of bog! Brought some s14 adjustables and they pretty much bolted straight in. I will be using a full nissan front hub assembly, s14 lower control arms and rxt 4 pots so its a bit of a mongrel Also took some measurements as the 2JZ fits in the engine bay JUST and i cant run radiator fans so i am recessing the firewall to give me some more room to play with Then i pushed it outside so that i could air out the garage from all the grinding smoke etc. Man its a pig thats for sure!!! Matt2 points
-
I think there should be two Cordias.2 points
-
Yep, 265 and 73 VJ Charger.2 points
-
I don't imply turbocharging at all. Keep it NA. At the end of the day, what are you trying to achieve? I would put an NA single cam RB30 in there with six throttle bodies. I'd then call up Rajab/Matouks etc in Australia as they specialise in SOHC RB30 performance. Slot their uprated parts into a rebuilt $200 Zebra U Pick motor and spend the rest of the money on tuning and fettling. I guarantee this combination will be stronger and more reliable than any turbo DET build of the same cost. It'll be just another boring old turbo R32 skyline if you DET it. Nothing special/unique. But that depends on your vision for the car. Entirely up to you. Just my two cents2 points
-
Prozac=Wizard2 points
-
Done a few trackdays and an autocross on the back track at Manfeild. Not very much has changed apart from some Toyo Proxes R888's, better brake pads and changed up the engine bay a bit. Handles so sweet around corners now, apart from one wheel spinning coming out of corners, because no LSD. An LSD is next on the list to get, once I can find a decent one for a reasonably price. Drove it up to a Taupo trackday today, it was going good until one of the front brake pads flew out going down the back straight at 180km/h. Luckily there was a long run off area, so no damage apart from some groves in the disc. We managed to get a new pad in there and drove it back home.2 points
-
Had to search to find this. Still here! Have been keeping busy as usual... Did a Zero Class drift day at Taupo back in March. First time I had driven there in a few years. Was a good day overall. Forgot how to drive properly in the morning, couldnt get it right. Spun a few times and collected a tyre when I ran too wide once. After all that I decided I would drive it how I should have been. Managed to burn through a few tyres, was getting pretty comfortable in the car by the end of the day. Got some in car footage from the day too. Just a quick run: Next time Ill give fourth a go exiting the sweeper along with some high boost engaged haha. Discussion: //oldschool.co.nz/index.php?/topic/48043-pedrac3rs-1985-ae85-levin-discussion/2 points
-
Slowly been getting the interior back together — new carpet is all in, seats are back in, looking great. I have finished restoring the dash and centre console and started to put them back in. I managed to source some 3M Di-Noc from an Architectural finishes place to replace all the faded old 'woodgrain'. It came out pretty well, if I do say so myself. I prefer the straight grain texture to the swirly walnut style that was in there before and the colour match with the steering wheel is spot on, which is nice. Old: New:2 points
-
Here is the requested video of the electric start. Have been riding this to uni a bit which is easily the highlight of my day. I am also continuing to improve aspects of the bike but it is great being able to ride it in between. I put a new front tyre on as the tube was beginning to bulge through the old perished one. Next on the list is new brake pads as the brakes are pretty marginal and other minor boring wiring stuff to sort. This will probably be the last update on the project as I consider it pretty much done, kind of glad to be honest as this bike has definitely been a bit of a challenge. Big thanks to all the guys who helped out along the way, especially Kempy for helping me with the electrical side of things, if it wasn't for you this bike would still be sitting in the corner of the shed in pieces. mmmm what to do with my spare time now?2 points
-
So this happened today... Pretty dam exciting really, starts with the flick of the key, holds battery voltage and seems to pull pretty hard.2 points
-
those repro tridens dont fit on the front of a val without spacers1 point
-
Funny enough, I just started reading that haha1 point
-
Yes that's normal, tape speed to set buy the rollers and the spindles have a basic clutch that just keeps a light load on the gears in the cassete1 point
-
KYs gonna be in auckland? Swish Might have to get van WOFed1 point
-
Loving your work man, hey where are you getting those little cutting wheels for your dremel? I have been using the ones that came with my Ozito rotary tool (couldn't afford a dremel) but they are so fragile they come to bits if you look at them wrong. Really handy but some stronger ones would be the go1 point
-
filled the inside of the boot lid with paint and finished filling the passengers door also. i took the bonnet off and got that ready for its first coat of primer. it had two little rust holes in the front edge which i cut out and welded in new bits. it had a couple of dents in it so i got it a bit better before priming it. it had the primer on it which was over the whole car. i have no idea what it is but it sands ok. so bonnet got its first coat of primer and passenger door got what i hope is its last. 20150807_174551 by sheepers, on Flickr 20150807_174609 by sheepers, on Flickr 20150807_190243 by sheepers, on Flickr 20150807_190316 by sheepers, on Flickr1 point
-
Same as going down on Al's mum1 point
-
It may be reasonably loud with only one muffler. Just get a small muffler put in place of the big bore and then a nice tip welded on the end1 point
-
Why you no fix vacuum lines1 point
-
Also bought a R32 GTR front lip through Alex/Moonlight racing. My inspiration1 point
-
yeah, pretty good idea, my vespa has a similar idea, but instead of using a disk it uses a notch cut out of the crank itself, which obviously is a bit more of an issue to change, you could possiby use a down draft carb and do a little sweeping curve to feed the port. obviously these days if you were going to make a 2 stroke you'd just fuel inject it.1 point
-
I think the car will cost less to feed than you1 point
-
If I went home with something like that my dad would call me a fool and cut me out of his will. I want to see this fixed1 point
-
that is fuckin legendary. side note, old man had a phone magneto hooked up to silvered toilet seat in one of his flats, handle in wall labelled 'dont turn'1 point
-
Got the new window rubber in. No more wet floor! Bought some semi-sealed beam headlights from Olds Cool Autos and some H4 bulbs. Sooo much better and brighter. That's about all really. New wheels should be here next month, can't wait!1 point
-
Ha ha, yeah, about half the size and half the toughness of a Charger, unfortunately for me. Just got the fabric from ebay, searched for Hokusai fabric. There were a few different types and sizes, these ones are wall hangings i think1 point
-
They do small jobs every day.1 point
-
Don't need duel carb's, just a single works for me. The best thing about an oxford is in a zombie apocalypse they will plow through brick walls and zombies as good as any muscle car but the zombies literally can't see an oxford, it doesn't register on their radar.1 point
-
Don't throw them away or there won't be any for me.1 point
-
Why not both? Early style sloped headlamp and some faded tail lamp lenses non-elephant style (good replacement if you break one, not so good if you want mint ones) some of the little chrome trims where the horn goes, old nokias and some random bearings and stuff.1 point
-
CRC soft seal?1 point
-
Gay. Never did another dual sprint, never made it to Hampton, and the diff drove me friggen nuts, so changed back to a 4.3 cw&p, as I couldn't find another 4.6 anywhere. Also used flash oil, so hopefully I don't cook this one. The only other crap i've done, is have one of the head light reflectors re-silvered, (have to open the other light now and fix the adjuster pivot, gah) Re-did this section of exhaust, as I hung it too low, Pic from only dual sprint I made it to, It was such a lovely afternoon the other day, I went for a dort in the hills, so much fun, and so impressed with the car, its a fucking ninja on crack in the twisties. Made myself very car sick also. Also, I felt bad that my gross Hilux made Dave (and many others, lols) sad, so hopefully this cheers him up. Don't buy budget tyres kids. Regards, VG. //oldschool.co.nz/index.php?/topic/25550-vintage-grumbles-ae86/page-201 point
-
Saw a mongoose like that but never saw a uniden in real life so maybe... if you can bypass it you find out.1 point


.thumb.jpeg.384ff72c8d2b0ee0d34a7bdedb55bdcf.jpeg)


This leaderboard is set to Auckland/GMT+12:00