
Leaderboard


Popular Content
Showing content with the highest reputation on 06/24/15 in all areas
-
I took the longest bits of elm and made them a pretty shape. Now that this 'picture framing' is done I just have to finish cutting up the rest of the elm to make a top. Perhaps in May Most of the rest of it looks shit, but if you squint a bit this corner looks OK14 points
-
Lots of little bits and pieces lately, been collecting parts: some spare chrome trims, a couple of interior pieces and some badges – a rechromed boot badge and a NOS rear quarter badge. Also got some nice new black carpet. The carpets aren't moulded, they're all just shaped flat panels, like lots of mats, so it was easy to cut new pieces and get them all edged. I'll get some pics when the new carpet is in. More excitingly, I decided on a fairly extreme fix for the little tears that were starting on the base panel of my driver's seat. The metallic green colour was going to be pretty impossible to match, so I got a set of slightly tatty seats from a Colt GSR, sporting several shades of green and got them recovered by Greg (64valiant) at Midnight Upholstery. Super recommended, they came out great, can't wait to get them into the car. Before: And after: Decided to try something a little different with the back panels, I think they came out pretty cool. Greg was super easy to work with, real nice guy and the quality of the job done is excellent, definitely check him out for any upholstery stuff you need.12 points
-
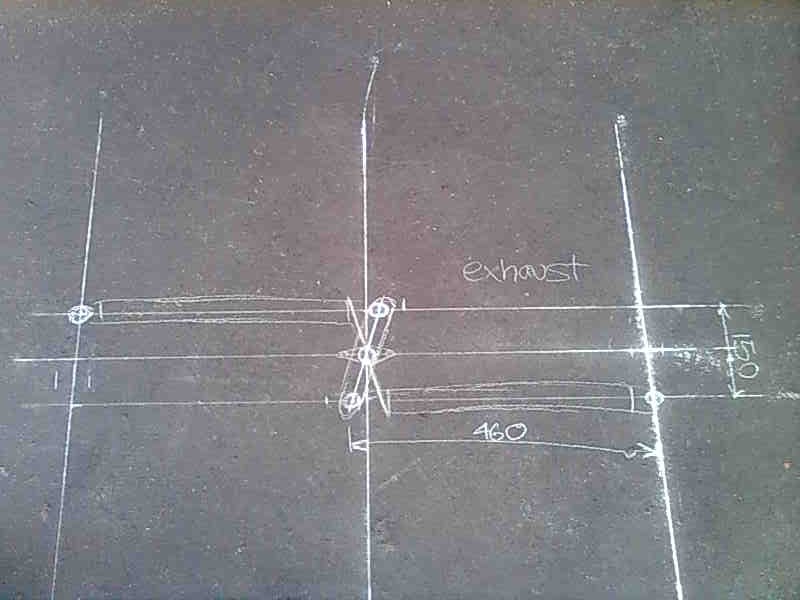
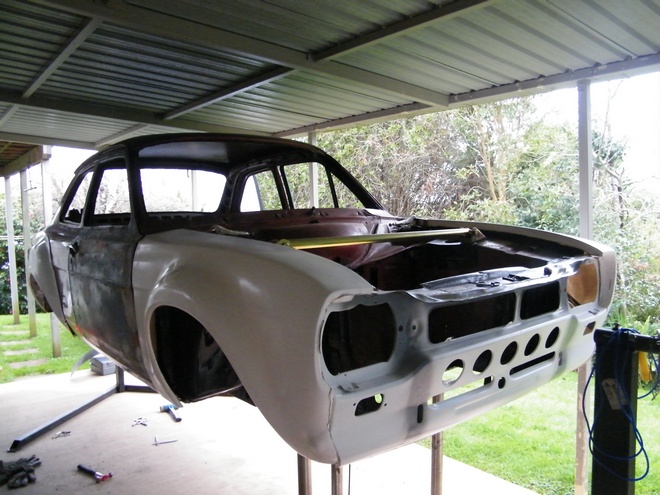
Hey Oldschool! I'm Sam, I've been browsing the forums for awhile now and I've finally got around to starting a thread for my old boat. This is Leila, my '74 Camaro. She's running a small block 350, Hooker headers, Edelbrock intake manifold, Holley carby and Mallory electronic ignition. Idles like theres some sort of cam in there but I don't know for sure, the rest of the running gear is stock apart from the air shockies in the rear. I bought her off trademe 7/8 months ago, she'd been sitting in an old fellas shed as he didn't have the time to drive it. I drove Leila for a couple of months before the brakes packed up and she sat on my folks lawn for a couple of months while I mucked around with my VL and saved some cash for new brakes. Pictured is soon after I bought it home, since then I've changed the wheels as the Cheviots looked too much like modgies to me, and rebuilt all the brake system. She's now wof'd and reg'd and I've been putting a few miles on it. The mrs and I took it to Hanmer last weekend and its also a pretty sweet daily driver. Sure beats sitting in traffic my commodore! Plans for the next couple of months are replacing the suspension bushes, rebuilding the steering, widening or replacing the rear wheels and fabricating a new exhaust system. Please bear with me while I figure out how to create a discussion thread and figure the rest of this forum business out! Discussion: //oldschool.co.nz/index.php?/topic/48915-chasinthemirages-1974-chevrolet-camaro/
 11 points
 -
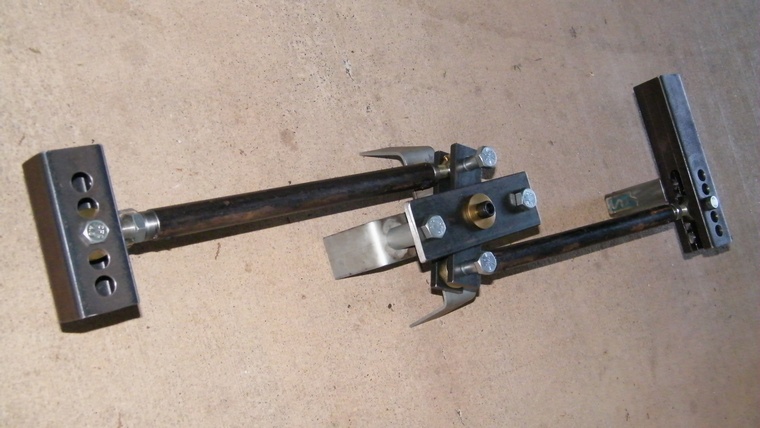
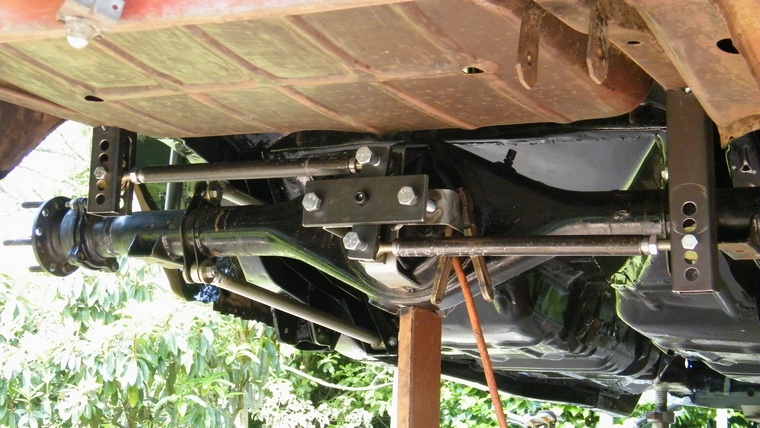
Watt's Link Ideas Concept Trial fit few gussets
10 points
-
1JZ.6 points
-
A table needs leg, which is what the LVL was for, but I was dumb and ordered LVL so big I couldn't cut it with any of my saws properly so I chopped it up into bits and took it to a mate who has access to a big mother planer. I gave him a drawing which my dear friend Mathers helped me with, and here's a leg. I like it. After the legs was done it was time to cut up some rails and dummy assemble the table base. Ummm, yeah. It's pretty big. Ooops5 points
-
Not a heap going on worth taking photos, so havent been updating this. Mainly been working on the tank, whole lota Weld grind weld grind weld blow hole weld grind, that'll do, then tank sealing But all done now, just waiting on it to harden. 96 hours cure time. CAM00423 by Hayden Rowe, on Flickr Drying tank completely before tank sealer goes in, wife loved coming home to this shit! Laura "Yay your baking" Me "When the fuck do I even bake?" open oven, and pull out fuel tank Laura face = Anyway Had been into Boyles all lastweek trying to get the last few pieces of the puzzle. CAM00437 by Hayden Rowe, on Flickr New 520 O-ring chain, CAM00436 by Hayden Rowe, on Flickr New front sprocket, which was the last piece for the drive line, and probably the purchase Im most happy about with the whole build so far CAM00428 by Hayden Rowe, on Flickr Brand new YSS rear shocks CAM00429 by Hayden Rowe, on Flickr Got such a good deal from Boyles Kawasaki. $550 odd RRP, I got them for WELL below half price. CAM00431 by Hayden Rowe, on Flickr Have turned out to be a sweet hook up. There colour combo is a spot on balance with the front end. Black, brushed alley and chrome all tie in with the front end and the whole colour shceme in genral CAM00433 by Hayden Rowe, on Flickr Stocked! CAM00434 by Hayden Rowe, on Flickr and the best part is that there ment for a Harley (no offence to the Harley boys) so now ive got GN250 and Harley parts on this bike. Living the dream! Just need a cam-am to complete the picture. CAM00439 by Hayden Rowe, on Flickr CAM00441 by Hayden Rowe, on Flickr Next up, wait for tank to do its thing, then hand over to Mathers for bog life/ then paint seat order Muffler cut chain to size and fit etc etc etc Cheers Hay-hole4 points
-
Took a sick day today. WOF & REGO'd again, let the fun begin. Coilovers and wheels asap.4 points
-
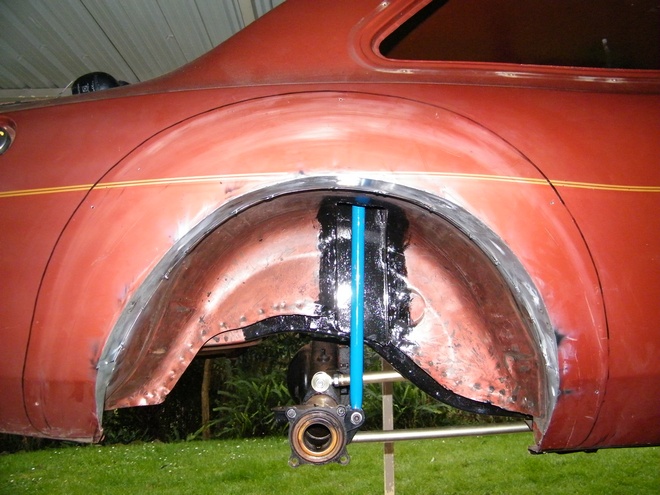
Rust repairs
4 points
-
Lower your asking price on your Cortina. Sell it. Use the money on this. My 2 cents: Cheap RB30E from a VL Commodore. Keep it NA. Spend your money on ITBs and the appropriate supporting mods. DOOOOOOORRRRRRRT3 points
-
^^ it had some pretty nuggety rust marks, I have found a mint rack ... haha mint rack from a dude in Tepuke who dismantles Evo's so it's all looking promising. Shuold have it up and running on Friday with a bit of luck. That's the second steering rack I have purchased from te puke in the last 6 months, i brought a brand new unit for my mini from someone over that way.. cheers to HIGHlux for the contact..3 points
-
I told my mum i was leaving my car in her shed (shes also overseas) she said no so i put it in tgere anyways and got an email a month later while i was on the otgerside of the world asking ke why theres a minor in ger shed and i laughed and laughed Lingout3 points
-
Im an idiot. Rolled up ur drive with Greg earlier.. Glanced at your car and said.. What's that? A charger? He was like ITS A GTO YOU FOUR EYES CUNT.3 points
-
Heres a decent photo of how the rims are looking she aint looking too bad! Was down in Hamilton afew weeks back and found this old advertising banner; thought id put it to some use! also am currently in the process of putting some guard mirrors on it too!
3 points
-
Spent a large amount of time getting these closer to ready this weekend. The wheel centre's took the longest. Removed old clear and hand sanded them to mirror finish. Very happy with the results. Going to look into coating them with something (ideas?) to keep them from oxidising. Yarns -> //oldschool.co.nz/index.php?/topic/47514-ants-tc24-gx71/3 points
-
can go from carpark, can also deliver y'all back there afterwards2 points
-
I'll have the Triumph there so can take three more people with me.2 points
-
2 points
-
If I could redo mine, Id go full fendered slam. Something abit different, everyone cuts the backs off, each to there own, I cut the back off mine too haha2 points
-
Starting a slow and steady build of a early 70's CB100 running full CR 85 suspension.... Will be running a smaller 17in wheel on the front and shortening the forks a little. Maybe someone wants to swap for my 19? Also if anyone is after any cb 100 parts let me know as I'm only really keeping whats in the last picture.1 point
-
I built my fist ever table for a friend last year, and quite enjoyed it, so I thought I'd build an outdoor table for home. I dunno anything about tables, but we live by the sea and I don't like rusty screws, so can't trust anything store bought not to contain inferior fasteners... off I went. I am retarded BTW, but you probably all know that already. First there was the timber. Some elm slabs and a ludicrous LVL post. I borrowed a mate's rail saw to attack the elm slabs. It was pretty choice.1 point
-
Discuss my aircraft carrier on wheels!1 point
-
I have 6 20v throttles. A 1ggze CAS. and plan on using beams Coil on plug with an link atom. Have someone ready to make the manifold too. but motor is last thing as the whole bay will get simplified 300% 6 speed is first major mod after cert as the w55 is horrible.1 point
-
A Predator would be a good choice tbh.1 point
-
Still space for any more attendees?1 point
-
RB24 20 Block 26 Crank and Rods and 4agze pistons PLS1 point
-
MKD, I'm in Perth. Motors are pretty easy to find though, so many copies of the honda setup around. I'm actually going to leave the rear fender on until I've worked out if I can get the rear wheel sitting where I want without cutting it off. Are there steel front fenders available? I like the way the front fender matches the back but id rather have steel, my plastic one is proper fucked and I'm thinking powder coating so steel will be easier to get the right colour. Cheers Matt1 point
-
also ken for a ride to avoid driving around in daily.1 point
-
Find a good condition standard 25det. Get a big turbo, top mount manifold, 3 inch exhaust, front mount, Wrx injectors, link g4. Now the most important part. Take it to Glen Suckling for a tune. 360rwkw /nearly 500hp all day. Too easy. Hahah.1 point
-
Sounds good. I will either be in the daily Rolla or jump in with someone else1 point
-
Why didn't you dowel, dove-tail and glue? No fasteners required. PS. It looks alright, I guess.1 point
-
Cheers for the offer.. I already have it man.. it's good to go Purchase was on the proviso that there was no marks on the surface of the shaft1 point
-
Hey dude me and there on the tree know of a good cheap panelbeater!1 point
-
Ct110 forks will bolt onto this . A buddy of mine has built a hardtail almost identical to this and made a jig to make more . Loving all your inspiration pics . Check out quake city rumblers on Facebook for more stuff and also jonnys speed shop1 point
-
Awesome project ! Look forward to your progress1 point
-
Check out the chain in this pic, it's obvious been sitting for ages Currently completely stripped except the forks, but my phone was full so turns out I wasn't actually taking photos. This is the closest pic I've got. Cheers Matt1 point
-
Count me in, my son and i really enjoyed meeting you guys in Ellerslie last week.1 point
-
I want a burnout video.1 point
-
Welding the tubs Guards Screwed on Next thing to tackle
1 point
-
50mm itb's and big cams roman1 point
-
Update time. Wow! I thought this would be a quick little write up but actually turned into an essay length spiel. Best you put the kettle on... So a fair bit has been going on in our little valley. I've been trying to remember to take photos but usually get carried away and have finished whatever before I remember. I did go up to the ridge a wee while back and take a pretty photo or two of the sunrise. Very nice up there. Cant wait to build a cabin for that place! Coming back down to the truck via the ridge track- Tuis playing morning tunes in the Lucerne tree next to truck. Since getting that lathe in place the shed has been getting used and sort of just evolving in doing so. Things/tools have found a place. With the winter weather it feels cosy- especially in heavy rain. Really needs a wood burner or waste oil burner for the colder days because man can it be chilly in the evening. I will make something but accept that it will only heat up a little area and be hugely inefficient trying to heat it all. Maybe something arond the main bench/lathe area would be good. One thing that we are both stoked with getting is the hoist. We could only afford it because we bought the secondhand lathe instead of a new chinese lathe. The bank balance is getting low as and we ummed a bit about spending the coin on a hoist but so glad we bought it instead of waiting because man its useful! I ordered it from trademe and had it delivered to a Nelson depot. Just managed to squeeze it in the van for a slow trip home which saved on the silly rural delivery charges. Shane came round the next day and helped put up the main structure. It went up pretty fuss free and seems fine for a cheaper chinese hoist. I can see where the costs are cut when compared to a Heshbon etc but its strong and well built where it needs to be. Currently we just plug the hoist into extension cord. Must order appropriate lecky supplies and lights then wire up shed! It dwarfs the Viva. Oh yeah- also note the steel rack we recently built. Was great to get all the steel we have found while clearing the block out of the rain and inside. Stepping away from the workshop we have been busy with many other things. First off we needed to get the ever growing piles of firewood out of the coming winter rains. Into our pile of telephone poles and old iron and we built this. I also nabbed some old wooden shed doors left outside a nelson garage doorplace. Free to take- i like. These I turned into a storage bin for all them little offcuts of wood that are a pain to stack. So now we have some storage but will need more. We have at least 50 pine trees big and small to chop down over next few years. Some in the gullies will just rot or be made into north shore style bike trails. Many we can use to keep us warm. Then that little sailing boat. The sun and the rain wont help it at all plus it was in the way- taking up space I could fill with another old car. So more telepoles and the 6m lengths of NEW iron that had been left in the bush edge by previous land owner came in handy. We built this... (turns out to be also very handy for lawnmower, old pushbikes and bike trailer storage) Meanwhile our neighbour has offered us her field which was overgrown with gorse and blackberry for the past 20 years. We wanted to clear it out so our view was nicer and had been intending to ask her if that was cool. Then she just said one day- hey how about we make it into a fruit orchard. OK ! So it was out with the scrub cutter and chainsaw and with a couple of days hard graft we had it all clear. It looks so much better and the soil is amazing as it originally had two pigs there then getting nitrogen fixed by gorse for past two decades. Next step is to plant it out but for now its just great the have a view with out gorse and masses of blackberry. Before.. During.. After... That little fence we have left up to plant grapes and kiwis on. We are both still very much newbies when it comes to growing things but no being stressy types what grows will grow etc etc Our neighbour- well shes very green fingered and will help us out heaps. Plus there's the nerd net for info. Main thing is I'm enjoying this whole land thingee and planting stuff way more that I thought I would Then there is the track up to our ridge. We had been planning to clear it for ages so a day or so with the scrubcutter and now its way nicer to walk up. Horse and Jen happened to turn up one day whikle there were up here for holiday so they got a tour of our freshly cleared track. We have now almost cleared out the building site at the top where we are planning another cabin build. Not photos of the now cleared track but I did take this one the other evening when we went up to watch the sunset and drink beer. When we got to the ridge a huge deer went storming away from us over the gully. Quite a sight ! What is cooler was the picture on my beer bottle... Speaking of tracks.. Hannah went away on a few days trip with her sister who was visiting. While they were gone I hooked into the start of our first mtb track. We have always planned the first track to head as gently as possible up to the ridgetop- a gentle enough gradient for an easy ride or walk. I really wanted to get something done while hannah was away as a surprise. I cut, dug, raked, carted, stacked, walked, toiled, bashed a track through the Kanuka grove just behind the cabin over two days and built whole first track. I really enjoyed it and worked through till it was almost dark. I was knackered at the end of the second day. Hannah got back from the tramp and I surprised them both with my new track. Its still a touch too steep to ride up easily up so Ive worked out a path for a track that seperates off where it gets steeper and will head back towards the truck then back again. Pretty much..more hairpins = more track = easier gradient (but also = more work....) Big thing getting built right now is our outside bathroom. We have had this planned ever since first viewing the property but had not yet decided on where, what and how. The 'what' bit we have sort of picked away at since before moving here. Discussed over coffee or beer (but not both) we have gone over ideas that have come about from years of using various homemade showers and dealing with a variety of toilets. Fascinating stuff. The 'where' bit sort of just fell in place once the cabin was up in its new location. Its on a slope backed with bush which is ideal for what we envisaged. Situated halfway between the cabin and the back of the shed its in a handy location for us and the cabin and its private with lovely views. The 'how' bit is just evolving as we build. Its an elevated building over composting toilet system. For now its the well proven batch type setup with wheelie bins. Rotated as they fill with a minimum of 1 year composting in the bins before going into a seperate compost area up off the driveway for another 6 months. Then the compost can be used in places like the fruit orchard and areas we are building the native bush back up. From all the reading we have done this is total overkill as far as dealing to any pathogens but hey. No harm there. Its going to be awesome having a decent setup that has a minimum amount of moving shit about, he he, and not have to pay or worry about involving outside services like septic systems. In the future Id like to build our own 'Clivus multrum' style system, a setup that uses a sloped bottom vessel and is continuous in operation. You can buy 1 m3 capacity units made in plastic if you have a spare $4000...which is an absurd price considering our 25000 litre tank cost $2600. I'll use stainless steel to make the structure. But that still involves more pingas and time which we dont have- the latter due to the longdrop filling fast. The grey water will be treated using a reed bed system. This is pretty easy espicially on our type of land because of the clay below. The water will only go down so far and then move along. Moving water through soil is the quickest way of treating it. It does not take many meters before any nasties are dealt to. First off we dug out the bank. This did take quite a while. I had to take breaks and sit down to sip at beer while looking at the mountains. We would take turns at this after Hannah saw how nice that looked. Eventually a large 'void'? was created and funny enough a hill appeared somewhere else. Much of this hill appeared next to the graden because there's some very lush dirt with some mighty fine looking well fed worms in it. Kevin just watched or chased clods down the slope. We also had this fella stroll out of the dirt where we had sadly destroyed his underground lair. What a huge bugger he (or she) is. I released him later further up in the bush but not until Id worked out what brand he was.. Turns out he's of the 'Stanwellia' species- related to trapdoor spiders and quite rarely seen as usually underground. His burrow was massive and we had sliced right through it with the spade. See here for another one.. http://www.nzherald.co.nz/nz/news/article.cfm?c_id=1&objectid=11307026 Then we planted four H5 treated poles set well down into the granity clay below. A thick plastic groundsheet runs up past the decking and right up the walls sealing in the treated plywood clad basement. The decking is insulated below with 40 mm thick insulation and the inside has reflective foil insulation. We want to create a heat trap to keep the interior as hot as possible so promoting a decent heat in the compost. Inbetween building we cleared out the bush around that area. When intially clearing the land last year of gorse we worked up to the bush edge and only so far in. We had left the gorse hiding within because its dying back anyway. But this area was still pretty bad so a few hours and we not only had a lovely little spot but yet heaps more firewood. Some of the old gorse was huge! So much more light into that area and on the bathroom. The pile on the left is gorse from just that little area. Above this we've built a nice solid little bathroom that measures 4 m2. It'll contain sssb - the shitter, a shower, a sink and a bench. Then we built steps using some more of the telephone poles. Its quite high up and we have to allow for our olds etc when they visit so easy to climb steps they had to be. Must build a rail soon because man I'd hate to go trippin off that ledge... We have made a little track through the bush and once tidied up will be a sweet way to walk to the bathroom from the truck. The steps come right down to this track. We picked through our pile of Rimu, picked out some possibly nice bits- possibly because you really cant tell until it goes through the planer. These became window and door frames plus some rafters. When the main shed was delivered the piles of sheets were protected some extra packing sheets in a dark grey colour. There were just enough of them to clad the roof with a decent overhang. Sweet! We still have a little left over for another wood shed too My old boss gave us a whole heap of wood leftover from his house build. All Cedar, Macrocarpa and some Douglas fir. Ideal timbers for building things with! So the Douglas fir we ripped down and planed then made doors with. They are barn style doors and Hannah has oiled them. They look nice. Photos later of them completed but heres a action shot.. Hannah painted the outside of the window frames with paint left over from the housetruck. Then I scored 4 litres of 'mist green' paint from nelson house parts. Its the same colour as the water tank and similar too the main shed. It should help the building blend into the bush nicely. I have a neat idea on an overlay method using random wood to break up what will other wise look like a tall painted ply building. I think it will work well. We will see. Here is the building so far with the primer coat on...1 point
-
Started to swap over my yokes Just need to machine an adapter1 point
-
Diff case almost done. just need to sort out a bump stop setup and make some caliper brackets. Then i cut a hole in it Welded up hole.. Have gained just over 20mm ground clearance. Doesn't sound alot. but its pretty much the same difference as going from 33" tyres to 35's. should have done the same to front when i had it apart.but didnt want to cut that sweet chrome. . Also, Someone in another thread awhile back, was saying how triangulated 4 links bind up with rose joints. Yeh nar nar nar.. only thing its binding up on is the ground.1 point
-
Got all the panels back on . Just need to paint bootlid hinges before putting that on . Will muck around with the dash n try get that in this week n try run a new cable from starter motor to ignition / switch . Also need to finish accelerator set up n bleed brakes . Put radiator in so I can go for a drive up the road Anyhow after a good garage clean this is how it sitz. Pics of everything ! Until next time... Thanks for looking1 point
-
UP date ! Managed to get it all in . Clutch fork in and working. Used 18r auto 3 speed gbox cross member which bolted onto w50 gearbox. I've almost finished my modified accelerator cable set up but got side tract re assembling all my bits n pieces !! Much excite ! Also figured out the springs in the front will need changing a scizzor jacks stuck under cross member ! A picture speaks a thousand words .. Lots more assembling to be done then will sand back some off the car before dropping off to panel beaters to prep for paint. Am hoping to have it finished by August 21st Giving me a week of test driving before hanmer meet !1 point
-
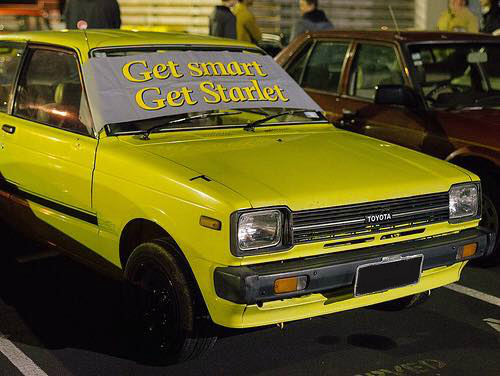
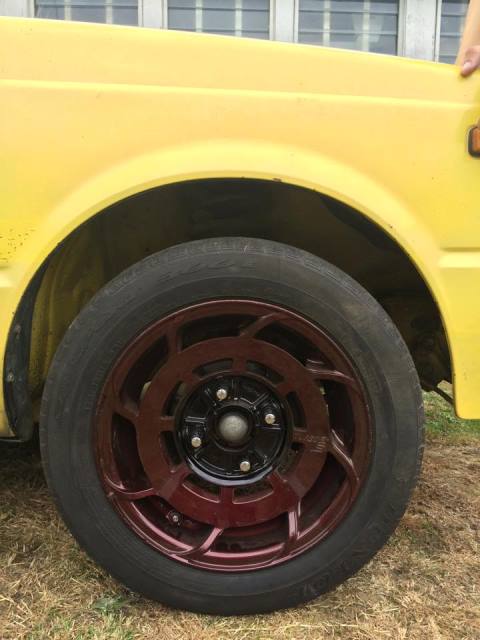
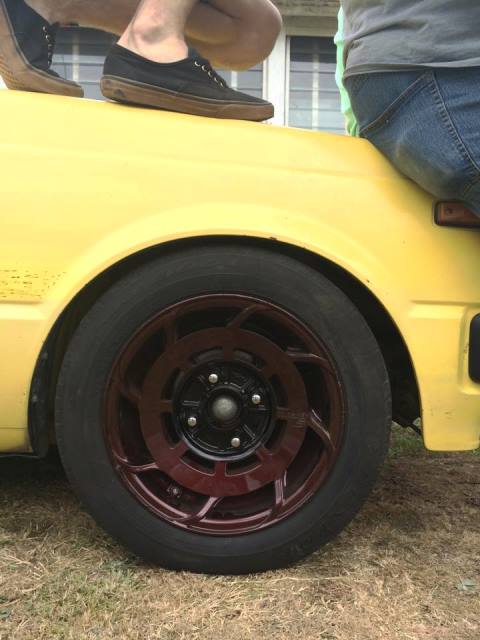
Finally got around to replacing the rear wheel cylinder and fixing a few minor things with that Devon was able to pass her warrant. Shakotom managed to sell the Heros Racing wheels around the same time i came across a set of 14" Manaray Turbina. Went and had a geeze, liked them so I came home with them. I'm stoked with how the actually look on the starlet. JUST NEED MORE LOW! so now i'm seriously going to start to have a look into getting this thing lowered and some new tyres for the rims. ^ would be ideal
1 point
-
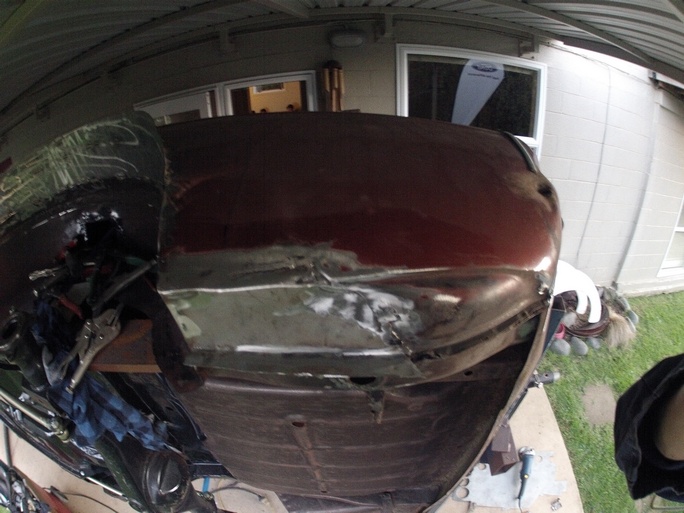
Also, I got sick of the squashy steering wheel so upgraded to this: And this morning some total dickhead was too distracted admiring my car (he claims) that he drove right into the back of it. I was pretty unhappy to say the least. Luckily he was only going slowly, there doesn't appear to be any significant damage, the bumper is snugged up a few mm closer to the body. I'll take it off and make it's all nice and straight but I think it should be fine. Should be addressing the low properly in the next couple of months as it's still rolling at original nanna spec height. Will get new wheels at the same time. I put the weird Uni-Pex wheels on for now, they look okay, but not great, definitely need more width/less tyre wall. Lastly, I really need to get the carbs cleaned up and tuned, anyone know a good carb place? Around New Lynn, Avondale-ish way would be good, or anywhere between there and town where I could drop it off on the way in. Cheers. http://oldschool.co....mitsi-colt-gto/1 point
-
So I bought a whole spare engine for it's extractors, super cheap from a dude who rolled his Colt. Never hurts to have plenty of spare parts I guess… Turns our the extractors were pretty rooted, cracked in a couple of places and evidence of some previous repairs. So I got a set made up, they look like this: and the rest of the exhaust replaced, now 2 1/4 all the way through, lets the Astron breathe a bit better. Here's a terrible photo: with a nice little double tip: The whole set up sounds great, really nice rumble without being stupid loud.1 point
-
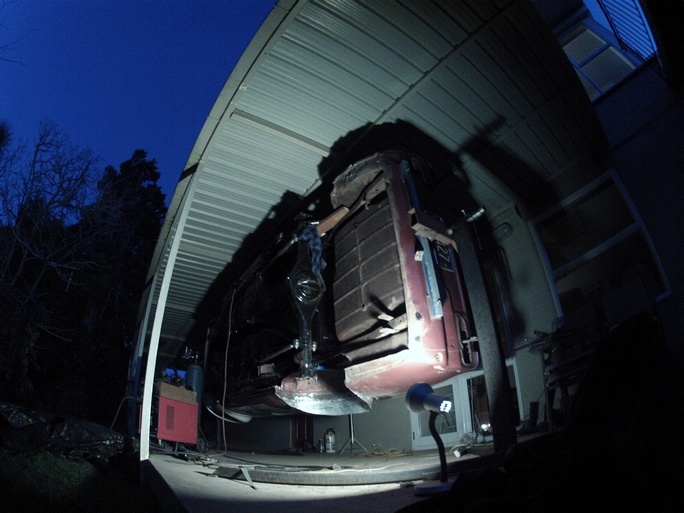
Not much been going on with this lately, just lots of little bits and pieces. Installed an alarm/remote central locking, new stereo. I think the stereo looks pretty good (better than the silver Kenwood tape player that was in there anyway), suits the style of the car well. You can see where I put the LED for the alarm at the bottom of the second pic Managed to get a new indicator lens to replace a cracked one. Apparently near impossible to find, after months I eventually got one by fluke — PartsWorld in Timaru had one that the label had fallen off, so they didn't know what model it was for but the part number on the lens matched the old catalogue number and it's a perfect fit. Not flawless condition, has a couple of scratches but no cracks and it polished up nicely. Before: After: I've had a few more bits and pieces arrive lately. Top rubbers and brush seal strips for the side windows and then this little NOS item from the States: My rubber steering wheel is a bit rooted, the rubber is soft and collapsing, so I was pretty pleased to find this proper leather replacement for less than the cost of getting my one re-wrapped. Also, while the car was clean I took it out for some night photos.1 point
-
I took the louvers off the other day. They're handy in summer for keeping the car cool, but make it a pain in the ass to clean the rear windscreen/see anything behind you. I think it looks a bit more slick and streamlined. Also making slow progress on the wheels, some more before and after:1 point


.thumb.jpg.b5491dbec1053270a4d99ed376fc2c36.jpg)


This leaderboard is set to Auckland/GMT+12:00