
Leaderboard


Popular Content
Showing content with the highest reputation on 15/09/24 in all areas
-
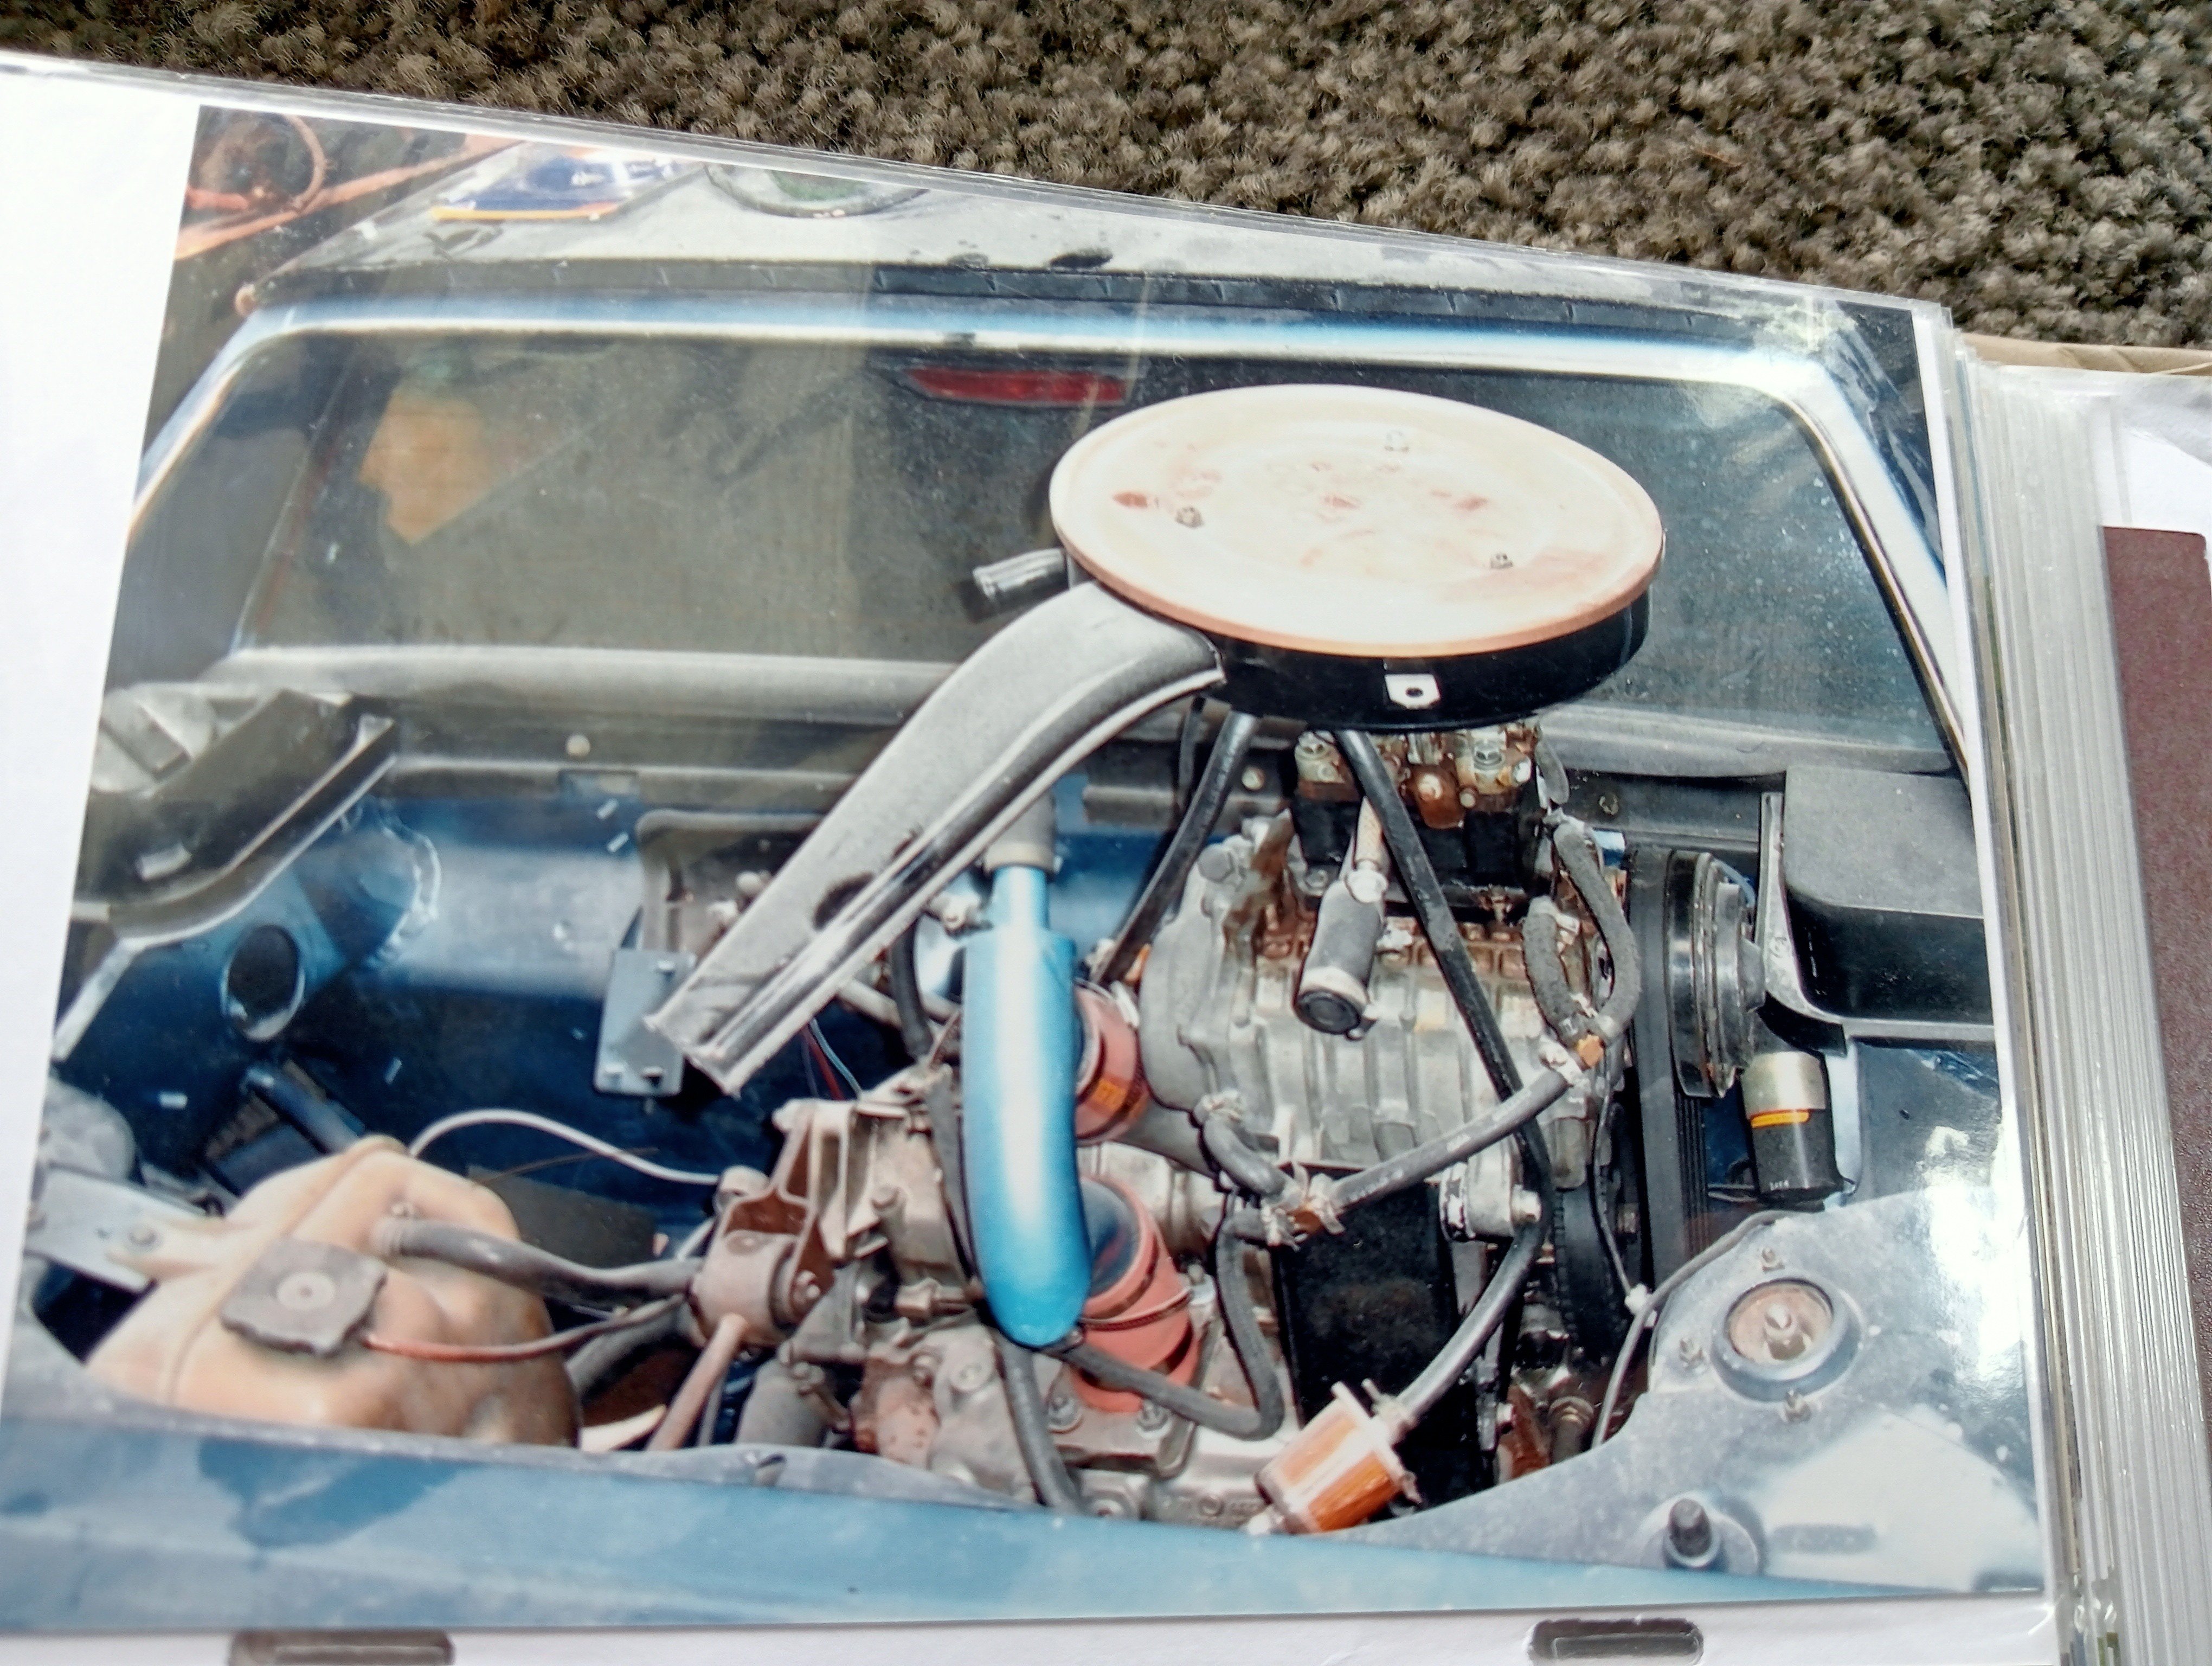
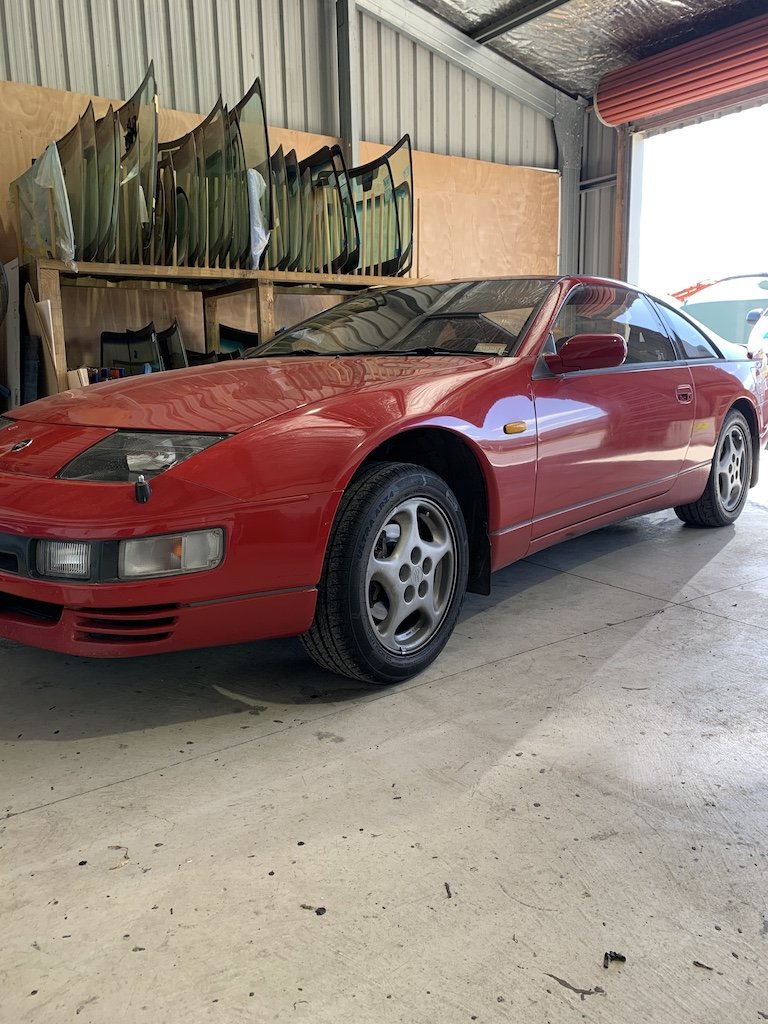
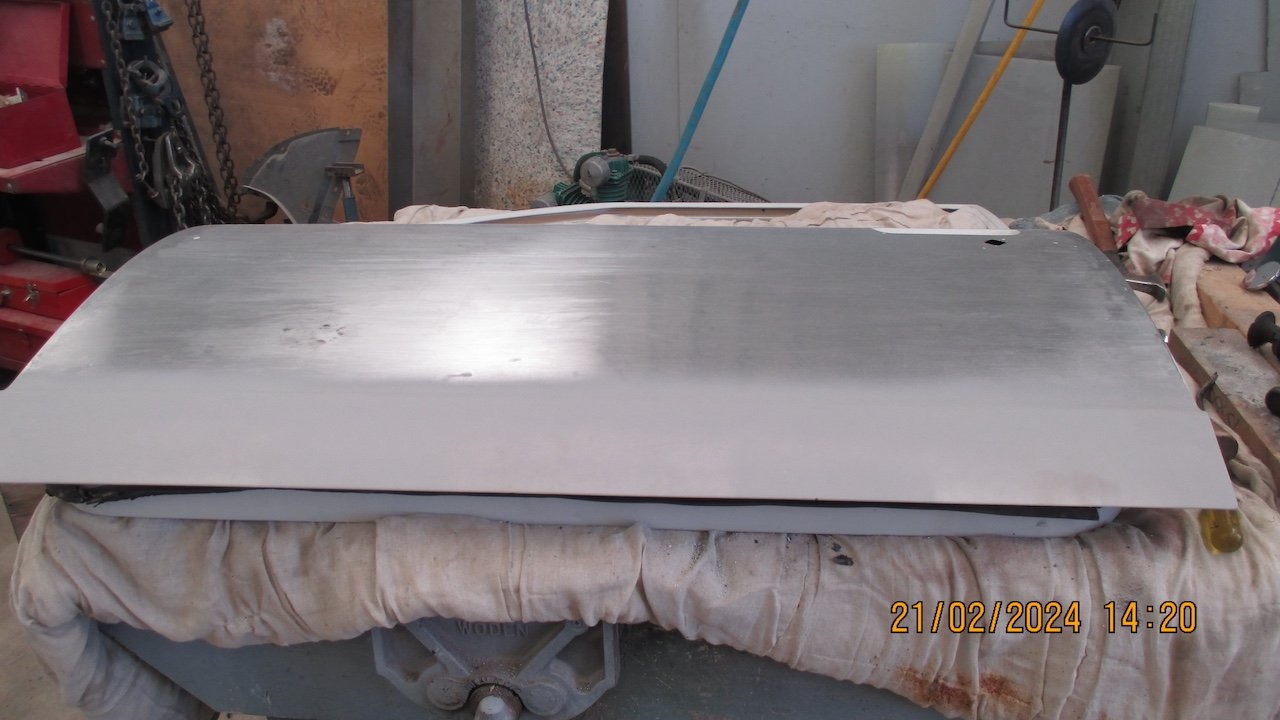
Some things have happened in the past 2 years since the last update. Have gotten a few wofs in it and taken it a few events around the place. It's basically "finished" now! Had the upholstery redone over the course of a year or so. Got the seats and door cards done, then a while later eventually got the carpet done. Because the NZ new spec Starlets came with the bare basic interior, the door/rear quarter cards needed some stainless trim to make them look a bit more up-spec. A quick road trip to Horopito and a search of their inventory, I came across a set of Zephyr side trim that could be cut and welded to the appropriate length, and then polished up. After hours of searching for the correct colour schemed tartan and where to acquire, I managed to order a roll from England and then matched up a tan vinyl to suit. Huge thanks to Mark D for doing the upholstery! Stoked with how it turned out. Took it to 4nR Jamboree and took out Best Toyota Drove around Autofest at Manfeild Made some KP friends Entered a Manfeild back-track drift day. Went really well all day with the thrashing it received, no issues, other than the lack of talent behind the wheel haha. Changed to some Bugeye tailights at some point too. Currently featured in the latest NZ Performance Car magazine (issue 310). Happy as with what @Snoozin and the NZPC team pieced together!28 points
-
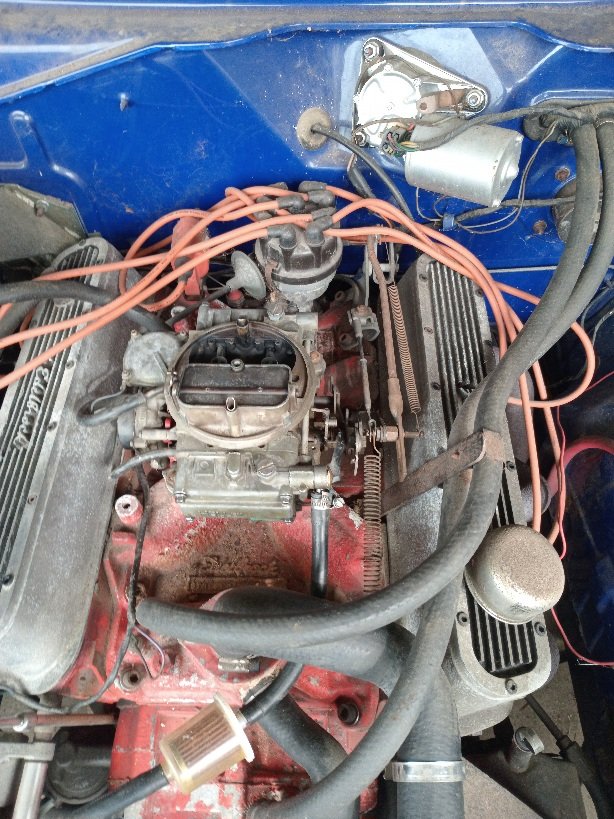
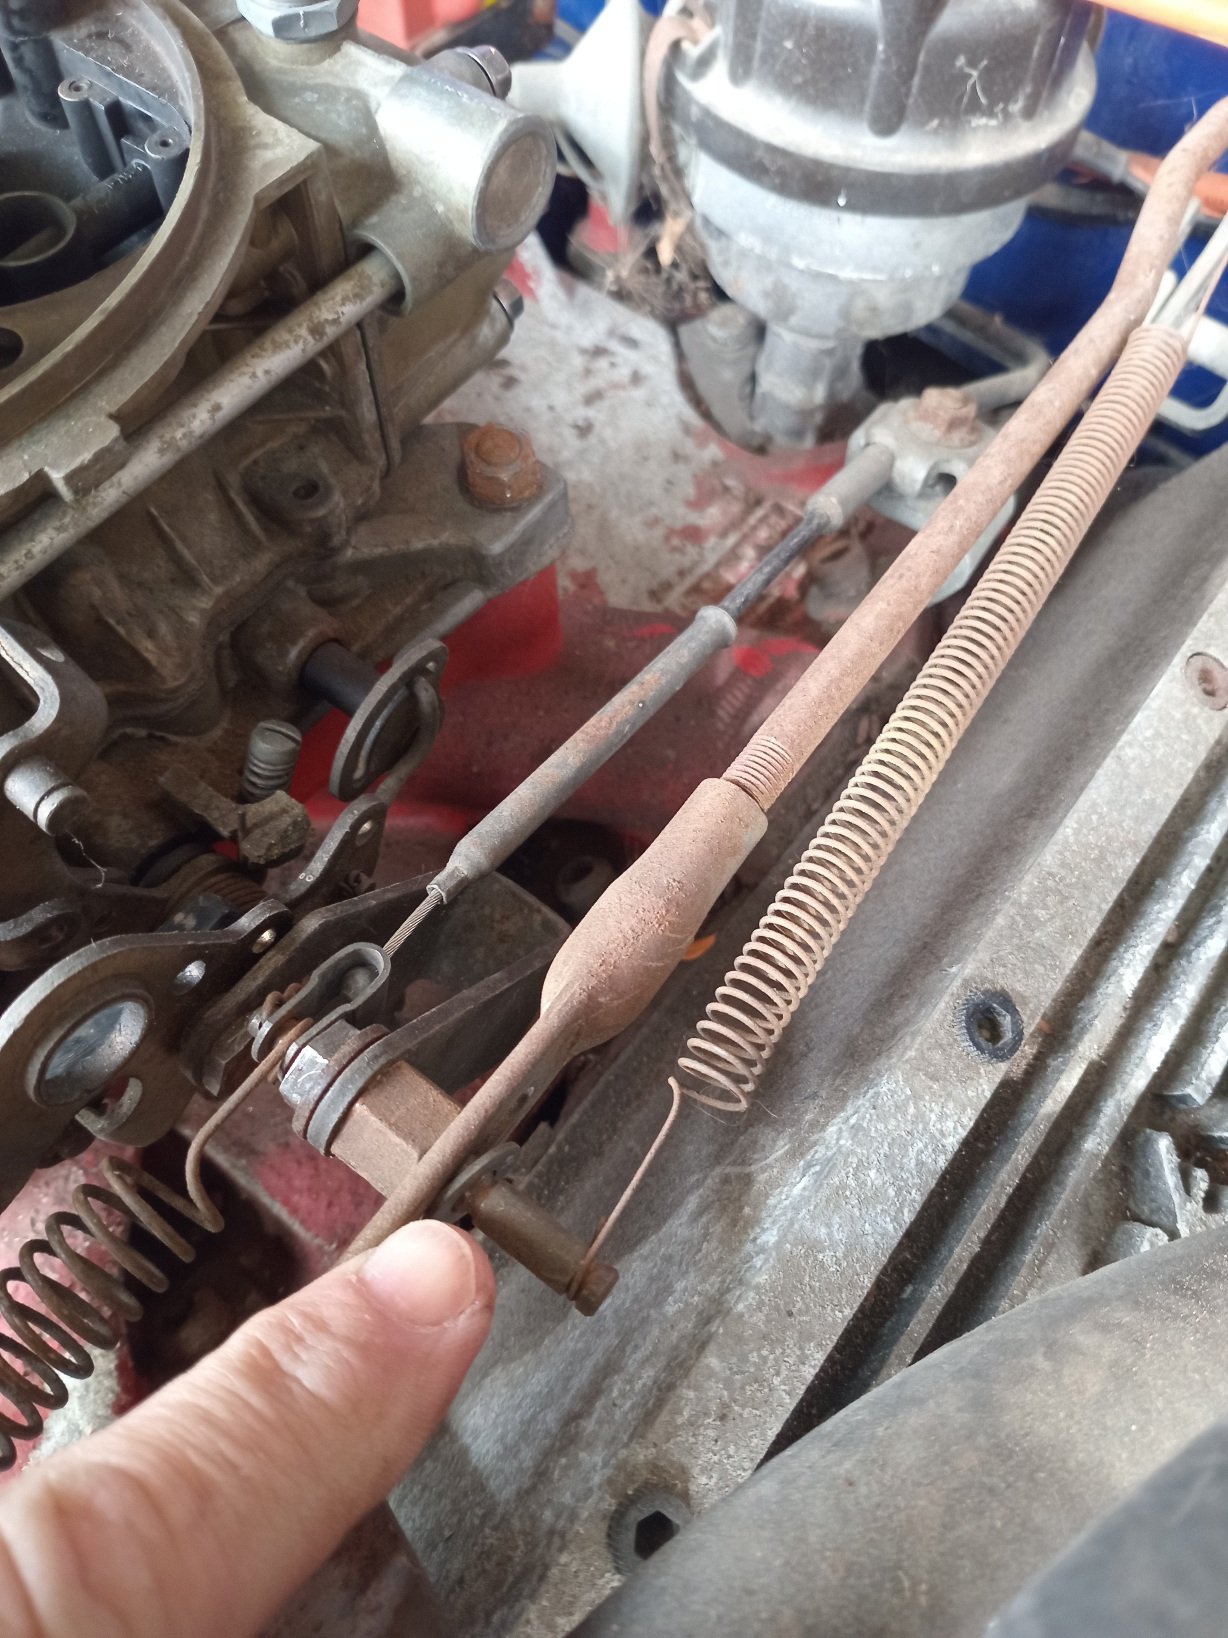
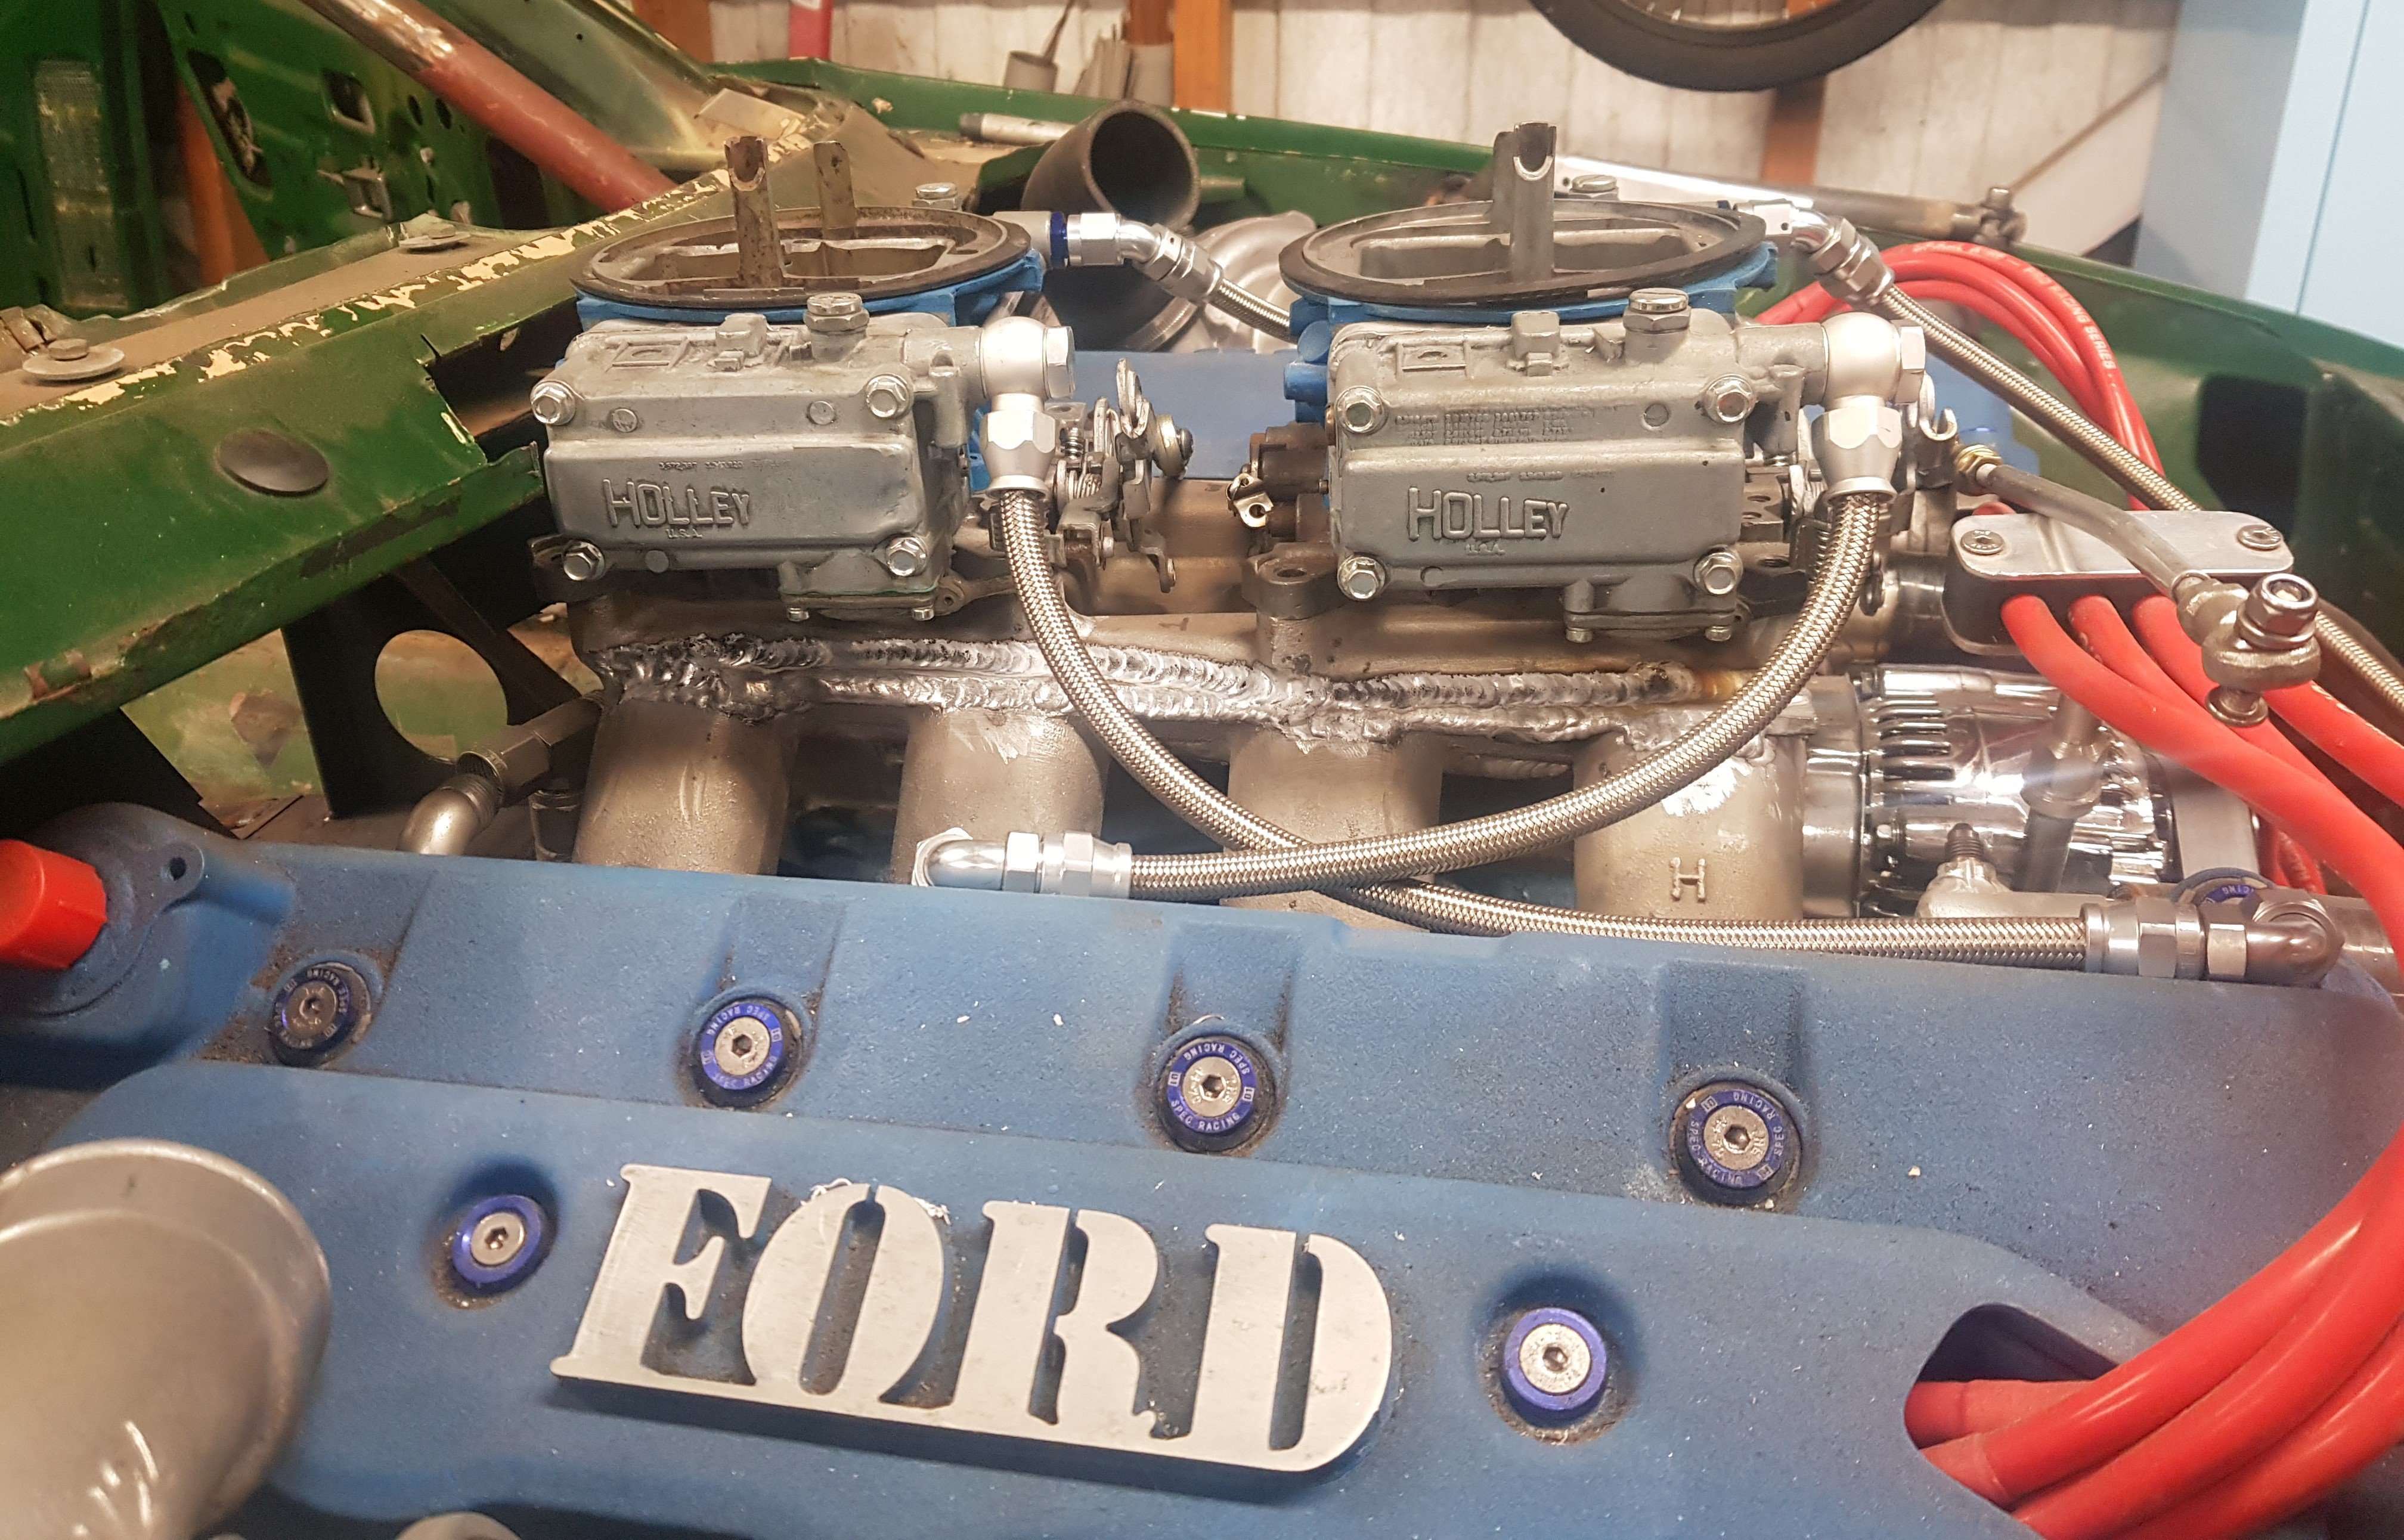
Carb reinstalled to engine. Unfortunately when I removed the carb, the E clip that holds the kickdown arm in place pinged off to never be seen again land. So a new one will have to be acquired.
 9 points
 -
Those of you that have been following along on my journey may have noticed that my van has an insatiable appetite for distributors. So just to refresh everyone's memory here is a brief history: Distributor 1 - a conventional points based distributor sourced off eBay for around $100 which lasted less than 50km before the shaft disintegrated. Who would ever have thought. Distributor 2 - an original Toyota points based distributor that I fitted all the eBay distributor's internals to and that lasted 440km before dying a sudden roadside death. Again no surprises there. Distributor 3 - distributor 2 fitted with Repco's finest replacement condensor which managed an incredible 87km before giving up. Distributor 4 - an aftermarket Chinese manufactured electronic distributor sourced earlier this year from a reputable Australian based supplier that managed an impressive 1106km before calling it a day. And that pretty much brings us up to date. So a little more detail about distributor 4. When I fitted it the van ran okayish, but seemed a little down on power and quite a bit heavier on fuel. I also noticed a slight hesitation at low revs which got progressively worse towards the end. Then about a month ago while out enjoying our usual Friday night burger run the van wouldn't start. A quick diagnosis and no spark at the plugs. Luckily we were close to home so I left Mrs Flash and our wee dog in the van and walked back home to fetch the Moke. Got back to the van just as the sun was setting and phoned my mate Steve the towie. Steve was attending a BBQ and I felt bad disturbing him so told him I'd make another plan. I had a towing strap with me and considered using the Moke to pull the van home, but something prompted me to give the van another go and she fired straight up. Mrs Flash climbed in the Moke while I nursed the van home. Although running the engine was behaving rather badly with a misfire and she wouldn't rev at all. We stumbled along and finally made it home. Next morning the van fired straight up and rev'ed cleanly ... WTF. Next day ... wouldn't start and again no spark at the plugs. So at that point you can imagine I'm cursing like a sailor while trying to figure out my next move. Knowing that new Toyota units are no longer available, I figured that the next best thing would be to get my hands on an original Toyota unit that I could have professionally rebuilt. Now it just so happens that I have this little puppy in my stash of parts: Looks well used and the shaft was almost completely seized on it, but it is a factory original and I figured that someone more knowledgeable than myself could bring it back to life. My first stop was the auto sparkie in town. Bruce is old school so I figured he was a good bet. Sadly he informed me that he no longer dabbles with distributors. Bugger... Back home I hopped on the Google and discovered a place called Performance Ignition Services based down in Victoria. Dropped them an email with a few photos including this candid shot of the dizzy with its pants off: Got a friendly call back from one of their technicians to confirm that they could rebuild it for me, so I popped it in a box and dropped it in the mail. And that brings us to this Friday when a parcel arrived containing one much healtheir looking factory distributor. So after removing my faulty a/c compressor in anticipation of the arrival of it's new replacement I cracked straight into the fitting of the dizzy. It fitted easily enough and the van fired straight up, but when I came to set the timing with my light I discovered that for some reason I didn't have full adjustment. Moving the distributor housing clockwise was causing something to jamb up despite there being plenty of travel left on the slotted mounting hole. WTF.... On closer inspection I discovered that the outer corner of the integrated coil pack was snagging on the hard fuel line. Pulled the dizzy out again for a closer look at the fuel line and ...... Some numpty had mounted the fuel line too high up by using the incorrect hole on the arrowed mounting tab resulting in the circled portion of the hard line being higher than it should be. That line has been like that forever, so it's funny that this didn't cause any hasstles with the aftermarket dizzy. Anyhoo, pulled off the nut, wiggled the bracket down into the correct position and reattached the nut: And now the hardline no longer clashes with the dizzy. Slapped her back in the hole, tweaked the angle till my timing light was happy and she runs like a champ again. Couldn't run it for too long as I still have the radiator out, but I'm hoping that my dizzy woes are finally over. Thanks for reading.
7 points
-
Awww yeah, all fixed up and clean again!
6 points
-
It's idling at 600rpm now and drives like it's stock again. Exhaust rattles are getting picked up as knock and pulling a little timing in the 300rpm it occurs, so that's interesting. using it to run around today it's driving so nice apart from the ride is a little harsher than I would like over the shit Waikato roads. Oh and trans flares on part throttle WOT is solid as on power mode it's fine.5 points
-
I pulled the rear valance off the green menace, like actually pulled it off as it was so rusty I didnt need to undo bolts. Gave it a lick of paint and bolted it up to the blue meanie, came up nice. I drew up some more random shit, this time the little caps that go at the end of the top inner door trim, this was for Elliot but the X community at large was pretty happy about it. Speaking of Elliots black bitch, he came around today with some lowering springs and some new rear shocks, I smashed those in while he removed the heater so we could replace the tap and make it work...the springs took a 1/3 of the time the heater project did. I forgot to take pics but the results are pretty great. He is fucking stoked. Also, some artfully arranged X1/9's;5 points
-
reminds me of sledge hammer's loudener
4 points
-
I couldn't get any decent pictures due to how tight it is behind the motor. But I managed to connect the SR20 heater pipes on the motor to the heater on the car. While the motor was out, I'd had reducer tails easyflo'd into the pipes. (Due to the silvia heater hoses being one size up from the datsun ones) the angles and shapes involved in getting from A to B so impossible, that everyone well meaning advise of "just go to repco and find something off the shelf that fits" was not an option. I ended up using a bunch of shorts, with elbows where it changed direction. It's ugly as fuck, and 100% not the right way/best practise to do it. But I ran out of fucks. And it's done now. Once that ordeal was put to bed, I was finally able to install the booster, and brake and clutch masters. The clutch is all bled up, and (with a bit of help from miss 12) I've seen the fork move as intended. I had a crack at bleeding the brakes too. There's a pedal, but I'm not 100% satisfied if feels right. (No matter how much brake fluid I've bled through it) I intend to revisit this once the engine is running, and it's getting some vacuum assist from the booster. Pic of refitted parts. I've also engaged an auto sparky about coming to lend a hand to knock over the last 10% of the ecu wiring too. (He's penciled in for next weekend)
4 points
-
3 points
-
Also this is what the green menace once looked like, check the fucking epic supercharger setup!
3 points
-
My signature exhaust tips
3 points
-
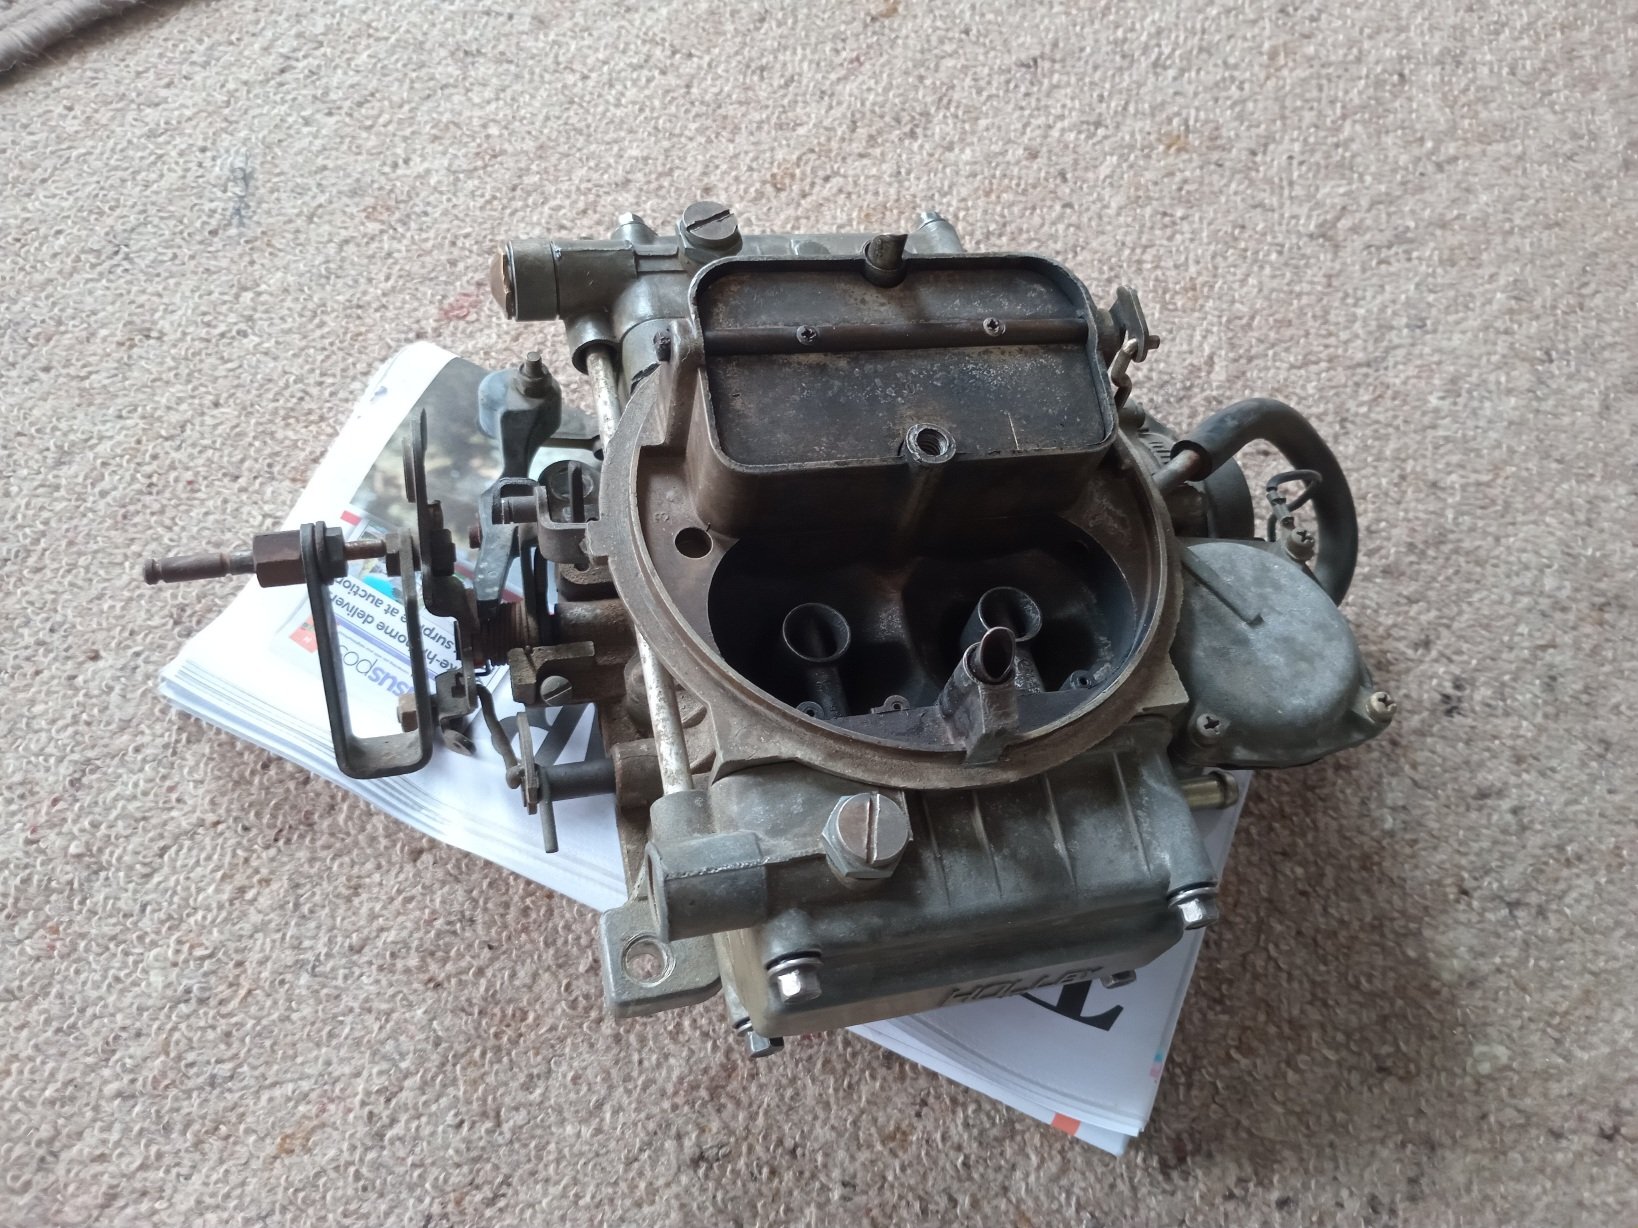
Got the carb back this afternoon. All freshly kitted and ready to sprinkle atomized dinosaur juice down a hole where it will meet its firey doom.
3 points
-
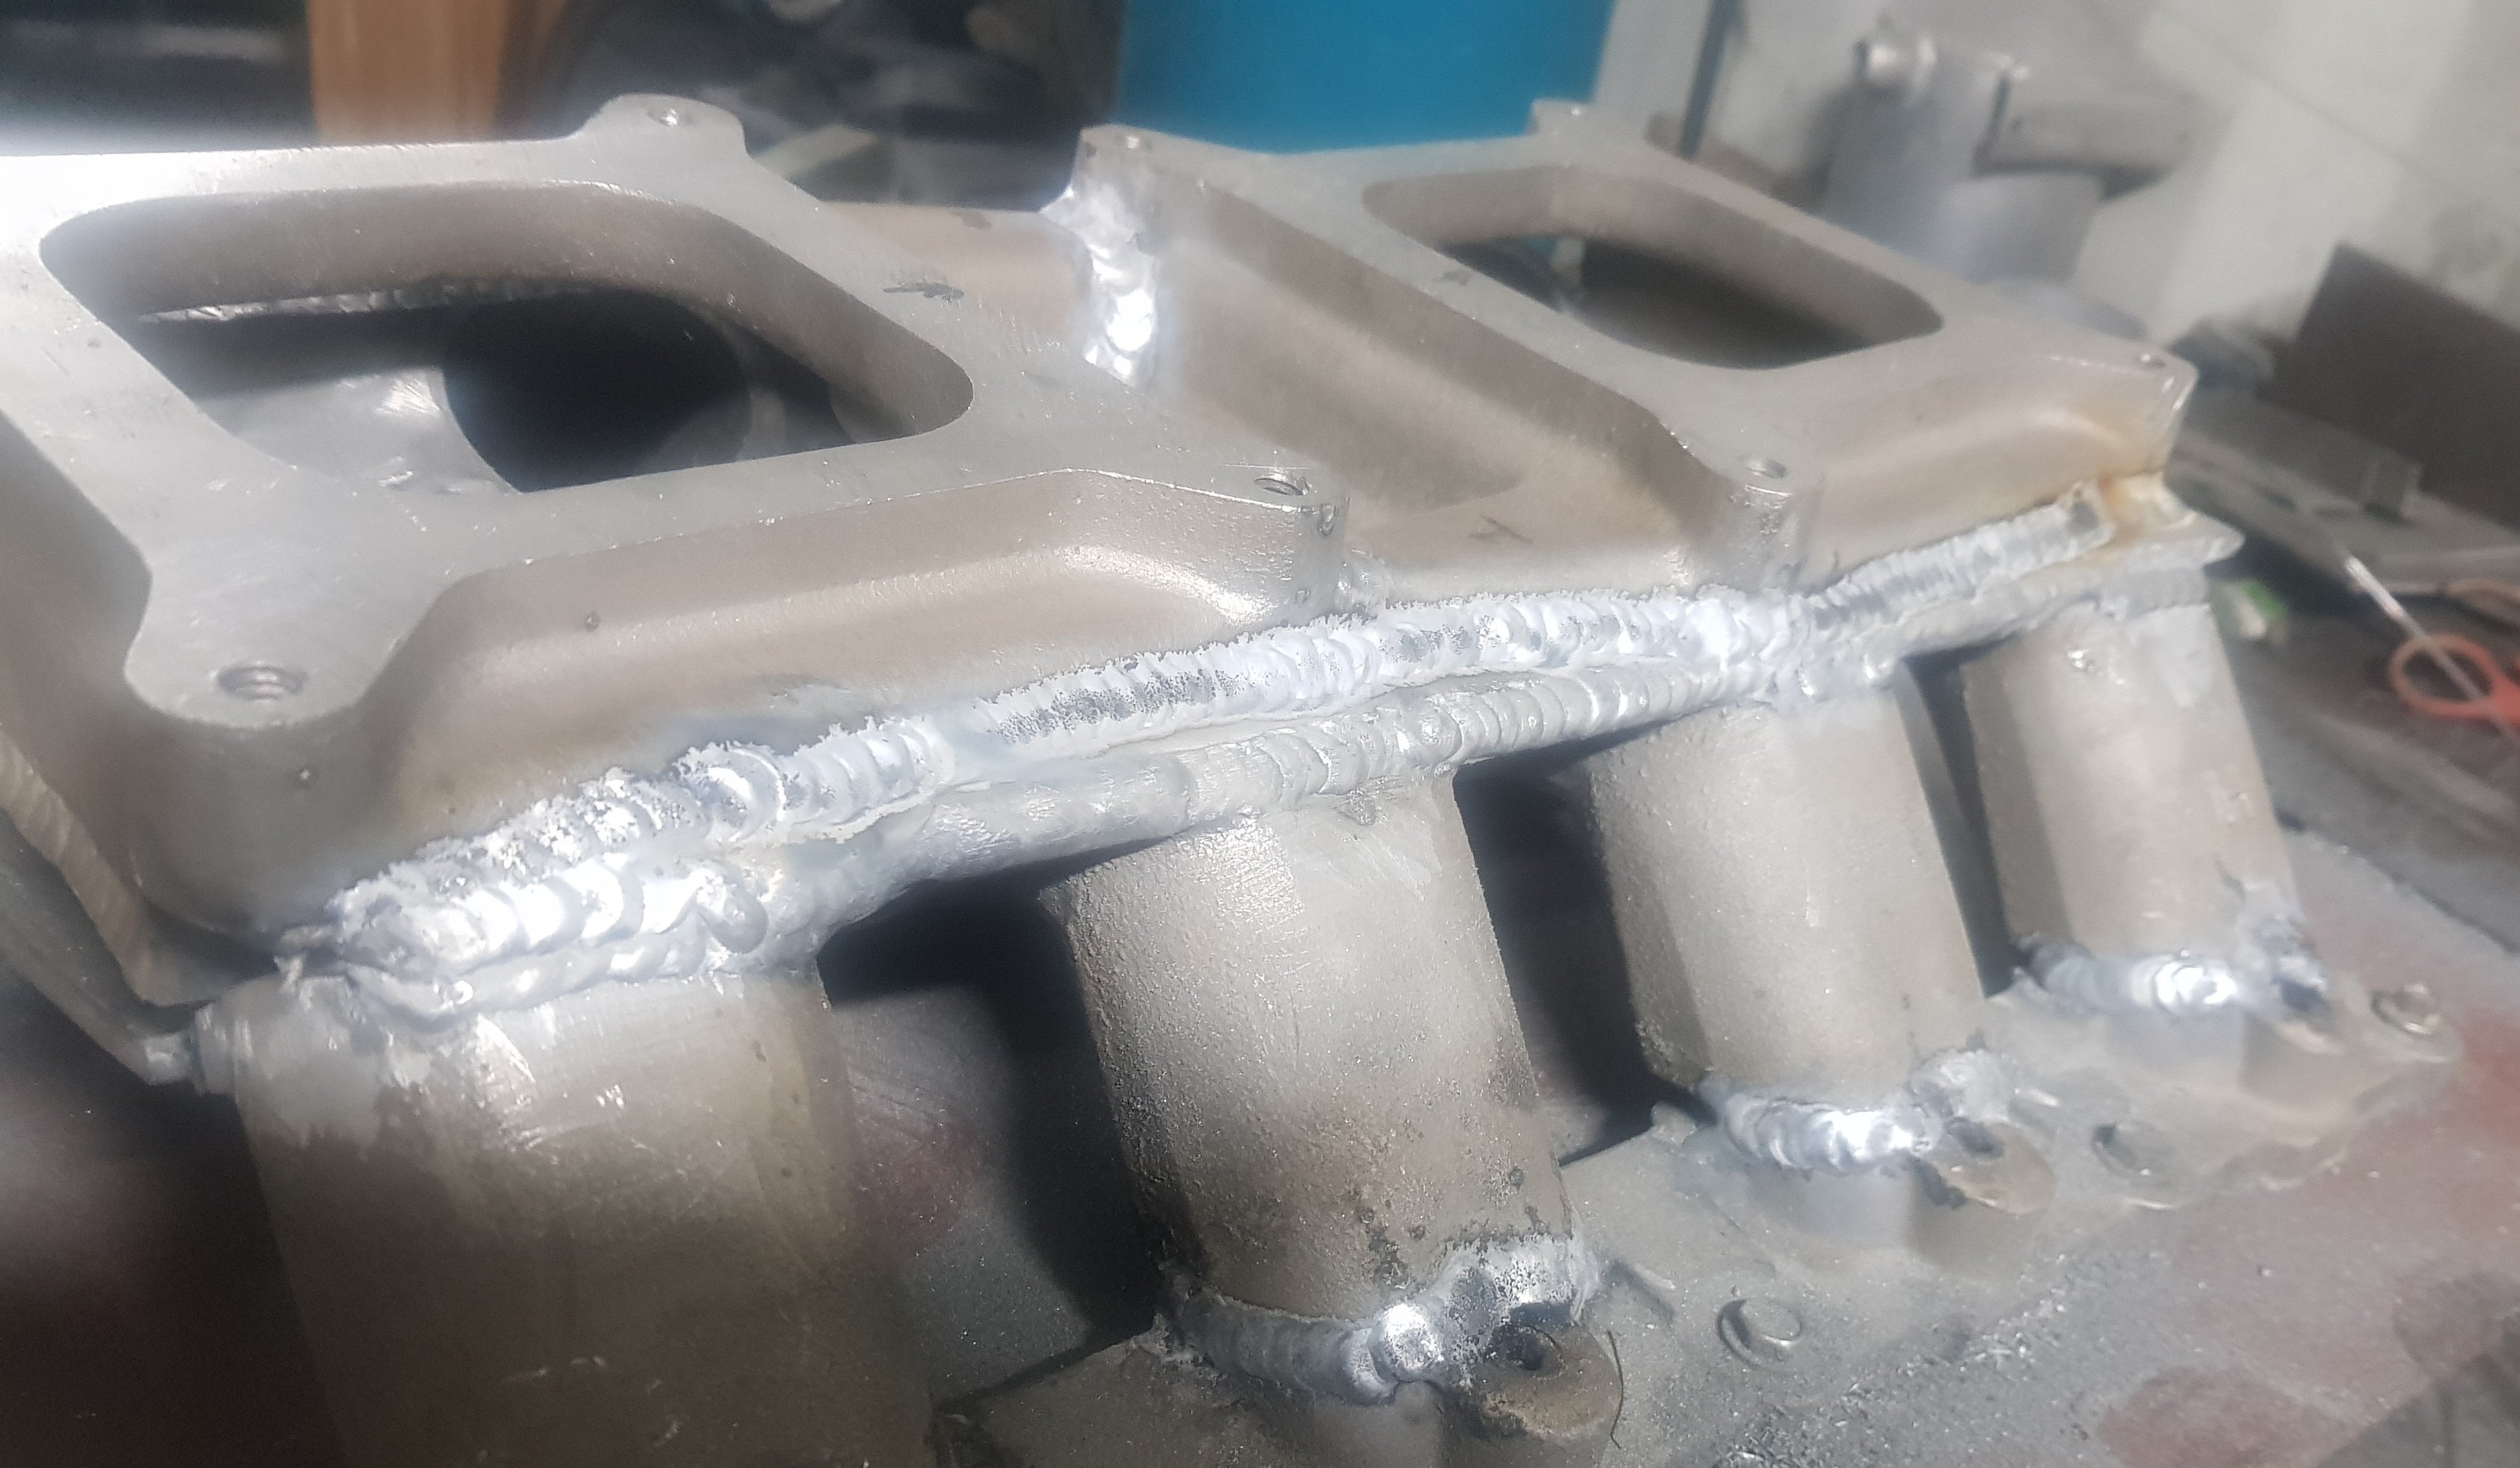
Then it was all welded back together: It's not quite finished yet. The welds will be smoothed off and the manifold sandblasted to give a 'cast' effect. It will also need to be faced top and bottom after all of those heat cycles. The work has dropped the total height by over 75mm which makes it far more 'bulge' friendly:
3 points
-
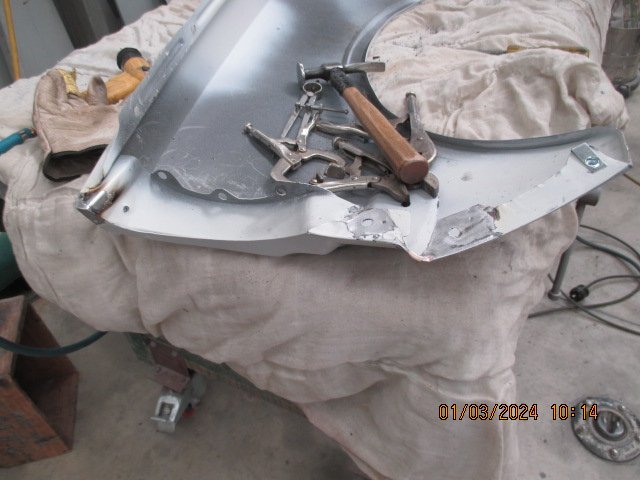
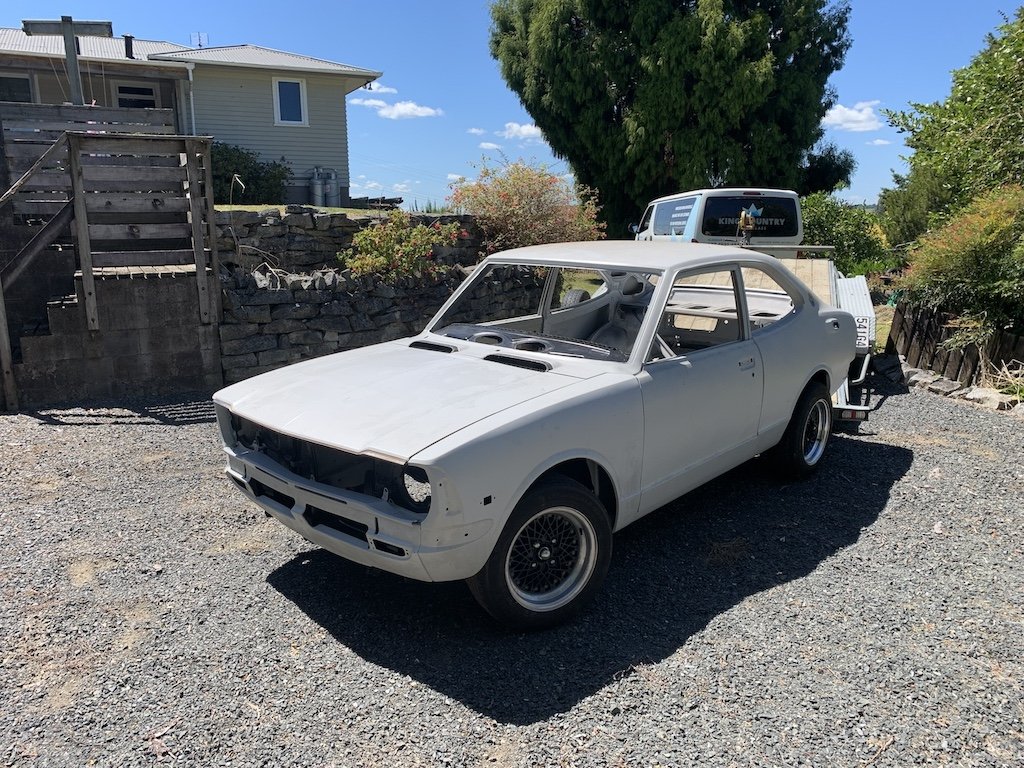
Took it to Keith Stewart to go on the dyno to be run in and get a tune put on it. Had zero issues, made 120.6hp atw. Will get some km's on it and take in back for a fine tune, should still have another 1000 or so rpm in it I'd imagine! Made an aluminium sump bash guard and that finished off everything on the underside. Couldn't find any good bumper end caps, so I drew one up in solidworks and my brother 3D printed out a couple to take some moulds off, so then we could make some fibreglass ones. Pretty happy with how they turned out! Far tidier than the old warped and cracked factory plastic ones. Had the bumpers, grill, headlight surrounds and fender mirrors painted in a metallic grey very close to the factory colour. Installed some NOS park/indicator lights that I got ages ago and put the bonnet on. That basically finishes off the exterior! Cert next!3 points
-
Old guy that owned checkered flag motors is long gone and was not the most honest guy so I’d say any paperwork was “lost” when they closed2 points
-
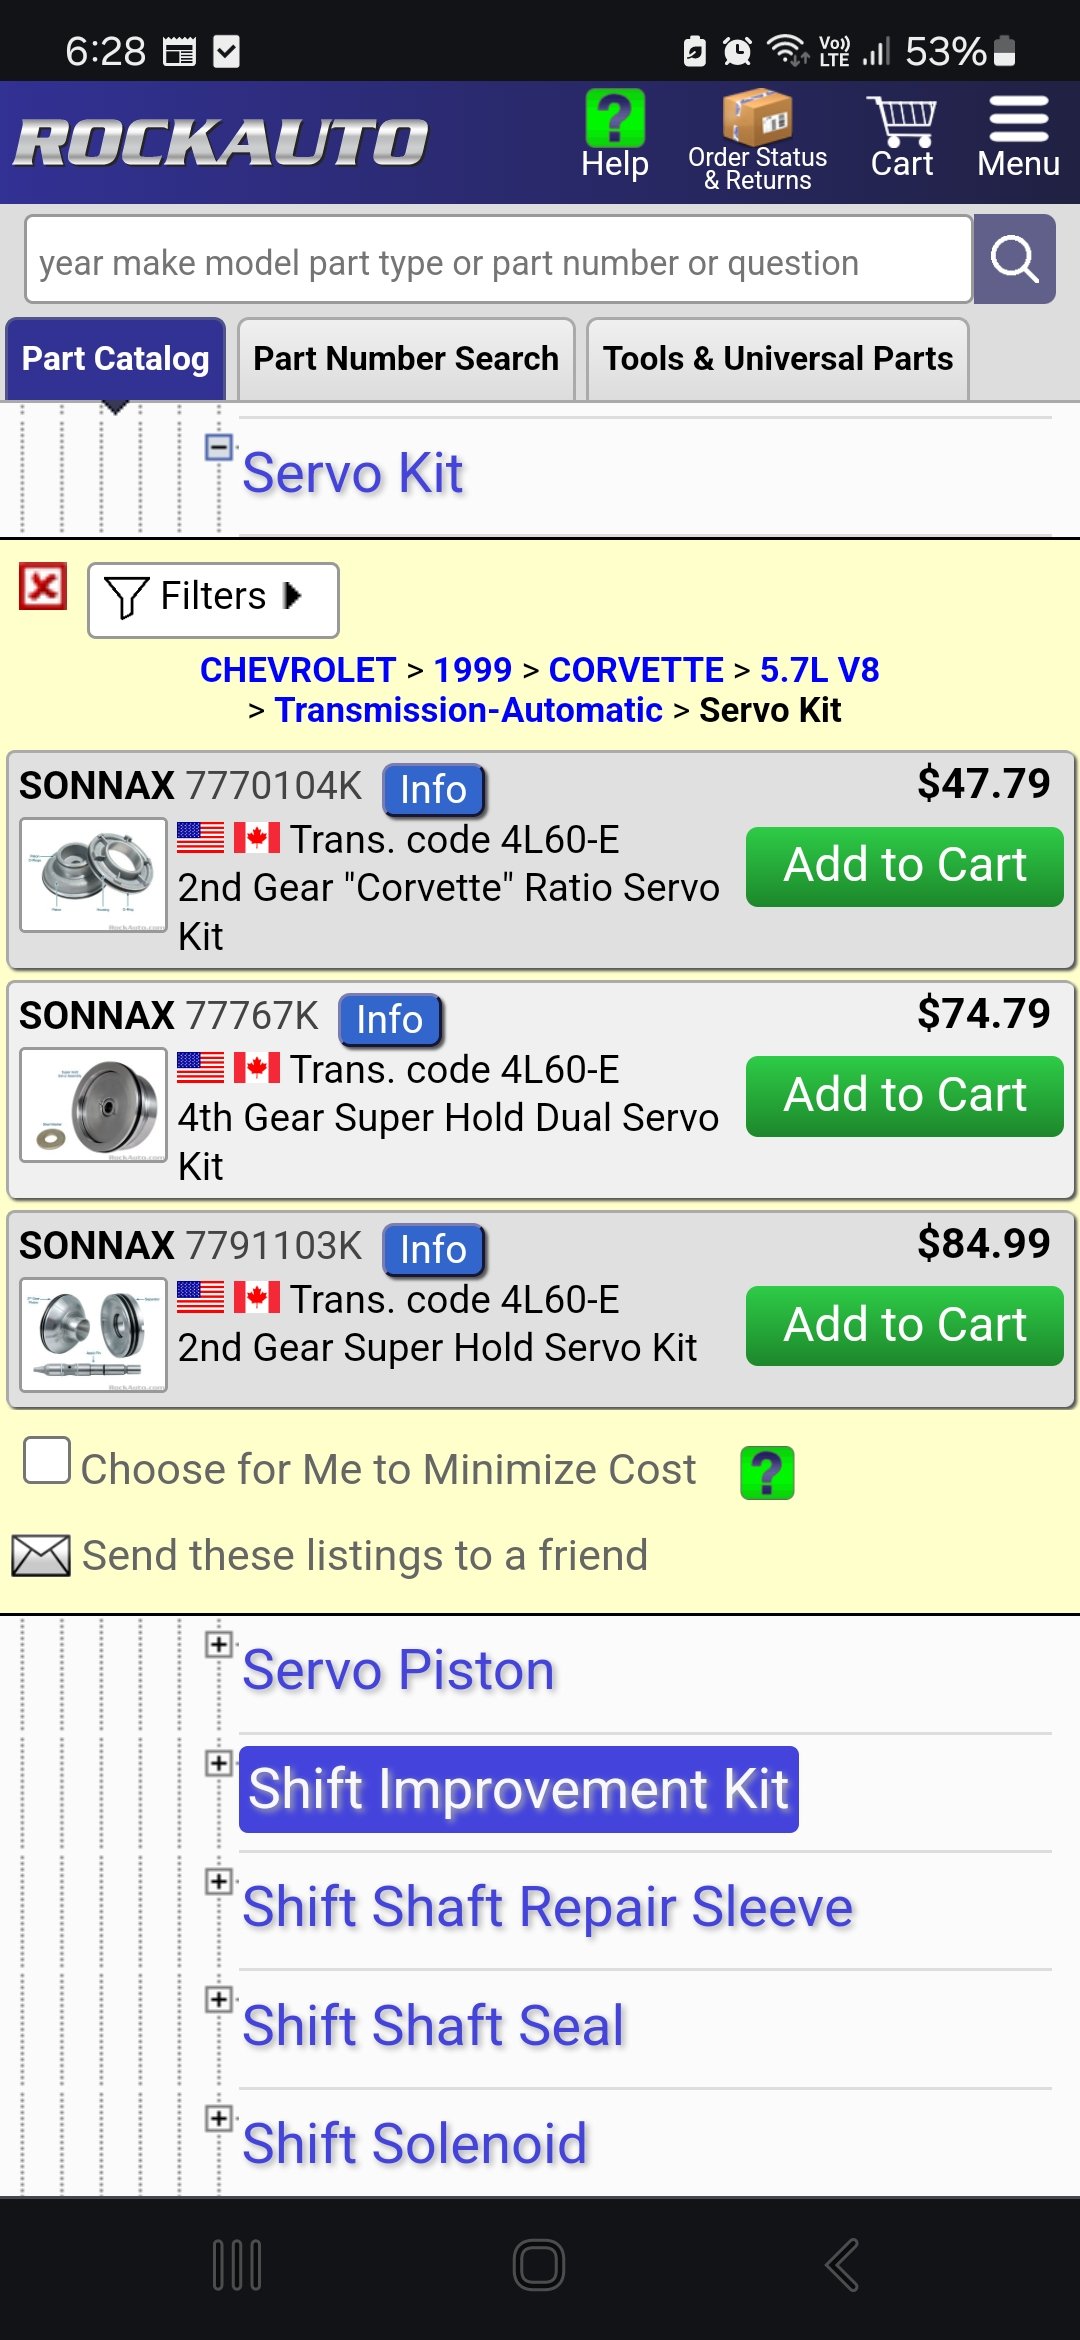
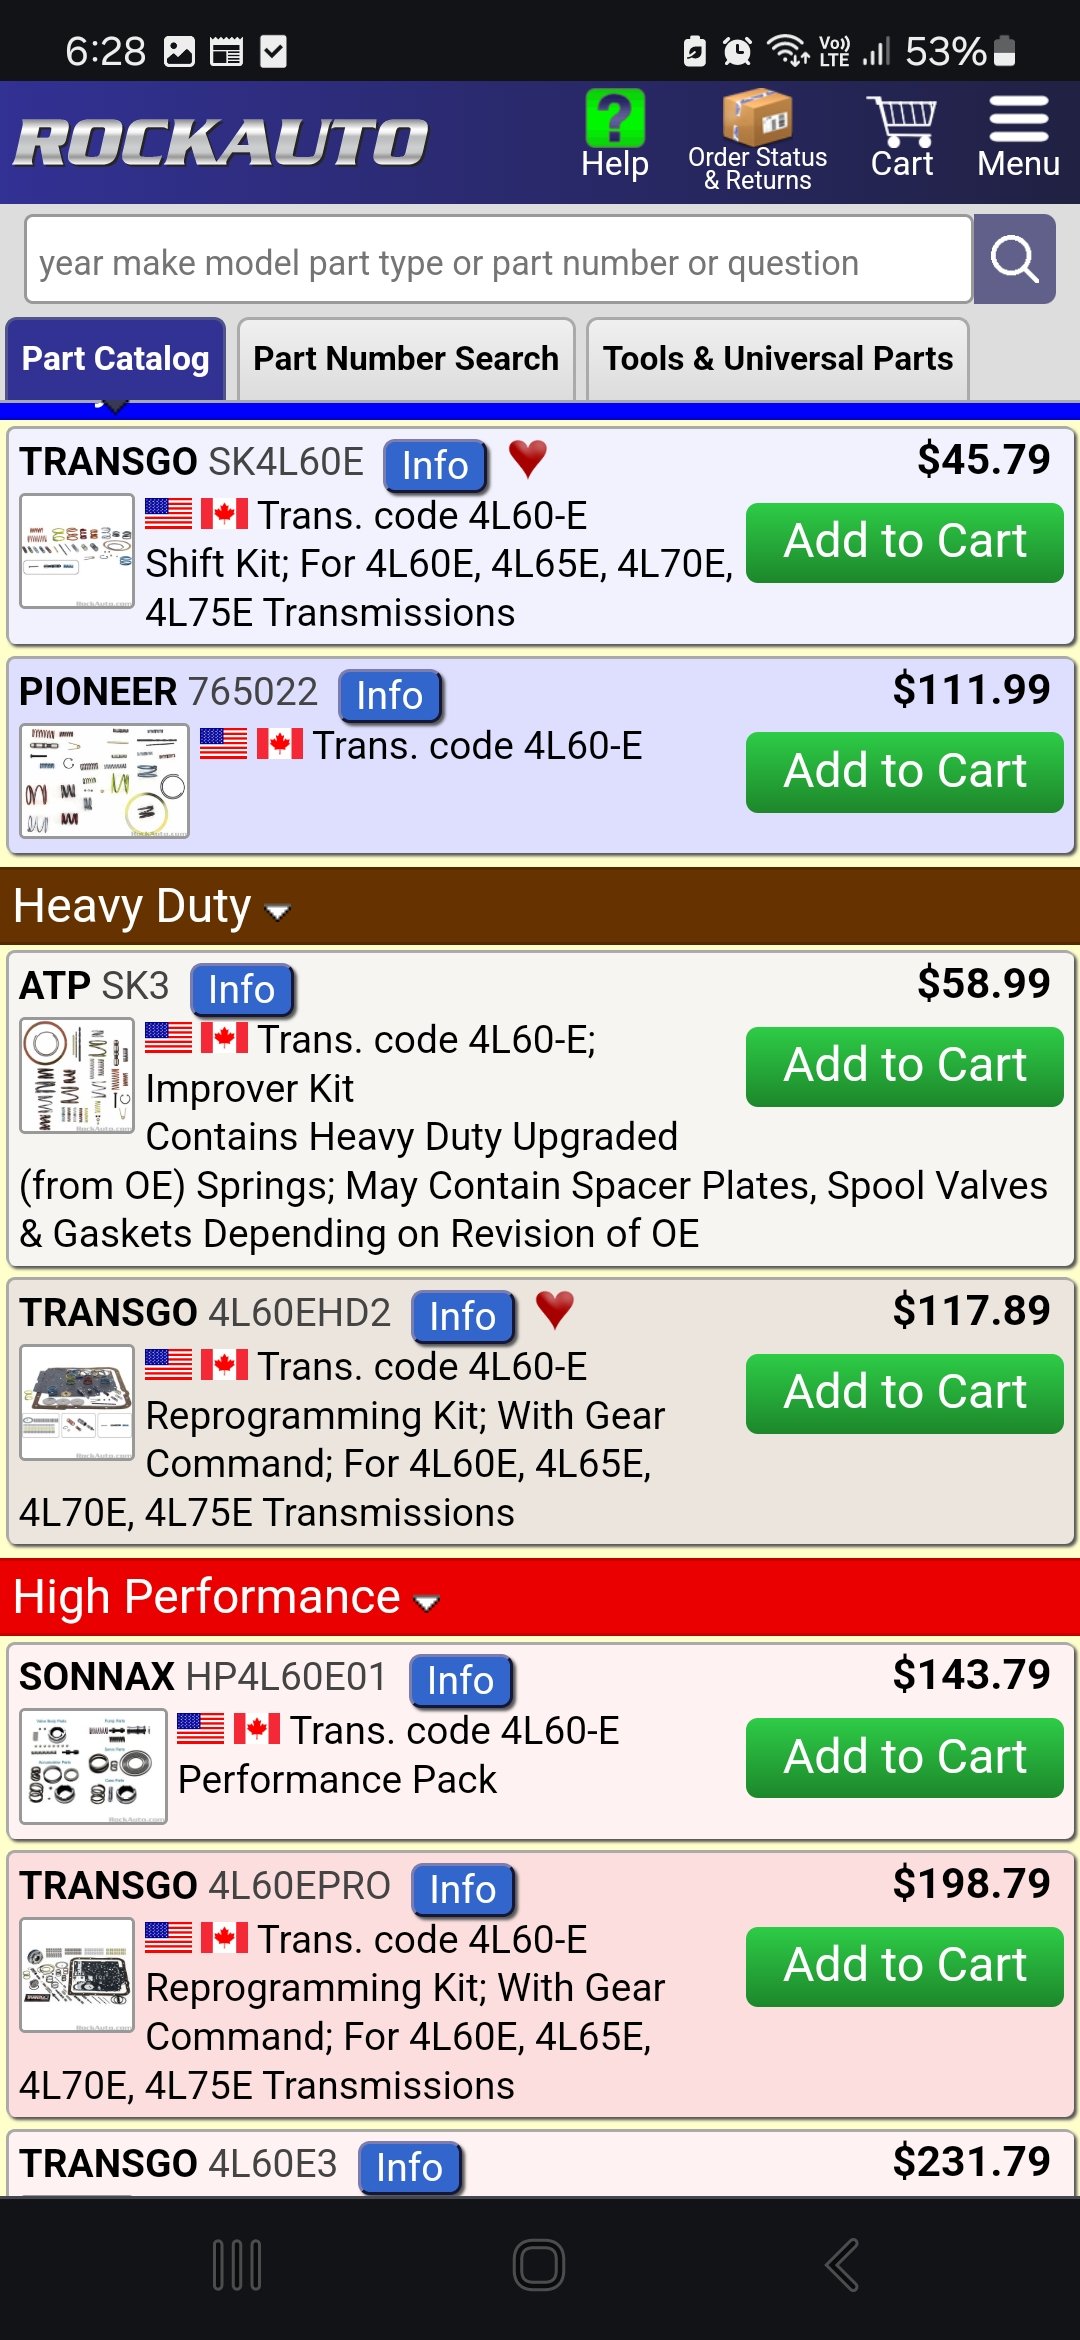
I got my corvette servo off rockauto, they also have shift kits
2 points
-
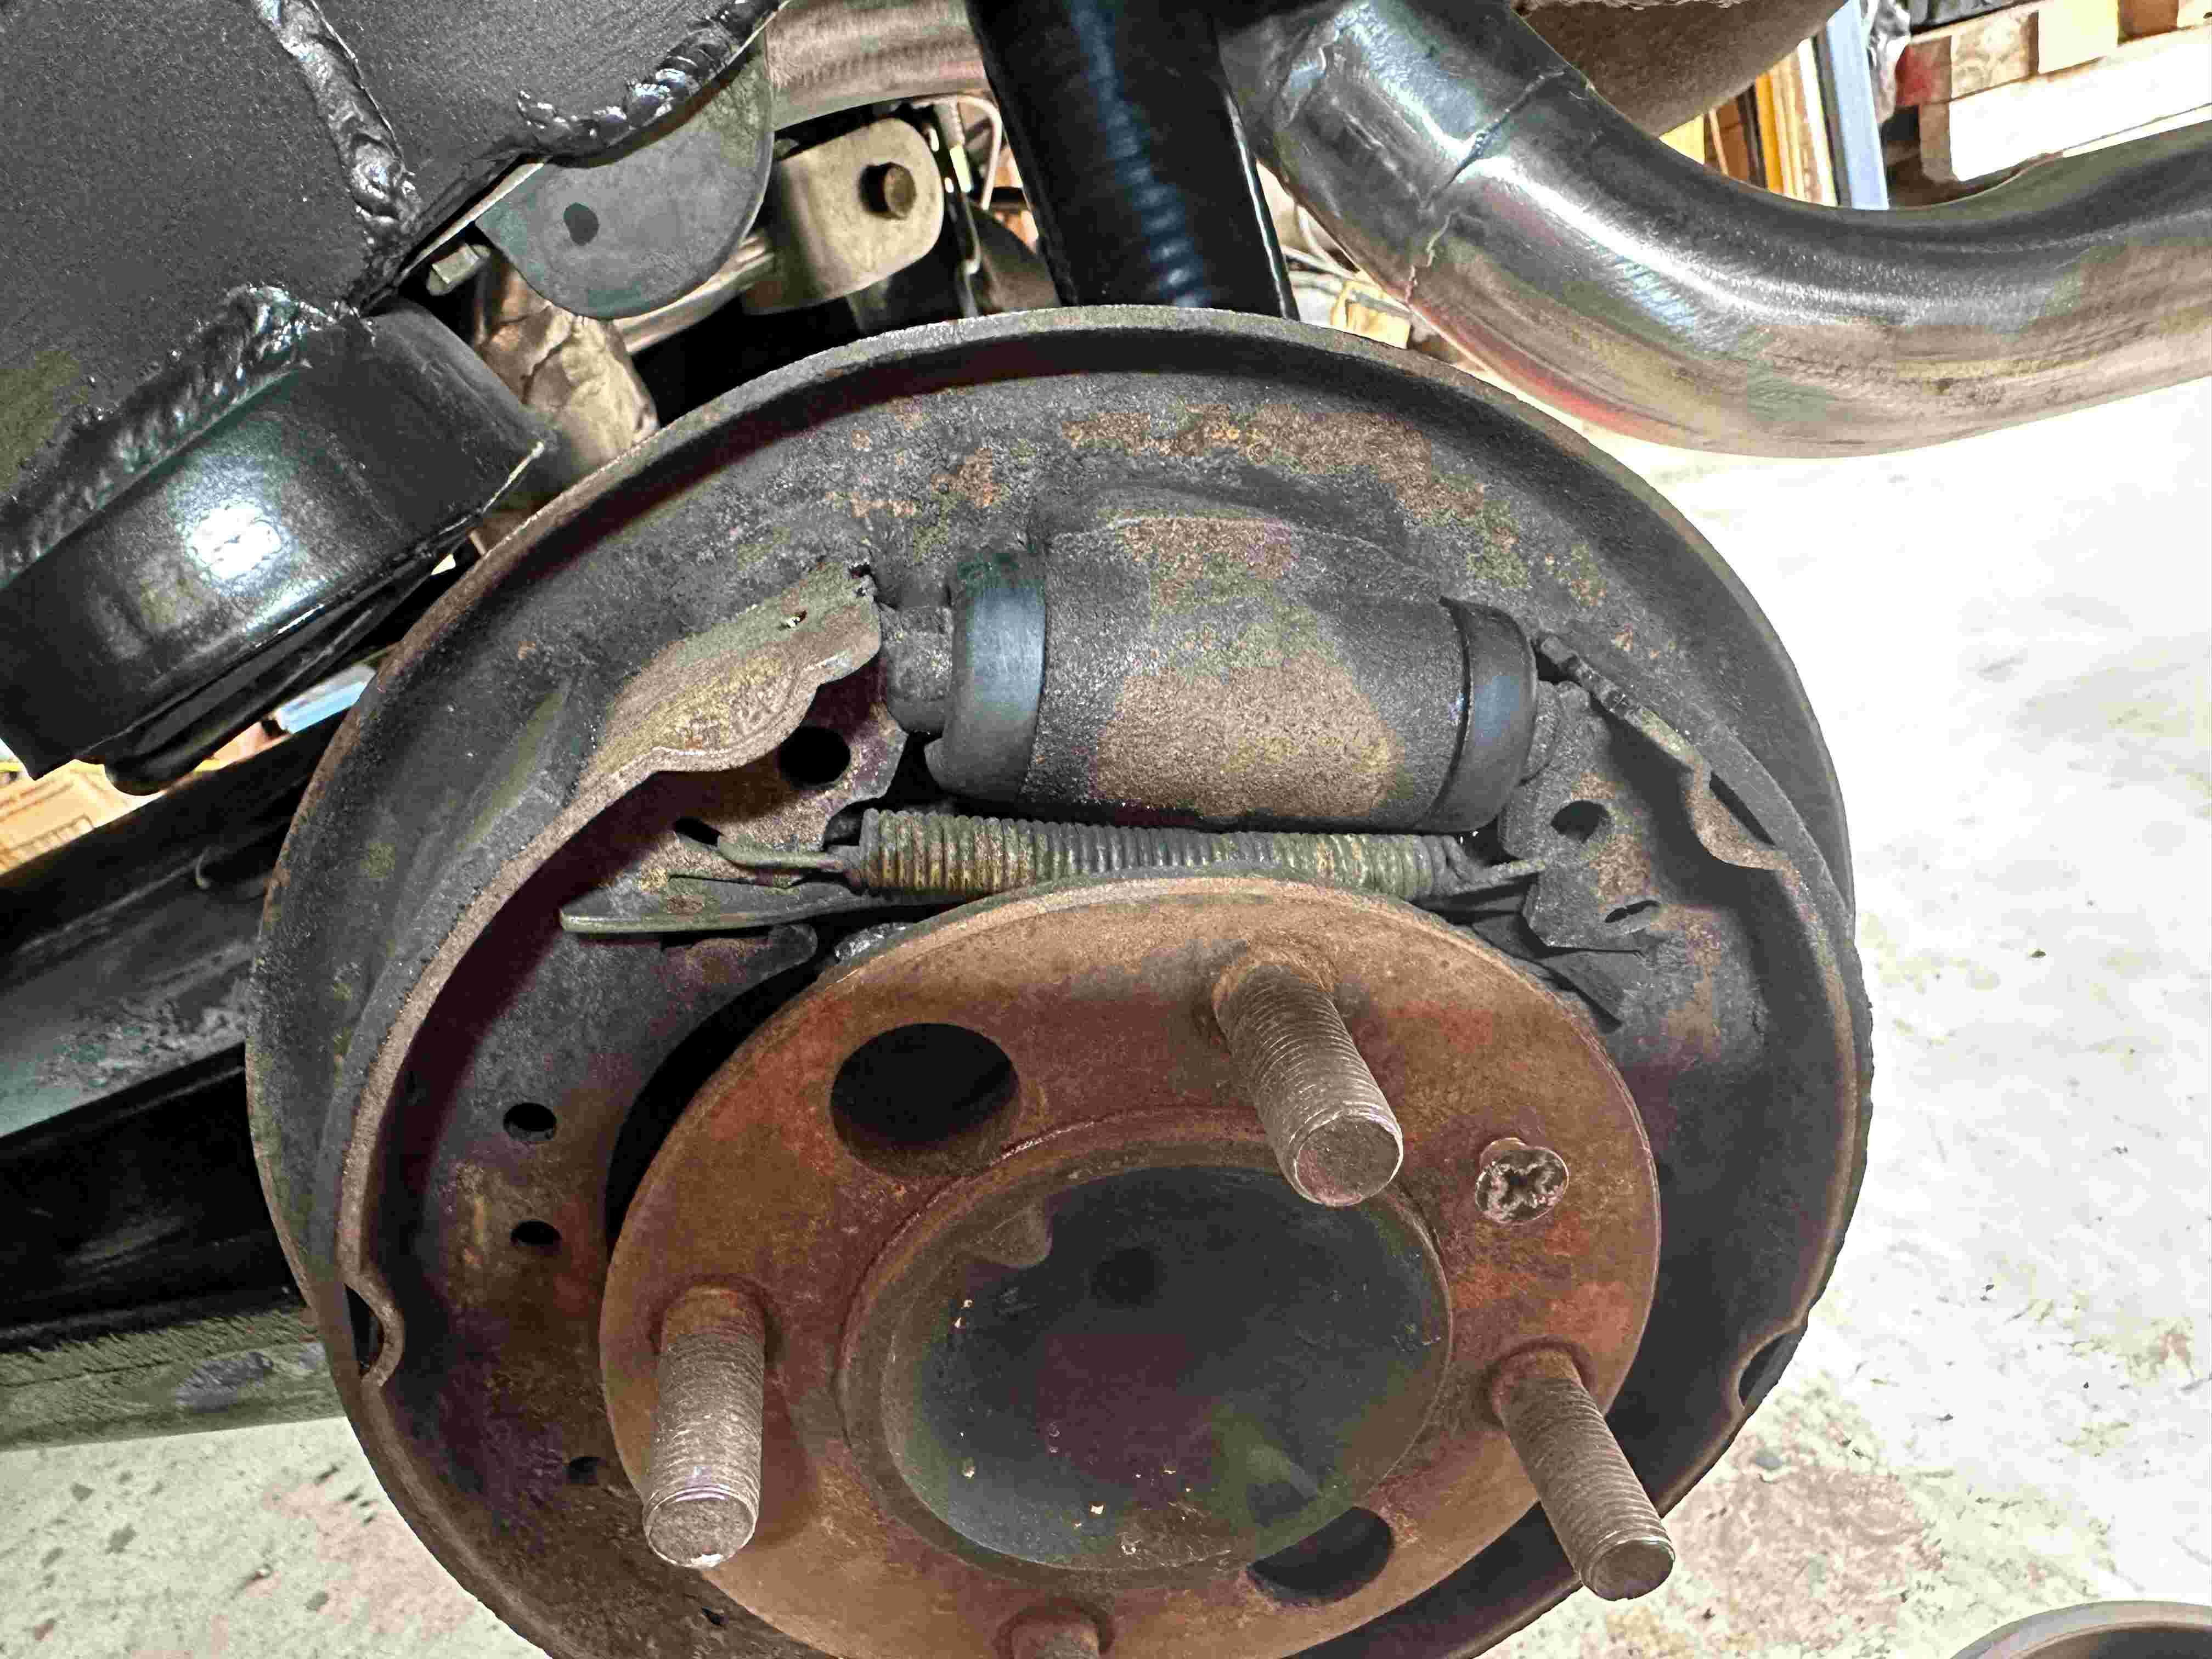
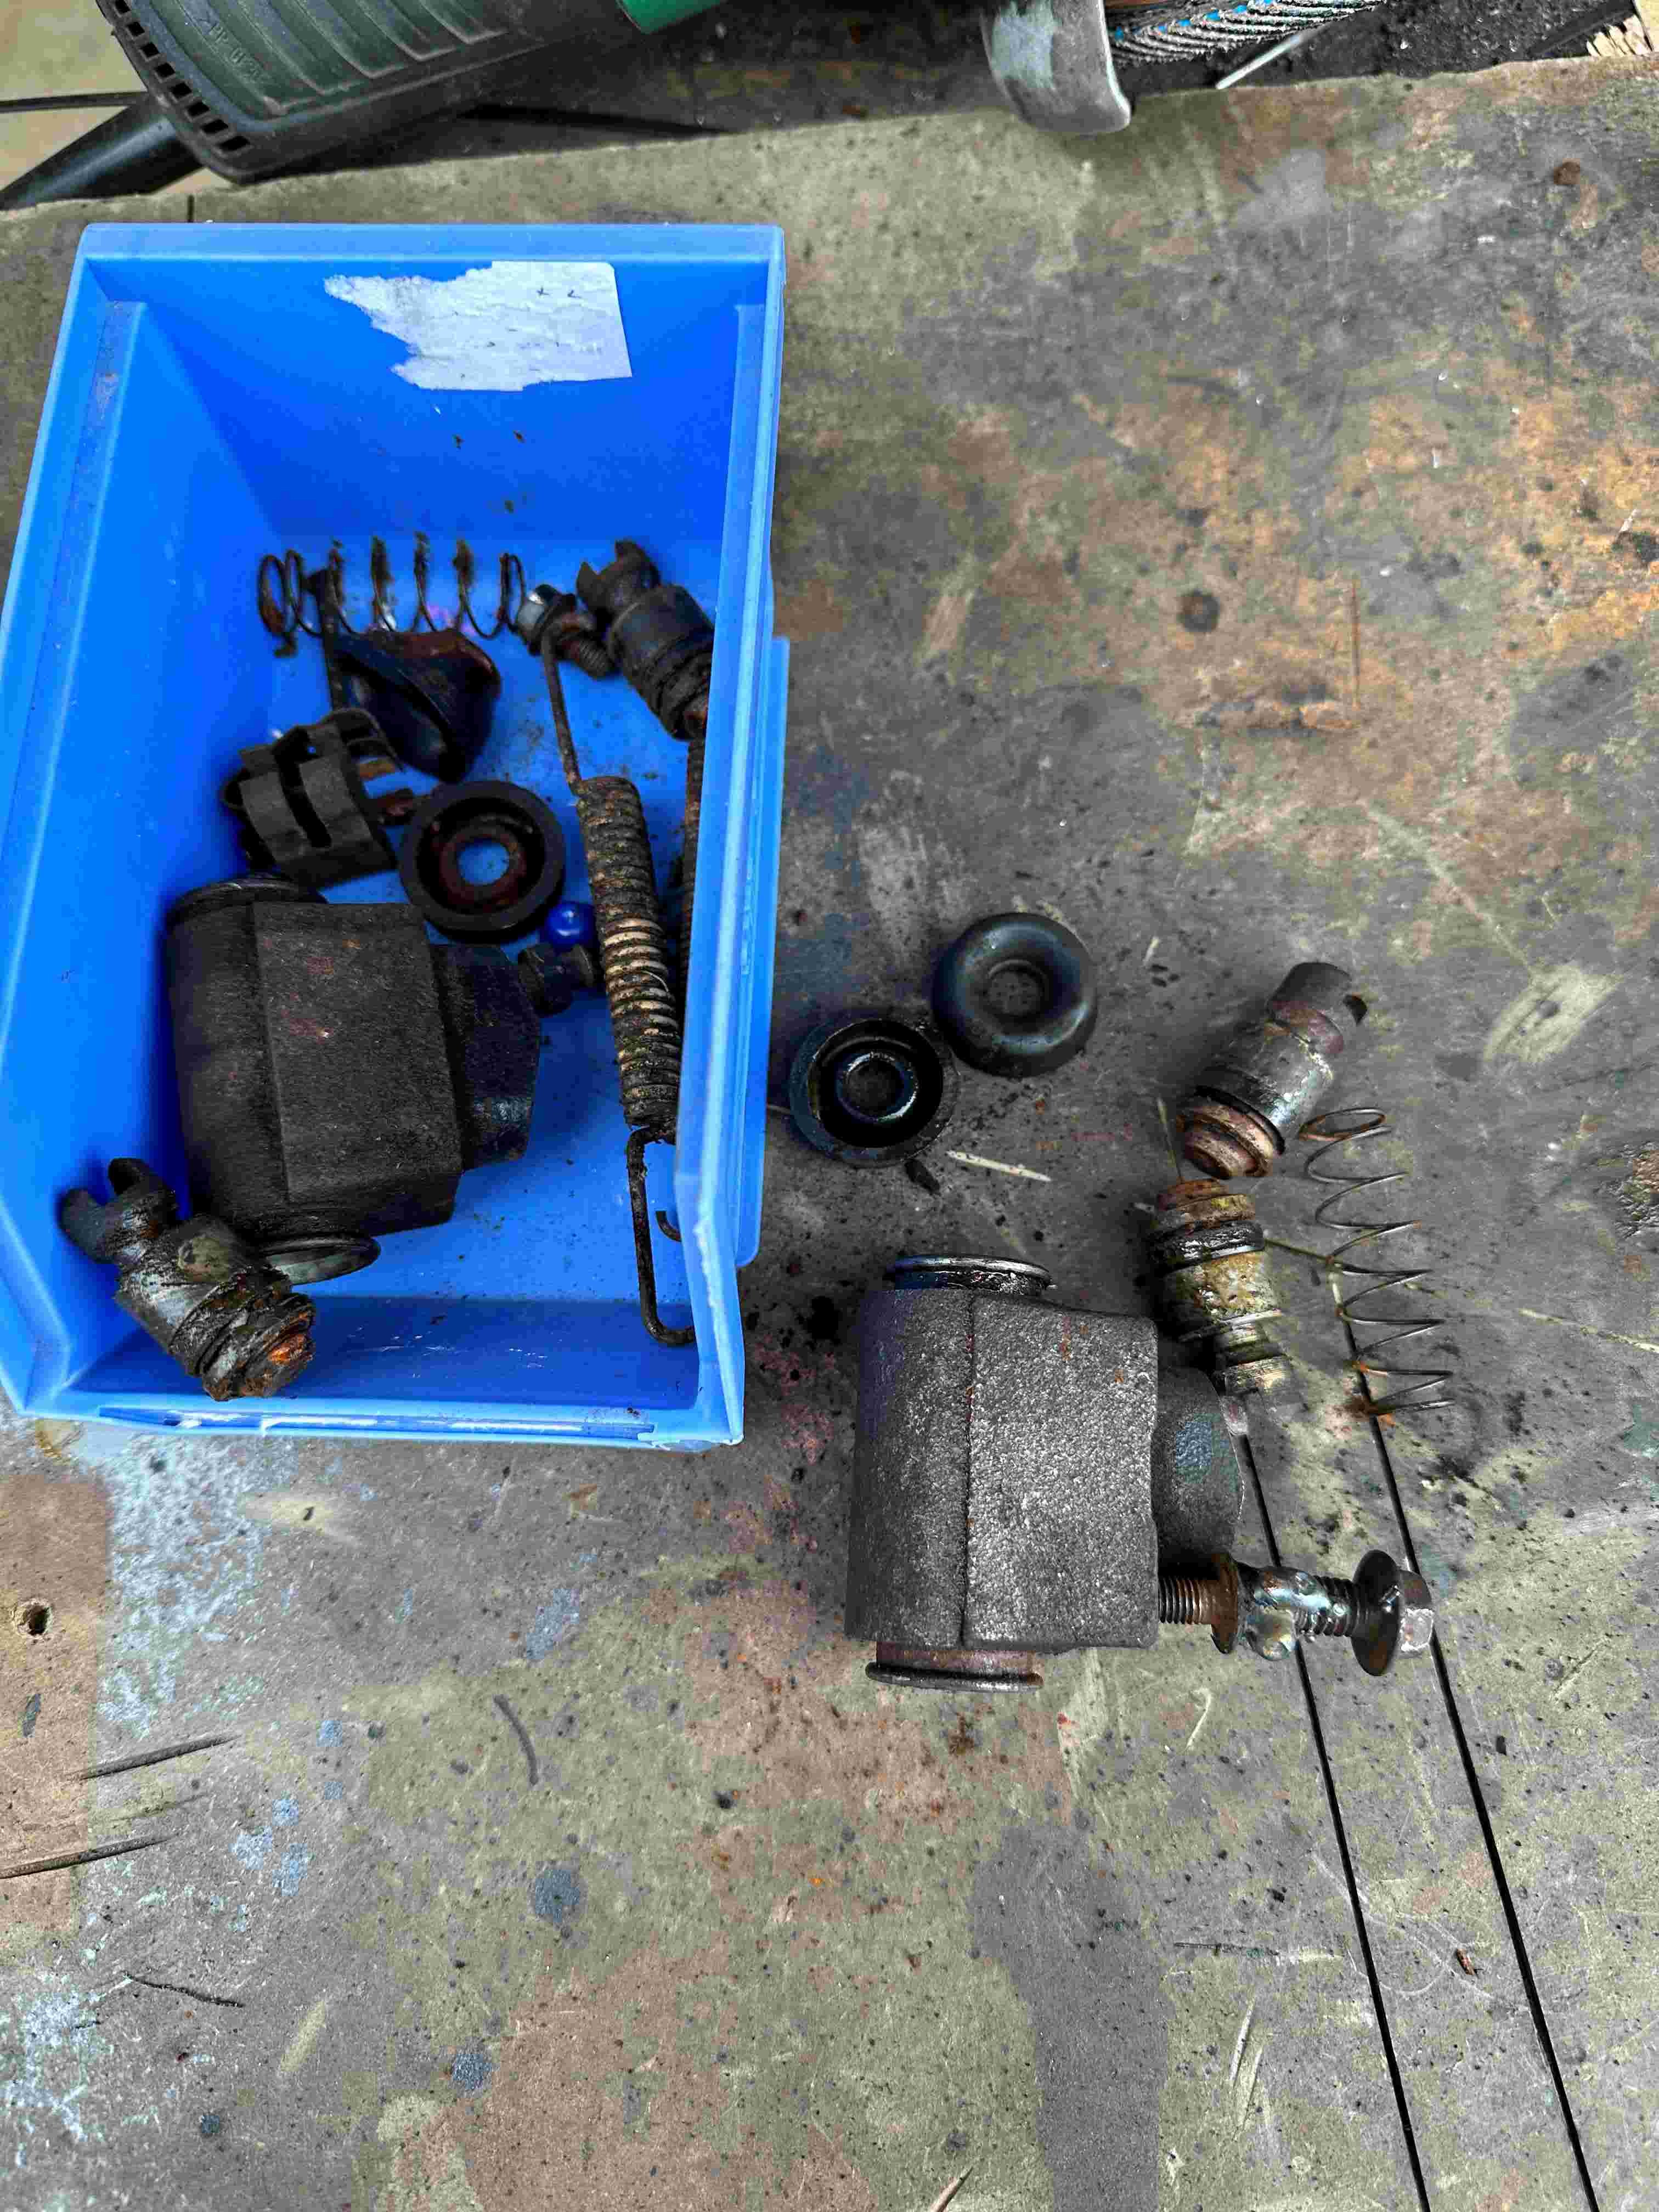
I bolted the diff back in and decided to have a good look at the rear brakes. The passenger side had been soaking in brake fluid for some time by the look, so I removed the shoes and cylinders and found the cylinder were junk. I did the drivers side as well as it looked much better. Once I got it out it wasn't. So now I need to find some new cylinders and get the shoes relined. It's become a theme for the for the weekend as the Tiger needed it's replaced as well, with replacements I could get from the car club. So, the Tiger is sorted which is good as we have the 60th anniversary coming up at the end of the month. Anyway back to the Avenger diff. Pic's of the brake cylinders. There is always that one bolt that causes pain.
2 points
-
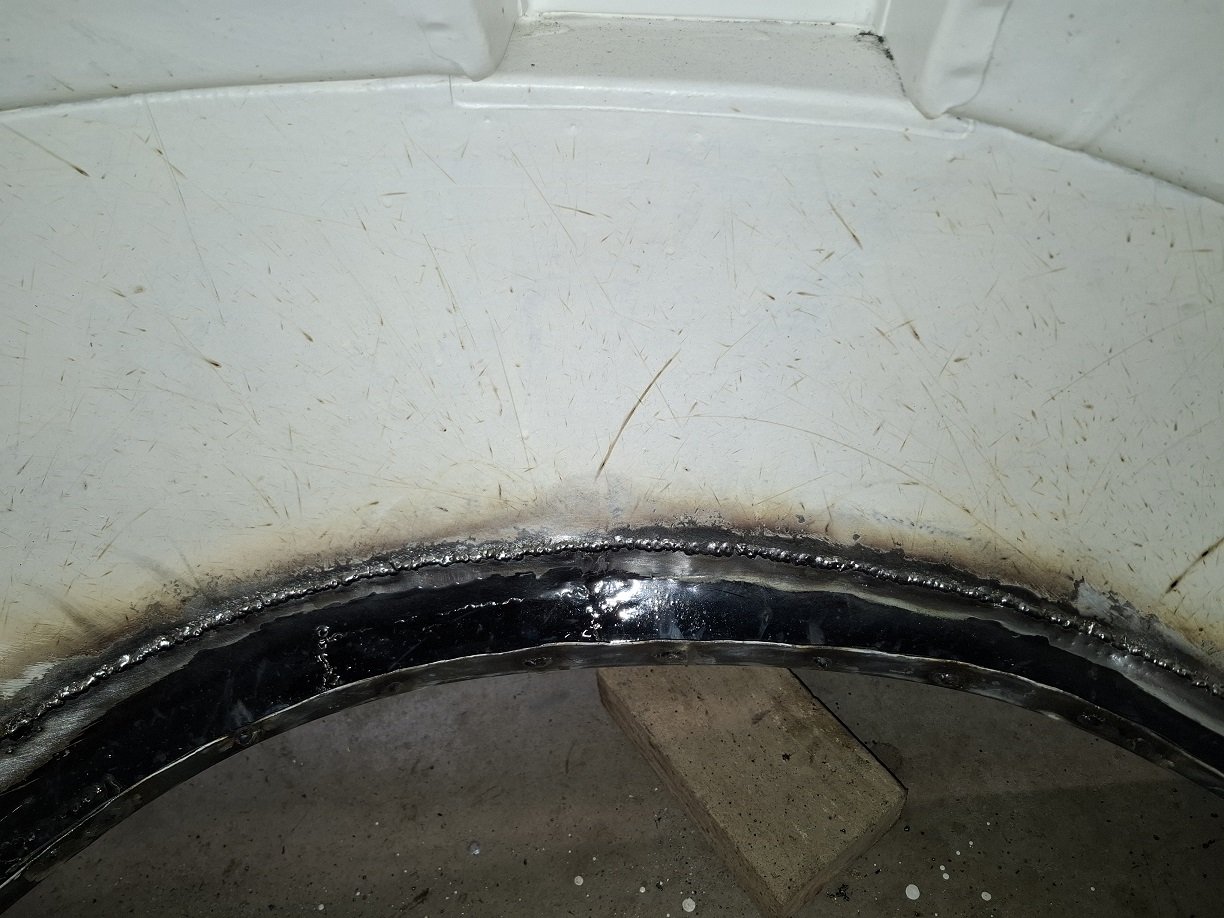
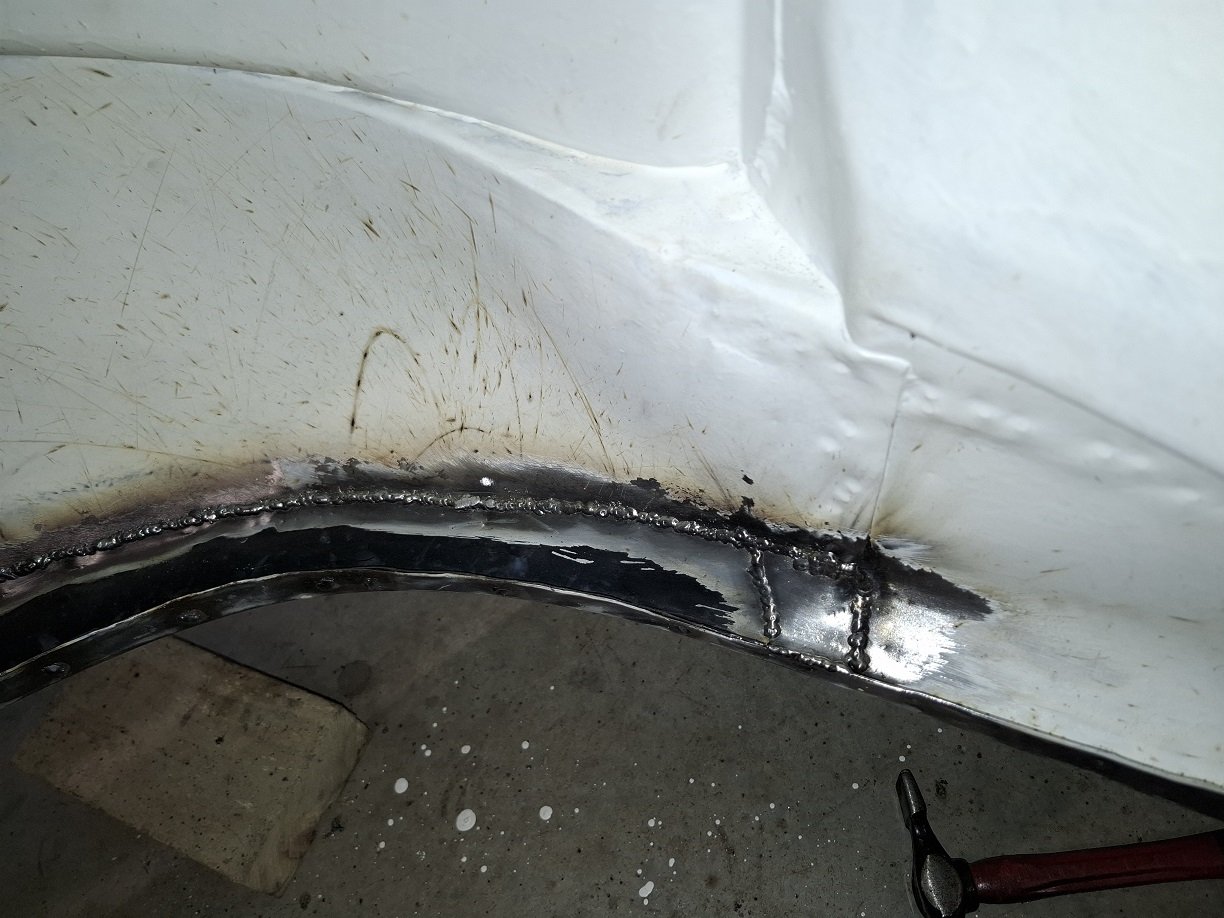
The inner arch. This took ages to get the right shape. See how much frilly I had to replace. Fortunately it's not really visible so I'm not going to grind the welds down. POR15 really is shit on new steel and the surface has no 'tooth', just peels off.
2 points
-
Getting the underside cleaned for export.2 points
-
Thats a holley have a look at the front of the choke horn, there should be a list number which you can look up and it will tell you what it is2 points
-
Moment of truth, getting a tune at HPR
2 points
-
Right, so another update. I finally got the bloomin Canopy off. A whole afternoon of Dad and I trying to gently remove it. Whoever had put it on there all those years ago, definitely didn't want it coming off. It was riveted, siliconed, welded to the windscreen frame and they have riveted the frame, then put box section to build the frame over top, so you couldn't get to the rivets -.- So we will start with a bit of a before photo. We managed to drill all the rivets from the top that were at the inside edge of the canopy like so Then came the removal of the front panel, which I might try keep and make removable for a bit of weather protection. Idk. I'll see if I can get a canvas one made or something.... Then pushed it outside and hacked off the frame at the windscreen end. Finally, it was to be an actual Moke and not some weird looking box thing that remined me of a C-Cab model T. I celebrated by taking some terrible photos and cutting off a bit of the car... As you can see in this last photo it looks like there is a little more rust work than intended as some moisture got under the canopy and there are a few small holes. Because all the panels are fairly flat, so it shouldn't be too tricky in terms of shape. I also bought my first part for the Moke. Scored some adjustable tie rod ends second hand off Marketplace. I think I have a few spare rubber bushings, so will change the back ones as the advice is to have nolathane on the front and rubber on the back side. I also have a lead on most of an engine, so just having a bit of a think about the best plan of attack, and a few options for gearboxes so need to see what's what there too. Plan next is to remove the side parts of the screen and then maybe start of the rust underneath.....2 points
-
Does the old guy remember what it's rego number was? There's a reasonable chance I have the plates somewhere under my hydraulic press2 points
-
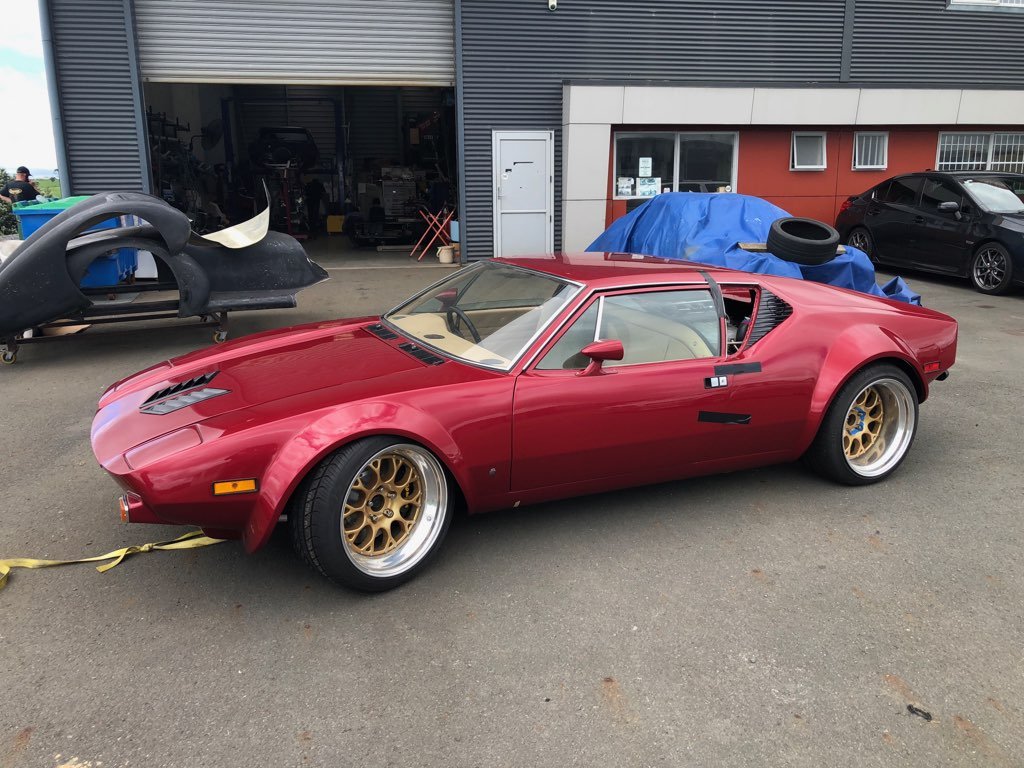
Just a quick update. I've been in contact with the original NZ owner, he's a real character. At the age of 85 he's just bought a McLaren only to find he couldn't get in or out of it, so has bought a new supercharged Vantage as well! (Oh how the other half live). Good news is that he's helping all he can and although he hasn't any registration details he does have some early pictures and has offered to swear an affidavit saying that to the best of his knowledge it is the same car. Being an ex MP and well known public figure it will hopefully add some weight when we put in an "alternative documents application" to NZ Transport. I'm still researching the cars history; we bought it as a pile of parts from a Turners Police auction after it had been confiscated in 2000 under the proceeds of crime act and had been in police storage for about 6 years, (the previous owner had been locked up for manufacturing meth!). It's a crazy story and I'll post a quick thread of the rebuild when the history is all confirmed. A quick few pictures of the almost completed car.
2 points
-
Part of the roof attachment mech is two hooks that are steel bits covered in rubber. After 40+ years this falls/wears off and the roof rattles like fuck. There are many fixes that involve packing shit with tape etc, but as I have the technology I thought I would solve it. First I just drew the boys up and printed them in PLA with carbon fiber, these looked pretty schmick. However the originals have a steel backbone and this was always going to be stronger. So I had the idea to trim all the old rubber off the originals and print a TPU sleeve to replace it. I gooped these on with some leftover windscreen glue, they are working well. The international X1/9 community got pretty fizzed about that let me tell you. I then printed some more plus some of the plastic pads that fit on the car in the same junction for the black X/Elliot. And while I am on a massive printing bender I modded the heater control faceplate by adding some lever detents to keep the levers in position, then drew up some vaguely factory looking knobs to interface with this detail. I made the top layer of the print a Hilbert curve, it gave it an interesting texture; And finally the rattle. More investigation found more shit in there in a completely inaccessible place; So I dumped a shitload of cavity wax (actually a bitumen ish thing) down there to glue it in place, and it kinda worked but not 100%. Shits quieter but still there. Sigh.2 points
-
Passed cert about a month back, still need to get it wofed at some stage though! But I have been driving it around ever since. Only small issue is the gearbox makes a horrible rattle at 100km/h, so I'll have to pull that out at some stage and see what's wrong with that.2 points
-
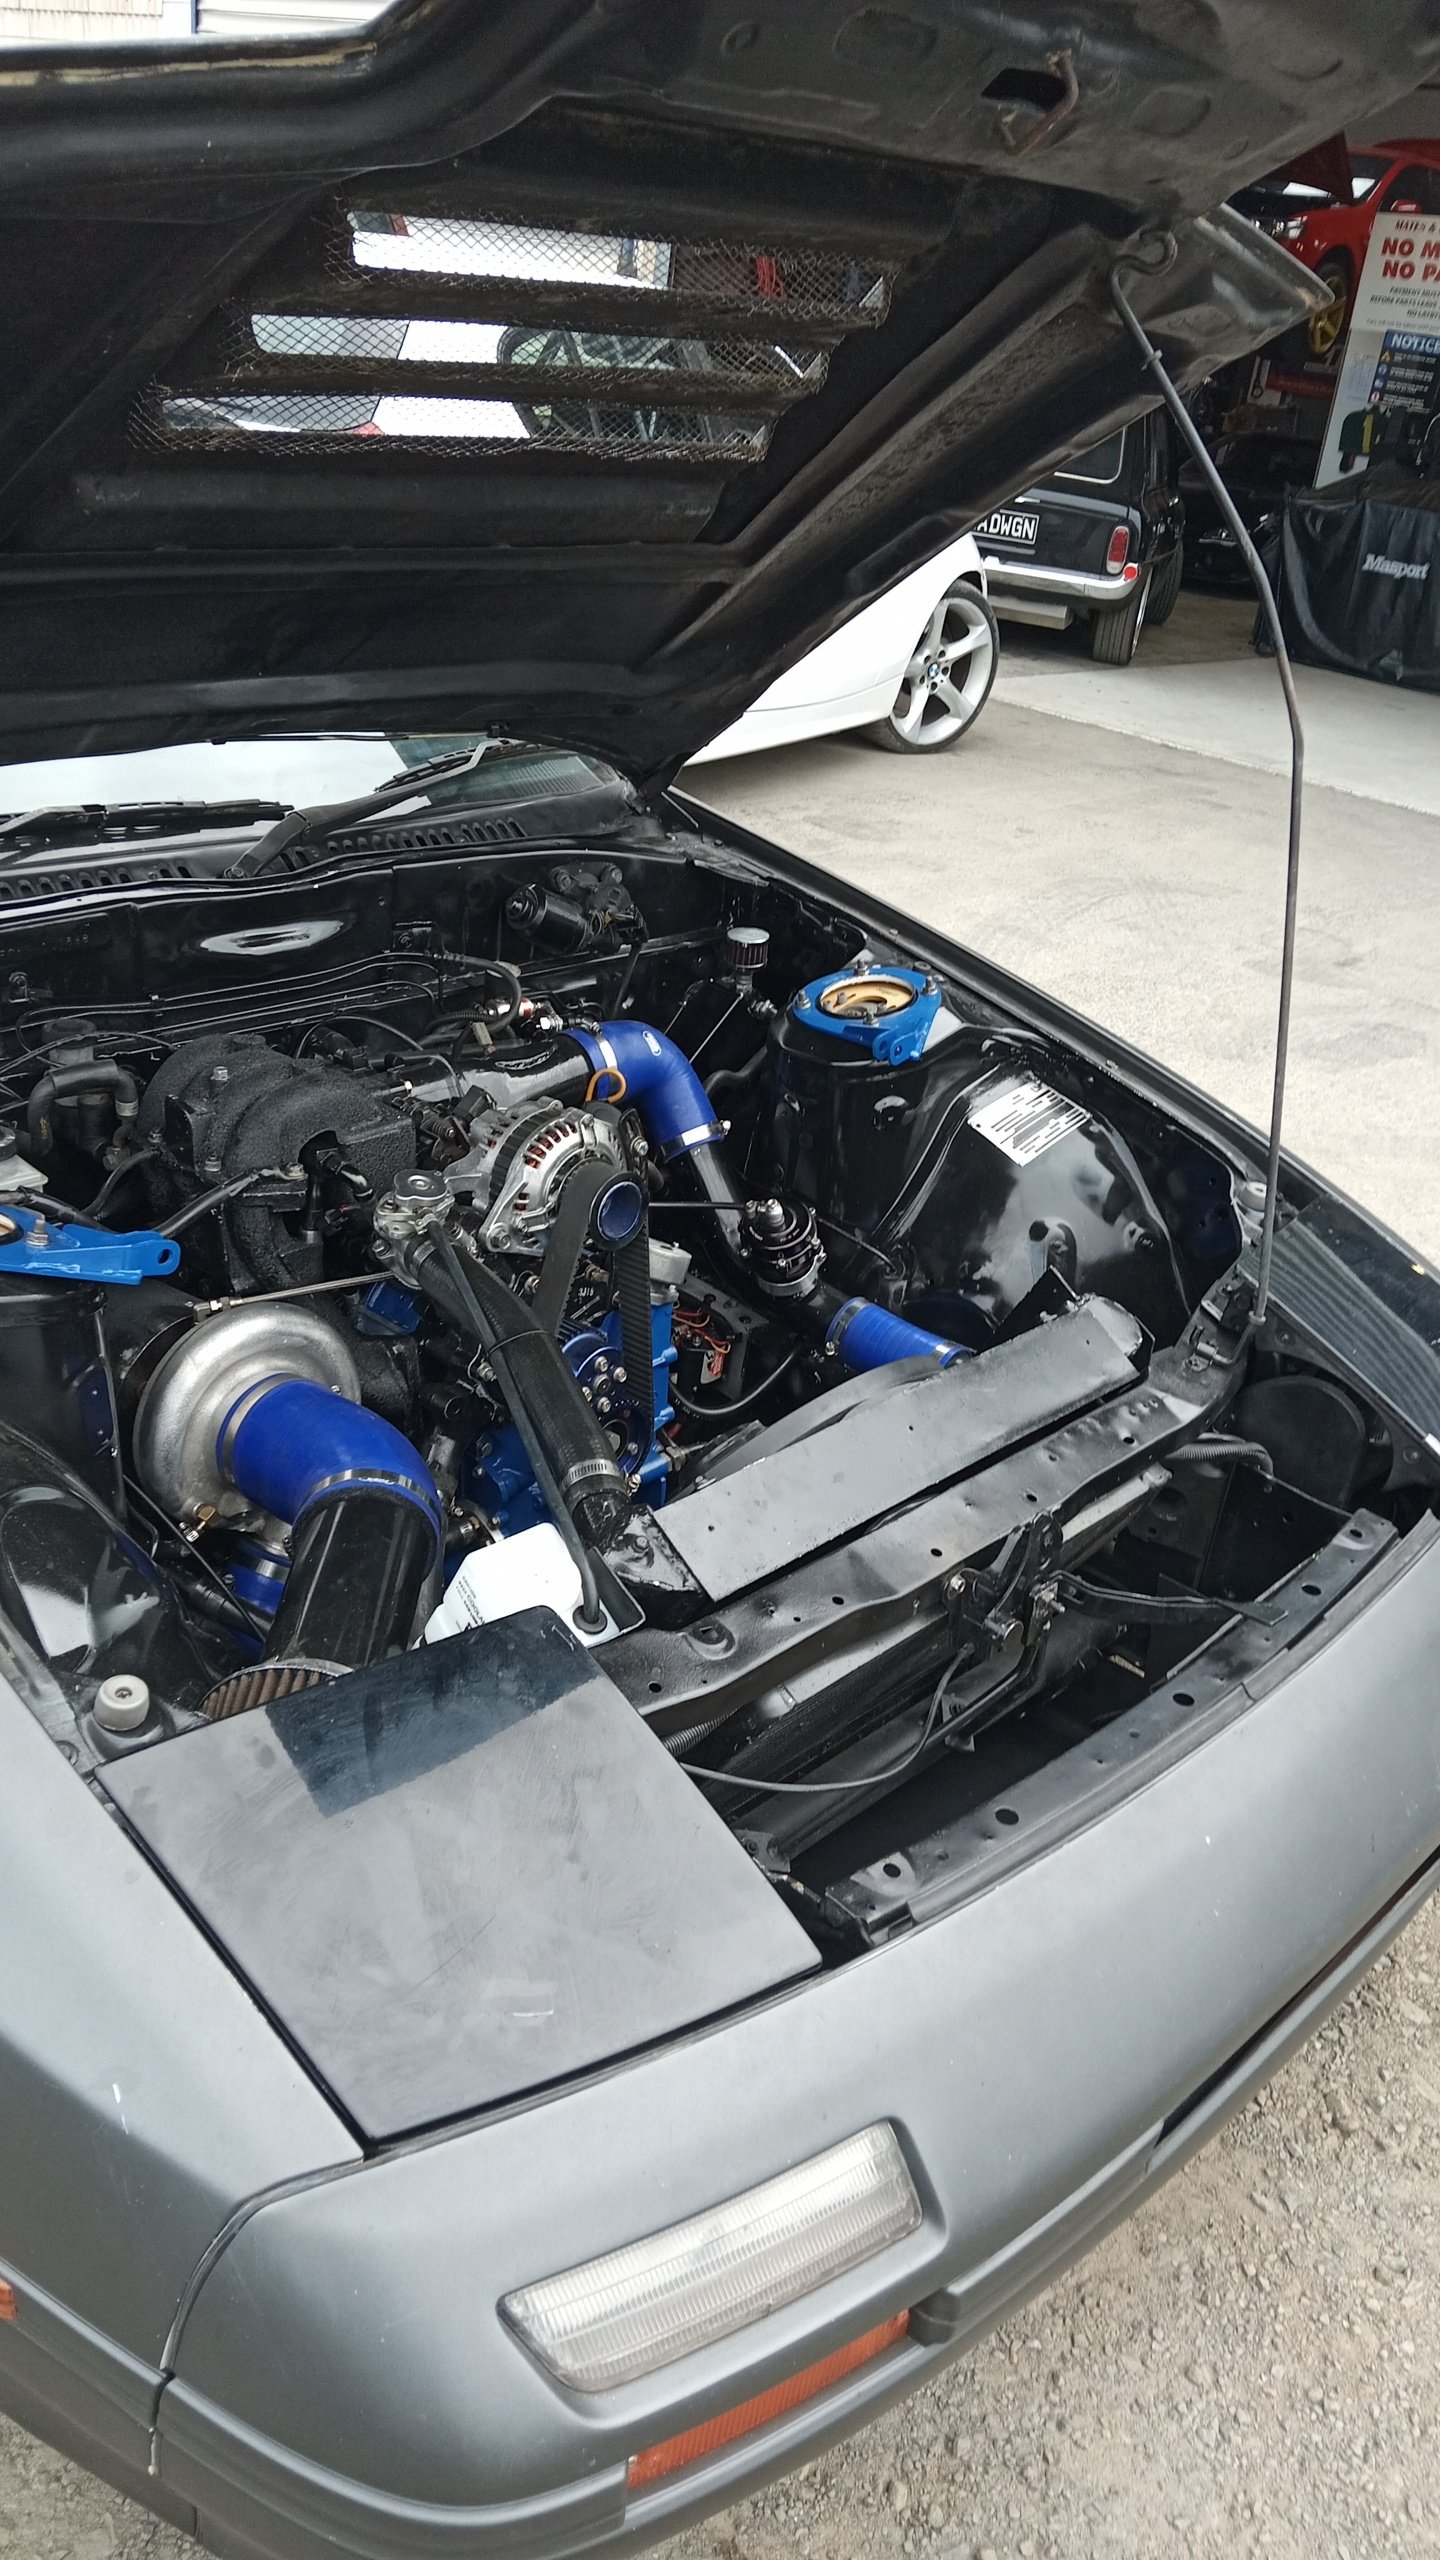
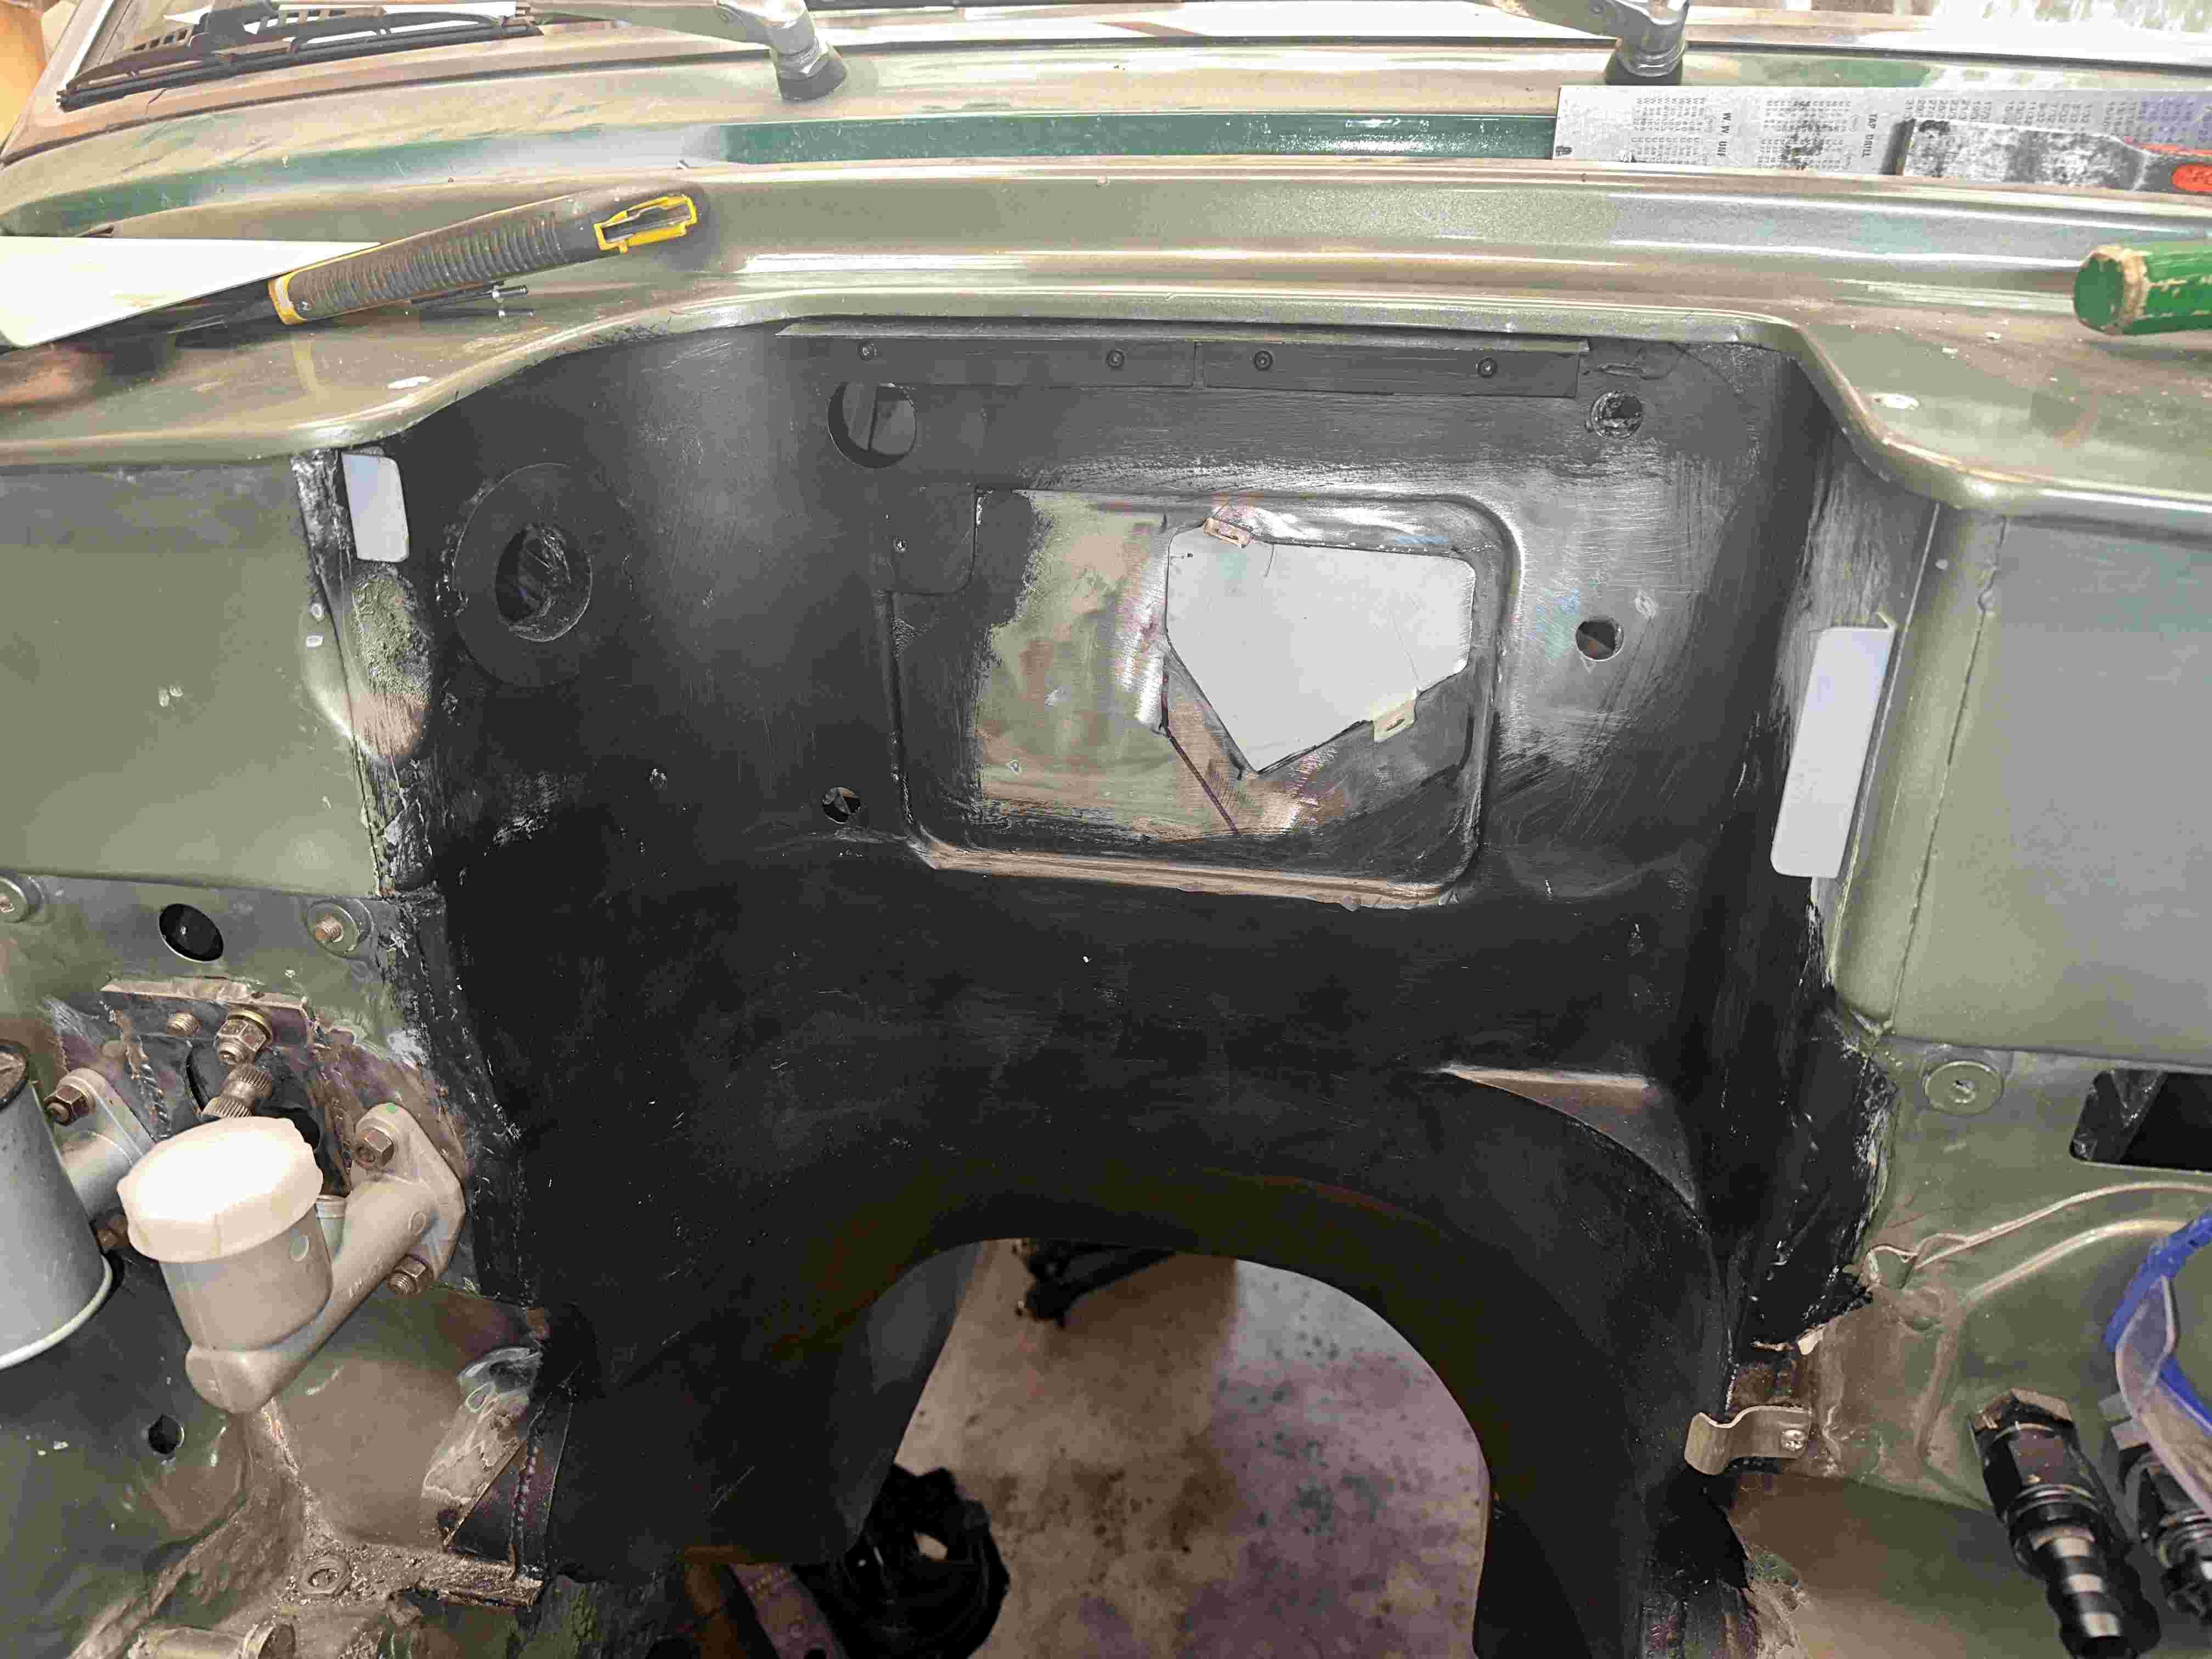
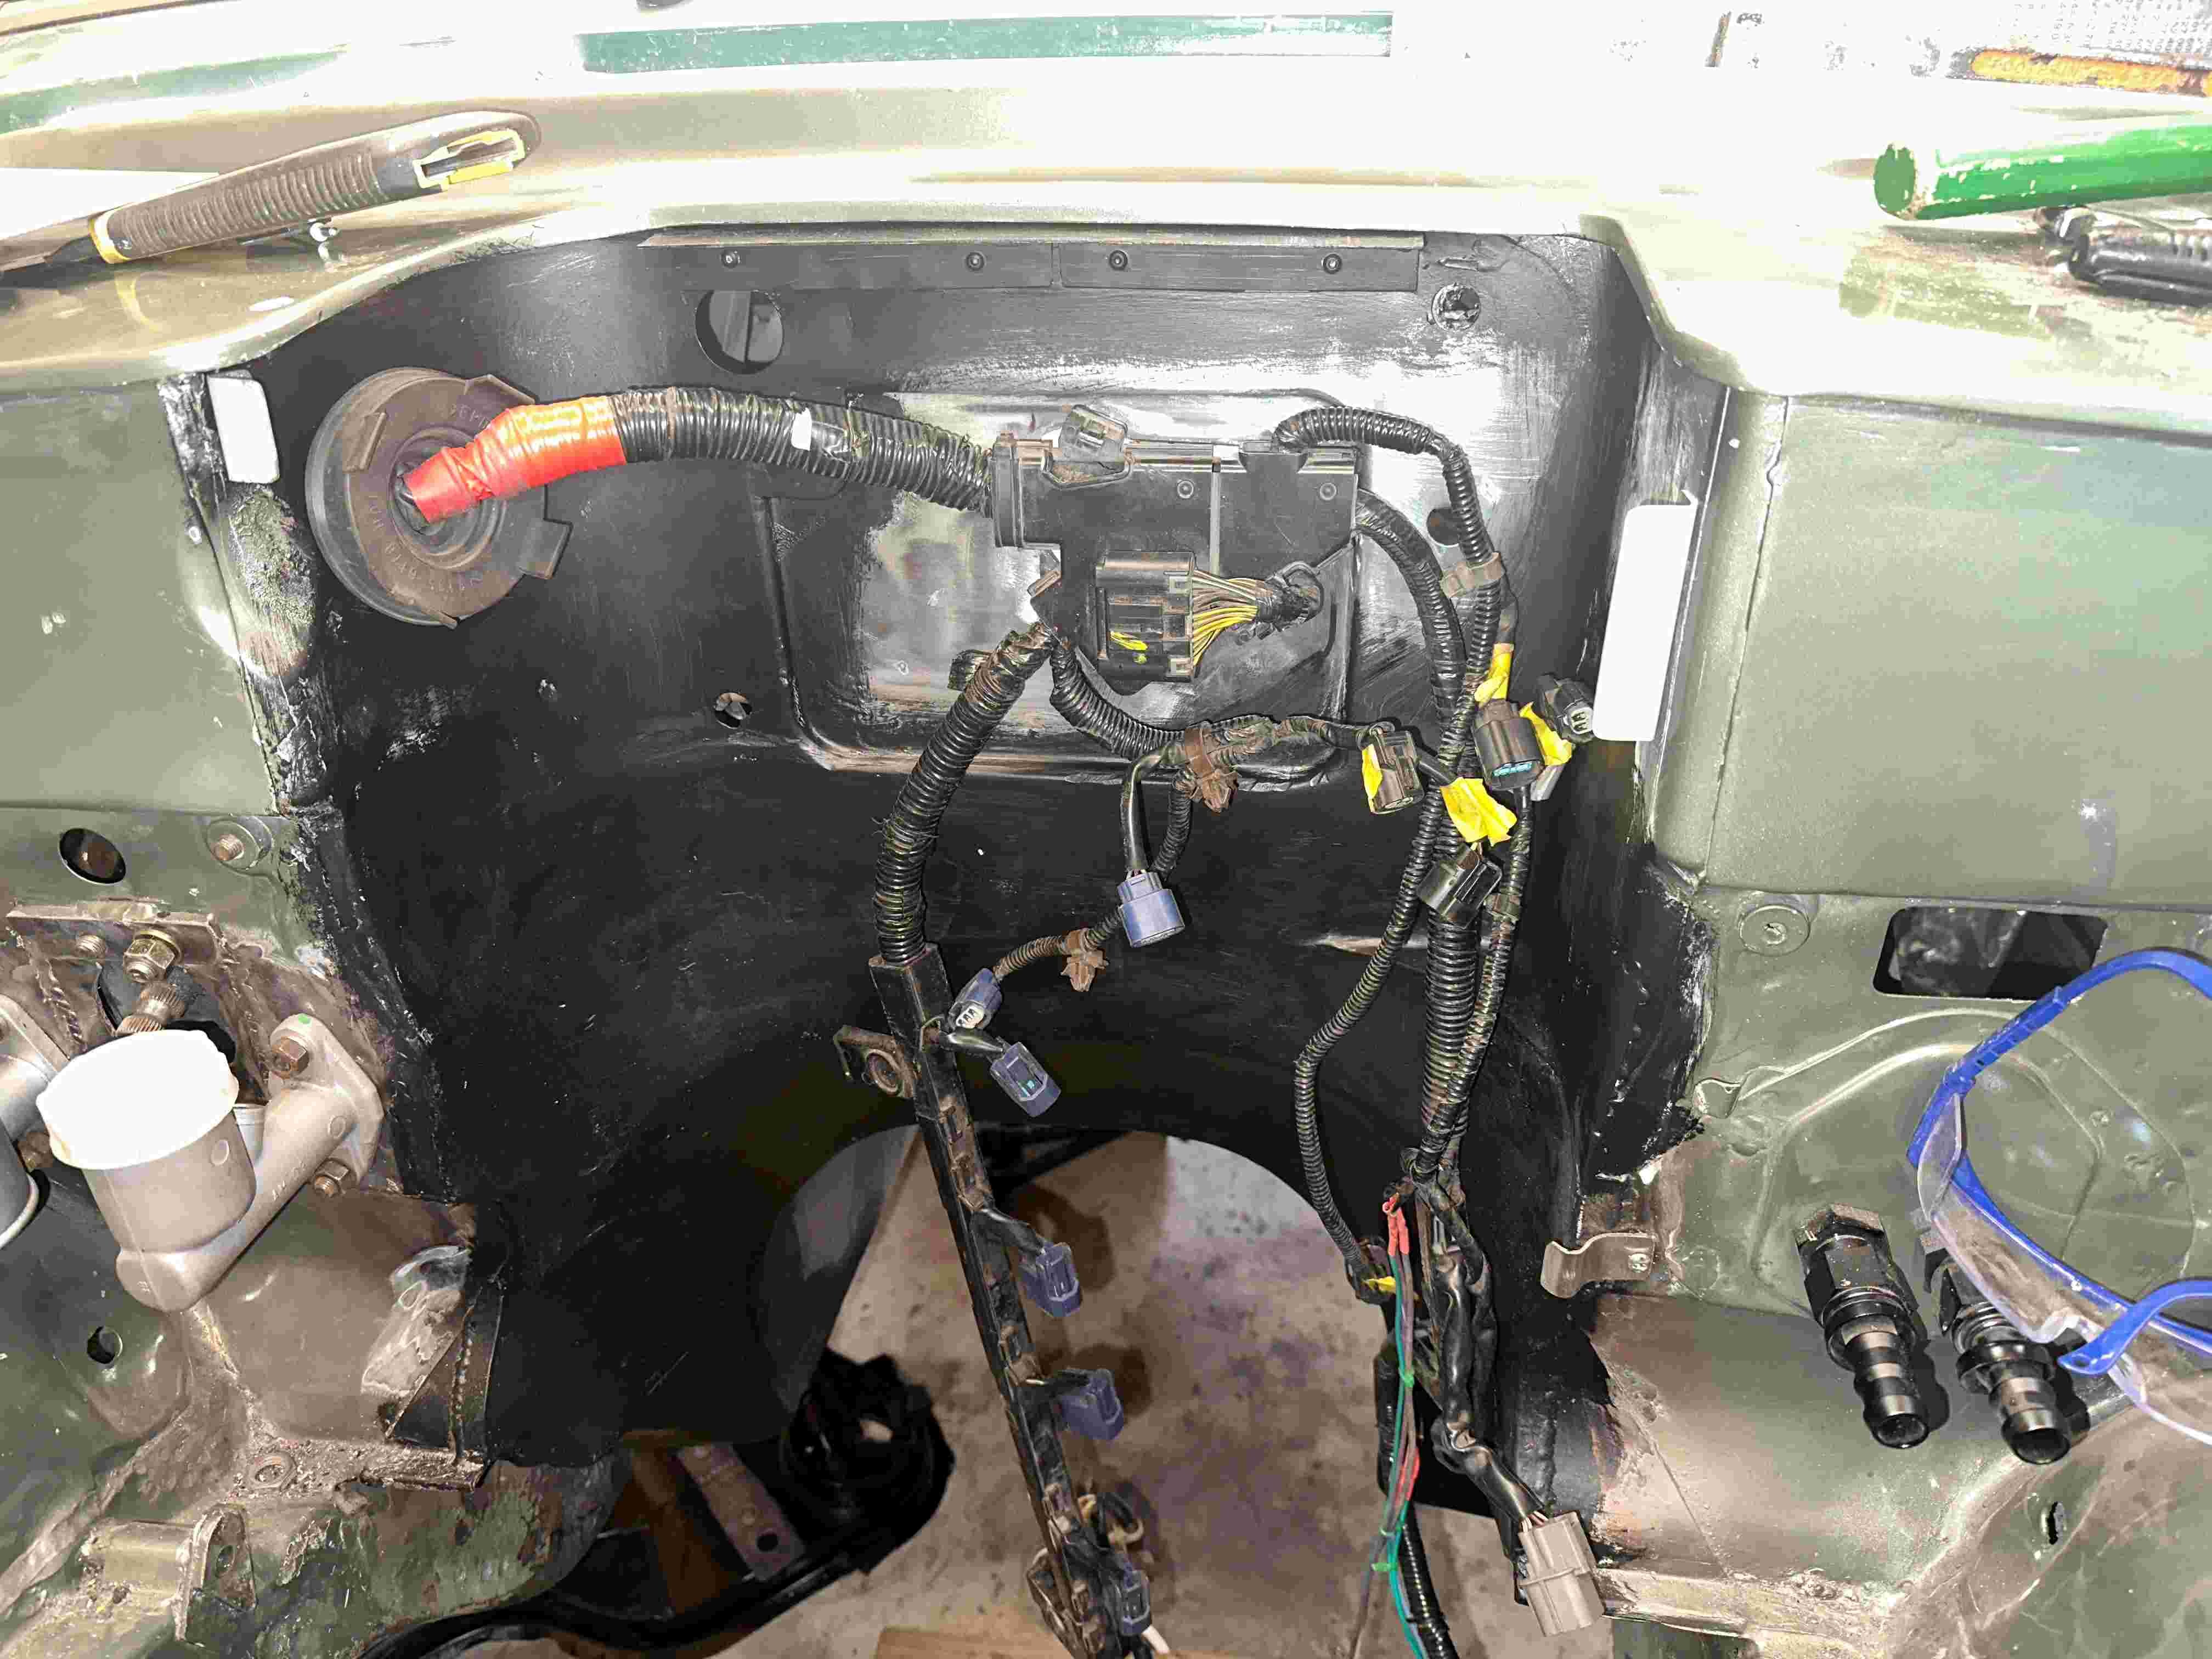
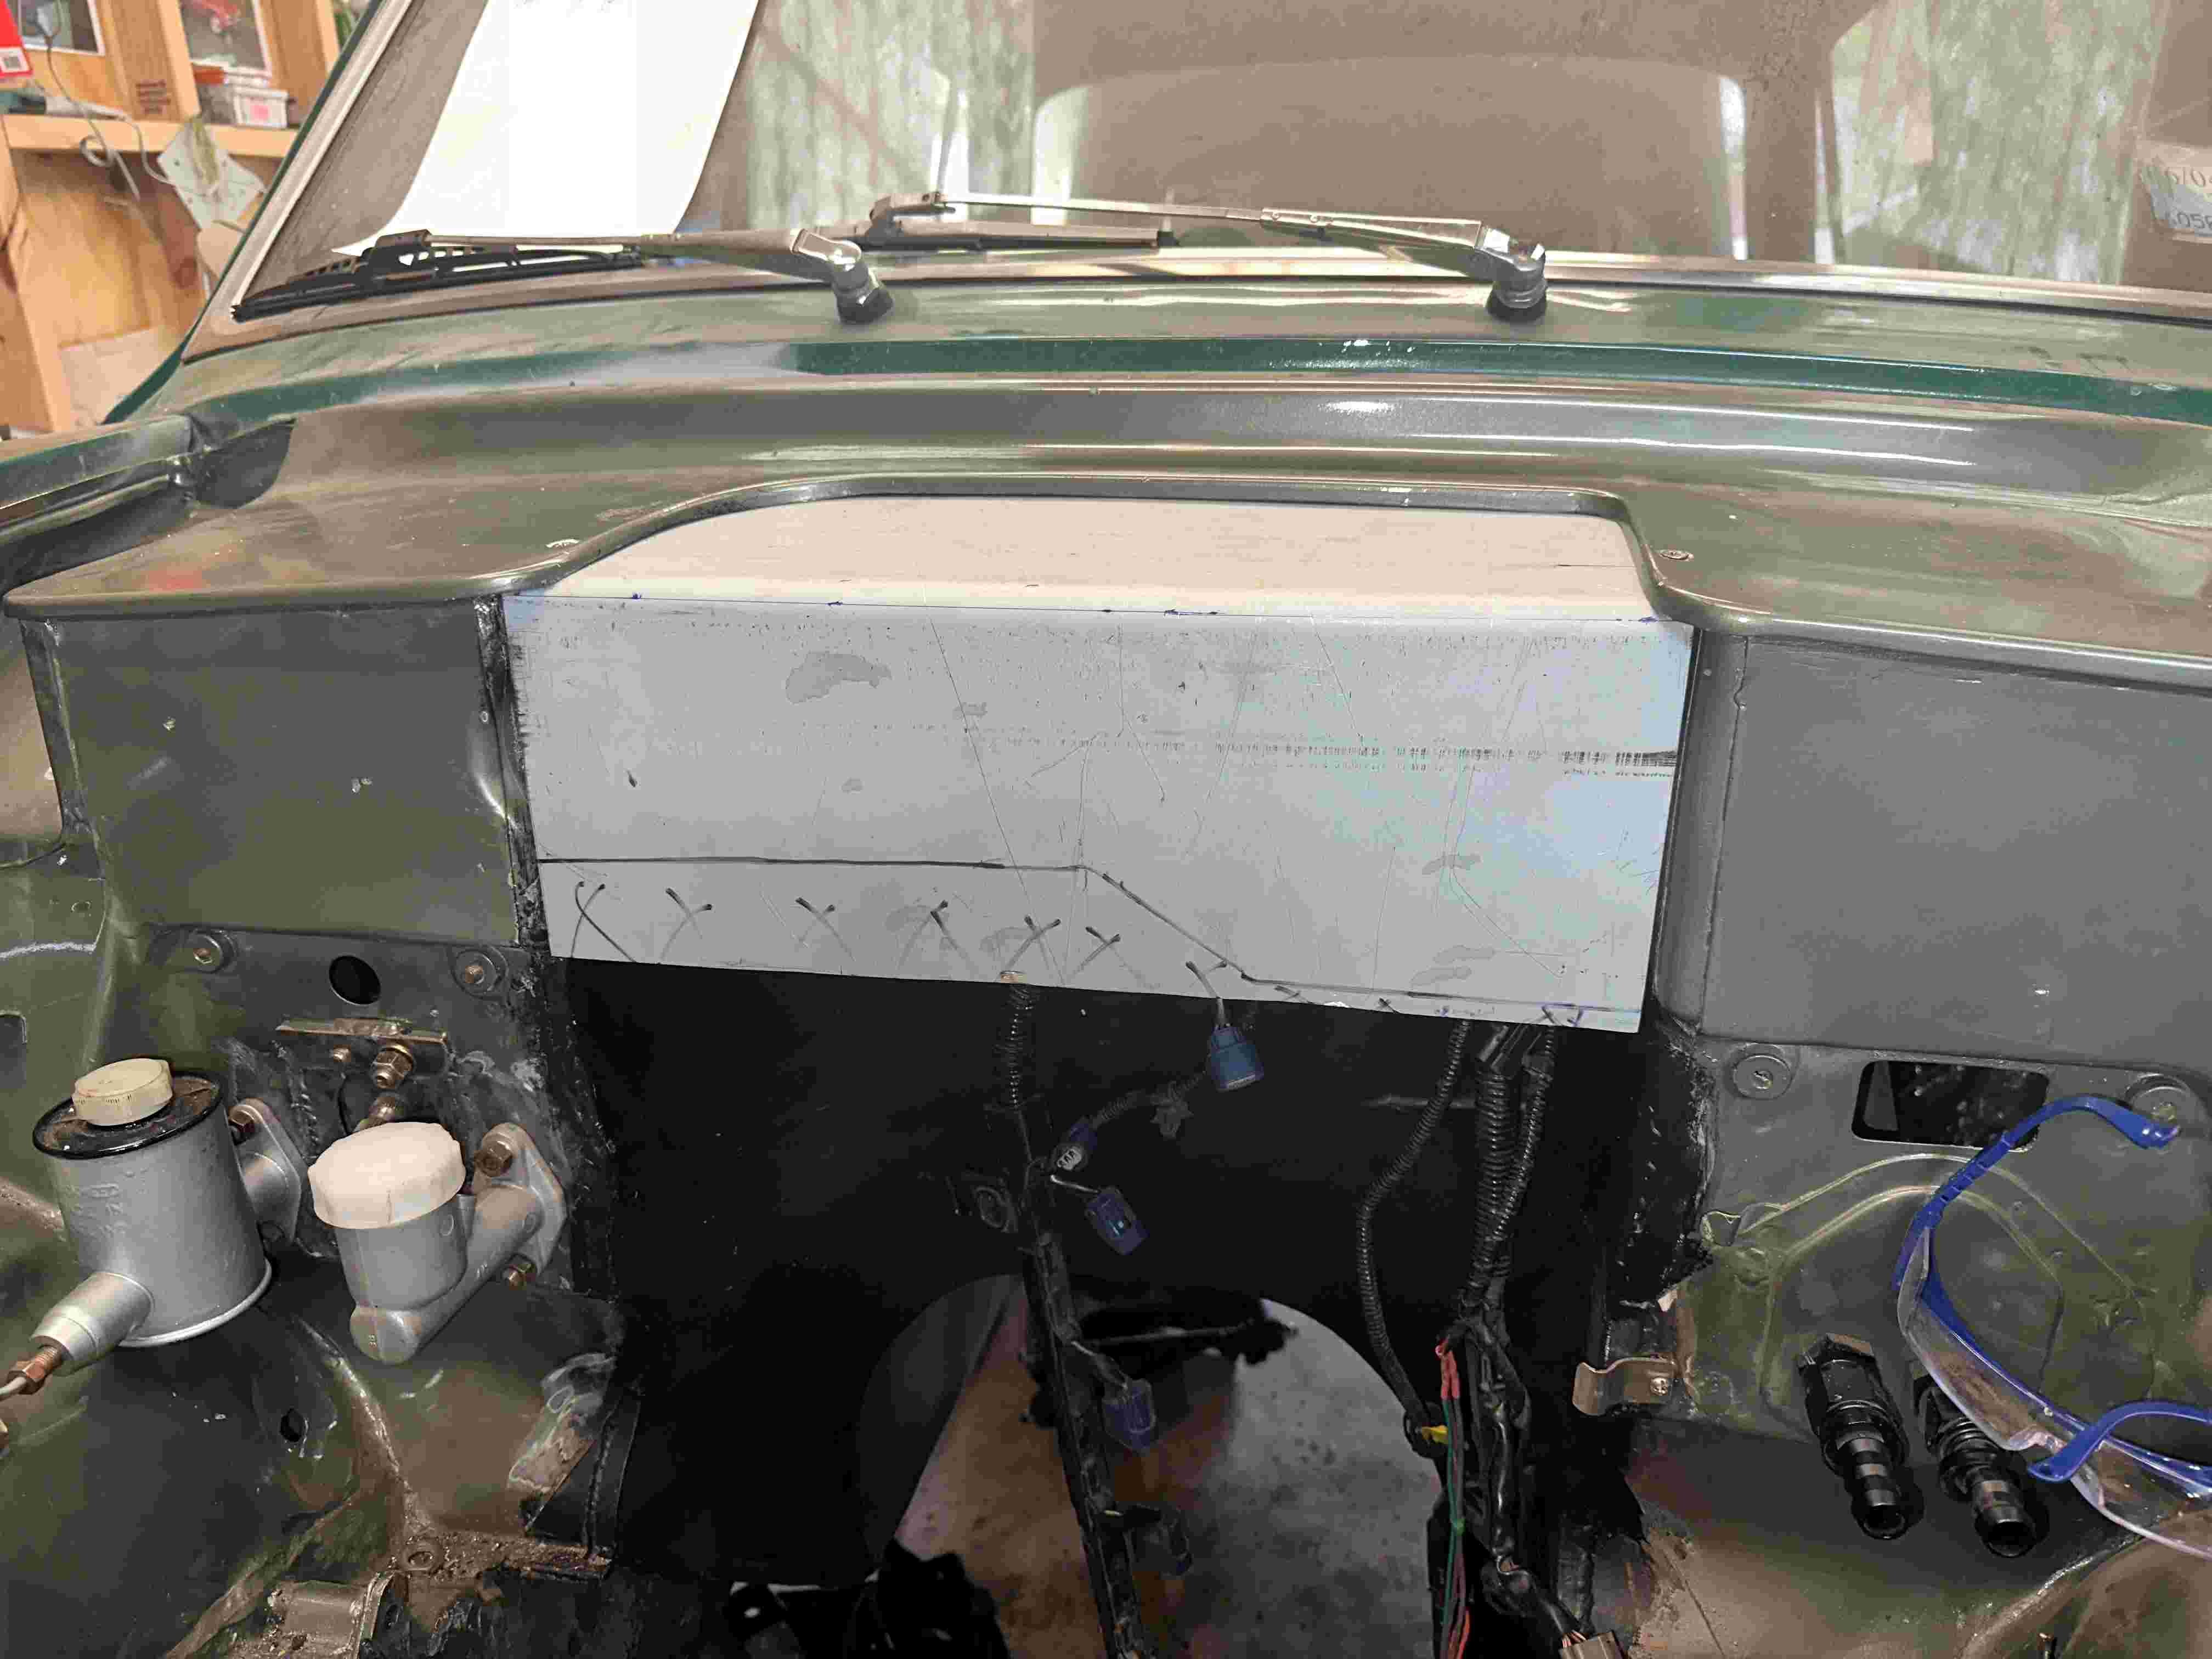
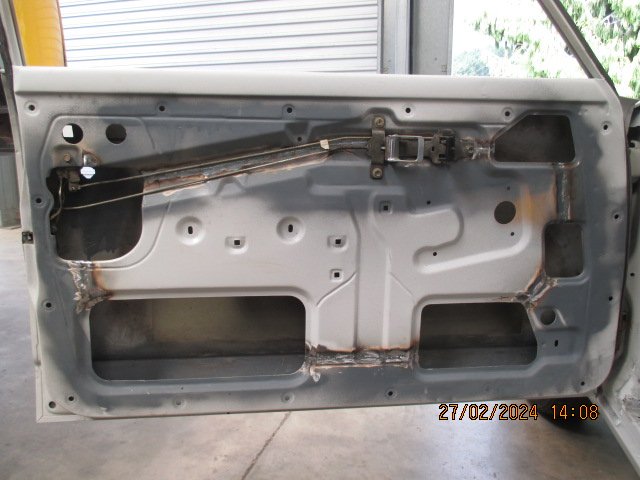
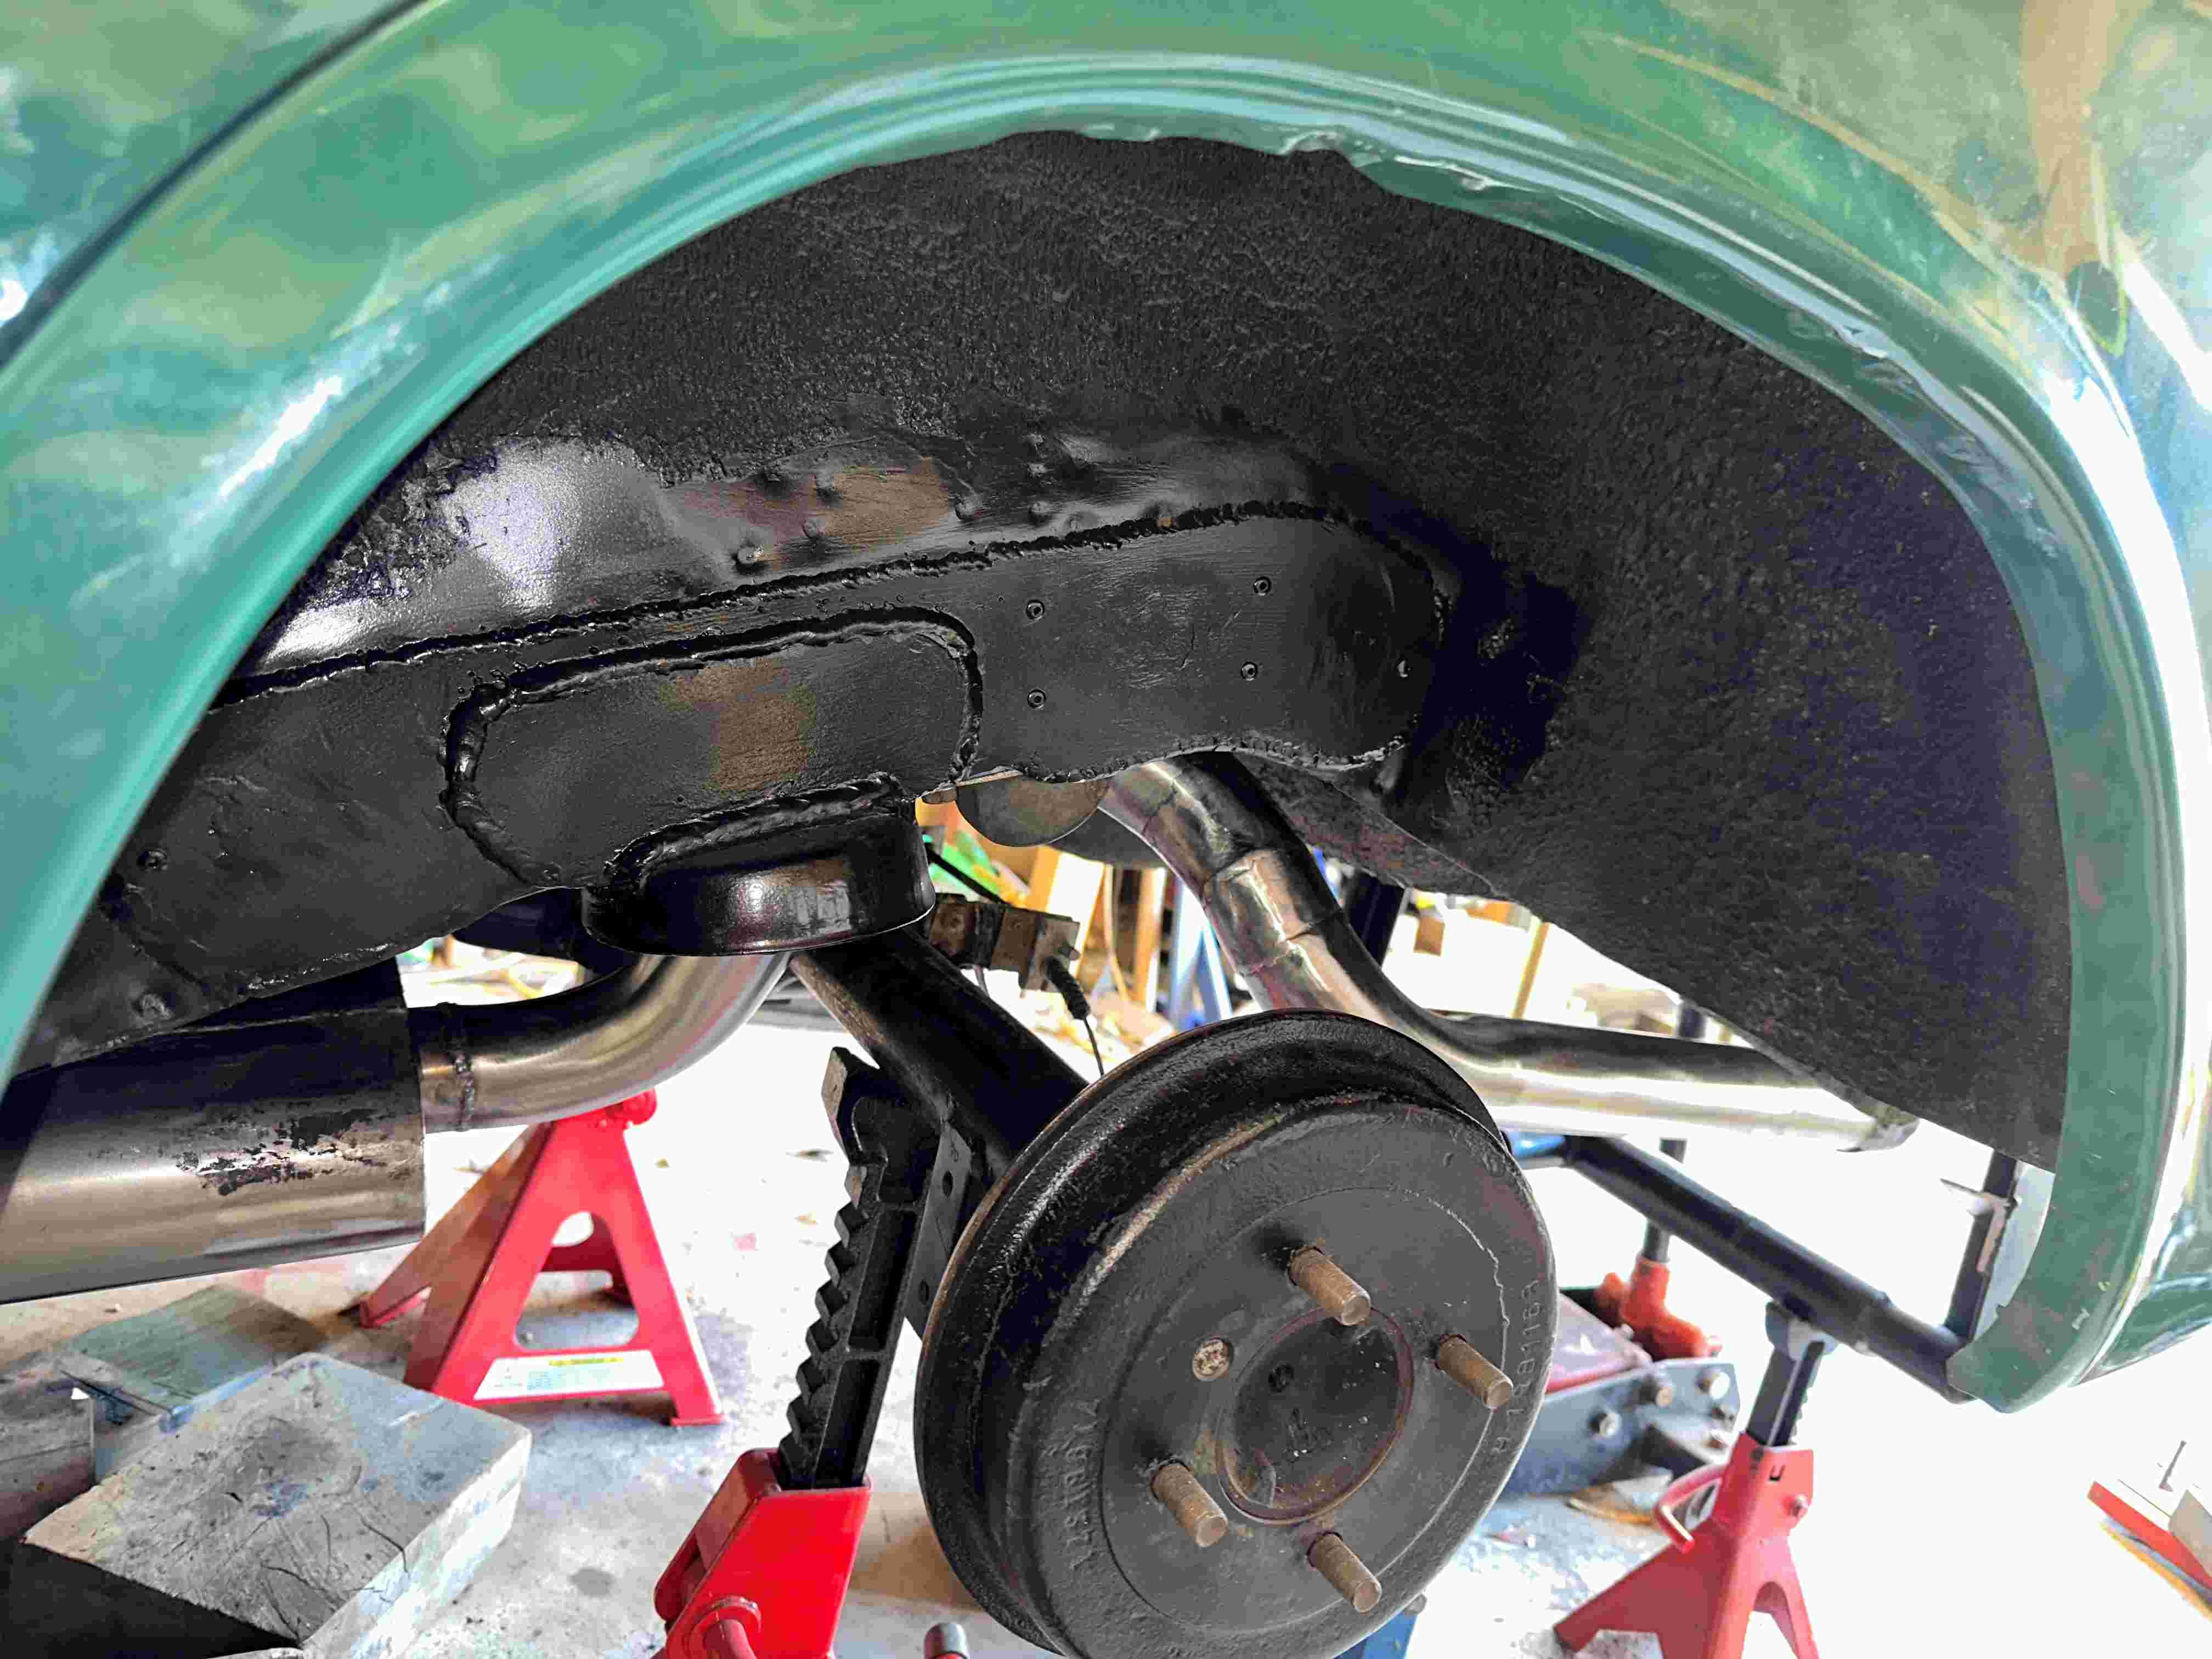
Made a bit of an overkill of a windscreen washer bottle that tucks in behind the front guard. Same for the radiator overflow. Windscreen back in and attached some new drip rail trim along with the stainless rain guards. Wiring of the body loom and Link ecu is pretty much done, other than a couple little things and the dash. Dash mostly back in. Made up a new base for the lower parcel shelf out of aluminium since the original cardboard one had seen better days. Made an alright spot to mount some relays and fuses. Waiting for some new door seals and then the doors can go back on. Hopefully get it started very soon, so it can go to the dyno and then get the upholstery/carpet done.2 points
-
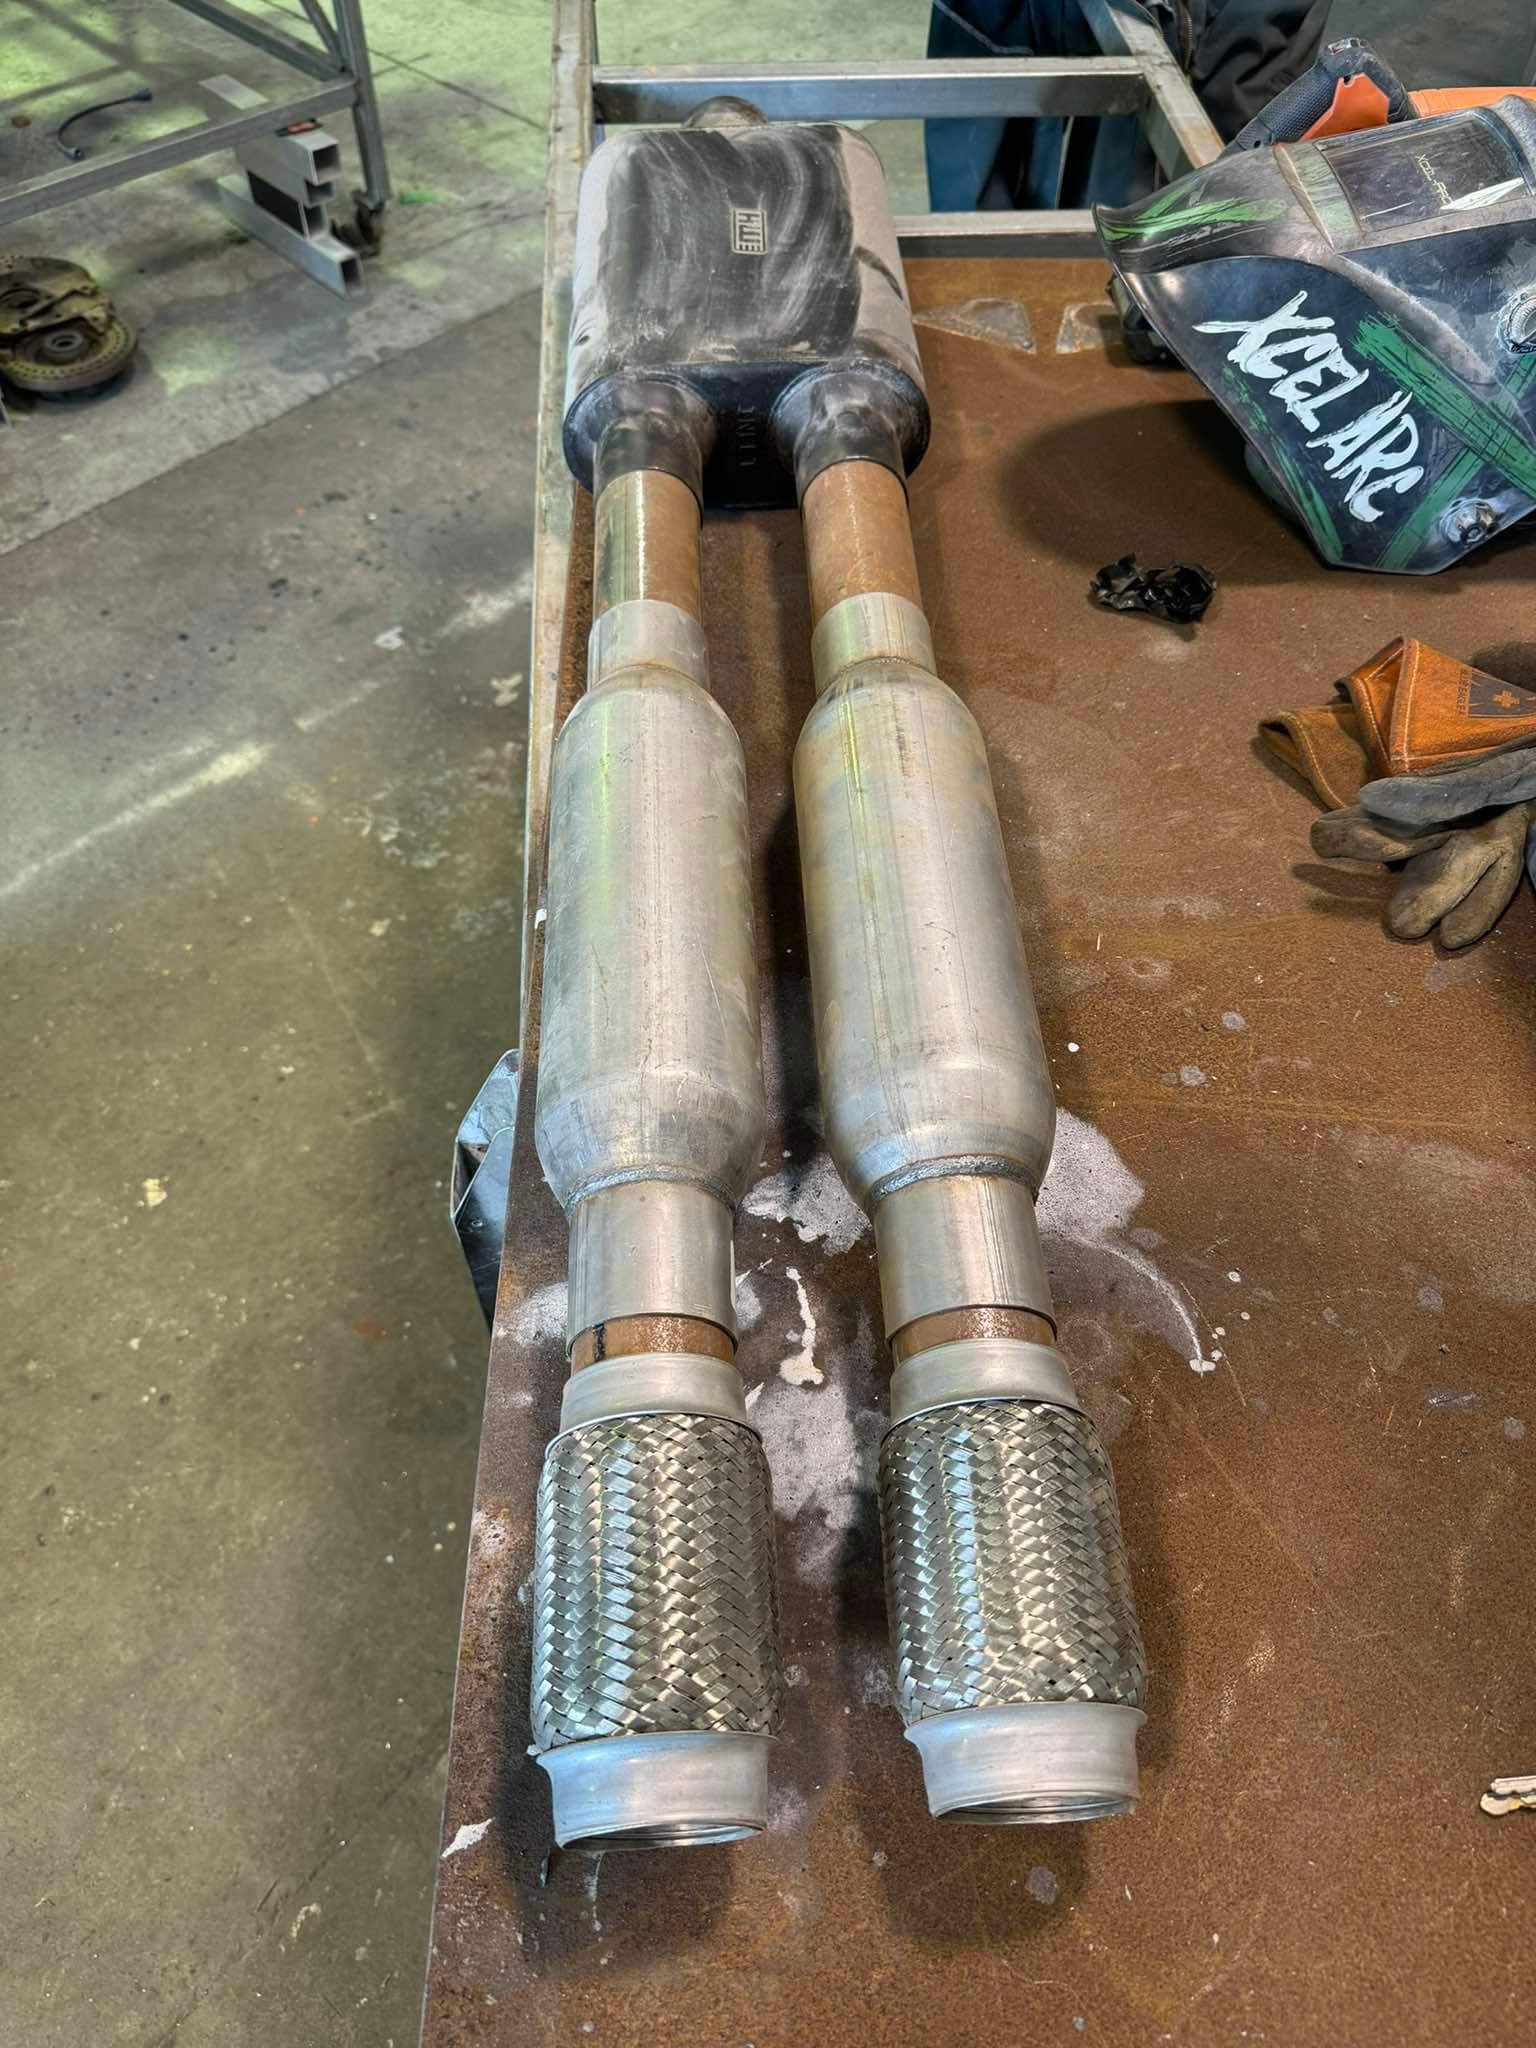
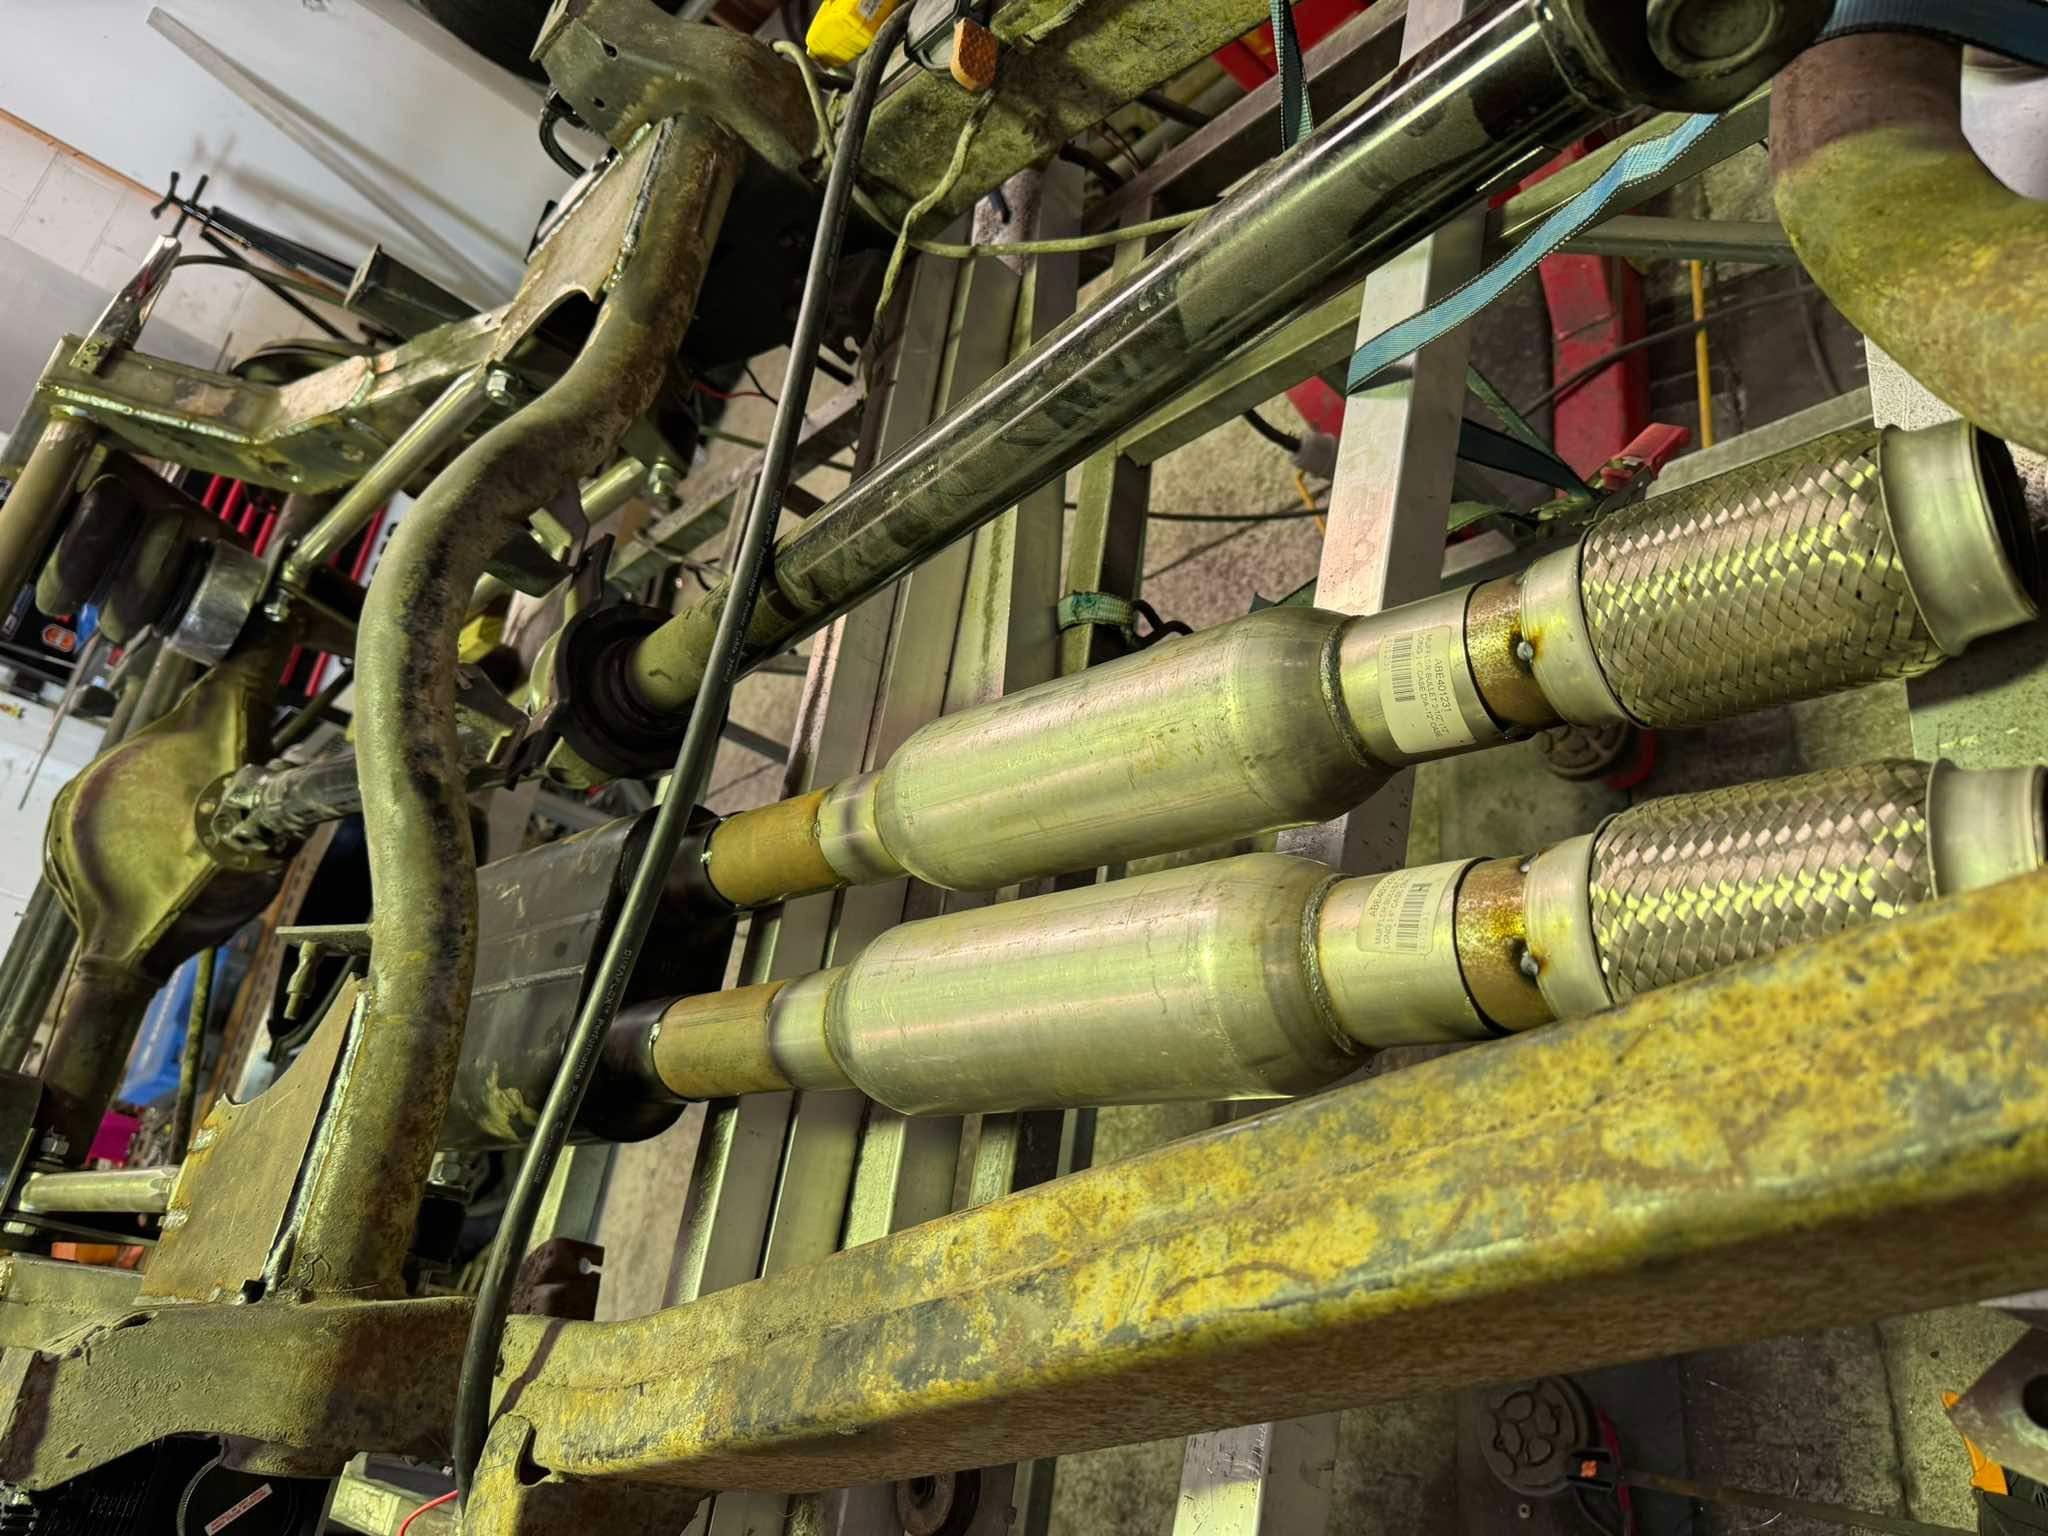
Still making progress on this thing. Have been a bit slack at taking detailed progress photos. Engine was dropped in a while ago. Radiator and overflow bottle finished up too. Fuel lines are done as well as the brake and clutch lines, they bleed up perfectly! Built the exhaust too. Went with a twin 2" stainless system and made the muffler as well. It's now fully welded and mounted properly. Swapped to the SSR MkII's Have put the original loom back in and hooked up most things again. Need to reroute the wiper motor plug, rewire the dash to suit the tacho cluster and redo all the wiring that runs through the front guards so it can be tucked away. Then I need to figure out how to wire up the engine with the Link ecu!2 points
-
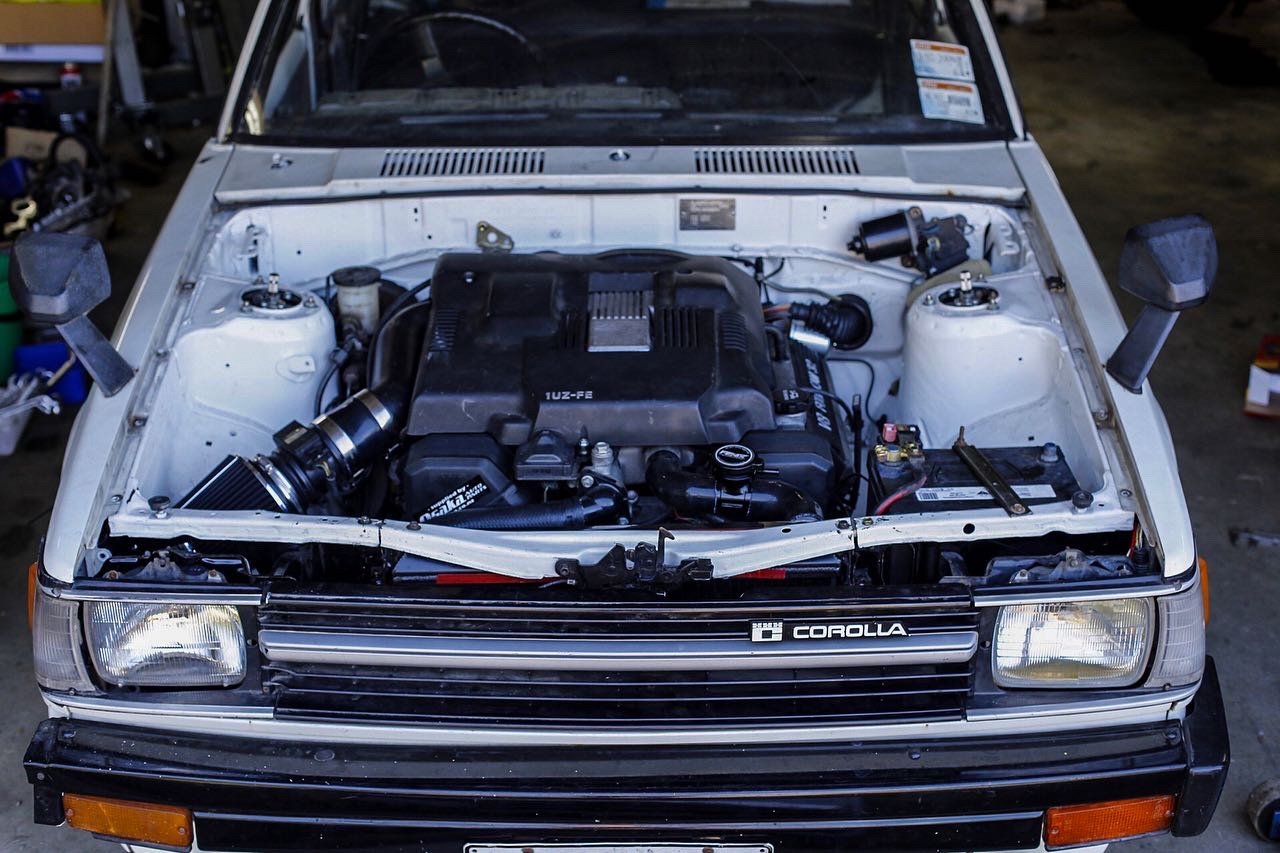
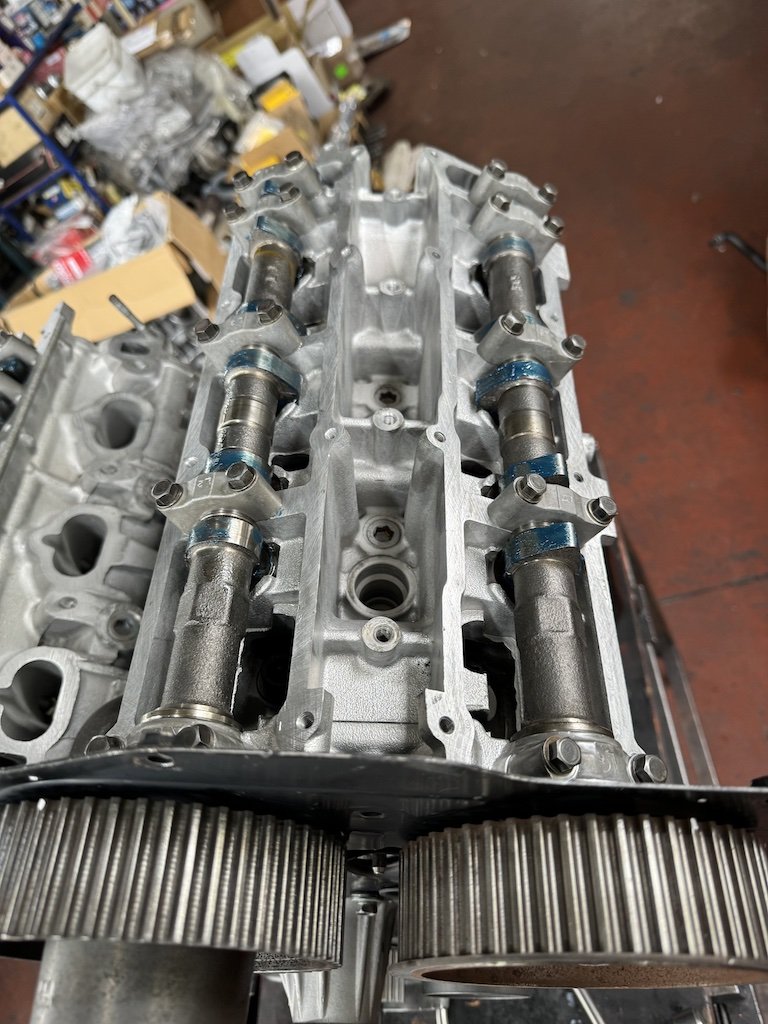
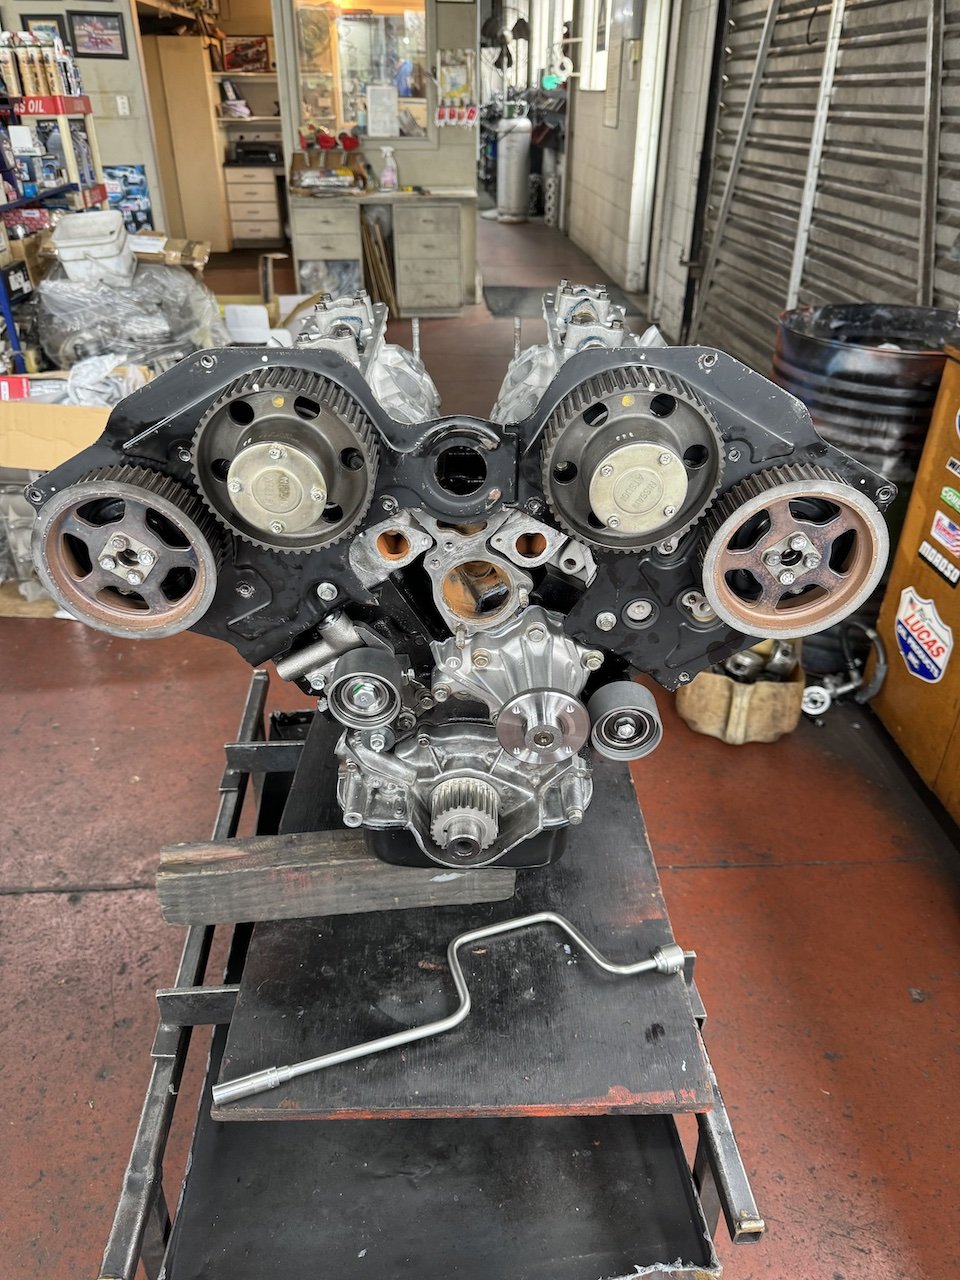
Made a new parcel tray out of some 2mm aluminium and mounted some Pioneer TS-X8 box speakers on it. Also fitted the rear window, just waiting on some new chrome filler trim to arrive, hopefully it fits right. Straightened up the bumpers and bumper filler panels. The filler panels are originally covered in rubber and they had a few spots where they had formed rust bubbles underneath and just looked terrible, so stripped that all off and tidied up the steel panels. Made some mounts for the radiator. Need to get the engine in to see if there's clearance between the fan and engine before I finish mounting the shroud. Finally got the engine back from being built. Basically it's got big cams, CNC ported head, uprated valve springs, TRD headgasket, Toda cam gears, then just all the usual stuff to freshen it up. Will try and get some proper specs soon. Got the throttle body's and manifold vapour blasted and then went through and replaced all the zinc socket head capscrews that everyone seems to send with their aftermarket parts, with some nicer stainless button heads. Gave the gearbox a coat of silver metallic basecoat and then since it was getting some clearcoat sprayed over the top, I thought it'd be rude to not throw some metal flake in too. Need to decide on something cool to paint the cam covers in now!2 points
-
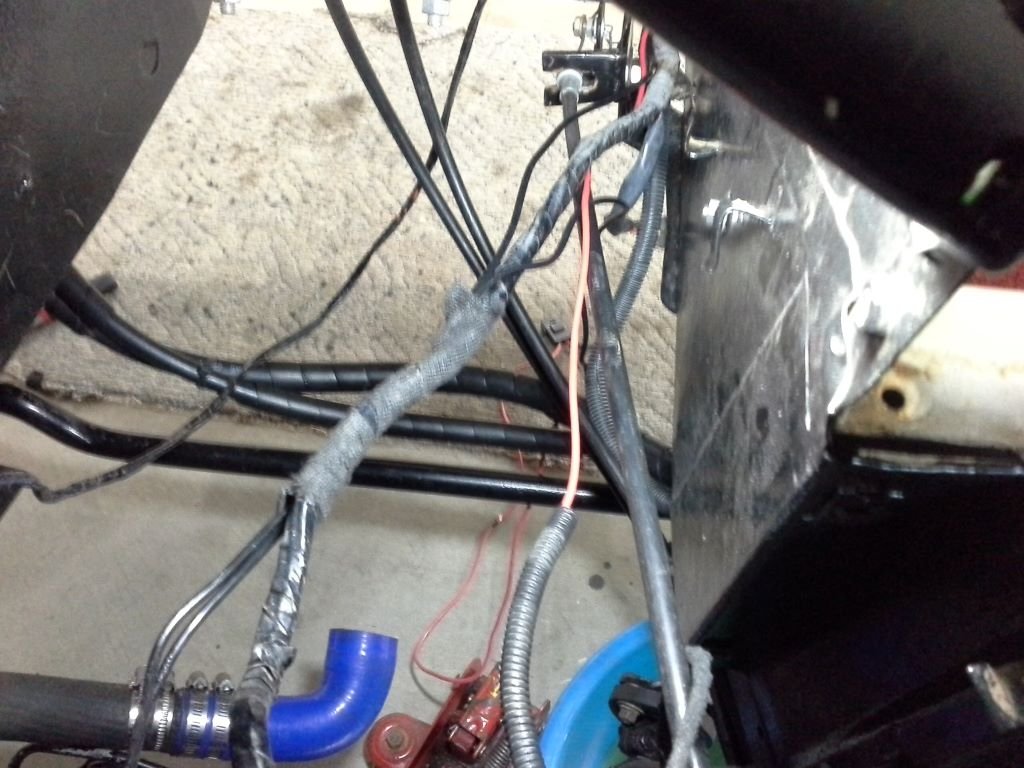
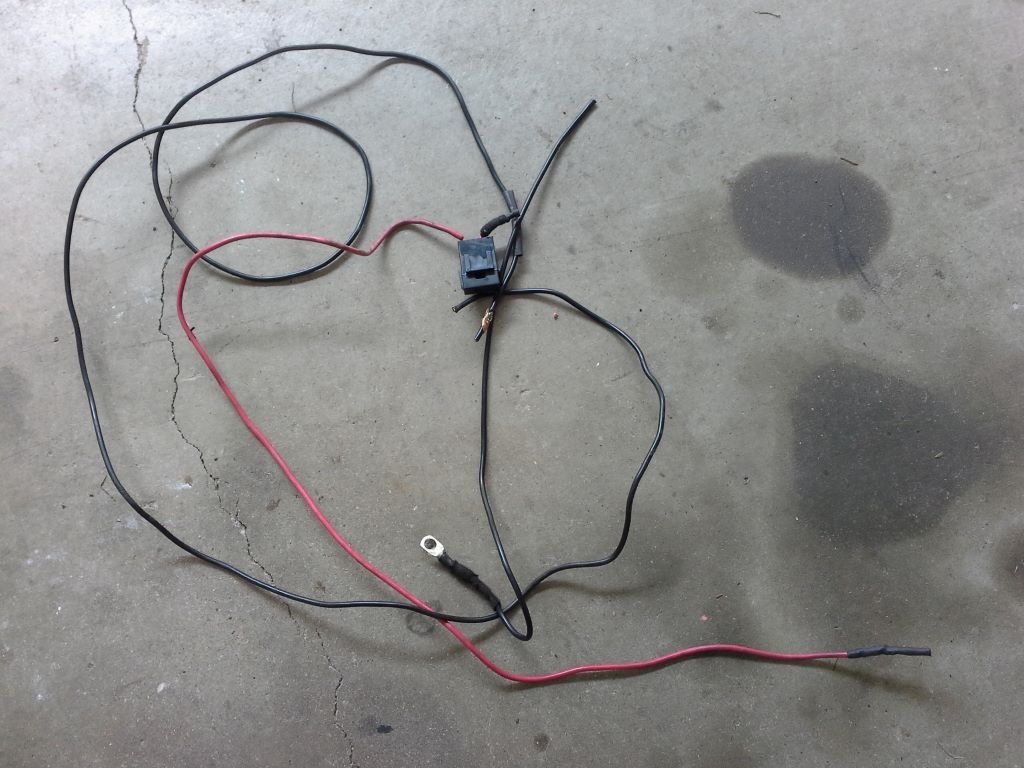
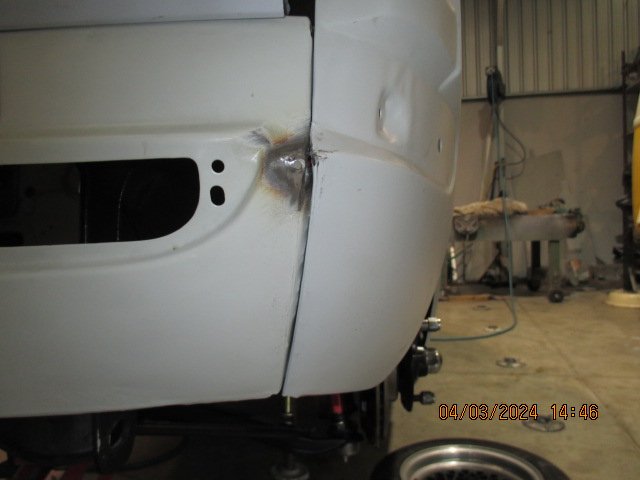
Today I managed to make a start on the a/c repair. First order of business was to remove the radiator to gain access to the a/c compressor and belt tensioner. The good news is that the idler pulley for the tensioner runs true and is pretty smooth. The bad news is that there is heaps of sideways play on the compressor pulley and it feels pretty rough when spinning it. So in summary I reckon my a/c guy was correct with his diagnosis. The Toyota Landruiser HZJ series use the same compressor so luckily my local a/c parts supplier has a replacement compressor on his shelf. With a bit of luck I can pick it up from him early in the new week. I'll replace the receiver/drier at the same time. While I have the radiator out I thought I'd remove the defunct power feed for the thermo fan. Some of you may recall that I ran a new feed earlier this year, but recovering the old feed meant unwrapping the wiring loom which is a helluva lot easier with the radiator out. Spent the rest of the morning removing the power lead and rewrapping the wiring harness, just to appease my OCD tendencies. And now ready for the bin:
1 point
-
Slazz applied with a hand cut new (not cork) gasket to hold everything together and it seems good. All back together fingers crossed this is actually a fix rather than bodge. Resisted urge to drive it any further then the end of street a few times to warm engine up and the stalling issue is now gone completely. Will let it sit overnight and test drive.
1 point
-
After pulling everything apart it was obviously leaking at the front port and rear port so I sat down and sanded the shit out of it till everything was nice and flat and shiny. The original O ring setup was garbage so I welded the parts where it could leak between cylinders and filled the other voids with half a tube of grey silicone.
1 point
-
Lots of sanding a little welding and Lashings of goop and a new custom gasket the bloody thing idles for first time since Turbo'd it1 point
-
Small update. I dropped the engine and trans back out as I need to tap a thread for one of the starter bolts. Don't know why it wasn't tapped, maybe they just missed that one. Also needed to get the wiring loom through the firewall. There is not a lot of room behind the engine so the loom had to sit higher than the engine which was going to be a bit ugly. I figured out where I needed to mount it and made up a bracket to hold the looms junction to the firewall and bonded it on with some JB weld. I drilled a hole through with a hole saw and made up a channel with a flange on it to fit the rubber grommet to. Then I made up a cover which will attach to some brackets I made up. It looks a little odd at the moment but I think once I shape the lower edge of the cover to the shape of the valve cover etc it will look ok. I will paint it black so it contrasts the cars paint colour. I have some of that Hammerite which is textured so I will see how that looks.
1 point
-
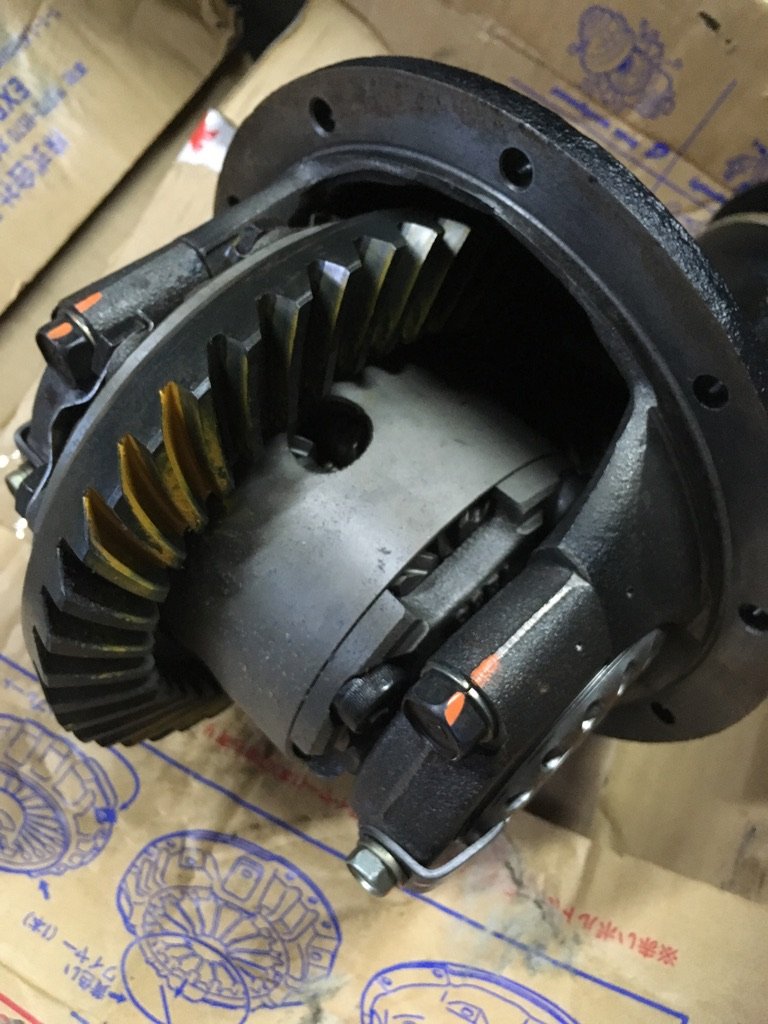
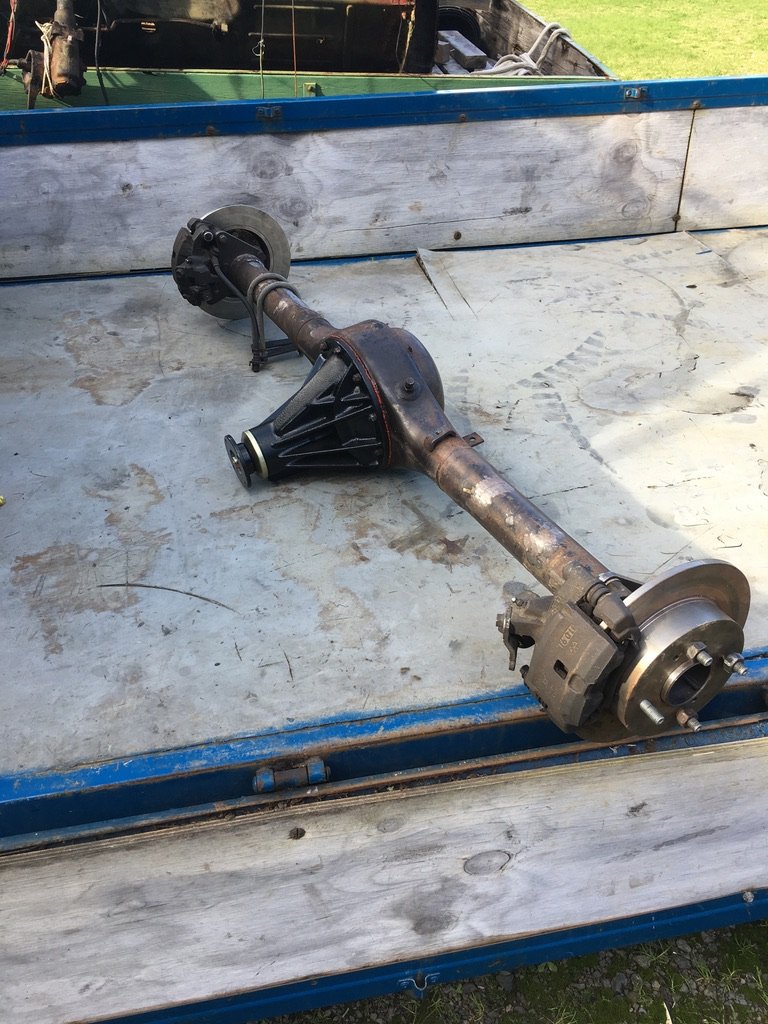
Because I have a spicy brain I'm going to make you all suffer through 12 years of out of order updates based on which photos I find first. The diesel wagon comes factory with a larger s-series diff compared to the normal KE70, but this still wasn't going to cut the mustard because V8 and because I wanted an easy LSD option. I looked at options, first was G-Series Hilux, which I decided was heavier than what I needed, and settled on an F-Series. Now I needed to find one. Some of you may have heard of a Crown foamer called @sheepers, @Snoozin suggested I hit him up about a housing, and he supplied me with an MS85 drum brake diff. Somehow it made it's way to me and I turned it from a 5-stud, 3-link drum brake diff into a 4-stud, leaf sprung diff with AE92 FXGT calipers and S14 discs. We drew up some caliper adapters on paper and got them laser cut (I'll probably make better ones now that I have skills and shit) and an engineer a friend in Silverdale uses welded and redrilled the axles before I chucked some Landcruiser studs in them. The amount of time it took to get the axles done really makes me scared of breaking one, but we will see how we go. The LSD was bought off someone on Facebook and is an Altezza A-series torsen of a forgotten ratio, most likely 4.1, my same SIlverdale friend sent it to our mate Kayne Barrie for a bit of a freshen up and to be put into the Crown carrier. It's got a solid pinion spacer and he has really high standards and attention to detail, so I'm sure it will be a nice diff. I set about making some really ugly brake lines which was a learning experience and I have just recently found out how dumb I am, because they run through where the bump stop needs to land, so I'll probably redo them, maybe even with braided line if I get super lazy. Keep in mind I'm a computer guy, and that this is my first rear wheel drive car.
1 point
-
1 point
-
Also in "Today stuff shows up for my Corolla" @di0n received the thread for my interior today The plan is to do my door cards in a similar fashion to these FJ45 ones he did, but black and with the orange stitching to match the FXGT steering wheel. I'll design and cut the cards and get him to deal with the stitching side. I've got some ideas for map pockets and armrests too so I'll see how I go. I'm thinking I'll do a detail section with a black basketweave vinyl too
1 point
-
Max showed up this afternoon with my sump which he has had modified to fix a leak and clear the steering rack better. I've drawn the lower pan flange in fusion and I'm going to try and design a wider slimmer winged pan to give me some more ground clearance and try and get the sump up in line with the crossmember. He's also had a 4age throttle body flange welded onto his 2T intake manifold so we can use the 4age throttle and it's corresponding TPS so I'll update his thread soon hopefully
1 point
-
My new reservoir showed up from Ali today, so I threaded it in and realised I couldn't open it under the pinch weld on the firewall. So I went and got an adapter to screw it into the AN3 front port instead of the AN4 rear port Now it fits nicely in front of the pinch weld.
1 point
-
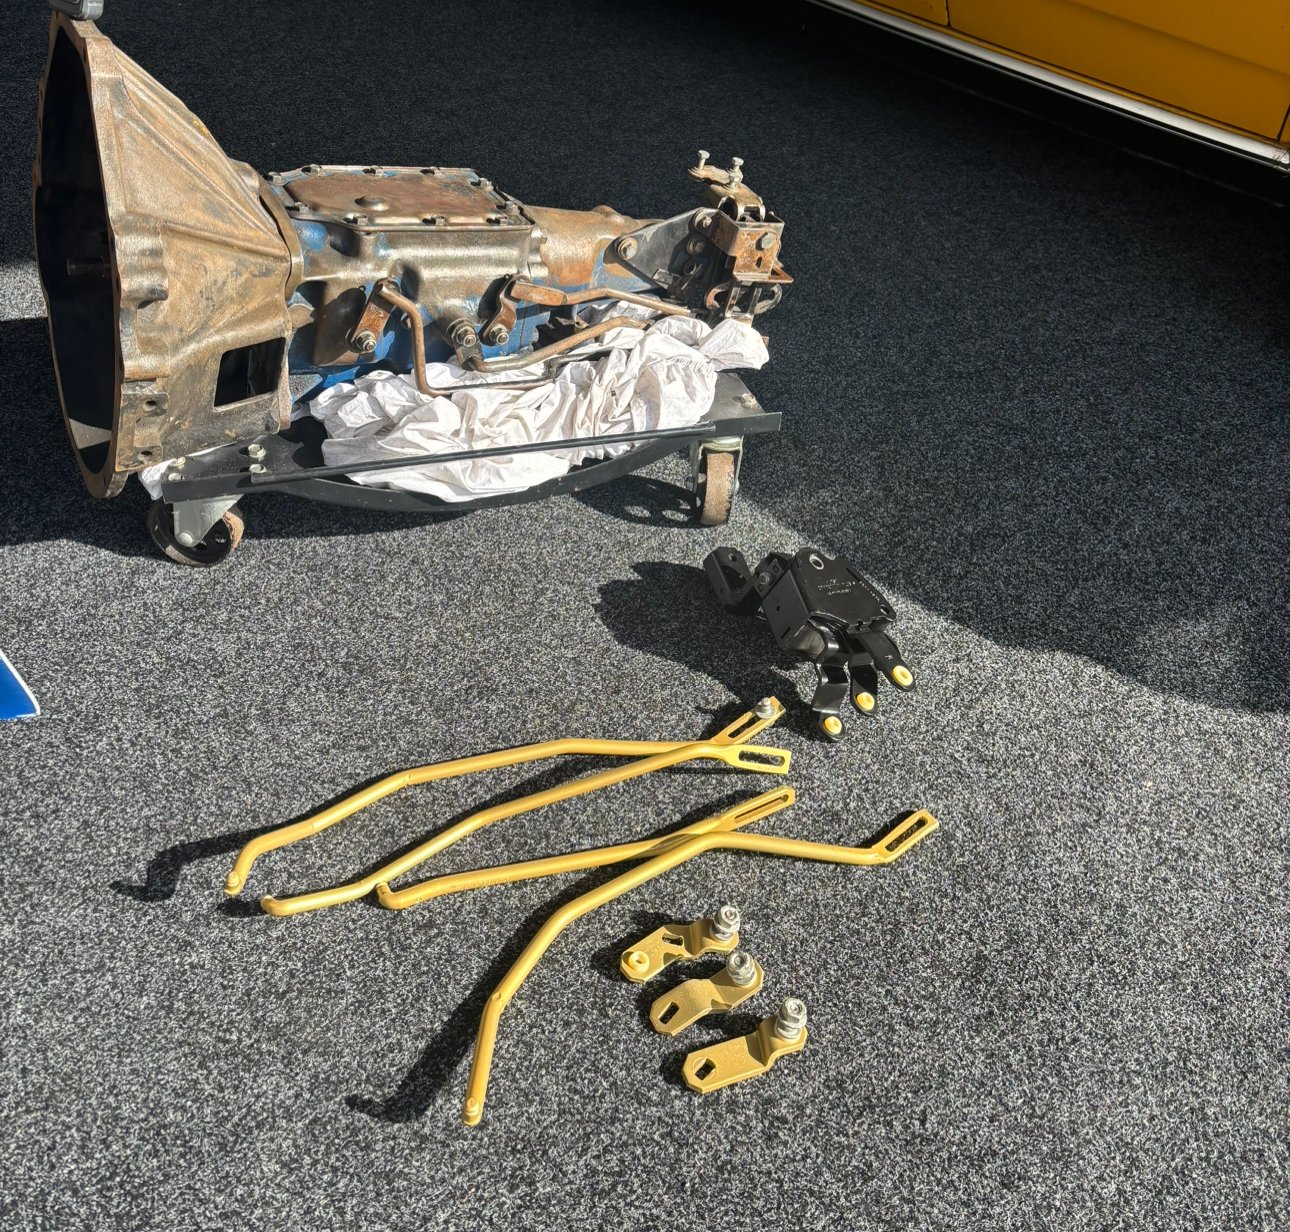
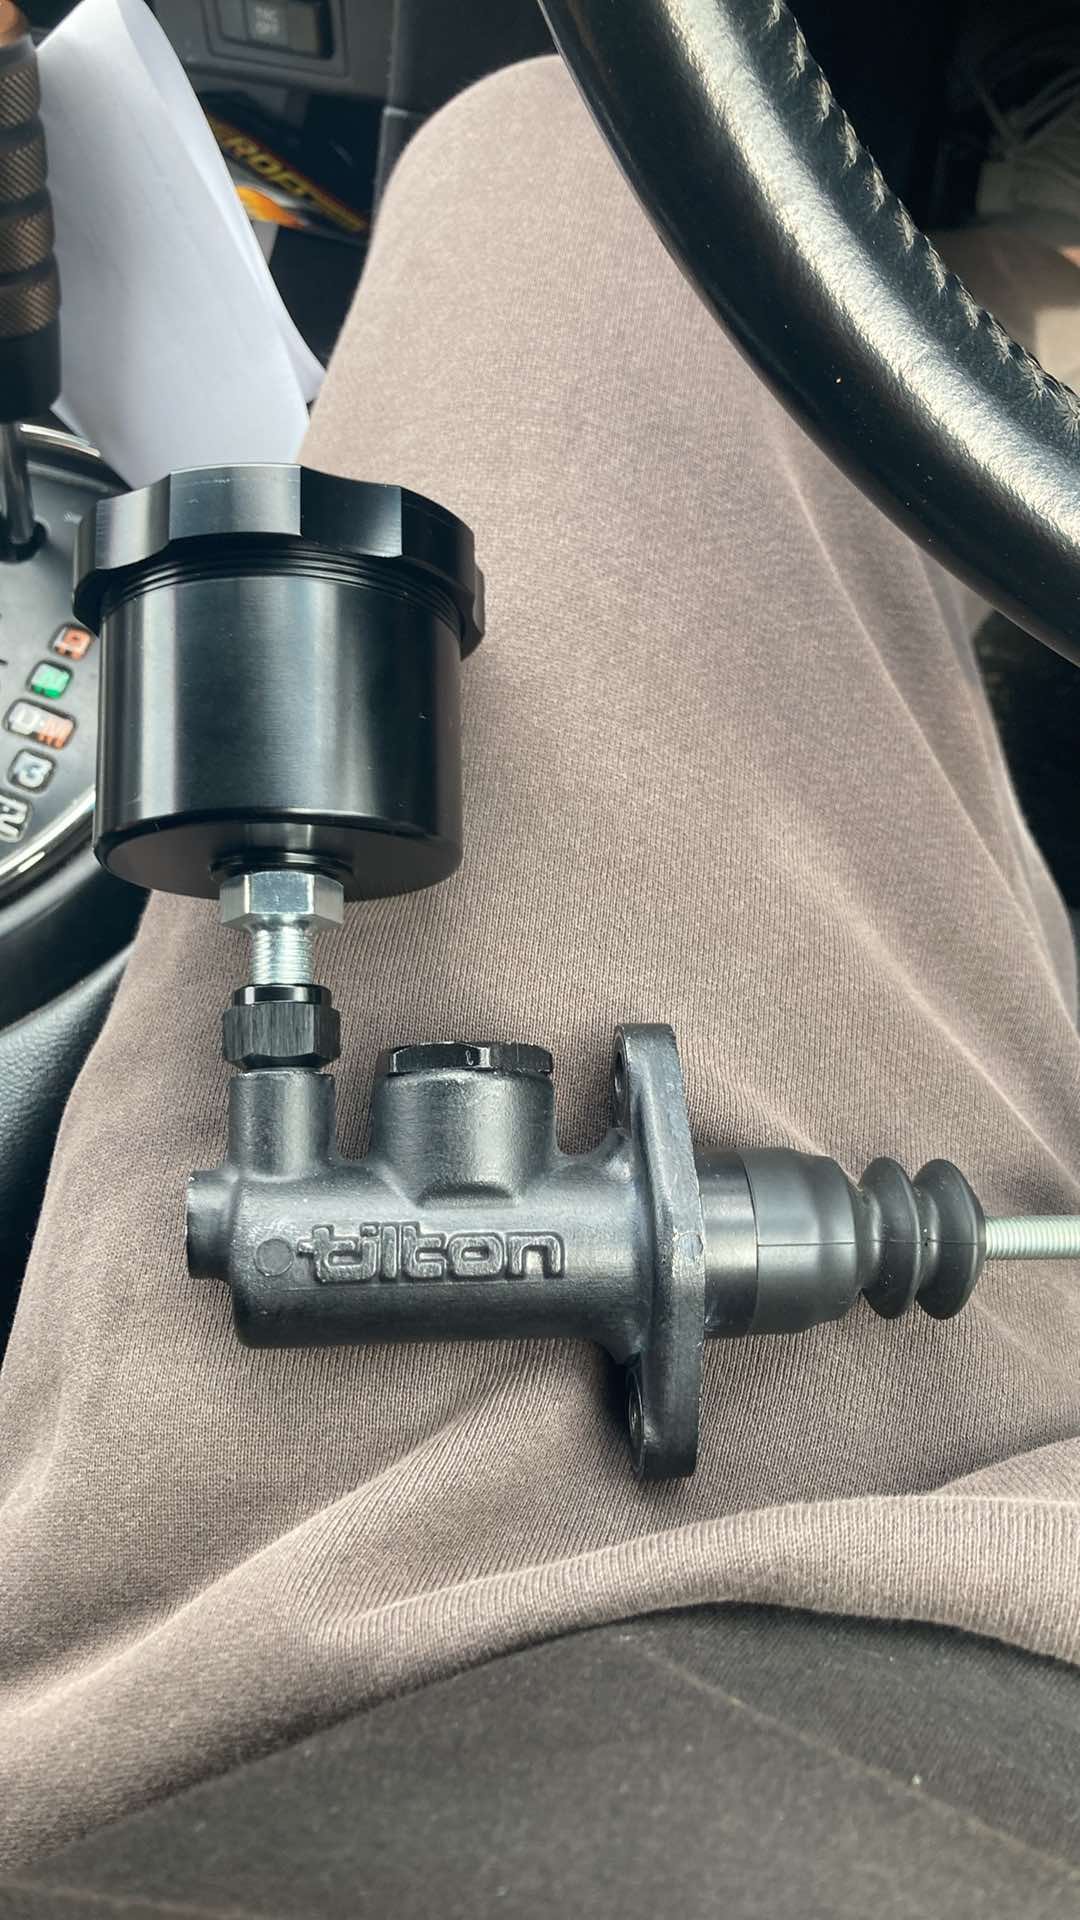
Discuss here Ok, so I bought this off @di0n sometime in 2012, needless to say, things haven't progressed quicker. It now has more engine than it ever needed and is in 1800 pieces, but sometimes @Dudley talks me into working on it. The engine is hopefully out for the last time at the moment while I do some bits and pieces like moving the brake and fuel lines out of the tunnel and making sure I'm gonna have enough clutch master for the hydraulic release bearing. The current spec list is: 1986 CE71 Diesel Corolla wagon. 1995 UCF20 second generation 1uzfe Factory 1UZ auto bell housing with an adapter plate Factory-fitted W56 (I think it's a 56) from behind the diesel 3S-GTE flywheel with Hilux Surf clutch Quartermaster hydraulic release bearing Tilton 76-series stubby clutch master with Chinesium reservoir Shortened factory driveshaft because the gearbox is pushed back to get the engine as low and far back as possible. Ex @sheepers Crown diff with Altezza LSD head with the KBM treatment. AE92 FXGT rear calipers and non-turbo S14 discs Ex C's Garage reset leaves and shocks MRP Wilwood kit Chinesium smaller brake booster MRP front Coilovers Early Evo/GSR Recaros on Bride rails A Racetech drivers seat on a Scarles bracket. Factory ECU Siemens fuel pump on the end of the factory fuel feed in the tank. 14x6.5 Starsharks with Direzza ZIIs
1 point
-
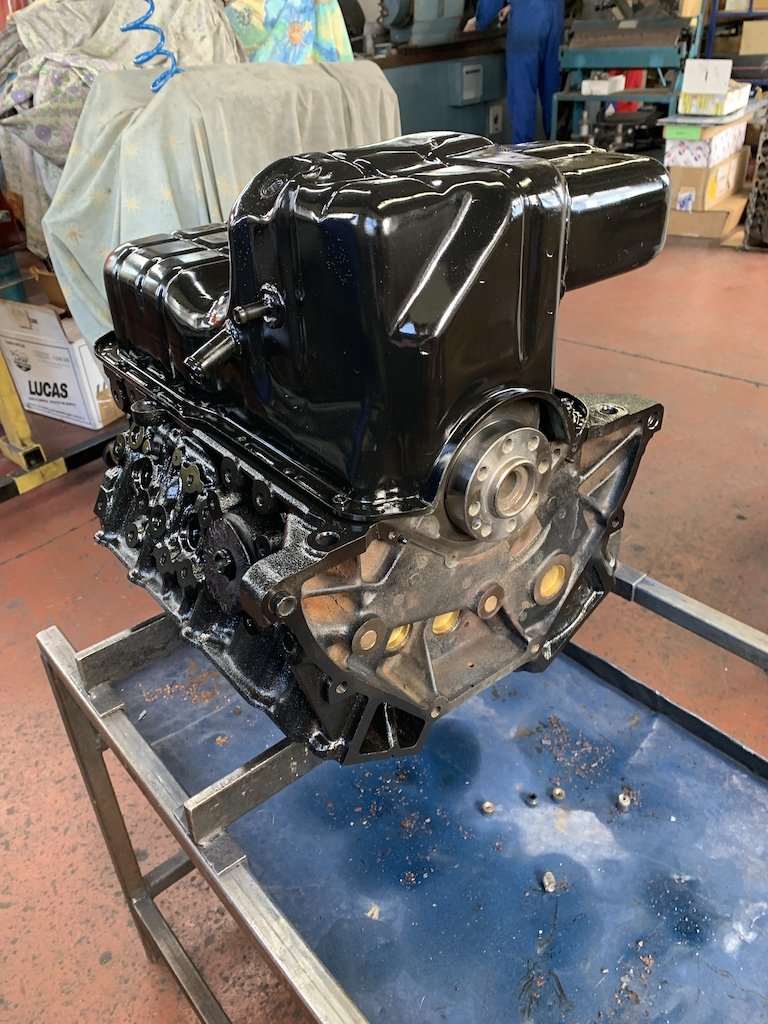
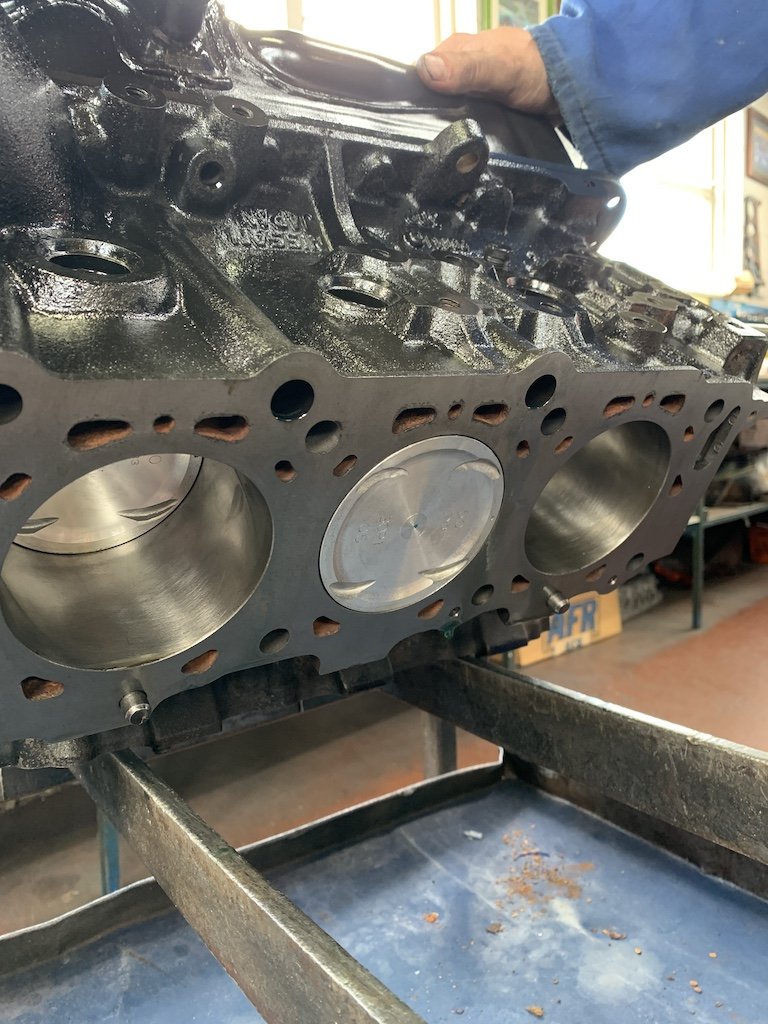
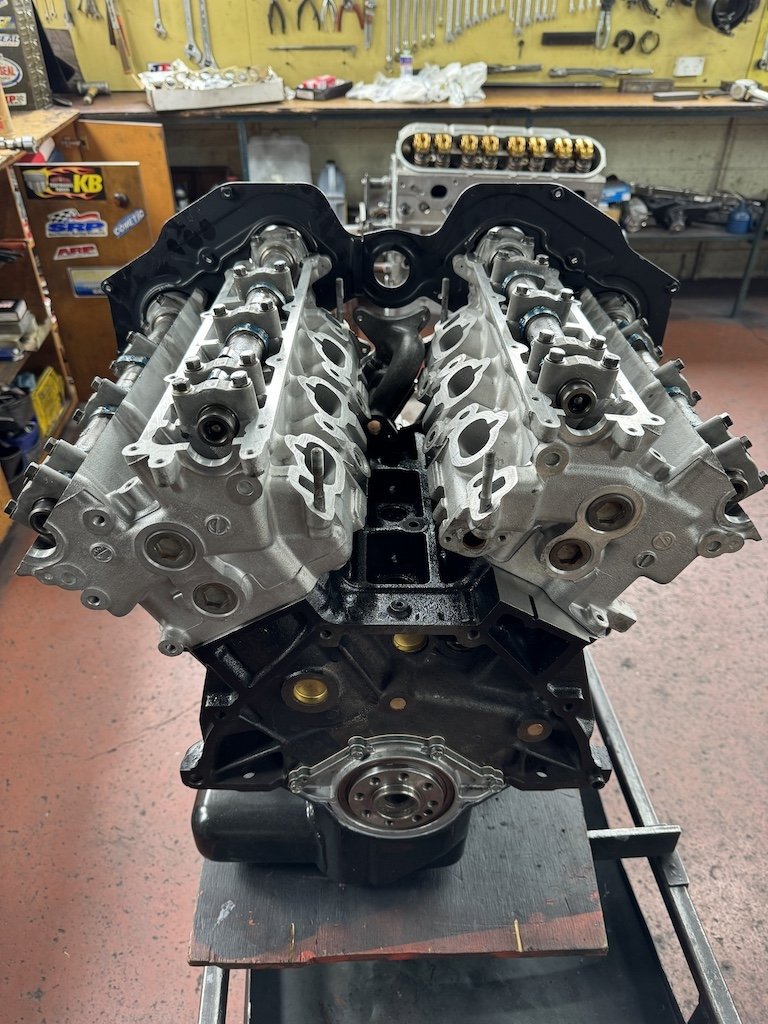
Bottom end got a total overhaul with new .5 OS pistons and rings, and the heads got tested, machined and a whole bunch of new bits thrown at them. Timing kit all done and turbo's are off getting tested. Slowly putting her back together in my spare time, replacing bits where I can.
1 point
-
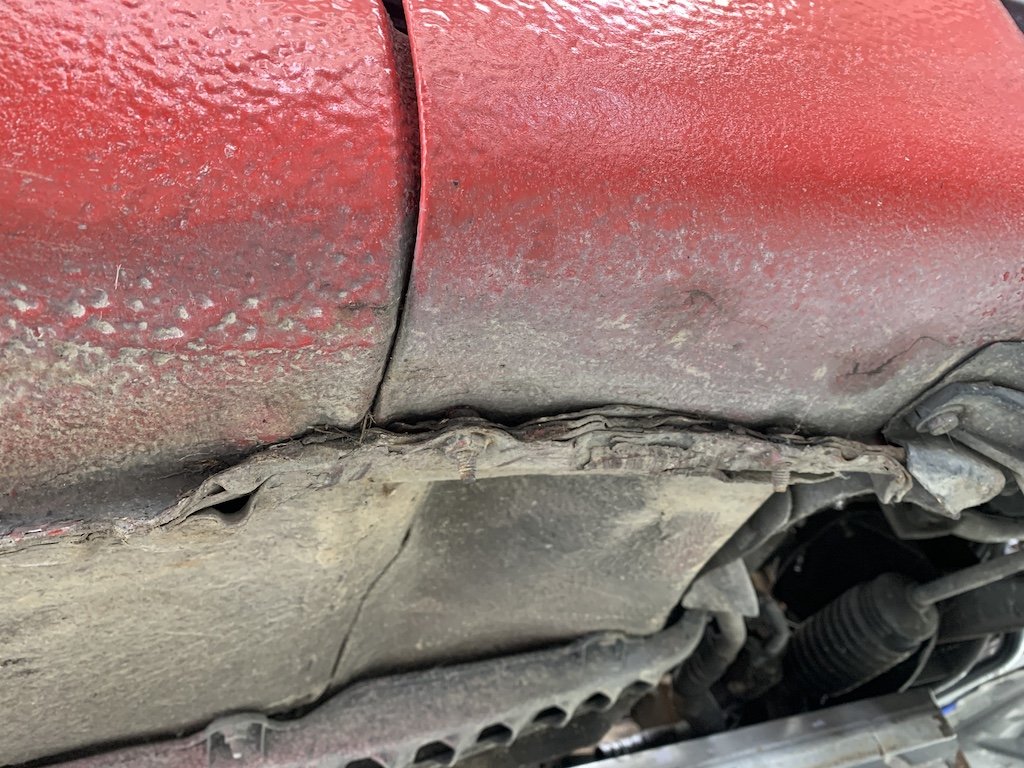
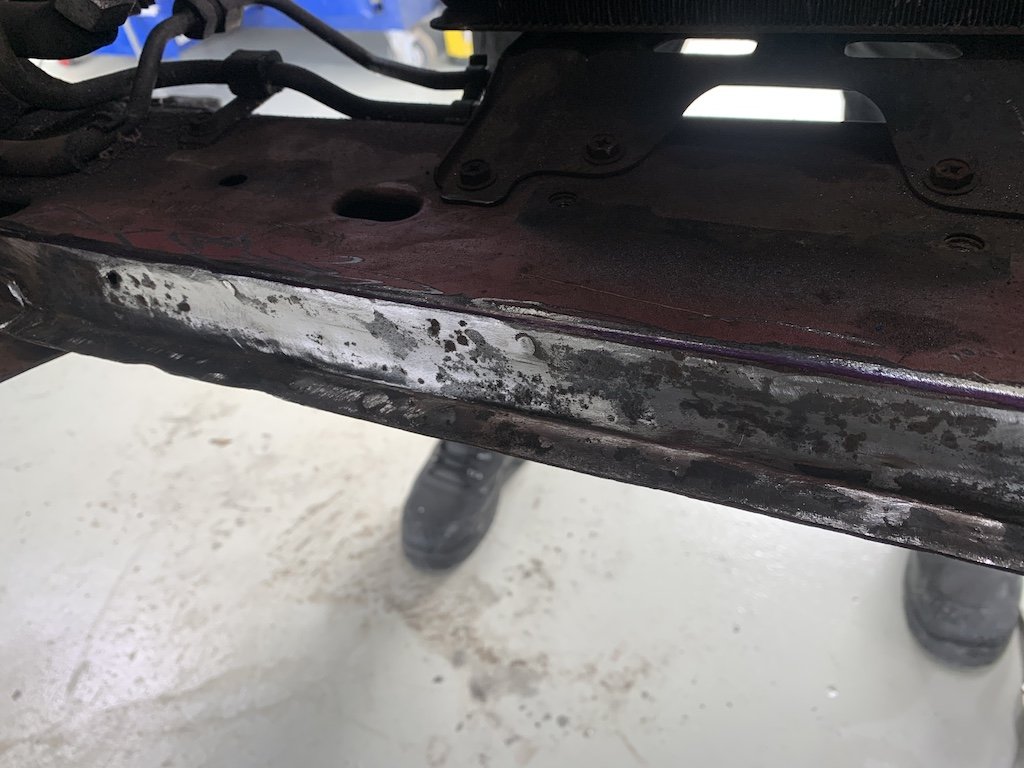
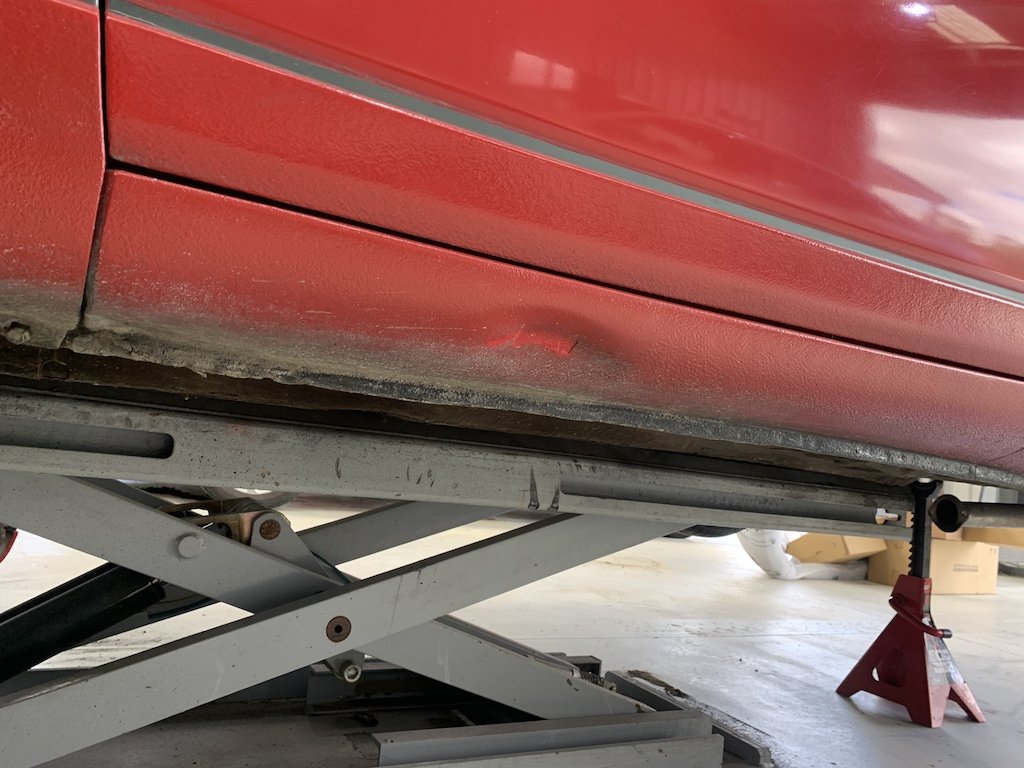
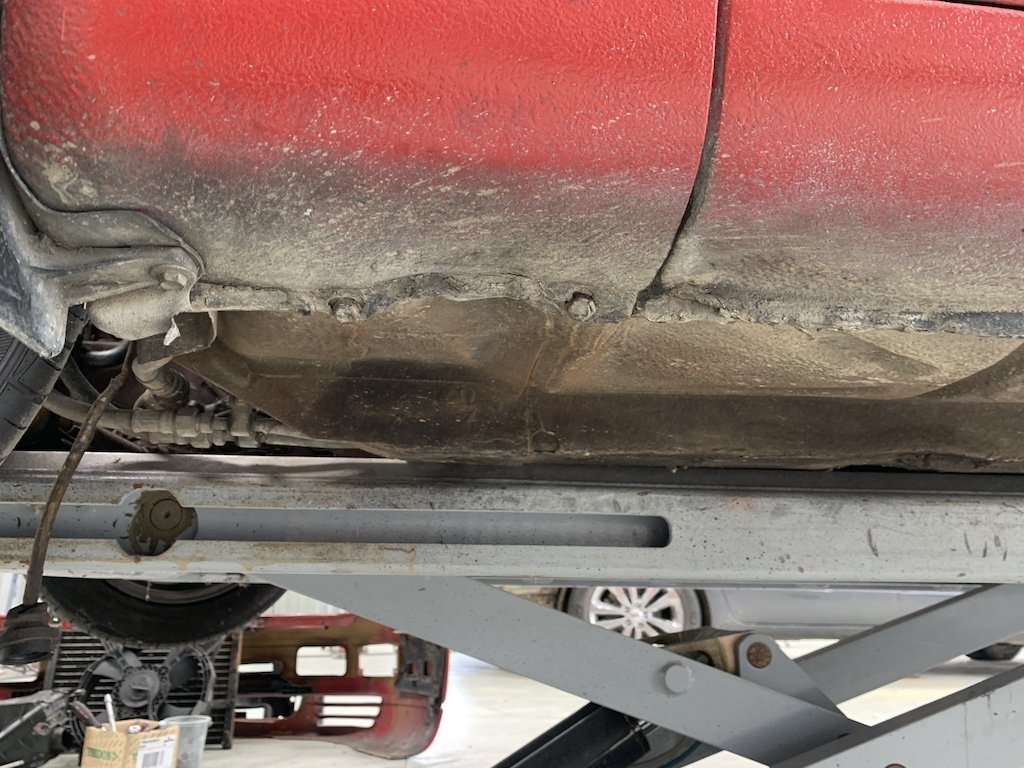
Next she was off to the body shop to get a dent out of the sill, the crushed sill joins straightened out and the radiator support replaced. So these are all fixed up and good as new again - the paint is so new it sticks out so might look at a quick closed door respray once it's done.
1 point
-
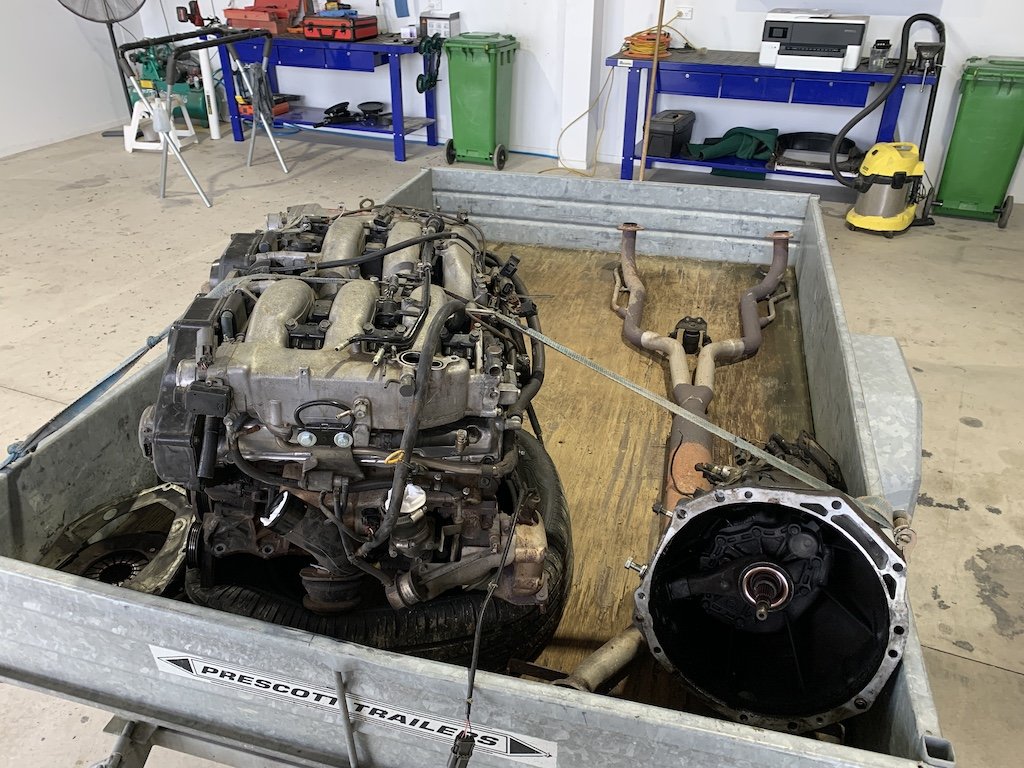
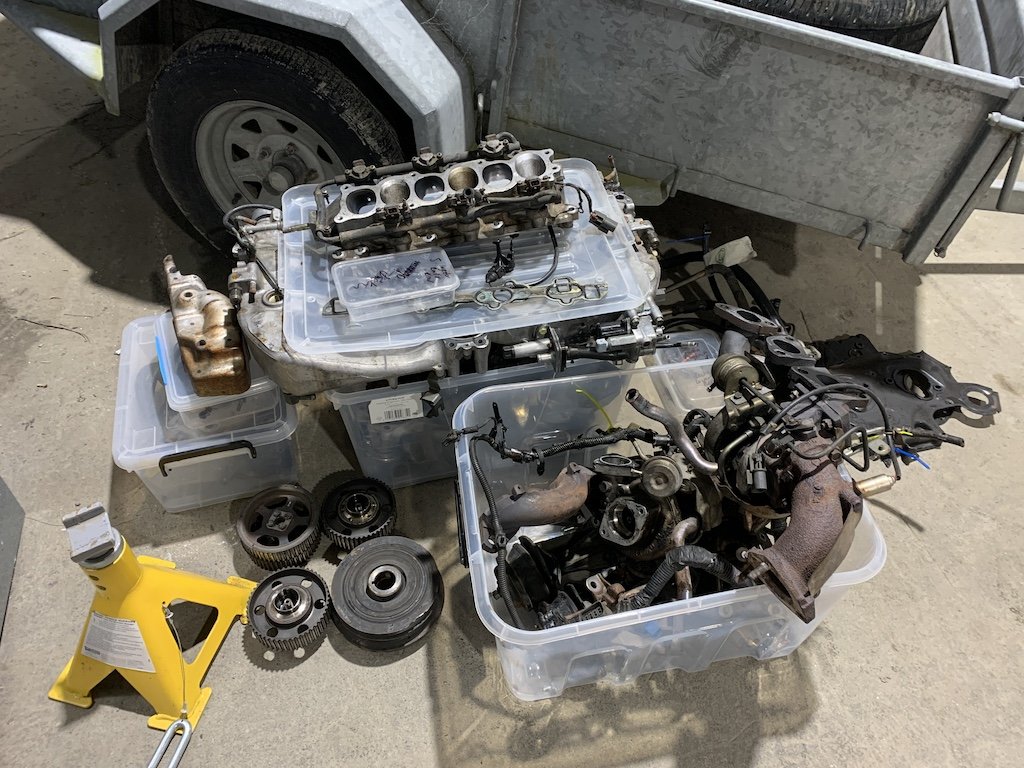
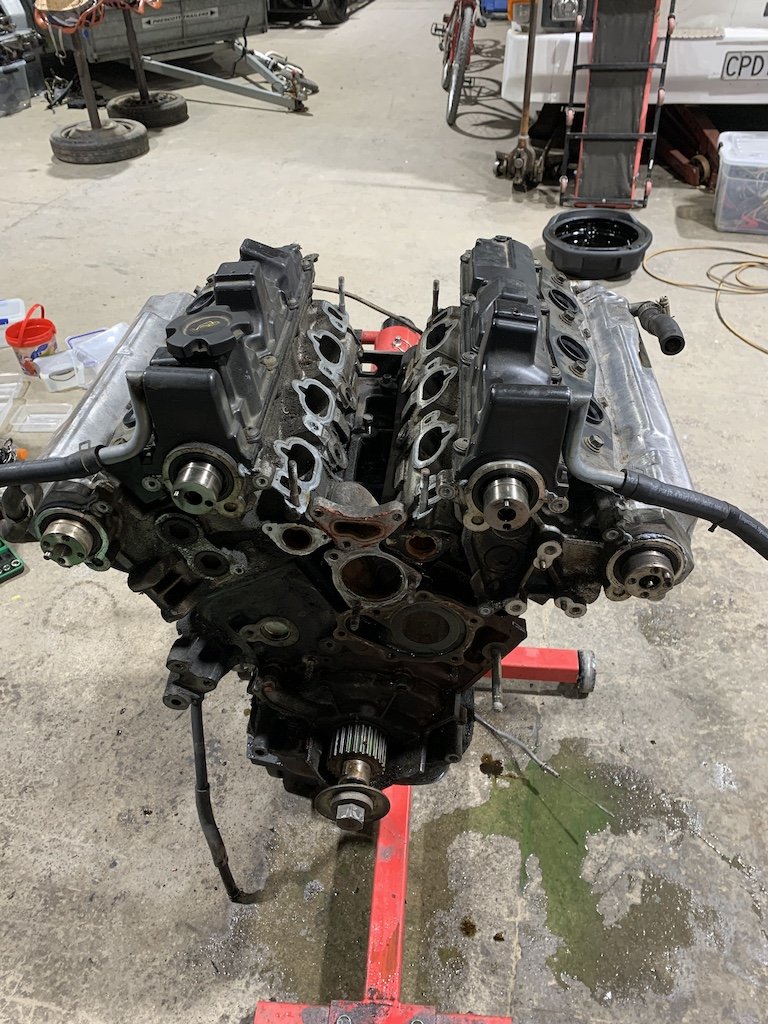
Well it happened sooner than I thought it would but that's life. Back in....holey shit, September 23, I had to pull the engine due to a head gasket failure so it was time to refresh the whole engine. Definitely needs 'more low' with the running gear out Started stopping it down, going through everything to see what was needed and making a list.
1 point
-
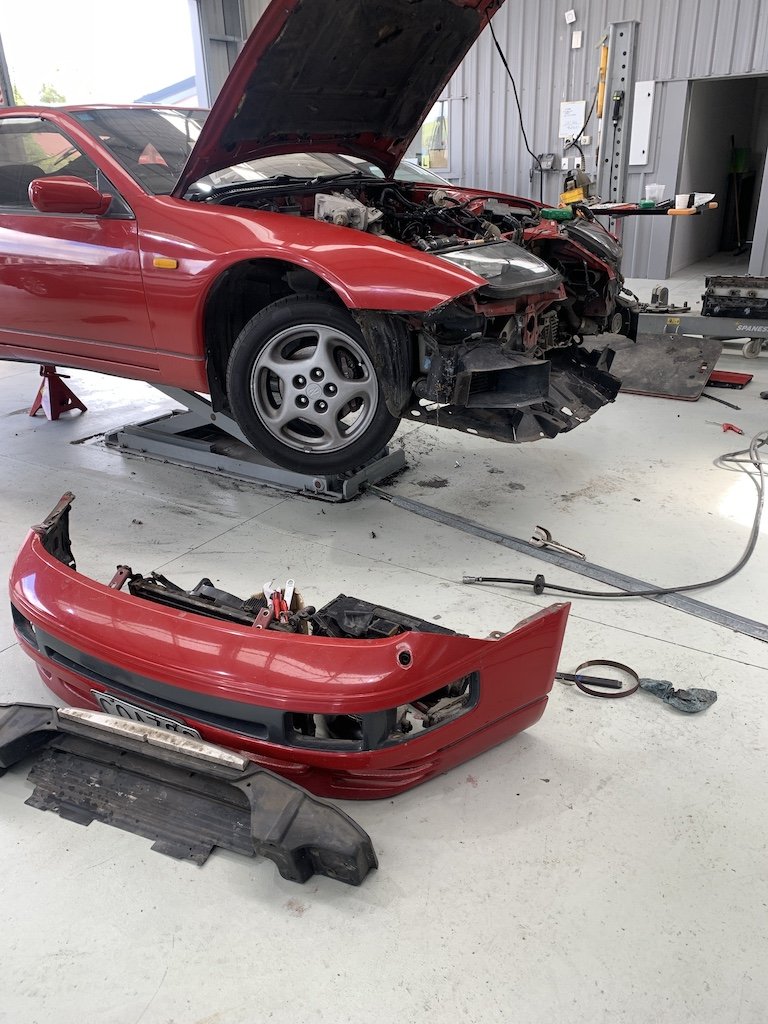
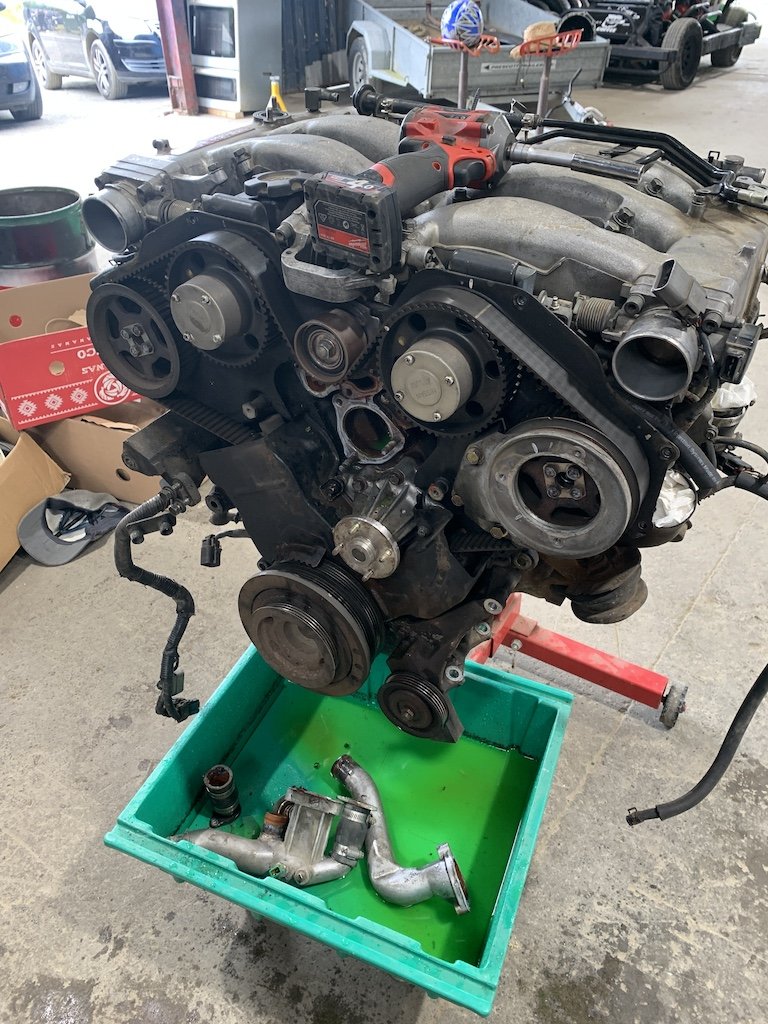
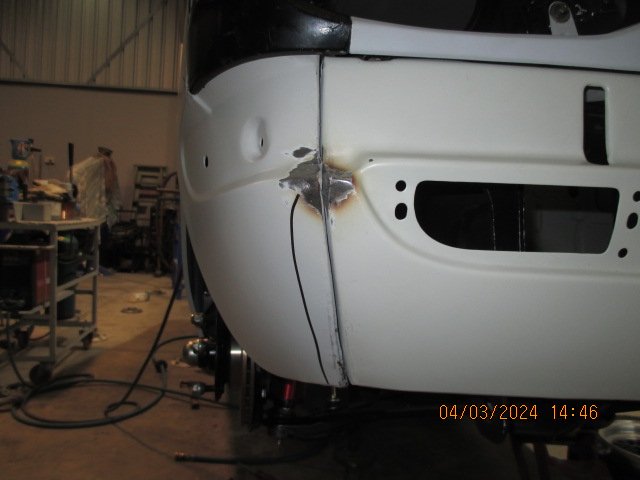
Car made another trip to a local metal magician to sort out some small dents and panel gaps. The fenders are aftermarket so needed some decent tweaking to allow the headlight surrounds to sit nicely and line up with the bonnet. He went to town with the hammer and file, cut out the inner door frames to get to the skins and pretty much tightened up the whole front end. I had to ask him to stop as it was getting pretty spendy - I have an engine rebuild going on at present on my 300zx too, the rest can get a skim of filler here and there. It's back in the shed, should be getting the final lot of body work and getting the interior and engine bay painted very soon.
1 point
-
Not biased at all, but there is more to gasfitting than jamming some pipes together and bubble testing it. Plenty of people think they are smart enough to do it though and they end up killing (innocent to the install) people. It just doesn't make the news. Not directed at anyone, but generally people who say they can do it because it's easy are the ones who should not be touching it. It applies to all trades really, every diddle-fingers think they are smarter with zero education. Ignorance is bliss till a kid suffocates in your DIY'd shower install. As you say too, too many imbeciles out there really.1 point
-
They can come for you too, same with electrical work WorkSafe NZ complaint leads to prosecution of Nelson man (boinz.org.nz)1 point
-
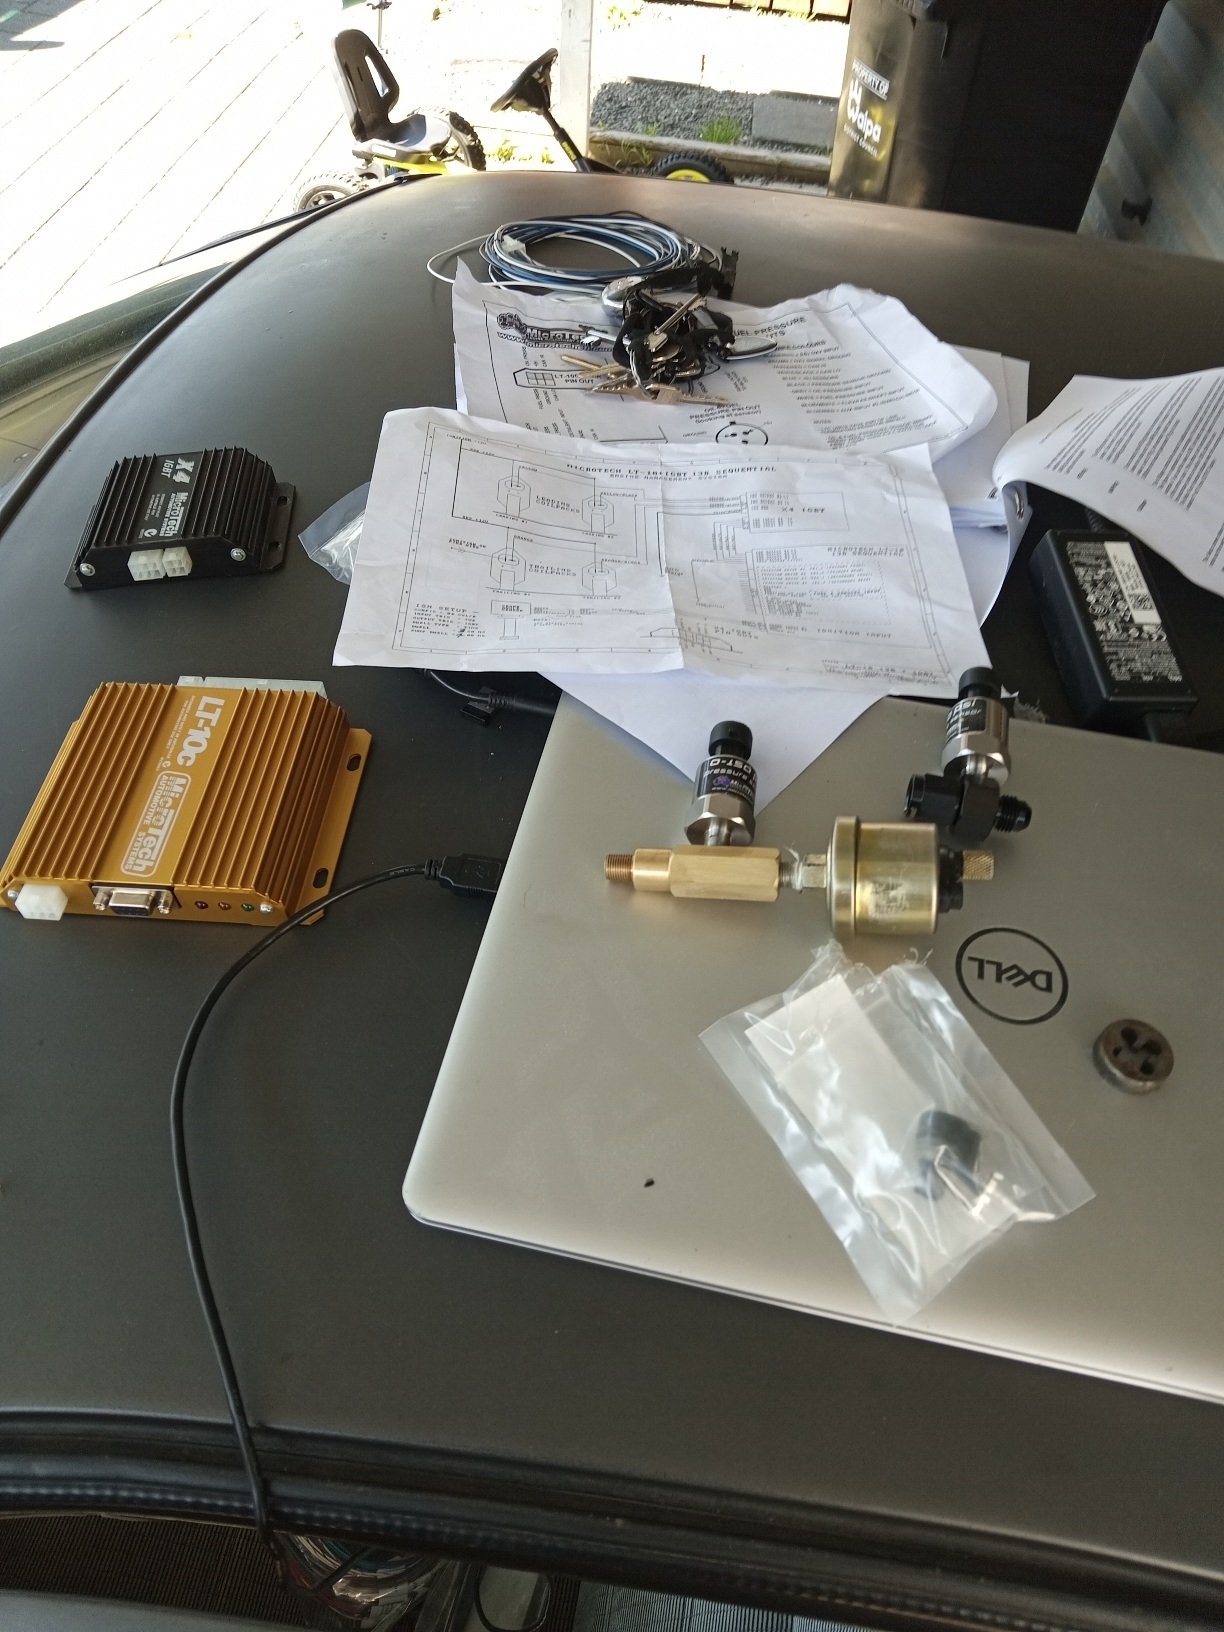
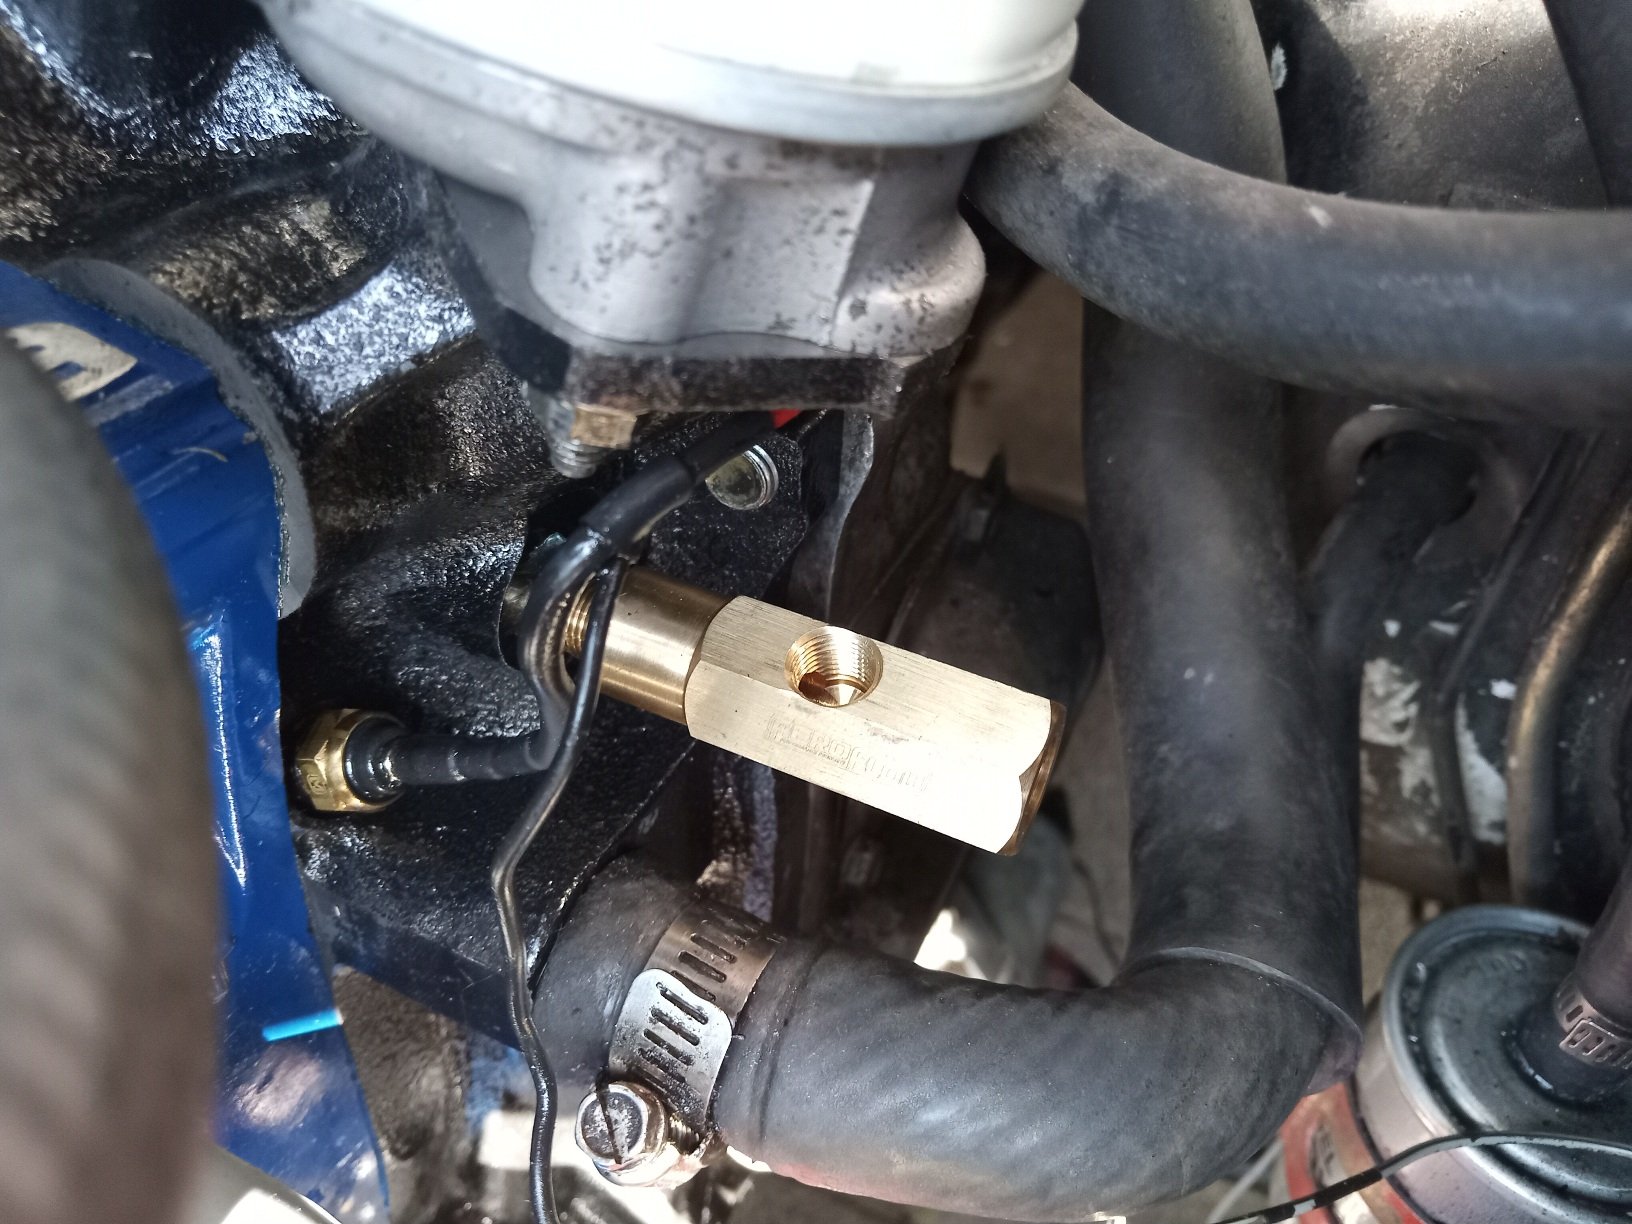
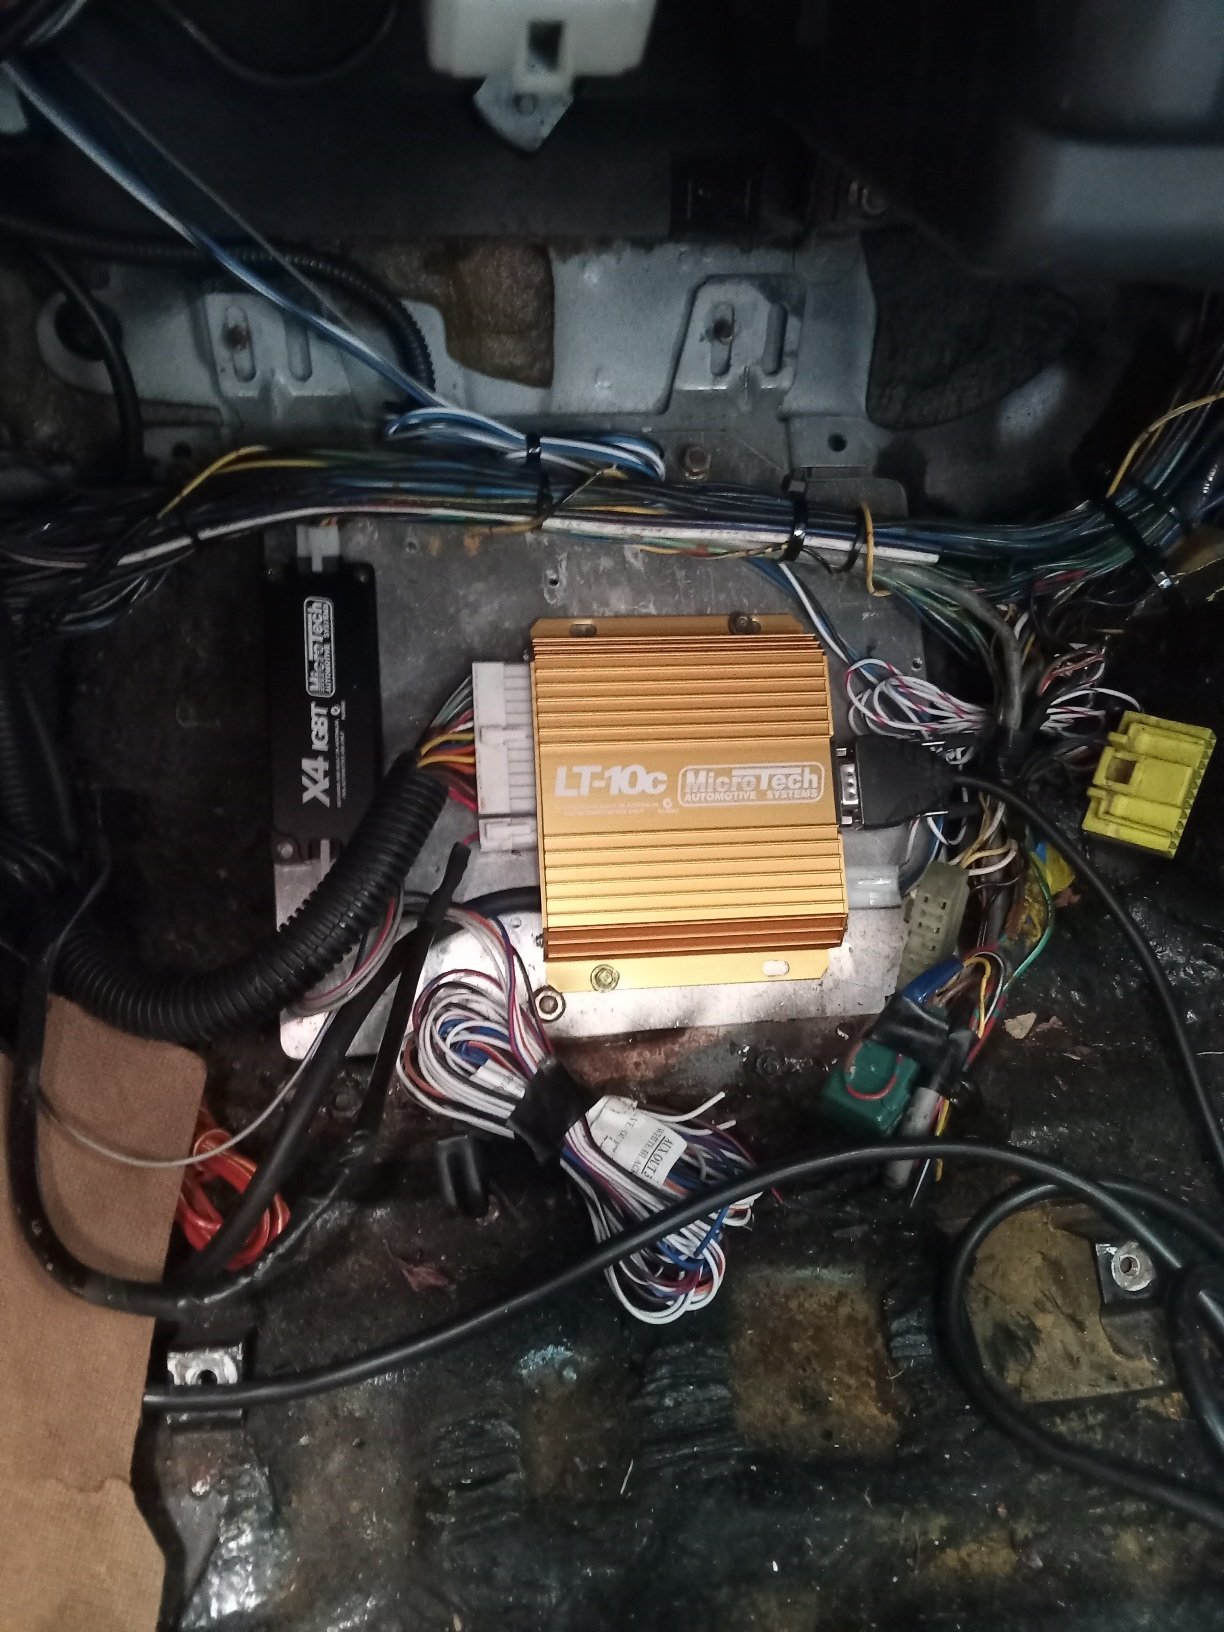
Well i bit the bullet after no luck in getting my old ecu checked, i kind of liked the idea of having some upgrades at the same time and brought a microtech lt10c, with optional fuel and oil pressure sensors to be tuned in for safety and a new ignition box..some adaptors from aeroflow to adapt the sensors into the system, and i get to keep my oil pressure and temperature gauges for keeping an eye on things easily . moving away from gull force 10 ethanol it used to be tuned to, because its no longer available, so going to run bp98 and motul 800 premix .i ended up wiring the sensors in myself because it was easy enough, and all went well there, still a bit rough and ready but once everything is confirmed to work right ill re install and tidy things up. Ready for tuning soon...
1 point
-
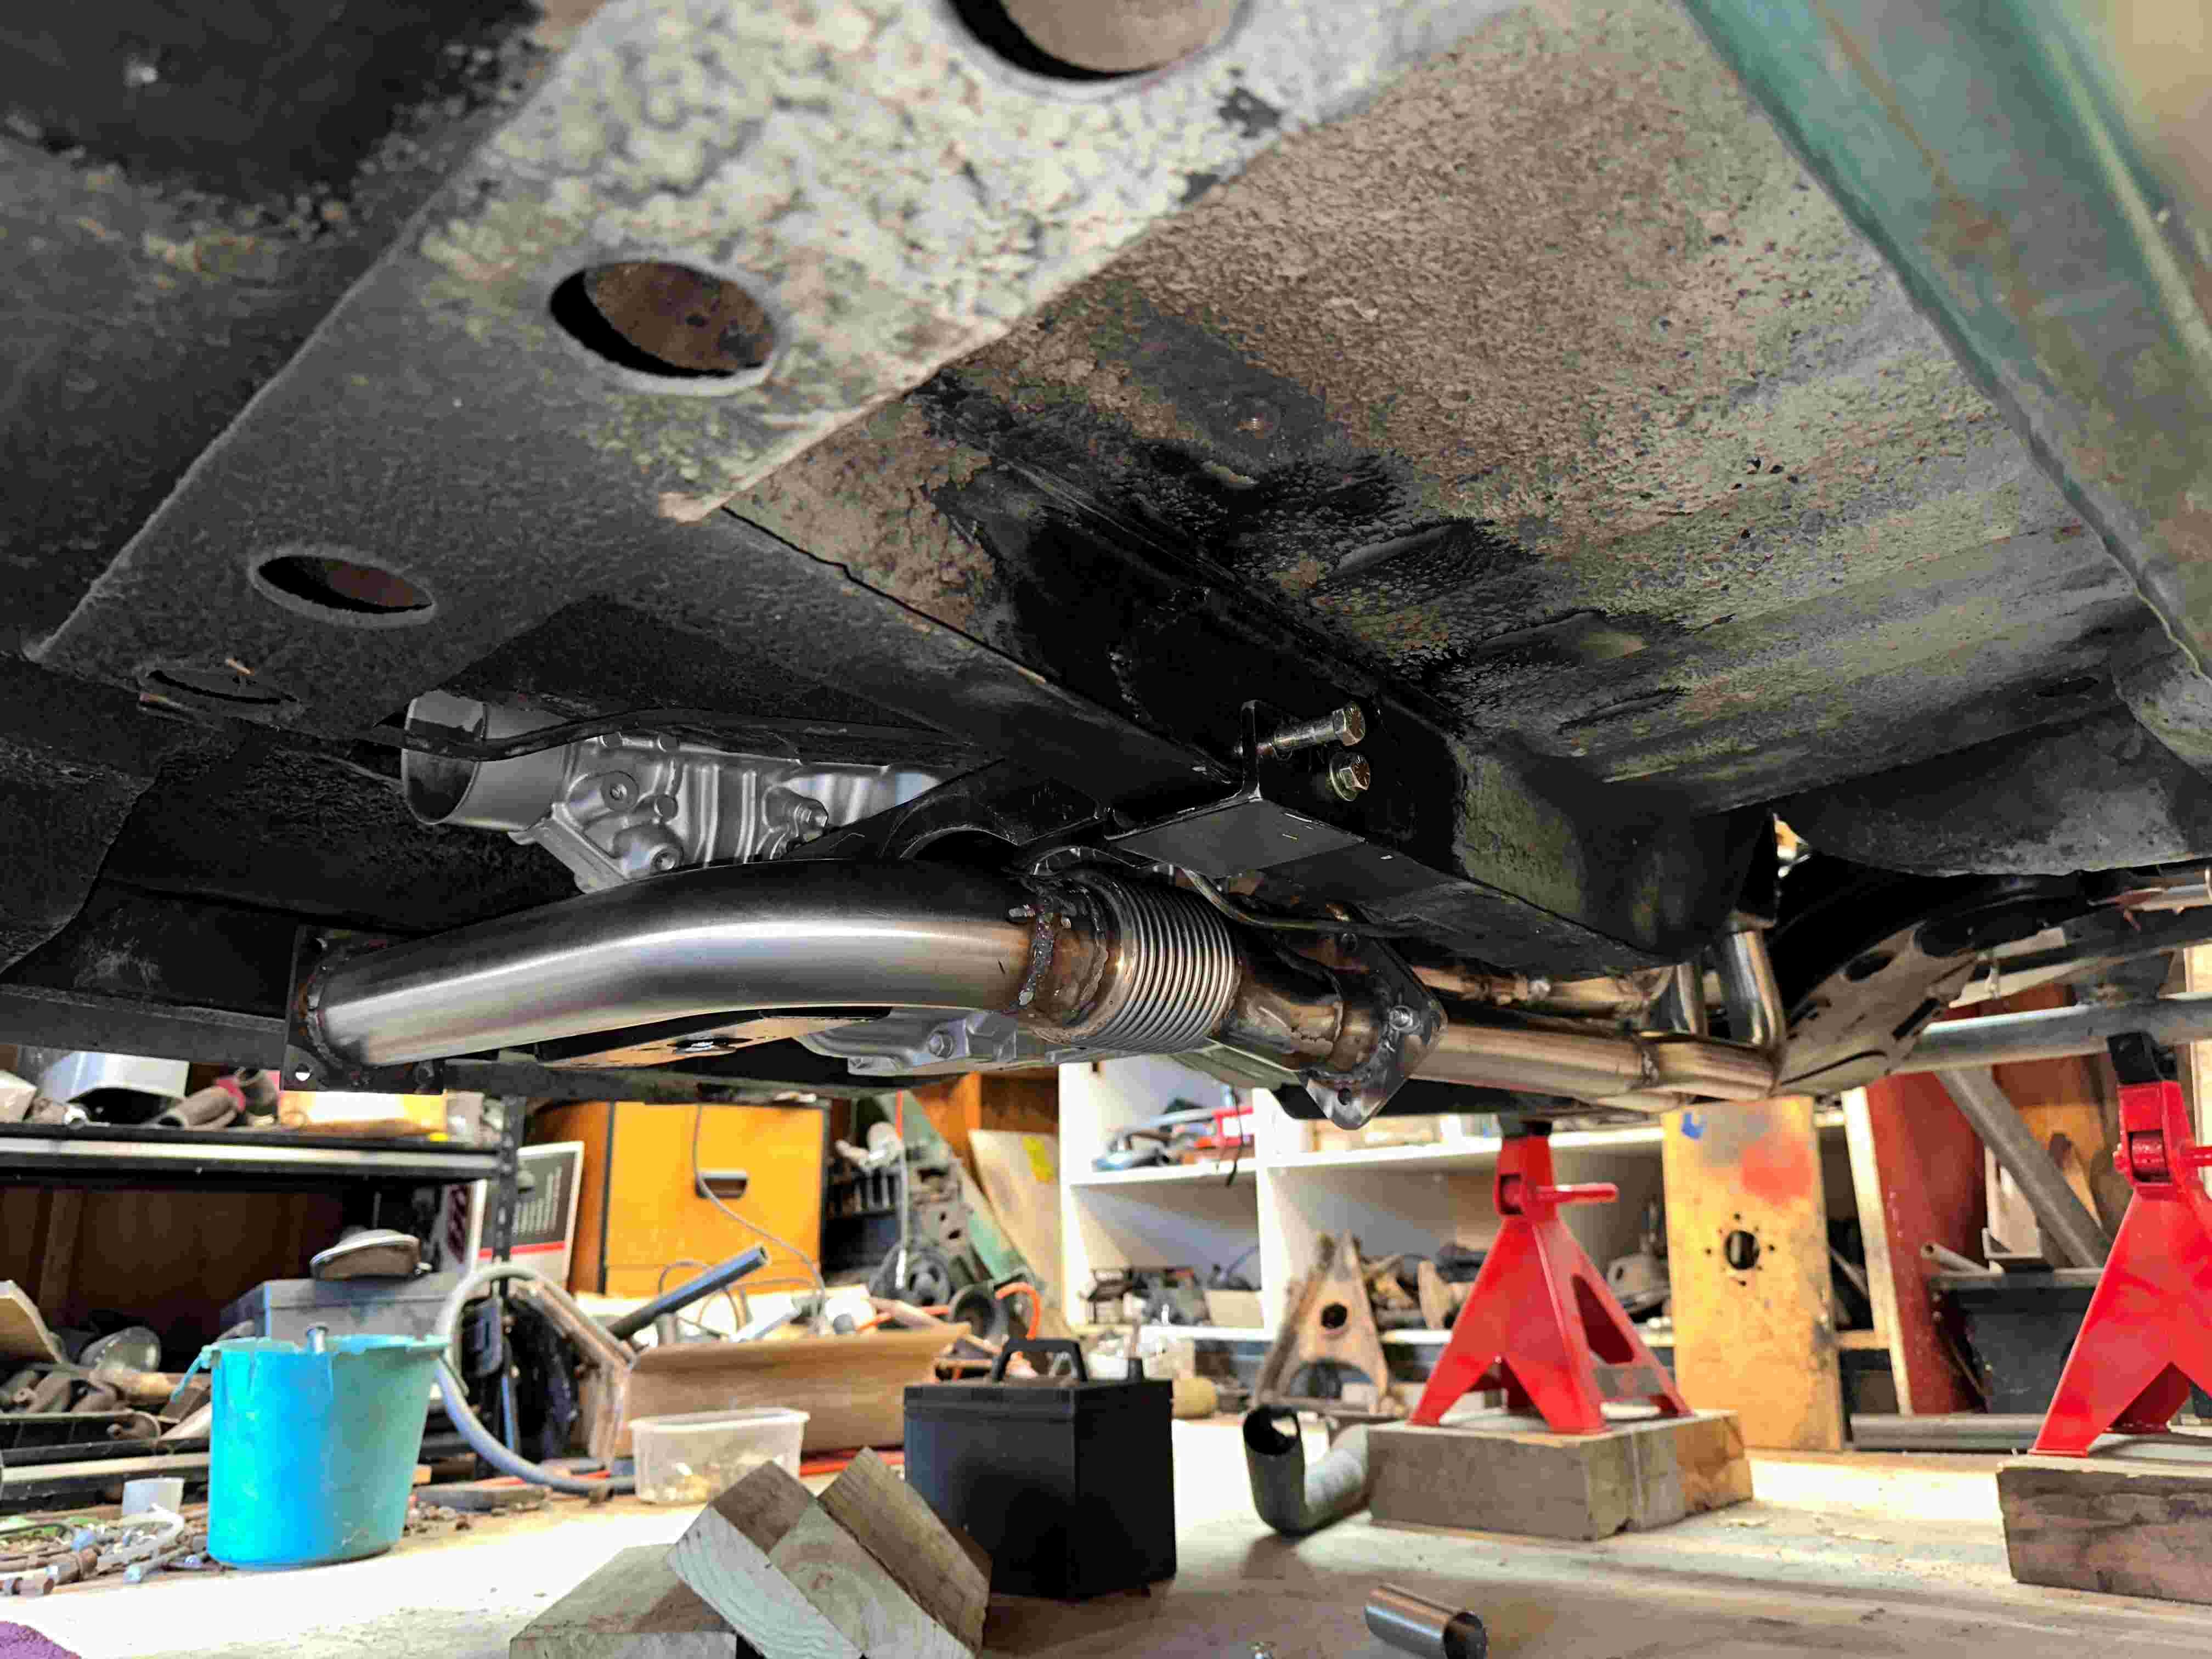
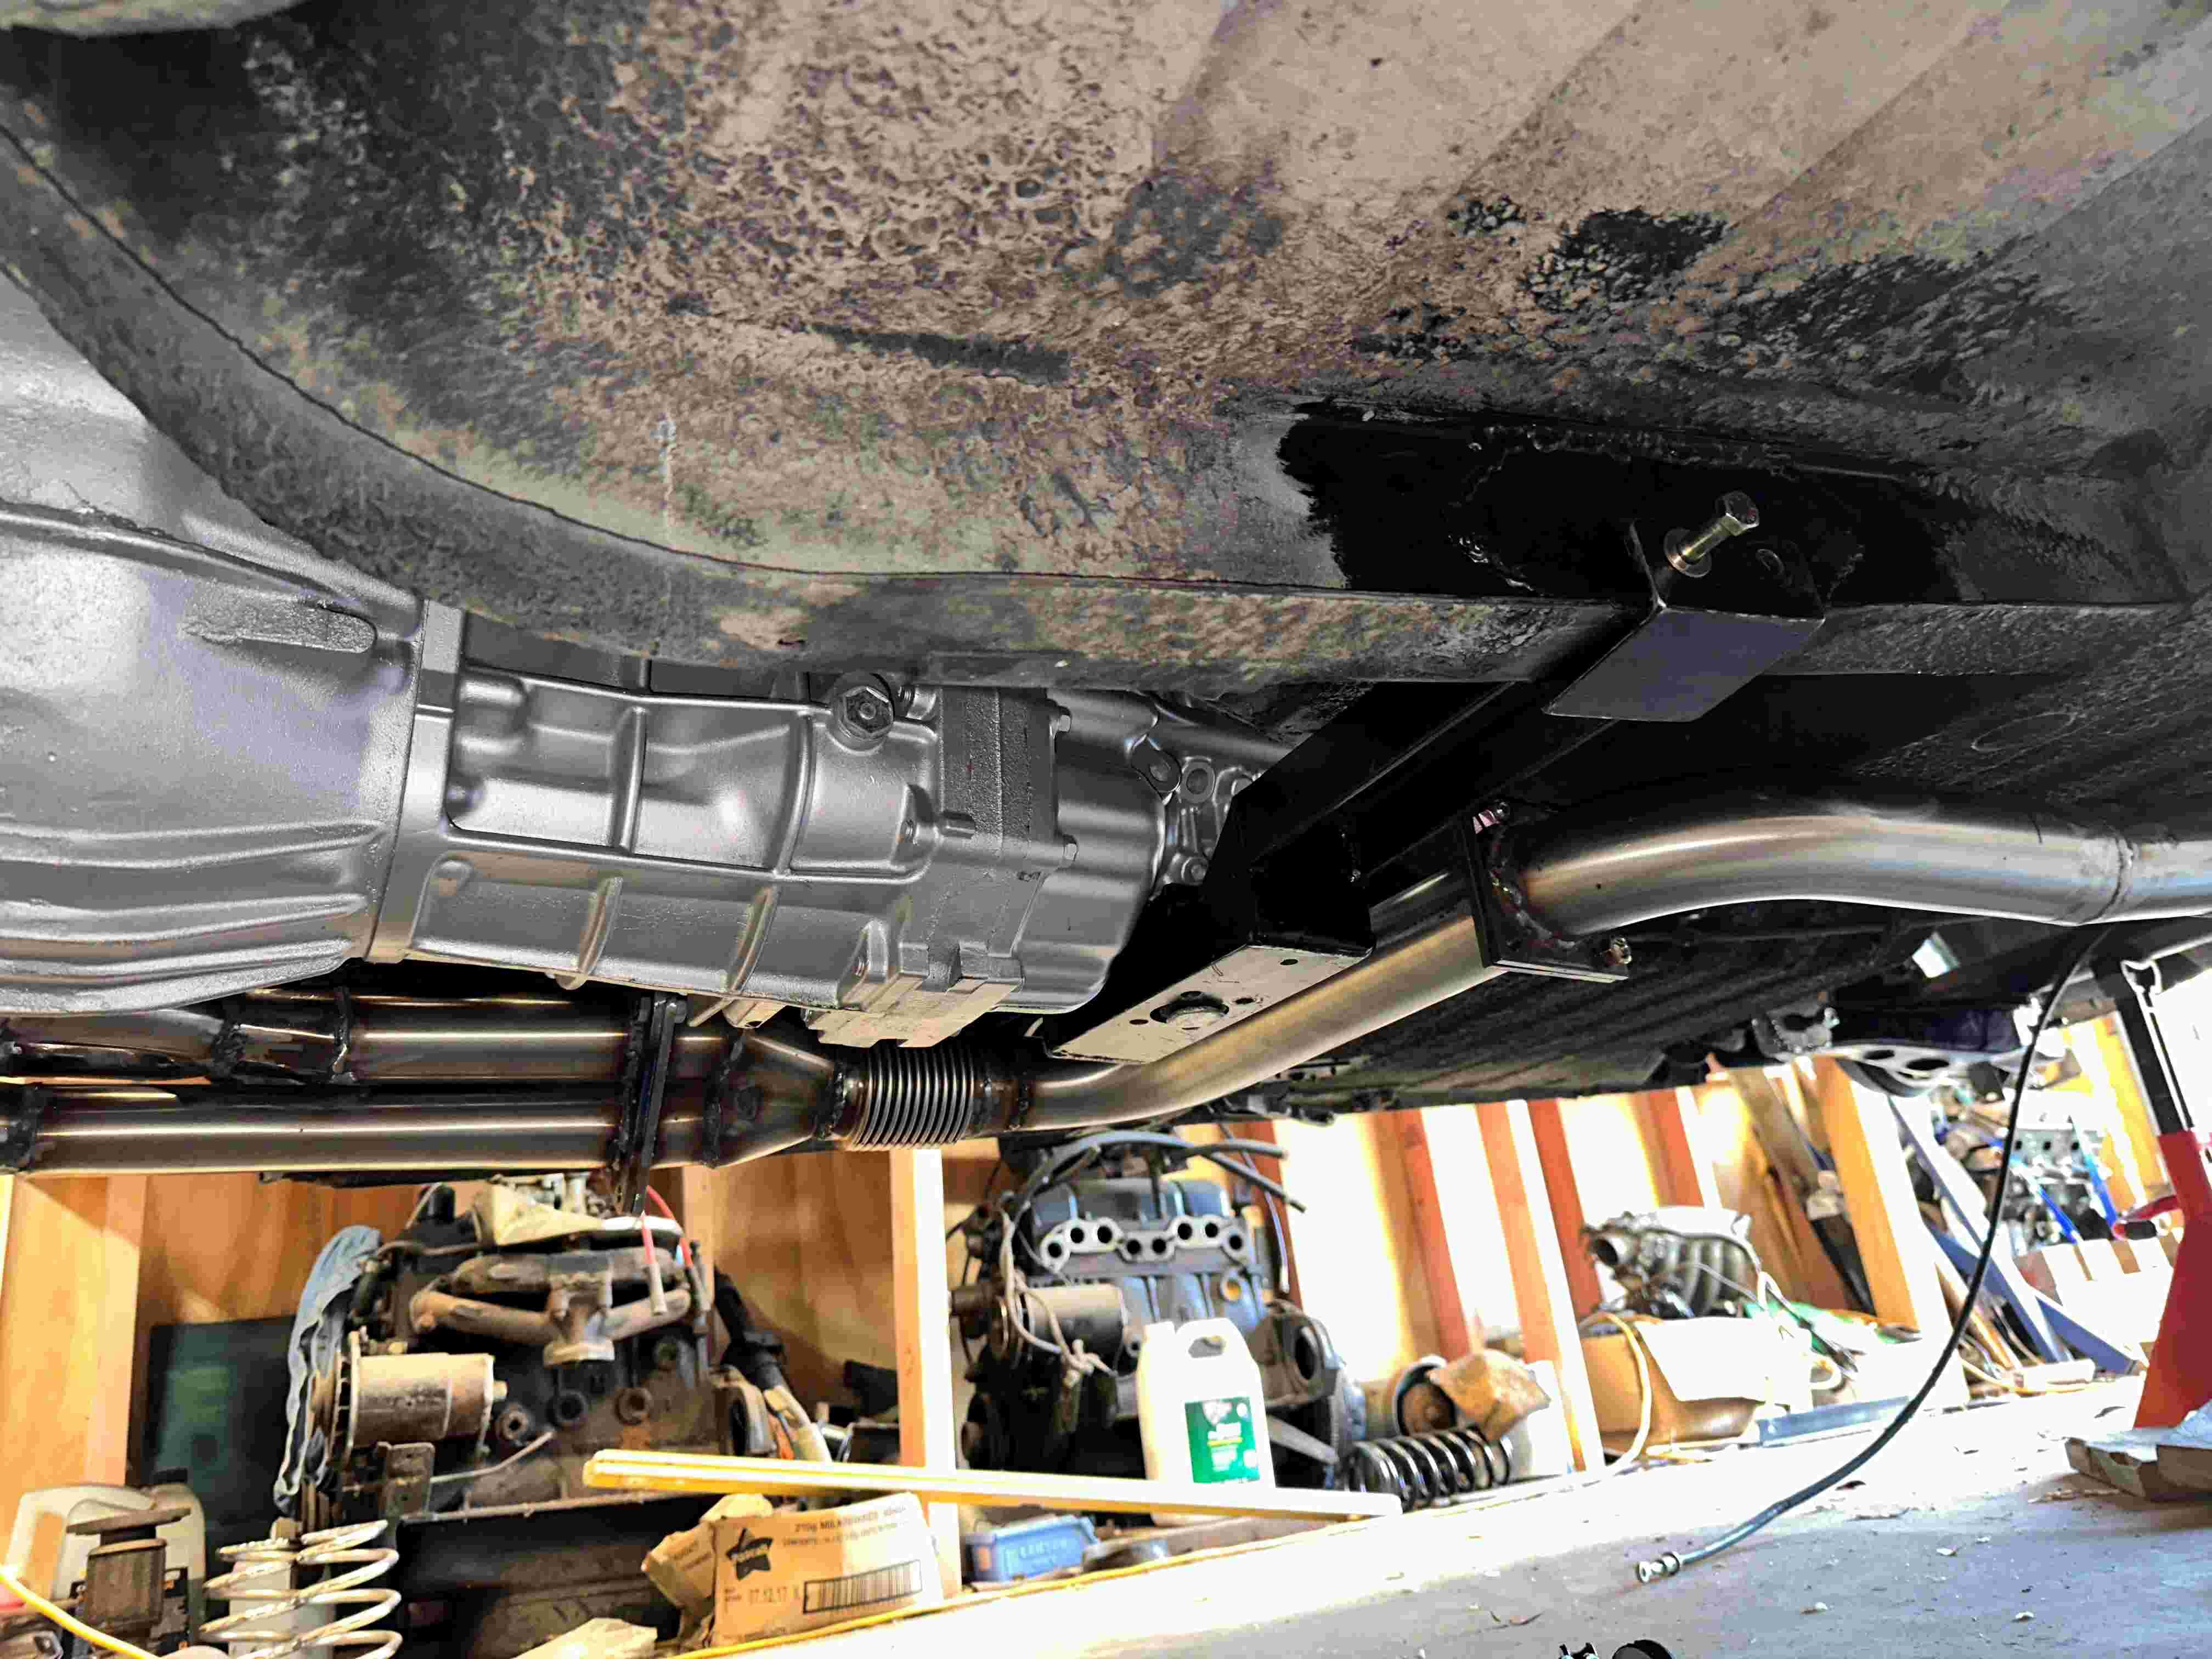
I have managed to get the rest of the exhaust mainly sorted out now. It probably would have been easier and a bit tidier if I had used a muffler with an offset inlet outlet, but I decided to use what I have. I still need to make up the rest of the mounts to finish it off. It's all in 2 1/2" and needed to be a bit of a serpent to go over the rear axle to miss everything with reasonable clearance. I think a donut would have helped a bit there. It may need a resonator in the tail pipe as well one day. I will see how it sounds for first.
1 point
-
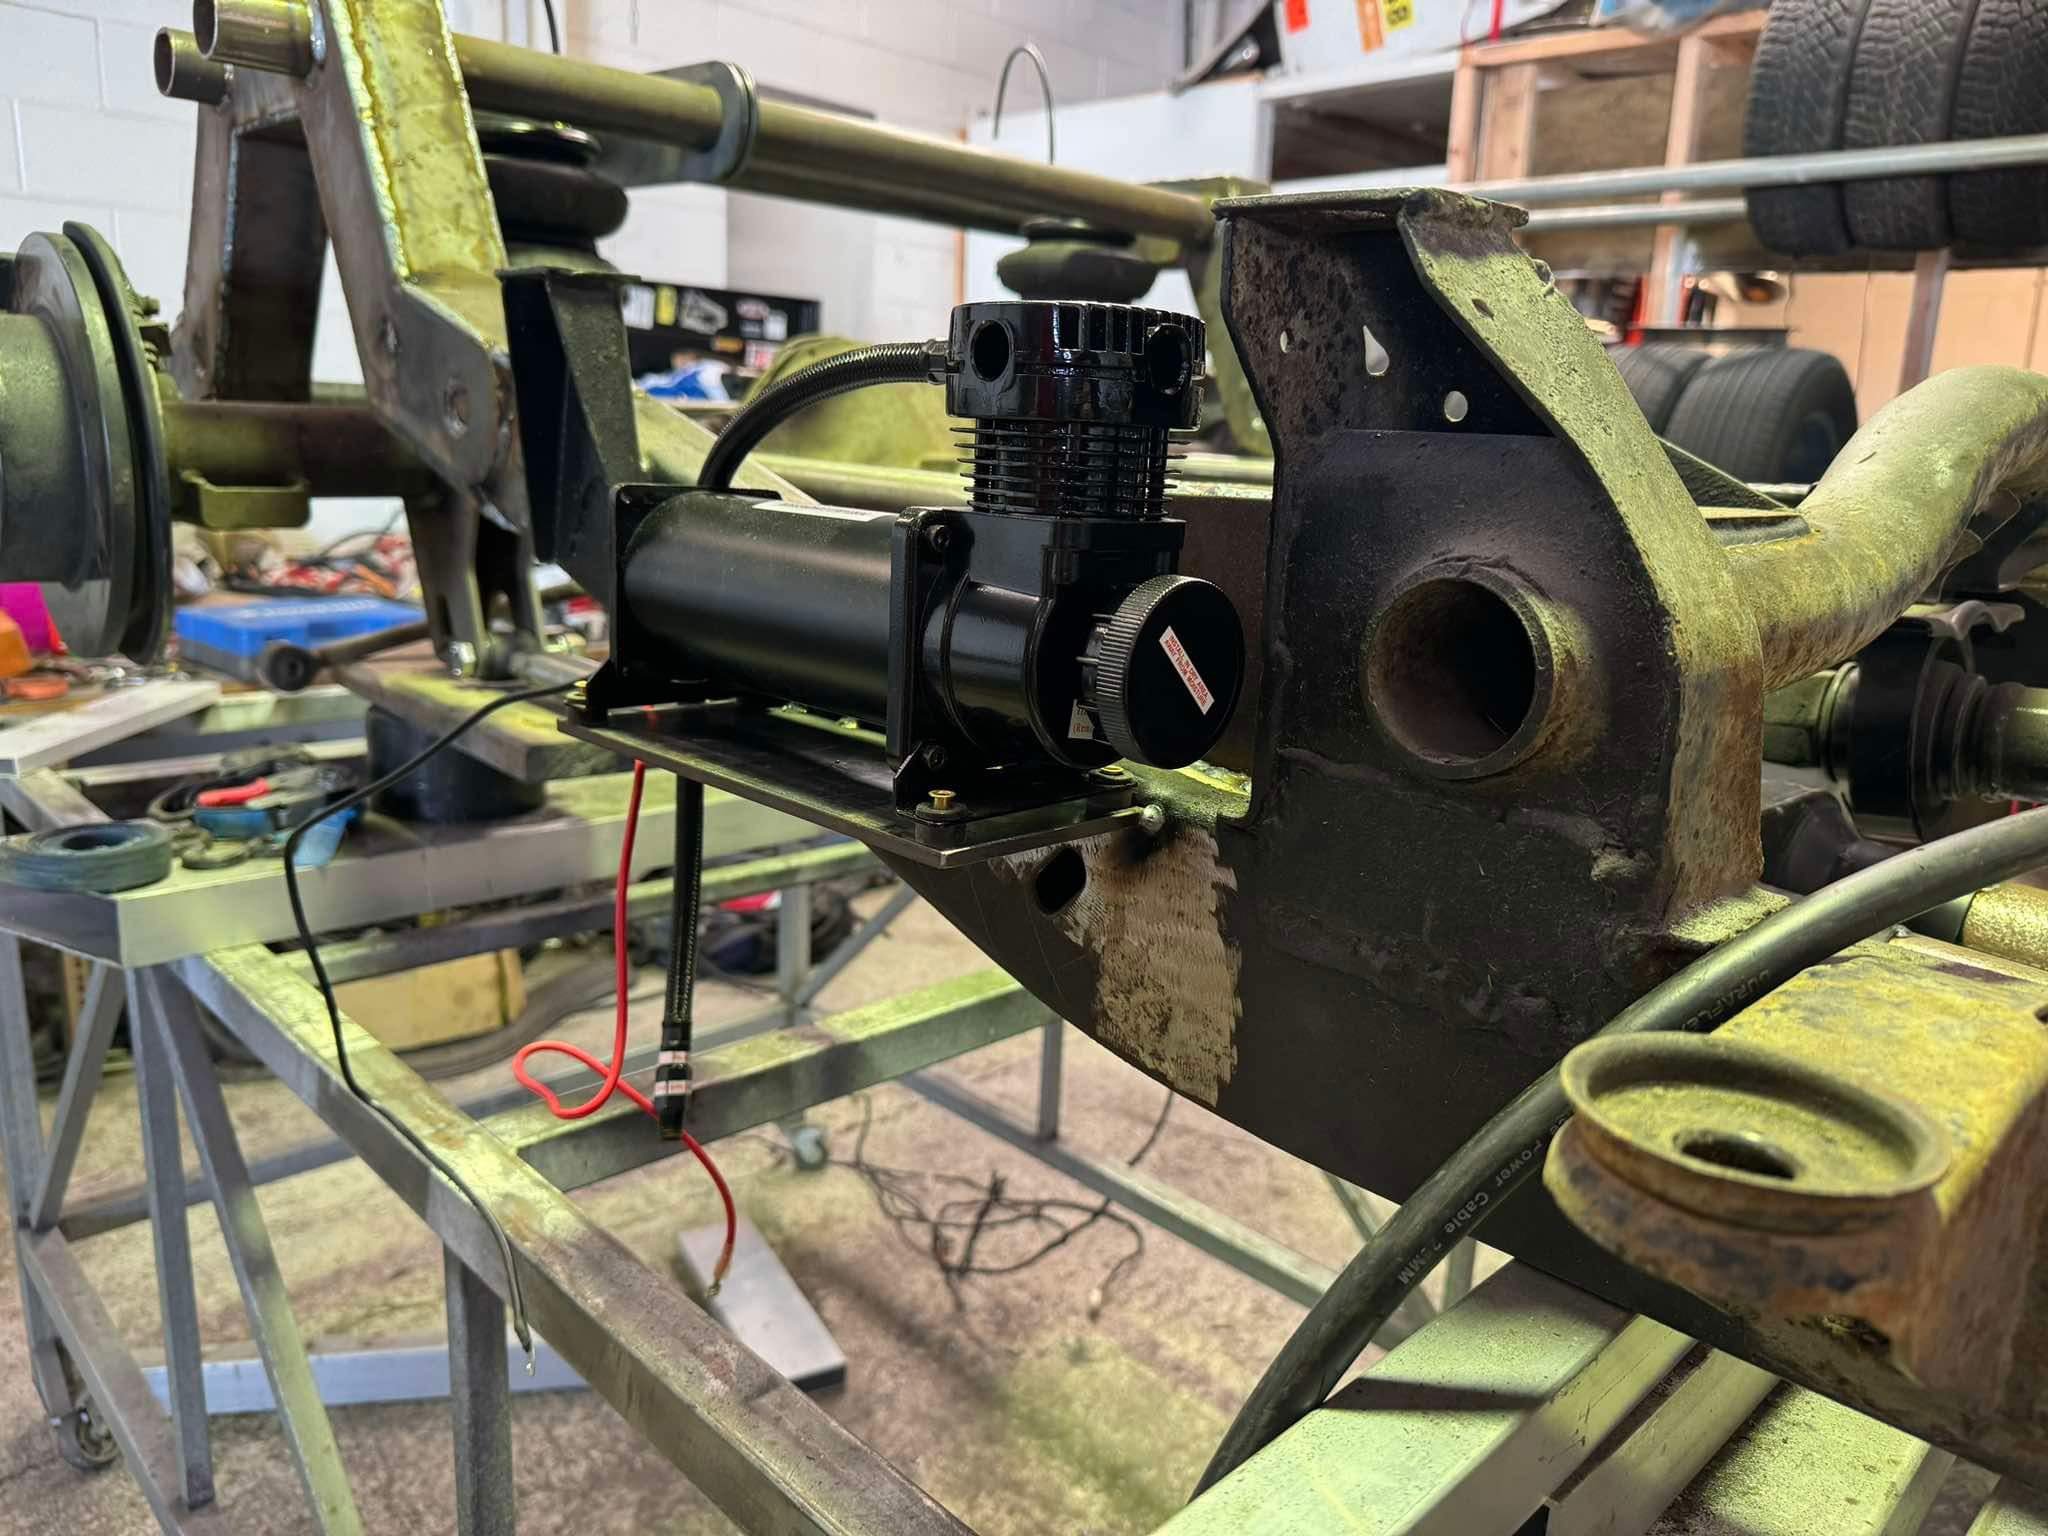
Still quiet at work, so did more on the ute. don’t really get much done, more pacing, looking, thinking, picking shit up, thinking nope not today. so I saw the compressor sitting in the box and decided to mount them. have settled to mount these below the deck at the headboard. The tank will sit above the deck. I’ve just run out of room in the back with the fuel tank going there and now the watts link. im fine with that. The compressor lines will come up through the deck and into the ends. i also decided to mock up the exhaust that runs from the headers to the tip, this has to dump in front of the diff. looks like a damn rocket ship of doom. ill make up a bit of an exhaust cradle as a hanger. will remake the headers to suit.
1 point
-
Thanks for the heads up from @Bearded Baldy a quick “work trip” to pick a part netted us a complete AU bro falcon diff cover and watts linkage, for the princely sum of $31 including the $4 for us to get in. best part was that we only had to undo 1 bolt. fyi, there is another complete AU diff there with watts link. Measures about 1620mm wide face to face. mine is 200mm narrower. now the fun part of figuring out how I can get the end link mounts to look decent and be strong. the bush ends fall directly inline with the chassis like it’s meant to be. it’s either, use the stock falcon arms, or make shorter ones for more money. im thinking that i slice a 100x50 to connect to each rear notch then build tabs off these to take the arms.
1 point


.thumb.jpg.570970b401ac8d26ce9af7c1bf2bd8cd.jpg)


sm.jpg.6d85570b966605298f2b45fd0f6c76ea.jpg)


This leaderboard is set to Auckland/GMT+12:00