
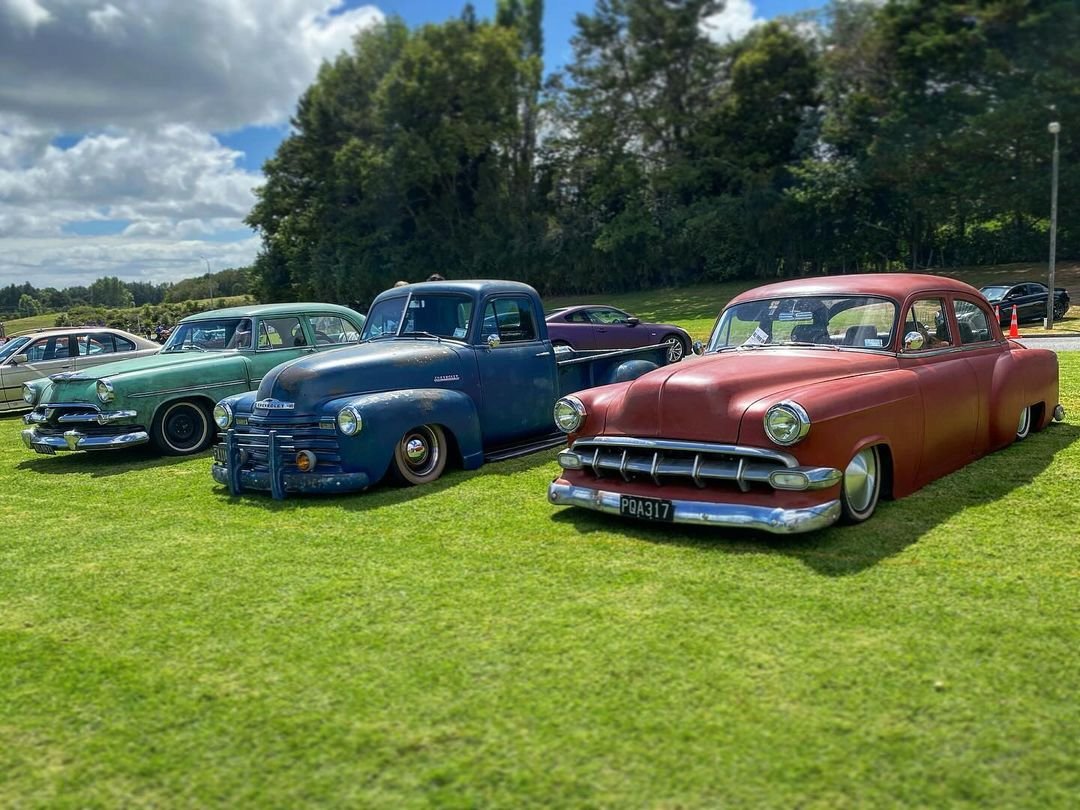
Leaderboard
.thumb.jpeg.384ff72c8d2b0ee0d34a7bdedb55bdcf.jpeg)


Popular Content
Showing content with the highest reputation on 04/18/24 in all areas
-
I actually have a massive boner for early Jimny 2-strokes. An old guy that comes into work has one, I'm trying to get put into his will so I can get my mits on it. Anyways, I have done a bit more on this thing. Don't laugh at my lack of wood working skills, I fucking hate working with wood. So I made the front guards, bit of a weird shape to try and make out of wood, mostly because of my being a tard and all. A bit of fiberglass & resin, a hint of bog, and they should come out pretty good. Then I got started on the bonnet, which is probably the most complicated shape on the thing. Added some wooden ribs, and a couple of dowels as reference marks, then put real thin MDF under them to keep the foam in, then filled the gaps up with foam, then carved the foam with a hacksaw blade and Stanley knife, then chucked a couple of layers of fiberglass over it, to give me a firm base to work with. It actually came out really close to correct, so will need very minimal amounts of filler. Next was lights. My B-I-L used OG dolphin torch reflectors/lens' on his Jeep, that he cut down to the correct size. New dolphin torches have four round LED bulbs in them, so don't look anything like a head light. The only torch I could find that was roughly the correct size, and also sort of looked like a real headlight was some budget items from Bunnings. I pulled them to bits, linished & sanded the OD of the lens down as small as I could, but so that the reflector still fit into it. I then cut the holes in the body to suit these. The front grill will hold the lights in, and also down size them to roughly the right scale size. I also found a Toyota badge that used to be on my 86 (before I got a legit one) that's pretty damn close to the correct size for this, but not sure if I will use it or not. The back lights were way easier, I found some LED lights on Ali that were the right shape and scale for this thing. They are meant to be in corners of the bumper IRL, which seems silly, as they would get smashed real easy. I added in a bit of wood roughly the same shape as the real bumper, and set them into this, so they are a bit more protected. There will be a steel bumper under them mounted to the tow bar in the future, so it should be quite a challenge for the kids to smash them. That's pretty much where I'm up to. Regards, VG. xoxox24 points
-
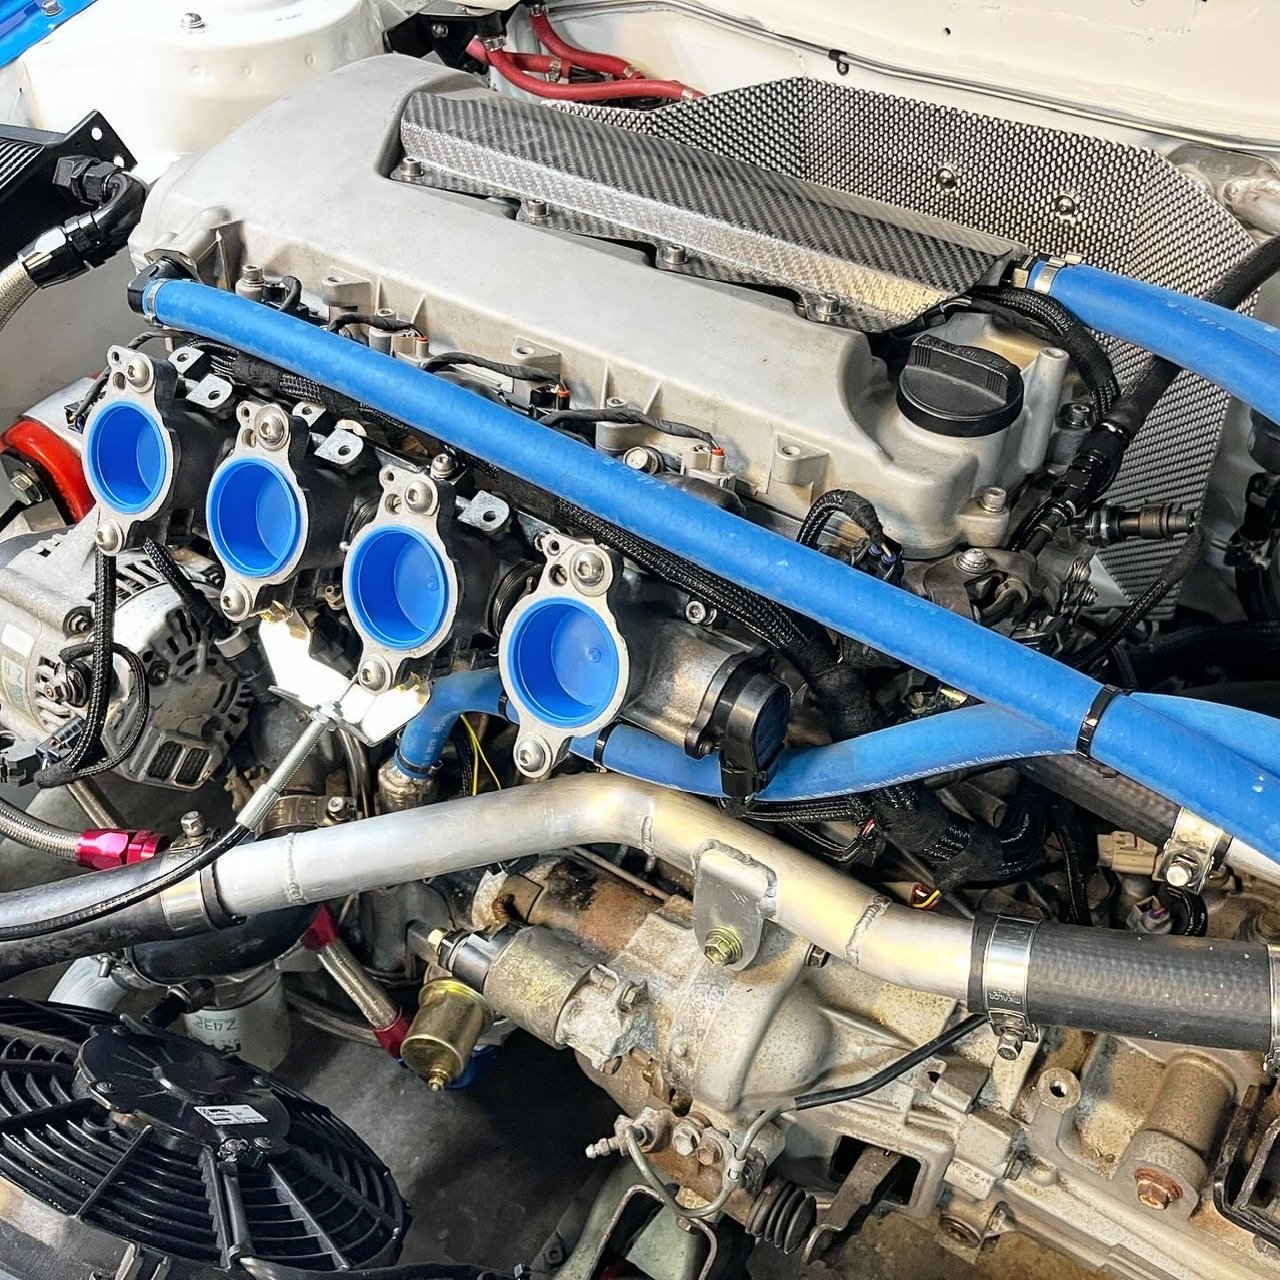
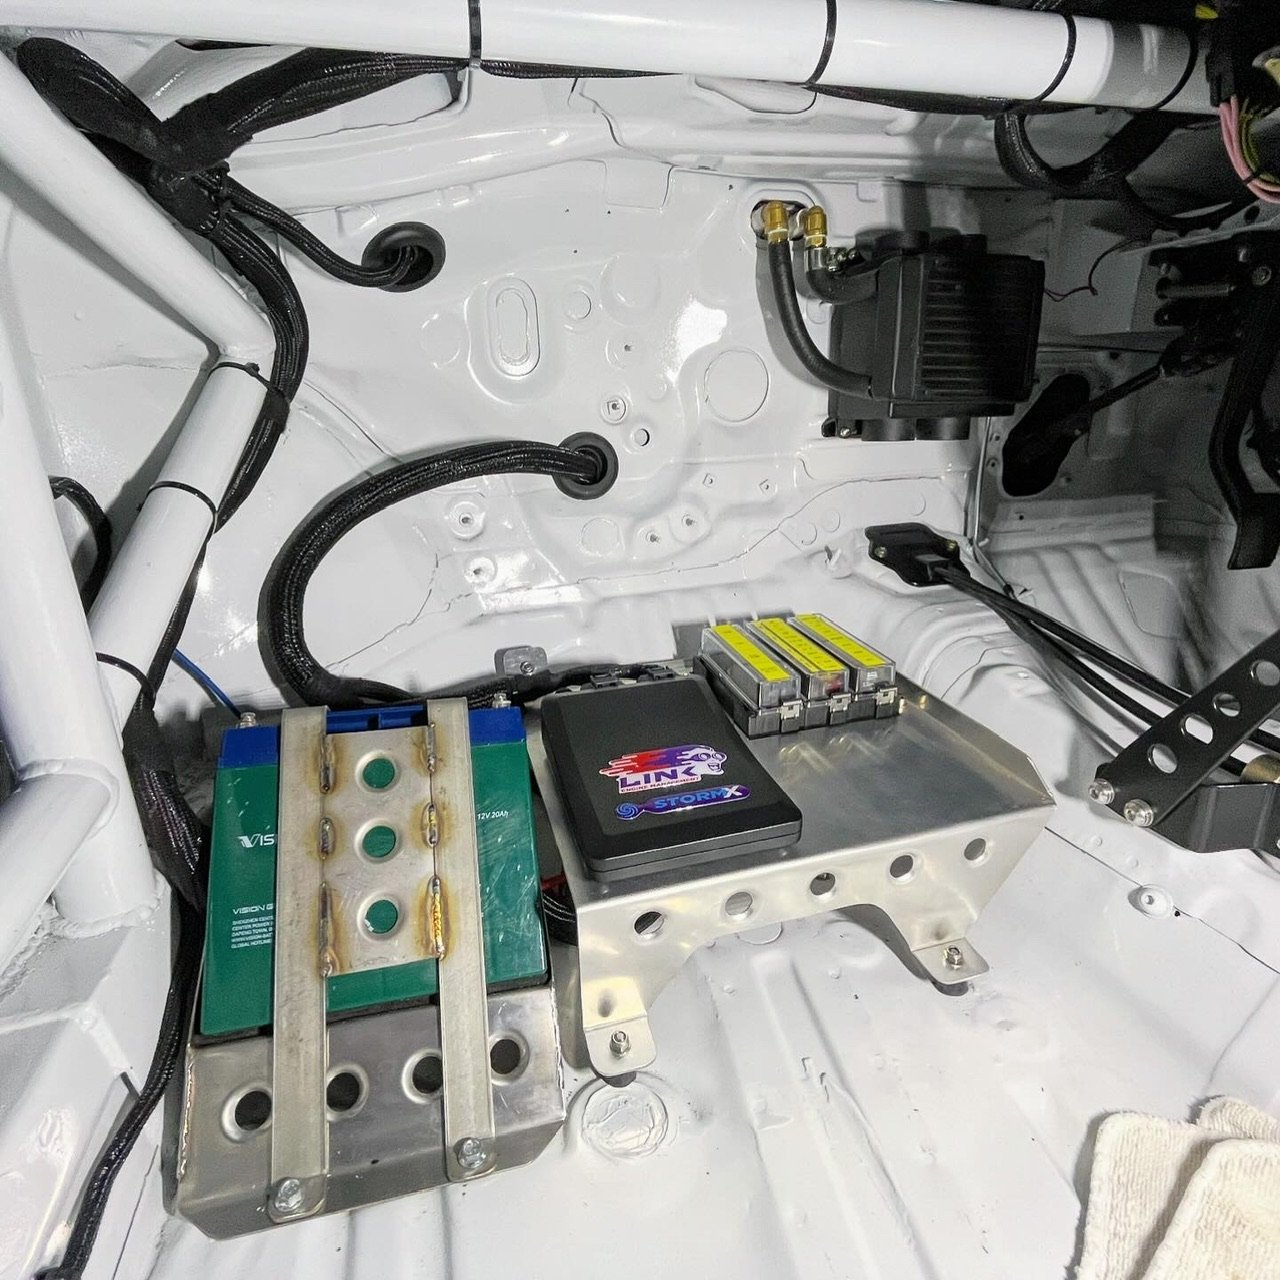
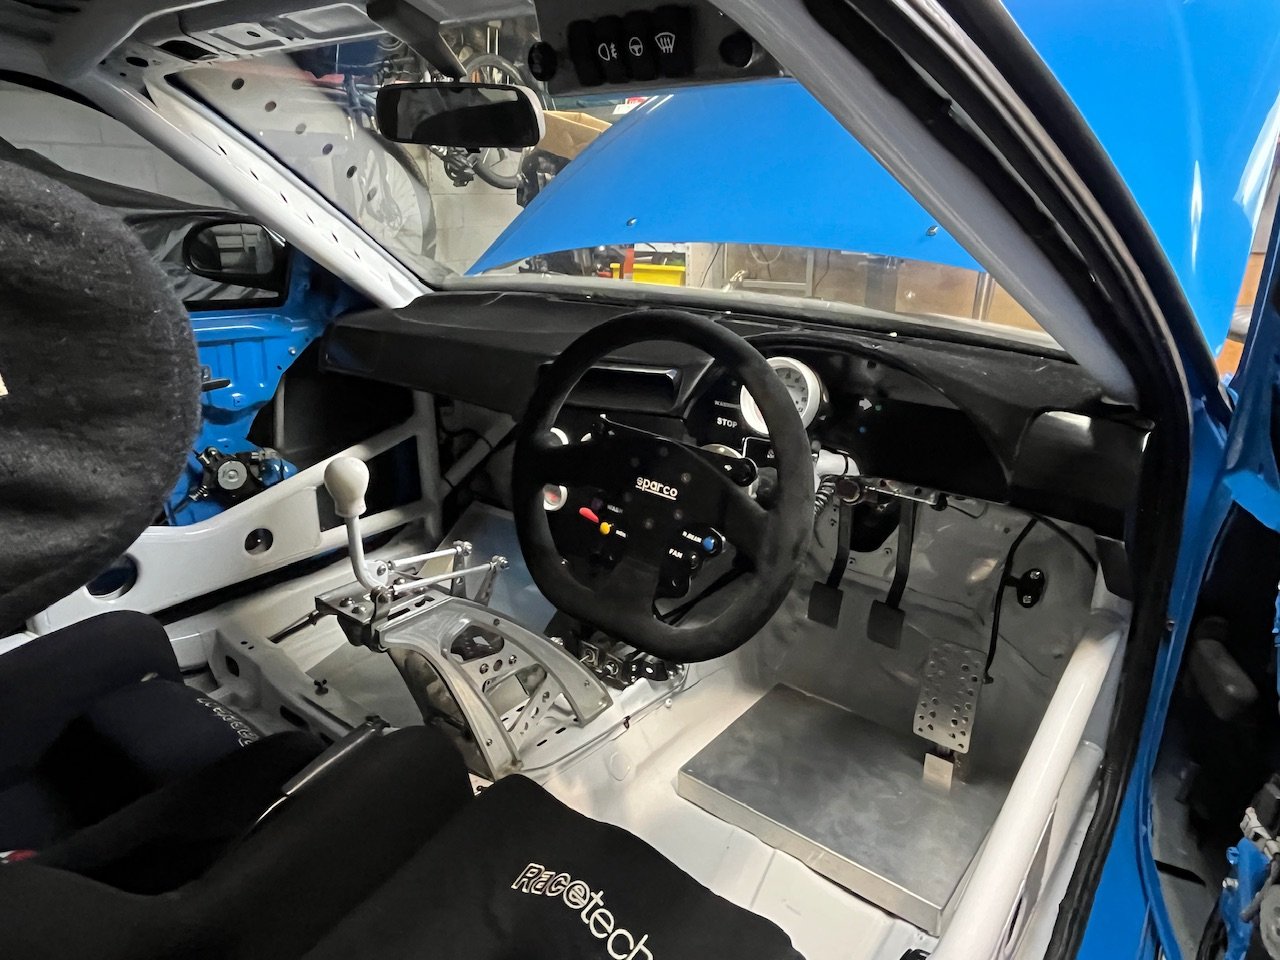
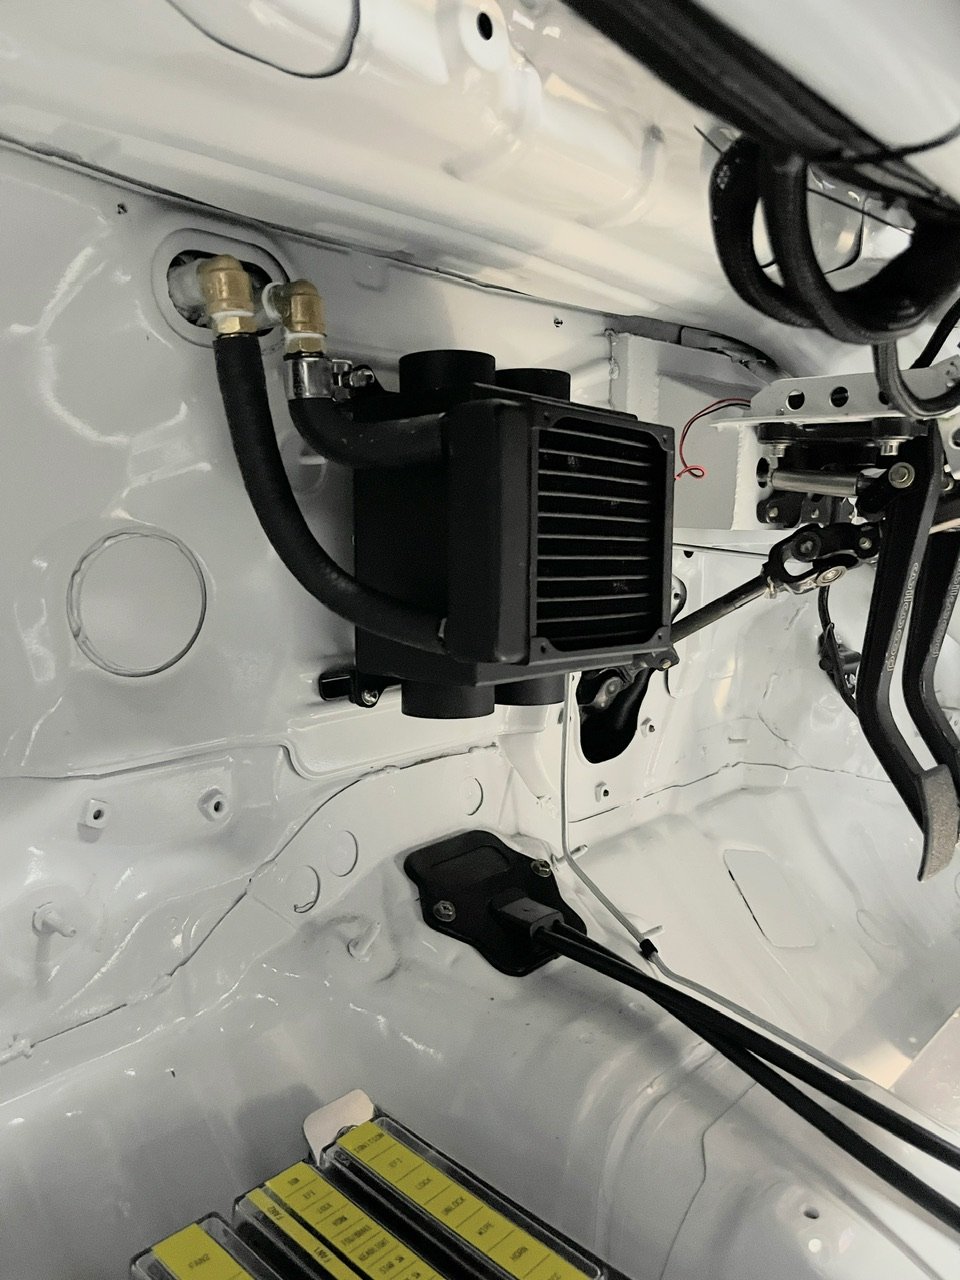
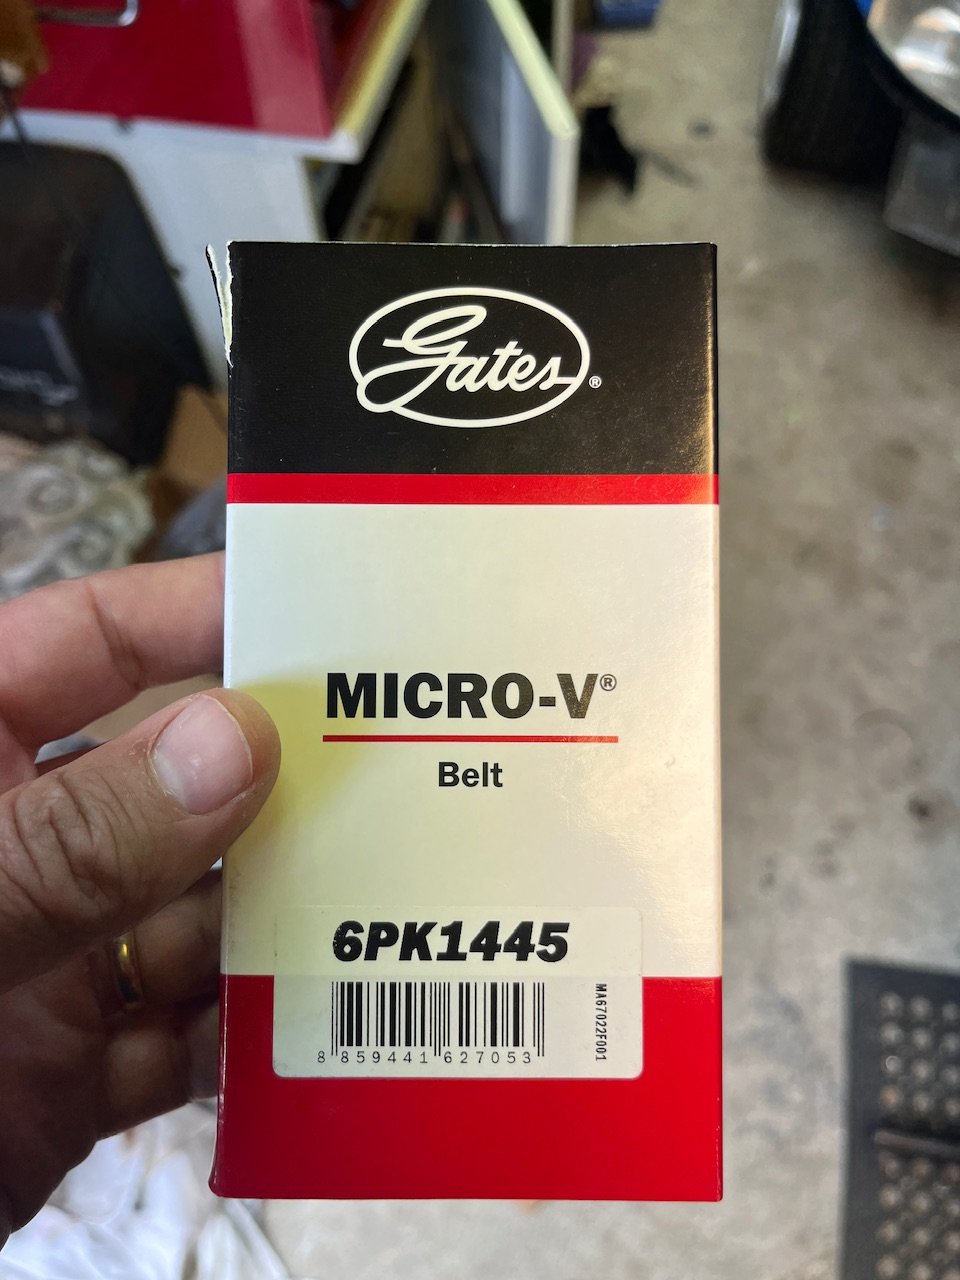
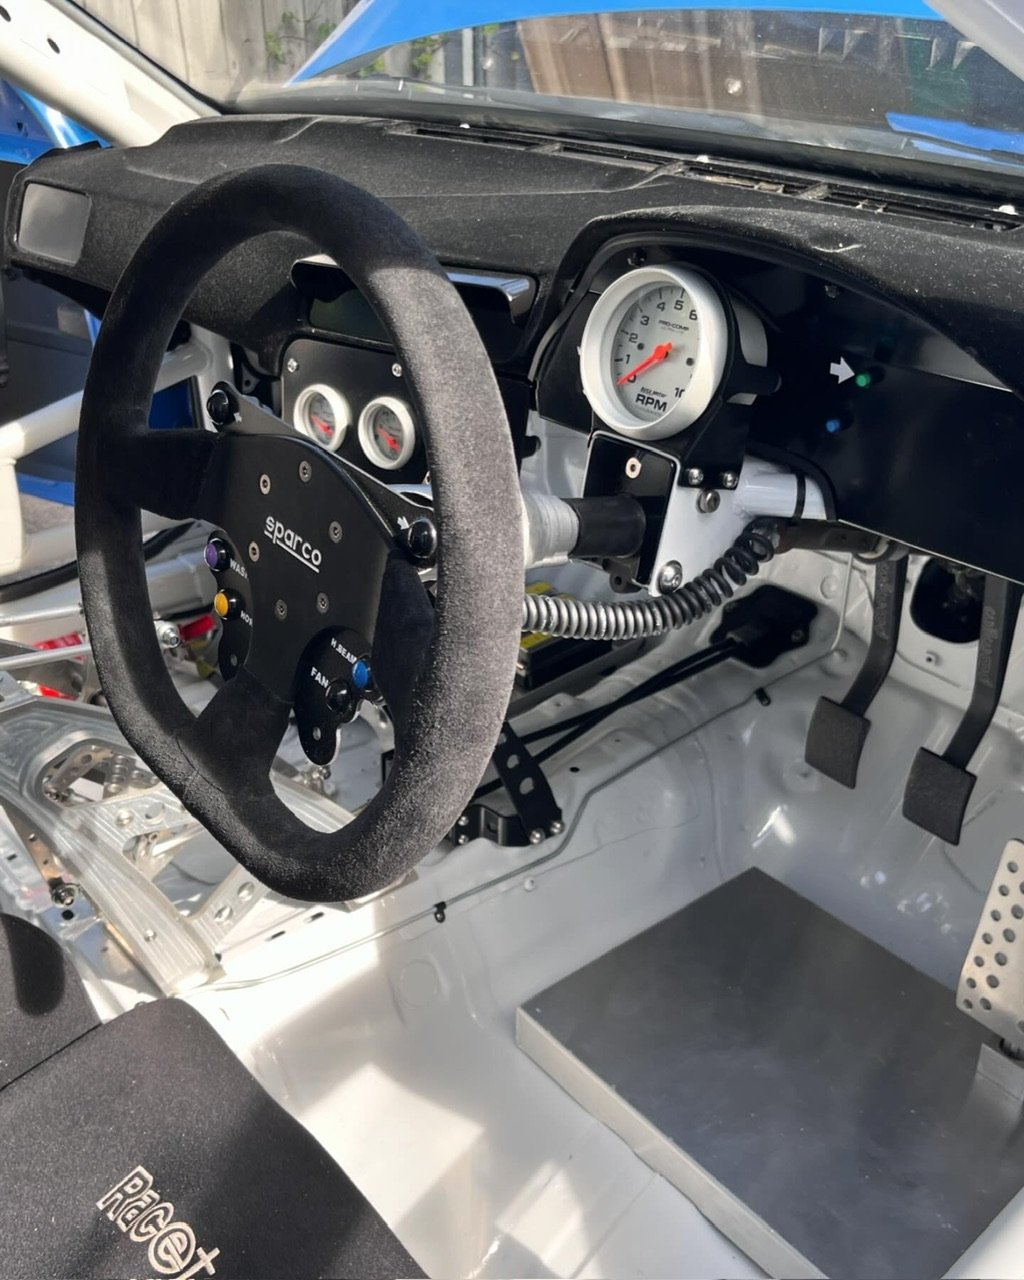
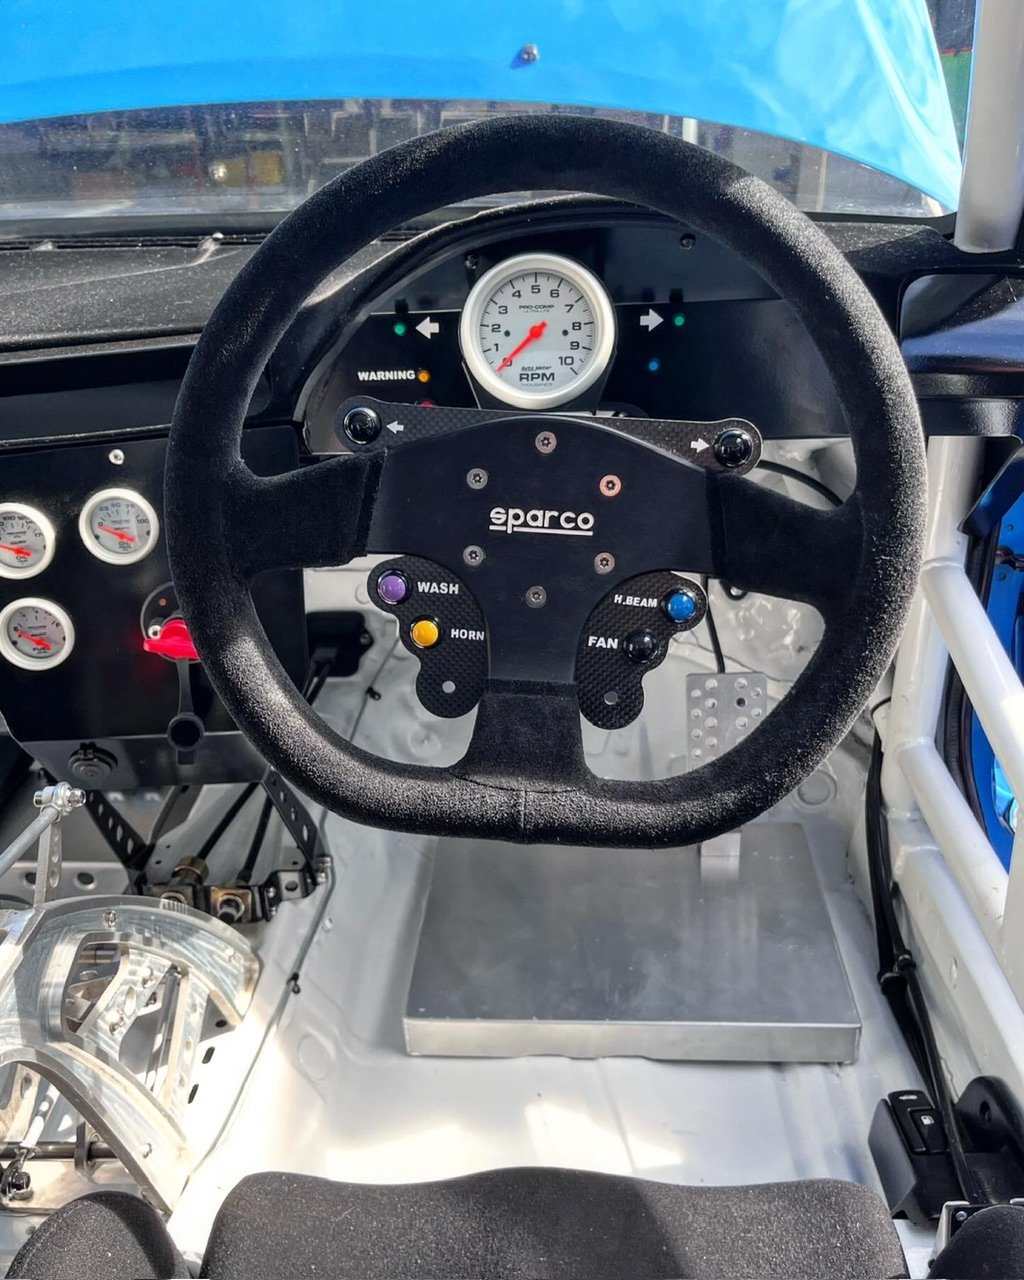
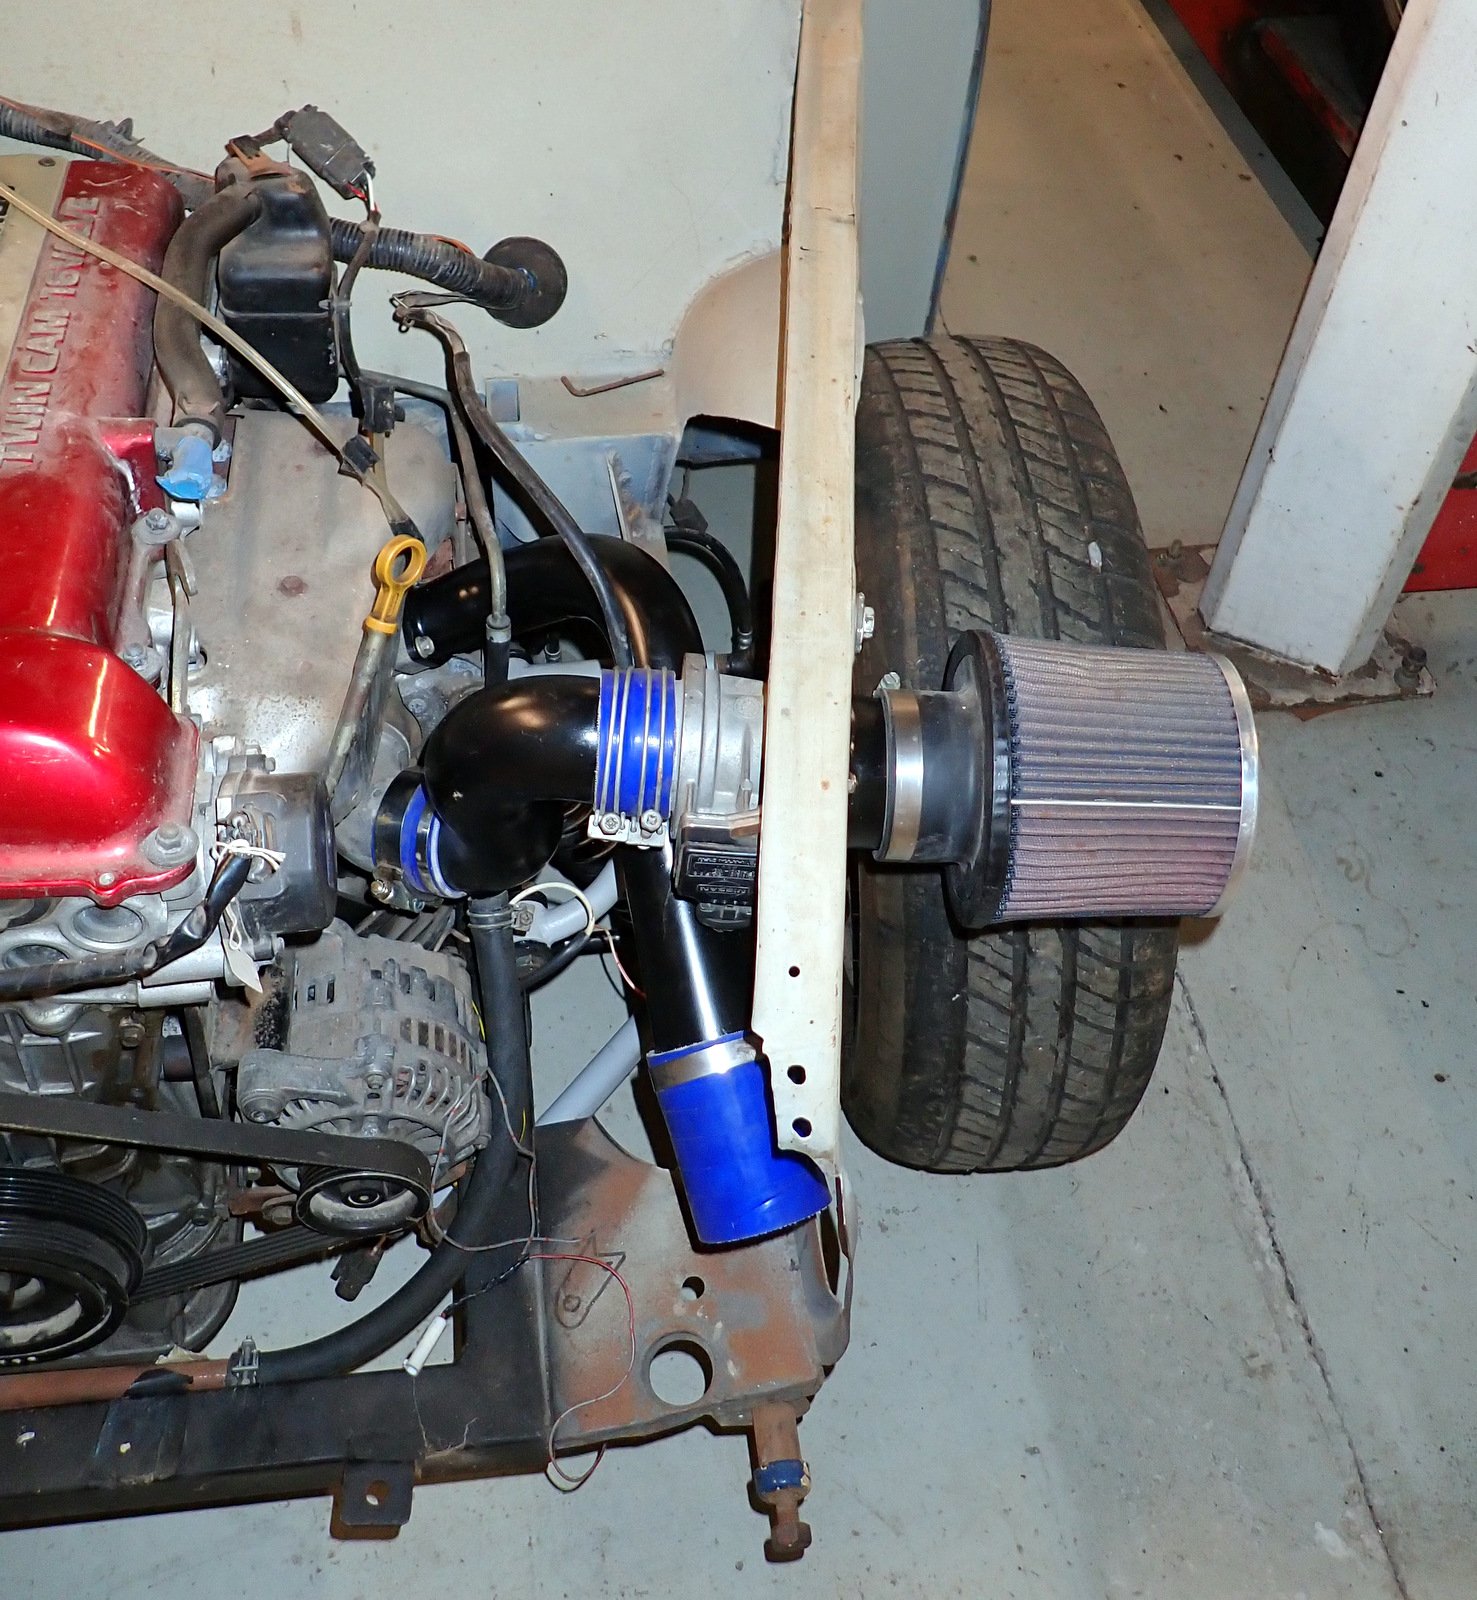
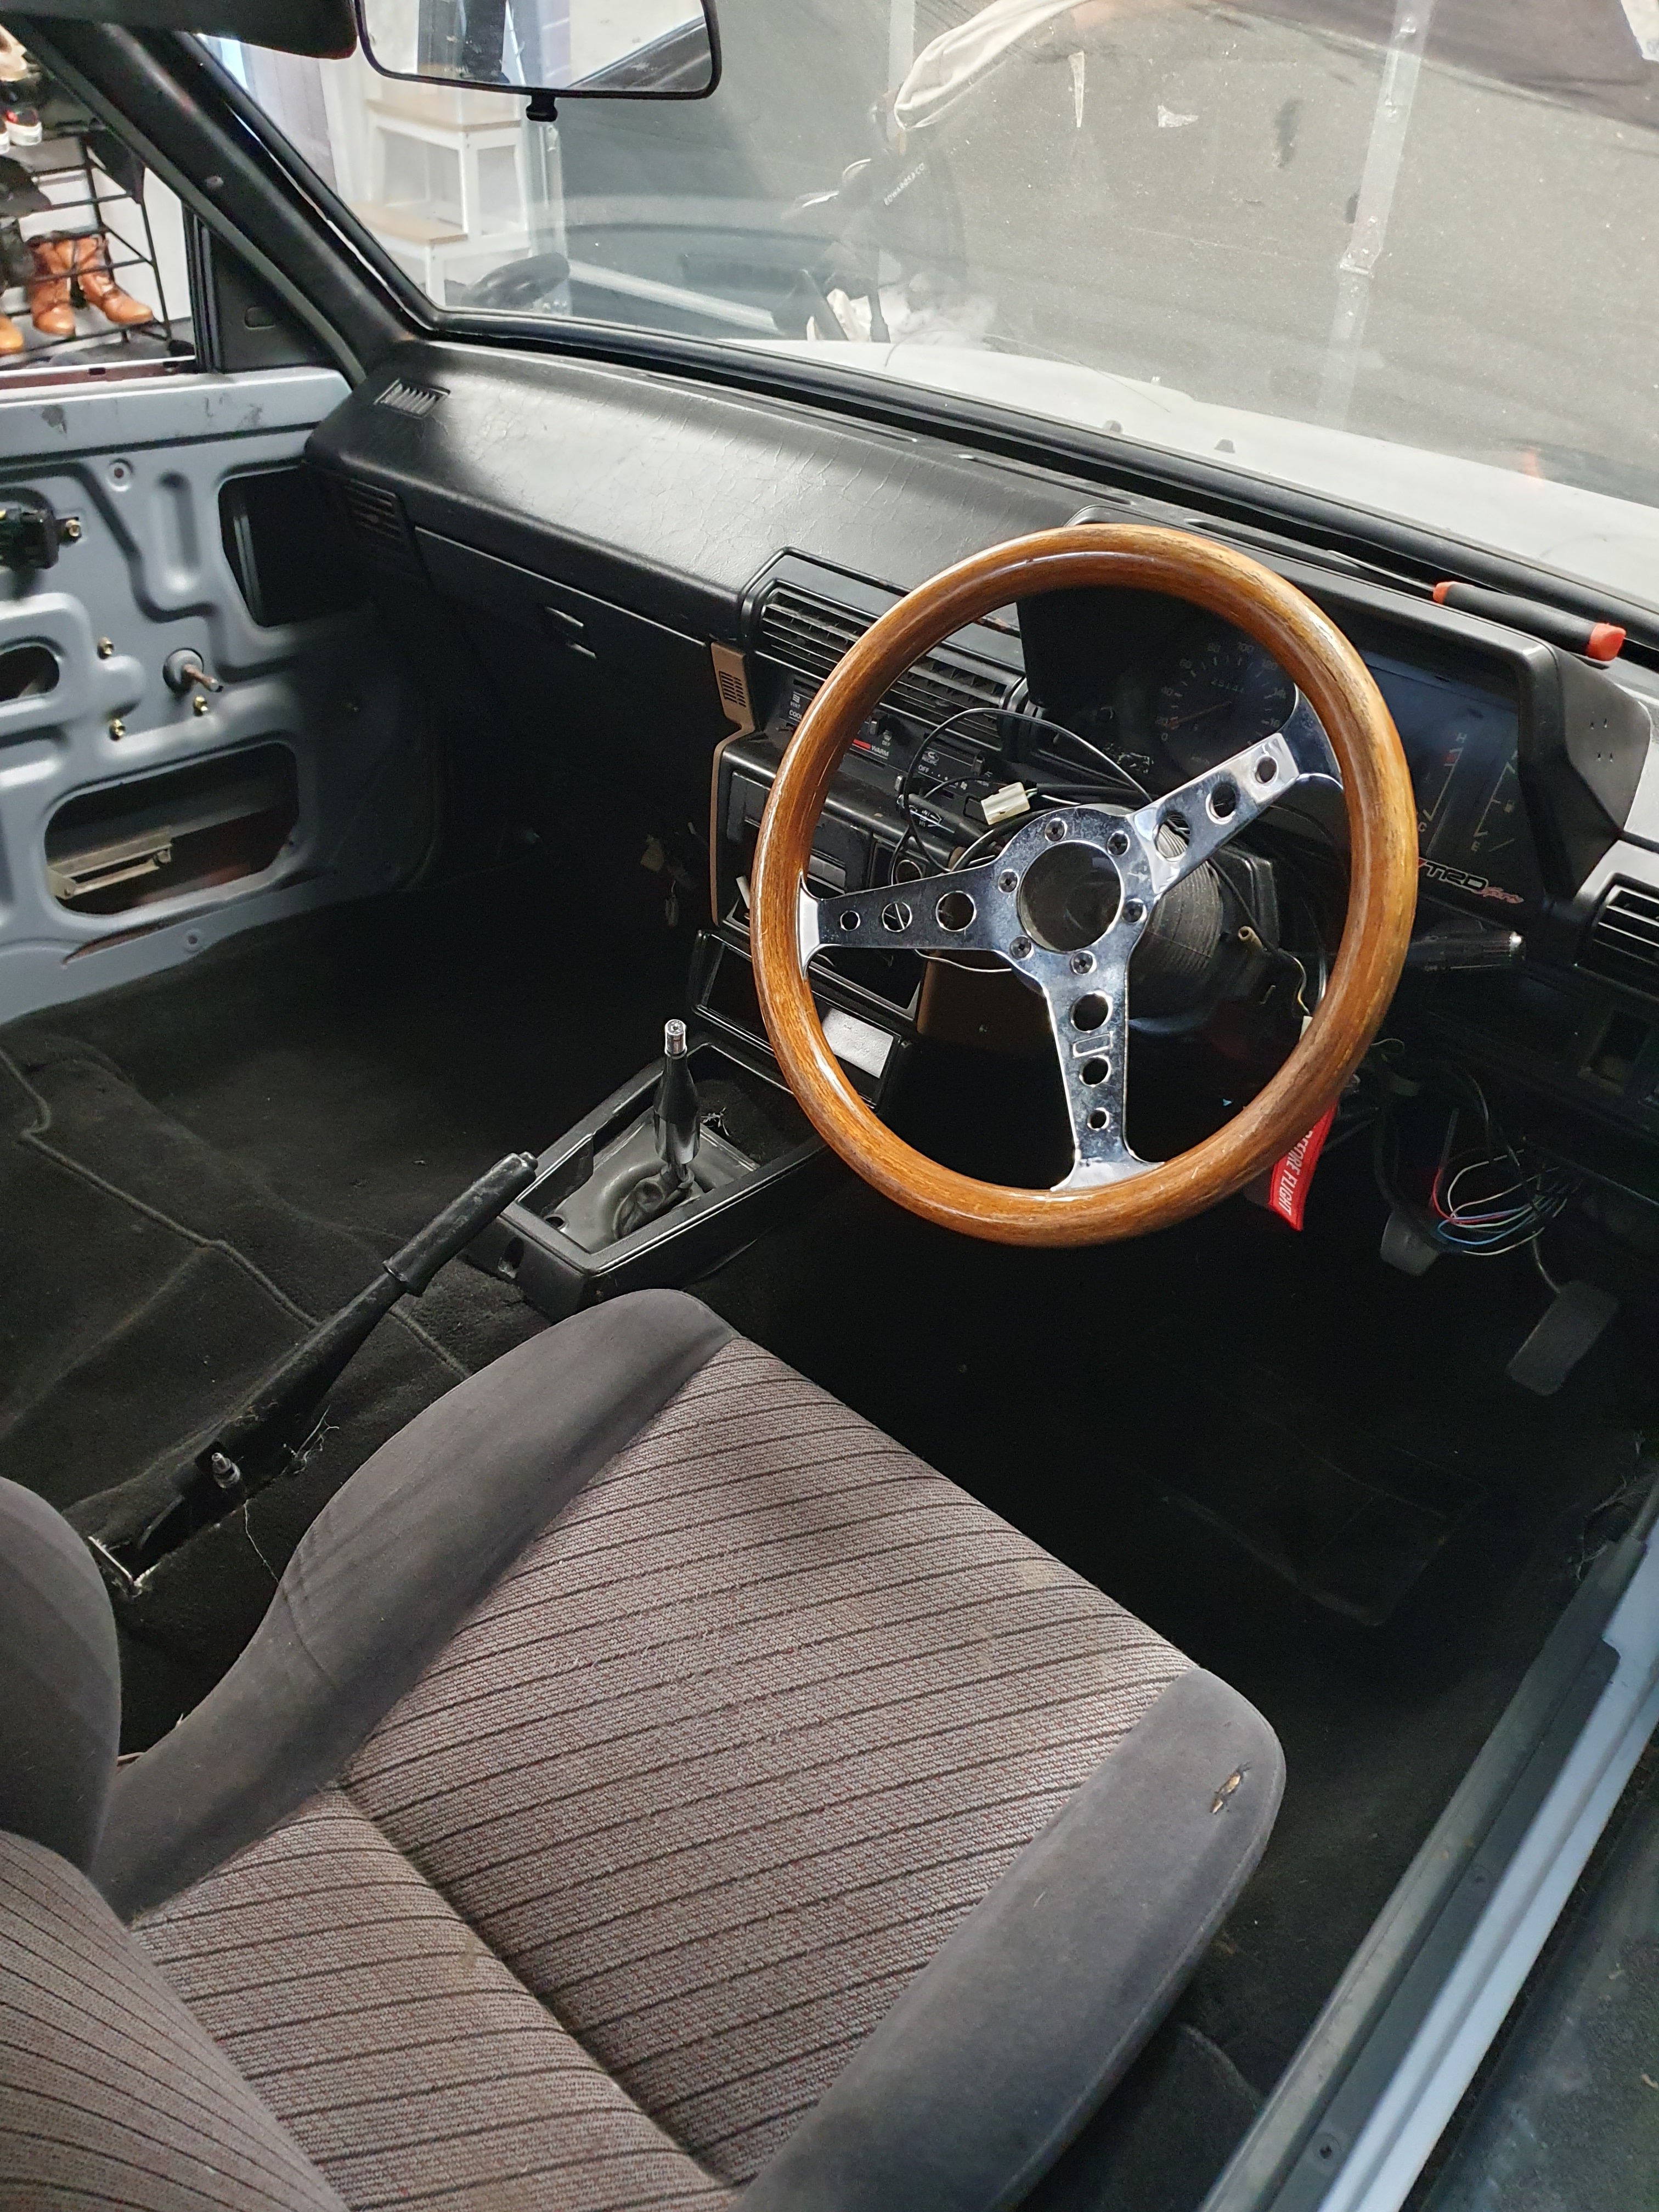
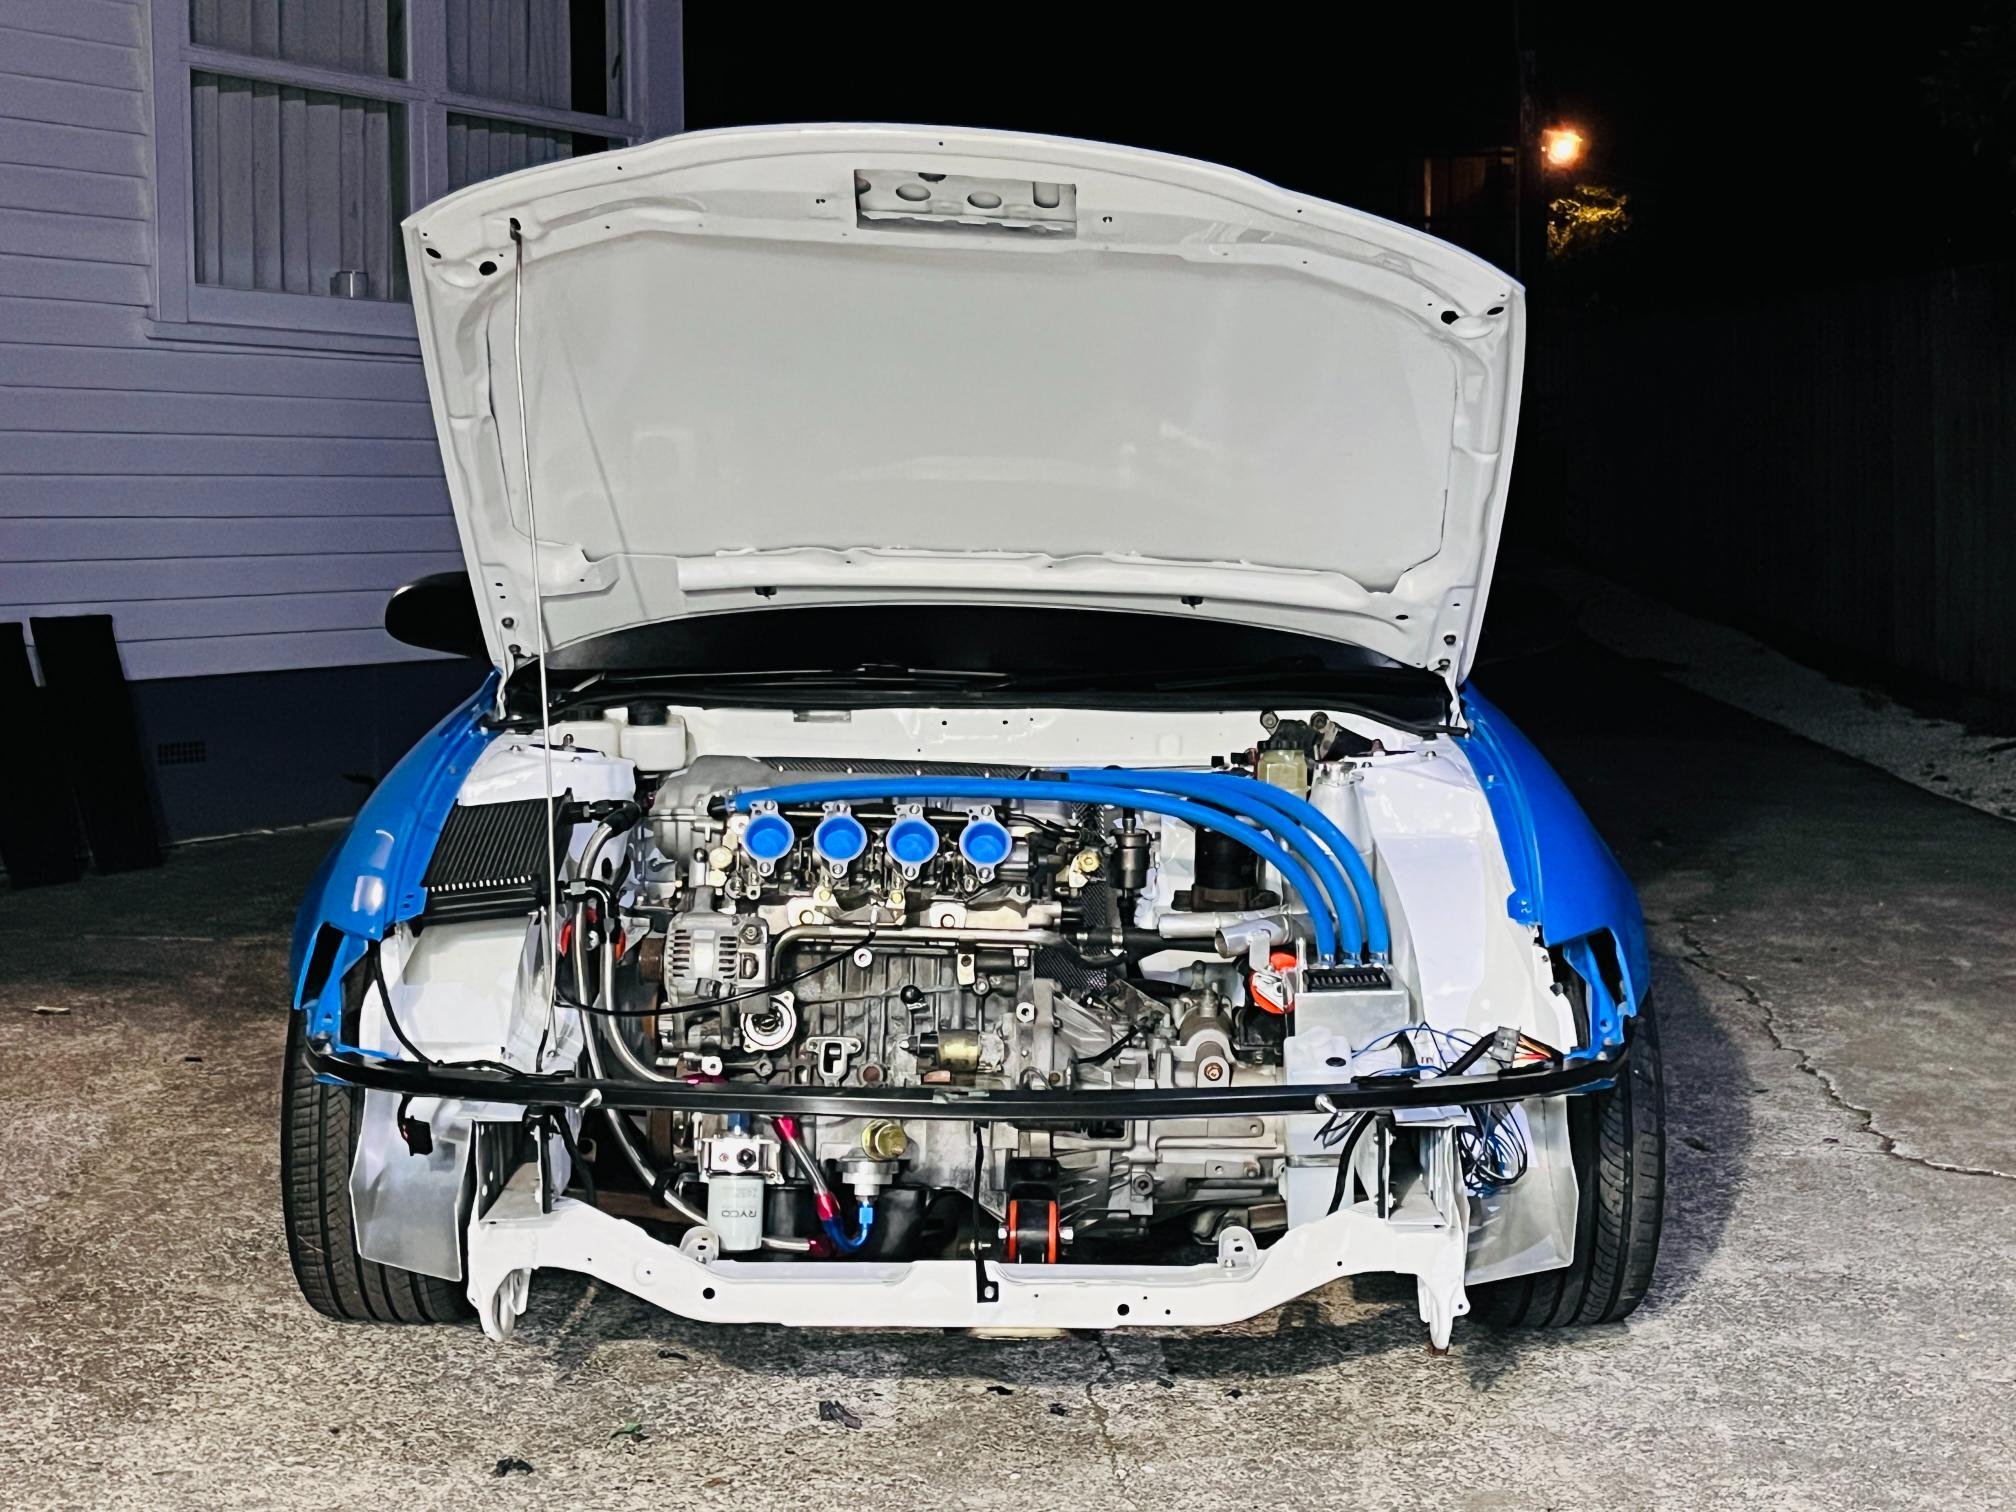
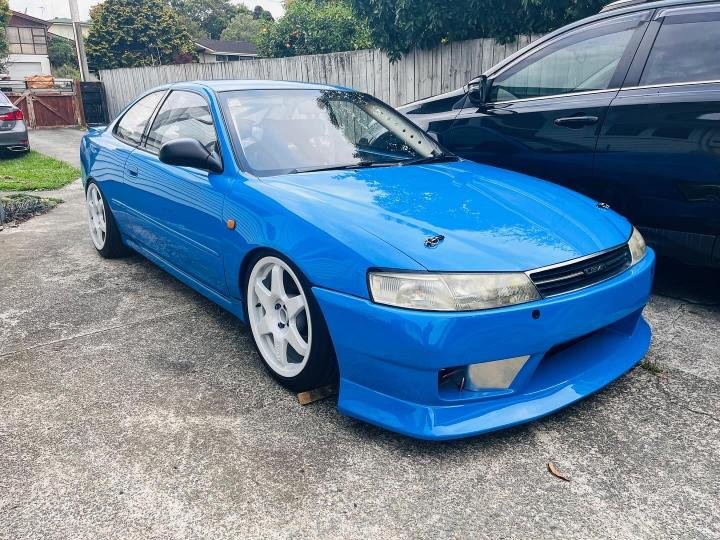
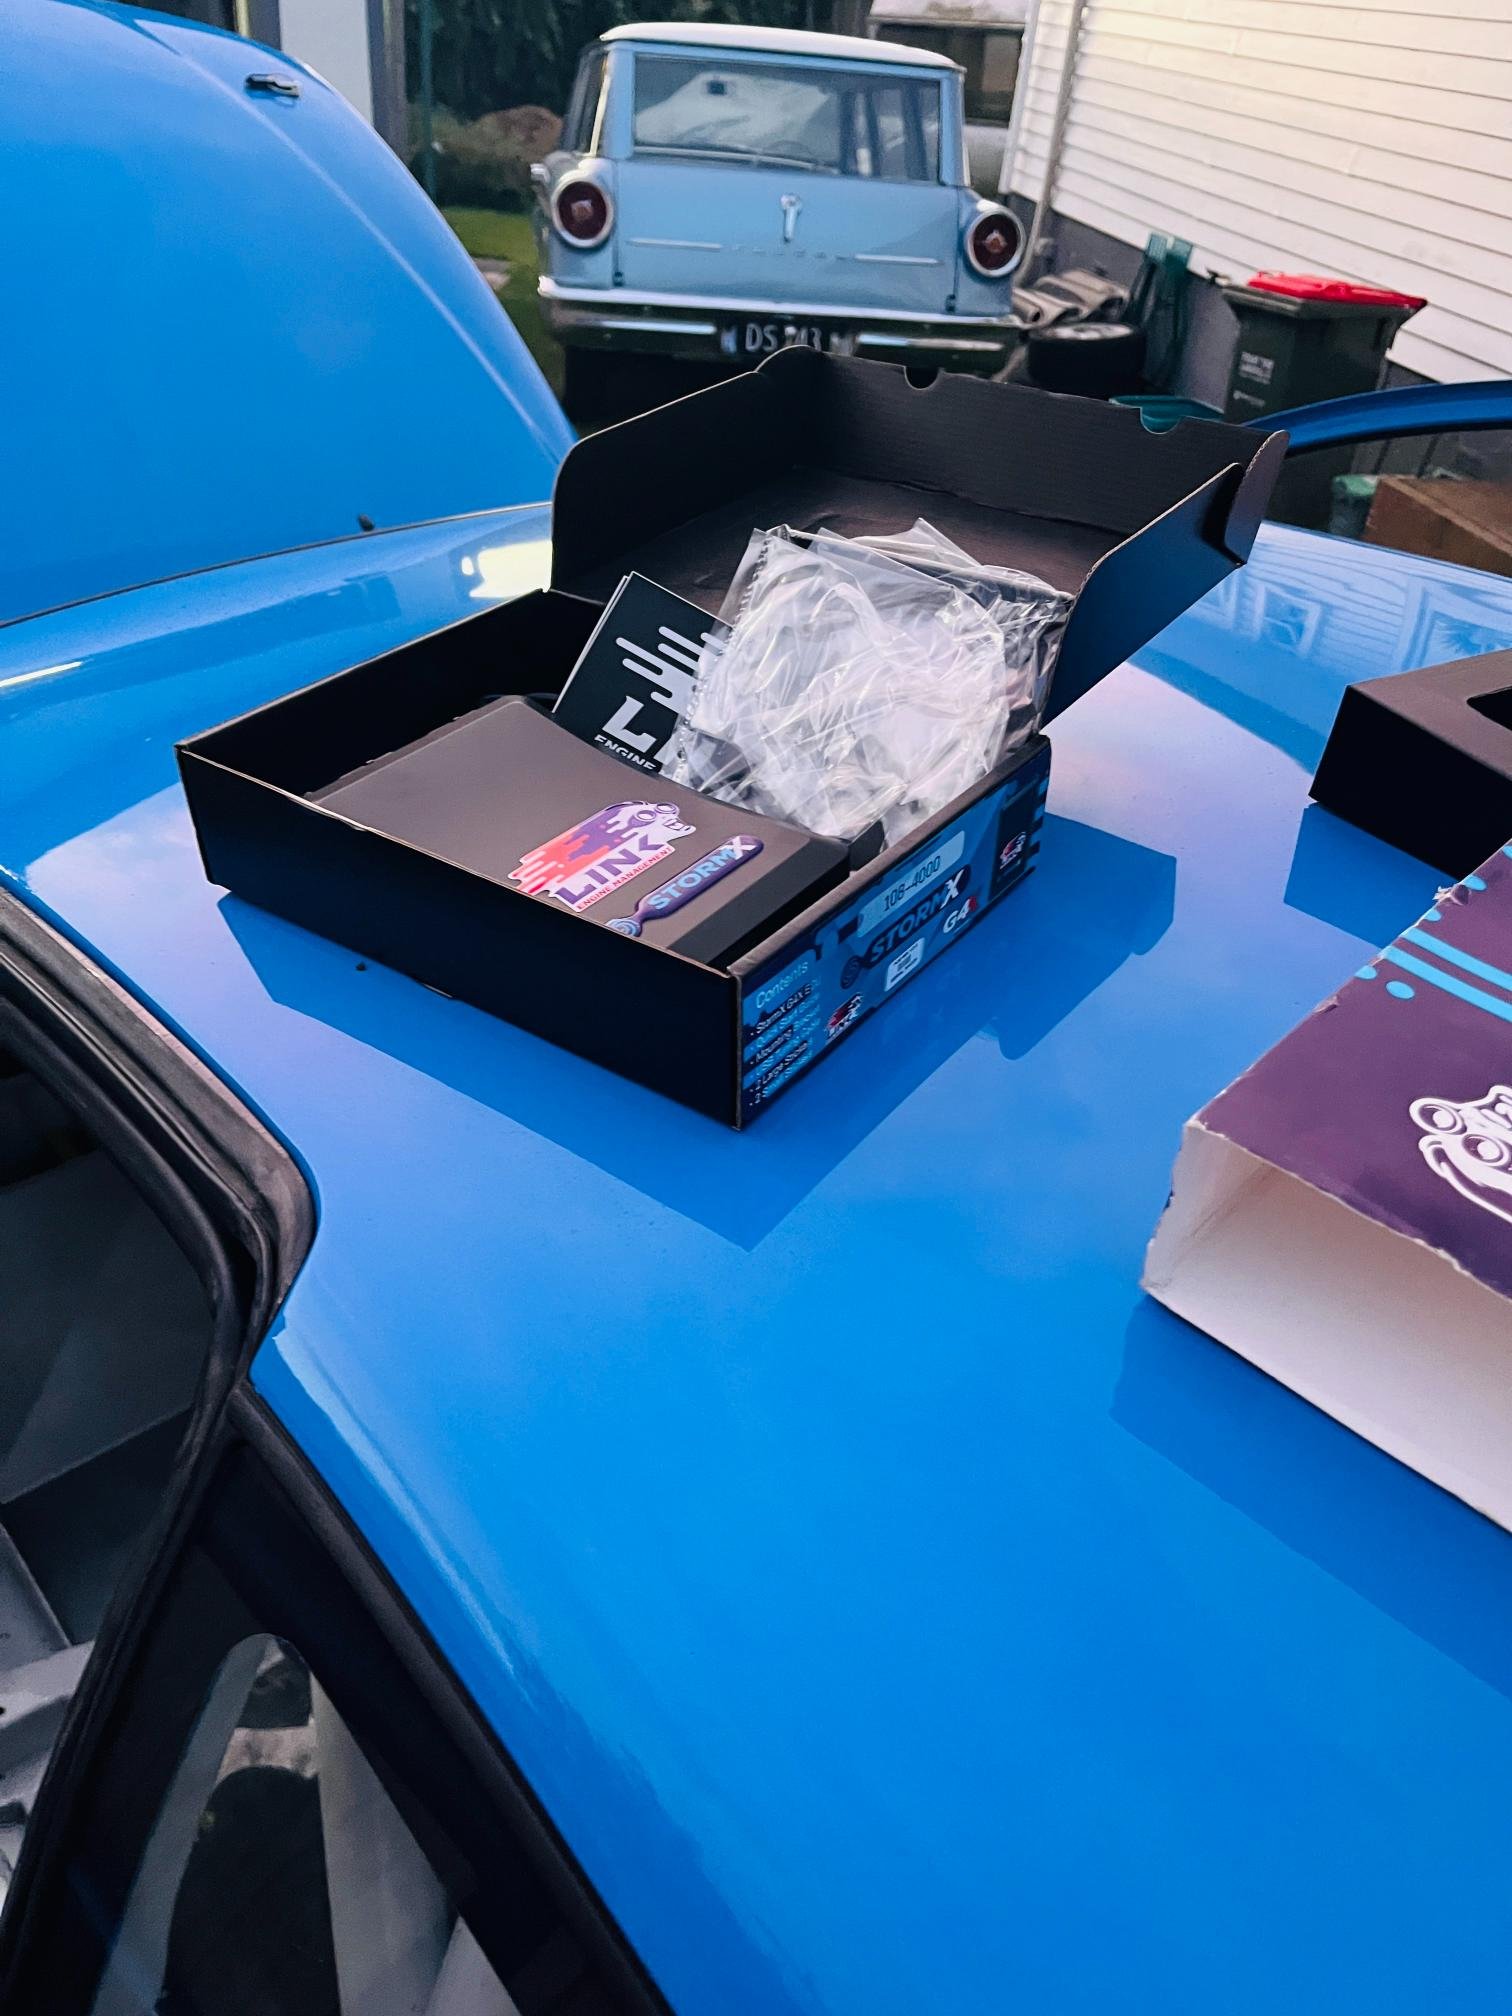
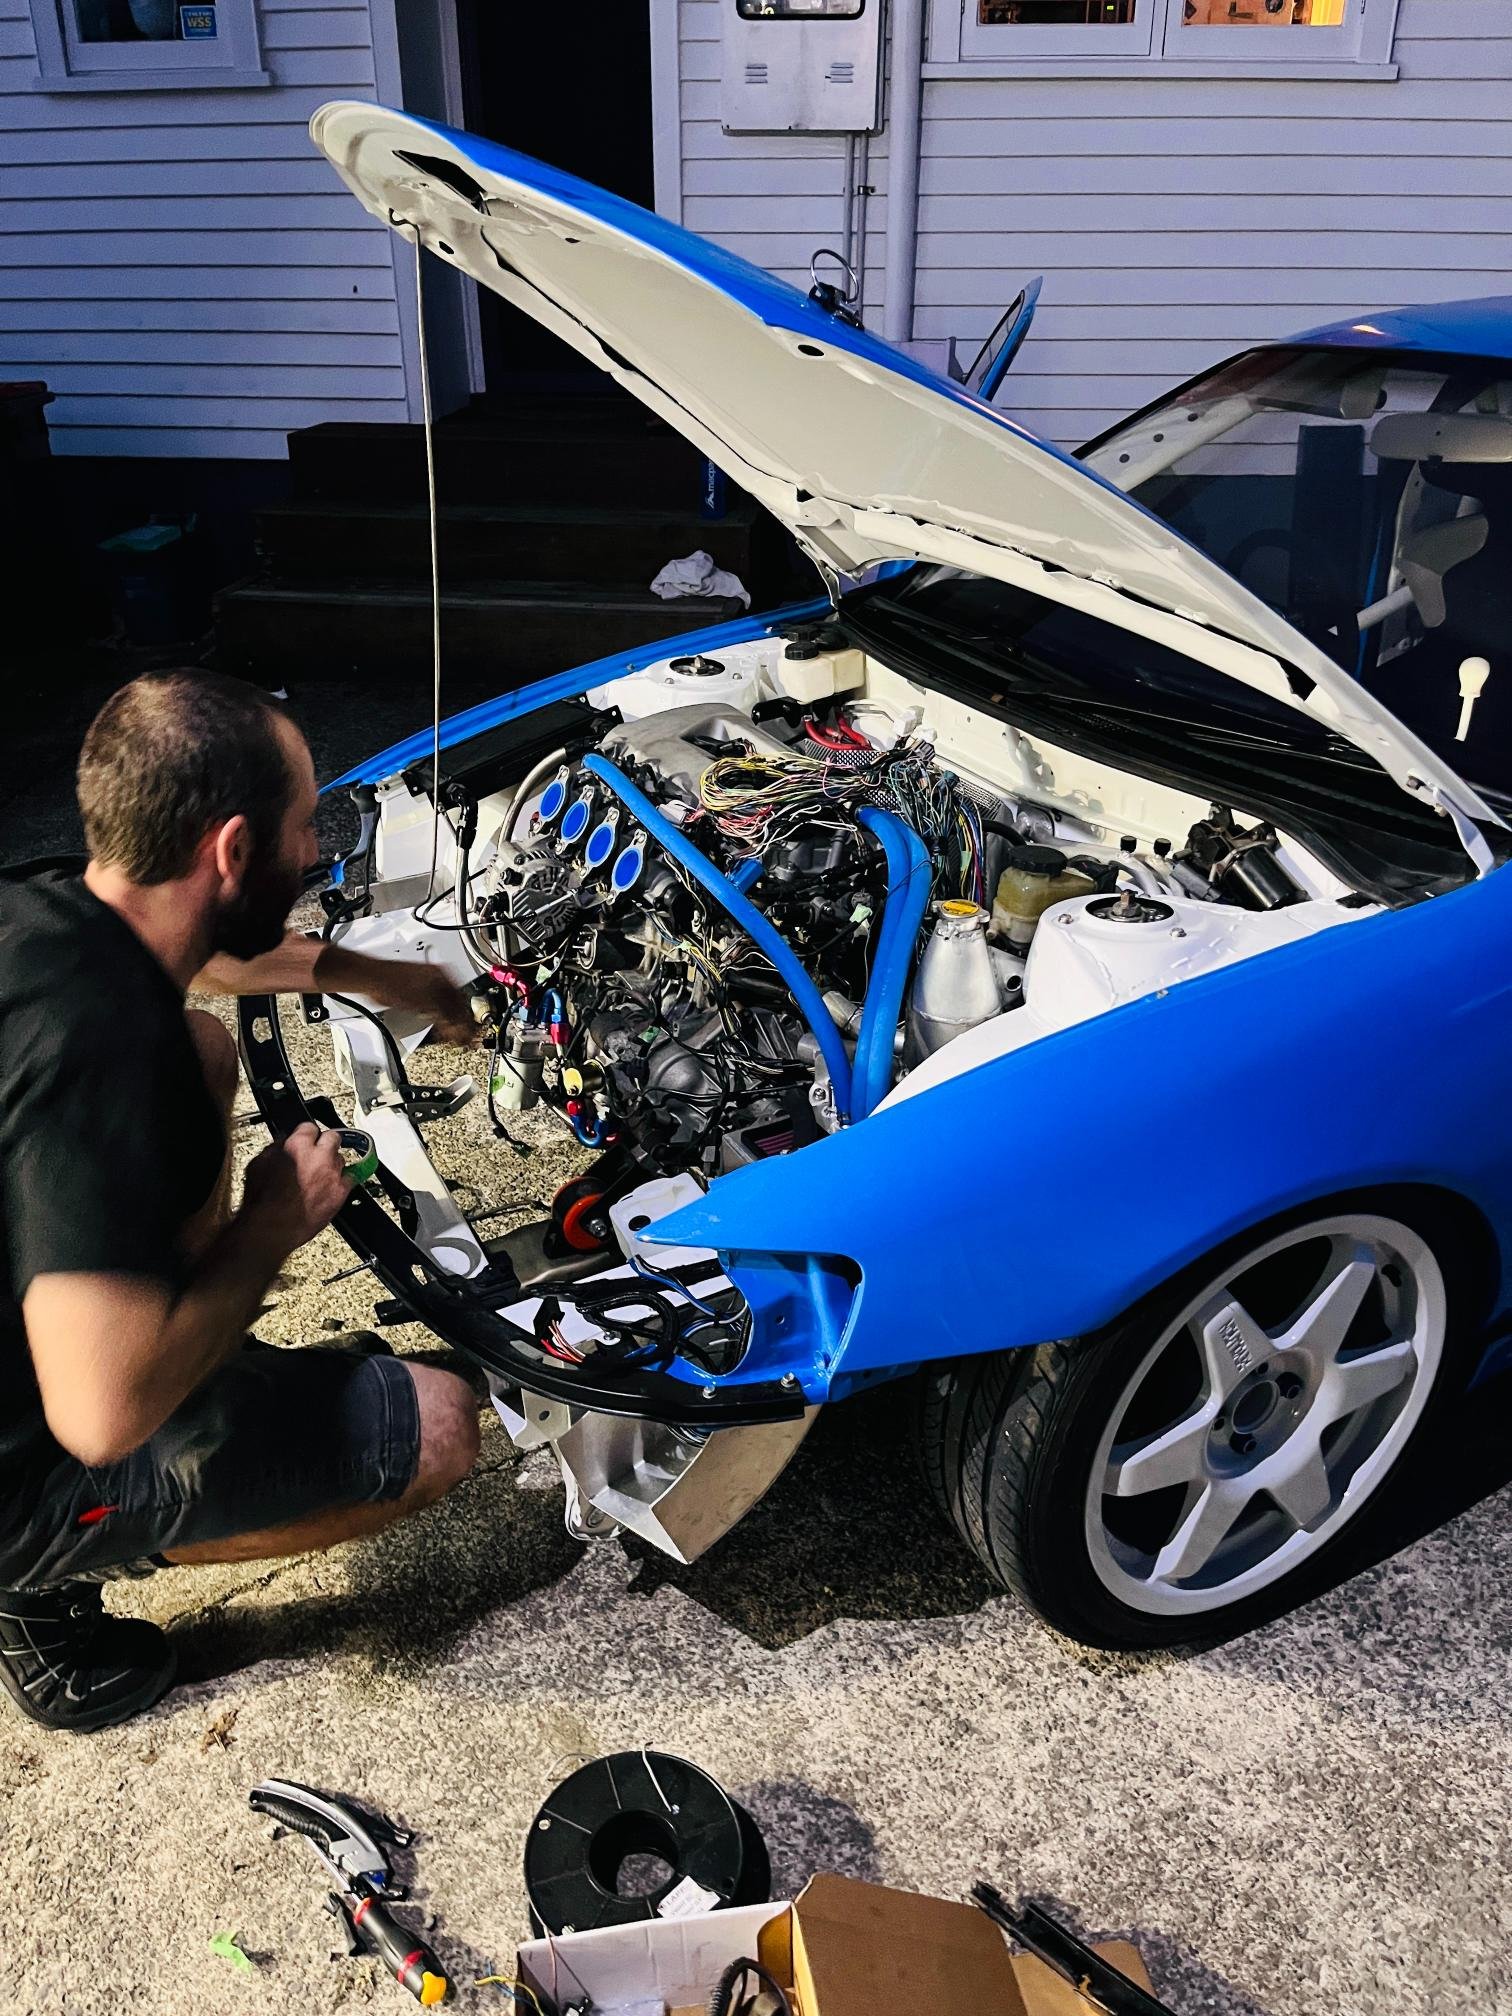
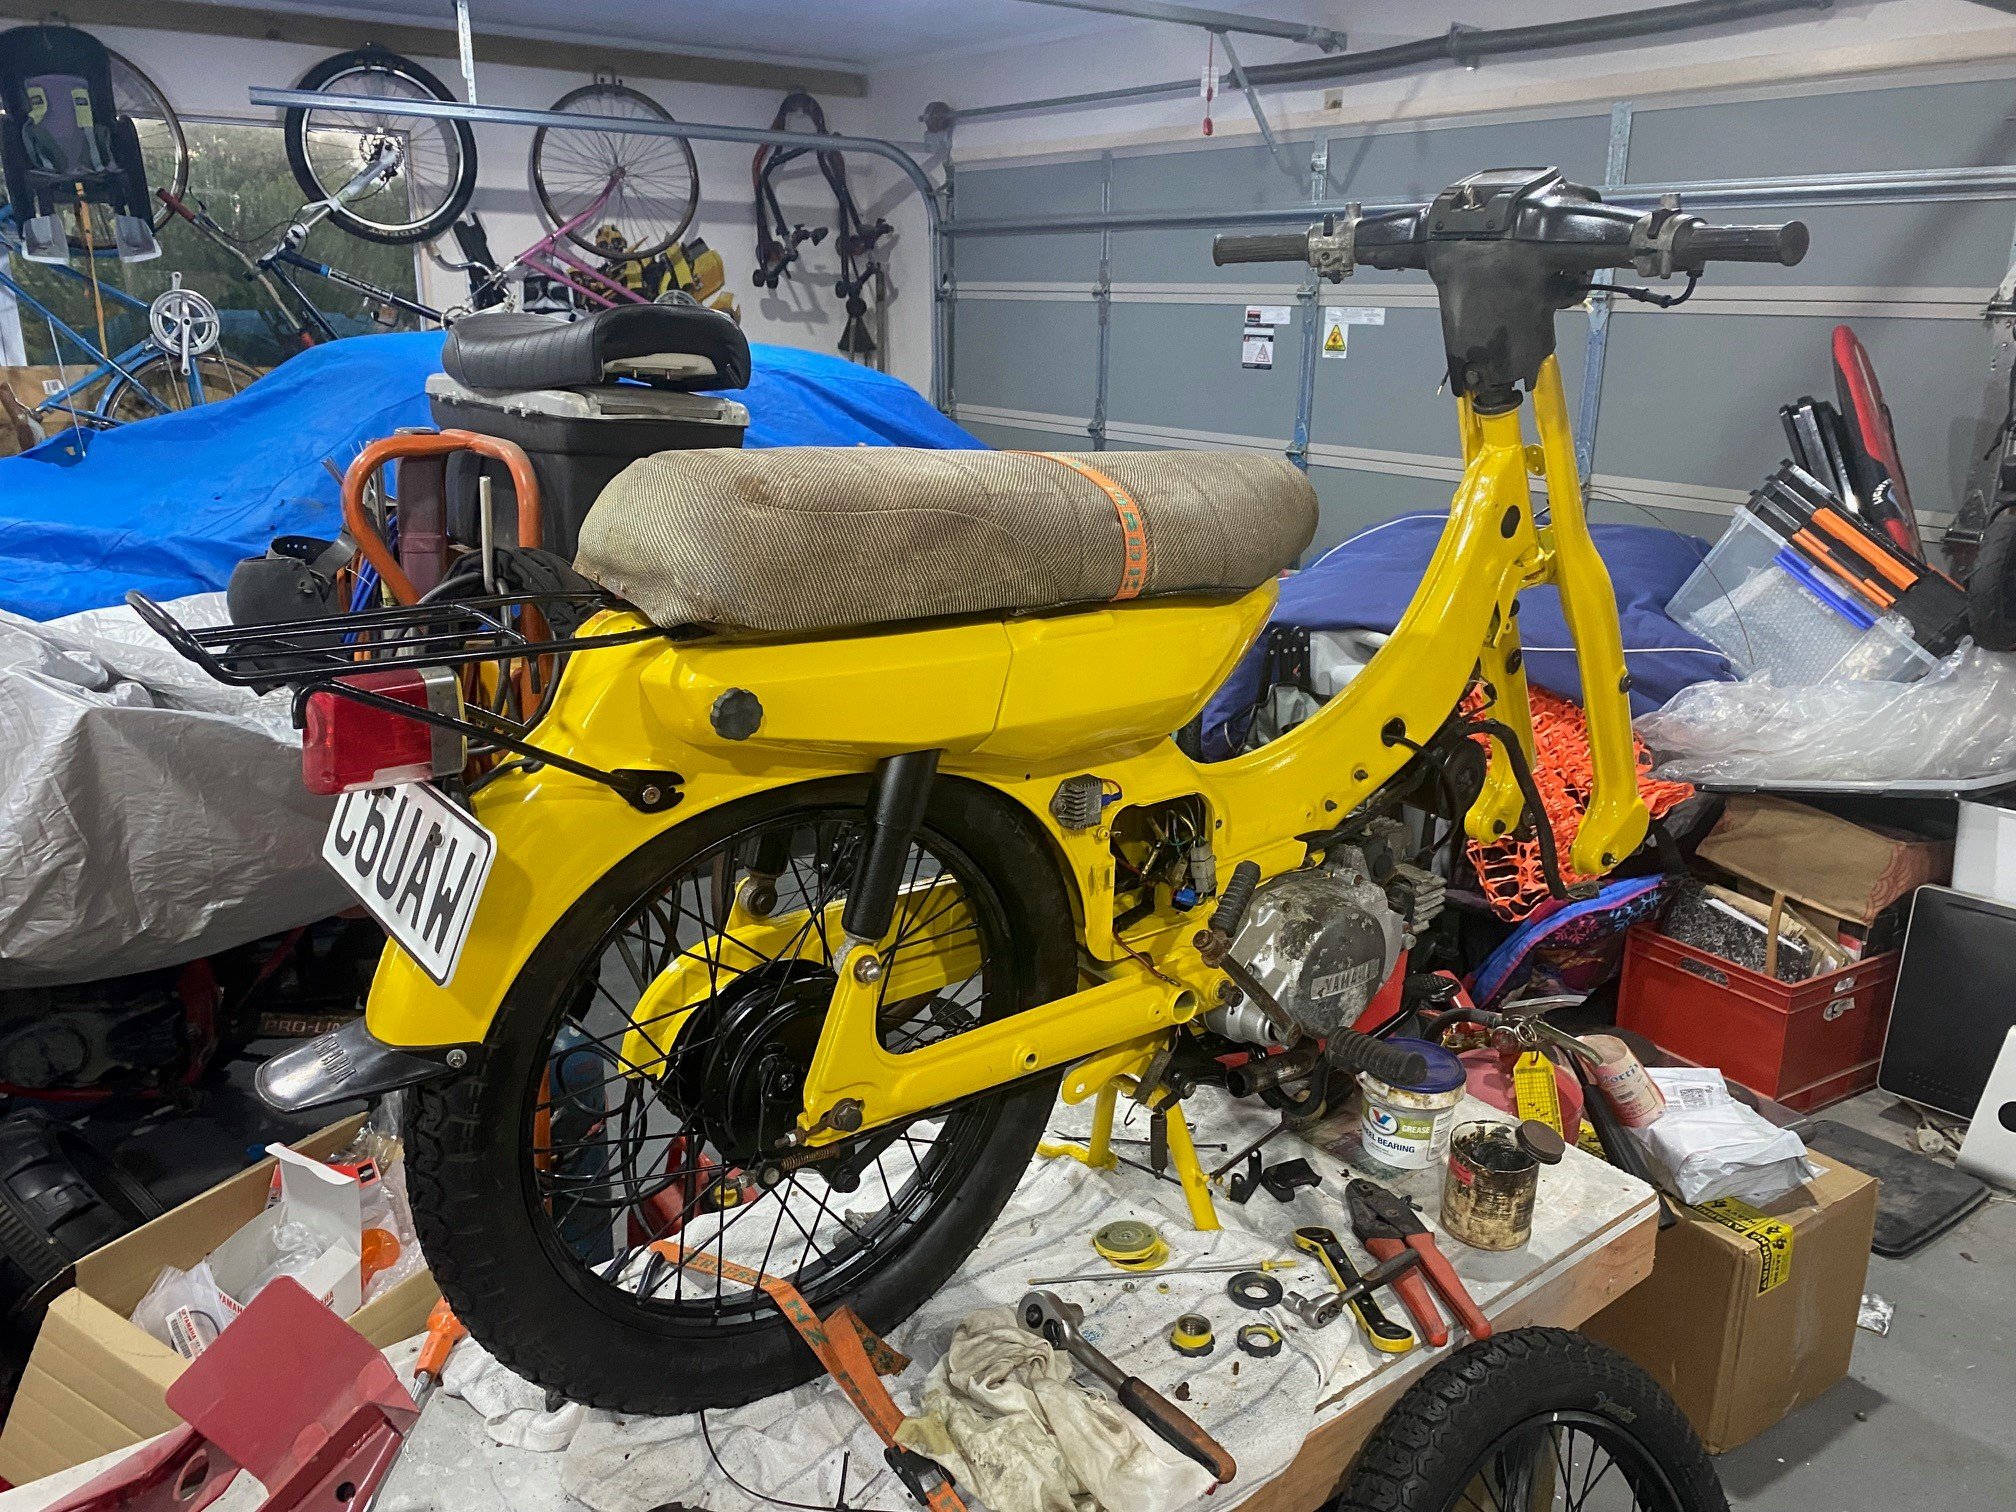
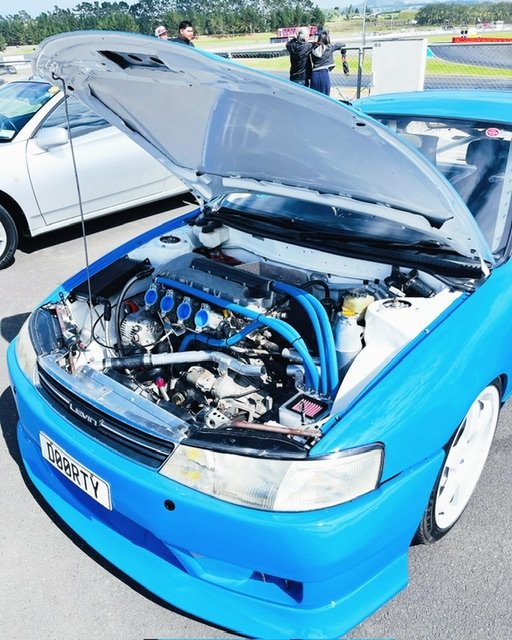
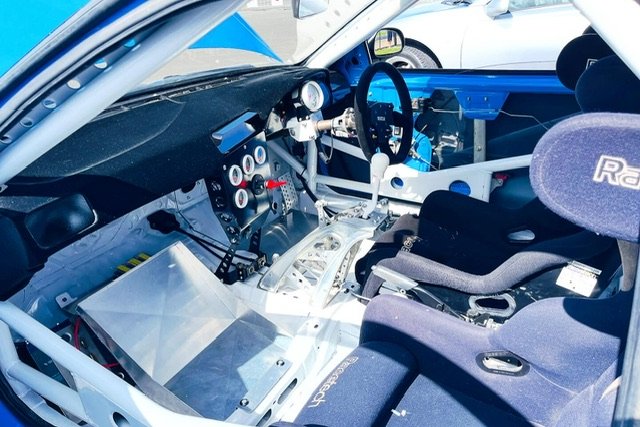
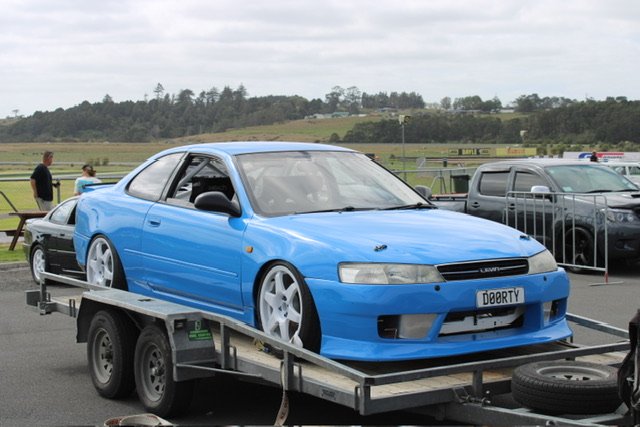
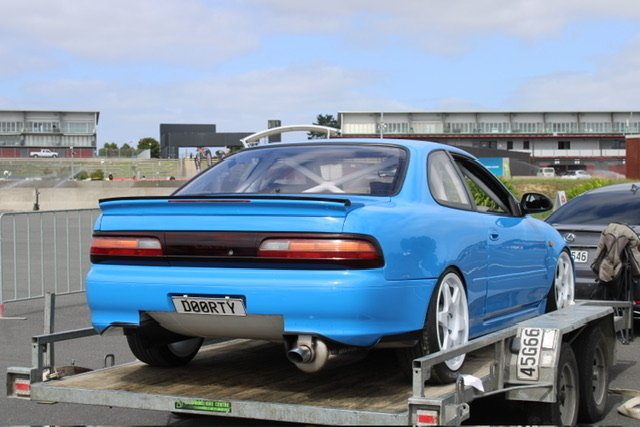
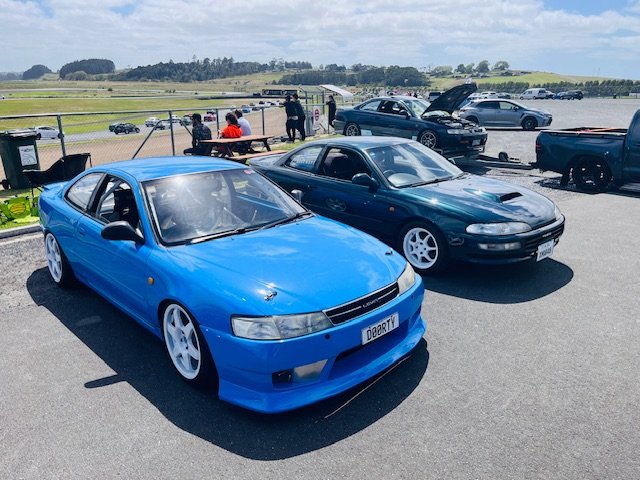
Quick update. Been busy over the past month so this has taken a bit of a backseat. Got some stickers made for steering wheel/dash. Makes it feel a lot more finished. I’m not 100% happy with them yet but they’ll do for now also tidied up the curly cord mounting. Looks legit now. So the set of pulleys I brought back from the states didn’t fit my alternator (which turns out is from a 1zz fielder). So jeffy came to the rescue and made a bush to suit. For future reference..1445mm belt works with no PS, and underdrive alternator and water pump pulleys. This took quite some time to figure out found a wee molded hose to finish up the heater piping. Still need to 3d print an airflow thing for the dash heater ducts. Cooling system is now sealed and ready for a pressure test (pending a few extra hose clamps!) Also replaced gearbox axle seals and filled with oil for first time in 10yrs. Hope not too much damage has been done from sitting around. Bought and sold another Levin to pay for Link Storm g4x and engine wiring loom. Loom worked out great looks very hidden away. Some small mods to make but all simple enough. next up; 1. fix stripped thread in engine mount 2. replace sump with baffled version 3. remount expansion chamber 4. make headers 5. first start??
 14 points
 -
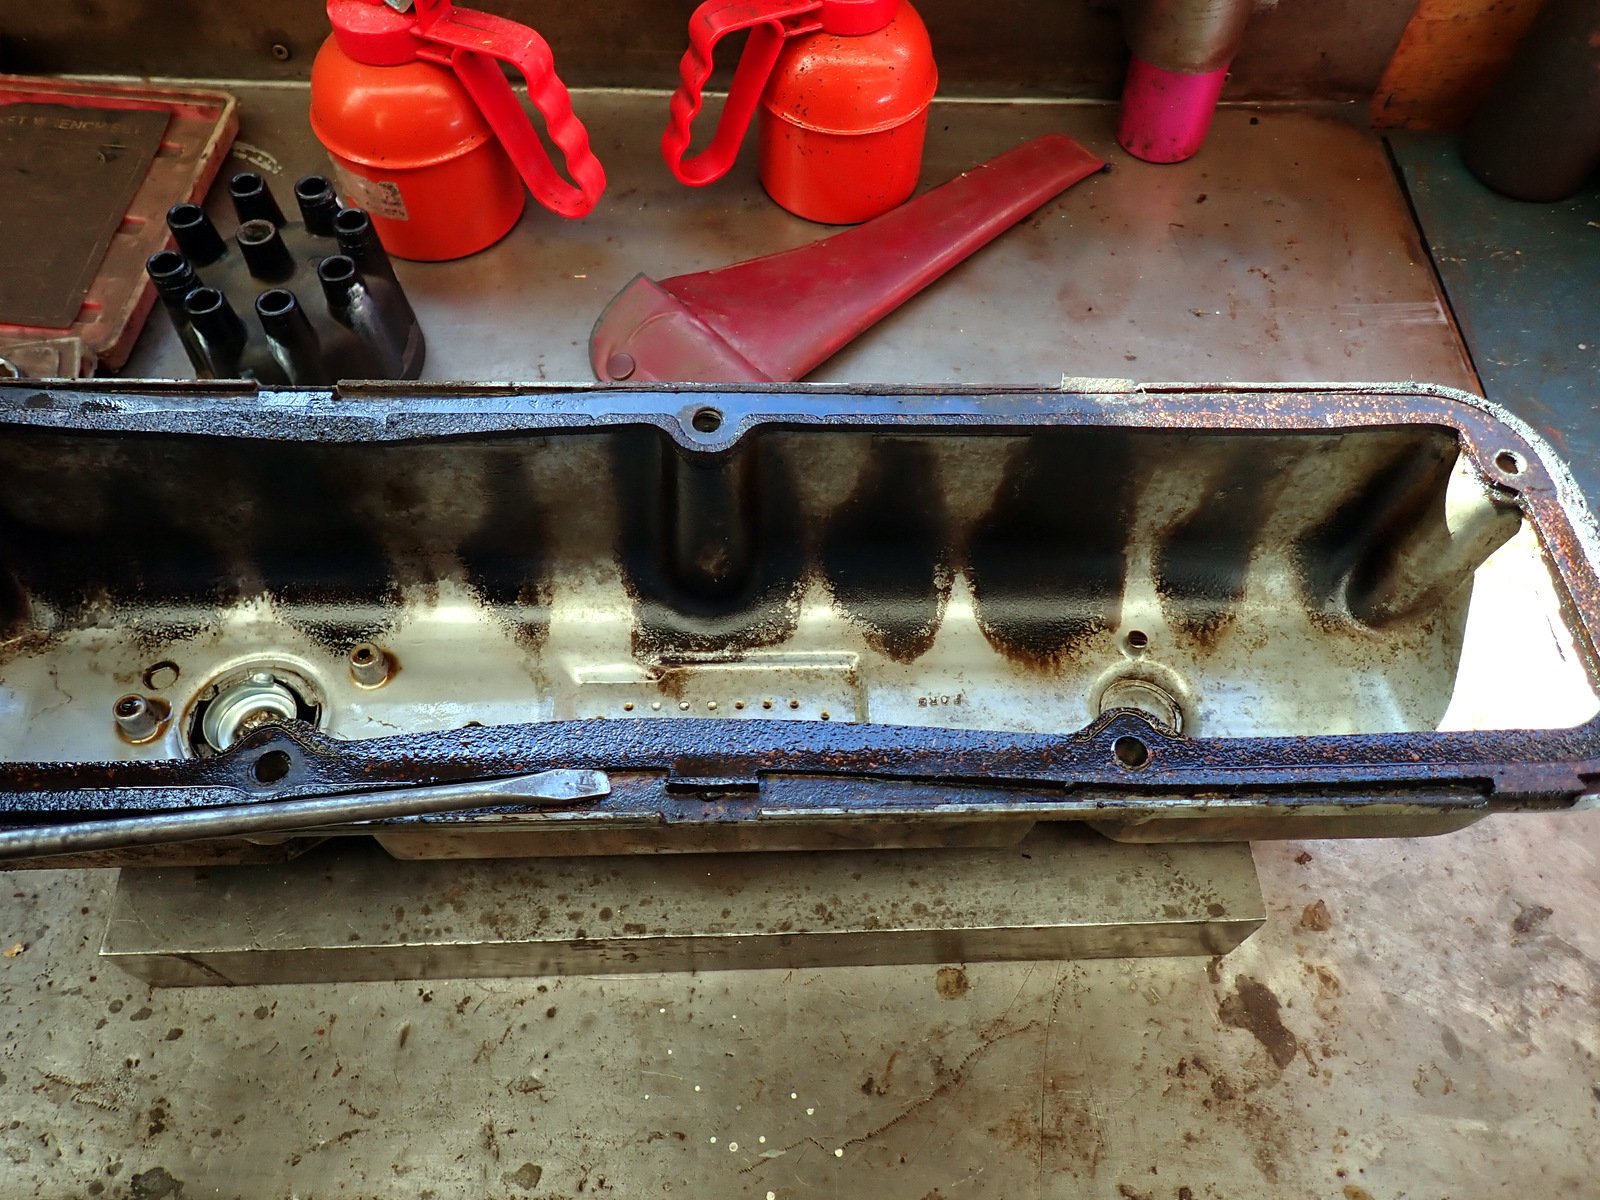
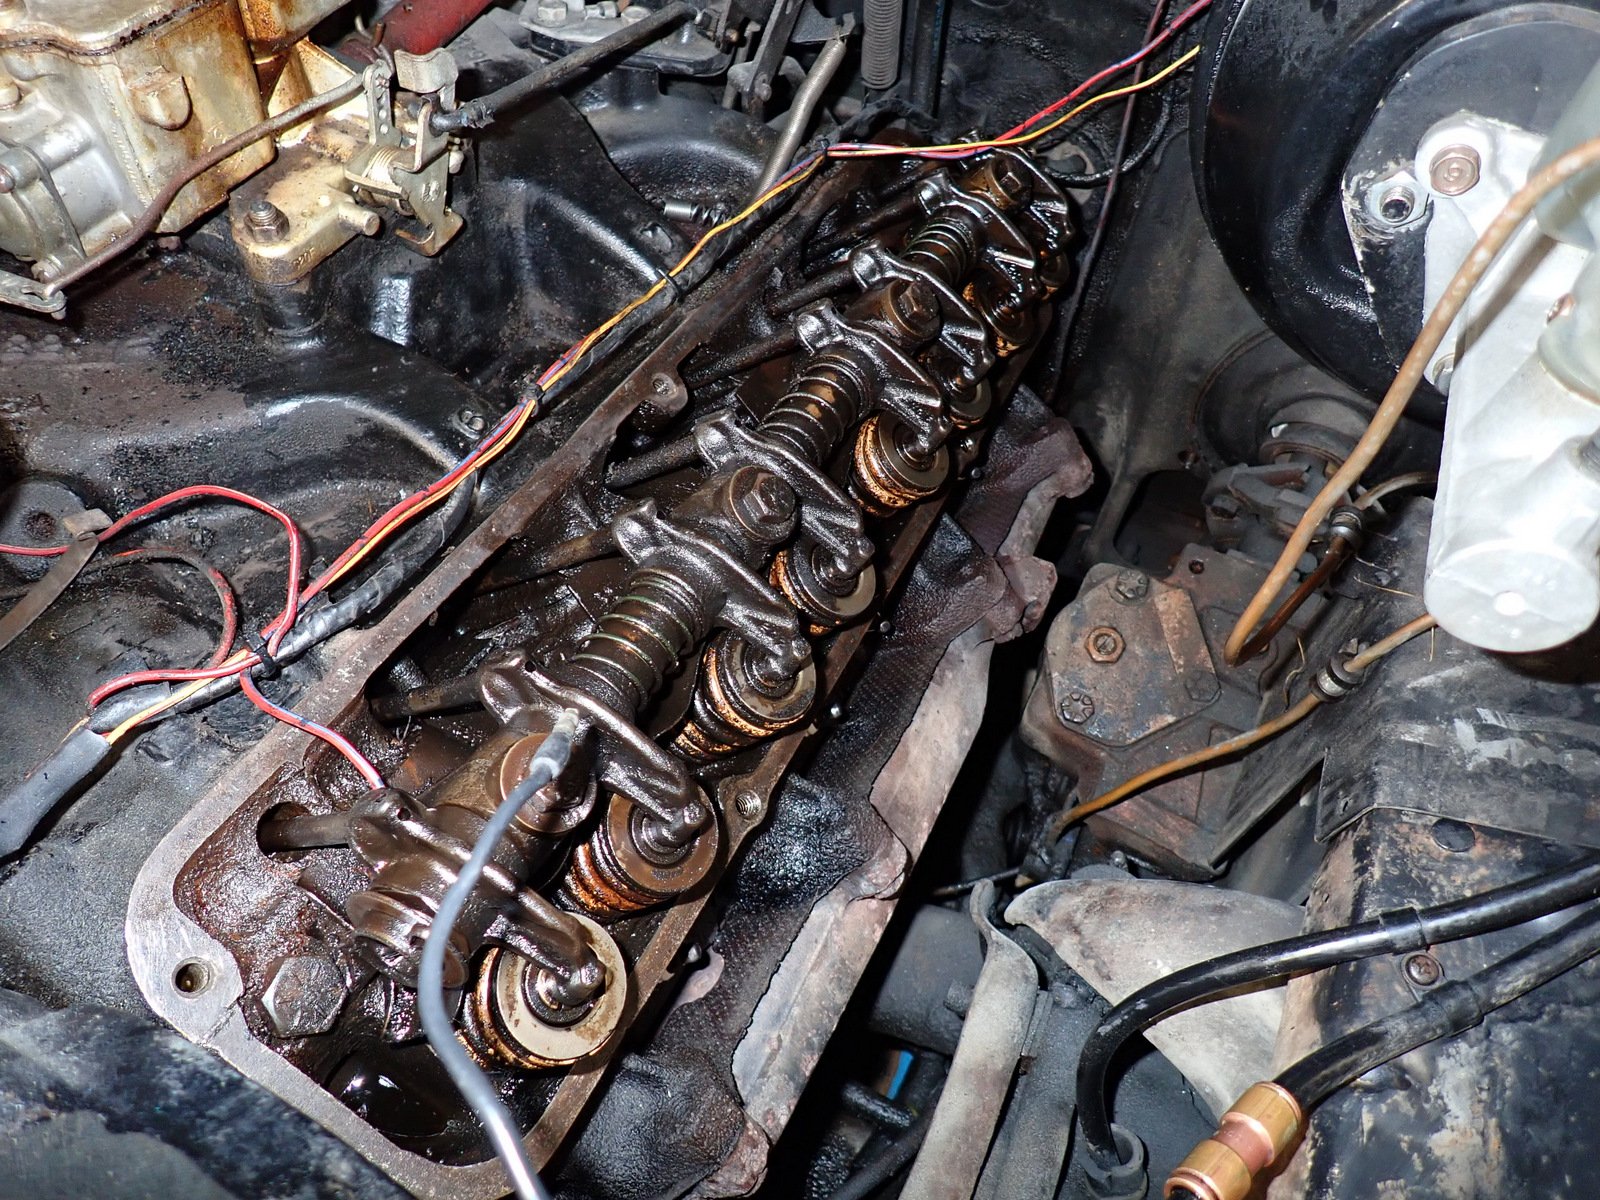
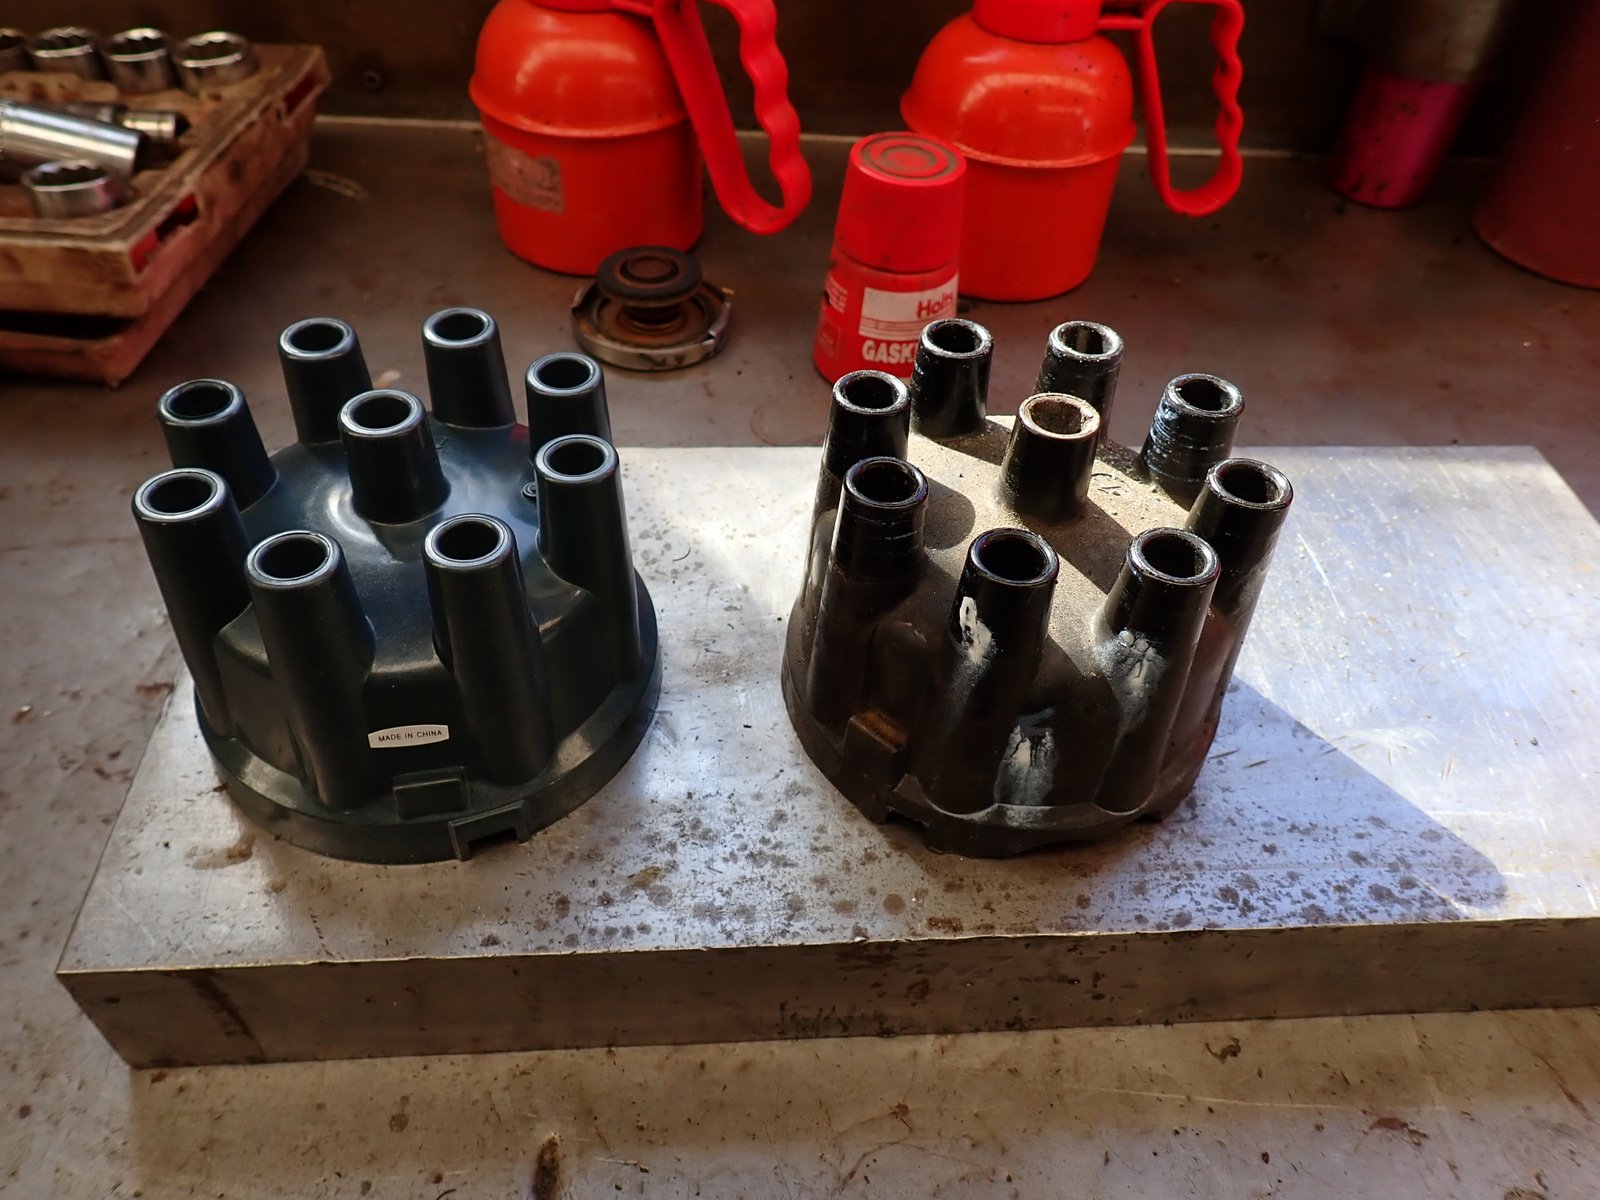
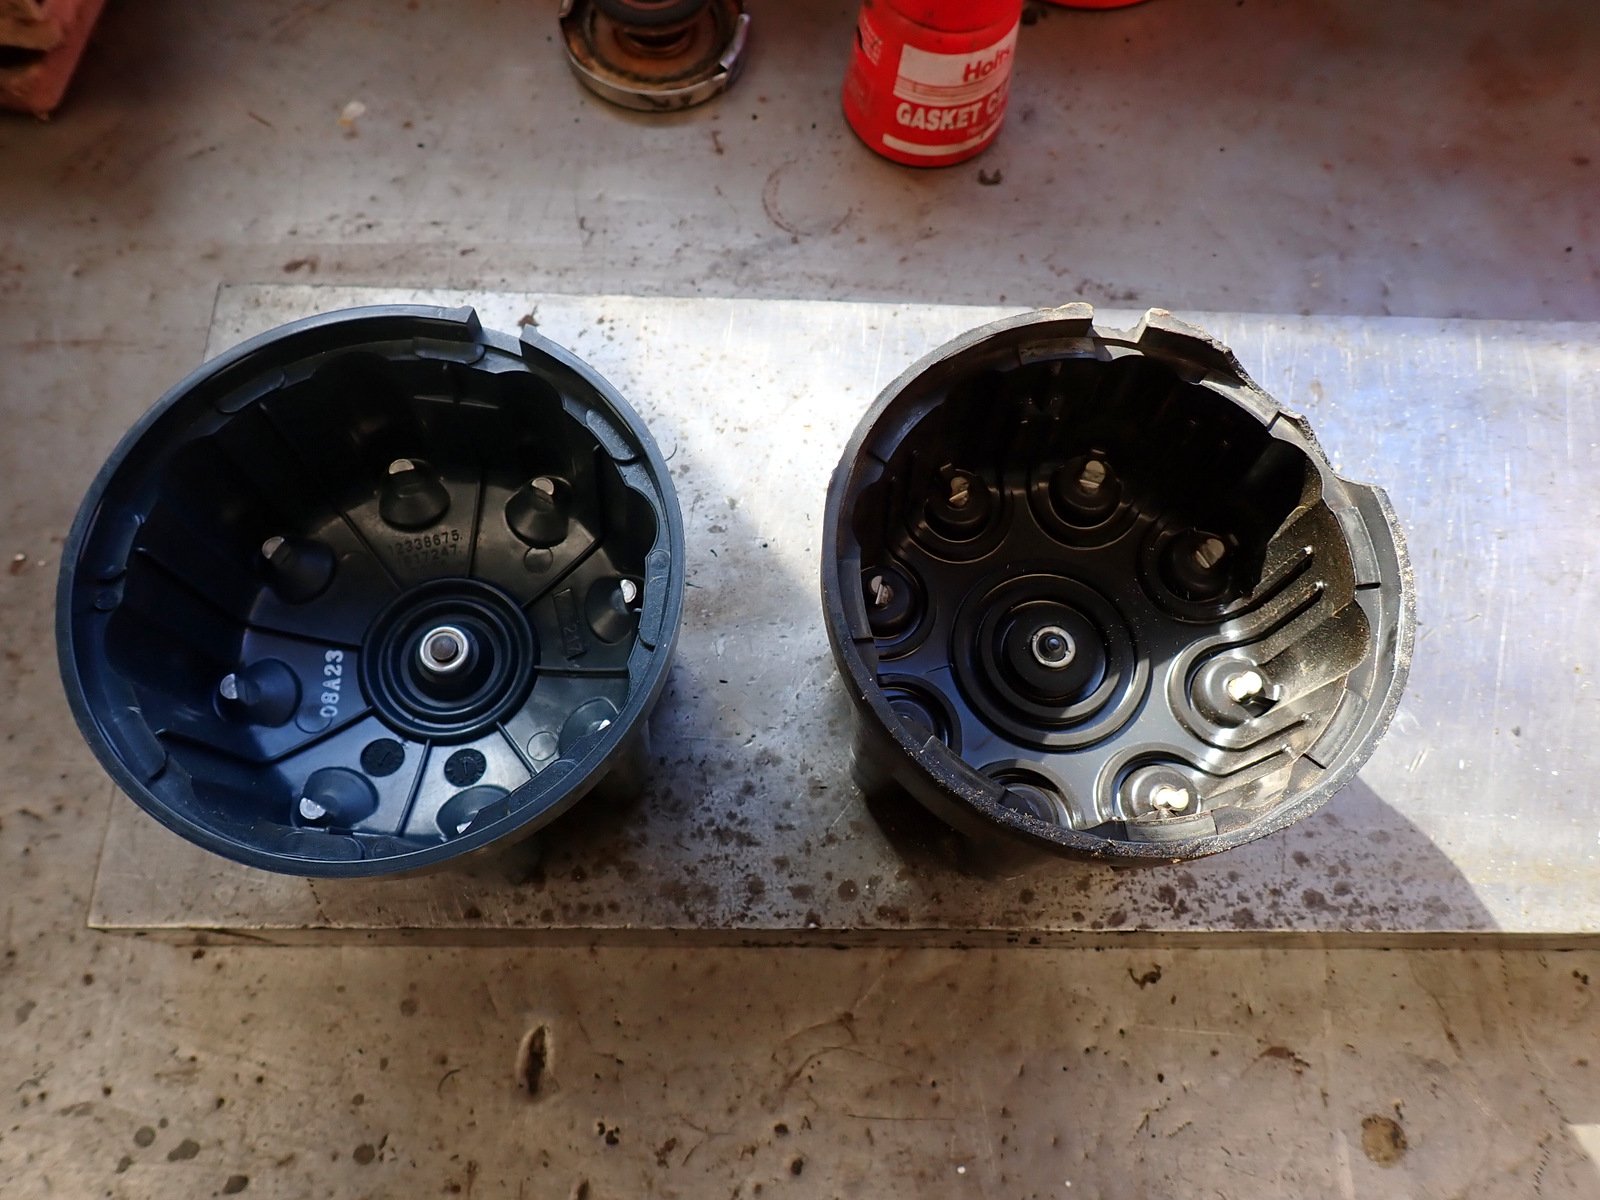
Pulled the leaking valve cover, misplaced gasket would be why it was so bad Nothing to see here. Ever get the feeling that your new parts (on the left) aren't as good as the old parts? I think I'll hang on to the old cap, even though it's a bit damaged. Might see if there is a more $$$ option on Rockauto next time I order.
11 points
-
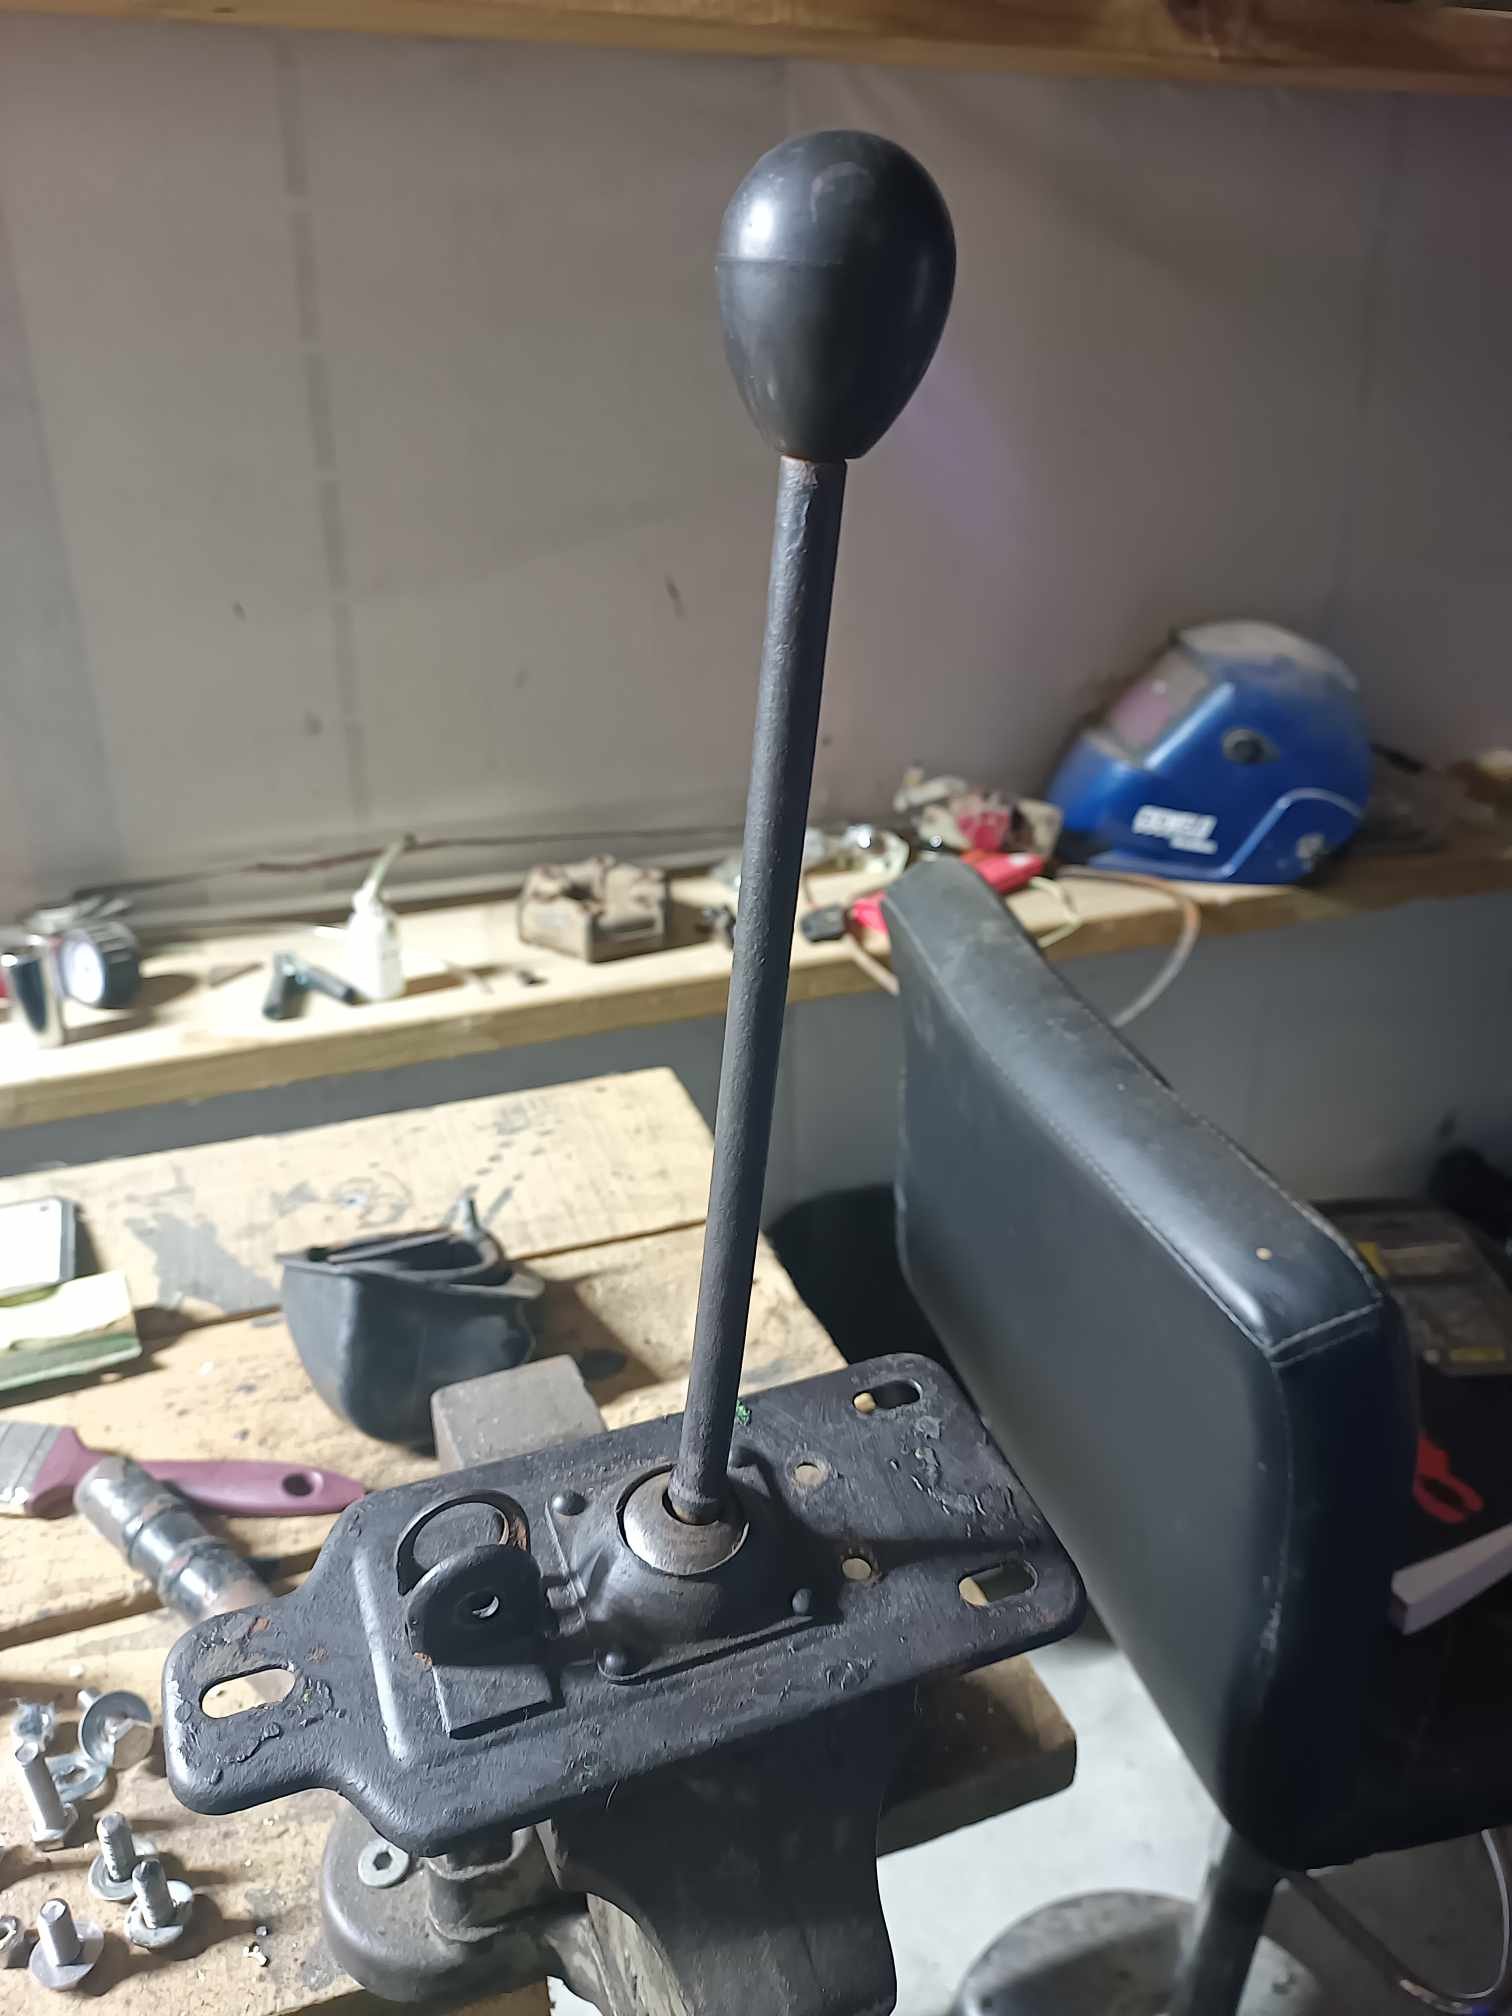
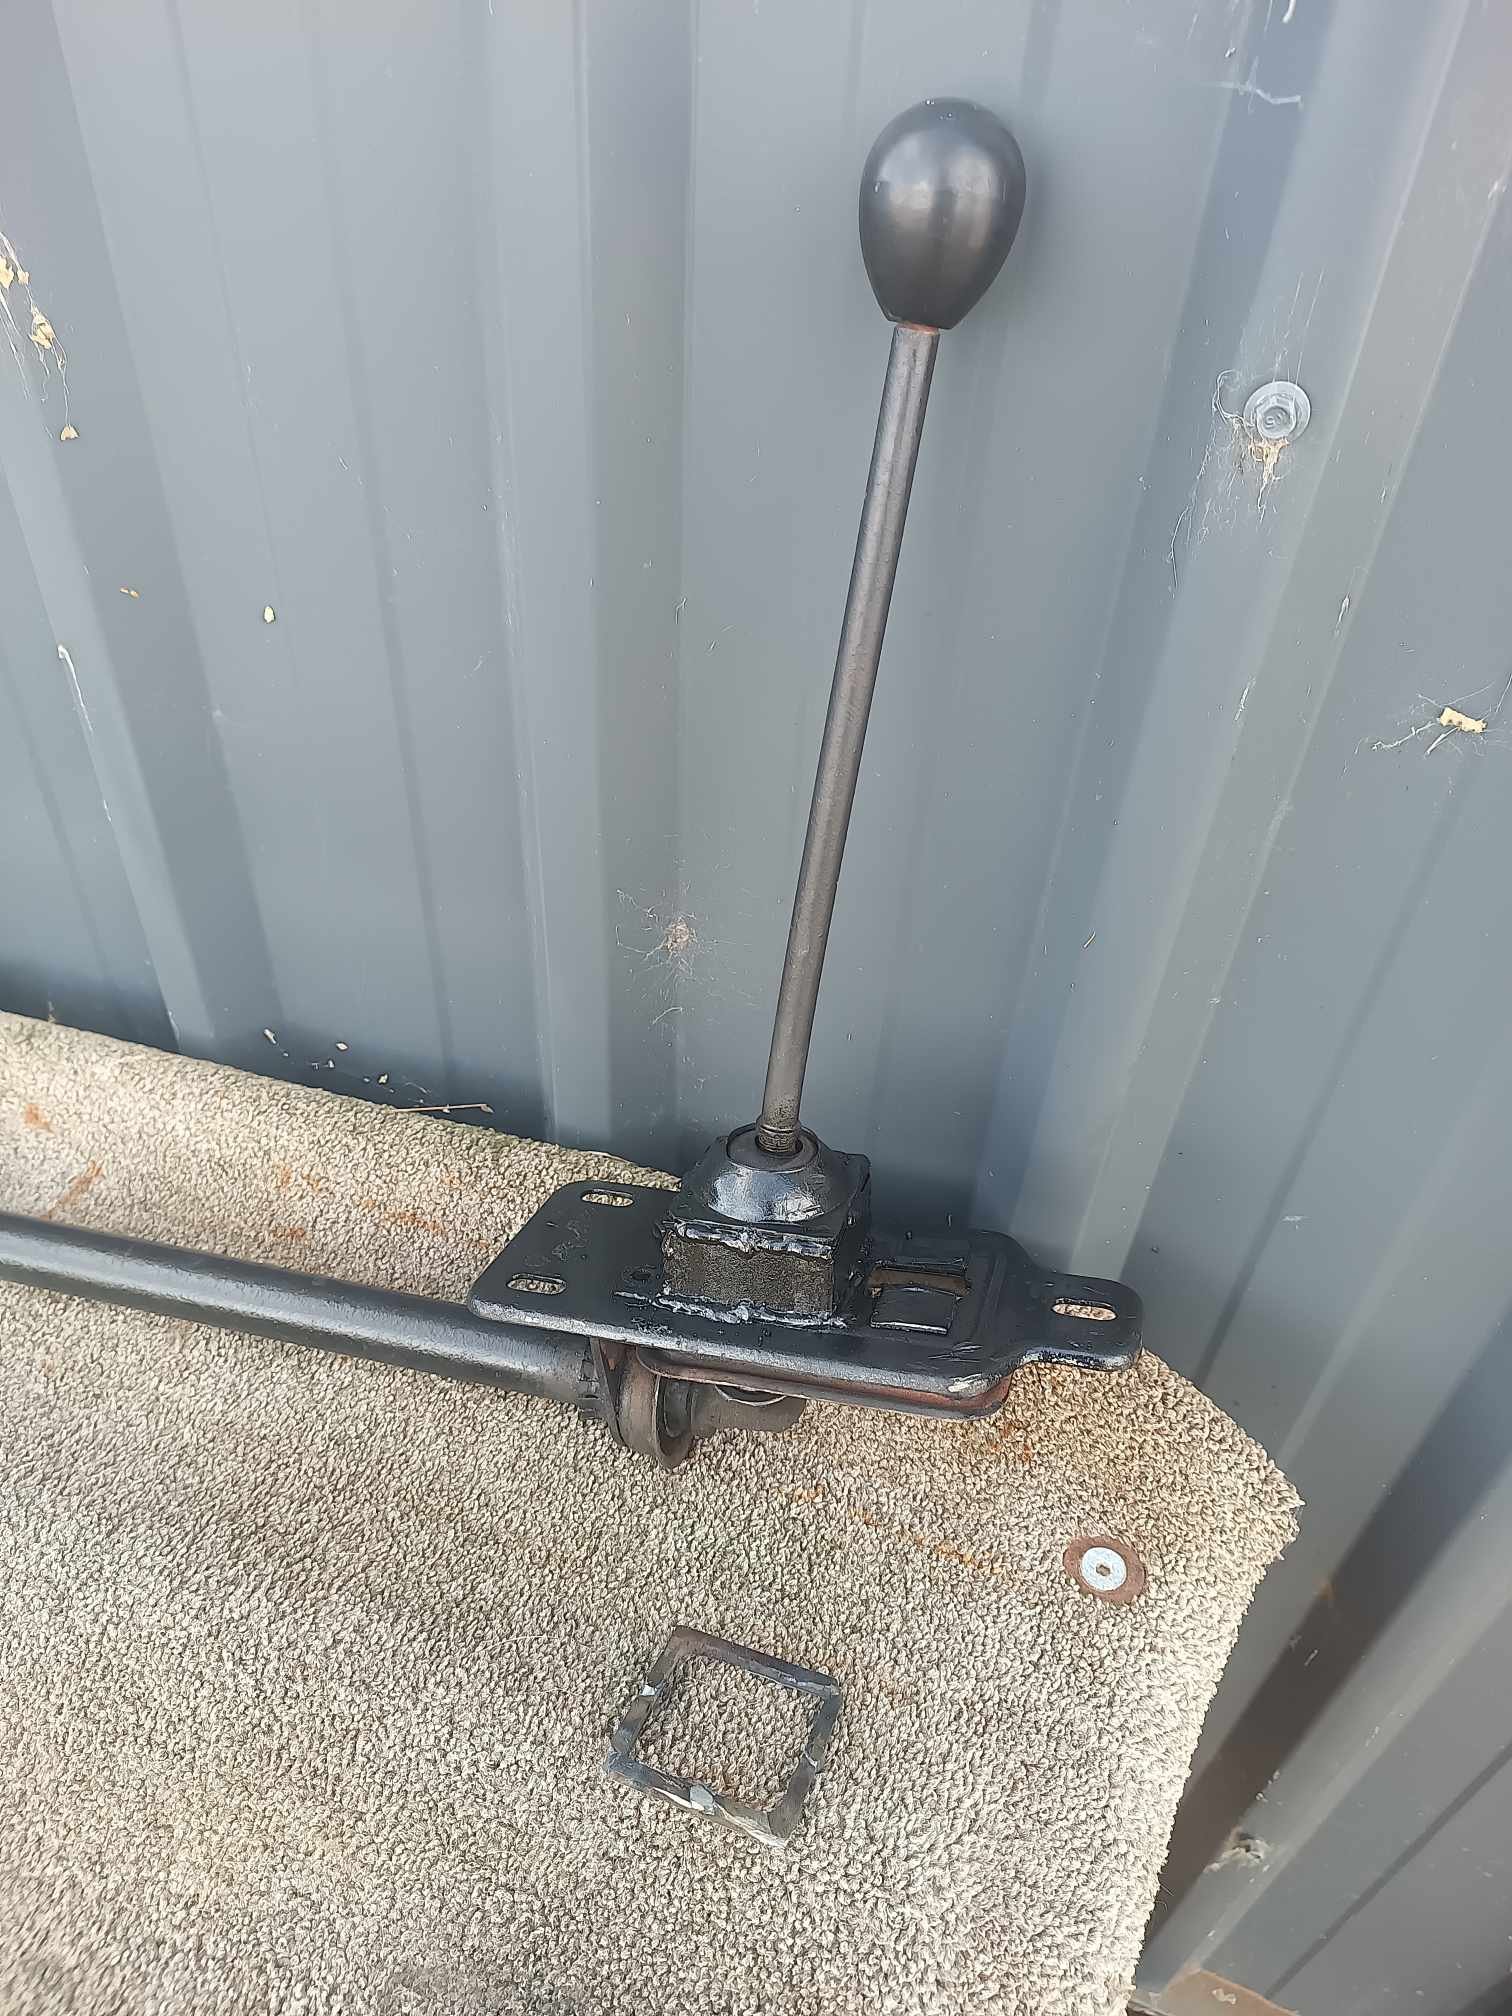
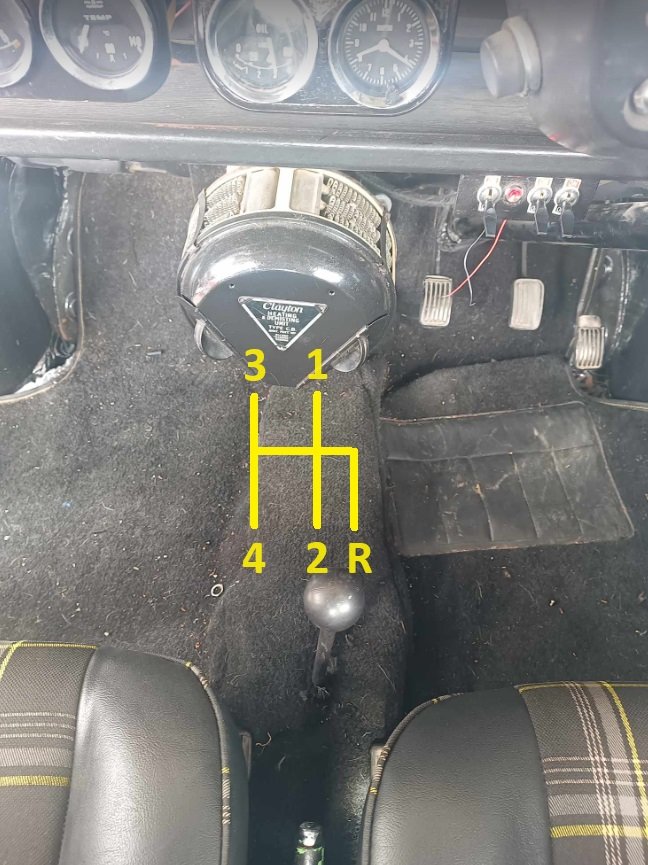
If anybody is going to call @yoeddynz a cunt then I'd appreciate it if you put the word rad in front of it. His embarrassingly lame MS paint drawing dumbing it down to my level worked and I now have a proper shift pattern. Happy days.
10 points
-
Got some paint on them and baked it with the heater for a while Good thing I have some photos from when I took it apart 7 years ago to refer back to for what goes where. Got one side done, looks better with the pipes painted I must say. Had to stop and tidy up the work area as we have a couple of house viewings tomorrow. I don't usually tidy up until either the stage of the project is finished, or I can't find what I need.
9 points
-
/spam
6 points
-
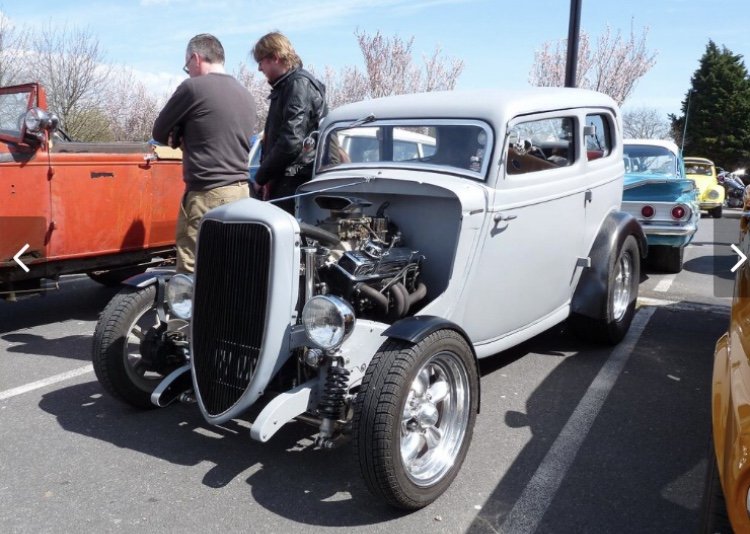
It’s been awhile since I built a hot rod. my last one was a ford pop that was chopped 3 inches and channelled 4 inches running a 302 Cleveland. i ran it in black primer for awhile and sold it to a guy in Aussie who painted and upholstered it.
6 points
-
Flights booked home, sigma may or may not make the journey. Place bets now4 points
-
@dmulallyjust wait until you see my knob...4 points
-
FIRST START! Turns out I'd bought a rotary thinking it was a 4AGE with the idle its currently got. Huge milestone and it doesnt make any metallic noises so thats a bonus. Its basically an unopened engine thats been sitting for god knows how long in some garage in Wellsford. Now has some extra bits bolted to it an a new ECU so Im surprised it did run okay for the 10 seconds it was on. Cant post a video unfortunately/ Now onto sorting everything else I've neglected. Theres a leak on the return line fuel fitting to sort, I probably need to extend a fuel hose down inside the tank so the fuel isnt aerating as it goes back into the tank. I need to track down the sick vacuum leak. Body side wiring to do, not all the gauge cluster works atm. Clutch fork retaining clips (due to some photo found, I did this already! woohoo), some oil in the gearbox is probably wise. Carpet seems to hide a multitude of sins...
3 points
-
So I started on the body. Did some CAD modeling, And then started hacking into 18mm ply, Then I took the old temporary seat and floor off, and made a new seat etc. I then started screwing everything together, And where it's at now, The back corners are meant to be rounded, but that's too hard for an amateur woodworker like myself. The floor and firewall will stay on the chassis, and the rest of the body will lift off. The bonnet and front mudguards will be the hardest part to do, but I have ideas, will find out soon if they will work. Oh and I decided to make it a BJ/FJ land cruiser (maybe it should be an EJ?) because the kids cousin has a Jeep already, and because I'm forcing them to like Toyotas, because not doing so would basically be child abuse. Regards, VG.3 points
-
So ages ago I got an old mobility scooter, with the intention of convert it into a mini Willy's jeep that my kids can blast around in. The donor vehicle was this beauty, in working condition but with no batts. I borrowed some old batteries from my BIL, but they were well past it, so had to invest in a good set, not sure on the range yet, but it will be decent with a couple of 50ah's in there. I then half assedly rearranged it to have a steering wheel from a ride on, and lowered the seat so the kids could drive it. I also fitted a foot pedal accelerator. It was like this for more than a year or so I guess. Then recently I decided I better actually work on making it into the jeep it was meant to be, before the kids get too old. So I did quite a bit of chassis modification to get the batteries back a bit (mainly so there's room for my feet to fit in) I also fitted new black tyres, as the old fronts were rooted. I then widened the front track 80mm to match the rear, not sure why they made the front skinnier to begin with tbh. Then I started work on repositioning the steering to one side. I used bearings and pressed steel housing I already had, and got a couple of sprockets to reduce the steering speed by half, to make it a bit easier to turn with the smaller steering wheel. The center hub slides to tension the chain. The shitty pressed steel housings didn't like having the leverage of the long steering shaft on them, and bent, so I machined up a hub to replace them, it's mint as now. I then whipped up a crappy temporary floor and seat (not finished in pic) so the kids can drive it while I build the body, which is the next mission. Regards, VG.2 points
-
Made it home. Heater tap was the culprit. When I turned it to cold it stopped leaking. Fixed?
2 points
-
Autopilot stuff. Gave it a lot of thought and decided that the main use I have for an autopilot is keeping us vaguely on course in light winds while I go make a cup of tea or steer the boat with the engine on which is boring if you have to do it for more than 5 minutes. The fancy expensive autopilots can be trusted to probably not kill you if you go down below to get some sleep while sailing through the night across the middle of the Atlantic. They react to wind gusts better and manage rolling nasty sea states under sail without getting confused as easily. Even then, some of the long distance sailors just carry 2 or 3 of the crappy cheap ones and throw them over the side when they stop working. Since I don't plan on doing long passages - and in challenging conditions I'd rather be steering myself or have another meat bag driving....I bought a cheap crappy autopilot second hand. The big brother to the one on Nice Try - the Raymarine ST2000+ Principle of operation is simple. The built in compass keeps track of your heading. When activated, it tries to maintain that heading by extending or retracting the ram to move the tiller and turn the boat. The bigger the boat, the more force you might need to use so the gruntier the autopilot needs to be. The ST2000 has a brass recirculating ball drive for the ram rather than a plastic nut on an acme screw as found on the ST1000. It also seems to have some bigger fets driving a slightly bigger motor? Not quite an apples to apples comparison since the ST1000 I have is from 1999 and the ST2000 is from 2012. Still rips my undies how simple these things are inside. Autohelm designs it then Raytheon buys them out and milks the design for a few decades. Minimal changes in nearly 30 years of production. No limit switches or position feedback. No conformal coatings on the board, glass reinforcement in the plastic or silastic schmoo on the connectors. AvE would be disgusted. Will install it maybe next week and see how it goes.2 points
-
Registered and paid. Keen to meet Ham again.2 points
-
Hopefully turn it into something like this.
2 points
-
Reminder for myself next time I wonder why it is taking off so slowly.
2 points
-
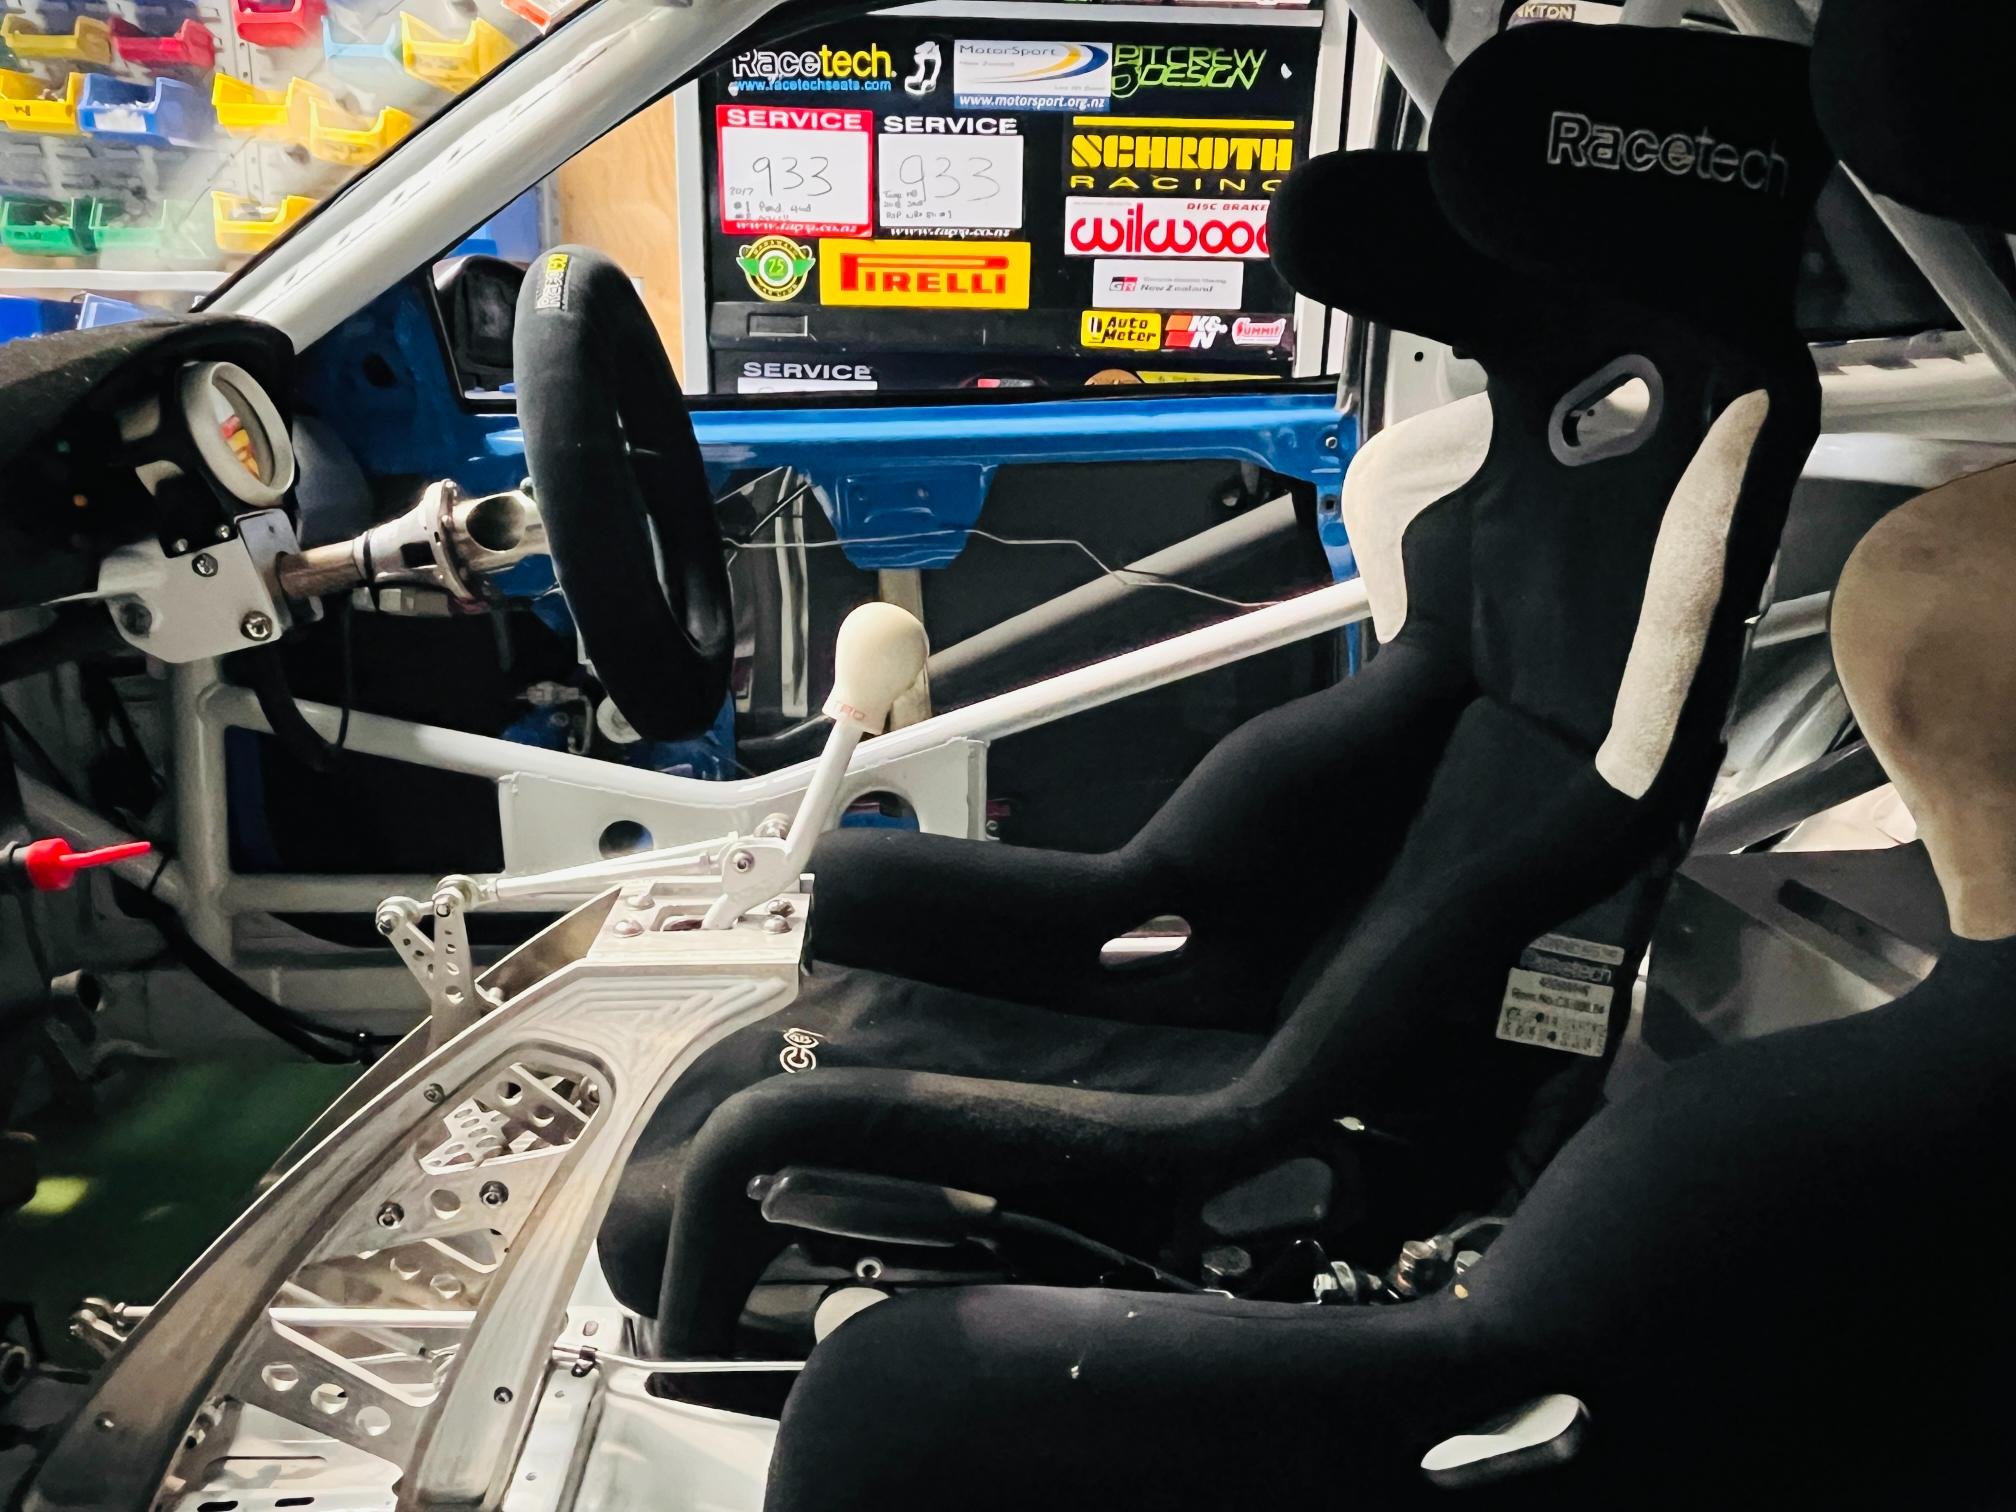
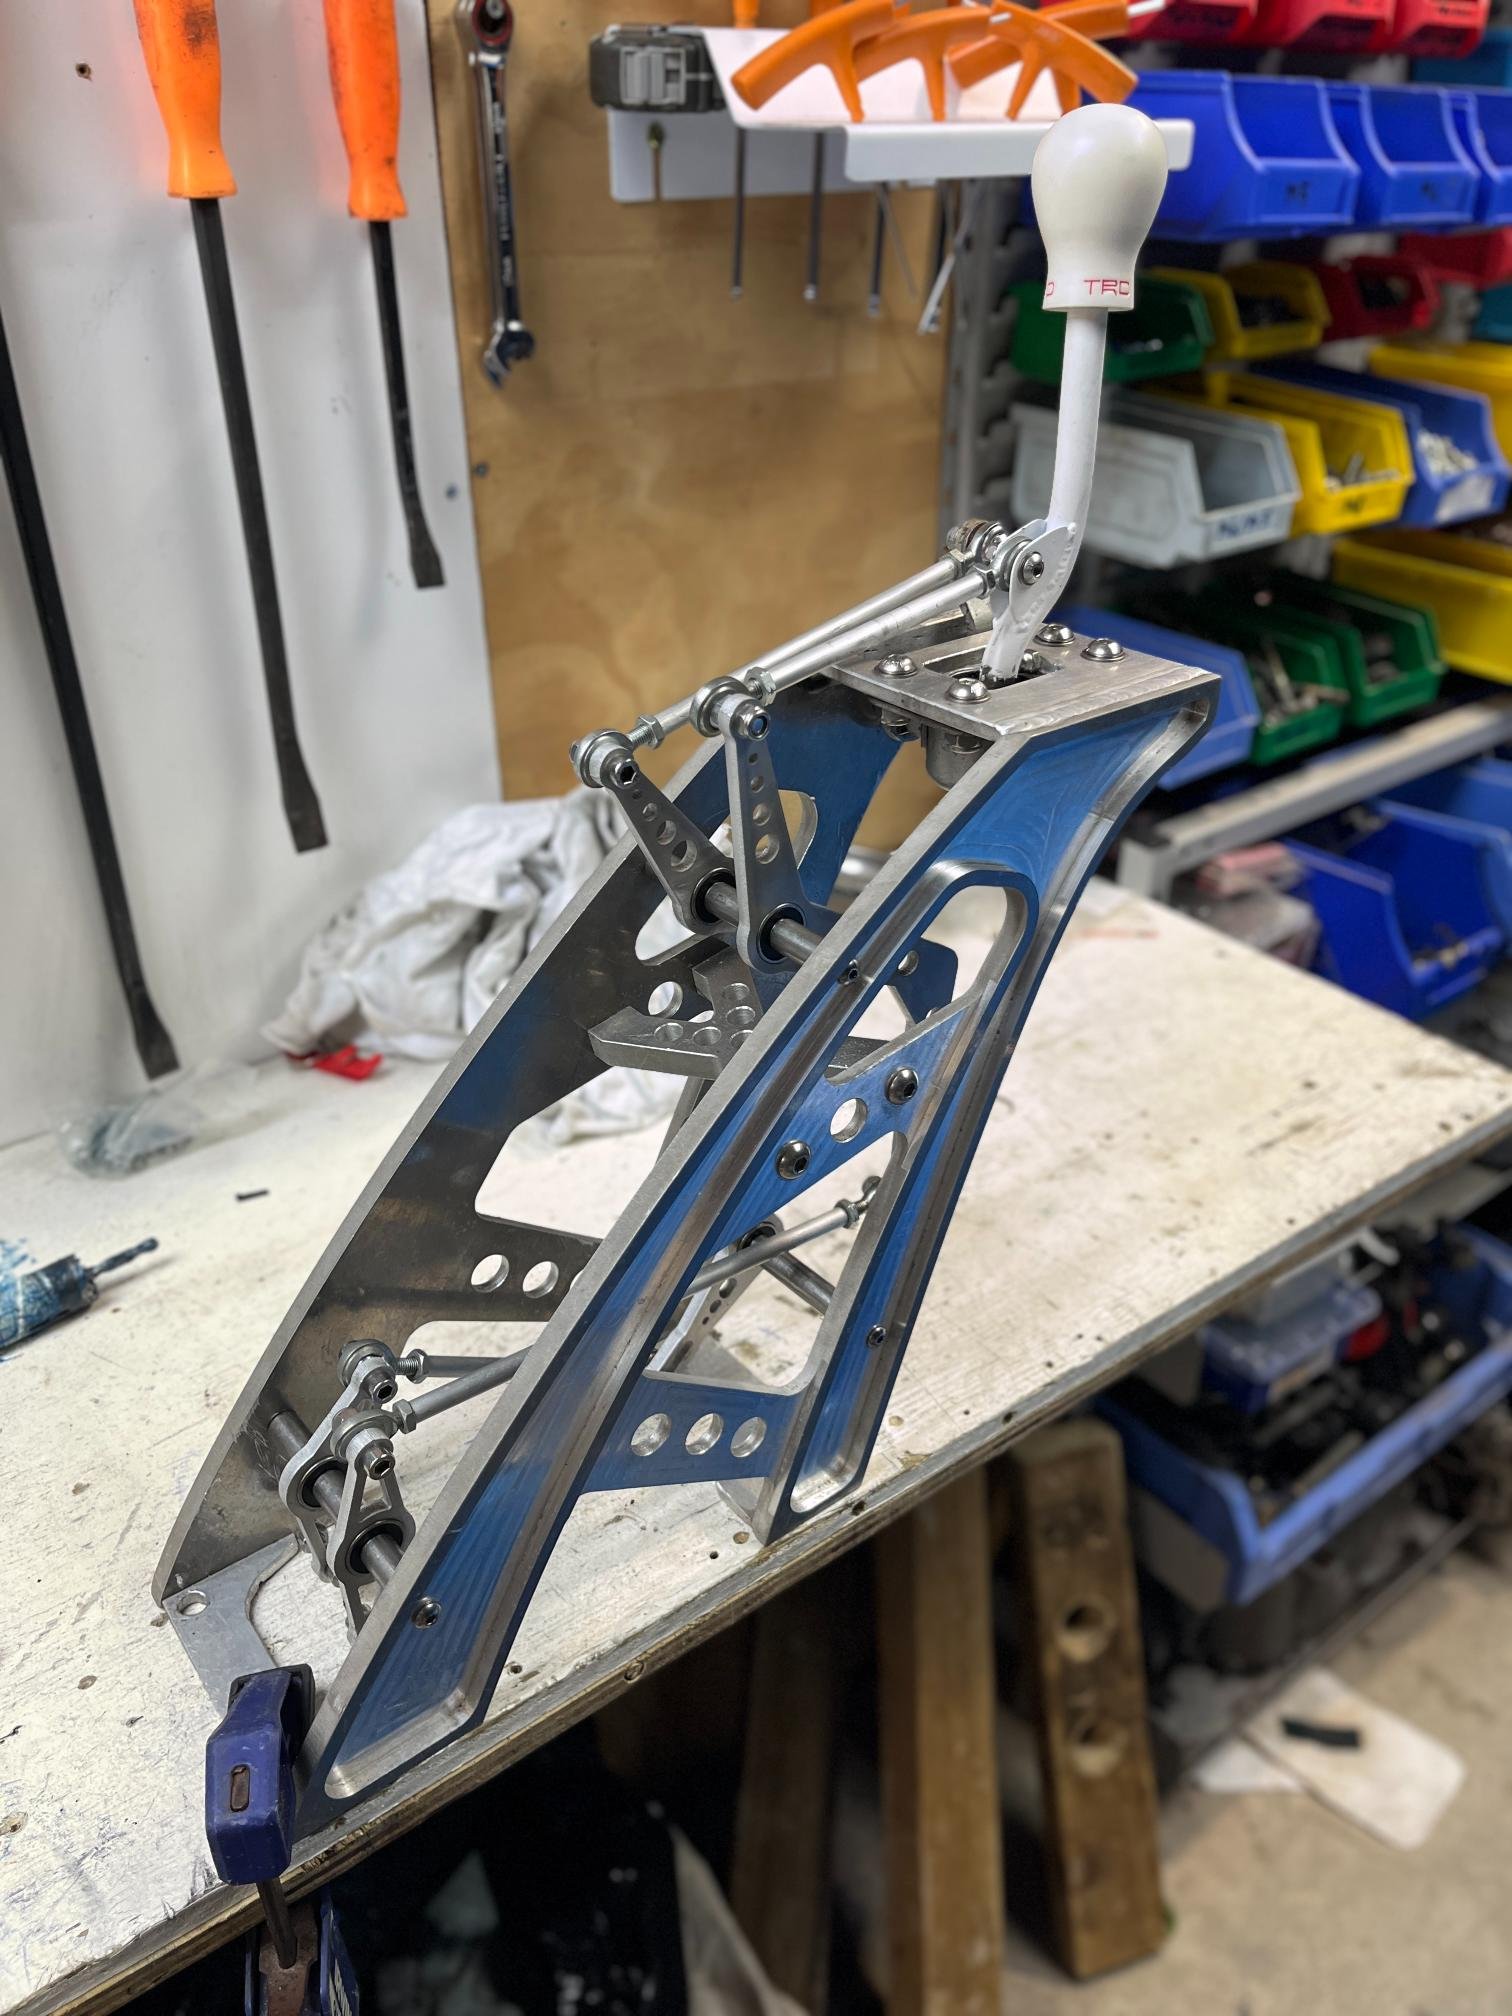
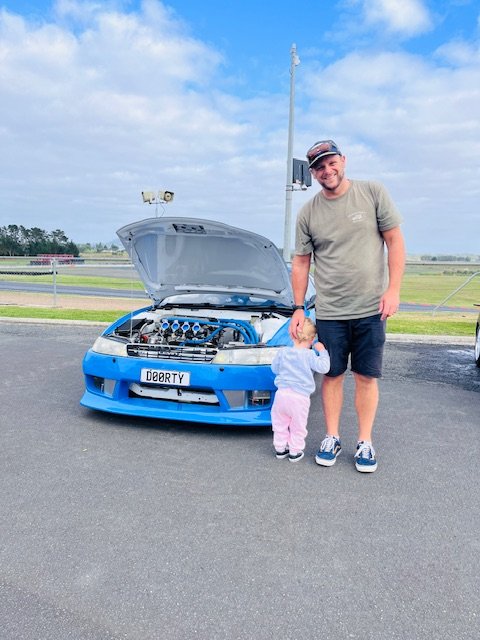
Lots of finishing details taking lots of effort with this project. Stuff that's been sitting on the shelf 'finished' for a few years always needs adjustments or I need to remember how it was supposed to be installed... Final adjustments made to the gear shifter. Locked skateboard bearings in place with Loctite (they are a gentle press fit). Also replaced axle seals and got driveshafts in place. Gearbox is ready to roll once I add some oil... Polished up the headlights finally. Look great, but could be better still. Repainted mirrors in repco 'trim black'. Turned out great! Decided to paint gurney flap black as well. Not sold on it but unsure what other options would look any good? Also, its amazing to see how unlike this car looks like a factory Levin... Dropping a car 4" will do that! Pulled the front apart to do final welds on headlight frames. All comes apart in less than 30mins which is great. Wasn't stoked to need to remove radiator again though (it's a bitch of a job!) And because I hate AN fittings & braided hose.... I sourced some Continental heater hose for breathers (not rated for oil but is no pressure and has 150deg C temp rating so should be fine). Bonus that it comes in almost an exact colour match to my car. Still one more hose end to fabricate for the final breather. 2zz has an obscene amount of breather ports so why not use them all!? Less crank pressure = more power. Last night Drew popped around to do a final measure up on engine loom. Added a few things and adjusted the factory loom to suit. He also brought some goodies with him. This is probably the biggest financial piece of the puzzle left so happy to make this step. Assembling the car and touching things up for Toyotafest at Hampton this saturday. Entered show in 'under construction' category. It's bittersweet because it feels good to finally have something worth showing/sharing with people for my 10+yrs of effort, but still so much work in the finishing touches. Next year I'll be driving it!!
2 points
-
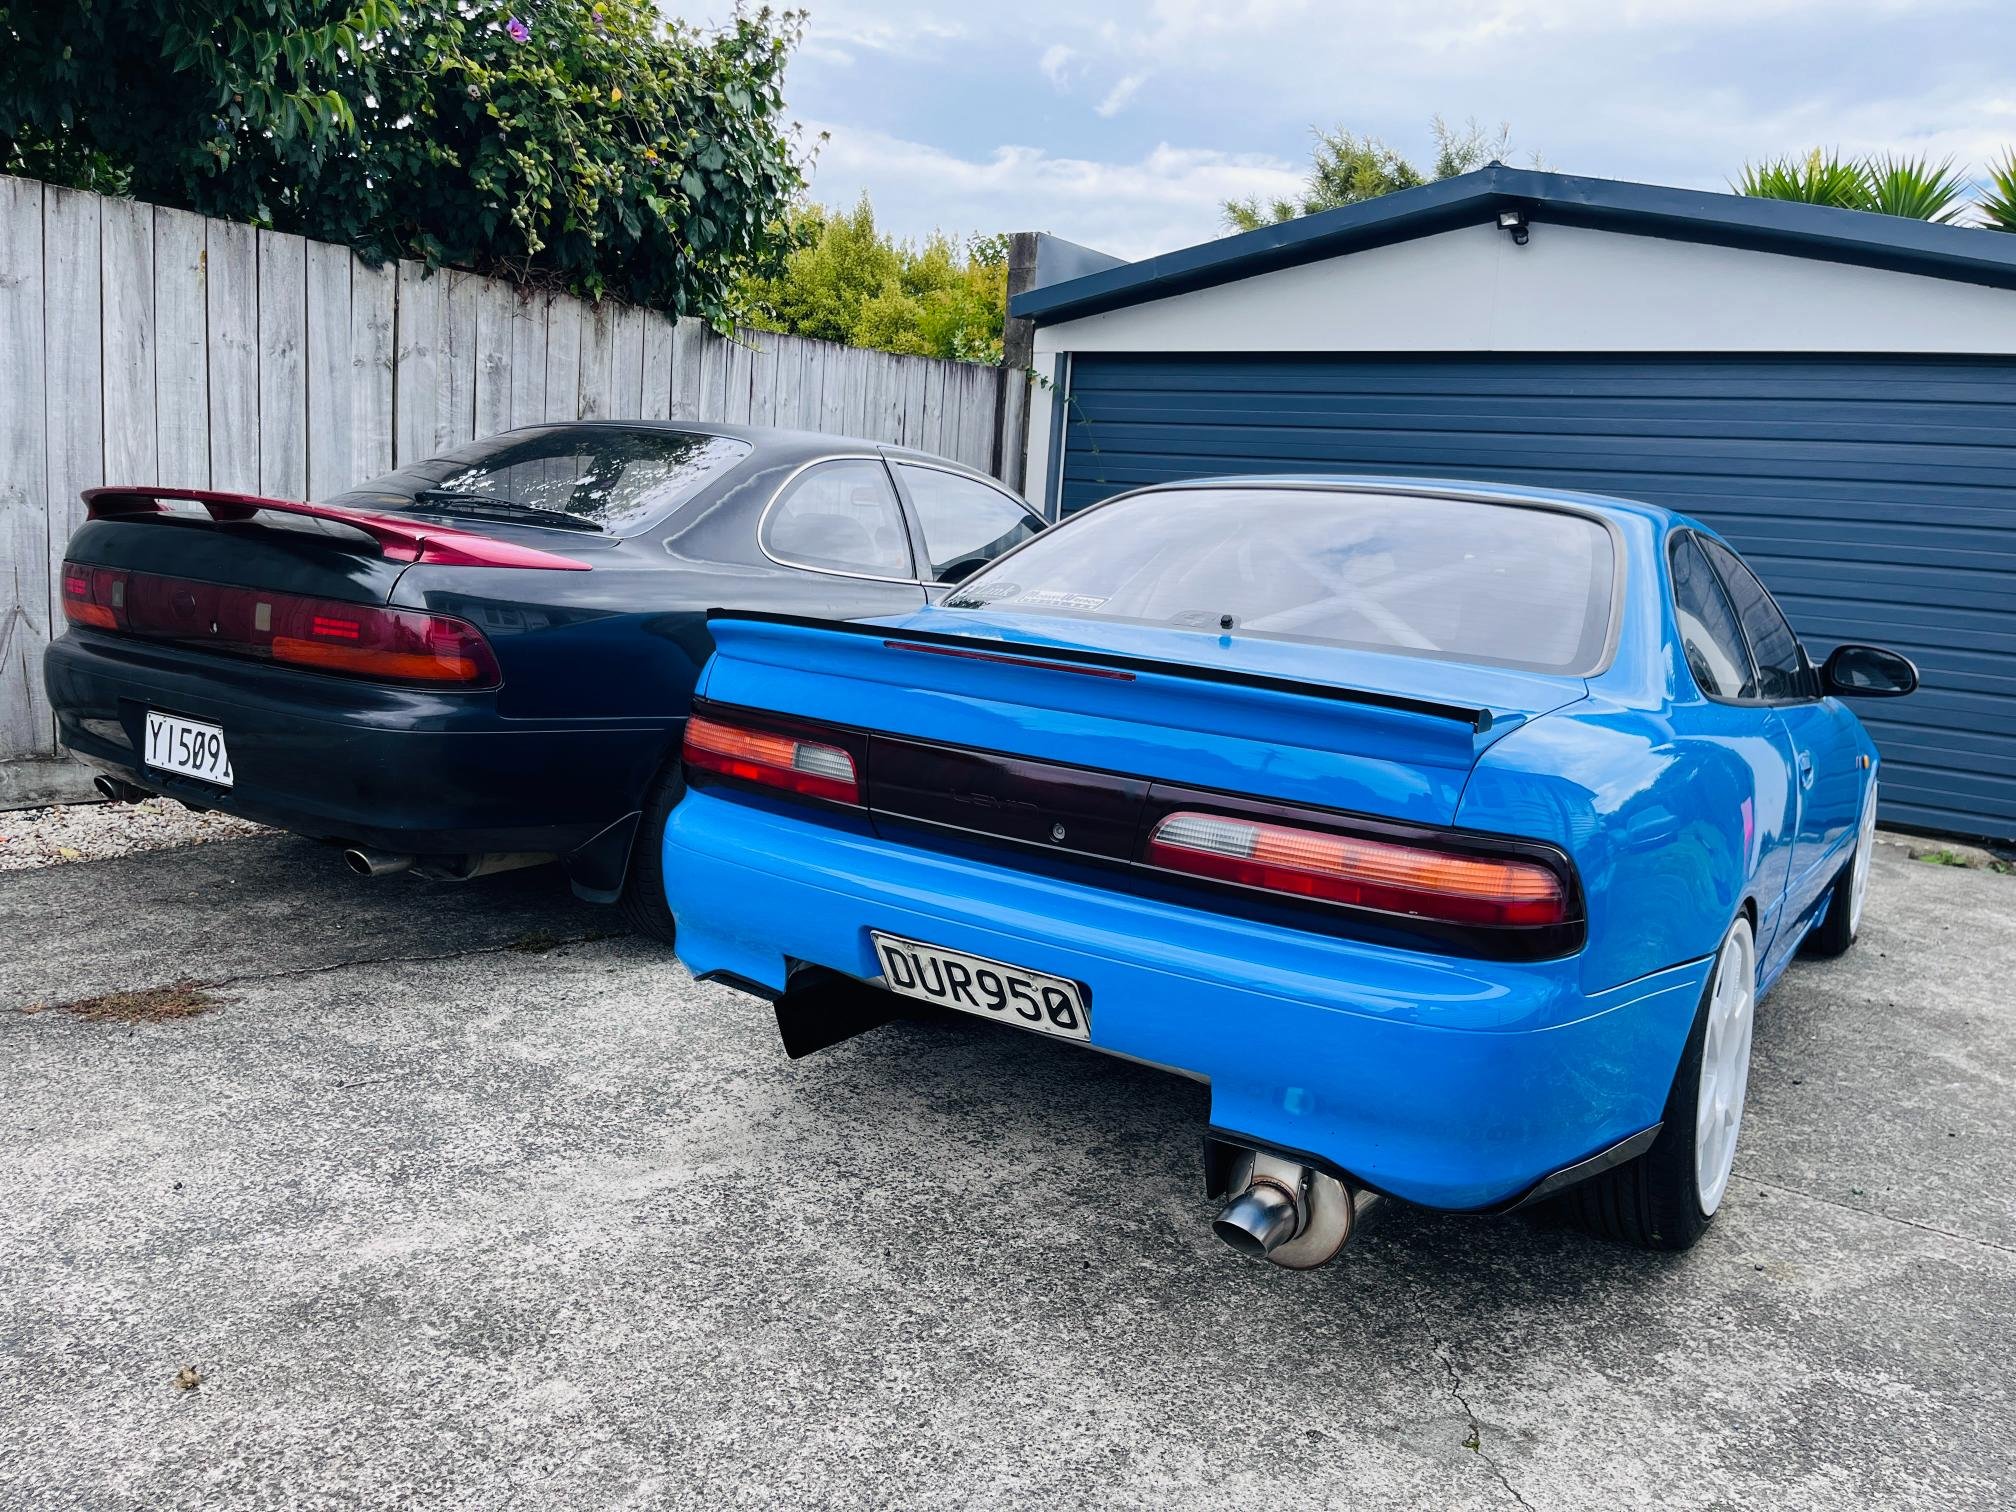
I've always loved Kei cars, but when my partner and I were in Japan earlier this year it was basically decided that we had to get one. So when we were able to come up with an excuse to get rid of the Leaf, we pounced. And hey it may be our new daily, but there's no reason it can't be a fun daily, right? Introducing our freshly imported 2019 Suzuki Alto Works. It's the HA36S chassis, FWD, manual transmission, and the previous owner was nice enough to kit it out with some KYB springs and shocks, an aftermarket muffler (perfect level of bubbly I3 noises), and classic-style enkei wheels (though the OEM wheels are also enkei, and I'd probably have chosen a different style, but they're growing on me). Also growing on me are the leather seat covers, front and back, which must have been made specifically because they perfectly wrap the stock recaros and rear bench. There's some stuff to do. First thing we did was give it a thorough clean, the sea journey really does a number to it, we still have to do a bit of a polish because there's some deeply ingrained gunk in there. But it came up pretty nice with a quick soak and the car's paint is immaculate. The japanese owner had some some other random stuff too, like hack apart the console for his stereo (which he then kept when he sold the car and blanked it out). I've got a new stereo to put in that should effectively hide the edges. He also put a random button in (also seen in shot) that turns on some footwell lights. Not really sure why. Also a bunch of bits of padding in the door and boot jams, I guess to stop rattles or something... clearly it works because the only significant noise in the car is the exhaust note. More frustratingly, he debadged the car. I snaffled a new boot logo from Japan, and managed to wrangle the part numbers for the awesome side decals, but they'll cost $800 to get here so will probably hit someone up locally to reproduce them. Compliance gave it new brake pads and wipers and I did the rest of the service - replaced oil and filter, new air filter, new cabin filter, replaced the coolant (old stuff was just water so happy about that), and now that I know where the fill plug is I'll replace the transmission fluid. I also have some new plugs that I'll get around to putting in. Better safe than sorry. The oil looked nice and see through and the filters were lightly used, it's a 122kkm car but has been well looked after. Tiny filter! The little thing can really go despite having a 660cc turbocharged engine. It's limited to 64kW by law but with only 690kg, decent torque and some amazing handling it can really get out of its way in a hurry - and sound great doing so. We've owned it for a week now and turn heads everywhere we go, it's funny seeing people merge in behind us to try and figure out what the hell we're driving (good luck without that works logo on the boot) or how they got chopped by a shopping trolley going up Hayward's. One of the cool things about this car being a modern enthusiast car is that it's pretty big in Japan. They've got accessories and mods flowing out of the stores over there and it's an awesome change from having to deal with the Starion or even the MX-5. The cars we worship are yesterday's news over in Japan, so it's fun to be near the cutting edge of what's hip. Plans for the future: - We've already ordered a huge wing for it ;3 - LSD - Upgraded turbo, wastegate, intercooler and intake system - Tuned ECU - Sweet stereo system - Dashcam (have installed a decent front+rear one already but didn't take pix) Napkin maths says with all of the above this thing will have a better power to weight ratio than most sports cars... but the Starion takes priority, uh, mostly... for now.1 point
-
The HB Viva went to a new home and have this new project arriving next week
1 point
-
Stand down osgc couriers. It’s small enough to put in an envelope for NZ Post haha1 point
-
Sure, who needs a heater.1 point
-
More chamce of the ferry fucking out tbh. Do you have room for a Lawnmower catcher from VG @MaxPower?1 point
-
I suppose I should show my face, as it’s in my hood.1 point
-
I got the viva all ready to run through final compliance and a hot Rodder friend offered me a couple of old ford Ys at the same time and I’ve always wanted to build another hot rod so had to make a decision. The vivas gone to a great home so made the sale a lot easier for me. I need to learn how to chop a roof and am excited for the challenge.1 point
-
wow, massive chub forming for this. in the words of sumpson, registered like a sex offender. hey @DoBro Jesus me and markku would be very keen on enquiring if any of the wounders fleet would be available to make this a more interesting trip. you can ask Als mum for a reference on how i treat other dudes rides1 point
-
I tagged everyone who voted yes. The relentless badgering of everyone else will commence shortly.1 point
-
@MightyJoe @yoeddynz @smokin'joe @Chris.QCR @Hannah @Willdat? @Truenotch @Valiant @ajg193 @Sungai Sungai @DRAD1Stylez @EpochNZ @sidewaysickness @datto_610 @igor @SwayBlack @NickJ @nzstato @azzar @Mof @Leone @yetchh @giddaymate @dr.wylde The entry form is up, i beseech ye all to fill in the entry form, and pay the man. Luv you long time1 point
-
But then I got it out of the shed!
1 point
-
Technically I’m only a part time menace1 point
-
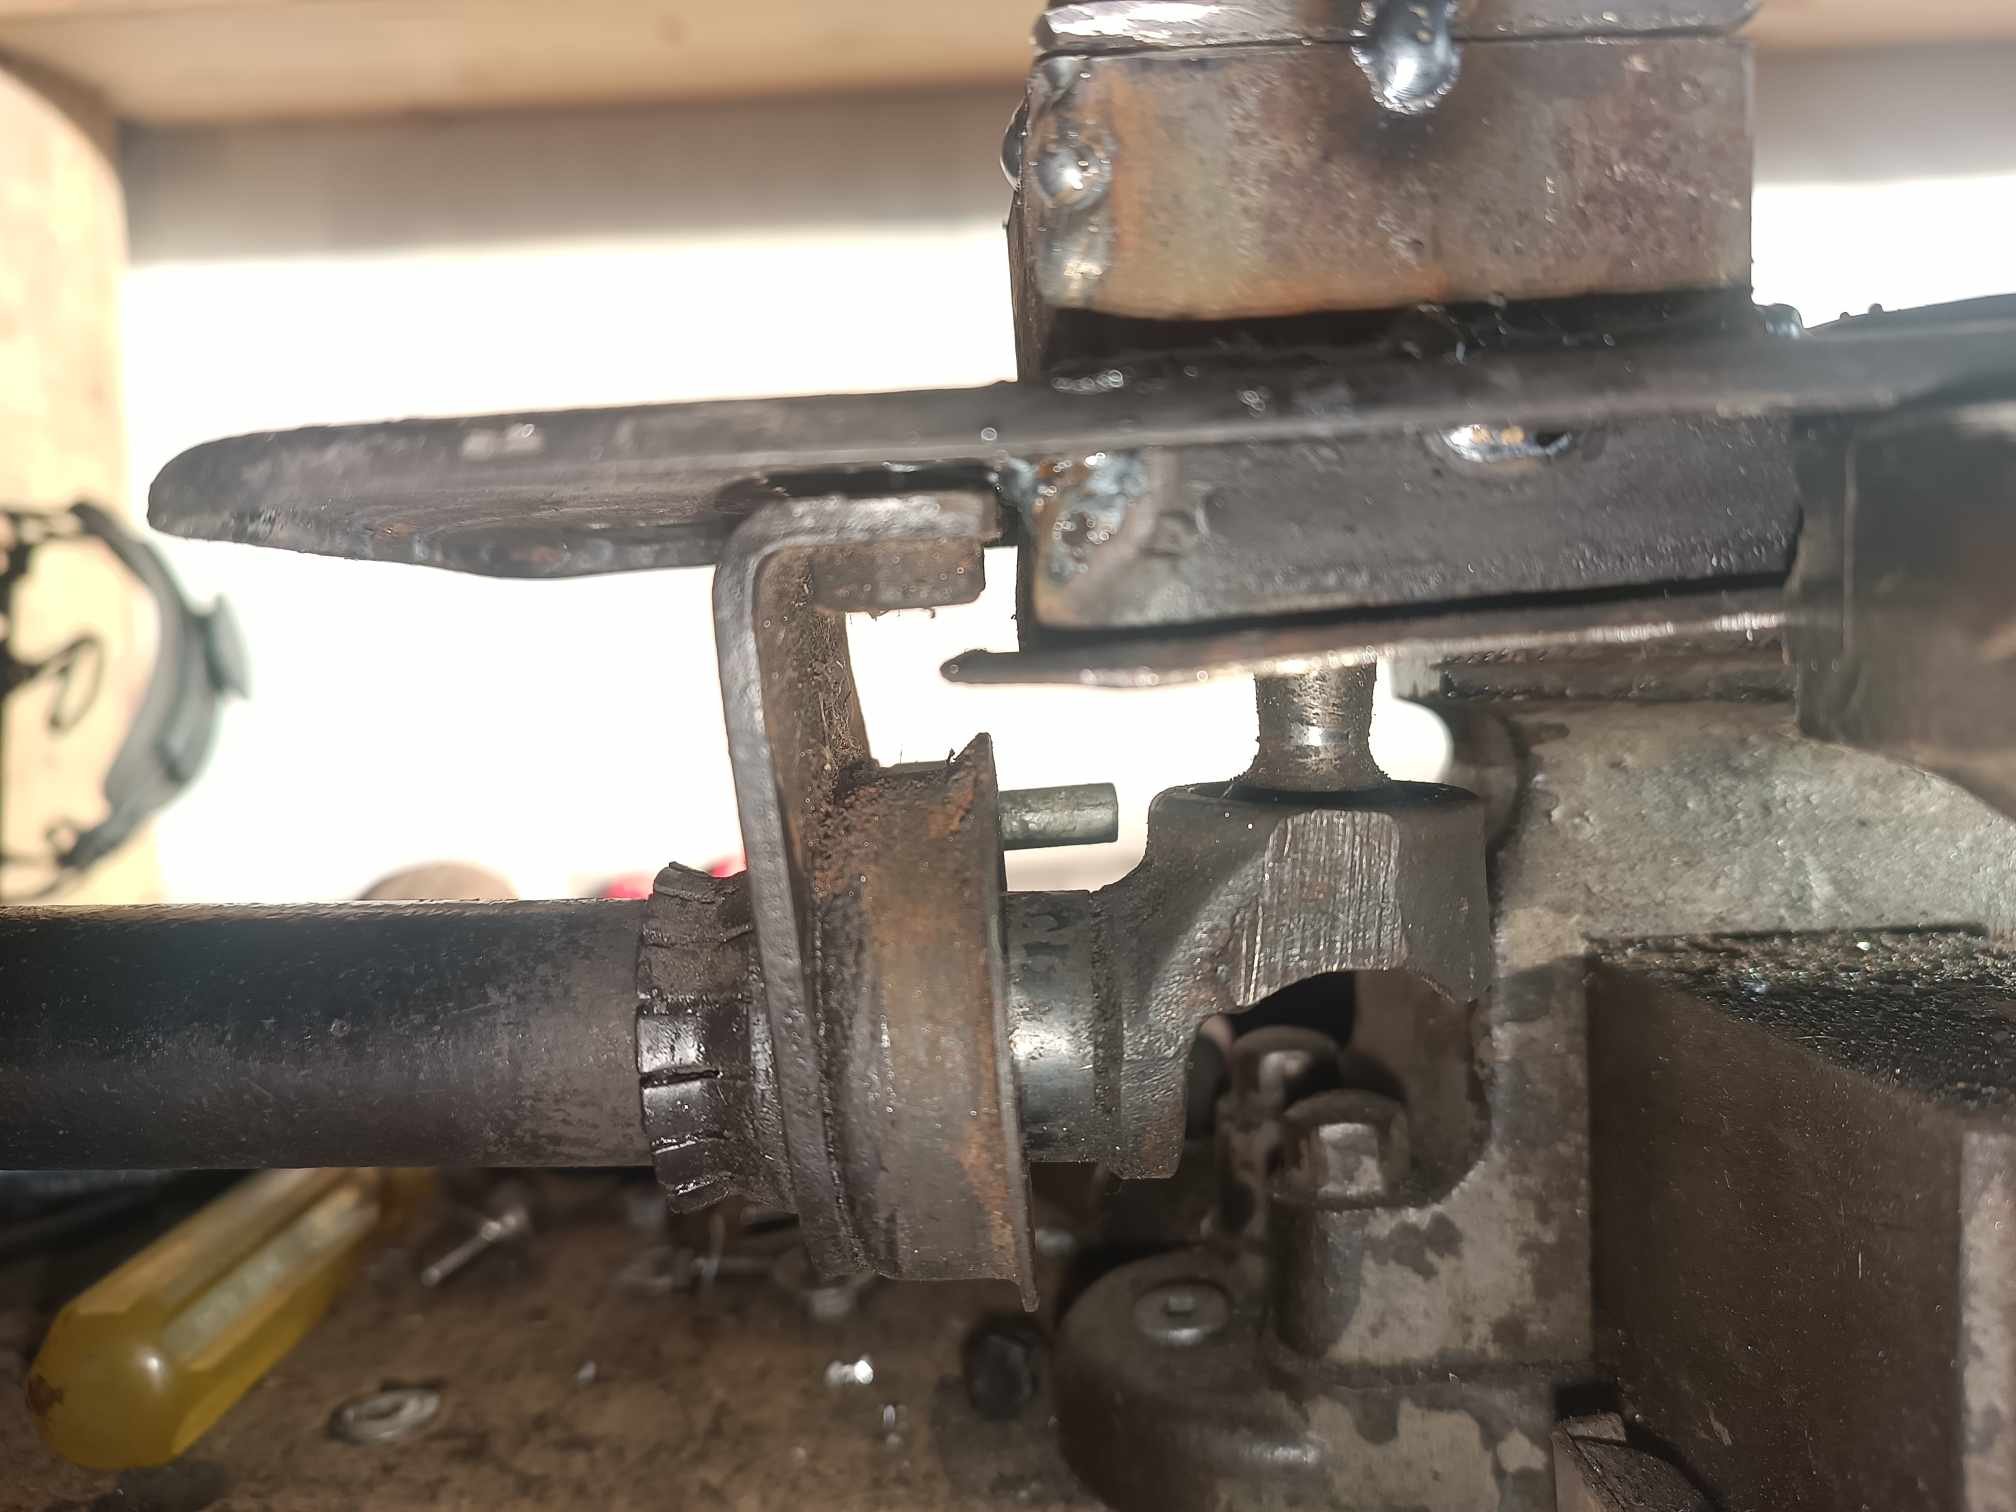
I gave the new lever an absolute hiding with a file. Took if from ~10mm thick to <6mm. I also machined up a bush from an old bolt. It looks like it will fit now, but not properly tested. I've also: straightened and painted the rear rack Waterblasted the cover and put a seat back together for the time being Painted the front end and started to re-assemble that Changed the oil Installed the chain and cover Re-registered it Hoping to finish assembly and fire it up tonight!
1 point
-
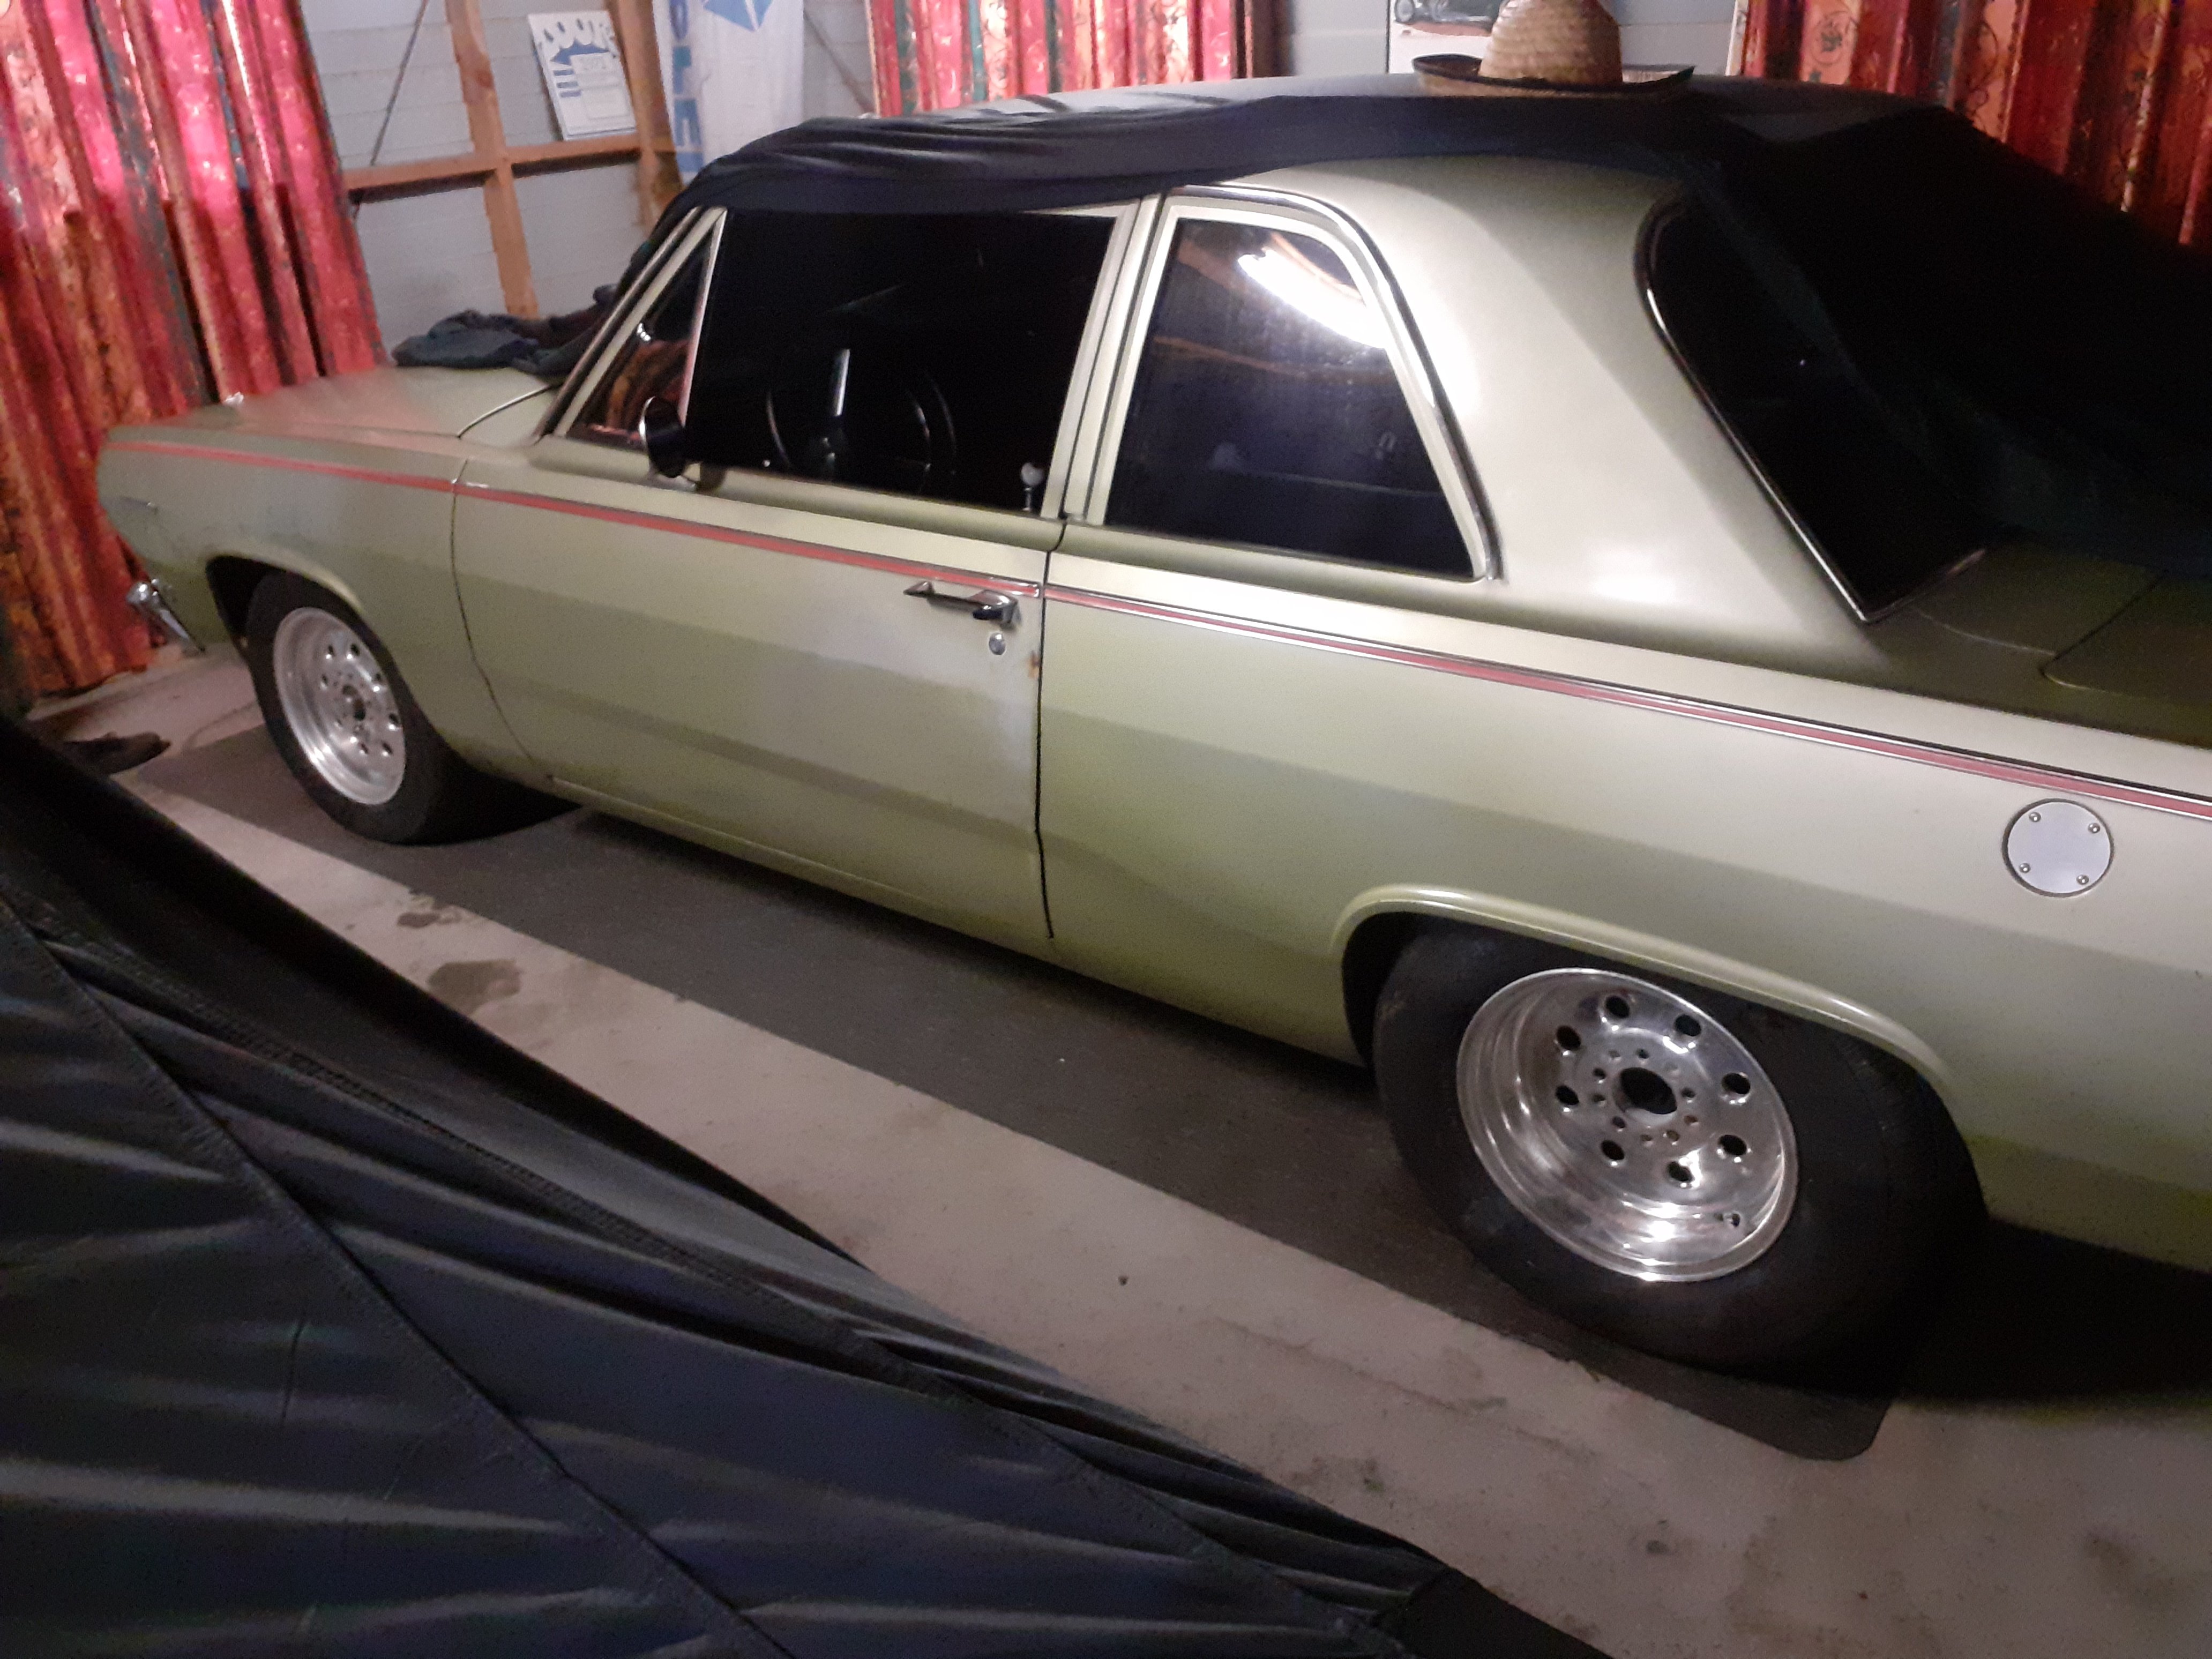
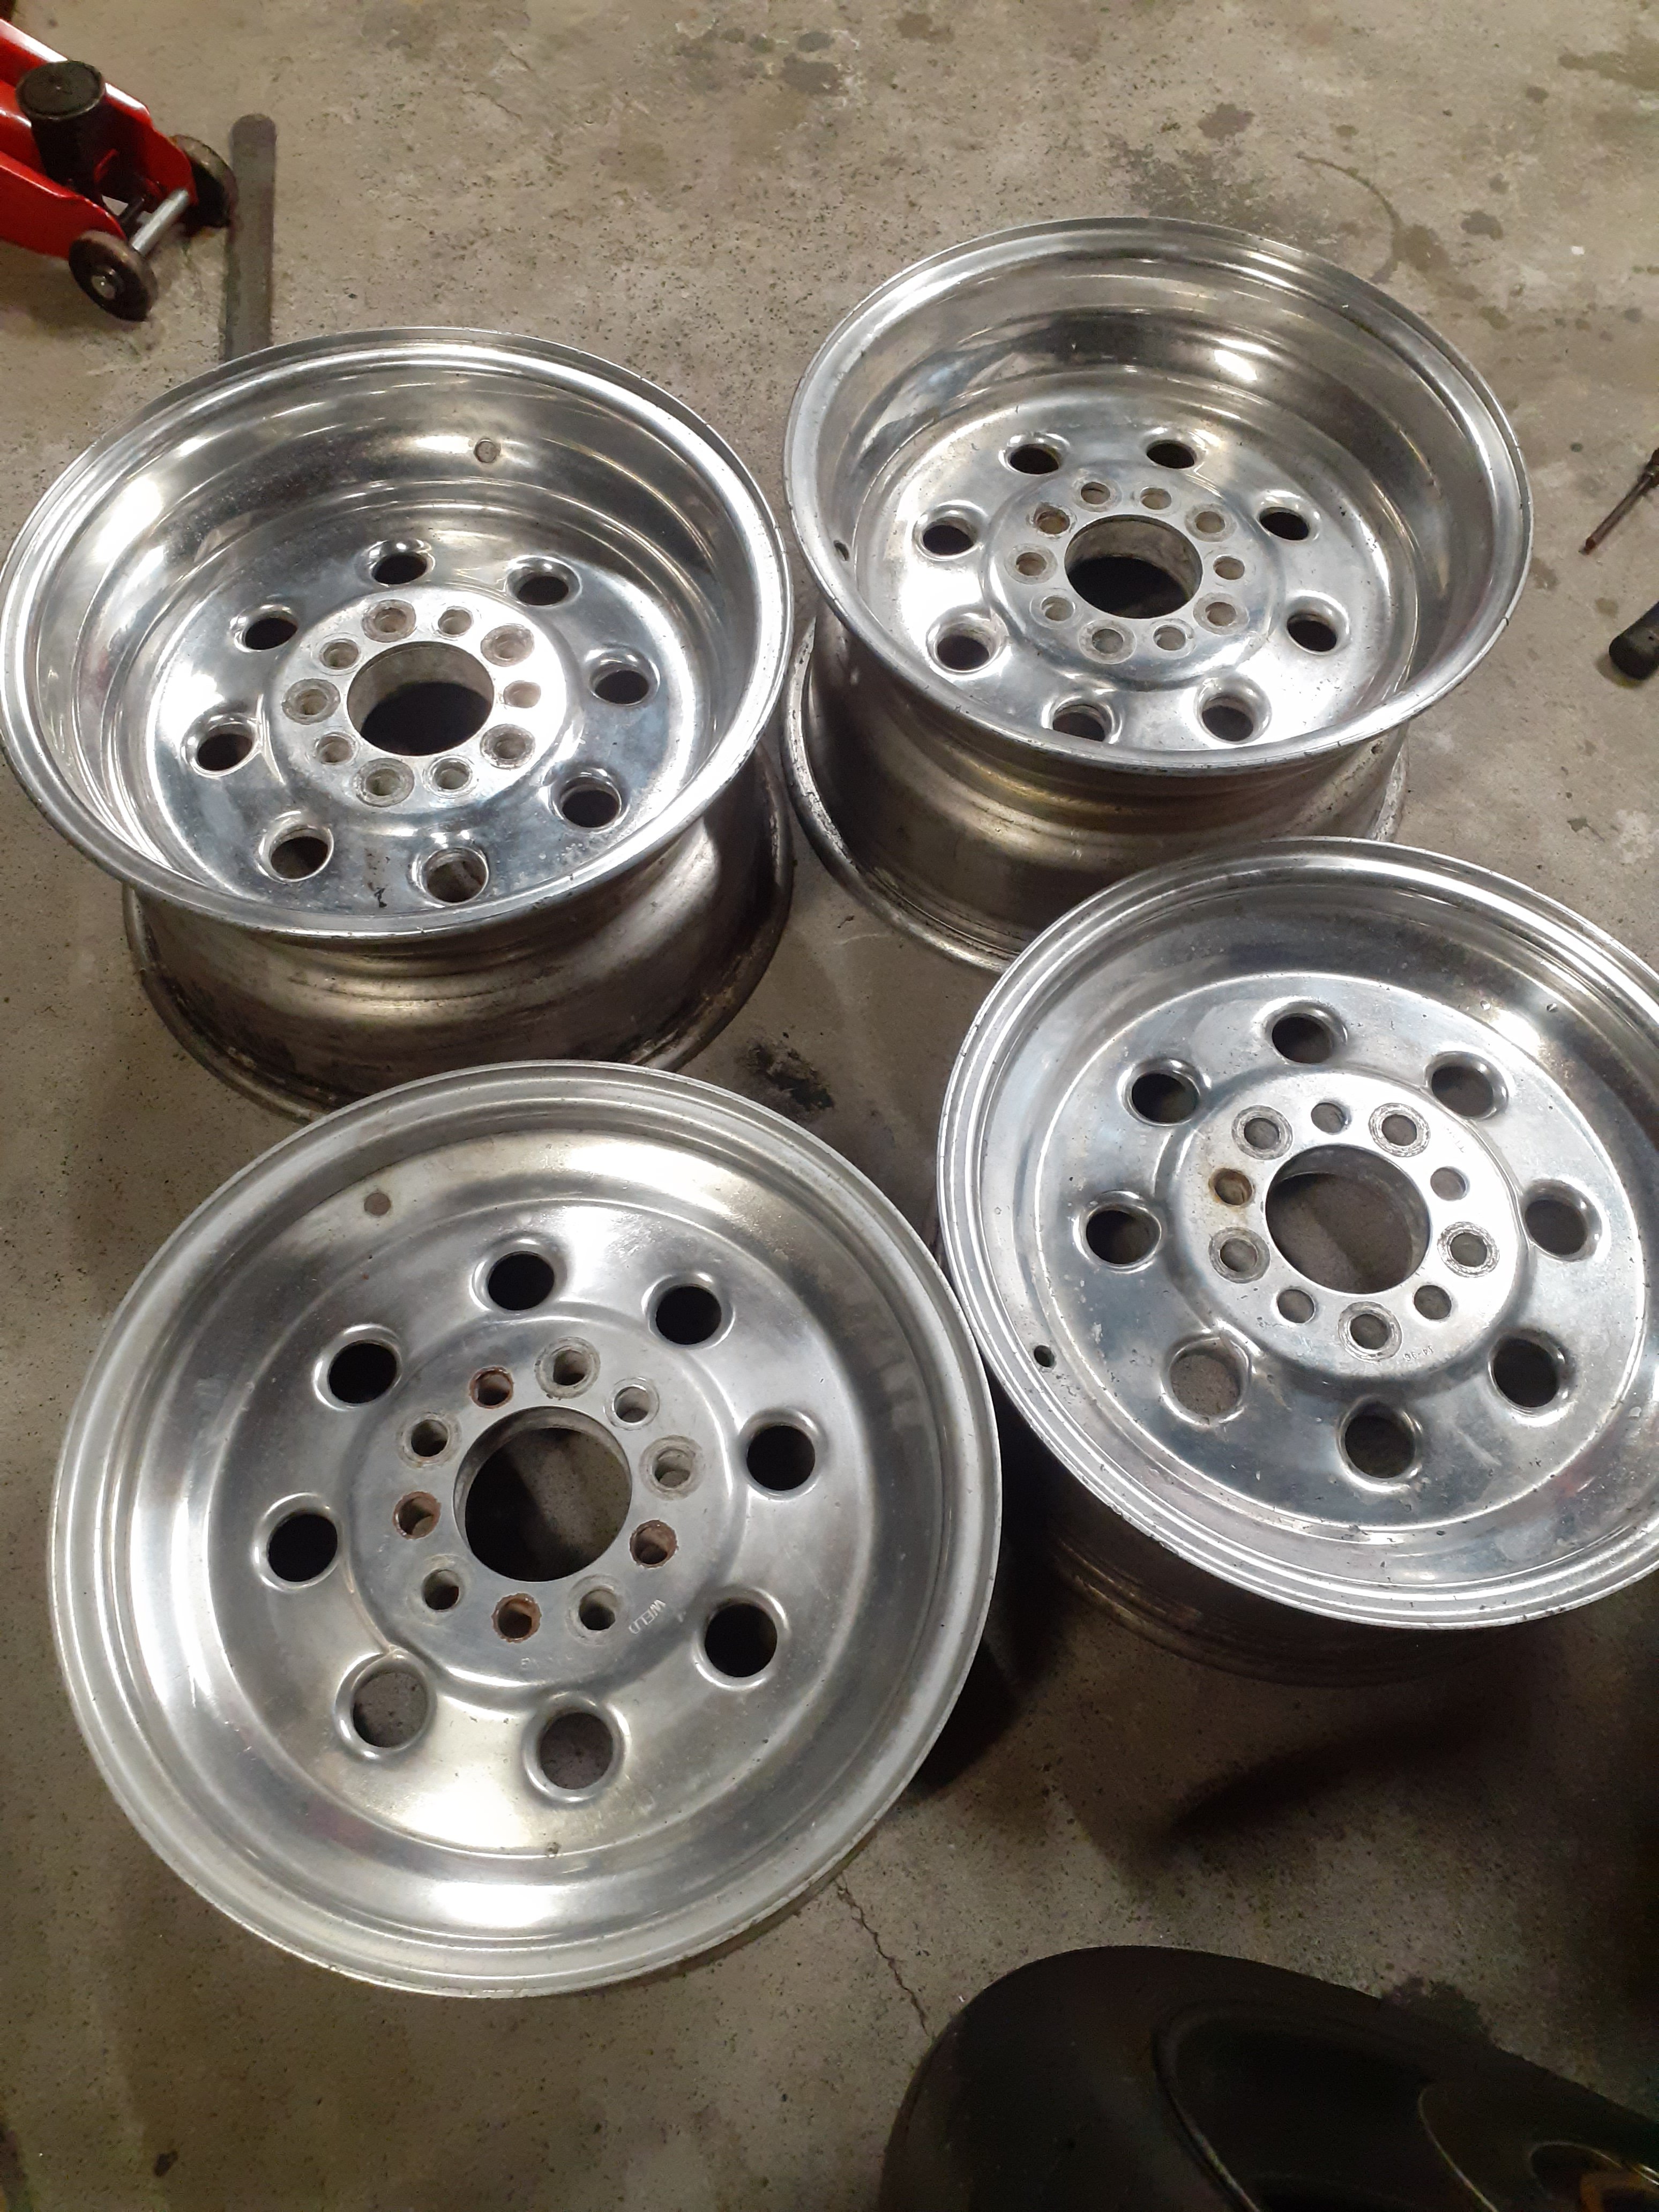
The steel wheels on it are very heavy. When it did its quickest time it had some very light cragar super tricks on the front. They were popular in the 70s but the internet reckons there's not many around these days because they were prone to failure. I bought them ages ago from a guy who took them off his car because they made creaking noises when doing tight turns, they were very cheap. They weigh as much as a bag of chips and are a bit sketchy, also the tyres were right on the limit speed rating and load rating wise. Plus I had to run a 5mm spacer which I did not like. I only did 2x passes with them on and didn't like it So I've had my eye out for a second set of wheels suitable for drag racing Being an impressionable teenager in the 90s who read street machine magazine a lot I've always wanted a set of weld draglites. They don't come up often second hand, I found a set a while ago but they were not wide enough. You can still buy them new but they are pricey Picked these up today, 15x5 and 15x8. Tried them on then got the tyres off, they are very fucked. They need a polish but should tidy up well Anybody know a good polishing place in south auckland?
1 point
-
After much head scratching and thinking about the radiator situation I listened to Koro @sheepers and just got a radiator that fits. Using the telstar rad as a template as its the perfect size I went down a rabbit hole of radiator websites to look up dimensions, turns out the perfect fit while fitting the criteria of cooling a forced induction 2L engine is a EVO 1-3 unit but i wasnt going to drop $500 on a brand new one incase it wasnt going to fit so haggled a deal on marketplace for this Fenix unit with electric fan for $150, few bent fins to straighten and a rattle can overhaul but im not complaining for the price. Yeah it just fits but I couple of quick mods will give me as much room as im going to get without hacking the whole front of the ute to bits. Water outlets will be easy to run with a few bends and straight sections but glad to have that headache sorted. Just the loom to sort out and mount an external fuel pump somewhere then il be close to firing it up1 point
-
It's not particularly difficult It is intended to be used by people modifying cars, to help them with their projects. there is a range of people with different abilities sending applications through and they all get looked at, they are not viewed as wasting anyone's time. Some are hundreds of pages long with cad drawings and FEA paperwork, and some are literally hand sketched drawings. Photos are very helpful in an application You will probably struggle to find someone to teach you how to do your particular project as it's quite different , so there isn't going to be anyone with a recipie for exactly what needs doing. Certifiers can guide you along the way but, time is money, if the certifier is willing to help design the car/mods you're wanting to do, it gets expensive quickly Time is the biggest factor when getting people to help you. It's not uncommon for me to spend 2-3 hours a day on the phone, talking to people about their projects, emailing , looking at parts etc etc. This ends up eating into the time I have to do work I can actually charge out- there has to be a balance and this is why it can be hard to find people who can help you lvvta.org.nz you can download a design approval application from there There are also infosheets on design approval https://lvvta.org.nz/documents/infosheets/LVVTA_Info_11-2012_LVVTA_Approval_Application_Guide.pdf https://lvvta.org.nz/documents/infosheets/LVVTA_Info_01-2016_LVV_Custom_Independent_Front_and_Rear_Suspension_Approval_Application_Guide.pdf1 point
-
Still has the 3hp but this cover is awesome still going strong
1 point
-
Does it have a name? The killer Bee, The Bad Banana, Caution tape, The one man school bus, Smokachu, Yellow bellied road snake?1 point
-
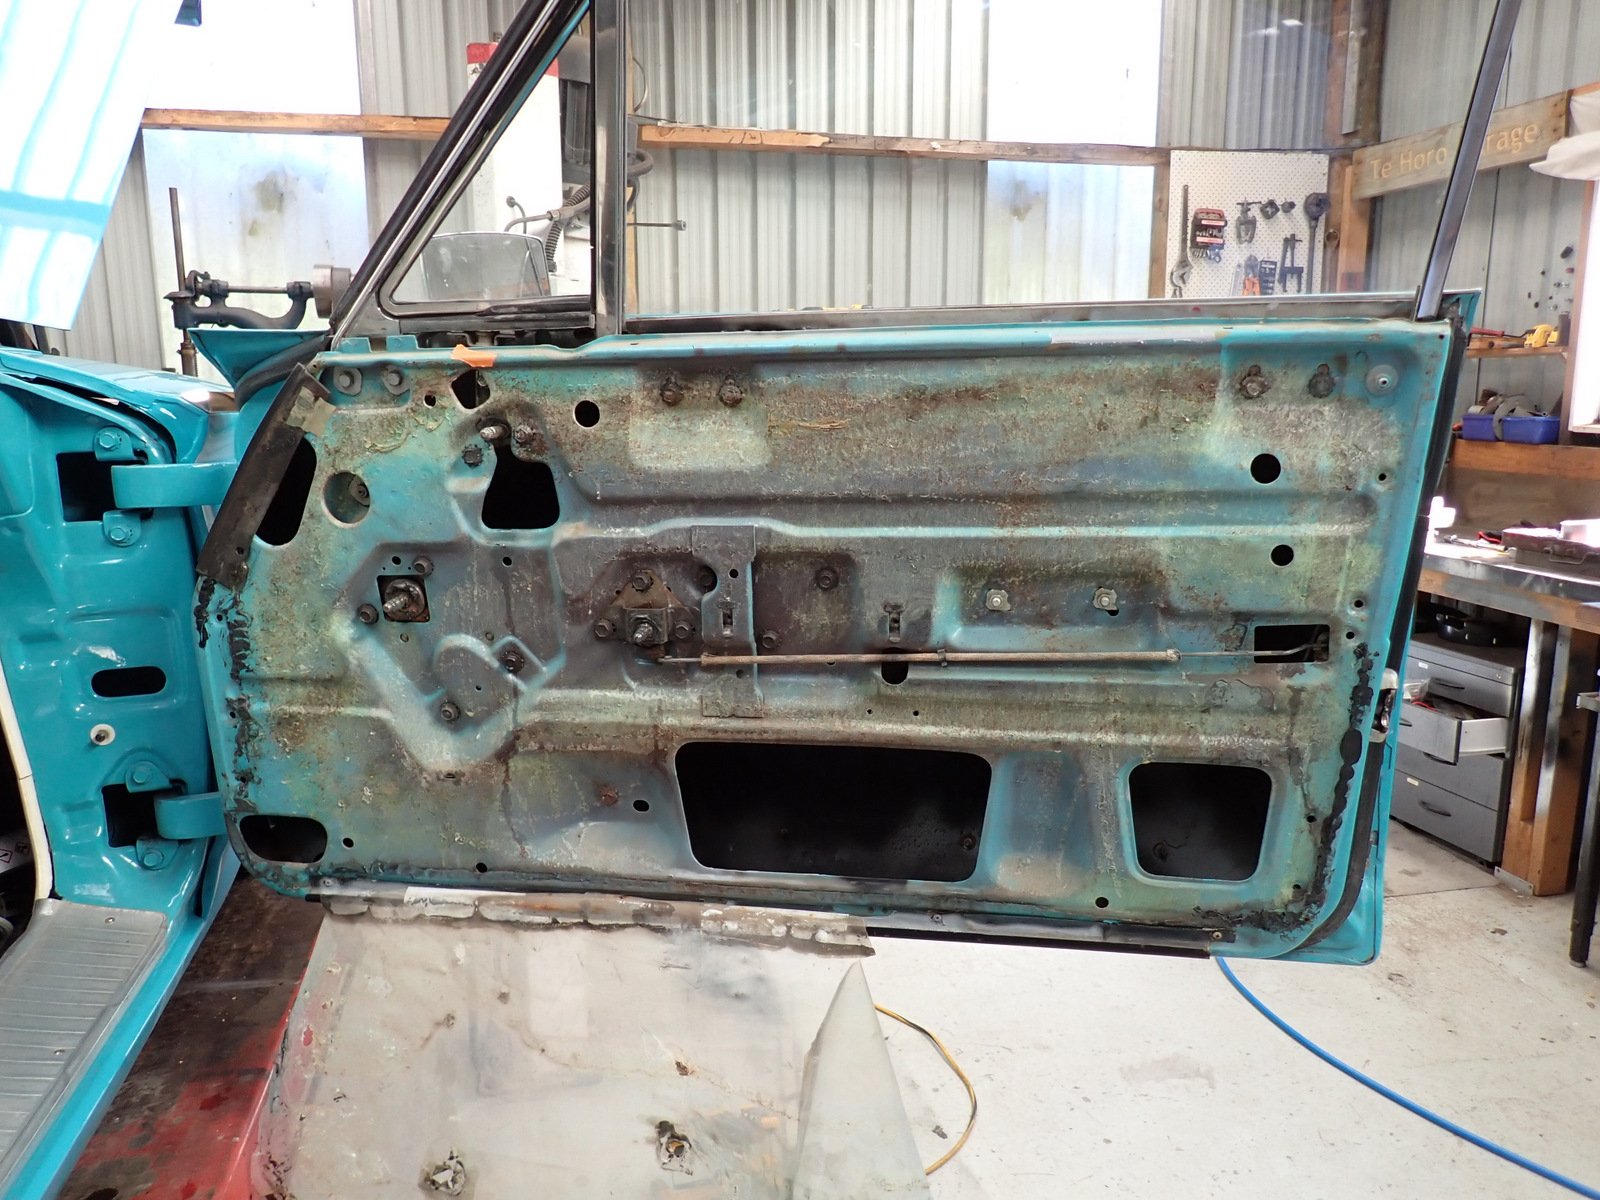
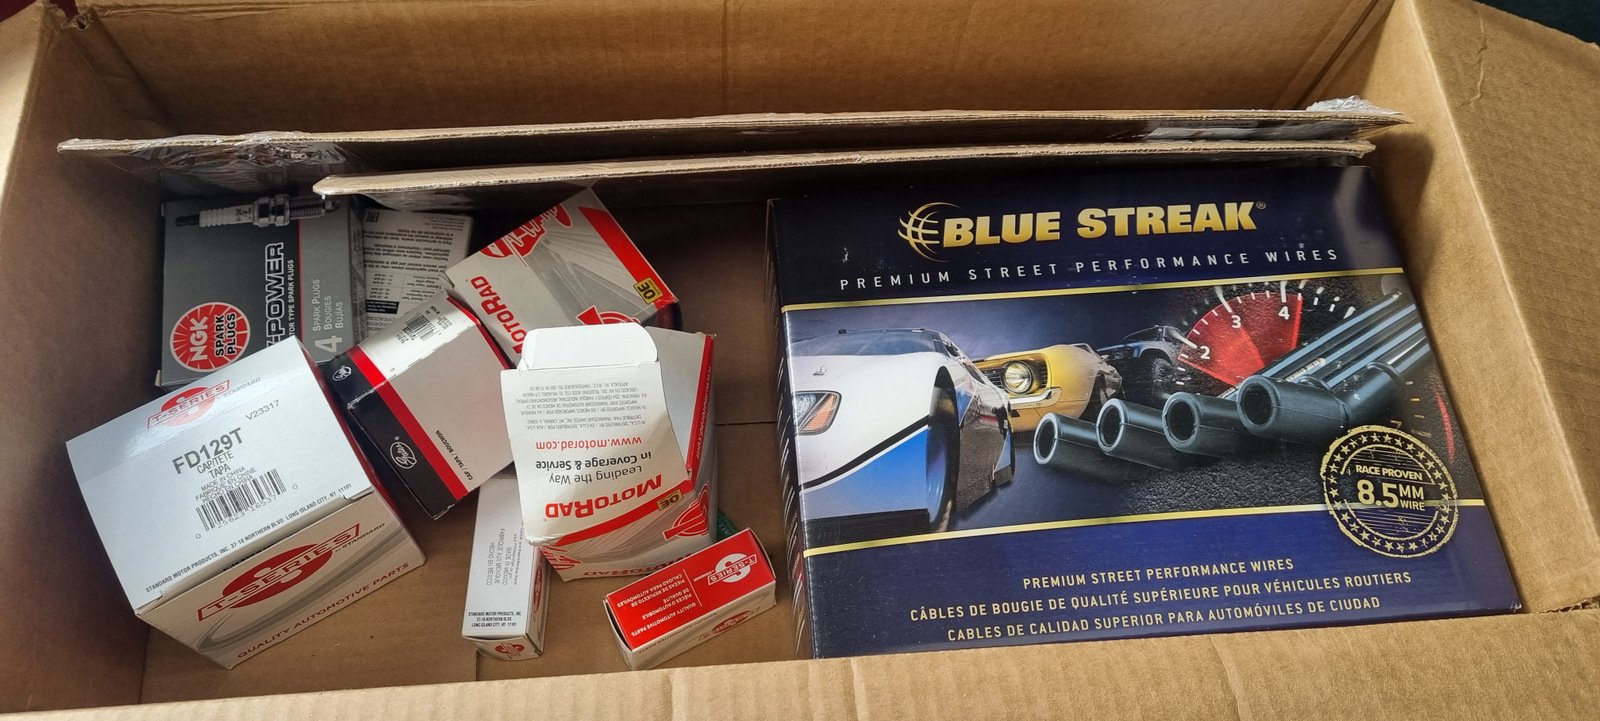
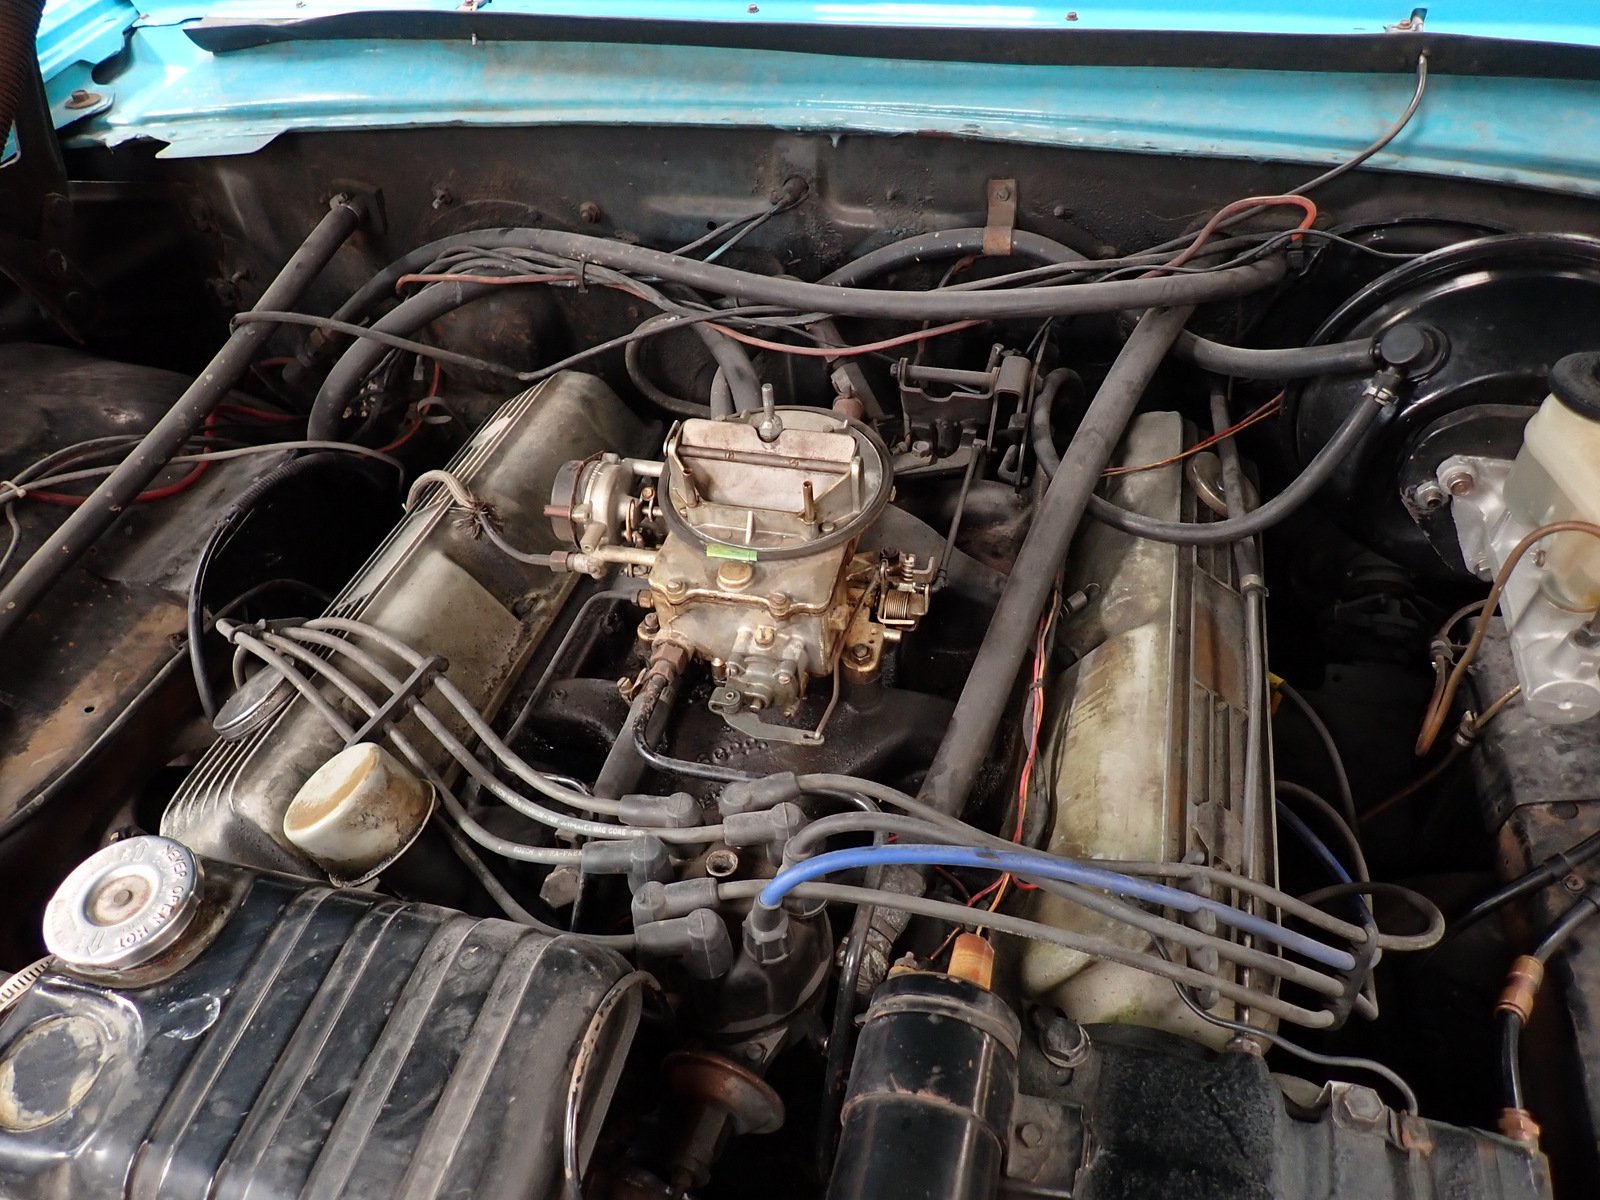
Lets see Muffler replaced, I left the other side there as it didn't look too bad Pulled the door trim off to put a speed nut on the self tapper holding the wing mirror Got some Rock Auto Looked at a grotty engine
1 point
-
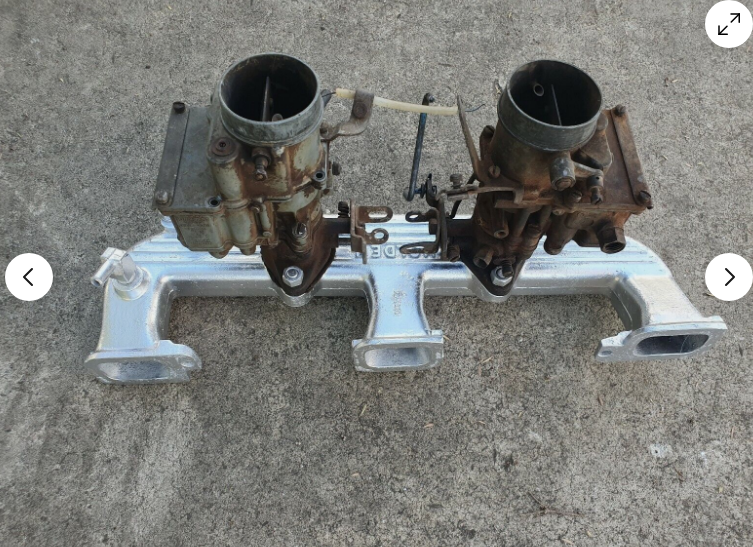
Same setup as a Holden twin carb I suppose
1 point
-
Theres a facebook group called 'Engine porn' suggested to me 2 nights ago. It looked interesting so yesterday morning at smoko time I put up some pics and a quick blurb about my engine build with a link back to the build thread here on oldschool. Thought they'd appreciate it and crikey - the response has been amazing Of course there's always going to be a Barry lurking...
1 point
-
Went for a decent blat into town tonight. A few things to note before I forget. Cruises at 2200rpm at 100kph and has buckets of power upwards from that so the gearing is spot on. Maybe because Im used to a shitty old slow chevy but it feels like a rocket. Makes a weird noise for a second on startup. The sump is too low. Either I have to put in stock springs or modify the sump. @cubastreet got any spare sump pans? The oil filler pipe is now hitting the firewall so I have to modify that again. Second is a bitch to find from 3rd but I'll get used to it. It has enough torque to take off in 4th but I'll leave the clutch alone. I might make the aux water pump booster linked to the ignition as I forgot to turn it on. It's criminal me having this car and living 10kms from a decent corner. It wants to corner.
1 point
-
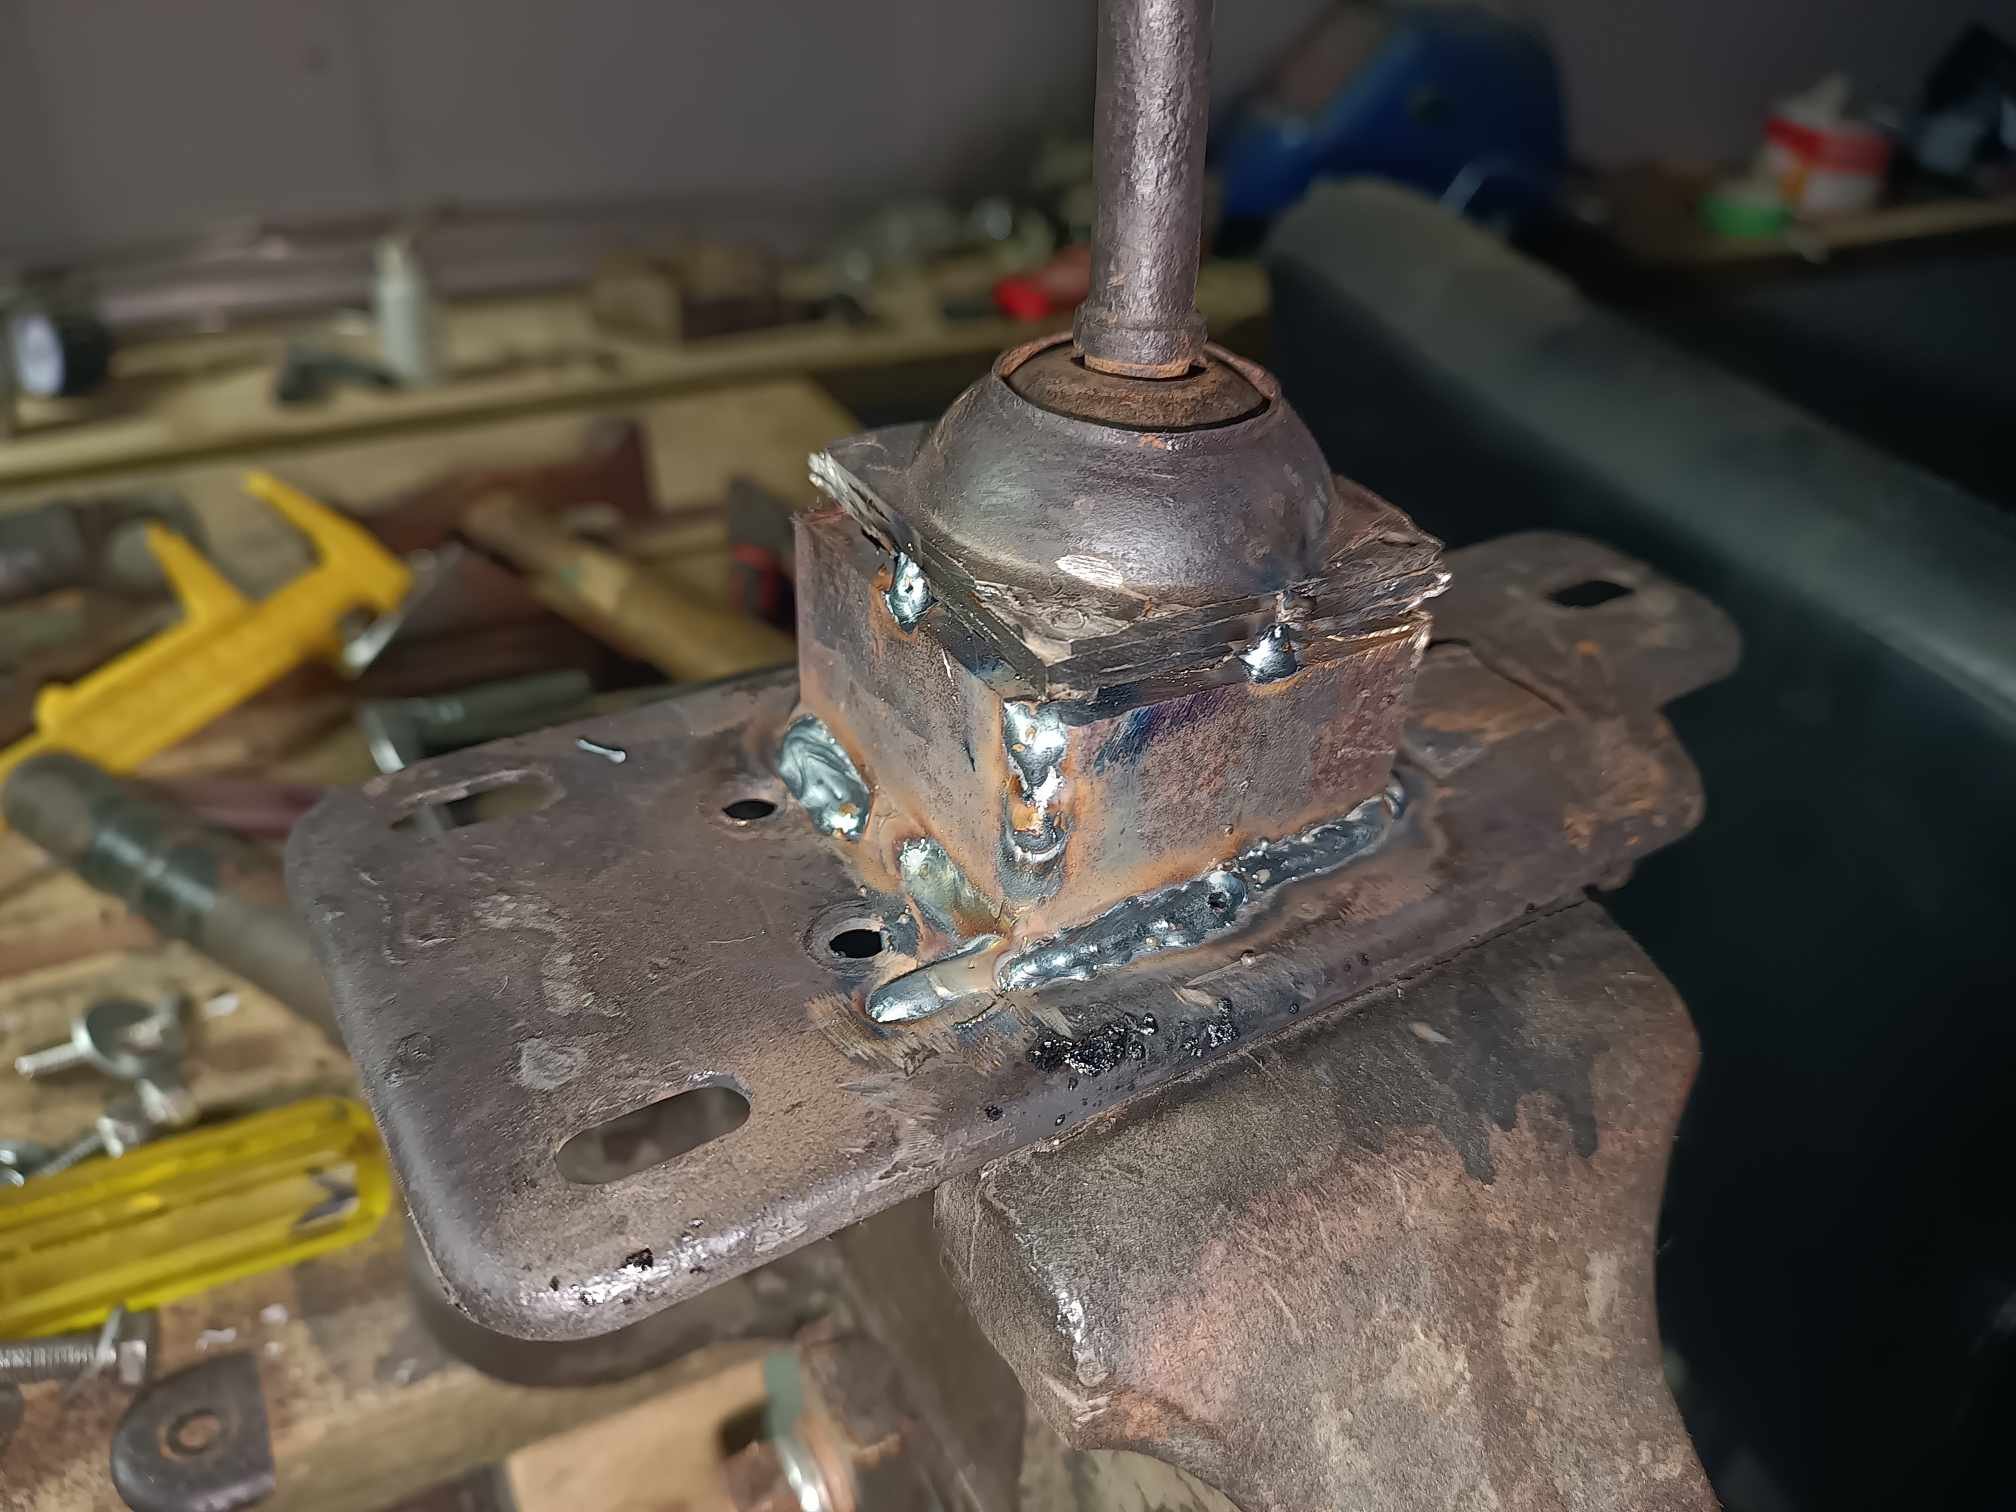
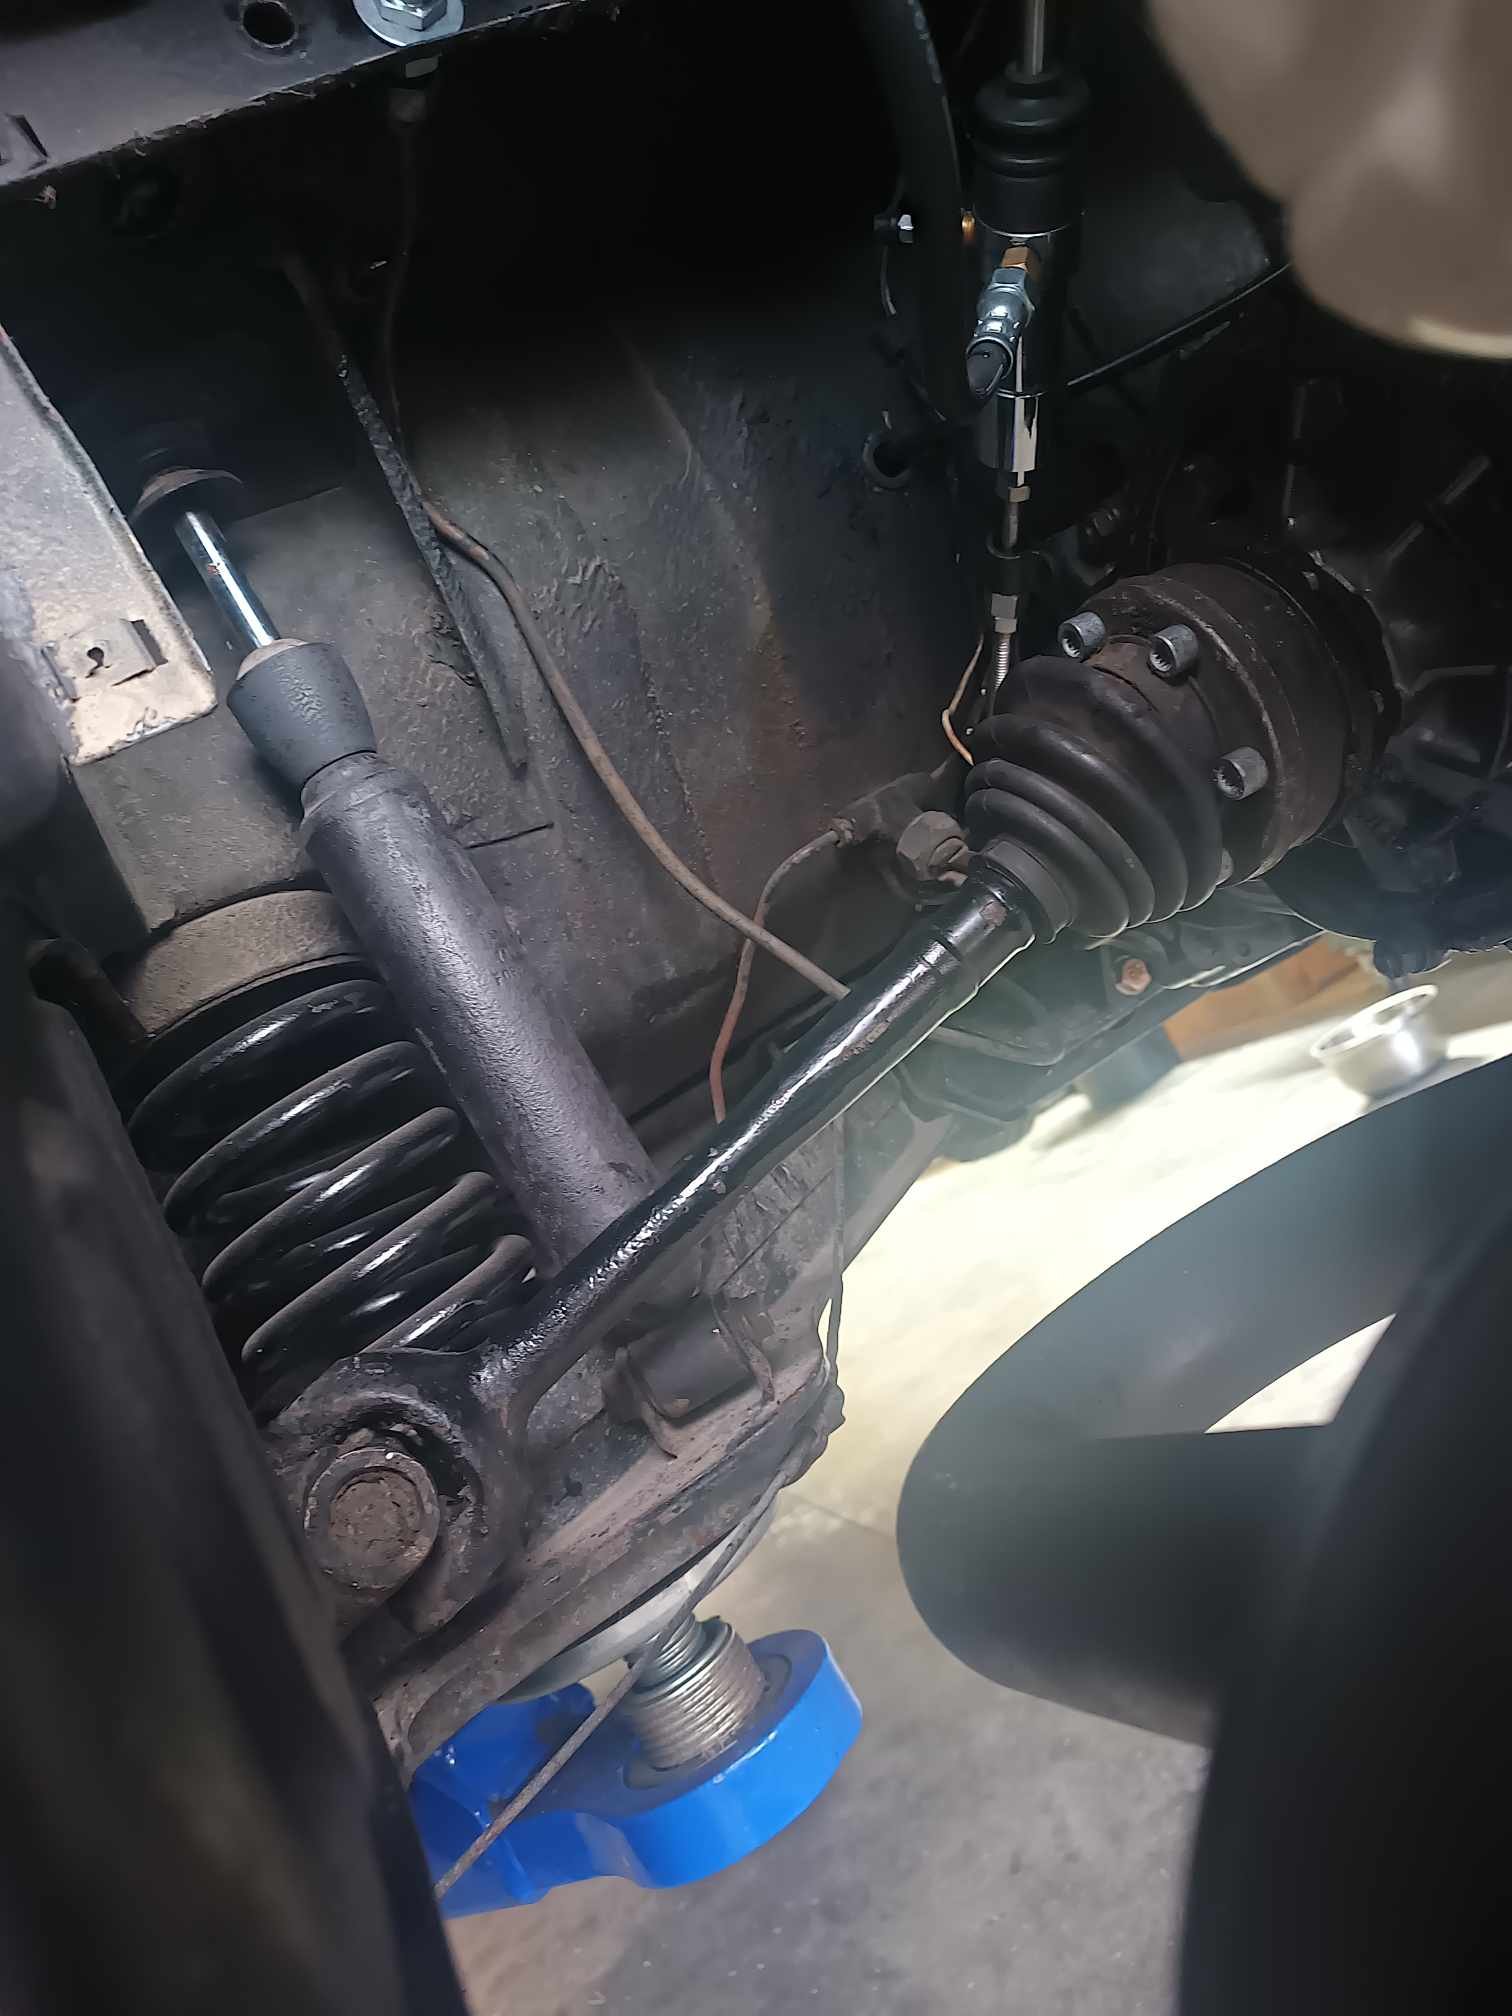
After nearly three months my half shafts are done. Thankfully they fit really well and no binding with the full suspension travel. How he did it was to make a jig out of angle iron. The Imp end was a few mm smaller so he stepped the jig to compensate. Then notched a V into the ends of both and lots of welding to fill it up. He checked the balance and said they were fine. In the meantime I have installed the slave and bled it with the trusted broomstick method. On the hoist the gears shift fine and no crunching and I can even find reverse which is novel in this thing. I presently have the coolant bleeding itself and have remade the radiator mount. The bolts welded into the side for mounting it were flimsy junk so I had to come up with a new solution which seems ok but may hinder my chances of putting on an electric puller fan. I have a short list of works to finish before going to LVV but mostly bodywork and fine tuning. I'll see how it feels after the test drive which all being well should be this evening. Sadly I have to spend time sorting my C20 for the wof fails. I really need to find a new place. 3rd wof in a row I have failed on a ball joint that was fine the previous wof. The chances of three ball joints that are 60 years old failing one at a time every six months is a little disappointing for me. Especially as the replacement always feels worse to me but passes. Oh well. I have this year to get down to 2.5 wofs and I'm on a mission!
1 point
-
A few snaps from Toyotafest. If anyone got some feel free to share as well. Great to get the car out and chat to lots of people about it. Lots of motivation to finish it now! Trailer queen for first and last time hopefully Finley loved it too
1 point
-
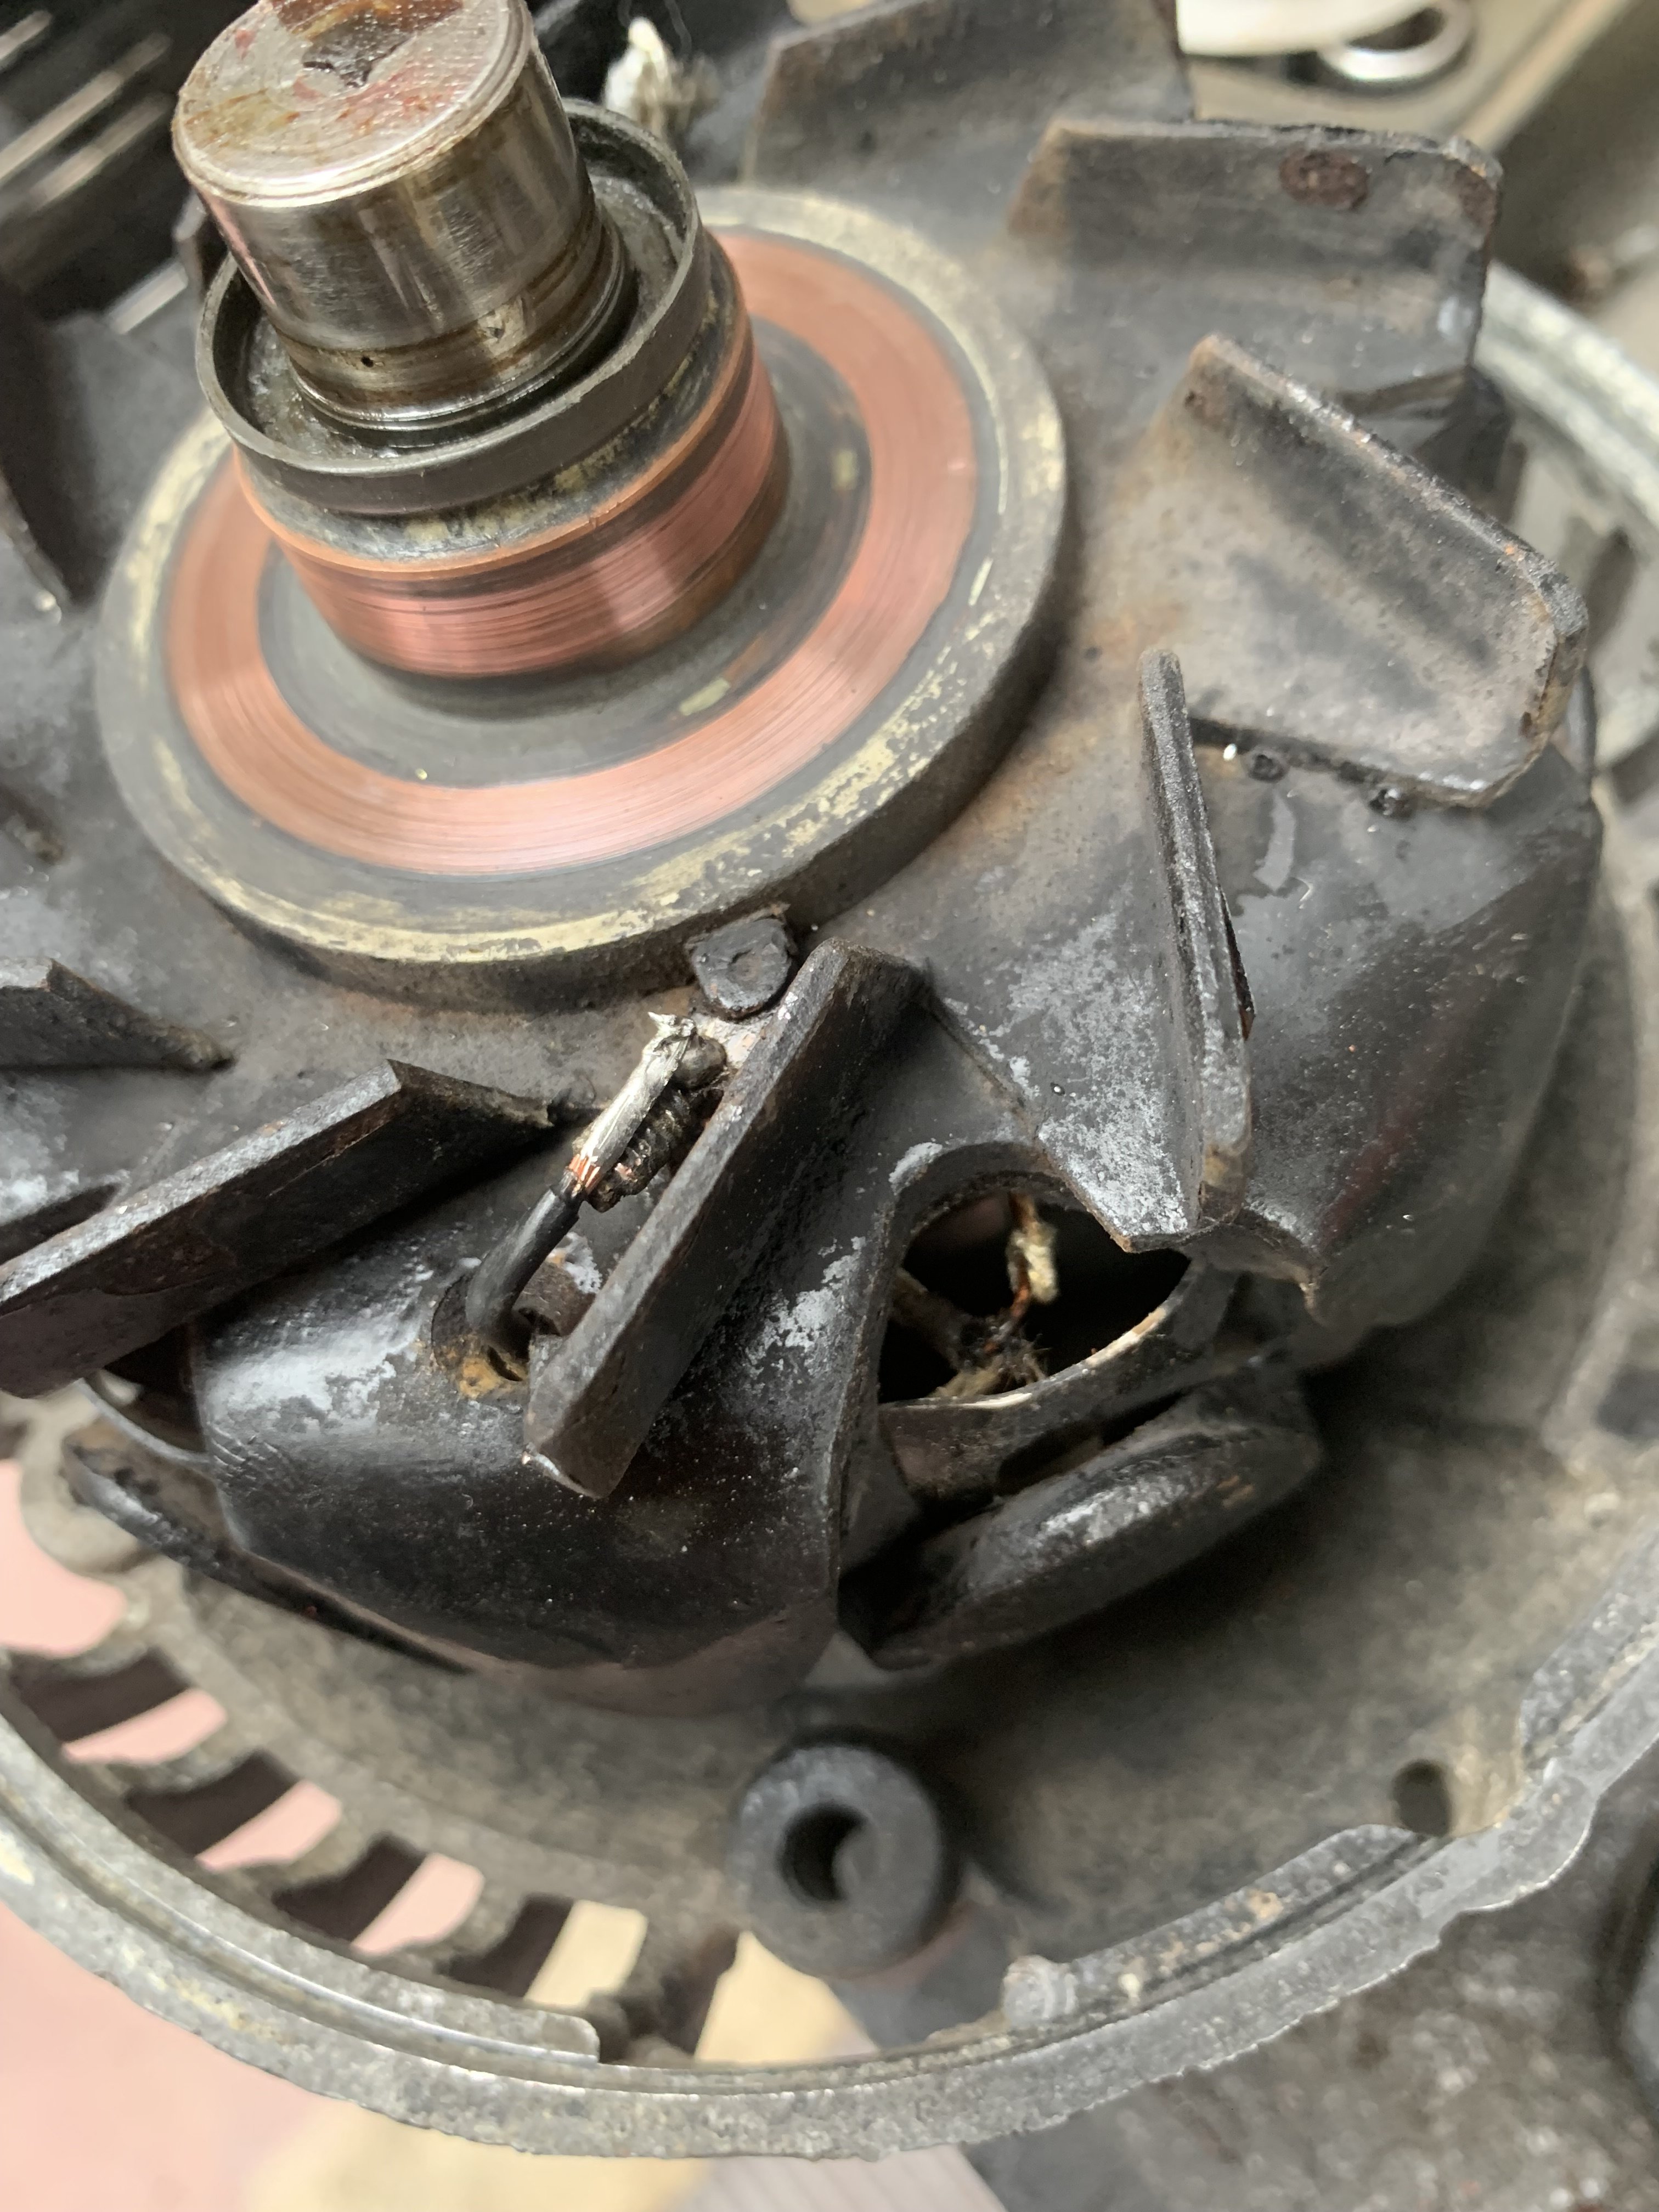
I had Lets Get Graphic re-make my side billboards in proper vinyl..much better! Accordingly the duraseal peeled off the adhesive and then they had to thinners off stubborn glue..oops. Took it for its biggest run out to rangiora MCM show.. went great until the needles wiggled and it stumbled then the Amp gauge read drain. Parked it up and left it until the trip home couple days later, it did it again but didnt hinder the journey. Few hundred metres from home it backfired and the needle came back to life and it was charging again! By the time id washed it and drove back in shed it wasnt charging again. Tore it open and spotted a broken field wire so i soldered it back on and not change. Weird. Fucked aroubd with tests and bypassing things, external reg tested ok. Left it with a customer whos a sparky, could tell he wasnt into it but said hed take a look but his test bench wasnt working. Few weeks passed so i went and grabbed it back. He did say the wire sheath looked like it was degrading and it might be earthing. Put my pick under the other field wire to tweak it into open space and there was no pull resistance..broken too. Was a bit awkward but soldered a new wire in between the broken ends and threw it back on, Amp gauge working! Then it stopped. Decided it was the centrifugal forces throwing it out and the wee bare wire patch was touching so dripped epoxy glue in/on to make a protective sheath and its been great since. Will get another Alt cause its pretty fragile and old.
1 point
-
Have being doing a lot of stuff recently to try get this ready for beachop. The doors now open electronically with the small spring loaded knobs next to the window. And lock using the factory lexus Remote. Door Rubbers are all on. Window rubbers are all glued up. Bitumen sound deadening in the doors. Is much more of a pleasure to drive. Even with the door cards off. Reversing Lights added and wired in. Have moved on to version2 of the boss air struts. Such a better product. No welding the bush onto the bottom, they come with a threaded boss on the bottom and a range of Threaded mount options. Also a 1/8 female npt hole for the air supply. Instead of the Hydraulic style male fitting and hose they had before. Made it to the last southwards Cars and Coffee in Kapiti. Excellent morning out with lots of cool cars to see. Matts & mine were easily the lowest cars present. Had forgotten about the 1954 210 inside. Was a nice surprise. Have also put a false floor in the trunk. With a 4 channel amp beneath that. On top of the space saver. Wired into the parcel shelf speakers and ready to wire into the front door speakers this weekend. Have an infinity Bluetooth Amp adapter to wire in, instead of a headunit. (despite costing more than a decent headunit) Also next up is to get some gas struts onto the hood. in place where the springs would of been. As at highway speed the hood likes to lift and float around. And is quite disheartening at 100kmh.
1 point
-
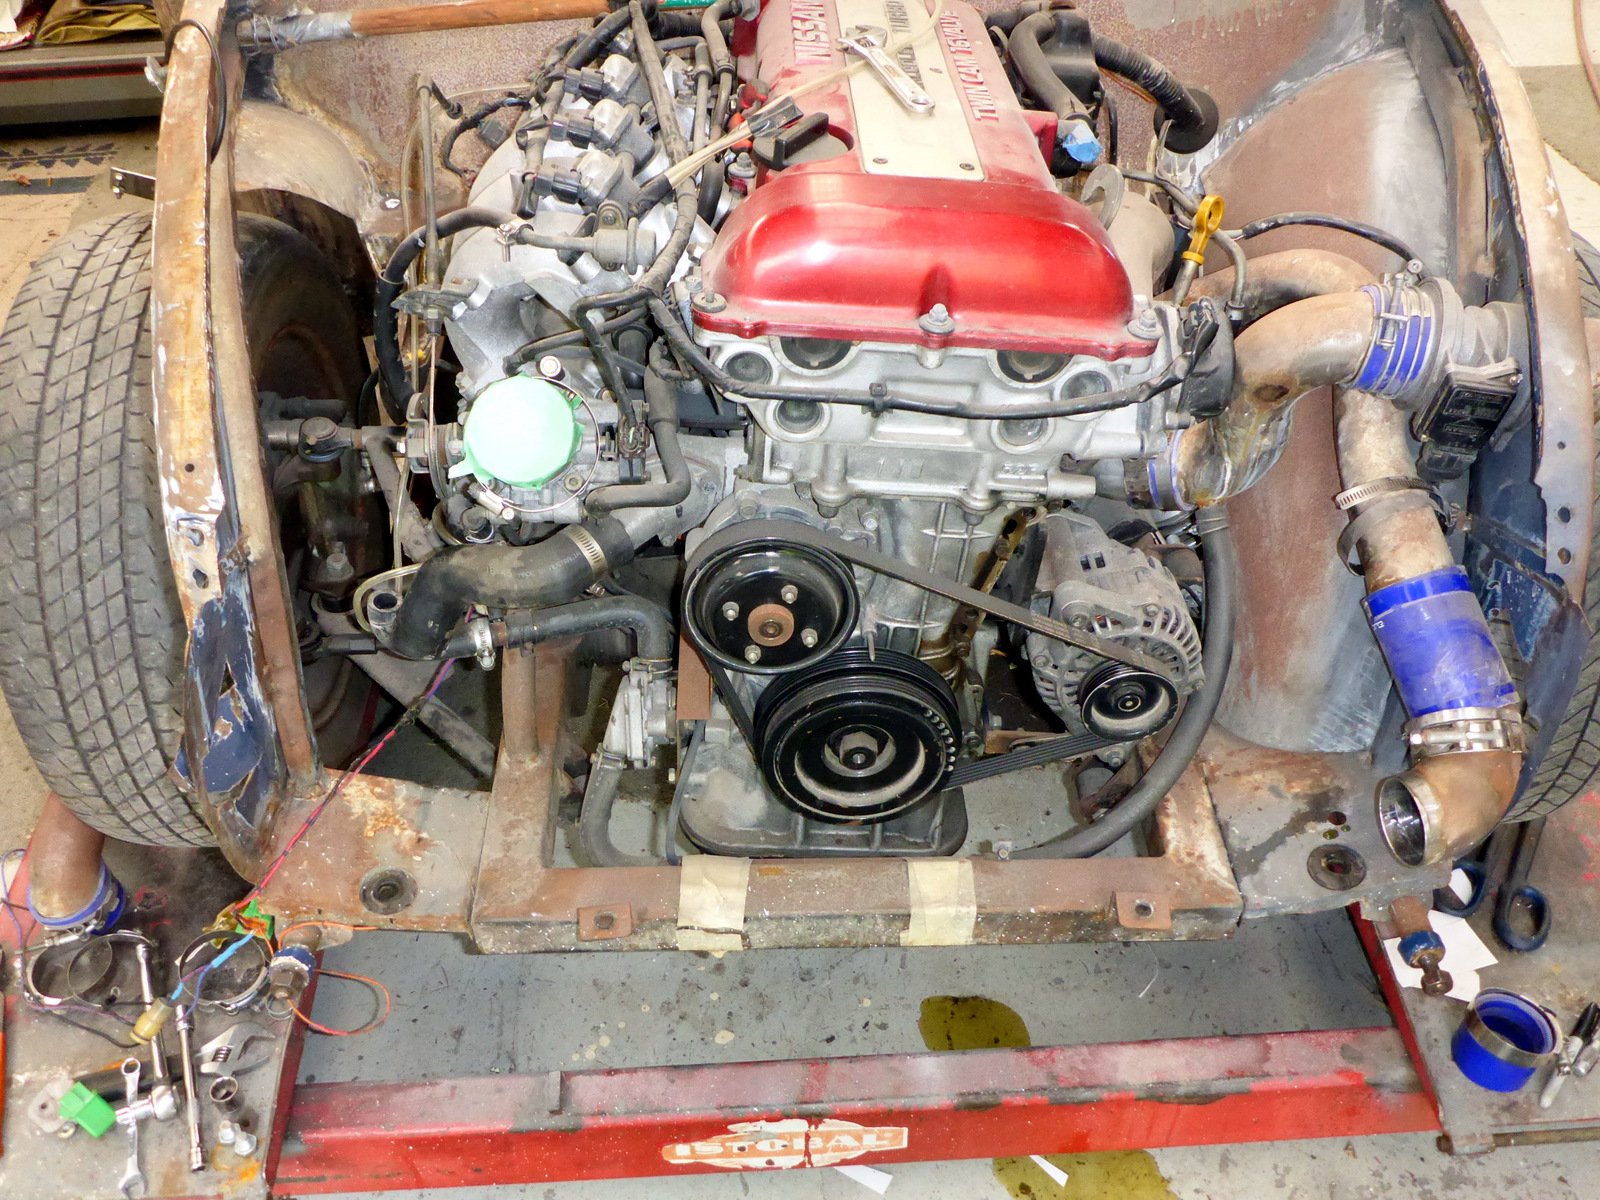
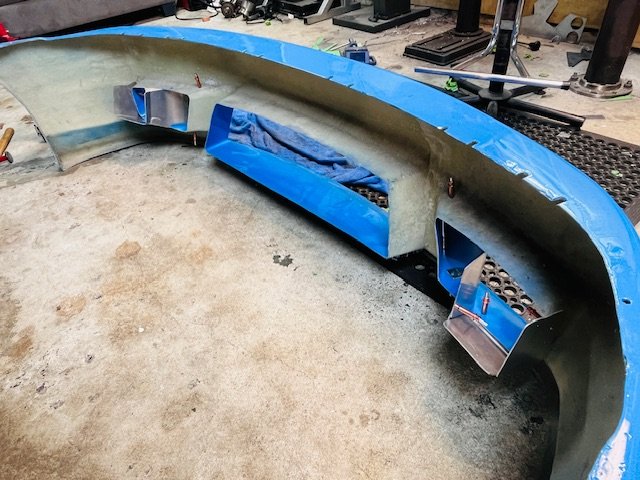
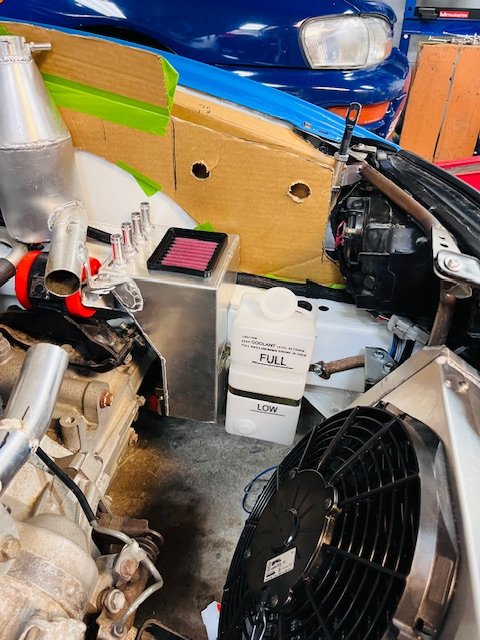
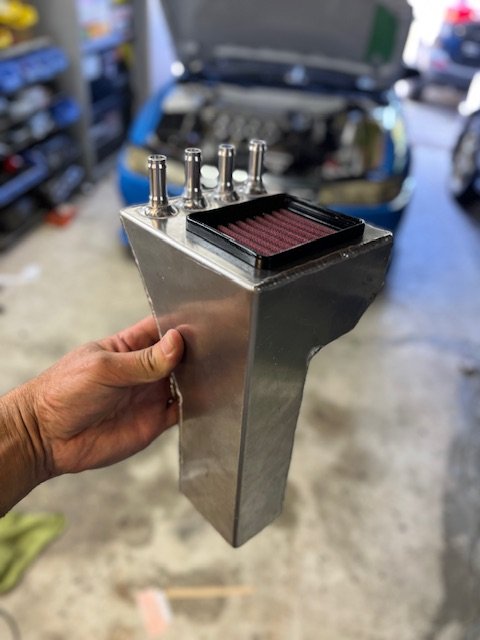
Getting a few loose ends of jobs tidied up before I tackle the last big job - extractors. Starting to look like a complete car. Catch can finished up. Internal baffle, tiny K&N filter from a BMW bike, drain tap in bottom so you don’t need to remove to empty!! Fits very well in the allotted space finished up radiator and swirl pot pipework (pending rubber hose) also finally finished the front bumper side ducting (radiator to come but that’s big job/non important to start the thing) Keep moving forward
1 point
-
So I finally got the engine mounted into the Imp with the freeway flyer gearbag. A lot of installing and uninstalling to see what works best where. As usually with these things it is a case of compromise and the least shit option which is to be expected. With the adapter plate and the VW being a bigger box I thought it would push the engine past the rear crossmember. Turns out that it's actually a shorter box and the engine was back towards the front by several inches. Therefore the carbs were hitting the firewall. Did not expect that one! So I had to make up a new gearbox mount bracket that pushed it rearwards 50mm. It will make the hump under the seat easier to make and possibly the linkage. New one installed here with me holding up the old one. The one issue this cause was that the output shafts on the gearbox are now further back. Annoying but seeing as there was always an angle to them it isn't that big of a deal. Except now the half shafts foul the exhaust. They had to come off and Ill have to cut a bit of length out of them. So out the pipes came and I got to chopping off the ends of the half shafts to line them up. I lined them up as best I could and scribed them for the engineer. I scribed them at full CV range with the wheel side at suspension stock level so I assume the engineer will weld it in the middle. He is a clever guy and I didn't want to tell him how to do his job so I'm interested to see what he comes up with. I took them in at lunch and he'll get around to it when he can. He promised to tack them up and I'll double check they fit ok before he finalises it.
1 point
-
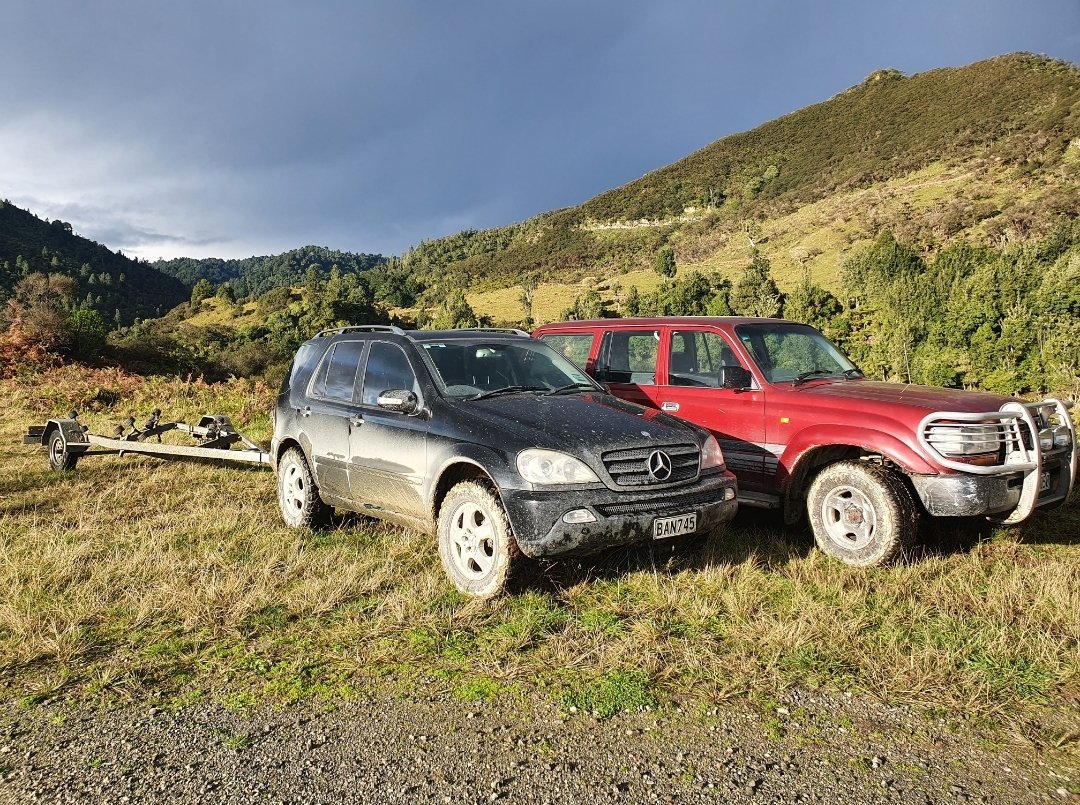
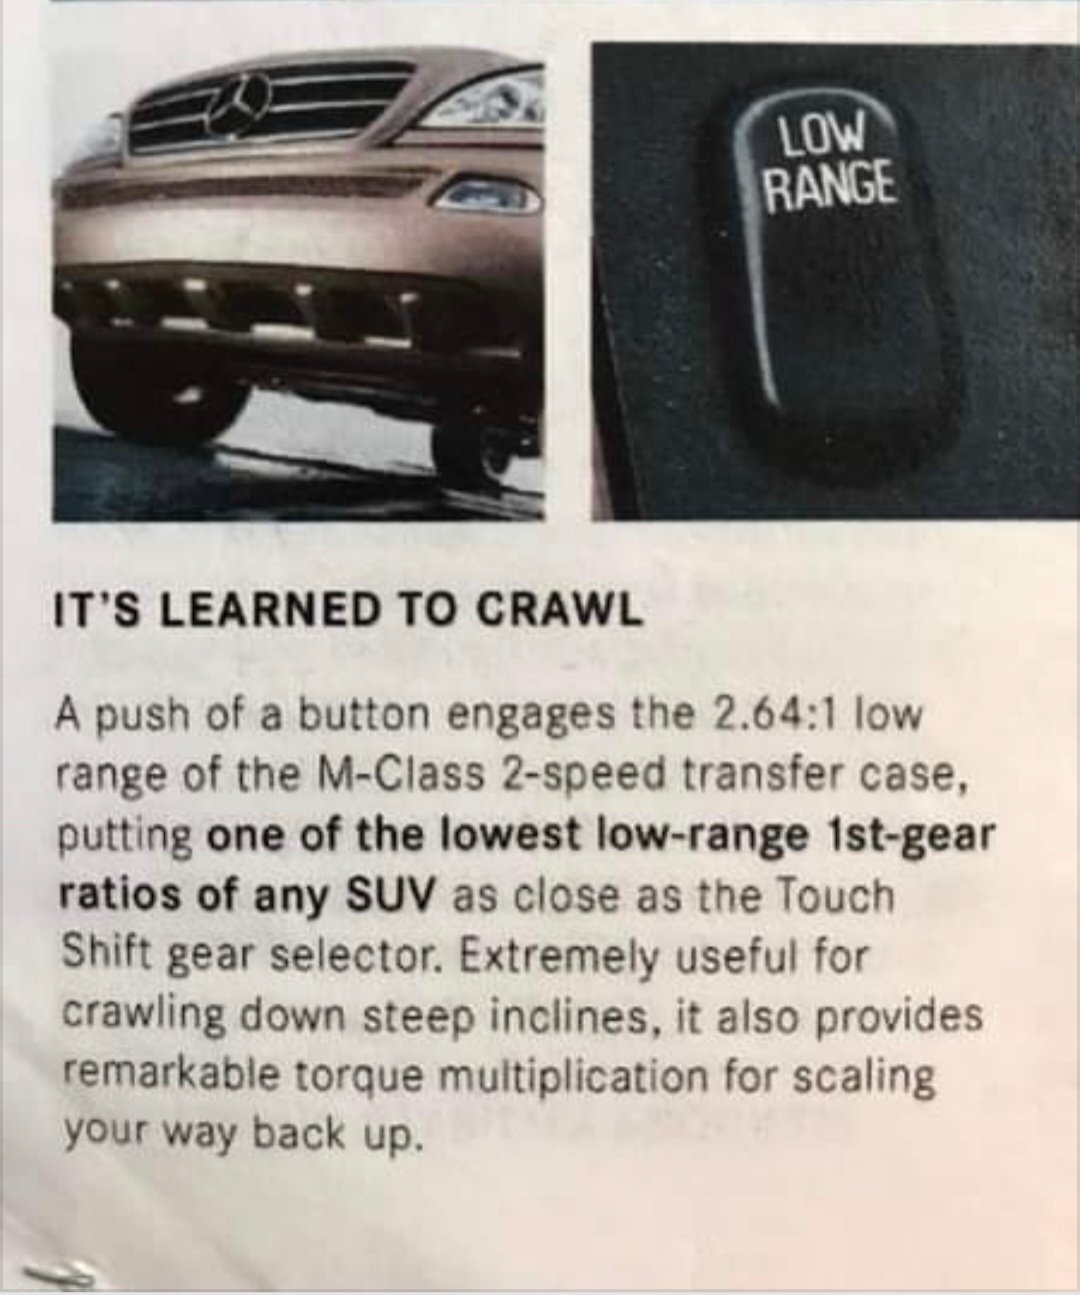
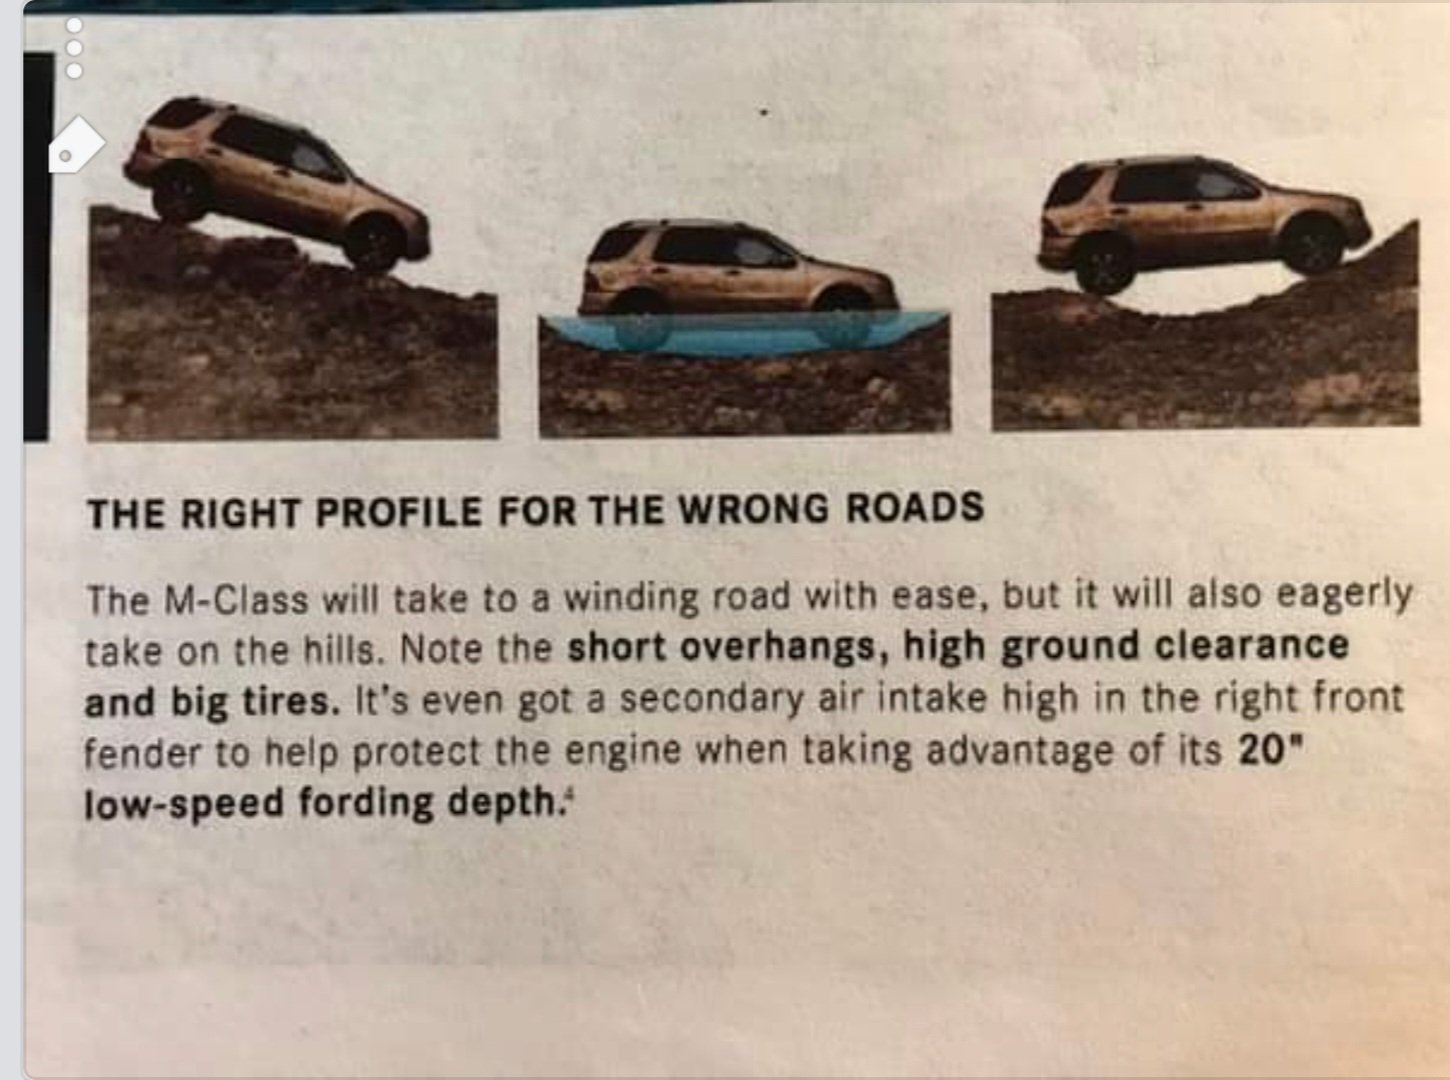
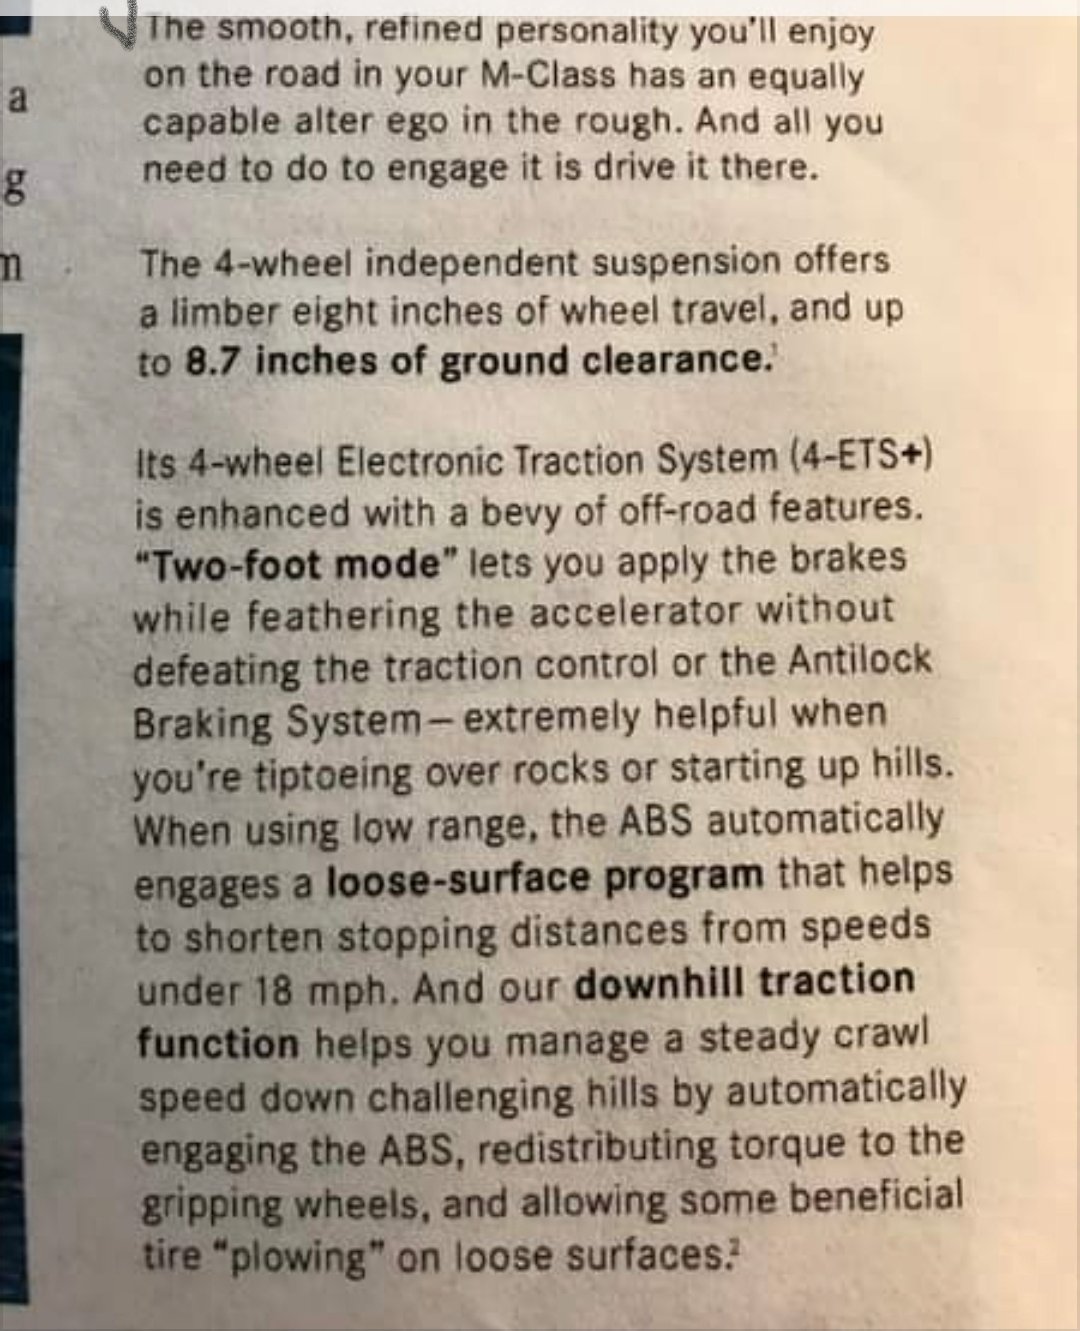
So there is some shit to know about the w163 platform. Firstly, they are the only Merc on a full chassis, or body on frame, aside from the G-wagen. They were originally slated to replace the G, and we're actually launched as a concept car in Jurassic Park movie (circa 1997). They are much loved by the Ruski's, most of europe, Asia the USA, and Soccer Mum's. They kind of invented the SUV category in a way. They are very safe and have many stability features and 12 airbags. Merc was broke at the time and half owned by Chrysler so the engines ended up in everything. Think Jeeps, Ssangyongs, ambulances and sprinter Vans erc. They run independent susp all around, torsion bars in front and coil over rear, yes they can be lifted both at suspension and body off frame. They have a low range transfer case with a very low crawling gear. They have exceptional departure and approach angles, still ahead of many more contemporary machines. They have a 20" fording depth factory. They have massive 4pot brakes and a very clever 4wd system in lieu of locking diffs. Basically they brake the slipping wheel which transfers the power to the non slipping wheel through the open differential...it all happens very fast and is quite effective. Toyota has only just copied this on the recent Hilux.. I suspect it's due to a patent. They were built in Alabama, Germany and Japan. The pre 2000 models are best avoided as they facelifted and fixed a lot of shit around 2000. They ran till about 2005. I'll mostly give my experiences with the 5 cylinder common rail. Sorry for few pics to accommodate my technical foibles, but there's loads of internet info, should you be so inclined. Or ask here. Some things I have had to solve myself. Cool Merc development vid... https://youtu.be/f599FIqCpSg
1 point
-
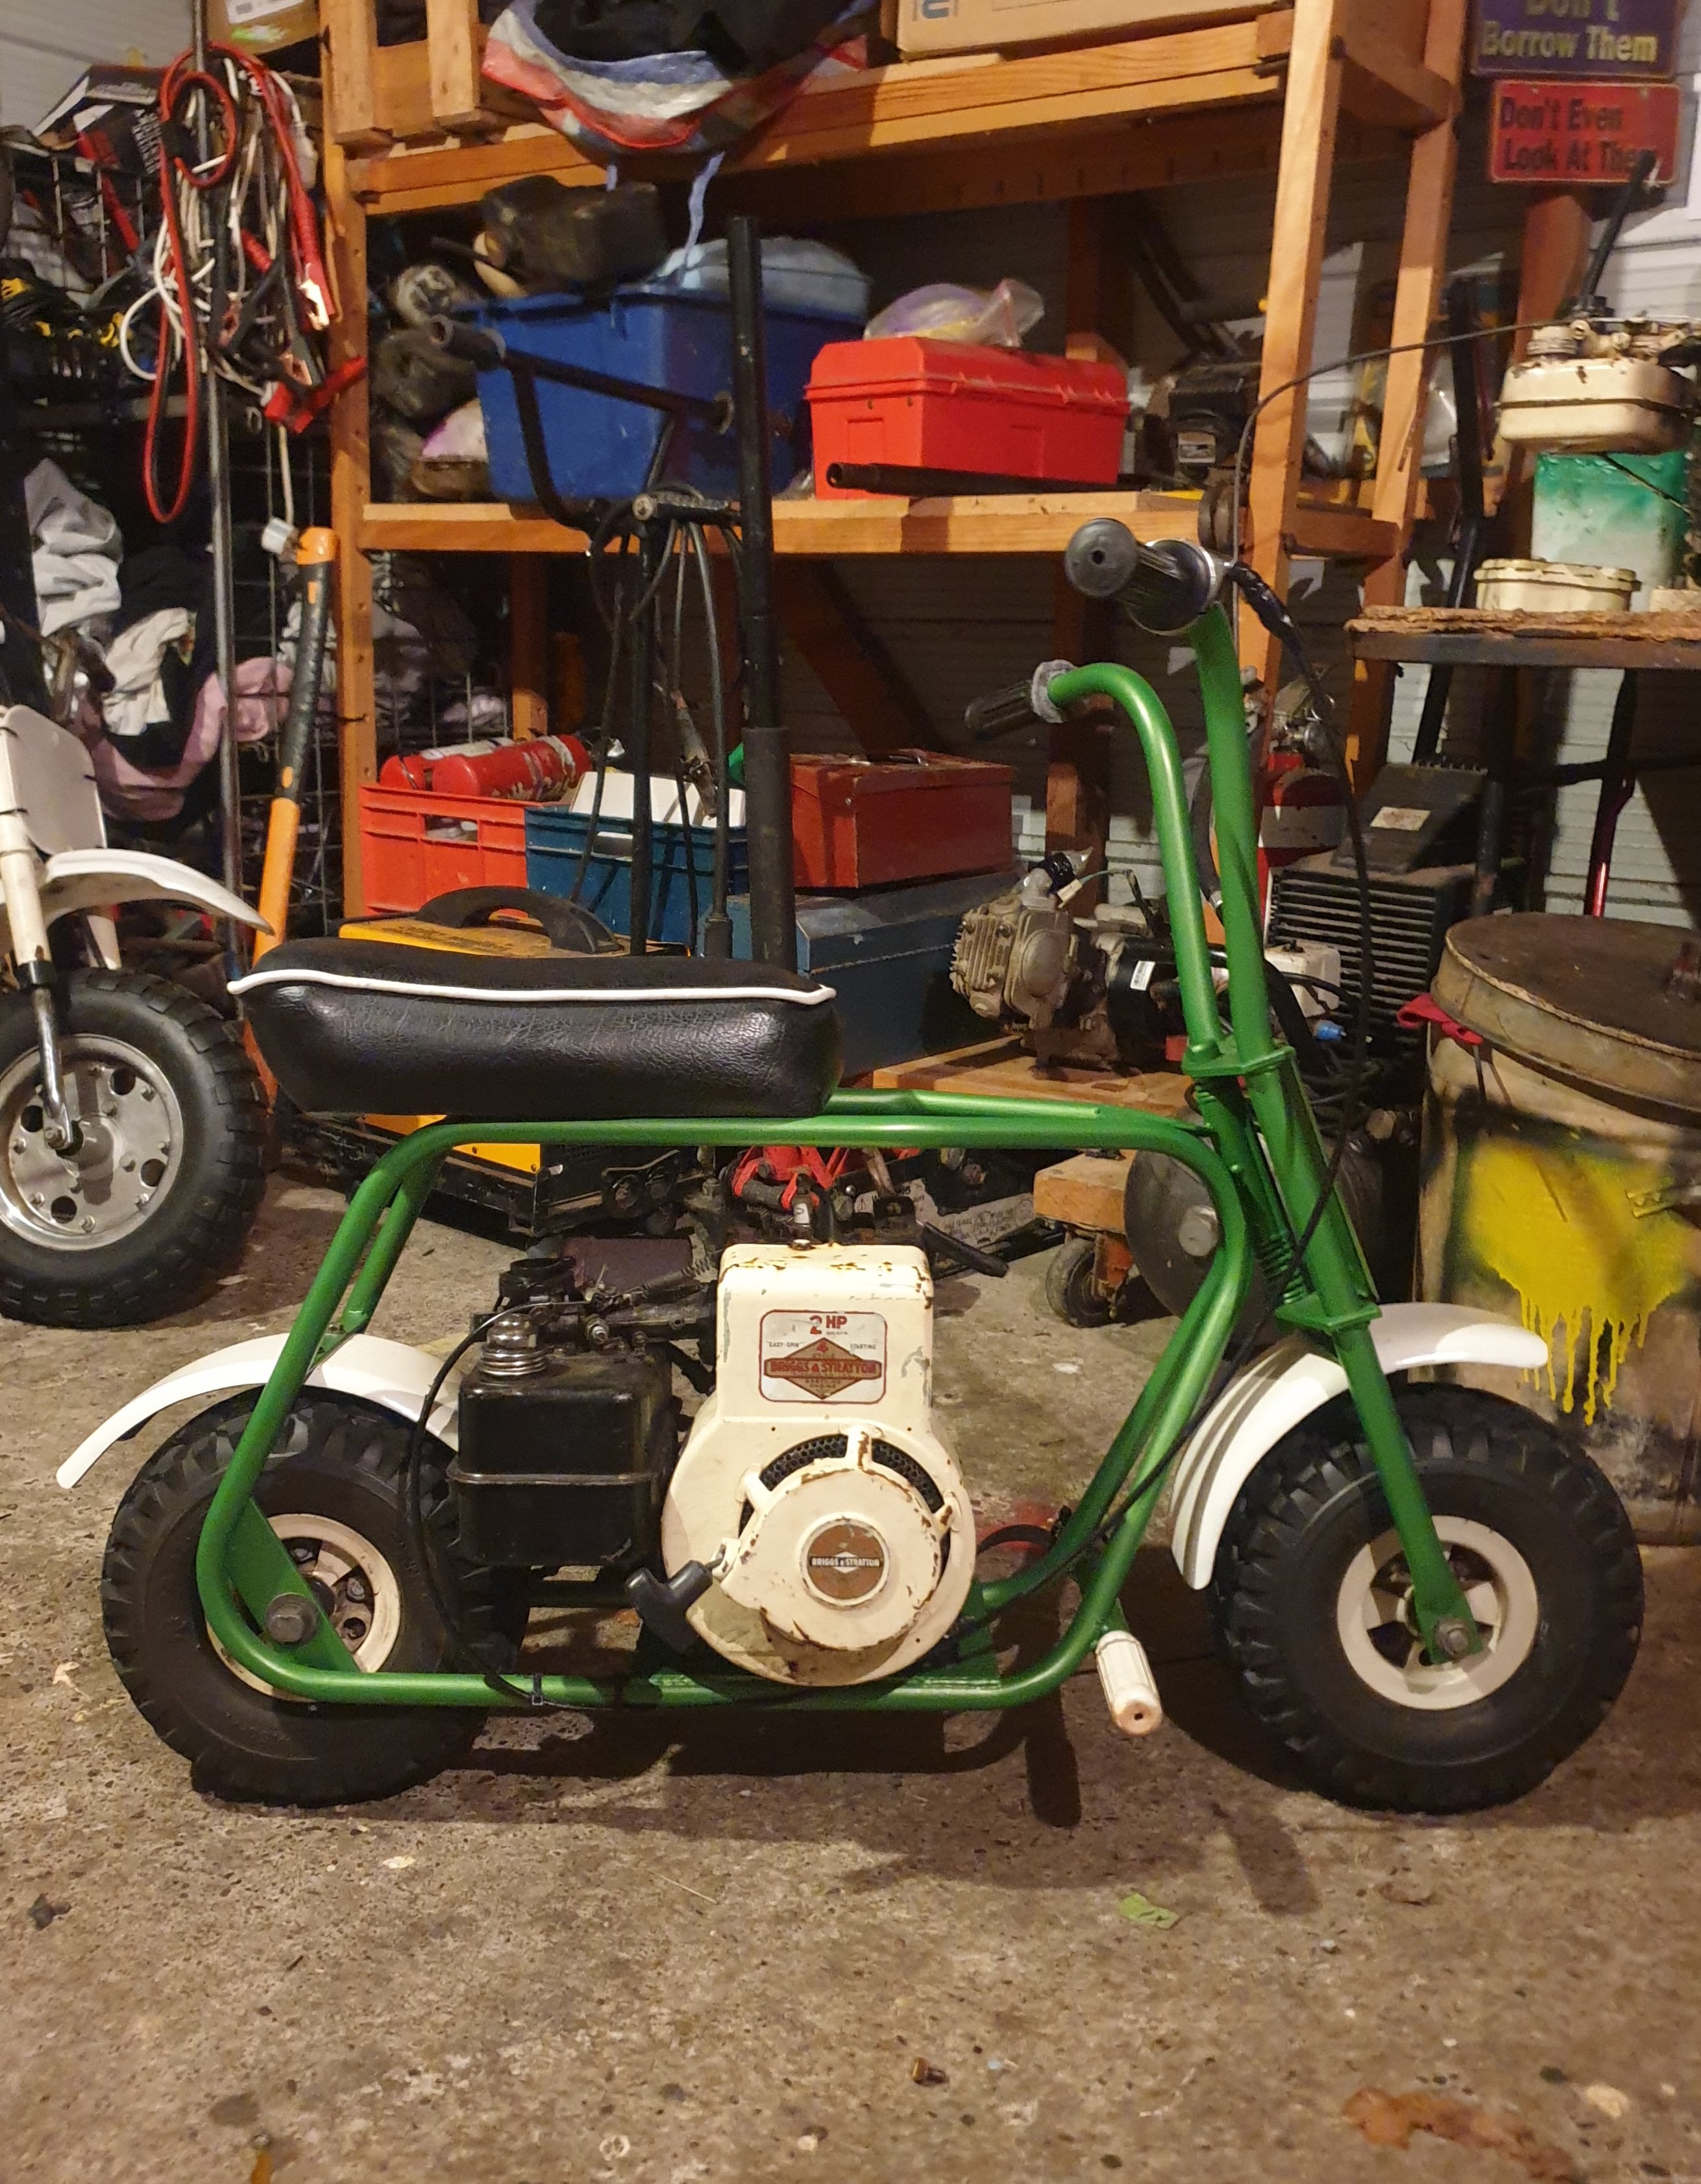
The mini bike corner looking choice
1 point


.jpeg.f1cce9356261f12f1194414c46a391d3.jpeg)


This leaderboard is set to Auckland/GMT+12:00