
Leaderboard

.thumb.jpeg.384ff72c8d2b0ee0d34a7bdedb55bdcf.jpeg)


Popular Content
Showing content with the highest reputation on 03/13/24 in all areas
-
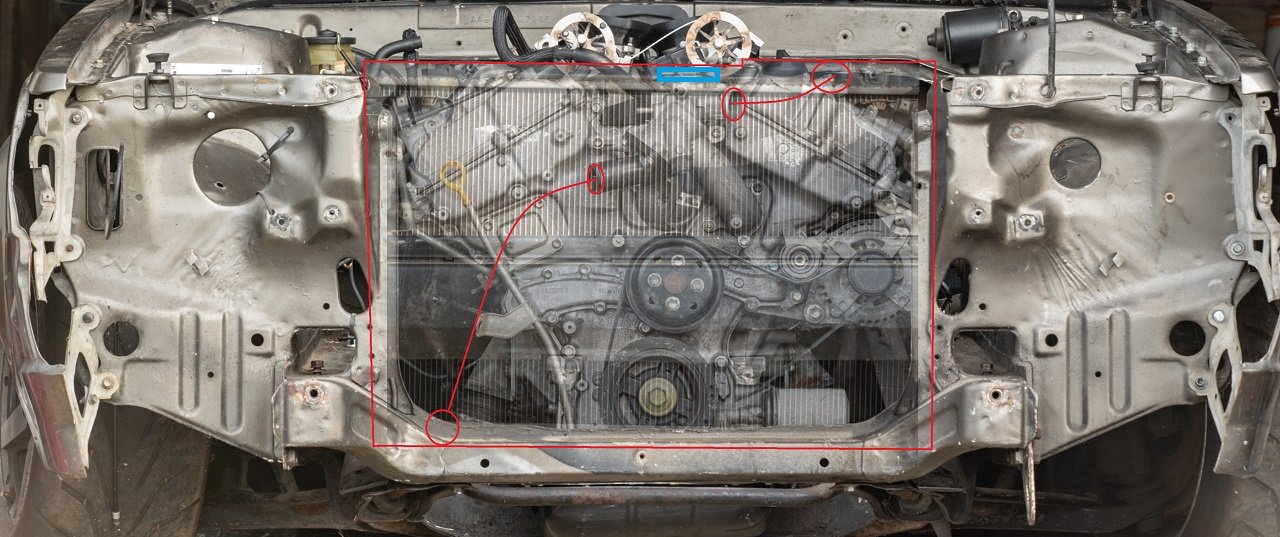
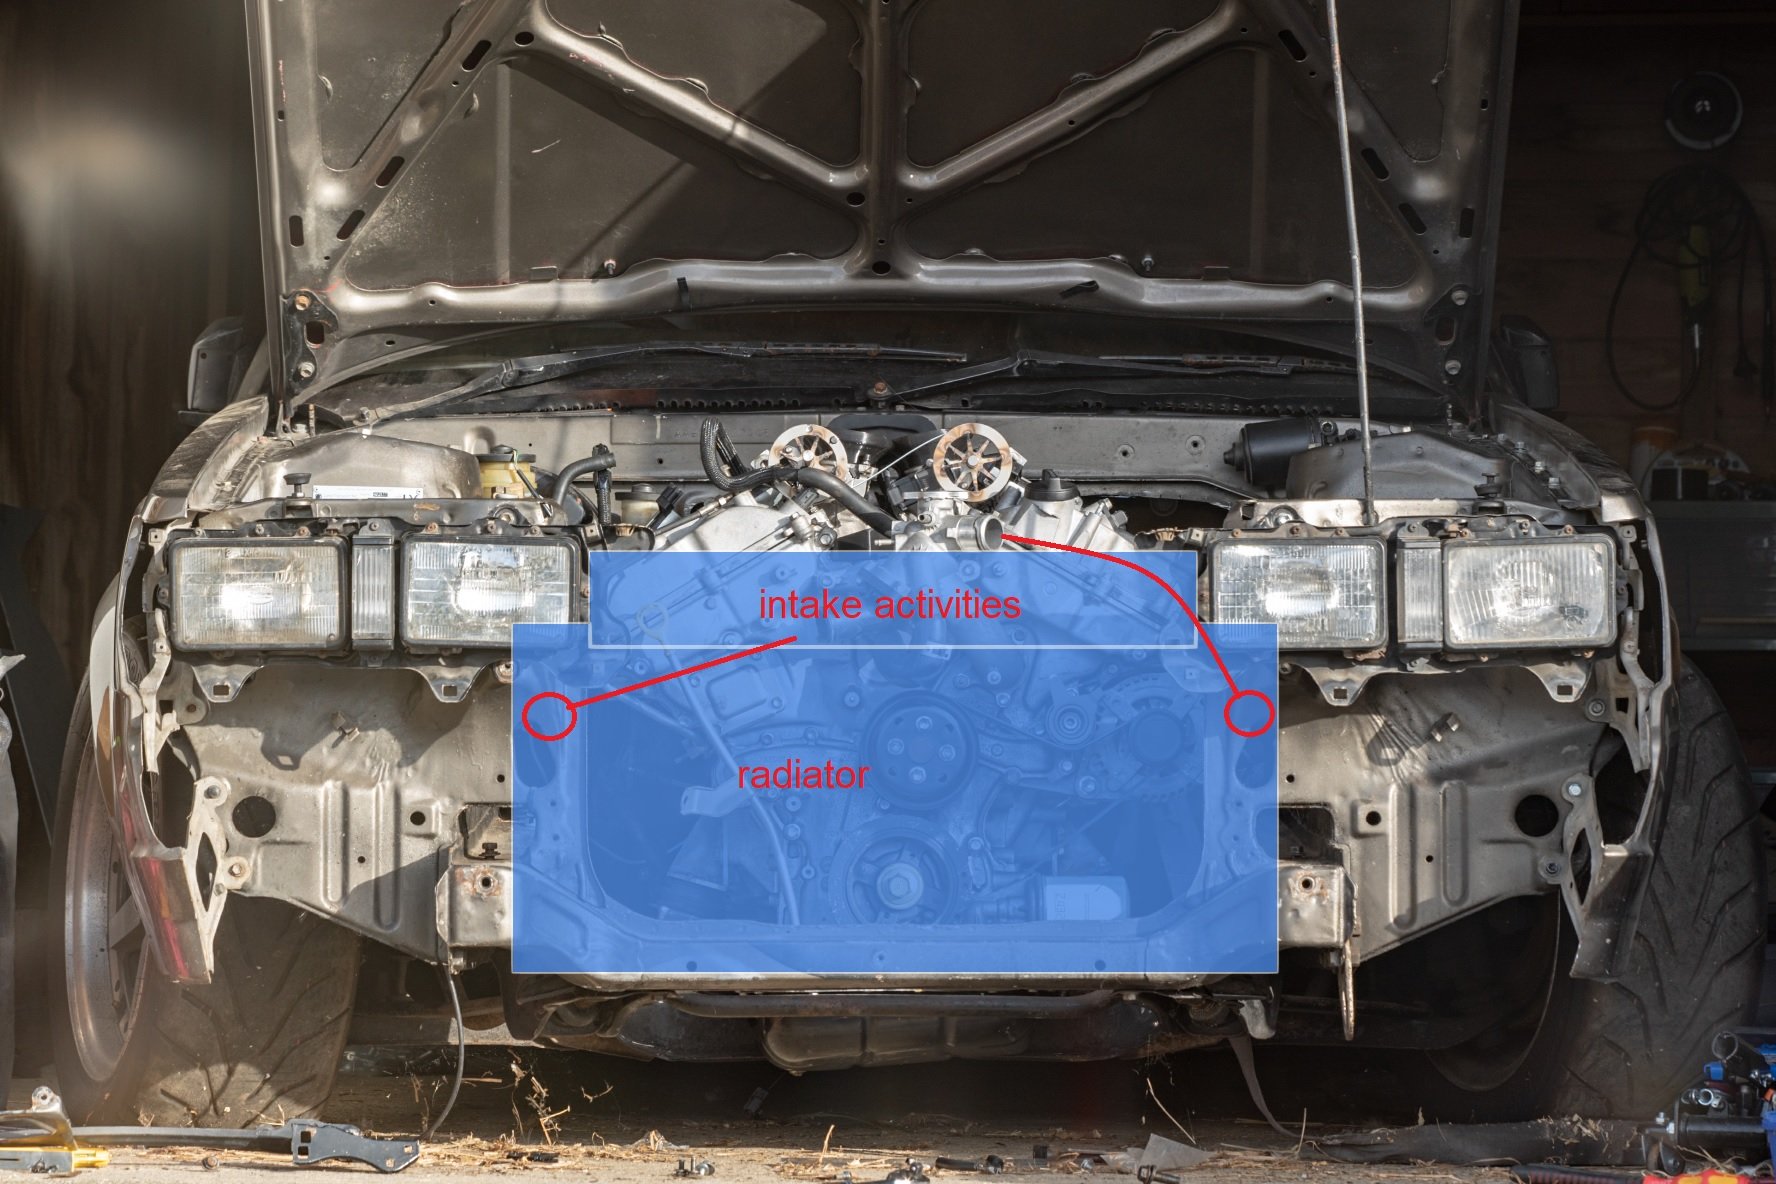
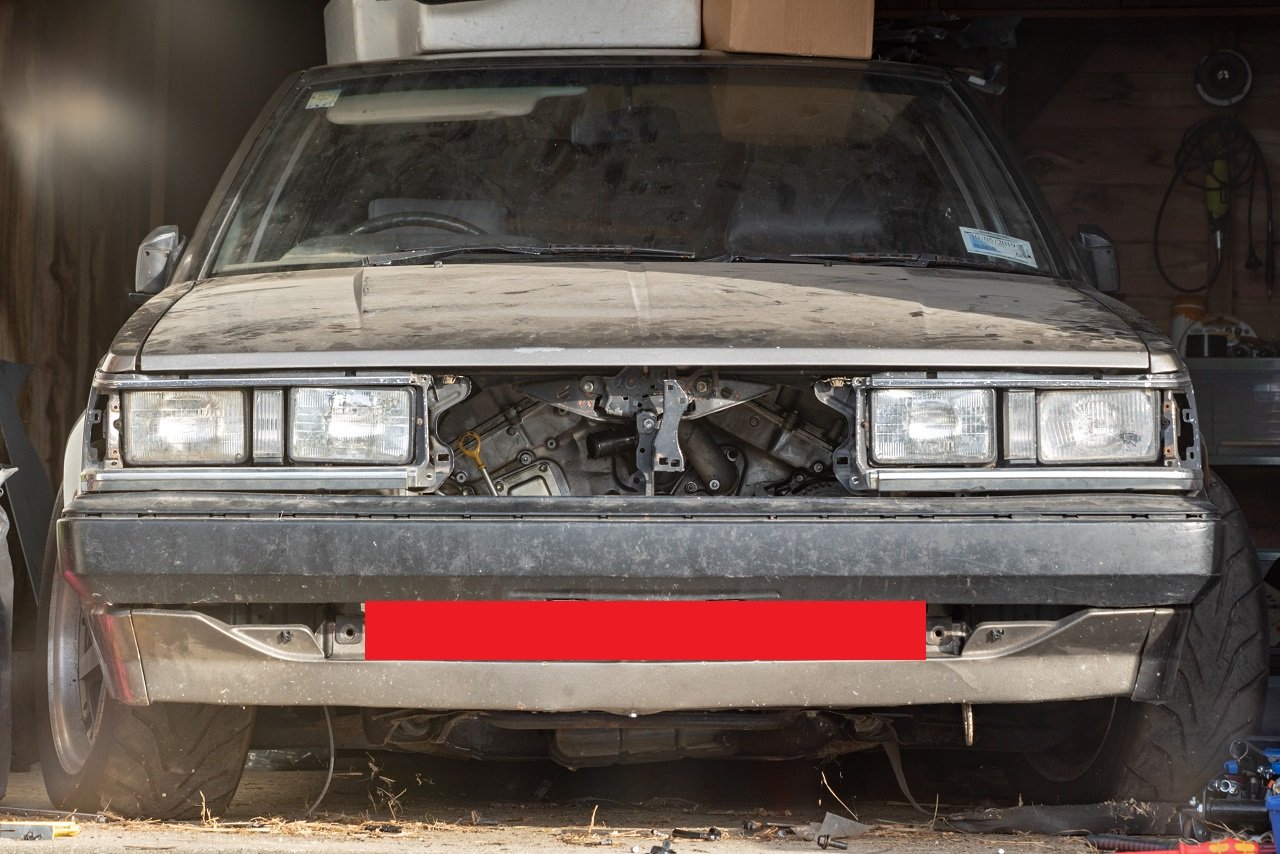
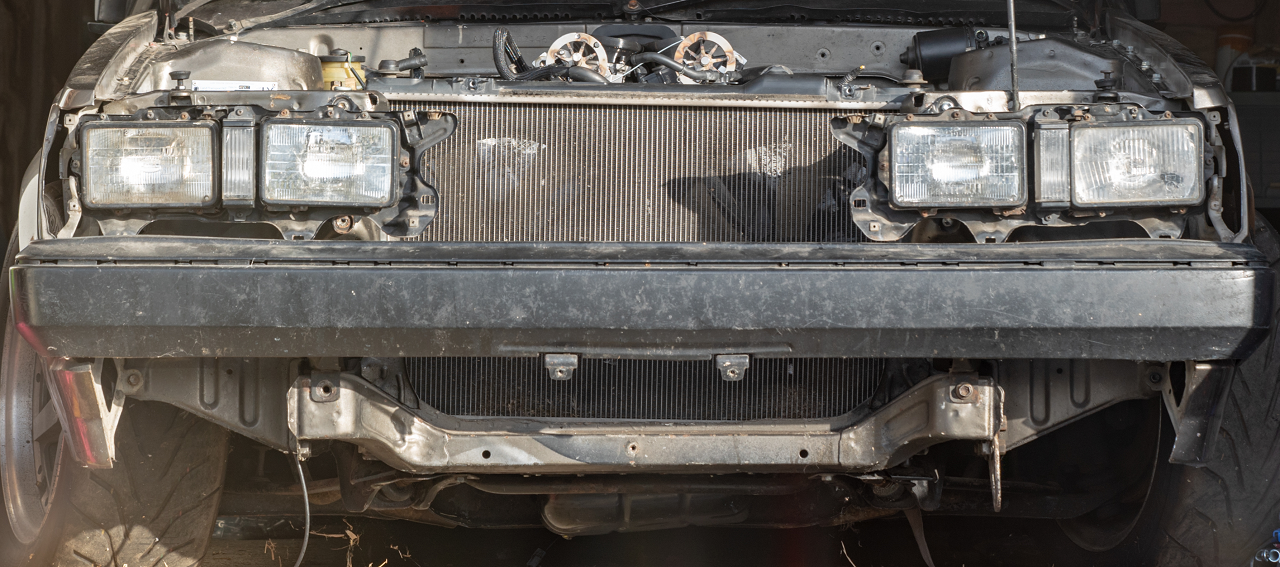
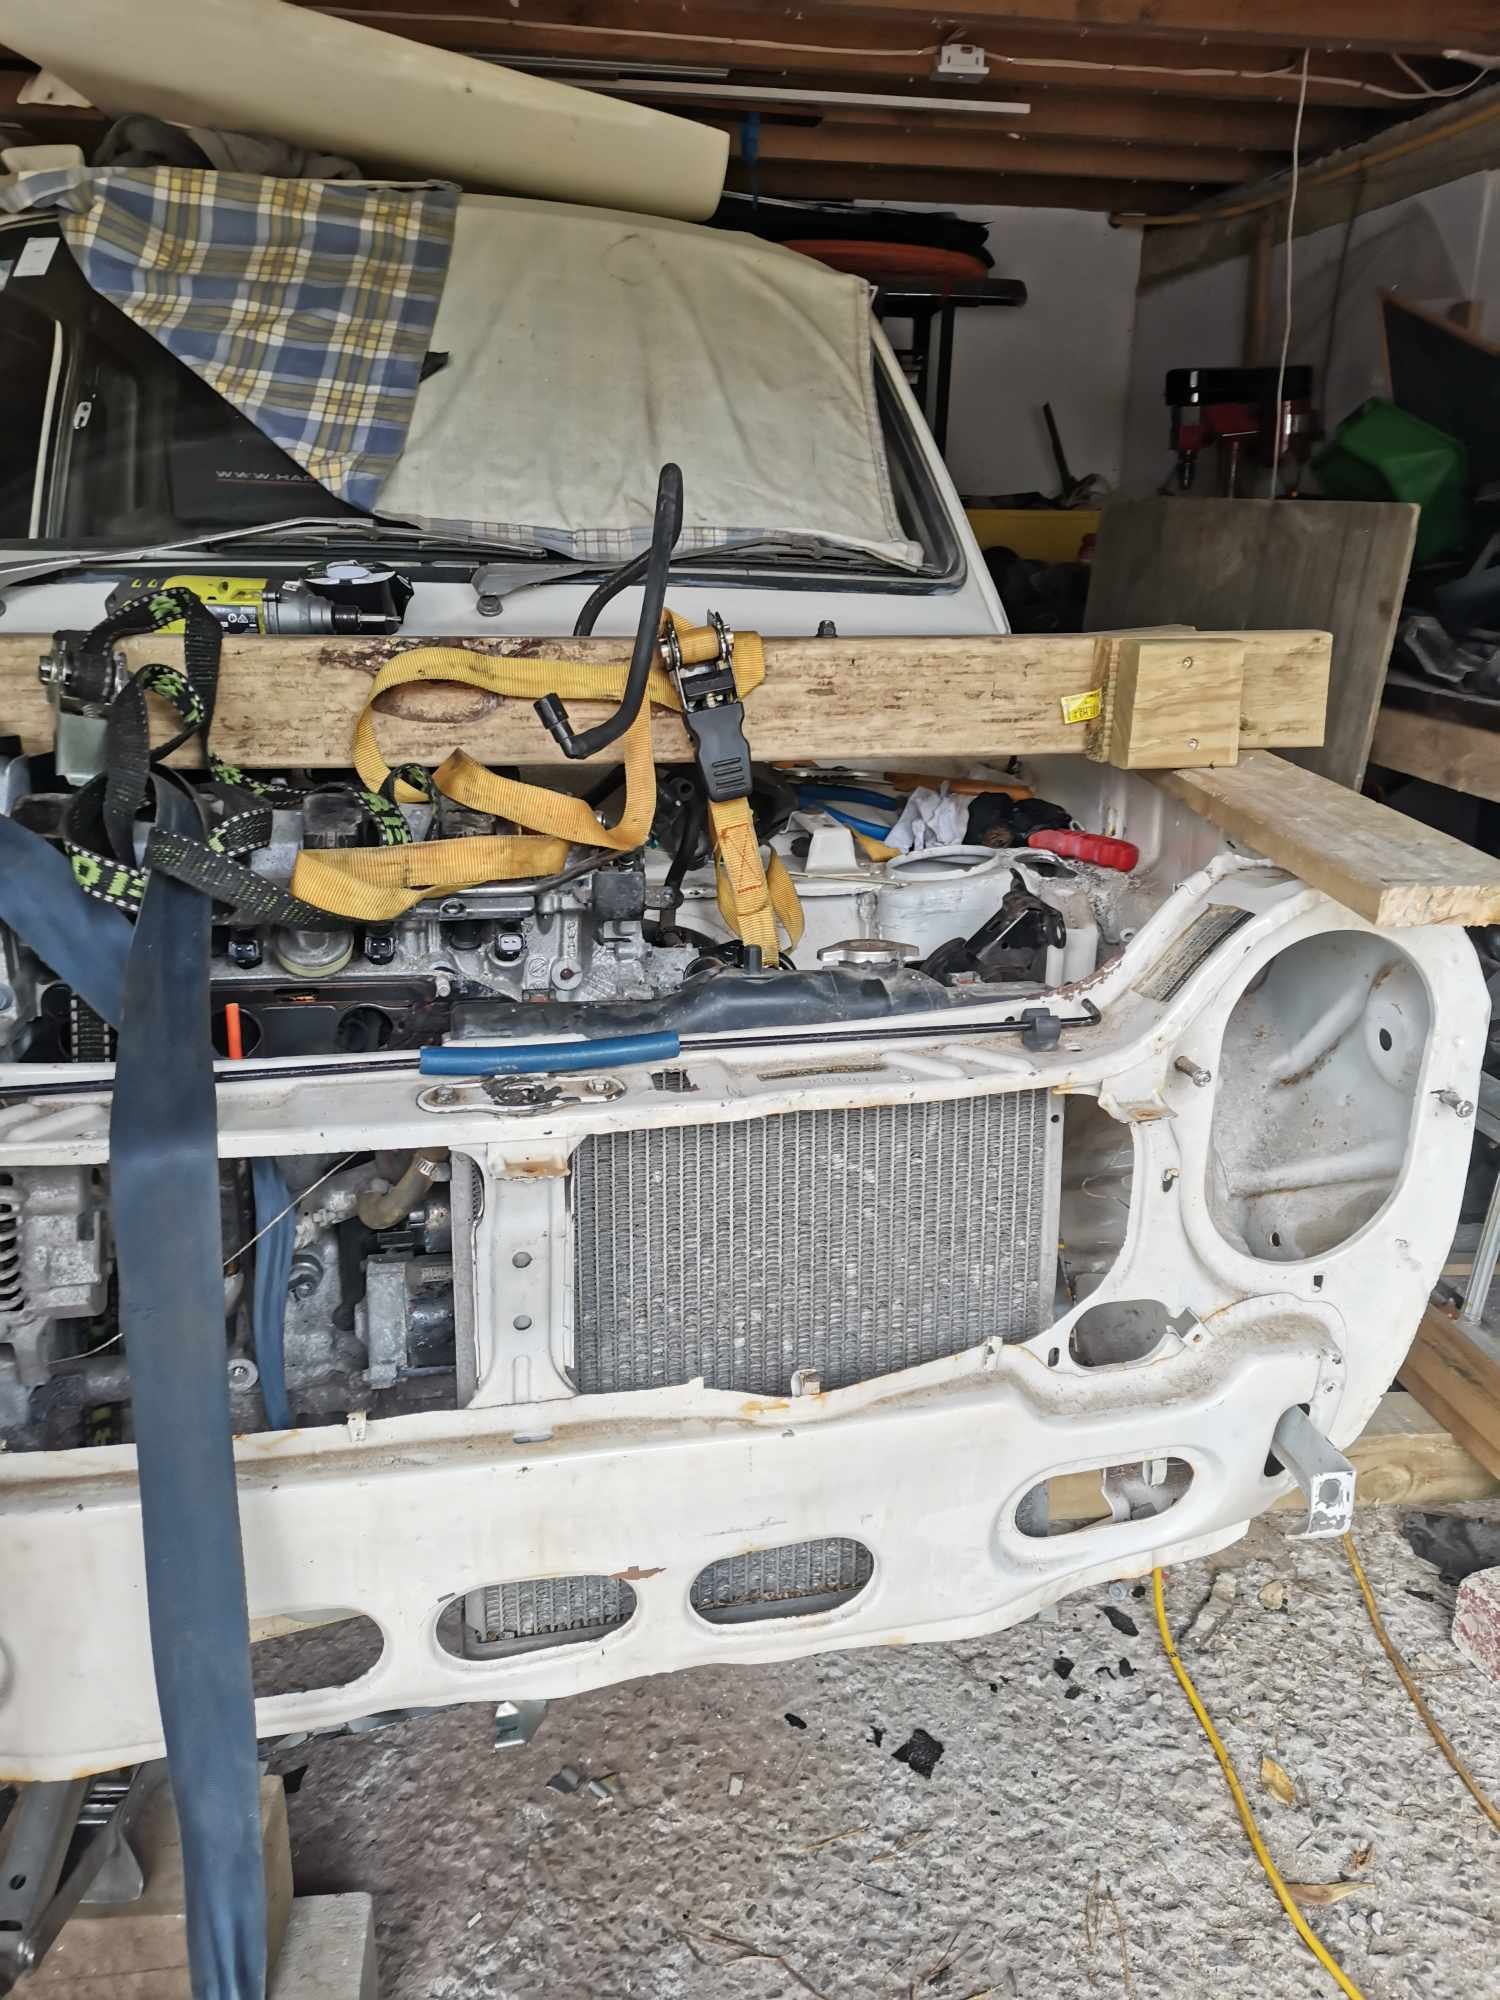
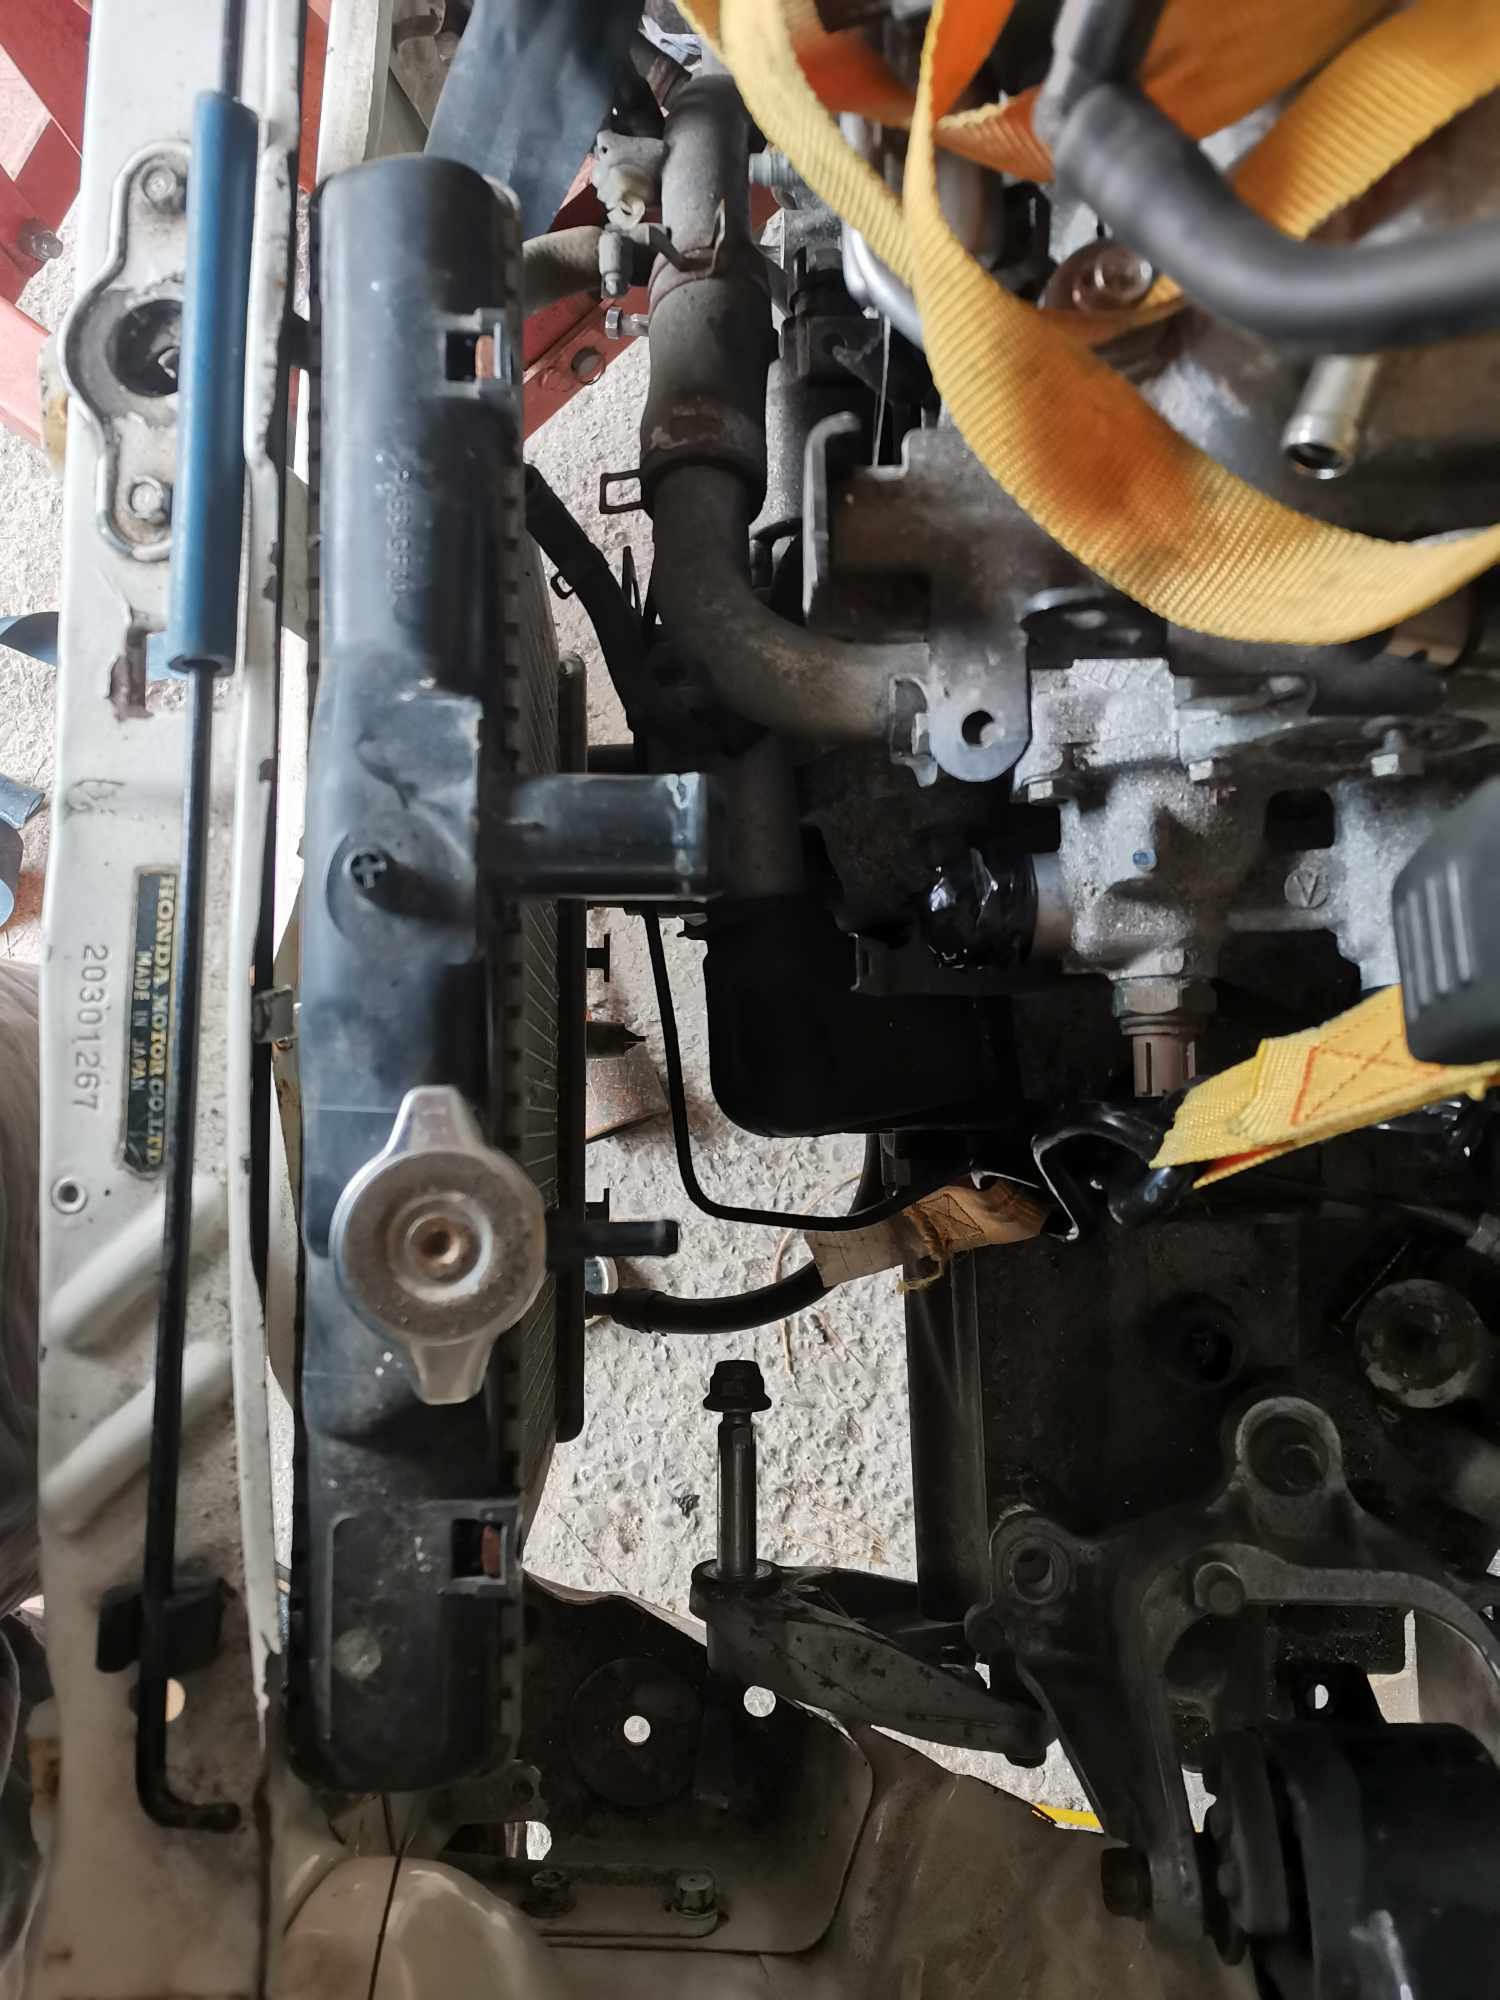
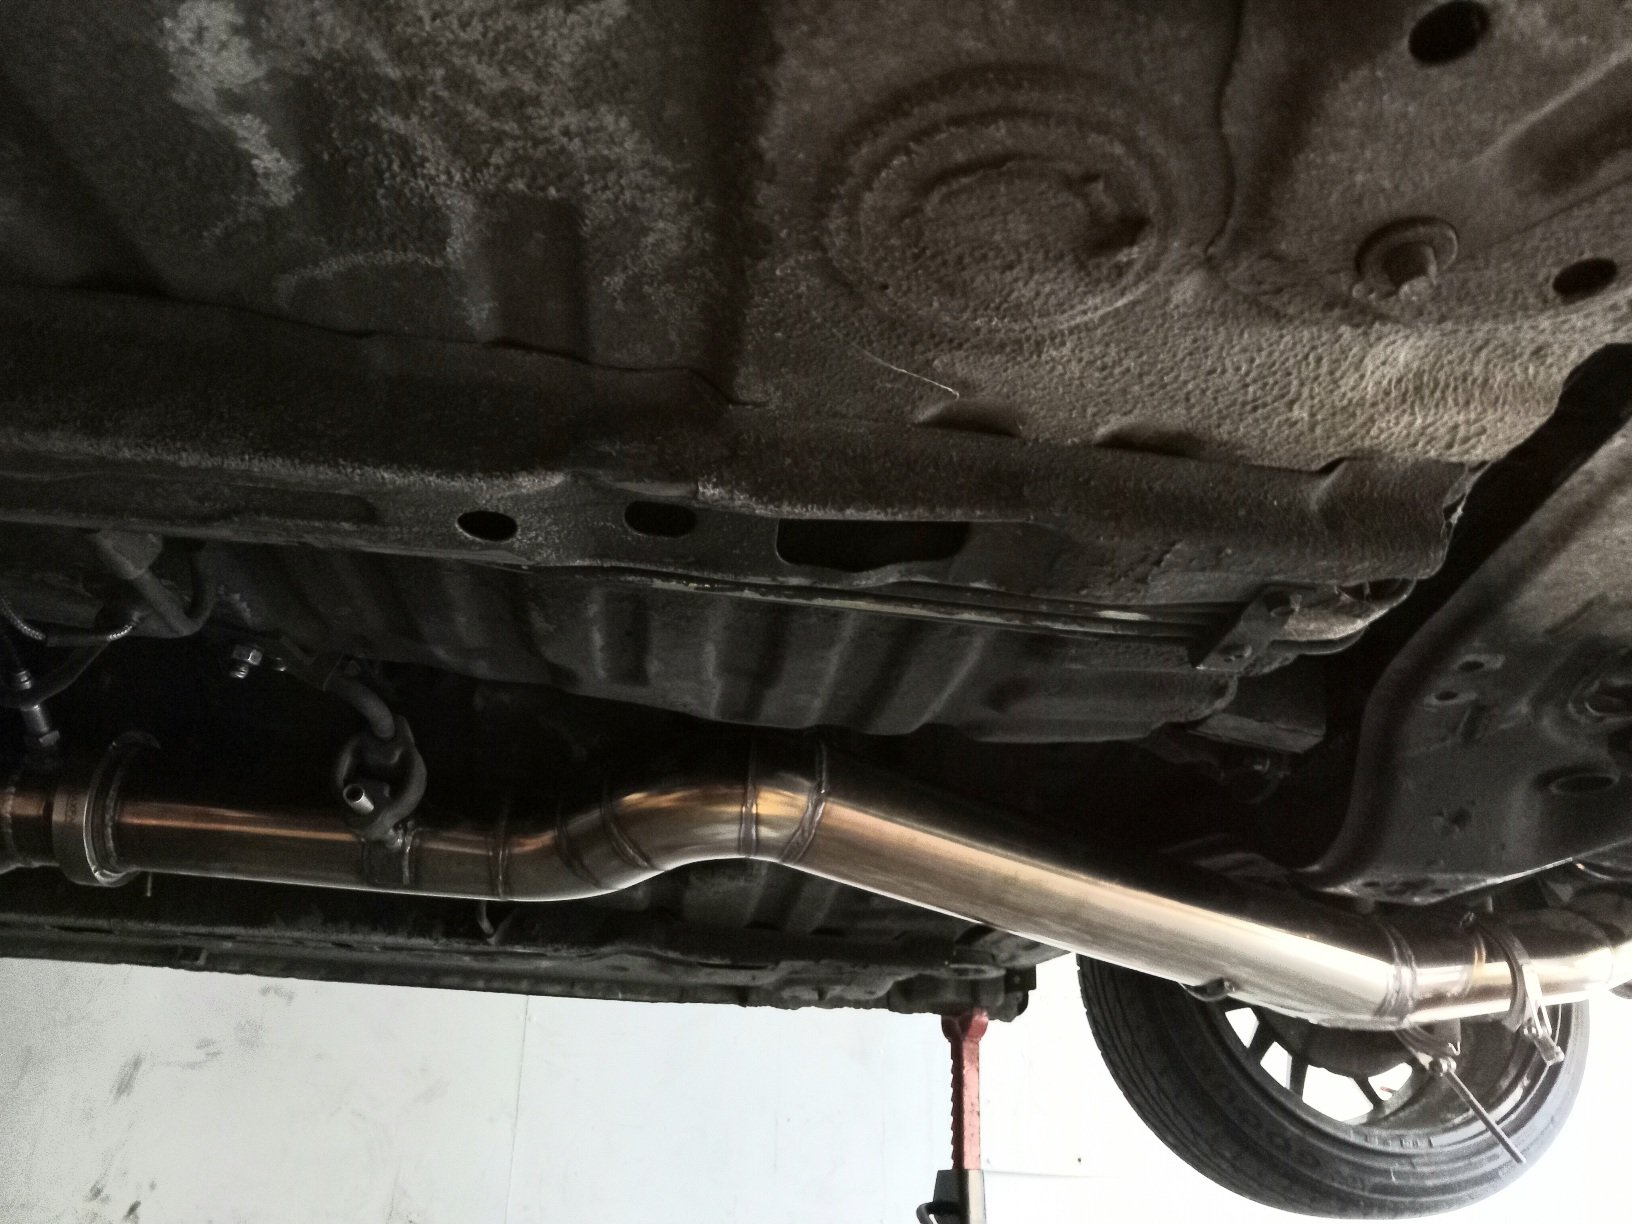
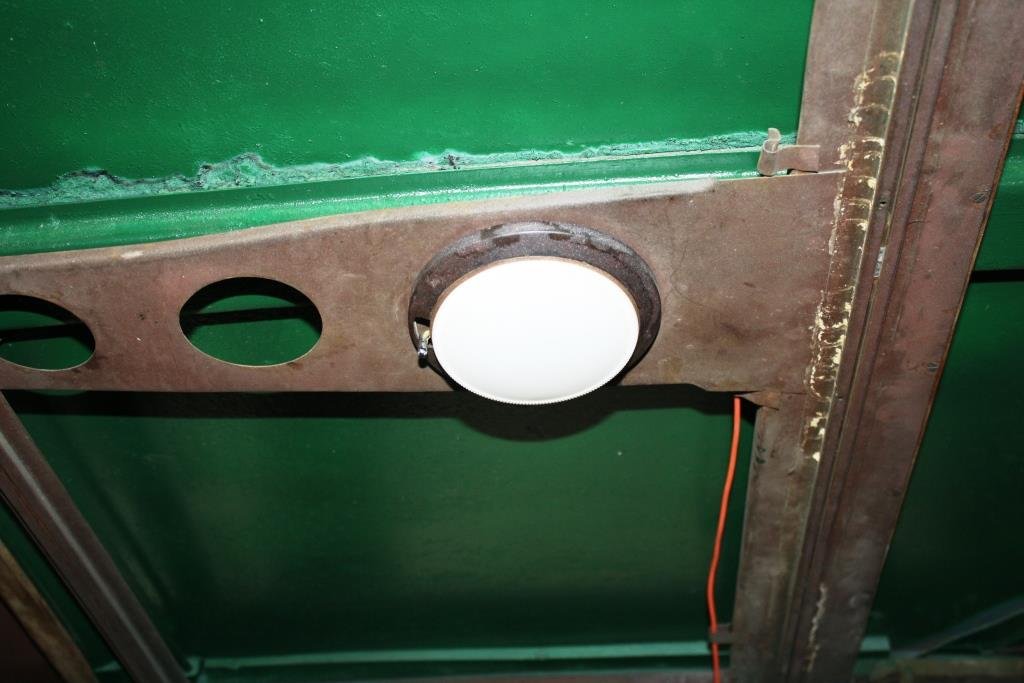
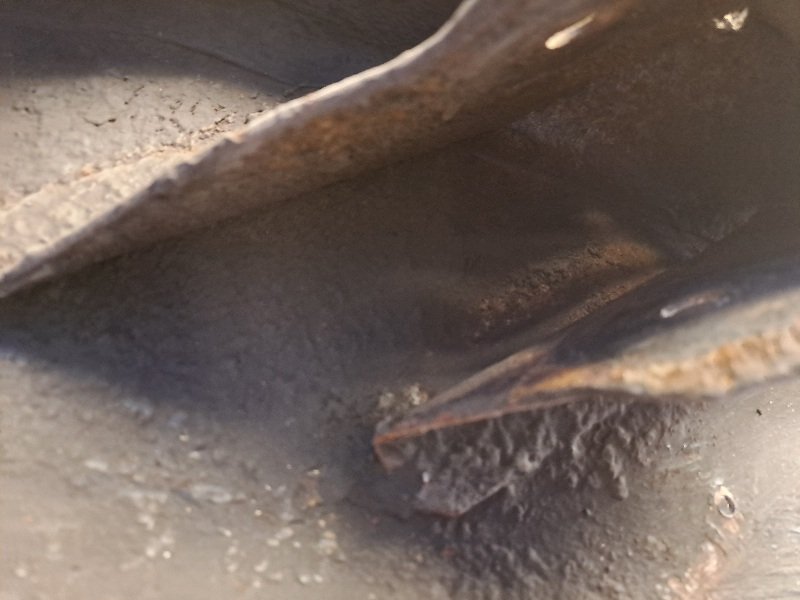
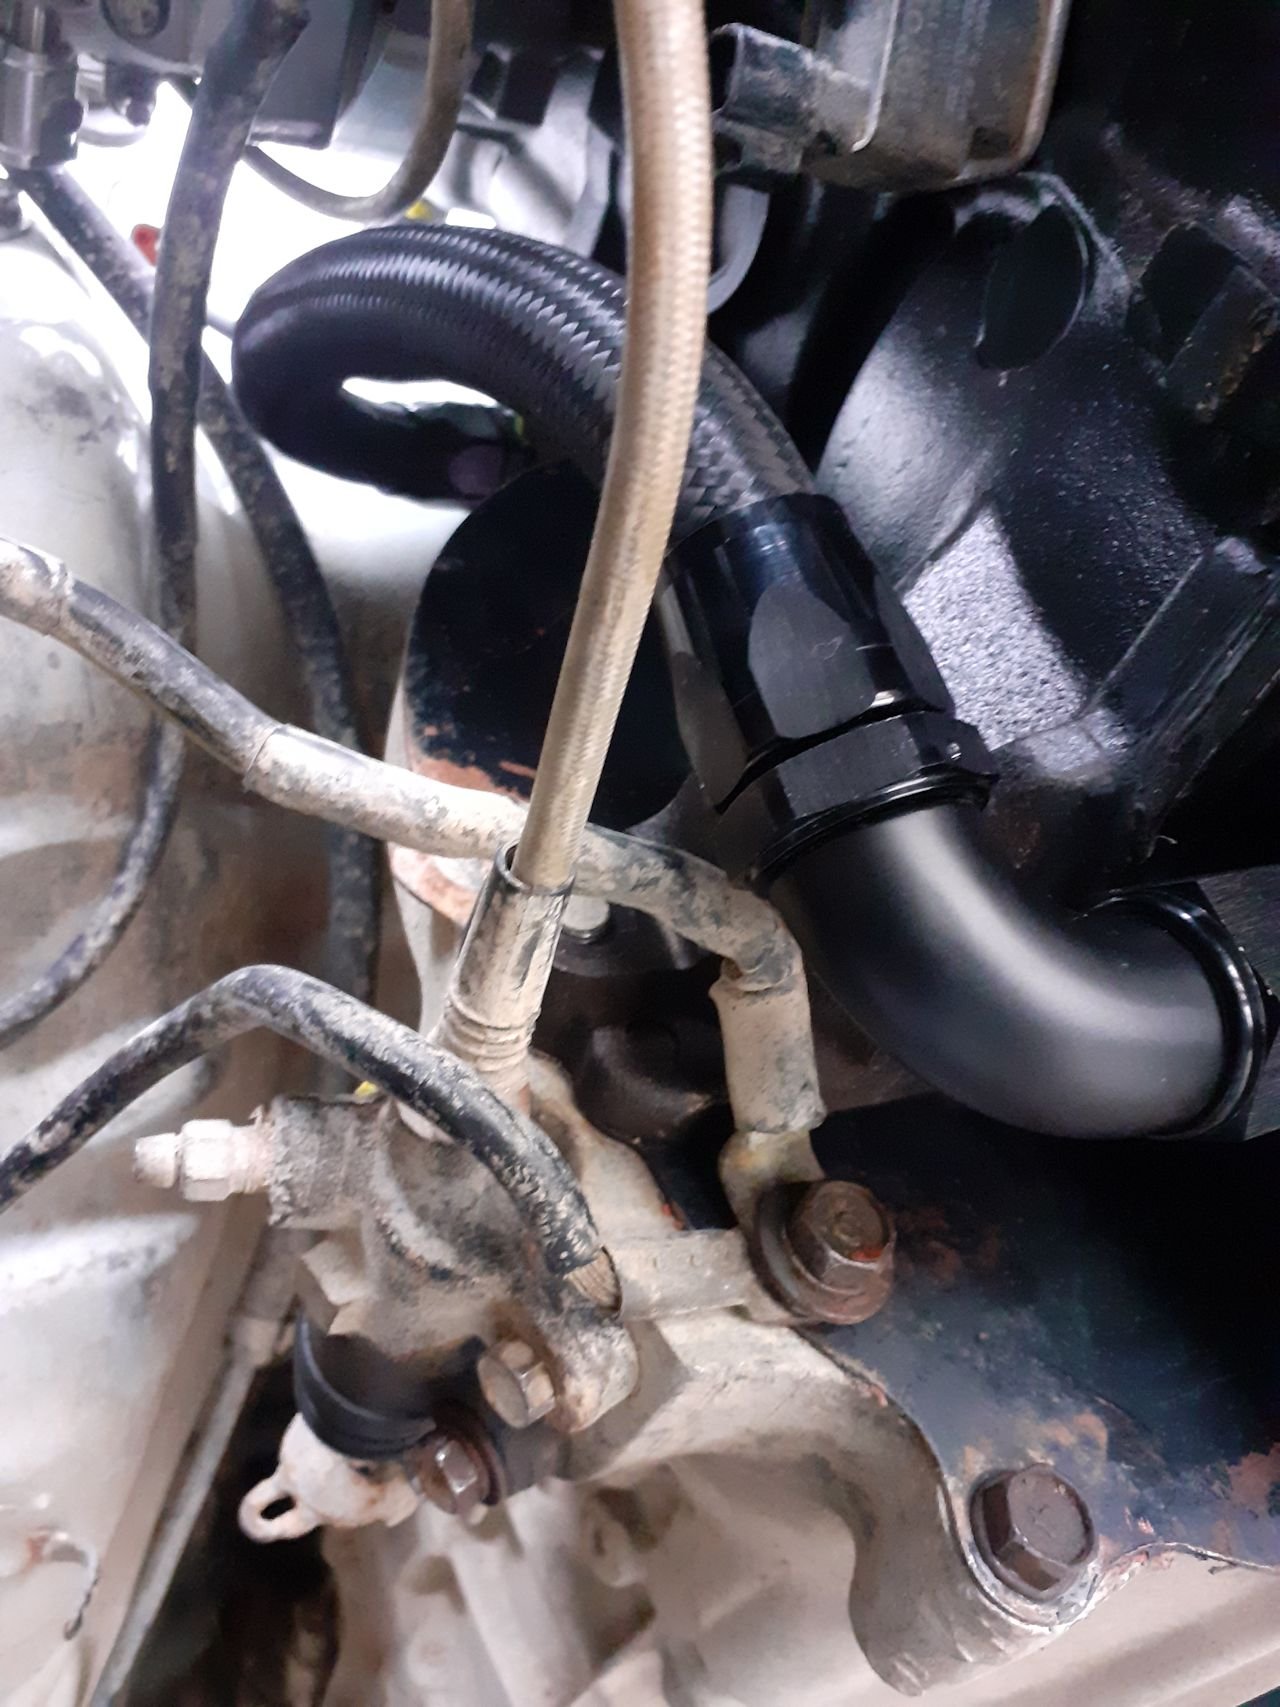
Radiator situation I've got the Mark X radiator in there currently, and although it made everything nice in a lot of ways in the back of my brain I know it's just not going to work quite right. As the top pipe sits too high. You can see it sits a little higher than the top crossmember too, and this isnt on any mounts yet. Just sitting hard against the bottom. The motor's radiator cap (in blue) sits a little lower than the radiator, and the top hose to the radiator flows uphill towards the radiator. All bad news for ever trying to bleed the air out of this thing. Another issue is that I'd love to have a front facing intake airbox that goes through to the front grill, like a lot of the BTCC type cars have. The best option I've found for a low, wide, twin core radiator that doesnt have a radiator cap (and does have an air bleed) is from an SW20 MR2. Being so much shorter, I can dedicate all of the front grill area for the intake. And they're a common upgrade item for MR2s, so cheap and plentiful. The radiator is 5mm wider than my chassis rails, but the end tanks are alloy and on the sides. So will just need a little slice and reweld to fit at the bottom. If I dedicate the top grill to doort noises, then I dont have a huge amount of frontal area for the radiator coming in from just underneath the bumper. Possibly need to remove the bonnet catch as well, but I'd prefer to keep it over having bonnet pins or whatever. This is a rough approximation of how much space I've got for each thing Red is intake stuff, blue radiator stuff, white is the open area that the radiator can get air through. So a lot of the radiator area will be fairly useless if hard mounted against the front of the car, as it wont get any air flow. so I'll try mount it as far back as I can towards the engine. All of this stuff is a bit off topic to my path towards getting the engine fired up, but I've been working on that too. Last night cut the fuel rails a bit shorter, so there's more room at the back. for the fuel dampers without hitting the body. Then also had the underside of the rails milled down so the throttle linkages dont hit the rail anymore. So that's just about all finished once I've retapped the ends and remade the AN lines to suit.
 16 points
 -
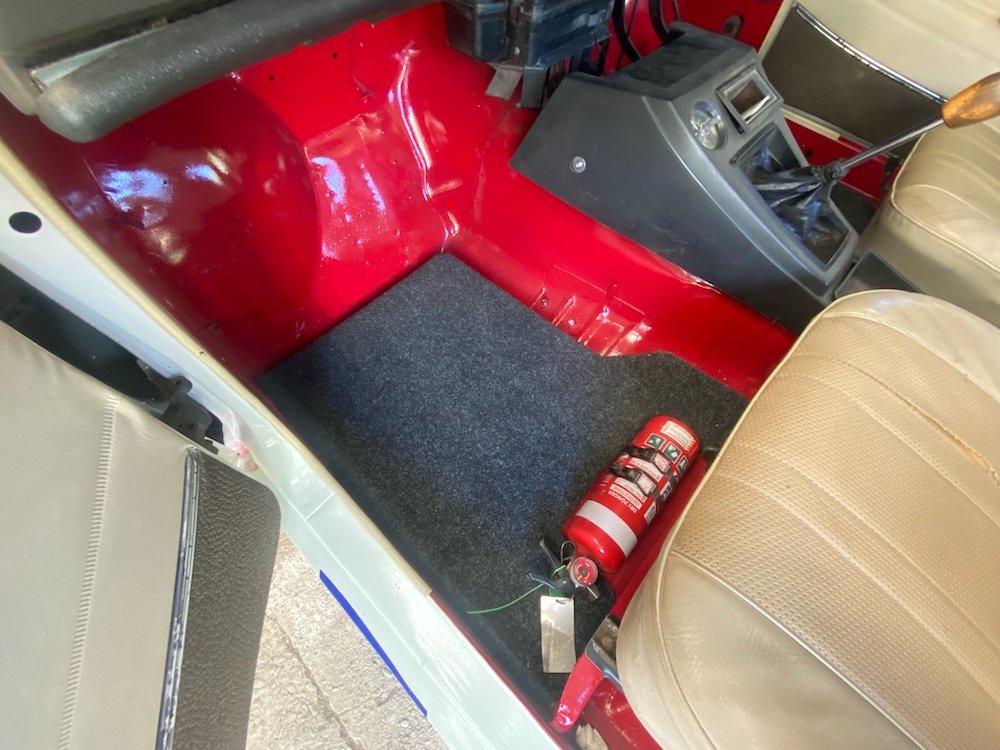
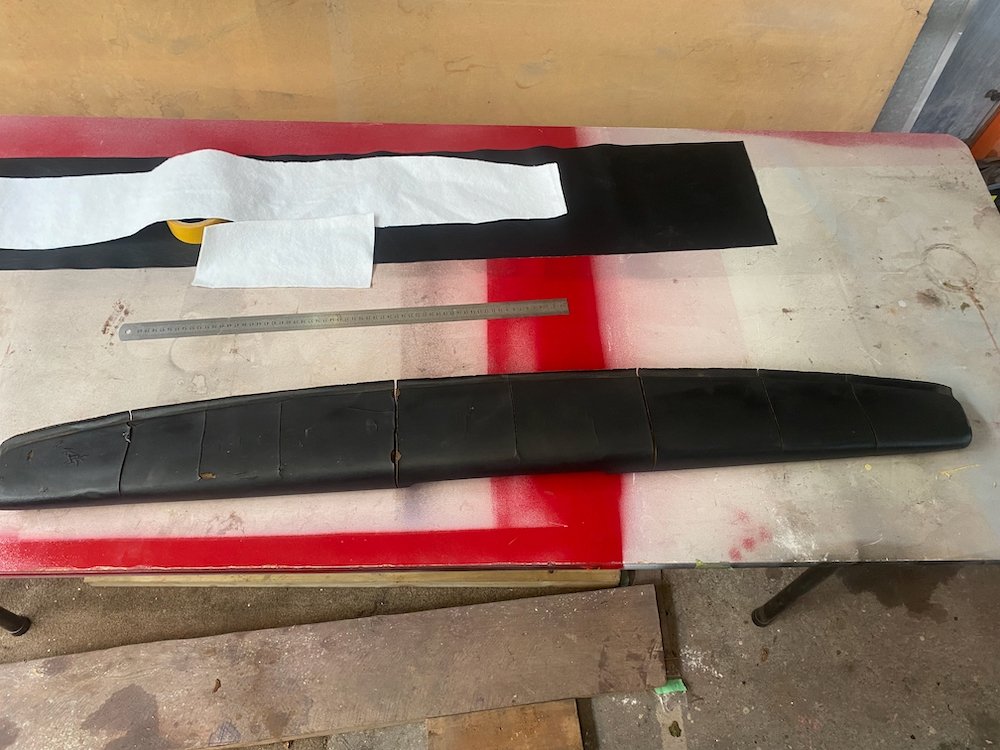
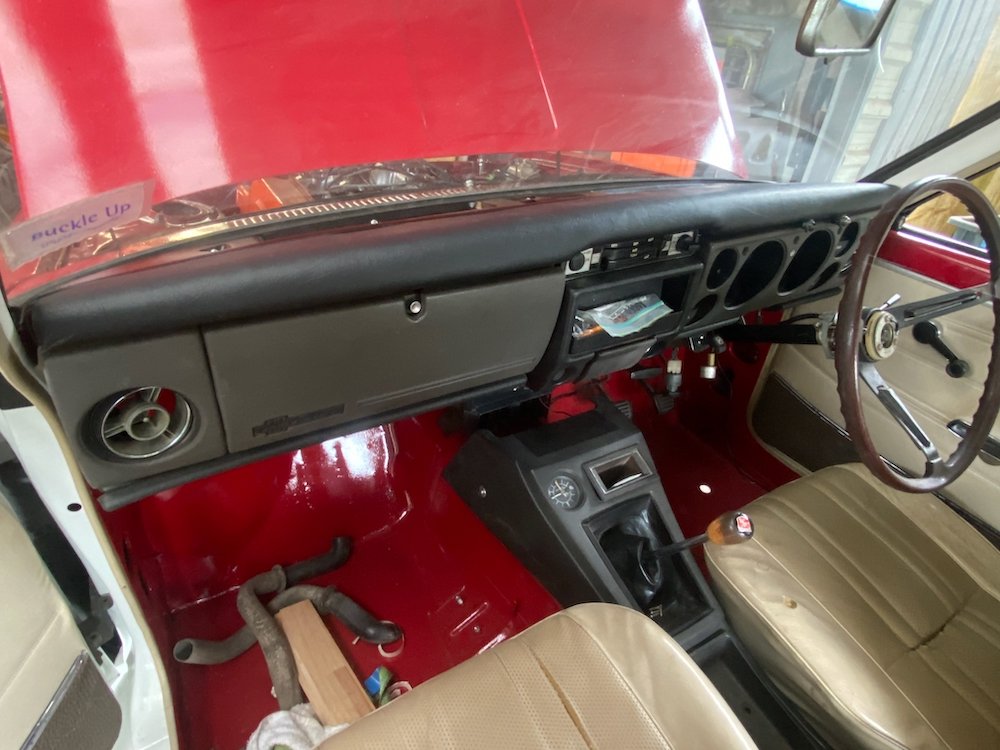
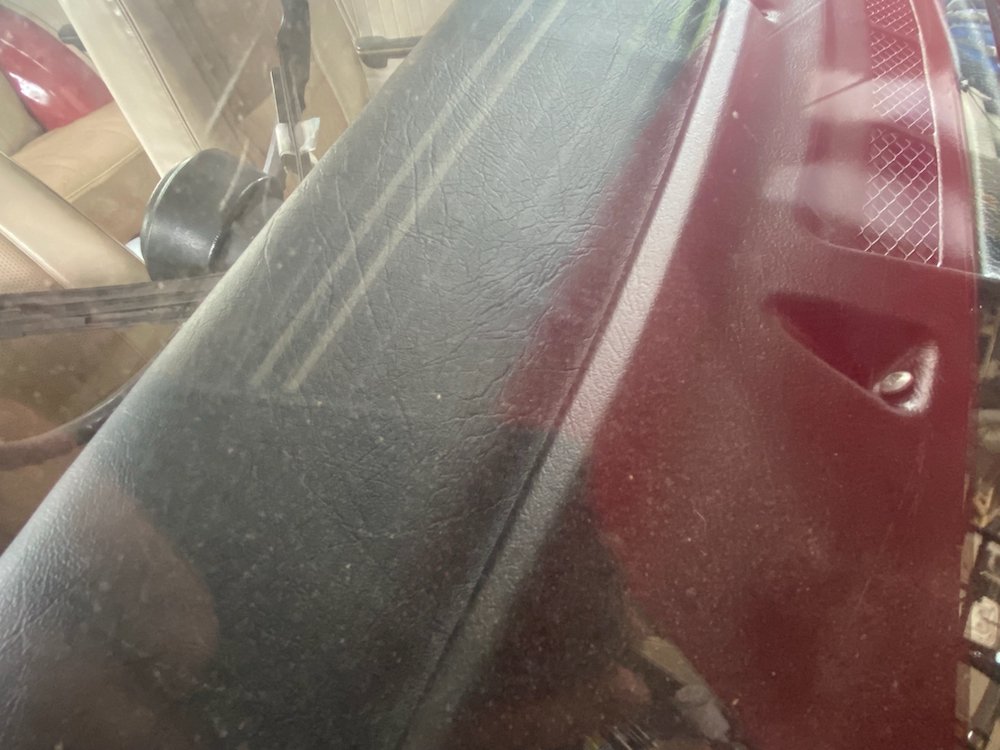
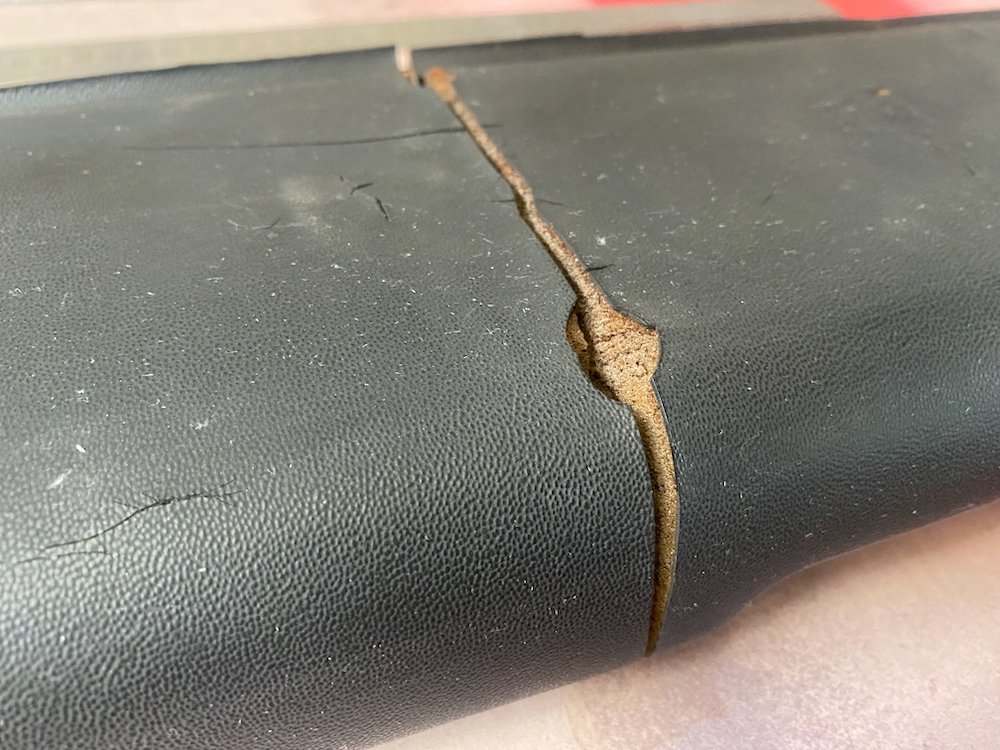
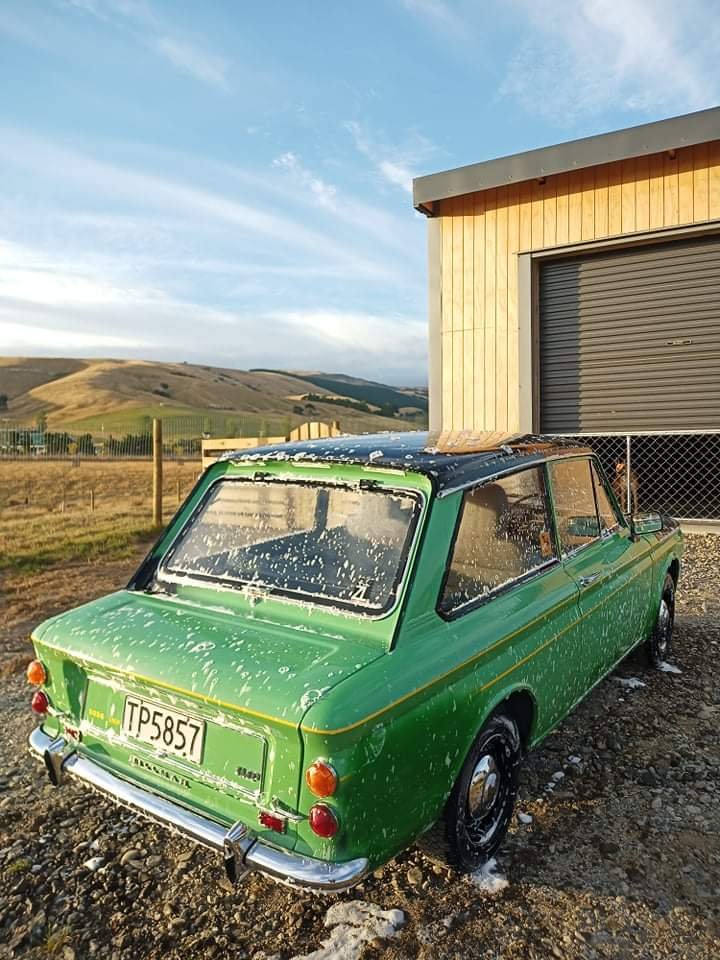
Interior polishing: Like most 50yo cars, the dashpad had cracked up pretty bad, long term i'd like to throw the check book at it, but in a budget friendly manner I called on my lovely GF and her knowledge of spotlight. We trimmed off the worst highpoints and double sided taped a layer of tablecloth liner to the pad, the idea here was the padding would hide the worst of the cracking once the vinyl leather was stretched over This was put on with the bare minimum of contact adhesive to keep the dashpad in close to original shape if needed for proper restoration further down the track. Finish result blends in well, of course the corners are a bit messy, but far nicer to look at than the old pad. Haven't been able to make a firm decision on the carpets but had an idea Chomp out some 7mm marine ply on the cnc, wrap in carpet offcuts from the 4wd.... Floormats that don't shuffle around.
11 points
-
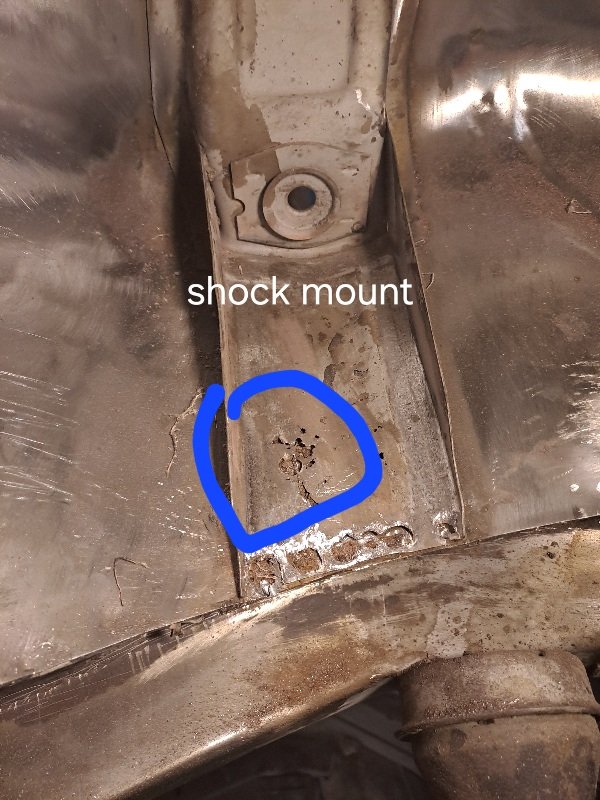
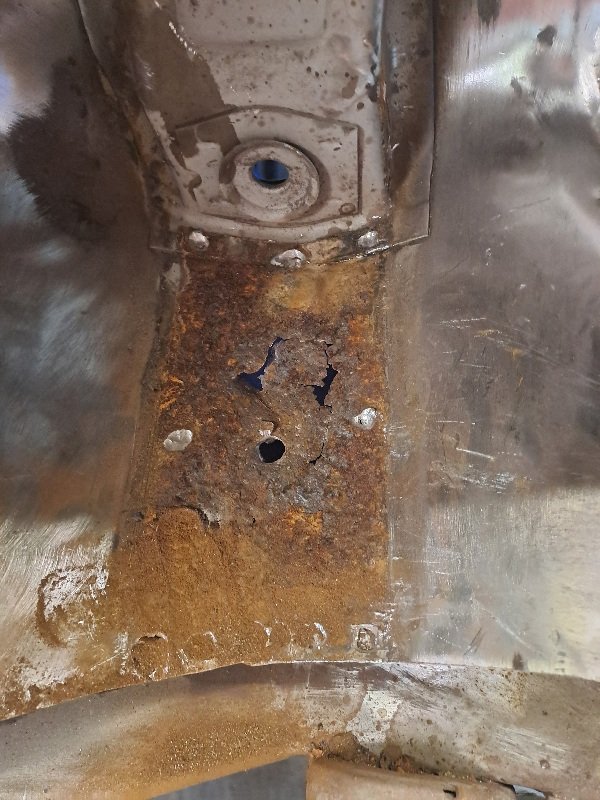
So chipping away I've found that having the options to sand blast the nooks n crannys works well and reduces the amount of dust and sand everywhere. On surfaces with underseal the petrol and rag method seems to be most effective. Followed by wire wheel or strip disk. I've started to tackle drivers real wheel well in this episode.
9 points
-
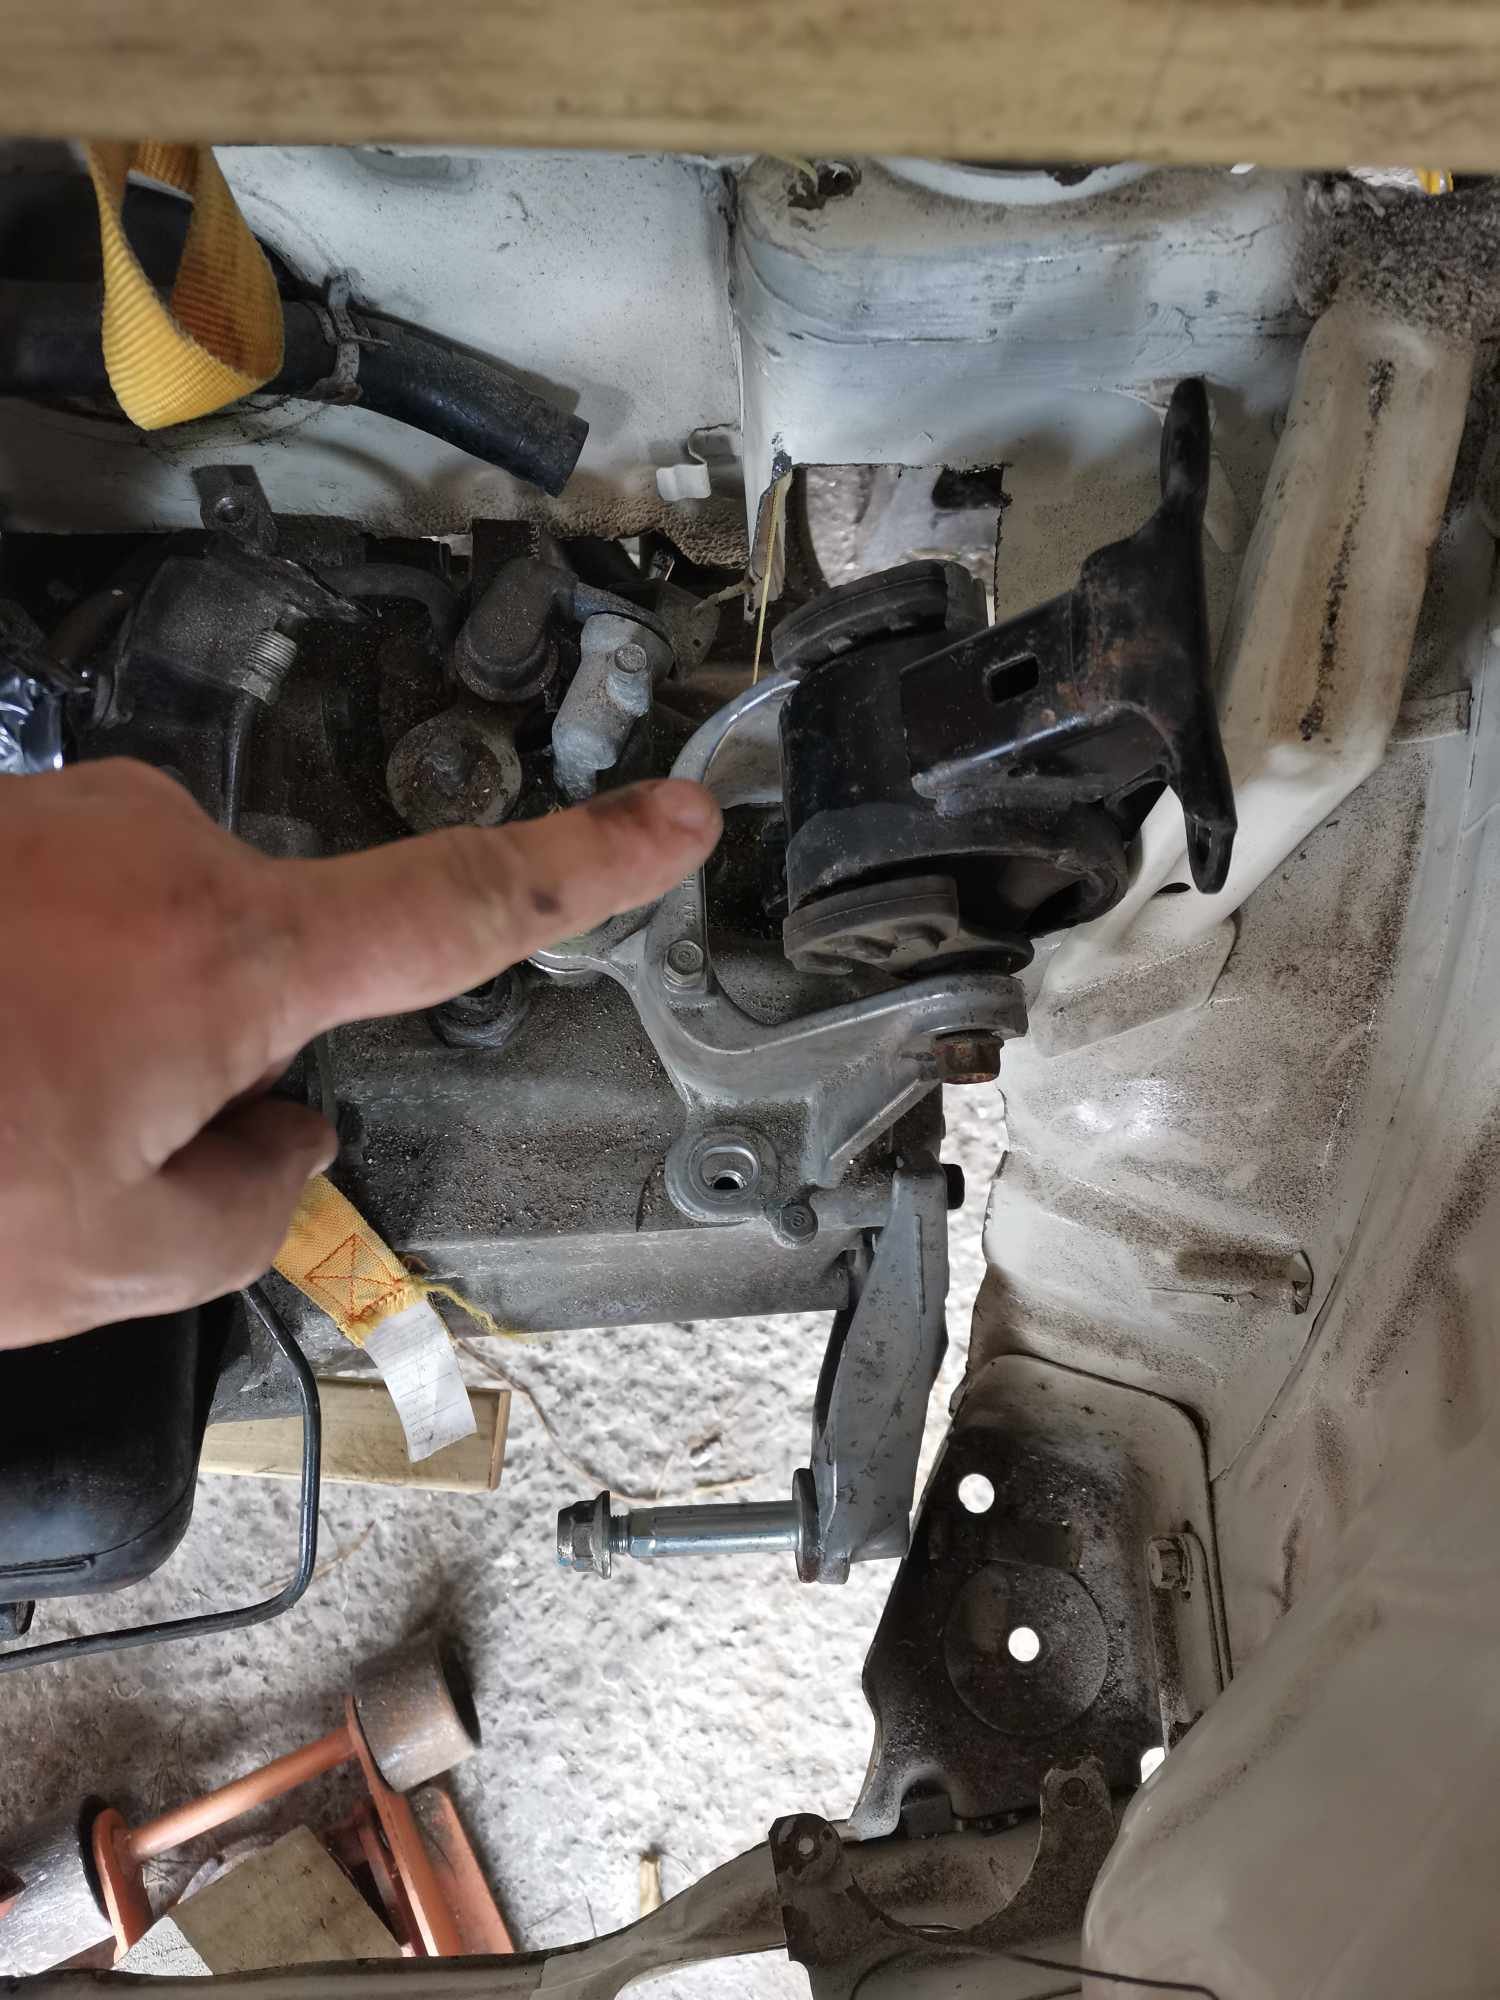
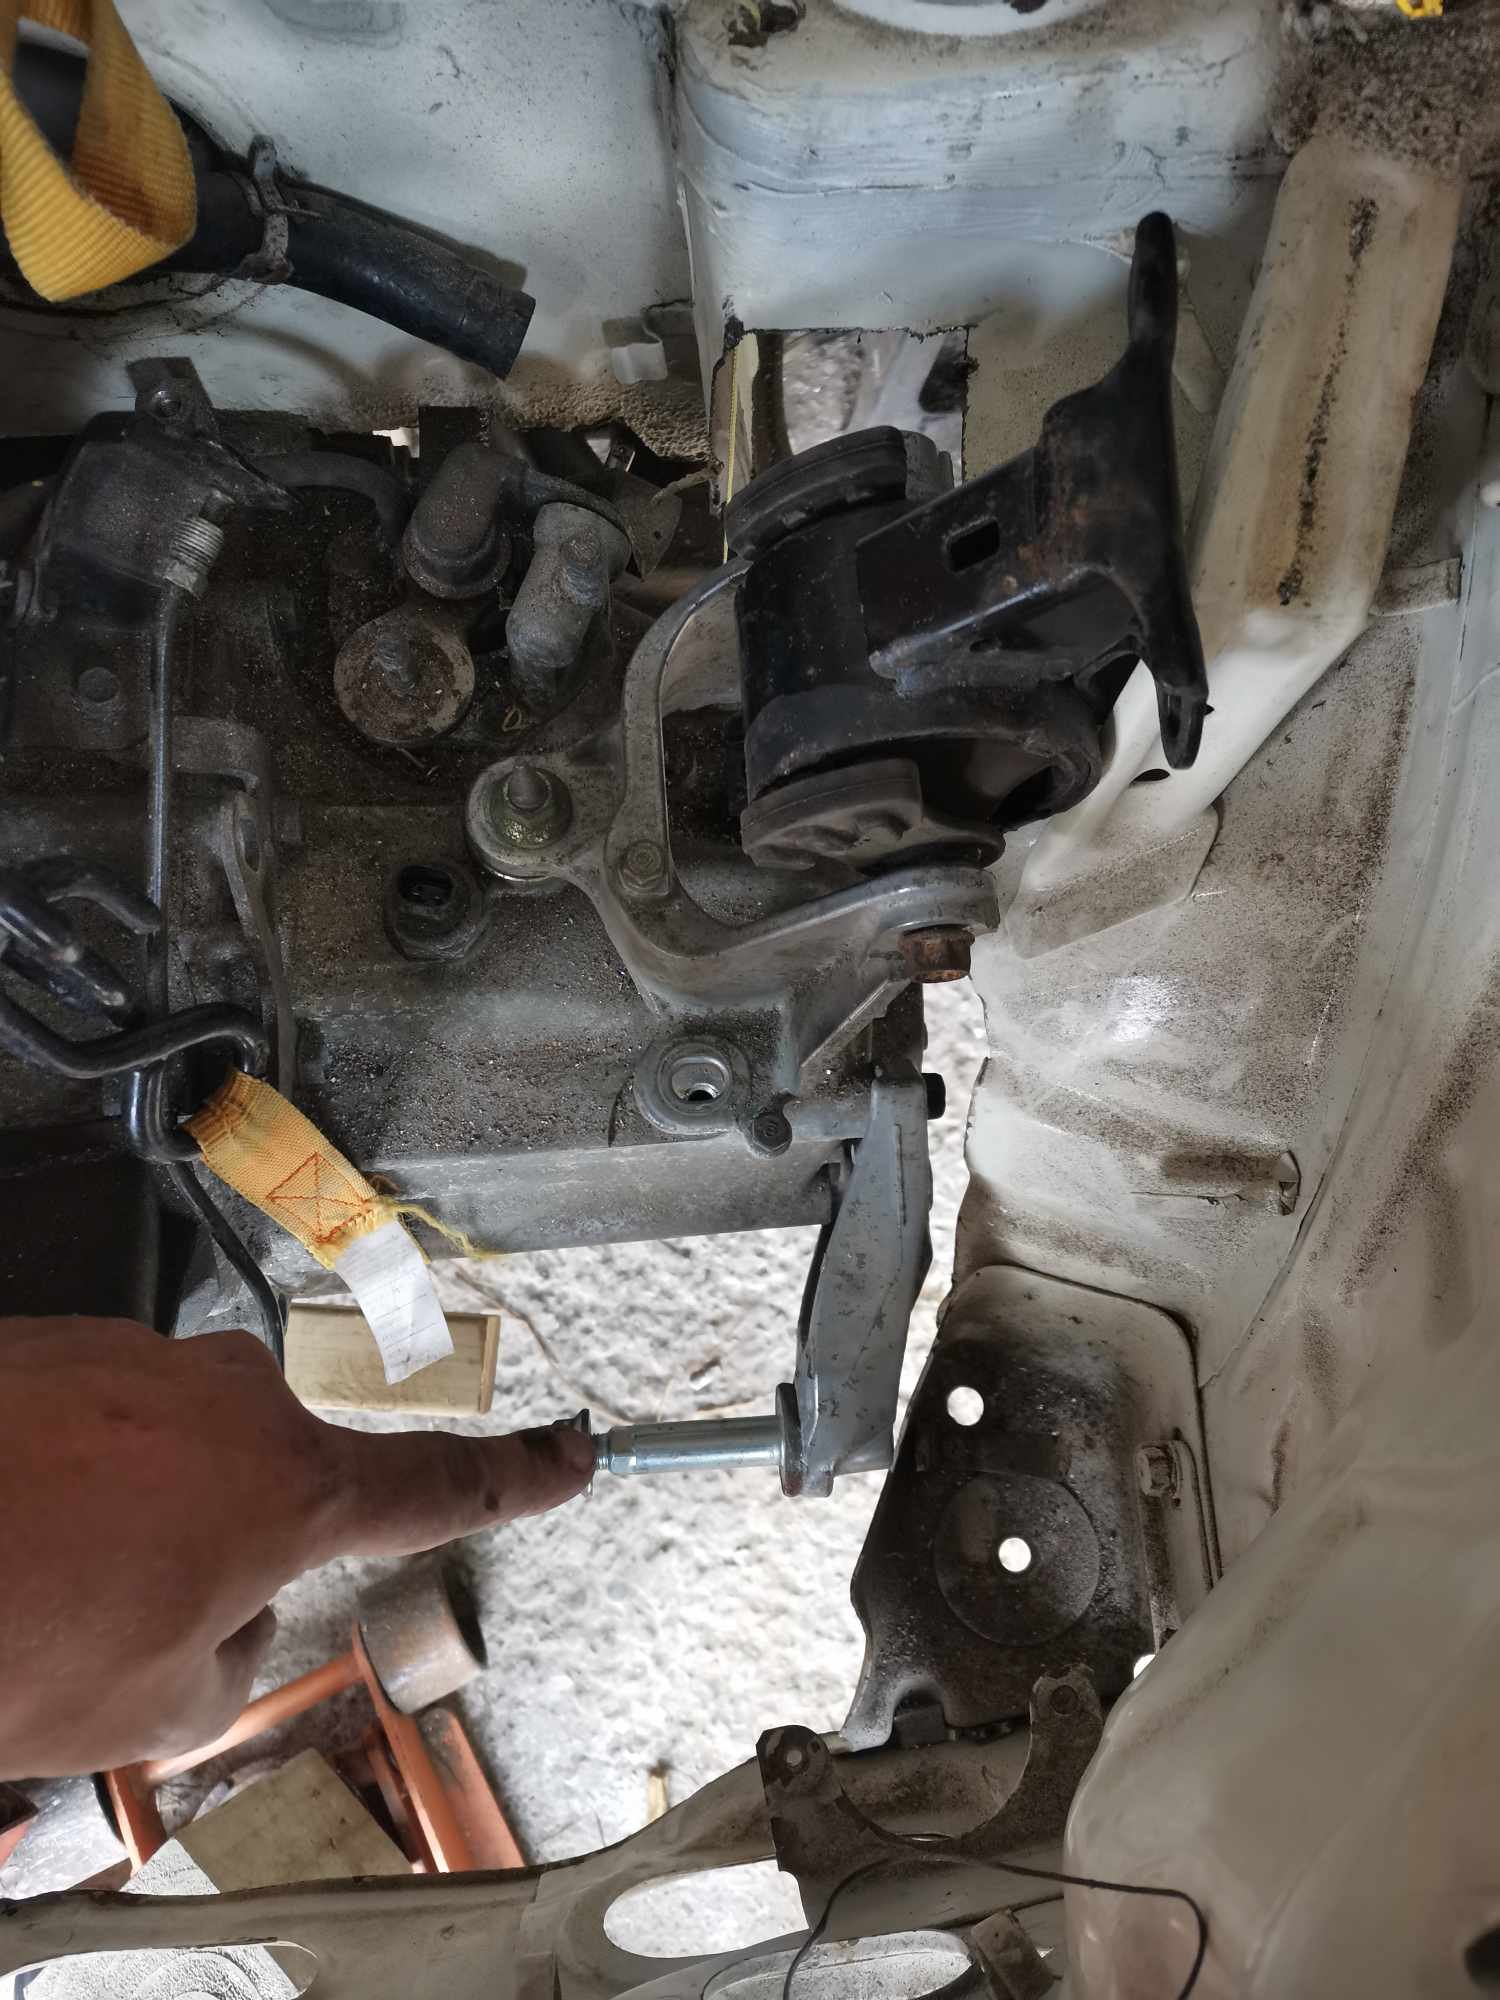
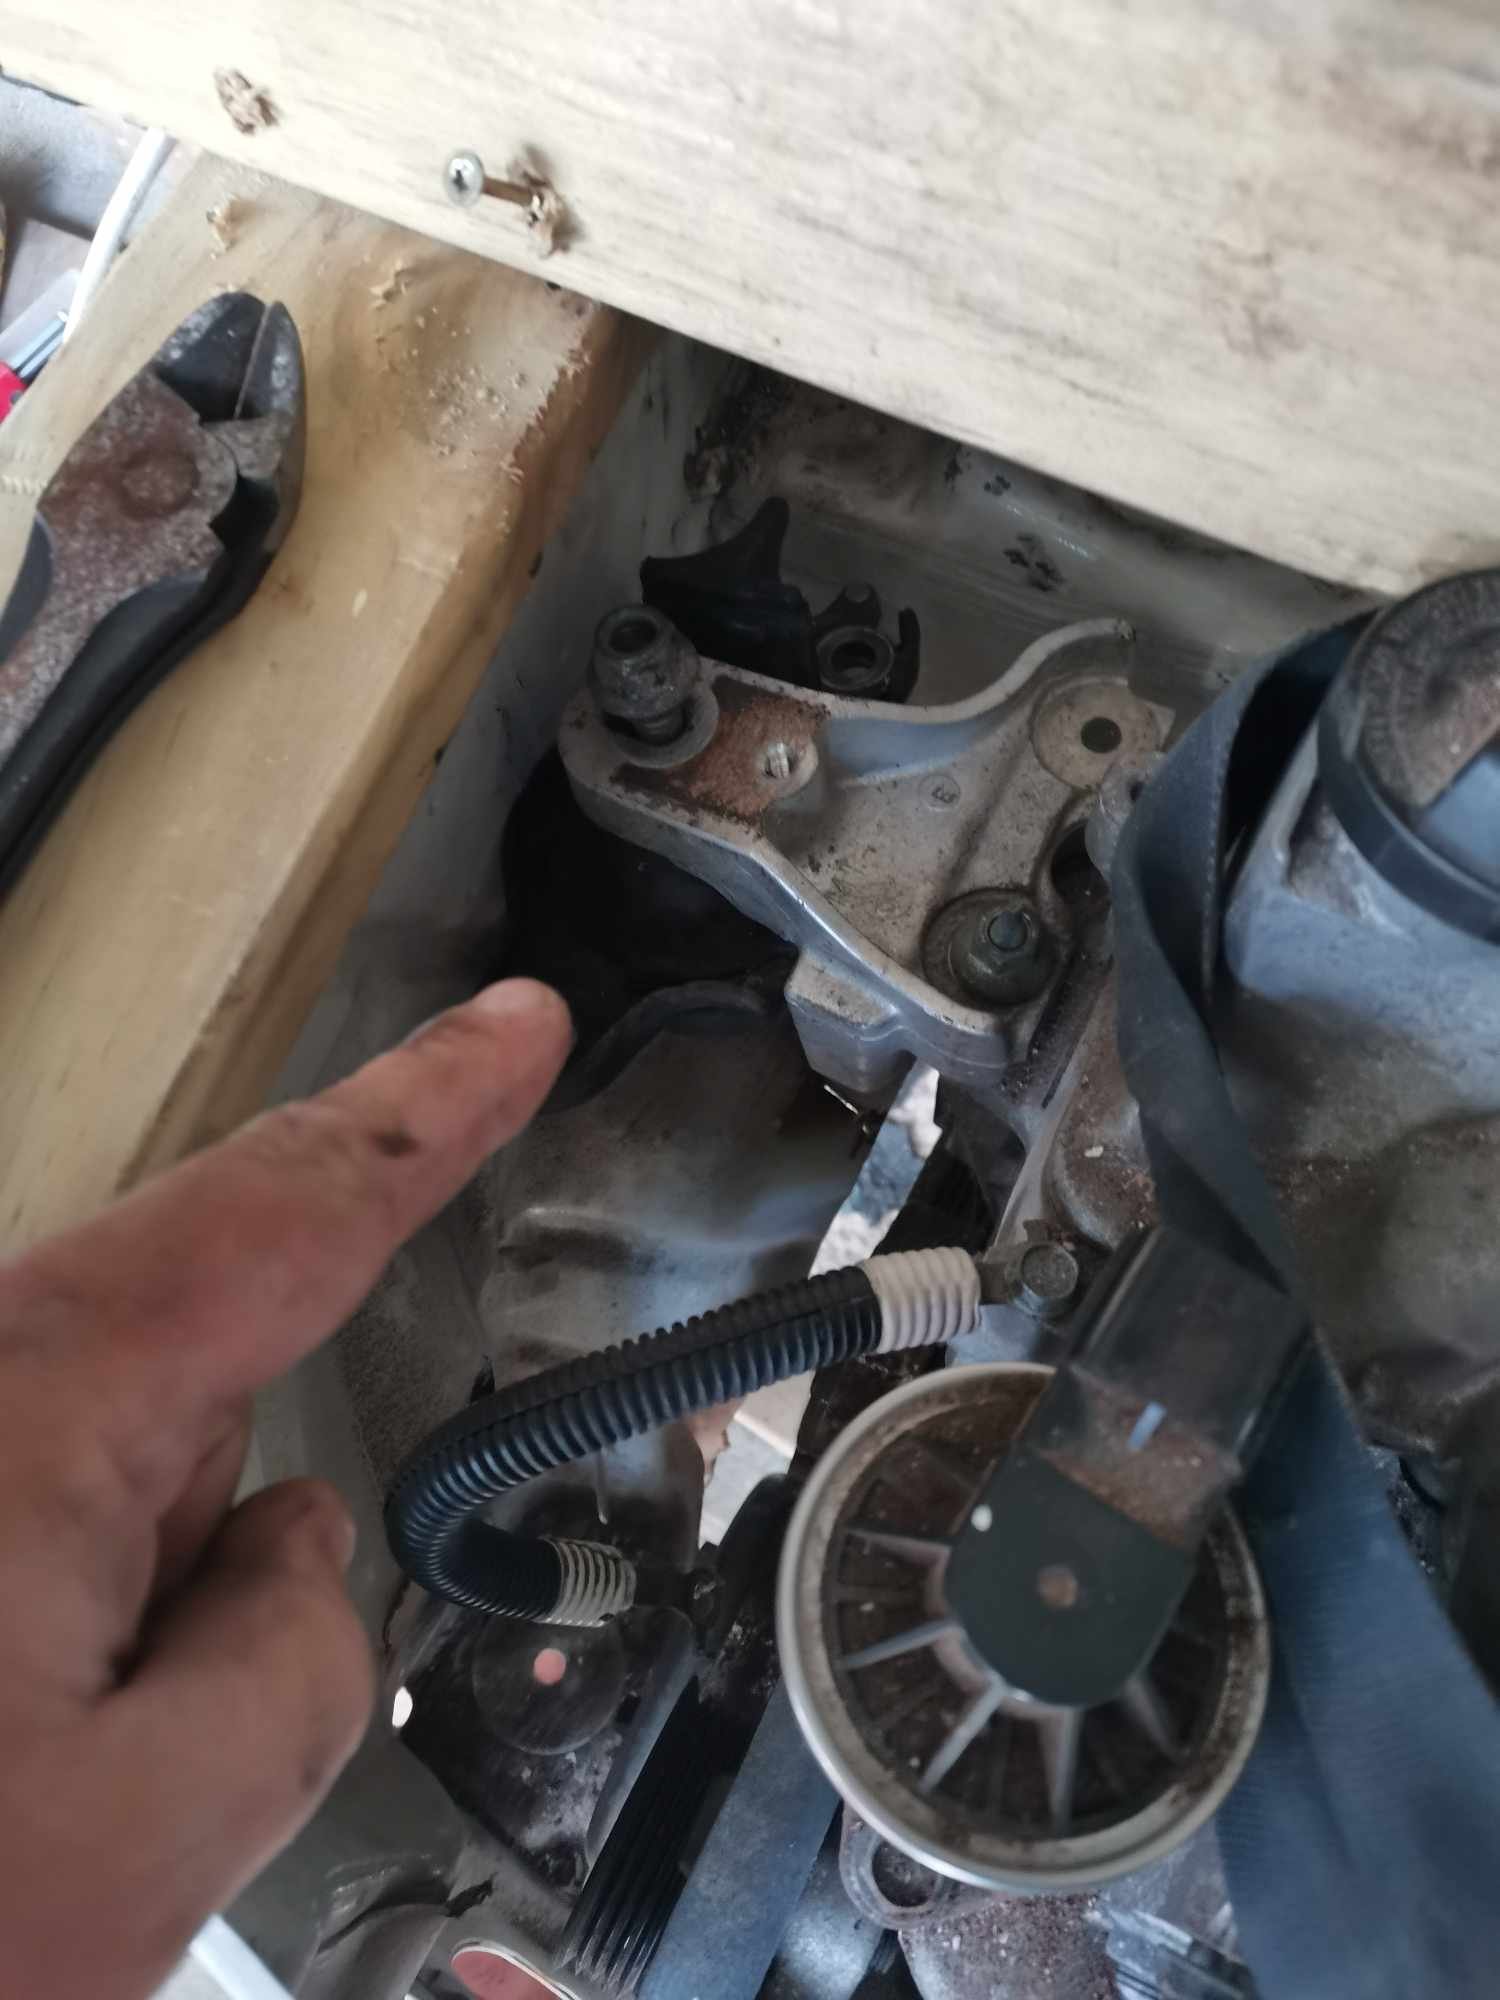
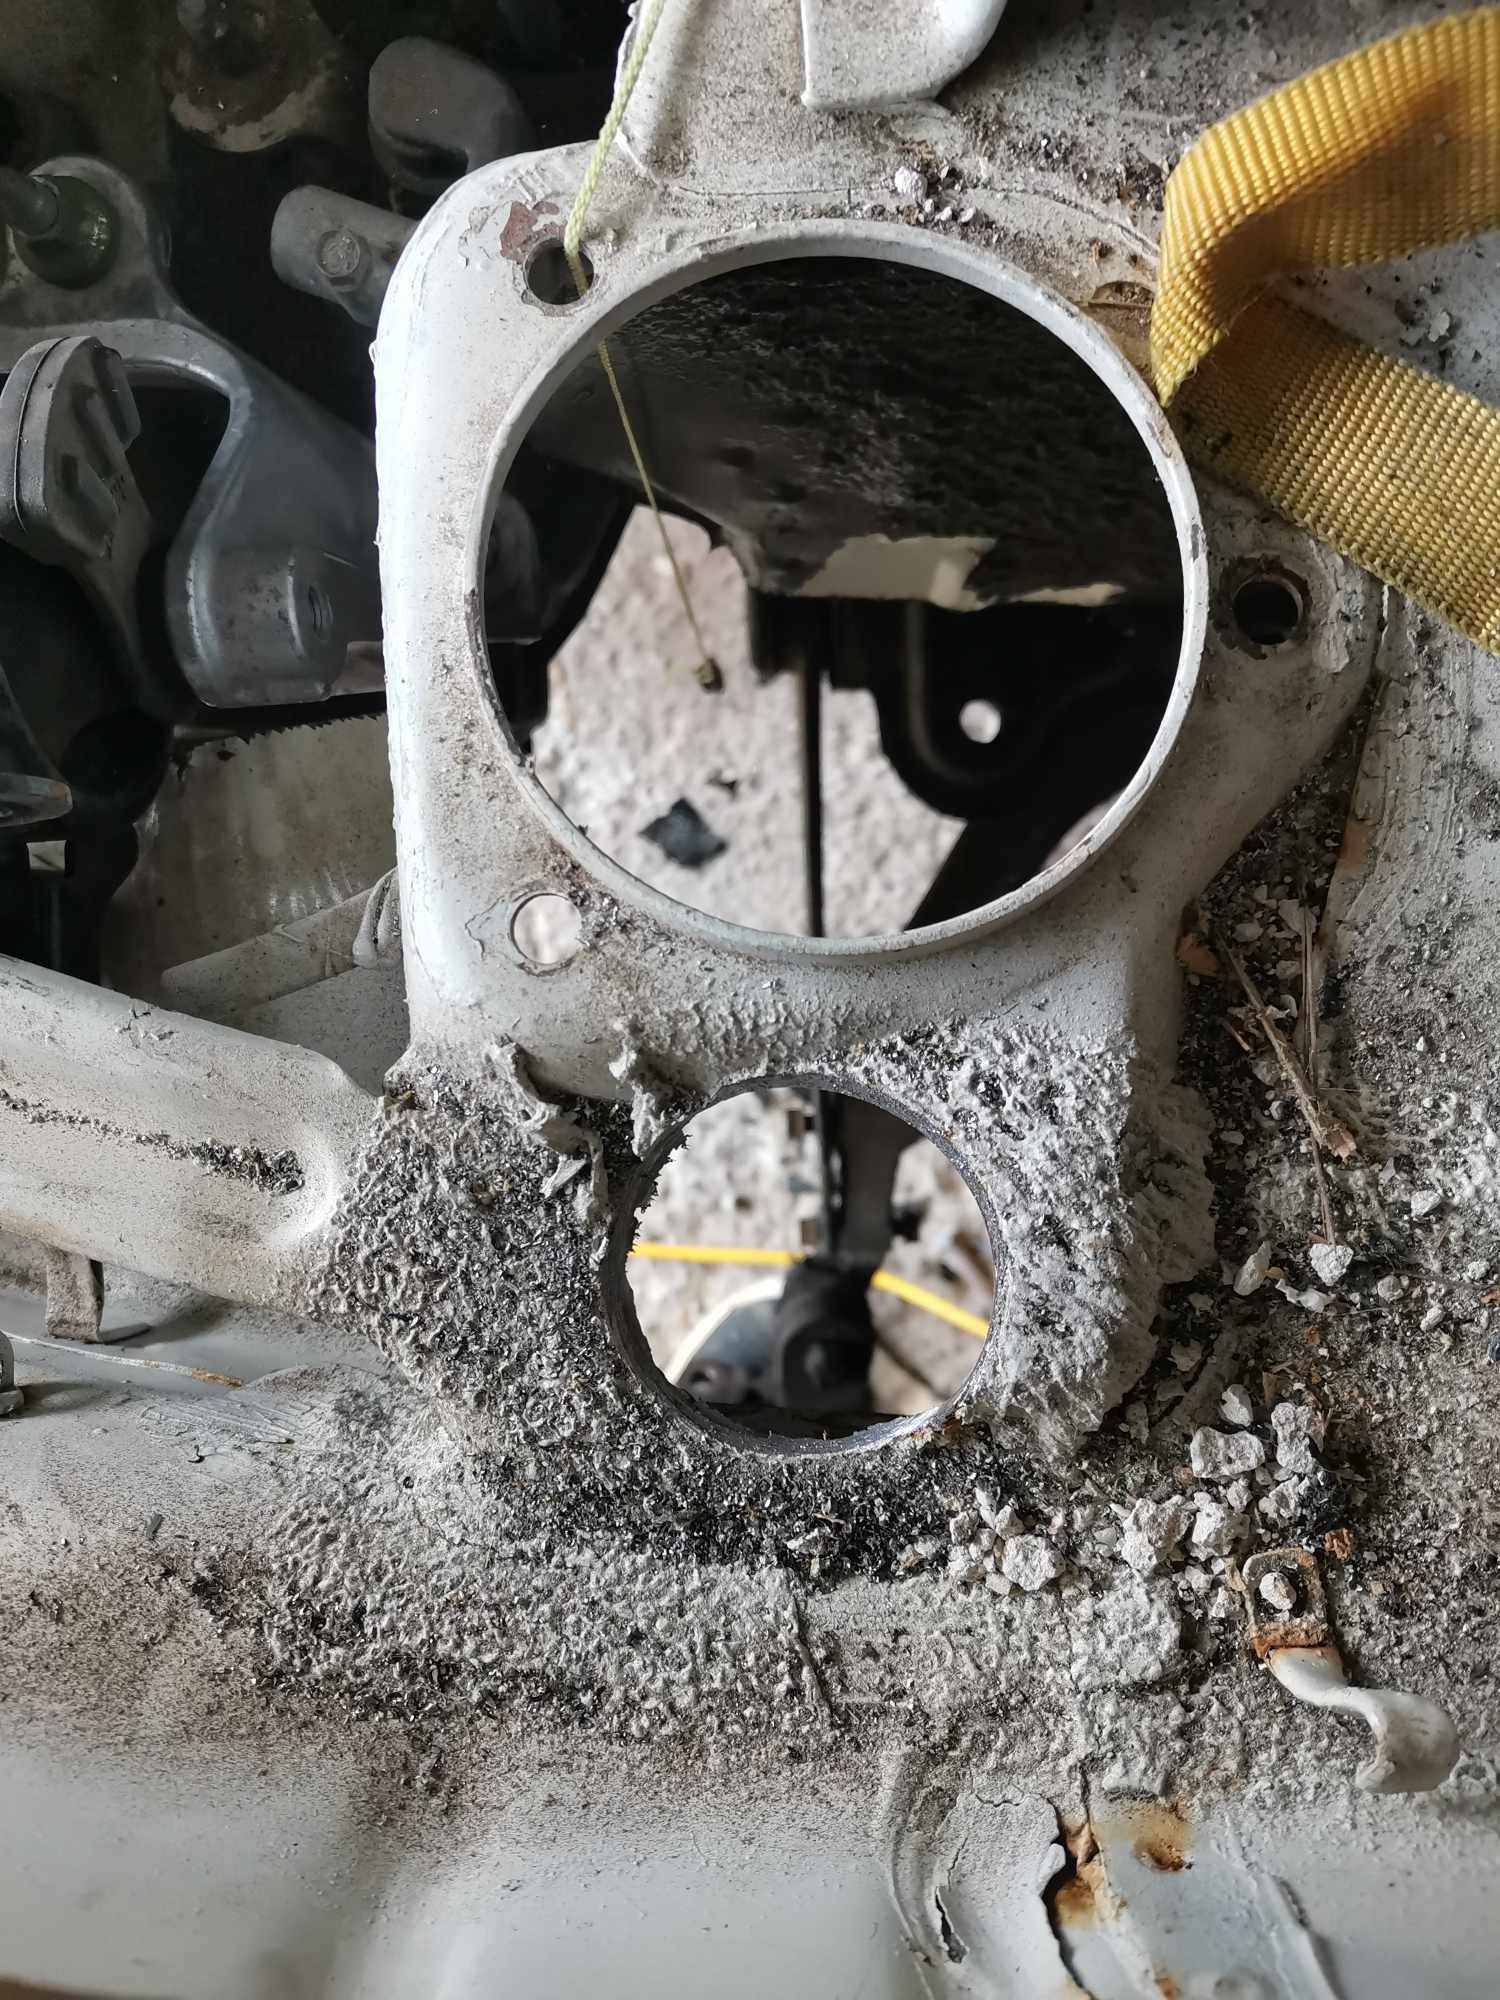
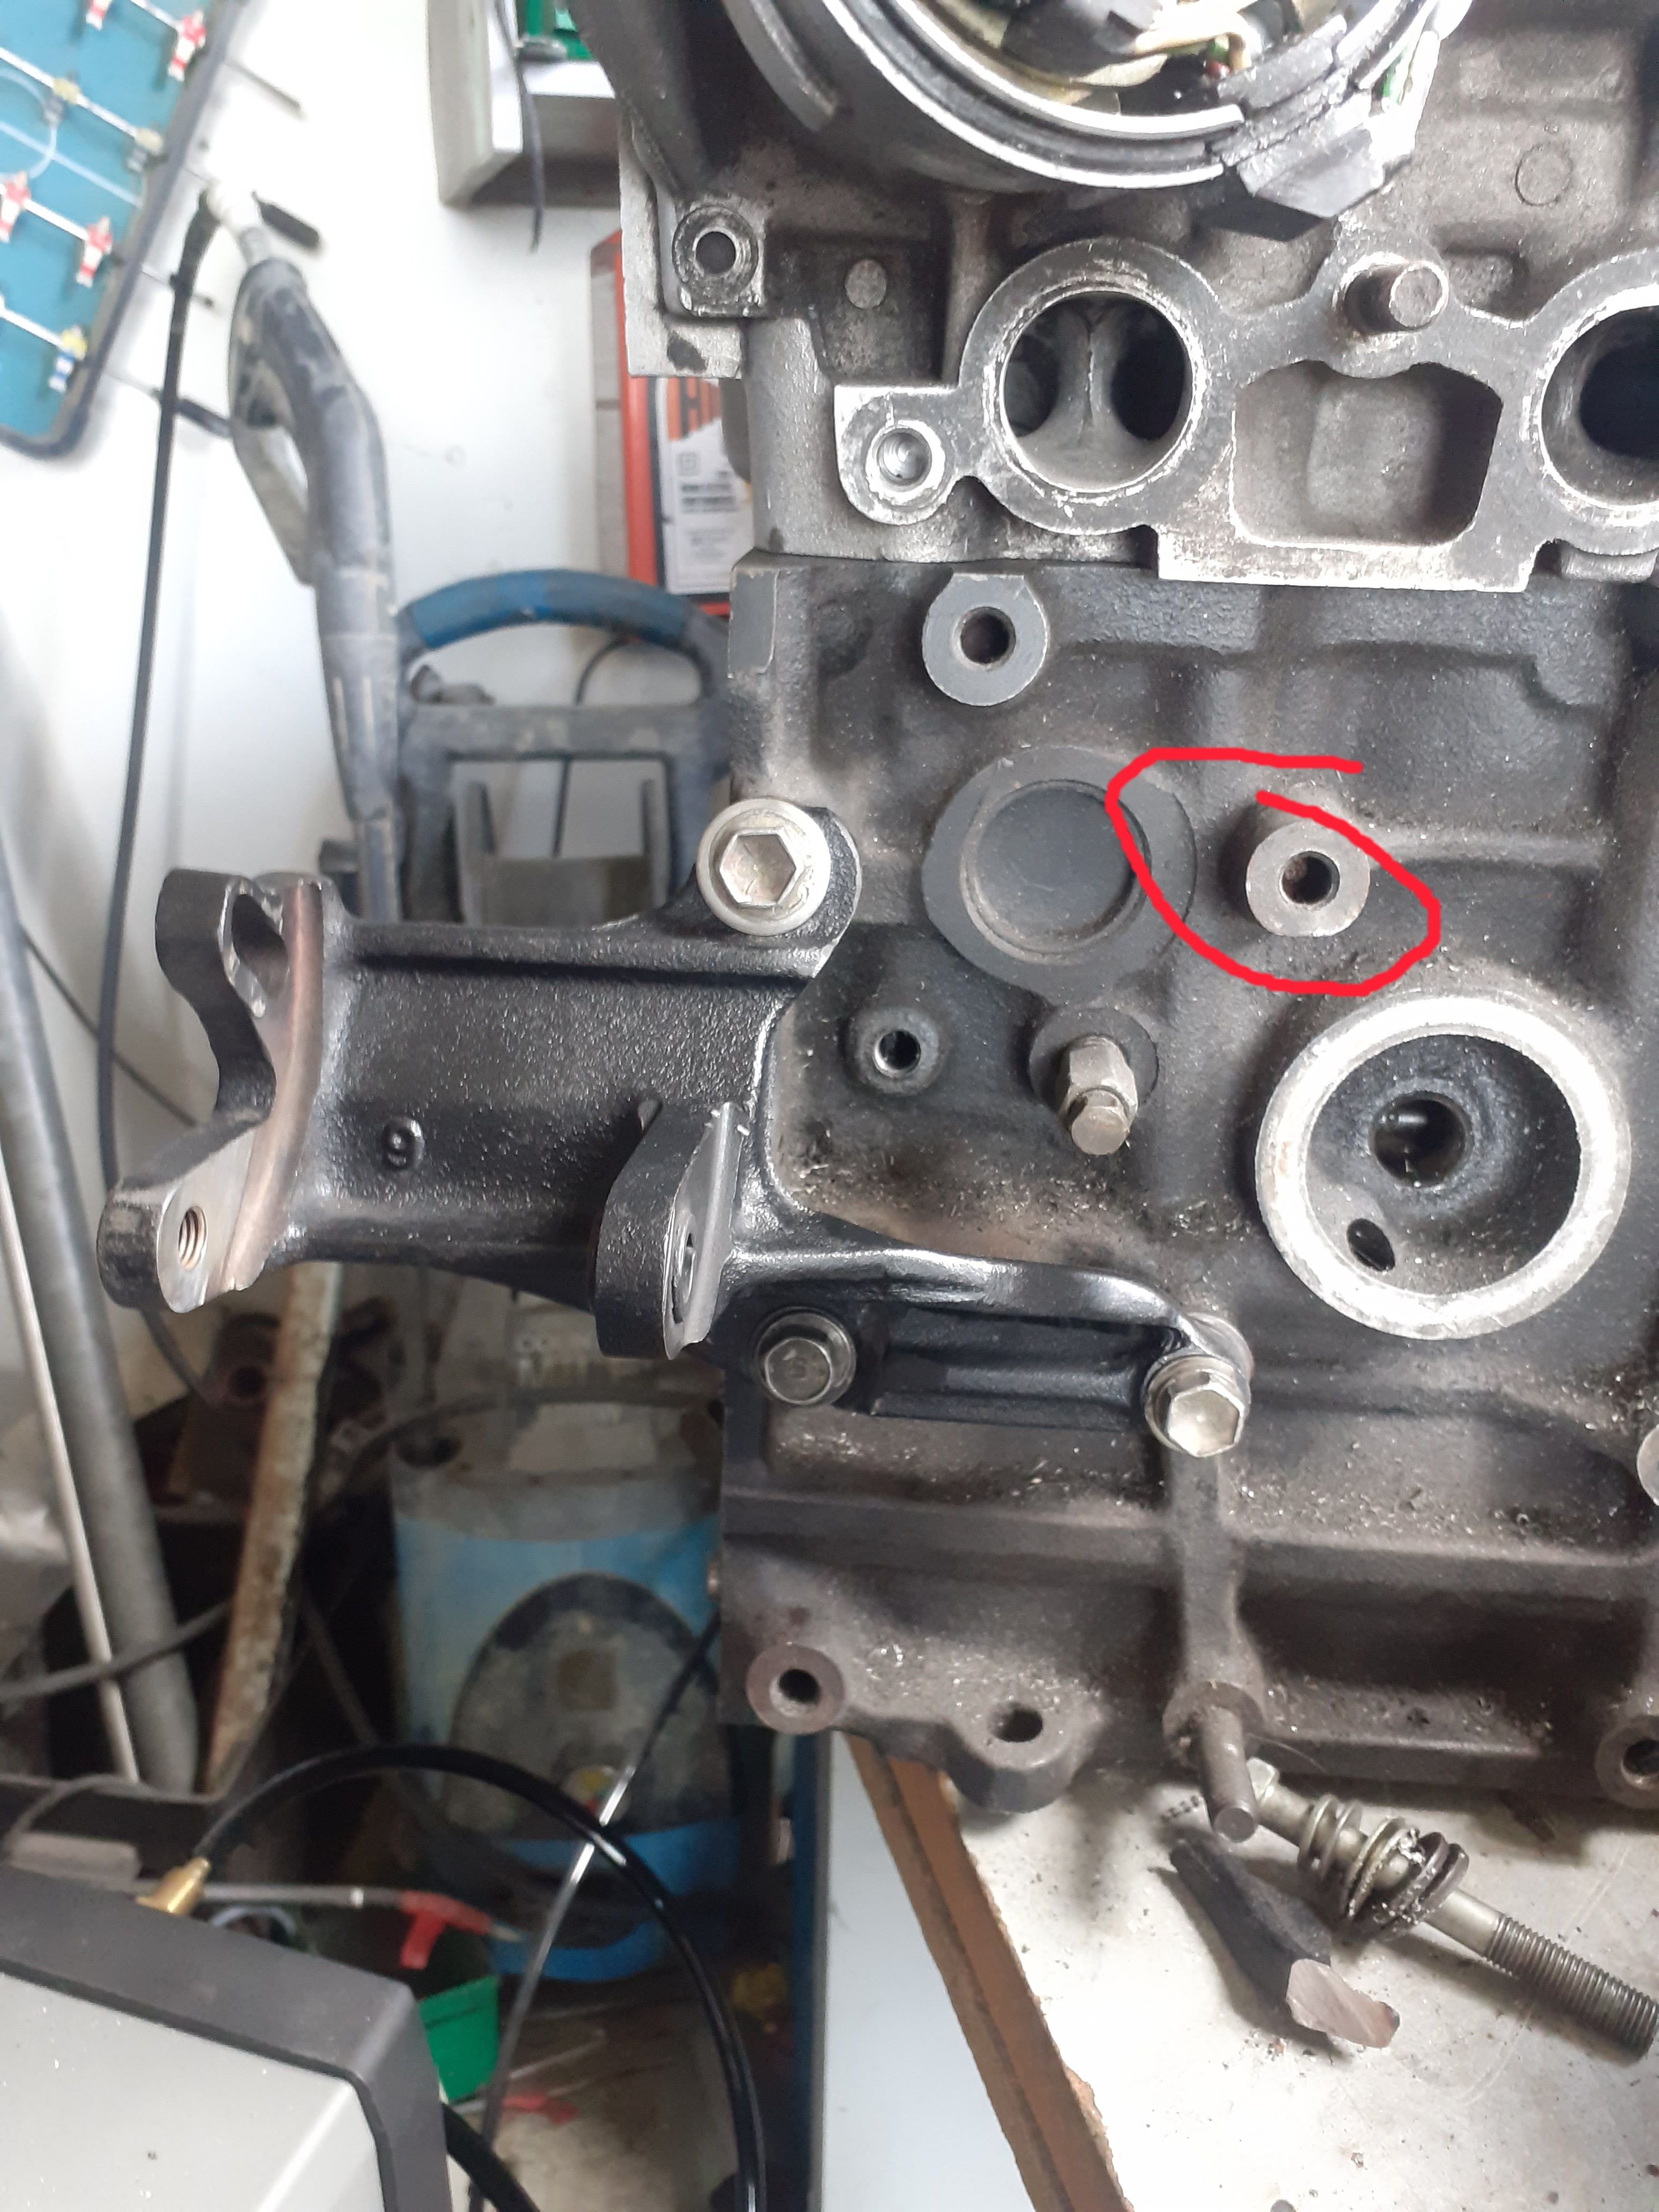
Fitting on factory mounts to see where they kinda land. Gearbox mount mostly fits. The mounting to the box bracket needs to be spaced up 20mm at least. Lots left on threads This bracket is reversed 180, used to point outwards, but this solution looks promising for a front mount Engine side looks half OK, needs a little clearancing with Mr hammer, might look for other options though. EG civic half size seems to fit vertically. Outlets ideally need flipping. Top needs to be to the bottom of the picture and bottom needs to be in the middle. Wondering if I can flip an alloy radiator and swap the fill neck... Hole in strut tower temp drilled so I can line up the evuk 7 shock on passenger side. Next up is steering rack, passenger knuckle and maybe drive shafts? Still keen if someone wants to come have a nosey in Wellington, I'm quite over my head here but continuing on regardless Discust below, https://oldschool.co.nz/index.php?/topic/49007-sirges-1972-honda-n360/
7 points
-
I modelled and printed some door card clips which as always gives me the deepest pleasure. These worked pretty well after some tweaks. These are not exact copies and are designed so they are easier to print, but functionally they are sweet. The drivers side window winder mech was deeply wrong, the wire tension adjustment was maxed out, hacked and the maxed out again, but the wire was still as loose as fuck and while it kindof worked it made horrible grindy noises. This came from the barrel where the wire was straddling grooves cos it was so loose. It was all down in a difficult to reach place, and those mechanisms are notoriously cunty to pull out and put back. Amazing that I got a bollock into that shot as well. The passenger side was sweet and the wire connection looks like this; After a bit of thought and dicking around trying to take slack out of the wire a genius idea came to me; I routed the wire like that through both lift points, which took up enough slack that I could tension the mech properly. Another 1/4 hr of contortion with a torch, phone and screwdriver and I had the wire slipped back into its rightful track. It works perfectly again, yay!5 points
-
na stuff doesnt need that much cooling, especially since your engine is a giant aluminum thing to start with. Also half the time peoples cooling problems, is all the stuff jammed up behind the radiator. if air cant get out, its not going to go through3 points
-
So massive then3 points
-
I've blown up shitloads of Bosch 4.2 and 4.9 sensors, so changed to the 14point7 Spartan controller, with the LSU-ADV sensor. It lasted the entire lifespan of the echo without blowing up a single sensor, and was running it "hot" on cold starts as well. (As it's designed to be more compatible with cold starts than 4.2 or 4.9) Compared to, I think my record with a 4.2 or 4.9 sensor for worst lifespan was that one lasted 3 days.3 points
-
I made one rev to the moon, but I never actually got it making decent power, and the vibrations kept wrecking shit.3 points
-
3 points
-
Update on the stug
3 points
-
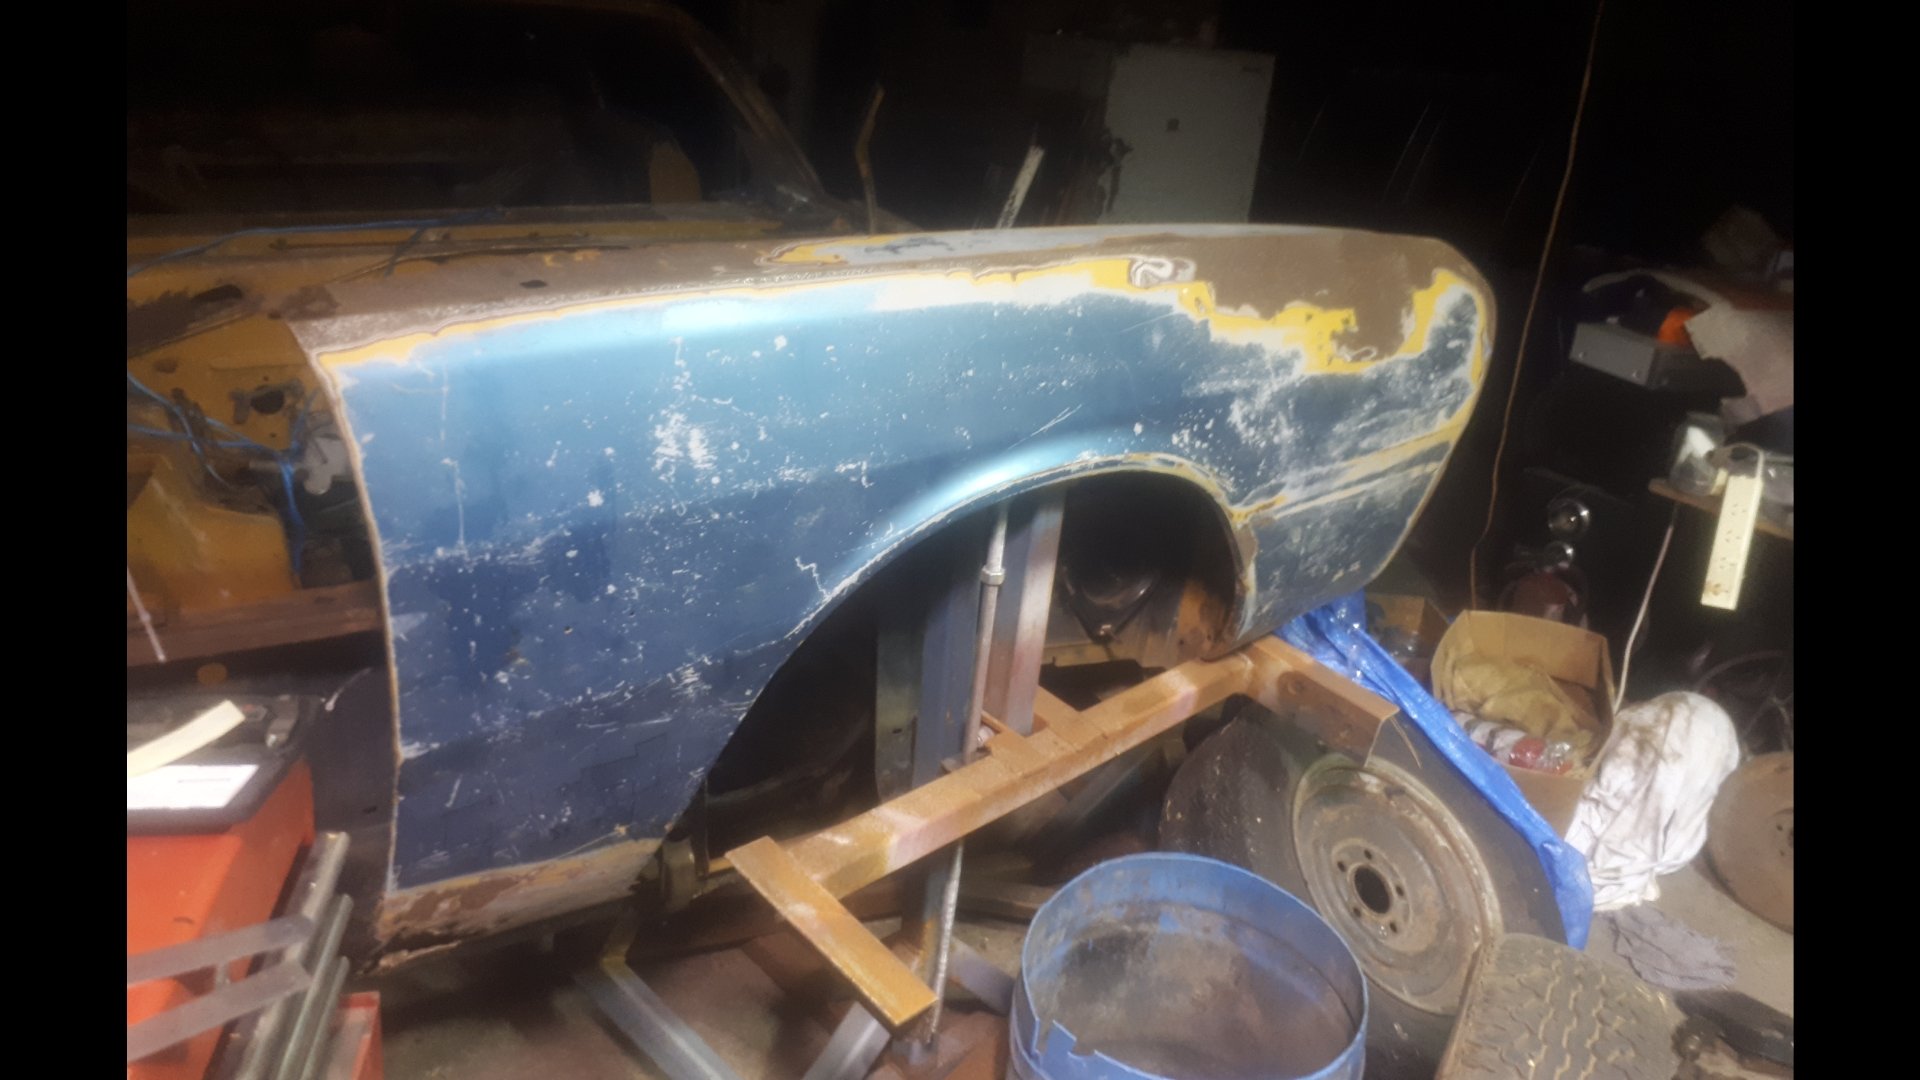
Im still thinking about this once in a while. Tracked down a less fucked right front guard. It was up welles ways. @Goat kindly let me use his house as a freight forward depot. The seller dropped it off, and a mate who was passing by collected it the next day. Picked it up tonight. Defo needs a wee bit of work. But i can buy the inner and outer bottoms off the shelf from Automotive Panel Craft in Oz. Thanks to @Classicdat for lugging it south for me too!
3 points
-
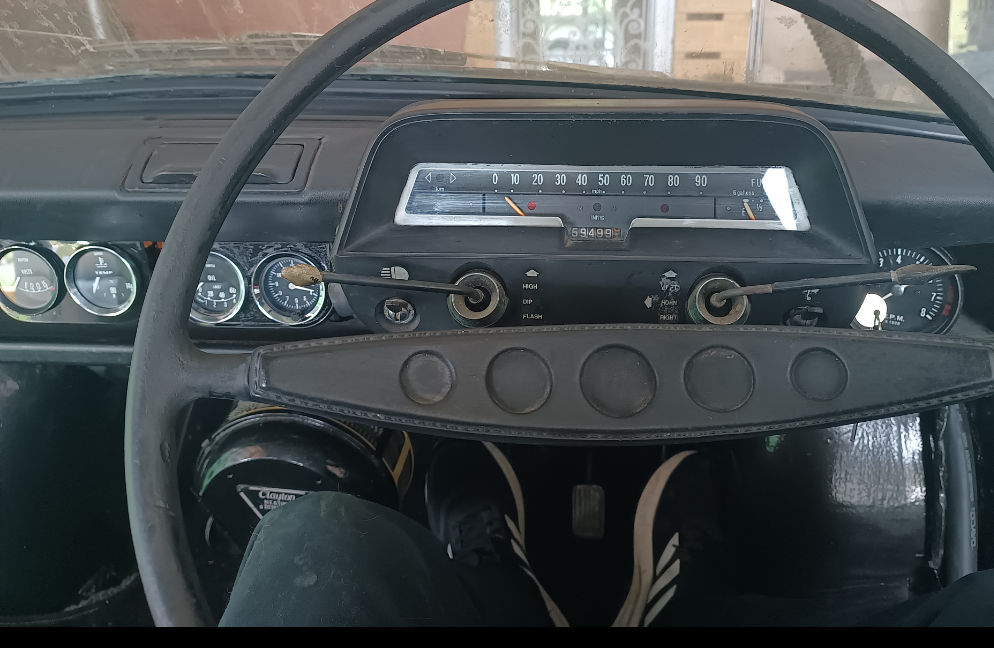
Bolted more shit on. I thought I had better reassemble the doors and check their function before chucking them on, and shortly I noticed that this little tit on the door latch had broken off, which would mean I would have to unlock the passenger side and reach over to unlock the drivers. See that tit on the diecast part? This actuates the lock from the door key; Commence bodging And it worked! I was quietly pleased with that as those latches are pretty much unobtainium these days Then I realised that I was trying to use the passenger latch in the drivers side, so that was all a waste of time. Except that the boot and engine cover latch levers are in the shut off of the passenger door. So actually it will be pretty useful to be able unlock the passenger side to get to those. I seem to recall this not working previously. So fuck all left to do really; Windscreen Box on and engine in Final wiring connections in the engine bay once the engine is in Passenger door Boot and engine cover Carb tune I am assuming the brakes will probably need rebuilding, we will just have to see. And whatever other fuckery arises.3 points
-
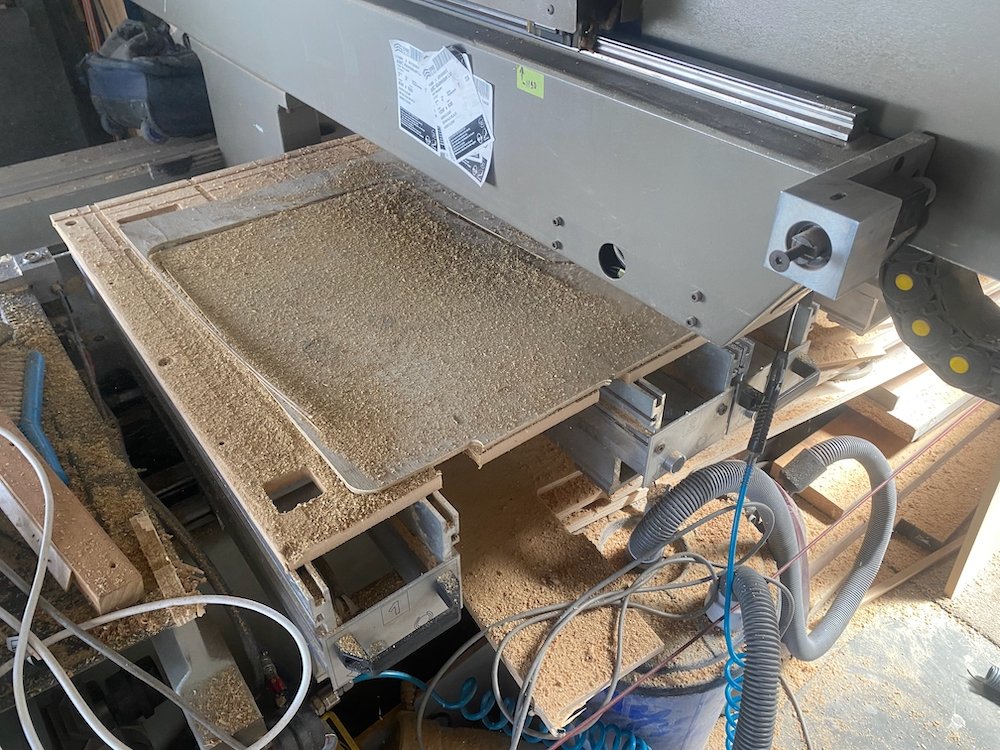
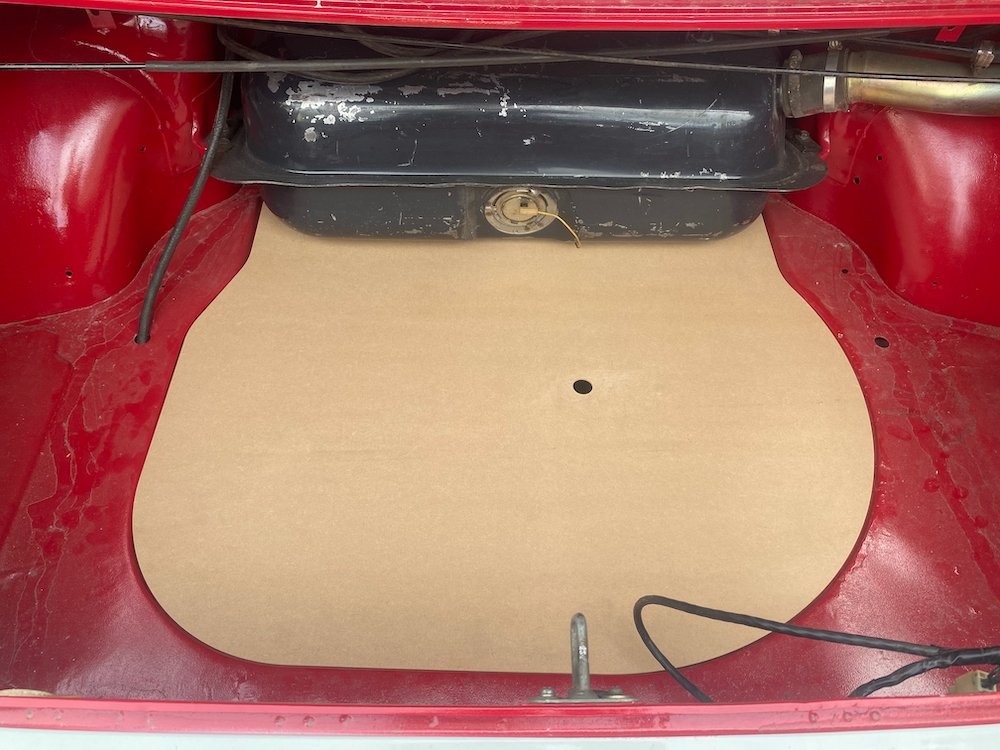
Was out in the shed again today so had a quick measure up and fed the cnc some mdf Quite happy with how much nicer the boot looks with the spare covered, motivates me a bit more to suss some carpet etc. From factory there were a few more trim panels in the boot, hopefully have a set on the way to copy, its something i've never seen before so looking forward to it!
2 points
-
Yeah I hear you, and I am focused on getting this from current its current state to a running motor/car ASAP with no fucking around on non essentials. (Can do that iteratively once it's going, like echo. thats the fun part) As I want to know how well my engine scheme is going to pan out! So the seemingly easiest way would have been to keep the Altezza radiator that I already had - but the pipe sizes are wrong, and the pipe locations dont really work either. I was hoping the Mark X setup would just tick off all of these boxes, just have to remake some top and bottom mounts. But it's actually only as thin as the Altezza radiator (16mm) and the hoses didnt really fit too well since the radiator and engine heights dont match relative positions to factory. Bottom mounts will be easy, but the top ones tricky because it's tall. But once mounted it's going to be even taller, and I suspect it will hit the bonnet. So my thinking here is actually to NOT waste my time, rather than to dilly dally with unimportant stuff. So I'm cutting my losses and ironically going to SW20 parts haha. To get the motor running I dont need an air intake at all, and I dont need any radiator ducting. So I'll bang the radiator in there, work out the mounts, work out the pipes, then fill the damn thing up. This new radiator is 40m thick core as well, so hopefully zero cooling issues if I can get some air to it. This SW20 radiator was $220 delivered so meets the cheap and cheerful criteria!2 points
-
Crazy idea here.... Run what you have, and see what happens. Don't waste energy theorising on what might happen, and over-complicating things. This was the Echo's charm, cheap, cheerful and iterative. I also know that your name is David and you're incapable of not over-thinking the whole process2 points
-
Do you have room to angle rad fwd (move bottom edge rear wards)2 points
-
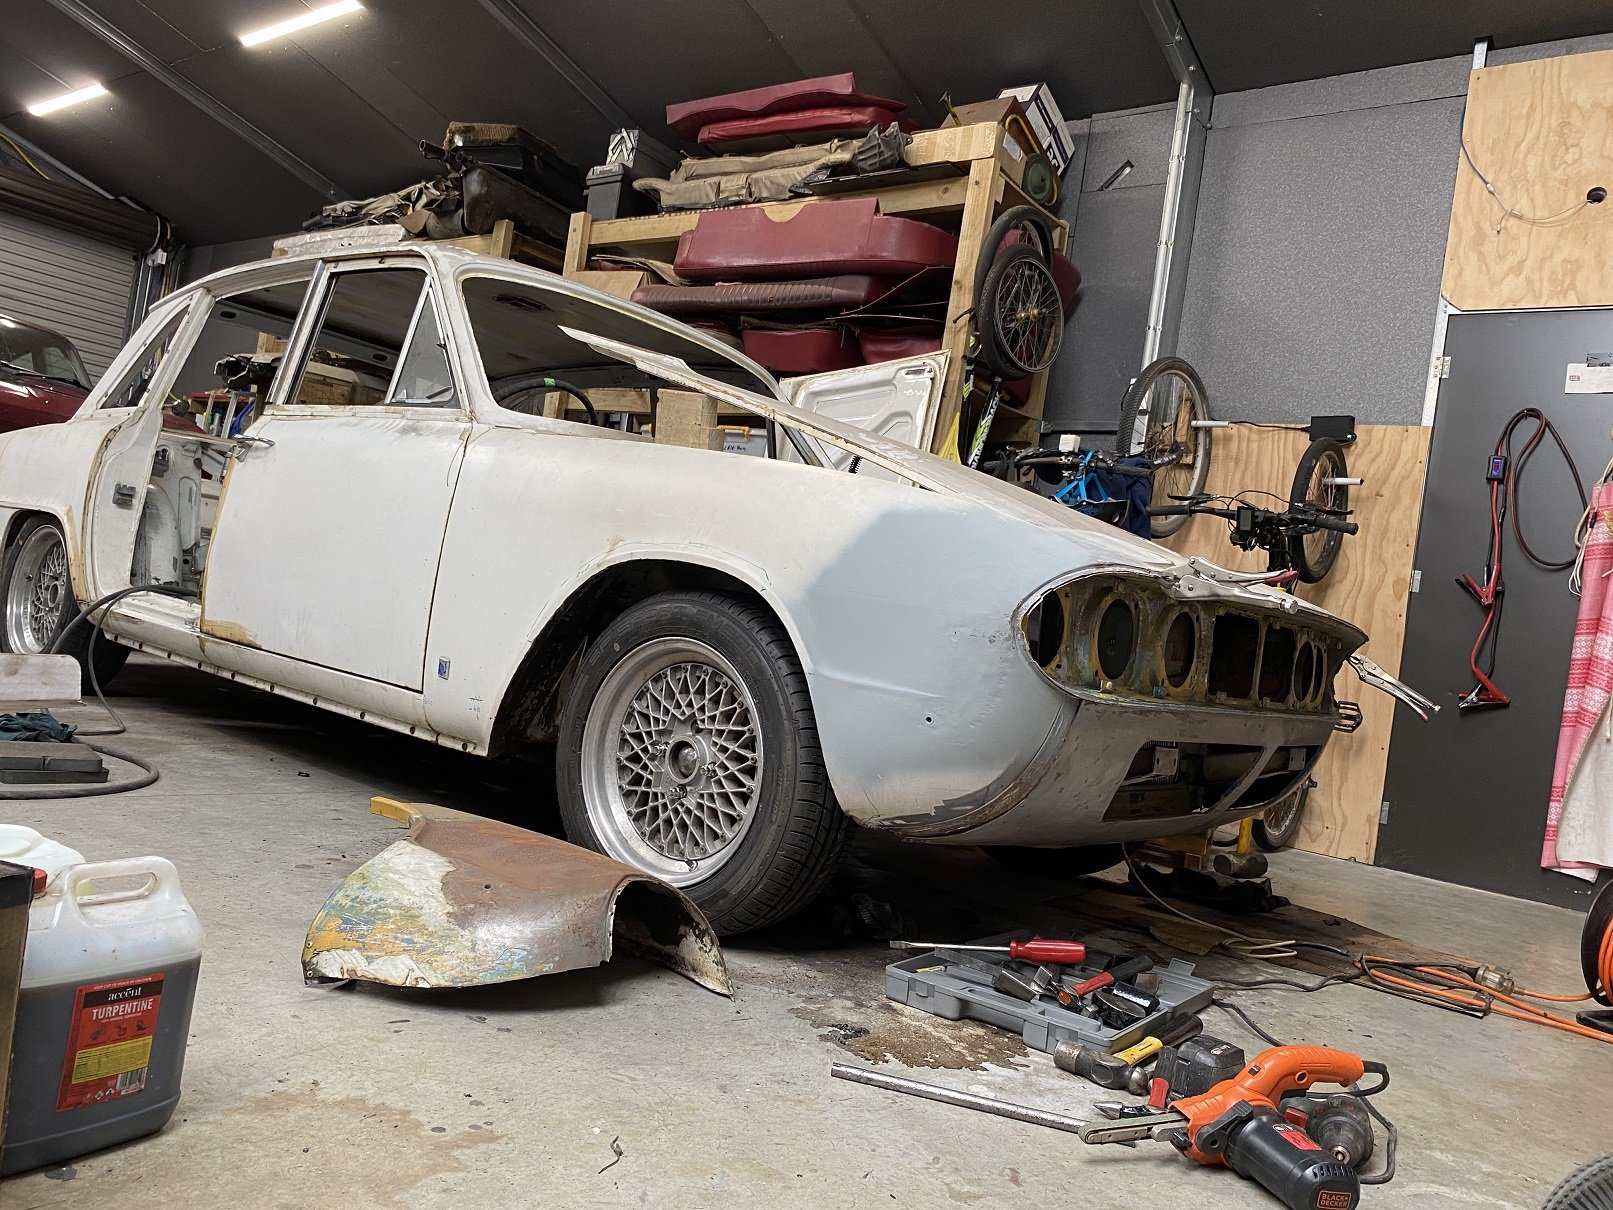
I had planned to have to weld in the front portion of the yellow guard because I deemed the panel damage beyond my skill to repair. The step thing on the corner had been totally flattened by someone else's previous attempt. I had a go at it myself maybe a year or so ago. But then the other day, I thought I'd have one more go, if I fucked it up I could still weld in the other panel. So I just hit it much harder... I think it's acceptable now, I reshaped the step and didn't fuck up the two... ridge line things. Should only need minimal filler. I also trimmed the doner front panels so I could trial fit them. This car had run into something and pushed in the front panels, folding over the lower front seam. I was unable to get the panels the budge with a slide hammer, so I decided I'd use the front panels from the yellow one, which were surprisingly rust free, unlike the rest of the yellow car. Front panels look like there will be no issues fitting them. I'm not ready to weld the panel back in, I still need to prep behind it for epoxy.
2 points
-
from memory it helps with rollsteer1 point
-
Out of interest what is the sw20 rad WxL? I will likely V mount IC and rad in z31 whenever i get to spend more time on it (heeding the advice above of just get it running again of course)1 point
-
1 point
-
I bought this one off AliX a while ago, it is now installed in the Fiat. I came with what appears to be a genuine Bosch 4.9 sensor. The reviews both in AliX and in the wider world are positive. I can let you know in a week or three how well it goes.. https://www.aliexpress.com/item/1005006080021720.html1 point
-
Well the car is gone, went for $2070. Someone in Auckland added it to their horde, he now has 7 Clio 172/182s, including one he has owned since new. Pretty pleased it's gone to a good home! Mods, feel free to close the thread.1 point
-
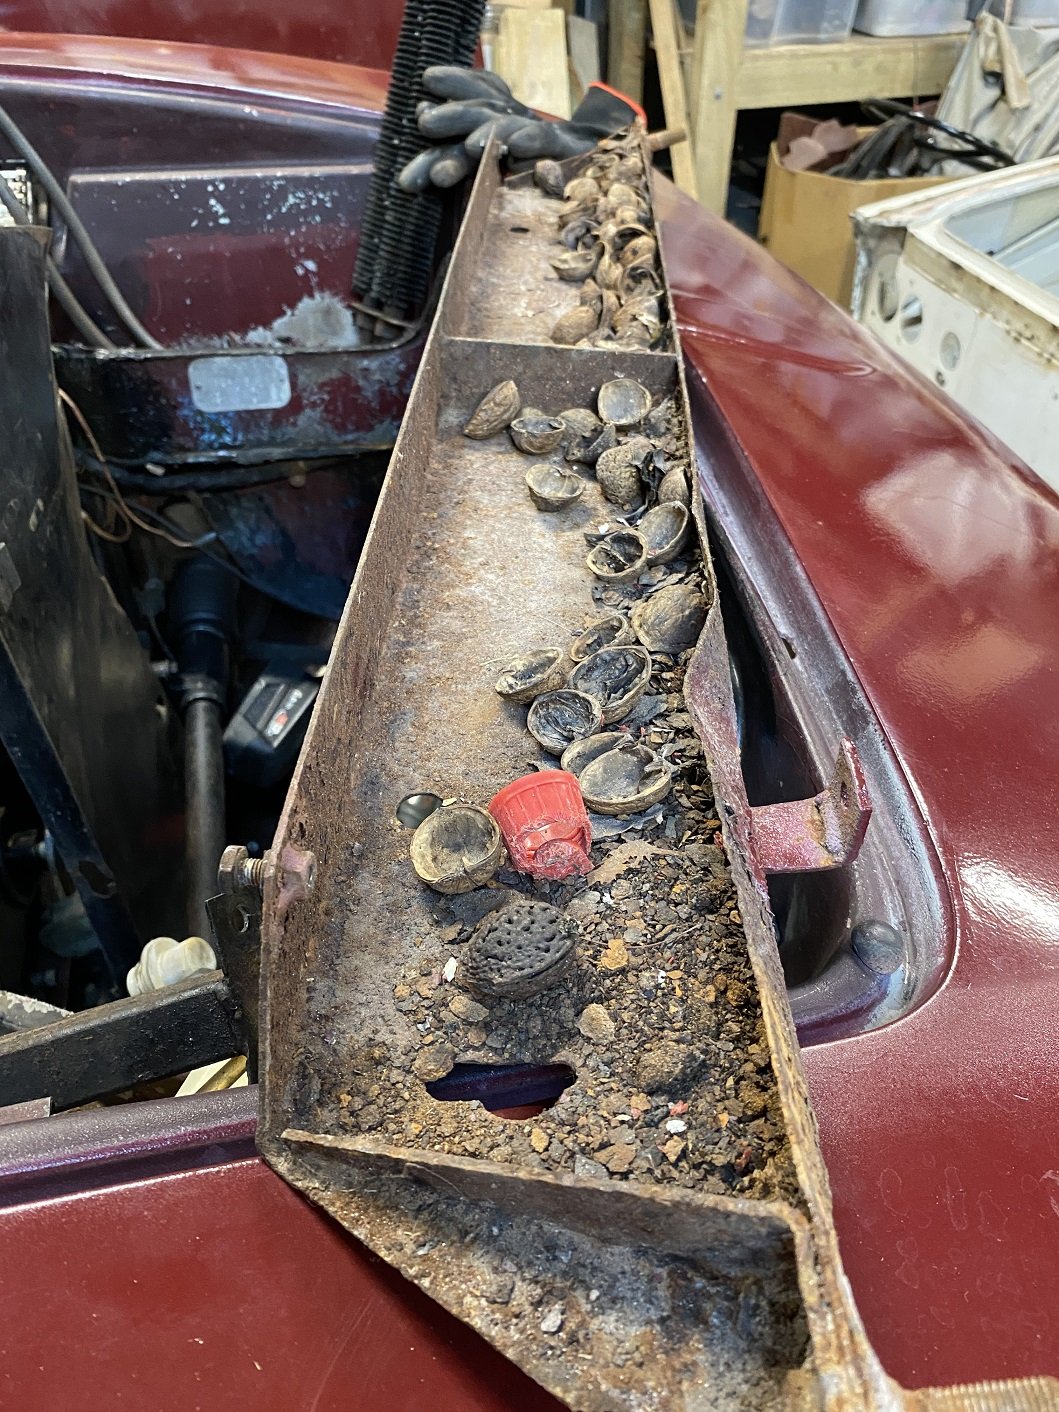
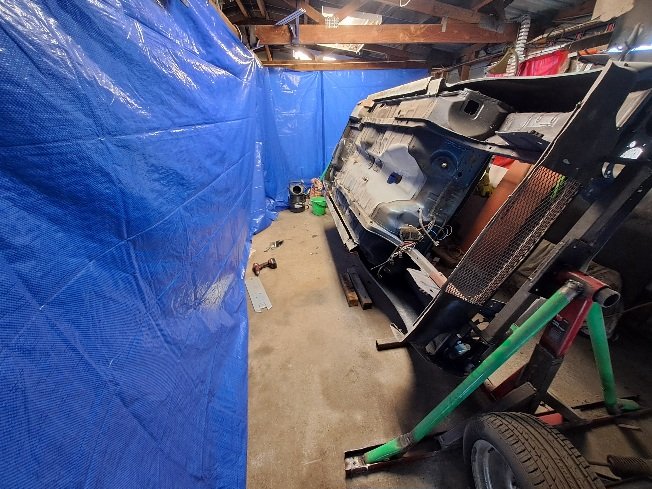
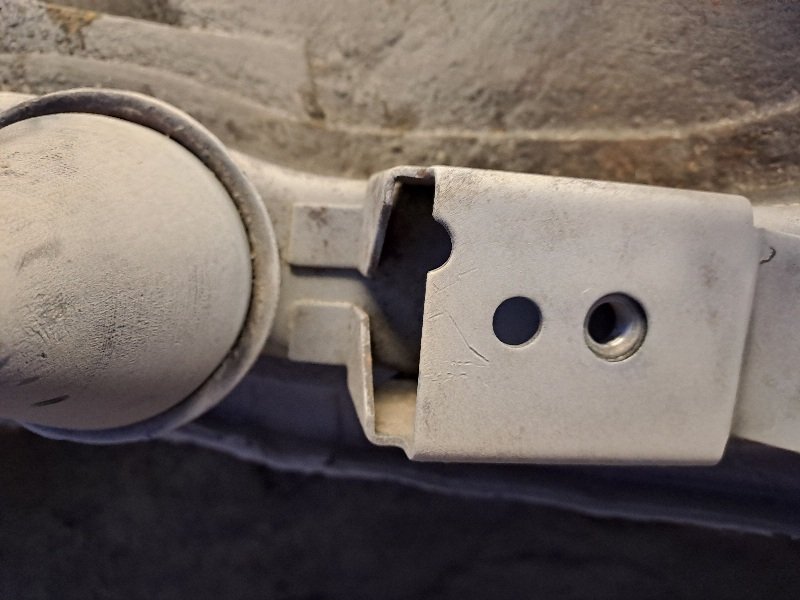
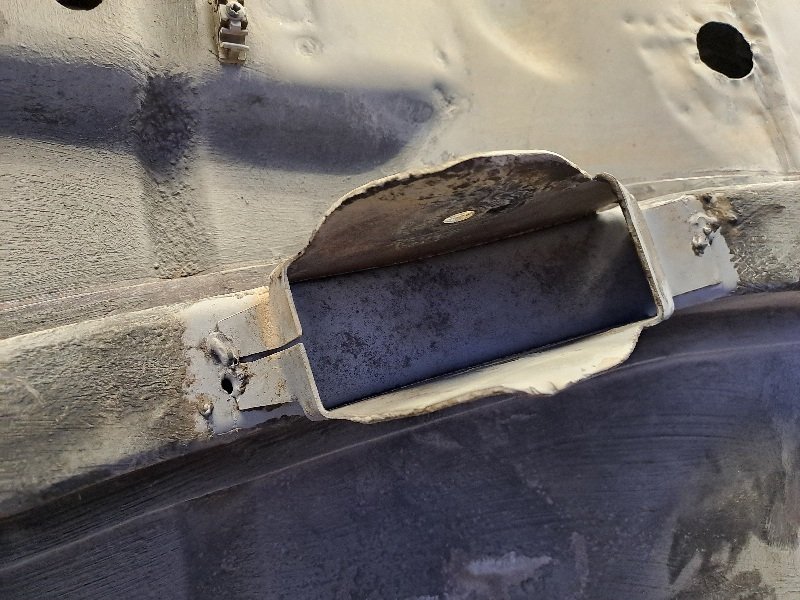
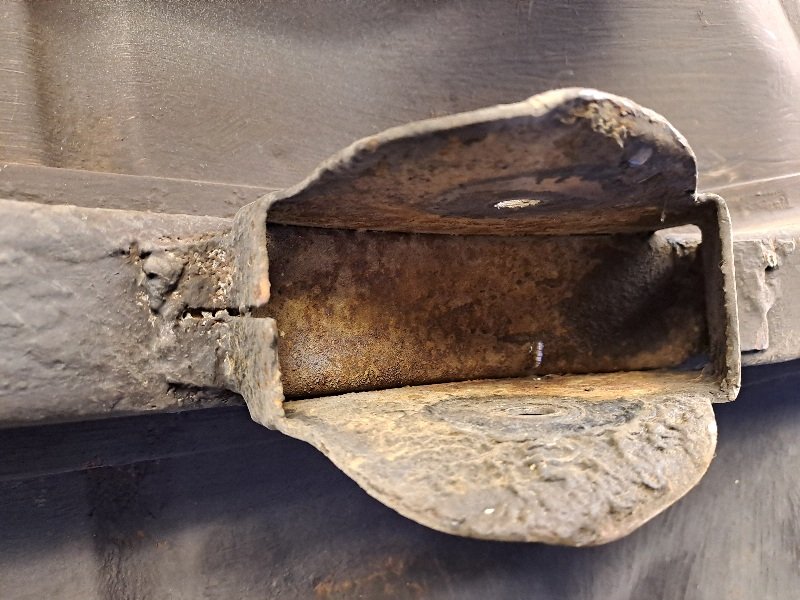
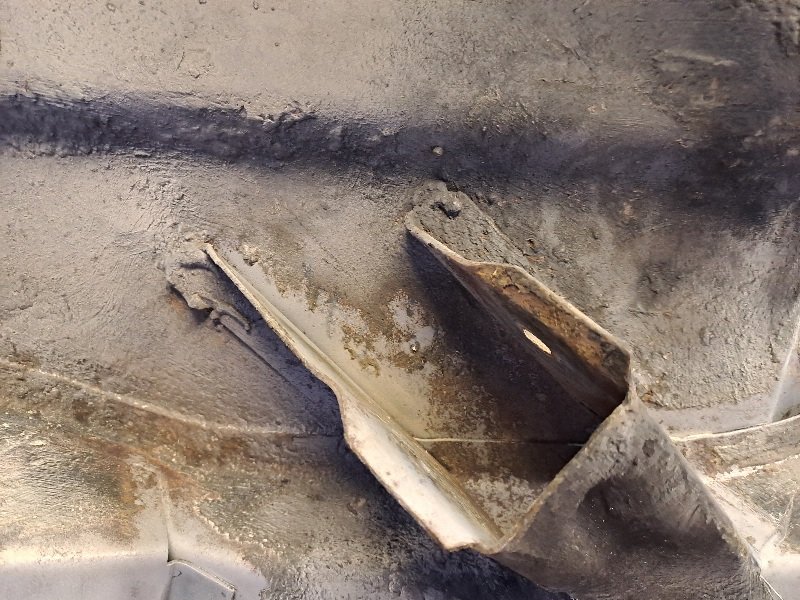
There is a bolt together structure forward of the chassis rails to support the 'nose' of the body and provide mounting points for the bumper. It had some damage from a front end impact. I dunno if that predates @dmulally 's ownership. Some of the structure was bent and rusty. The loom was also earthed on part of it, but that part didn't seem to be bolted to anything and just floating. I decided to take it out. WELL... I guess some rats were using this as a dining room for a while... Some of the fibreglass was also damaged and sorry if it was you Damo, but OMG it was not patched together very well and is failing. Who ever laid the glass mat probably also scrunches toilet paper rather than folding. There's delamination and big flappy bits of mat sticking up all over the show. I assume it was done by feel, upside down, because of poor access. I think I'll cut/grind/sand it out and have a go myself.
1 point
-
Had a great time catching up with the fella over the 4 days. Only known this guy @RUNAMUCKfor 41years. Hoping to convince the other 2 horsemen in future years. Looking forward to our next drink fella, MEOW
1 point
-
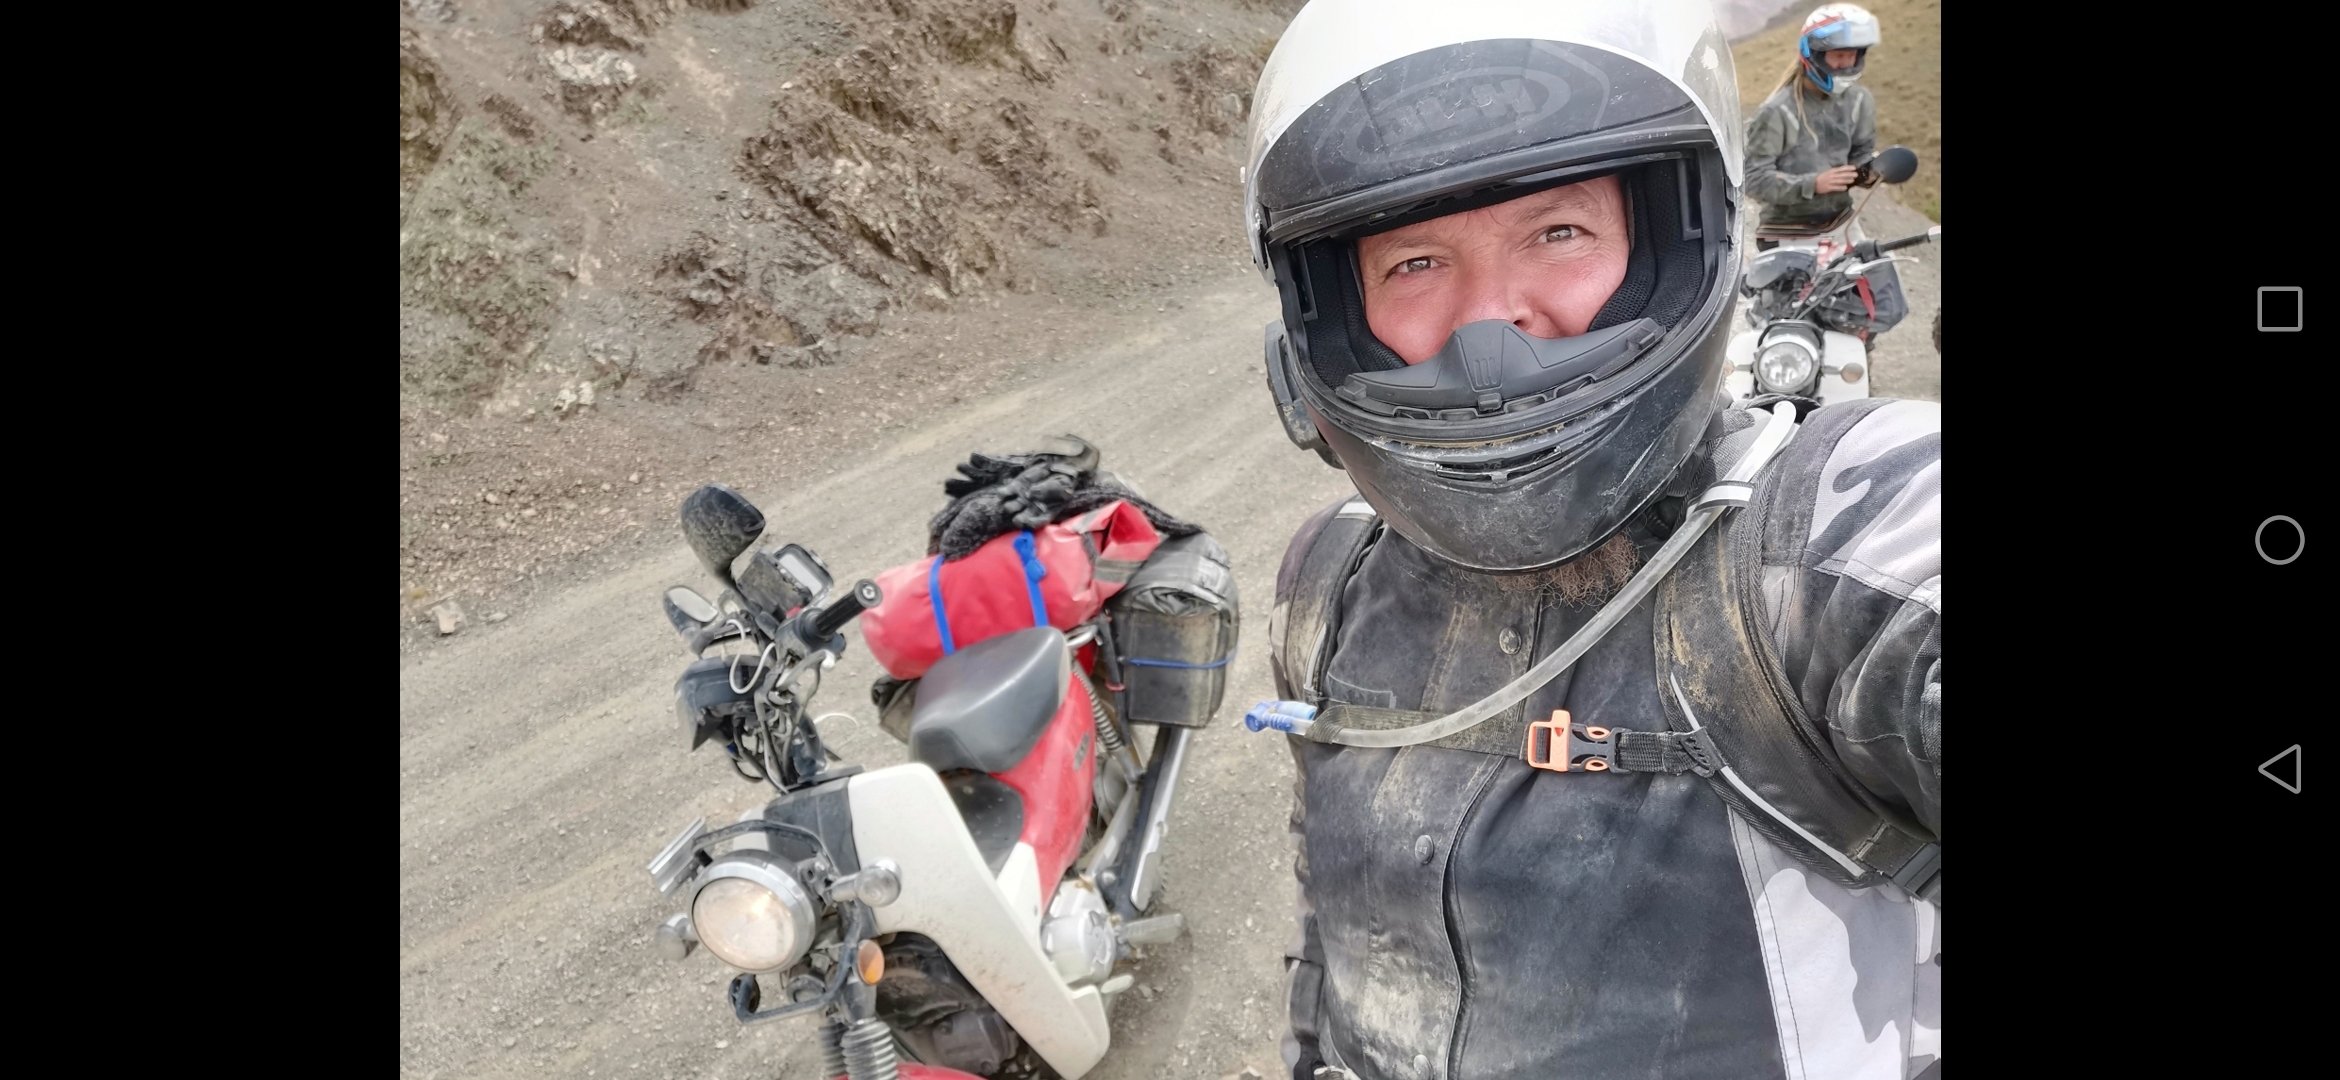
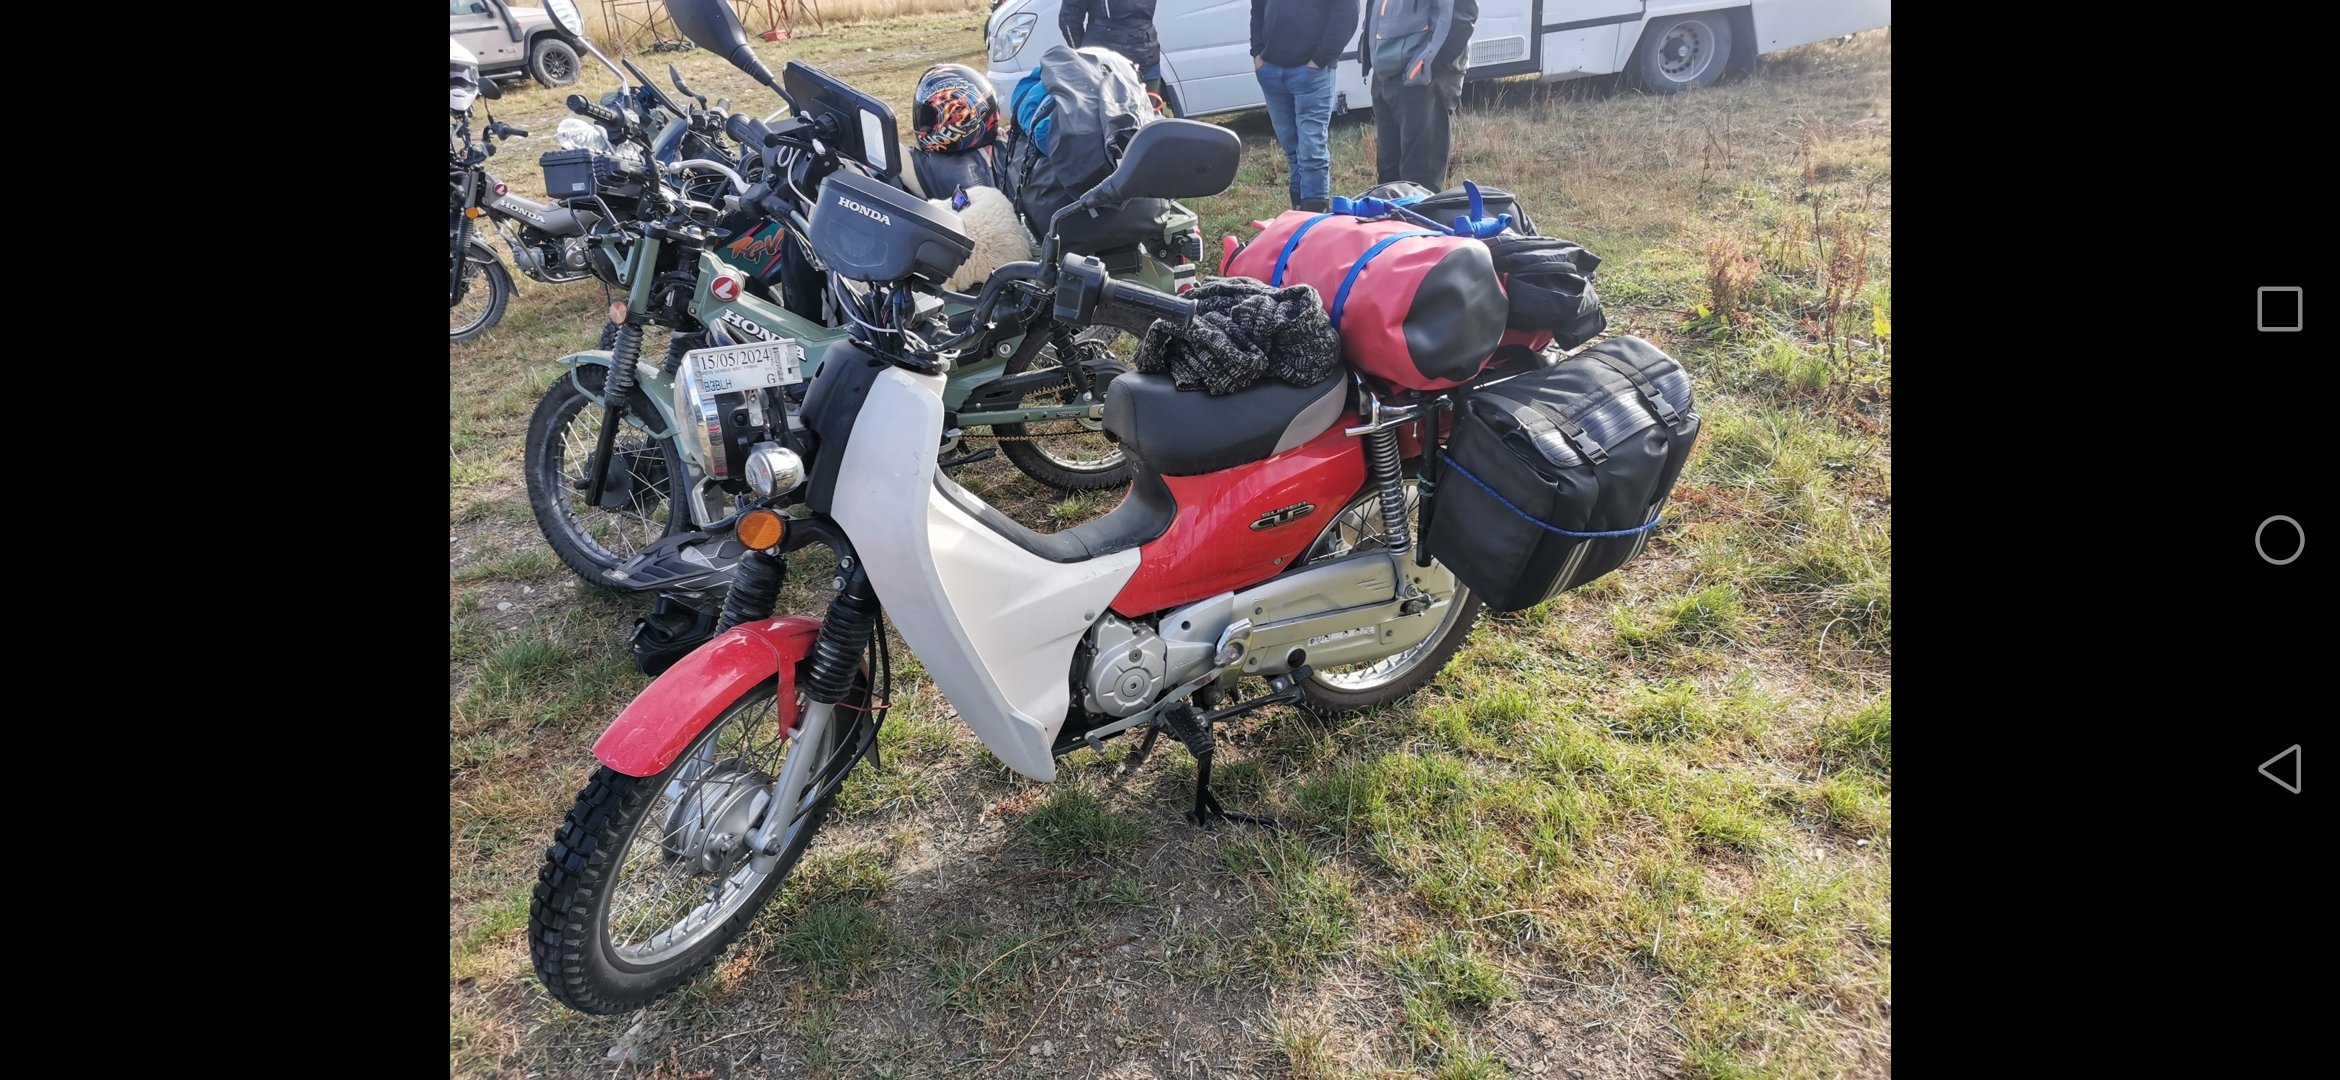
Headed out on my first moped melee this year. Really appreciated the invite @RUNAMUCK. What an awesome group of legitimate GC's. Had an absolutely amazing time and already looking forward to doing it all again next year.
1 point
-
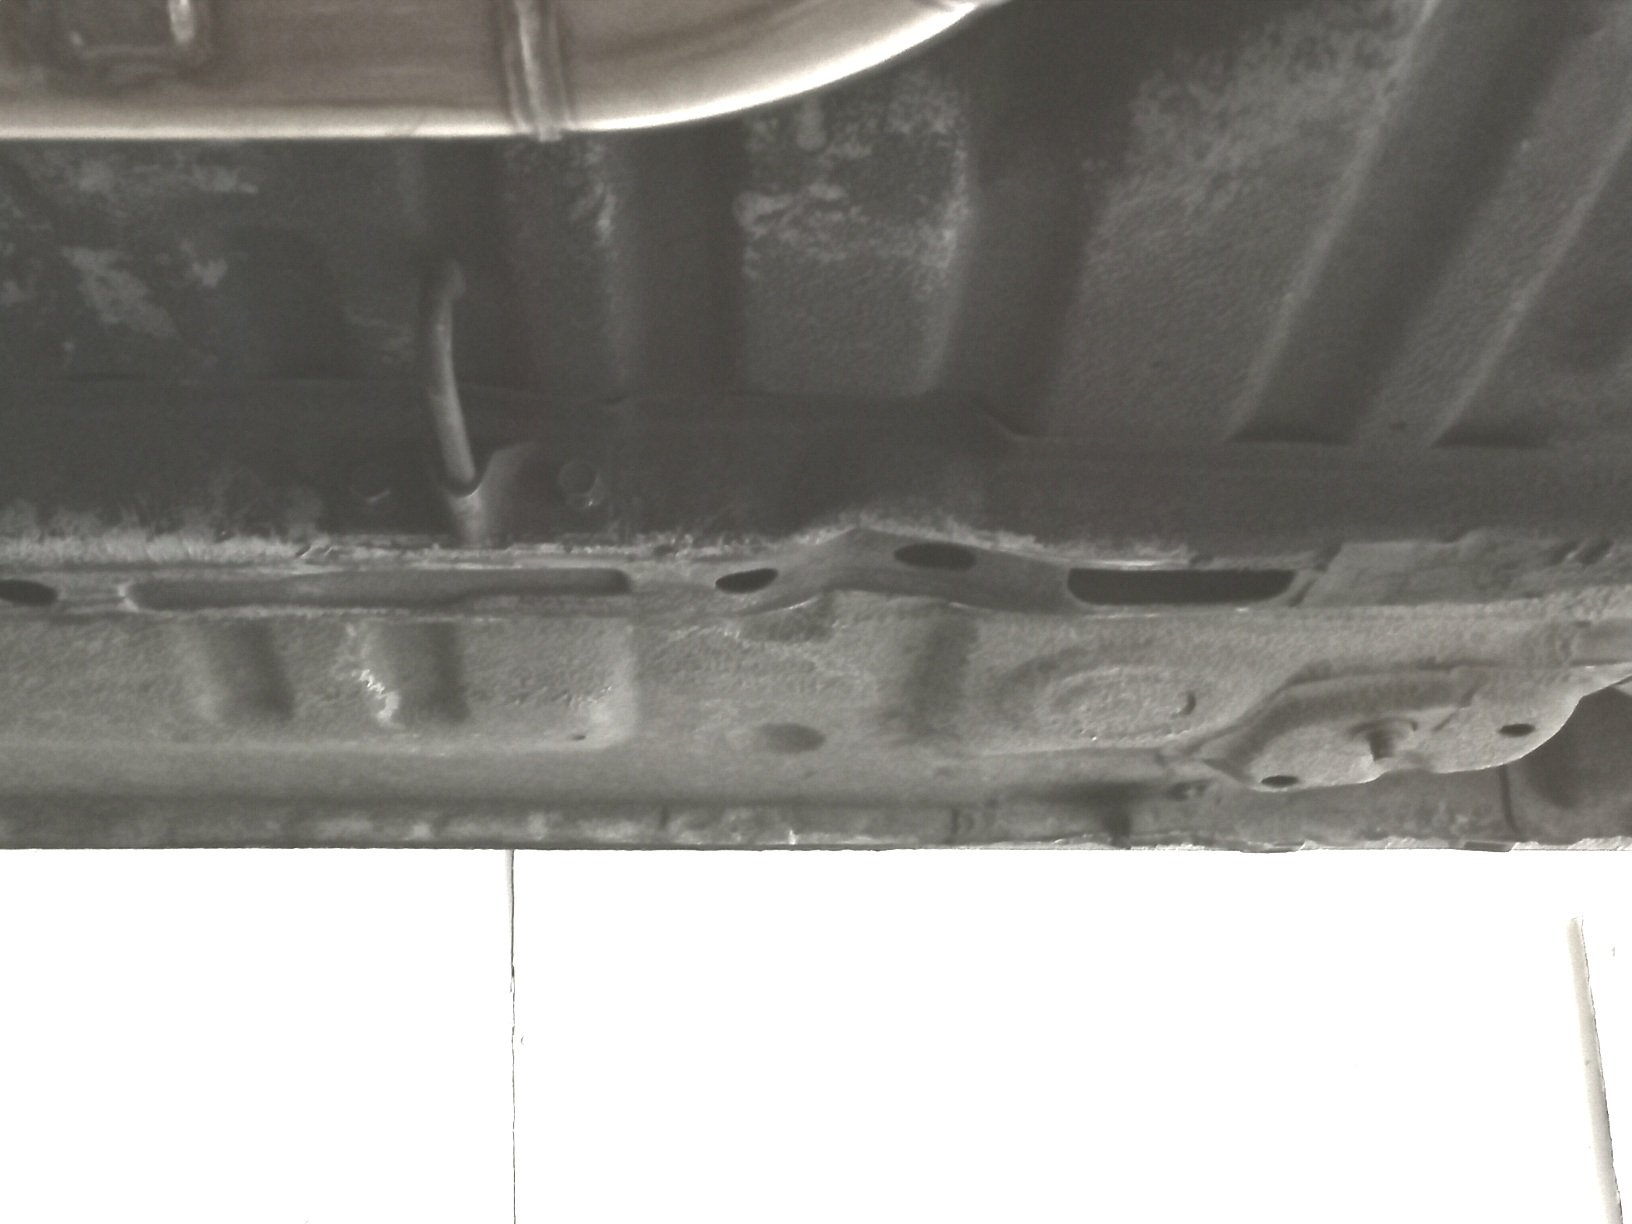
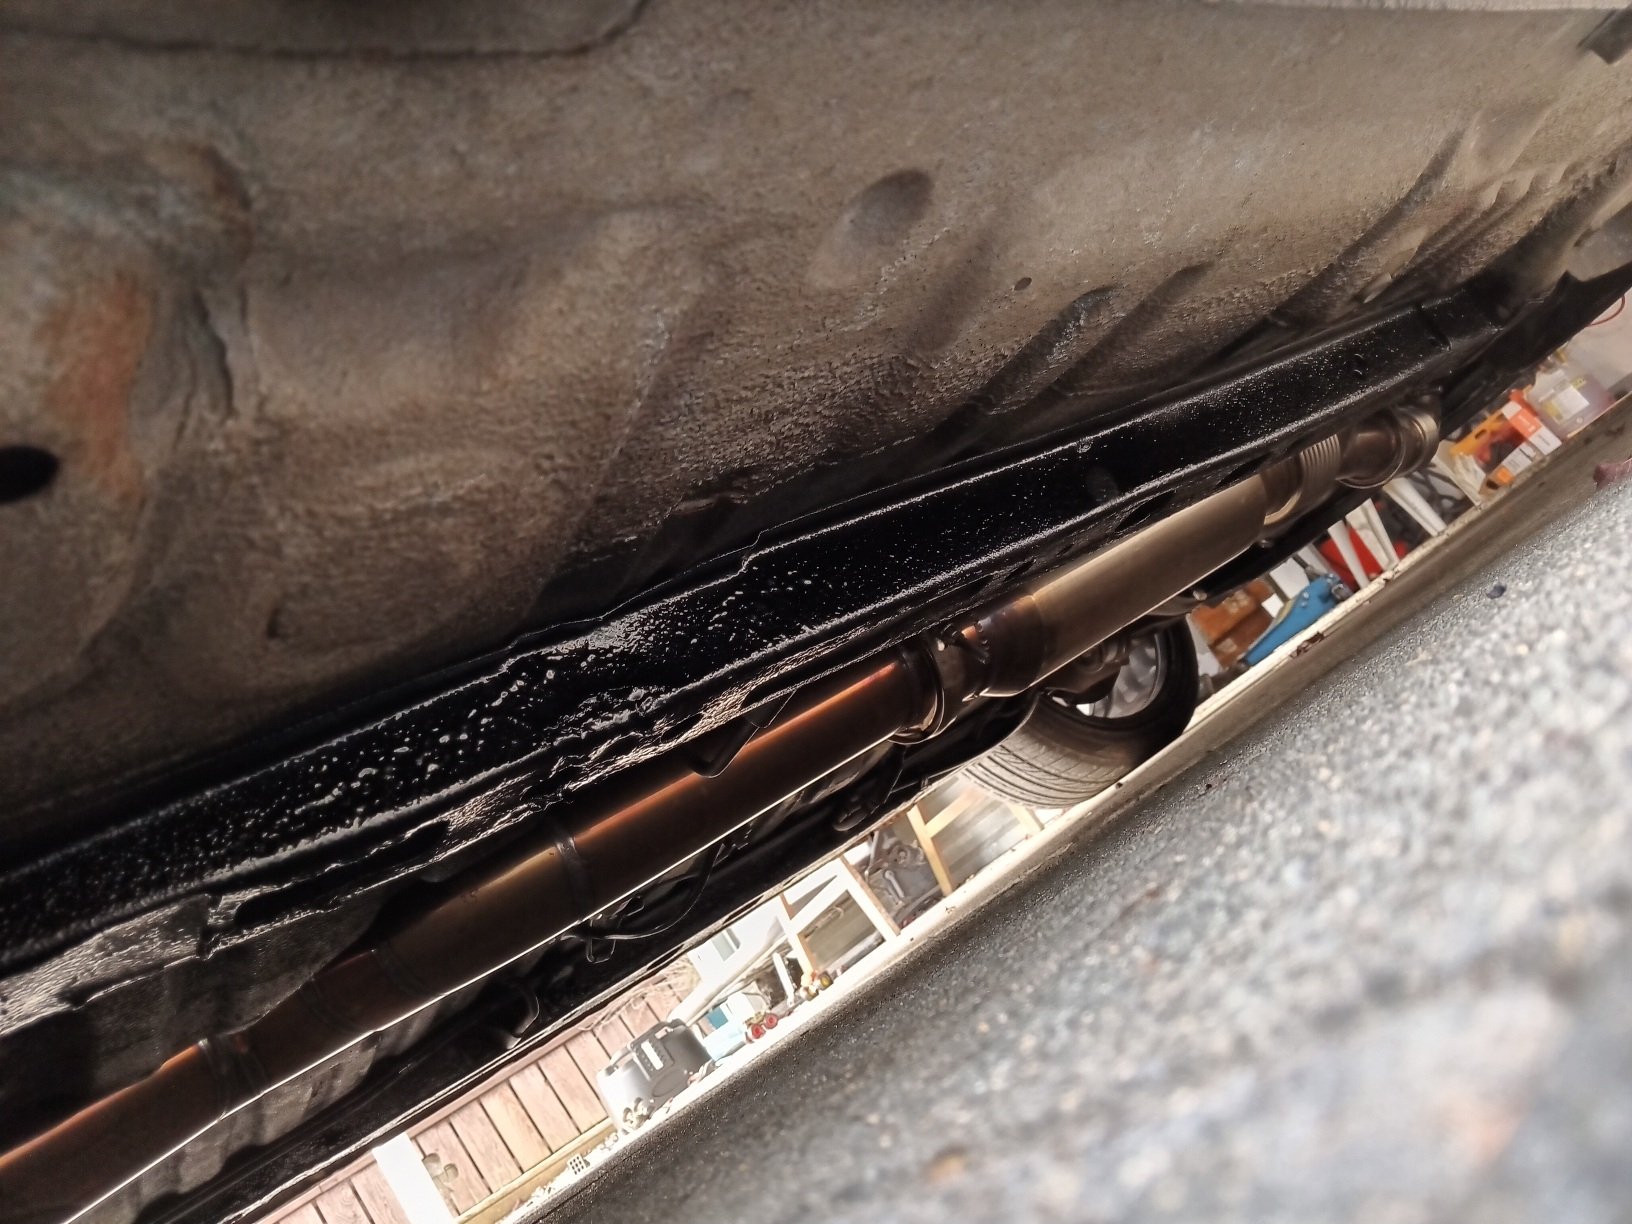
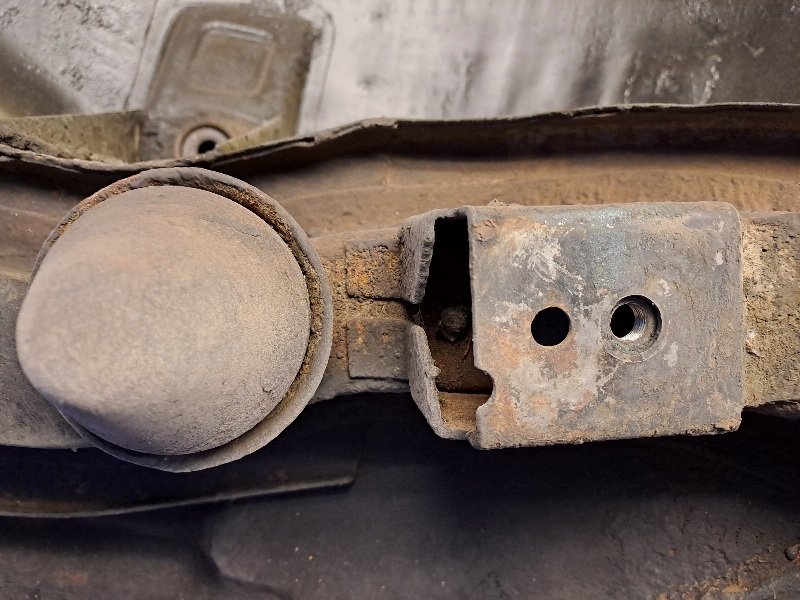
My chassis rails were a bit pushed in, and most likely would have failed a wof, so i took it to blairs panel repairs, he did an awesome job and even fixed the pinch weld areas that were also bent up, and undercoated it all for a great price and all done in a day, couldnt ask for more really, one less thing to fix on the road to a warrant ..
1 point
-
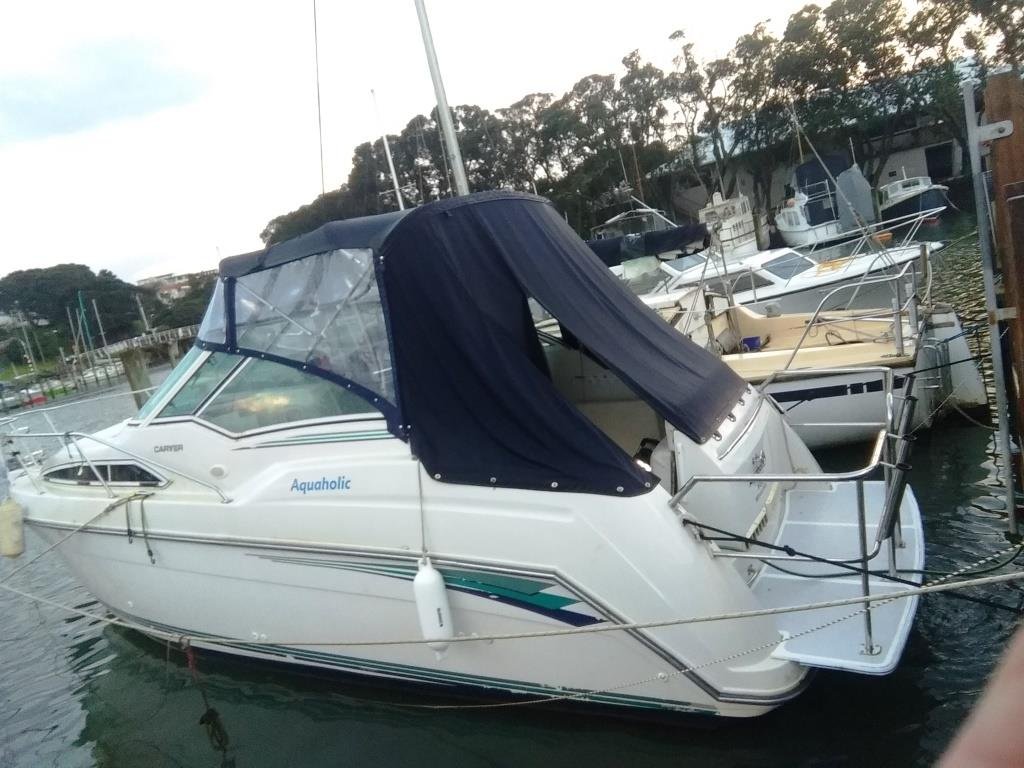
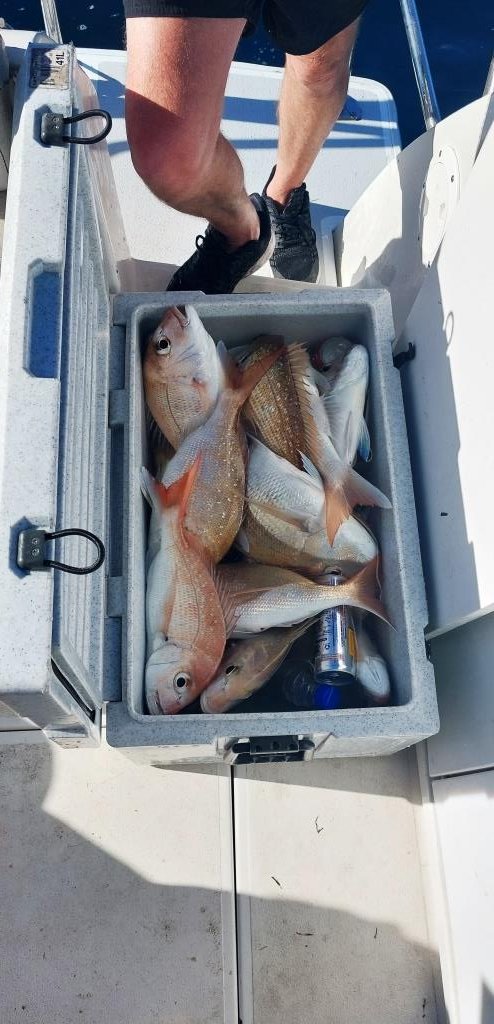
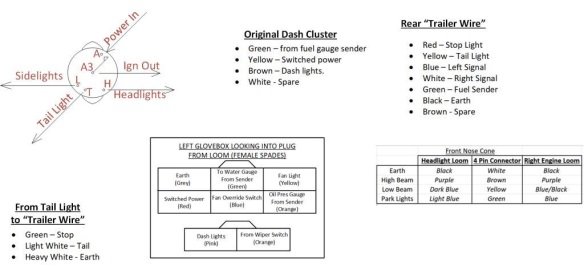
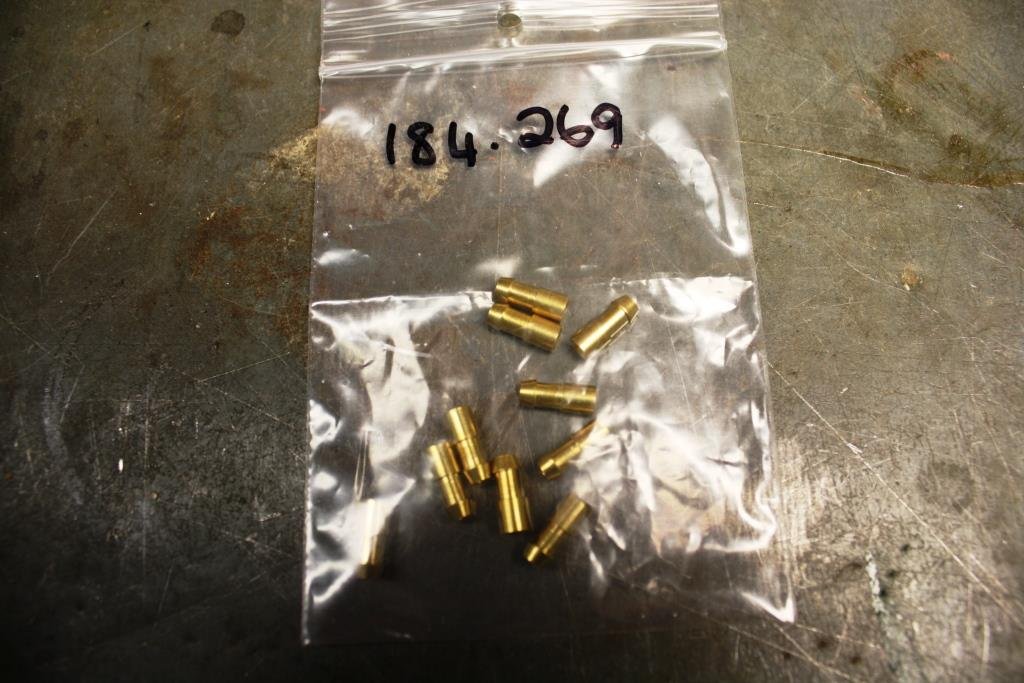
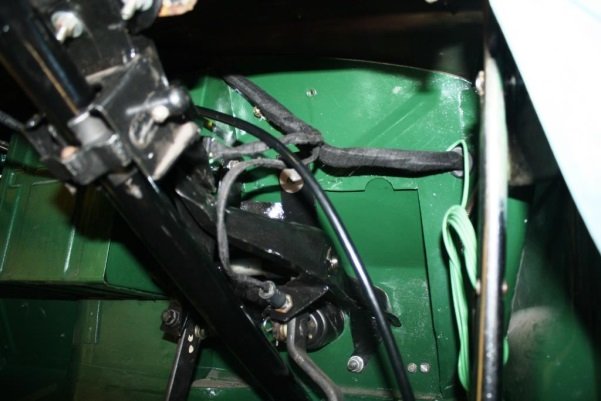
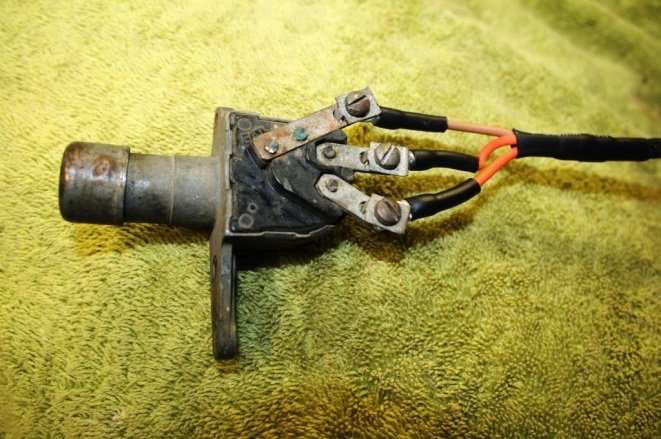
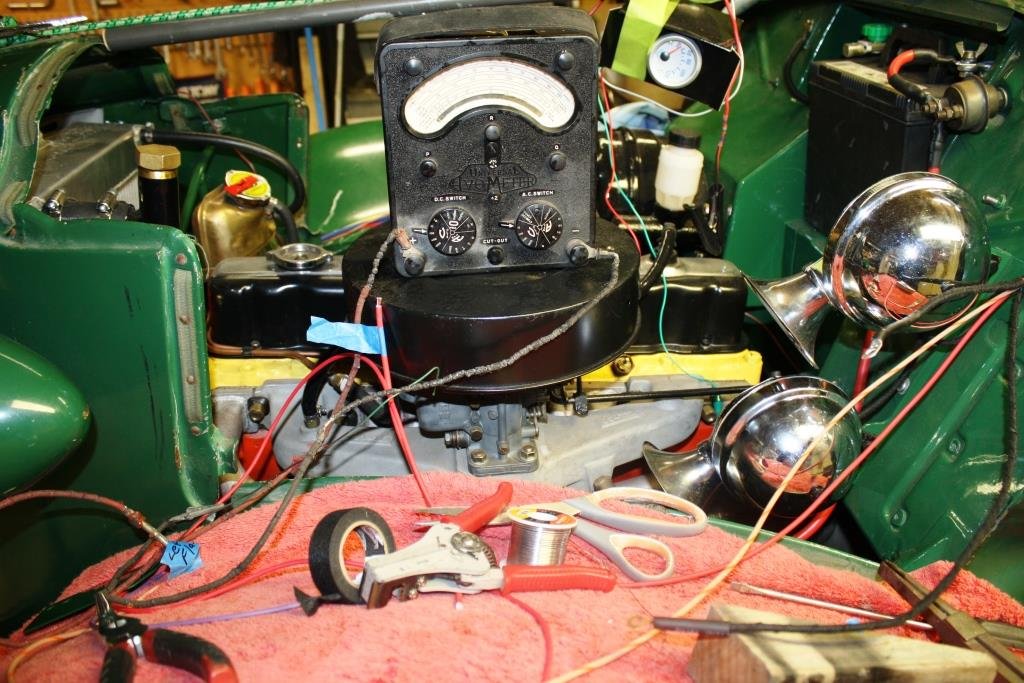
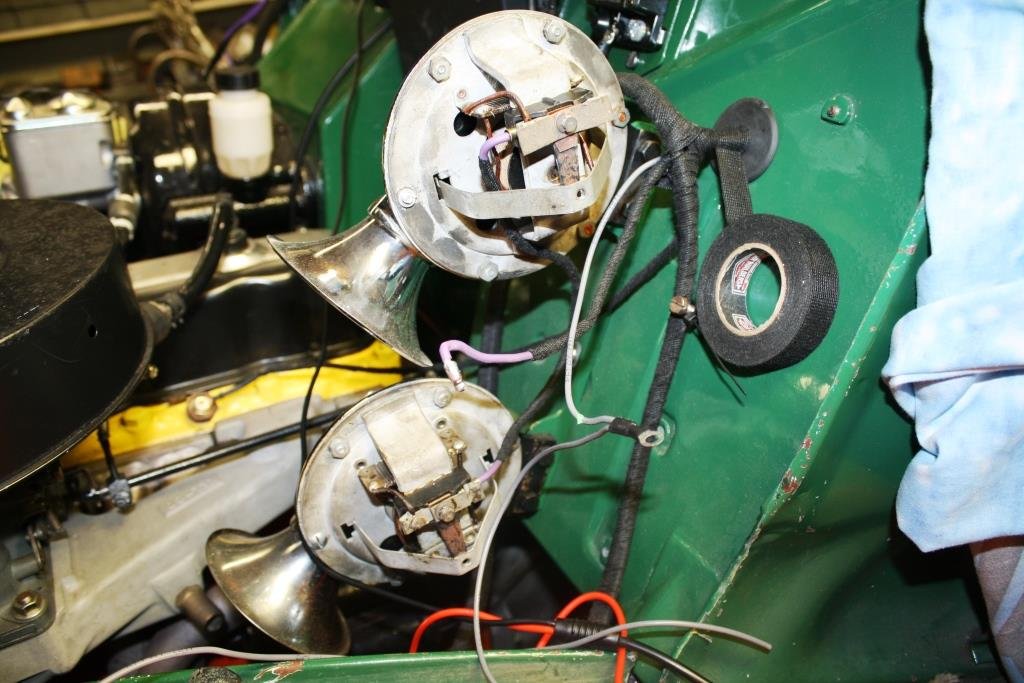
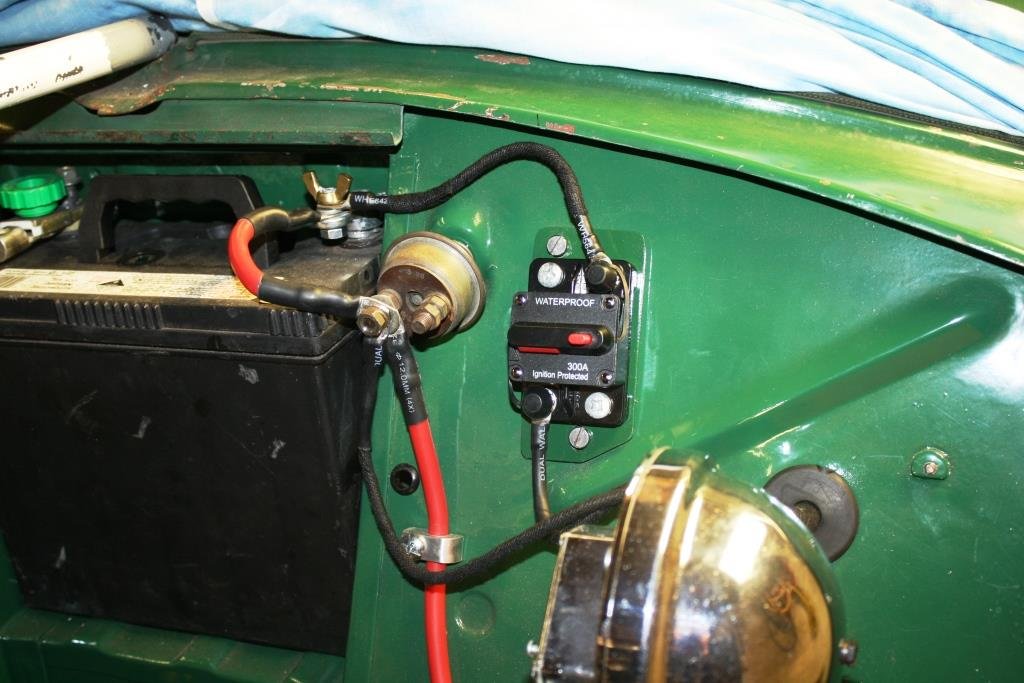
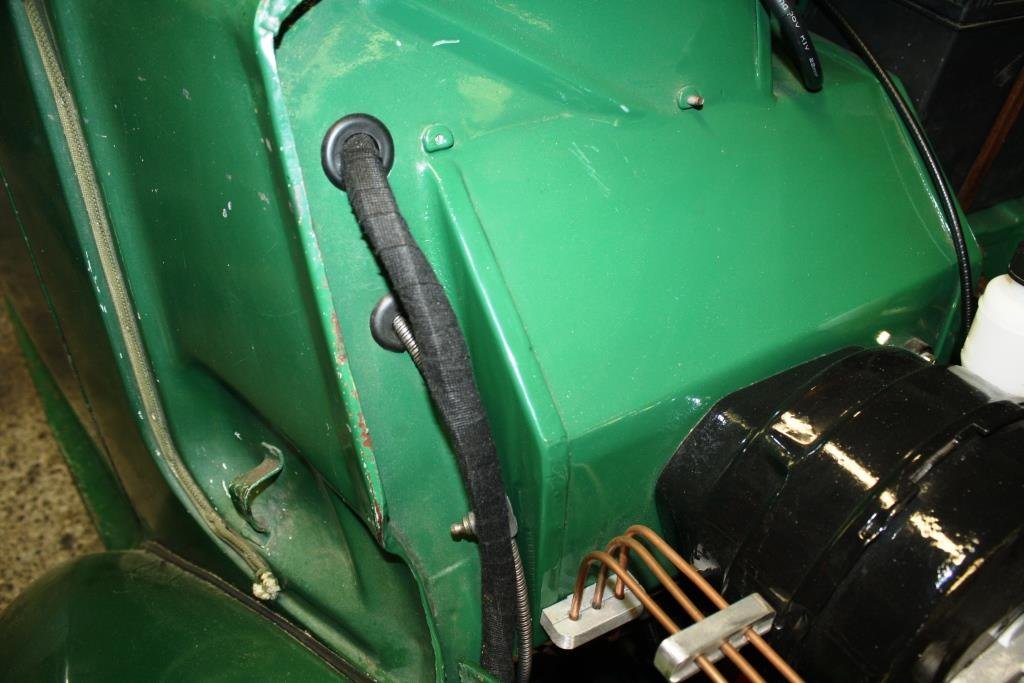
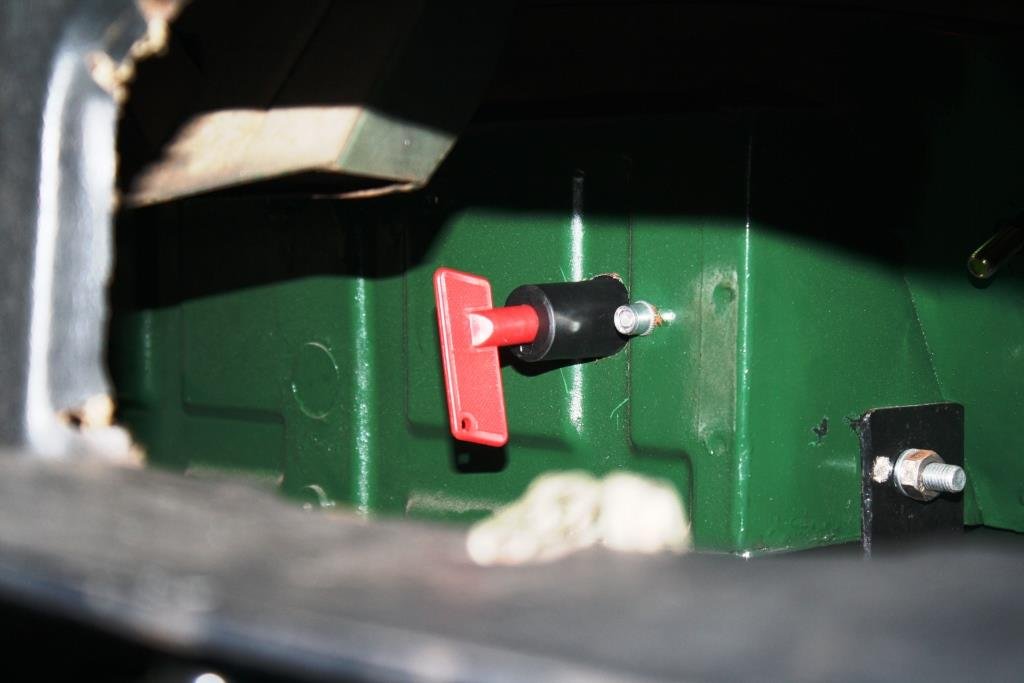
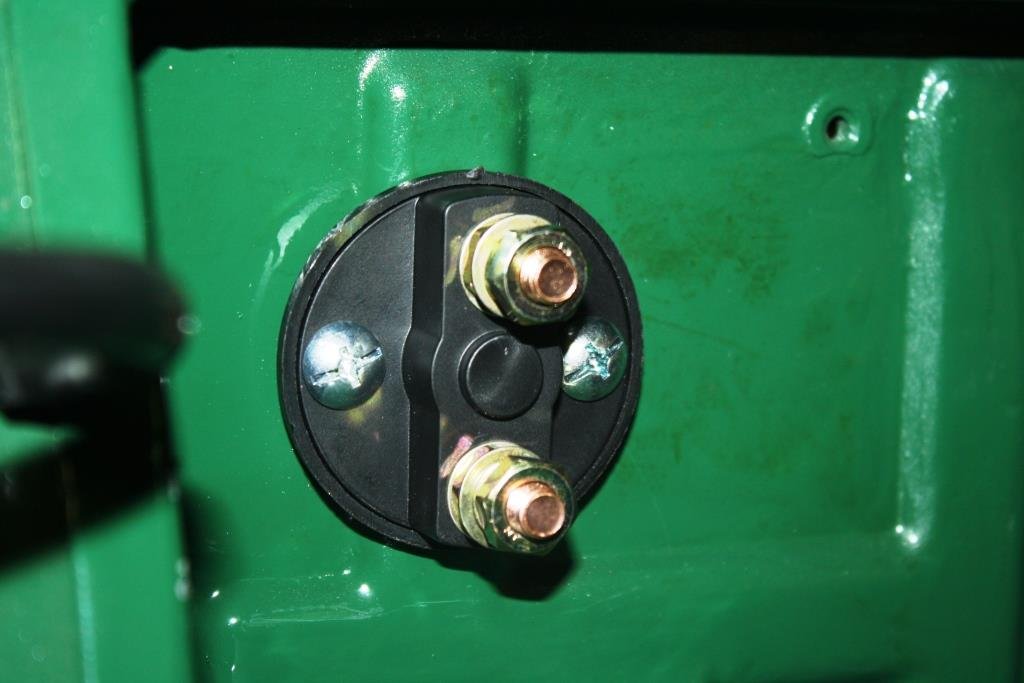
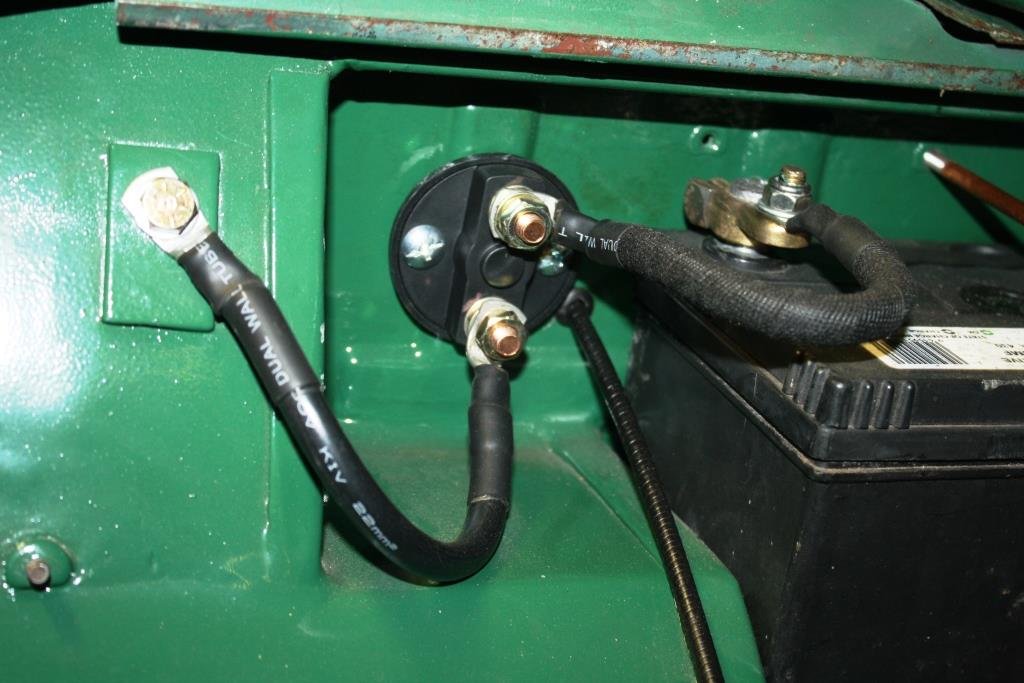
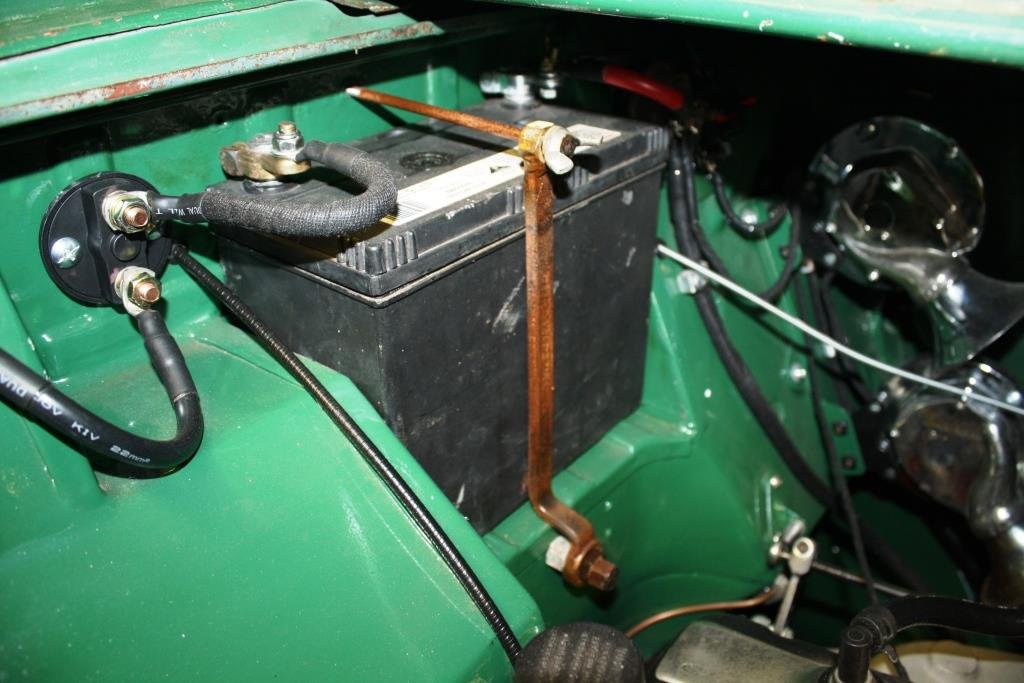
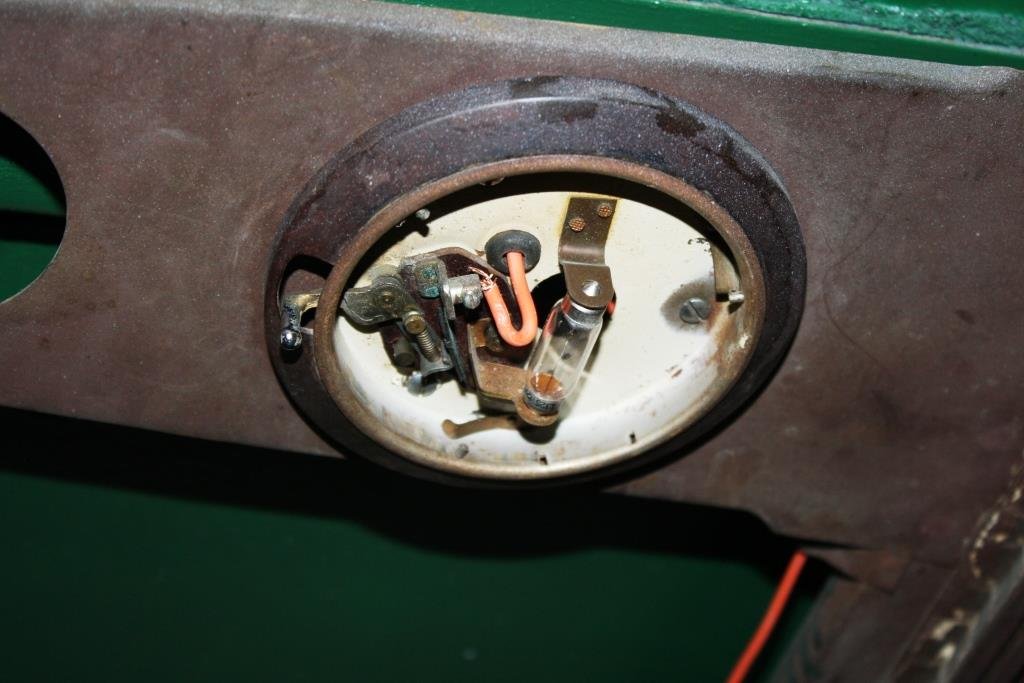
…………Yes I know I’ve been a slack prick, re: this thread. With final arrival of summer the good ship Aquaholic insisted that I take her and some of my disreputable mates out fishing… (What could possibly go wrong?). It was a hot day, we got thirsty, we drank heavily and we “got fush”…….(as you do). A few days later my brother turned up at the Viaduct in this bloody monstrosity, and the good ship Aquaholic (and a certain part of my anatomy) felt very, very, …. small…….(Sibling rivalry can get complicated!). ….so we headed north. The view from the bridge was cool…… Accommodation wasn’t too shabby…. …. And the lounge was bigger than the one at home… Thankfully there was a bar on board for self medication! Back home I was stricken with a bout of the much feared “home handyman-itis” and I accidentally started rebuilding the front of the house… (Note the cunning accumulation of Brownie points with the “ever lovely Mrs. sr2”). After the above brief hiatus I’m finally back to Rigamortice’s wiring. I’m trying to document as much as I can because my memory is like a sieve. I managed to source some cool old fashioned bullet connectors…. I’m almost finished under the dashboard, getting sick of working upside down. The dip switch still works so I hit it with some contact cleaner and we’ll see how it lasts. I’m running relays on the lights so it won’t be carrying the amps that it used to. I’m using my 70 year old meter just because I can. The horns are all wired up but they sound like two strangled cats, I’ll have to do some research on how to tune them. Circuit breaker in place instead of a fusible link. Mounted the battery earth cut out through the fire wall Repurposed an old offset ring spanner for a battery clamp. Managed to get some life out of the interior light with a new bulb and fresh wiring. Cleaned a ton of crud of the diffuser…. And it works.
1 point
-
I've got a kit of my Chevy in the stash, maybe it should be next on the list. Kind of fancy doing it as it was after it had finished the Alaska Highway & was just a yellow maintenance truck.1 point
-
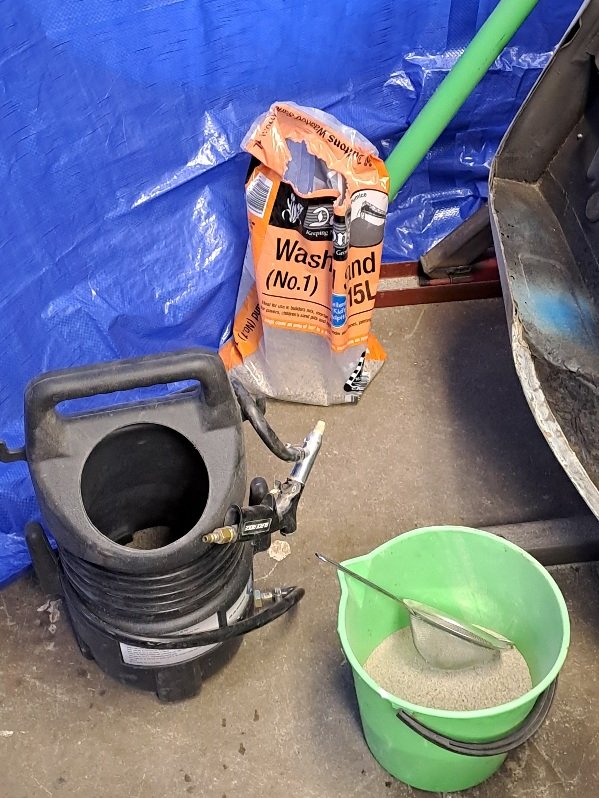
So time to attack the underside so I looked into how to do this. Acid dipping was going to be 1st option a place nearby but that was no longer around and closest place was tauranga with a 6 month wait? Next plan was sand blasting, the entire shell quoted was 3k so out of my budget. I decided to just go cheap and learn along the way. I first got a sandblaster unit from super cheap. For sand I bought a 10kg bag from bunnings. I fired up compressor and it was a fail. Sand would not flow, it was damp... adding water to it was a worse idea it blocked it entirely. I undid hose and blew it out. So wet sand and water was a no go. Dry sand only. Tipped the entire bag out on clean concrete floor to dry, then sifted it into bucket ready for launch. I then made slight increases to the diameter for sand input and the air hole. Since this stuff goes everywhere I put a tarp up and wore a mask and welding helmet for protection. Had the fan blowing dust outside and got cracking into it. These are the 2 sides as a comparison, check out the horrid welds? These are factory or before my time...
1 point
-
Wash your mouth out !1 point
-
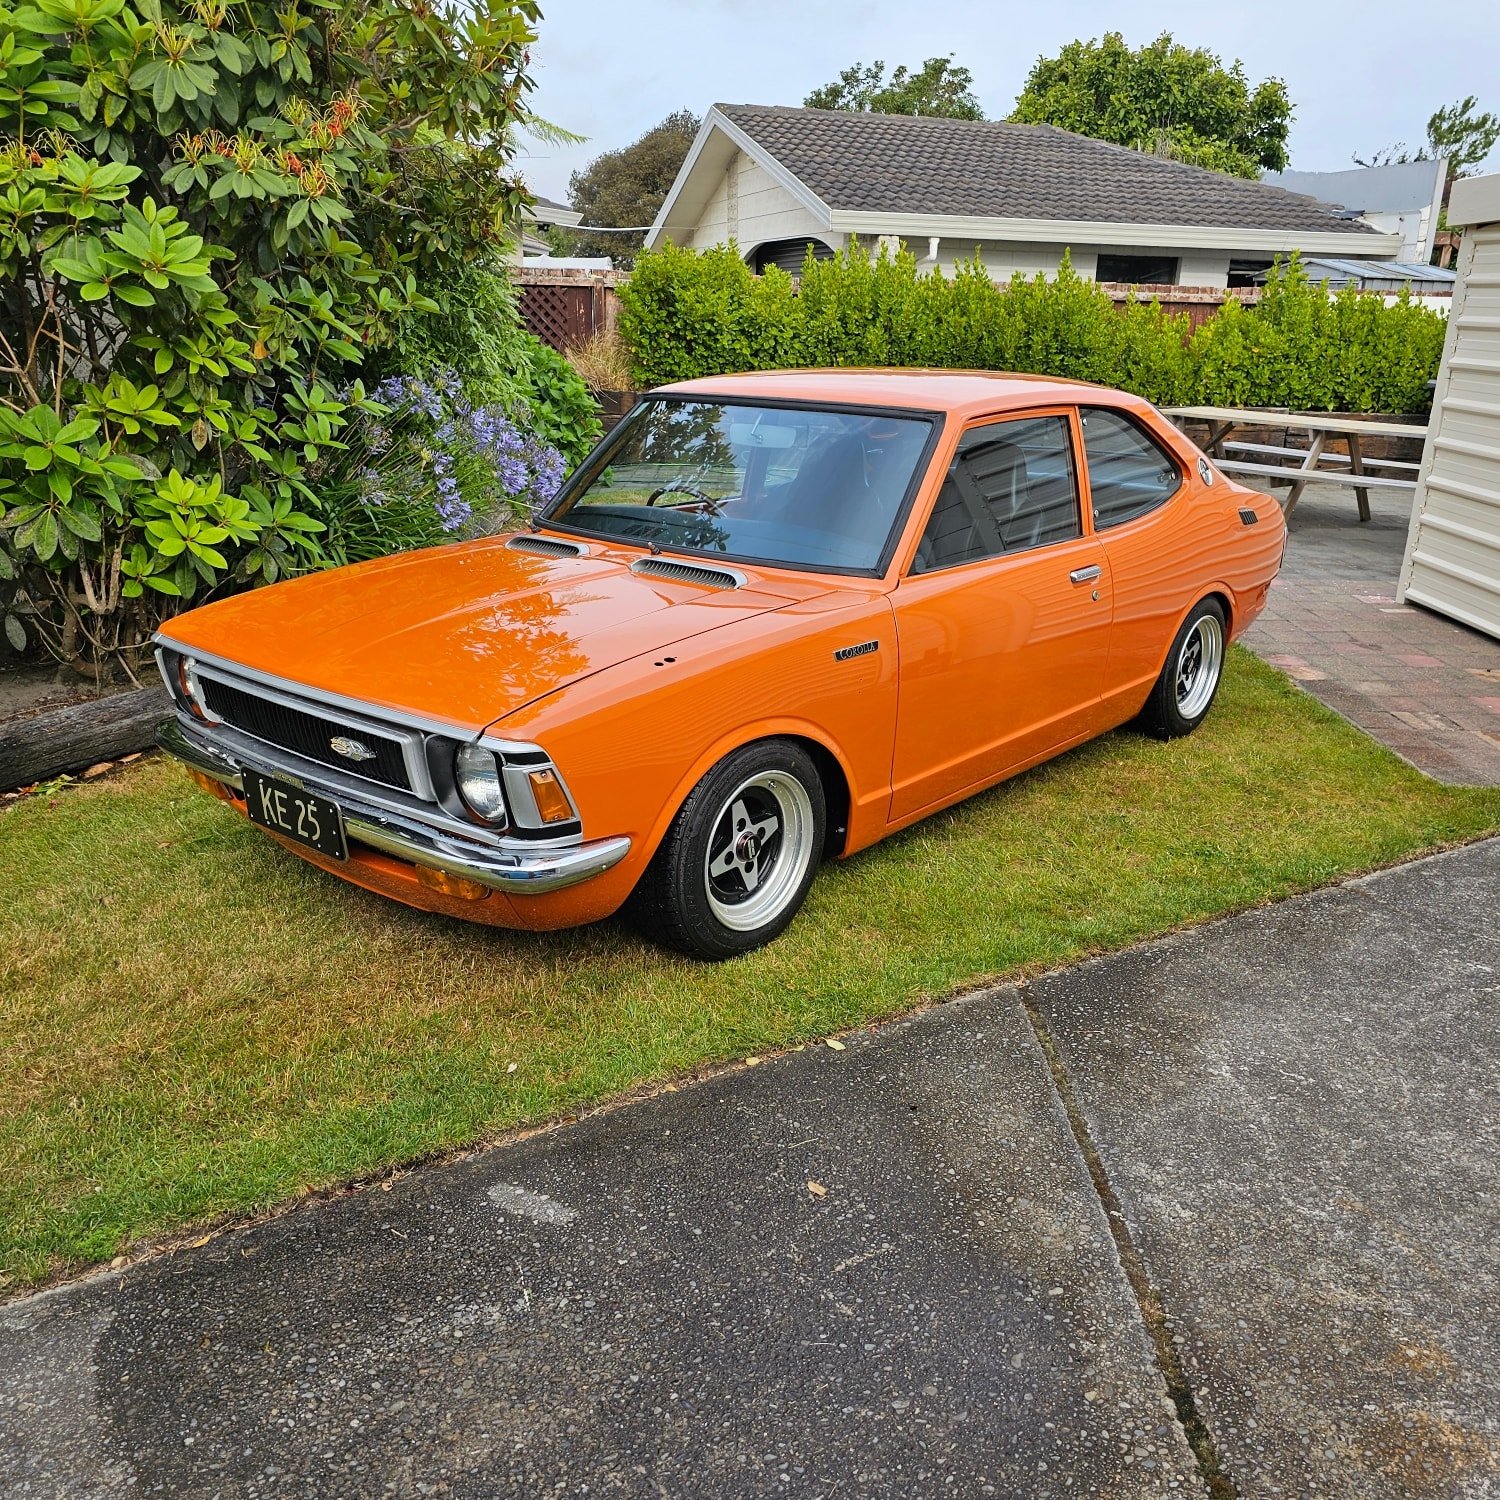
1972 ke25 rego on hold Full resto panel paint full strip down Just about every part has been off and rebuilt upright 4k from a kp60 race car I brought. Factory black interior new brake and fuel lines rebuilt brakes list goes on really needs its own thread https://oldschool.co.nz/index.php?/topic/89183-horndogs-1972-toyota-corolla-ke25/page/4/#comment-2617629
1 point
-
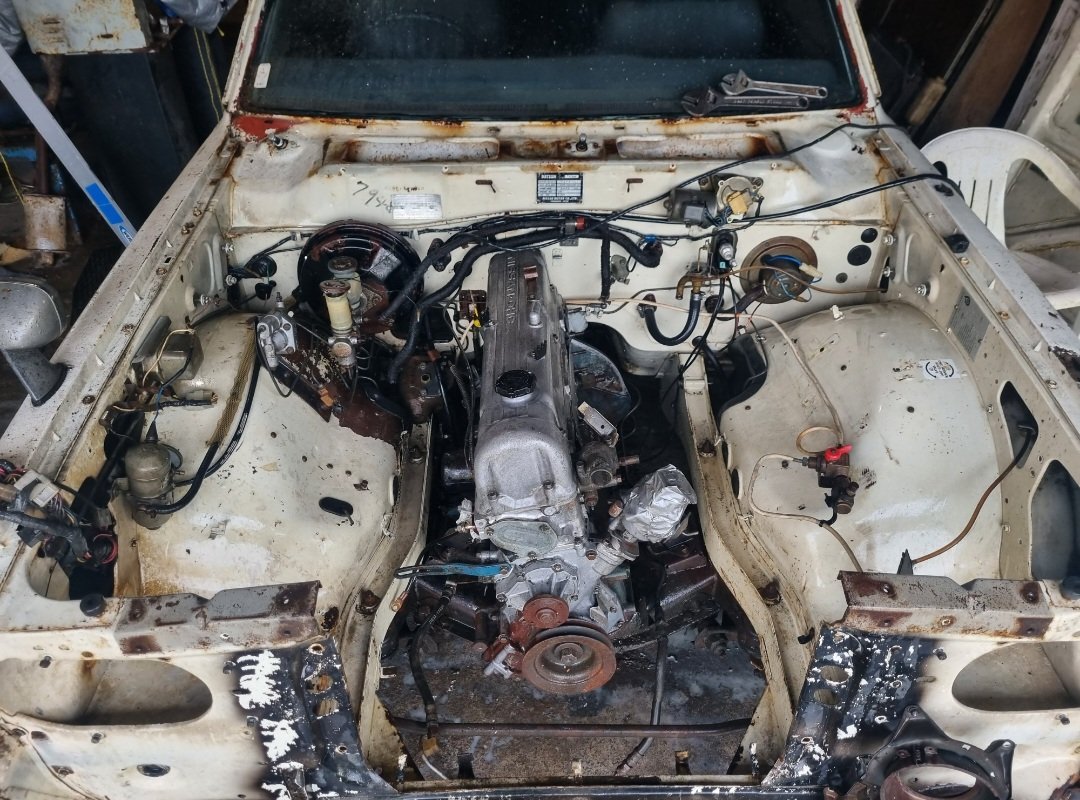
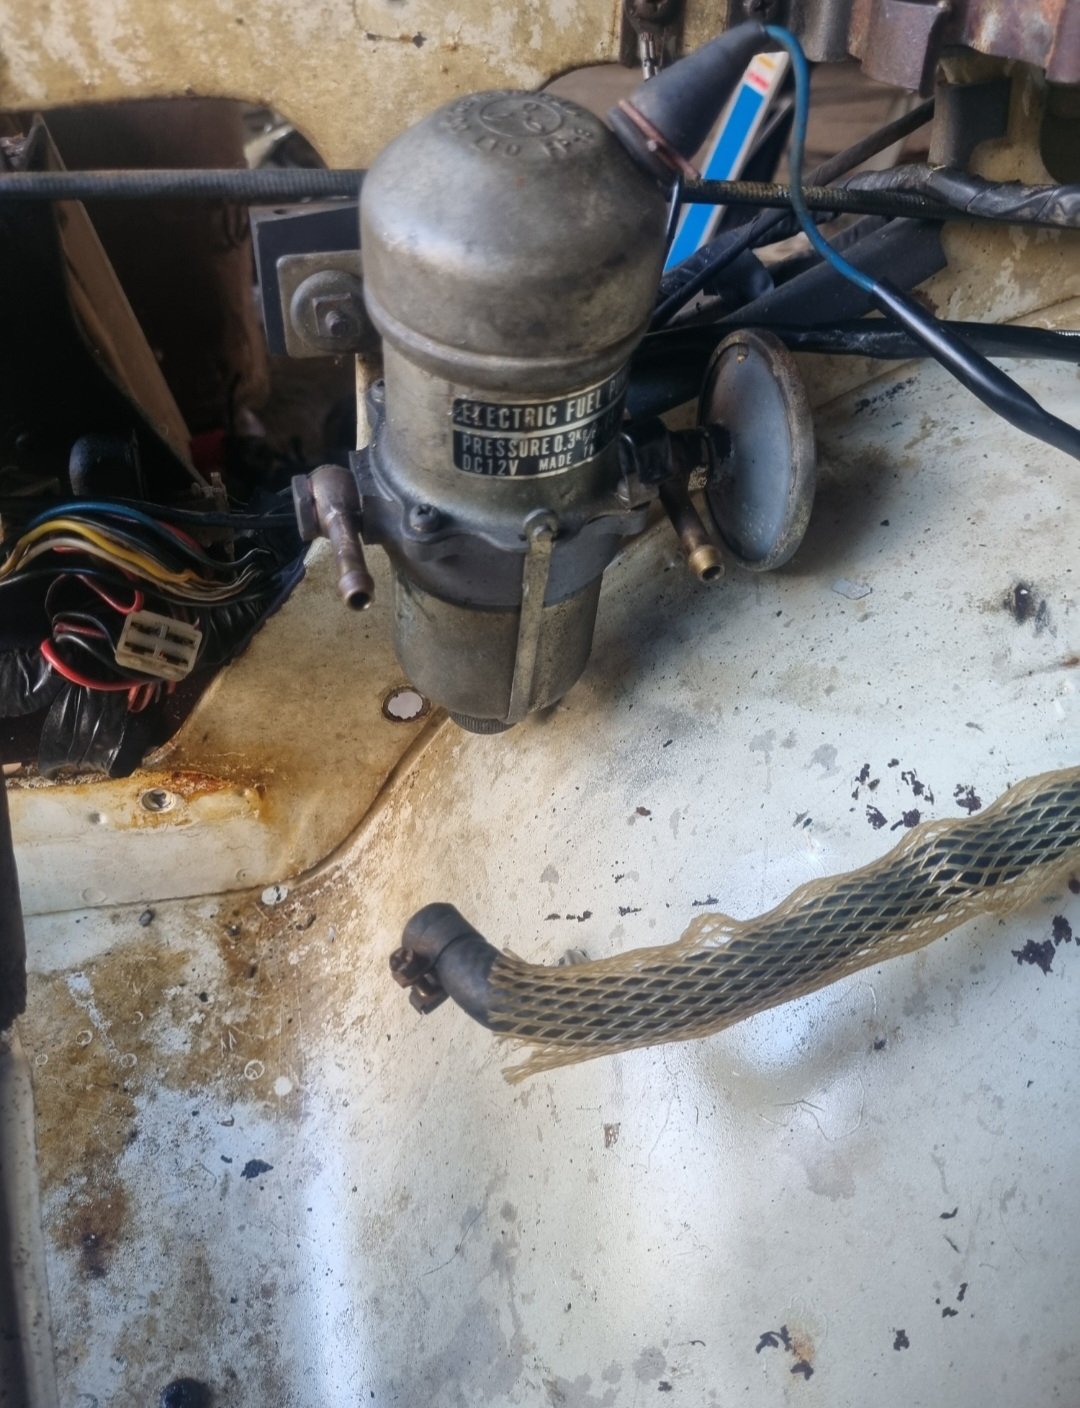
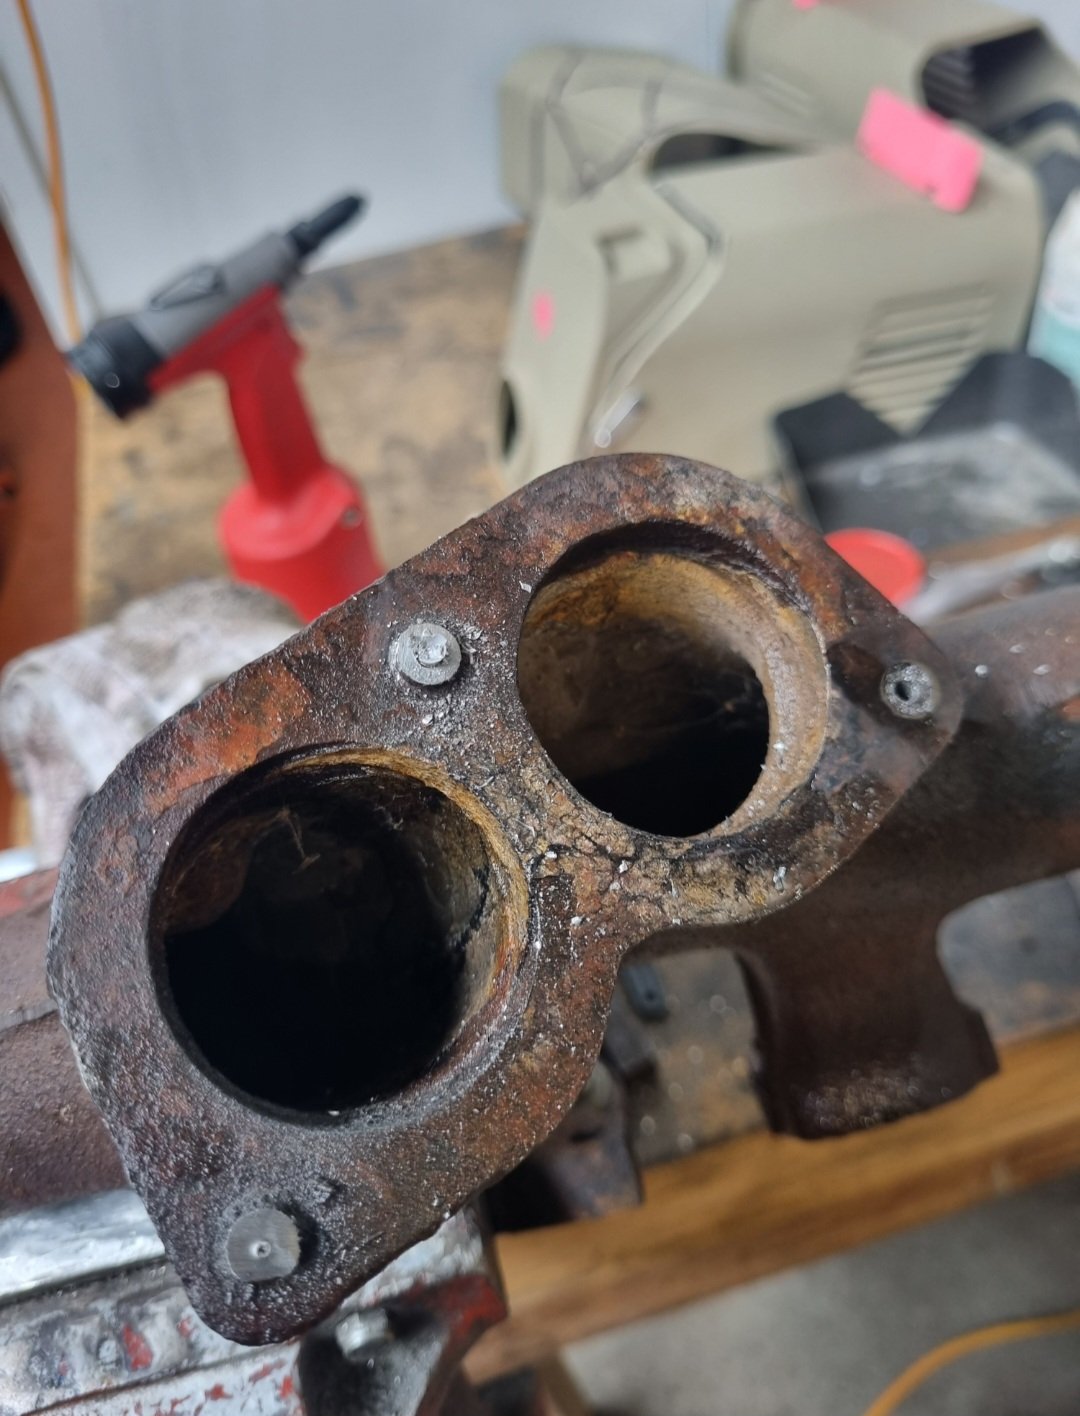
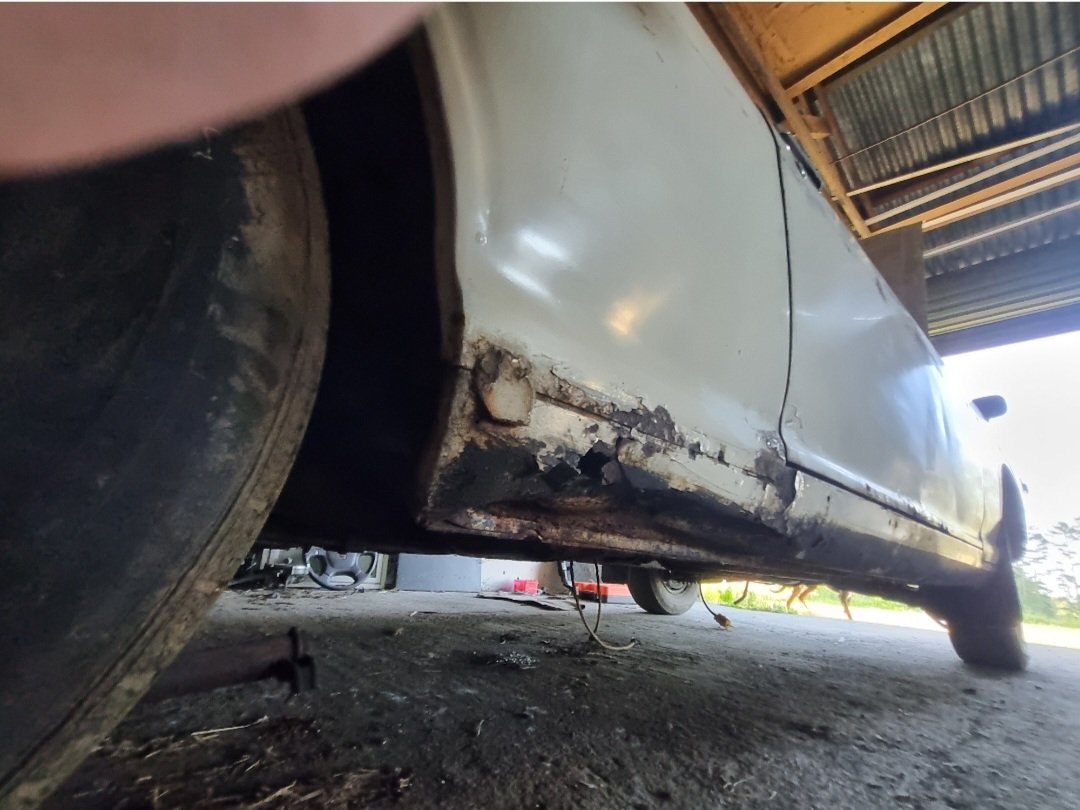
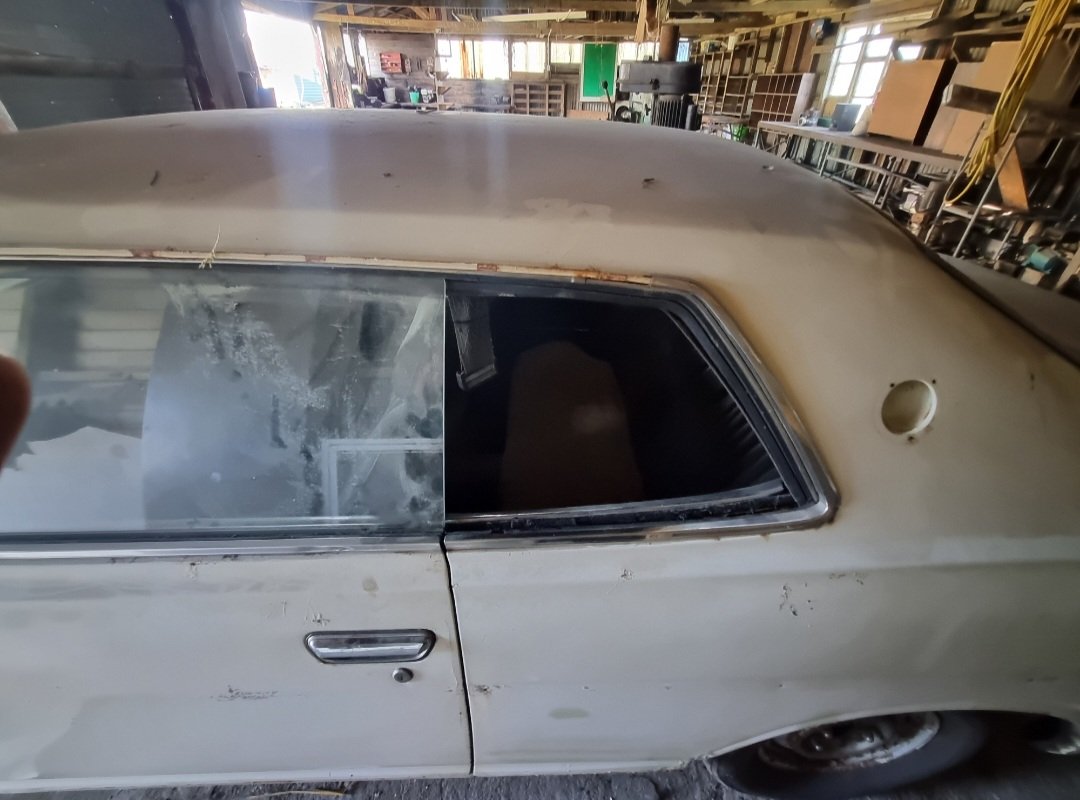
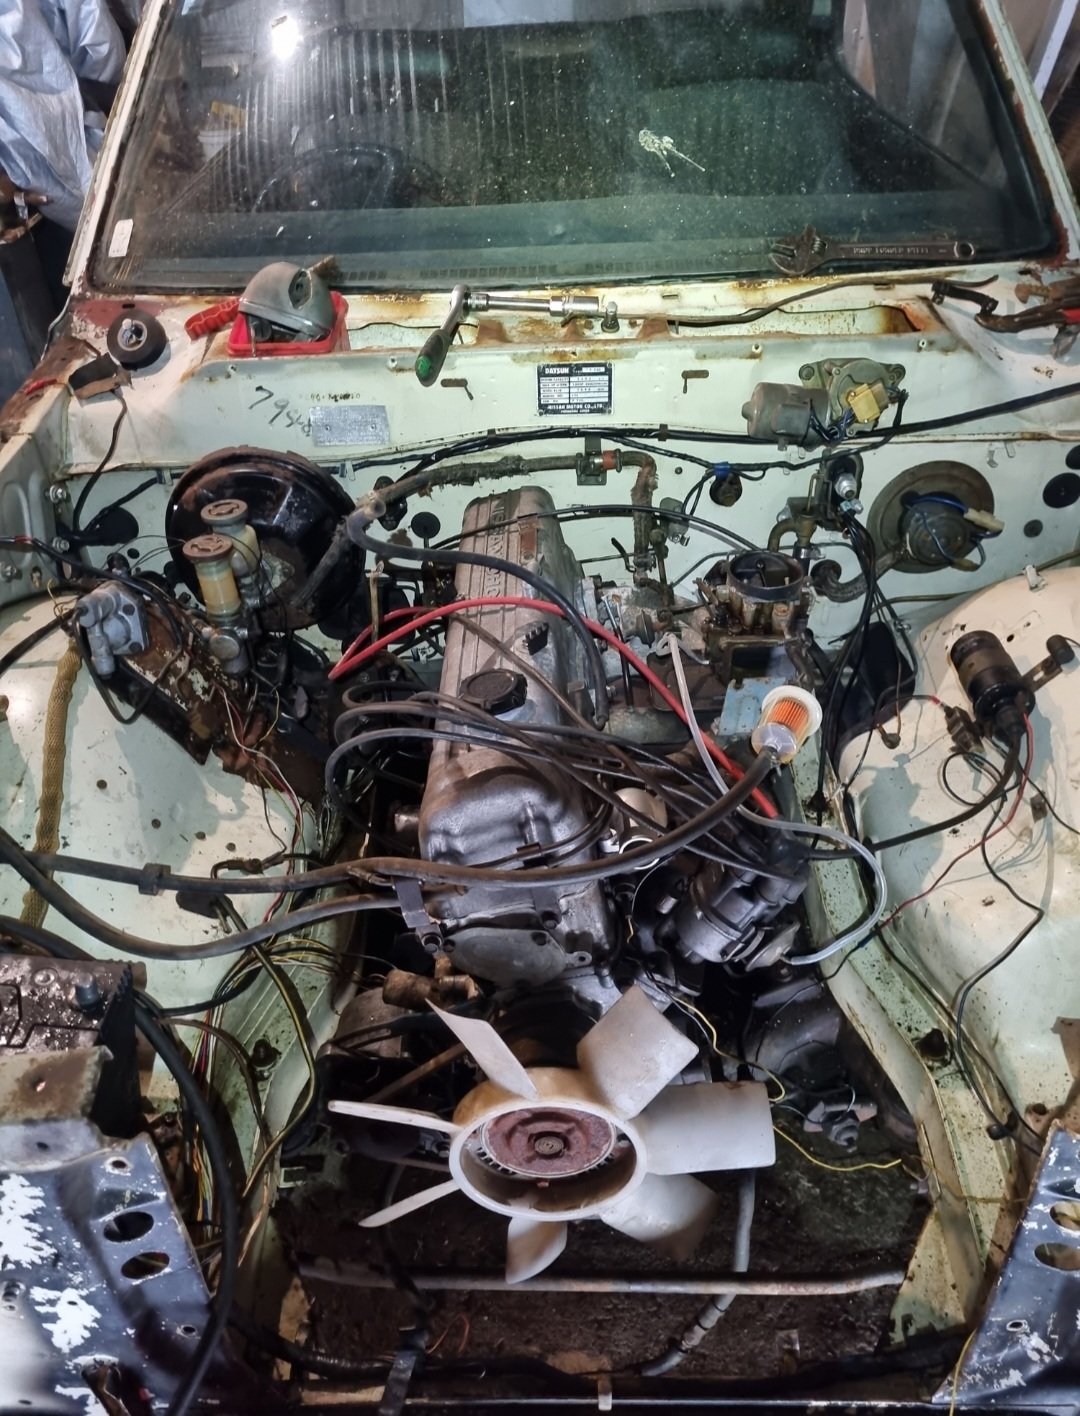
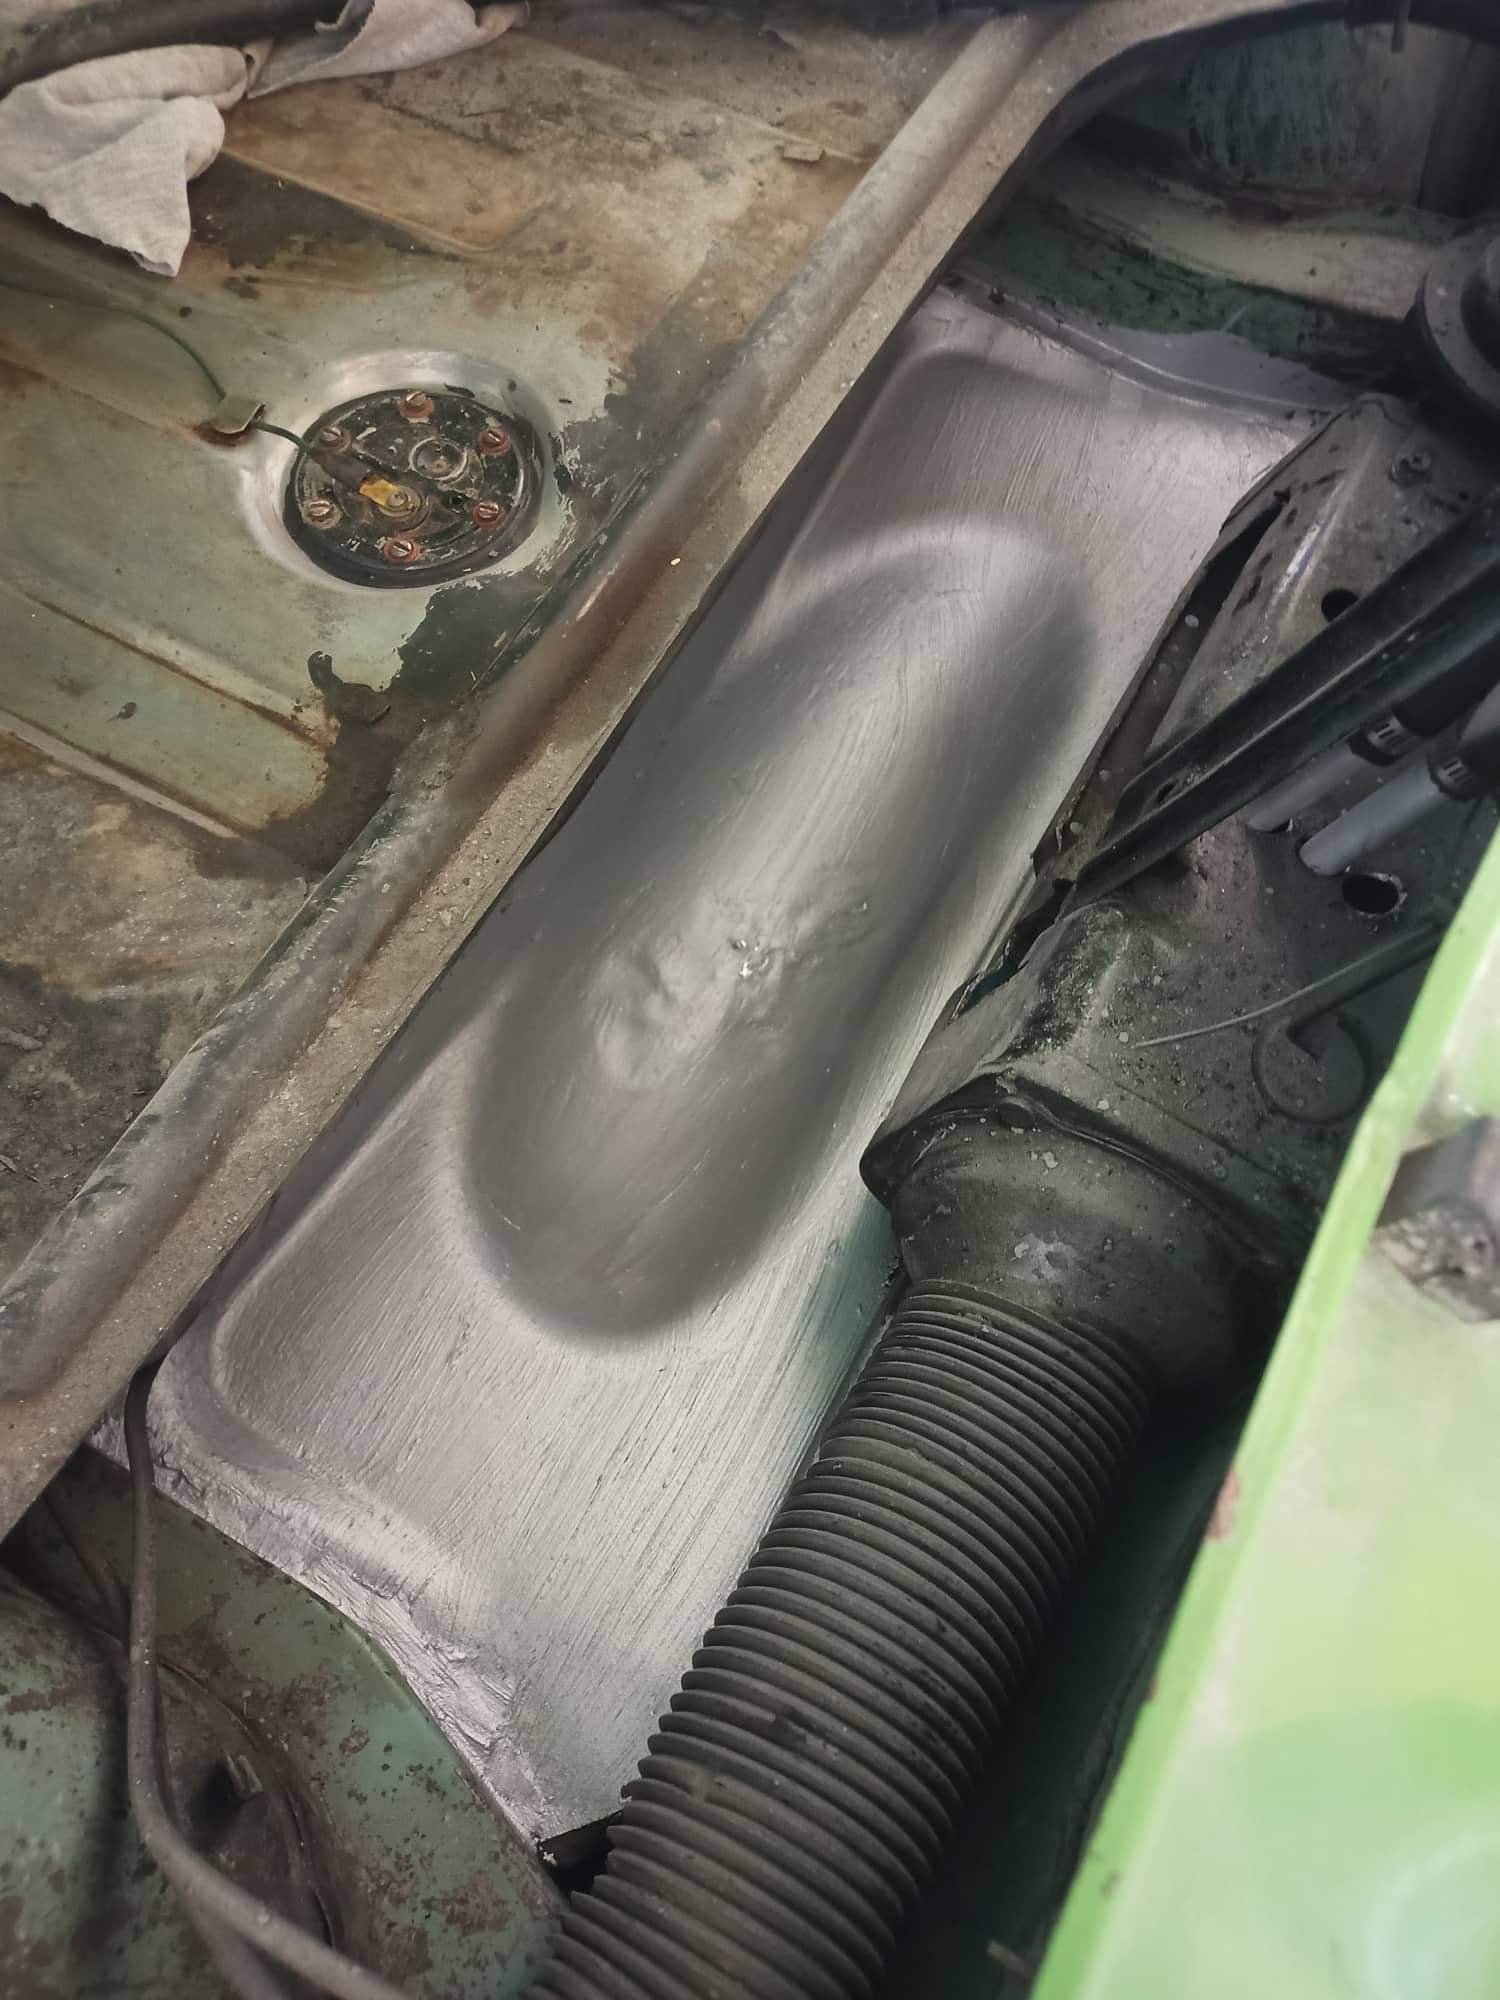
Been a few weeks now since I've had this thing. Started by deskunging engine bay with degreaser and waterblaster. Lucky my shed at home is so shit, as I had to waterblast it inside as the brakes are still seized. Before and after Removed a whole lot of junk out of the engine bay. Was originally a CNG car so all that shit went in the bin. Also had a/C so I pulled all that out too as I have no pump and the rest of it looked pretty unserviceable. Keeping it simple for now but would love the opportunity a/C eventually. Then set to deciphering the basket case wiring. It's like 15 year old me had been there and thought I could improve on it. Bit of work with the test light and had it all figured out. A lot of fuckery was going on but I got to the bottom of it. Had an electric pump owing to the CNG, I didn't hold much hope but shorting it sprung it into life. Next up removing many broken studs and retapping holes. All gravy. The big news today however is that after finding all the various parts that were strewn all through it (thankfully only a few bits are missing), and assembling back onto the engine with a new manifold gasket, thanks to @fletch new front pulley (had big chunk missing) and new thermostat housing. Old bitch fired up, after my comedy of errors forgetting to install rotor...woops! Thing runs mint, oil pressure around 60psi so I'm happy. I'm surprised it actually ran on the decayed plugs I cleaned up and shitty leads, but firing on 6 and sounding like she's ready for the demo derby! I'm stoked Have also cleaned and vacuumed out the rat shit from inside and pulled the old house carpet out and, whilst not mint inside is really not too bad. Door trims are a bit fucked and the seats have a few tears, as well as missing rear seat base, but otherwise good. Have assessed the rust situation and for an old Datsun it's really pretty good. The floor is mint. I mean mint. One pinhole. Engine bay also only a few pinholes, front cross member is toast though, so will remake once I get a rad support panel. A little bit on inner sills above floor, and both outer sills need replacement. One lower door needs a little bit of work, other is mint, as are the front guards, barring some dents and shit. Lower rear quarters and rear valance are toast, and boot floor either side of wheel well needs replacing. Not looking forward to finding a passenger's side rear window however... Next mish is to tidy up the bay wiring proper and perhaps get the brakes working so I can do some skids. That's why you own a Datsun. Will then work from front towards the back on the body work. This is not taking precedent over the camper, I have simply had more time to tutu with it in the school hols. Have spent a grand total of about $45 on parts so far to get it running, sold off some shit too which has offset the price of a set of widened steelies @ThePog kindly located for me in the mainland. Chur.
1 point
-
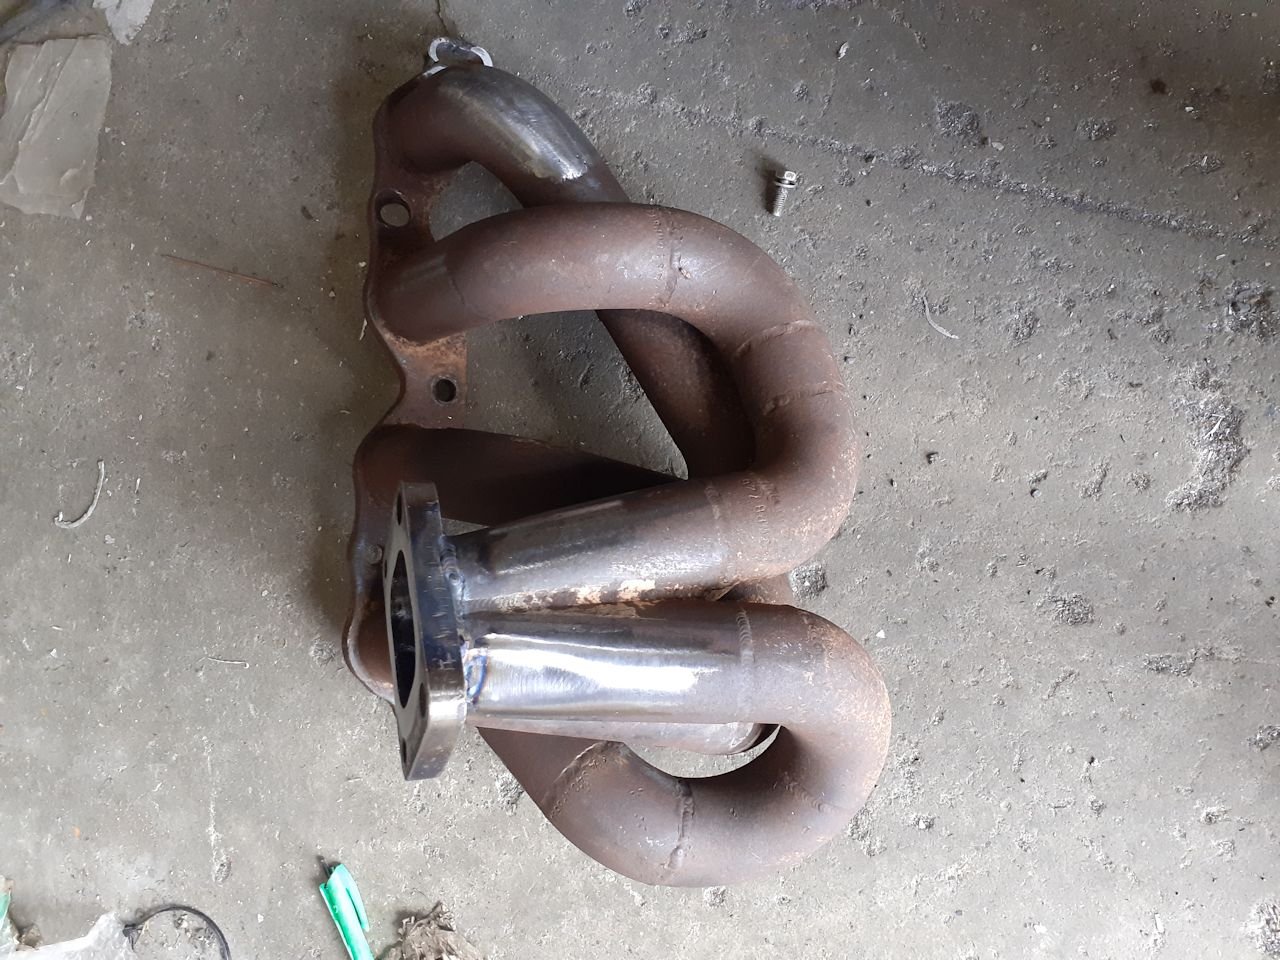
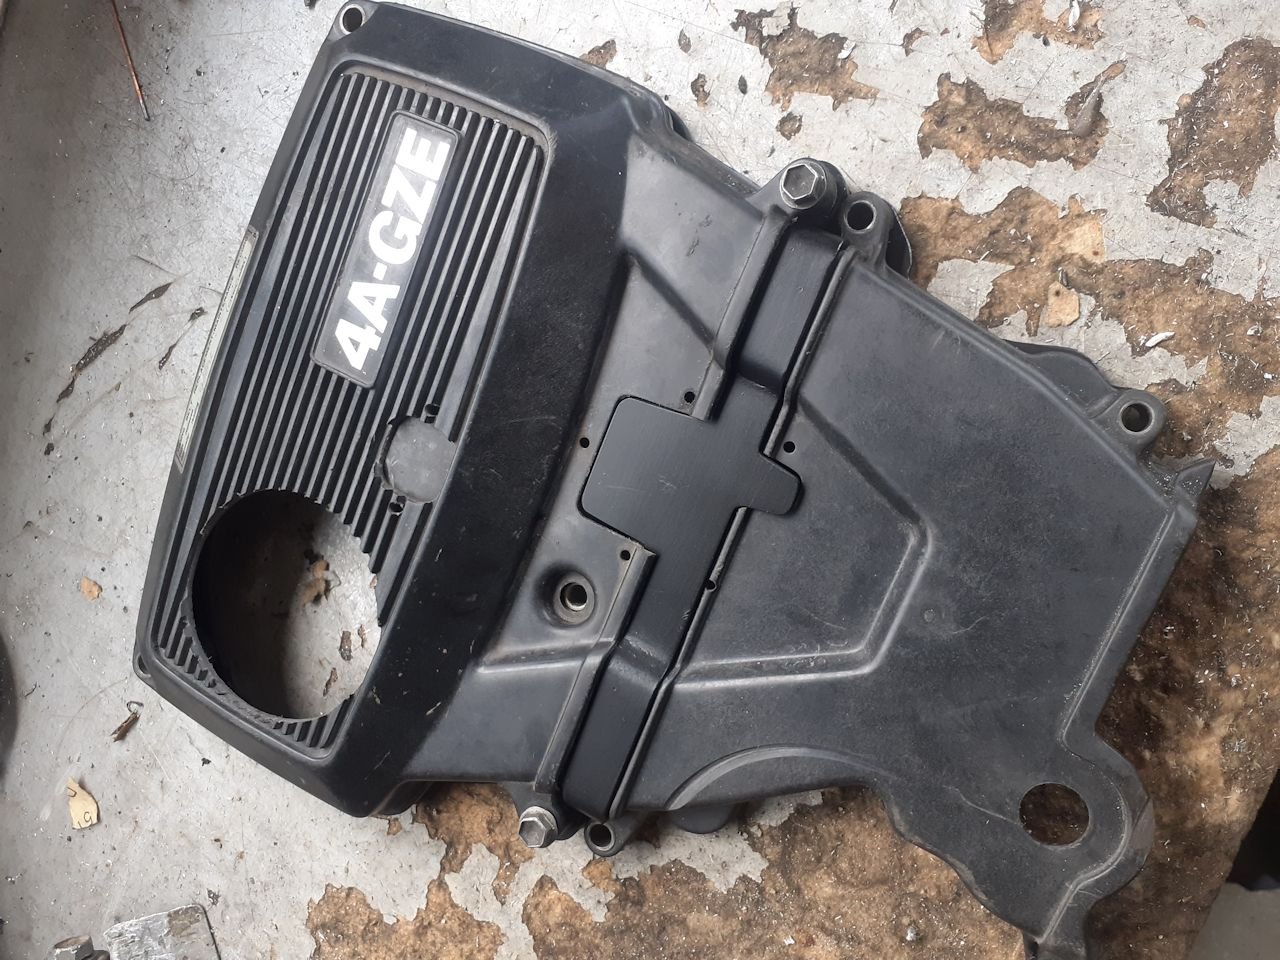
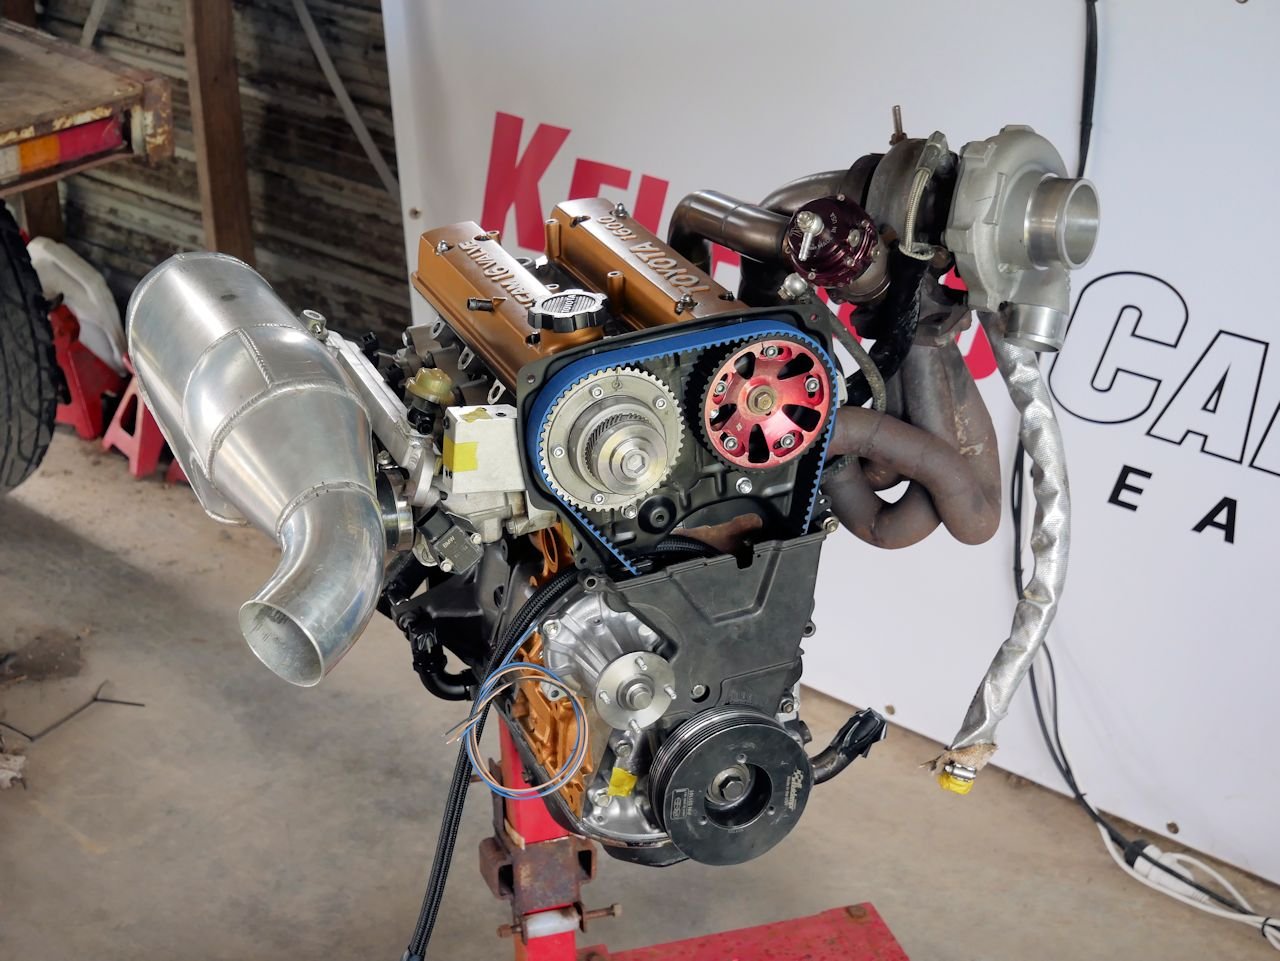
Still working through a few things. Also forgot to mention, the new engine still runs super nice with the big inlet cam and vvti. could daily drive it like a factory engine, smooth idle. doesnt stall out easy etc. would be pretty unsuspecting in a street car. Anyway since has to go in mud and stuff, been making the cambelt covers fit. which took some time, since has oversized pulleys and the 7a block is 15mm taller. made up a 3mm spacer between backing plate and the plastic covers plus a bit to fill the gap. had to nang a hole out for the vvti pulley to stick though. obviously covers arent going to seal off. but should keep most of the junk out some other stuff that had to do, that actually took pictures of. added an external oil drain to back head, between the to trigger sensors. since is bigport head. and this thing is mostly going up a hill when tapped out 7a block is missing a bolt hole which my butchered blacktop ps pump bracket bolts to. so did some illegal welding moves and made it attach to one of the lower bolt holes. also had some alignment issues making it spit the belt. which think i have solved cut 15mm out of the exhaust manifold, rather than modifying everything attached to the turbo. and yeah other stuff.
1 point
-
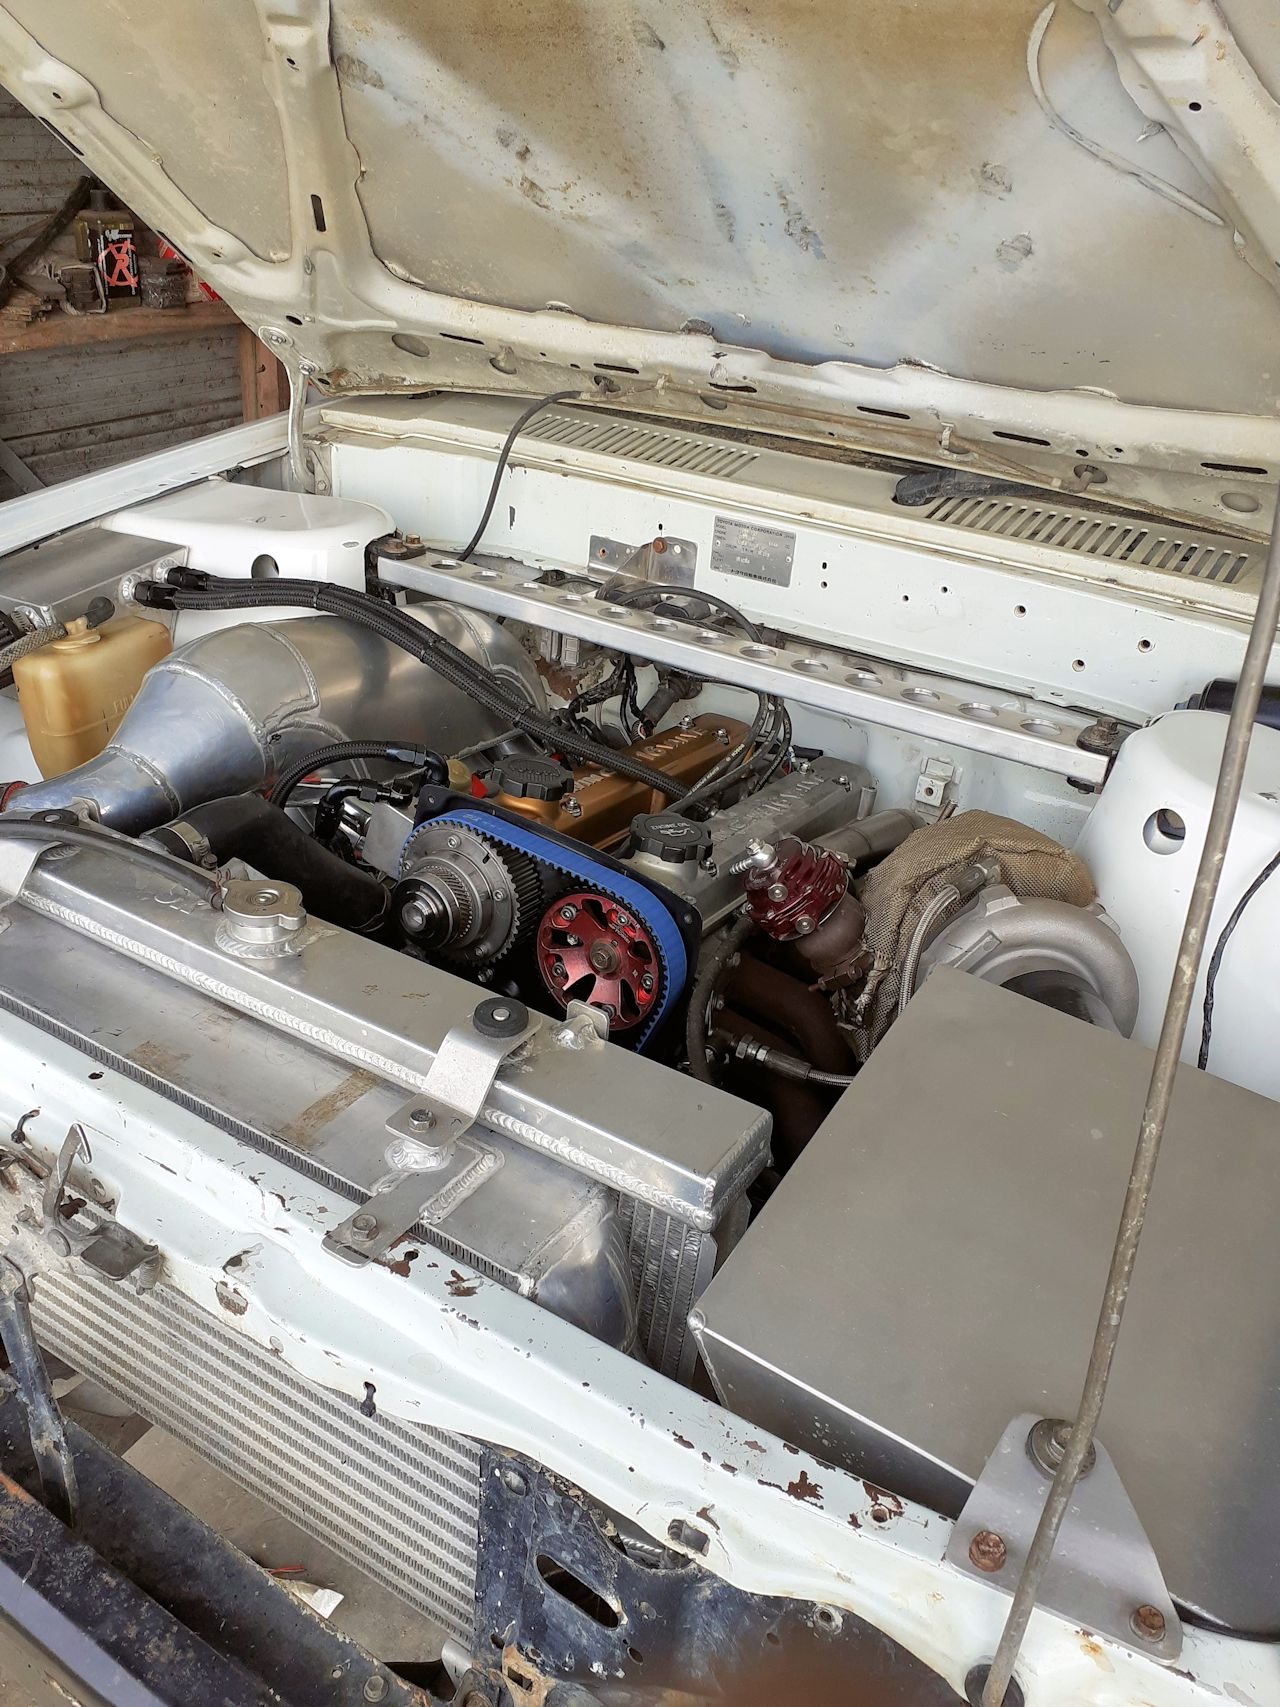
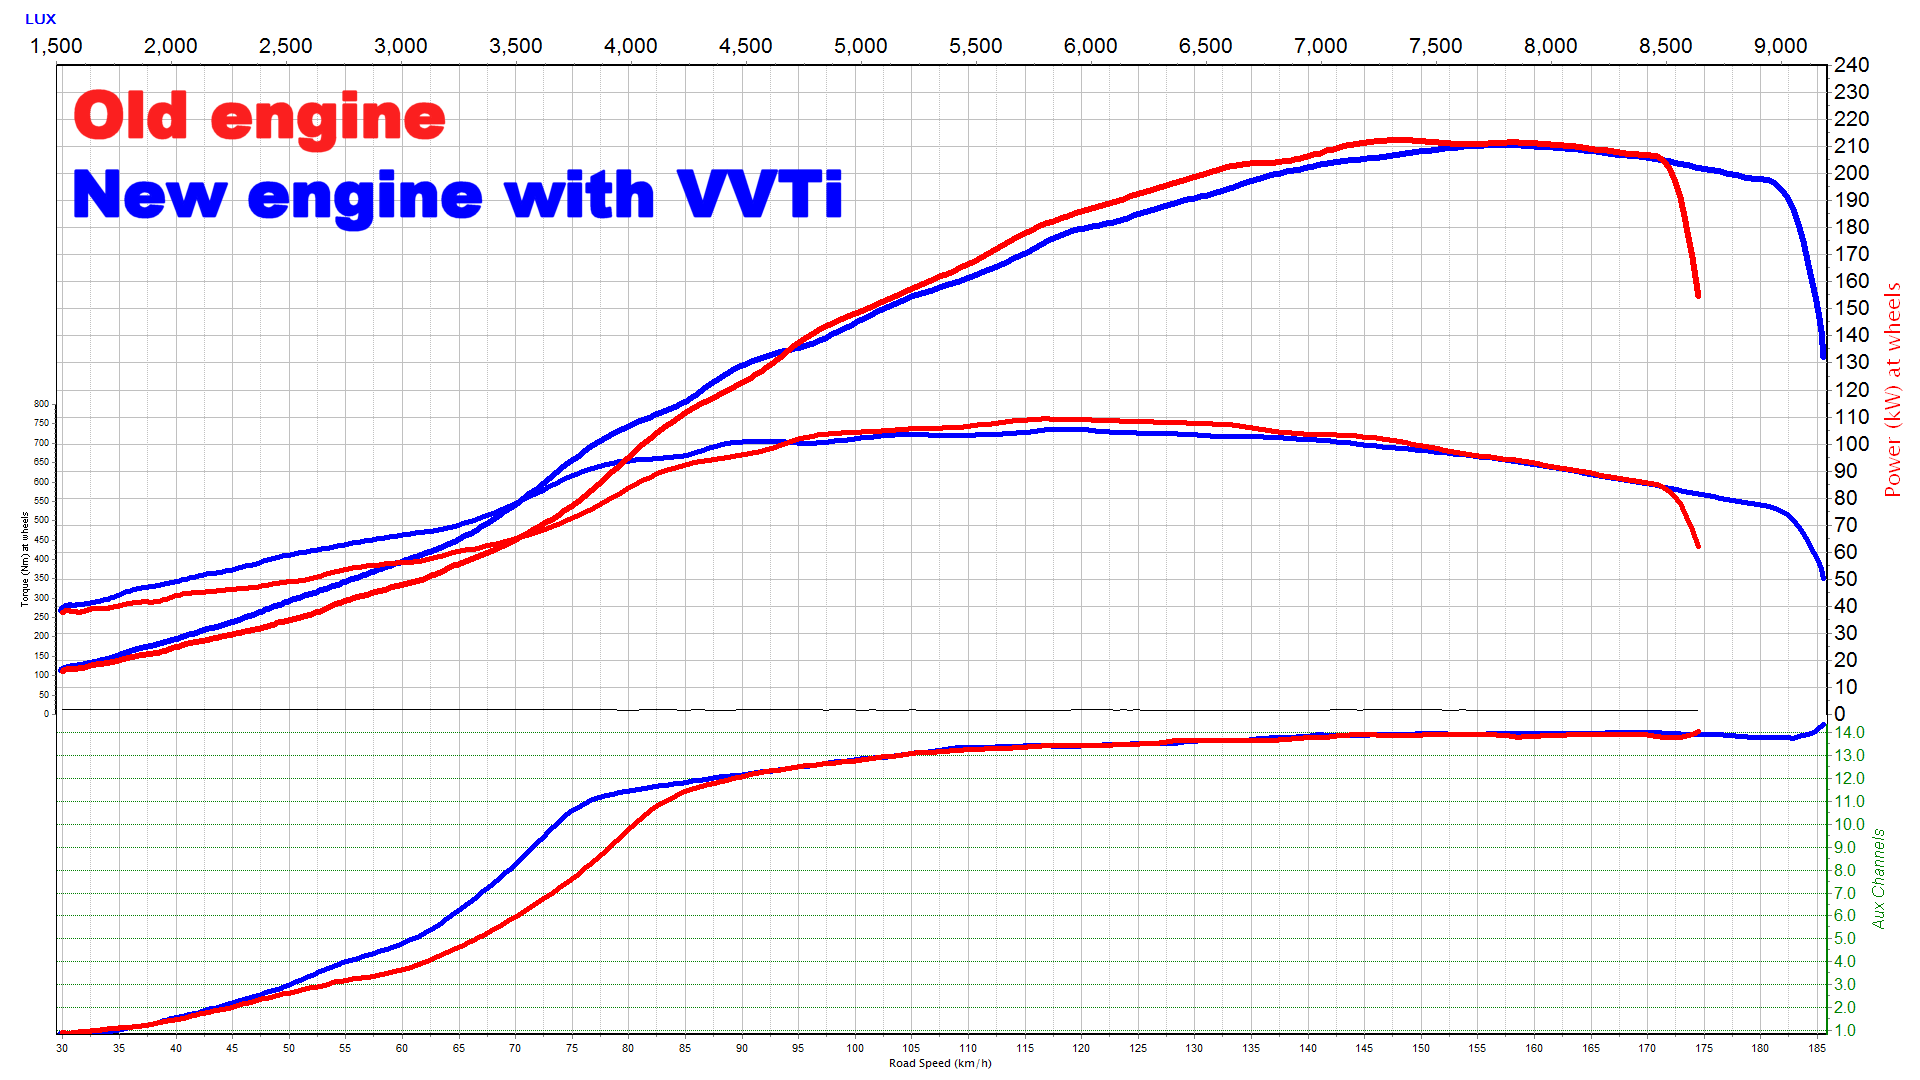
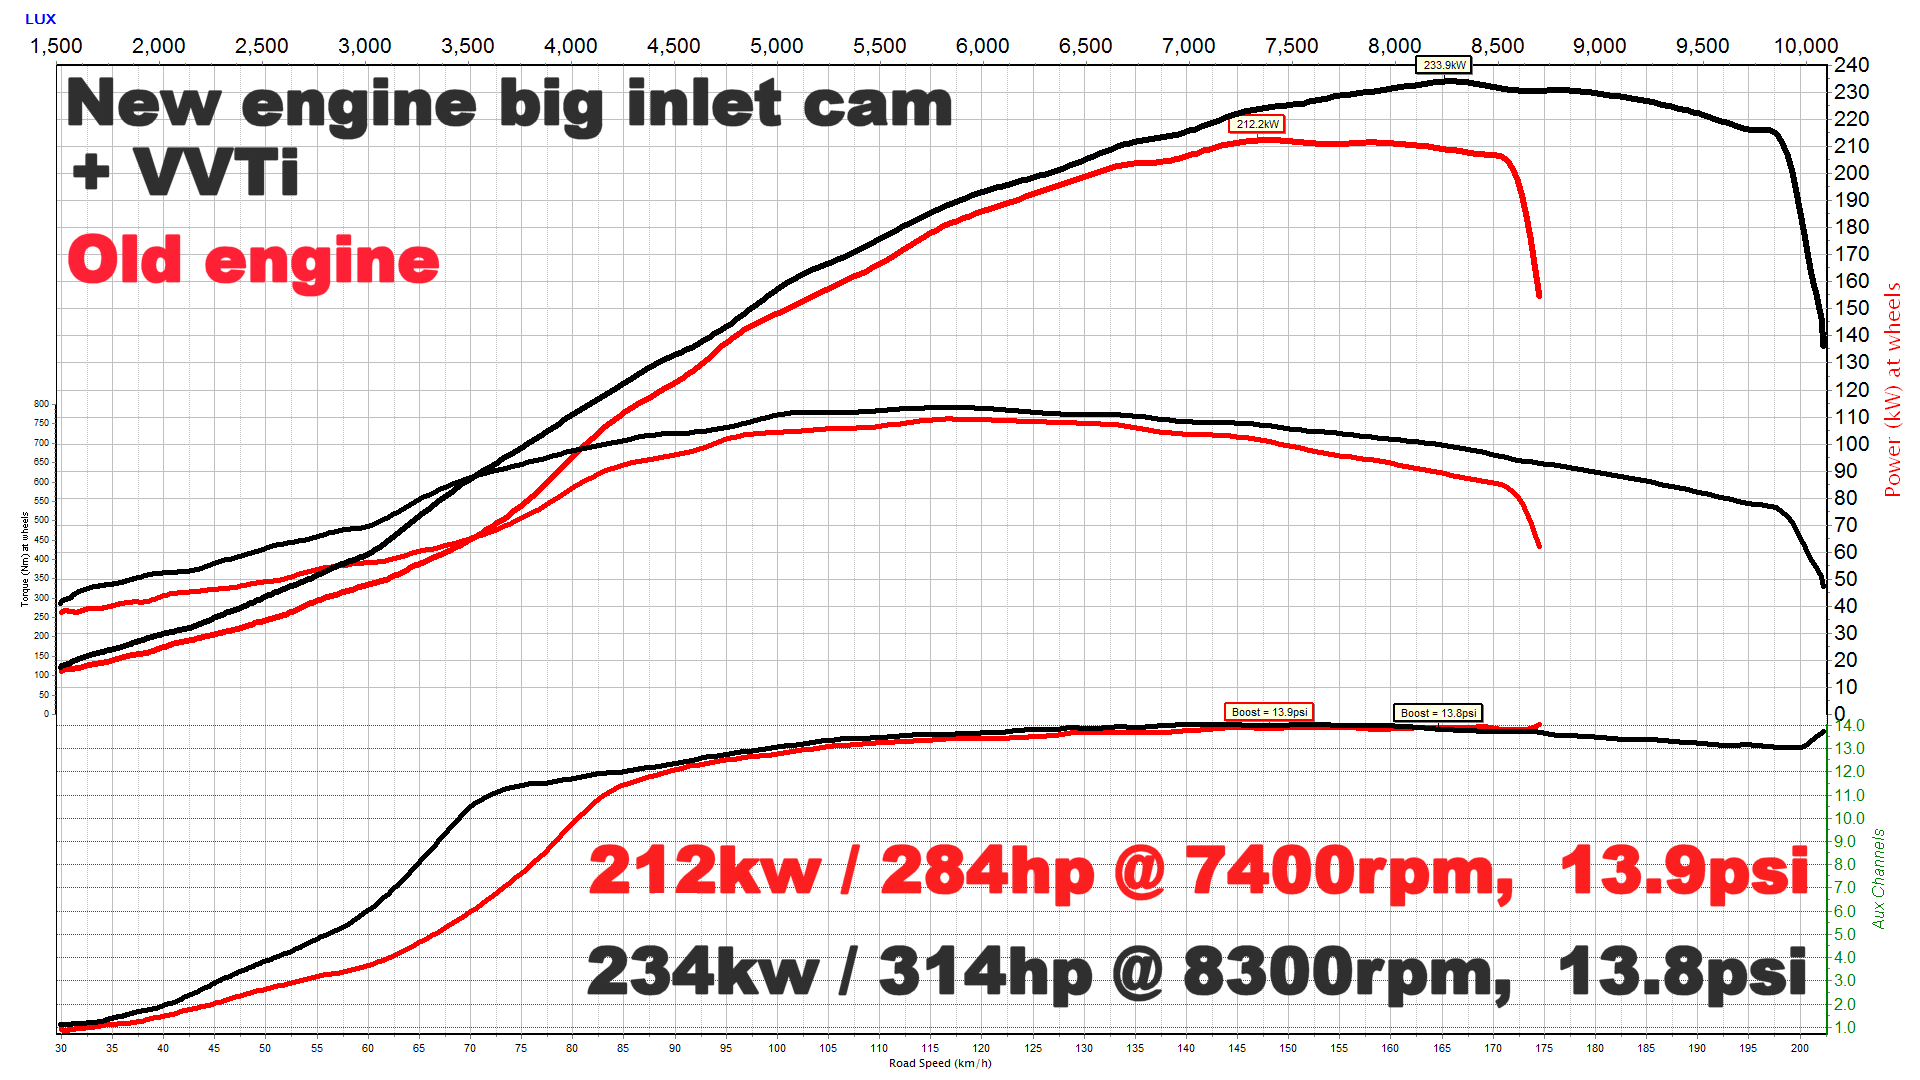
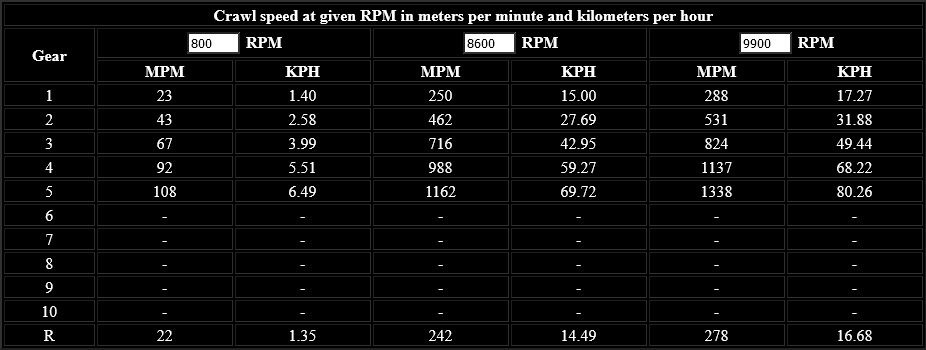
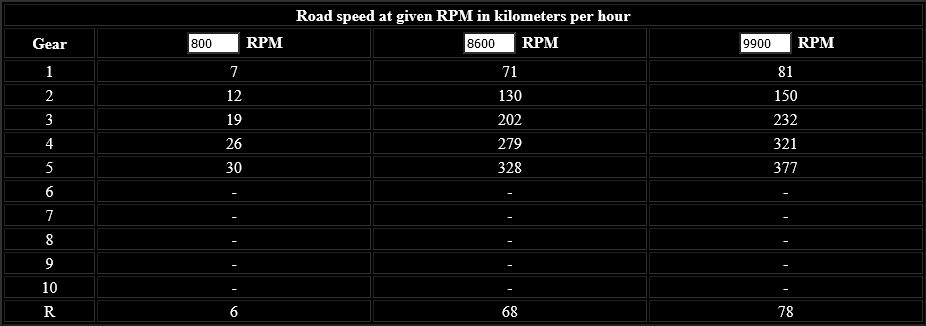
After working on this thing for 2 weeks solid, got it all together and running. Pretty much nothing was a straight bolt together, I think the only thing that went straight on was the plenum to intercooler pipes. everything else had to be modified in some way. but you get that when no 2 parts on this engine are meant to go together from factory Had a few little issues once running. but mostly plain sailing On stock cams the old engine made a little more jam (better head by the looks) but can see the vvti doing its stuff to hold the new one up. with boost coming on decent amount sooner The plan was always to swap to a bigger inlet cam and use the vvti to make it run nice for 4wding stuff. Was going to run with the stock cams for a bit, but had some oil leaks which i was down to the cams to fix. so didnt even make it off the dyno for a test run. Turns out the big inlet cam was the money as expected. is a 284 from 193b set. Pretty happy with it. It already had plenty of power for what it needed to do. but having more power and revs tagged on each end makes a big difference, especially in high range with the retarded gearing speaking for retarded gear ratio's. this is what 10k rpm, 4.88 diffs, w56, 4.7 crawler gears and 33" tyres gets you so my main mud bashing gear when you want to get places is 4th, old engine would do 8600rpm. new 9900rpm. so i can pull the same wheel speed in 4th as in 5th before, which was a bit too tall to get going in. but if you did it would zing. so 4th should be good now... High range is where it gets really dumb. If skip to the end of the video below i was in high range. chasing down cars driving down the road while in the paddock more graphs and noises in the vid. skip to the 7min mark at least.
1 point
-
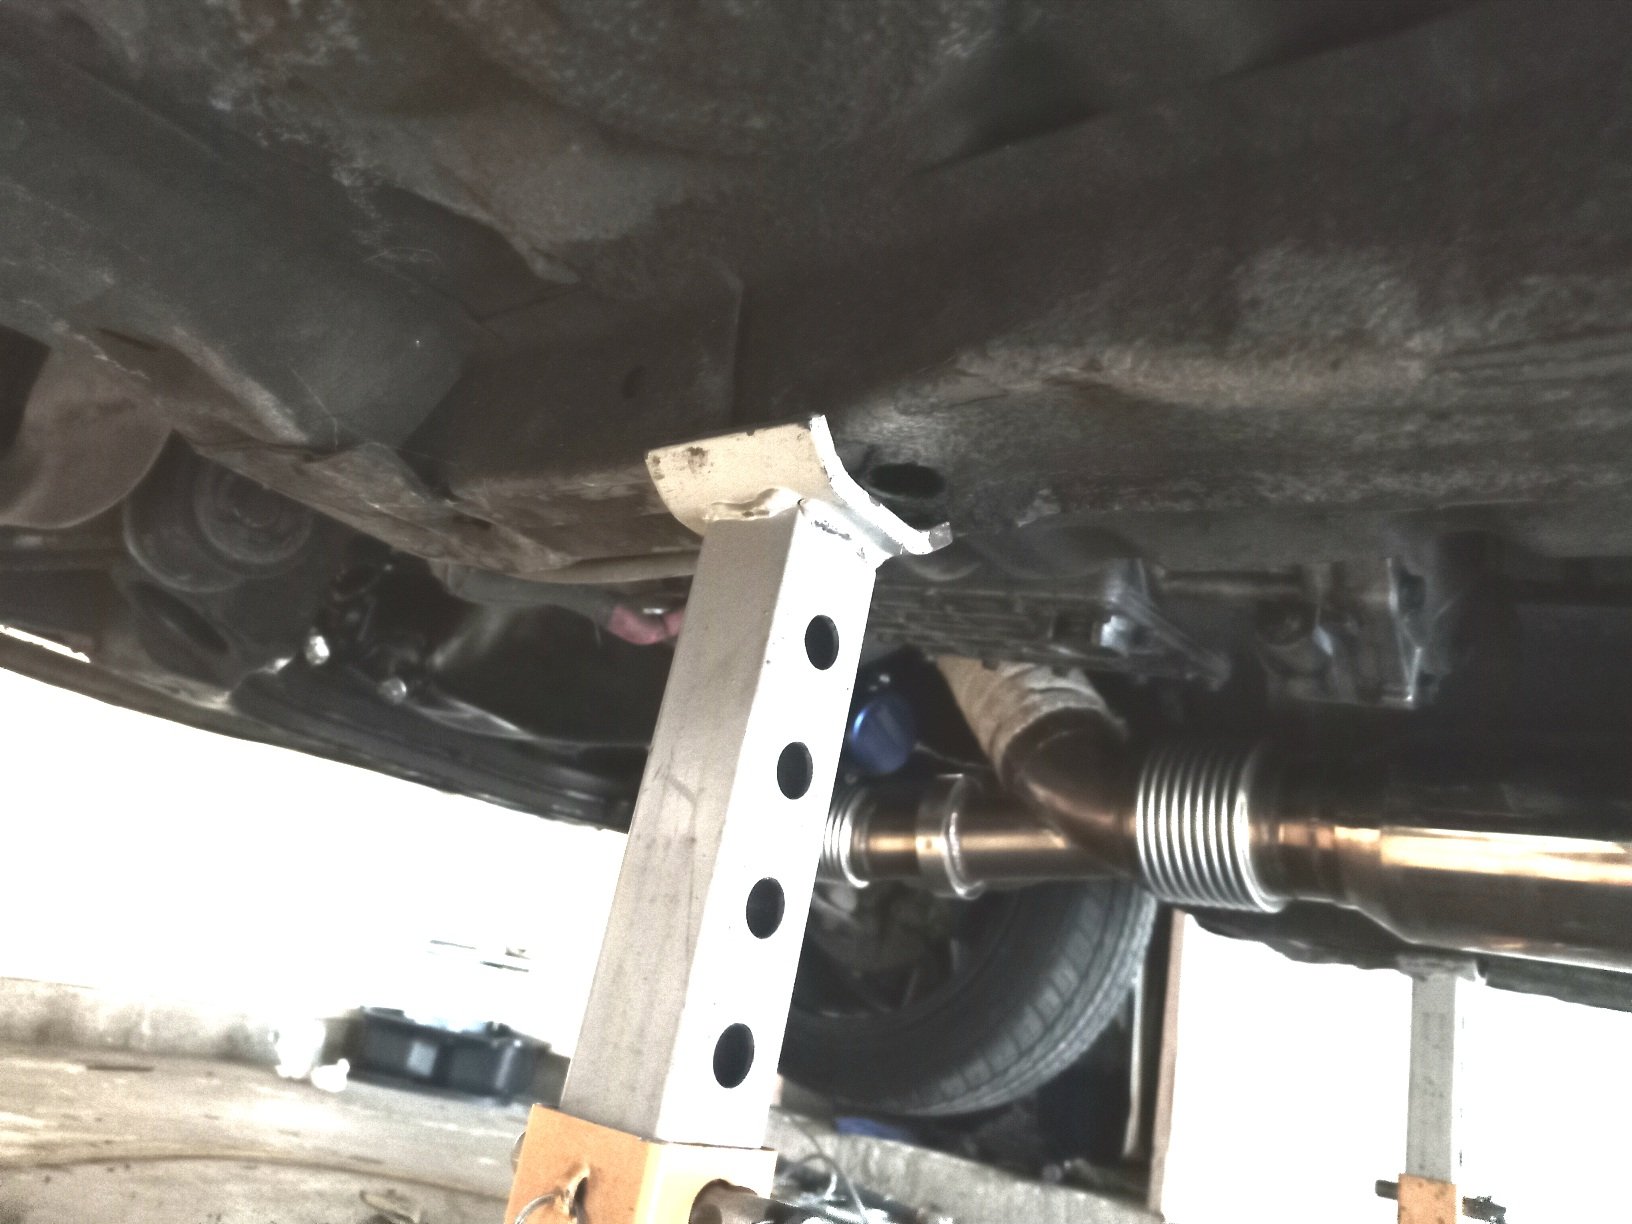
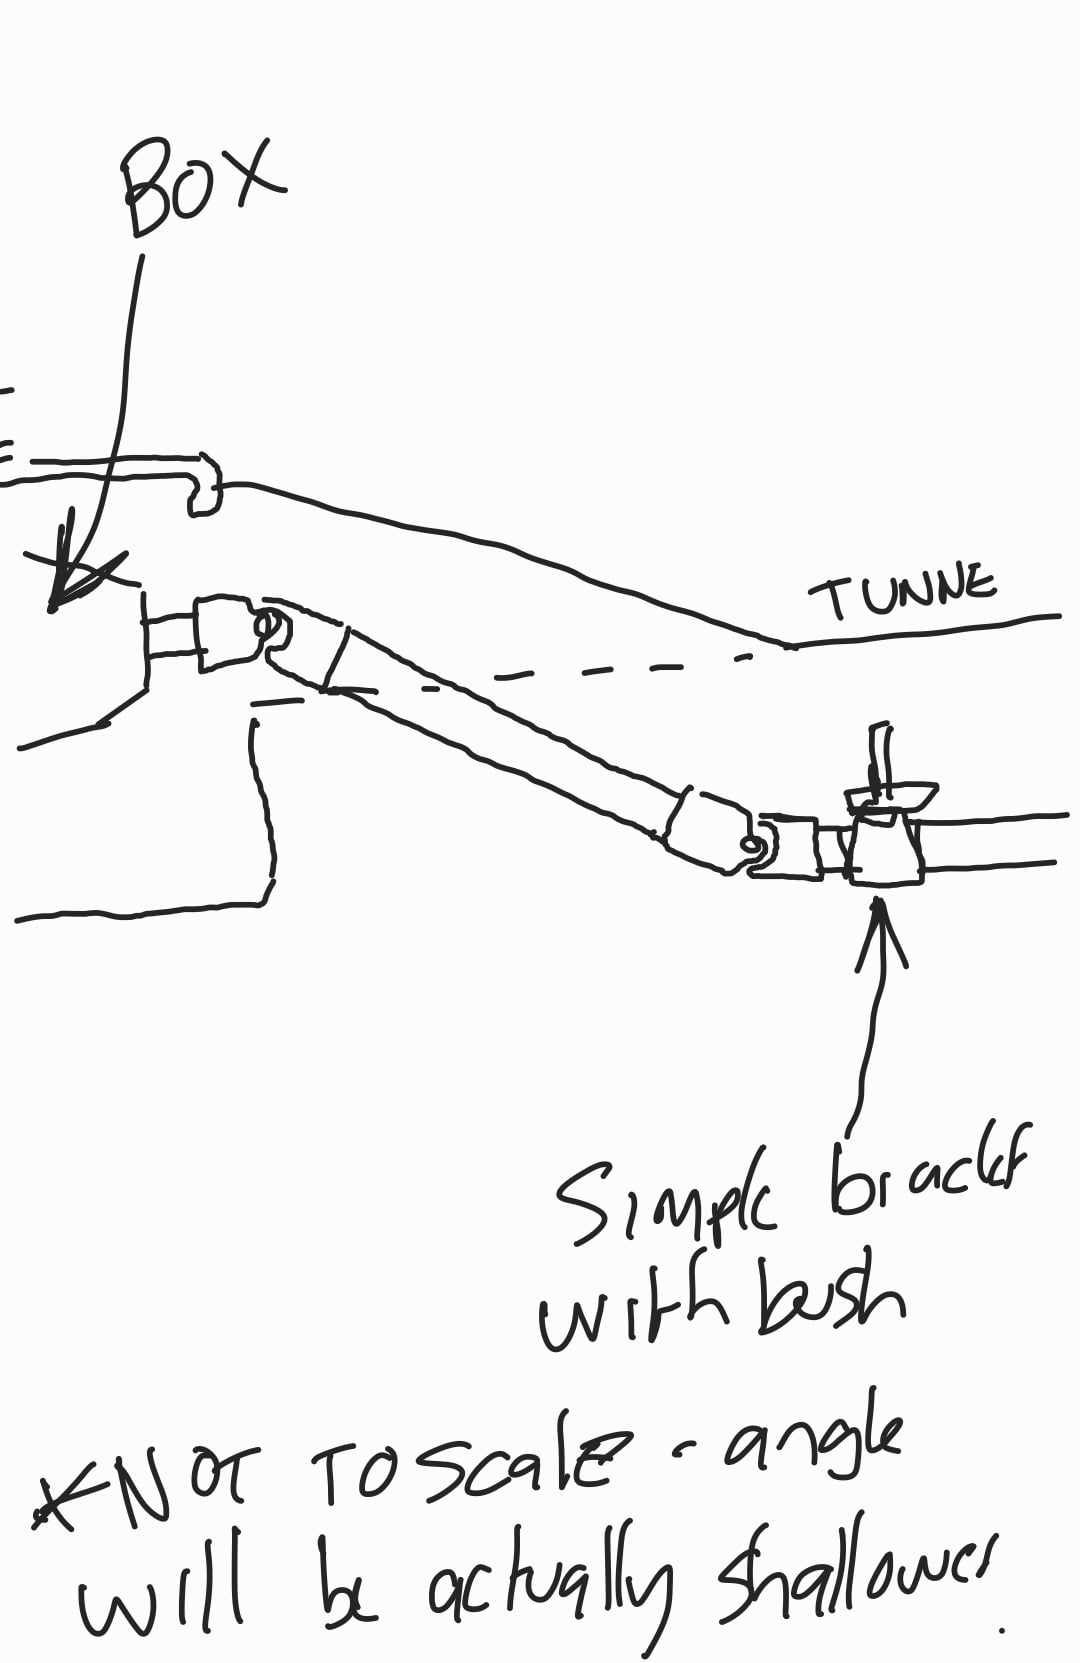
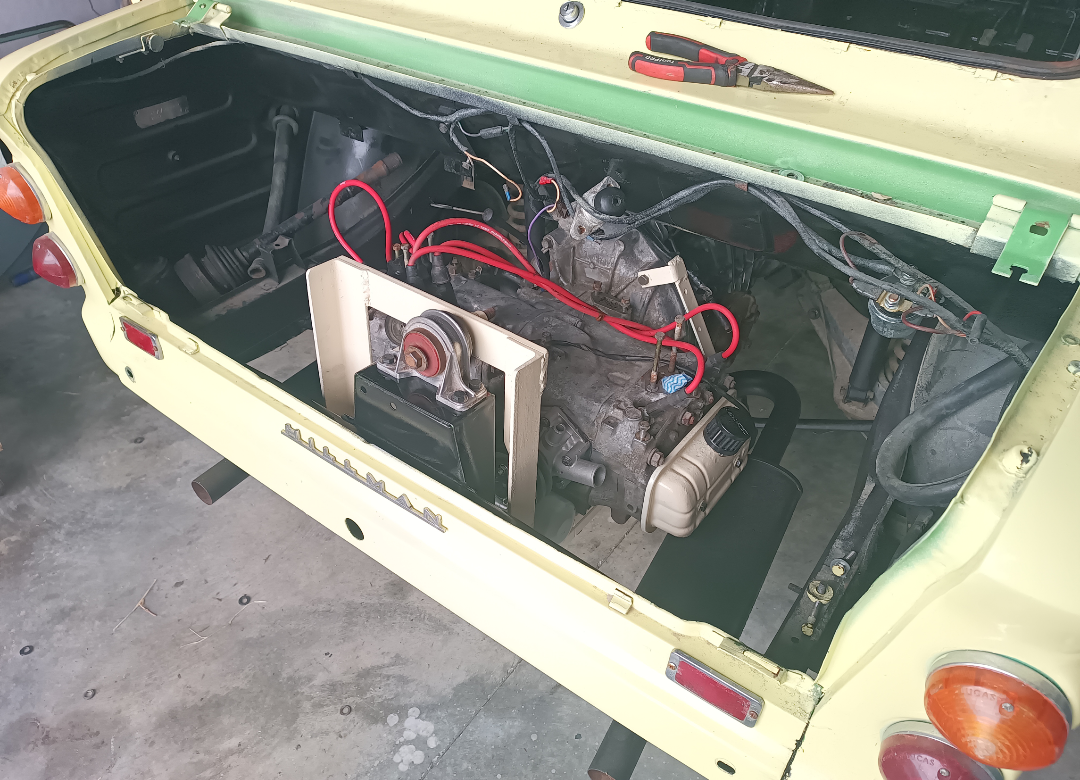
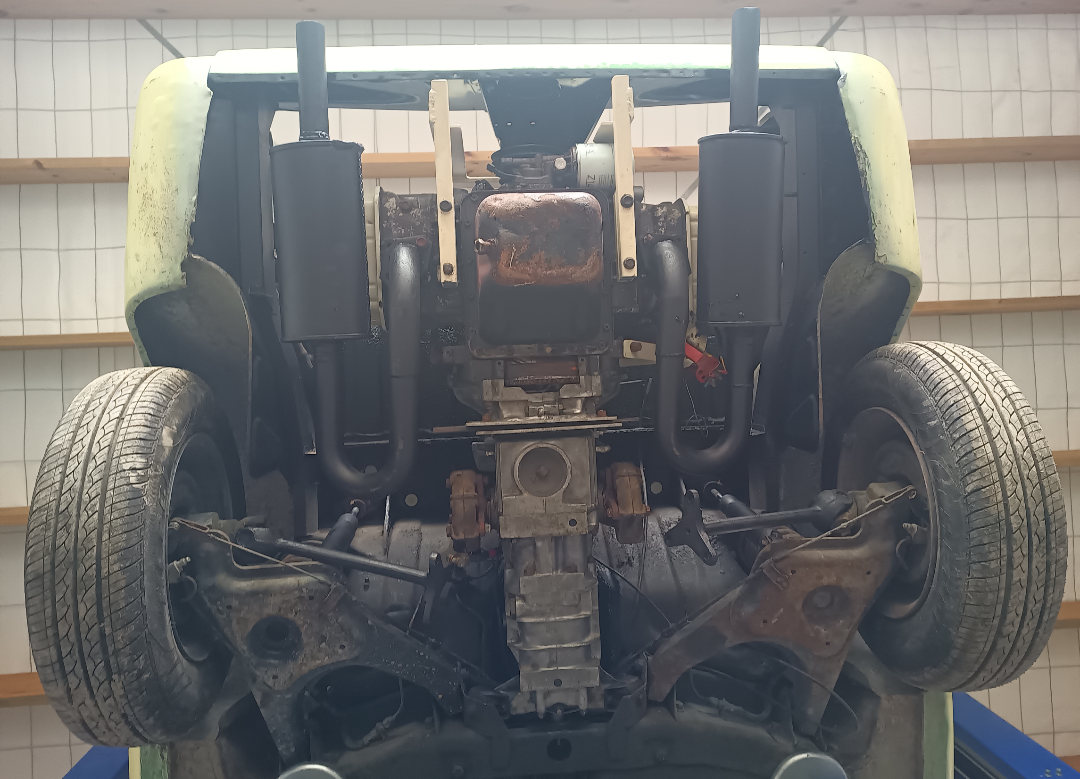
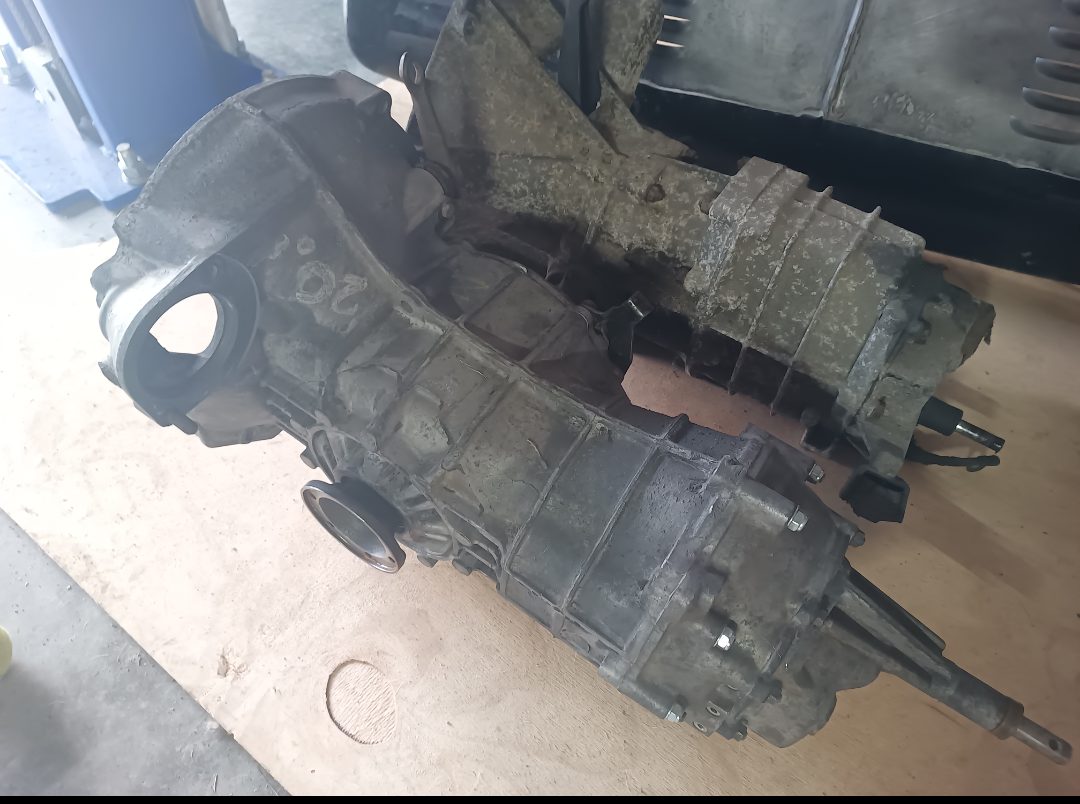
So I'm not happy with the imp gearbox/gearing and out it comes in favour of the VW box. Here is a professional engineering drawing of what needs to be done. It was either this or move the handbrake assembly. I'm not sure which one would be more painful. I've probably added three months and maybe an extra $2k to the build but it will be a lot more reliable and the engine will live a lot longer at 700rpms less at 60mph.
1 point
-
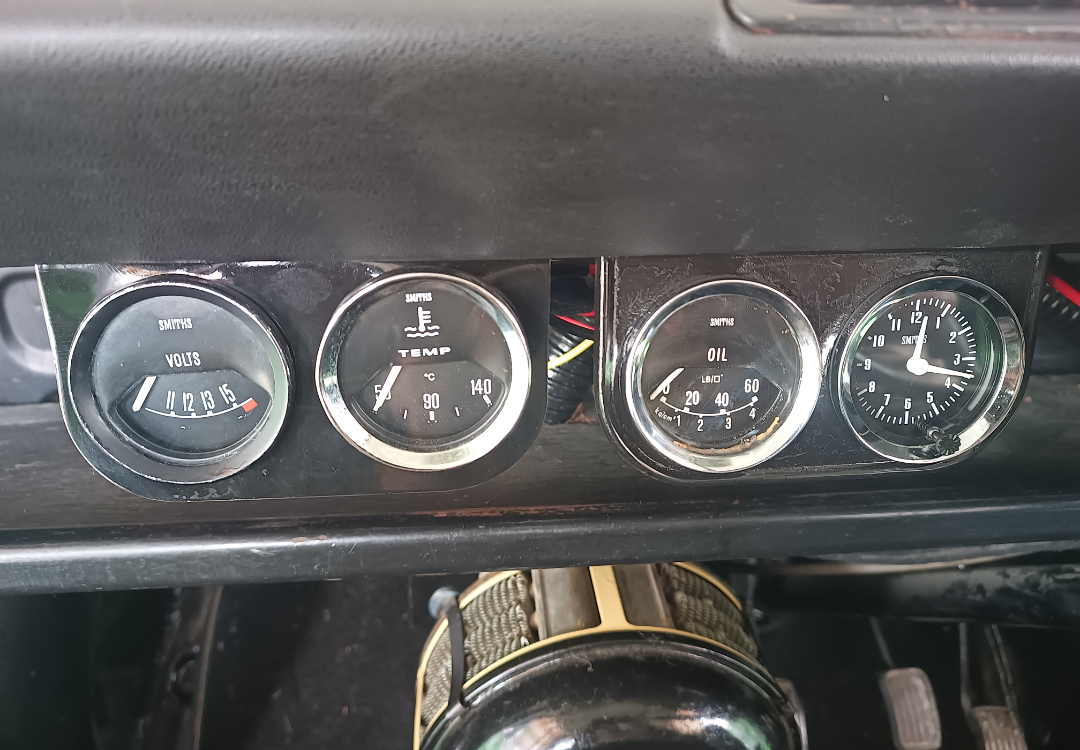
Got the gauges in with the problem child being the electric oil pressure gauge. I have tried switching the terminals and putting it through the 10v stabiliser but no joy. Maybe it is seized from lack of use who knows. Ill sort it out eventually however. Rest of the gauges seem fine so far.
1 point
-
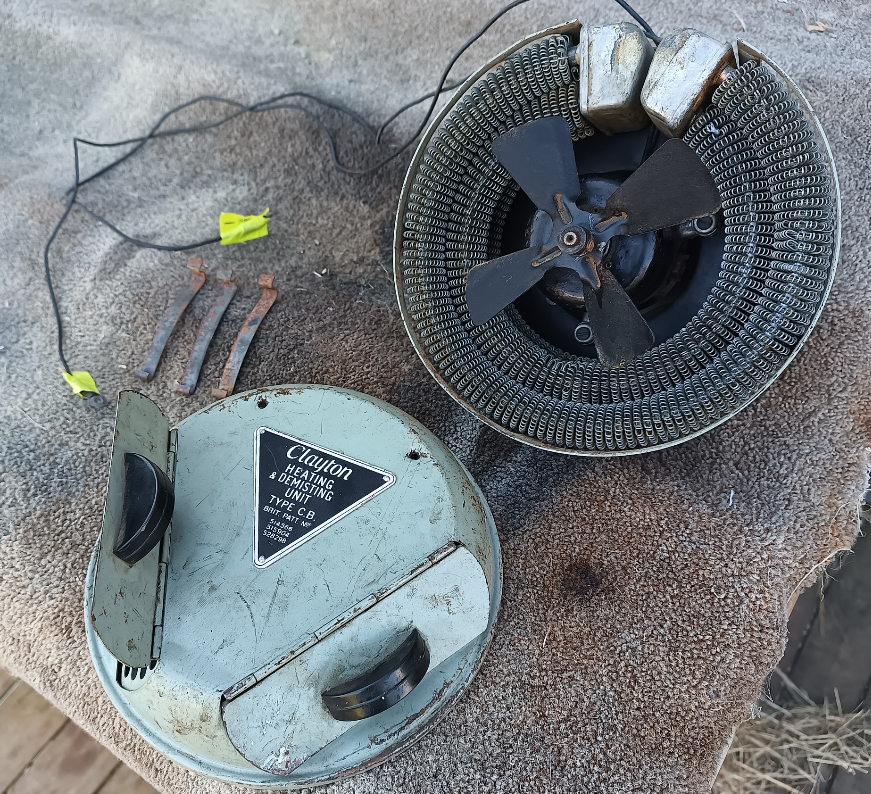
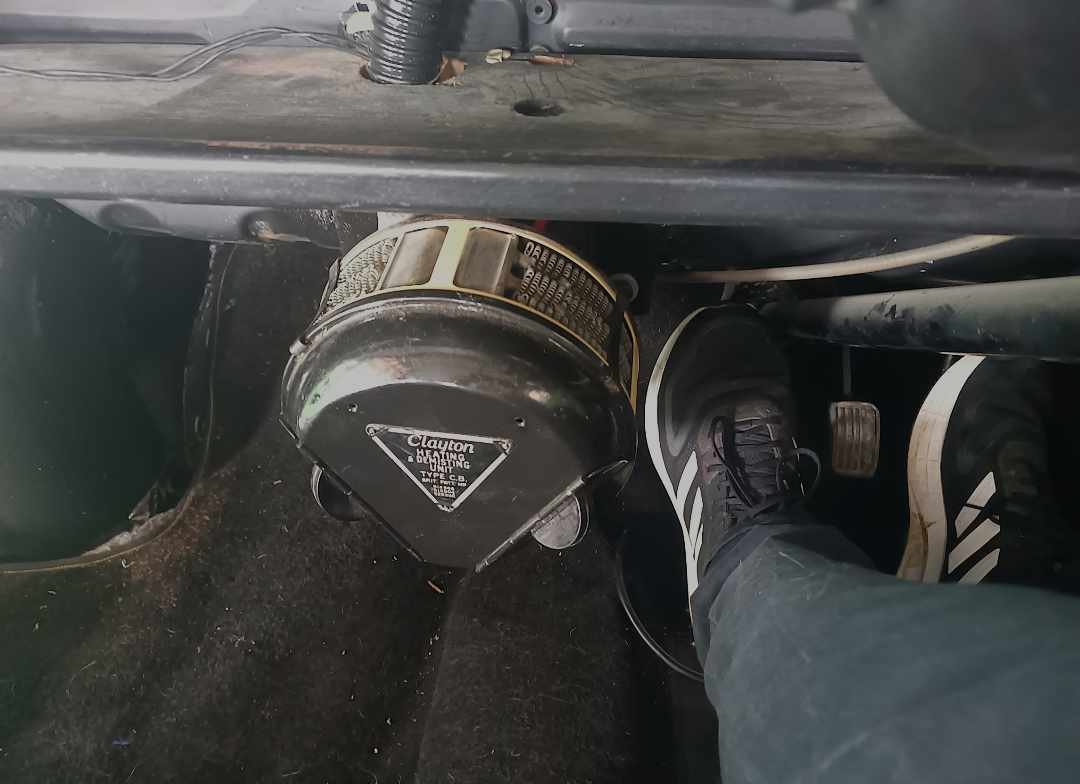
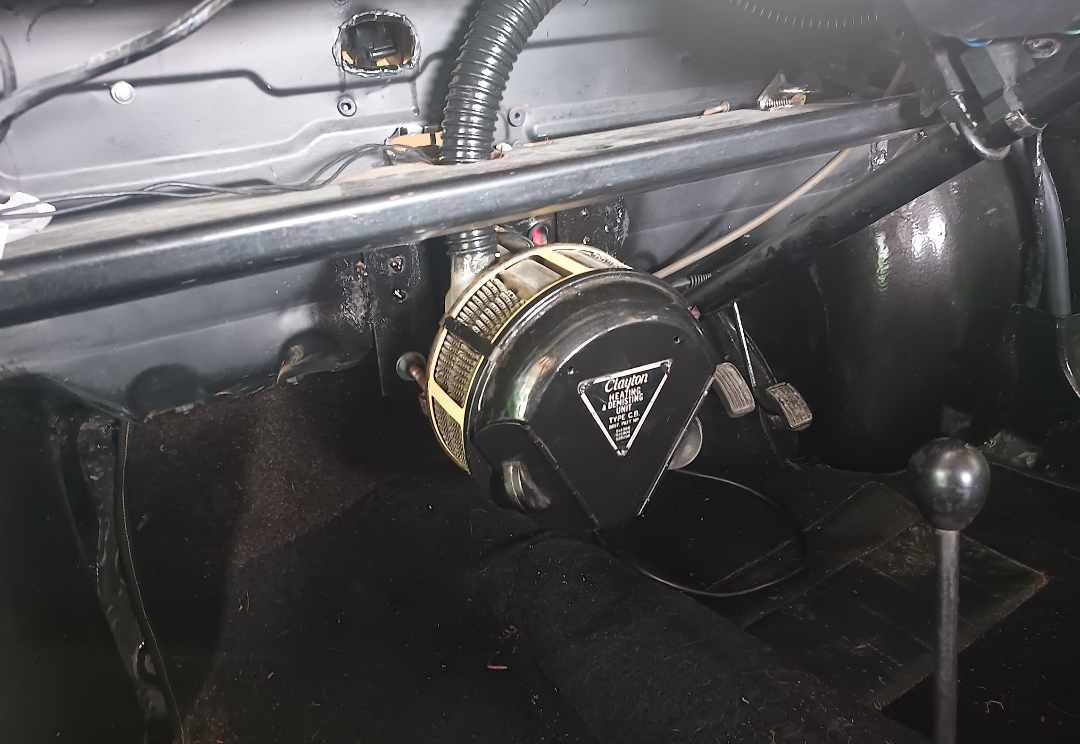
Finally got the heater mounted. I managed to get it so that the pipes are outside of the cabin and it isn't in the way of legs or the gearstick. The hot air tube to the windscreen needs something at the screen end but I don't have to worry about that for a while. Should warm the trotters up nicely in winter. I might bypass it all together in summer. See how I feel. It is powered by a voltage step down converter to 6 volts.
1 point
-
So she is in but it isn't all sunshine and lollipops. I have the wrong water pump so have ordered the right single row pulley one. I can use this one on the EA81 hopefully. I have taken the carbs off to rebuild properly. I have the old single carb still there but am in no rush. Lots of little jobs to do now. I'll try and do one a day to keep things ticking over whilst I wait for parts.
1 point
-
Right then. So the reco'd Imp engine suffered a setback. I was on my way to pick it up (Martinborough to Tauranga is a looooong way in a GMC) and 20 mins out got a call it had seized on the test bench. So thankfully my plan B was already decided upon and brought forward. I popped out to the LVV cert chap who gave me the green light to use the venerable EA81. It weighs the same as the Imp donk and only the gearbox requires some changes to the bodywork to fit. The EA81 is presently being reconditioned. The gearbox I have decided upon is a "freeway flyer" VW box. 0.87 4th and 3.8:1 final drive. A massive improvement over the super short Imp box. Some challenges remain in that the selector is out the top rather than the bottom. So the gear linkage will need to go on top of the tunnel rather than under it. The handbrake and rear seat platform are in the way but I can sort that. Don't really have a choice not to. I have started on the mount and am up to version 3. I'm trying to use the original Imp mounts and a bracket linking the box to them. I have a shit load of other things to do but am rushing to get the mount done so I can sort the half shafts. The engineer said he would get back to me on what is acceptable which is fine. I'll get Howat Engineering to sort so I know it will be acceptable. In other news I dropped off the front seats to be retrimmed. I was going to use original seats but the modernish buckets I have are super comfy. I also had a custom front radiator made for it which I havent taken out of the box yet. It will be fed with the original water pump suplimented with a davies craig ewp Ill put at the other end to help push the water around. I got the springs lowered by Aechers but I think it is a little too low. Might stop being a tight ass and invest in some adjustable coilovers. It's all happening!
1 point
-
1 point
-
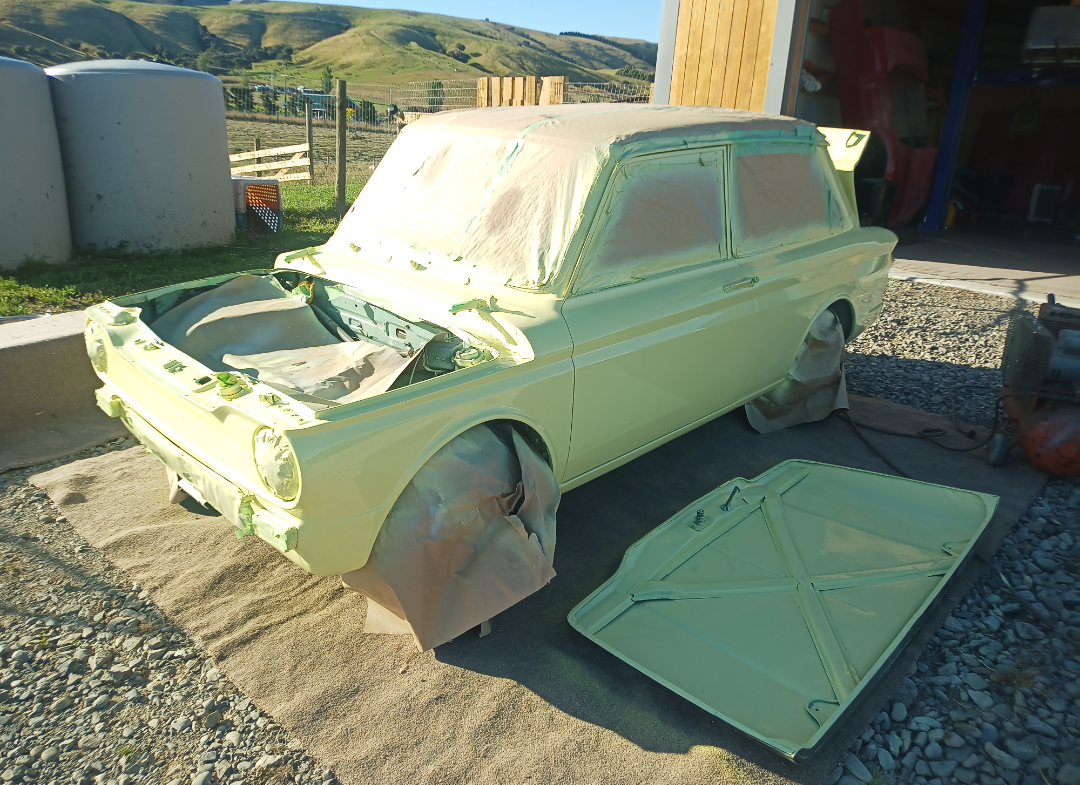
Slapped some colour on it this morning. How I paint is I do a very light coat and go a little heavier over anywhere that has rubbed through the primer. Then one full wet coat. Then walk away briskly to clean the gun for a few hours so I don't get tempted to "fix" mistakes.
1 point
-
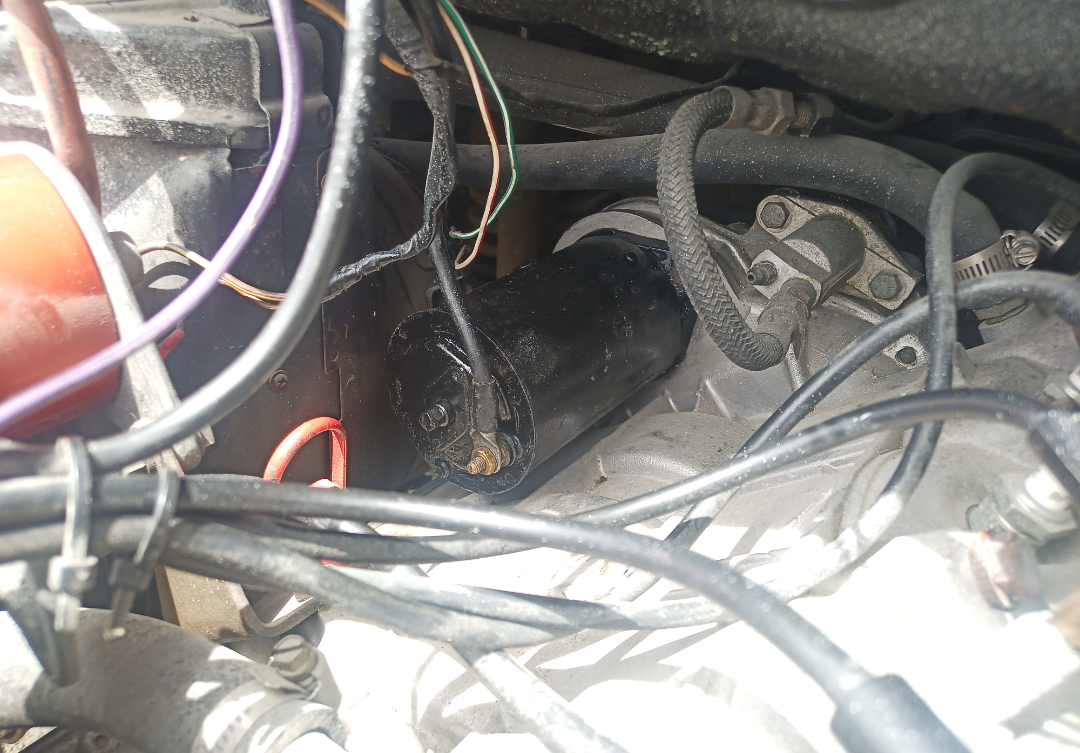
@smokin'joe saved the day by sending me a starter motor. I greased it up and gave it a restoration in a can and it works perfectly. Now I can get it outside to wet sand and ready for round 2 of painting. Like a rat with a gold tooth in there.
1 point
-
Right then. WOF time is upon us and time to sort the things that could be a potential cock blocker and generally tidy things up. I did order a mechanical water temp gauge but it's the wrong thread for the block so I might have to get one of those ones which goes in the rad hoses. I've ordered four new tyres as one had a slow leak and they are all pretty old and cracked. Doubt they'll pass the WOF as is. So whilst I'm waiting for that I'll sort some minor things. I had to put some sealant on the fuel gauge sender so whilst I was there I coated the spare wheel well in POR15. It was a little rusty looking so this is the perfect crime. Also took this opportunity to get rid of the crappy pit bike pod filter and tarted up an original one. It's presently baking in my state of the art heated paint booth today. This is the heat resistant POR15 which takes daaaaaays to dry.
1 point
-
Booked in for first thing tomorrow morning. Could have taken it today but it was too hot and my back was rooted.
1 point
-
Dropped off for a wof/pre-wof this morning. Treated it to a bath prior. If it fails miserably it will be a waste of car wash.
1 point
-
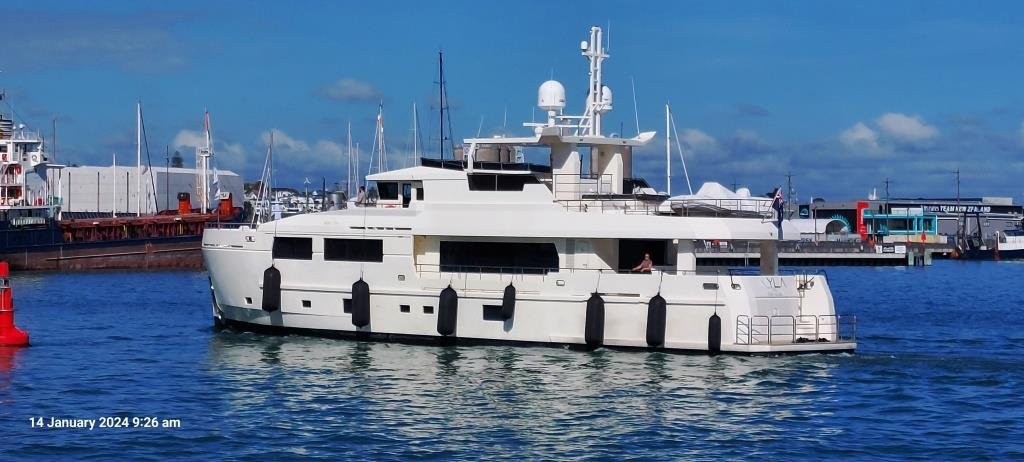
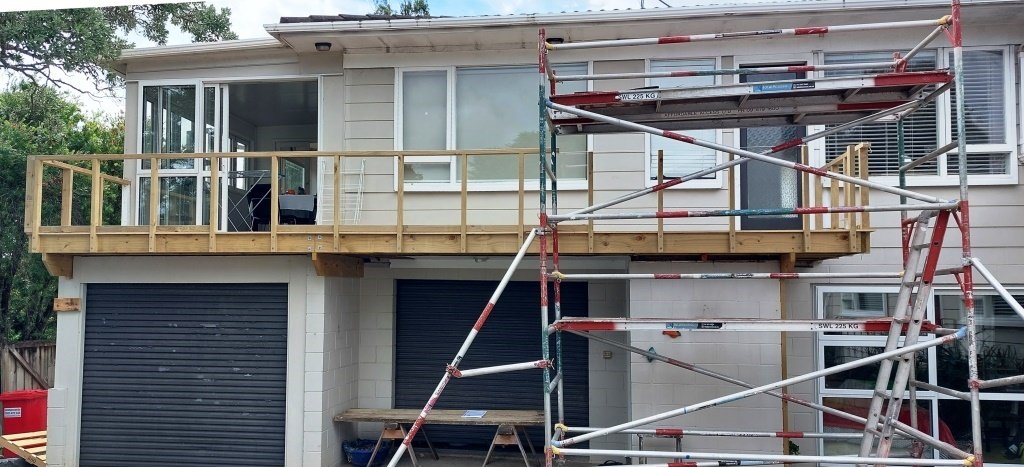
It has an exhaust. A new radiator. A new thermostat. New LCAs. There's a new PS hose in my garage. And a spare water pump. Needs the Park lights looked at. Alignment. One day I will share the long and interesting story of the workshop I took it to. Today I'm just going to pick up some scaffolding so I can paint my house. Unlegal. But still convenient for moving things.1 point
-
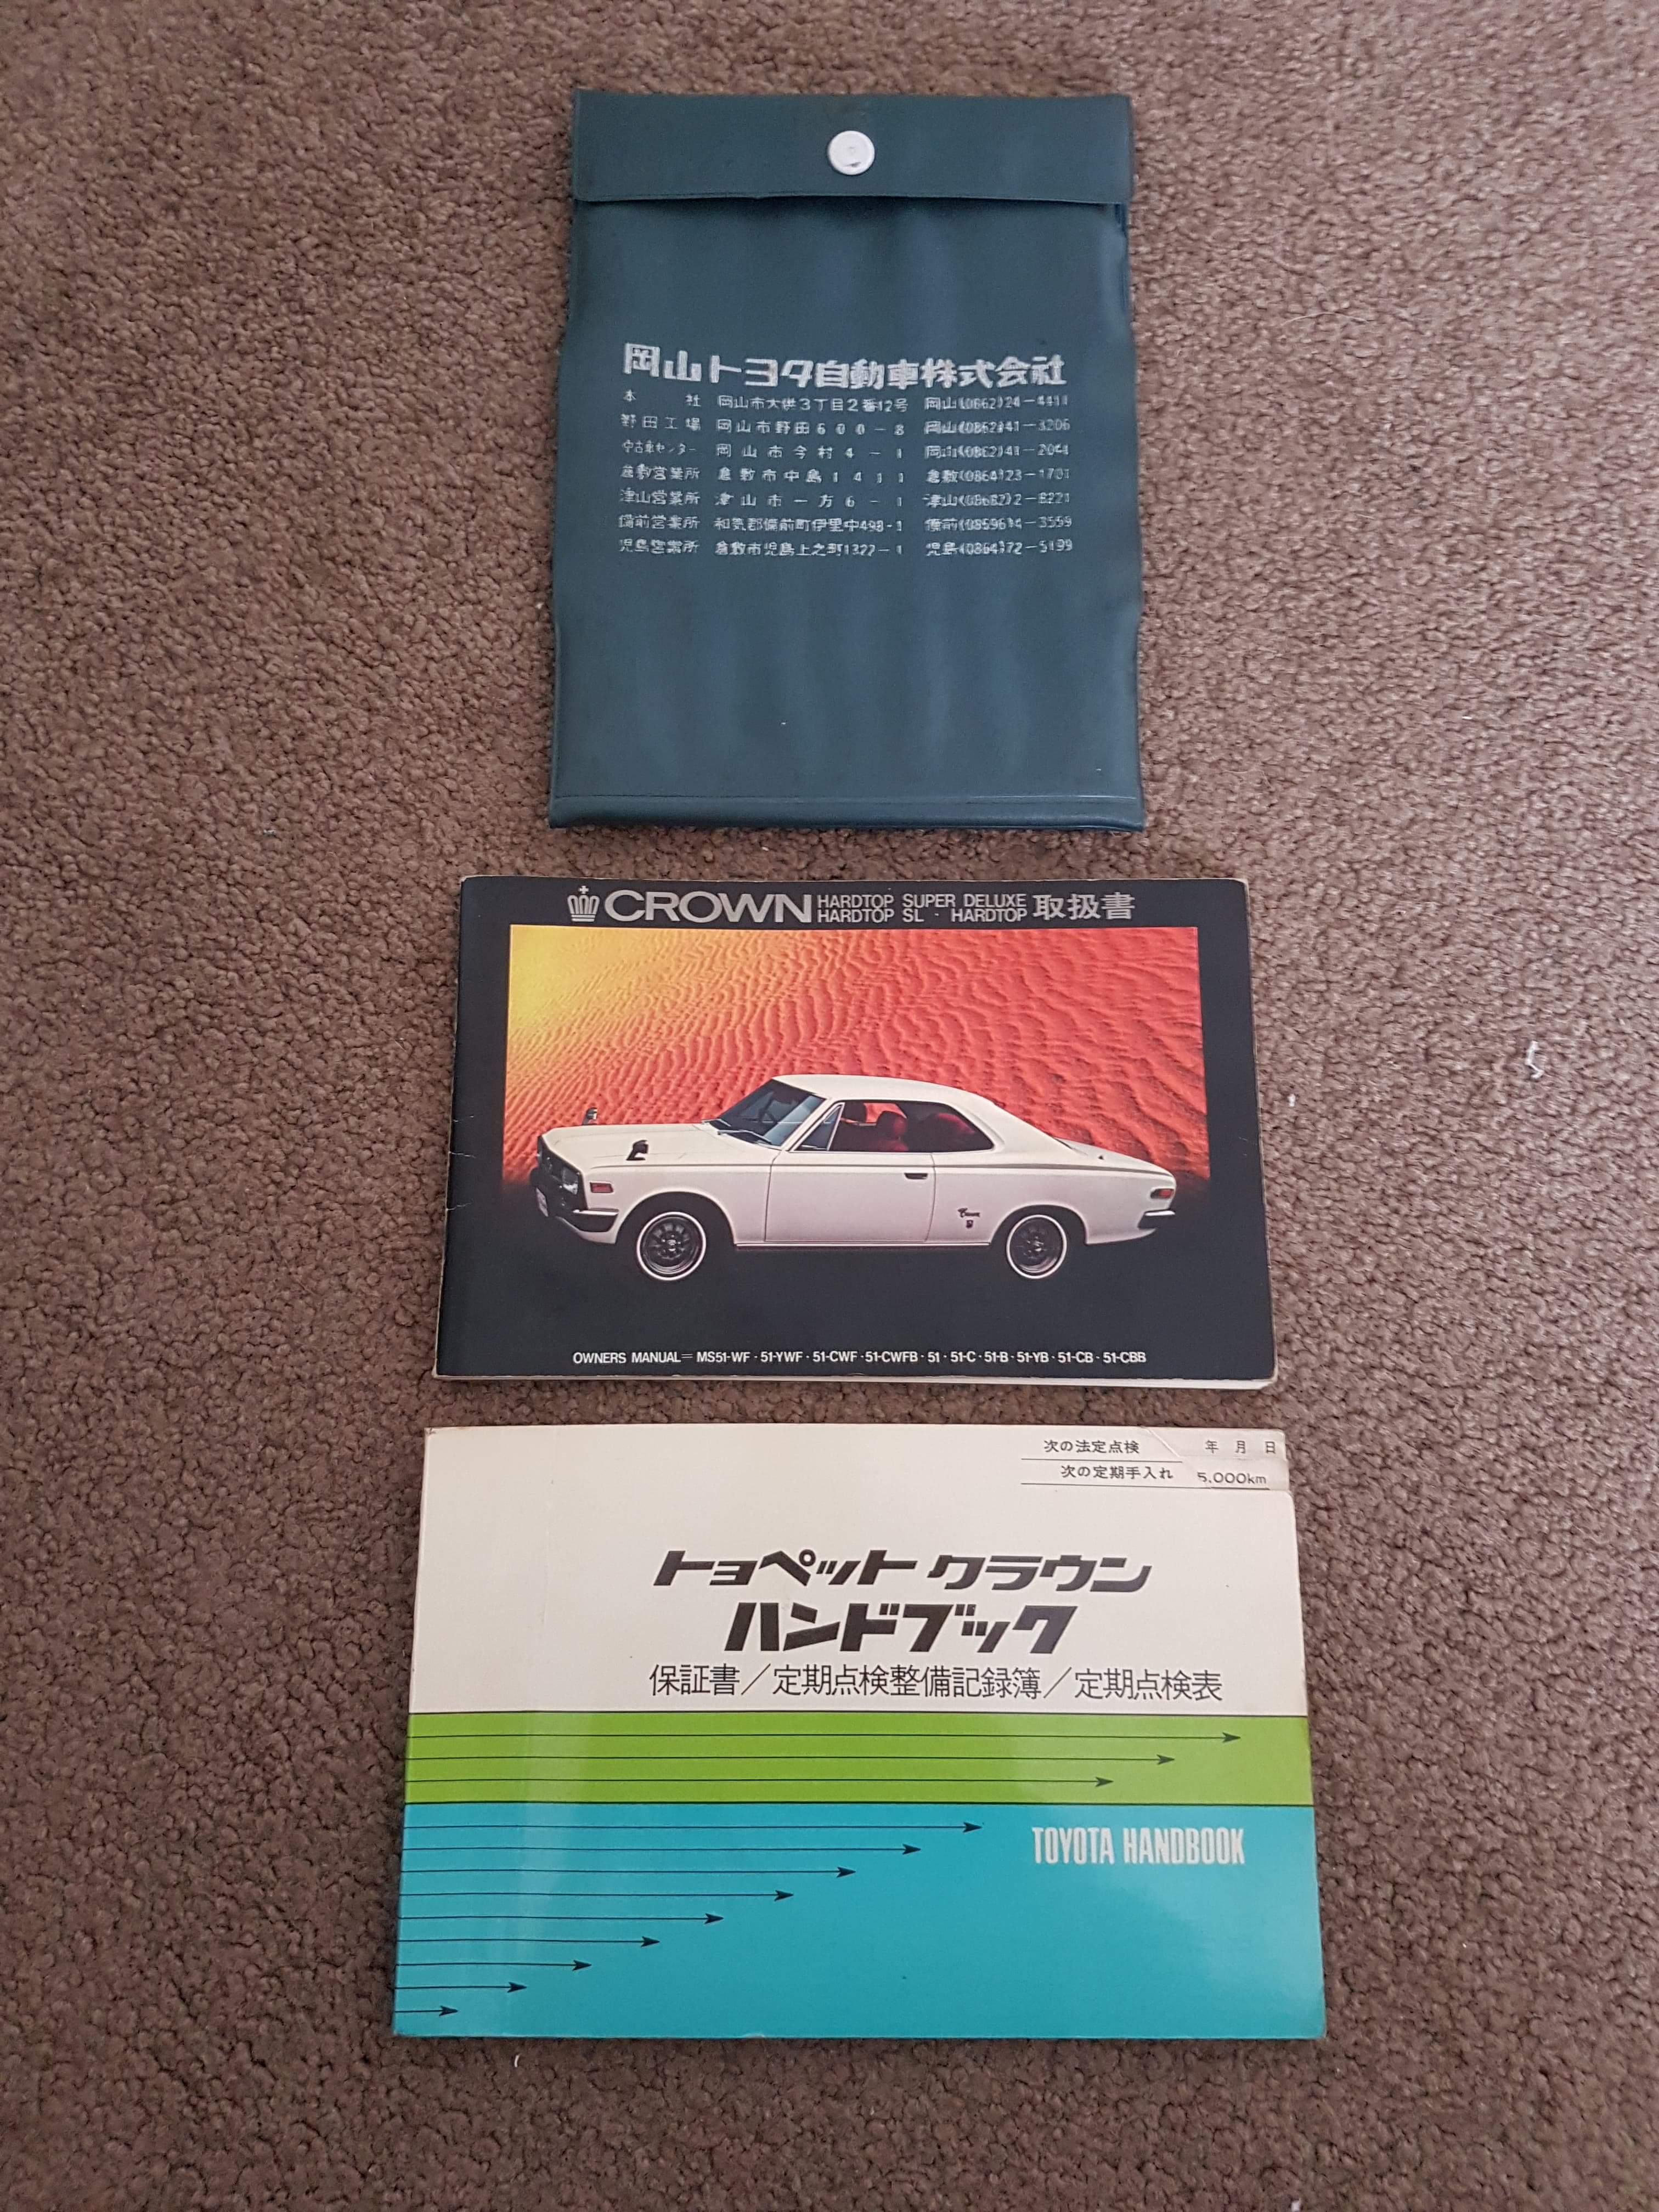
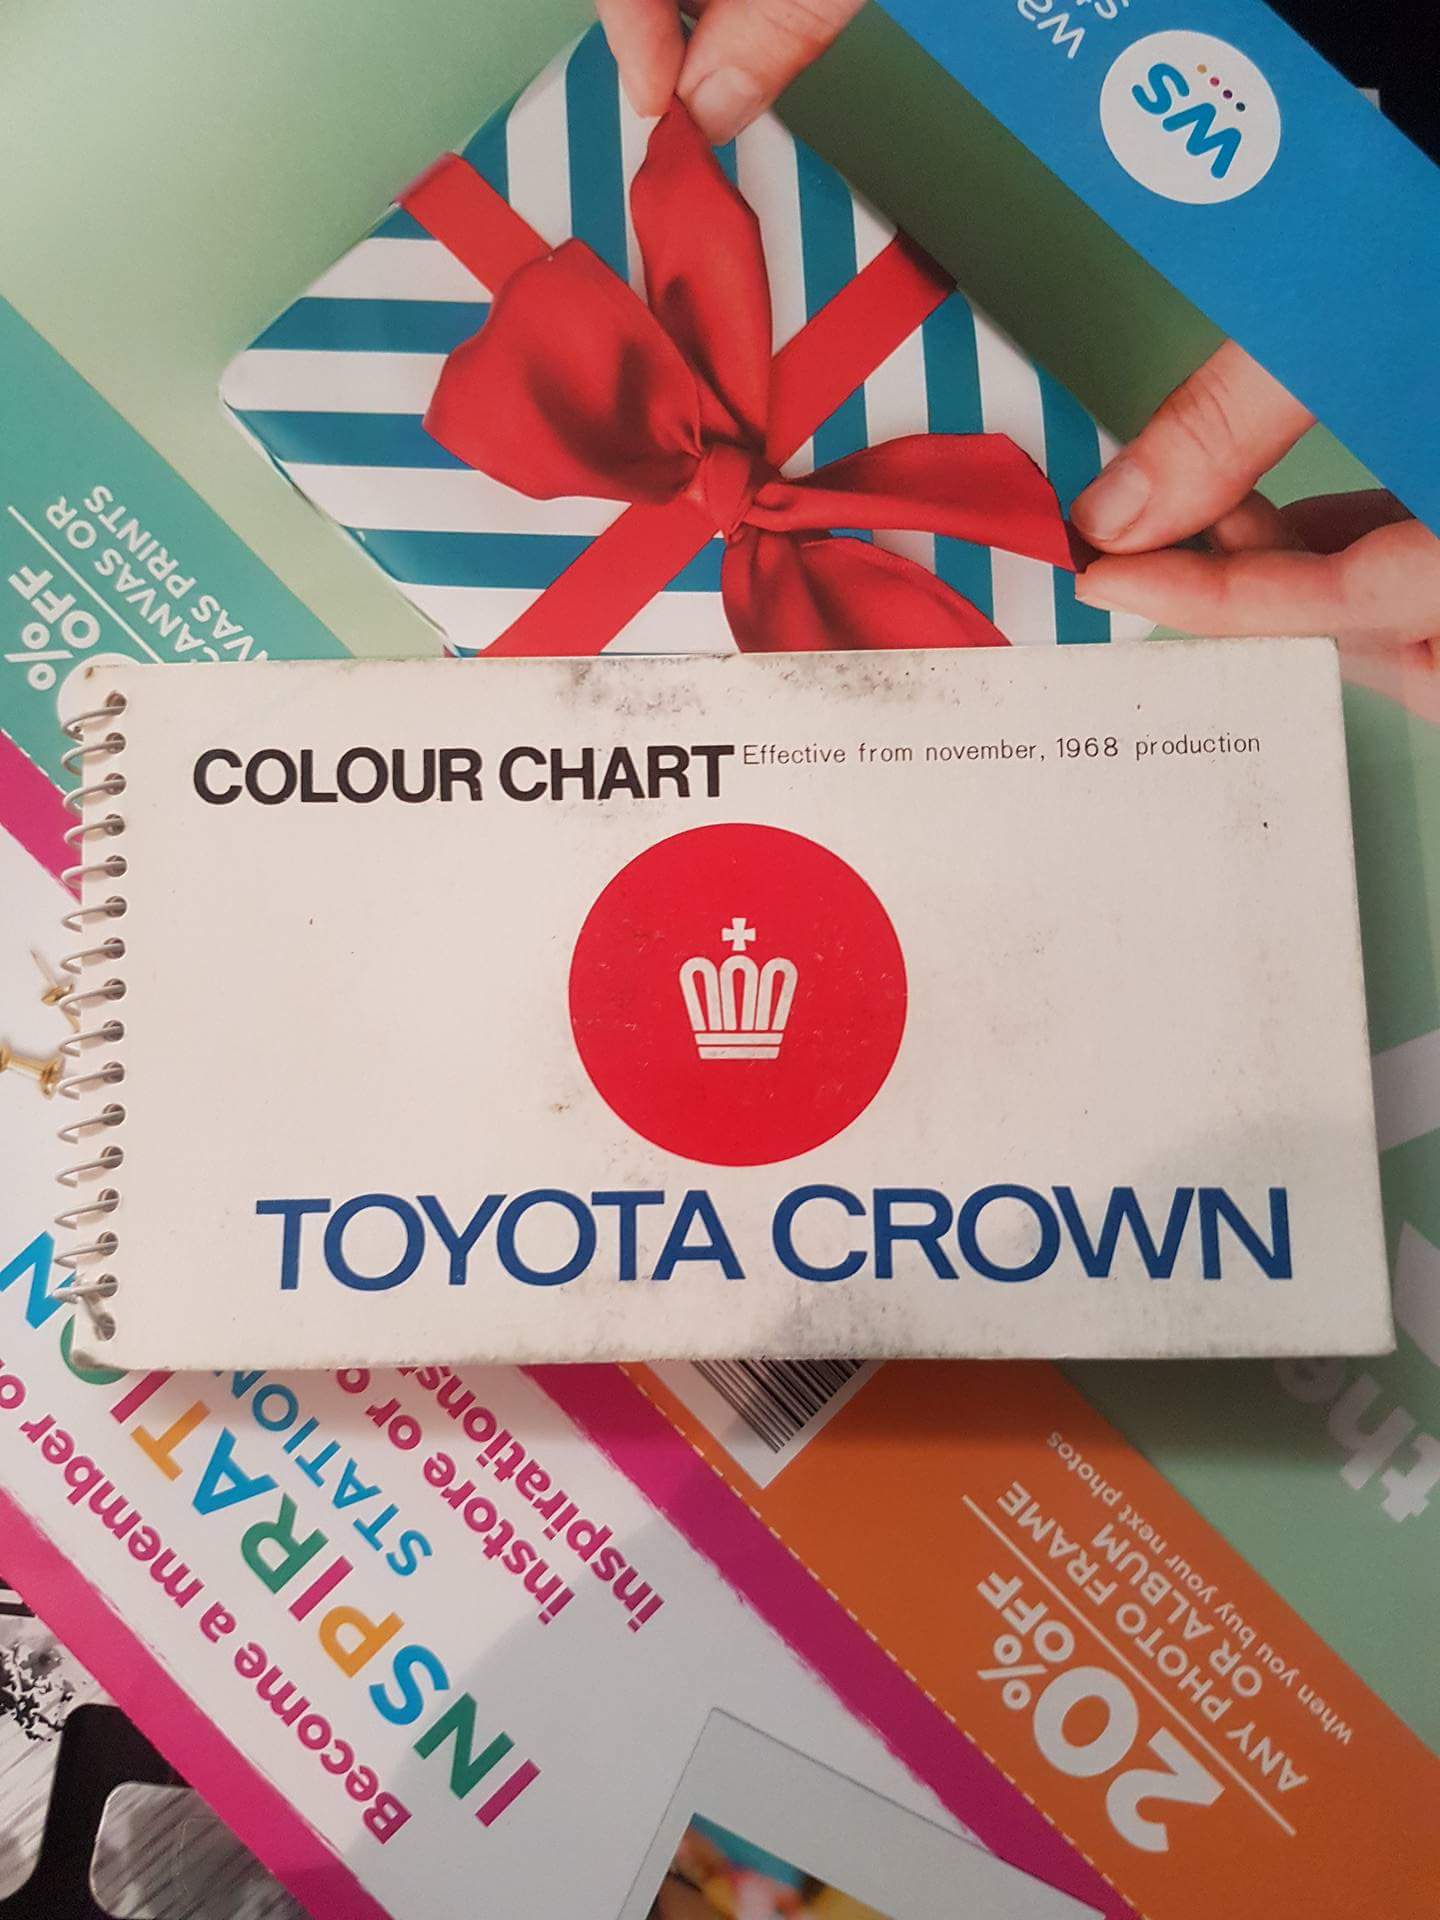
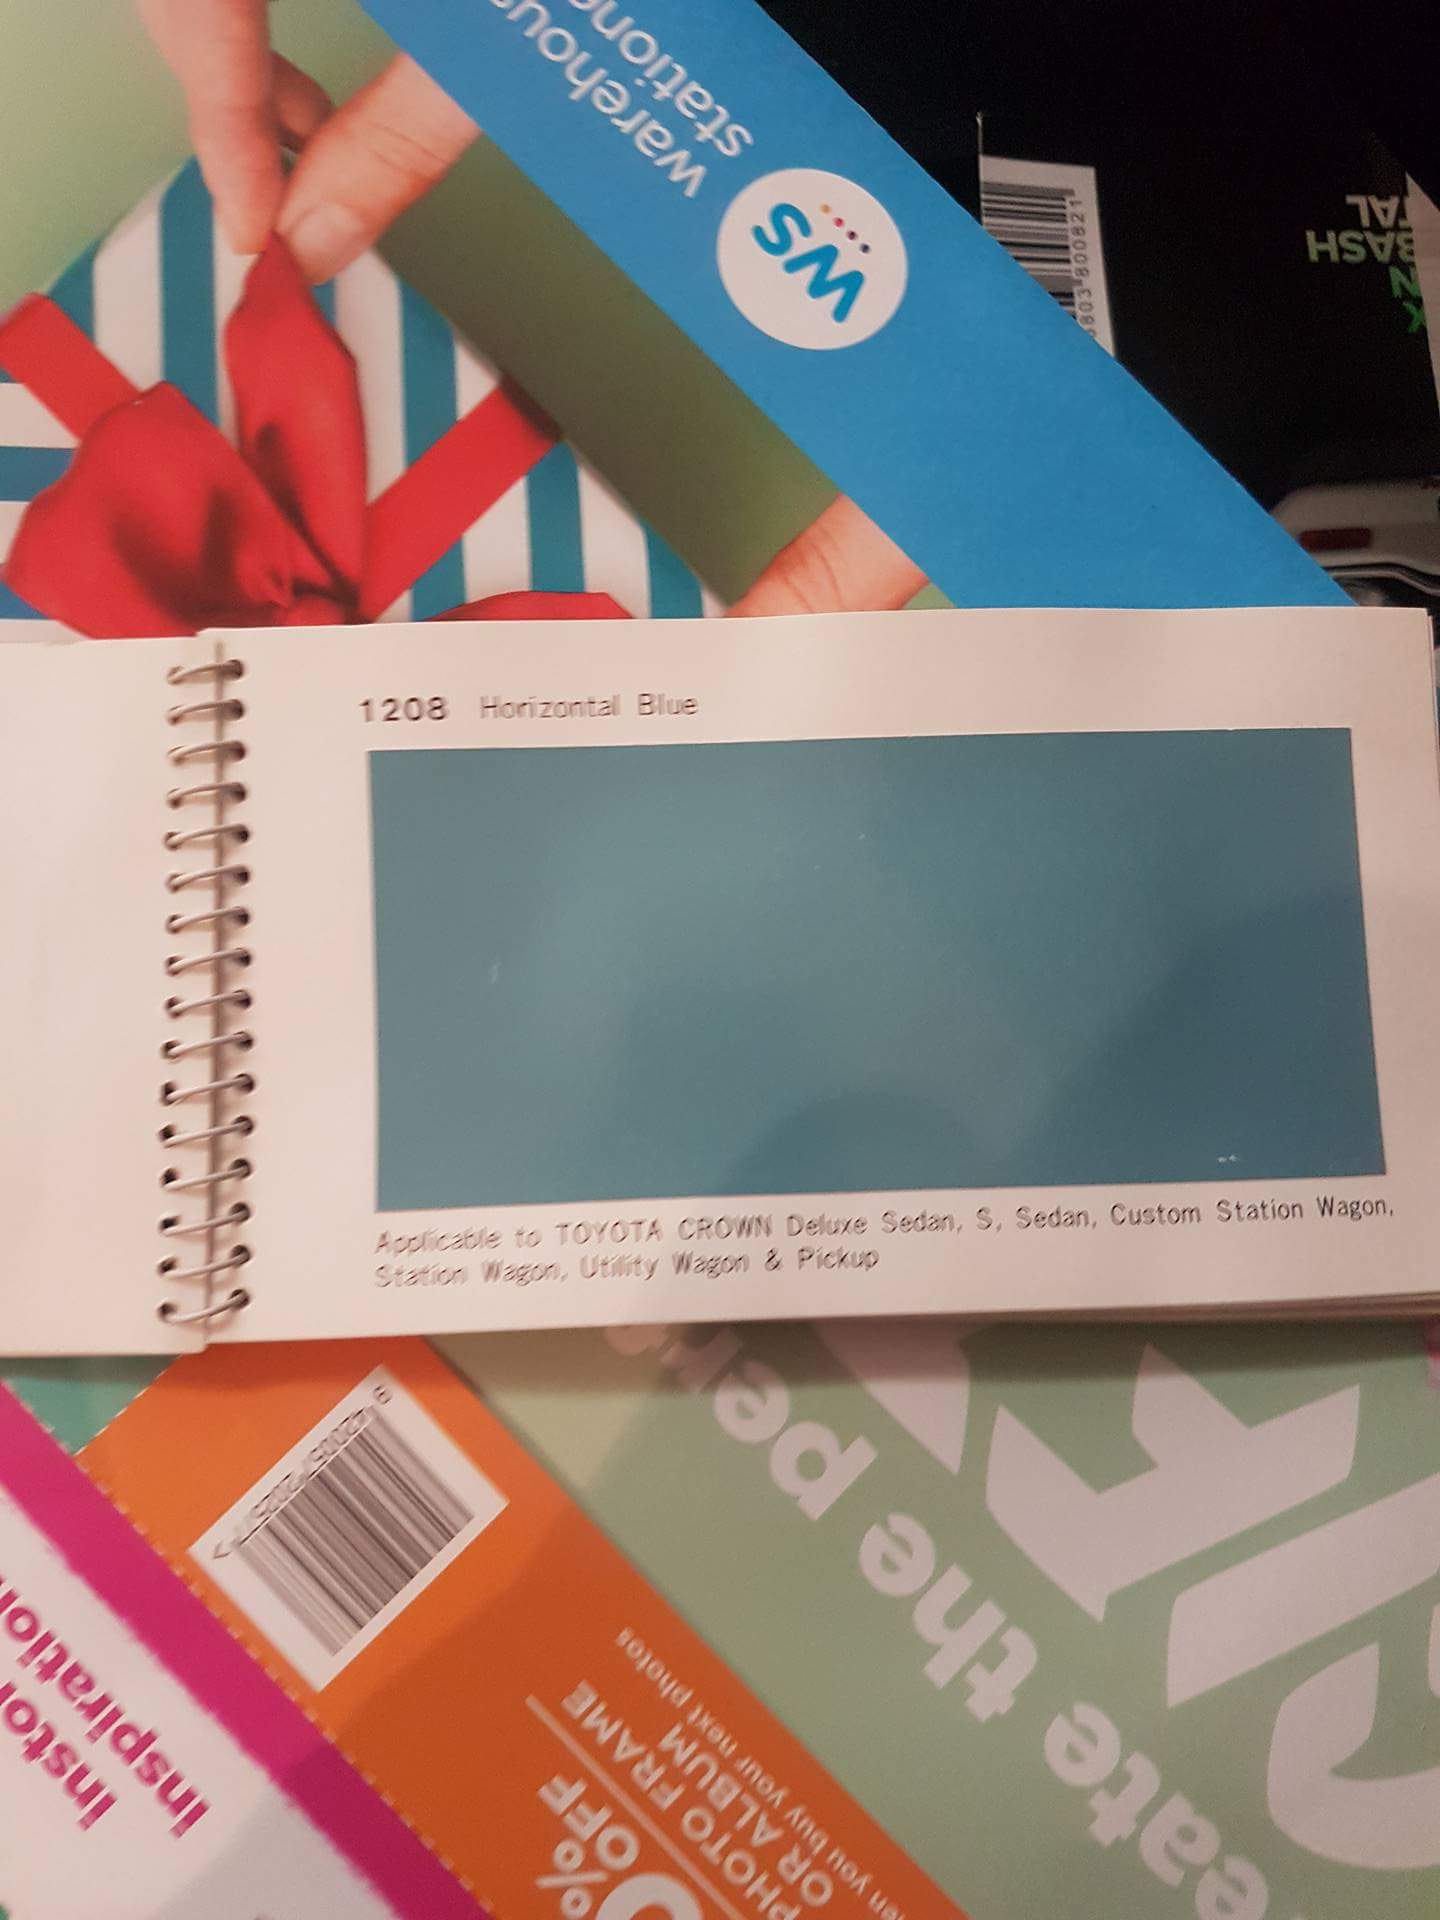
Nothing has really changed . Few we books from japan. and nz crown colour chat . Sort of colour im thinking of
1 point
-
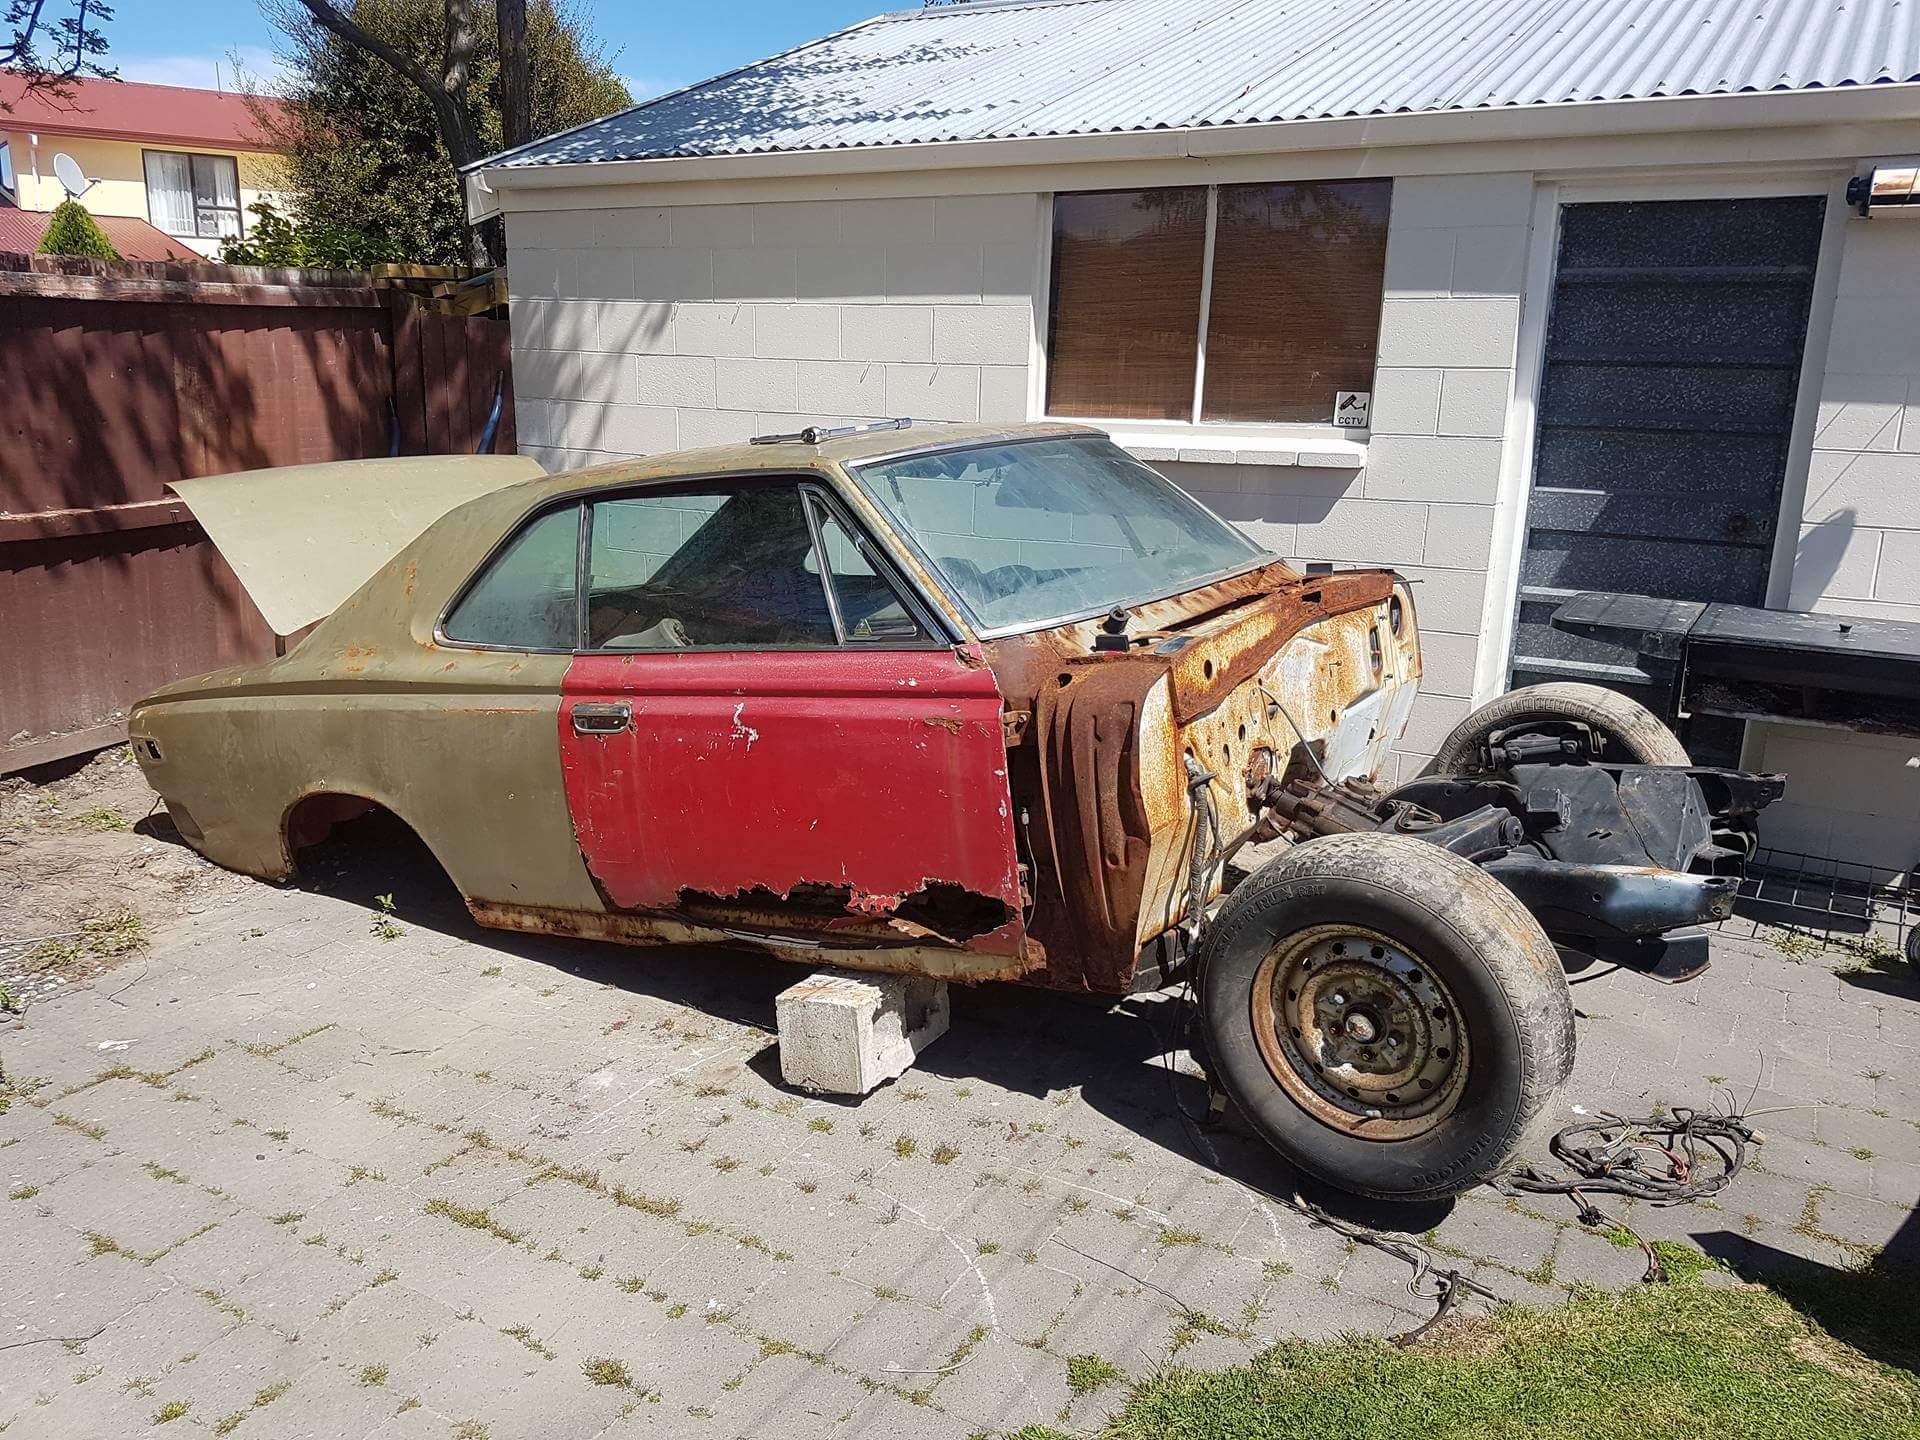
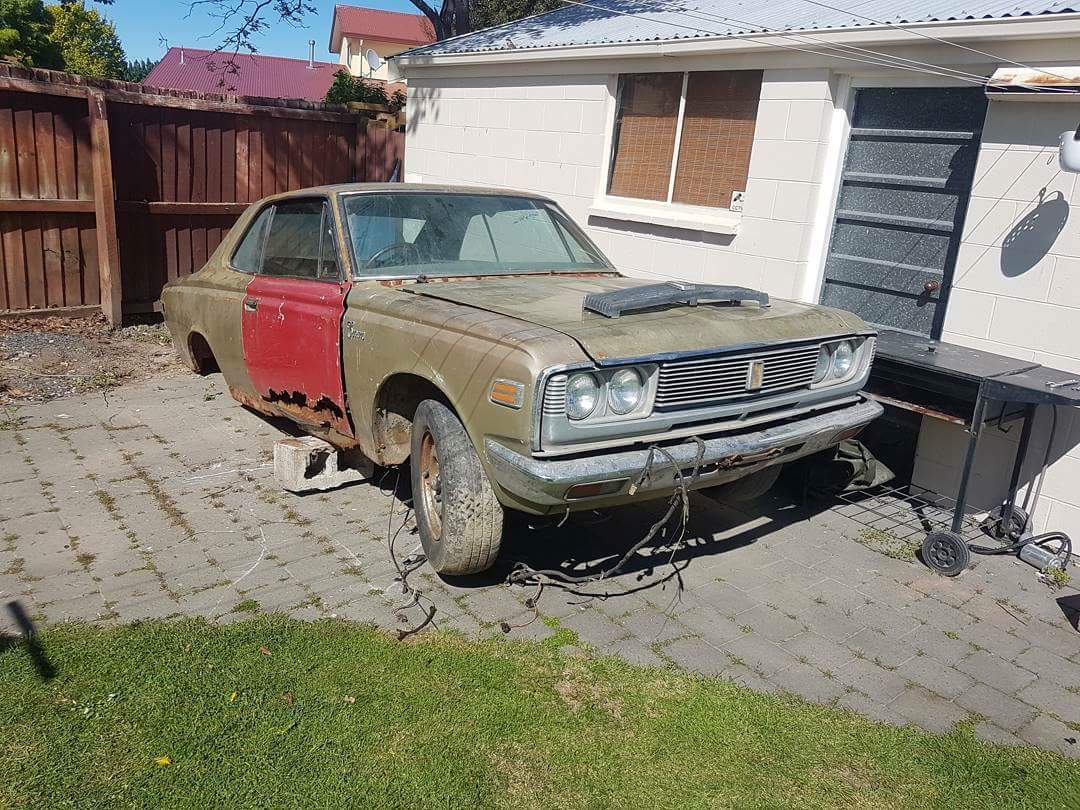
Has been set up for 350 and 9inch rear back in the day .Not sure if it ever saw the road with this . By the state of the gear box tunnel I'm guessing not . Using as a parts car as it's rusty and missing fair few bits
1 point
-
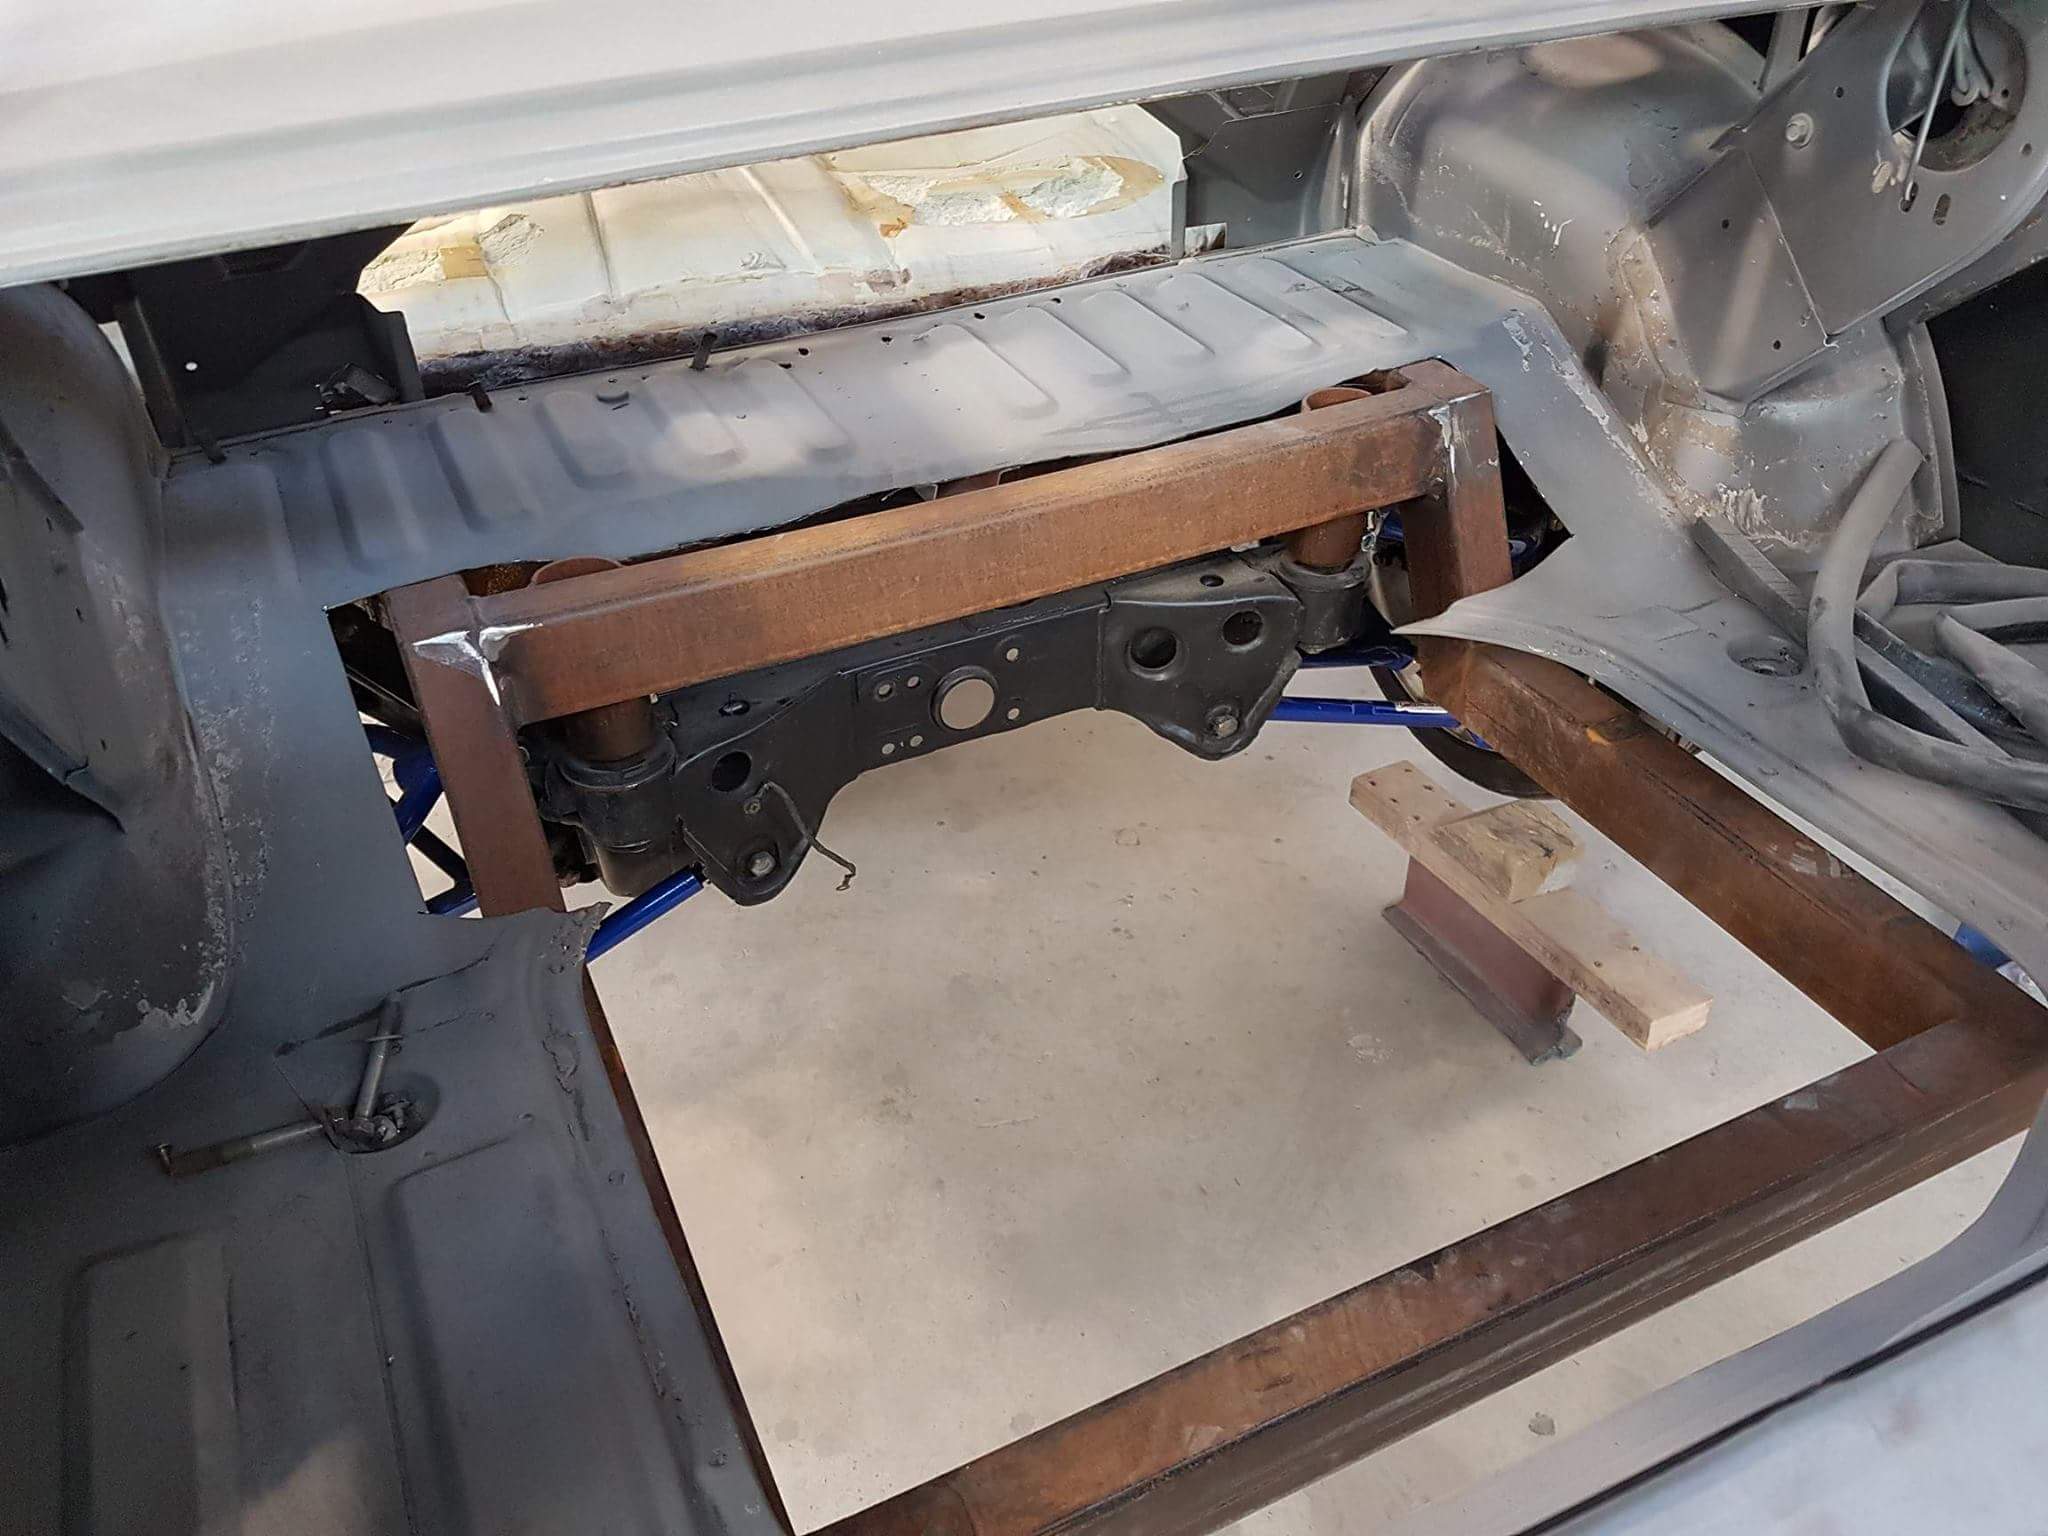
Boot floor cut out and sear tray to suit the chassis and worked out the 9s won't really fit in the rear so going to try a 8inch and flears
1 point


.thumb.jpeg.e0a4bff61111e0c8c7396950fcc94da1.jpeg)


This leaderboard is set to Auckland/GMT+12:00