
Leaderboard


Popular Content
Showing content with the highest reputation on 12/17/23 in all areas
-
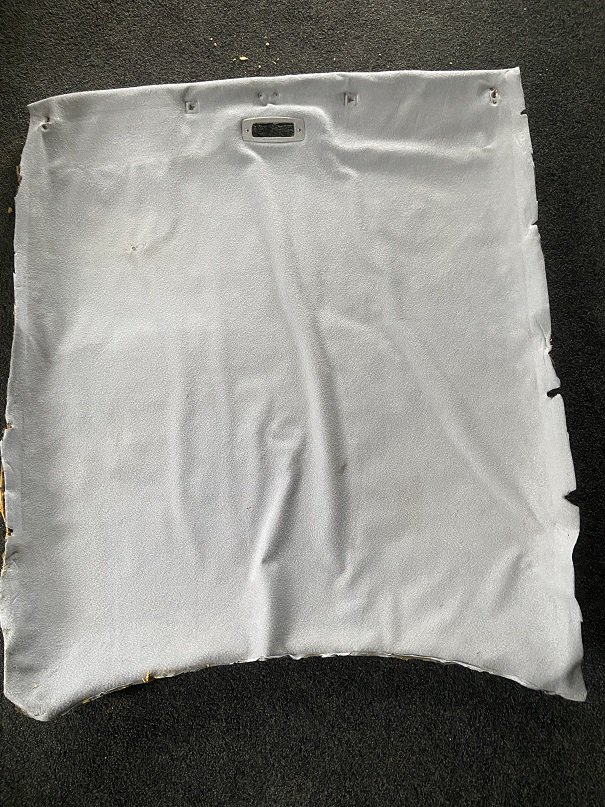
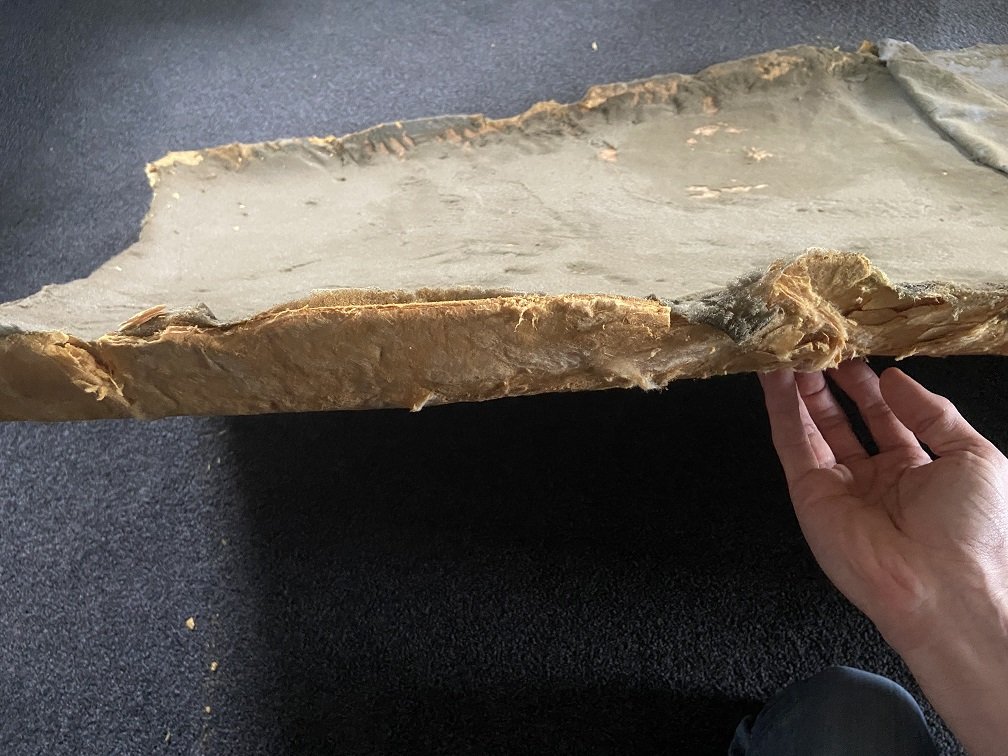
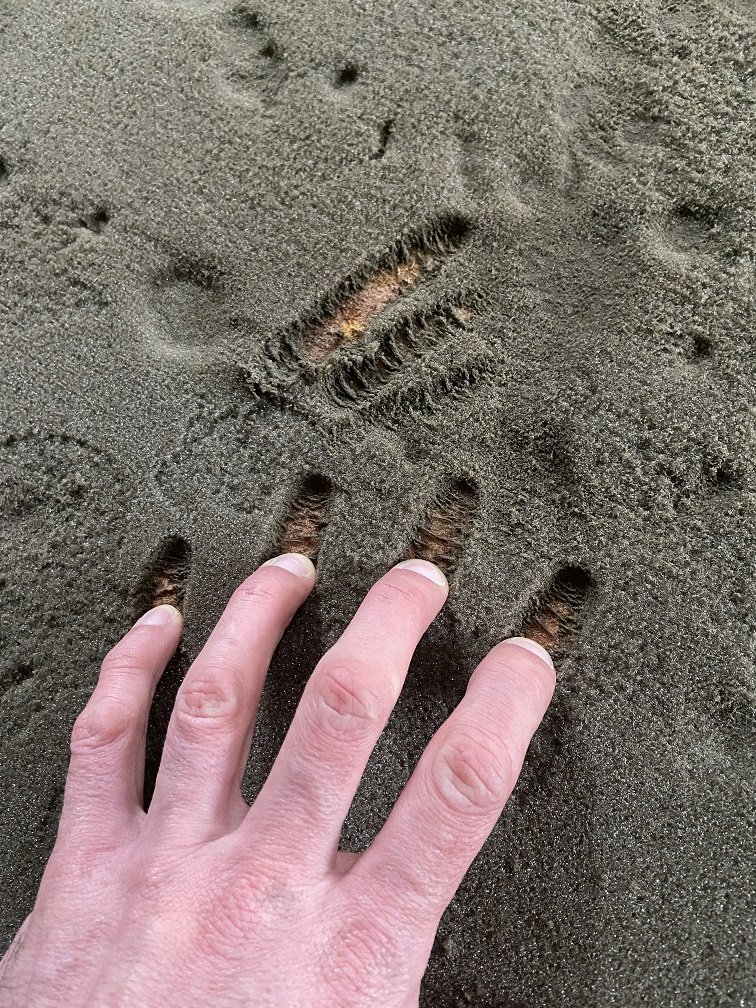
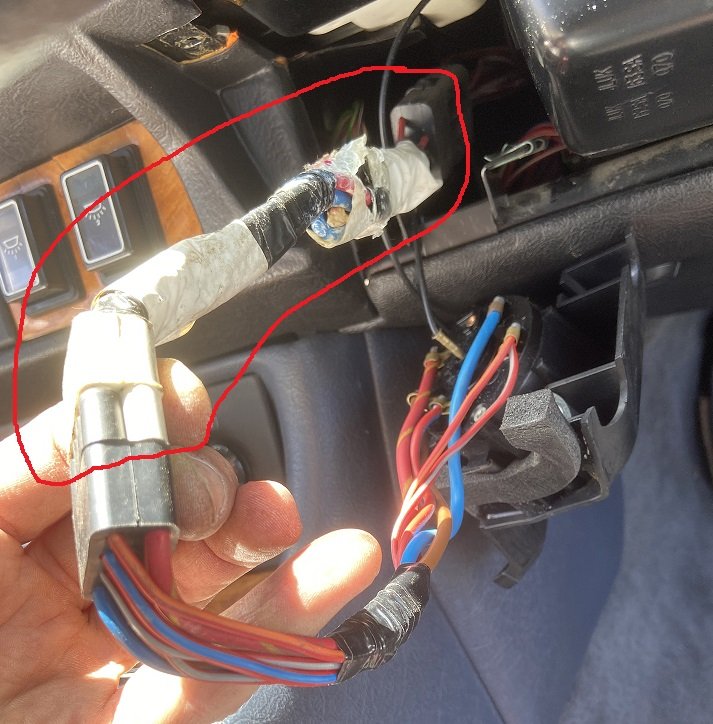
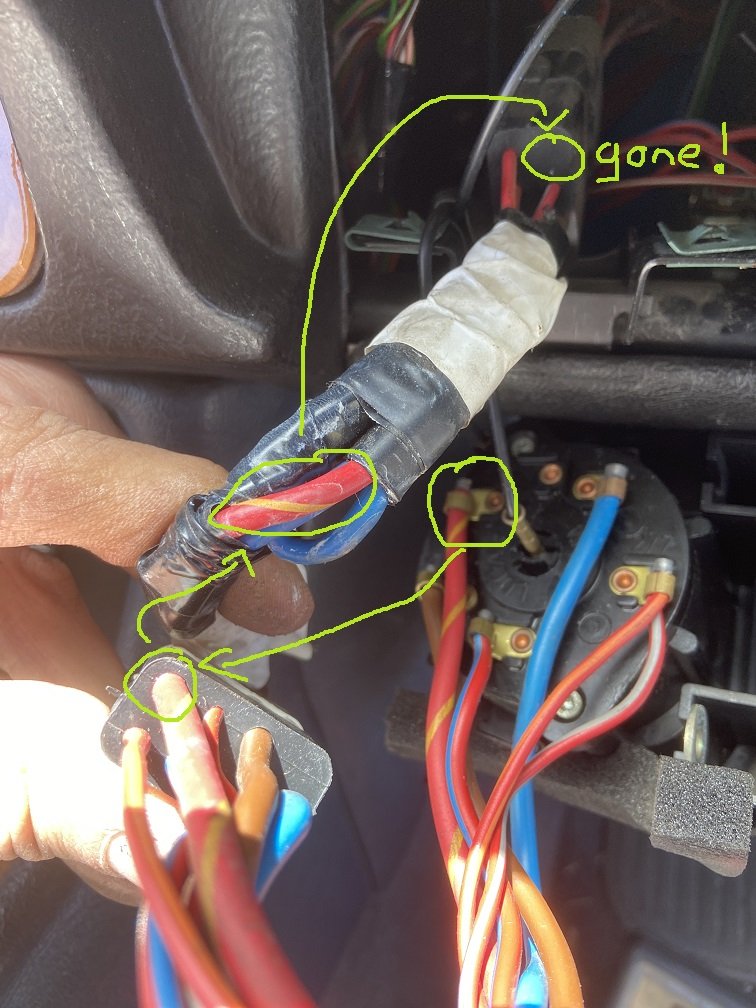
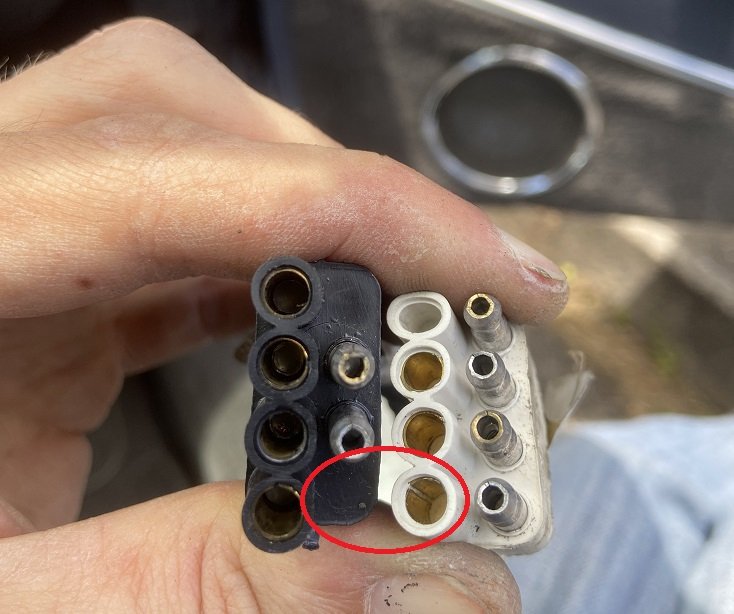
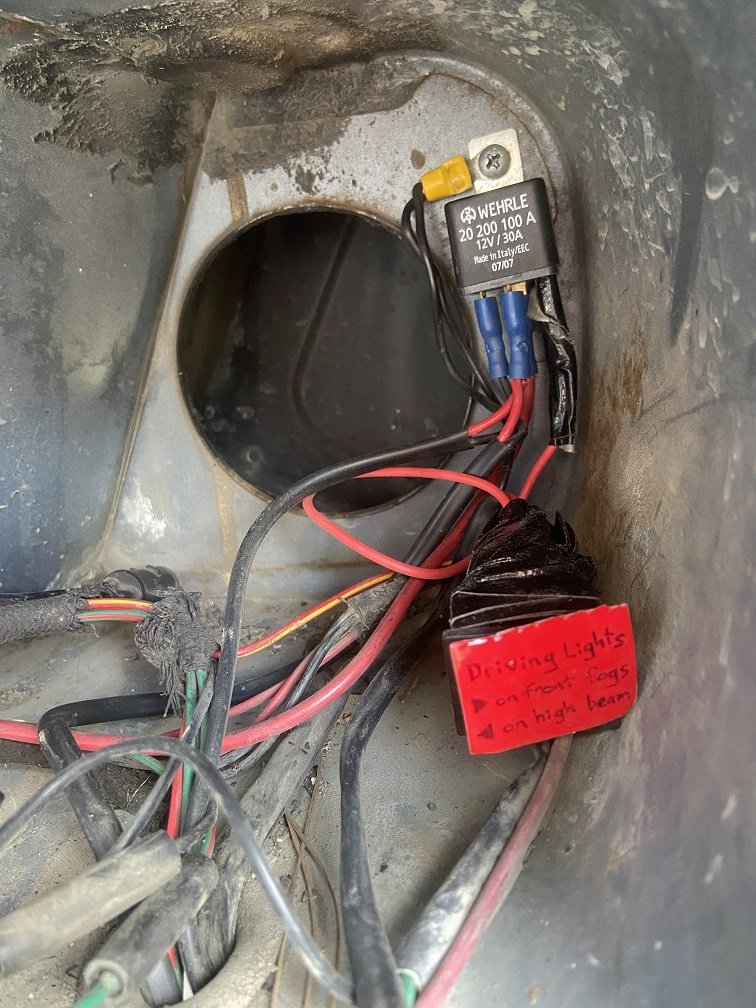
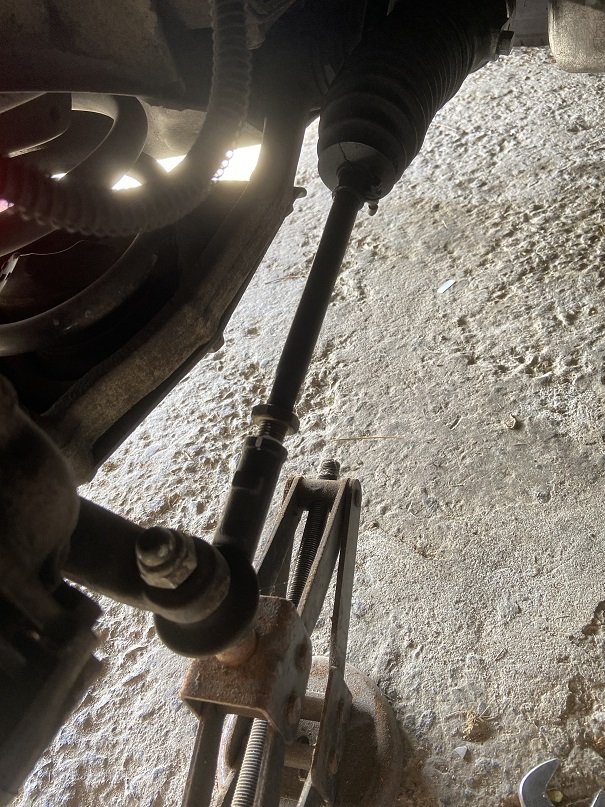
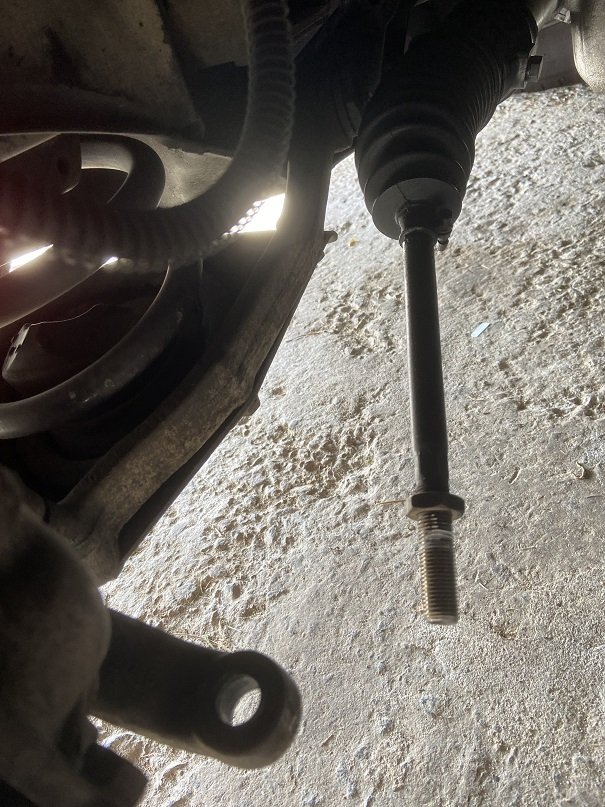
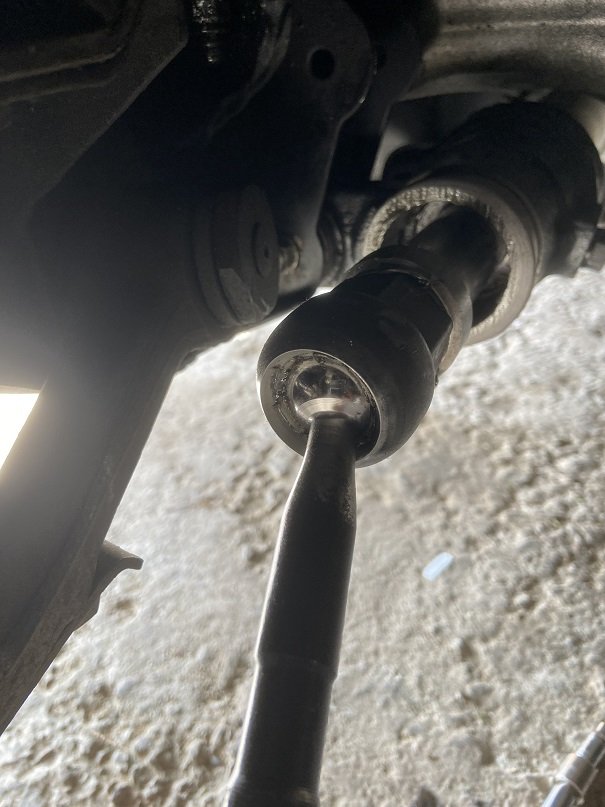
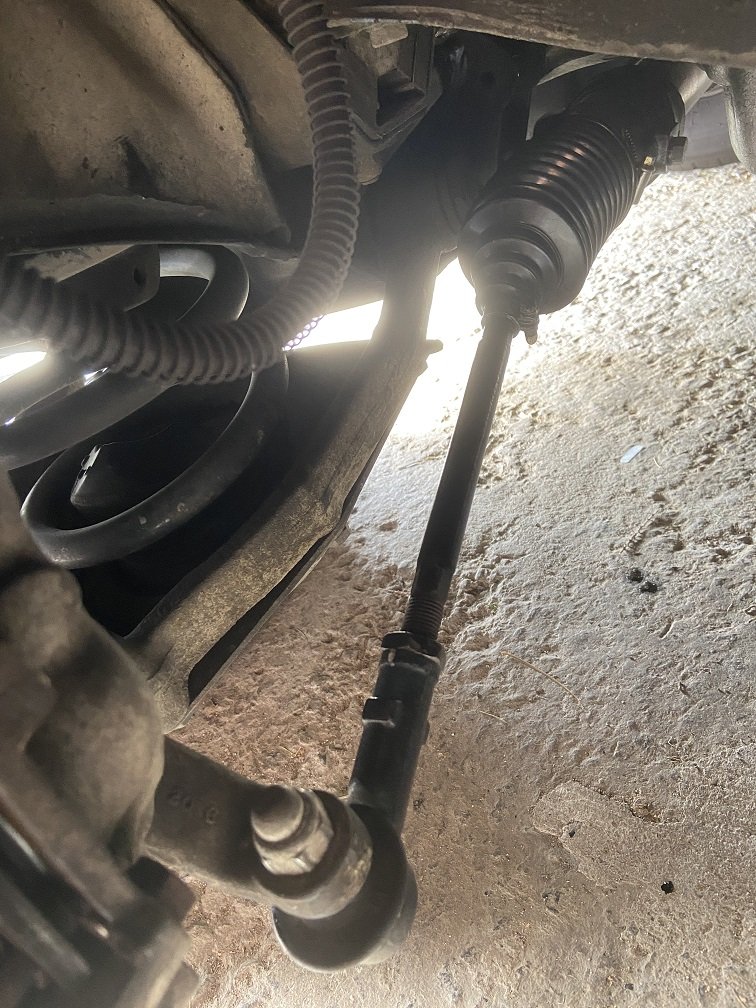
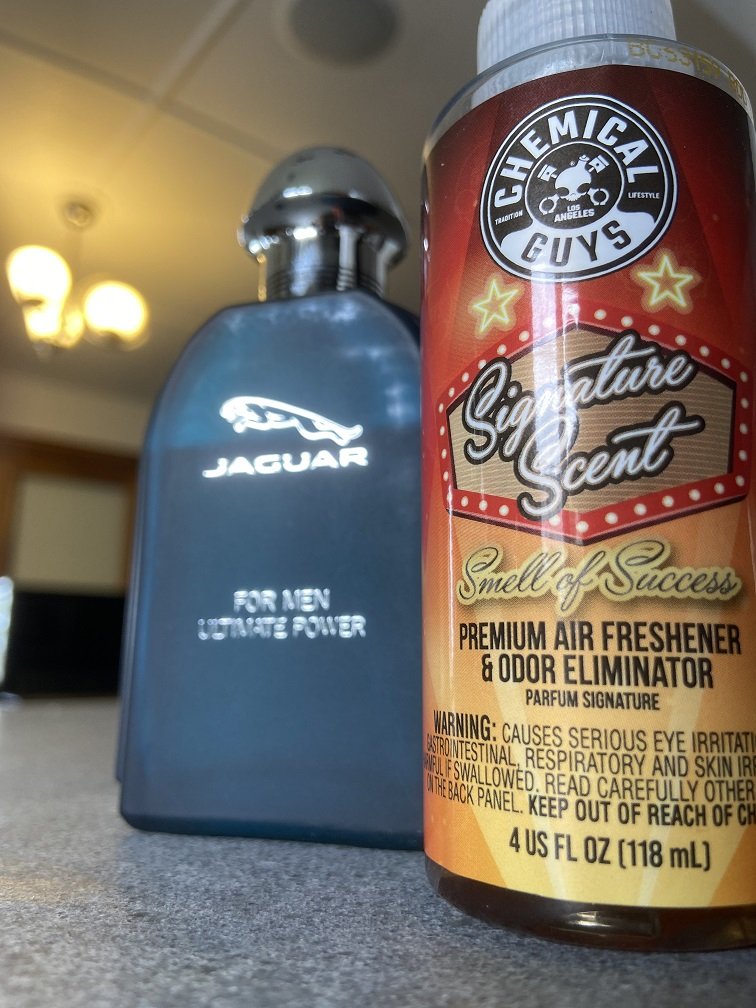
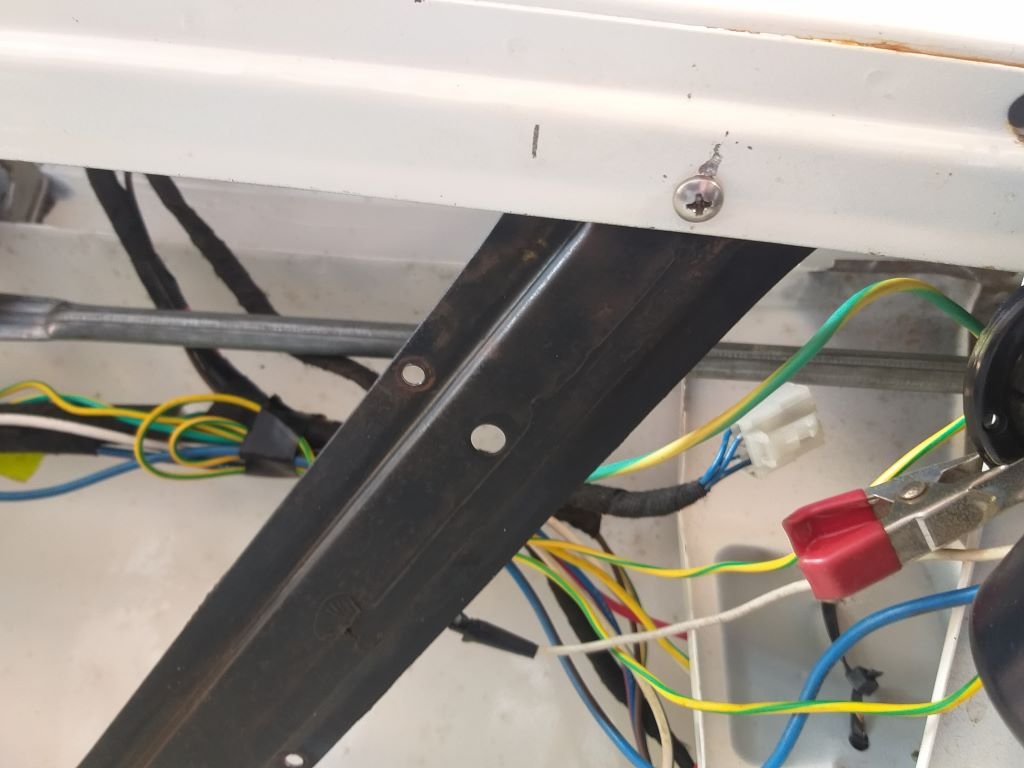
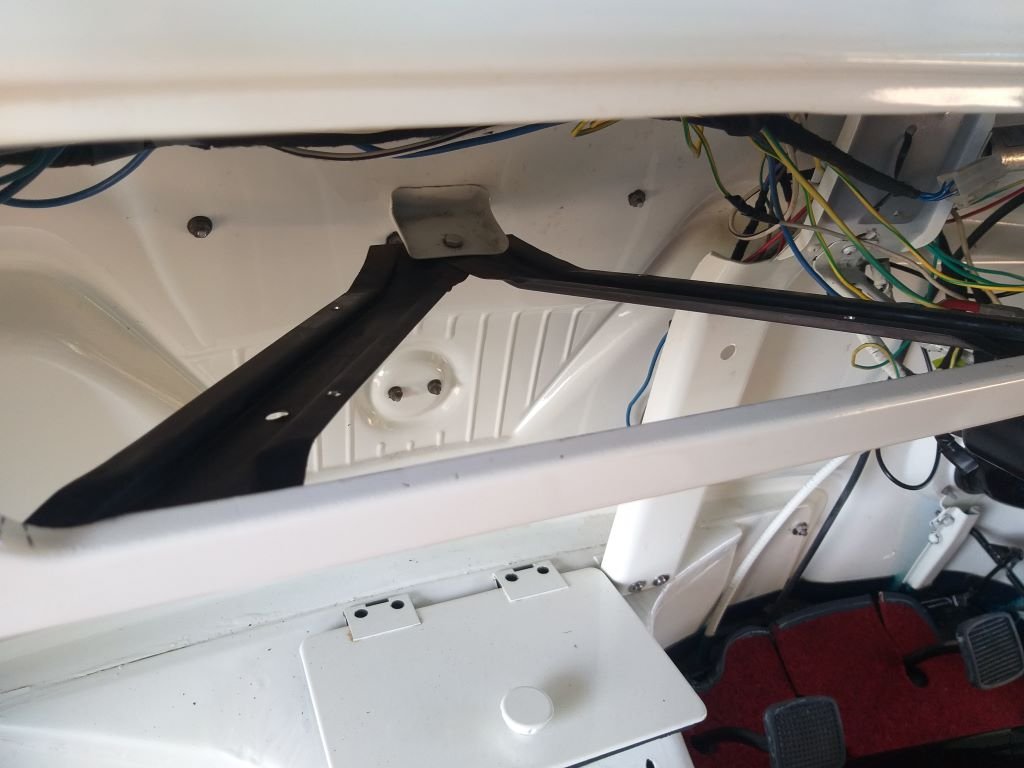
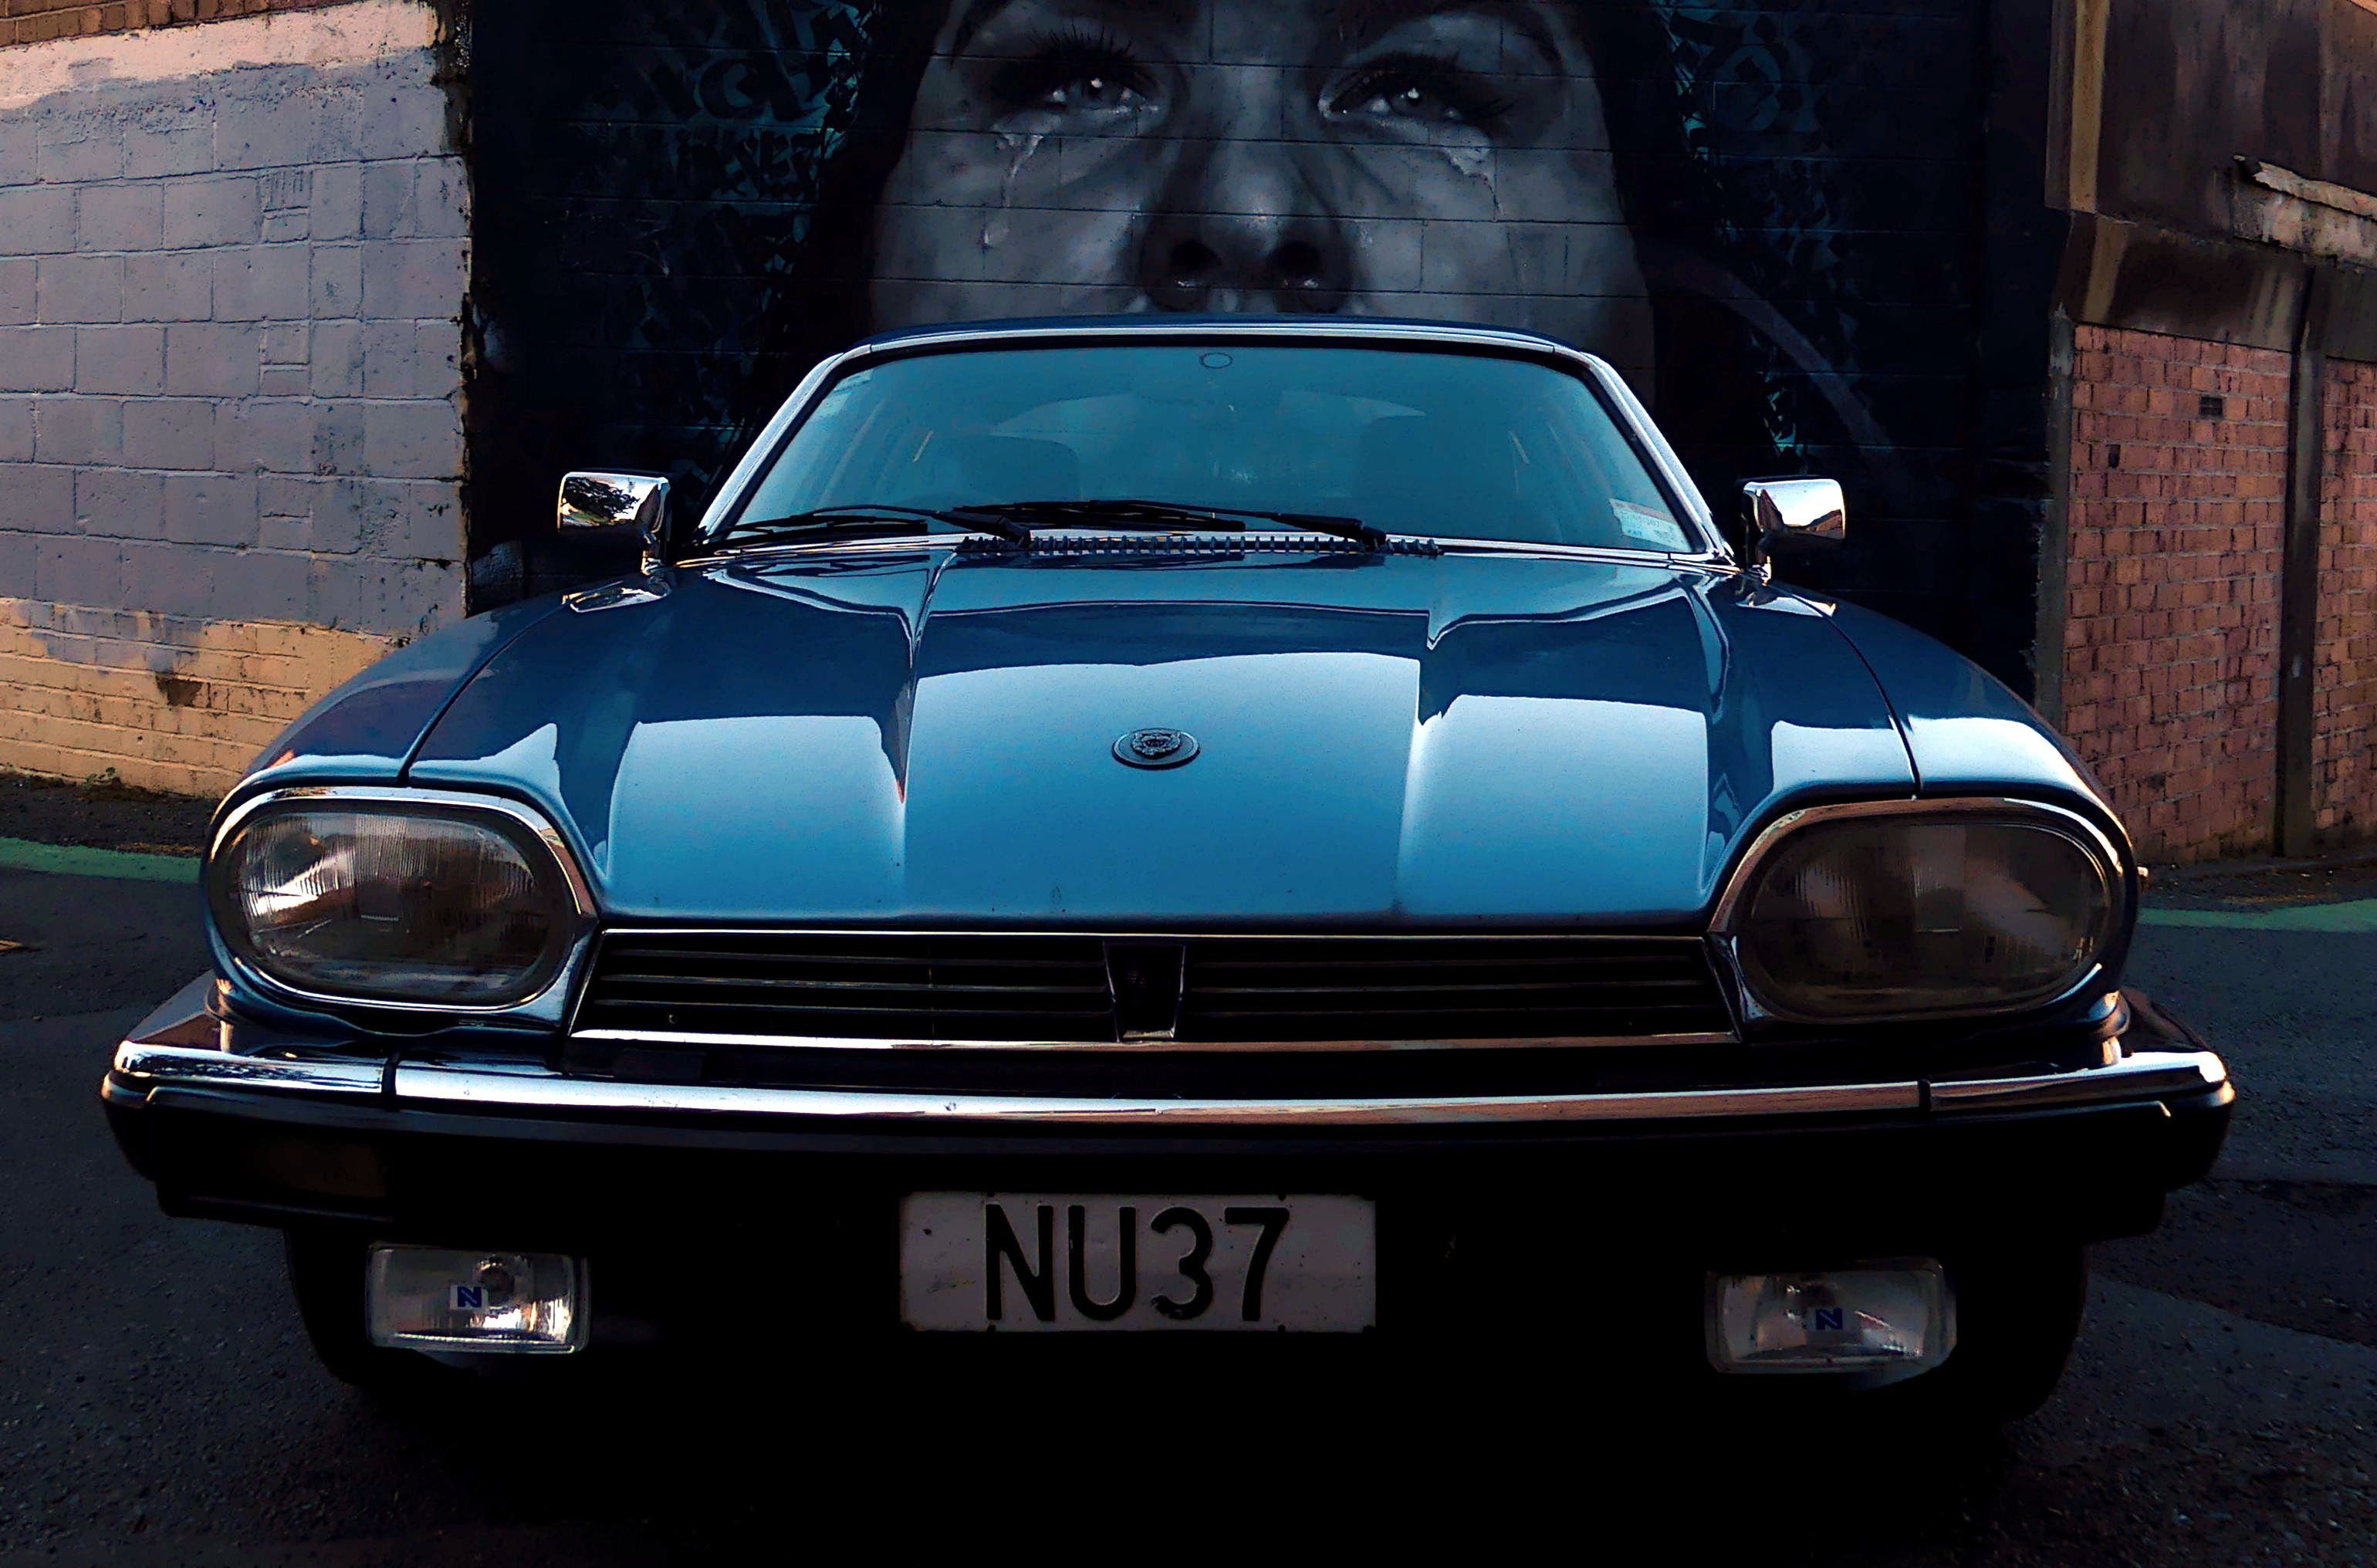
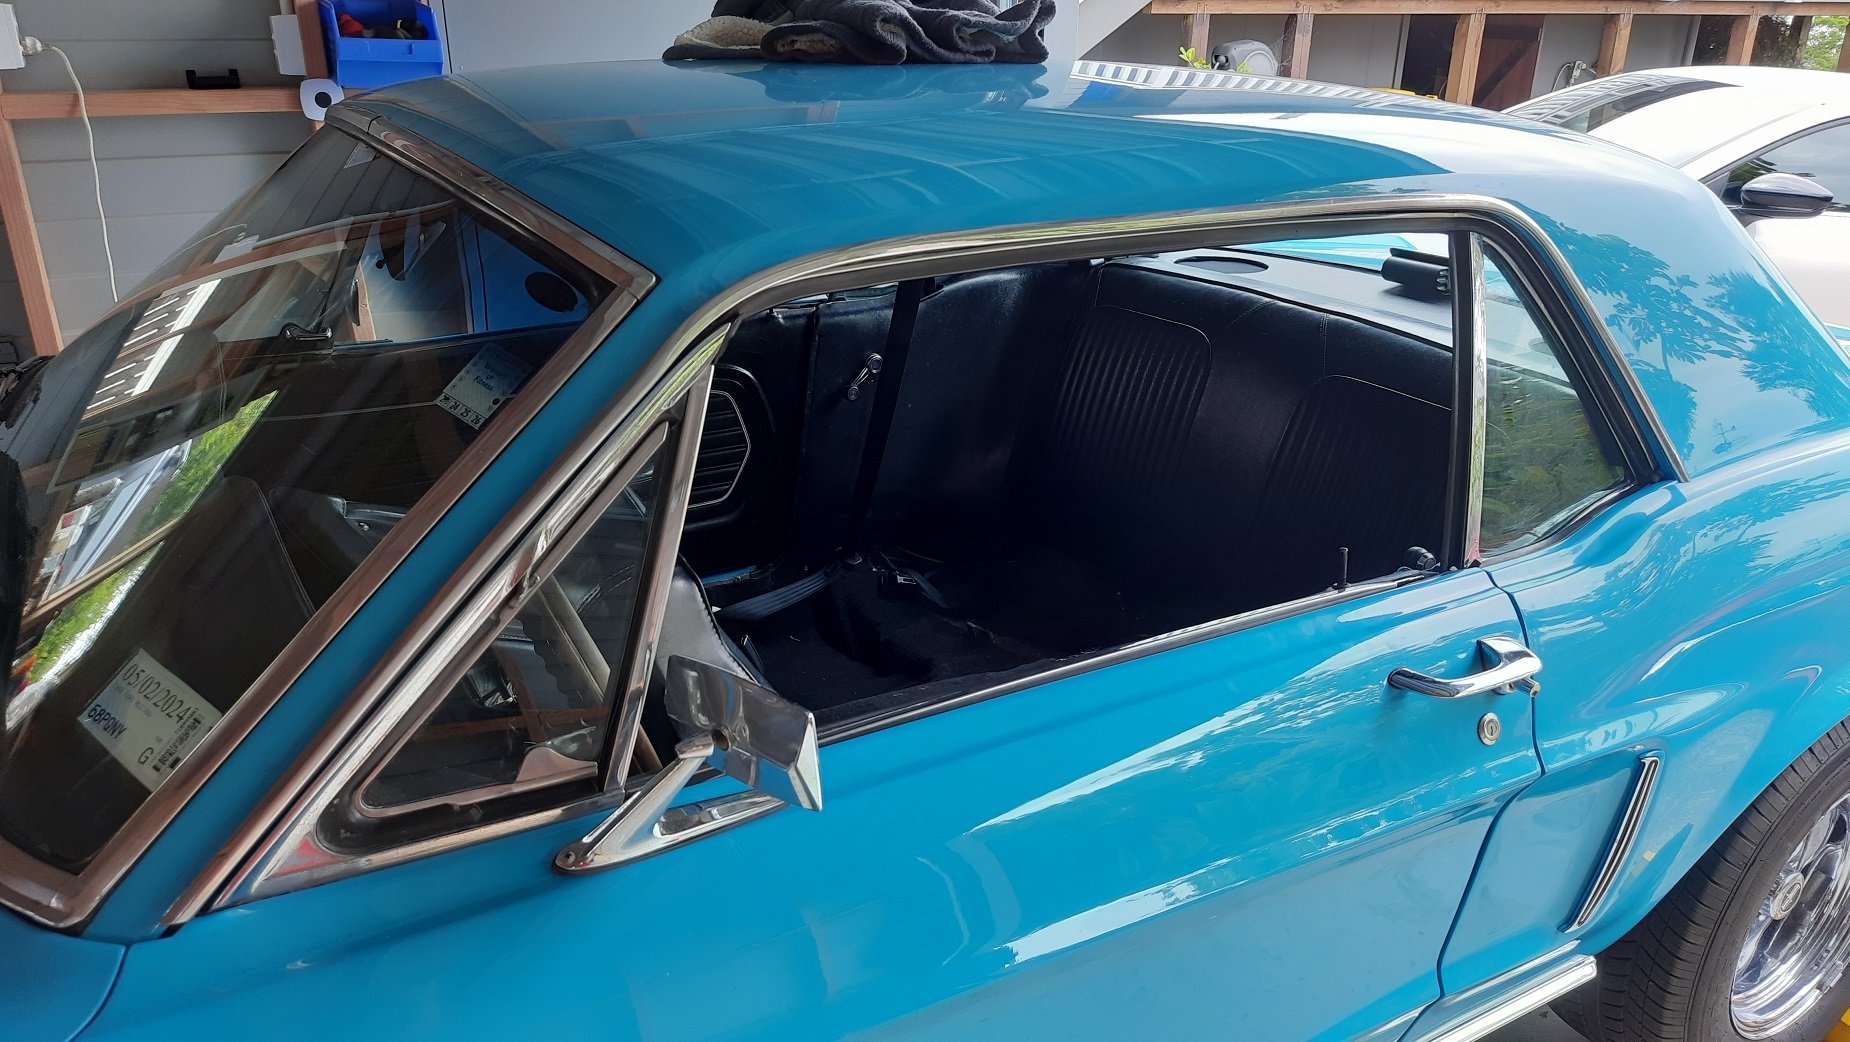
The headlining in the Jag started to sag badly, so I took the whole thing out. The backing is made of Weetbix covered in crumbling foam, and it's impossible to reuse at this point. The previous owner of my car was an upholsterer and his repair didn't last, cos nothing will stick to this flimsy mess. So now I have no headlining and no interior lights. You can get replacement headlinings which have the Weetbix backing shell replaced by fibreglass or something, but the shipping from the UK is crazy. On the Jag's last WOF inspection, they gave me a warning that they didn't like my aftermarket driving lights coming on with my high beams. Having the lights work that way made sense to me, but whatever, I figured I'd change them around to run off the front fog light circuit to keep the WOF man happy. Although my car didn't come with front fog lights from factory, it still has the dedicated fuse for them, and the dedicated SPARE fuse for them , and the headlight switch still has positions to activate them. So I figured I could just find the fog light plugs behind the bumper and they would already be functional / already be live when the headlight switch was set to the correct position. Right? Nope. After an hour or two of poking around, I found this stuffed in behind the headlight switch: It's an adapter for cars without fog lights, and its purpose is to stop the headlights from turning off when you turn the headlight switch to the fogs-only position. The adapter also prevents the fog light plugs from becoming live, because it breaks the connection to the fog light circuit. You know, that same circuit which is nevertheless fitted with a fuse and a spare fuse. You can see that the fog light circuit is discontinued in the photos below. So I just removed the adapter completely. Now my fog light circuit is live. The aftermarket driving lights in my car were conveniently run off a relay rather than directly off the high beam circuit. I added a switch to toggle that relay's coil supply between the high beam circuit and the fog light circuit, in case a different WOF man takes a different view of how my driving lights should work in future. The relay and switch are sitting inside of one of the headlight recesses: So now I have a way to drive around with just my driving lights on during the day, like a plonker. Then I actually went for the WOF, and failed because of a split steering rack boot. I replaced it all by myself, because I am a totally legit home mechanic. Currently on the Jag's to-do list: Find another solution for the headlining Get the auto looked at (I'm pretty sure it's slipping and getting worse, so I'm afraid to use full throttle now) Stop the drivers window sticking Fix the radio (some speaker wiring must be shorting somewhere, cos no sound comes out) Install the new rear subframe mounts Install the new rear trailing radius arm bushes I'm becoming more of a Jag man as time goes on. Check out my Jaaag fragrance collection, which lives in the car: "Jaguar: Ultimate Power" (a couple of sprays on the car makes it go faster), and of course the Smell of Success. Apparently, success smells like creme brulee / vanilla / caramelised sugar, whereas the Jaguar fragrance ironically smells like lemons.
 12 points
 -
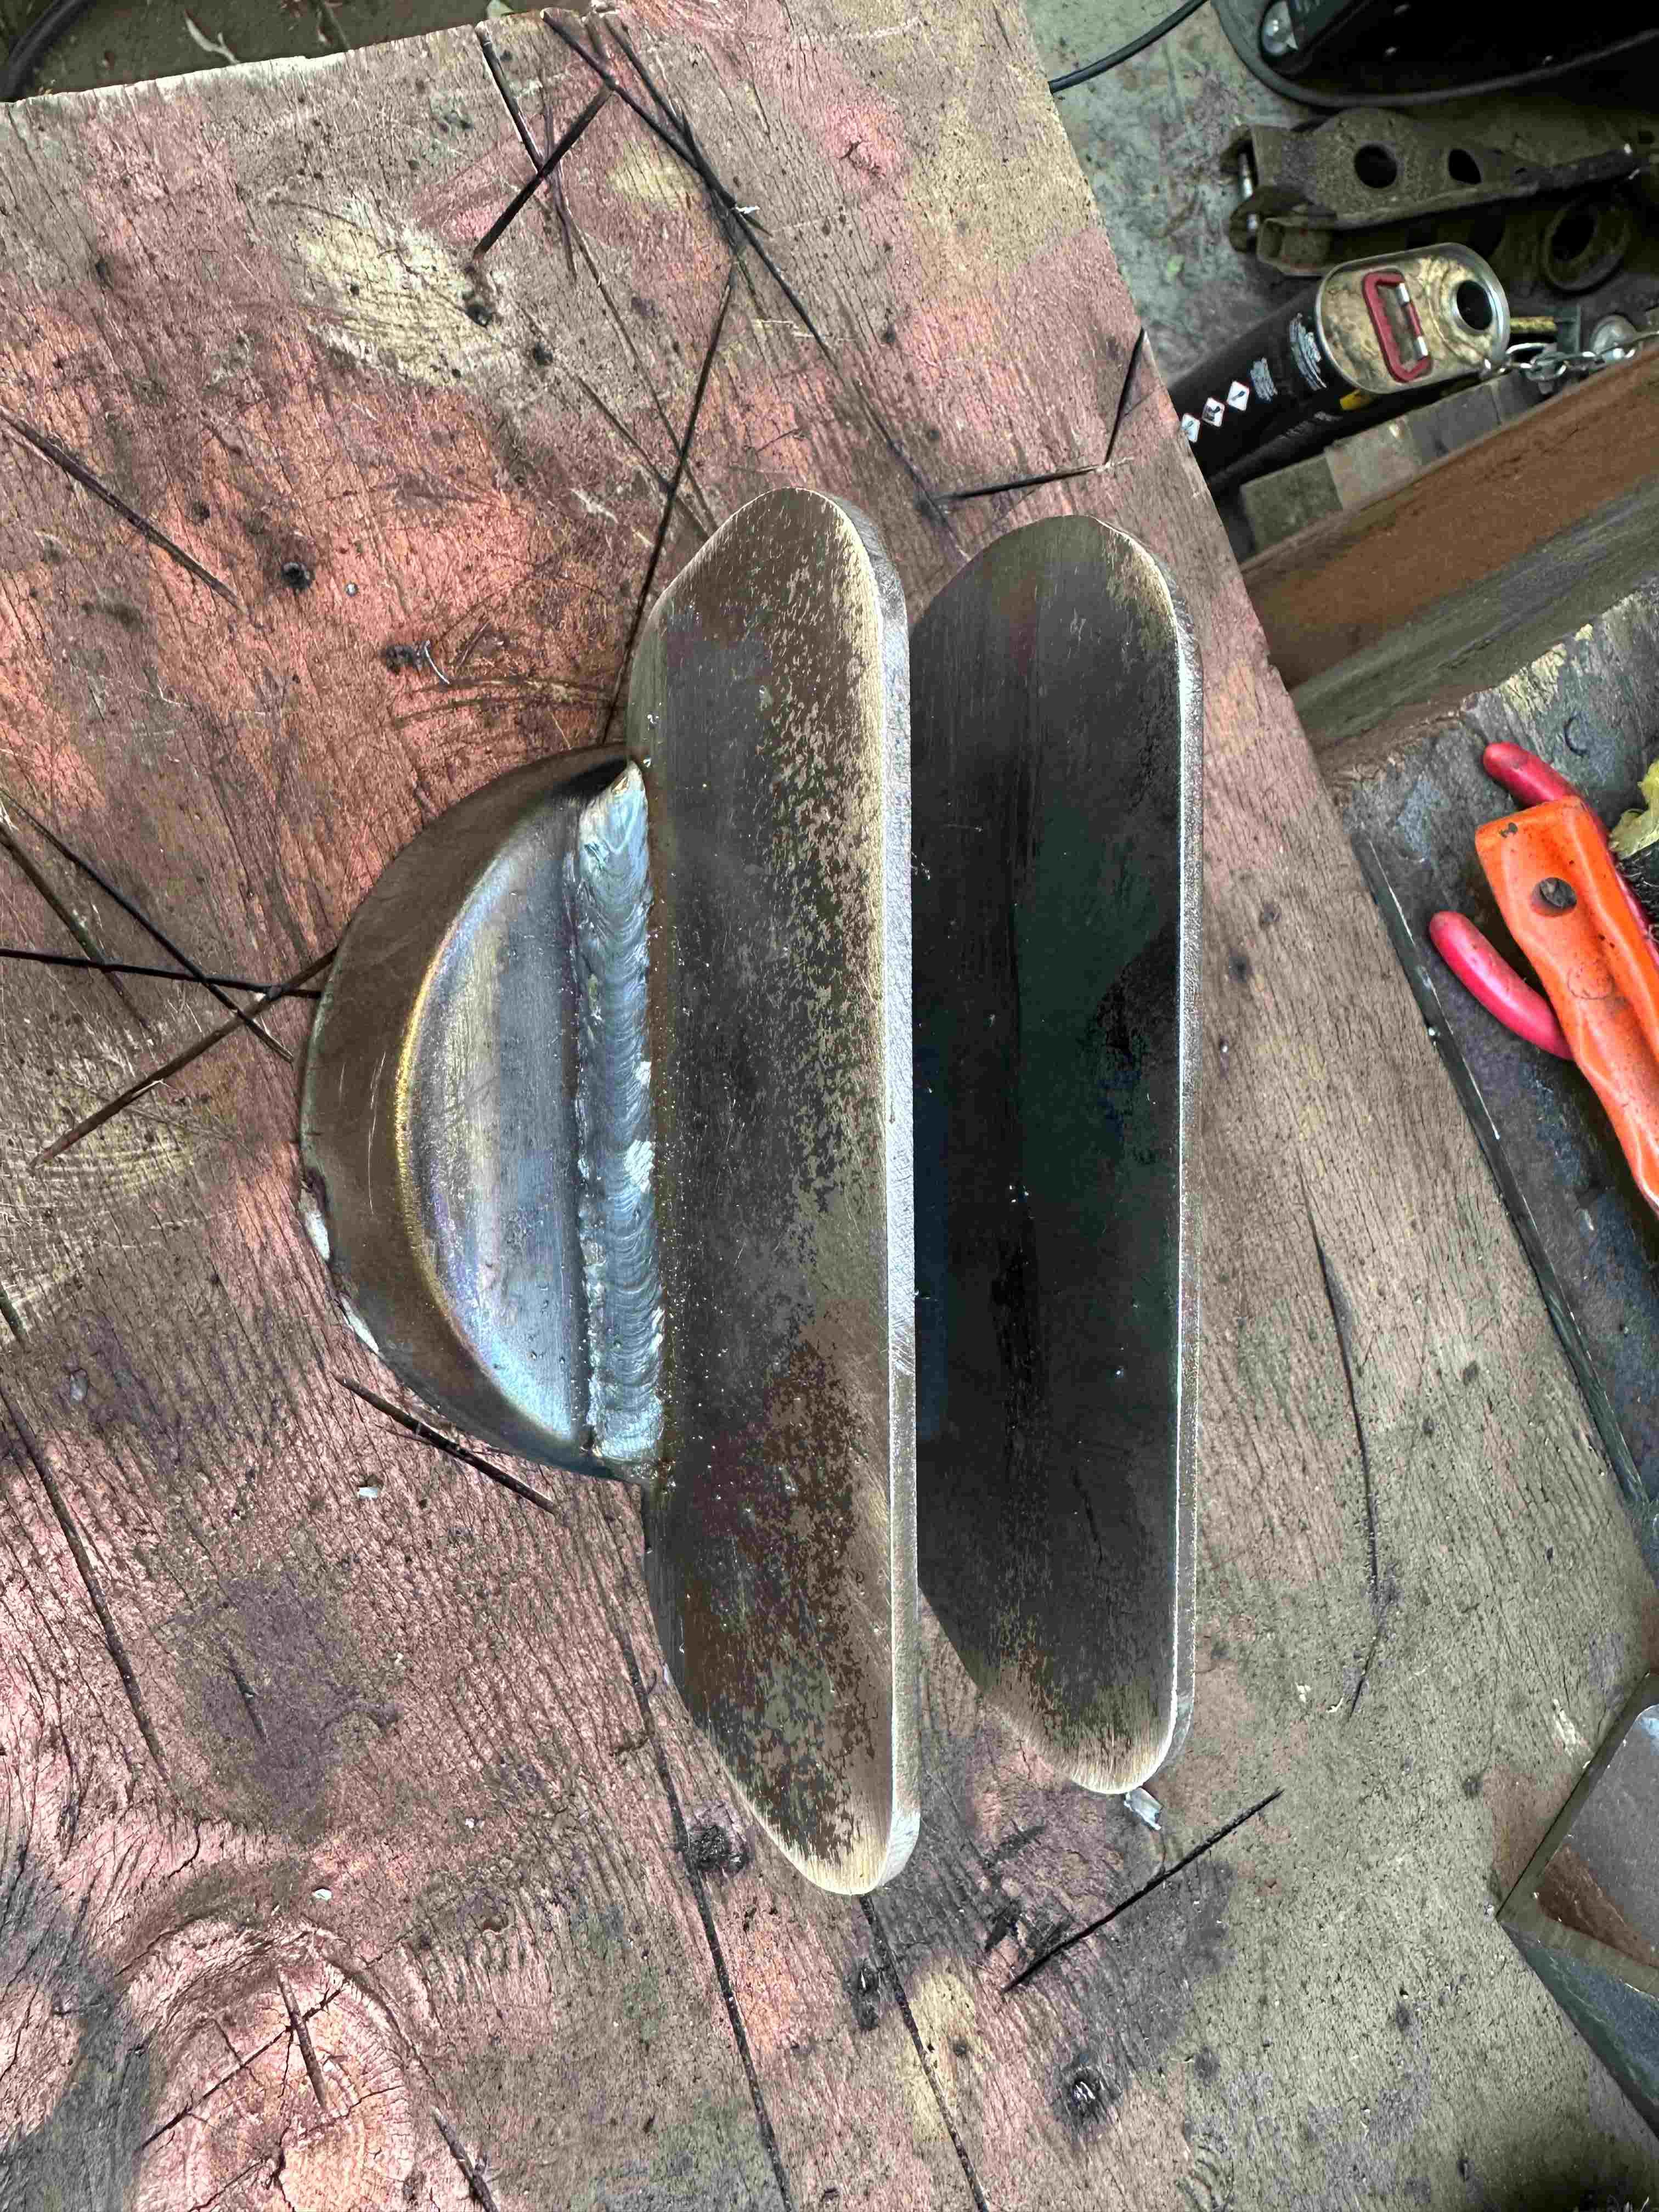
I cleaned up the other Avenger spring top spring perch and welded on the plates to attach it to the chassis. I tacked it in place and lifted the diff back up into position and fitted the upper track arms and offered up the springs. I got one side in but trying to fit the other side the car became very unstable being only a shell and being up high. I decided to abandon that side before I wore the car, which is still quite heavy. I think I will wait until the car is down a lot lower.
7 points
-
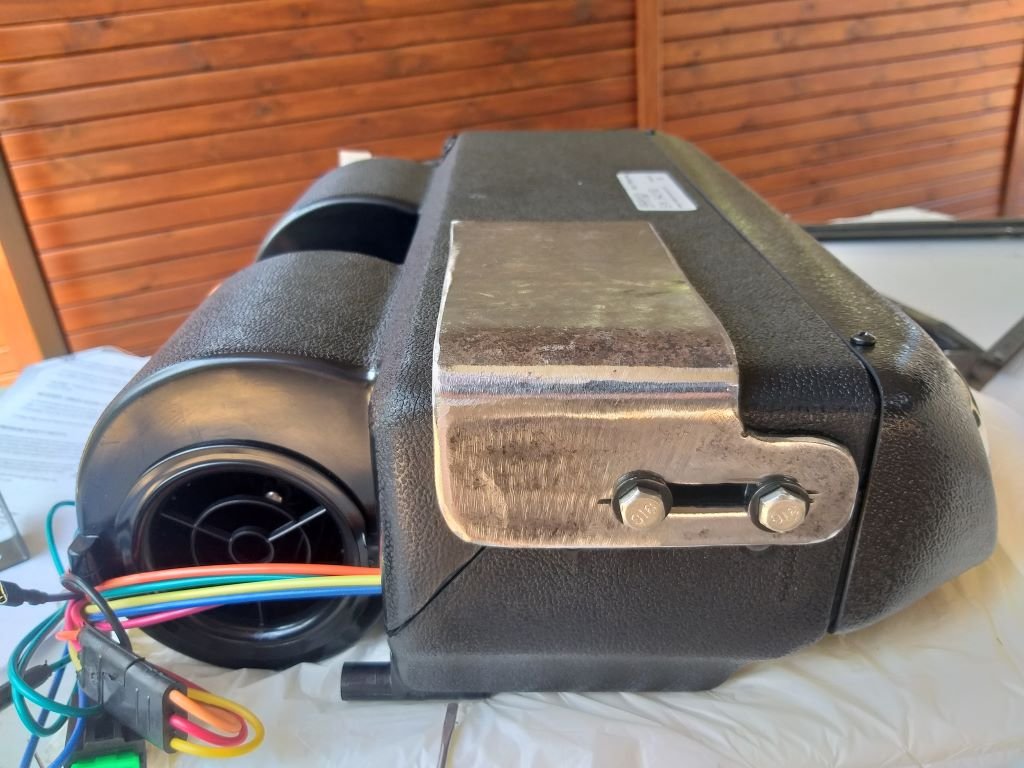
And that's the holes drilled so that my a/c mounting brackets bolt up to the glove box bracket. I wasn't happy with the puny looking rear mounting bracket that came in the a/c kit. So, I spent a bit of time making up my own rear bracket in true "Rough & Ready Restos" fashion. With all of the mounts completed I slapped the glove box bracket back in position and then bolted in the a/c unit. I'm pretty chuffed with the result. It doesn't look too out of place. The other good news is that the gas lines are located on the RHS of the unit which means that I can hopefully hide them behind this panel: The panel currently hides the main wiring loom and a few additional circuits that I have recently added. I whipped it out to see how much space is left behind the panel. Looks like I should be able to squeeze the a/c pipes in between the wiring loom and the front panel. I've still got a few additional circuits to add (including some a/c related wiring) before I can wrap my extra wiring loom, but hopefully that will neaten things up too. Thanks for looking.
6 points
-
Took the old girl along to the Pukekohe car clubs Xmas grasskana . it was a sack, single wheel peel , so zero traction. but I did have shitloads of fun. one really good course in the afternoon, basically doing the old scandy flick (handbrake did f all), power over, sideways for 90% of that course was good fun. needs an LSD asap. might have to find an LSD or get one through palmside for the escort English diff I have.
5 points
-
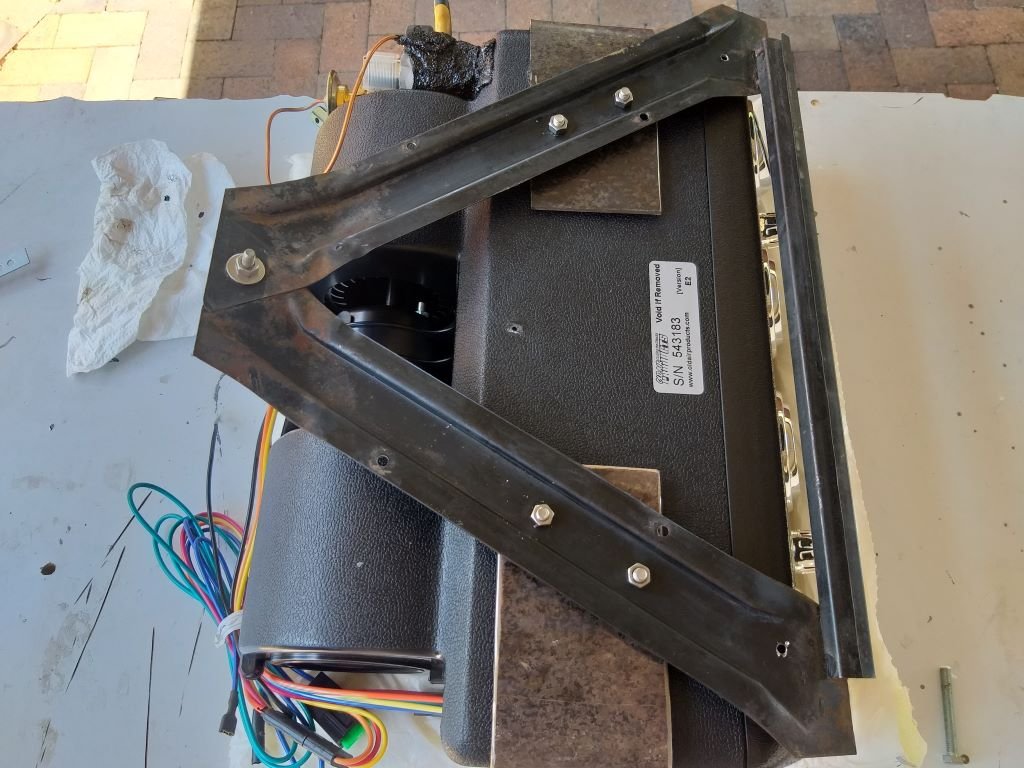
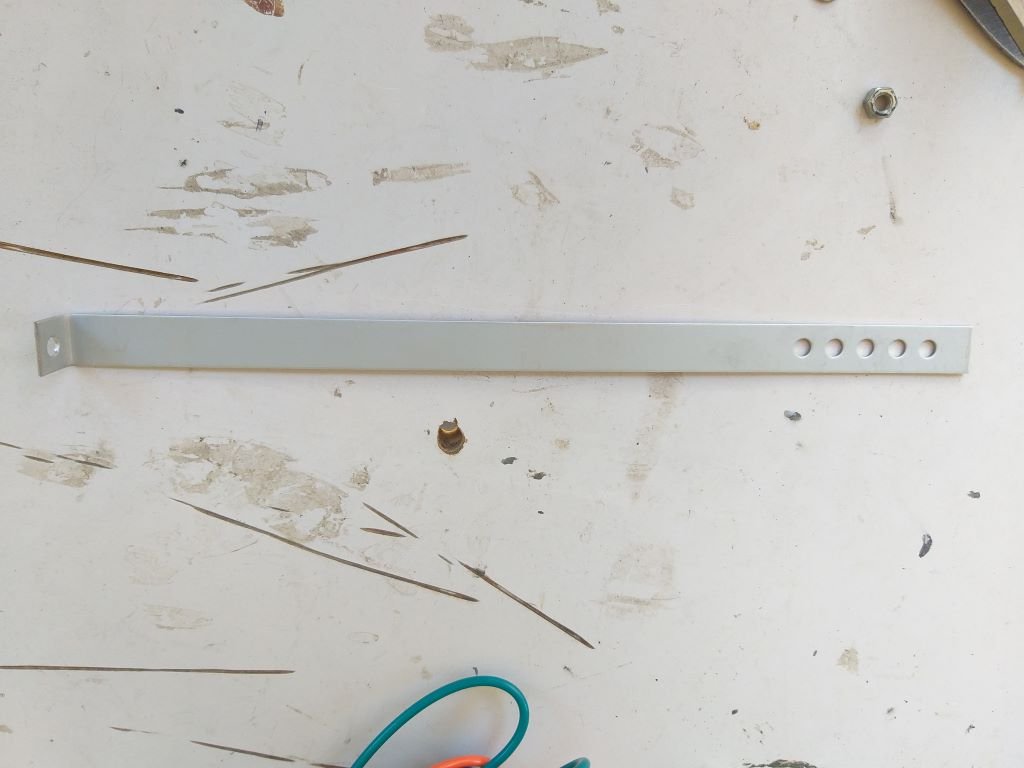
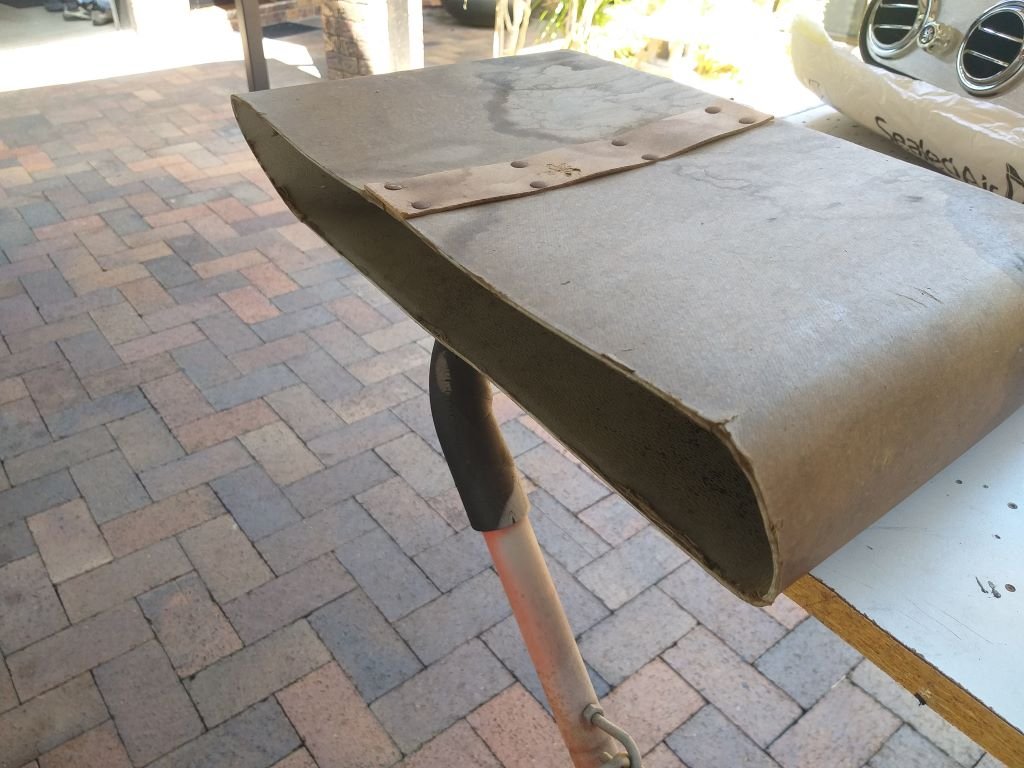
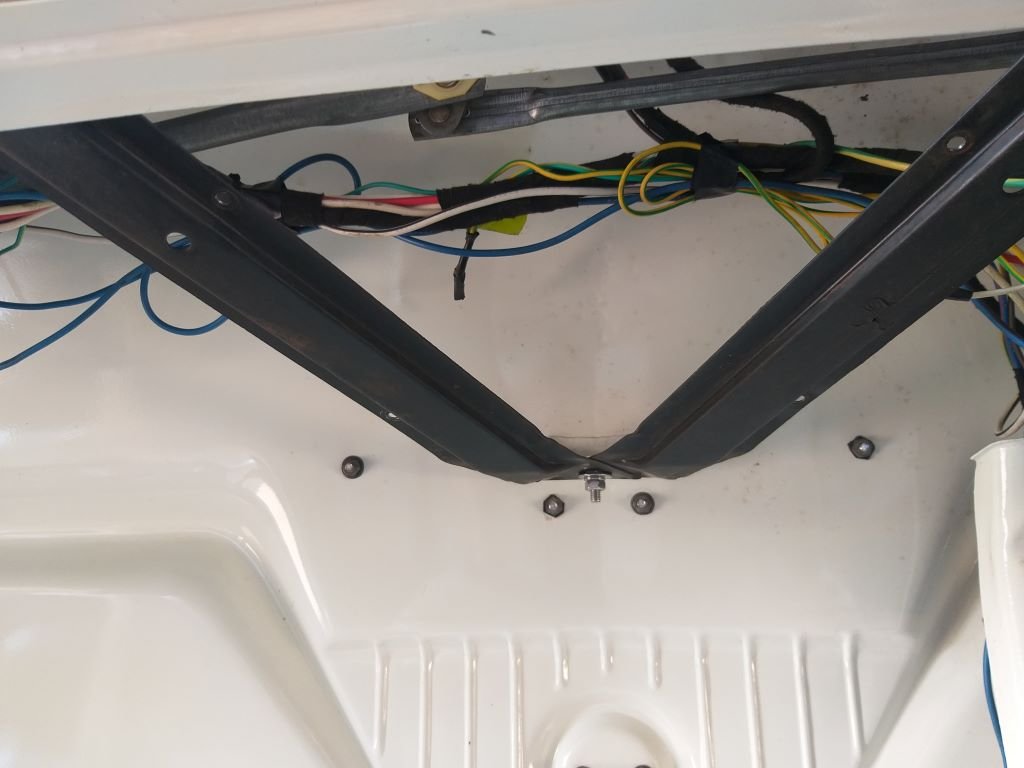
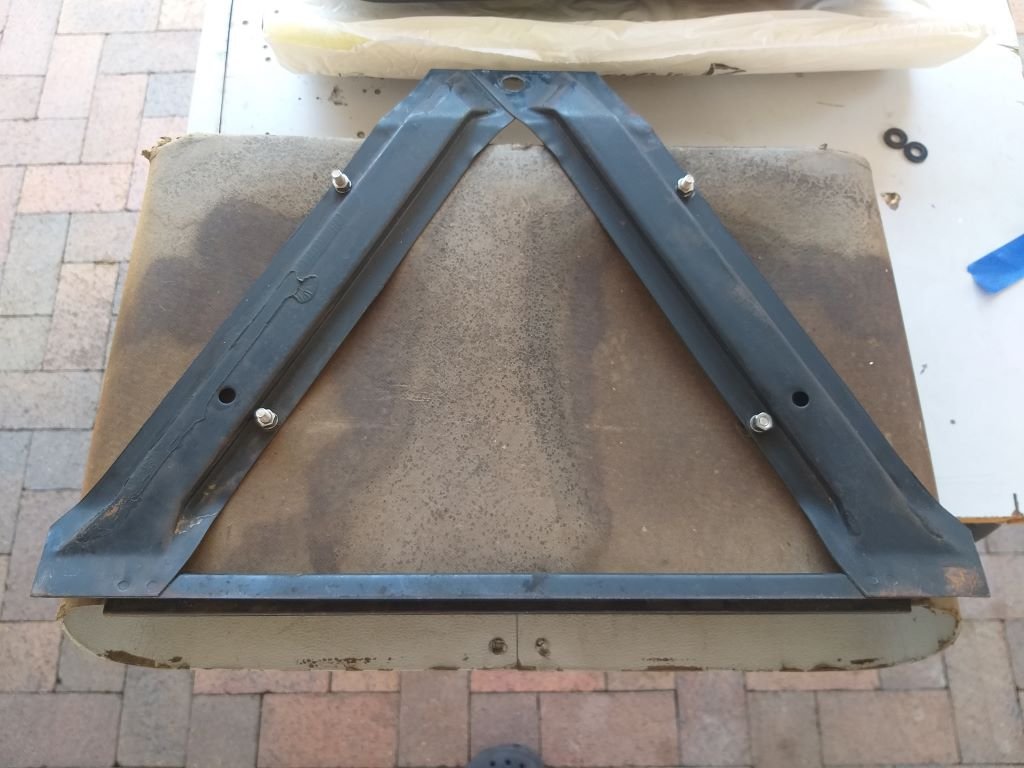
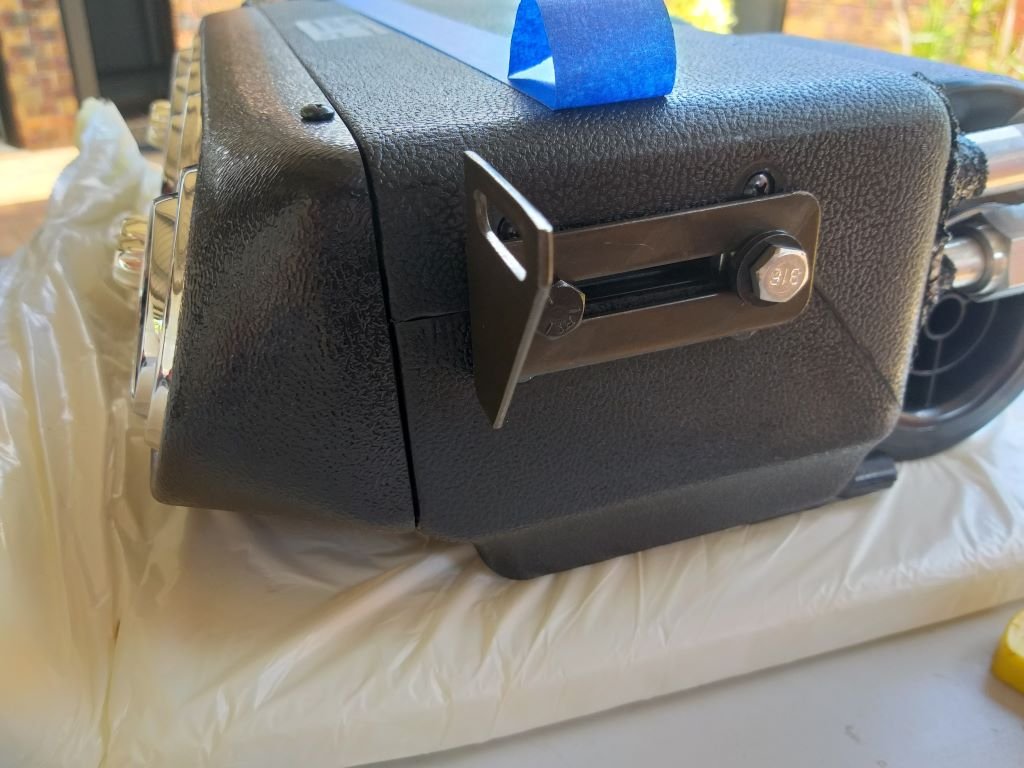
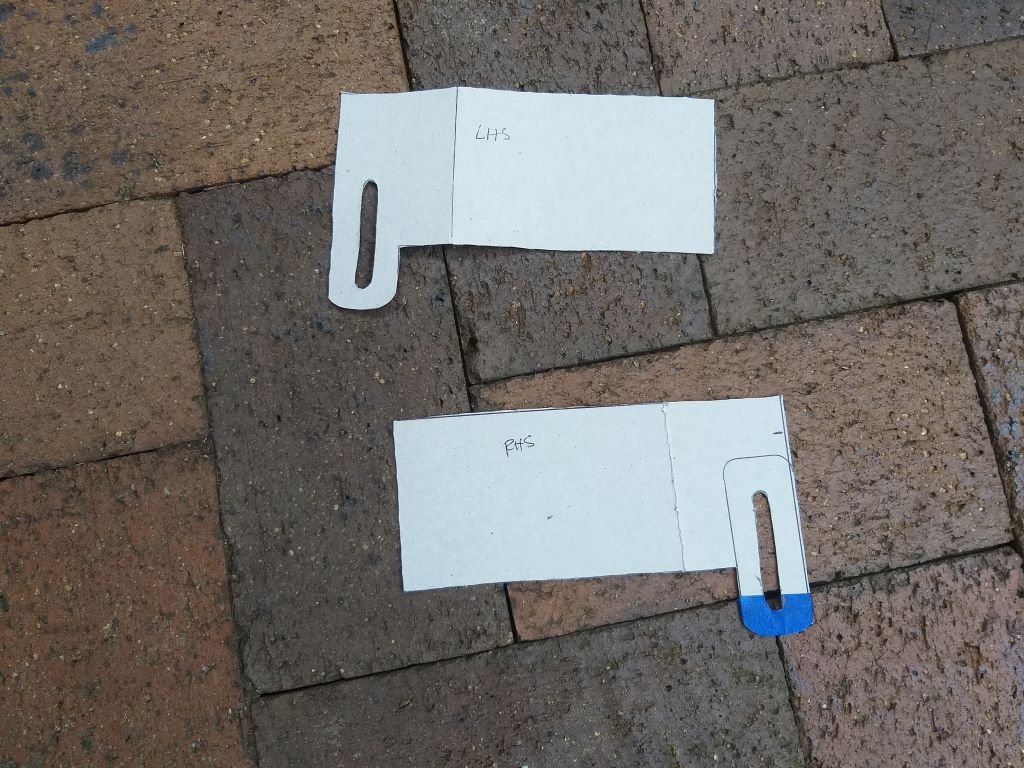
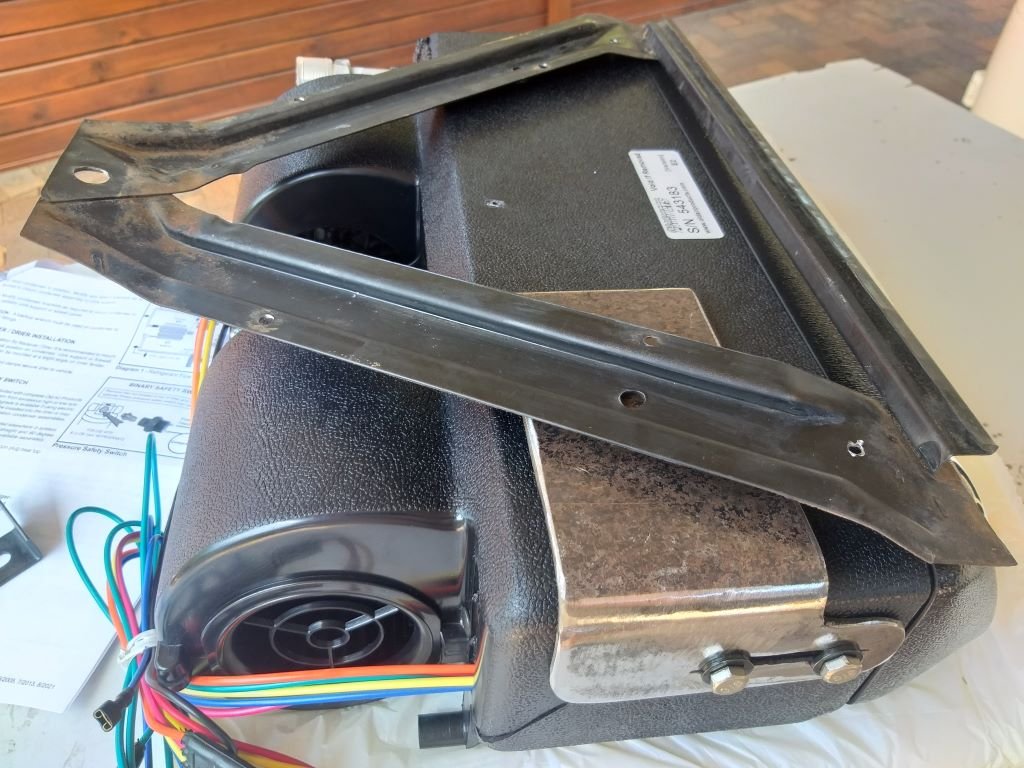
Next step from a windscreen wiper perspective would be to fabricate a mounting bracket for the L300 wiper motor. Now I'm thinking that I can fine tune the positioning of the motor by either shortening or lengthening this intermediate drive shaft. And hopefully that shouldn't affect the sweep in any way. Feel free to correct me if I am wrong. I figured it would be better to finalise the glove box and under dash a/c unit installation and I can then position the wiper motor in the space left over. So the first step was to retrieve the dusty old glove box for closer inspection. It's a bit grubby but still looks functional. The underside of the glove box has a nifty mounting bracket that looks like so: The pointy end of the triangular bracket mounts up to a little bracket welded to the inside of the front panel with the longer side resting up under the lip on the dashboard, like so: Now I'm thinking that refitting the glovebox has the added advantage of allowing me to use the same mounting bracket to support the under-dash a/c unit. But in order to do that I need to add some fixings to the dash lip to make the bracket more rigid for the additional weight. I poked two extra holes in the dash lip and added some stainless-steel self-tappers and it's nice and solid now. Next step was to take a closer look at the mounting brackets supplied with the a/c unit: Those definitely aren't going to work for me, so I spent a bit of time doing some CAD and came up with these: Grabbed some 3mm plate that I had in stock. Did a bit of cutting, did a bit of bending, poked a few holes to replicate the mounting slot and I ended up with two of these: And the plan is to bolt my newly fabricate brackets to the factory glove box bracket in more or less this configuration: So, the plan for tomorrow is to mount the glove box bracket back in the van and then offer up the a/c unit so I can work out exactly where the holes for my mounting bolts need to go. Stay tuned for the next exciting episode.
5 points
-
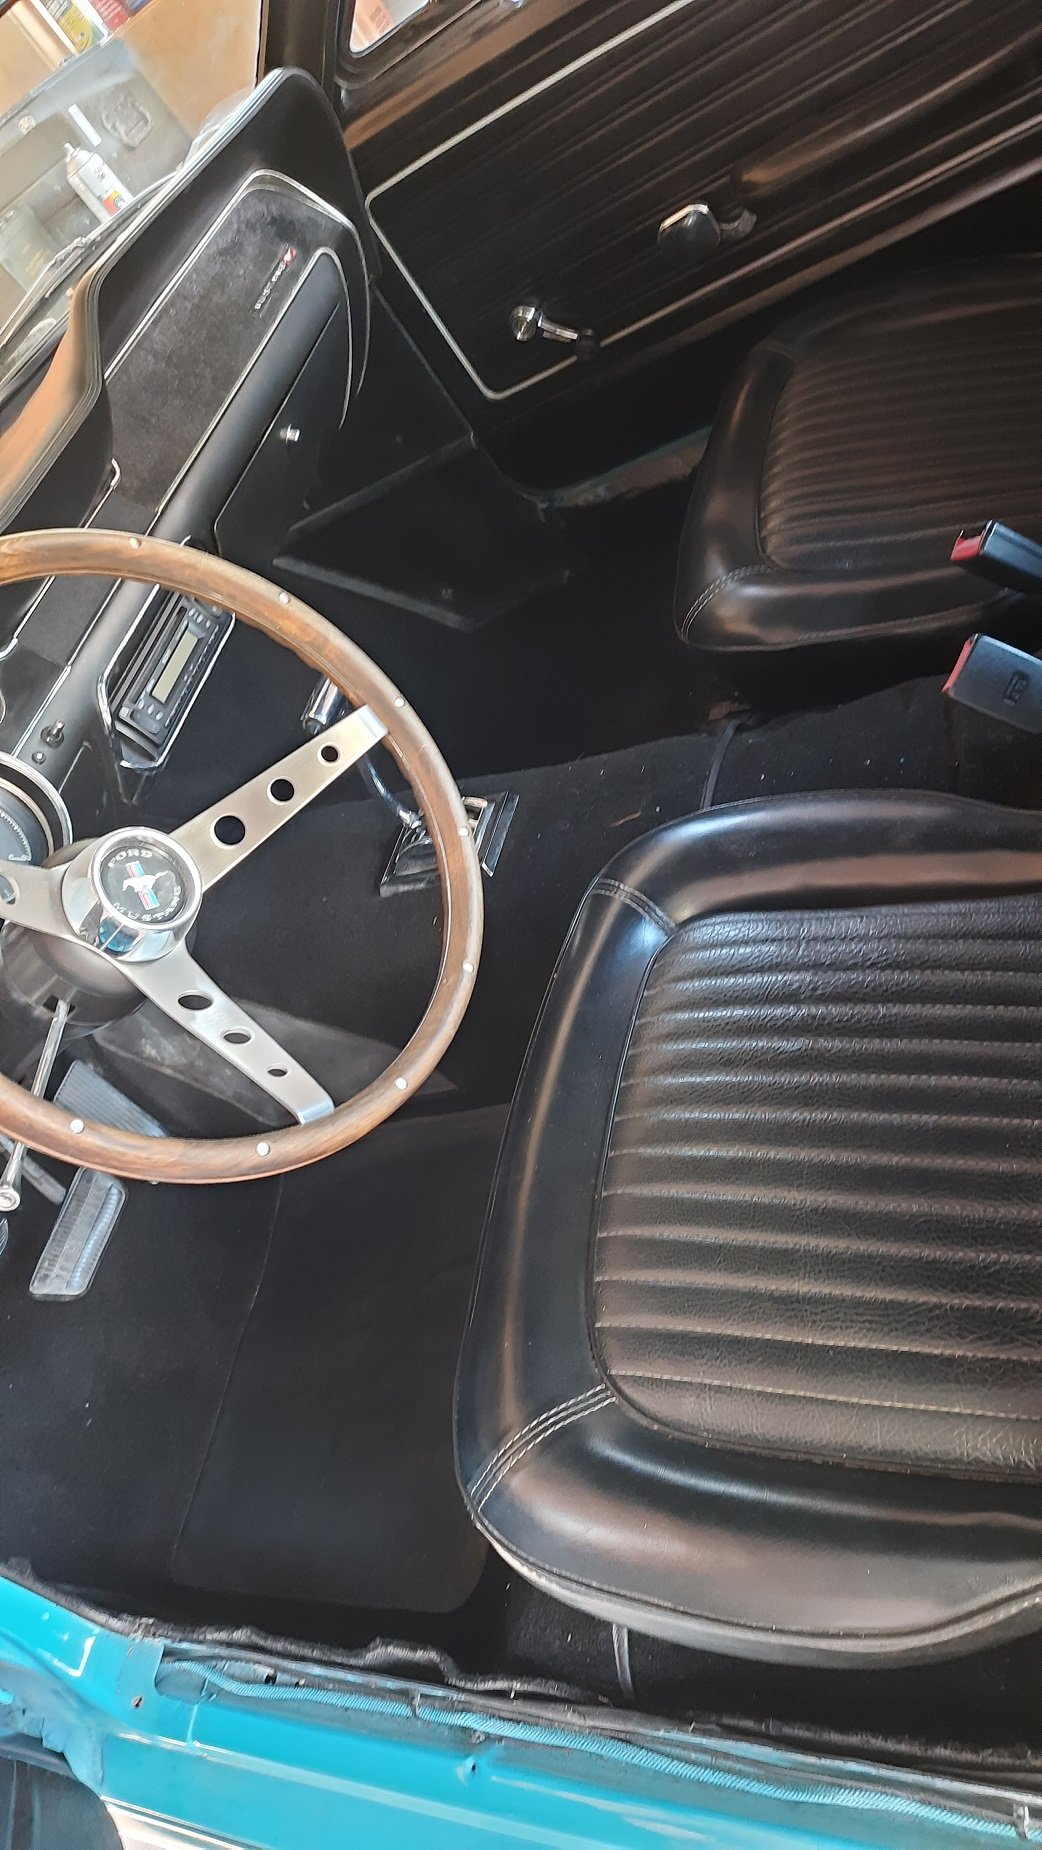
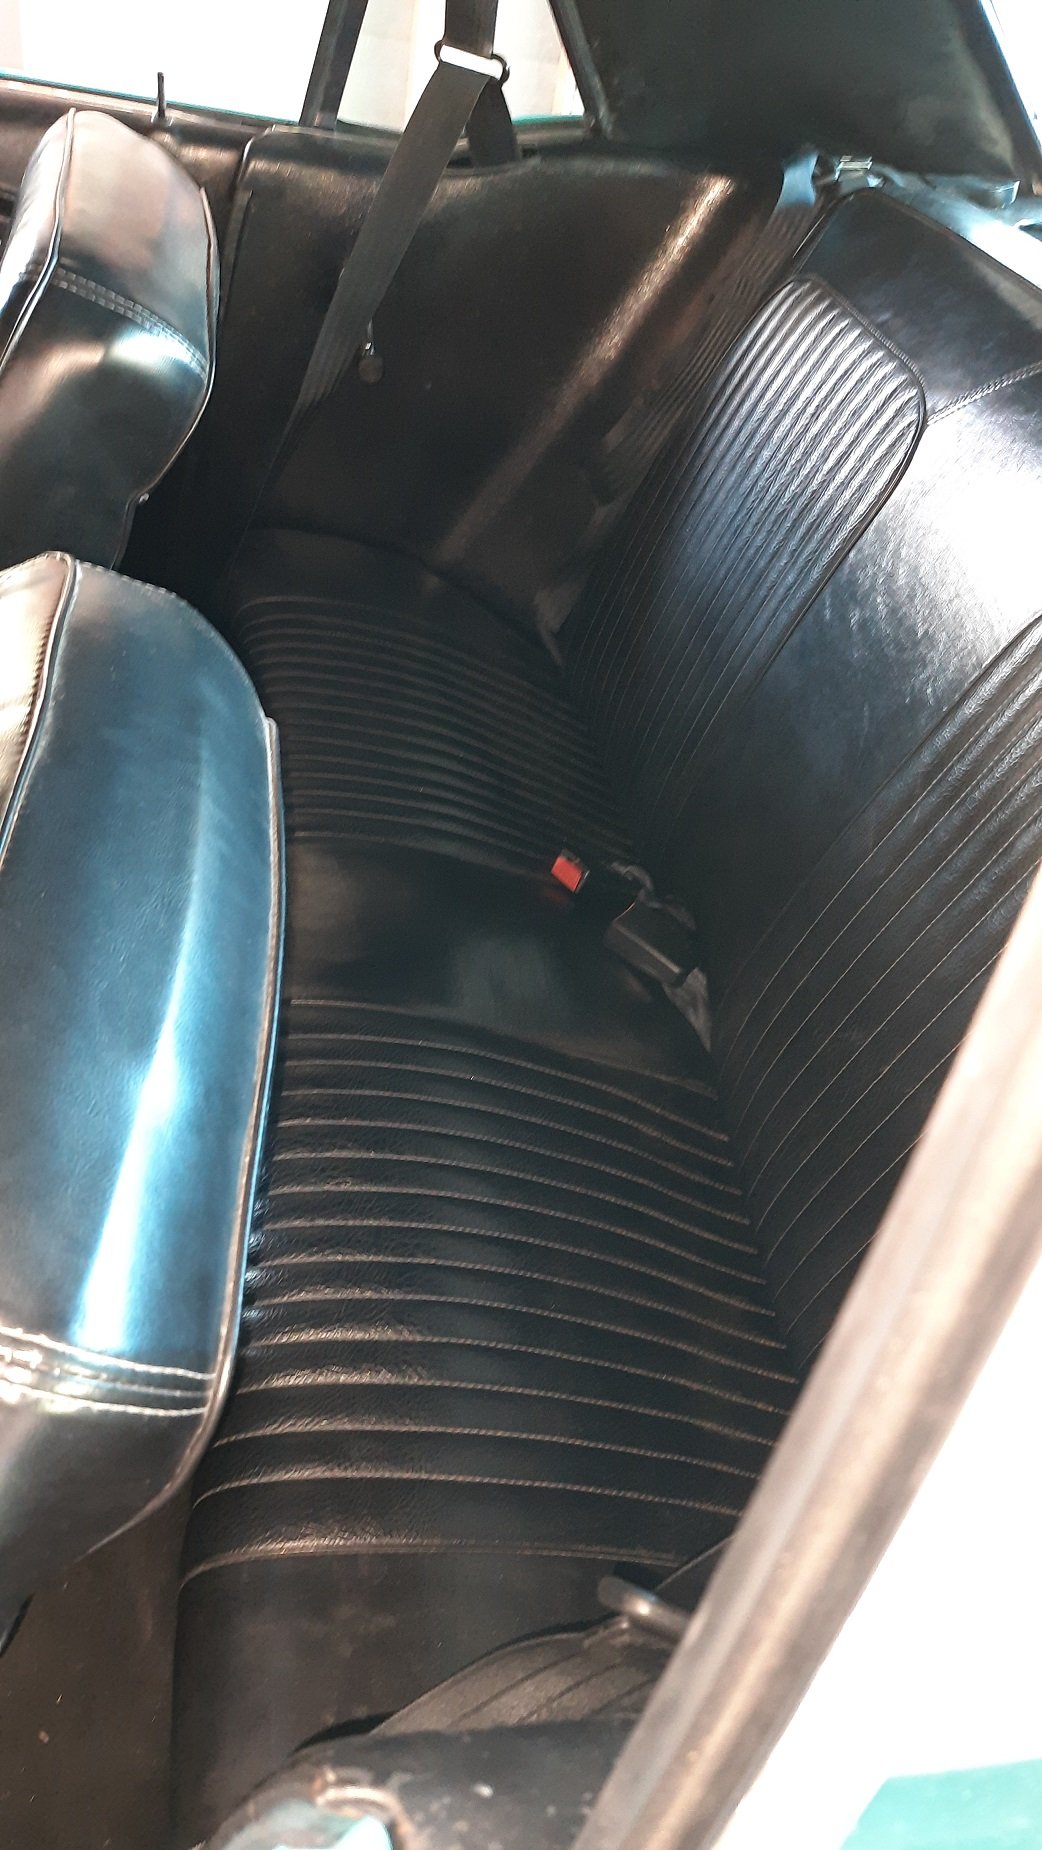
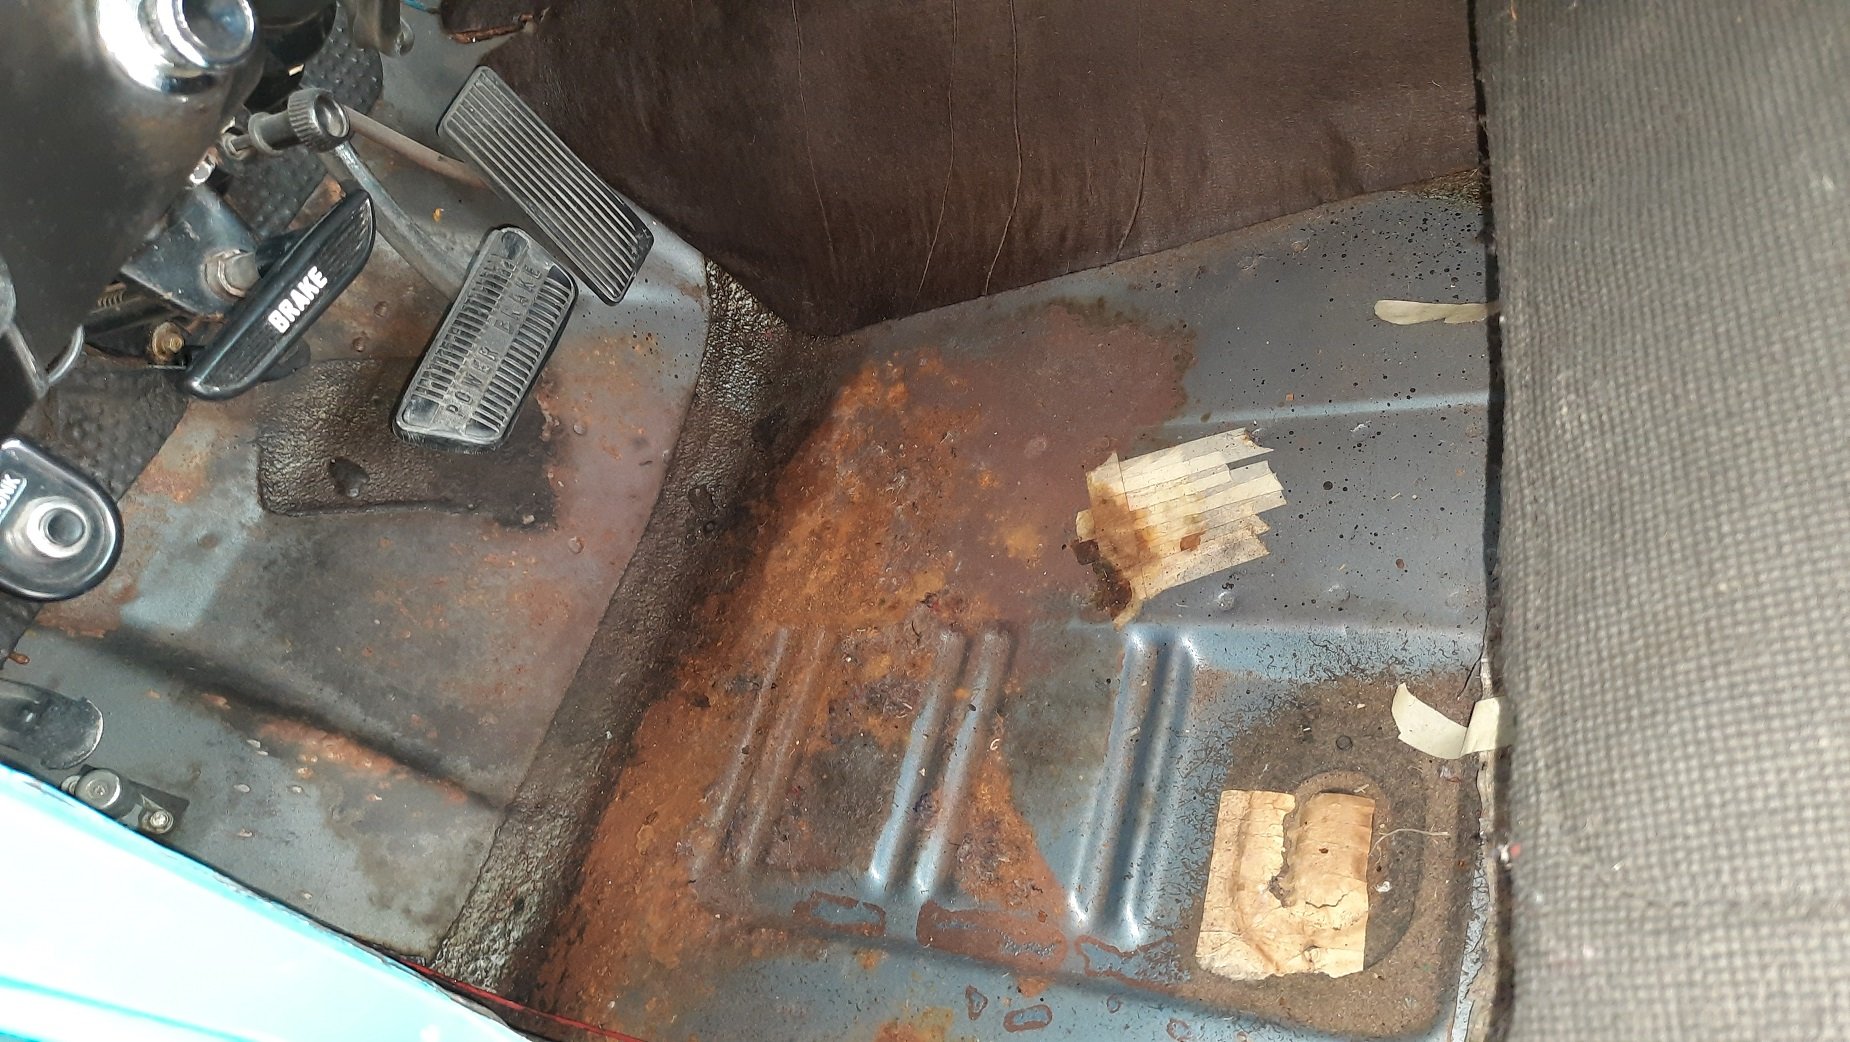
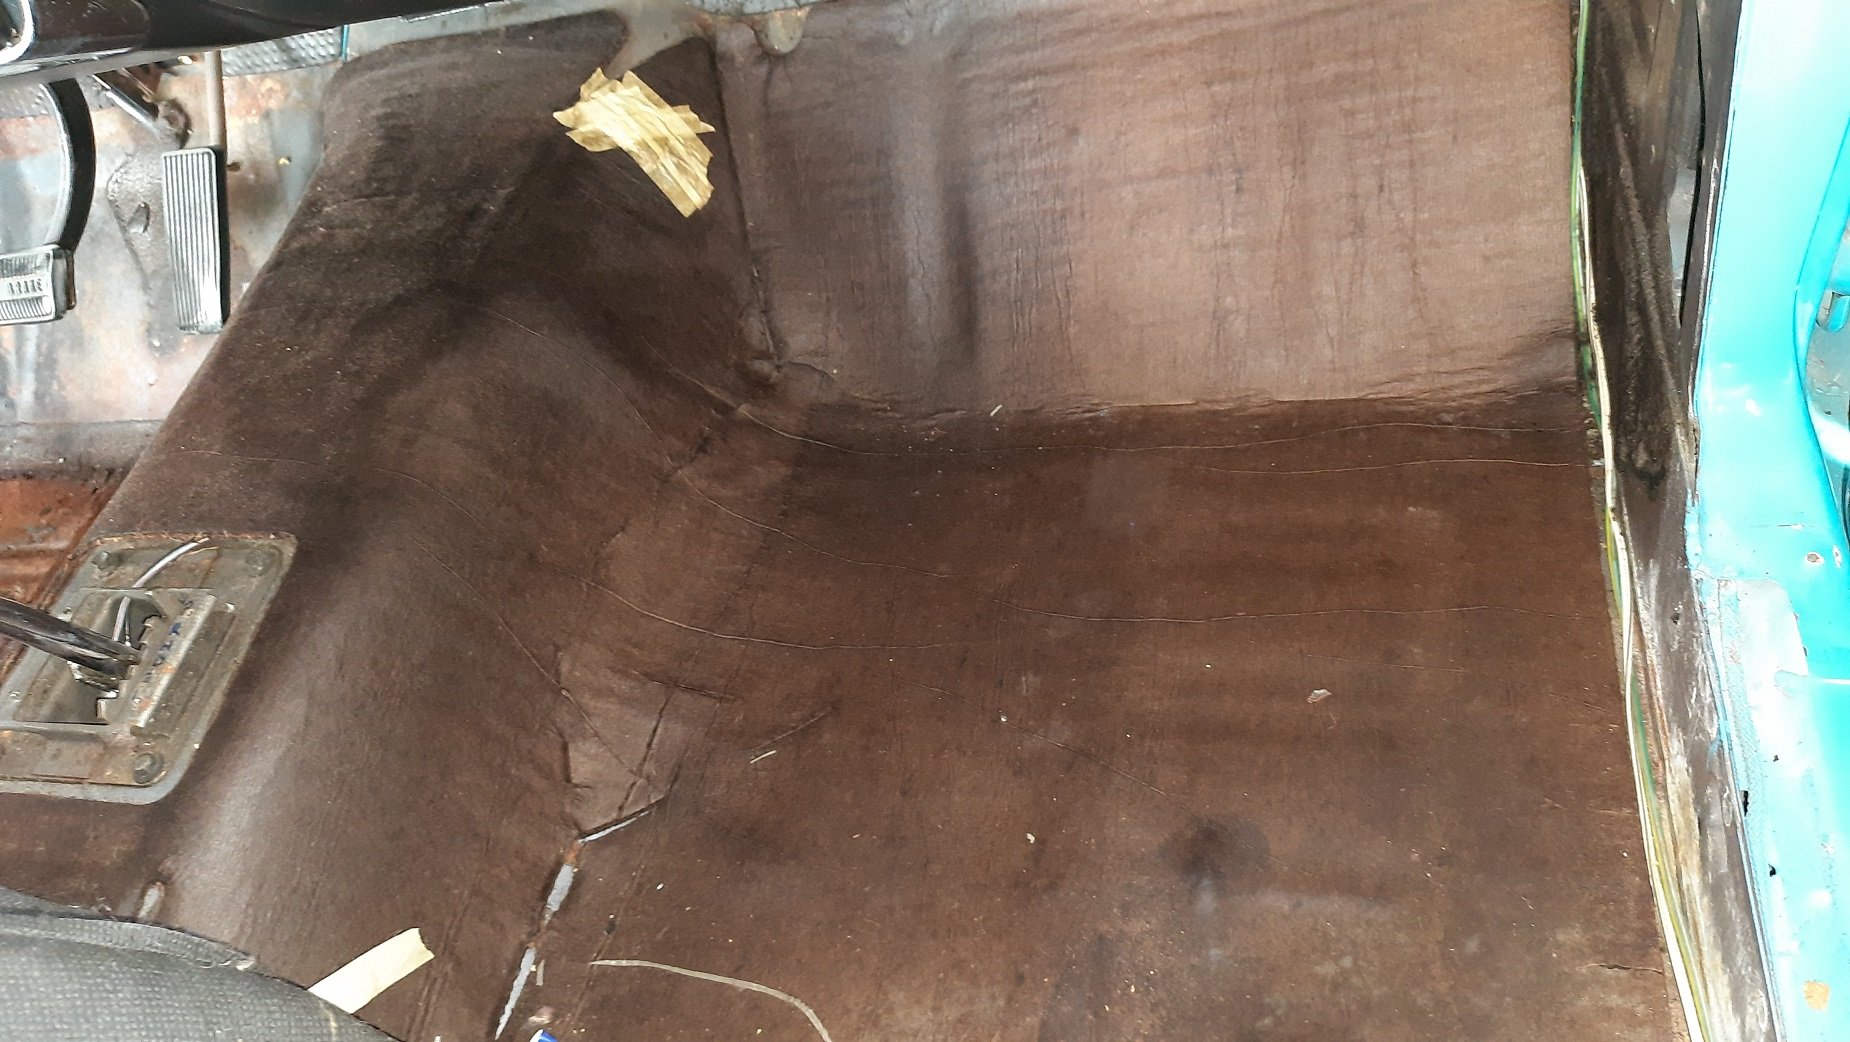
With no real service history, I wanted to give the car a good going over before driving it too much more. The plan this weekend was to change the engine oil and filter, gearbox oil, install a headunit, and swap out the illegal fog lamp bulbs. I started with the fog lamp bulbs, since it was raining outside and it was easier to do this before the car got wet warming it up for the oil change. As part of the compliance inspection, the front fog lamps were disconnected. I had a quick look and noted they were LEDs, which isn't allowed (scatters the beam in a reflector lamp and is blinding to others), so I presumed that's all it was. I was wrong. I plugged the LEDs in and switched them on. Woah! They cast a very "green apple" shade of green. Definitely not legal. I grabbed a pair of "white" H16 halogen bulbs to replace them. Since the front of my guard liners are currently missing their clips, it's quite easy to peel the liner back to access the back of the fog lamp, even with the wheel on. Much better, now I can actually use the fog lamps if I want After a quick drive around the block a couple of times to warm the engine up, I lifted the car on Quickjacks and got to work The underside is remarkably clean, although thankfully it was grimy so hasn't been recently cleaned to hide anything. Not a drop or misting of liquid where it shouldn't be. I should say, having been under the car now, the undersealing work the panebeater did was very good. They undersealed and then painted it all body colour, it's a very tidy job. The engine oil is very easy to change. The sump plug and filter are just right there I drained the old oil out and removed the filter. According to the sticker on the door, the old oil was about 1000km old, so wasn't bad but was a little dark. I don't know when 1000km ago was in time though, maybe 2021, but IIRC they do dates differently in Japan. I imagine it's had a lot of cold starts moving it around during import and compliance. I refilled with 2.6L of Castrol 5W40 full synthetic and moved on to the gearbox oil. Draining was easy, the plug is right on the bottom of the box The fill plug though was a real pain. It was very tight, and I had limited space. It's above the axle, hidden above this rib on the gearbox casing. Always loosen/remove the fill plug before draining the box, just in case you can't get it open. I managed to get just enough leverage on it using my floppy head ratchet and a 3/8th square adaptor (to move the ratchet away from the gearbox). I tried the normal ratchet and an extension and couldn't get it. With the filler opened, I drained the old fluid out. The level was bang on, so that was good, but the fluid was looking quite dark The new fluid had a more clear-yellow/green look to it Also good was no chunks came out and the magnet had minimal sludge on it. Because the gearbox has a Cusco plate LSD in it, I had to use special oil with LSD additives, so the LSD wouldn't excessively wear, or cause drivability issues when cold. In this case, I thought it best to just spend the money and get the proper Cusco oil. The gearbox uses 2.3L. I had noticed the LSD was a right grump when it was cold. Chattering, clunking and binding when turning. I'm hoping new fluid will lessen these issues. I know they're pretty normal for a plate type LSD, so might have to just get used to racecar life. Refilling was done, like all my gearbox oil changes, with the pump bottle of goodness. So easy to use, and with the dual-action pump, quick. I filled the box until it started to run out, waited for it to stop and then plugged it back up again. Both plugs had some thread sealer applied. There were a couple of items I wanted to check under the bonnet while I was there. Firstly, I removed a coil pack and spark plug to check it. It's an HKS M40XL high performance plug. The condition of the tip didn't look bad, but the corona stain on the ceramic was very dark indicating it was probably either quite old or had a hard life (maybe both) I also checked the air filter, which had been replaced with an HKS panel filter It wasn't too dirty, but I'm not a fan of HKS filters. This side, the dirty side, is a fabric sheet. The other side, on the turbo inlet, is foam. As they get older the foam can break down and get sucked into the turbo/engine which can cause failure. This filter seemed ok, but the foam was starting to age. I have another Blitz panel filter on order to replace it. With those checks done, I removed the intercooler water sprayer setup as it wasn't connected and wouldn't be needed when I fit the larger intercooler. I removed the hose all the way to the boot, which is where the bottle used to be fitted. I also found both battery terminals barely finger-tight, so sorted that. The last thing to do while the car was in the air, was to finish removing the door decals on the RH side. This was painstakingly done with a heatgun and gently picking the letters off one by one with my thumbnails. I had to be careful not to dig into and damage the underlying Works decal these were stuck on top of. The Works decals are quite interesting, the black section is patterned and textured. You can also see the letters had faded into it, but it's barely noticeable in person. With that done, and the car lowered to the ground, it was time to warm the oil up and circulate the gearbox oil. Unfortunately this is where it all went a bit wrong. Immediately out of the drive the car was misfiring. Back into the garage, I removed the coil I had checked, refitted it and tried again. This time the car was running great; I warmed it up and it was boosting a solid 14PSI happily. And then it started to misfire under load, now you can hear it breaking up just by revving it to about 4000rpm. I suspect it's sparkplugs and/or coils (since it's the only thing I touched that could cause a misfire), so have a new set of HKS spark plug on the way and some new uprated ZC33S coil packs to replace the stock ones, but they have to be shipped from Japan. So in the meantime, I worked on a couple of other things. First, I checked the rear washer jet. Turning the wiper stalk to activate the washer resulted in the pump making the right noises, but nothing on the glass. Interesting. I checked everywhere to make sure the hose wasn't disconnected somewhere and pouring into the car, since I believe the previous owner had been using the wiper stalk to trigger the intercooler pump. No leaks were found, so I just kept the stalk turned. Sure enough, after about 20 seconds of whirring, I hear the PSHHP PSHHP of air coming out of the rear washer jet, followed by a steady stream of fluid. I guess it's been a very long time since it was last used and it had to prime the hoses. With no wiper, all it did was make a mess down the back of the car, but at least now I know it works, so when the wiper arrives it will be one less thing to fix. Tinted glass = zero visibility when the glass is dirty, so having a wiper is a no-brainer. Next on the list was to fill the big gap in the dash with a headunit. I love how this car sounds, but man you hear a lot of other noises when you don't have music playing in the background. I had imported a replacement surround, radio brackets and an adaptor harness from Japan. The first step is to yank the old surround out. It's just clipped in around its perimeter, and without a radio installed, I could just grab it and pull. The factory plugs were still present, which was excellent. I was also replacing the surround as the owner in Japan had cut this one to mount the Defi dash in it, and it had two screw holes from the visor. The chosen headunit was a cheap $80 (on sale) Android unit from Aliexpress. The main reason for this was so I could run TorquePro on it natively, when on the track, and keep my phone free for Racechrono. When I had the Jazz on the track I wanted to keep an eye on coolant temps, but with no temp gauge I had to rely on TorquePro, but couldn't display that alongside Racechrono, so this should sort that issue. Mounting it was easy, until I realised that the unit was so short it only had one set of mounting holes. I discover what this means later. Having previously soldered the adaptor harness to the headunit harness, I plugged it in and installed the headunit. And pressed the start button to give it power It booted right up, and since I had previously bench-tested the unit and updated it, the wireless Android Auto kicked into life Not bad for $80! I then went to fit the surround and noticed the headunit was sunken way into the dash. It seems because it only has one set of mounting holes I couldn't move it forward far enough on the brackets. To fix this I used washers on the mounting screws to space the whole thing forward, which helped a lot. The unit also includes its own GPS antenna, which I routed across the dash and up near the windscreen The main interface is nice and clear. Just usual Android things. If I cared, the FM radio does actually work too. Seems I need to work out the time and date though... Torque connects well to a BT OBD2 device connected to the car Plenty of customisation to be had. Hard to miss a nice big easy-to-read number though. That should do the trick nicely. The final thing to look at was the horn. I wanted to test it and see what it sounds like since the Japanese owner fitted some Bosch "Rally Evolution" horns and they appear to still be fitted. I pressed the horn pad on the steering wheel. Nothing. Key on maybe? nothing. Hmmm.... The steering column shrouds had to be removed again for a look. Everything on the column was connected, nothing looked out of place. I knew from my searching that the horn wire was the pink wire on this plug I grounded it with a test light, and sure enough, just about shite myself at how loud the horn was! Well, that works then. The issue must be in the horn pad. The only way to access it is to remove the airbag. Using a 10mm spanner I removed the negative terminal from the battery and set about removing the airbag. There are three small holes behind the spokes (one on either side and one at the bottom), which I pushed a long hex key into, which pressed on a release clip and popped the airbag forward That'll be the issue then, the horn pad isn't connected to the clock spring. There should be a plug with a single wire on it in the plug next to the yellow wire. That single wire should go to a terminal on the horn pad. Using my multimeter on continuity, and staying well away from any yellow airbag wiring, I checked the continuity between the pink wire on the column, and the pins in the plug in the steering wheel. The first pin was the horn pin, it had continuity to the pink wire. I made a little jumper harness using a pair of insulated spade terminals I plugged both ends in, plugged the airbag in and pushed the horn pad home with a click. I reconnected the battery, and suddenly we had a horn on demand. Excellent. The previous owner swapped steering wheels before I got the car, so I suspect he must have forgotten to refit that plug when he did it. And that's about as far as I can go since the car isn't drivable. I have put it on Quickjacks again since I need to have the tires replaced on Tuesday, and will just send the wheels in instead of the car. I'm hoping the spark plugs show up quickly, so I can swap those and see if it fixes it. I really hope it does.4 points
-
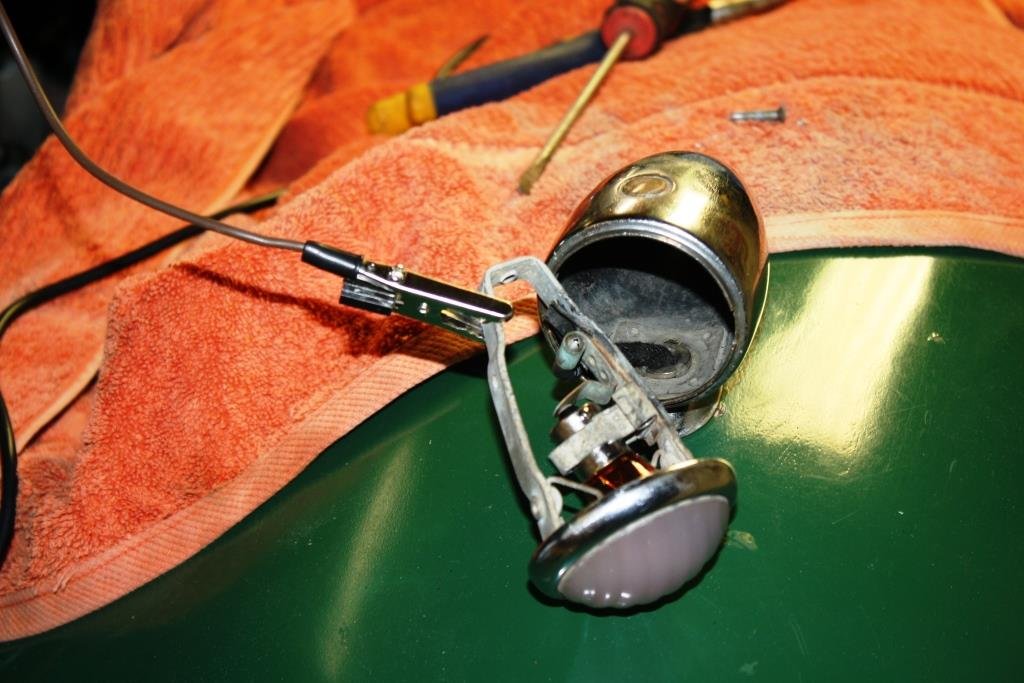
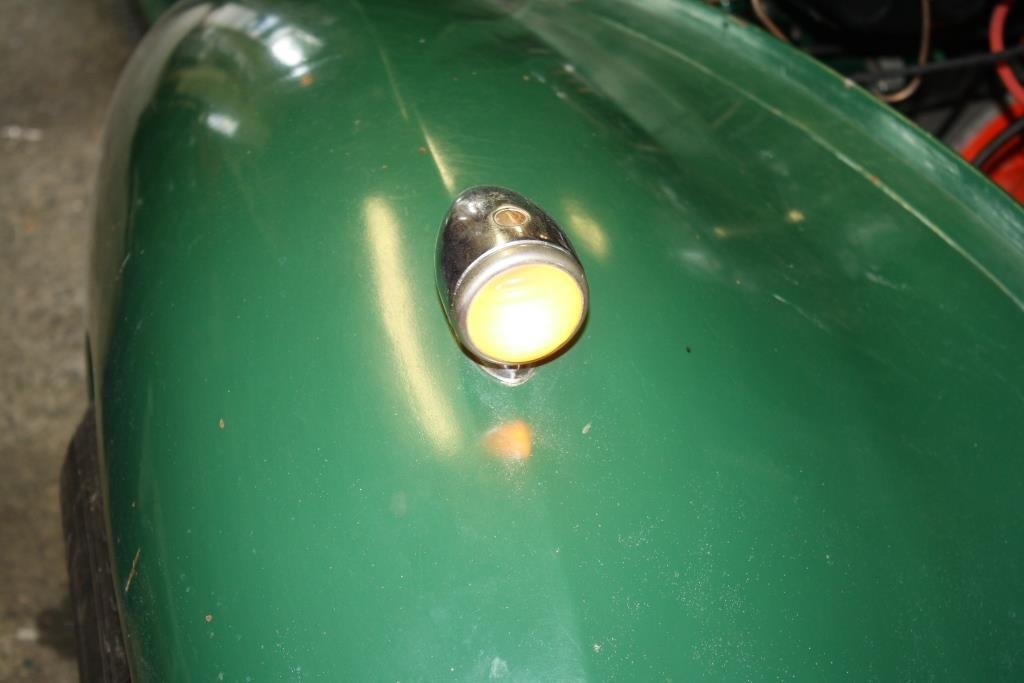
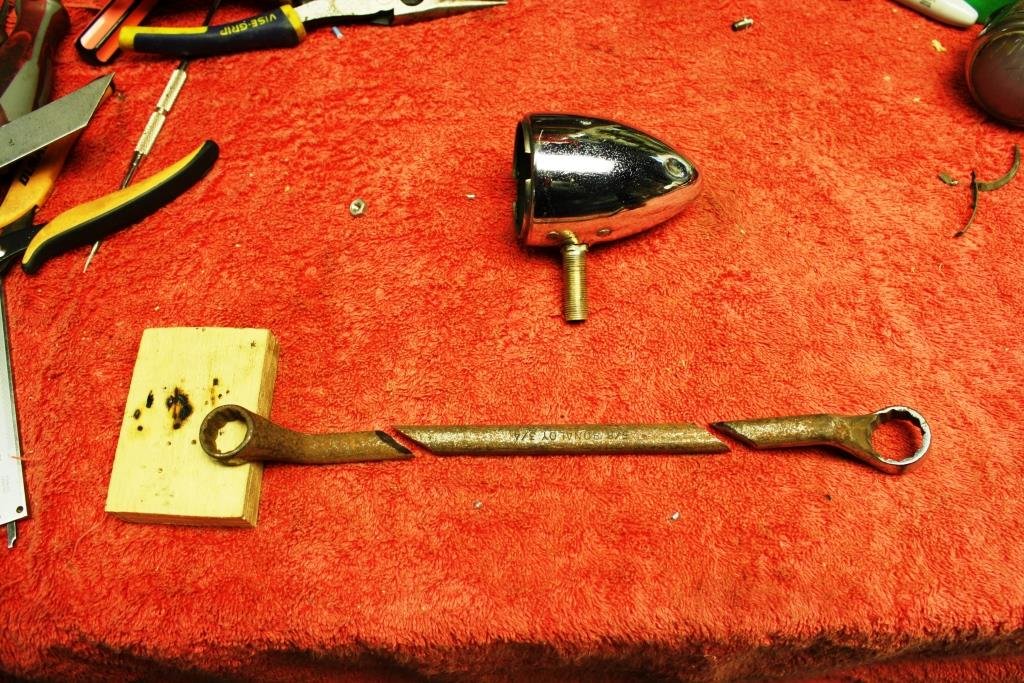
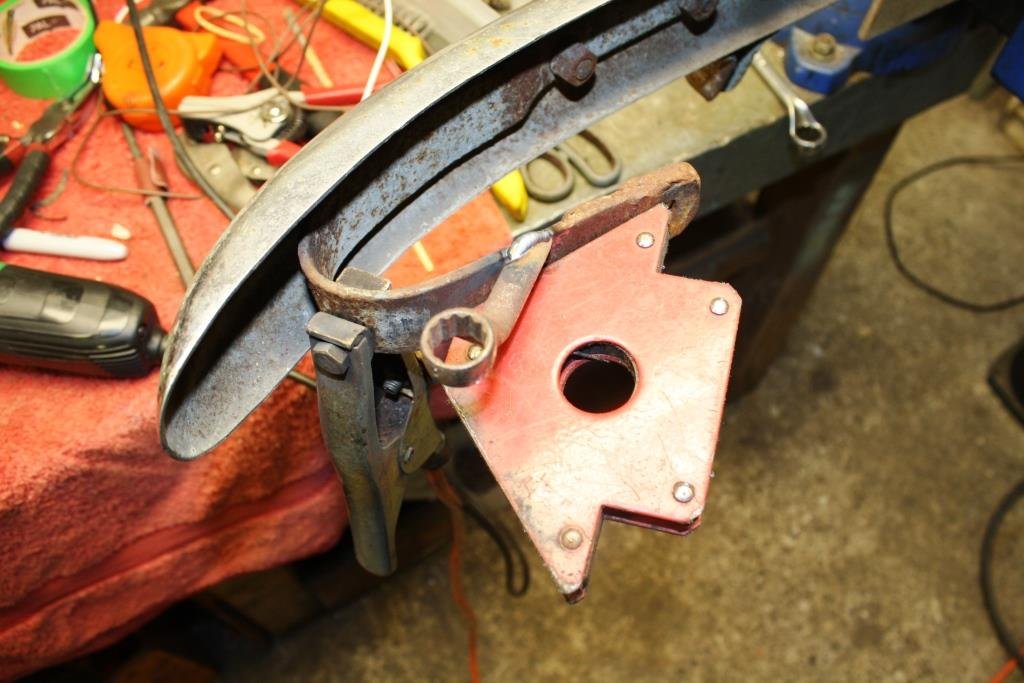
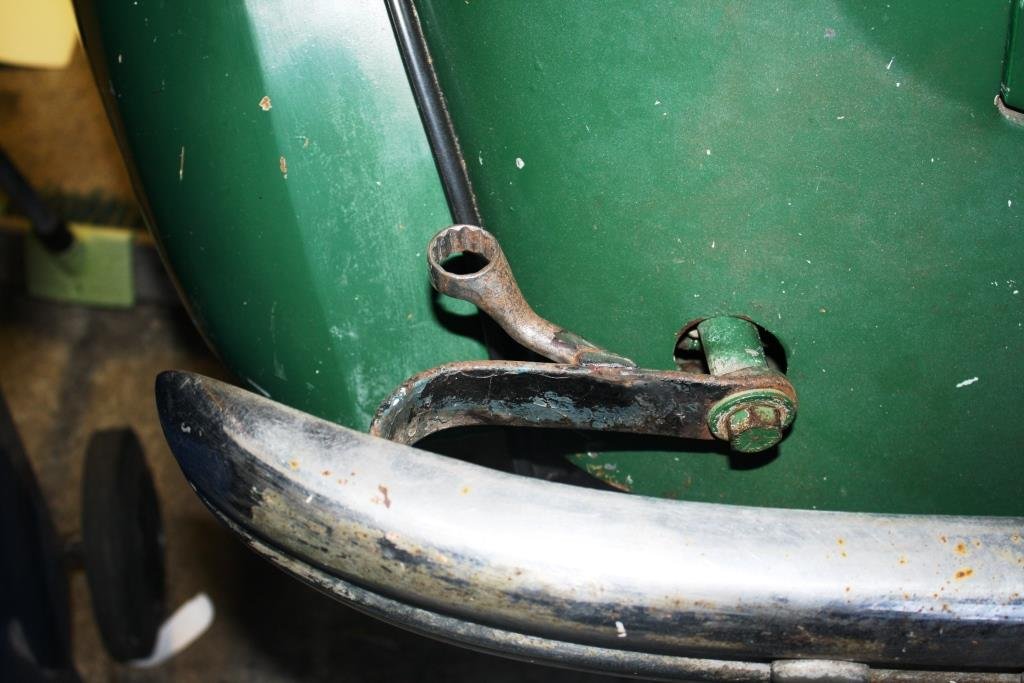
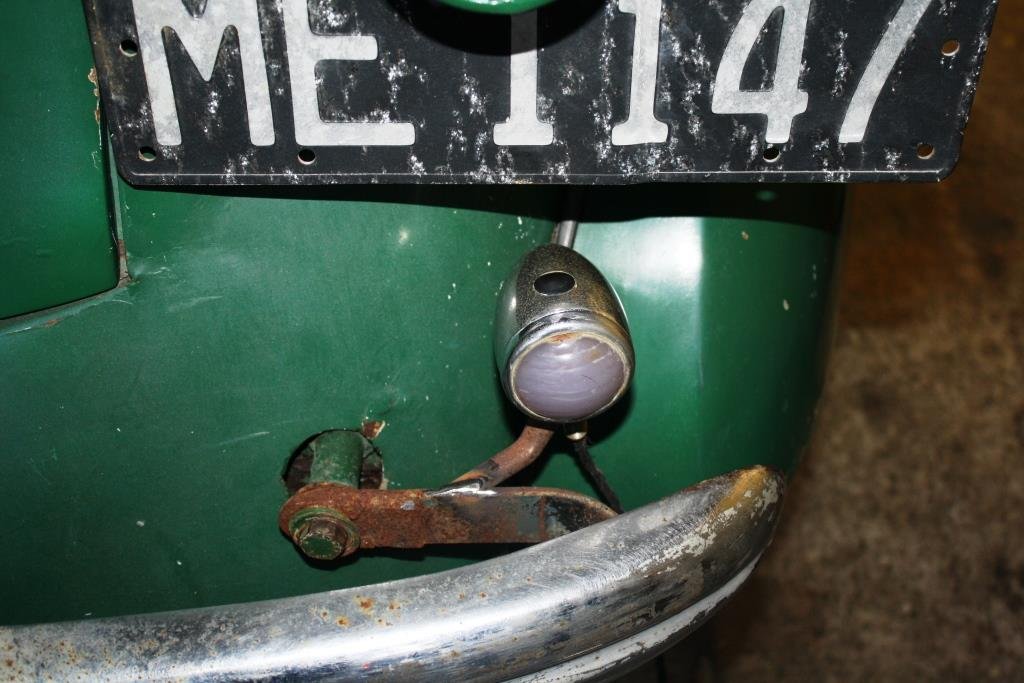
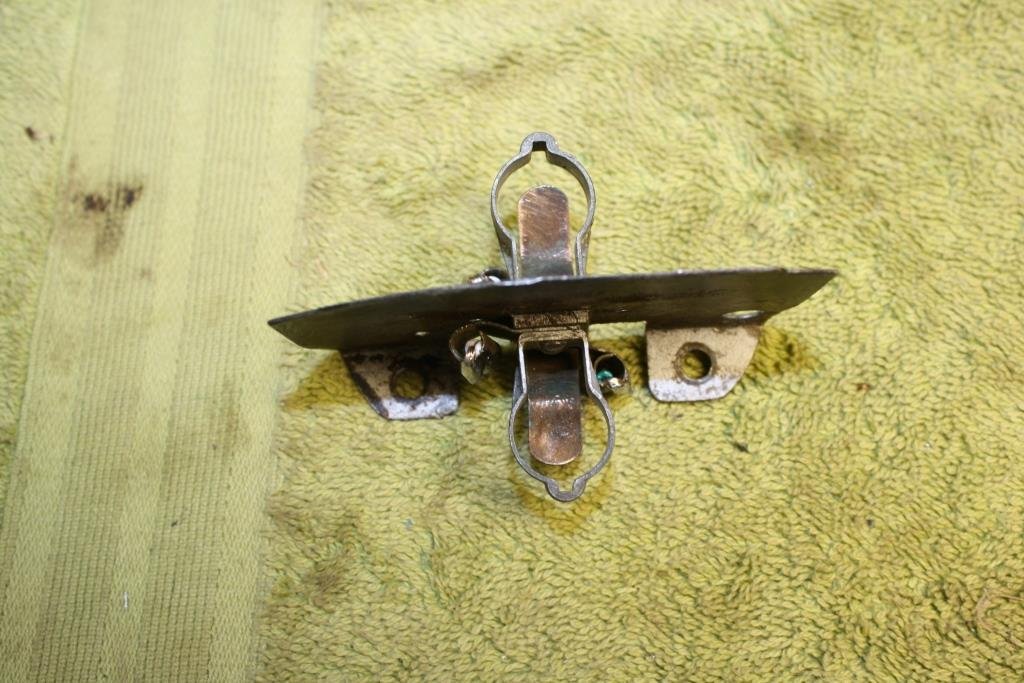
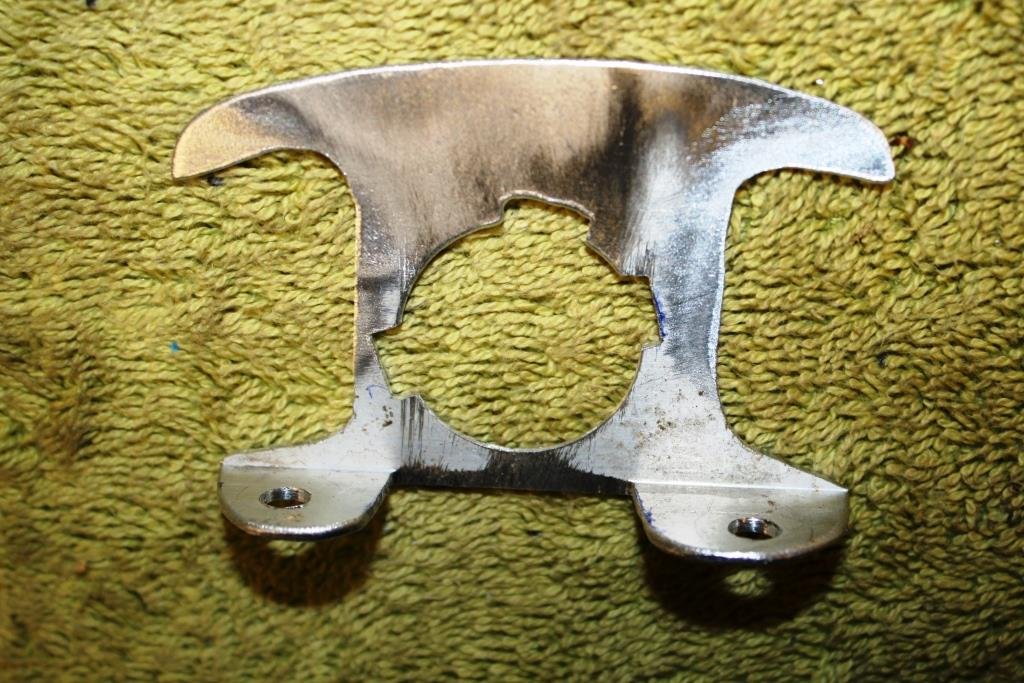
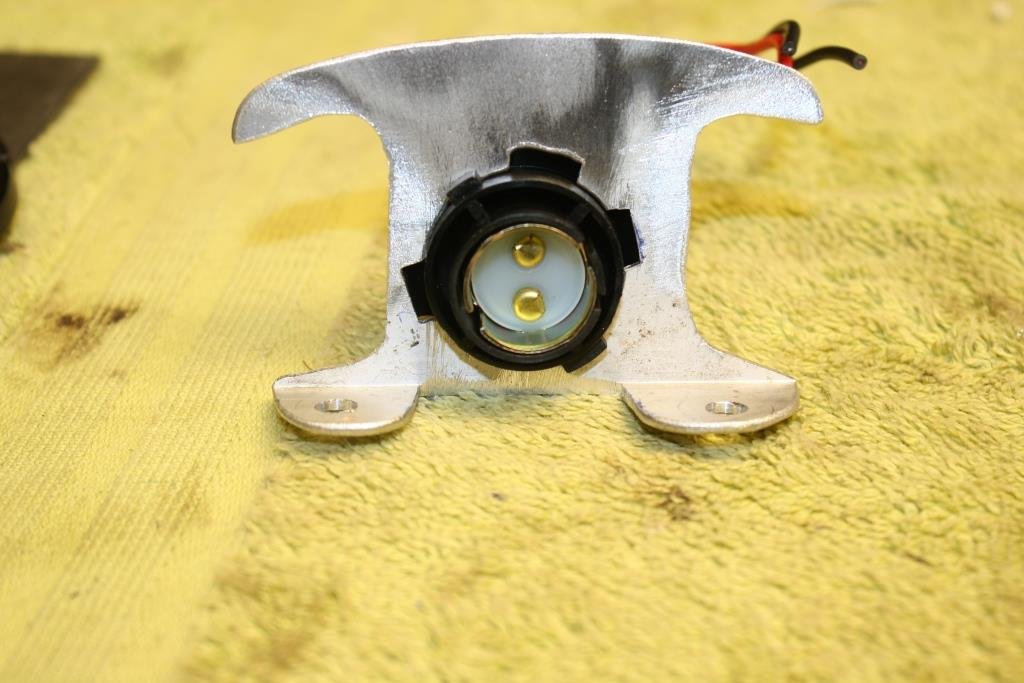
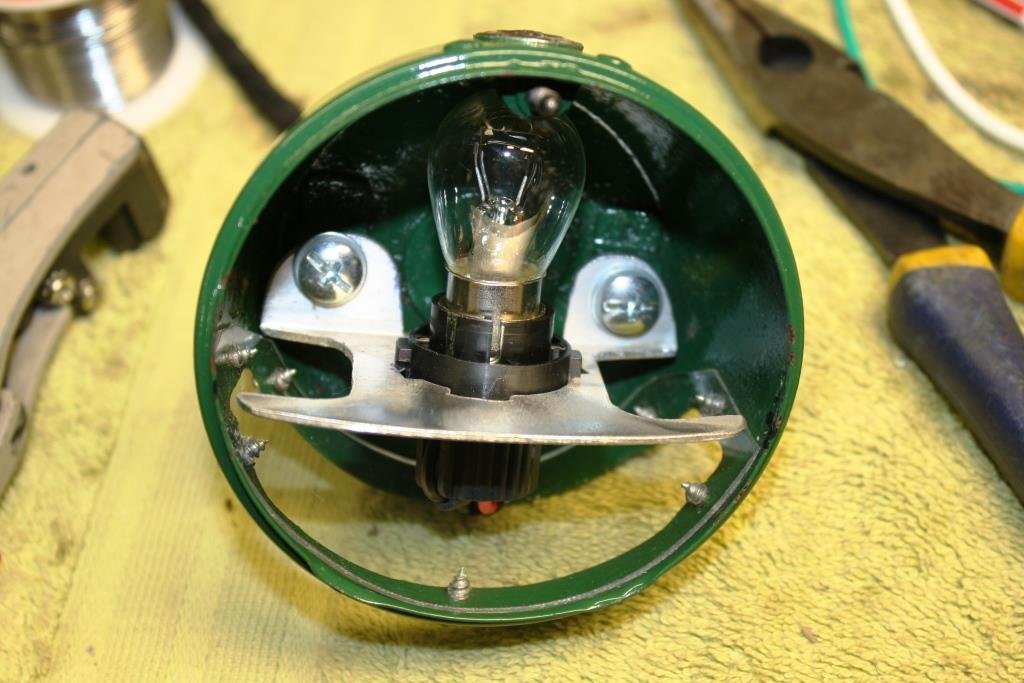
After countless, sleepless nights of painstakingly thorough soul searching and self-analysis, (fuelled by the considerable imbibement of 101 Wild Turkey) I came to the conclusion that for Rigamortice and myself to have any chance of surviving typical Auckland traffic we would need indicators! In 1947 indicators were yet to be invented and trafficators were considered to be state of the art high-tech. Maybe the side lights on the front guards could be converted to indicators with an orange lens or bulb…….? This became my fiendishly cunning justification for Rigamortice and me spending far too much money on a beautiful pair of P700 replica headlamps that had the parking lights built in. I struggled to get anything that resembled either light or life out of the existing sidelights. Same old problems as with the tail light, corroded terminals, dodgy insulation, and almost impossible to strip down while keeping it intact. Yes; sadly 70 years ago when they were new they were junk - Lucas, “the prince of darkness” strikes again! So I found these bulb holders on line…… …and fitted them with orange bulbs. Old vs new….. Luckily the original lenses gave it that elderly, faded, glow! I had a spare pair to use in the rear. I attacked an old Whitworth offset ring spanner with an angle grinder….. …welded the bits onto the bumper irons….. ….. with some fabric wrapped wiring they look the part - and they work!
4 points
-
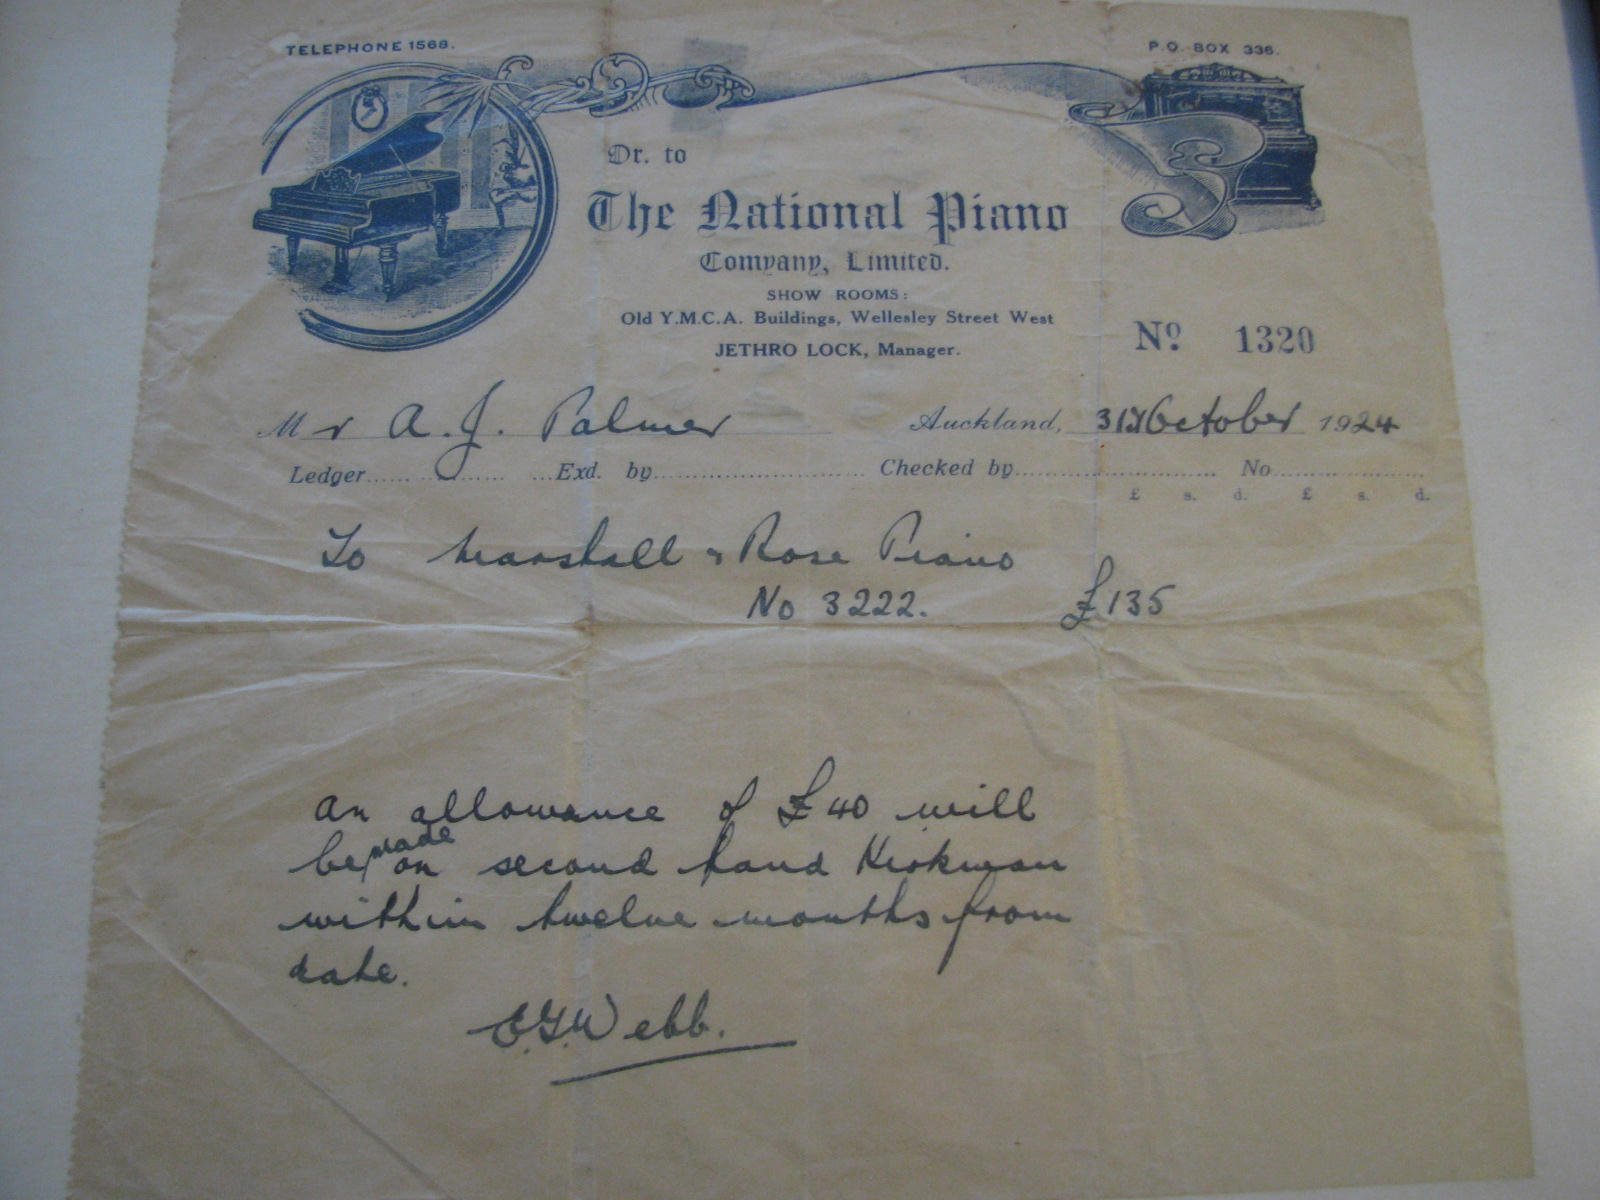
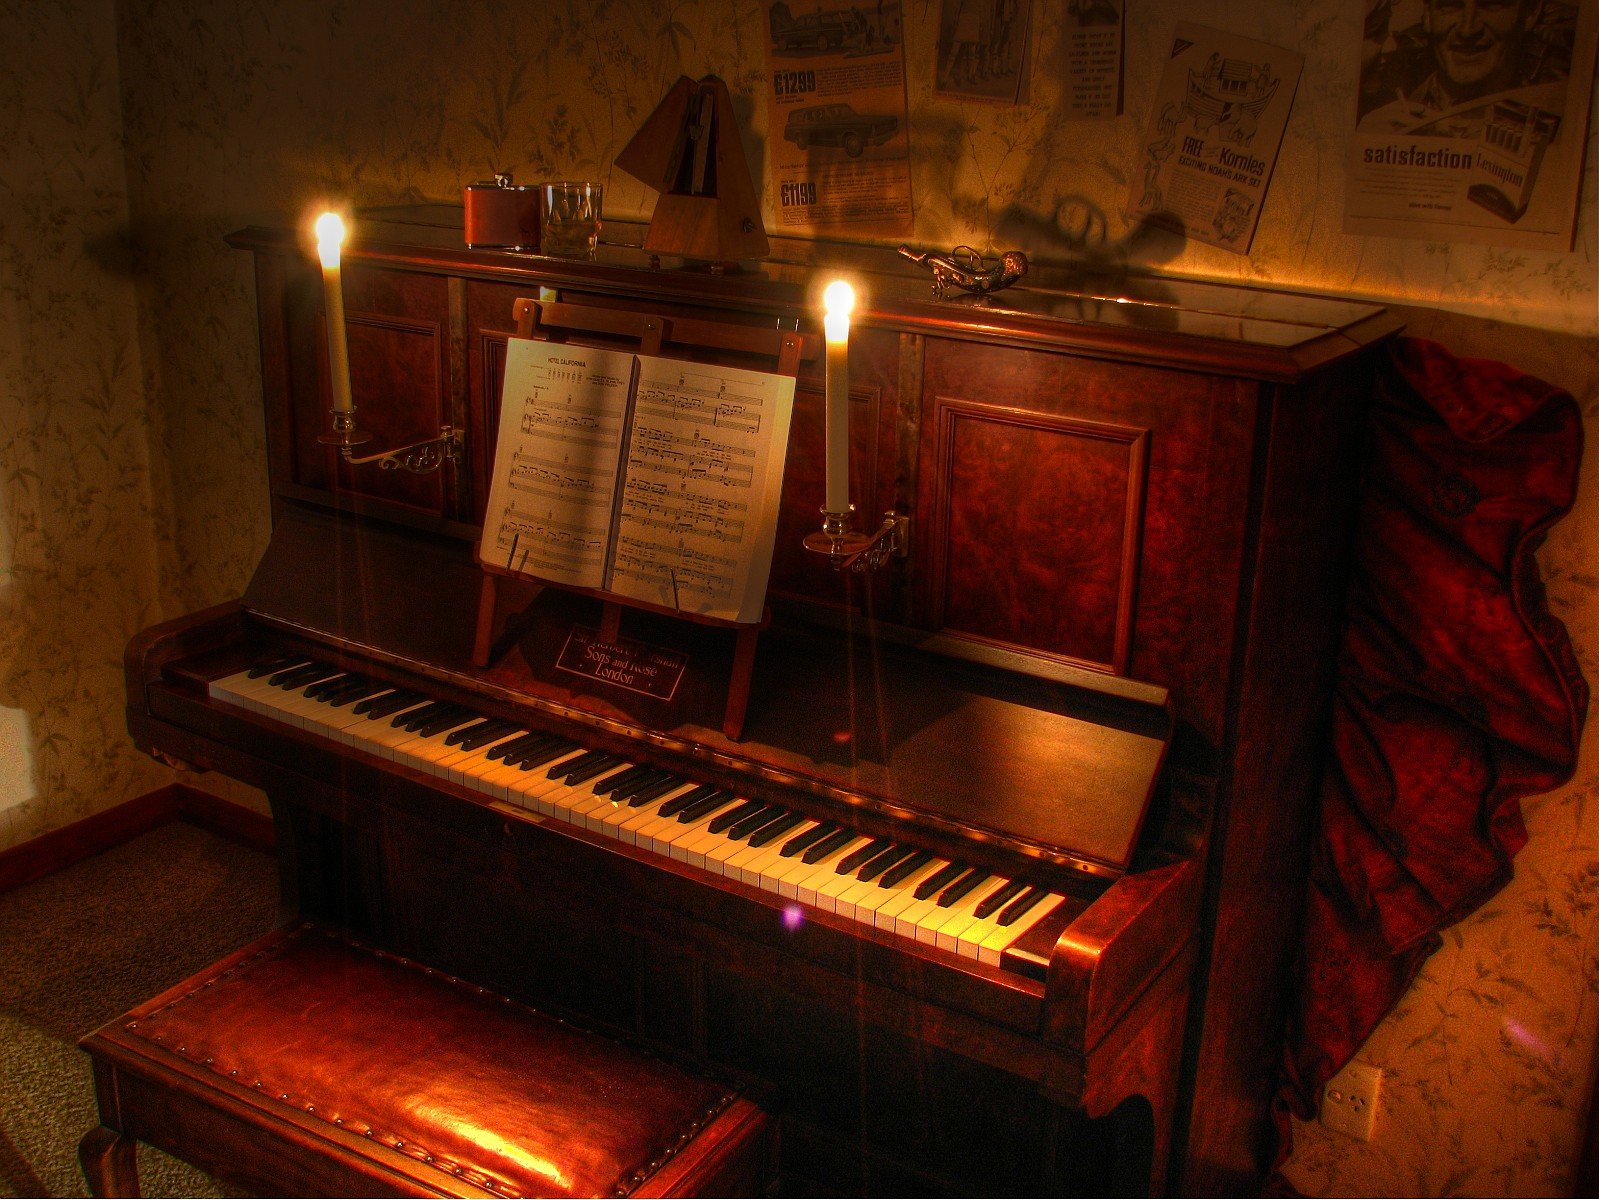
Uh-oh, it's time. This thread will be long and tedious and you probably shouldn't read it. Eventually there may be some videos but I need to bury them behind off-putting Barry stories. Four score and nineteen years ago, before the internet, computers, CDs, cassettes, before NZ switched to decimal currency, before TV, vinyl, WW2, the Great Depression, the popularisation of radio, before the majority of NZ families owned a car or even had electricity in the home, it was still the golden age of the piano. My great grandfather on my mother's side had just upgraded to a shiny new British piano (Japanese pianos weren't a thing yet, and German pianos had fallen out of favour in recent years for some reason). Somehow the receipt from that piano purchase survives to this day: More recently we also unearthed this photo of Great Granddad playing said piano: OK, so he's only "playing" the piano using a push-up pianola. These were a mechanical contraption that sat externally in front of the piano, somehow read scrolls of music via pneumatics and played the piano keys the same way a human would. A human was still required to power the device by pumping foot pedals, and then to take credit for the performance. They could also adjust things like volume and tempo on the fly via hand-operated sliders. Here's a random photo of a push-up pianola being used with a grand piano: When you think about it, this is a ridiculous amount of complexity, weight, cost, physical space, maintenance, effort etc just to reproduce music. Anyway, although using a pianola doesn't qualify one as a musician, my grandmother told me that Great Granddad would put a great deal of focus into adding expression via the pianola's levers. She recalled one instance where he finished a performance and heard applause coming from outside his window - someone walking down the street had stopped to listen. That's it, that's the highlight of the first part of this piano's life. From there, the piano's life was presumably pretty standard - a lot of sitting in the corner. My great grandfather had six children and the piano wound up with his youngest, my grandmother. Possibly the earliest memories of my life are of visiting my grandparents' house, where the piano sat in a back room down the hall. I would go down there, bash on the keys randomly, come up with a convoluted name for my amazing impromptu composition, then head to the front room where the adults would be talking and try to get their attention: "Did you hear that? It was called... um....um...." (invariably I had forgotten the name of my composition by then) The piano then passed to my parents while I was still young, possibly because my dad (who isn't from the piano's side of the family) showed some interest. Here's a top tip for any parents of young children: Tell the kid that if they go to bed early without any fuss like a good boy, their dad will play them a song on the piano as they fall asleep. This will mess them up for life. So I inherited the piano when I got my first house. Here it is at my place ten years ago, with a duvet jammed behind it: It's a Marshall & Rose upright, made in London in 1922 (best guess based on the serial number). That manufacturing date should have given it long enough to take a slow boat to NZ prior to its purchase here in '24. In car terms, you could liken this piano to something like a Rover P6 - an above-entry-level product, manufactured by a still-independent British company who would later be swallowed up by a conglomerate and produce less-unique products until the conglomerate went out of business for British reasons. Just as Rover would outsource the odd driveline component (a transmission here, an engine there), this piano uses a complete action assembly (the internal moving parts) from an outside supplier. The candleholders are aftermarket accessories which I added - basically they're the piano equivalent of fitting a roof rack and an external spare tyre to your P6 to make it look more 'classic car'. The piano's finished in burr walnut veneer hidden under darkened old varnish. Believe it or not I cannot find another exactly the same online. My plans for this thread are: to bore you all silly by rambling about piano stuff to document my project to record ten songs to celebrate the centenary of the piano's purchase. I've picked one song from every decade of the piano's existence (judge's decision is final and no correspondence will be entered into), and I plan to record one a month between January and October of 2024. Whether I find time to achieve this, let alone in video format, and whether I go through with making the results public, time will tell. The goal is that January will be the 1920s song, February the 1930s etc, and I will regret this very much.
3 points
-
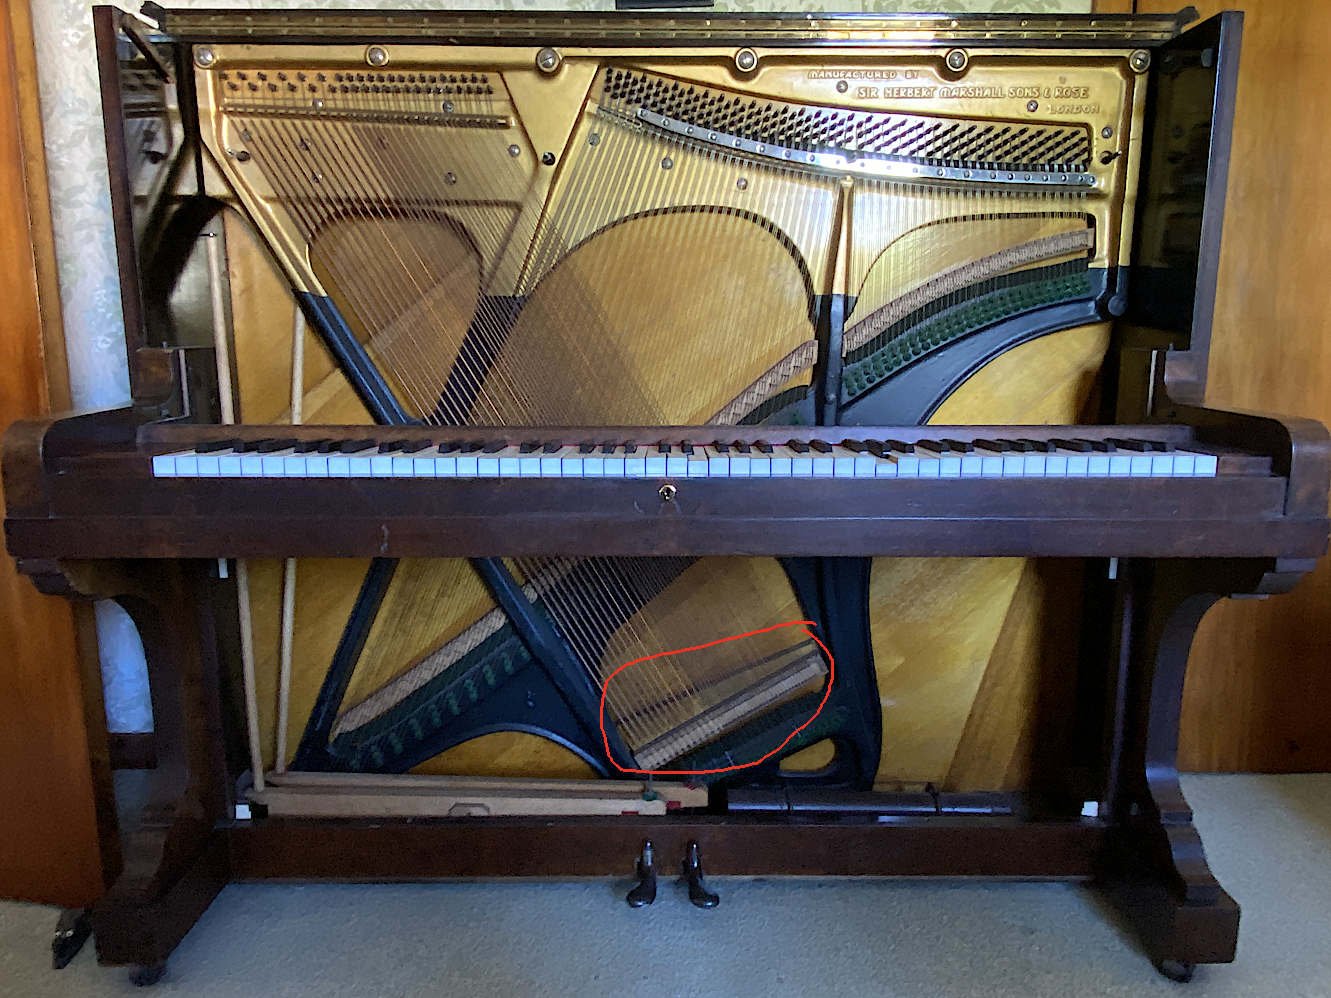
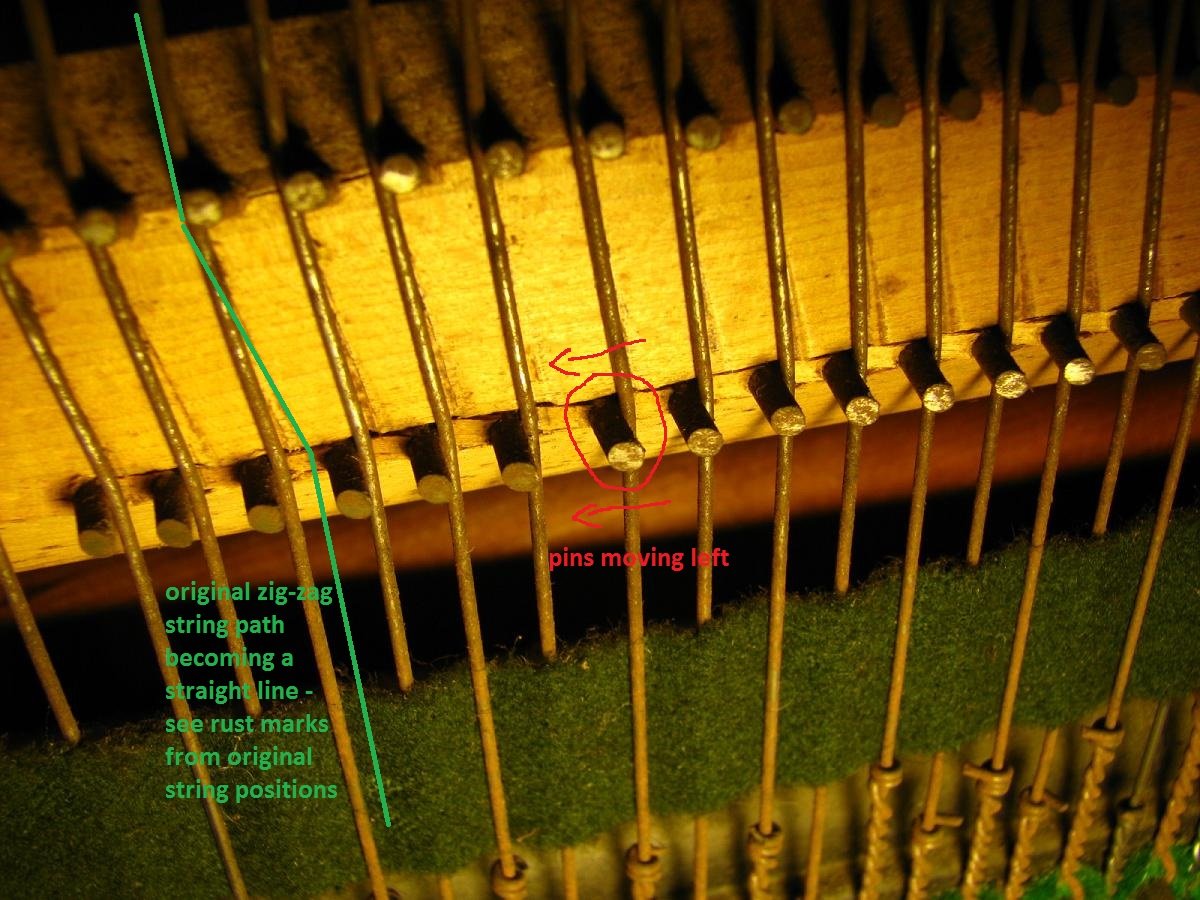
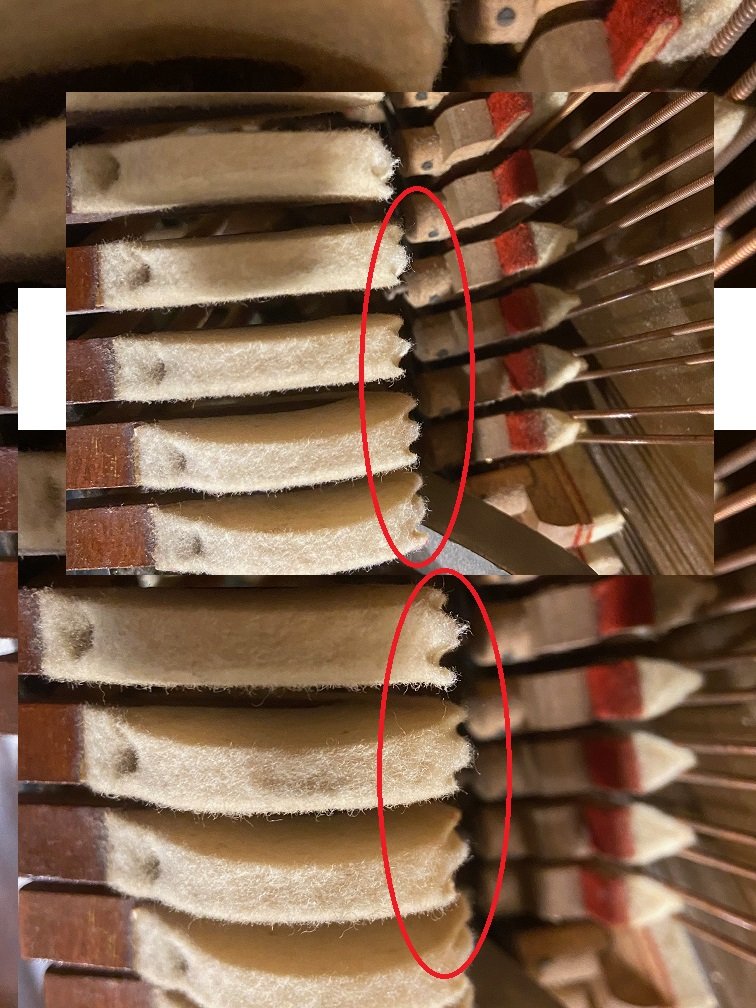
Everything's going according to plan. About as well as you'd expect! I had it tuned just last week and one or two strings slipped immediately. It's a big ask for a piano to survive nearly a hundred years in playable condition. Some selective refurbishment has been done, but the hammers and strings are original (save for the few I broke playing boogie woogie as a kid). Here's some of the stuff that's wrong: The bass bridge (circled in the photo) is shearing/collapsing in the bichord (two strings per note) section, allowing the bridge pins to move under the sideways pressure from the strings, affecting the tone. See later photo. Apparently the bass bridge has rolled, affecting the downbearing. The bridge is a cantilevered design, suspended in space and only attached to the soundboard at a point slightly closer to the soundboard's centre. This allows the bridge cap to be positioned closer to the bottom of the piano to maximise string speaking length, while having the string vibrations conducted into the soundboard at a more central point where the soundboard vibrates more freely. I think. The downside is that the bridge cap's not directly supported, so the cantilever can be crushed back against the soundboard under pressure from the strings, until the string downbearing is insufficient, affecting the tone again. The pinblock is wearing / tuning pins are getting loose. Due to wear from being tuned and due to the wood aging, the tuning pins get looser in the pinblock over time and they don't hold their tuning as well. In my piano there's also no more scope to hammer the pins further in to make them grip better. The hammers are wearing. See later photo. The felt hammers of a piano develop deep grooves over time from hitting the strings. It doesn't help if the felt is 99 years old. The felt gets compacted and hardened, and the contact point of the hammer gets flattened and enlarged, all of which affects the tone. Various bushings in the action are wearing. The hammers wobble left and right and the piano clatters like a typewriter. Some treble bridge pins are loose, creating false beats (an out-of-tune sound which can't be tuned away). What's the fix for all of this? Take all the strings off (to get at the bridges) and throw them away (because they're 99 years old, dull/oxidised/rusty, and would probably break during reinstallation) Take the tuning pins out (because the strings are off) and throw them away (because the worn pinblock no longer grips pins of this size firmly enough) Break the bridges off the soundboard Make new bridges from scratch and stick them on Install new larger tuning pins Make and install new strings Rebuild the action with new hammers The fact that new strings and bridges would have to be custom made would mean there was an opportunity to get super nerdy and redesign the piano using modern analysis and materials. Piano Barry warning. The scale design of a piano refers to the speaking lengths of the strings, their wire diameters, tensions, the copper wrapping of the bass strings etc.. Scale design is a mathematically complex task which probably took forever back in the day, but which now can be done more accurately with computer modelling. These days there is a greater selection of string wire thicknesses to choose from, and they've figured out the percentage of a wire's breaking strain which gives the best tone. So the impression I get is that they feed the piano's parameters into a computer and it corrects the homework of the original designers, allowing the piano to be rebuilt better, stronger and faster than new. It'd only cost six million dollars a bit more than a new piano. Here's the bass bridge for "interest": And here's some worn-out hammers for your viewing pleasure: Sir Herbert Marshall would not approve: The plan is to have the existing hammers reshaped early next year, along with giving them some new bushings to reduce the typewriter clatter. It'll be like polishing a rusty car / rearranging the seats on the Titanic.
3 points
-
So, we left off with me giving up on importing an Alto. Where to from here then? I nearly gave up on Altos. The whole importing thing had really stressed me out, and the constant rollcoaster of emotions involved in it just did my head in. I started looking at other cars, but absolutely nothing interested me... except an Alto Works. In the time I had been trying to import an Alto, I had heard of one that had been brought into the country earlier in the year, with the intention to be a track car for the owner. He never got around to doing anything with it, so asked on a Facebook group I'm part of if anyone was interested in it, and posted these photos Phwoar, what an angry looking little car! Obviously it had had a life in Japan, being fitted with a bolt in cage, no carpets, obviously lowered and on nice wheels. Under the bonnet were some visible goodies too. Hold on a sec, that engine bay looks familiar.... Sure enough, using my Google searching powers I managed to dig up where I had seen the engine bay photo before; a Minkara Carview blog from the previous Japanese owner! The most interesting bit though? It was a legit JDM trackday car. I even found the owner's Youtube channel, which has many videos of the car fanging around tight little tracks in Japan Along with finding out it was a track car, I also found out all the mods the owner in Japan had done to it. Now, I didn't know what was still fitted to the car and what had been removed, but I knew two important things it still had; a Cusco 1-way LSD in the gearbox, and a Cadcars 3685MAX 85hp upgrade kit, including an HKS FCON piggyback computer and HKS EVC6 boost controller. It also had adjustable suspension, wider 15" alloys, full exhaust, the front lip and rear spoiler, carbon blade on the bonnet and some bigger intakes under the bonnet. (It also still has the Cusco front swaybar, discovered after purchase) It was missing its factory Recaro front seats and anything resembling a rear seat though, which wasn't ideal. You can see in the above interior photos it has some billy basic Alto seats fitted in the front. Anyway, I got in touch with the seller in NZ, and found out he was in the process of having the car complied for road use in NZ since it would be easier to sell on the road, than as a track-only car. As part of that process, the cage had to go. It wouldn't meet NZ cage standards, and couldn't be used in a normal road car. To make the process easier, and not have to certify the car (an extra process and expense, limiting me from further changes to the car), the owner swapped back to standard Works KYB shocks and springs and some wheels he had from another Alto. Yes, the owner had privately imported three Altos, a Turbo RS and two Works (this one and an AGS "automated manual" one). After quite a bit of discussion, I agreed to buy the car, with some conditions. It needed to be complied and on the road. It needed to have the full Works Recaro interior, a stock airbag steering wheel, and had to be on standard suspension and Works wheels. With some jiggery-pokery involving his other two Altos, and one that was being wrecked local to him (a real low spec poverty one), he managed to get this one into the spec I needed, and still have two other complete Altos, albeit missing some of the Works bits from one. The car went in, and failed its inspection. The cage holes needed to be welded up by a panelbeater and signed off by a repair certifier. Not a problem, it was booked in for the work to be done, and we waited. And waited. And more waiting. Eventually we heard from the compliance shop that the work had been done, and it was all ready to go, but they had been waiting on the one and only repair certifier down there to actually give it the big tick, and he had been away on unplanned leave. After a couple of weeks, the car was finally signed off, it had a new WOF and just needed to be registered and have plates fitted in order to drive it on the road (A task left up to me to keep costs down). As it turns out, as part of the work at the panelbeaters, the underside of the car had been completely sandblasted and undersealed... and guess what, it cost about $2,000. I believe on this car it wasn't done because of rust, but because they had to protect multiple areas on the underside where it had been welded, so was easiest to just do the whole underside. Once back the seller changed to the stock wheels. The car looked much better on the stock 15" alloys (even if I don't like black wheels; they suit it). The tires on these are stuffed, which is why they weren't fitted during compliance. The seller also fitted the Recaro interior front and rear (the rear fabric matches), and a stock Alto (not Works) airbag steering wheel. A truck was booked. They sent the biggest one they had. An anxious wait over the weekend and I had the call, it was 10 mins away. I wait outside, expecting to see a delivery truck with the car on the back. No, I hear this angry little growl coming up the drive, and sure enough, it's the Alto. The guy gets out and apologises, he had to drive it the 10 mins from the depot because the Alto was too small for their local delivery trucks. He loves it though. I park it up, have a quick look over it and take some initial photos First impressions; it's small, but also very spacious. The Recaros are more comfortable than expected and fit my wide frame fine. The gearshift is divine, it's almost rifle bolt action. It makes great noises and pulls like crazy on boost (and it's not even at its full boost currently). It's not all perfect. Everything is covered in dust from the panel shop. Its everywhere. There are some areas where the paint isn't perfect, and the dash has some random screw holes and things from various track based gubbins being used. It's not an open road car, at all. At 100kph, it's pulling just shy of 4000rpm. Sure, it's on boost instantly, but that little 3 cylinder 600cc engine is just whirring away constantly. There are kits to replace 5th gear, and lower the rpm to about 3000rpm, so I'll probably look into that at some point. The LSD is brutal. It's a clutch type Cusco Type RS 1-Way unit. When cold, it knocks, it binds, it thumps. It's quiet and smooth when warm though, so I have some new Cusco oil to change shortly. The way it works is making me rethink how I drive and corner though. When on the throttle, the diff will relentlessly pull you around the corner. The steering feels heavy, but where you point the wheel is where you are going, no exceptions. The moment you come off throttle though, the front end suddenly darts to the inside of the corner as the differential unlocks and allows a speed difference between wheels. I can't wait to see what it's like exiting a corner on the track. I have already started removing the decals on the bonnet and along the Works side stripes. It was a shopping list of some things the car no longer had, and I wanted the nice clean stripe instead. Stickers were the previous owners thing, not mine. There's plenty to do. Parts are constantly arriving from Japan for it. Being a 2016 car, and so modern, parts are ridiculously plentiful and readily available for it. I'm used to having to hunt around for scraps years after the cars stopped being popular, but currently, anything I want, I can get. This weekend it'll get a full oil service, since I don't have any real service history, and it'll get a couple of the goodies that have already arrived from Japan fitted. It's not the stock, 4WD one I was planning on, but I love it. *Parked next to my colleagues Honda S660. One of few cars that makes the Alto look giant.3 points
-
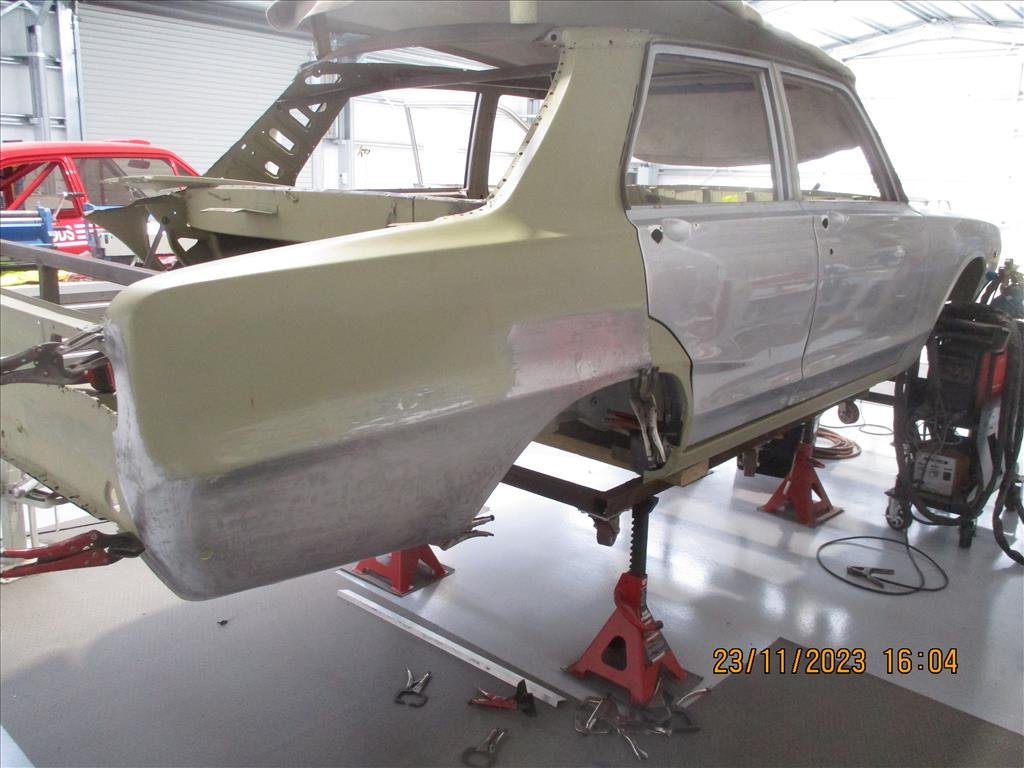
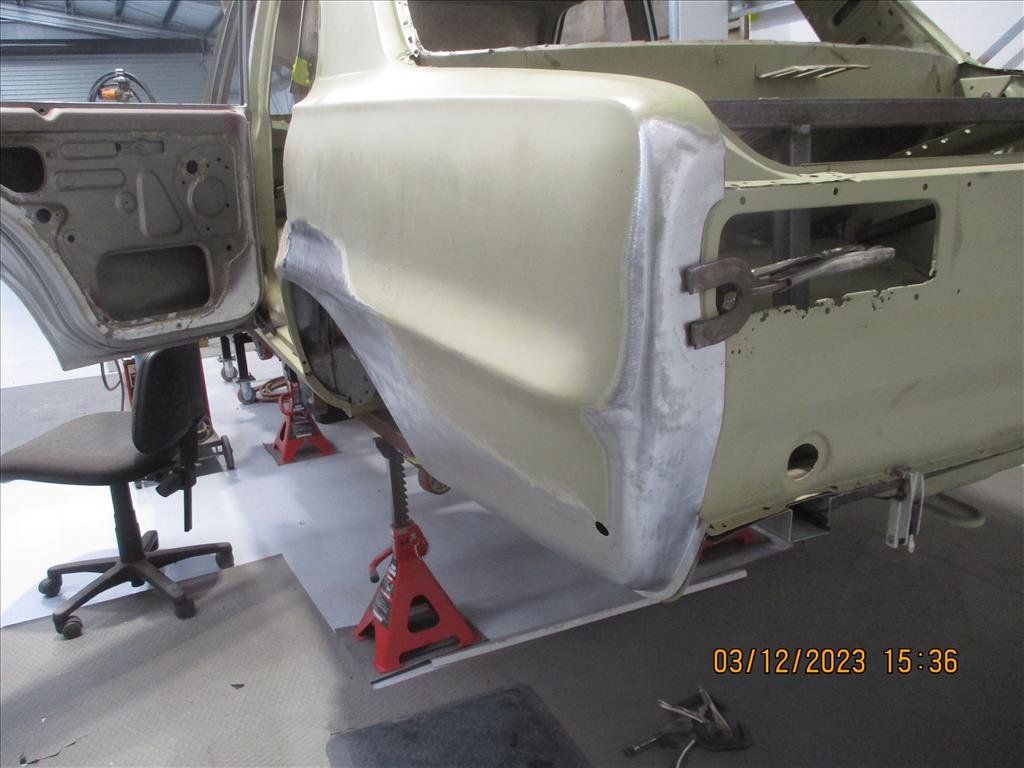
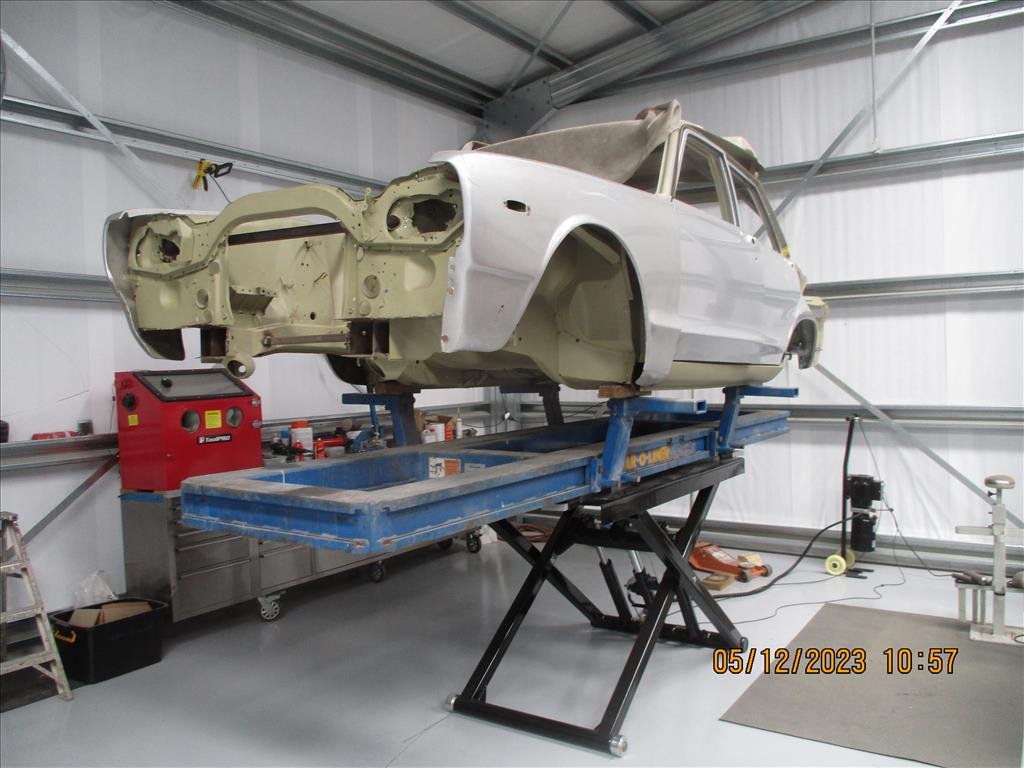
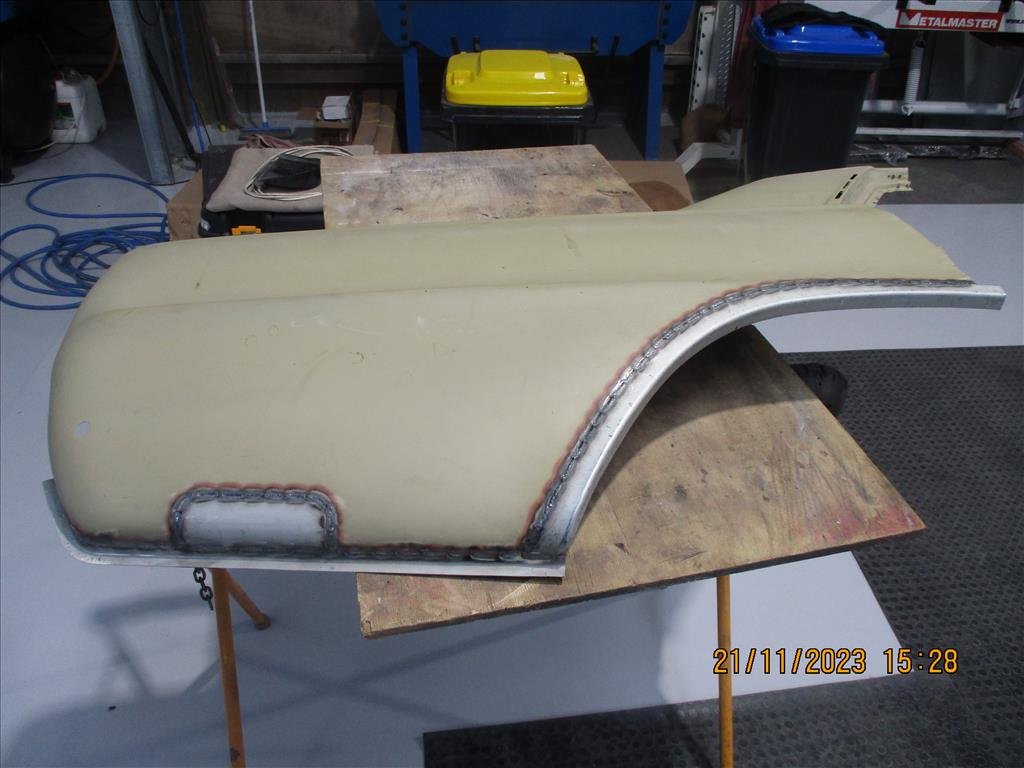
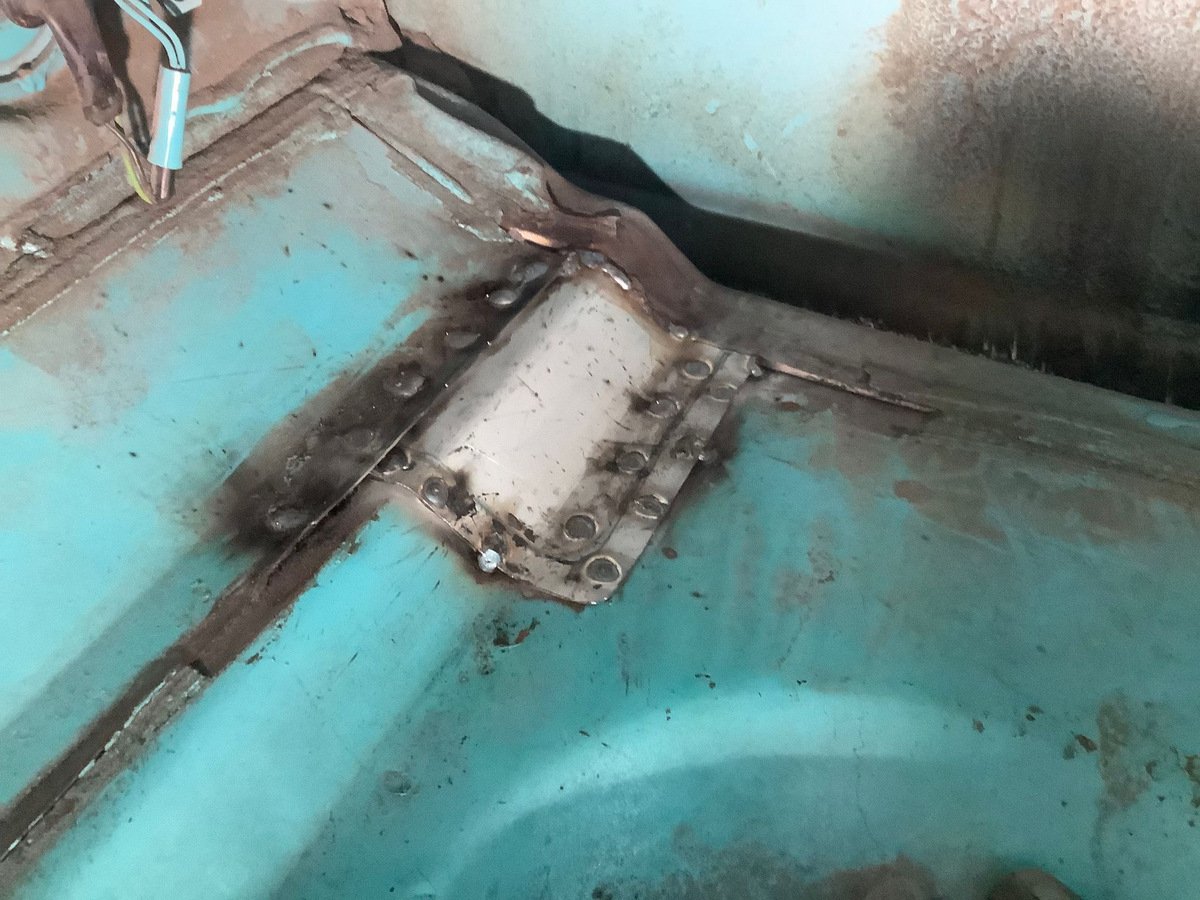
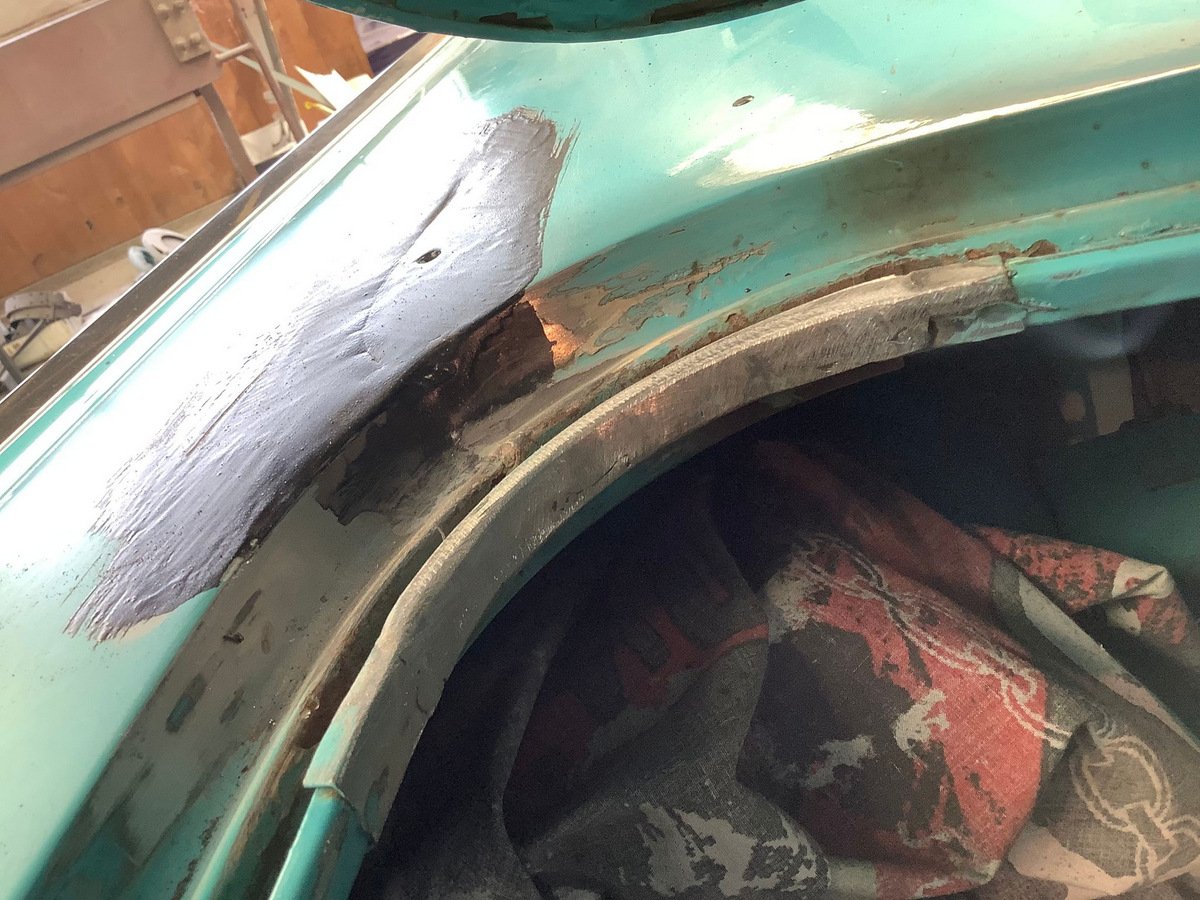
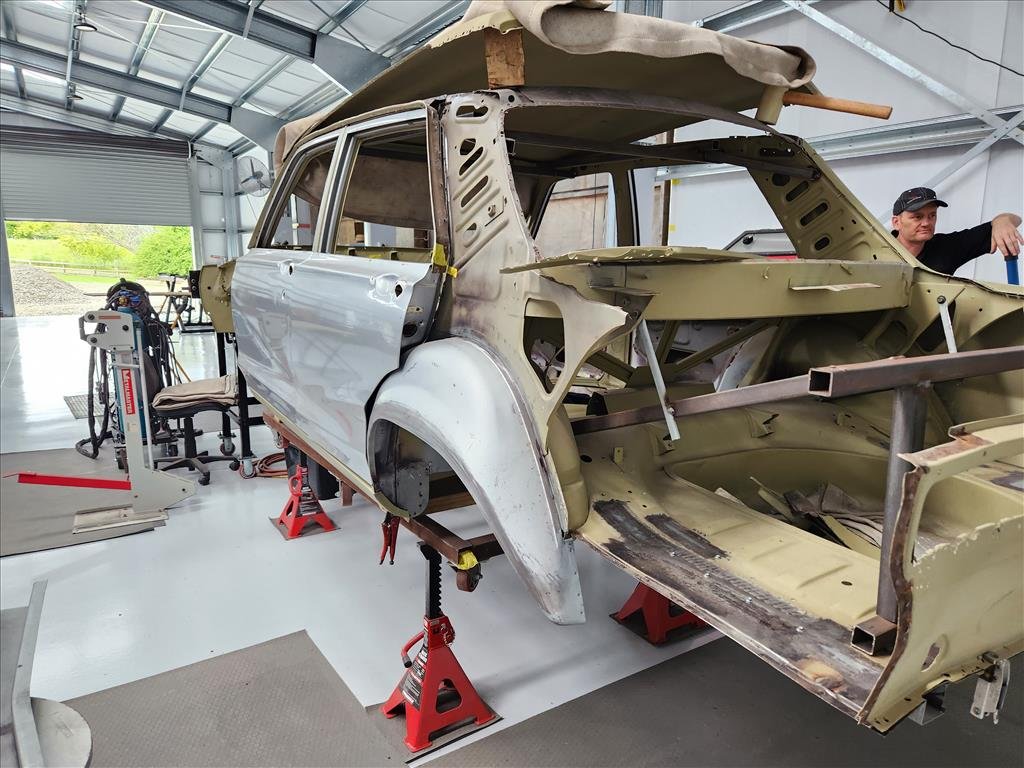
Another Panel Barry update has arrived in my inbox. He's now finished up all the rear quarter work which was quite extensive. The edges were rebuilt on both sides as well as some of the inner parts where it met up with the side panel and inner arch to make sure it was seamless. Next step as mentioned earlier was to get it on the chassis machine which much to our surprised it seemed fairly straight but there was marks from where it had been previously pulled. Not really a huge surprise, the car is old so it would have been ambitious to presume it had never been in an accident before. He's also been busy doing some re-alignment on the side sills and the doors to make sure they all line up and close properly before having the doors dipped and see how much of them are just filled with bog. He also found some damage on the chassis rail at the front and underneath a bit, probably from a forklift lifting it which is unfortunately common in Japan so that's being fixed up too.
3 points
-
Apologies for not making it today, wife’s car (vw golf) did the European thing and shit the power steering. so I spent the day fixing broken motorcycles.2 points
-
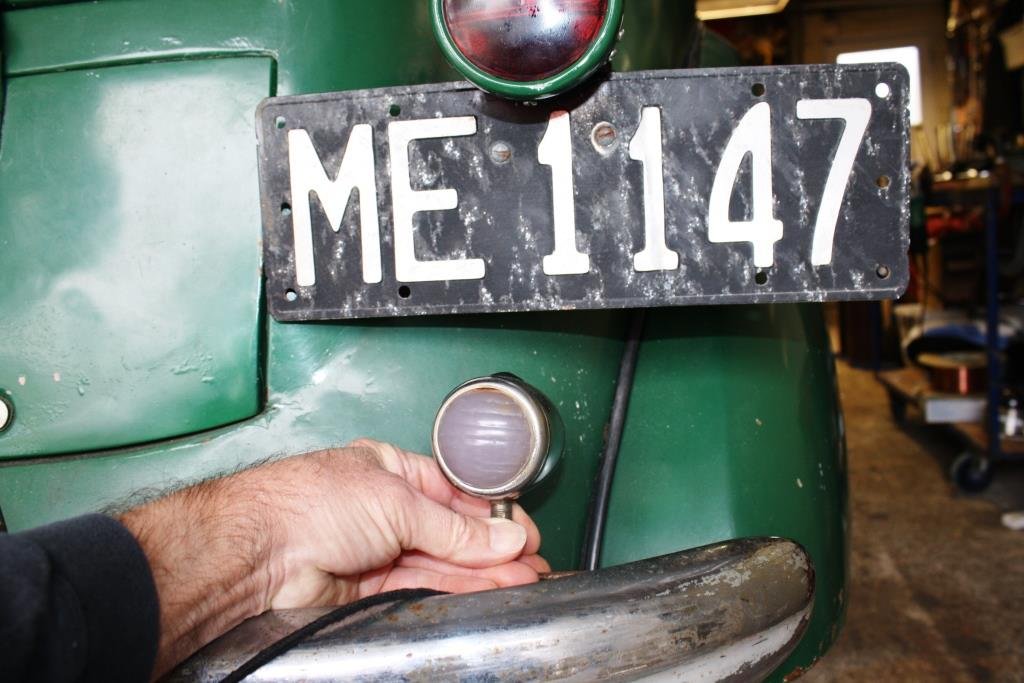
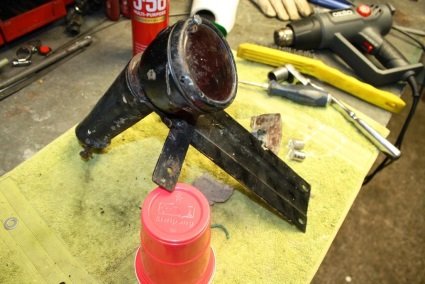
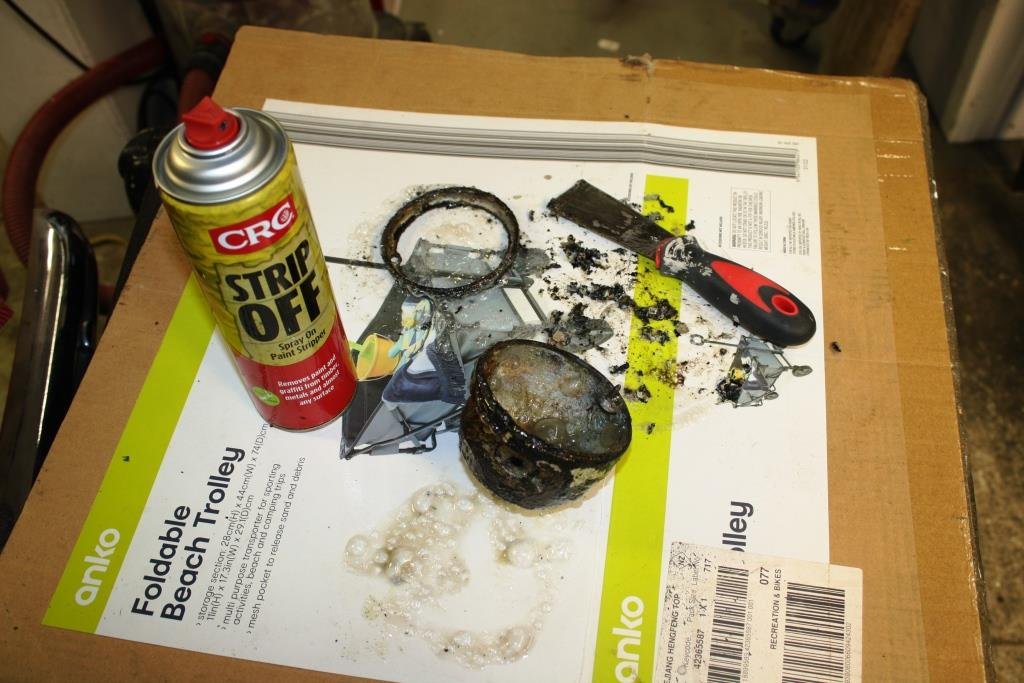
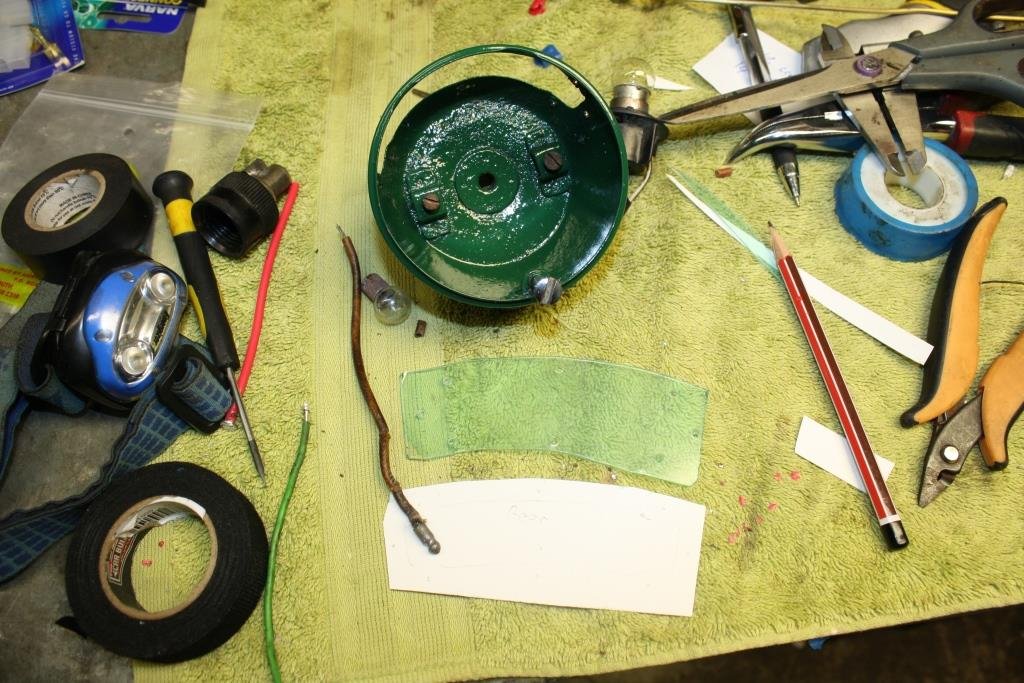
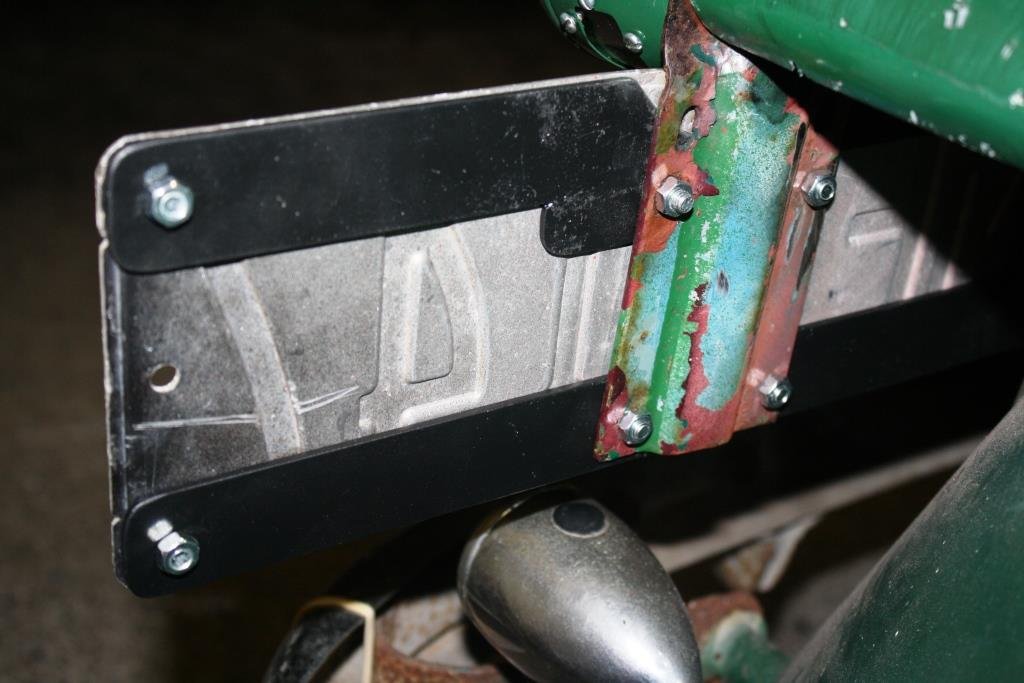
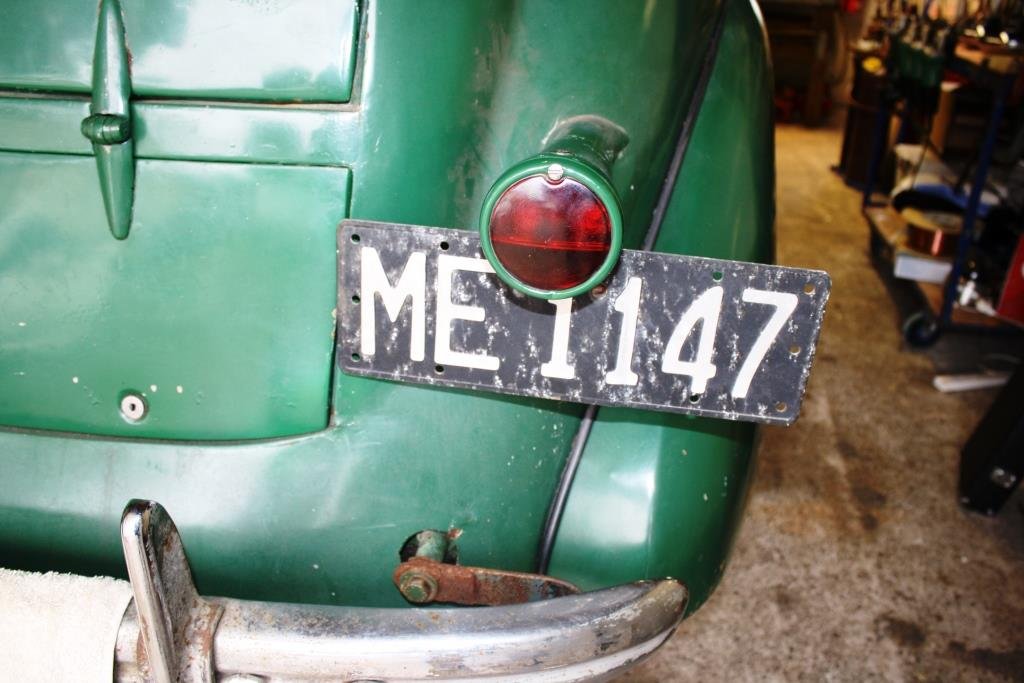
Working my way through the electrics….. This is all that was left of the original tail light, (i.e. the bloody thing fell off!). I started stripping down the tail light I’d got from the Vauxhall Car Club. Paint stripper, rust kill and paint……… I replaced the clear number plate lens with plastic cut from a welding helmet lens cover. The bulb holders were badly corroded and shorting out. I made the call to upgrade it and made one of these out of a piece of scrap alloy. It fits a modern bulb holder……… And just fits inside the housing. The number plate was a little bashed and battered so I reinforced it a bit. Still looking suitably bashed & battered but it all works!
2 points
-
Also some repairs in the boot floor area and seal lip And I got him to delete the aerial hole as it was broken off anyway Drove it home yesterday, barely made it to the nearest gas station but sweet after that. Missing a few bits for now. Delivered to paint shop today, but main man wasn't there. Will go discuss the plan tomorrow.
2 points
-
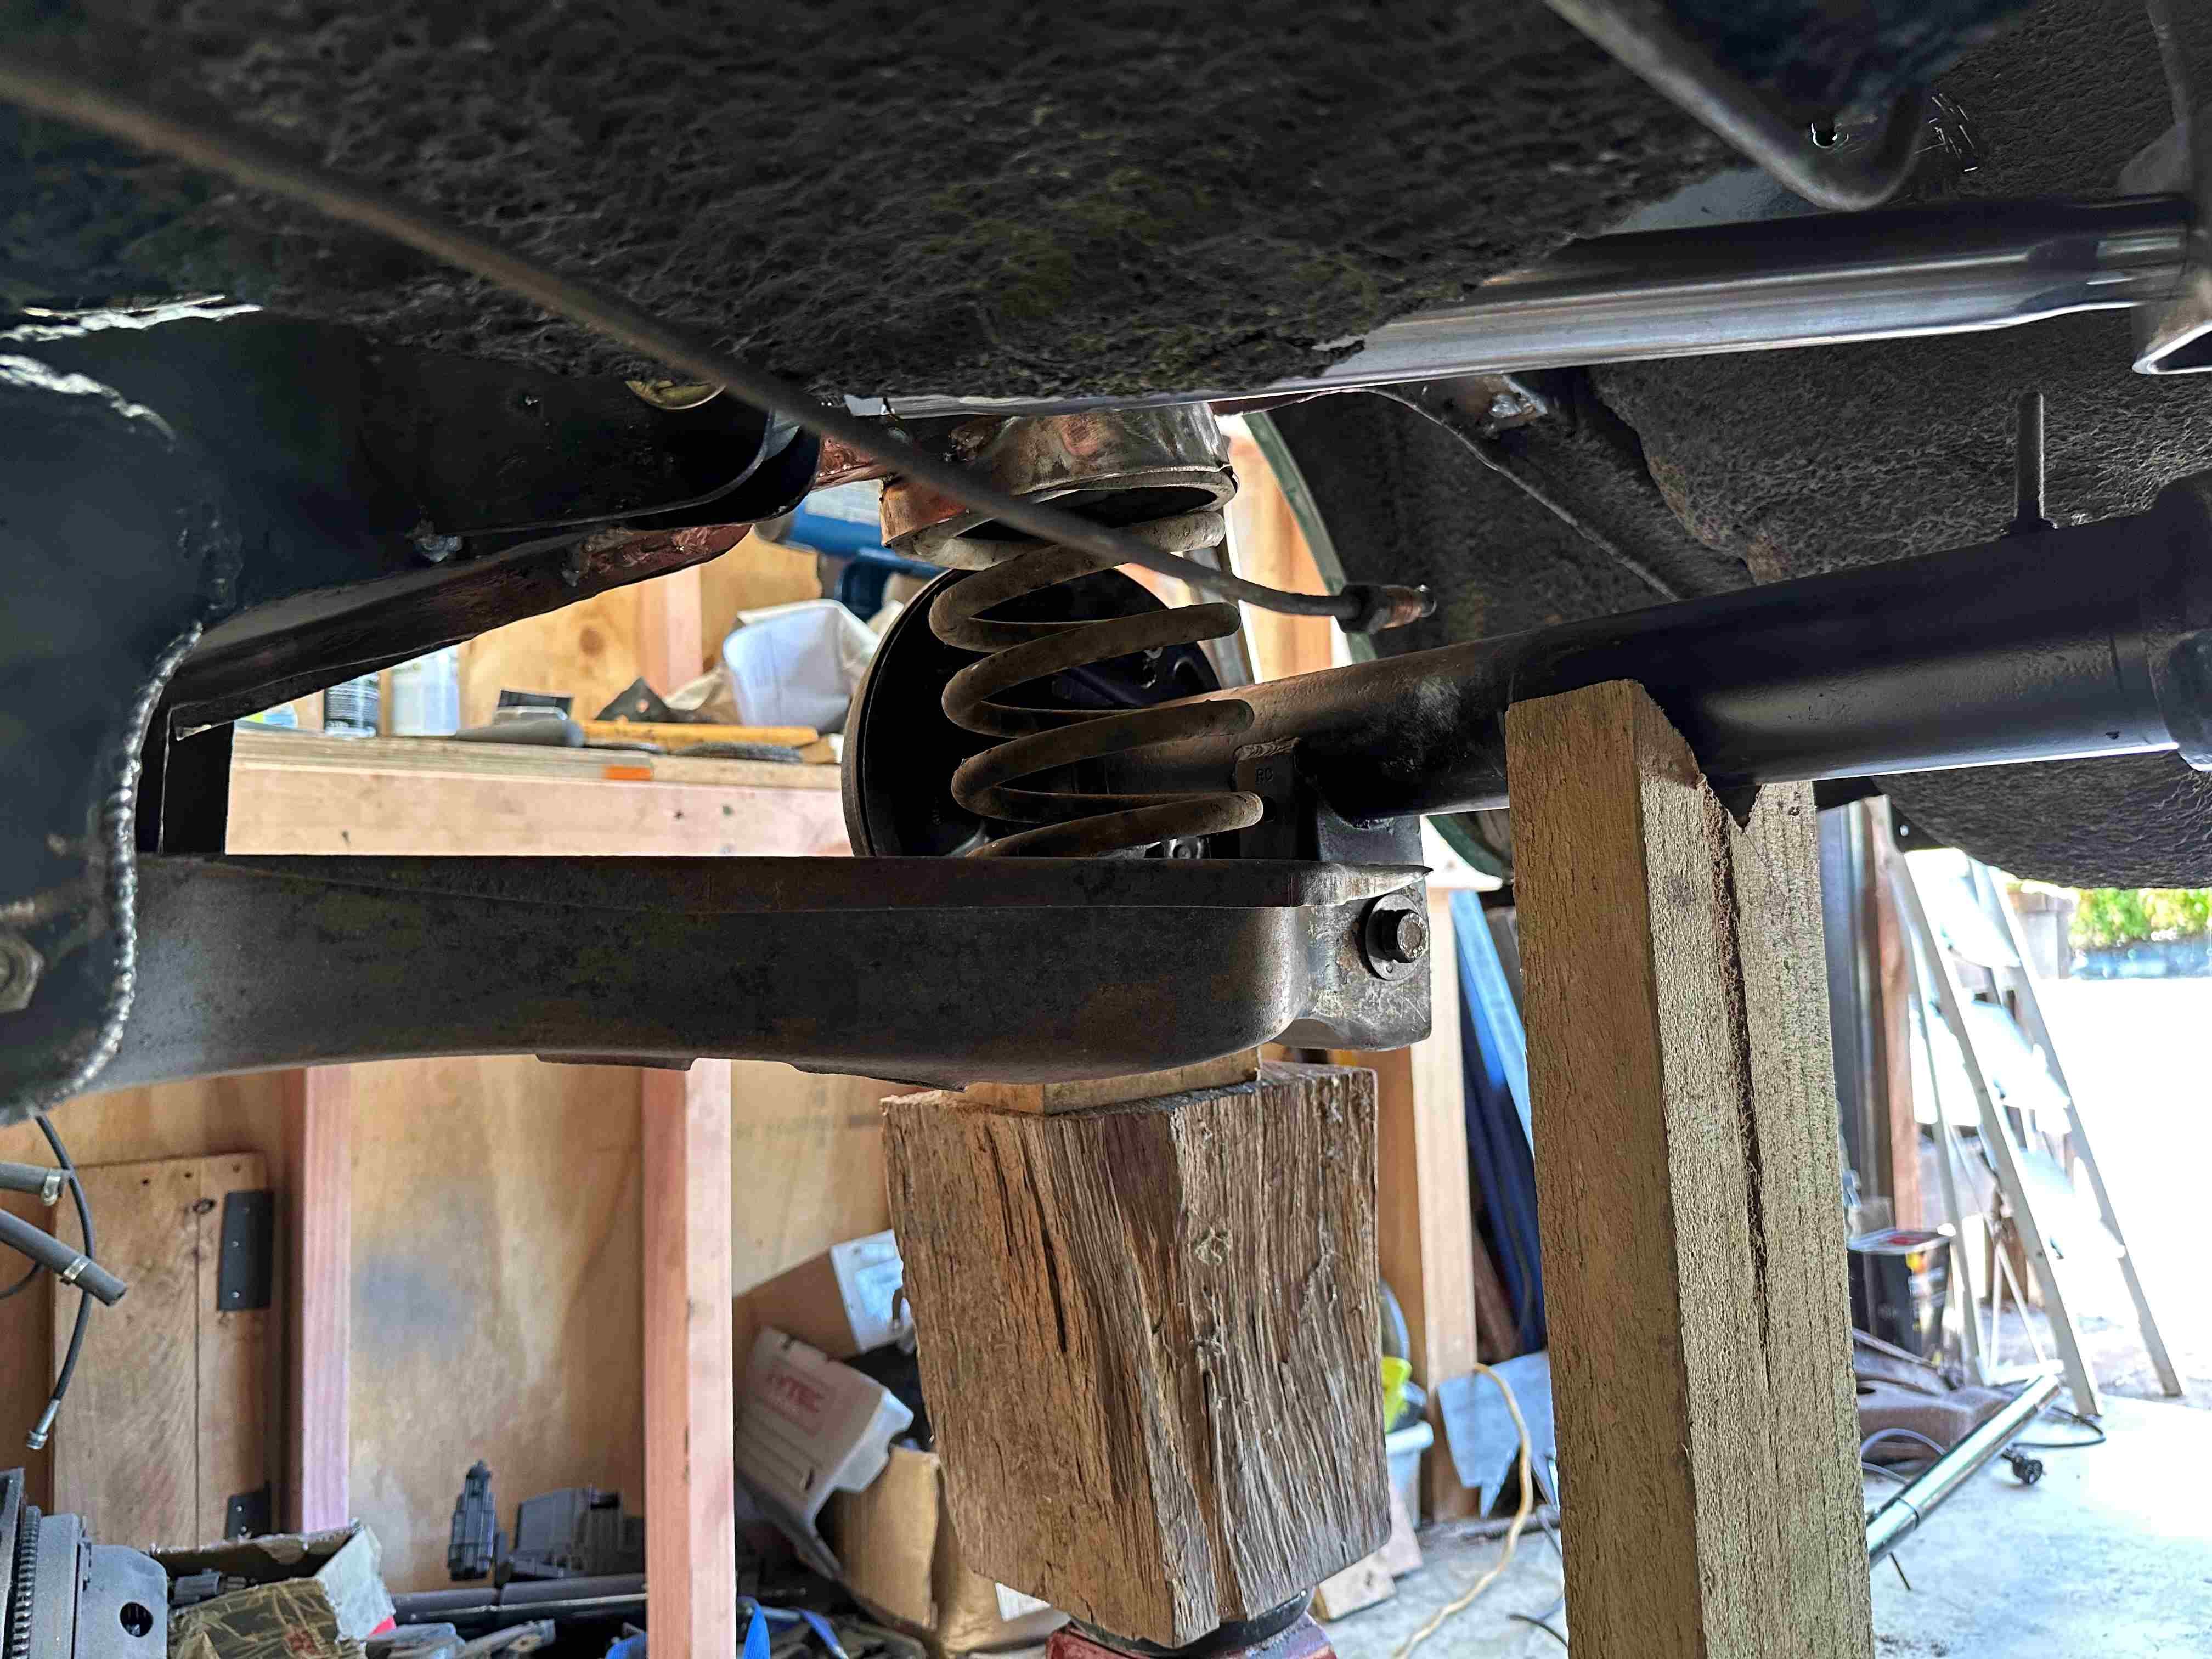
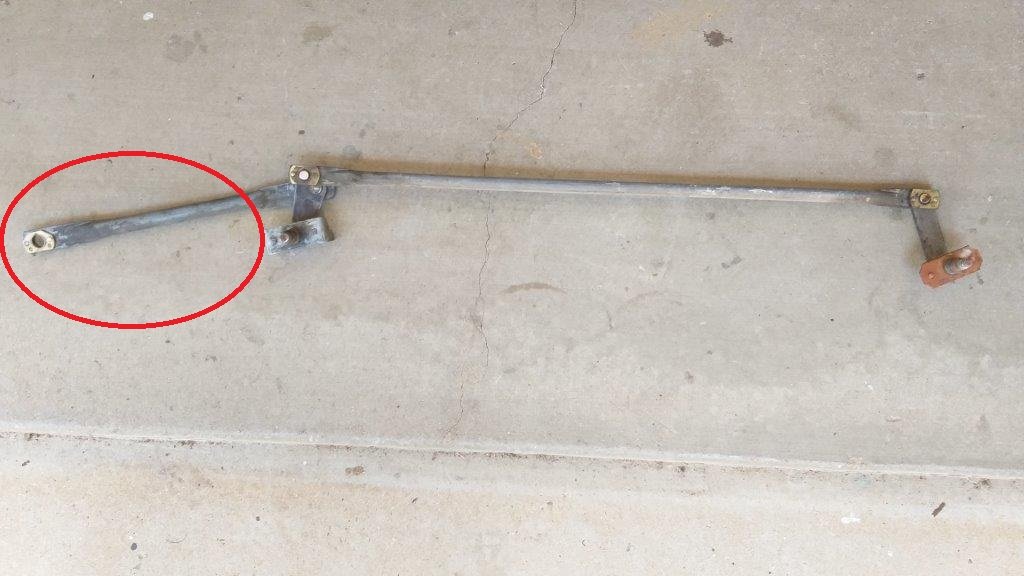
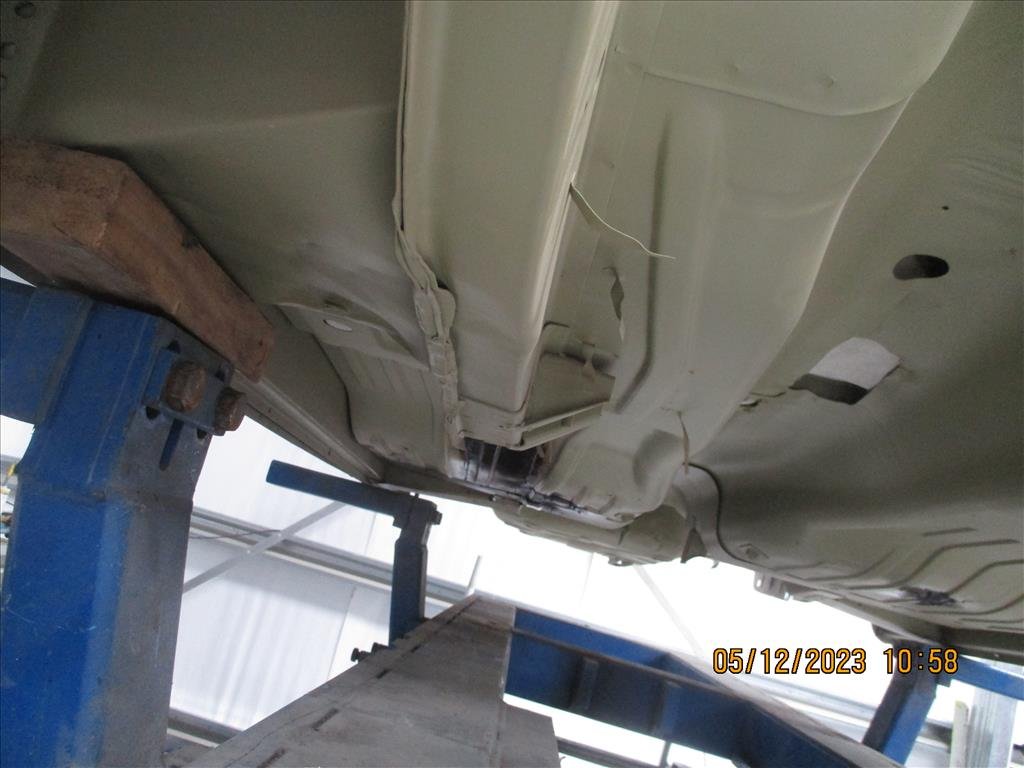
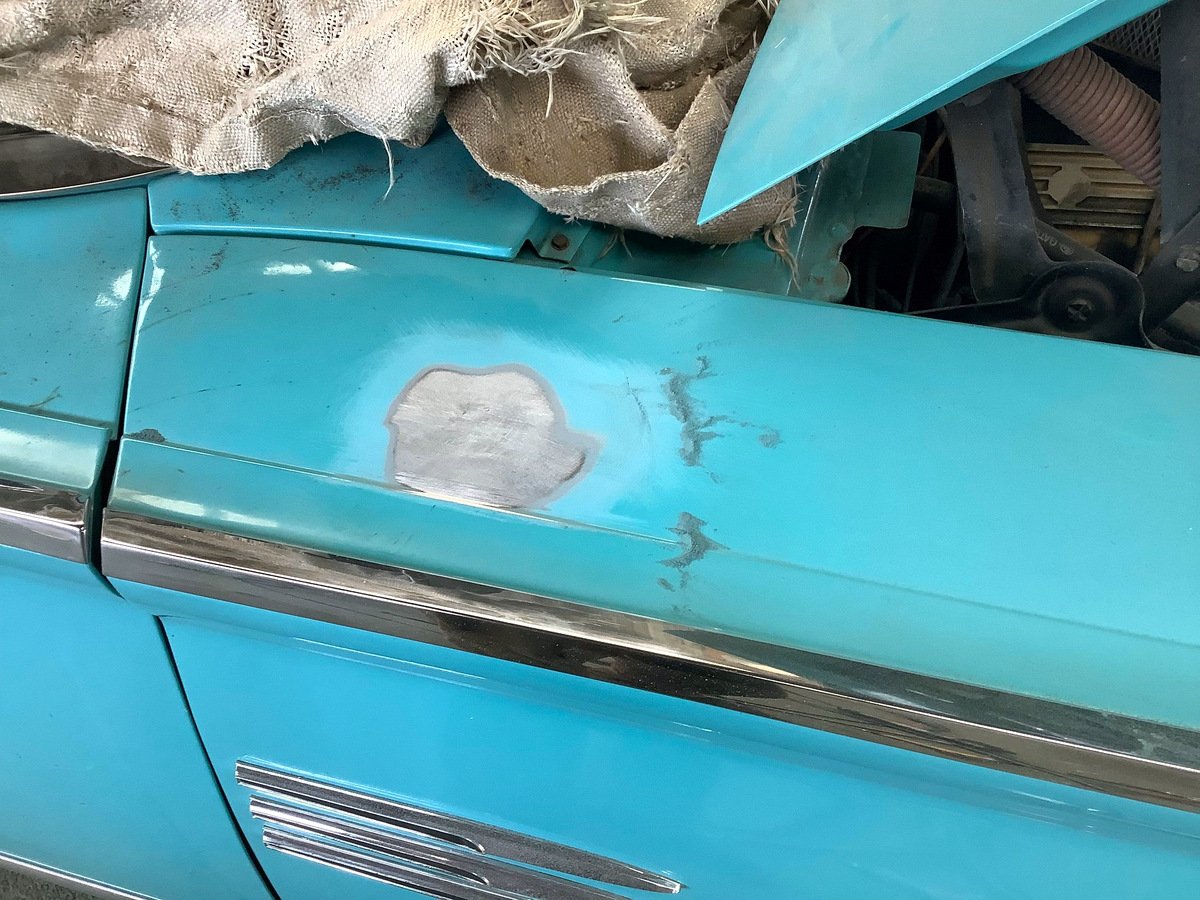
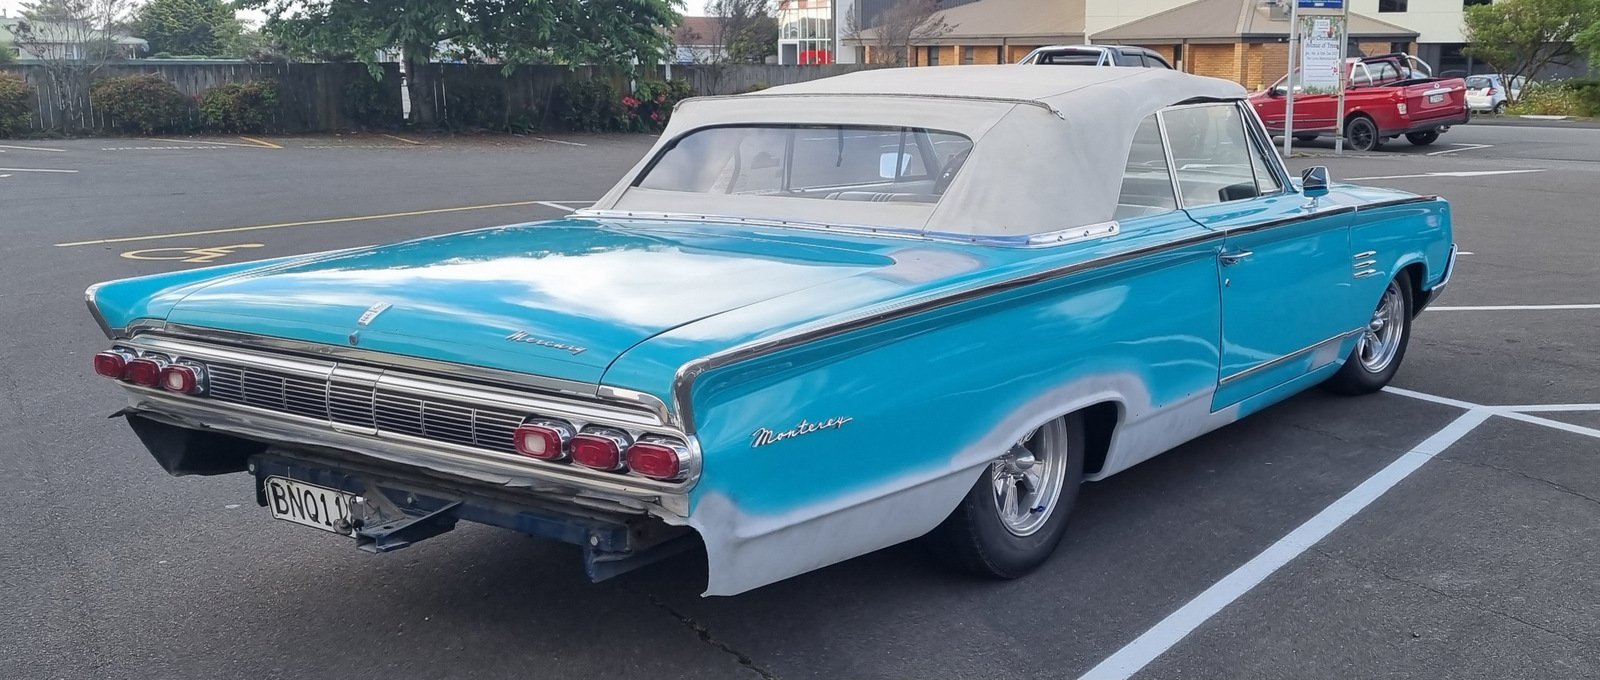
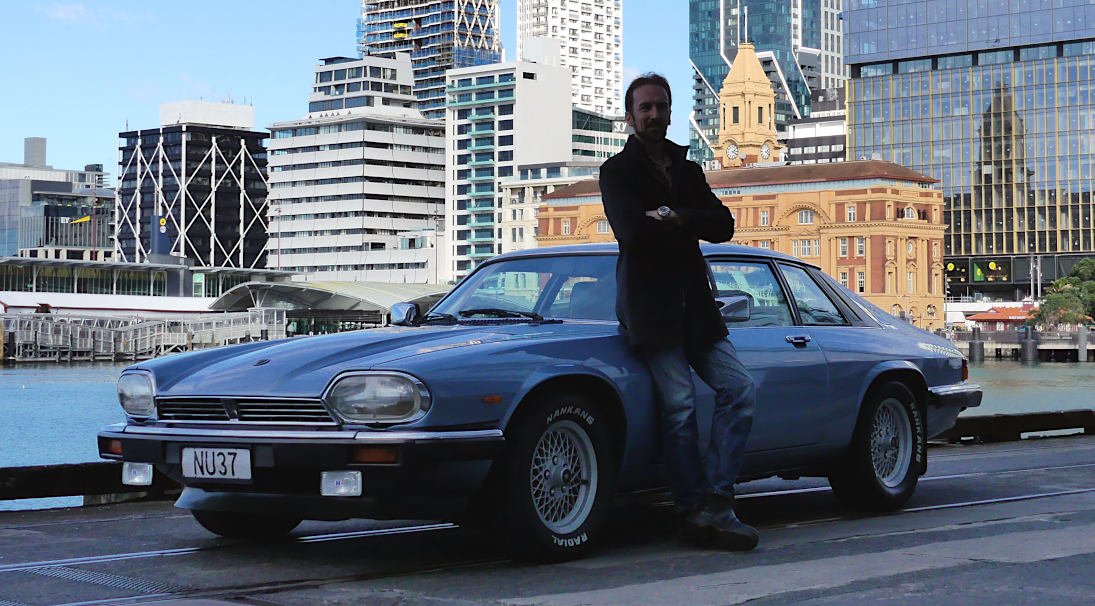
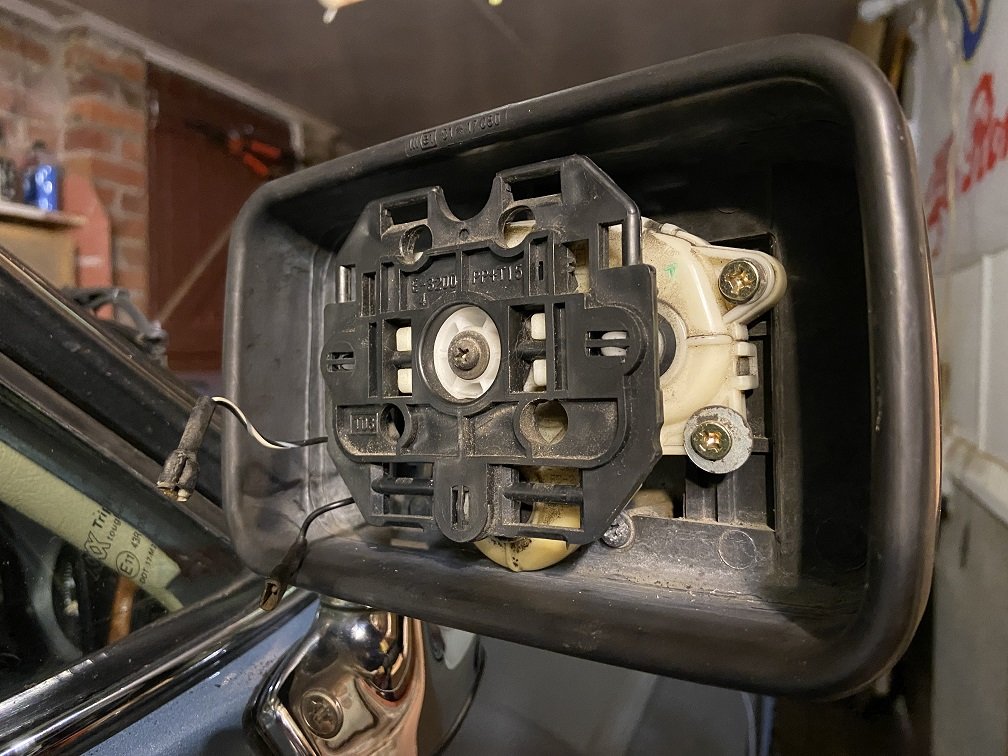
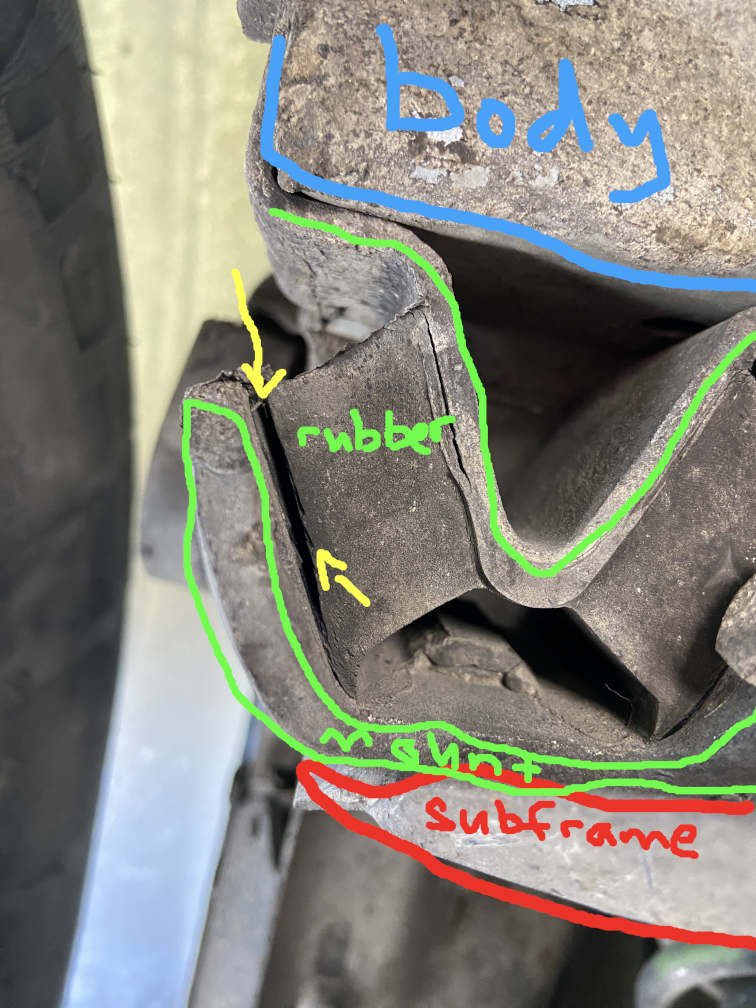
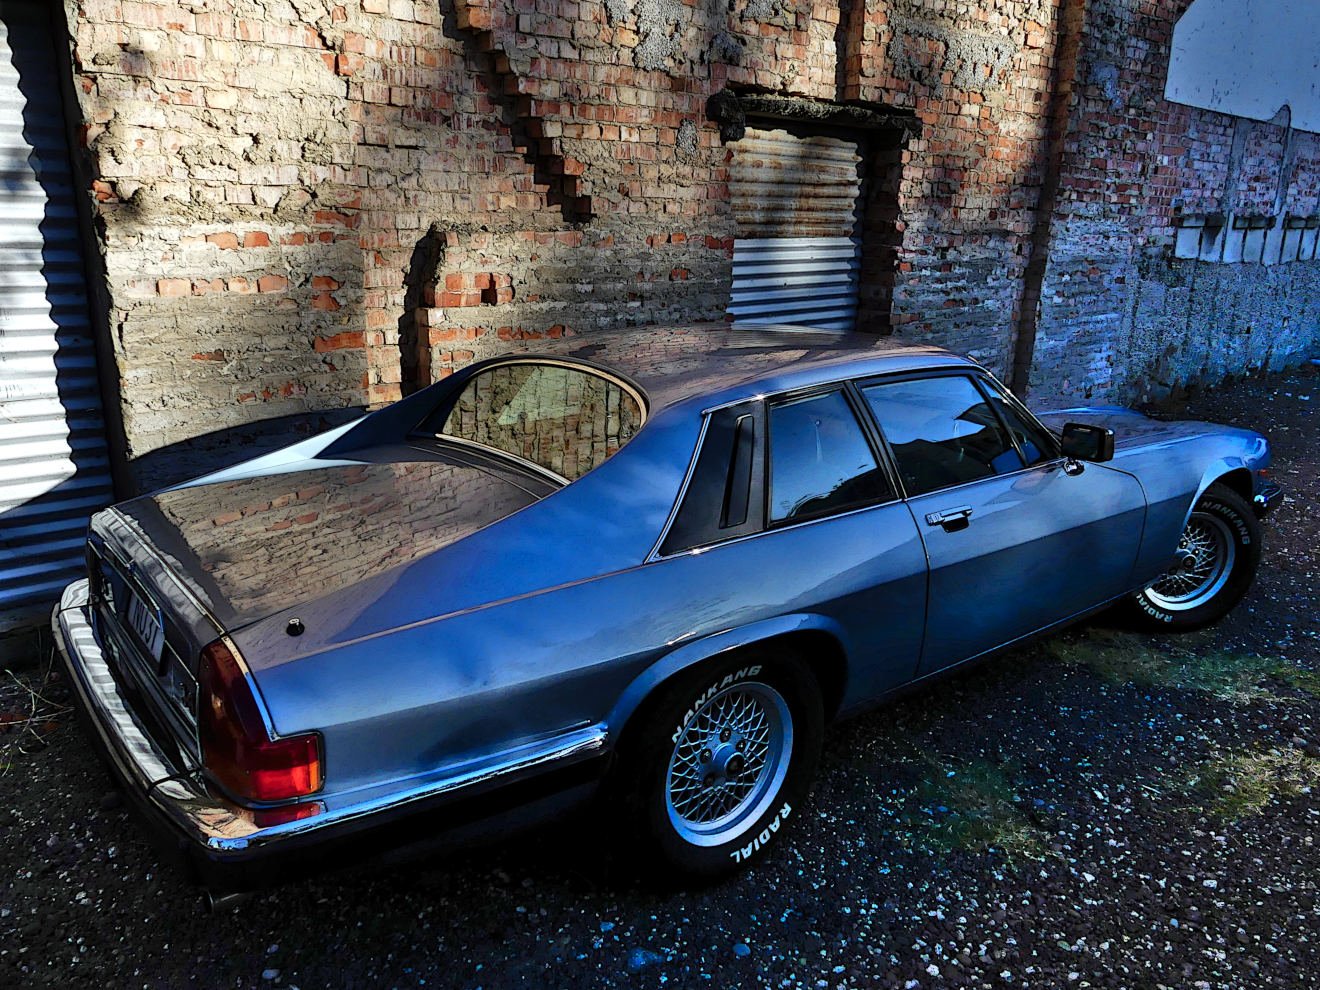
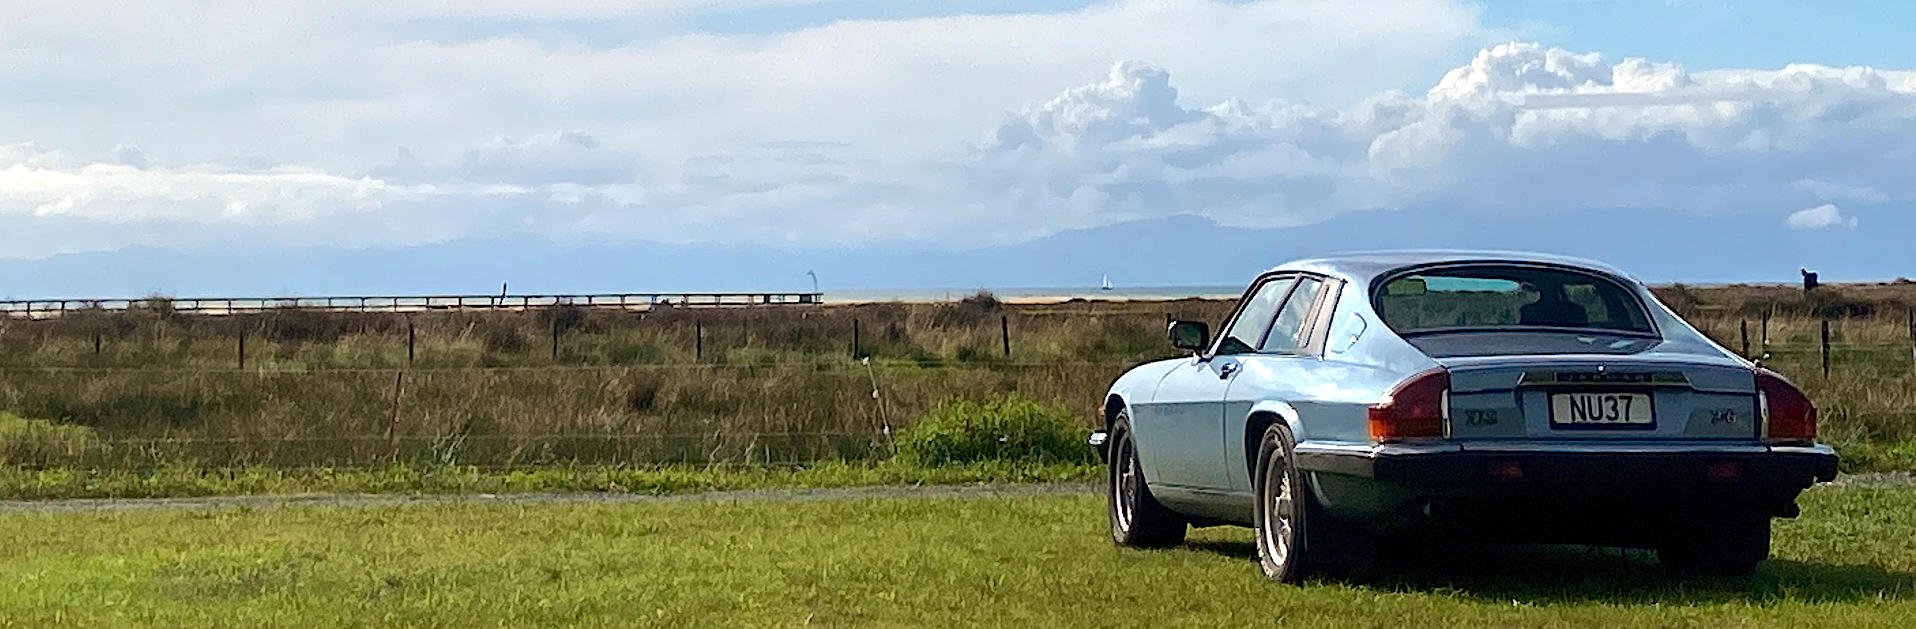
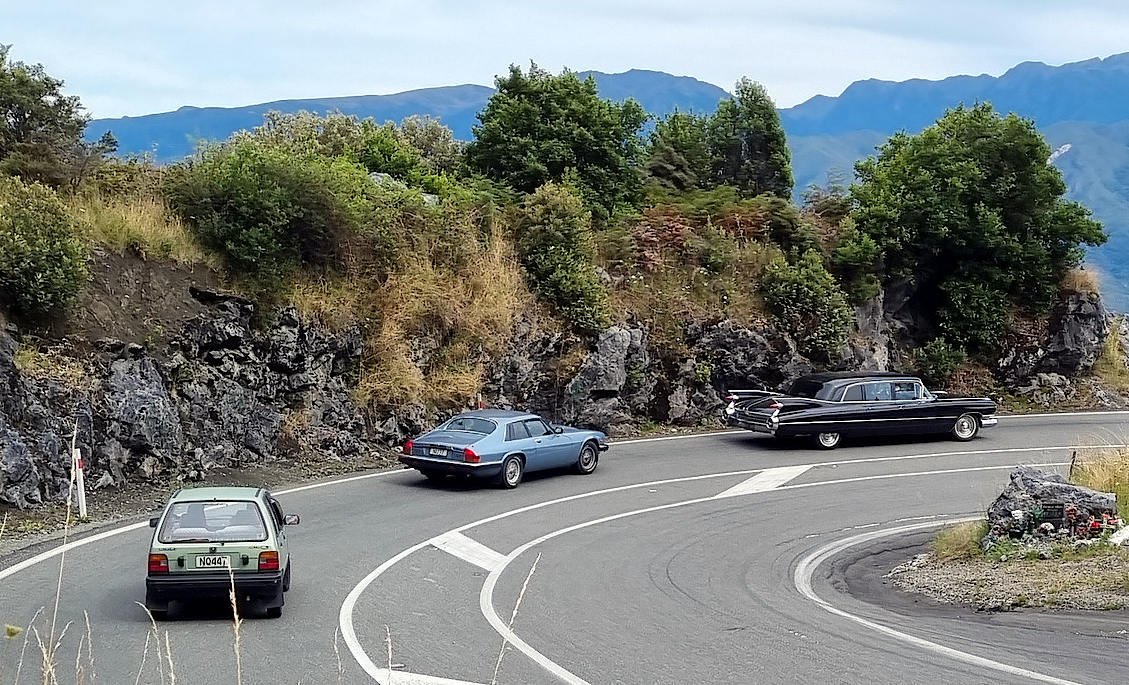
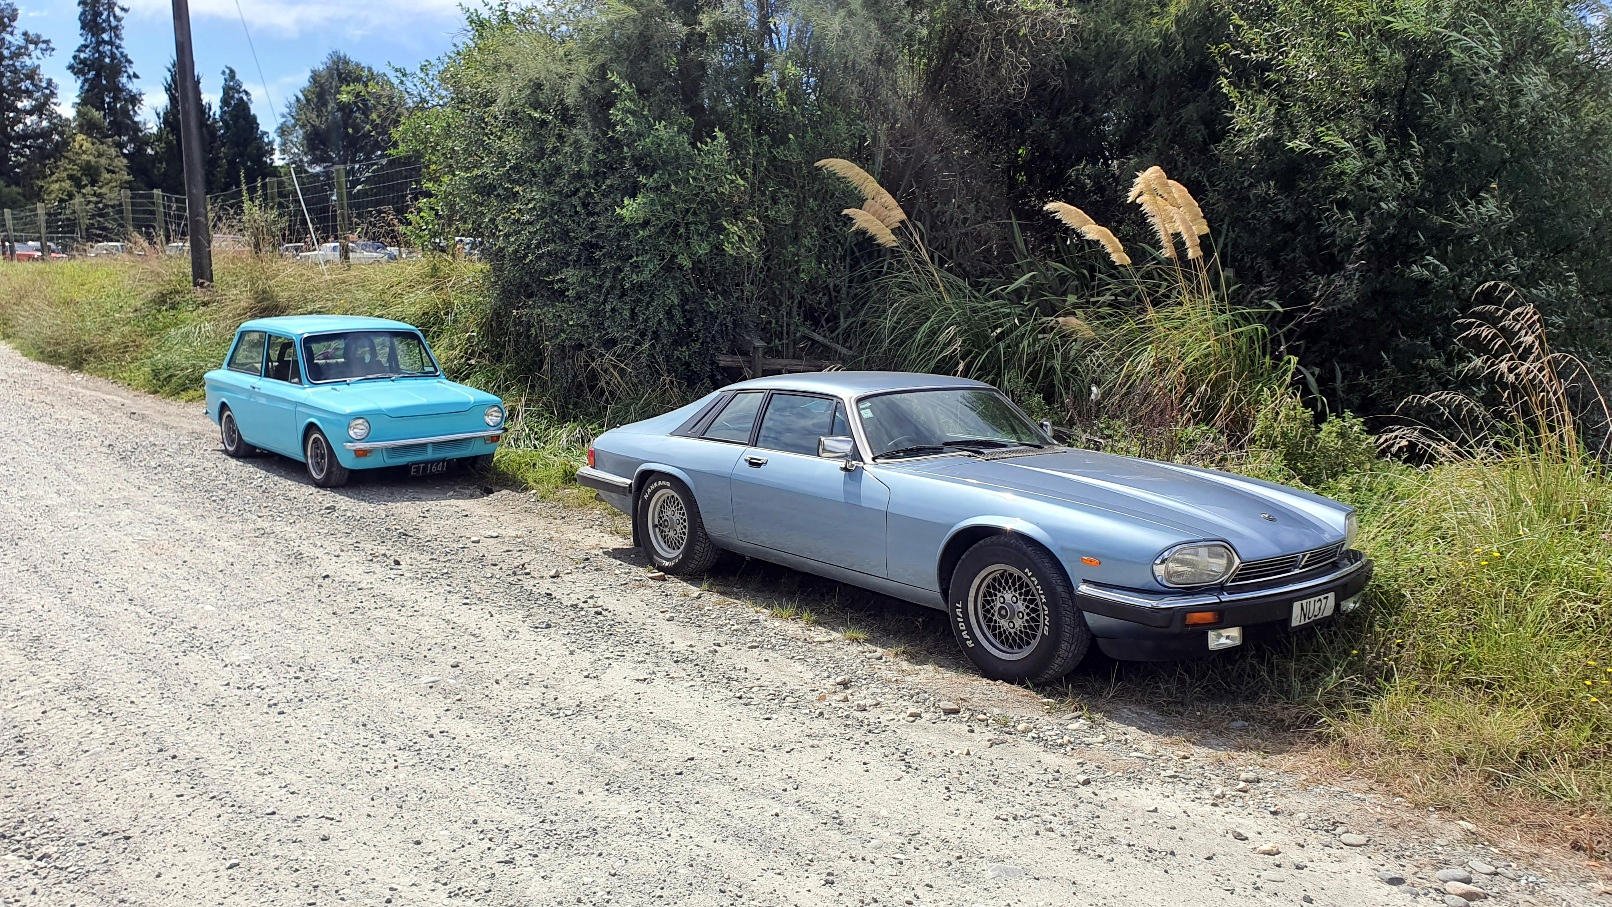
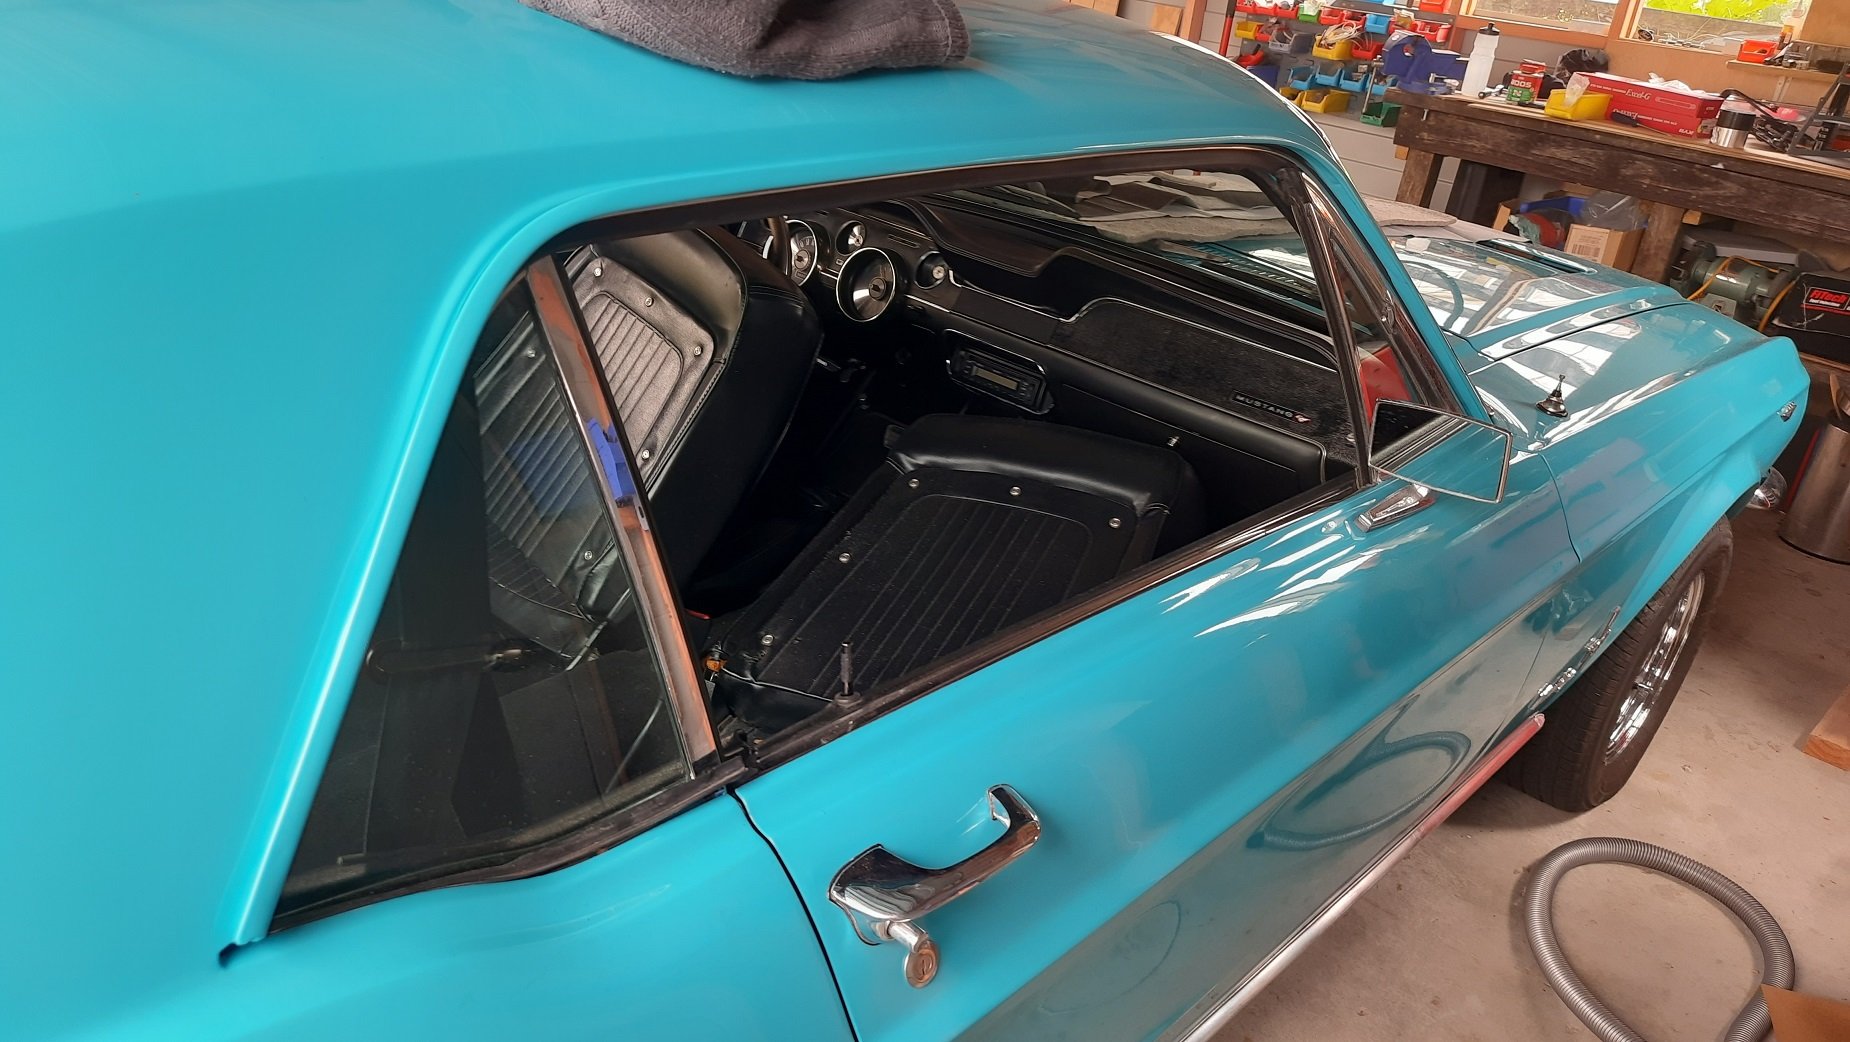
^ Some shady character.... Nats '23 in the South Island was approaching. I sent the Jag to get the wheel bearing races changed and the front brakes seen to as well. Apparently the calipers were seizing, which might explain why I felt the brakes had been easy to lock and slightly slow to unlock. Now I have new discs and pads and rebuilt calipers. While the Jag was at the shop for this work, Auckland got flooded, but fortunately the Jag escaped. I was running out of time till Nats but still had more 'grand touring' issues to address. The driver's wing mirror glass was still too wobbly despite my best attempts, so I gave up and screwed the mechanism from a modern Japanese car into the Jaguar wing mirror housing. Shhh. The mirror glass now protrudes slightly rather than being recessed, but it no longer shakes around. I'll have another shot at this problem at some point. The passenger side windscreen washer jet was only producing a useless dribble. Upon investigation I noticed that the factory washer nozzles are heated to prevent them icing up! This doesn't matter if they're corroded and useless. I temporarily substituted the nozzle from a garden sprayer and it's far superior. I topped up the diff, and while under there, I noticed this rear subframe mount is starting to come apart (yellow arrows): This is the left rear one of four mounts which hold the rear subframe to the chassis. After Nats, I ordered a new set which have since arrived but I haven't fitted them yet. I decided I needed to make some visible modification to the car for Nats, to make it appear that I'm a legit car guy and not a chequebook racer / Sunday driver. I figured I could have a go at the dashboard veneer - grind off the lacquer then put Danish oil on it, same as I did for the centre console. Before: Unfortunately the 'after' photos (not included) don't look so good. I was in too much of a hurry and I burned the veneer with the stripping disc, ground through it in spots and tried to hurry the drying process too much. So now my dash looks a bit funky. I Reassembled it anyway and drove from Auckland to Marahau and back. On the way down from the ferry to Marahau, I rambled to my poor passenger Johnnyfive that the XJS could have done without IRS, RWS, LSD, inboard rear discs etc.. Then my favourite part of Nats turned out to be racing back over the hill in the above photo, chasing Yoeddynz's Imp and a bunch of motorbikes and making good use of those technical features. I was glad for my new brakes that didn't lock or fade, new tyres that let go progressively, diff that allowed me to plant the boot mid corner, handling that often seemed to allow me to turn harder than the limit at the cost of having the rear break away.. On that last point, I kept imagining I had more oversteer in one direction than in the other, due to that rear subframe mount which was surely tearing itself further to bits.. I got back home with no exploded coolant hoses, no exploded diff from oil starvation, not even that much engine oil consumption. Fuel economy never got better than 10l/100km on the trip, and I discovered the car would stumble and misfire more after several hours of driving. Add that to the list along with a sagging headlining. One more fun fact - I weighed my wheel/tyre combos, because who doesn't enjoy a bit of Dave Science(tm). 'Performance' 17x7.5 wheel only: 11.1kg plus 10.2kg 235/45R17 Bridgestone Potenza tyre: total 21.3kg Jaguar OEM 15x6.5 wheel: 8.4kg plus 12kg 235/60R15 Linglong tyre: total 20.4kg plus 10.9kg 235/60R15 Nankang tyre: total 19.3kg So I save 2kg per corner by reverting to the combo with the best road manners.
2 points
-
Well, here it is, the culmination of months of trying to import a car. Months ago, I heard through Facebook about an estate sale auction that was happening a couple of hours north of where I live. There were a few cars there, including some cool MG and Healey classics, but only one really caught my eye; a little 1990 Suzuki Alto Works nugget. I've always loved Altos, and here was one that was small, manual and turbocharged. It had been off the road for at least 11 years or so, and the rego was on hold. There were no keys, the condition was unknown and they could not confirm it ran. Excellent, my sort of car then! Long story short, I took some time off work, borrowed a truck that could tow a trailer, and made a trip up the line to see if I could win the car, with a plan to bring a trailer back the next day if I won it. We get there, and there it is, in all its glory. Look at that little face, what a nugget. I'm not sure how long it had been up on the blocks, but it was certainly in "barn find" condition, dust and all. It's clear that it hadn't been touched in a long time. The interior was.... disgusting. Everything was covered in dirt, or mould. On the plus side, it still had all the original features, like the cool seats and steering wheel with WORKS horn button. How good is the dash cluster though The little F6A twin cam 660cc turbo engine would love to rev all the way to the 7500rpm redline. The car had been converted to manual, and wasn't quite in showroom condition, with peeling paint, the horrible interior, and a large dent in the front RH guard, which had slightly damaged the door and bent the hinges Worst of all though it had rust in both sills, and the rear boot seal lip was just crunchy flakes at this point. Still, I wanted it. I found the keys to it (on the keyring for the Wagon R next to the Alto), but didn't try to start it. Long story short, the bidding started at about $200, and there were a handful of us bidding on it. Suddenly it was jumping up in hundreds, and only two of us were left bidding, in the thousands now. I had a firm budget in mind but the guy I was bidding against was there to win. Not once did he drop his hand. I hit my limit, and bowed out. I later heard from someone else there, that the winner had wanted an Alto Works as a garage ornament for years, and was prepared to pay whatever it took to secure it. It was not to be. Hopefully he got what he wanted, and it sees the road again one day. So, I did what any reasonable person does and began to obsess over Alto Works. Old ones were cool, but had the inherent issues of being old, and harder to keep on the road. I knew of the newer HA36S models from 2015, and although I always loved how they looked with their angry face, I had never seen one in NZ and didn't think I could afford one. But as it turned out, between the sale of the Yaris, and Lucas, I suddenly had a healthy looking bank account. The next problem was the fact that as far as I could tell, when I started this process, there were none in NZ. I had been curious about the importing process and buying from auction in Japan, so got in touch with an importing broker, who agreed I should be able to get what I want, with the budget I have. The HA36S Alto Works comes in a few variants (including the Turbo RS, which is more common but didn't come in manual and is a bit less "hard core"). I wanted manual, not black or red, and preferably 4WD. I bid on a few cars at auction in Japan and just kept falling flat. Despite watching auctions for a bit before I could afford to jump in, the prices were suddenly thousands of dollars more than I was expecting. Not only that though, 4WD ones were proving rare, particularly ones that weren't from the snowy northern regions. After bidding on a couple of dozen cars, and missing out (one, a nice blue 2wd one, by only a few hundred dollars, which ended up being imported by another Kiwi and now lives locally), I finally had one on the hook. It was 4WD, manual, wasn't from the north, in silver, and had good KMs. It was grade 4, and had minimal damage marks on the sheet. It looked nice in the photos, but Japanese auctions are very limited in the info and photos they provide unless you can get an inspection. In this case, it had a couple of exterior photos, and an interior one. No underside or engine bay. I did spot and liked the slightly wider flares, and aftermarket muffler though. I liked it. I contacted the importers, who translated the auction sheet and gave me some bad news. It had underbody coating, and some rust. Not to worry though, in their own words, "for around $2000 trade rust repair will be carried out under the supervision of the repair certifier and come with a repair certificate. It will be sandblasted and rust treated and painted black. Rust repair is in fact a good thing, your car will be protected from future rust and will pass every WOF for a long future". Sounds good, but to be sure, I ordered an inspection at my cost. In the mean time, knowing that it'd only be a couple of grand to have it blasted and coated, I submitted my bid, factoring that repair work into my bid. It was all the specs I wanted. The auction came and went, and I heard nothing, and no inspection results were provided. Guessing I had lost it, I went to bed that night and forgot about it. I woke up the next morning to two emails. One, at 10:51PM "YOU WON A CAR TODAY!" and a second, at 11:03PM, the inspection result with photos from the inspection. Handy. Well then, I had an Alto! I was excited. I looked over the inspection photos, and noticed some spots of rust I would rather weren't there, like in the bottom of one of the doors and around the engine bay But other than that, nothing really concerned me. The underside had been undersealed and there was still some rust in the seams, but nothing a couple of grand of repair work couldn't fix This is where it started to go pear shaped. I got an email from the importer, asking "are you sure you want to import the car, we don't know how bad the rust is and the rust work costs could be higher". Based on the photos, I was still confident it wasn't that bad. Heck, I could've fixed most of it in an afternoon with a wire brush and some rust killer. Also, I had agreed to buy the car already, I didn't know at this point rejecting it was even an option. I said to continue. The invoice for the car comes through, and I pay promptly. Yay, I'm getting an Alto! Three days later, I get another email. This is where the scaremongering really kicked up a notch. They had "spoken to compliance" and would need the engine removed to repair the rust, plus sand blast, plus repair cert $$$$$. "Good thing the car will be protected from any future rust" he continues to say. Suddenly the repair work was being quoted at approx $5000. Well, I own it now. I've paid. What other choice do I have? About two weeks of radio silence later, I get an email from the boss. It failed border check and has been flagged for rust. That was expected, they fail any signs of underbody rust. The advice was to abort, and send the car back to auction, otherwise the potential repair costs were now "$8000++". That's a lot of money for a car that was already going to be $15,000 landed, on the road. I weighed up my options. I could import it and risk the costs. Or lose my $1000 deposit, get a refund and either try again, or find a different sort of car. I chose the latter. I rejected the car, and asked for a refund. That was the end of that car He agreed to refund my money, less the deposit, by the end of the week. Happy days. The money didn't arrive. I wasn't too worried though, I could use that money to bid on another car; so I was still looking, and bidding in the mean time. I was advised to stick to higher grades like 4.5, and to avoid anything that mentioned rust. In order to be sure, they wanted to get an inspection on any car before I could place a bid. The funny thing is, now they could suddenly get an inspection to me before the auction closed, unlike the one I won. I found a nice looking blue one. It was manual, 4WD, 67,000km and grade 4.5. It sounds like a winner, so got them to get an inspection with the intention to throw big money at it. The auction sheet said nothing about rust. I actually found this car later listed on Beforward (another importing site), listed in the north, in Hokkaido. Not a good start. The inspection came through quickly, well before the auction time. Externally, it looked very nice. The drivers seat was worse for wear. The bolsters were squished, and the fabric looked very worn and gross. Surprising for 67,000km. But worst of all. Rust. It wasn't as bad as the one I won, but it was there. It was on suspension components, on the sills and worst of all, coming out in the seams in the engine bay. Clear signs of having spent time in the snow. Keep in mind, this was a grade 4.5, with no rust noted on the auction sheet! I decided not to bid on that one, I couldn't take the risk again. There were a couple more, but only one that was really notable, made me very angry, and was the nail in the coffin of my importing experience. Manual, 4WD, silver, completely stock standard, 117,000km on the clock. It was the spec and condition I wanted, in the Ks I could afford. It was a grade 4. I wanted it. I asked for an inspection, and sure enough, it came through with plenty of time to spare. And it looked GOOOOOD. It was spotless. New AD09R tires all around, the underside was clean, no sign of rust, the interior was nice. The body even had minimal dents and marks. Someone had looked after this one. I was very excited. It was perfect. Nothing could stop me now. I placed a very generous bid on it, to make sure I would win it. I didn't win it. It sold for well under my top bid. It went for less than my last one. Why did I lose it? Because they chose not to bid on it, based on the recommendation from the person in Japan bidding on the car. Why? because of this dent in the rear quarter panel. Apparently that would "need a repair cert" to import. I threw my toys at that point. There is no way a dent you can barely see would stop that car being imported. My closest guess is they forgot to place my bid. I was angry. On top of that, I still hadn't got my refund. Twenty two days after I was told it would be refunded by the end of the week, after me asking repeatedly, I received a partial payment of about a third of my money, with an excuse that "Japan was holding the money from him" but he could "manage it next week". Next week came and went. Just shy of a month later, after a rather terse email, I received anther partial payment of less than half of what was left and yet another excuse, about the car having not sold (not that that was ever a condition or term of the refund, that's what the deposit is for), but that it would be sorted. Two weeks later, and my patience was done. I threatened court action to recover the remaining money. I was sick of the broken promises and deadlines. Two days later, I had the rest of my refund, in full. I know it's not the norm, but the whole auction and importing thing just left me feeling really bitter. If I didn't know two people now who have used their service (albeit at least in one case, not completely smoothly either), I would've wondered if it were a scam of some sort. The auction system itself seems to be broken and the auction grades mean nothing. A grade 5 is as close to a new car as a used car can be, so a 4.5 should be near new with some minor marks. Grade 4 should still be very good, with a couple of slightly bigger marks. So why were the grade 4 and 4.5s so junk? I have heard reports of corruption in the system too, where sellers have paid for higher grades, but I don't know how true that is. Long story short, I was left $1000 out of pocket, with no car to show for it, and a bitter taste in my mouth. I'm very glad I could even get a refund; although the Terms on their site allow for it, I still wouldn't have been that surprised if they tried to decline the refund, or wait for the car to sell first. Don't worry though, not all is lost. I gave up on importing, but I didn't give up on an Alto Works.1 point
-
I've always loved Kei cars, but when my partner and I were in Japan earlier this year it was basically decided that we had to get one. So when we were able to come up with an excuse to get rid of the Leaf, we pounced. And hey it may be our new daily, but there's no reason it can't be a fun daily, right? Introducing our freshly imported 2019 Suzuki Alto Works. It's the HA36S chassis, FWD, manual transmission, and the previous owner was nice enough to kit it out with some KYB springs and shocks, an aftermarket muffler (perfect level of bubbly I3 noises), and classic-style enkei wheels (though the OEM wheels are also enkei, and I'd probably have chosen a different style, but they're growing on me). Also growing on me are the leather seat covers, front and back, which must have been made specifically because they perfectly wrap the stock recaros and rear bench. There's some stuff to do. First thing we did was give it a thorough clean, the sea journey really does a number to it, we still have to do a bit of a polish because there's some deeply ingrained gunk in there. But it came up pretty nice with a quick soak and the car's paint is immaculate. The japanese owner had some some other random stuff too, like hack apart the console for his stereo (which he then kept when he sold the car and blanked it out). I've got a new stereo to put in that should effectively hide the edges. He also put a random button in (also seen in shot) that turns on some footwell lights. Not really sure why. Also a bunch of bits of padding in the door and boot jams, I guess to stop rattles or something... clearly it works because the only significant noise in the car is the exhaust note. More frustratingly, he debadged the car. I snaffled a new boot logo from Japan, and managed to wrangle the part numbers for the awesome side decals, but they'll cost $800 to get here so will probably hit someone up locally to reproduce them. Compliance gave it new brake pads and wipers and I did the rest of the service - replaced oil and filter, new air filter, new cabin filter, replaced the coolant (old stuff was just water so happy about that), and now that I know where the fill plug is I'll replace the transmission fluid. I also have some new plugs that I'll get around to putting in. Better safe than sorry. The oil looked nice and see through and the filters were lightly used, it's a 122kkm car but has been well looked after. Tiny filter! The little thing can really go despite having a 660cc turbocharged engine. It's limited to 64kW by law but with only 690kg, decent torque and some amazing handling it can really get out of its way in a hurry - and sound great doing so. We've owned it for a week now and turn heads everywhere we go, it's funny seeing people merge in behind us to try and figure out what the hell we're driving (good luck without that works logo on the boot) or how they got chopped by a shopping trolley going up Hayward's. One of the cool things about this car being a modern enthusiast car is that it's pretty big in Japan. They've got accessories and mods flowing out of the stores over there and it's an awesome change from having to deal with the Starion or even the MX-5. The cars we worship are yesterday's news over in Japan, so it's fun to be near the cutting edge of what's hip. Plans for the future: - We've already ordered a huge wing for it ;3 - LSD - Upgraded turbo, wastegate, intercooler and intake system - Tuned ECU - Sweet stereo system - Dashcam (have installed a decent front+rear one already but didn't take pix) Napkin maths says with all of the above this thing will have a better power to weight ratio than most sports cars... but the Starion takes priority, uh, mostly... for now.1 point
-
No, purely hoarding them - Despite all advice to do something with them. Same goes for all of her bulldozers/hovercraft/heavy engineering equipment from the 30s to the 70s.1 point
-
@76rolla_gurl did1 point
-
Cleaned the switch pads Carefully cleaned the plastic isolator and installed the new pcb And back in the keyboard I'll give the key caps a clean before final assembly1 point
-
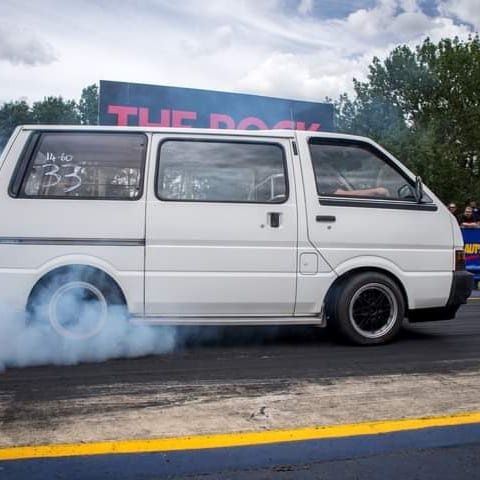
https://youtu.be/NkqrAkC47kY?si=xV532fGI7k3Sk2Zr o/s drags, just for fun-times diddnt get any better-so was just a good day racing different cars. Its got a stainless 3 inch front pipe with a screamer on it haha Couldnt afford the drag radials
1 point
-
New games console just dropped:
1 point
-
Black Friday was a busy day for purchases, most have arrived. Returning back from Canada in February for a month and will probably take a day just to sift through all the boxes of goods. From Flos.ie: T50 Rebuild kit - includes bearings and syncro's AE86 rear caliper rebuild kit x2 toyota bolt kits for 4A-GE and AE86. handy to have AE86 axle gasket and seal kit From jspfab.com 4A-GE billet alternator mount 4A-Ge Small port billet fuel rail From battlegarage-rs.com: AE86 radiator support grommets (will need to fab up some bottom radiator mounts for the chassis( AE86 reproduction handbrake cables (hopefully these are fairly bolt in...) AE86 front wheel bearing kit From RockAuto.com: outer/inner tie rod ends lower/upper radiator hoses master cylinder to suit TE27 T50 chassis rubber mount U-Joints (may or may not work, but for $20 a pop they went in the cart) AE86 Slave cylinder AE86 diff wheel bearings From eBay: Full weather strip seal kit, doors, front/rear windscreen and also the quarter glass KE2X front suspension full bushing kit (LCA, RCA, Sway bar etc) KE2X rear leaf spring rubbers From aeroflow: Full brake line components to do the lines from scratch for the car. The plan is do internally do the hardlines and keep as much out of the engine bay as possible. What a list of parts that took to do 20231123_133812 by phillipbaines, on Flickr 20231129_114049 by phillipbaines, on Flickr 20231130_115850 by phillipbaines, on Flickr 369614281_265637686127074_8864140772265512620_n by phillipbaines, on Flickr 371525757_1390195848577597_8157815245025420762_n by phillipbaines, on Flickr 384562657_368923975694554_5263749068142941737_n by phillipbaines, on Flickr 404957639_398279992532980_7428382900749870146_n by phillipbaines, on Flickr 385545074_365483589195832_2746782362506946816_n by phillipbaines, on Flickr Picked up a set of volk mesh 6.5" wheels, could possibly look to relip 2 for the rear to make a bit wider but think i'll flick a pair and then try nab a pair of 8" wheels from Japan. I need to fit the diff first though and see what i can actually squeeze under there i-img900x1200-17008152302pqs6m7 by phillipbaines, on Flickr Also a set of advan mesh 6" wheels i-img1200x1124-1700185932wnwzz22418398 by phillipbaines, on Flickr alt by phillipbaines, on Flickr rail by phillipbaines, on Flickr That will be all for now. more to come in February when i'm back in New Zealand Discussion:1 point
-
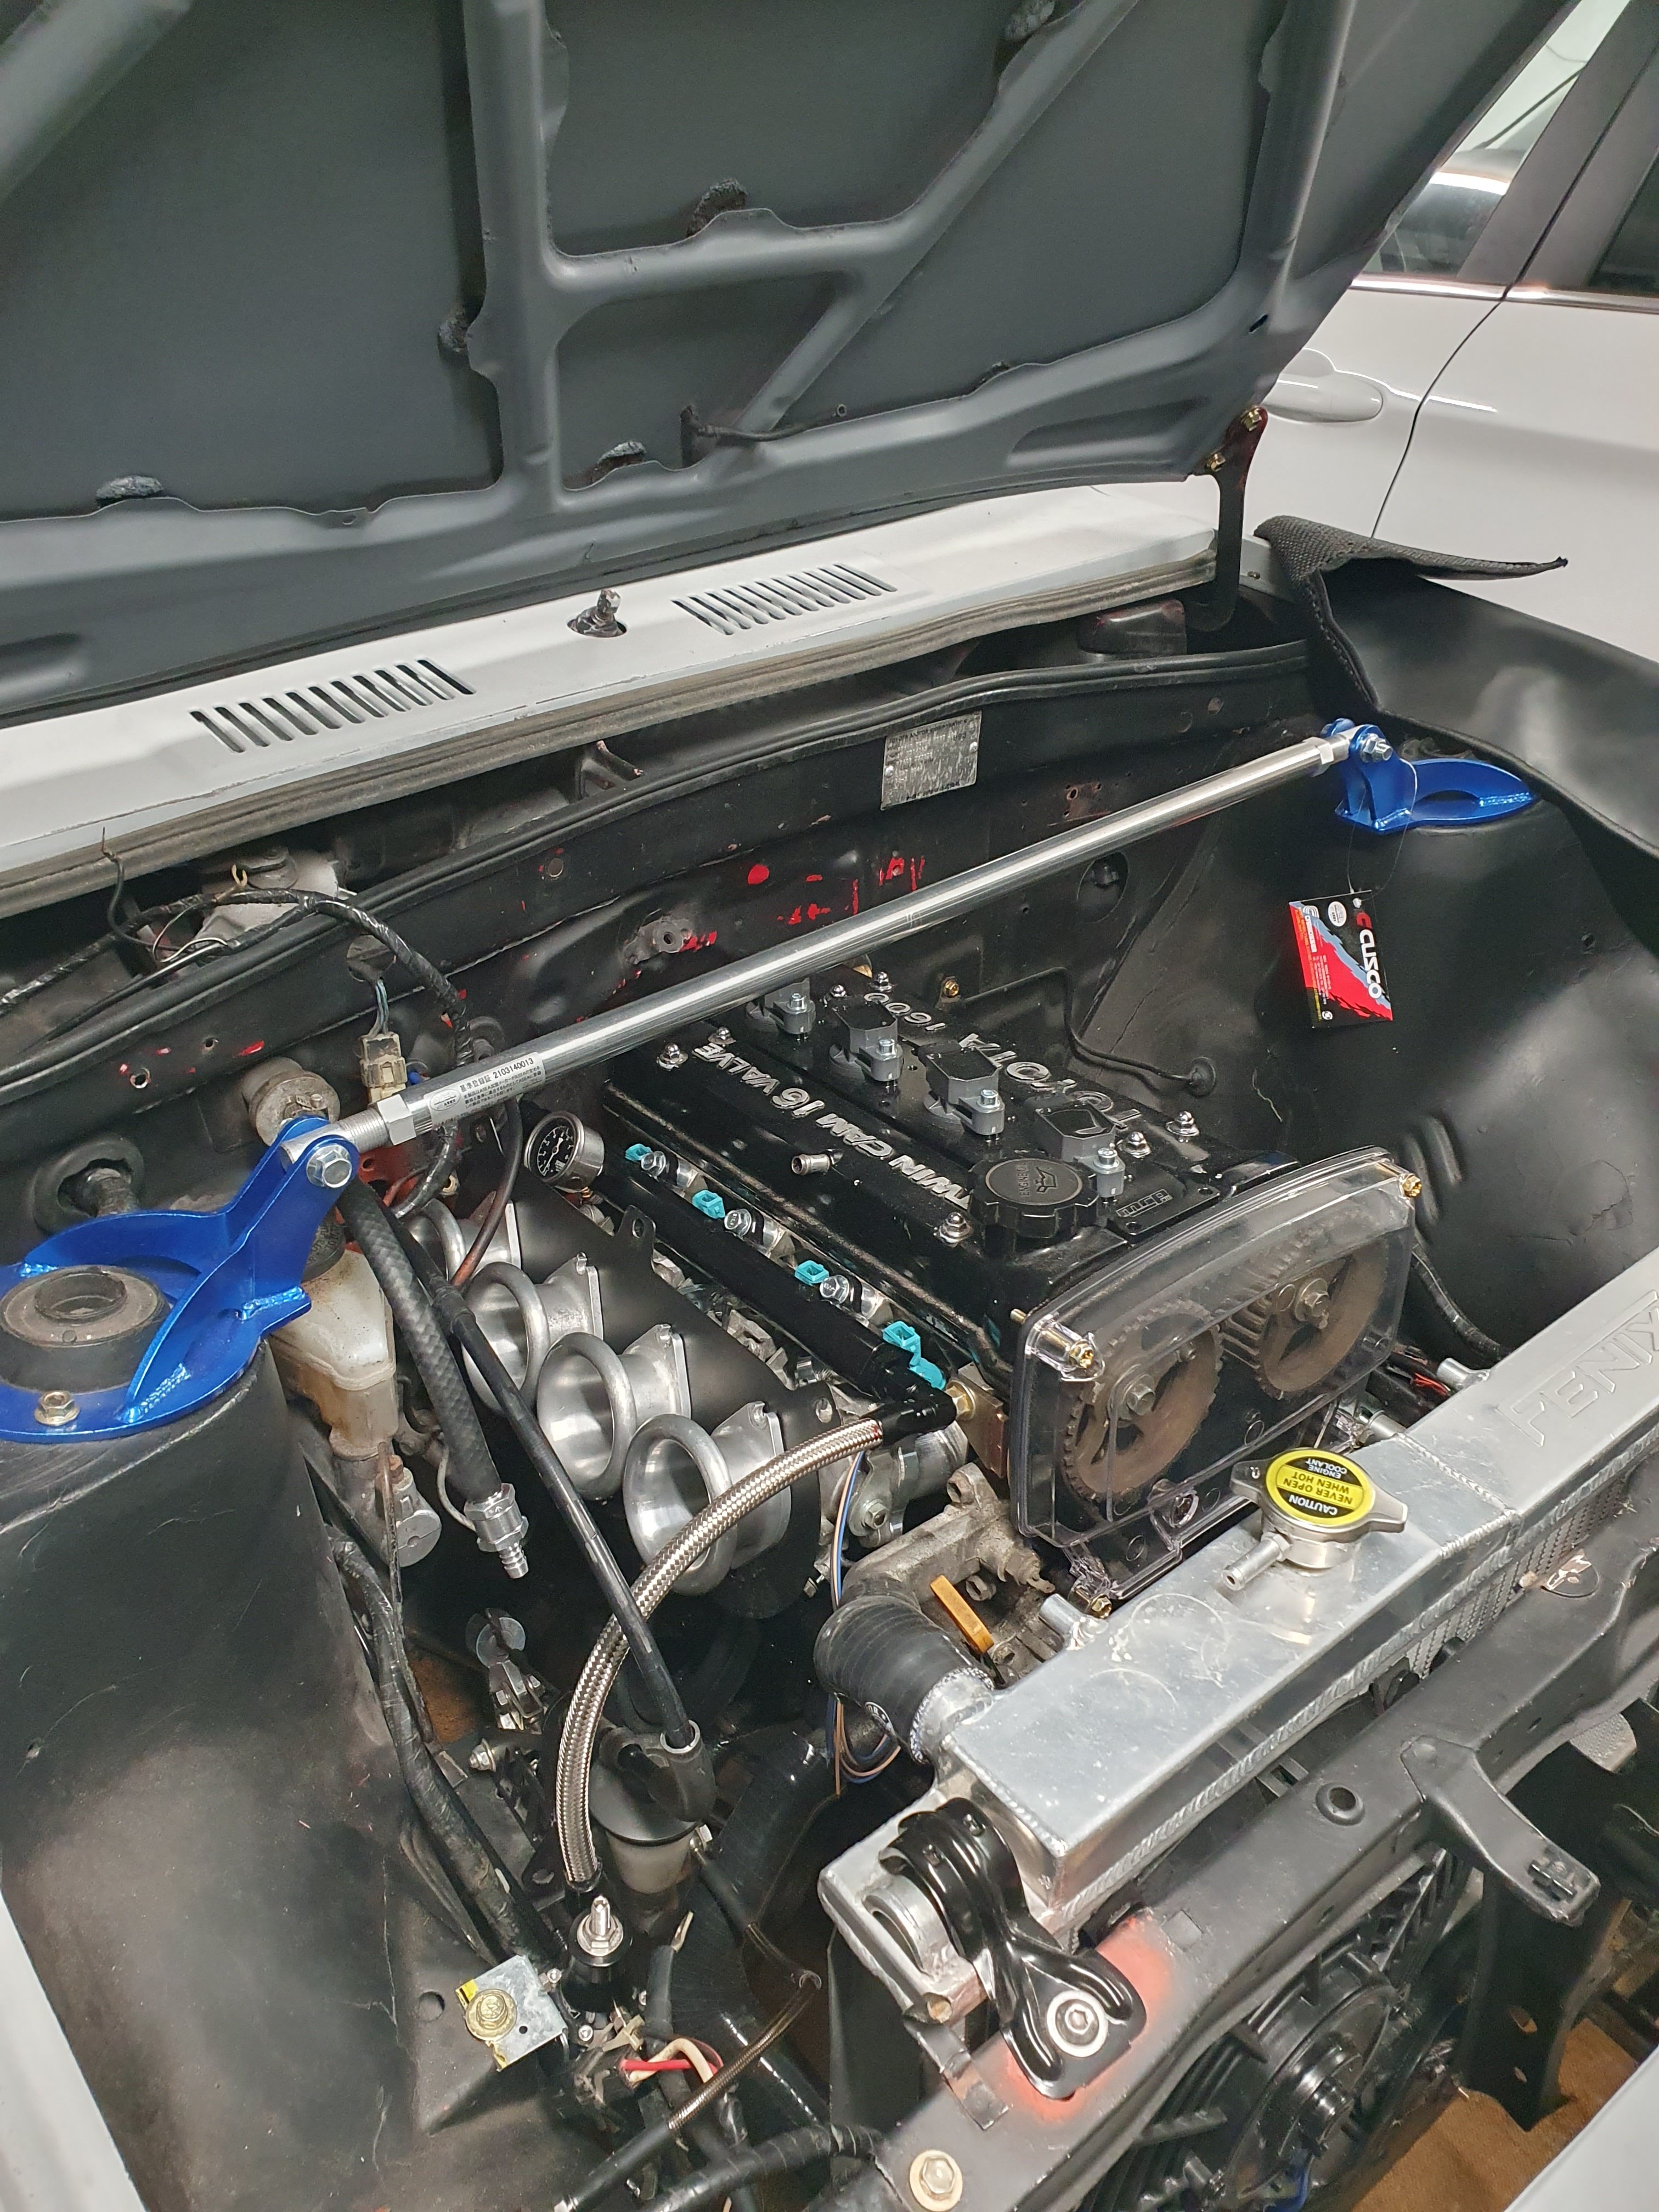
Better get on with things, the first start is looming over me........ (now that I'm a Dad, shitty jokes are acceptable). PM me if youre after a loom made from a MaxxECU dealer, my mate who is doing my car has made it very easy! Few more packets of Haribro gummies and we'll get there! Shout out to Shyam: Get Grounded It's looking far too crowded for my liking but the 50mm trumpets look great. They are BT trumpets on ST throttles so something will need to be done about that. Looks like I will be able to get a ITG filter on after all. (EDIT: too keen on the filter update, no, I cant run the ITG filter).
1 point
-
Post sound insulation I reinstalled the underlay and carpet. Looks like new... or just like it did before I mucked with it. Seats and trim panels back in. I also got a guy in to replace the drivers seatbelt so once the driveshaft is back in it is good to go. Then I tried the rear windows again as they are a bit tight. The passenger side went up then slightly down before binding and going bang. The new regulator is now bent along with the vertical guide. Obviously it was not properly aligned and bound up. Fuckit. I'll deal with that later. Running out of cash to spend and fucks to give on windows for a while. I'll get it running, warranted, maybe do the shocks and bushes and then bother with windows again.
1 point
-
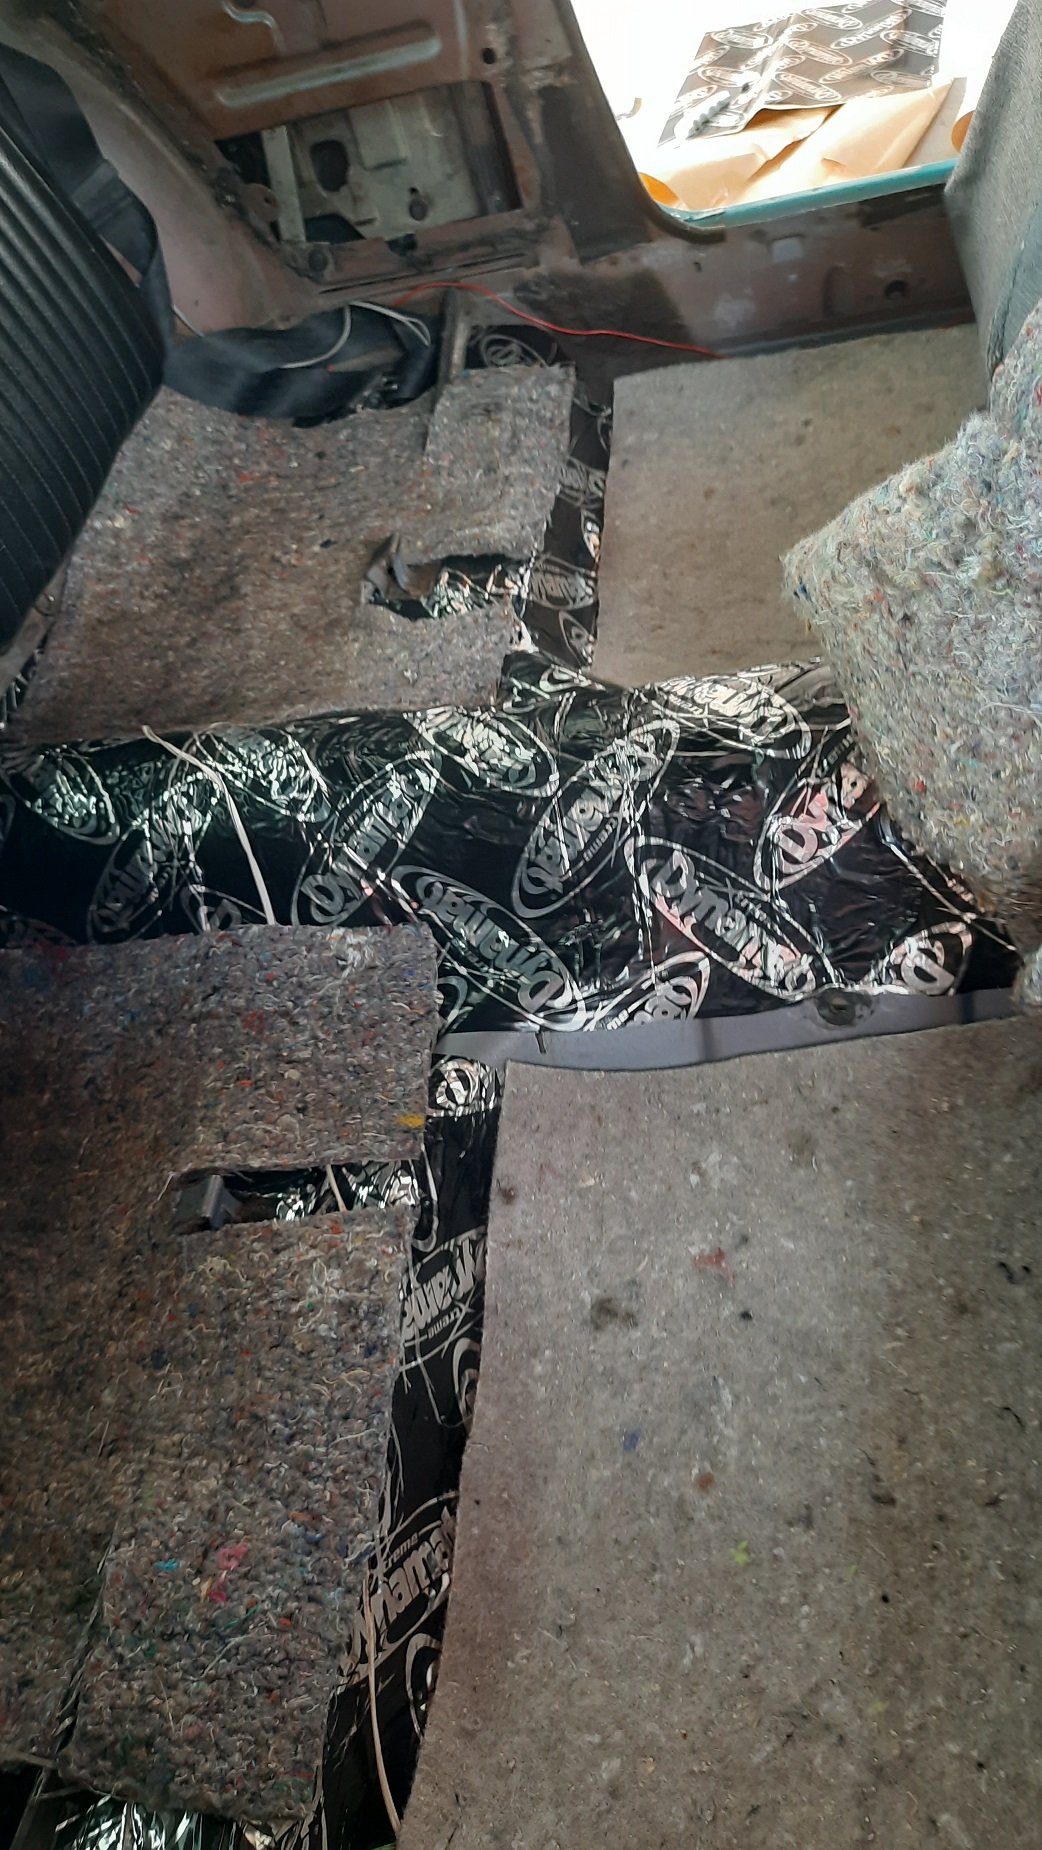
Finished the sound deadening. There was a bit of red stuff under the drivers feet, and no original sound insulation. I'm picking there was a bit of a leak so they removed the insulation but didn't treat anything. I gave this a wire brush and sprayed some rust converter. I didn't have any POR or Brunox so I just sprayed some primer and flat black. Didn't take a photo. The passenger side still had the original sound insulation Ripped it out again and this side was much cleaner than the drivers side A couple of mats and tape and it is now all covered except under the front seats.
1 point
-
Whipped the tailshaft out and got it to the drive shaft shop. Below is the front yoke (with dodgy extra section welded in) I can't remember whether this is drooped or ride height. The drive shaft is probably second hand and was probably fitted and possibly lengthened after the the car was un-lowered. It is a 3" tube with a 2 1/4" section at the rear yoke connected in via a rubber joint. I hadn't noticed it so didn't take a photo but the driveshaft guy pointed it out. Chucked in a bung to stop loosing the fluid, thanks whoever made that suggestion. Not sure what I'll end up with. It will need to be MASSIVE to take all the TORQUE from the 289 though. It will likely depend on what yokes and tubes the driveshaft shop can get. It was also suggested that we lengthen it by 15-20mm as he likes to only have 25mm extra gap at ride height. Hopefully I can drop down to 2.75" tube to save a bit of weight since I don't need 3" tube which is a bit chunky.
1 point
-
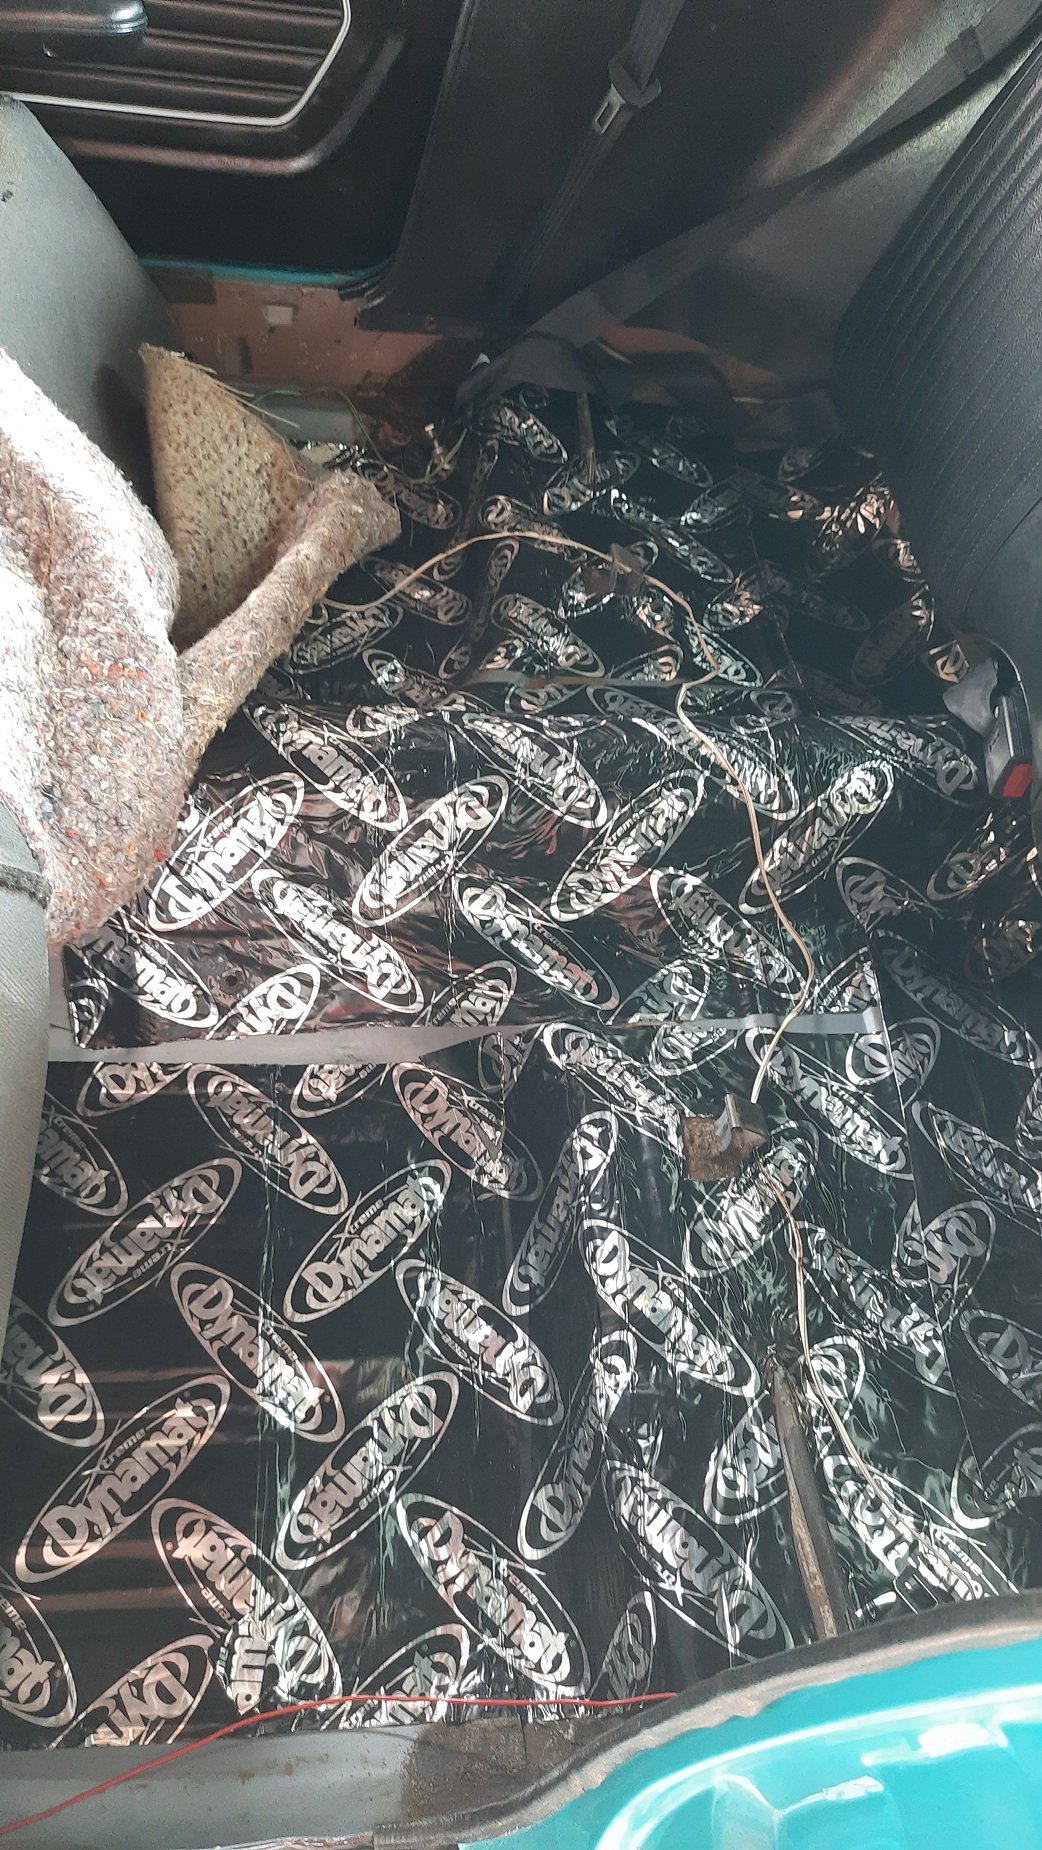
Finished up on the sound deadening in the rear. Just worked with the carpet pulled back. Dynamat is much easier to use than I thought. Got it all laid nicely and then put the underlay back on top. I then had a go at refitting the chrome trim around the drip rail. I used a bit of Dow Corning 4 silicon grease on the rail and it slipped on reasonably easily. The right hand side did not play the game nicely though. I could get it on in places but not all the way and didn't want to smash it on. I think the thickness of the paint makes a bit of a difference I may try again later or just get my panel guy to give me a hand for 5 min. (or 30s probably) Side with no chrome: I also jacked up the car and measured the driveshaft. It is about 35-40mm between the spider and the diff yoke once disconnected and pushed fully forward (at ride height) which I think is about right. I just need to check if the driveshaft guy can make a new one minus the extra welds and dodgyness. With it up in the air it is less than 5min to get it out so easy job.
1 point
-
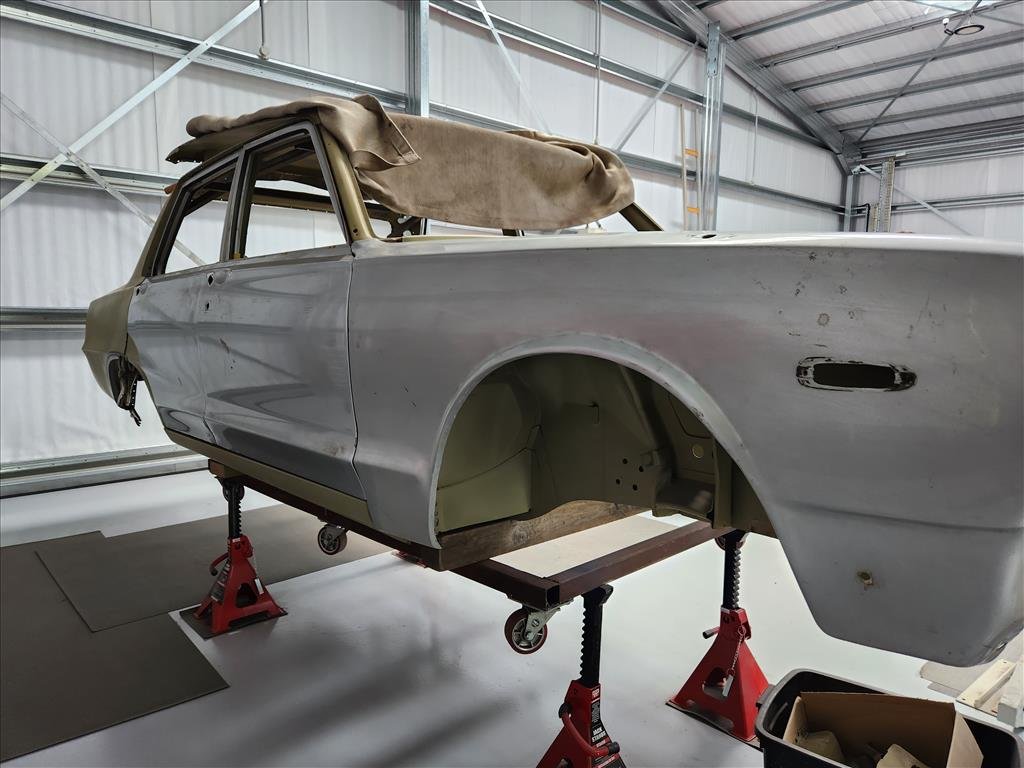
When I was back in NZ recently I made a trip down to see the old girl at panel Barry's shop. Nice place he's got and it's sure a long way out of the way! Can't imagine the fun transporters have going down there. She's come a long way and yet, there's a long way to go. We went over what's been done and what's still to be done and he was happy to show me things that he's worked on and the tools etc, nice guy and extremely knowledgeable. I'm happy the car is in his hands. Next step once he has completed up the other rear arch edges and lined them all up is to put the car on a chassis machine to get it as straight as possible, he happens to have one in-house. While that process is taking place the doors will be dipped to see what we're working with as a couple of them are messy around the bottom and one for sure is definitely full of bog.
1 point
-
This is amazing. A one family owned survivor still in working order. How well does it hold a tune?1 point
-
It's a slippery slope... A friend of mine has a shed with 30 or 40 pianos in varying states of repair.1 point
-
you were right! i shouldn't have read that.1 point
-
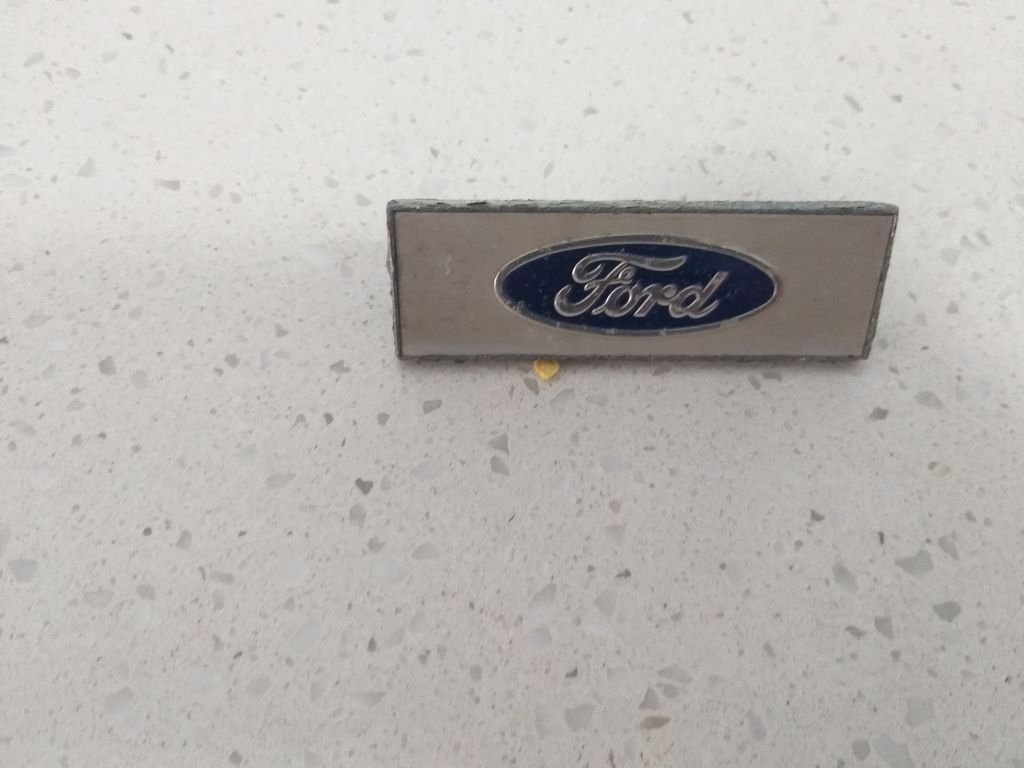
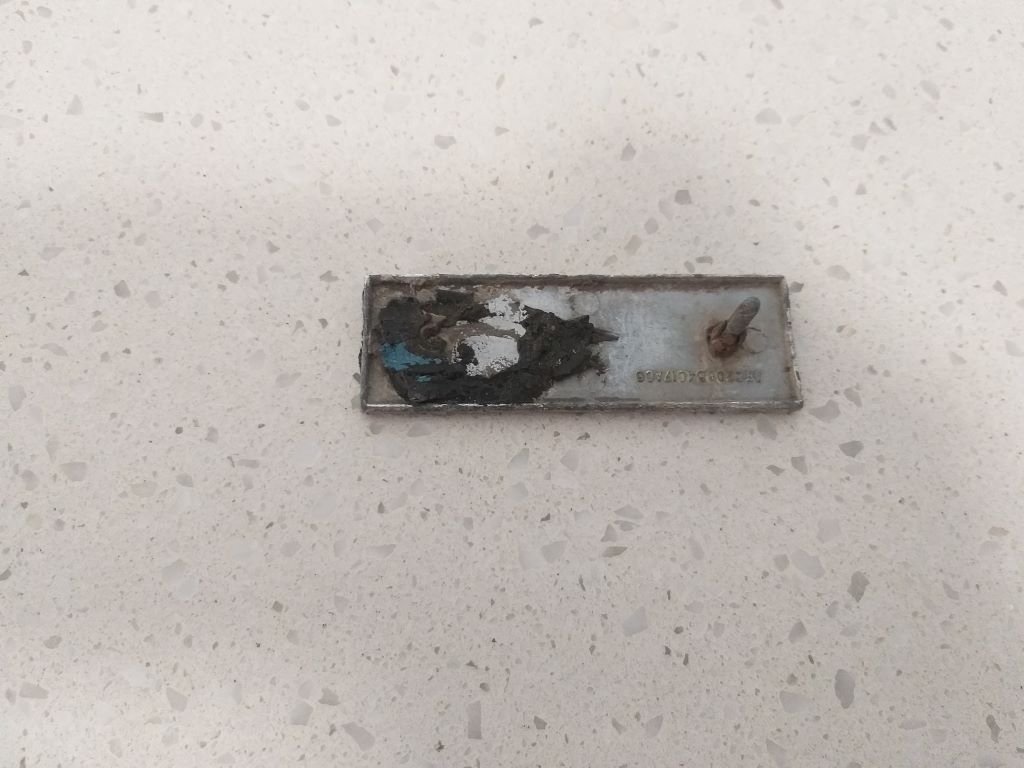
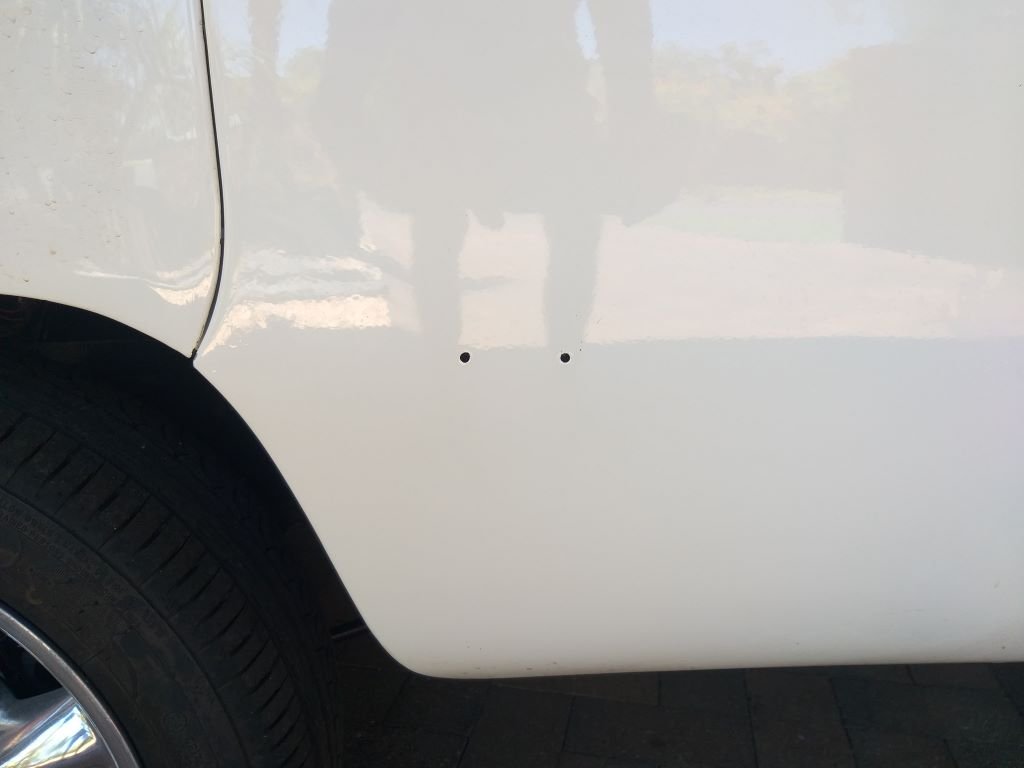
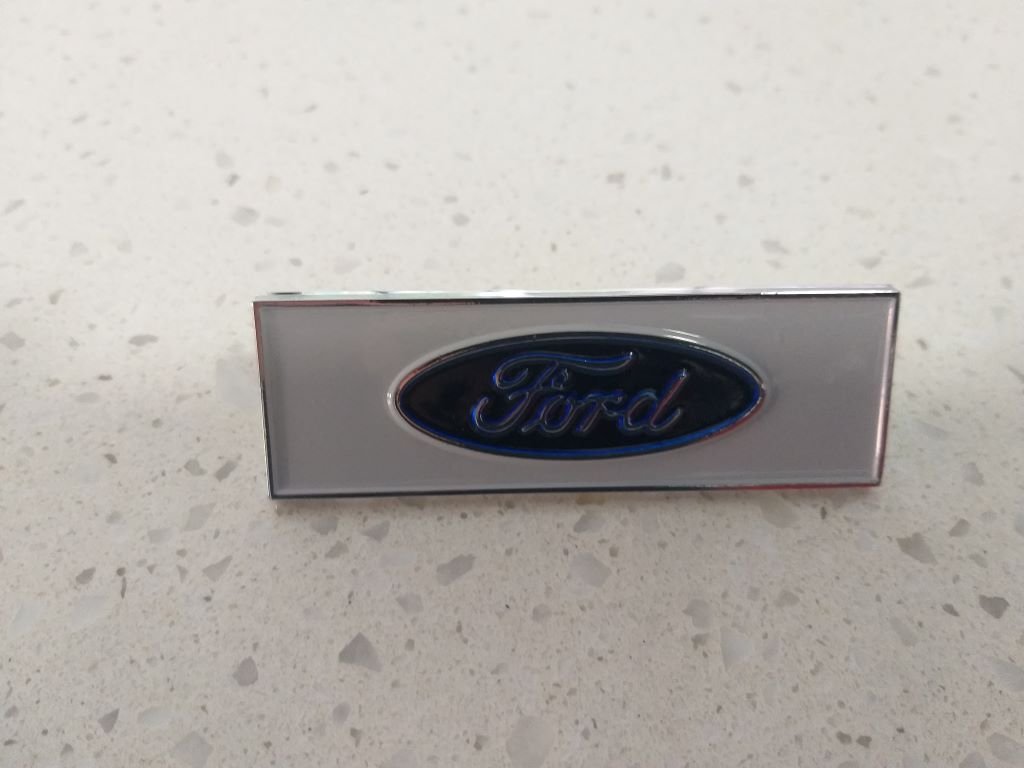
Small job today. Way back in 2019 when I bought the van it came with a box of bits that hadn't yet been fitted by the panel beaters. Lurking in the bottom of the box was a sad looking fender badge. I could have fitted it, but somewhere along the line one of the mounting pins had broken off and in the past, someone had done a bodge job that I wasn't keen to repeat on the fresh paintwork: So, I've been rocking these two bodywork holes for way too long: My OCD could no longer handle the situation so I did some research and it turns out that these badges are common across the early Cortina, Capri and Escort range. I managed to find an onshore supplier and yesterday this pitched up: The same supplier sent me two fresh press clips, so I slapped the new badge on and everything is right in the world again. Thanks for looking.
1 point
-
The front drop spindles and disk brakes finally arrived after about 9 months of waiting. So chucked them on, the calipers didn't clear the 14" wheels, but we had a 14" HQ Holden rim sitting around to test fit and they just had clearance. So got a pair of them to run on the front. Went to America for a couple weeks a month ago and brought back a bunch of goodies in my suitcase. Twin antennas, body mounts, tail lights lenses, steering column rebuild bits, driveshaft centre bearing, accelerator pedal, fender ornaments etc. New port wiper motor aswell, since the original one never worked and I couldn't get it working. and a CPP power steering box. Had the power steering pump and reservoir on the LS so thought it'd be nice to have it. The CPP drop spindles pushed the steering arms out 19mm each side, so that made the Ackerman angle pretty much zero. I asked them if they made any steering arms to rectify it, but nope. I guess Americans can just heat them up and bend them to suit. Drew some new ones up and had my brother 3d print the prototype. All looked good, so had them laser cut out of 20mm mild steel. Also shortened them up for quicker steering too. On to the front airbag mounts now. The lower arms aren't quite flat, so welded another piece of 3mm on top once the had shaped the main piece of 5mm to suit. Made a compressed size dummy bag for the RE7 air bags. That way I could get the upper and lower mounts the correct height and in line. Used some wooden discs to build up the height on top of the dummy bag and then packed the rest with some resin. This allowed me to push the lower arm right up and get the resin to form the shape of the top spring pocket. Once set overnight I cut it to the diameter of the steel pipe the upper cup will be made out of. That then gave me the cut pattern after wrapping some paper around it to make the template. Steel cup all made the perfect shape to fit inside the spring cup at the top. All fitted with 3/8" threaded rod holding the top mount in place. Still need to countersink the lower plate holes and figure out a bump stop for it. Also new shock mounts made up, basically a copy of the Ridetech ones as that was easy to do. Test drove a truck with the single pot GM brake calipers on it, which are what came with my disc brake kit, and didn't like how they barely stopped it. Dad said he had the same issue with the ones on his too. So decided to make some adapters for some WIlwood Dynapro 4 pot calipers. Made a wooden mock up first, then drew them up in Solidworks and then 3d printed to make sure they were all good. Got them laser cut as well, out of some 16mm and 10mm mild steel. Still got to machine them up to fit.1 point
-
1 point
-
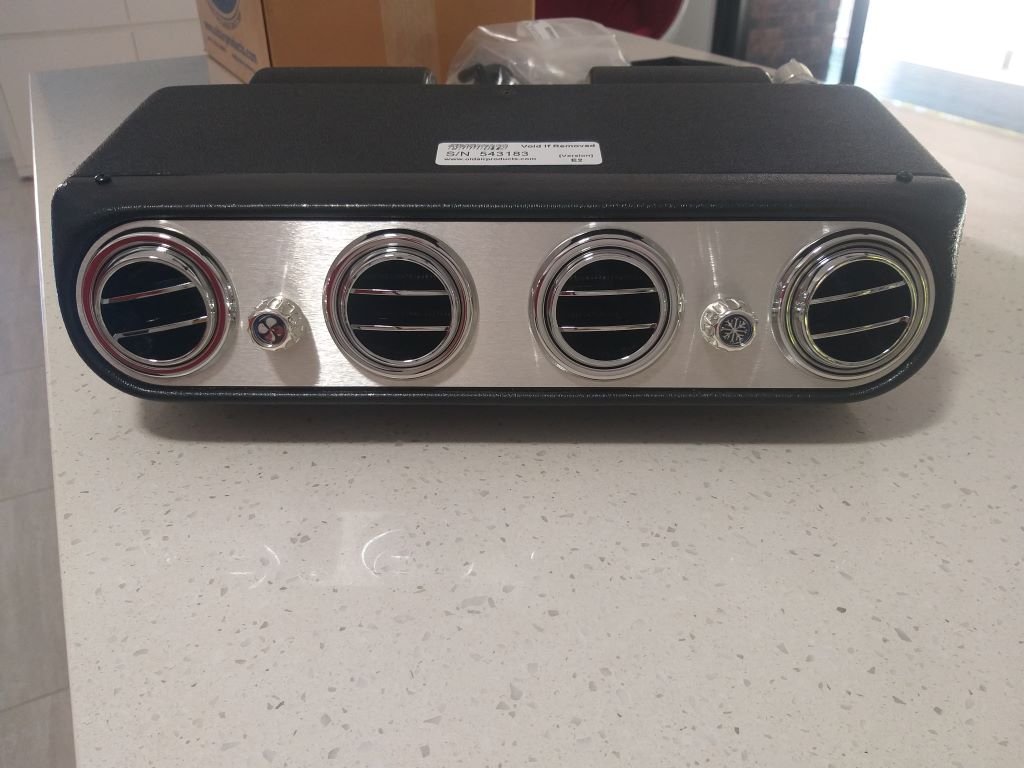
And I've now got the next batch of a/c related bits. Receiver drier with mounting bracket, pressure switch and a pair of adapter pads for my Denso compressor. And then my 23-inch condenser and a pair of 10-inch Spal pusher fans. I can't wait to start putting this lot together.
1 point
-
Well, it's official. The Thames van has taken over daily driving duties from our Mazda e2000 which headed off to its new owner last Saturday. With the cash from the sale burning a hole in my pocket I figured it was time to violently execute "Project A/C" so I hit the "buy now" button on a few bits and pieces and there was much excitement when the courier dropped off the first of the boxes a few minutes ago: And upon opening the box this little puppy peeked out into the light of day: Noice !
1 point
-
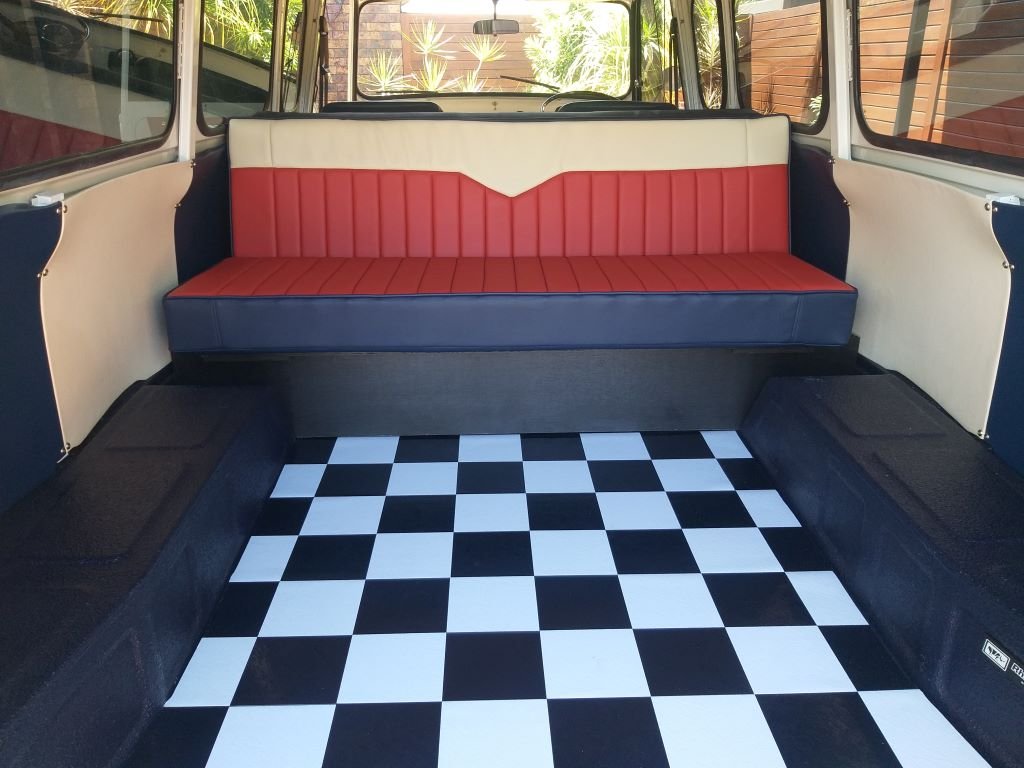
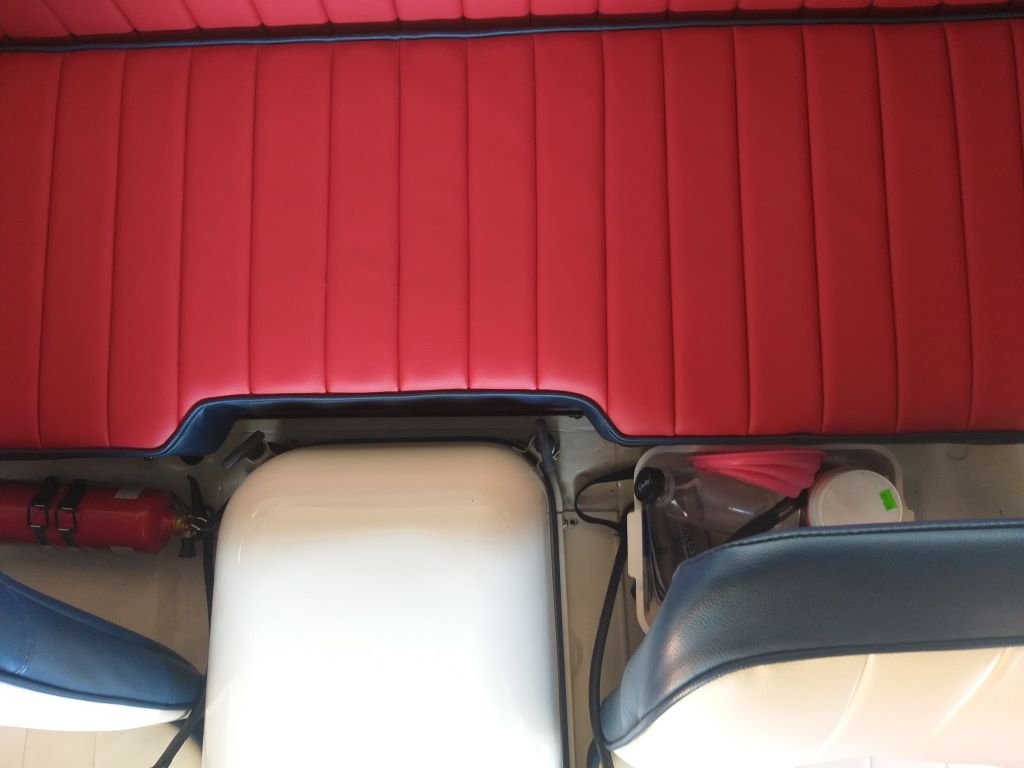
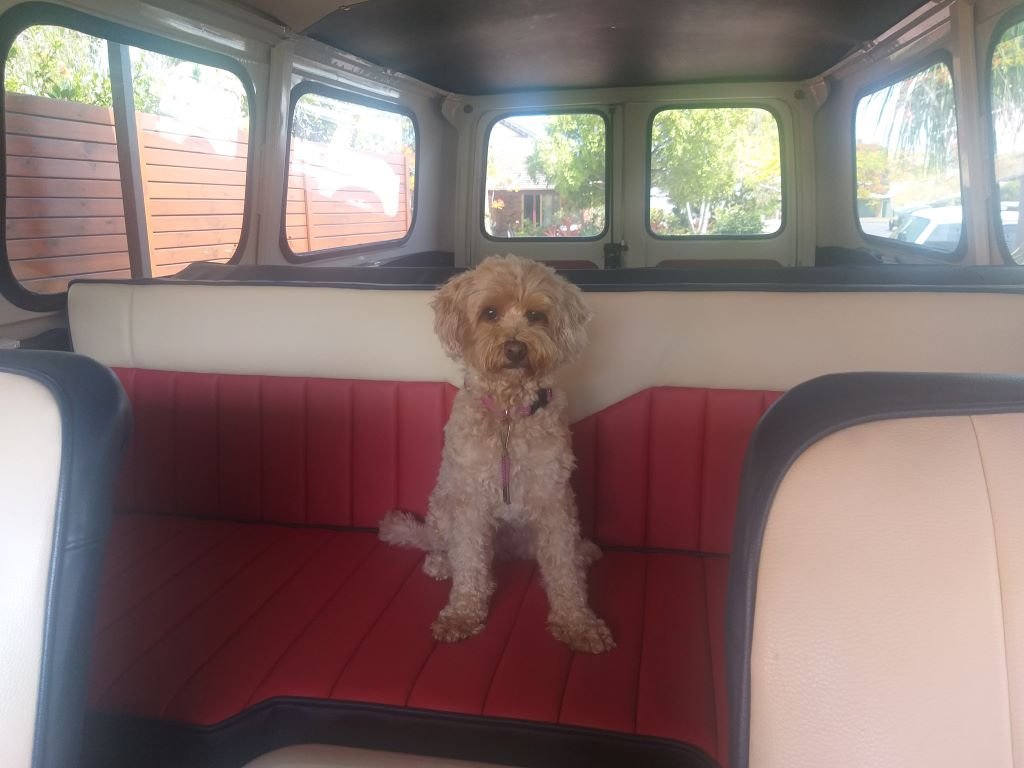
This year is one of those significant wedding anniversaries for Mrs Flash and I, so a few weeks back I asked my lady what she would like. Now most ladies would ask for some new jewellery or maybe a new outfit or two, or perhaps a romantic weekend away at some fancy resort. But that's just not how my girl rolls. Without even thinking about it she immediately asked if we could rather spend the money getting the upholstery work done for the back of the Thames. Jeez, no wonder I love this woman so much. So, with the decision made off I headed to town to visit two of our local upholstery places. The first stop was at the auto trimmers. Now I get that these guys do nothing but cars all day, but I was still expecting the chap to at least comment on the Thames, but not a peep. He noseyed around with a measuring tape and then proceeded to give me one of those loosey goosey "between this and this" verbal quotes where you immediately know that the final figure is going to be nowhere near the bottom figure quoted and you are likely to get very little change back from the upper figure quoted. Anyhoo, undaunted by his lack of enthusiasm I headed off to the next stop which is a place that mainly specialises in recovering furniture. Now as I pulled into their driveway, I spotted this guy scurrying across to greet me and we proceeded to yarn about the Thames for a good 10 minutes before we even started talking business. It turns out that Bill is originally from Masterton where his dad ran a motor trimming business back in the day. The minute that Bill was big enough to reach the pedals on the sewing machine he was put to work and by the age of eight he was already doing diamond stitching which was all the rage back then. We chatted a bit about what I was looking for style wise and Bill was already throwing in some really good suggestions, so I knew I was on to the right guy. We looked at some samples, Bill took some measurements and the next minute Caroline the owner handed me a written quote that was significantly less than the first quote I got. Winner! Roll forward a few weeks whilst Caroline sourced the marine grade vinyl material and some top-quality foam, and I then took the van around for final measurements. Because the cushions are loose, I didn't have to leave the van with them which was another plus. Roll forward another week and late yesterday I got a call from Caroline to say that the cushions were ready for final fitting, so we wheeled through first thing this morning and Bill laid down some velcro to keep everything in place and then proceeded to do the final fit up. To say that we are blown away with the results would be an understatement. The job has turned out absolutely amazing. Rear facing couch looks like so: Bill even shaped the base of the front facing "dog box" so that it clears the engine cover tie downs: And lastly even our doggo seems happy with her comfy wee seat. Thanks for looking.
1 point
-
Ready for wof??? Hmm will see tomorrow. booked in at the local workshop. all lights are working no rust brakes bled and it stops, eventually lol top of the roof sits lower than the top of the well side of the ute. She’s a mission to climb out of now that I’m getting older haha
1 point
-
Seen this in my travels online - 1/72 Revell kit, cut in half.
1 point
-
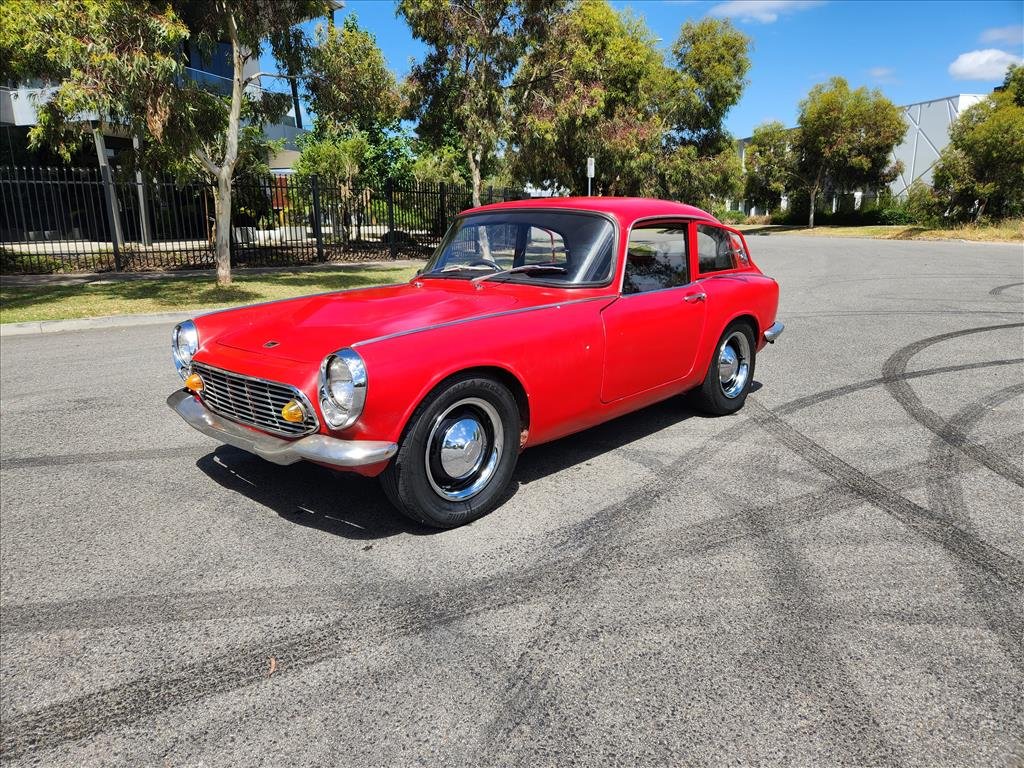
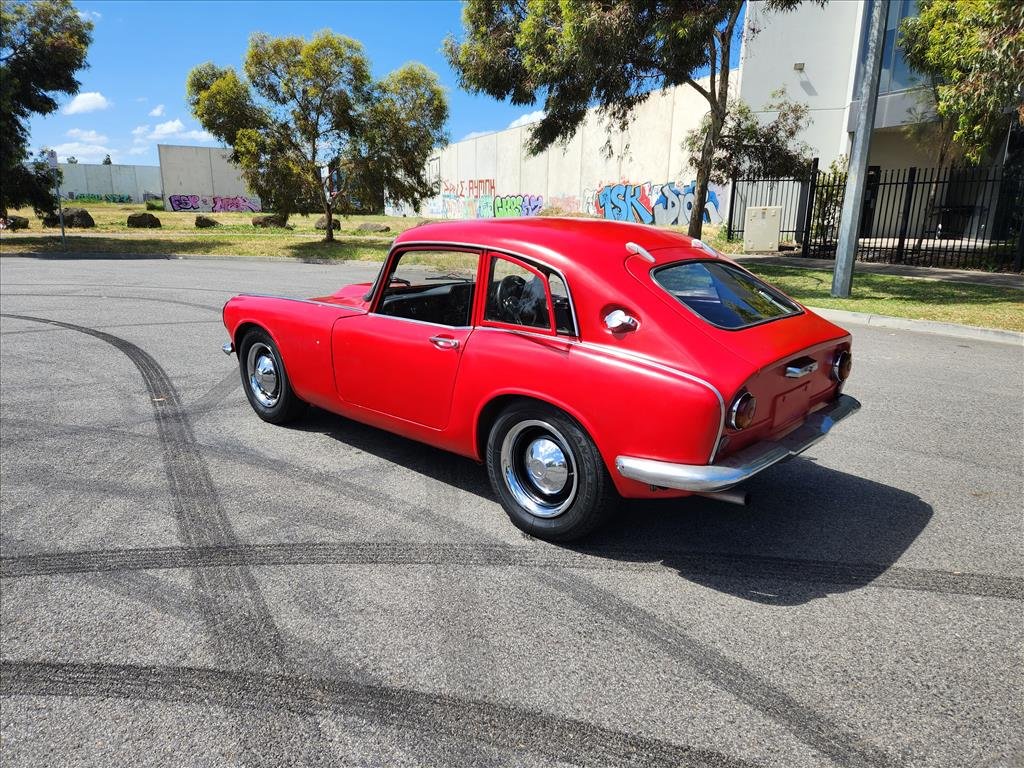
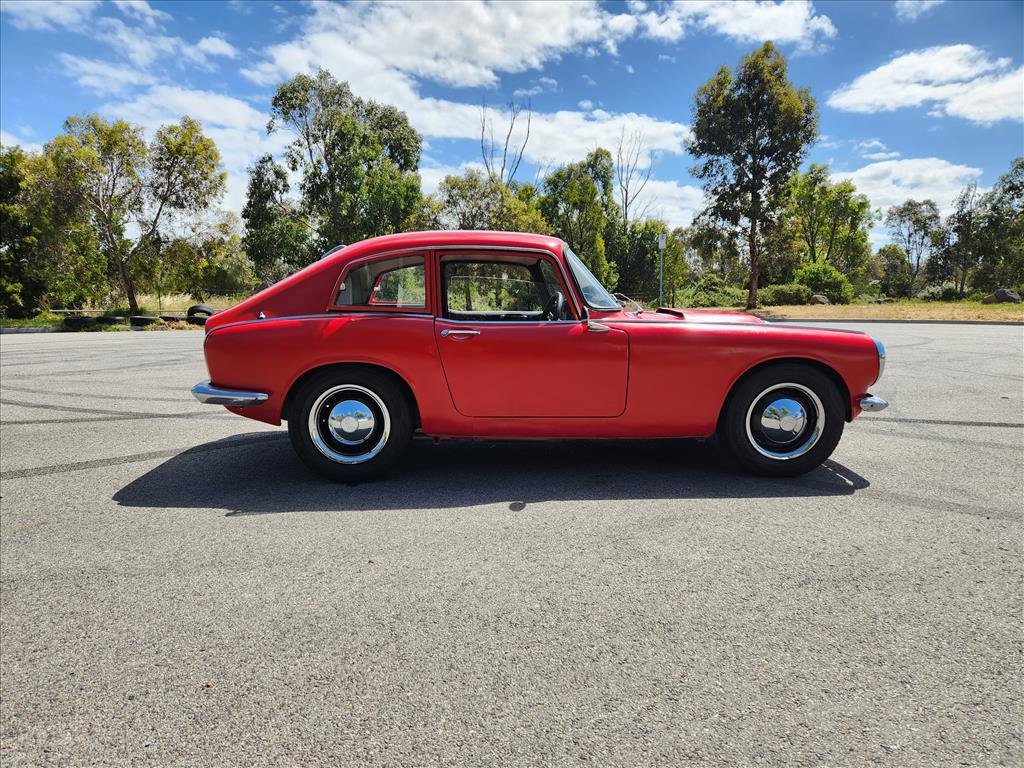
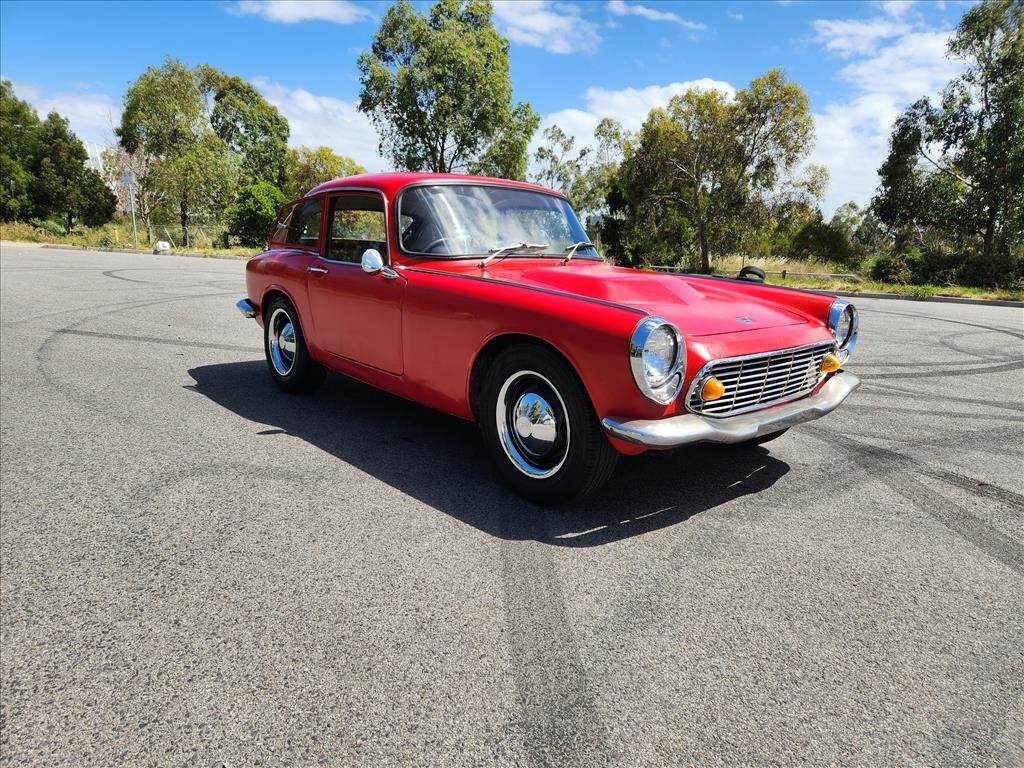
Not much to update recently as I've been doing things on other projects too new for Oldschool but today I cleaned up Barry the S600 and put some of the interior back together as I'll be looking to sell it soon. Just don't get the time to work on it with the other projects and honestly it was more of an impulse purchase being that my mate had it available. So here's some beauty shots.. if anyone is interested or knows someone that may be, I'll be happy to assist with shipping to NZ.
1 point
-
No leaks so far underneath.. I haven't really driven it around since cleaning up though. I did have a closer inspection at the front arms and sure enough there are some lock stops on there. Both of them were wound right in so I wound them out about as far as I could without them falling out but still it hits the inner guard. I could get longer bolts or could just ignore it, probably will choose option 2 as it's the most cost effective solution. Also while I was in there I tried to replace the grease caps for the front hubs but seems like my replacements didn't fit so I just blasted the old ones with some super cheap black paint, turned out about as you'd expect. I'm thinking I need to find some proper toe arms for the front as those old style ones are a bit of a bitch to adjust and the toe definitely needs fixing up. lol S600 is so small
1 point
-
Check out the Marcus Hayes channel on YouTube, he's always ducking with st170 motors in his Mk1, mk2, plastic fiesta and his old man's shitter wagon.. Quite interesting setups with its, weber and el stockos1 point
-
Did a few little pre Beach Hop jobs, changed oil etc. Visited beach.
1 point
-
WOF time recently and needed to replace from tires (wheel alignment damage) and get the rear exhaust fixed (I did a hack job on it as part of the airbag thing). I left the car at Jensen & Moore in Levin for a couple of days for Tony to do his thing. No holes now. The brakes were sketchy when driving home from Levin so had a look at those today, and found a distinct lack of brake fluid in the reservoir for the front brakes. I suppose the Corolla reservoir doesn't have enough capacity for the Falcon calipers as the pads wear down, will have to pay closer attention to that. Anyway, needed a bleed session followed by a test drive.1 point
-
Old and new The Rancho units were a bit longer so I had to dick around with the upper mounts a bit. Got them installed over a lazy weekend. I've done some test driving, adjusted between 5 and 9 (min is 1 and max is 9). Definitely feels better tied down, currently set on 7 which may be a bit too stiff. Made it down an almost 4wd spec track to a quiet section of Te Horo beach during the week.1 point

.thumb.jpg.570970b401ac8d26ce9af7c1bf2bd8cd.jpg)


This leaderboard is set to Auckland/GMT+12:00