
Leaderboard


Popular Content
Showing content with the highest reputation on 10/03/21 in Posts
-
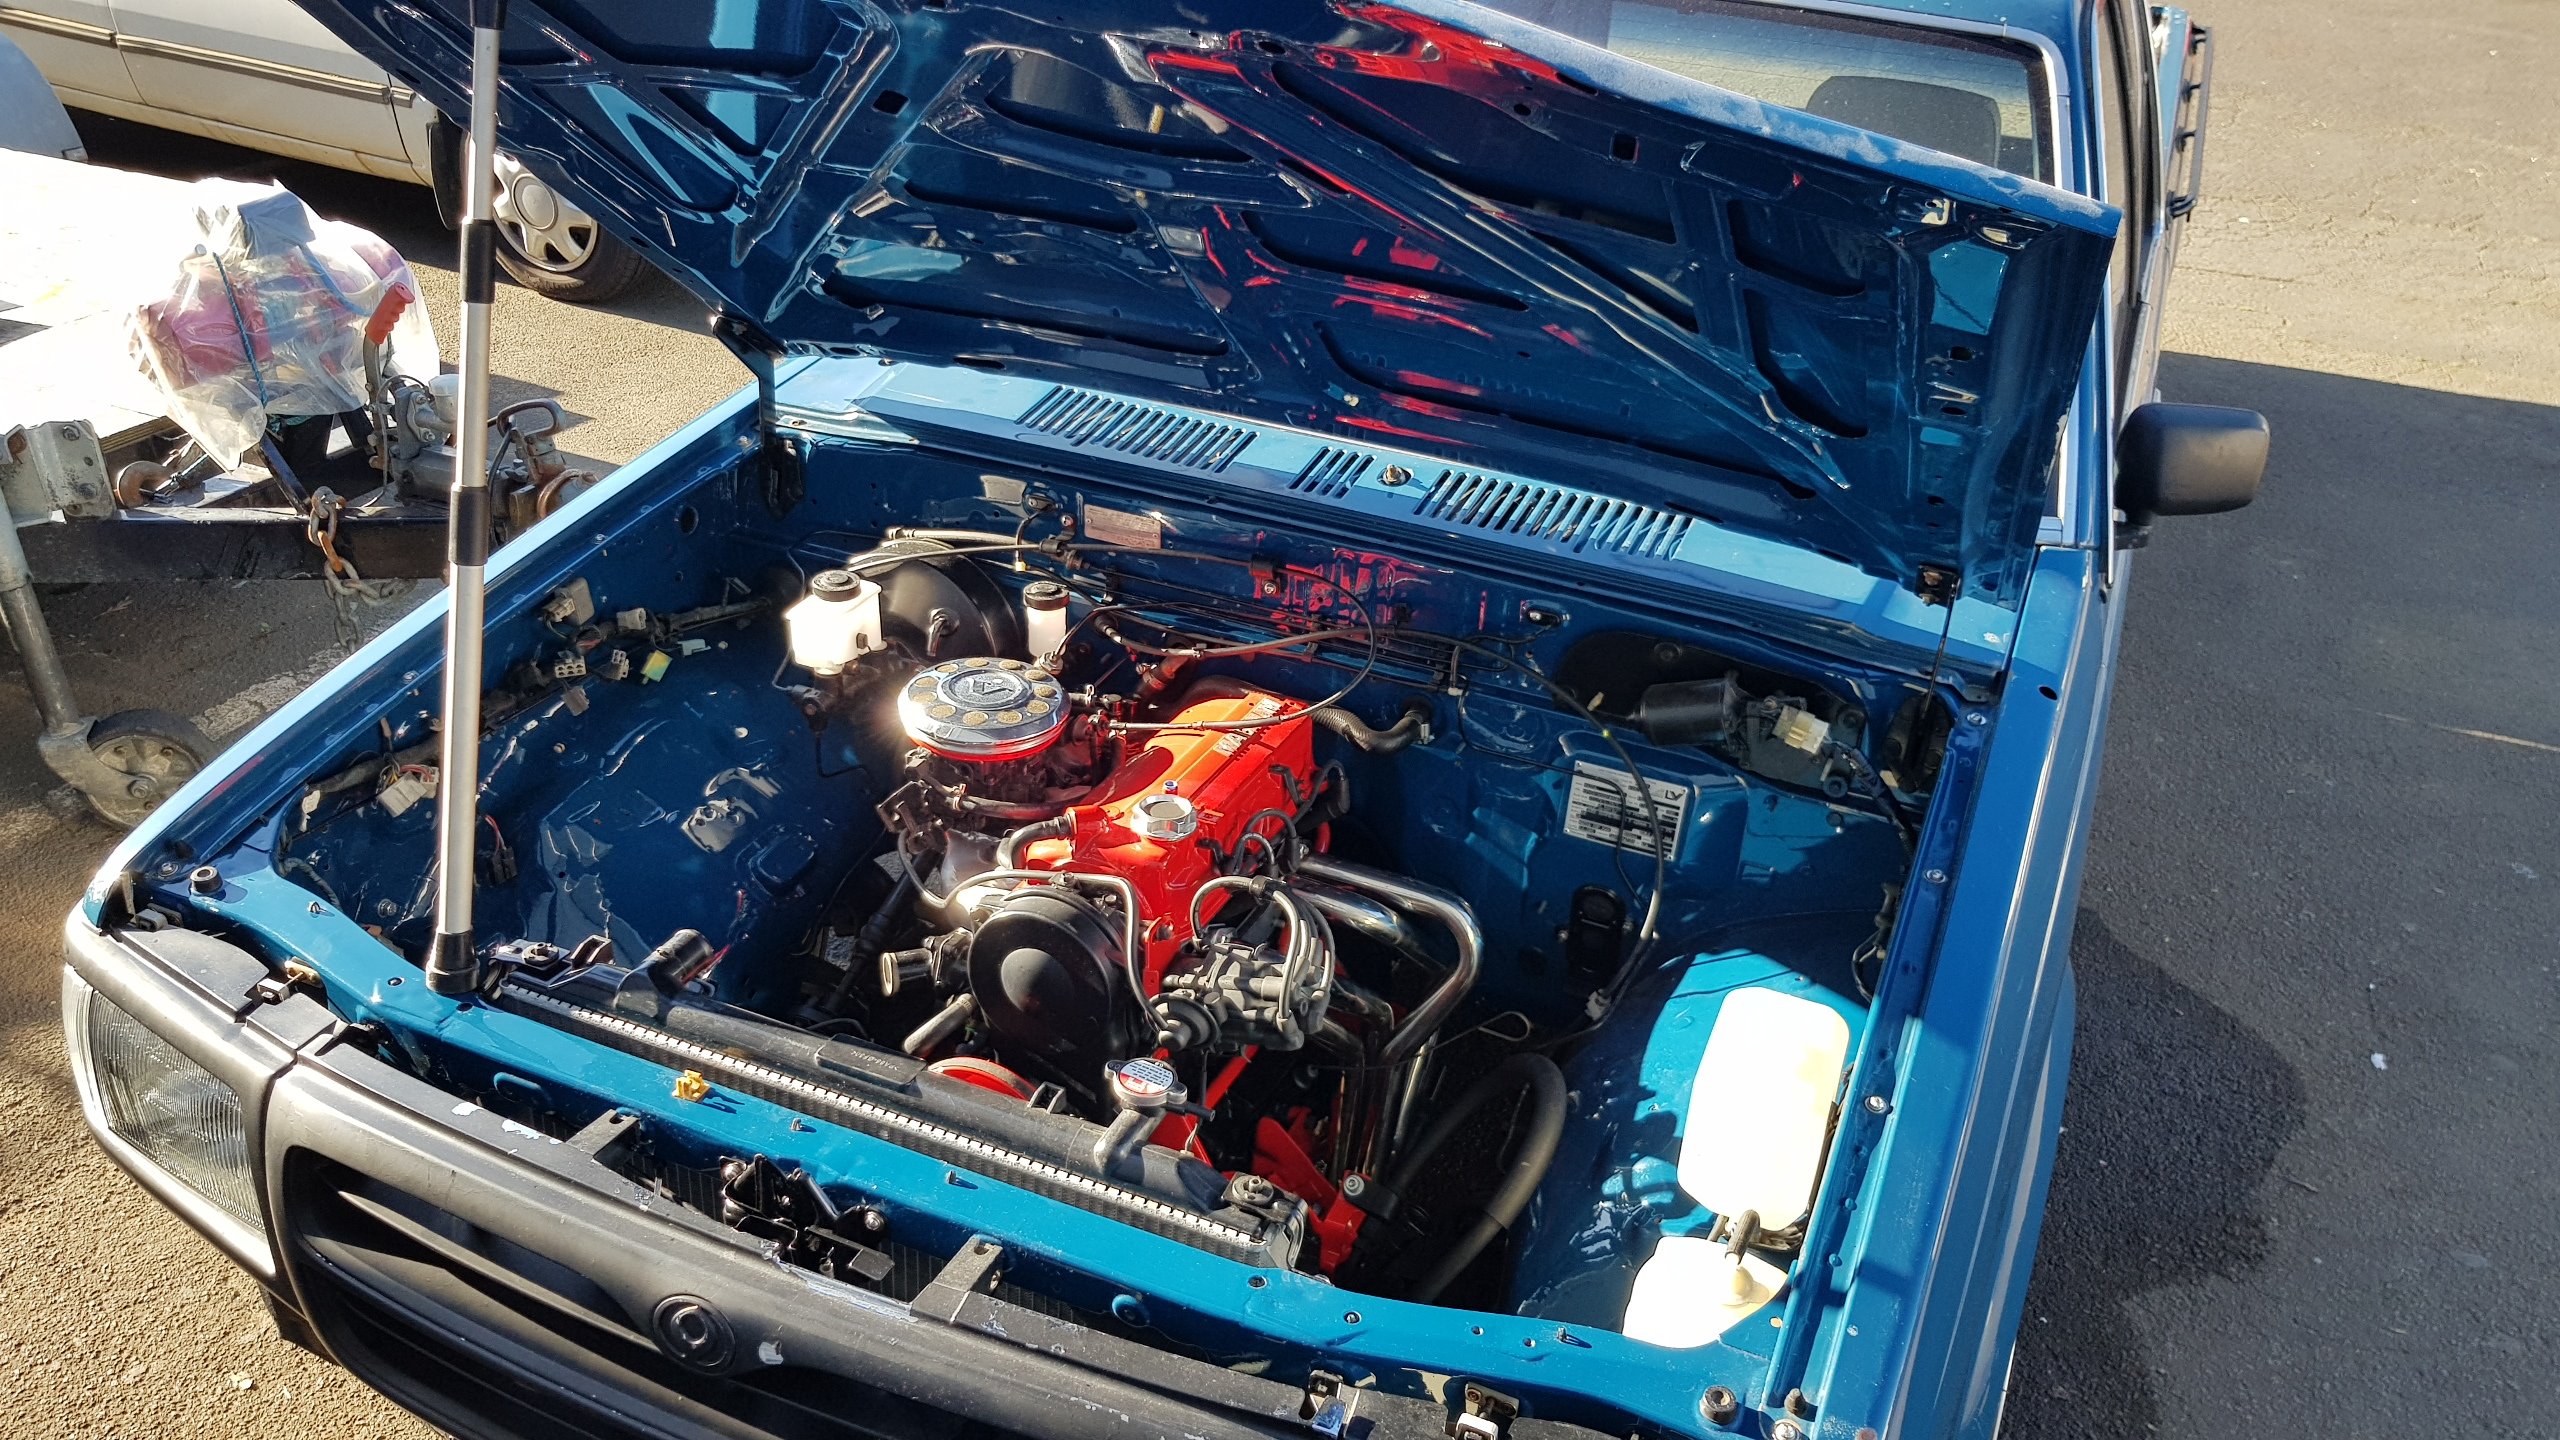
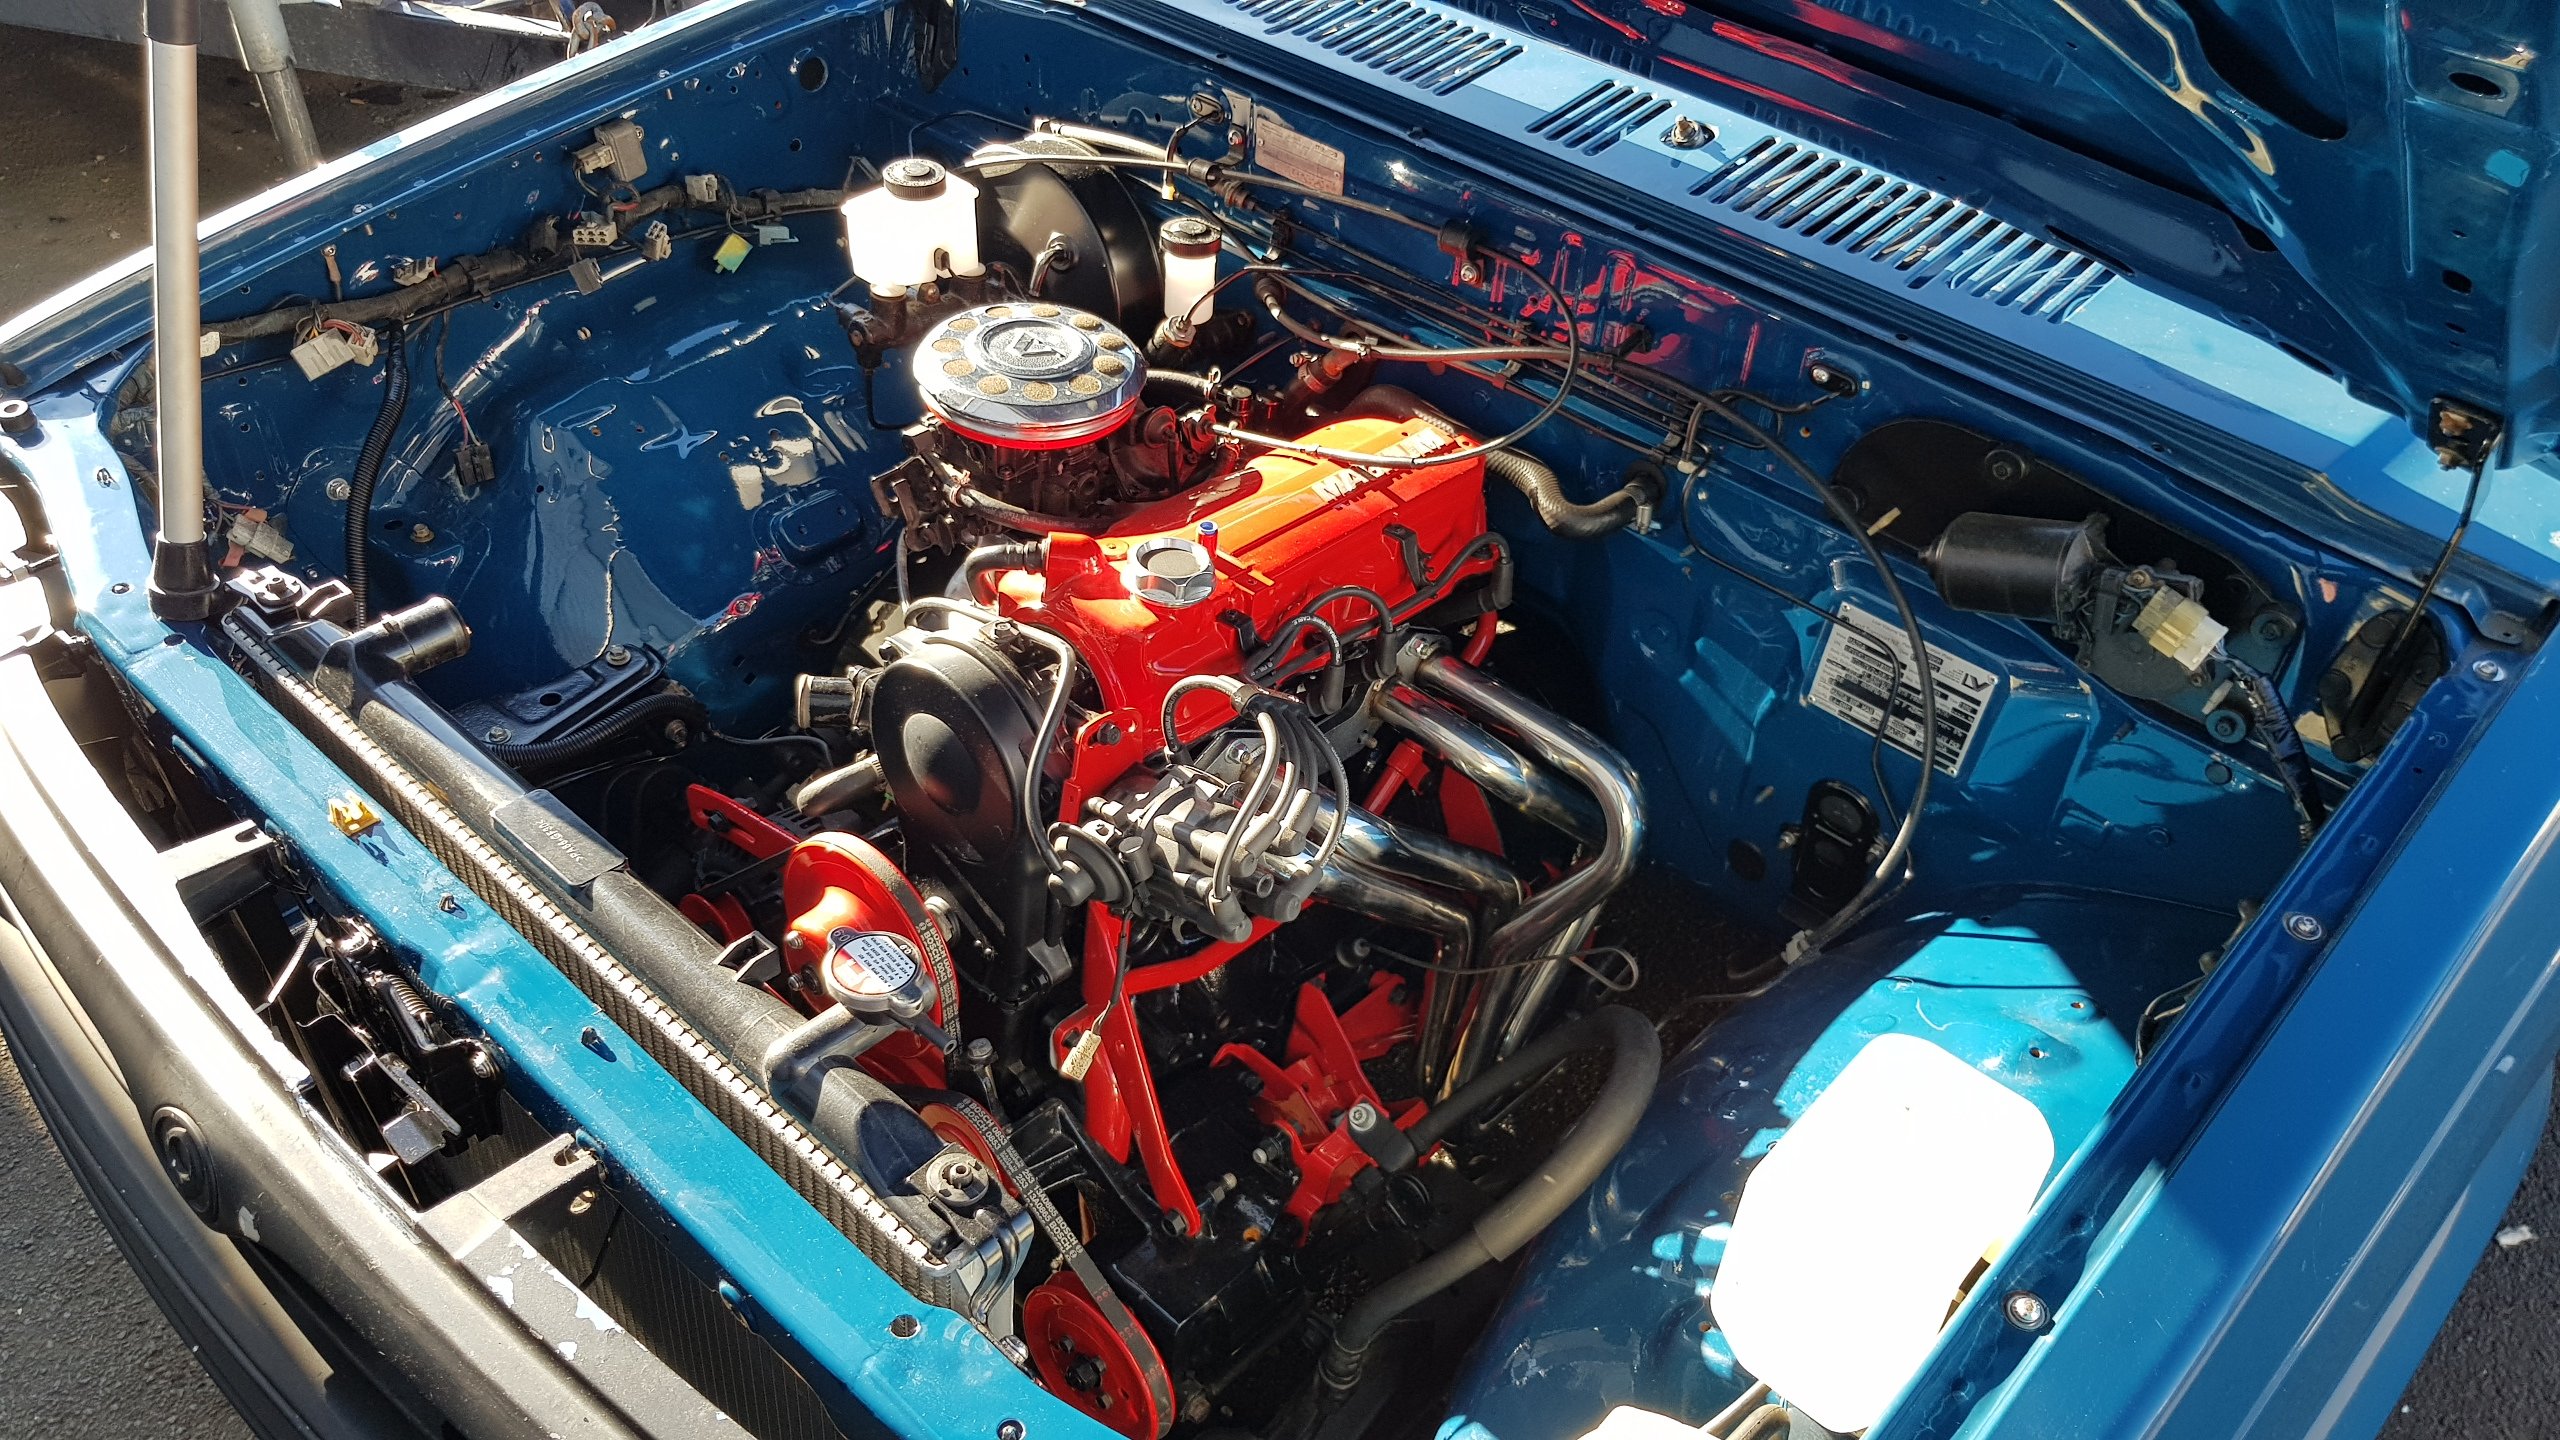
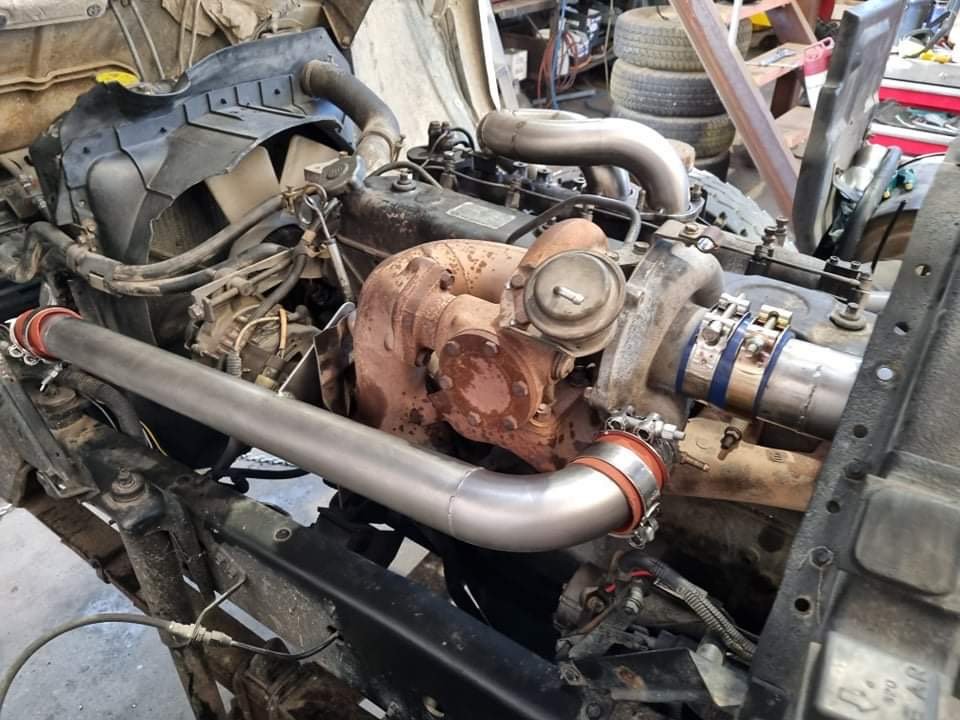
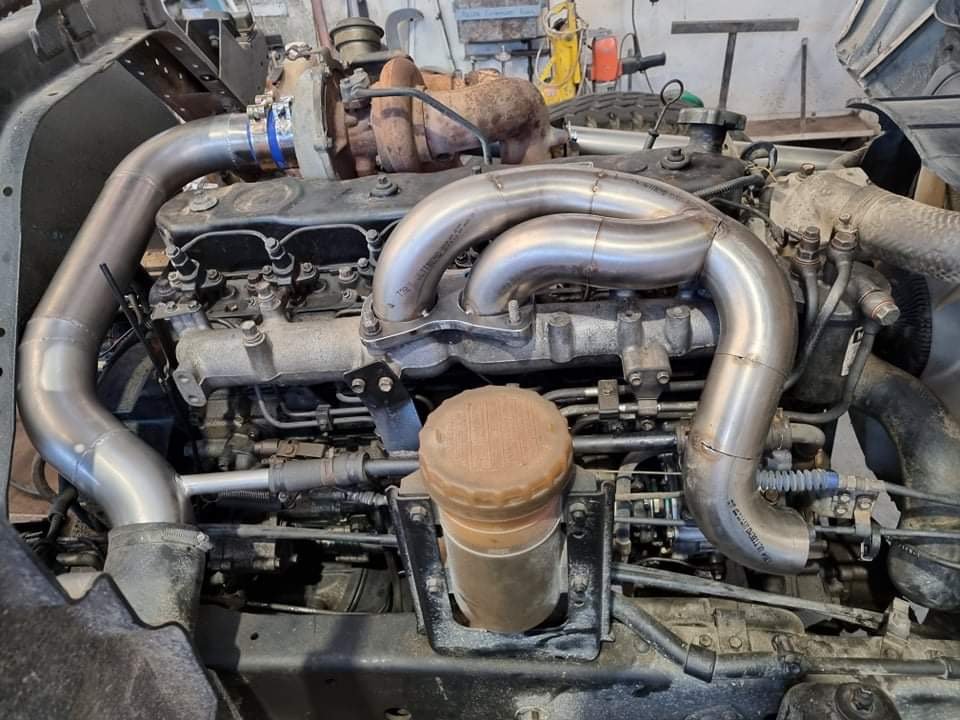
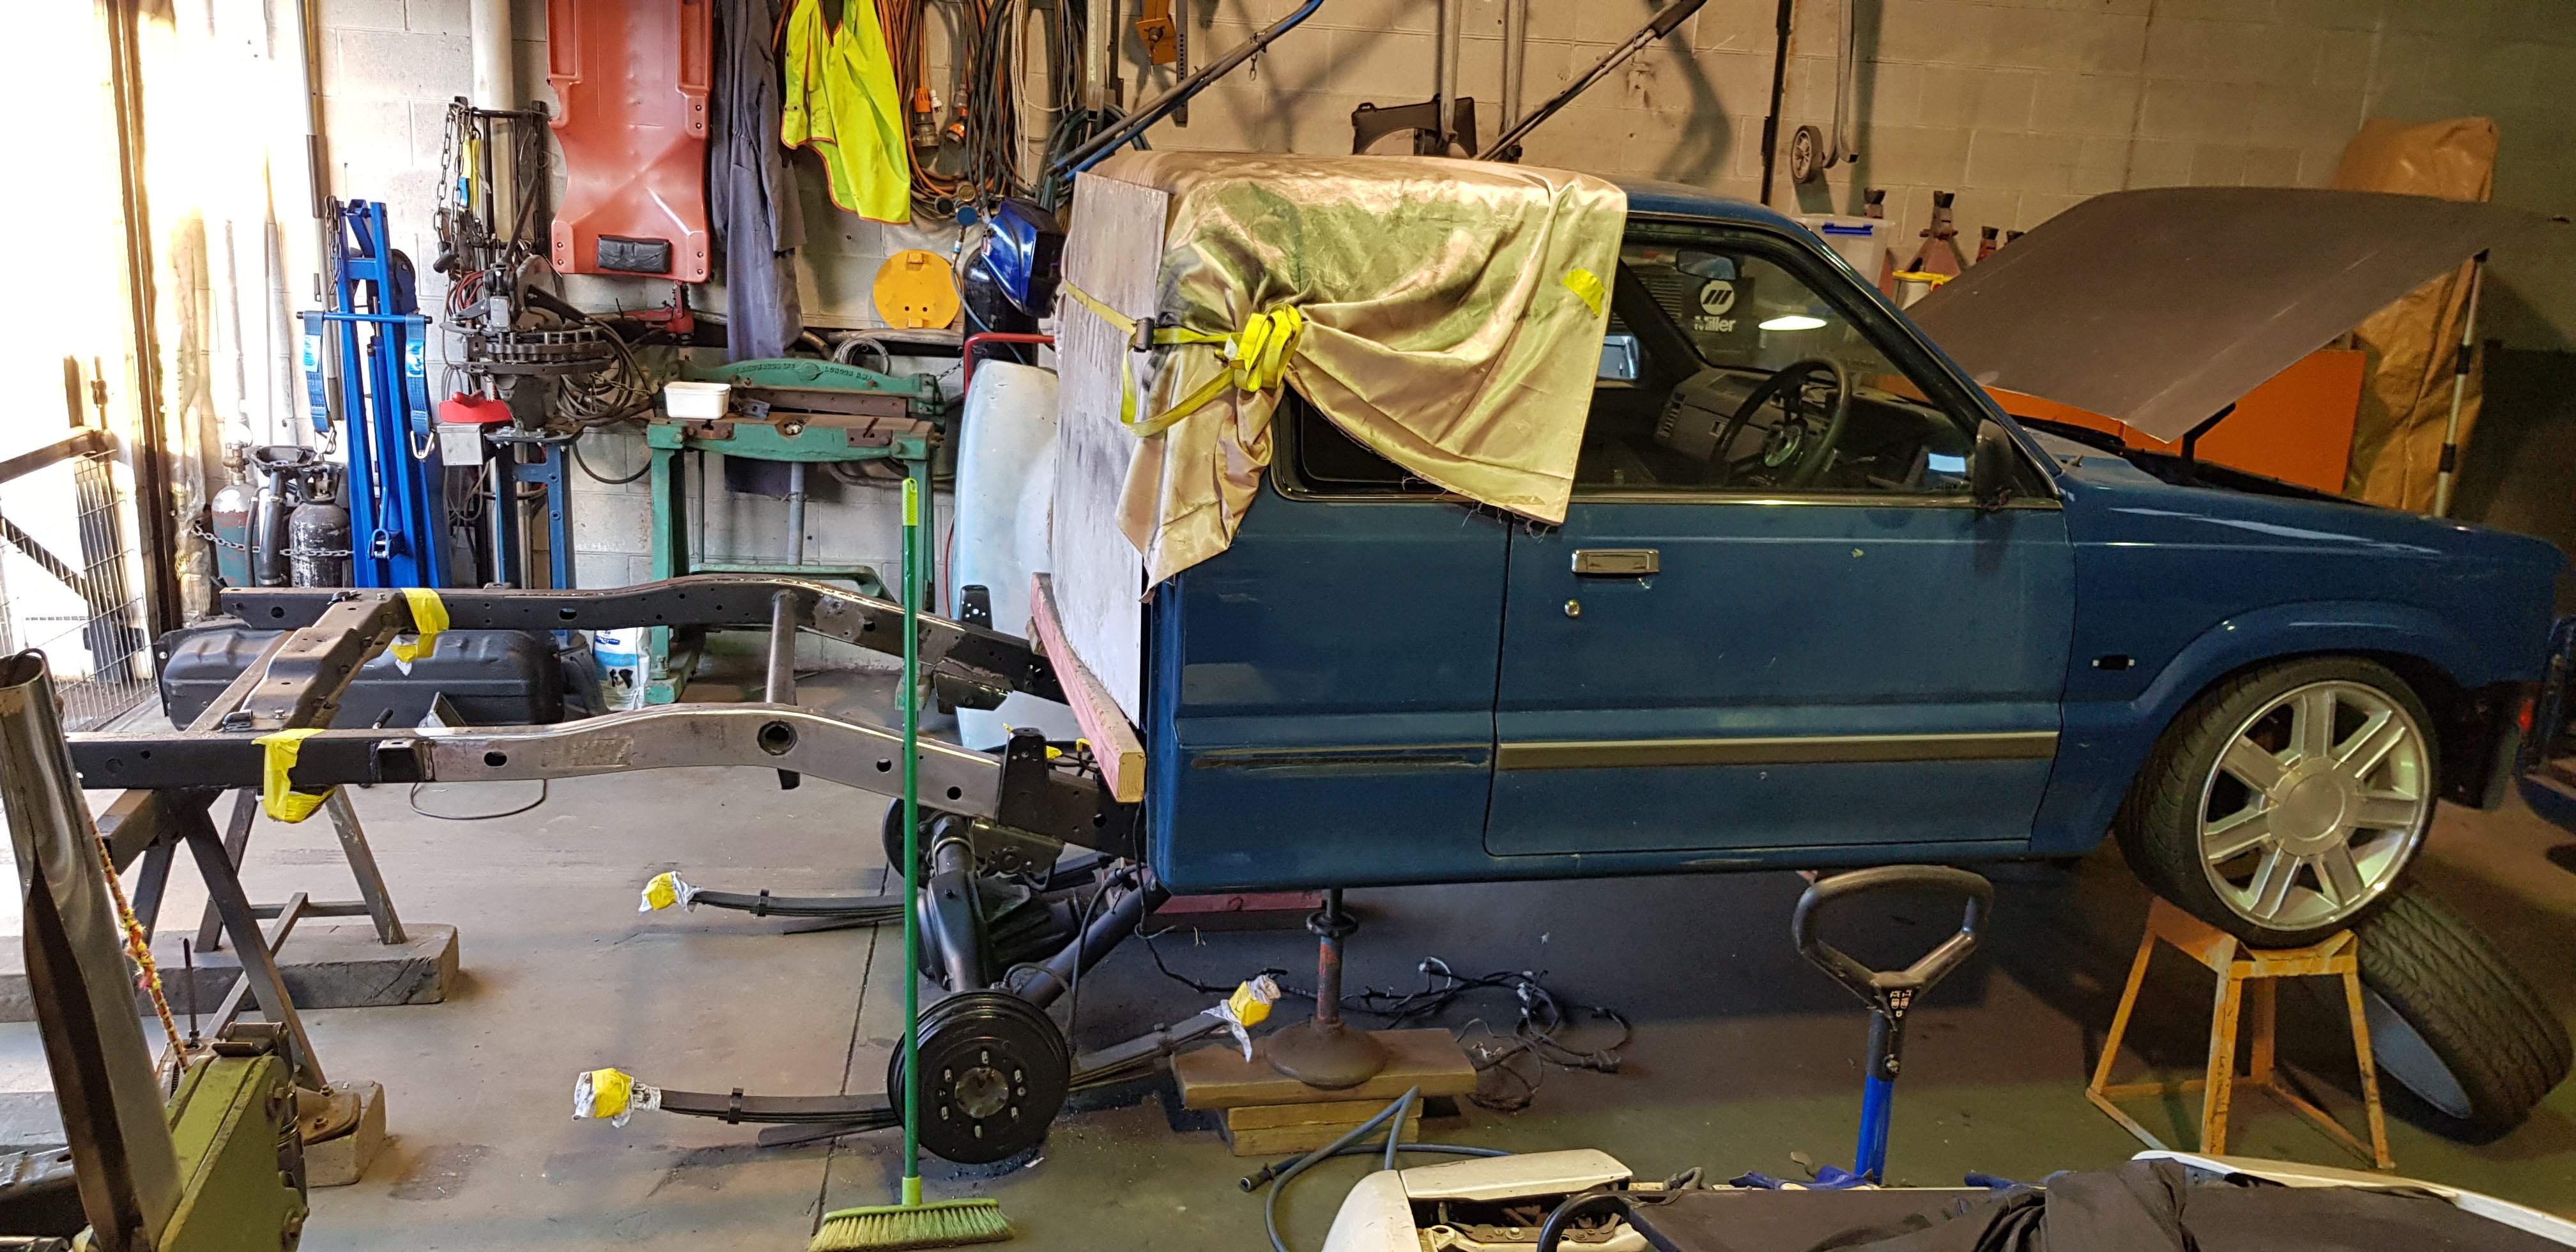
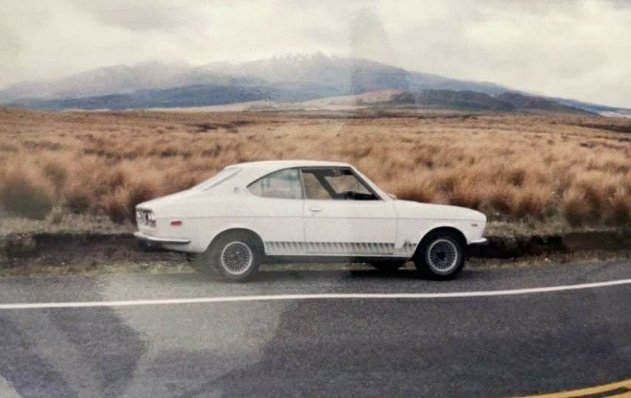
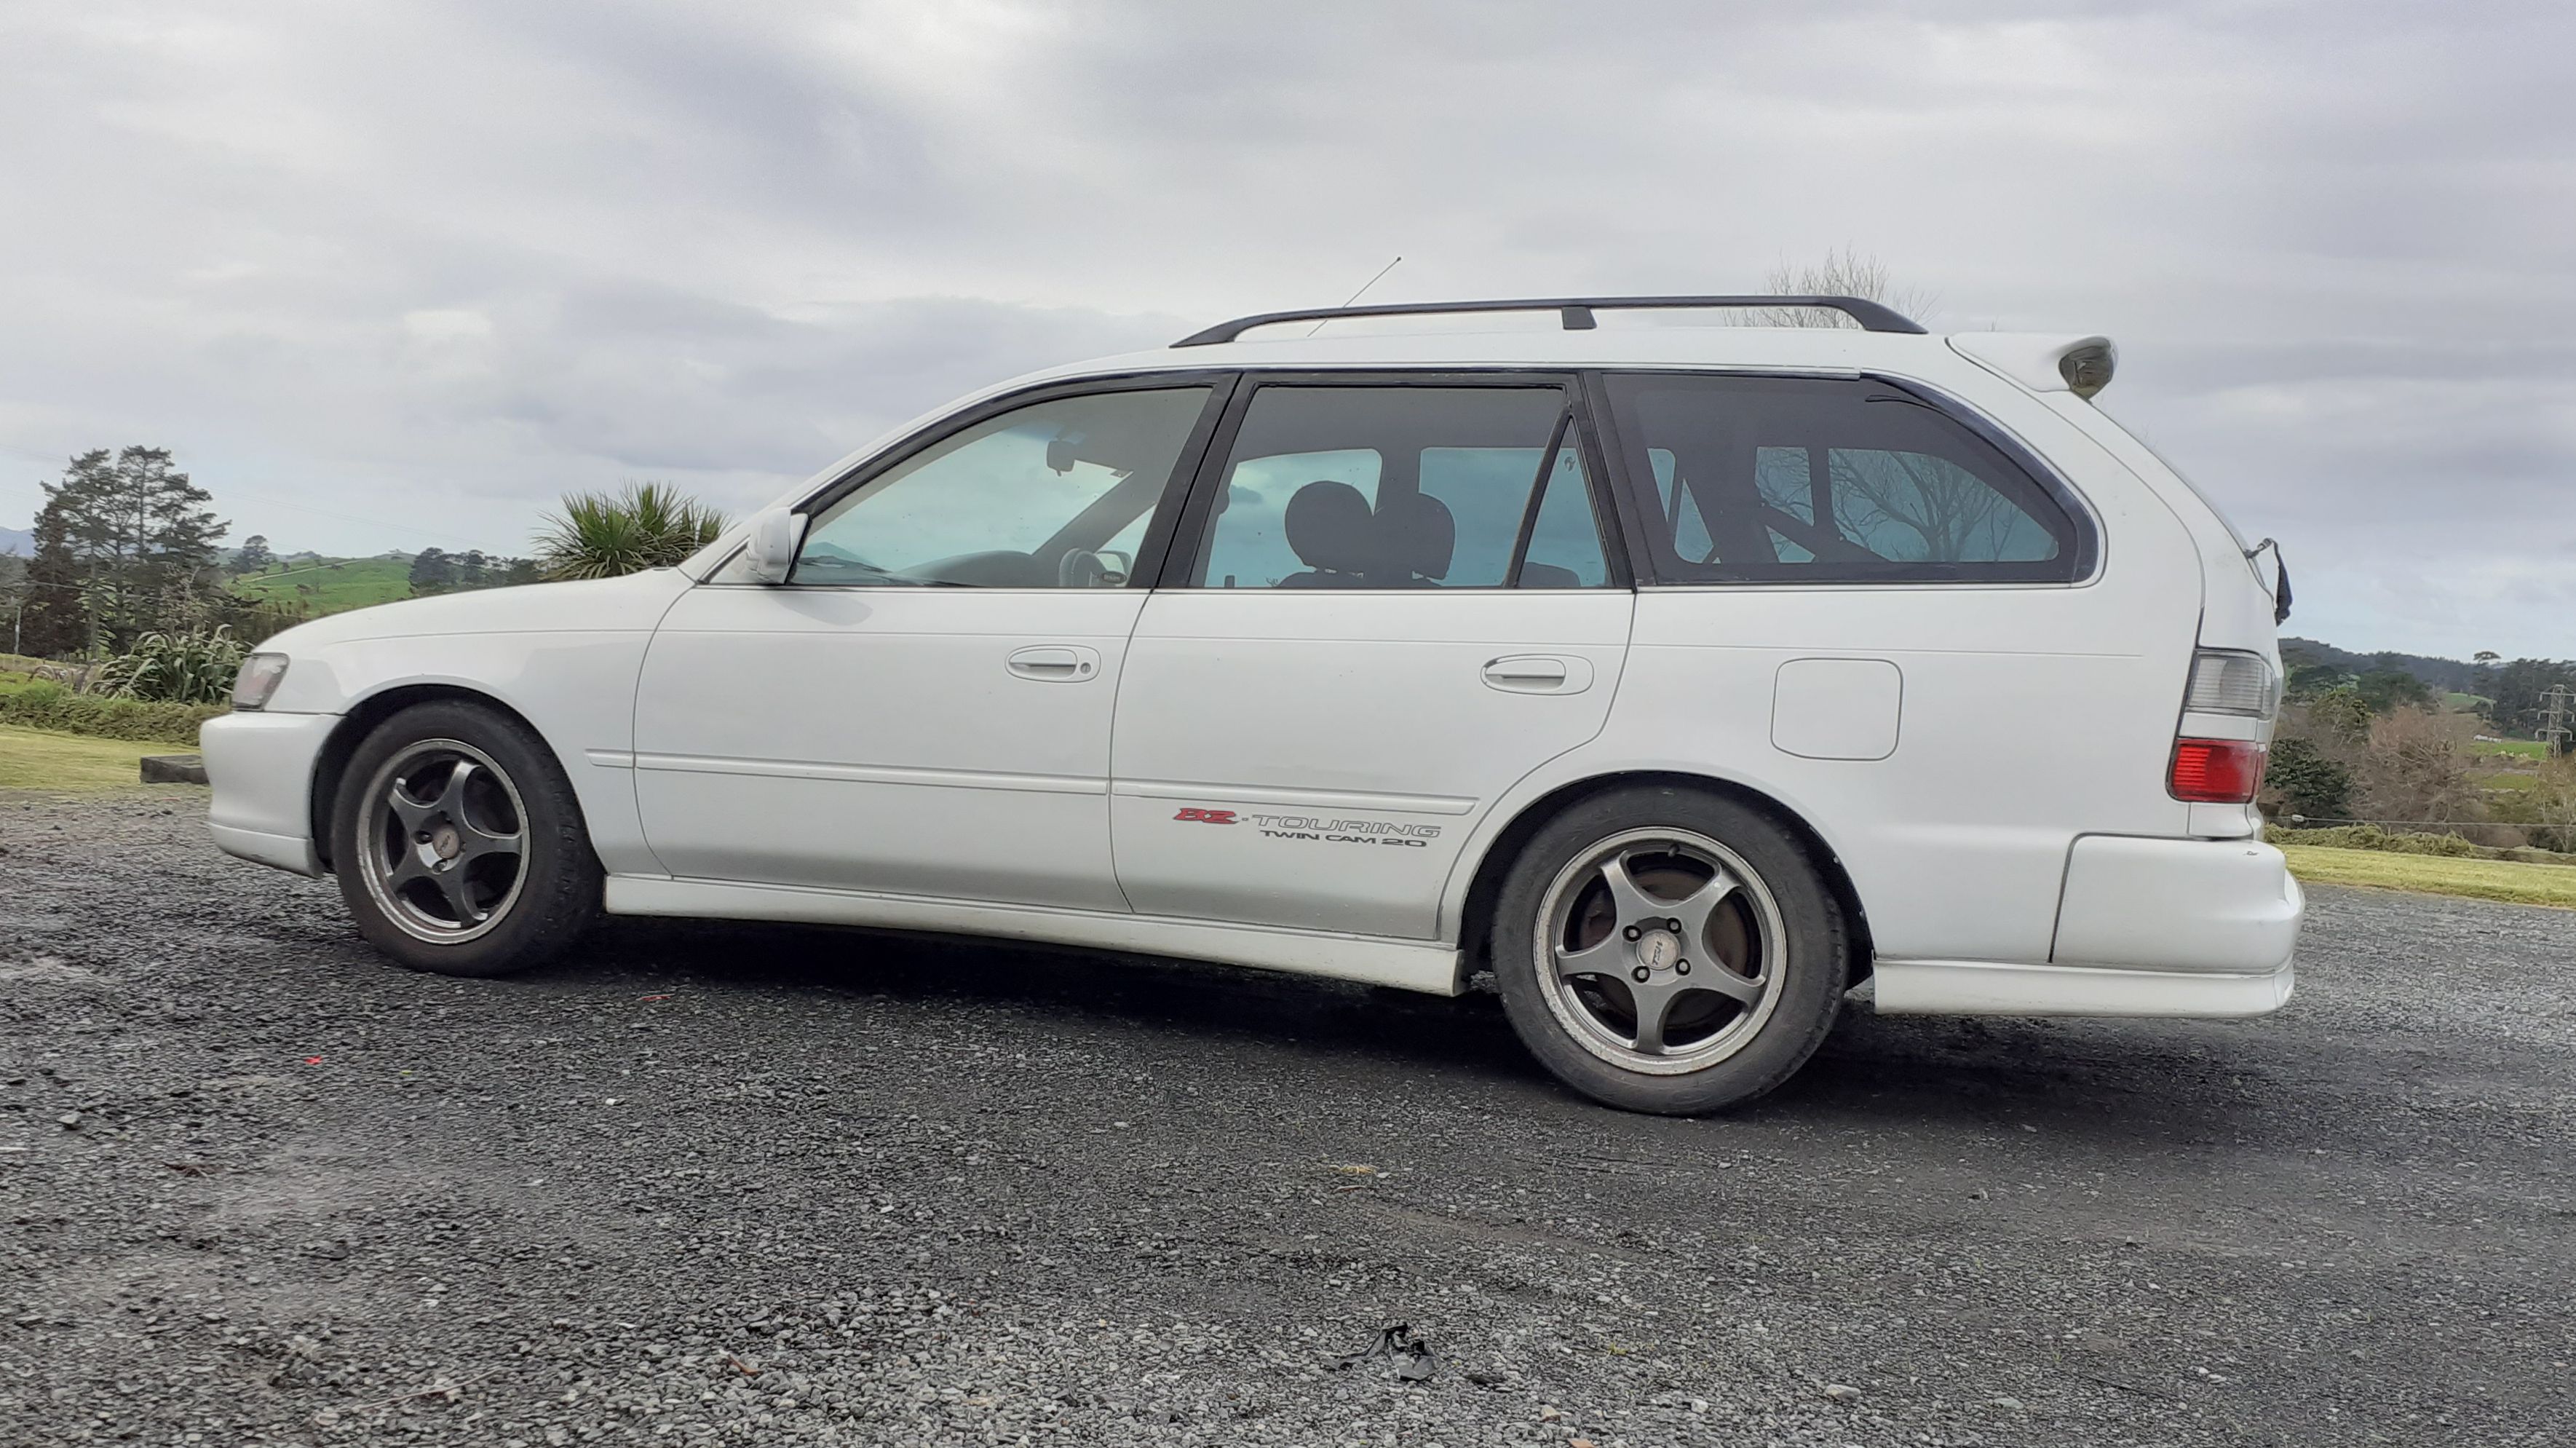
Made the most of the mint weather today and gave the engine bay and motor a wash, then tidied/wrapped some wiring on passengers side of bay. Need to do the other side still. Got my stainless headers fitted up too, so as soon as my hoist is free I can whip up the rest of the system. Getting keen now, nice to finally see the front end coming togethor.
 14 points
 -
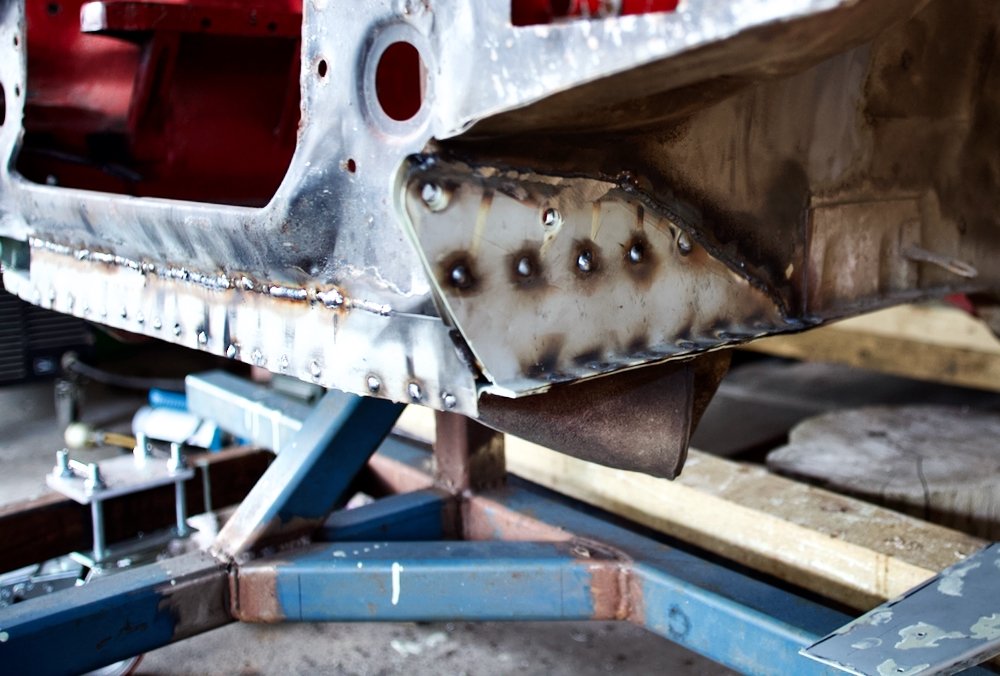
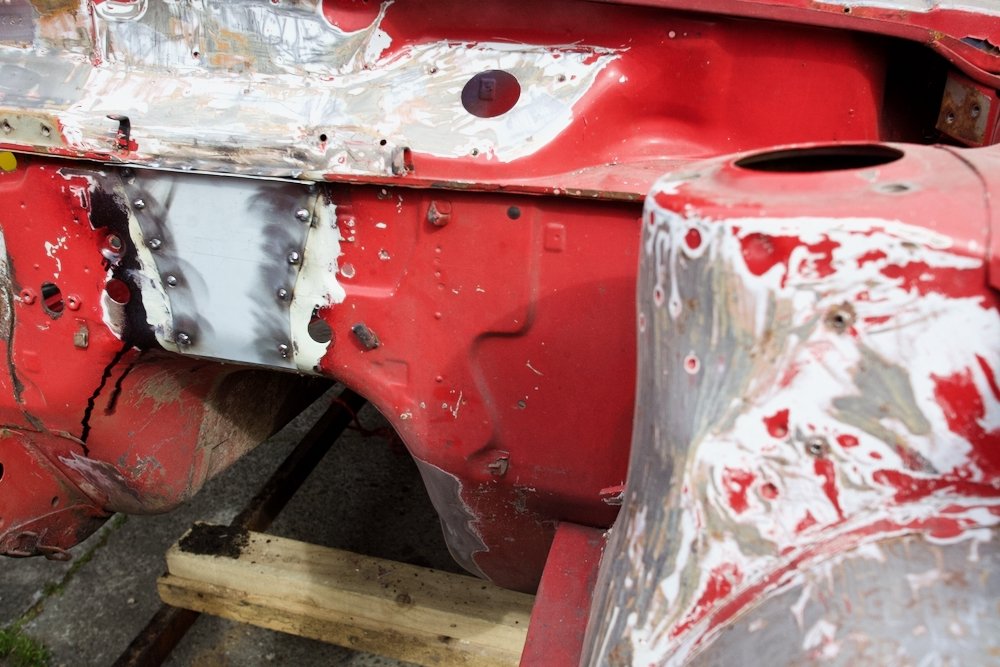
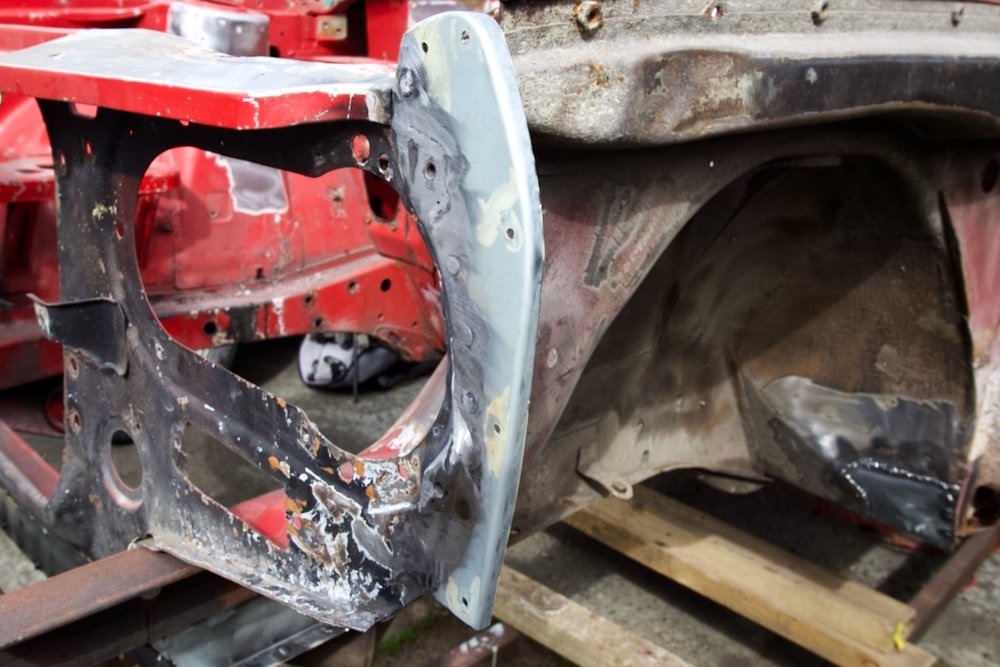
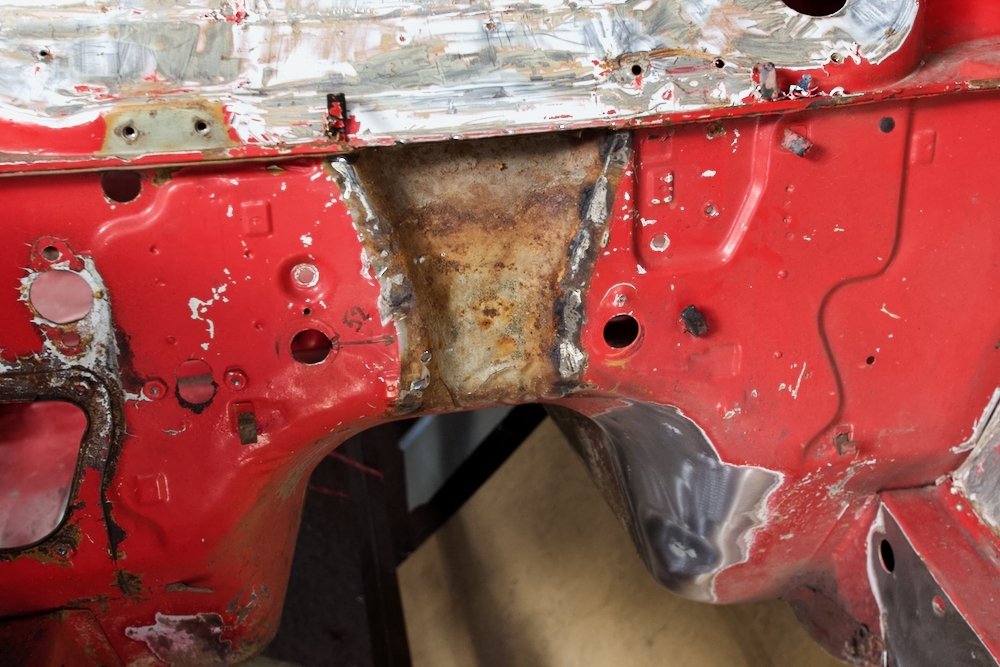
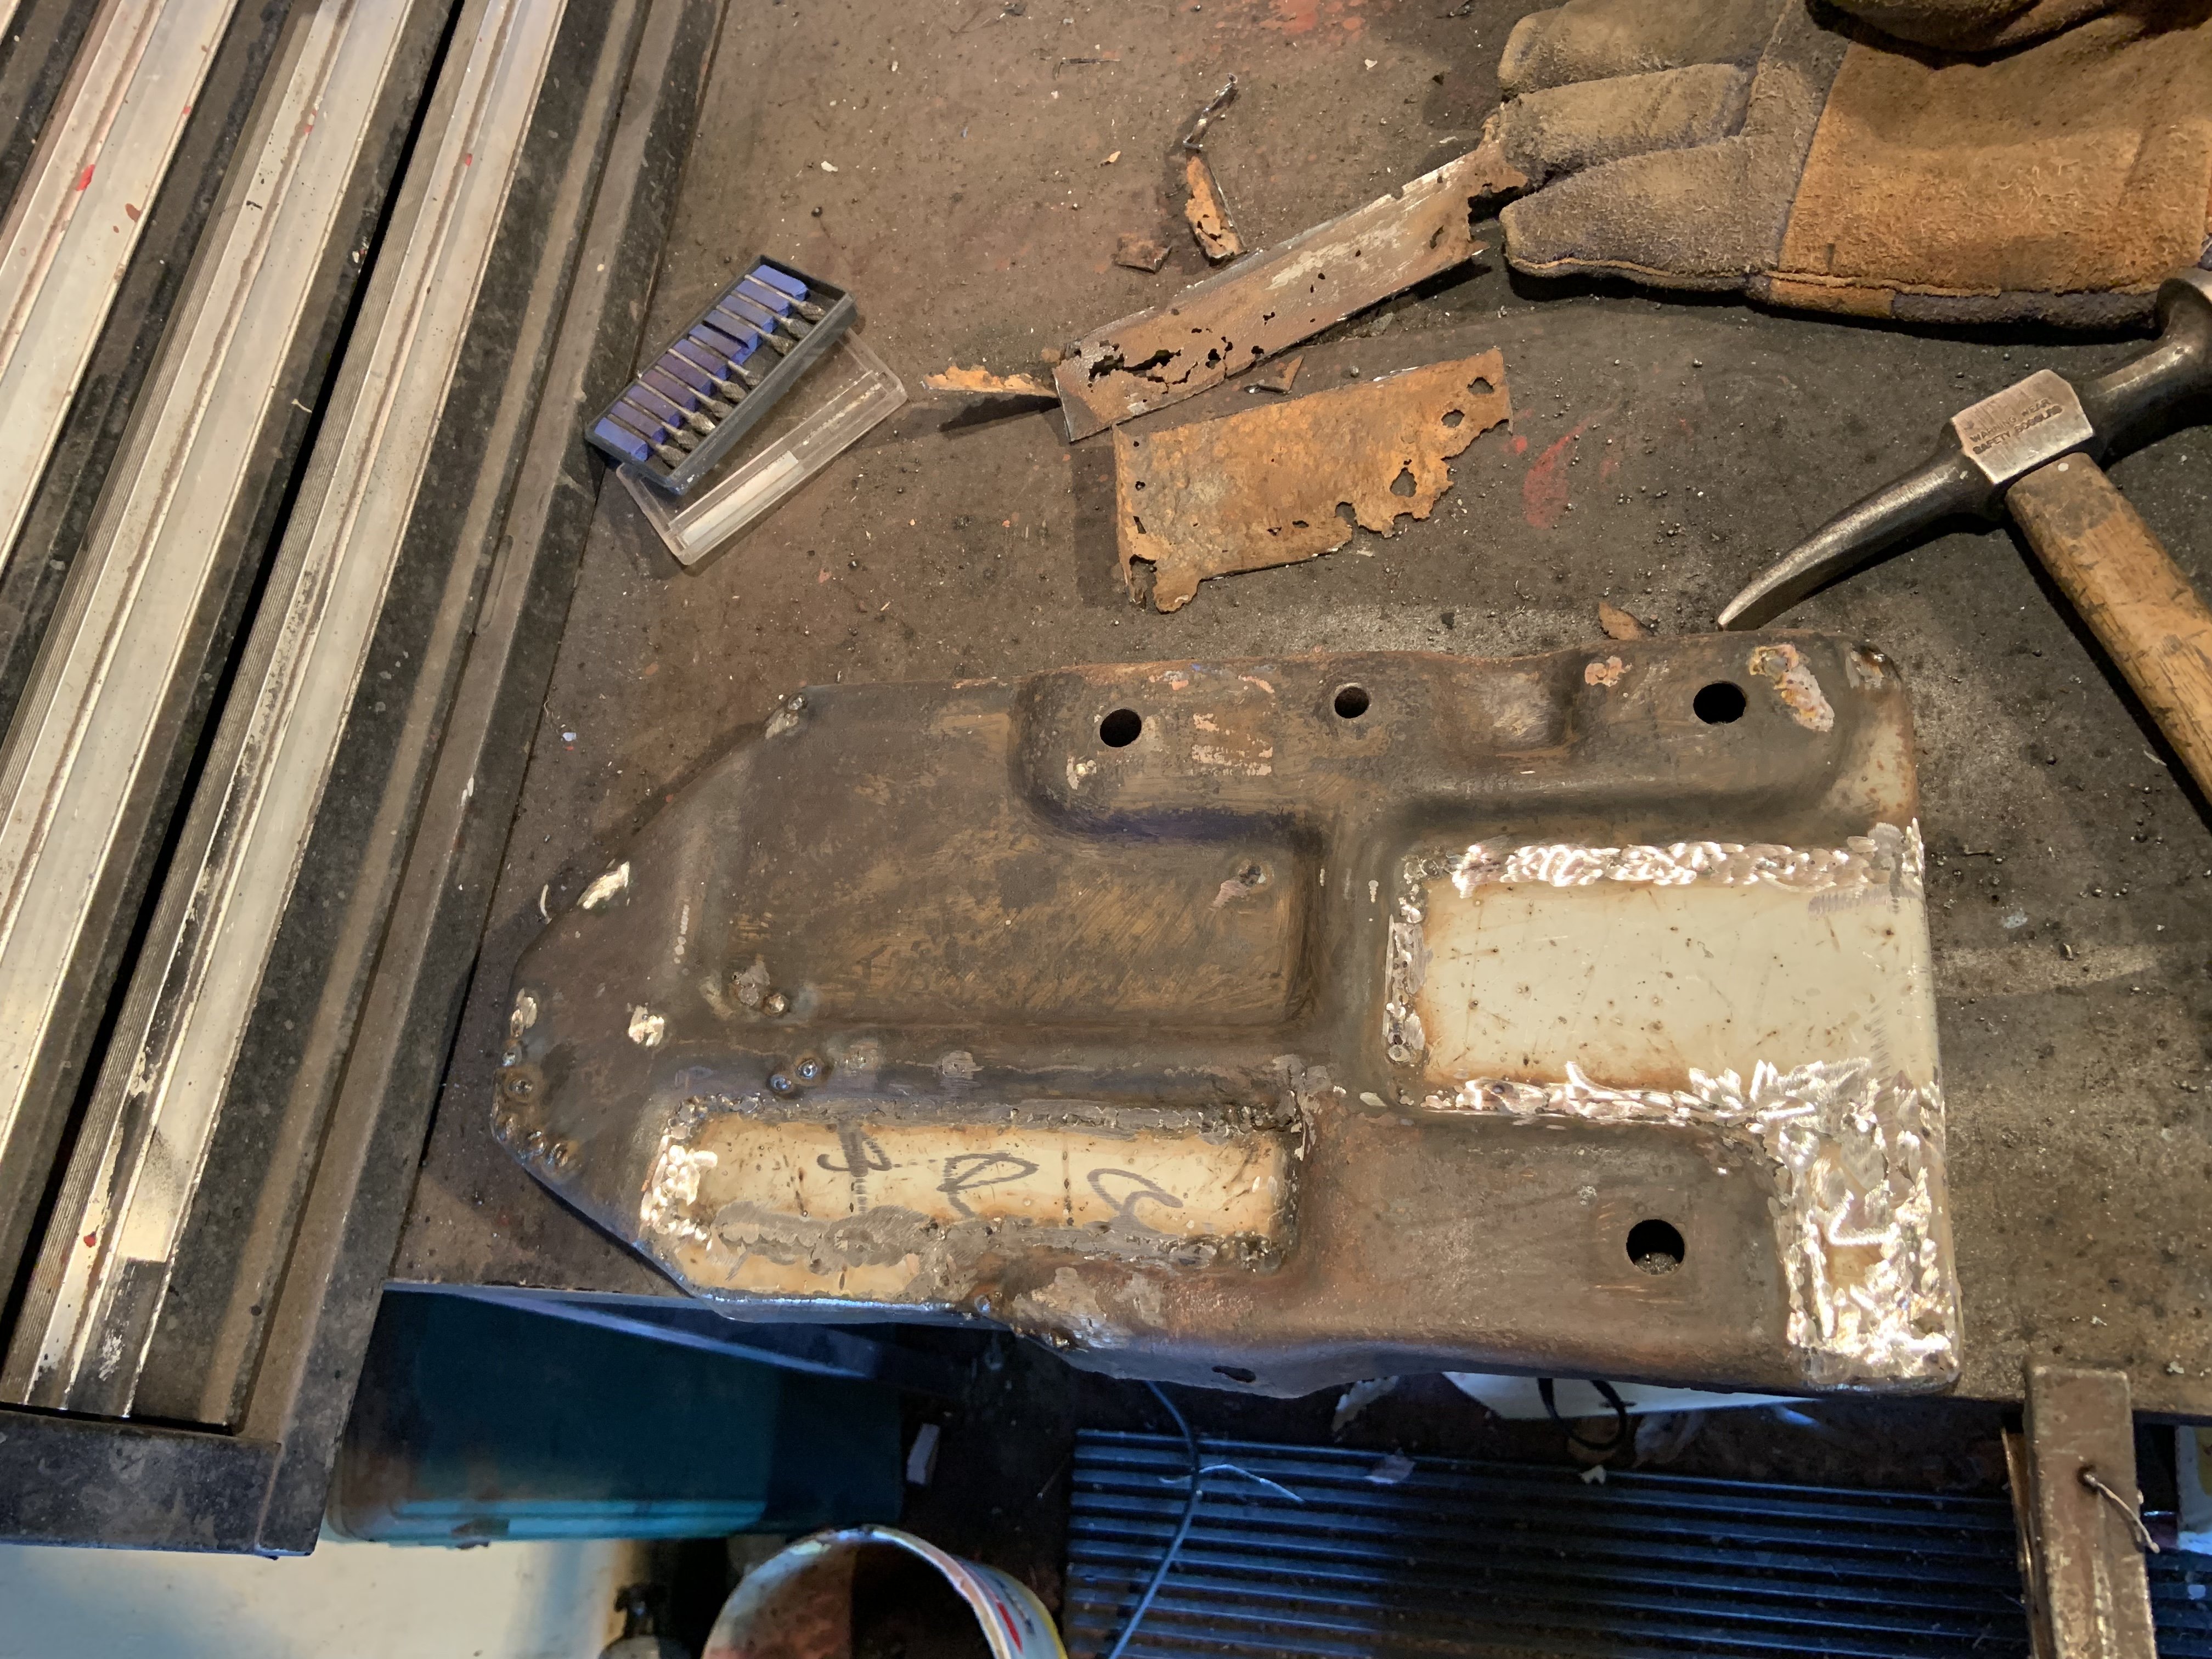
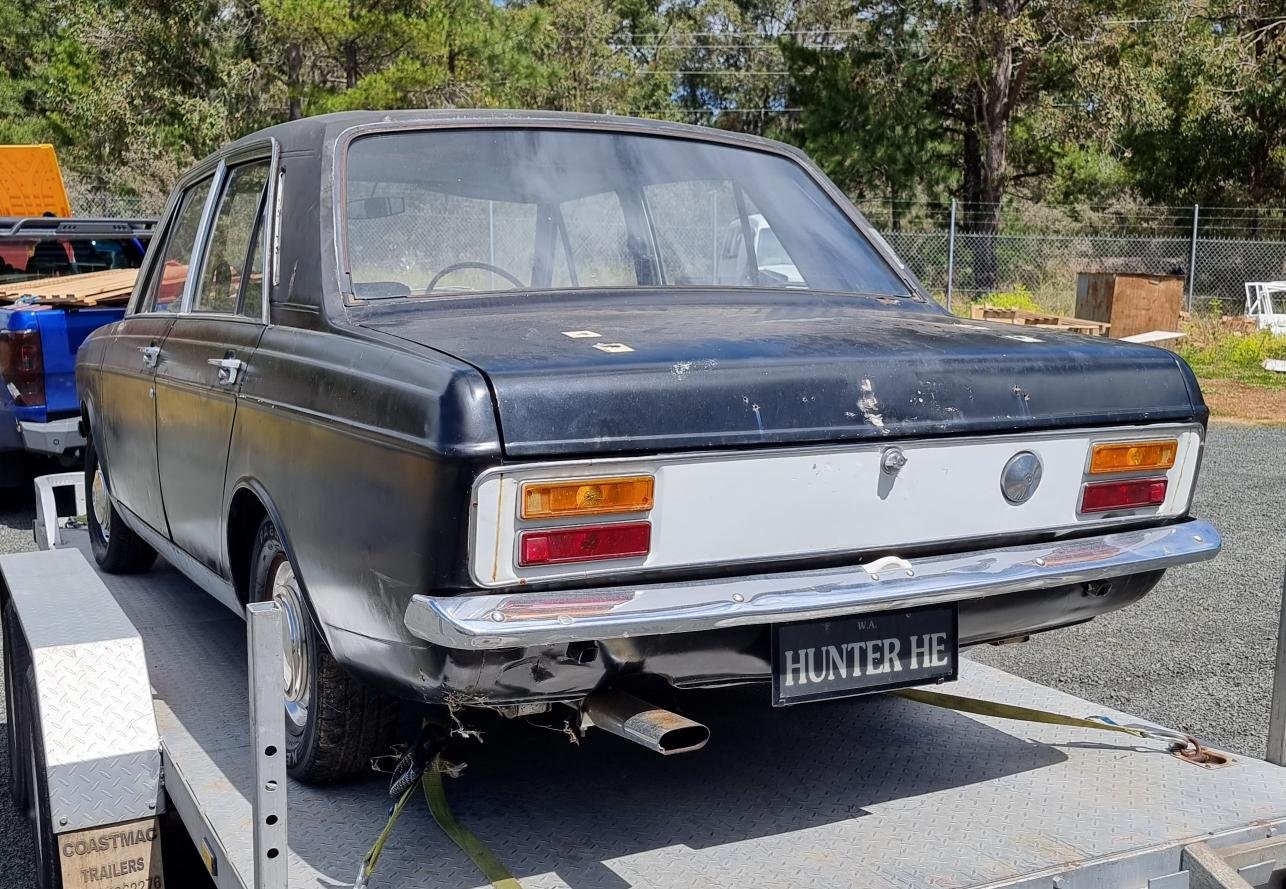
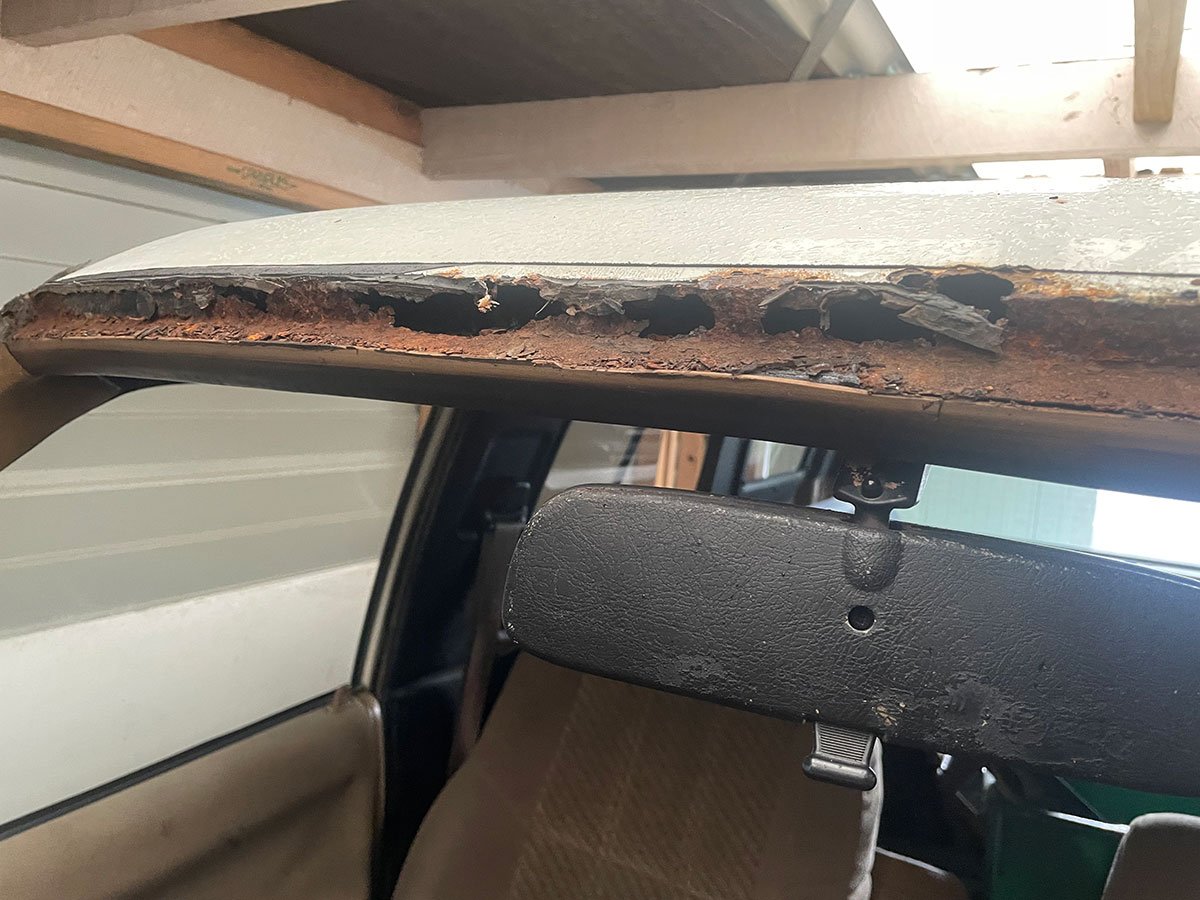
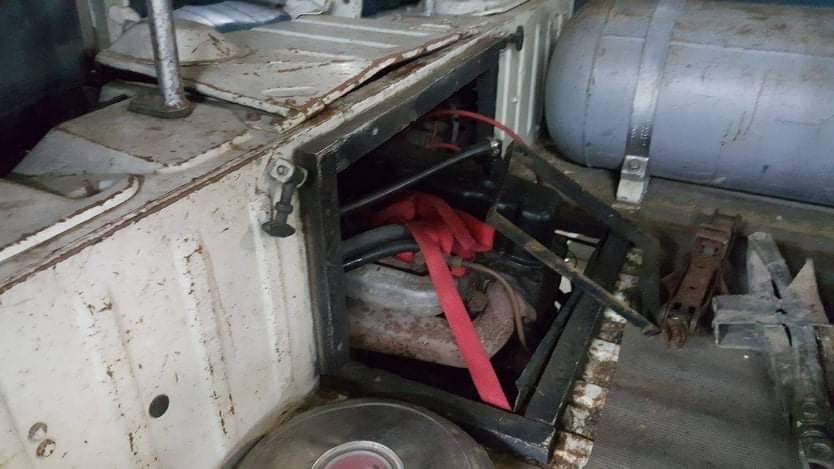
Progress....... Heard the neighbour wasn't too pleased by my weekend activities on the angle grinder, they're lovely people so went and had a chat to keep the peace, end result I spent a day rearranging the workshop so I could work with the door shut, day behind, but further ahead. Workshop tidied and organised, fizzed on patches The light surround was a challenge, none of the holes would be doubled up on the final placement, took me a while to think of the obvious, dry fit with bolts, drill spot welds, hold with clecos then do a slow and terrible job of trimming off the excess. Not the visual end result I was hoping for this patch, but secure and better than it was plus it will be hidden behind the guard! Drivers floor patch, slight pain to fold up but lots of hammer work to stretch around the corner. The scuttle drain runs down the middle of the firewall, the bottom had folded over (Likely during engine/gearbox swaps) blocking it off and was subsequently full of crap, with the lower edge showing heavy corrosion, I couldn't leave it alone thinking what could be in there, drilling out the spot welds underneath was thankfully only surface rust, wire wheel, treat and epoxy primed. With those patches in I can officially tick off front end rust repairs, with the car now spun around in the workshop work on the boot floor can begin....
13 points
-
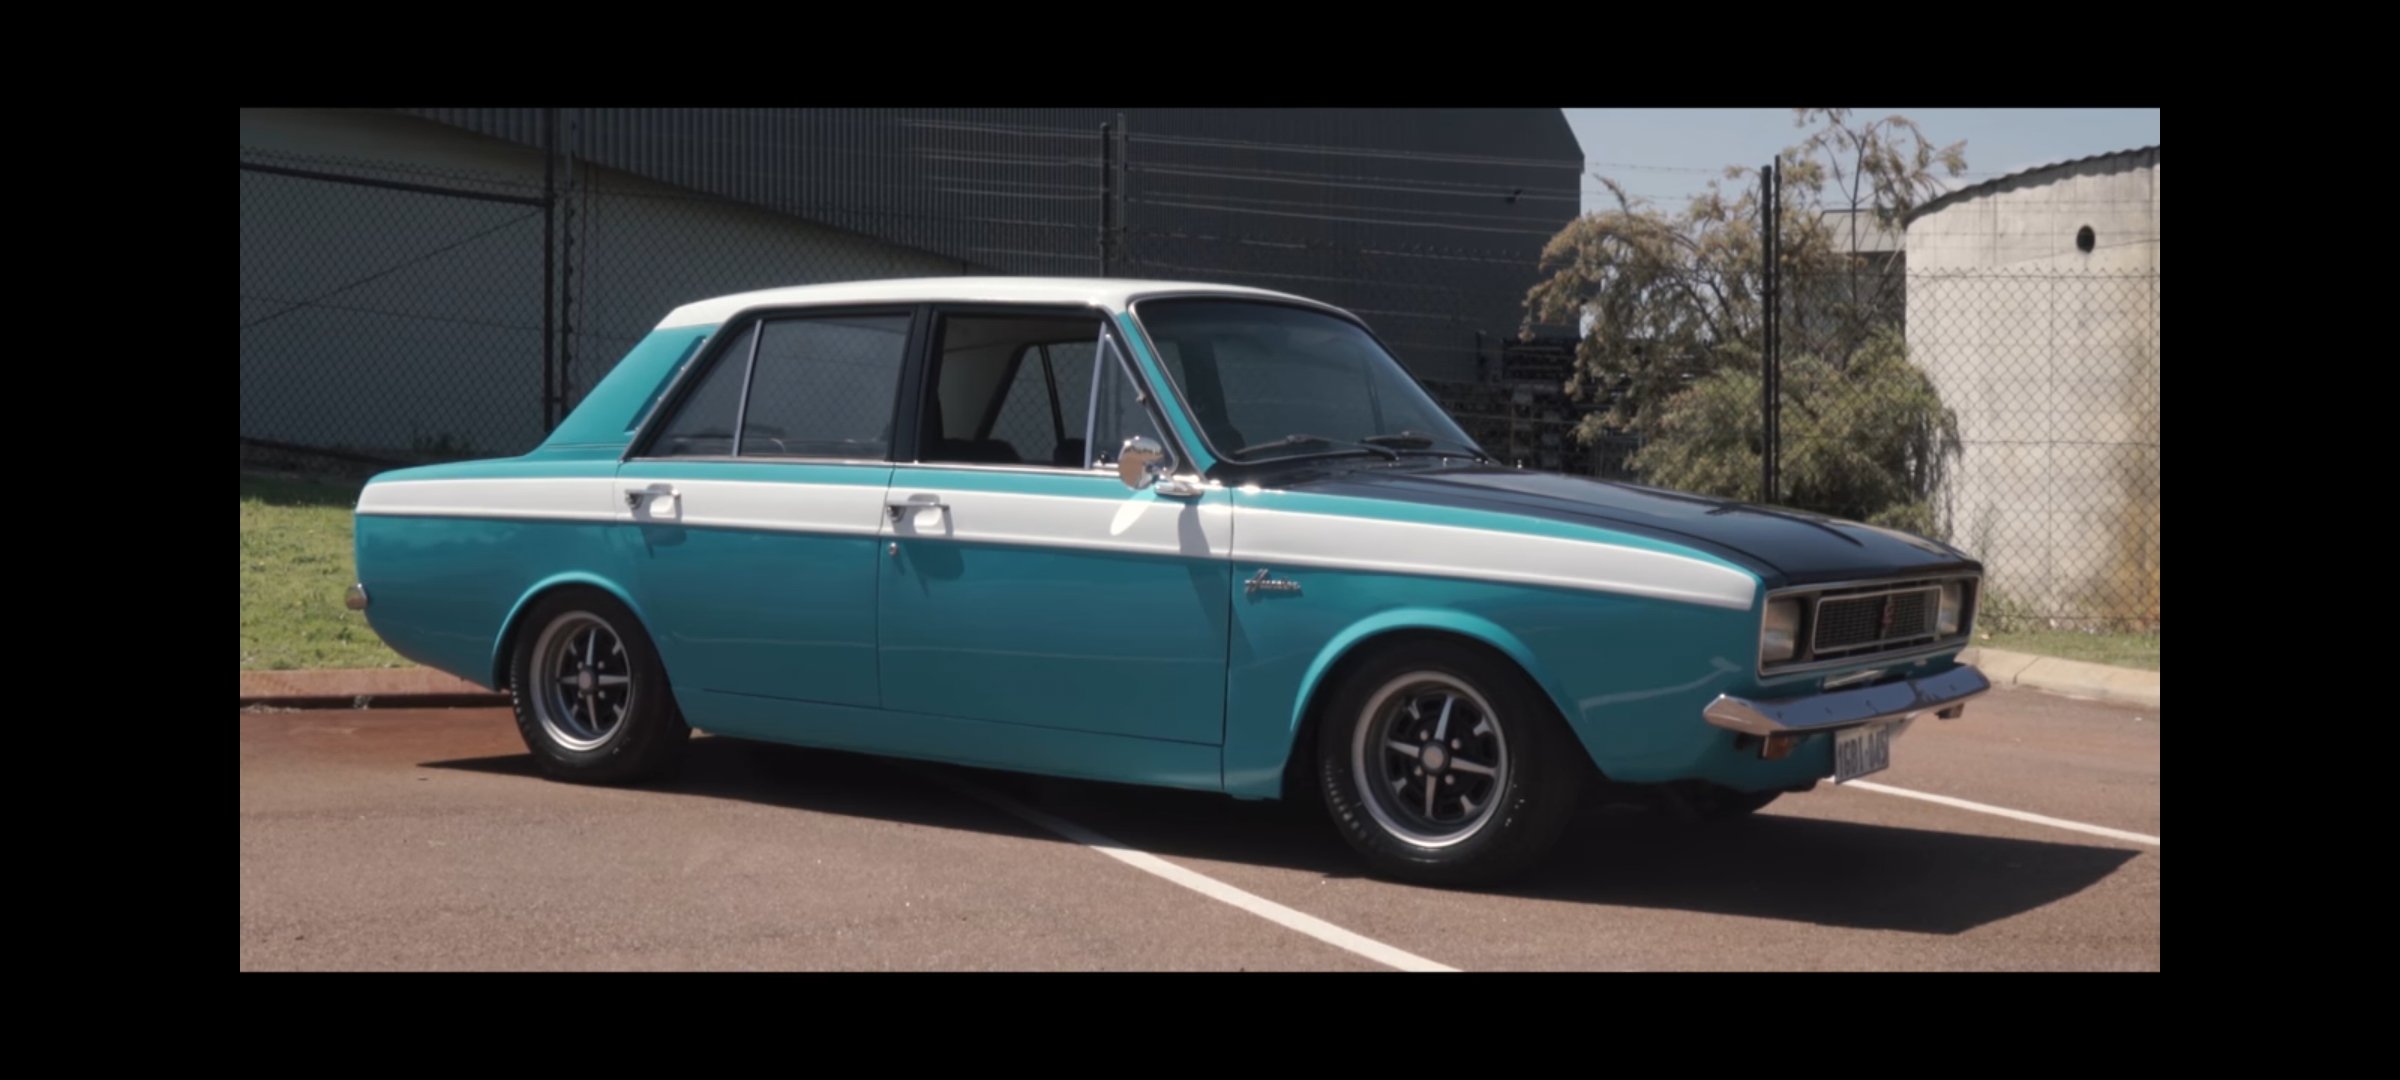
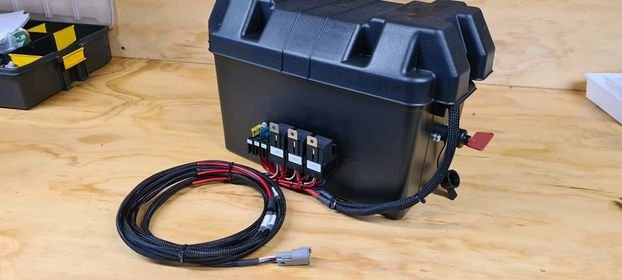
Lame updates: fizzed some metal back into the battery tray and painted it with nice thick paint! Also stripped the pinstripes off the bonnet in preparation for sanding and some satin black 2K both sides. Hit the wiring loom with a thinners rag and wiped everything, cleaned up the terminals etc. sucked! Will tape it again as I put it back in. Blasted more clips and speed-nuts + painted, spend some time on the bench grinder wire wheeling nuts and bolts, painted inside the dash where it was a bit crusty from rodent piss. Cleaned up and painted the bonnet striker catch and voltage reg bracket. Made some gaskets for the inner guard splash guards, more to go. And in fantastic news, I jumped on some wheels for the back! Just the size rim I wanted and the BFGs are pretty perfect..hard to get used to these old man profiles but they will suit it wicked
11 points
-
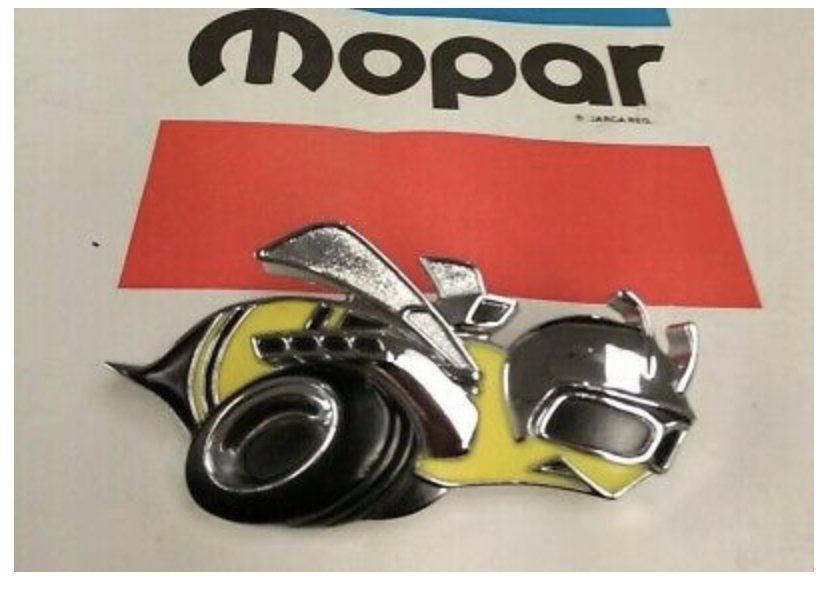
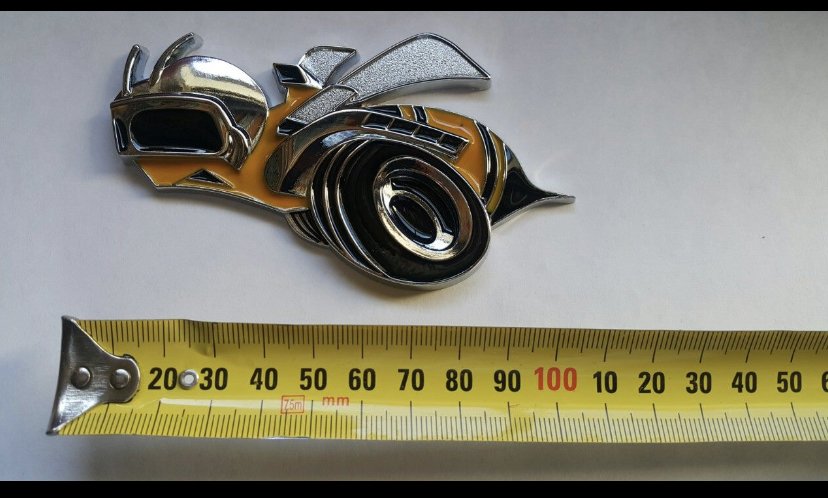
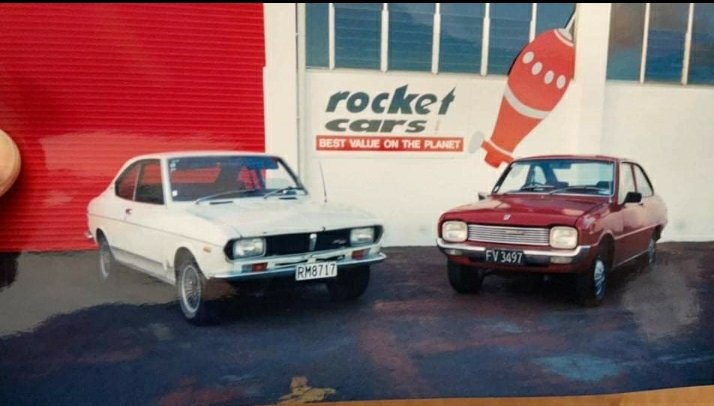
I’ve bee-n doing some bee buying too. Finally Sacked up and had a go at eBay. Got a NOS hood bee (shaped to fit contours of nose of bonnet, mounts with pins) Got some 8in decals for in the tail stripe and that came with 2 smaller ones that go in the rear side windows. There’s also an auction for a stick-on one in Nz that I’ll put on the tail panel That should complete the super bee disguise! I love the R/T badge already on the bonnet but I probably ought to fully commit to a theme
10 points
-
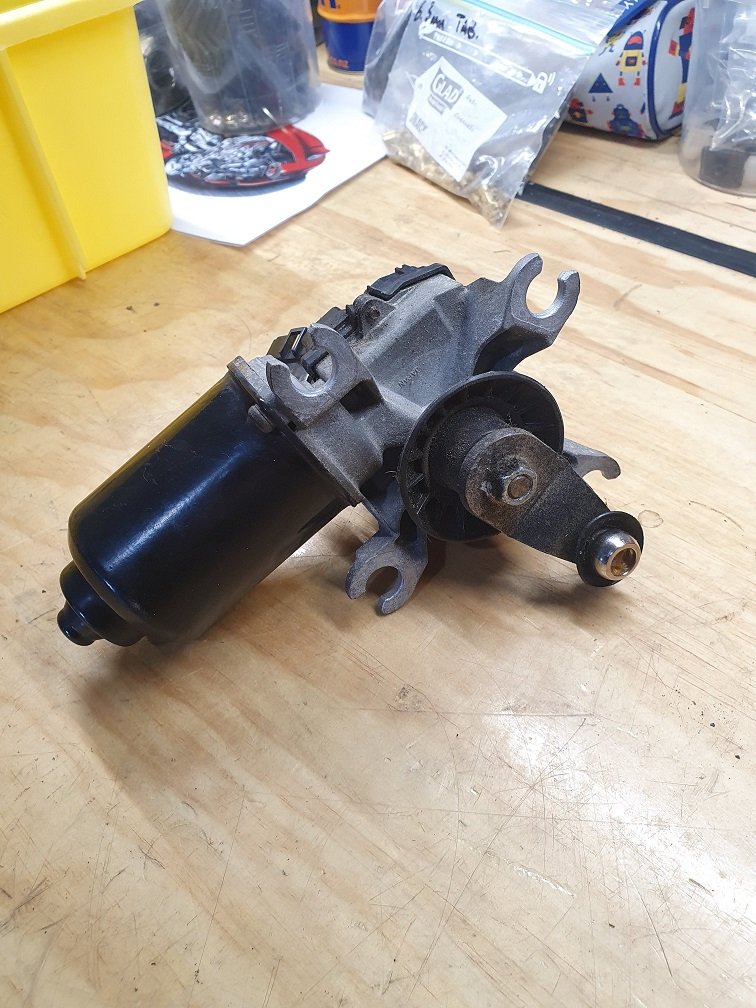
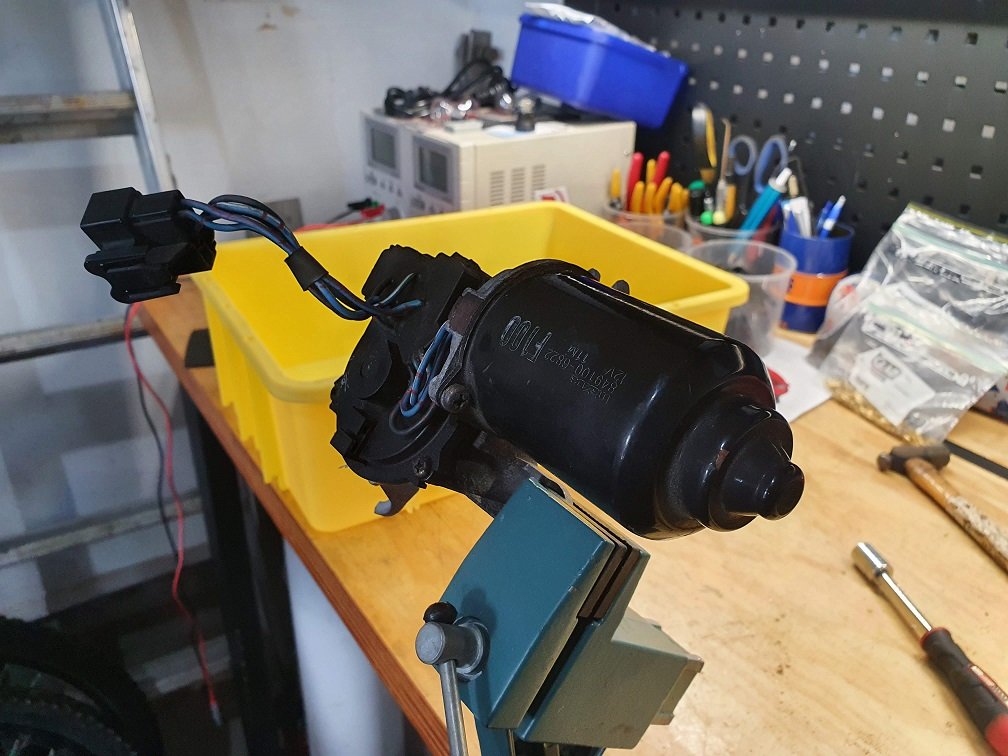
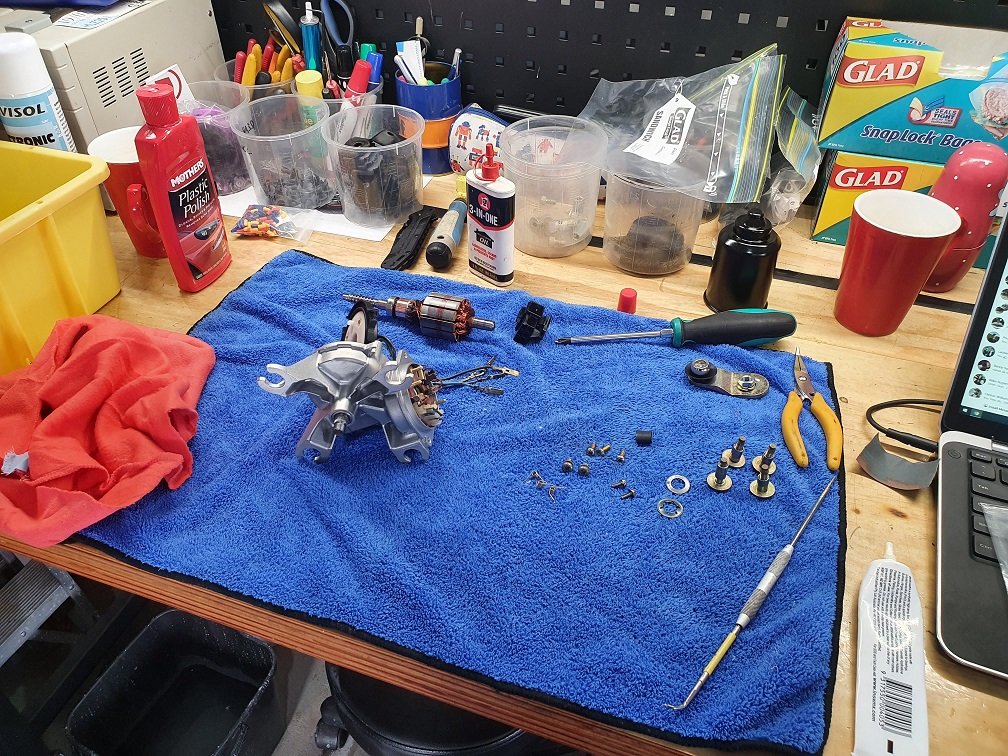
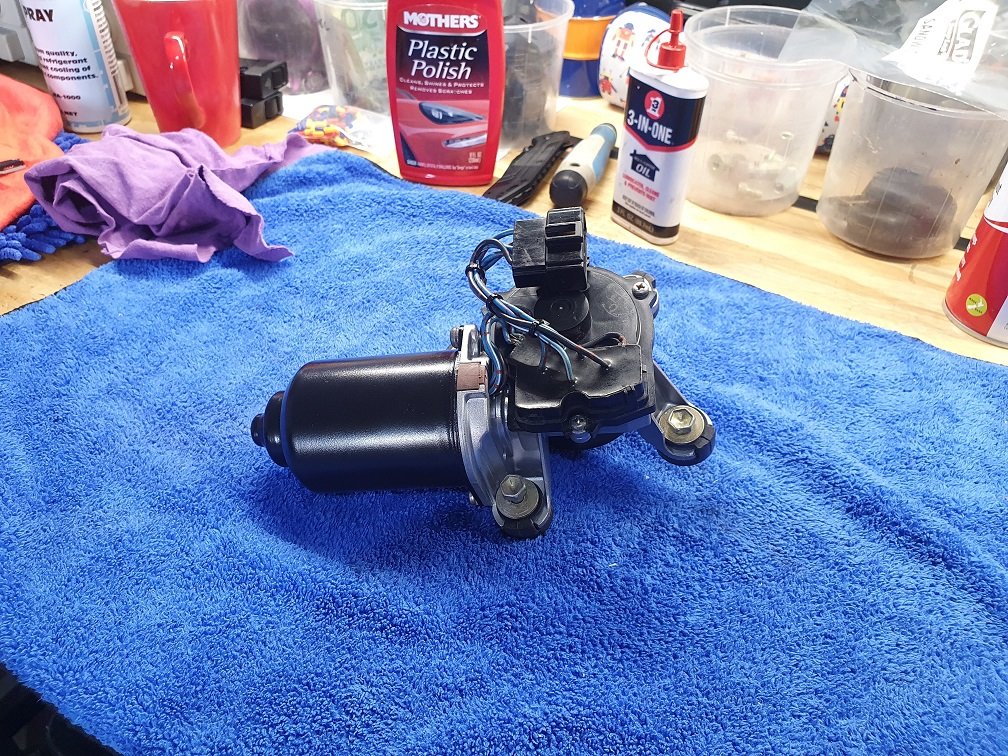
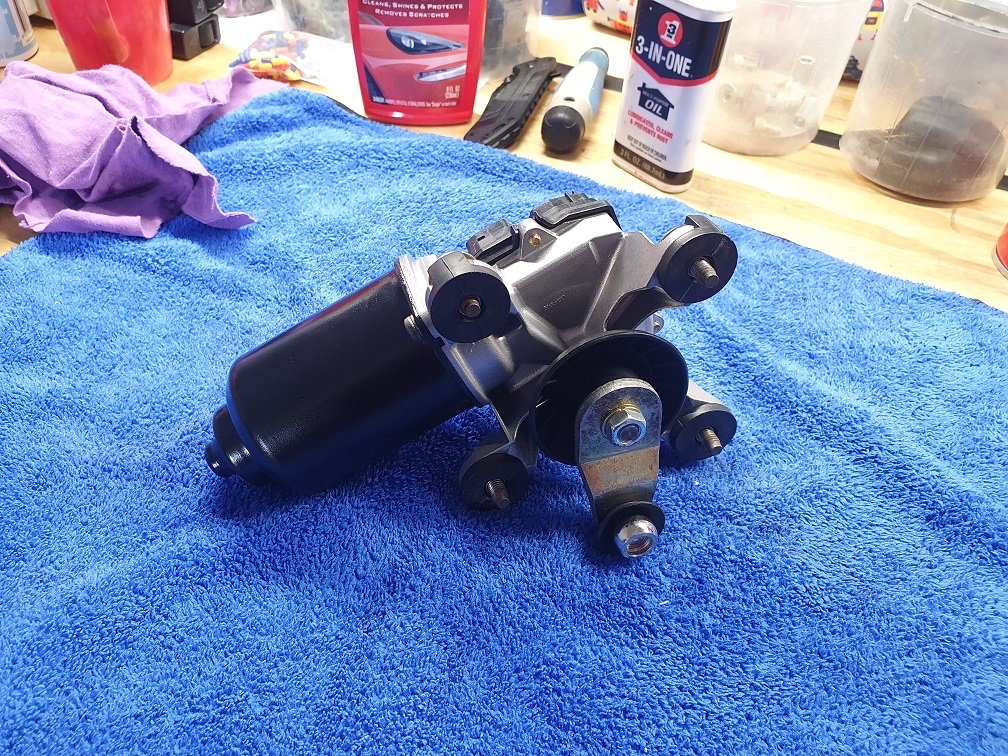
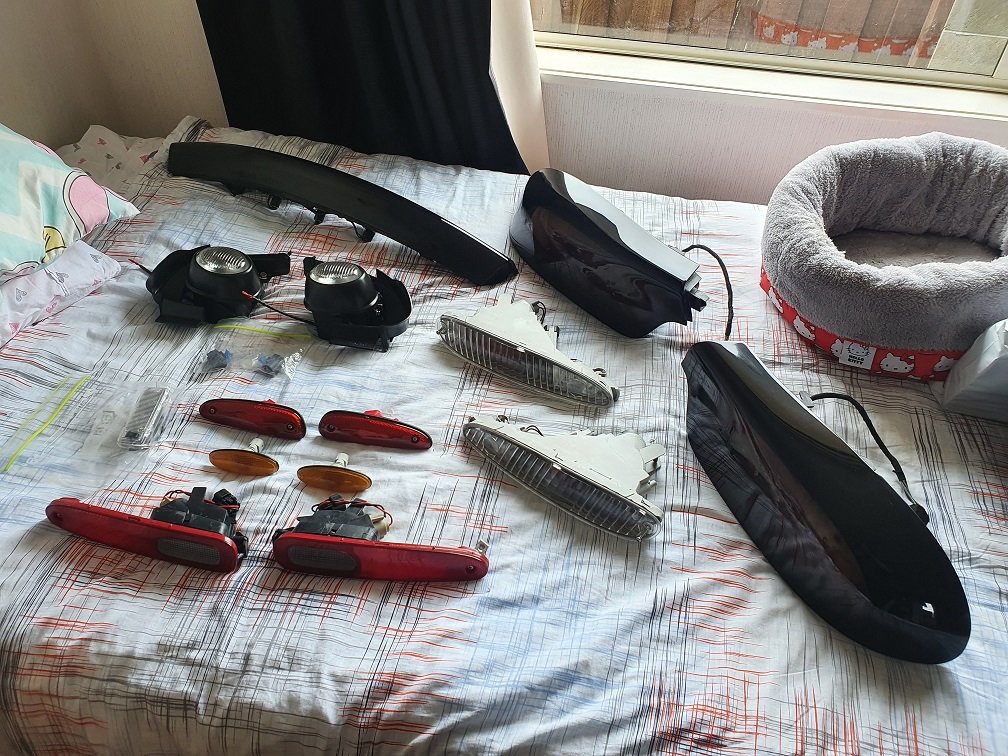
More waiting, more restoring parts that don't actually help the thing run.... A front wiper motor popped up for sale cheap, so I nabbed it. I'd done the rear motor, so figured I should do the front too. In the scheme of things, not terrible, but stuffed powder coat, a bit of rust setting in, and filthy. Atleast it actually ran at a decent speed though, so better than the rear one! Blew it apart, cleaned everything up, sanded the commutator and gave the brushes a tickle up, they have heaps of life left yet. Didn't go full-bore on this and get everything re-zinc plated, most of the bits were absolutely fine, just needed a good clean, aluminium housing blasted, and the motor casing painted. Reassembly time. Nothing complicated here. I was a little bit of an idiot and didnt mark the alignment of the pivot arm when I disassembled it. I'll be able to sort that when fitting it to the car though. Draws a little less current and sounds smoother than it did before the job, so that's got to be a score :-). Spent a few evenings sanding down, then back up through the grades, and polishing all the exterior lights. The fogs are ones I stripped and had the housings powdercoated when I had the white car, were still sitting in a box in the garage, so that's a score. Really early cars like mine have yellow lenses inside the fogs, but I prefer the clear ones, so was nice to have this set from a later model car. The yellow ones are still on my car, so maybe they'll get a resto at some point too, nice to have options :-). Everything has new LED bulbs. I'll need to put a load resistor in parallel in the indicator circuit somewhere to trick the flasher / body ecu thingee, but that should be all the lighting sorted and ready to fit. I've got a few balls up in the air restoring other parts, the door handles are an interesting one, waiting for them to come back from powdercoat. I'm also modding a set of aftermarket headlights to bring them into the 21st century, but I'm not a hundy on how that's going to work out, will be interesting. One day soon I'll stop procrastinating and dive into the engine bay again.
9 points
-
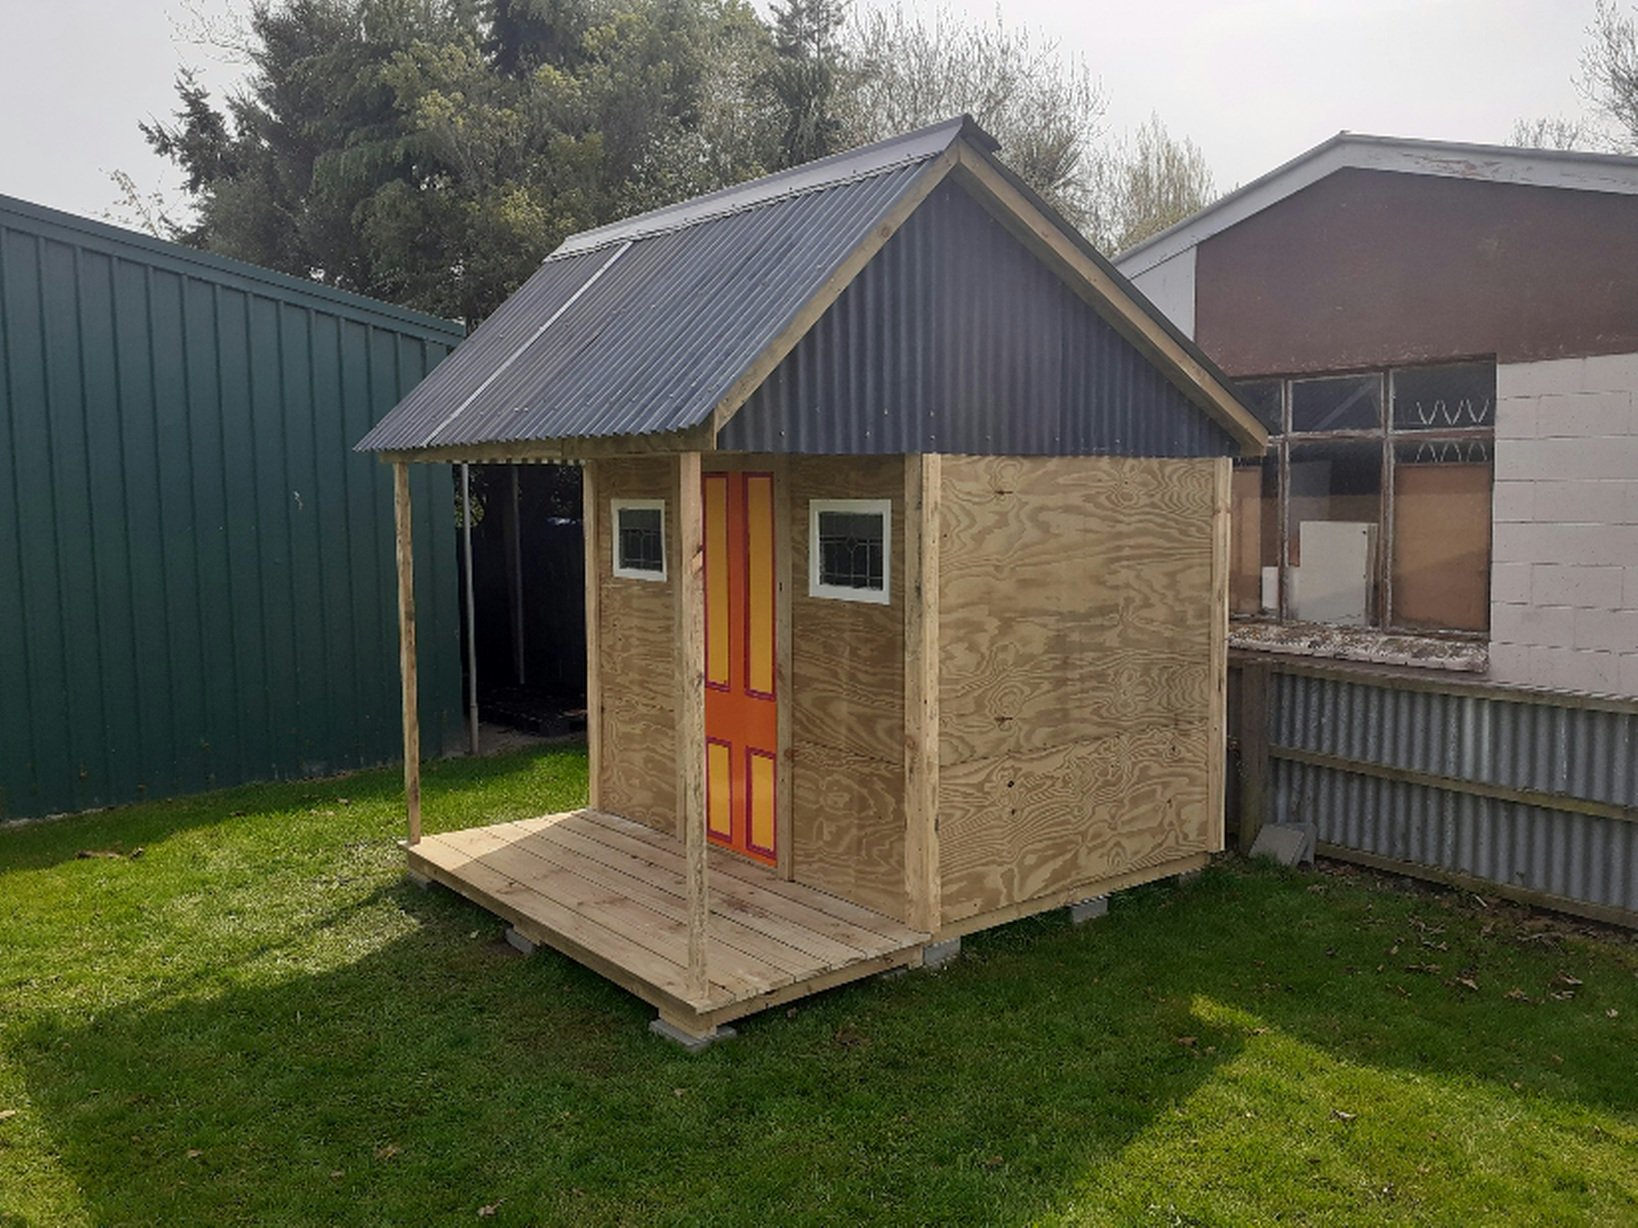
Cubby house finished today.
8 points
-
Ten percent power increases with these two weird tricks. Find out why manufactures hate him.8 points
-
long time no update, basiclly finished building this thing then with about 200km's of testing it was time to hit the brass monkey with the boys, i had the only breakdown if the trip losing the nut which holds the shifter linkage on, easy fix. This thing tractored along great for something not made for gravel, only had 1 river crossing i had to push the bike through as the air filters were too low. i deff took it some places it shouldn't go and tested out the strength of the sump on some rocks but its awesome so fun to ride, the only downside is the seat is extremely uncomfy and the loud exhaust gets exhausting after 7+ hours or riding at once. the time has come to sell this thing and move on to the next build so if your keen ill do a os/ppsc discount. learnt some much building this but i suck at owning stuff. Bit of a pic dump for you guys 10 days 3500k's and 3 dudes.7 points
-
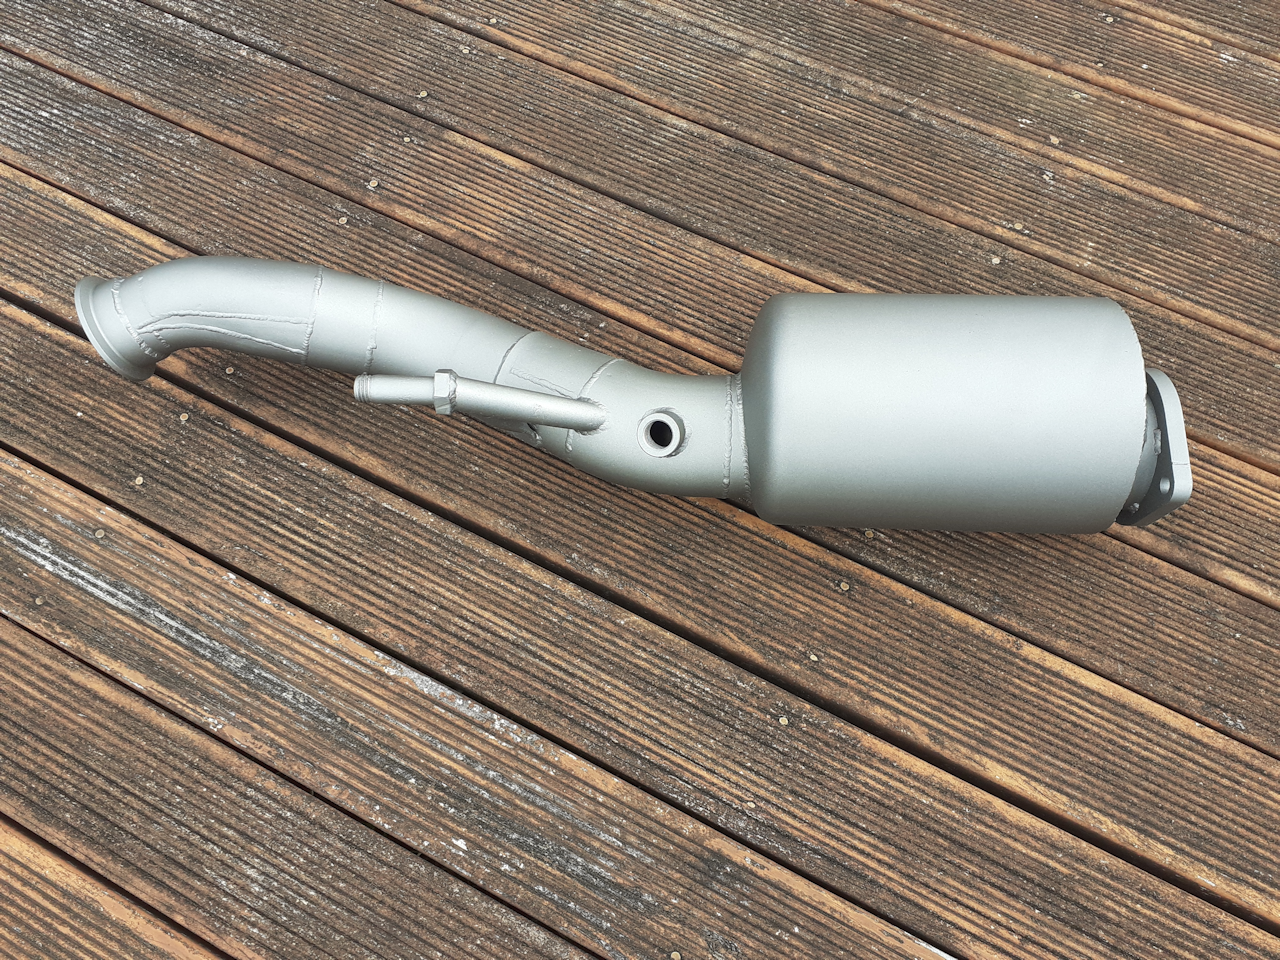
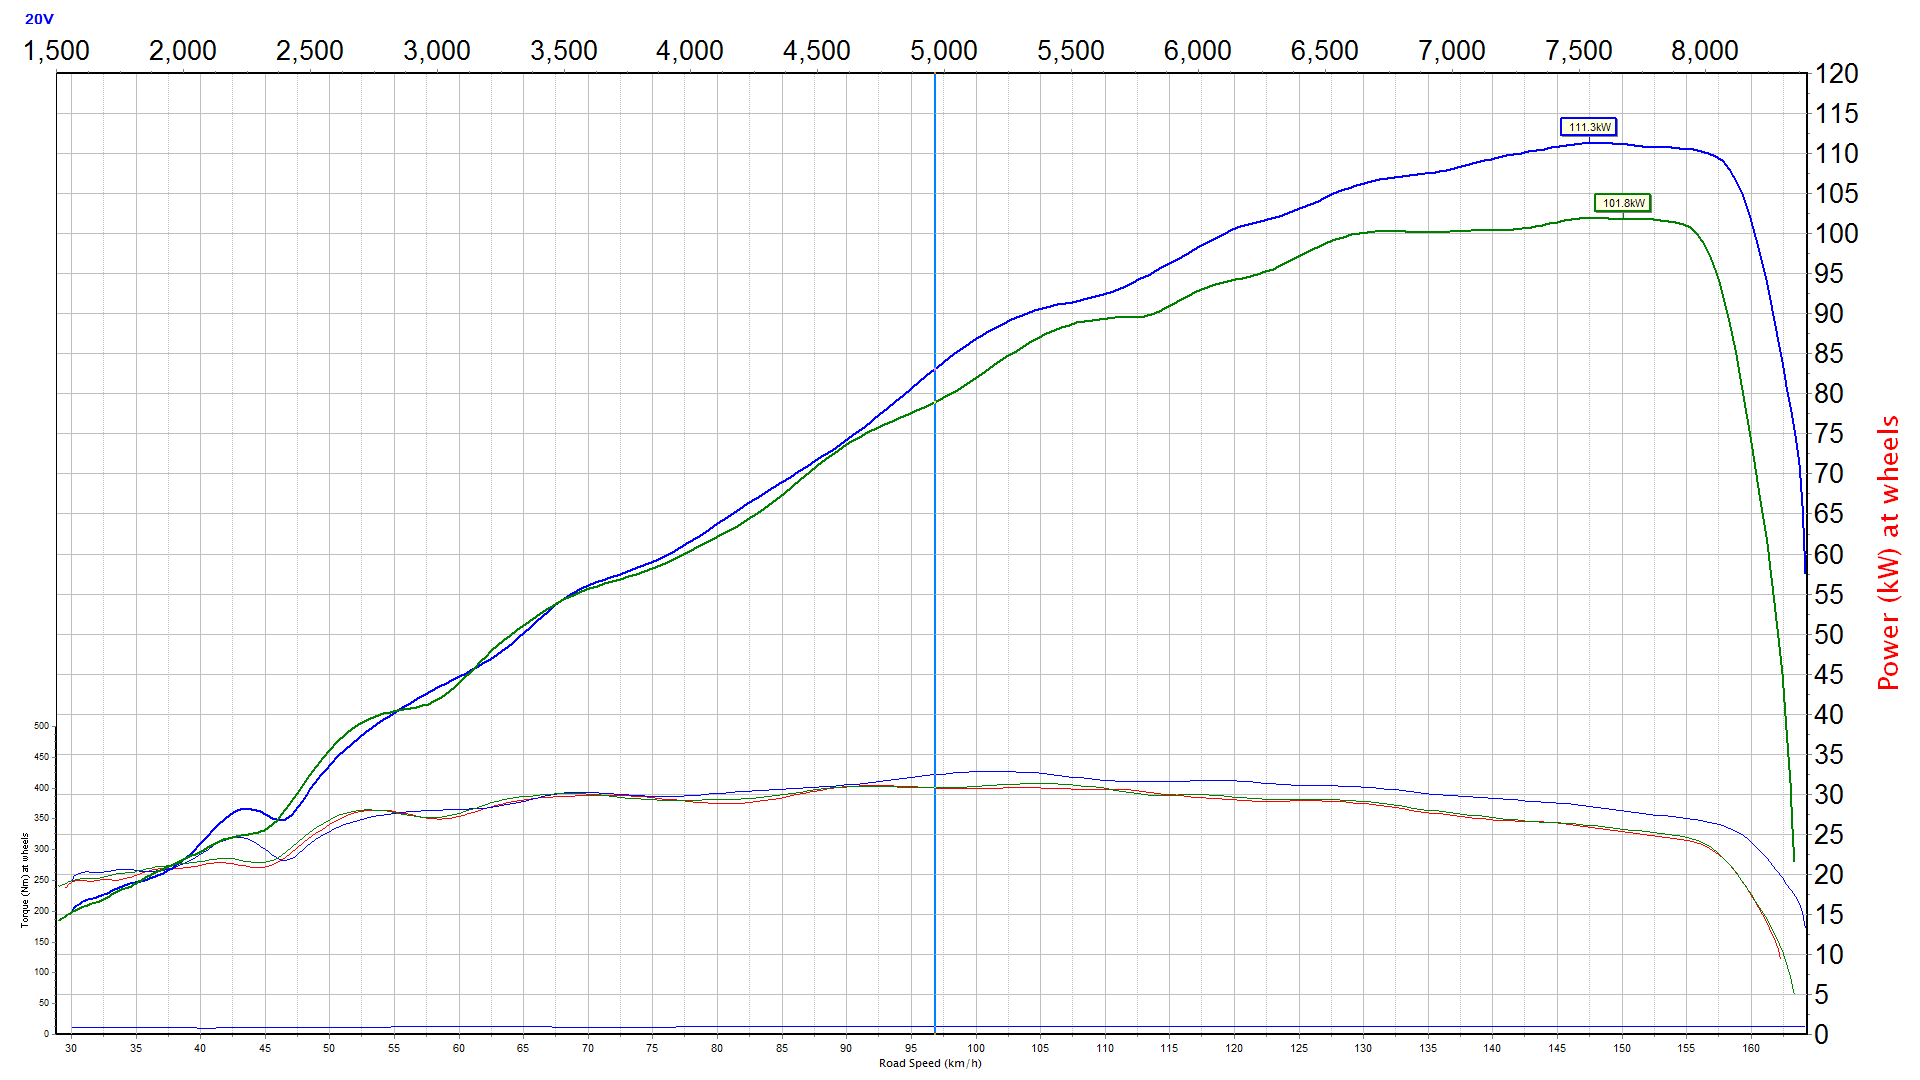
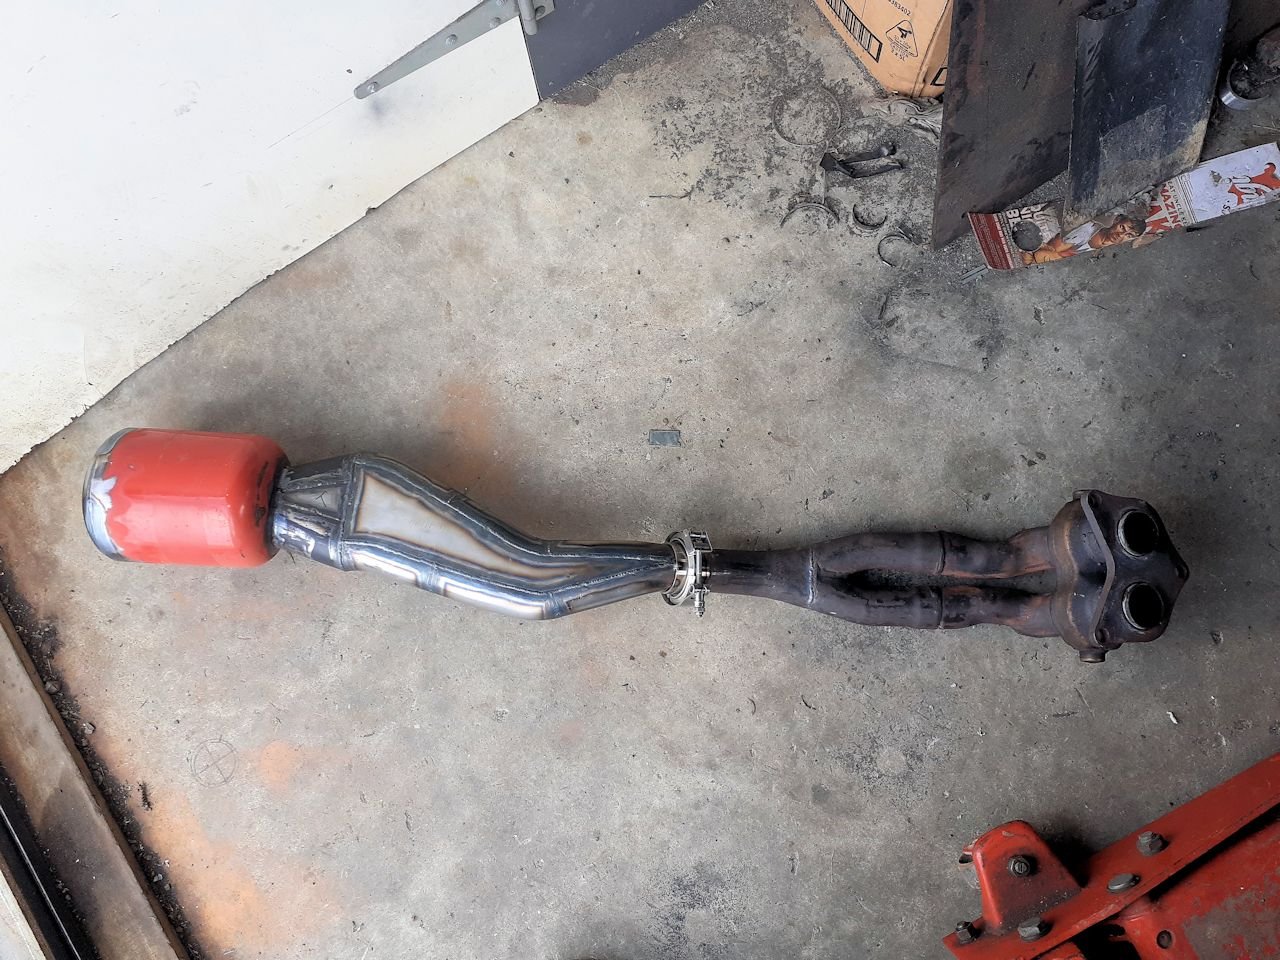
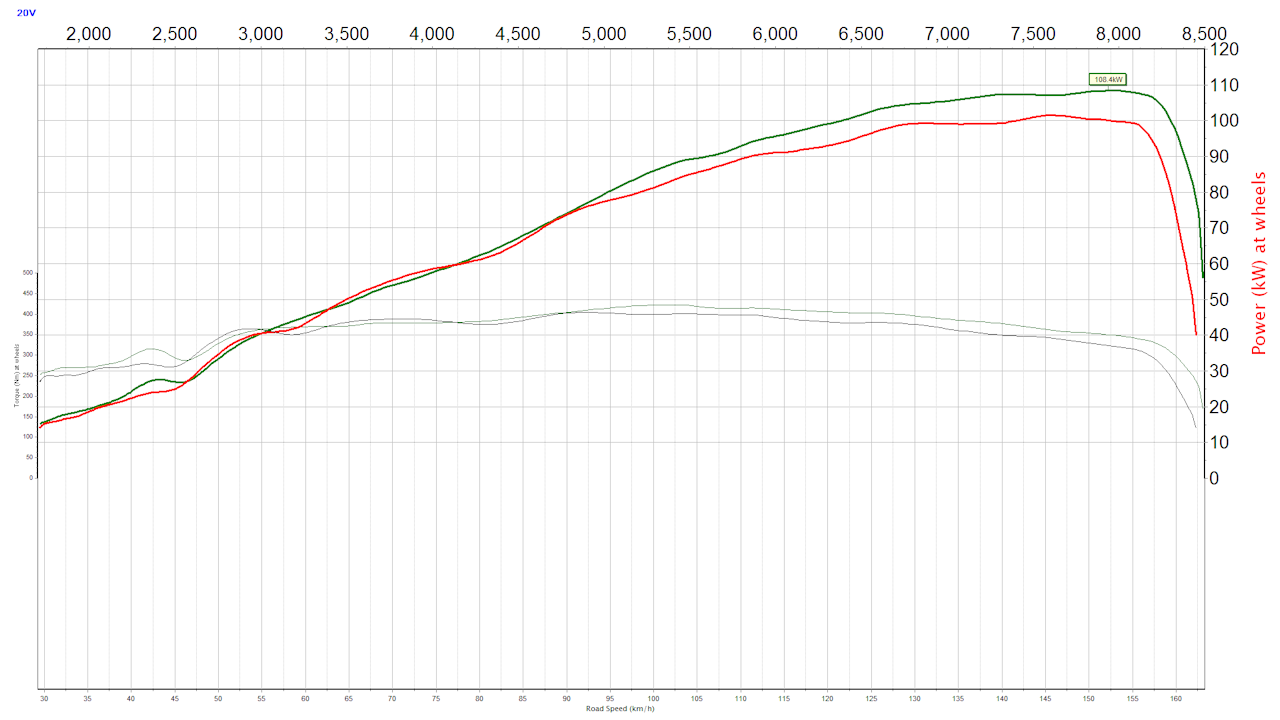
made another front pipe. up to v3.1 now. green line is stock blue is with the trumpets and v3.1 pipe. rest factory, factory exhaust and airbox/ intake etc. still nana spec quiet pretty good for changing a couple of bits of pipe, but fairly complex pieces of pipe! Its still running the pvc trumpet ends. so maybe a few more kw in it with better belmouths and modified airbox cover red line is with the exhaust dropped off after the v3.1 pipe. which should be easy enough to replicate with big exhaust.
7 points
-
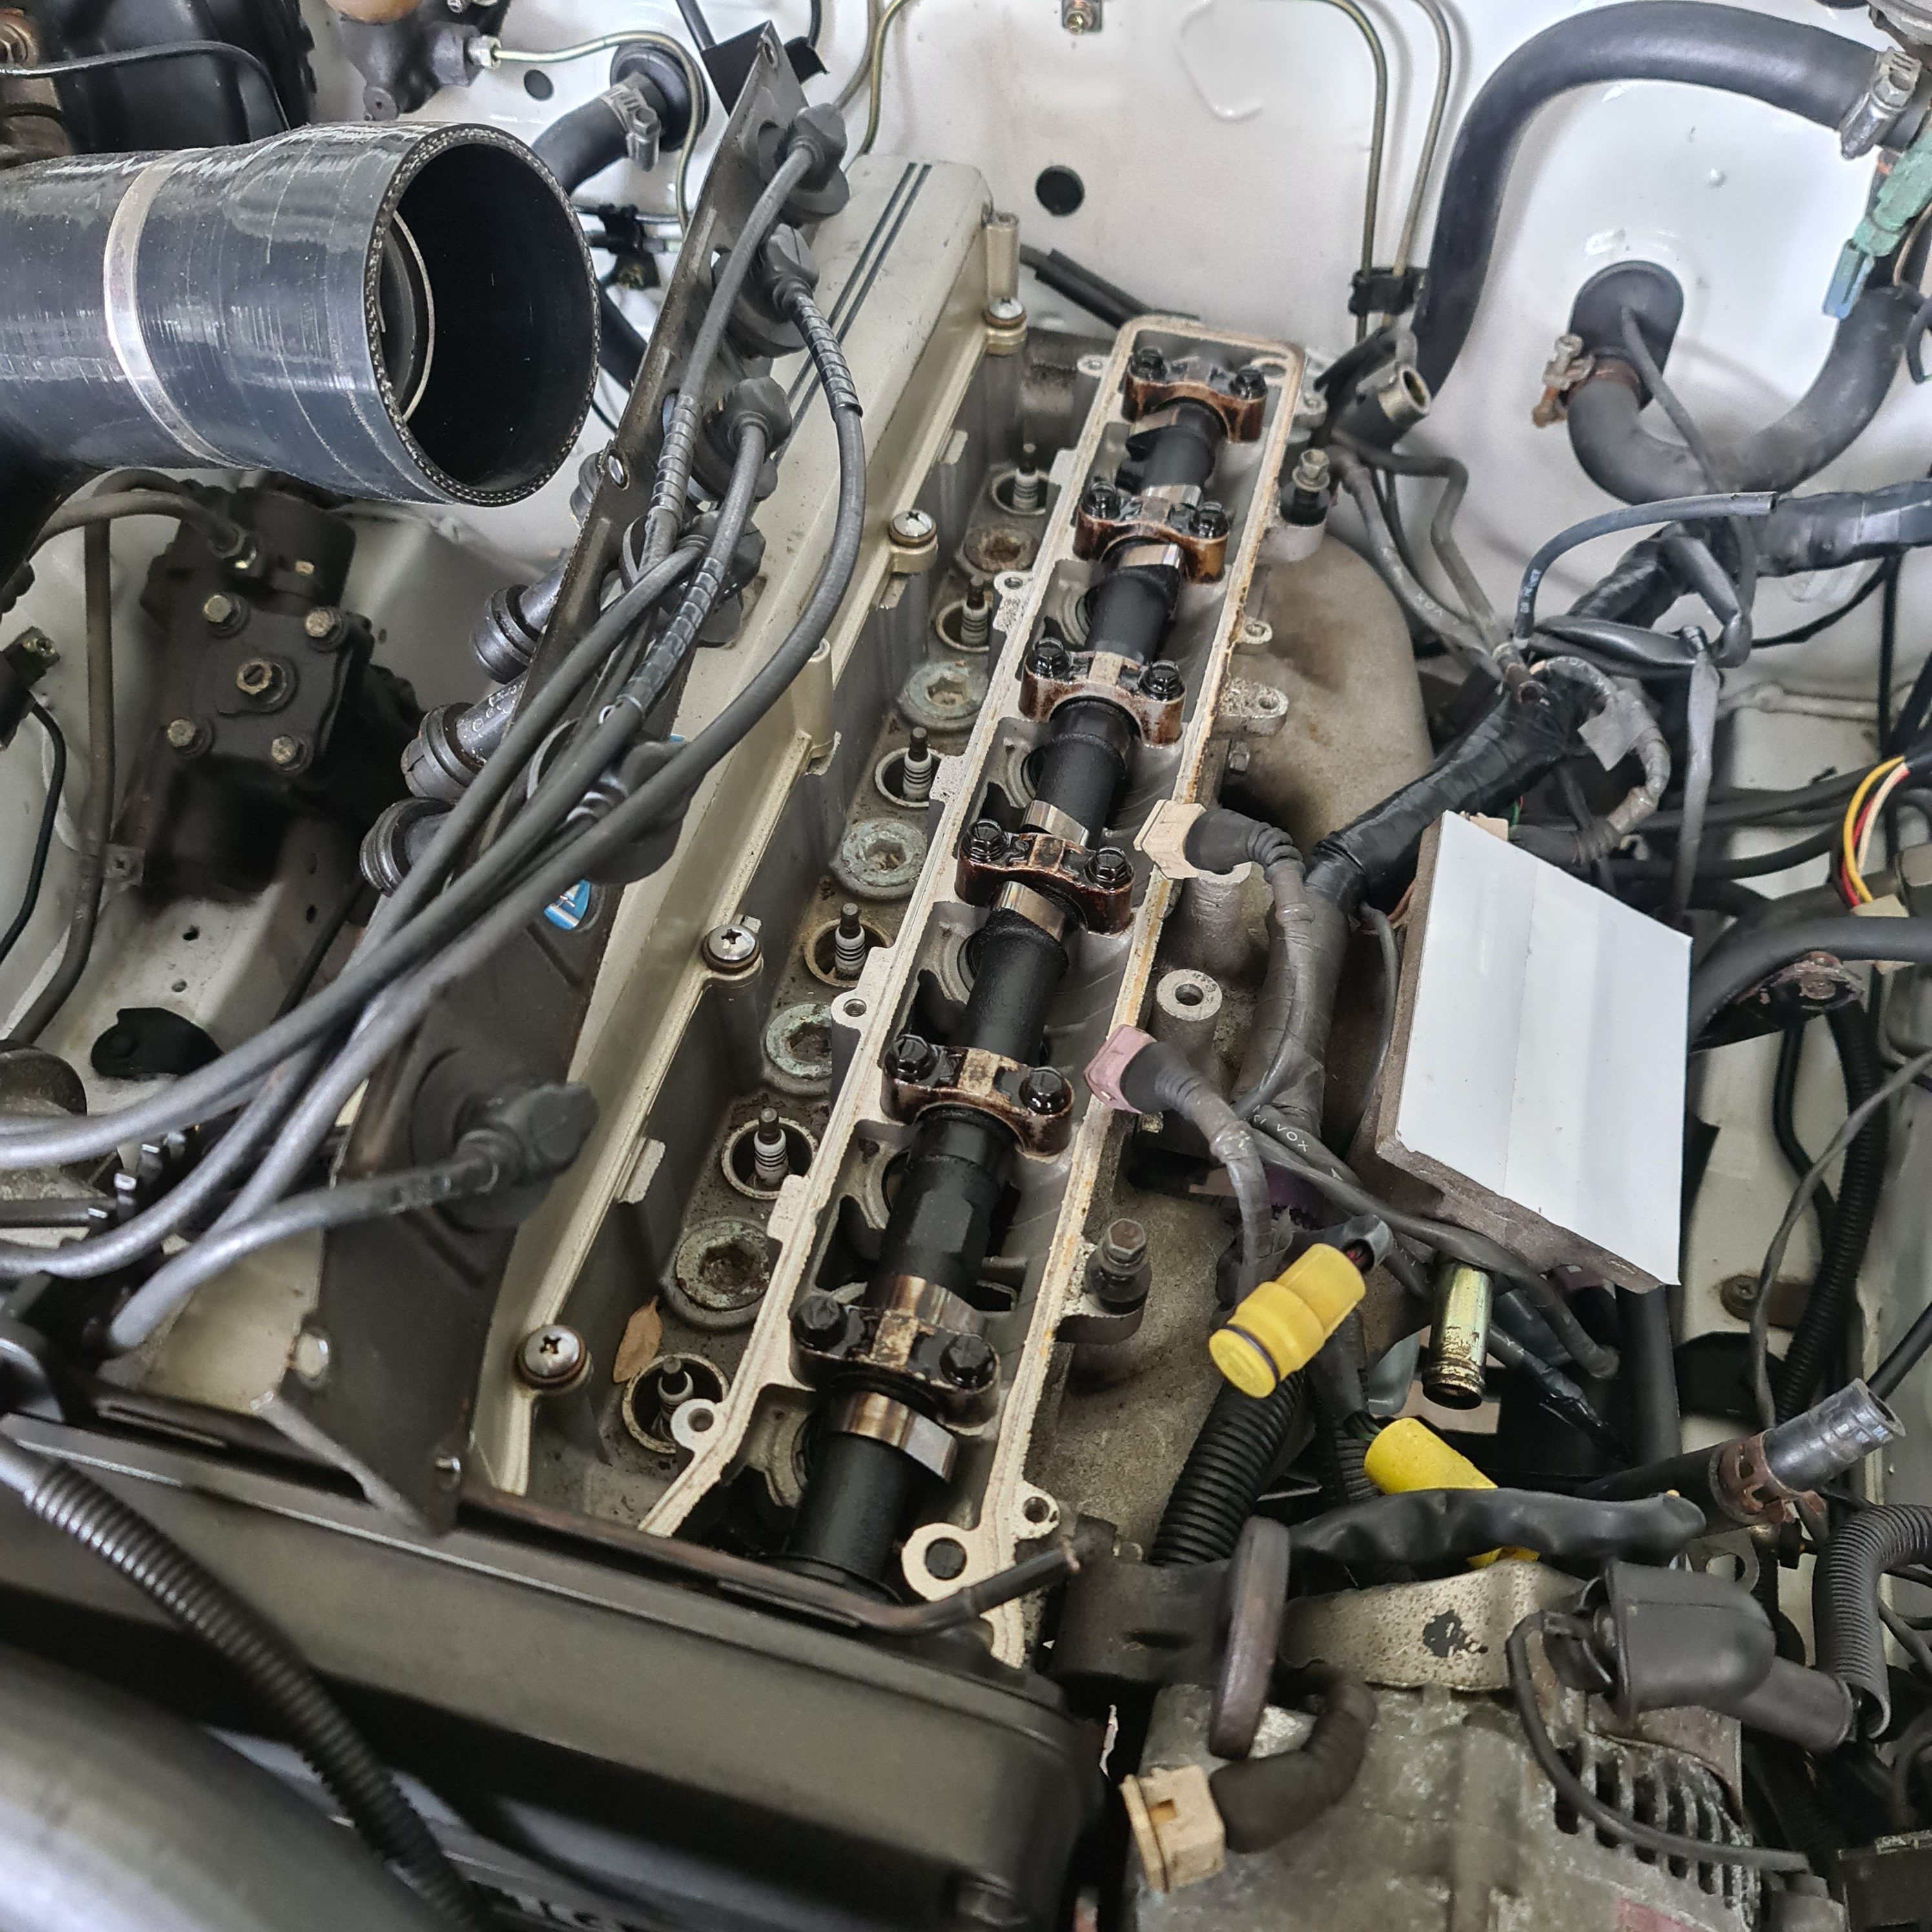
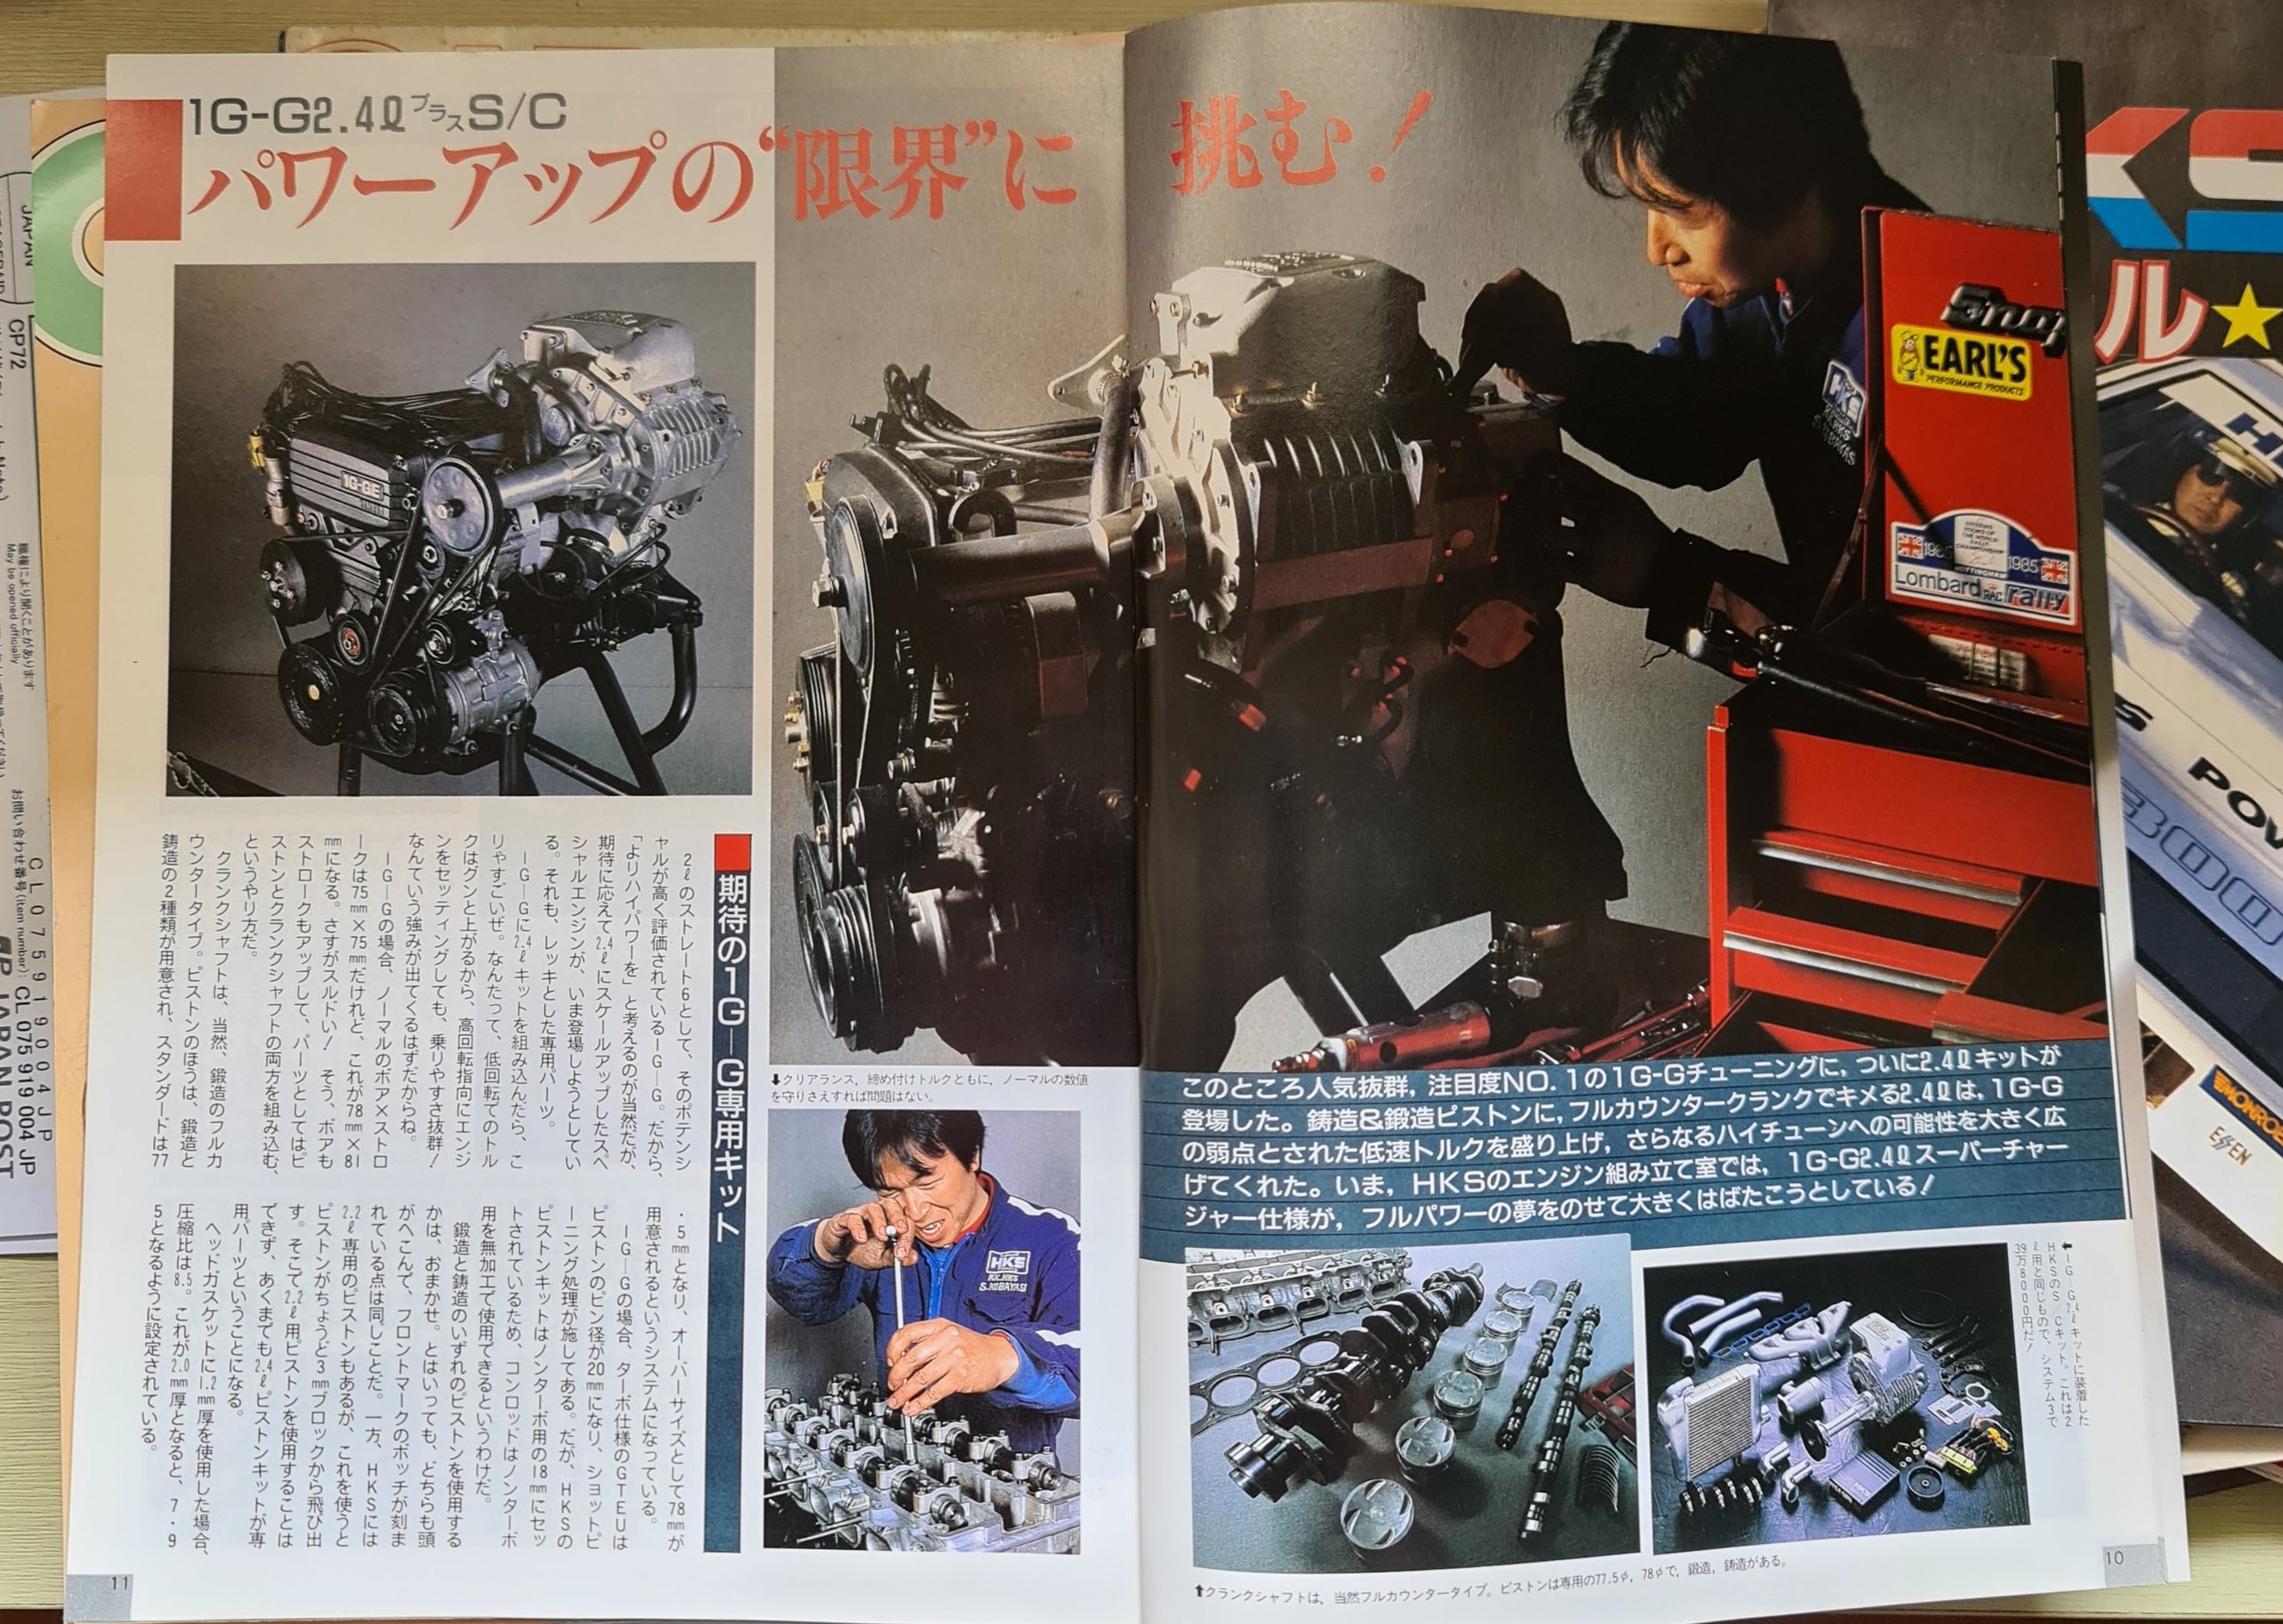
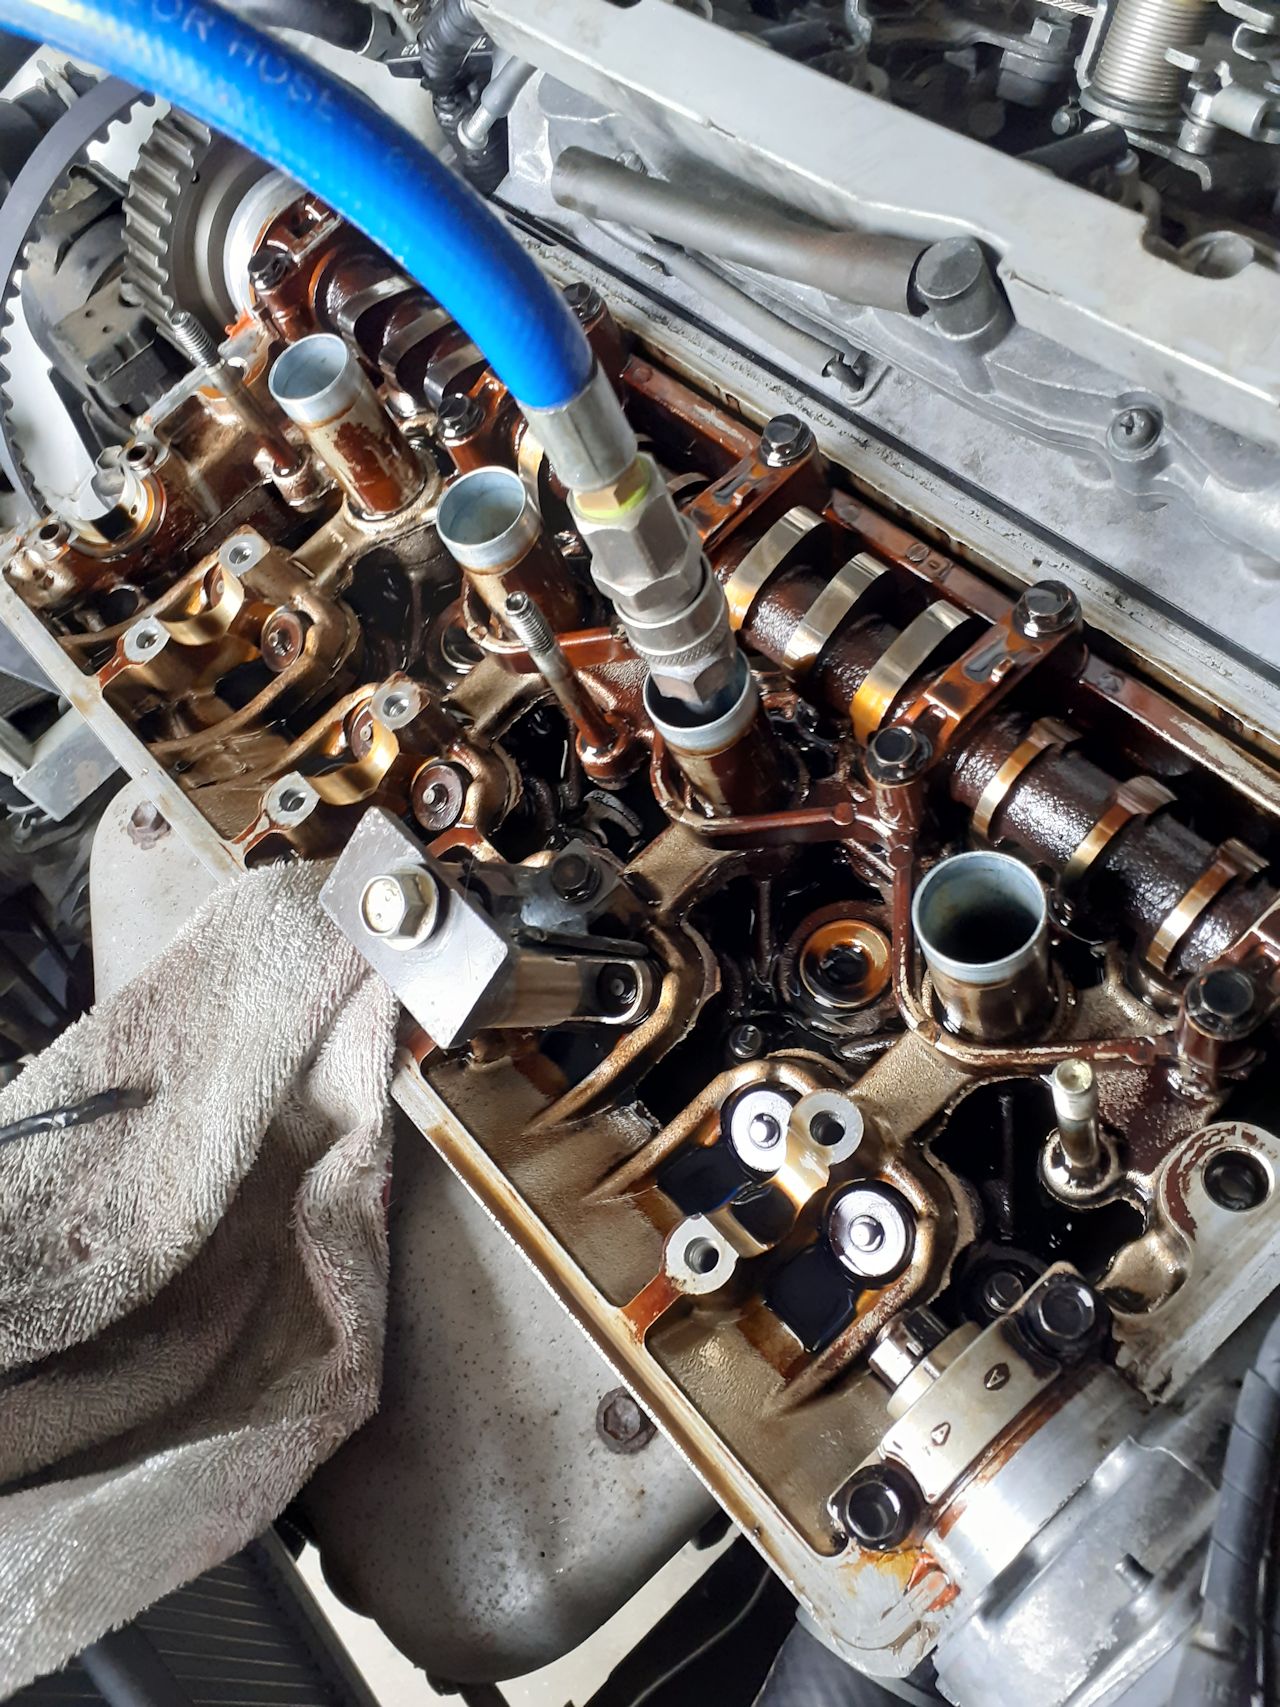
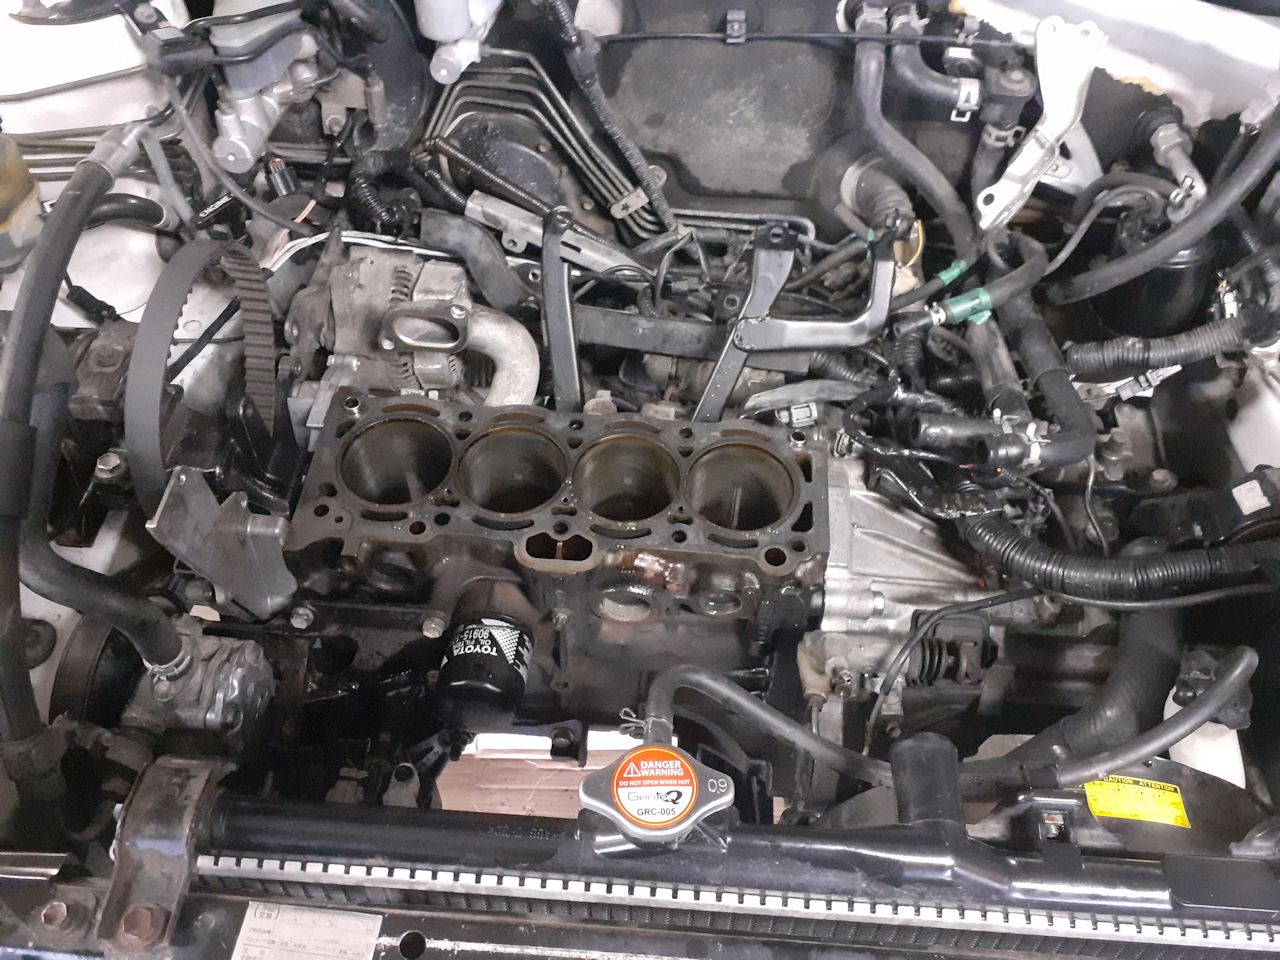
Glad I grabbed spares of the injectors as two were seized completely. Recieved the lot back with 6 tested and new caps fitted. I cut the offset keyway off with a craft knife put them in the fuel rail and decided to prime the fuel system to make sure there were no leaks. After about 20 seconds it starts pissing out two injector seals. When I installed them they didn't feel as tight as usual in the rail. Took them back out and the rb20det injectors are 7.14mm where the o-ring sits and the 1gge are 7.84mm in the same place so my 1gge injector seals I have from new gasket kit aren't suitable. Decided to have a browse under the cam covers while I'm here to check for wear and it still looks as clean as when I assembled it almost 2 years later. Also using this time to improve some of the hoses and vacuum lines and fit the old vacuum tank for the heater (heater goes cold when on boost currently) Have been looking into changing to a 1ggt/ze spark plug R5671A-7 .7mm gap from the current BCPR5EIX-11 with 1.1mm gap I also finally found an article on installing the hks supercharger kit which is in the 1987 hks power catalogue I was always confused about how they offered an intercooler version since the charger is mounted directly on intake manifold. This manual shows that version has two pipes coming off the intake manifold which will go to intercooler, who knows how the air would actually circulate through intercooler??
6 points
-
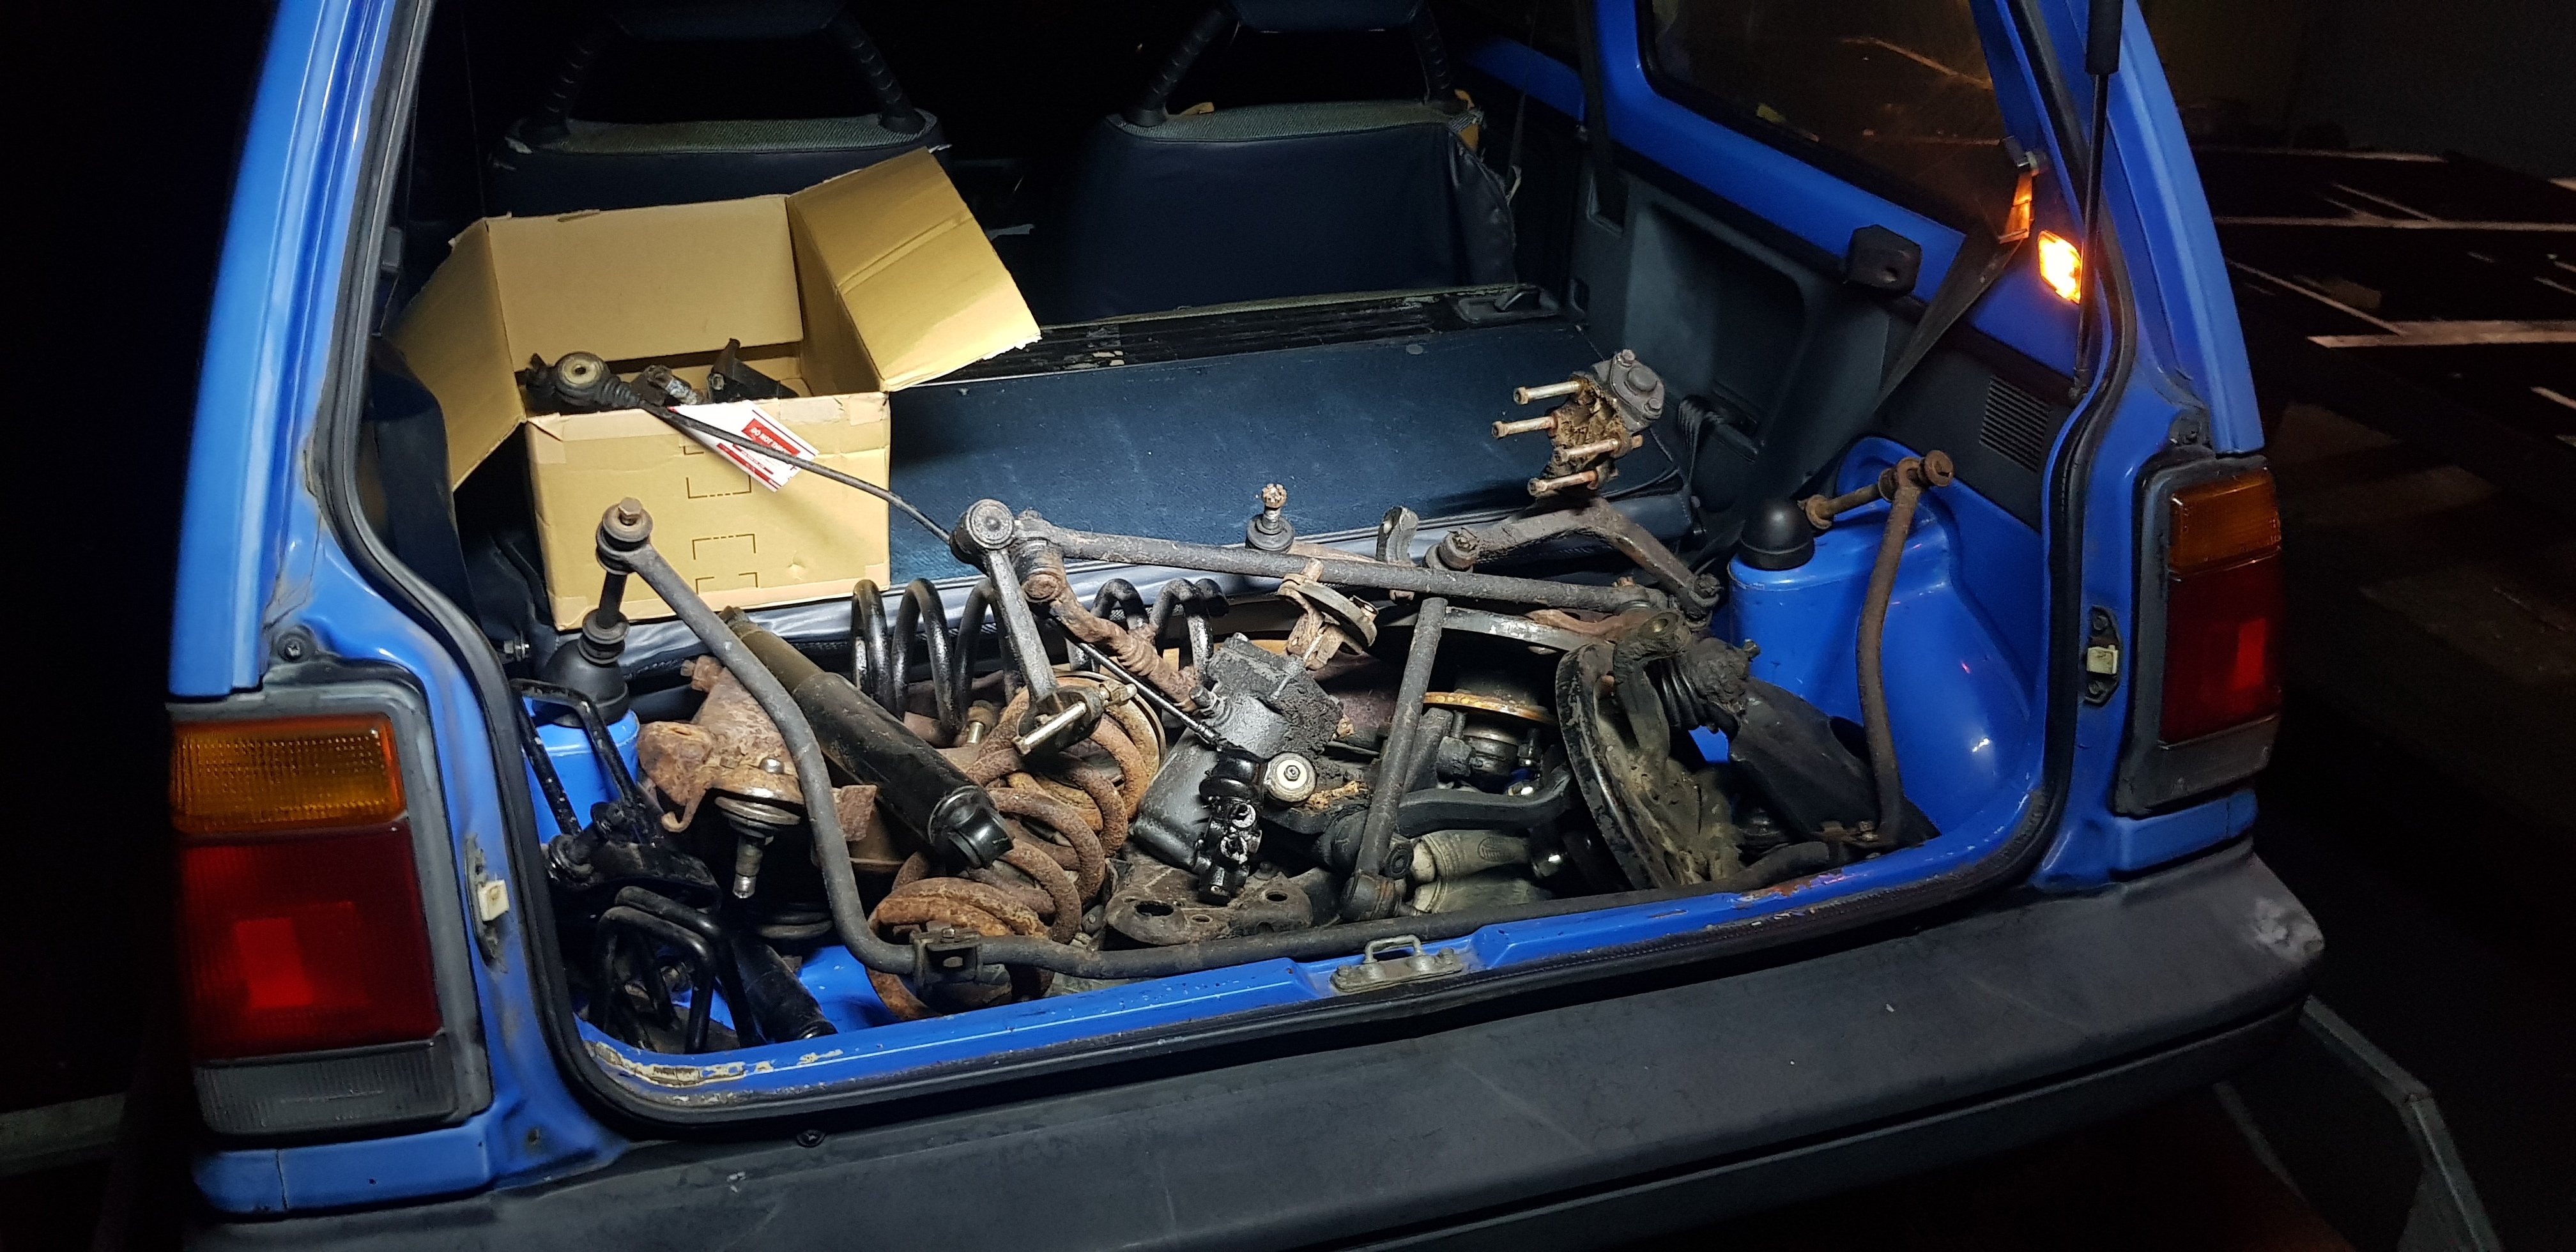
Brought new headlights and corner lights off Kent Dist which got sent when Chch went back to Lev3. Was a bit of a mission but tracked down some headlight adjuster/mounts and the correct bonnet latch/support. Got the grill/lights mounted up on wedenesday just been, and the painter had my bonnet/bumper ready to collect yesterday. Got the bonnet fitted last night and adjusted the latch/cable. Also collected the leaf springs from Archers yesterday. They reset them 2" flatter so threw them back in last night aswell. Need to mod the fuel tank x-member as diffs hard on it now, but at least with springs back I can work out shock heights.
6 points
-
So it's been awhile since I've done really anything too it apart from poking holes in rust spots to see how far the screw driver goes in. Had it somewhat running and now theres no spark which kinda sucked since we had to push it up onto a trailer and well its not as easy when you are on a slight hill and there are bolts hitting the trailer so the car wont go up. Not to worry some random off cut bits of wood popped it up a bit. Of to go get painted by my mate at the panel beaters so that will be the next update. Kinda stole the colour scheme off a couple race variants and also a video I found on youtube who happens to live 3hrs north of here. Next I'll probably convert it to an electronic distributor since its much much less of a hassle and also fix the brakes.... which... didn't really work too well
5 points
-
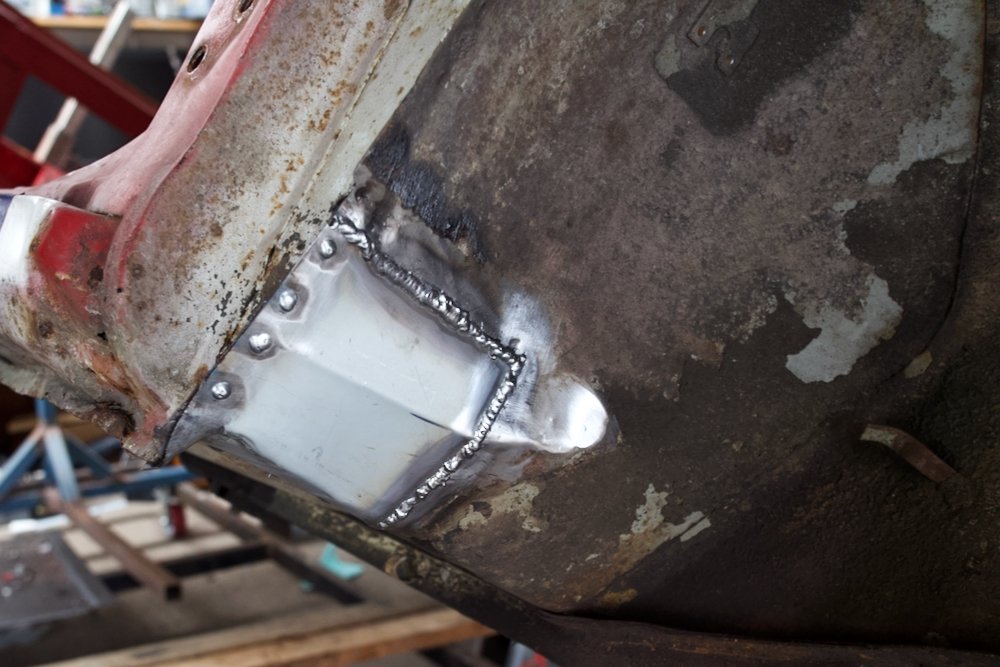
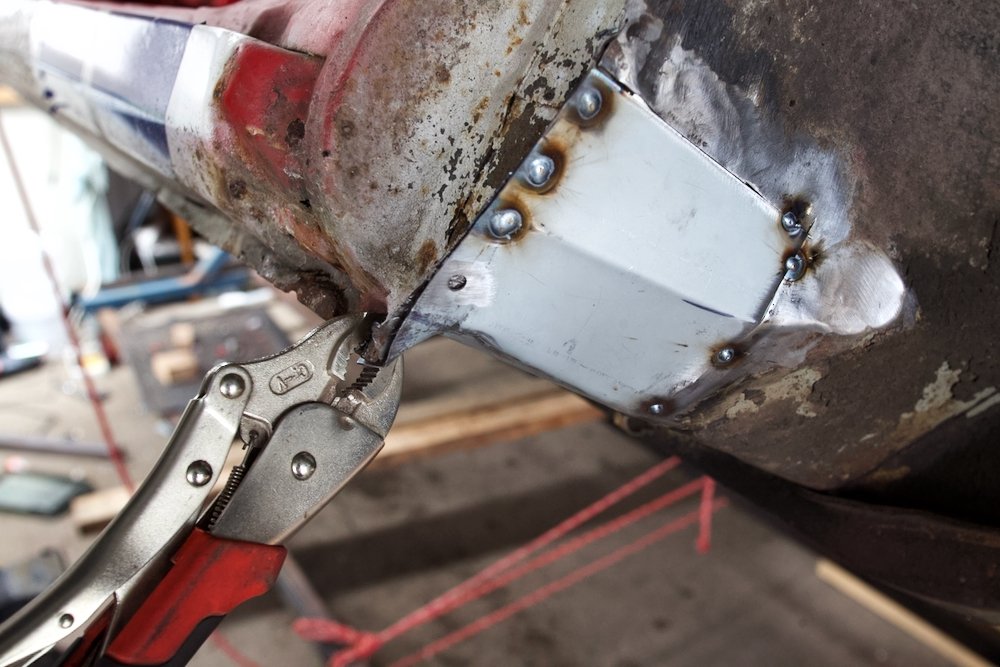
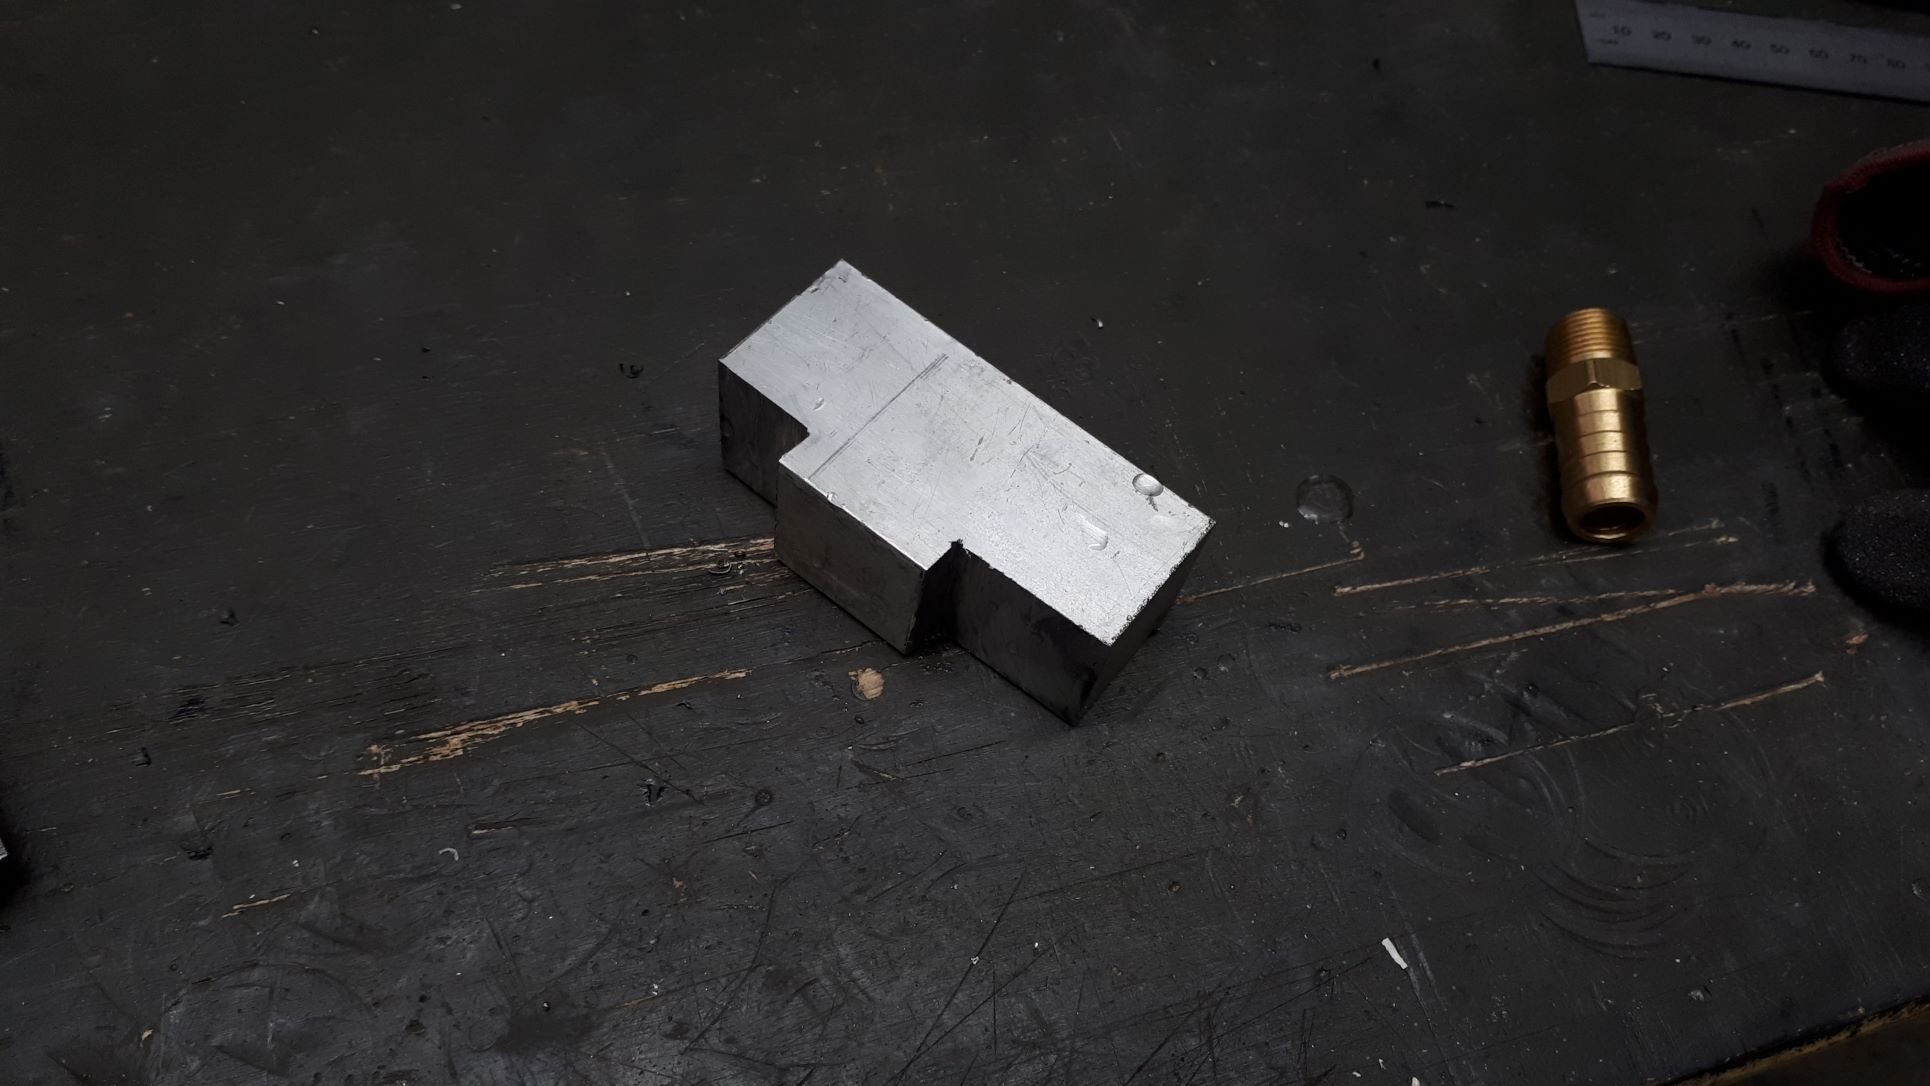
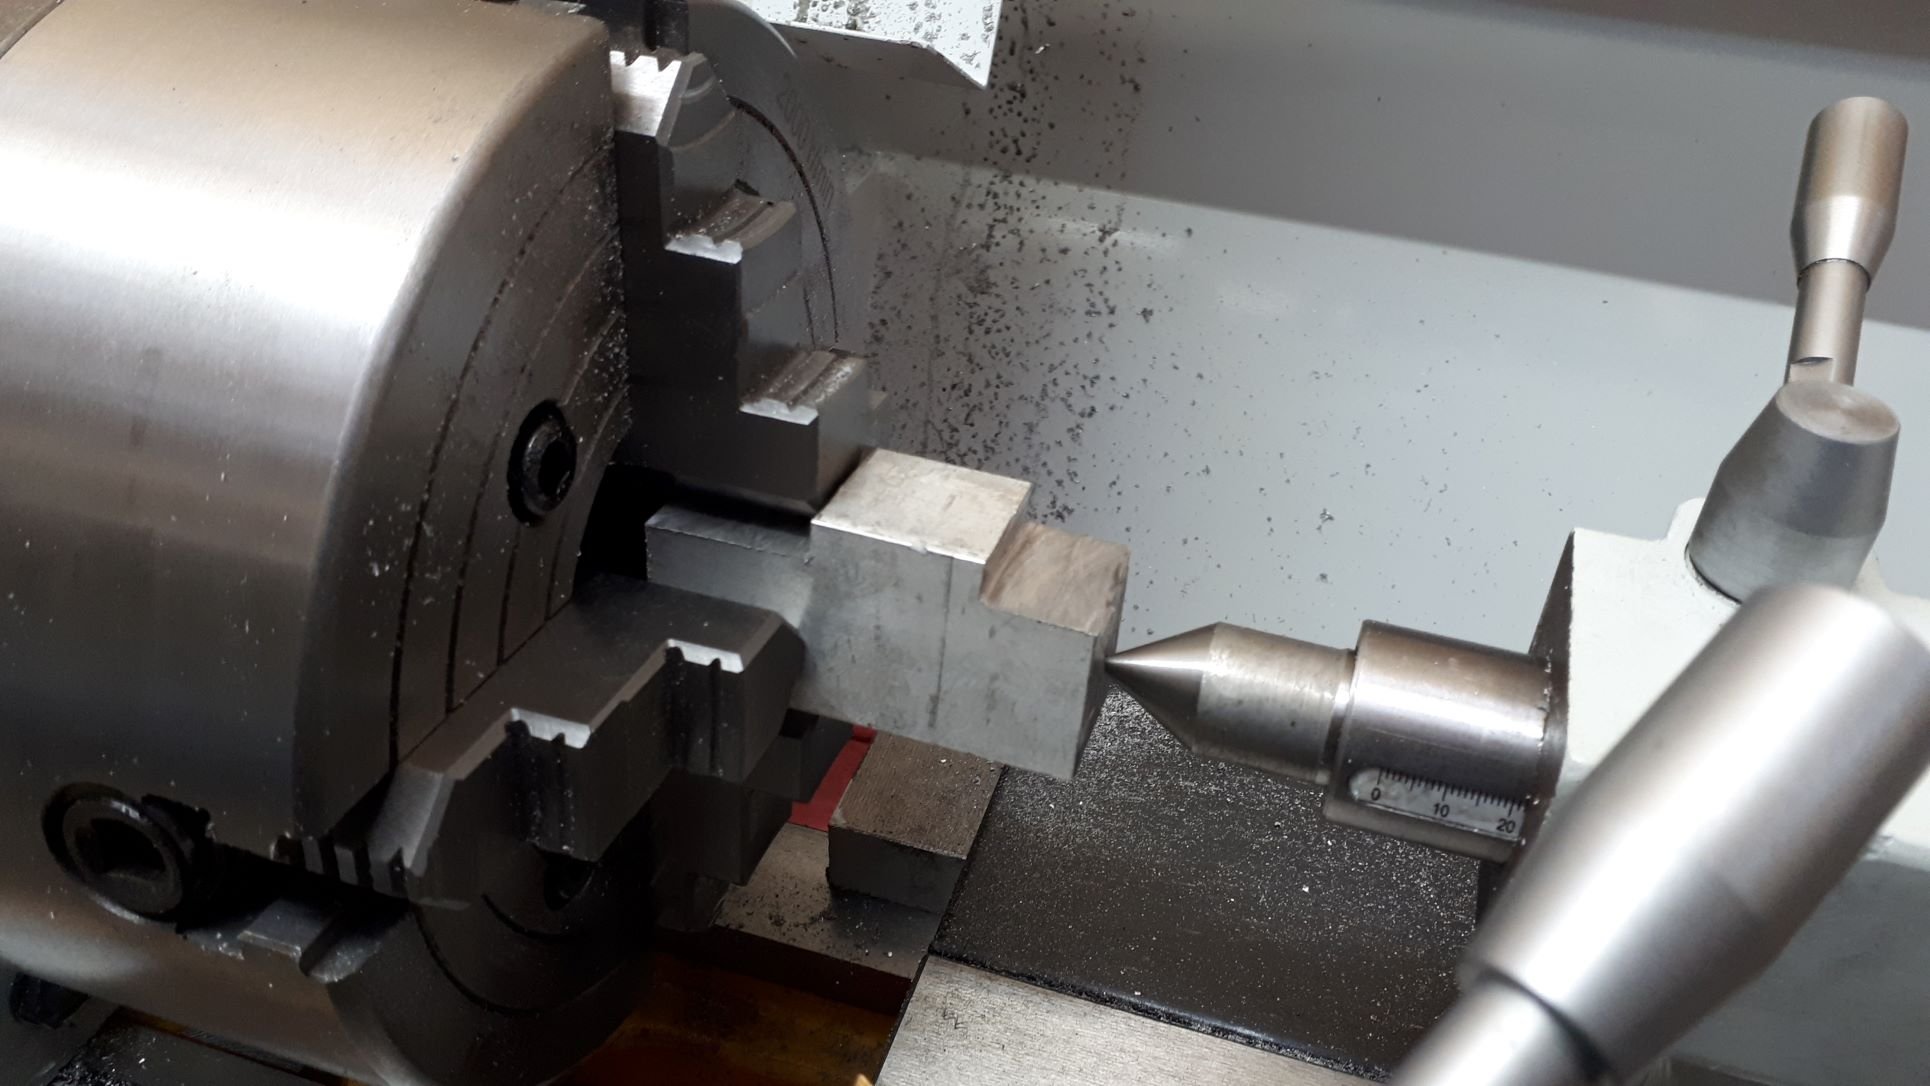
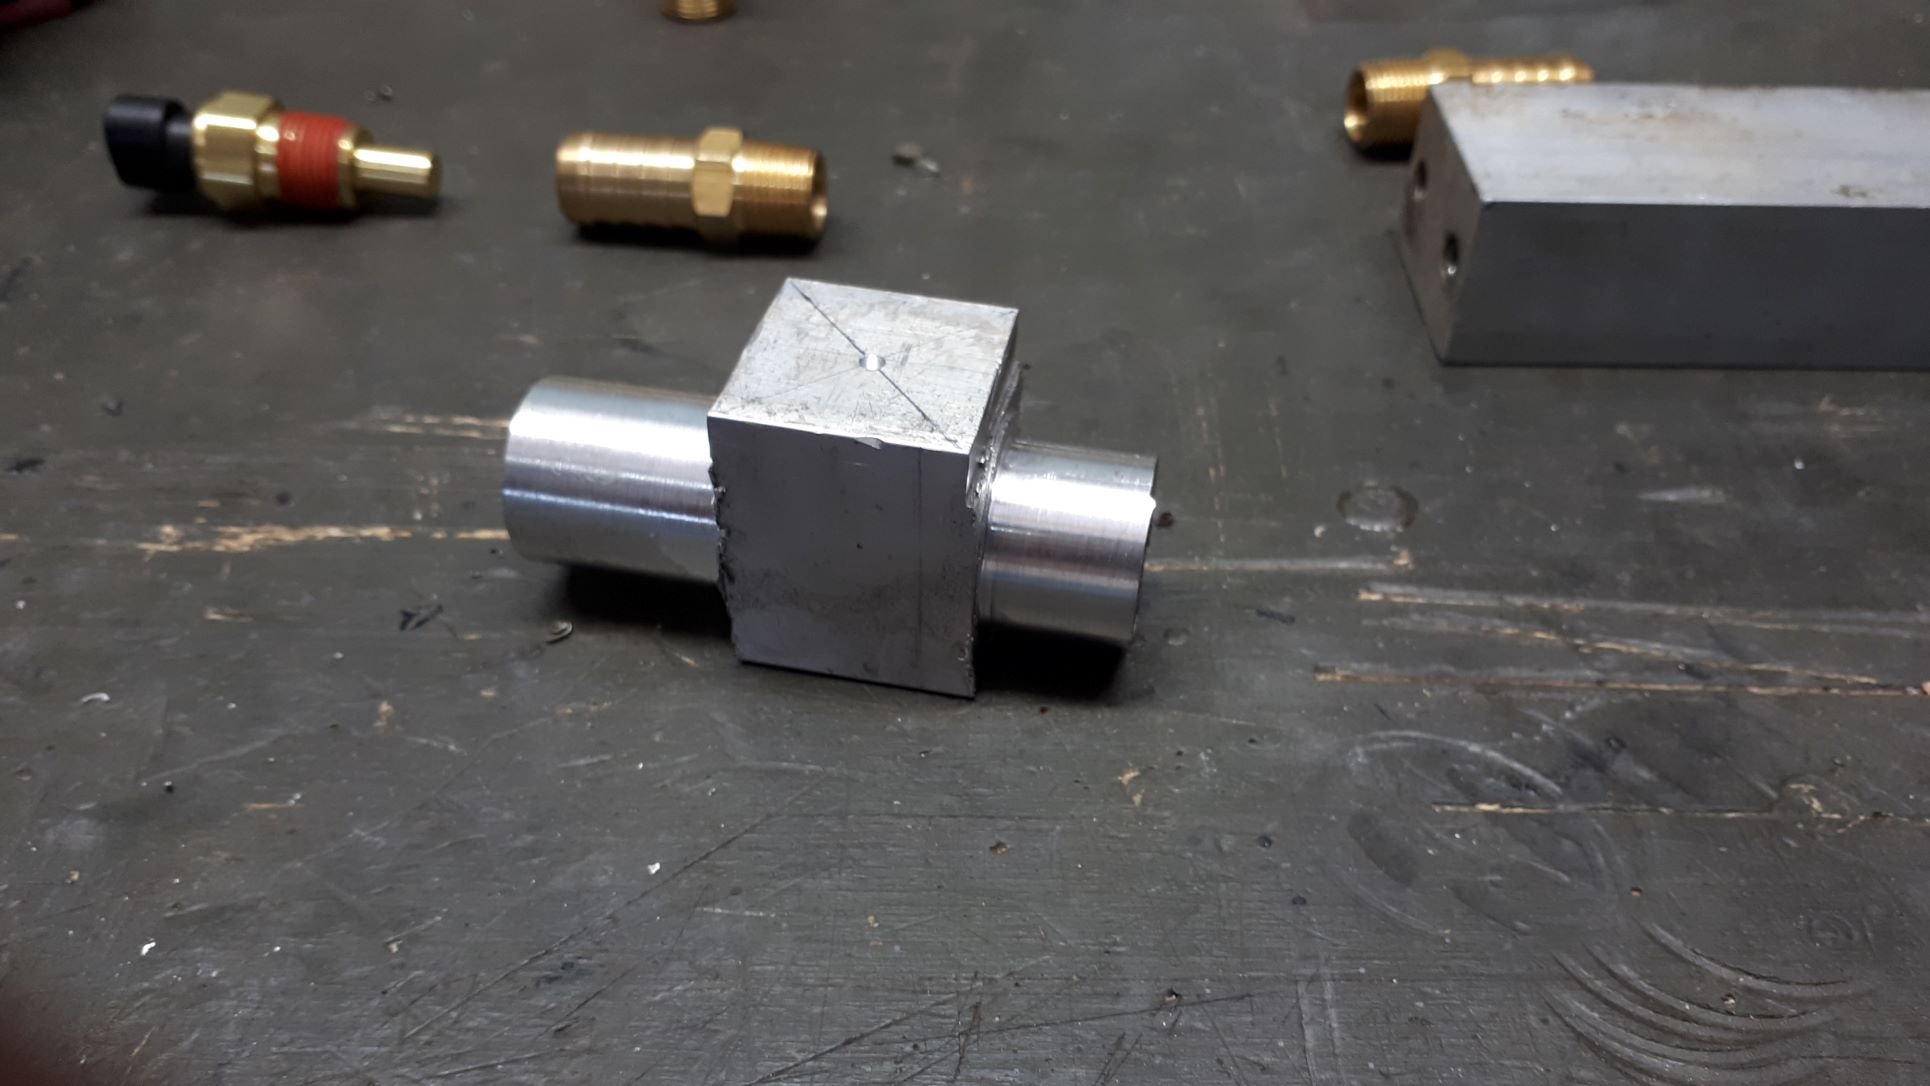
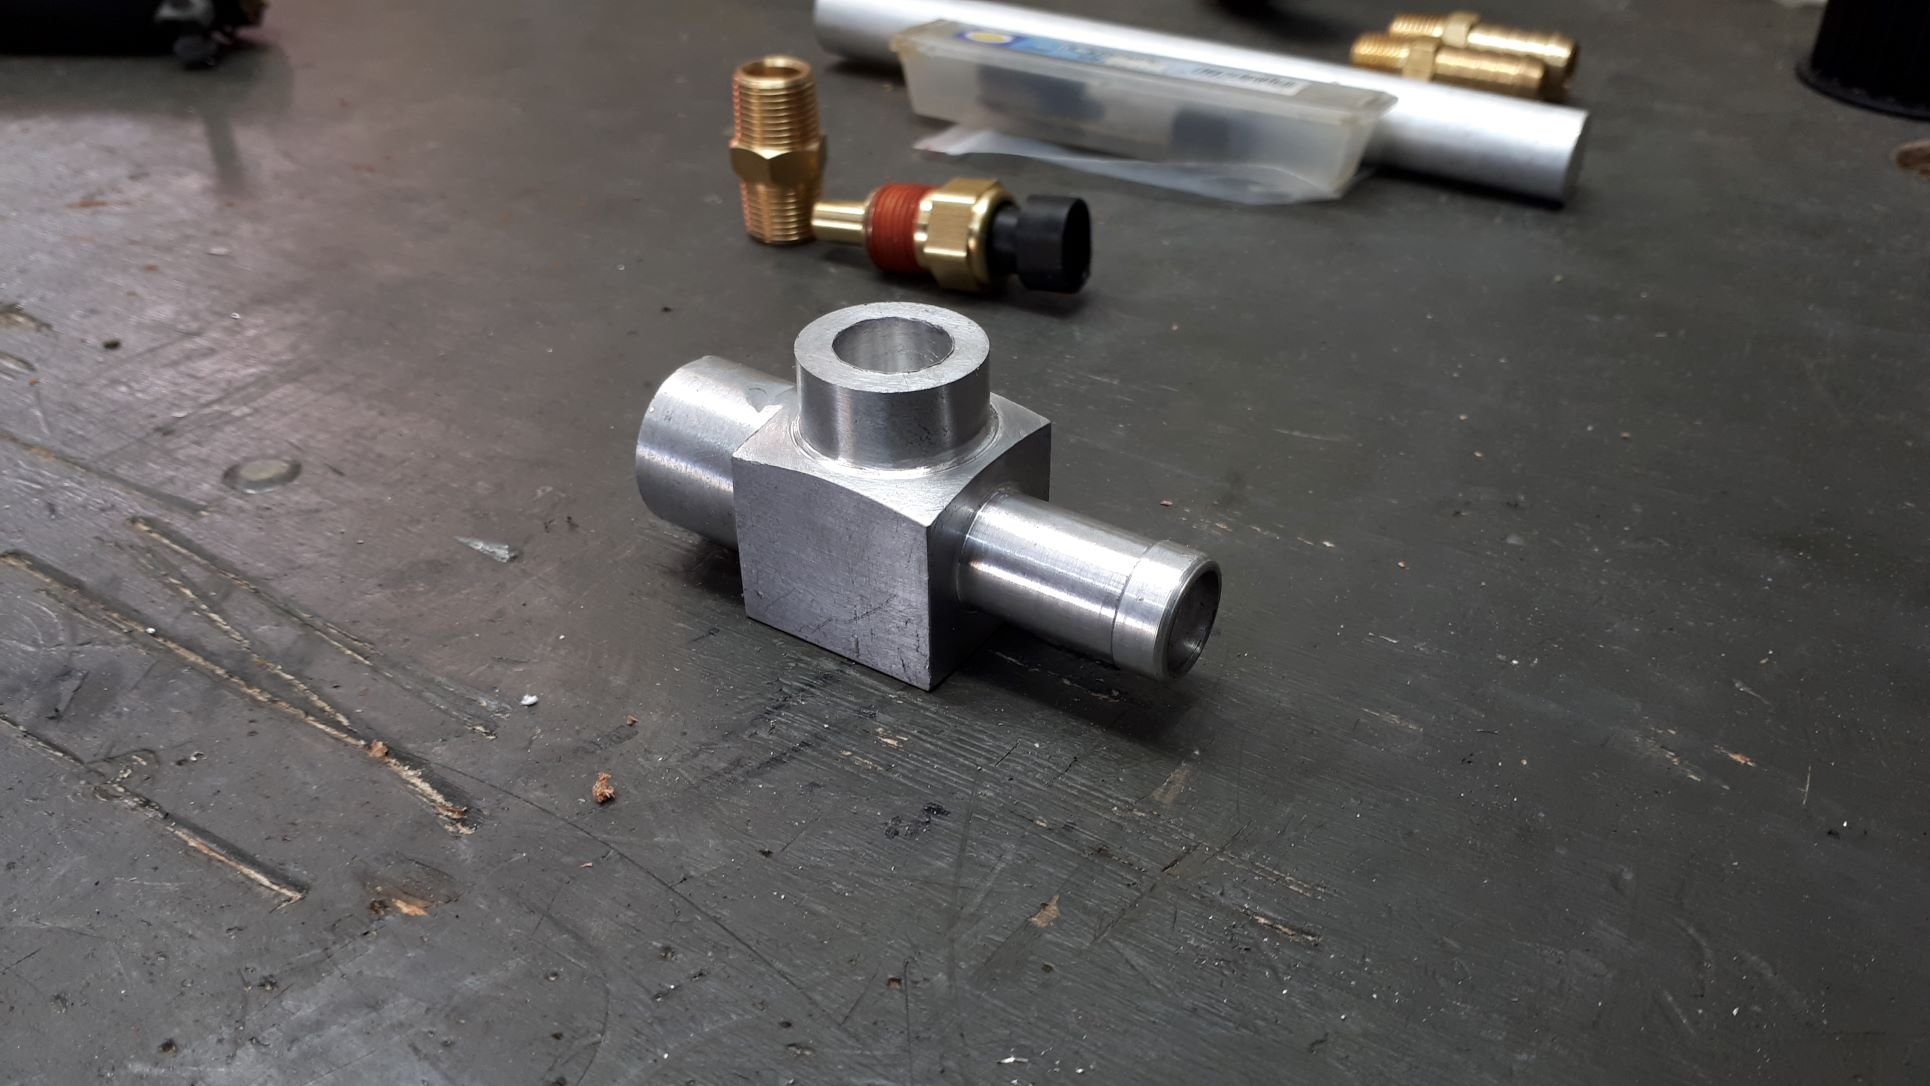
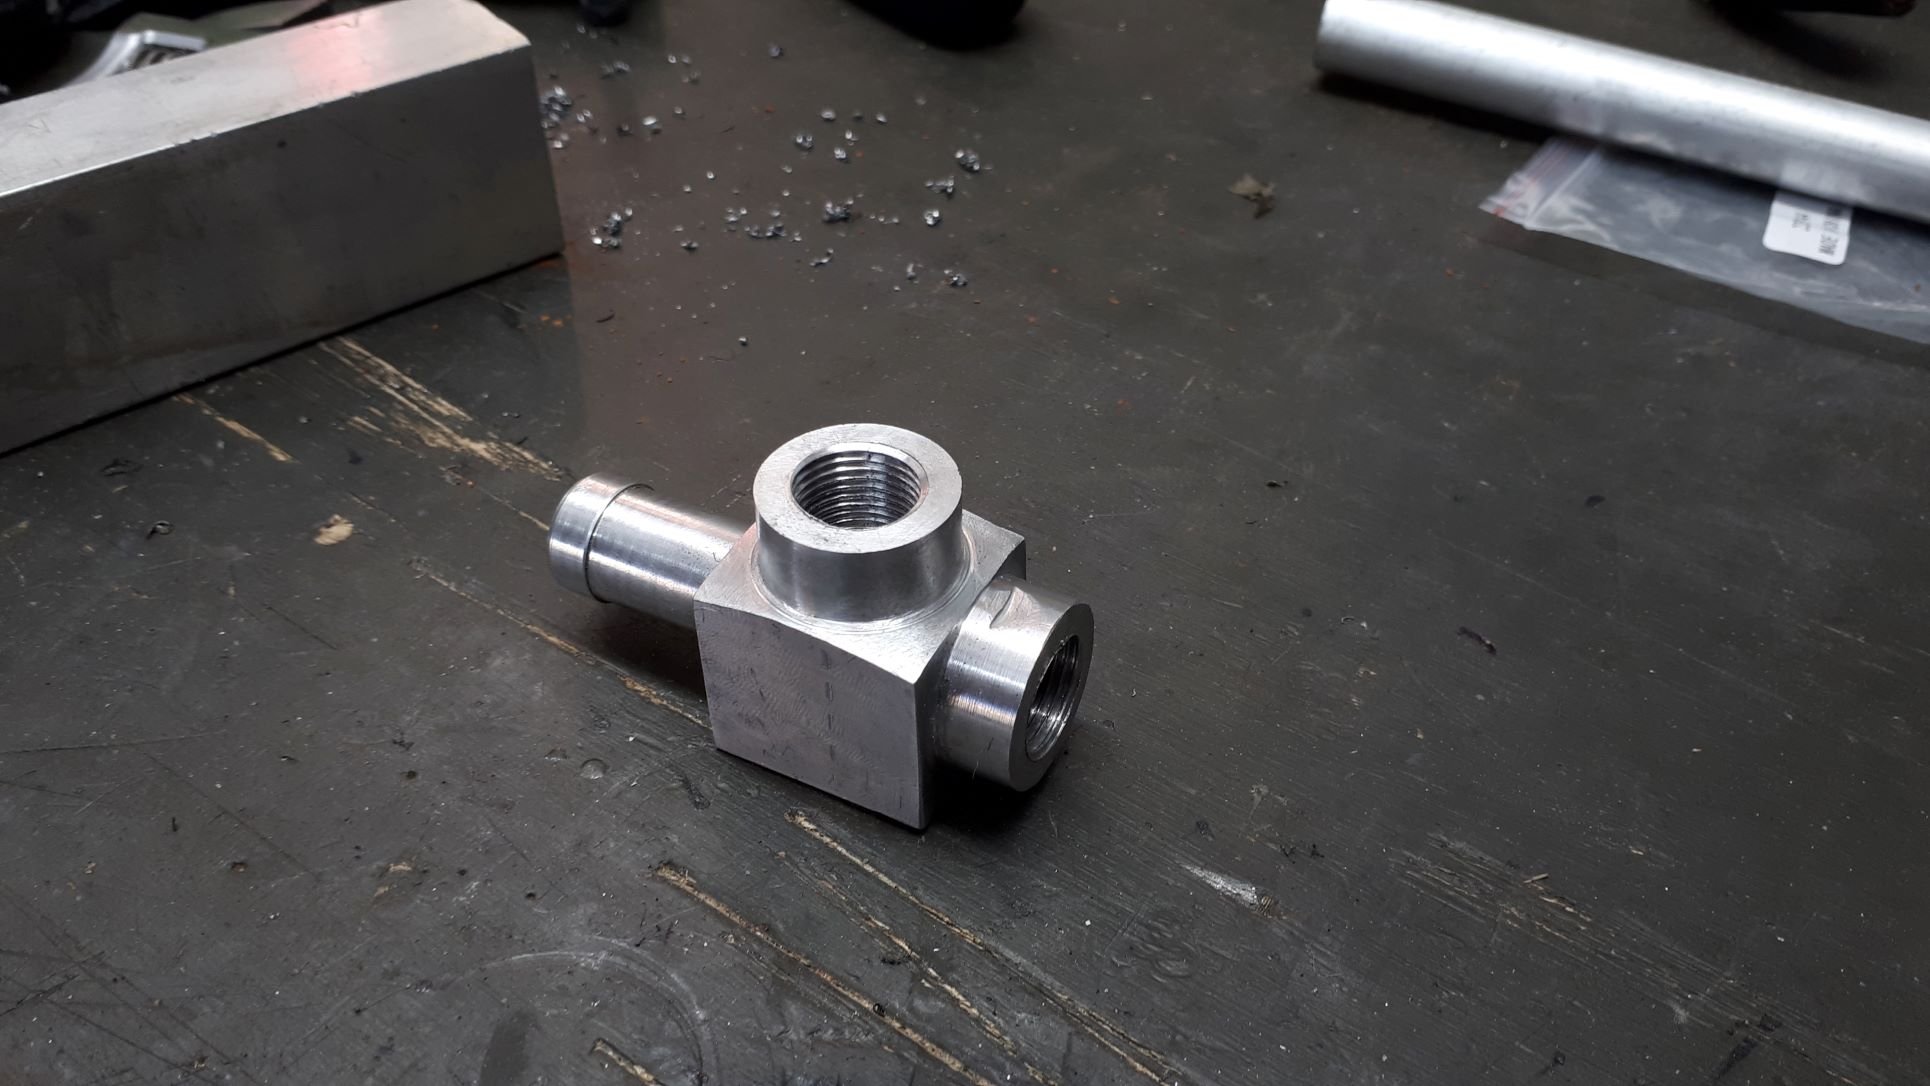
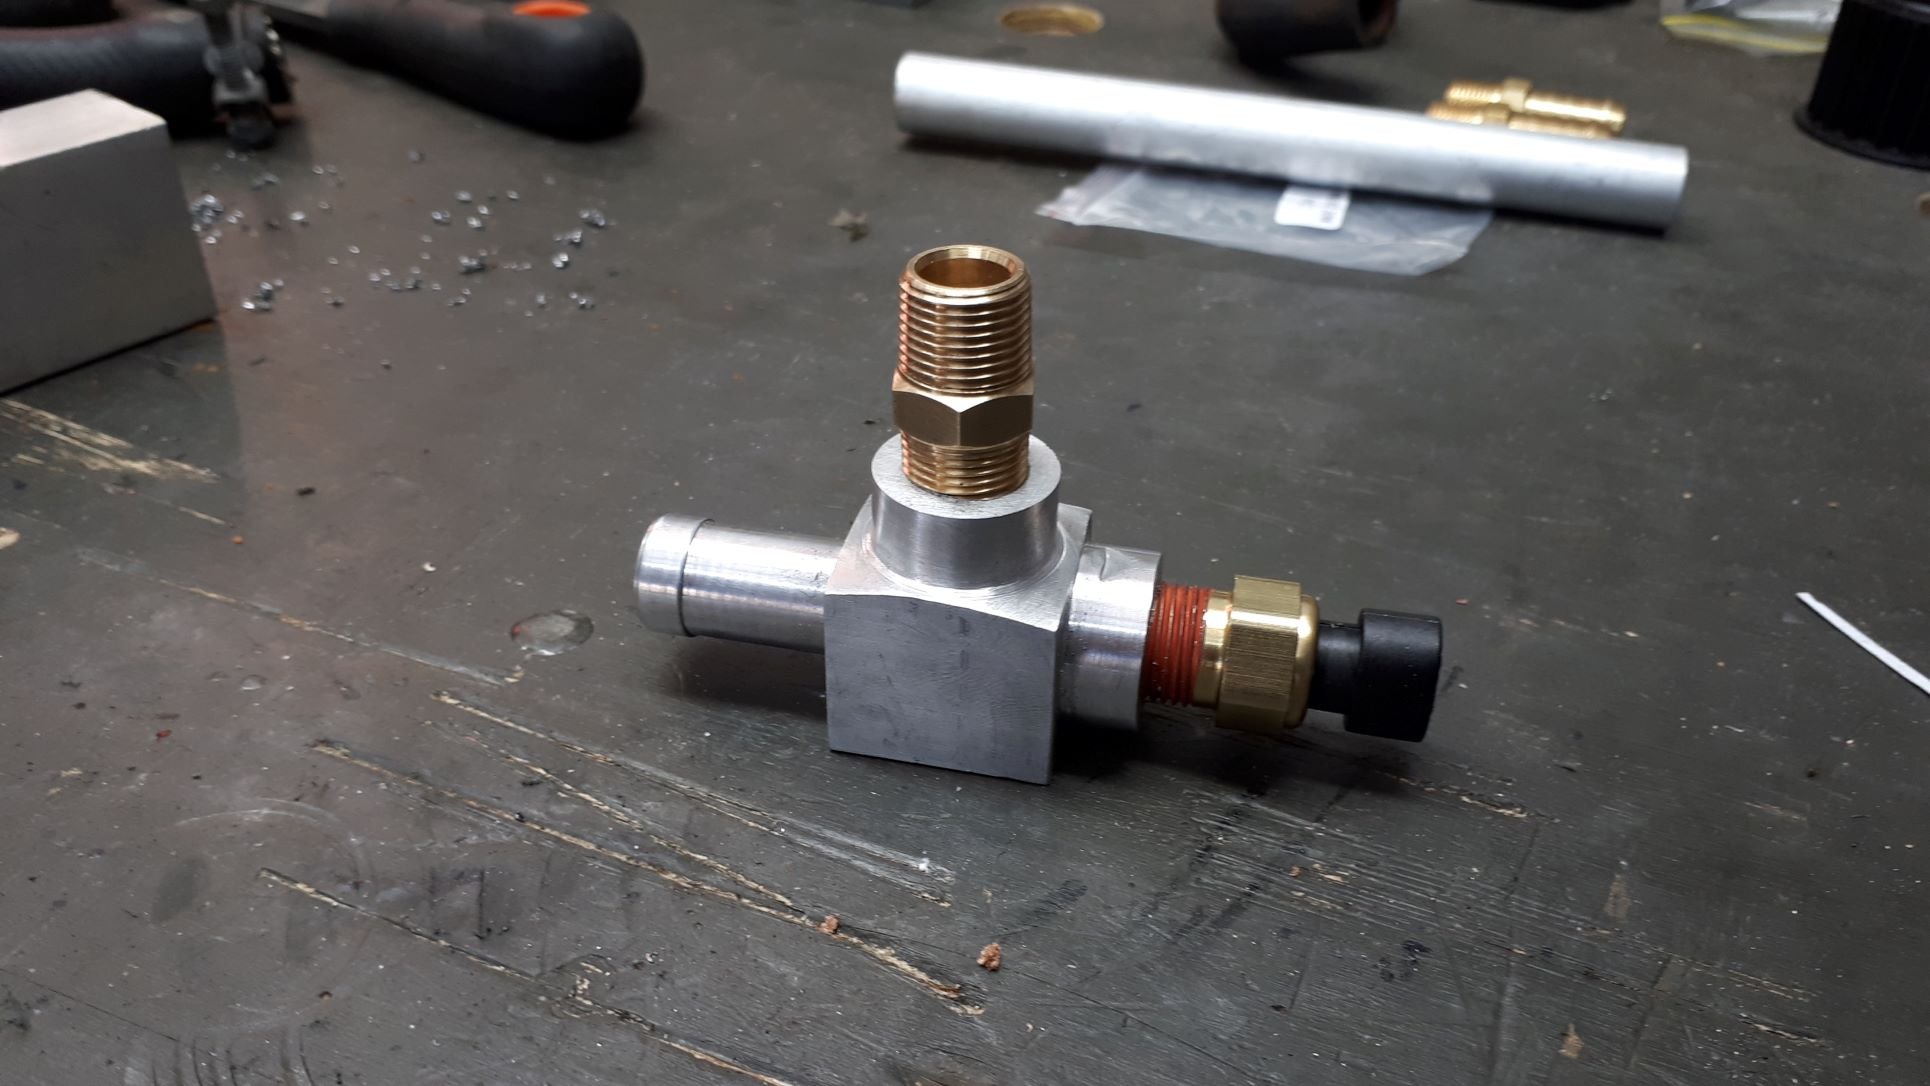
Hacking up the manifold resulted in the removal of some water fittings and I needed to reinstate the removed cooling system components. I had a nice piece of aluminium under the workbench so decided to make a custom fitting. The lathe is a fairly new addition to the workshop, a couple of friends very kindly offered the use of workshop lathes however I decided that I had enough work to do to justify buying my own. Also I haven't used a lathe in many years and I knew that everything would take forever. I have never tried to make anything like this before but I think came out pretty well.
5 points
-
OK, so the over winter refresh didn't happen, due to too busy and new shed still not being built,but I did remedy a few things. Firstly I took off the rooted bash plate, cut off the destroyed bottom end, then bashed it to shape, and redrilled new holes, so the bit that was way up the front, is now in the danger zone. Next I fixed the rip in the UHMWPE. I heated it with a gas torch, beat the shit out of it, tucked the edge of the rip under the bit in front of it, added a few more bolts, then ground it flat. I also trimmed the UHMWPE a bit, as it was slightly covering the edges of the intake. Next I made a new steering cable mount. Out with the 50x3 full of holes abortion, and in with a solid 50x6 hunk of beef. I also added and extra bolt, offset the hole for clearance, and made the cable mounting hole the correct size. (New one not finished in pic) Then I decided I wanted full throttle. It could only get about 80/90% due to lever hitting steering wheel. I modified the piss out of the lever, so it was out further when closed, giving a longer throw, allowing full movement of the throttle body. But then it fouled on the dash (was hitting before it was modified) so I shortened the lever, and made a 25mm steering wheel spacer out of nylon. (I painted the lever and made a cable holder after pics were taken) Next I changed the hitch to a 50mm, and put a new jockey wheel on, as the old one was a faggot. BUT then the windy handle fouled on the upright the winch is on. So I moved the spare wheel and the winch upright back, but still too close (the old jockey wheel winder handle cleared by 20mm which was a cunt) so I cut the top off the upright for clearance, trimmed off a few other bits of steel that didn't need to be there, and then made a new receiver (which is a bit yuck, and I'll redo again some day). Now everything has lots of clearance, and works much betterer. Then just a week of two ago, me and the lads went for a little pre season test boat. It was a lovely we outting, I didn't break anything, and I only hit like 4 rocks, and not very hard, so I'm getting better. The only pisser was, even though I spent ages jumping up and down on a big bar, trying to bend my ride plate back down, I failed to bend it back enough. I couldn't get much over 55kmh before it started porpoising and jumping completely out of the water, which sucked due to me having 100% throttle, and not being able to use it. I took off my last half assed effort of trying to fix this, and had another go. It seems to be bending the sides of the ride plate out, thus letting the plate come up, without the bottom of the plate bending (it's been dead flat all along) so I bolted some lengths of 50x6 angle to the sides of the plate so it can't bend, forced it down to level with the bottom of the boat, then bolted it to the stays. Hopefully this works. Neat. Regards, VG.4 points
-
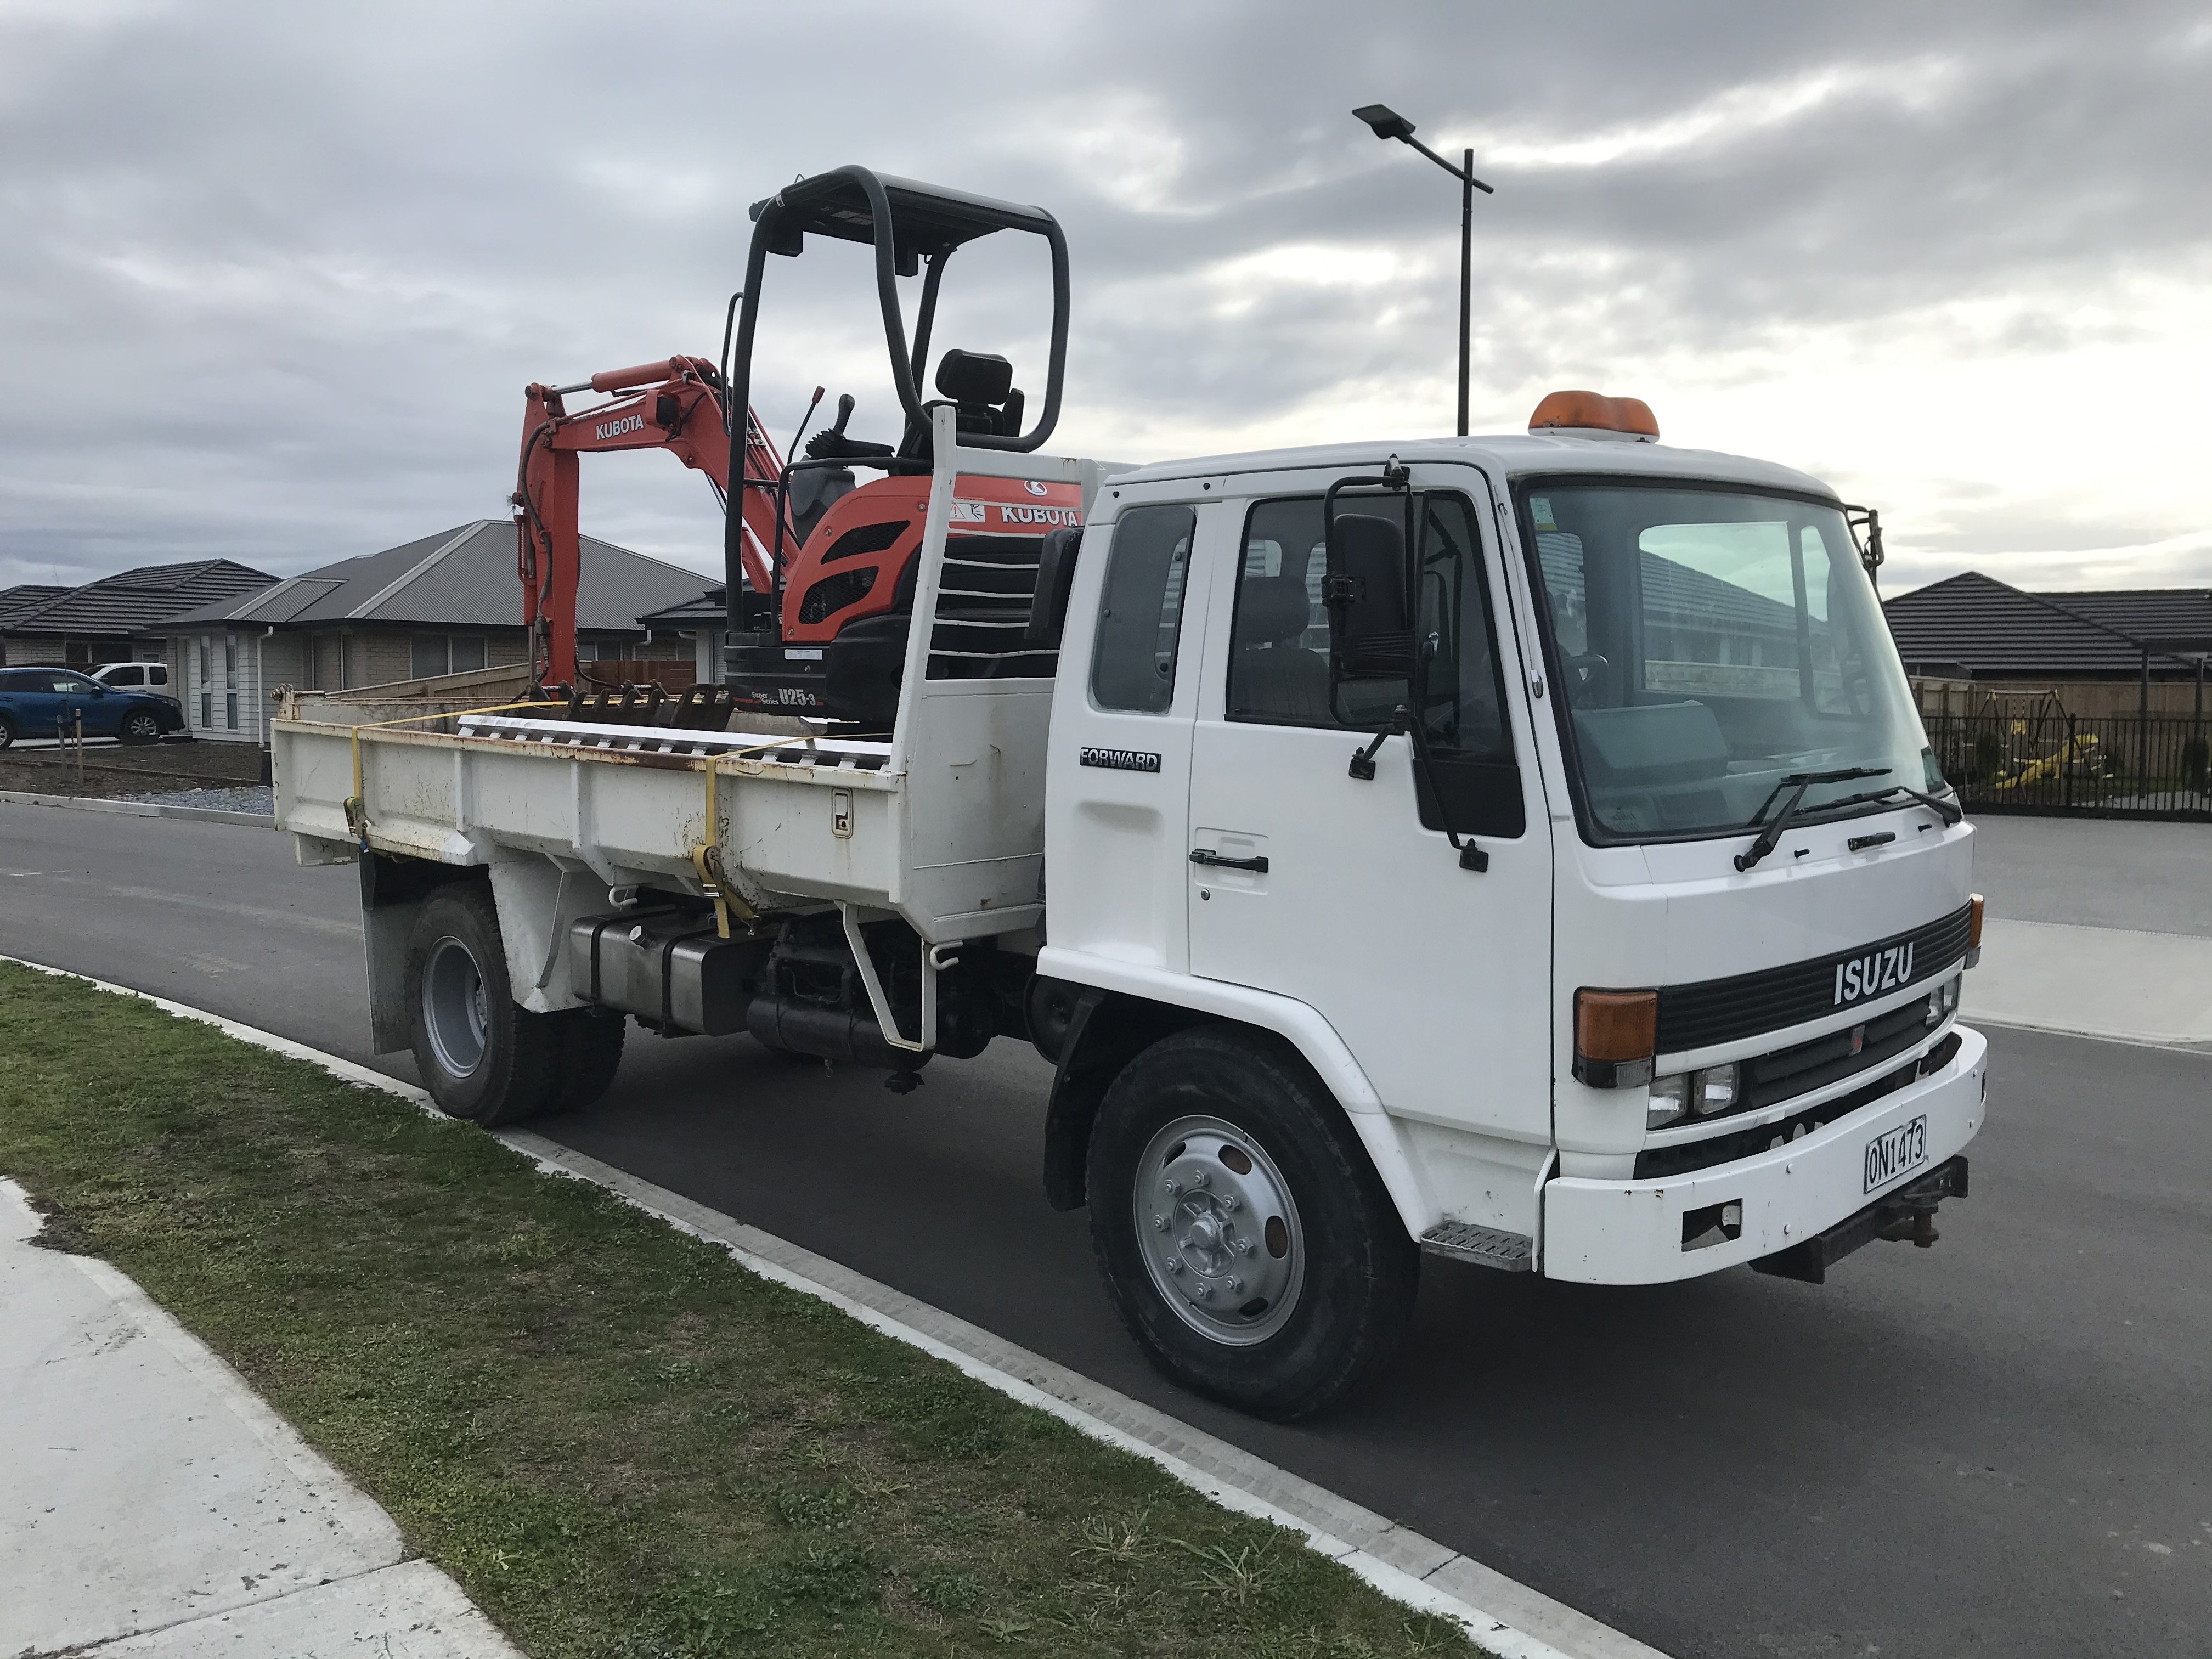
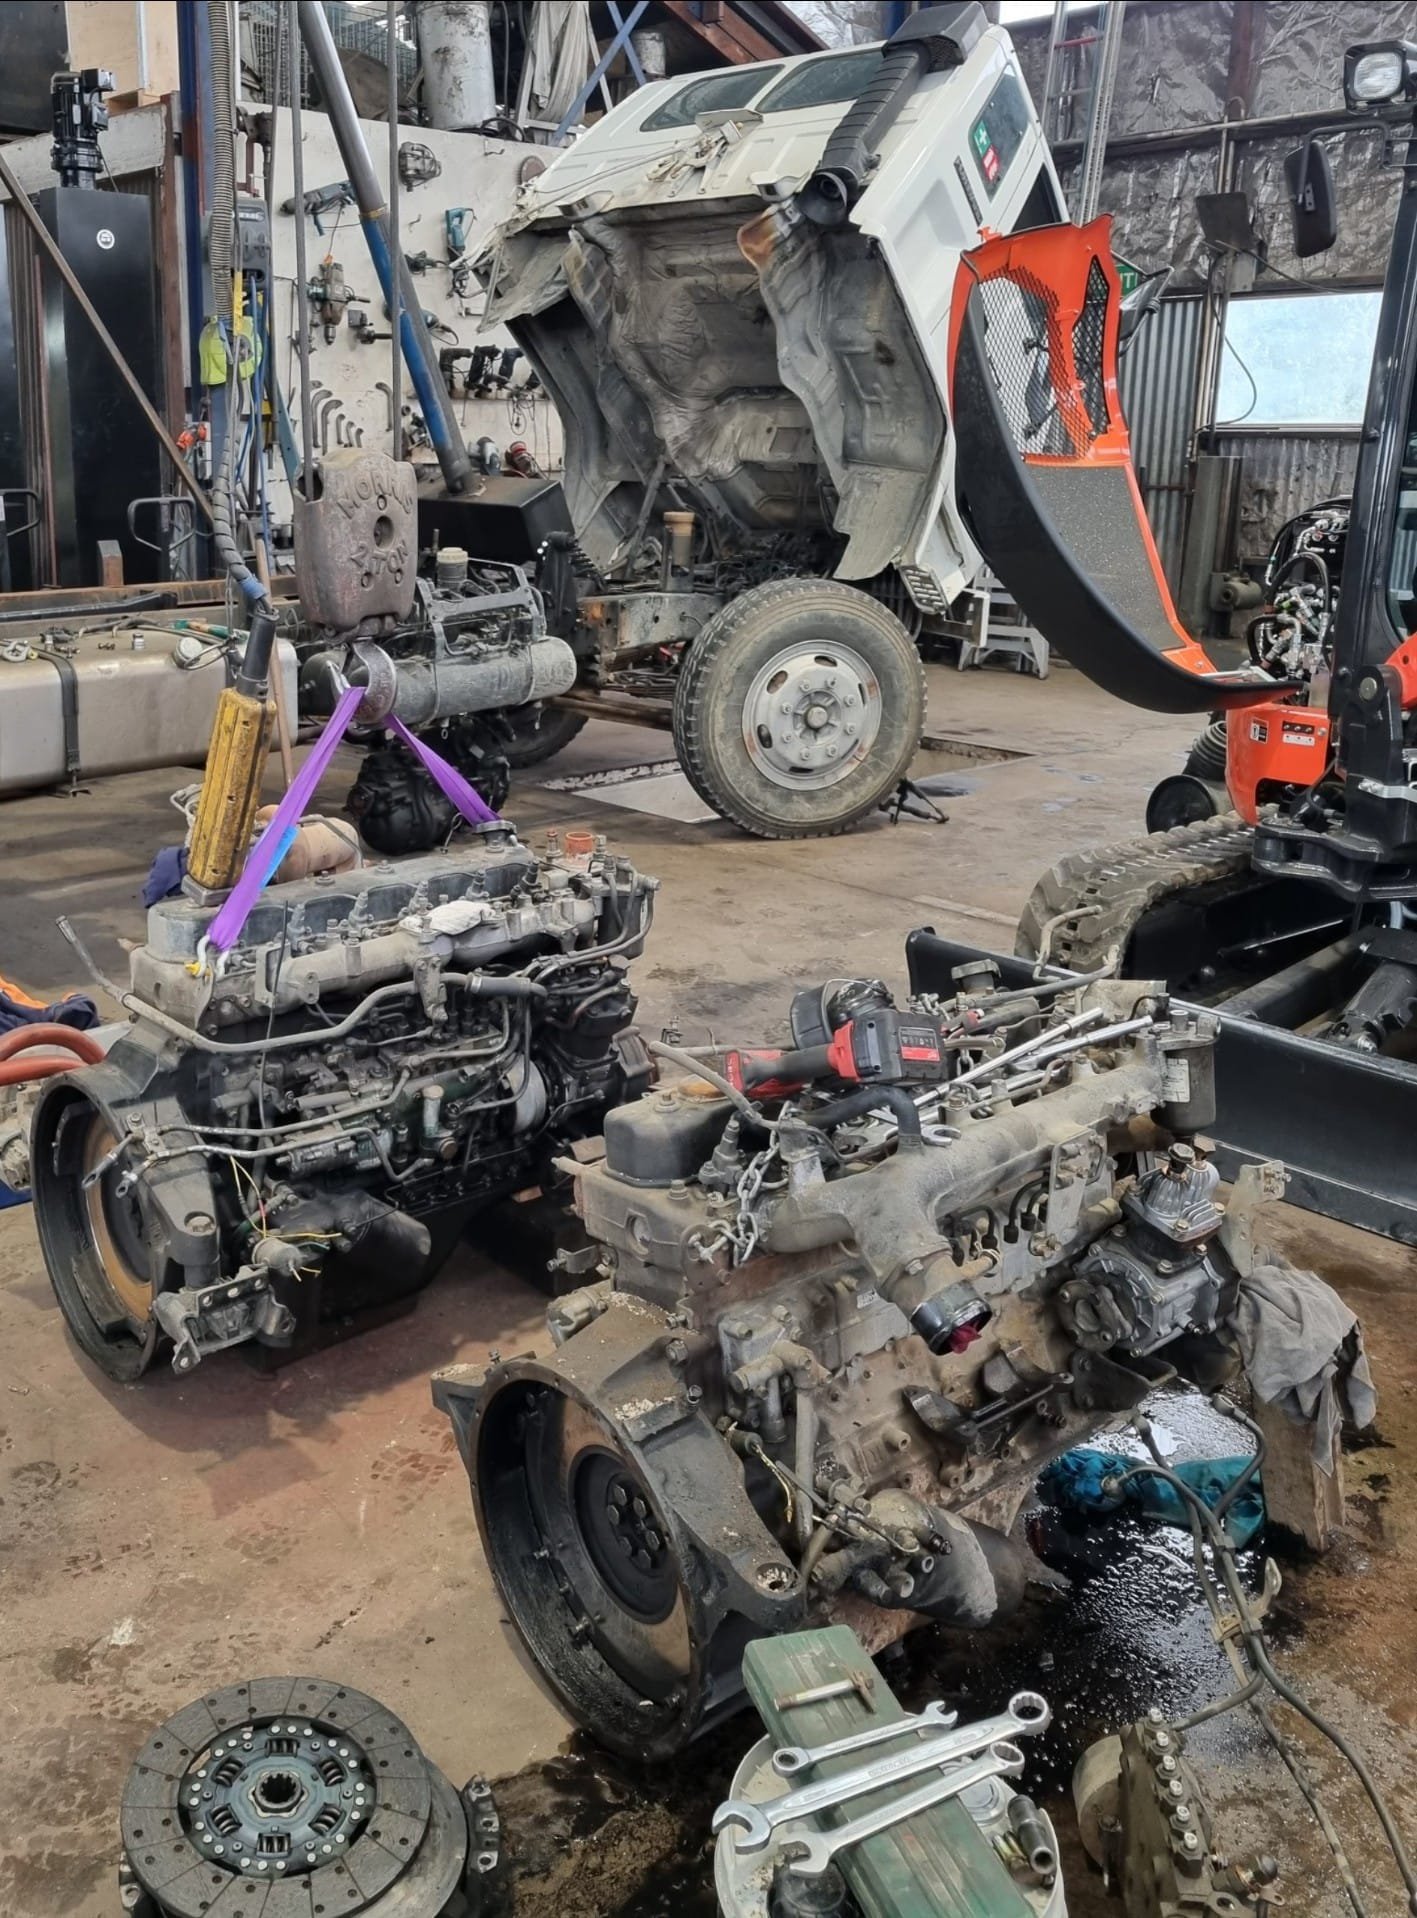
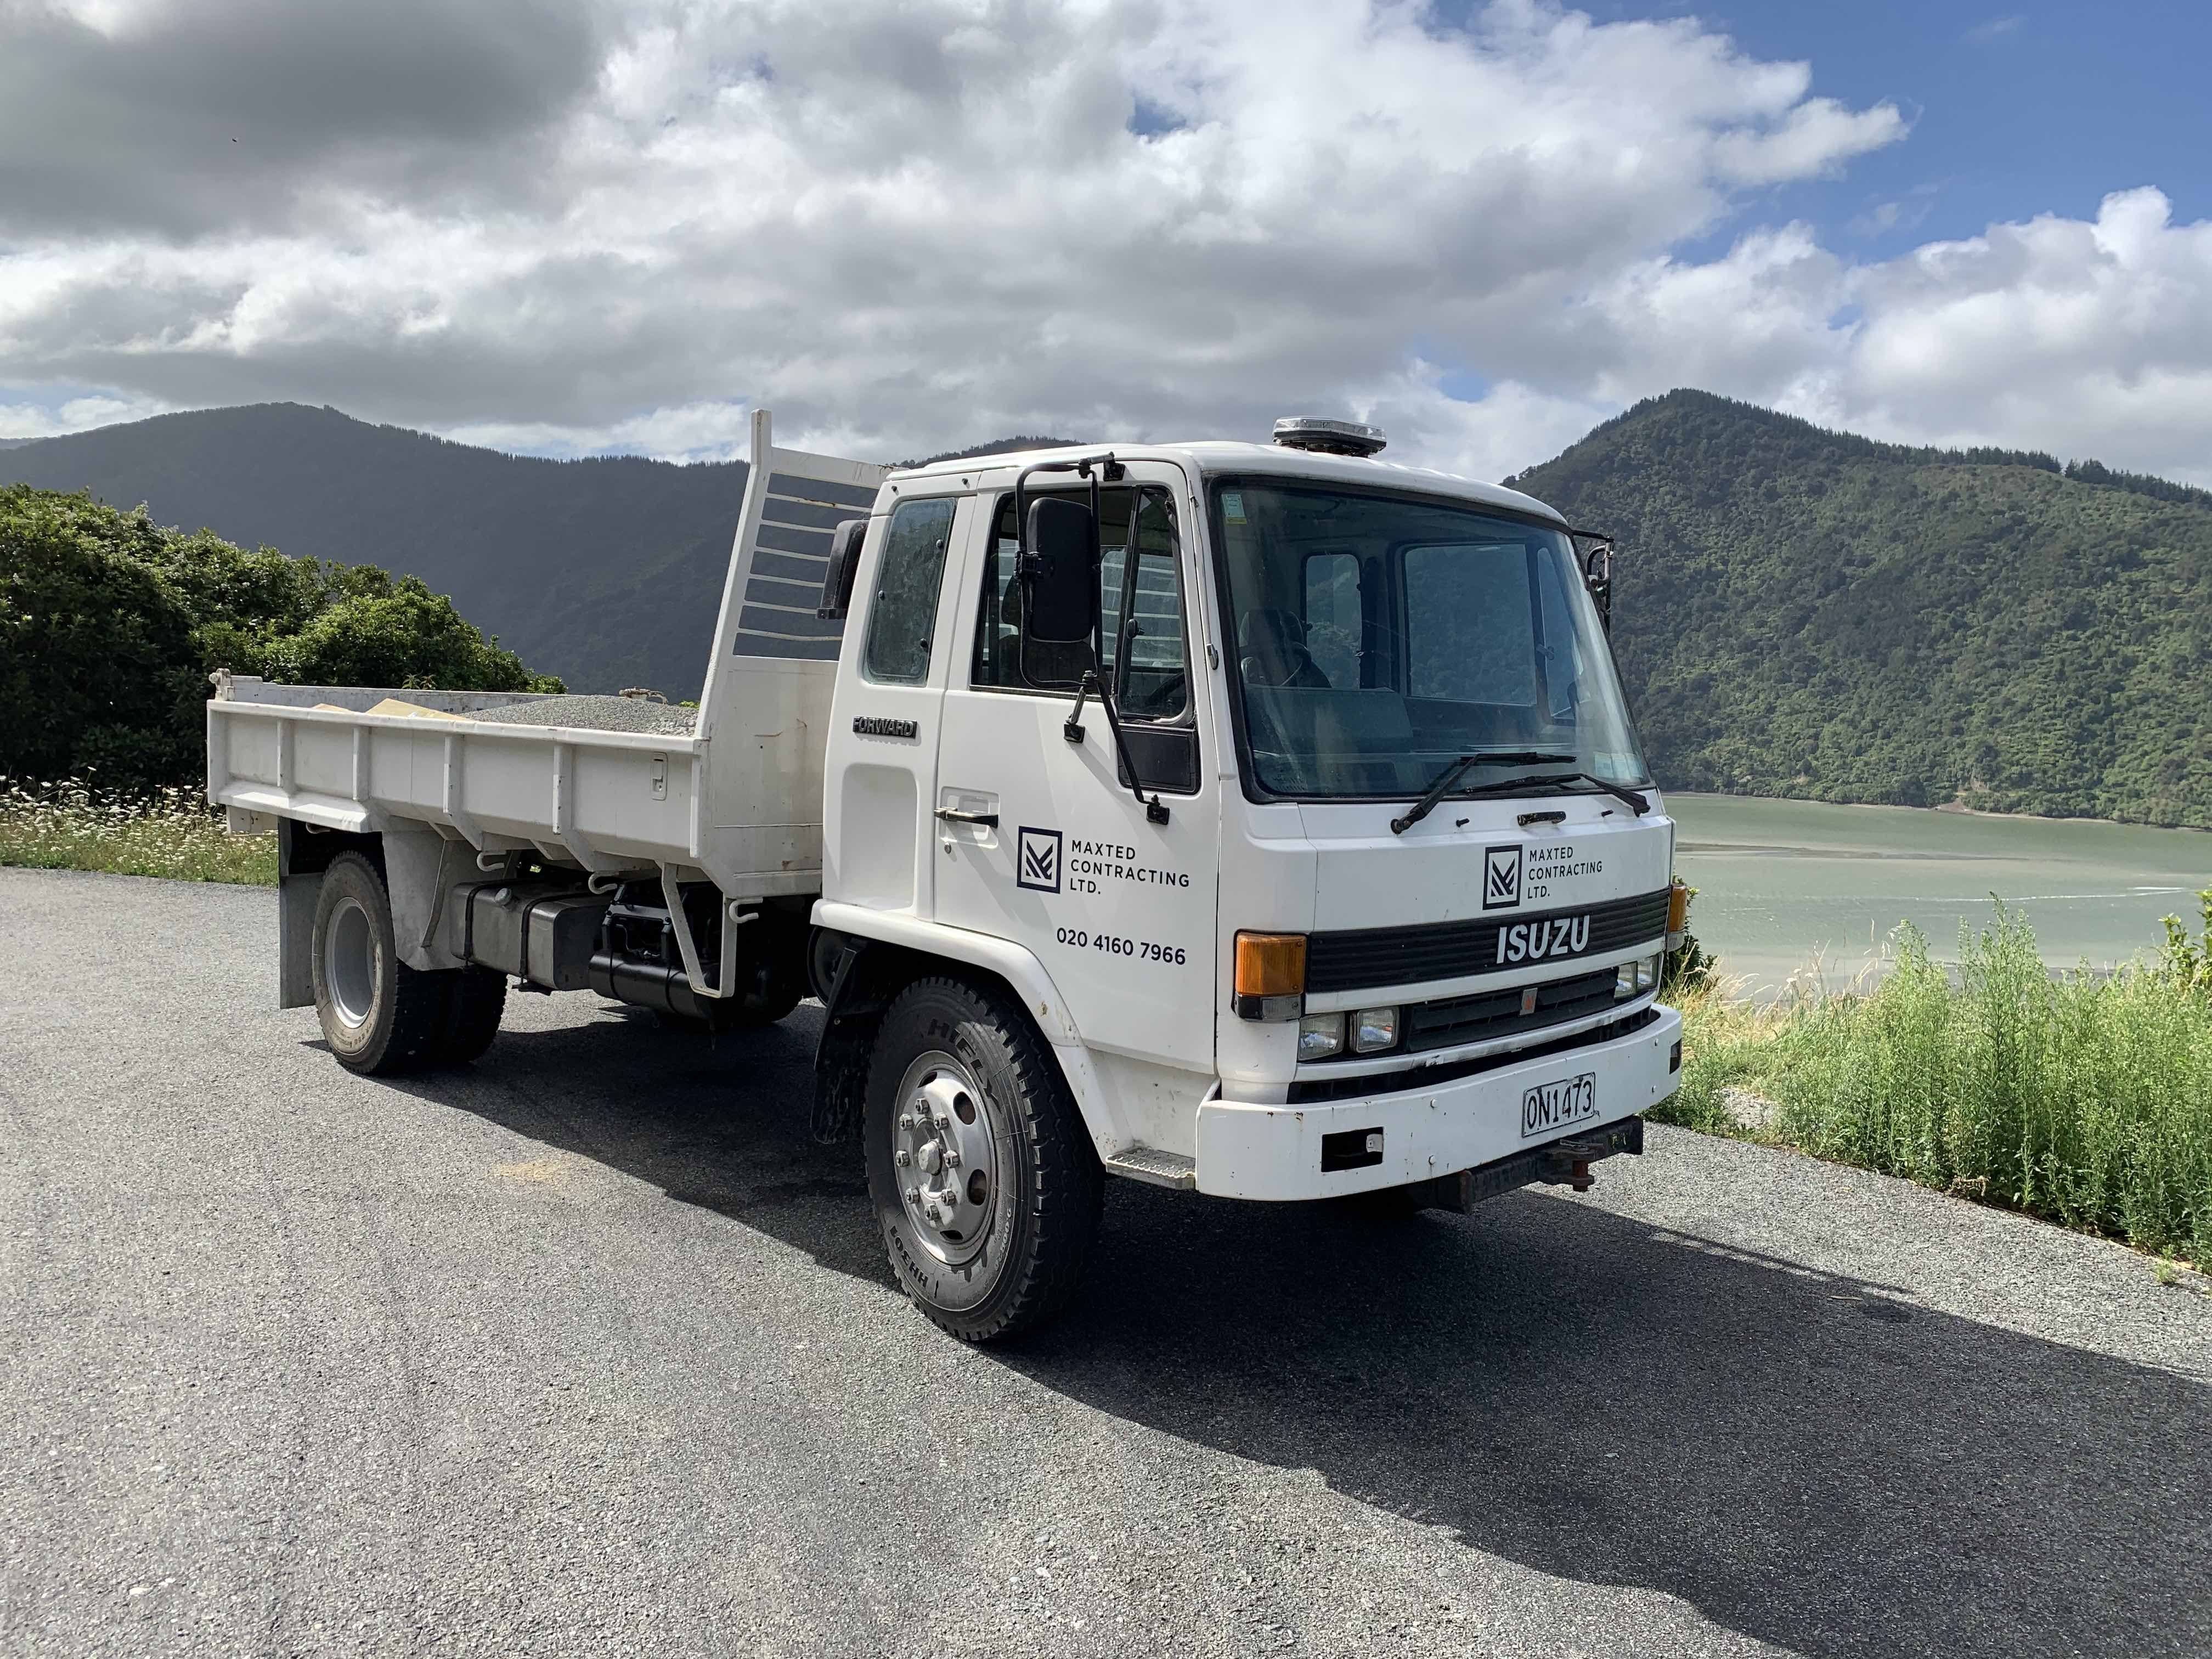
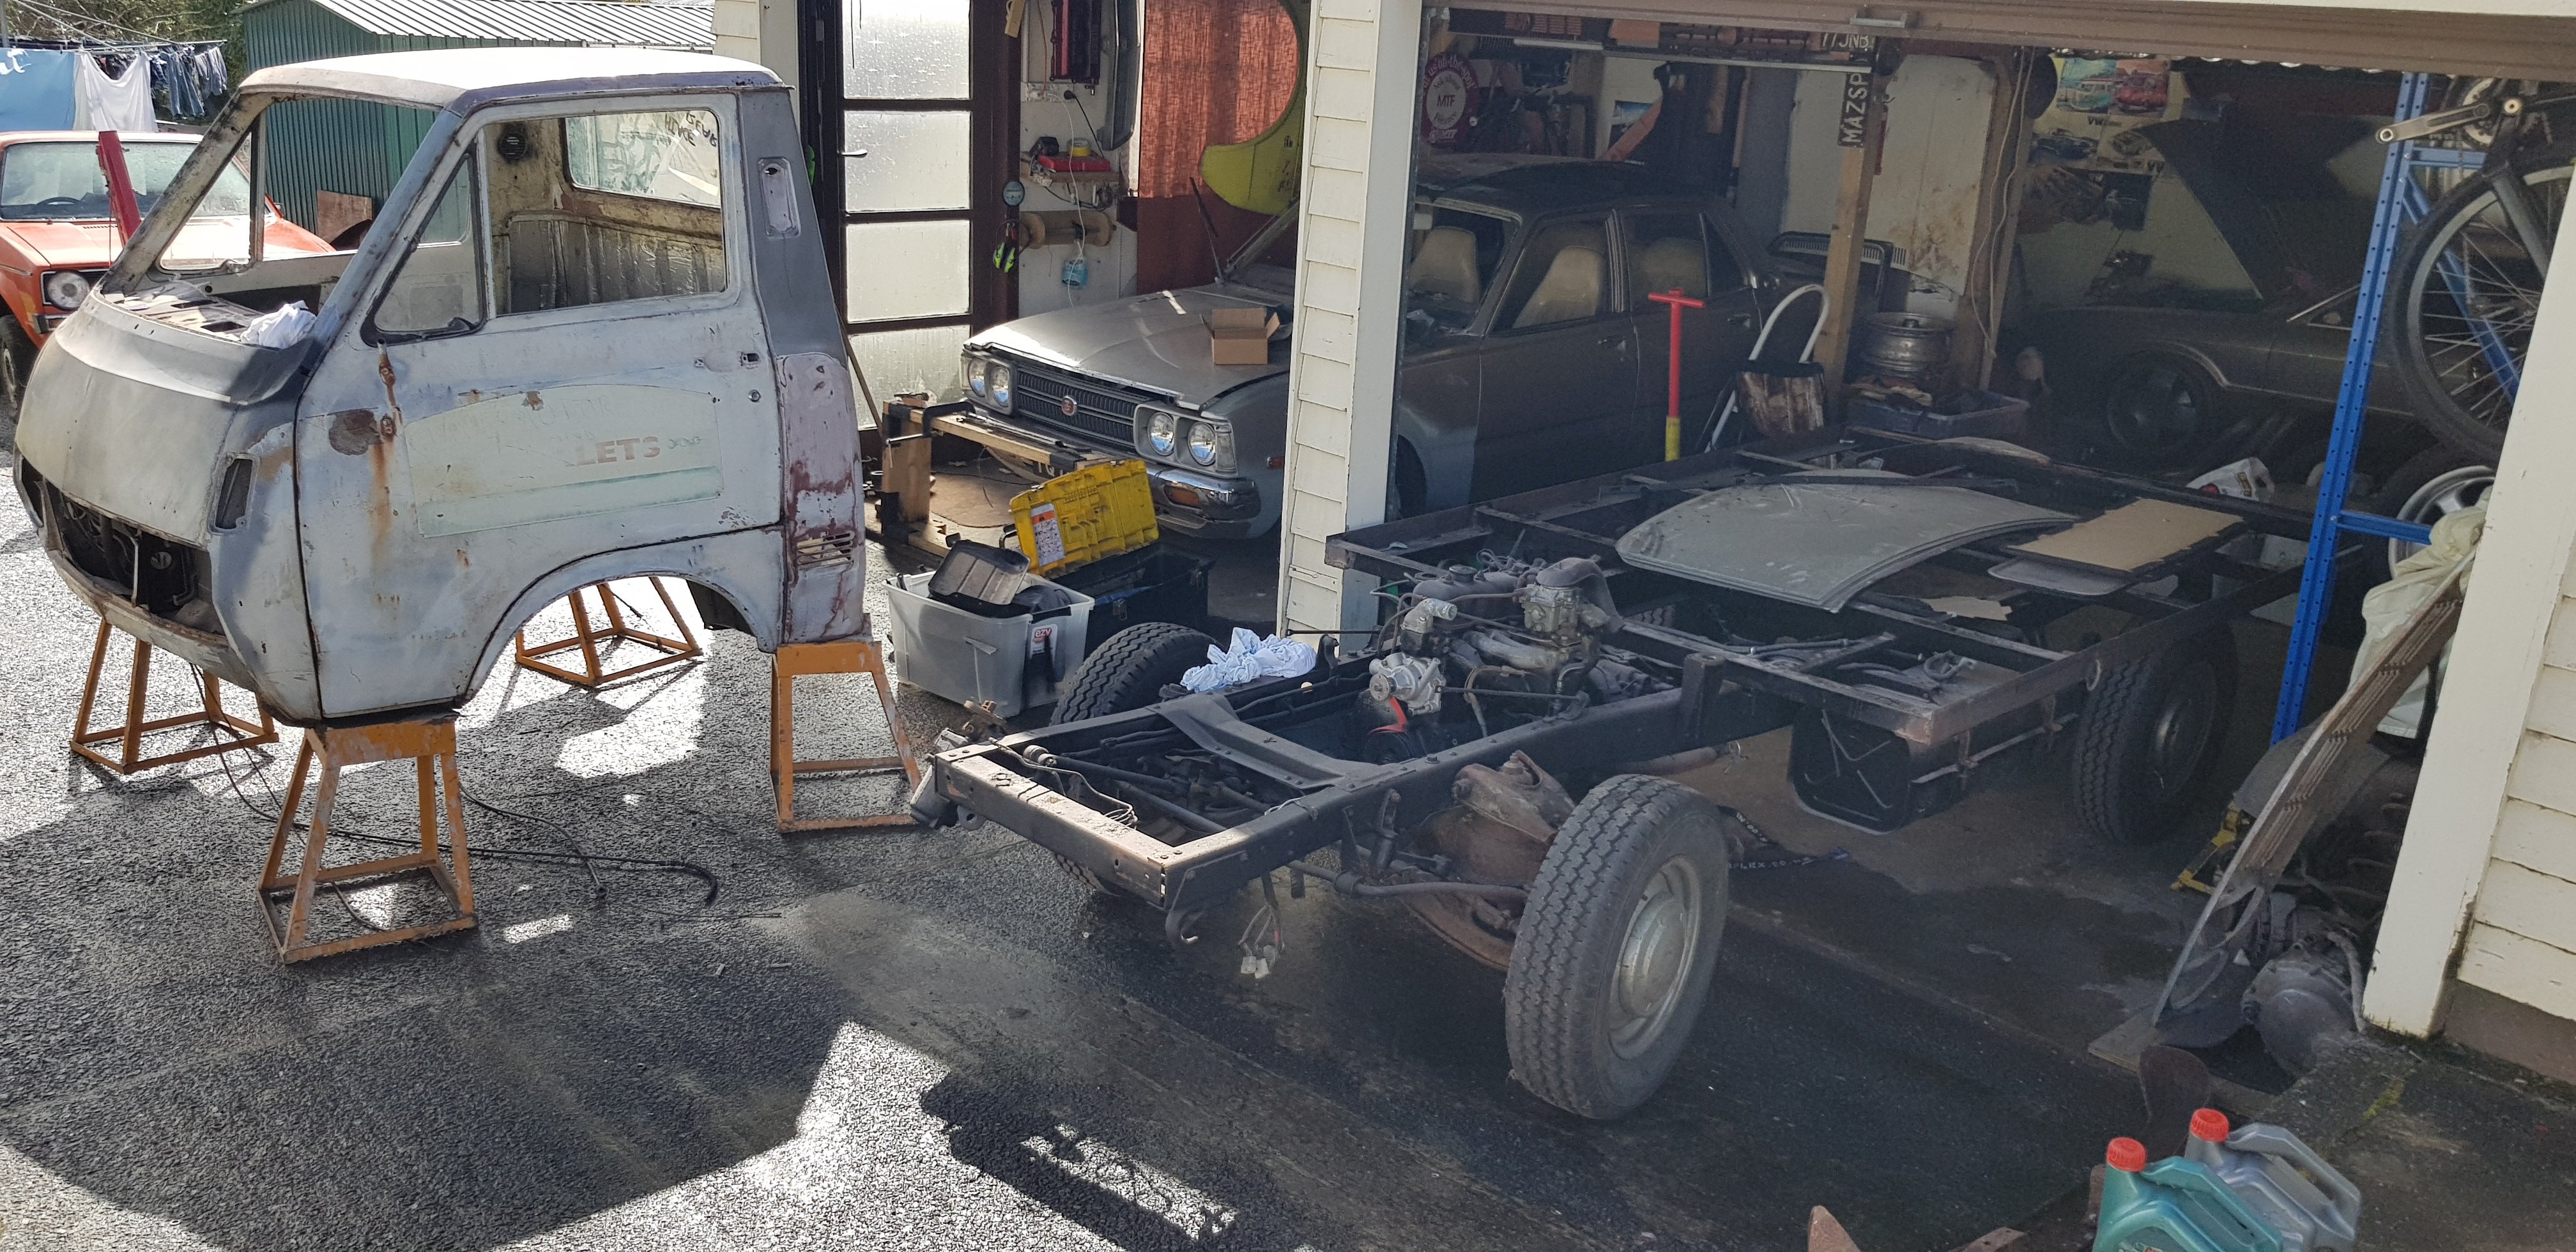
It is kind of oldschool, has steel bumpers and just scrapes into the 80's ? Anyway I ended up buying this old truck to go out on my own doing excavator work. It had parked around the corner from our house for years always had thought it was pretty cool, had driven them at a company I worked for and remembered them being good old trucks (still see lots on the road so must be). Have been lugging my digger around on it for the last 18 months and decided it needed some more grunt to prevent embarassingly holding up traffic and to make it up the quarry roads with a full load without resorting to first gear! so it has become a bit of a project! I had been keeping an eye out for the slightly larger capacity (6.5 litre 6 cyl) engine using the same block, to what is in it (5.8 litre 6 cyl), and ended up coming across the turbo version so a deal was struck and it is now being fitted. decided to intercool it and chuck a new clutch kit in while it is already apart and a quick skim of the flywheel.
3 points
-
Took fora half decnt hoon today. About 60km outta town and back. Ol girl runs real good happy as. Sold my yamaha sx4 225 so now i can sus the ol cbr out
3 points
-
Finally managed to find all the facelift swap front end bits for the b2000. A buddy in Upper Hutt hooked me up a bonnet, grill and bumper, and a local mate managed to collect and bring up while we were in Lev4. Did a quick test fit of bonnet then as soon as Lev3 happened it was off with the bumper to the paintshop.
3 points
-
Rubber grease is the best. Wipe off excess afterward and what's left normally soaks into the rubber with time2 points
-
That's a pretty impressive gain !2 points
-
What an enjoyable day, felt like being a teenager again with nothing to do all day except fuck around with cars. So nice. Starting at the start, I bought a RWD waterpump pulley and got the engine all buttoned up. Ended up using the aftermarket alternator pulley, which will need replacing as the larger diameter will mean it isn't spinning as fast as it should. I put it it all together without the thermostat so that I can flush the cooling system easier, but the rear housing of the water pump is leaking like a sieve, so it'll need to come apart and be goo'd up. So today I filled the cooling system half a dozen times while getting the car out of the carport, cleaning 3 or 4 years of crap off it, pulling the dash apart, putting it back together, and putting the car back in the carport. All while moving it multiple times so my neighbours could get in and out of the driveway. I wanted to do interior work out of the carport because it's dark down there, and I can barely open the doors. I also spent quite a long time bathing all the interior in armourall. The dash probably drank up 250mls of it and still looks dry as a buzzards crotch, anyone got any recommendations for rejuvenating products? To be fair, the dash is already cracked, and it isn't going to improve much, but I'd like to stop it cracking anywhere else. Barn find spec dirt: I sorted a bit of accumulated crap out of the inside so I could sit on both sides of the car, then stripped the lower dash, with some assistance. The goal was to fit all the missing bits of the fan system/ducting, including an AC delete tube. I didn't bother when I put the dash in, because racecar, and I also put gauges in the place of drivers vents. I took those out and refitted the vents. I also fitted an AE86 dash cluster that I've had sitting around for yonks. The oil temp gauge goes straight to hot though, which is a little annoying, but not the end of the world. I did notice that one wire into the dash cluster was broken out of the pin, maybe that's the culprit. Once I got the dash back together it was time for a beer, so I tucked the car away. Next is sorting the cooling system leaks so that I can flush it and fit the new thermostat with some actual coolant. I did also notice that a the surface rust in some parts of the car has really accelerated, which isn't all the surprising given that it lives above wet concrete for most of the year. It's going to need body work sooner than later, which sucks. I'd like to have more time to save up and do it really well , but it'll probably end up being a bit half assed. Oh well.2 points
-
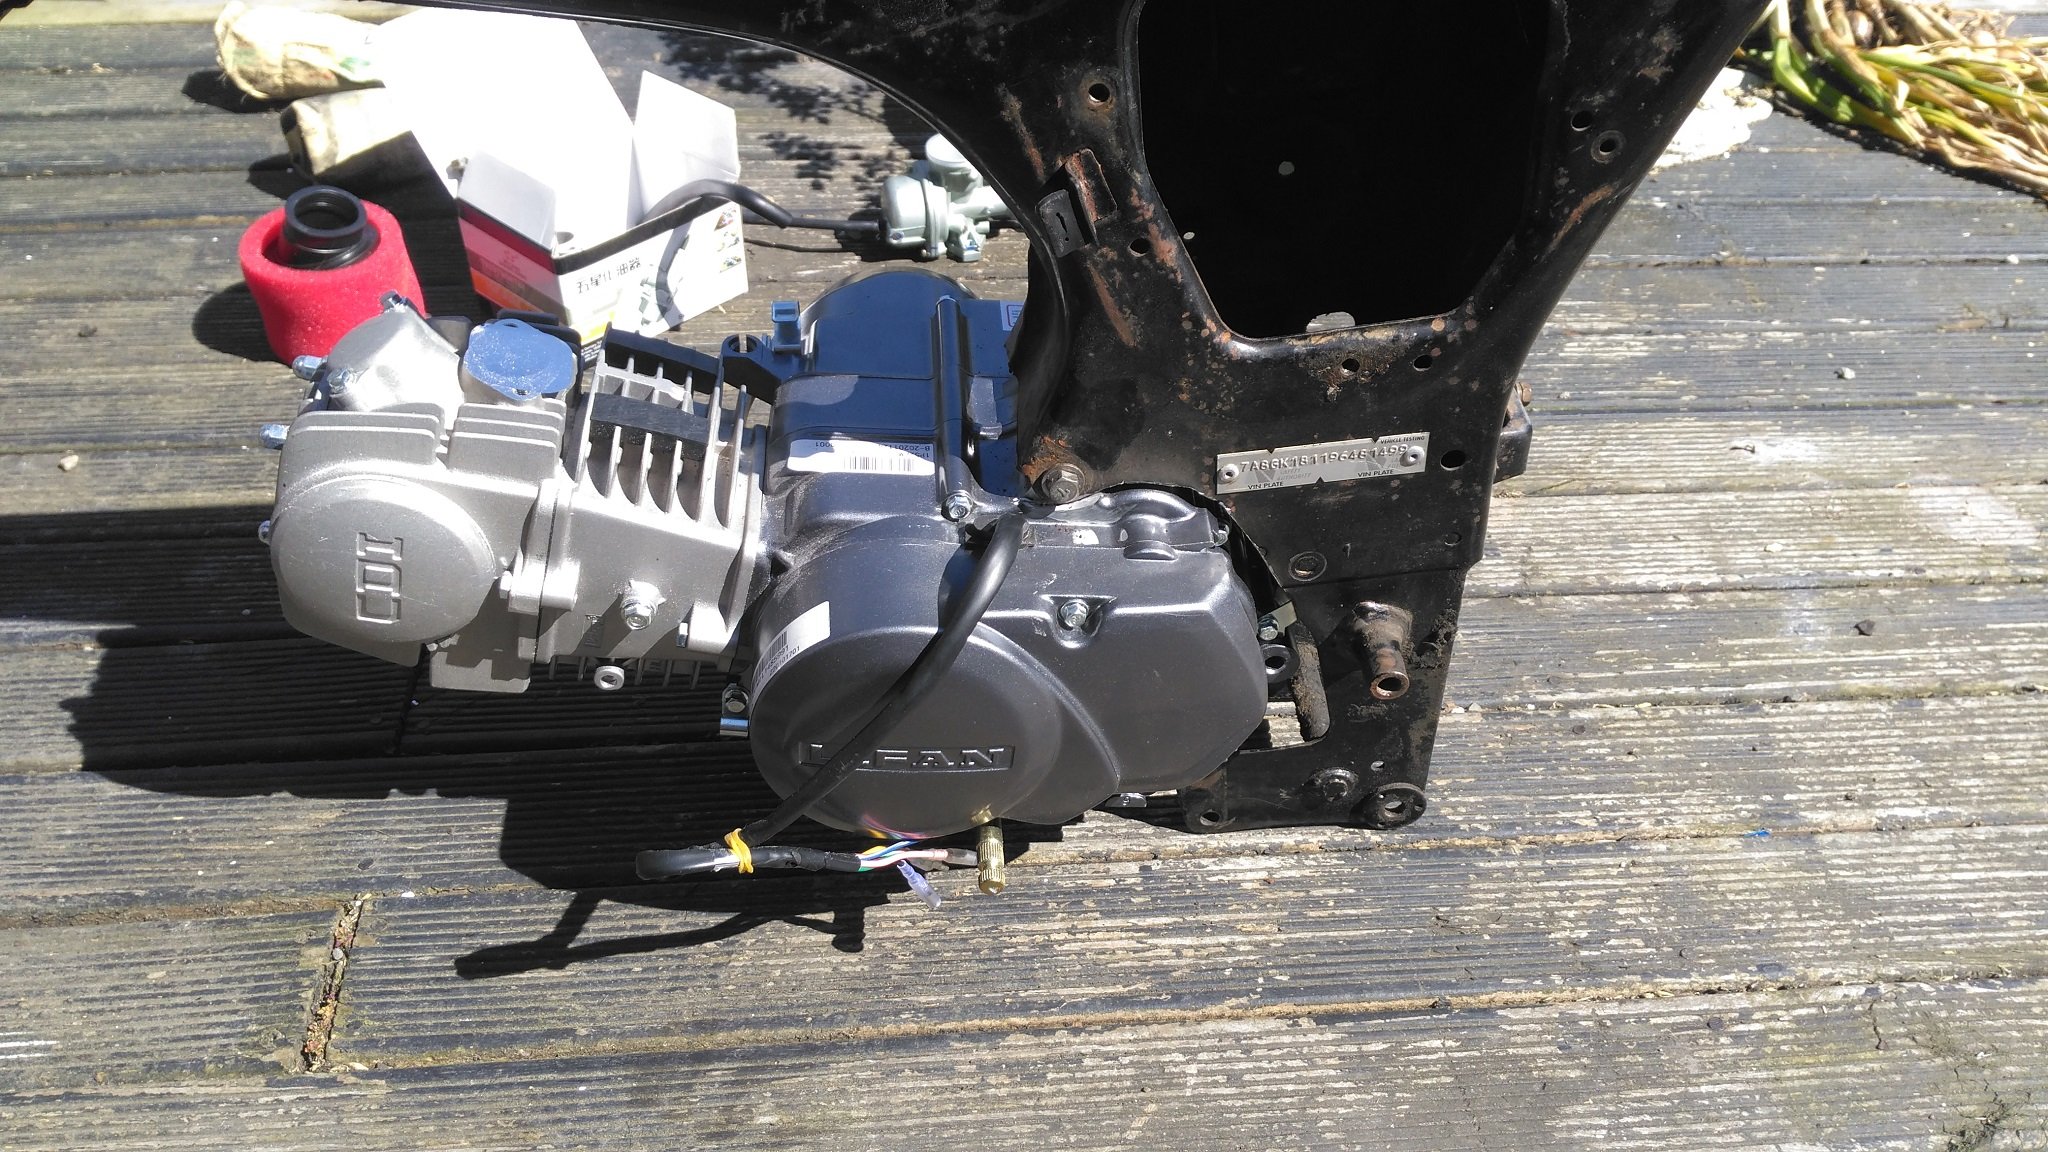
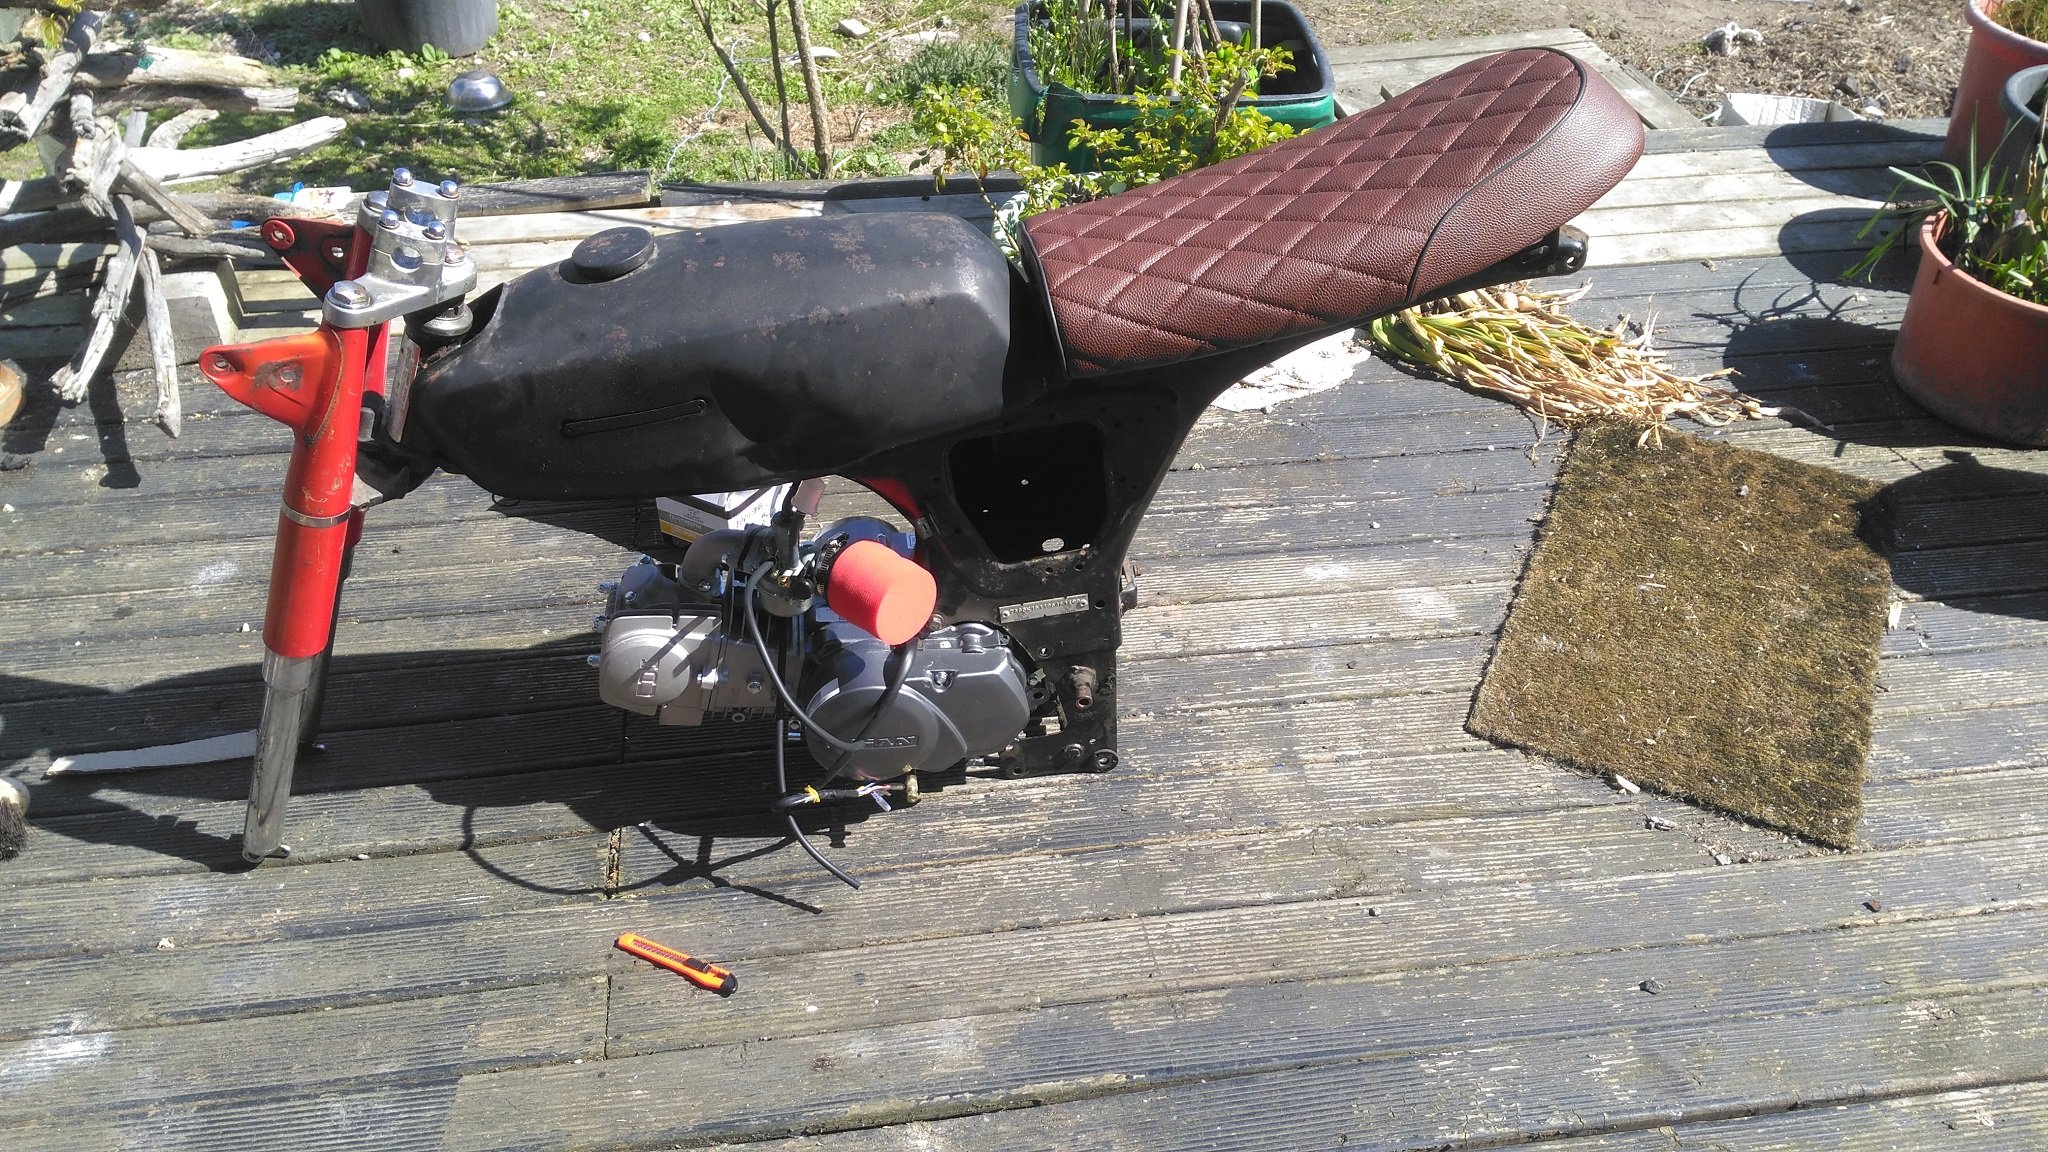
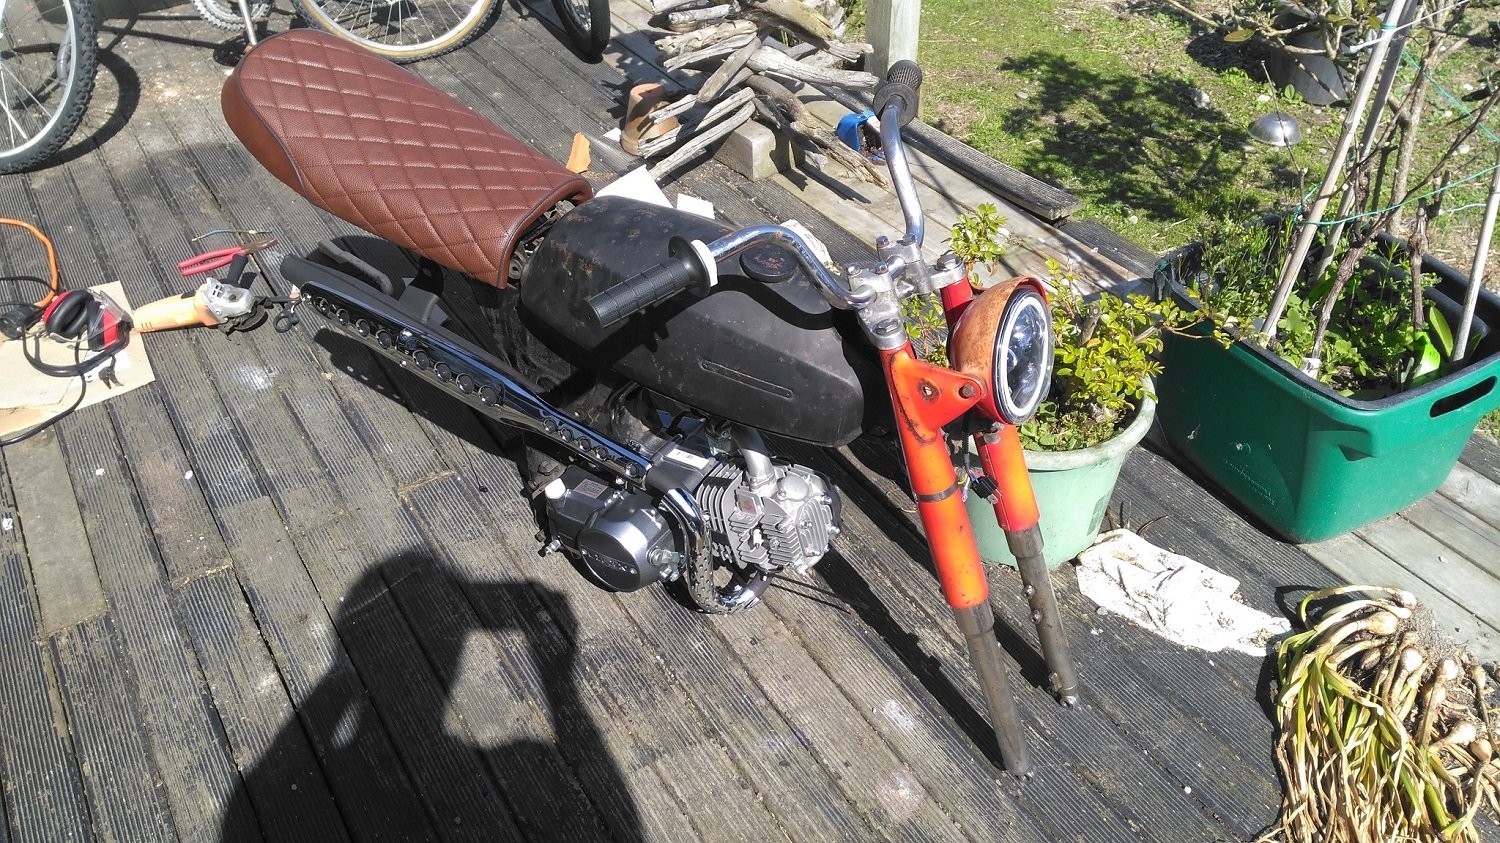
Beaut day in the 03....so time to get to it! After visiting Andy @ mBike to swap my 19mm carb for a 22mm one, it was off to @h4nd's with the frame and motor in the back of the capacious teutonic hatch. Much hilarity with a grinder and dremel ensued. First job waas to cut back the upper mount by about 8mm. Finished off with the dremel...(Hands by @h4nd) And with much fettling....progress! Although the angle was all wrong and there was no room for the carb under there. So it was back home with some purloined tools to carry on the fight. Initially I was just going to slob around in the sun and forget about it, but curiosity got the better of me......and in the best trditions of CAD I made a start. Bloody Hell!!!!! It looks like it will need a bracket to allow the back mounting hole to be used (at the moment its just out in the breeze). Ive been conversing with Jeremy @ Kaos Kustom works who is plannng on doing an A50 swap so might see what he can do. I've taken lots of photos of what I've done so far for his reference. And then......silly season ensued and all manner of parts made an appearance. Please note I was just making it up as I went along so the fitment and placement probably wont be final. So thats where we sit. The owner has already been gushing over it and has pronounced it "Good".
2 points
-
Have taken it on a few journeys down the marlborough sounds (those hills helped inspire the engine upgrade) drives nice for a old girl. got a good snap of it parked on the way to the mahau sound. some photos of the pipework the workshop have made for the intercooler and air intake. found a truck destined for scrap and stripped a lot of interior parts to tidy up the inside of mine, was pretty stoked it had pretty much everything that was broken on mine in good nick!
2 points
-
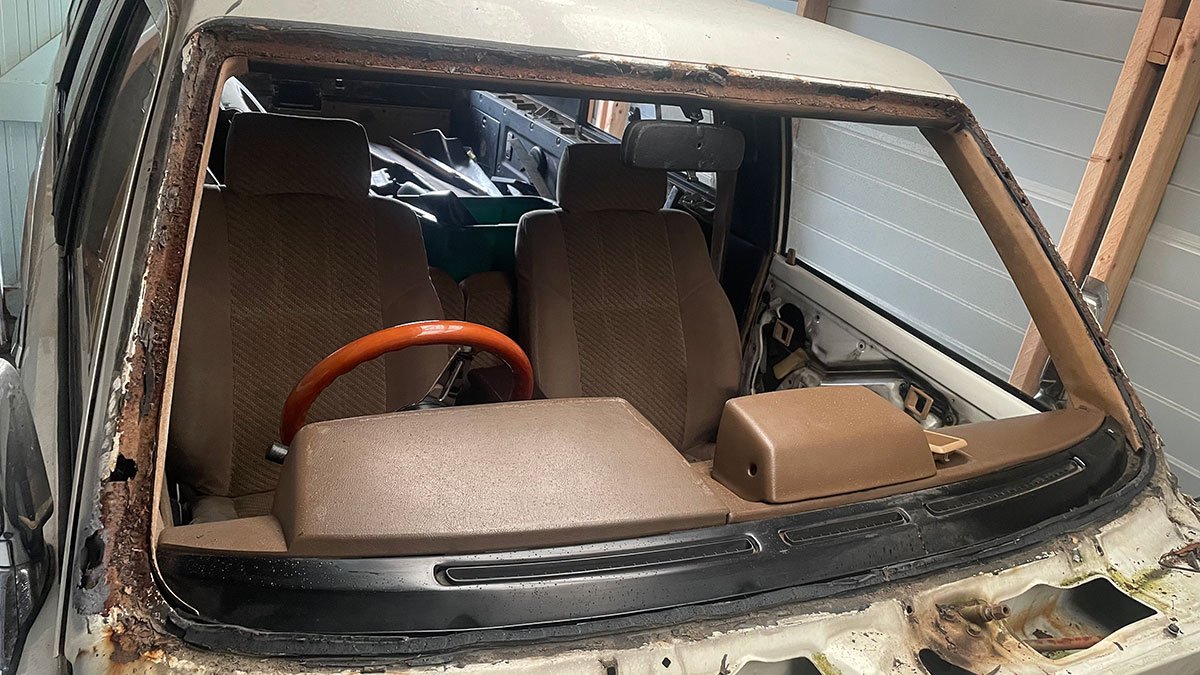
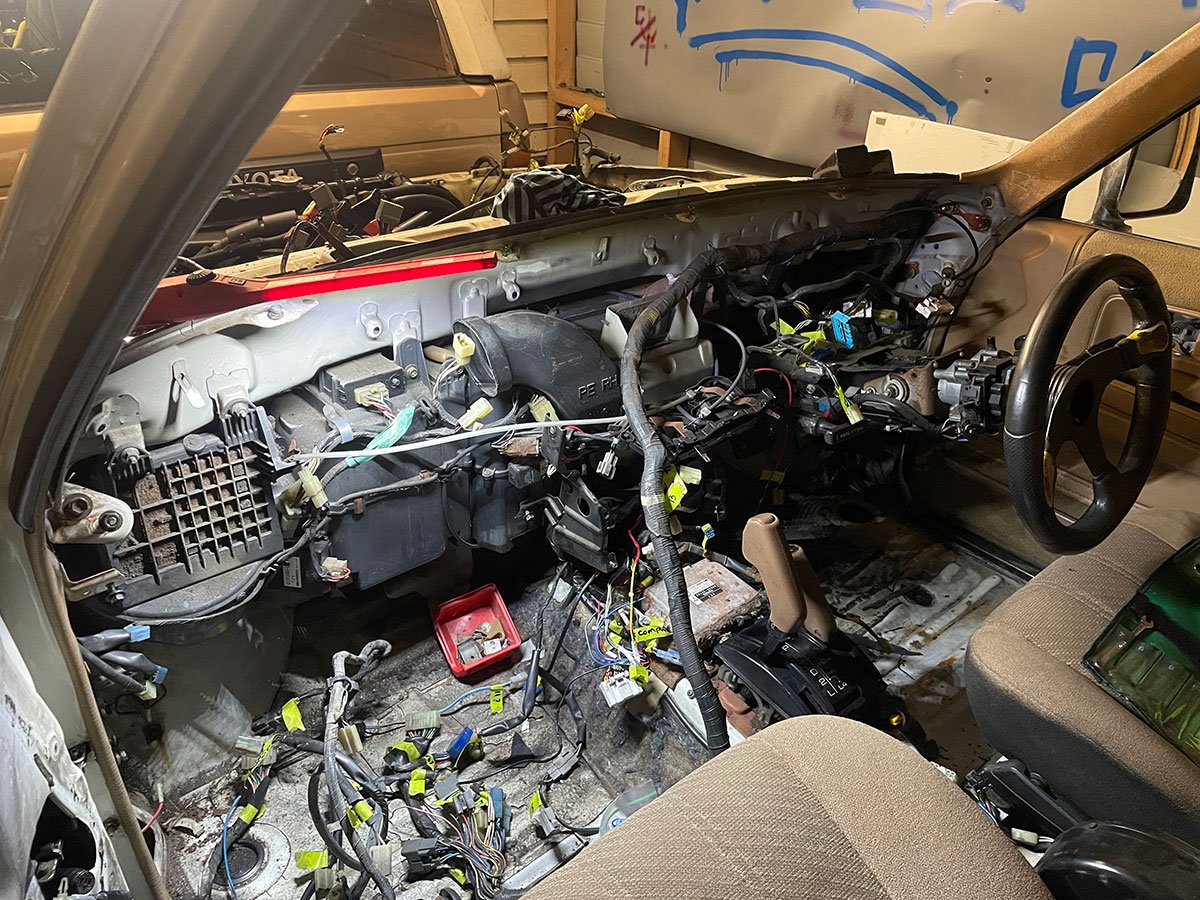
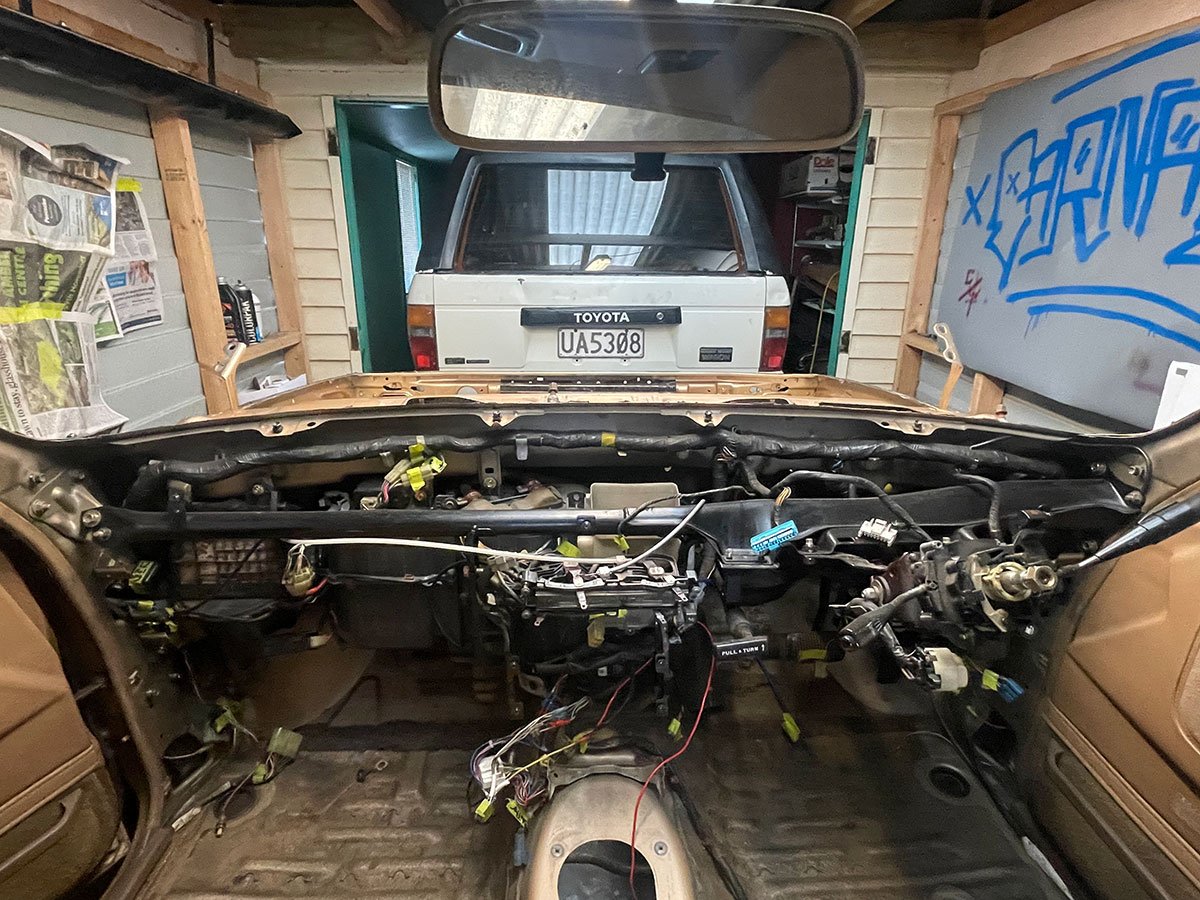
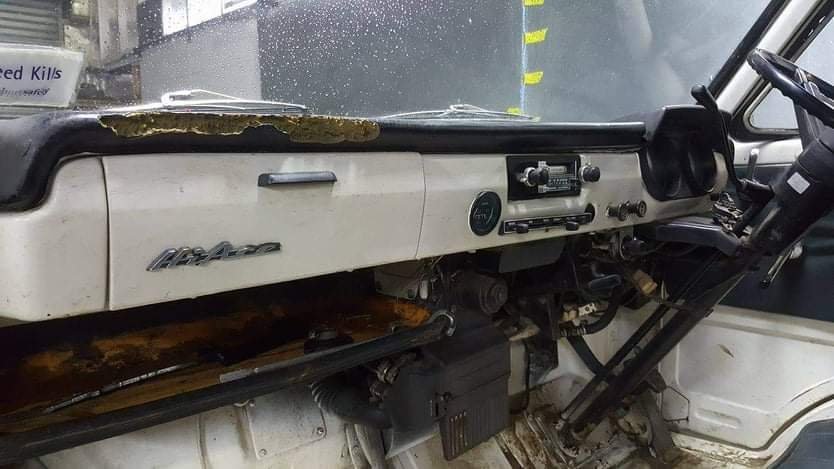
Had the front windscreen removed to make it easier to remove the loom and also because it needs to go into the gold body. She isn't pretty haha Then proceeded to remove loom and install into the gold body. Glad thats out of the way. So far there's 3 plugs that are different between the looms... The door light switches and the loom to the rear (tailgate, lights etc) nothing to major, hopefully thats all.
2 points
-
2 points
-
2 points
-
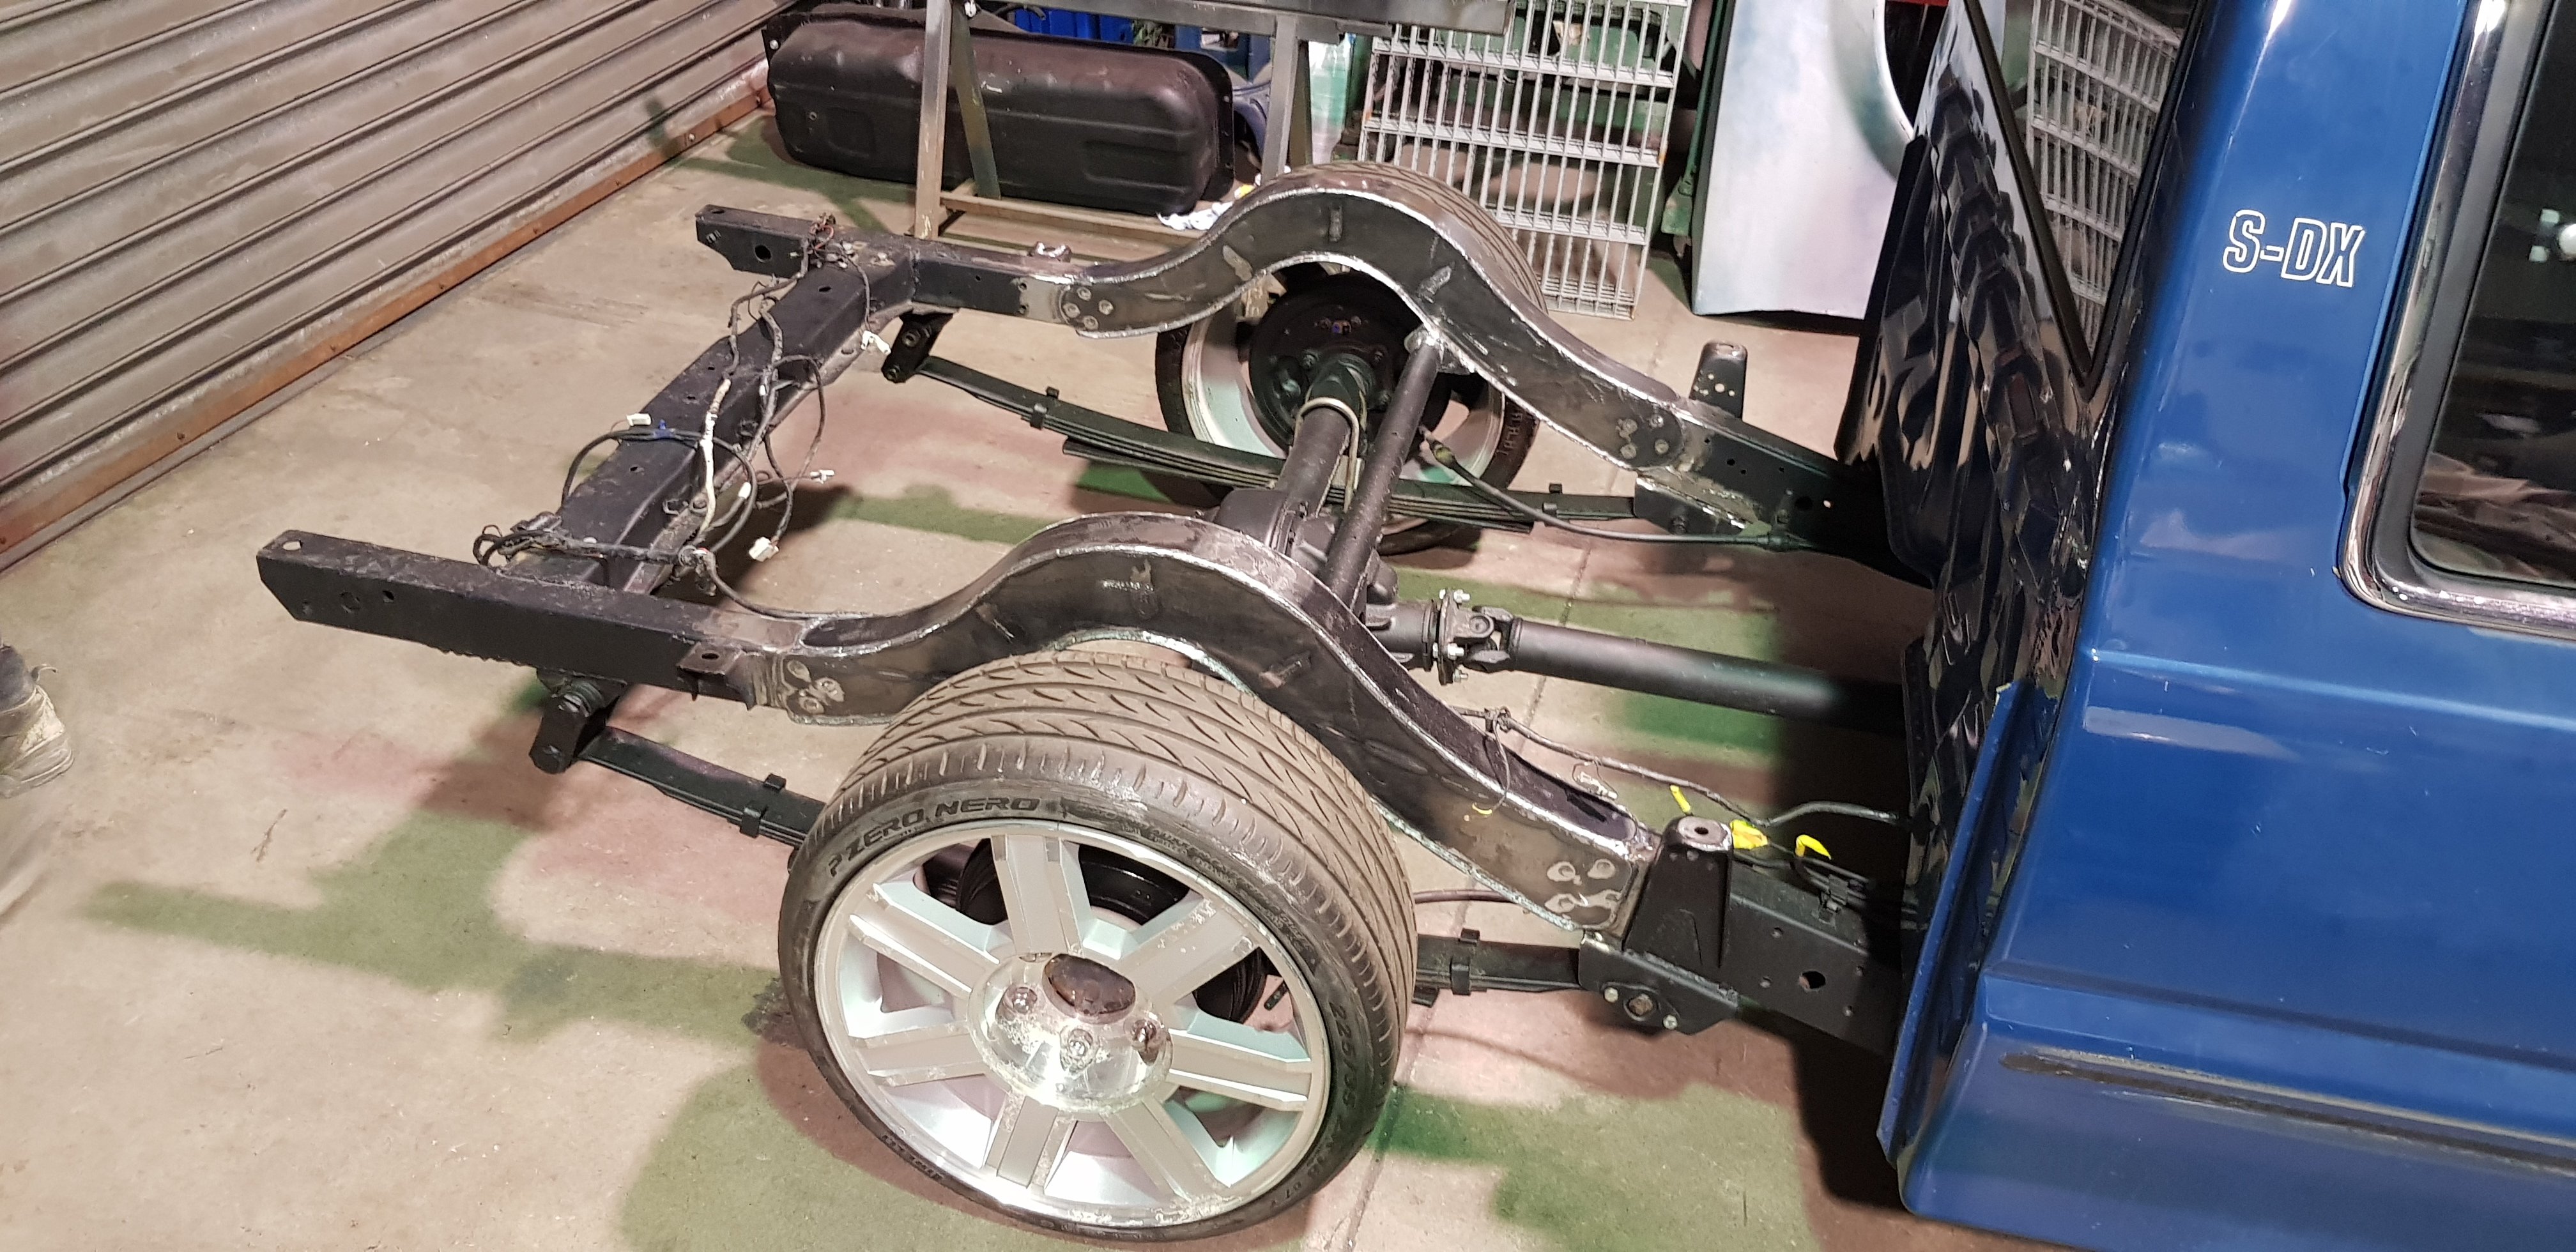
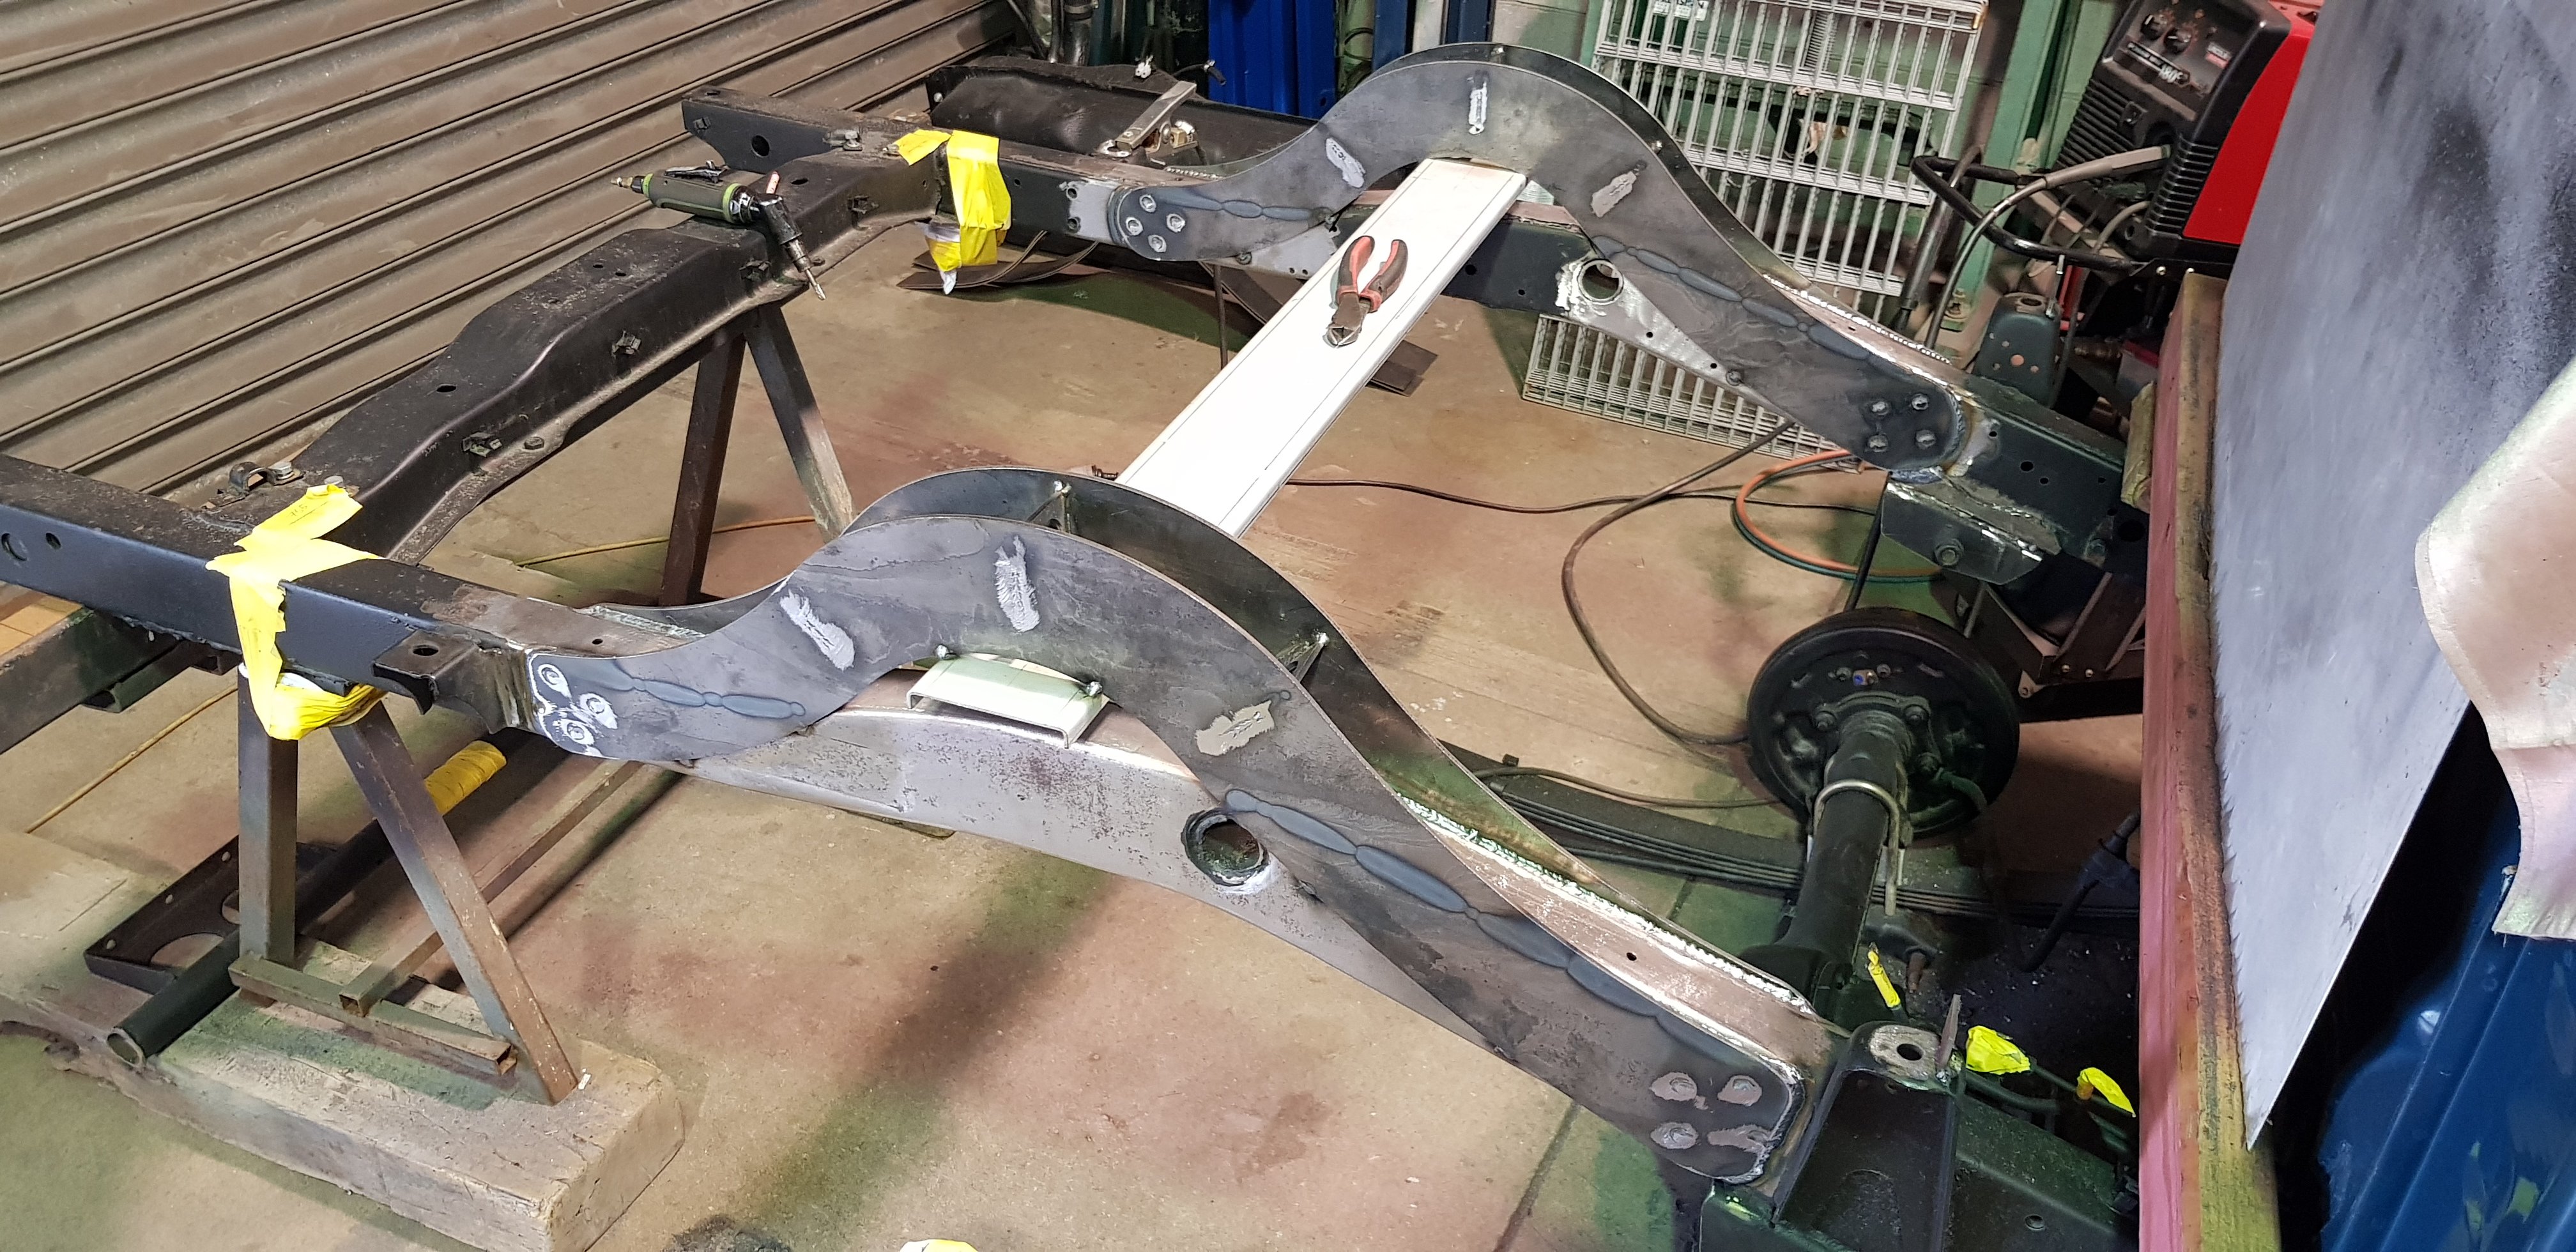
Fast forward to now... A couple weeks ago I ordered some precut universal c-notch side plates off Airride Nz and rolled up the top/bottom capping to suit. On Sat 7th Aug I decided to bring it inside for the week as I had some space til another job showed up later in the week. Spent Sat/Sun getting it setup, rear end stripped and the rails prepped. Spent a few hours after work each night getting the notch plates in, the capping on and it all welded up. Had a few interuptions so didn't get it done by Thursday night like I had planned, and had already picked up job that was booked, so panicked a little, but @cletus bailed me out and gave me storage for the night. Hit it hard on Friday 13th and got the rails finished and the gas tank mount back in. Also managed to redrill the front spring hangers 2" higher then threw the springs back in and pushed it back outside.
2 points
-
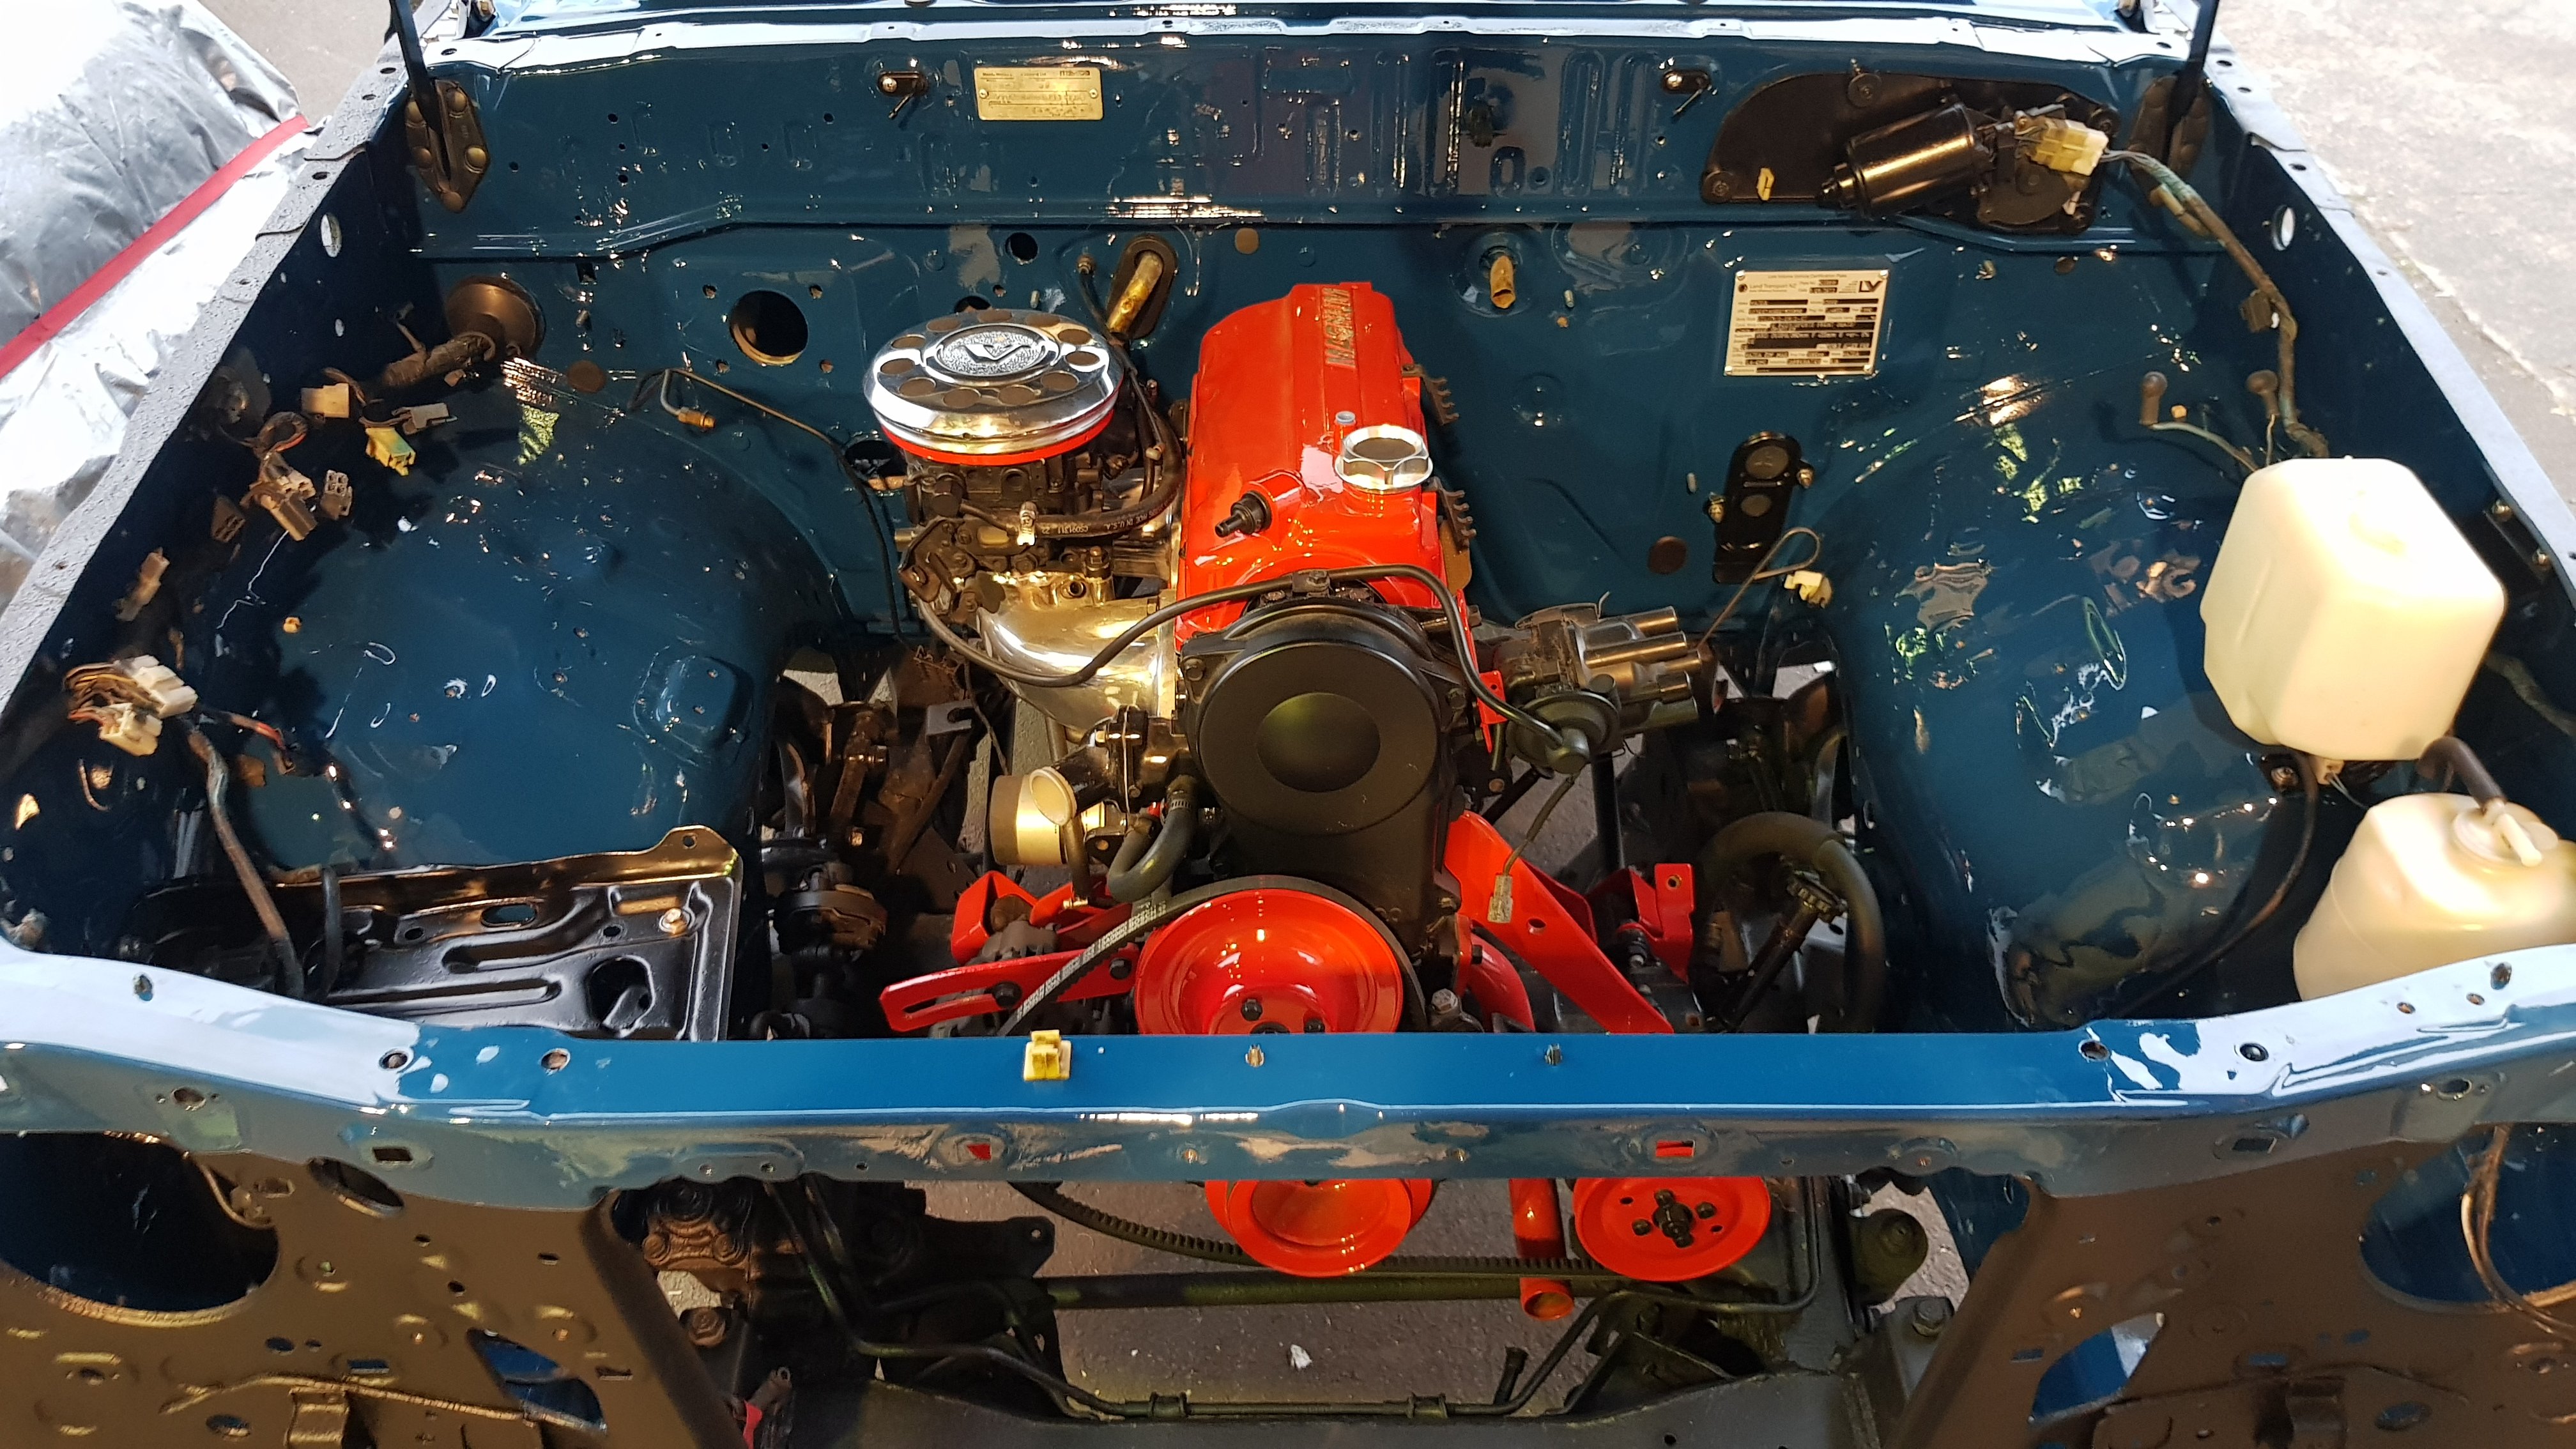
Spent a fair bit of time on this motor for when it was in my other b2000. Filed all the casting marks off the steel bracketry, shaved all the ugly bits from the intake manifold, welded up the unused vacuum ports then had it polished, and made a low profile air filter top and base from an old Volvo hubcap. Then gave everything a nice coat of paint. Should be a pretty clean bay once I'm done.
2 points
-
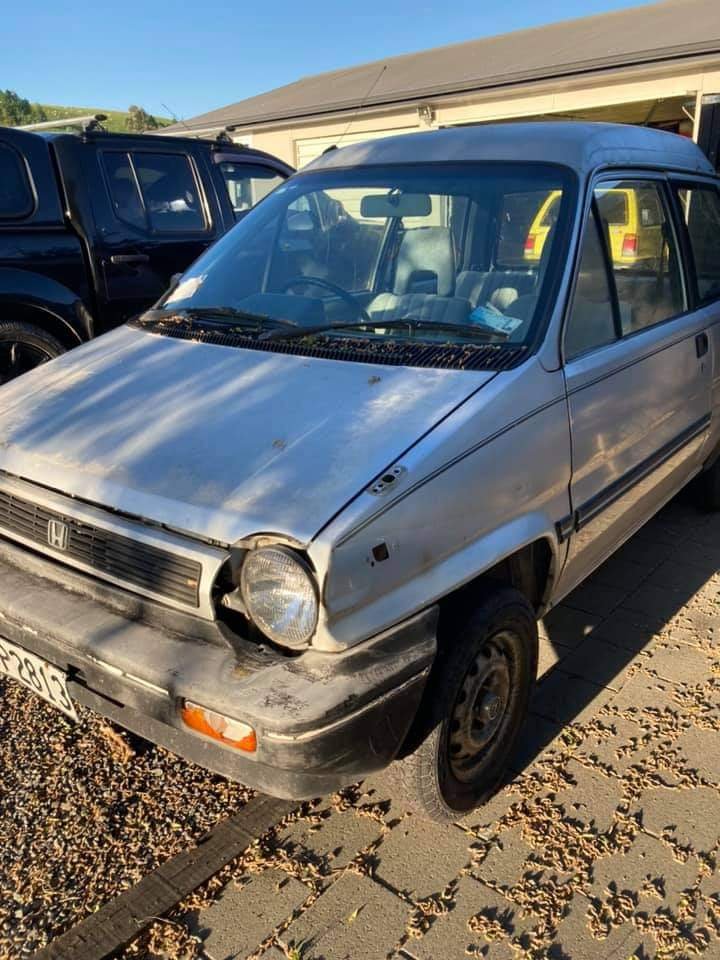
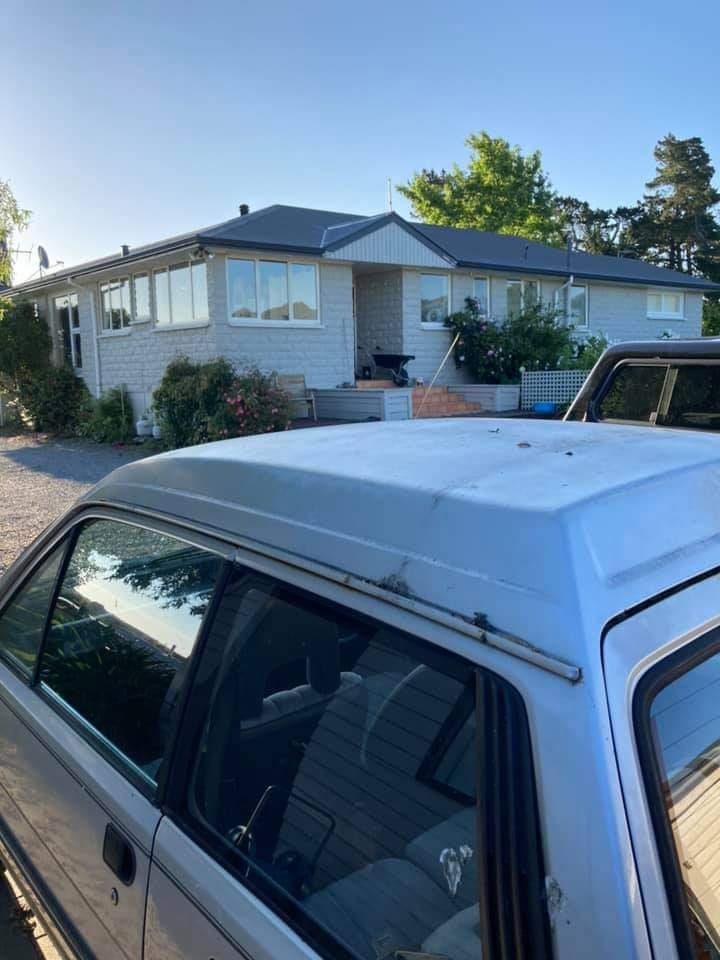
I brought this '84 'tallboy' Manhattan roof City-R in November 2020 after regretting selling my red City-E earlier in the year. It was dirt cheap, and I love the odd/rare stuff so I grabbed it. Its one of 3 that I know about in Nz currently. Unfortunatly it was/still is in Christchurch and I'm in Auckland so I need to organise getting it in the next month or so. Thankfully a mate of mine has some land so has let me stash it there since I made the purchase. I have been actively buying some pretty hard to find 'cool guy' bits for it throughout the year from both Yahoo Japan and locally. It's crazy to think I've dumped easily $4k so far into rare accessories/optional parts for this thing, when I paid $350 and have only seen it once in person. I will keep collecting bits for it, but probably won't make a start on the resto til well into next year some time
2 points
-
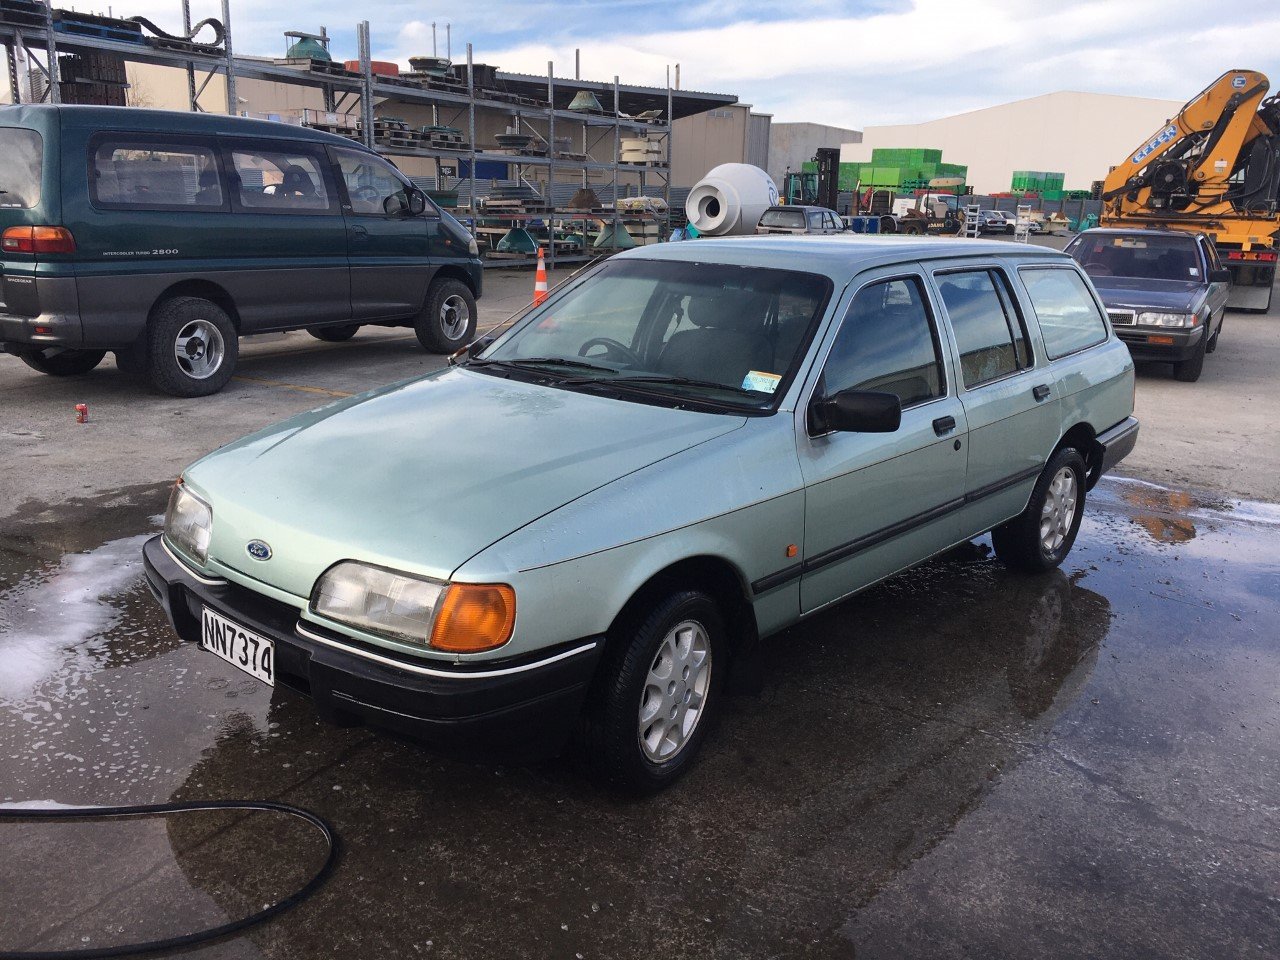
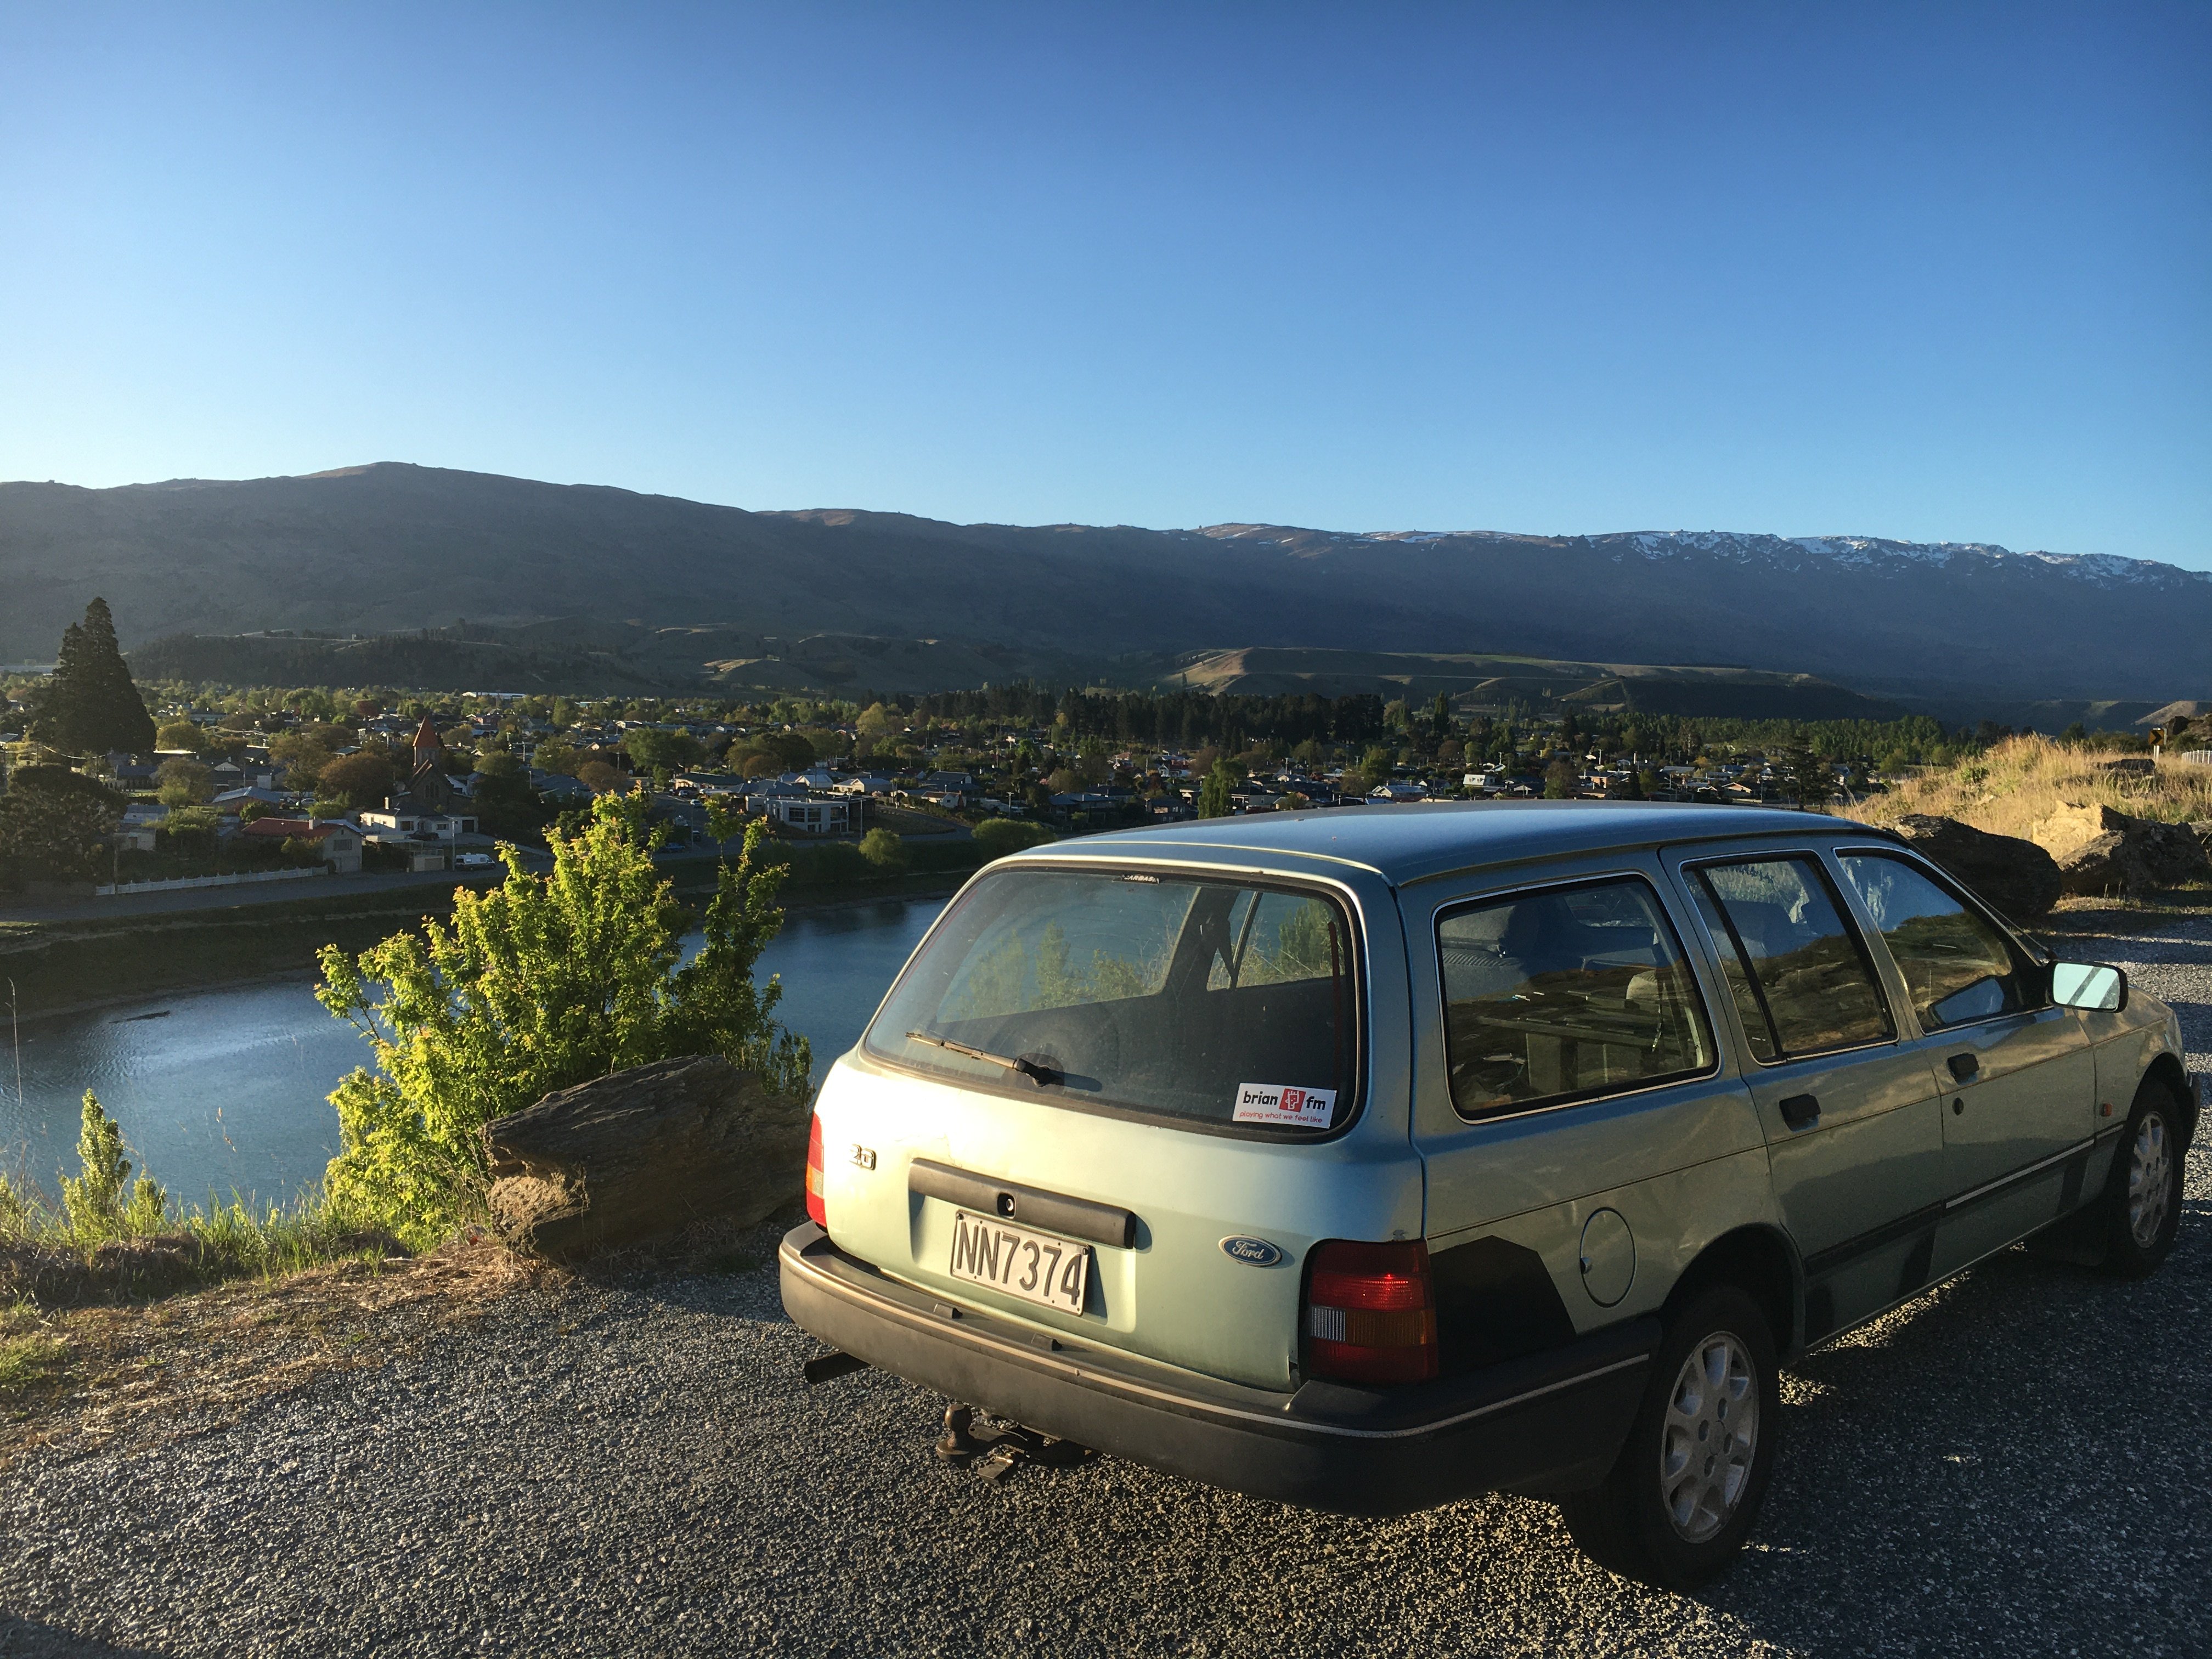
You all know how bad Karl is, right......he's like a crack dealer for old car people, always knowing what your weak spot is..... The vehicle in question has already featured elsewhere on this forum, I had made slightly unseemly noises towards the owner that could only really be described as "Car Fapping" (Cor, its gorgeous, lovely,etc <eyes roll back>) so when he announced he wanted to sell it I was a pretty easy mark. When I was a teenager these things were the schiznit; a friend droves his parents white Mk I and we called it "The Space Shuttle" cos it really looked like something out of Nasa. Telecom had a whole fleet of them. They were the biggest selling car in NZ for a few months at one stage. A days work at "Honest Jesses Used Mitsubishi Repair Depot" had her looking mint although I will still need some of Harrys labour to fill in a few holes. Sure, she is a MkII from 1988 and has the slush box attached to the 2.0 Pinto rather than the manly 5 speed that every man and his dog lusts after, but she runs like an absolute tank. She has been my daily driver for ages and has taken me everywhere...... We did Cromwell 2 weeks ago (via Dunedin and Roxburgh, then home over the Lindis) and this weekend she took me and the bride to Dunedin for the long weekend, eventually clocking up 890k over 4 days. There are a few ideas on what to do next on her (Karl definitely has a few) but the biggest problem at the moment is trying to find a spare week or so when I dont need her for it to happen! (Big thanks to @- i5oogt -, @JustHarry and @DoBro Jesus) for their efforts so far) Discuss: https://oldschool.co.nz/index.php?/topic/78024-epochnzs-teenage-wet-dream-sierra-estate-discuss/
1 point
-
Soap is cheap.1 point
-
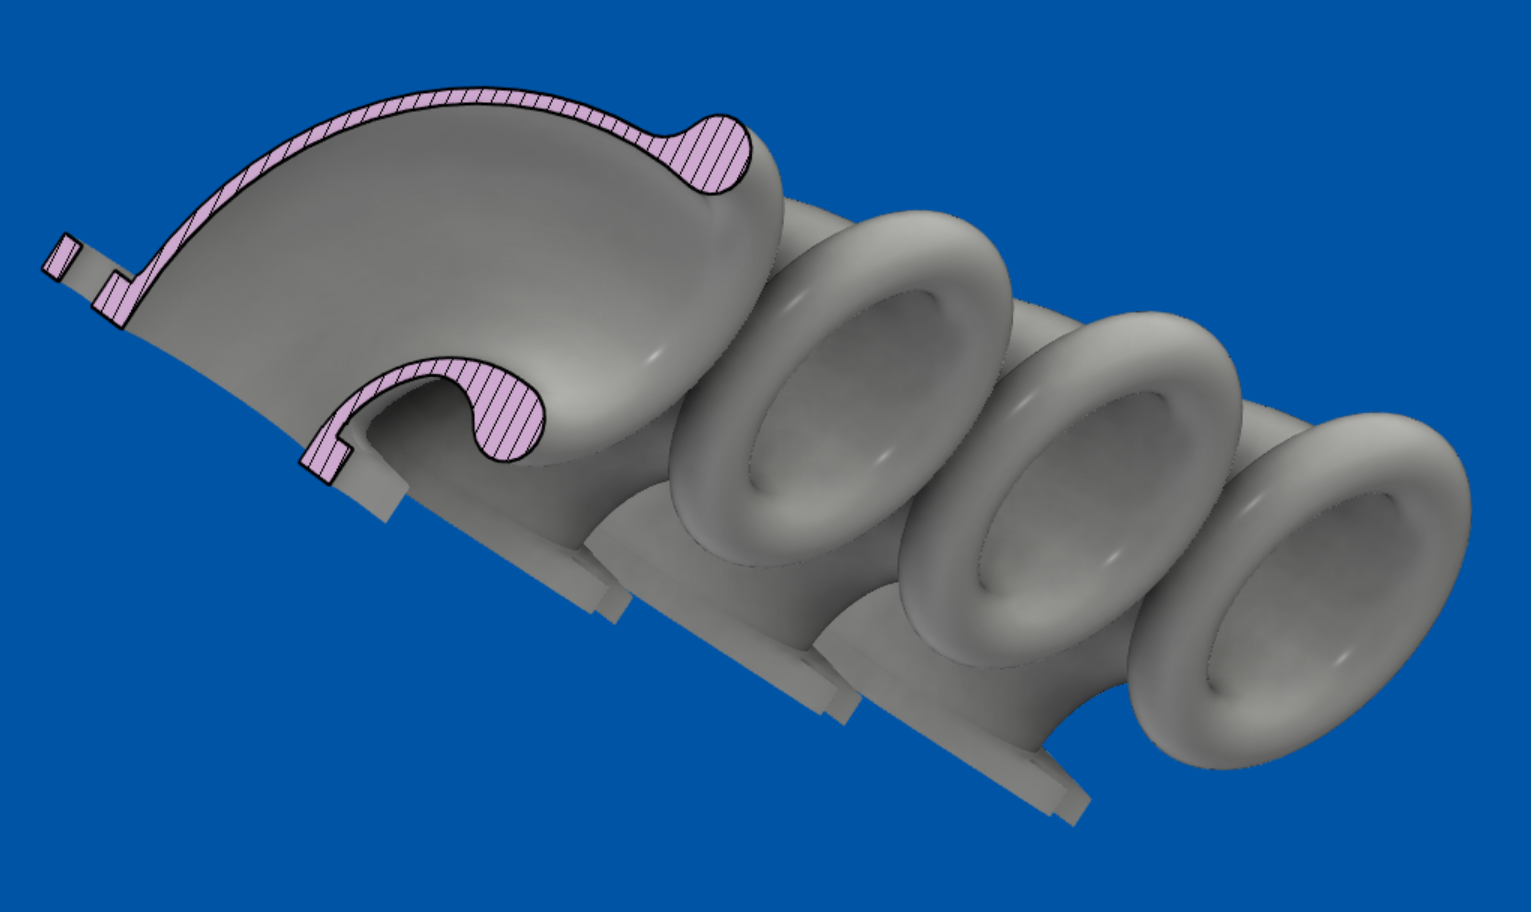
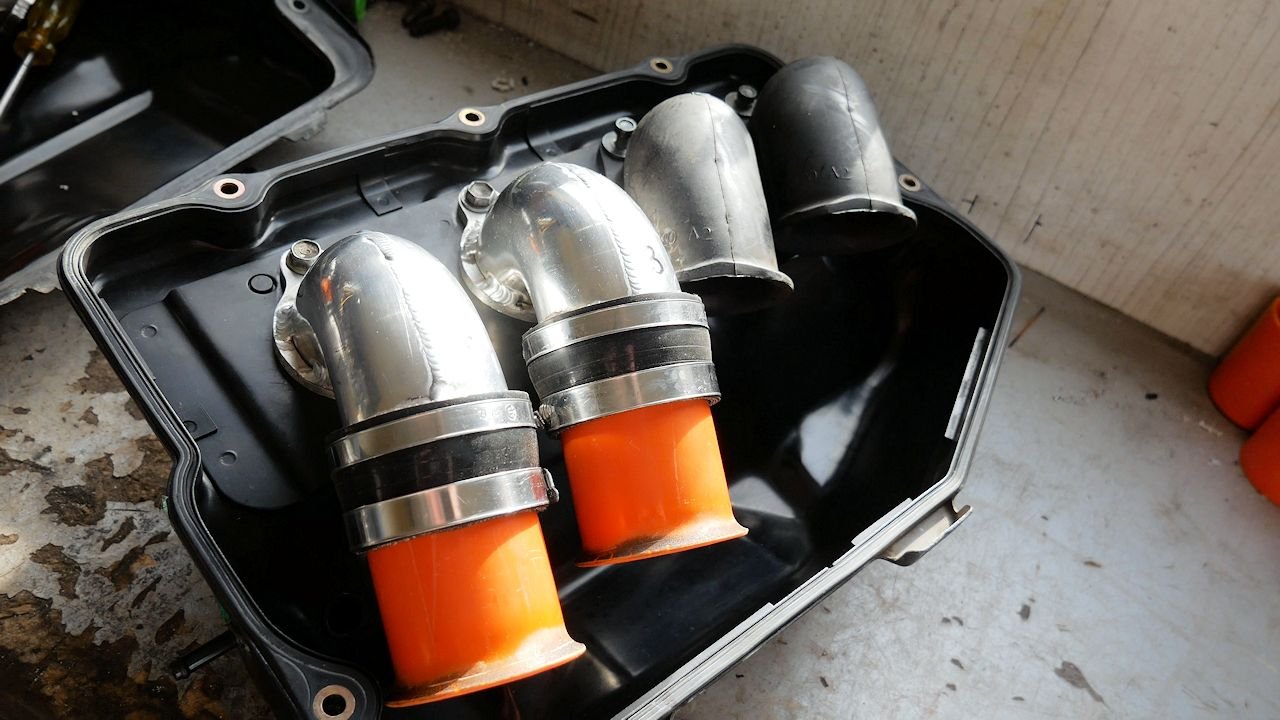
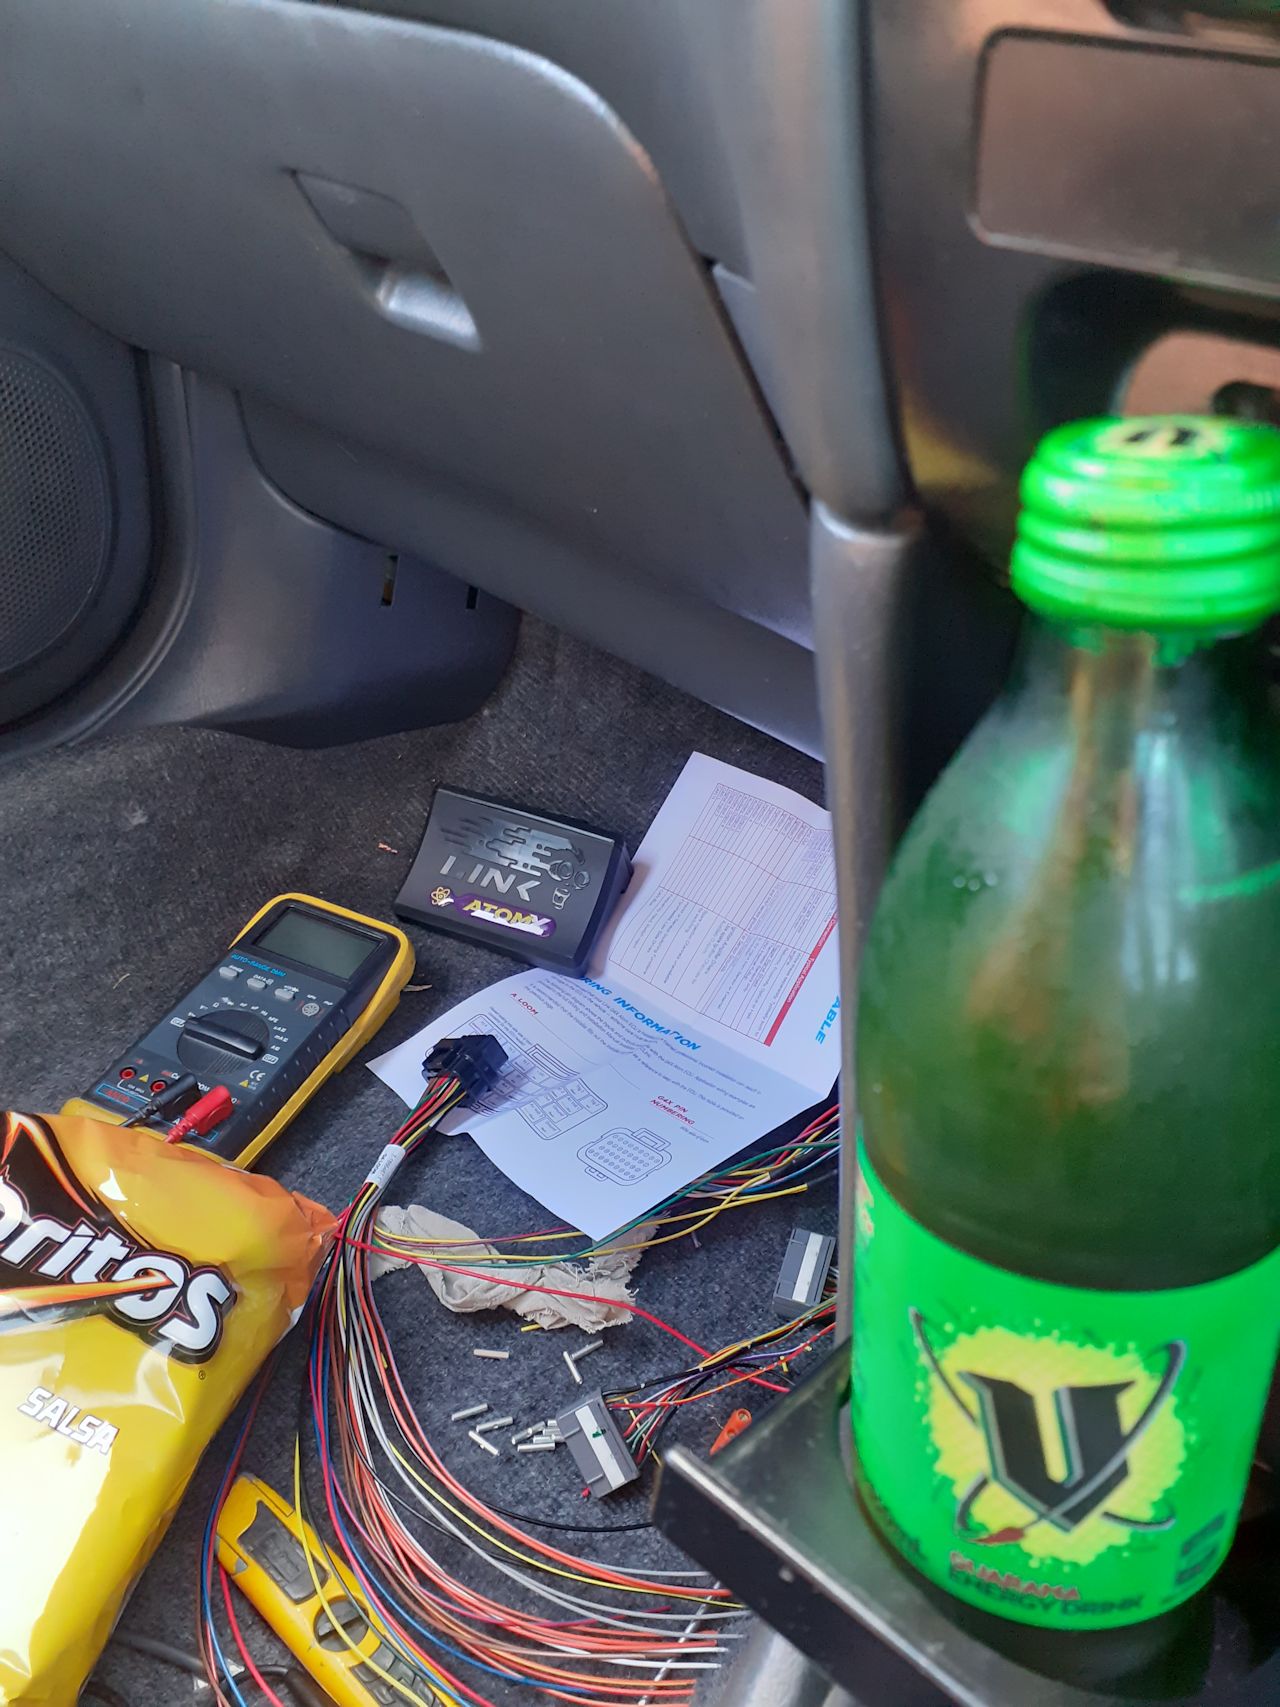
So a few different things ABS pump / wheel speeds I've not been able to make any progress on the ABS pump swap, because I cant get to an Auckland pick a part site to grab some other wheel speed sensors. Doesnt look like I will be able to any time soon. So for now I've put the regular speedo drive back in, and wired it up. Will just repin to suit standard ABS pump. Track day next Friday! Exciting. Traction control setup Since ABS setup wont work, I have setup a timer based RPM limit instead. If vehicle speed is zero, and you are over 90% throttle. Then the rpm limit changes to 4000rpm. and a timer resets to zero. As soon as it sees that the car has started moving, the timer starts and the rpm limit starts increasing along with the timer up to the normal max. So the idea is that if the rpm goes faster than what is physically possible for the car, it must be because of wheel spin. so a few quick ignition cuts then you're on track again. It's taken a bit of trial and error to setup, but its working good so far. Green line is engine speed and yellow line is the rpm limit. So ideally on a good grippy launch you stay just below the yellow line with no intervention needed. It's not ideal and I'll still pursue getting front and rear wheel speeds. But it's pretty good in the meantime. Rear disc swap It was only $65 at pick a part for an entire disc brake rear end including hand brake cables, ABS sensors etc. So cant complain about that. The only tricky part of swapping it in, is that you need to remove the exhaust in order to remove a heat shield, to swap the hand brake cables. Certainly not the worst swap of this sort I've done. Not sure if I'll get this swapped over in time for track day next Friday. Probably a good idea to get new discs and pads. Trumpet swap So far I've had the best powerband by using some rather long trumpets. They've been through a few iterations fine tuning the angle and lengths so they dont hit the bonnet or the radiator cross member. However the current iteration that I'd settled on still ever so slightly rubs on the bonnet when the motor is under extreme movement. It's only the slightest rub so I'm not actually concerned - and only on one of them. But long term I need an airbox over them and an air filter, so there's simply not enough room. So my only real option was to put a much more aggressive bend in the trumpet and then as a result they are a fair bit shorter. But also more clearance around everything. As a result you cant fit the bolt into the bottom hole anymore, it needs to be slotted So I went for a drive to see how the powerband would change, expecting some slight losses if anything. However so far results are looking better than before, considerably better. Not sure why though. To reach target AFR you can see the closed loop lambda was wanting to add a peak of 22.7% more fuel which is an insane increase. I added the extra fuel then reran, and it stayed on target with minimal trim. So that was interesting. But I'm not quite convinced this is consuming 22% more air with just a trumpet swap. However it's possible that the older trumpets were badly shrouded by the bonnet and the radiator cross member. It's now up to 69.9% duty cycle with the 2ZZ injectors. Previous best was 66%. Although thats only really an indication of what's happening at max rpm. My fuel map is looking increasingly comical. I think I need bigger dia exhaust and/or VVTI to reclaim that mid range. It would be pretty good to get some of that 4000ish rpm region beefed up. On the whole though, have been fixing up some minor issues but I'm as good as ready for track day. Cant wait!
1 point
-
forgot to post these. first is R32 GTR intercooler core design. second is plazmaman core. 2021-09-28_06-56-17 by sheepers, on Flickr 2021-09-28_06-56-26 by sheepers, on Flickr1 point
-
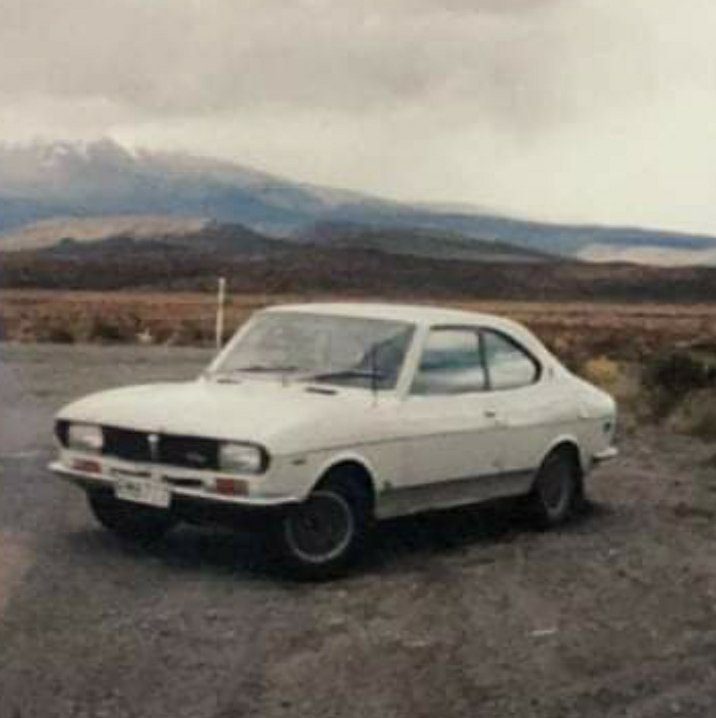
Just got sent these pics from the late 90s. Was bought in Chch and driven up to Auckland, pretty sure it had a piston motor in it by then, as the rotary had been replaced after it died. Probably one of the last drives it ever went on!
1 point
-
Not as awesome and hectic as @Transom's beast, but I have one of those standard sized folders, they normally bolt to a bench and take up valuable bench space. I'd already done some strengthening mods, did a mod yesterday that I had been meaning to do for forever, took all of half an hour and most of that was finding the right size bit of box section. Just welded some box section to the feet of it, now it slides into the end of my welding/work bench. The bench weighs a lot so it is very sturdy once in there. Comes out easily, and I can hang it on the wall in between it's very occasional use, rather than having it in the way all the time.1 point
-
And that’s my last day on it, back to reality next week. brother still has a wee list of holes to fill but she’s bloody close! Diff back in, wheels on and rollin! rear valence almost dialled Hard to scale but that’s a big pile of cast-off Chrysler1 point
-
Back on track! When you have a waterjet on site, rooted shackles are no problem! order number workshop the middle of the rear panel is holey so they waterjetted a profile for the pullmax and hooked into it! made a full length piece but wasn’t worth the potential hassle as it’s a w shape so just chopped bits out. the underside piece was shit so replaced with disruptions and great difficulty here’s a wee bit where ya feet go I made yesterday raised this portion wrongly stamped in the Chang 1/4 The dumb floor was too small in all directions so trying to transcribe it.1 point
-
Mean! We have chassis rail and torsion bar crossmember. Stuck the suspension back in so it can go on the ground and lose the bracing for floor replacement soon. Part way through the boot floor at the end of the day. I have no rhythm so it’s my fault we buggered up the hump and we had to chop it out and make separately to cover the high portion of the tank.1 point
-
I got to alex about 4:30 and brother had spent most of the day on it so I snapped some pics quickly one side zipped up and quarter being welded on, other side not far behind!1 point
-
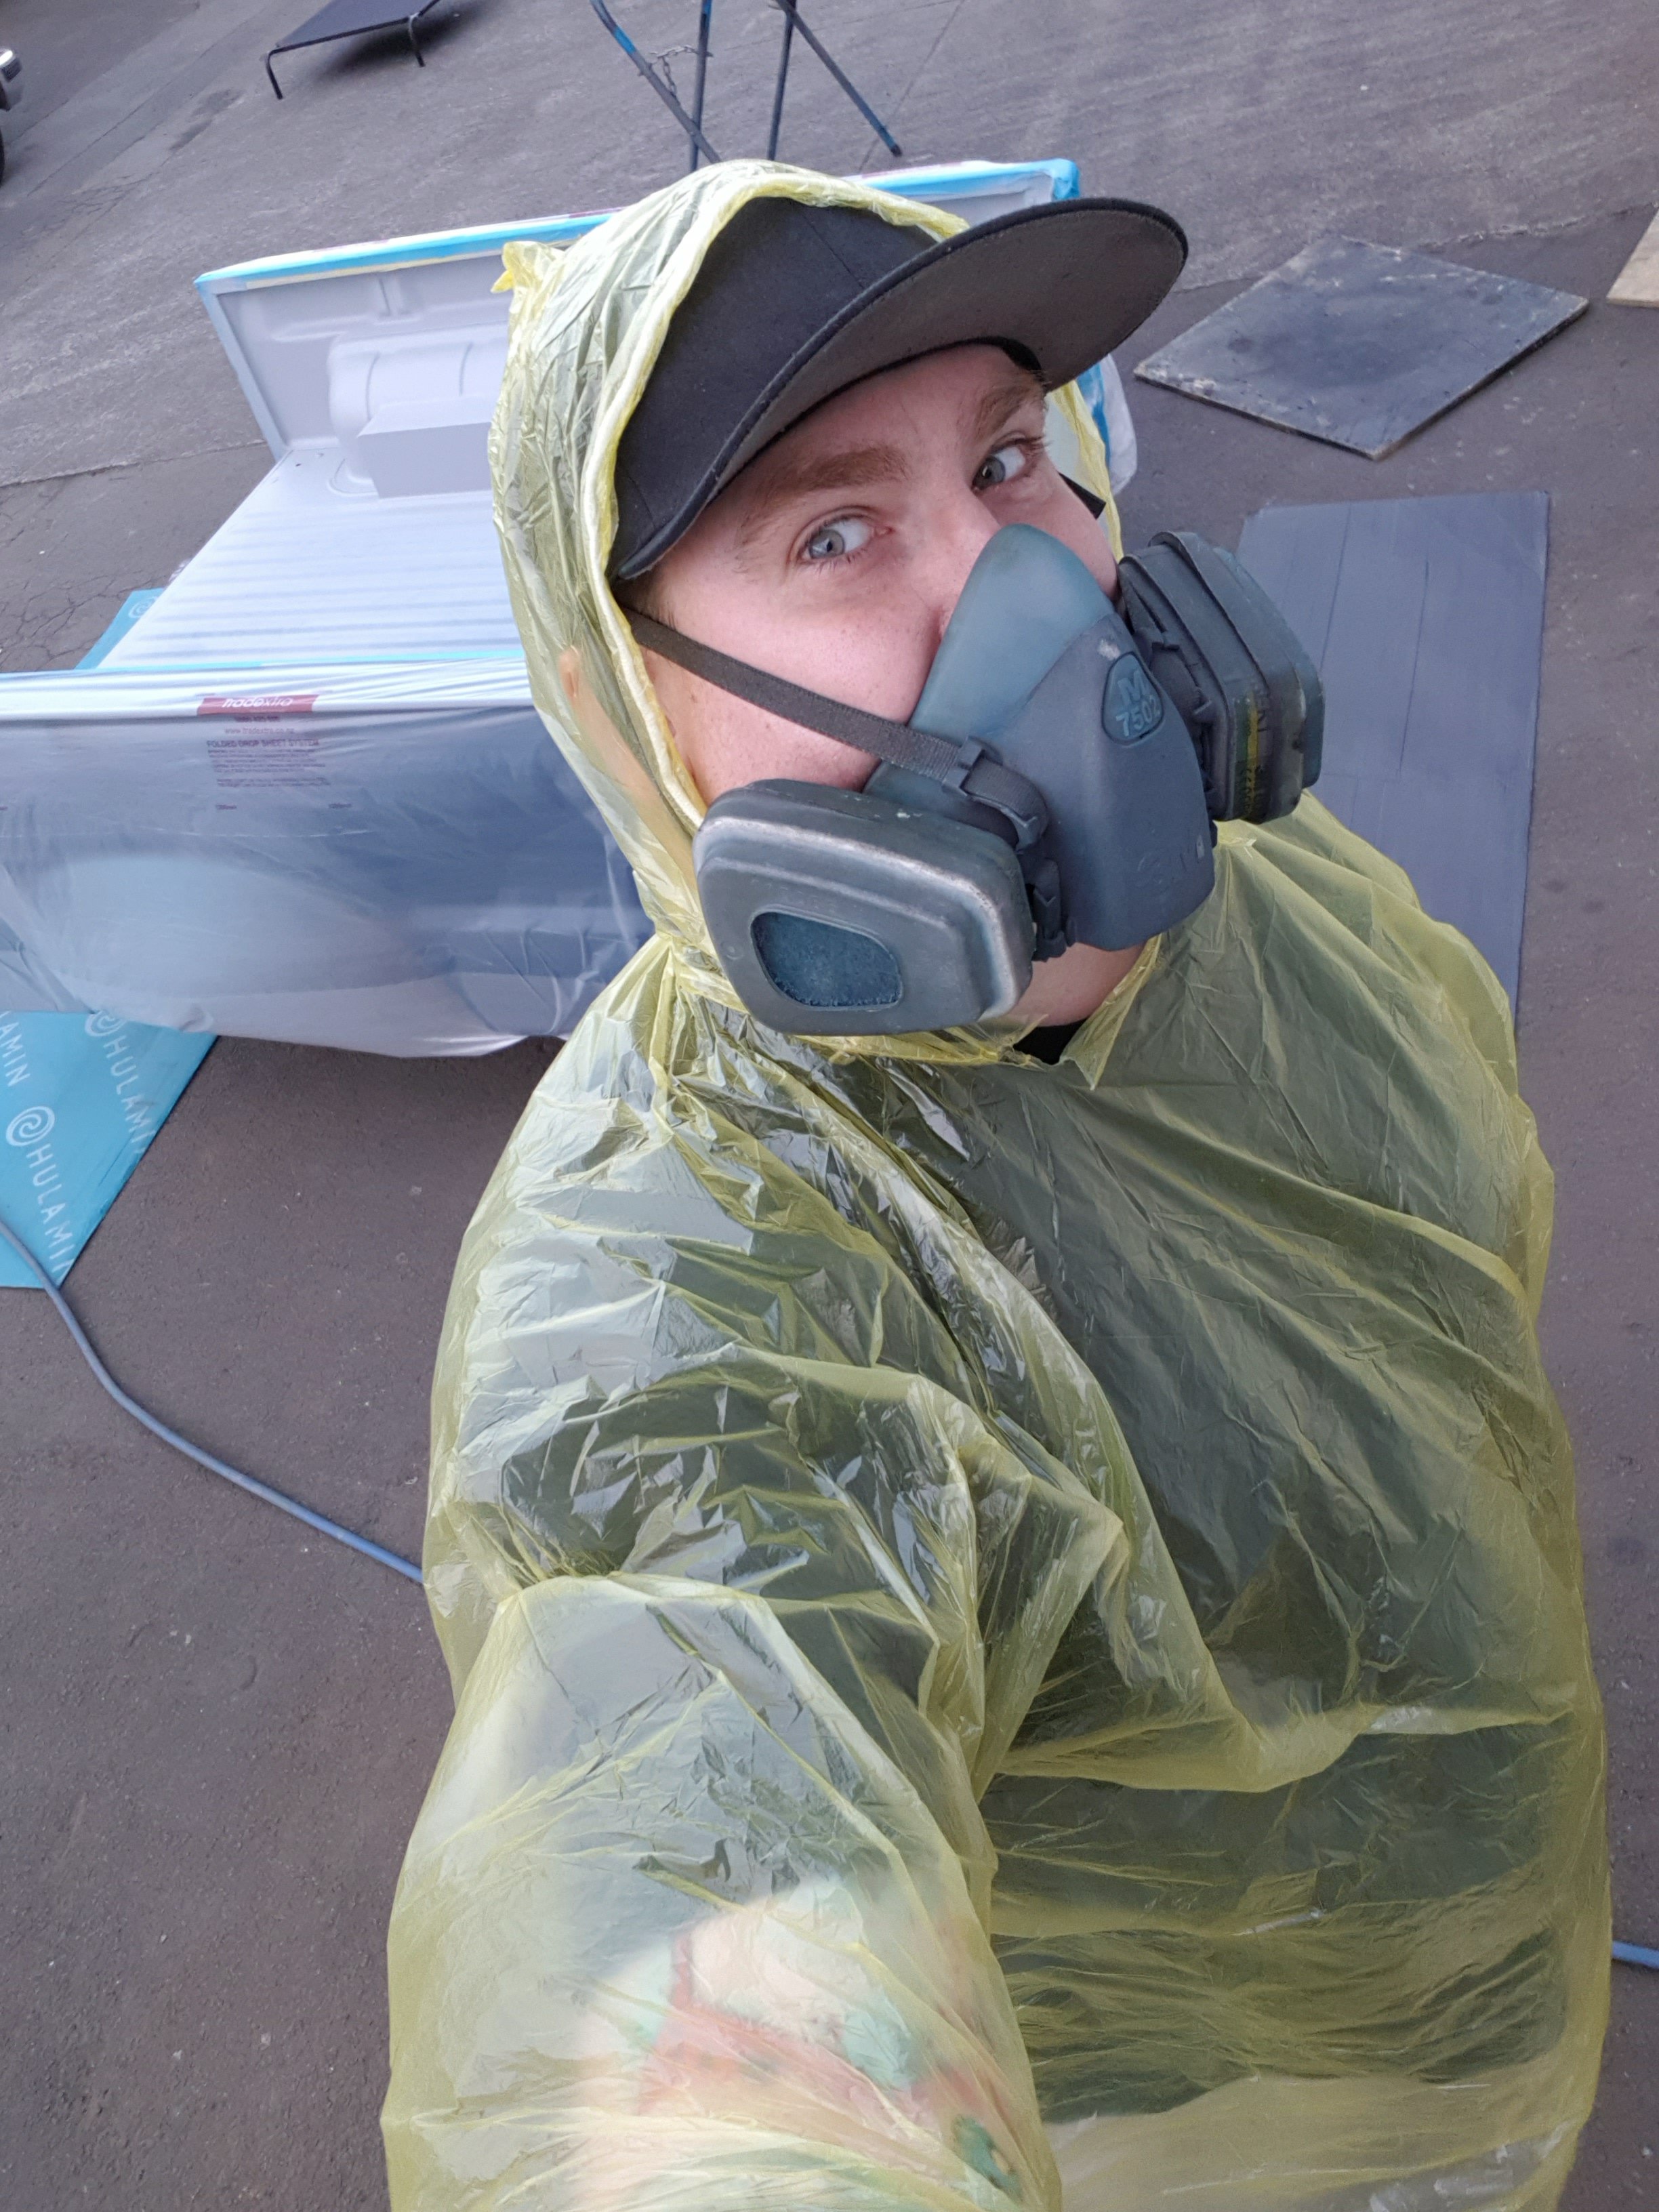
I've lined a fair few trays in my time, and one thing I have learned is that the hippo liner and underbody sealers make a horrible mess and make your clothes all sticky so I put my poncho on and got involved.
1 point
-
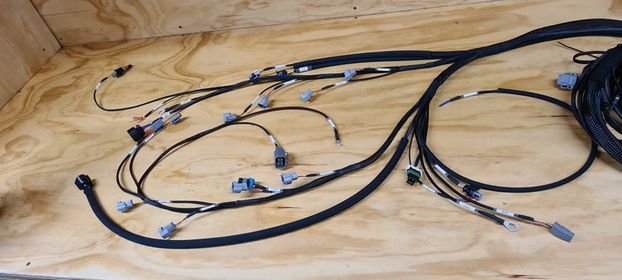
got a list of a few places I frequent msel.co.nz techflex.co.nz bmotorsports.com eficonnection.com racespeconline.com efihardware.com having accounts with local auto electrical wholesalers means I can access a lot locally, but not easy to get in the door there. also check out on facebook motorsport wiring alliance for tips and ideas, best advise practise on small thing like bikes and sub harnesses that are easy to redo before diving had first into a whole engine loom Braid sleeving always looks good and is quiet cost effective and easy to work with
1 point
-
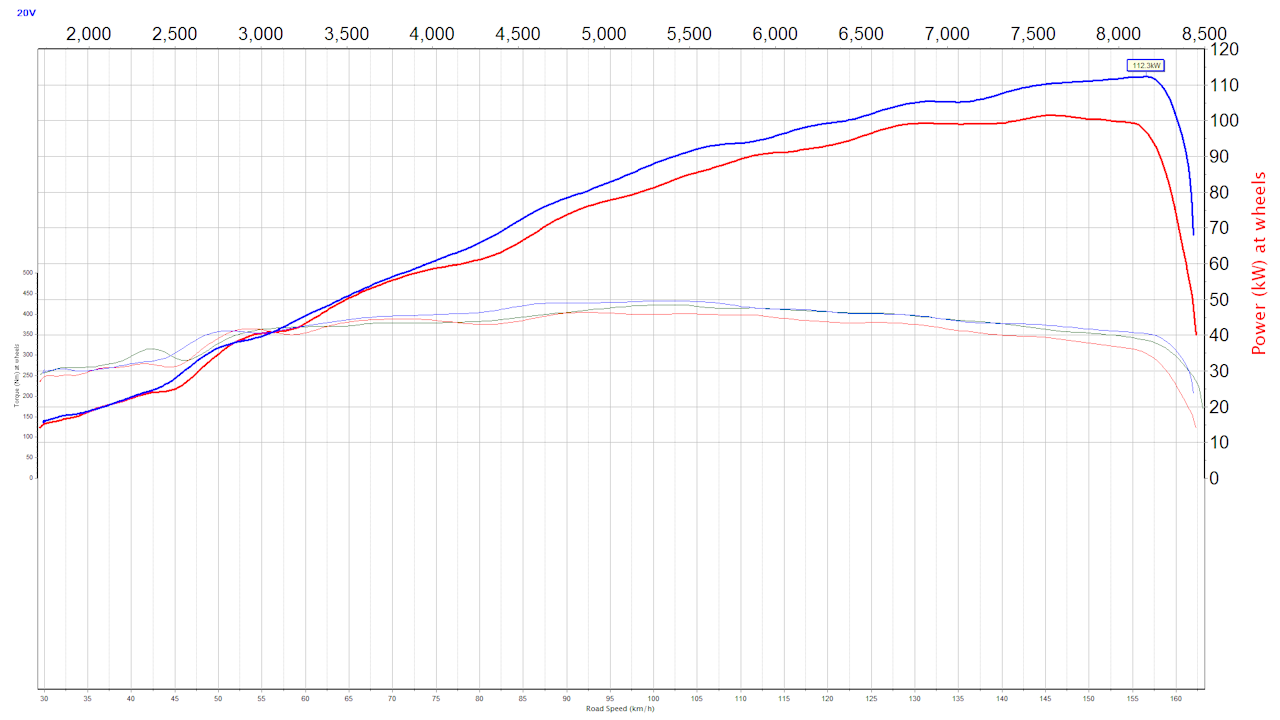
So I dyno'd this junk and it made 102kw. Sometime later i did a couple of tunes on fwd blacktop's. one had pon cams, one had some big kelfords. both made 108/109kw. with a big hit in the midrange. and midrange numbers already seemed disappointing stock, compared to my 16v stuff. So decided to do a little r&d on mine this worked but vibrated like shit so made this and these With the peashooter exhaust and factory airbox still, it made 108kw. with a stack more midrange than the cam'd engines red is before any changes with the airbox removed and exhaust dropped off after the new pipe. it made 112kw and picked up the bottom end more So yeh trying to convince one of the guys with the bigger cams to try the parts see if will pick up the midrange they lost video version:
1 point
-
It came on steelies, and I did end up buying a set of 20" polished centrelines for it, I just didn't like the fitment, so decided to run these 18" Caddilc Escalade rims instead. I had Brugar Engineering bore the centres out slightly to suit the b2000 hub and threw some times on. Nothing too fancy but different than your average static minitruck with 18" Pajero's or 15x8 trailer wheels.
1 point
-
Stripped the hiace flatbed chassis on Monday arvo. Kinda choked up for space currently and the Honda boot was empty so it volunteered itself.
1 point
-
Had a van party this weekend. Me and @piazzanoob hooned up north to Fungarreh on Sat and caught up with @Dudley who took money off me in exchange for bulk hiace stuff. The 12r donk and driveline from his flatbed truck will find its way into my van sometime in the near future.
1 point
-
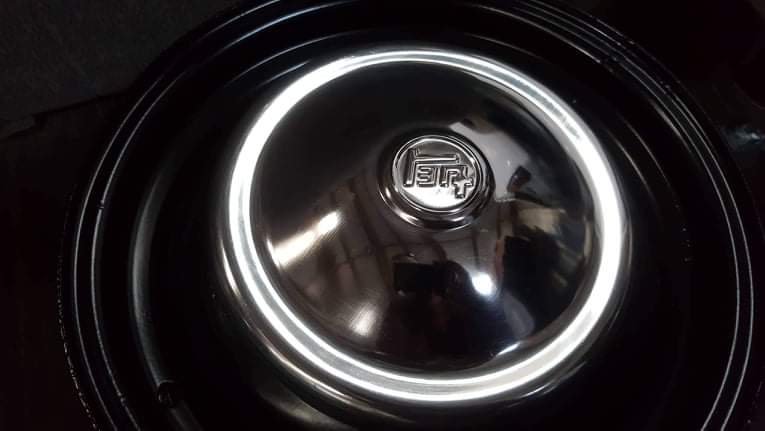
After the mission down to Wilfs place to get a bunch of parts I needed for it, I got the original rims blasted and powdercoated, and managed to find some of these sweet TEQ hubcaps off ebay. Super stoked on these as there aren't many sets around.
1 point
-
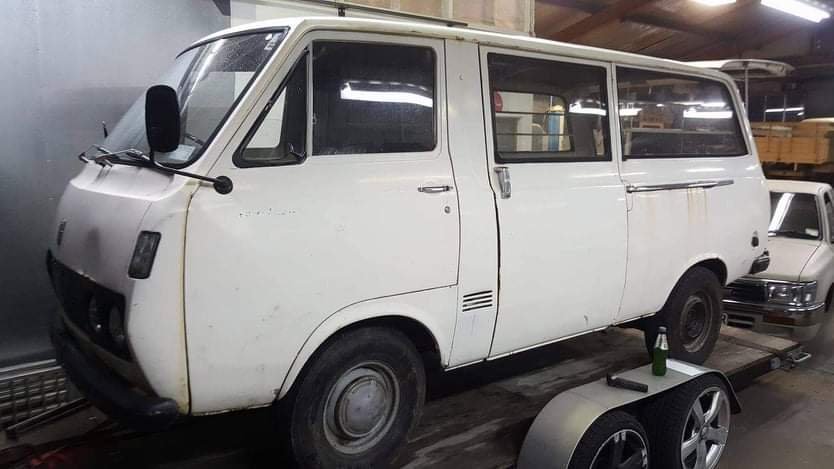
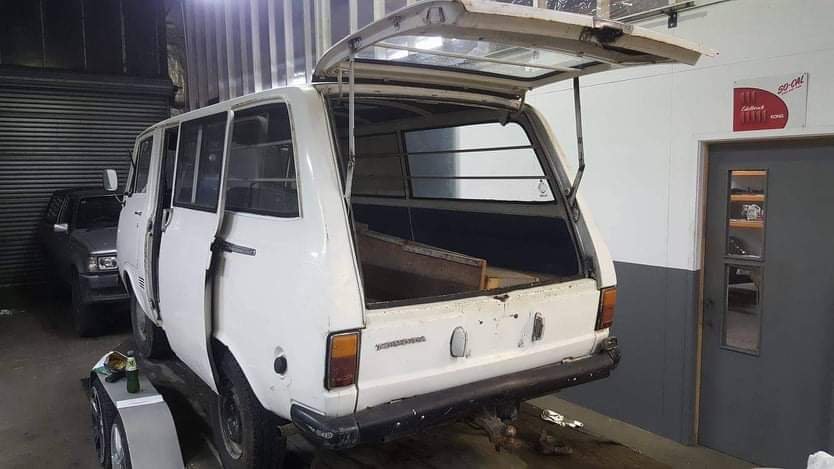
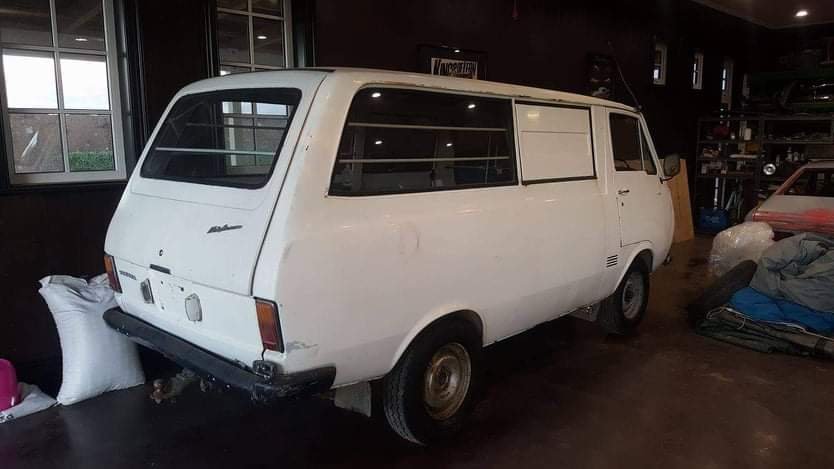
Had been pretty keen to own a first gen Hiace for quite some time, so when when this '68 Rh10 popped up in early 2017 I jumped on it. It needs a fair bit of love, but was saved from the crusher and pulled out of Takanini Pick-a-part by the fella who I brought it off. At some point in its life, some sicko had slammed a Holden 186 and trans in it, plus swapped put the original rear axle for the holden unit. I worked out a deal with seller, that I remove the motor/trans and return them to him to onsell, and I got it at the price I was happy with. I really havn't done bugger all with it other than collect a bunch of new old stock parts for it. Its kinda become a mobile storage shed whilst I have been focused on other builds.
1 point
-
I worked out a deal for this tidy old girl in mid 2017 but didn't pick up til end of the year as fella still needed it until he moved back to Singapore. I managed to pick it up a couple days before the OS drag day so @rxtoy could drive it when he flew over and he could race me in my City. Its an '86 Gsl 1800 5-speed Cordia which has only just clicked over 112000kms. (Had just over 103000 when I collected it) It was my dads life long friends, who was the 2nd owner and had it since 1990. Has been garaged most of its life as in the early days of Kens ownership, he was still on active with compulsory Singapore Military service, so 6 months of each year he was over there, then when he was in Nz he worked mostly from home. Its not perfect, but a pretty tidy survivor. I don't drive it much these days but I really should get it on the hoist soon and give it a service plus get the taillight seal issue sorted. Its a bit shit to drive around town, but its a dream on the open road. The thing cruises mint at 100-110 and just floats along the road.
1 point
-
Ol mate of mine is down from Aucks, and was keen to go for a bash (which we did, unfortunately) so we did the dam to dam run again (Matahina to Aniwhenua) all went well on the way up, apart from bad porpoising again, due to ride plate being bent up from rock bashing the last few outings. On the way back my steering failed again, praise allah it was just after the gnarly rapids/pressure waves, but was about as far away from the car as possible. The dude that built it, had used a 3mm bit of ali angle to hold the end of the steering cable under that dash, and it sheered off. I managed to loosen the remaining bit of angle, and wedge the edge of the bit connected to the cable under it, then do it up. I added a cable tie to try stop it popping out. Amazing it lasted the trip home, but it was a bit nerve racking driving back thinking it could fail at any moment. We hit a few things as I was scared to do sharp steering movements, or go too fast, but we made it back. We hit a few things we shouldn't have hit, and I made a few poor piloting decisions, which has led to some hard hits, and some of the worst welds letting go, I've also torn the UHMWPE by the intake, which is a bit of a pisser, not sure how I'll fix this yet, Also, this bit protects the bow/keel/join in the UHMWPE (I dunno boat bit names) and I made a mess of it last weekend (ref: above video) So I have lots of things to fix/upgrade/rearrange/maintain now, so might take it off the road/river for winter and get to fixin! Regards, V "fuck that's a big rock" G.1 point
-
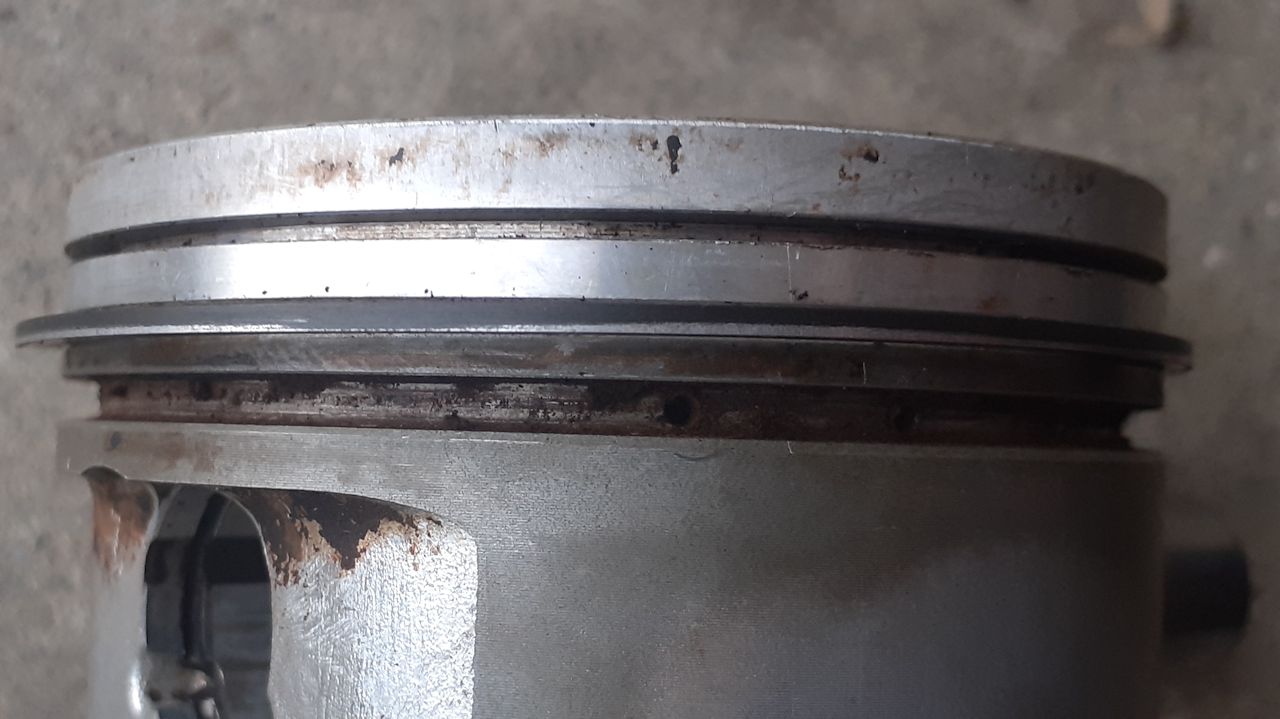
Boring up date on this turd Got the shits with stock ecu being a turd, and installed a g4x atom. wired it in to stock loom leaving the stock plugs in place as well. so could plug stock ecu back in. went something like this: had it running with basic tune in a day. then a while to get the alpha n tune and cold start, a/c idle up's with the stock isc to work nice. tbh i got lazy and never finished it properly and only has a road tune on it that spend an hour or 2 on. still, drives way better than stock ecu an uses quite a bit less gas. somewhere along the line i got sick of my 6 year old nephew mocking me about the jacked rear ride height. turns out someone had put cobra springs in the rear for some reason which sat higher than stock. so threw in some rsr low springs, not superlows so can still rally spec it. drove it for some time and was bit smokey. which i assumed was the exhaust valve stem seals. because again was too lazy to do them. only did intake. made some tools to do it in place and yeh that didn't fix it. drove it for about 6000k's before getting over the smoke and using all the oil. come to the conclusion it was something to do with the rings or pistons. was super unkeen to pull the whole engine and box out again. so pulled the head and sump off, which actually wasn't that much fun either, but better than the whole engine out. looking at this pic reminds me that the stock radiator top tank was weeping. so put in a cheap replacement, which actually looks super legit for the price. anyway. pulled pistons out. everything looked fine there, they looked better than the other 2nd hand ones i brought just in case, with about 20mm of carbon on top of them for about 18:1 compression. rings.. not so much. when i did the rebuild toyota rings with 3 week wait, and the 2nd option was out of stock also. so brought some acl/hastings rings. which were the most expensive also ?! they were pretty questionable, the gaps in the rings went square. by the time made them square the ring gaps were a bit over spec. but went with it because needed to get it running not piston out of engine, just there so could get camera to focus. this 2nd ring has 6000k's on it. can see the shiny bit is the only part been touching the bore. some places hasn't really been touching at all. so yeh either bore really oval or rings suck. im going with latter. engine running bit rich to start with on stock ecu probably didn't help the cause. but would not use these rings again So gave the block a dingleberry hone and wacked some japanese npr rings in it, which look to be identical to the toyota rings. were also cheapest. they were all bang on out of the box ring gap wise. so didn't need to even gap them. done probably 1500k's on it so far and got the seal of approval from my friend rangi re smoke. Think its still using a little oil but what 20v doesnt.. since i have to pay for my own gas for the first time in forever. stock ecu was doing about 9.5?L per 100k. with link 8.0. with new rings seems to be 7.8 ish. probably do better if i actually finish the tune.
1 point
-
Back pressure is a myth, biggest pipe you can practically go is where it's at.1 point


.thumb.jpeg.384ff72c8d2b0ee0d34a7bdedb55bdcf.jpeg)


.thumb.jpeg.e0a4bff61111e0c8c7396950fcc94da1.jpeg)


This leaderboard is set to Auckland/GMT+12:00