
Leaderboard


Popular Content
Showing content with the highest reputation on 30/05/21 in all areas
-
Suspension partially done, 2" drop spindles, 3" lower springs in the front , and diff put on top of the springs in the back. I drew up a notch and got that laser cut, that's ready to pick up this week so next job is to whip the tray off and glue the notch in and make some shock mounts One of the front shocks fell apart when I took it out , that explains the rattle in the front suspension I'm not sure if the wheels will stay, one has started rusting already and its probably going to rub once the front bumpstops get a trim and the rear has some travel. So I'll probably put the stock wheels back on And waiting for some new front shocks I ordered a couple of weeks ago but I think covid has slowed that down
 29 points
 -
So I've been slowly chipping away at everything, with life getting in the way at times. Finally managed to get the extra baffle i needed for the sump, it's a Clockwise Motion FD2 baffle, meant to be one of the best and should be handle the gforces on the slicks i run. Of course even though the FD2 engine was initially based on the CL7 one, Honda decided to change the sump ever so slightly between versions, so had to modify the baffle to fit. Engine back out to fit it, clutch and flywheel all installed and rear main seal done while it was out as it saves possibly doing it later. Gearbox has new bearings throughout as the original ones at 140,000 k's had had a hard life. Engine and gearbox back together and all back in and shifter finally fitted. New fuel rail arrived, and could finally fit the FIC 775cc injectors (smallest with datasheet i could get for the cheapest price) and FPR to the mainfold and fitit all for the final time. Next was cooling, so I got some ali pipes bent up to a template I made, keeps it really nice and simple (and light) and the only joins are at the engine, radiator and water pump. The standard breather is on what is now the back of the engine, which is pointing at the firewall and would just be pain to route to. Also when racing best to have a good breather system so 2 10AN female fittings were added to a valve cover i stripped and then painted. Next up was the cabin wiring, a pretty significant job, and the final piece of the puzzle was the console. Actually quite challenging to make as it needs to be within reach when i'm strapped in and also handle the main cutoff switch which takes up a lot of room. And to get it looking half decent takes some planning. So first step mocking up position of switches to make sure I can reach them. I want to be able to easily maintain and diagnoses any issues with the wiring, so I then made a grame for everything to attach to. Worked out where to put the cutoff switch. Then wired it all up. I'm running some nice Deutch connectors at the rear so I can easily unplug them and check what the pins are doing with a multimeter. Final version all painted up But finally all fitted up Heres the engine bay at the moment Exhaust has been fitted for final time and I'm getting down to sorting out the last of the stuff in the engine bay (ducting, intake piping, catchcan etc)18 points
-
Been a while - it’s been exhausting ... built some very dodgy 3-1 headers to fit thru the incredibly small gap between motor and front subframe - down into a pair of flexys and then 2-1 was aiming for a crossover and twin pipes to the back but nope not enough room thru rear subframe - wideband goes in the top of the 2-1 join then piped to one big muffler at the back Needs to come back out for a tickle up and paint then I’m gonna call the exhaust done
9 points
-
The project shed is mad questionable in the dry,and leaks like fuck above the powerpoints in the rain.. we’re having a big ole storm so I can’t do much today without getting fried. Vacuumed more sand, battery drill out n drilled some spots in anticipation for the new chassis rail, gave the mig torch a wee going over etc. and here’s repairs Ive done during the week.9 points
-
Nah I CBF with E85. Especially now that gull pulled out of having it at the pump. My thinking was that if new pistons are cheap enough its a lot easier to swap them than machine them. Especially if putting some other rods in. Especially if they have better piston rings. Either way, will figure it out! It will be interesting to see what the piston tops and combustion chambers look like after some high rpm carbon removal haha. And sensibe AFR with no EGR. Im just having shed wiring and some new concrete done this coming week, some time after that I'll whip the head back off and see whats going on.7 points
-
The final task on the original Rolla was to stick the Carib suspension into it, and basically revert it back to the car as I bought it, but slightly better. As mentioned in my last post I had removed all the suspension from the Liftback to swap into the Carib, and left the poor little Liftback a hovercar. Well, over the past couple of days I have been working hard swapping the old Carib suspension back into the liftback so it can return to being a driveable, functional car again. It's a pretty straightforward job, made only slightly complex by having to wrangle a bunch of bits up and over the exhaust. Completely doable solo though, with a little creative thinking. I started on the rear, as that was always going to be the harder of the ends to work on, since there is a lot more to it, and a bunch of the work has to be done from under the car. The hardest bit was getting the lateral links mounted on the subframe, since they had to be left attached to the knuckles (as inevitably the lower bolt will be seized and its a prick to free it up) and the bolts cannot be fitted with the subframe mounted due to the proximity to the fuel tank. Some creative use of the jack to lift the knuckle up, got the bolts through the subframe and the subframe mounted. Before fitting the struts I did need to replace the RH rear strut as it failed its WOF for leaking, which it certainly was; it was covered in oil. I ended up removing the spring and transferring the spring and top mount over to one of the shocks that originally came out of this Corolla (good thing I'm lazy and hadn't been to the scrap metal yard yet). Then it was a case of mounting the two struts at the top and swinging the knuckles into them. Before I was done with the rear suspension, I had to fit the rear calipers. Another WOF fail was that there was a horrific imbalance, with the RH rear brake only having 30% effectiveness. Upon splitting the caliper from the bracket, it was obvious why. A twisted and torn boot, and signs of moisture around the piston. I wound the piston out and removed the old boot. Behind the piston was a bunch of really old grotty fluid. The piston was manky as, but cleaned up well. No rust or pitting. It might be stainless? I removed the old piston seal and fit a replacement from the kit and after lubricating the seal and piston, carefully wound the piston back in. Next was to fit the new boot. I left the piston out a little and slipped the boot over the piston first. I then used a tiny flat blade screwdriver to carefully push the boot into the recess around the opening for the piston. This was followed by the spring clip, making sure it seated properly. I wound the piston out a little further to check the boot had seated correctly. Once the piston was wound right back in, the sliders greased, and the pads had some copper grease applied to them (they had been fitted dry previously and were almost jammed solid in their bracket) the caliper was done. The other caliper was in much better shape, with only a tear in the slider boot. So this was also replaced with a new one. Who knew one caliper kit could do so many calipers, albeit bits here and there. All that was left was to fit the calipers to the rear knuckles. The last WOF fail for the brakes was to swap the brake hoses for the ones from the Liftback as the Carib ones were cracking. Moving onto the fronts, this went a lot quicker. It worked out at a smidgen over 5 minutes to install the strut, and mount the knuckle, per side. This is quite simple in comparison. The front calipers were in decent shape, with only the same issue as the rear pads; they had been fitted dry and were jammed in their bracket. That sure as hell won't help the braking effectiveness. The only catch was that on the LH front hub I had bent two of the studs trying to remove the hub nut. This meant a quick trip in the rain to Pick A Part to grab a couple of studs from a donor there. The old studs were a little tweaked Compared to a replacement stud I used the same method to remove these as I did on the other hubs when I fit the longer studs. A balljoint press to remove the stud, and an open ended nut to pull the replacement through. With the replacement studs in, the rotor went back on and the front calipers were fitted. I used a hand vacuum bleeder to suck fluid through the calipers, which worked fine on the front, but for some reason the rears had nothing coming through. I removed the bleed nipples to look further into it and sure enough, both rear bleed nipples were completely blocked with rust. I spun them up in the drill and ran them against a wire brush until I could see where the hole should be. And then cleaned the hole out with a pin until it was clear The actual sealing surface of them was perfect, but I suspect these brakes haven't seen any maintenance in a few years. Fitting the bleed nipples, I finally had fluid coming from the rear brakes. After bleeding all the brakes, I had a good pedal and a working hand brake. The only thing left to do was to back the car out of the garage, give the wheels a quick clean (it didn't help much, the brake dust is well baked on), and go out and take some photos. The photos were so I could list the car for sale today. Hopefully in about a week I should have a buyer for the car, and it will be on its way to a new home shortly after. Even with the worn-out old Carib suspension in it, it drives better than it did when I got the car. It rolls a lot, but doesn't drive like a leaky old boat this time around. It's a much better car than when I got it, even if it's kinda back to standard now. Not even kidding, I will miss this car. I forgot how fun it is to bash around in it until I was driving it to take these photos. It's a great little car, and it will hopefully do someone well as cheap transport. I just have to hope the Carib lives up to the little Liftback. I'm sure the 4AGE should keep me entertained.7 points
-
Yuuuuuuuge turnout with such a stellar day.... Good meet though. Lunch was grouse.
5 points
-
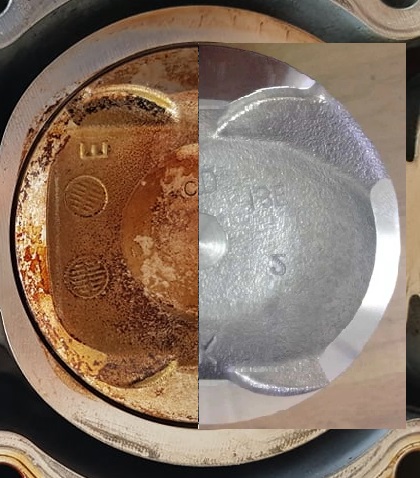
I've had a look through another person's build who managed to use Prius pistons okay with same cams, and apparently VVTI working without any trouble. It looks like the important difference is that they used the earlier version of the engine with the 13:1 piston, not 13.4:1 So I tried to find some pictures of an early 1NZFXE piston. Aqua motor on the left, early prius motor on the right. Top of the picture is intake valve cutouts, tells the story! Can see that its definitely got much bigger valve cutouts and pretty much the whole piston shape is a bit different. It almost looks like the shape near the intake valve would give better flow around the valve perhaps at low lift near TDC? Although it would be a bit of a bummer to have to use 13:1 pistons instead of 13.4:1, (Even though both of these numbers are ridiculous) I guess if I machine the valve recesses on current pistons it might end up at that anyway. But with all of the hassle of getting that done. One additional benefit would be that I dont think the earlier motors used the troublesome low tension piston rings. If that's the case then it also solves a bunch of other potential long term issues. So, if starting this over. An earlier prius motor really would be the better option in every way. Dont need to drill the block and swap the sump to match up to the manual box. The engine mount bracket fits properly. The normal engine accessories can fit in their normal spots. Valves do not hit pistons. Mechanical water pump, so blowing a fuse doesnt blow your motor! So there's no real advantage to the 2012 motor at all. Apart from that I found one for cheap with exceptionally low km on it.
5 points
-
Excellent question! At this point I'm leaning towards 12-13-14 November. Route and Direction TBC5 points
-
This chapter is called: I blew up my motor but shit that was good . So the VVTI issue. I realized that I would be able to get the front plate off the VVTI pulley, and then hopefully wiggle free the spring and the locking pin without removing anything else. Thankfully it worked! Then put that front plate on, and done. Then fire the motor up, advance the cam 5 degrees - success! The cam is moving, finally. Excellent. However - with more advance I ended up hitting valves into pistons - at around 20 degrees advance. Bummer! This motor must have smaller valve cutouts than the non hybrid engines I guess. I should have checked this, rookie mistake. So in some ways it was good that the locking pin was stuck, otherwise I probably would have done this on day one instead of lots of fun doorting around. It doesnt sound catastrophic, I dont think any valves have broken off. But the motor turns over like it's got no compression now. So probably tweaked the valve heads. But it's not crunchy sounding and it turns over freely. If anything I'm a little dissapointed that it's come to a fairly inglorious end, rather than sent to valhalla at 8800rpm blaze of glory. The options from here once the head is fixed or replaced: -Keep as is, run with no VVTI (boooo) -Cut bigger reliefs into the pistons so full VVTI can be used (hooray) but slightly less compression thanks to cutouts (boo) This all sounds like a bit of a downer, but my general mood right now is I'm fizzing about what an awesome success this all was. As a proof of concept, and a reasonably cheap project to keep me entertained this has been completely excellent. What I've learned is that there's no way I'm going to have the discipline to keep the revs on this motor below 8k when it loves to still rev up past that. So it would have been a matter of time until rods exited block. Also since I now know that I will have to remove pistons for machining some cutouts, I can replace rods at the same time with cheap stronger ones. This gearbox is a bit clunky and it could really do with an LSD. So while it's all apart for LSD install I can see if the shifter forks are a bit beaten up or something, and replace with parts from my old box which is buttery smooth to shift. So I've learned some stuff that would necessitate engine/box removal regardless. There will probably some slow progress for a while, but I'm super happy with how it's all come along. My goal is to get the car awesomely sorted for a December trackday and OS drags if they'll let me pest peoples eyes and ears with an Echo again. A++ would do hybrid motor doorts again
5 points
-
They're building an NPD station around the corner from my house at the moment. Looking forward to that 100+ octane goodness.4 points
-
Yeah that would probably be the most straight forward way to do it. Instead the wife and child and I are going to to make a couple days of it and tear the ass out of the Accord.4 points
-
Just carve out the pistons and send it. That 0.4 of compression isn't gonna make fuck all difference when it's already in the 13s, unless you plan on using South island spec 100+ octane. Which I know you are. But still, it'll be fine4 points
-
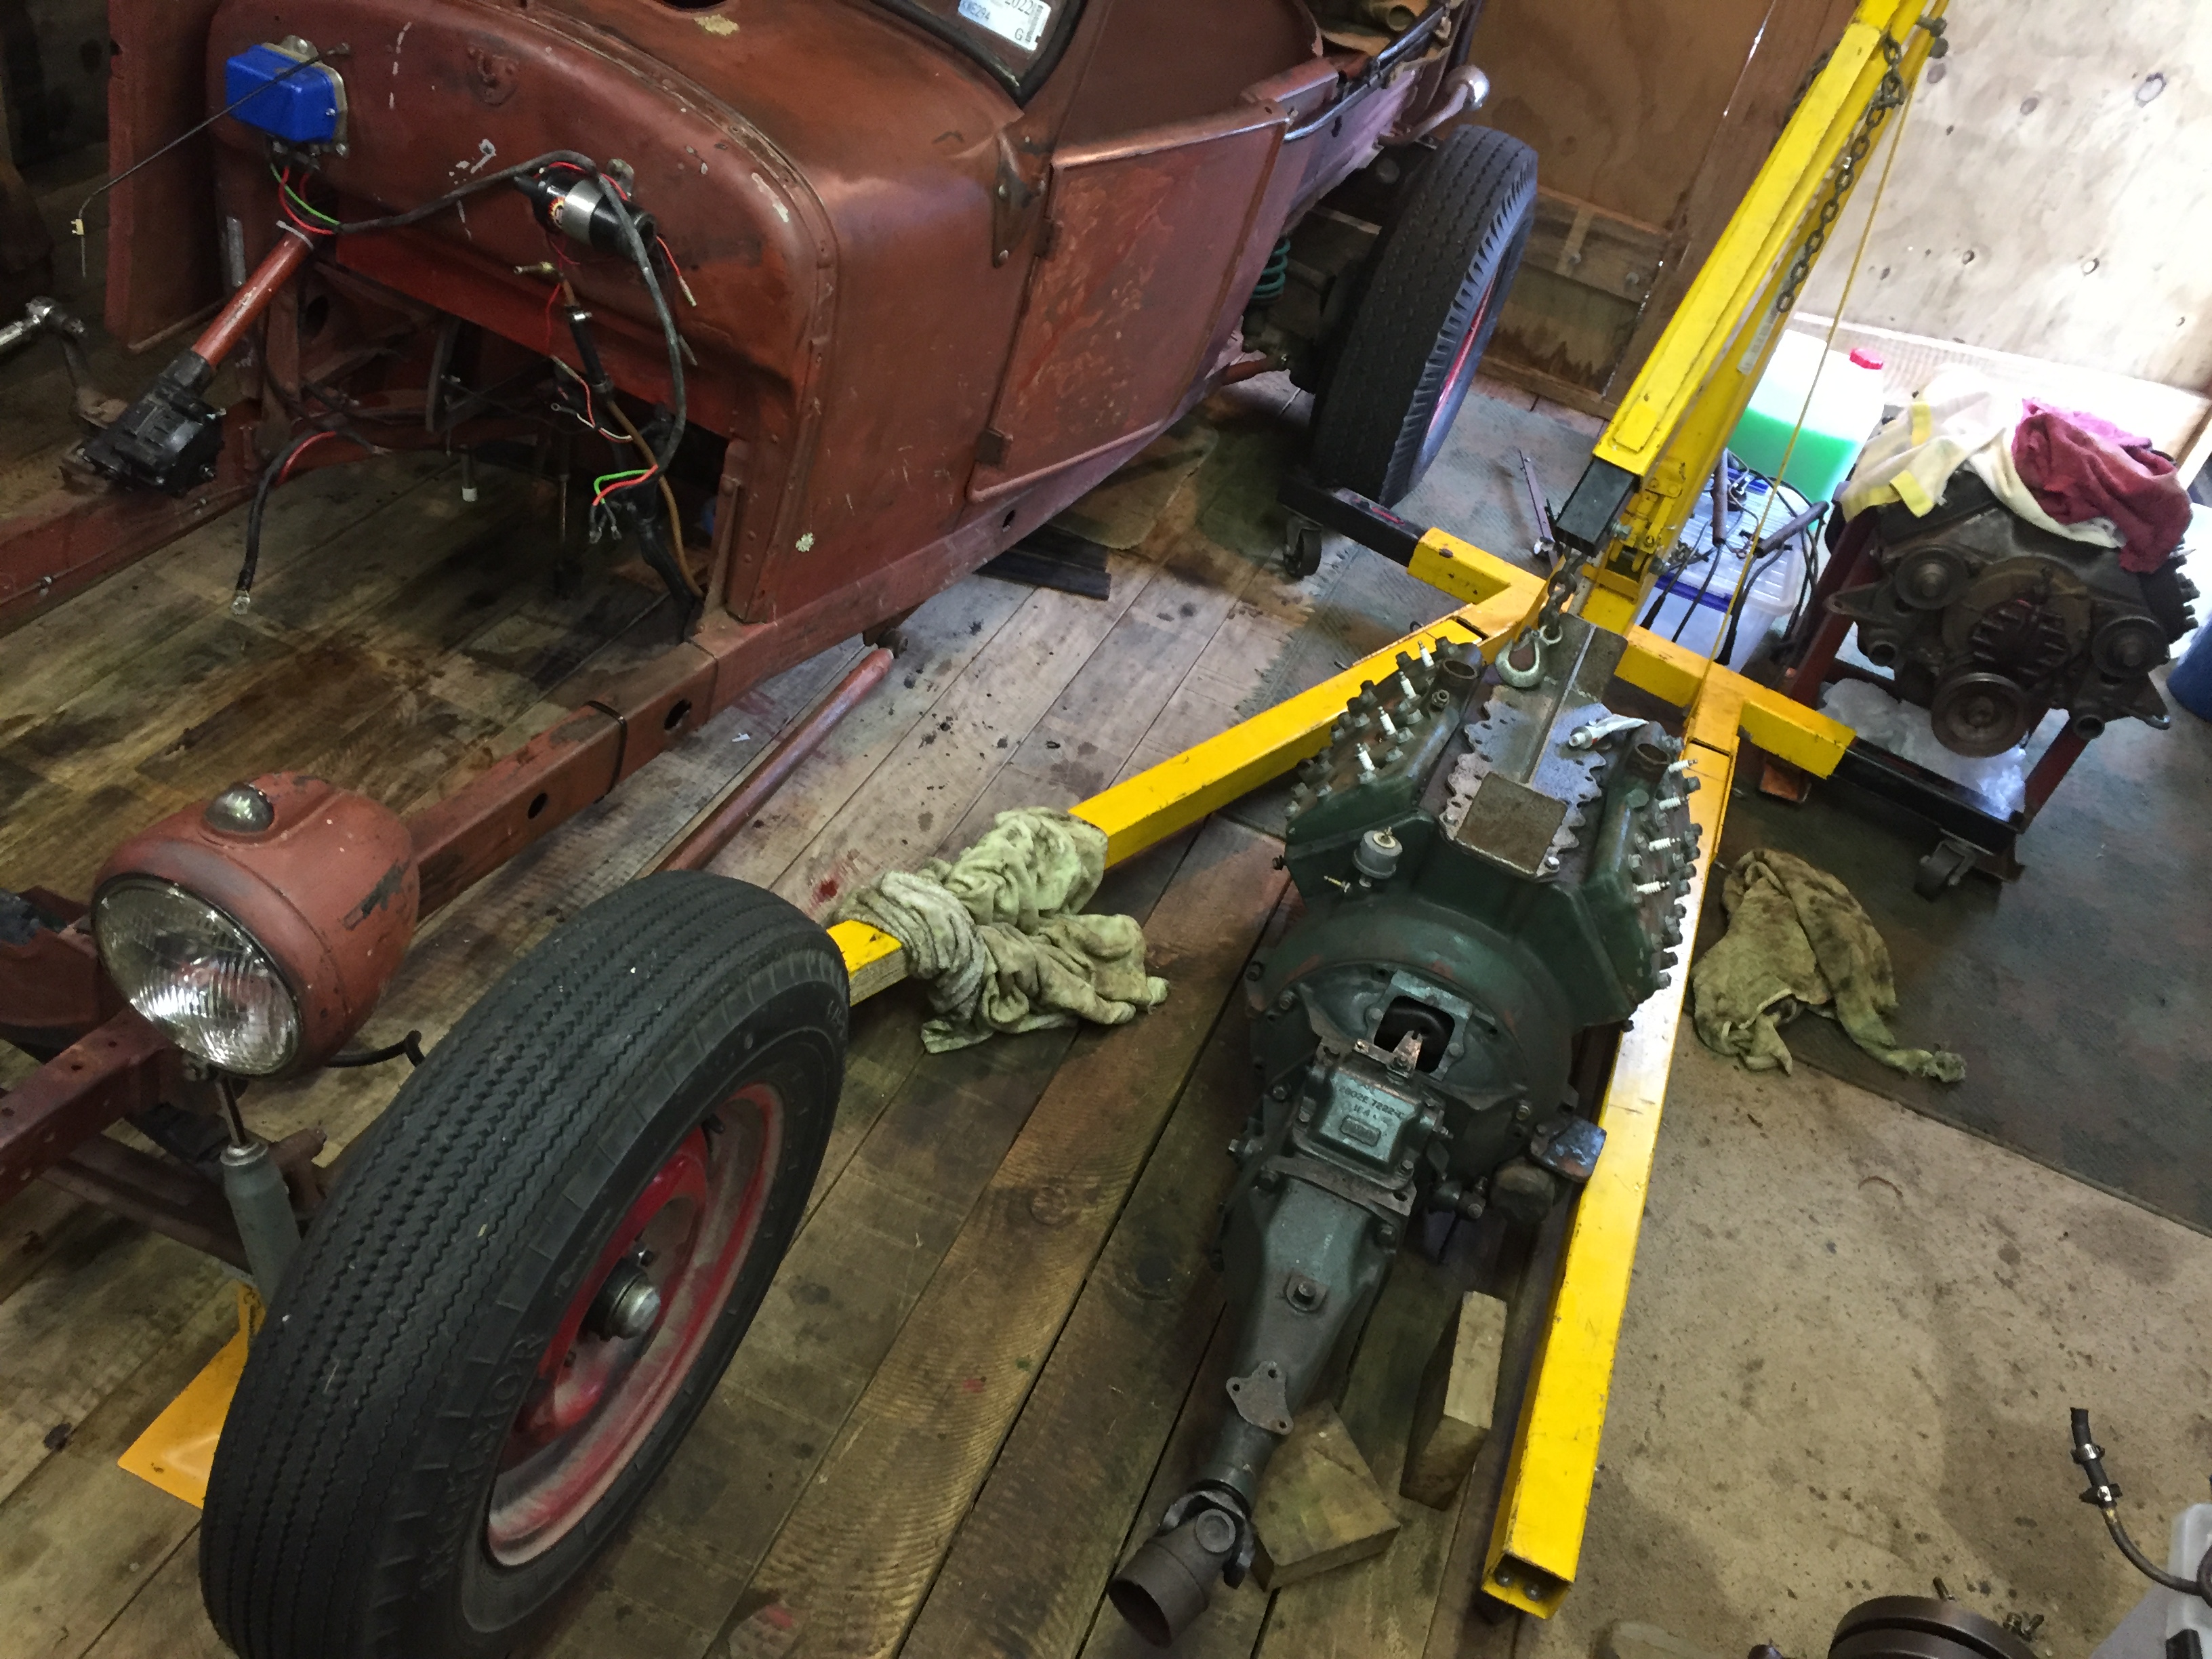
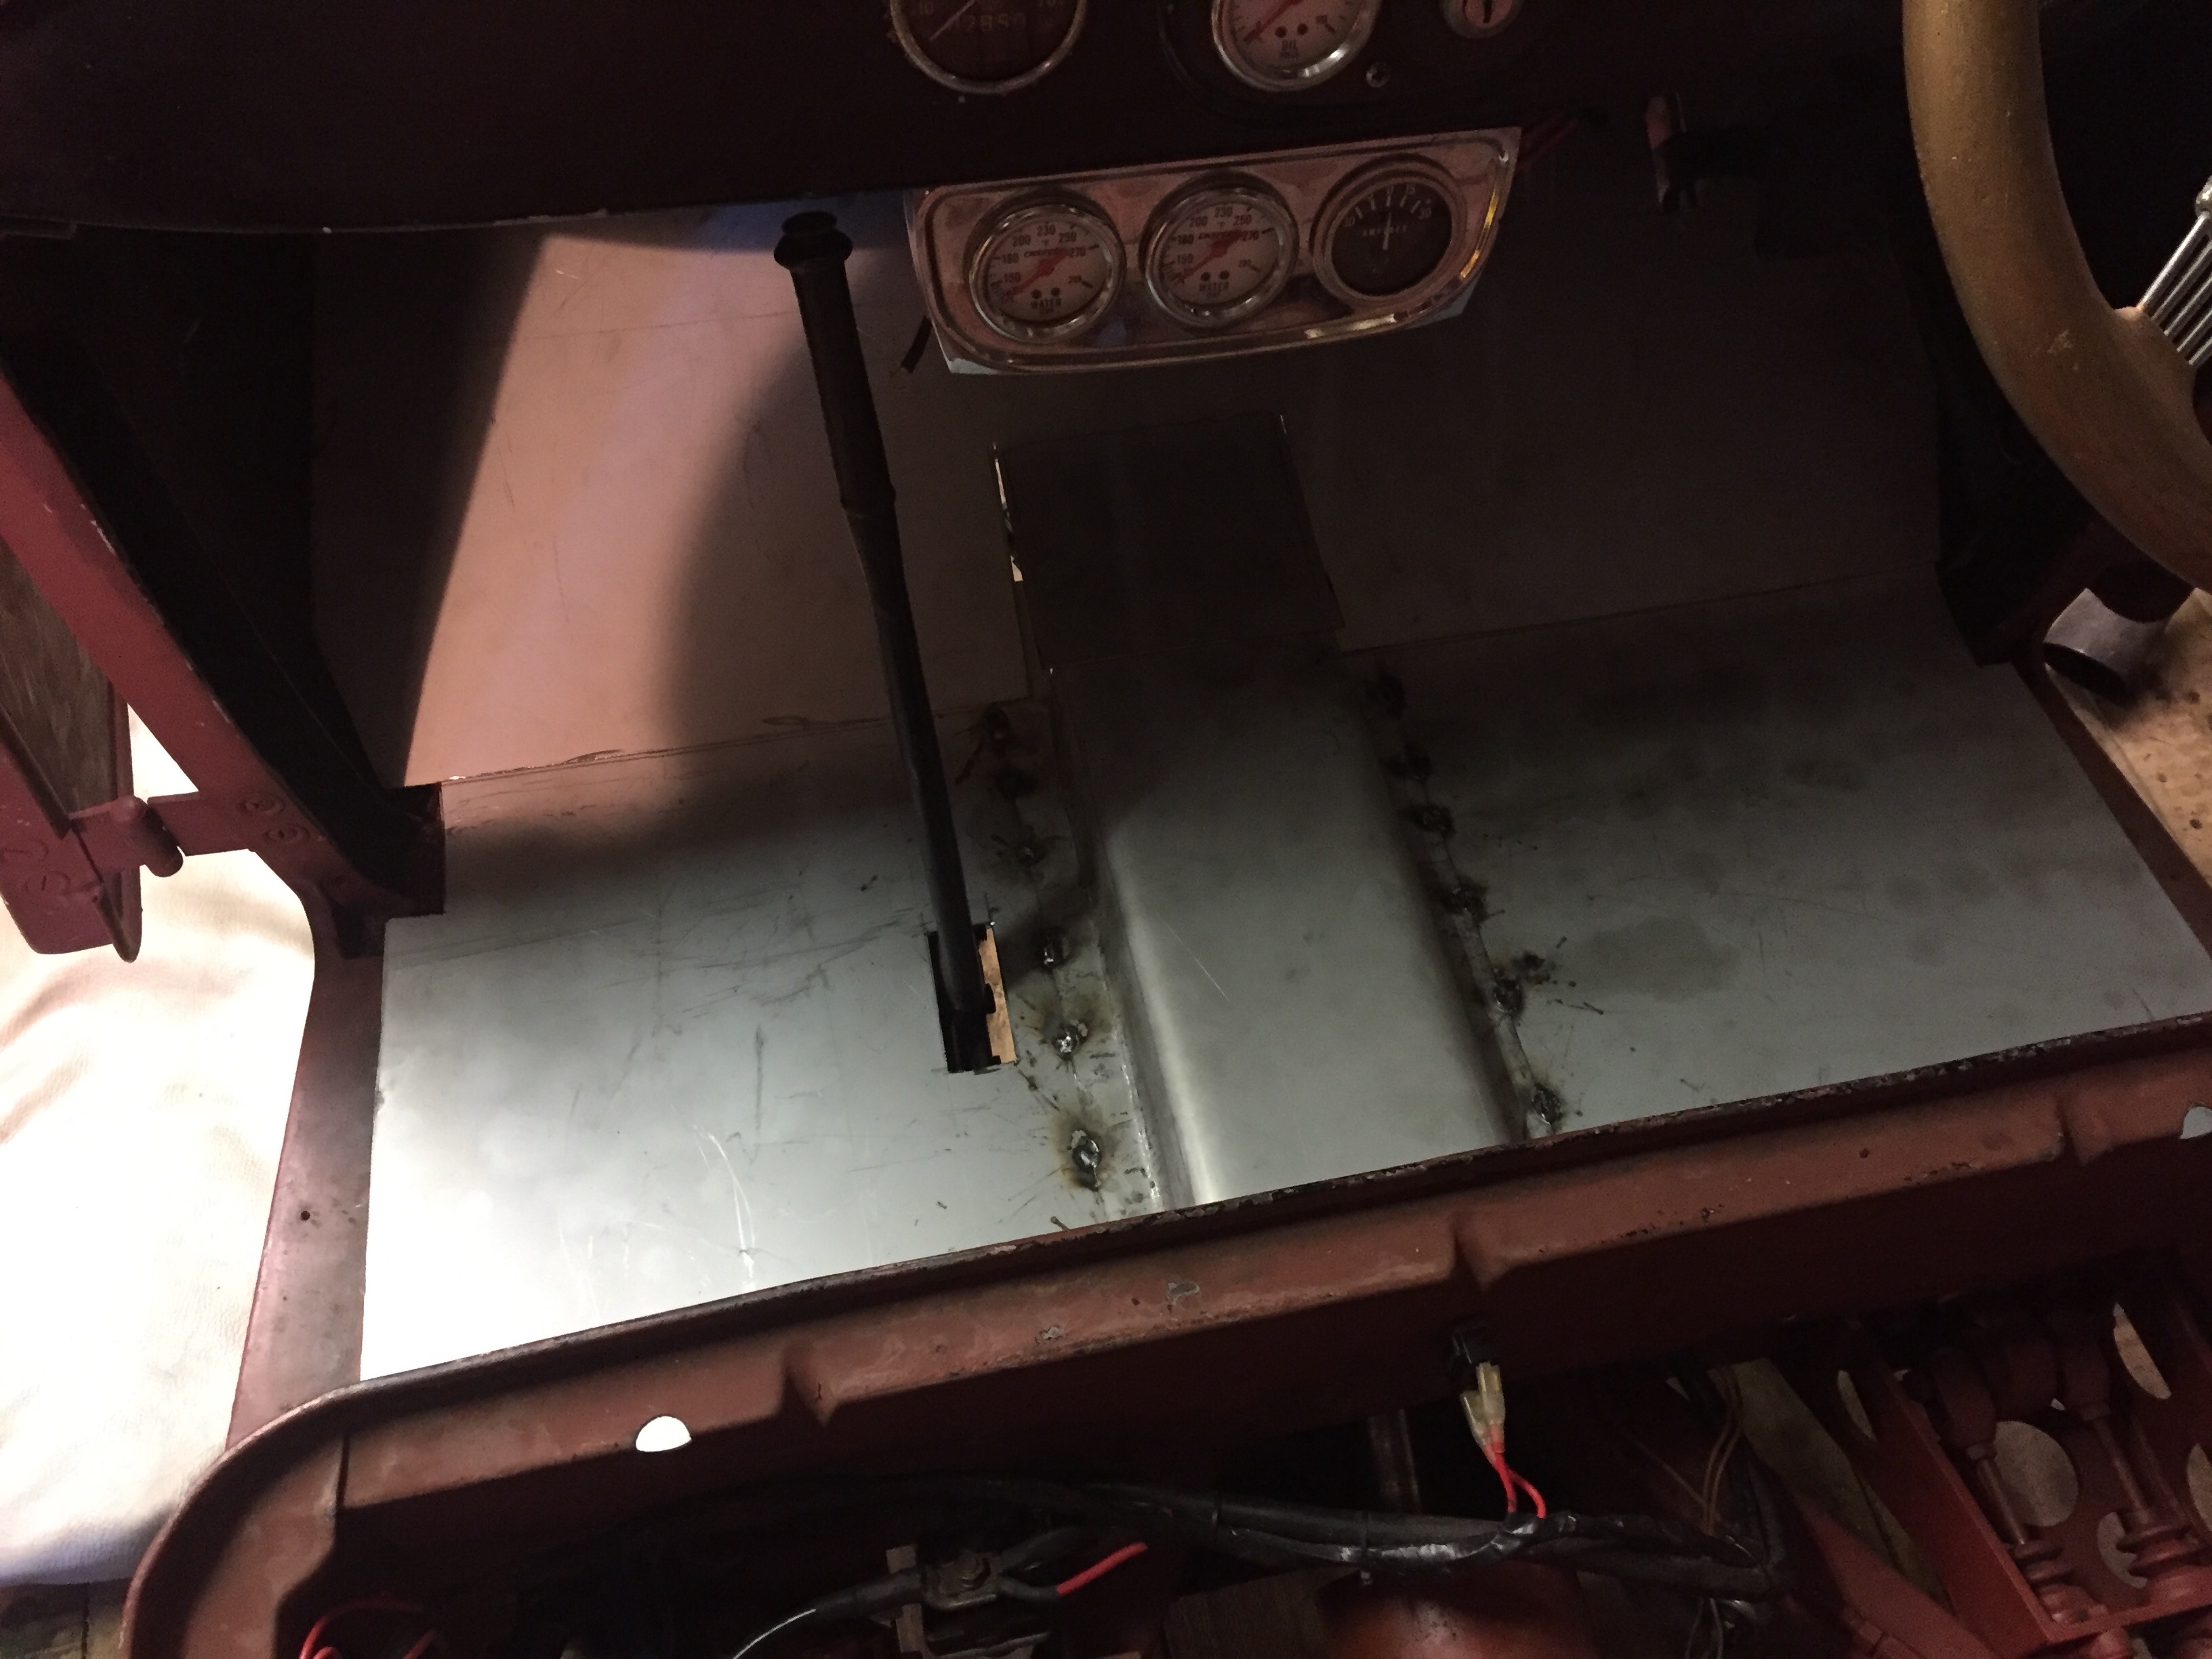
Had a lot of trouble with my health but I managed to get the engine out, I have sort of come right, I just need to remove the clutch off the new motor to fit the pilot bearing and drill and tap the holes in the new bellhousing. started making a new floor, just going to make a flat one as I am going to glue carpet to it, old one was half steel and wood and very hard to remove. I am shit scared of starting the new motor, got to get hold of a pressure pre lube tool to prime the oil pump and gallery’s, engine builder sed run it at a fast idol for 20 mins and keep the rpm changing
4 points
-
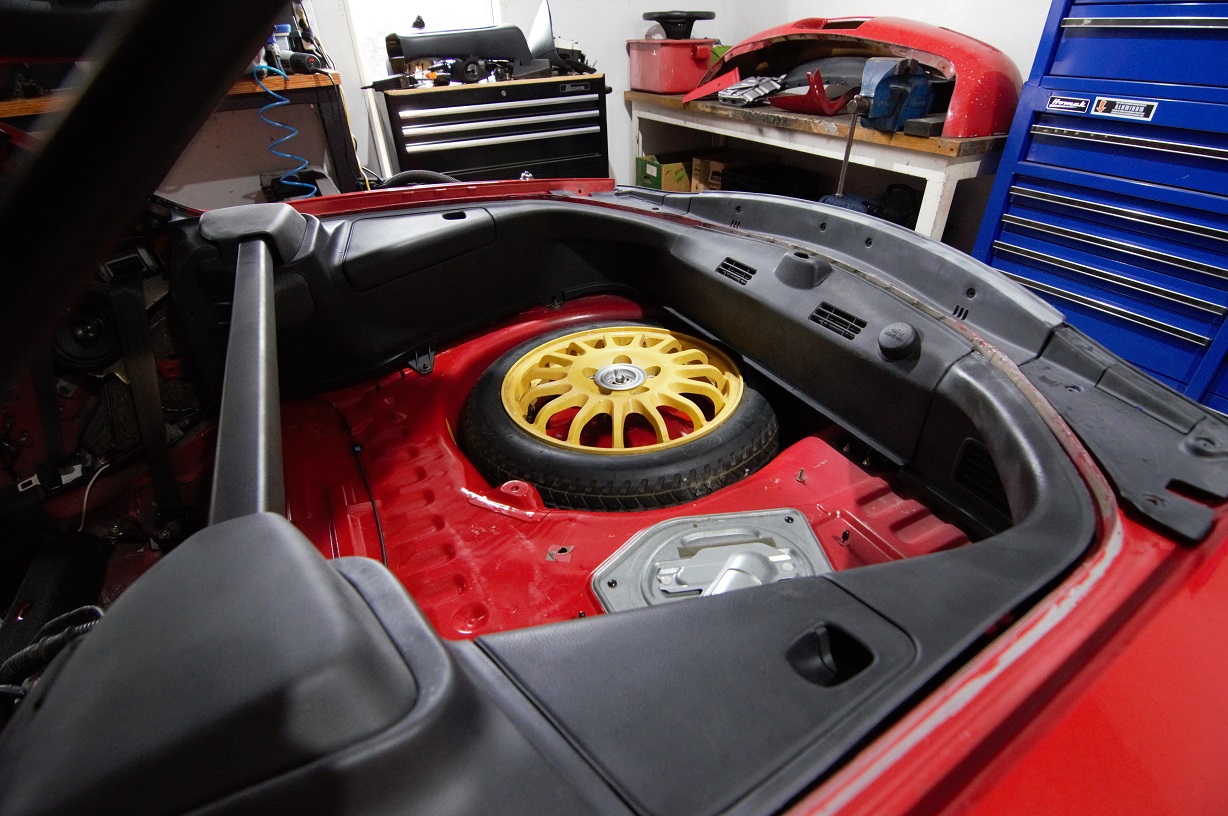
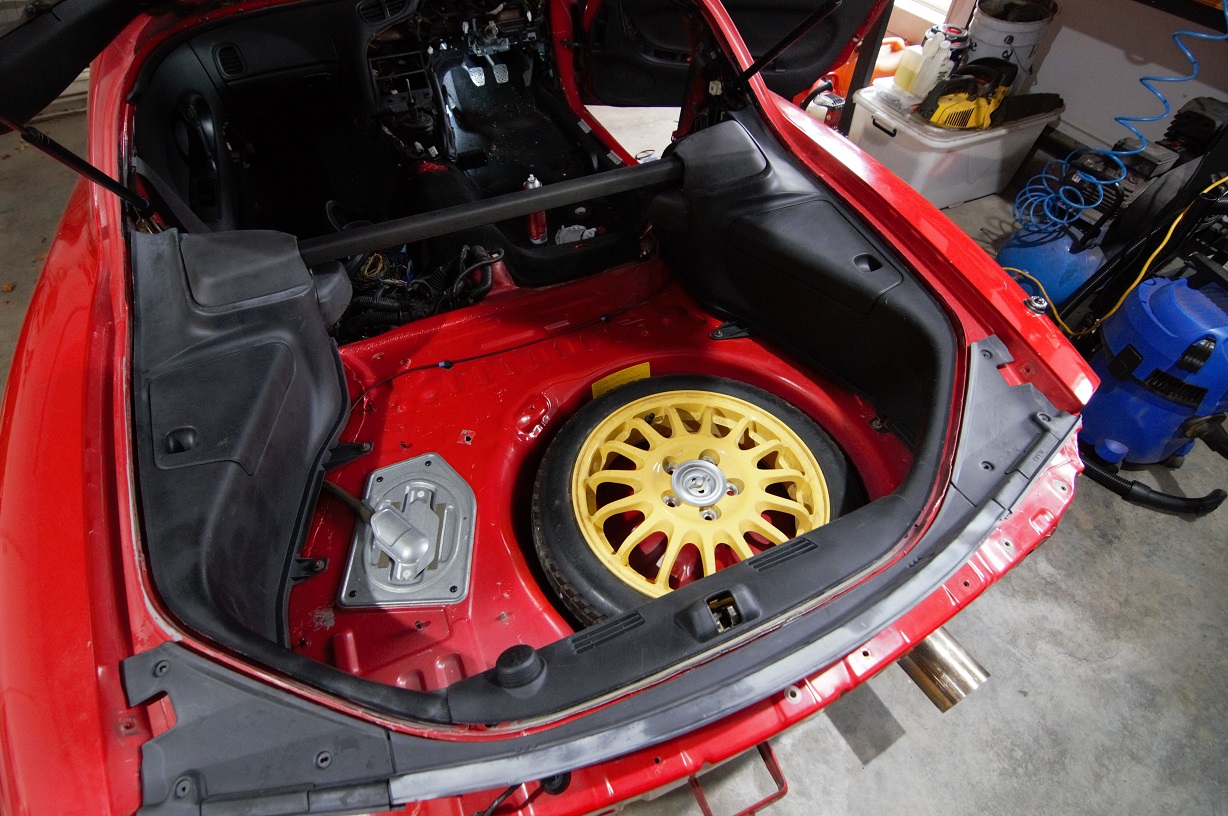
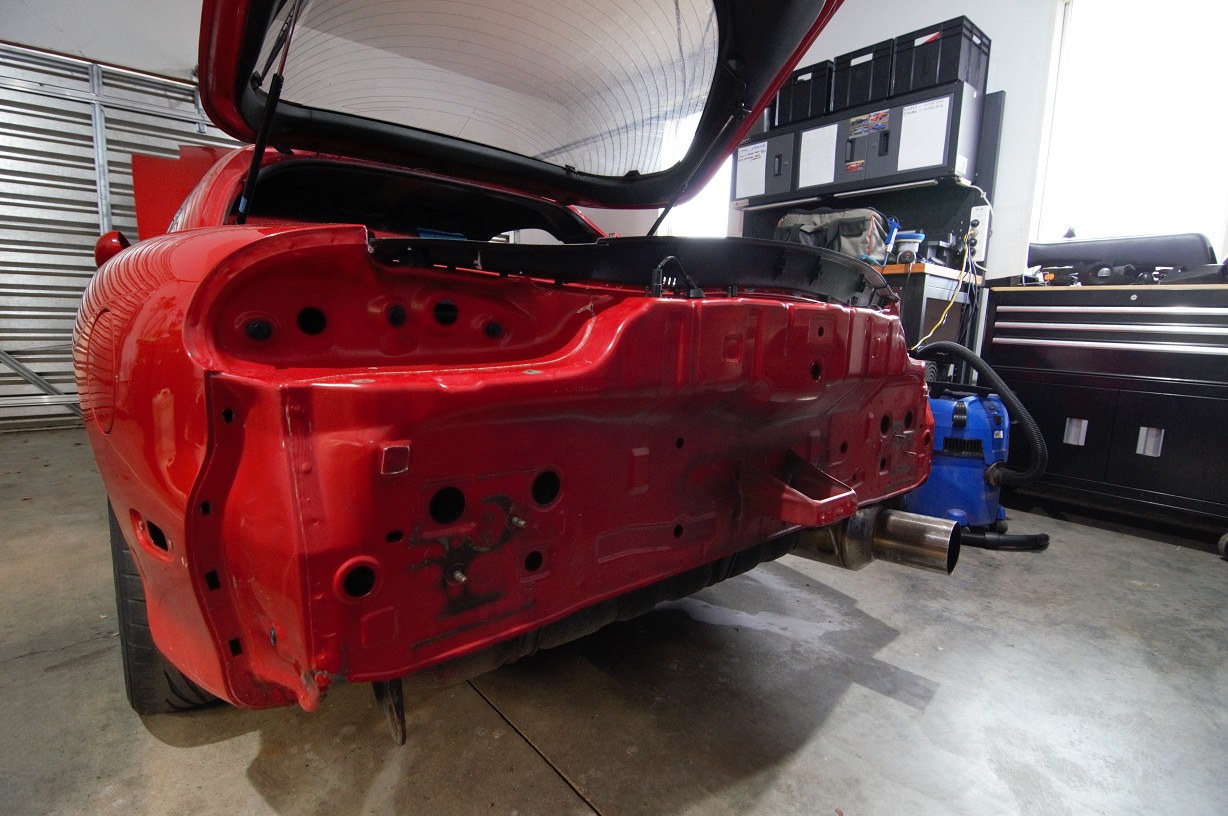
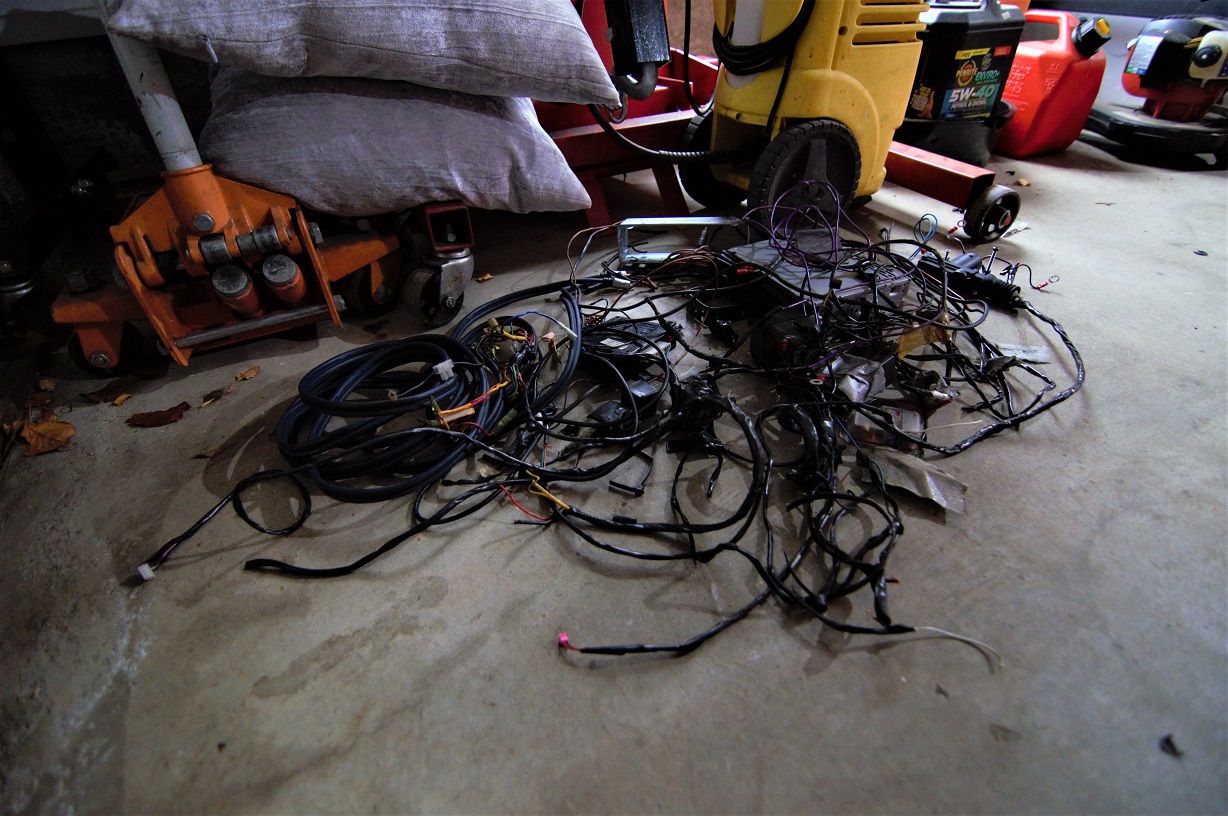
Been beavering away on this when time allows. Much of the job has been sourcing non-broken / missing interior parts... But the boot space is now complete! A lot of time was spent cleaning in here. With all the trim stripped out, I scrubbed everything to within an inch of its like to remove the disgusting scunge and overspray that was everywhere. It not smells lemony fresh :-). Was lucky to find a proper 16" Enkei spare for it and the hold down hardware. Both tool trays are accounted for and complete, as well as the correct aluminium jack and handle, and the wheel chock. So a good score on those OCD detail fronts that don't actually matter, but make me smile anyway. I've cleaned it's bum up good and proper, ready for the bumper to go back on, but I'm waiting on some replacement inner brackets before that can happen, and they're ex-japan, so it'll be a while till that happens. All of the rear lights have been sanded through the grades to remove the cloudyness they get, and then polished. I probably need to do another sand on them with 2000, then polish them again to remove the very last of a few fine sanding marks. Part of cleaning up the rear end was a non-oem-wiring-ectomy... There was a LOT of shit to remove. At some stage there was a water meth injection system in there, and the rear washer bottle had been modified to be the reservoir. I've replaced it with a good condition non-modified one, and removed the tubing, relays and wires. The then turned into a complete wiring cleanup... There have been a few stereos / amps in this thing over the years I'd say, as well as a BEL 615STI-R integrated radar detector, and some cheesy alarm system that had wires tendriling all throughout the car, and some weird home-made vero-board / pcb device on the main radiator fan relay... Possible some sort of delay to keep it going after the car was shut off? All going in the bin. This left some repairs to places where things have been poorly cut and spliced into... In particular, the main harness from the ignition switch was a mess. \ Cut that mess apart and replaced the old twist 'n' dry solder with open barrel crimps The key when doing this is to stagger the location of the joins, keeps the harness from becoming bulky. It's probably arou nd 20mm shorter than it was when I started, but still heaps of length to reach it's attachment point Then seal with some adhesive lined shrink, wrap in cloth tape, and that's a solid repair that will last the life of the car :-). Hopefully I can get it to a point where I can crank the motor over this weekend, and do a compression test, but I also have a new washer and dryer to install and I suspect a clogged downpipe to clear (in the rain, lame)... So it might not happen, we'll see :-). Chipping away at it though. Also, Rangiora Mazda are going to love me. I've sent them a list, quite a long list... Will be a decent bill I'm sure!
4 points
-
I got some like this, but I can't find who was selling them here https://horusdy.com.au/product/3000amp-jumper-leads-6m-long-heavy-duty-jump-start-car-booster-cable-truck-van/ Long so I can jump cars facing the wrong way3 points
-
Not bolted on clamps... But I got some kincrome ones from Bunnings. Surprisingly inexpensive. Even has an inline voltage thingo. The clamps are much sturdier than the flimsy SuperShit ones that are really easy to bend, they are plastic coated steel with 2-2.5mm thick copper teeth. The wire core is also a decent size. The cheap ones tend to make their wire look more heavy duty by making the insulation thicker but the core is still small.3 points
-
Few more hours this afternoon wonder if they spot welded through this sealant or injected it in after? im lucky in that it’s not a full/dusty corrosion, just around the rust holes! wasn’t too bad inside the drivers sill. this is inside the sill again. I didn’t weld it up today as I wanted the Brunox to cure. patch pile growing3 points
-
It came to NZ before it made its way to the UK. Was campaigned as an endurance car down South, at that stage it was less about "letting it get away," and more about it just being an obsolete old race car.2 points
-
10 days ago it emerged into the sunlight .. very bright and shiny Delivered to the shed and straight into reassembly
2 points
-
Exhaust in place for a trial fit, nice and compact. Engine side of the wiring loom done, except for the aftermarket sensors. Working on radiator/oil cooler ducting. Really happy with how they are coming out. Things are tight: So the Skunk2 Ultra Street Manifold, Skunk2 Throttle Body and the Skunk2 Ultras street manifold spaces (to increase plemnum volume) don't fit together. So you end up hacking the throttle wheel to make it all fit. Speaking of Skunk2 brillance, here's how the intake manifold arrives to you straight from the casting. Bit of hand work done to remove the casting flaws they left in it, not something you expect to have to do for the price... Intake is location is challenging so the front grill is now one piece so I could get rid the some of the brackets. Fibreglass bonnet to save some weight and to do the new exit ducting out of it. Ecu mounted out of the way: Nothing worse then trying to work on wiring in a car with a cage, so made the relay/fuse box able to swing out2 points
-
It's not really Oldschool, but thought it might interest some people on here just because its a bit different. It's also the reason progress on the Marina is currently stalled, but more on that later. Well, no one can ever say my taste in cars is anything but diverse. After selling the Mini, it was time to get something a bit different. So here it is, a New Zealand built (In the Thames Plant), 1998 Toyota Corolla Liftback in the NZ only colour of Firefly Metallic. The pinnacle of style, power, comfort and... well, no, its none of those things. What is it, is cheap, reliable, hardwearing and easily modifiable. Built on the E11 platform, much like the much more desirable AE111 Levin/Trueno/Sprinter/Carib, but a far more practical 5 door liftback. There are plenty of other, "better looking" Corollas out there, why didn't I get one of those instead of the "Marmite" looks of the bugeye? Well, because I grew up watching these, The Corolla WRC. Sure, they were 3 door, widebody hatchbacks, but look at the iconic bugeye front. I've always had a soft spot for that look, even if others don't particularly like it. So what about my car? Well, it's a top spec 1.8 GLX, meaning it has all the fruit available at the time, such as 4 electric windows (Woah), an alarm (omg), a cd player (flash), air conditioning (cool), a rear spoiler (sporty), and 14" alloys (racy). Of course, there are other options like ABS, electric mirrors, variable intermittent wipers, cup holder, and a towbar, but the main attraction to this particular car (other than price)? The big block 1.8L 7A-FE engine. In these cars in NZ there were two options of engine. The far more common 1.6L 4A-FE, and the 1.8L 7A-FE. Both make about the same HP, somewhere about 110-115hp on paper, but the 7A makes more torque, about 20NM more, but at about 2000rpm lower, making it a stump-pulling torque beast. Driving a 4A and 7A back to back was the reason for me hunting down a 7A powered car because the difference in low down torque is very noticeable. It feels more punchy and eager, whilst the 4A was a bit more rev happy due to its shorter stroke. Interestingly, to get the longer stroke in the 7A, the block is 15.4mm taller than the 4A. Unfortunately, good 7A powered cars are a bit limited in their availability, which meant either paying a high price for one, getting one that was neglected and stank of cat wee, or going very cheap and getting one that has some dodgy paint and an automatic transmission. No points for guessing which I chose. It was cheap, but its also filthy, the clearcoat on the bonnet is almost completely gone, the seats are all worn out, and there are various other issues here and there. It's not perfect, but for what I paid for it, I wouldn't expect it to be. Of course, it wouldn't be my car if it didn't have some funny quirks... How's this for a quality passengers mirror? I won't lie, it actually kinda works The plans are to give it a really good service, to keep the engine as happy as possible, since its what I bought the car for, and convert it to manual. Various other improvements will happen along the way, such as poly bushes, bigger front brakes, rear disk brakes, bigger swaybars, 15" wheels and sticky tires, and maybe coilovers eventually. All of this is for the purpose of having a fun car to thrash around the streets, but also have the ability to drive the two hours to the track, thrash it relentlessly and then drive home. Not to forget that since it has a towbar and its a liftback, it can be used to haul all the things I don't want to put into the Honda, like runs to the dump, or scrap metal. A true workhorse. This won't be a short term project as I'll be doing it on a very tight budget, so time will be spent hunting down the best prices on things instead of just making it rain. We can all partially blame my friend with a 2ZZ-GE powered AE101 wagon for planting the Corolla seed in my brain. It just makes sense though, since I couldn't drive the Mini hard for fear of breaking it, but a Corolla will go forever no matter how you treat it, parts are so cheap and available, and its all just Toyota Lego with bits being swapped from different models to improve it with minimal cost. So that's it. Follow me on this "boring car" journey; or don't, it's up to you.1 point
-
Keen to come along for a recce if your gunna jimny it1 point
-
This is shaping up nicely! Nice work on that console, looks great!1 point
-
1 point
-
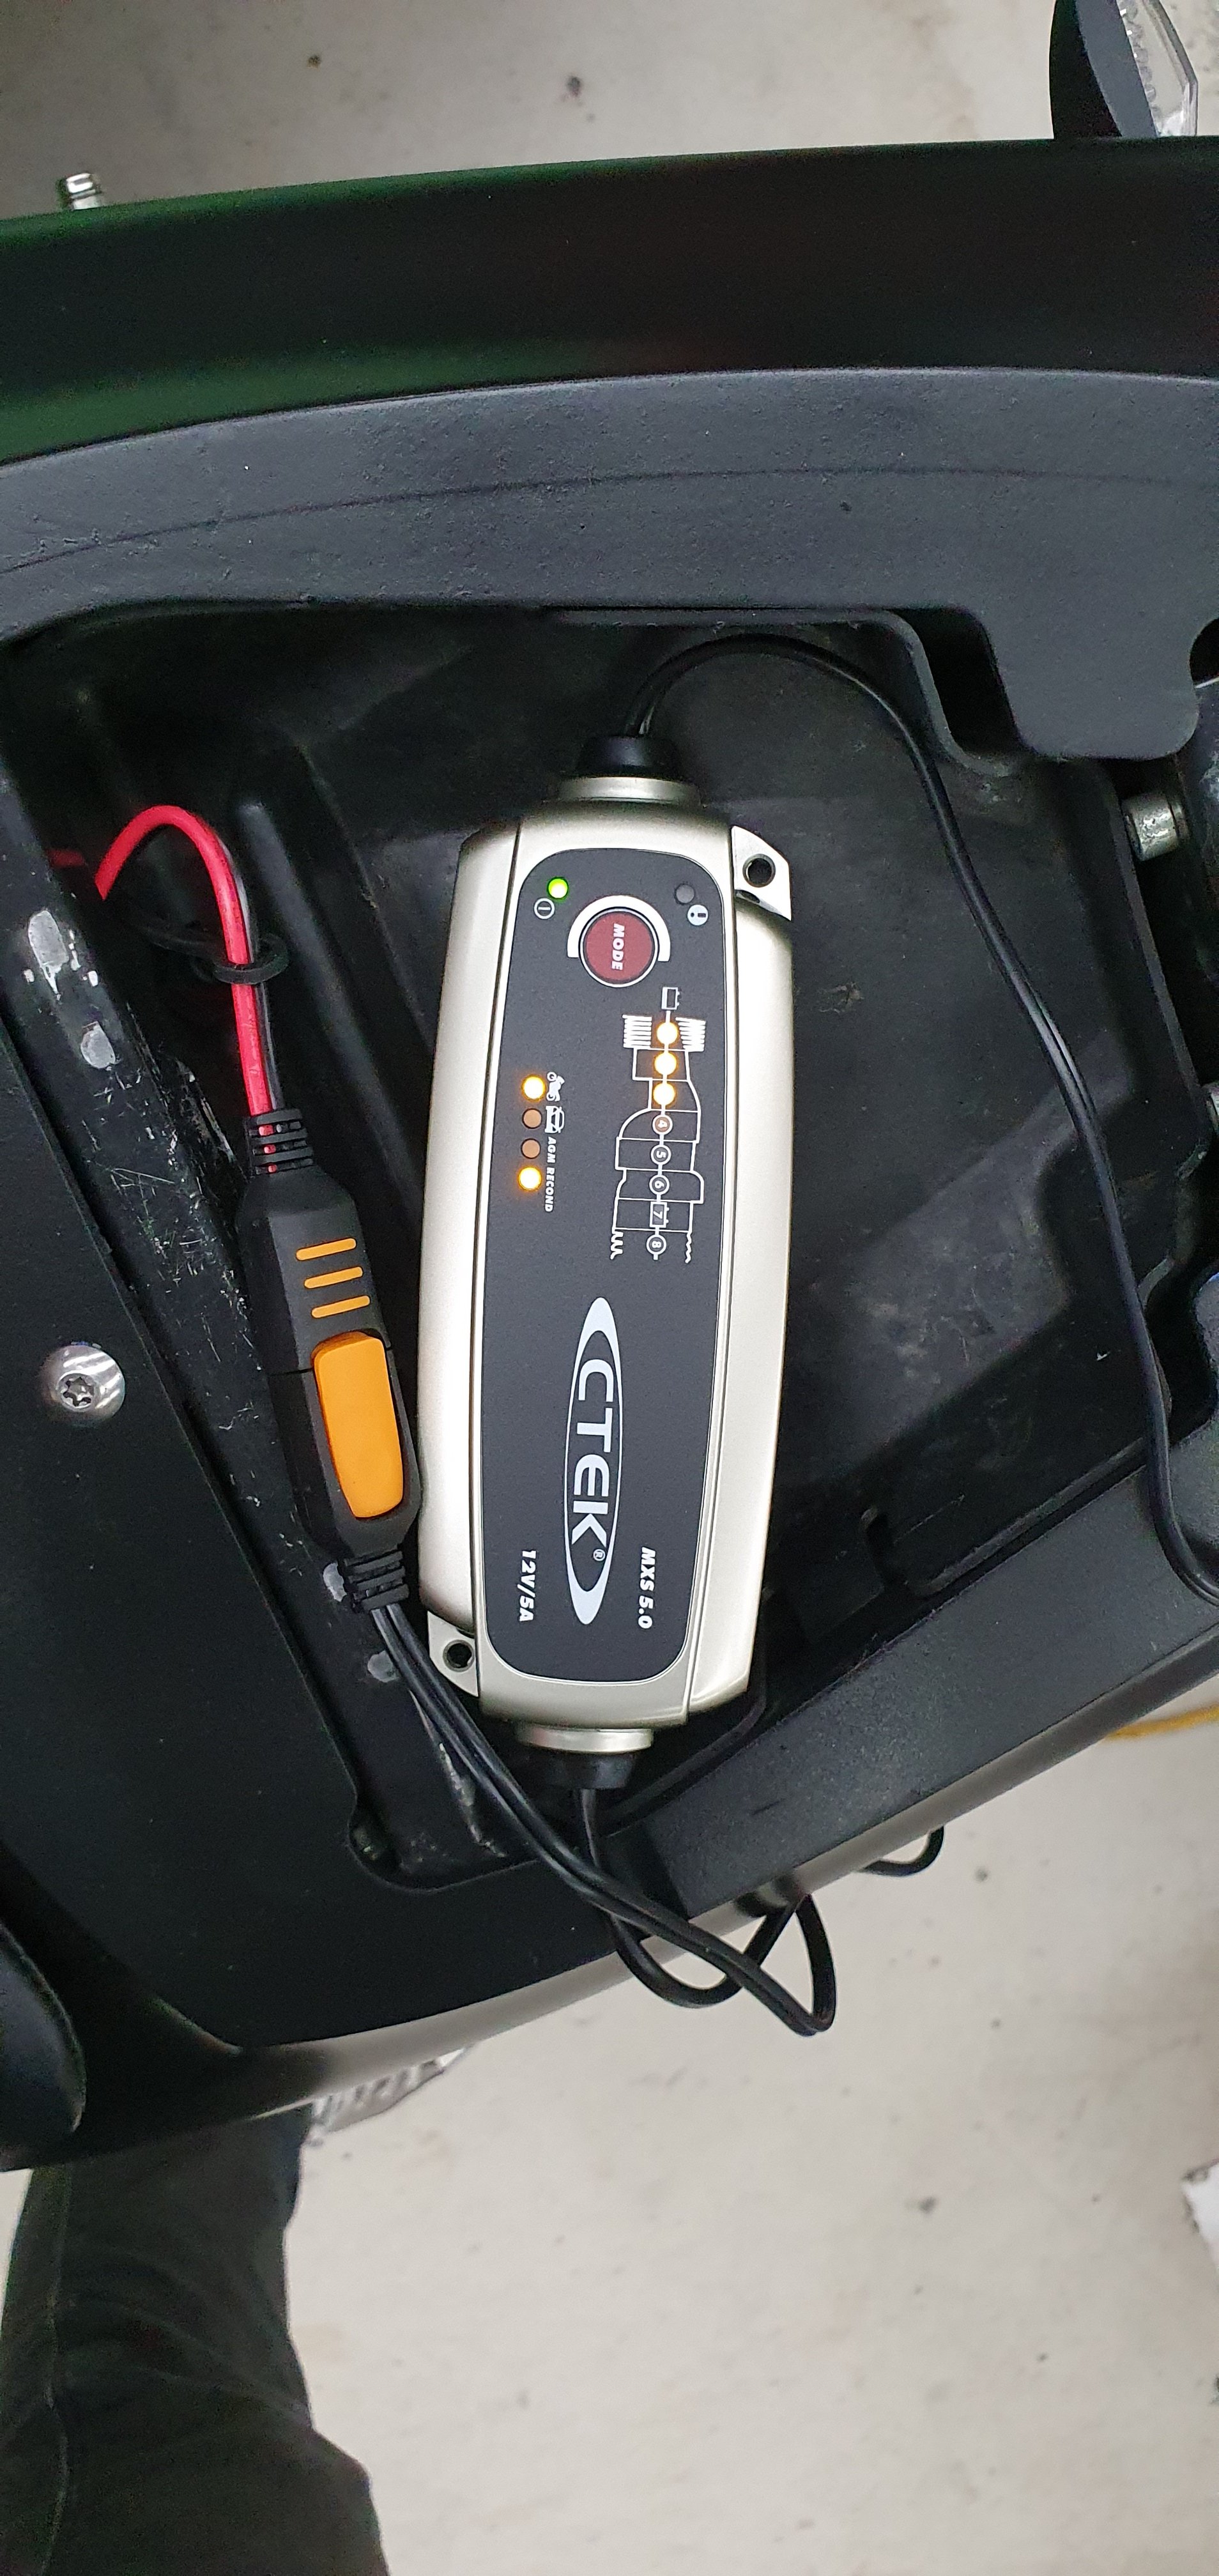
Can't get enough of this thing. Its a miracle of technology, reviving old batteries back from the dead.
1 point
-
Beaut day for it..... NAAAAAAAAHHT. See you animals in an hour.1 point
-
Flexfuel it and run E85 as well1 point
-
Hoping to go for a nosey at exact route within the next few weeks.1 point
-
Haha, that's excellent! Still blows my mind how plentiful and cheap aftermarket parts are for this motor. Definitely not something I've been used to.1 point
-
Finished charging the impala, now its working its magic on the buell. I've got it set on motorcycle and reconditioning mode. Ctek recommend doing reconditioning mode at least once a year, so seems like a good idea to start off this way. The leds show that the battery wasn't very charged, so its a good save.
1 point
-
Keen to bring my off-roader and mower over sometime.1 point
-
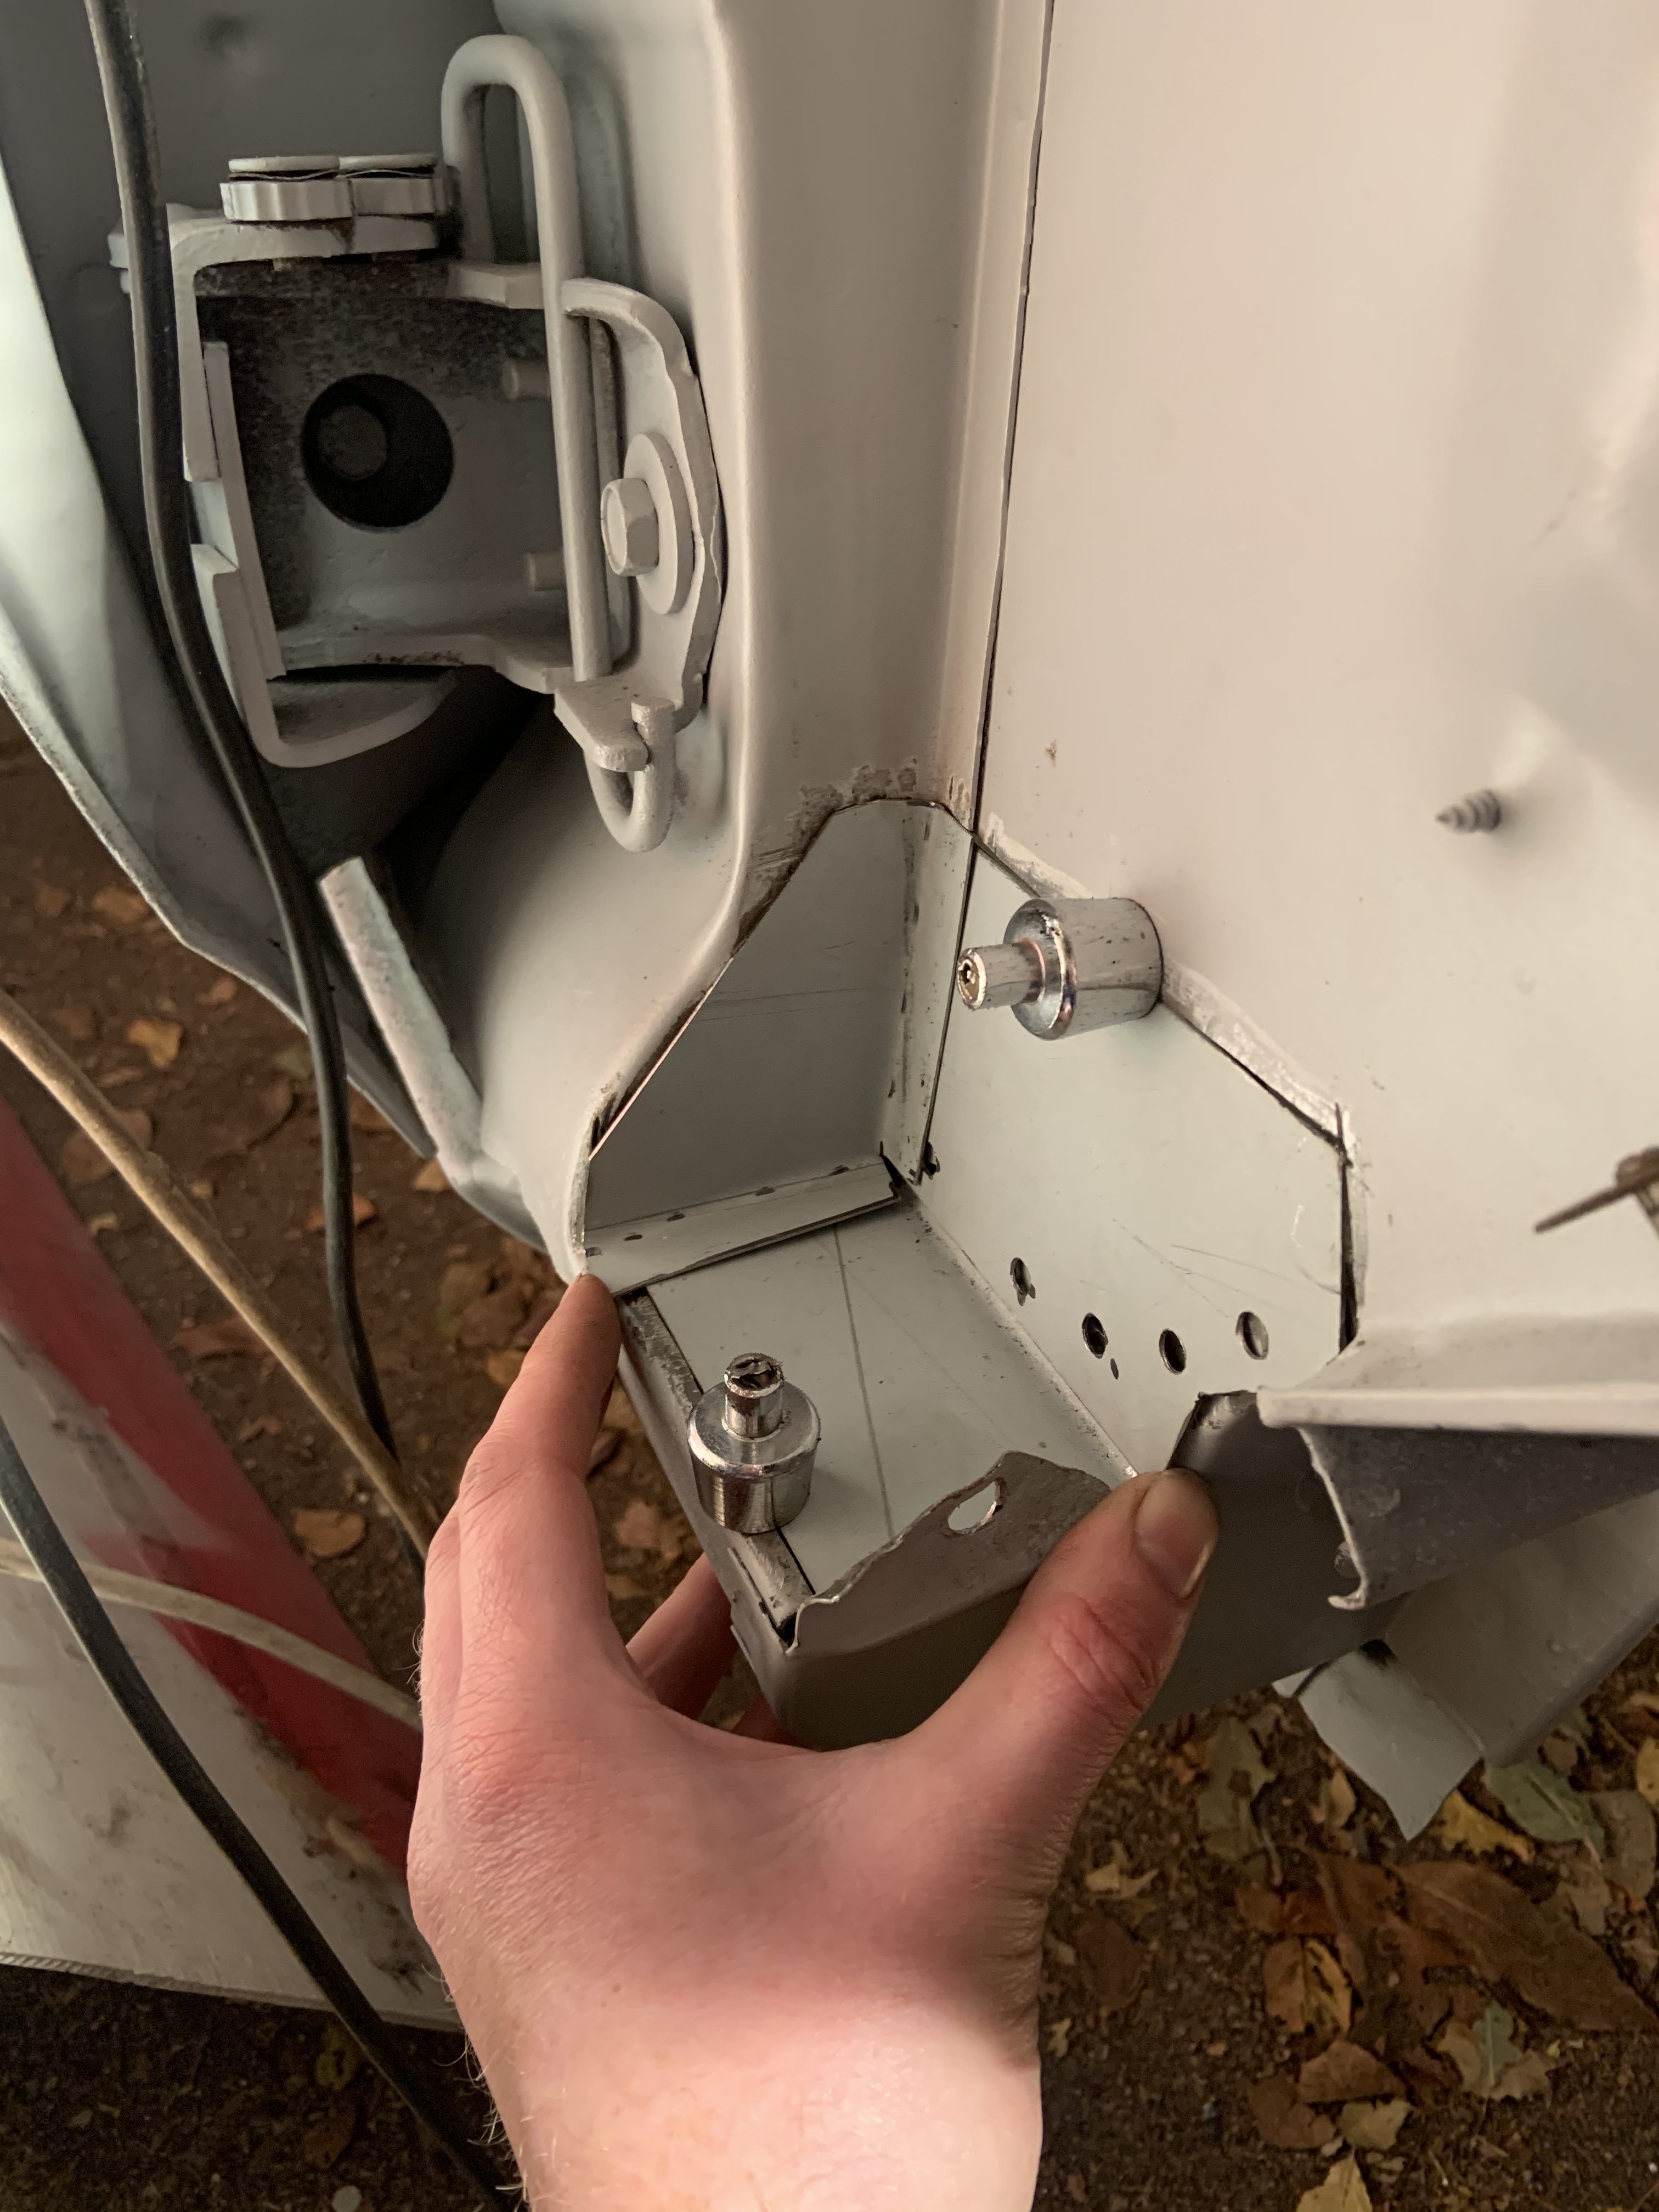
Since this is just a proof of concept I didn't want to drill any additional holes in the Thames chassis or floor, so ended up fabricating a few new brackets so that I could mount the pivot and the outer sheath support bracket for the cable. So with everything temporarily mounted in position I gave it a whirl. Instant fail ....... Still not enough torque to get the gate lever to move smoothly. I was surprised by this outcome as I figured that the unequal length arms on the intermediate pivot point would have given me extra torque, but not so. In desperation I even tried reversing the pivot arms so that the longer arm would be on the cable side. This reversal meant fine tuning the temporary support brackets, so yet more time was spent cutting, grinding, drilling and welding. Still no luck. Sharing my frustration with Mrs Flash over a cuppa, she reminded me that success is the result of moving from one failure to the next with no discernible loss of enthusiasm, so spurred on by these words of wisdom it was back out to the shed to puzzle out another approach. Lying in relative luxury on my manky old piece of house carpet under the Thames is where I do some of my best plotting and scheming. Whilst lying there and fiddling about with the gearbox gate lever it suddenly came to me that maybe the solution lies in something other than a cable or rod based mechanism. What about some other way of moving that bloody lever.... it only needs to travel a maximum of 15 mm in either direction ... how hard can it be FFS ..... Alternatives you say ... well what about hydraulics I thought. Needing both a push and a pull movement I'd need two separate circuits. Thinking this through my head started to hurt. I'm not saying it's impossible, more like it's way beyond my skills base. My next thought was electronics. What about setting up a pair of solenoids that could be activated by micro switches located at the bottom of the shift column. Now I don't know much about solenoids so last night I spent a bit of time asking the google and it turns out that a pair of linear solenoids might be the go, only thing is they would need to have a "push and hold" function. Turns out there are such beasties available, but I wasn't convinced that they would provide enough torque to be up to the task. Puzzling more on this topic last night whilst sitting in front of the idiot's lantern, I suddenly remembered that I had seen one of those central locking solenoids fitted to the tailgate on the Starwagon donor van. What have I got to lose I thought. So first thing this morning I harvested it and was able to temporarily mount it using a few bits and bobs. I've only tested it in one direction thus far, but this little video clip shows the result of the experiment.1 point
-
My lovely lady surprised me with some more bits.. bottom rear screen corners and screen chrome clips + Screws!
1 point
-
Got a few bits and pieces on the XR100 the other day. Still need to try repair the OE handguards, fit an engine bolt, fork boots, wheel bearings, tubes, should probably do tyres too, check valves and basic tune up shit. Genuine Honda fuel hose out of seal packet sent from Japan. ZING IMG_20210523_170413 by John Bell, on Flickr Happy enough with how its looking though. IMG_20210524_164259_1 by John Bell, on Flickr1 point
-
1 point
-
1 point
-
tonight i made a shield to go over the digital dash so it doesn't reflect off the inside of the window at night. fairly simple thing, just held on with double sided foam tape. ill see tomorrow how well it functions. 2021-05-24_06-54-34 by sheepers, on Flickr 2021-05-24_06-54-28 by sheepers, on Flickr 2021-05-24_06-54-18 by sheepers, on Flickr 2021-05-24_06-53-58 by sheepers, on Flickr 2021-05-24_06-53-44 by sheepers, on Flickr1 point
-
Good for cleaning out the jets though1 point
-
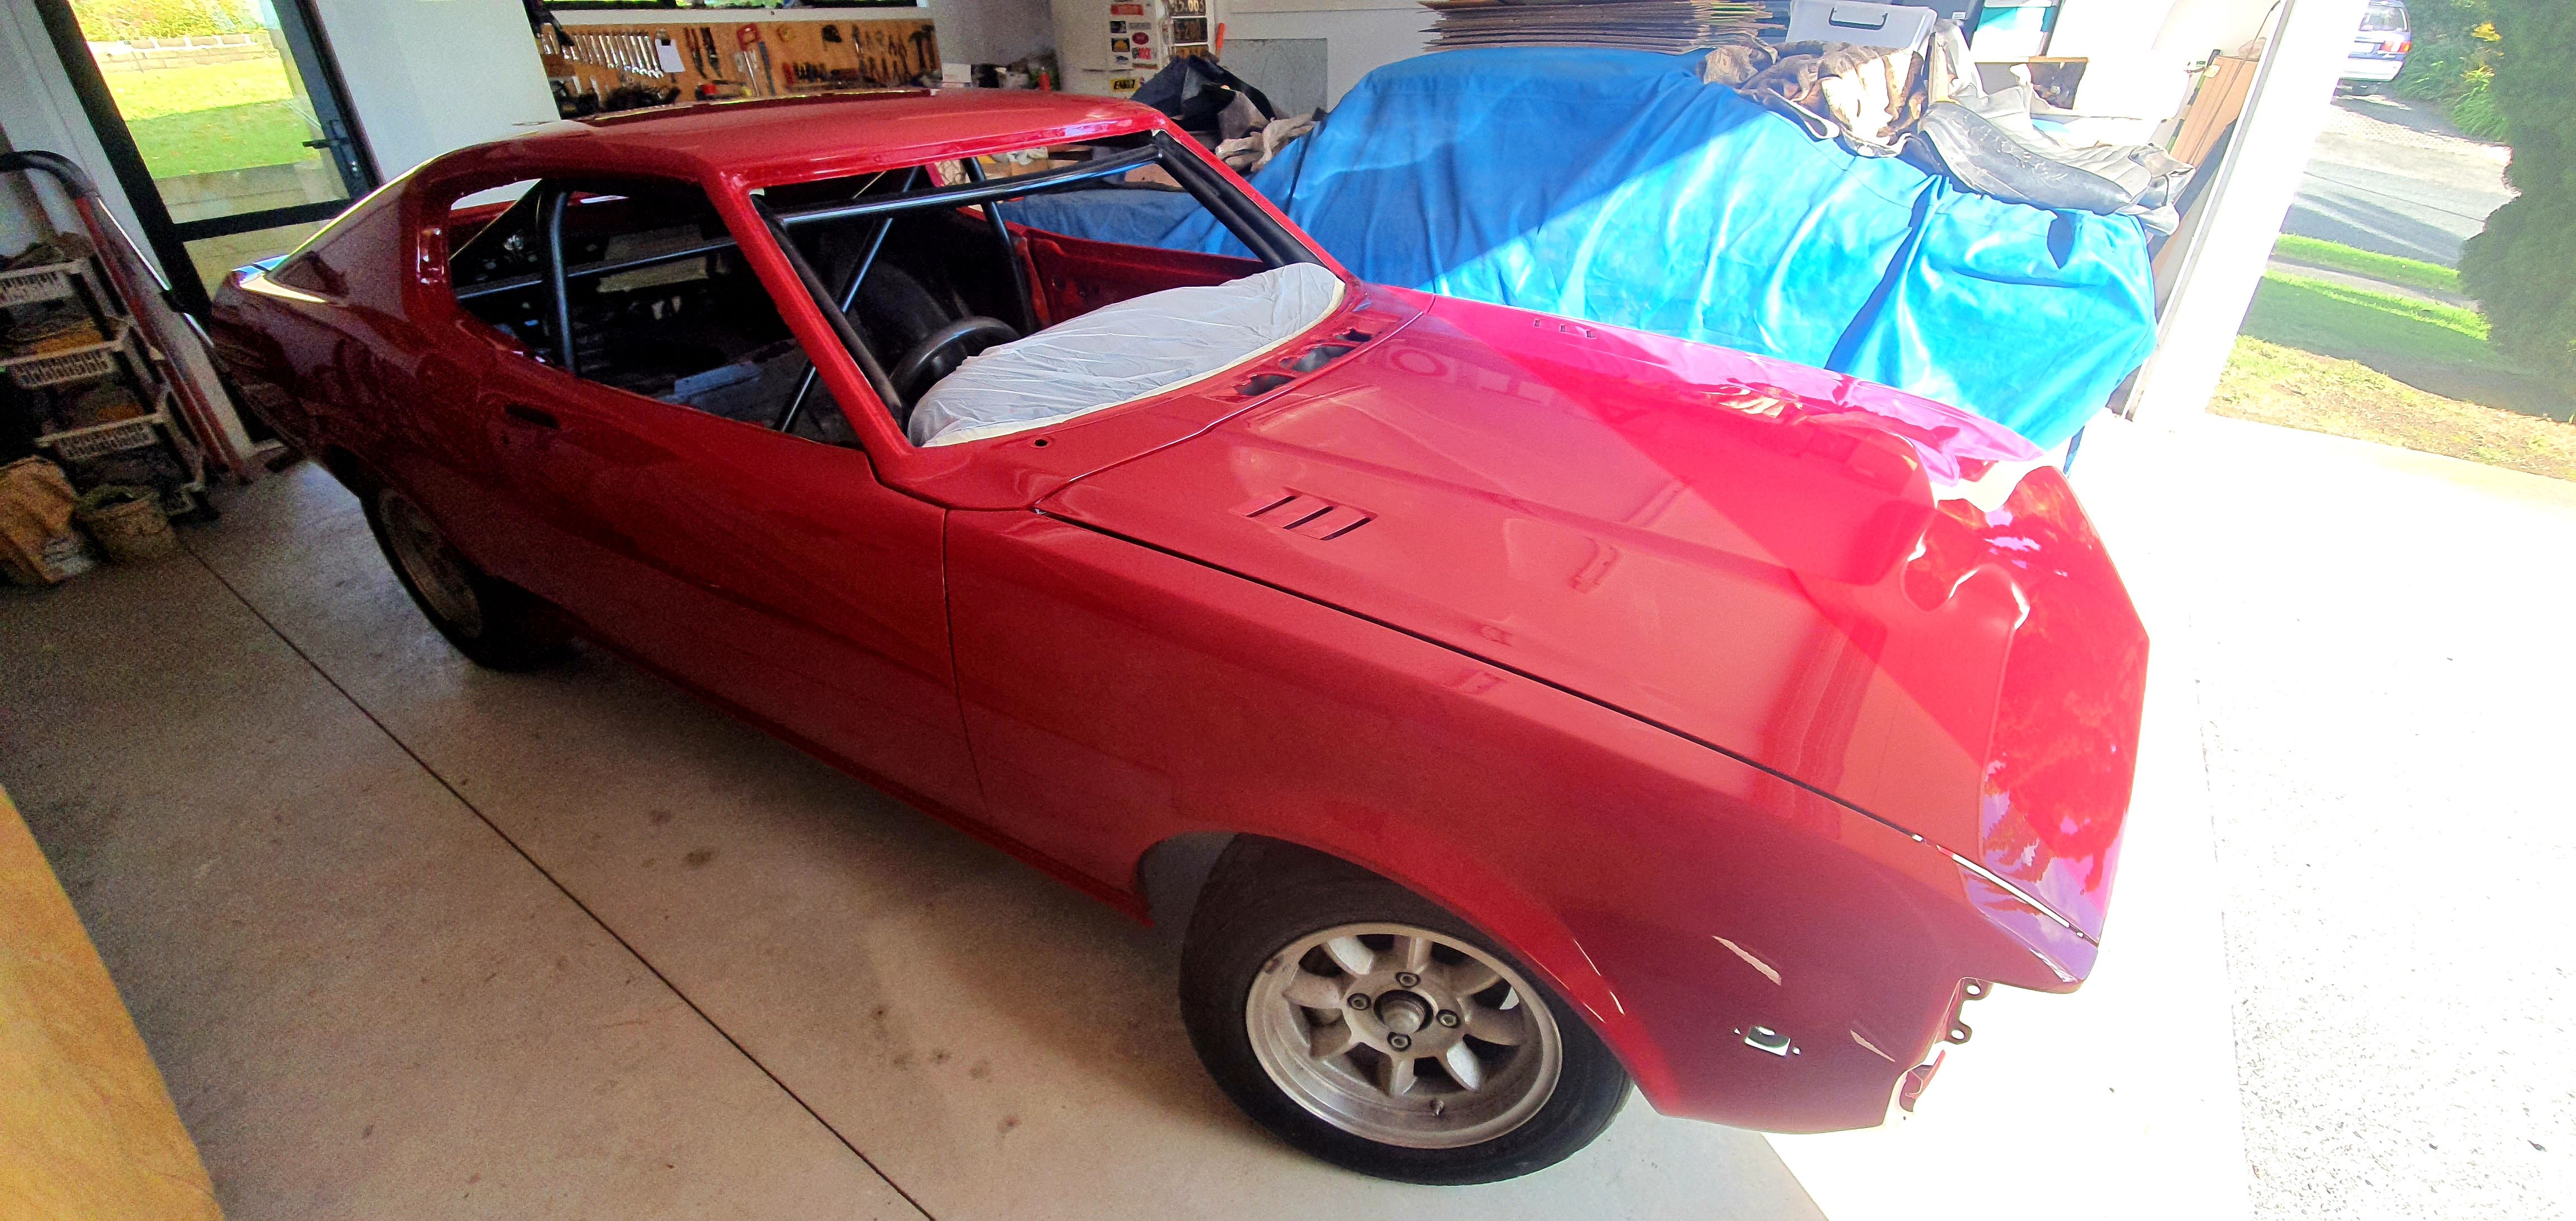
Today was a big day, spent turning two average cars into one good one. I've made the decision to keep running this as Project Rolla, as it's more a continuation of the work I was doing on the Liftback than actually being a full replacement. It's kind of a body and engine swap, whilst everything else, including the future plans, are the same. So a couple of weeks ago, as you know, I picked up the Carib and dropped it at a friends lockup. I hadn't seen it since. During this time I had been working on stripping the good bits out of the Liftback, ready to transplant them into the Carib. I'm not sure if I mentioned it, but way back when I did this work on the Liftback I noticed that the lower pivot bolt in one of the hubs had almost no bolt poking through the nut when torqued up. I knew it was tight but wondered if I had cocked up and used the wrong washers or something. No, as it turns out, someone had cut the end off the bolt... Well, I guess that's why it was shorter, someone had taken a cutoff wheel to the end. I don't know why, but I replaced it with a spare I had anyway, to be safe. It's pretty clean under there, much better than the Carib, as it turns out. I left the calipers to last so I didn't end up with a bunch of brake fluid leaking everywhere for too long. I also took this chance to check the calipers over and give them a tweak. The fronts were good, only needing some debris removed from the gap in the middle of the pads. The rears I split to clean and grease the slides. Hopefully this makes the handbrake work a bit better as it's never really been good. One thing to take note of when assembling these calipers is that the rear has a piston that needs to be wound in to retract. This piston needs to be aligned so the notches are at the top and bottom, aligned with the bump on the housing at the top in the photo I found one of the slider boots torn and not working as it should. As I had a rebuild kit spare (for the sticking caliper on the Carib) I pinched the boot from that. The old one was stuffed The new boot was a different design but worked the same. Hopefully that helps. With that checkover done, everything was put aside ready to be transplanted. Today was the day, the everything was loaded up into the back of the Honda, and taken to the lockup to be transplanted. There aren't a lot of photos of this work as it's all been covered in previous posts, and we were working to a short timeframe. The rear came apart and went back together easy enough. Nothing too major, except finding the rear muffler hanger has almost rusted completely through, so will need to fix that soon. The first of the new HEL transparent purple braided brake lines went in too. They look quite pink in the harsh light, but they are actually quite a decent match to the purple of the Vogtland springs. We had some real issues removing the hub nuts. We suspect someone turned the ugga dugga gun to 11 and just went full send. On the Liftback, we torqued the nuts to the required 250 odd NM, and to remove them I used a long pry bar in the studs to stop the hub rotating whilst I used a big breaker bar to crack the nut. I tried that on the Carib and only ended up with a couple of bent studs and a bent and broken pry bar. This bar used to be straight It's probably my own stupid fault for using a jack handle on the end of that long breaker bar. The amount of force when the pry bar let go and shot across the workshop was shocking. Thankfully everyone was well out of the way and only the pry bar got hurt. In the end, the winner of the day was my trusty old Ryobi cordless rattlegun. I didn't expect it would ever touch it, but after a bit of ugging and dugging it spun that nut right off. I'll be going straight to the gun for that in future. With those off the front could be swapped too, which meant more braided lines. But first, we had to remove the old struts, which are utterly caked in old CV grease, and exceed the threshold for festy and into some other realm of extreme grot. The old, manky, black brake fluid was flushed through and the system bled. Full hovercar was required for this. Once the brakes were all bled up nicely, we dropped the rear of the car down on its wheels, lifted the front higher and I slid under to replace the rear engine mount. This is a real bastard of a job, but it seems the easiest way to do it is to remove the mount through bolt, remove all the bolts in the subframe, lower it down and pull the mount out that way. We supported the engine with a crane but it seems that might have been a bit overkill. I found it easiest to barely line the mount mounting bolts up in the subframe but before raising the subframe up again, wiggle the mount enough to get the through bolt in place first. If you do it later you'll find the engine sags and is miles away from lining up the hole in the mount. Once the through bolt in you can lift the subframe up again and bolt it in. I took the time to replace the front swaybar bushes here too since all the bolts were already out. And that was that, the wheels went on and the car was loaded with all its remains. This caused some laughs at the rear ride height, as it was well dumped with all that weight in it. Hopefully it still retains some lows with all the weight removed, but I'll need to wait and see. Before heading home we snapped some more Corolla gang photos since my friends Corolla had arrived back today from having some work done. Corolla Gang 1.0 Corolla Gang 2.0 The drive home was interesting. having to try and dodge as many bumps as I could due to all the loose stuff rattling around in the boot, but I did notice it retained the nice ride quality of the Liftback, as well as the nice progressive brakes. What it's lost is some down-low torque, but it also gained many thousands of RPM to play with at the top end. I'm looking forward to driving the back roads in anger in this thing. Keep the RPM up, and keep the engine singing, seem to be the go. Unfortunately, a couple of issues were highlighted, the main one being the RH CV joint being destroyed. It makes horrific noises when turning, and even makes noise when accelerating. Ugh. I kinda guessed this by the boot being split and ALL the grease being on the surrounding suspension components. Thankfully I know a guy down south that wrecks Toyotas, and sure enough, he has a good axle, so that will be with me next week. I can't install it until the garage is free though, so need to get cracking on the liftback, fitting all the old Carib parts to it and get it driving again. It also needs a wheel alignment, but that will happen after the front arms get polybushed. I'm waiting on the bushes to arrive at the moment. I'm still not sure if it's a better looking car than the liftback or not. I guess most people probably think it is as the bugeye wasn't the most loved design, but I like both designs. The wagon is a hell of a lot more practical though, with its low loading floor and high roofline. Its also got a split rear seat base which the Liftback didn't have, which means one side of the rear seat can be completely folded flat and the other side still a useable seat. There's more work to be done yet, specifically a WOF, but it'll be a couple of weeks before I can get on to that.1 point
-
So that is more or less up to date now. Over the week I've been pulling the good bits out of the Liftback And tomorrow ill be pulling the suspension/brakes out of the Carib and swapping in the good bits. Then its a case of getting a WOF on the Carib, and fitting the Carib bits to the liftback to make it a runner again and sell it cheap. I didnt plan on getting rid of the Liftback so soon, I had hoped to get another year or so from it before moving on, but this is just the way its panned out. I really enjoyed driving it, using it as a momentum car and just driving everywhere foot flat and slinging it into corners. Unfortunately this has meant the Marina is on the backburner until the liftback is done and sold, even though i have everything I need to make the Marina drivable. #Priorities.1 point
-
Well, it was a good run with the Liftback Corolla, but unfortunately it's become unfeasible to keep it going. Back in December, I posted about repairing the rust in the A pillar. At the time this appeared to be a good solid repair, with new metal being welded to good thick, solid metal that I treated with rust converter. Unfortunately, 4 months later, the pillar was full of paint bubbles. I was hoping it was just lifting paint due to the humidity when I painted the repair, but once I started poking it I knew I was kidding myself and it was all game over. Note in the below photo the line of bubbles running rearward too. I poked at it, removed all the paint in the area, poked some more and end up with some holes. It wasn't looking good. The metal around the repair had gone from nice solid weldable metal that had been treated, to thin and full of holes. The repair was holding up really well, but everything around it was crumbling. In this instance, I didn't want to weld it again. The metal is too thin and too close to the windscreen. My only real options were to have some professionally fix it at a large cost (and removing/replacing the windscreen) or to fill it with a fibreglass/metal body filler. I did the latter. Not before absolutely filling the area inside and out with rust converter, and then a zinc-rich epoxy paint. The filler is a rust inhibitor too, so there are three things trying to stop the rust there now. A slapped on some of the New-tech reinforced filler, making sure to thoroughly jam it into the holes and make sure it was a nice solid part of the structure. And sanded the super hard hairy filler back A layer of normal body filler went on over top to smooth and shape the repair Next was a coat of primer, more sanding and then base and clear coats. It's not my finest work, there are sanding marks and the blend to the older paint is harsh, but for a quick redo to slow the rust down and keep the panel weather tight, it's not bad. I'm not kidding myself anymore though, I know the rust will be back. It's super aggressive. The car previously lived by the sea (as shown by the underbody rust), so I'm wondering if that has been a contributor to how bad the rust is. The previous repair before mine was rubbish, and if it had been letting salty sea moisture in before it was fixed, it might explain it. Anyway, so the days of the Liftback were numbered. I knew this. I was planning to limp it through its next WOF or until the pillar needed more work again and then replace the car with another Corolla that doesn't have rust, and transfer all the good bits over, and revert the LB to standard and sell it at auction as a cheap runner. As it turns out, this popped up on Trademe, with a stupidly low price. A 1997 Toyota Sprinter Carib BZ Touring. Basically a JDM AE111 Corolla wagon with a different face (the Corolla was a bugeye like the Liftback), oh, and a 165HP 20V 4AGE that revs to about 8000rpm with ITBS and a close ratio 5 speed manual. I figured if I was sticking with the Corolla platform so I could reuse all the bits I spent money on, I might as well upgrade and get a more grunty engine. The 7AFE is a good reliable unit with decent down low pull, but it runs out of puff easily, doesn't like to be revved and isn't a sporty engine. I asked some questions to the seller, who was a young guy that had had the car in his family for about 10 years. It had been everywhere, done everything, and had over 300,000km on the clock. The car had failed its WOF a couple of months ago on a few simple things. A couple of bulbs, a leaky rear shock, a rear brake imbalance, and a rusty fuel pipe. Nothing major. The seller was kind enough to drive the two hours today to meet me closer, so after having a good look around and taking it for a drive, I paid the man and drove the Carib straight to the lockup to wait for the parts from the liftback to be available. It's well worn, and had a hard life. It's also had a…. typical Kiwi Toyota life; Run on 91 petrol (should be 98 due to high compression), bare minimum servicing, no receipts. It feels all of its 301,000km; wobbly, loose and tired. Thankfully other than a couple of scrapes and dents it doesn't really look like its age/mileage. It needs a damn good clean inside and out and the paint will benefit well from a machine polish, but there doesn't appear to be any obvious peeling paint or major fade. The "underside surface rust and rusty fuel pipe" looks very minor, and may even be less rusty than the Liftback had before I went over it with a wire brush, rust converter and epoxy zinc. The engine smokes at high RPM but as far as we can tell it's all black smoke from the shitty fuel it's running and not blue. The engine also feels real flat, which will be a combo of that fuel, and the VVTI pulley rattling like a diesel. The seller did advise he tops it up occasionally, but since it's got a few pretty bad looking oil leaks, I'm not overly surprised. But hey, the AC and heater both work. Winning. It needs more work than anticipated, but it's kind of expected due to the price, KM and deferred maintenance (why is that such a running trend for cars I buy?!). Now to make the list, and order some parts. So thats where I'm at for now. As it stands I'm hoping to transfer the front hubs/brakes/shocks, rear crossmember/arms/shocks/hubs/brakes, wheels, towbar, radiator (liftback one is near new), radio, and steering wheel between the cars. The only thing I'm not sure about is the towbar, everything else should go straight in. The Carib has ABS, so swapping hubs should be OK. Front control arms and swaybar will be polybushed at the time as that was the one thing I didn't polybush on the Liftback. The liftback will then be rolling on the old Carib parts, and will be sold with the remainder of its WOF as a $1 reserve on Trademe, to try to get some cash back. There are a couple of parts the Carib failed its WOF on that I'll need to pillage from the Pick A Part wrecker for the Liftback since I can't reuse them, but nothing hard to get. I'll miss the Liftback, its been a great little car and my first foray into actually modifying cars. I have fixed a lot, but never really modified anything.1 point
-
I had some concerns about the clutch, so day three was started with us plumbing it in and bleeding it. Wednesday We were over time now, but were fairly confident that this would be the last day and we should have it ready to go by the end of the day. Oh how fickle Murphy can be. The flexi was plumbed into the clutch system and the reservoir filled with brake fluid. We bled the system until no air was coming out, but the clutch pedal felt really weird (very soft with no feel) and there wasn't a huge amount of movement at the fork when the pedal was pressed. The fork was also loose as anything and moved a lot by hand. Something wasn't right. It looked like the pivot "mushroom" was too small for the fork as it just flopping about. We decided to head to Pick A Part on a research mission. We checked the various cars there with the same gearbox and came to the conclusion that our mushroom was definitely too small. Here is a photo of one from PAP. Note how you can just see the underside of the head, how thick the shaft is and how big the hex is in relation to the boss it screws into. The spring also sits against the shaft just under the head. Now mine. See how much smaller it is in almost all directions. The spring is miles away from touching it, and you cant see the head at all. No Bueno. Iain made a quick call to a local wrecker he has had good luck with before (Wellington Toyota Dismantlers in Wainuiomata), and we were very lucky that they agreed to sell us a fork and pivot. They don't normally split them from boxes, so they really saved our arse. After a "quick" drive to Wainui to pick the parts up, we went back and started the process of removing the engine again. Thankfully because we tested the clutch first there wasn't a lot else we needed to remove. We split the box from the engine again, and this is how different the two pivots are Its a straight replacement, and the fork now "clicks" into place on the springs. Everything was cleaned and greased, and the new fork was installed with the replacement pivot. And hey, its back in the bay again. It took us a couple of hours to pull the engine, split box, investigate and swap the pivots, install gearbox and reinstall into car. Not bad. With the engine back in the car again we once again hooked up and bled the clutch. This time we had a positive clutch feel and movement at the fork. The fork now has little to no play. Big difference. Since everything was going well, we proceeded with installing the axles, shifter cables and all the various bits we disconnected. For the first time in a couple of days we were on the ground again So much room for activites Makes filling the gearbox easy But eventually, the radiator had to be refitted, but you knew it was serious because the last thing I did this day was to refit my nice valve cover. I removed it initially so it wouldn't get scratched or marked. And that was it for Wednesday. Thursday was going to be a good day. Thursday With only a few more things to connect up, and a couple more fluids to pour in, it was almost time to see if the car would even start. We plugged it all back in, I checked the gearbox was in neutral and turned the key. Sure enough, the engine spun over. Win! The inhibitor wiring was good! Better than that, the reverse lights even worked. A+ work by Iain. So that's it, all that was left was to fire it up, run it up to temp and bleed the coolant out, which is exactly what we did. Whilst it was warming up, it even passed the "will it go back and forward" test. After what seemed like an eternity of waiting for the thermostat to open and the fan to come on, it moved under its own power. Corolla squad! I cannot confirm, but it may have been driven on a (private) road with no bonnet. Its a weird view, seeing the back of the headlights A quick check the fluids were still where they should be, and the bonnet went back on. With everything cleaned up, all the tools packed in the boot, we set off for my place in a Corolla convoy (had to get the Honda home somehow, since it's been my workhorse during this work). Friday That brings us to today. A couple of little niggles have shown themselves. Nothing major, but the shift base is worn and hard to find gears (it came from a car with over 260,000km on the clock), and there are some subtle noises that seem new. I also need to reassemble the interior. Before I can reassemble the interior I needed to replace the shifter base. From a quick check at Pick A Part most seem to have quite a bit of play in the main pivot, but one of the cars I've been pillaging for parts (a bugeye like mine) has only 160k on the clock and the shifter base was nice and tight, so I grabbed that, along with a good score of a nice near new, current model, Pioneer Bluetooth headunit for a significant discount. I couldn't fit any of the interior bits back in without cleaning them. They were all festy as hell, with sticky slimy goop everywhere. Maybe skip this section is you have a weak stomach. Simple green does a pretty good job of cleaning it off, but ugh, people are gross The cupholder in particular was pretty bad. It was the source of a lot of this muck. They must have spilled a lot of drinks over the years. These were really sticky and hard to use. They didn't so much pop out as just sorta grind their way into place. the cup holder can be removed from the bottom piece with the spring by levering the tabs out Everything was like this though. Glovebox, center console, center stack, knee panel. Everything needed a damn good clean. I know it triggered some people that have read my earlier posts seeing how festy the center stack was. The cup holders now work nicely, and with a little grease on the rails, they slide smoothly with a defined pop when pressed. With all that cleaning out of the way it was time to reassemble. I noticed that the climate controls had a couple of little bulbs. I wonder if they work, I asked myself. No, they didn't. I popped a new bulb in to test So I transferred the little green condoms over, and bam, climate lights The ashtray light was also blown, so I replaced that with an LED since it goes through a green filter and doesn't have a condom on it. I would have LED'd the climate too but I didn't have green LEDs. Now it's just a matter of reinstalling everything opposite to how it came out. One exception is the center bin, which is replacing the CD player. I swapped the brackets over, gave it a clean and fitted it. The cleaned climate trim went on. This also had a lot of gunk on it previously. And the new headunit installed. It's still not a high-end unit, but its much better sound quality than the previous one. The sound quality is so much better that it's now showing how bad the speakers are. Check out that lit up climate control too. Flash. Cup holders and center bin. And the main attraction. 5 Speeds of fury. With the interior now all back together, I couldn't help but take the car for a decent fang around some local back roads. I can now conclude that having more control over the engine means I can out drive the brakes and suspension. Guess. I need to hurry up with the next lot of mods then. So that's the manual conversion done. The difference is huge. The car is more responsive, happier to rev and a lot more flexible in how you drive it. Looking at the height of the front now too I guess its taken a decent amount of weight off the front axle. A HUGE thanks to Iain for taking the time to help with this swap, and for letting me use his lockup space. I couldn't have done this without his help, but to be fair he's the reason I had Corolla on the mind in the first place. Also, thanks to everyone else that has supported me with this car, even if it's just a like on social media or a comment on a forum, it all matters. Now to plan the timeline for the next mods. I have everything I need, it's just a matter of getting it done.1 point
-
TOTP Noises1 point
-
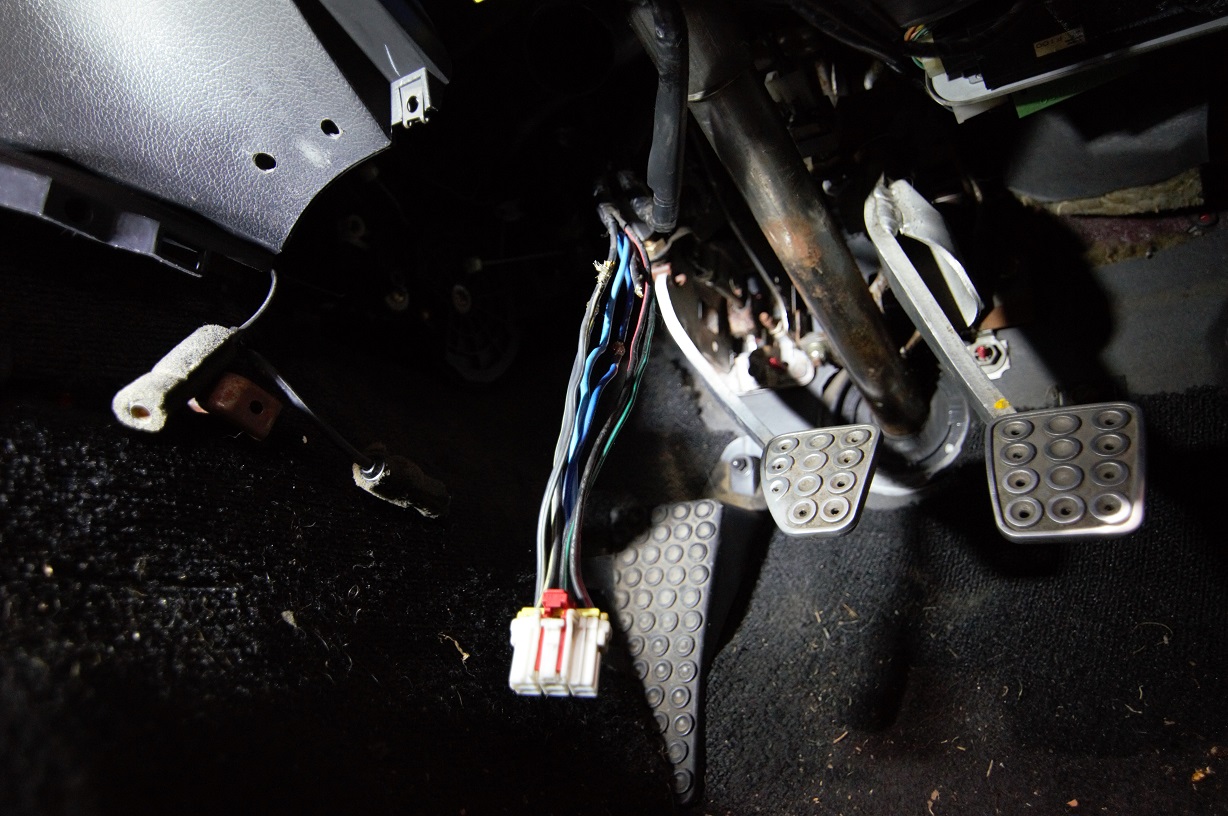
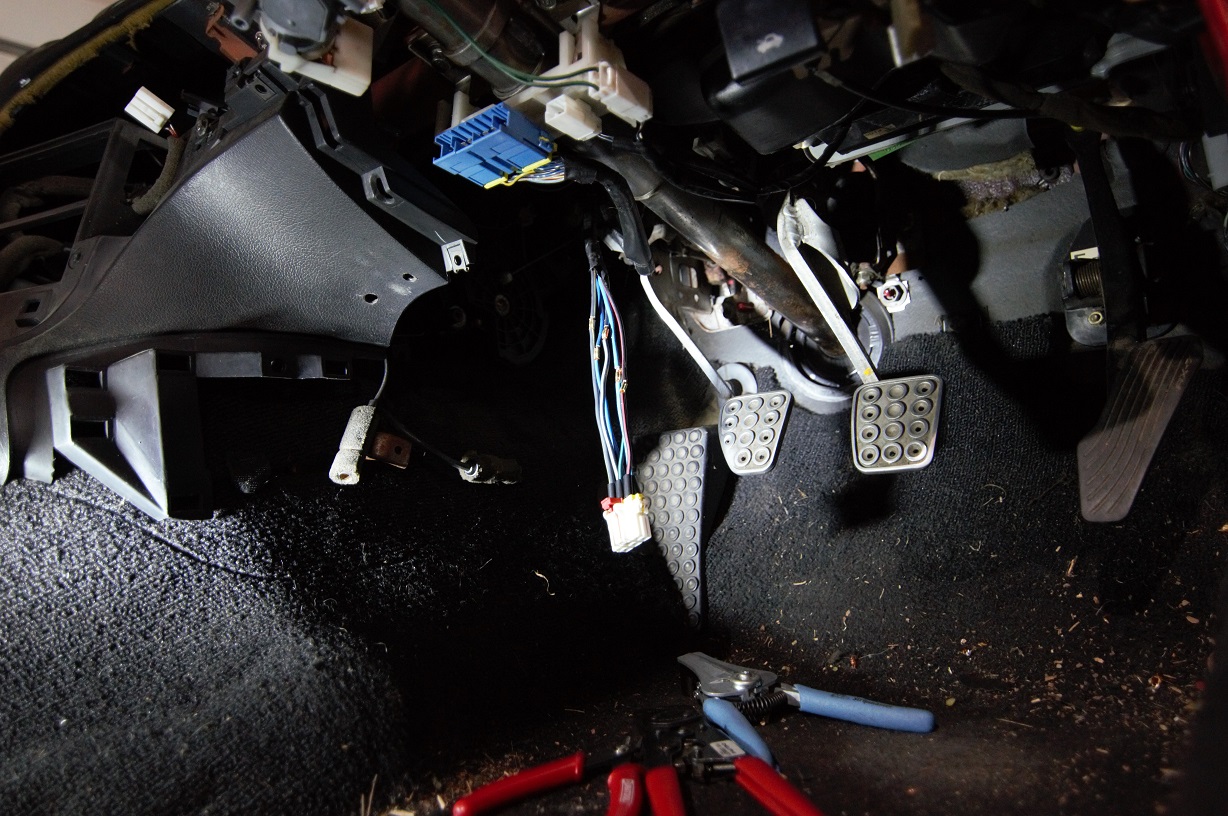
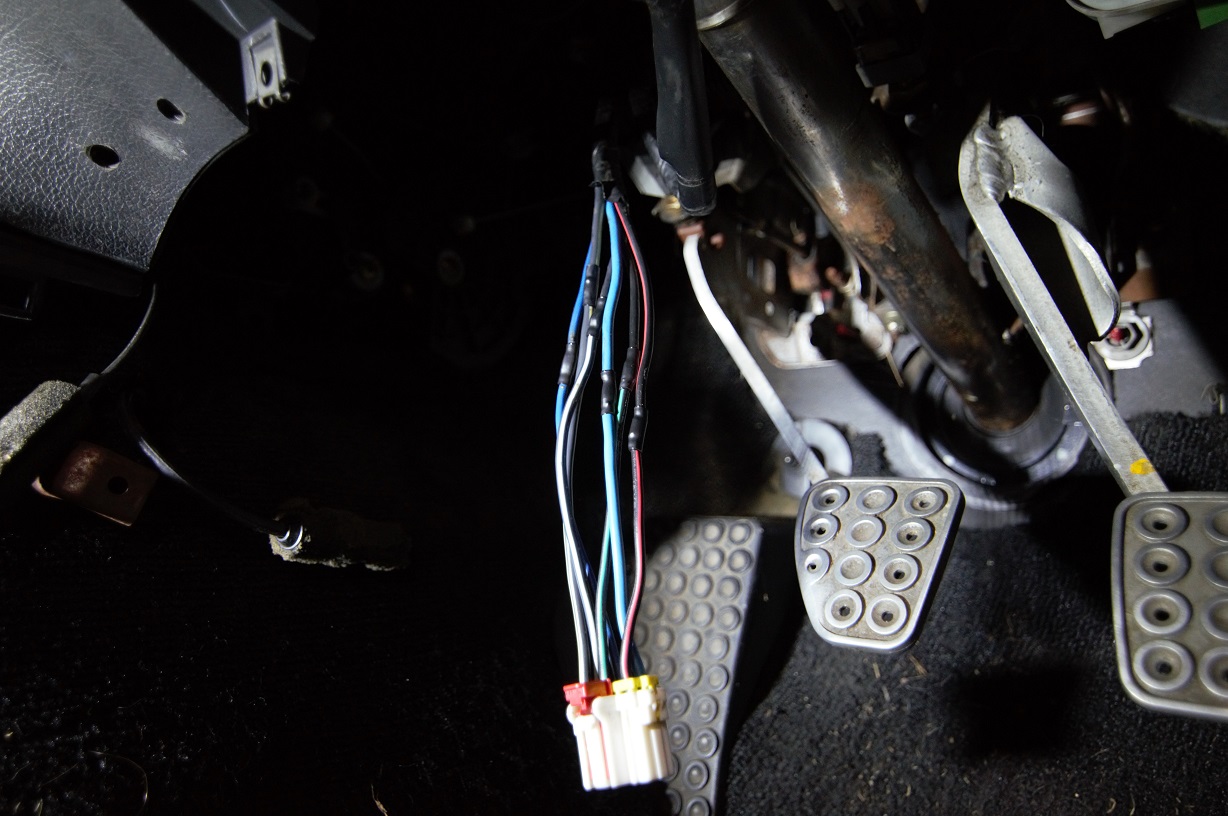
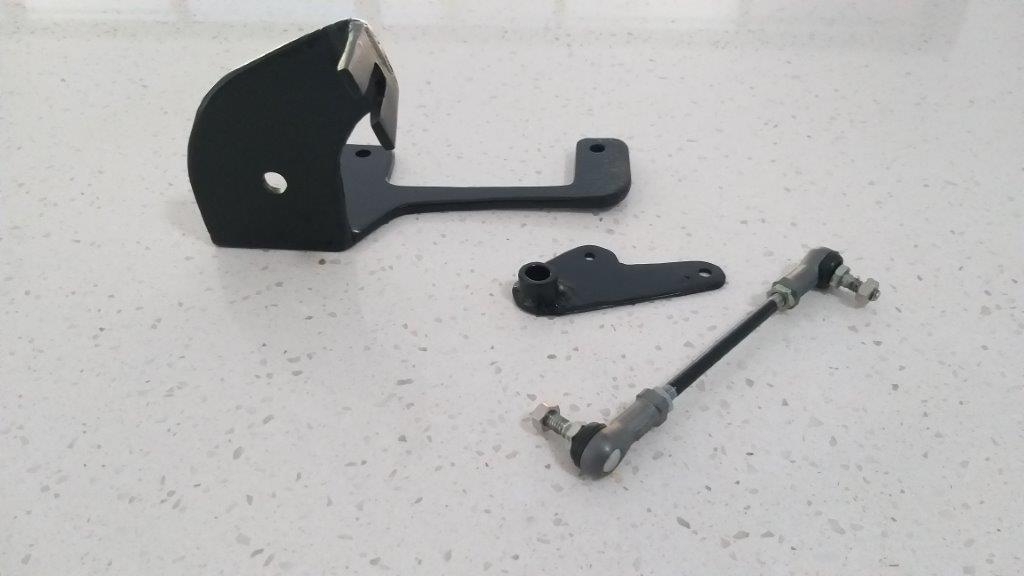
I guess by now everyone is tired of reading about my accelerator setup, so I'll close the subject off by sharing a photo of the new components with a quick splash of paint. I'm looking forward to working on something else tomorrow.
1 point
-
Because my life is pretty sad, I spent a few hours building this working mock up of version 3 of my HiAce to Thames accelerator cable bracket. Stole the mini ball joints off the ends of my gear shift cables for the intermediate shaft, so I'll need to order in some replacements. Even went as far as to make a longer pivot lever so the accelerator pedal is now nice and soft with heaps of travel. Should make for nice smooth acceleration. So all that's left to do is to replicate this mock up in something tougher than a piece of dirt old plywood. I'll hopefully make the finished article a lot more pleasing on the eye. Thanks for looking.
1 point
-
So I got the bike all together and dropped it down to Danny, Hayhole and the team at Watermark Signs in Wellington. What a bloody transformation! I gave danny a bunch of photos of the original Rothmans Dakar NXR750 along with what vectors of Logos I could find. Danny drew up the vectors that I couldn't find, color matched everything and sized it up. Hayhole did all the application. Im absolutley blown away, its come out far better than I ever imagined. Its still not 100% complete. I still need to get the sump guard and crash protection on. This wont happen for a week or two though as the tank needs to come back off so I can install the new choke plungers when they arrive from Japan, less than a week before the rally, eeek. I'm cheesin. Will get some lush photos done of some of the cool details once its all back together properly. I do find the before and after photo quite mesmerizing.\1 point
-
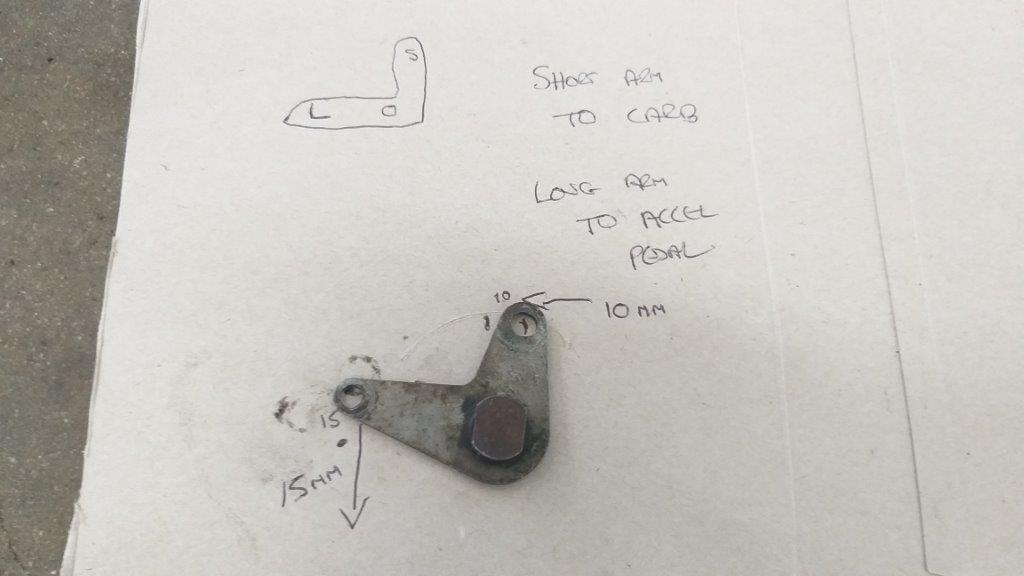
Now the eagle eyed amongst you will notice that the arms are slightly different lengths. I setup a little "test bench" using an old cereal box. Poked a hole through the box for the pivot bolt and ran a little experiment. For every 15 mm of travel on the long arm the short arm travels 10 mm. If my maths is correct this works out to a ratio of 1.5 to 1. Adding my original pedal movement figures of 45 mm to 30 mm into the mix, this just so happens to be the exact ratio that I require. If I was to connect the short arm to the cable and the longer arm to the pedal activating rod, I'm thinking that the pedal will need to travel further than it currently does and hopefully the longer arm will slightly reduce the force needed on the pedal to move the cable. Please shout if there are any glaring errors in my theory. Anyhoo, in order to give this a try I've got to fabricate a MK 3 version of my cable bracket, so that is the plan for tomorrow. Thanks for reading.
1 point
-
first start -1 point
-
the latest tasks on the africa twin have been the wiring. Ive put together a custom carbon fibre dash which I will show once its finished. The existing wiring for any accessories consisted of both "twist n tape" and household TPS wiring so anything non factory got ripped out and binned. I have a few accessories that i want to run (LED lightbar, USB sockets, Koso temp/volt meter and heated grips. I thought the best way to run all those tidily would be to run a decent guage wire direct from the battery though an ign controlled relay to a small fuse box which can be used as a distribution post, the little narva 4 way ones were the most neat and compact I could find. its all tucked nicely out of the way where it cant rub on anything. I needed one relay to switch the fuse board, and then needed a second one as I want the light bar to be switched by the full beam circuit. there is a separate switch on the dash so I can turn off the lightbar to stop it being switched by the full beam circuit. i got some relays that click together with harness's to keep that tidy. Upon testing I noticed that all 4 of my indicators were flahsing (now LEDs). some reading and i found out this is becuase of the "turn signal indicator bulb" on the dash. it receives an input from each side indicator circuit (no ground) and grounds though the opposite side bulb. This works with the resistance on incandescent bulbs but LEDs dont have enough resistance so the voltage leaks accross and all four flash. the easiest way to fix this is remove the turn signal indicator bulb in the dash, but thats dumb becuase its handy at reminding you your indicators on so i made a fix with two diodes and modifying the factory wiring. I cut one input to the turn signal indicator bulb and ground it, then made a little loom of two diodes merging to one wire for the positive feed (for those that dont know a diode is like a one way valve). I put the diodes in an old fuse holder to keep them safe. Works a treat. https://imgur.com/BCPRJpA The other wiring farkle on these old pigs is shared by many other bikes of the same era (mostly triumphs and ducatis) and that is the regulator rectifiers fuck out. They are old shunt type RR's that get really hot. the biggest issue with the hondas is the cheap shitty plug they decided to use. the plug starts burning out and resistance increases, so the RR cranks out more volts to compensate and eventually cooks itself. mine was working fine but I thought id check the plug out incase and.... It was certainly on its last legs, so preventative maintenance needed. The upgrade of all upgrades to the charging system on these bikes is to switch to a "MOSFET" type regulator off a modern bike. the tech in these farkles means they dont get hot, barely warm and are way better at providing stable voltage. problem is they are like $400 new and the $50 chinese knockoffs are time bombs apparently. A few evenings of trawling trademe and i found a 2016 honda cbr600 that was at a wreckers and got the mosfet RR off it for $100, choice. If doing this mod you want a genuine japanese made "Shindengen" RR, the mosfet ones are idetified by the suffic "FH" at the start of the model number. the most common is the FH020AA which is what I got, it is the same size and bolt spacing as the factory "SH" type regulator. it also has choice waterproof plugs. I had a fair bit of trouble trying to locate some 45mm stainless tube for the exhaust but @Hayholes mum came through with the goods while i was down in welly for conference. Came home and got that all sorted and @Mitch.Wkindly tigged it up for me. looking bloody lush. you can see the new RR mounted here too. im yet to tidy the wiring but its being upgraded and wired direct to the battery with a 30a fuse in the positive line. and here we have it... the first start in almost 2 years, and since all the new carbs and shit have gone on it....1 point


This leaderboard is set to Auckland/GMT+12:00