
Leaderboard


Popular Content
Showing content with the highest reputation on 06/26/19 in all areas
-
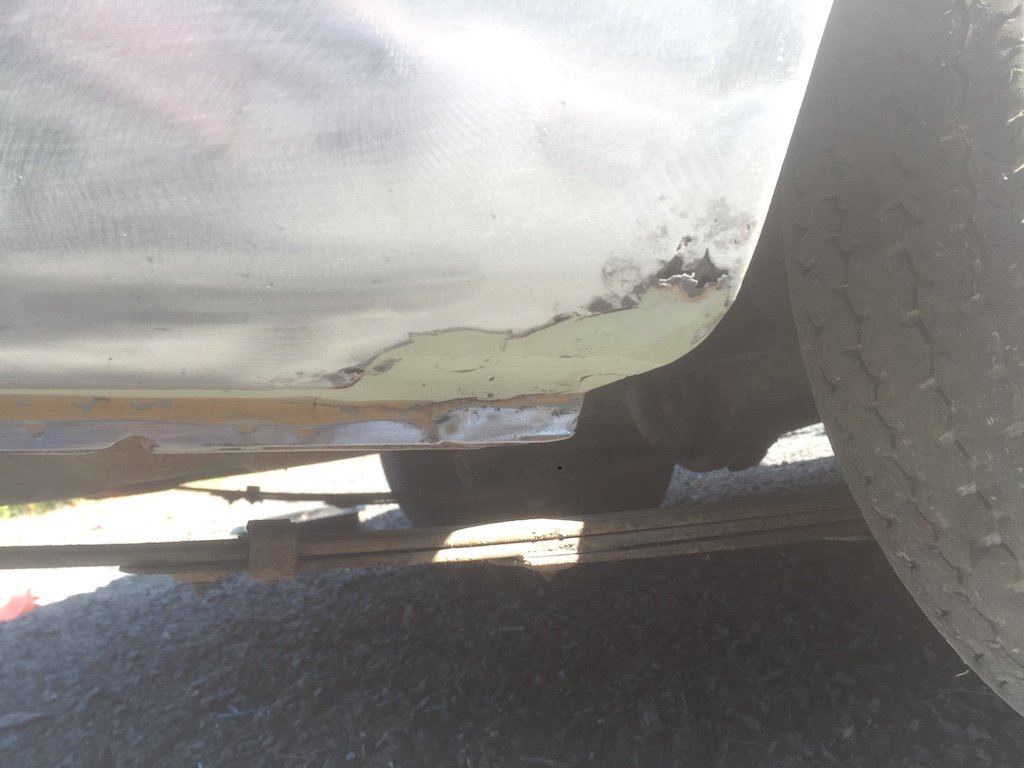
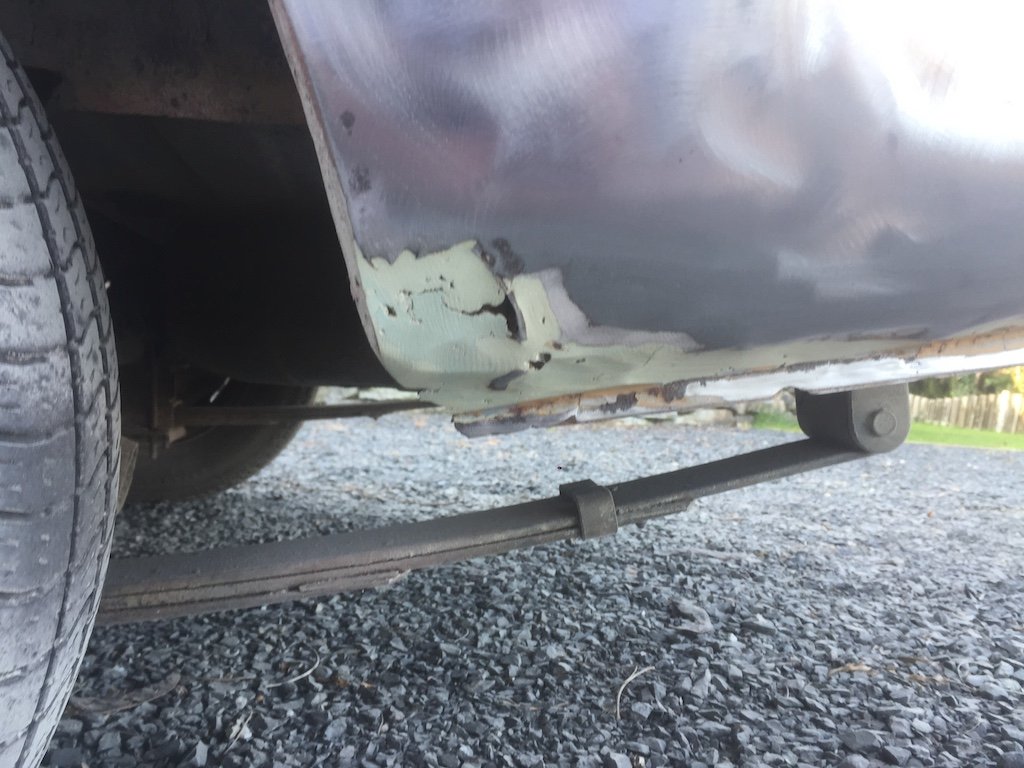
Well now.. its been a few weeks and time for an update. So far the Imp has been reliable and not let us down but it has also been true to its English form and left a few little puddles about. I'll talk about them soon. We took it on its first big road trip which was fun, although a bit noisy. I couldn't really cane it super fast on the hills because Kevin the cat had to come on the trip with us. It was a few days away to visit my parents so we cant just leave the kid at home... The car did the trip with no hassles and returned an OK 35mpg, not bad considering its geared quite low, has had heaps of sitting on the spot being tuned and due to the constant annoying flat spot right off idle I had to accelerate faster then I'd normally bother in average driving. It certainly hoons along very very well although it has an exhaust boom right around 60mph, which is around 4000rpm thereabouts. It became a bit too tiresome however should be better now I have added a load of sound insulation on the back parcel shelf. I am super impressed with the Datsun A12 engine!! Its really peppy and fun, very smooth (allowing for the annoying carb issues) and just works so well. I can totally see why they have such a cult following around the world. Everyone who chats to us about the car (and its ALOT of people.. its a right little magnet this car) think that the Datsun conversion makes so much sense. More often than not folk are full of praise for the Imps they knew, had, learned to drive in etc , except for the standard Imp engines reliability. This is a shame because I think the standard Imp engines are great however one must accept that they do need to be cared for a bit more than many owners obviously could be bothered. But the Datsun engine- first comments are usually " what a great swap- those are bomb proof engines " usually followed with the comment "it must be hard to get those engines now because all the ministock racers have got them all"... So anyway.. the wee Imp ran well and got us to Blenheim and back. But before that big trip I wanted to sort a few things. One job was to build a cold air fed filter box and carb lid to let the engine suck on some cooler air rather then the super hot air floating about in the top of the engine bay, due to Imps not having the luxury of lots of cold air running through over the engine. So I built a filter box, sized to take a modern Honda filter. I have made the box large enough to handle bigger pipes and the volume that might be needed when I plan to upgrade the induction. Box... With filter in place... This box fitted under the parcel shelf above the gearbox. Sort of out of the way and hidden but easy enough to get to. It was fed with a flexy alloy pipe from under the car. Another section of pipe headed backwards to a plenum/tophat thinggee I made for the carb... It was all going so well I thought. I splashed some black paint on it all so it looked a bit neater... Then I fitted the tophat to the carb. This is where things went a bit... tight. It seems that I had completely forgotten to measure how much room I had just above in front of the carb. Not enough it turns out .... The engine lid wasn't able to go back in place! A few choice words that somewhat rhymed with duck along with a sentence that sounded quite similar to 'well you stupid punt' were uttered. I then calmed down, realised that at least I have now got a filter box sorted for future upgrades and with that I removed the lot and refitted the previous air filter I made. At least its winter so a bit of hot air cant hurt I did another couple of jobs before the trip. I swapped out the fuel gauge which wasn't reading correctly for a spare unit I had.. I was also fed up with trying to adjust the clutch. The slave cylinder fitted had a 7/8" (22mm) bore and being pushed by the standard Imp 5/8" (16mm) master cylinder, which happens to be the same size as what the Datsuns use. However- Datsuns use a smaller 17mm slave to get the correct amount of stroke at the slave. I wasn't getting enough stroke so the clutch pedal and release fork clearences had to be set very tight to clear the gears. But I did have a very light pedal... So I worked out that the amount of stroke available from the Imp pedal, whilst being very close to that on a Datsun, was not quite enough I could get a good working system with a slave of around 3/4" (19mm). However- there didnt seem to be any slaves available out there that had the same mounting lugs, in 3/4" bore, with a metric fine hose thread. But I did have some spare random 3/4" seals, some stainless bar for a new piston and a big lump of alloy. So I made a new slave cylinder to suit. I could have sleeved the existing one down and I have a 3/4" reamer to help but I wanted to keep that one intact in case it all went pear shaped. Plus...its more fun making things ! I offset machined the lump of alloy down in the 4 jaw, bored and reamed it to suit, milled the shape up and machined a new piston to suit. But I was having too much fun and forgot to take many photos.. New next to old... It works heaps better! I can now have a bit of slack at the pedal and at the release bearing and still get my gears. Another job was to take the carb apart for the 14th time. I'm getting very quick at this and can field strip a Hitachi 306 carb in under 15 seconds, blindfolded, with both hands tied behind my back, whilst under water breathing through a straw. The carb had a few leaks. I realised that the top lid was pulled out of shape... I carefully filed it and the body flat, cleaned it out again for the 10th time and made a new thicker gasket to suit... On the next test drive the leaks had gone but I had still had not cured the flat spot. So I gave up and made a parcel shelf instead. I did have an original Imp one but it was a bit wobbly and a pain to fit. I made a new wooden one for the passenger side so now actually had somewhere to sit our phones, wallets, bag of Werthers originals, old parking tickets, a broken pen, out of date fuel vouchers and, most importantly, a screwdriver for constantly tweaking the carb settings. Again, so much fun but no photos. I finished the shelf the morning we set to leave. We plonked Kevin the cat into the car and set off. A lovely trip was had with the only downer being that the cold I had caught at fire brigade practice a few days before was really kicking in to full runny nose time, while the weather was a bit... Wintery. Got to test the wipers out though (must fit intermittant control kit I have) On the way over to Blenheim. You can spot Kevin. I took my Dad out for a hoon in the car. He loved it and only complained about the wipers being in the way of his view. Not a car fault but more down to the fact he must only be about 4'5" tall now... Back home and more recently things have happened. I weighed the car at the local tip... 750kg. The guy said the scales are within 10kg. So its in the ballpark for what I was guessing. A bit heavier then a standard Imp to be expected with a heavier engine, seats, exhaust, radiator and associated cowling, water pipes etc. But still light enough I think standard Imps are around 700KG ? More recently- one of the output shafts on the box leaks. I think it might be the shaft moving out just a touch too much on certain corners and the seal running off the land its meant to seal on. Or the seal land on the shaft is too worn. Or the new seal I had fitted has moved. The car will soon go on the hoist and I'll have a look. Cant really drive it until I sort this. Expensive stuff this oil- even more expensive if its loss means a buggered transmission. In other news I have made a parcel shelf for the drivers side. Now I can stash all my own crap within easy reach .. I am going to make some speaker boxes to mount under the shelves alongside a headunit. At a later date when I can afford to do so I'll fit an Amp and sub. I do like my music and there is only so much of Datsun A12 at 4000 RPM booming I can cope with so I need to drown it out. That is about all for now. Wish me luck with my seals...8 points
-
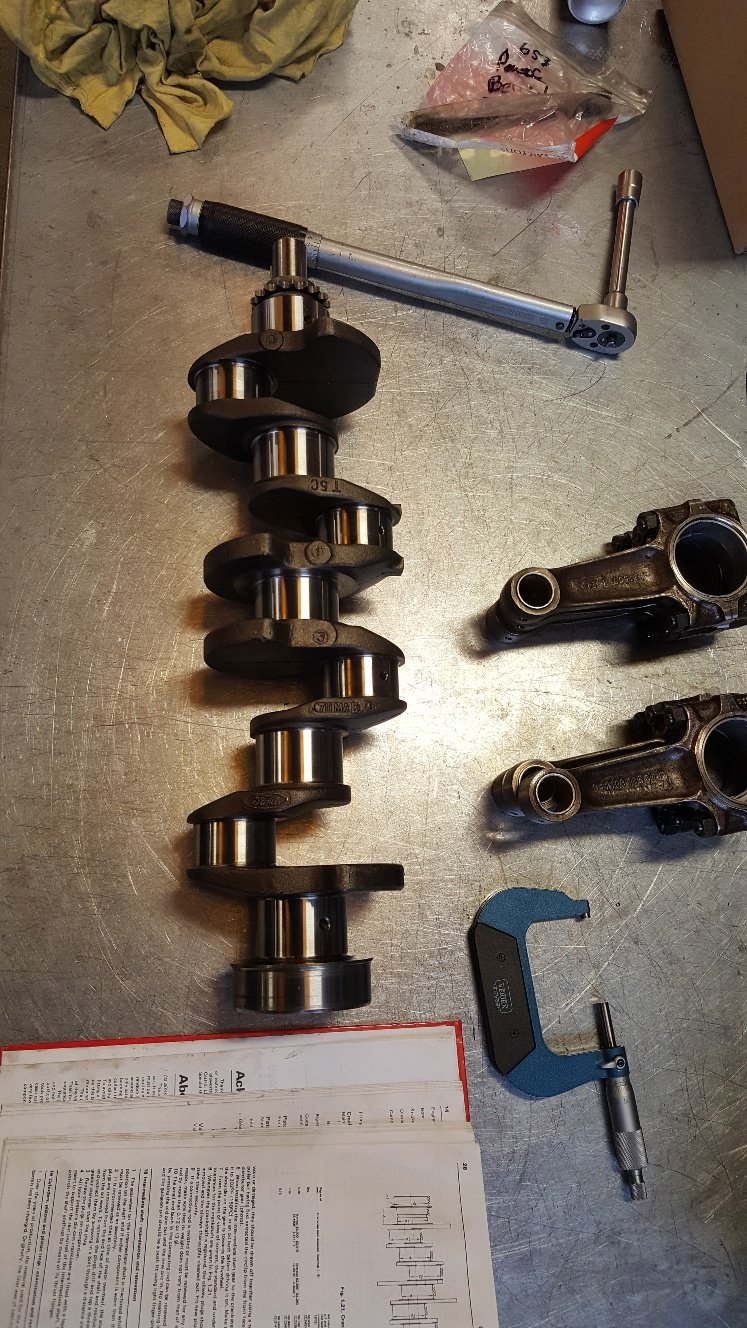
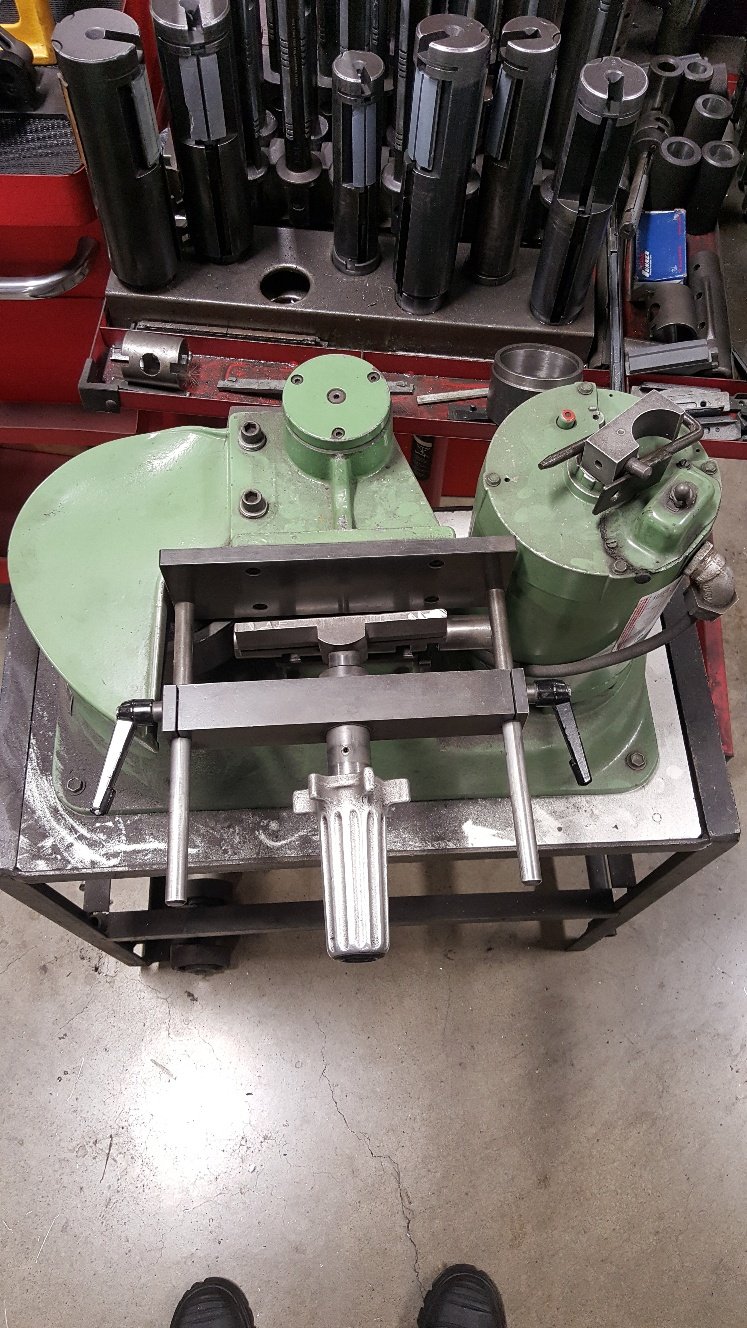
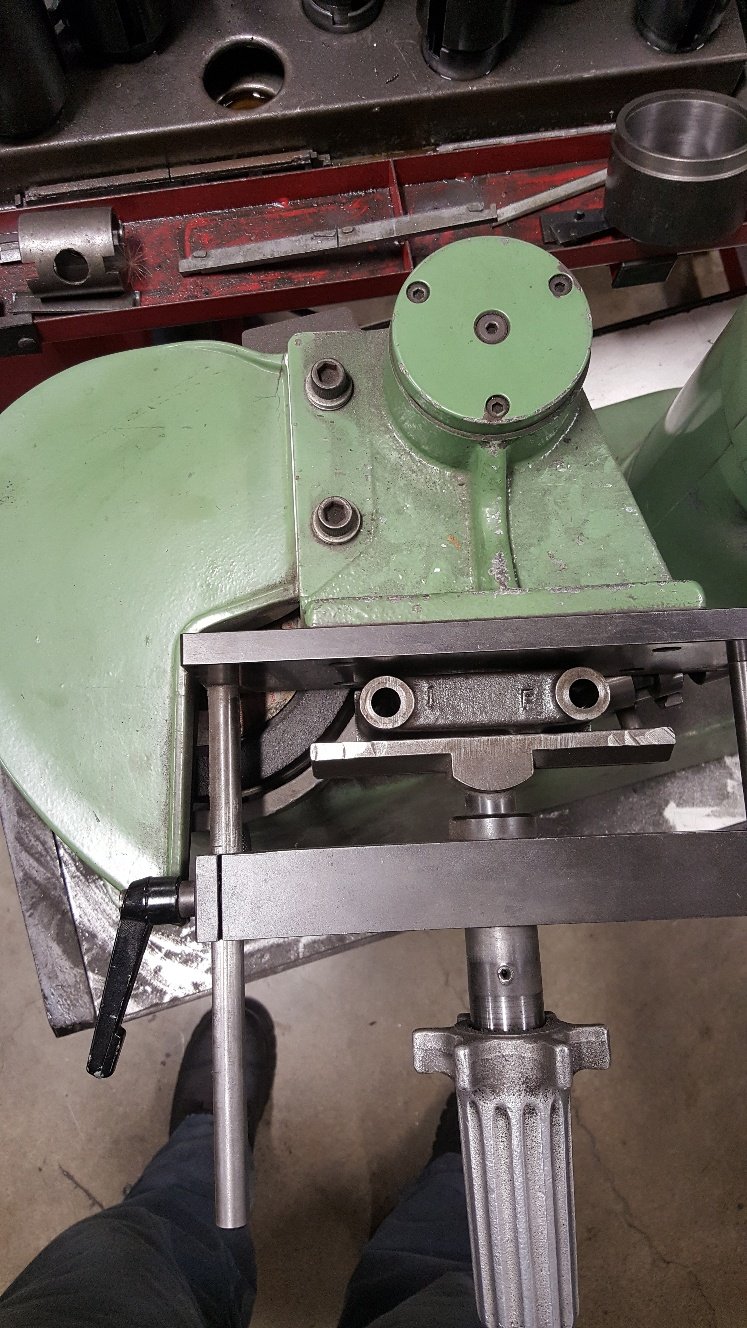
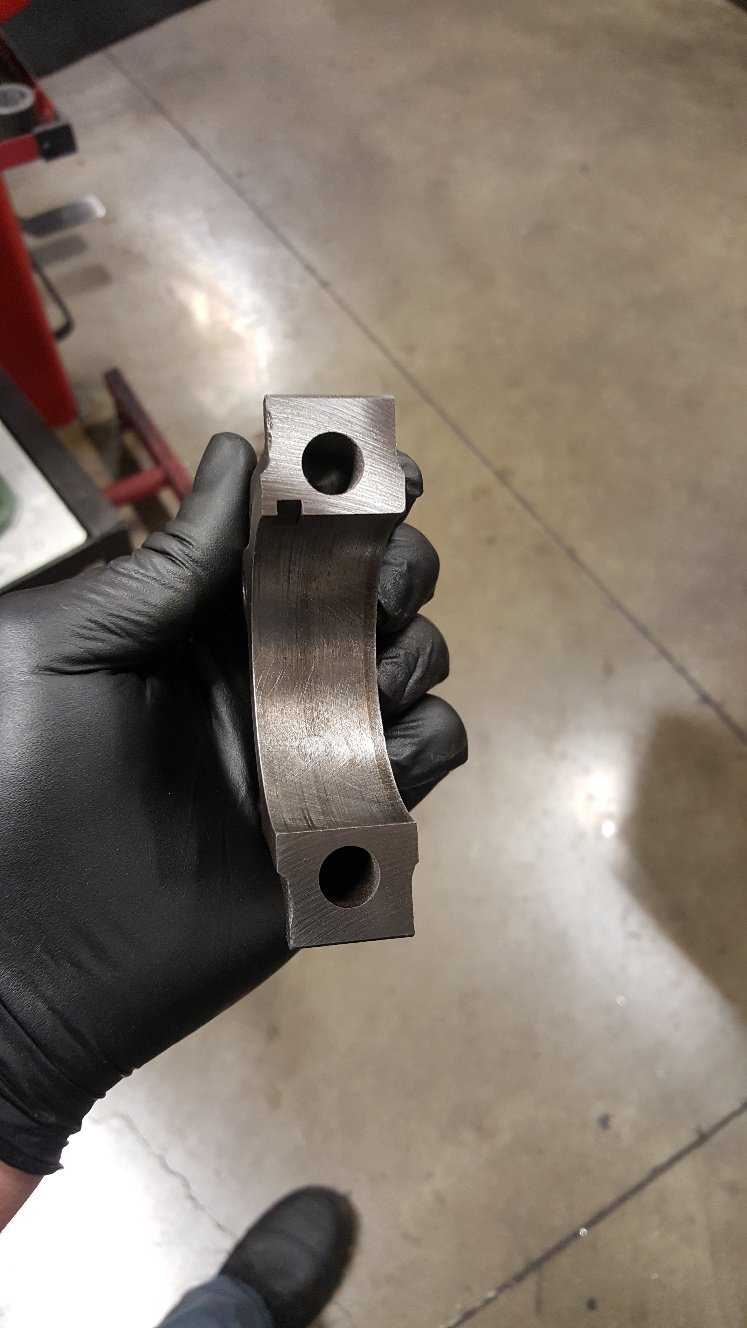
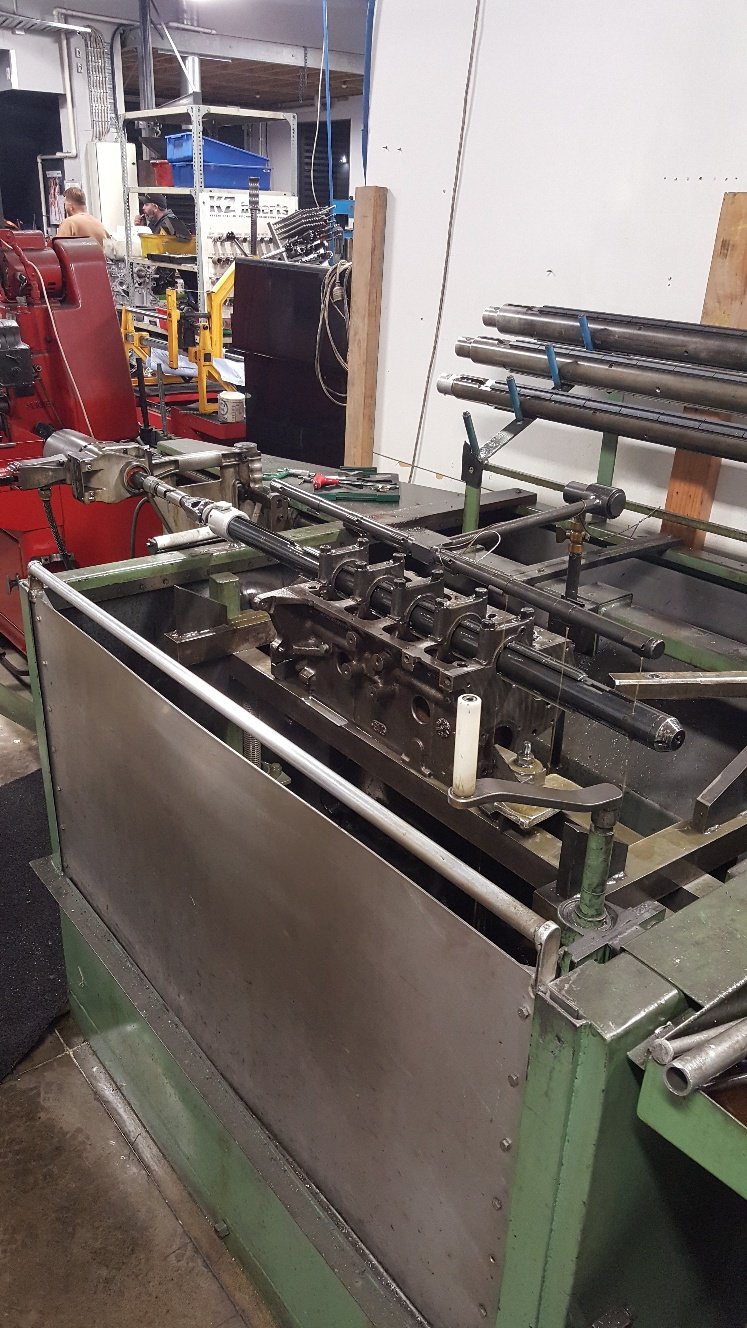
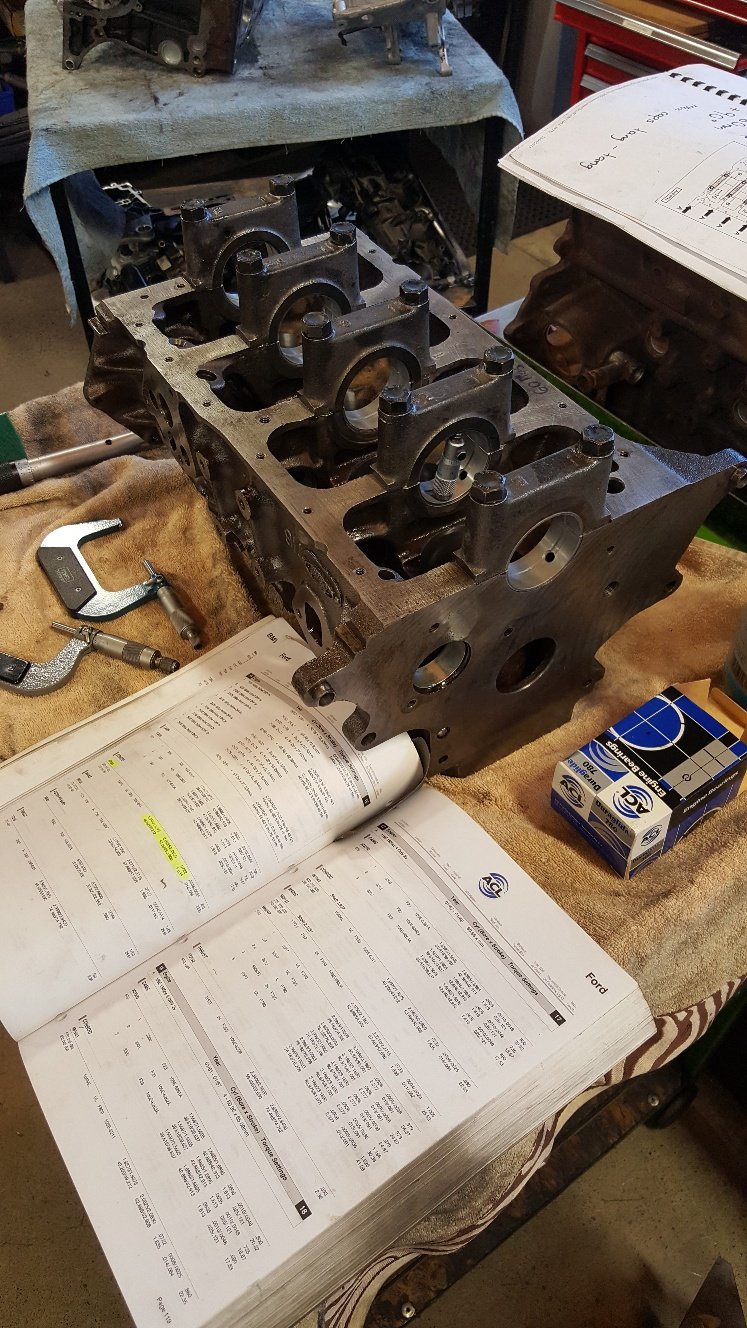
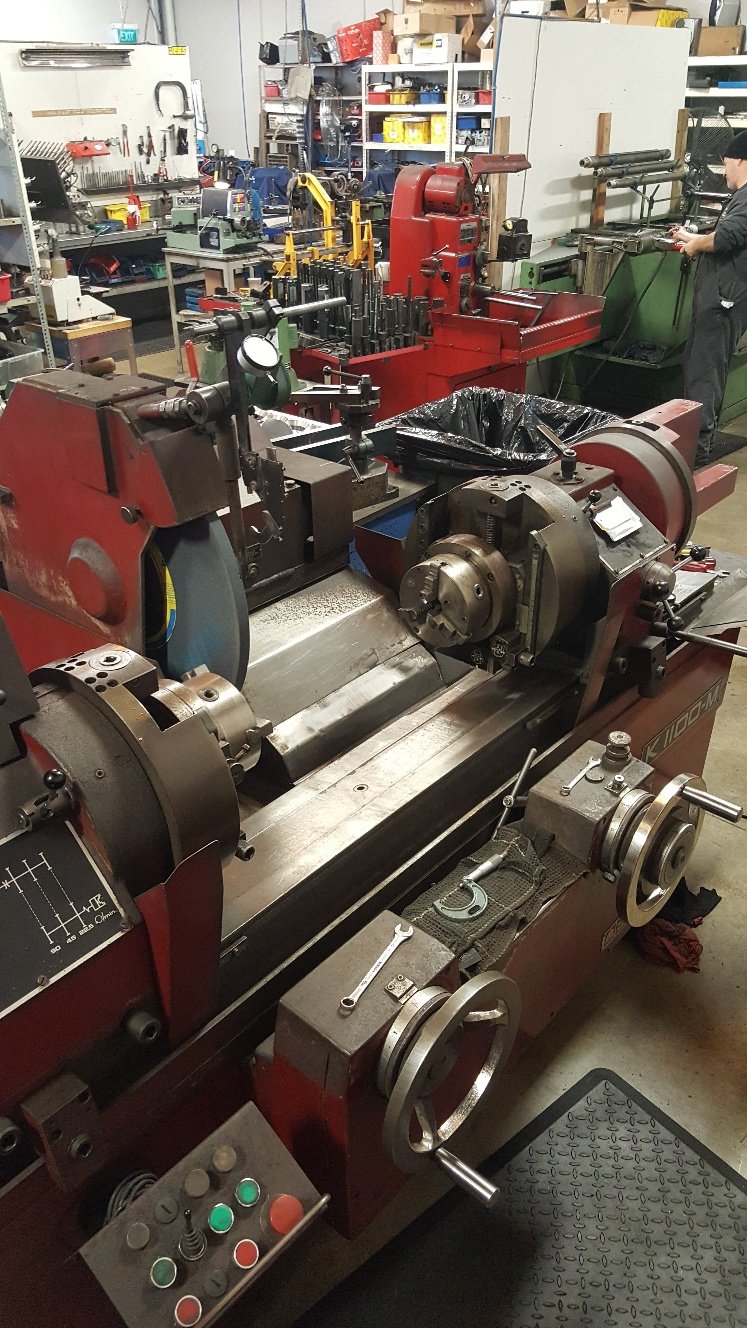
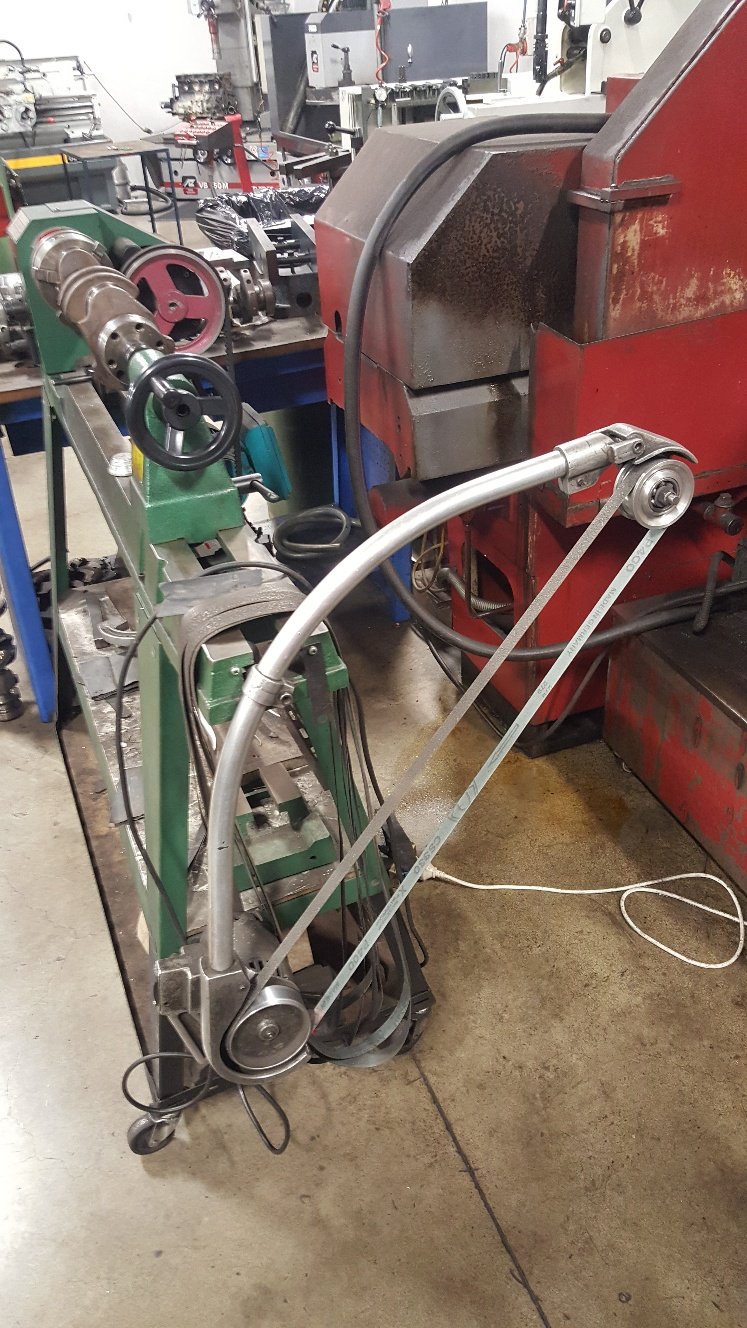
So I have the crank ground and ready to go. So I got started on the Align hone. This block didn't necessary need align honing It was within book spec in the mains. I haven't fitted aftermarket studs which is another reason for a tunnel hone, the studs normally tighten the tunnel up due to the extra torque you can apply to the stud giving better clamping load. Another reason is if you have run the main bearings this can also put the tunnel out of round and or put a bend through the tunnel. Here's a picture of the cap dresser. I used this to resize the rods earlier on. This is the main cap in it. It ground about 3 thou off each cap. First picture is the cap ground and ready to be torque up back onto the block. The next picture is with the block in the Sunnen Align hone. Sunnen is one of the industry leaders in honing. Our block hone is also a Sunnen Cv 616. So I just refitted the main bearings to check clearance. I've got 2 thou vertical oil clearance in the tunnel. Its nice and straight now. This isn't something we do to every block as some don't need any attention. But most old blocks either weren't that great from the start or have had a hard life.
 4 points
 -
Been quite busy working on this at the moment. Dropped it off to Pitstop Kapiti to get the exhaust sorted as it had a pretty nice split in th exhaust plus I had the rear section replaced and also extended Then it went to Kapiti Signs to get rebranded with my company details on it which is subtle and has come up really well! All the original decking timber had been removed ages ago and with the new Vitex we cleaned it all up, trimmed the two outside pieces down by 10mm per side and we were away! We oiled the wood first and man it came up well! 144 holes drilled, counter sunk, and fittings later... very tired hands. Also did some work on my BBQ trailer while I was at it. I had a sheet of Acacia left over from out showroom shelves from my day to day job so I cut that up, oiled it and added it to the trailer. Wouldn’t expect it to last long but time will tell. Looks nice and tidy and will look good behind the Ute as I tow it to functions. It’s a converted JetSki trailer. Ute is attempting to get a WOF today. I’m hopeful though as I’ve done heaps of work on this recently and it’s current WOF only expired last weekend. Matt4 points
-
16 Valve club for lyfe. @Stu
3 points
-
Haha, yep, I read that last night. We need a dyno...3 points
-
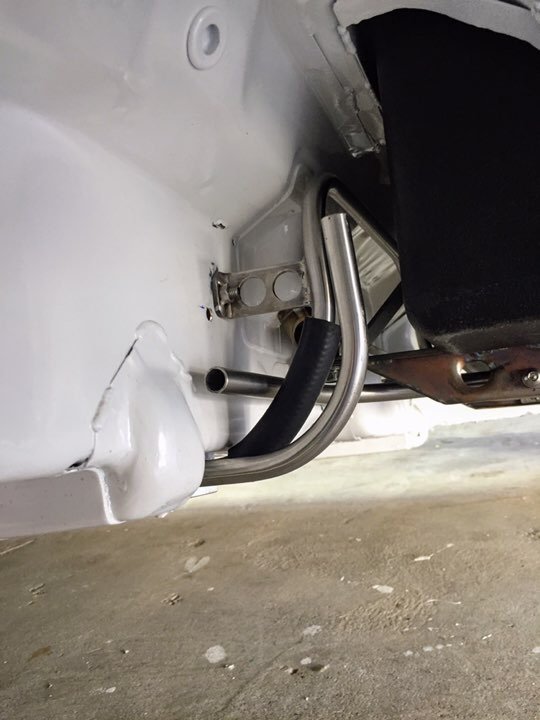
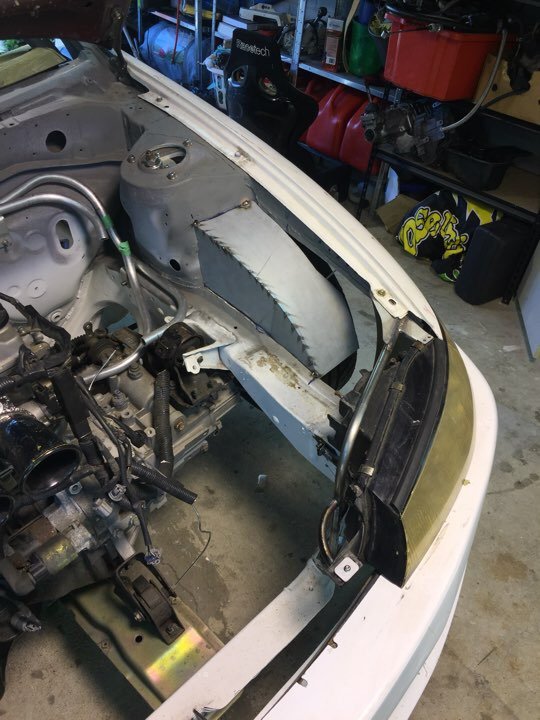
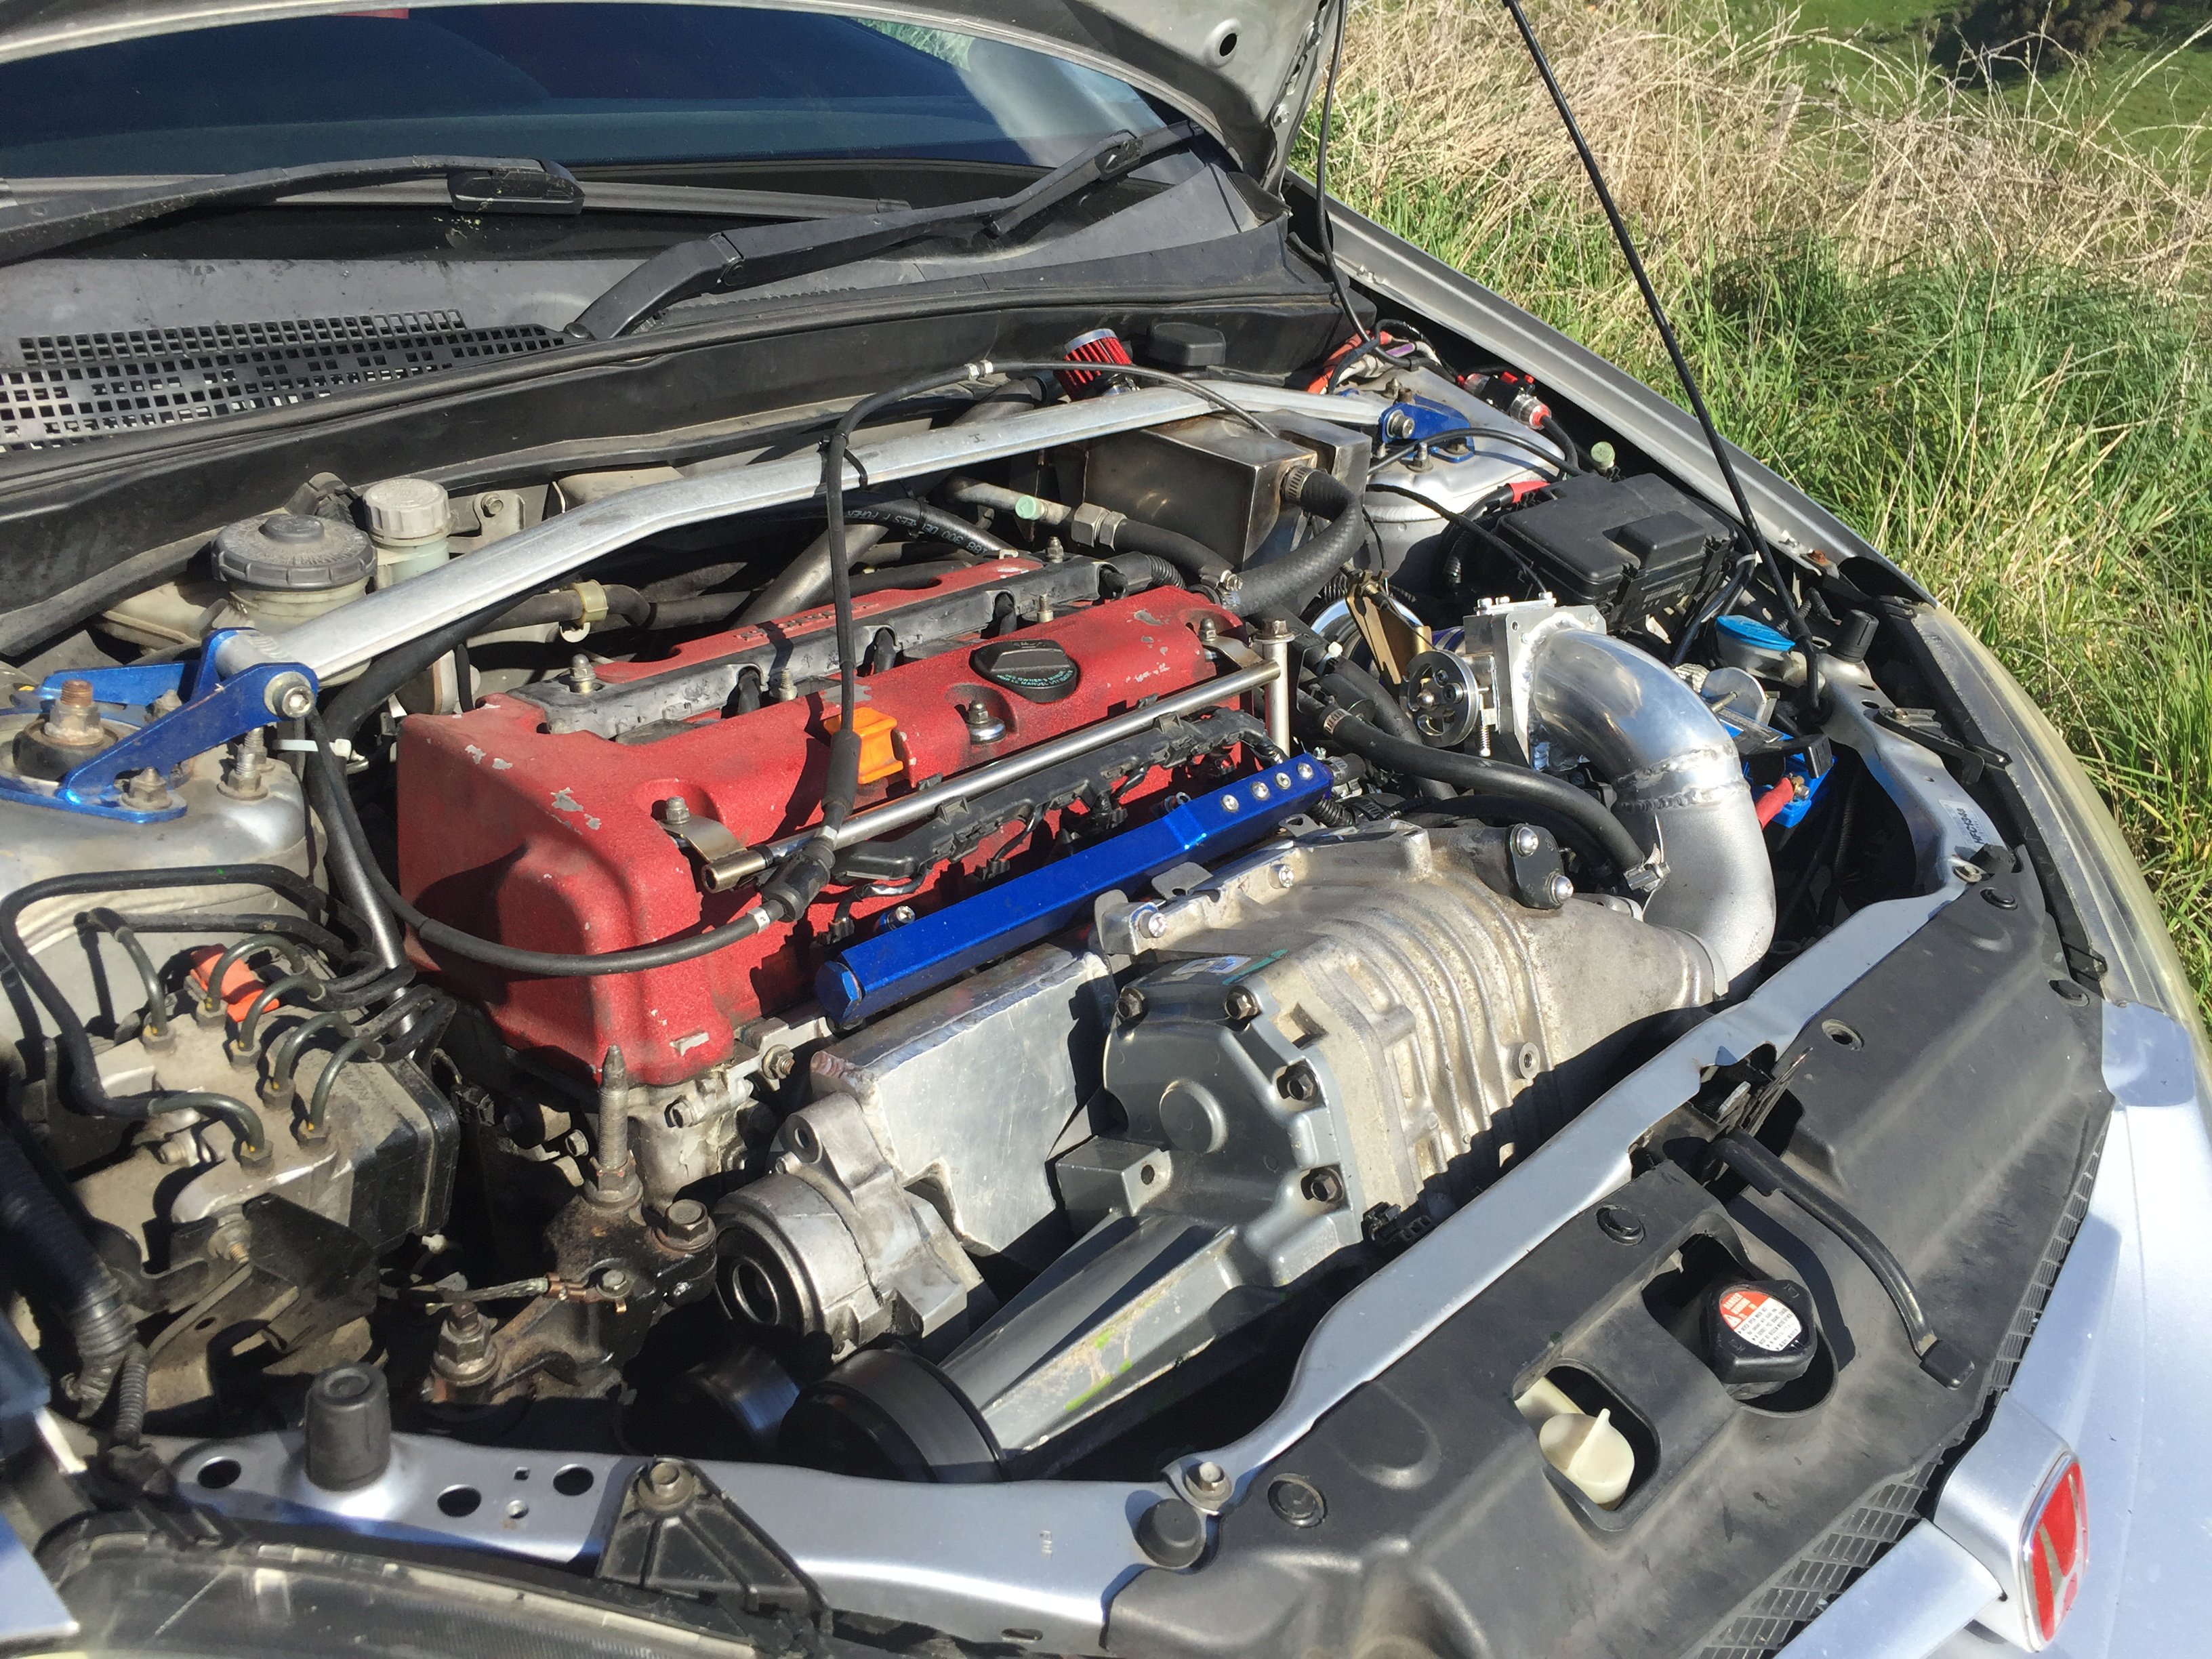
Been chipping away at this even though work has been crazy busy the last few months. Competed the front passenger tub and headlight tubeframe. Have left the inner quarter panel for now due to: a) I didn’t like what I did on the drivers side and need to change it and b) I couldn’t figure out the best solution here so will move on and come back to it when I find more enlightenment. So so much room for activities up front. Airbox is guna be huge!! so I bought my old road car back as a rolling shell that I sold to @Robbo a few years ago. I know it’s a tidy shell and still certed etc. don’t know what I’m guna do with it yet but for now it will sit in a shed at the farm just need an engine so may slap it together for something like 24hrs of lemons or other endurance racing event/get it back on the road and do some doorts or just keep it for when I eventually write off this shell (it will probably happen one day) Had a real lol moment when the strop broke and it rolled off the back of the trailer in the middle of Rotorua! Haha it came with a fibreglass bumper the same as the one I have for the racecar, spare facelift side skirts and most importantly a bumper support so I can mount the racecar one without more fab work woohoo! result is the front end is together for good now. Going to be challenging to drive anywhere on the road at this height (not a bad problem to have) while waiting on more materials for the exhaust I started ironing out my fuel supply pipework. Have used 1/2” stainless tube as an alternative to braided lines as I hate smelly fuel lines inside the car and the ID of 1/2” is the equivalent of -12an or something stupid so will be plenty big enough. Made some fuel line clamps lamps from some Ali I had lying around. Very happy with the result. any recommendations on fuel pump/filter to use? Want something reliable with a no-bleed back feature so I can run two pumps in parallel. Dont need much flow approx 200lph will be ok I think (need to check calcs) I’ve seen too many fuel pump failures at the track or beginning of stages that stop people completing events. Not going to take that risk.
3 points
-
while we are on the subject, remember that time at meremere a NA 16v beat a turbo 20v. @Stu2 points
-
Lol yeah it makes sense, I'll replace it with something better when it comes to it. The magazine was a solid paper block when it dried so chucked it. Bit of a tragedy not getting to see 1980's boobies.2 points
-
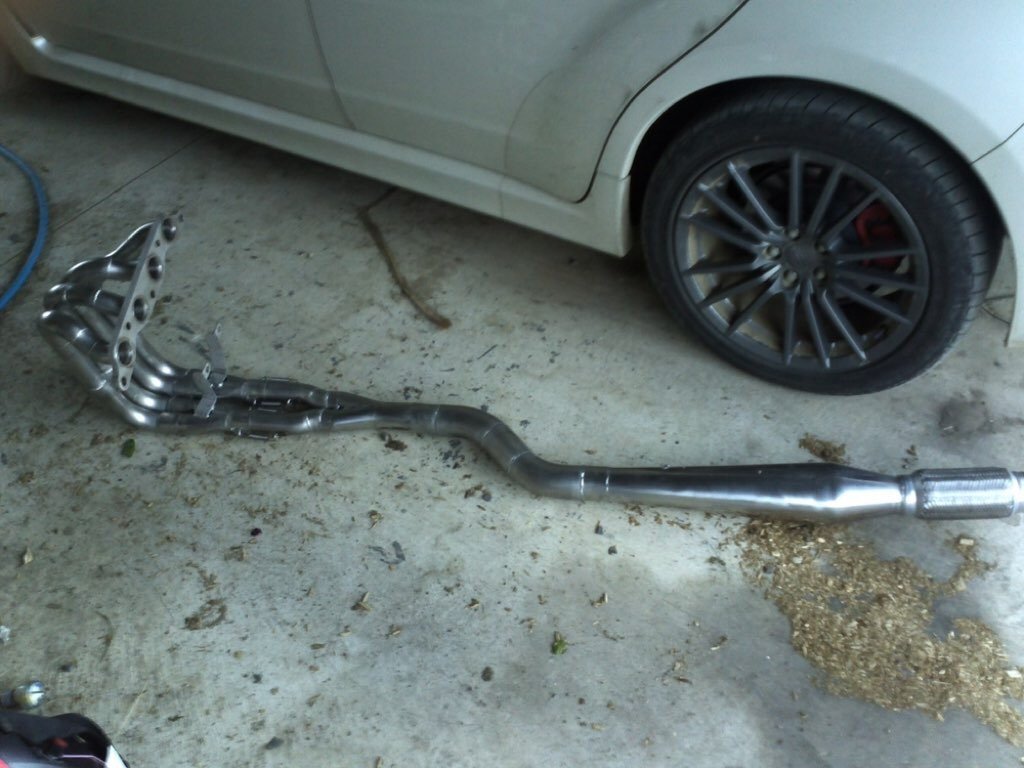
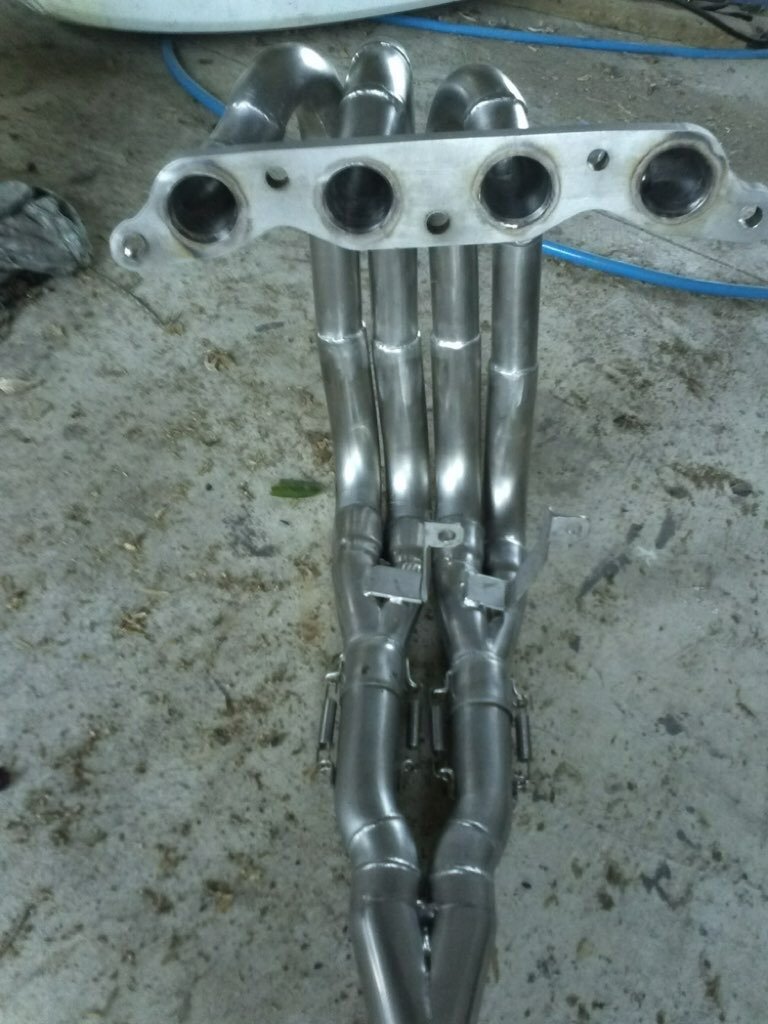
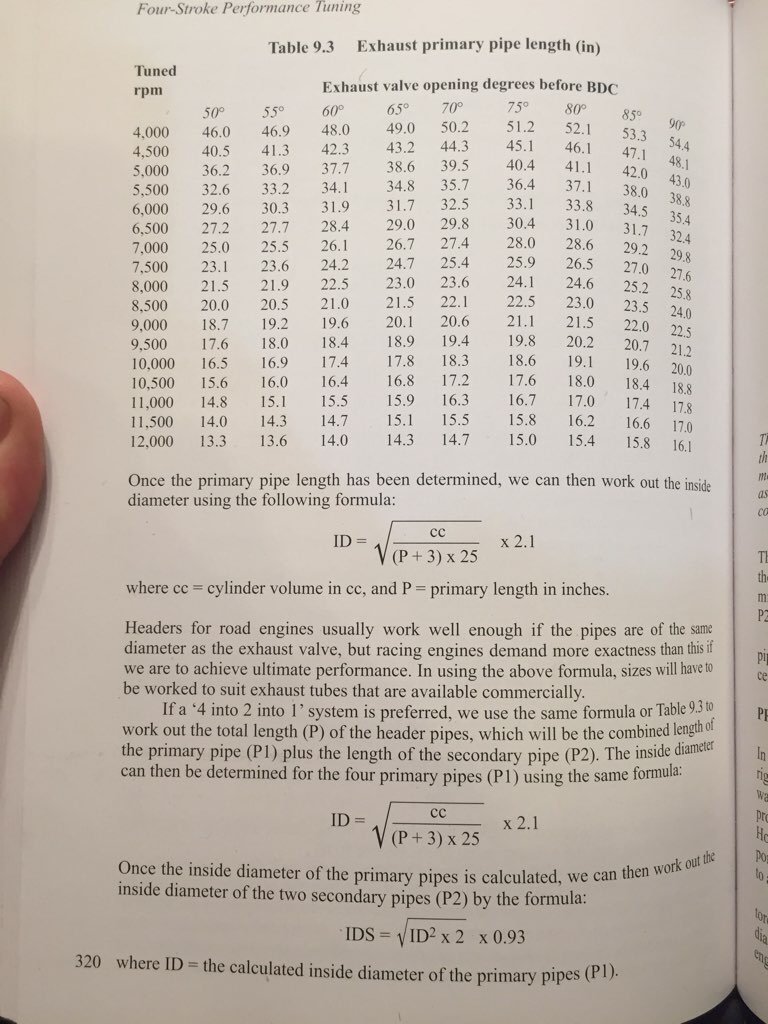
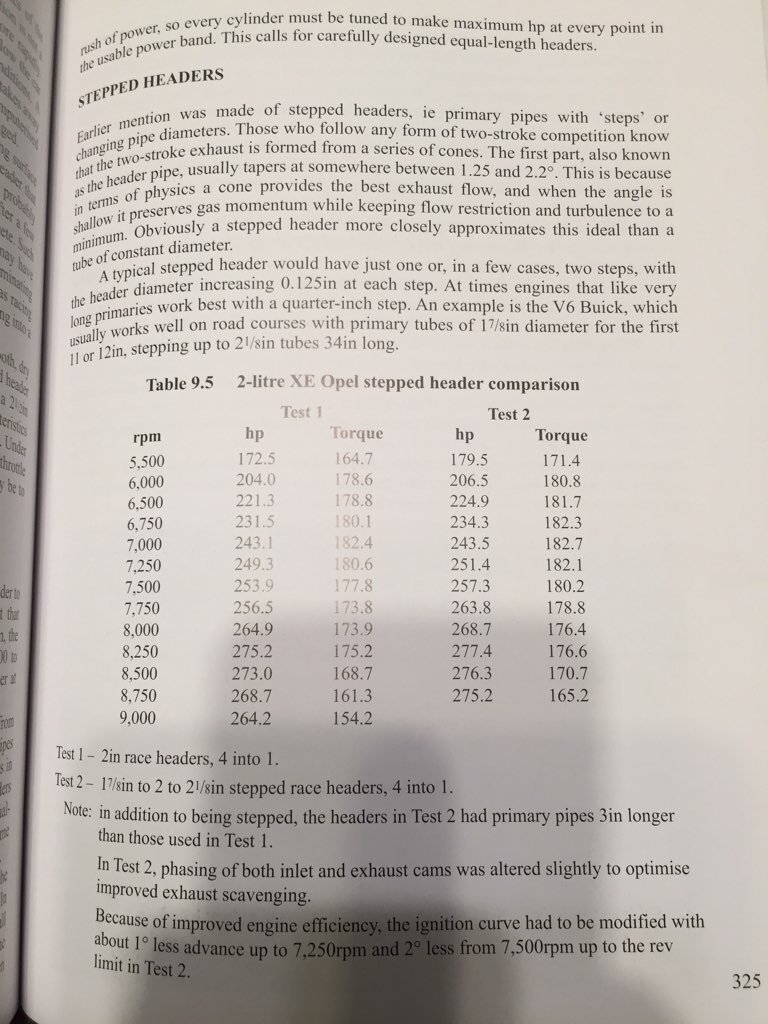
Yeah the step is the way to go. From what I’ve been reading they broaden your torque range by a good 500rpm. I think it would be worth doing a bit more work on the collector and the restriction straight after Which sets up the scavenging effect. here are the headers on dads car they were good for 140kw but is suspect they are a bit small for the 150 it’s now making. In hindsight we should have gone to 4-1 design as the range it makes power in has so many more variables such as cams and intake than just the header design and you want them to compliment each other slightly offset not all line up in the same spot. Making power is like building momentum (I.e. area under the graph) Keen to see how far this thing can go 150kw is a lot. What compression are you running? I’ll see if I can pull out a dyno graph of the old mans 20v. Edit: @Truenotchafter reading those articles in my build thread I realised my understanding of reversion vs scavenging effect was wrong. I always understood them to be the same thing but they are quite different. the reversion wave (exhuast particles) travels at approx 300ft/s (this may change depending on cylinder/header sizes and compression) and the scavenging wave (sonic) travels at 1540ft/s (this is a number a smart old Barry once told me to use with expansion chamber distance from exhaust valves) I guess the trick is to set up the lengths so you don’t end up with a flat spot caused by reversion but still get the benefits of the scavenging. I wonder if the reversion chambers would effect the scavenging wave too?
2 points
-
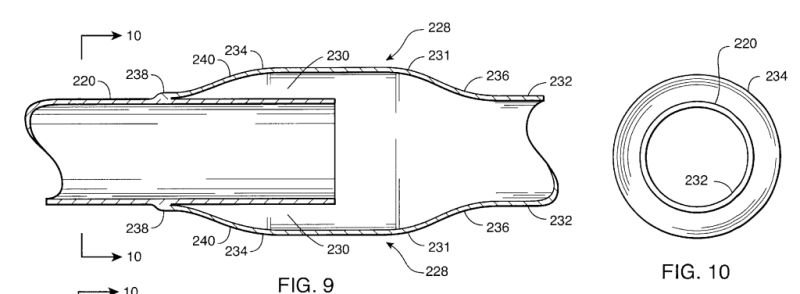
You got me started... Now you receive homework... Some systems have them after the header, some have them on the header: Here's a reading list about anti-reversion chambers: https://crateinsider.com/using-anti-reversion-to-create-free-power/ https://thumpertalk.com/forums/topic/1075515-megabomb-header-explanation/ https://forums.seatcupra.net/index.php?threads/exhaust-design-and-anti-reversion.319359/ https://nasaspeed.news/tech/engine/the-art-of-scavenging-myths-and-methods-of-getting-burned-gases-out-of-an-engine/ https://nasaspeed.news/tech/engine/the-art-of-scavenging-myths-and-methods-of-getting-burned-gases-out-of-an-engine/ A bit about megaphones: https://www.hotrod.com/articles/post-collector-exhaust-add-ons-can-affect-exhaust-tuning/ ... This hole is almost as deep and weird as the black magic of 2 stroke expansion chambers...
2 points
-
They can put it back in the system. I bought a car for parts (with rego on hold) and when it arrived I decided it was too good so a couple of weeks later I go to get it a wof and told its been dereg, wtf I thought, called up ltsa about it and the previous owner dereg it after I bought it so ltsa reinstated it with a few clicks while I was on the phone to them. If only it was that easy to rereg a car thats just fallen out of the system2 points
-
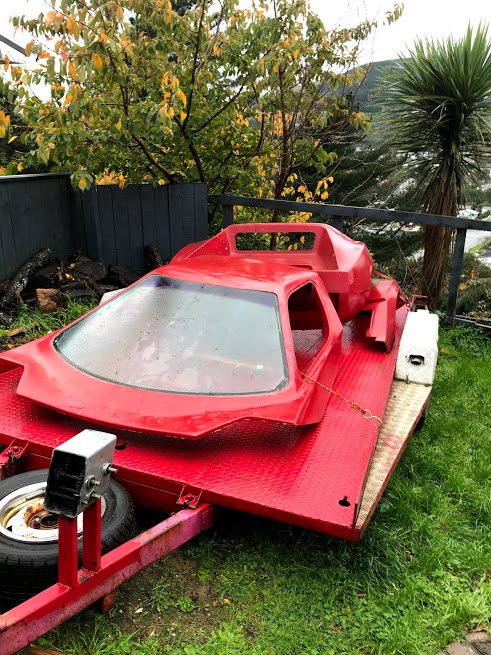
Got some very useful bits. The roof is a life saver, the glass is cracked but I knew that already. Also got a front lower section, rear lower section, the top front and rear which is supposed to be one piece but that bit has been cut in half and missing big parts. It was going to be lengthened and put on a ladder chassis but that project didn't go ahead. I mainly need the roof and the bonnet. But the other parts can be used as a mold to fix my front section. Also got a new bonnet and rear engine cover. Looks like the vw engine type cover.
2 points
-
Here is said motivation requested
2 points
-
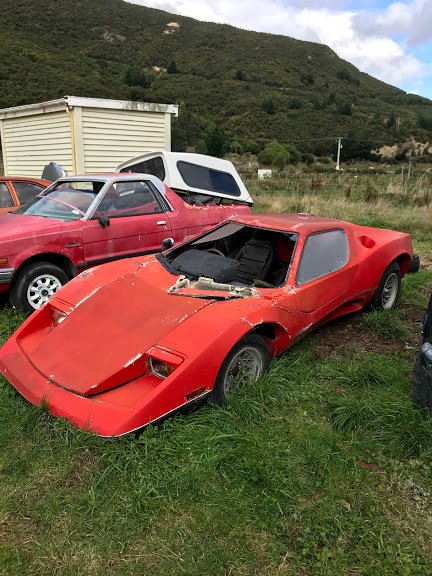
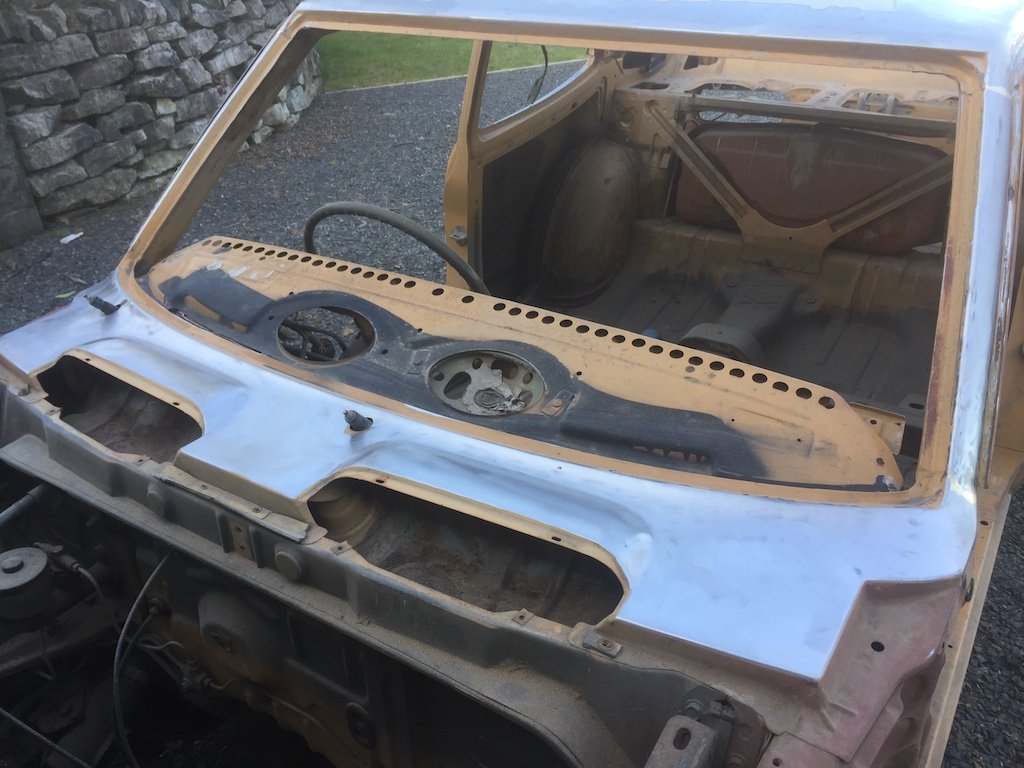
For some reason my wife hasn't murdered me. So here's another project. It popped up on the Facebook market place, which is about the only thing it's good for in my mind. Long story short, the seller had it among several other assorted wrecks on a big off the grid property, the cars were already on the land when he bought it so there is zero history. I wrote out a receipt stating this so I have a way of proving ownership. There is no police history for the plates or chassis number. The plate and chassis are not on Carjam, or NZTA where I spoke to a few people including a supervisor who was very helpful but basically it came down to the fact its not on their records because it must have been deregistered before they moved to a new system in 1994/5. Paper records were kept for 7 years then destroyed....fck. So here I am knowingly buying a unregistered car with no history, no windscreen (unique to the car) and has been left outside for who knows how long. But the metal floor pan is solid. WTF am I getting myself into:
1 point
-
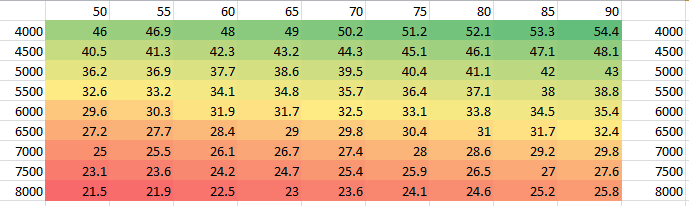
This is intereresting to me right now, because it shows how much you can potentially move the powerband around with exhaust side cam timing. So assuming you could move the exhaust cam a full 40deg, which mine cant its only about 20 deg, here is the information from this table put in a graph showing how much you could move the powerband peak at a given tuned rpm range: (only went to 8000rpm because cbf typing it all out) But the trend is that higher the rpm its tuned for the bigger the rpm range is. So if I had a header designed for say 7500rpm I could only spread the peak by probably 5-600rpm with 20 deg of VVTI. But then thats not unsubstantial if its a taper away from that peak on either side. I guess you could also move the pulley a tooth on the cambelt. Will be interesting to see how this relates to some IRL testing in a bit. Heres the data from the table with a colour scale In hindsight stopping my numbers at 8000rpm is dreadful, why even get out of bed for less than that. But also, CBF doing it again so here we are.
1 point
-
Yep. And the speed of sound changes with temperature, so it's important to know the rough temperature of your pipes too.1 point
-
Wow that’s pretty close! Yeah smallport life is much better than 20v and easier to make the same power.1 point
-
Had a company track day today, took the crown for a couple of laps, 100% just for a Photo Op. holy shit its terrible on track! cant corner at speed to save itself, might need a wheel alignment, but im pretty sure its just the chinese tires and nearly 2 ton weight! it did pull a (GPS indicated) touch under 170 km/h down the main straight which i thought was pretty epic for a 2ton brick with a soggy automatic. that little supercharged 1g can really pull! if it didnt over heat the brakes after two laps and wore a better set of tires, there would be more in it, but its unlikely to ever see track work again. especially once the mopar miata is running.1 point
-
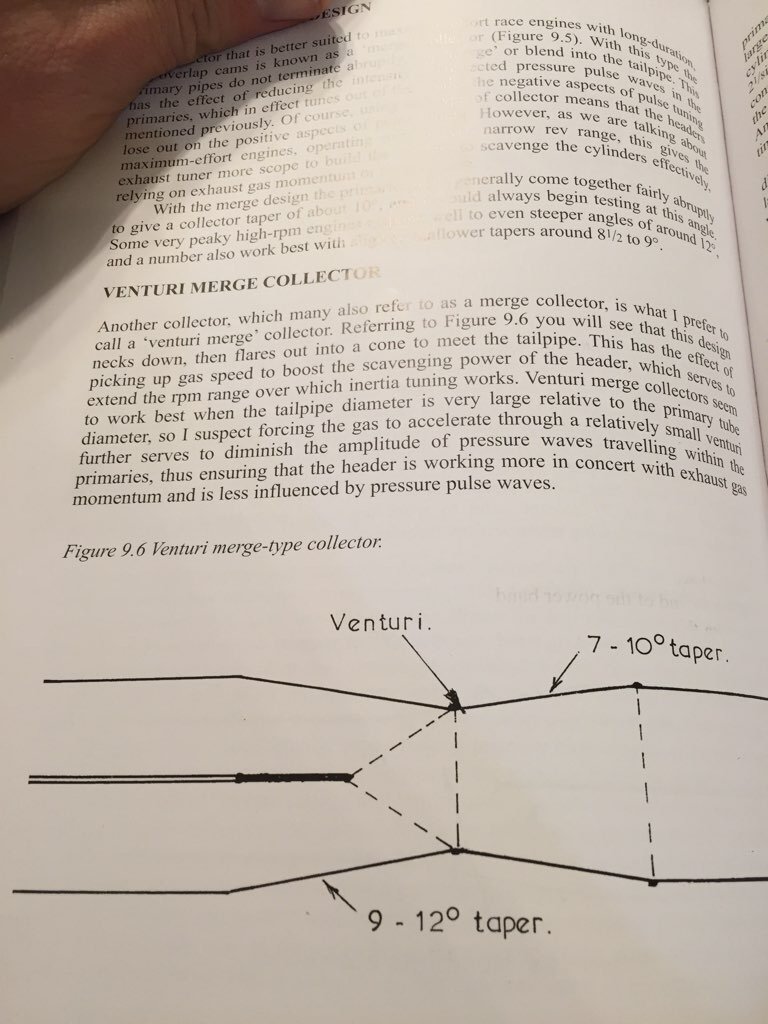
Interesting data from this book I’m reading that might help explain the tube diameter change (or lack thereof); engines typically produce peak torque at a mean gas velocity of 250ft/sec. (peak torque rpm is determined by size of pipe diameter) the max hp of the engine is determined by the pipe diameter changing the length of the pipe tends to ‘rock’ the power curve of the engine around the point of maximum torque Here’s some interesting data about primary tube diameter; Stepped headers; and data on venturi collectors; apologies for the spam in your discussion thread! This subject has got my brain ticking over far too fast in the last few days..
1 point
-
So the sonic/acoustic pulses move independent of the mass flow of the exhaust and much faster.1 point
-
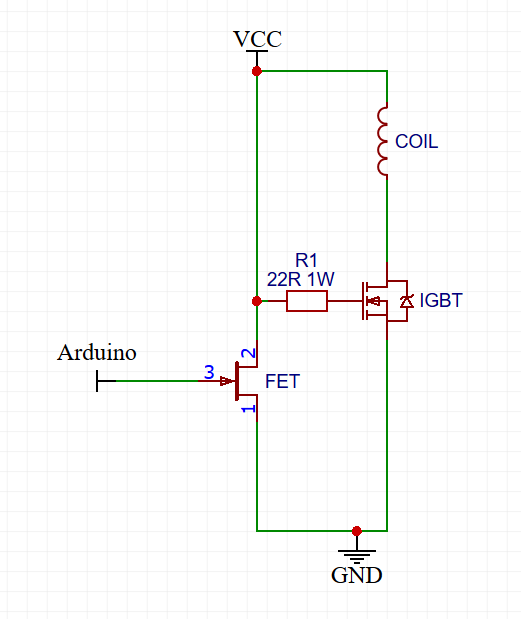
On your schematic it connects to the boost converter + via a 330 Ohm resistor, states grounds are separate. Is that what you meant? Grounds should never be coupled using resistors and all elements of a circuit should be tied to a common ground. Also, I'm a bit dubious about you tying the output of each FET/IGBT to ground behind a diode, I'd get rid of them. I'm pretty certain most ECUs run low side drivers i.e. place the IGBT after the coil so it grounds the coil. I think right now, without the use of a bootstrap circuit (something to ensure that Vg is always higher than Vs) you've got some funky stuff going on as the inductive kickback will overwhelm in the input signal. Somehow you've managed to get it to latch up each gate using those resistors but it definitely doesn't stand a chance doing what you want it to with the IGBTs signal input being tied to ground via diodes. Fuck it, this is roughly how it should look: This will invert the signal but you can just negate that in software (Coil fires from high to low). Might be worth protecting Vcc with a diode on the IGBT side. EDIT: Also, I forgot to add a resistor between the driver FET and Vcc. Right now it'll just short and explode.
1 point
-
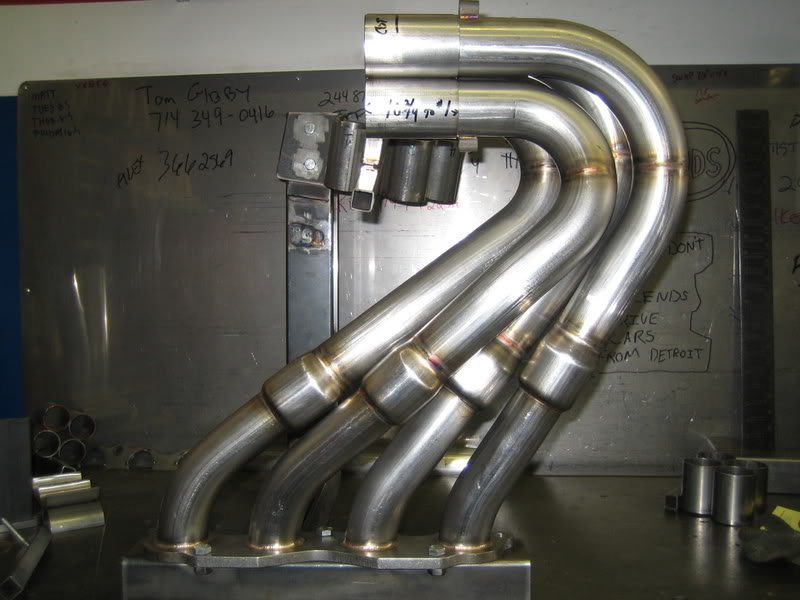
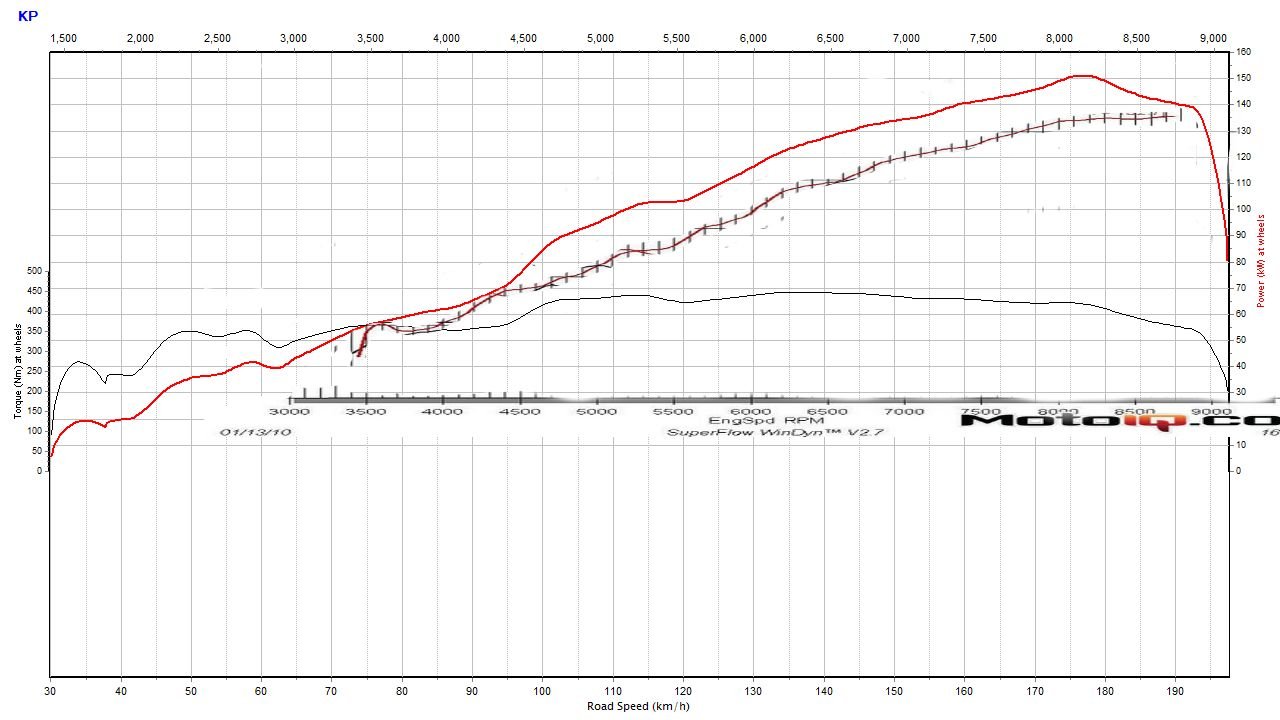
@Truenotch Those chambers look interesting. haven't tried anything like that on the runners. but definitely going to put it in my list of things to try. Have something similar after the collector to my exhaust. black part being 2.5" collector. red the cone and green 3" exhaust can see the cones on both extractors here @Rhyscar I have a short merge for the 44.5's with same 2.5" collector. it didn't seem to have any effect. but was pre dyno, so possible was some very minor differences. will likely revisit the megaphone setup also. should be gains to be had, but not expecting a lot like on the intake side. Its running somewhere between 12.5 and 13:1 compression. was going to go for more on latest build but cheaped out on new pistons. could skim a little more off the head. but would likely have a negative effect. as its all pretty tight and would have to adjust cam timing to gain piston to valve clearance. Found a dyno run to overlay from here https://motoiq.com/extreme-engine-tech-technosquares-monster-naturally-aspirated-toyota-4ag-part-3/ 1800cc engine, another interesting point is they are only running 285cc injectors, im using 540's at 60% = 324cc worth fuel. guessing they could be running high fuel pressure otherwise would be 100% duty for that power Looks pretty good vs this one considering down 200cc
1 point
-
Have you seen this? https://thumpertalk.com/forums/topic/1075515-megabomb-header-explanation/1 point
-
4 stroke is the same where you want to have that negative pressure wave reach the valve For the small amount of time where they are both open to draw through more intake charge (scavenging) The trick is to make sure the valve is closed before the vacuum sonic wave stops (length of expansion chamber determines your window) to prevent reversion pushing spent gases back into the chamber. I think we are both on the same wavelength... the 4-stroke application has a lot smaller rewards than 2 stroke but is still worth chasing.1 point
-
Yeah it is a black hole indeed. Interesting data about the megaphones. Looks very weighted towards v8 collector sizes though! The book describes them as tail pipes and has similar data around 7-10deg angle and lengths. There isn’t much about the angle of the reverse cone but my understanding is the steeper the angle determines the sonic power reflected and over what rev range. I suspect picking something in the middle of the recommended angles (similar to dads expansion chamber) is the way to go unless you are doing all the calcs and can test 2-3 designs.1 point
-
Have you done any reading about anti reversion chambers on headers / after headers? I know you tested an expansion chamber at one point, but I'm not sure if you've given these puppies a go. It sounds like the theory around stepped headers could serve a similar purpose to these anti-reversion chambers. They look like they could be fiddly to make though... There's quite a few open wheeler headers with these bits in them (high level like F2 and old F3 cars) and lots of chat in the big block speedway world too.
1 point
-
maybe worth a try. but im more leaning towards 44.5 is just too big. the step made more power, so tempted to try that on the 38mm's. the stepped section will be getting pretty small and may cause a restriction though. no real specific area in the rev range im aiming for, what ever it likes really. Tbh goal already achieved was looking for 150kw with good midrange power. but why not carry on.. i know i could easily make 155kw+ with the parts i already have hanging around. but would only be good for wank factor or a circuit /drag car. as would take a big hit in the low/midrange. would be interested to overlay my power curve onto other 4ages making the same power.1 point
-
It's so cool seeing this car on the ground with a front bumper and bonnet. Looks staunch as fuck.1 point
-
at this stage contact the Trellis Outdoor Centre in Tauranga, they are the first Heat pump boxes I've seen with my Panels (or any local handy man / Trellis manufacturer should be able to "knock one up") "someone" might make a killing in a Large City buying & up-selling my Panels eh (I'm still under 5x Auckland area Stores) only the Ply Fern portion is my creation / responsibilty, I've been trying to sell (or make contact) to shops all over NZ and it still a slow process, even with a nation wide rep for the past 12months Mitre 10 Mega Hamilton sent back their order (didn't want to create an account for a "Small order") vs Dunedin that ordered 2x Pallets of Panels in Feb (sorry didnt come here to derail or interupt the thread with my issues hah) Another!1 point
-
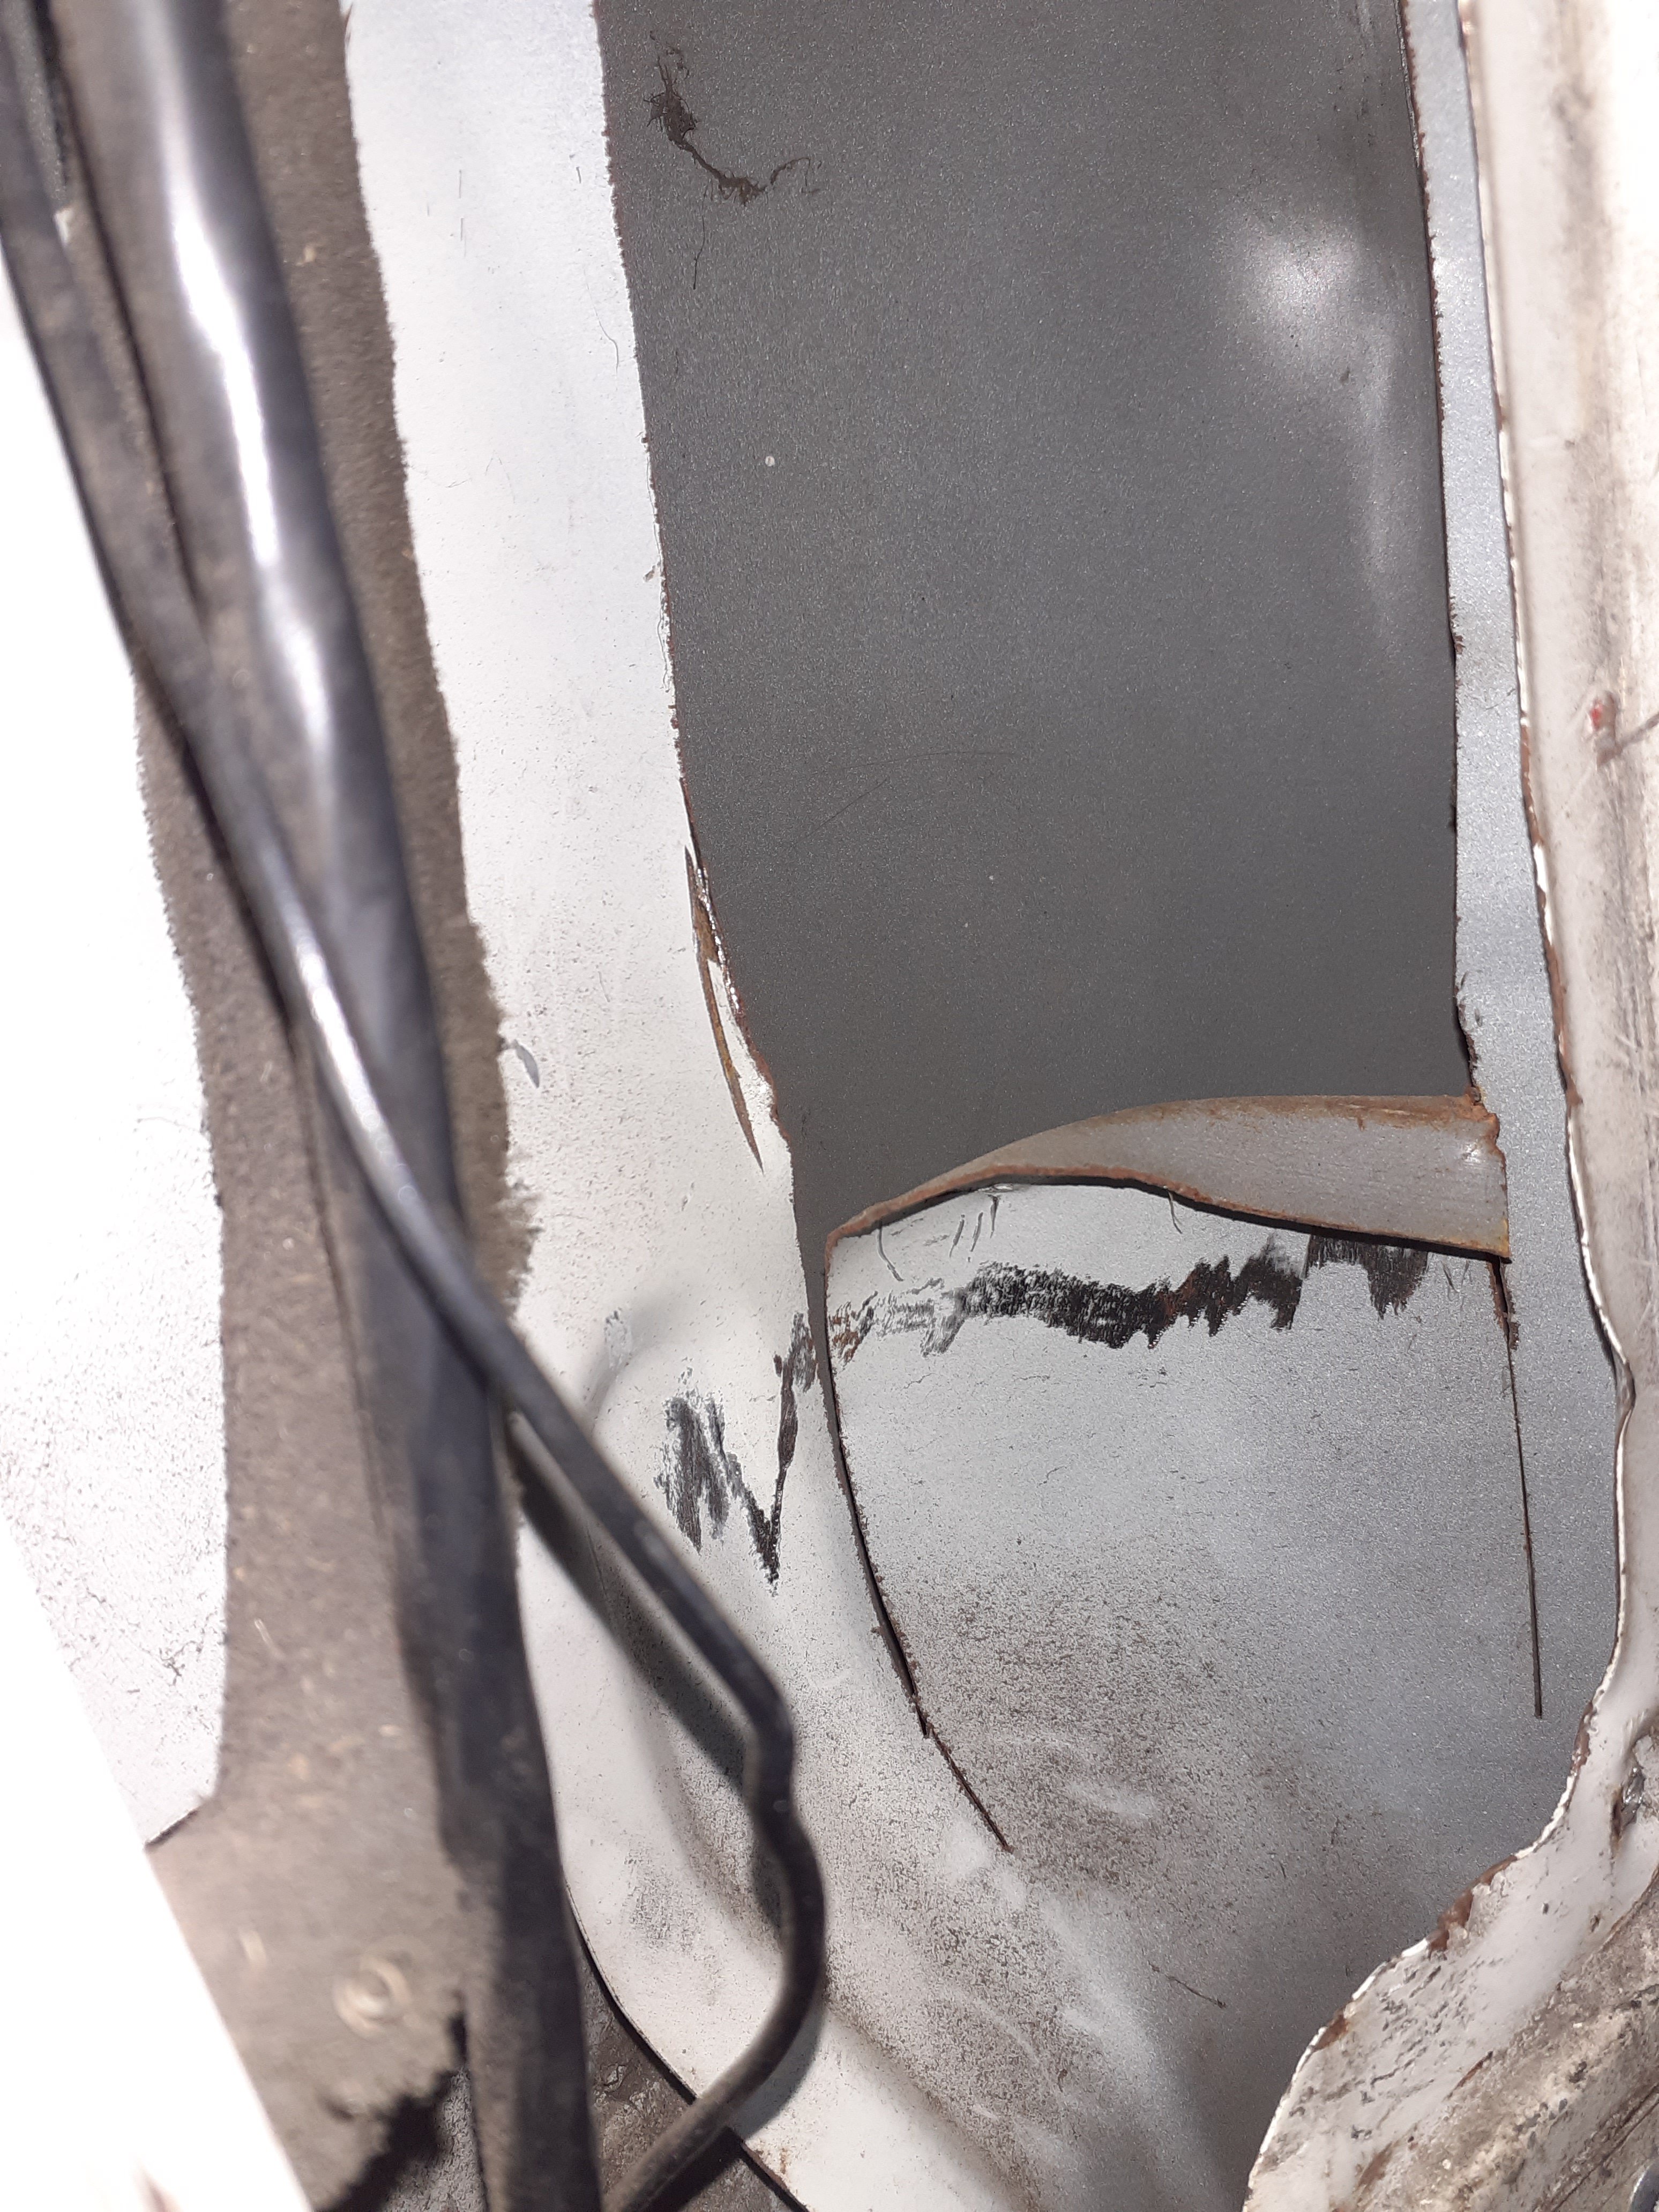
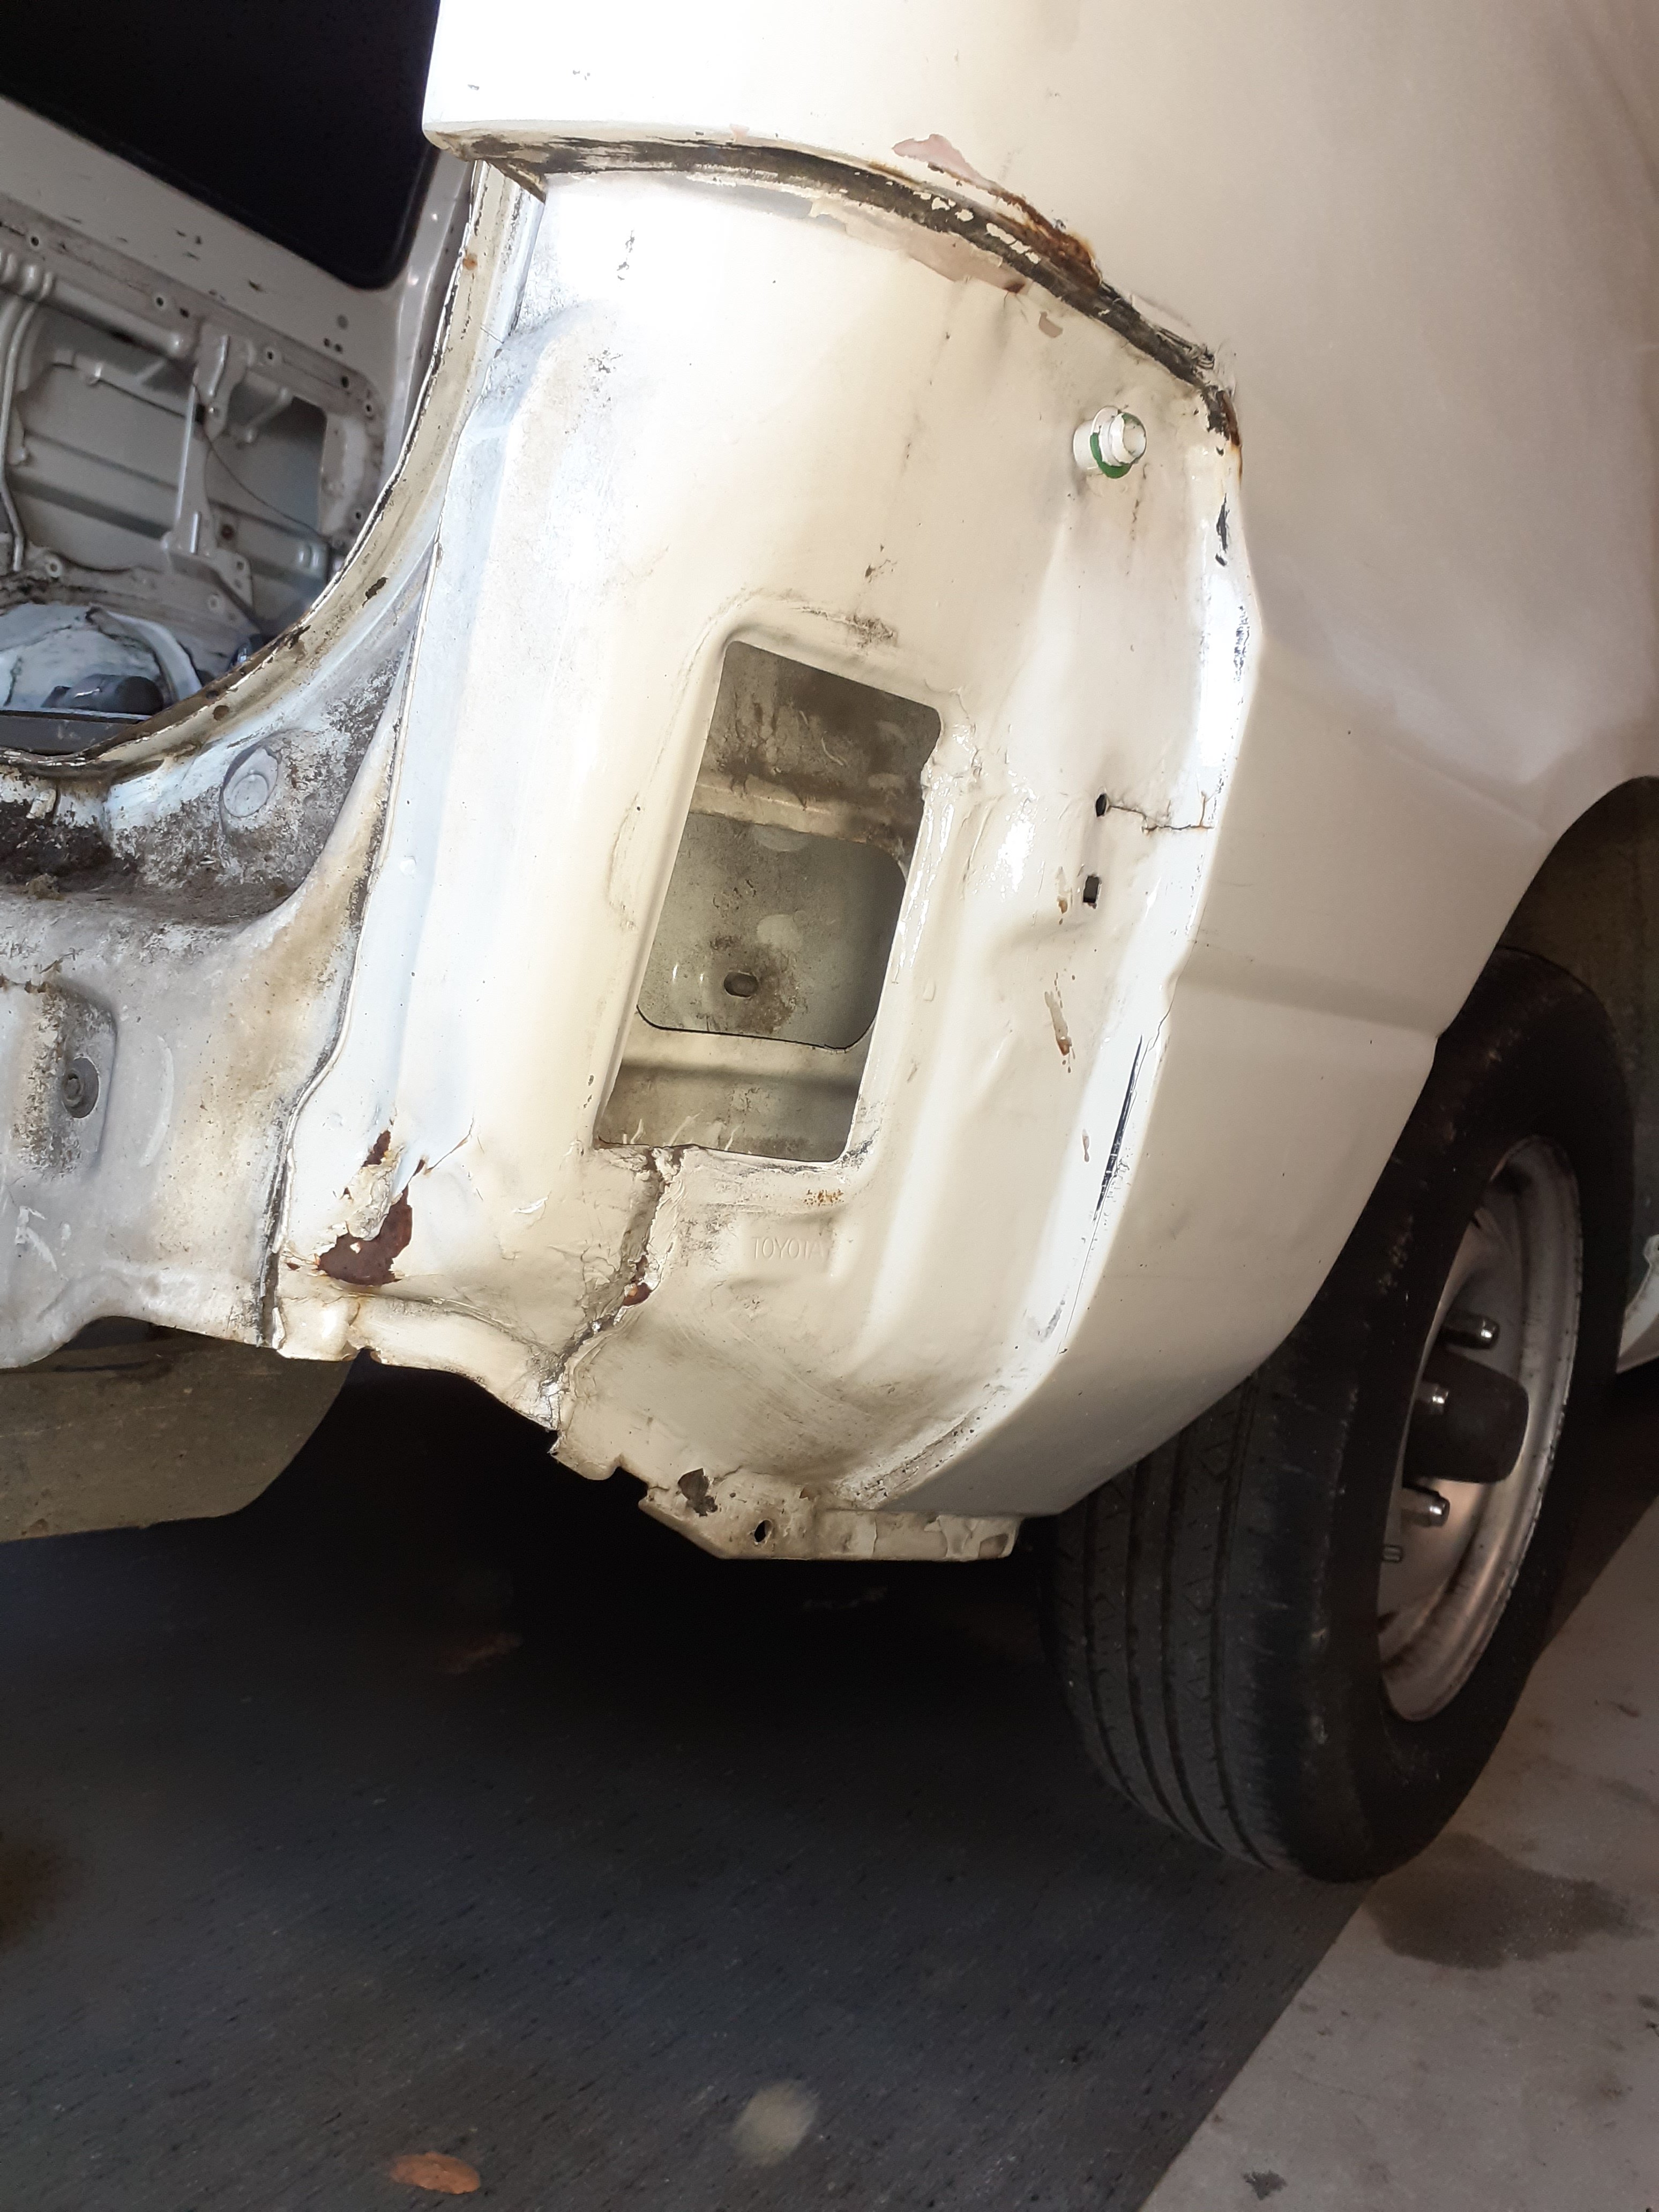
Prep for paint on van commenced Whoever the panelbeater is that did this repair needs a dickpunch.
1 point
-
noisy version of above1 point
-
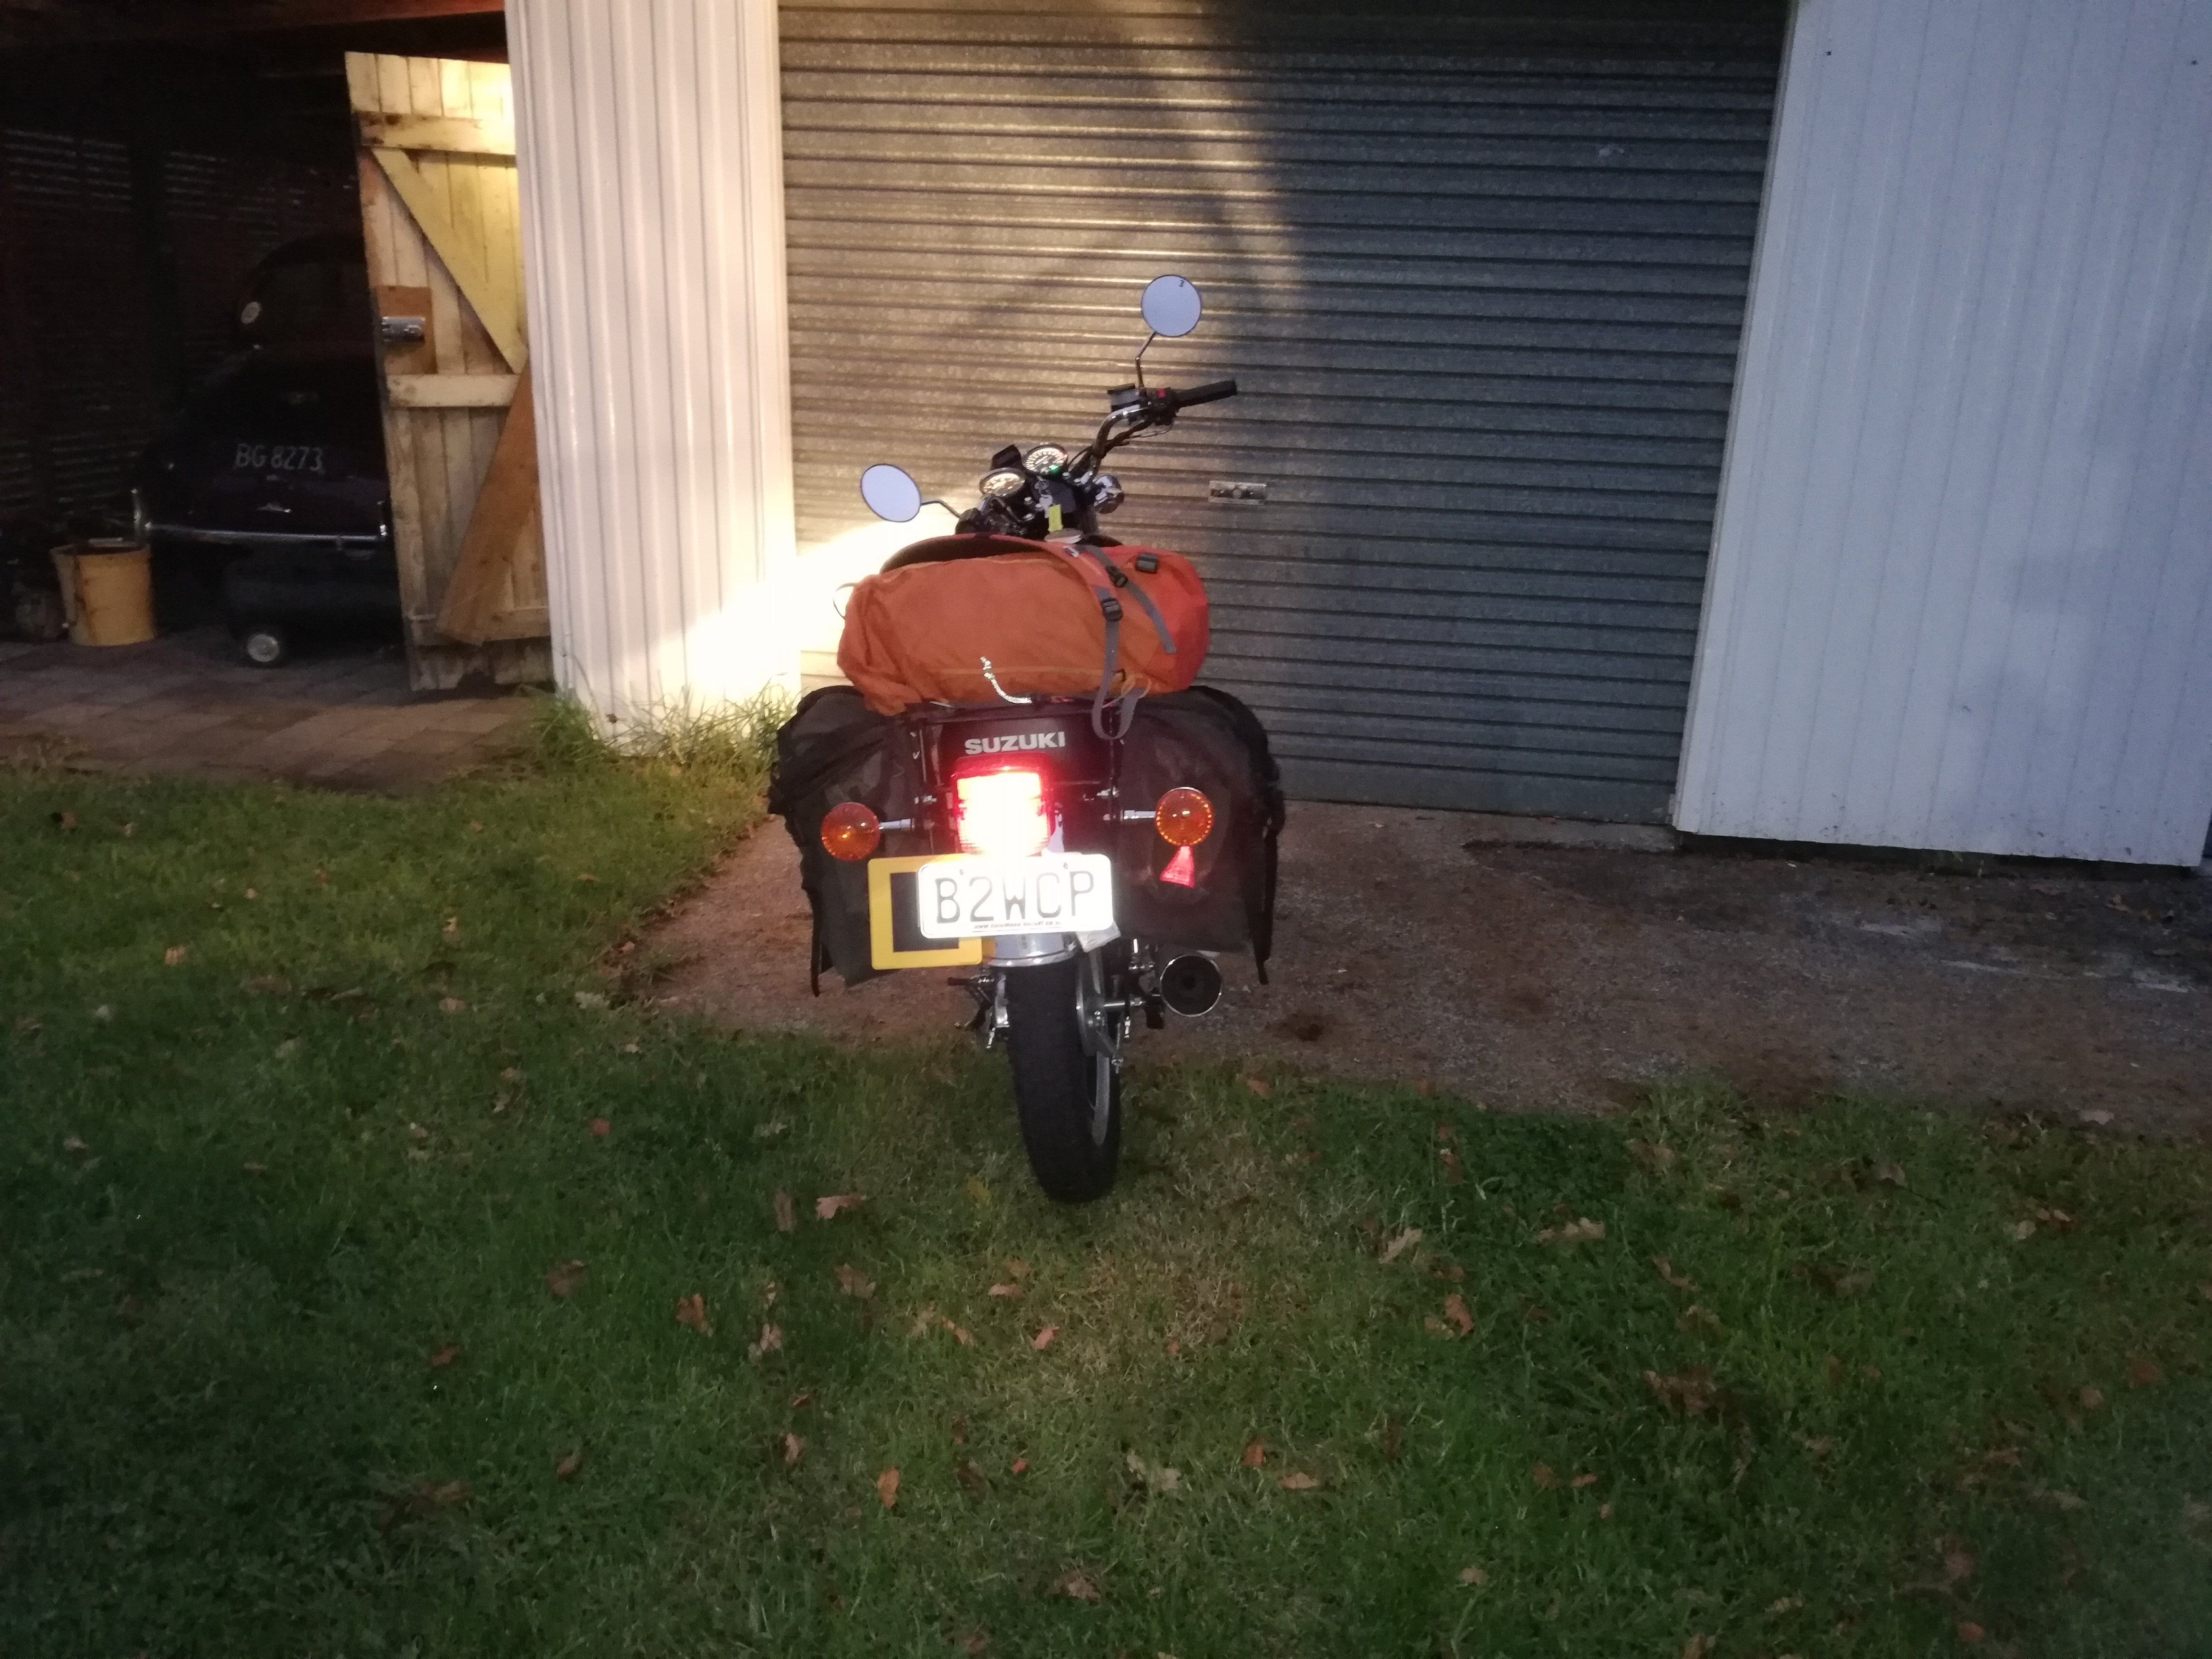
Adventure GN Does more than 100kph so I'm wondering if NZ ones get higher gearing, or are they putting 150 cyclinders on them sneakily? 260km and I've not hit reserve yet
1 point
-
Tempted to order this https://www.airsuspensionbook.com/1 point
-
It'll be clean, but it will still have lost a lot of its properties that makes it useful.1 point
-
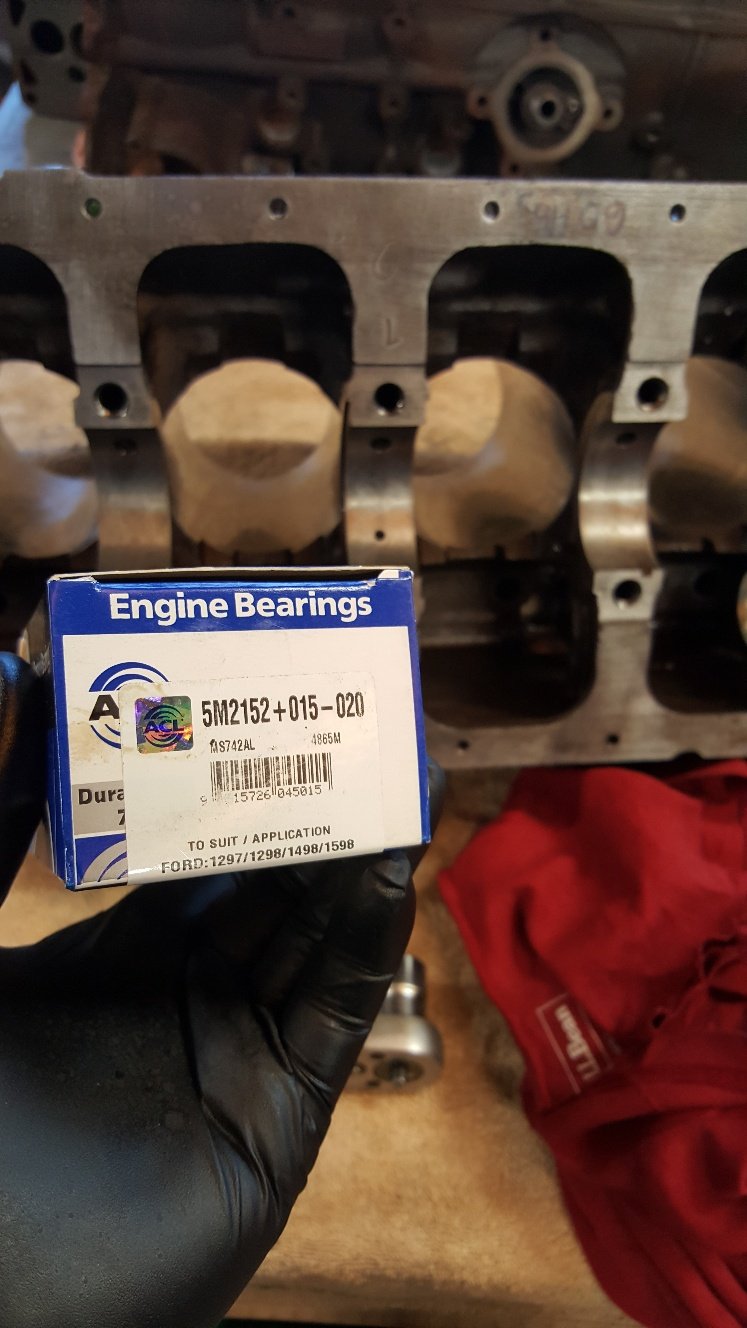
So i got my hands on some plus 15 back -20 main bearings. Thanks to Ford and their below average machining they mis machined the main tunnel on some of their blocks and had to come up with a solution of +15 back bearing to take up the slack. These can be challenging to get at times. So then I mount and measured them so I had a size to machine the crank too. Got the crank dialed in the crank grinder. Start to bring the wheel in and just touch the journal and you can see the .002 thou wear. The grinder has just started to clean up the left side and a bit in the middle. Once it's all ground we put it into this modified wood lathe we use for polishing.
1 point
-
1 point
-
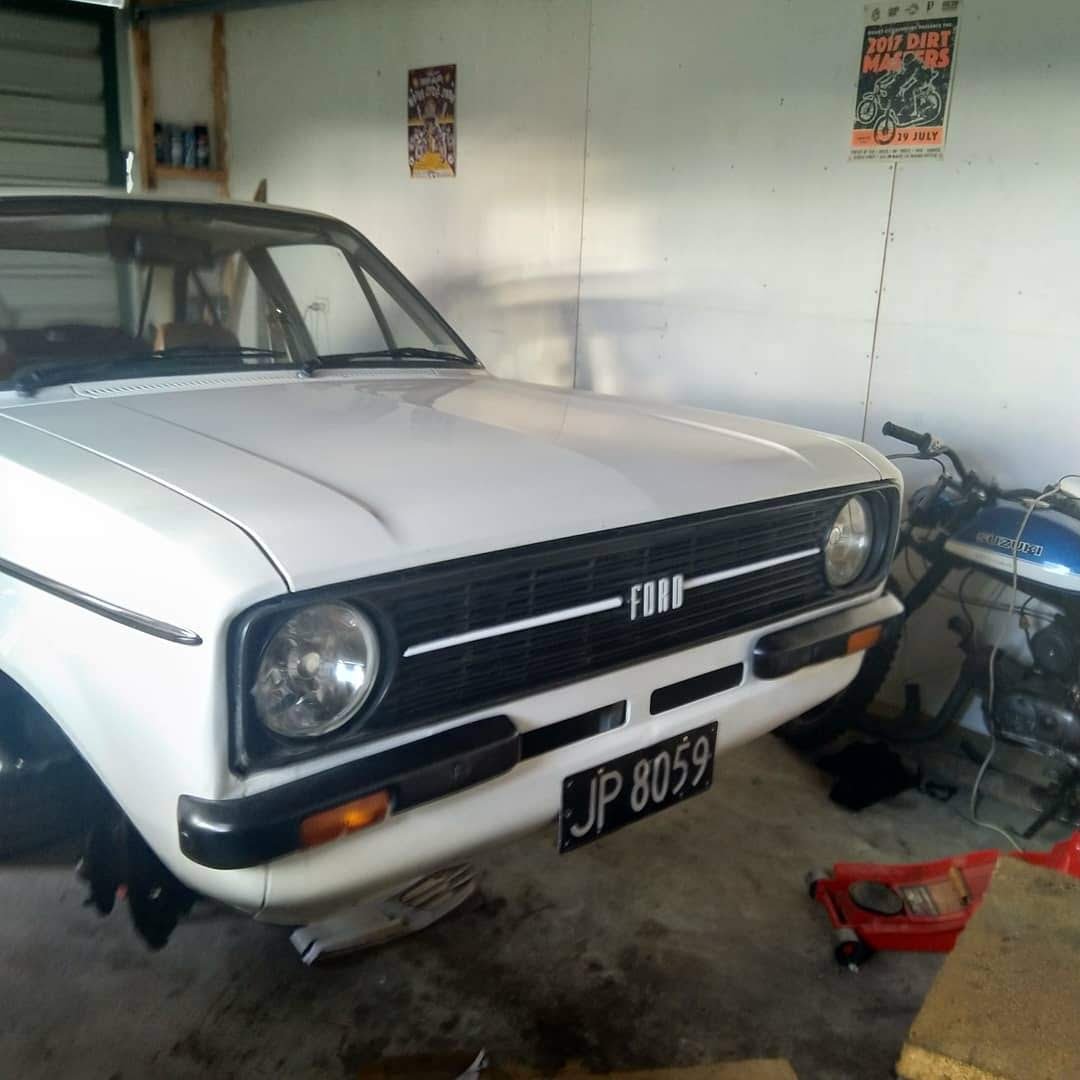
Hey guys, been lurking for a while and thought I should get around to posting a build thread. I bought my Escort about 6 months ago. Previous owner had bought the car from new and drove it until he died. Only 136,000kms, a lot of which were at highway speed between Chch and Rangiora. Interior was in great condition, body had a few scrapes but nothing major and was basically rust free. Probably going to be pretty slow progress to lack of funds, but will hopefully get painted over this summer. Discussion thread1 point
-
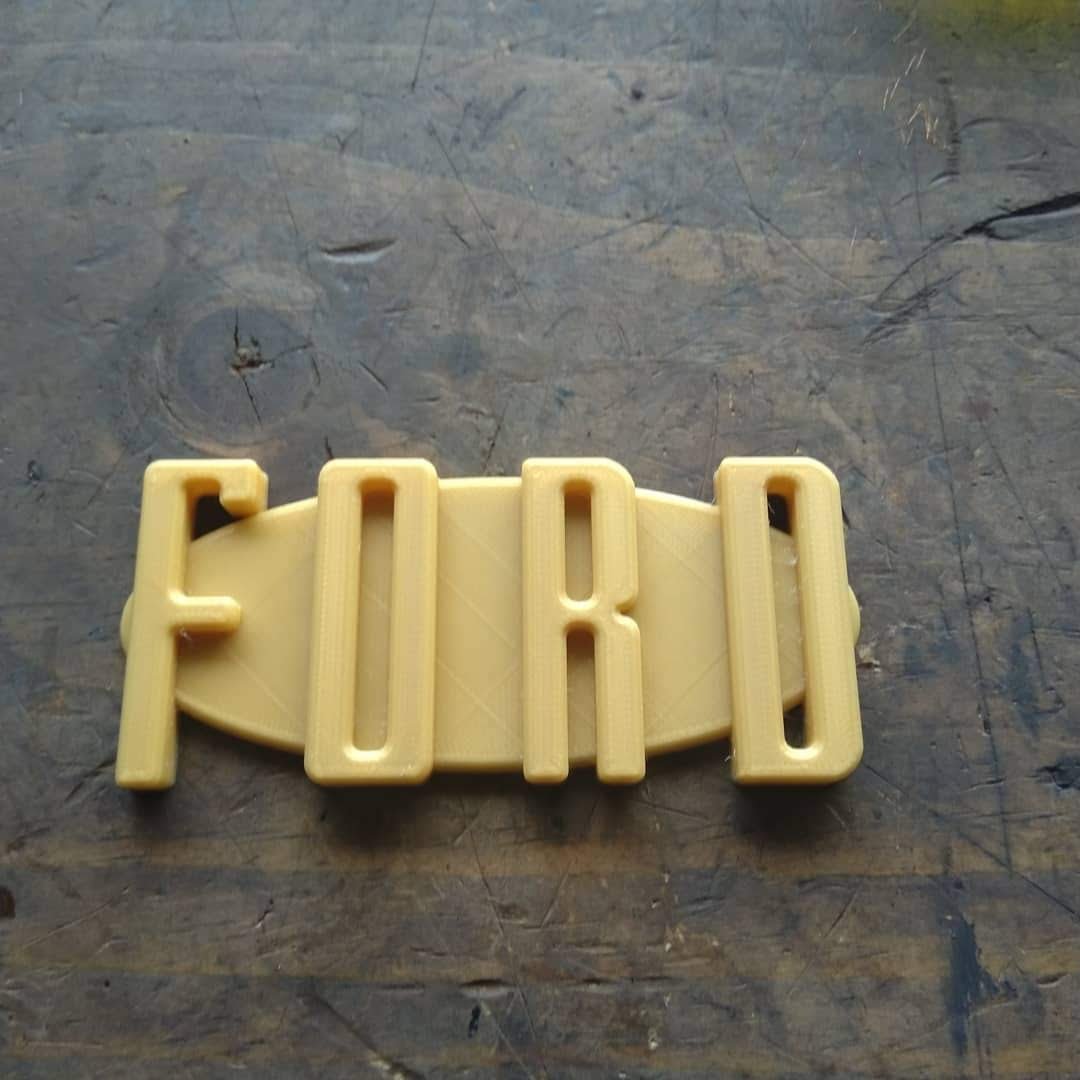
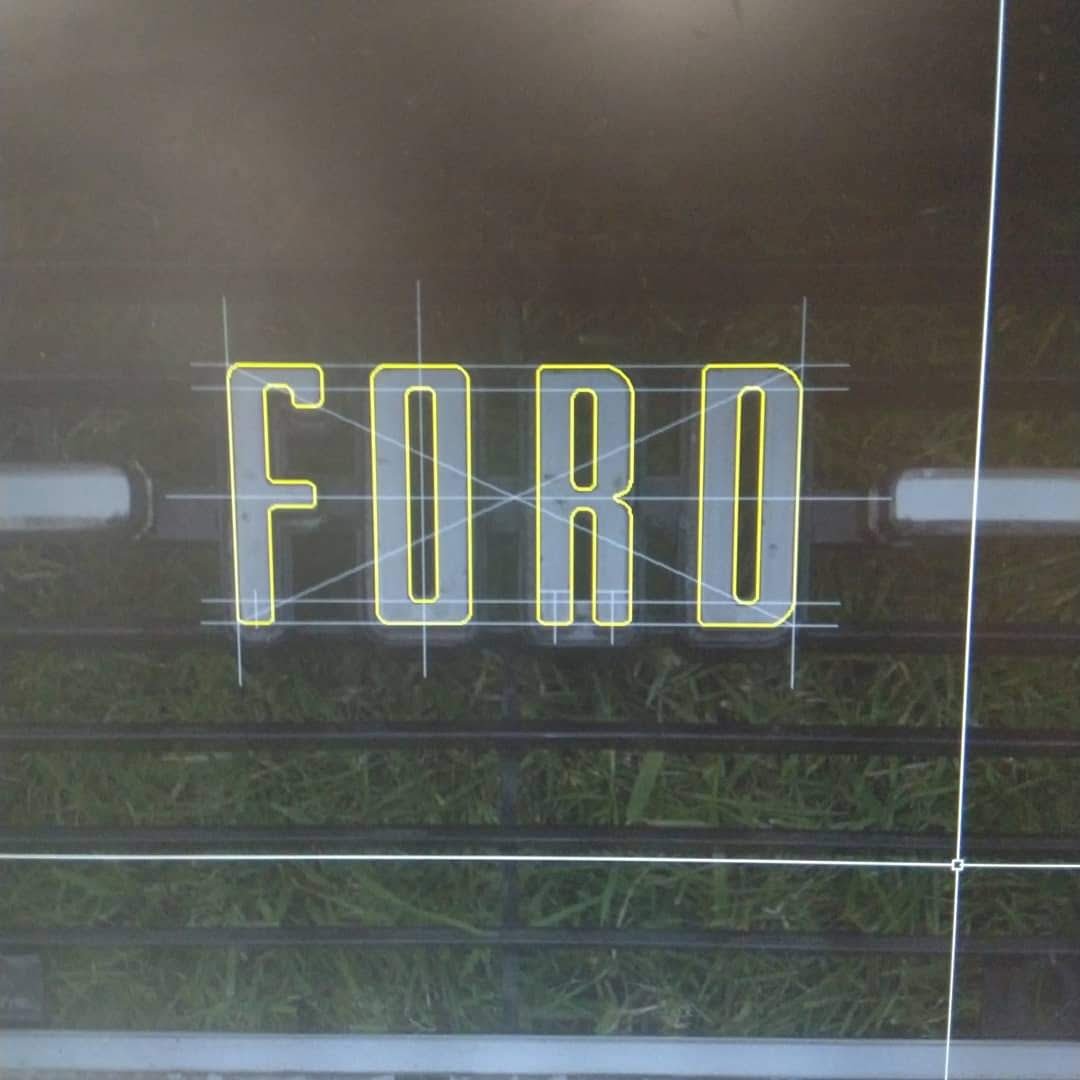
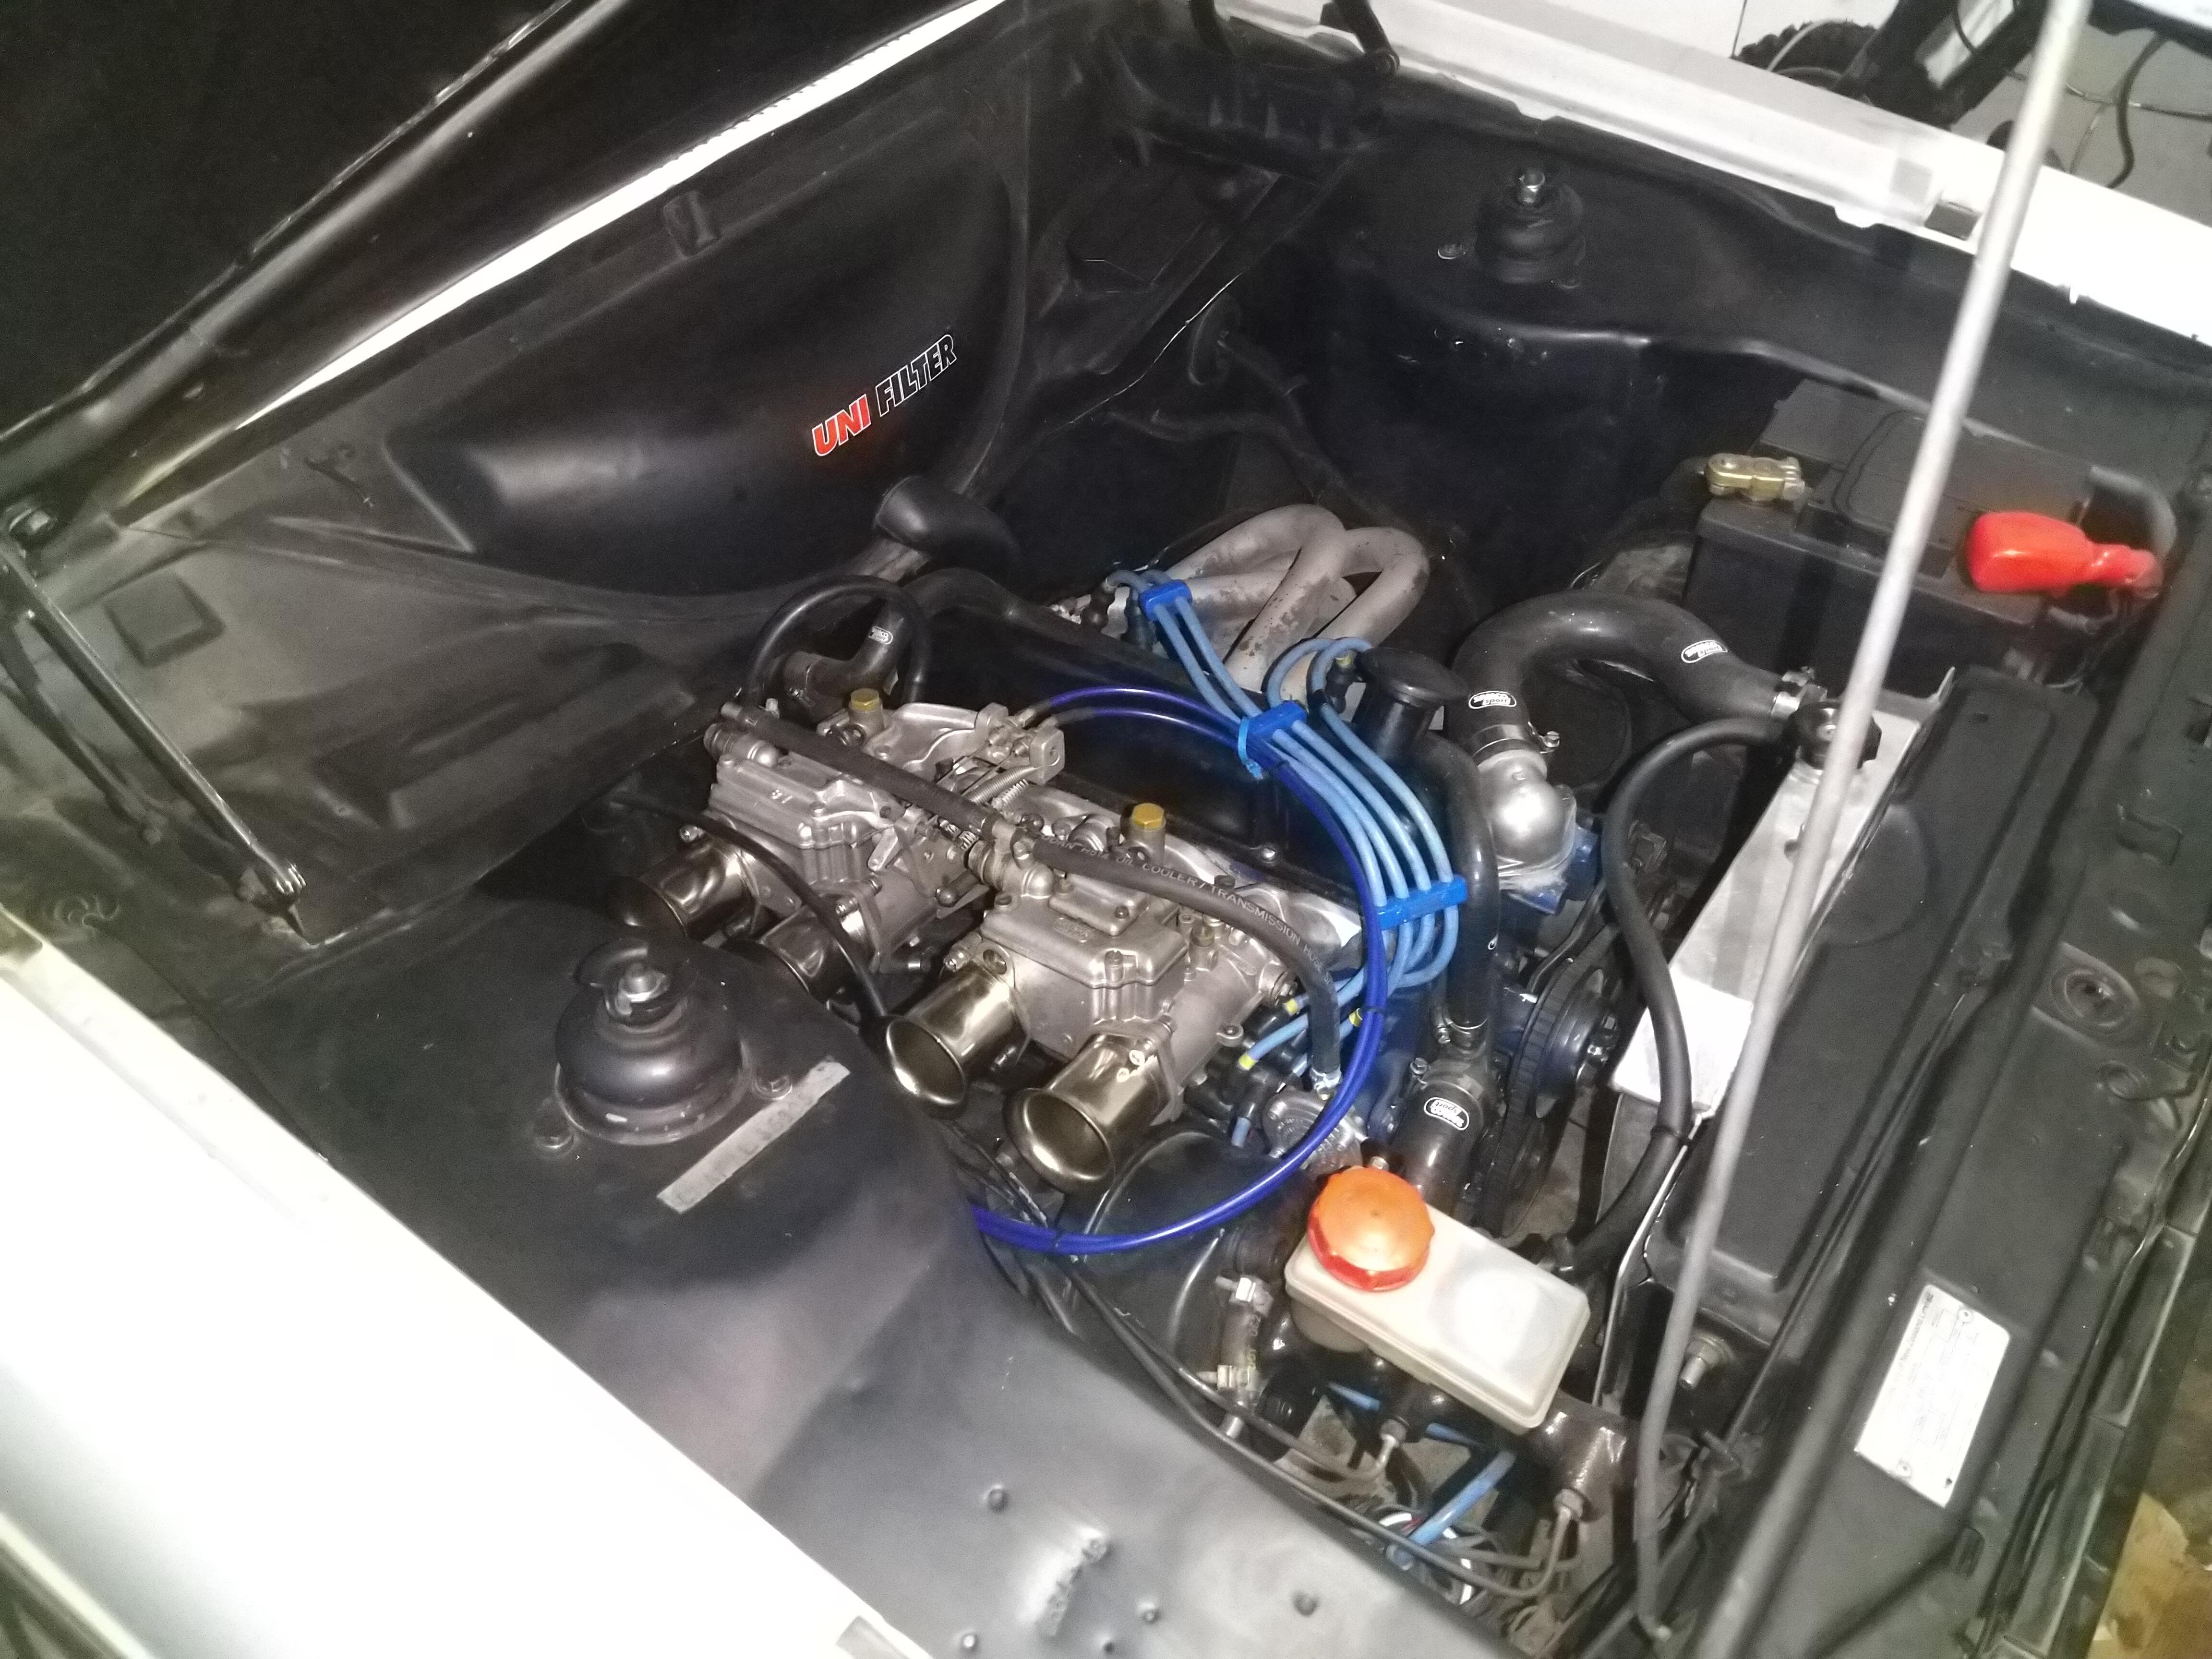
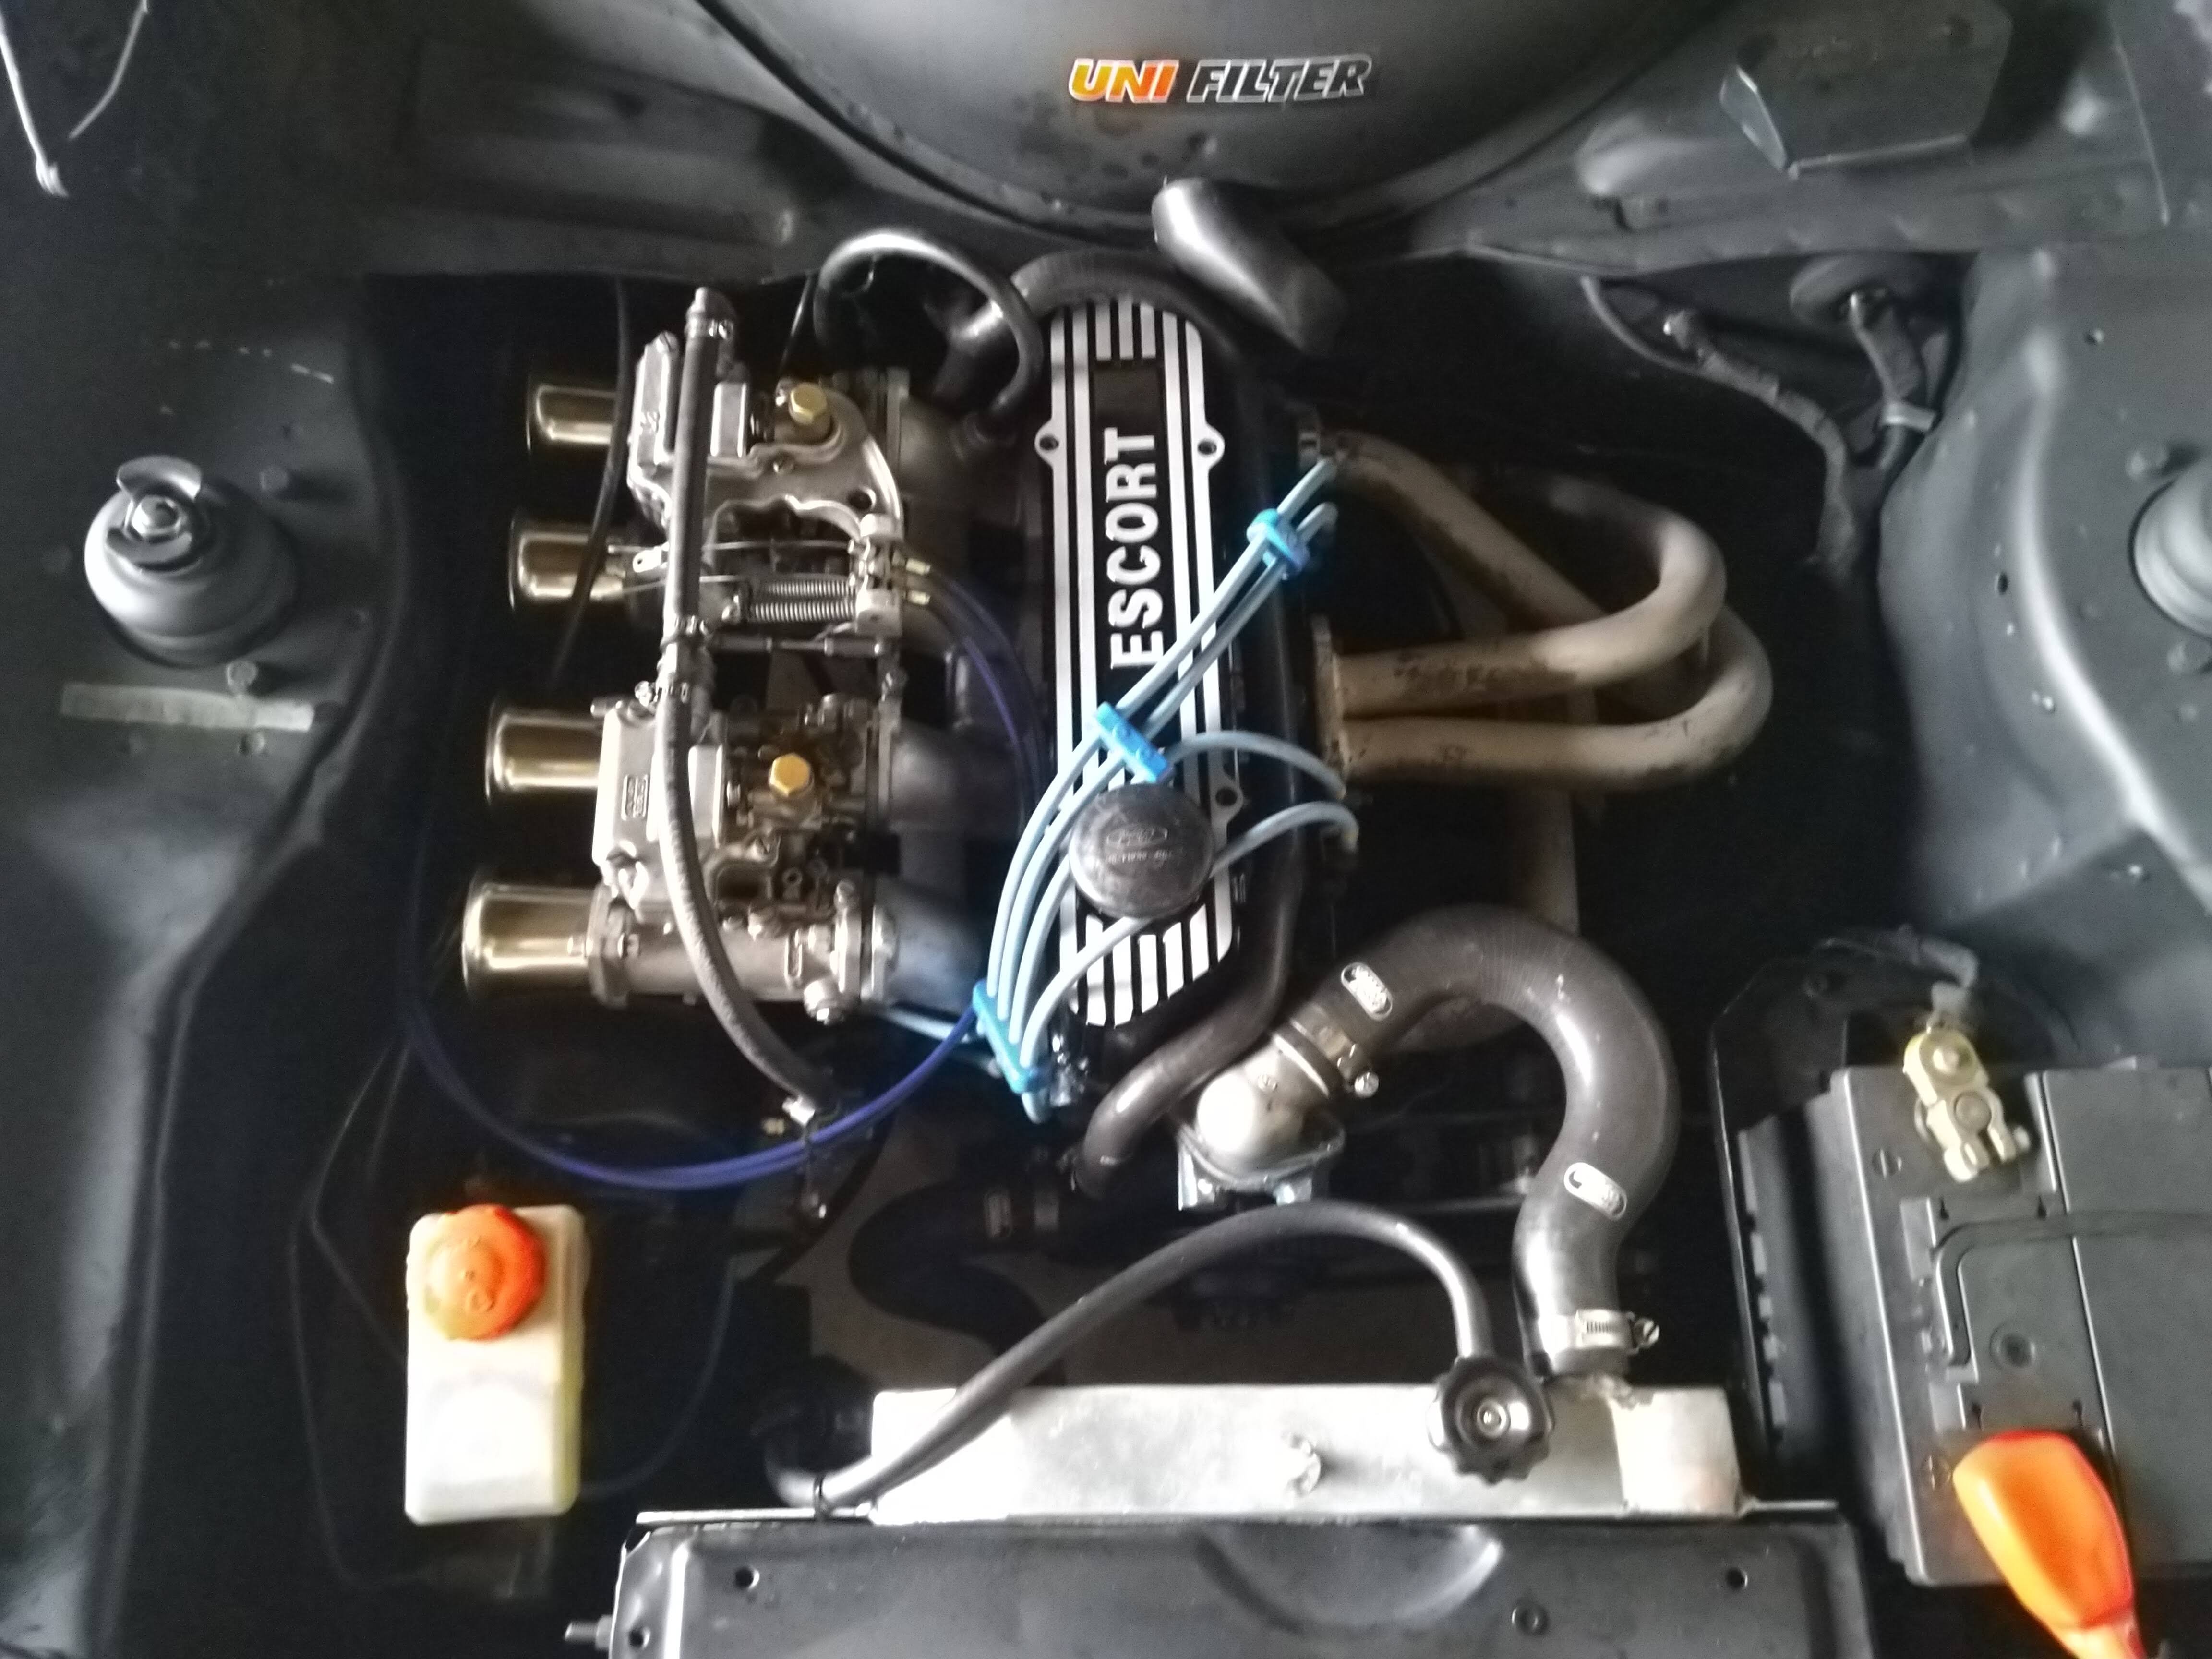
Been pretty useless updating this. Scrapped the front lip, decided it didn't really suit the car. Since my last update, I've done a few things. I've fitted a set of DHLA 40 sidedrafts and a new rocker cover. The sound of the side drafts is amazing and throttle response is much better. Got a new rocker cover. Purchased from jrcast.com, took a couple of months to arrive but worth the wait. Stoked with the quality and finish. I 3D printed a FORD badge to attach to my oval style front grille. Really happy with the result, can only tell it's not real when looking clsoely at it. Got a new project coming soon, will put a thread up when I get the car.
1 point
-
Bit more rust work done... never exciting really. But, I decided to sort my mirrors out whilst the rust work was being done. The mirrors were from @WLDRX2 and with a bit of cutting and welding. Originally from a 80s L200 I believe. Matt1 point
-
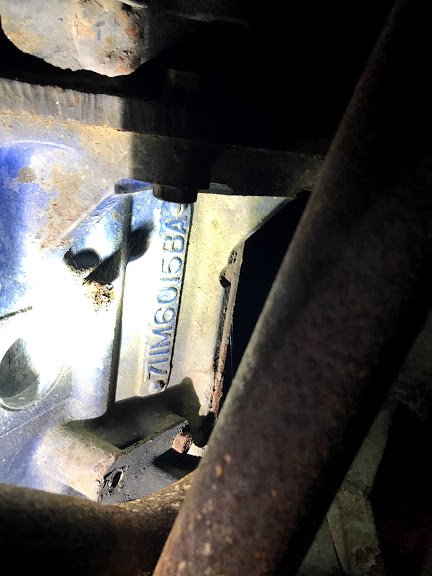
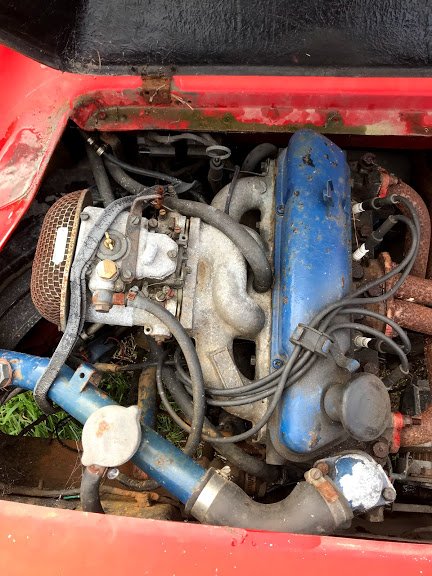
A little bit of detail on the engine, its a 711M block and L3 head which should make it a 1600 sport. But it has extractors and a 42 DCOE 8 Weber. I wonder if its standard internals and cam? I haven't tried turning it over yet. The coil was removed and inside the car, either its dead or was a way of immobilizing it. The fabricated radiator pipes are steel and rusty inside, no water in it due to dried and cracked bottom hose (I assume). It does have oil in it.
1 point
-
Pics of one of this summers projects... Been wanting to make a sth american asado rack for ages, then one came up on trademe cheap so snapped it up (so no fab to show off there). Needed to make a firepit to use it though, and because asado requires epic low and slow action, came up with this pit and windbreak in one: That worked so well that I rebuilt it, this time properly levelled with more 'patio'. Also built some outdoor furniture out of some macrocarpa sleepers, came out pretty good and should last a while, they are fucken heavy1 point
-
I changed the decals on the door after I got the Ute as I didn’t want to be driving anything with Seedys name on it haha. I do some low and slow bbqing and some catering events here and there as I am a chef by trade so I sprayed a lamb, a pig and a Weber BBQ on the door.1 point
-
Football season is over and the sun is out.......it's paint stripping time! Shiny straight steel and only two spots of rust that'll need cut out behind both rear wheels. So far so good. In other news, I managed to get some old rego history down at my local Toyota and managed to track down a previous owner via Facebook. He was a bit of a rascal back in the day and had quite a big tab with LTNZ shall we say. Here's what it used to look like..... He warned me not to bare metal it as he had put a bit of bog into the roof, but I figured I have a spare if it's real bad and I'd rather get any old bog out incase it's on the bare metal. Should hopefully finish off the big panels tomorrow and line up a sandblaster during the week.
1 point
-
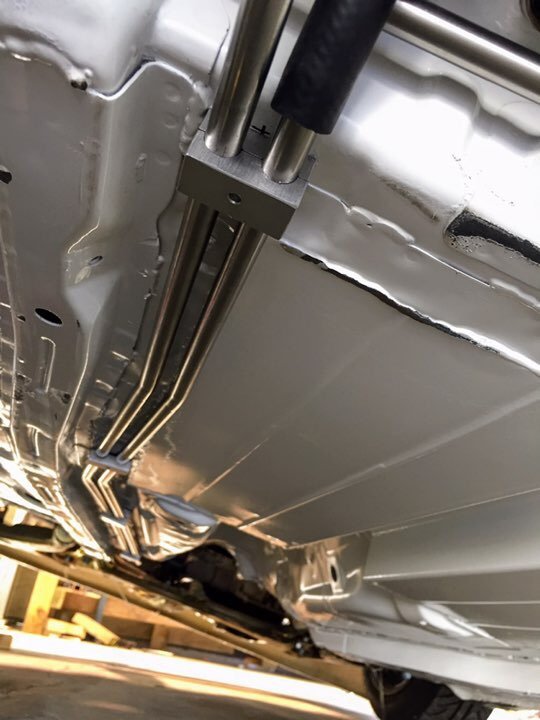
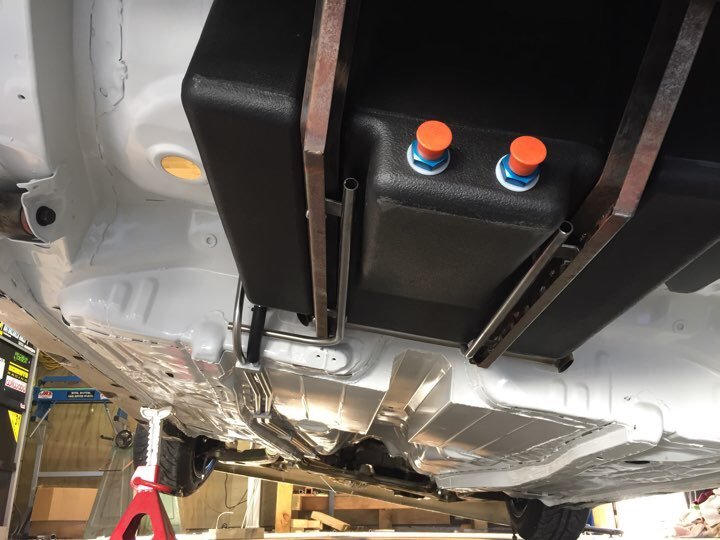
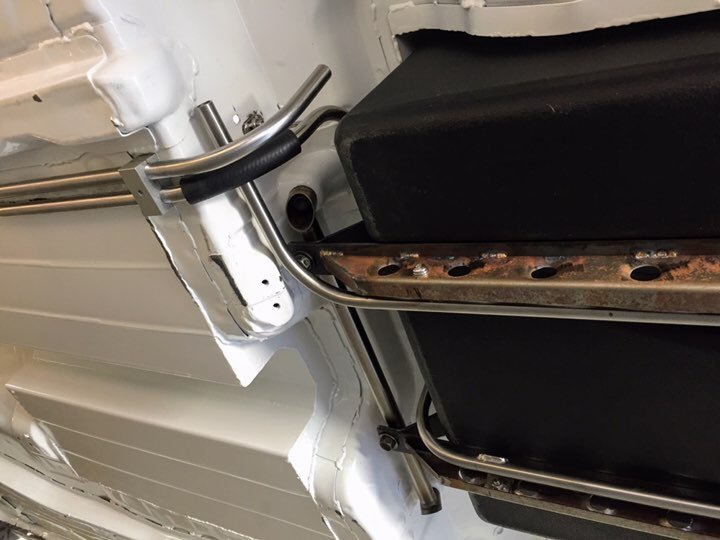
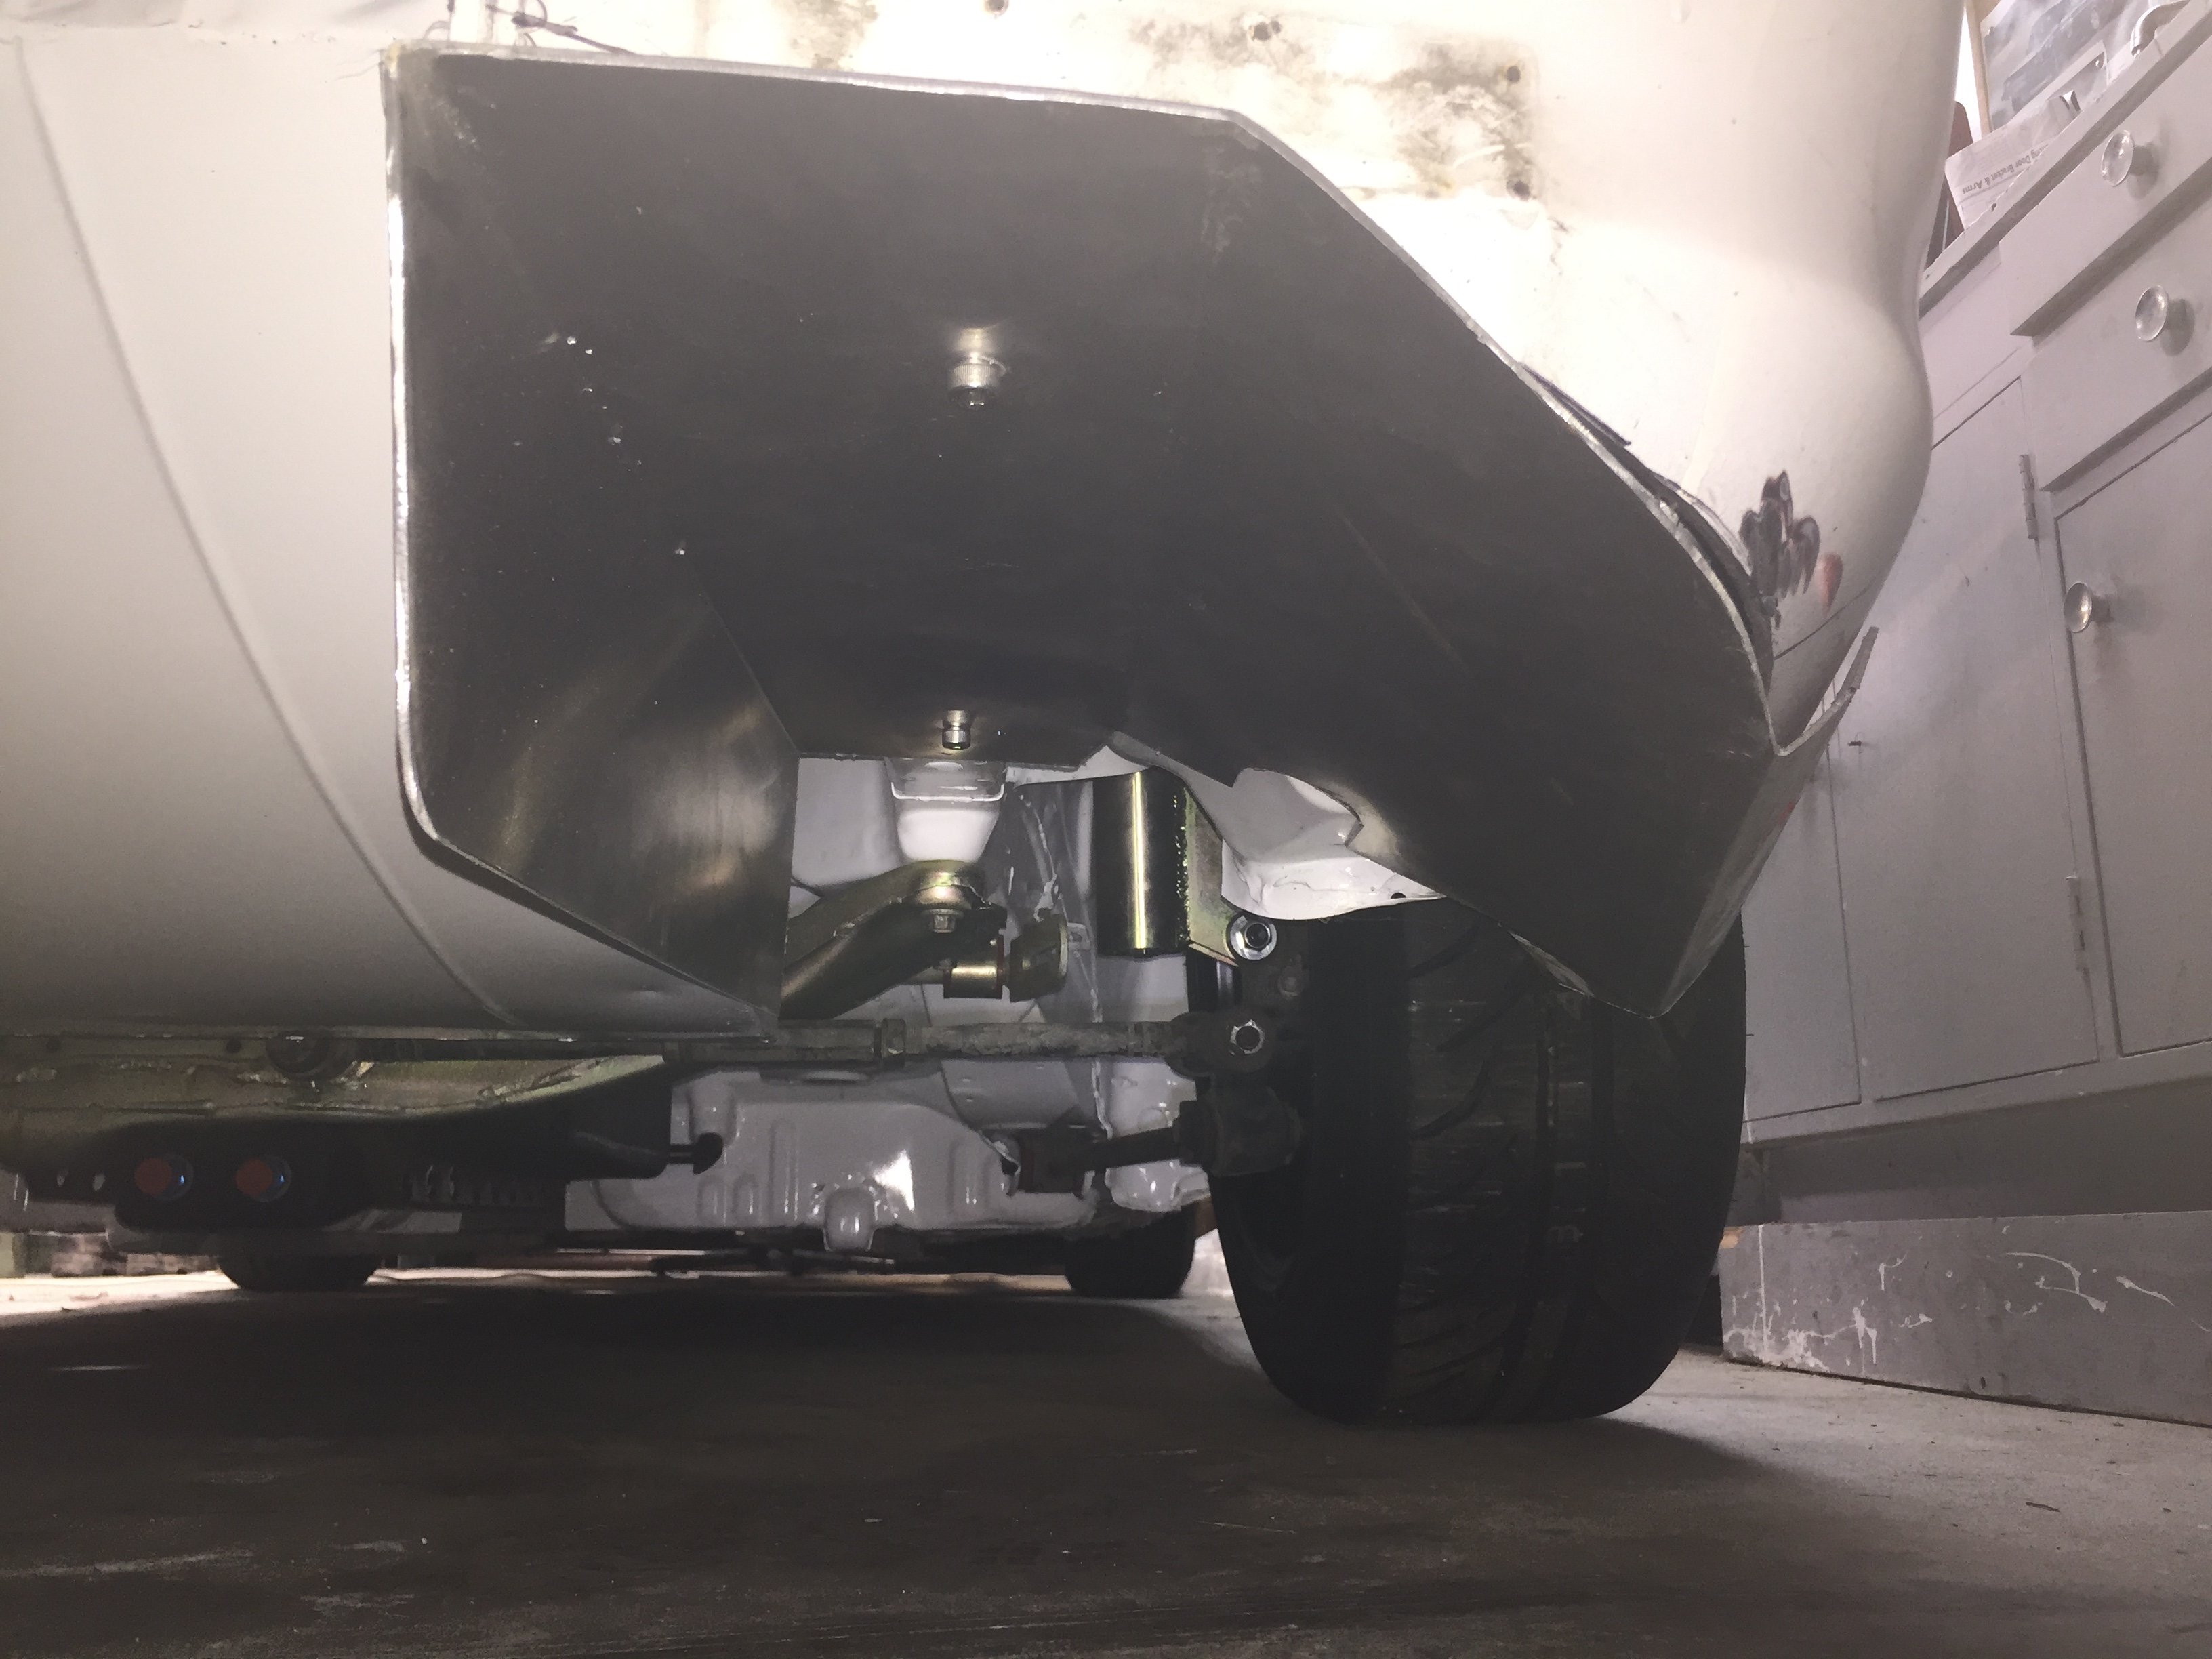
So it’s probably about time I put an update on this. Since I last posted a lot has changed. I bought a house and got engaged! New shed is grouse and been actually working on the car and other people’s car quite a lot. Namely supercharging a k24 Honda engine. Damn it goes good. Progress report; rear diffuser side plates folded and fitted. Aim here is to empty the air from the rear tyre wells cleanly and just look cool and be functional-ish Lots of room for activities (got to get a bloody exhaust out here somehow too - but that’s a problem for another day) Fuel cell mounting is now complete also. Maybe over engineered it a little but it’s not going anywhere in a crash most importantly. Mounted straps to stainless tubing front and rear with bosses welded in. Was the strongest/lightest combo I could think of doing. Pretty glad this job is done it was a pain in the ass Haven’t finished off the plumbing for the top end of the fuel cell yet. Maybe it should be next on the list?
1 point
-
1 point
-
Man Really wanna bag my Oldsmobile freds not helping1 point
-
Yesterday: Today: Finest quality rattlecan rebuild. Turns out this was a leaky bung replacing a frost plug, small seep that only really showed up with the paint. So thats out now, and a fair bit of old shit that'd been inside the block. Next up his scrubbing up the bay... I didn't get a before, but believe it or not this is an improvement. Really wanna find a dual plane edelbrock manifold cheap while i got it out. No fucker seems to have one to sell.1 point
-
All the shit out of the way, ready for the RB conversion Wasn't the easiest, but wasn't the worst. Tidy up time. Getting it back in will be interesting.1 point
-
That last post is last, last year. Doesn't seem right. Spent all weekend fucking around remounting the alternator and making brackets to fix the bodge job done on it way back in Reno. It now has a full swing of adjustment and doesn't squeak like a really inappropriate simile. Enjoyed three trips to repco getting the right length belt for the new mounting postion, only to realised i'd completely forgotten to include the water pump pulley into my mocking up, so put that on and the oe belt was the perfect length. Many hours wasted. Lowering is next on agenda as 15' Supremes look too big, so need to hide them in the wheel wells. Also rusty spots.1 point


_sedan_(23230030334)(1).thumb.jpg.34d765361d66c78db614bae6ea2c156a.jpg)


This leaderboard is set to Auckland/GMT+12:00