
Leaderboard


Popular Content
Showing content with the highest reputation on 03/09/17 in all areas
-
Lol, so oil pump has turned up, bought via rock autos. look at box, oh yeah, some sort of brand. Open box, well well, what have we got here, genuine Aisin oil pump with the Toyota symbol ground off haha. Score in my books. Now I just hope it fits, as its for a cressida and all Anyway, not sure when thats going to make it into the car. busy this weekend, possibly busy the weekend after. and somewhere is nats and then I'm away the weekend after nats also. Such a busy time. Plus I need to get other crown on a hoist to do exhaust, So, kinda stuck in between both, as they both need to get on a hoist really. Not keen for removing sumps on the ground haha. Anyway heres some pictures of the turd. Seedy Al12 points
-
What an engine! I wish I could say this was my crankcase! Sadly its on loan (like most of the other bits!).9 points
-
Fuck yeah!!!!7 points
-
Pics of manifold pls. I have minimal experience with Ford V8s but I know Holden V8s have issues with aftermarket manifolds/distributors getting in the way of eachother. The other thing is you could simply use the range of rotation that is available on the distributor, pull all of the leads off, find which outlet on the cap the rotor sits closest to with #1 at TDC, use that as your #1 cylinder lead (even though it may have been a different cylinder before but that no longer matters now), refit the rest of the leads in the correct order on the cap to the correct cylinders and give it a crank. You will now have the distributor in roughly the correct place and some tweaking will allow you to get it spot on.3 points
-
So gearbag got back into the car today, still a few things to sort out under there, but atleast the cunty part of trying to install a heavy gearbox under a car on axle stands by your self is done and dusted. So tomorrow it might be driveable again, however, there are some other jobs that really need to be done also. One is to swap out the very noisy fuel pump. Not sure its because its a cheap item, or because I possibly didnt prime it correctly when I first started it, but either way, it sounds like there is a coffee grinder going constantly under the car. kinda gay! and want to change the spark plugs, because I didnt ages ago, and it seemed a bit missy. once those are done, its dash and exhaust time. Pics of some crap. Front Bearing all swapped over. Helicoiled selector thread. And two very different clutch forks. The more I look at the difference in these, the more I can only feel this is why I have had so much issue with clutches in this thing so far. Correct fork is longer at both ends, which probably means my release bearing has been acting a bit funny on the pressure plate. Hopefully no more! Rad and stuff3 points
-
This old girl is a bit of a sleeper. Its injected but not using Lucas PI injection. Its running a fully custom set up, Custom fuel rail, Nissan RB30 Injectors, Link ECU, Link Ignitor, Electronic ignition, Mitsubishi TPS, And a whole lot of Confusing as F**K wireing!! All of which makes one Bloody quick Triumph 2.5.... Its manual Overdrive too.3 points
-
The rest of my aliexpress stuff turned up today steel bung for sump rivnuts etc. I was a noob and ordered -8 instead of -10 bends so I'll order some more and wait. I got the rocker cover and piping welded up which looks sweet! so much better (and faster) than braising. The factory pcv/breather system has this ugly separator box on the back, I turned up a adaptor so I can get a -10 weld in bung in place and to to the catch can. I lost count on a few of the passes before measuring but its pretty close. I'll cut out a retaining tab and get it all welded up nicely later.2 points
-
Matthew Rimmington couldve been swayed to sign off with a certain sexuak favour im sure. Congrats dude2 points
-
Yeah I'd yank the dizzy at tdc firing #1, set it so the rotor is on the middle of its travel clockwise/counter from any interference then bang the leads back on in the required order.. then at least you can advance/retard as needed.2 points
-
You can make your own timing tape, measure the circumference of the balancer, then divide by 360 to figure out the measurements for timing marks. Then mark on a bit of tape1 point
-
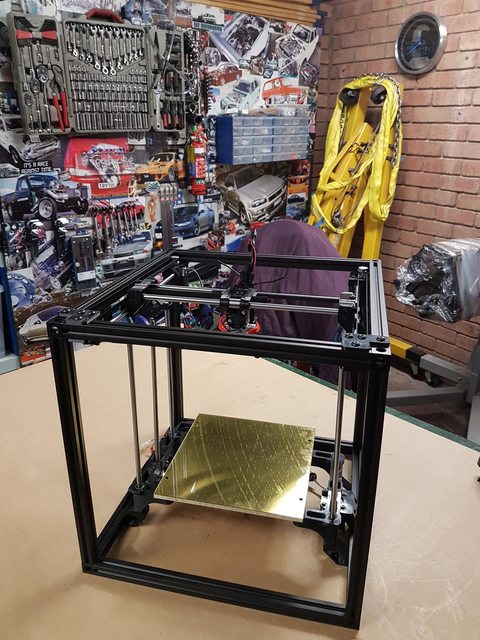
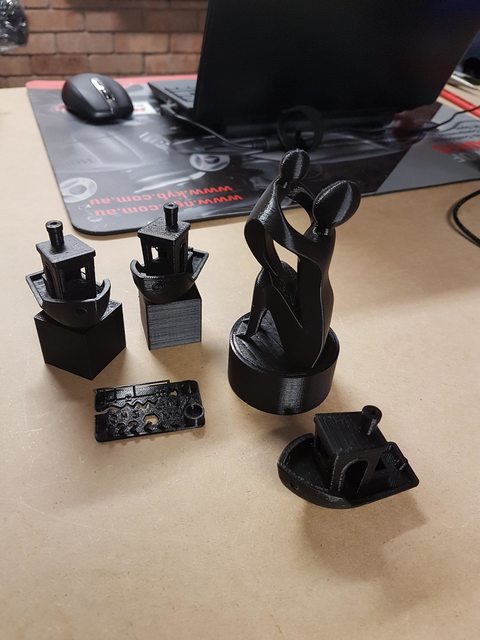
I got into 3D Modeling earlier this year, coming from knowing nothing i've done quite well i think. The main software i've settled on is SketchUp with the STL Plugin, ThomThom CleanUp3 Plugin that produces good Models for Printing in which I primarily use Simplify3D though i have found a few bugs in that with overhangs and occasionally i will slice with OctoPrint. I read as much as I could about printers for a few months and eventually settled onto a custom Printer design called a VORON, its a CoreXY design that has a very light print head for very fast travel/stability, it also has a 240v SSR heated bed which warms up super quick. There is a ton to learn and what really didnt help me was i couldnt find a good guide that helped in the initial calibration of the printer & filament (i've since written one) More pic's here if interdasted.
 1 point
 -
0.5 mm at a distance of 100 mm from the hub axis would equate to approximately 2.5 mm at the centre of the shaft, assuming the whole shaft is bent at the centre. In that case, 2.5 mm would probably be beyond tolerance and probably cause substantial vibration. But yeah, try with the gearbox disconnected, or try inspect the wheel bearings for any roughness.1 point
-
Ok thanks for the info guys! Since its up in the air I might drain the box, take the driveshaft out and get somebody to tow me up to motorway speeds to see if it still does it without the gearbox attached to the spinny bits. Thinking about it now .5mm and .4mm doesn't seem like much compared to how buckled some wheels i've had in the past have been that haven't been nearly as bad! And as for being a mechanic I have seriously considered it. I've got enough tools and diagnostic gear to make most apprentices jealous1 point
-
If you have no luck in akl, i'd give coastal fasteners down here a call, http://www.coastalfasteners.co.nz/1 point
-
#1 valves on rock? Thats not #1 firing tdc, thats #6 going by the firing order1 point
-
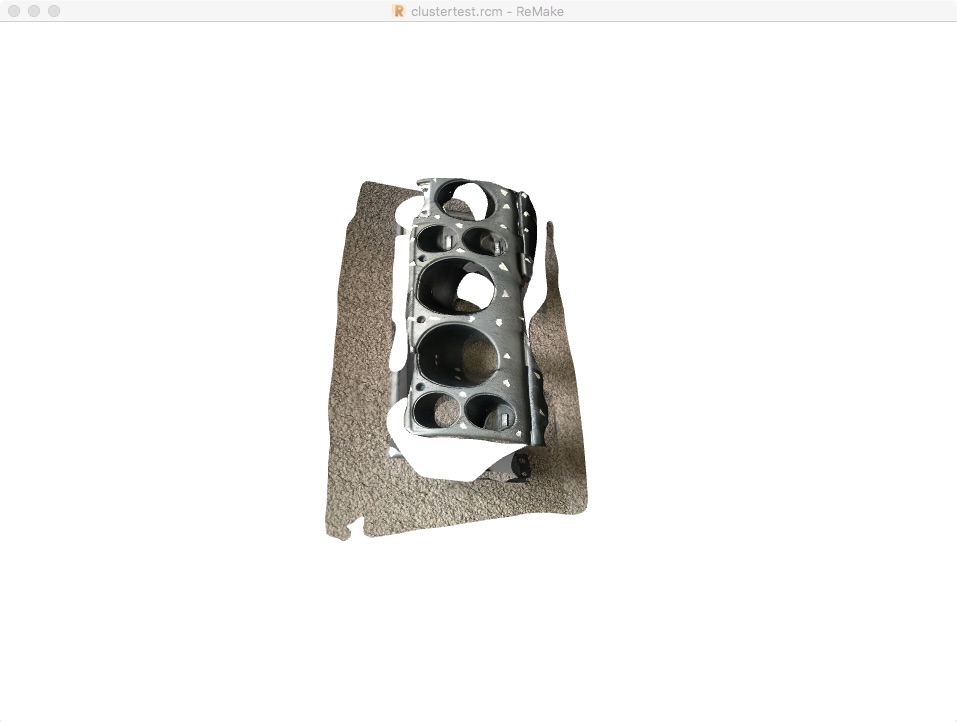
Autodesk Remake, but you had to pay to be able to scale and do anything useful with the model I haven't done much more with it.
1 point
-
FS5W71C Floor Shift 5 speed Warner synchros 71mm between shafts centers C revision box. (Larger countershaft front bearing, larger 1st/2nd synchros+ selector) R4W71B Remote (column) 4 speeds B revision. Etc FS5C71B Same but the C stands for Porsche type steel servos(synchros) I have found these in random zed's but in no particular pattern. RFB twenny debt and 25 no debt and s13/14 have the C type box with the 6 bolt plate at the back holding the shifter. The bellhousings are mostly interchangeable. If you try to run a C onwards gearset in a B housing you will need to machine a bit of clearance for the larger counter gear and bearing, and drill out the 1st/2nd selector rod hole from 14 to 16mm. The B gearset goes straight into the C housing with the C bearing, but you need to sleeve the selector hole down to 14mm. The gearbox revisions went all the way to H. The later ones had synchros on reverse and double synchros on 2nd. I have a good selection of boxes, parts, new synchros etc in stock if you need bits. Barry out...1 point
-
Monster Garage Factoid - the 71 stands for 71mm between centres of the main and lay shaft in the gearbox. (just like the 63 in 63a means it is 63mm from centre to centre)1 point
-
Engine bay looks like it came out well. I guess the front end is going in next?1 point
-
Small update. Massive thanks to old man KY for sending up a camshaft (thats not in two bits). Whacked that in and chucked the belt back on, engine turns over by hand with no odd noises or oddities (such as sudden loss in compression) which is a good start. I was hoping to compression test it but turns out its not really practical to do out of the car (cant bolt up starter etc without bell housing). Although might see if I can find a rb bellhousing for a loan as it will likely bolt up. Recent trip to Japan sourced a few goodies (crystal shifter, lace seat covers, stickers etc), and got my pine back on for some nice wheels so spent last night browsing yahoo japan. Also found a mooneyes visor haha https://wing-auctions.c.yimg.jp/sim?furl=auctions.c.yimg.jp/images.auctions.yahoo.co.jp/image/dr000/auc0212/users/7/0/8/5/mackys_1-img383x263-14818565326td6al22809.jpg&dc=1&sr.fs=20000 Need wof for nats so thats the primary goal (booked in for next weekend). Have done some work already that needed sorting so shoudl be straight forward.1 point
-
First thing is 302 and 351 have different firing order. You can fit 351 cam's into 302 and vice versa so you will need to know what cam you have. Also figure out TDC with a screwdriver down the #1 spark plug hole. Once you have that then figure out what diameter damper you have and buy some MSD timing tape and fit it to the pulley.1 point
-
Swords. Make swords.1 point
-
so i had a old hospital bed kicking around at my folks for about 8 years so though i would put it to good use stripped it down and turned into into a motorbike stand. this is version 1.0 still want to lower it more so its easy to get on and off so will use some smaller castors and mount them up higher. hopefully have some at work and need some with a lock. dont like the ugly brace for the front wheel but made it all in a hurry1 point
-
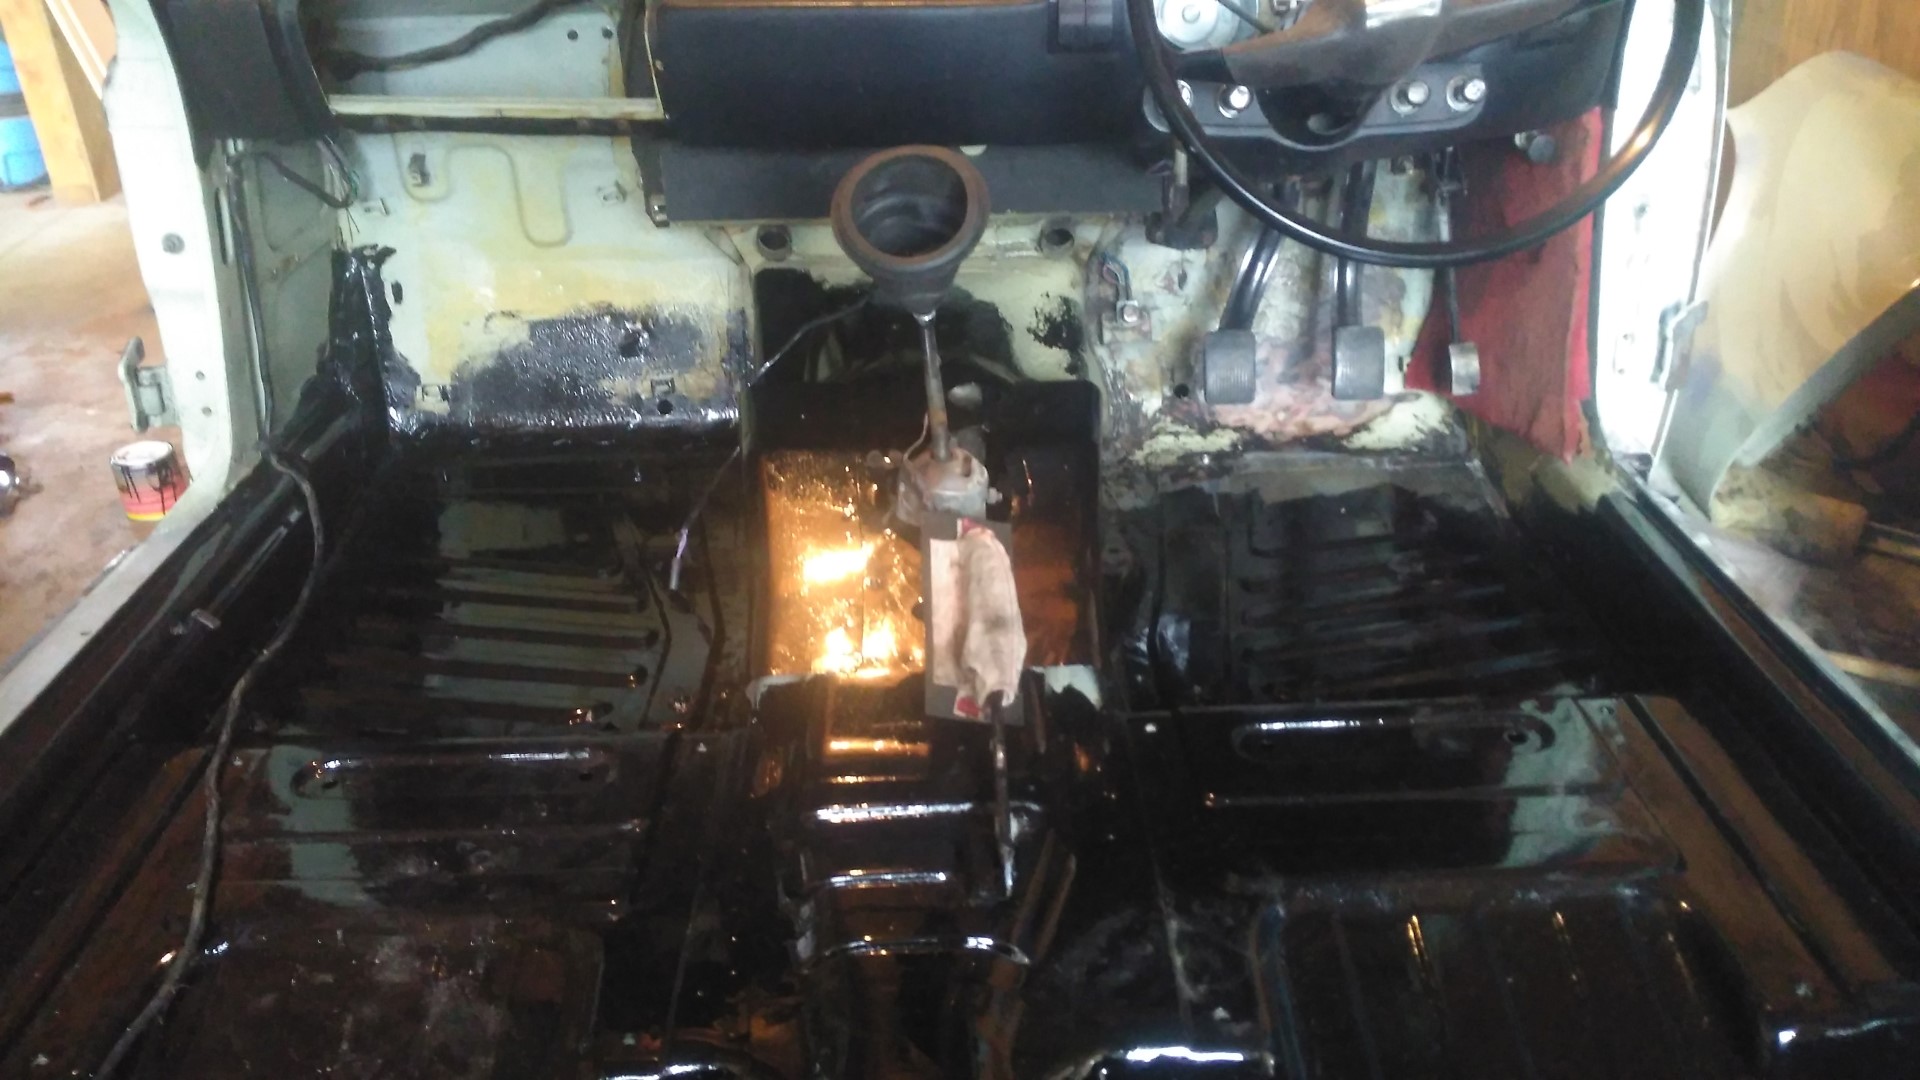
Well as usual got a bit carried away. Planned just to remove the rust in the drivers side floor but ended up taking the whole floor back to metal and painting with POR 15 Sorry about the pic quality but there is very bad lighting in the garage. Think it turned out pretty well. Carpet is Very faded and rotten in places so hopefully can get a new set soon.
1 point
-
Well, unproductive weekend. Have a new front bearing for gearbox, a new clutch fork on its way, and a new rear main seal Non of which have been fit yet unfortunantly Will make a stab at gearbox tomorrow. So yeah, looks something like this in the engine bay now1 point
-
Been a while. I have mounted the rev counter in the dash, installed headunit, speakers and some doof doof. Yay purple wheel nuts Attended Hardpark and enjoyed myself more than I expected I would Also hit the Ford day in Kapiti, the weather was real bad and it actually got called off but it was fun while it lasted. Driving home my wipers got slower and my lights got dim....the alternator died Thankfully (in a weird way) I still run points and EVLSKE made it home Replaced the alternator and we were back up running again annnnd we attended the British car day So all was going well but ya know how it is with old british cars....the headlight switch burnt out on the way home from the inlaws farm in Levin, no problem the lights stayed on so we got home. Unplugged the switch and all good. The next morning was the day of the Shannon auto spectacular, we drove to the inlaws and my lady and 2 of the girls stayed there. My eldest daughter and myself carried on through to Shannon. We stayed for a couple hours and then we headed back to the inlaws. The back road between Shannon and Levin was nice and quiet so I put my foot down to stretch the legs on the Escort. The gearbox had other ideas. There was a major internal malfunction and the internals exited through the gearbox housing and left a trail of destruction in its wake. So this is the view from under the car I picked these up off the road It came out in 2 pieces 2 weeks later and we are running again! Scored a Gearbox for a good price, new driveshaft universal, some fluid and its all good (Y)1 point
-
Went out to buy some resonators, realised how overpriced for how simple they are, so decided to make my own. Rolled up some perforated sheet, wrapped in stainless steel wool and fibreglass strand. Will probably make another couple to put in behind the diff, which hopefully will make it reasonably quiet. It's a real shame no-one is going to see underneath here once it's done.1 point
-
Twas a good read. Bit hard to read, but good all the same.1 point
-
Metro Polishing, 14A Parity Place, Glenfield. He's usually there 9am ish until 2pm. Likes to go fishing often and sometimes won't be there on a weekend. Does magical work, for best reuslts get Mr. Vapour to strip the paint by blasting then take them to Jack at Metro.1 point
-
So yeah, pulled this apart, replaced stuff, and put it back together. New Water pump, timing chain, sump cleaned and tappets reset. Did all this as I was chasing a noise I could hear in the engine. Would appear I have made it worse lol. However chain did need doing as it was a bit worn. Noise sounds like its in the top end somewhere, My guess is its tappet gap related, as adjusting them seems to have made it worse. Going to pull off the rocker shaft etc at some point soon and see how they look, possibly re-surface if required. So yeah, good time fun and stuff IMG_5455 by Allan Ainsworth, on Flickr Stuff1 point
-
Heck yeah I did. Was the first thing to go and godamn fuck that sub box is heavy and difficult to move. Yeth.1 point
-
Bam.. Now I just need a power point.. Got 95% of the battens finished on the weekend, had a bit of a fuckaround Sunday tho with my head not working and making a couple of mistakes, easily rectified but just time consuming. Also started nogging/packing out for the bottom batten and closer, for anyone wanting to do a 45mm structural cavity I used Herman Pacific V5 cavity battens and redway 45mm PC cavity closers. HP specified 12g stainless screws which turns out not many stock, the only ones blacks had were 100mm.. won't be coming off in a hurry, but they also snap if you give them to much guts with the driver. Shot of the cavity closer on.. Another 42m to go.. also need to level the section a bit more, there's a bloke on the corner two houses down that has a couple of old tractors he burns around the streets on (and in the Santa parade) he leveled another neighbours section so I might hit him up and see if he wants to do mine.. need to plant grass, the dust/and blowing around the place is killing me..1 point
-
Left hand hanger done. Second time lucky to get this one.1 point
-
Bit more done on the holiday..1 point
-
Might start my own excavation business.. Had to move a bit of dirt to fill in the trenches round the back, ended up being the quickest way to do it.. Put the first of the battens on this arvo, Not sure if you can see it but goddamn this house is wobbly.. Gonna be a bit of packing and shaving going on. In other news, failed my preline last week.. needed a ps4 for the beam in the lounge which is fair enough, but he didn't seem to understand the bracing elements, on the plan it clearly states that the existing gib is to remain and if removed to be replaced with 13mm braceline and nailed in accordance with gs1/n requirements, the bracing plan just shows which walls of relined, need to comply. He didn't get that, said I needed to talk with someone more senior. Had my subfloor inspection confused with a firewall inspection and then didn't do the subfloor even after I corrected him. Passed the sewer tho.. hopefully power goes in on the 13th..1 point
-
Drainage was finished on Sat, forgot to mention that.. power went up the pole today, 180A 3ph.. should be good Another couple of weeks before they come out and inspect/test/ connect it all, but nearly there. Shit shot of meter box with fuses ready for a meter. Inspections booked for Wednesday, for some reason there was a section 37 on my place which means construction stops including inspections, then for some reason it had lapsed.. something to do with resource consent..1 point
-
A little more progress, Pulled up the shit bits of the bathroom floor and started filling the hole, cunts had cut holes everywhere.. Had to go buy another front door as the one we got for 15 bucks wasn't gonna cut it, got a cedar for from the pumphouse for 120, needs a little repair work around the bottom outside corners and it's obviously from a wonky house as there was a 10mm wedge filllet on the top and the same amount taken off the bottom, anyone know where I can get bits of red cedar? Anyway, sanded oiled and hung it.. Not sure if it's gonna match macrocarpa.. we'll see I guess. Also applied for some council inspections, subfloor, sub drainage, drainage and preline.. digits crossed..1 point
-
Holy Fucken Fuck, Almost a year later and no update. People must think I just fuck around and do nothing Not true! Heres some pictures to prove otherwise.1 point
-
Got a bit done in the last couple of days, chopped the over hanging secondary bearers back to the line of the ecoply ready for the cavity battens, had a guy come over to look at where the gas califont was going and bam ended up running all the gas lines ready to plumb up the heater and burner.. legend, thanks Luke.. didn't expect it so quick Got some holes filled in the floor The repair boards generally sit about 2-3mm higher than the rest but I'm sanding the whole floor anyway.. Nice to look under the house and see a bunch of plumbing and shit, spent so long with nothing there.. brings a tear to me eye.. It's also been completely insulated under there thanks to my mum and F-inlaw Here's my electrical plan.. Spent the afternoon finishing off the last of the wiring, just the califont to send power to and run the controller cable and then, bar the front door, I think I'm ready for a preline inspection Wire shotz Got a bit hard to pull wires through at the end.. Everyone loves wire shotz.. Plumber and drain layers come back Saturday to finish the storm water and sewer, then that's also ready to inspect.. good times..1 point
-
This happened today... Bit of a milestone..1 point
-
Job done..1 point
-
Ok.. so it seems now pb is working I'll have to go back and edit that other post, but for now... Spent the last few days putting up the soffits, did them out of grooved bandsawn shadowclad so as to match the final cladding.. And a bit of under floor insulation, Cleans it up a bit under there, also bought and installed a fuck off 200x200 Mac post... just to prop up that huge ridge beam and really heavy decromastic tiles.. Chippie came over to check my work and reckoned a couple of nail plates would be good to hold it, I went for bolts.. So far so good, will finish the porch soffits tomorrow and start some other shit..1 point
-
Bit of CAD. Slowly slowly getting there. Most major parts are detailed. A lot to go.1 point


This leaderboard is set to Auckland/GMT+12:00