
Leaderboard


Popular Content
Showing content with the highest reputation on 10/20/15 in all areas
-
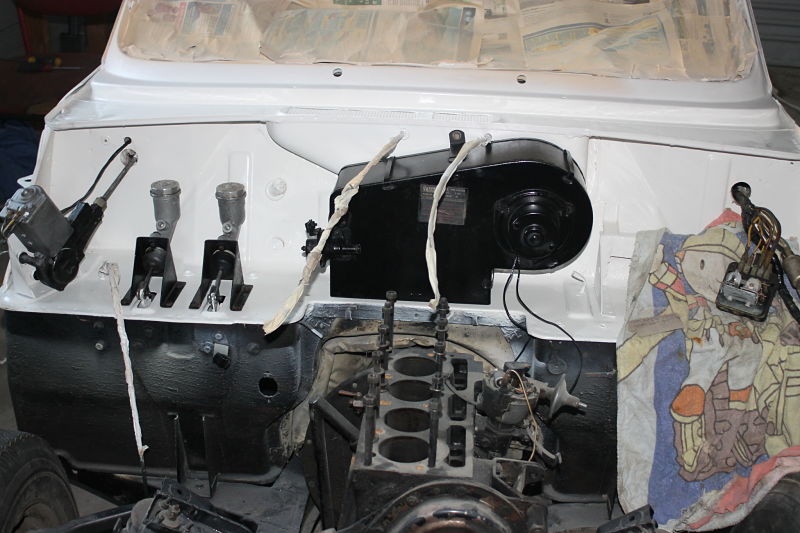
One gigantic weak point of the FJ20ET is the stone-age ignition module (or Power Transistor Unit, in Nissan-speak) which has a habit of crapping out like clockwork after 20 years (let alone 30). When this shits itself, many people report a distinct lack of power, hesitation when accelerating, and other weird symptoms consistent with either an intermittent or weak spark due to a bad module. Hmmm, this sounds all too familiar! The FJ20 isn't the only Nissan engine to suffer from this issue; if you google "Nissan PTU failure" you'll get about a million hits all talking about the same thing. Owners of other '80s Nissans (notably American Z31s and S12s) have been able to figure out a way of adapting an ignition module called the "PRW-1A" or "PRW-2" plus the matching coil from various later model Nissans. Transistor technology has also come a long way since the 1980s and the supposed advantages of upgrading to this setup are an improved idle, better acceleration, and most importantly, no more hesitation between gears. Sounds mint. But as far as I'm aware, no one has managed to adapt this setup to the FJ20. So I thought I'd give it a go. In fact, Nissan realized the original FJ20 PTU was garbage, so in 1985 they actually upgraded the ignition system to something called "Plasma Spark" with an all-in-one coil and igniter - amusingly, this is similar to the setup that all the Z31 owners complain about. In other words, also garbage. This is the stock non-Plasma Spark FJ20ET module, the little button thing on the coil bracket. This is the PRW-1A. Ironically, the module in squid is perfectly fine, as the previous owner managed to buy a Nissan old stock replacement in Japan in the mid 2000s... and furthermore, I'm taking out all the factory ignition gear when the Link gets wired up anyway! All of this work will be so I can get the coupe running better and not have to solely rely on the crummy old transistor setup. After checking about 40 different wiring diagrams, reading a bunch of threads on various forums, and going nuts with the multimeter using squid as the test dummy, I finally managed to work this out: Simply put, all of the existing wiring can be used, with a couple of caveats: an extra ground from the PTU needs to be run, and I still have to figure out if the factory tacho output works without requiring an extra resistor or diode. And the best thing is that instead of paying upwards of $200 (after currency conversion and shipping) for a stock replacement PTU if you can find it in stock, you can buy these bits from Pick a Part for about $30, as the PRW-1A and PRW-2 setups are used on P10 Primeras, U13 Bluebirds, N14 Pulsars, and basically anything with an EFI SR/GA/CA engine from the early to mid '90s that doesn't have the ignition module in the distributor. The end result (again using squid as the test mule): Eureka! Ran out of time to test the tacho output, will add that tomorrow and give it another run. If it all works hopefully this weekend I'll be able to make another trip to the wreckers' and obtain a couple more plugs to solder together a neater loom. Then the big test will be finding out whether it runs for longer than 5 minutes (i.e. no cold start cycle messing up the testing) and/or if I can put any load through it without melting the module or the coil. This will take a bit of planning - the coupe isn't currently drivable as the alternator developed a charging fault in January this year I suppose I could do some sneaky driving around the block a few times in squid... which hasn't seen the road since 2013. Discuss: http://oldschool.co....ns-dr30-wedges/9 points
-
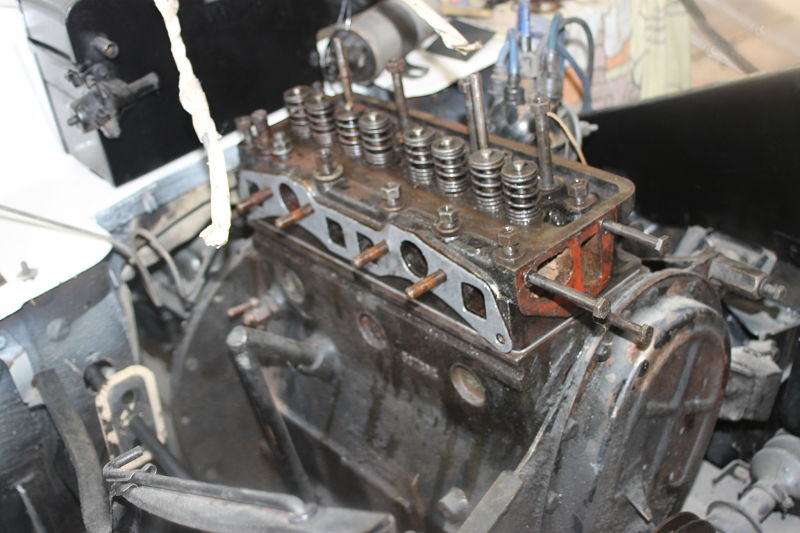
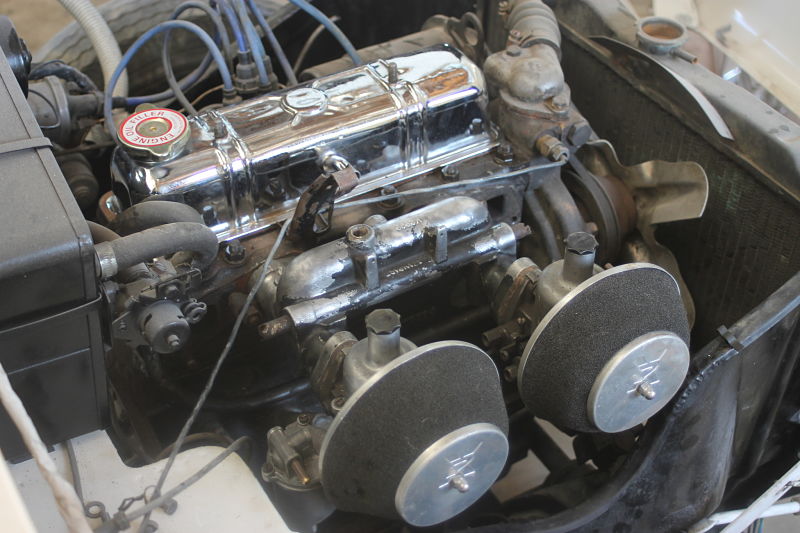
so the engine got a good clean up including new gaskets and piston rings. I also scored some twin hs2 su carbs and a polished rocker, looks pre sweet i reckon.
 7 points
 -
Its not a scummy Nissan tractor engine mayte, its a high quality Toyota forklift motor.6 points
-
I paid a bit extra with the tonner and bought a bulk lot of hq front end parts. 3 RUSTY hq guards (sold) two OK guards with monaro flutes welded in, one hq bonnet (will sell), one radiator support panel and two nose cones (one very rusty, sold) The plan has been to just fix the rust and leave the cosmetics until later...but then my cousin came over and offered to take them away and make them nice. Can't say no to that! I also bought this off trademe for $200.. Fiberglass and I should be able to cut that gay scoop off without much trouble.6 points
-
So drivers side, Fabbed up the tail end of the OG panel, no it's not made of playdough, it just looks like it in this pic. Welded that sucker in, getting a bit over this rust bidness. Not really all that happy with the finished result, the front wheelwells are better, and no one will ever see them! Very tricky not being able to reach the back of the panel, there is a very gentle curve to these sides, nothing is flat, anyway, I gave it a bit of a beating with hammers and leavers and got it much better, will have another go at it later. I did start getting the bottom plates ready to be spotted into place, stripped the black paint off, welded the nuts (just in case) flattened and welded the two big drain holes up, dunno if this was a good idea or not, might be a reason the factory added these? primed with the weldable stuff, and some very tidy tail light housings I got on the weekend. So the next update should have the body temporarily back on the pan, hopefully everything still lines up and I can spot the bottom plates in place. Gotta get hold of my brother in law first, he's a cop and works crazy shifts so is hard to reach sometimes, even though he lives about 2 minutes away. I need his thread tap set, one of the runningboard bolts is broken off in the sill, it's always been there since I've owned the car, so I'd like to sort that before the sills get closed up. And then, um, I'm not sure then. Body will have to come back off to finish up the spot welds and will need to put some paint on everything. I'd like to paint the whole shell off the pan but will prolly just do the inside, bottom/underneath, sill, wheelwell etc and then paint the outside on the pan/rolling body. Then I guess it's time to strip and paint the pan so the body can go back on for good. HELP!!5 points
-
i cleaned up the windscreen channels and brushed some primer onto them. i didn't take a picture of the back because I'm a bit useless. 2015-10-19_07-50-42 by sheepers, on Flickr i had some paint left over so i splashed it about as best as i could inside the rear quarters until it ran out the bottoms. i did both sides and there is paint all over the floor. 2015-10-19_07-50-25 by sheepers, on Flickr 2015-10-19_07-50-34 by sheepers, on Flickr5 points
-
For the last while I have been trying to sort out the clutch and throttle. I want it to be really simple for the wee fella to drive while he is little, just a go pedal and a stop pedal in one gear only. Then when he is older he can have all five gears and a clutch to play with.... In hind sight I should have gone with a smaller simpler engine. So I have been playing around making a throttle pedal that controls the clutch and the throttle.. I am up to the 4th version, the first three used springs and levers but I just couldnt get it to work with out my son needing Arnold Schwarzeneggers legs. Here it is, I bought a chinese hydraulic clutch set up and made this abomination. I need to tidy it up and strengthen it. It probably belongs in the design disasters and fabrication foibles thread, but eh, it seems to work.4 points
-
that scoop those guards Pontiac nose please, 1984 Australian street machine magazine needs you4 points
-
$$$ is why , already saving for event of the year next year...4 points
-
I see where this is going4 points
-
So instead of doing what I needed to do I started something else. Fan swap. After a quick measure I found that the Volvo fan shroud is a pretty good fit for the Cedric radiator, with a bit of trimming I ended up with this. The rad core is only marginally bigger, about 15mm left to right and 5mm top to bottom. It's tight but it fits. And the dual temp switch and housing3 points
-
now for sale $500 takes it away. got full set of tidy seats and heaps of spare parts. doors, gearboxes, motors, diffs, guards, bonnet etc... fix the rust in the floor and put it back together, reg on hold.3 points
-
i just use washers (of checked thickness) as i cbf doing the bolts up3 points
-
Proof:3 points
-
As I say, it's hard to say from the pictures but to me (and I am no welder, at all, let's just get that clear) it looks like these ones just have a bit of solder blobbed onto the metal, enough to make it stick, similar to a tack but nothing of metal gluing substance. I've been told off on here for my welding before and it looked similar to that but mine was on panel steel that was inconsequential. More heat though and the weld should "sink" a little (by comparison to what I see) and fuse the two pieces of metal together. I would practice on a few pieces of scrap angle to see what settings on your welder work best for that thickness of steel then grind off any of those on your setup that look a bit odd by comparison.2 points
-
I love the front end on this car. Wow...so back in 2012 at the last RR gathering I went to I spotted what I just thought was an old nissan done up as a race car with a pretty looking engine. Its not until now that I find out it was a genuine and very rare c10 GT-R. Whoops. I took a few photos but only seemed to have kept the engine bay shot . I had taken sooooooo many photos on that last trip over that I had to do a cull and I thought not many would be interested in 'another race car mock up'. I'm not really that clued up about many old Japanese cars to be honest. Dear oh dear. I feel dirty. anyway- here.. the one photo I kept... Bryn's article on it. Bryn told us he was keen on coming over to stay a bit again. If so maybe he takes pretty photos of your car. http://www.speedhunters.com/2012/08/car-feature-hakosuka-skyline/2 points
-
Final vid before it gets to NZ.. Ewan driving it to the port https://vid.me/7MNo It's on a boat now! Discuss: //oldschool.co.nz/index.php?/topic/49704-mlracings-hakosuka/2 points
-
So I've been looking for a hako for about 4 years now, keeping an eye on the prices and how quickly they seem to be appreciating in price as the world notices them (thanks RM Sotheby's) and with some hard saving I've been able to finally make a purchase. The car is a 1971 2000GT with L20 engine and 5 speed. Unknown ks, bit of rust around the place (wouldn't be one without it) but overall a fairly solid start. I purchased this from Restored.jp who some may be familiar with, they make aftermarket FRP and carbon parts for old cars like that Hako. This was the owners personal car.. whether that's good or not is yet to be known but it's a nice story anyway. I'd be interested to have contact with other owners of Hakos in NZ as it would be handy for parts and general networking. I'll be working on this in stages (as I'm now broke) to get this up to road legal spec.. More to come but I've already figured a couple things I need to do before it's even here ! I understand there are several in NZ already, any coupes or road legal ones? Discuss: //oldschool.co.nz/index.php?/topic/49704-mlracings-hakosuka/1 point
-
There was a tonner on trade me recently that had a ute tray on it, looked OK. The difference in wheel base can be sorted by using more of the ute body. From memory the wheel base difference is 4 inches. Many years ago I had a ute that had the tray cut off. I think it had been a tow truck for southern districts towing from the remains of the colour. Anyway the flat deck we built was great for carting stuff round. It had drop sides and tailgate that came off easily, best of both worlds. I have seen a few had a tipper decks, that would be very cool.1 point
-
A C10 coupe just turned up in chch , a mate just imported it after looking for quite sometime . Already has a impressive garage of Nissan toys1 point
-
Use an oem MLS headgasket on your VR4, should be all gravy on standard valvetrain I would suspect. I would be more worried about any previous machining carried out to the head or block.1 point
-
I would because why wouldn't you? Bit of blutak/Plasticine on the piston with the head sat on top.1 point
-
There is a yellow WB oneton in west auckland with a Chevrolet looking step side tray on it, Make a nice wooden tray and polyurethane it.1 point
-
unless you have a 1/2 scale mightboy id say they should squeeze in1 point
-
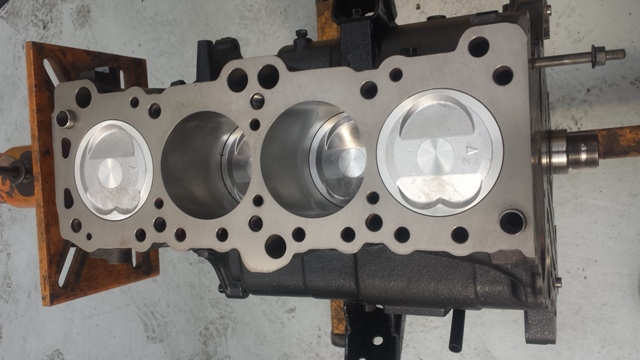
Picked the block up today. Cylinders re-bored +0.5mm, Deck skimmed, pistons machined and everything balanced, cleaned up and assembled. Could not be happier with the Job completed by Glen at Glen Durie Engine re conditioners in Woolston.
1 point
-
Are you sure about those welds on that setup? It's hard to see properly from the photos but there's not seemingly a lot of evidence of heat in there. I'd hate for the shell to get bent if the structure collapsed is all.1 point
-
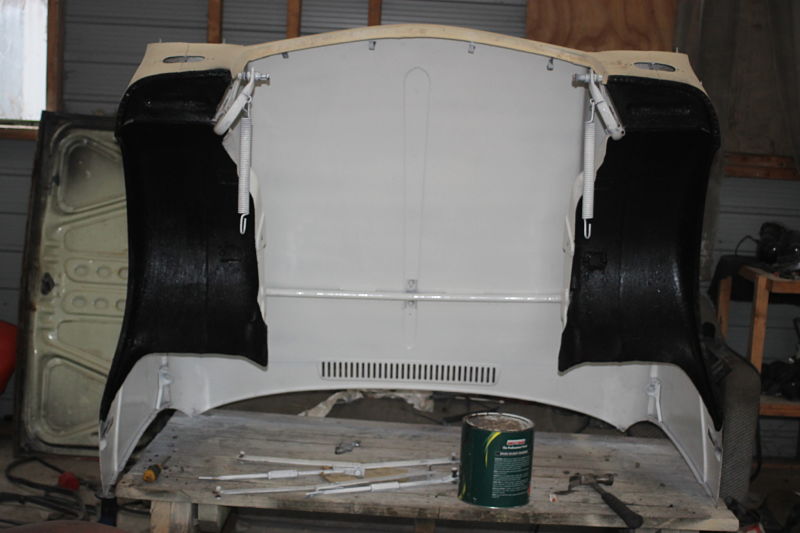
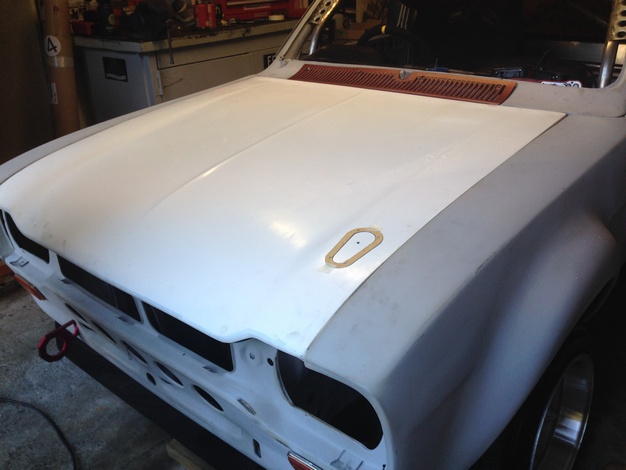
The underside of the bonnet also got painted
1 point
-
the engine bay had a good tidy up, then it was time to sort the engine.
1 point
-
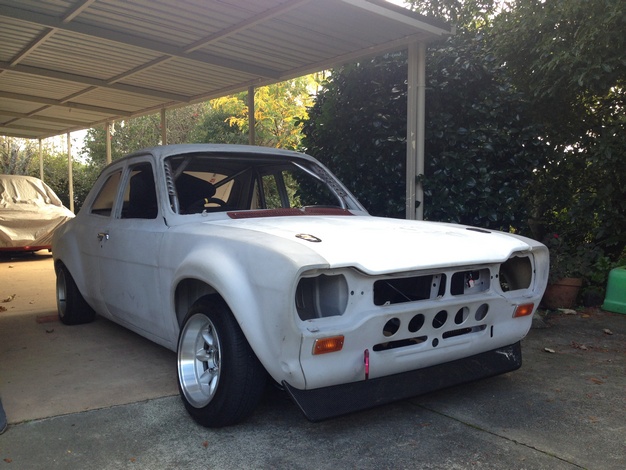
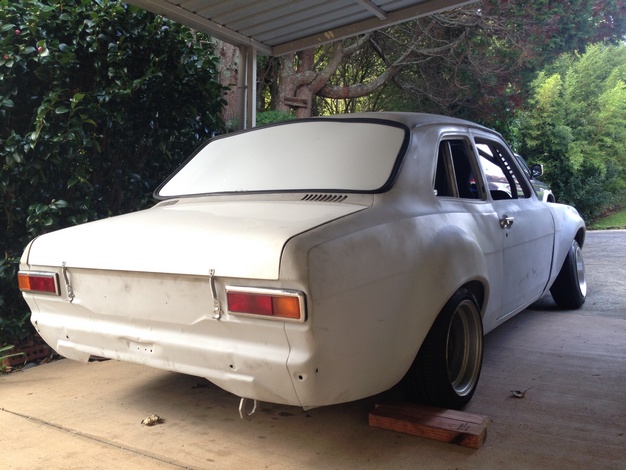
Dragged the Escort out Fitted new Fibreglass Boot and Bonnet Cut holes in bonnet for latches Fit boot springs and trial fitted the rear lexan window
1 point
-
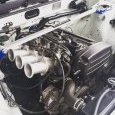
Almost ready to fit flywheel, clutch and then gearbox. Spent some time today adding rear engine hook, modifying the 16v extractors and giving them a paint. Clutch, flywheel and pressure plate with brand new pressure plate bolts. Fitted the SQ engineering blanking plate to the what is now the rear of the engine, this used to be the top outlet that went to radiator. Sealed and attached SQ engineering rear water bypass - also fitted the rear engine hook I pulled from the 3au before I sold it. Gives a bit more clearance, still not sure if the Dash temp sensor will fit. Finally got around to cutting out the shifter hole to make way for the J160. Im still thinking I may need to go back another 10-15mm but will wait till we fit engine and box. Would rather not cut too much out. Modified 16v extractors, Im still in two minds about running washers on the ends like that. I think I may get someone to weld some extensions on to the flange so it bolts on better and looks less dodgy. Oh and Gearbox has been picked up from Brendan so its now all ready to bolt up, he also modified the 3SGE starter for me. Laser cut flange is being picked up tomorrow so all going well (and depending on engine crane availability) we could have an engine and box sitting in the car in the next week or so.1 point
-
Donations of motivation to- //oldschool.co.nz/index.php?/topic/45620-flyingbricks-198-holden-wb-ute/1 point
-
So I had a few mates come over and look at the ute. The further we dug the worse it got.. Multiple layers of bog all cracked through and rusting under. Such a bastard. Most people were like MAN UP....until they saw it in person and were like One of those guys suggested I pop to his uncle's place for a look at his hz oneton. I got all dreamy as I realised this tonner had a FAR more honest body and a deal was done. (I didn't get the wheels) From now on I'll refer to both vehicles by their respective colours. Yellow was stripped completely bare and its body lifted out of the shed (I didn't consider getting it out when I pulled it to bits) then its chassis.1 point
-
Jif in the oil or down the air intake? If it's only down the intake brasso might work better.1 point
-
thats better, 2015-10-03_04-04-18 by sheepers, on Flickr 2015-10-03_04-04-07 by sheepers, on Flickr 2015-10-03_04-03-50 by sheepers, on Flickr i painted the other rear quarter too. the wind blew the plastic mask sheet and it touched the door in the middle. no biggie but a bit of a pain in the butt.1 point
-
ahhh something your kid will remember forever , the day dad and i started the cycle car for the first time!!! good dadding bro!1 point
-
Depot has picked up the car today from Tottori Nice to get a couple of photos of it not from the seller. Discussion //oldschool.co.nz/index.php?/topic/49704-mlracings-hakosuka/1 point
-
More here: http://www.tyresmoke.net/forum/topic/125425-my-volvo-854-t5-r-591-hp524-ftlbs-project-the-story-so-far/1 point
-
sorry john, couldnt help myself1 point
-
Another small update. Good news = We had a healthy baby girl. Bad news = Garage time is pretty low for now... I'm on the home straight, the last of the planks have very little bending to be done, shouldn't take too much longer...1 point
-
Haha, cheers. Baby #2 is coming out the sun roof tomorrow so I doubt ill be able to get much time to work on this thing for a while. Here it is at the moment having a test fit, with the driver inspecting.1 point
-
It turns out that two of the Omoris I'd taken a gamble on buying in Japan (oil temp and water temp) had busted senders/mechanisms in addition to blown backlighting. Bummer. Robinson Instruments in Onehunga were helpful enough when I phoned to inquire about getting them repaired, but as they'd never worked on Omori gauges before they couldn't really give me an accurate quote for repair. I did find out that the core disassembly charge would be $37.50+GST per gauge, plus appropriate labour/inspection costs before any repairs could be made, so that's probably the best option I've got short of importing another pair off Yahoo. The added bonus is that I can get the backlights fixed at the same time. In the meantime a triple set of '80s Lamco gauges happened to come up for cheap on Trademe. Thinking they could be a nice alternative option, I decided to chuck a bid in. Okay, they do look rather... industrial, so I will just repurpose them for the track car. Everything works though, bonus! Coincidentally they came with Subaru sandwich plate and water temp fittings that are both directly compatible with the B6T. Discussion: http://oldschool.co....ns-dr30-wedges/1 point
-
About 4" out of that would do.1 point
-
Lately in Sedan lyfe LSD found a home Bum got lowered some more, front next For a rainy day hmmm 15x9 Fun Lots of little jobs done/to do Got some velocity stacks, a heat shield and some gaskets for the carbs Have put 71C gearbox on hold for the mo1 point
-
cheers i tried that link and registered, but the link aint working for some strange reason.. i will go and have a proper look thru that website tho. thanks . as for car, i was actually lookin around for a written off cyborg, cos i wanted to put a 1600 turbo in it. but hard to come by that would have been cool. but the 2L should make her fly. will be updating pics as i progress.. paint will be applied this month. just tidying engine bay..1 point


This leaderboard is set to Auckland/GMT+12:00