
Leaderboard


Popular Content
Showing content with the highest reputation on 08/30/15 in all areas
-
Another six years passed quickly. My beautiful long suffering Sharon, (these days Mrs sr2) and I bought the flat we were renting in Milford, (many thanks to Peter Thomas, RIP mate). My music career was going strong, we were all getting into dirt bikes and Rigamortice was still hauling arse as my daily driver. What can I say, life was good. To be honest she was starting to look a little scruffy, (my early teenage attempts at panel repair were biting me in the arse badly), the little X2 rattled a bit on startup but she still as always did her best for me and pulled strong. Even old cars need a little hug now and then….. In 1992 a collection of overly enthusiastic volunteers from various assorted hot-rod and car clubs formed a committee and came to the conclusion that despite having travelled safely for over half a million miles in various states of mechanical modification Rigamortice posed a real and present danger to the voting public and needed to be subjected to things called “regulations and certification”. I didn’t have a clue what they were talking about but “rules and certifications” sounded very important so Rigamortice and I humoured them by trying to look interested. To their credit they were obviously very clever & determined people who had far too much time on their hands and knew heaps about politics, using impressively long words, inventing regulations and certifications and forming committees to invent even more regulations and certifications! Both Rigamortice and I were overawed by their self-sacrificing tenacity and their astonishingly concise use of mind numbingly self-contradictory terminology - in desperation and under increasing duress we consented to filling out a “Vehicle Modification Declaration” form. At this stage we couldn’t help but be reminded of Officer Opie from Allices Restaurant; (listen from 6:30 to 7:40 or just sit back and relive the full 18 minutes of beautifully, innocent, delicious anarchy). We soon discovered that the “sad little man that the very clever hot-rod and car club committee members had given the task of confirming the above modifications” was in denial that Rigamortice was in fact fitted with a “Starship Enterprise Warp Factor V Hyper Drive” and was not happy with the “structural modifications prior to 1991” being described as “oxidization”. After a vigorous negotiation process where I hid behind Rigamortice while the “sad little man that the very clever hot-rod and car club committee members had given the task of confirming the above modifications” hurled a multitude of thinly vieled insults at me about my car and the marital status of my parent at the time of my birth, we eventually (with a small amount of violence on my part) reached a compromise and I was given paperwork! Eight months or so later a rather confused lady in a L300 courier van T boned Rigamortice very, very hard. Luckily although written off the van hit with the left front and when extracted from the wreckage the hysterical and bruised lady van driver was essentially unhurt. Sometimes you just get lucky.... Modern cars have an effective crumple zone; designed in 1935 Rigamortice just took it on the chin like an old boxer. I drove home in a daze with a very sore neck and a bleeding thick lip while Rigamortice sported a wobbly rear wheel and a rear chassis/sub-frame that had been seriously pushed sideways. A short time later Sharon and I had a baby on the way, we'd bought the house next door and Rigamortice ended up parked in the back yard……
 11 points
 -
I though I would post a few pics of the progress of my 1964 powered wheel barrow. I picked it up off a farm where it had been since the late 70s and decided it needed to be restored when I got it the engine was seized up really tight but I freed it up and put new rings in it now iv stripped it down and I'm painting all the parts for it. Here is a pic of it after I got it.8 points
-
Pulled the cab off the chassis today. Flipped the chassis upside down so I can finish welding the c-notch. Once that's done it can probably go to get sandblasted. Heaps of room under the bonnet for a supercharger7 points
-
Here is the engine after I cleaned and painted it.7 points
-
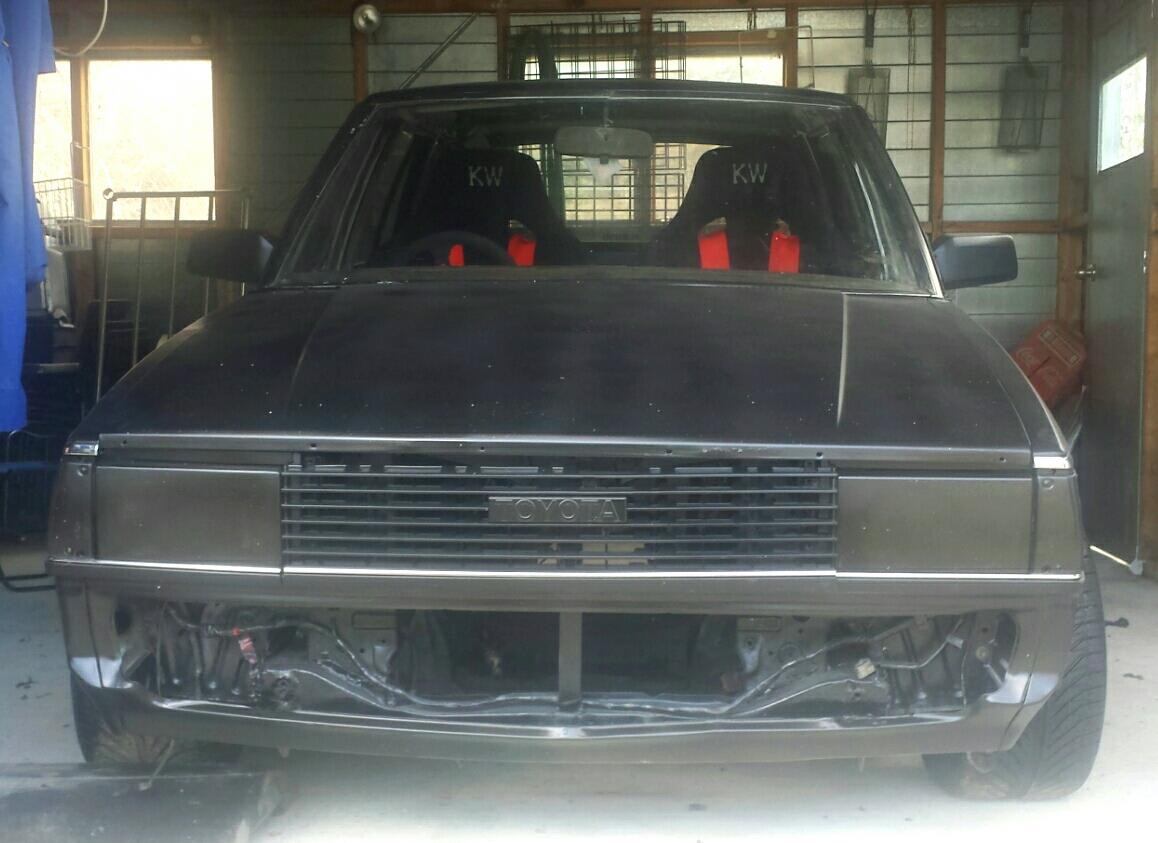
Ended up going back to the wrecker and raiding the last of the supersallon bits off the car .i now have a full factory black interior and various bits of more chrome.also scored another diff and housing which i will convert to disc brake and a estima diff that bolts straight in.My short shifter from oz turned up and reduces the shift by up to 50% looks and works great on the newly reconditioned w57.motor is now in the hole.just need to fab up some engine and gearbox mounts.sump misses the cross member and steering linkage but the front damper pulley is touching the sway bar.Am i aloud to cut and add in a new section?. ITBs clear everything which was my main concern,and shell be tight up where the radiator goes. Cube short shifter5 points
-
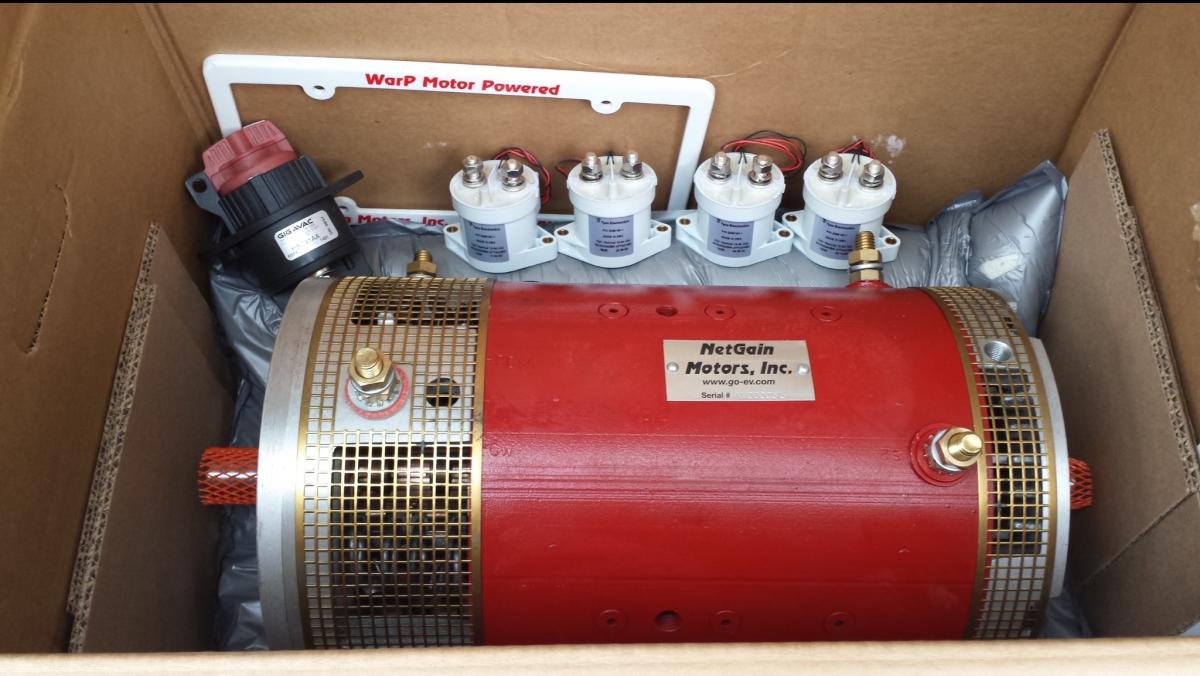
Today we received some really good news and bits! Firstly I got the bonnet chrome installed! Although small really complements the car and makes it complete. I also recieved the WarP 9 motors, Tyco EVC500 contactors and maintenance switch which will be off to the engineer next week to get installed! We also meet with our biggest sponsor Peter, the CEO of ETCO who has opened big oppurtunities for the KEV70!
5 points
-
Monty Checking out how grippy lol Not sure if please with his new living room ornaments.. Thanks to MM for the springs, we swapped my Original alloys for - sent them off monday morning, and received the springs along with the carbs from Japan on Thursday.. Put the springs on Saturday after work... Discuss; http://oldschool.co....ith-added-moss/4 points
-
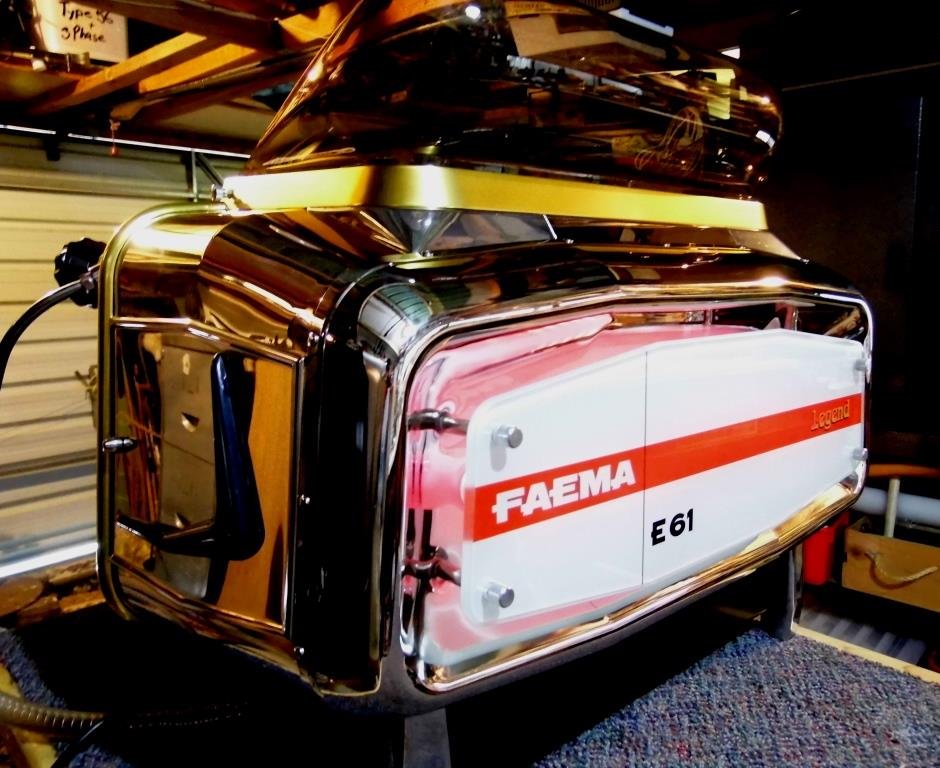
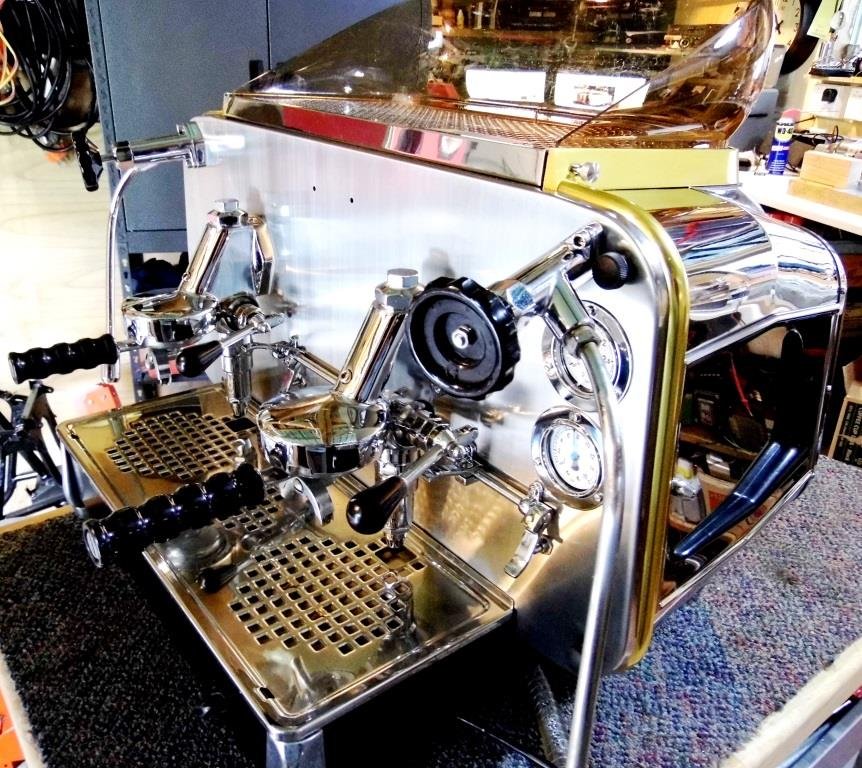
On their way mate. Here's a couple of pics with the stainless all polished up and after a couple of coffee's made. Still have the final decals and brass nameplate to go on as well as the flexible steam wand, various bottom section covers and somehow polish the scratches out of the perspex cup holder on the top. I like the bottom section left black as you see it now with the under body showing so I'm pondering painting the stainless covers black... ( the covers you see with 'FAEMA" written on them in the first phoyo on page one)
4 points
-
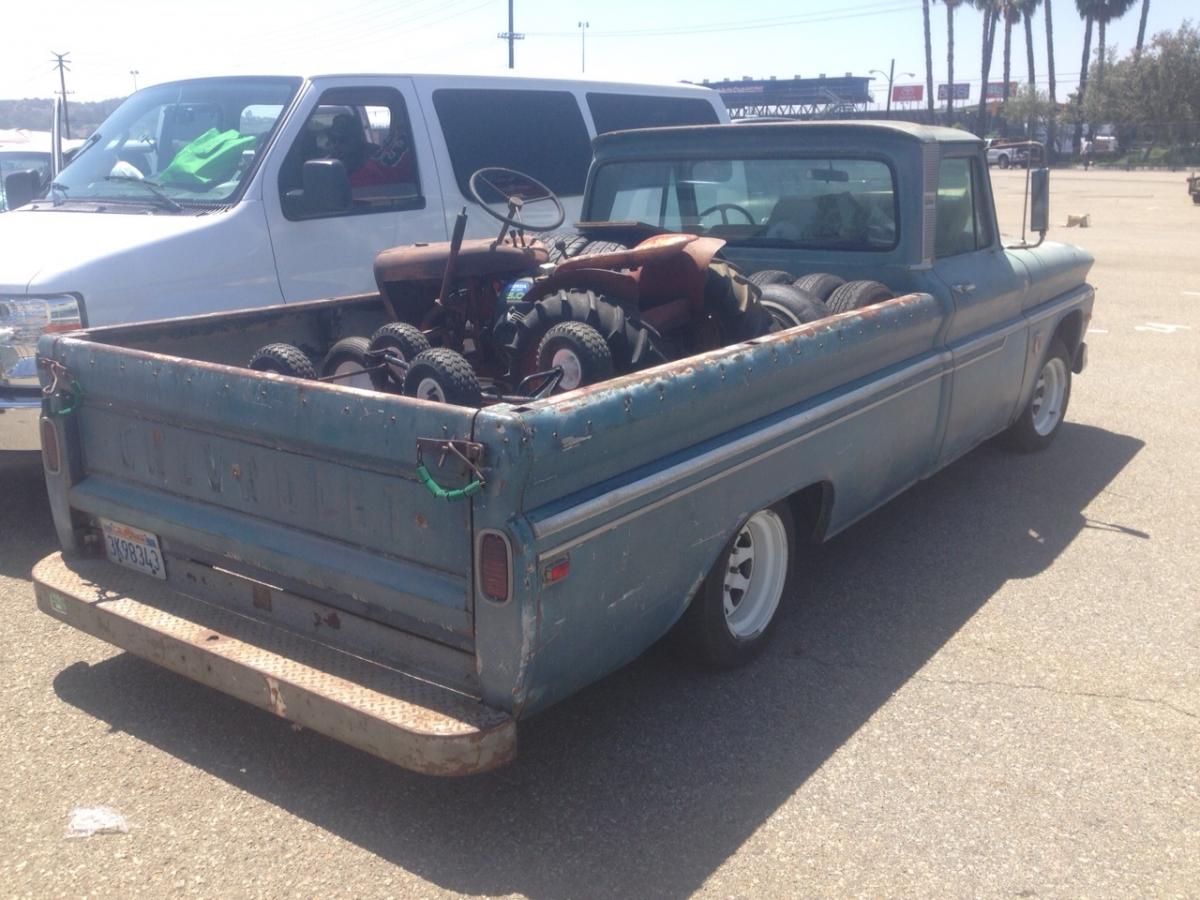
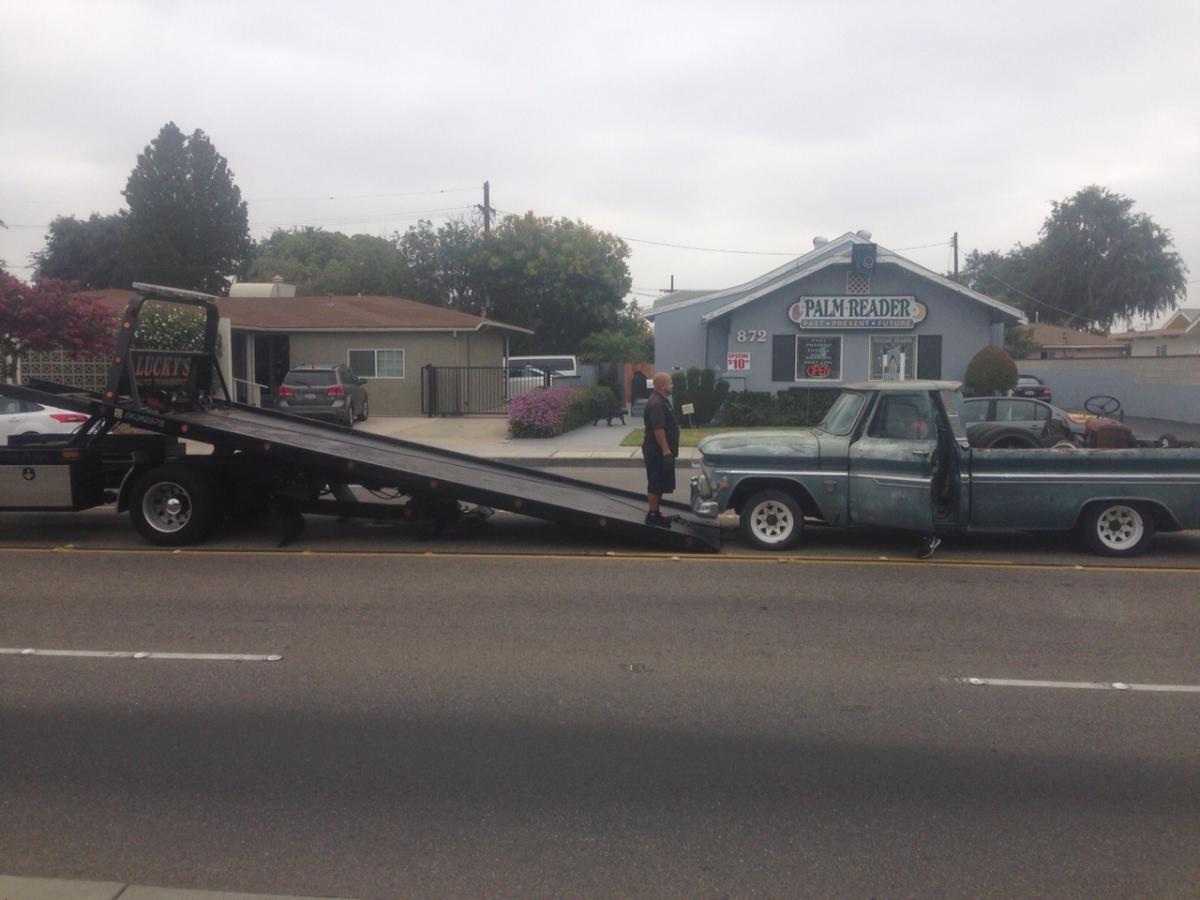
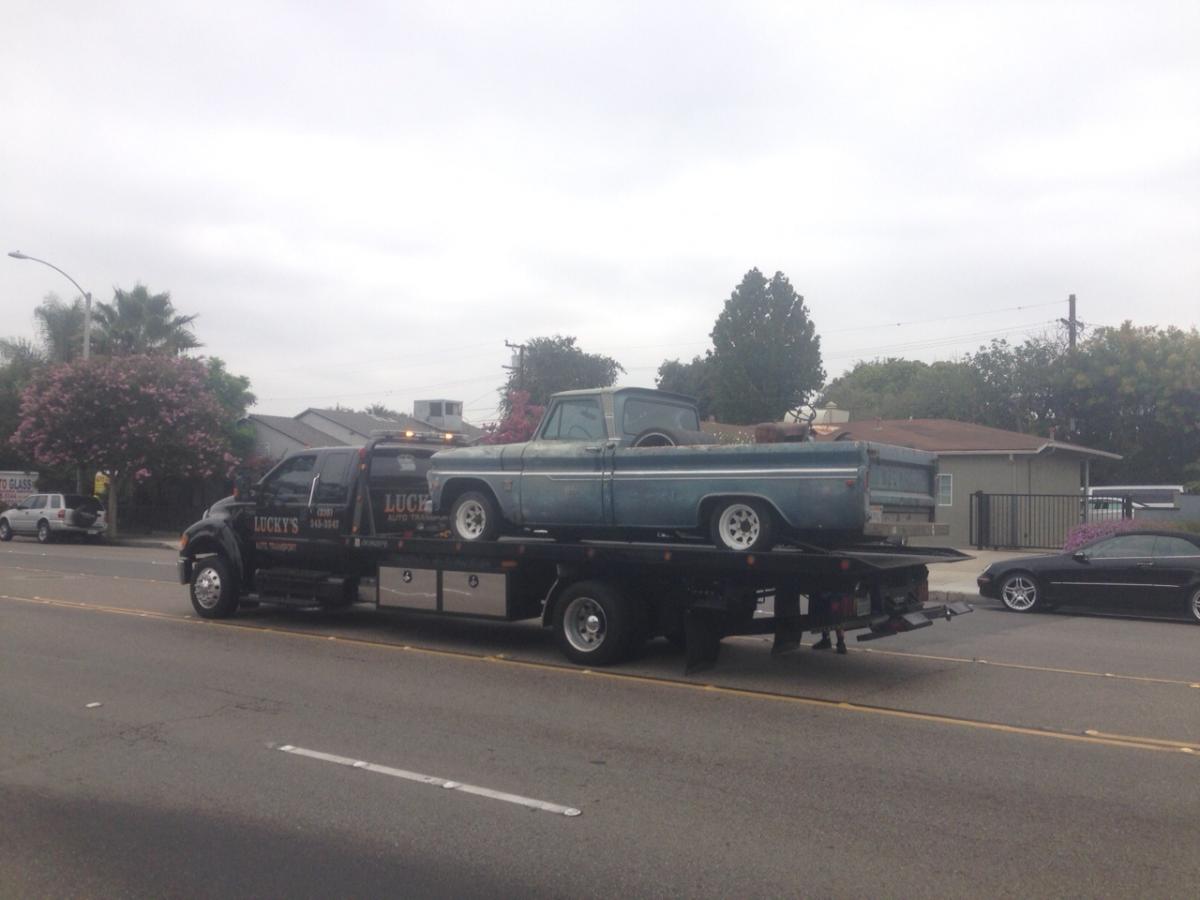
Hi, Just got back from the States. Picked up a C10 Fleetside truck, Custom cab, big window, factory v8 engine, manual. Found it at Pomona swap meet, was one of the more realistic priced car/trucks there. Bought it off some nice Spanish low riders. Pilled heaps of stuff on the back and drove it 100 miles to the next hotel. Got hold of Lucky's towing and had it sent to the shippers to be packed with some other crap and sent back to NZ. Also while there visited a lot of rod shops and car places. Picked up a airbag kit for it, drop spindles and stud conversion. which I'll be installing when it arrives in NZ. Now its just a waiting game. Discuasion Thread
3 points
-
I haven't updated this for a few weeks but there has been quite a bit happening in the background, my rear calliper mounts have been made, they are getting a small bit of machining done but I should have them back this week, my 3D printed steering arms have also been done and are due to arrive in the next couple of days but this is a picture of them I have a plan for checking the amount of toe change which I will work through once they arrive. I have also made new engine mounts and a new crossmember that sits a bit higher And how it will sit I have test fitted it and it is all looking good so I will get some paint on it then get it all mounted up and finally I had some new wheels arrive old one on the left, new one on the right they are Koya BN-Teks, pretty much look identical to the ones I had but without all the bolts. So these ones have a load rating on them so are good for cert. Bit of a shame that I can't use the old ones but there were some other issues around those anyway which these fix as well.3 points
-
Got into the bottom of the A pillar, I need to make it fill in the red line! IMAG0389 this is the foot well under the front of the floor, I think I will need to roll it over again and remove this right across to the other side and get a new one folded up. Luckily my old mate from school owns a sheet metal shop and can pretty much manufacture anything from sheet. IMAG0388 The new sill and guard seem to fit ok, but I will need to brace the door opening before I move it and check it hasn't opened up while sitting there. The red tape on the sill is about where I will cut it to match up with the new rear guard. IMAG03873 points
-
We were there and it didn't rain.3 points
-
Also while talking to Tom/VG about pick up, he mentioned that he had the bones of a scooter that he may sell, so a deal was made and I added this beast of a AZ50 to my collection It's got AN125 suspension front and rear, a good engine and a live rego, so once I figure out the wiring it'll be a goer. At this point the plan in my head was to put the engine/suspension/plate onto the ZZ and the ZZ front end onto Sandy's SJ, had thoughts of a simple swap taking a couple of hours max, more on this soon... Today's effort = 399.9k round trip to go pick them up Fairly lightweight trailer, Altezza still didn't like towing it uphill. Got the scoots back to Gisborne with no issues, unloaded them into the shed and even though I really wanted to go home and eat I just had to have a bit of a play. Well it turns out that my plan up there isn't going to work quite as I had imagined, as it turns out Suzuki decided to change things up a bit with the AZ50, the 2 bikes have completely different frames and engine mount locations, no chance in hell of bolting the AZ engine into the ZZ Figured in that case I might as well try to just get the ZZ going, hooked up a battery, flicked the key on, pulled the brake and pushed the starter = nothing. Fitted the kick start which ominously was in the helmet hole and tried to kick it over, nothing, no engagement, grabbed the fan and tried to turn it by hand, it locks up every turn and clunks a lot, no sign of compression and a metallic jingly rattle from the variator side...I do believe it's fucked! Also the brake disk is bent, and the front wheel has a ton of play, so might not even be able to use the front end on the SJ. The plan now = 2000 Suzuki AZ50 ZZ Frankenscooter/Aliexpress special! Think naked Honda Ruckus style like VG had started doing, but with the finest (read cheapest) LED lights, air filter, exhaust and anything else that catches my eye that Aliexpress can provide! And with me attempting to wire it all up results should be hilarious! Also as I don't have a welder there is likely going to be a LOT of cable ties and creative bolt on bits involved... Hopefully I'll be able to salvage at least some bits off of the ZZ to use on it. Check back tomorrow for progress and what I find when I start stripping the ZZ. For those of you that made it through my rambling attempt at a build thread have a gold star TL;DR? Tough.2 points
-
Asked around a few places locally, but haven't found much more than a Passola needing a coil "at least" and a crashed Jog -I may still buy both to combine. So I turned to trademe, where I came across a complete Sepia ZZ being offered as a parts bike, which I snapped up as I was thinking it can't be that bad... Note the "spoiler" instead of a carrier rack and the high stop light Suzuki was so proud of they emblazoned the front with a sticker telling you about it haha I mentioned it in spam the other day to see if any one would be able to get it at least closer to Gisborne from Tauranga and if Mr. Grumble would be keen to store it a couple days if I could get it to Whakatane. As it turned out he was going to Tauranga a few days later (Friday just gone) and would be able to pick it up for me as well as store it! Sounds like it was an interesting area to pick it up from too. So yeah BIG thanks to VG for picking it up!2 points
-
Correct yes you aren't able to run injection. The Injection manifold does however offer more torque over the flat plane style ea-eb manifold. You can run a distributor, however in instances of a big whack the distributor gear can fall off - which also drives the oil pump - things can quickly go south. Caps and rotors are prone to jumping and breaking, so I've opted to go for the ECU ignition only - rev limit, stronger spark and turn key reliability - well thats the intention anyway. Yes also have to run the stock exhaust manifolds.2 points
-
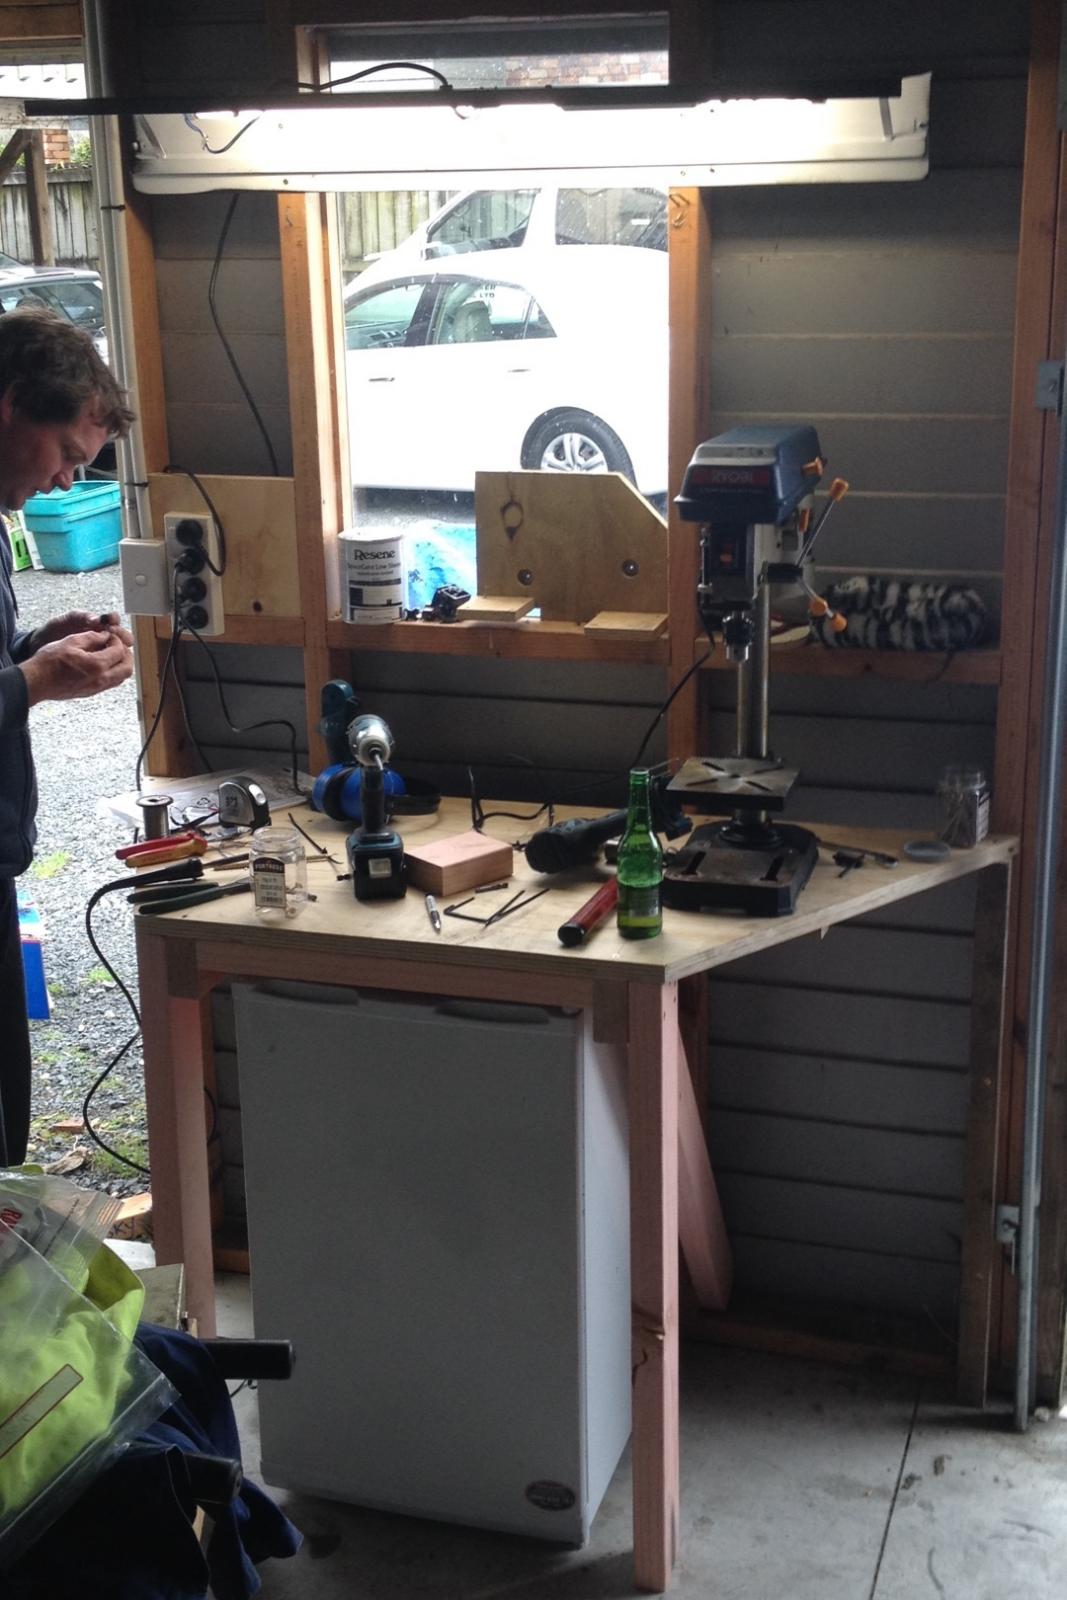
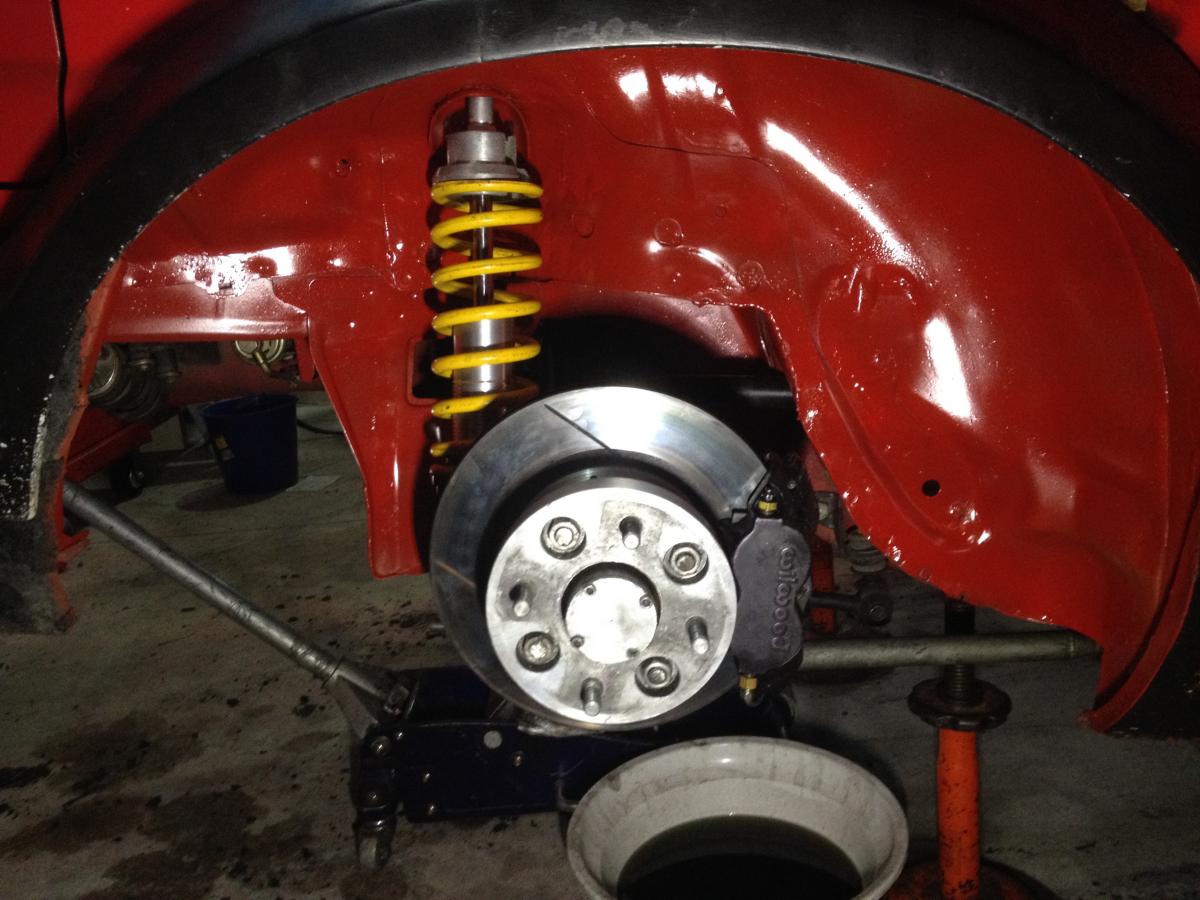
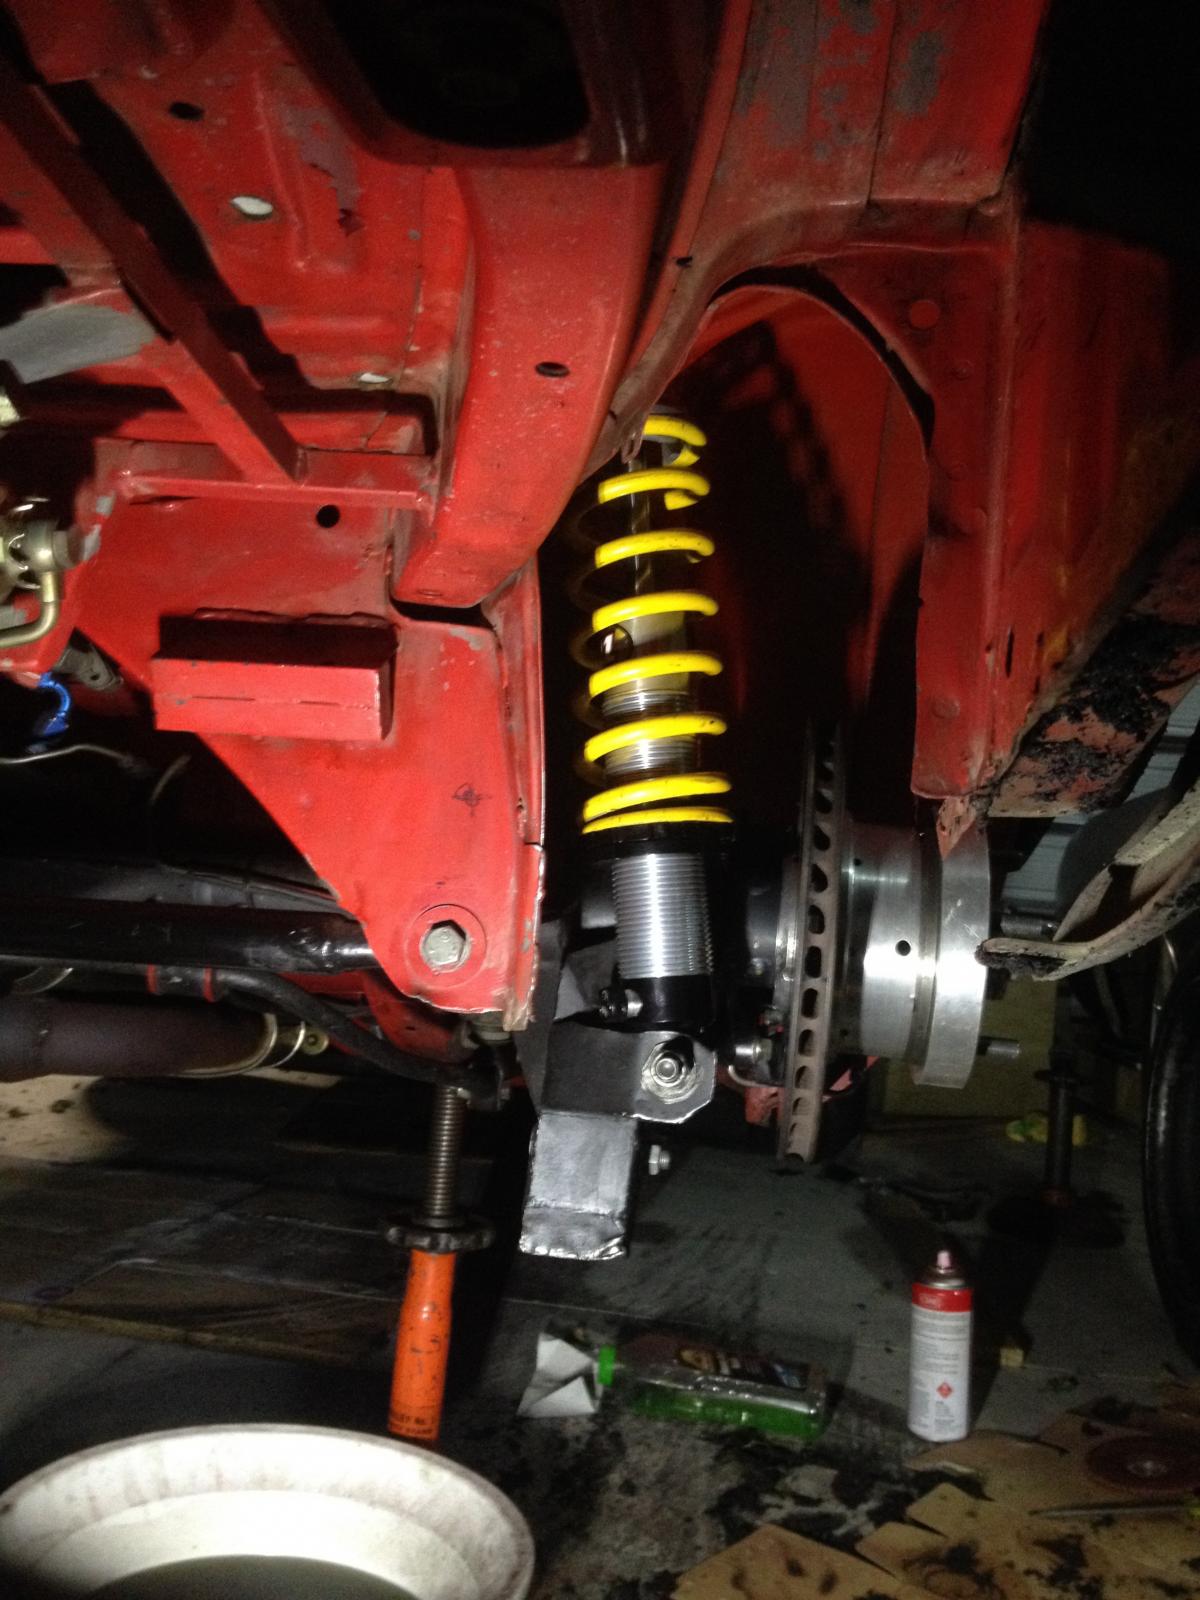
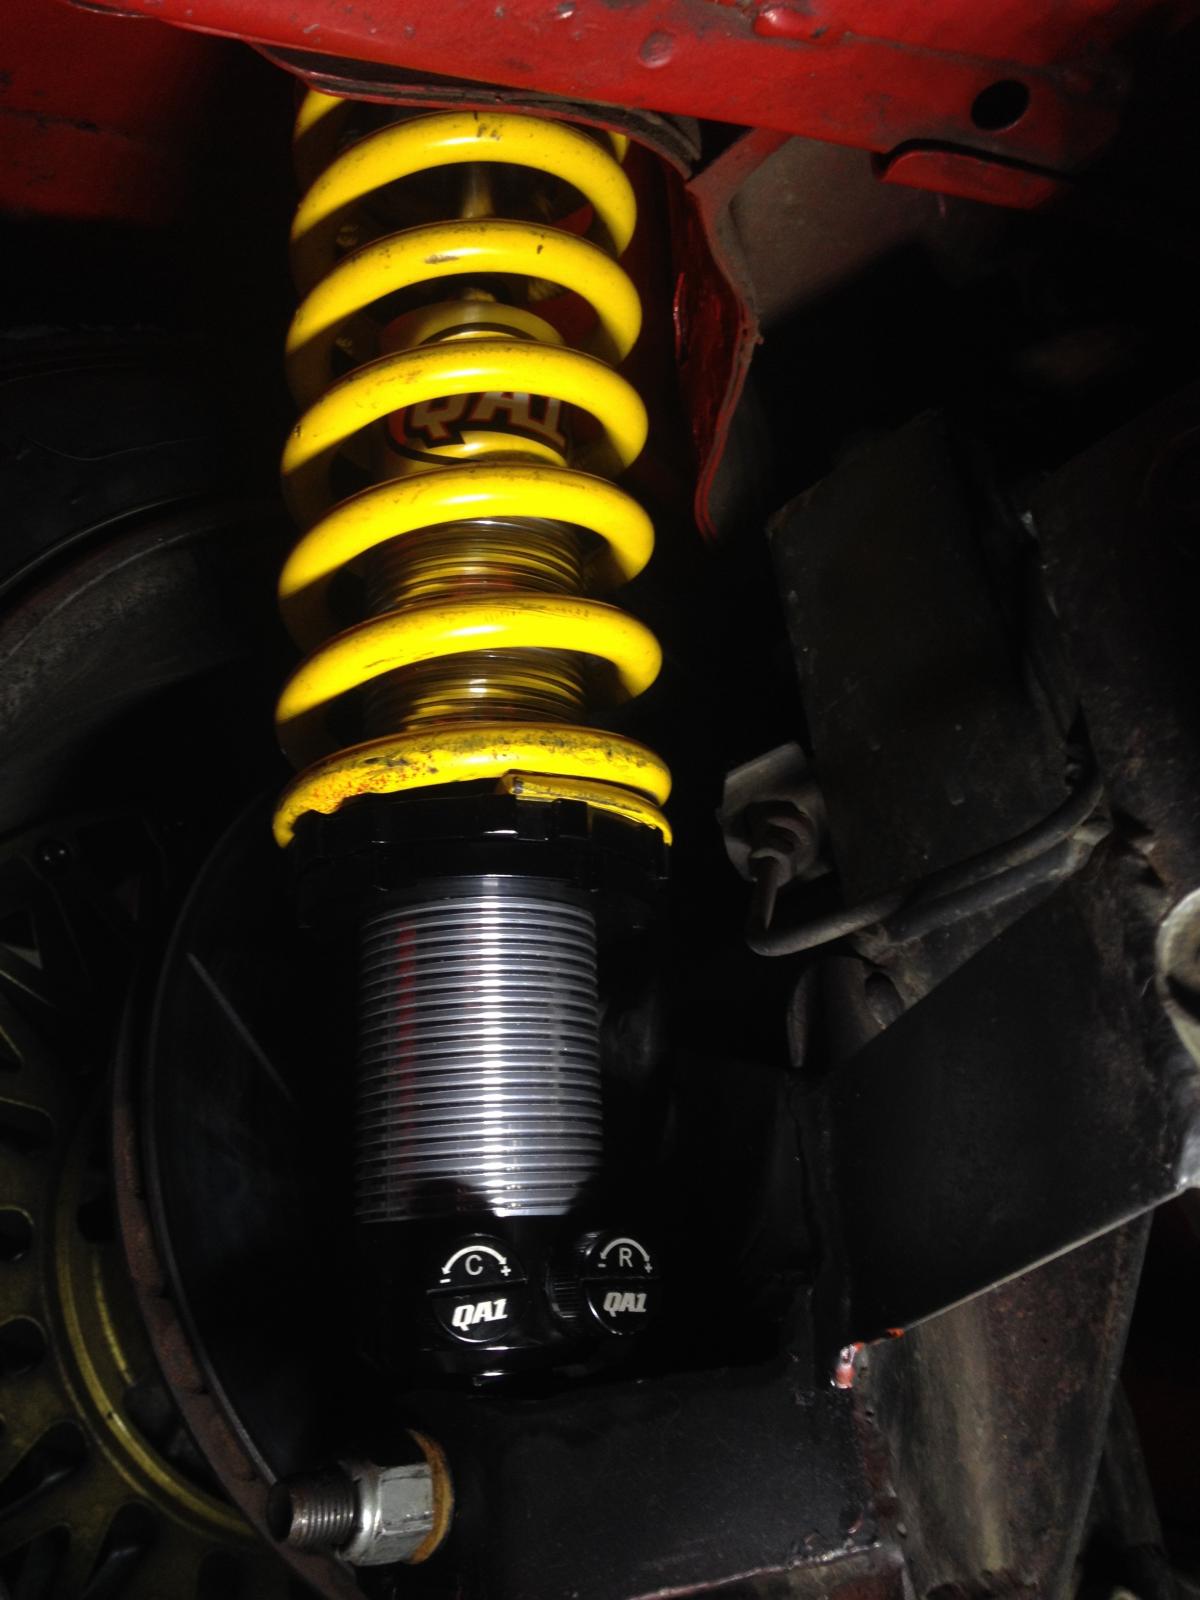
Shocks in, new wheel bearings and seals and a decent cleanup with a lick of red paint: The adjusters are accessible from the inside with either your fingers or a screwdriver: And back on its wheels for the first time in a while: I also added a fridge-house to my collection of benches:
2 points
-
Go tthe mrs to give me ahand to crank this over today, I got her to write down the compression tests (before it started) Not so good on 3 and 4! However ITS ALIVE! https://youtu.be/HCPhc2MetpI https://youtu.be/HCPhc2MetpI Mrs actually got it going first, shes stoked, lol, this my my first start. fresh fuel including filling the carb bowl got it running so guess the fuel pump is borked or has an air lock I forget to test the compression again afterwards but it started & revved well enough so im guessing it was a gummed up valve or something. Stocked as that mean i can get it built up with the existing running gear. Wont be going too far before the engine comes out, for a freshen up but at least it can theoertically move itself around till then! Once it has brakes and a working clutch...2 points
-
Slam them in as is and run e852 points
-
The body was looking a little sad so some panel work was called for and a coat of burgundy paint. Near this time I was ignominiously excommunicated from the Auckland chapter of the Vauxhall Enthusiasts Society for the then unforgivable transgression of “automotive blasphemy”; (i.e. modifying an “already perfect” Vauxhall). Rigamortice loved doing skids with her new motor but the Vanguard diff ratio was far too low and the stud pattern was different to the HQ pattern on the front. When the novelty of doing one wheel burnouts on 15” skinny cross-ply tyres finaly wore off I found a 3.3 HD Holden rear end, fitted it with the larger HQ drum brakes and changed the stud pattern by welding up the old stud holes in the axel flanges and re-drilling them. The old girl was starting lift her skirts and haul arse well (for 30 years ago) and it became obvious the 1930’s style lever action rear shocks were struggling with the additional power and traction so out came the rear end again so I could convert it to telescopic shocks. With a little tweaking of the new suspension I had a car that was happy to be pushed hard and was comfortable with 3 times the original 48 BHP. The only issue was that the standard under floor single circuit 1” master cylinder was having difficulty with the HQ disc/drum combination. I was running a dual Hydrovac booster system with a VH40EL on the front and a VH44D on the rear and despite fitting both boosters with matching “complex” (dual acting) control valves the combination still felt clunky and lacked feel. When late one night I caught myself designing an external control valve system that could operate two boosters simultaneously I knew that drastic action was required and in desperation the following morning, I attacked the driver’s side firewall with an angle grinder…… I mounted an XA Falcon pendant style pedal box and rebuilt the firewall to accommodate an XB Mastervac and dual circuit master cylinder. At the same time I converted to a hydraulic master/slave cylinder clutch combo. Finally the car felt balanced and a joy to drive- problem solved! After a series of small but interesting and exciting fires Rigamortice had to be completely re-wired and I ditched the generator in favour of a ‘modern” alternator. A good mate turned up with a rare (at the time) Yella Terra head he’d procured from his neighbour and it proved to be the ideal combination with the X2 cam, the pacemakers and the DCD Weber (I tried a 350 Holley but it just used more gas and never idled properly). With a little tuning Rigamortice was starting to get a reputation for being a lot quicker than the old tart looked……… love those "one wheeler peelers!"........ One month (and a number of instances of unintended, deliberate, sustained loss of traction) later the Nissan gearbox shat it’s self into shrapnel. I found a W40 Steel case 4 speed Celica box (very sexy in its day) and modified the Holden bell housing to accept it, problem was the main cross member sat where the new gearbox needed to be. I jacked the old girl up, put her on axel stands to keep the chassis straight, pulled the front seats out and cut the whole floor out from the B pillar to the fire wall to expose the chassis. I welded in a piece of 4” RHS to form a new cross member, cut a section out of the original cross member to accommodate the new box and extended the original inside chassis rails. A new floor made from 16 gauge Zintex was welded in and a pair of Triumph 2000 front seats were fitted. Rigamortice had yet another new lease on life.
2 points
-
FAIL So Hellux failed, but not by much! Have a small list of fairly minor things to sort, which shouldn't take long, and more importantly should cost stuff all. So the seat belt buckles were bolted to the seats, which meant a whole bunch of extra rules applied around the mounting of the seat, so I thought I would just simply bolt the buckles to the factory mounting points on the body. WRONG. Turns out it has no holes/nuts, had a bench seat it did, which seemed odd for an SR5, but guess it was an option or some shiz. So I made up another set of doubler plates for the belts, as seen below, WRONG. The eagle eyed of you, will notice that I welded std M12 nuts to them, they have to be metric fine. Bugger. So I need to change these. Thankfully I got the seat ones rite, so they are all gravy. He also wasn't happy with the floppy material buckle storks, so I have to change them to cable ones. It has to have an engine check light, which I think is slightly odd? Needs a fan shroud, which makes sense. Have to slightly change the front drive shaft loop, easy. And then I just have to take pics of all the doubler plates and hoop mounts that are under the carpet/seats inside the vehicle, and its done. And here's a pic of the old girl in all her hideous glory, ready to set sail for a fail. Grott. Regards, VG.2 points
-
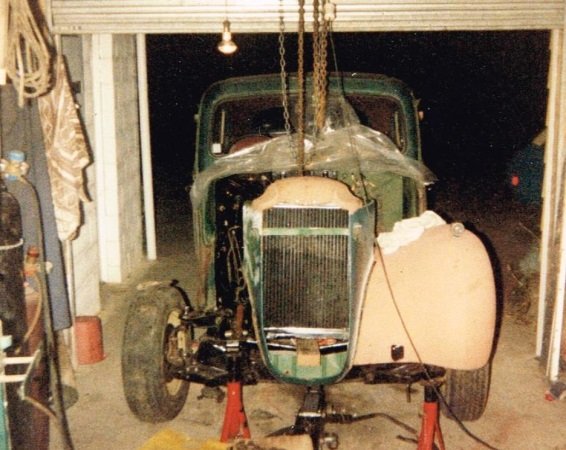
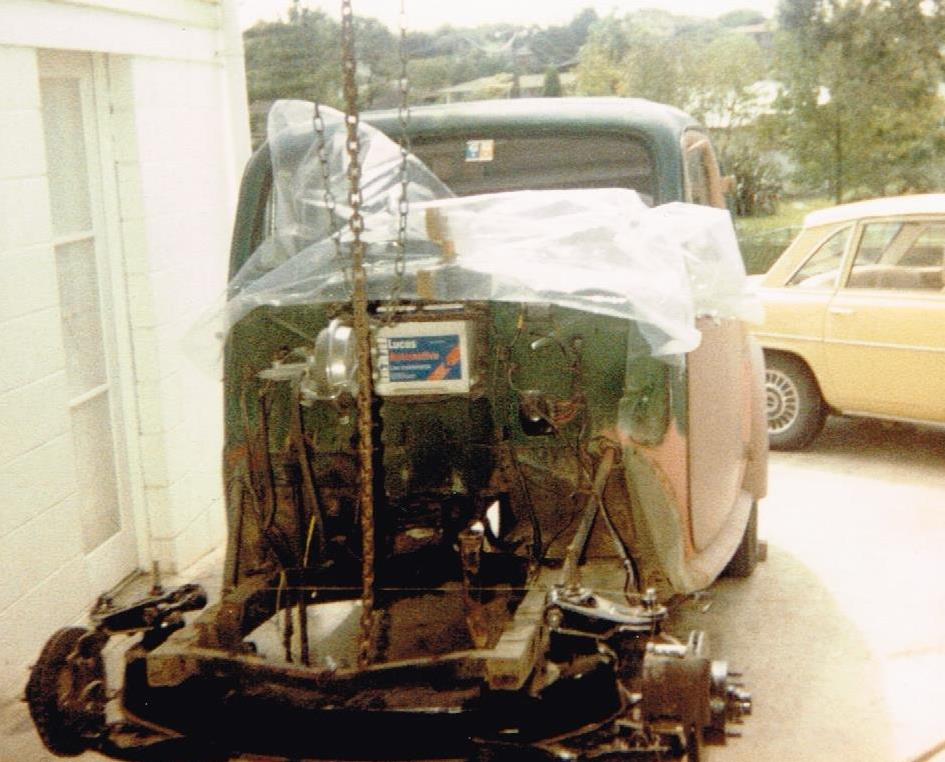
In the summer 1986 I removed all the front bodywork and scrapped the engine, box and front end. I was left with 2 chassis rails and a big hole with a head in it! Soon I was crawling under cars in public carparks with a tape measure and haunting the local car wreckers in search of a suitable front end. I finally settled on a HR Holden wishbone setup that I fitted with reversed HQ stubs and discs. A shortened Austin Kimberly R&P was mounted behind the cross member and connected to a Triumph 2000 steering column. All I needed was a motor and box….. Sometimes you just get lucky, a guy I worked with had a mate with an X2 186 motor hooked up to a Datsun 4 speed and he needed money. $60 later I was poking it into the old girls engine bay. After a few weeks spent fabricating mounts, throttle and clutch linkages, a drive-shaft, etc. Rigamortice’s new donk was starting to look like it was where it belonged. I ditched the X2 twin carb setup in favor of a downdraft DCD Weber and scraped together enough money to buy a set of pacemaker headers.
2 points
-
Yup a 2 core shielded cable. one core for signal / trigger one core for sensor ground ( attach to sensor ground at ecu) then run a power feed to power the hall effect sensor. Ground the shield at the ecu end ONLY to sensor ground.2 points
-
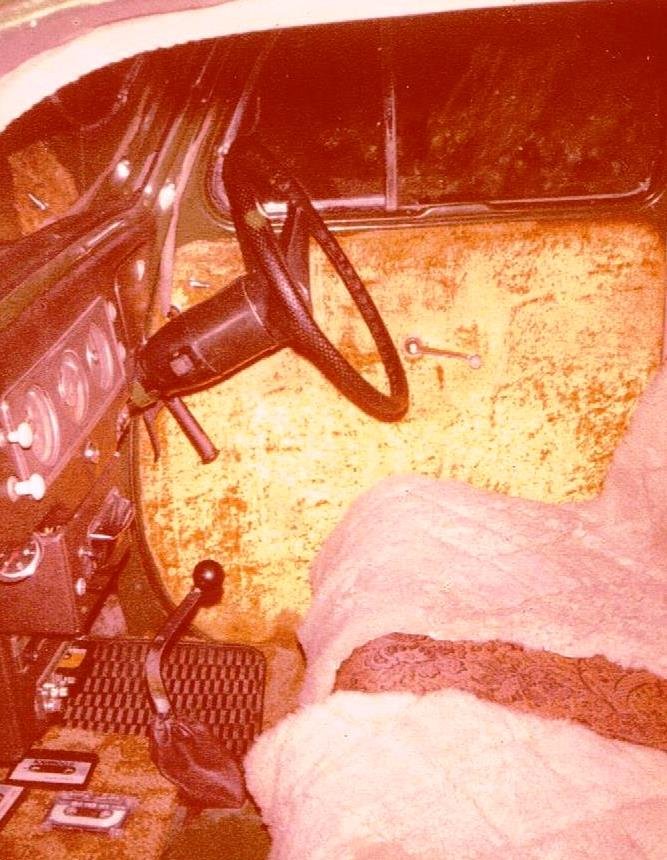
My name's Simon and In hindsight I should have labelled this thread "sometimes you just get lucky". 1973 in little old NZ was a good year. Colour telly had finally arrived (not that any of us could afford one), Pink Floyd released Dark Side of the Moon, petrol was 10 cents a litre, and I was 15 years old and needed my first car real bad! I spotted an old 47 6 cyl Vauxhall parked up in Hastings rd. Mirangi Bay with a faded 4 Sale sign in the window and grass growing through the wheels. After a round of fierce negotiation with the owner the paltry sum of $15 was settled on. With only $10 to my name I borrowed the remaining $5 from my long suffering father, (not sure if I ever repaid him) and the deal was done. After a triumphant arrival at home in my “new car “on the end of a towrope behind Dad’s 6/99 Worsley we discovered the motor was seized rock solid, within days the family was calling the car “Rigamortice” and the name just stuck. The only three early pictures I have was one taken by my mother (thanks mum) while I was bolting the bodywork back in place after Dad helped me with a “rings ‘n bearing” job - all done with the engine block still in place,….. ……and a second of my little sister and my eldest sisters’ daughter (big family) posing proudly beside Simons “new” car. …..and a third from when I found another J14 Vauxhall to park beside (Rigamortice is the green one). Within a few years the old girl had had been fitted with an LIP motor & box complete with Impala shifter, the “knee action” front suspension had been ditched in favor of EIP wishbones, I’d fitted a Vanguard diff and the interior looked like either a cheap massage parlor or Bishop Brian Tamaki’s living room, (the 70’s were a little weird!). Discussion Thread //oldschool.co.nz/index.php?/topic/49843-sr2%E2%80%99s-1947-vauxhall-%E2%80%9Crigamortice%E2%80%9D-discussion-thread/
1 point
-
A couple of weeks back I came across a pretty damn tidy 2004 SJ50 languishing behind the local Honda shop, was told the carb was fucked but if I wanted a project it was mine for a very low sum. Dusty, but otherwise tidy Turned out it was just a simple plastic piece in the throttle slid had had the top snapped off, which meant that the throttle wouldn't open at all. Order the part from Suzuki and decided to see if I could MacGyver up something to get it running while I waited for the proper part to come from Japan. Didn't think to take a pic of the repair, but imagine a loop of .8 mig wire on the top of that plastic bit. Put it back together replacing the spring and oring I'd discovered had been lost and the scoot then fired straight up and idle awesome. Wouldn't run at all past half throttle with me on it though, was leaning out hard! Raising the carb needle 2 notches almost solved it, but it was still sometimes mucking around once hot and smelling rather hot. The spout off a SCA flexible funnel sorted that out There is a intake behind the front wheel which directs air through that tube and over the engine. Still waiting to be fitted, the mig wire works fine haha Chucked a new battery in and some rego and job's a good'un It was at this point I had to relinquish the SJ over to my partner Sandy, but as I'd been riding it around a few days I'd caught the bug so decided I had to have one myself!!1 point
-
I expext this to come out as a thai spec drag scooter thanks1 point
-
Nearly forgot... I scored an AW/AE/KP long boss kit from Richy at this month's Burgerboes, which now gives me the option of fitting an aftermarket steering wheel to the New Kid. Cheers dude! And after wanting a Twos R Us engine cover gas prop kit for ages, buying one for the previous car, and being quietly impressed by its simple yet functional design it became a mandatory upgrade for the new AW11. Also in the same shipment: a K&N drop-in filtercharger (on special) and TGP key blank (cheap). Discuss: http://oldschool.co....1-sc-chit-chat/1 point
-
Faaaark I might have an aw11 rear screen at the olds...1 point
-
Man this looks ace in those picks they dont even do it justice compared tonin the flesh. Obviously your dedication has paid off! Now that pumps going Ill need another excuse to come round1 point
-
Got the spotties on today woop Woop! Bloody bright too which I'm happy with.1 point
-
Wow, that looks super great!1 point
-
Shet, i got these brake brackets in the 64.....1 point
-
The 70s were a hell of a drug eh i hope she comes out as a 70s brit custom style with an even more horrible interior1 point
-
^ depends how much boost you are going to wind into it. around 10psi should be fine on 10:1 running on 98 pump gas. my stinky 4age done 10psi with 11.5:11 point
-
Got the 27s on today, really happy with how they sit, no scraping at full lock etc, lifted it more than i expected too which is a bonus! Pics don't really show how much higher it is cause of the angle which is a pain.1 point
-
Got reasonably motivated with this in the weekend, receieved my ratmat, so ripped the interior out on sat and went to town with the sound deadening! Got 14 sheets of it which covered the boot, most of the floor, inner door skin on the rear doors and inner and outer skins on the front doors! Really happy with the result, would definitely recommend it if yo' ride is rattly and loud! While i had interior out i fitted my new sounds which is an Alpine IDA-x100 headunit, 4" Alpine type s speakers, Rockford fosgate prime series 6x9s, An older Alpine 4 channel amp, Orion XTR series monoblock amp running a little Digital Designs 8" LE-MO8 sub running at 1ohm, full 4 gauge wiring throughout, this lot with the quietness of the ratmat makes for a significantly more comfortable daily! Pics: And then when i was at one of the tyre shops on a parts run today i spotted a set of 27x8.5r14s! So had a yarn to the guy about them and bought them half a hour later woooo!1 point
-
Well this has been like downloading an entire season of my favourite telly series. I have had fuck all time to read the forum lately, so I've been catching up with bits and pieces as I can over the last day or two. I had the good fortune to be able to read this build thread from pretty much the point where you started diagnosing right through to now in one hit. It was the whole story in one compact 30 minute long read. I was worried that I was going to get to the end and you hadn't got around to trying to start it yet. Thankfullly when the video came into view I was very relieved. Top work on the methodical diagnostics Zac. I would have flipped all the tables and punched holes in all the walls well before now. OS really needs people like you to increase the average IQ count and I feel smarter just by reading the thread. Now you need to build a compression tester with that spark plug adapter and read via a smart phone app. Good motherfucking job man. You deserve a cold beer, shoe shine and back massage with a happy ending.1 point
-
i have been plugging away at bits and pieces on this, and last weekend cleared two! engines from my tiny shed with the help of EURON8 - the 125s 1608 and 4 speed box, and the croma turbo engine which was on the engine stand. Now there is way more room to move (some room to move!) We also tried to fire the engine up as id run out of things to take off, and put back on but only got a few mild coughs - the oil pressure light did go out from cranking so thats good (pump is not broken from dent in sump) So i think no-start condition is a combo of - the fuel being a bit stale (i drained the 2300 tank into the mower can which was being gravity fed into the fuel pump), so have some fresh 98 to try (hoping its old gas!). - maybe low compression - will borrow my neighbours compresion tester to see about that, and - Also the voltage at the coil was a couple volts lower than the battery so may jumper that too, but sparks looked good and blue. I also closed up the last bits on the front corner just before as the Wellington parts car was going to be no help here. (ive already done about 6 much simpler patches on the wing and front valance which you can just make out) Quite satisfying making these complex bits and getting them to fit given my tools are one small vice, some hammers and gilbow shears, and the all important cereal box for CAD. only 992 holes to go.1 point
-
Well I've had a pretty damn good morning. Changed the oil, topped up all the fluids and set off for a test. Hit up Repco and got myself an accessory USB socket to charge my dead phone, just in case I needed it, and a fire extinguisher, for a similar reason. Car was pretty smokey, and had a bit of oil to burn off the turbos/manifold too. It wasn't running overly well. Would stutter, miss and backfire if you gave it even the slightest amount of jandal, so I was anticipating having to get home and rip into it again... But I stuck with it, and took it for a drive along some back roads where I could open it up a bit... After a few backfires and misses, it cleared its lungs, inhaled a bunch of air and FUCKING WENT NUTS! I had to remind myself that the motor is pretty fresh, so I didn't give it all the beans, but holy hell does the thing shift. Feels like the fastest car in the world to me at the moment, but that's because I'm sitting on cloud nine seven. After that clear out session, it seems to drive really really well. No farting or missing when tootling around town, just drives really well. The idle is a little high, and not completely smooth, but I suspect that's just going to involve setting up the throttlebody correctly, which I can now do, as I can get it up to operating temp. Going to give it a much needed wash now, get some rego for it, pay the insurance and head off for a longer test-drive . Grins ear to ear.1 point
-
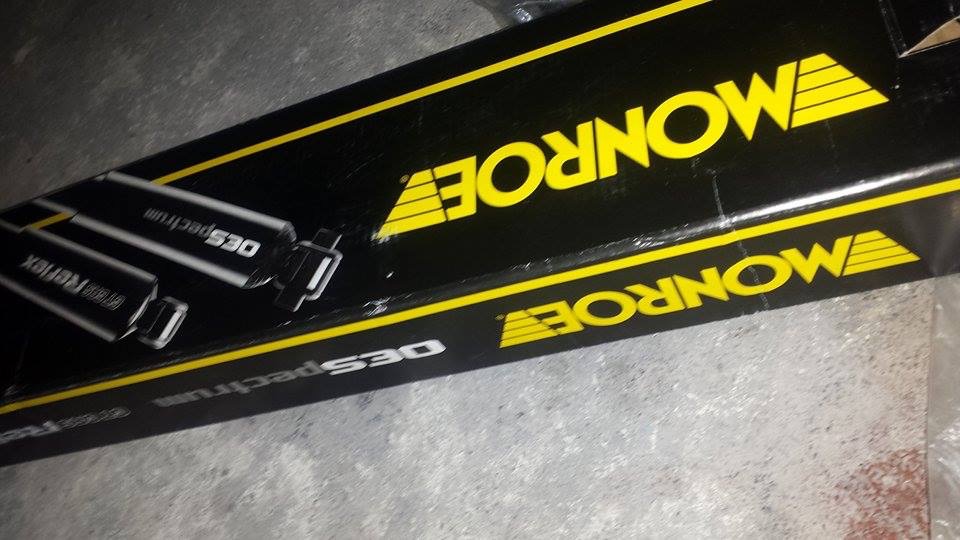
So a little update on things going on. I have recently purchased Monroe shocks but have a few odds and ends to get those fitted. I also got the plasti dip cleaned up to reveal windows and some chrome! The motors are in New Zealand on their way to Chrustchurch for pick up now. The brake lines are going to have to be custom made which is more money to spend but nothing to harsh. All looks good in the near future steady work untill the motors come then it's of to the engineer to get A LOT of work done.
1 point
-
Gidday Guys, Just a little photo update of what I got upto today. Attached the AA badge to the grille. Swapped the side indicator lenses for a pair that were in better nick. Comparison below. And then took it for a cruise to Ardmore. Looking at doing the interior bits next weekend.1 point
-
The last week or so has been a bit quiet as I have been waiting on bits to arrive, the rear caliper mounts are being gascut and I have been gathering bits to make up the new crossmember. I thought I would put up some pics of what I have been working on though. SO I have been told that because my front suspension is a jumble of Anglia, Mk2 Cortina and custom made parts that I will need to do a bumpsteer test as part of the cert process which is fine but there was one thing that made me nervous and that is the steering arms that I bought out of the UK, now these are supposed to correct the steering geometry with the Mk2 stuff so I thought to be on the safe side I would model up the Anglia suspension and check to make sure that it is all good. So I took a bunch of measurements and put it into Solidworks so I could move the suspension and see how it reacted and actually get some proper measurements relating to bumpsteer. This is what I came up with straight away It was looking like there was going to be a problem with all this, I was getting something like 3 degrees of toe change over 100mm of suspension travel, which is quite a bit, anyway there is no way that it was going to pass with that so the steering arms got put on hold until I get to the bottom of this. I had a read through of the technical bulletins from LVVTA relating to the bumpsteer test and found some really useful info in there pointing to the fact that the tie rods might be too low. One thing though, it did get me doubting whether I had my model correct, I was thinking that maybe if I had taken some measurements incorrectly then this could be throwing off the whole thing. So as a check I then modeled up the standard Anglia suspension to see how that compared and it was all good, basically no toe change over the same 100mm of travel. So it now looks like I might be correct that the tie rods will end up sitting too low here are some pics to show what I mean Standard Anglia My setup In the top pic the dashed lines representing the TCA's and Tie rods (the ones that angle down towards the bottom of the strut) are basically parallel, in the bottom pic they are not and I am pretty sure this is the problem. Now I am no expert my any means so if anyone out there has a different interpretation then I would be keen to hear it. Something that I noticed that I think may be giving this problem is that the Anglia steering arm is a lot thinner than the custom ones I have so the connection point for the tie rod sits much higher, also these custom ones have the tie rod connection coming off about halfway down the body which also isn't helping, and finally the fact that they need to be 16mm thick is also a problem. What I need to do is move the whole arrangement up and there are a couple of ways that I can do that with the most obvious being to make them out of thicker plate and machine a step between the strut mount face and the top of the tie rod connection point. Anyway I haven't got it sorted yet but at least I know what I have to do (I think...)1 point
-
When we last saw our intrepid hero he had welded up the rear strengthening panel and had cut the other end of the channel and the A pillar open. Well I don't have a photo but the rear panel is welded back in place and looks just like the other side now, I then chopped even more of the rot out and last week sandblasted the lot. front side inside the bottom lip on the front of the channel there was not as shot as the passenger side, so I decided to keep it and try to weld up the small pinholes caused but rust pits and some idiot with a spot weld drill(me). I also sandblasted the top of the sill, where the carpet holder strip was welded on. The metal had very bad surface rust and really needed sorting, I'm still in two minds about replacing this rust trap of a thing, do you guys think it would look super weird without? my other idea was to get some stainless sill steps made up to fit, any thoughts? carrying on, out with the old shit, in with the new. goes here. including my world famous pat. pending dents. just finished welding up the heat pipe last night, while I had the blaster out I cleaned up the air scoop that goes inside the channel, and bent up the inside panel that it mounts to. Just need to smooth the welds on the heat pipe out and weld into the channel, was hoping to have it done this week but i kinda forgot about the heater pipe things. Chur1 point
-
front struts assembled
1 point
-
hello everyone, did a little bit more work. here. and here. Then I patched this thing up. and made it pretty. And then started opening up the front and A pillar. Still heaps to do, Drivers sides not as wasted as the other side, but still needs nearly the same amount of work to get rid of all the rust. cheers!1 point
-
More progress, I took last Wednesday off work and also had a half day in the garage today so got a bit more done, the tunnel is now all welded in, it came up pretty good I reckon, I was thinking that I might need a bit of bog to smooth it where the tunnel meets the firewall but it is pretty good as is. Anyway here are some pics, and these are the last ones of the tunnel I promise Then it was on to the rust, the bottom corner that I found the other day is pretty far gone, I kind of expected this as Anglias are prone to rusting out here so I wasn't surprised to find that it was a bit worse than it looked, anyway it's all fixable, just going to take a bit longer. And it doesn't help that over the course of the last week I first blew up my drill, then my die grinder crapped out and finally today my powerfile (which is my favourite tool) started making massive popping noises and smelling like burnt plastic so I am thinking it is done. I had been saving some money to buy something cool for the car but now it looks like it will have to be spent replacing tools.1 point
-
Soon my pretty, soon. mocking up the twins1 point
-
That thing is awesome good score!1 point
-
Here is a cople vids I made a wile ago1 point
-
At first I inteded to use the standard fuel tank so I added a surge tank to the bottom of it Then I started on the exhaust and anyone who knows Anglias they will know that the tank sits under the boot floor which doesn't leave much room for mufflers. This concerned me as I have a feeling that the car is going to be quite loud. About this time I did a Tig welding course at Polytech and we had some stainless lying around work so I made this Oh yeah and I had a custom oil cooler made by Race Radiators here in Chch, they did an awesome job I would reccomend them to anyone thinking of getting one made. Here it is mounted in the front1 point
-
In my experience the Head Gasket issue generally comes about when the cars have been sitting for a while. They can continue to be problematic because people put the wrong headgasket on them. There are a couple of variations on the motor, cast iron head and alloy head, its more desirable to have the alloy head, as the engine has more HP. The cast iron heads were fitted t the early Hunters, some of the Station Wagons, and the last of the Hunters. NZ made Hunters way after British construction had finished, and the Iranian Peykan contruction started, so most of the late model Hunters built in NZ are actually Peykans. Other things to look out for rust: Front Guards....over the headlights where dirt gets flicked of the wheels and stuck behind the headlight boxes ....and the rear has a box section like an Escort/Cortina which typically never got paints....like the Ford Sills....Check the full length of the inside sill. Engines are generally pretty noisy in the Tappet gear, and they will have "blowby", as the engines base is a fairly old design with not so flash piston ring sealing, a good Hunter engine should pink a little under load...they ran fairly High Compression engines There are still heaps of repair parts for the engines, and belonging to the Hillman Humber Car Club, the Rootes Car Club or the Sunbeam Car Club might be useful. Have a good look at the condition of the wiring, like most British cars of the late 60's design, the Hunter wasnt overly equiped with fuses, and as a result electrical faults generally meant melted wiring .....my Sceptre Wagon had a front loom replaced using "chocolate block" connectors, and a few hours had to be spent sorting that out. Other than that, The Hunter was probably a better car than its British rivals like the Cortina, and the British Leyland stuff. The engines are a good performing (although really not as tunable as the Fords) reliable unit, and the driveline is pretty simple to maintain.1 point


.thumb.jpeg.384ff72c8d2b0ee0d34a7bdedb55bdcf.jpeg)


This leaderboard is set to Auckland/GMT+12:00