
Leaderboard


Popular Content
Showing content with the highest reputation on 08/12/23 in all areas
-
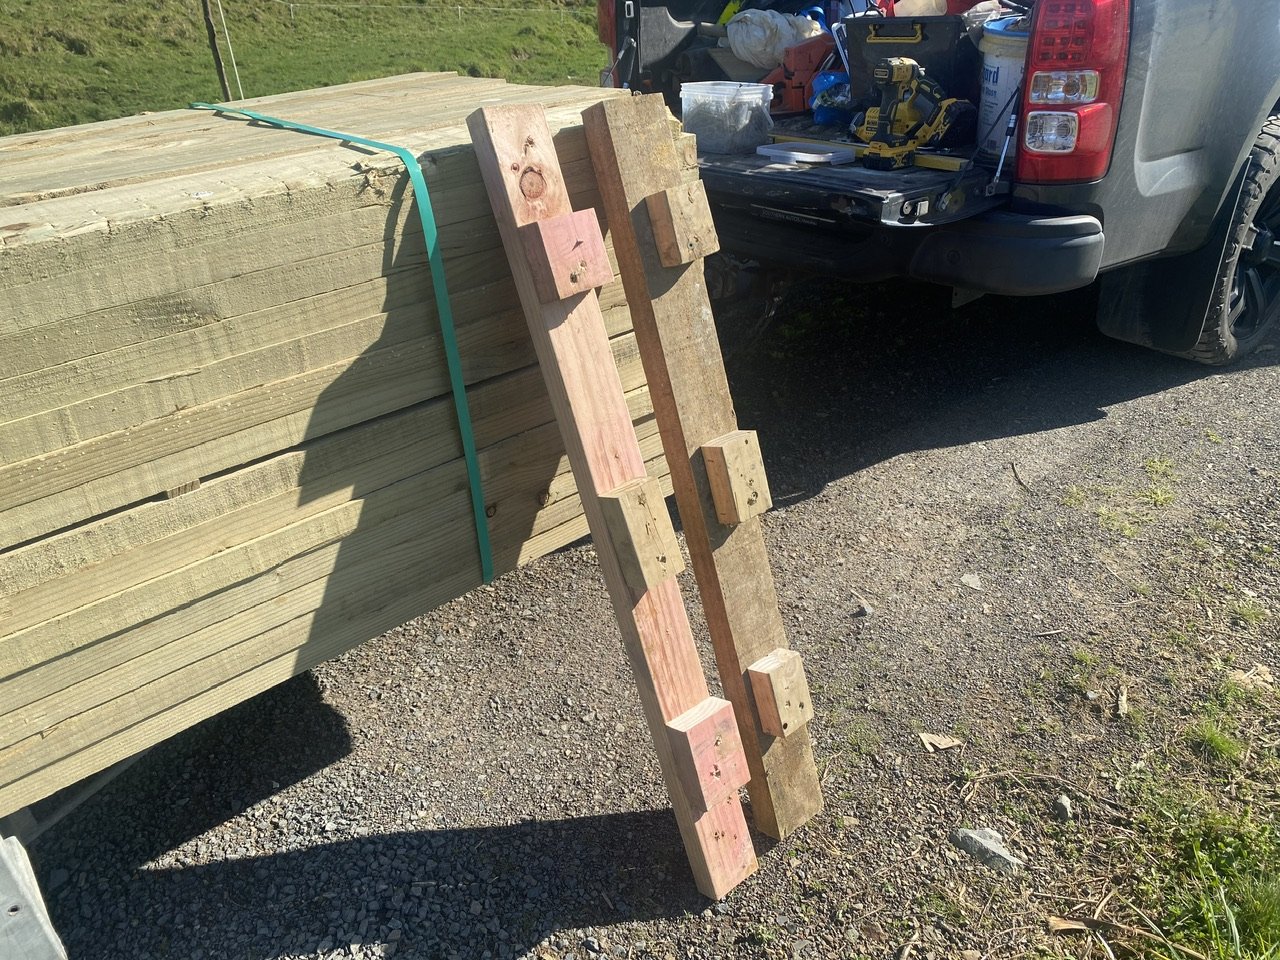
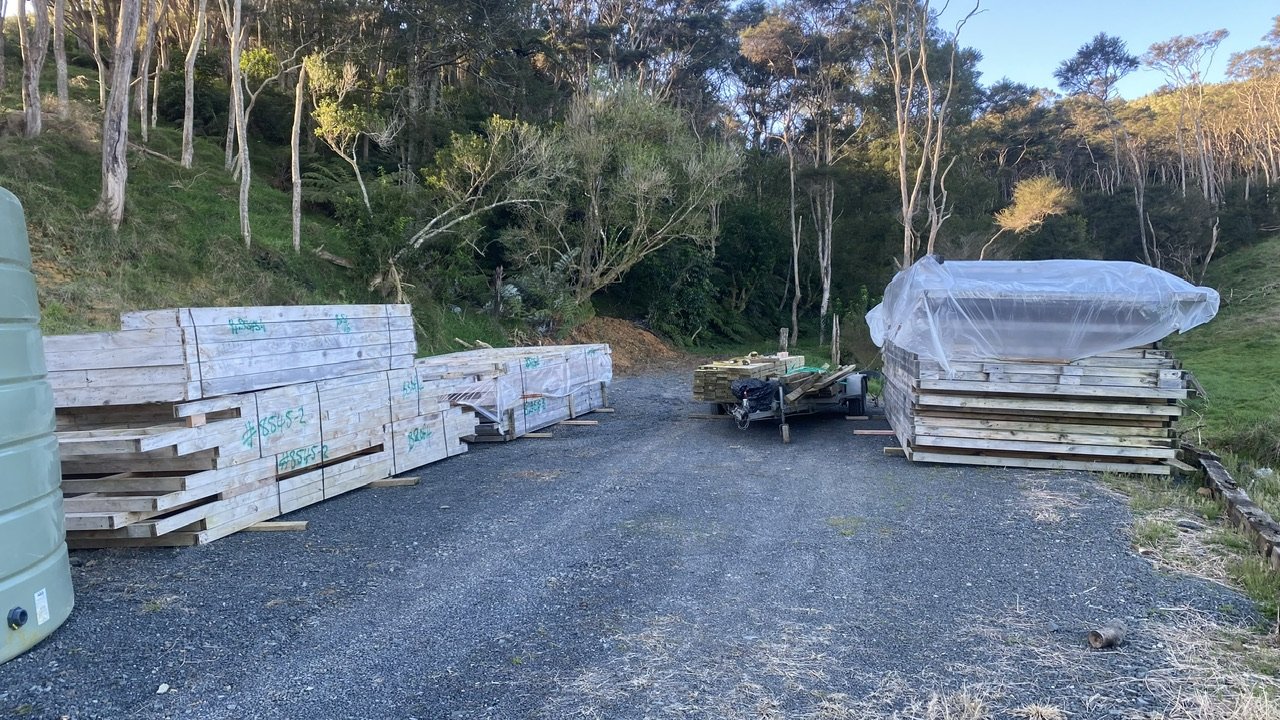
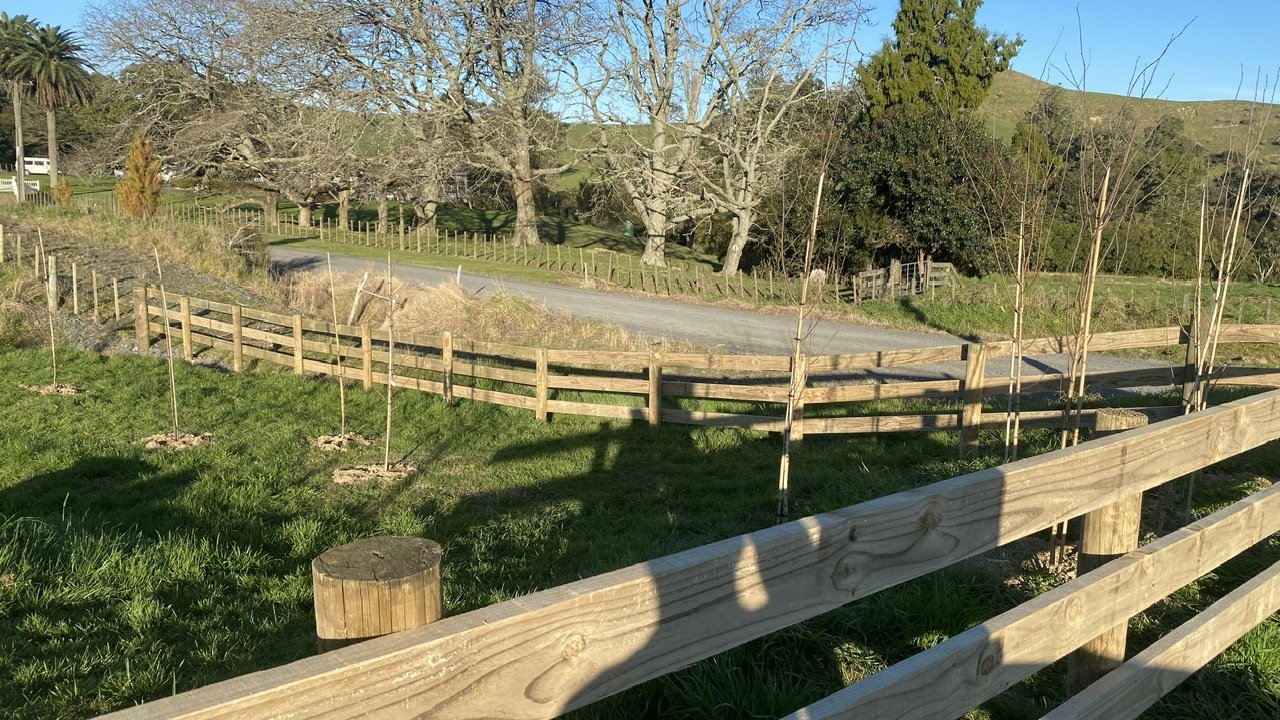
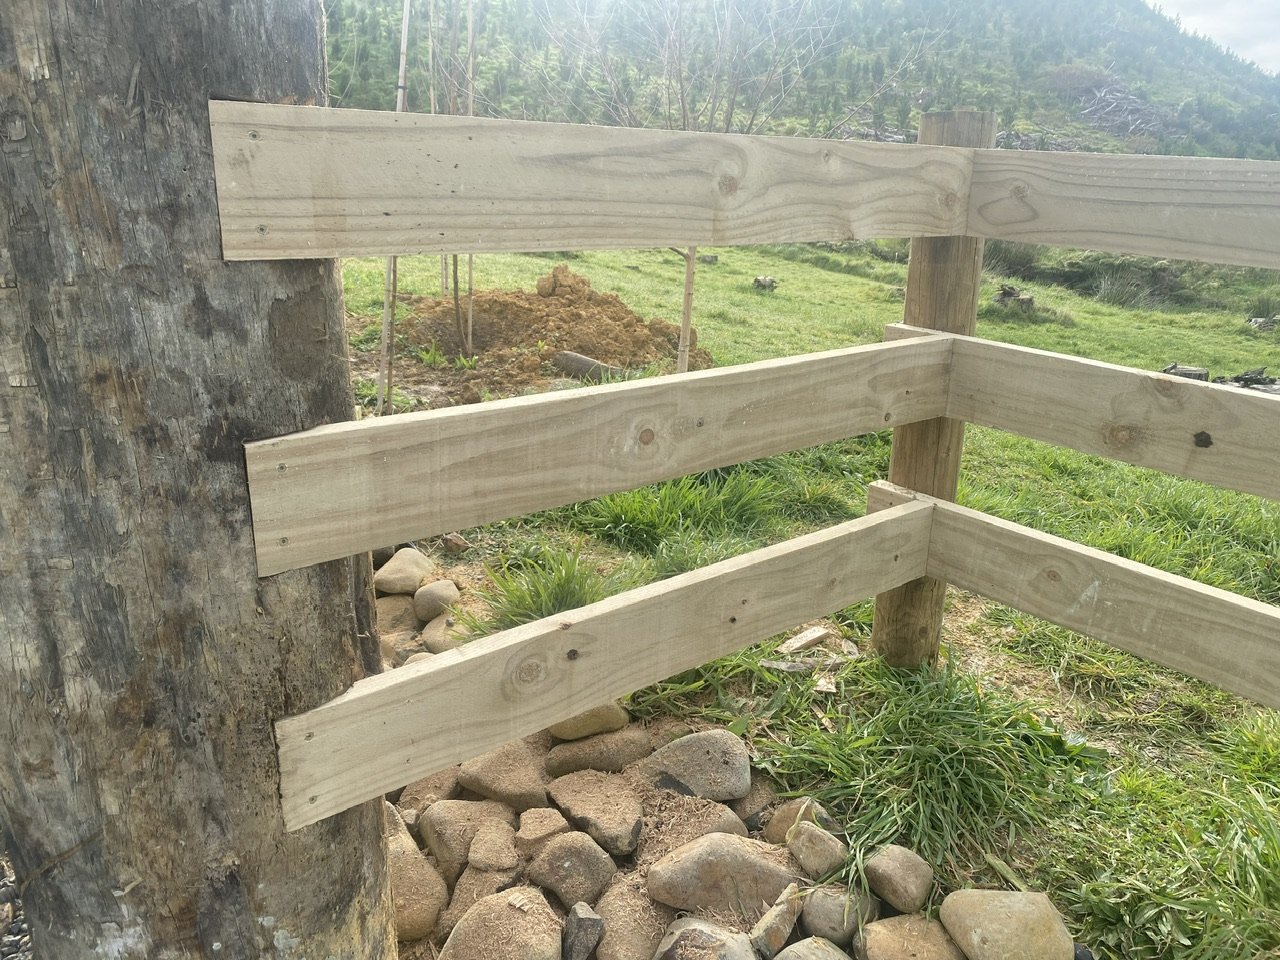
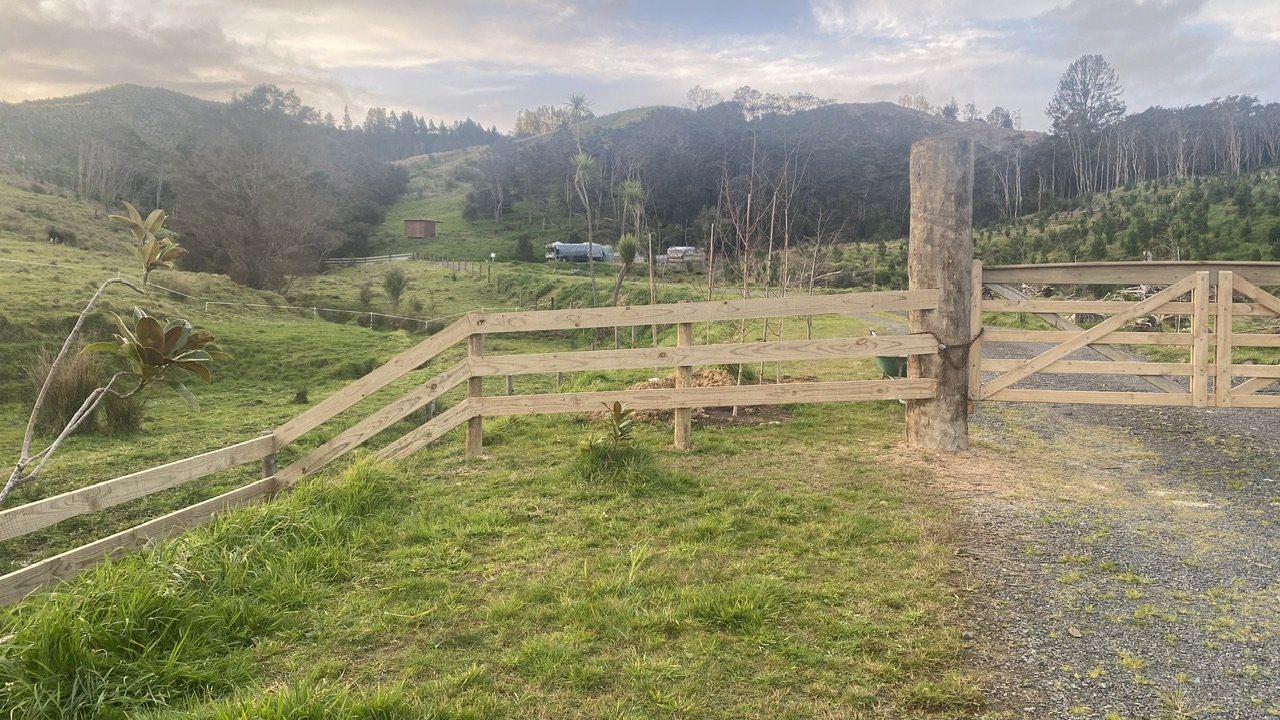
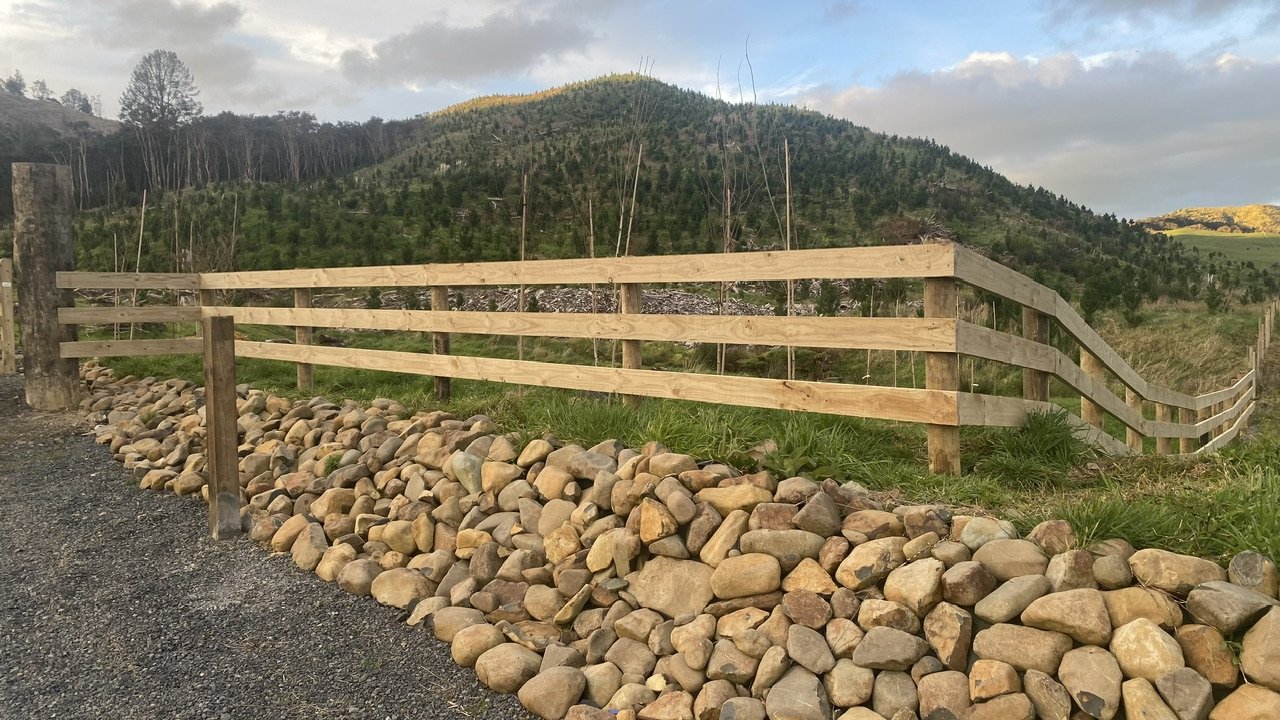
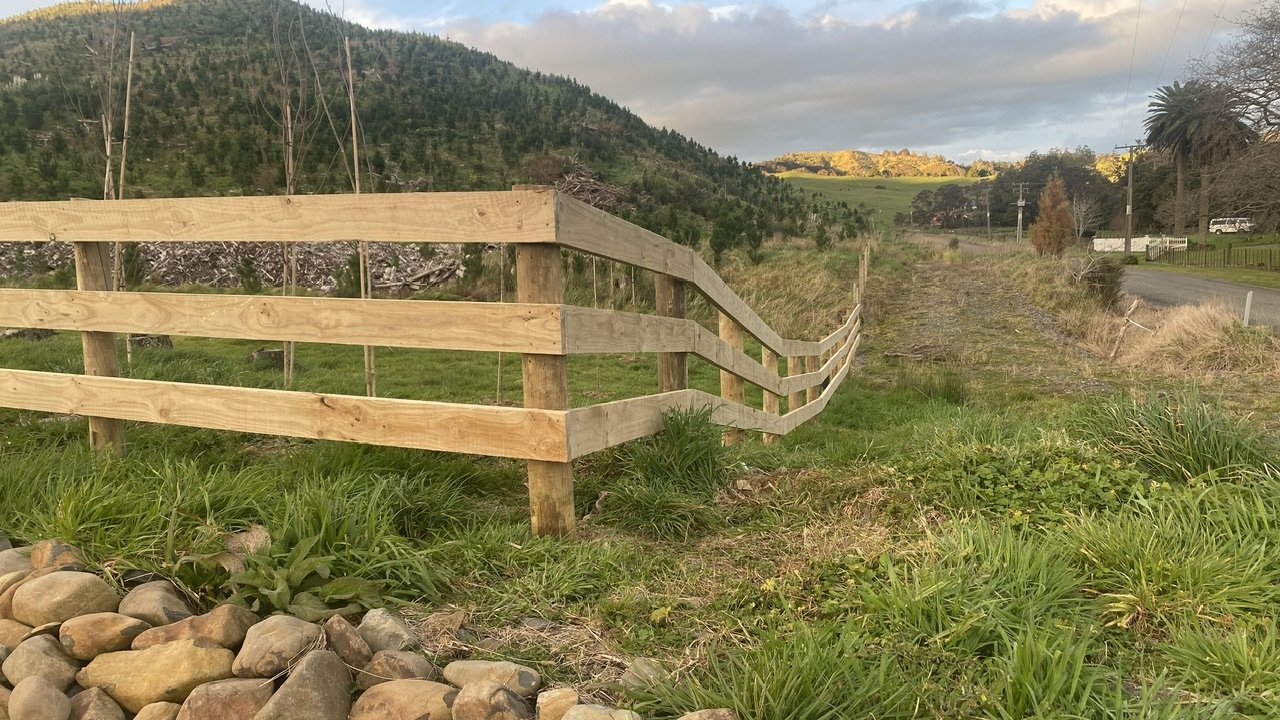
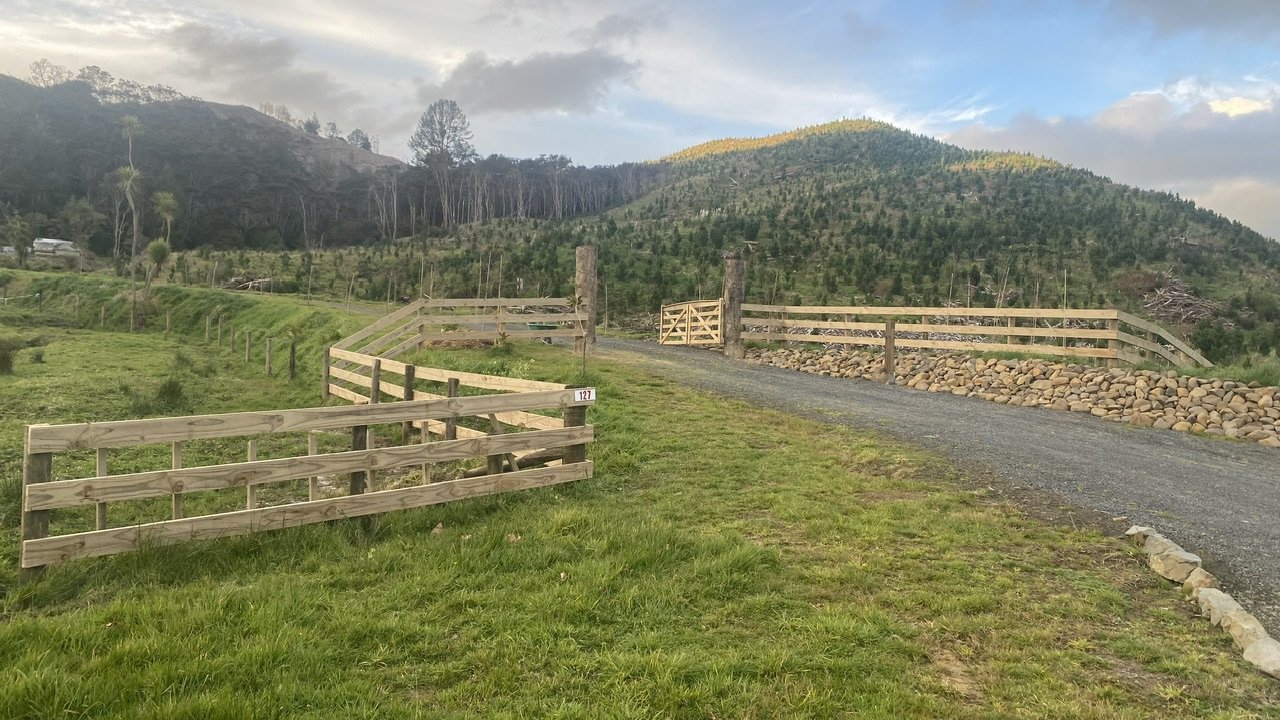
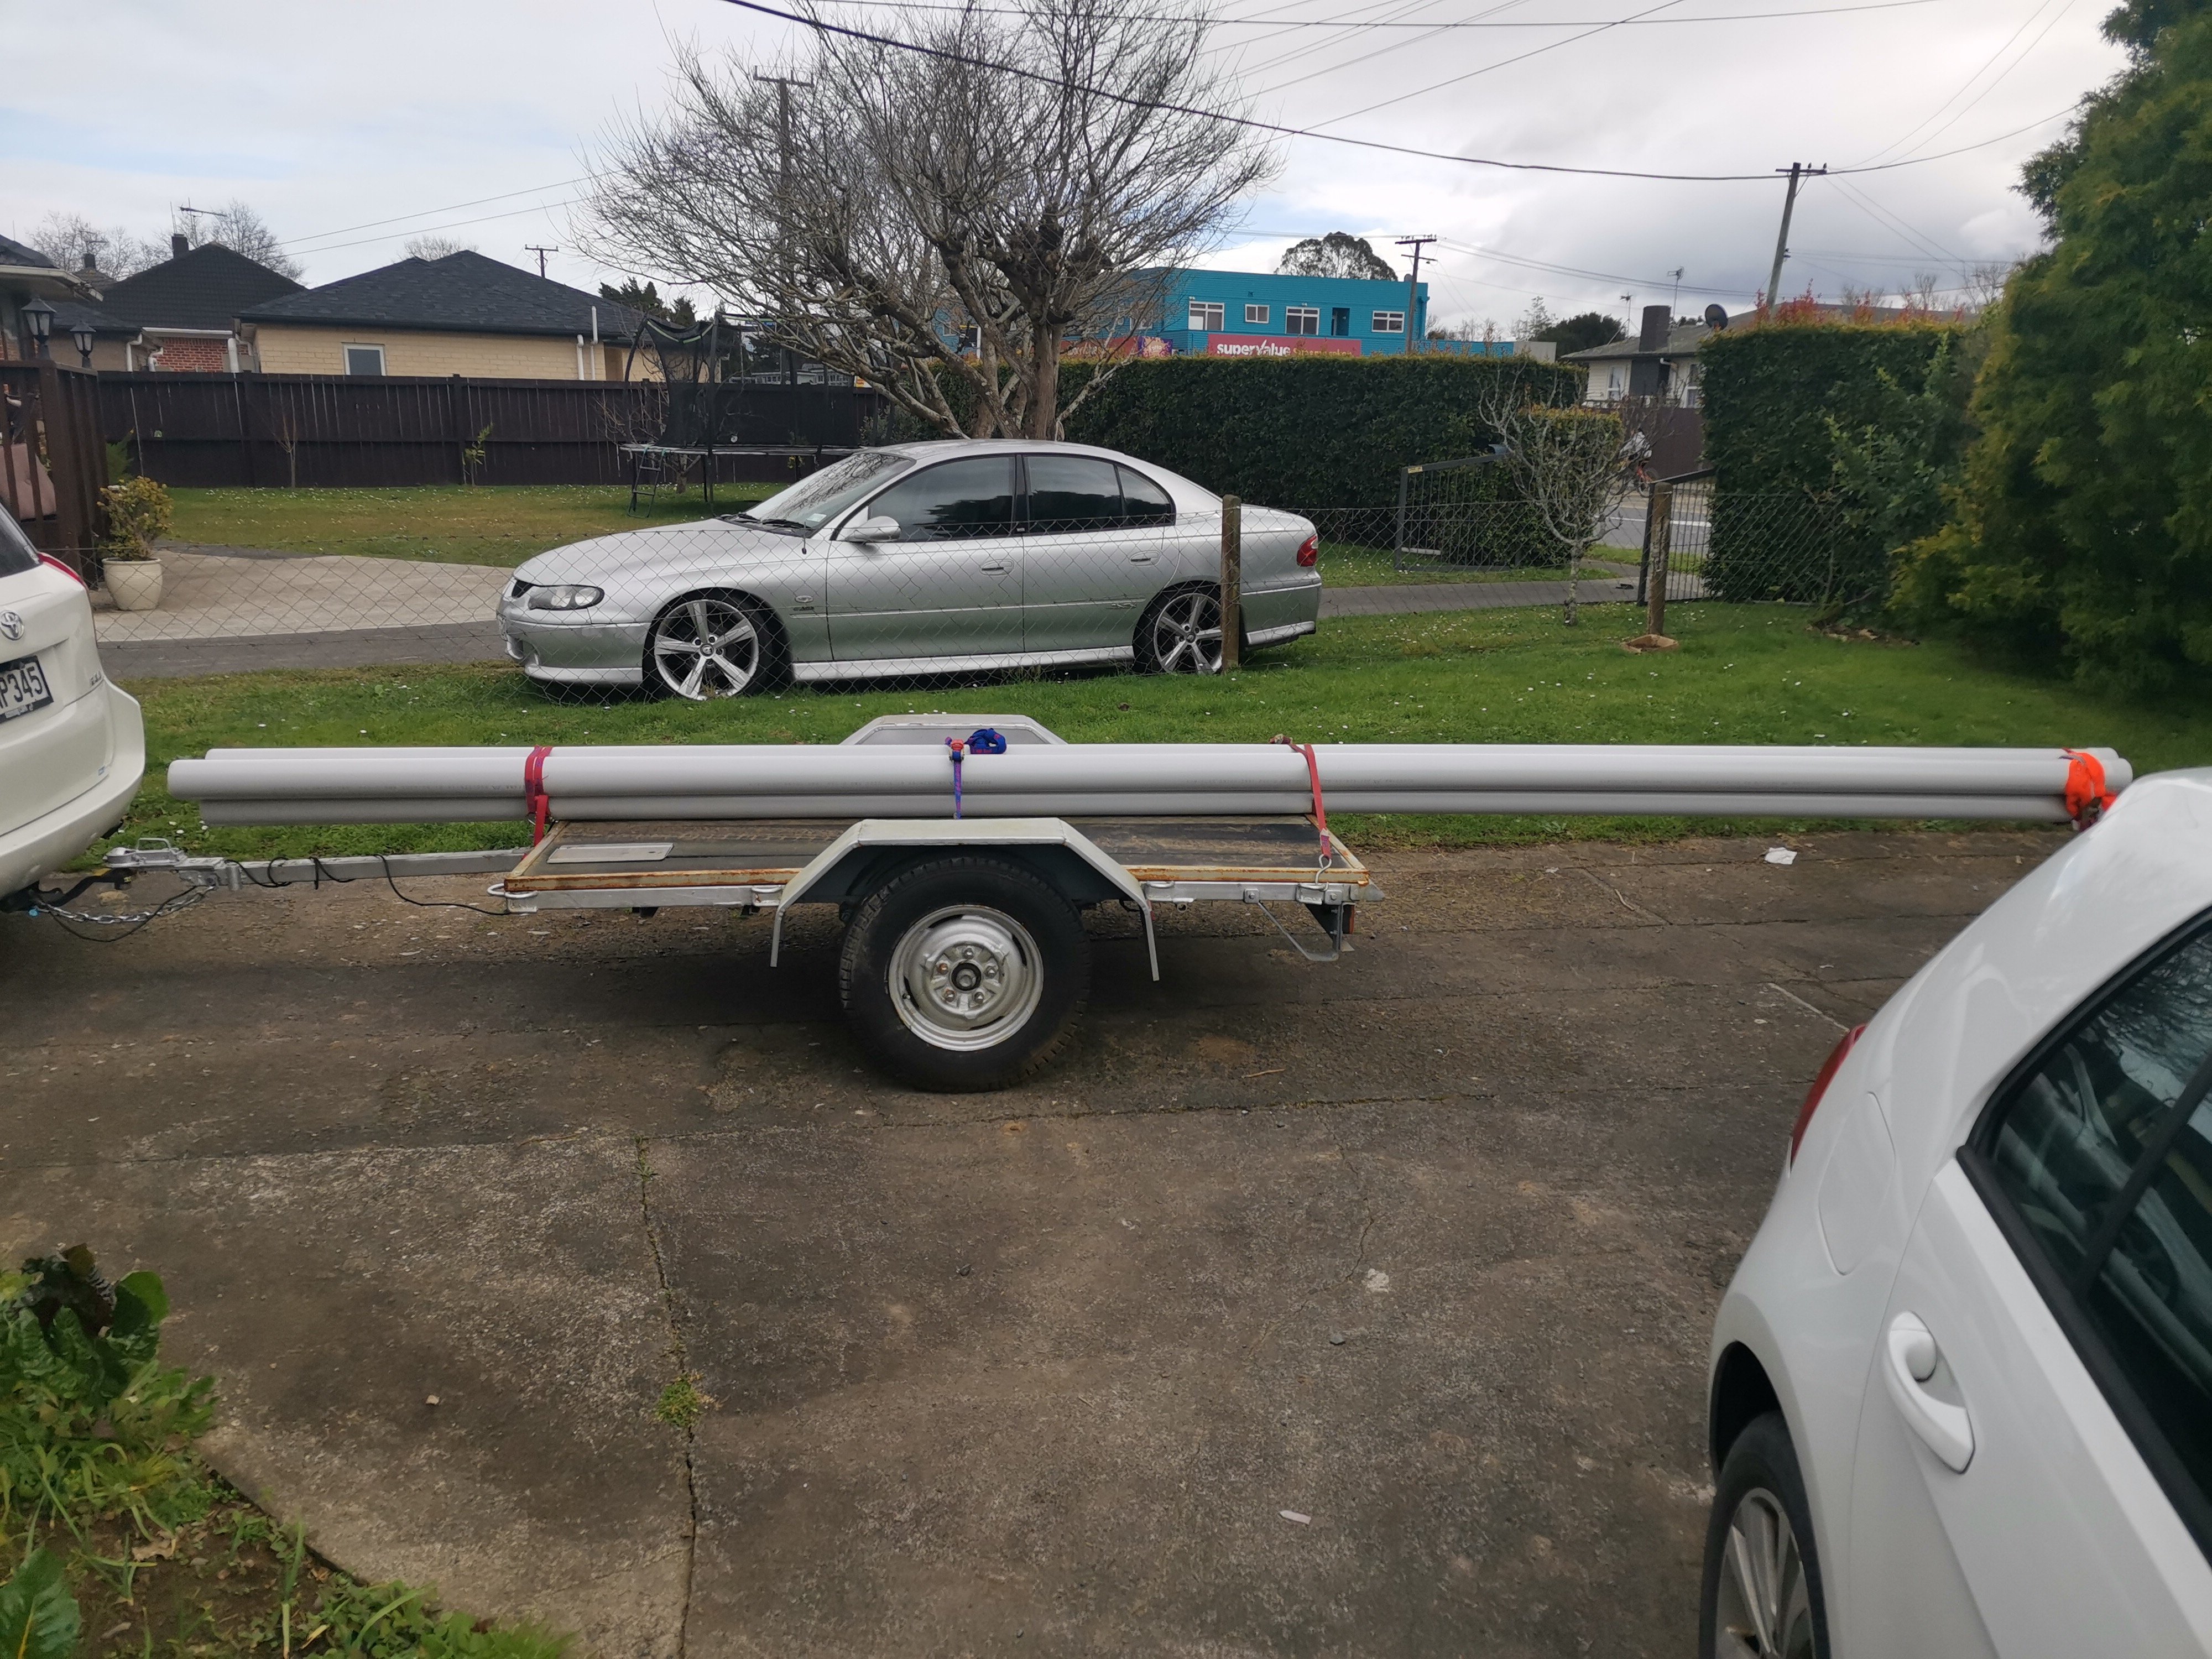
Finally managed to pick up the fence rails from a mates yard. Got a whole packet in the end cos my boss gets a good rate directly from the mill down in Nelson. Was waiting for a while as my boss said I couldn’t pick it up due to the weight of the pack being near on 3 ton, so the initial talk was to split the pack so I could. Turned up expecting to get half the pack only to discover said mate has a she’ll be right attitude like me and said ahh that pack is only about 2.5 ton so should be fine.. hmm.. 50 PSi in the tyres and I was away. Got there in the end with a few more grey hairs on the head. Made a couple of jigs which proved to be a game changer when you’re doing it all yourself. Got the easy part done last weekend. Also had my free frames from work turn up that I’ll be building my shed out of. This weekend I finished up the front fence and I’m pretty rapt how it’s all turned out. I checked the rails into the gate posts. Ran the rails down the left side and trimmed all the long post tops down. This is my favourite pic of the day..
 16 points
 -
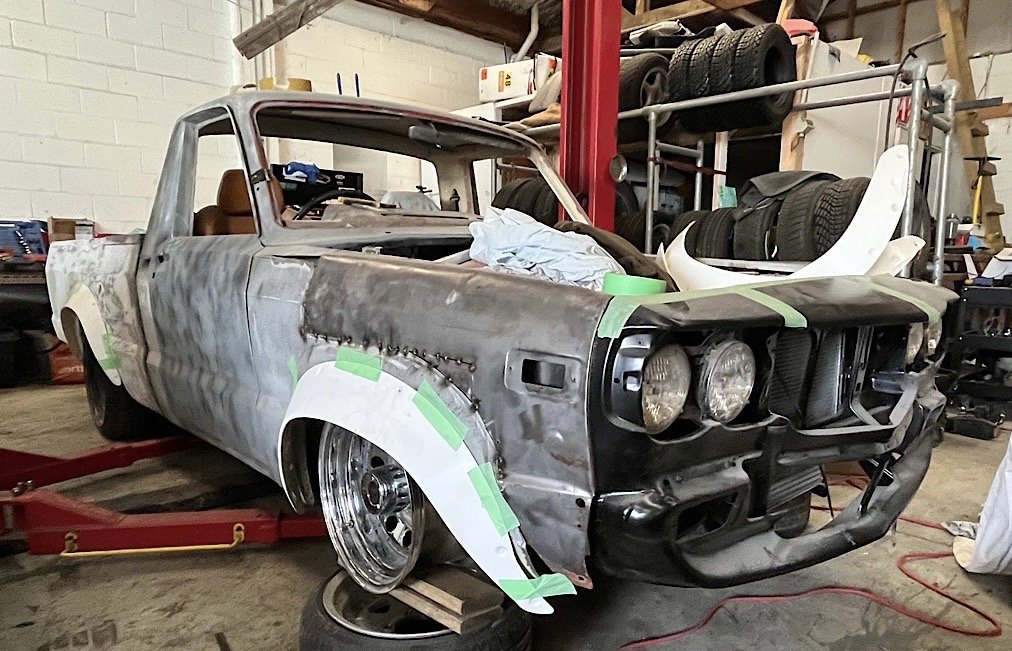
Thoughts on these flares? made for an RX3 coupe. Got these from Andy Duffin. the rears fit the moulding lines damn near perfectly. this allows for full tuck on the cragars with the 225s. the rear can run a 25mm spacer to bring it out to the flare lip. the front in the pic is slammed with no spring. wheel will eventually go up another inch I guess with the bags after some rearranging of the upper spring perch. the rear has stock leaves and 50mm blocks, so will drop Atleast 150mm, maybe 200mm from this stance
8 points
-
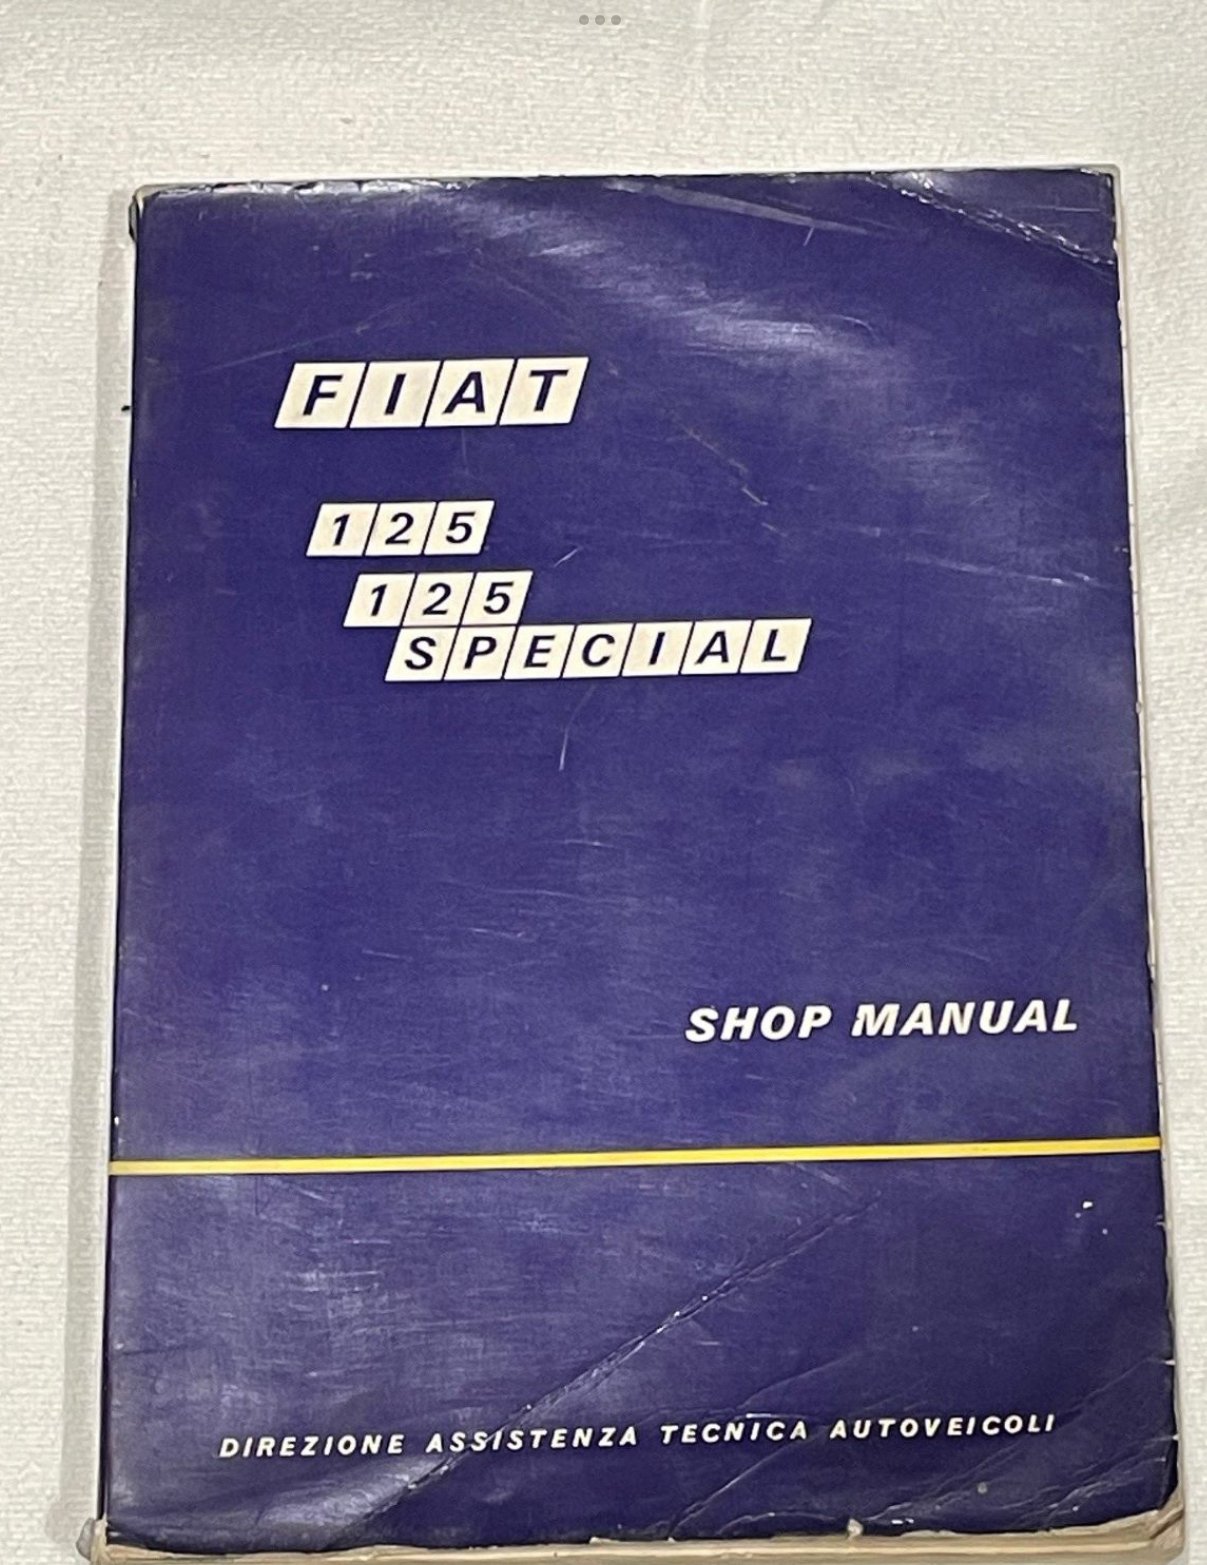
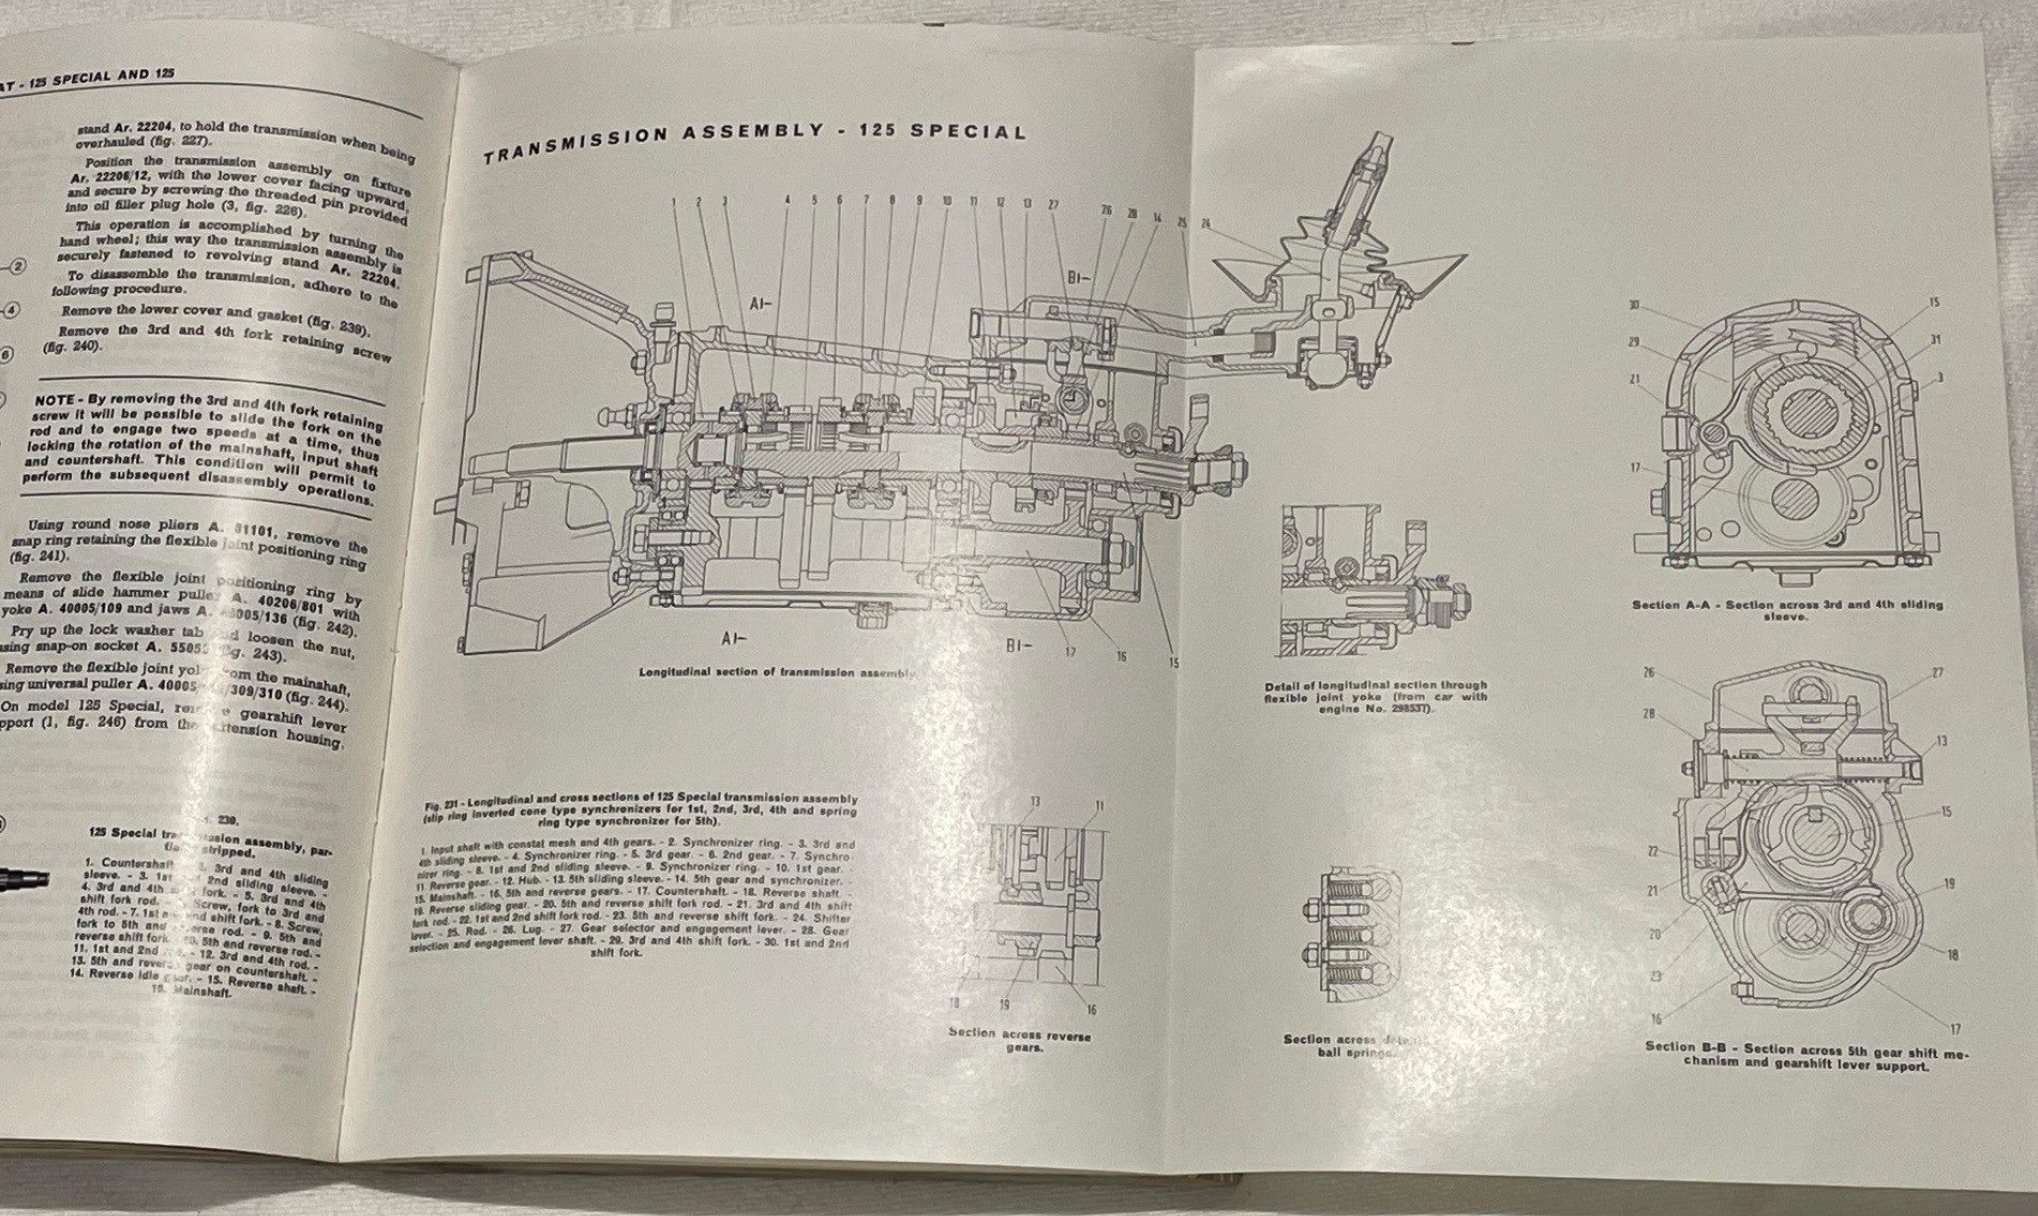
I was very excited to see this book come up on the Tard while I was away. Quite expensive but they don’t surface every day. BUY NOW! Factory workshop manual! Super detailed beautiful illustrations.
7 points
-
Fab'd up and fizzed on some mounts today with @MaxPowers help with the flash welding6 points
-
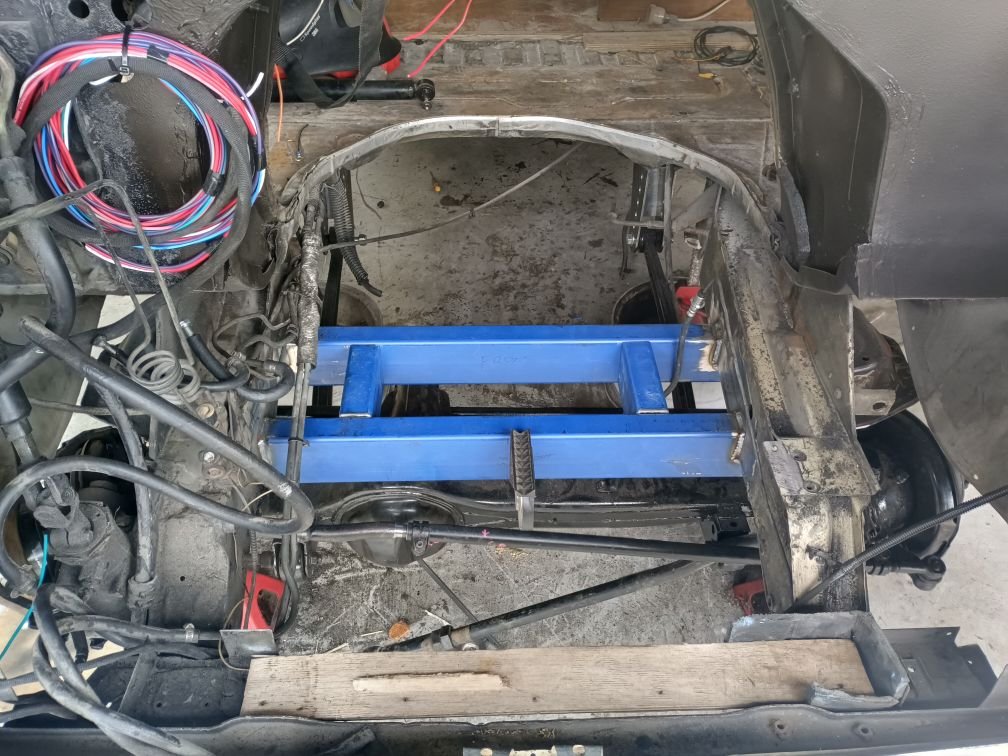
I haven't had much time in the shed this week, got a few jobs knocked off. My guy cut threads onto the steering crossover shaft to adapt the chev output rod to the Toyota crossshaft, it'll work but be tight with the Panhard bar so I need to.brain that some more, also need to make a bushing for the centre hole to take up the slop between the tapered bore and the mount stud on the steering damper to mount that. I got the back diff sitting in place,it's narrow but will work I flipped the shackles and ditched the blocks that were in there which gives me 5" of lift or so, I'm thinking I'll match the front to this, I want to add some airbags or gas riser shocks as well for driving when the boat is on and water tank full. I'll bolt it in tomorrow but won't weld the perches and shock moints in until engine and trans are in and I can set pinion angle I also got the front crossmember beams in. This was a bit of a job but I'm much happier with the spring hat strength now. Problems solved : - spring mounts stiffened - place to mount Panhard bar - ties front frame rails together again instead of just relying on core support - place for engine mounts to attach Problems created : - panhard bar sits at an odd angle with beams, needs brain - engine will sit too high to clear beams so I'll have to notch into them a ways then beef it up again after My welder was farting around a bit so have that a birthday and went back over a couple of beads too Next job is probably sort out the seat and belt mounts and frame up the roof for cert
6 points
-
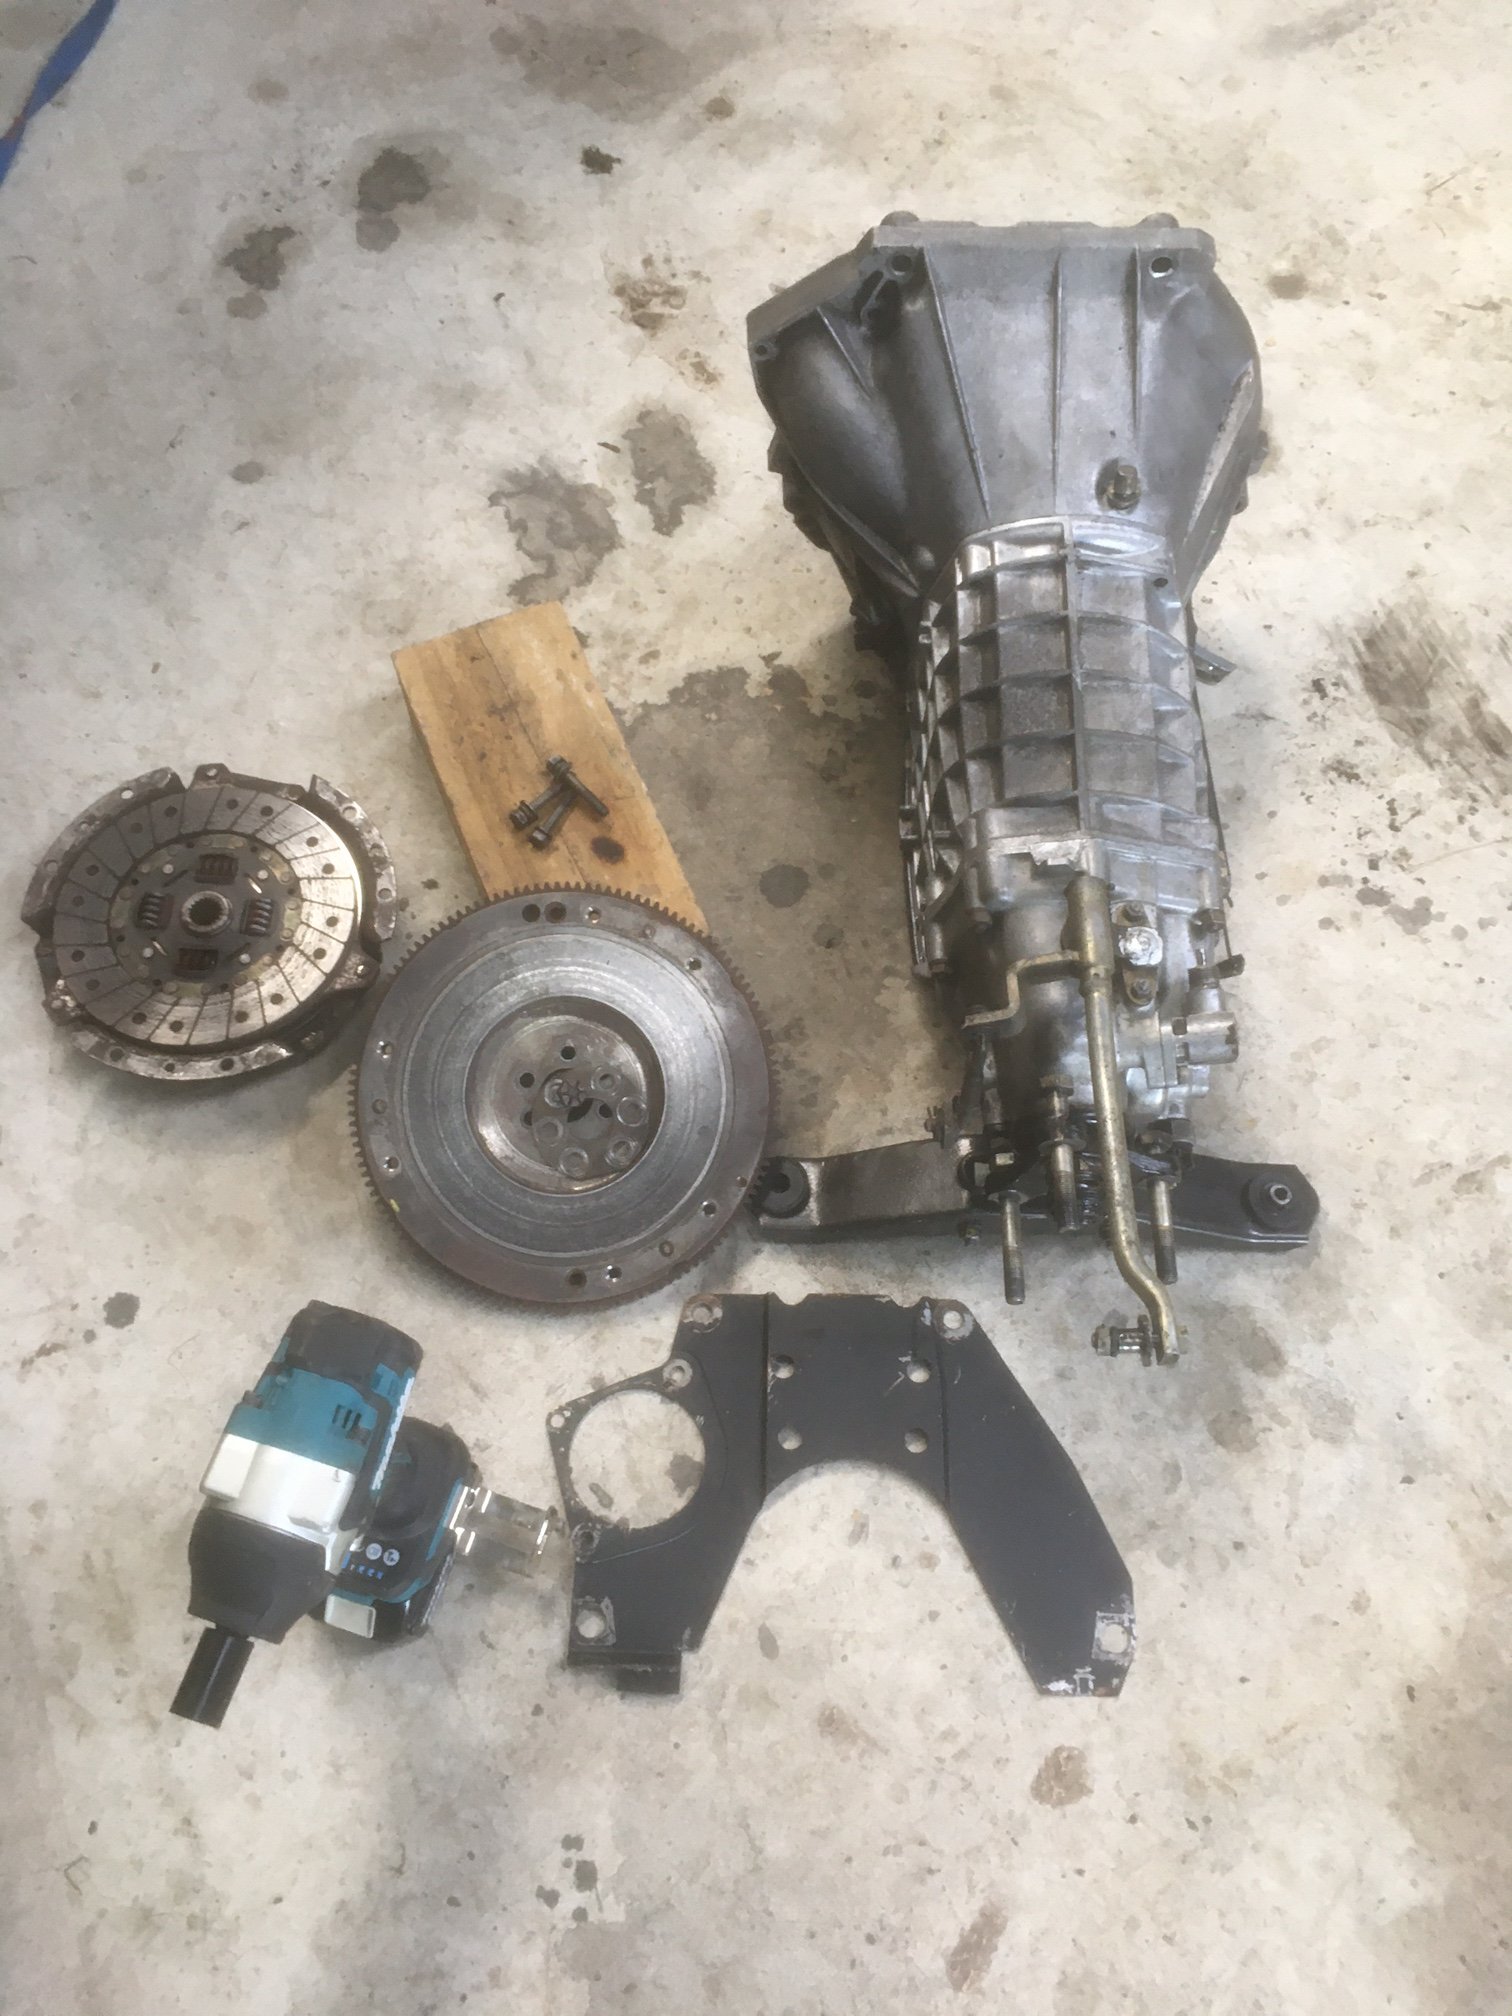
I’m glad I have a hoist! With little wiggle room to get the gearbox out it’s nice to do it standing up instead of groveling on the concrete underneath the car. The leak was obvious. Will be using rtv this time, no gasket. With it apart I’m lead to think (dangerous) is it 5 speed time?
5 points
-
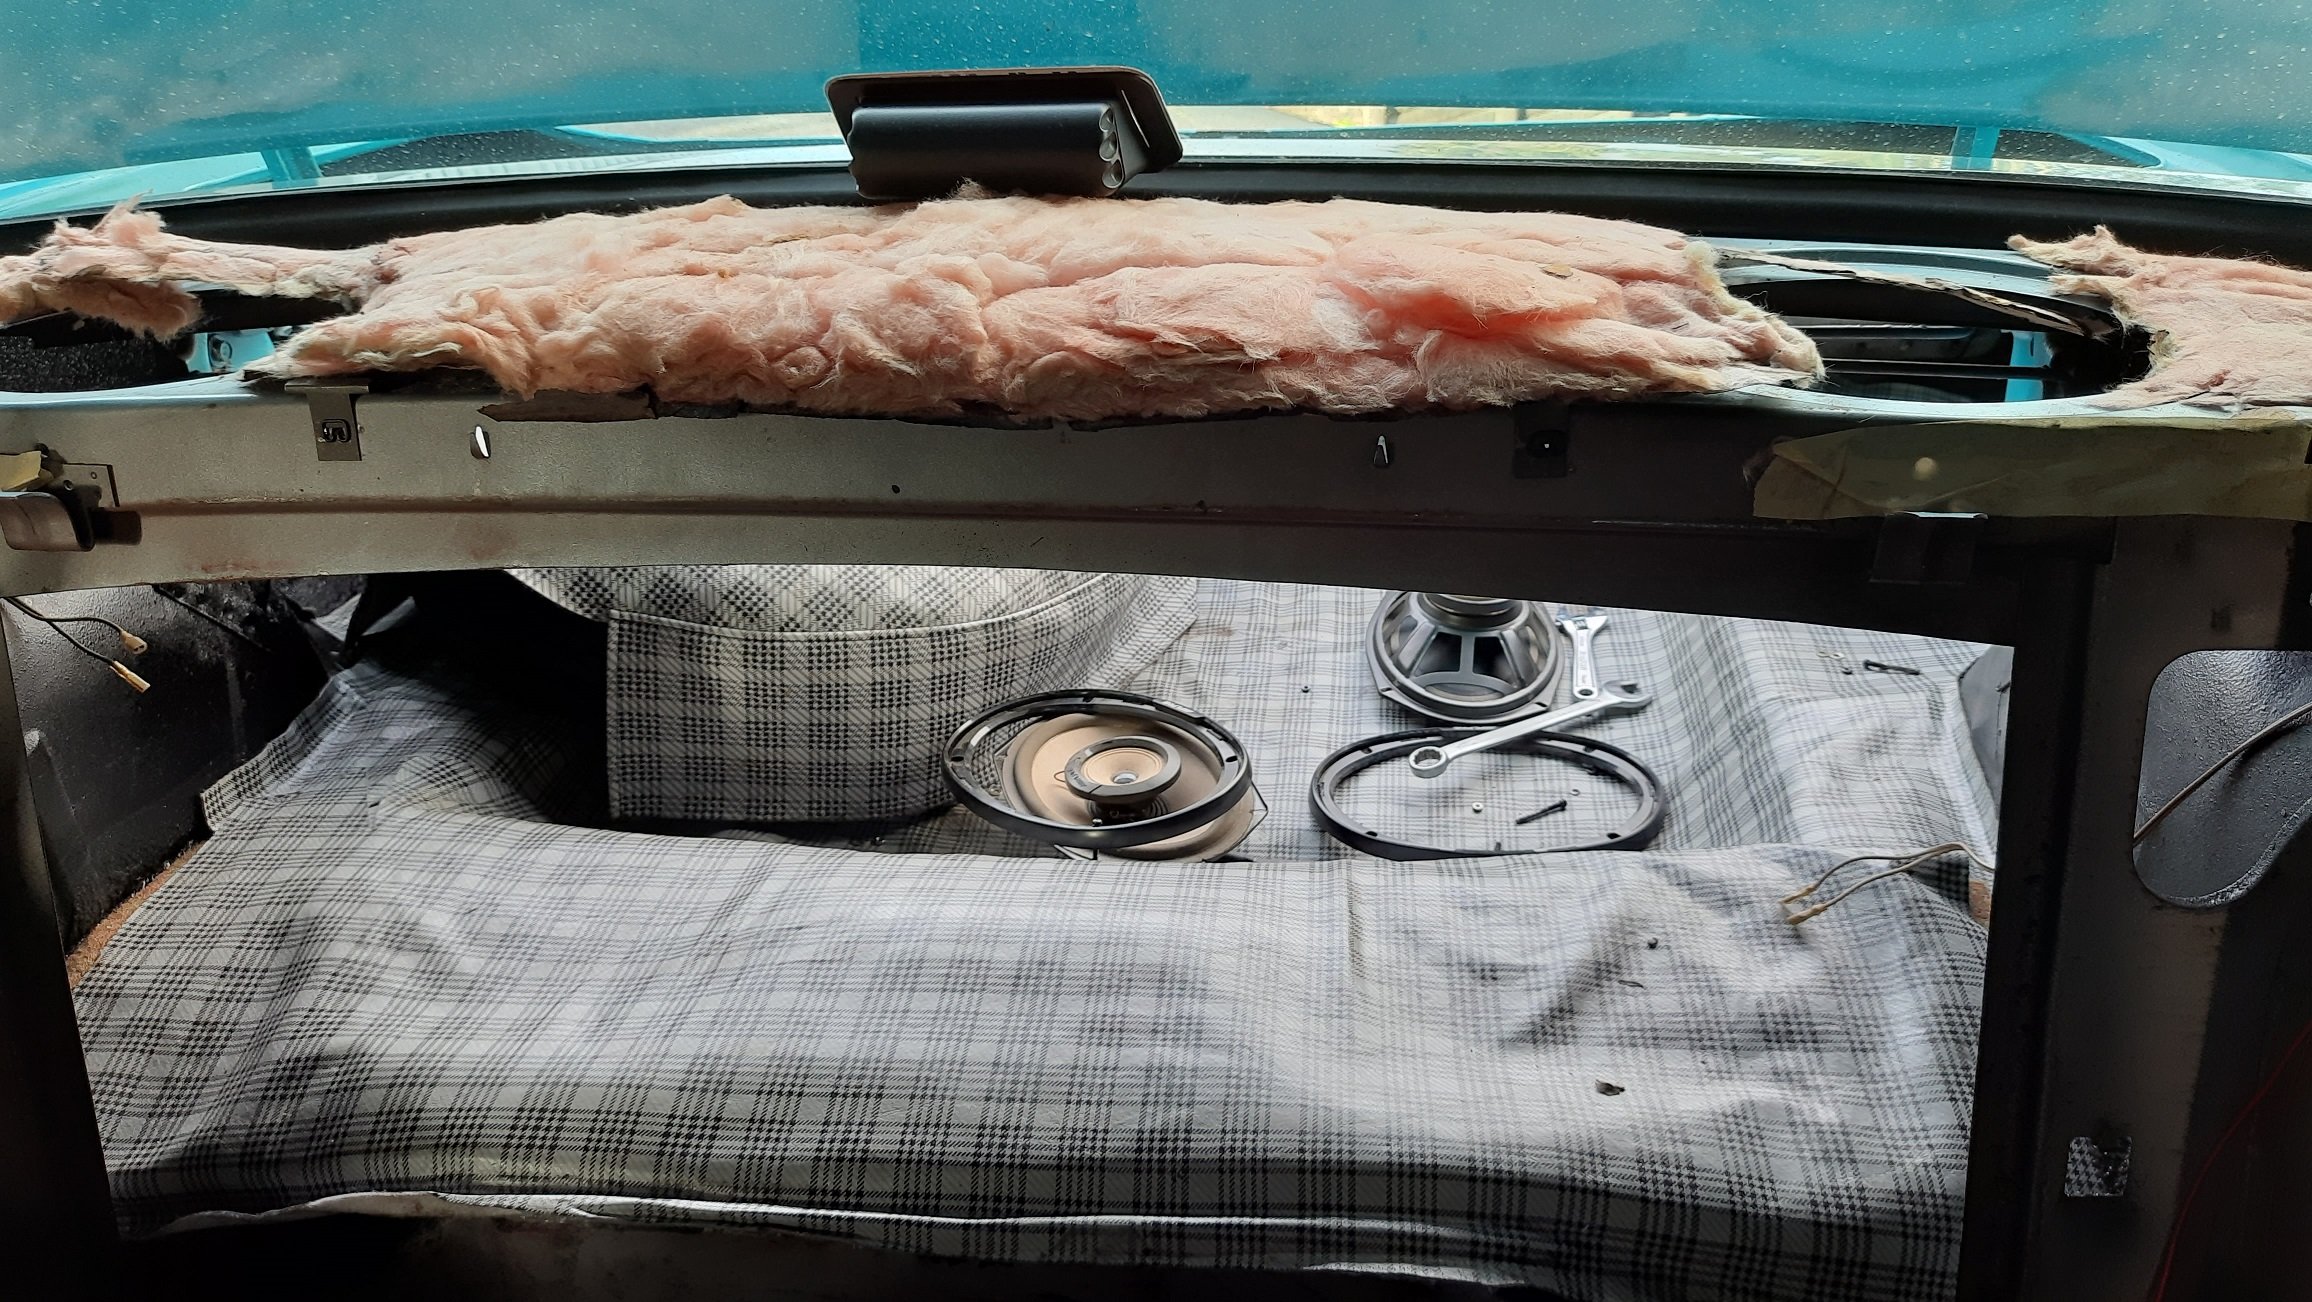
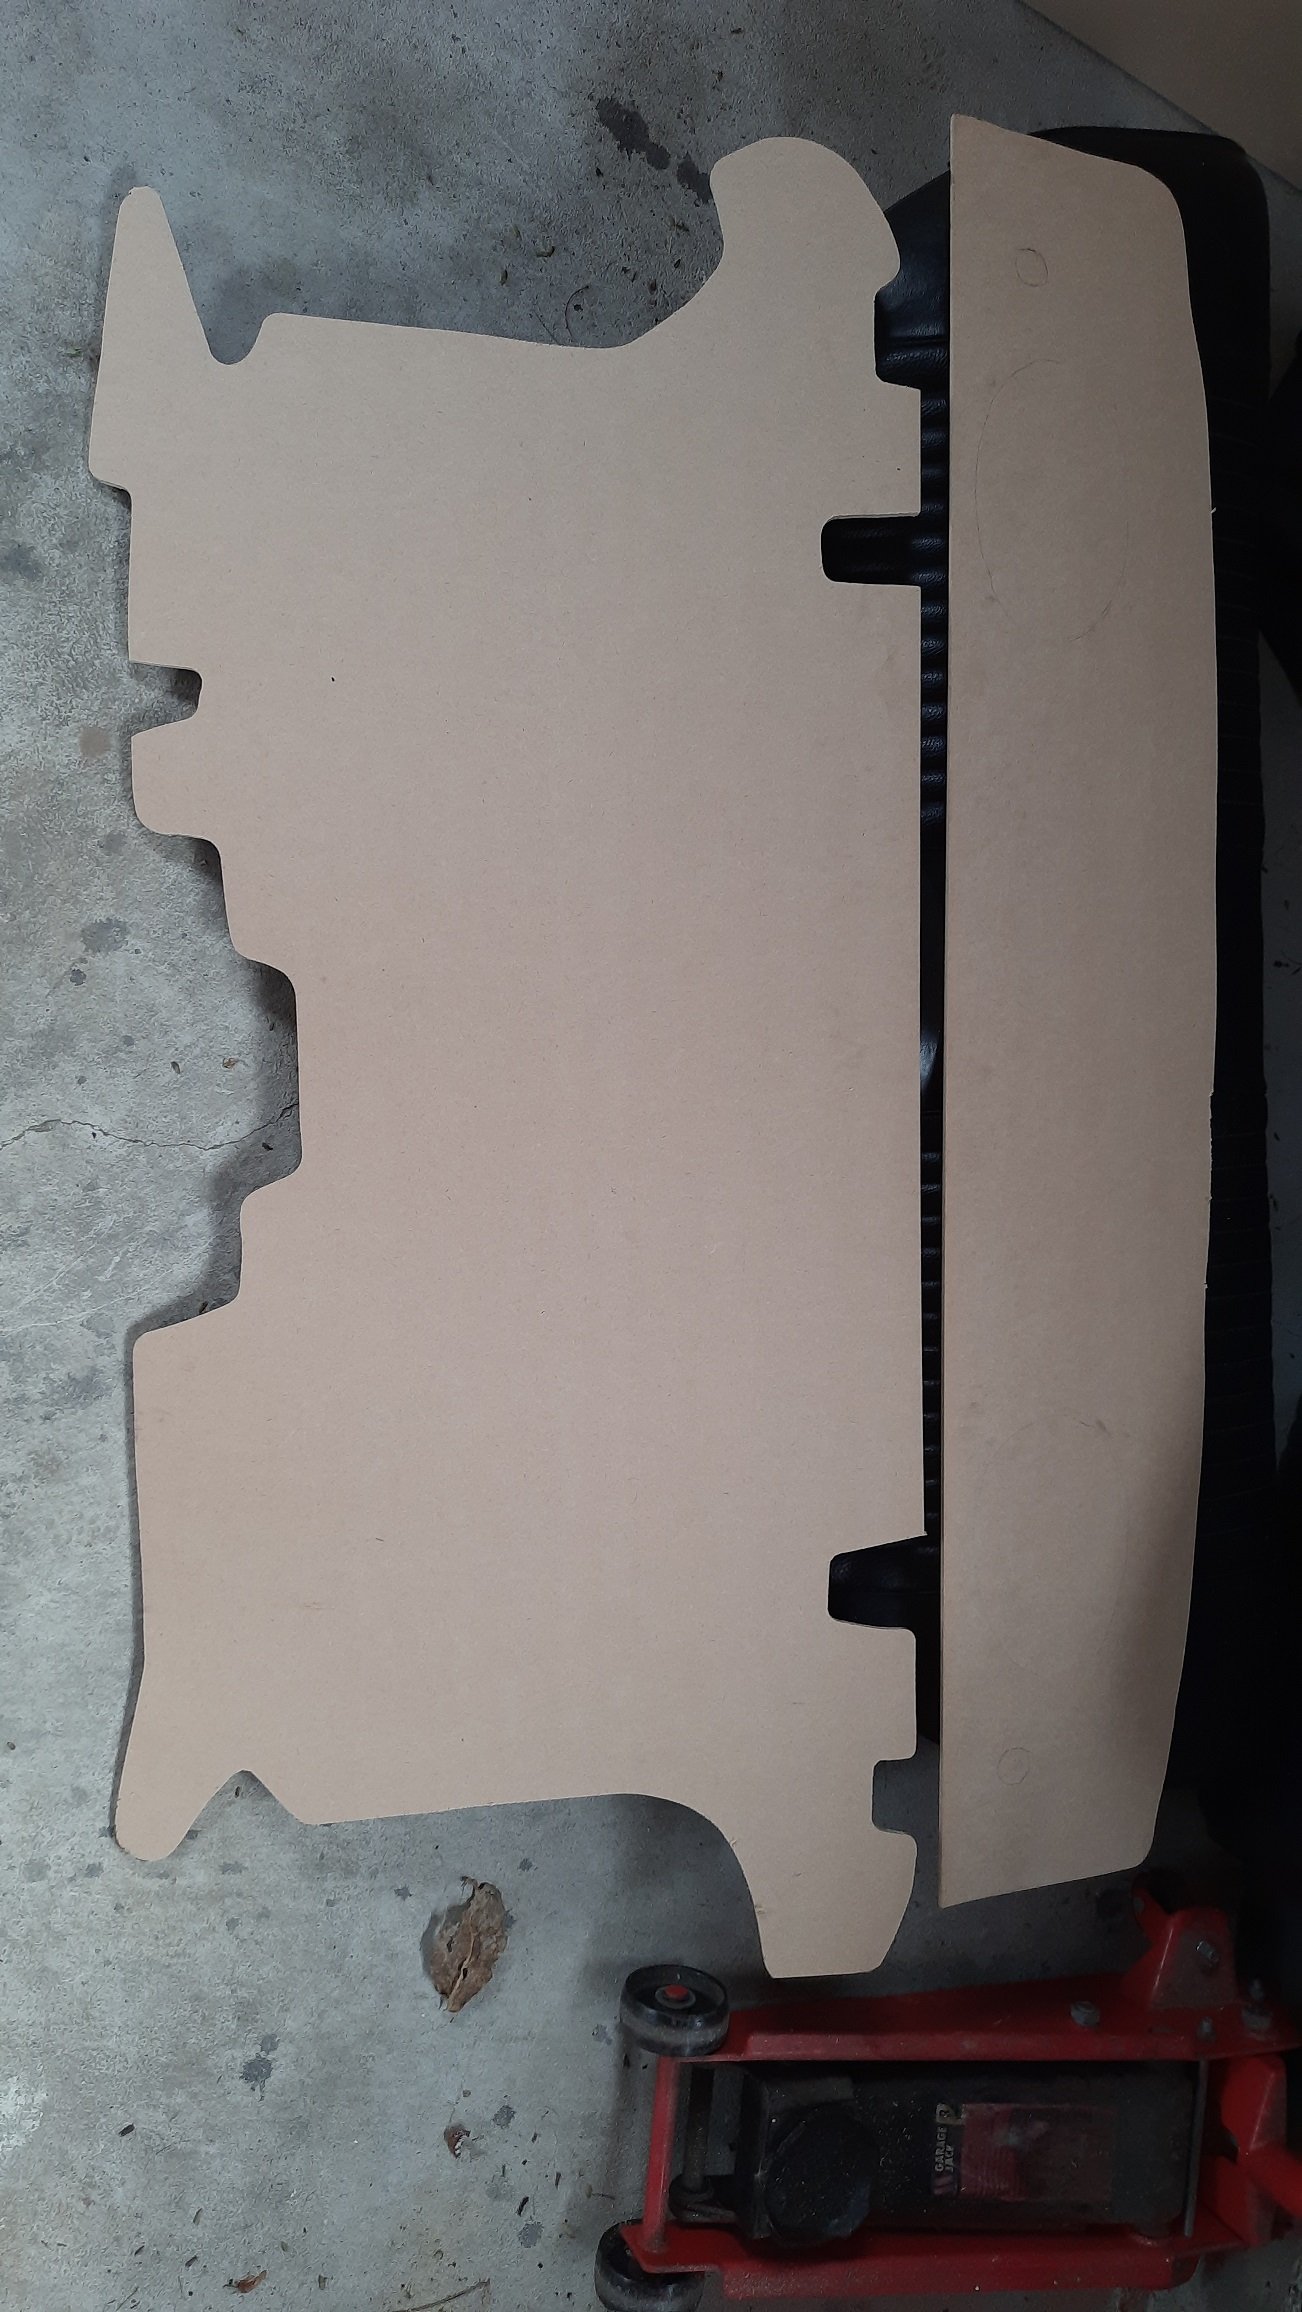
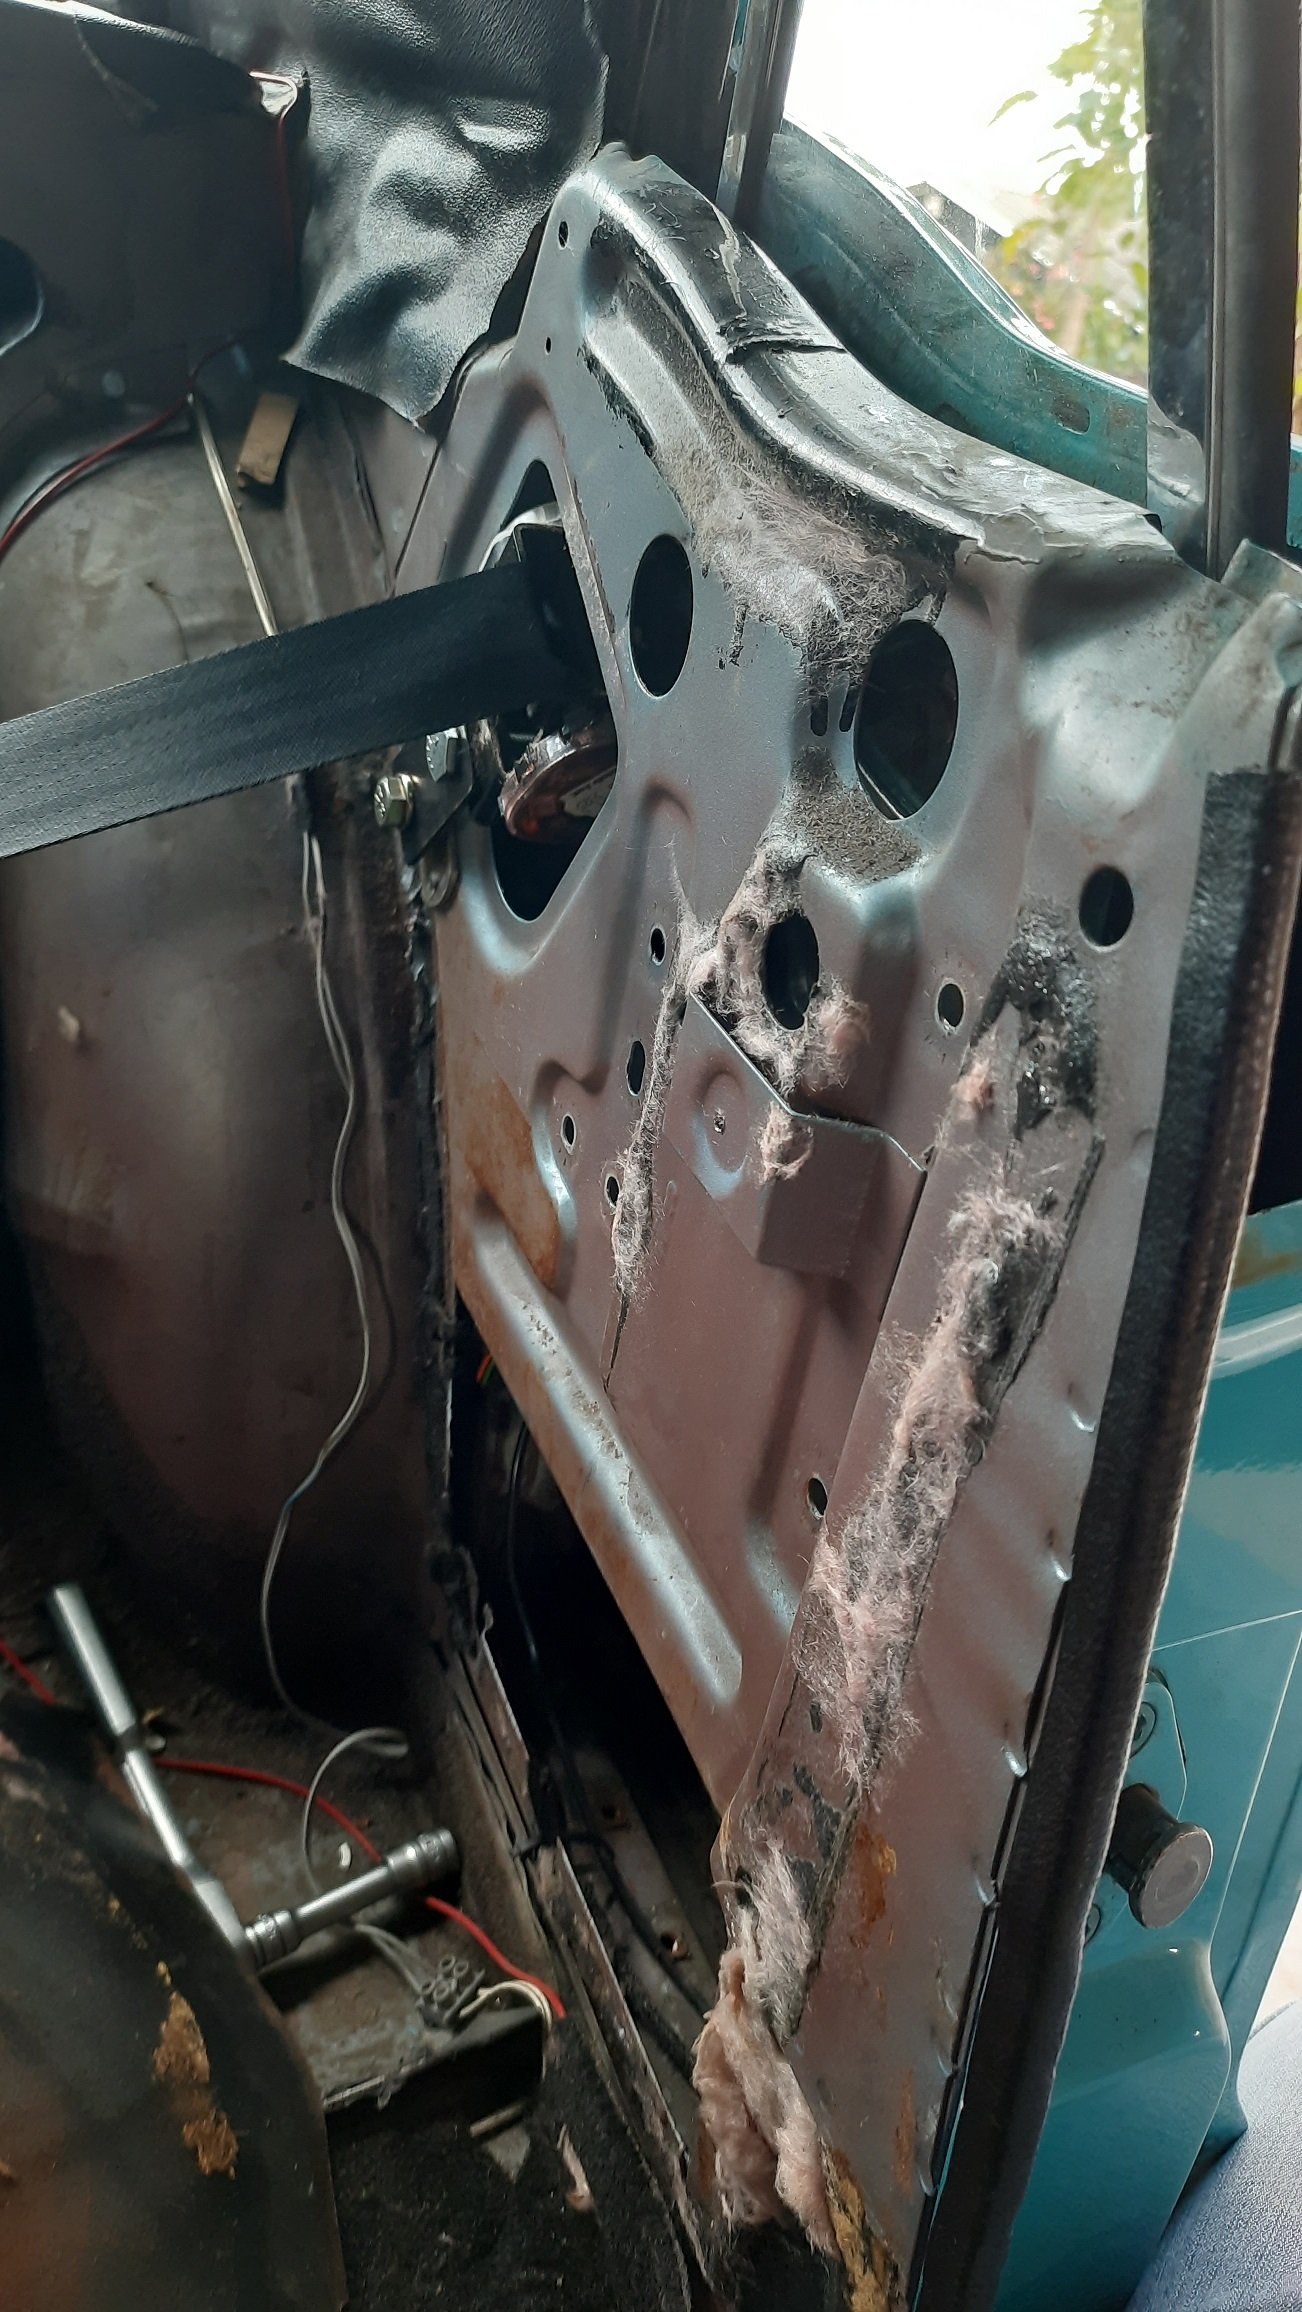
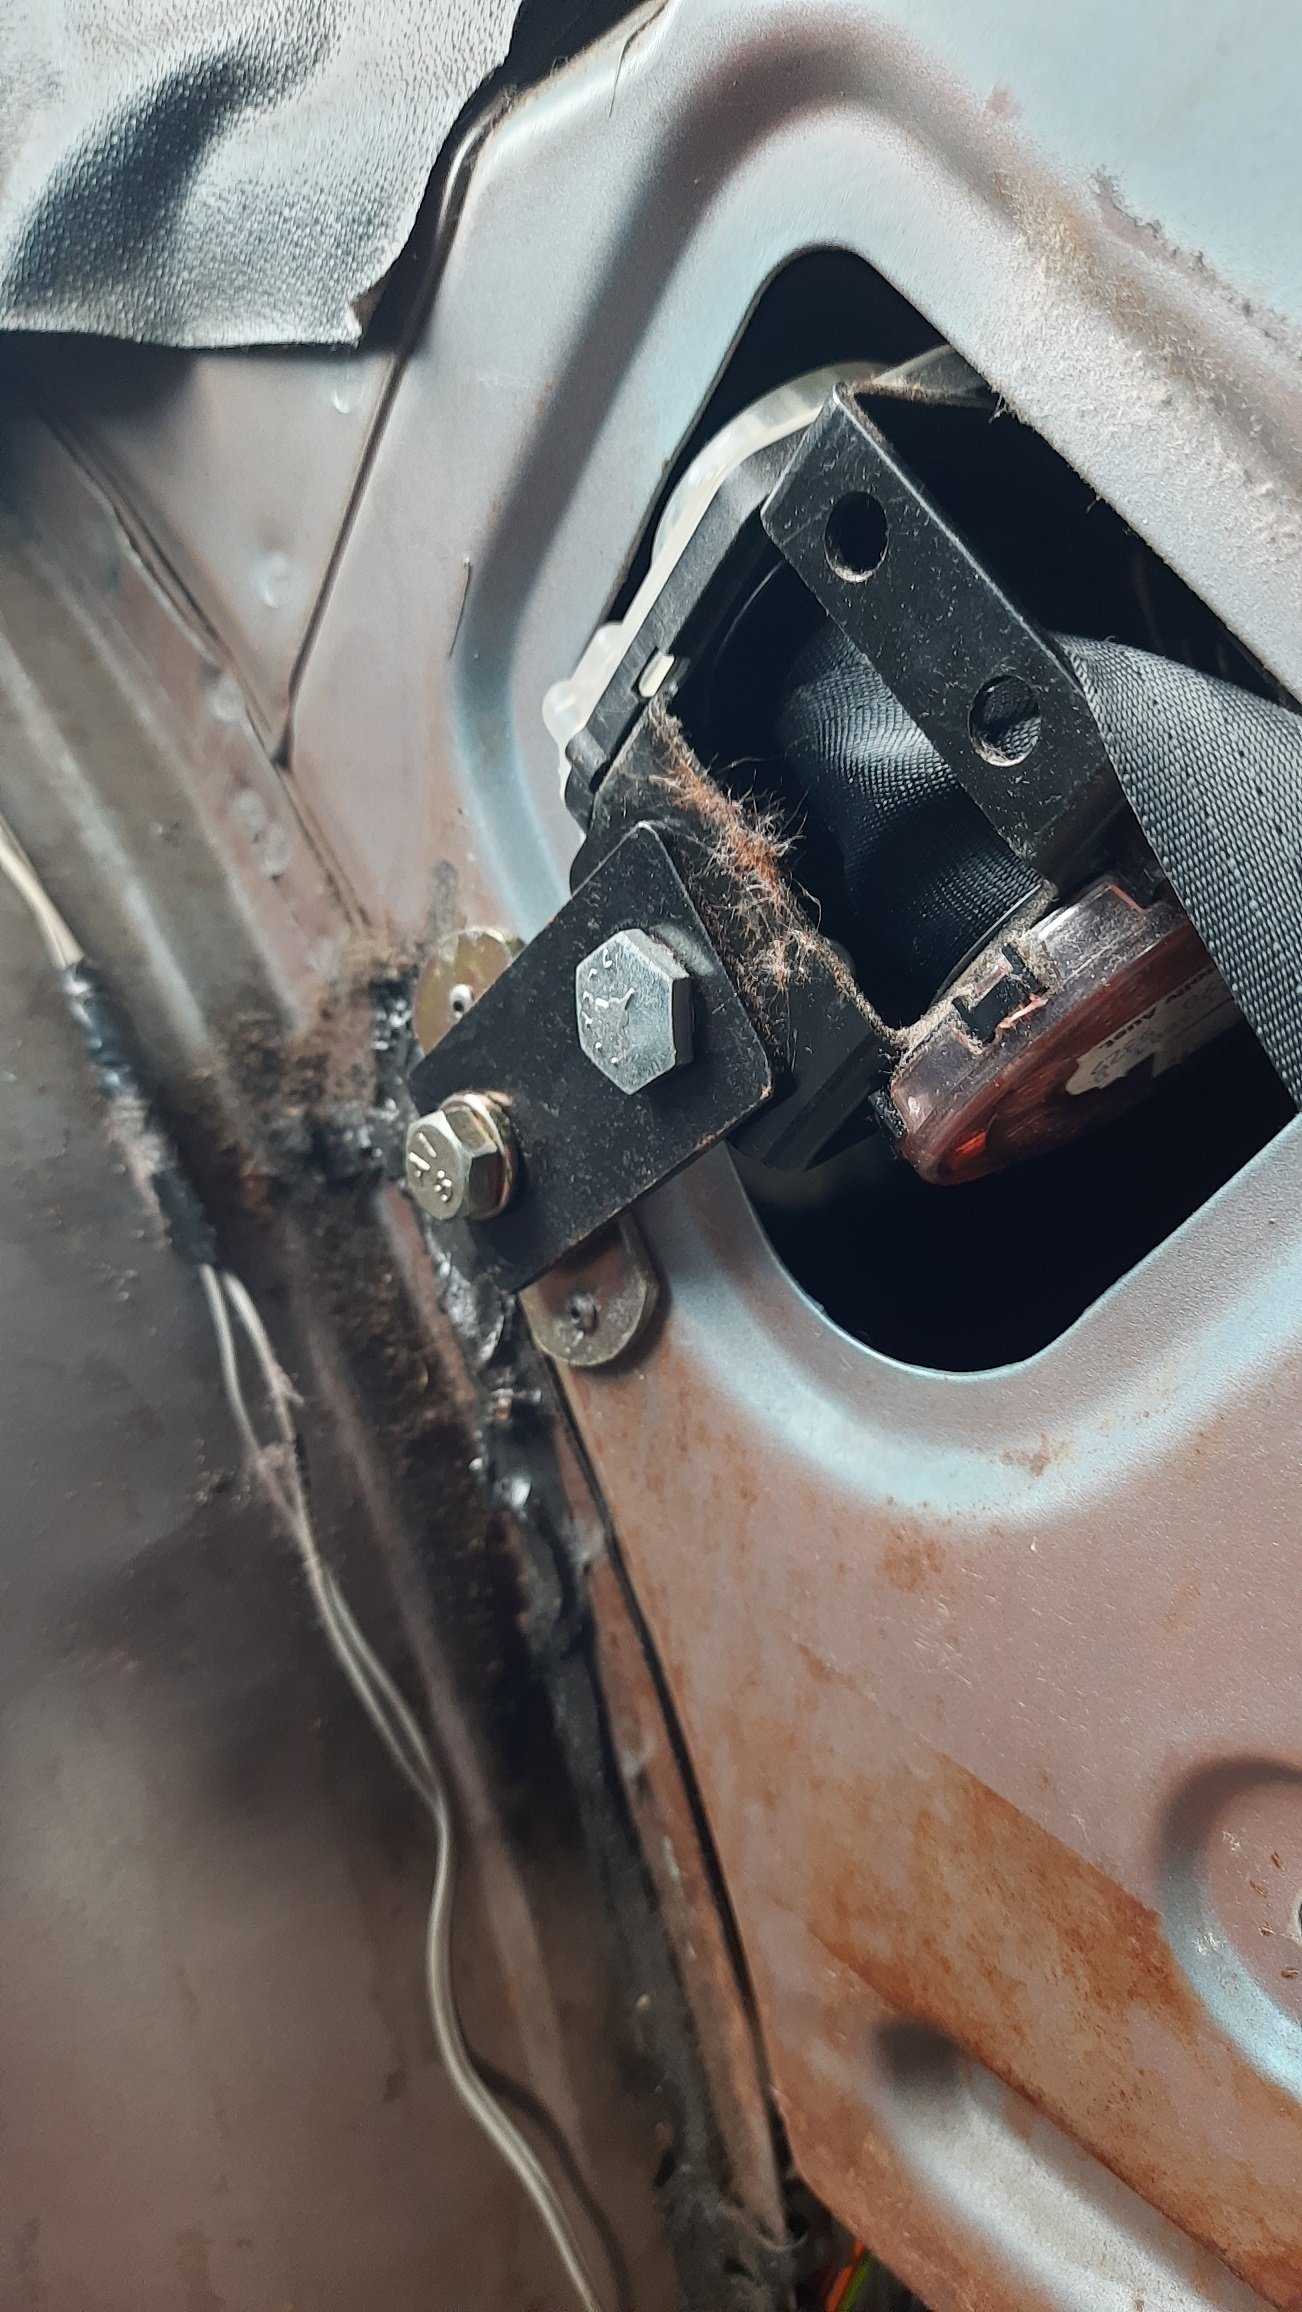
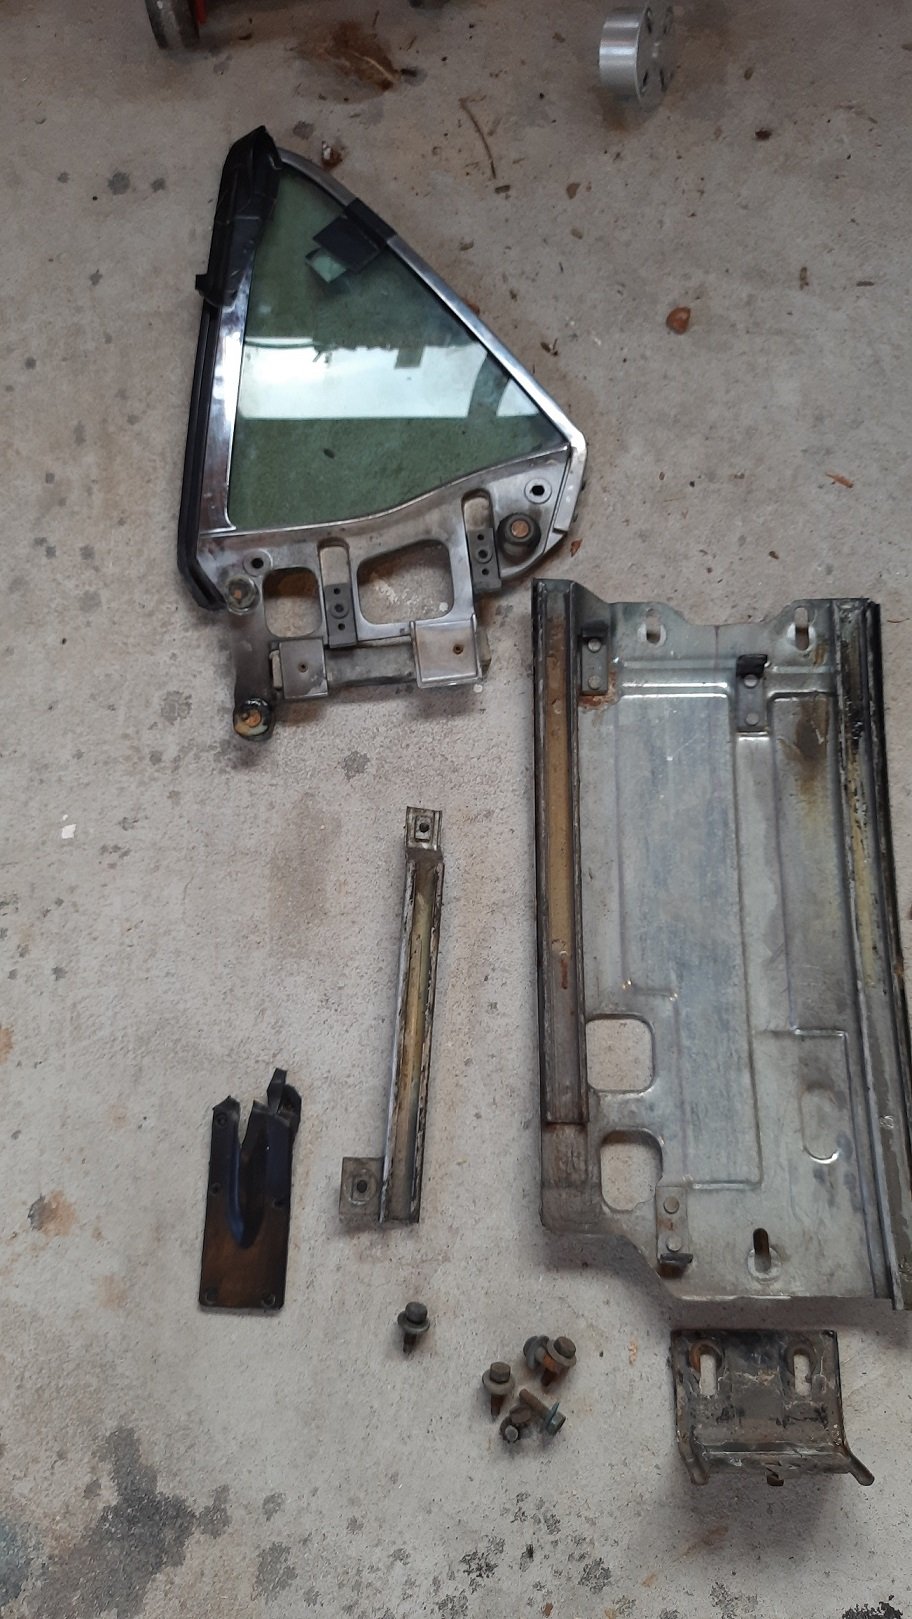
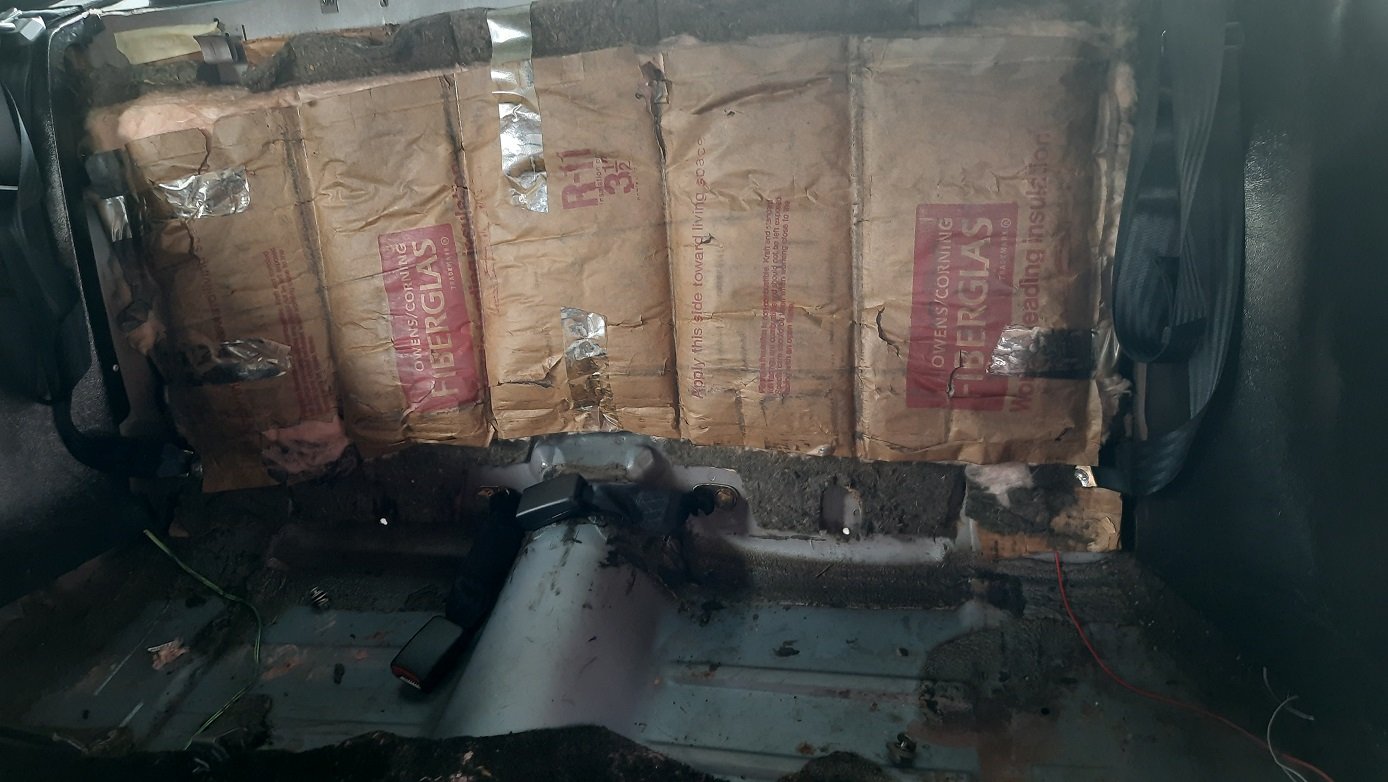
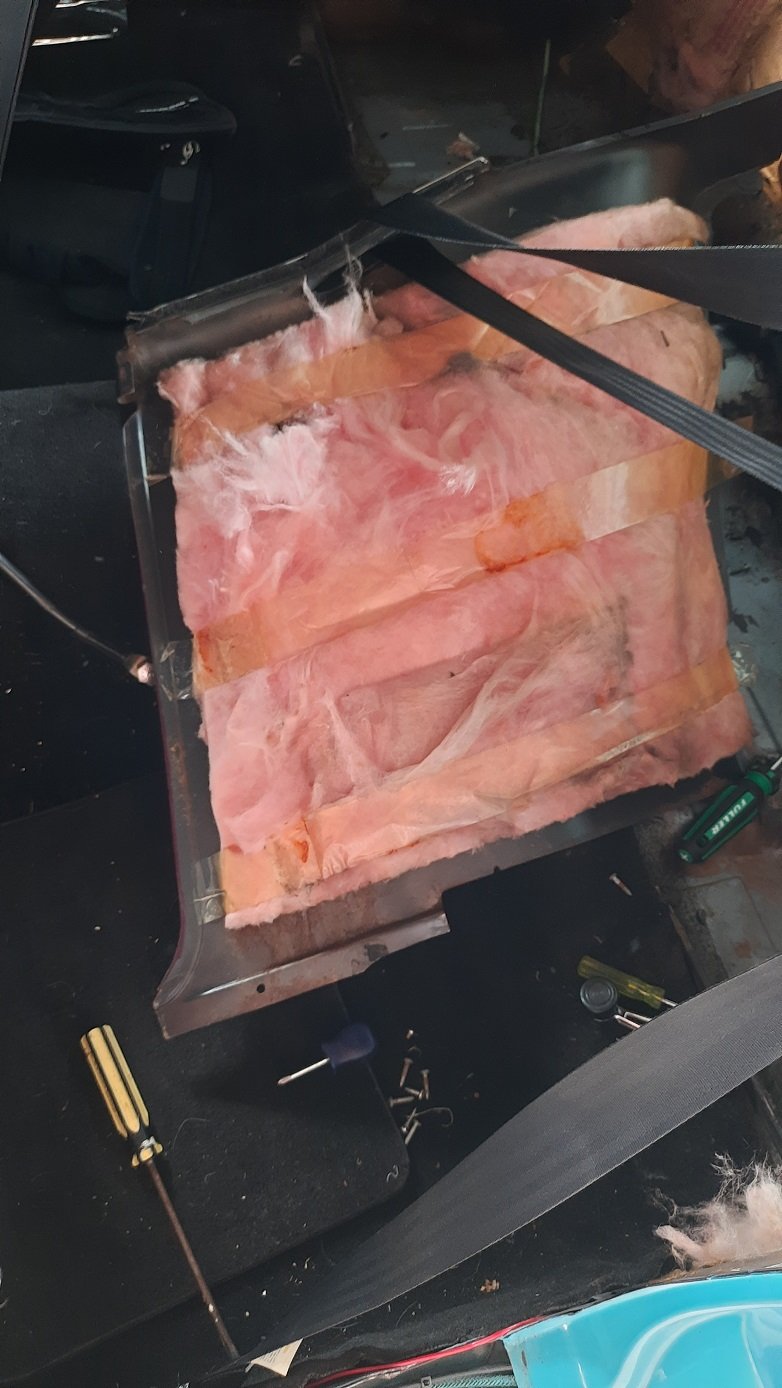
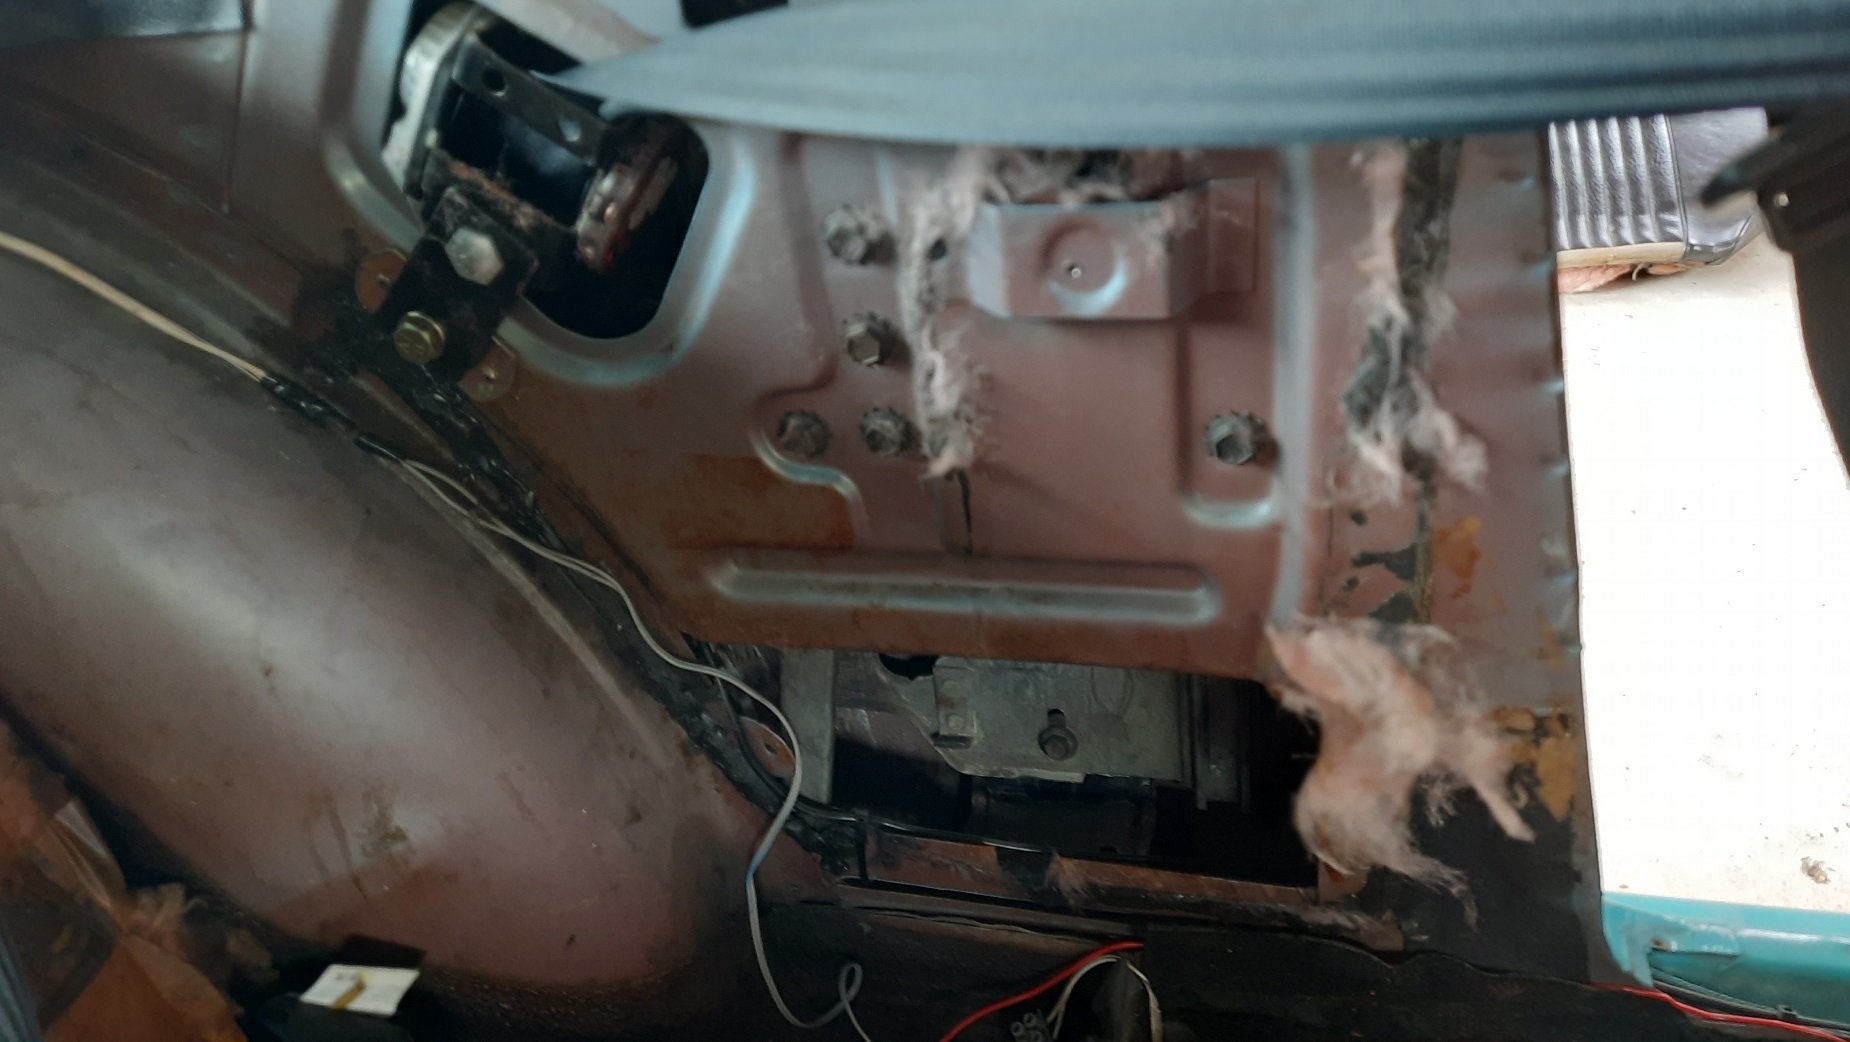
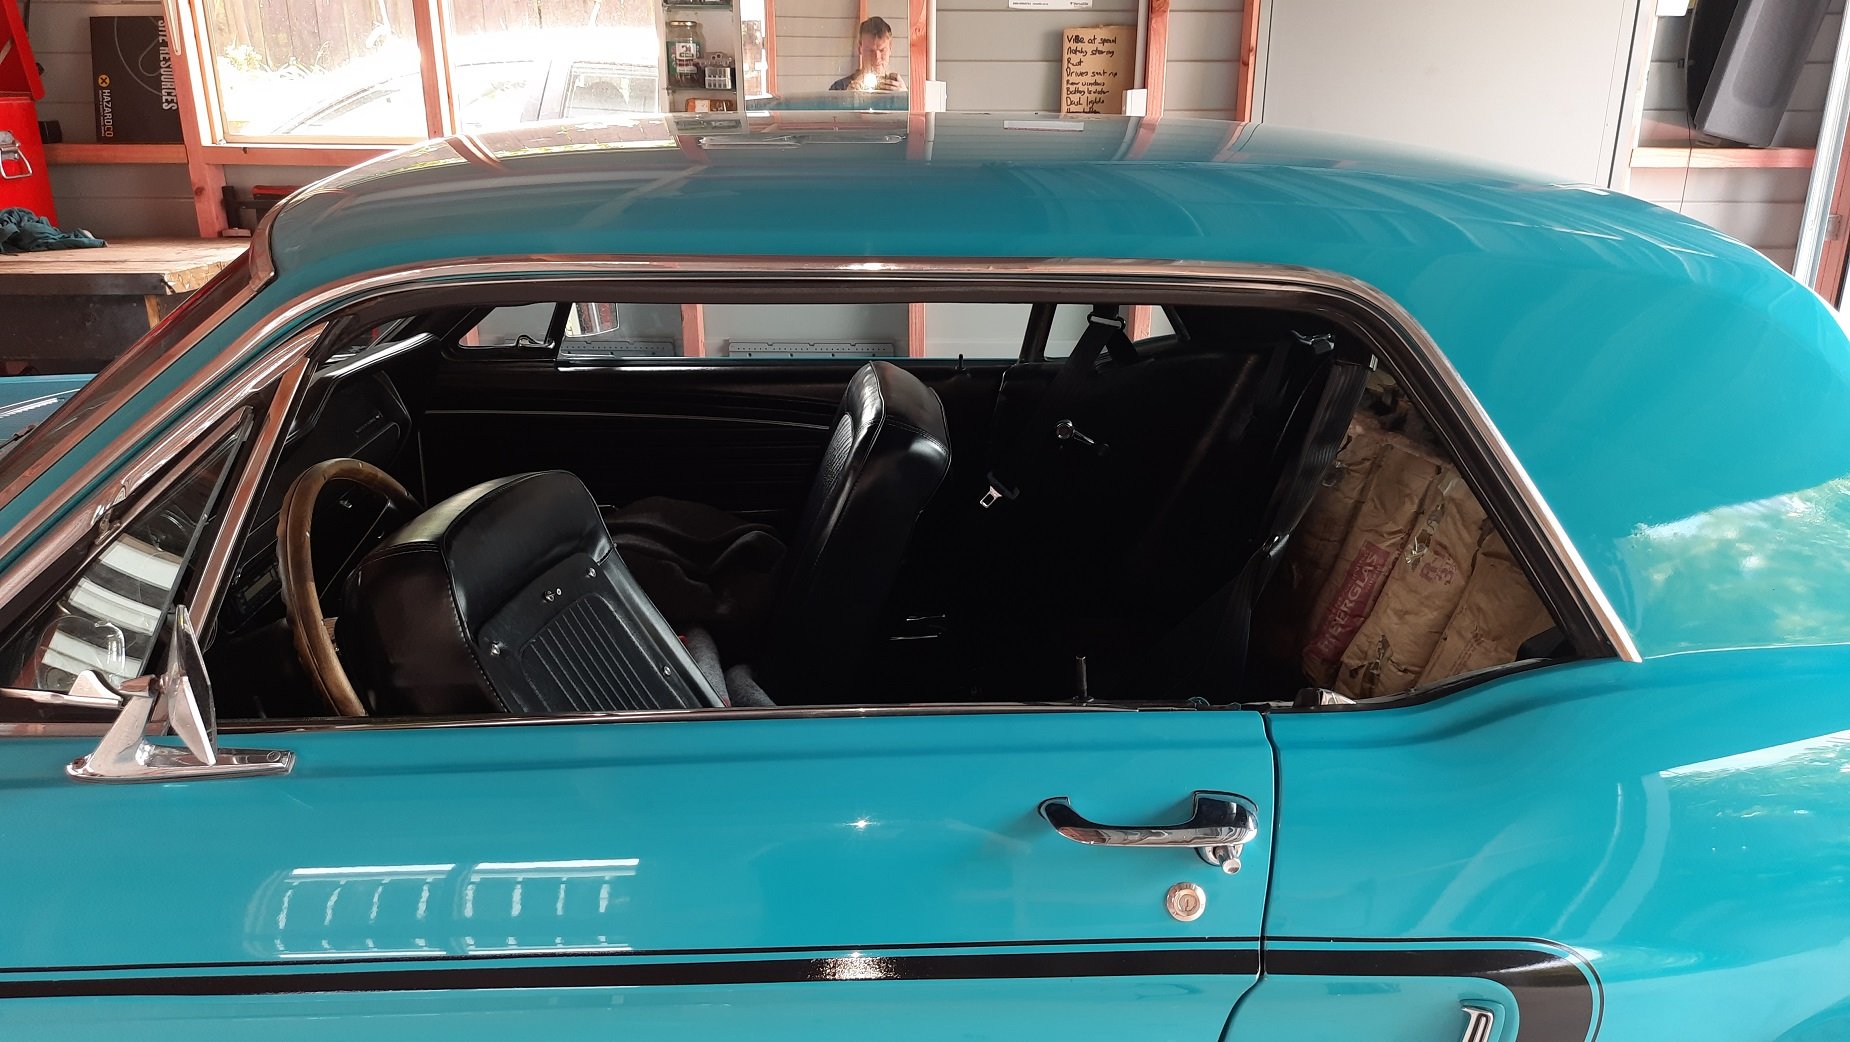
Started pulling a few things out prior to taking it to the tin basher for the panel and paint repairs. I took out the rear seat, parcel tray, and trunk divider as both were just cardboard and shit. A previous owner loved his pink batts, not sure if they were doing much but it's in the bin now. I kept the parcel tray for now just in case my new one is too thick but hopefully I'll ditch it. Also took out the speakers but I may just end up putting them back minus the grills. I made new panels from 9mm MDF. The parcel tray will get covered in black vinyl that I have left over from doing the same on my Fairmont. I may put some speaker mesh on the tray itself rather than the ugly grills although I will lose a bit of the 90's 6x9's bro look. I'll get some proper underlay for both I think. Next I took out the sail panels, more pink stuff here too. I don't know the sound isolation properties of Pink Batts but since there is a lot of tin resonating I doubt it did much. Got a good look at the seat belts. I'm not sure if the car came with lap sash belts but I'm pretty sure the inertial reel is after market. Bit sneaky it hasn't been certed but looks pretty legit. Only problem is it blocks the window mech so will need tweaking so the window goes down. Took the window out so I can service it and get it working. It is actually really smooth so should work ok if not contacting the belt reel. Not sure how I'm going to get it all back in though, it is a bit fiddly. Will give the cavity a good clean out, already got some crap body sealer and sand out. I can see why I have a bit of crud under the paint on the outside as there was a bunch of sediment between the inner guard and the outer sail panel. I may wait till the paint is done to finish the inside just in case he cuts anything out. Looks pretty clean otherwise. Will give it some spray in sound deadener and fish oil once the paint is done.
5 points
-
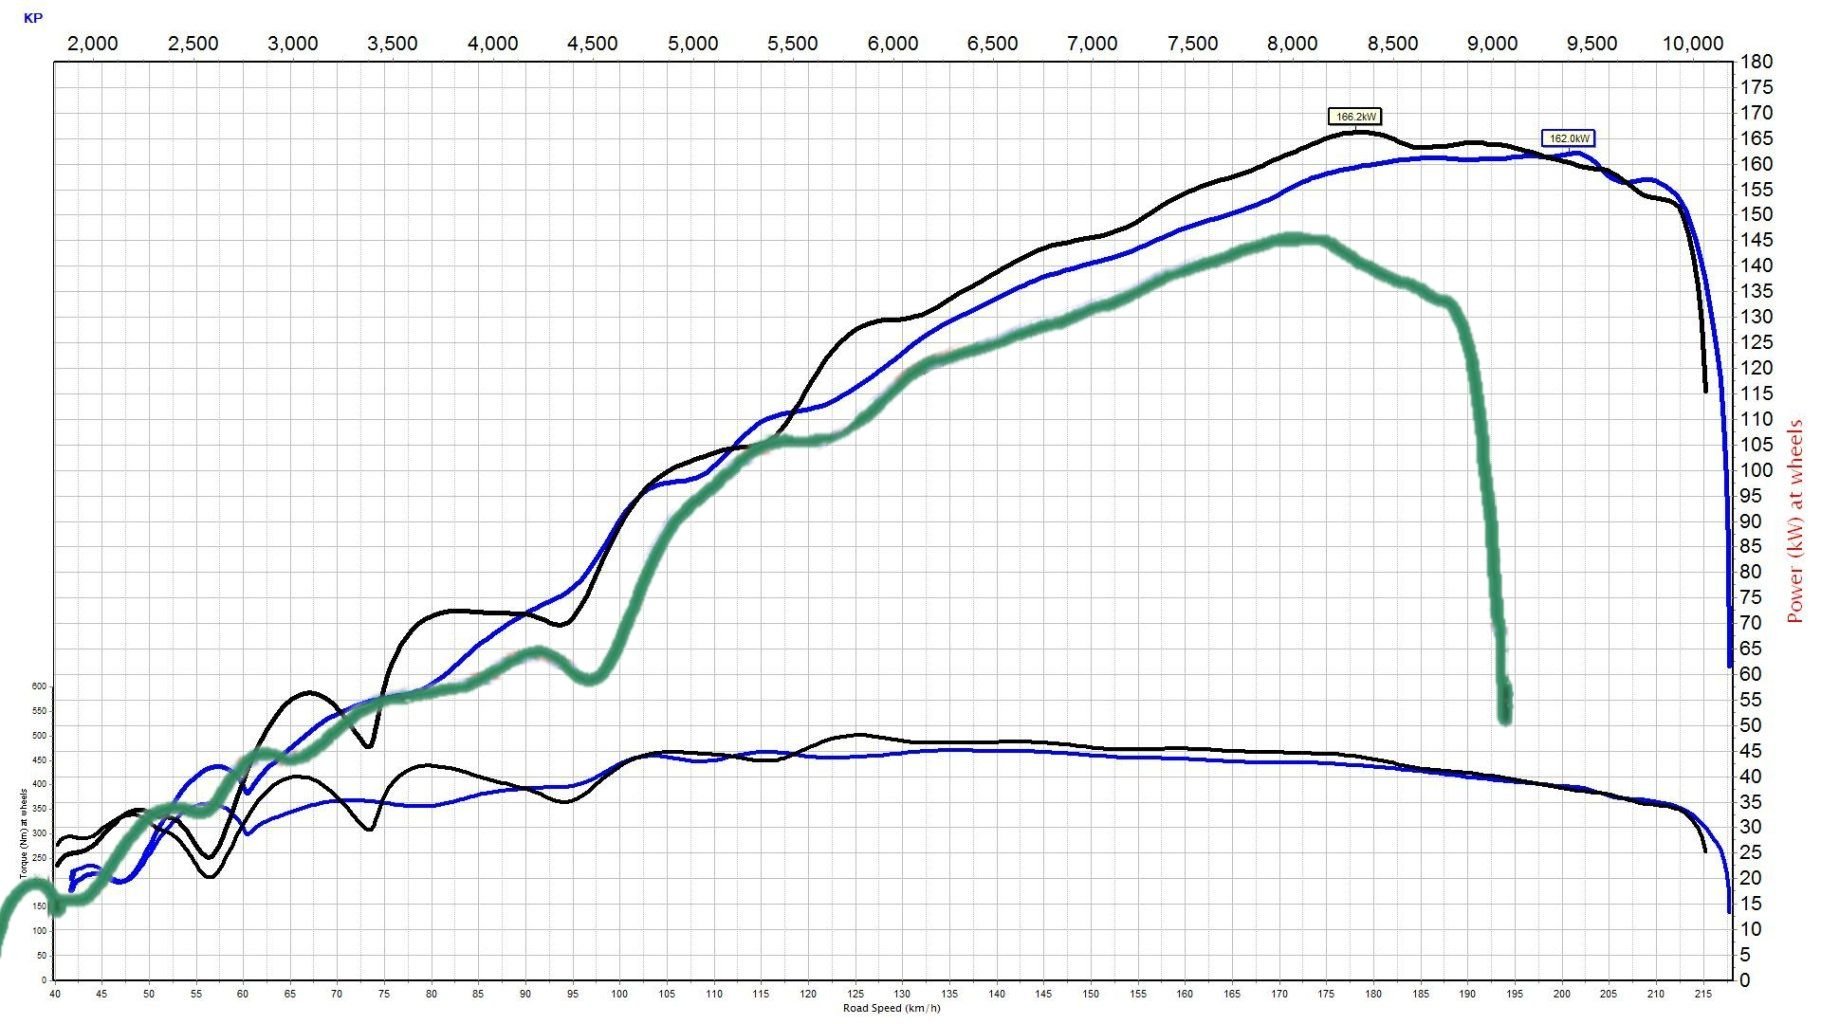
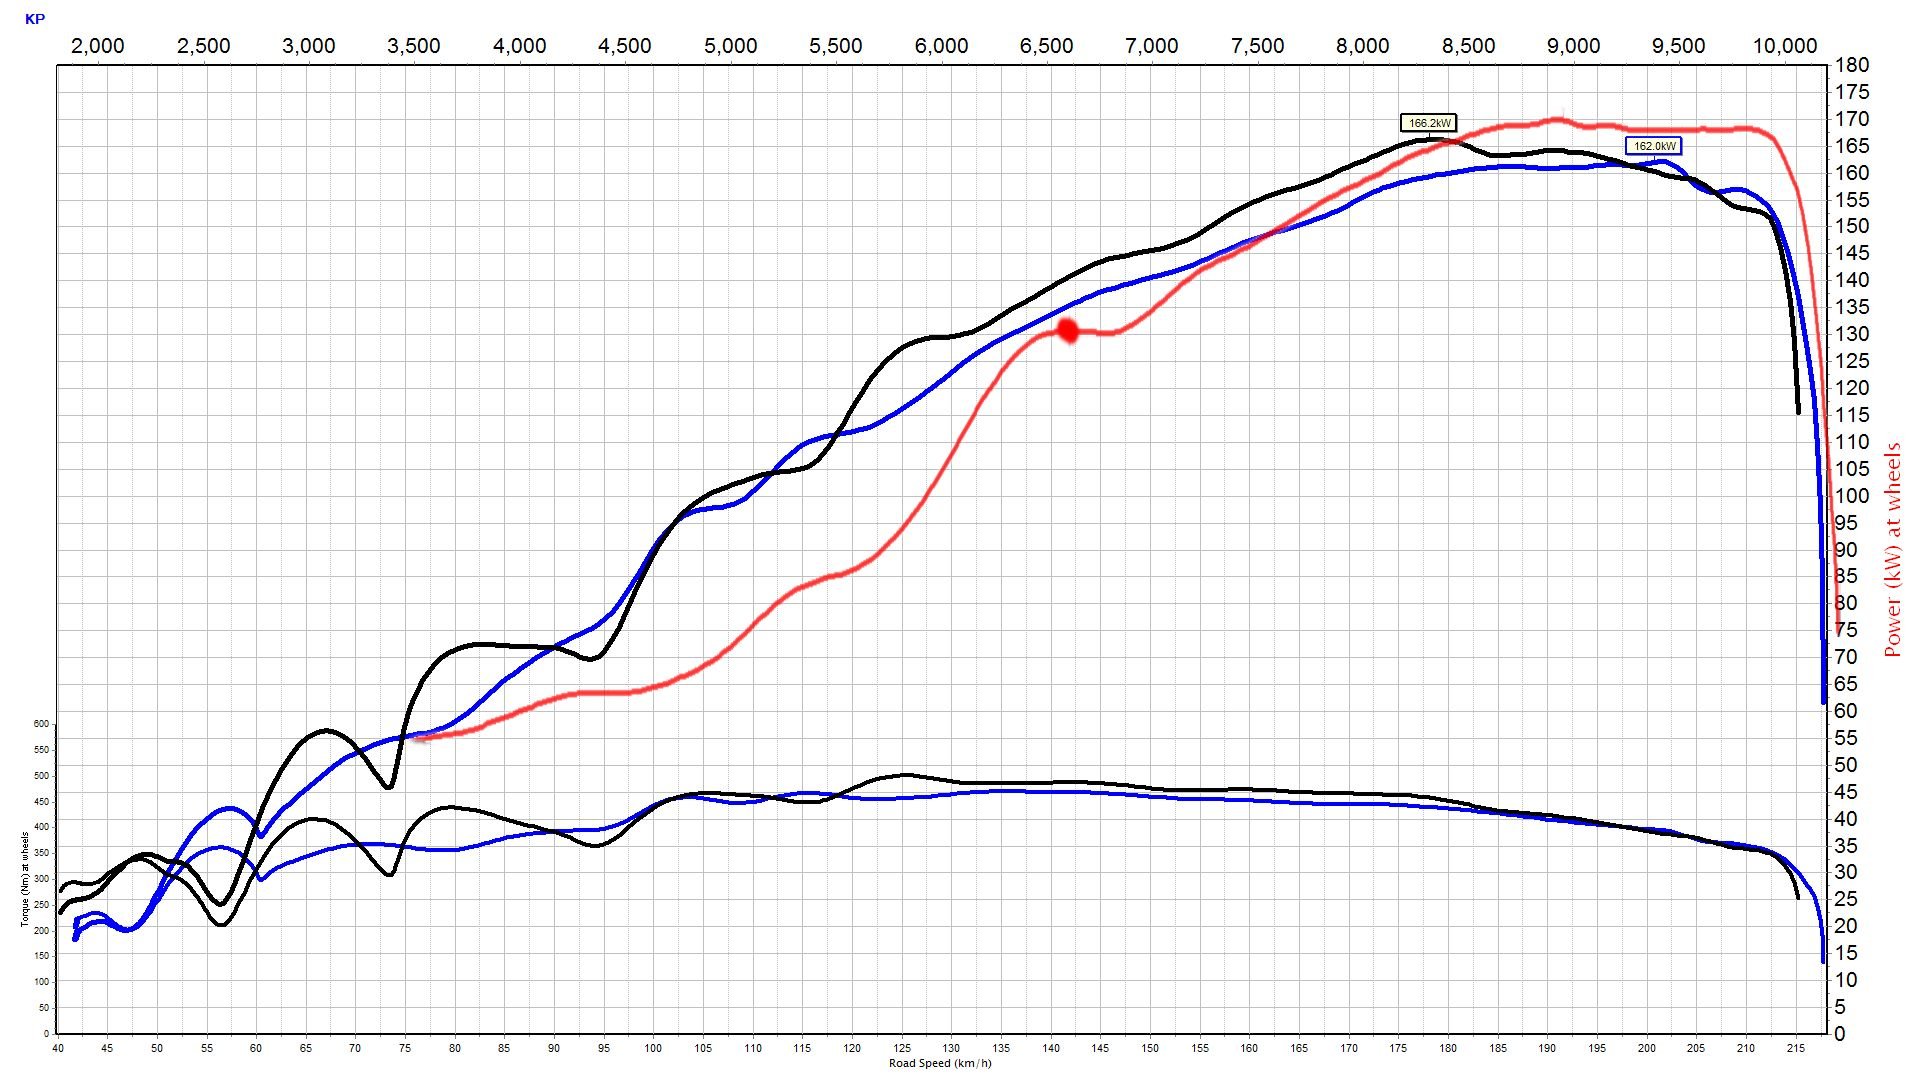
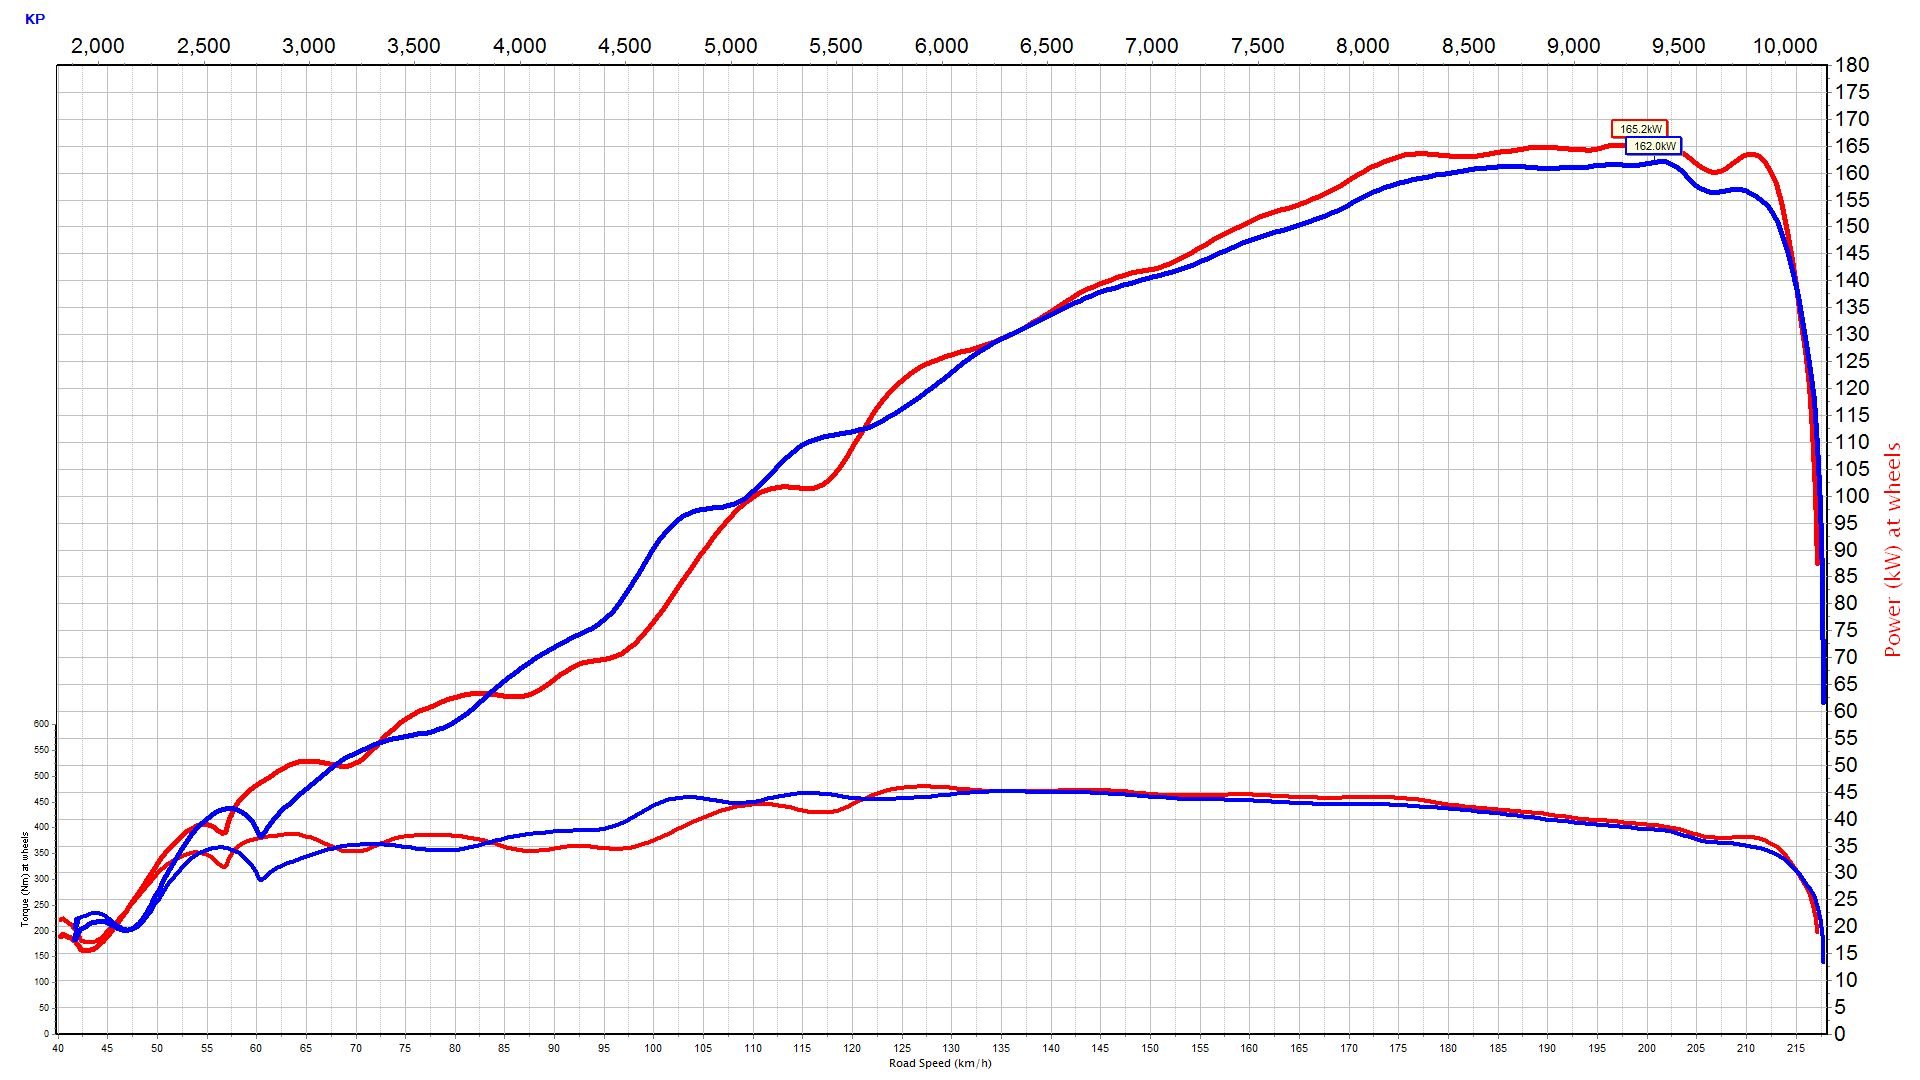
Ok, so the green line is the last time i tried the big headers. which happens to be the setup i ran a 13.5 1/4 on. And i thought the 146kw was about the most i was going to get out of it back then. not make over that number across a 3000rpm window Red is the atlantic car
4 points
-
Lost some of the U bolts on a shit road after getting ducked around by a useless seller, so have a bit of a bent guard. Many ratchet straps held it together for the ride home Very fixed now and out doing legal things
3 points
-
I am continually blown away by the never ceasing progress you make with half an engine. Great work man, just great.3 points
-
Ready for upholstery now...in black 2K paint...yes!!
2 points
-
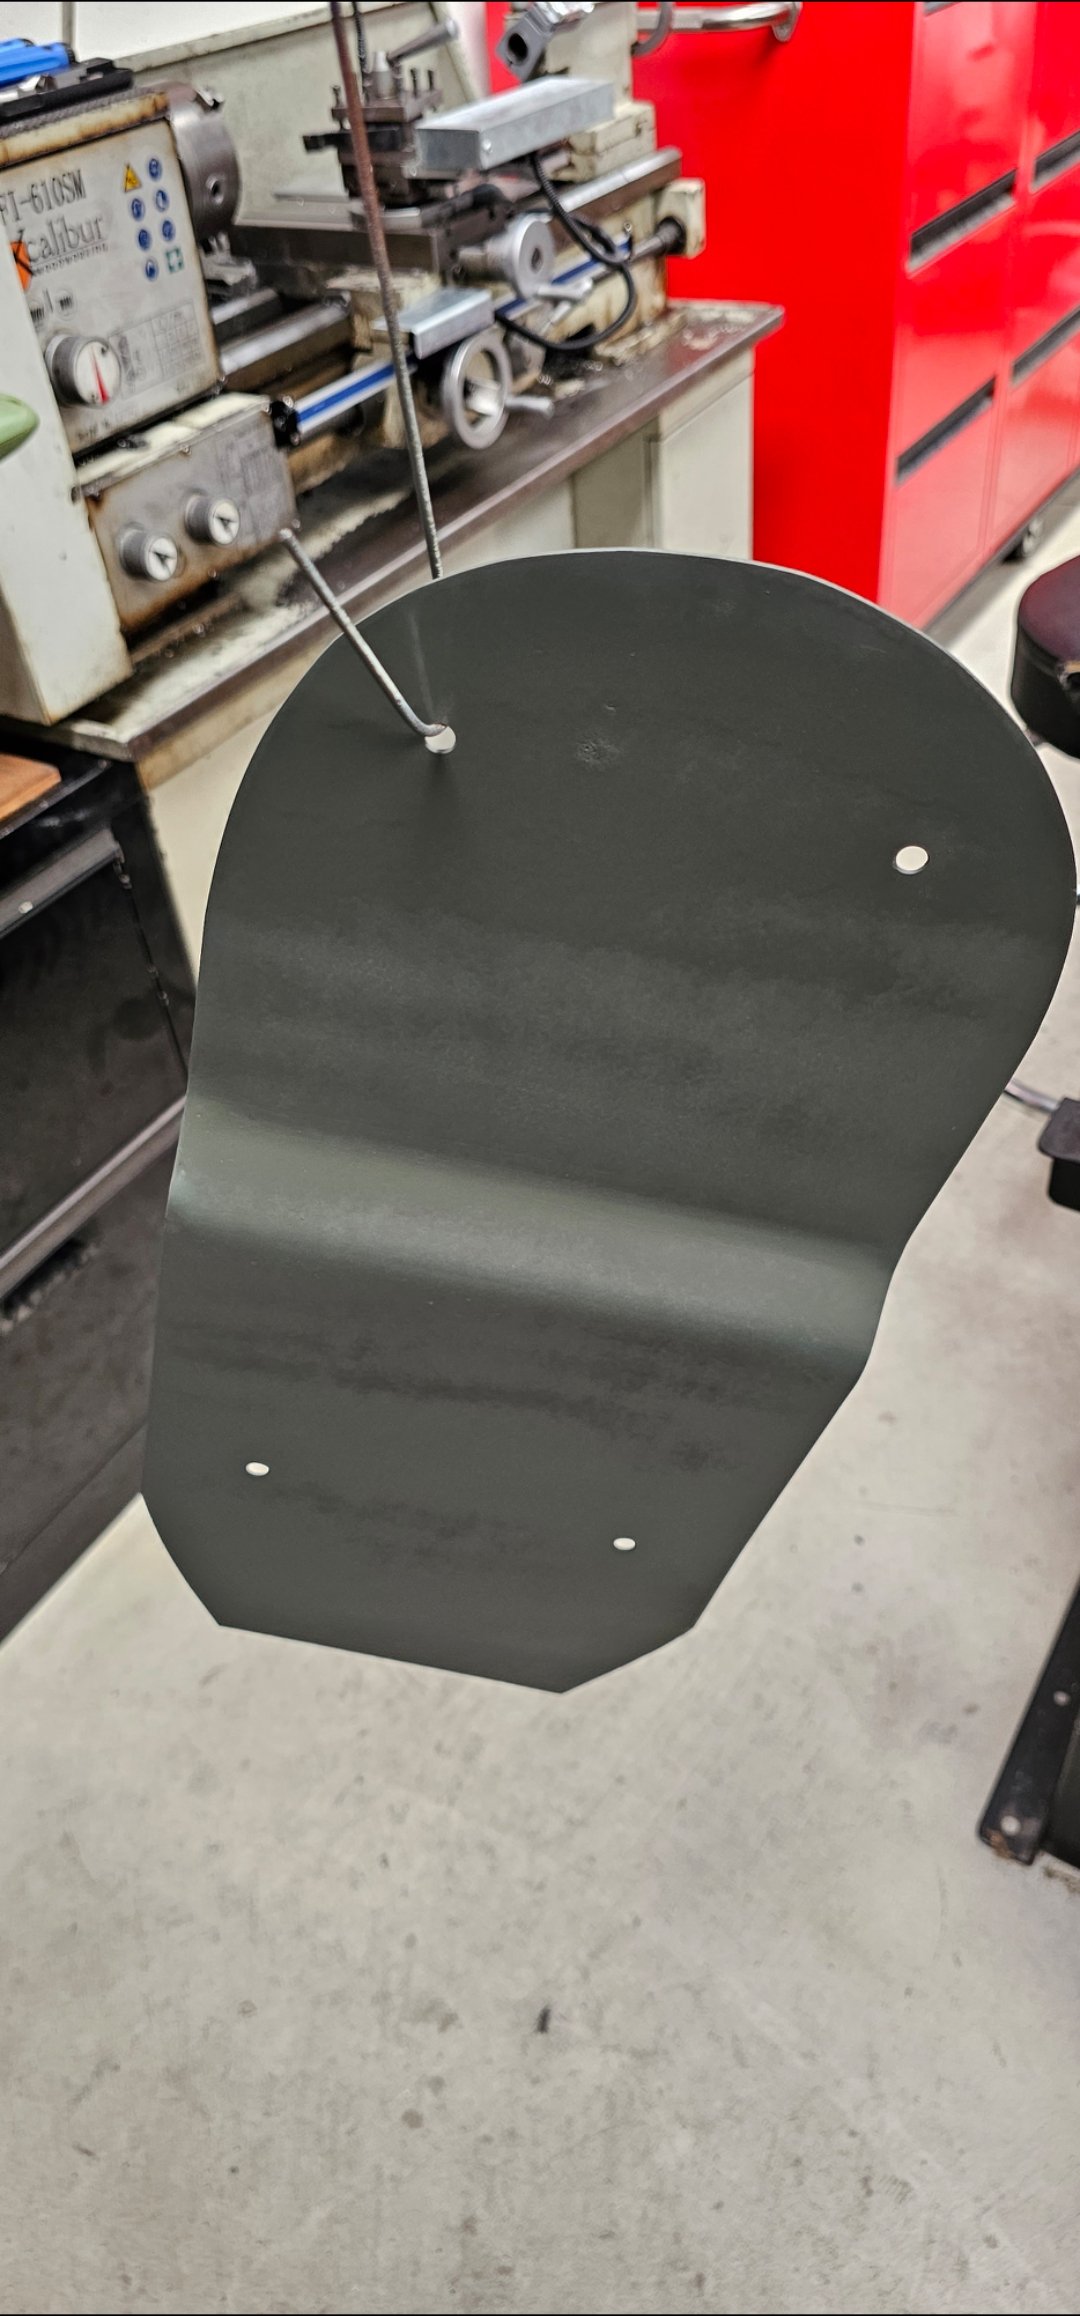
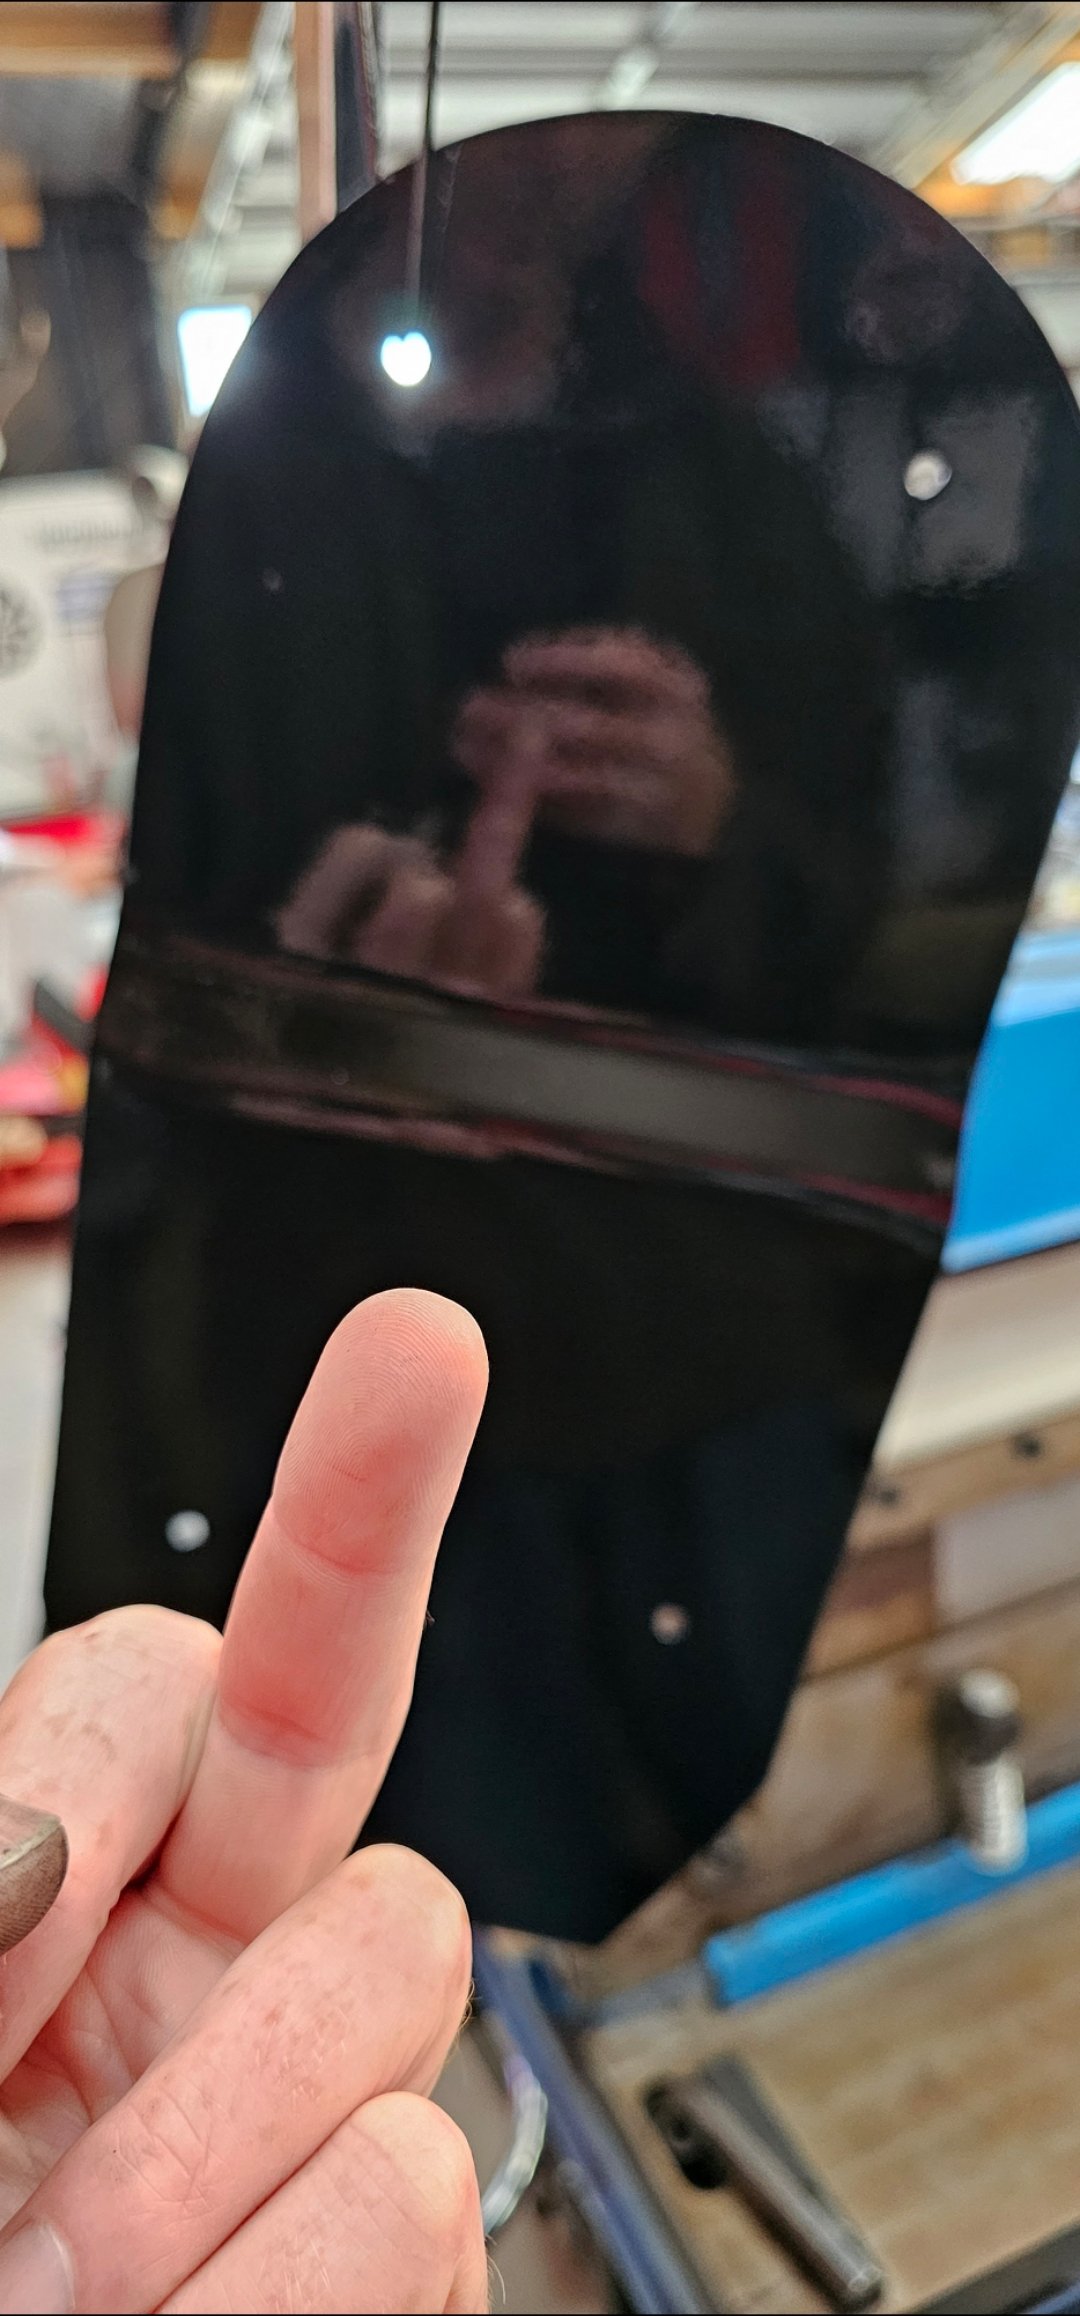
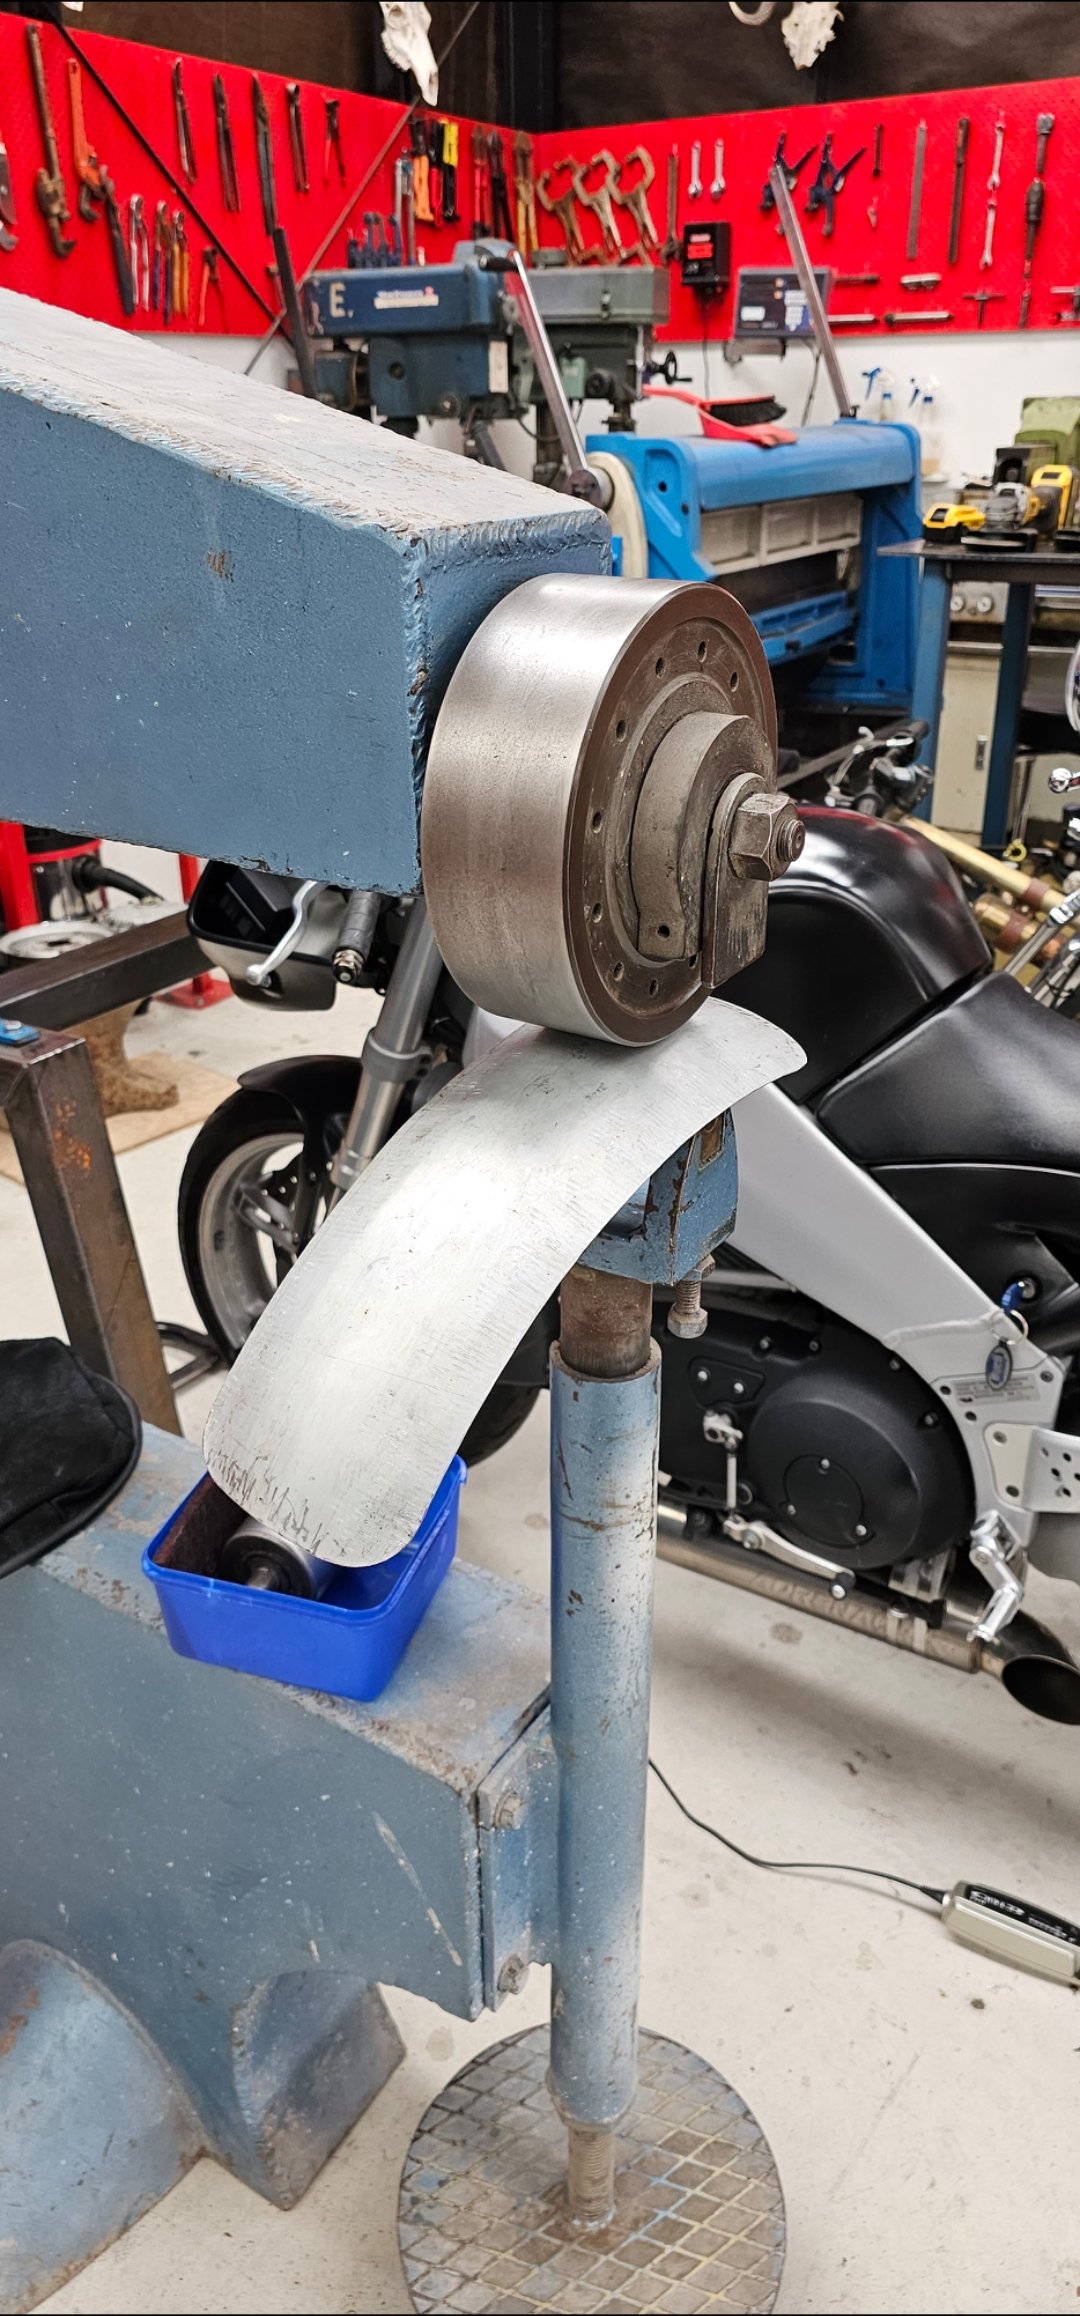
Something a bit different, scratch built fender out of flat panel steel. Im trying to learn new things, so hopefully this kind of thing gets better the more I do it.
2 points
-
Looks perfect for displaying a dead person for a state funeral2 points
-
Accommodation Unfortunately there's not really big motels/cabins in this part of the world. I tried to stop in places that have at least something, and is still on route. Night 1. There is only a couple places to stay in st Bathans so you all better get in sooner rather than later for beds. I think it may even be that you might have to book the whole place then divide it up between yourselves. If you have to stay at somewhere like Omakau then we can meet up en-route to Thompson gorge. I'll be camping at the st Bathans domain campsite. Night 2. Waikaia there is a hotel/motel, and a holiday park. I'll be camping at Piano Flat campsite which is about 20 mins up the road which we will be heading up the next day. Night 3. Ranfurly has a holiday park motel/cabins, motel and hotel. I'll be at either the holiday park, or Waipiata domain which is about 15 minutes away.2 points
-
Have you considered a Borg Warner 78?2 points
-
Oven cleaner. Just a tiny bit on a rag was perfect for removing the last stubborn bits of carbon staining on the pistons. Now for the what I fear is the trickiest part of the engine assembly which is assembling the two crankcase halves together, the last half over 3 pistons. Its the bit that's if not done correctly could at worse break a piston ring. Even the one of the manuals states this... So I started the process by giving the crank case halves a nice clean over and prep. Then I got the crank out from its hidy place under the table. Gave it a good clean and as per advice from @GregT double checked for any burrs in the oilway holes. They were spot on. Very nicely finished all over. Put the crank in the hole... Note the smallish crank thrust washers... (edit- this is just one of them - there's another on the flywheel side but I couldn't get a pic of that one because the flywheel adaptor hub is in the way) Rotation direction aside, this is probably the engines weakest spot in terms of being used as car engine, with a manual box that is. Good quality oil with snake oil ptfe treatments and don't sit at an intersection in gear with the clutch depressed etc etc will be the name of the game However all is not glum because after some extensive bedtime scheming and designing I have a good idea as an extra precaution I might do. Anyway- back to the build. Now I had to make some special Goldwing specific tools. Firstly are the piston ring compressors. Here's a pic of one of the Honda items ... Basic and gets the job done. But expensive, especially combined with the other bits and anyway - I like to make as much as I can. I got a bit drainpipe from a local plumpers supplies. It was actually a perfect fit over the piston. Like 10 thou smaller in ID and it wouldn't have gone on. Fluke. Lady couldn't be bothered to charge me anything either I chopped it into bits... To machine such flexy plastic rings I needed a support. Luckily I had a lump of thick alloy tube leftover from removing a customers lpg setup. I skimmed it down... Now I could turn a taper onto the rings and make lots of plastic mess... The taper locates the compressors into a tapered lead at the base of each cylinder liner on the LH case, so guiding the compressors and stopping the chance they might flex out as the case is lowered down over the pistons heads. I had to get the taper angle just right. Cut each rings in two. Now for some decent quality velcro. I found a meter pack of one side sticky, the other for sewing. Perfect! I then bolted the clean, shiny pistons in place. First to go in were the ones for the RH case that the crank is bolted into. Then the left hand pistons get bolted in place... More tools. This time some woodwork. I searched in my wood supplies and found a nice lump of Eucalyptus. Firstly two support blocks made to measure according to sizes specified in the manuals. They are used to space the cases at certain stages. Then a trickier bit which is used to hold the upper most piston straight and in the right location. In that last pic you will note two white plastic supports for the two lower pistons. Honda sell these as part of the kit. Not cheap either. So I cut up a bit of plastic chopping board to suit. The velcro strips needed wire pulls as like the Honda items. I have no fine wire, or a piano to steal some from. But I have a fishing rod, now with a shorter line. So it was all set up for the 'big lowering and clamshell manoeuvre' Oil the bores, the piston crowns, carefully lower lh case. The top compressor slid down the piston, rings were inside the bore and the case sat on the upturned blocks. Remove the wooden piston support and then slide compressor down and remove by pulling on the fishing line loops. Please excuse the lack of photos. I was a combination of being both nervous and satisfied and not thinking camera. Not until the block was over the next two remaining pistons and rings were in place. Then I took some pics... Plastic chopping board supports removed.. Final two compressors pulled out... Case faces cleaned one more time, dowels reinserted, 2 new O rings installed, lower surface gets a thin spread of 3 Bond sealant. Case is lowered then all these cleaned and pre-organised bolts go in and get torqued down. Job done. Phew !!! I had a cup of coffee and tidy up in preparation of the next stages. Its nice having a break from work and not having customers jobs cluttering up the space. Just a little spare Imp...2 points
-
More wiring done. The joys of buying old shit, that has had several owners of varying degrees of giving a fuck previously work on it. To be fair, I'm somewhat in the middle of this spectrum when it comes to wiring ability too. But I've certainly cleaned it up a lot from where it once was.
2 points
-
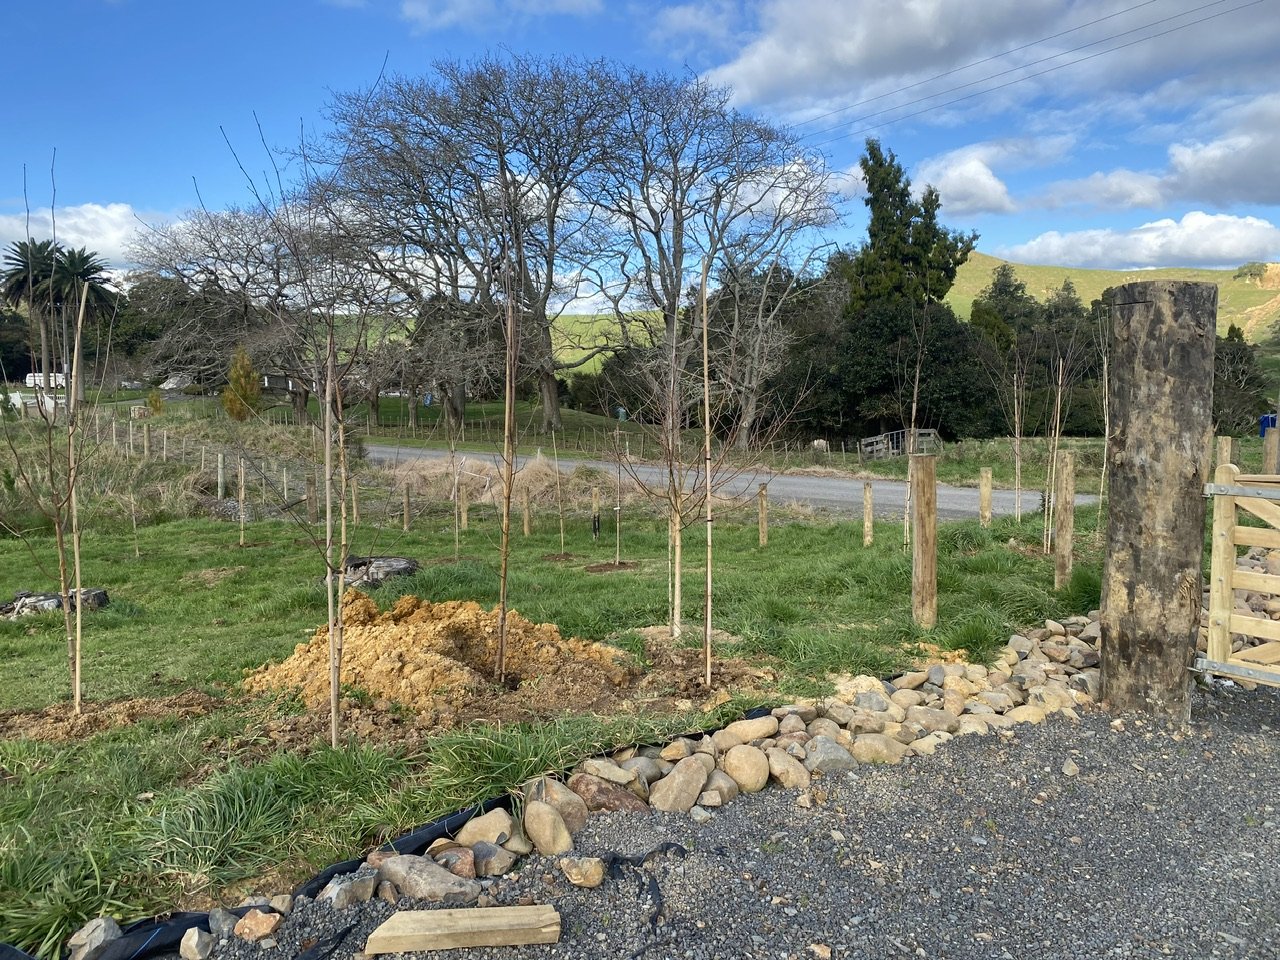
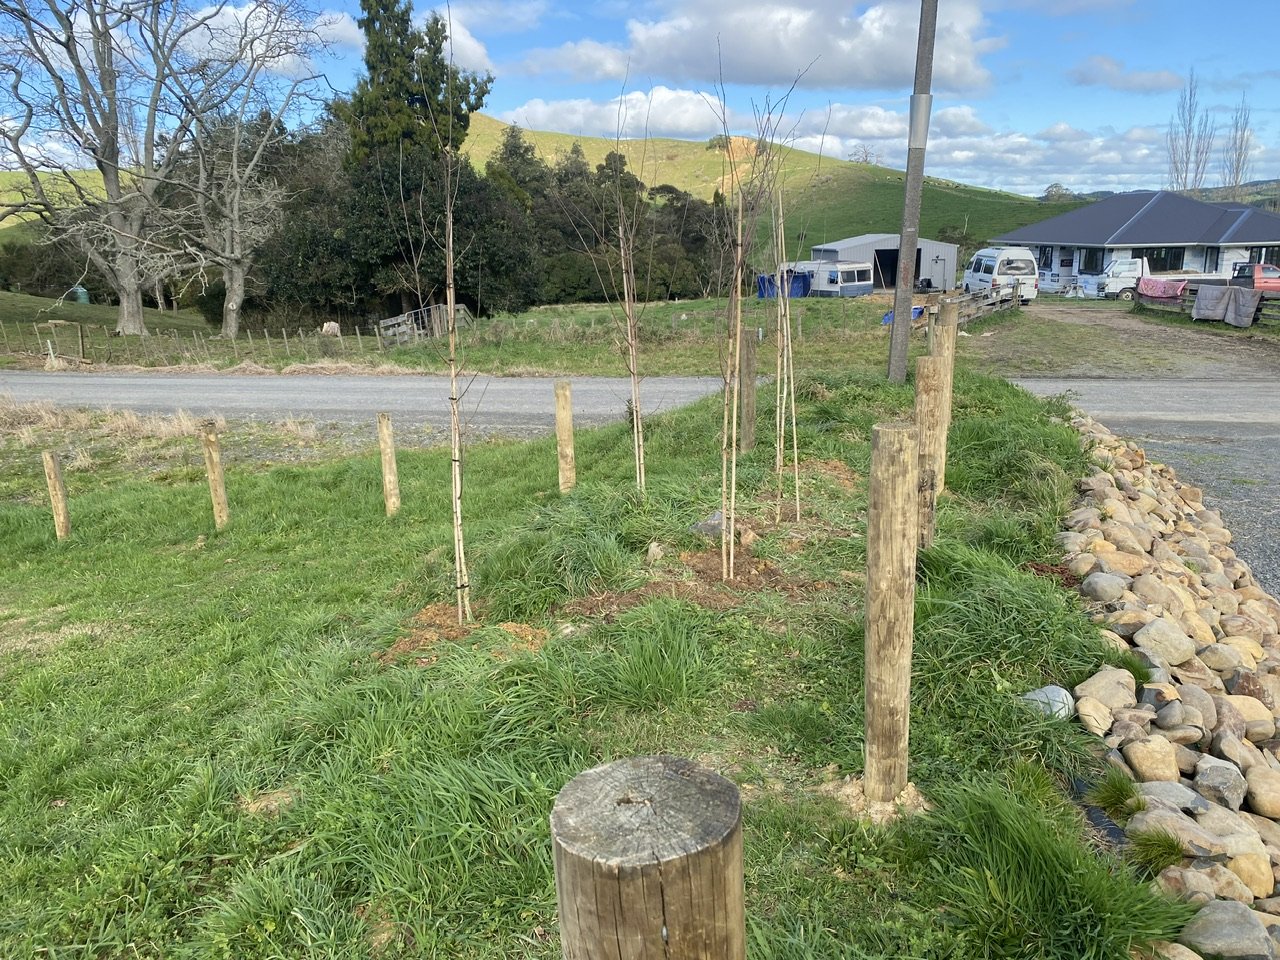
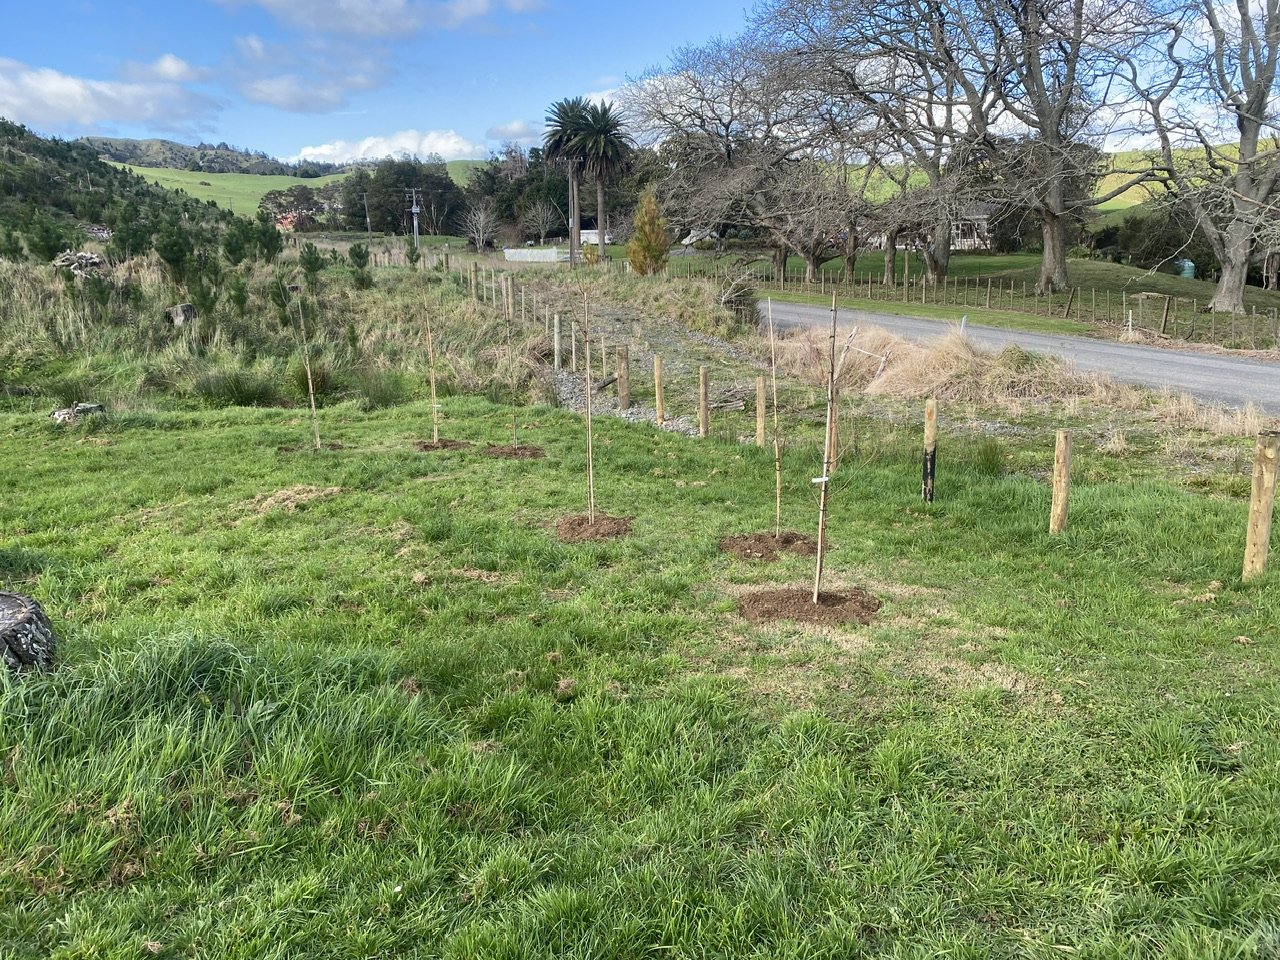
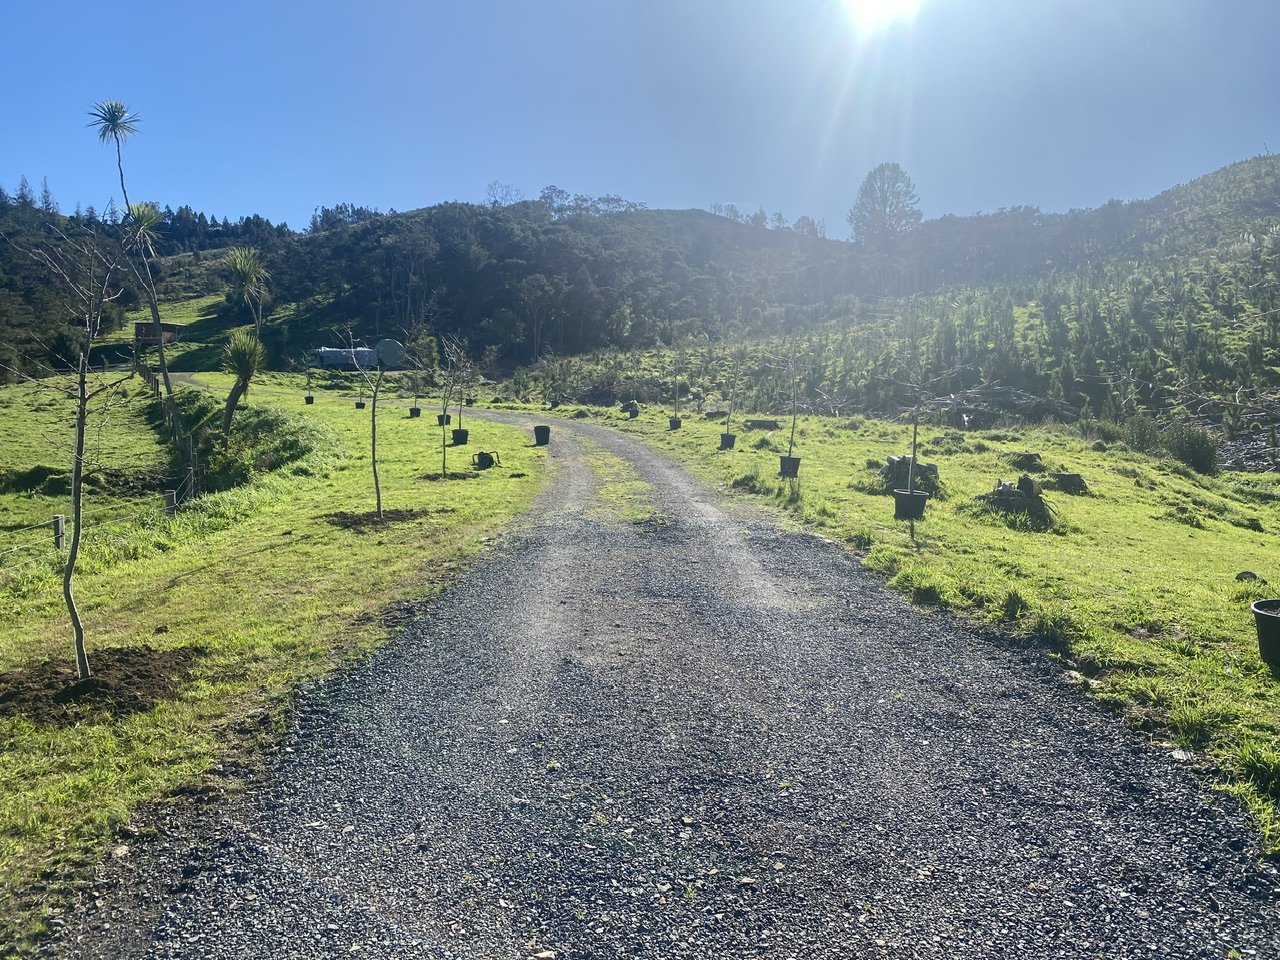
Well bugger me, that escalated in a hurry.. I wandered into Rainbow Nurseries in Ramarama to see when their next sale was on, got told hasn’t been an open door sale for the last few years due to covid and new buildings being built but she remembered me from last time a number of years ago so showed me around and then emailed me a list of trees they had for sale online. All I wanted were a few trees to go up my driveway as I like the old “tree lined driveway” look.. I ended up getting a bit carried away.. bought 16 prunus awanui (cherry) trees for the driveway and 21 Betula jaquemontii (birch) just cos they were cheap and should look nice when established.. $40 plus gst per tree ain’t bad considering they’re 2-3m tall.. Anyway, 2 days and 37 trees later they’re all in the ground.. note to self.. no more trees. And, move those mounds of dirt before they become permanent features.
2 points
-
Ok so every single car Ive ever bought has ended up being sight unseen, and so far its worked out ok (all the ones ive looked at before purchasing have been lemons that Ive walked away from) Imported my first car and second car from Japan, first time seeing them was picking them up from compliance. Next car was my old Honda Shuttle that was a $1400 trademe purchase that a friend picked up in ChCh and drove 15 hours home for me, then a trademe $1 reserve CR-V that I sold 2 weeks later for profit, then a Manual CR-V that was in Auckland, then a trademe $1 reserve Caldina for my wife, then imported a Vitz to replace the Caldina, then to replace the second CR-V a newer CR-V that was also a trademe $1 Reserve deal... typically the first my wife knows of them is after the auction is closed...... So not one to break with tradition, on Sunday I was at work and got a trademe notification on my phone that an Auction on my watchlist was due to close. For a 1997 BMW Z3, and most importantly it was cheap. There wasnt a plan to actually buy it but with 2mins to go there was no further bids so I put one on it, half hearted bidding war that raised the price $80 and Id won. Fuck. So I dutilly made sure there was no money owing on it and transferred the money, an hour later had confirmation it had been received so txt my wife to see if she wanted to go for a drive to Rotorua because Id bought something I shouldnt have, her first guess was a car and when she found out what it was was more excited about the purchase than I was. Finished work at 2pm, picked up the car at 3:30 and was pleasantly surprised it was in better condition than I was preparing myself for. Drove it straight home (wife with her AA memebership card following) with the roof down and froze my ass off, home at 5 got one pic and then it was dark.
1 point
-
I like the red toolbox? reflection on the side of the tank...1 point
-
Took the van for a quick squirt around the neighbourhood to test the manual steering. As I turned into our driveway she suddenly died. Pulled a plug lead to check for spark ... nada. Pulled the dizzy cap off to check spark at points. Turned the engine over and the rotor wasn't rotating .... WTF. Pulled the dizzy apart and the shaft is broken. That will teach me for buying one off fleabay. I'm going to head into town on Monday to visit our local Toyota Parts Depot to see if I can source a reputable dizzy from them. Oh...... and in other news manual steering is pants compared to my power steering, so guess what I am refitting tomorrow ? https://youtu.be/l6S6nJY7t681 point
-
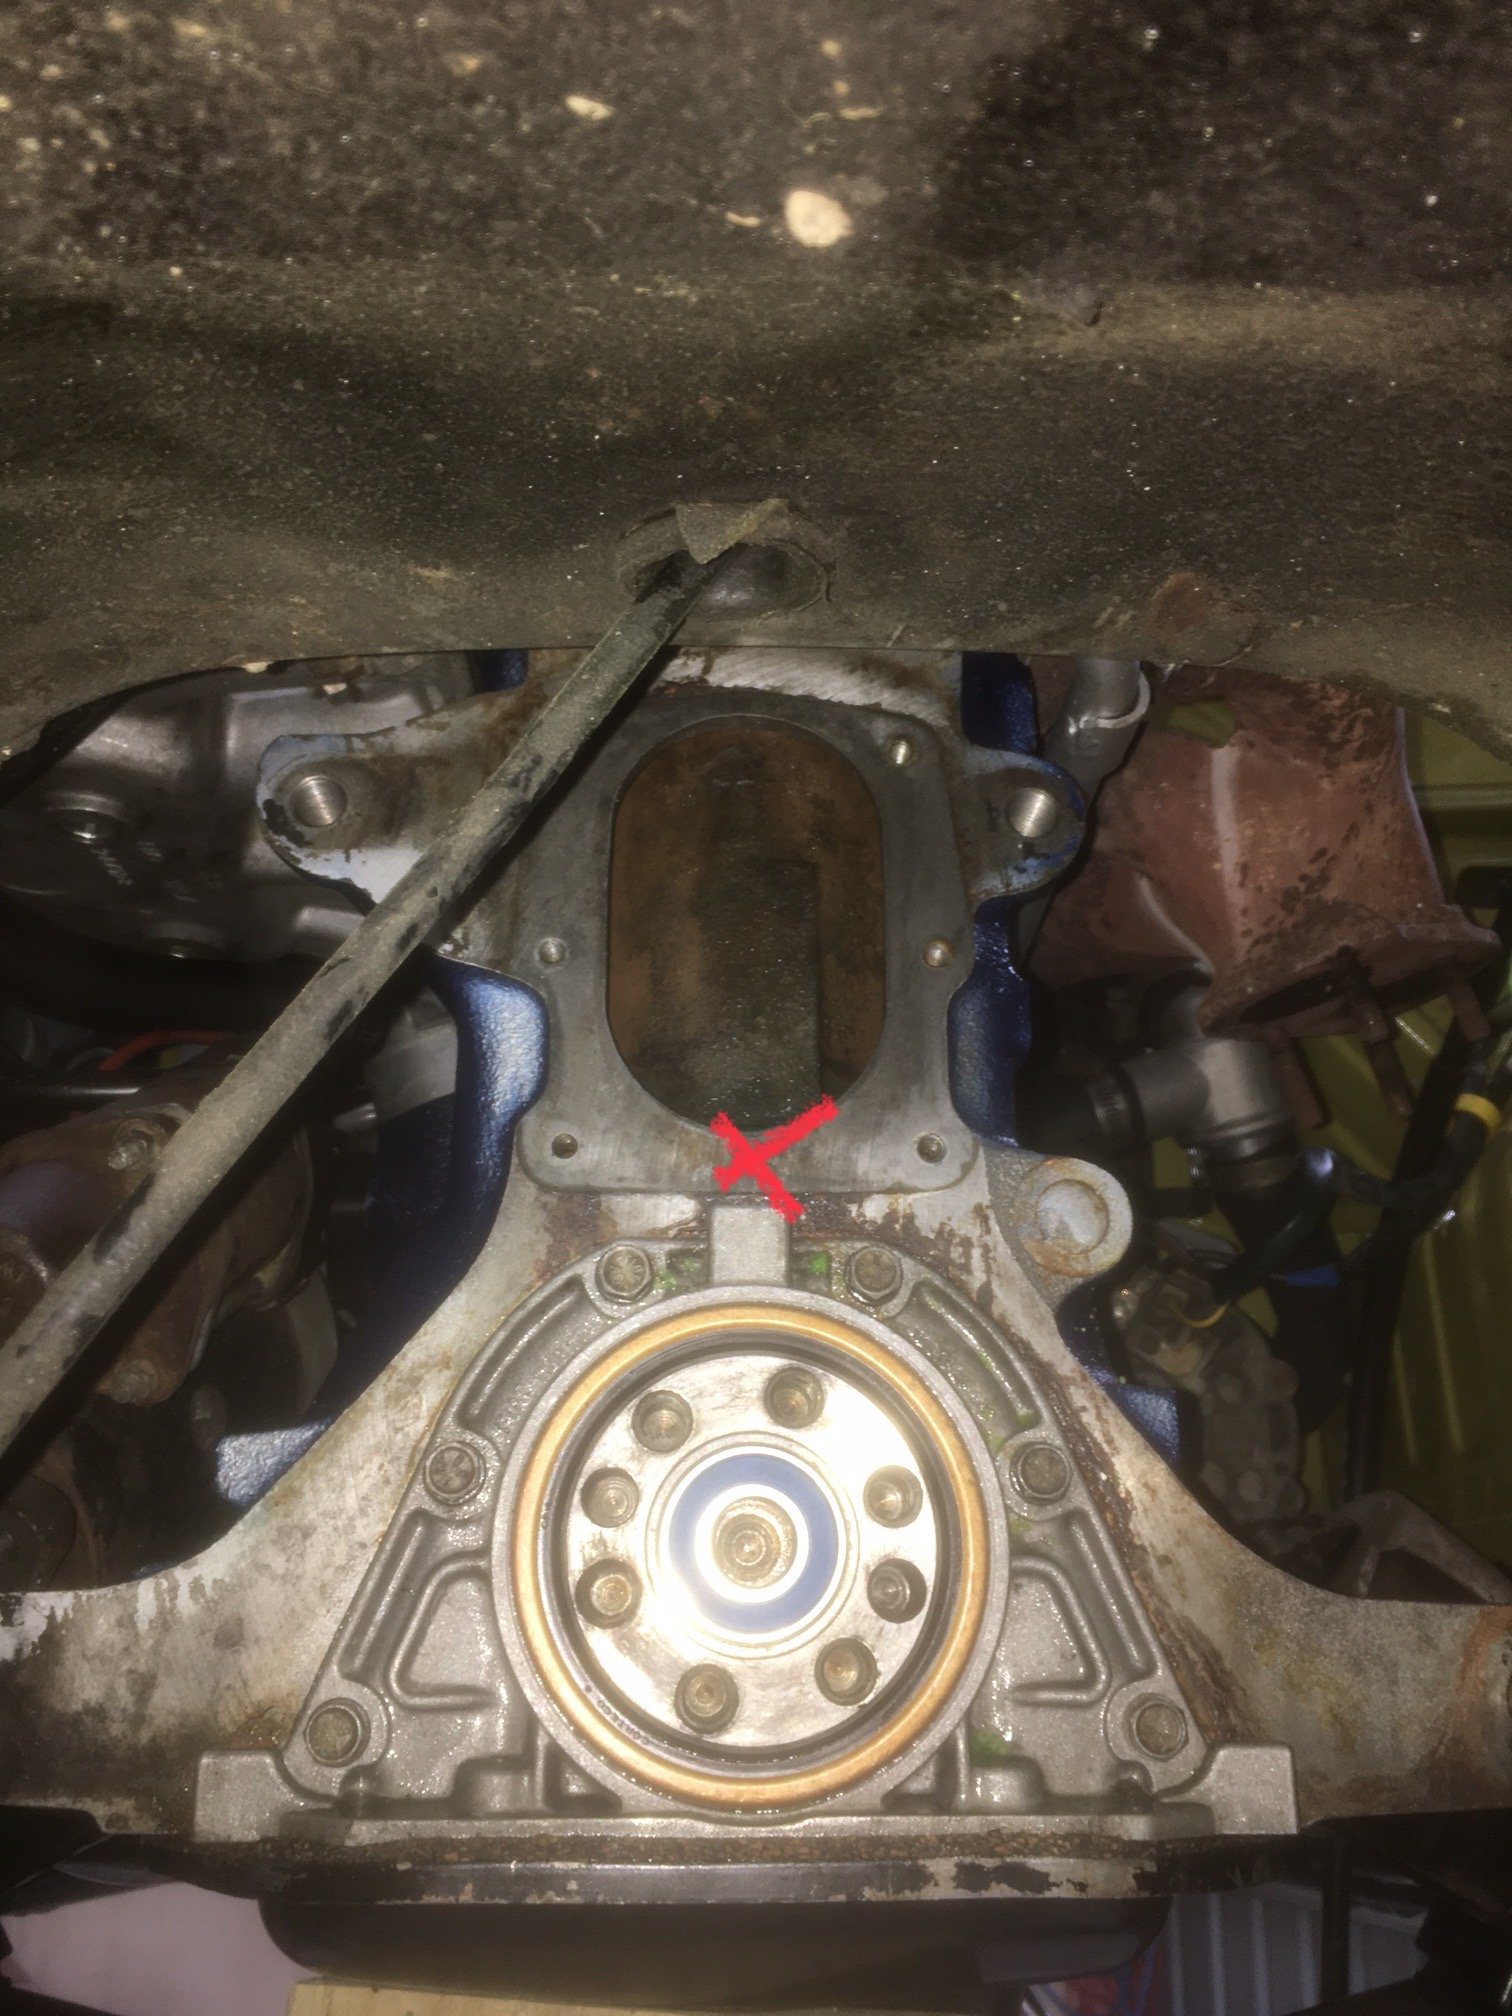
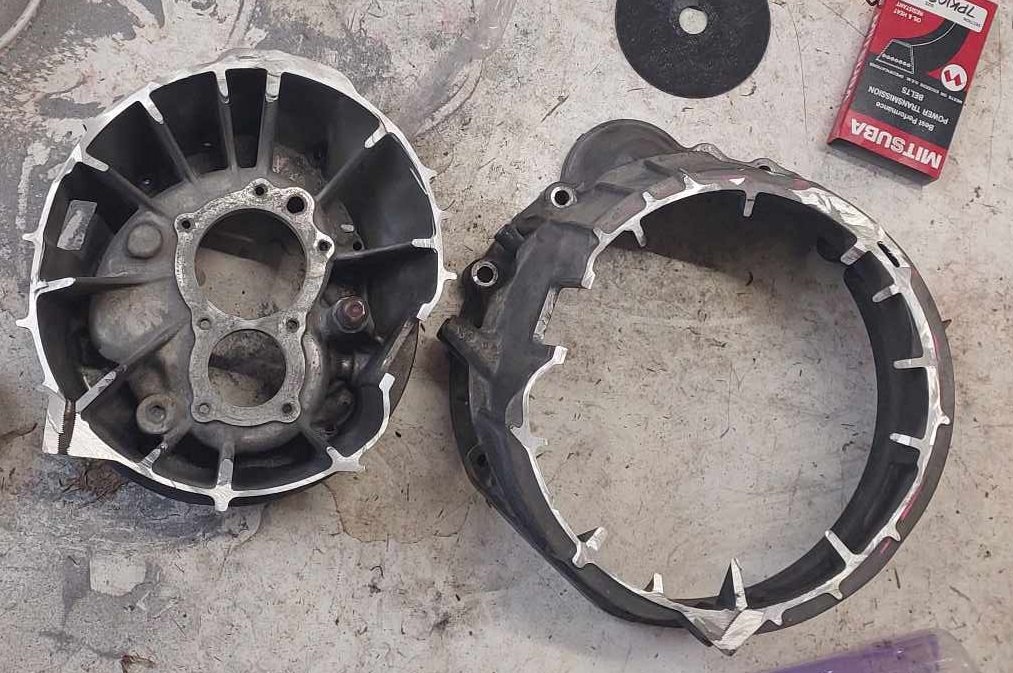
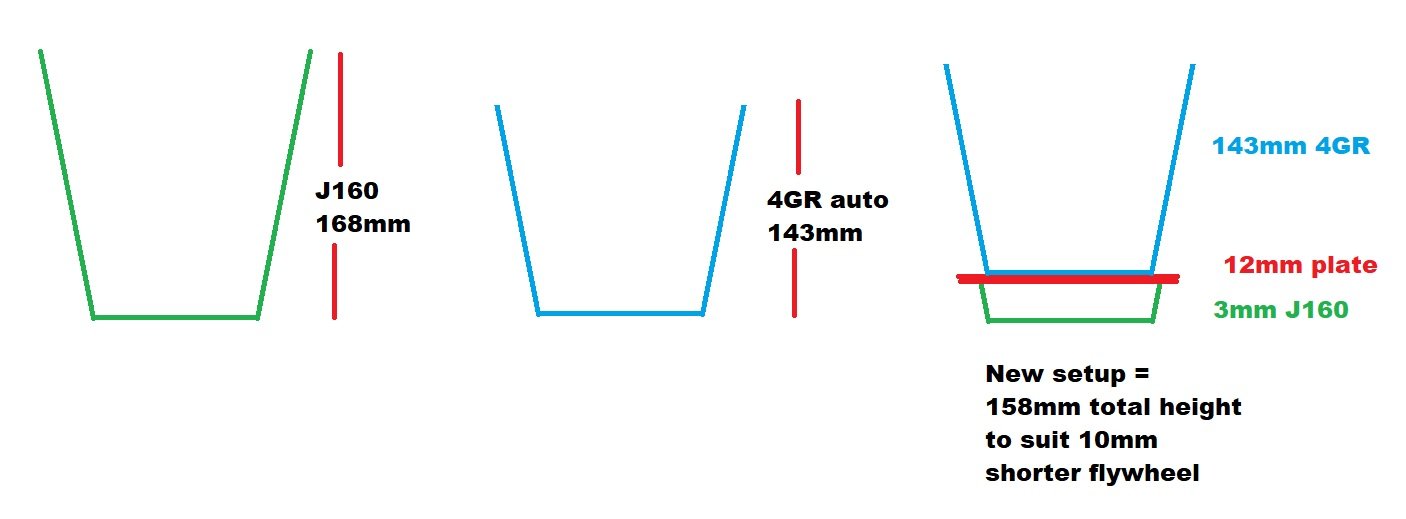
I dont know if this is news to anyone else, but today I discovered that cut off discs for aluminium are a thing. It was actually super easy to cut this off. RIP 1G J160 bellhousing. You will not be missed. I've cut it quite high so that it can be milled down accurately. However, so long as I could centralize the new bellhousing correctly, it might work out alright just to weld it straight together rather than use a plate. Imagine that the top half has its cut line about another 50mm or something further up, where it tapers in a bit more. Unfortunately I've got work trips keeping me busy through nearly all of next week so it'll be a while until I can make any further progress. However, on the whole I'm stoked with how things are progressing currently. A few of the big remaining jobs are very close to getting ticked off. Or more specifically, once the sump and bellhousing are sorted. Then I can finish other jobs that are dependent on these being finished. like finalize the engine height/position and make a gearbox crossmember. It's going to be awesome to have the motor all put back together, and sitting in the right spot.
1 point
-
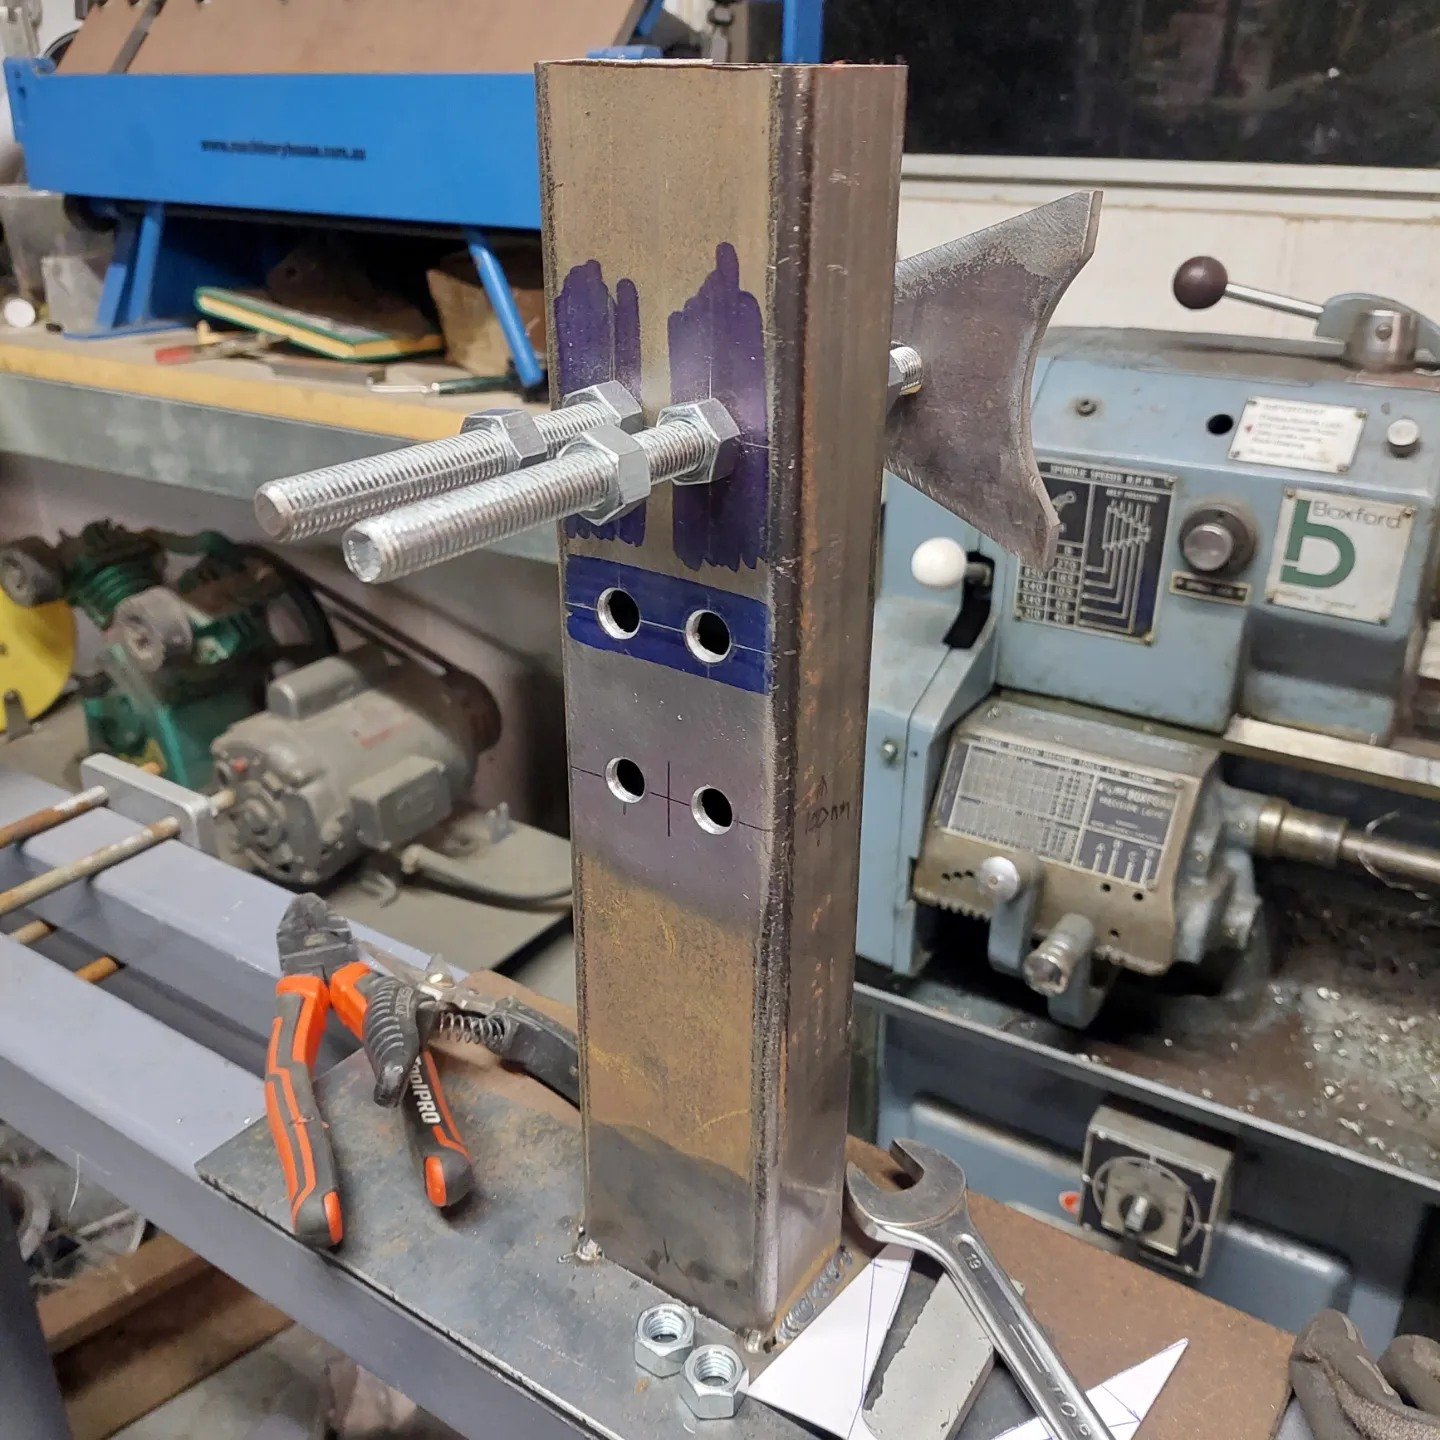
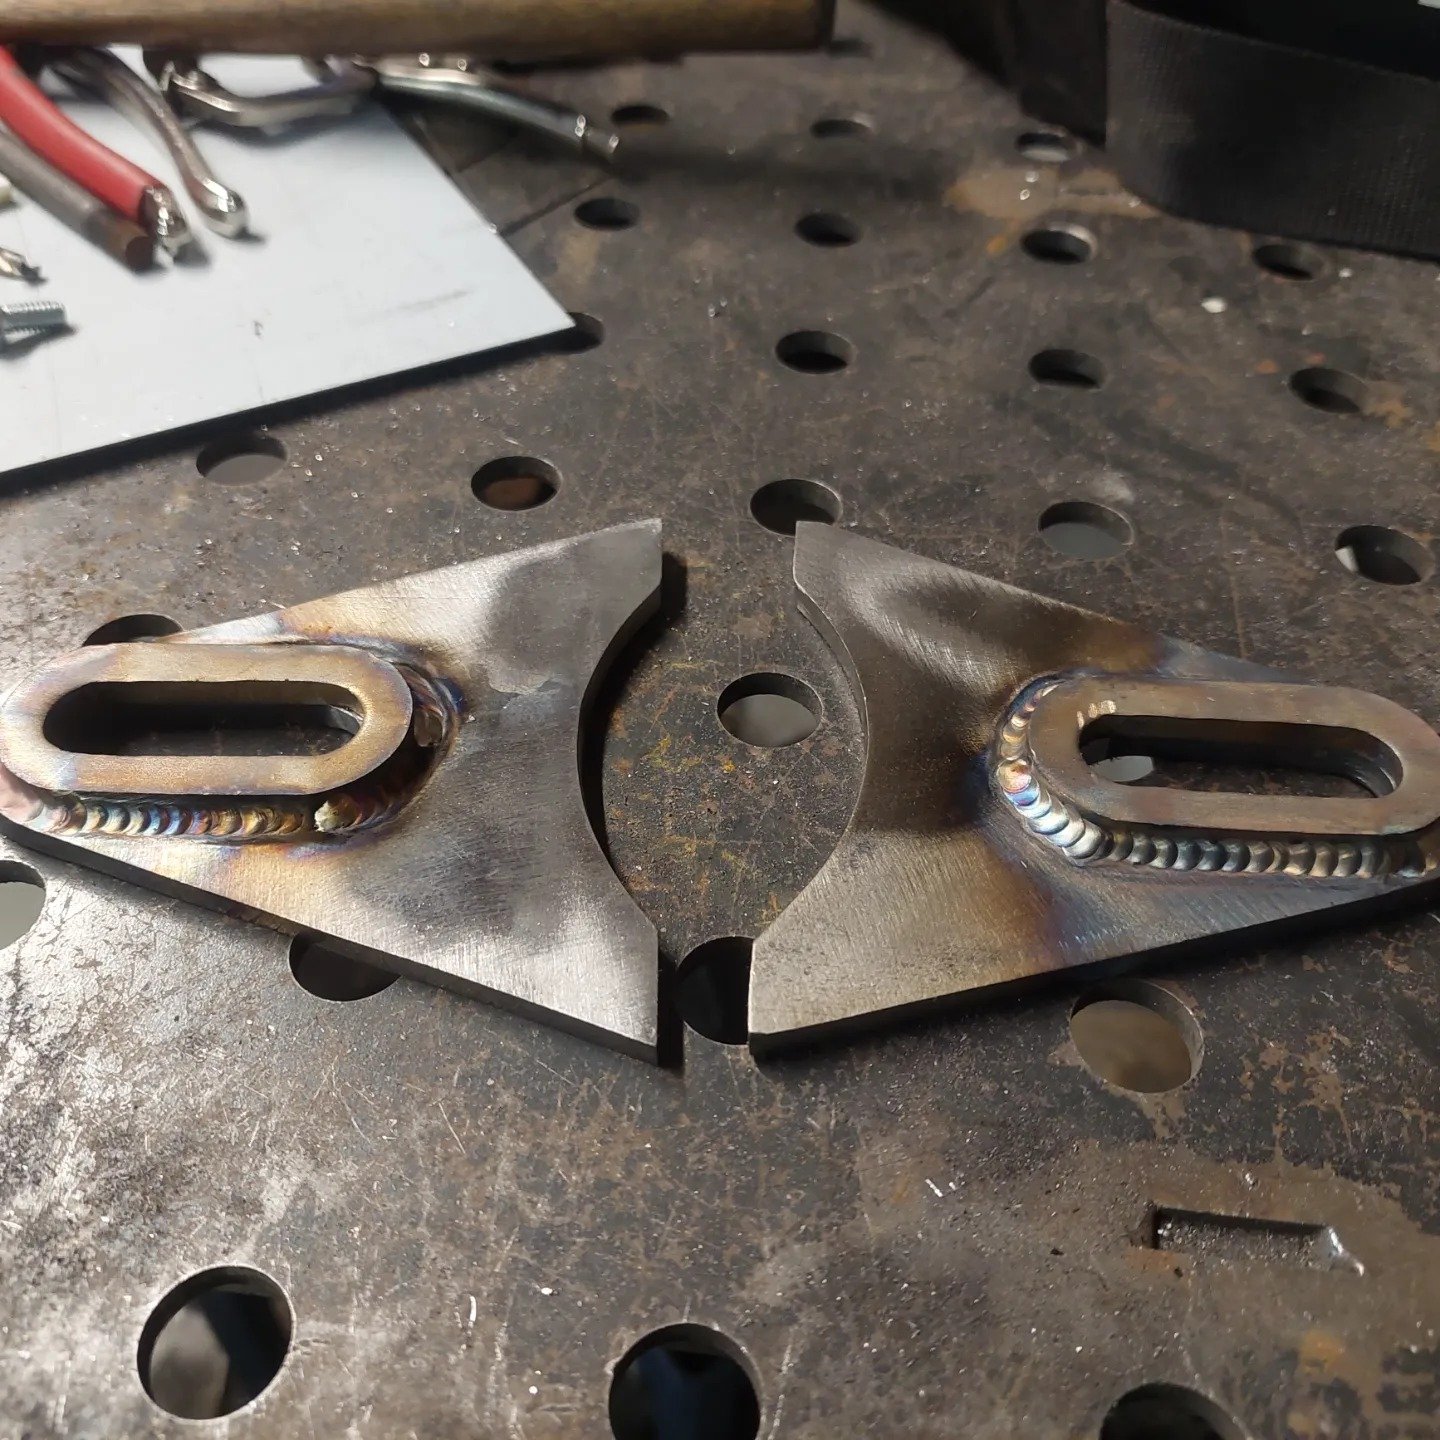
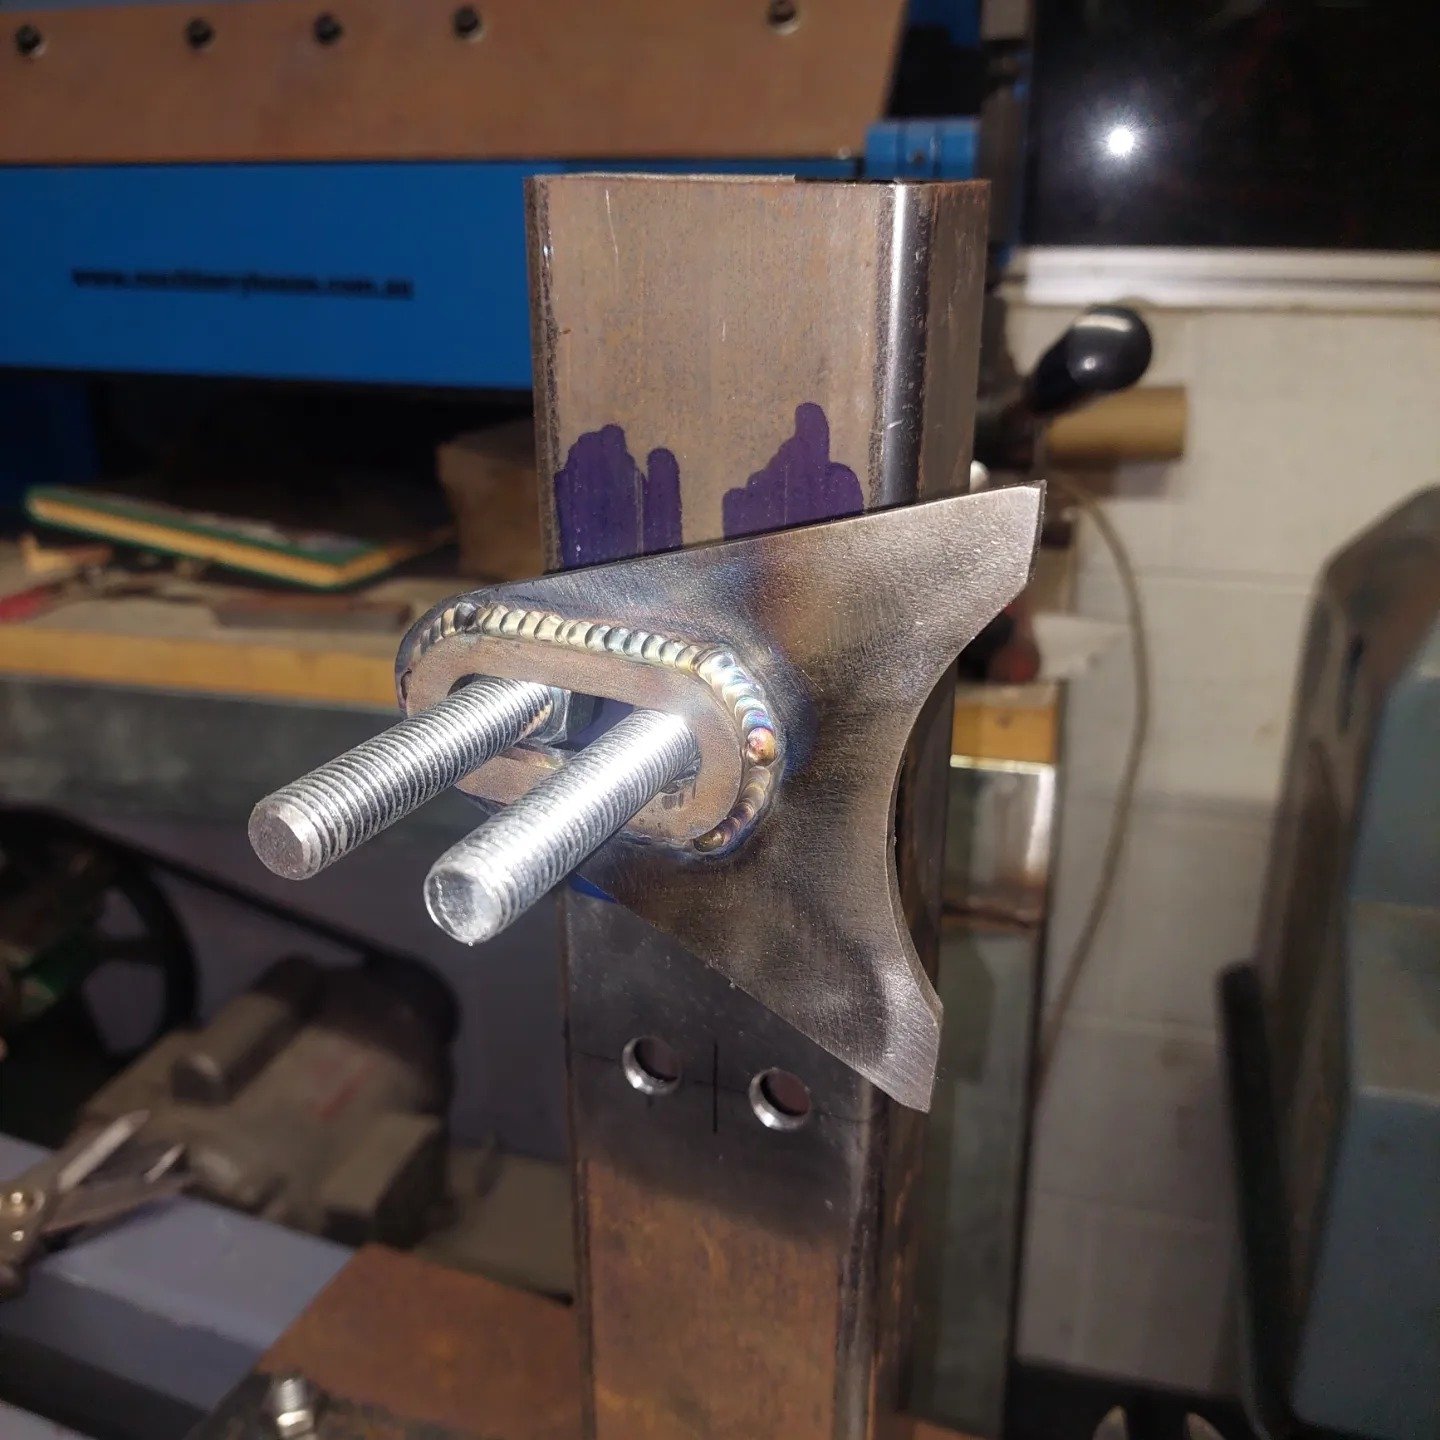
I grabbed some 75x50mm rhs from work and drilled a few holes to accomidate some 12mm threaded rod to clamp the axle plates to and welded it to some 150mm wide 3mm plate to clamp it to my frame jig. Then I cut out some axle plates from some 6mm steel plate then added a stainless steel detail to it to stop the paint from getting stuffed when adjusting the chain
1 point
-
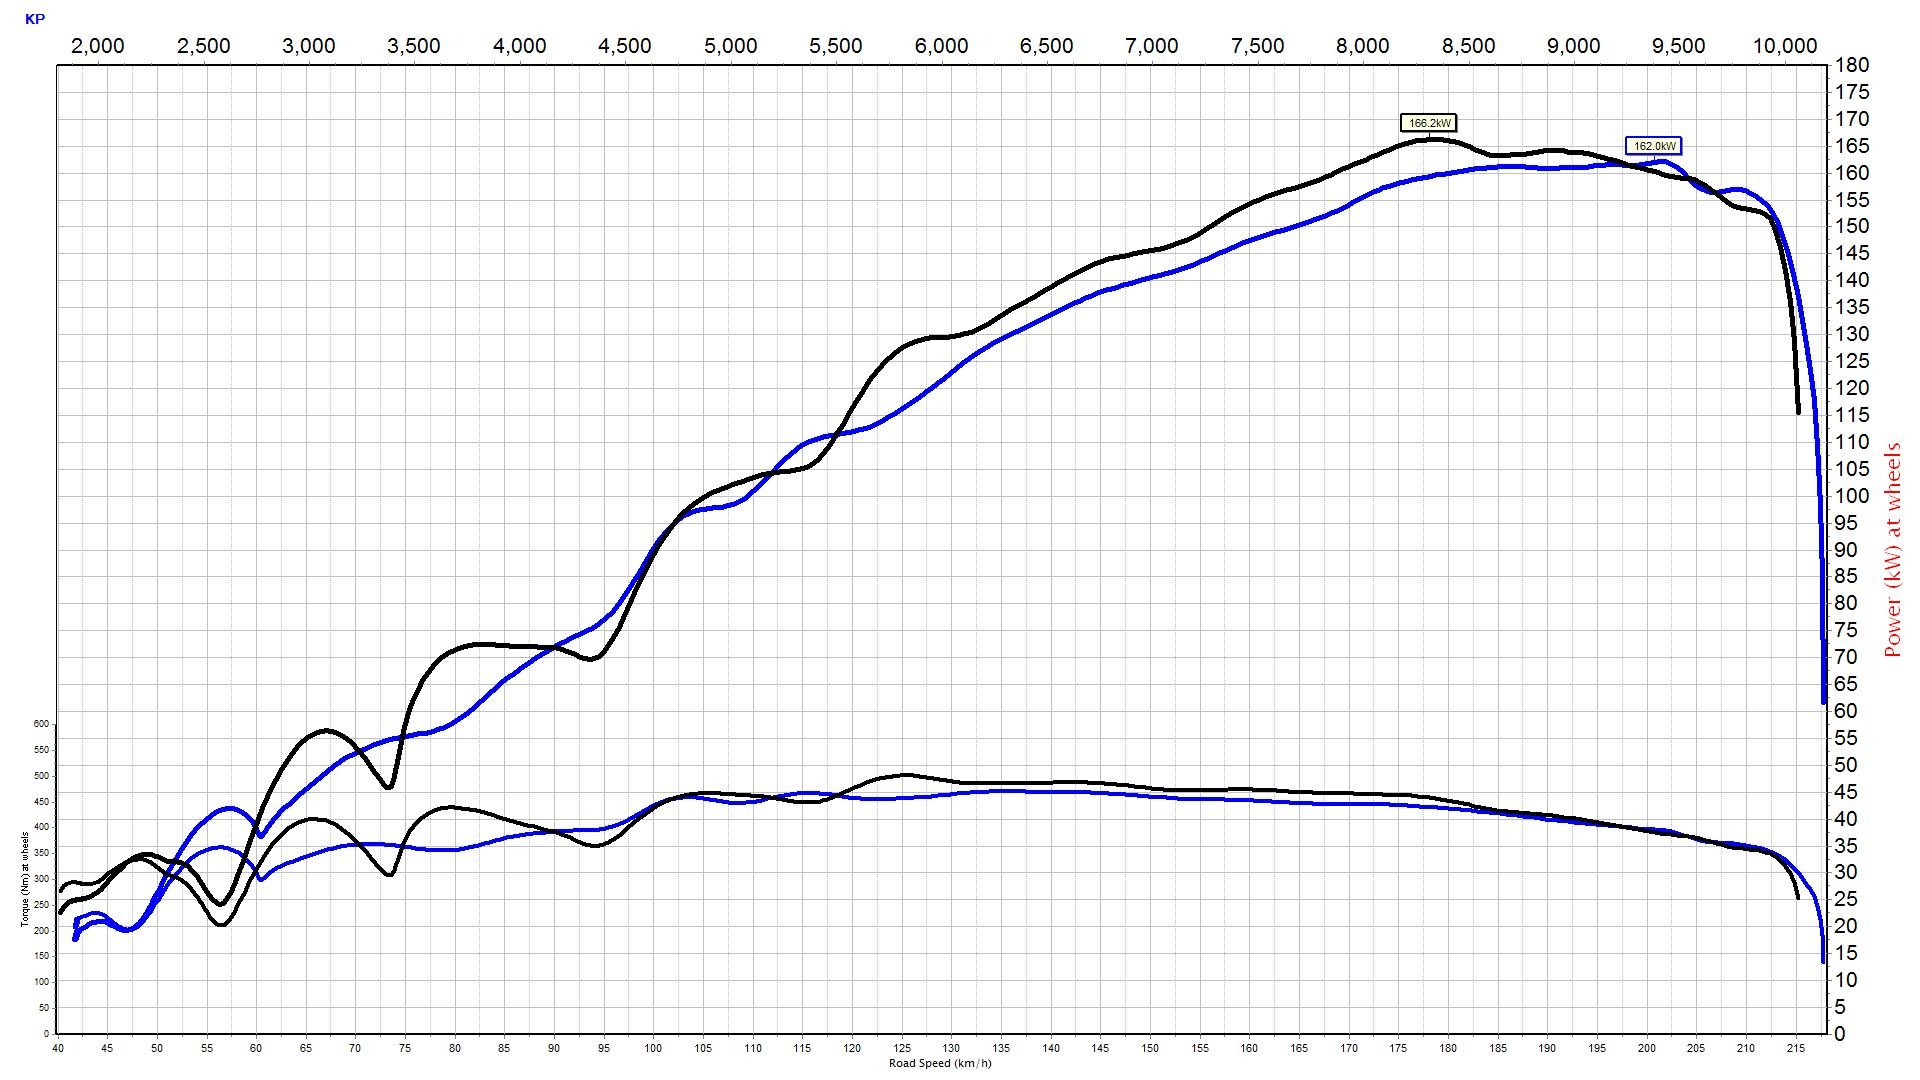
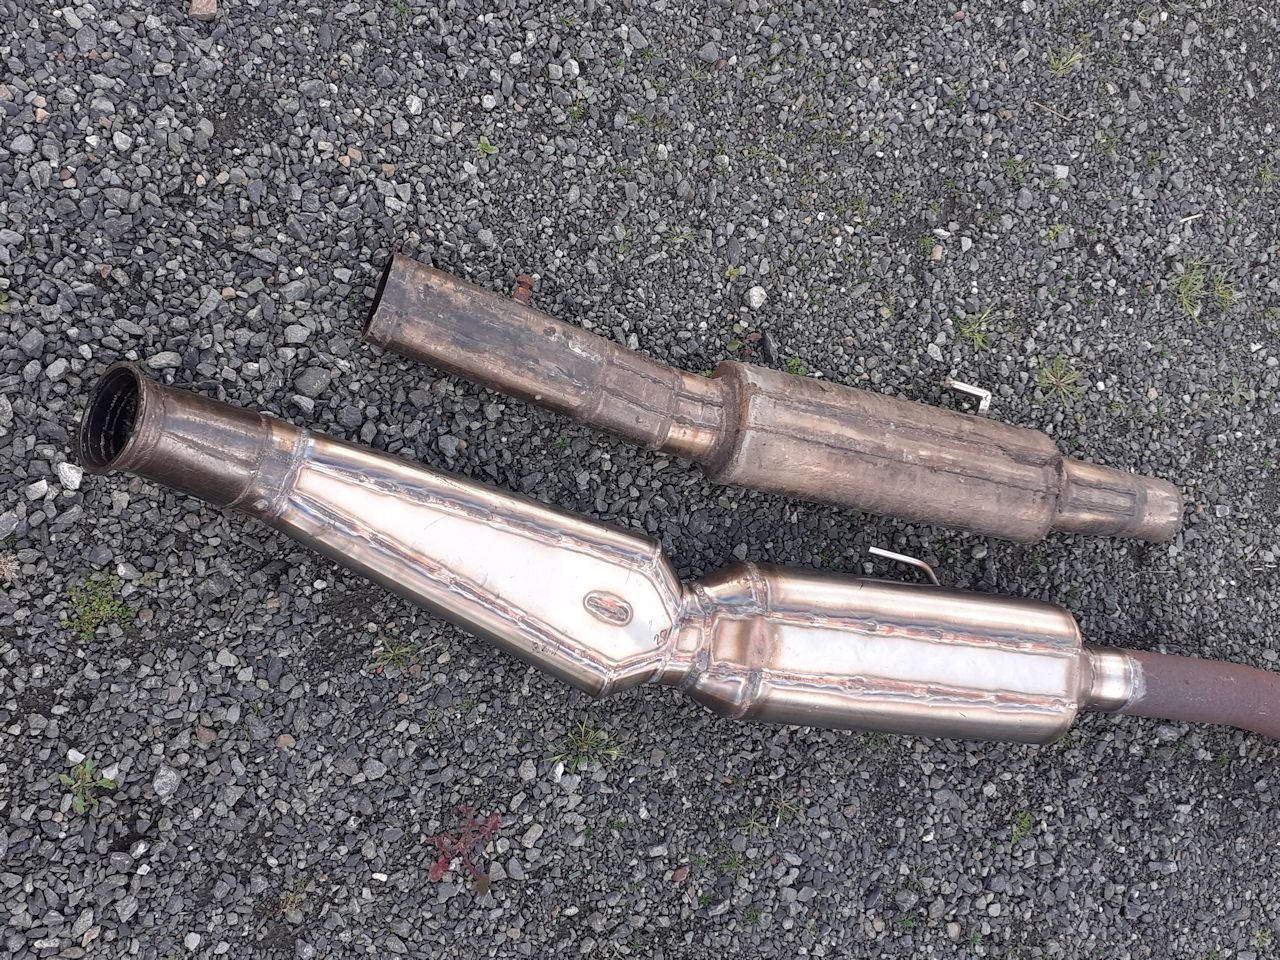
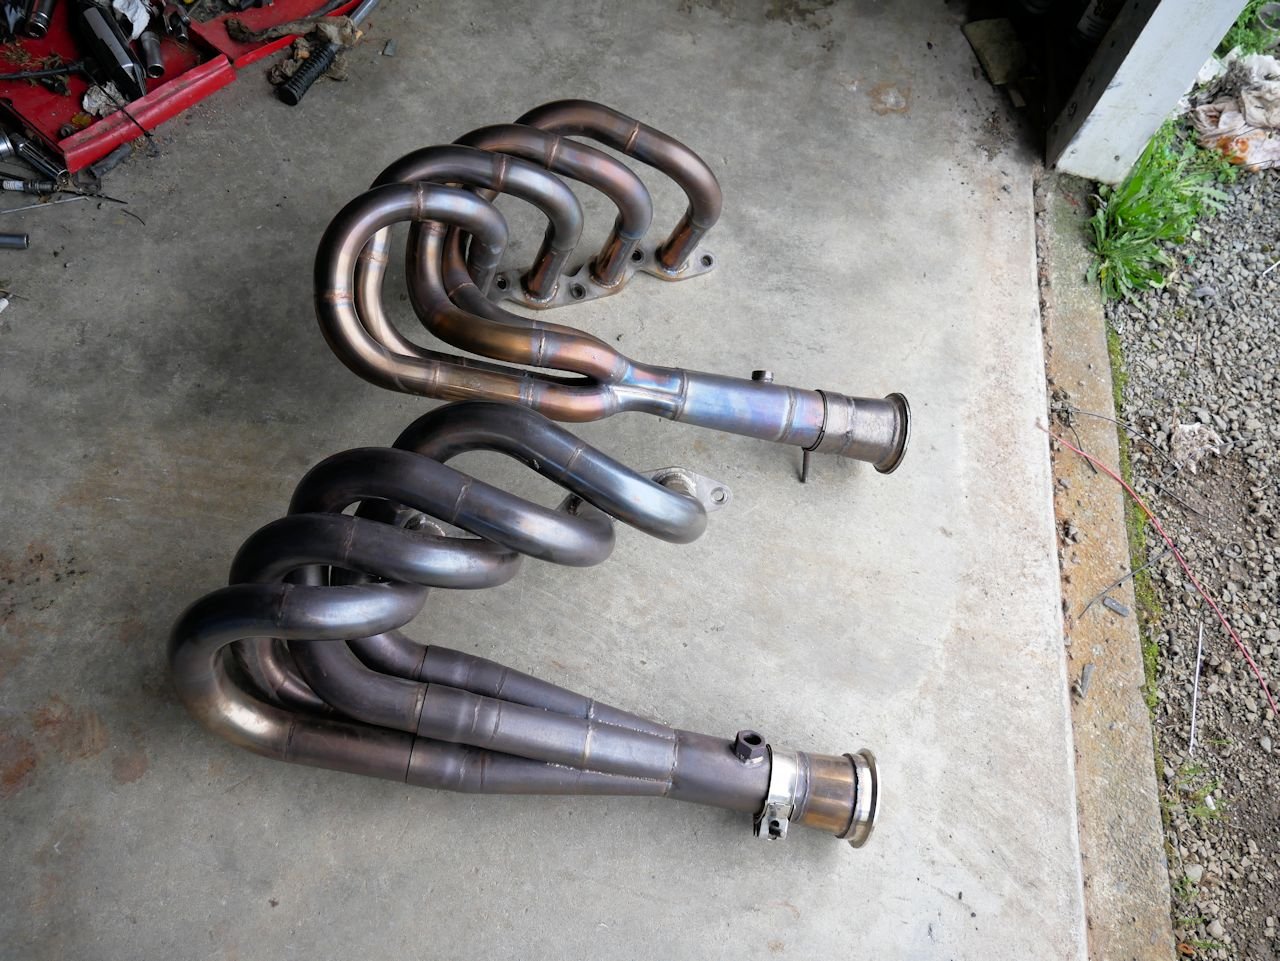
so I tried the big headers i made ages ago, now engine is making more power. kinda same deal as last time. more up top, and a decent hit in bottom end so did some testing with some new exhaust setups after headers. then built something that would actually fit on the car made the below abortion, to replace the existing abortion for reference inlet and the outlet after the reso/muffler is 3" tube. Black is the big headers with the megaphone pipe. blue is small headers with the old pipe as in above graph. bit wiggly under 4k. but aint care about that. pretty good gains through midrange. has picked up the bottom end to match the what the old setup did. the megaphone pipe makes it fall over a bit sooner, but over all better. some fine tuning of the angle would likely help Im running a different collector on the big headers now. but yeh otherwise as below,
1 point
-
I think I will be able to keep the clutch fork which is good! As it would become tiring if I had to bleed the slave cylinder every time I blow a motor up.1 point
-
Alright so one of the reasons I've been dreading dealing with the bellhousing situation, is that usually things are located with 2 or three dowel pins, and then held together with bolts. The problem is that unless you get the dowel position exactly correct to the centreline of the input shaft, it can end up being way off. Then you might end up having problems like the gearbox runs real hot, or keeps wearing out bearings or whatever and wont necessarily know why. So, I think the universe decided I deserved a bit of a win after the adventure of aquiring the box. Because the Mark X auto box doesnt use dowel pins or anything like that, to locate the bellhousing onto the gearbox... It just has a giant circle, and a giant round hole that press up against each other. Too good! So a bit of brain storming with a few mates and taking some measurements, I think I've got a plan. Basically the J160 bellhousing is 25mm longer than the Auto one (hooray) So I'll basically cut almost the whole thing j160 front off, and weld on a flange/ring that will be easy to position relative to the input shaft hole. As the bellhousing wont be in the way. Then the bellhousing locates on the ring, and bolts up. Sweet! Also this bellhousing pattern is bloody easy. Both sides are symmetrical and it's really easy to index their positions relative to the round hole. So something like this will end up welding onto the gearbox. I am thinking could use a second plate in the middle that also slots into the input shaft hole of the gearbox. So it will be exactly central. Then once it's welded on, the bellhousing can center itself on the ring, and bolt into the correct place easy as! The only issue will be that there's no hole for the clutch fork to go through, and will need some bosses welded on for a slave cylinder. EDIT: no, the existing slave cyl holes will work as they are further back. Sweet. So I'm gonna chop up a bellhousing, print a test piece and then I'll hopefully have @Stu be able to work some magic with machining and welding etc. Pretty awesome that this looks like it'll work easily, as long term I've always viewed this sort of job as really difficult / above my paygrade.
1 point
-
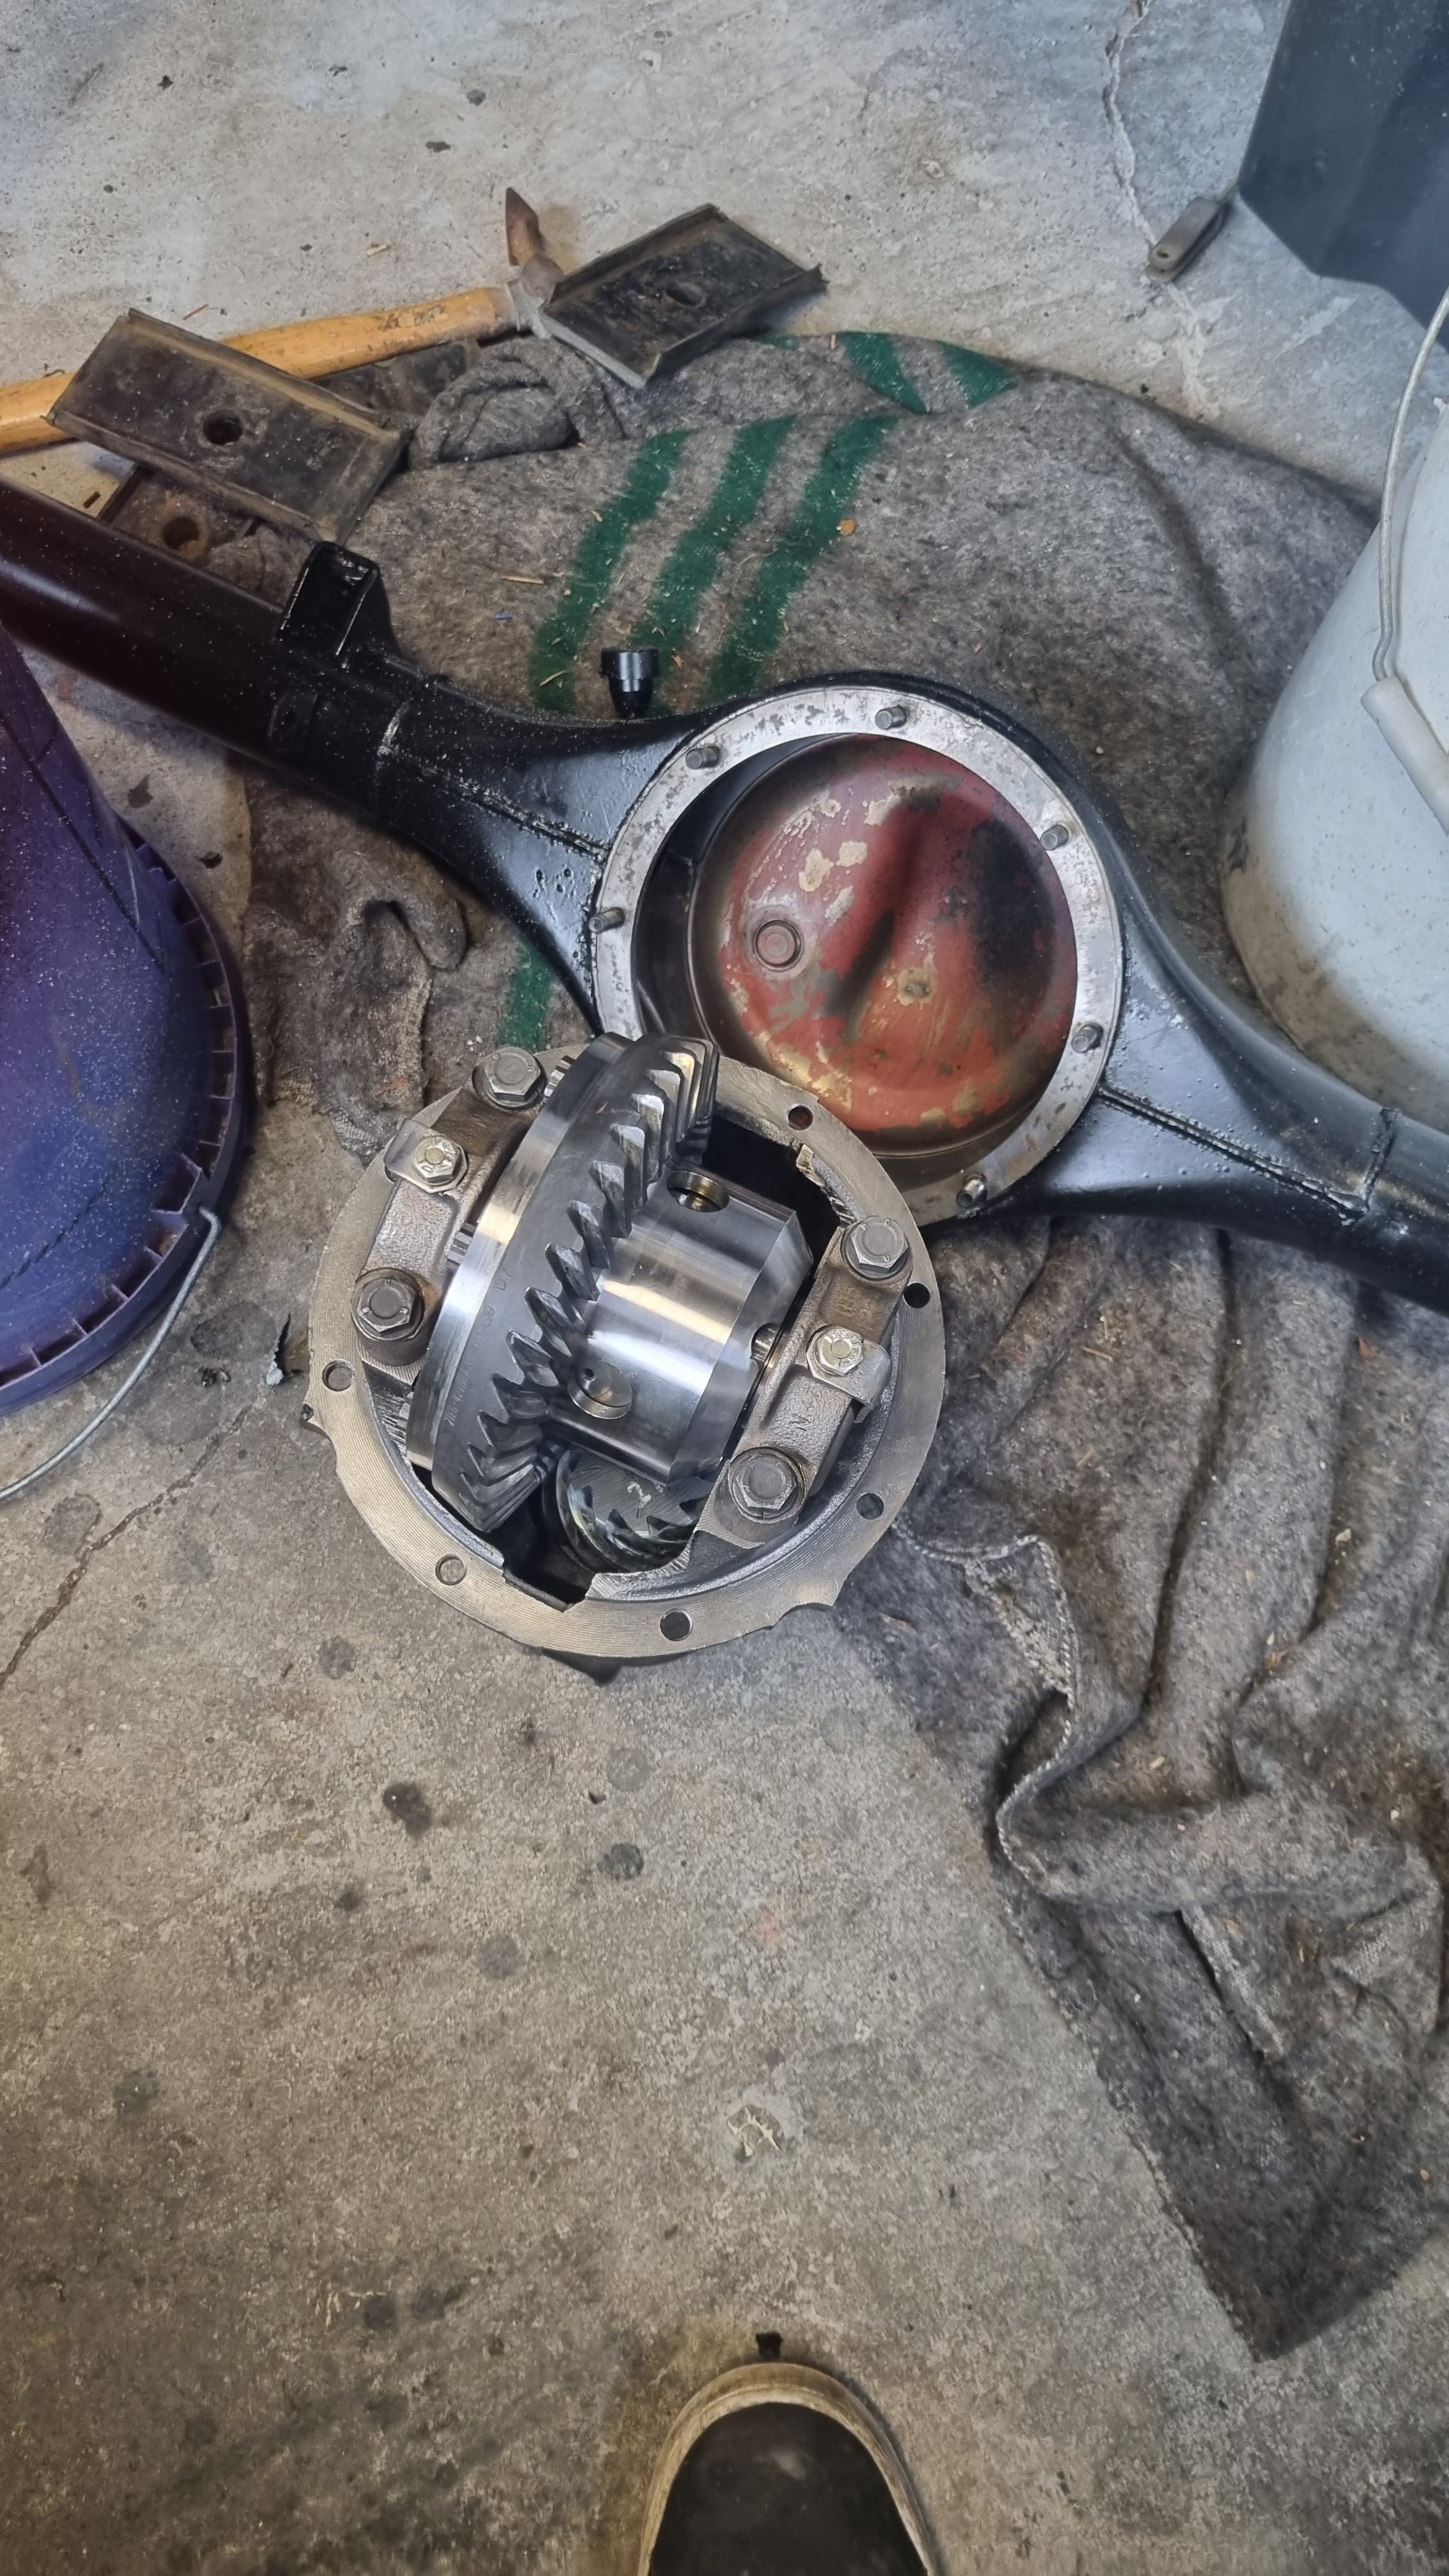
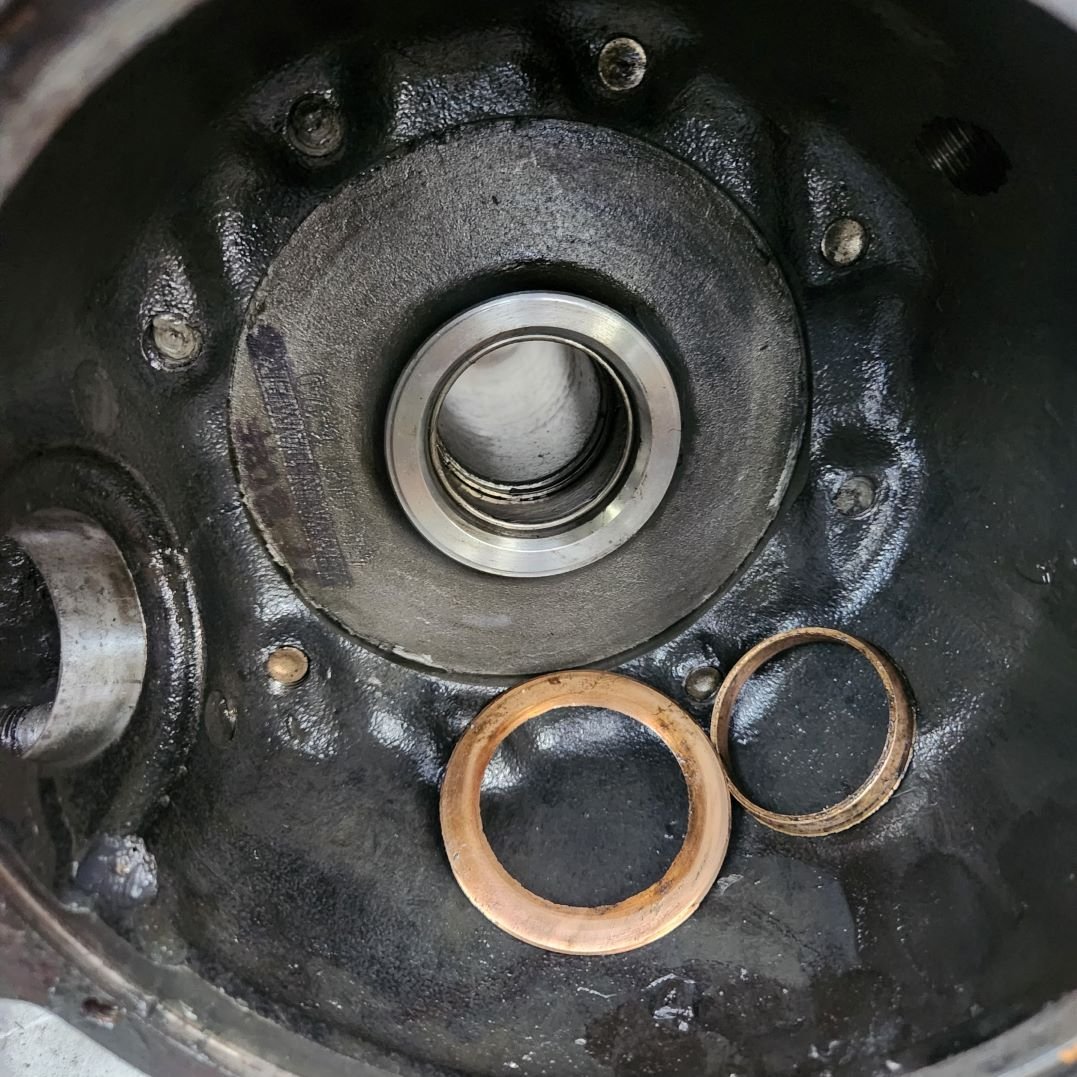
LSD and new bearings installed, meshing was perfect in the end, very happy with my first diff rebuild, more parts to aquire now to keep going!
1 point
-
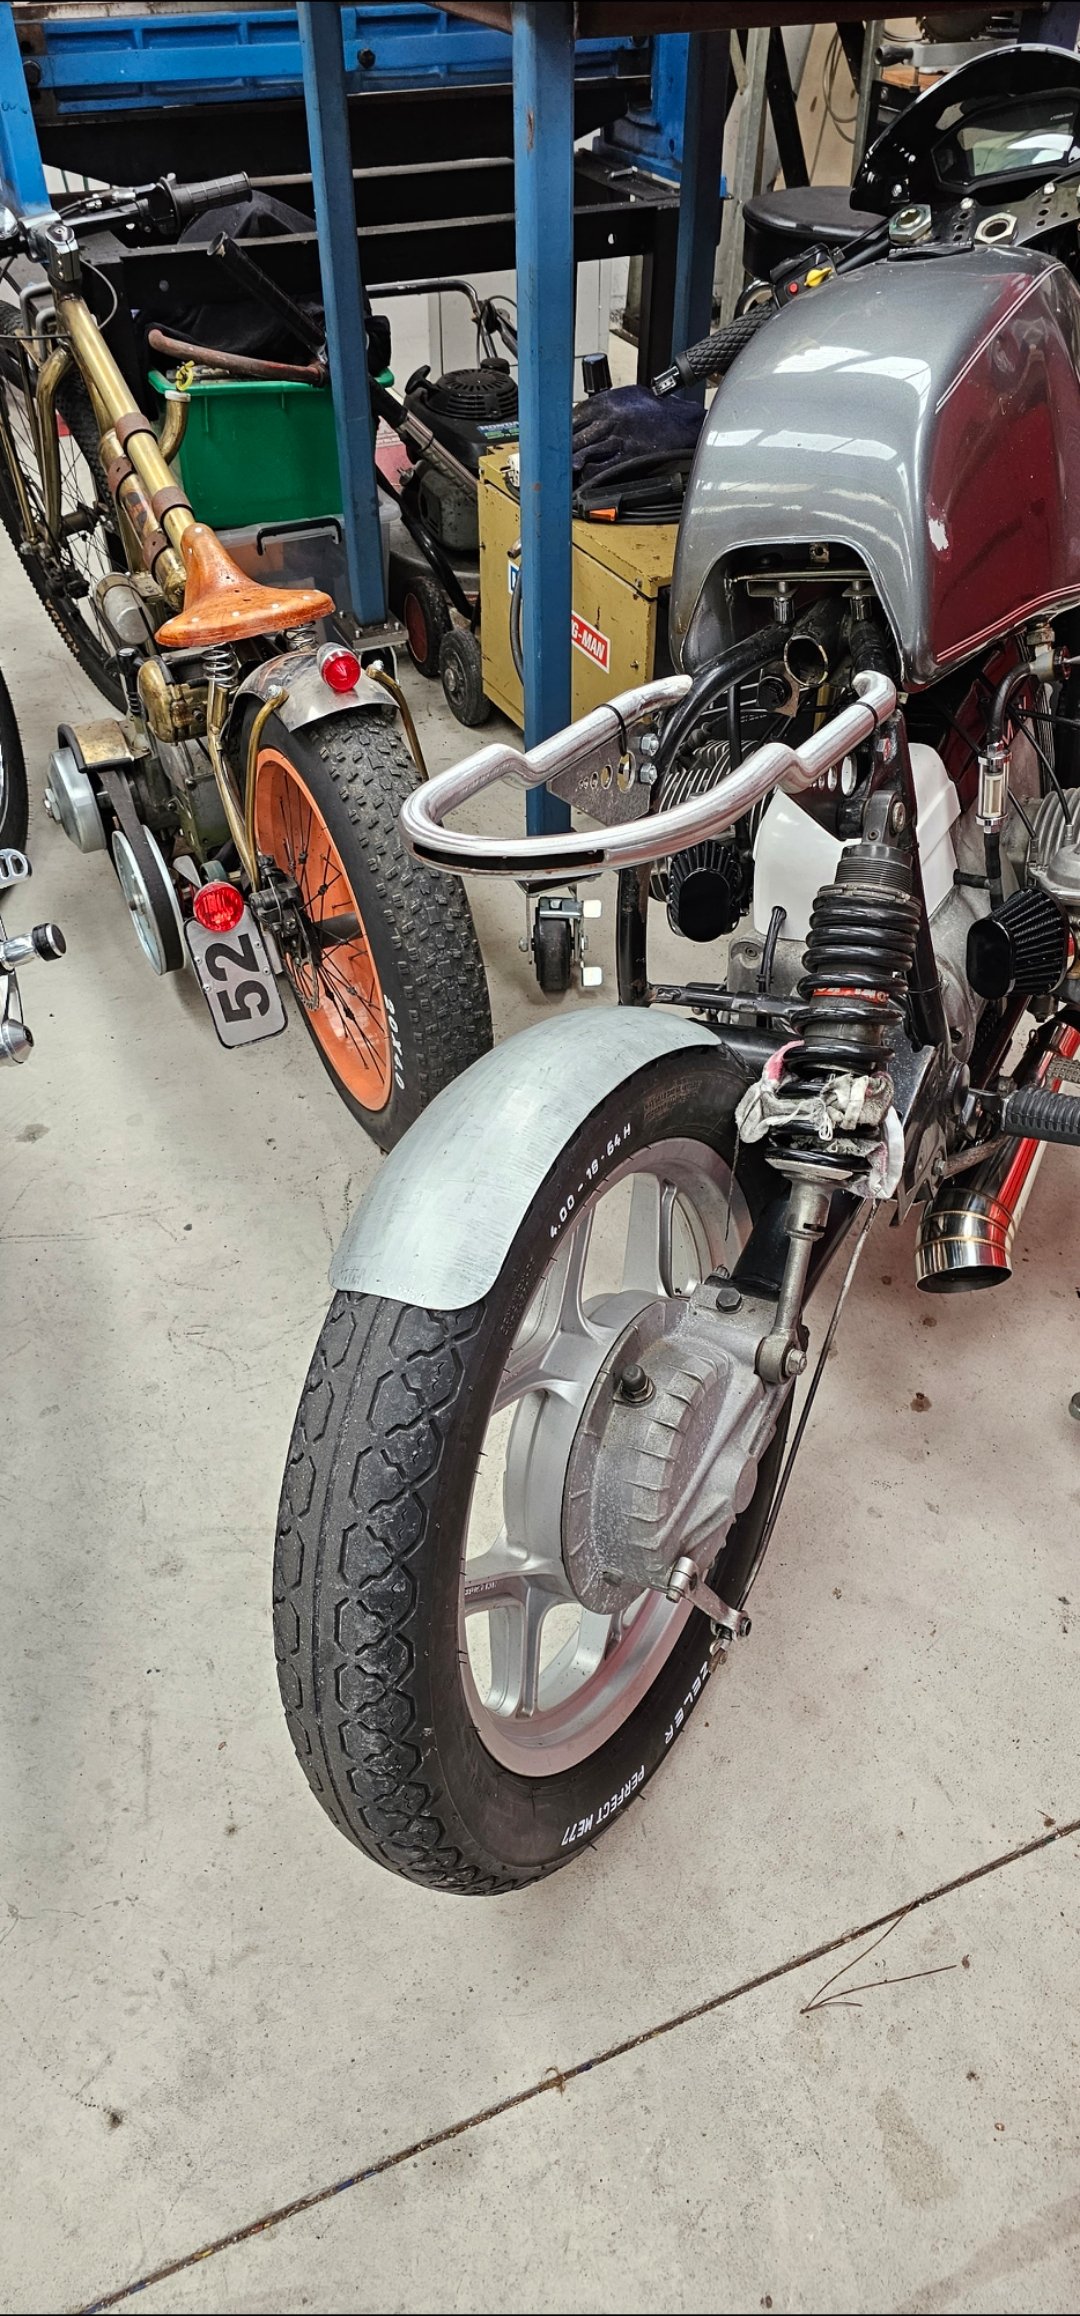
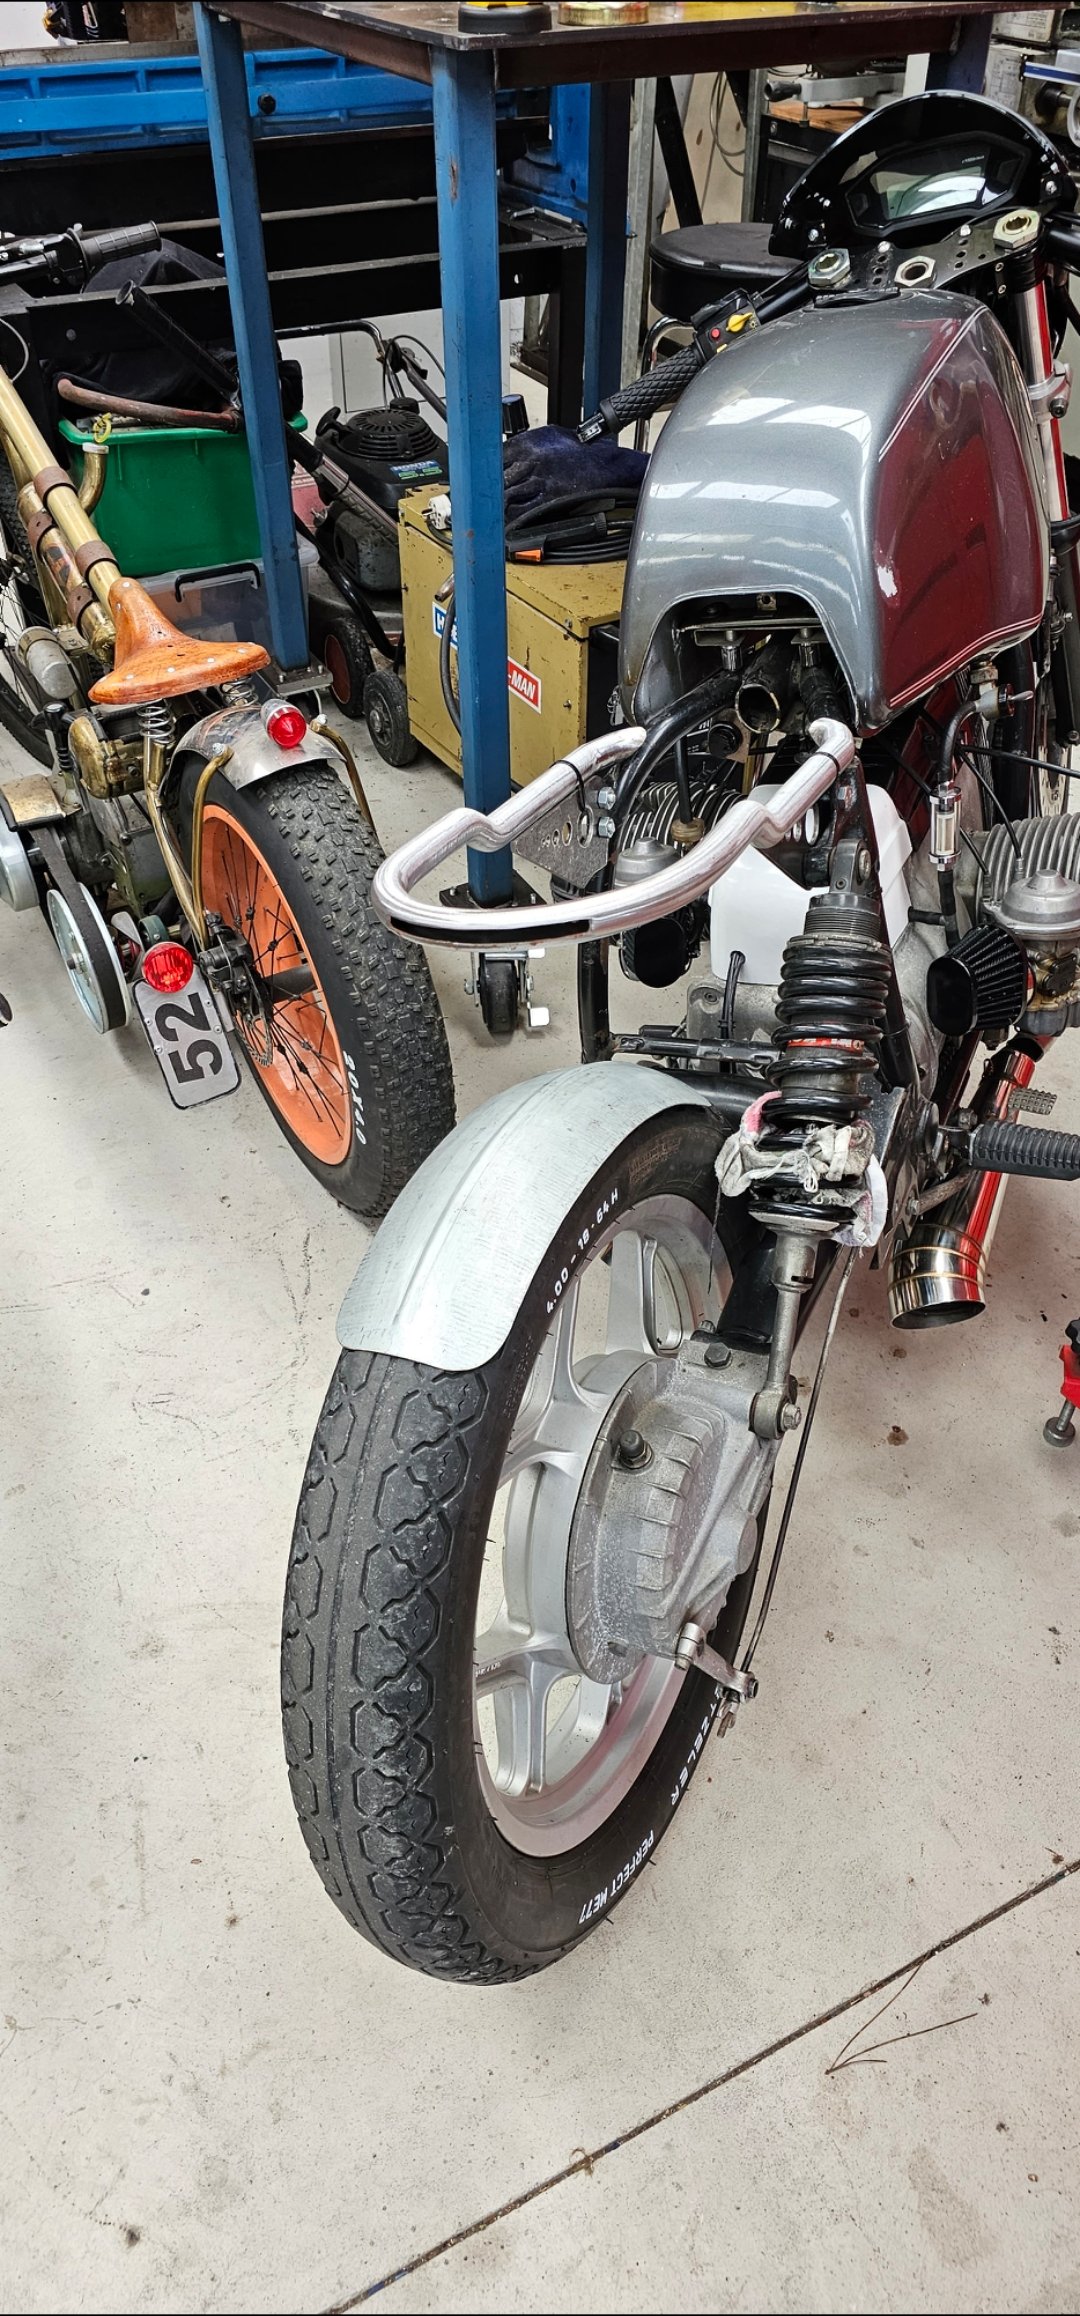
Front fender mounting all figured out. I rolled a thick bit of panel steel to hide under the fork brace, then bolted the fender to that. Sits nice and tight to the wheel, with about a 10-15mm gap. Its not a part I want to stand out at all, as I personally hate the way all front fenders look on motorcycles, but needs must for legal requirements.
1 point
-
More bush mechanic googling says that you can get results from stuffing an inner tube in the tank then inflating it to pop the depression out. Could be a go since its in the corner by the fuel pump hole so I can stuff it in there then use a length of timber to confine it to the dent1 point
-
Havnt done anything exciting, did an Aliexpress order of a couple new blank keys, a central locking actuator and some door handle gaskets. Have since decided that the reason the central locking isnt working is that one or both of the door switches are faulty as the interior light is always on if you have it on "door open" mode. Anyway, swapped the door handle gaskets today, exciting I know but they looked shit Just need to pop a cover on the door jam and poke around with a screw driver and you end up with this: Bits of yuck on gasket get cleaned away then pop this on: Not a perfect fit (because $2 off Aliexpress) but good enough
1 point
-
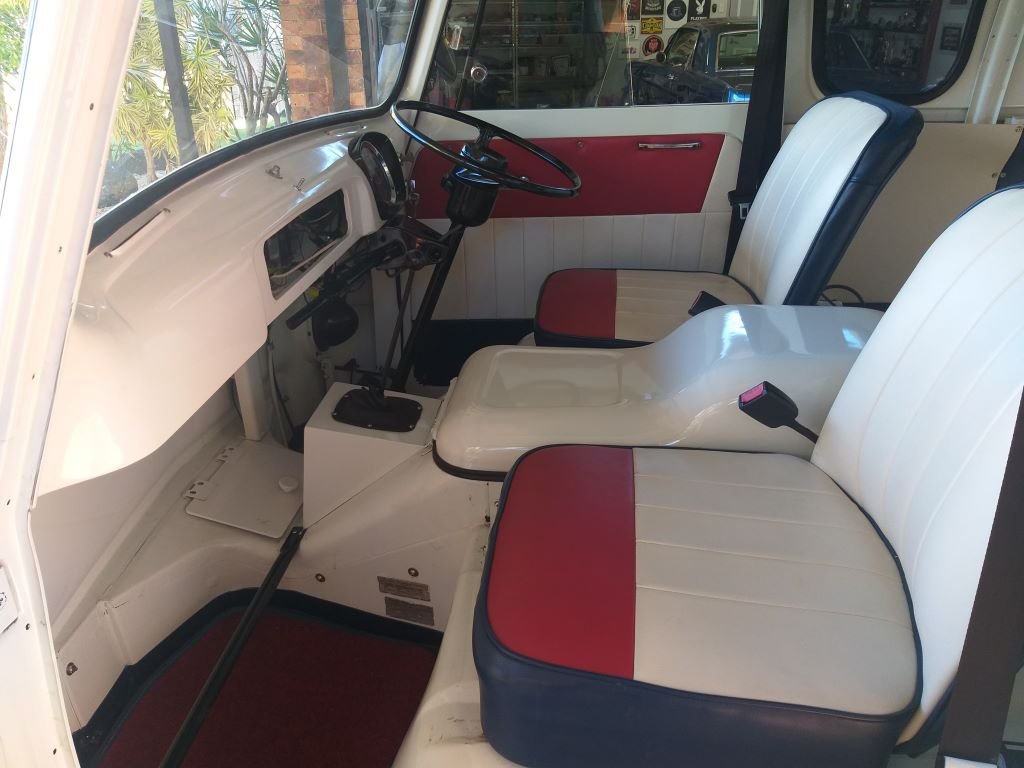
I then removed the passenger side door latch and gave it a bit of a birthday. The latch is spring loaded but was sticking open which was bloody annoying when trying to close the door again. Pulled the mechanism apart, gave it a good degrease and a liberal coating of lithium grease. It's not perfect, but it's better than it was. While I was at it, I took a photo of the interior just to show off the fresh paintwork on my new gear stick surround. When I first purchased the van, I wasn't a big fan of the upholstery colour scheme, but its slowly growing on me.
1 point
-
Ticked off a few more small jobs today. First up, I wasn't 100% happy with the King Springs currently fitted to the front of the van. Can't really describe the issue, but the ride just didn't feel right. It's almost as if the front felt a bit loose every time I hit a small bump. So, first thing this morning I took half a coil off the original Mitsi springs and chucked them in. Front now sits slightly higher than with the Kings, but it's still got a bit of a rake going on, so I dig it. Took it for a squirt around my local test track and it feels great. I was expecting to have to take the springs out for a second round of trimming, so unfortunately didn't take any photos of the trimmed ones, but I did shape the coil end as per the originals and also spritzed a bit of satin black on the bare steel before putting them in. Sunlight made for a crappy photo, but hopefully you get the idea.
1 point
-
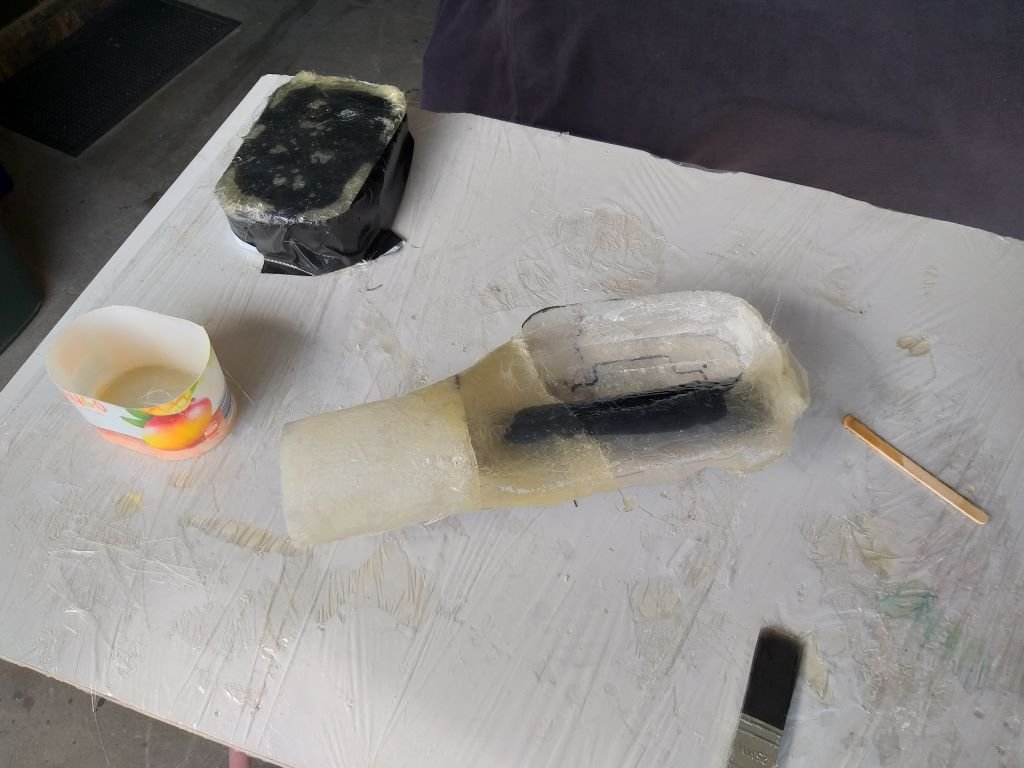
Carby Hat - Chapter 6 Fine-tuned the top section of the tube and also made a start on the lid. I need to head into town to get some more resin so I can mate the lid to the main body. May as well get some more mat too, so I can lay down the second layer.
1 point
-
Pulled the diff, LSD acquired for fun times, Now I'm trying to figure out how to put it all together again properly, meshing correctly etc, never done this stuff before! Will be worth it if I get it right though
1 point
-
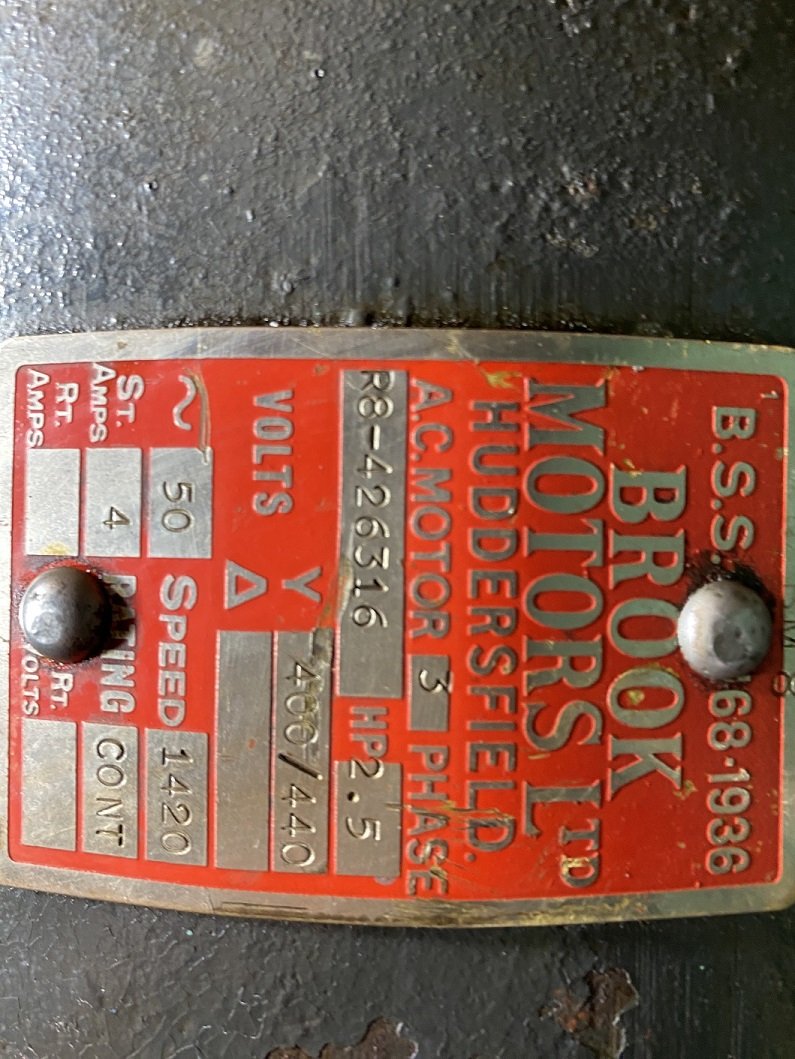
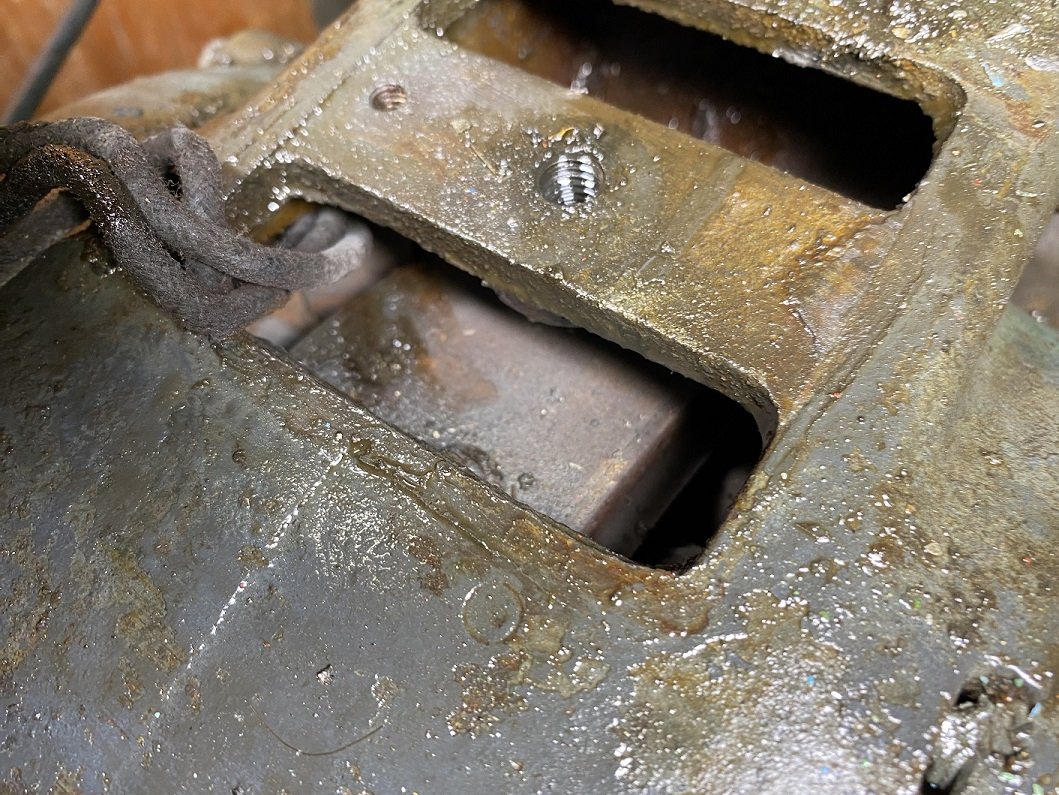
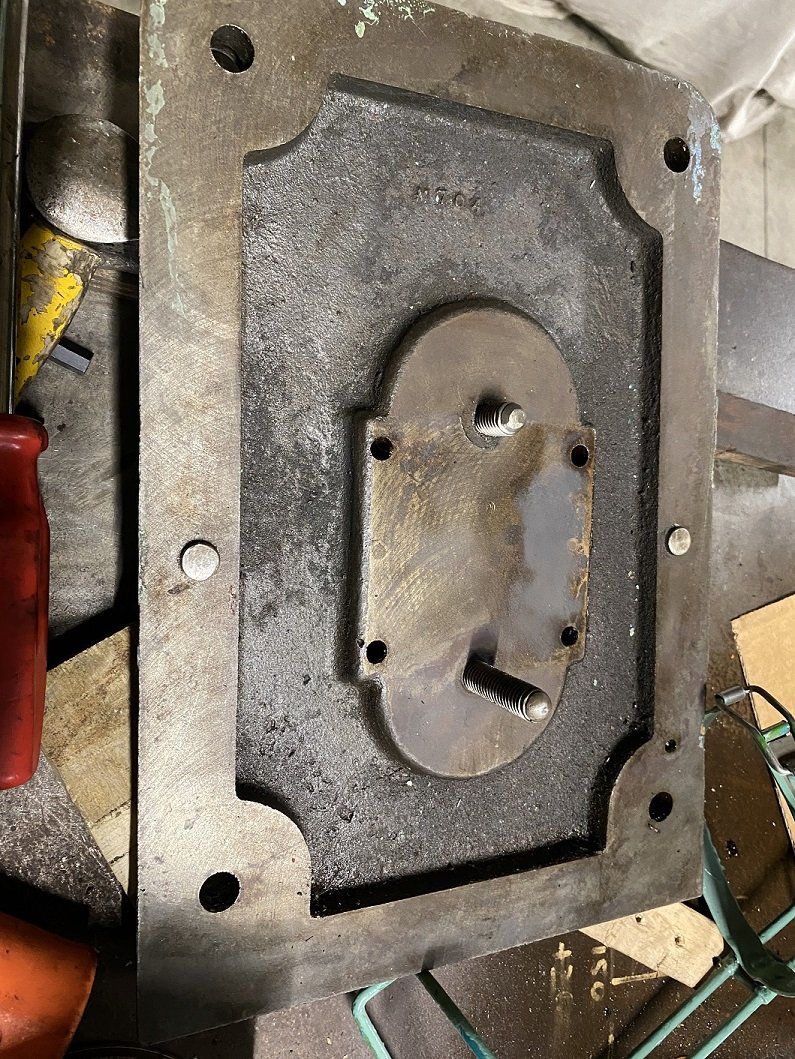
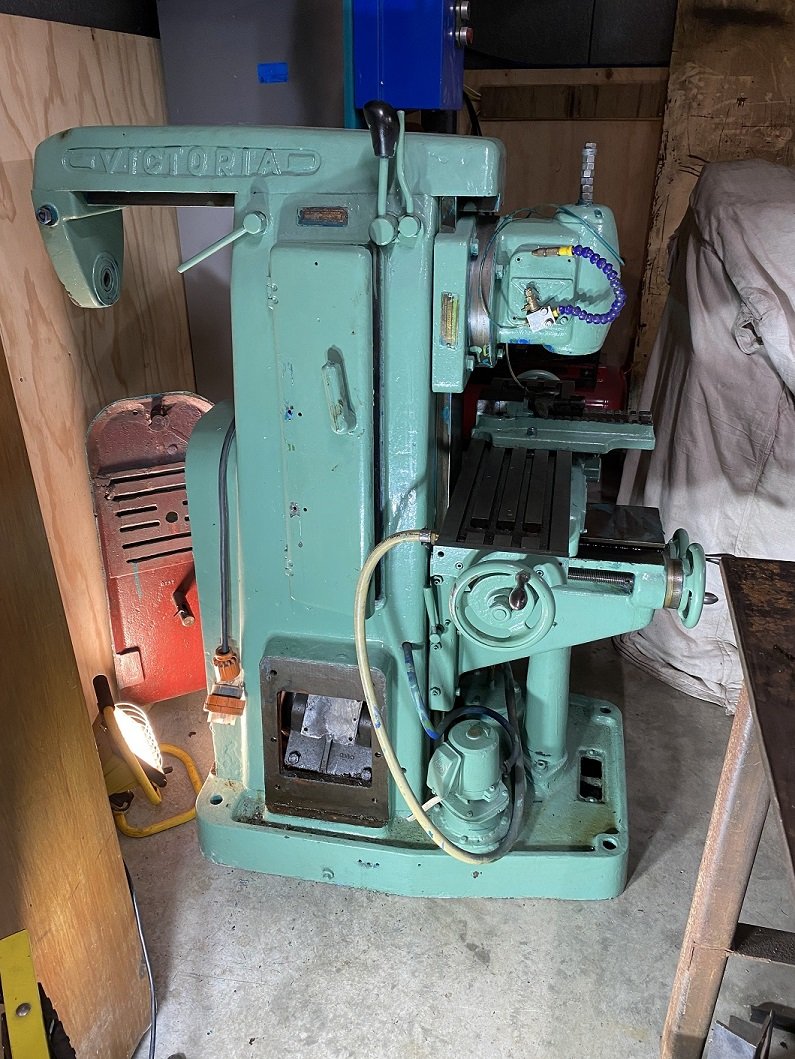
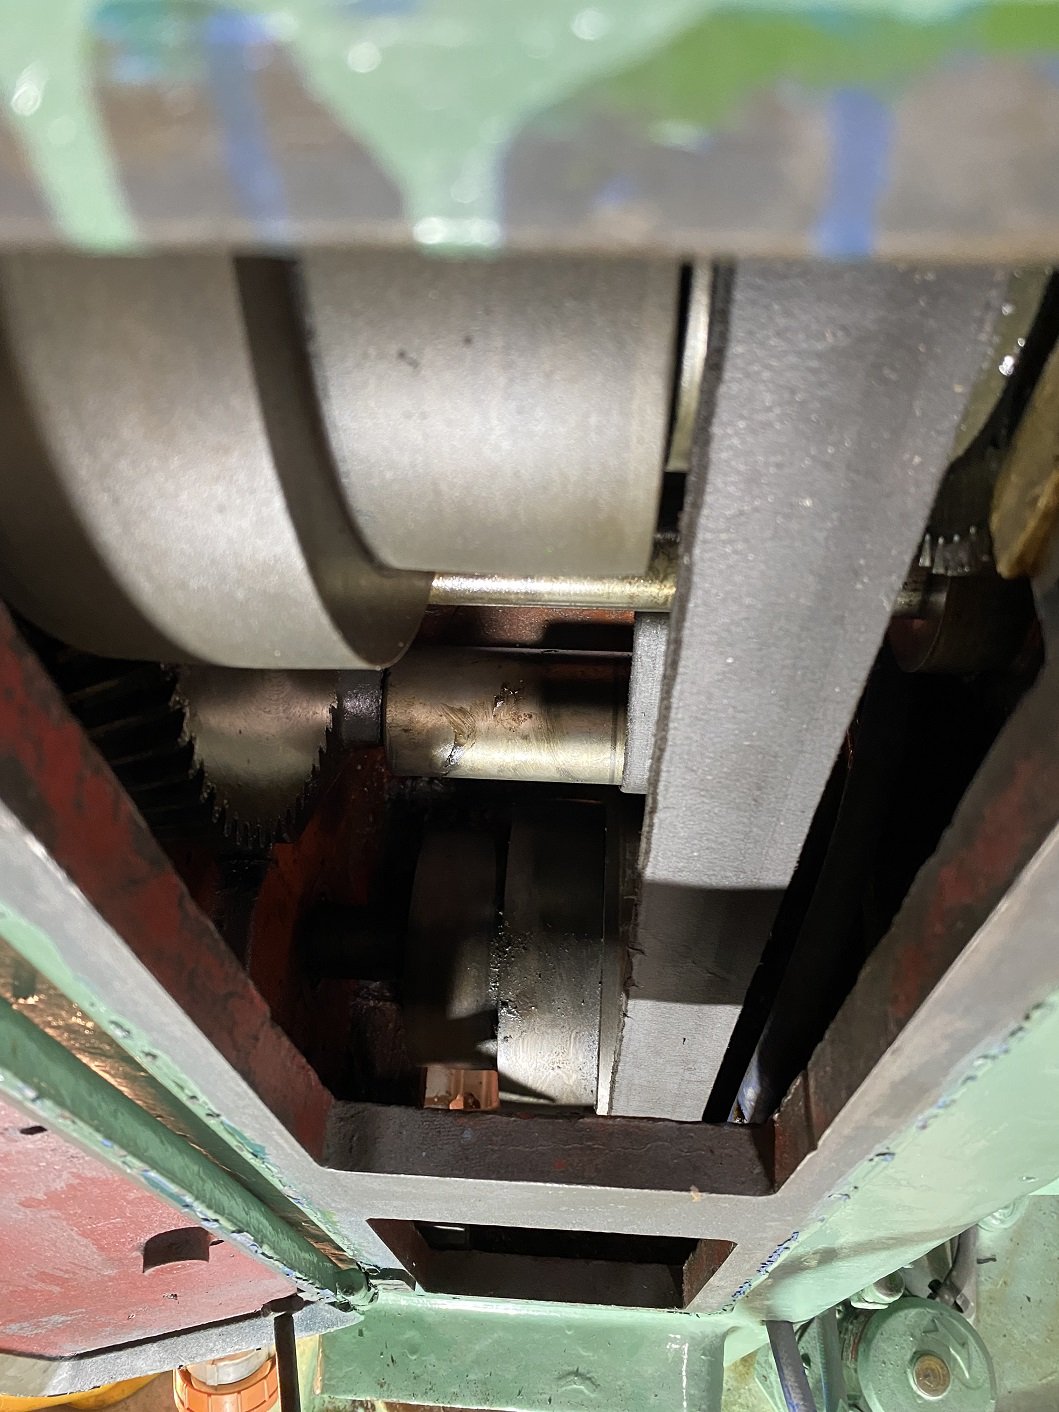
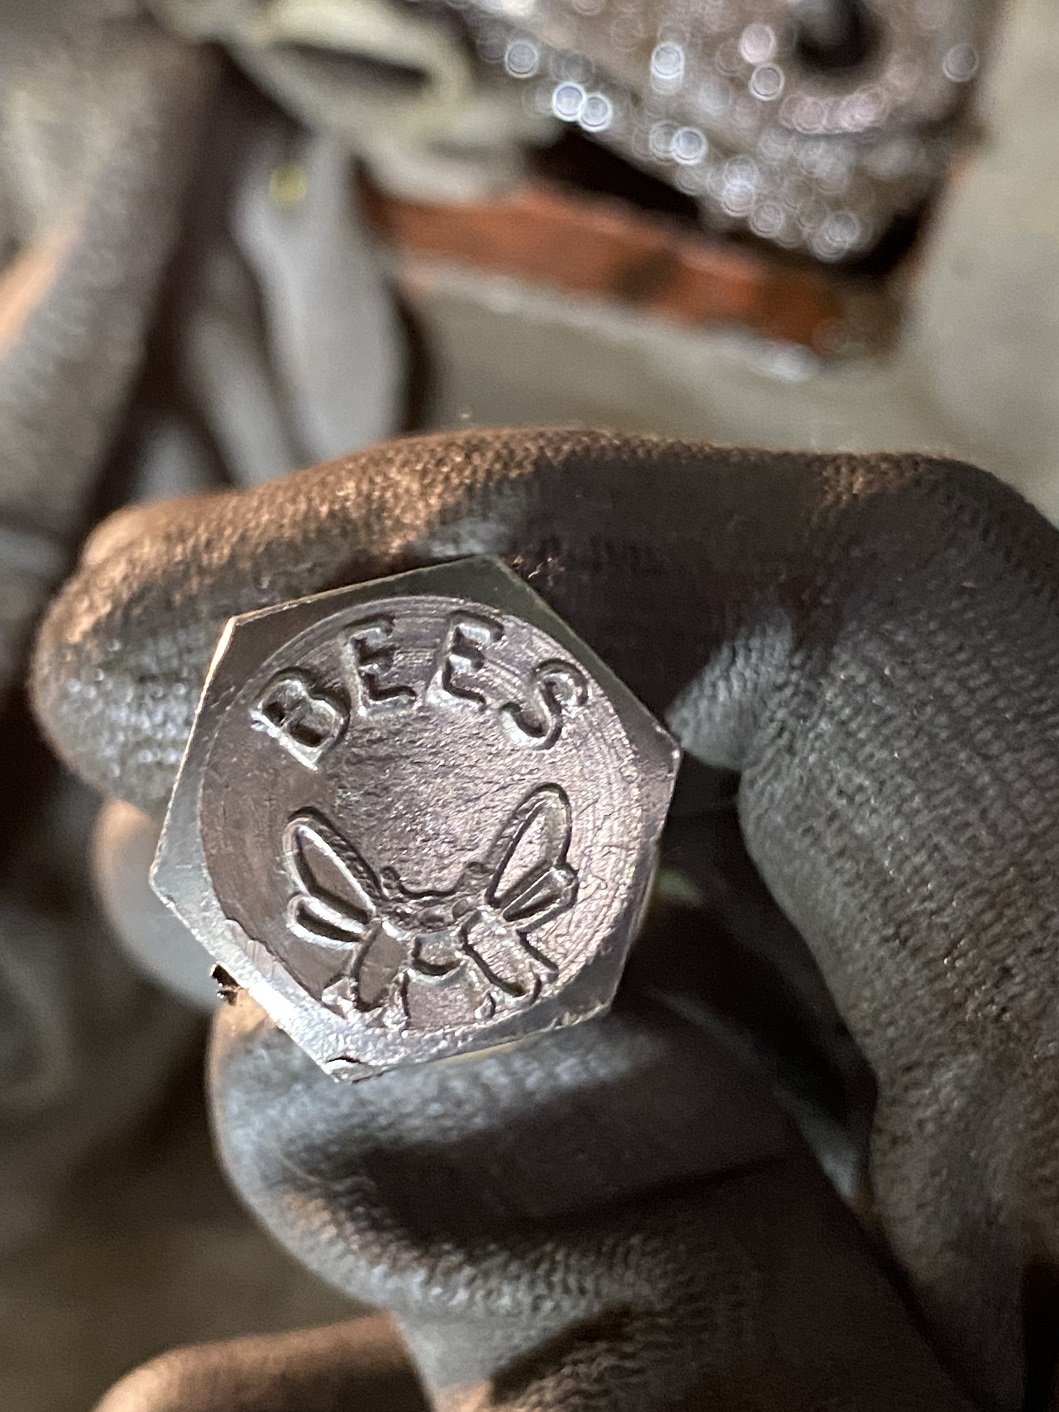
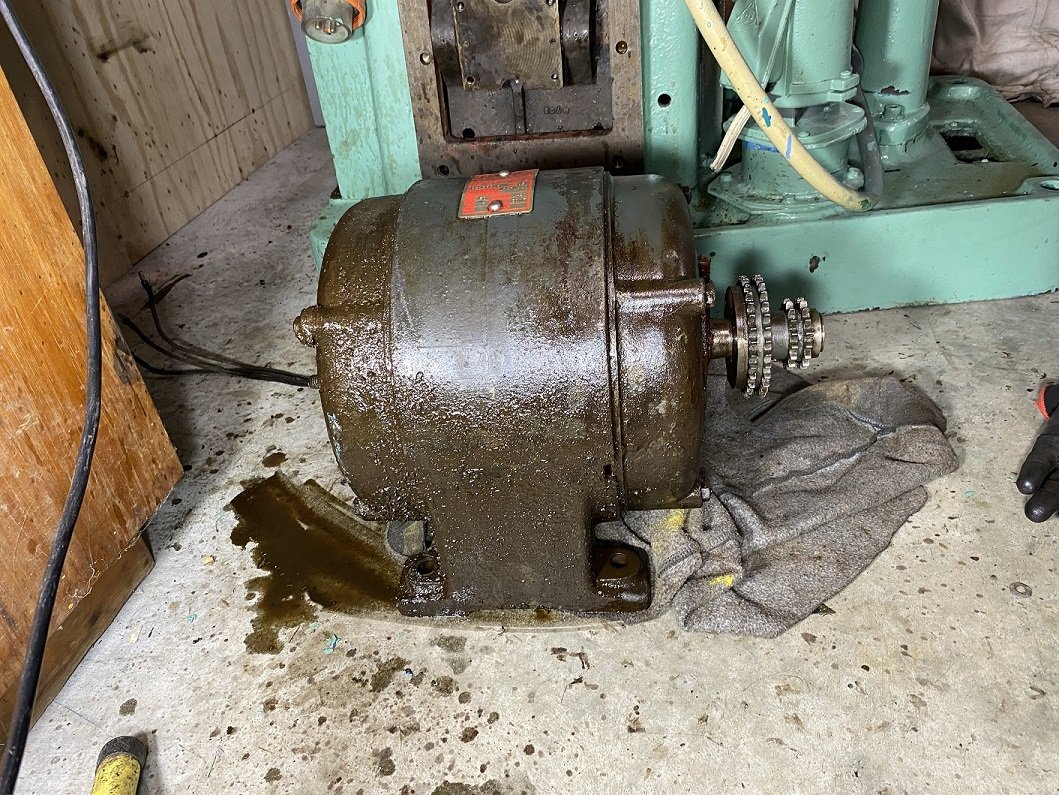
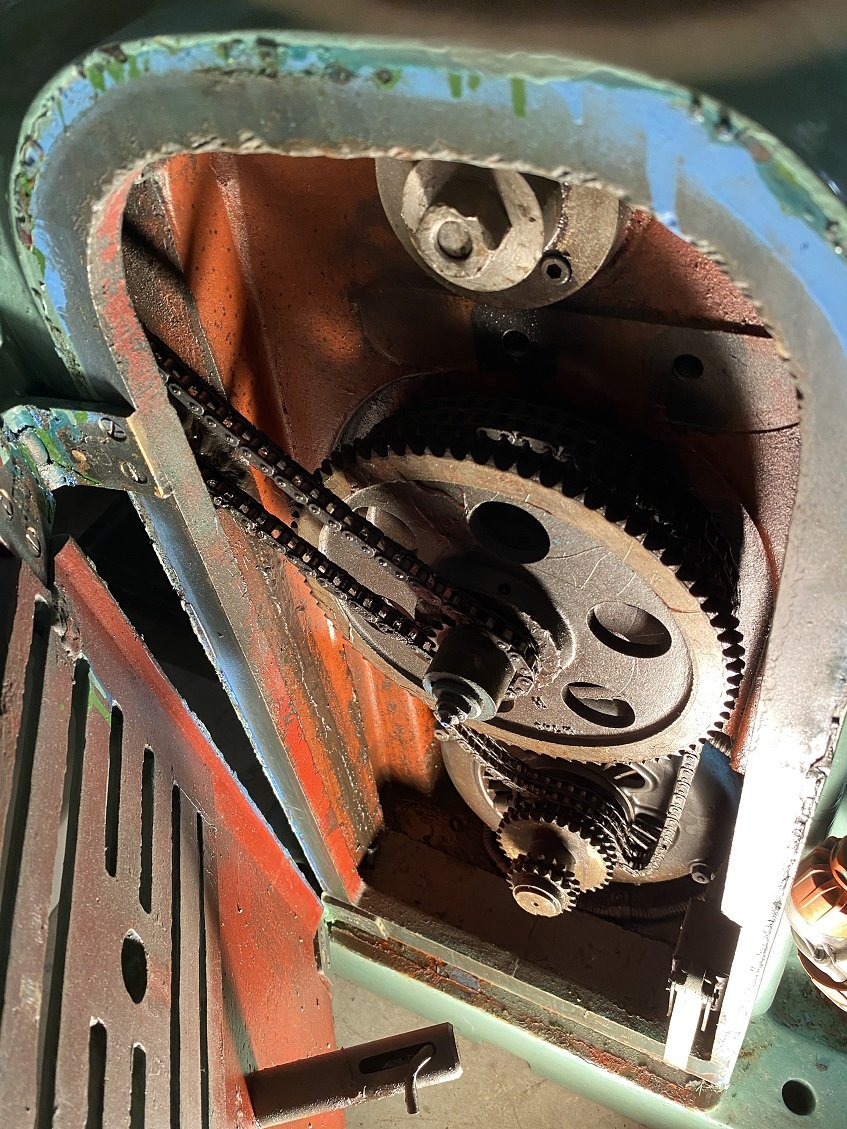
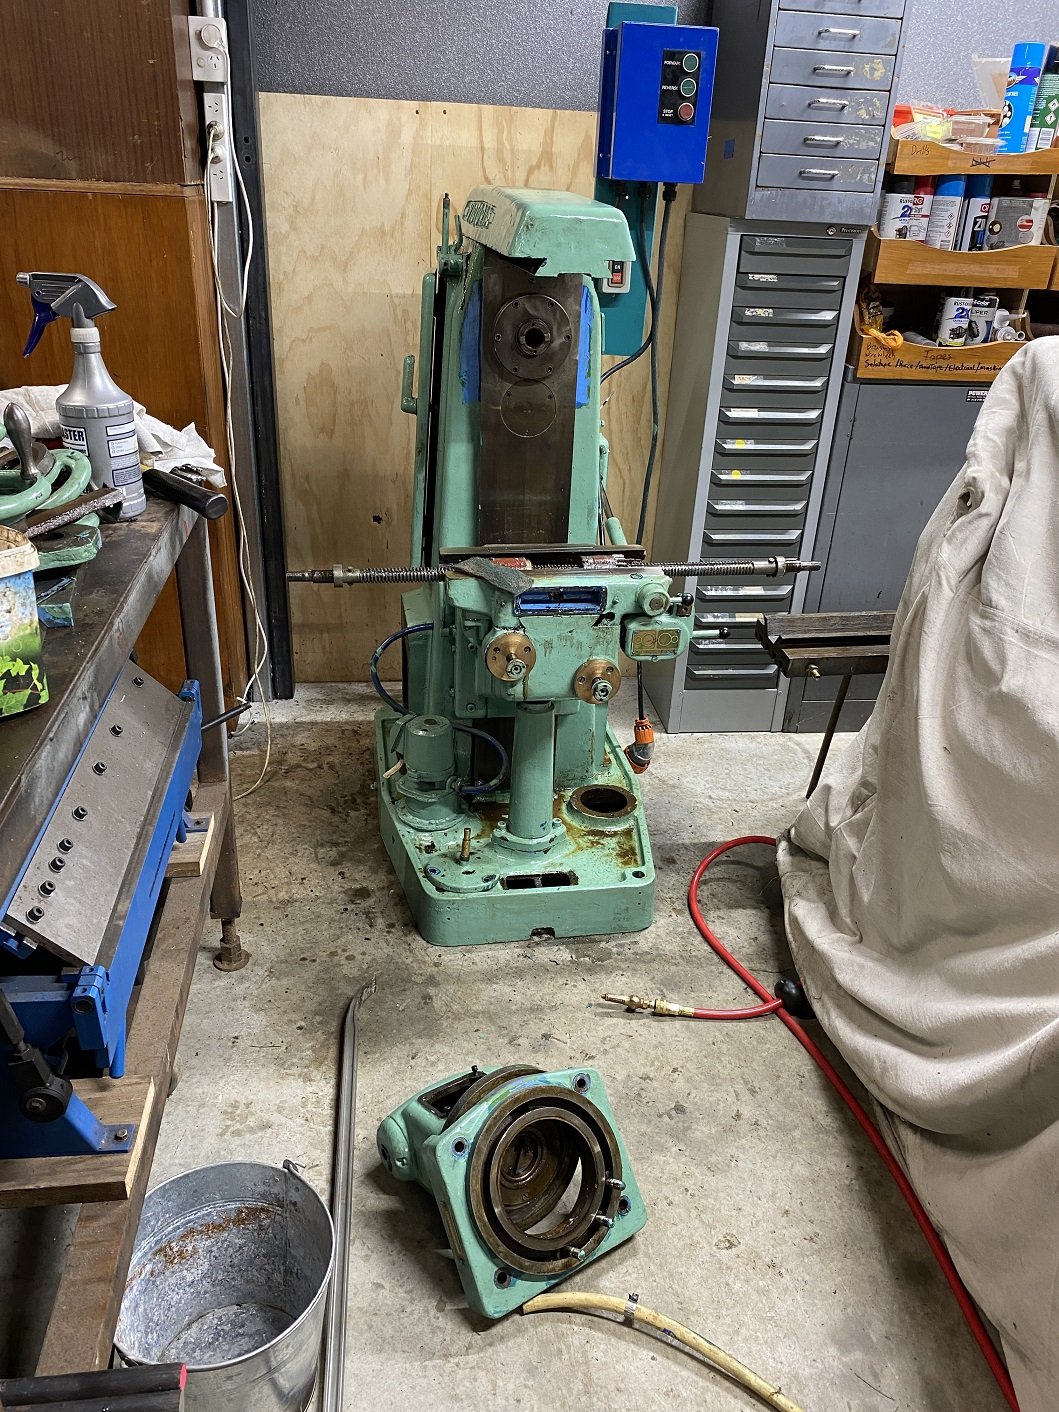
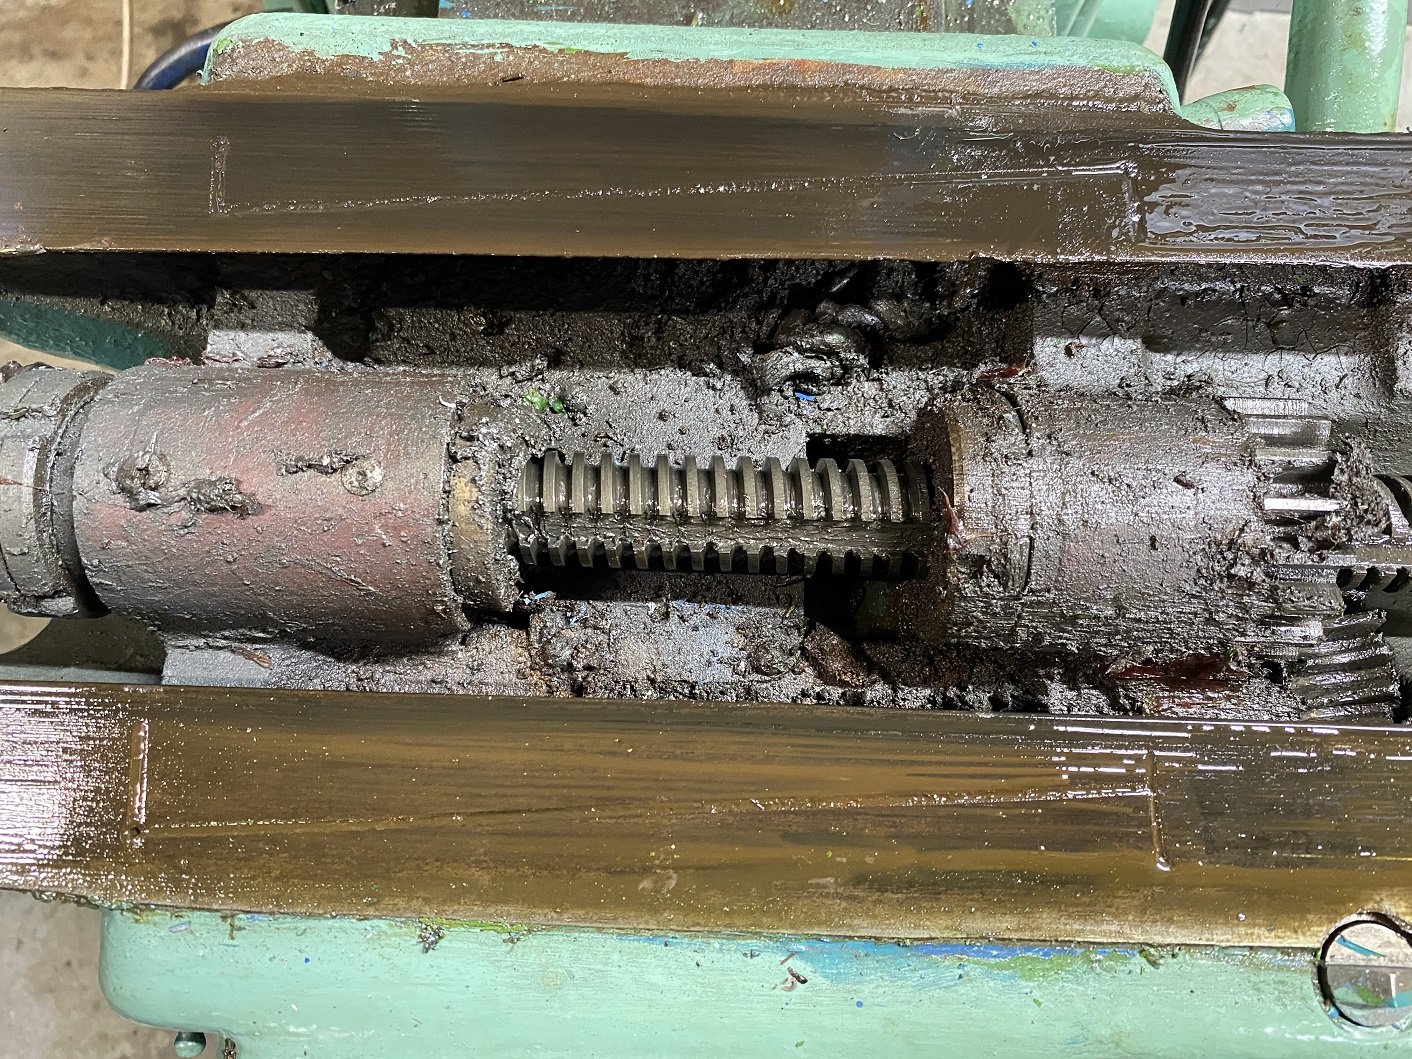
I just picked this up last weekend from one photo on Trademe from a guy who took 9 days to respond to my emails. It seems to be in okay condition. But there seems to be grease where I would expect oil, so the wheels are a work out to turn. And all the oiling nipples have been painted over. The inside is full of old oil and grease and dirt. So I guess I'll pull it apart enough to clean the grease out. First step. Get the motor out to find the info plate so I know what VFD to get. The motor is mounted to a rocking mount. That's bolted to this cover with a couple of threaded adjusters to adjust the tension on the drive chain. Yeh, CHAIN... The chain going off to the left is for the axis power feed gearbox. The motor BARELY fits through that hole, and it has to be at the right angle too. That big gear then goes into the column to some flat belt pulleys. I assume Everything has to come out of here to replace that flat belt. NFI how this is supposed to come apart, the manual I have is for the MK2 and 3, which are quite a bit different to my MK1. They changed to V pulleys instead of chain, and a gearbox instead of those flat belts. But I managed to get the motor out. It seems real big for 2.5HP. But it's short maybe? And after cleaning the filth off the info plate. I'll need a 400V 3 Phase VFD, it can't be wired to use 230v 3 Phase. Because the motor doesn't have separate terminals for the coils. It does have these cool looking BEES bolts.
1 point
-
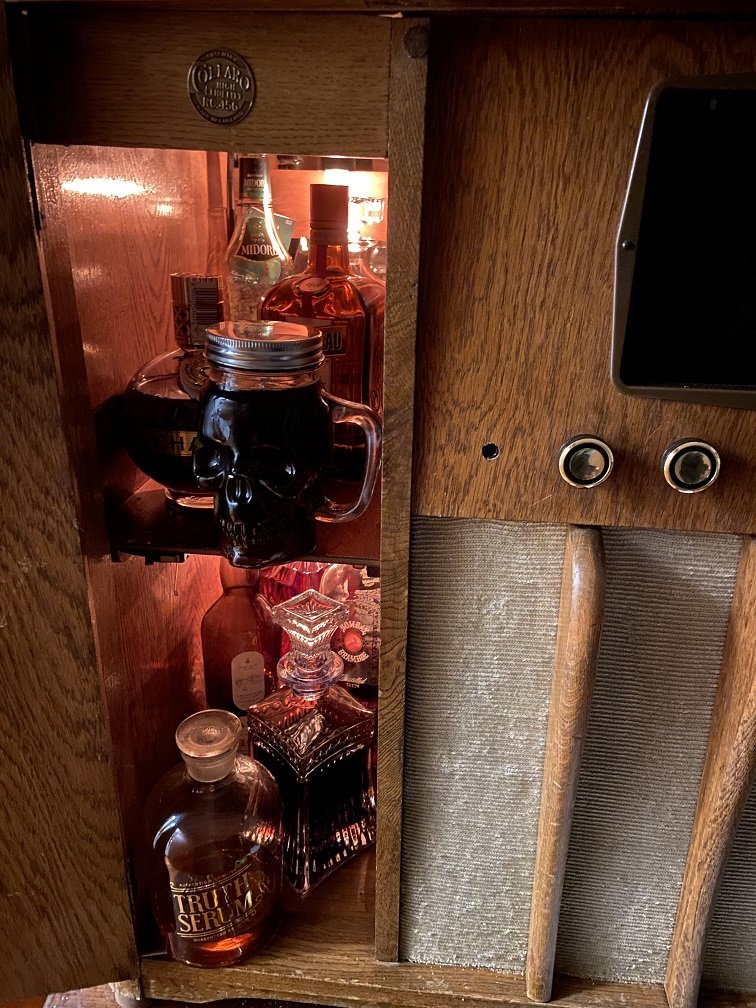
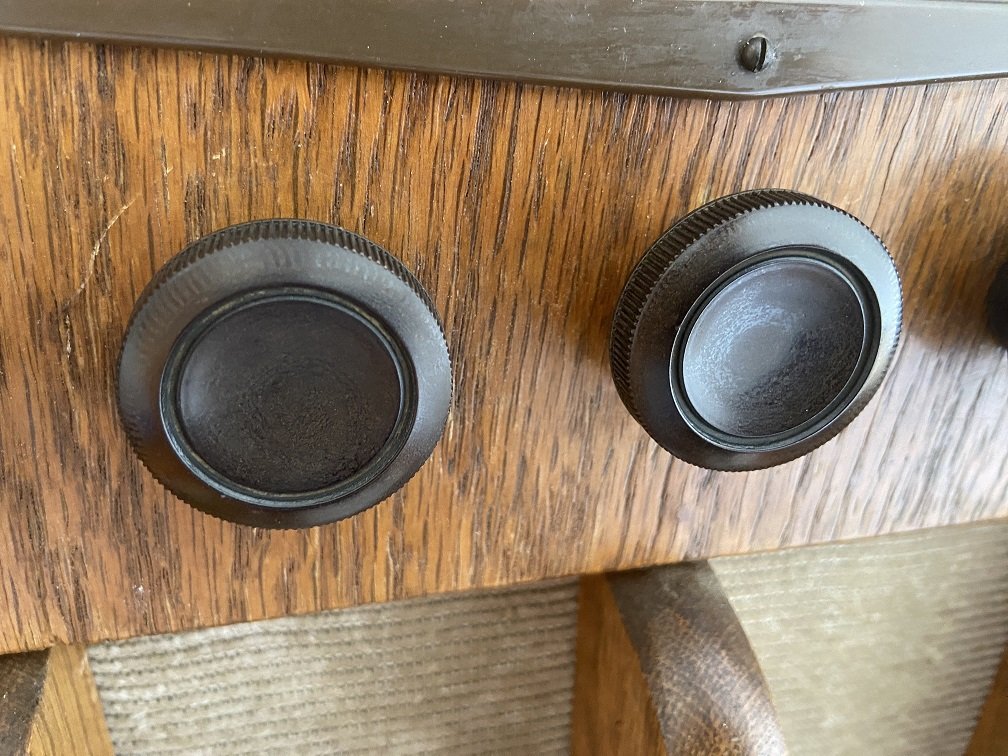
When it's finished. The radiogram has been stranded on top of a table in my back room for the last half dozen years. I literally cannot move it - I live by myself, it's heavy and too big to get my arms around. I can't really take good exterior photos of it in its current location, and the exterior isn't changing much anyway. I'm trialling various badges above or below the display window, and I'm considering ditching the original knobs in favour of these shiny ones: I've cut more pieces of mirror to line the backs of the booze cupboards (originally there was just a single piece of brown chipboard over the whole rear of the cabinet). Over the years I have bought a couple of decanters (for class) and various skull-shaped vessels (what class?). No genuine old crystal decanters though, in case the lead leeches into my booze if I use them for long-term storage. I must hunt down some decanter tags. One day when the project is done, I'll bribe someone to come and help me carry it out to its designated spot in the living room for some beauty shots and videos. Then before I get the camera out, I'll celebrate by trying absinthe for the first time.... ....turning on whatever tunes seem appropriate... .... getting hammered and tripping out to all the pretty lights.
1 point
-
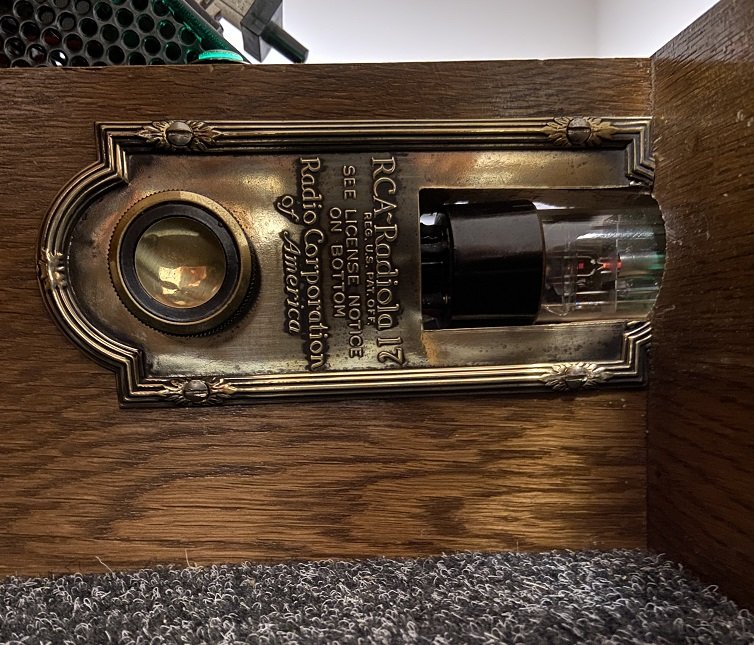
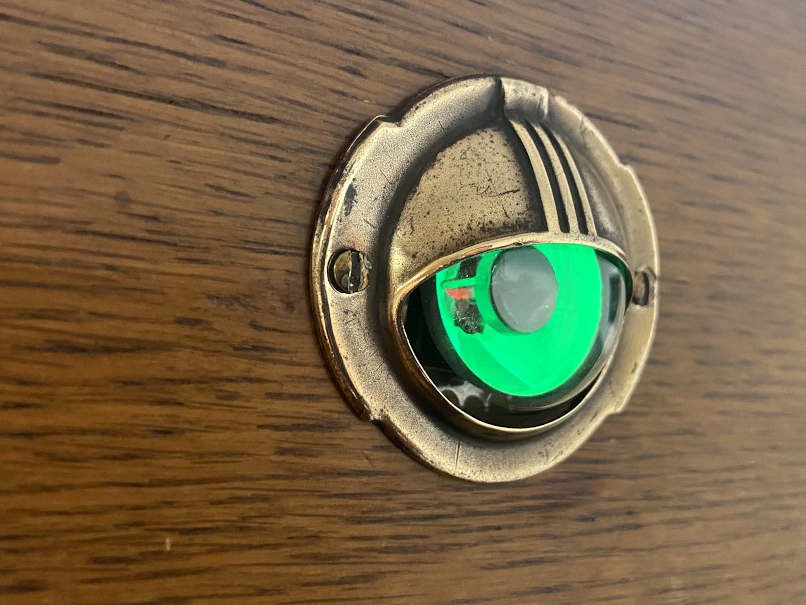
I'm going to attempt some cosmetic refinishing of parts of the cabinet, for example the upper surface of the lid was pretty rough: The rear edge of the lid was chipped (see RHS of photo), so I bought some coloured wood putty and tried to strip/sand/fill/varnish the lid. Results not great so far. Character marks still exist under the varnish, surface of the varnish is still rough. Haven't given up yet. I also wanted to improve the original plastic radio knobs, but this is AFTER cleaning and trying to polish them on a bench grinder: The plastic still looks oxidised / dirty, but it doesn't want to polish to a shine. I may substitute new knobs with blingy brass trim. I've been refitting various panels to the skeleton of the radiogram, untangling wires or cutting corners and bodging things until they fit. One of Barry's 100-year-old radio faceplates now helps cover the hole for the main magic eye, while also providing a viewing window: I may try to tidy that up further. The important part is that you can see the valve doing its thing: For the last ~2 years, my control panel has been floating loose so I can flip it over and do some wiring, then balance it on its side to operate the switches, hoping nothing shorts out.. Exciting update - it's finally mounted back in place, which wasn't easy. And even now that the control panel is full of messy electrical stuff, nothing gets too munched or shorts out when the actuator lowers it down flat! (this was mostly good luck rather than good management) Aaaand when you open the lid of the radiogram the controls raise up automatically OMGmylifeiscomplete. Yuss.
1 point
-
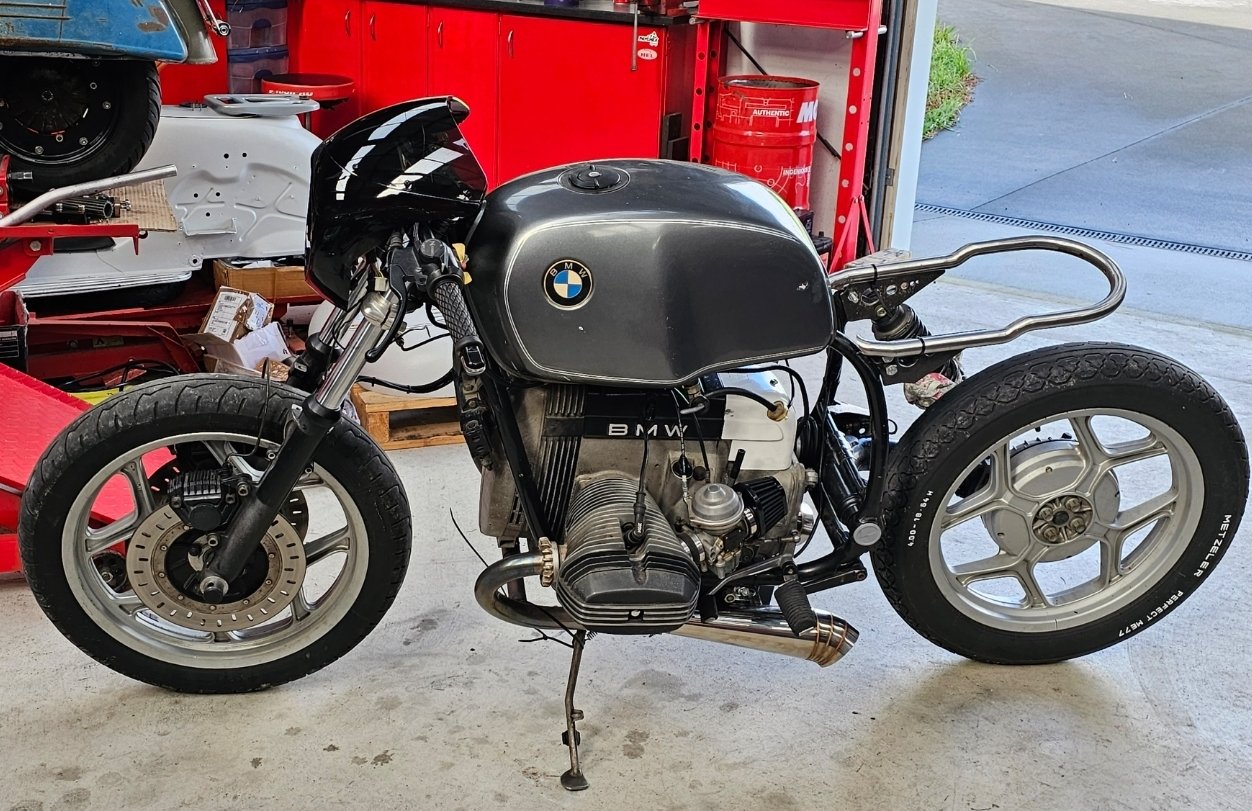
Instagram ready photo...aka, mocked up with duct tape. But after fettling it into 4 different hights and 4 different offsets fore and aft I settled on this position. Ideally id like it another 10mm back towards the tank, but its already created endless issues with cables and wiring.
1 point
-
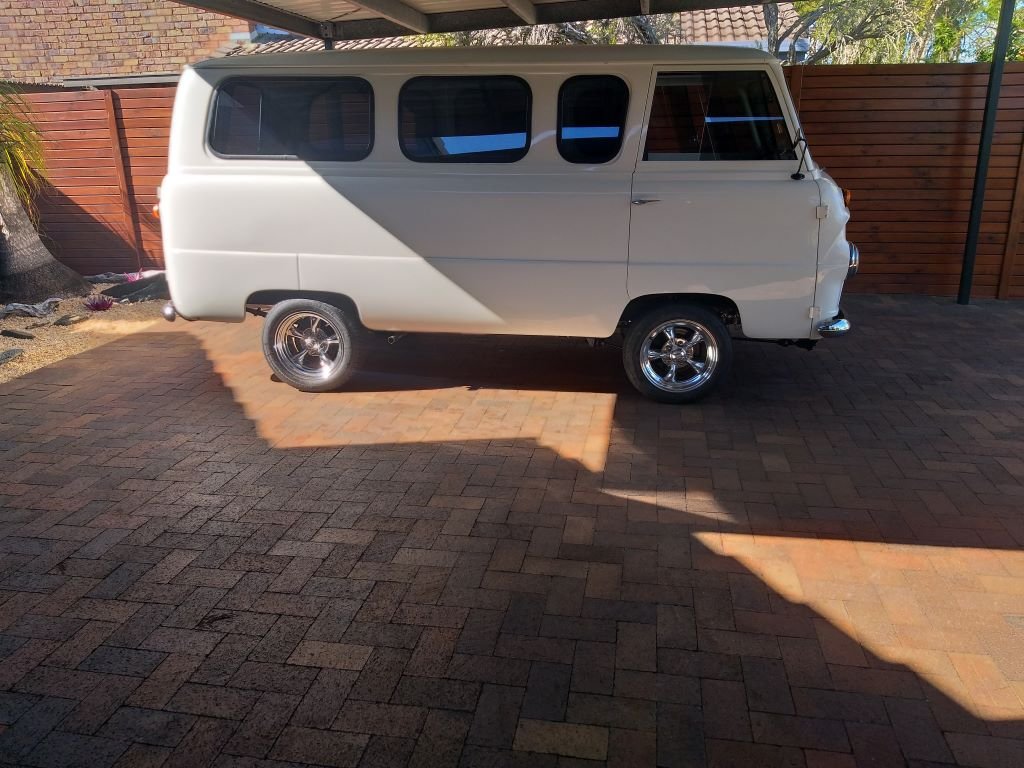
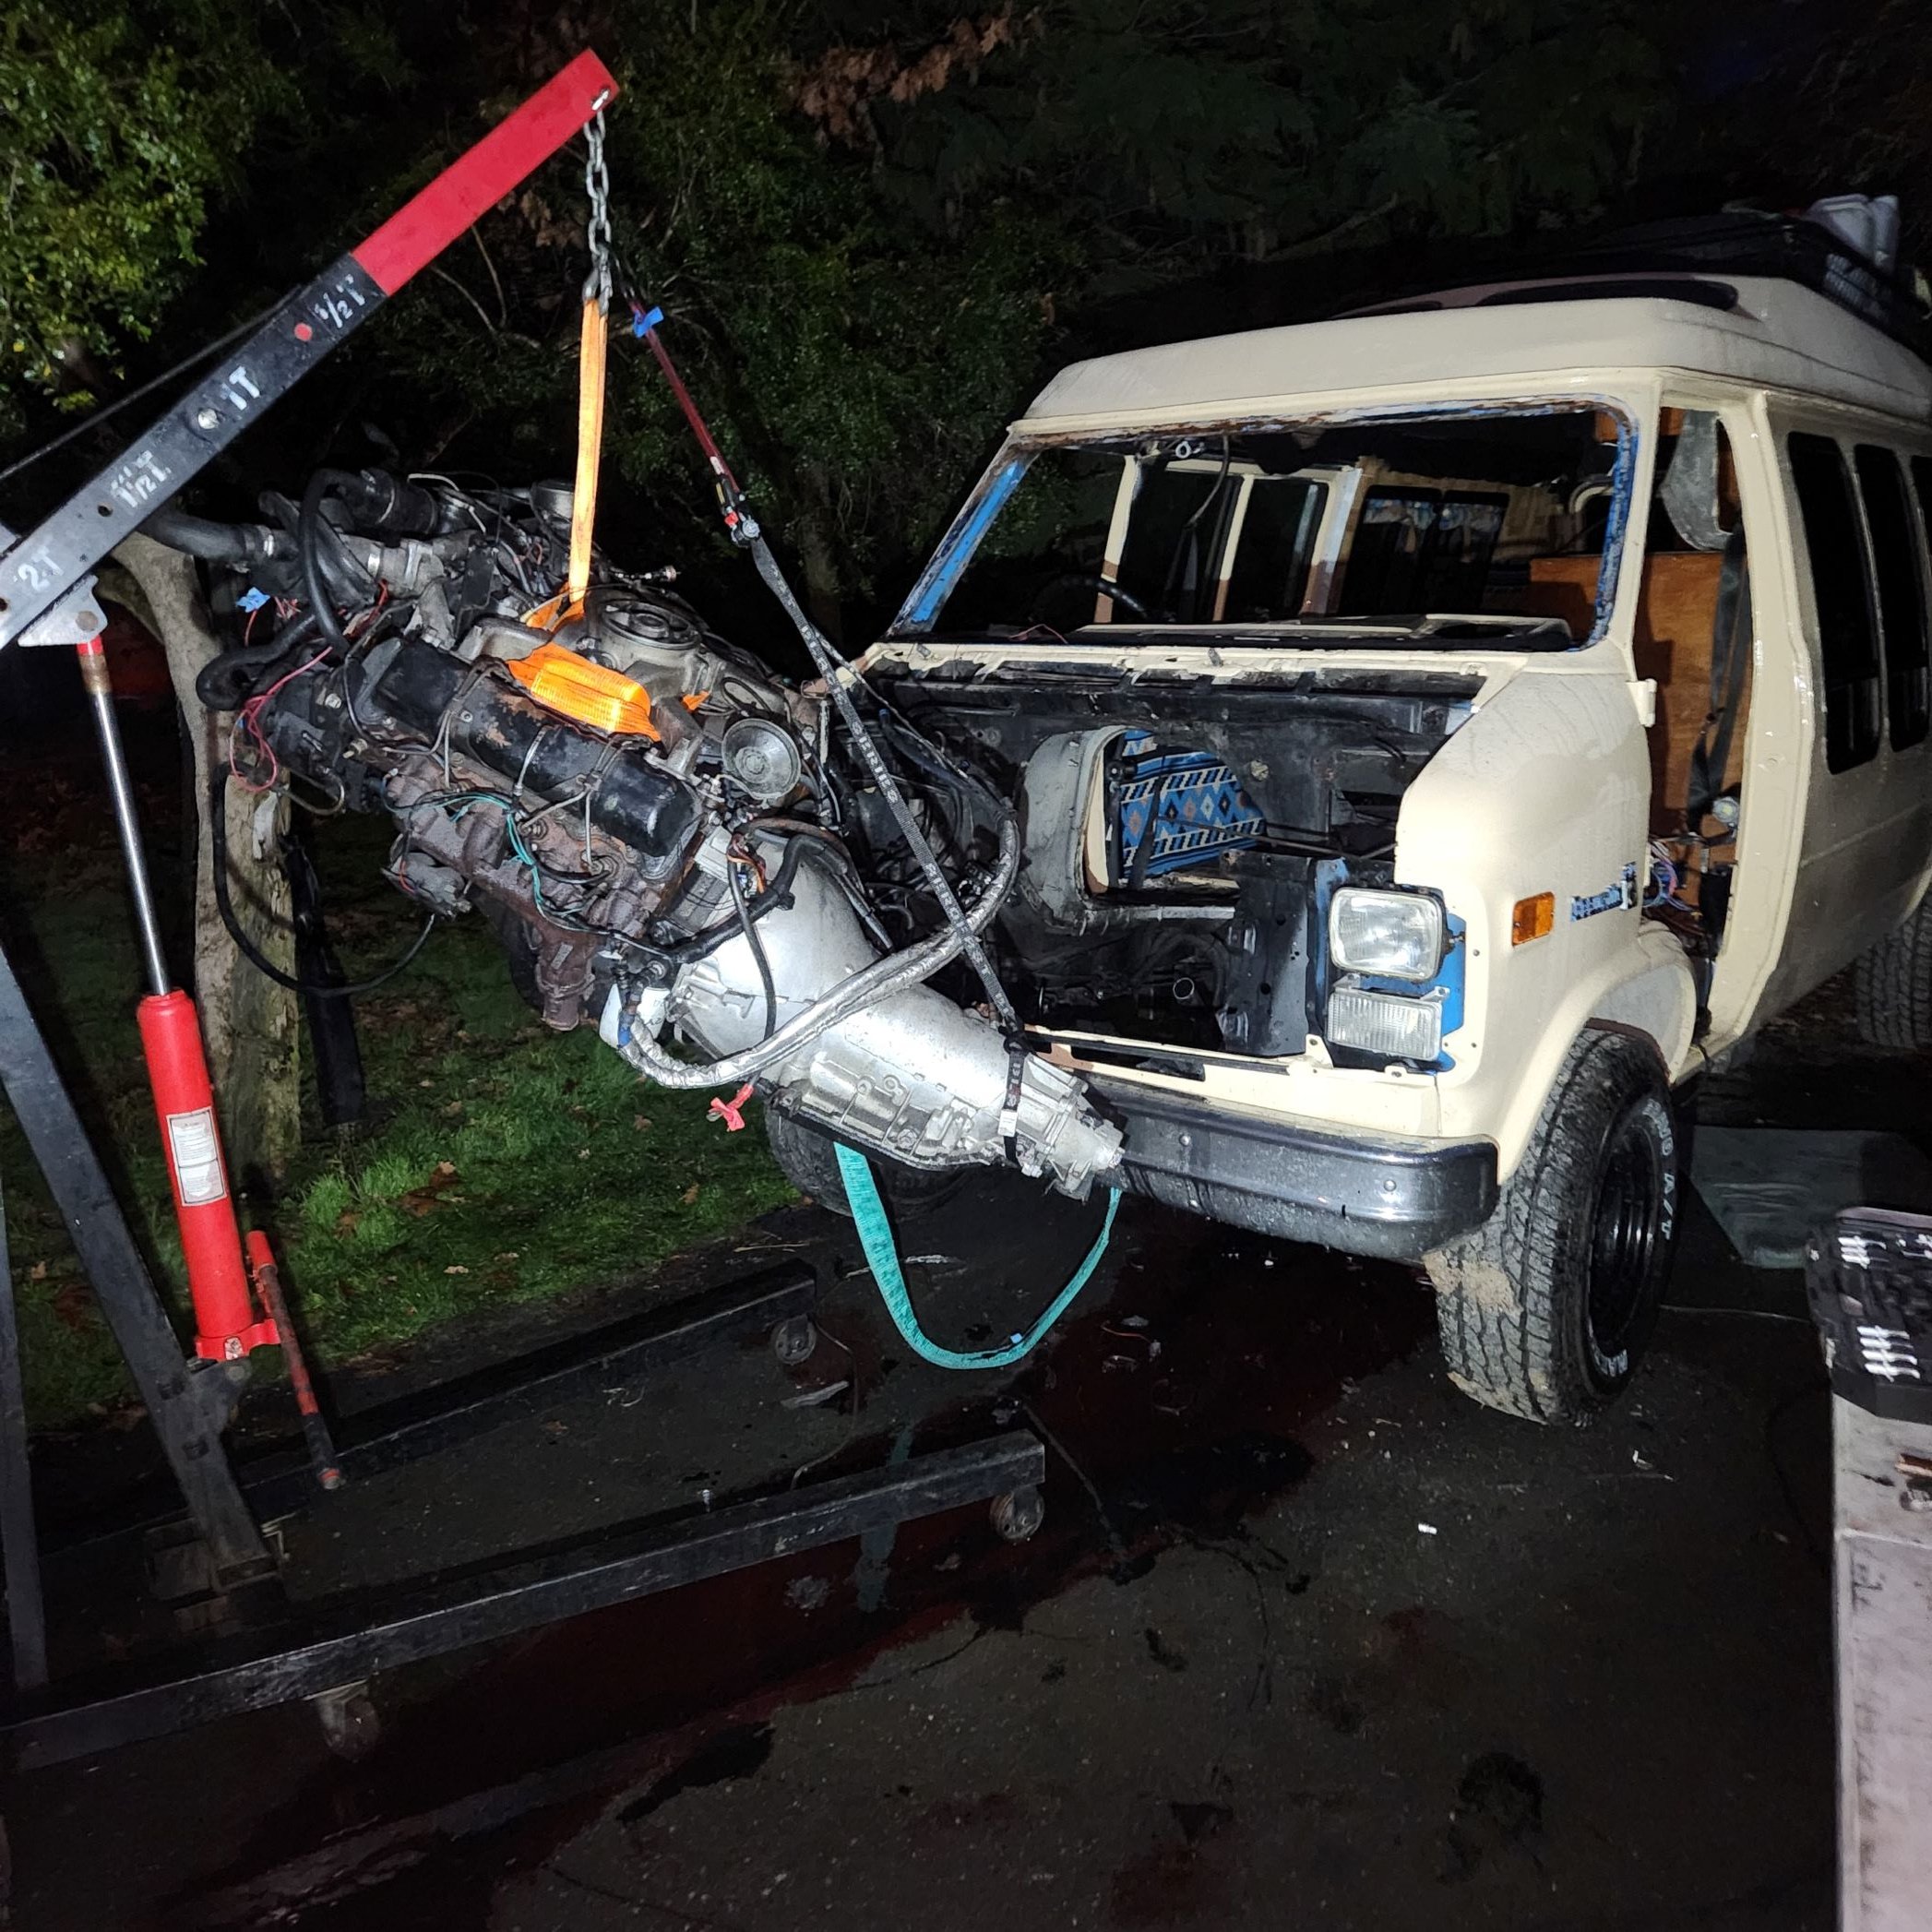
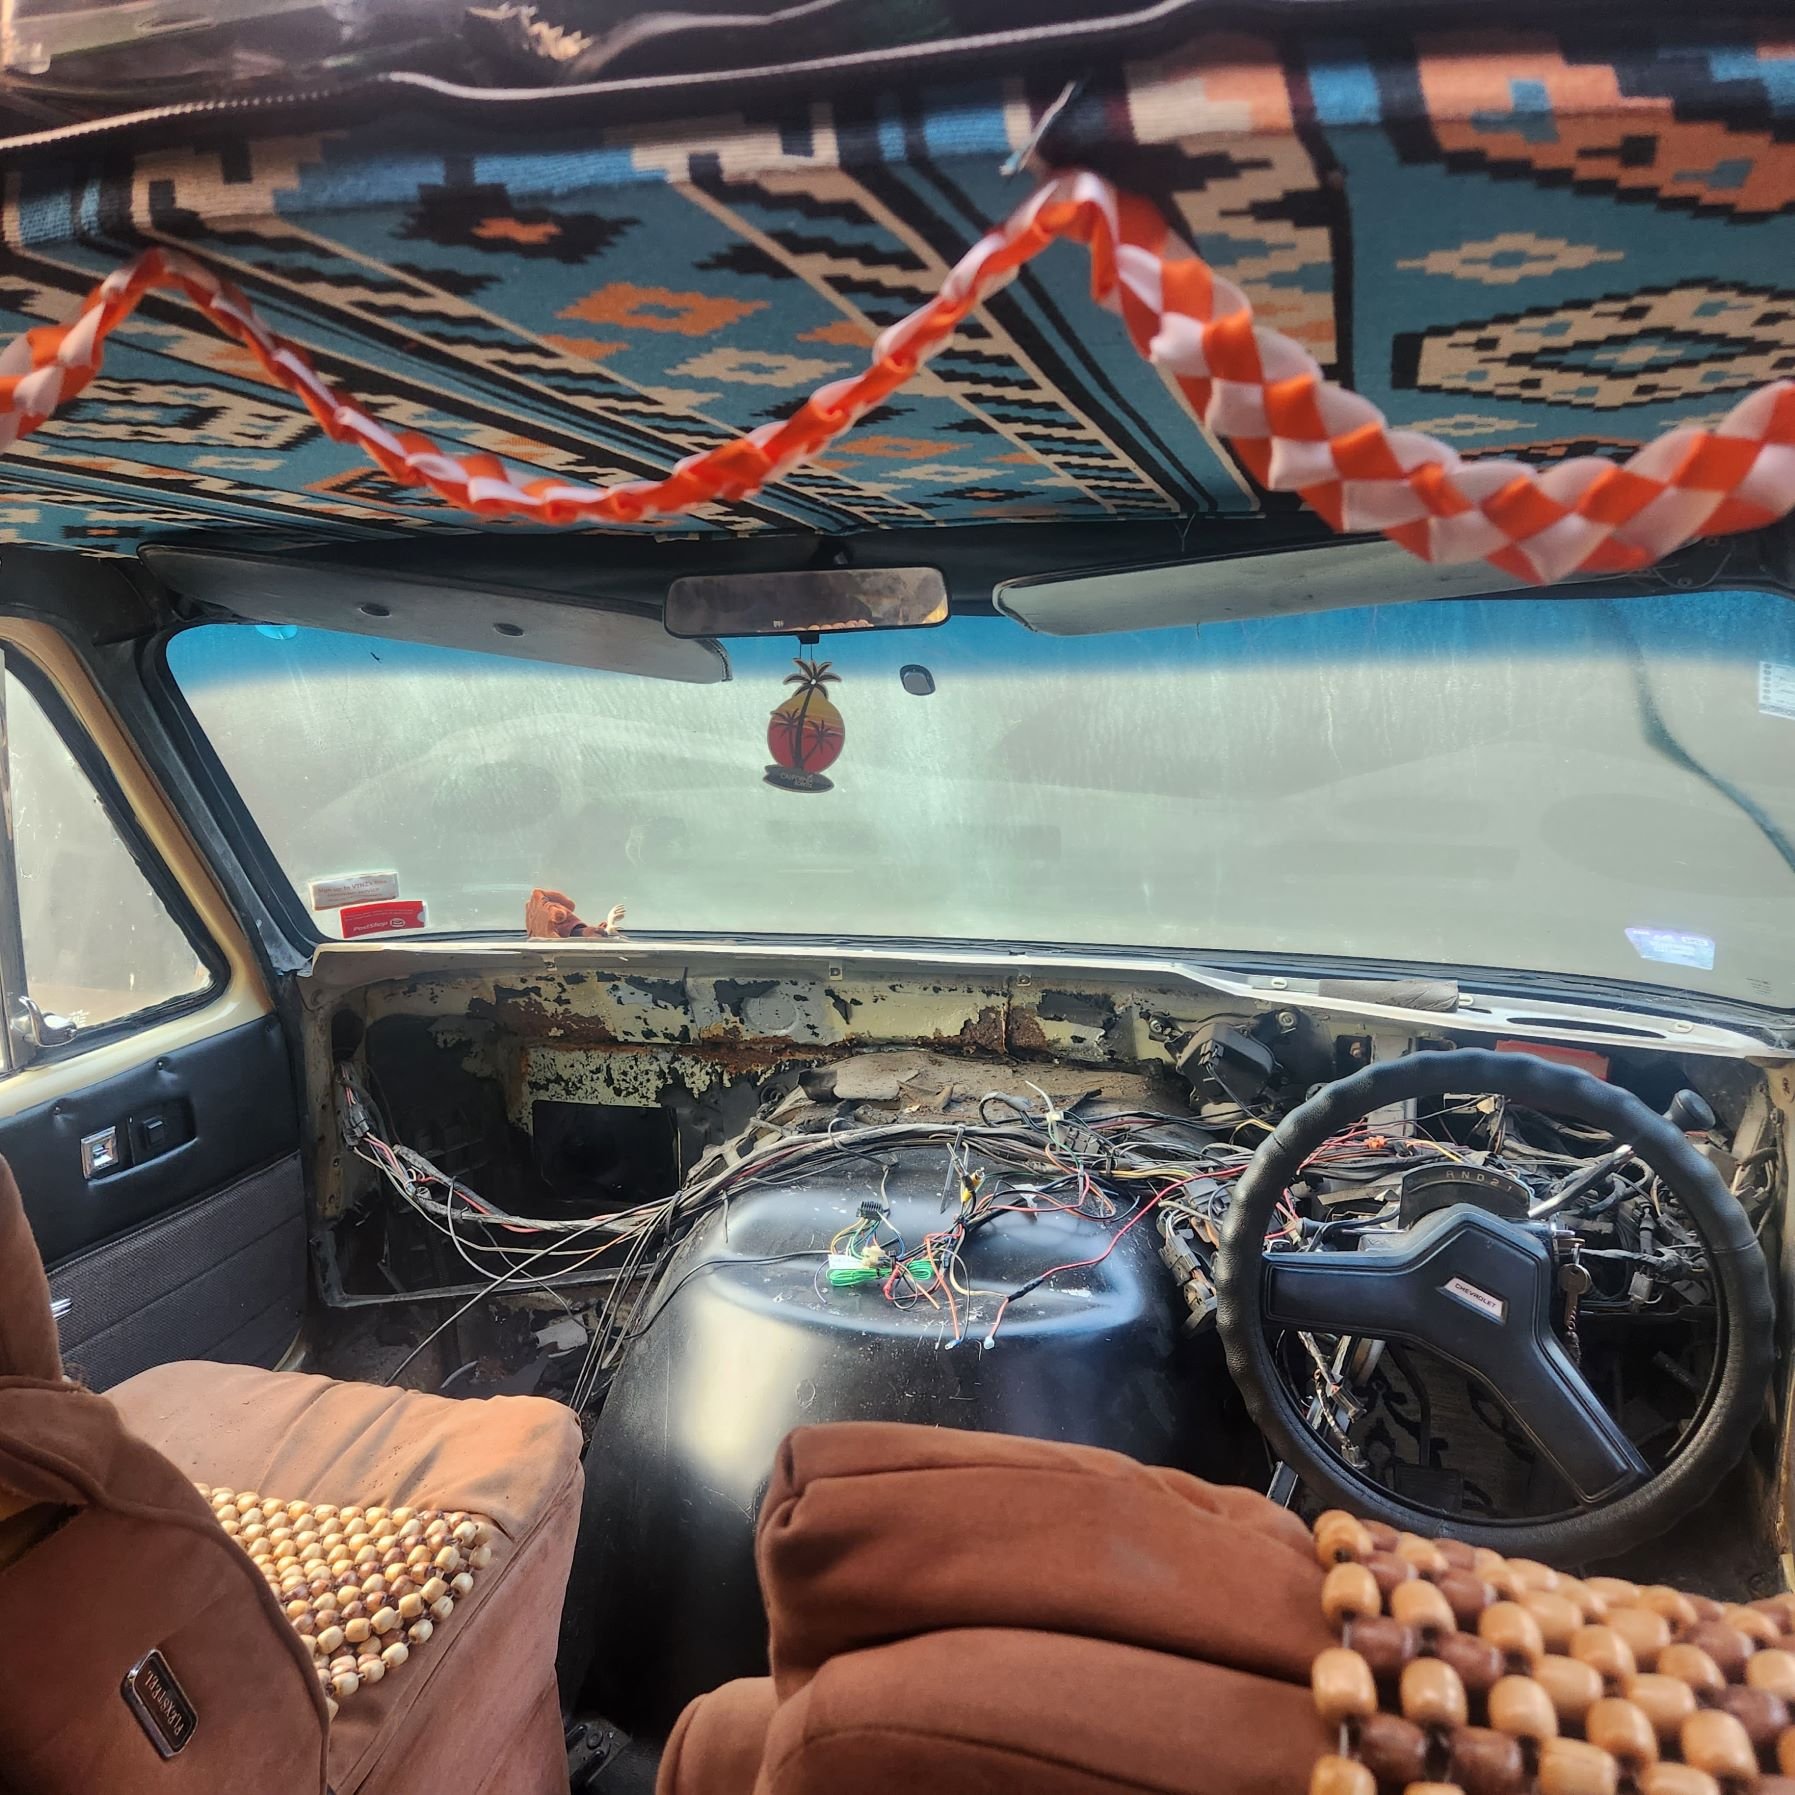
So it needed a bit of work, the RHD conversion hasnt aged well with leaks and the wiring was just flat out shit, tape covering soldered joints everywhere, 3 feet of extra loom in the engine bay where the fuse box and AC had been moved, then leaks around the windscreen from the AC box install etc. And the roof had just been chopped out for the glass top. So I got the shits with it and listed it, figured Id sell it and get something newer and dump some cash into a pointless but fun fwd rx323 which will now be on hold for a bit I had a guy. lined up then took it in for a wof and it failed on sketchy details around the RHD conversion and cracks in the filler / sealant around the roof. I got upset for about 3 seconds then decided Id keep it and fix it. This was on friday Friday night / sat morning : Sunday night : I wanted it 4wd but couldnt find axles wide enough in NZ ( 66" ) , the conversions Id seen mostly used Dana 44s and 60s and leaf springs up front, not ideal from a handling and turning perspective but easy enough to fit. I have a 460LE with transfercase from a suburban which I planned to use but was going to have to import axles, not keen. So off down a google hole I go and the widest diffs I can find were 80 series cruiser at 63". Theres room in the fenders for a narrower front end and itll fit and turn 15x10s I reckon ( see below ) I found pair of axles, engine ( 1HDT ) and trans close to home ish for a good price so got it all home ( sunday before pulling van motor ) 6.2 dinosaur after 110ks : 1HDT after 300ks , I did timing belt etc yesterday and it all looks clean as inside I probably run a modified pump but these things and a piece of cake to get running, needs alternator wiring and power to fuel cut solenoid. Ill rewire the whole van, have a harness on the way. Back axle will go back on leaves, ill just weld new perches on it Front is the fun bit. The van has a big crossmember which holds the motor and upper and lower arms, spring hats are in the right places but new diff will hit the crossmember so ill cut it right down to clear the diff and put the new ( offset ) engine mounts in. Im rebuilding the swivels now, one of the hub bushings / bearings had disappeared so will get those done this week. Ill run coils on the chev upper mounts and cruiser axle mounts, im pumped on the coils. Then trailing radius arms with some mounts with vertical adjustment ( lots of holes ) sio I can correct caster while Im sorting ride height. So this static rollover threshold with LVV for lift limits might be an issue but once I sort the crossmember itll give me some space to drop the engine and get crank down. The van is over getting the rust etc done now, meantime Ive put new vent windows and frames in and will make up the roof stiffeners itll need for cert
1 point
-
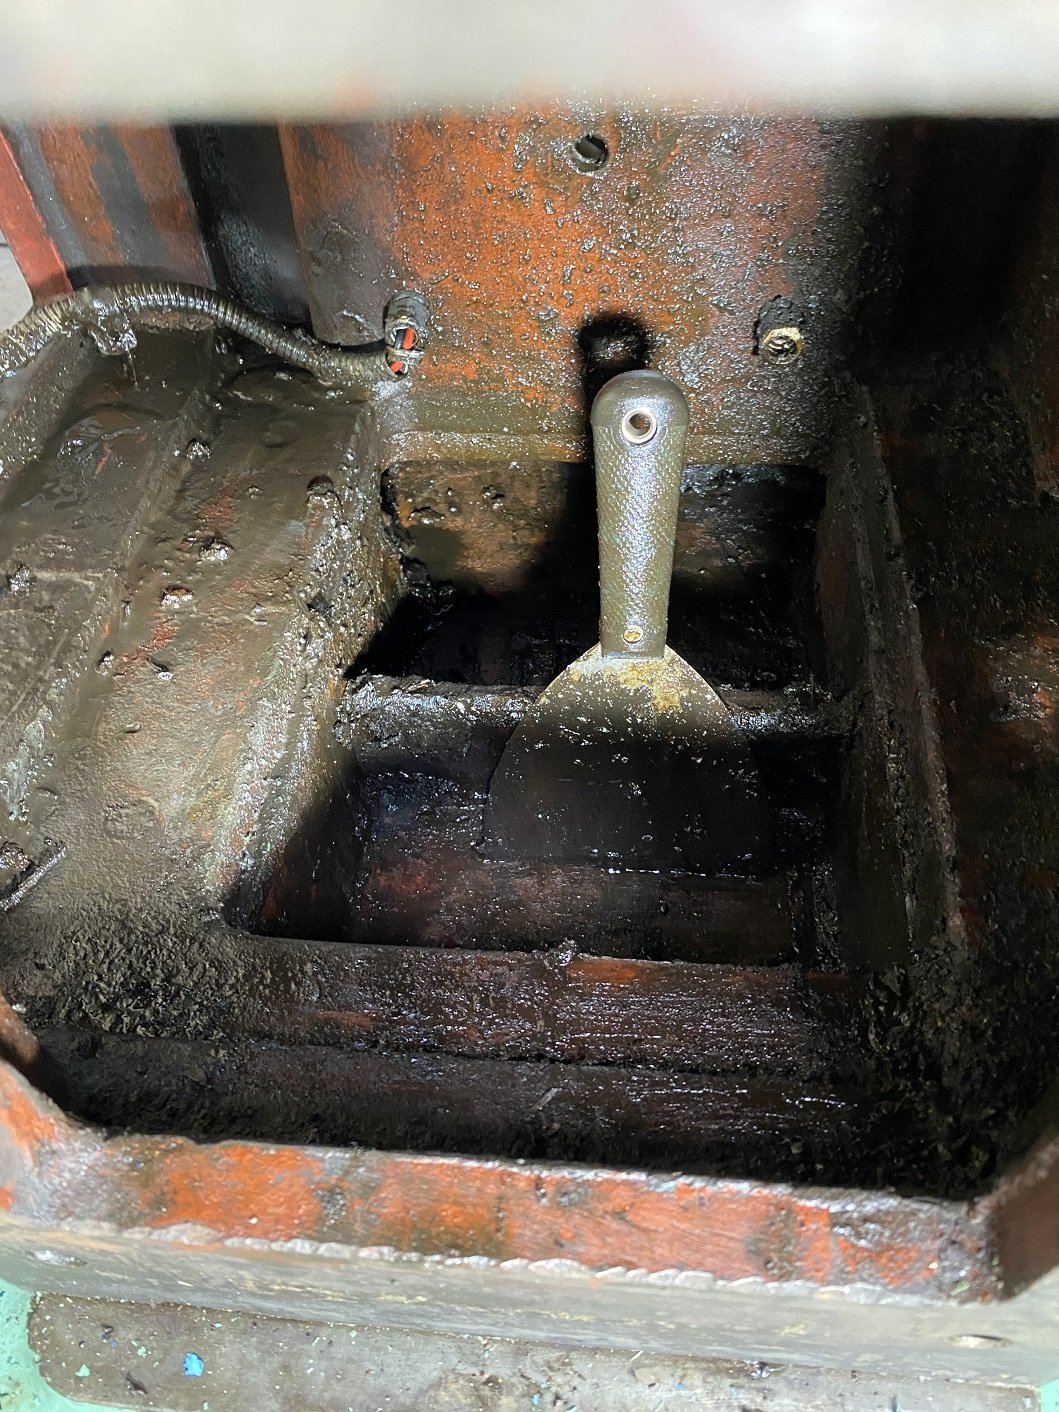
I've been taking it to bits to clean. The overarm support is really bloody hard to move, I've been using the sledge with a block of wood, then once it was forward enough, there are some holes I can get the prybar in. The part of the gib strip I can see looks suspiciously like aluminium flatbar..... Hopefully it's not. Just because they look like grease nipples on your mill or lathe, doesn't mean they are used for grease. OIL! OIL! OIL OIL OIL OIL !!!!!!!!!! No wonder it took so much effort to turn the wheels. I cleaned up the top surface and it's real dark, like black, but I can't feel obvious scoring, so I'm hoping it's okay.
1 point
-
Today I learned.1 point
-
So that was Sunday, since then Ive seen it in the daylight for about 10mins due to starting work early and finishing late. Unexcitingly its just a 1900cc M44 Engine with a 4 speed auto, has red leather seats, some 18" wheels which look like BBS LM but dont have the BBS logo on them and a Japanese "ARQRAY" stainless exhaust system. Known issues so far is that I cant get the boot open, its electrically actuated and a common issue is the wiring loom snaps where the boot hinges, also the thermostat appears stuck open as it sits at 1/4 of the temp gauge while driving but rises to just on 1/2 while stationary. Background of the purchase is that Ive been sort of looking for a cheap project for a while (because the house, small boat, Integra and 3 small bikes/scooters just wasnt enough) and missed out on a 2003 Mini Cooper S last year because I chickened out plus it was manual which the wife isnt that happy driving. Kinda liked the idea of a Triumph Spitfire but without the old brittish car problems and classic car prices. So had saved a trademe search for cheapest Mercedes SLK and BMW Z3 and occasionally kept an eye on them with no real intention of buying but had researched each and found both to be fairly reliable but typical older Euro car issues. Then came my moment of weakness. Plans were to hoon it for a couple months and then sell in Summer when everyone thinks a convertible is a good idea, but now my Wife quite likes it. So plans have changed to fix its so far minor niggles and keep for a year or so Let the mid life crisis/hairdresser comments commence1 point
-
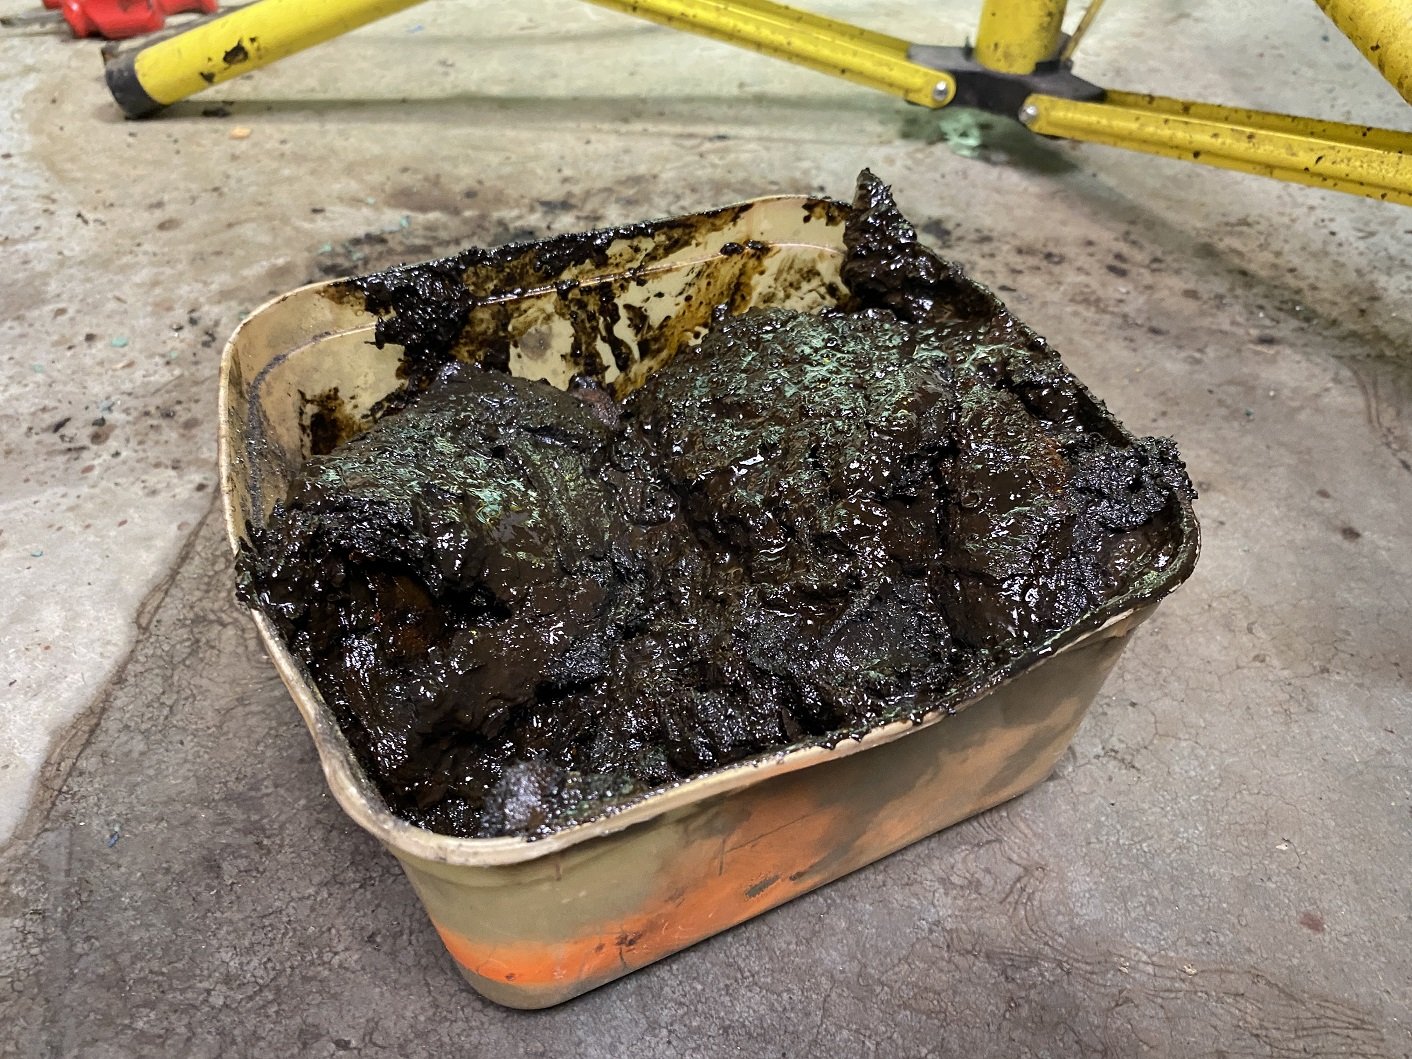
With the motor out, it was less hard to clean out the sump sludge. I filled two icecream tubs with all the sludge I could reach. But I think there may be a cavity at the back I don't have enough elbows for, as well as the area in front of the column. So glad it doesn't smell... Since I can't reach all of it, I've emptied about 3 litres of undiluted ExOff degreaser into it and I'll leave it for a few days. It seems to break it up quite well scrubbing with a brush, the brush doesn't become instantly packed with grease(it's possibly more like oily mud?). I'm thinking I can maybe suck it all up using some hose attached to a bucket and have the shop vac sucking the air out of the bucket. There is a drain plug on the side, but that's totally just going to make a big mess on the floor.
1 point
-
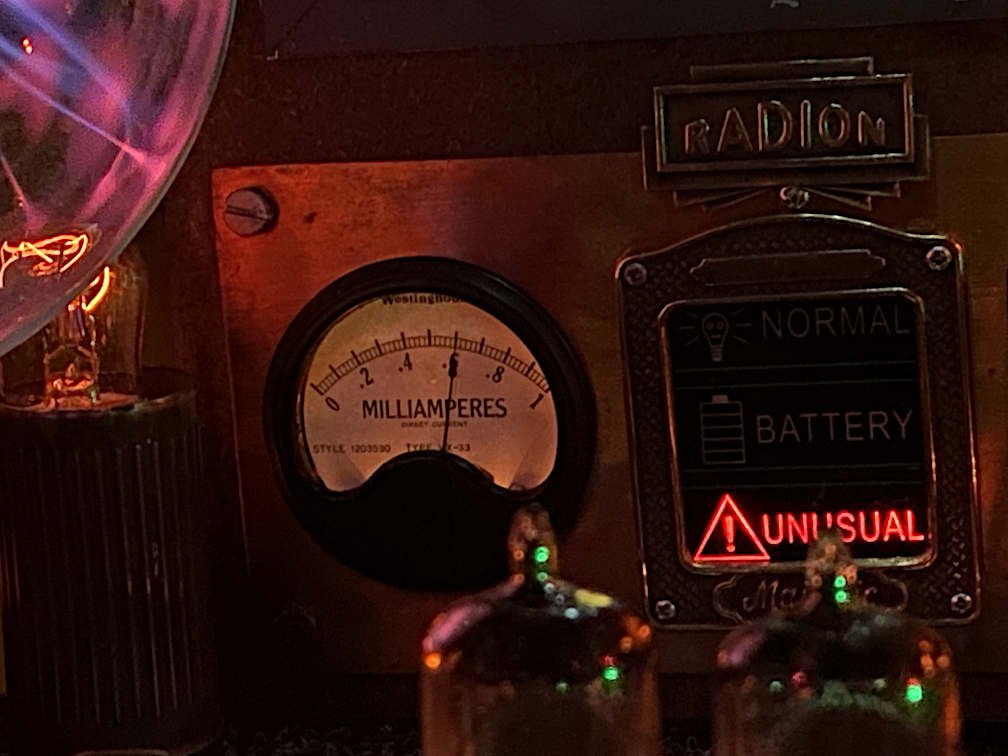
I finally got hold of one, identical to the stolen image above. It will be a better match for the brass door handles on my radiogram. Here it is in place of the chrome surround which was visible in my Nov '21 and Jan '22 posts: Other recent shopping hauls include a bunch of postcards of old ads for alcohol and sci fi, plus a few small radio badges. What else have I been doing besides buying stuff? Bugger all except maintenance - this project is now so old that it's starting to break down of old age before it's even finished. Two of the dodgiest analogue / moving coil meters gave up the ghost, and so did one or two little backlight bulbs (I'm using bulbs instead of LEDs cos it's more hipster). So now this 'MILLIAMPERES' meter is new: (probably for the best - the old one in my 7/10/22 post might have had radium paint and I should stop trying to fix it just in case) This one is new too: The surround I've stuck over it is to help with my improvised illumination. Another thing I replaced was the accessory relay with the burned contacts, because having that relay interfere with firing up the project was getting annoying. So I'm still really at the same point - I've got some unappealing tidying and mounting/assembly tasks to do. These tasks are complicated by years of ad-hoc wiring additions made without much consideration for final assembly. Maybe I'll finish them some day. =\
1 point
-
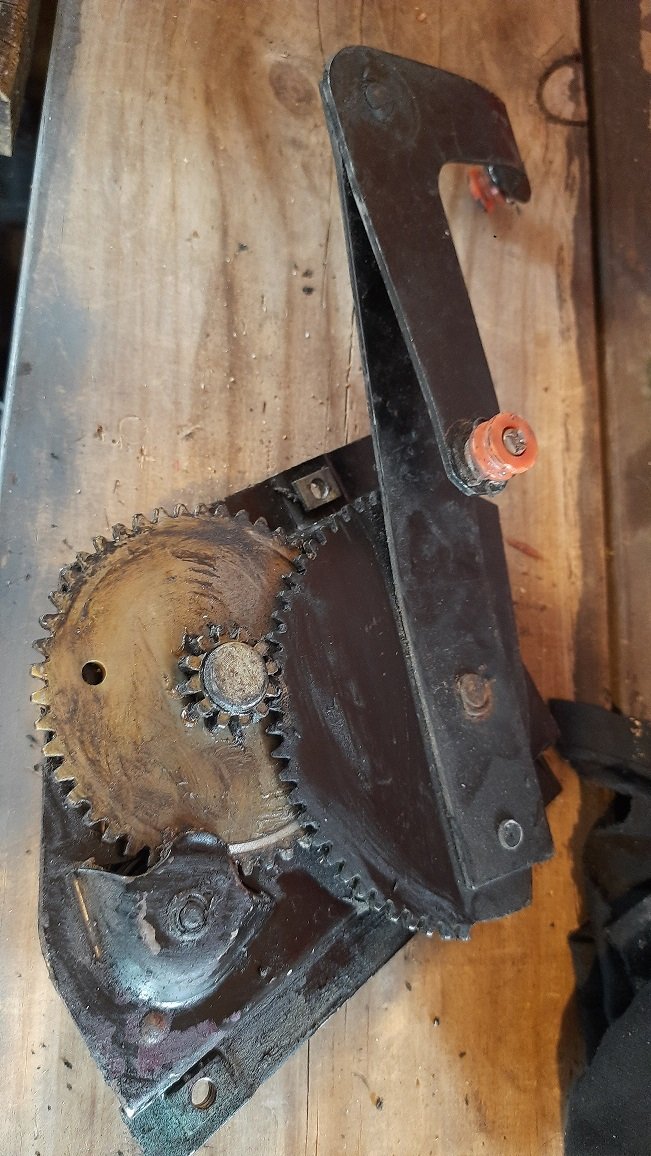
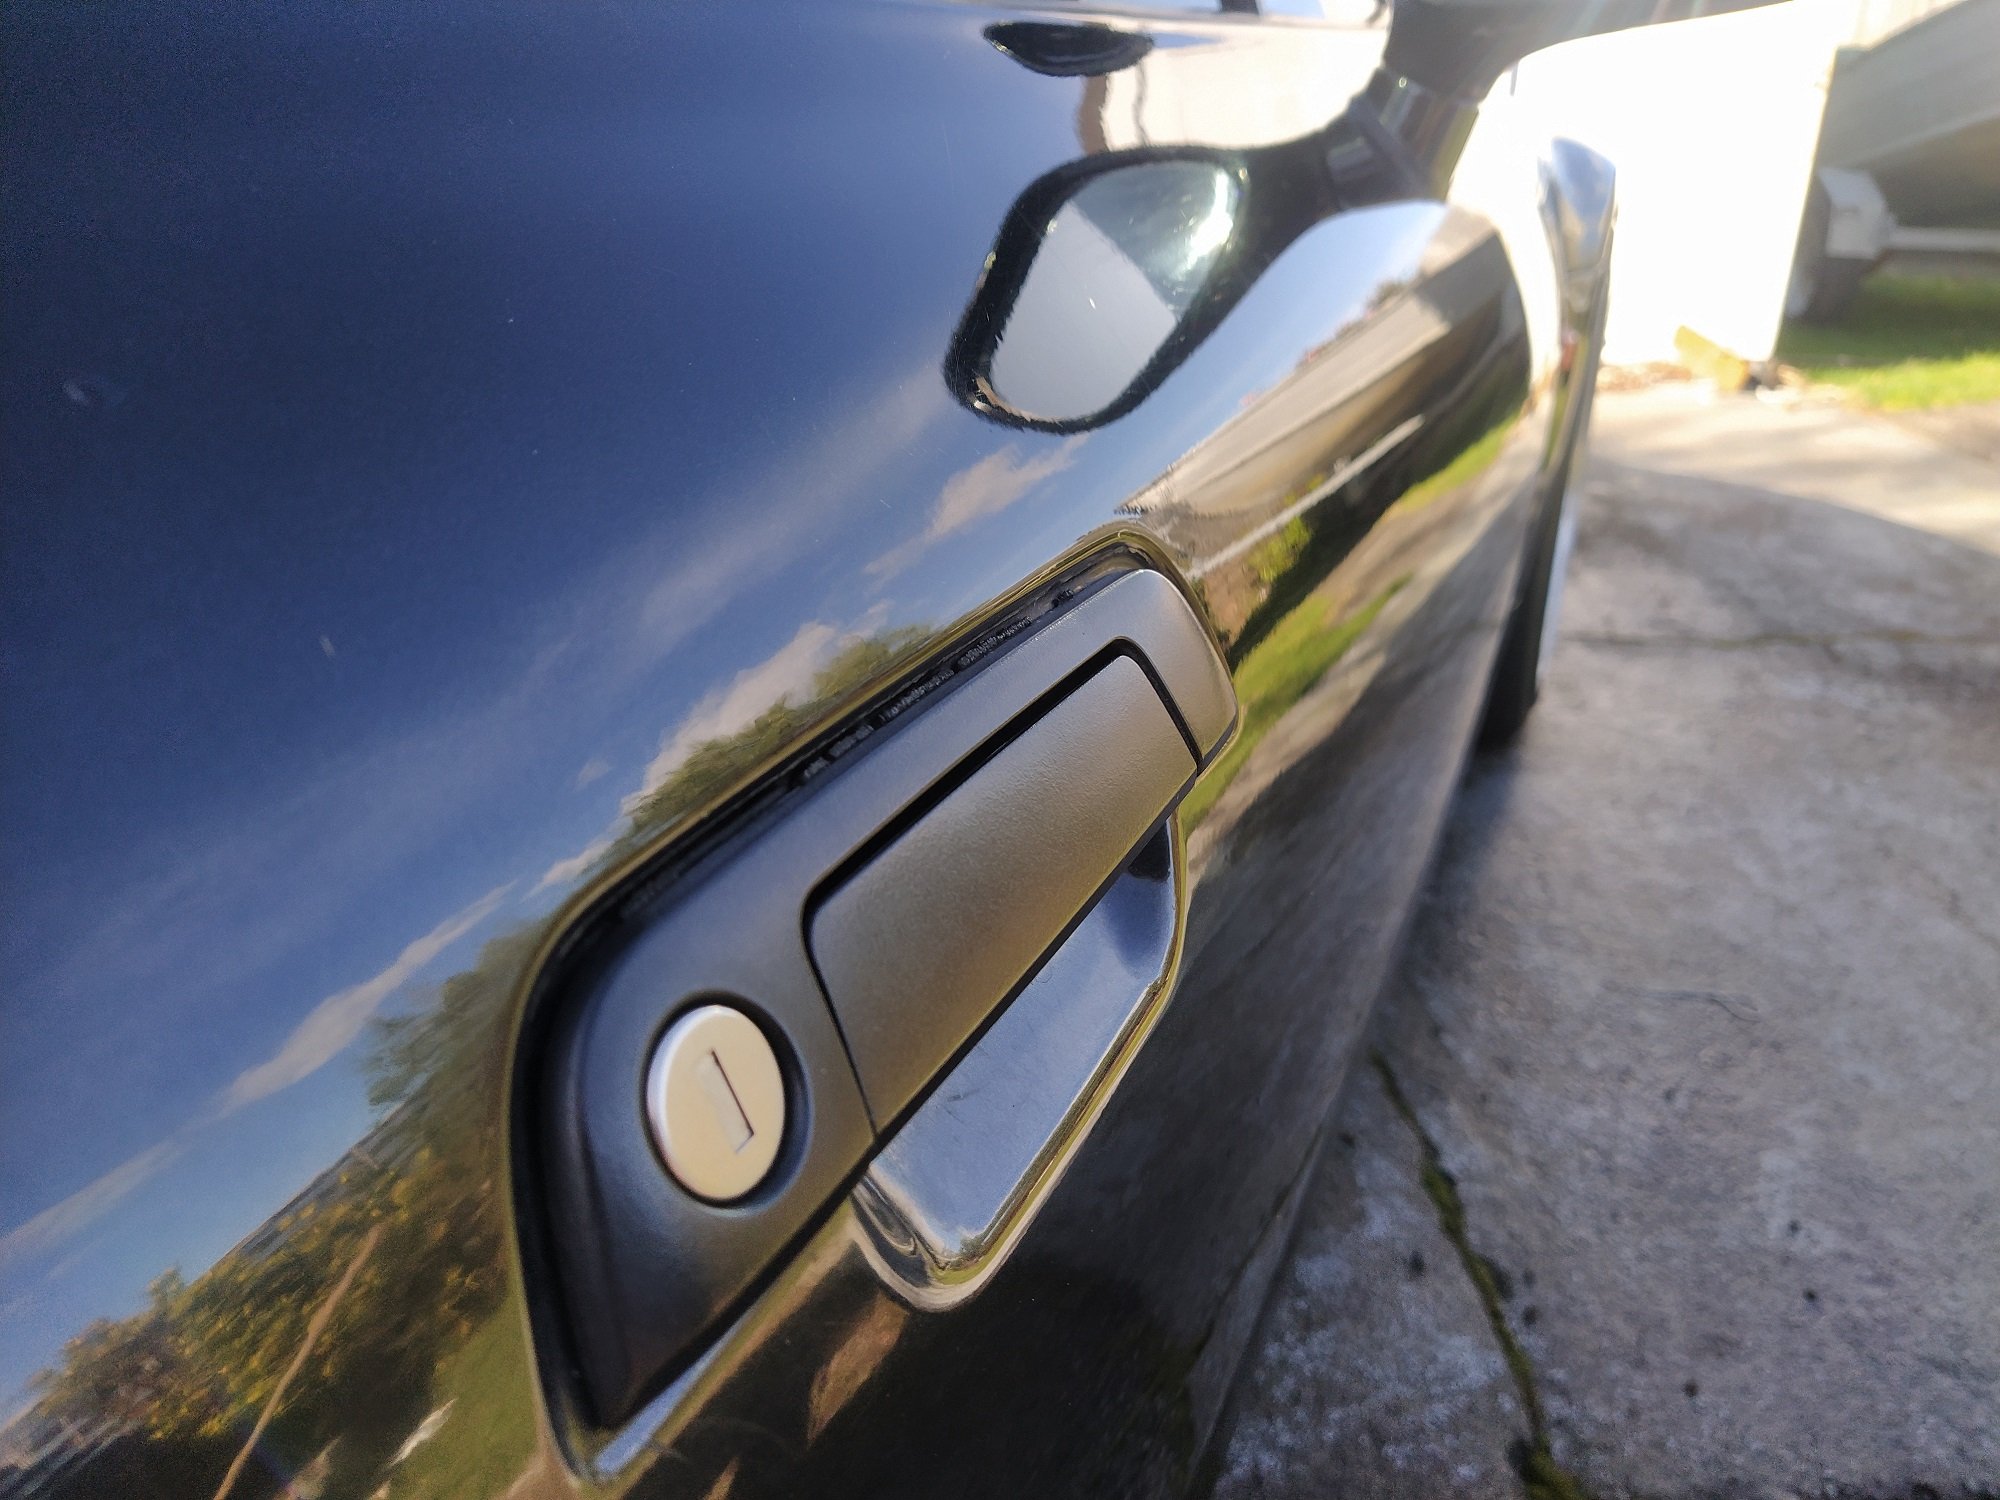
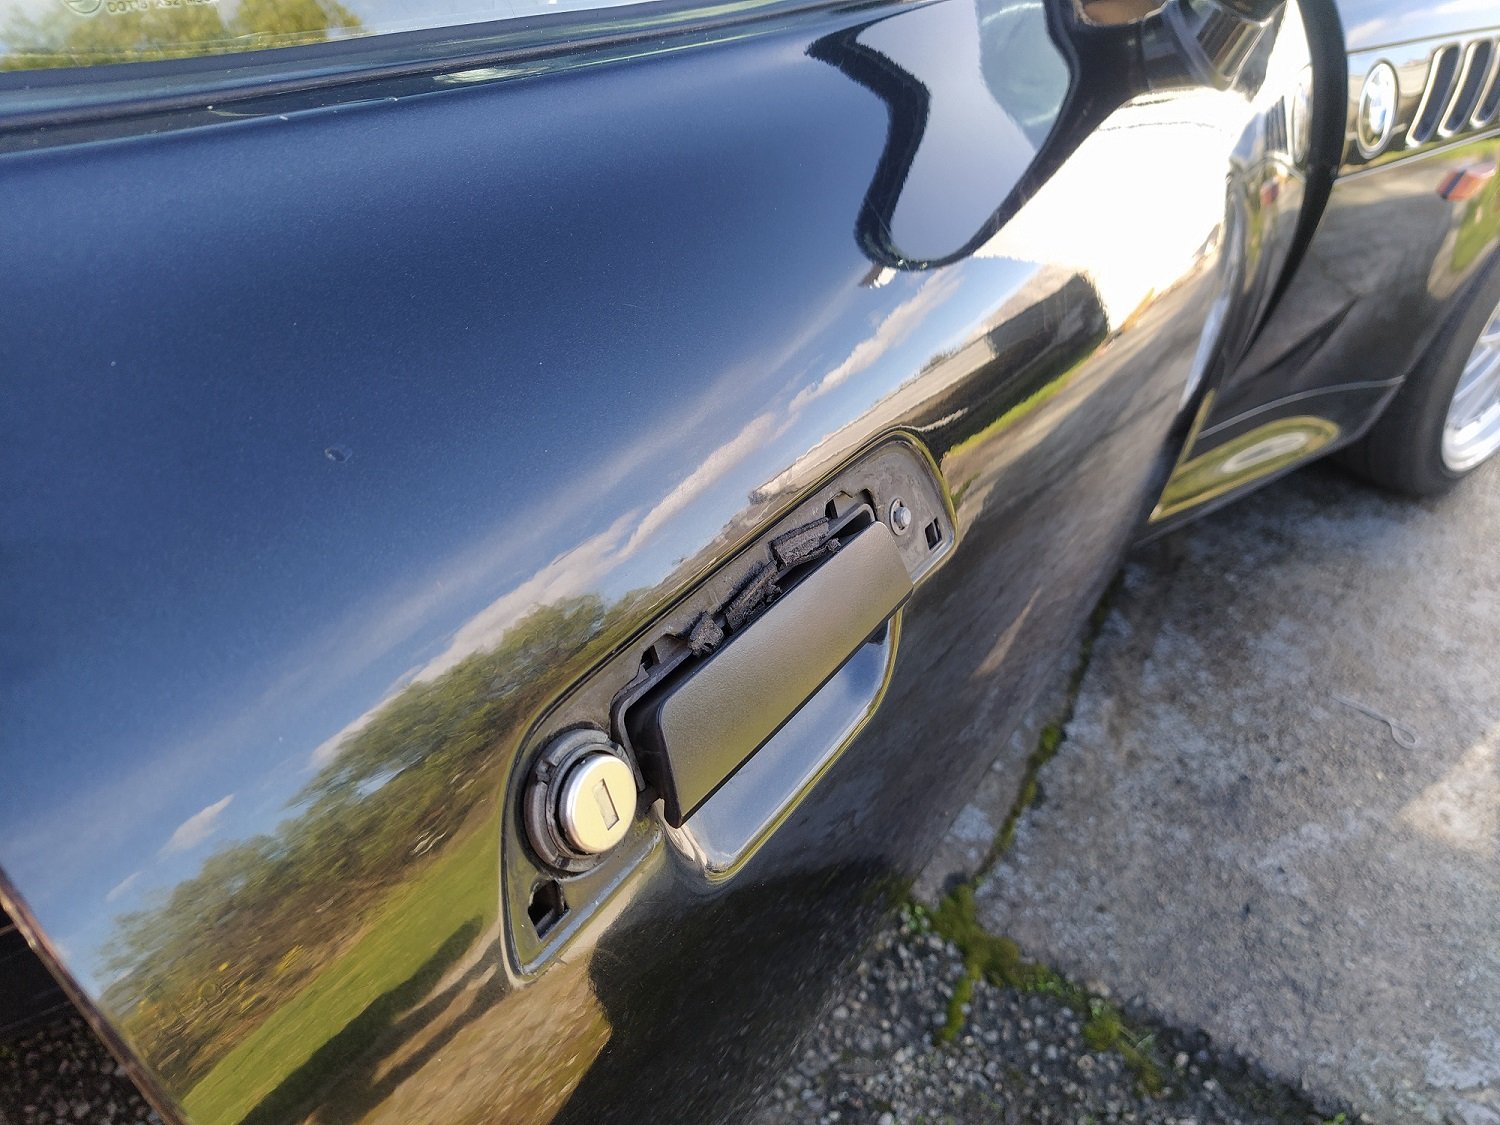
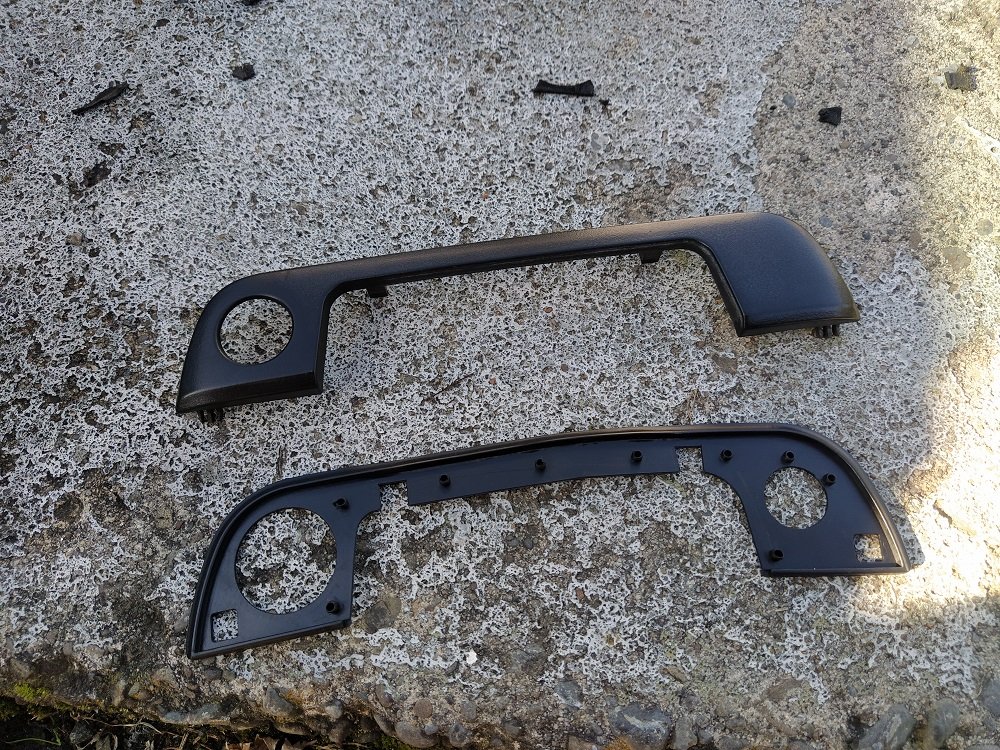
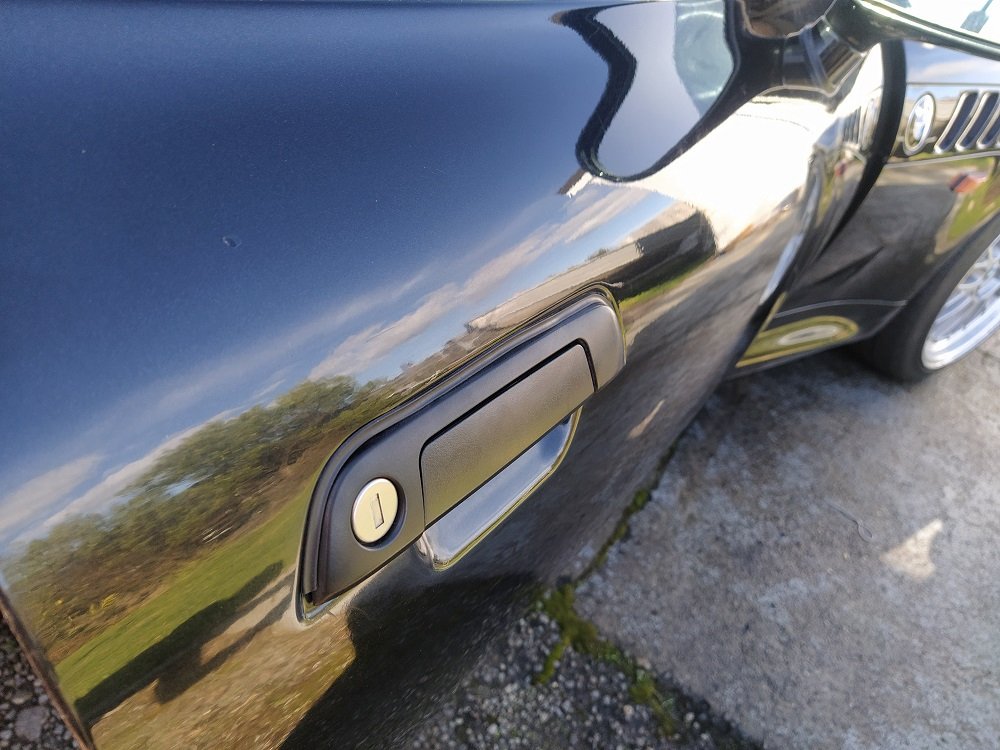
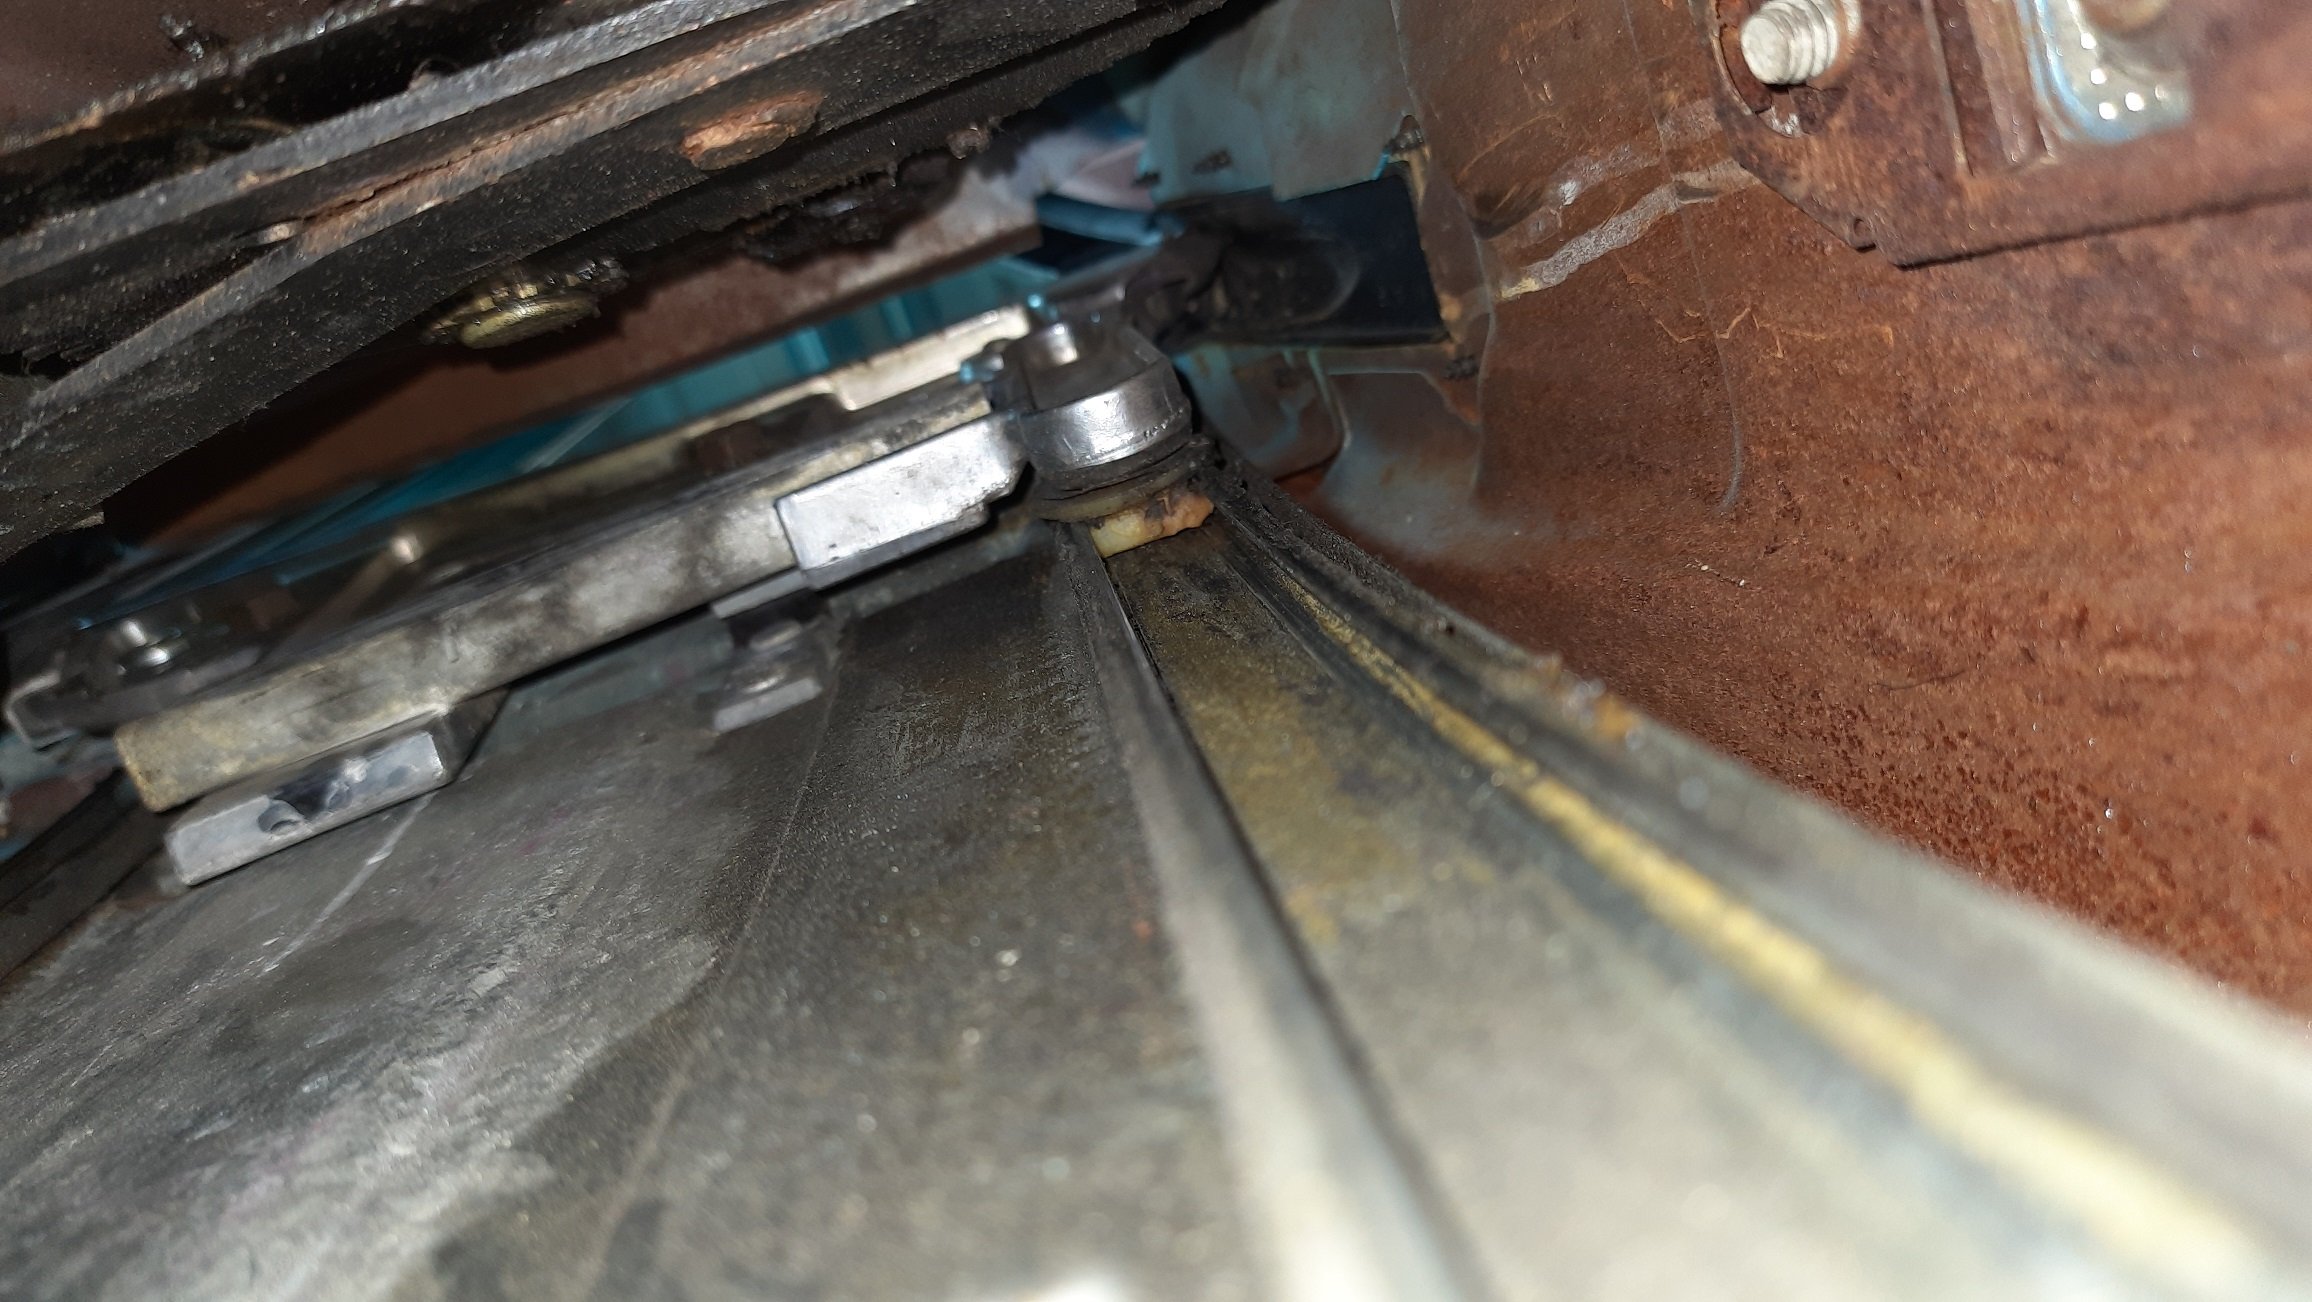
Decided to have a quick look at why the rear windows don't go down. Started by pulling out the seats and then side trim The previous owner really liked house insulation, not sure if it is achieving much The side panels are actually metal. Mustang guys probably knew that but news to me. I can see why you'd insulate it but dynomat or similar would be better. Later project. Can see how the window system bolts in and also (badly focused) the inertia reel. What you can't see is the rollers on the bell crank came off the fixed and moving sliders. Still can't see it here but it was wedged at the top behind the inertia reel. I think the belts were probably fixed and inertia reels added and there may be an interference problem but getting the rollers back on proved to be a bitch. I got one back on the window but not the fixed slider and then removed the roller to see if I could set that first and probably made things worse. I probably need new rollers and to actually remove the system and clean it all up. I could then also clean up the red stuff inside the panel while I'm at it and cavity wax it all. I think there will need to be a take two. Did manage to slide the window down by hand though. Secure as.
1 point
-
keep the top links parallel if you are going to run a watts or panhard. best only do a triangulated setup for packaging, ie cant fit a panhard or watts link. also be careful with the angles of the arms. they don't need to be out much to effect handling or straight line grip. having a range of holes at one end or the other for some adjustment, is a good idea. there was some decent info online about angles etc last time i looked1 point
-
how much does a 2L pinto weigh?? with crank handle, extra flints, spare wick, 35 liters of spare oil (recommended by ford to be carried at all times your journey is going to be more than 100 meters) spare rubber band and exxon valdez size enviromental spill recovery kit. 435 tons, perfect for stopping your boat from floating away even during the biggest storms. i cant think what else you'd want to use one for...... sheepers.1 point


This leaderboard is set to Auckland/GMT+12:00