
Leaderboard


Popular Content
Showing content with the highest reputation on 12/27/22 in all areas
-
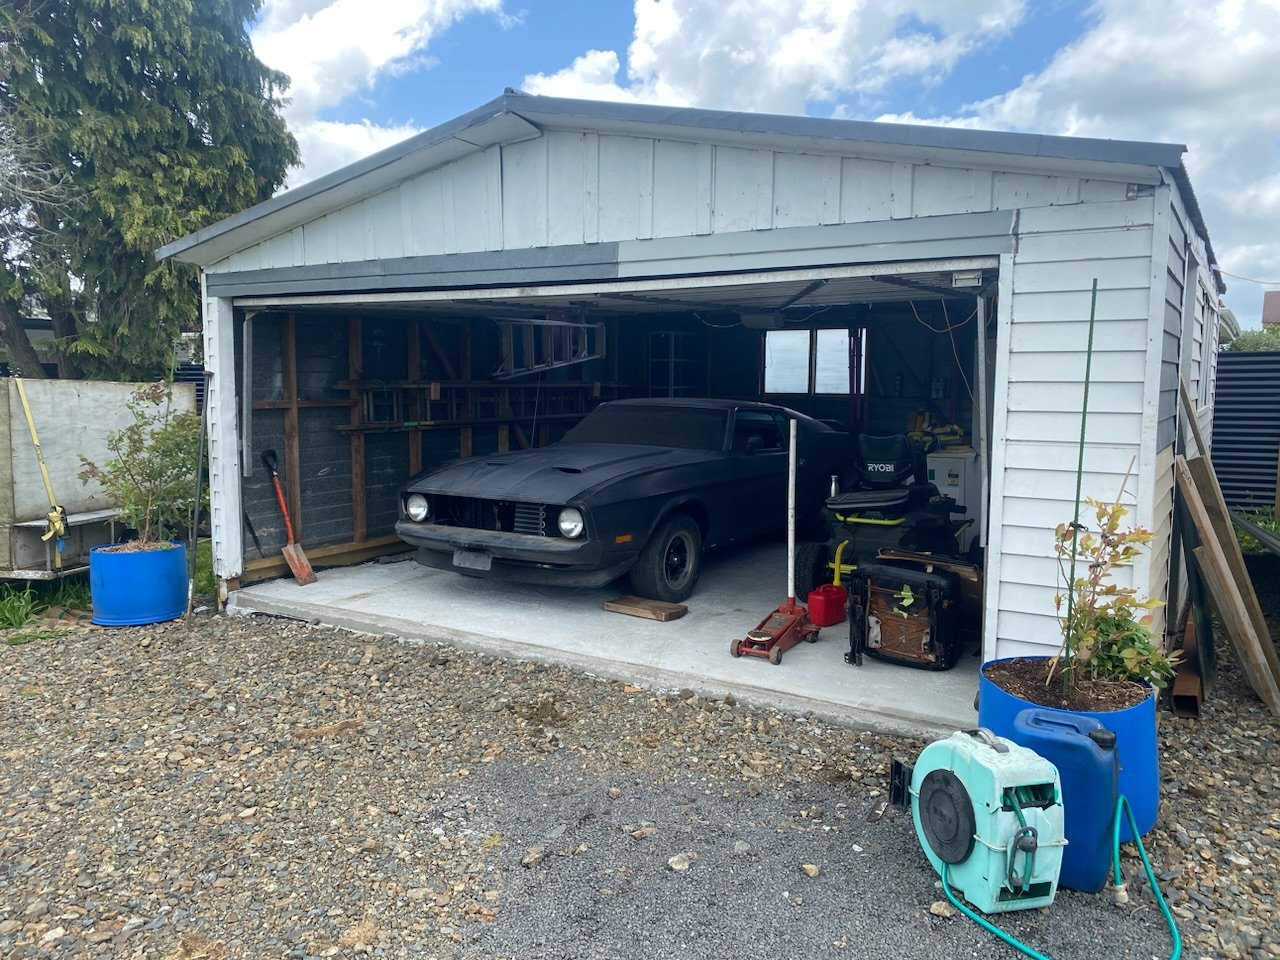
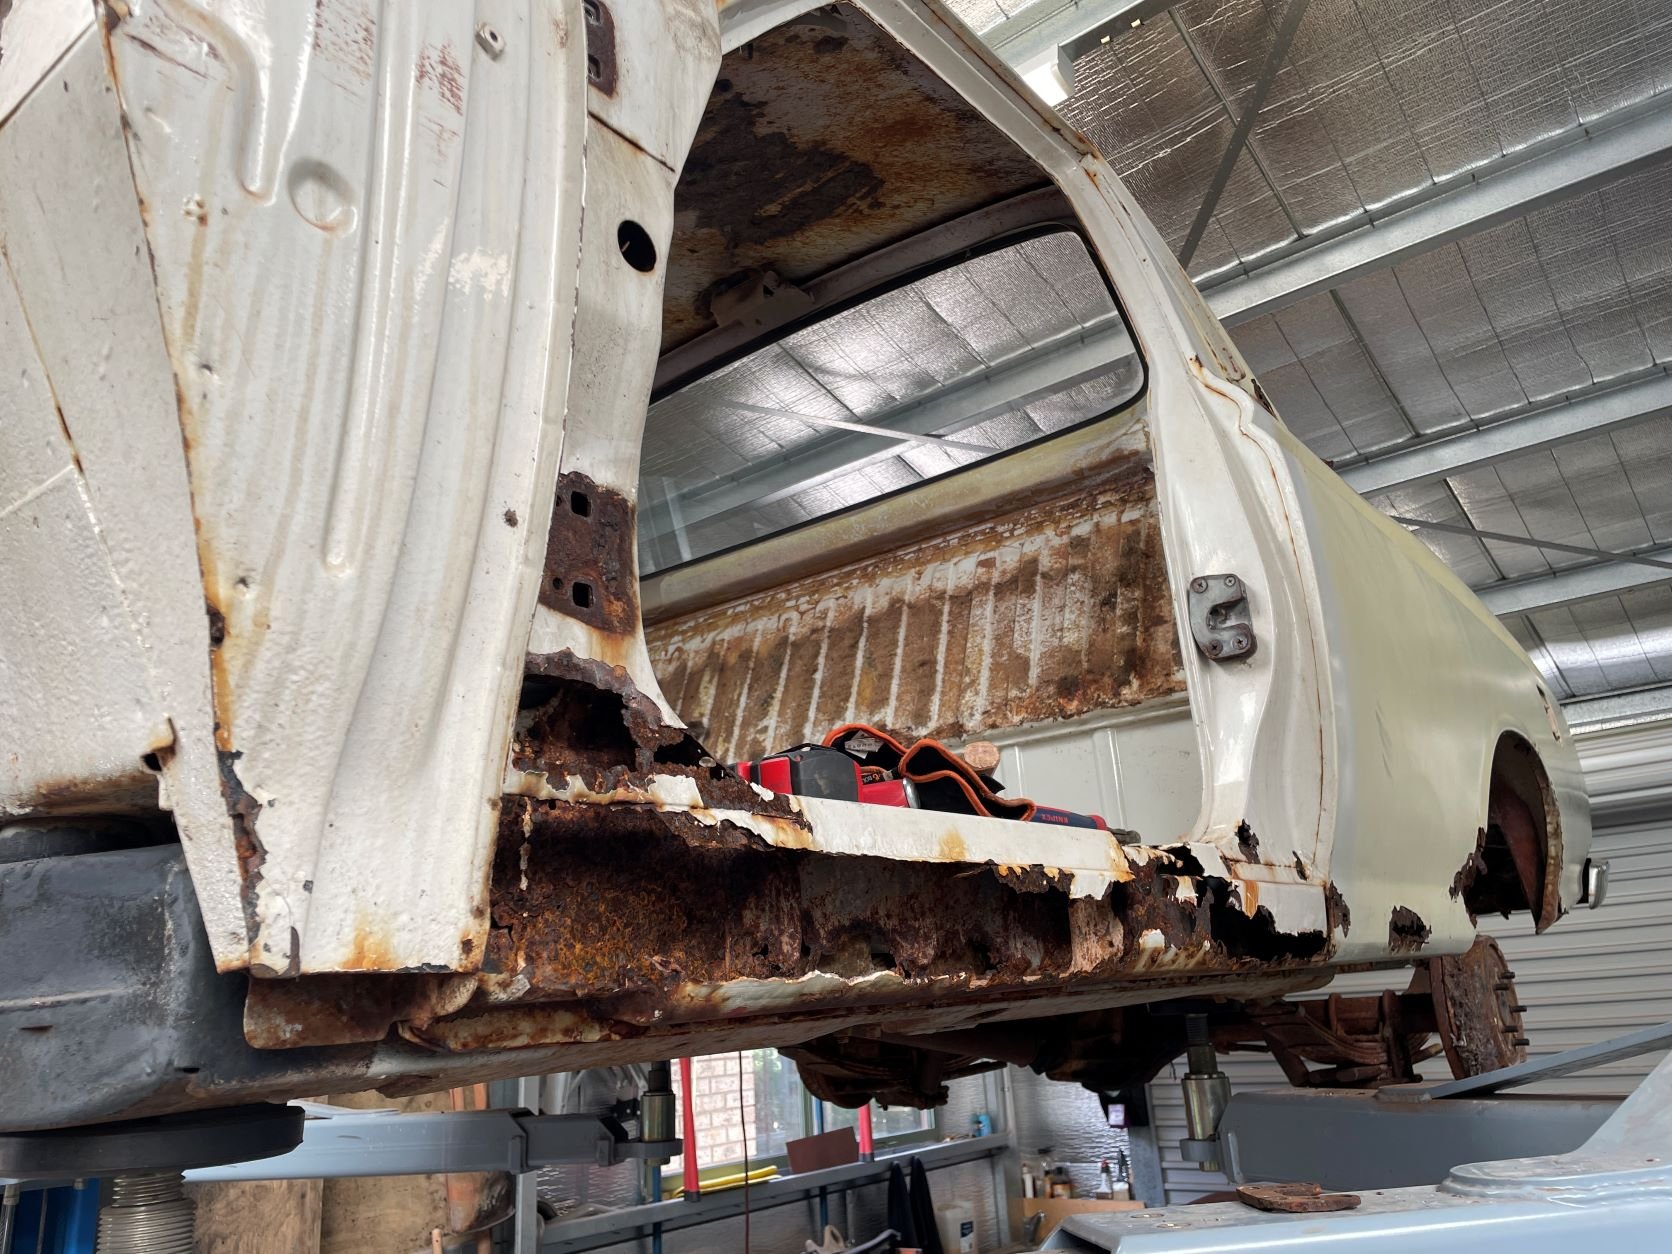
Another few hours in the garage today, doors are assembled and hung properly. Almost forgot to spray underbody deadener in the guards! Smashed some more cavity wax in the doors and guard structure and my face. The guts of the fittings for the tail lights and rear panel are a bit flogged out so I’ll have to get a kit, half of them holding for now.28 points
-
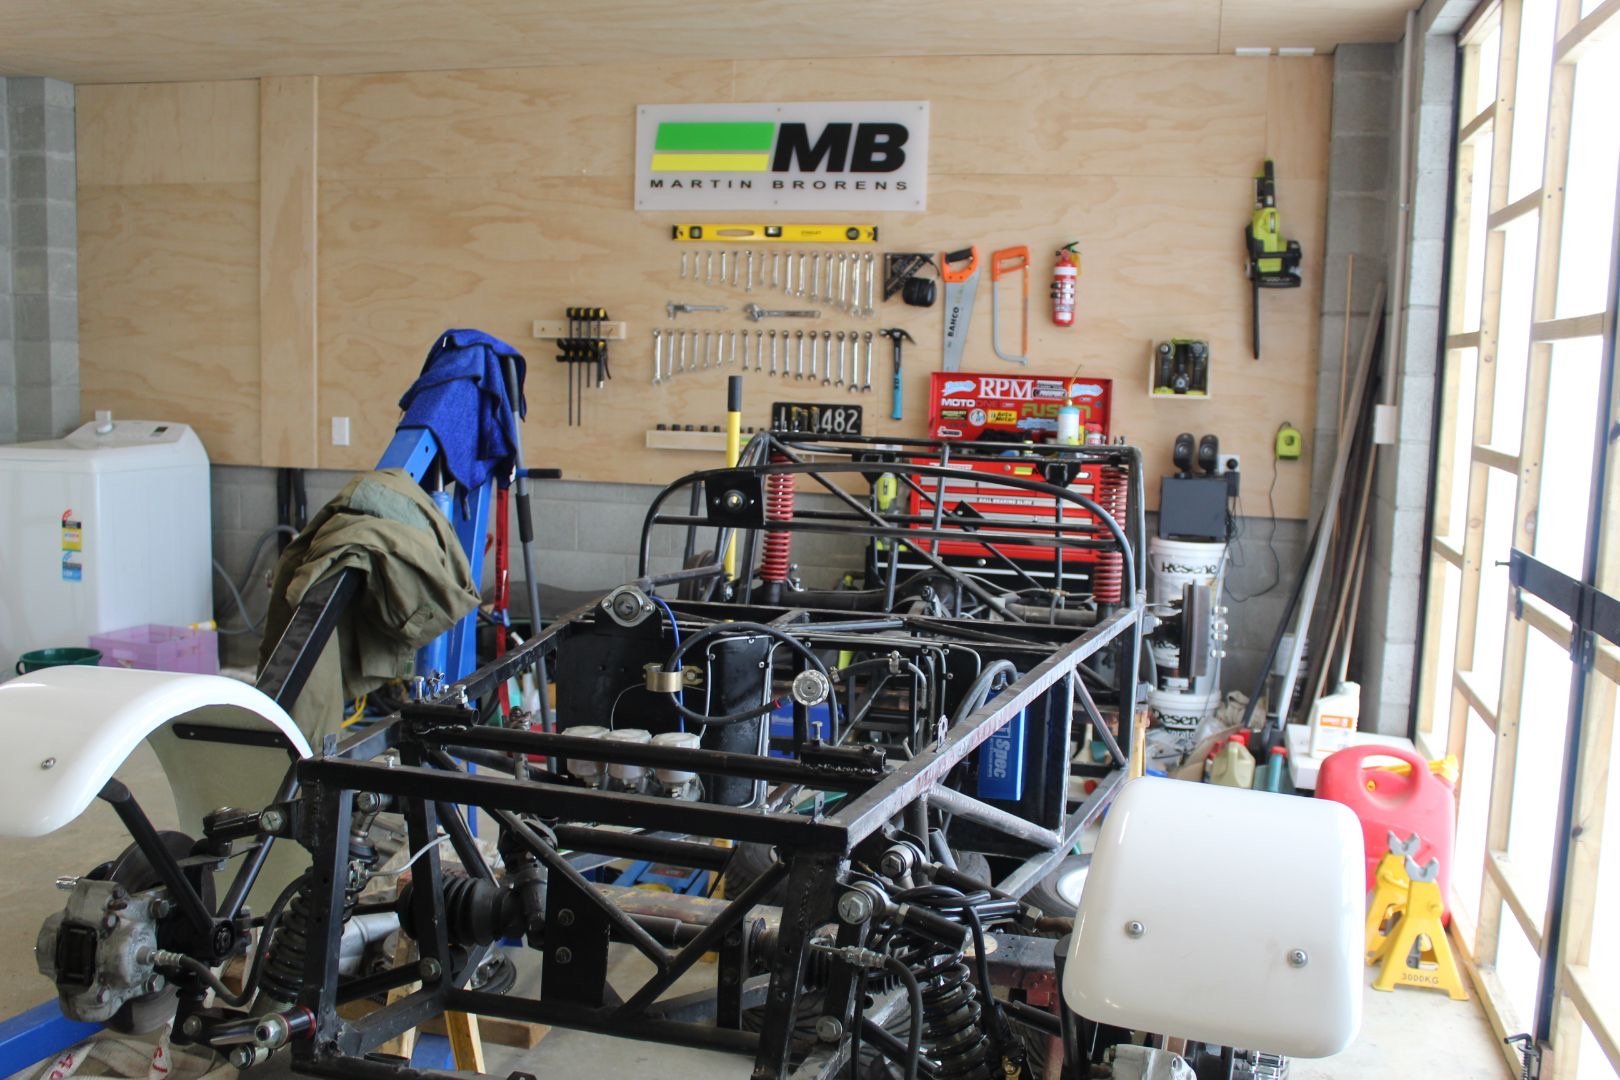
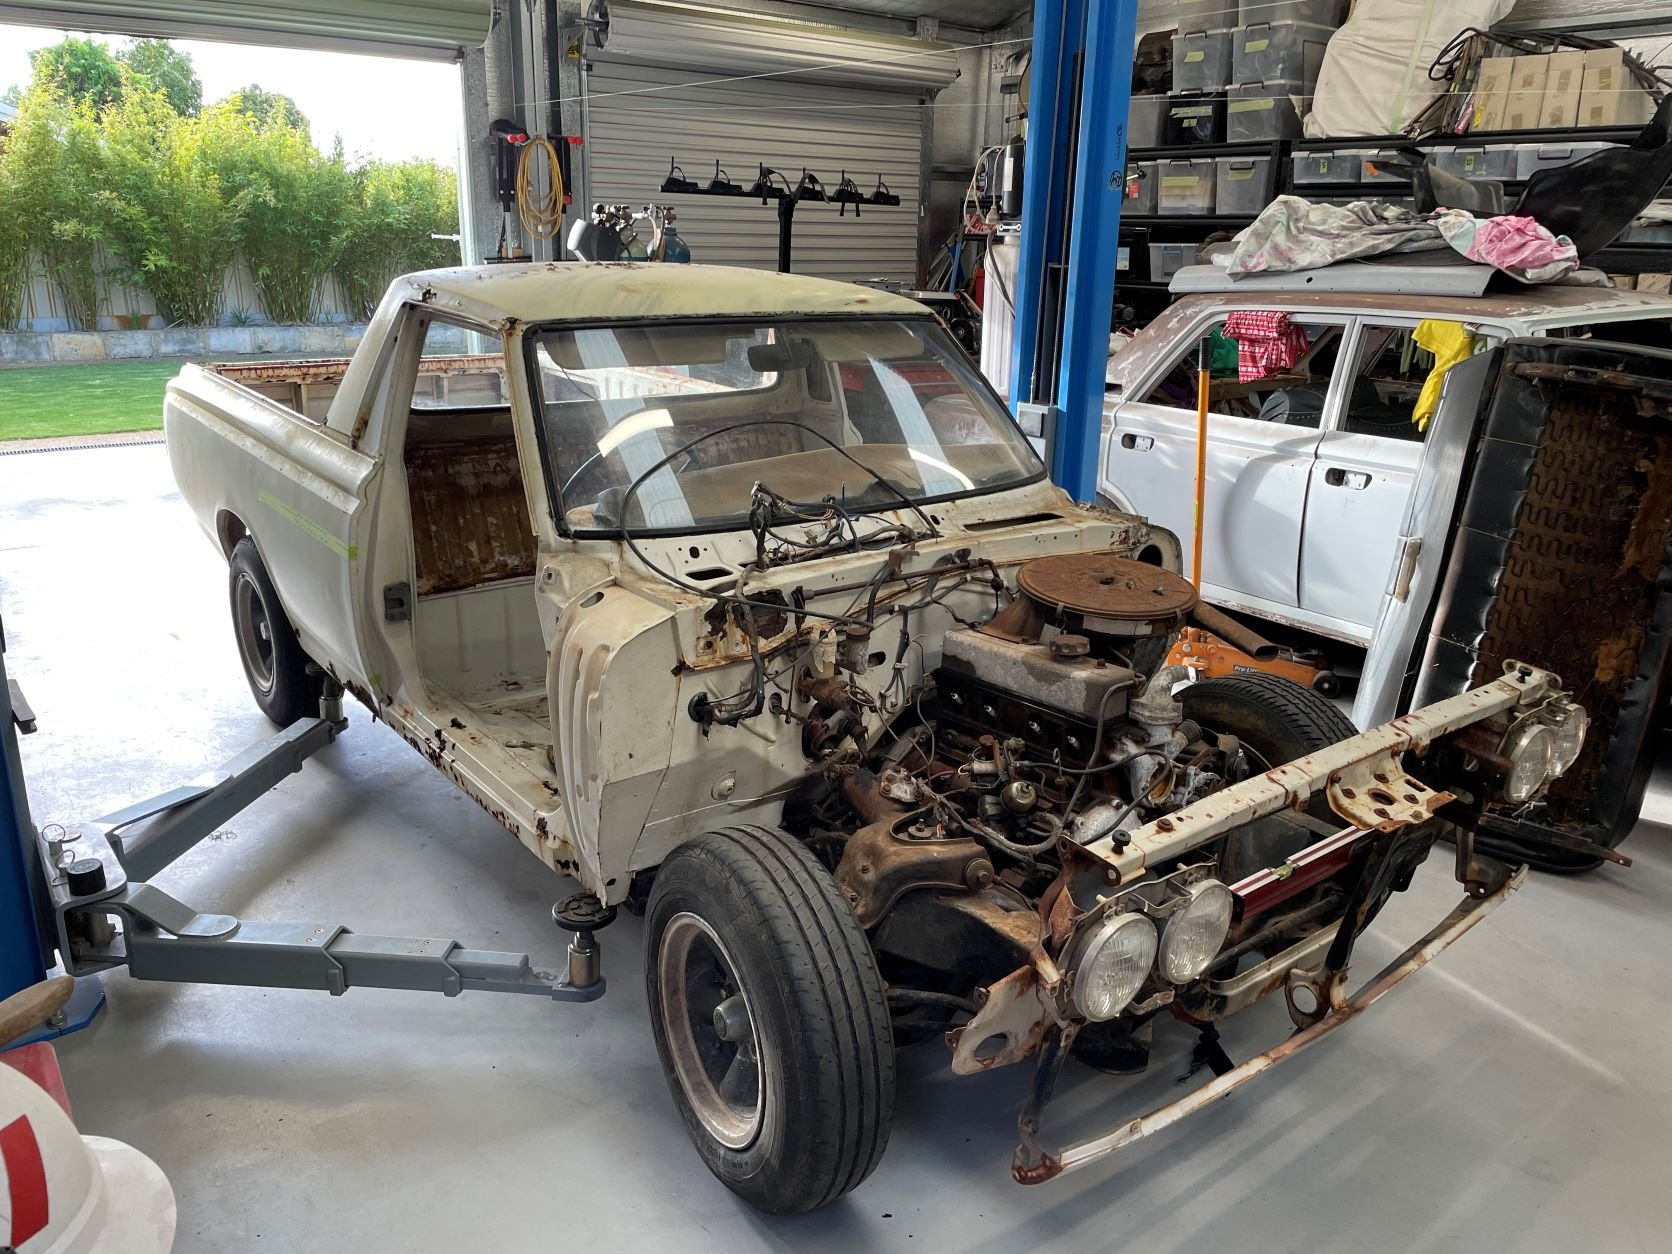
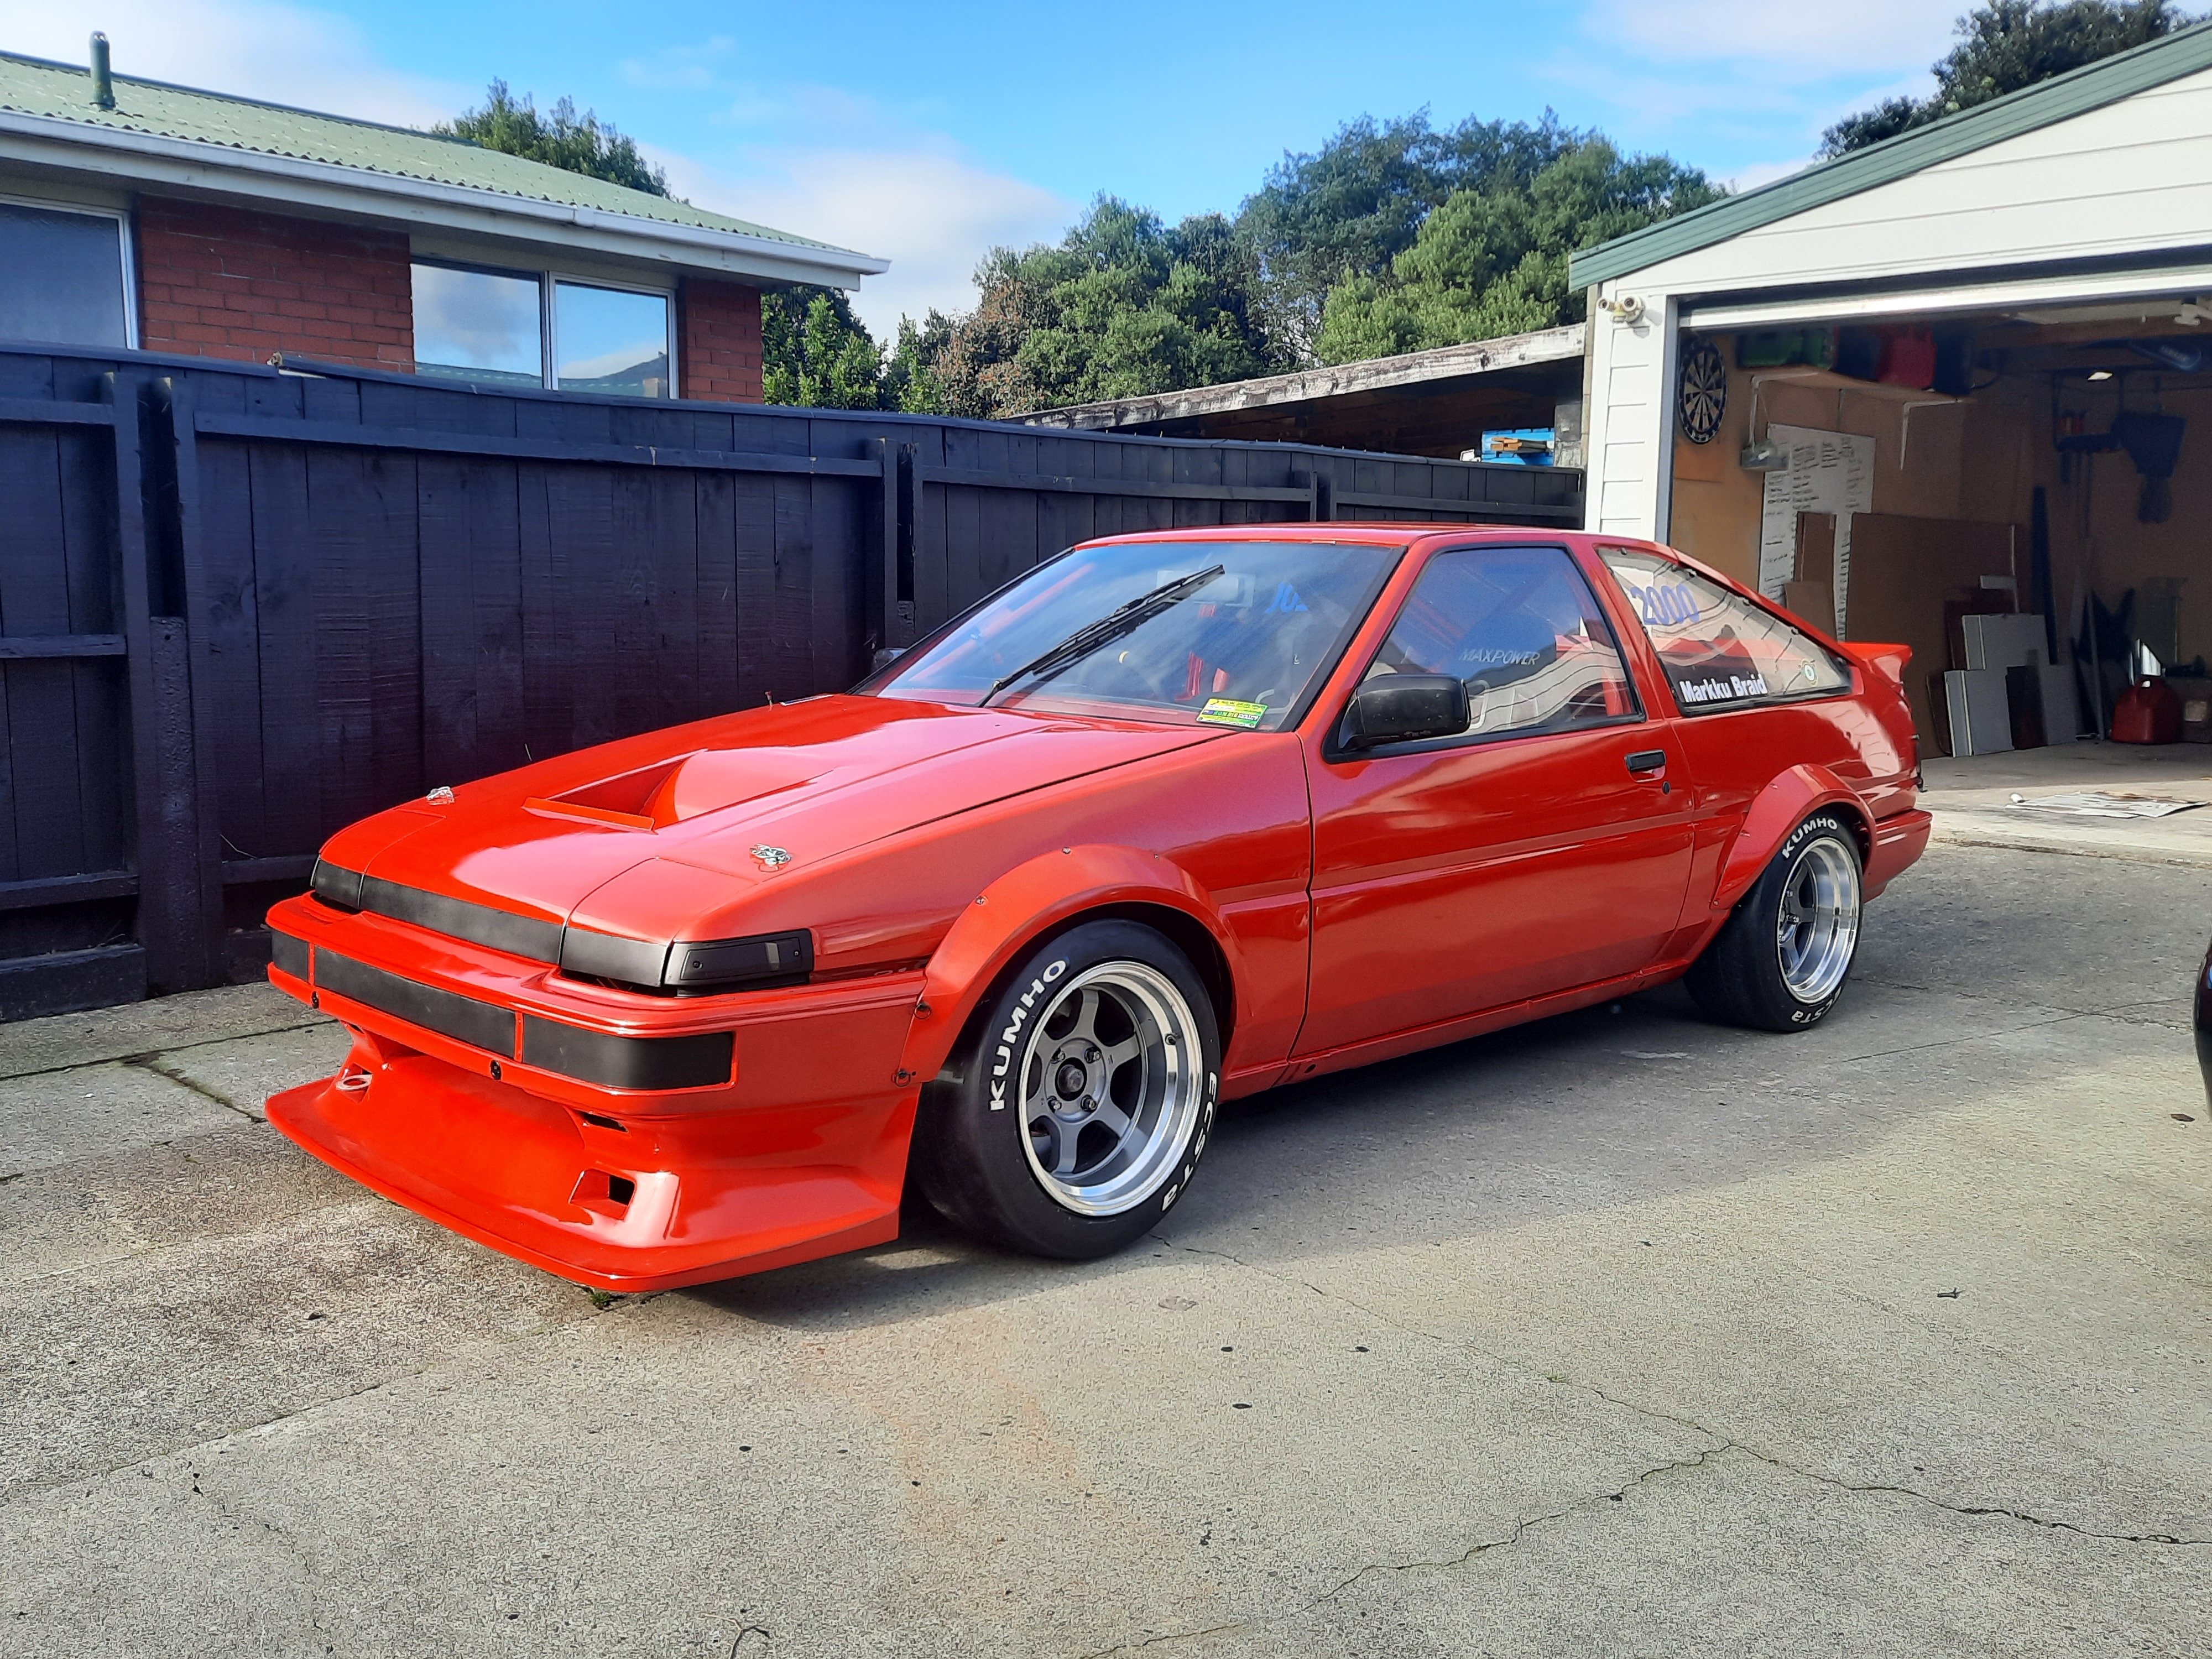
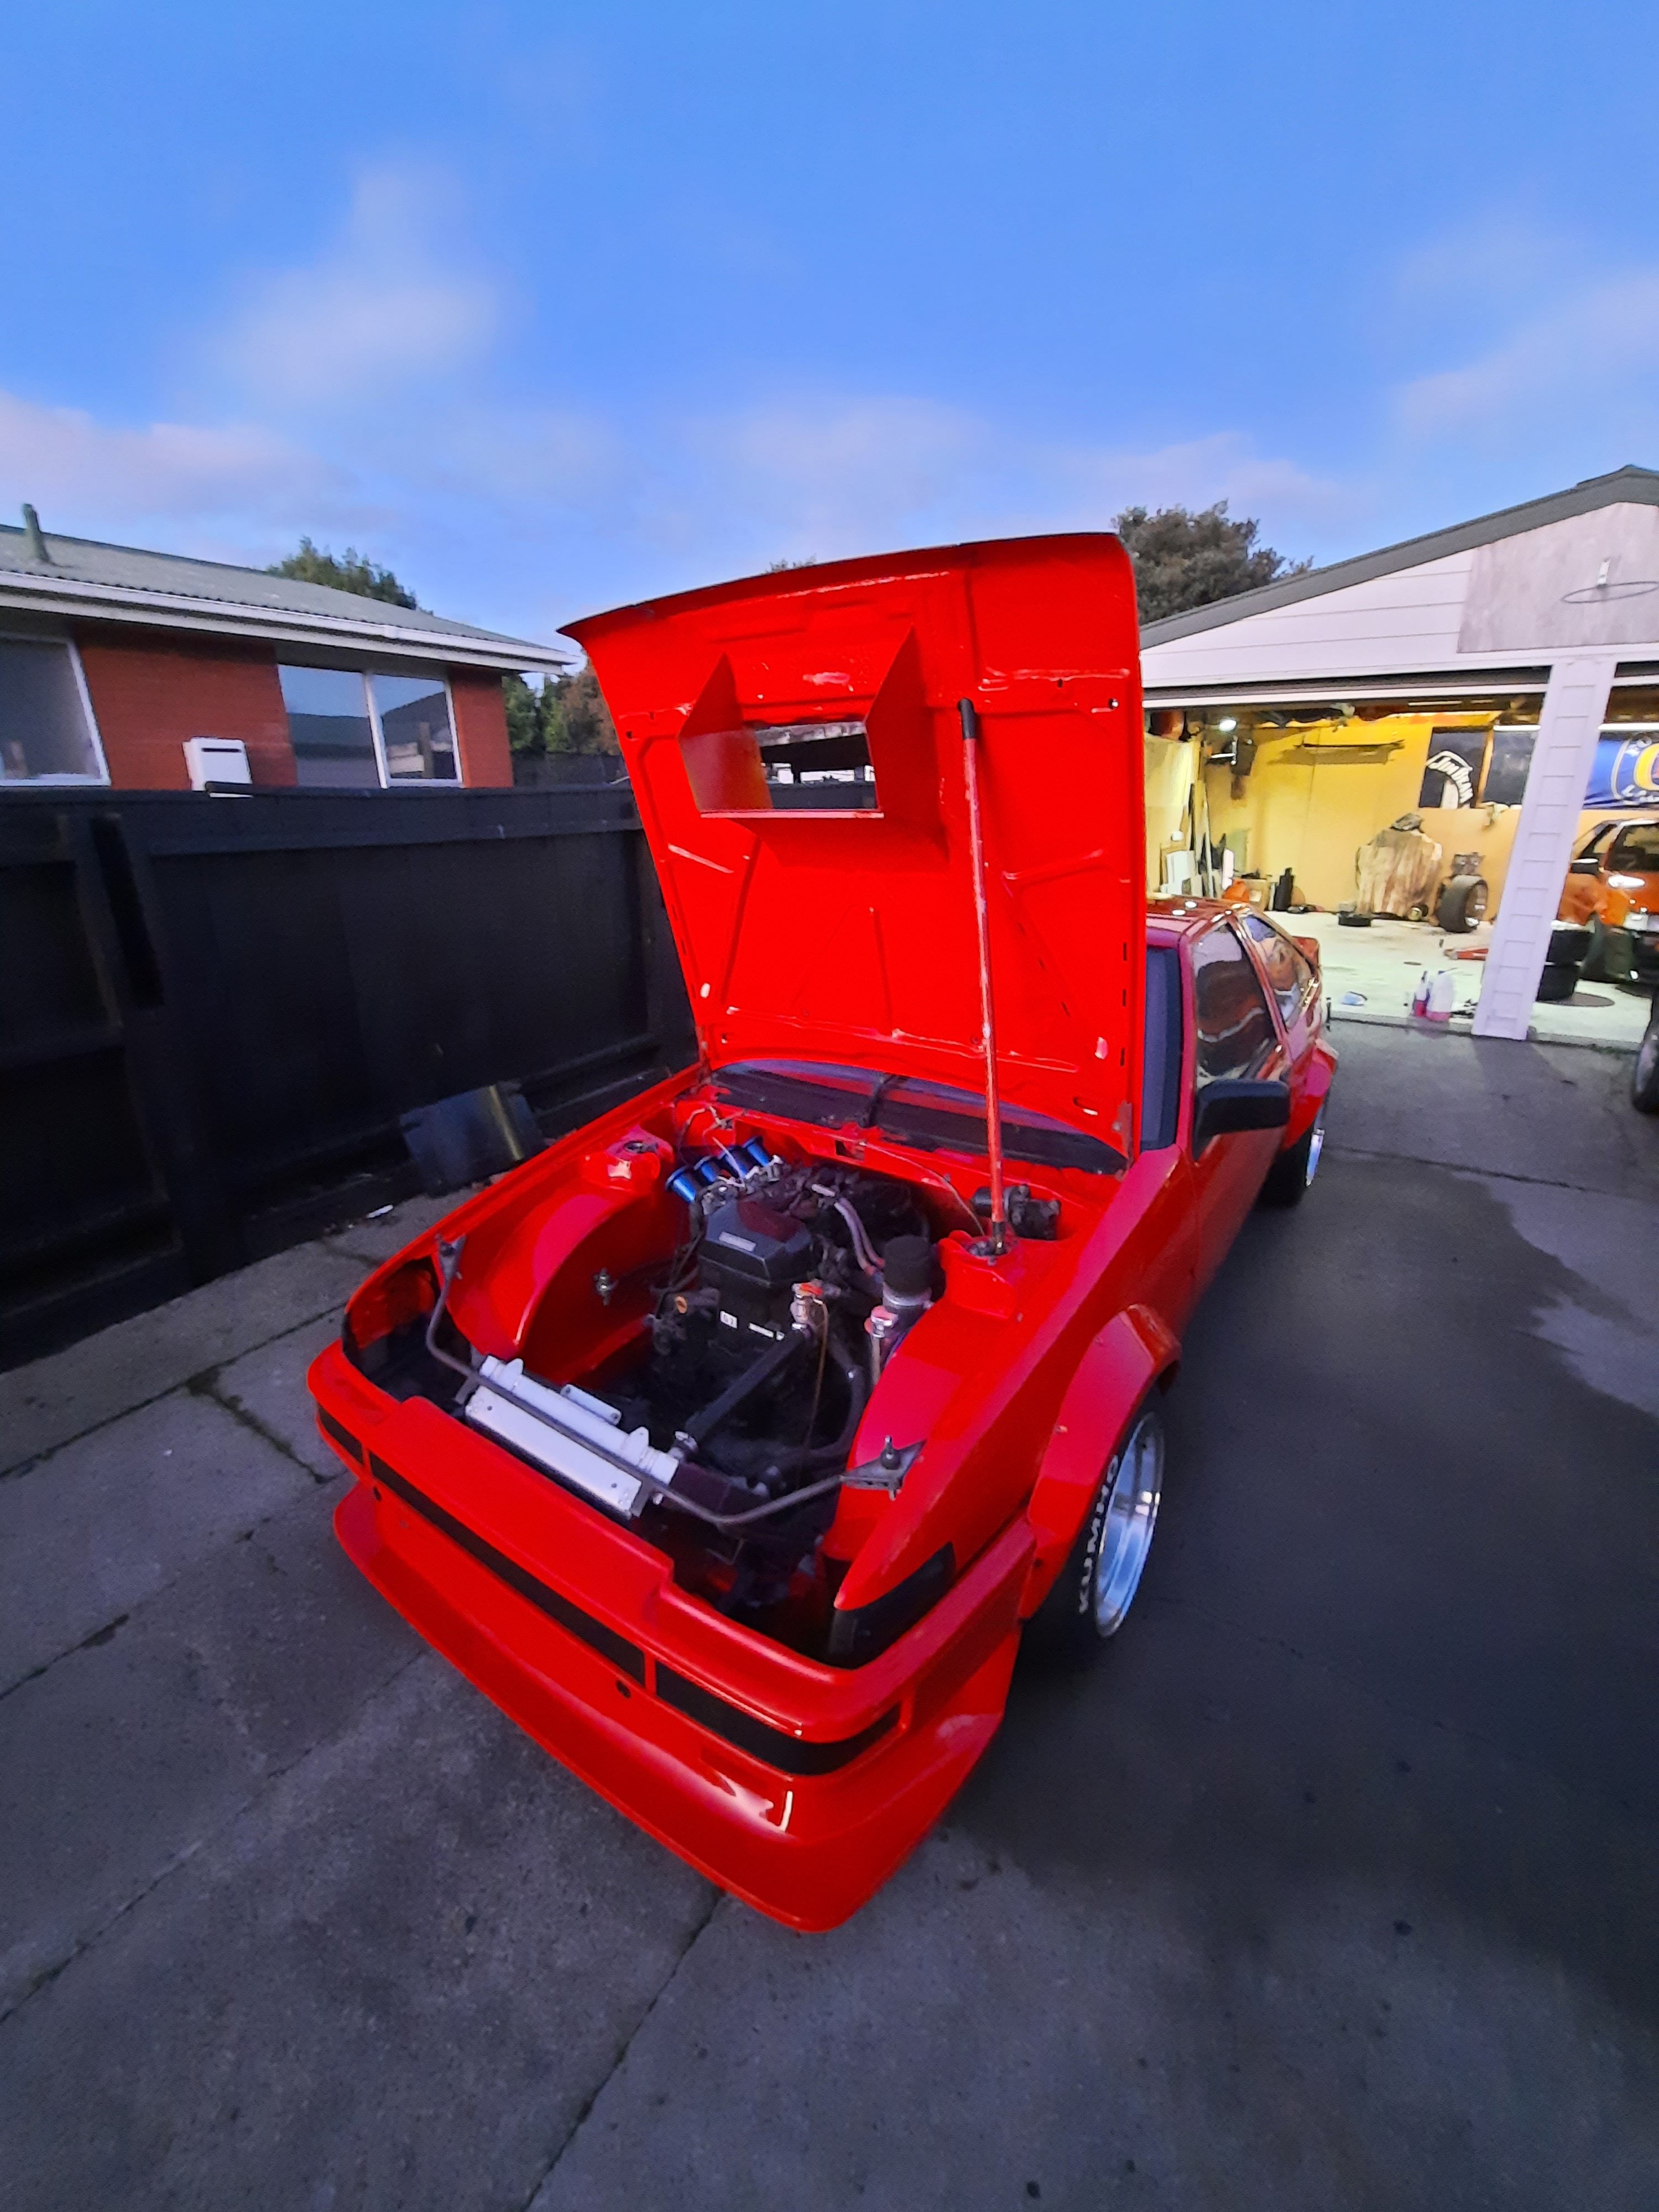
I am genuinely humbled with my amazing friends. @Seedy Al@Goat@JasonK who all turned up this morning to help me do some stuff that my aging body just struggles to do, especially on my back (giggidy) . We did a solid 6 hours work, fitting gearbox, making brake lines, mounting fuel pump and filter plus a multitude of small shit I cannot even remember. Thank you so much to you guys for the motivation ♥♥♥, your enthusiasm, your getting shit done while I stood there and complained about my aches and pains. You have done in 1 day what would have taken me a solid 6 weeks of nights to do. For this, I am so very grateful. Love you guys and I hope your good ladies squeeze your buns and touch you in ways that I shouldn't. So now I have pretty much everything done under and outside the car that I need to get done and I move to doing the interior stuff and get as much of that in as I can before I ship it to the sparky for a rewire at the beginning of Feb. Some pics from today. Doesn't look like a lot from previous pics, but I can tell you that a metric fuck tonne got done. (2 olympic size swimming pools stacked to the top of an elephant on a double decker bus travelling to the moon to be precise) Dreamy Al.26 points
-
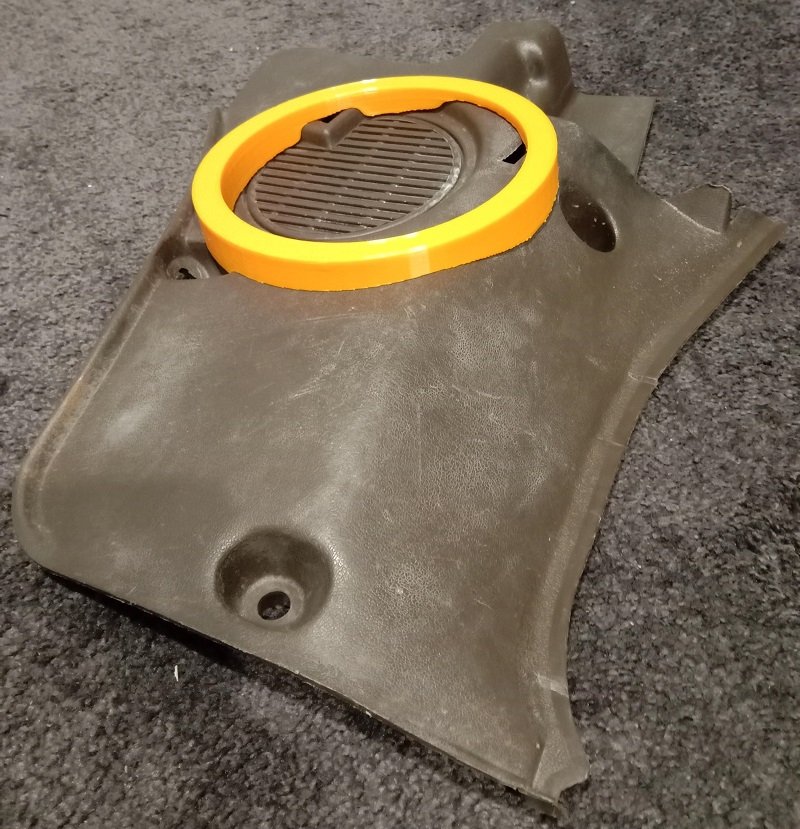
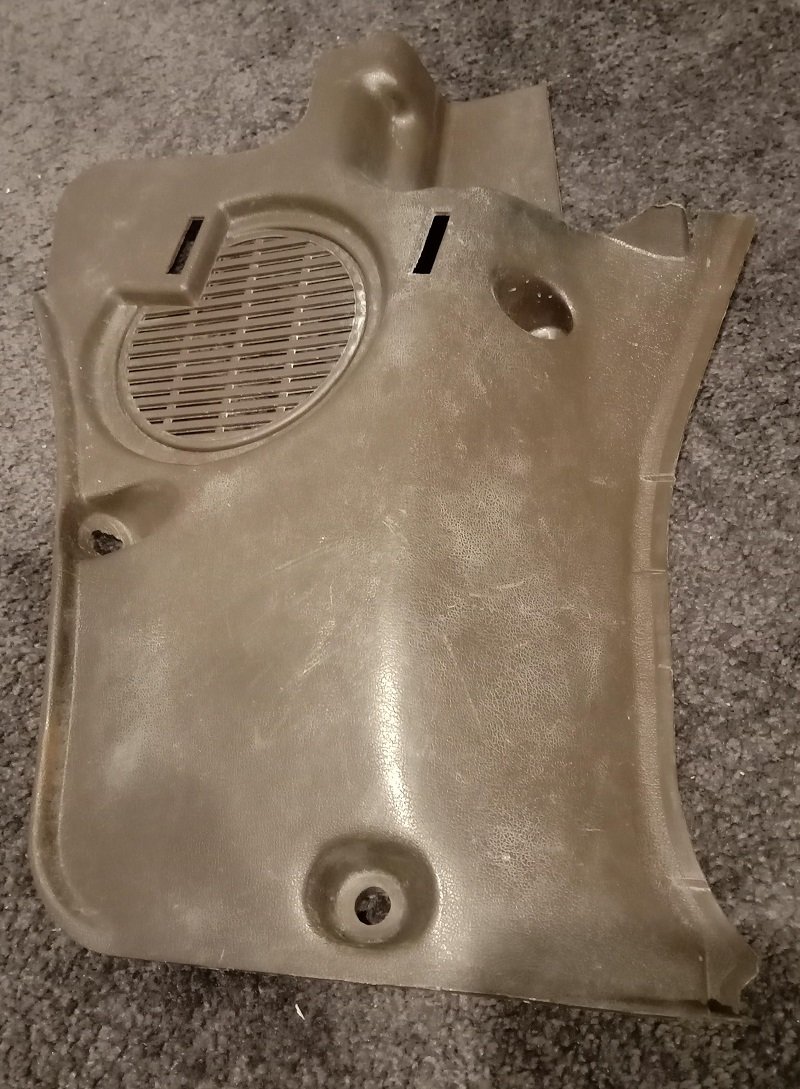
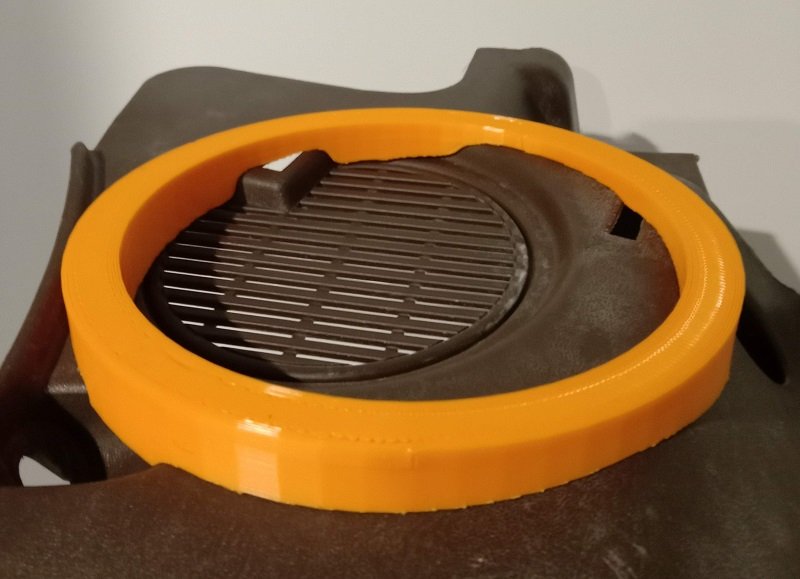
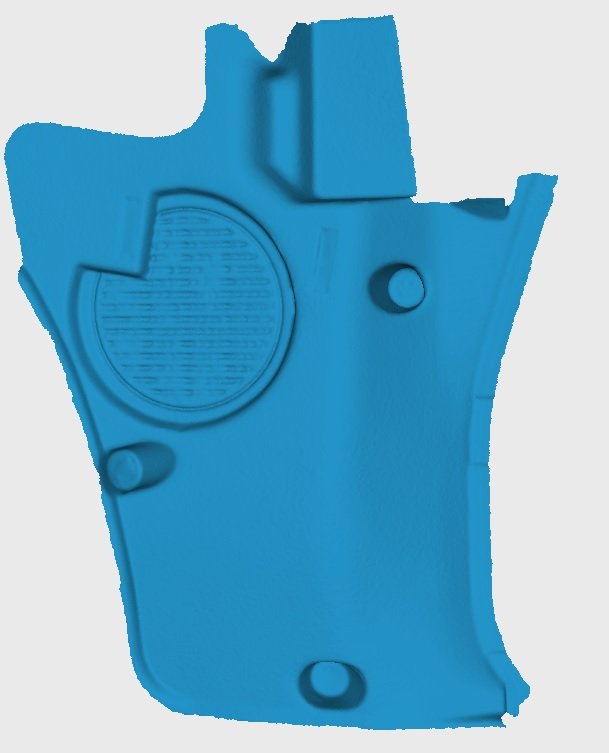
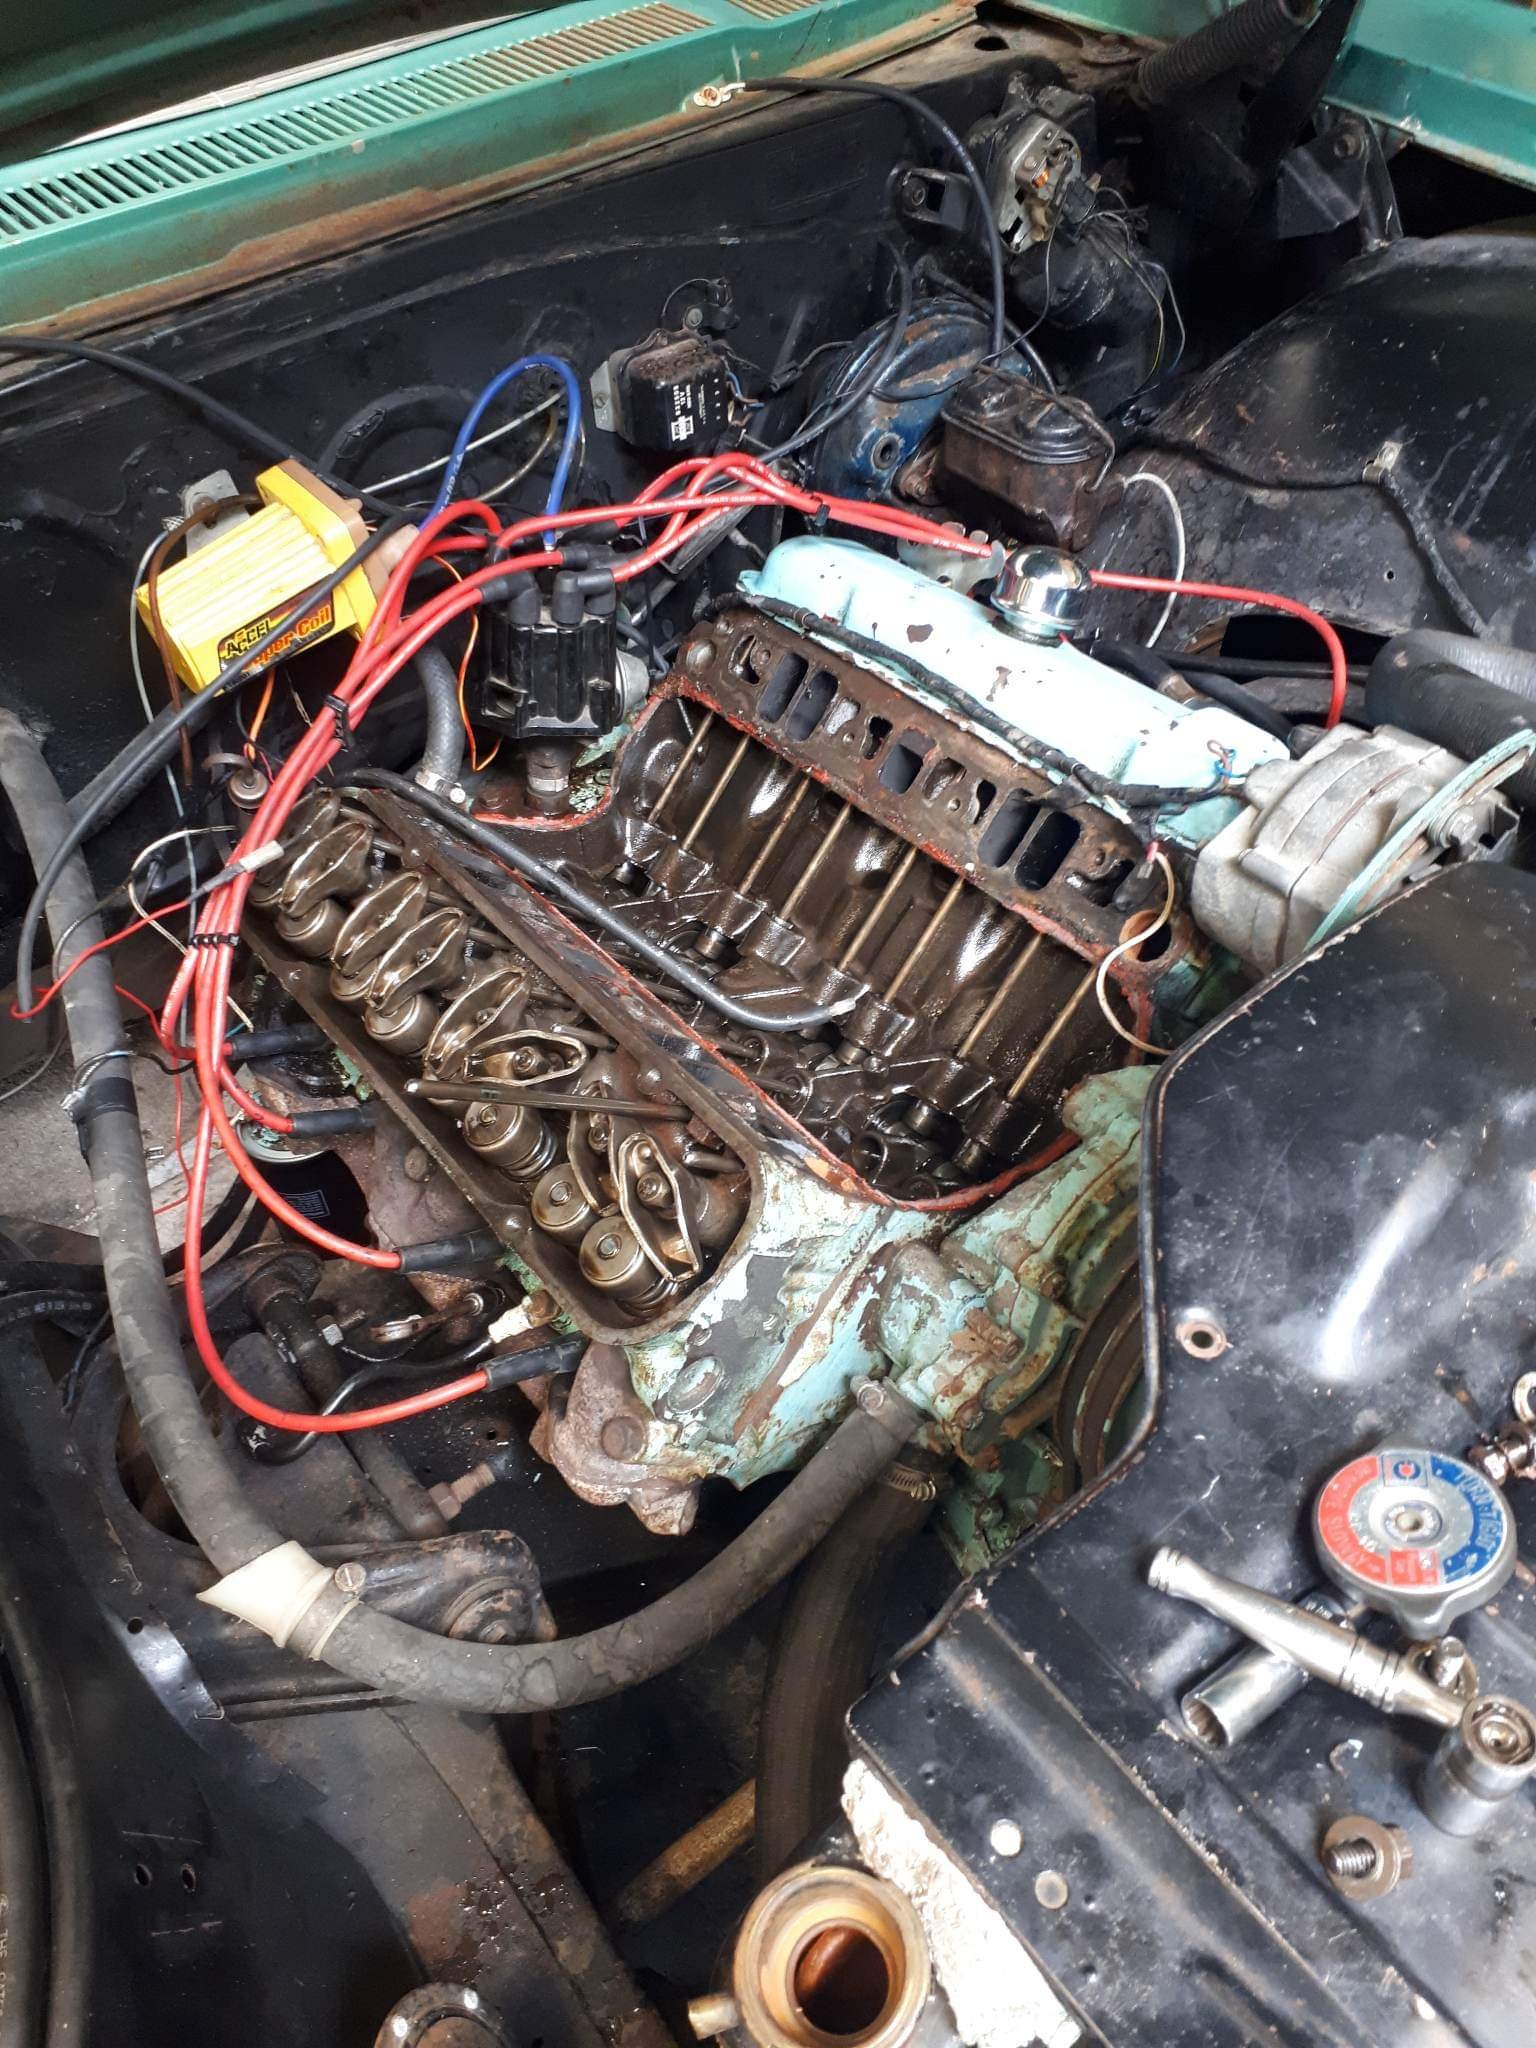
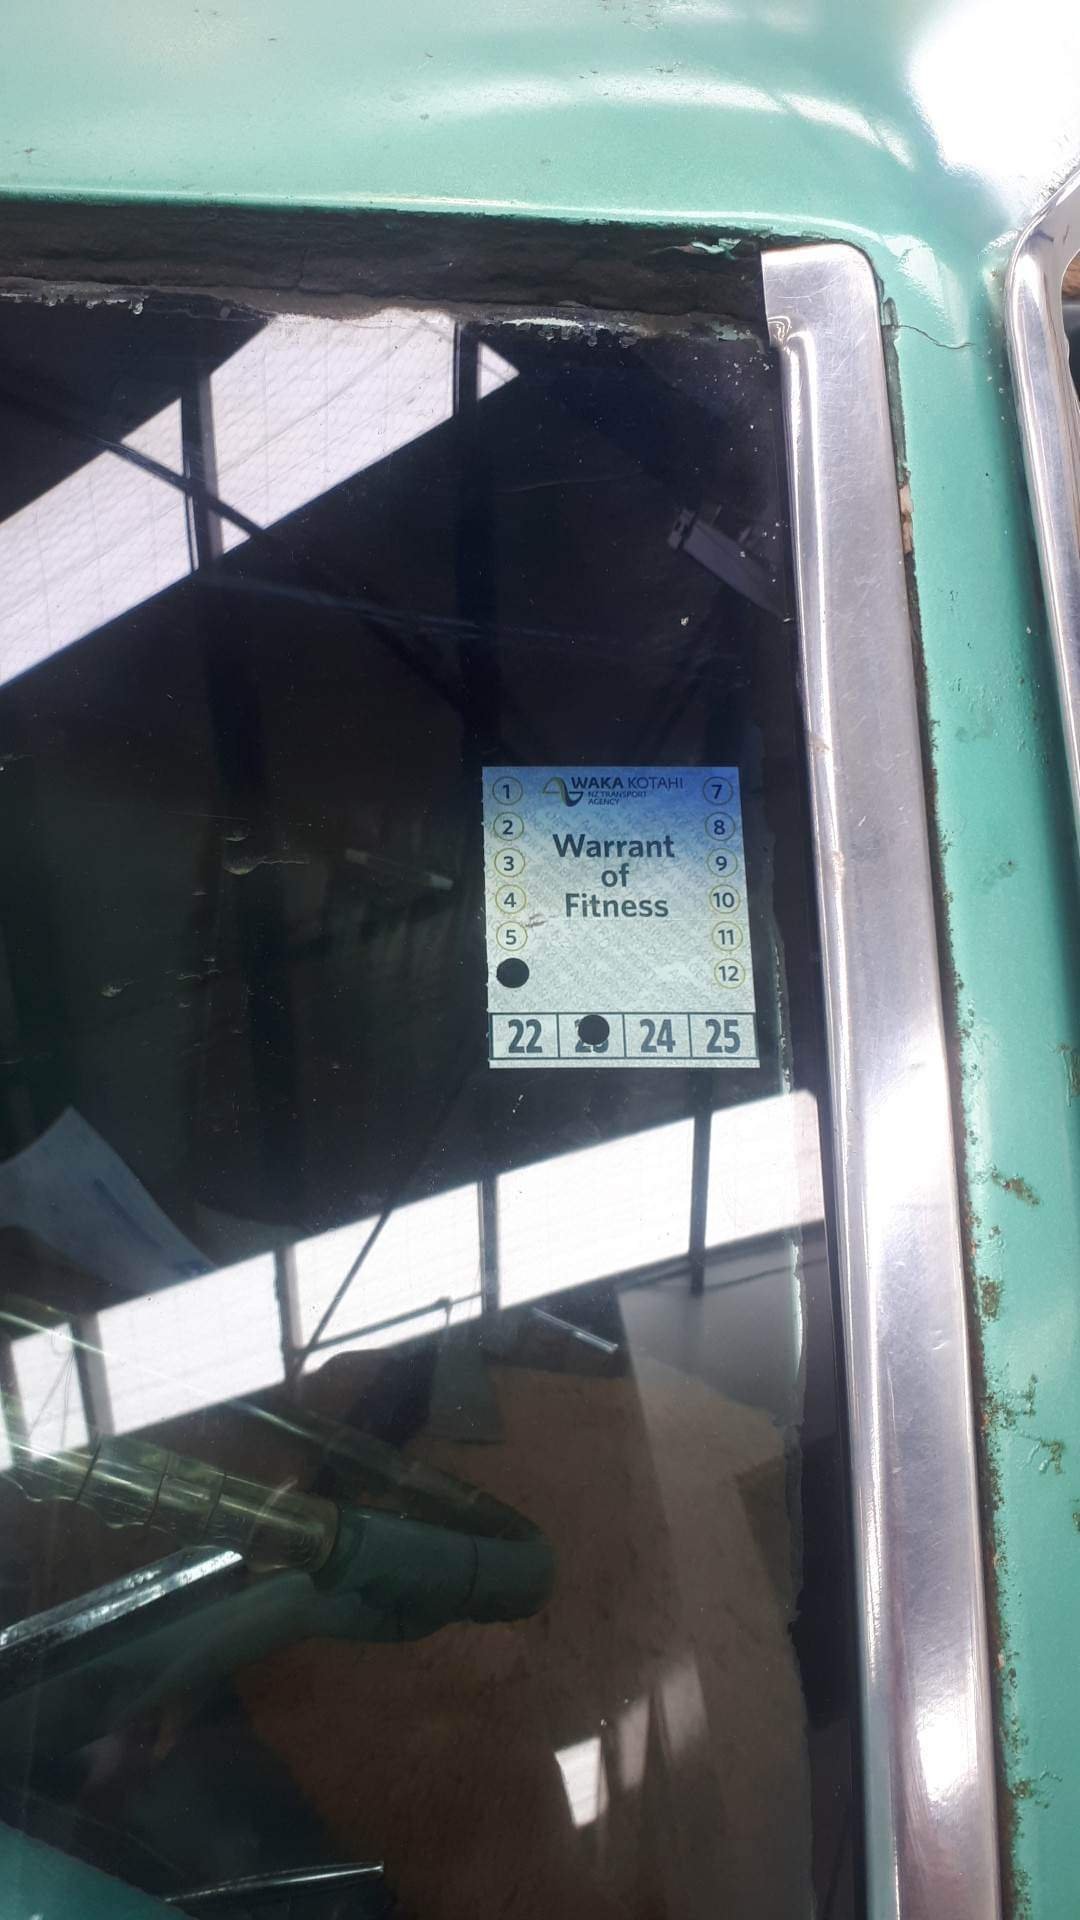
Quick update while there is some peace and quiet around here. Went for cert recheck and got the big tick / cert donut. May have already covered it, but spent a bit of time sorting the suspension travel to get it to comply. Just one of the joys of a light chassis, where half the weight in the rear is unsprung. Lots of maths and a bit of trimming here and there and I got it bang on. Pretty sure I could pull the rear suspension out with my eyes closed now. So yeah, cert man said I did a good job and I was on my way. Christmas period means it won't be in the system till next year, hopefully no hiccups in that regard. So i'll hopefully have it WOF'd by end of January. Carb still needs a bit of work, there is a local guy that rebuilds them, but i'm not sure he will be interested in determining what the actual problem is. So I may have to try sort that myself. Just likes to either run on, or stall at lights. So I currently have it fiddled to run a higher idle so that it doesn't stall, the less embarrassing option. So time allowing i'll potentially swap bits between the cars and see if I can isolate the problem, be it the dieseling solenoid or whatever other voodoo controls such things. Have been using my aliexpress claybar on the windows to remove all of the garbage left on them during the build, coming up nice. Have also been looking into sound options as that will make things a bit more pleasant in the cabin. Pretty raw, even with carpet, so looking to get a big ol' roll of deadening and laying that in places to quieten that up a bit. Sound wise, looking to put some components up front and amp them when money allows. I have a sub and amp from many years ago, but really don't know if I can be bothered installing that. So will see how the front speakers go and work from there. As part of cert I had to weld up the rear speaker holes in the parcel shelf. Didn't have to, but to keep the seatbelt anchorages in the rear shelf, they had to be filled, so that was my preferred option. I don't want to cut the rear panels to fit speakers. Box speakers to bolt on the shelf are silly money these days, so for now I have no interest in rear speakers. So yeah, front speakers are around the 4" mark from the factory, which isn't going to work. So I scanned my kick panels the other day and printed up some practice speaker rings. The idea being that i'll cut up a spare pair of panels and mount the printed parts (that won't be orange) to the kick panels and cut out in the inside. Currently has nice black panels installed, so they will be removed and put away for safe keeping. I'll then paint the spares, one of which is half brown half black, to be black. Will have a play with changing the angle of the speakers too, this first run was just to see if my theory was right. I was pretty sure while it was printing, that I had fucked something up as the profile of the ring did NOT look anything like the panel. It was though. So here are some pics, will update when road legal all going to plan. Panel to be scanned: Scan result, which I wasn't worried about accuracy so didn't bother scanning with my more accurate scanner, rough and ready will do the trick. Speaker ring, rough print as it's a concept print, not a final print to be used. Couple of photos of it on the panel, has the potential to make the install pretty neat and should look relatively factory IMO. /spent /fred for abuse advice:
 12 points
 -
Dailyed for a week. Used heaps of petorl Motor has a knock at cruise 50-70ish mph at part throttle. Rod knock maybe? Will see if Sylvesters have bearings when they reopen. Otherwise rockauto
9 points
-
Alright so rather than trying to make this fit in a cramped space and get a compromised result. I'm gonna start with what I figure the ideal ram-air box would look like and I'll cut my spare bonnet around it. Then see what difference there is in a best case scenario. Will hook up a map sensor into the base of the airbox to see what sort of pressure gains are possible. Then if it works good, I'll try compare that best-case result to something that fits the car. So will have a base plate section that is 100mm radius around the throttles, and then 60mm long non tapered section (so this is high pressure zone) Then from here it's extruded with a 5 degree taper (may as well stay safely below maximum) Then a bellmouth on the entrance to try make sure flow stays attached. This thing will be absolutely monstrous, haha. About 525mm long so I cant print it all as one piece. However if I make the angle 6 degrees or 7 degrees then maybe it will be fine. The narrowest part of the slot has an area equivilent to an 80mm circle which is heaps. Could maybe go a little smaller. However I've also just assumed that the airflow direction will be perpendicular to the throttles which it wont be. Will go measure what sort of angle there is. then adjust it.
9 points
-
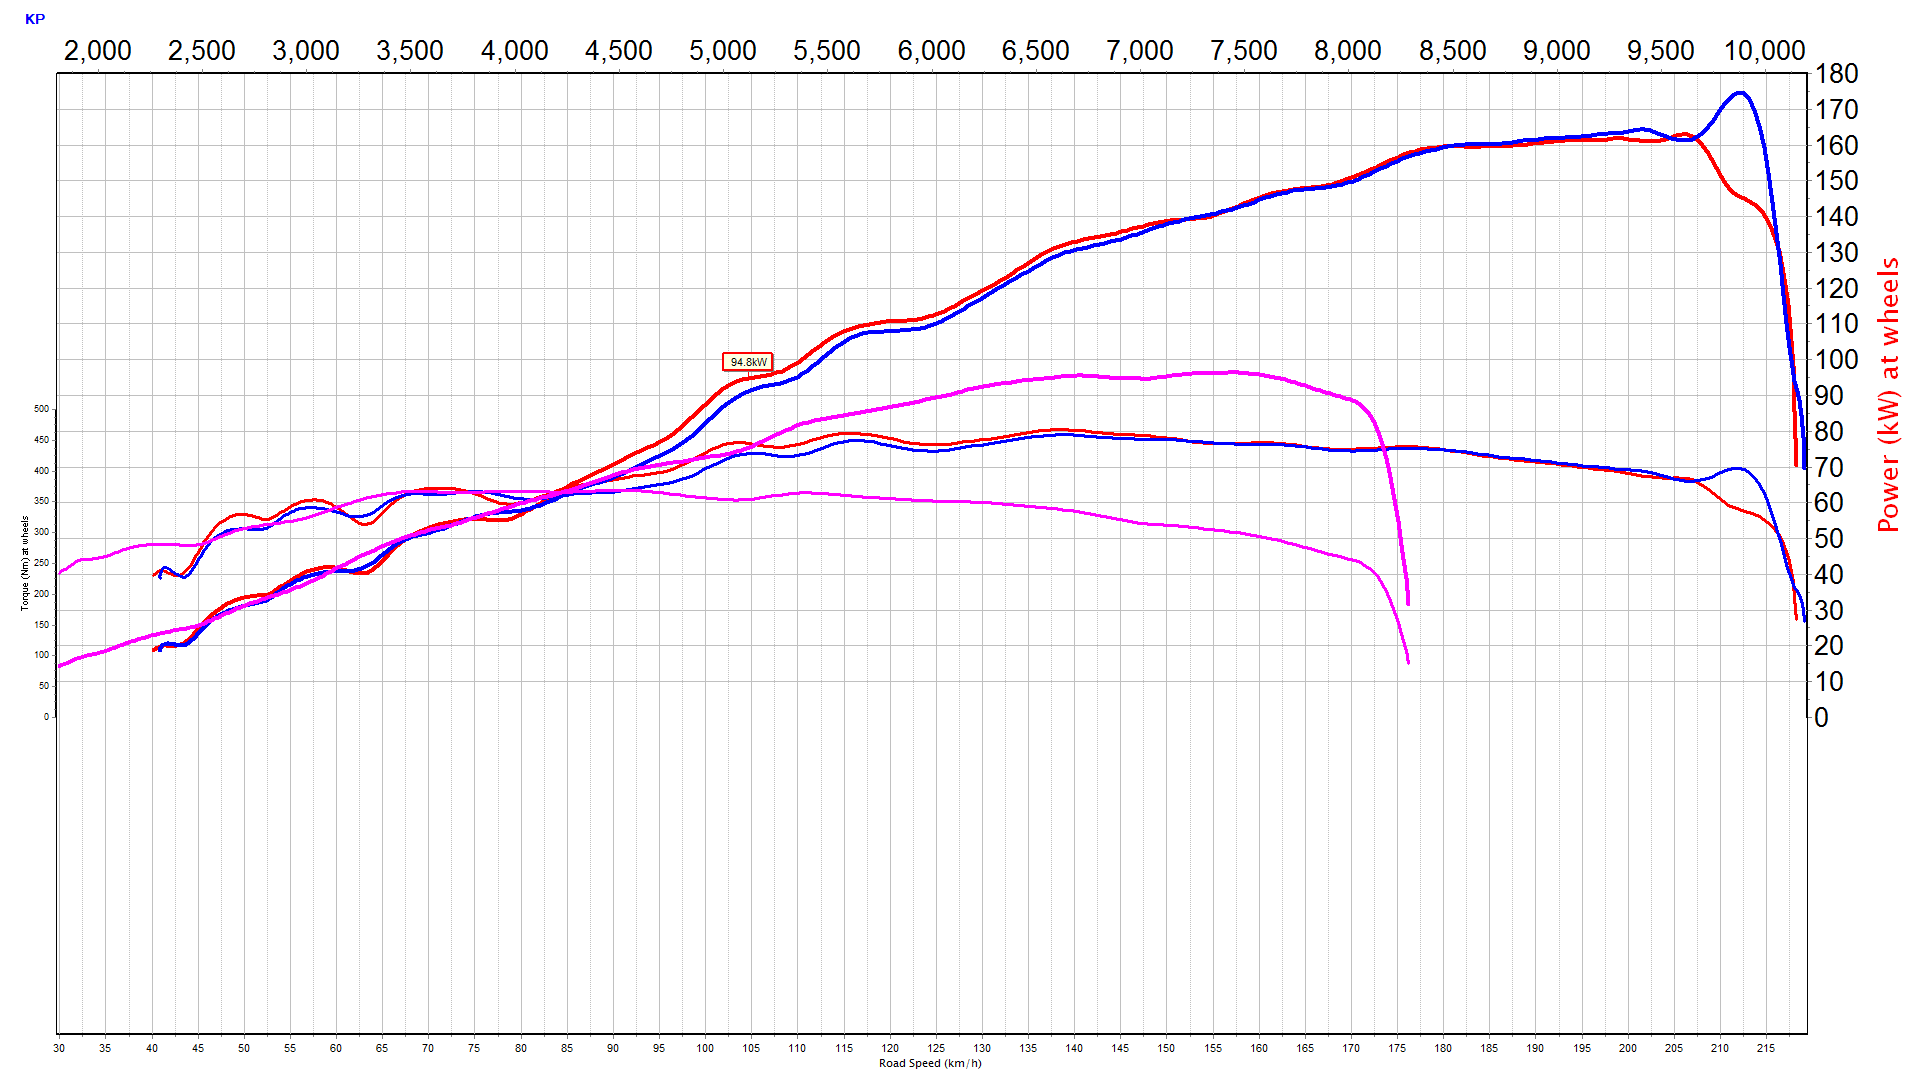
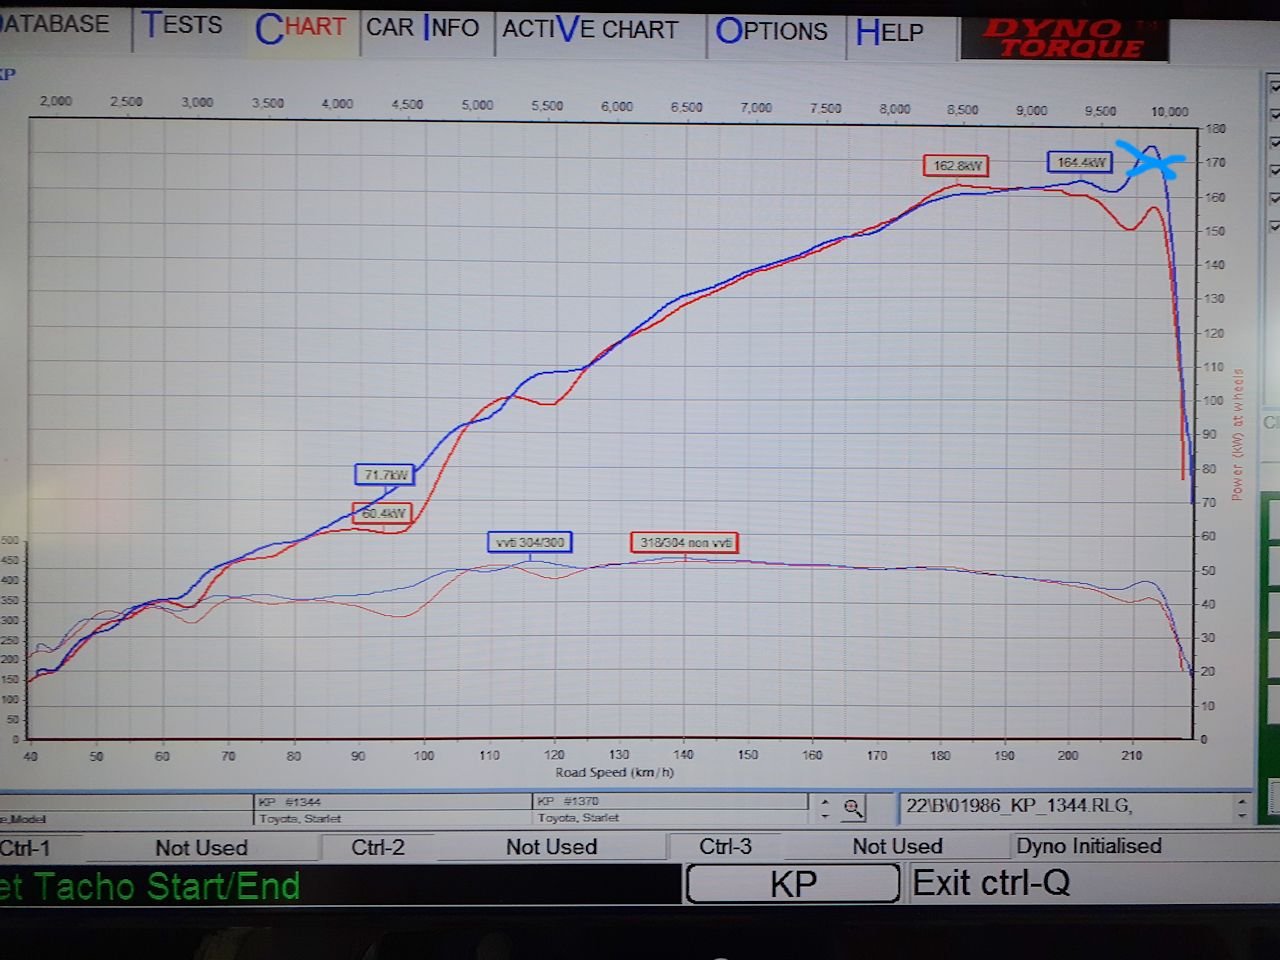
so managed to get a little more advance out of it. another 5kw on the bottom end. power curve looking pretty sweet now. Rpm scale slightly off on this one. forgot change it when adding the stockish engine run (pink) Vs the 318/304 hvc cams, filled in the holes nicely. should drive heaps better. really nothing in it top end wise. Its even better than it looks on paper, since runs way nicer with the vvti and smaller cams
9 points
-
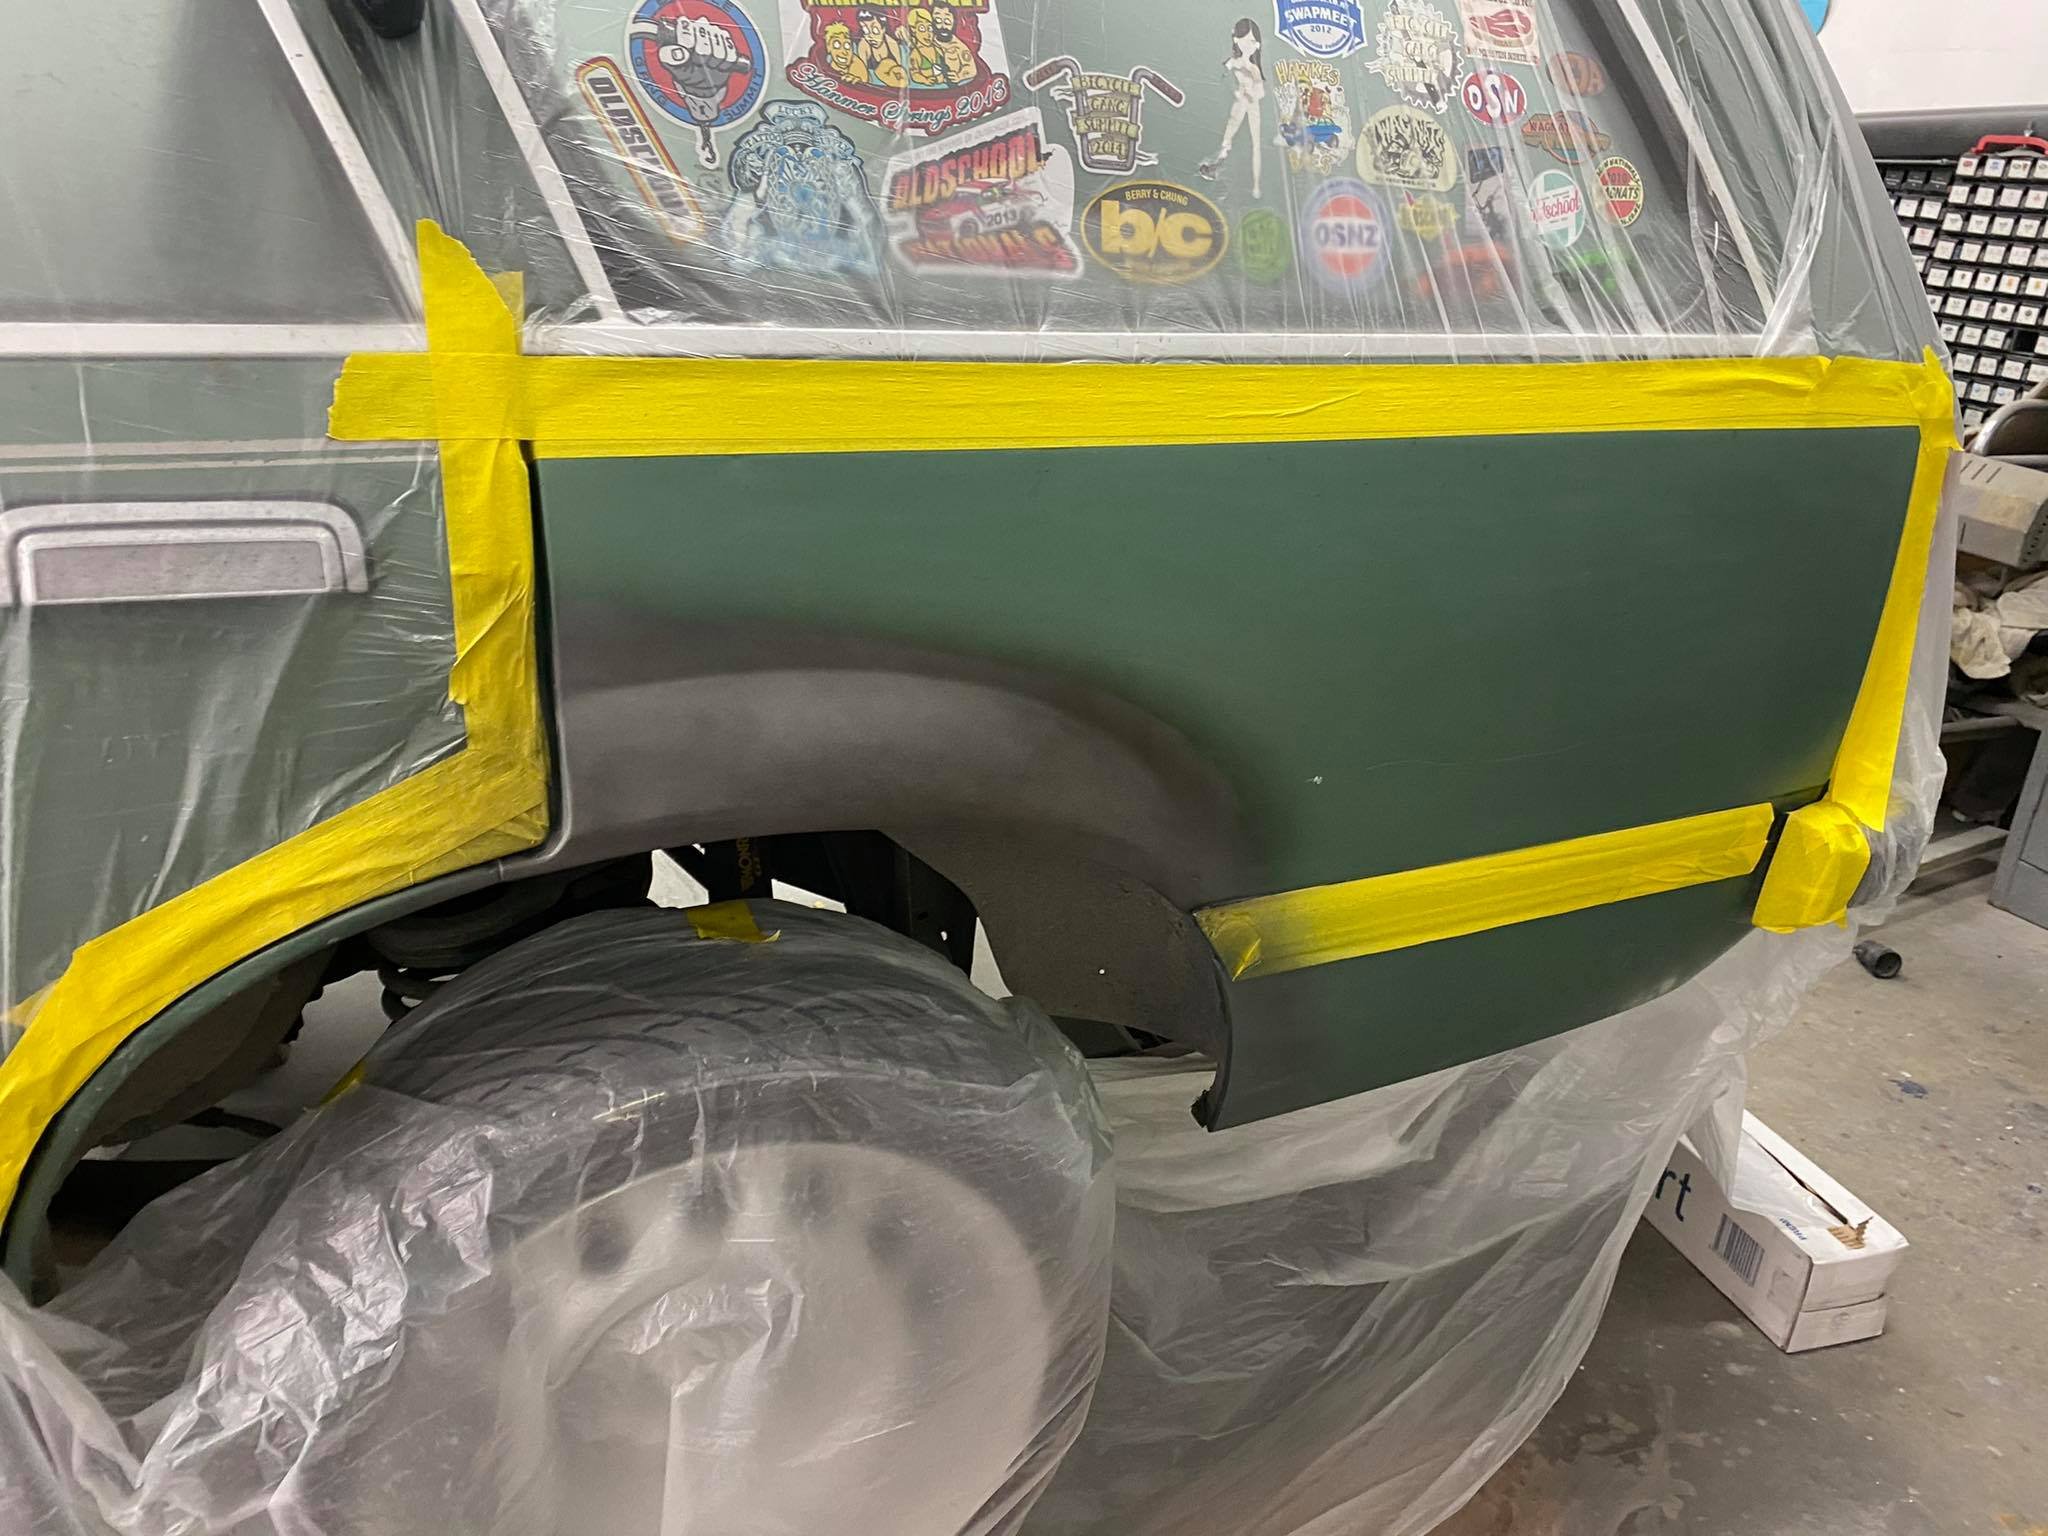
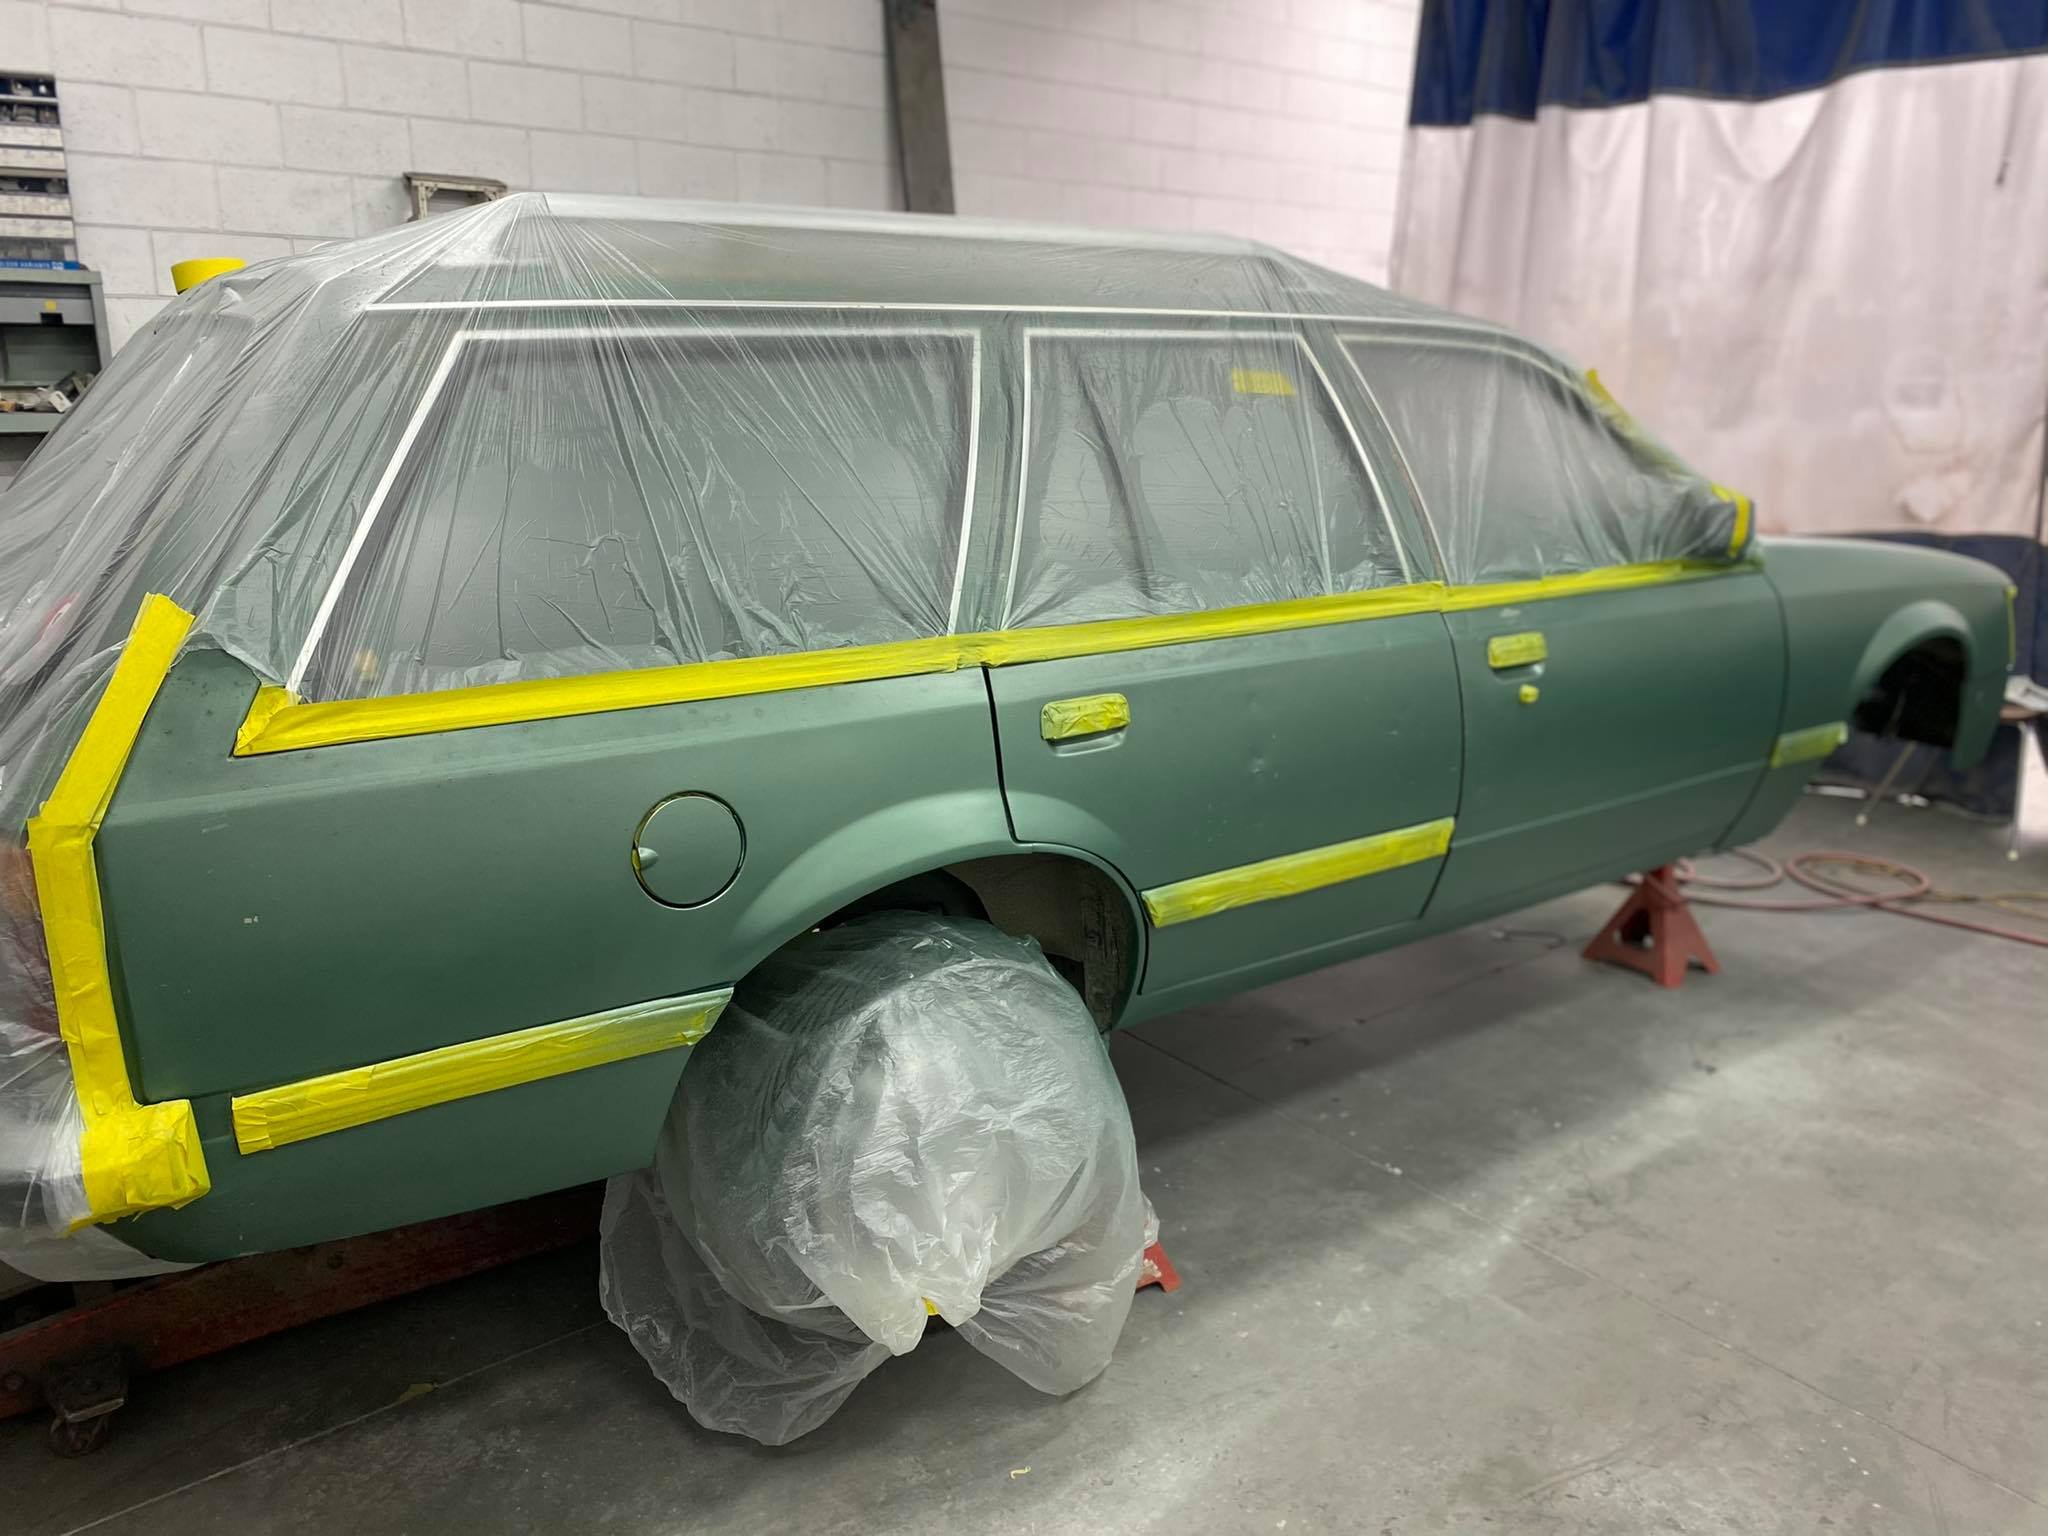
Phew, that colour has a big range! Can’t wait to whack satin black on top. All in all it went well, got lots of crap in some parts and a water drip on last coat of last door..you always hope it comes out perfect but there’s a flat and buff in the future!8 points
-
Just for shits & giggles I acquired a 4x4 some years ago, which I dragged up to Hanmer Springs. Having tried wearing out the increasingly sad 2.7 ..... & failed so far its time to give it the setup I really wanted from the start. So, I obtained a factory flatdeck cos my pockets weren't deep enough to get 1 built specially & some of the aftermarket decks I didn't like how they are put together Yup, there's a catch, buy a deck & get the rest of it for free. Swap decks & sell again as a wellside. Apparently it's presold already, she with the battlescarred bitsamissin has now expressed an extreme interest to relieve me of this column shifted underpowered rolling roadblock
6 points
-
I went for a drive with the new radiator setup. I dont have the radiator fully blanked off, but generally the radiator stays around 35-45 degrees when cruising at 100kph with no fan going. So doing some full throttle stuff, the engine temp still spiked even though radiator temp stays low. So that's interesting. Maybe the flow through the thermostat is the current bottleneck. After all its designed for 75hp maximum and tootling around at half that. I guess I can try take the thermostat out and see how it compares. The radiator temp did slowly creep up some time after a full throttle run, so ti will be a bit more punished with continous full throttle at a track day. But that's where finishing off the ducting will help.
6 points
-
Bit of an update. I'm practicing my welding before cracking into it again but I brought a tyre changer from super cheap. Soooooo I stripped down all of my hotwires ready to clean up now. Chur
5 points
-
If you're not worried about cosmetics I'd leave it the way it is. A recently removed and refitted vin tag is much more of a red flag, they are not easy to make it look like they haven't been fiddled with once removed They are stuck on with adhesive so are easy to damage5 points
-
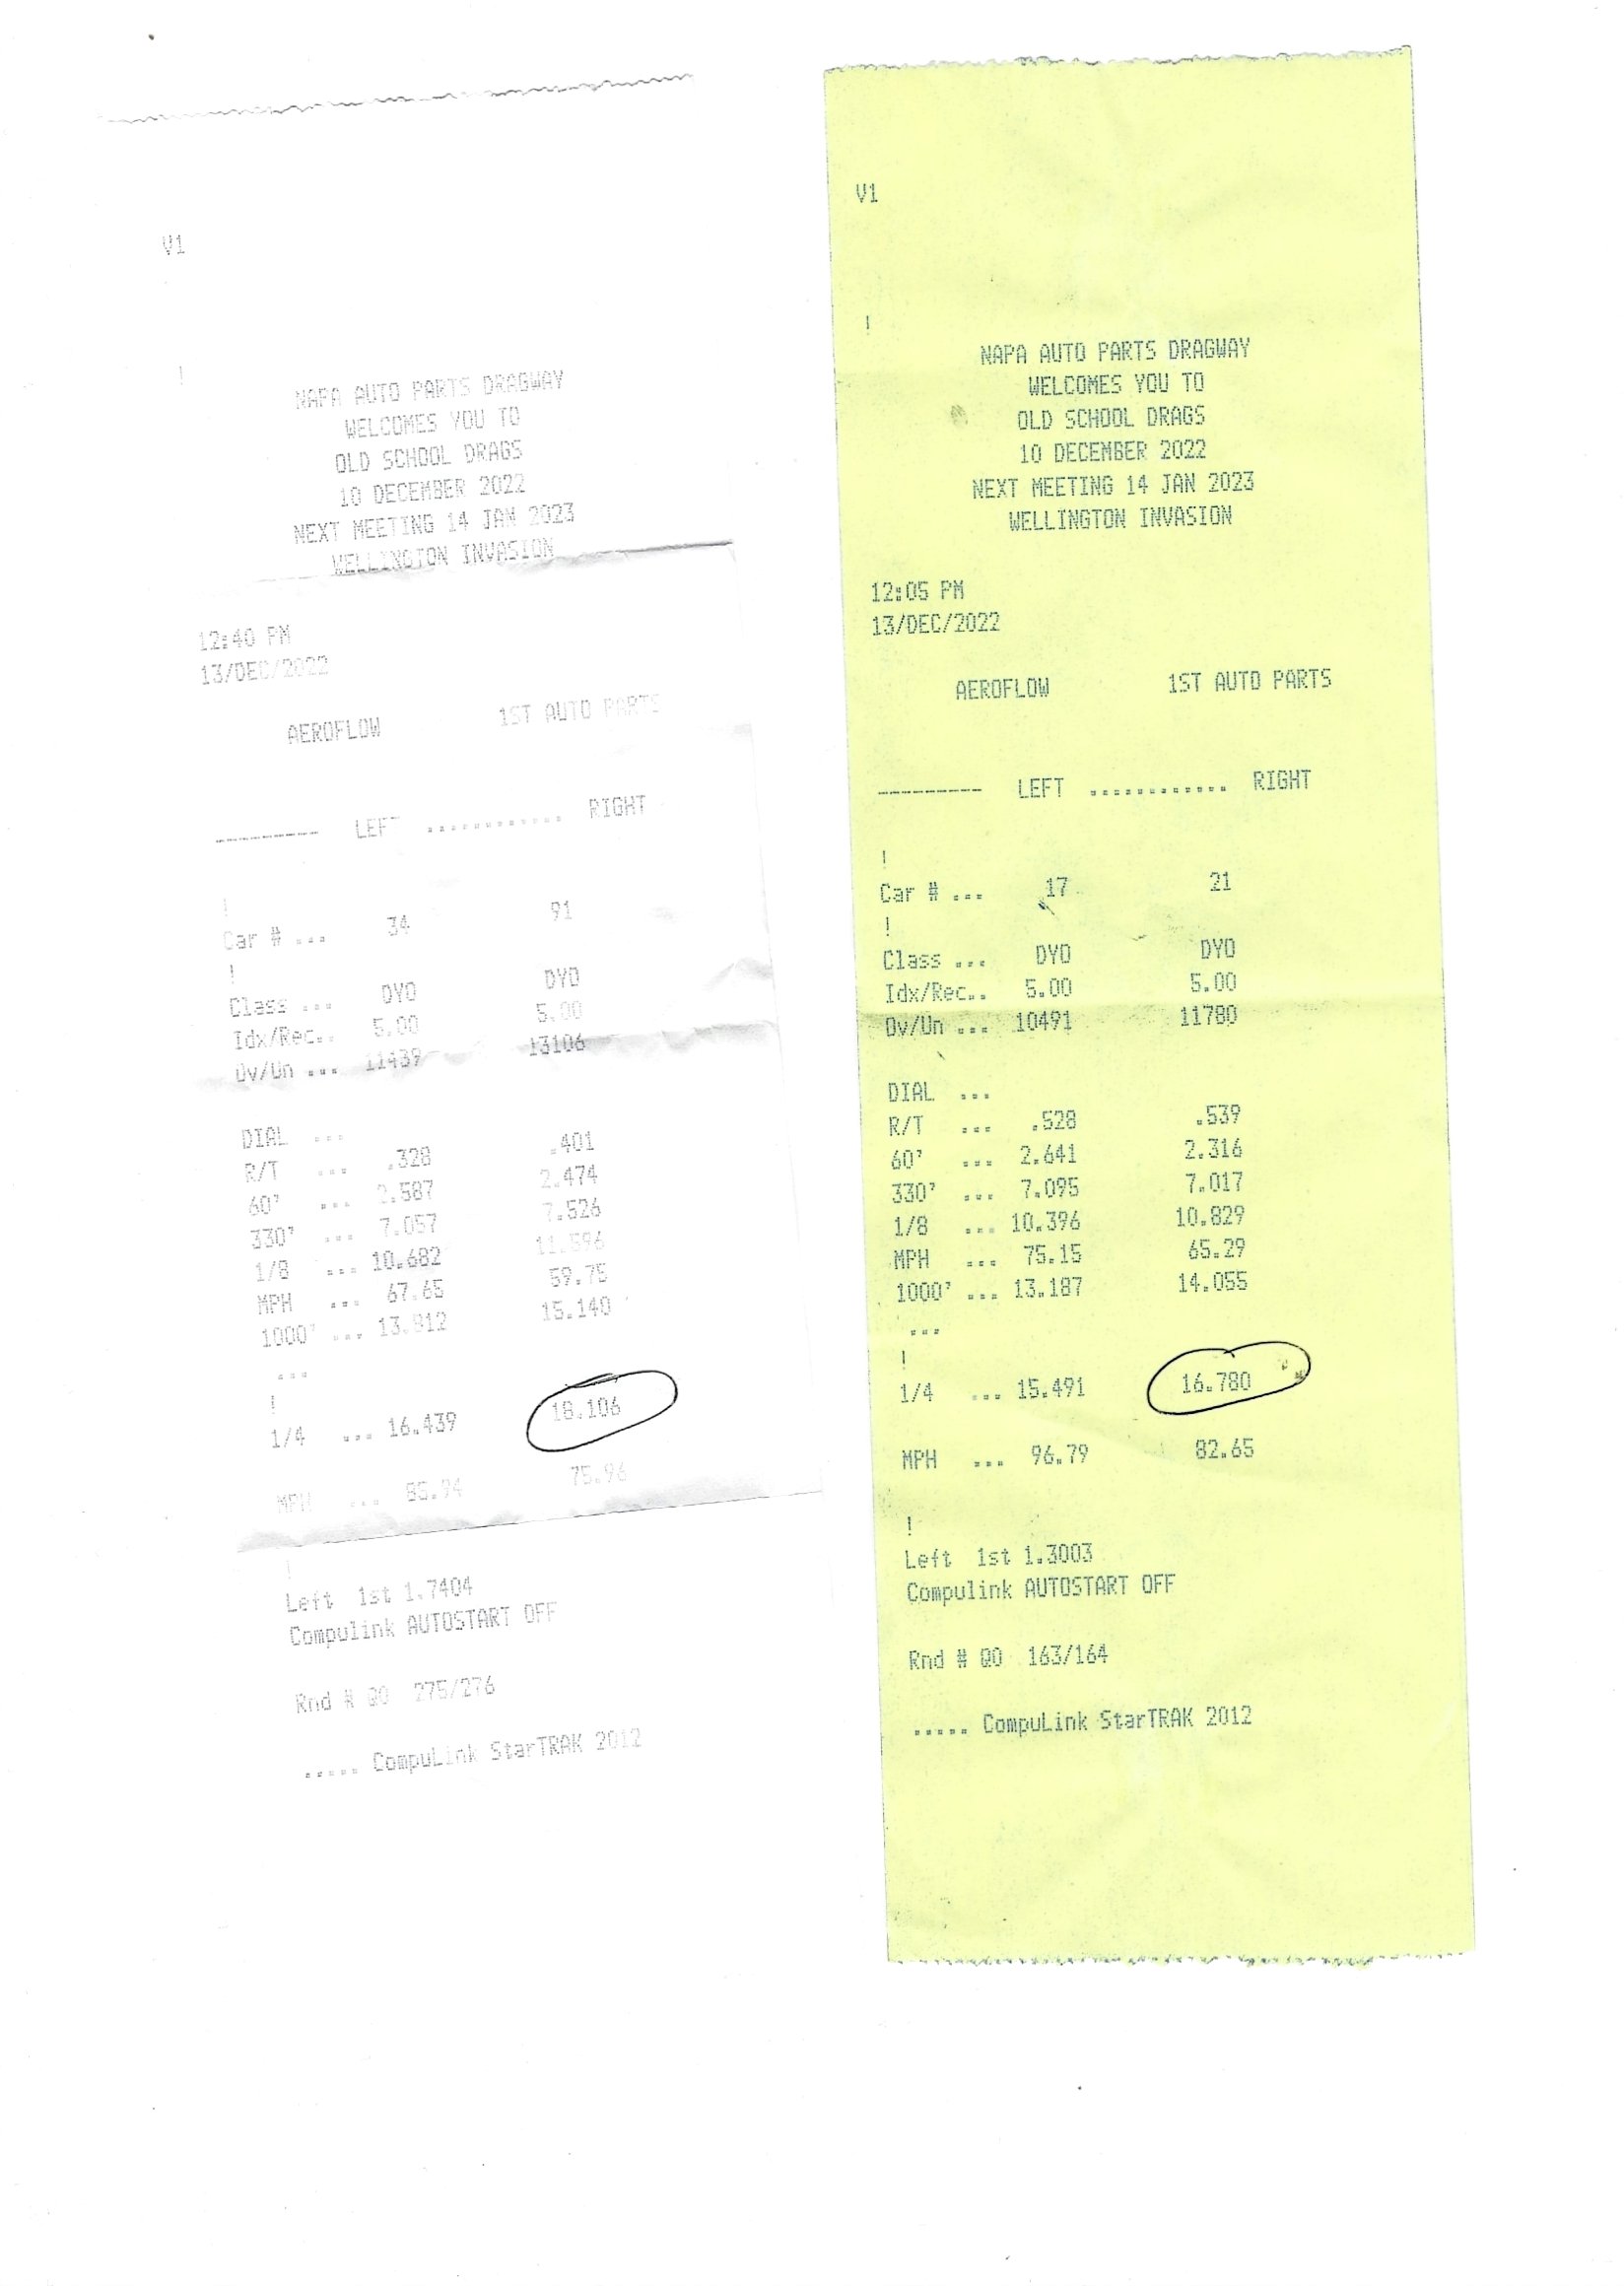
Made it through it's second certification relatively easy other than admin time. Missed a couple events I had planned to take it to but still went to the os drags. Best time was this 16.780. Before supercharger kit was 19.8 Was interested to beat a stock gz20 with a 1ggte Had one sketchy moment where a hose popped off the back of the head at the top end of third gear and the back stepped out but it corrected after I buttoned off. Put hose back on and tightened clamp and it was fine.
5 points
-
Recently I decided that at some point next year I'd like to move this thing on. I never thought I would after wanting it for so long but I'd really like to track down an old supercustom or maybe even just pleb spec yh50/60 hiace with plans to 1gg swap. The liteace is a bit small for the family to enjoy especially since I changed it from 3 seats to 2 for engine clearance. This hasn't put a stop on mods at all. A custom winged sump has been made by a fellow OS member which should help get it on its guts again. A pair of bspeed cam covers are en route and I've also secured this bit of kit to test fit and see if it's viable It's an SK (sanyo-kiki) blow through carb turbo surge tank along with these early HKS cam gears I've sourced. I'd like to track down the hks cast turbo Manifold and some hks cams also. The shape of the plenum looks like it could be mounted upside down with elbow orientation moved and may clear the seat. If things get too messy I'll leave as is but it's worth a shot
5 points
-
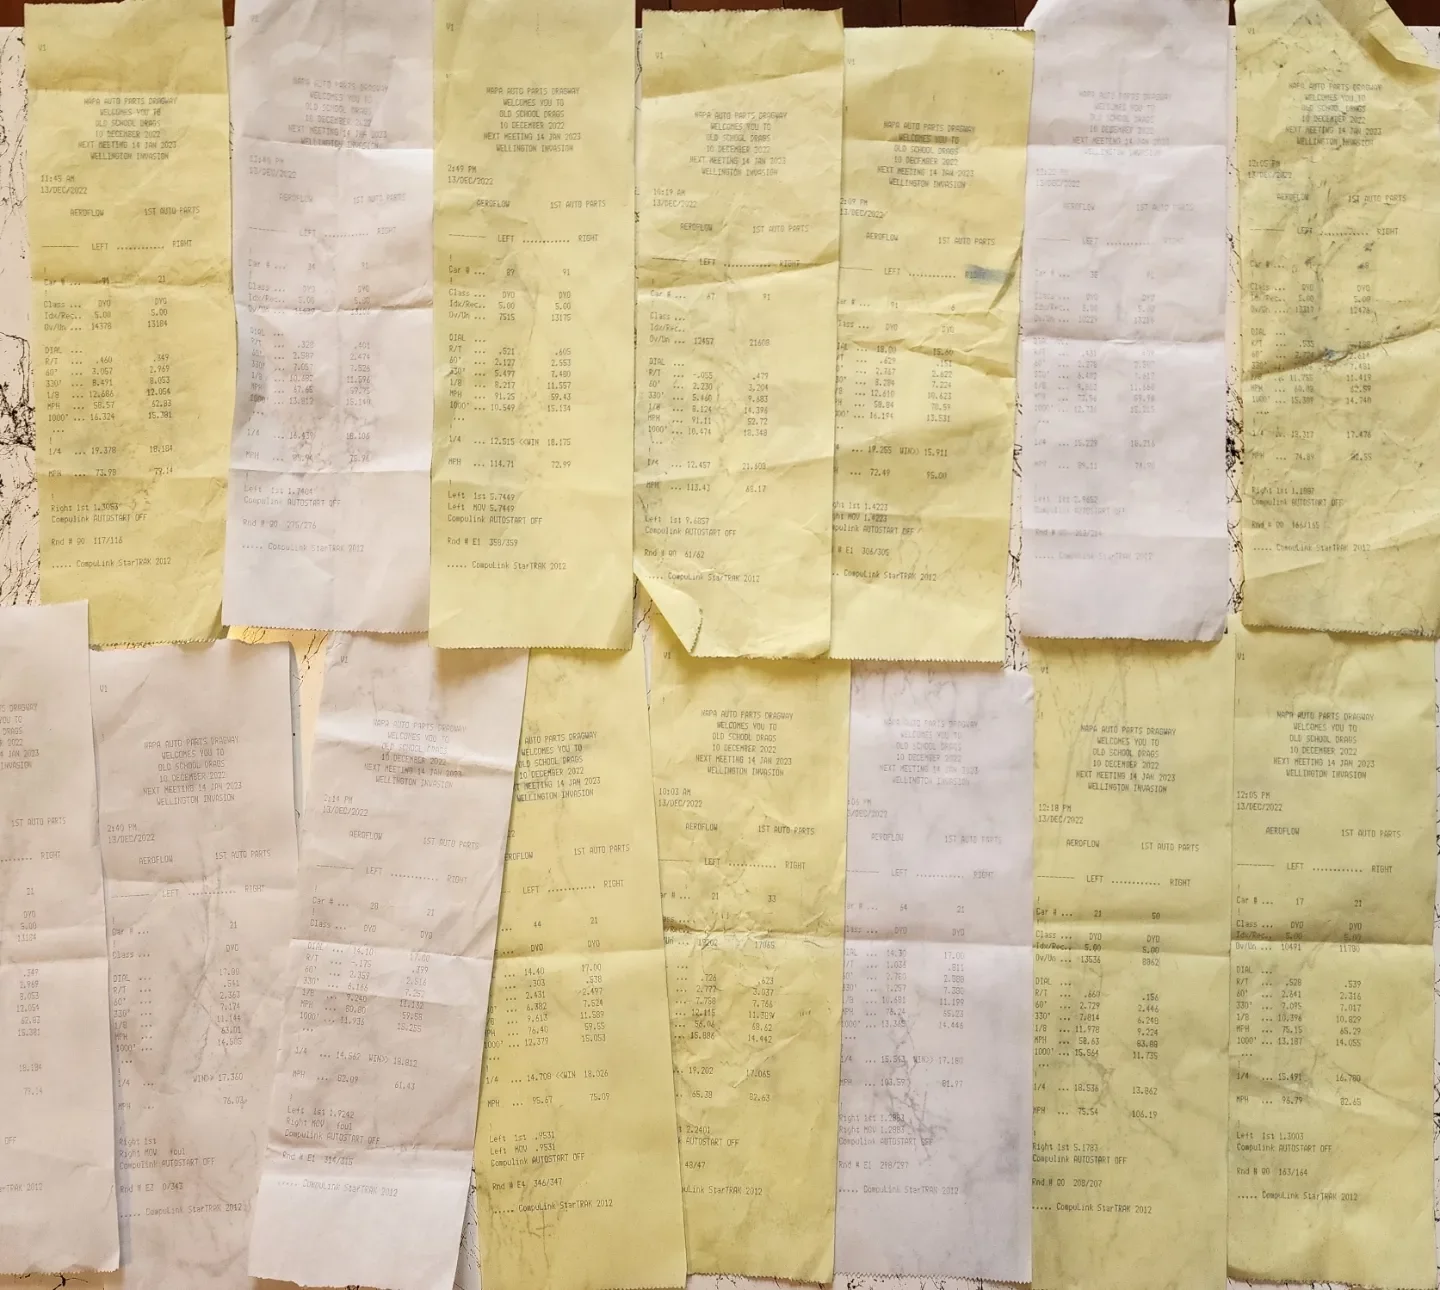
Now approaching 5000kms since being 4AG powered! I swapped out the 3.9 diff for the original 4.6 in anticipation for the OS drags and tool all tools and ply drawers for full race mode. My friend and i punched through 8 runs in the van and i did 8 runs in GX. Best time for van was 18.106 which my mate was able to grab. I actually feel like the 3.9 would have been better. We both felt there was an awkward place at 6-6.5k rpm in 4th just before the finish line where it was to close to shift into 5th where some taller gearing would have helped. However van ran flawlessly on the day and drove the 45 minutes each way before/afterm.
5 points
-
Here's an interesting one5 points
-
I had a wof guy knock me back for a hard to read chassis number, I thought it was fine but his eyes must have had too much toe in or something. A clean and some black paint wiped into the stamping and we were all good.4 points
-
The VIN being painted is probably least of the worries (come WOF time) on that vehicle if masking it was too much work.3 points
-
It's a huge pain for cert. The correct, legal method for repainting an area with a vin number would be to take the vehicle to a place that deals in vin/compliance etc , they remove the tag and keep it in a safe place, you take the car home and do the paint etc, then once it's done 3 years later take it back to the same vin/compliance place who won't have changed inspectors/lost the tag/ gone out of business, and they refit the tag. In practice, this never happens because nobody knows about this until afterwards Then we have to send them to a vin/compliance place to get confirmation that it is the correct identifier for that vehicle, which can be easy, or a long involved process with forms and approvals from nzta3 points
-
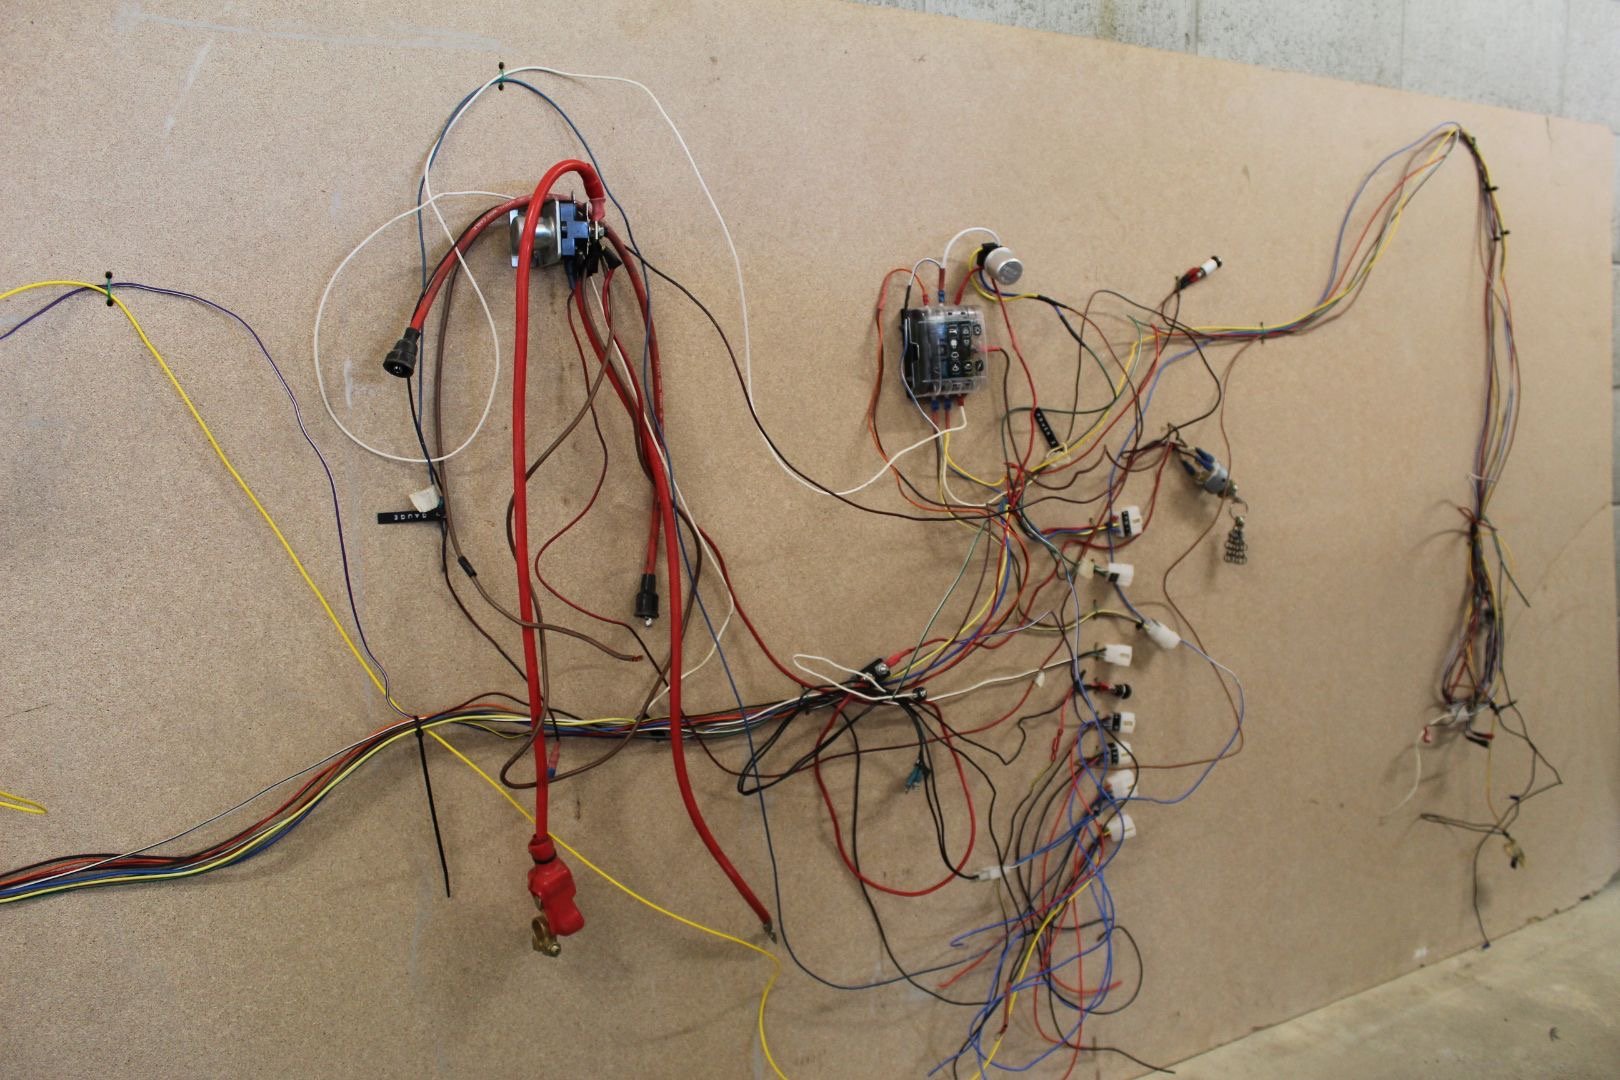
Decided to do my own “over summer refresh” - I suspect it won’t be back together for some time, but I’ve made some progress. Have pulled everything apart, engine out, back to bare chassis minus the diff, brakes and a few bits Terminated everything on the wiring loom so it’s no longer just individual wire connectors, each gauge has its own plug which should make things easy if the dash ever has to come out again. There’s no doubt a better way to do it but I’ve enjoyed the process regardless, is good to actually understand how it works, even though it probably has similar complexity to the wiring loom found on a horse and cart… And yes all that blue wire should be purple for illumination on the gauges but I couldn’t find any purple in stock, so it’s blue. The connectors will go inside a waterproof box along with the main board. Tethered the whole loom to a board so I can map out everything properly this time. The loom itself was for a McGregor 7 and I never bothered to terminate anything at the right length- again I’m trying to do it properly this time. Fuse board had a crack in it so replaced that with one from burnsco. Once the engines back in I’ll fit it and check lengths etc before wrapping it up. Next step is to tidy up the chassis and remove any unnecessary brackets, weld up some holes. Maybe it’ll be back on the road by 2024…
3 points
-
The rear brakes are more complicated due to the extra hand brake stuffs. The handle pulls a lever which pushes a pin down through the caliper and into a little freely-rotating bracket on the underside of the piston, forcing it down. No idea how common this method is. Bleh. Let's clean that up. Here's what it looks like all disassembled... not pictured is an extra retaining ring and a forgotten seal which is still inside the bore. The pin bearings also haven't been pressed out in this picture - one side's bearings were all rusted up and they cost $$$ for some reason so I hacked apart red's brakes. I fortunately was rewarded with another pair of good ones (and a pair of shit ones) for a total of four good bearings. Phew. As mentioned with the fronts, the rear pistons from the black car are fortunately in good condition and can be re-used So once again I went through the motions - except spread out over a month~: derusting solution overnight, a good scrub, let dry in the sun... ... fix the sandblaster, sandblast it all, rust preventative, caliper paint. We painted our house recently (still need to paint the garage) and I'm really over brushing things. But it's done - for now. Not pictured: I scrubbed all of the parts I was re-using in the parts cleaner, left in evaporust overnight, scrubbed again and they came out great. The aforementioned starion angel who gave me a bunch of rebuild link and advice pointed at these washers to replace the old crappy ones. They're slightly conical washers that provide resistance and springage for the brake lever. They're cheap so I grabbed a set (14 required to do both sides). Unfortunately they're a little chonkier than the originals Five will fit. Angelman went down this road and says he has no problems. However half of my original washers were perfect and after the evaporust the other half looked pretty good (red's ones were all trash), and should survive for a while covered in grease, so I decided to re-use them. Here's after the evaporust and before wire wheeling and greasing. Reassembly time! You can see the post-brush washers front and centre. Everything here has been slightly greased with brake grease. First I put the bore seals and pistons in with their boots. The rear boots have locking rings in place which I found extra scary. After a bunch of fiddling I got them in place and I think they seem to be operating fine - I tested with some compressed air. We'll see! For the hand brake stuff I will be following this guide by kev from the star quest forums as the manual calls for a special tool and press to squish the washers down for re-assembly, so there's a knack to it if you don't have it. The idea is to re-install the bearings in a particular order so that you have extra room to fiddle the arm into place. First bearing in on one side... The rebuild kit came with a new o-ring for the plunger so I put that on after greasing and placing all seven washers, then screwed it down into the piston and aligned it like thus: The key and spring then go into place. Now the bullshit starts. Put the other bearing on the lever arm and push it through, and use a screwdriver to push the key back. The problem we're overcoming is that the washers need to be pressed down to get the arm all the way through,. The idea is that with only one bearing in play, there should be plenty of angle to feed the arm through to it. In reality this is a massive pain in the arse; the arm still won't go in without pressing down somewhat on the washers and there's a lot of force required to do so. I'm not sure how but I managed to get it started with the first side. Then it's just a matter of pressing it home the rest of the way in the vise and locking it in place. However, the other side did not want to co-operate... so I found a much easier alternative. 1. Place the caliper in the vise such that the hand brake assembly is pressed up against one end. 2. Use your favourite chonkdriver to lever down on the arm; this is supremely easy to do thanks to l e v e r a g e. 3. With the arm lined up, give it a few taps with a mallet to get it started. Then pick up where you left off and press it home per above. Now I find myself in a greasy situation. A tiny sachet of brake grease is $20. I'd need many many sachets to fill up each caliper assembly per factory standard. The manual states which types of grease to use, but in an unhelpful way. "Orange" grease for much of the reassembly, and the hand brake area, and "pink" for some key spots. I couldn't find a translation for these on the net* but I'm guessing it's a combo of brake grease and then some kind of generic high temperature grease. (* something I'm picking up in the auto world is that everyone has an opinion on how something should be done right, and they get angry at the way other people do things and call them clueless muppets. However all of these people have functioning working cars so clearly it doesn't matter as much as these commenters wish it did) My compromise is to use a combo of a $20 sachet and the sachet the rebuild kit came with to fill the bearings and the cavity with the washers in it... ... and high temperature wheel bearing grease for the remainder of the space under the hat. This feels okay to me. The only mechanical action this area gets is when the hand brake lever is actuated. The part of the pin going into the piston is on the brake fluid side, no grease in that equation. And the wheel bearing grease is high temp so should be able to deal with the high brake caliper temps that make it to it. Then the hats get filled with more grease and snugged into place with the old retaining rings. I had some dramas with paint sneaking its way into the pin holes on the brackets but nothing a dremel couldn't clean out. Boom, rebuilt rear brake calipers! Nice to (a) tick these off, (b) clear my work bench and (c) delete this info from my brain ready for the next thing. There might be some more paint cleaning to do to fit little brackets and what not but calling this done for now.3 points
-
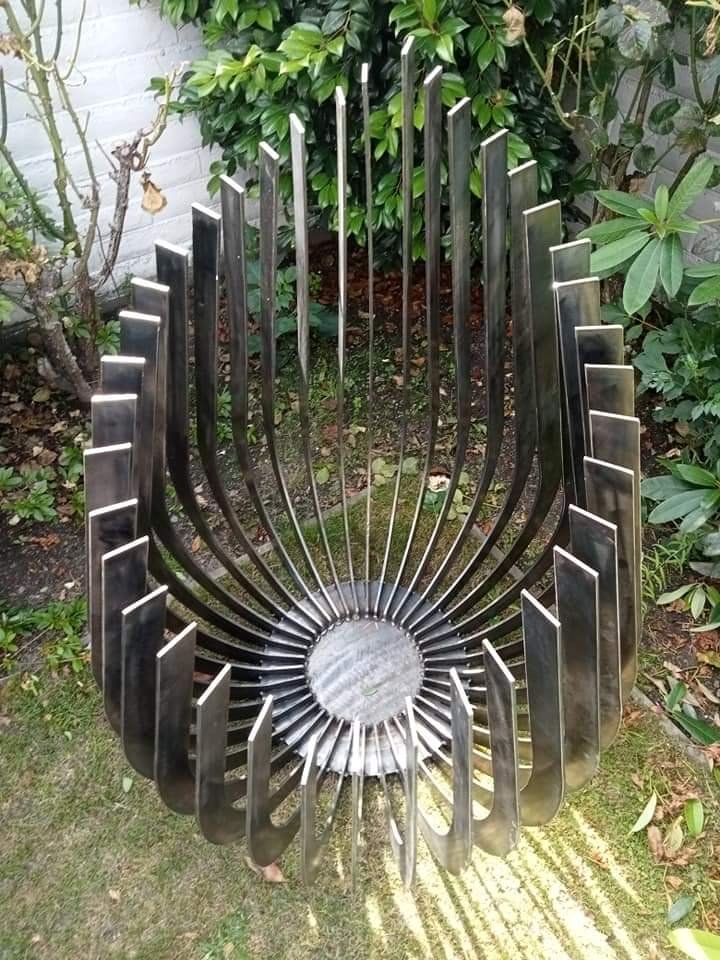
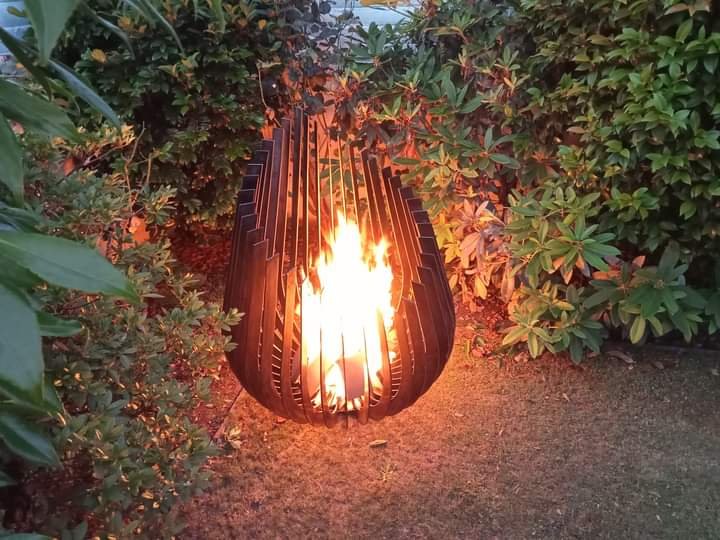
The wife has been bugging me all year for a outside fire for the garden. So I made her one for Christmas.
3 points
-
Little photos Got the head lining all back in and interoir trim and upholstery back in. Got all the lights and wipers etc working. Then submitted my work for scrutiny Wof obtained First one since 1995 or something
3 points
-
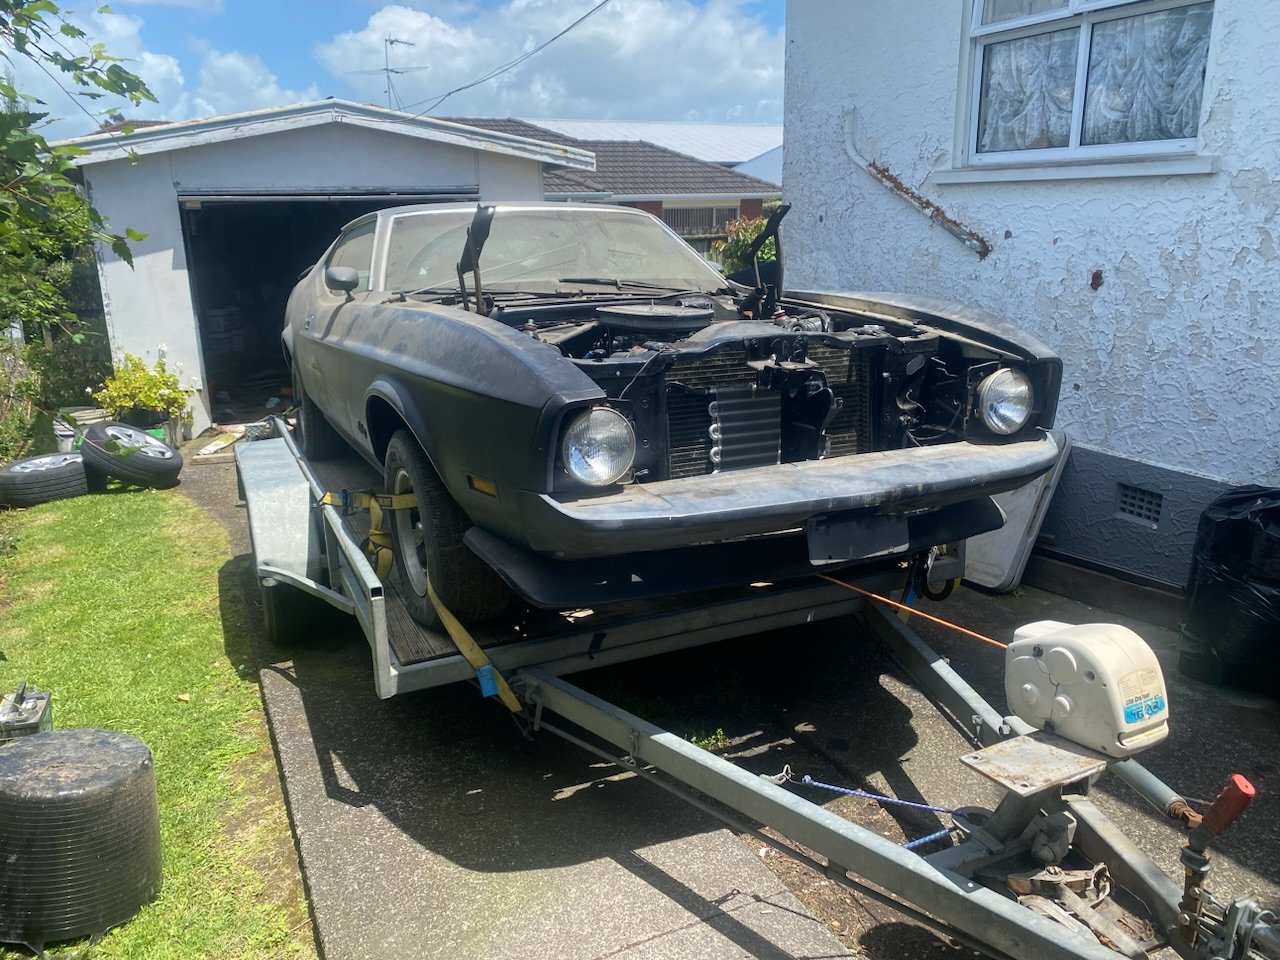
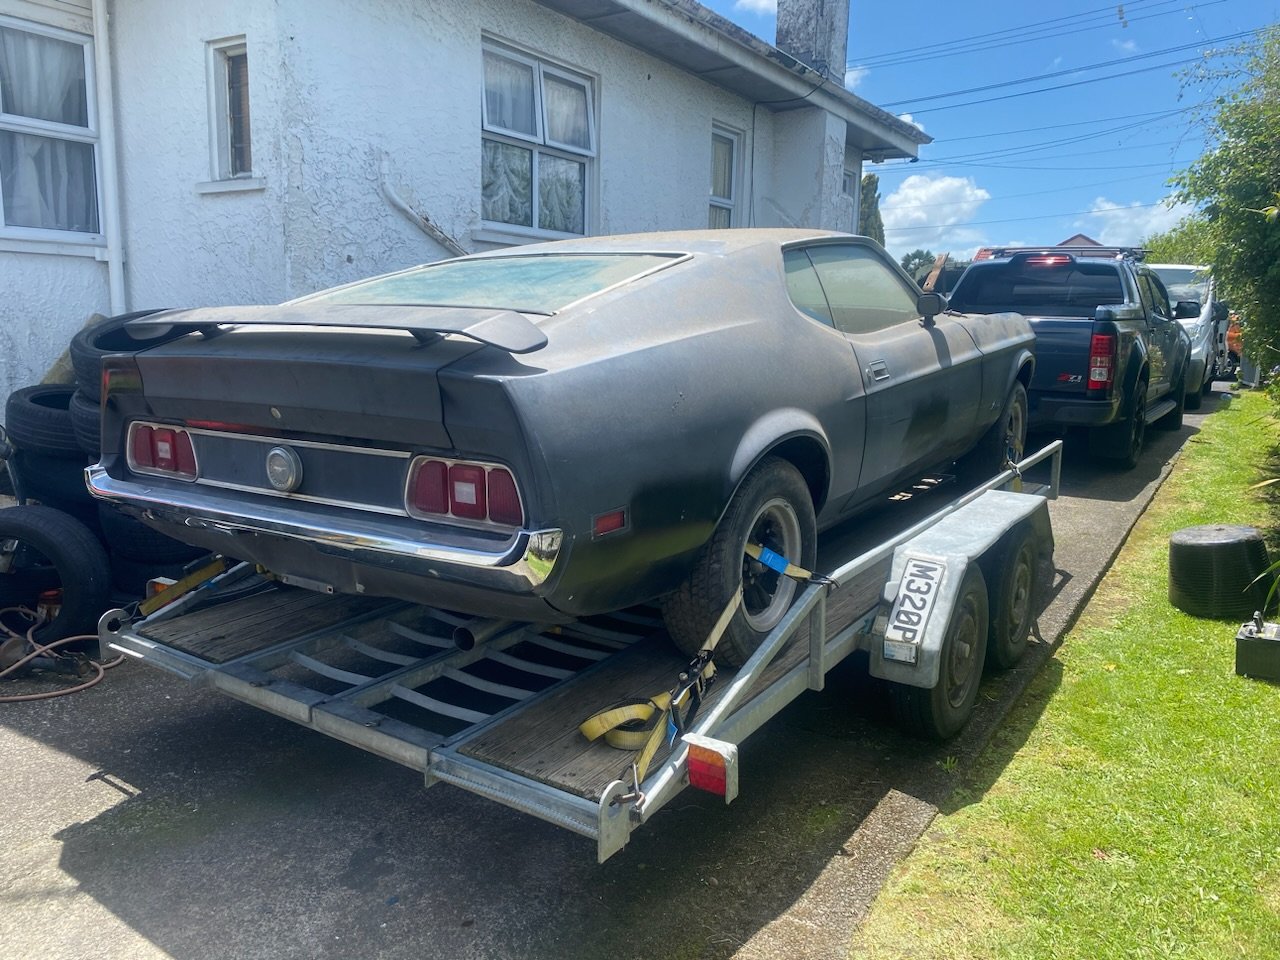
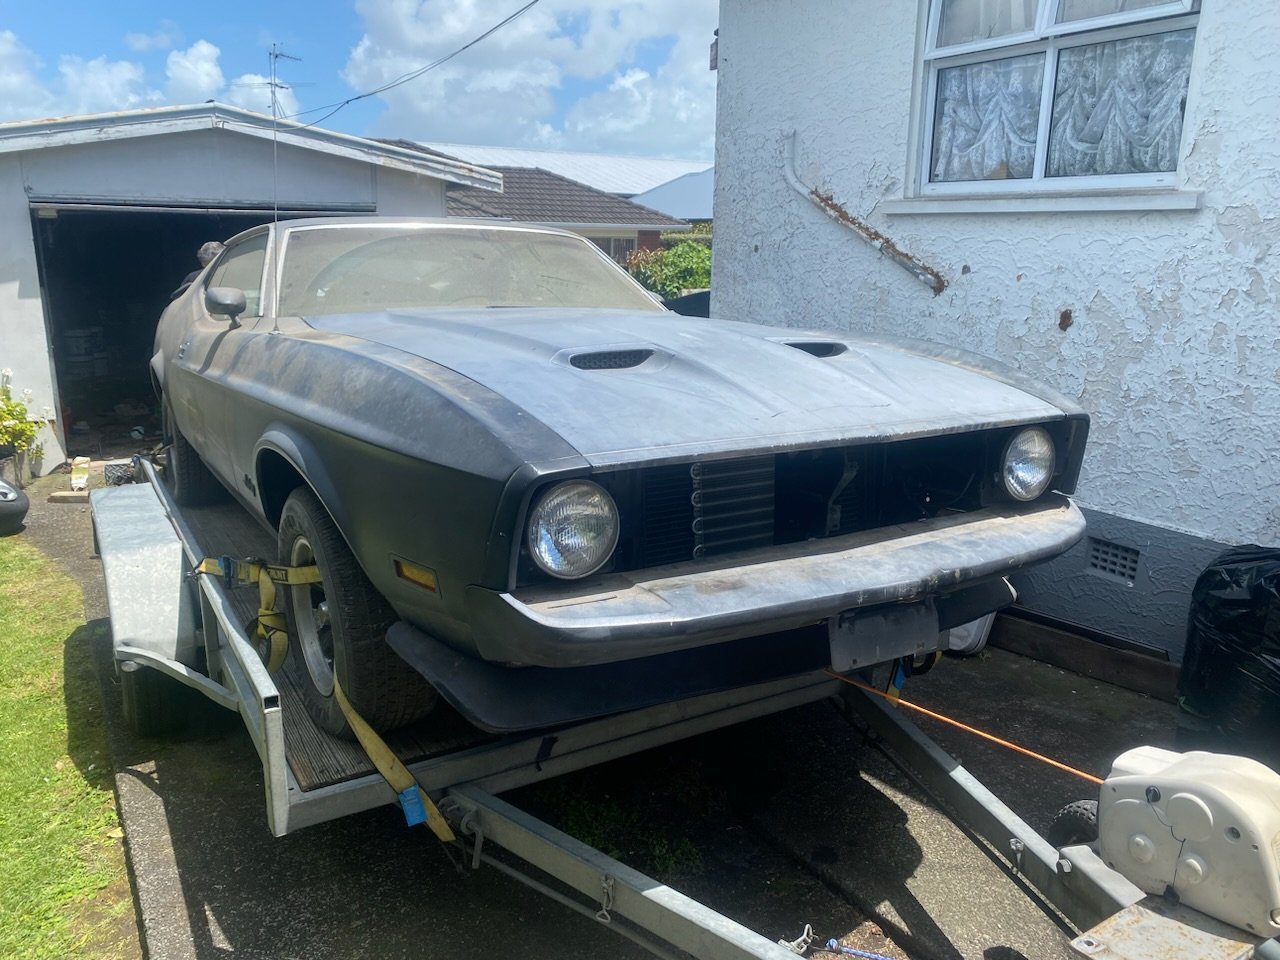
Probably a premature post on this considering I may not get started on it for a few months, but I did buy this off my mate a year ago and finally built a garage for it to go into last month so it was about time to pick it up! The day was an entertaining shambles from the start, one highlight was my winch crapping out so borrowed the boat winch.. then that popping off the trailer on the way home and went tumbling down the road. Amazingly it still works. Anyway, the car is safely tucked away in my garage.. some may recognise it as Ben’s old car originally. My mate has done a few little things in his 6 year ownership, notably putting on an Edelbrock manifold and Holley carb (I’ll find the details out later for reference), and buying a full exhaust for it which needs to be installed. Carb needs setting up also, it’s missing a spring for the kickdown, and I’m not sure what else needs doing but it’s not quite running right. Also installed a trans cooler, headers, some new shocks and bushes here and there. Barn find.. New home.. wish me luck
2 points
-
Yeah it's running an electric pump, turned on full speed all the time. When the thermostat is out, it pushes water around like crazy. I dont think the pump itself is the issue, they use the same part number pump on the bigger hybrid motors too. Hmmm if it does fully open only by 95 deg then maybe it's not so bad, as it only got to 96. Will need to drive it for longer to see if that number keeps going up, so long as it's not over 100 then it's probably fine.2 points
-
I have done some testing regarding this, and at about the 20 year mark the adhesive doesn't offer much resistance. The main thing to pay attention to is the rivet spinning just as you break through the cap which will leave an obvious mark2 points
-
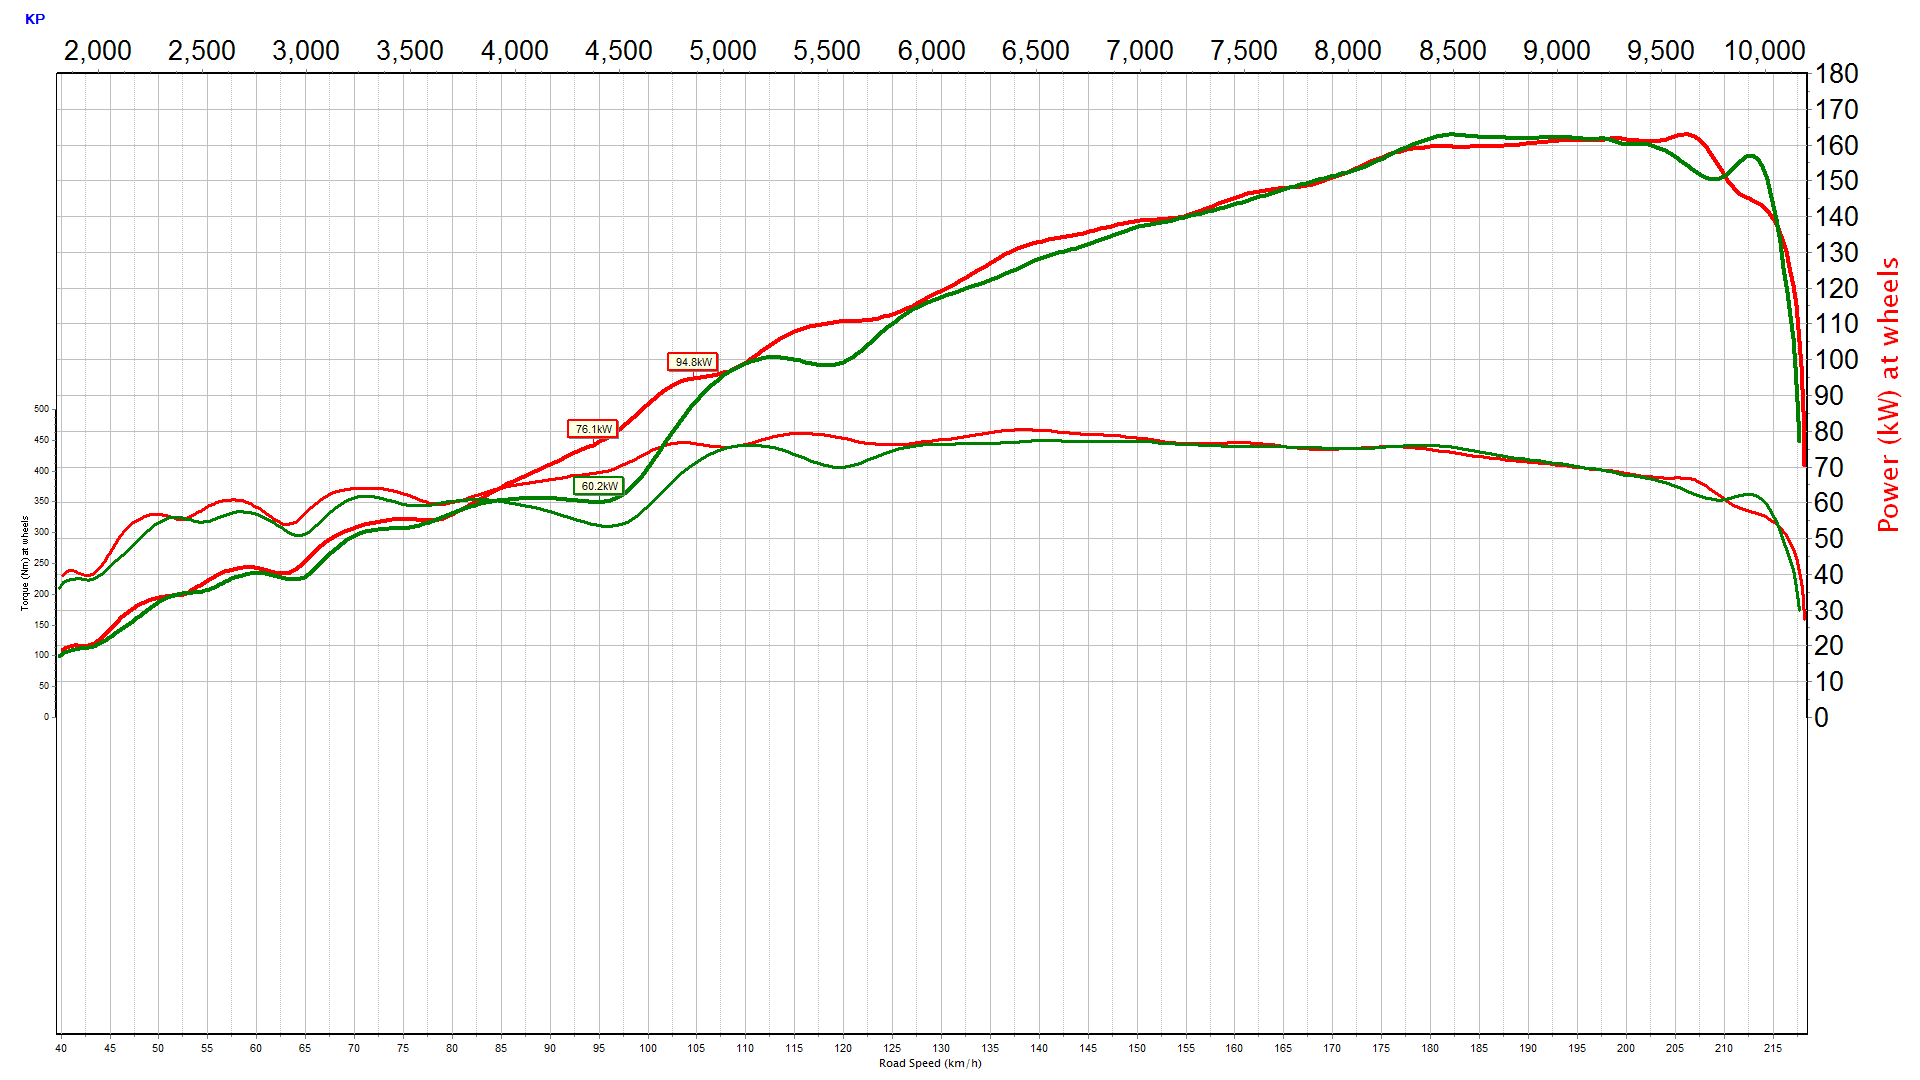
Managed to get it to start ok without putting a limiter in pulley. had to crack the throttles open quite a bit to let more air in. and messed with tune and cold start settings alot Only makes 70psi on compression tester when cranking. usually well over 250psi. can feel it blowing air back the throttles on compression stroke! so ive basically done the opposite of @Roman and turned my 4age into a prius engine. It actually idles best at full retard. like it has some weak little cams. The vvti is pretty slow it react. but 99% sure its just the oil feed line. i had to come off the oil pressure sensor hole. just used an an4 line had hanging around. will change to an6 see if fixes. Going to try get a little more advance out of it, piston to valve already pretty tight but, i'll gamble bending some valves for a little more, as it still gaining midrange with pulley maxed out. will also help with the prius engine issue. Good news is, its making good power on smaller cams. vvti setup is using 304/300 cams. Below is vs the 318/304 was running at os drags ignore the bump at end.. dyno being a diddle
2 points
-
All set to Wipe everything down and apply paint! Front valence, rear endcaps and boot lid will go on the other side giving plenty of room to move.2 points
-
That will be for repair cert not lvv cert, LVVTA now runs the repair cert system. I believe they intend to run different rules for pre 90 vehicles, in an effort to help people who are restoring older cars as applying the same rules for an HQ holden and a 2020 kia does not make sense2 points
-
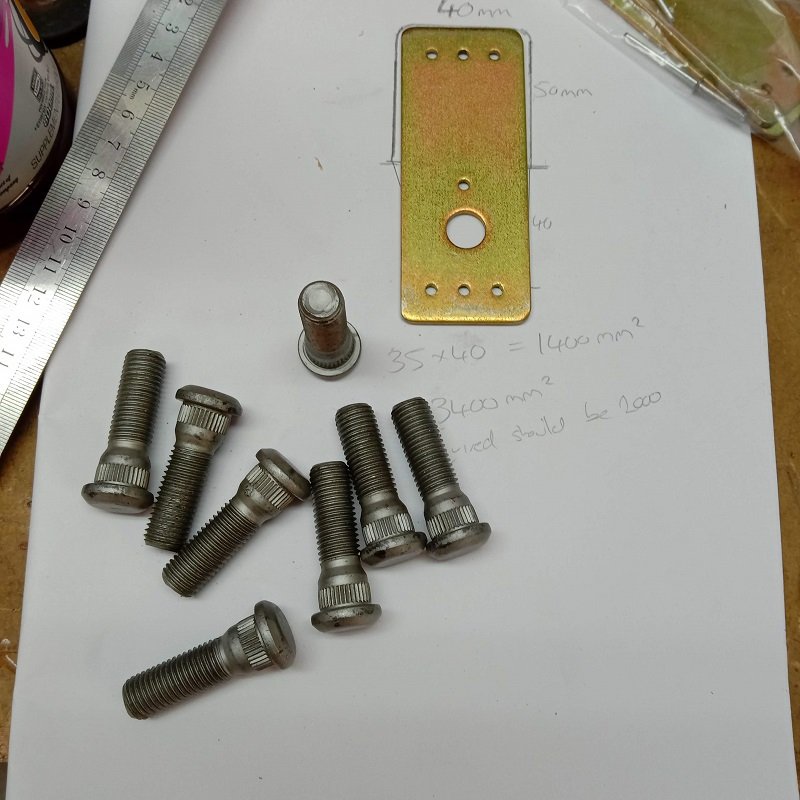
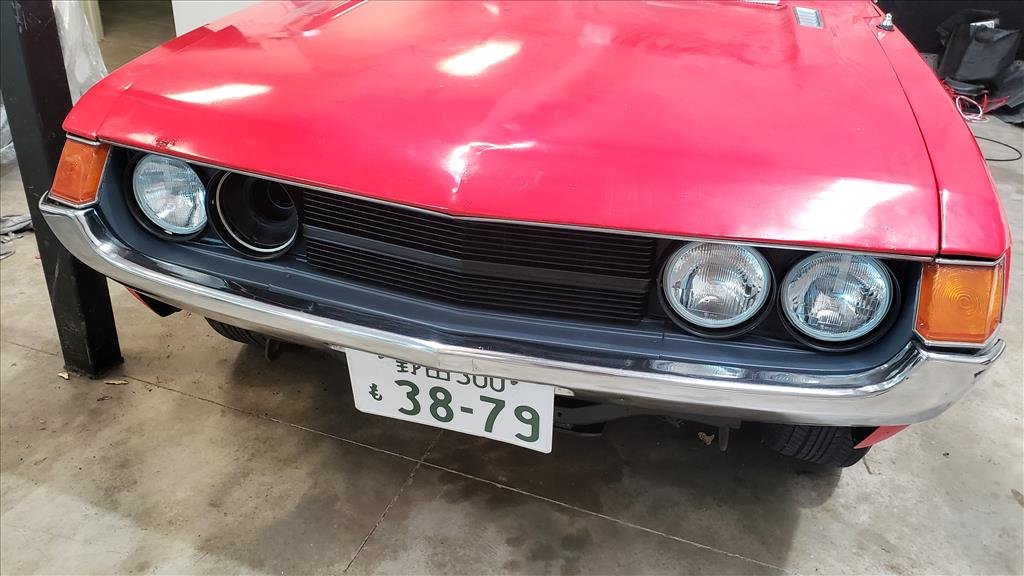
So yeah, where the fuck did that time go... Have been working on this a bit harder over the last few months, was supposed to be done before child number two arrived, but that never happened. Anyway, took it to local workshop a while back for them to tidy up quite a few loose ends that I just didn't have time to do. Had them check my timing belt job, set timing, tune what they could and put it through a WOF check. Funnily enough it didn't pass. The sheet was filled with many of the problems I had asked to be fixed lol... so they could have saved some ink and fixed my list first, but minor thing. So I got it back running a bit better, but on a knife edge between stalling when coming to a stop, or running on when shut off. I've fiddled with it so that I doesn't stall now, and will leave it at that. I have a rebuild kit for the carb, so at some point that will probably get fitted. For now it drives fine for cert etc, so it's down the list to do. Then I took it down for an alignment and made the technicians Friday well and truely, two hours later he was looking a bit out of patience haha. But I now had a failed WOF sheet and an alignment sheet. So it was time to book it in for initial cert check. Turns out they are busy chaps as the estimated 3-4 weeks turned into 7 weeks away. To be fair, it was a good few weeks between calls as I wanted to do WOF / alignment before booking as didn't want there to be any surprises. So 6 weeks later and with a week till check, I figured I better check everything was ready to go. Nope, carb had decided to play up quite a bit since it had been parked up. The battery I purchased to get the car shipped down had finally had enough so it was off to SCA to get a new one. Didn't fix the carb, but it sure made the time between firing it up and fiddling less than the battery charge it needed each time. Battery was always on the list as well as a full tank of gas, don't want to be that guy when dropping the car for cert. So anyway, dropped it in a week ago and it came back with a few things to sort. Nothing too major. Rear seatbelt mounts didn't exist they were just drilled through a single skin at compliance. So that was one item to sort, what a nightmare too, so little space to work with. Ended up laying in the boot for a few hours getting them to fit nicely. Suspension travel was not adequate in back, so I have sorted that now hopefully. Gained quite a bit of travel, while still meeting all of the cert requirements. Wasn't sure i'd be able to get it done with my springs, but certifier and Clint both had ideas to help with that. So got that sorted and gained around 30mm travel. Wheel studs up front slightly too short. I set myself up with this one as I had been using factory nuts for all my testing of turns etc. Then put on some nicer ones I didn't check the engagement, it's less of course. So hit up Mark at Toyota as 2+ years ago he had sent me a photo of the wheel stud options in case I needed new ones. They arrived next day, so they are on my list to fit now. Of all the jobs on the list, they are the easiest, so they will be done last. That was the list to rectify, along with sorting the exhaust to not hit the car. Exhaust wasn't too bad, but I had the front joint fixed and that involved them jamming the exhaust against the trans. So I pie cut the exhaust at the trans and rewelded it bent down. this lead to problems further down the exhaust where it hit a crossmember just above the diff. So I grabbed a mount from SCA on the weekend and welded a dropper from that to the exhaust. I have plenty of support stopping the exhaust from dropping, just none from stopping it heading upwards. Wasn't really on my radar at the time, but with it being lowered and a lot firmer than factory, something had to give. So that's all fitted now and so it's rubber on rubber with minimal distance for that travel. So it shouldn't stressed the rest of the exhaust, and it stops all noises. Sorting the suspension took me probably 1.5 days of solid head scratching and removing and reinstalling most of the rear end with small adjustments. Such a PITA with the limited space I have. I also wasted a lot of time forgetting to include droop in my travel calculations. Was getting pretty hard to get decent travel till I remembered that counts, duh. Some pics. Filling it up with the good stuff Studs that need to go in, as well as working out plate area vs the space I have to fit them. Got it sorted, trimmed them a bit, while staying within the requirements, zinc'd then painted. Still well and truely have the clamping area I need after being trimmed (not shown). They will be bolted into the car with 5mm bolts, one of which will pass through a sheetmetal packer. I'll then use the provided rivets to finish securing the packer between the plates and jobs done. Gave this side another tickle, I didn't want to fuck with the exterior look of the fenders on the car, front or rear. So that meant I needed to get as much space as I could on the inside. Rear is nice and easy to add clearance without compromising anything. Will give it all a paint up as some flaked off the inside. Don't want any rust forming in the now formed channel, so will sort that out too. Thankfully there were two threaded holes in the car above exhaust. So I cut some steel and made a solid as fuck bracket to bolt to the car. Then bend up some round bar and curved it around the exhaust. Zap zap later and with some molten steel in my armpit I was done. It's not supporting any weight in this setup, it only prevents or at least reduces greatly, the rate at which the exhaust can travel upwards. I had both ends of the mount enter it from opposite sites with the hope this will prevent it being able to physically come apart. Seemed to work in my head, time will tell. Didn't want to weld caps on the ends as it would make removing the mount impossible later. To remove it now you have to unbolt it from the car to slide it off the exhaust. And hopefully how it will sit when finished. So I now have till the end of this month to tidy up all of the list, when i'll drop it back in for recheck. Pretty sure I have all of the things sorted after speaking with certifier today. It's basically as low as I can get it with the 15x7s in this offset, with factory fenders and sufficient suspension travel. It's been 4 years of mostly struggles to get to this point, so the weight on my shoulders is finally starting to lift. That's all folks.
2 points
-
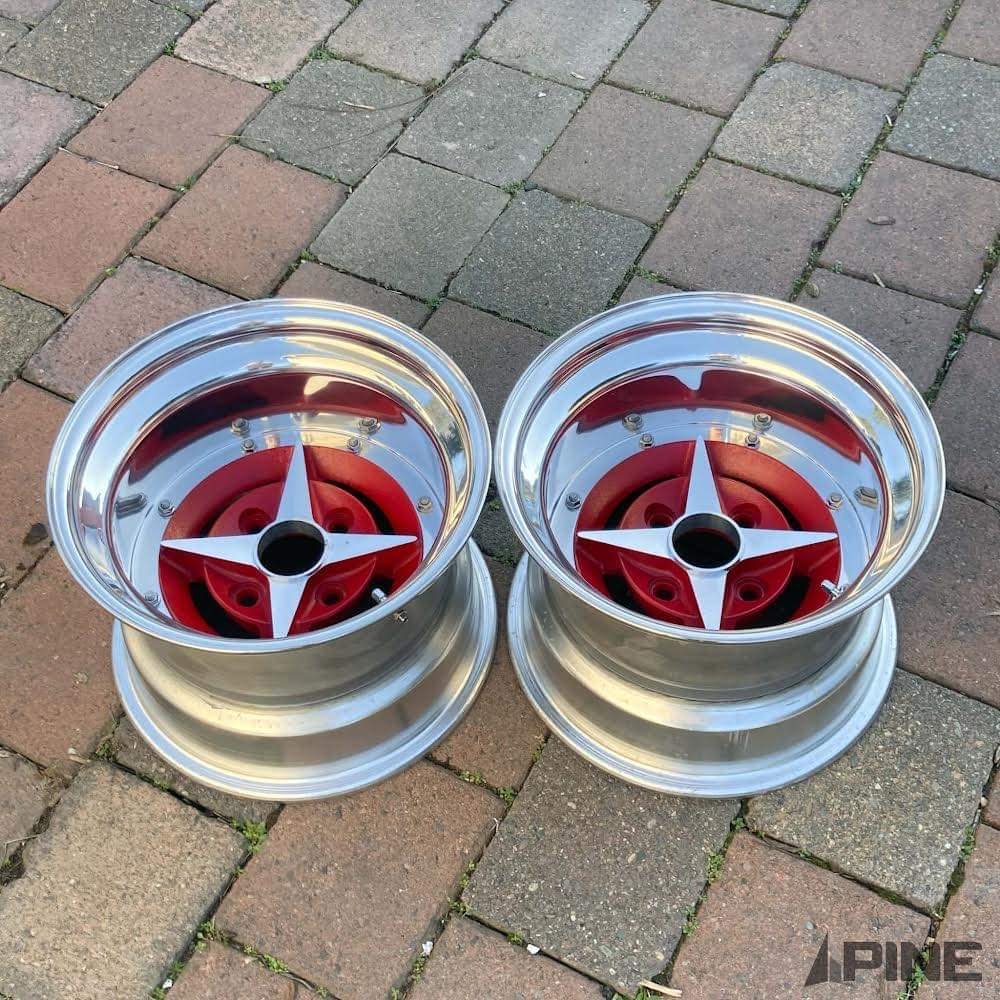
Techno Phantom pair have just been finished in a 9j A type SSR Tomcat 10j A type pair have just been painted to match.
2 points
-
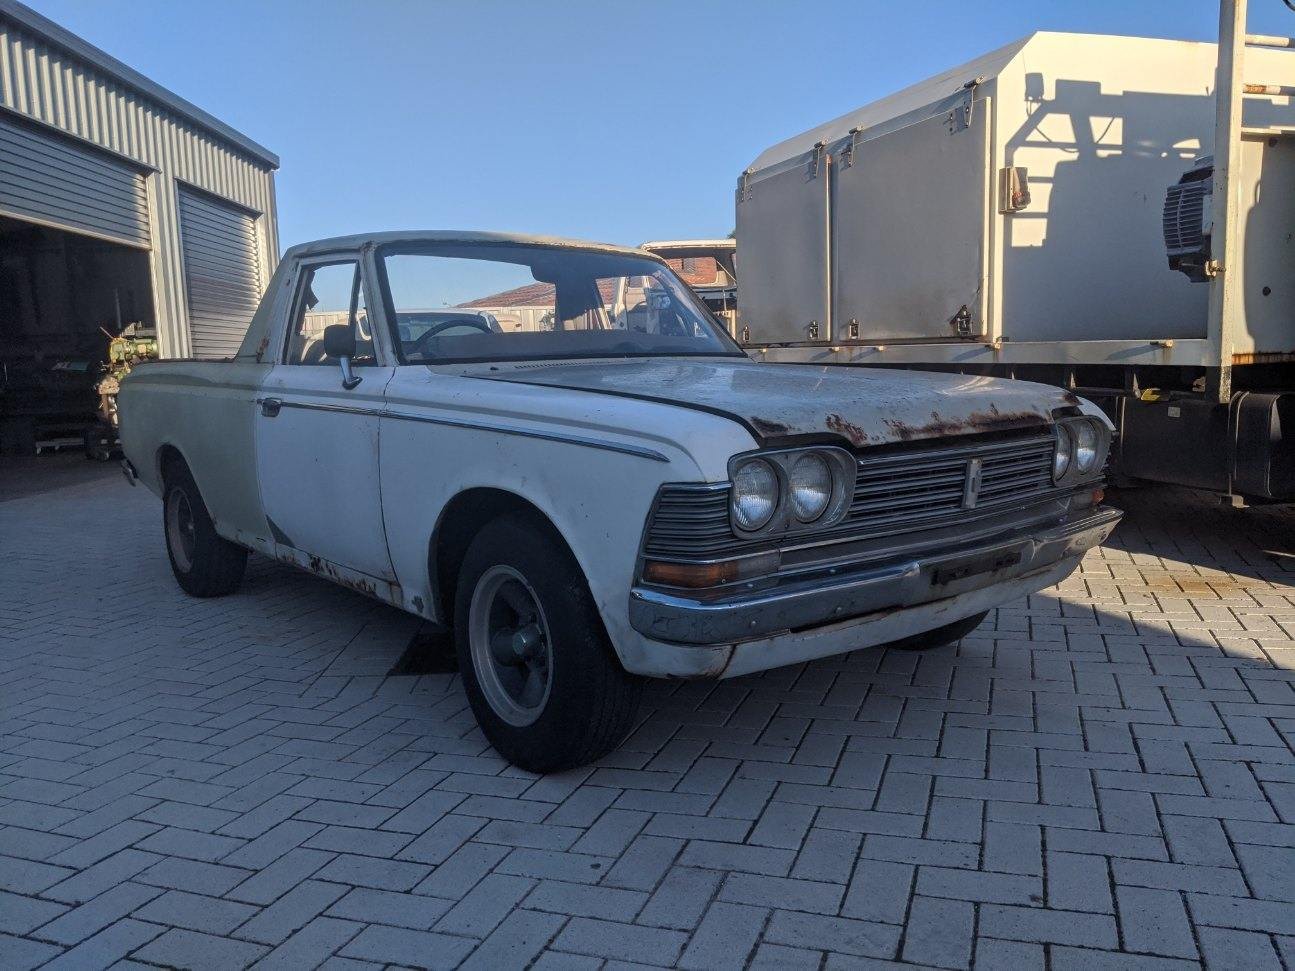
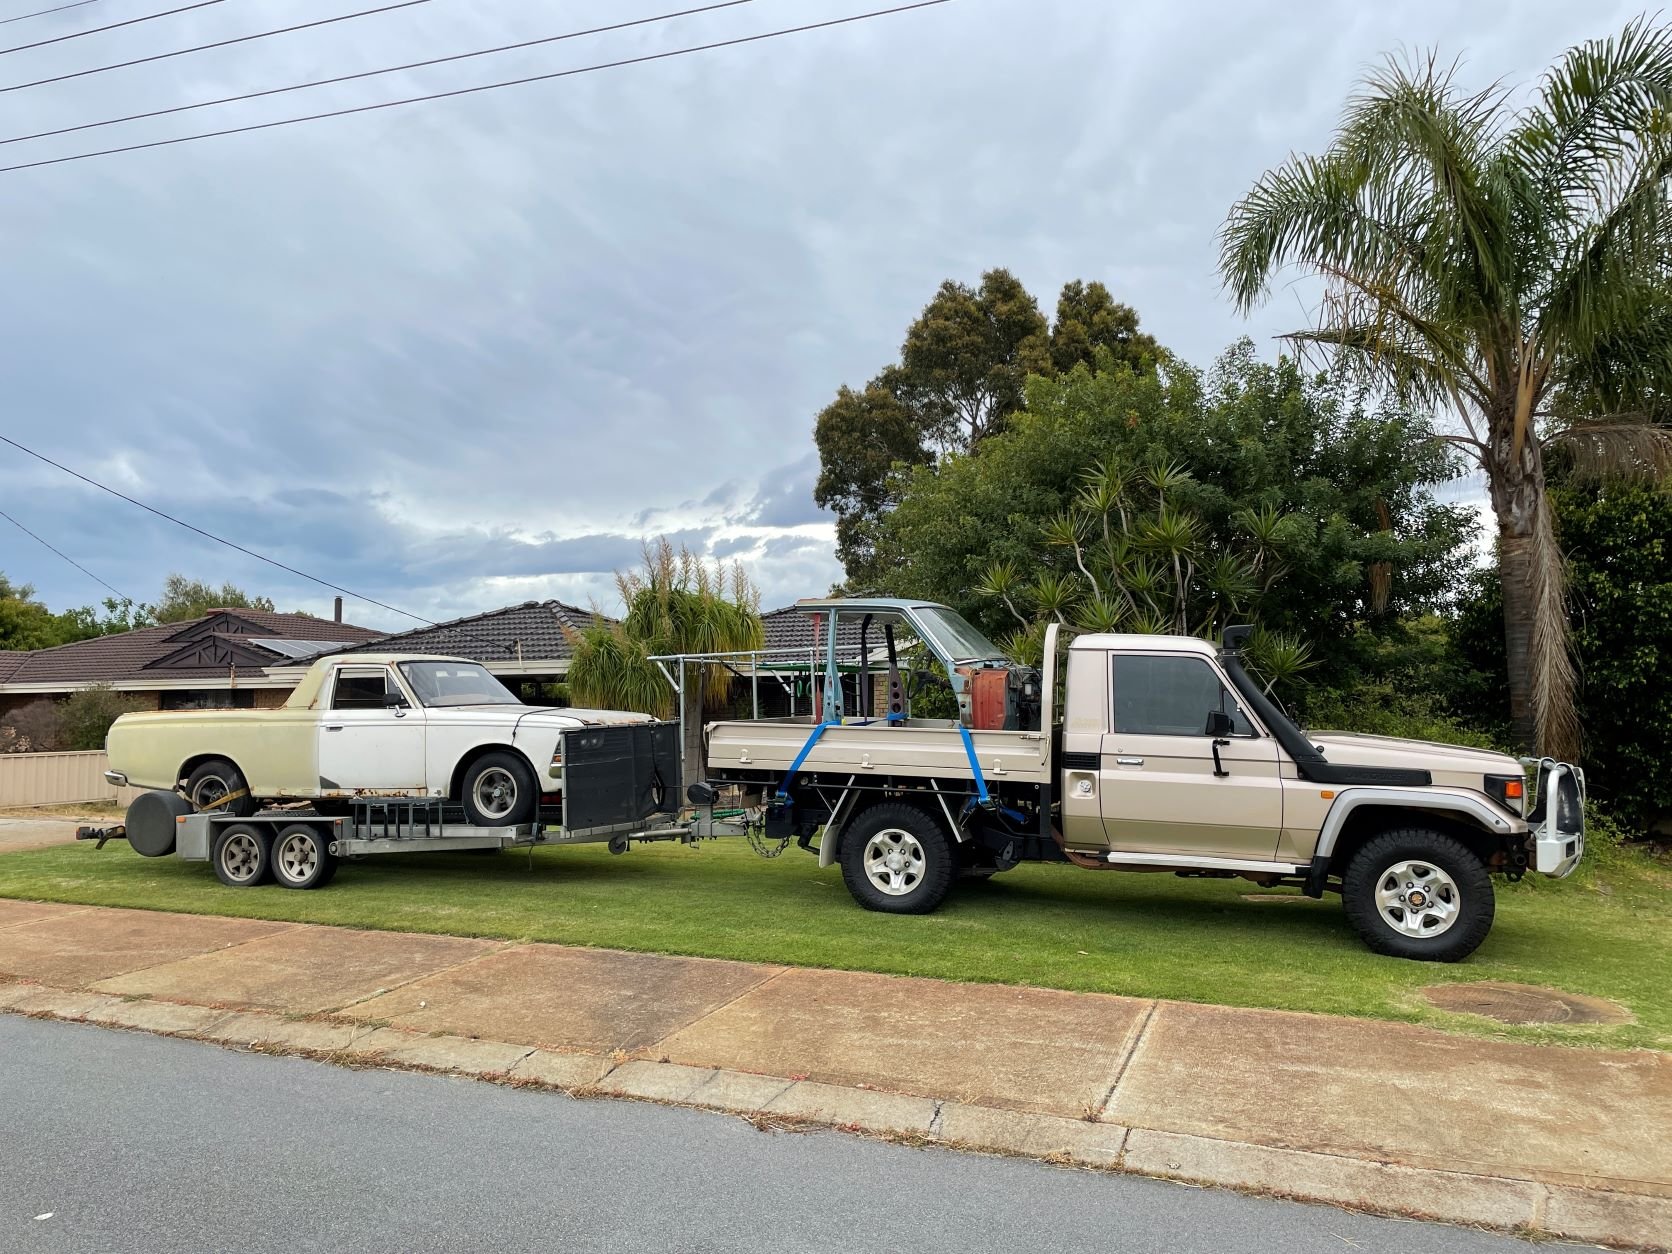
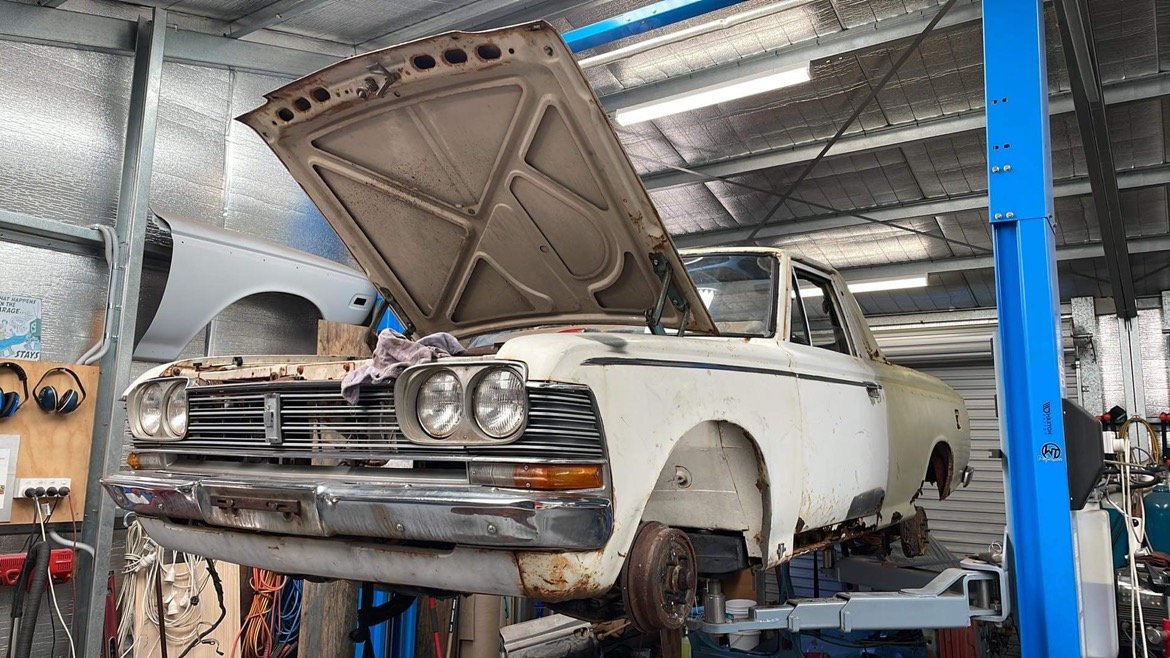
After spending quite some time reading posts of other people's vehicles - I figured it was time that I got my shit together and posted my rusty junk up for the world to see. After developing an unhealthy penchant for 1969 - 1970 Toyota Crown's some time back, I have seemingly added a hobby to the list of hobbies - collecting Crowns. As was told to me after finding my first - 'You can't have just one!' - the collection has grown. The latest, being this RS56 Ute.... This old girl is the latest addition to the fleet, which currently comprises of 1 x MS55 Sedan and 2 x MS51 coupes (separate threads to be generated for those at a later date.....) Anyways. I get a message from a guy I have bought from before, and the conversation basically went like this; Him: 'Want to buy a Crown Ute?' Me: 'Yes'. It was made known up front that the vehicle was pretty rough, and that a sedan 'half cut' was available at a reasonable extra cost to support with rust repairs. And so it was done. Photos were sent after the agreement was made which did little to curb my enthusiasm. All collected one slightly miserable weekend. Stoked as. Of all the Crown shapes, the 50 series really do it for me. Of all the 50 series body types - the ute really gets me rigid. Once I got it home (and made some space in the shed) it didn't take long to work out just what shape it was in.... Uhhhhhhhh...................... Oh well. I sorta knew what I was getting myself into - so carried on regardless. All in all, the front half of the cabin is..... garbage. But that's why I purchased the front cut of the sedan. Beers were had, and plans formulated. *EDIT* Page of discussion here:
1 point
-
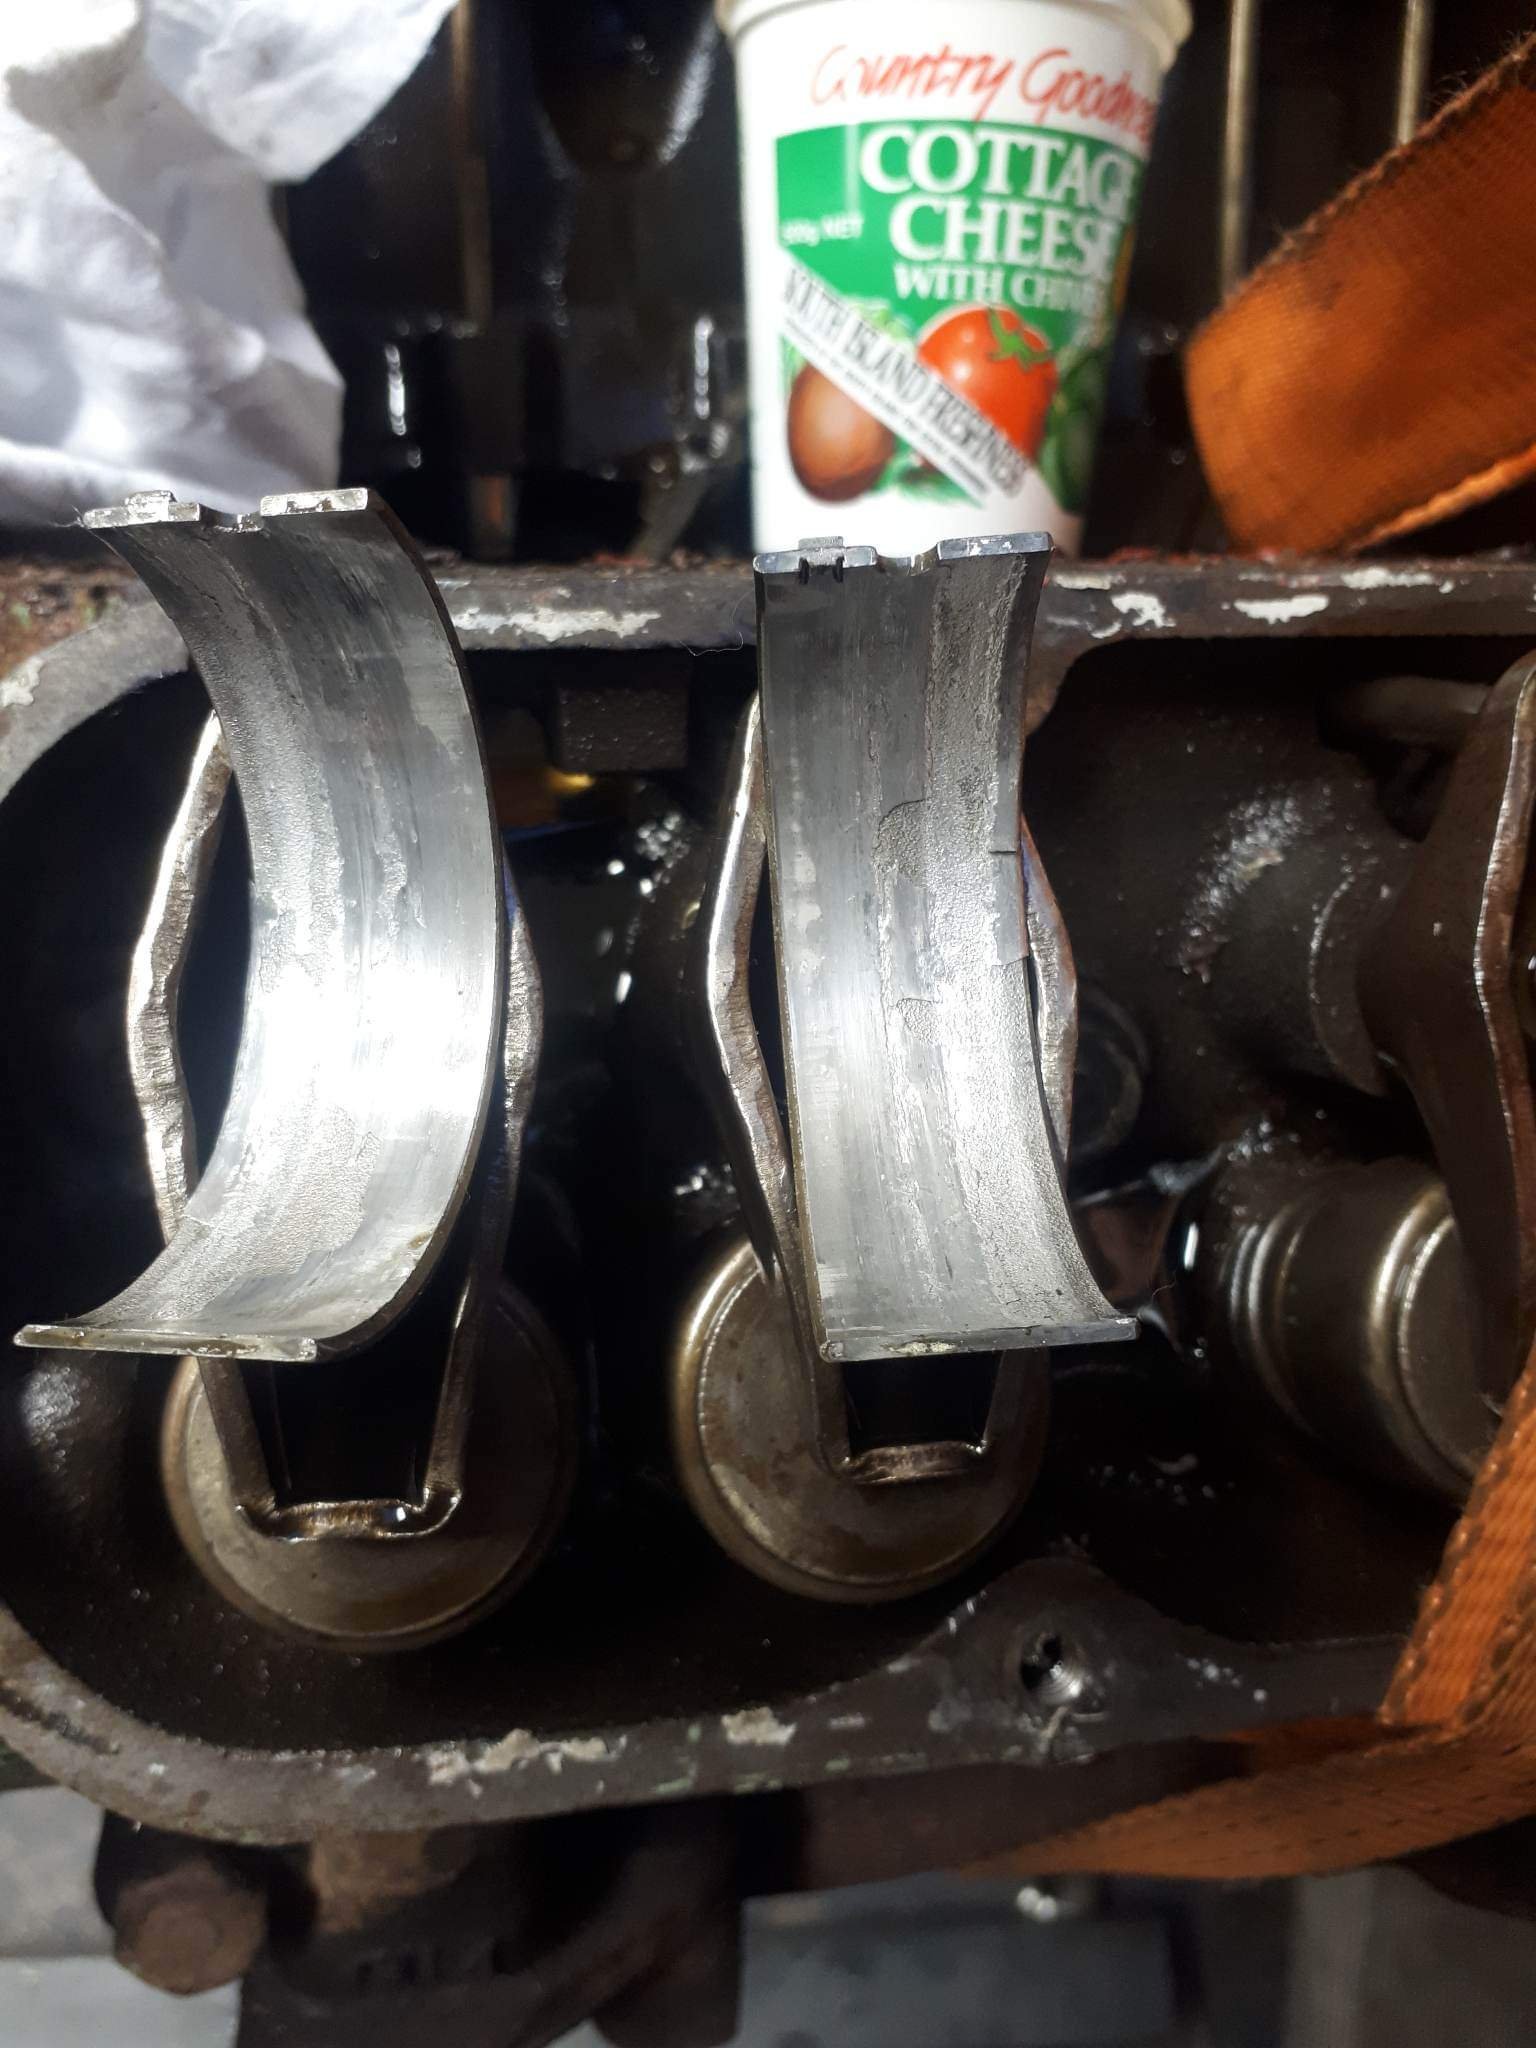
Took the motor out and dropped the pan. Heap of sludge in the bottom. Not ideal. Heres the money though. Big end has failed. Caught it early enough that it's not marked the crank Hopefully find some more 1thou under bearings locally
1 point
-
Very pink. So cool!1 point
-
Alright consider me sold on the subject! Will be something interesting to test. Especially since I've got your differential pressure gauge to test things with. Then I can hook up a MAP sensor into the airbox as well. However I'll need to try figure out what is actually going to be physically possible to acheive. Maybe I will use my other bonnet before I cut it for other reasons, and make a little airbox inlet space.1 point
-
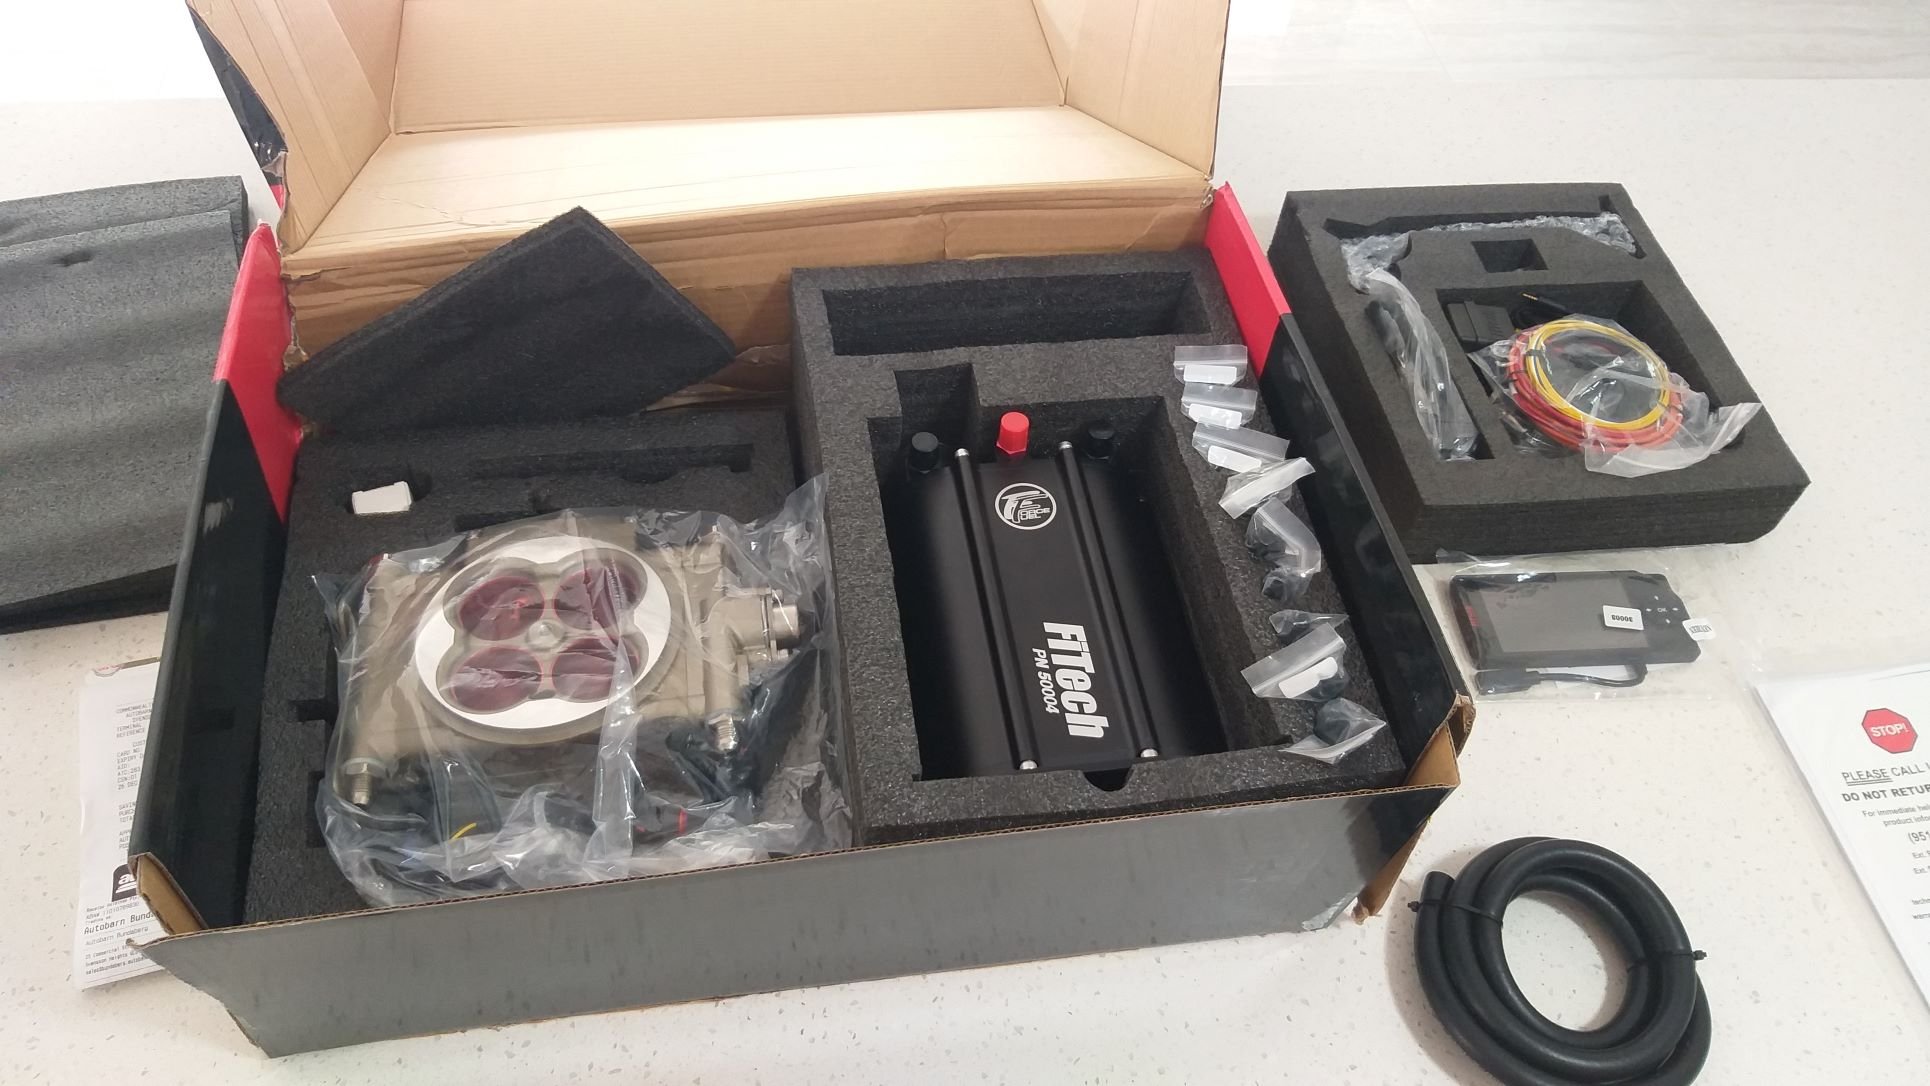
I've been pondering what to do on the Muzzy from a fuelling point of view for a few months now. Allow me to set the scene: A previous owner had fitted a brand-new Holley 600 4-barrel carby to the mighty 289 small block. Although the car runs really well, it can be a bit "fumey". Chatting to a couple of folk more knowledgeable than myself, the general consensus was that she was over fuelled. This was supported by the fact that the car cold starts easy as with absolutely no choke required. Another clue is the fact that after a short drive with the windows down I smell like I've just been out mowing the lawn. Whilst "eau de unleaded" may appeal to some, it gets a bit tiresome after a while. Anyhoo, supplied with the car was the original 2-barrel intake manifold as well as two old carbs, a 2 barrel Holley and an old Autolite. Both look pretty manky and would need a full refurb. I'm not really keen to go back to a 2-barrel, so I discarded that option. My next thought was to look out for a Holley 465, but they are getting hard to find and are also pretty spendy. I tracked down a family run performance shop down in Victoria who specialise in refurbing old carbs and they were offering a reco'ed and bench run 465 without me having to supply a core unit for just under $900 delivered to me in Queensland. So again not exactly cheap. Now back in the day when I was playing around with my V8 powered Bedford van I ended up trying and discarding 3 different carbies before I was happy. First up was a Quickfuel, then a Holley and finally a refurbed Rochester Quadrajet. With the cost of each carby plus a few dyno tunes thrown in for good measure the spend was getting up there. I was never 100% happy with the van as even with the Rochy it guzzled the juice and at one point I even toyed with fitting EFI, but at that time the cost of off the shelf EFI kits was pretty eye watering. So, getting back to the Muzzy I decided that a bit more research was needed before pulling the trigger on the carby. Spent many a night with my good friend Google and Youtube. Even pestered a few USA based Mustang gurus for their advice and eventually ended up setting my sights on the Fitech EFI. Now it just so happens that my local Autobarn is a Fitech stockist and earlier in the week I dropped by and saw that they had one Fitech Master Kit in stock. Today they were having a 25% off Boxing Day sale so first thing this morning Mrs Flash, our wee dug and myself hopped into our trusty old Bongo van and headed through to town. Got there 10 minutes before store opening and I was second through the door. Literally bowled over the poor shop assistant to get my hands on the kit, but get it I did. This is my first foray into the land of aftermarket EFI, so I am on a steep learning curve. Let the fun commence.
1 point
-
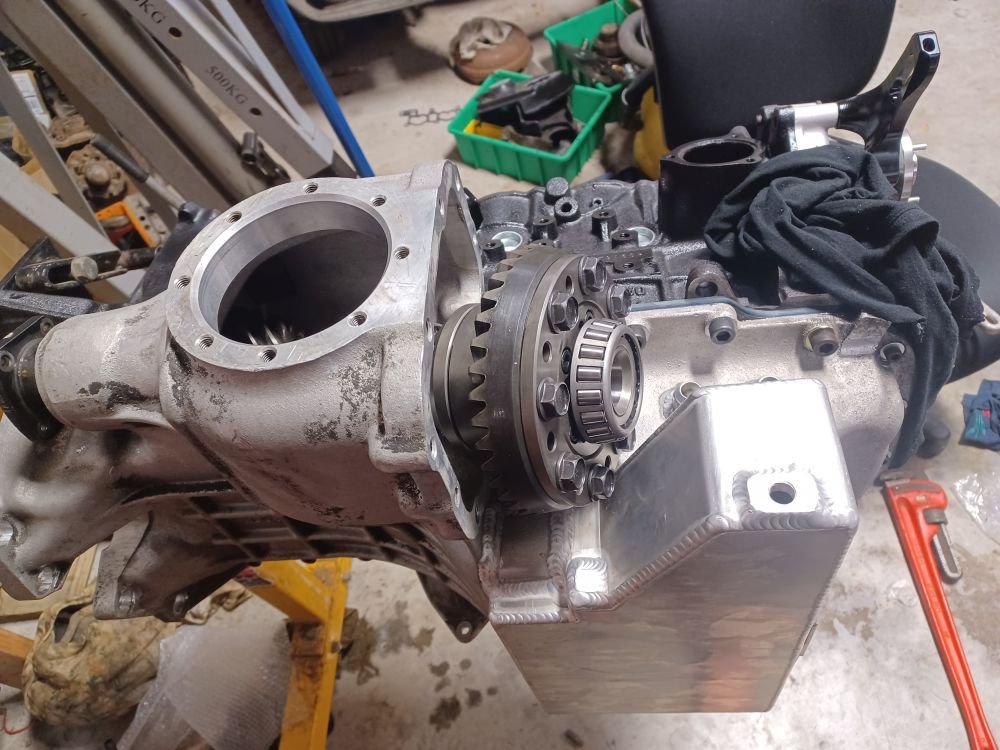
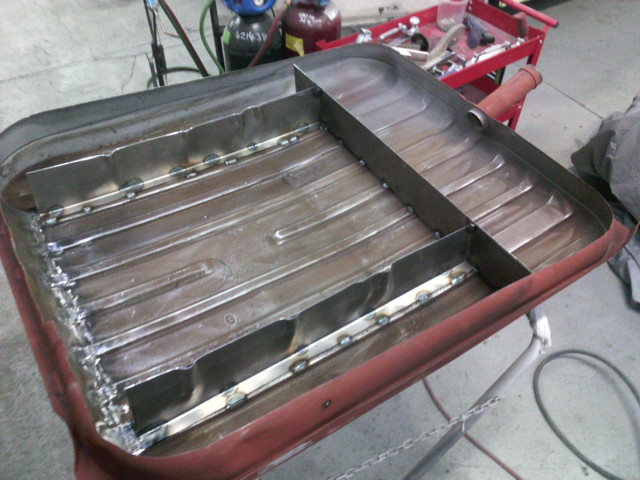
I stripped the ring gear off the stock open front diff and installed it with some new bearings onto a quaife torsen lsd. Lots of guys on the SAU forums rate it as the best mod to their GTRs. @Bistro came round for a few beers and gave me a hand to install the adapter plate and test fit the sump. Had to come off again as there was a bit of extra clearance required on some of the adapter plate bolt holes Its all on now, and i fitted all of the diff parts with new bearings and seals everywhere. I jumped ahead a bit and fitted the pinion seal before i measure the end float so that might have to come off again. Fingers crossed its ok. I got the crown wheel backlash perfect at 0.15mm. spec is .13 - .18 Pretty happy with that. Need to paint the gears next and hopefully the pinion is ok and i can seal it up. Its a prick of a thing to fit the diff in so im hoping it does not need to come back out again. The hardest part is waiting for parts. I can buy all the seals and shims i need, but they are usually 3 weeks from overseas. Once the head comes back i can fit that and do some plumbing and fit it back in the car. I might do the transfer case next. Maybe overhaul the gearbox.... Its a slippery slope
1 point
-
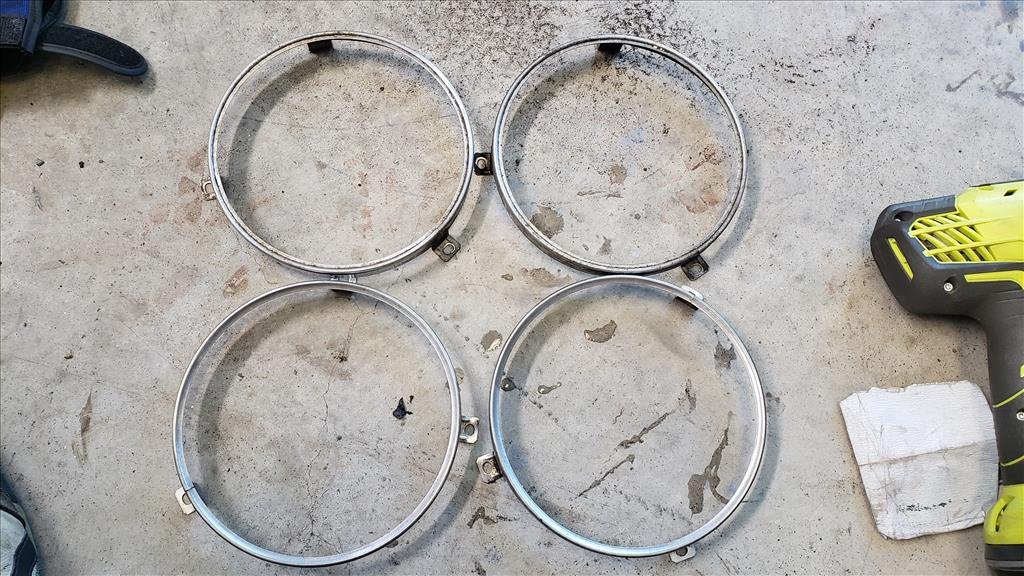
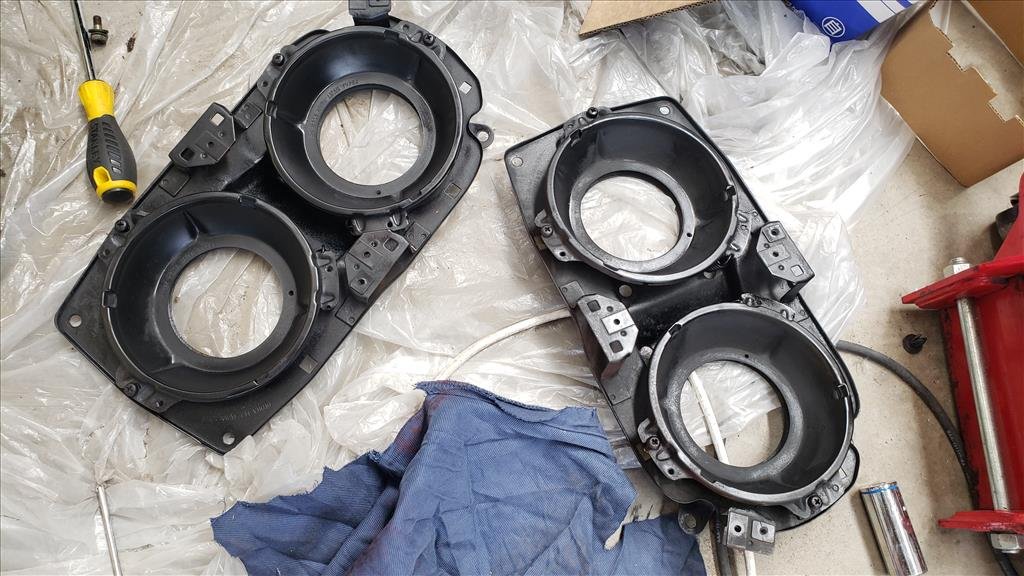
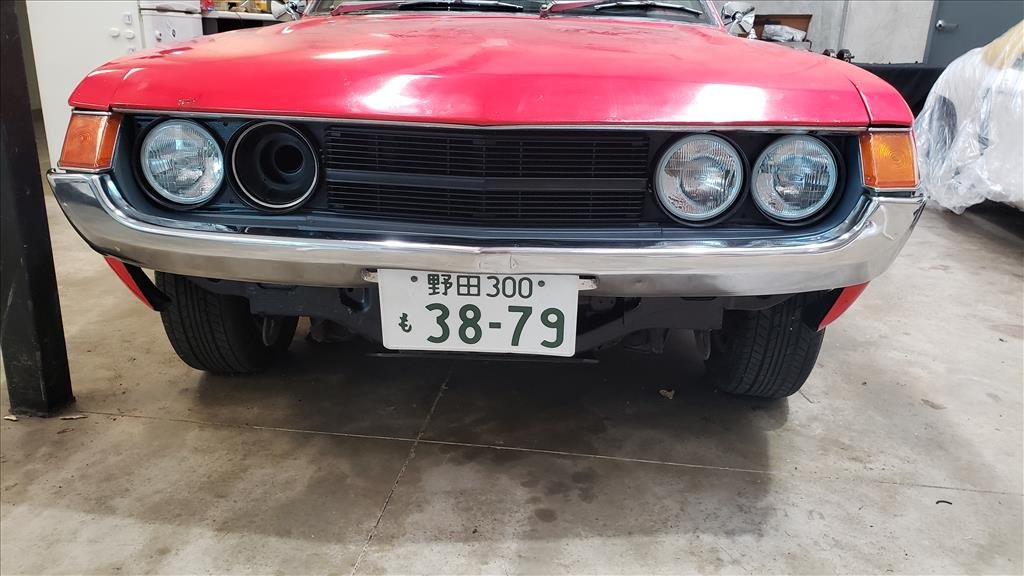
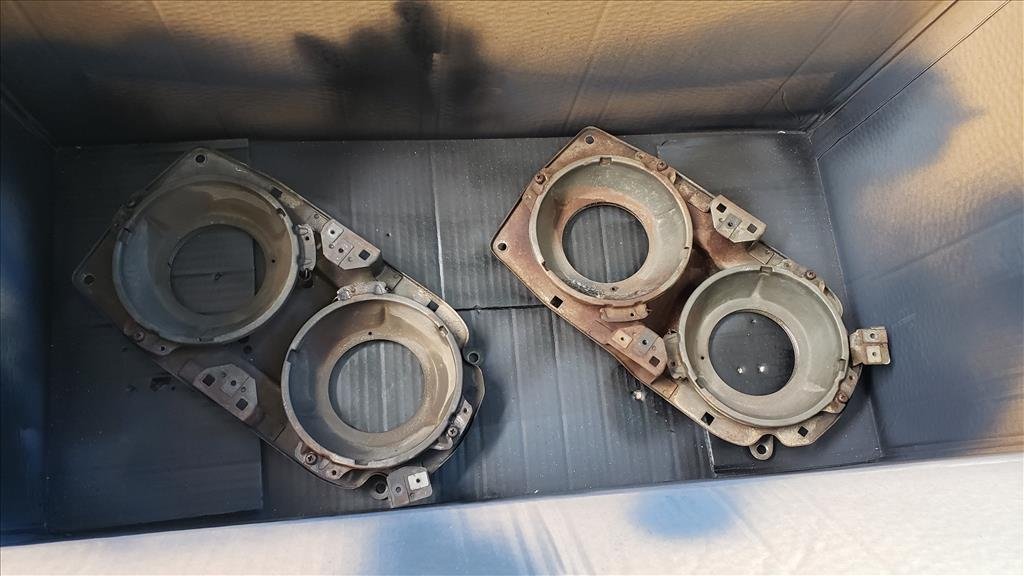
Big things today! The front is back on; mostly. I was a but dubious the driver side would go together again as the fender is really mangled but seemed to work. I guess it was always like that I just didn't realise until I took it apart. I think I will have to re-align the door slightly to get it to work perfectly(ish) but so far not too bad. New Koito headlights arrived during the week but I couldn't put them back in with the janky old headlight buckets so fired up the paint booth again. By this time in the relationship I'm far from worrying about the small details so just laid it on thick. While waiting I gave the trim rings a bit of a clean up before putting them back on as well, don't wire wheel your leg, it's a little painful. Top before, bottom after. Now, Toyota has an idiot-proof way to make sure you put the correct lights in the correct buckets. On each light there are these little tabs that sit into the corresponding part on the bucket. What they did not think about was a greater level of idiot. You see I went and grabbed one of the inner lights and tried to offer it up to the outer bucket but it didn't fit. In my infinite wisdom I presumed the lights weren't correct so went and cut these tabs off. Installed it but now the light is loose. Turns out when you put the right bulb in the right place everything works great and you don't need to cut the tabs. So as a result now I have a sweet intake, but that'll only be temporary. Super stoked with how it's come out though when you compare it to how it was. I just need to wrestle that front lip back on which I expect will be even more of an ache than before.
1 point
-
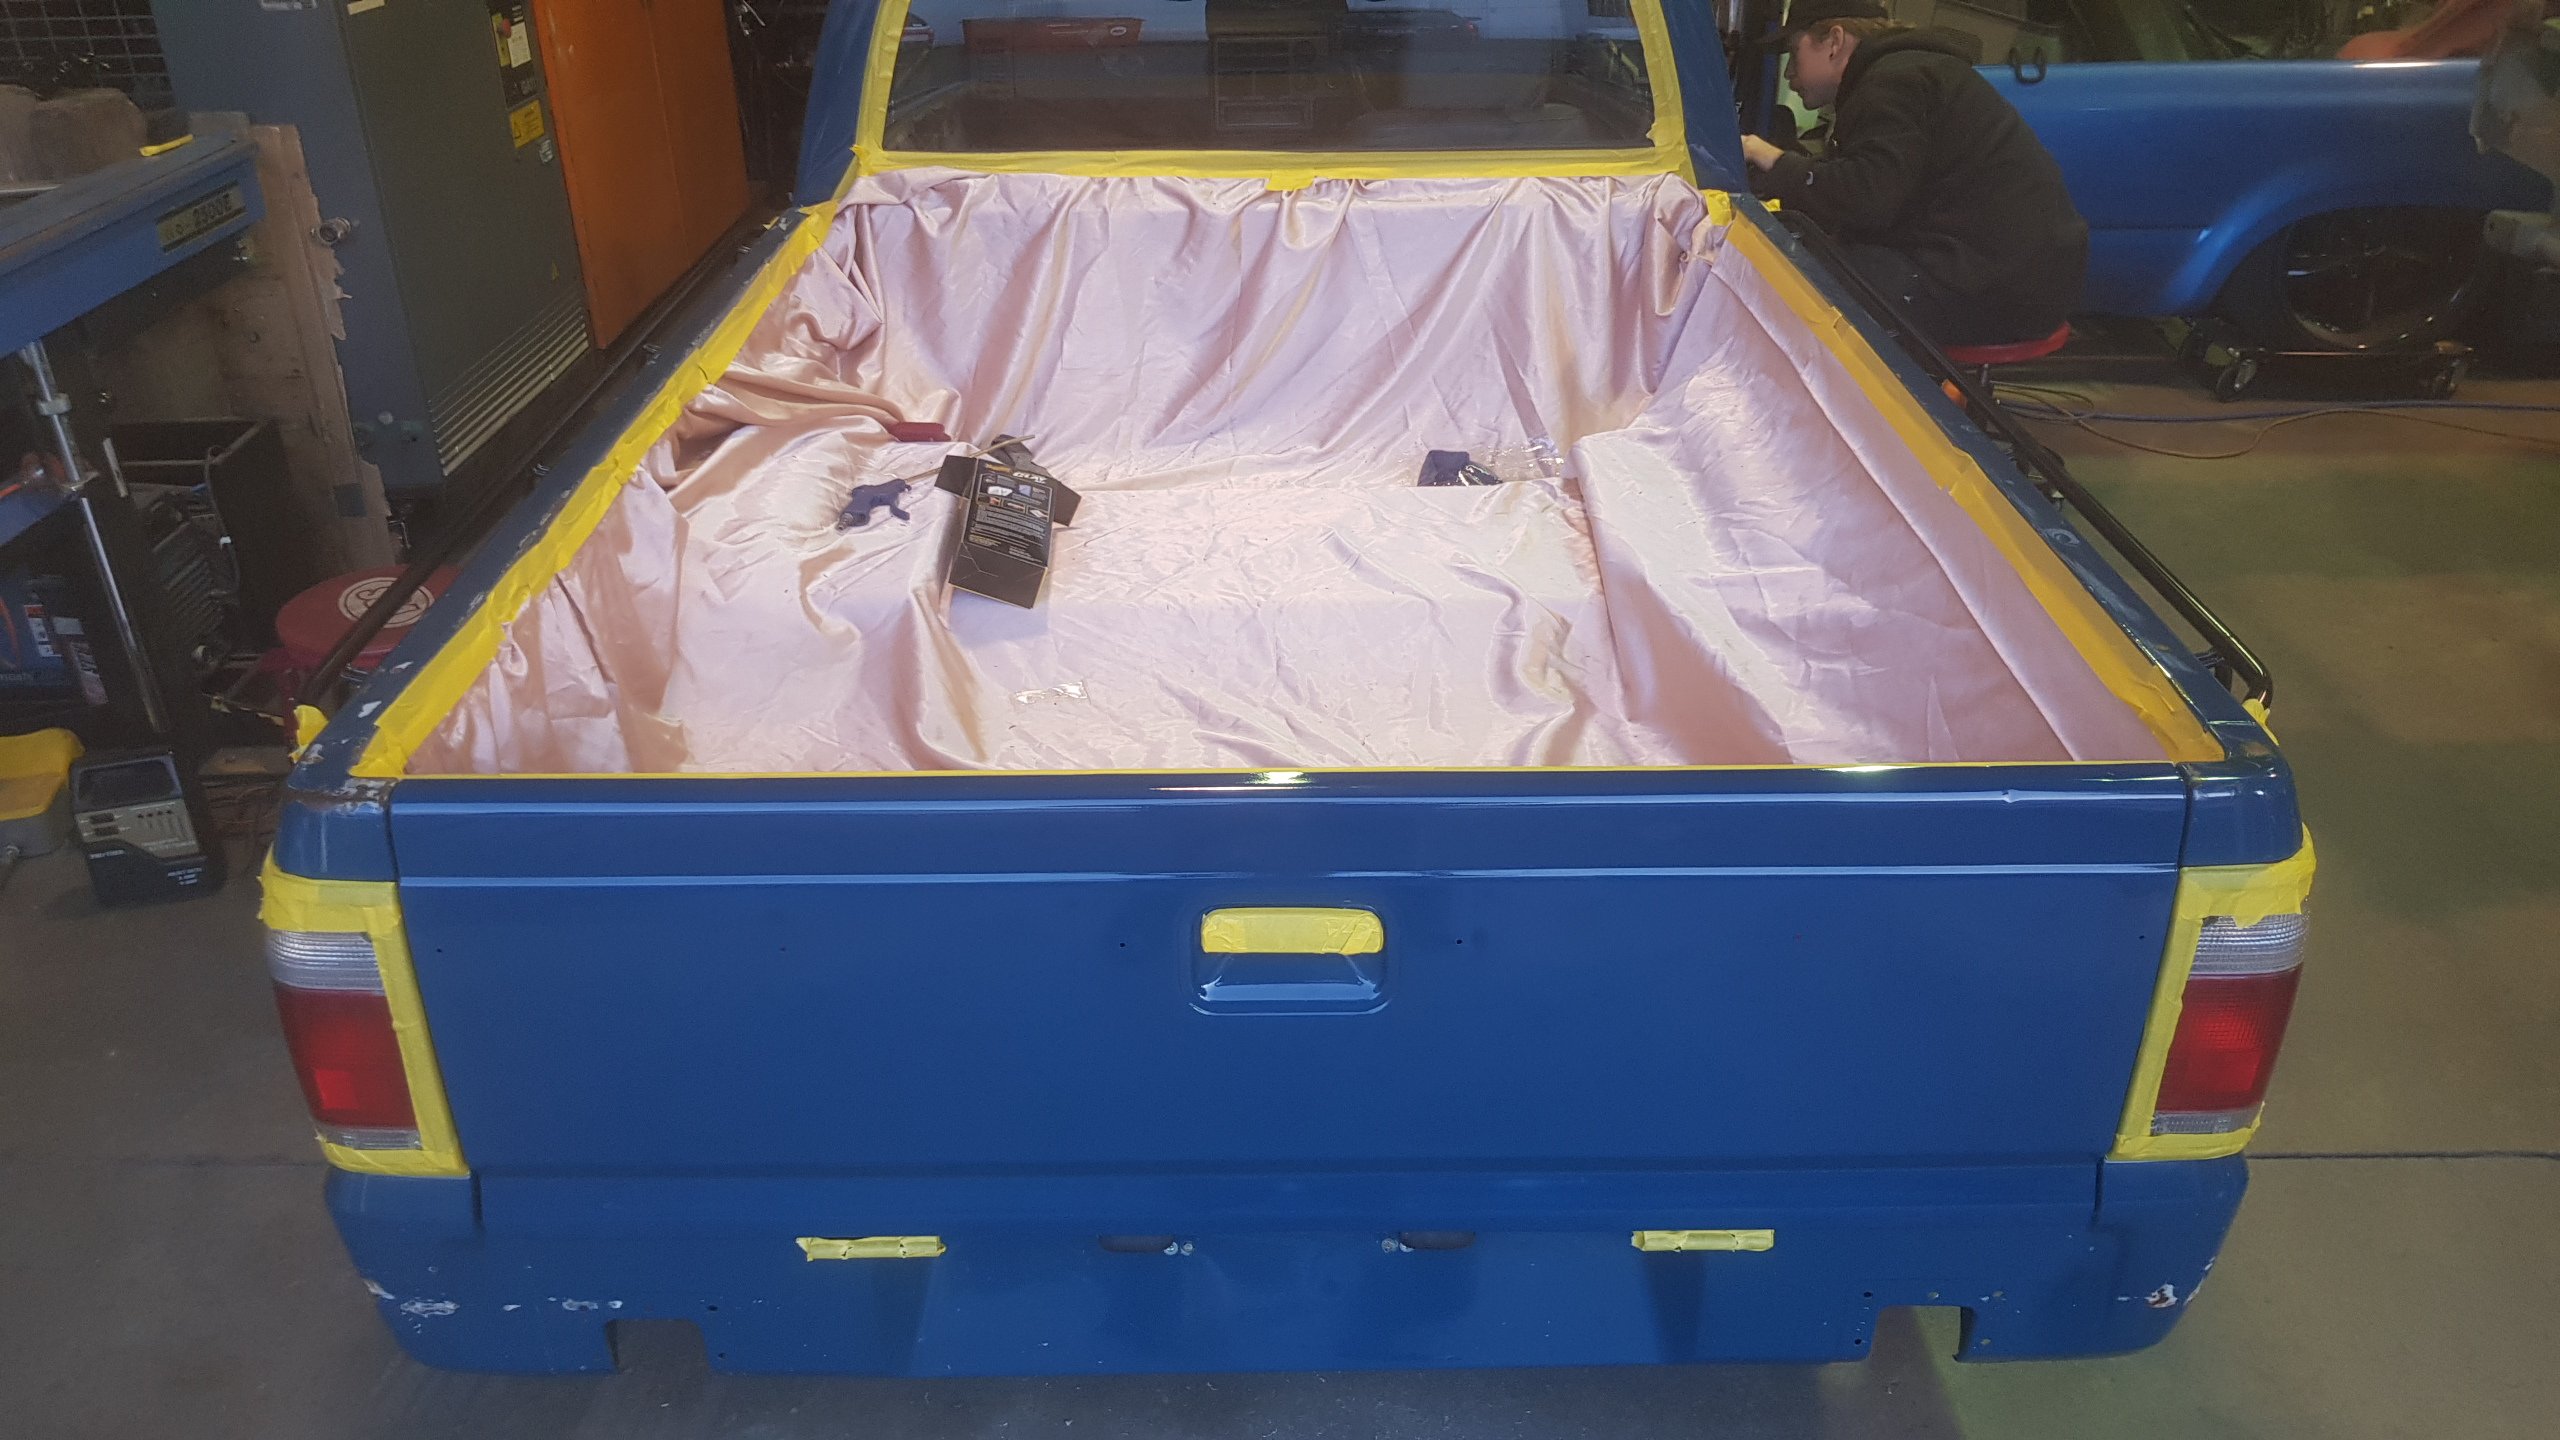
Started chipping away at some repairs. Got rid of the scabby hazey hatches covered in rock hard masking tape. Replaced with; Plenty of time spent with some wd40 scraping petrified making tape off various stainless deck fittings. Then got the missus down below to start painting the sides of the berths, put an epoxy coating on the bilge to stop stuff soaking in; Started varnishing some of the wood trim too Next task is to sort out some wiring and hook up my new sounder, chartplotter and solar panel.1 point
-
Still whittling away at this new bbq area. We had stashed away a pile of old power pole hardwood cross bars that were left on the land when we bought it. For the last 8 years they've been hiding behind the water tank waiting for a use. Moved them out and propped them up for a wall. Tried it out for a morning coffee.. Then sunk some treated poles into the ground - again - left on the land. The same stash has been used for the boat shed and all four wood sheds scattered about the property. Bought some timber and along with some douglas fir given to us we started a framework for the deck. Removed all the old screws from some old decking we had down next to the housetruck when it was parked up.. Bought new decking for the longer runs and then it was time to get baked in the sun and use roughly 600 screws. Kevin watched but did not offer a paw to help.. Was the longest day yesterday - nice to day to get the deck down. Next step will be steps. Oh and some handrails to suit.1 point
-
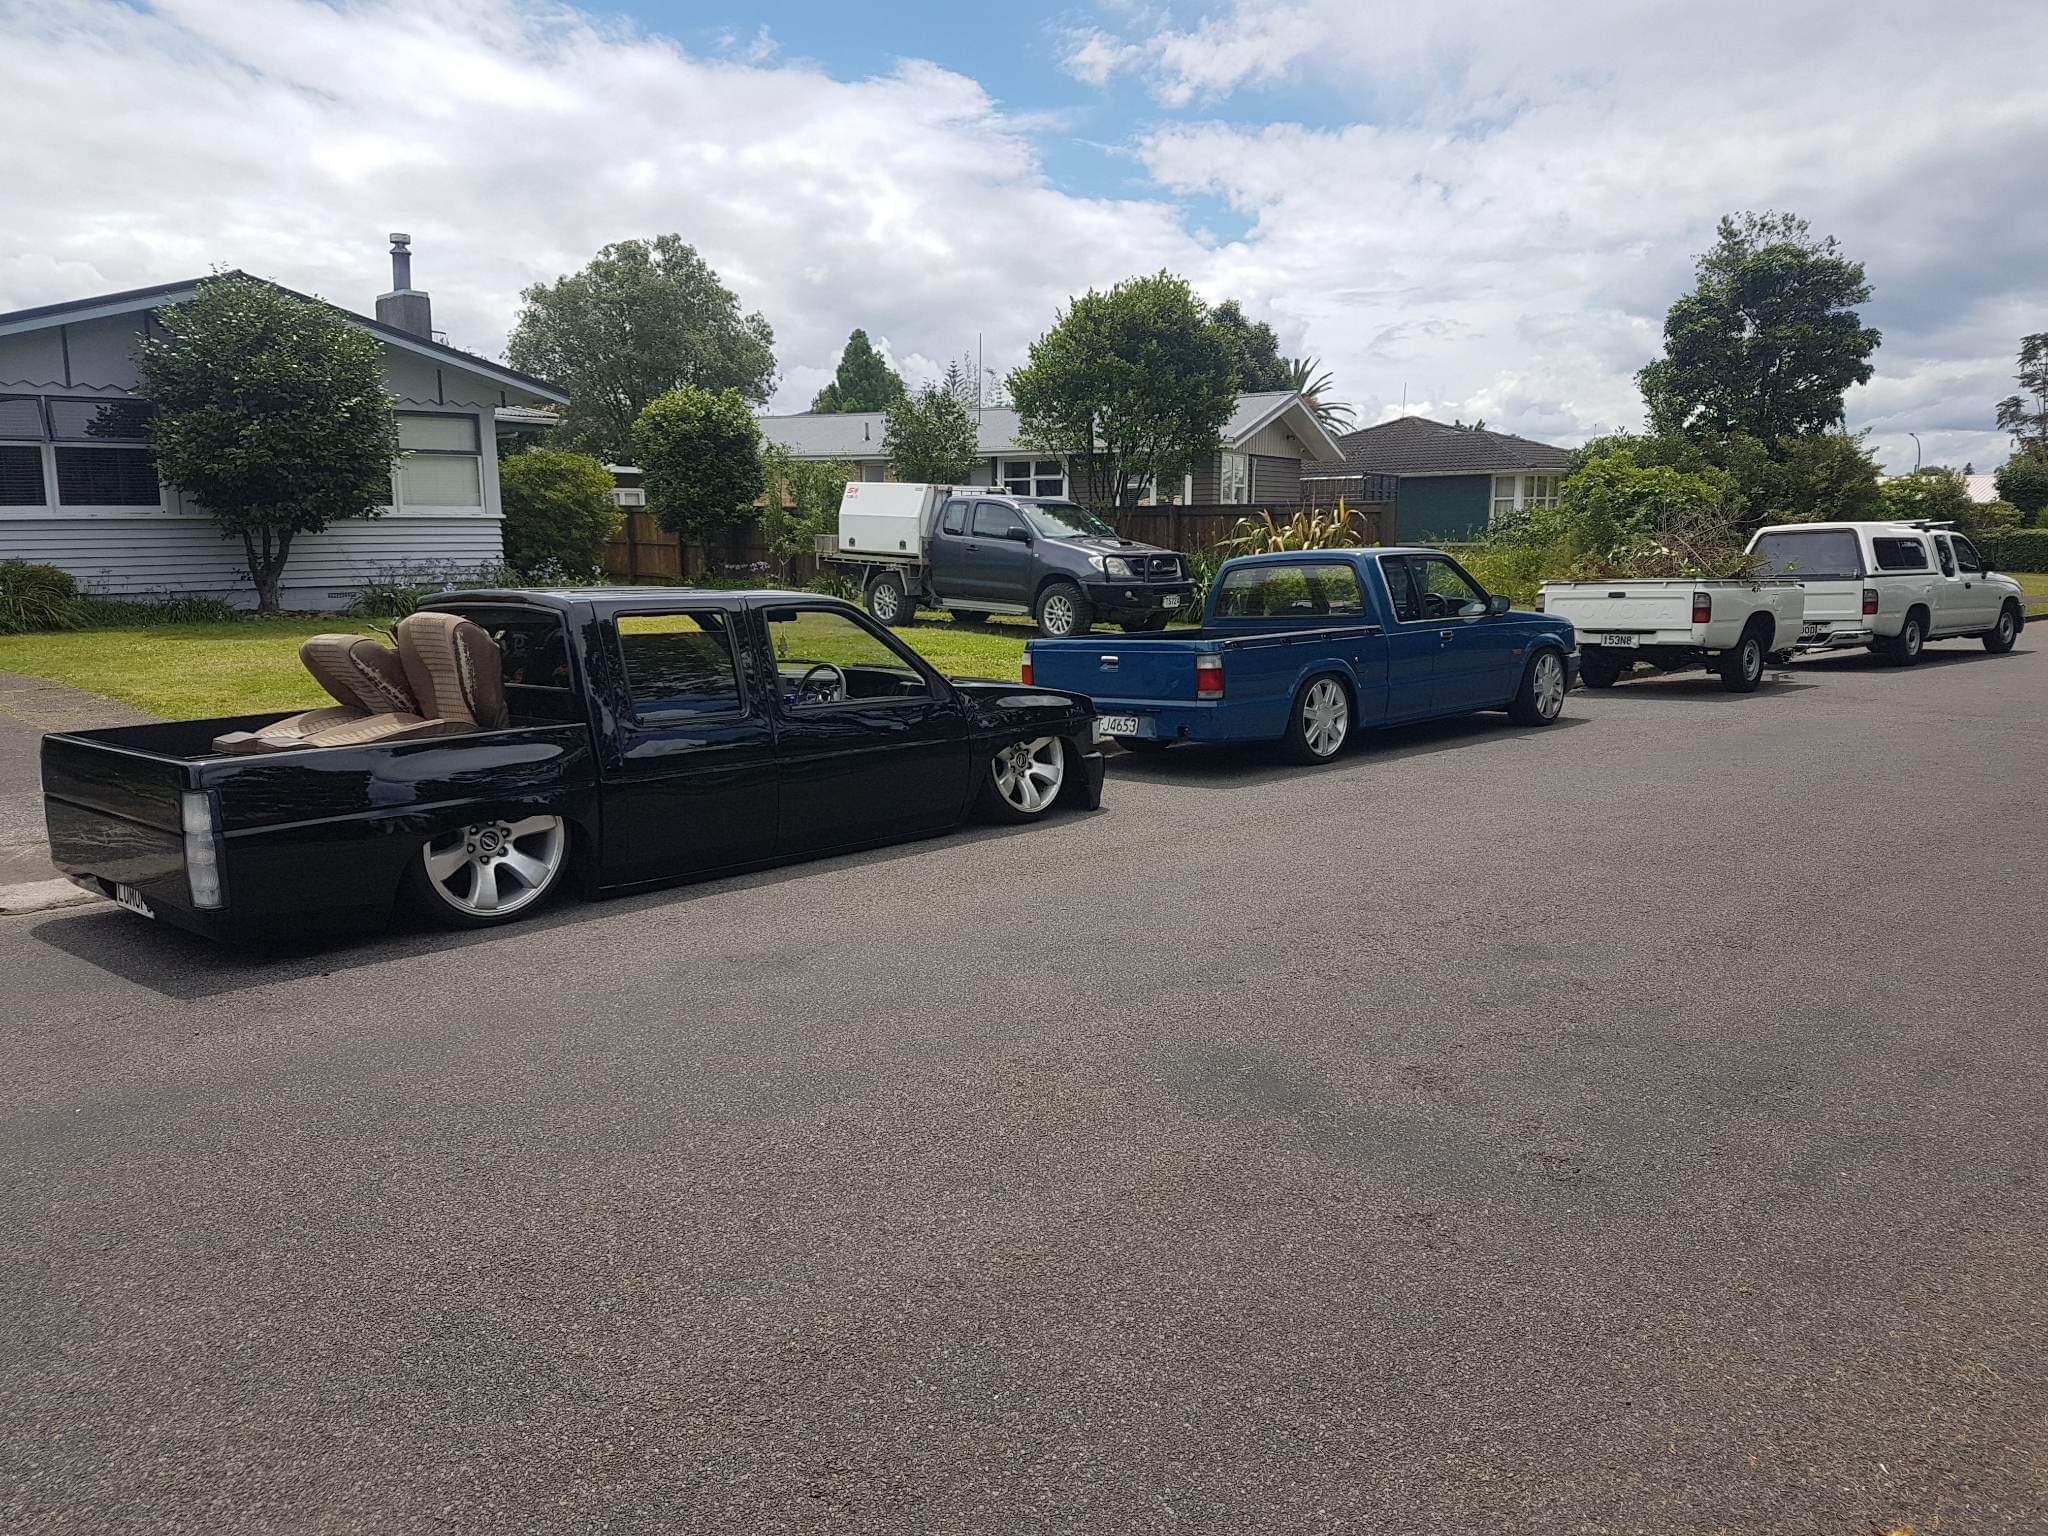
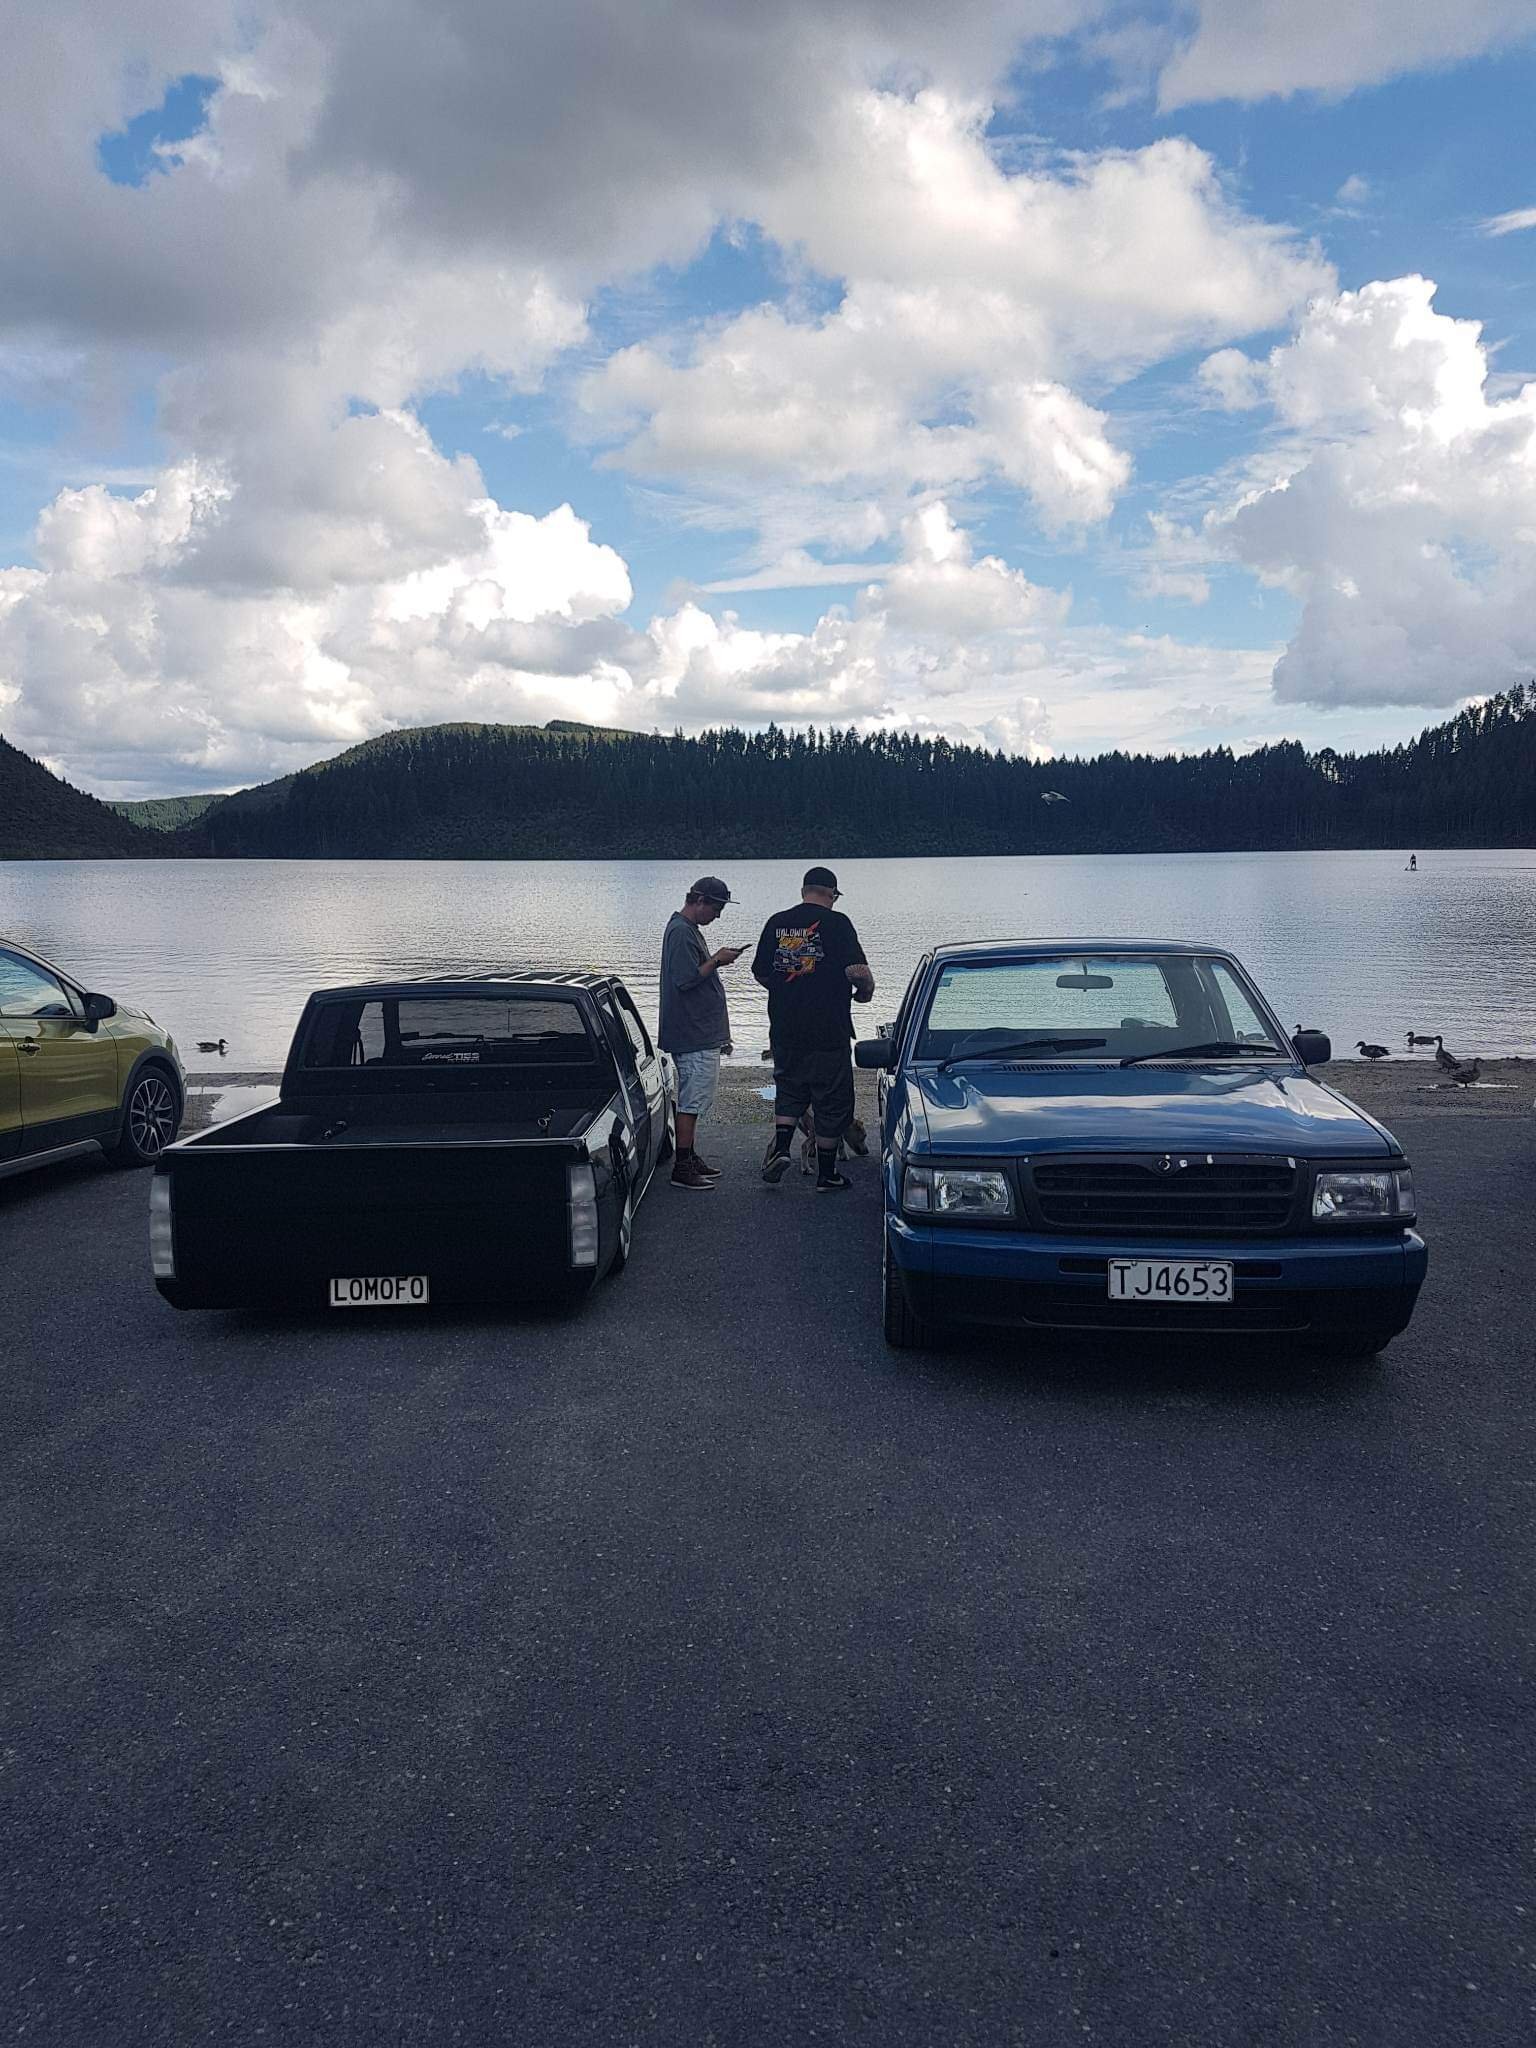
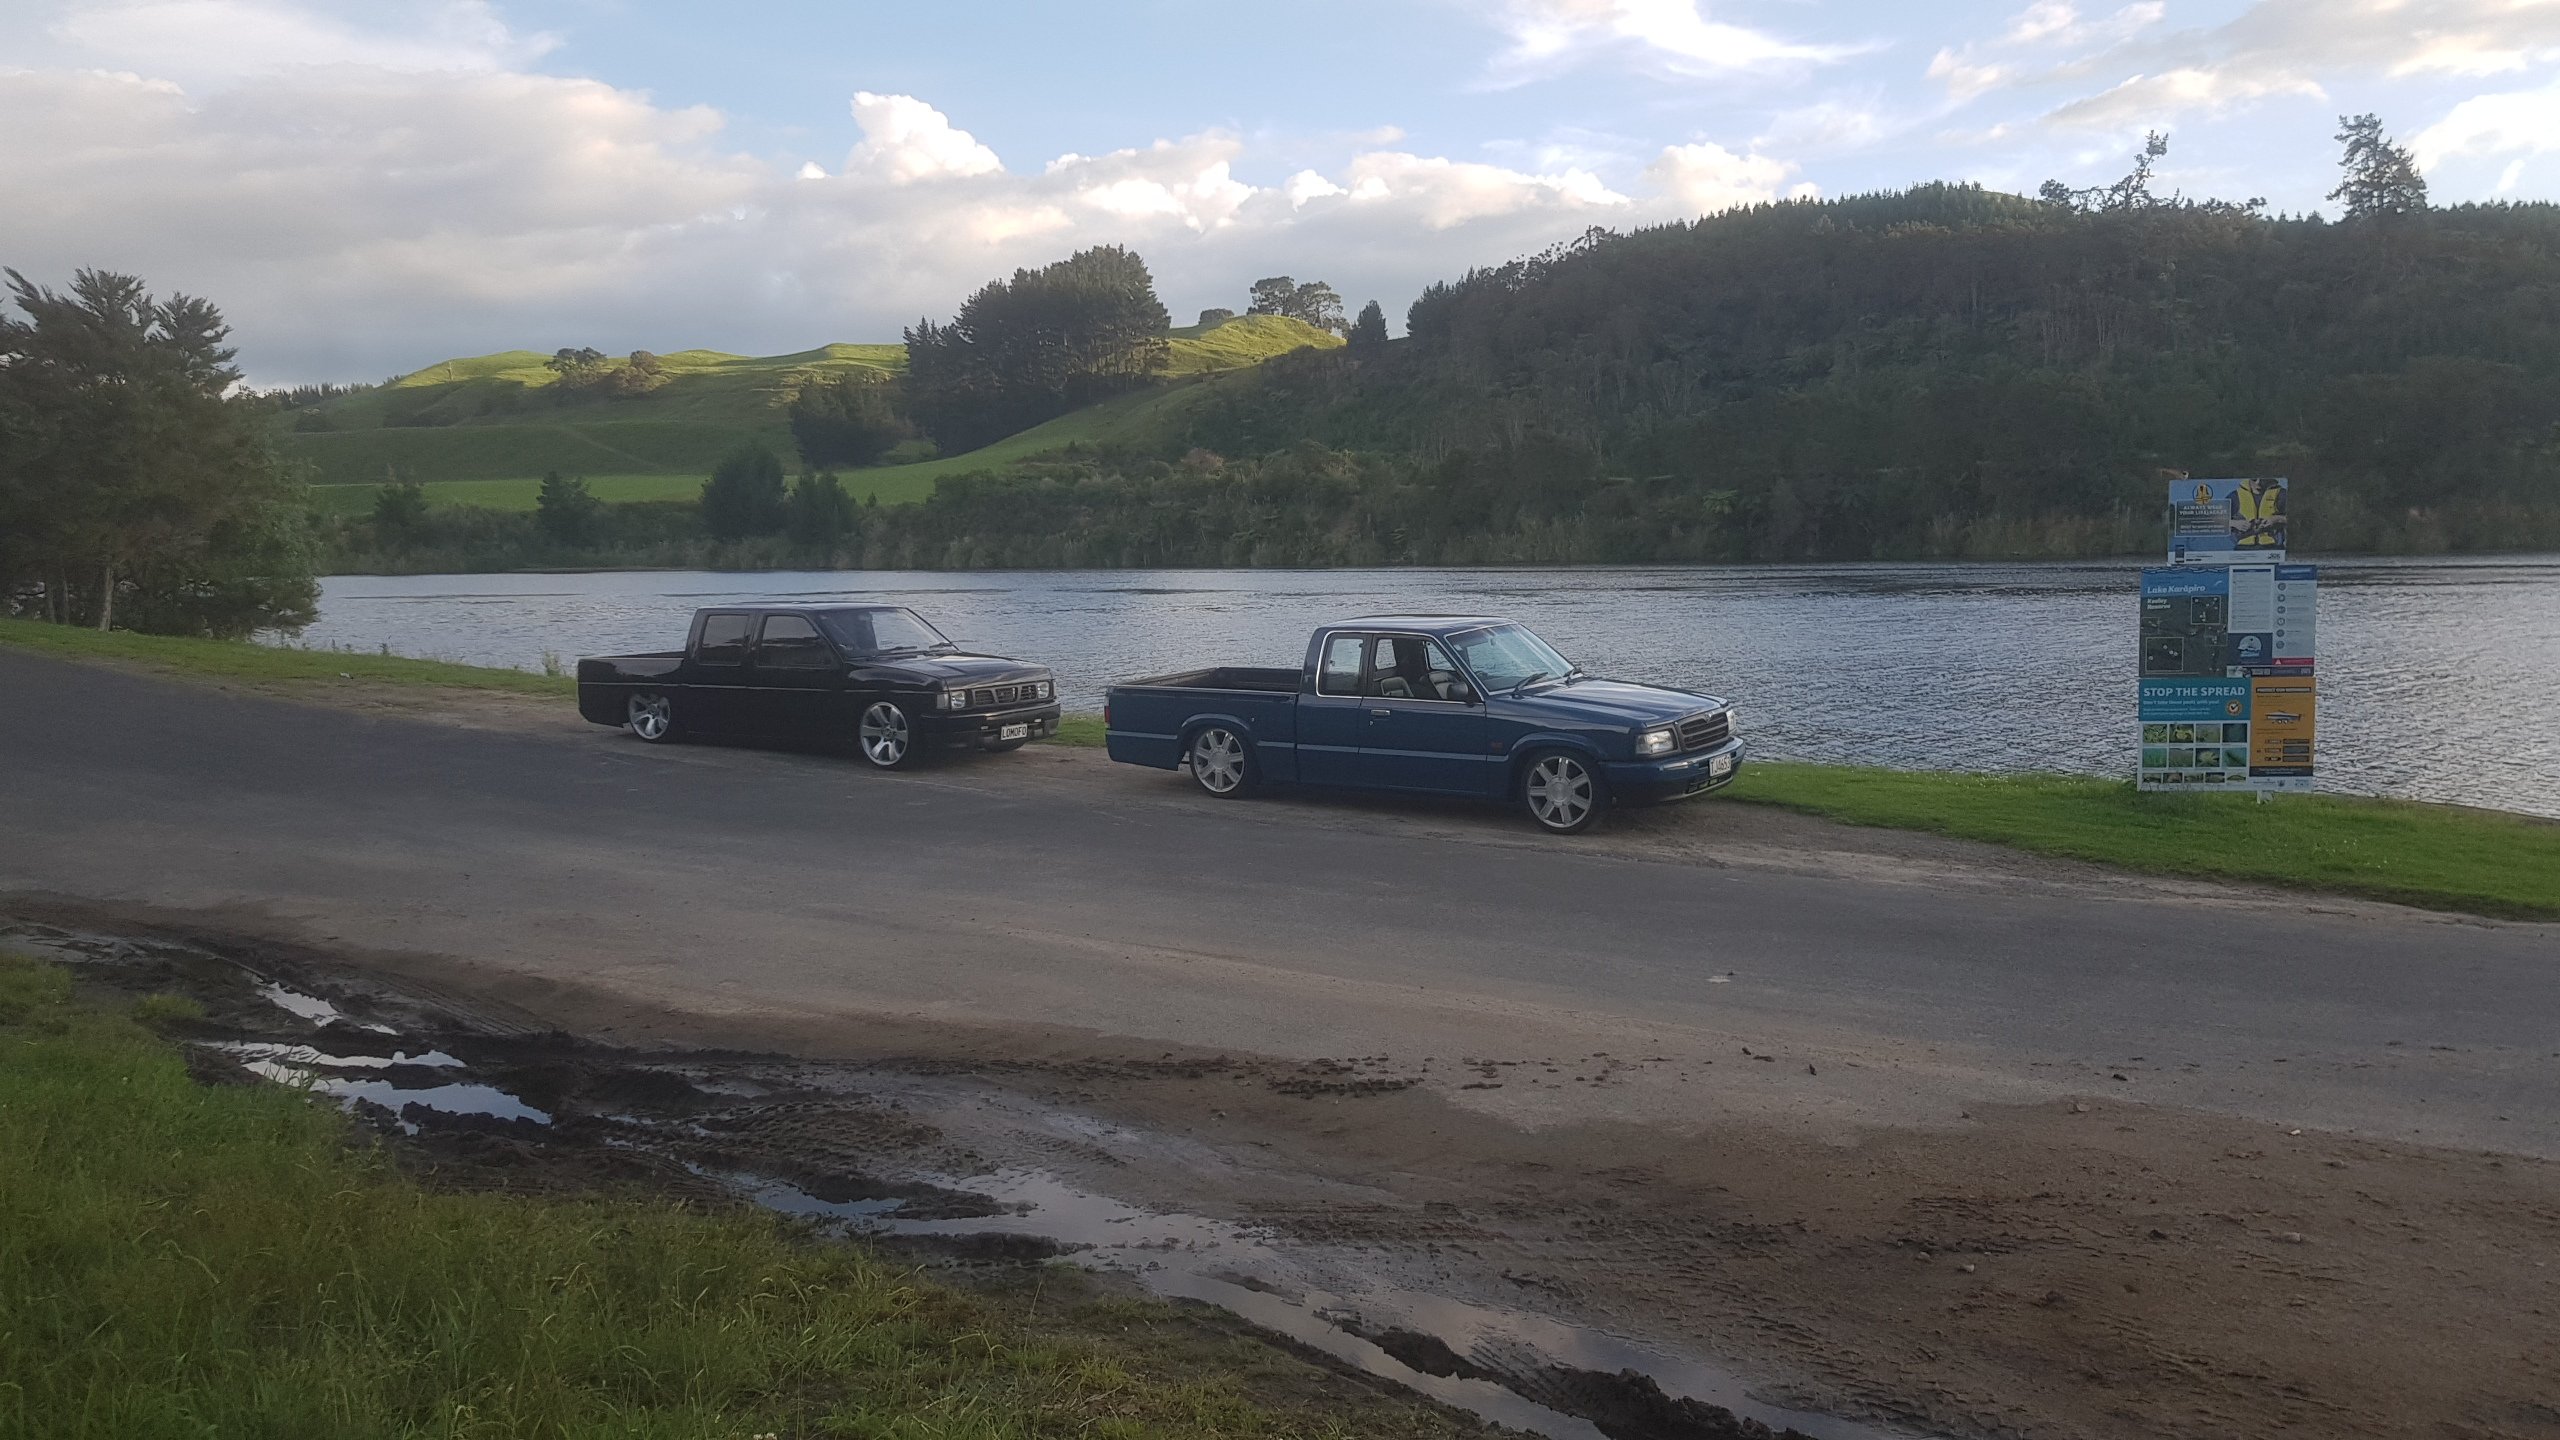
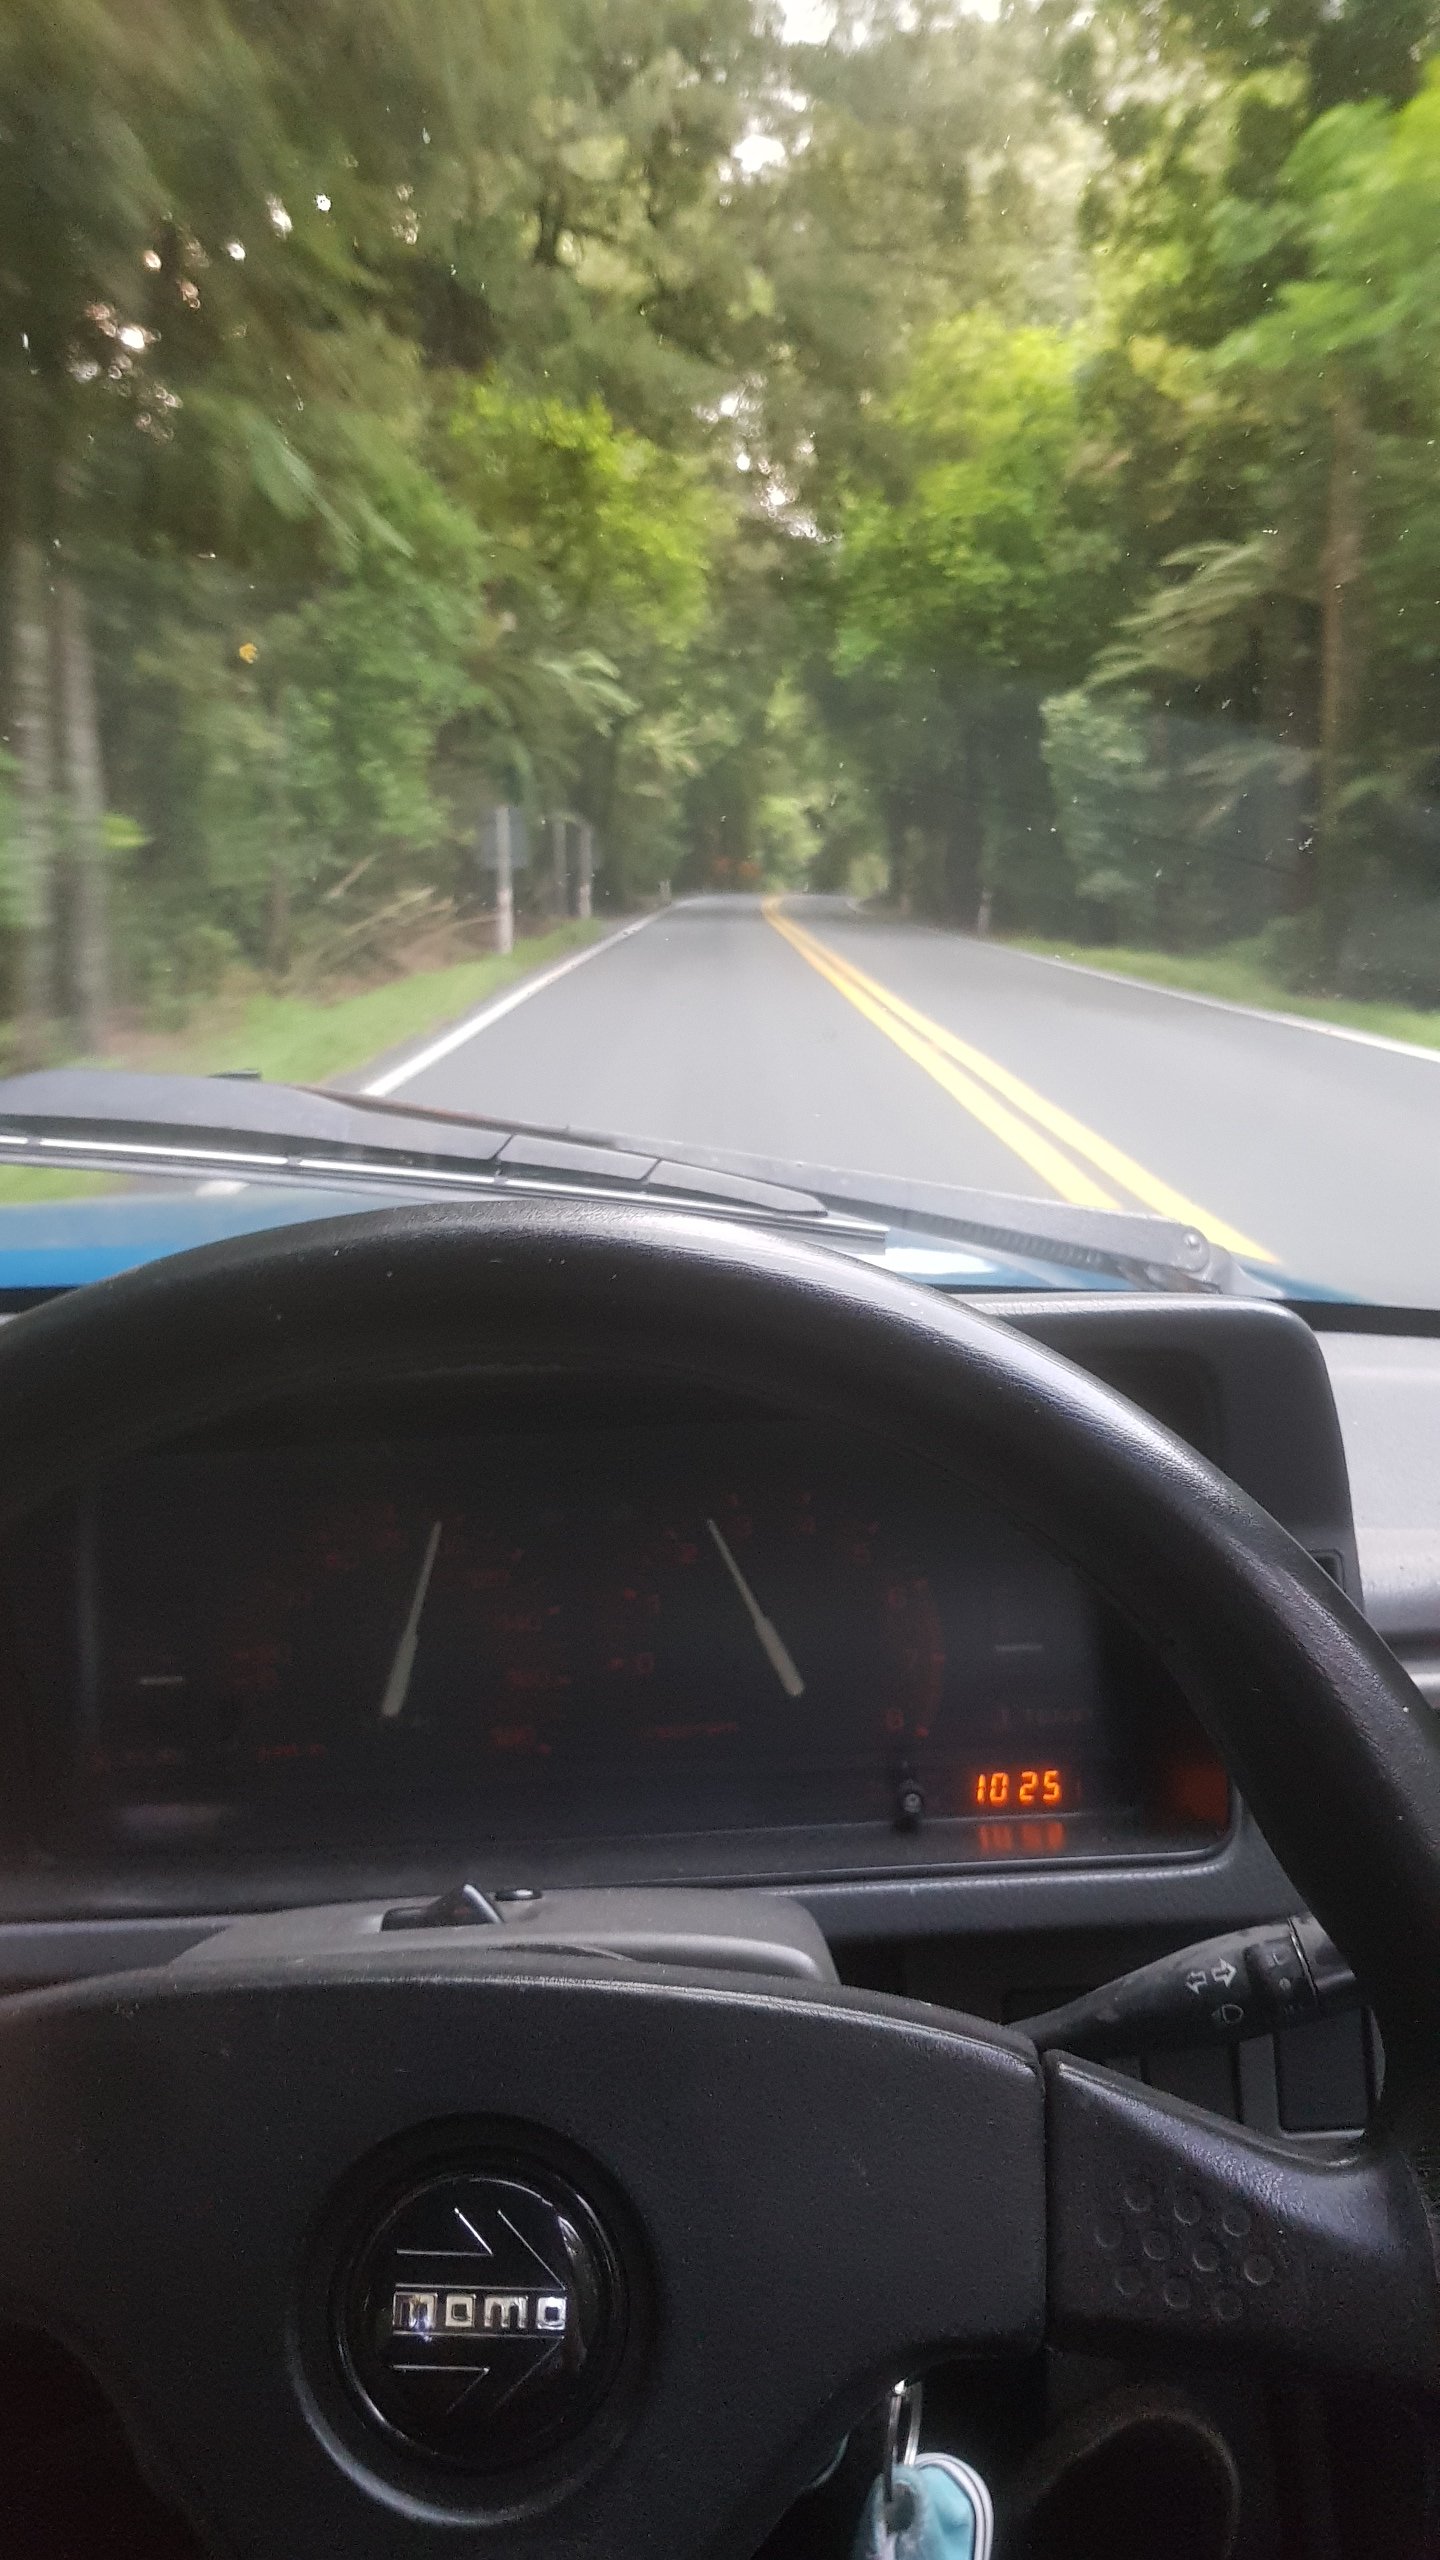
Took the mazdawg on its first major outing yesterday with a buddy I met up with Cambridge on the way Destination was @hoods place in Rotorua. Got burgers and went to the lake. Dog got treats and splashed around in a new environment so she was happy. Stopped at Karapiro for a bit on the way back. Truck ran like a top. Only issue was its fuckin gutless. It cruises sweet, but nothing home when ya stomp the loud pedal. Been a while since I have driven one so figured thats all it had to offer, but whilst stopped in Karapiro I did some checks. Felt like secondary throttle wasn't opening. Sure enough, accel pedal gets full dort on carb, but only off the primary. Might have a linkage missing. Will figure out this weekend, but other than that it was a great shakedown cruise for it. Bloody road closures on the way back added an hour to the trip so that sucked.
1 point
-
1 point
-
New og wheels for elmo
1 point
-
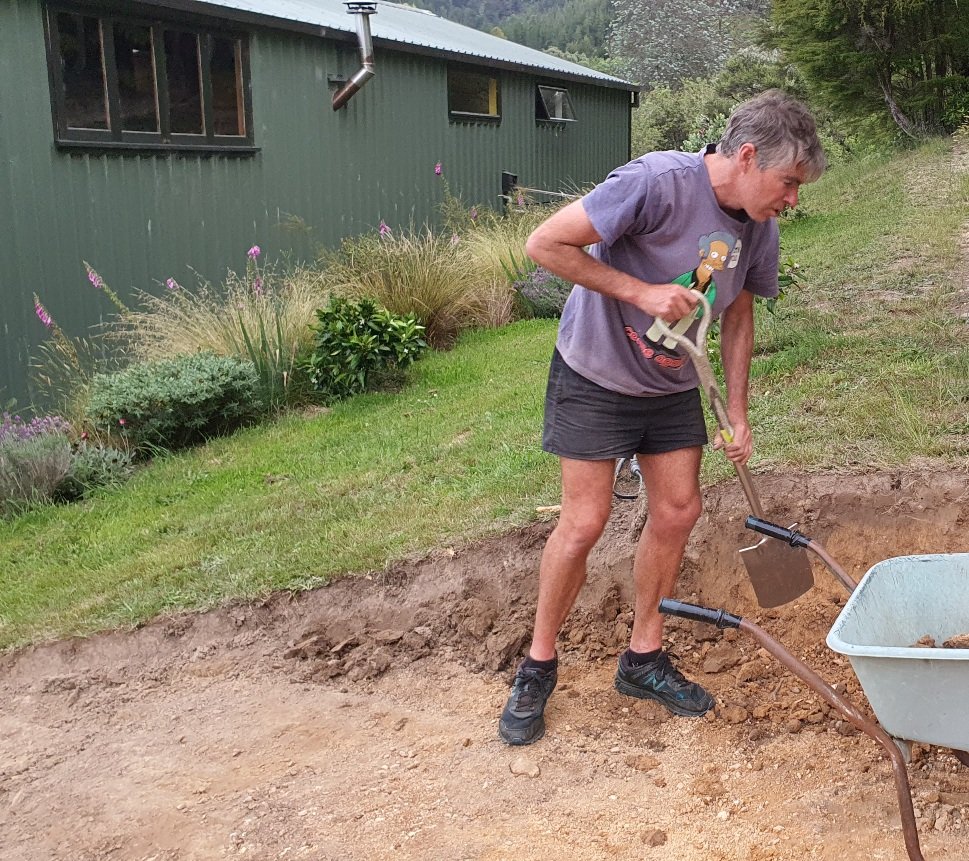
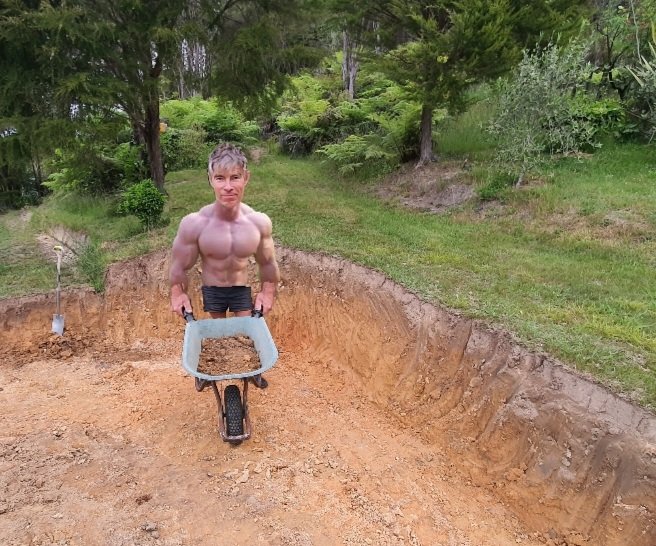
Phew! What a day. Started out full of beans but man it was hard work.. I'm sure I've burnt some fat and bulked out a bit. Started off digging in here.. Sun was intense but was getting into it. I changed my outfit.. But the end of the day I was pretty wrecked and my muscles felt pumped!..
1 point
-
Well I did spray bog the top of the quarters Tuesday , didn’t have much left so practically one decent coat. Then Friday evening I found the expensive 2k spritz I forgot I brought last year when I was doing the doors! So I sprayed a few coats on the tops of the quarters and Down the Swage that runs half the length. Saturday was a nice hot one so I was all geared up to prime, but the spritz was too soft.. spanner in the cogs but ok, I’ll do other stuff and prime Sunday. Sunday comes and it’s pissing, there’s too much moisture in the air to safely spray, but that fucking spritz is still soft. Could scratch it with a fingernail like fresh house paint. Monday is warm, that should cook it off. It didn’t. here I am laying into my putty-covered finished bog with 18 150grit pads on the sander, clogging up faster than the shitter at a cheap restaurant. dogs cock, fucking defeating. I’ll prime it tomorrow after work cause it’s supposed to be hot. Wet weekend forecast so it will be perfect for me to start blocking it by then. This spritz thing will bite me in the ass ~ not sure where or when but soft paints don’t tend to lead to 100% success rates. While I wasn’t able to spray, I cleaned and vinyl dyed my door cards and sun visors, drilled holes in floor and half installed gas pedal, oil changed for some Penrite diesel oil with zinc I got in a deal that will help clean the engine initially. Also found some engine bay ‘inspection flaps’ I’d forgotten about so cleaned up and refurbished the clips. Re-painted some other clips and the marker light housings that got a bit wet and a bit crusty while stored. Spread some bog on the front spoiler and got that ready for primer too. No pics sorry, the door cards look all wrinkly and shitty by themselves but will never notice when installed1 point
-
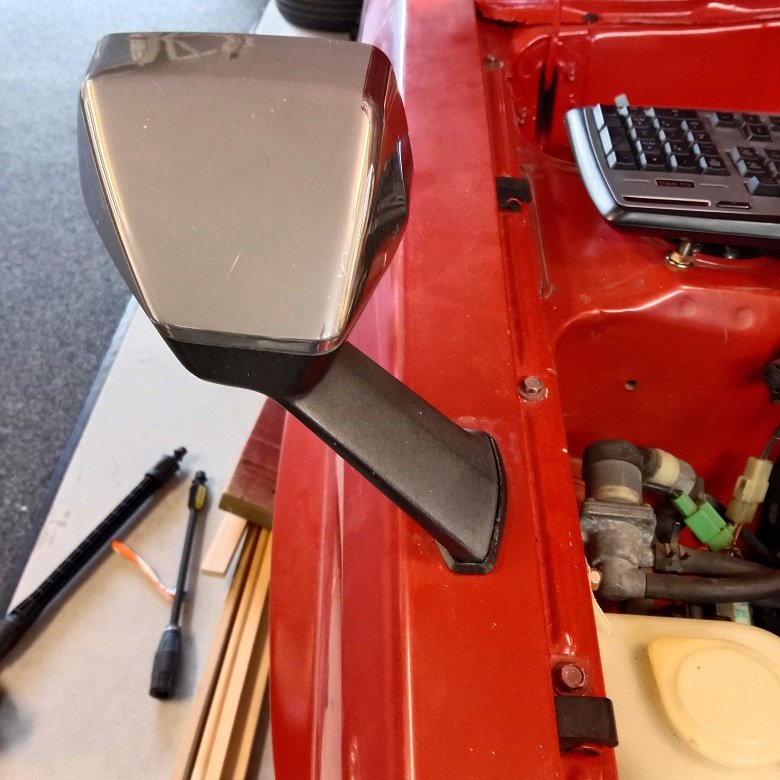
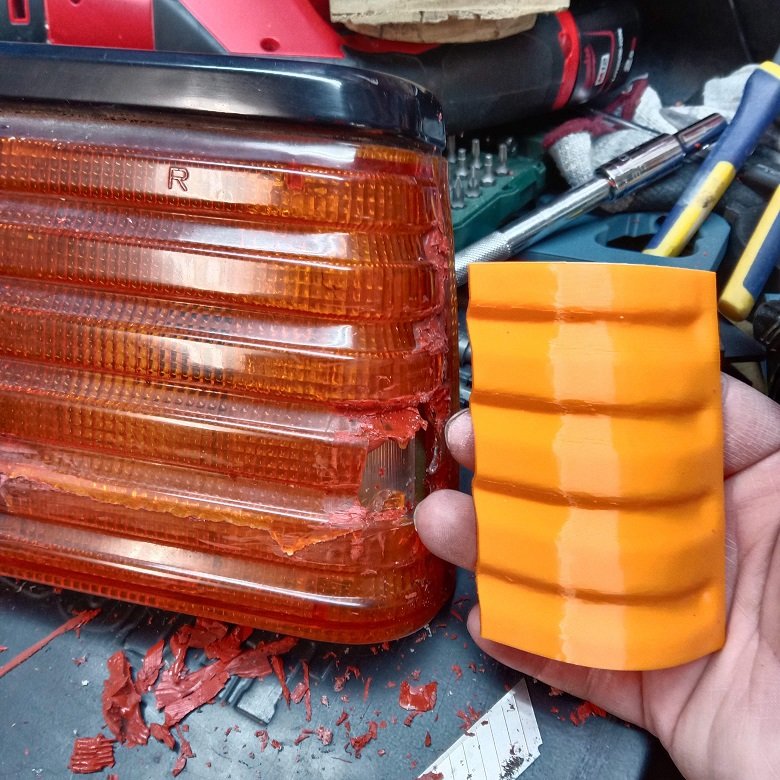
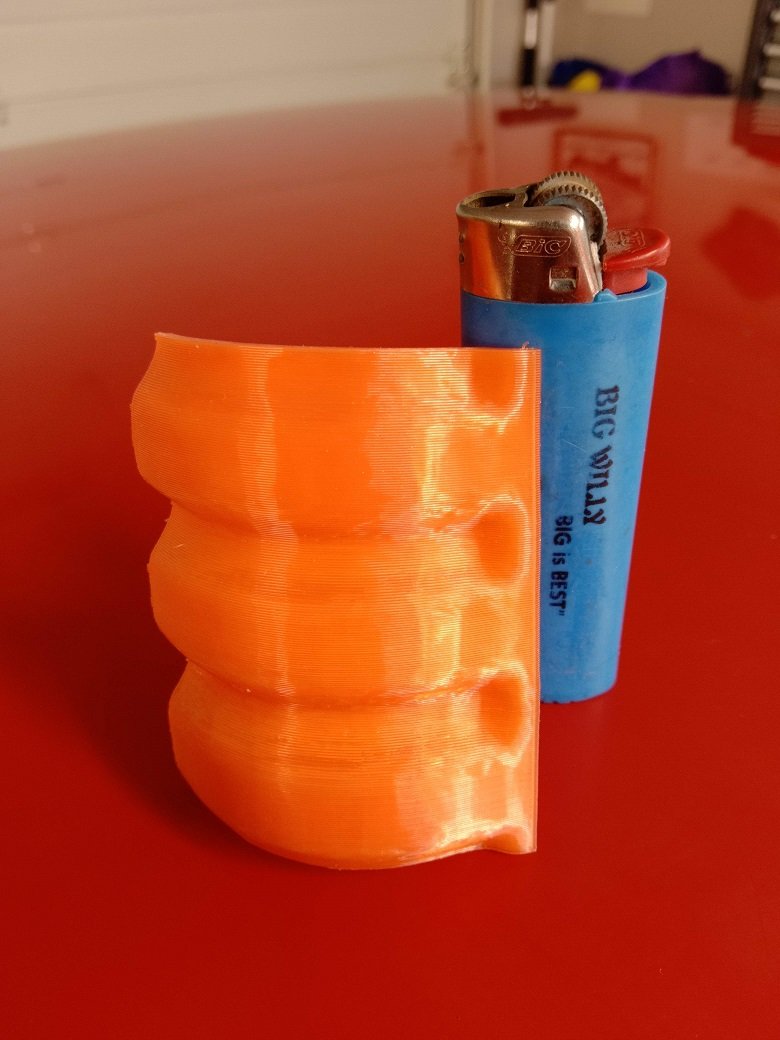
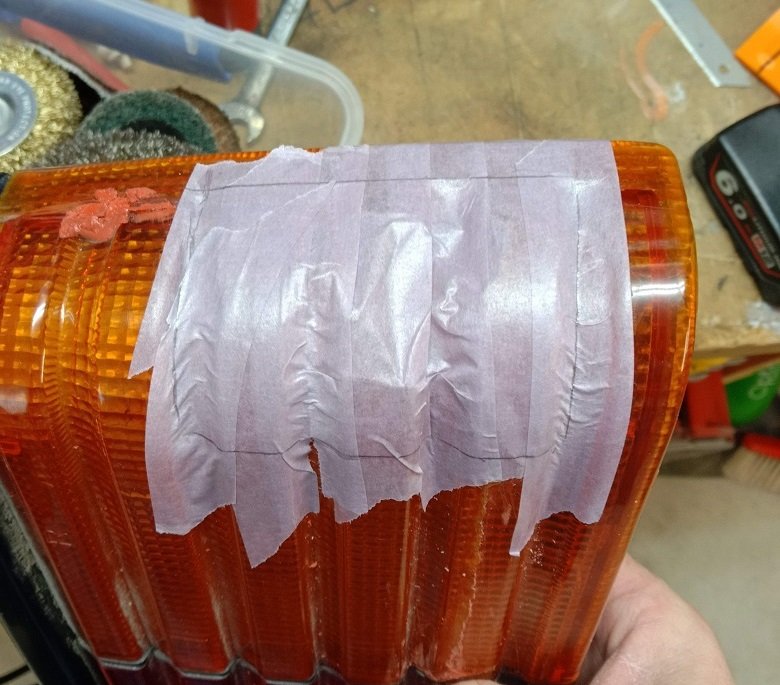
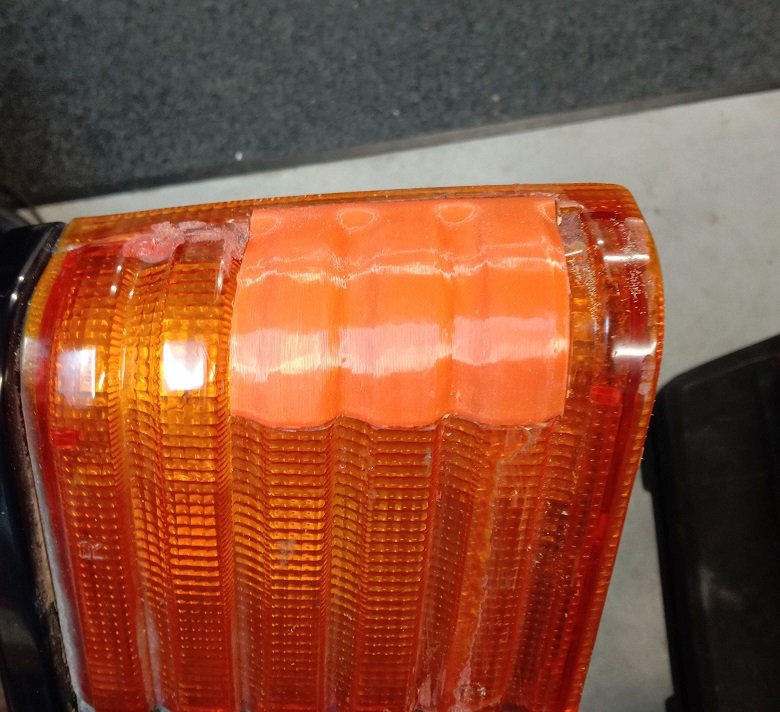
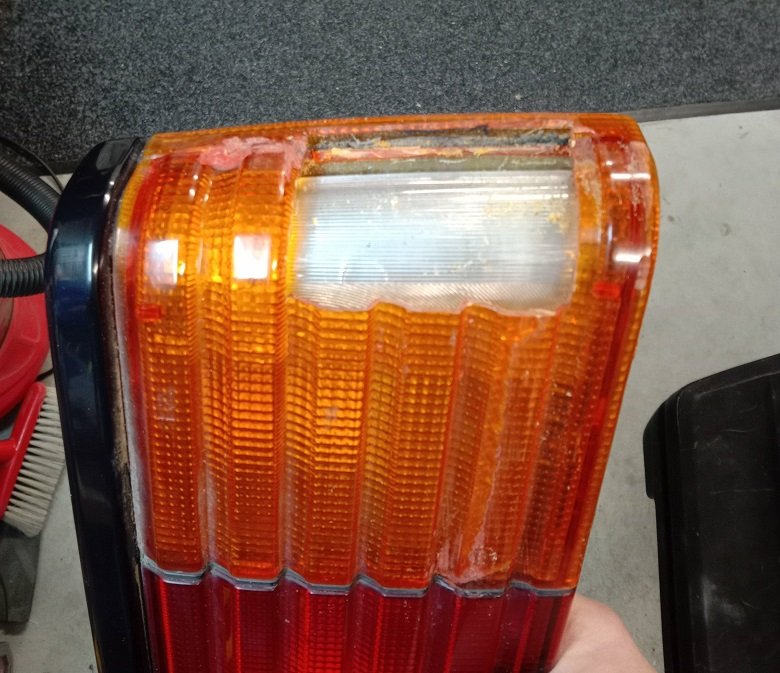
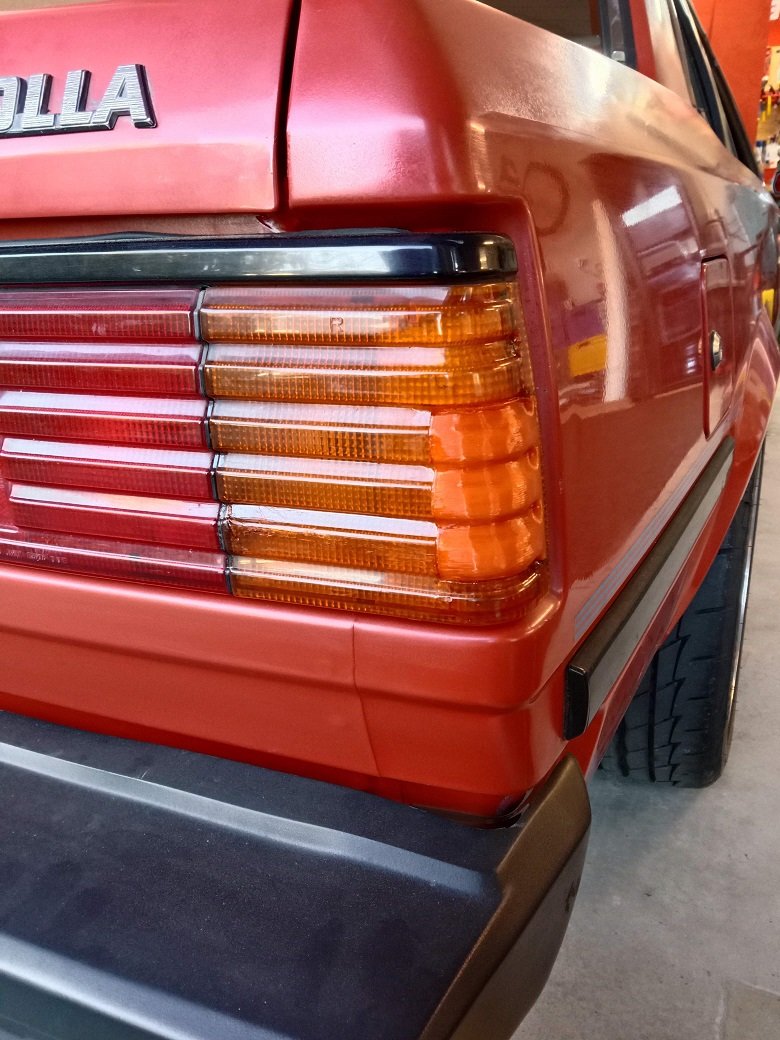
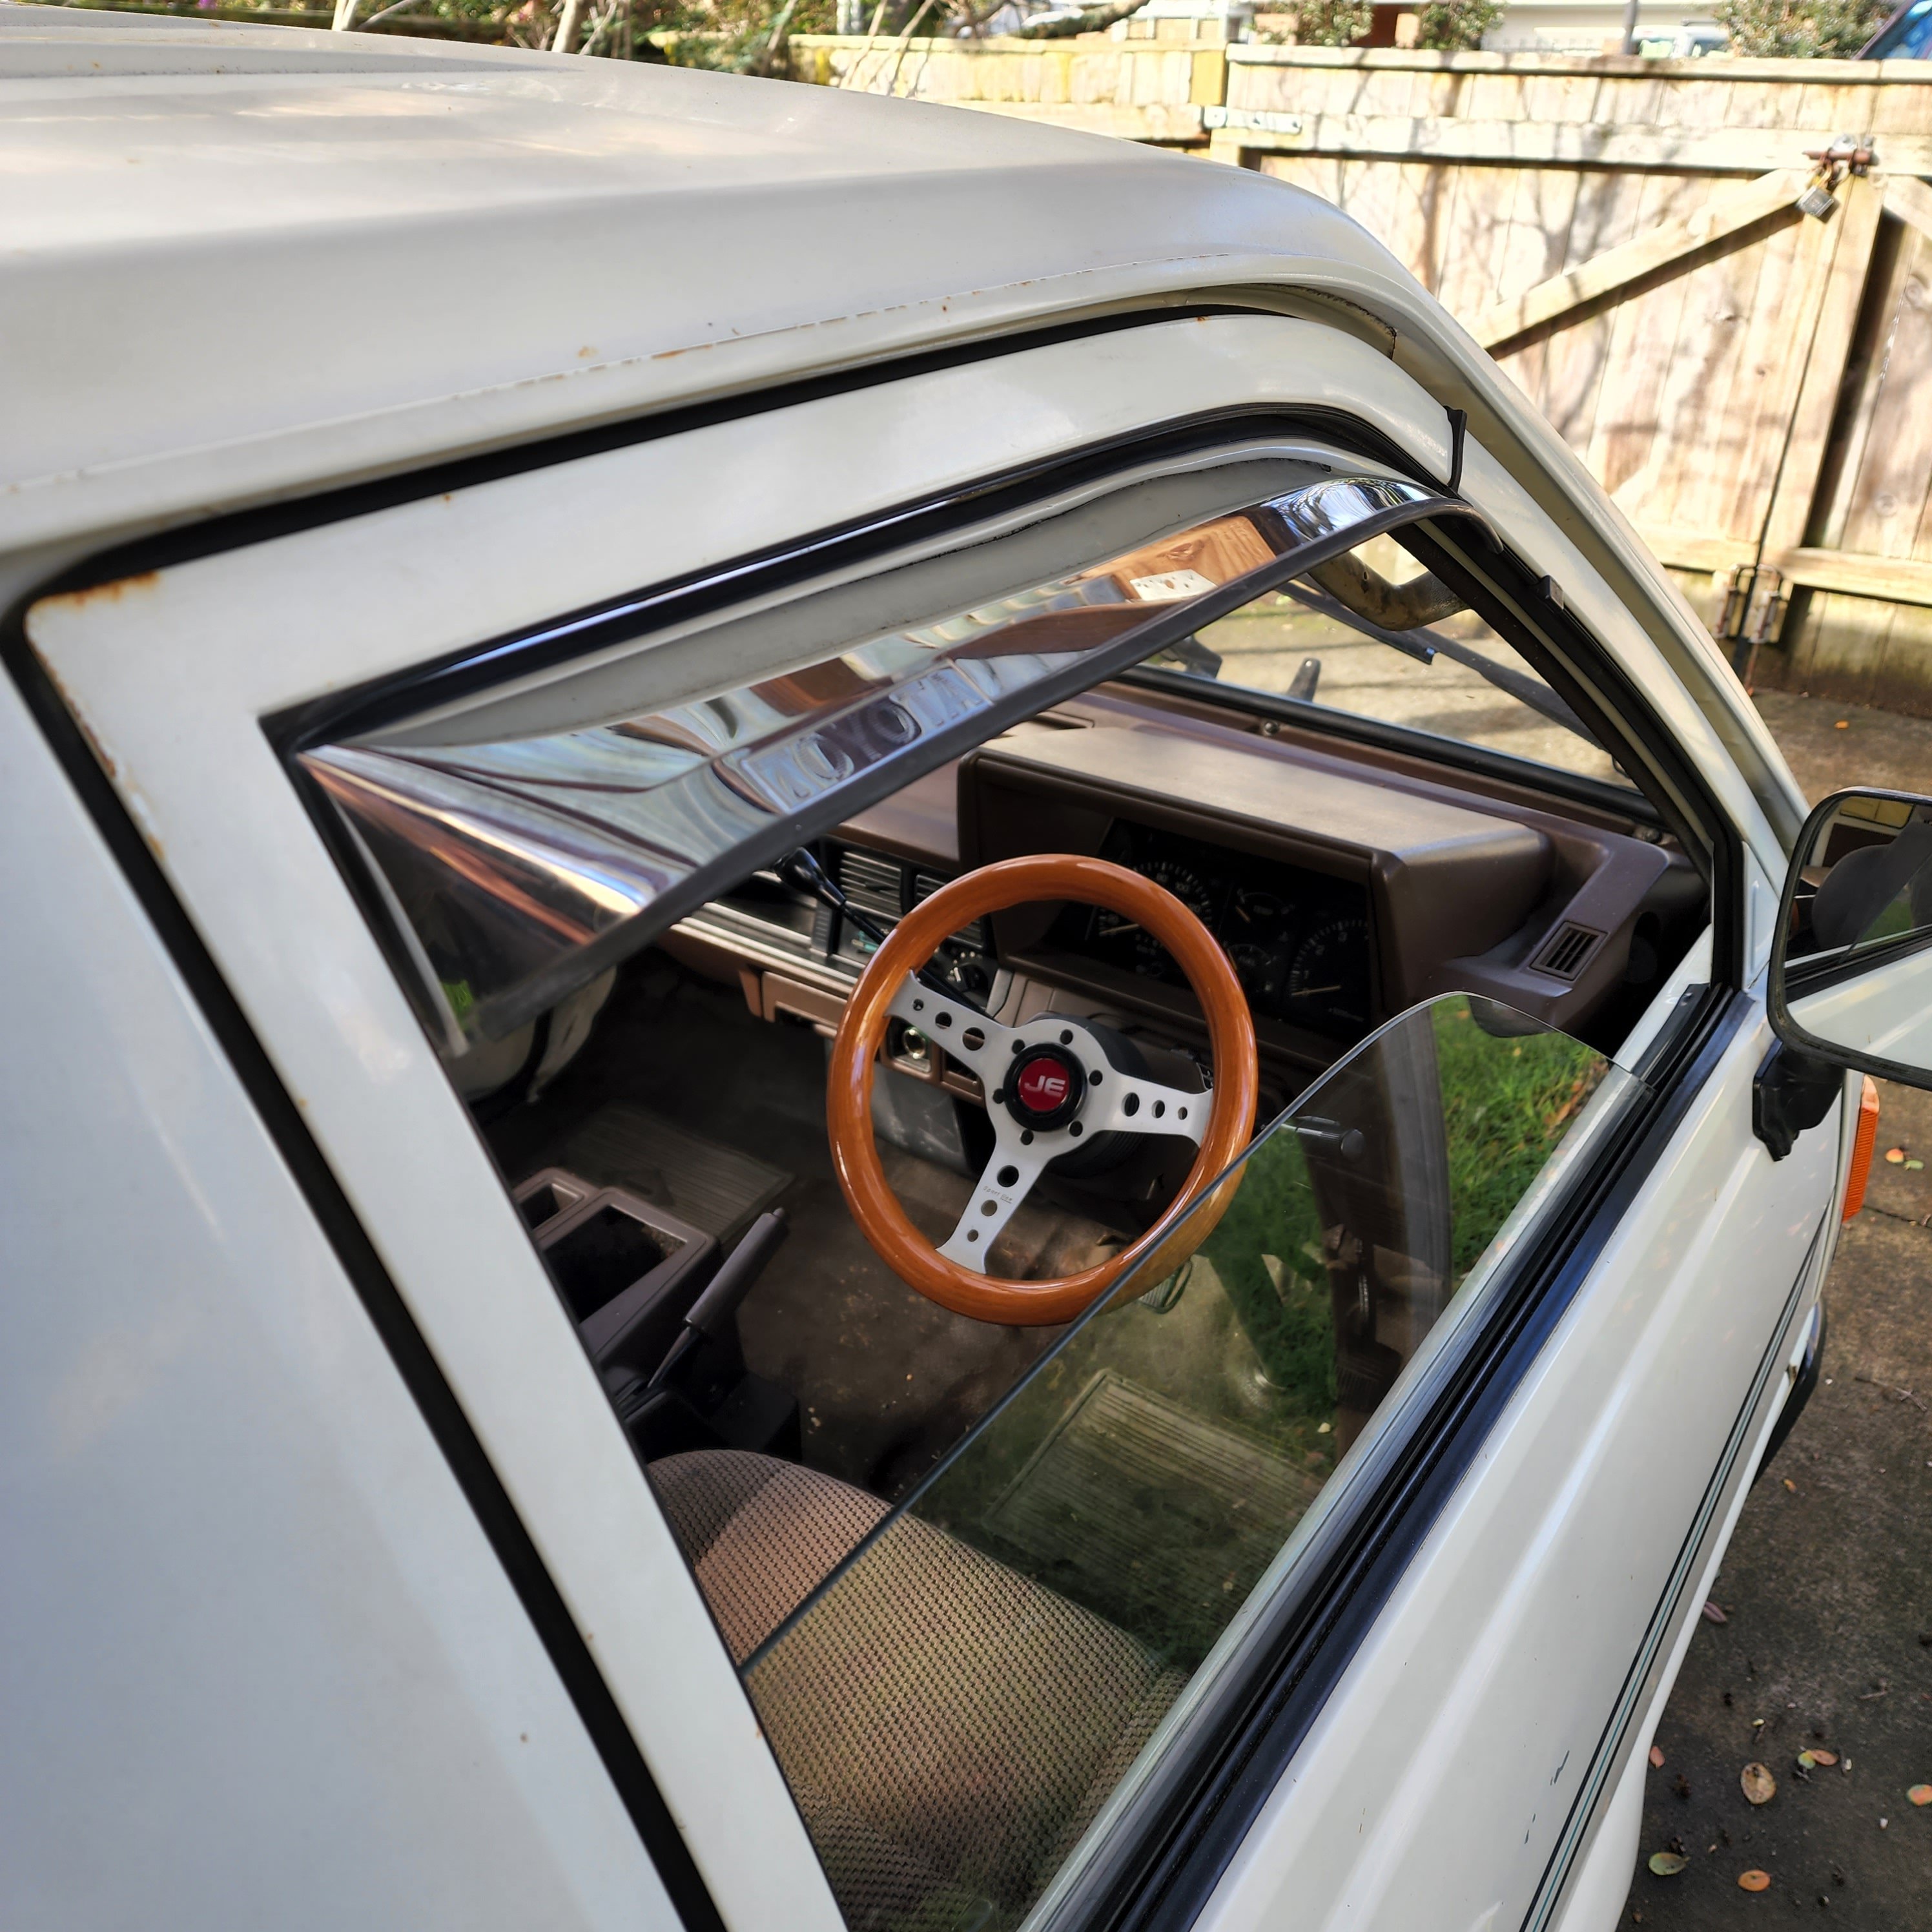
Shit a brick, over a year since last update... So believe it or not, this thing is still progressing. I'll try remember what i've done while I write this update. I have taken it to my local garage to get some jobs done. Jobs I can mostly do, but I want it in for cert this year not next year, so gotta be done. Had the carb checked over with some work done to get things running a bit nicer. It starts easily now and runs fine, just needs a bit more work when coming to a stop. I'll probably fiddle with the idle a bit and see if that sorts the stalling. If not i'll get garage to take another look. I got some longer shocks for the front coilovers as I was sitting a bit low (impossibru). Wanting to keep the fenders factory so that coupled with pretty square tyres on much wider than factory wheels, means they are close to rubbing it too low. So the shock bodies are 50mm longer, which gives me the option to keep it as low as it is now and also lift it 50mm while still having enough of the shock captive in the sleeve on the hub. I also installed some keeper springs up front as I only had 30mm of droop from memory, so now I can have 30mm up to quite a lot. So i'll set it at 40mm potentially for now. But may change that to 50mm if it isn't going change my bump steer enough to cause issue, I have no idea on that stuff. Rear suspension is unchanged, but I still have some work to do in that area as I don't think I have enough droop there. So may need to look into the 1/3 droop rule. There is only so much weight in the rear once you take the diff and wheels out of the equation. And the springs I have were developed specifically for AE86 and are progressive 4.5kg. Worst case would be having Cobra make me some springs of lower rate, but that is last resort as they will not compare to the springs I have ride wise. Can only fill the fuel tank so much, so i'm a bit stuck as to how to add some more weight without it being super obvious that's what i've done. Anyone with ideas around this problem please let me know. Interior is complete now, all belts installed, plastic trims and the likes. Have swapped out the dash cluster as the temperature gauge wasn't working. Asked in spam about diagnosing things and found the sender on the block is working fine, the wiring was fine, which only left the cluster. So i've swapped in another one, thanks Goat for including all of the spares with the car! So I now have a fancy as fuck analog clock and no tacho, but a working temperature gauge, so i'm happy with that for now. Don't have the money to pay someone to fix the other one at the moment, but i'm sure it's something I can swap back later. So now I have a working gauge I could see that the engine seemed to be staying cool enough. I'm not 100% convinced the thermostat is working correctly. So I may swap that out when I have a bit more motivation, just to be sure. So that's where it is for now, fine tuning the running of it, then i'll book cert and alignment. Still haven't set the final height yet, but that will happen. Excuse the wall of text, there will be lots of missed, but no point making the wall longer, so here are some pics. Fred for discussion etc Oh yeah forgot I 3D printed a few bits for the car, very rough and ready, but I have a better 3D scanner now so plan to make some better parts when time allows. Longer shock body comparison Printed bases for my mirrors, only have one good one with car so 3d scanned it and mirrored for other side. Came out ok, but will improve on it when I have time. Had a taillight to fix as well. Replacement lights are just not a thing here. I spent a very long time watching Japan auctions but any I found went for (to me) silly money. Think the last pair was north of $500. So I printed my own repair as I don't care what it looks like, so long as it's functional. Before: Printed a test section out of plain orange filament I already had. This was after scanning the taillight on my other Corolla. I could have just as easily scanned the passenger taillight of this car which isn't damaged and mirrored it. But since I had a drivers side to scan, I did that instead. Didn't take too much work to turn it from a scan into a printable object. Print new piece out of transparent orange filament. Trimmed the original print down till it just covered the damage, before printing the final version below. Sitting in place Glued in place and painted over the whole thing a few time with transparent modelling paint. Got it closer to original shade and tinted all the clear glue I had used to fill the gaps. It's no piece of art, but it sure beats the before version.
1 point
-
Threw some fresh tyres on my other wheels and have been getting it ready to race next weekend. Few more jobs to do tomorrow and then it's pretty much ready to roll!
1 point
-
1 point
-
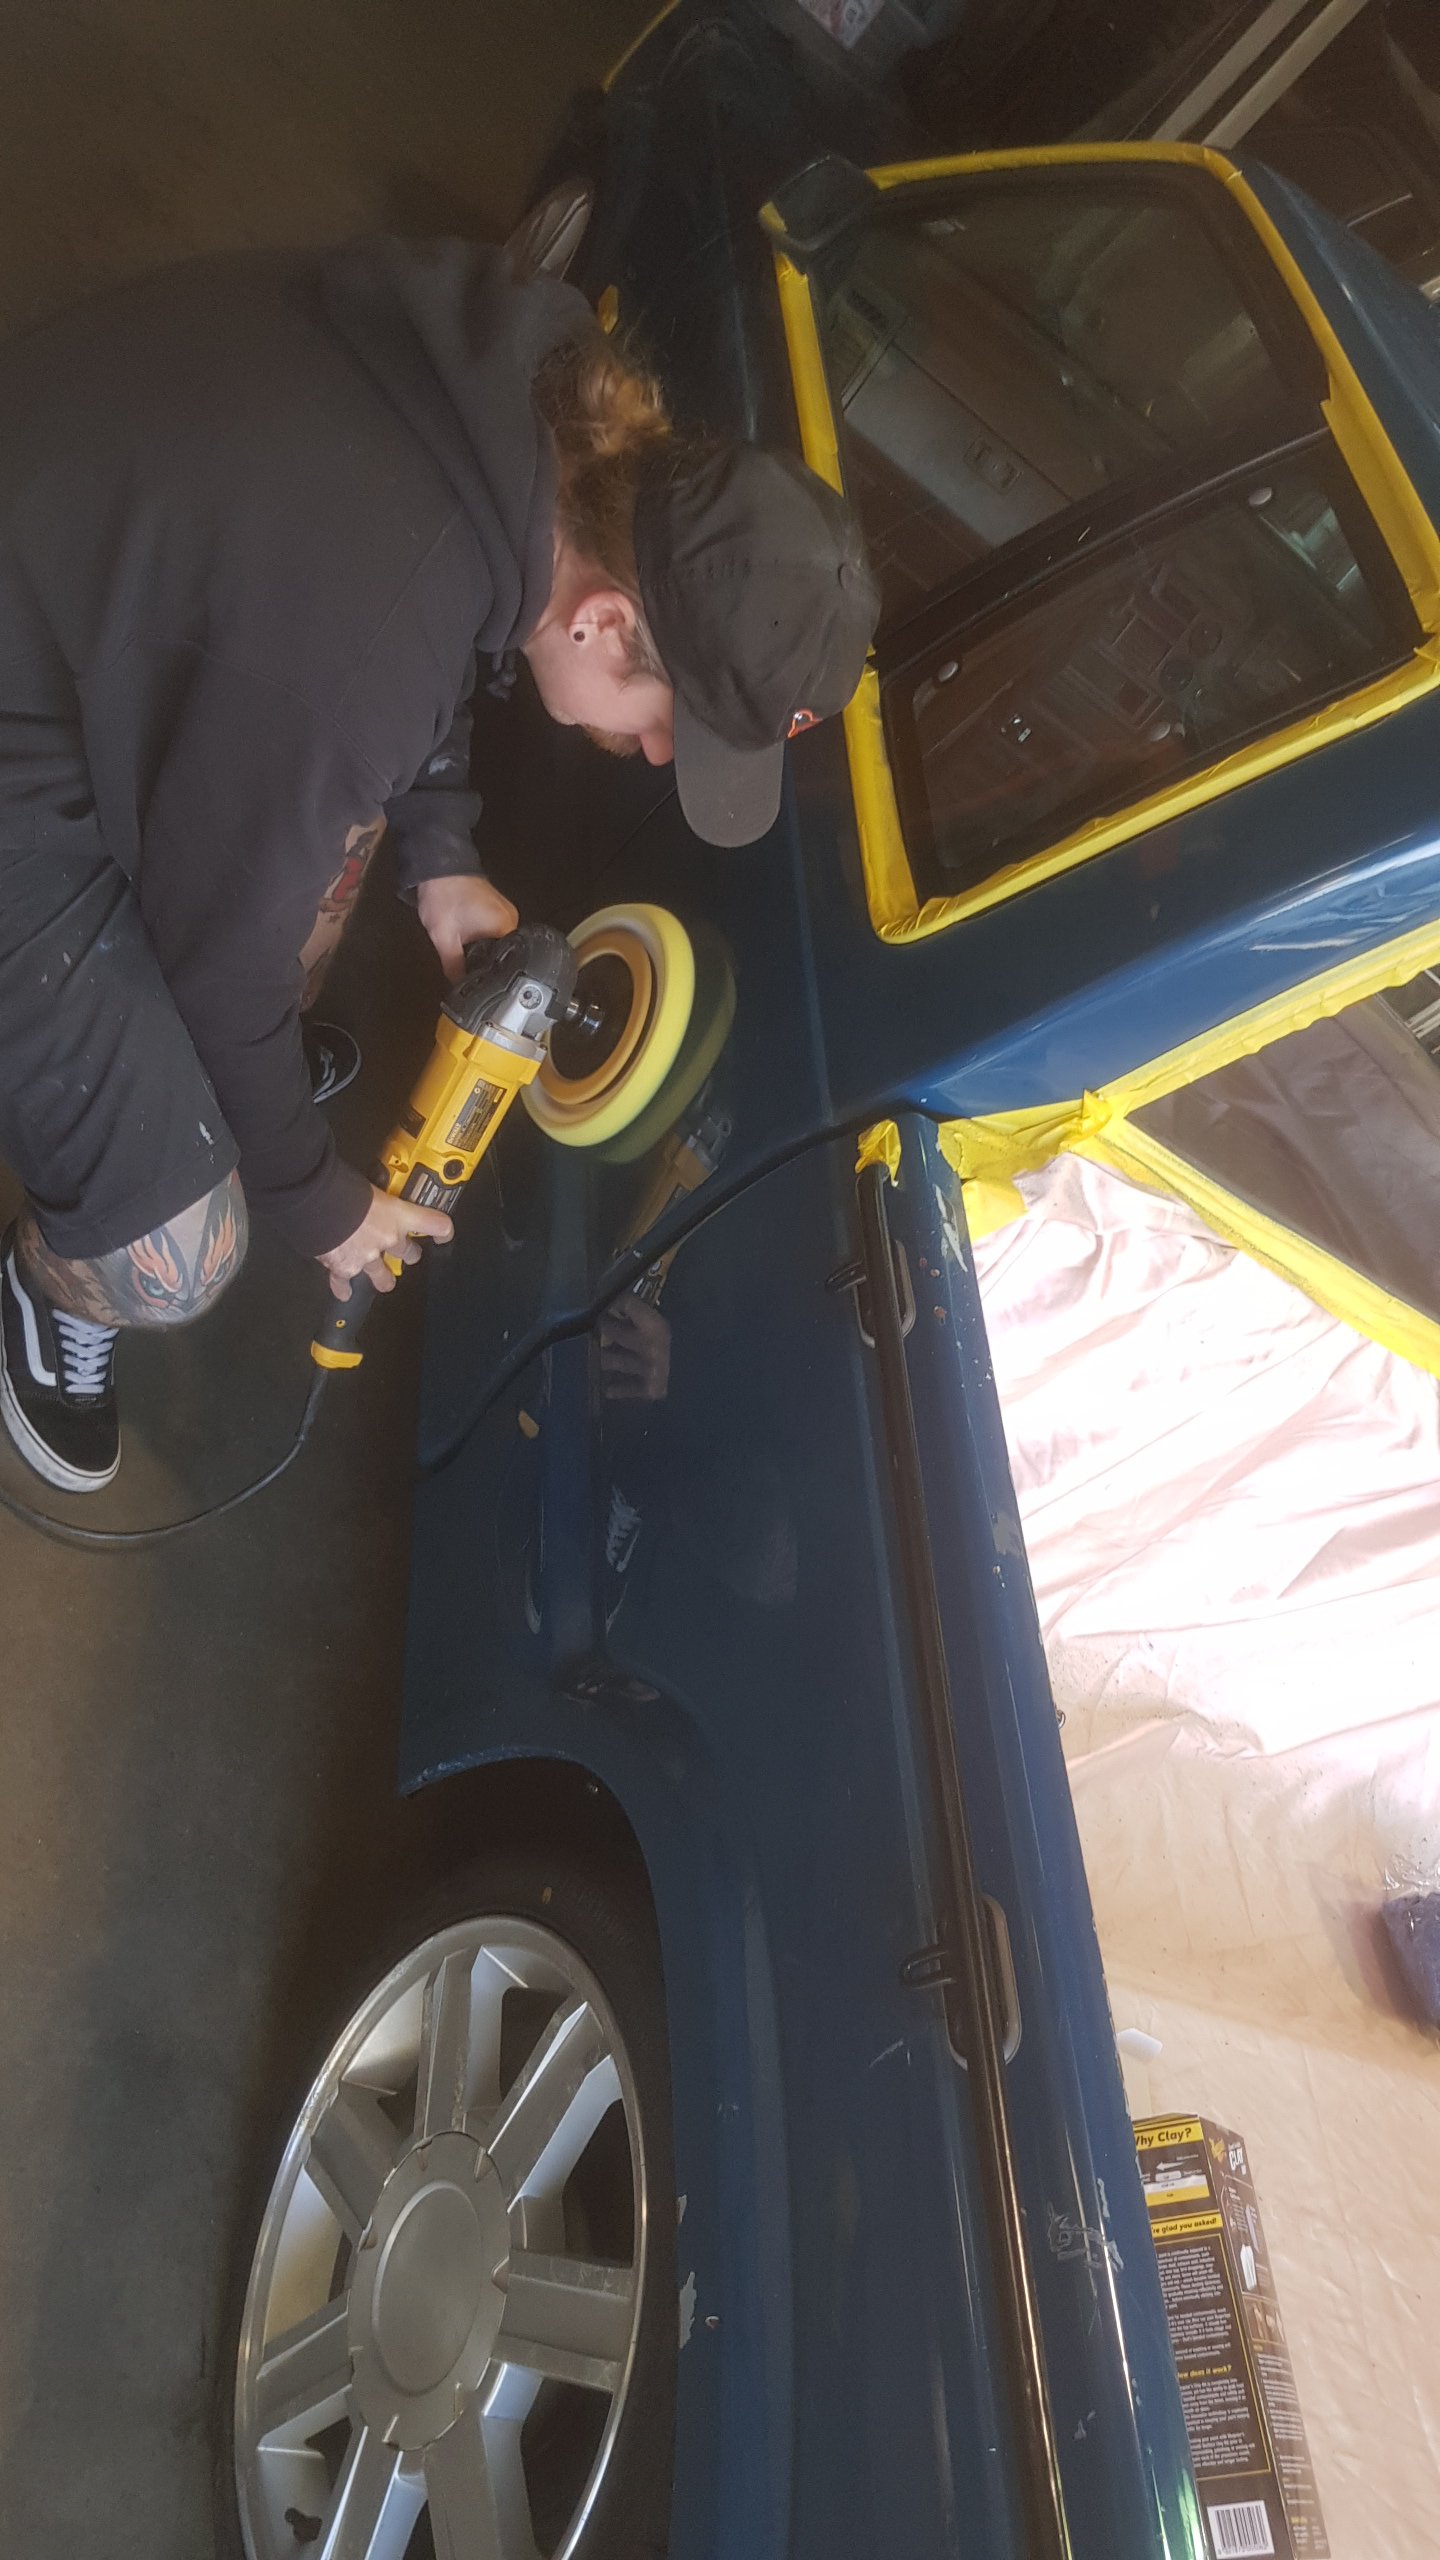
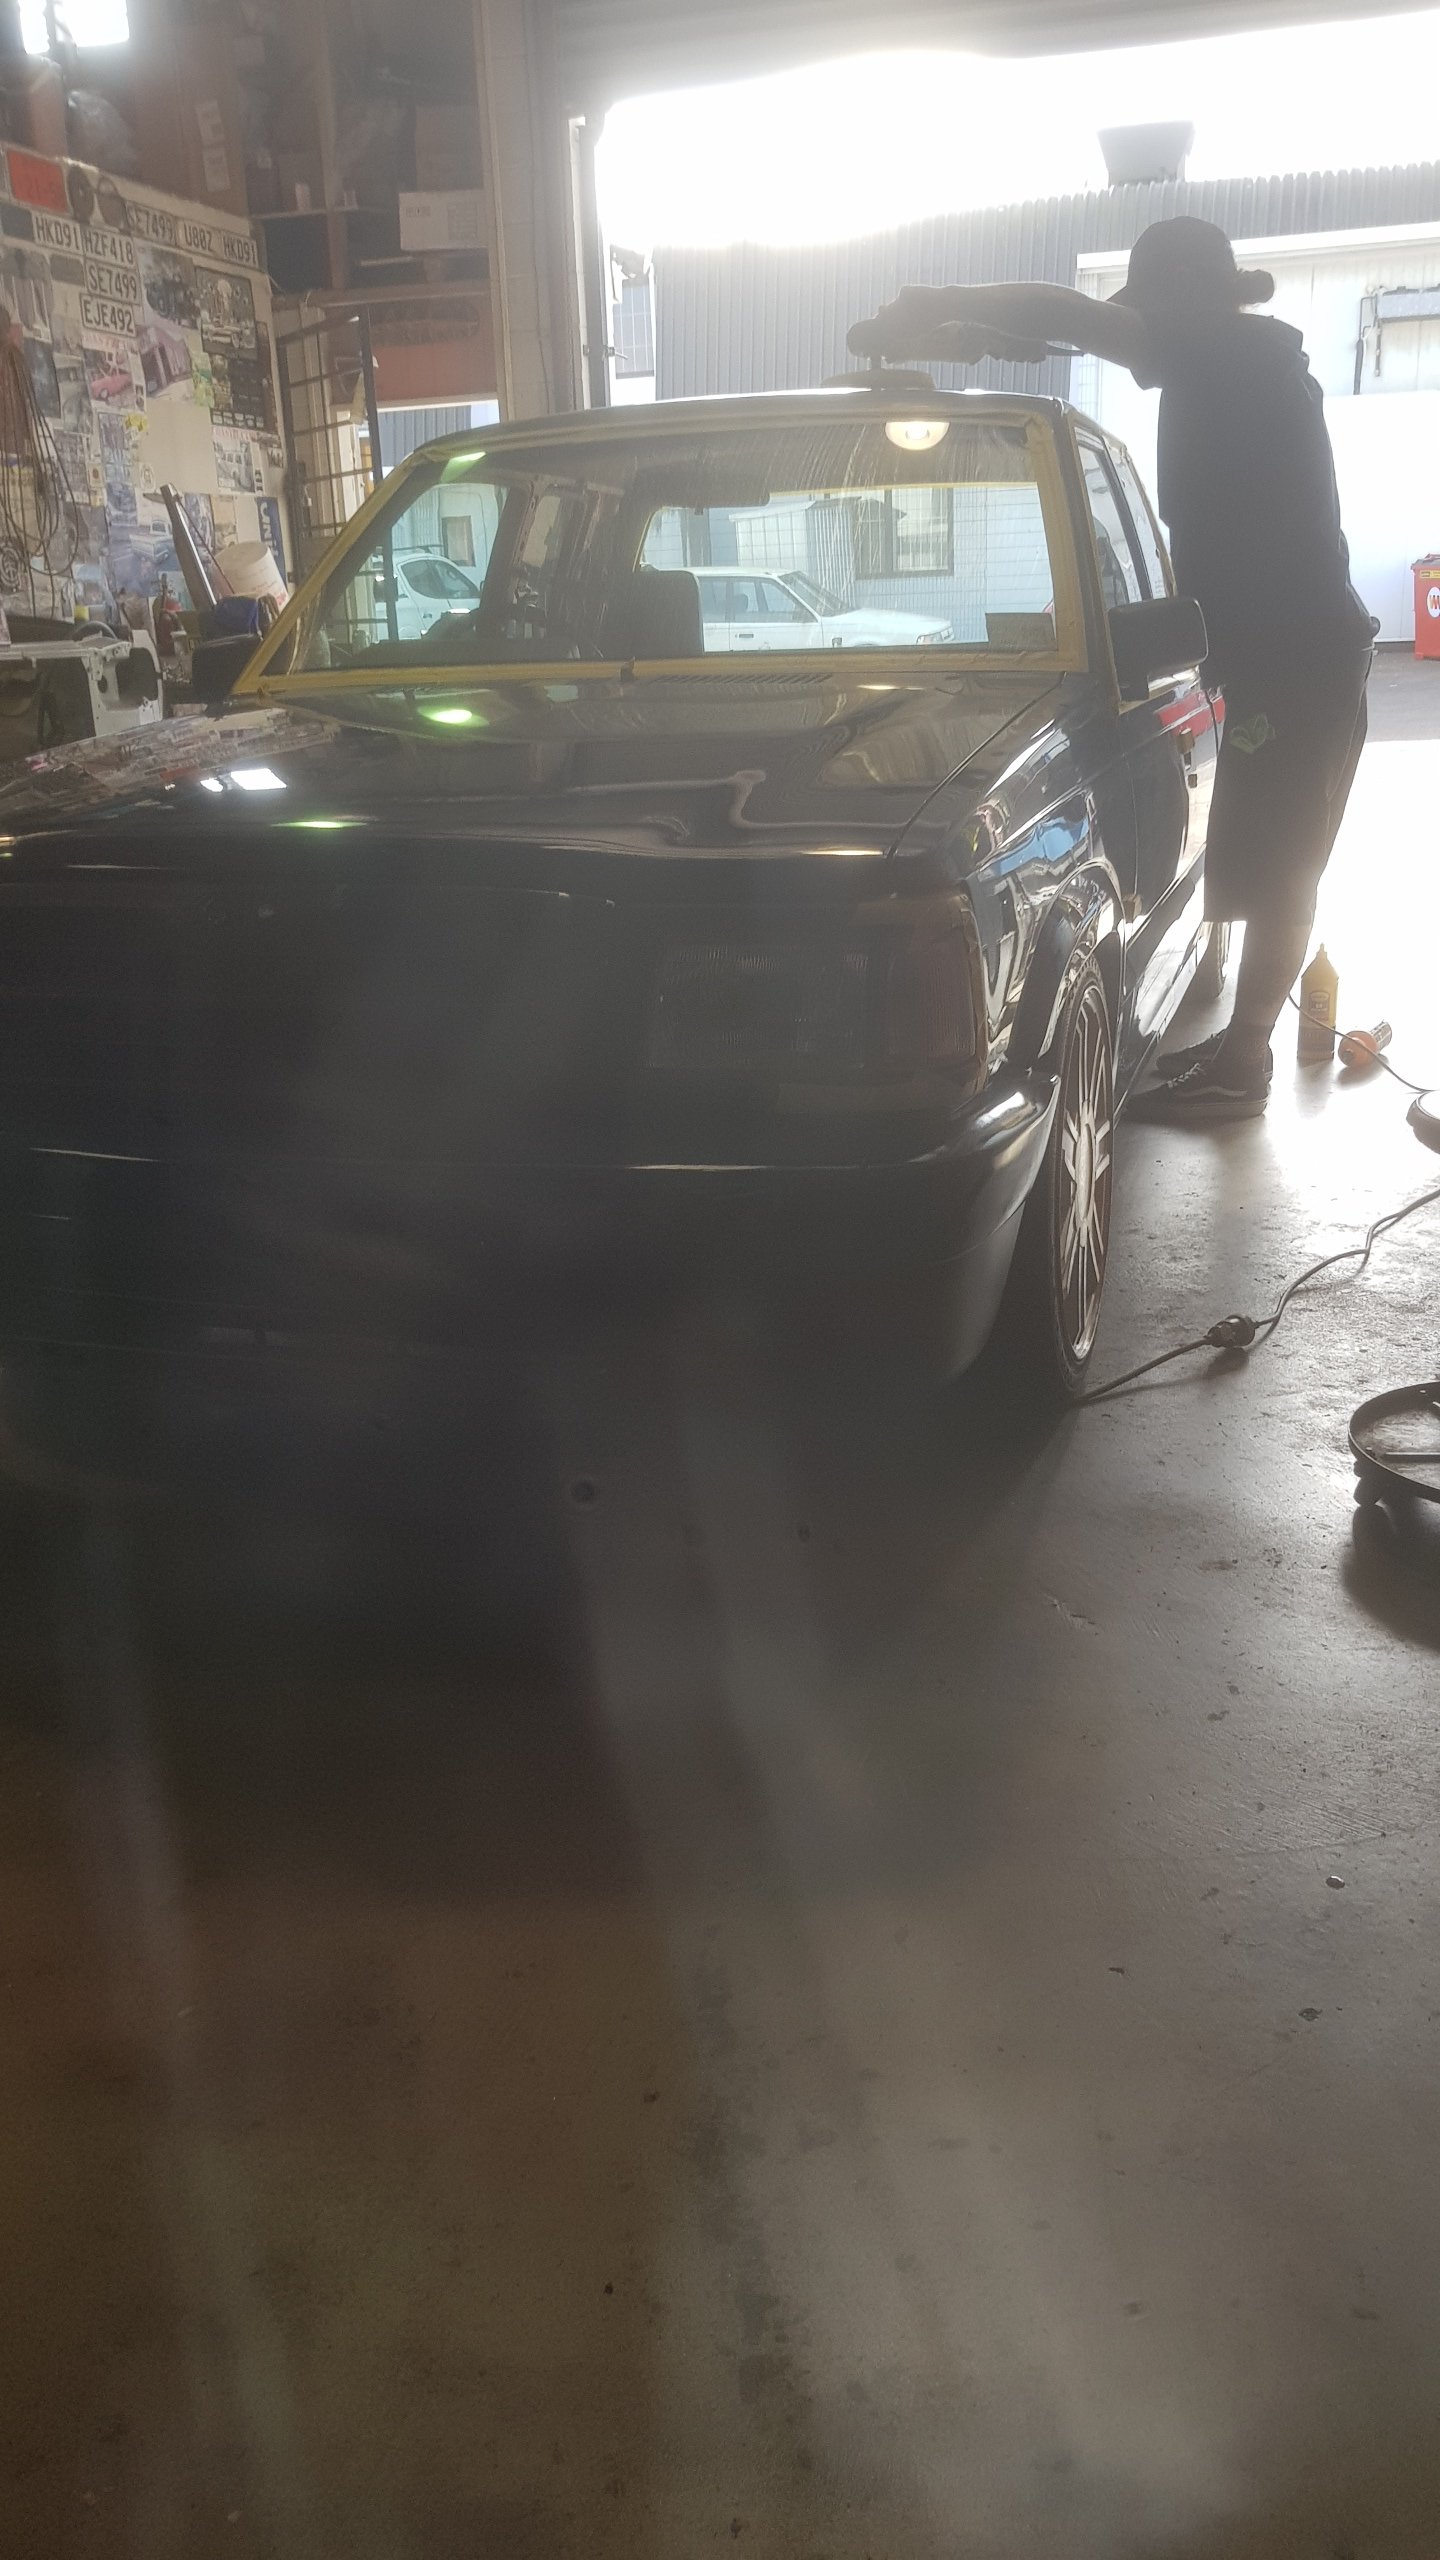
After getting the booster vac hose fitted I took it for a quick hoon on Friday night. Goes decent, needs a bit of carb barrying. Brakes work fucking awesome which I'm stoked about. Had a bit of an issue with the cam blanking seal at back of head. It fell oit somewhere when we where going round the block and it pissed oil all over the gearbox and my floor. Had a spare so pushed it into place. Maybe there was meant to be a retainer plate that I didn't fit way back when I assembled engine. Theres 2 bolt holes either side of it, so will take plug back out, glue it in, then make a retainer plate to hold it. My buddy Adam came over on Saturday and whipped out his buff. Got rid of the last of the chalkyness on the cab and doors, then gave the rest a quick run over. Big effort from him, farkin legend.
1 point
-
just baffling isnt it.... \
1 point


.thumb.jpeg.e0a4bff61111e0c8c7396950fcc94da1.jpeg)


This leaderboard is set to Auckland/GMT+12:00