
Leaderboard


.thumb.jpeg.384ff72c8d2b0ee0d34a7bdedb55bdcf.jpeg)
Popular Content
Showing content with the highest reputation on 12/19/22 in all areas
-
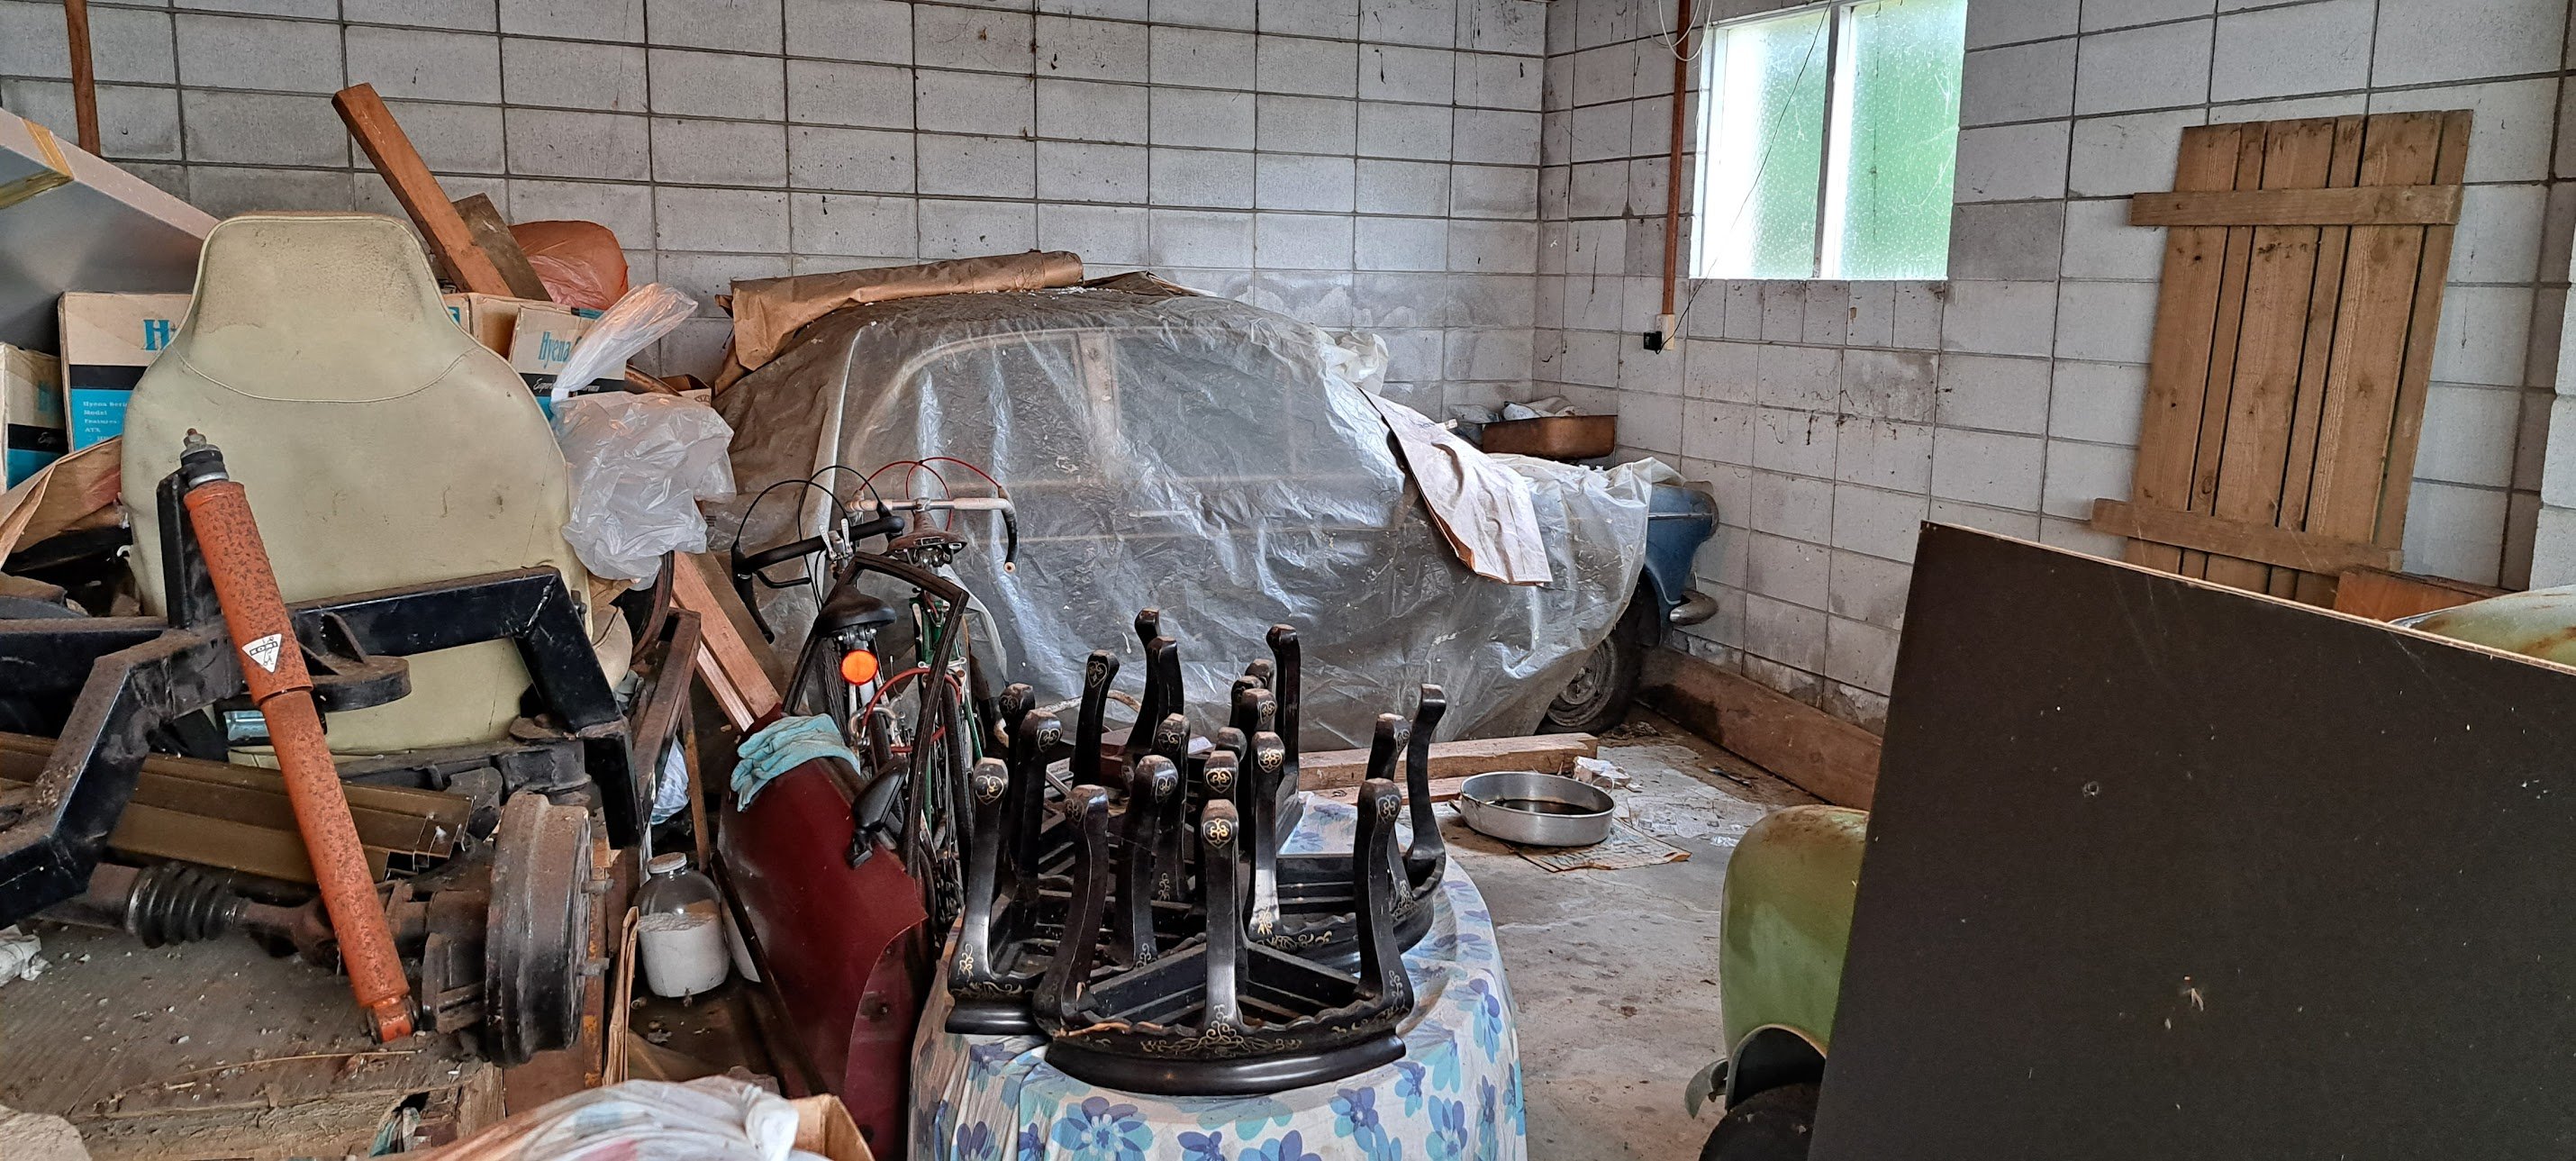
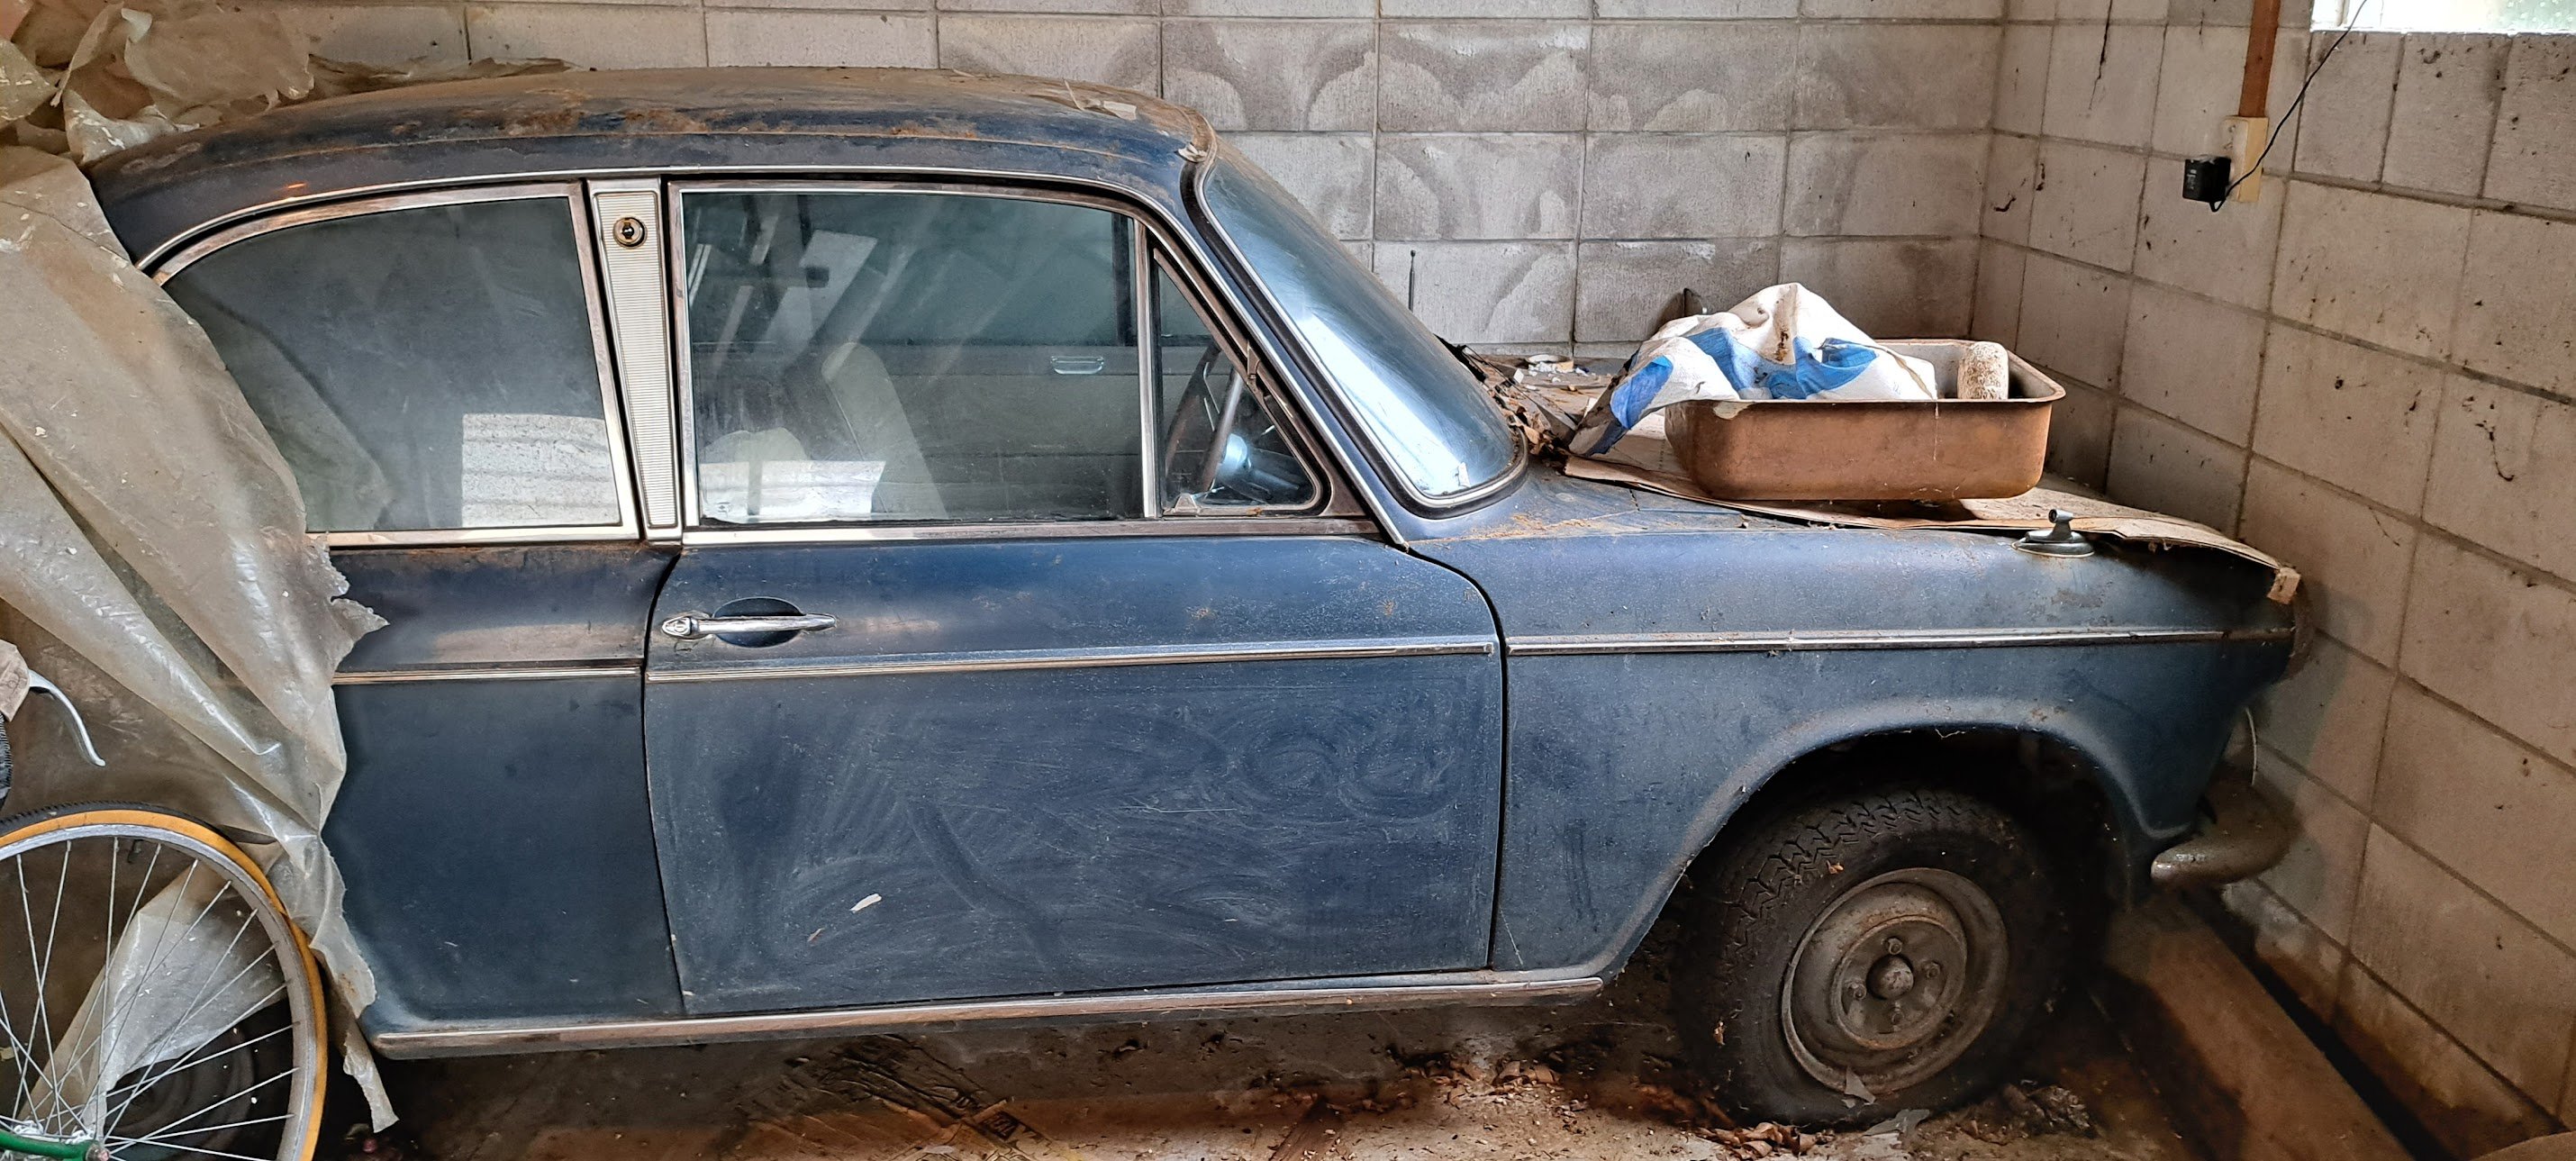
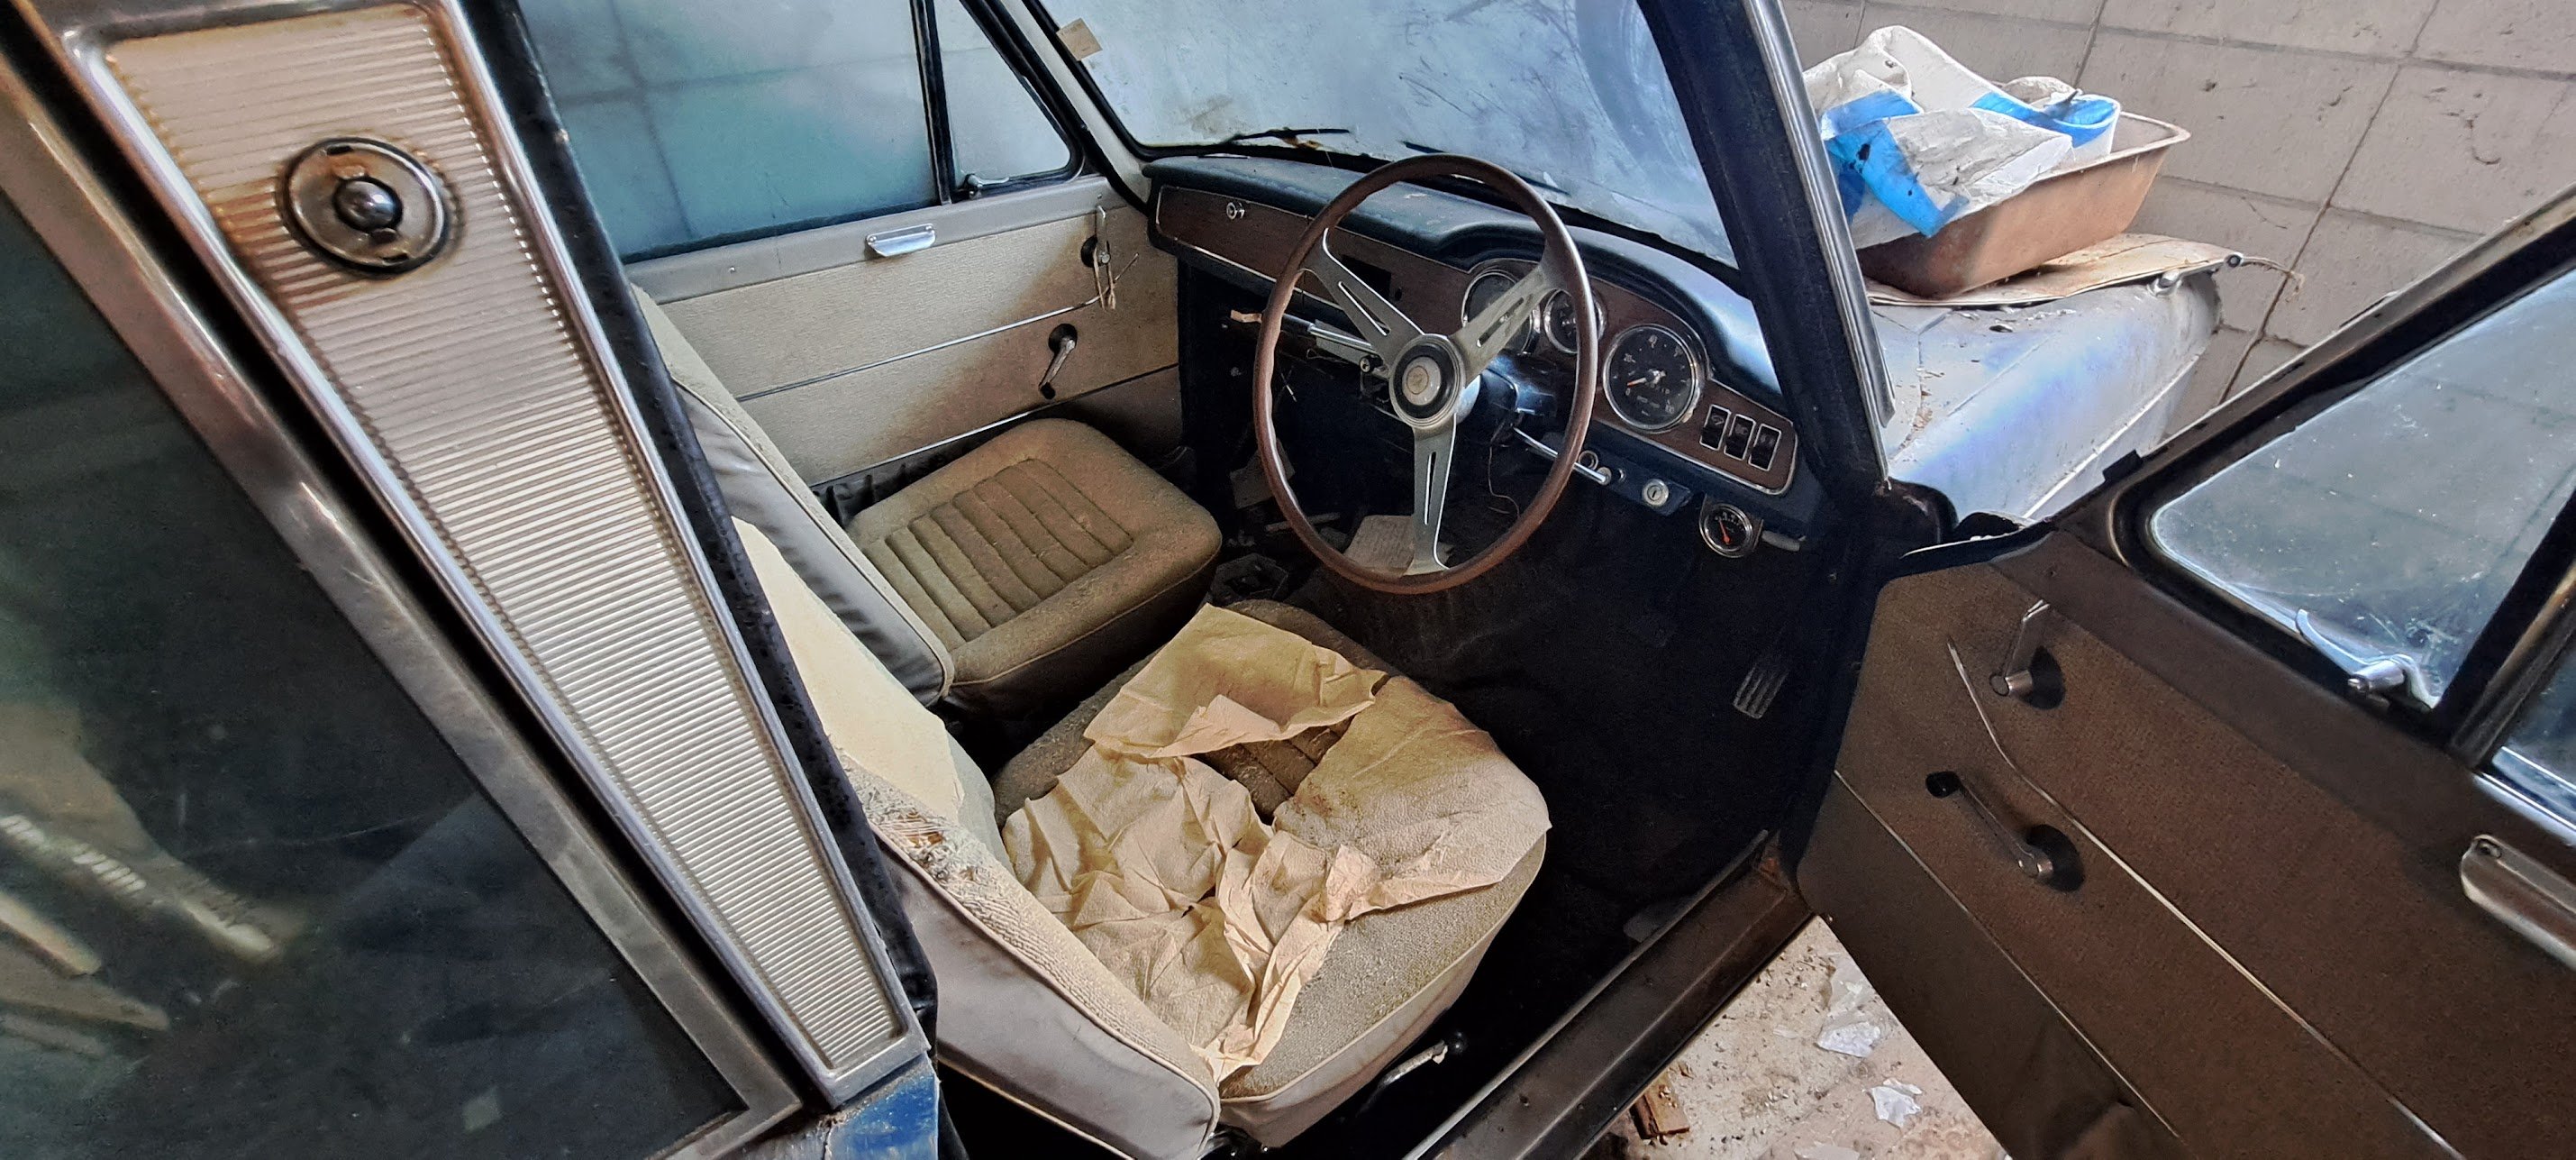
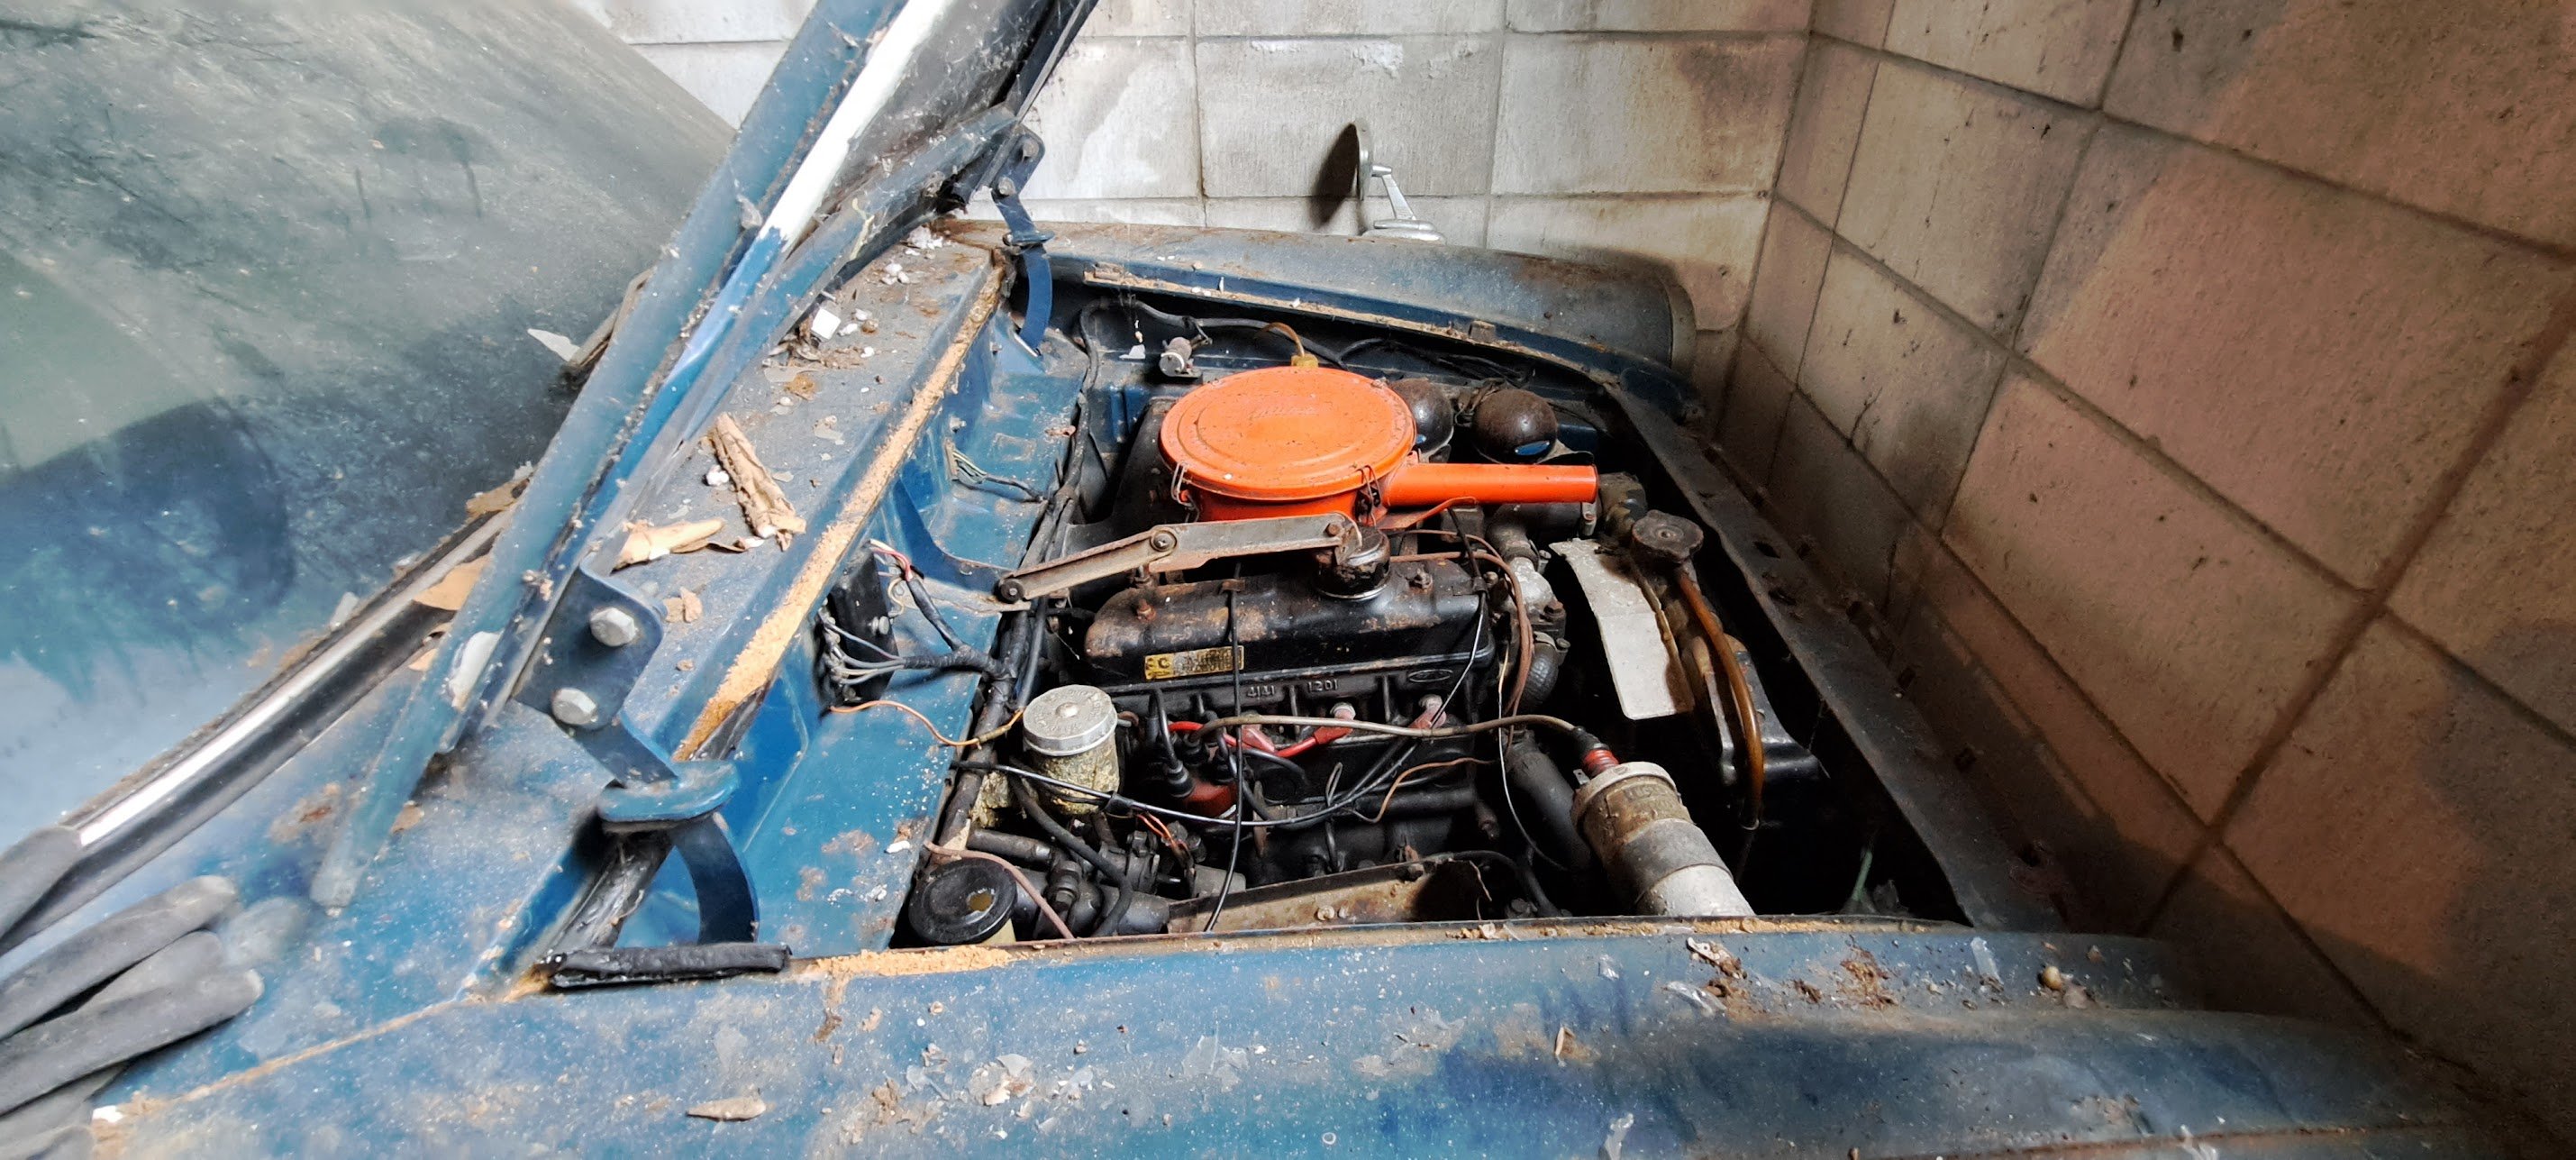
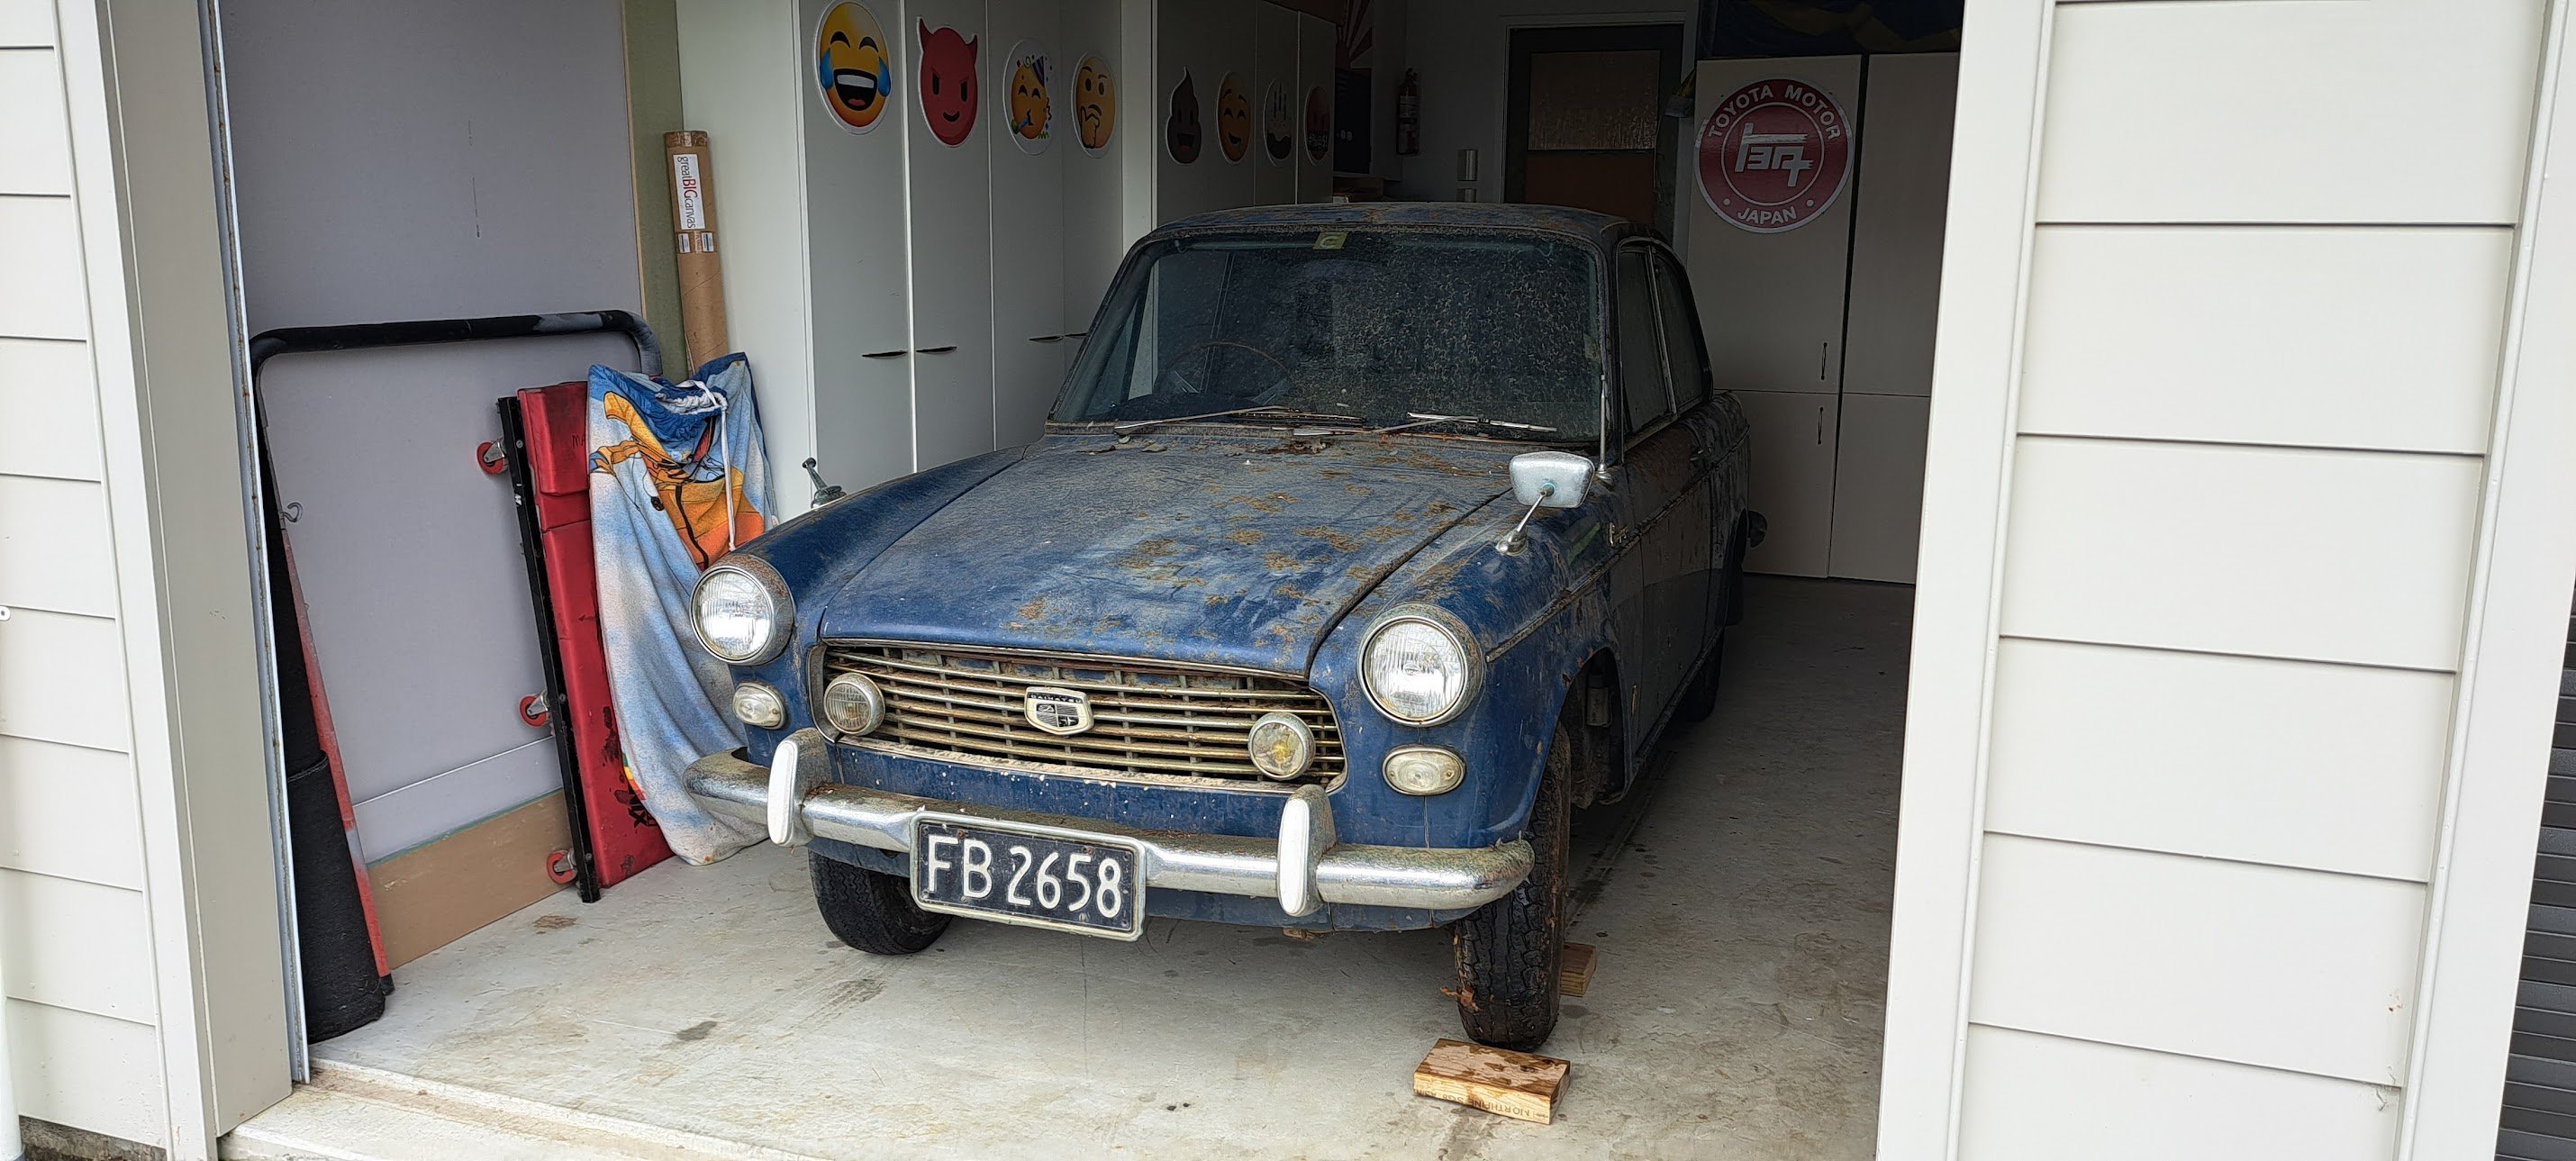
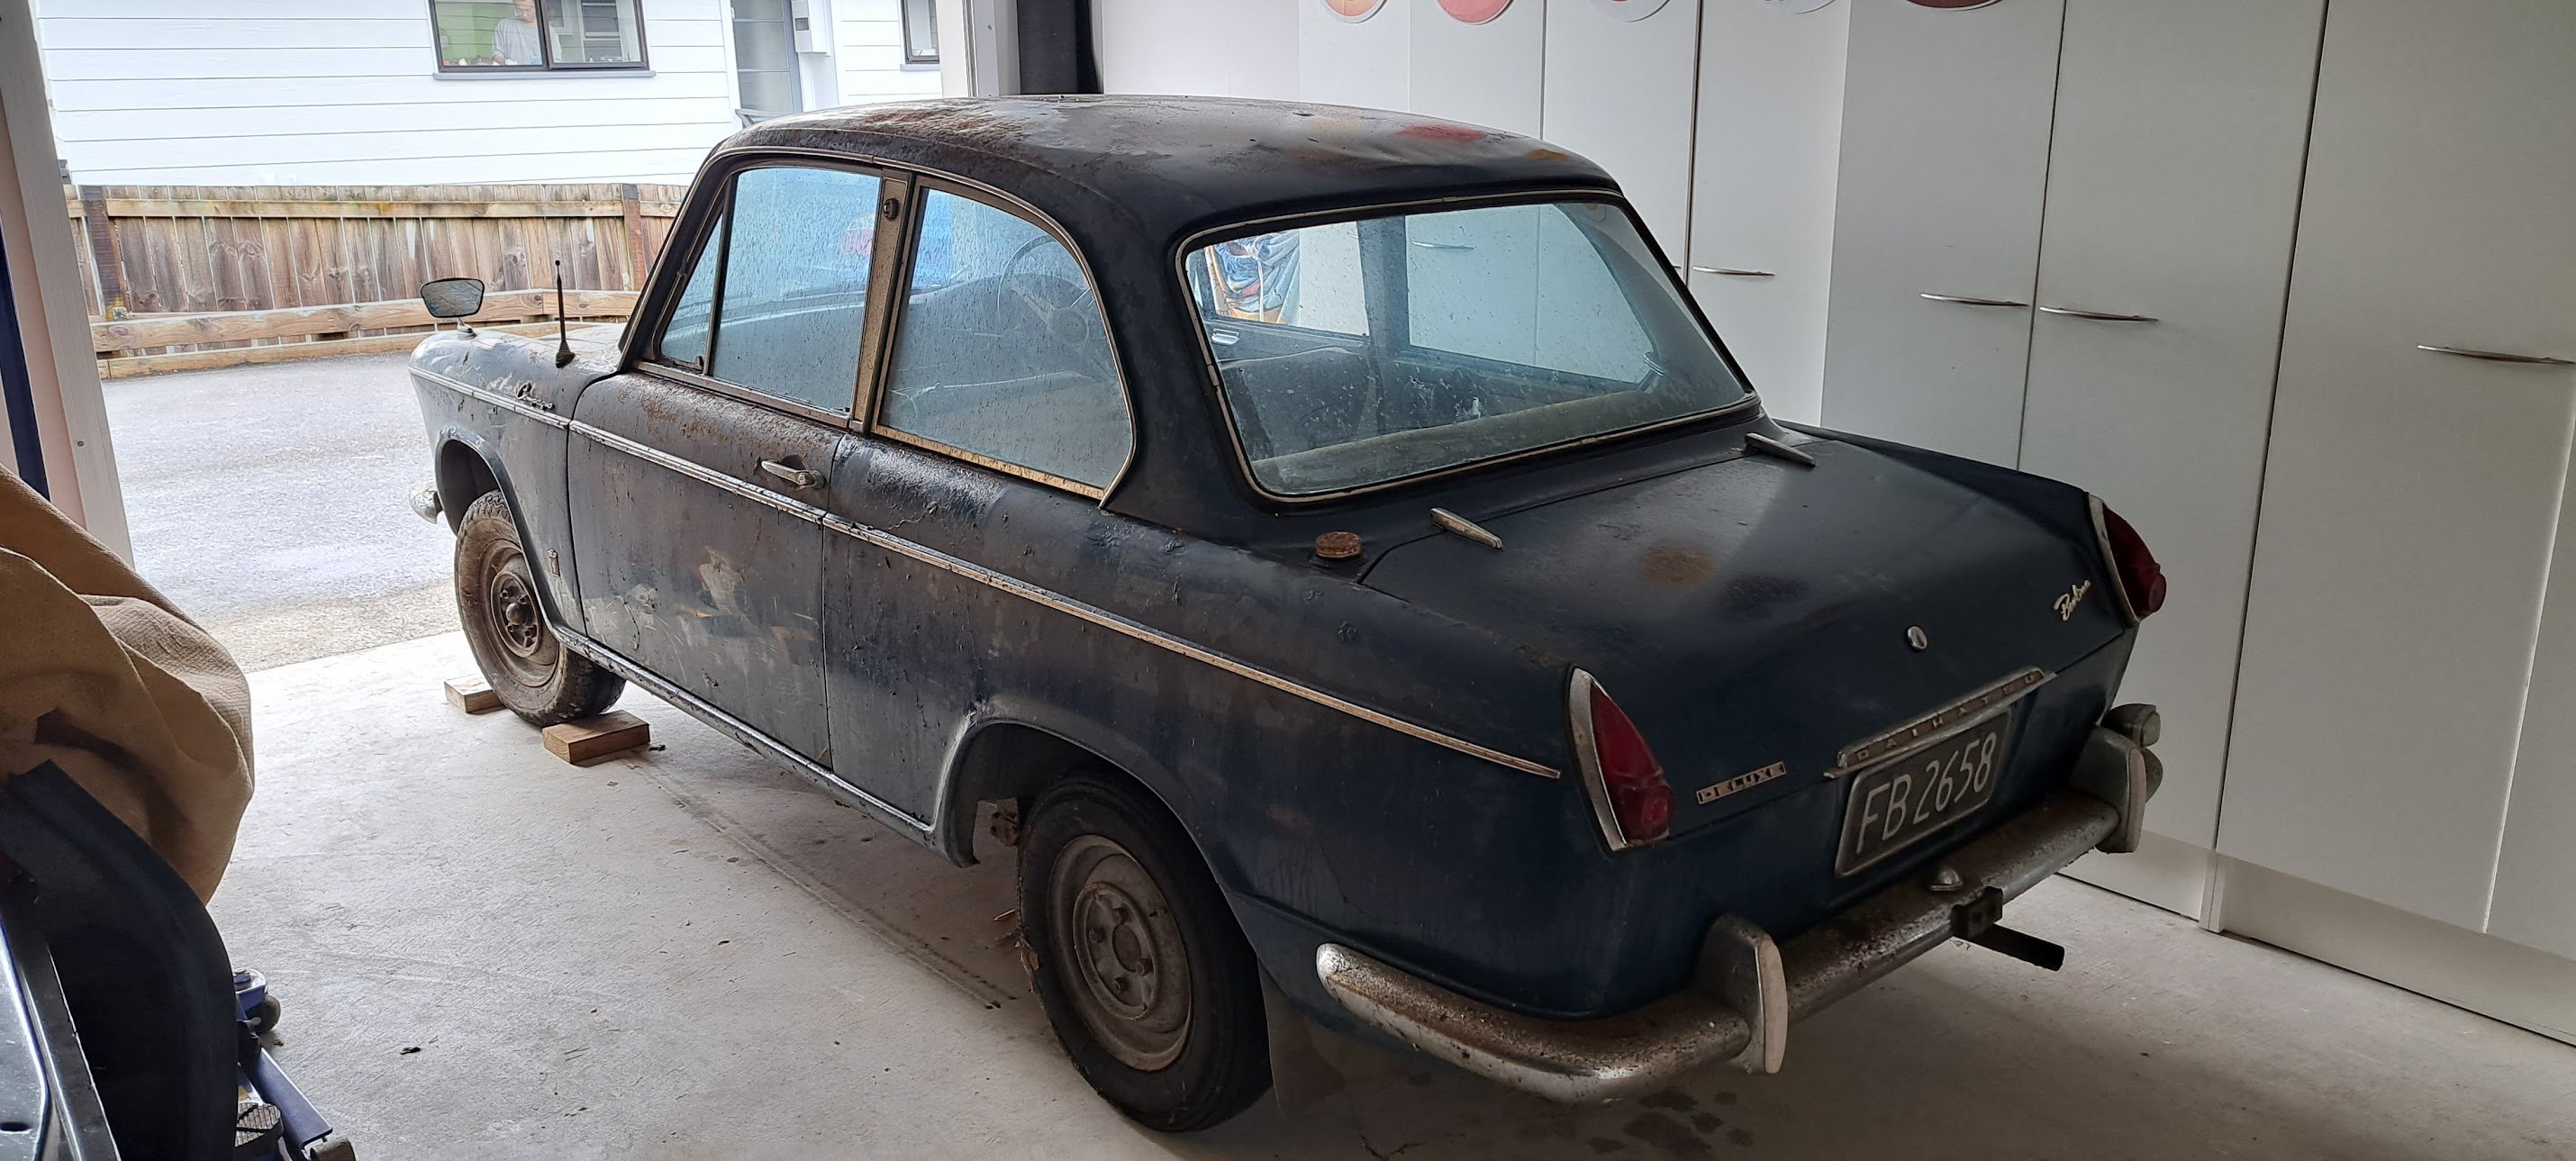
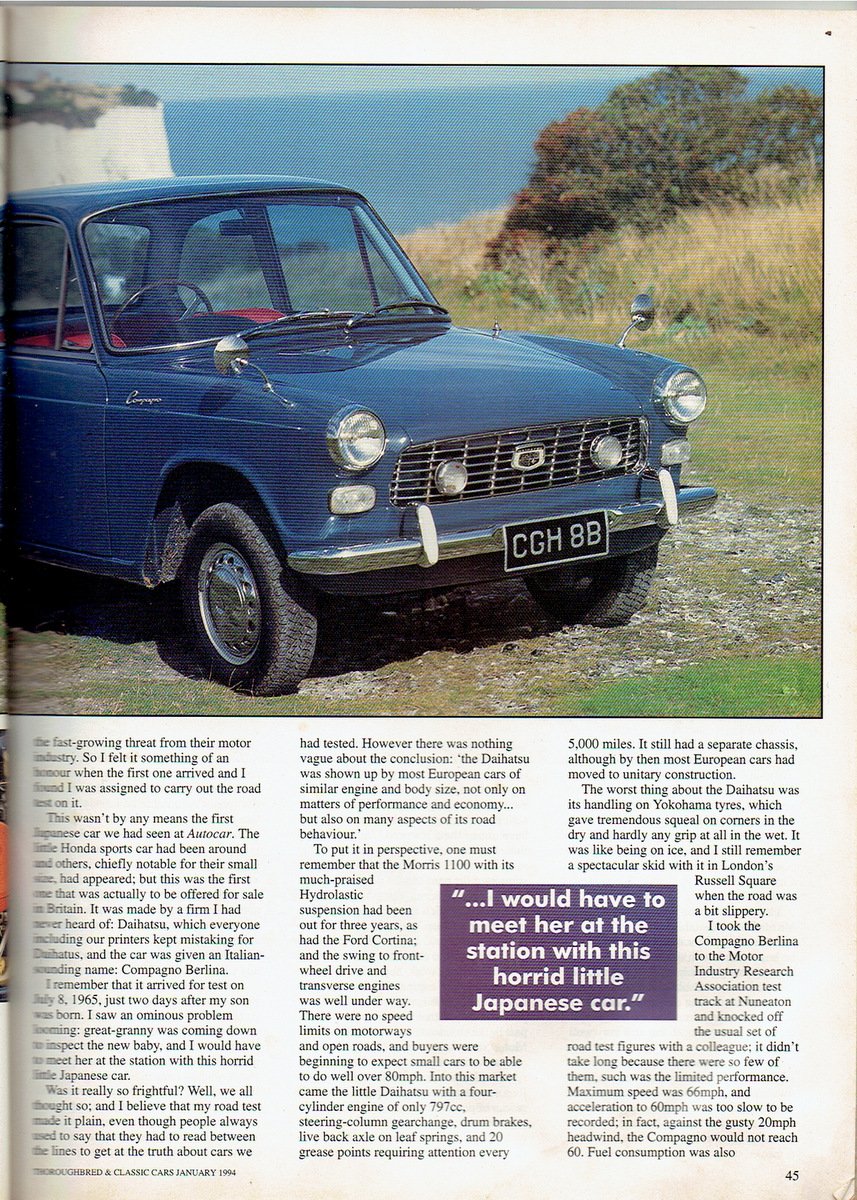
Around 25 years ago i worked with someone who mentioned they had an unusual Daihatsu in their shed. Owned since the early 70's. I'd kept in touch and occasionally asked about it but not much happened. A few months ago i ran into him at a car show and mentioned the car was now available. A "barn find" viewing and unearthing from 45 years sitting in one spot. And I was the proud new owner of this rare little beastie. The details: 1965 Daihatsu Compagno Berlina Deluxe 2 door 2 other owners from being sold new in NZ in 1965 by Campbell motors 53000Miles. Stored since 1977 due to front brake failure and dead alternator. 800cc "FC" motor IF ANYONE KNOWS ANYTHING ABOUT THIS CAR OR THESE COMPAGNO'S OR PARTS PLEASE PM ME For now it will be assessed, and things like brakes and clutch hydraulics will be rebuilt. Motor is locked so freeing this up will be tried. I have the original ownership papers and other details so it should be able to go back on the road relatively easy once mechanically sound.
 26 points
 -
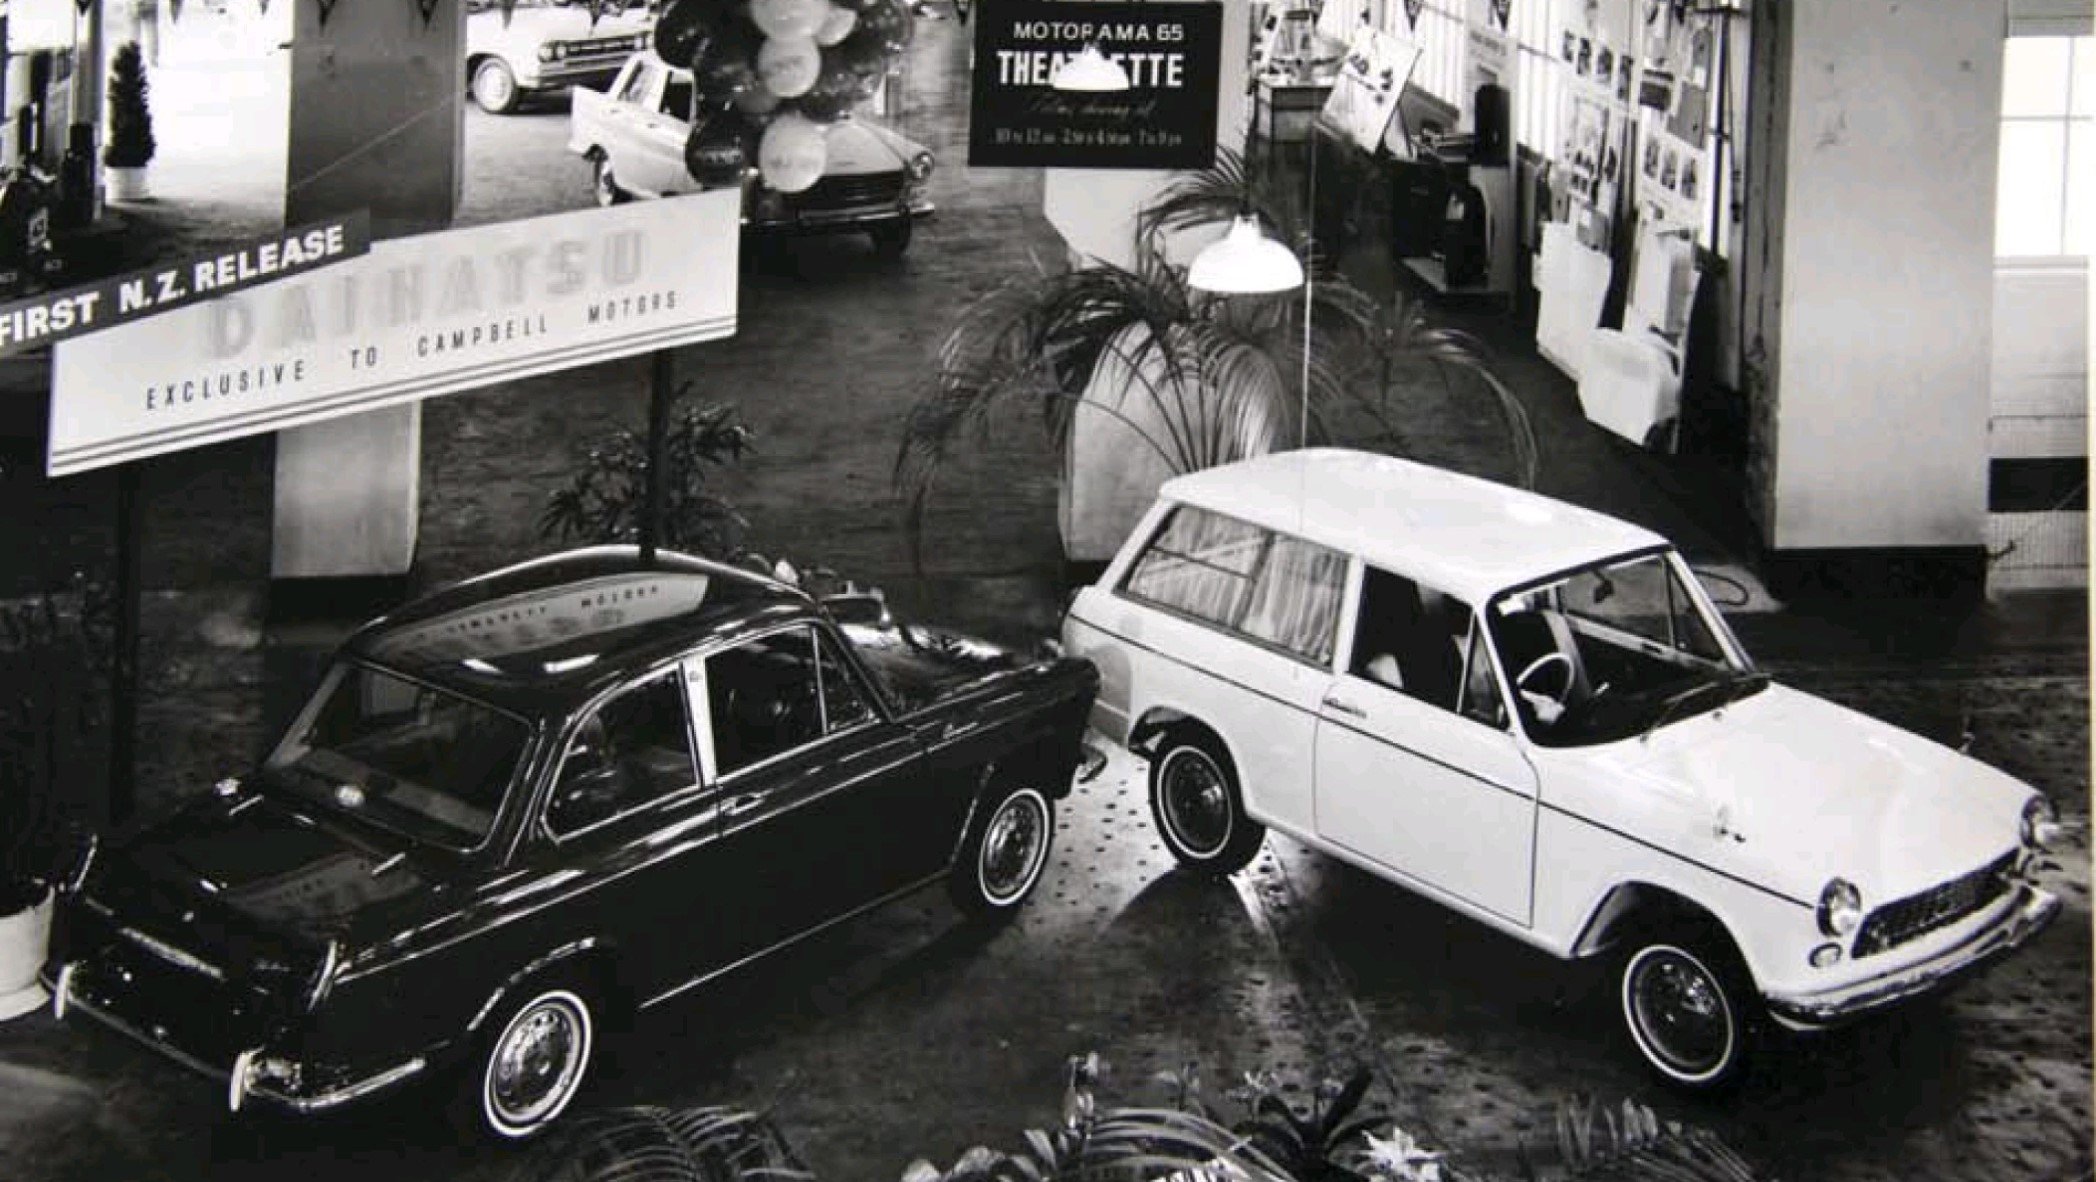
This is the actual car on the Campbells stand at the 1965 Motorama - the wagon was last seen in the 80's by the old owner of mine. Possibly these two were the only ones sold here.
19 points
-
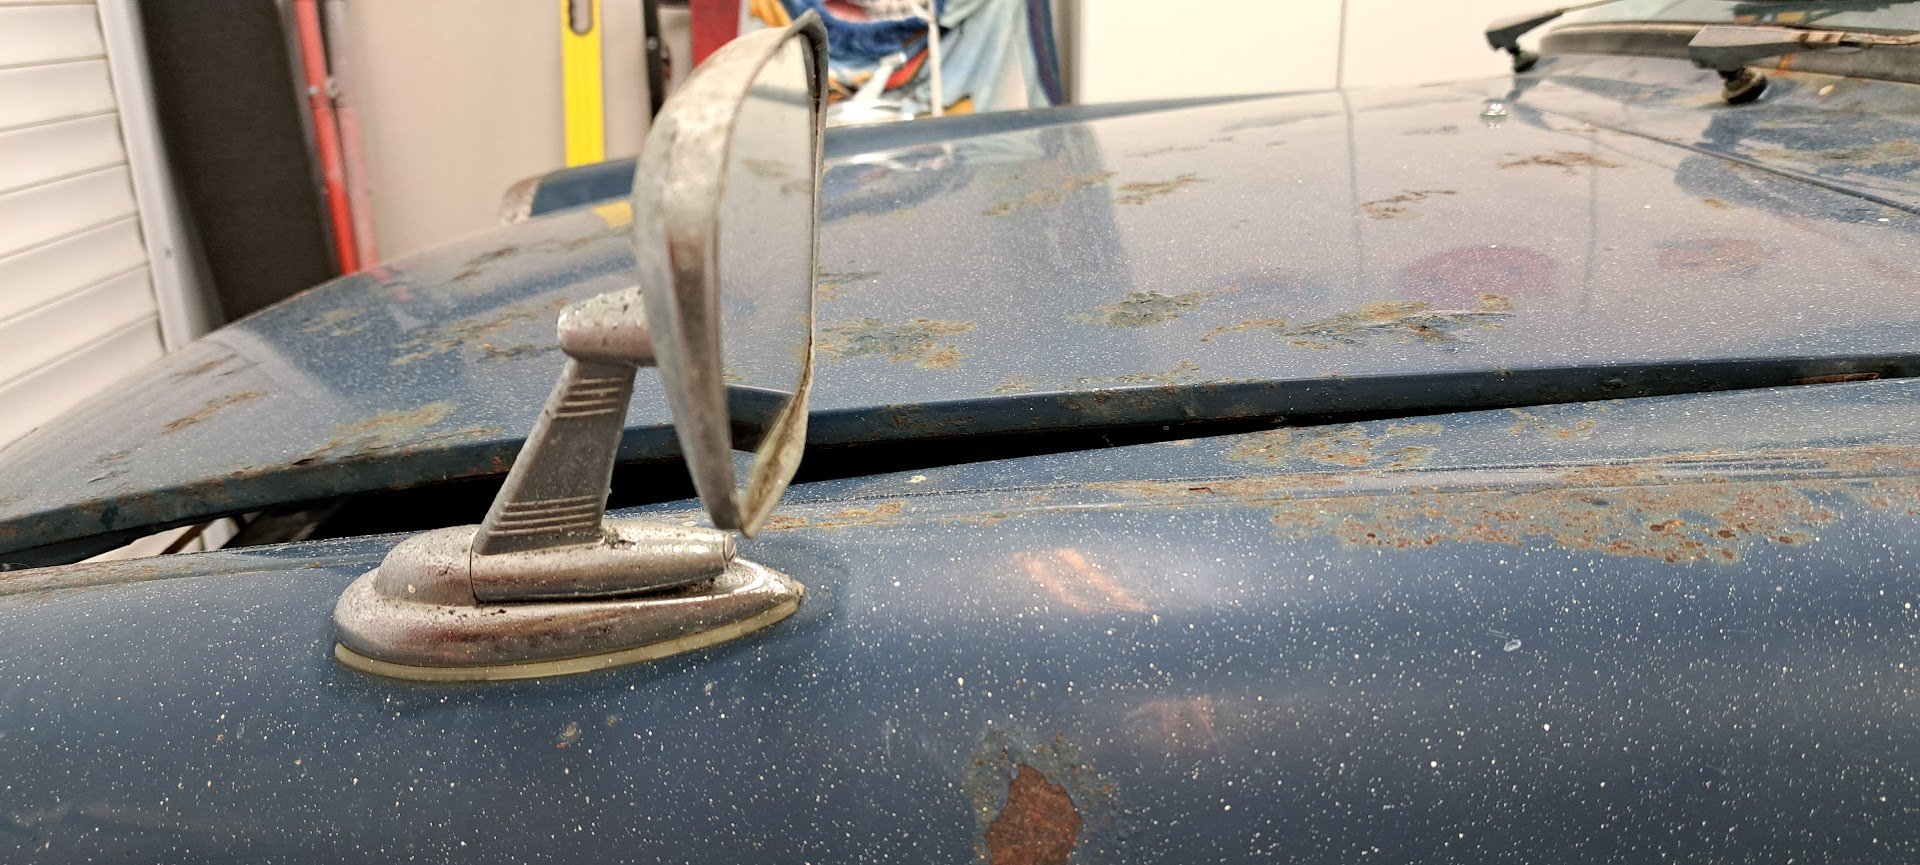
It has some fantastic patina this car too - tempted to run it as-is
18 points
-
So I sold the old girl over a year ago, and haven't done any work on the new one since about then too. But I want to go off-road'in, so I sold out, and purchased a SXS. I looked at a couple of RZRs, but didn't fit in them, then found a YXZ1000R, which I fitted in, and it really tickled my fancy. So the new sleigh is a 2018 Yamaha YXZ1000R. The dude that owned it also had a 2016 YXZ, which he had turbo'd, and then blew up due to losing an oil line, so he purchased the 2018 as an engine donor. He started ripping it to bits then realized it probably wasn't the most financially smart thing to do. So he swapped a few parts between them, and then left the 2018 in a shed for a few years. I got it relatively cheap, because he has taken a few goodies off it, and left it half dismantled. When I got it home a few weeks ago, I went over the whole thing checking bolts and seeing what was missing. It was only missing one front sway bar link, the front bull bar, one hub cap, a few bolts, and lots of plastic clips. I gave it a good clean up, got a new sway bar link, changed one CV boot, and applied a shit ton of bolts and plastic clips, and it's pretty much ready to go for a hoon. You may have noticed it's quite colourful, that's because all the blue bits + the shocks are from the 2016 one. It also has 15" aftermarket wheels rather than the 14" bead locks it came with. This is what its meant to look like, I would like to make it look less patriotic/American one day, and cut down on the range of colours. I also need to make a sweet bull bar for it, before I destroy the front. The neat thing about these, is they are not CVT like the Polaris and Can-ams, they have a 5 speed dog box that is electrically shifted via flappy paddles, and has a big old clutch pack that is controlled by an ECU. They are also a 3 cylinder, so sound way better. And that's the main thing, sounding cool while banging through gears. I will add some extra bars to the cage (they are a bit shit std) and put 4 point harnesses in it sometime soon. The other big upgrade is to widen the track all around with 50mm wheel spacers, apparently it makes them handle a lot better. Looking forward to doing some skids/jumps/flips/rolls in this soon, neeeeaaaat. Regards, VG.12 points
-
After a bitter-sweet journey, its time to say farewell to the old girl:
9 points
-
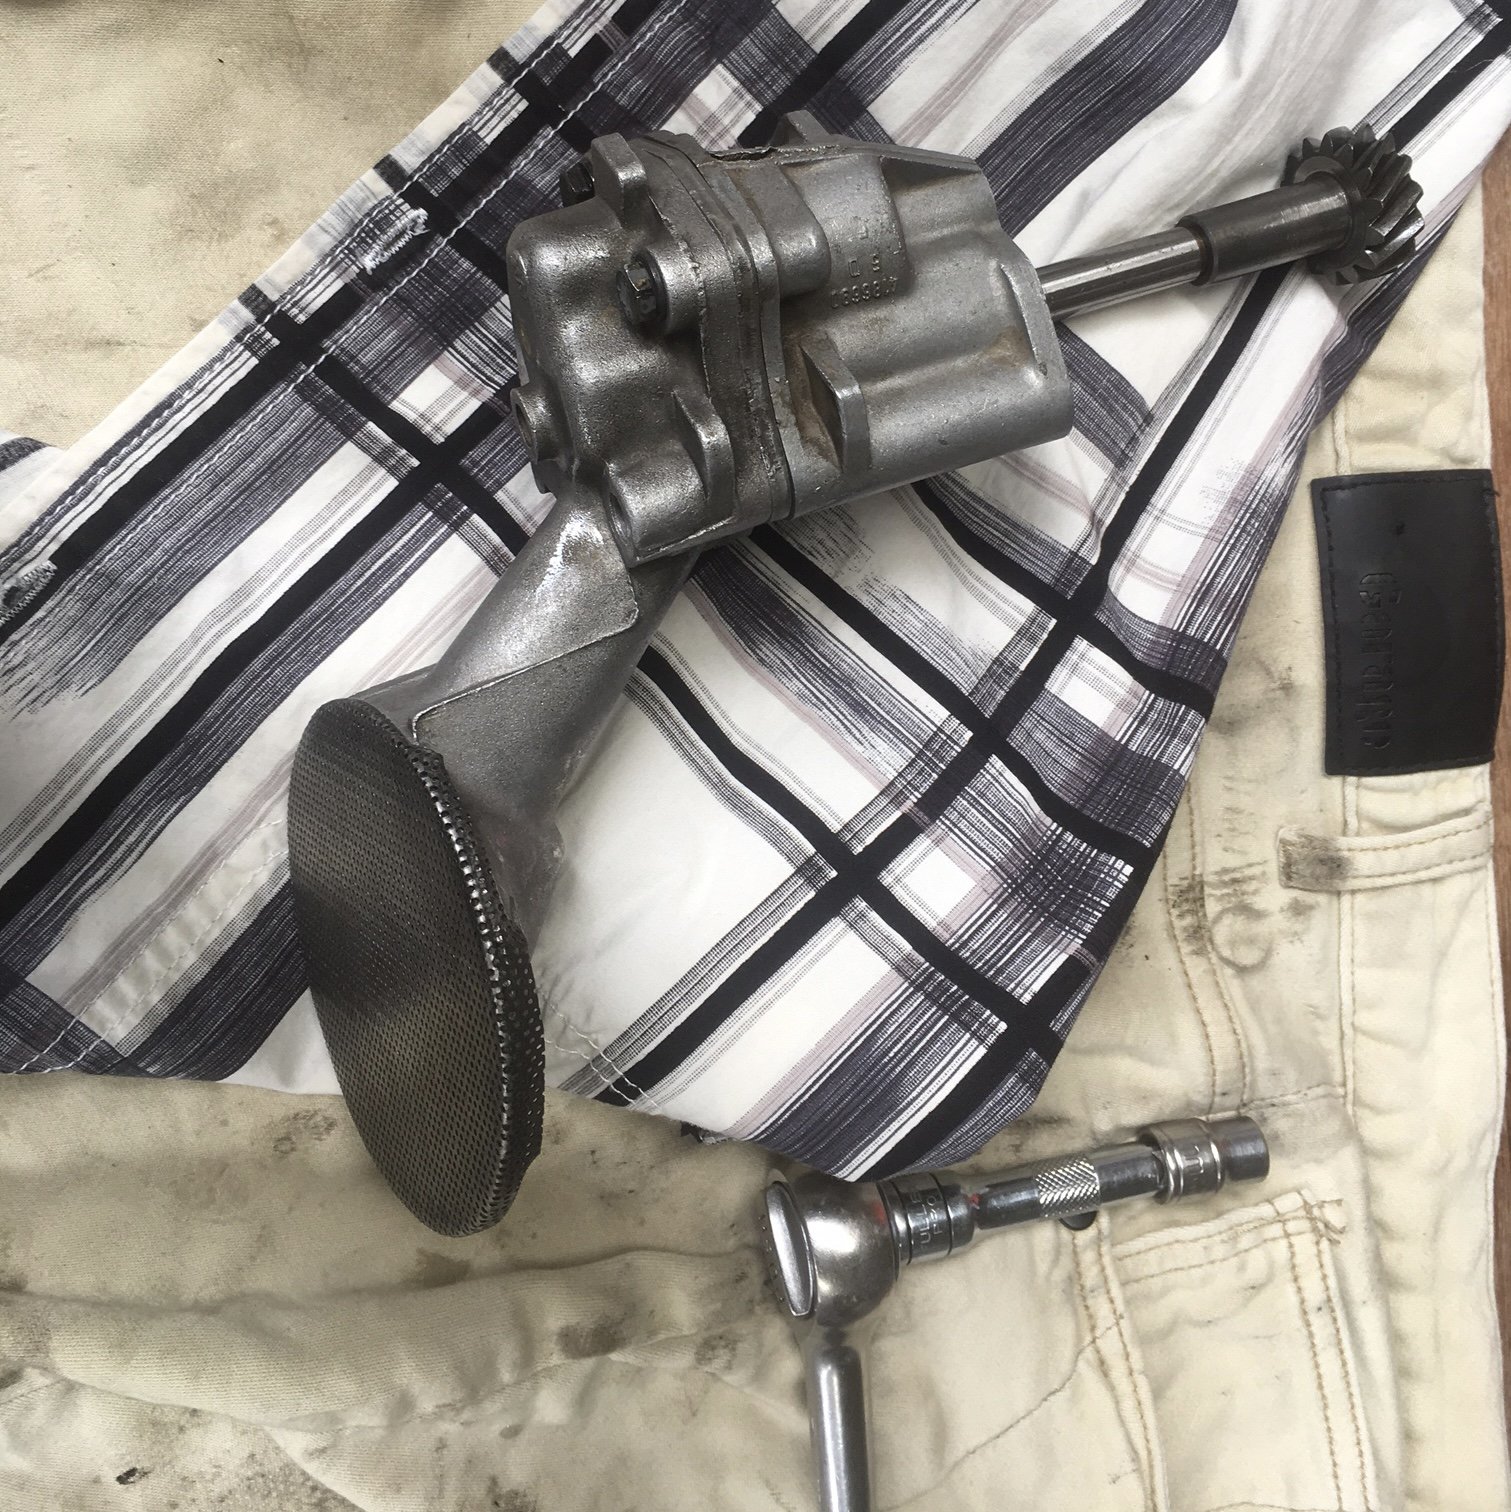
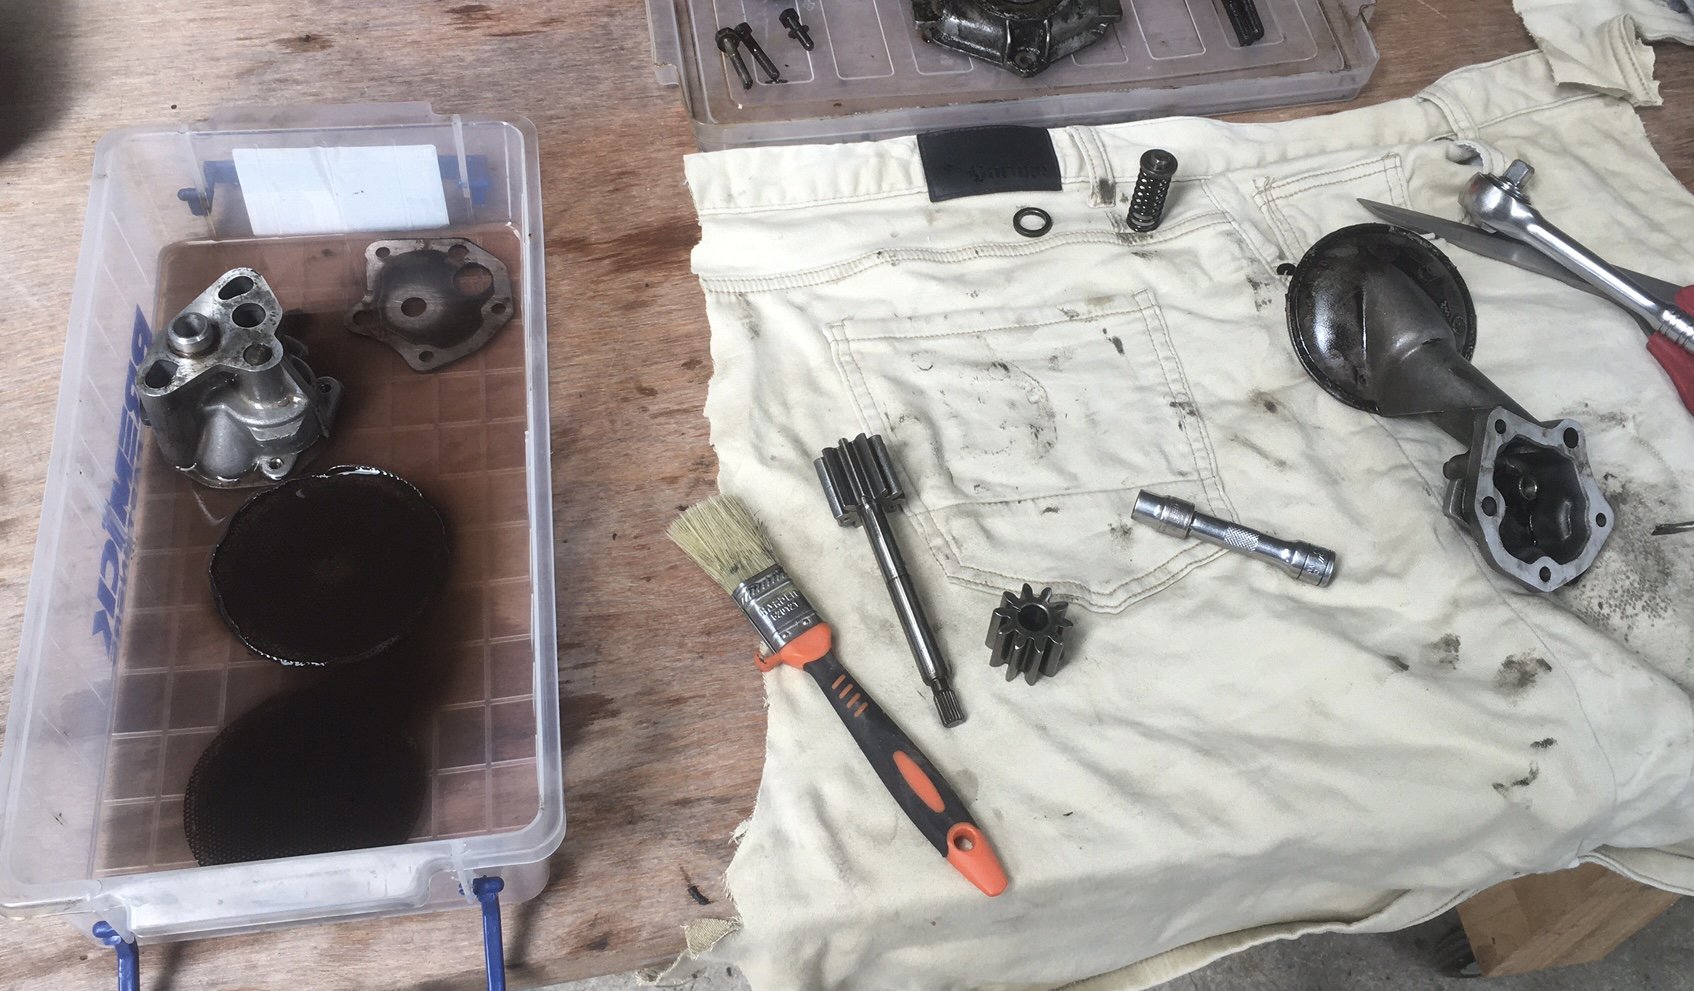
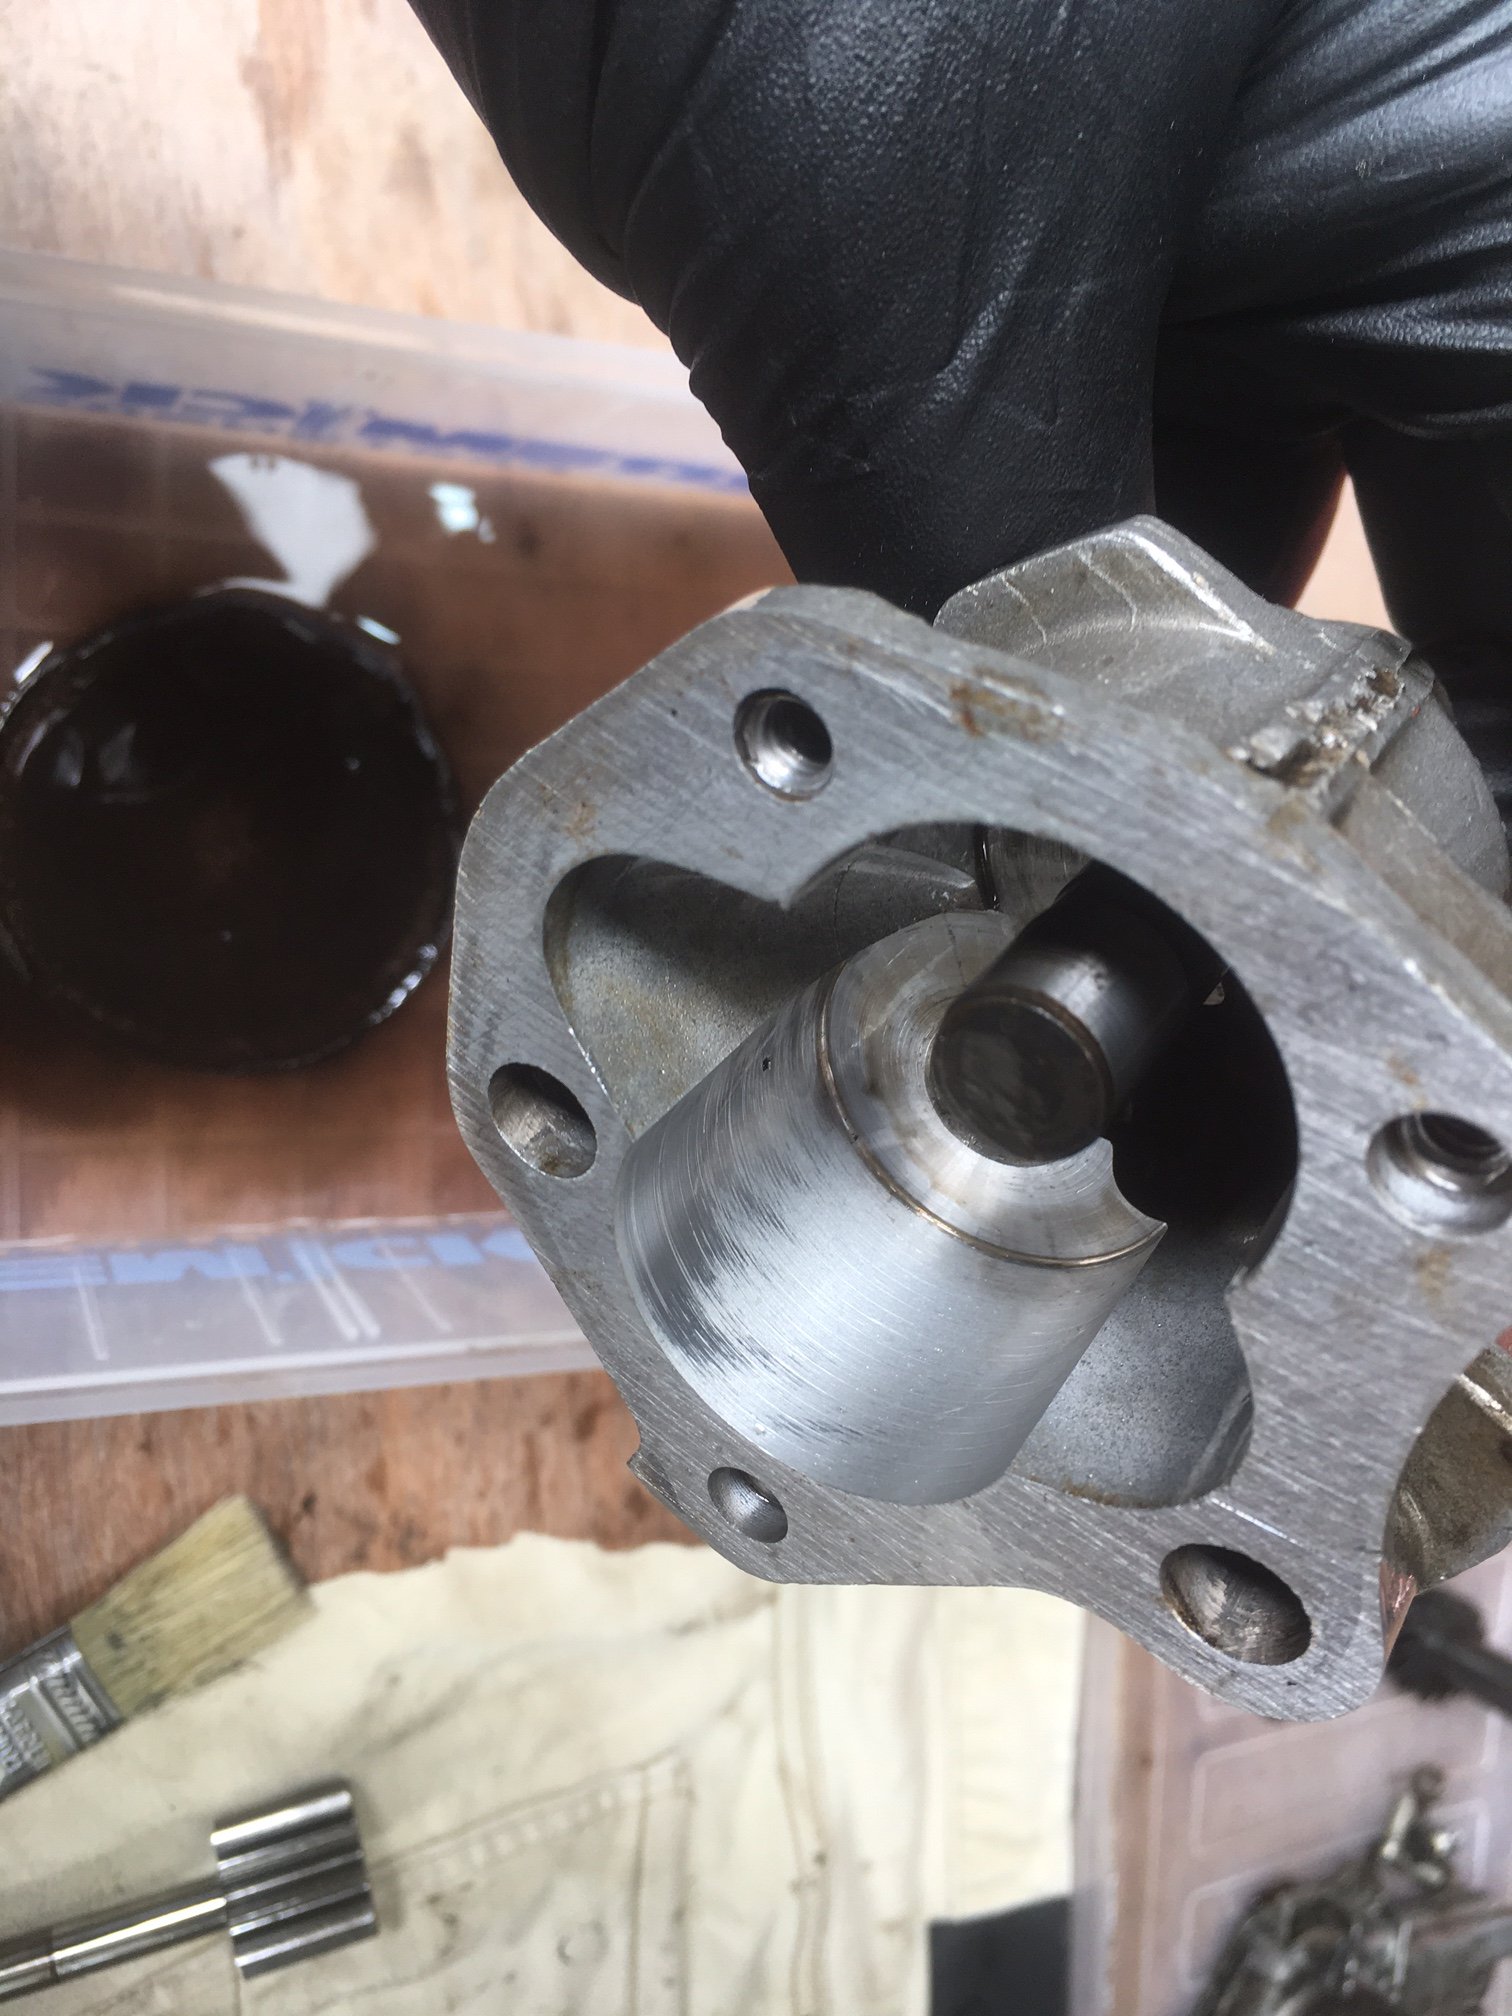
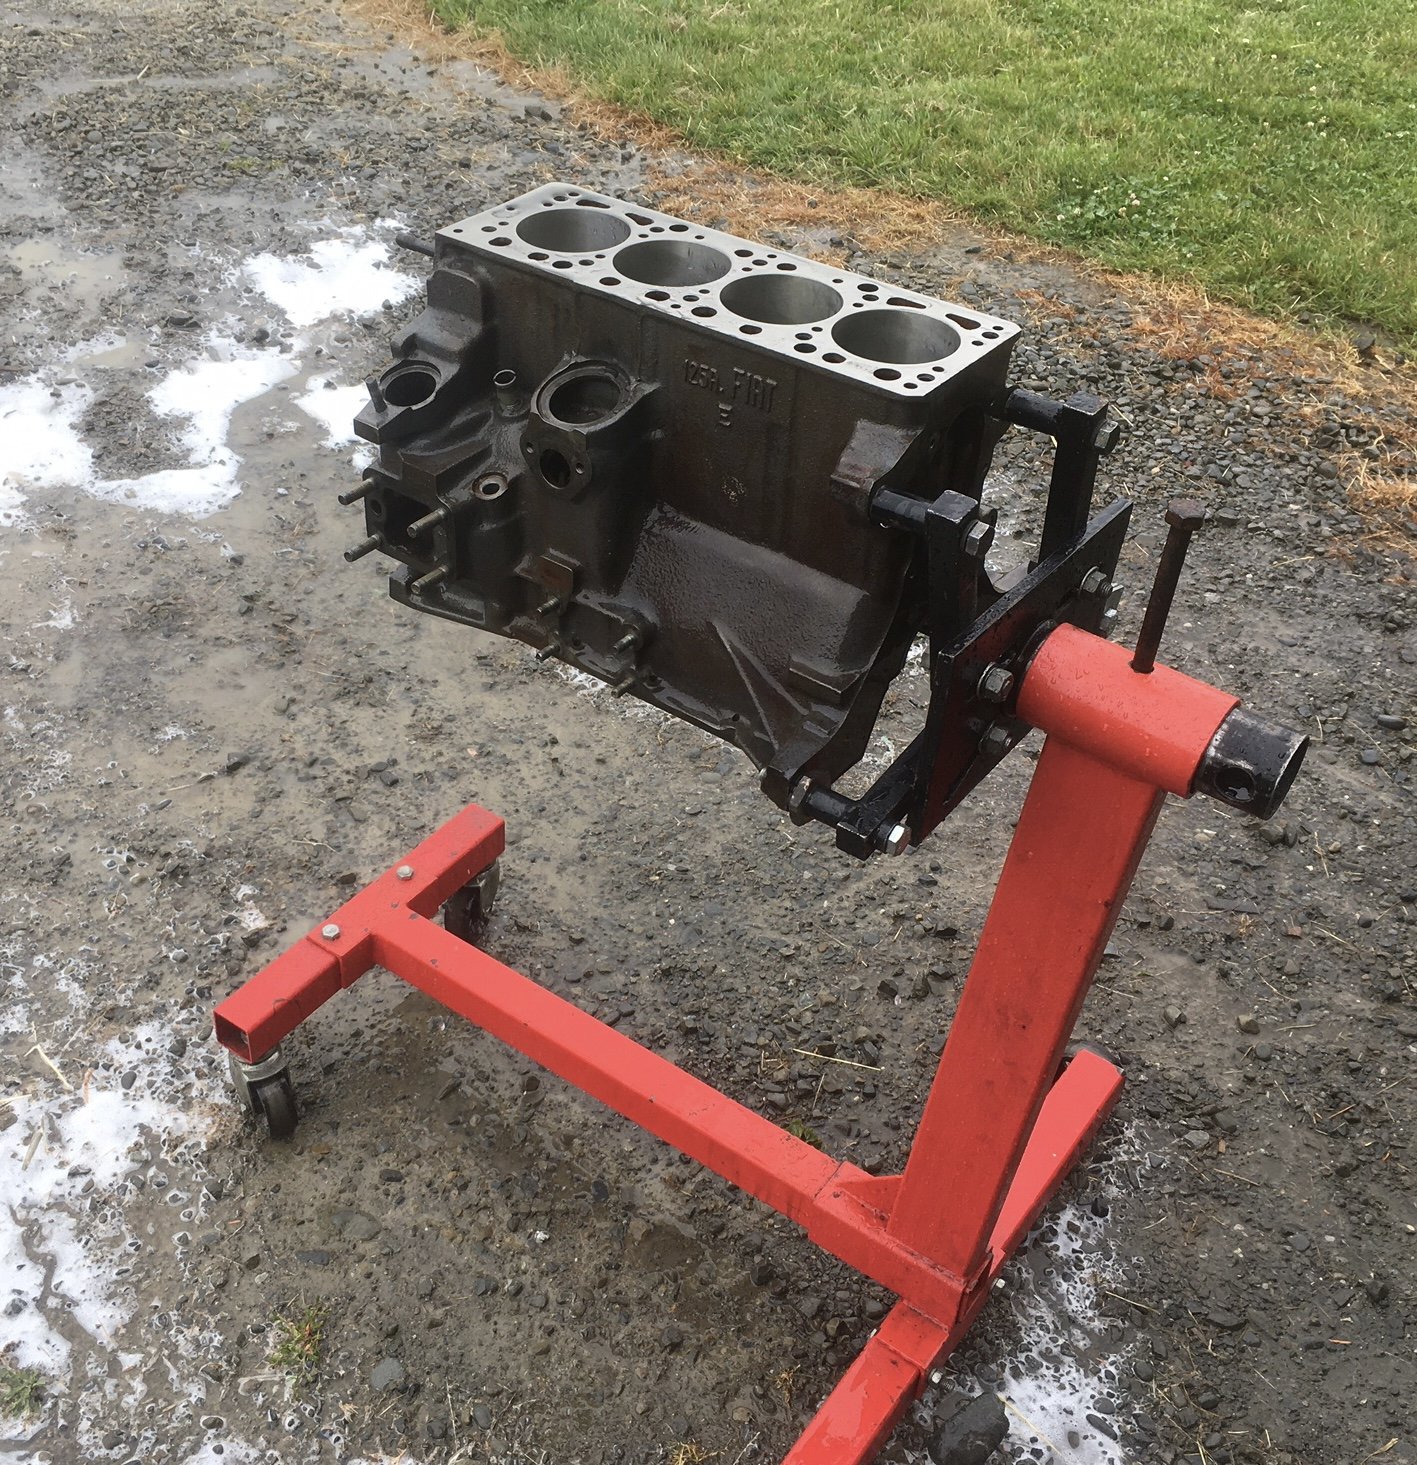
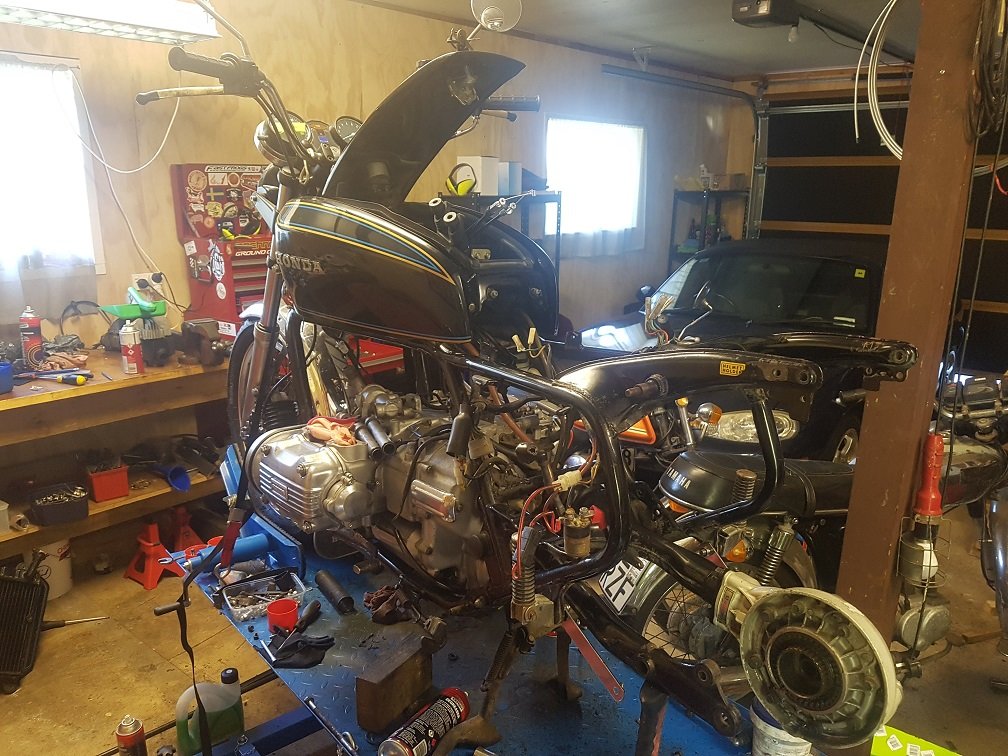
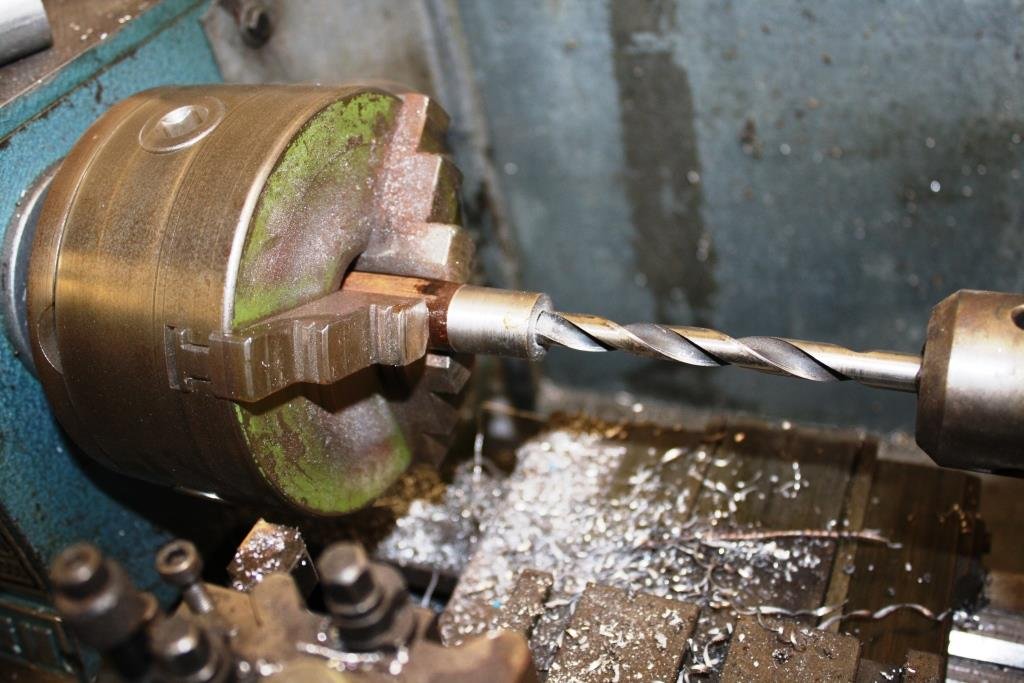
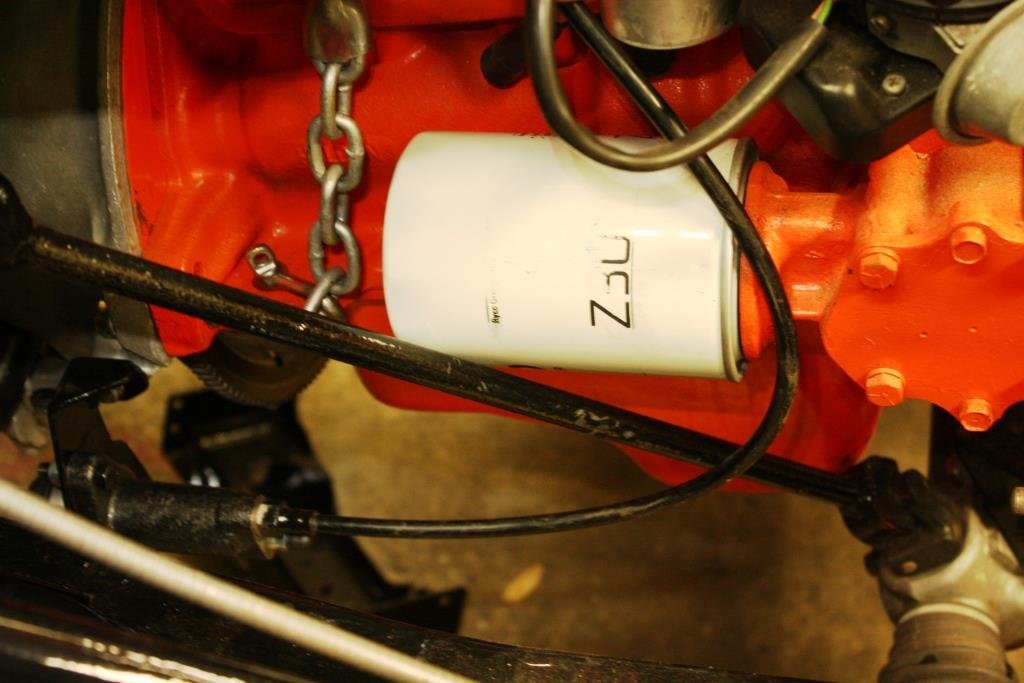
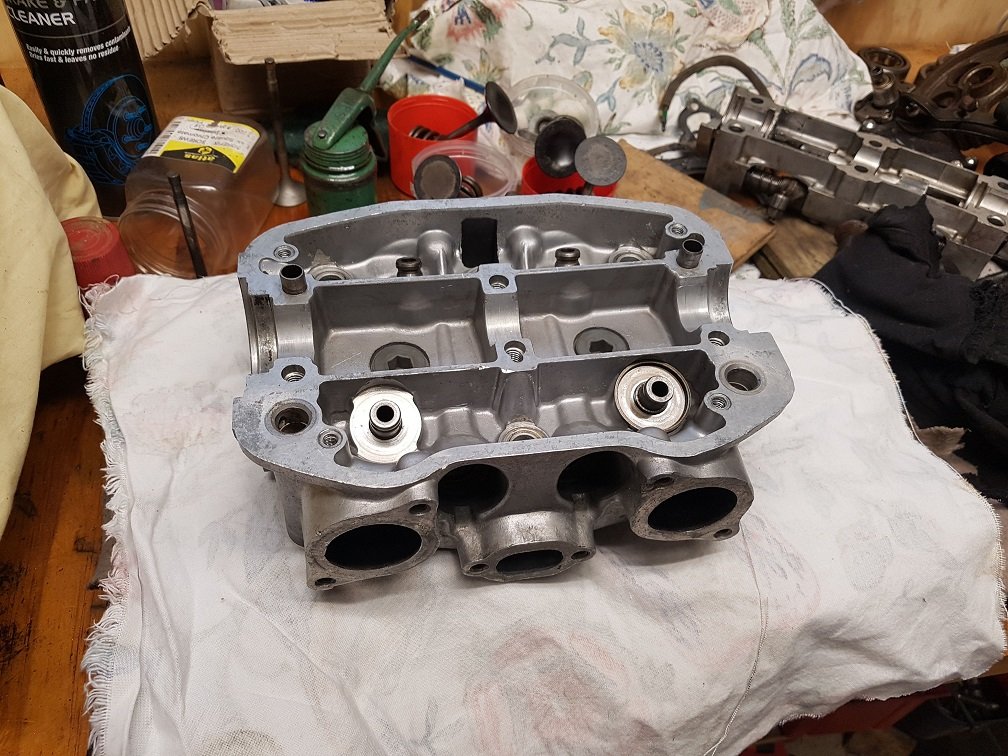
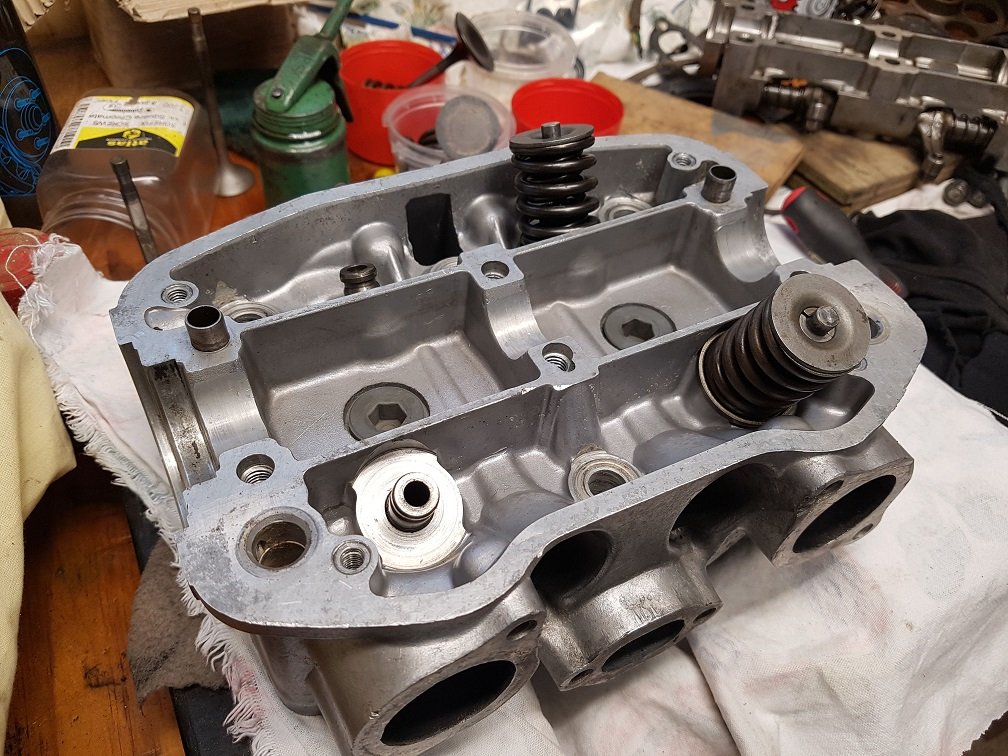
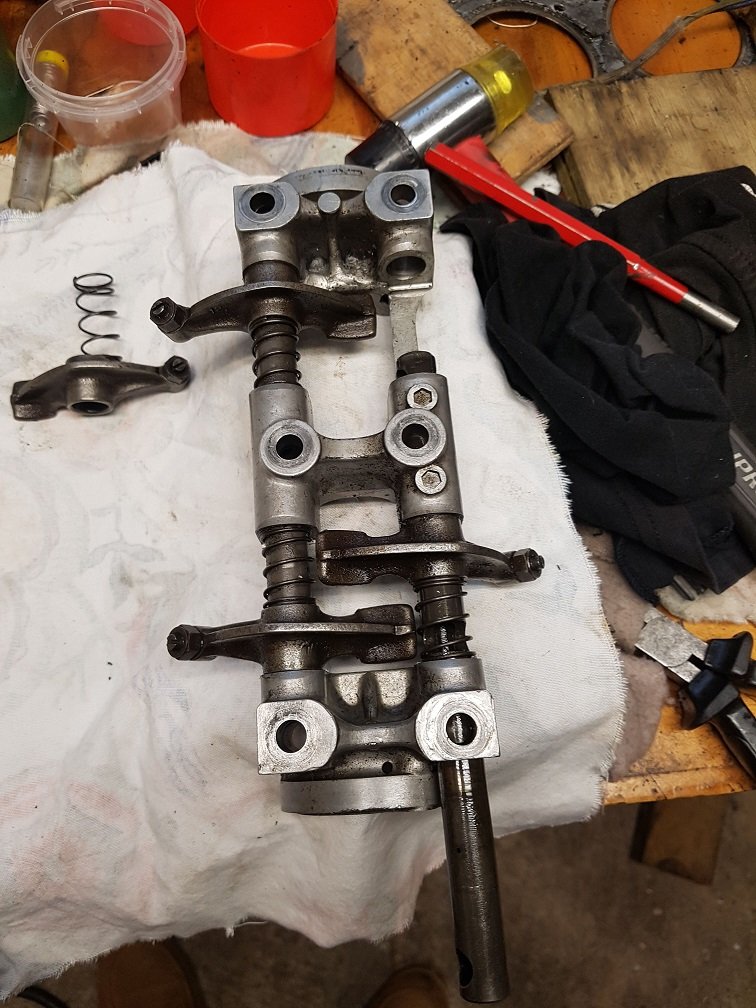
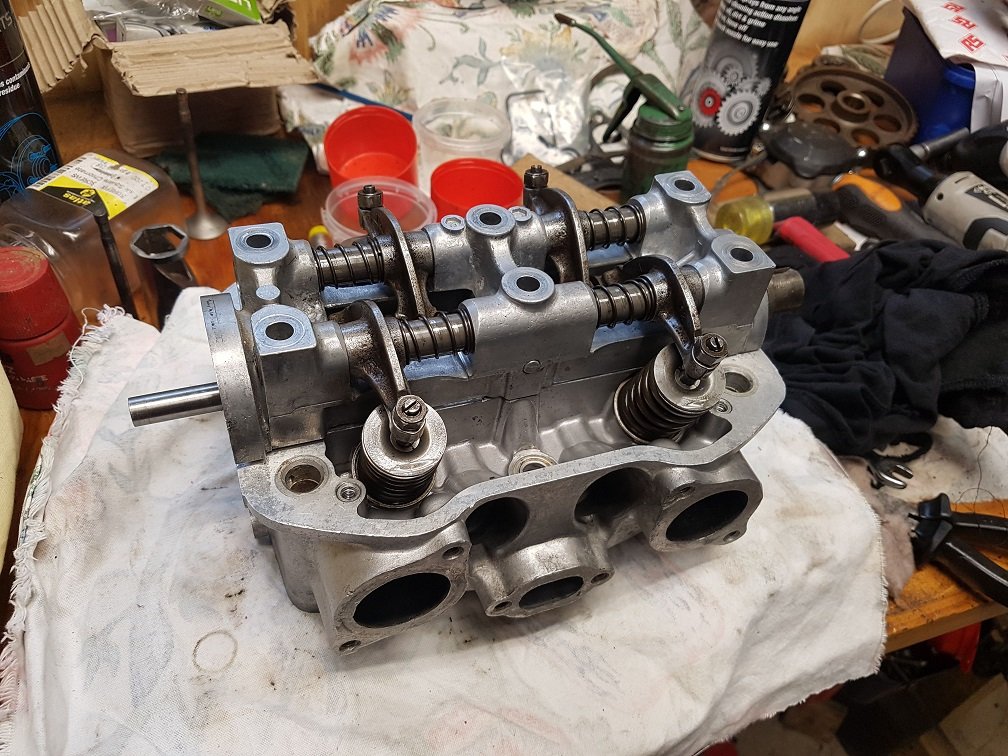
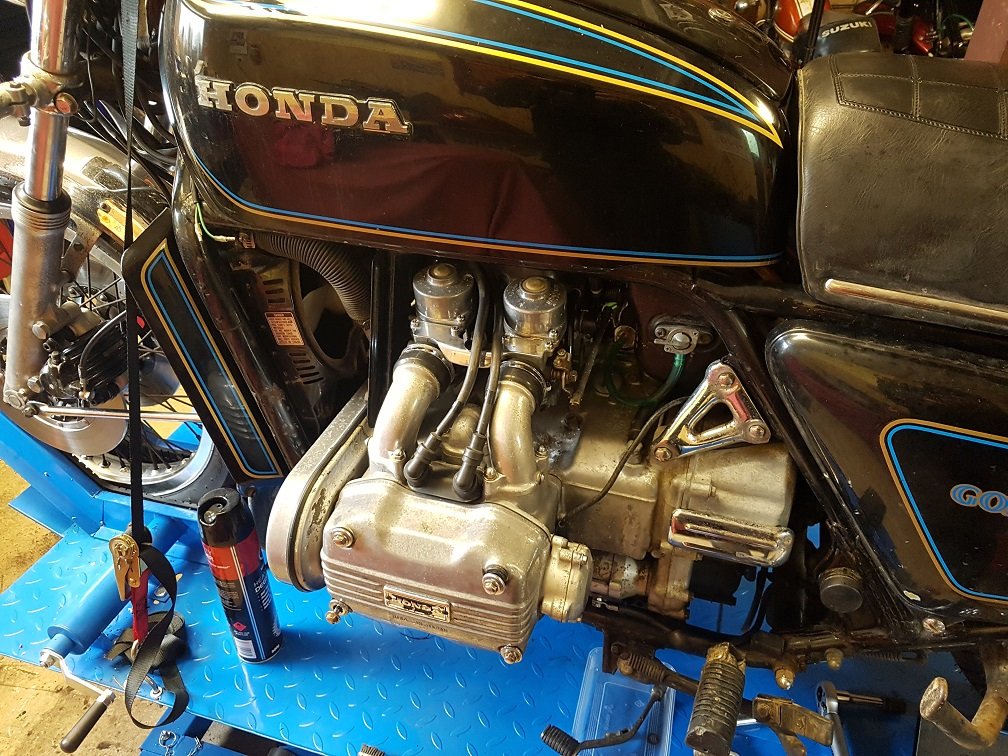
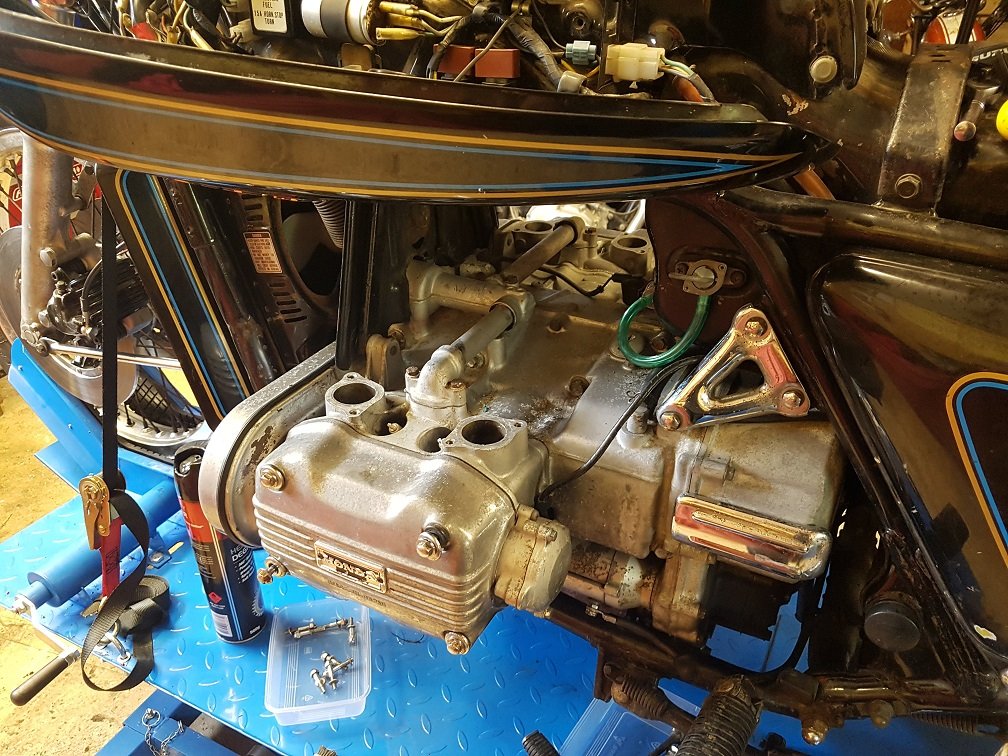
Tis the season to pull finger. I’m eagerly anticipating the return of my head from the engine shop, so therefore I feel it is time to start prepping the bits and pieces for engine assembly. Most minor components were put in plastic bins upon disassembly and left, and thus are caked in baked oil filth. The first job I gave myself was to strip and clean the oil pump. Job 1 was to carefully prise the pickup screen off the pump, as there were several bits of hard carbon lodged in the holes of the mesh. CHANGE YOUR OIL PEOPLE!! There are just 3 M6 bolts holding the two halves of the pump body together, and it pays to have a good hold of both halves as you remove them or else the relief spring might try and launch parts across the workshop. I don’t have a parts washer, so a container with some liquid gold (petrol) has to suffice. The petrol soon starts to look like the crude from whence it came. There is some light scratching on the mating parts and inside the housing. The flat parts got a tickle up on a sheet of 800 and then 1200. You can’t feel the scratches in the housing so I left them… the car had mint oil pressure before. All reassembled with a lashing of 20w50 and a new drive gear. The old drive gear looked fine, but they are considered a consumable in Fiat World, as they have a very important job. You see, the gear also drives the distributor (via the auxiliary shaft off the timing belt) and if the internal splines shear (a known occurrence on old engines) the motor will continue to run but the oil pump will suddenly stop! Now wrapped in my Sunday shirt ready for fitting later.
8 points
-
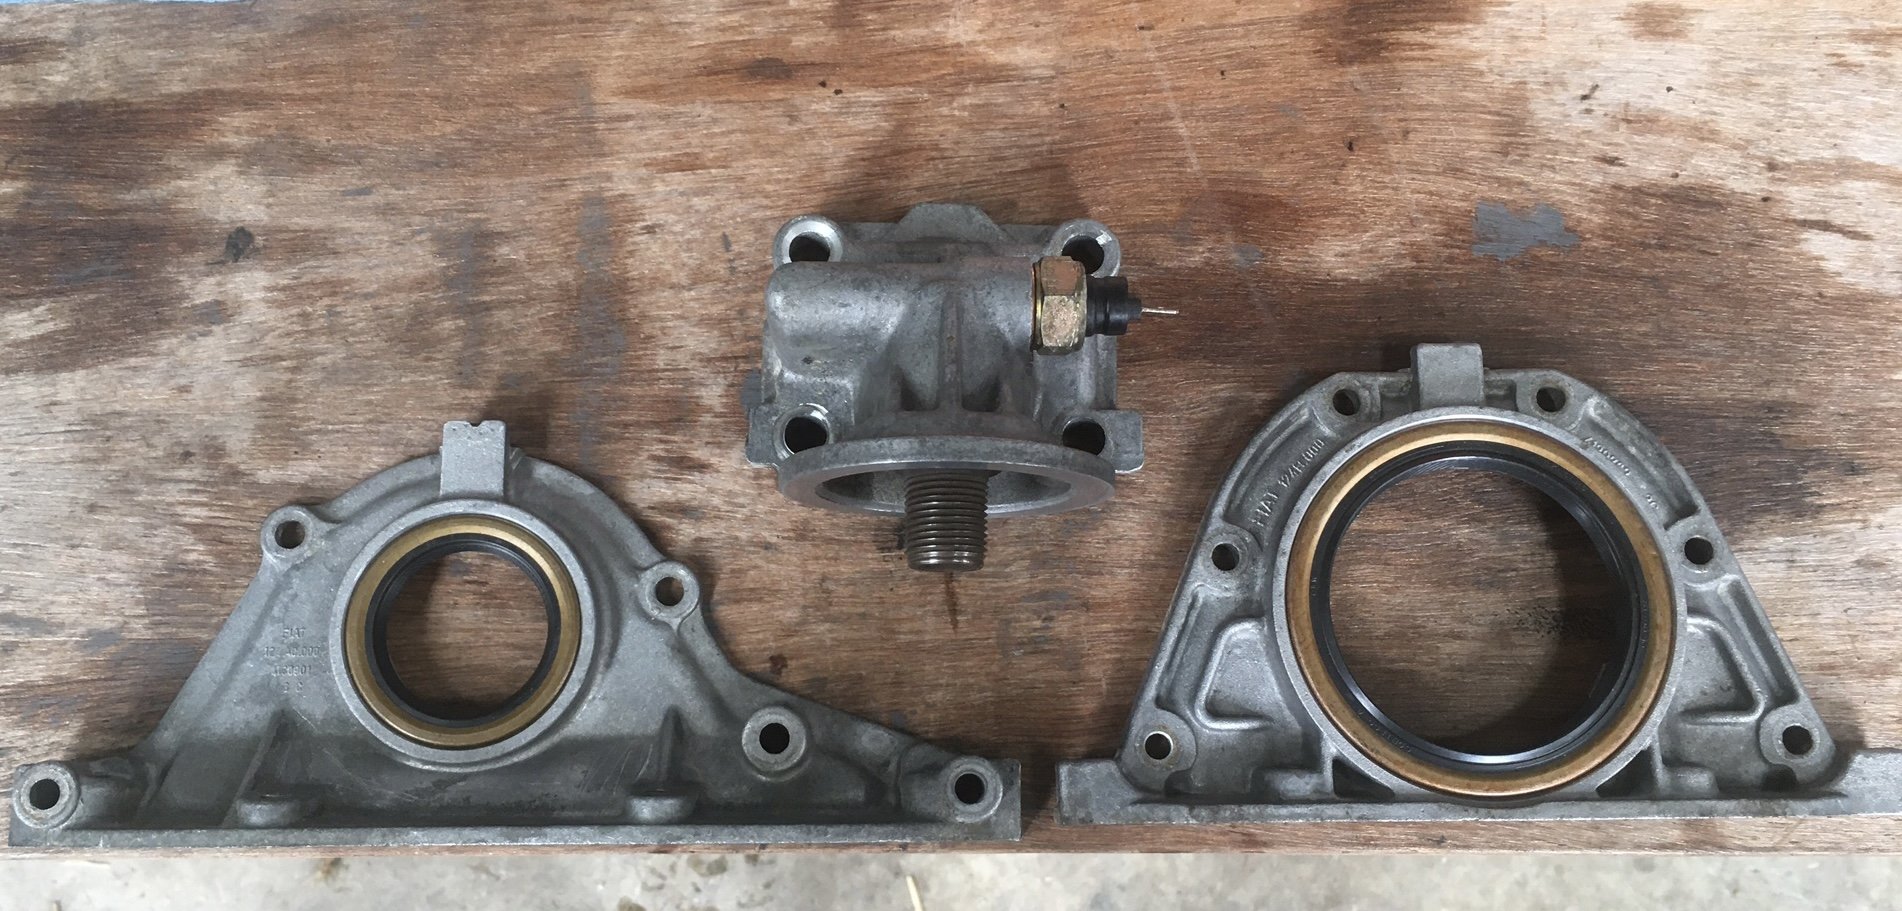
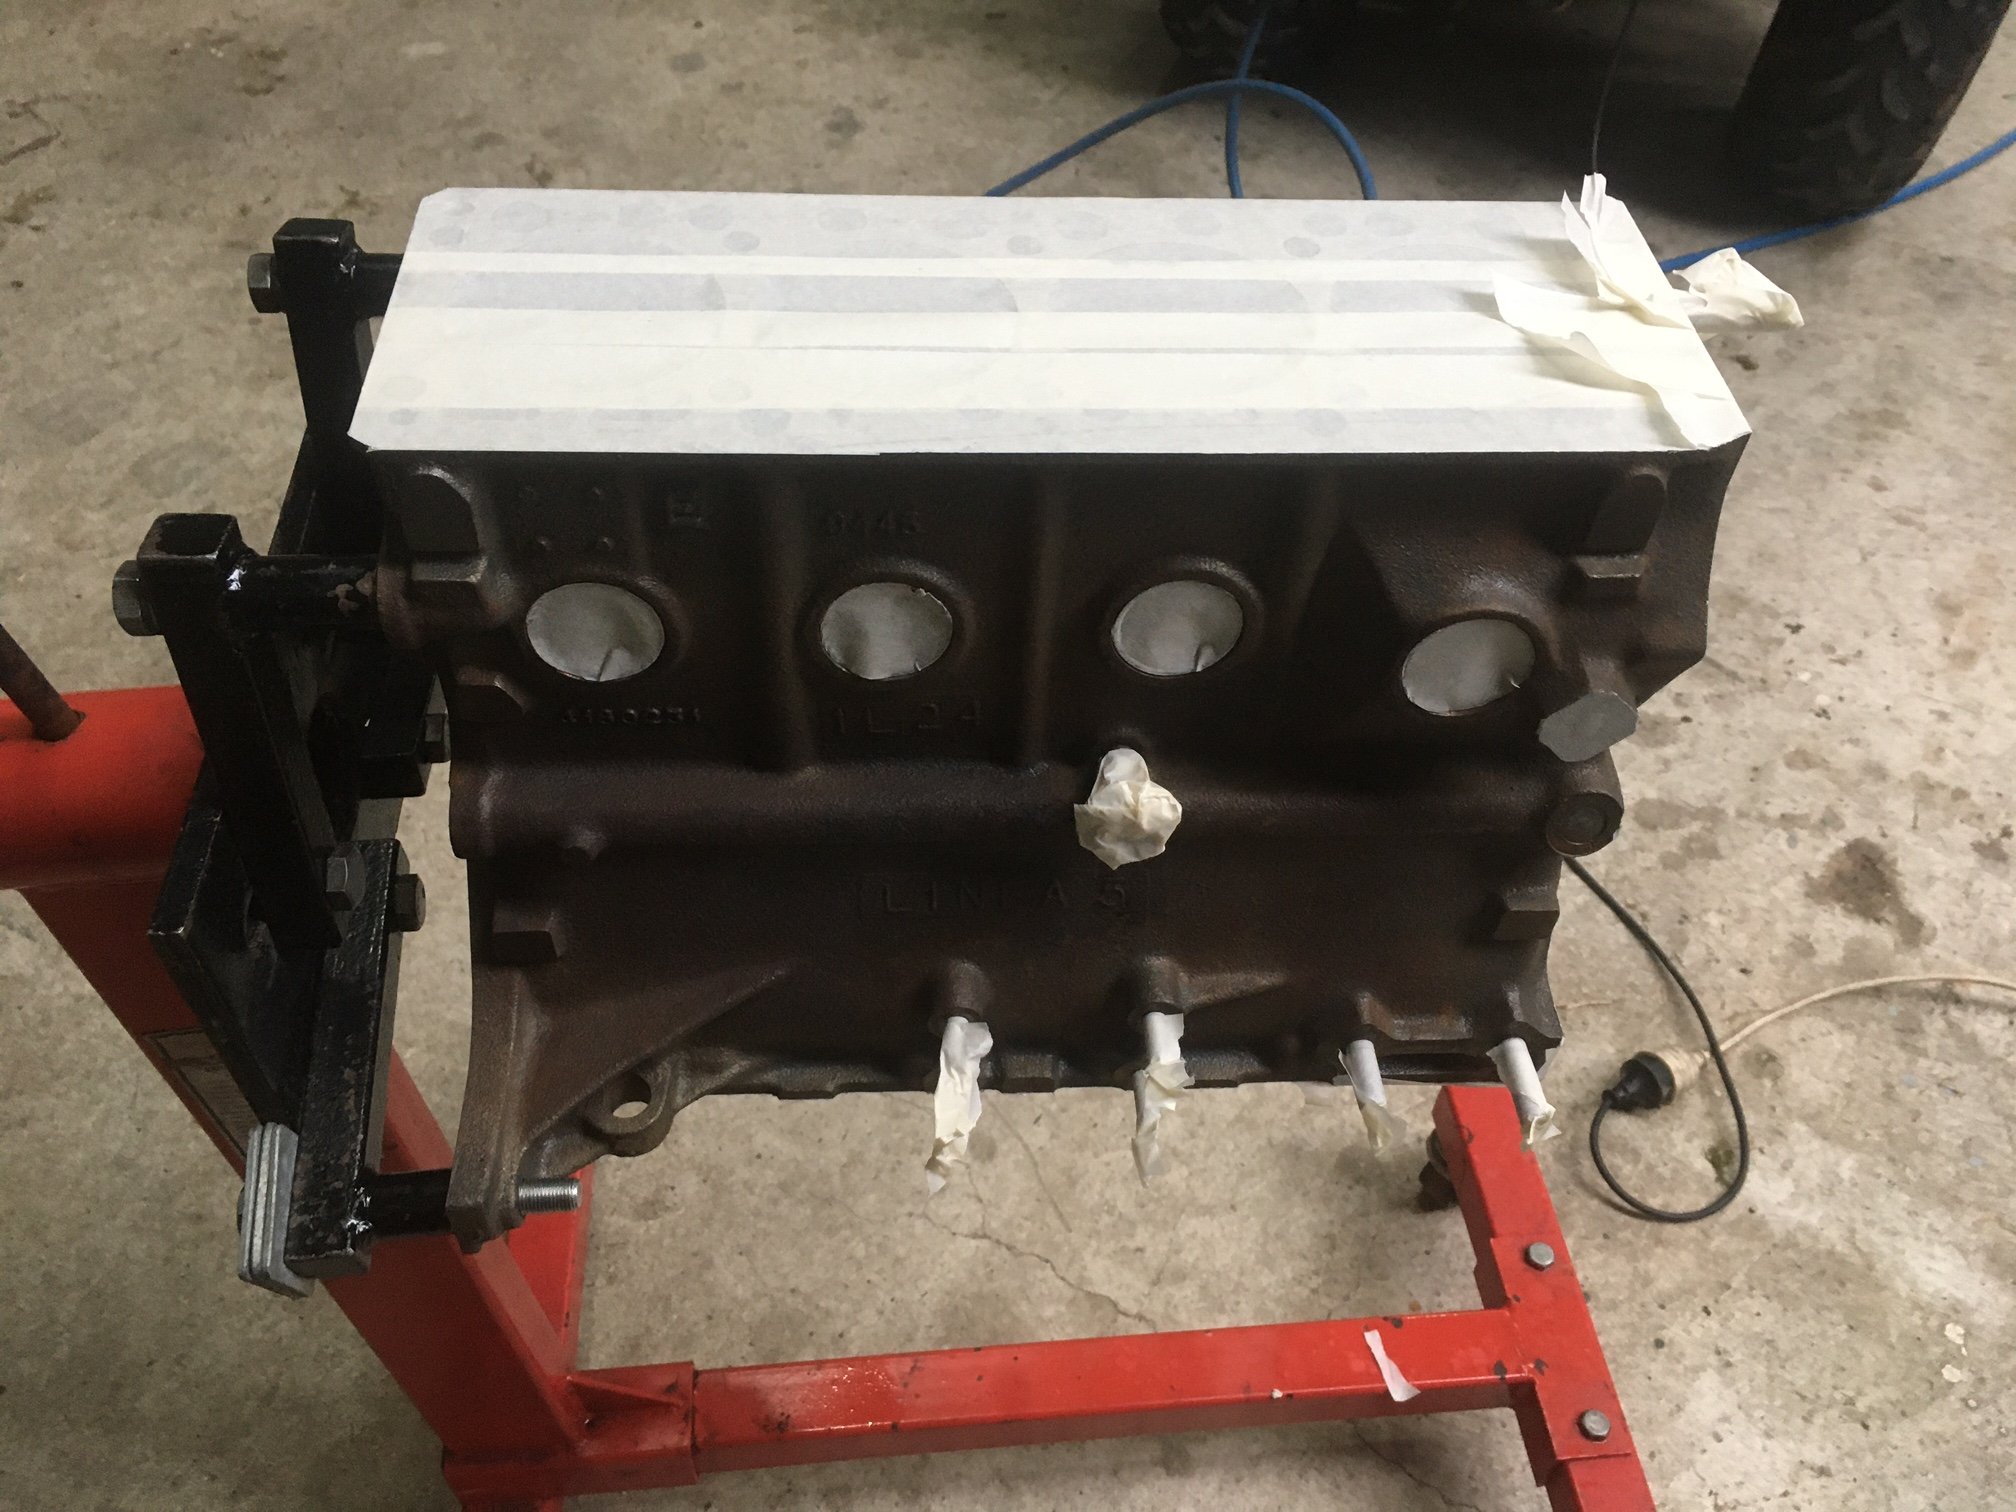
I’ve cleaned up the front and rear crank seal housings and fitted new seals, also the oil filter housing. Then outside with the block for a hot soapy wash. Of course, the bores started to flash rust immediately despite me working as fast as I could to dry everything. I soaked them in CRC as quickly as possible and wiped it away as well as I could.
5 points
-
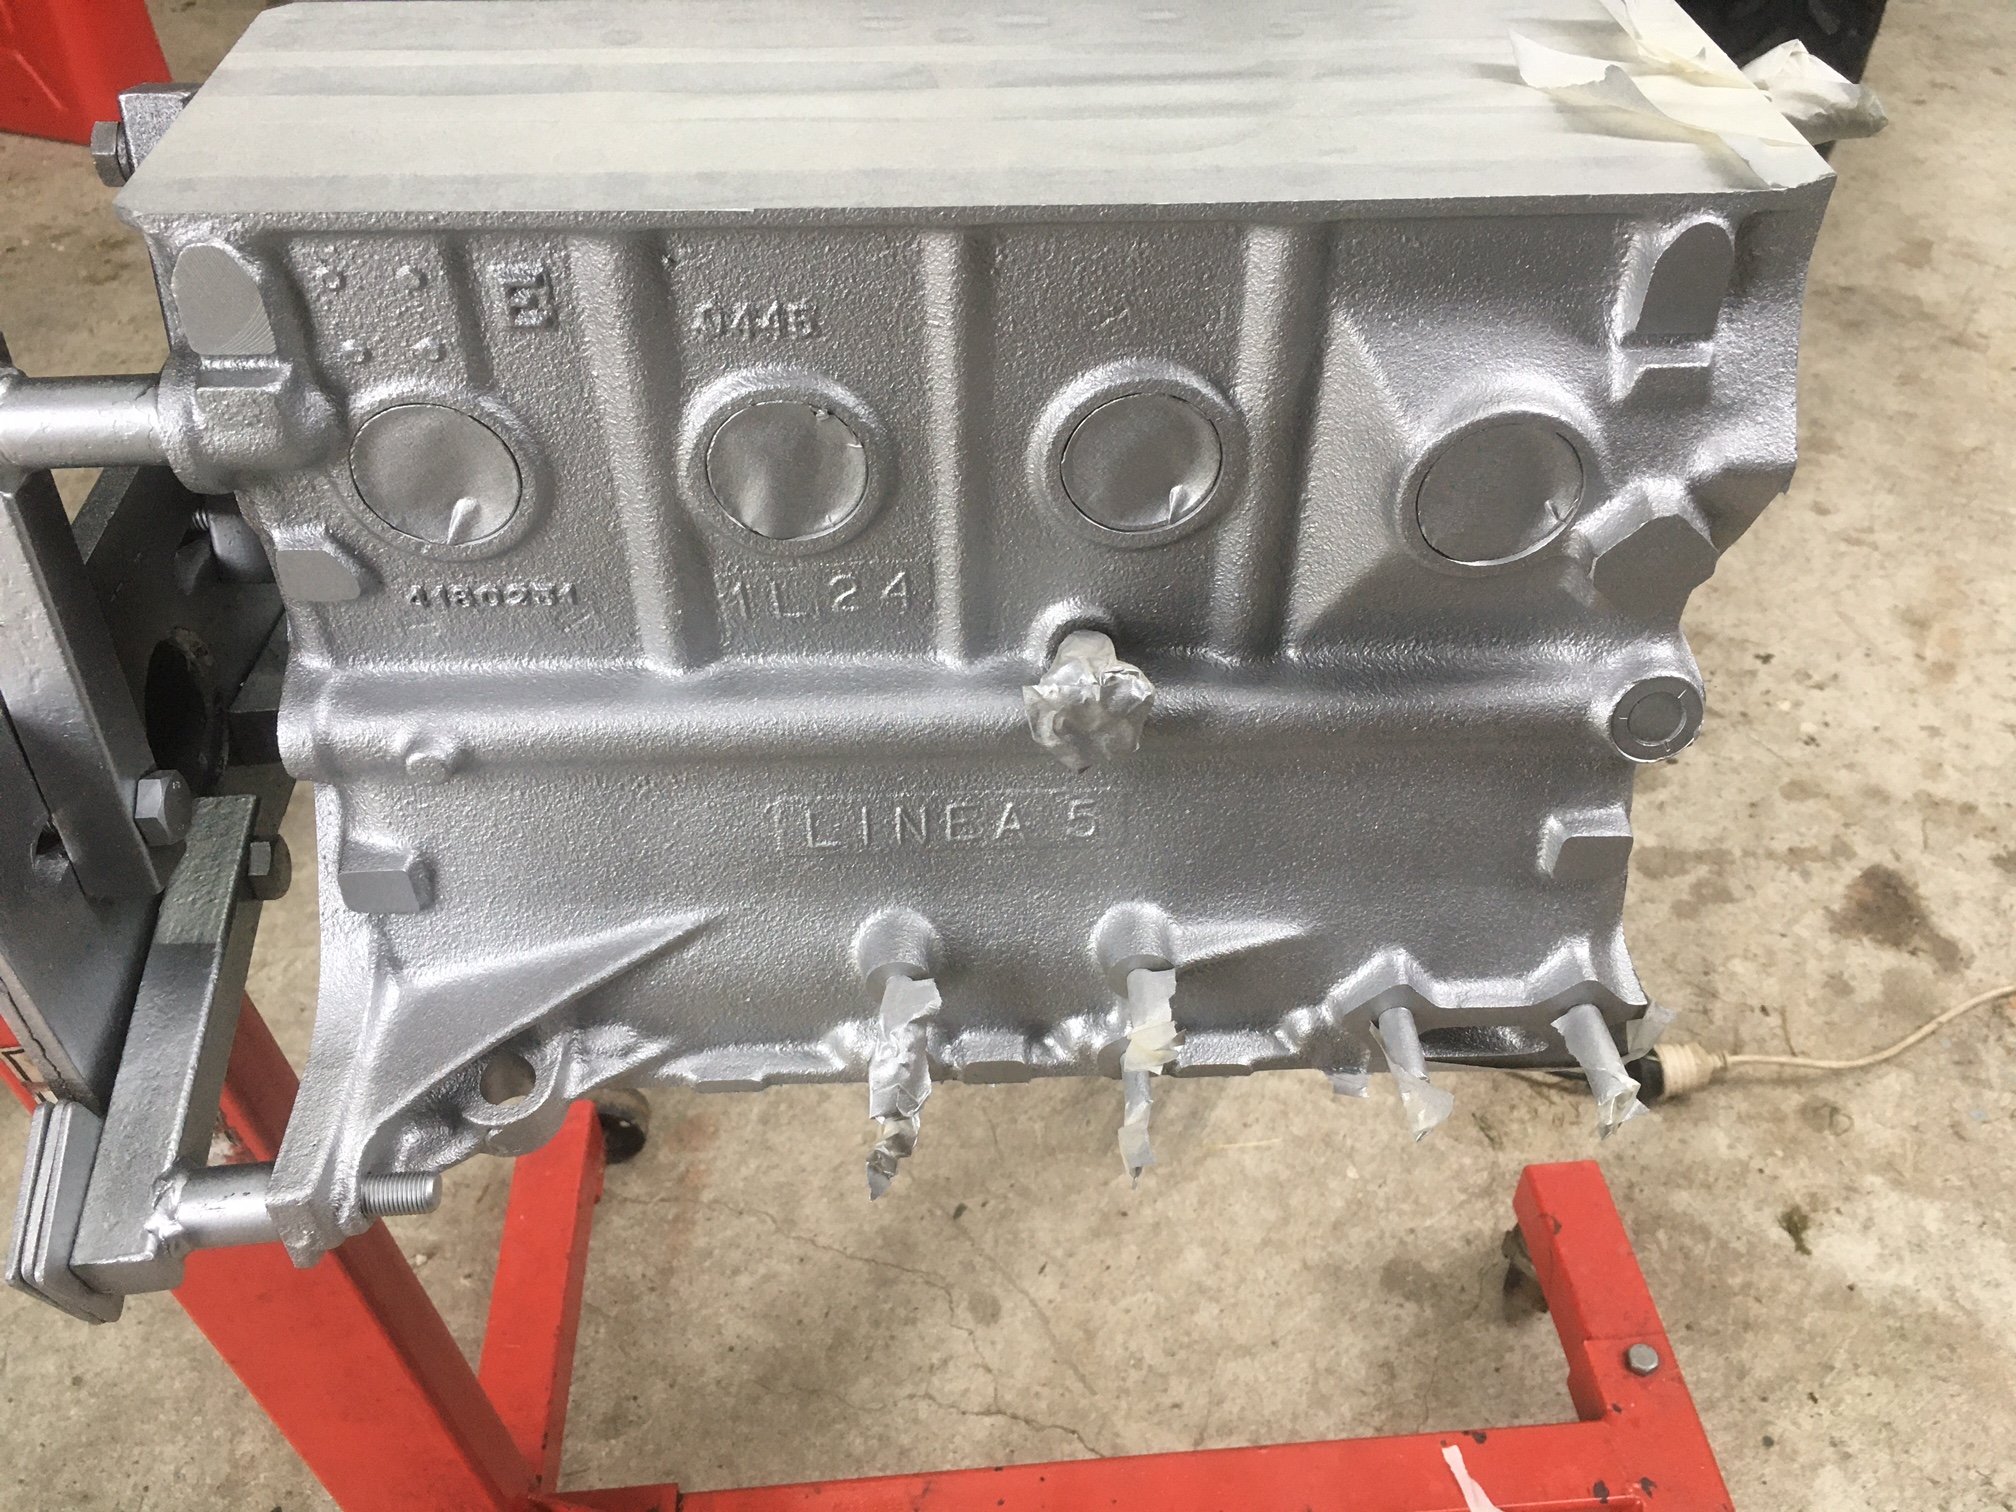
Then I masked the block. And finally I get to apply the Ford Grey engine paint which is very close to the original Fiat grey. EXCEPT….. IT’S NOT FORD GREY!! Crap crap crap! It looks stupid. I did the full coat to prevent rusting. Not sure what I’ll do about it. I might let it cure and then go over it with something else. I’m not sure how this error occurred.
4 points
-
This is how I sold my wife on the idea: And this is how I sold myself on the idea:4 points
-
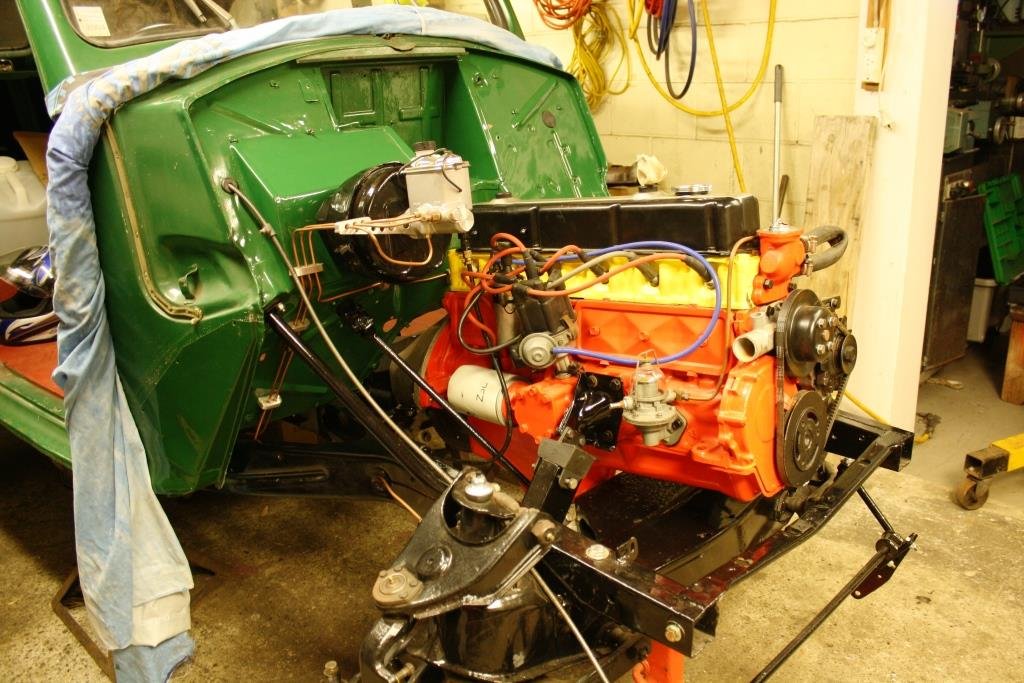
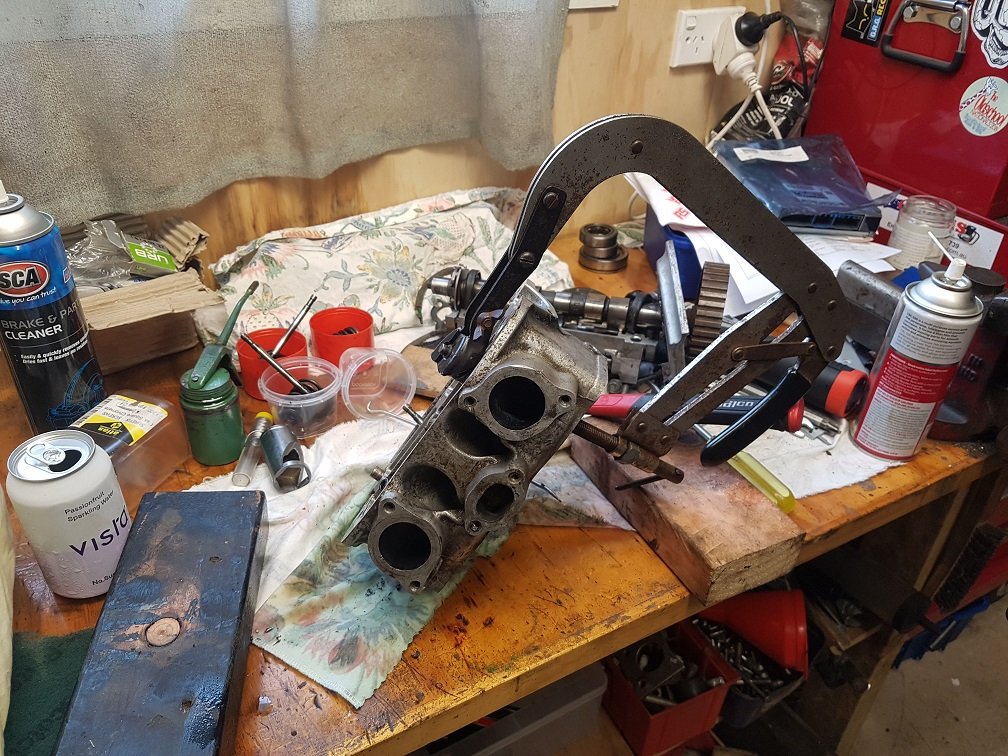
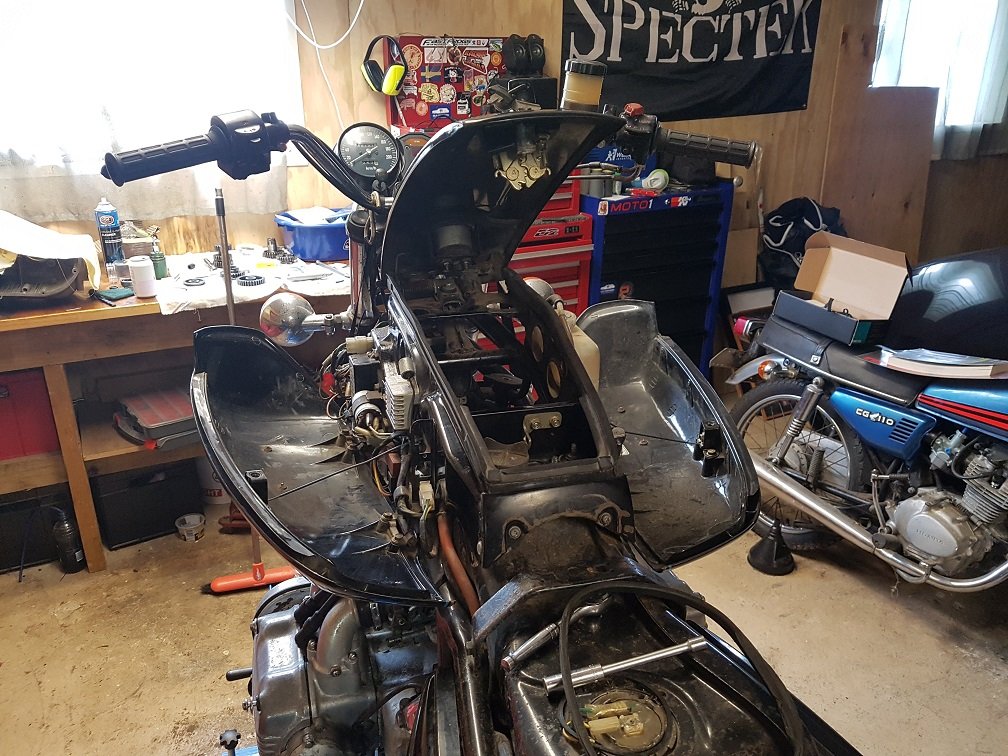
Woah what a week it's been! I have spent almost every night (Thursday was rest day) in the garage until well past my bedtime working on Lucas, trying to make sure I was on track. Right, so we left off with the basic 3.9 in the car, but nothing attached to it. My first goal this week was to get the crank pulley on, but before I could do that I needed to strip it down and fit the trigger wheel for the Speeduino crank sensor (just some "futureproofing"). This is the original SD1/EFI pulley. Since I converted to the original V-Belt front end I couldn't use the 3.9 Serpentine pulley. This is what a bad crank seal can do to the pulley. The hardened, almost plastic, seal can wear into the metal. I will keep an eye on the seal and if it leaks I will either need to source another pulley, or fit a Speedi-Sleeve, which is a thin tube of steel that goes over the damaged surface to give the seal something to seal against. A quick zip with the rattlegun removed the three bolts Because it worked, I am replicating the same install that Effie had, with the trigger wheel (the same 6 bolt 36-1 2.5mm thick trigger wheel from Lloyd Specialist Developments) mounted between the balancer and the PS pulley, so I slipped the rear section of the pulley off This allows the trigger wheel to slip on. I have marked the same spot I aligned Effies pulley to A+ reference material Before it can be fitted, you need to hammer down the roll pin that locates the pulley The trigger wheel should now fit flush And the rear pulley can now be bolted back on Compared to the Serp pulley, it's quite different. They're the same basic length in terms of pulley alignment, but the snout on the Serp one is much shorter to account for the crank driven oil pump. The crank pulley bolt is 15/16", if anyone was wondering Now, this is where it's interesting. I had done a lot of research and asked around, and as best I could tell I needed a crank spacer, so I paid a hefty amount to get one from Rimmers. The spacer goes on after the pulley, and allows the crank bolt to secure the pulley if the crank end is too long (otherwise if you did the bolt up without it, it would only touch the end of the crank and not the pulley). This example image shows the spacer. It's just a thick ring of steel. Long story short, I didn't need it. My pulley fit perfectly, and the bolt secured the pulley against the end of the crank. Oh well, I love paying lots for surplus parts. So, yes, the pulley was then slipped into place Where it promptly fouled on the timing pointer. I remember this from Effie, and the fix is to file the mounting area down to about where the orange line is, to clear the now slightly offset rear pulley. I refit the modified pointer and did the main crank bolt up to about 6 ugga duggas. Next I thought, "oh, let's install the power steering pump bracket". Nope. Should've done that BEFORE fitting the pulley. So I undid the pulley bolt again, slid the pulley forward enough to get the bolt in and secured the bracket. The lower bolt on the front needs to be spaced away as it's used to having the TDC sensor bracket mounted on it. I tried to do this with washers, but in the end just smashed out the old sensor and mounted the bracket. I think this time I might end up modifying this bracket to work with the Speeduino crank sensor as it's quite a neat little mount, instead of making. my own bracket again With that little segue done, it was time to get messy, swap out the valley gasket and install the intake manifold. First I had to split the manifold from the trumpet base, so I could clean it all up. This proved to be harder than expected, and I had to use a chisel to carefully separate them. With the trumpet base off my plan was to just replace the main feed and return hoses, and the injector seals I removed the rail and injectors The old hoses weren't looking too hot. They weren't leaking though. The return to the regulator had a somewhat clever attachment, as in it almost wasn't attached It had deformed the hose too Regulator with new hoses. I tested the regulator and it held vacuum, so that's a win. I removed the injector clamps, taking care to only poke my finger with a pick once. Use said finger poker to carefully lever the big rubber upper seals out of the housing as it'll be corroded in there. I replaced the two hoses that link the pair of rails The old seals look pretty gross I used a sharp knife to carefully cut them off. The lower seals were stuck in the manifold, and hard as plastic. A few of them were quite deformed too. I hadn't originally planned to replace the hoses on the injectors as they weren't leaking and didn't appear cracked (not like the ones on Effie), but upon closer inspection, there were fine cracks in the rubber As it turns out, the inner layer of the hose had basically turned to plastic and crumbled when cut. Don't presume the hoses are OK just from a quick glance. Thankfully I bought a kit from Mr Injector in the UK that came with new seals, hoses and the retaining ferrules (the metal cup at the base of the hose). I set about cutting off the old hoses and ferrule. The instructions are very strict that you must not use a knife to cut the hose off, so in the end I used a combo of "aviation" snips and side cutters. I got it down to a fine art, and took only a matter of seconds to strip the hoses off. I would use the snips held upright to cut vertically through the ferrule, which would usually take two snips do, then use the side cutters to twist the cut ferrule out. I would then use the side cutters to munch horizontally at the bottom 1/4 of the hose, until it was damaged enough that I could push sideways on the top of the hose where it would rip through the cut section and come off. The new hose and ferrule are straightforward to fit. Slip the ferrule on, dip the end of the new hose in fresh engine oil, and push it onto the injector, using a hard surface to push against and force the hose into the cup of the ferrule. That locks the hose into place. Injectors with fresh new hoses Now the new upper seals can be fitted. Don't be like me, and for the second time, forget to put the upper retaining plate over the injectors first. Thankfully I remembered before the first seal dropped into its groove. You cannot fit this plate with the seal in place. Lube the seals with some rubber grease and slip them into the groove I cleaned the corrosion off the bases with a wire brush in the drill, and loosely fitted them, along with new lower injector seals. Next, it was time to clean the manifold up. I removed all the old sealant and wire-brushed the under intake coolant pipe. Speaking of, I had bought a nice new, remade, stainless pipe in anticipation of this job, only to find it's not needed. I think someone has been here before as the pipe fitted is in good shape, and made of a thick-walled steel pipe. With the intake cleaned up, I moved to the valley gasket. There aren't many photos of this because when refitting I was against the clock to get the manifold back on before the sealant went off. I removed the old one and promptly directed it to the nearest bin. Like the heads, the valley is coated in a layer of burnt-on oil. No sludge though, and the cam appeared visually ok (some wear but had lobes and the discolouration wasn't abnormal, it'll do for now). The new gasket and inlet manifold went on easily enough Starting to look like an engine again, with the injector rail fitted too The intake was promptly covered in a rag to stop anything falling down the holes, and then I used my engine brace to lift the engine for the sump gasket replacement. I recall commenting when I did the sump gasket on the Tess, how much easier it would be with an engine brace, and I can confirm, it's much easier. Yes, I had replaced the sump gasket when the engine was out. I purchased a new nice cork gasket from Rimmers, and when fitted, it split in one corner almost straight away (with the bolts gently nipped up by hand), and overnight had split in a further 3 or 4 places. I ordered a replacement gasket locally, which was supplied as a Permaseal gasket. This was slightly thicker than the unbranded Rimmers one, and had a better shape. With the sump off you could see how the seal was spat out. Most of the seal was destroyed removing it from the sealant though, and by golly that was not a fun job, scraping sealant off the bottom of the engine, under the car. I did check the bolt holes in the sump when it was off last time, but didn't really check the flange for straightness, which I should have. Whether this contributed to the seal failure, or it was just a rubbish seal, we will never know. Using a straightedge, you can see how the flange dips down. It was like this the whole way around. Using the tried and true rag and grips method (rag to protect flange surface, grips to pull flange up), I gradually tweaked the flange as straight as I could. There is still a dip in places, but it's only about a mm. I then used Hylomar to stick the new gasket on Which then made its way to the underside of the engine. The bolts were all nipped up by hand, with no splits in the gasket. While under there, I reinstalled the torque converter bolts, and cover plate. I also removed, cleaned and installed the oil lever sensor with a new washer and some thread sealer. With the sump on again, I could put oil in it, which meant only one thing; priming the oil pump. I reinstalled the SD1 distributor (the 3.9 one doesn't have the oil pump drive; I might look into if I can fit an oil pump drive to it as the ignition curve might be more suited to the engine) and connected the ground temporarily. I turned the key, and nothing happened. Ah, I forgot to plug in the main loom. I tried again, and had the sweet sounds of the engine turning over on the starter. After a few turns the oil light went out, and I could see fresh oil coming from the rocker gear Great success! I did have a fail though... even after doing the same thing with Effie, I forgot how much transmission fluid the trans can pump out of disconnected cooling hoses. Knowing the oil pump worked was great. All it took was packing the pump with Vaseline so it wouldn't suck up air. Before I could drop the car down to the ground again I needed to sort the exhaust. I dug the original EFI exhaust manifolds out of storage, only to find they were the same as the ones already on the car. Regardless, the studs were in better shape, so after running a die down the threads on the studs and cleaning the flanges, they are the ones I used. The downpipes weren't looking as good. One of them had a leak that I knew about. It was in a crack in a weld, and since I have a welder, I quickly ground it back and hit it with the welder. That area to the left wasn't looking happy either, so I quickly made up a plate, and hid it from sight. It's not pretty, but it'll work. These downpipes are a bit of a mess really, and would benefit from being replaced with some nice long tube headers. There is also a hole in the bottom of the Y joint in the main mid section, which sounded like a tractor last time the car was running, but with it installed in the car I would only blow a bunch of holes in it with the welder, so that will be fixed when the exhaust comes out to fit the wideband O2 sensor bung. In the meantime, I wrapped it in exhaust tape and put a clamp around it. The manifolds were installed with new gaskets and sealant The downpipes could then be wiggled into place. For the first time in a few days, the car was lowered back onto its wheels. Sweet positive camber yo. This brings us to today. Now it was a case of putting the top of the engine back together. First was to install the new valve covers, since everything goes on top of them. These are the original EFI covers, painted in black wrinkle. New stainless hardware to fit them Much better than the gross old ones The power steering pump went on next. As I had been advised, it was a lot easier to install without the pulley on the front. Just like Effie, I spaced the pump back from the bracket with one washer on each bolt; this brings the pulley into alignment with the crank again (which was pushed back due to the trigger wheel) On the other side, the alternator bracket was next to be fitted. This was almost straight forward, except one of the bolt holes in the head was bigger than the old heads. I had a spare bolt that fit (new on the top, old under it) As the new bolt had a larger diameter it no longer fit through the hole in the bracket. A 10mm drill made short work of that problem. And bracket in place, with new coolant hose beneath it Getting there. The power steering pump was finished off, with the pulley and belt fitted. It was refilled with ATF. Moving up top again, the trumpet base was cleaned thoroughly, and refitted with a smear of Hylomar on the flange. This allowed me to run the wiring that lives under the intake, and tidy everything up under there. The plenum top could be fitted I don't know why, but it really triggers me when people run the wiring harness under the throttle mech, instead of over it, on the platform designed for it. I think all my SD1s except my first one, have had the wiring run like that. I fixed it on Lucas, so now its how it should be Finally, the rest of the engine bay could be assembled. I removed the transmission oil cooler, and re-routed the cooling lines into the radiator as they should be. So, what does that mean? IT'S STARTING TIME. I checked everything was connected, made sure the oil level was good, and that the power steering had oil. Then I connected the battery and turned the key. It didn't start. I noticed it backfired into the intake a couple of times, so suspected the distributor was 180 degrees out. I removed it, spun it around and refitted it. And turned the key. It's alive! I only ran it for a short time as there was no coolant in the system, but it ran well and ran quietly. I filled the cooling system up, and then ran the car to bleed the system. When the engine was at operating temp, I checked and topped the transmission up, set the idle speed, and set the timing to approx 10 degrees on the timing light. The engine runs really well, it idles nicely, and really shows how loud the old engine was at idle, this one is just so quiet. The oil pressure isn't amazing, I didn't expect it to be, but it's within the "good" range when warm, of 15psi at idle and 30psi driving. It was slow to come up when cold, but I'll see how it is tomorrow, since maybe it was only due to the first start. As long as it has pressure, and is quiet, that's enough for me. After it burnt off a bunch of stuff and filled the garage with smoke (from the engine bay, not the exhaust; the exhaust is perfectly clear, with no signs of smoke) I took it out in the rain for a quick test. It's hard to judge because of the rain, but acceleration seemed quite rapid, when it wasn't fighting for traction. The engine is turbine smooth, and revs well. I'm looking forward to the weather clearing and seeing what Lucas can do now. Job done. One week from engine out, to driving. Now to shake it down and see if it makes it to work on Wednesday (60km round trip in traffic) for the Christmas party.4 points
-
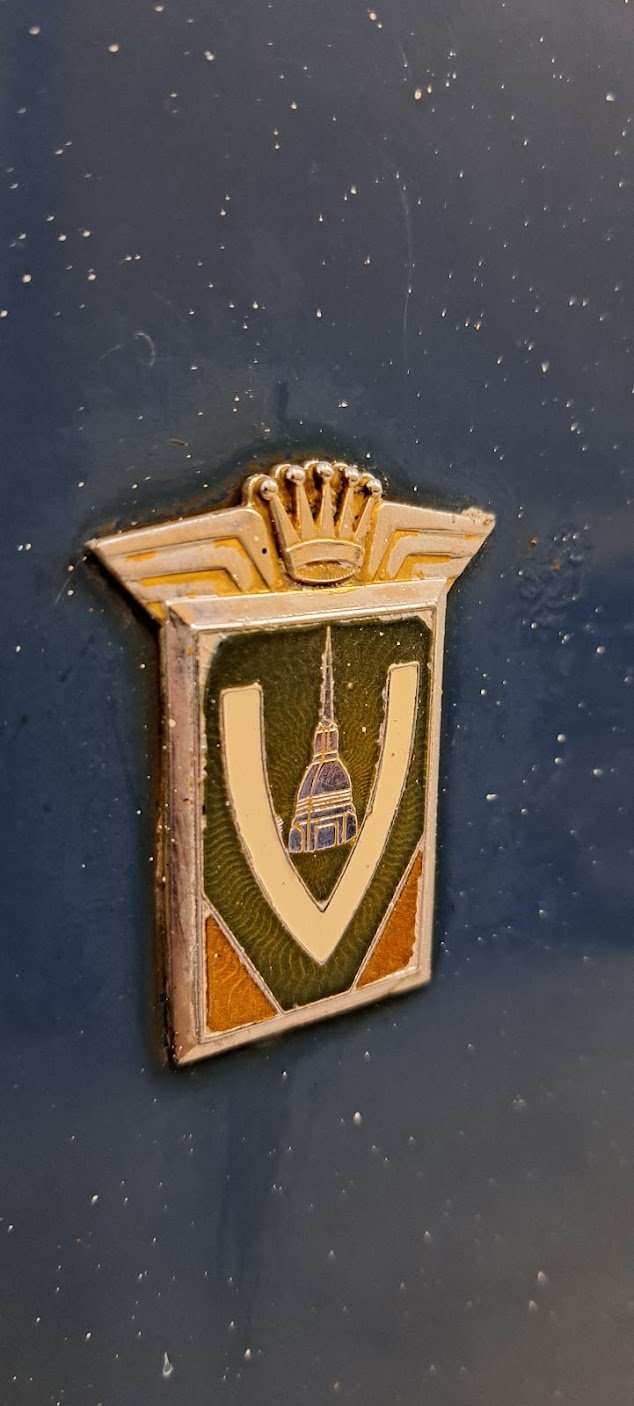
This lovely badge on the front guard - Vignale and a Lancia Appia Lusso Berlina Vignale is the closest I have found to it
3 points
-
3 points
-
Happy as I had been wanting a one piece top yoke to replace the HEAVY factory two piece rubber bushed unit for six months. I found one of these (no longer made) on ebay but the guy wouldn't post to NZ and the asking cost plus the estimated youshop cost was huge. I asked again over the weekend and came to a very good arrangement, so it's now on the way to me. This will save over 1kg (could be closer to 1.5kg) and is probably the nicest looking option that has ever been available for the bike. I'll throw some titanium bolts in there from Ali express too.
3 points
-
3 points
-
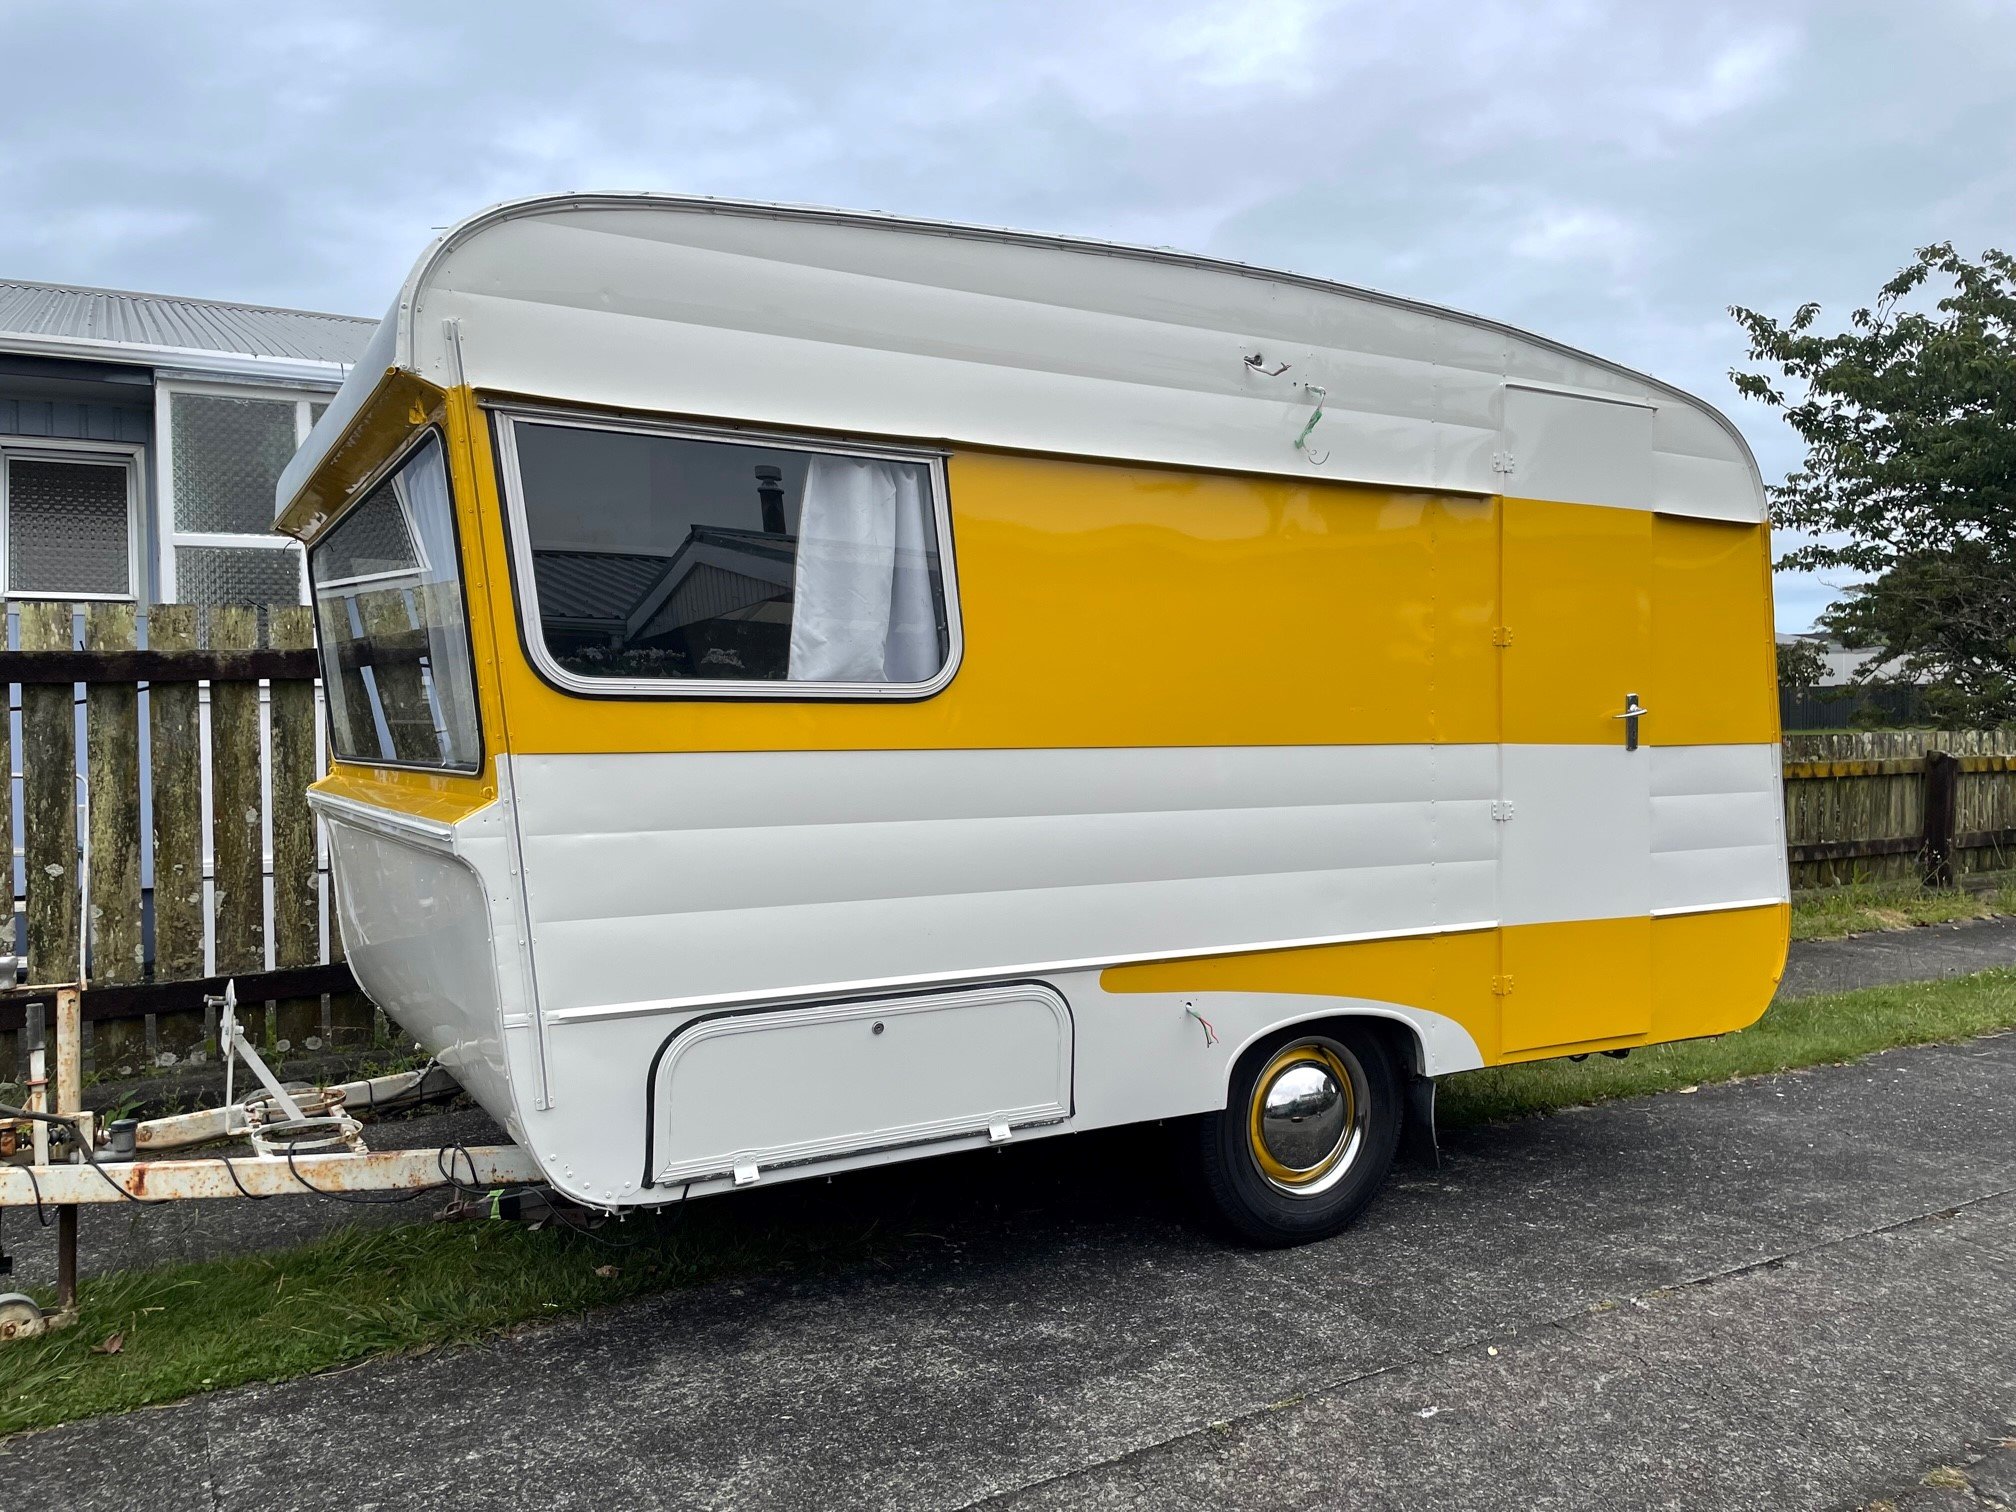
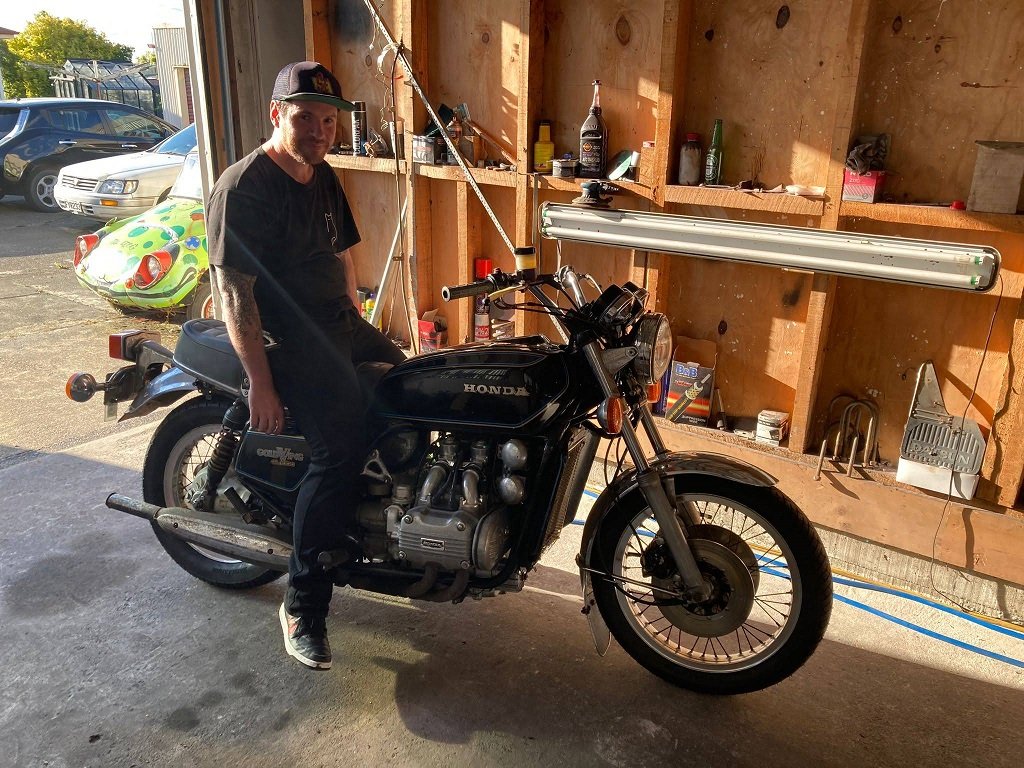
Oh yeah, This went for its first WOF since October 1996. Just over 26 years ago! Clean sheet VTNZ Wof. Its all legal beagle. Rode it right home and put it in the shed. Has been raining every opportunity since (except last Sunday). Will get some pics of it in its current, legal state next time its sunny here. It actually looks really good out in the sun. Had a few VTNZ patrons, plus the wof inspector complement me on how nice it was. Sounds wild, and pulls really well. Super comfy. Just need to fix the fuel gauge as it reads negative !? The more fuel the lower it reads? wut. Gotta sell it though to fund new turds, if anyone needs "the black bull" in their life, lemme know.3 points
-
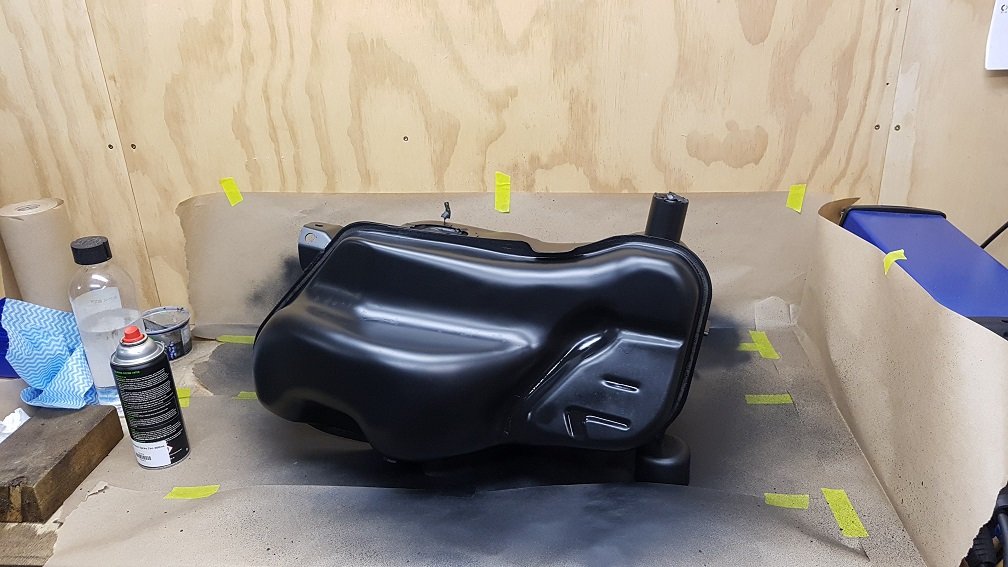
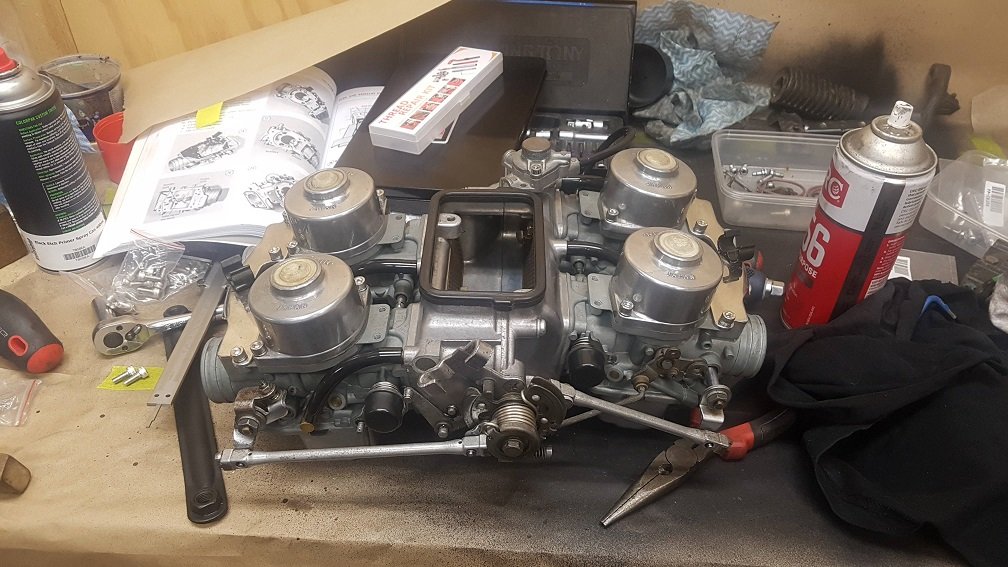
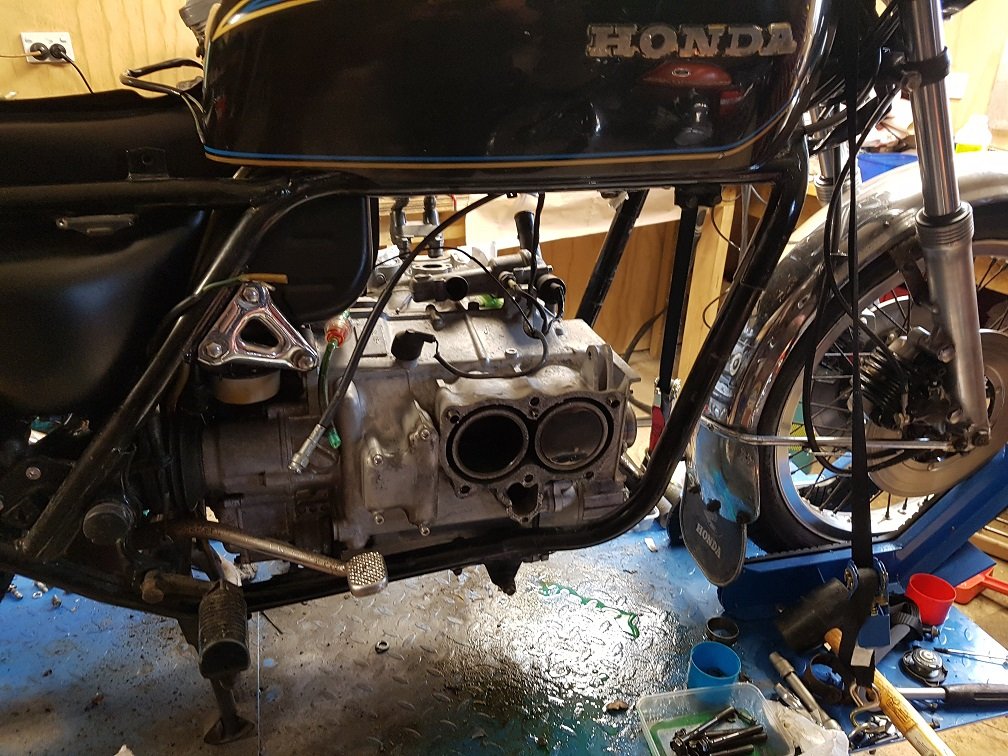
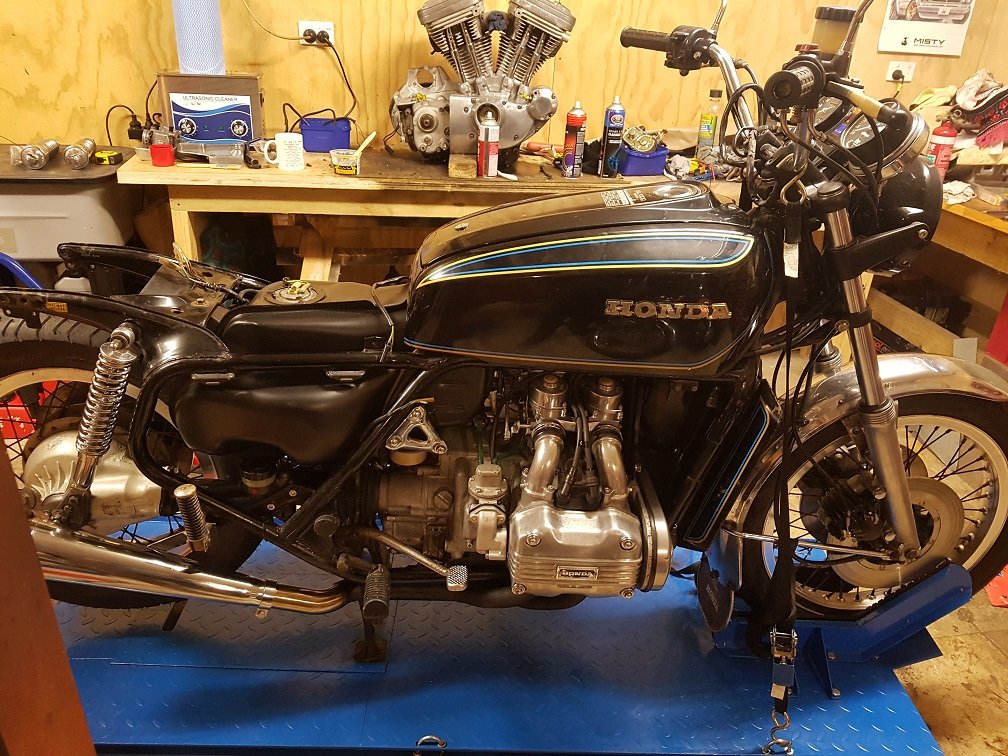
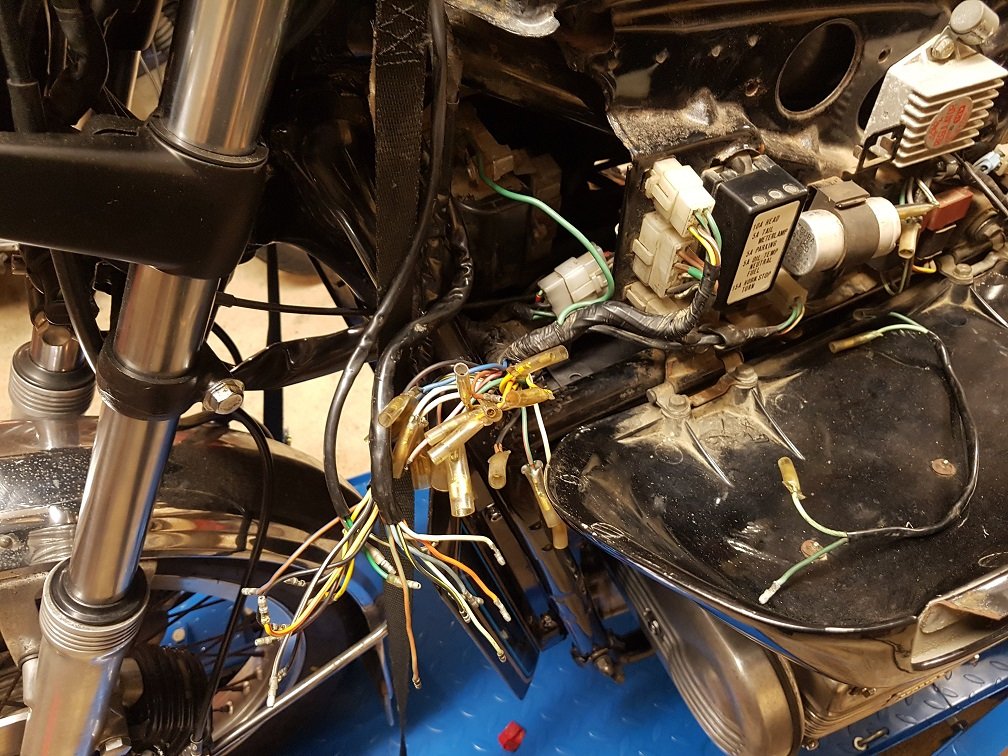
It was so effective, that it actually ate away the bottom of the fuel tank. Turns out it was mostly just rust holding it together. Parts are almost unobtanium, and my Scottish and Dutch heritage make it difficult to for out money for a good condition one. So i just mothballed it for a few months. Bought more bikes in the meantime, turned them into projects, and now came back to this. I stripped the tank back to bare metal to see what i had to deal with: It was swiss cheese, but a few hours with the tig i managed to get it holding gas! I ended up having to just plate over the whole area as it was so thin and just kept cracking the welds. A lick of paint, and its just like a new one: Popped the carbs through the ultrasonic cleaner and reassembled: I get it all back together, pop some fresh gas in it. And it fires right up. On all 4. Perfect! Oh, but wait. No it wasnt, theres a sweet smell of coolant in the air, and if I stopped it for 30 seconds and re-started it. A solid column of stem comes out of the right exhaust, and the expansion tank bubbles when i rev it. Cool one, nice. The other headgasket is blown... Ah well, i'm well familiar with this process: Cleaned up the surfaces, fortunately this cylinder head was in a lot better condition than the other one. So just needed a clean, then wanged it back together with the other gasket i already had in stock. She runs, beautifully, no combustion in coolant, no coolant in combustion. All cylinders run at the same temp. Revs up to redline, and starts before you've even finished pressing the starter! I'll call that a success. For now anyway. Giving the wiring clump a bit of a tickle up, then i can put the rear back on and take it for its first ride since i've owned it! Then i can switch back to the Laverda, as i've now got all the bits i need to assemble the engine! And now, hopefully, my bike stand will be free so i can put some other turd on there.
3 points
-
Oh my bad.... Merry xmas to me i guess. Ordered up a electric water pump kit with side mount alt bracket. This will allow for better water pipe routing. The bottom hose is on a jacked angle as it is now, kinks the elbow, so not ideal. Also picked up my twin resonators and twin in single out muffler with 2 multi bend mandrel kits. 2" primaries into twin 2.5", through resonators, both into a sungle muffler with a single 3" out. Havent decided if ill side exit just infront of the diff ir send it all the way to ghe back. Just need to pick up 2 flexis to go on at the end of the primaries.
2 points
-
Fuuu that does sound nice compared to the canams that sound like a rideon lawnmower2 points
-
Whoa! (Sucks teeth). FOUR-stroke! Flaaaaash!2 points
-
WOW thanks @Nominal this is awesome2 points
-
Actually, nothing so lowbrow as PC
2 points
-
The right thing!2 points
-
Yeah I enjoyed all of it. Cheers @Thphantum for manning the big green avocado. Good to see @Greenie and the family too, cheers mate.2 points
-
This was rather grand. Would trade again.2 points
-
Ordered my paint and supplies today. Have a plan to start on panel and paint over the break. Hopefully the colour ive chosen will work with this, 65% confident. Havent decided on what ill do with the interior.. Dash and door cards will stay factory tan/beige. Need to find a roof liner and bars for it. It has a bench seat with the typically collapsed drivers corner with splitting. Do i try to find some tan bucket seats or just bang some covers on it for now?2 points
-
The fake chrome flaked off the door panel strips yonks ago so I masked them and flicked some bro chrome and clear on to break them up a bit. This-morning I spread everything out and cleaned up, hammered some final primer coats on everything! Then closed it up and left it to bake, it’s hot as balls in there so will be awesome for it. I’ll try my best to leave it cure for as long as I can before wet sanding, there’s no shortage of stuff to do in the mean time right? Bad news this week, I emailed YearOne for tracking details on my vinyl roof and bits seeing as the headliner arrived separately a few weeks ago.. ..he said it was accidentally shipped direct to me from their supplier and not back to them for collation, the rest of the order isn’t ready yet despite no ‘back order’ prompts.. Fucker. Ill sand the roof back a bit and spray it black in the mean time, only a month until I’m aiming to have it back together with glass in and not holding any hope the vinyl will appear in that time.2 points
-
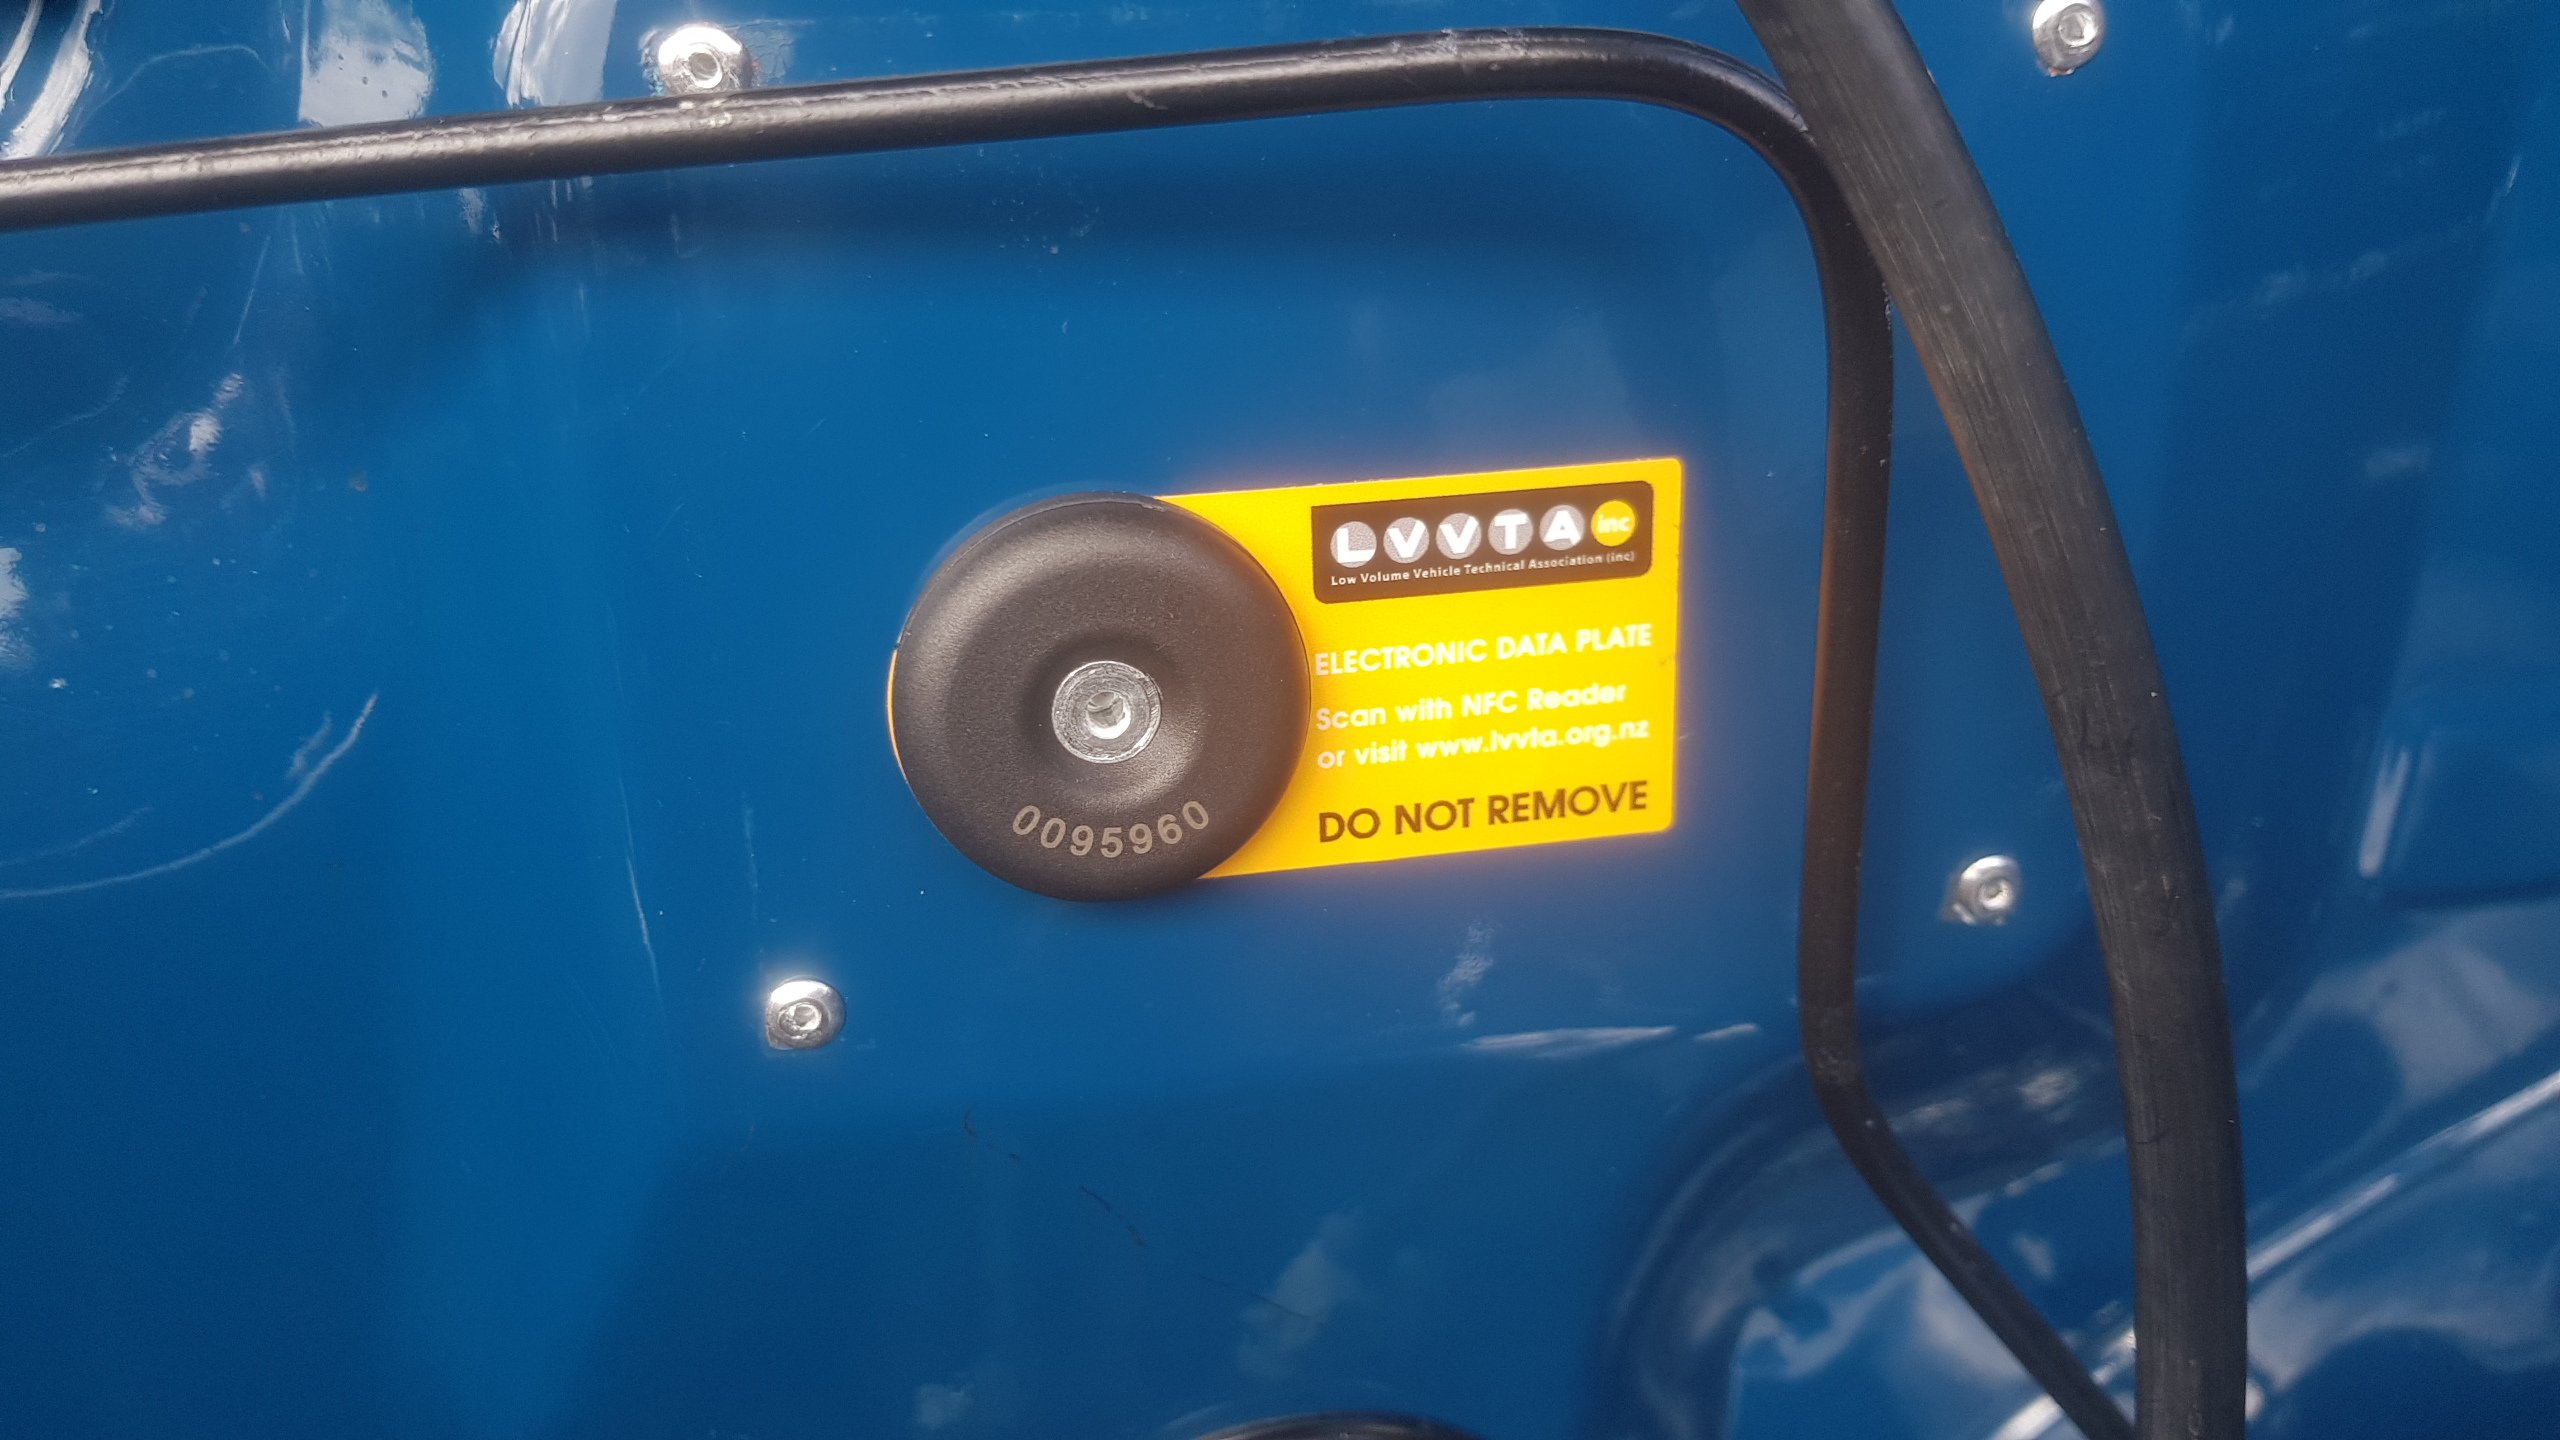
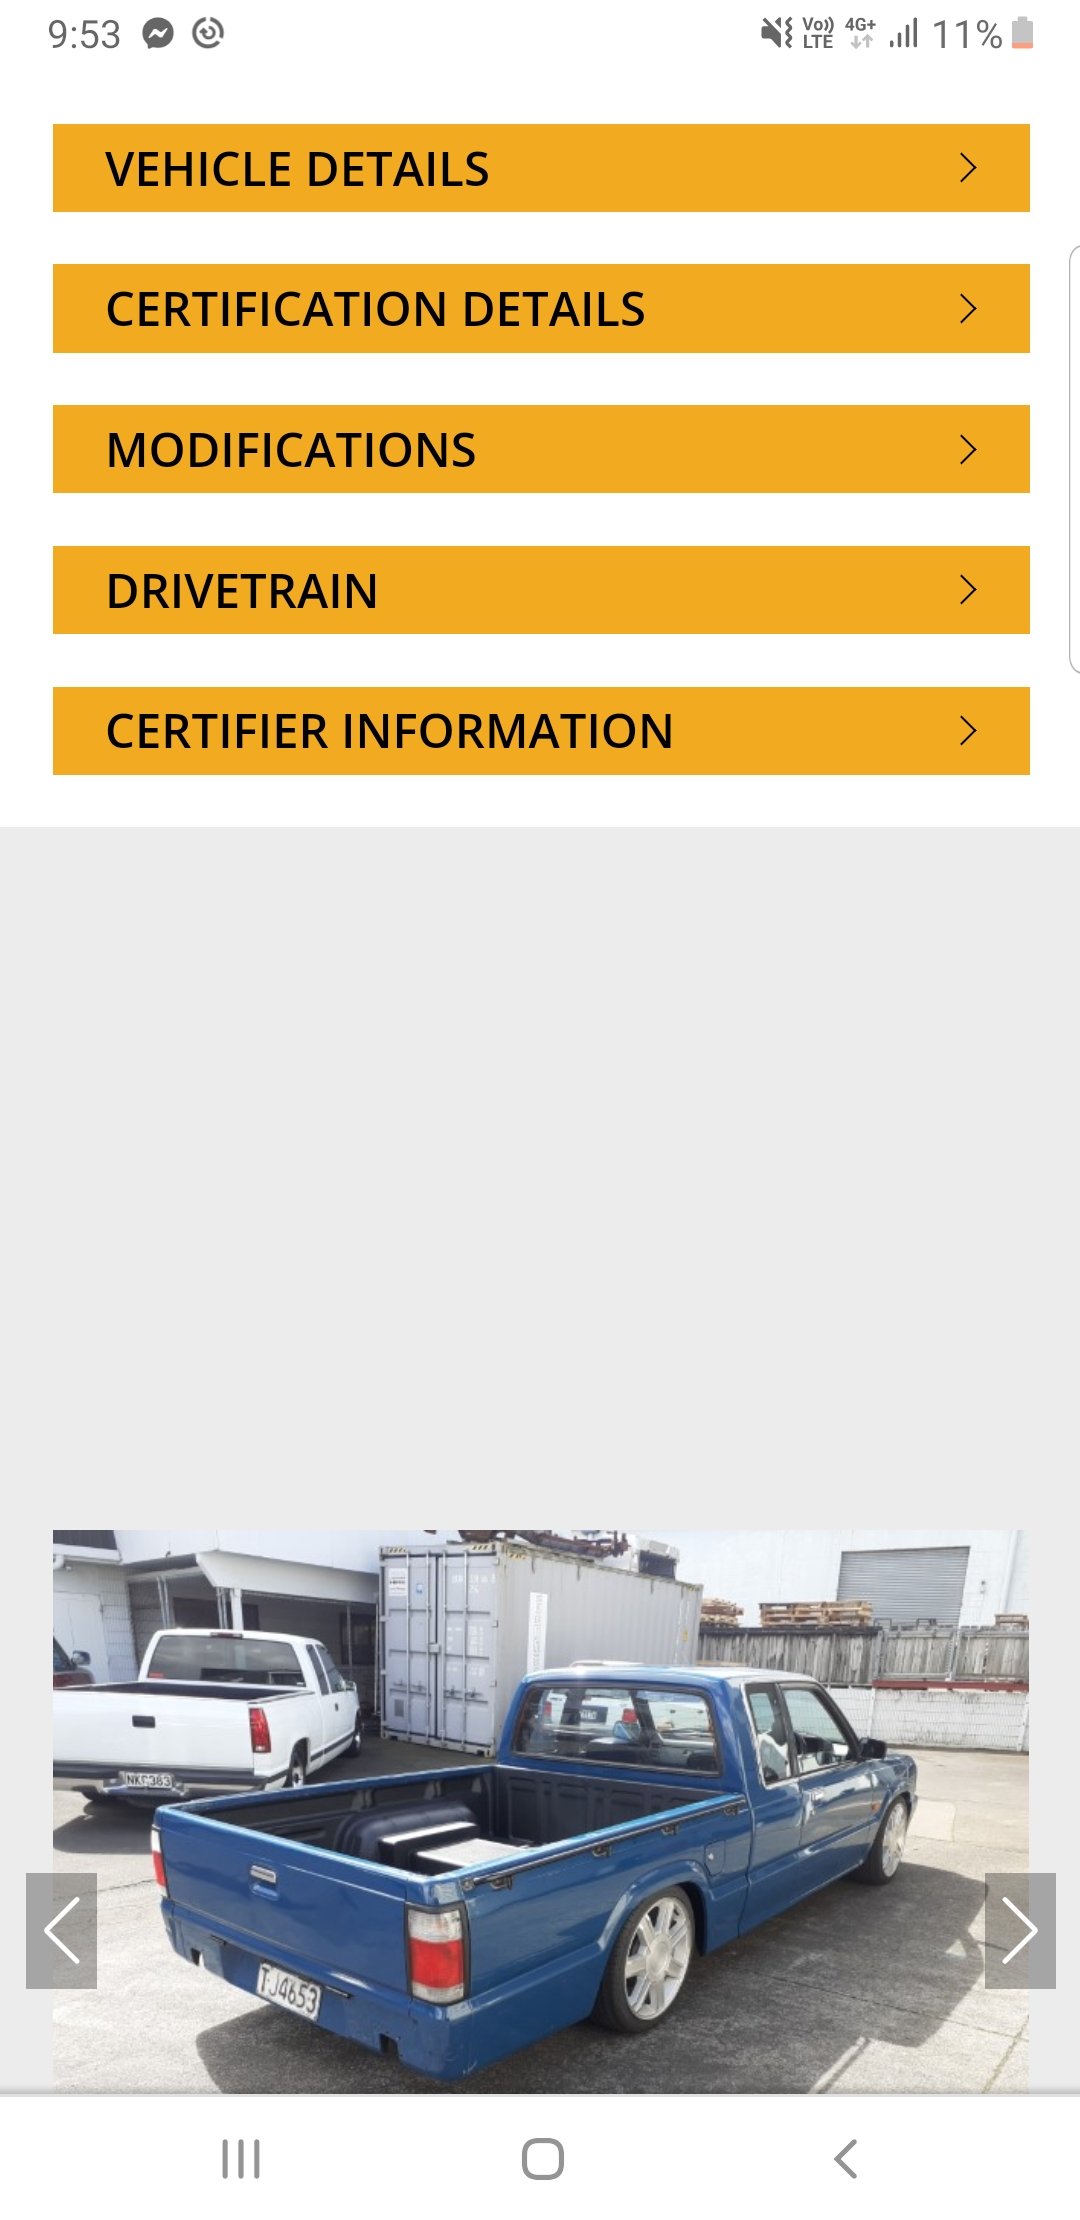
That will be for repair cert not lvv cert, LVVTA now runs the repair cert system. I believe they intend to run different rules for pre 90 vehicles, in an effort to help people who are restoring older cars as applying the same rules for an HQ holden and a 2020 kia does not make sense2 points
-
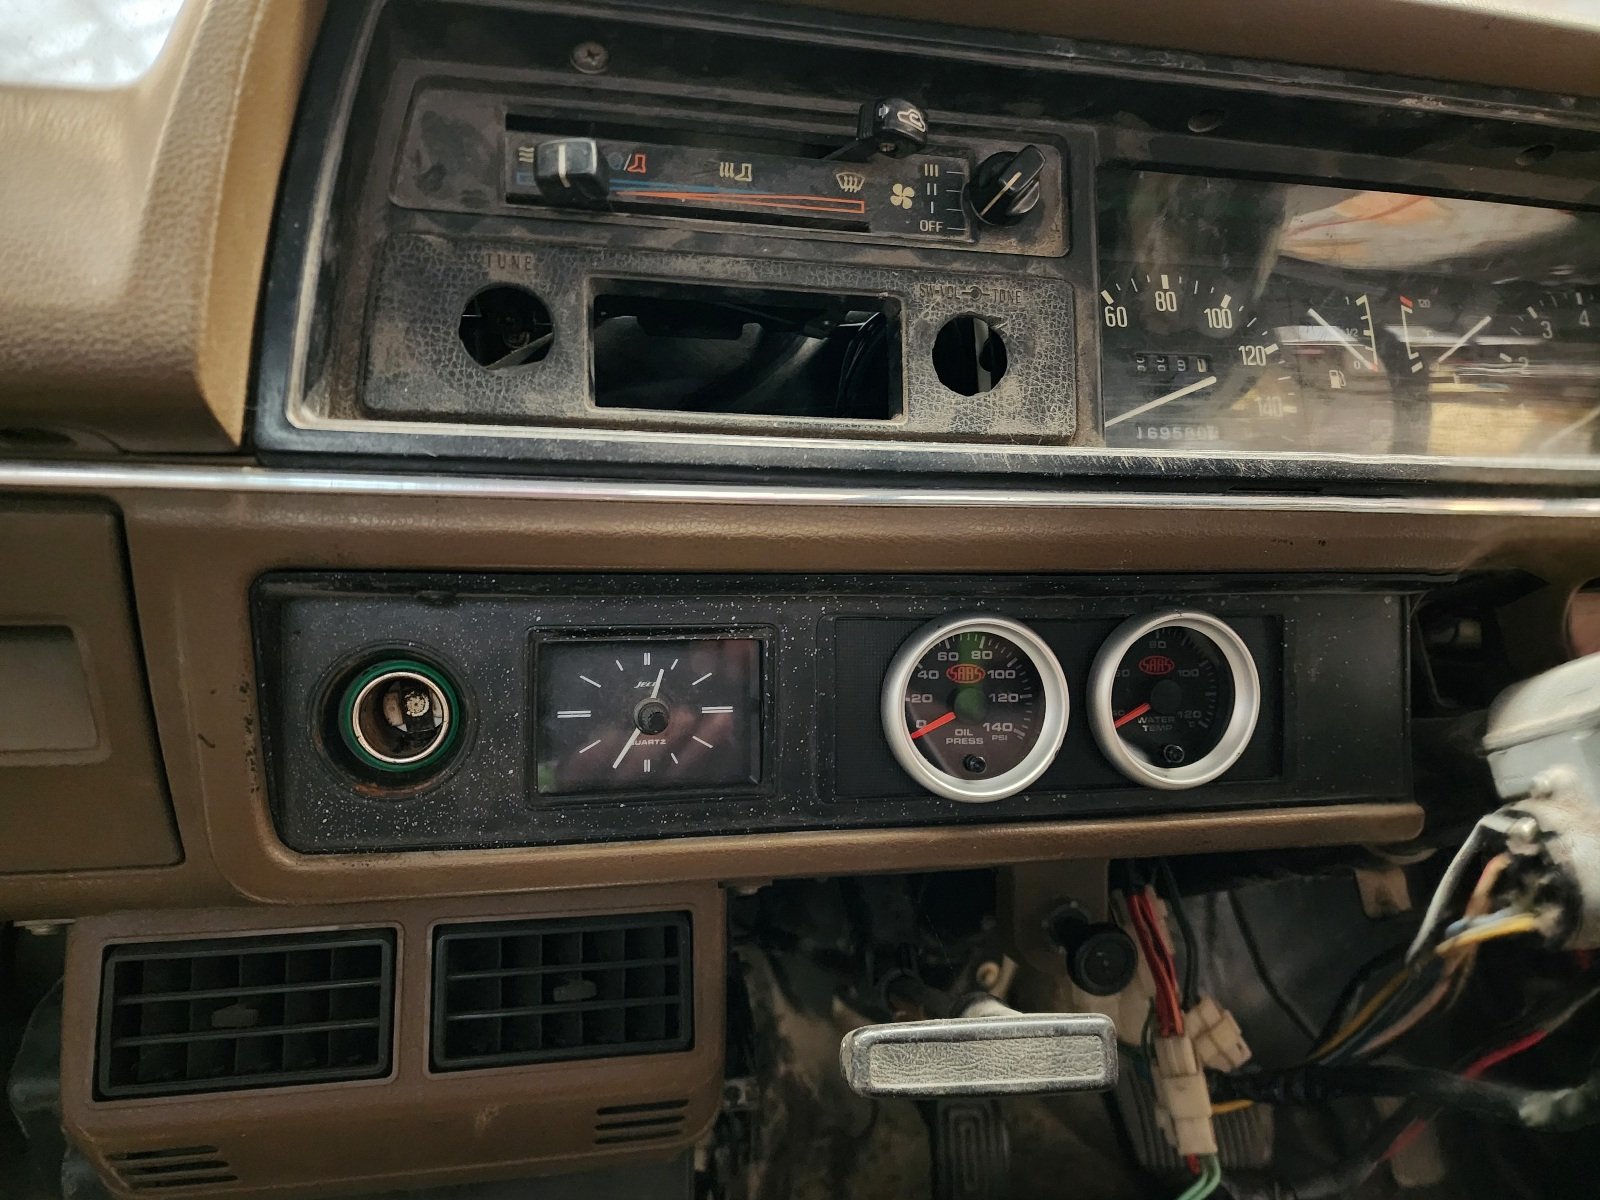
Some more things were done today. Plastic welded in a panel to fill the dash pocket hole. Devided on 2 saas gauges as they are elec and 2" to fit the slot. Everything eles was larger or from offshore. Love the fact that theres a clock, havent checked if it works though. The socket next to it is connected and features a green backlit ring. Shes a flast ute this one. Havent been doing much on the nosecone this week, been too busy
2 points
-
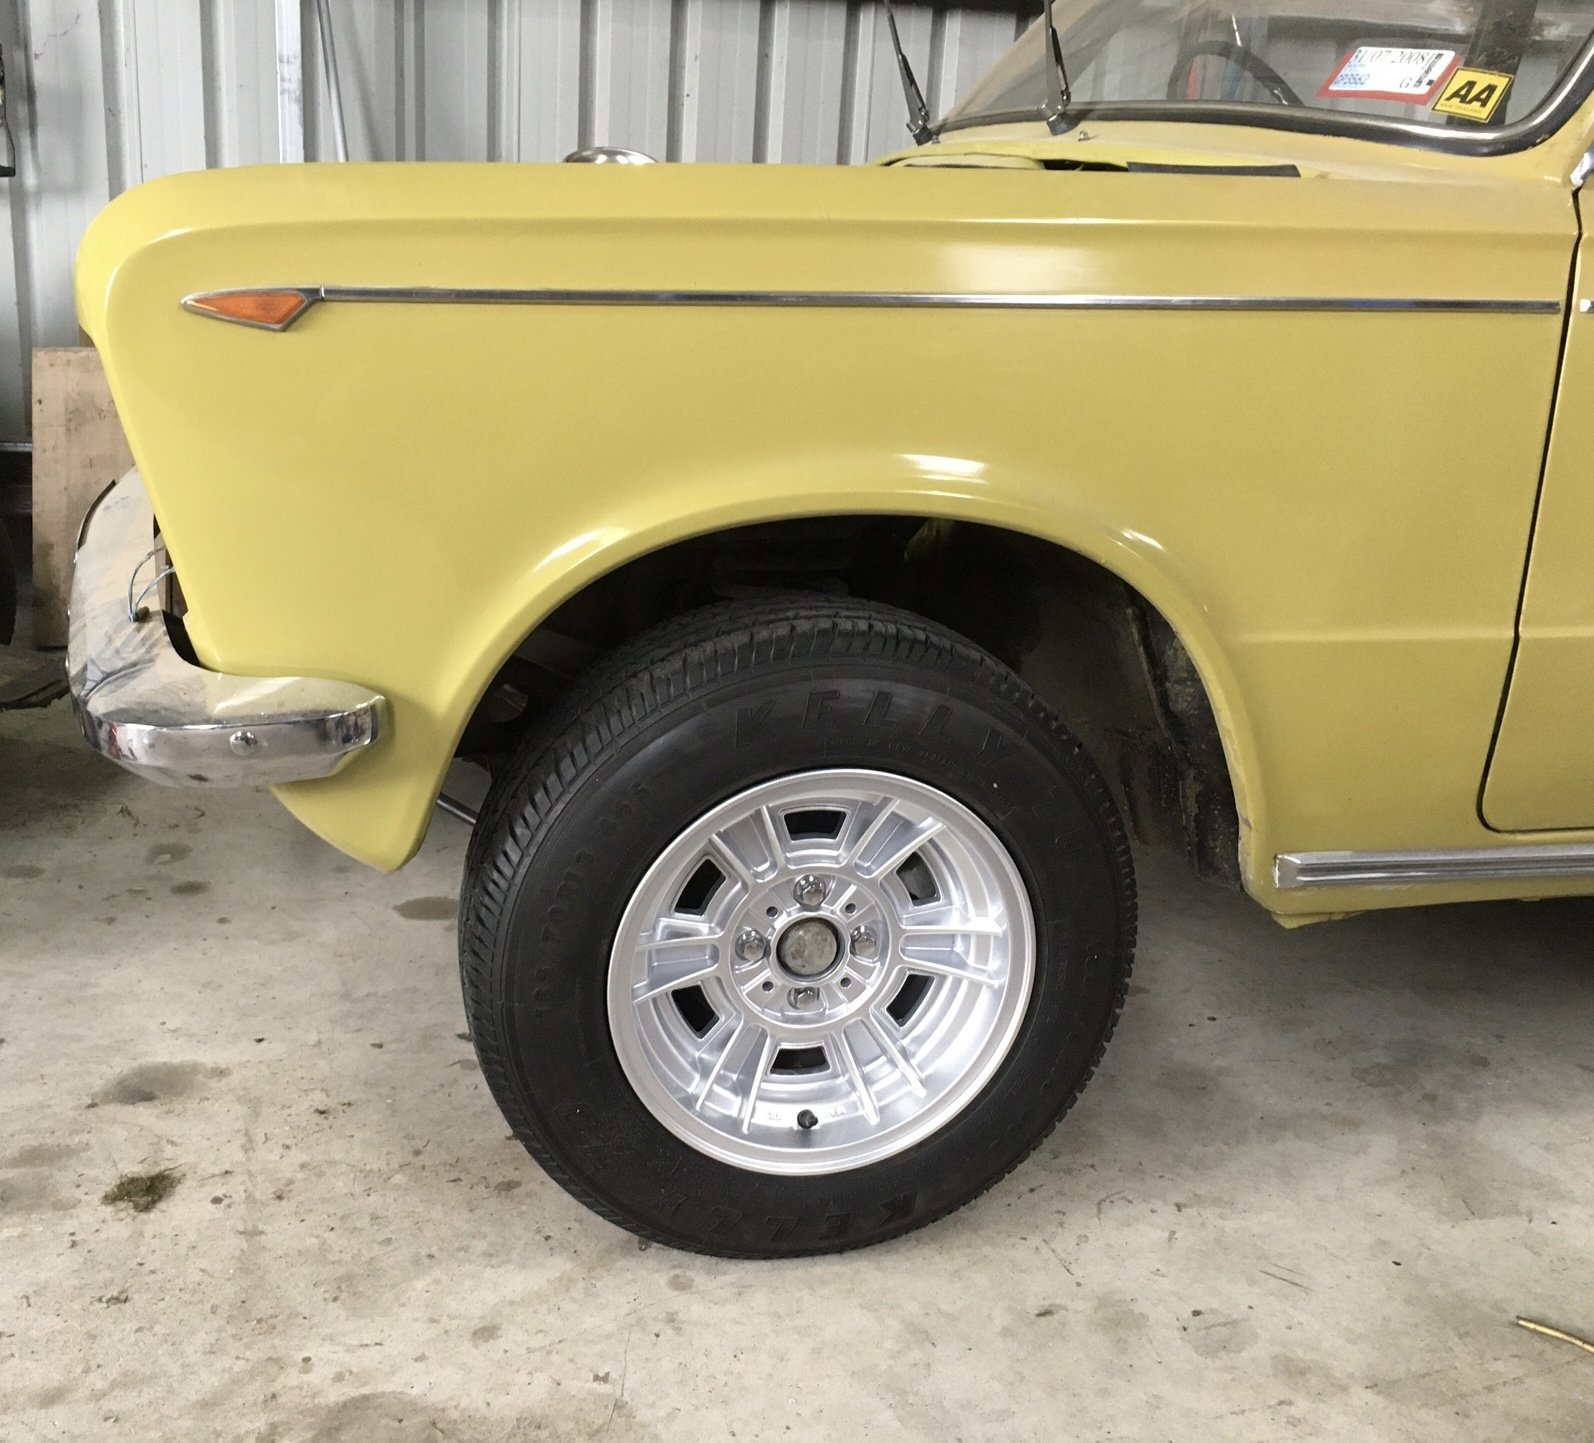
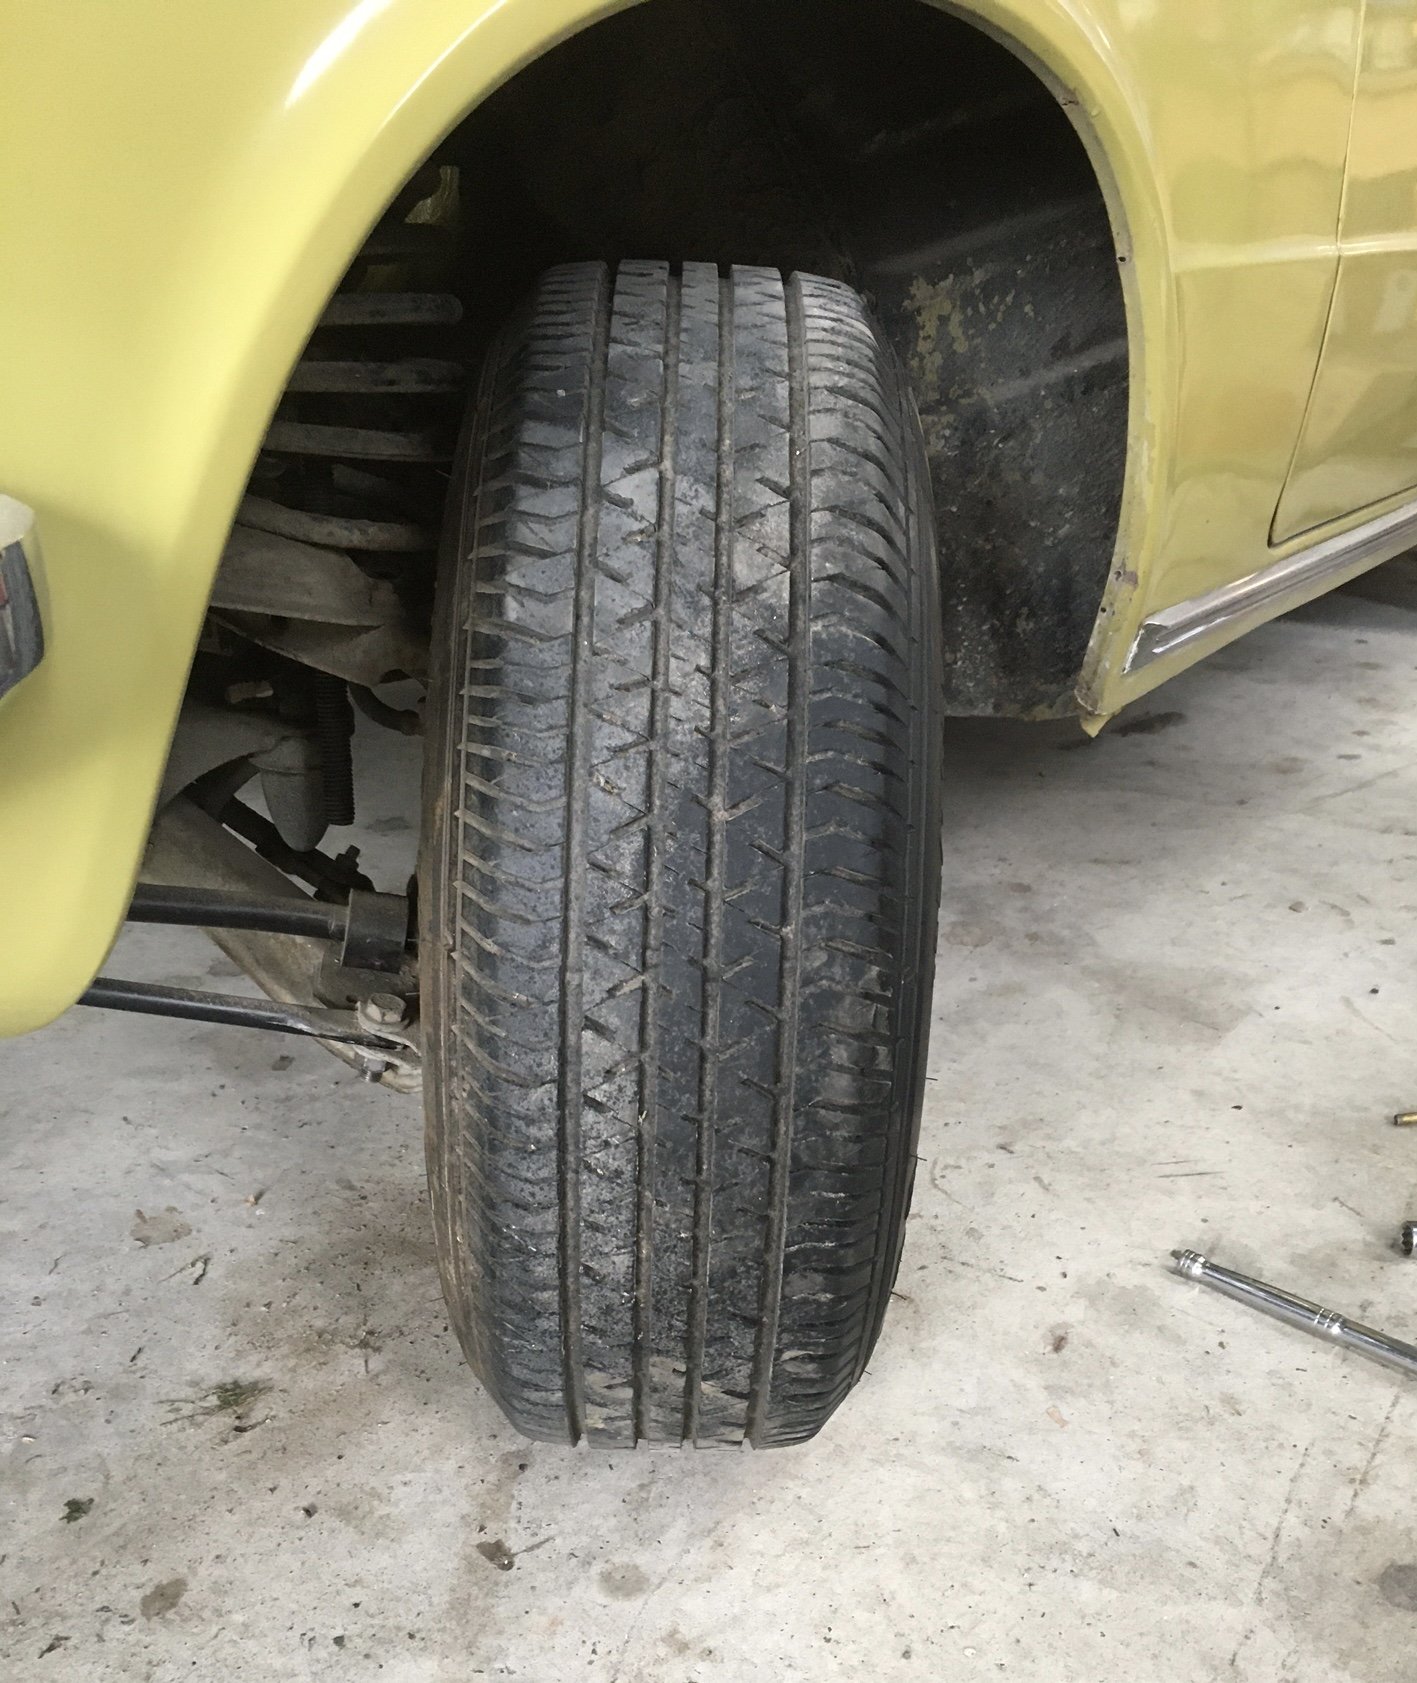
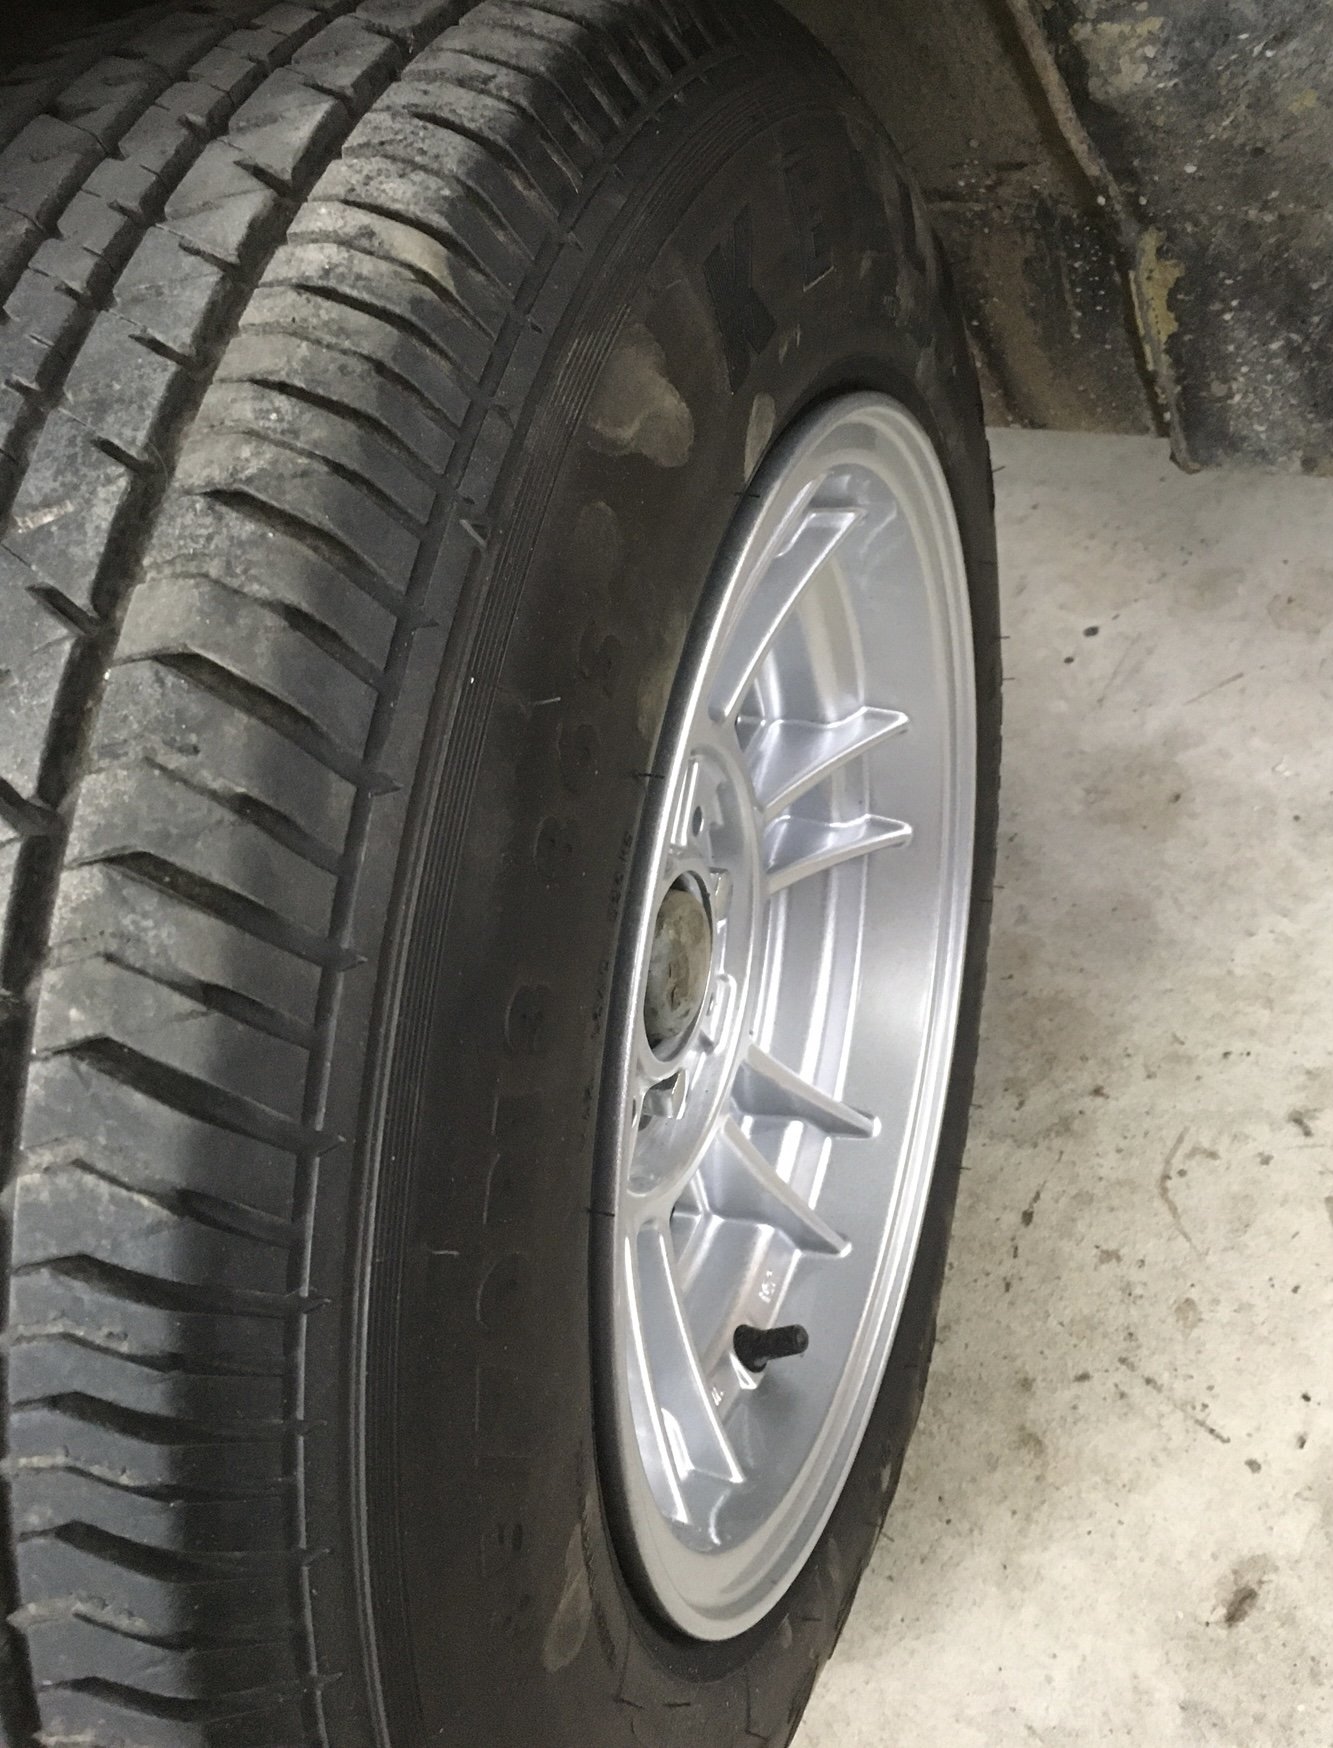
What do you do when you’re not making progress but want to play with your car? Rims! Local good guys at Tyre General in Rangoon offered to pop one of my old tyres onto the new rim to assess the fit (technically I’m not allowed to run a 185 on a 7 inch rim) at no charge. The idea was to see if it looked too stretched and/or stupid. Head on view: Close up: Side profile: yes,yes, more slam required but there’s no engine in there! There is a spring compressor installed but still only got it down an inch. The stock springs are looooong and getting them out will be fun. Not. Please comment on the stupidity factor or otherwise in the Discussion thread
2 points
-
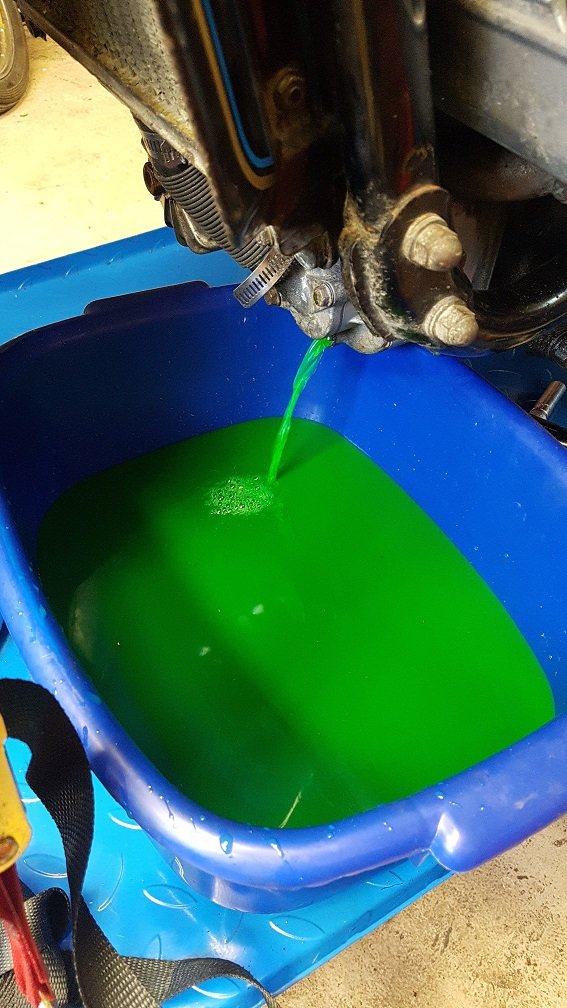
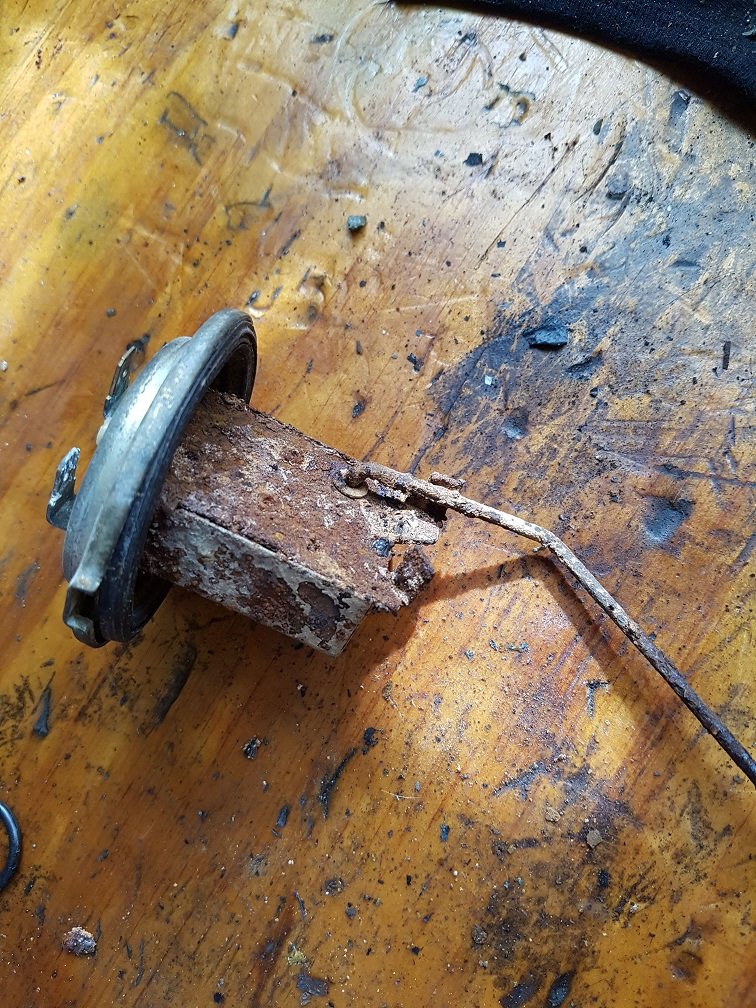
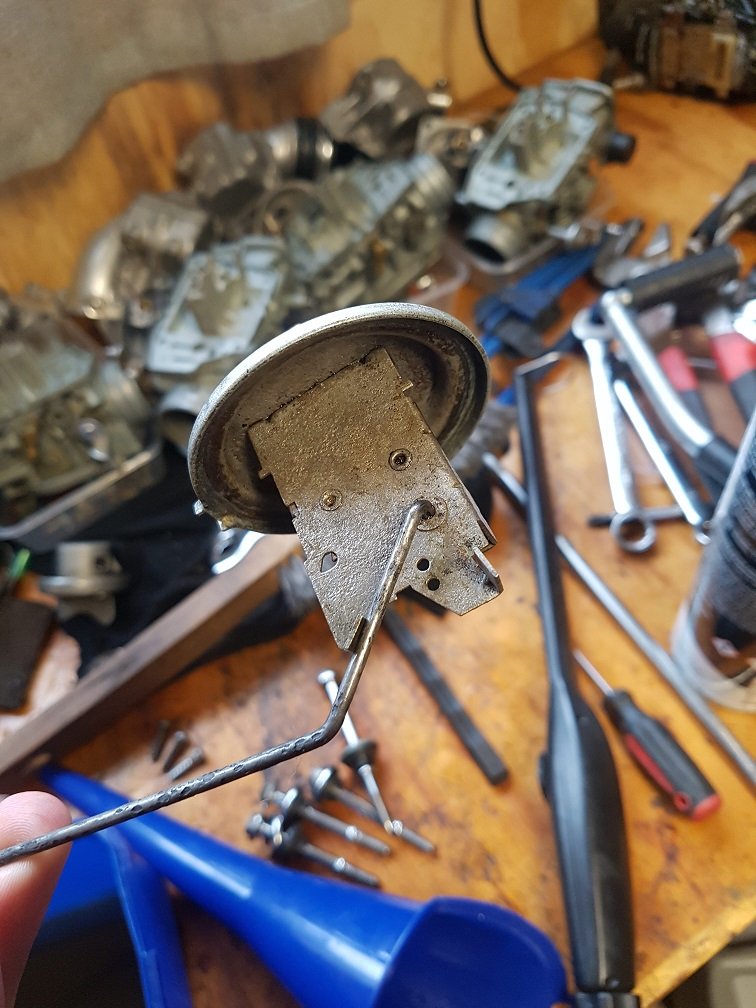
The misery continues. I finally got it all back together and running. Then it started to run really badly. I.E. not at all on the cylinders on the side i had just done the headgasket on. Oh boy. I double checked all the cam timing, and that was all good. So must be the carbs (again). So whipped them off for a 2nd stripdown and clean. I had noticed that the fuel lines had all turned dark brown. Hmm. Rust in the tank? Yep. yay... Better pull the tank out. What a fucking mission. I got the tank out, and yep, she was rough. Tuel sender shows the condition of the inside of the tank: Yummo. I ended up buying some CRC evaporust and soaked the sender in it just to see if it met its miraculous claims. Yep, I'll be dipped, it sure did. A++ Cool one, nice. I'll get some more and fill the whole tank! Over the course of a couple of weeks I was rotating the tank around letting it do its magic. It was working a charm!
2 points
-
Just when I though the mechanical gods were cutting me some slack with the local seals, I went to reassemble the rocker assembly only to find out why this head was in the parts bin. The thread was completely stripped on one of the bolts. One with a dowel no less. Yay. Things ground to a halt, as I didn't have any helicoils. Bike night Tuesdays are great. And the infamous Seedy Al turned up: With one of these: Ooosh, M8x1.25 here we come. A quick helicoil and we were back together Gaskets on (Its so happy!): Head on Timing belts are brand spankers even though they look old. Just got a bit filthy from the trip plus engine disassembly and cleaning. Believe it or not, I am cleaning it up as I go. The engine was filthy, and the paint has come off in places and the alloy is stained dark. So can never get it looking mint without a spraybomb. Orders of magnitude better than what it was though. The engine even does a complete 720 degrees without binding. So I must have done something right? Just need to set the valves then the covers can go back on. Tonights job.
2 points
-
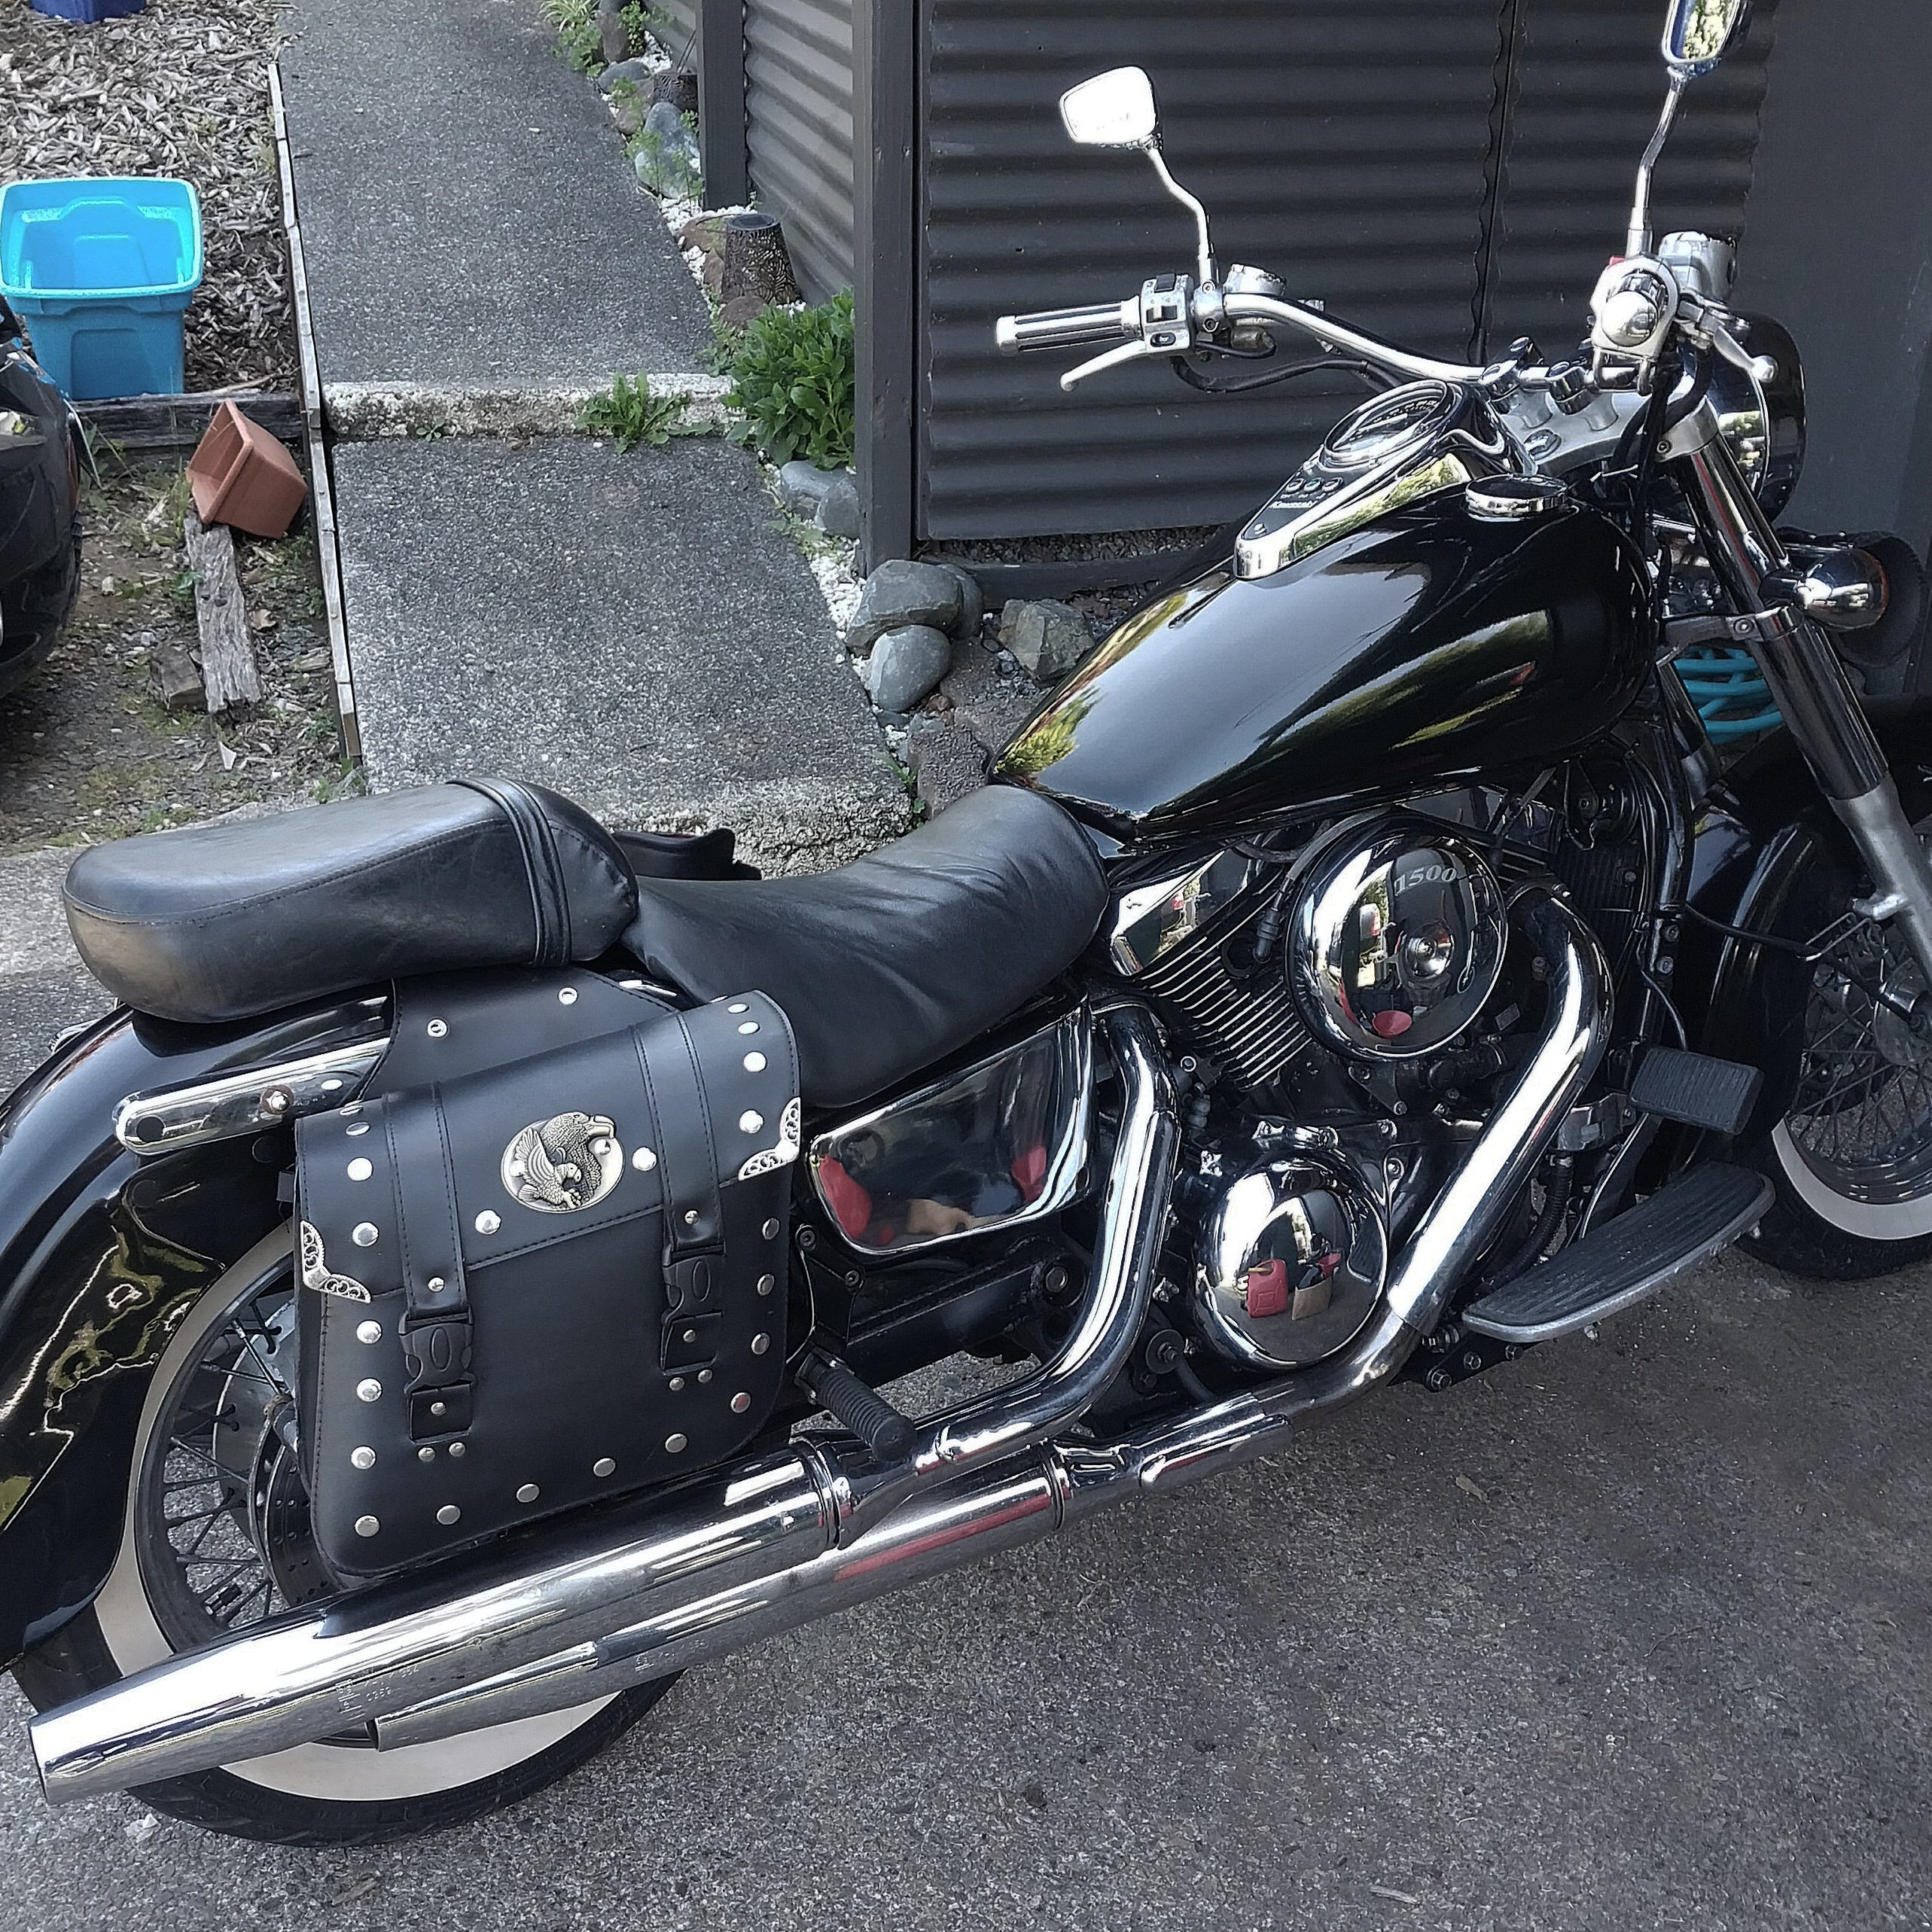
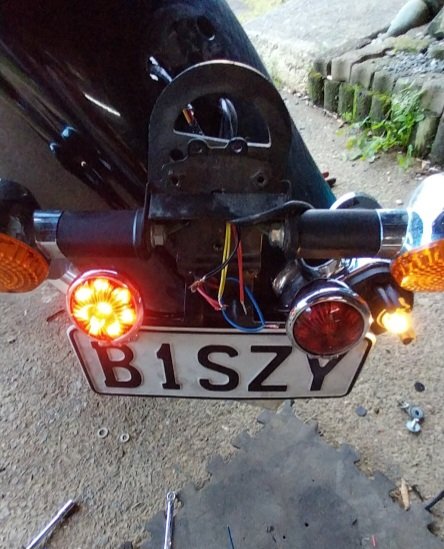
I've been all blah blah about getting another bike for quite a while On the 4th December I bought this thing 1997 Kawasaki Vulcan VN1500 D2 Classic. I call it the 10 footer. As in It looks mint from 10 feet at 10 miles an hour. Been owned by a "tough biker type not man enough to admit its not a Harley”. He's lowered the back guard. I lifted it up to original but didn't like it. I have lowered it back down. It's got some Aliexpress chrome taillights with dead sections. Bought some more then...  Ones a non worker. Another one coming. While at it I've rectified some mean as twist and tape wiring/whole new loom for the taillights. The brackets for the pillion seat were completely missing which i have sourced and fitted. Plans are a cosmetic rebuild over winter involving a colour change. The paint on it is nicely done (black with green metallic fleck/green pearl over top but the prep on the tank looks like its been bogged and sanded with 36 grit and primed with no rub back. The filler can be seen clear as day. Apparently it was hit by a woman with a tomahawk. It may need a new tank. Cross that bridge when I get to it. I need to tidy the horrendous muffler "delete". They've hacked it out and made a hash of it. Its rowdy and my neighbours hate it. Good... I'm also looking for an original taillight to fit back on. It's not everyone's cup of tea, and I appreciate that. It was cheap (I think) at $6200. I didn't need to travel south and fell well within my budget. My wife likes it and that is the biggest hurdle. It's got torque for Africa but it's not super fast. It is HEAVY!!! Weighs 292kgs. It's like riding a barge. Far cry from all of my other bikes in the past. It turns heads, gets thumbs up and I'm stoked with it
1 point
-
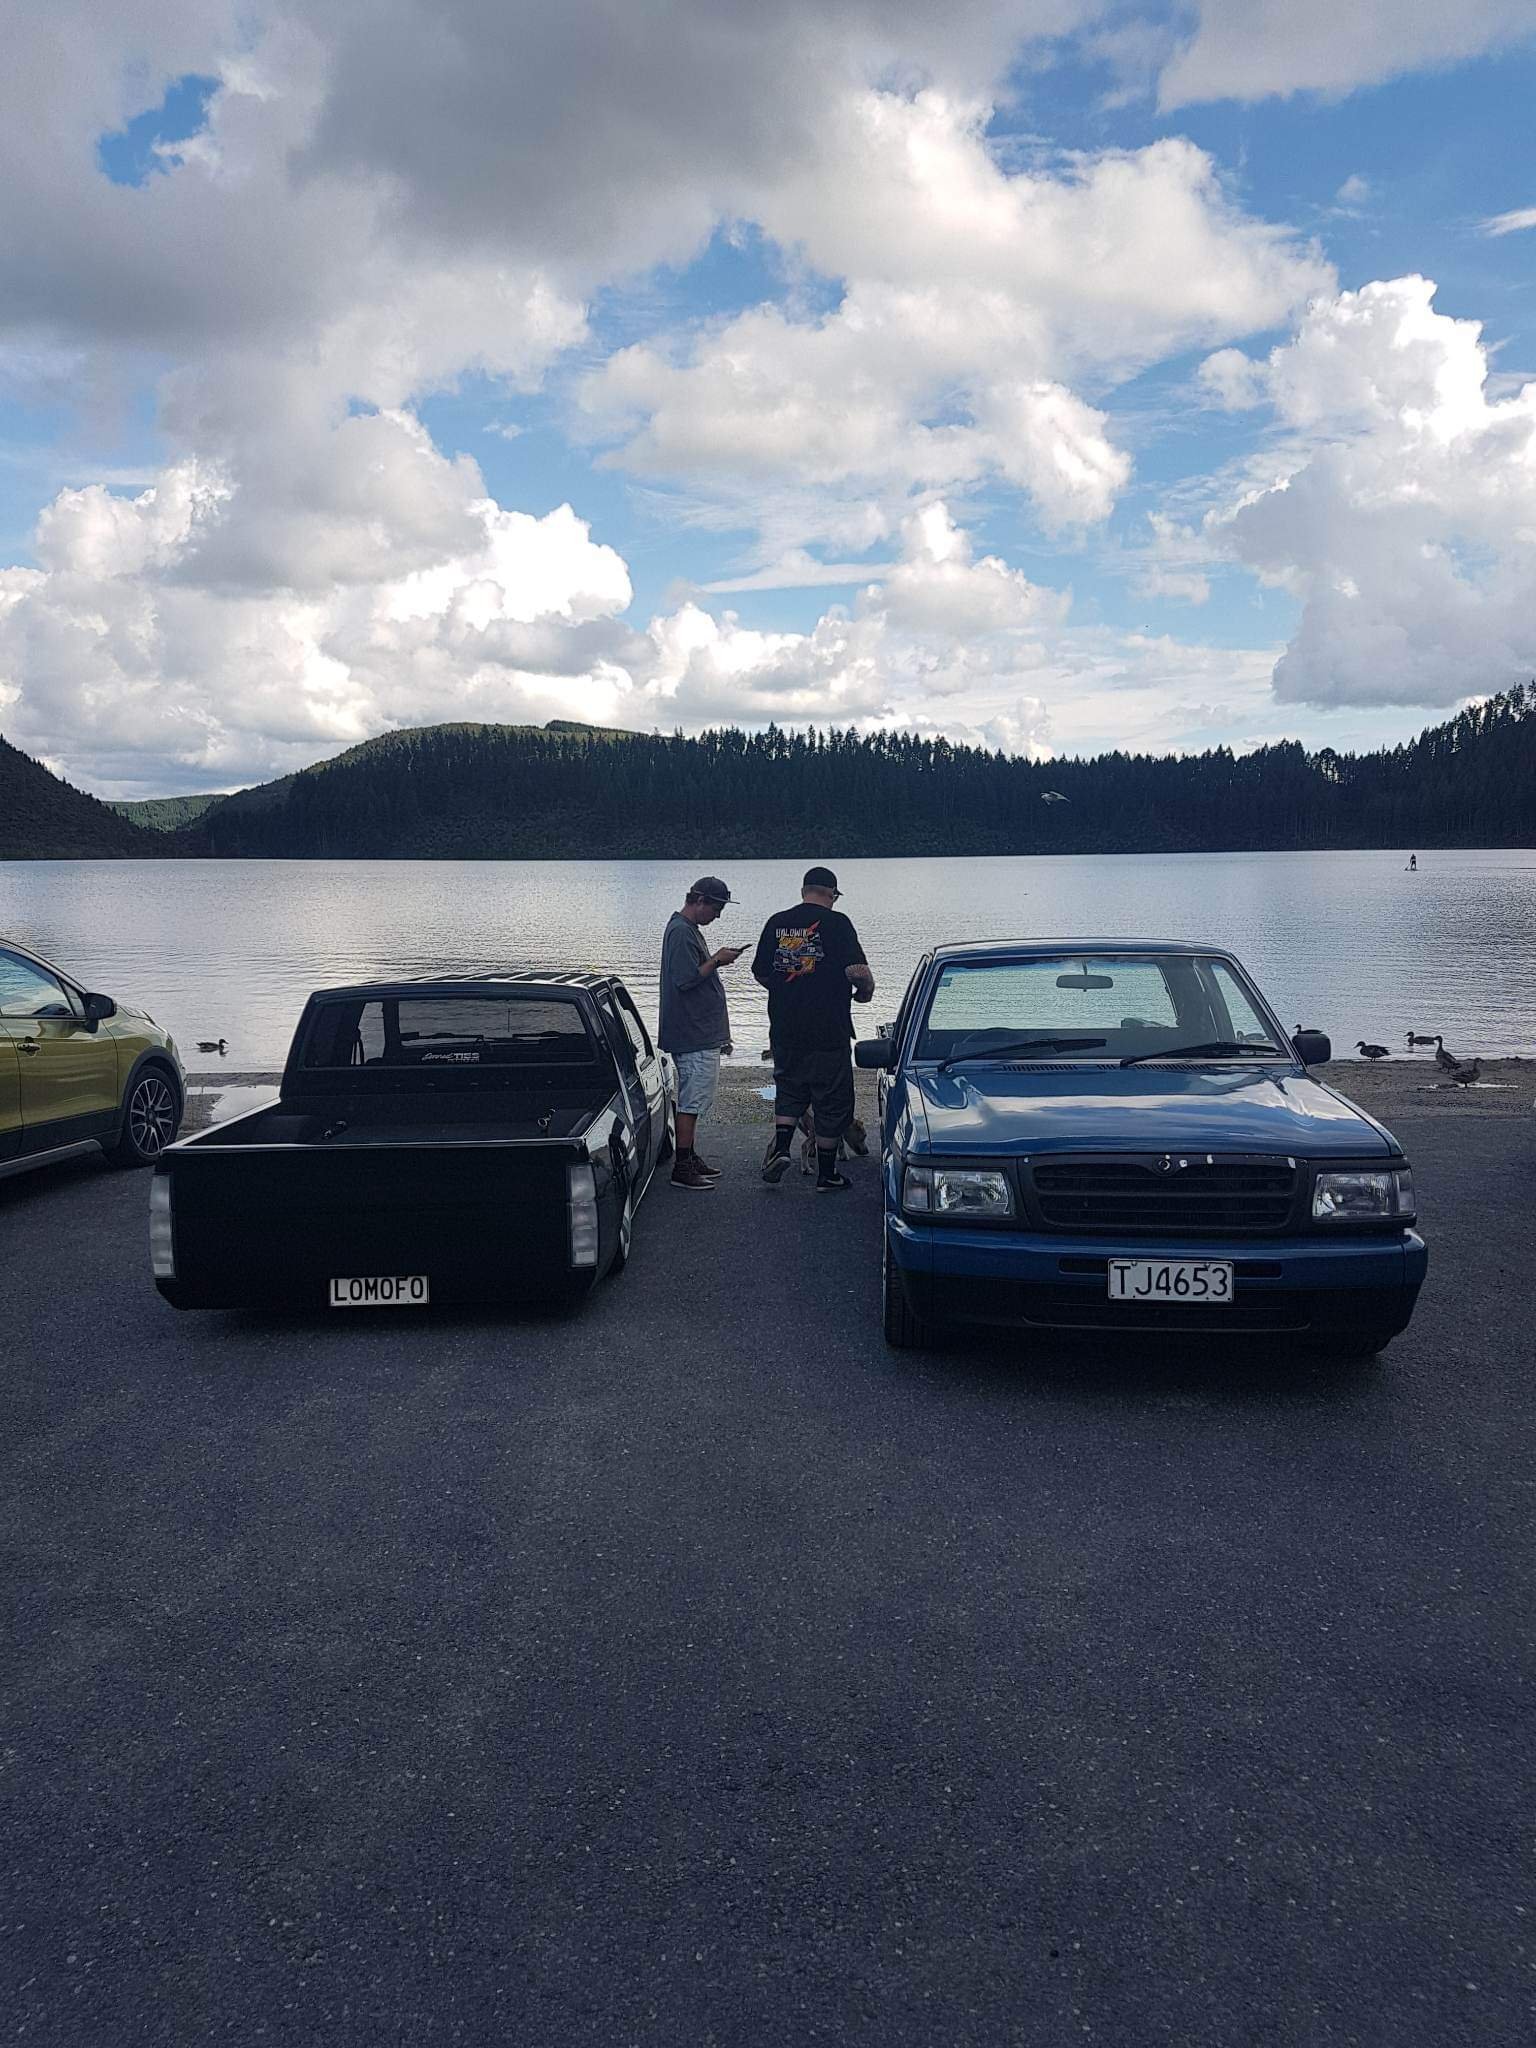
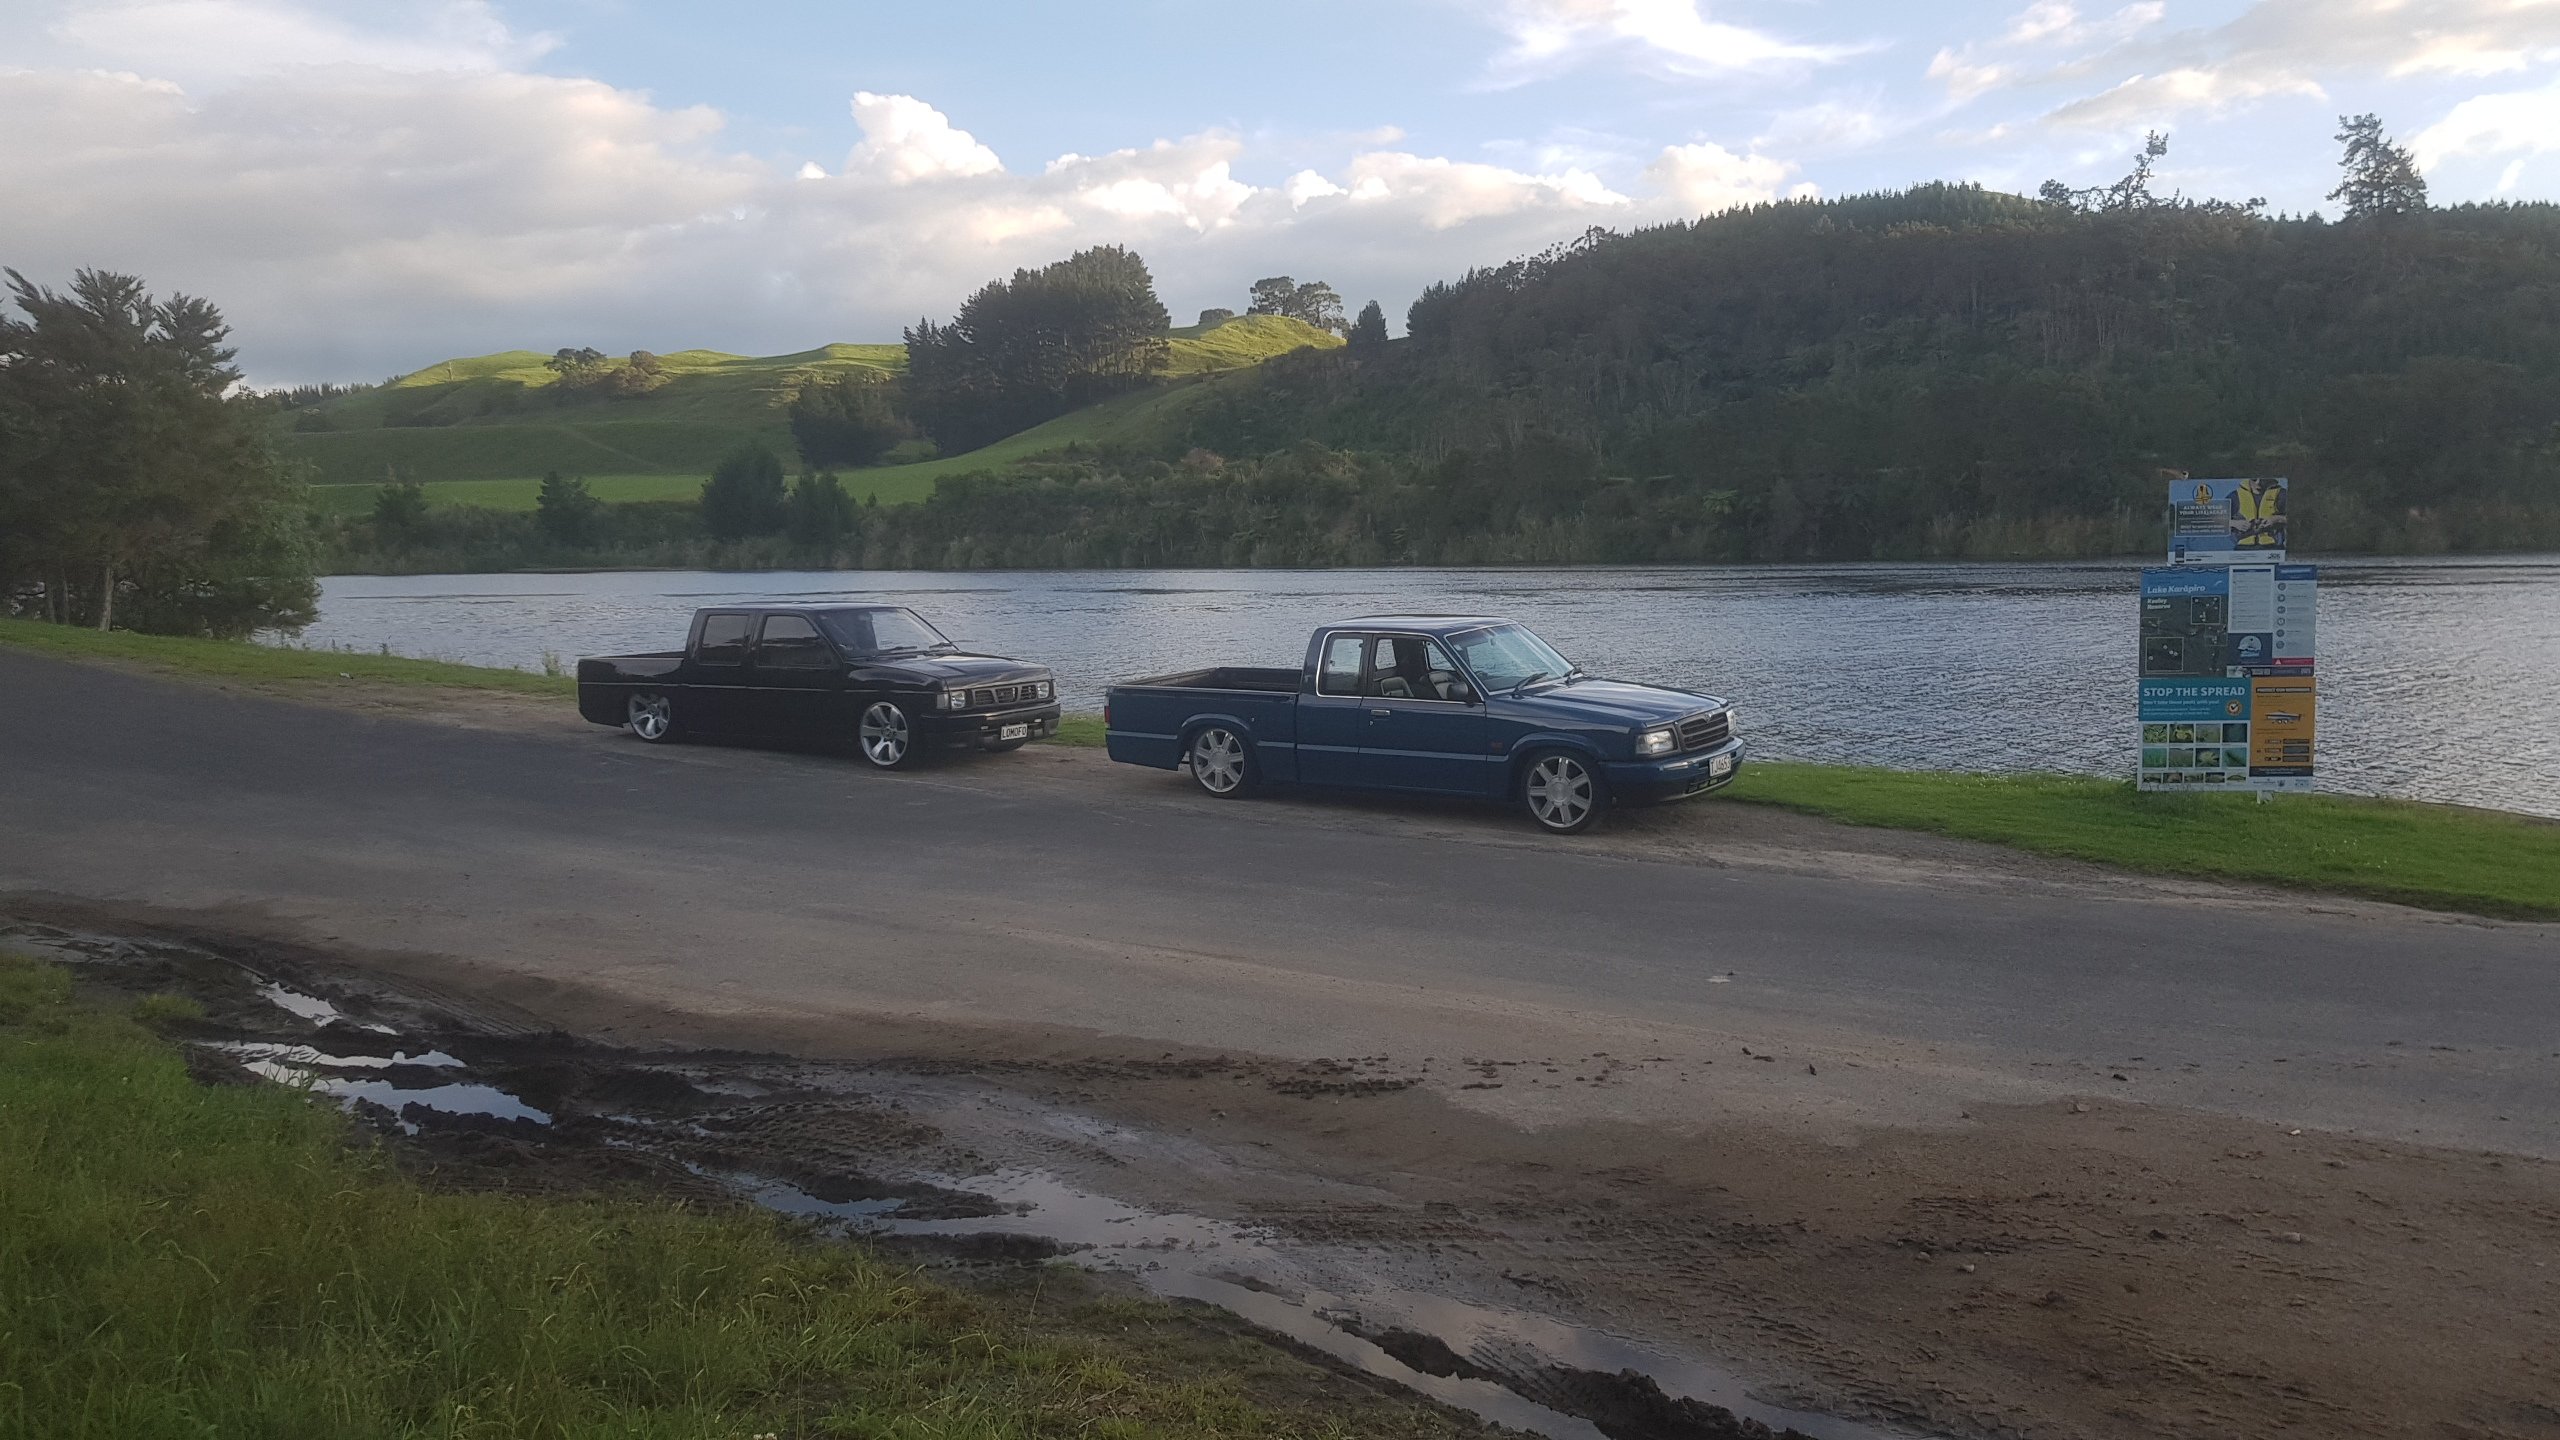
Took the mazdawg on its first major outing yesterday with a buddy I met up with Cambridge on the way Destination was @hoods place in Rotorua. Got burgers and went to the lake. Dog got treats and splashed around in a new environment so she was happy. Stopped at Karapiro for a bit on the way back. Truck ran like a top. Only issue was its fuckin gutless. It cruises sweet, but nothing home when ya stomp the loud pedal. Been a while since I have driven one so figured thats all it had to offer, but whilst stopped in Karapiro I did some checks. Felt like secondary throttle wasn't opening. Sure enough, accel pedal gets full dort on carb, but only off the primary. Might have a linkage missing. Will figure out this weekend, but other than that it was a great shakedown cruise for it. Bloody road closures on the way back added an hour to the trip so that sucked.
1 point
-
Yeah you want the biggest one possible, even the best single phase machines run too much when painting a car will run all the time on the blasting cabinet. Look for a 15A plug one with 3hp there are even 20A plug 4hp single phase units out there that are probably getting in the ballpark of the correct air delivery for painting and blasting.1 point
-
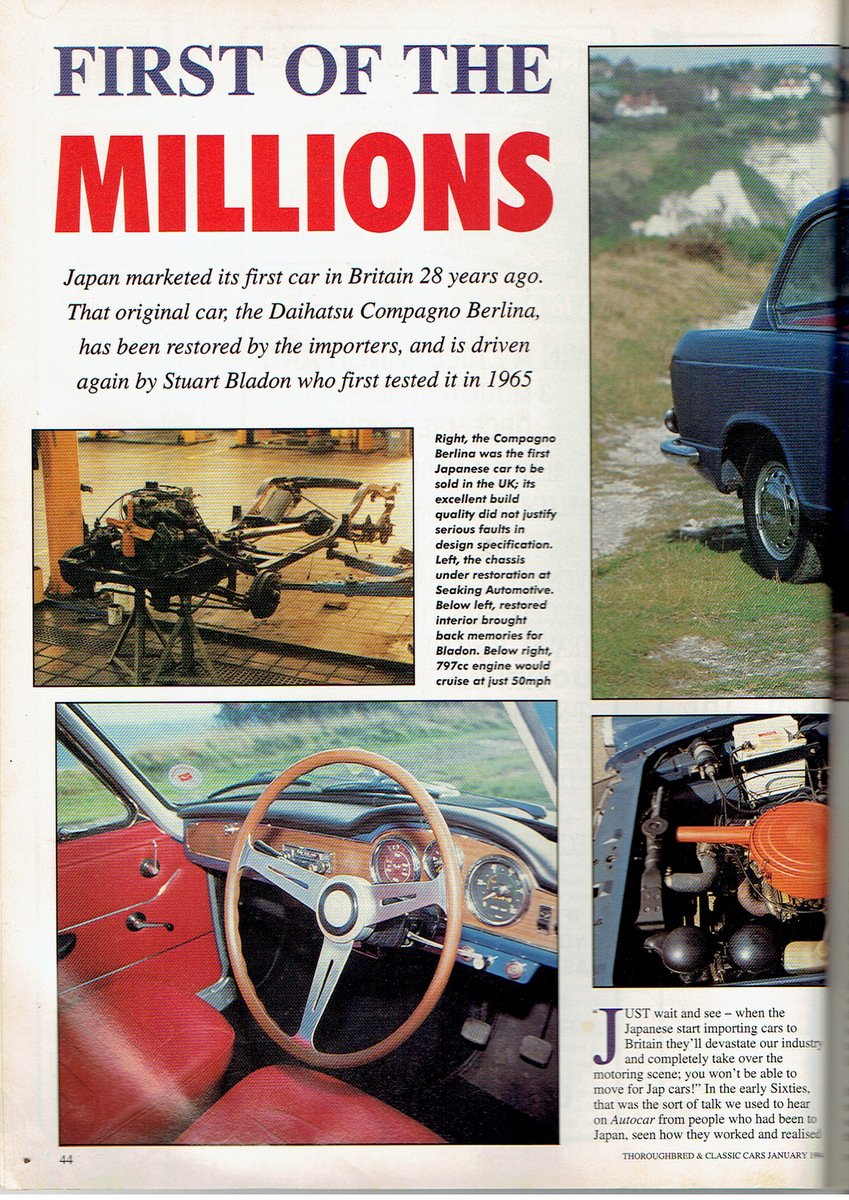
Excellent move. I didn't know there were any in NZ. I think one of my old Practical Classic mags has a story on one that was restored in the UK.1 point
-
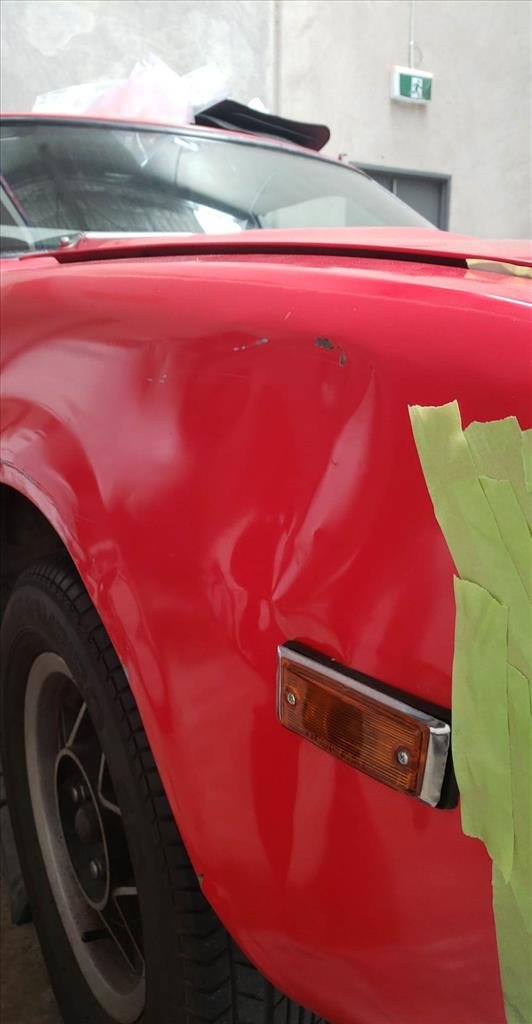
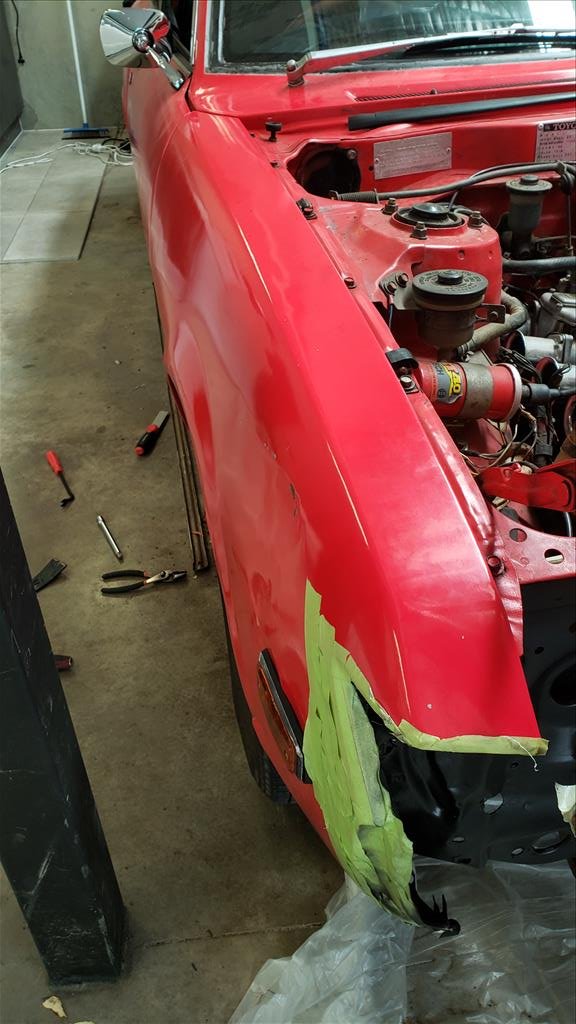
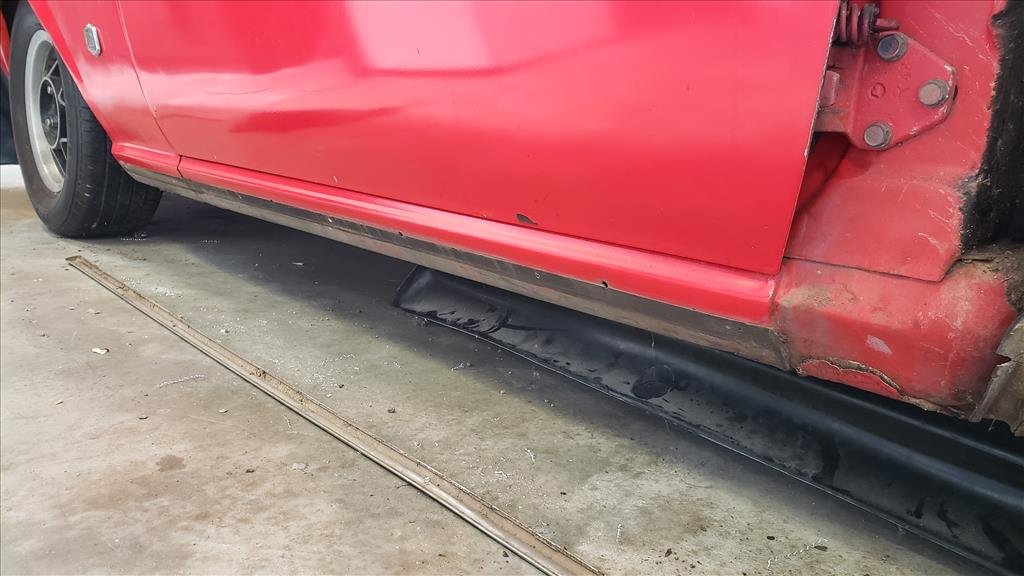
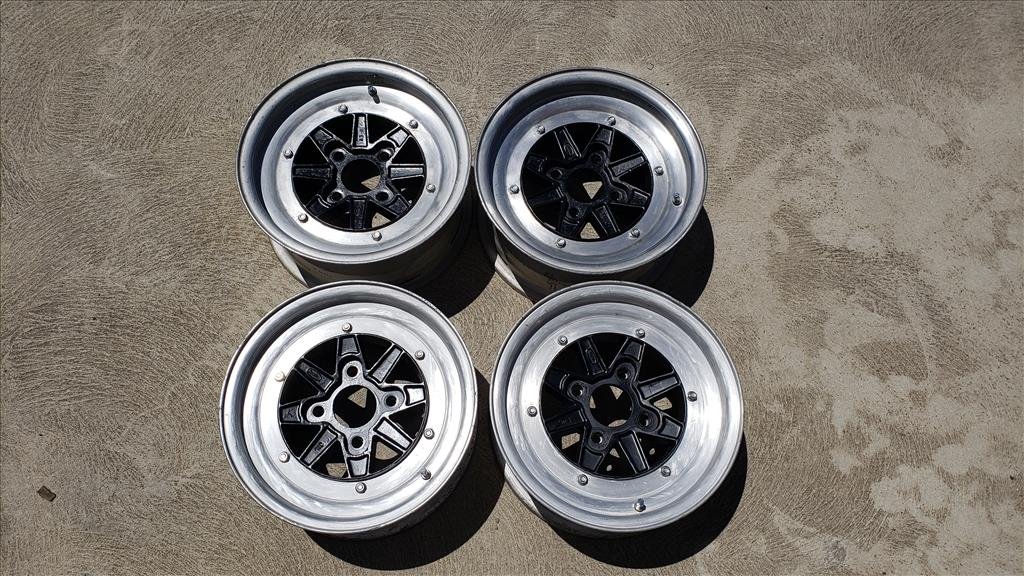
A bit of a slow weekend but got a little bit done. Wheels are finished enough for me, solid 10 footers. I'll get tyres mounted up to them probably after Xmas. Will the hold air? No idea, are they straight? Probably not, but at least the faces aren't rusty anymore so that's something. Sometime in the past I reversed into the side of my garage and caused this decent dent so today I tried to remove a bit of it. The guard is super wavy (like the rest of the car) but maybe it's better? Doesn't have the huge dent anymore just a bunch of small ones, good enough. The problem is the car is bent so the join down where the bottom of the door is on the sill is actually pushed in and needs to be pulled out which causes the bottom of the guard to touch the bottom of the sill panel if that makes sense. To remedy this I can probably slot the mount holes down the bottom and squiz it along, hopefully. Just a couple mm will do so the door doesn't hit it every time opening. I also found out the side trims were riveted in when they're meant to have clips and screws.. so have got some correct hardware on order but need to do the old drill brush trick on the black stuff underneath again. Waiting on new headlights and corner lights then back on the front end assembly next week I reckon.
1 point
-
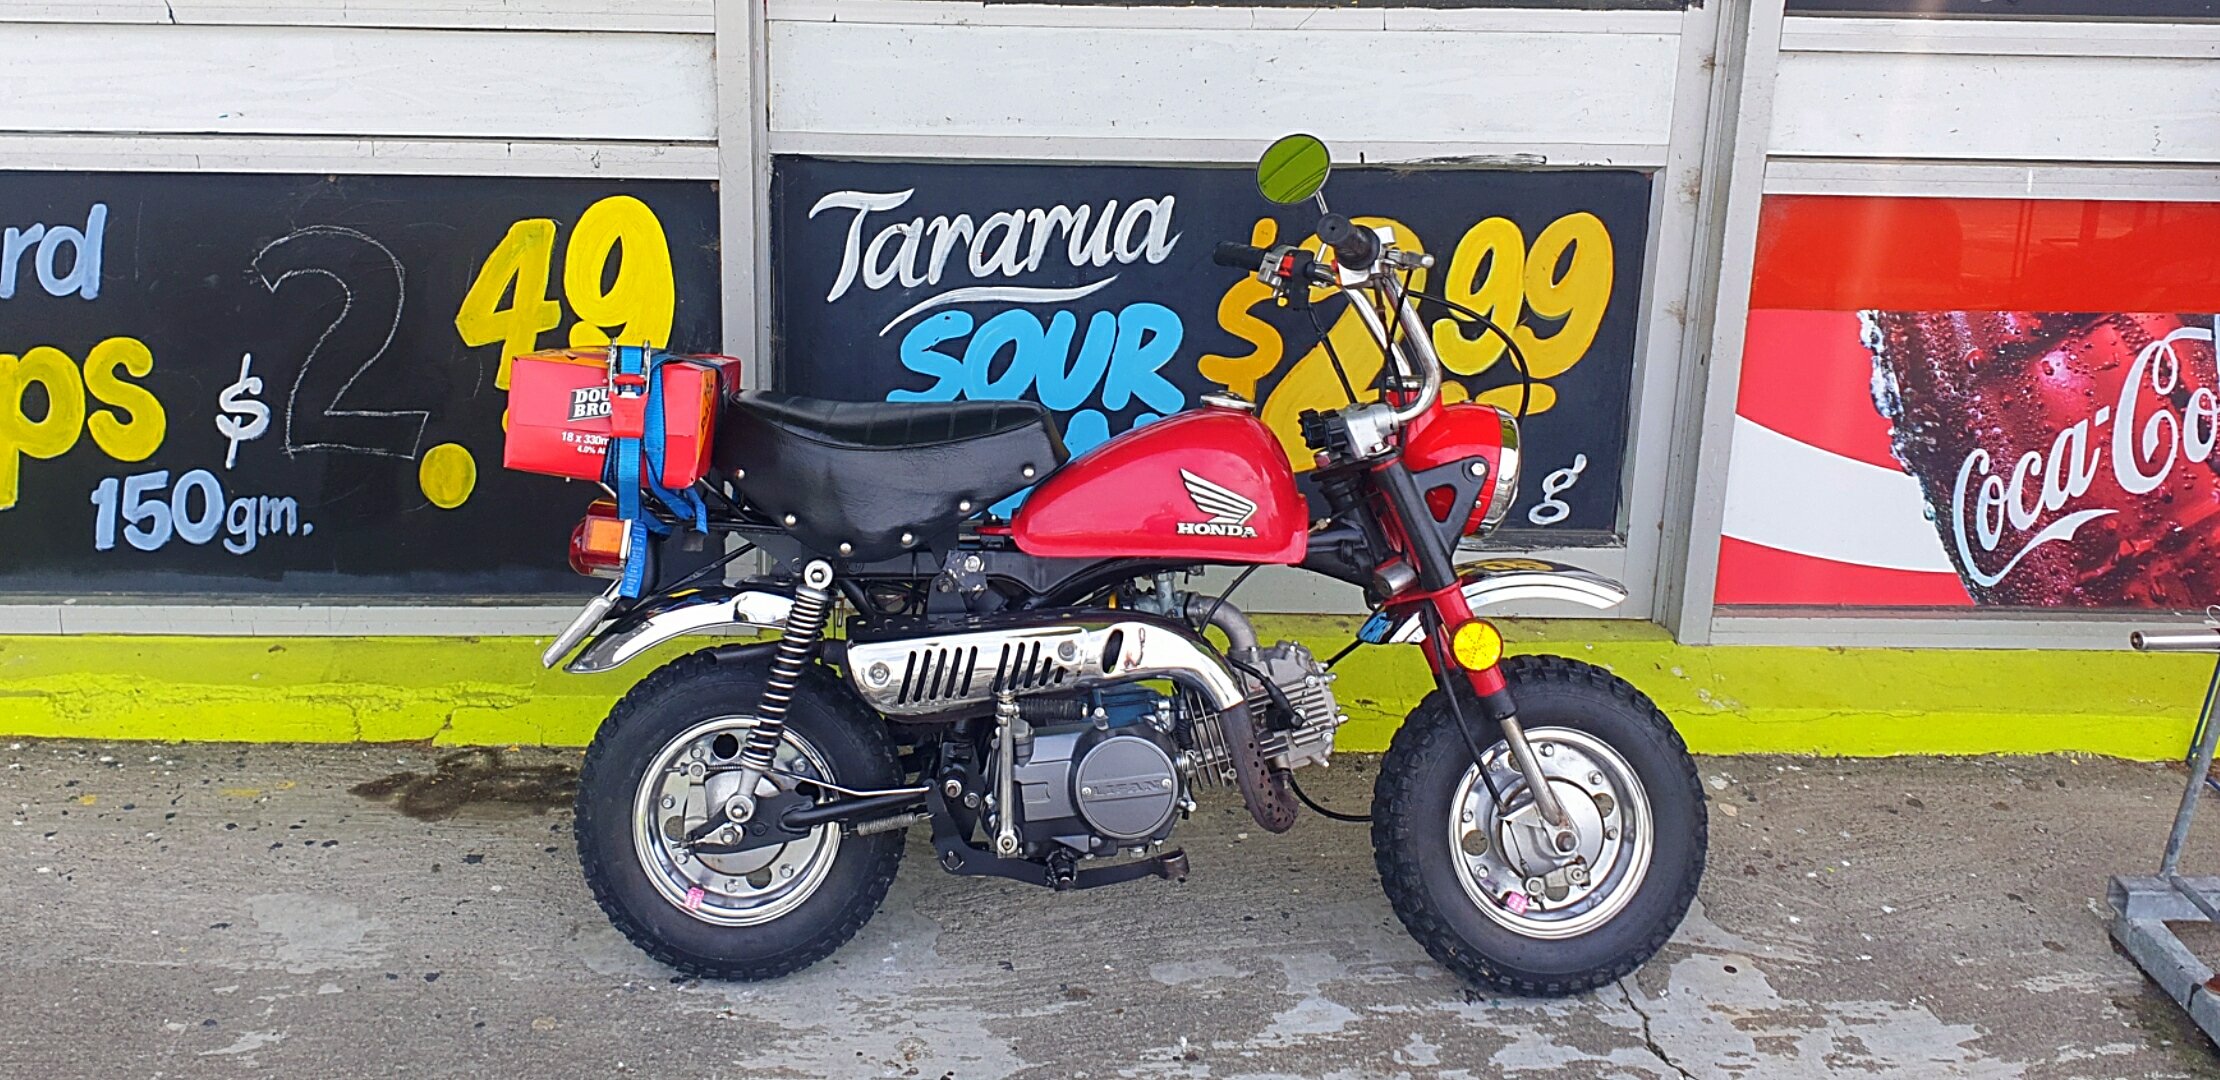
The monkey the lil falla that keeps on givn
1 point
-
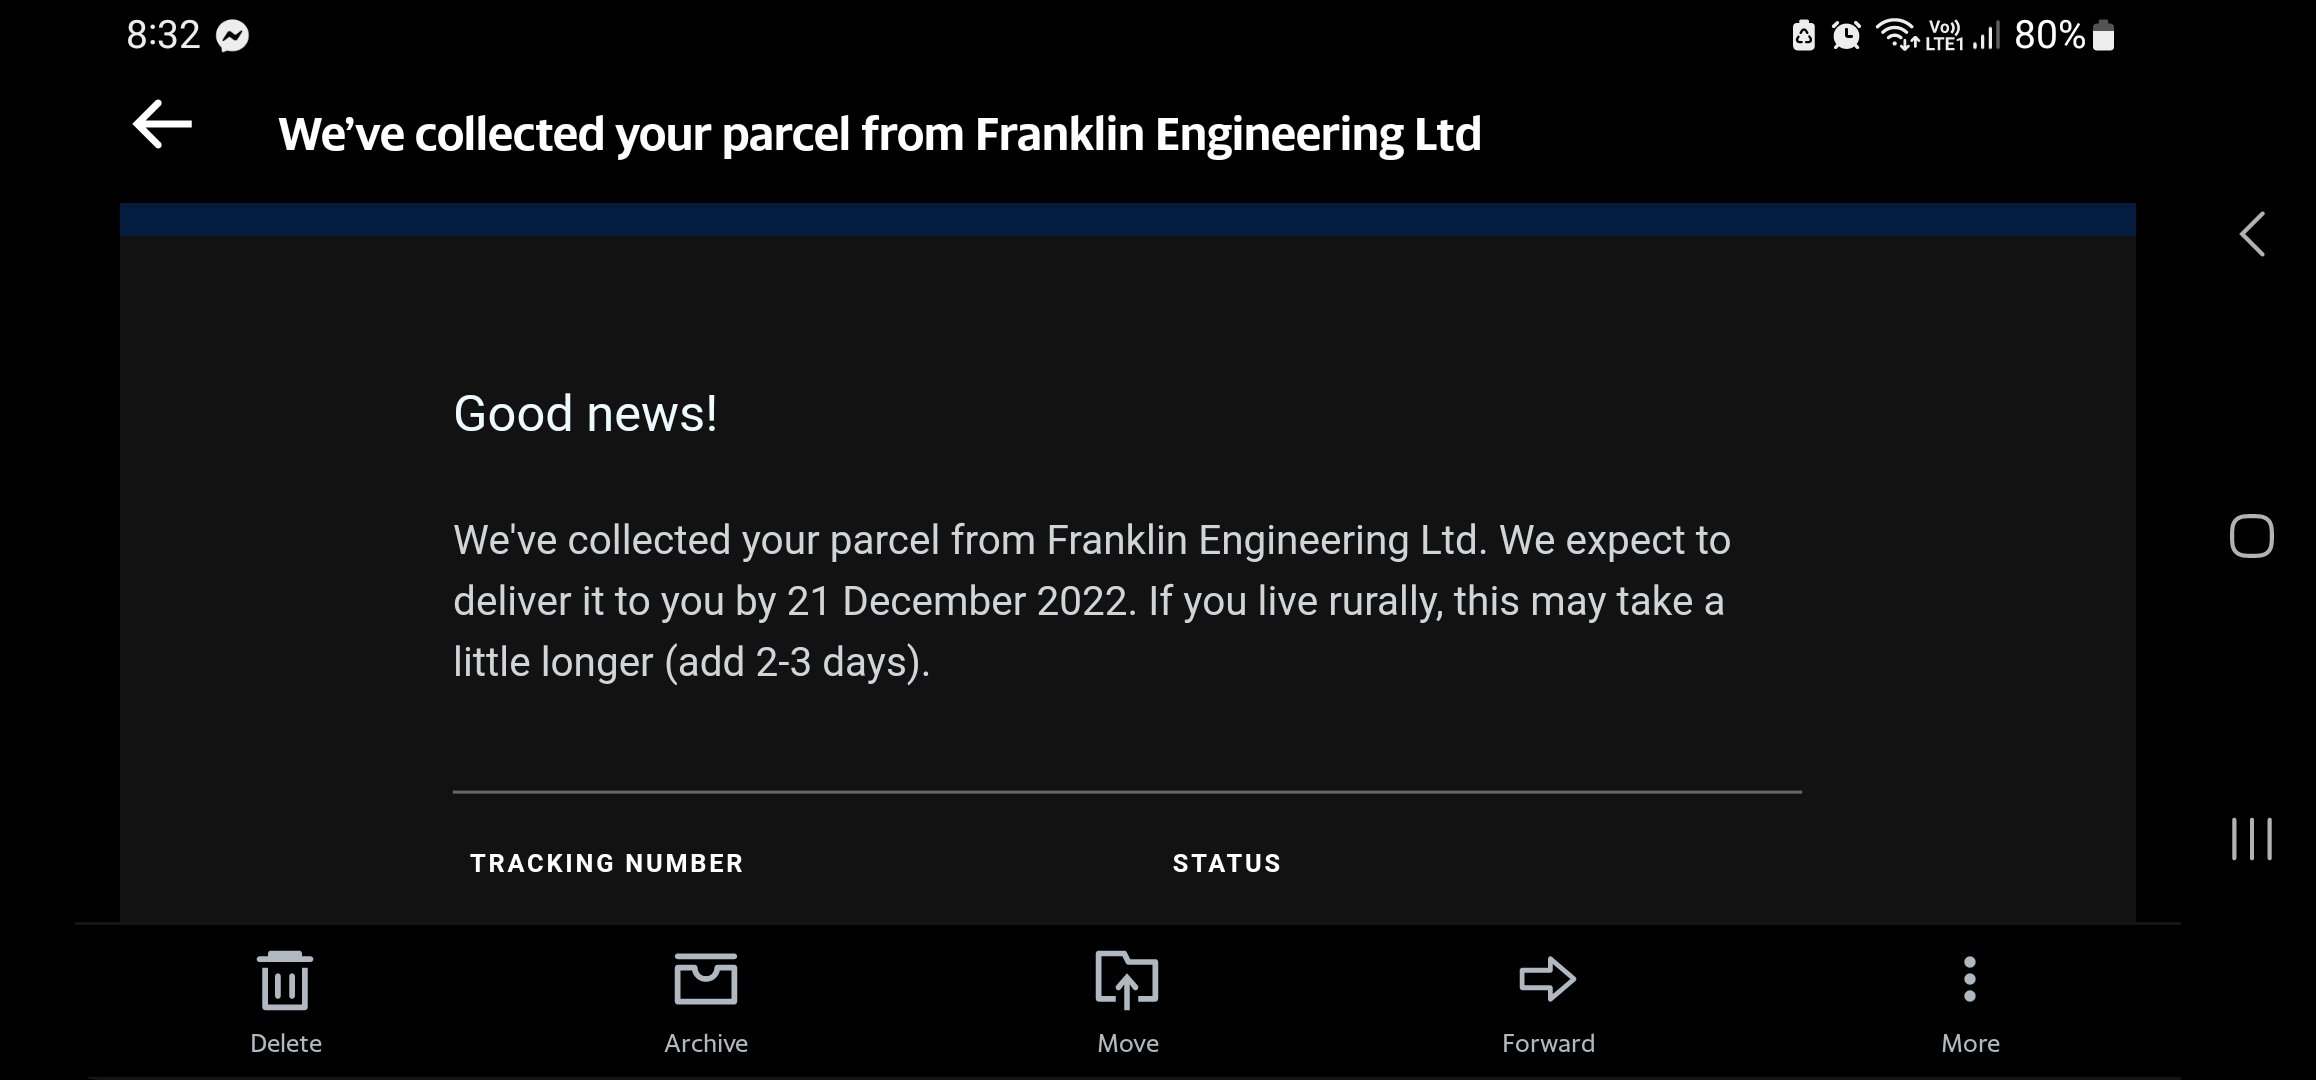
Absolutely stoked. Now I've got hours of painstakingly screwing all the awning buttons, hooks, lights etc back on, making sure every screw goes into a little dot of sealant to make sure I don't make any new leaks. 2 buckets of water proofing goo arrived in the mail yesterday as well, so I can get onto coating the roof.
1 point
-
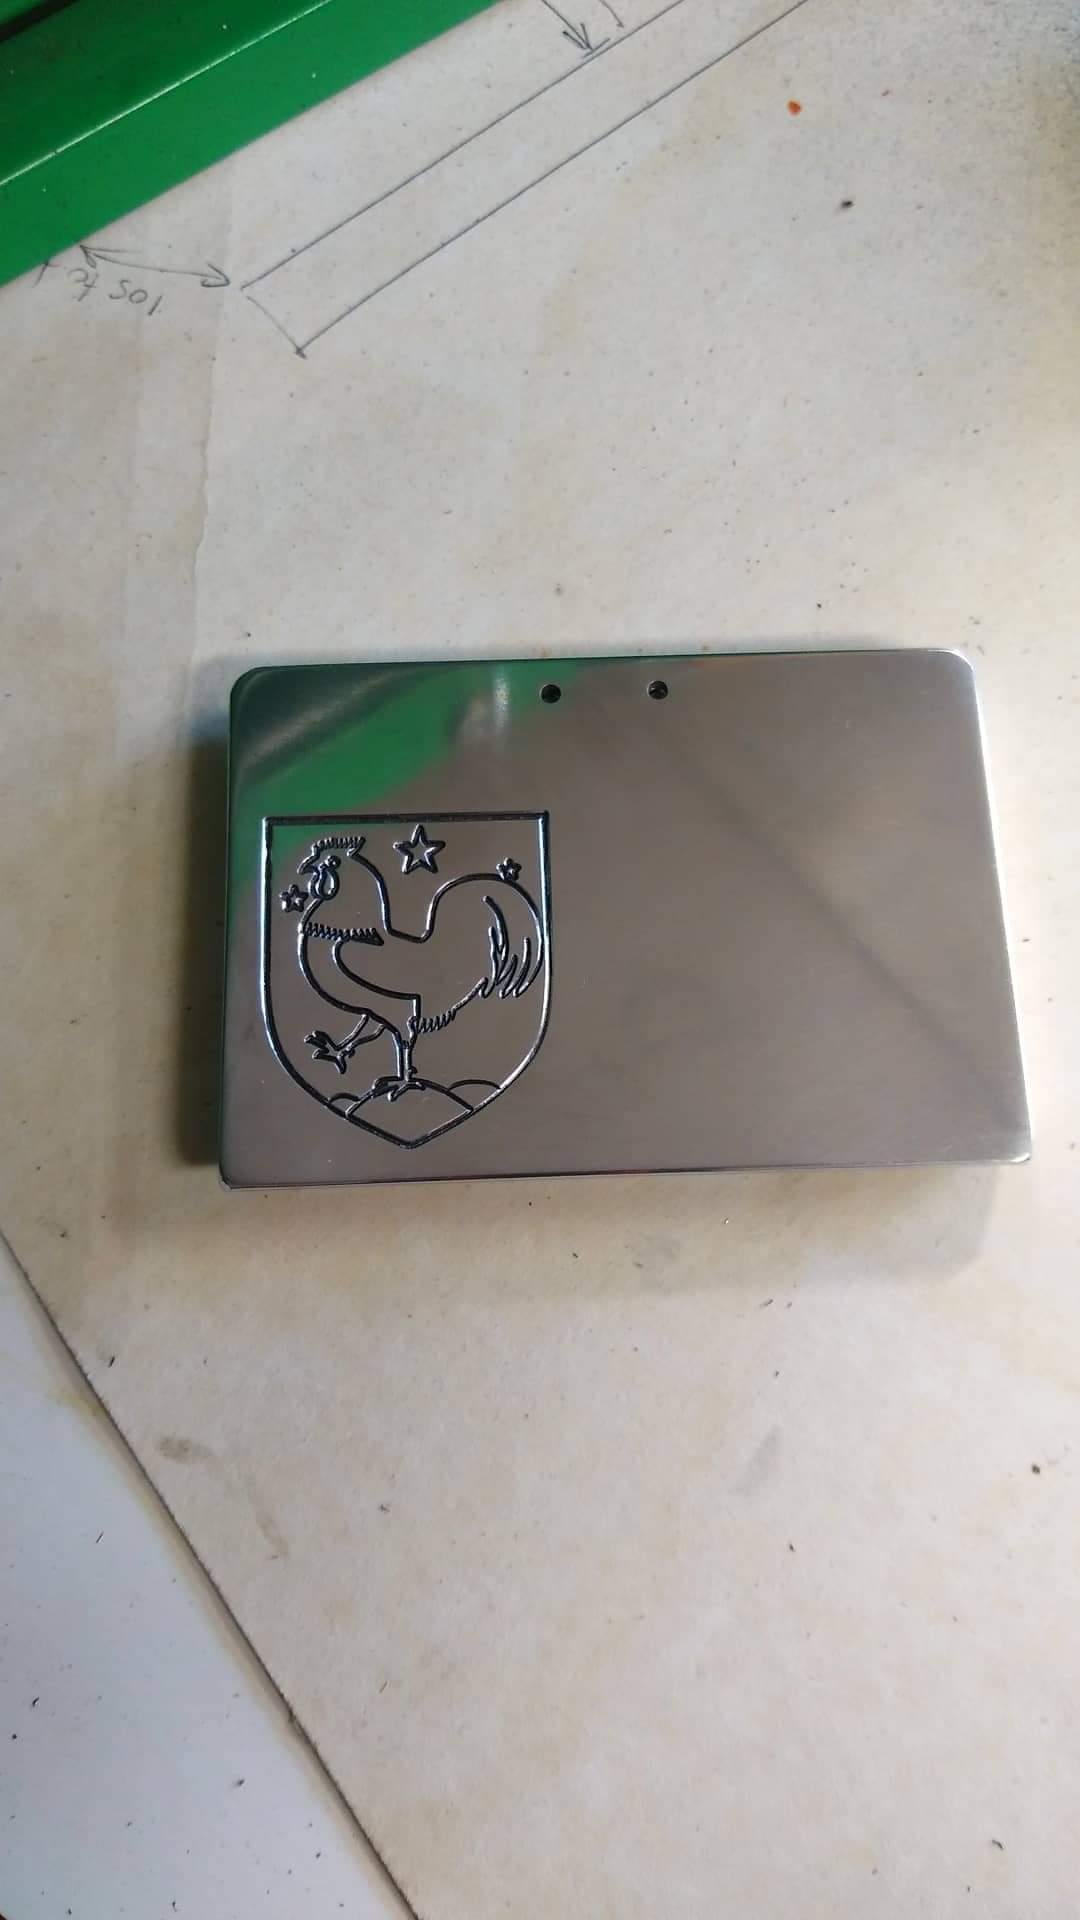
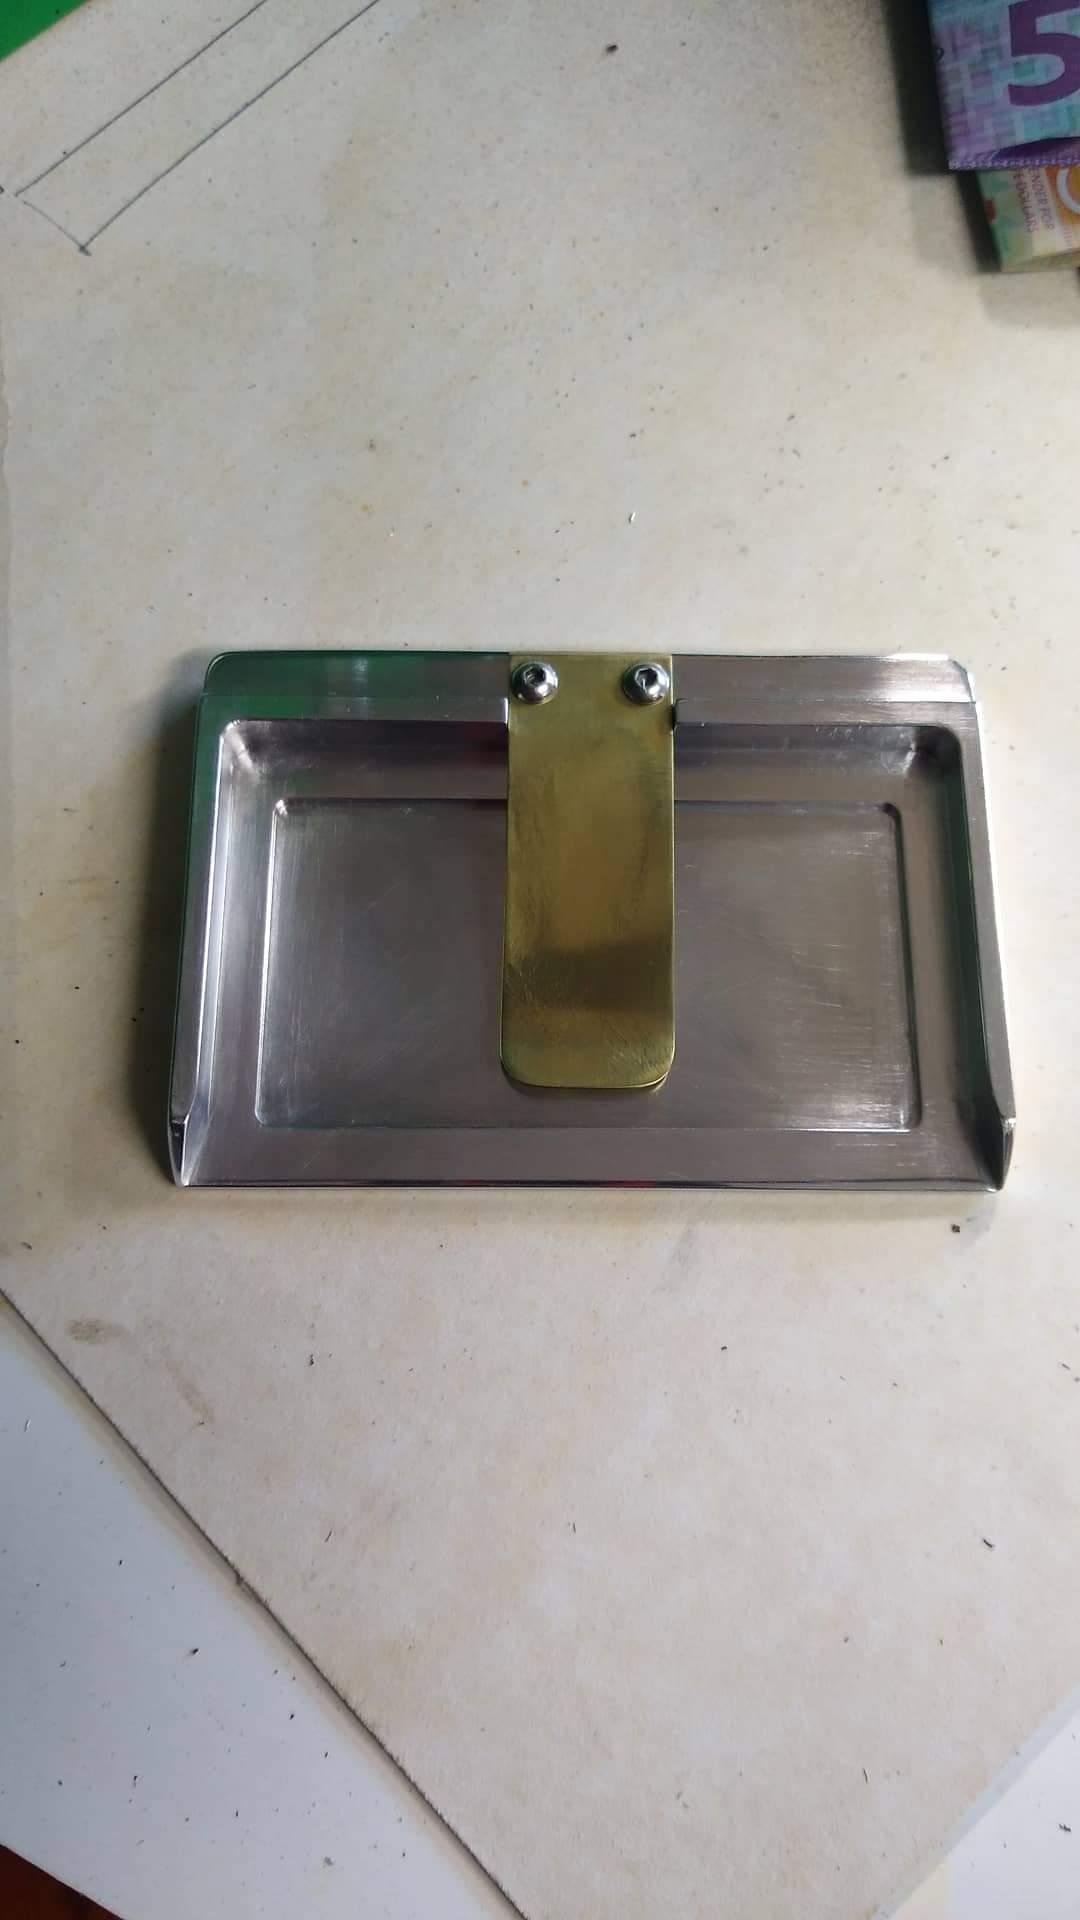
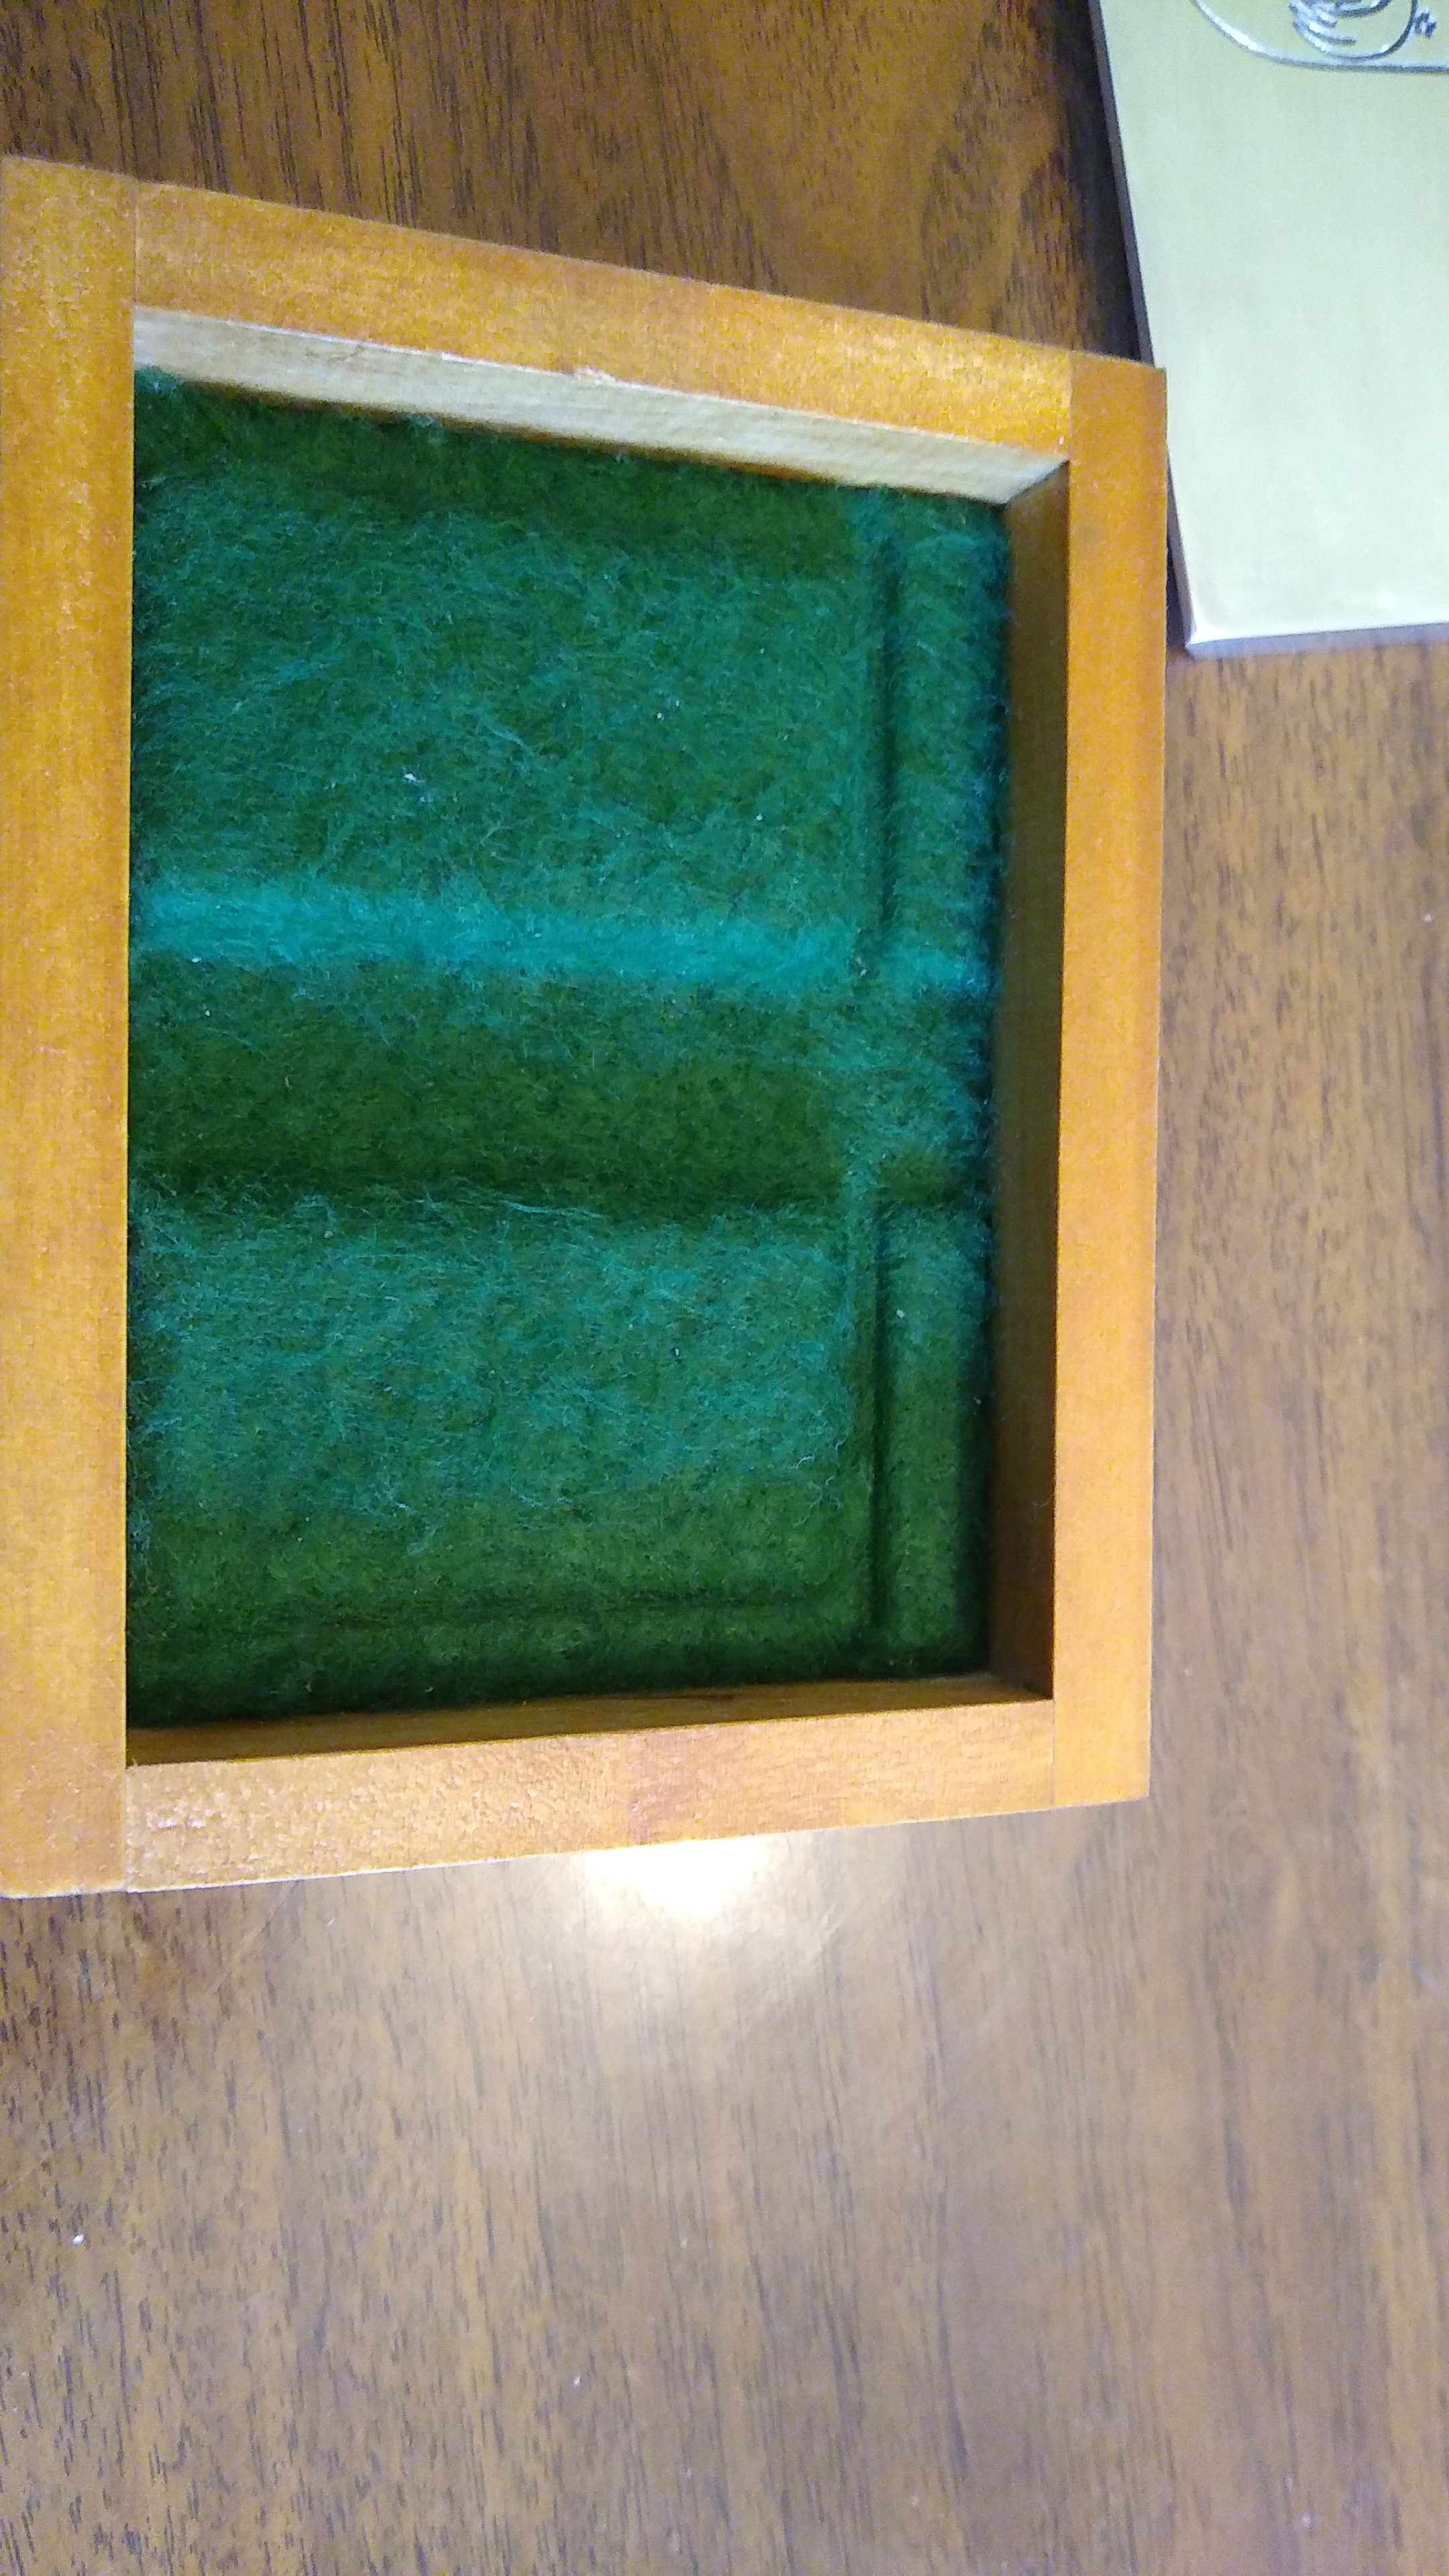
I made this aluminium wallet for my brother for Christmas. It has a small internal pocket that can hold a couple of notes and it can take four cards easily, five if you push it. Wallet was all machined by hand, only the engraving was done with the CNC - it's our family crest. Box is made from a rimu floor board and has a nice felt covered insert and tinted glass cover.
1 point
-
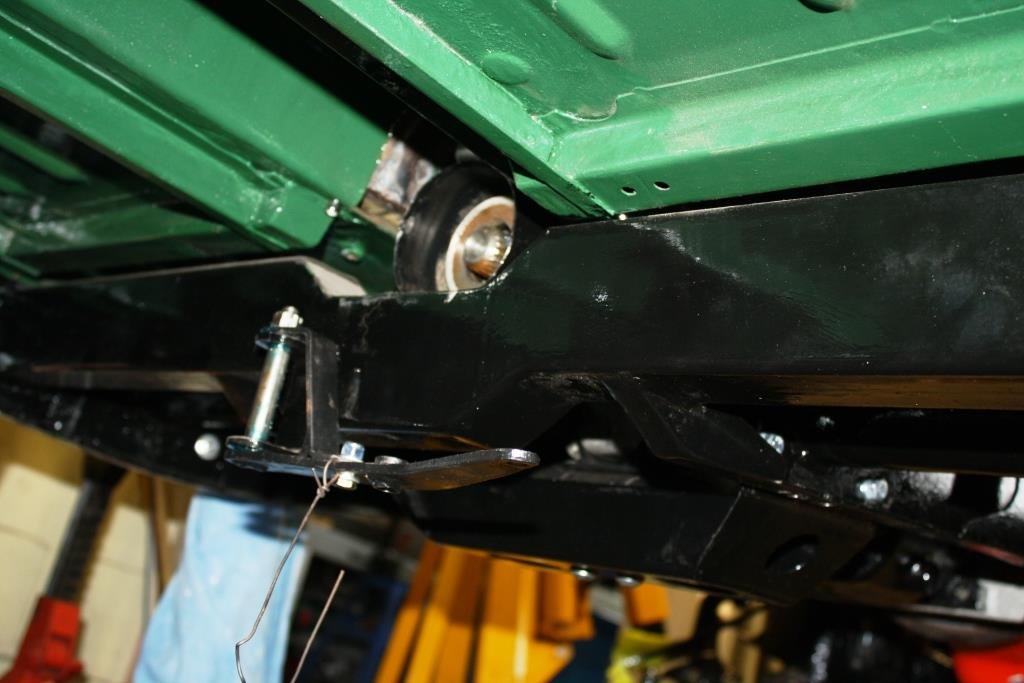
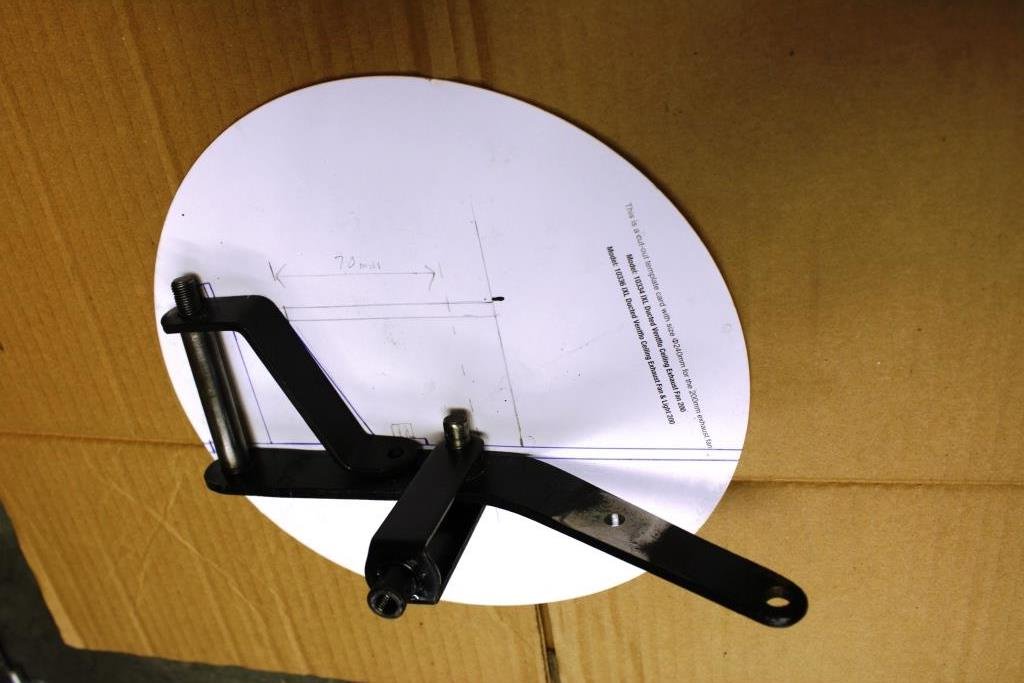
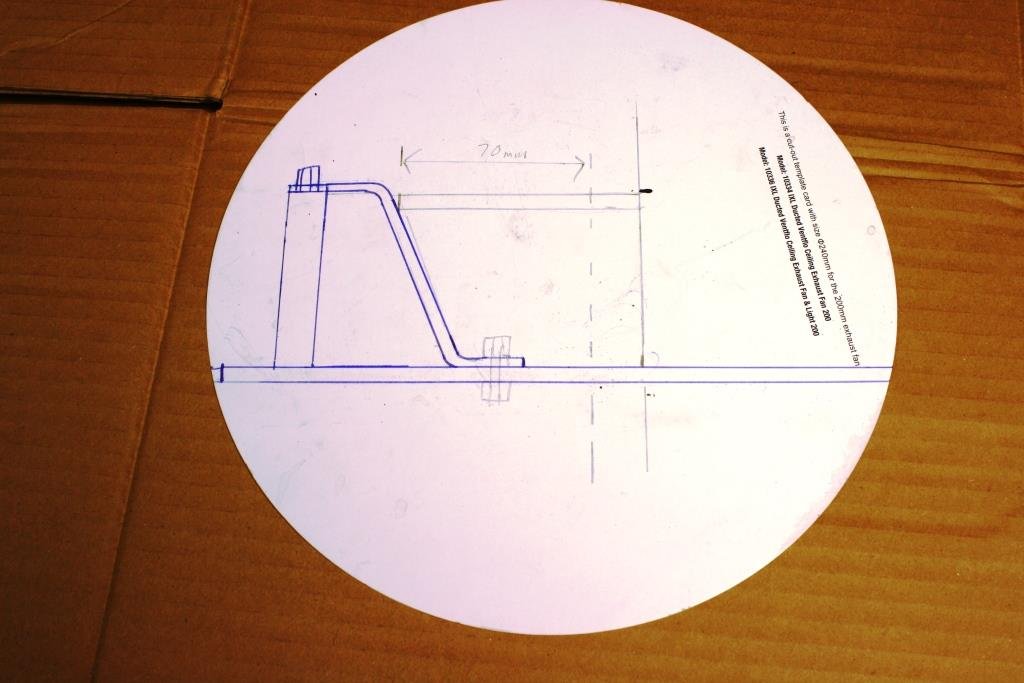
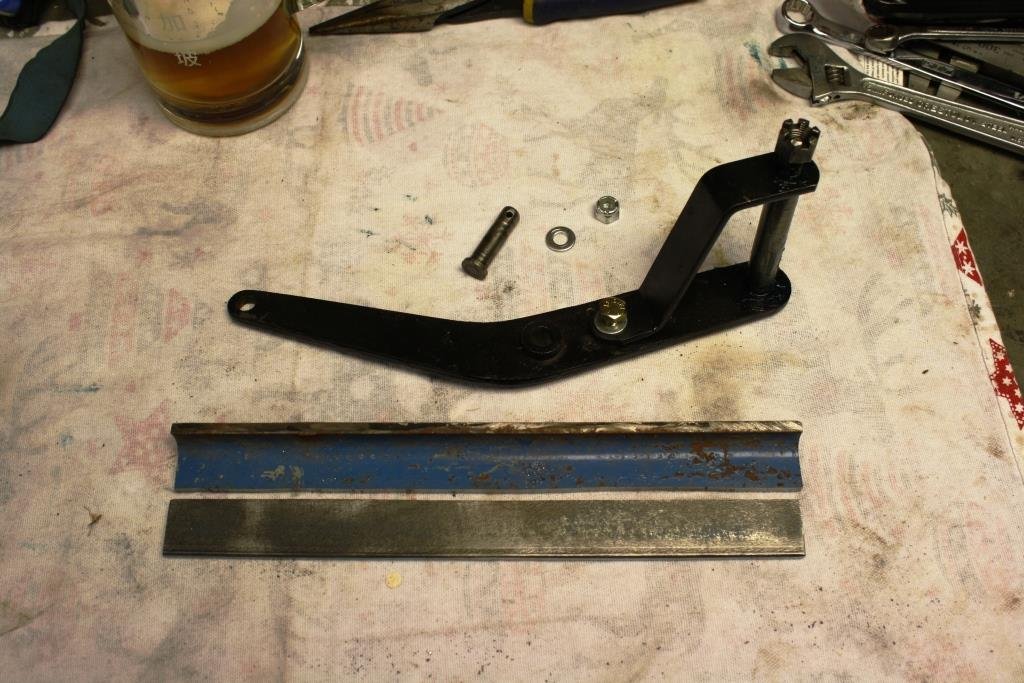
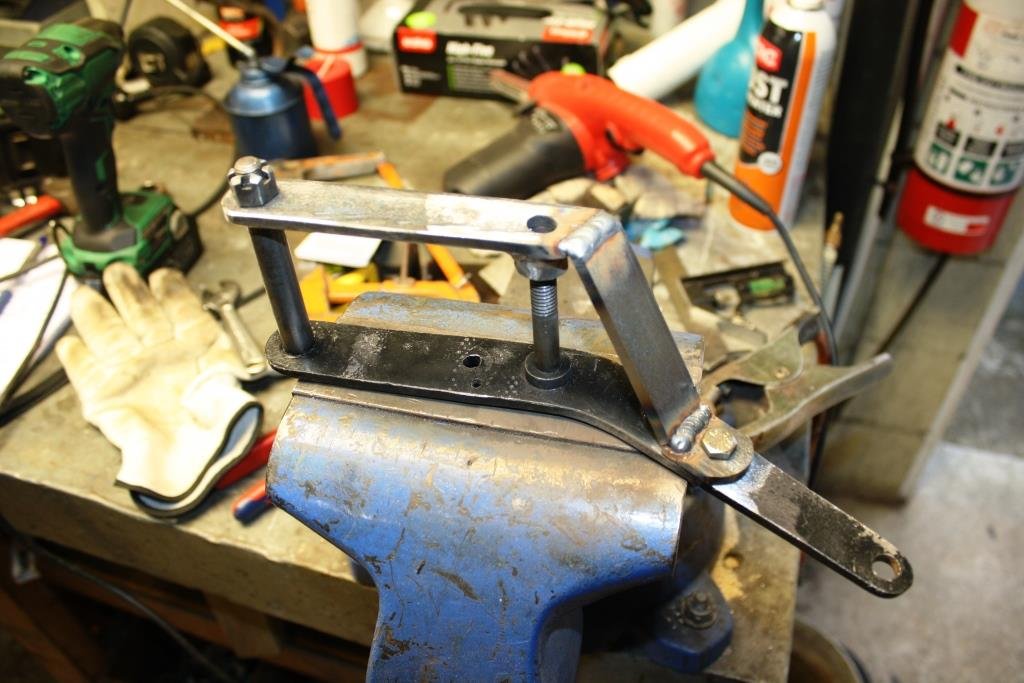
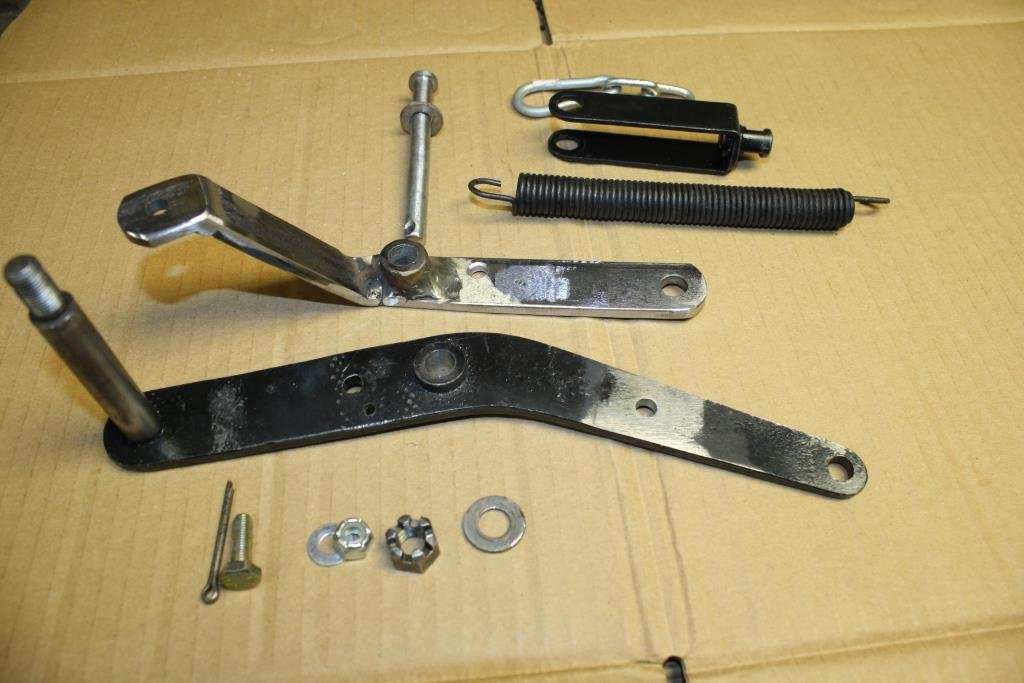
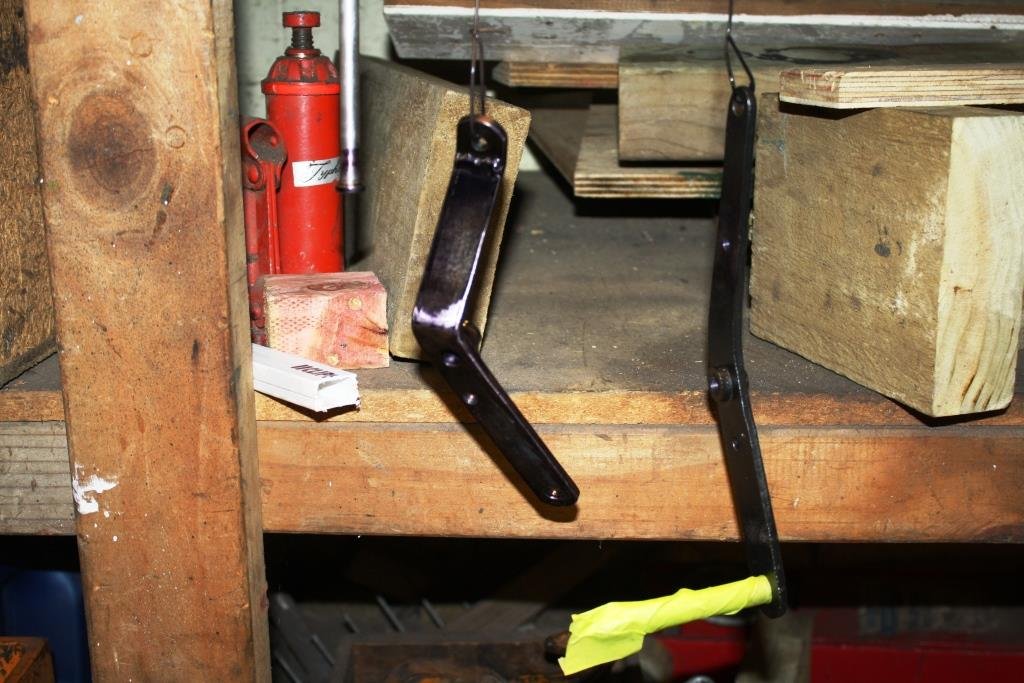
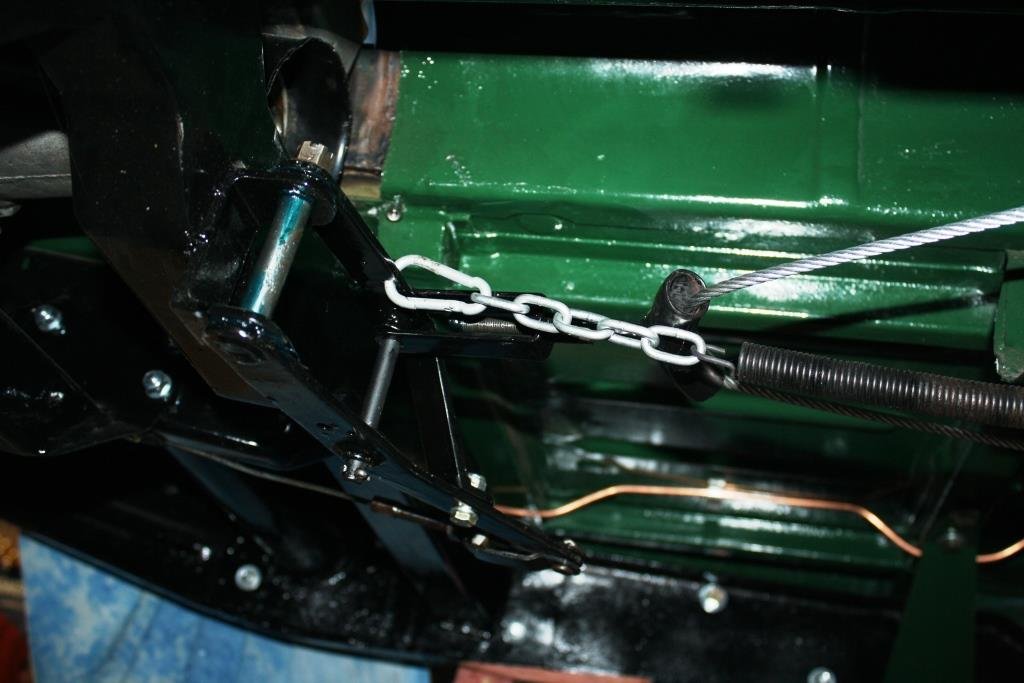
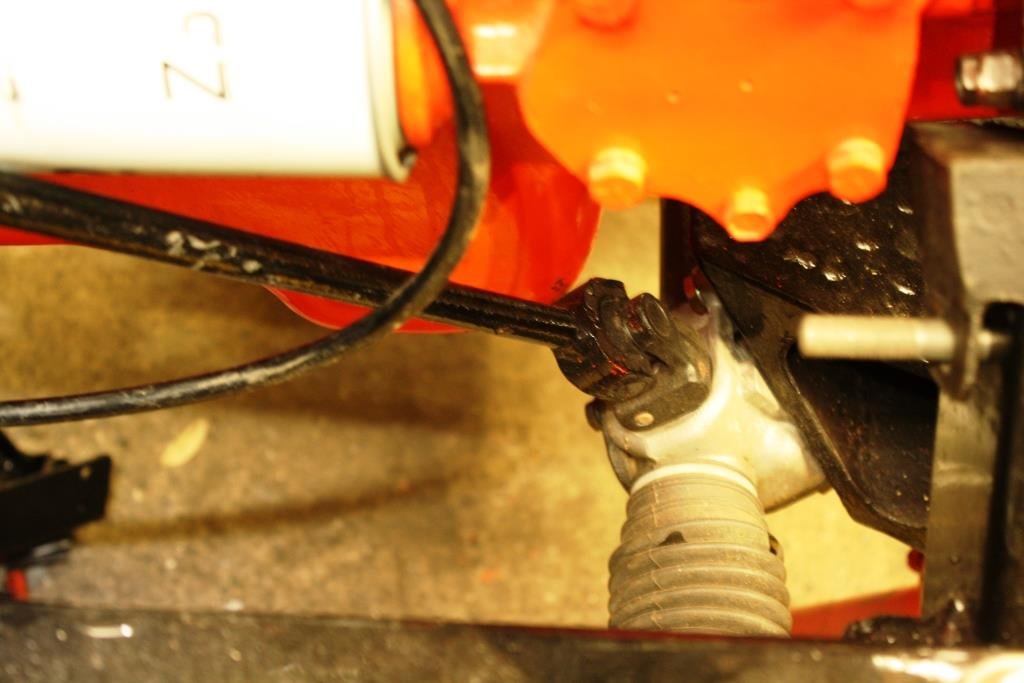
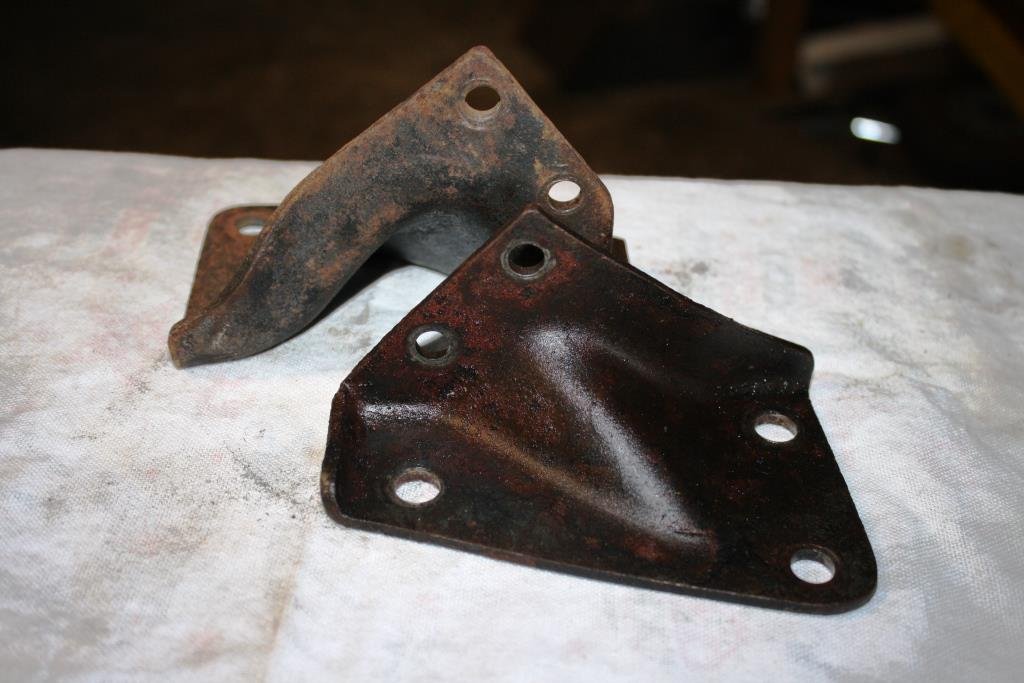
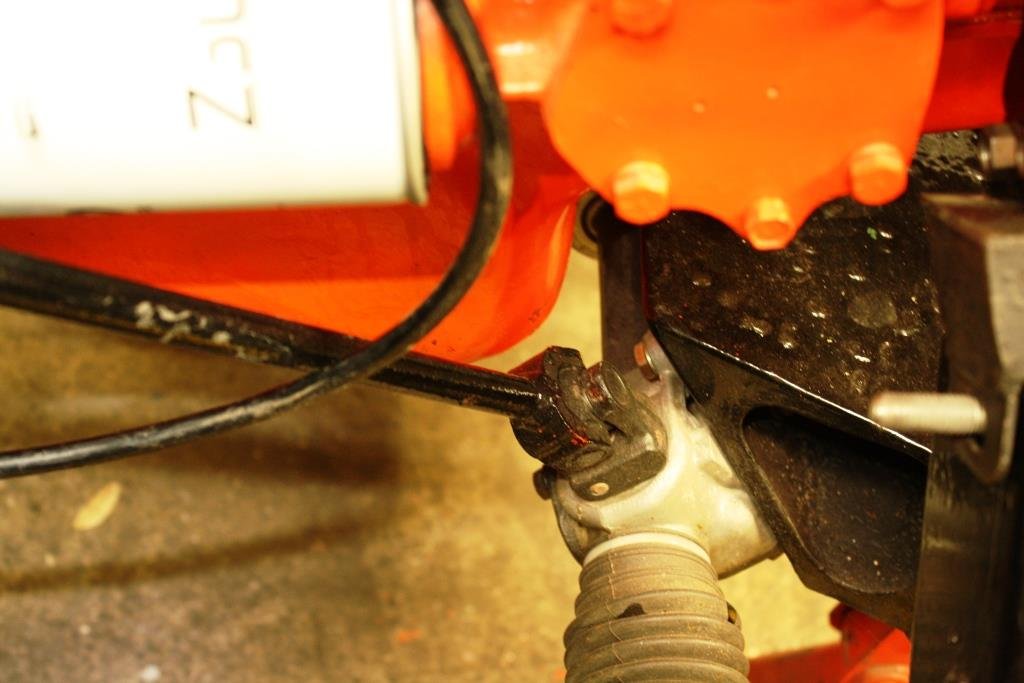
While groveling around underneath the old girl trying to figure out how to get a bloody 2 ¼ inch exhaust to fit where a 1 1/8” had no issues I fell seriously out of love with my handbrake quadrant and decided it could be improved on.. Remaining true to the tradition of this build I removed a “finished” component to butcher it up and change it. First a little CAD (cardboard aided design) work. Hacked up some scrap steel……. Turned up some scrap steel…… Welded up some scrap steel…… And ended up with this lot……… That needed some paint……… It’s a little hard to see under the car but the result is a lot more tidy and satisfies Rigamortice’s obsessive-compulsive personality disorder!
1 point
-
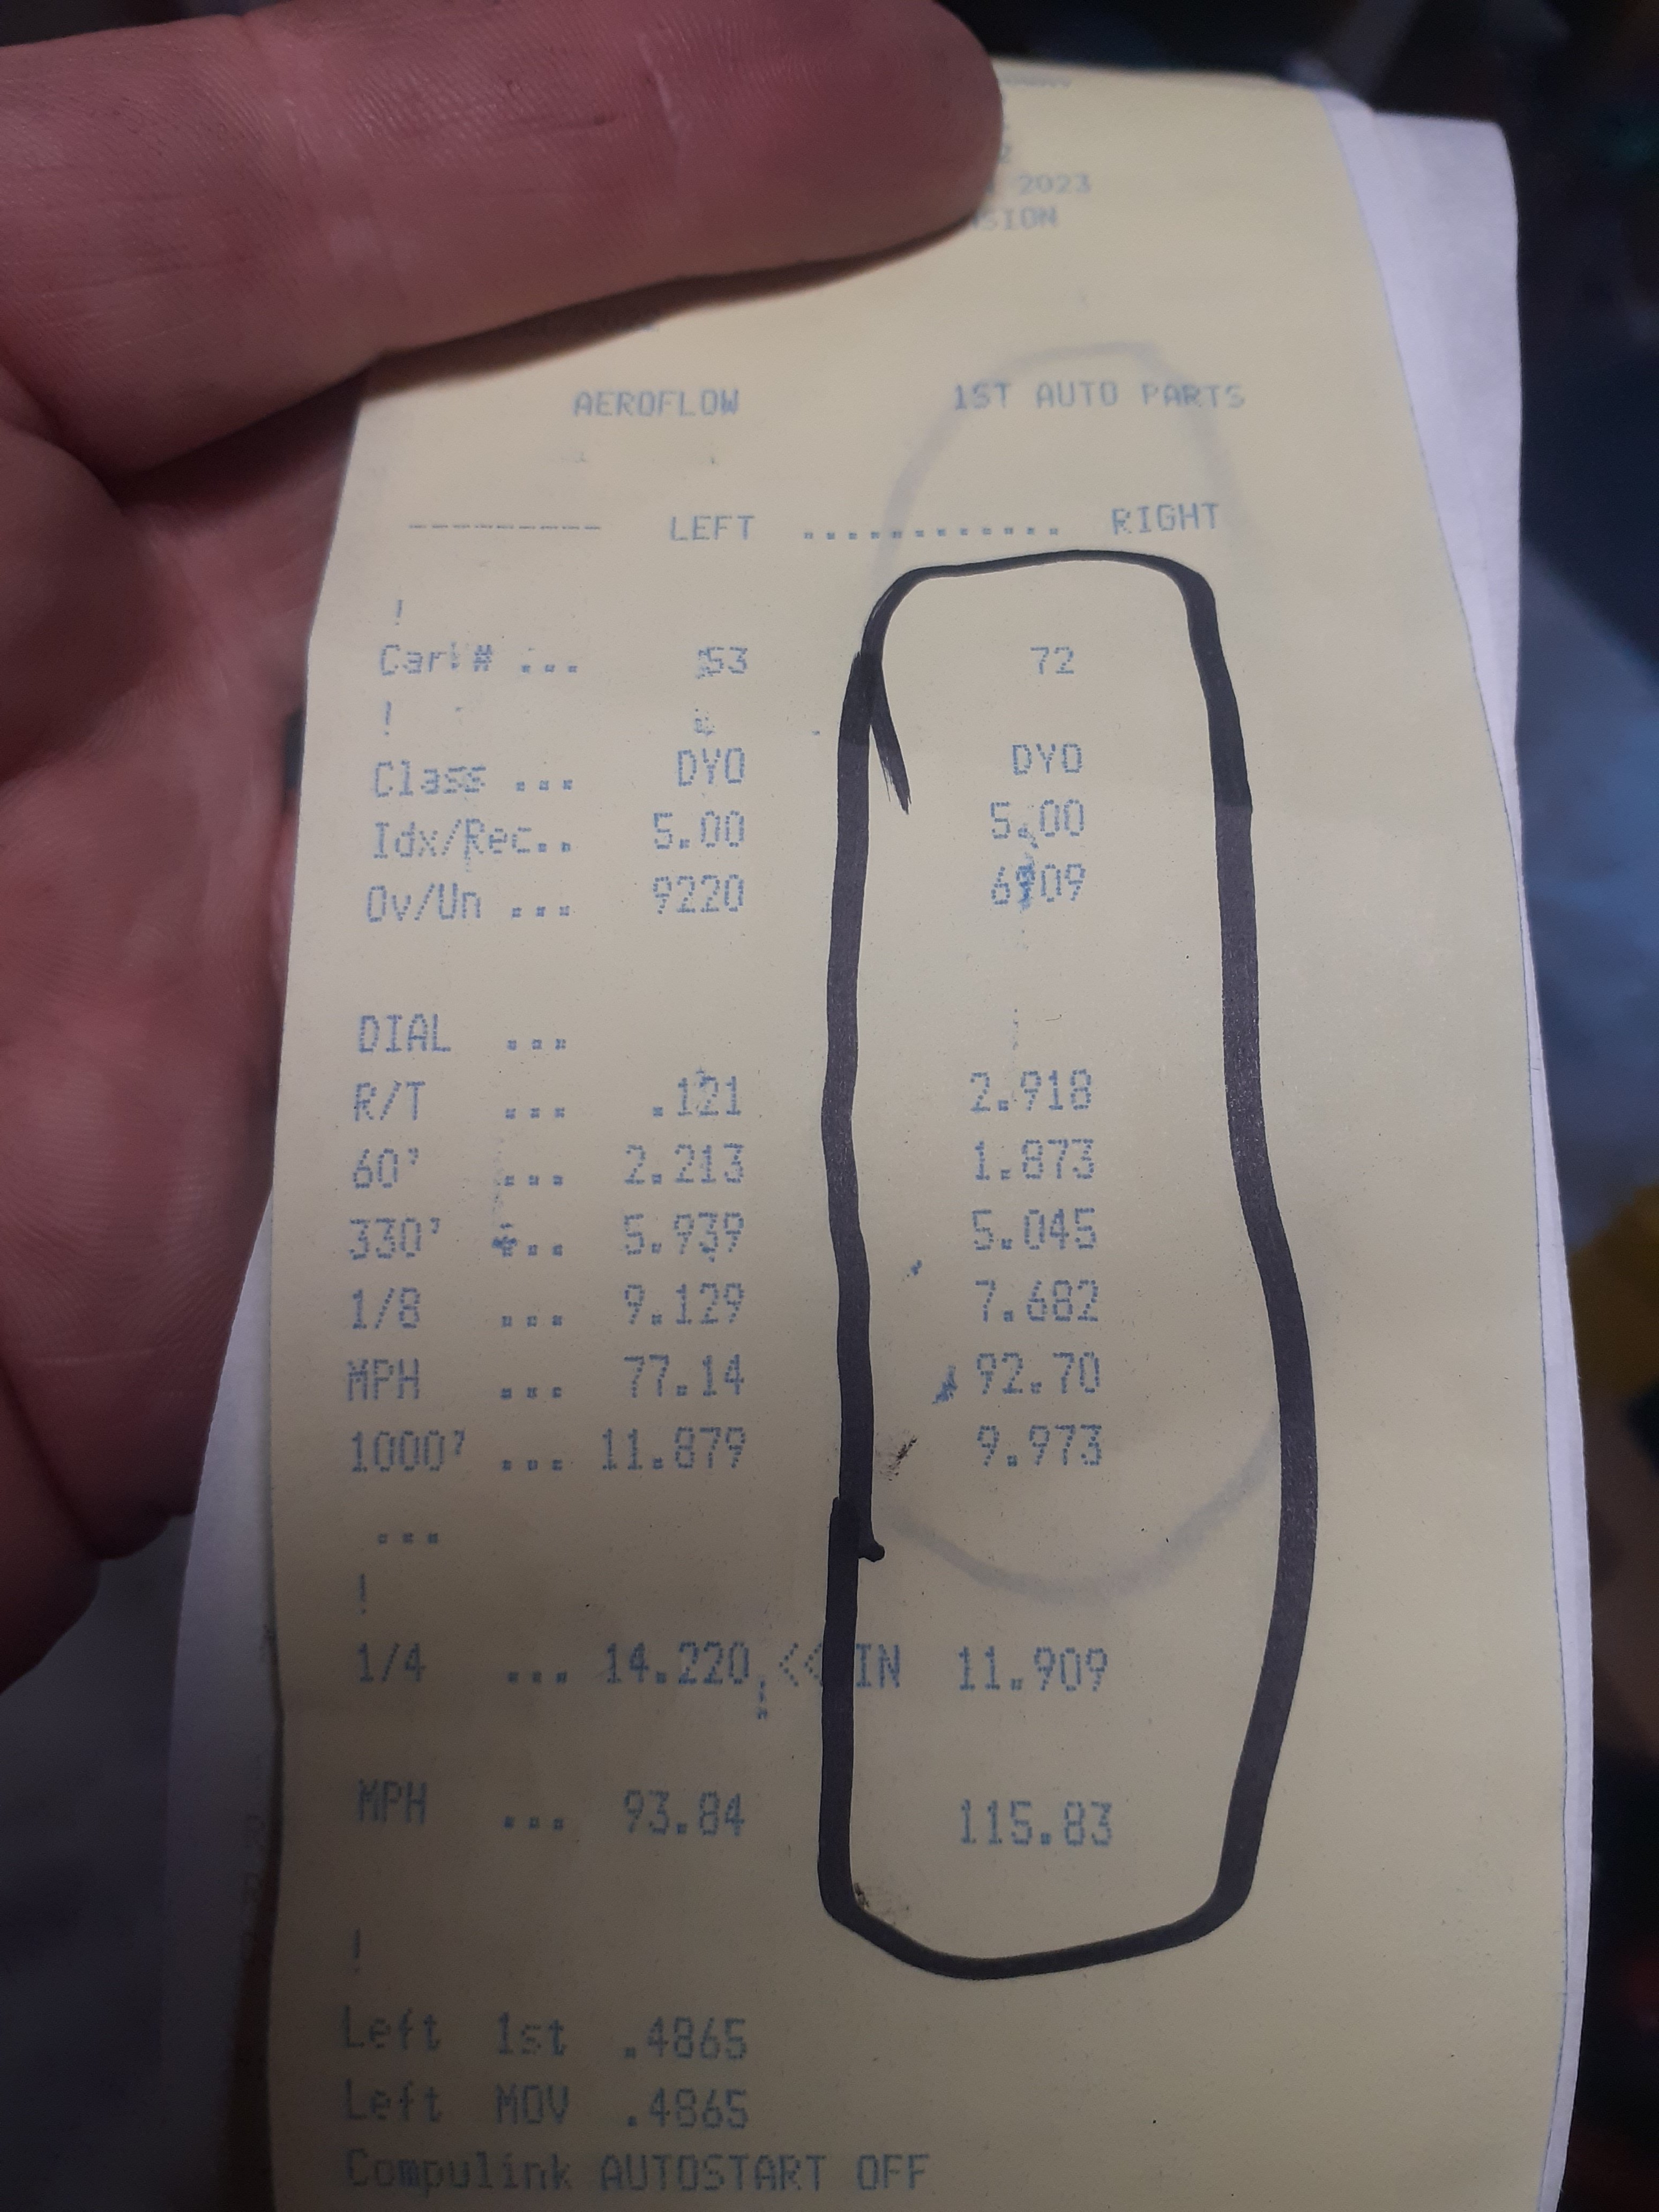
Oldschool drag day '22 edition Did 8 passes Interestingly, every single one was 115mph. Did a few 12.4, 12.3 etc then 3x 12.0 in a row Last pass was near the end of racing so not much time to cool down, I ignored the green and let it build boost with the brake pedal pushed as hard as I could , when I let the brake go it left harder than any other pass today, 11.90 massively stoked with that. I've never paid much attention to 60ft times but it appears that I should, as mentioned all passes were the same mph but the quickest was 1.87 vs 2.3something for the slowest
1 point
-
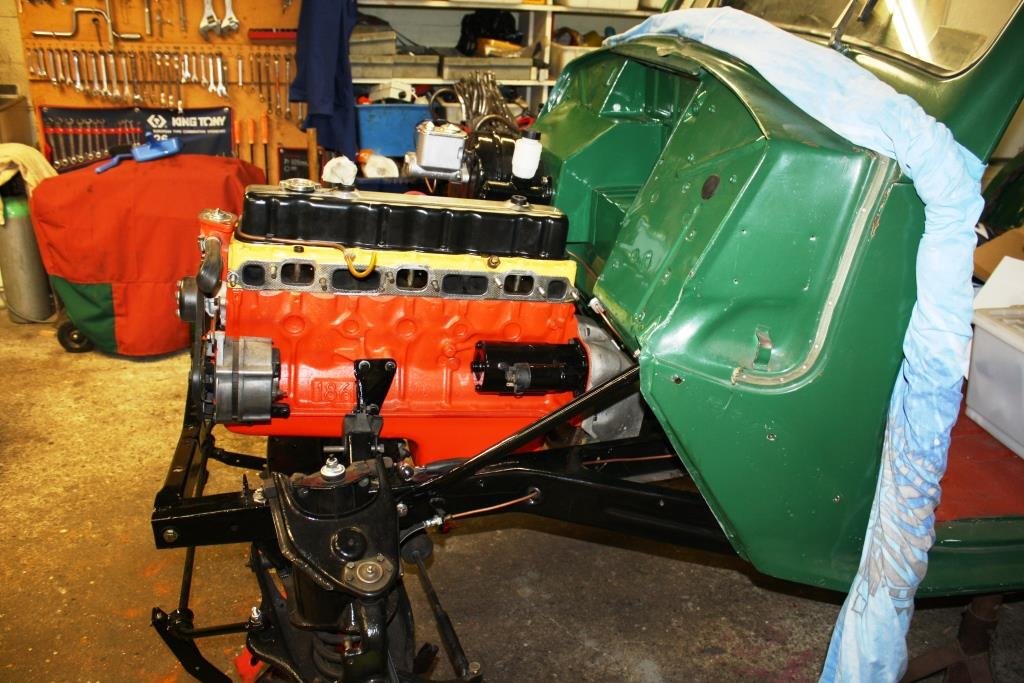
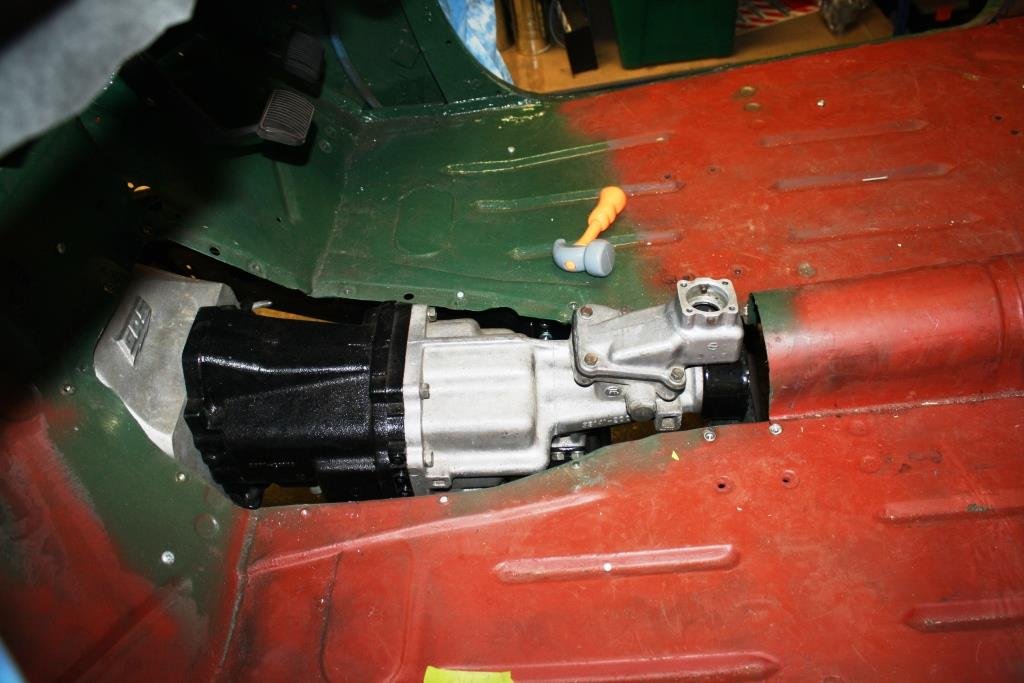
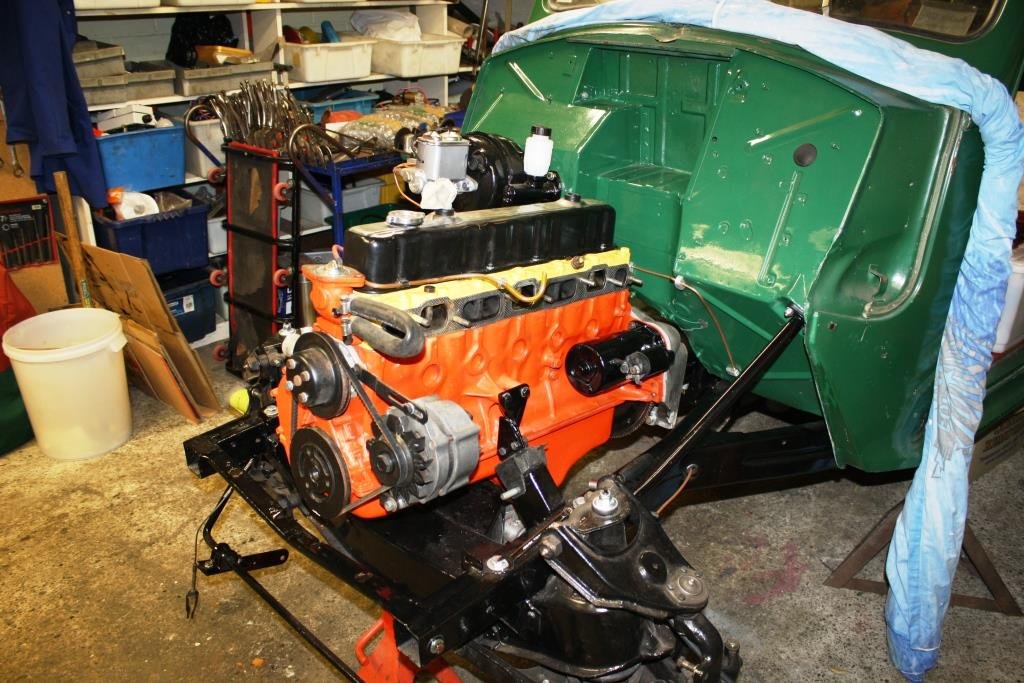
Time to stick the little 186 where it belongs…. Had a big issue with lining up engine mounts…. Discovered the oil filter was in the way of the steering…… And the steering rack U/J was hitting the sump ....????? After a Wild Turkey or two and some head & bollocks scratching I remembered that the left and right engine mounts were different sizes……duh….! Swapped them over and everything fitted like a glove. Even the clutch slave has room to breathe…. Looking good. Our 4 year old racing driver/grandson hit the g/box with his plastic hammer and it fits…….. Finally after 5 years, motor back in place………
1 point
-
1 point
-
It's alive! Threw the rebuilt injectors in and seems happy as. Drove around the block and makes all the right noises and not too many of the bad ones. Next steps are to put the front back together so it looks like a car again and then start chipping away at the rest of the issues including but not limited to cracked windscreen, bald front tires, no cert, no wof, no reg.
1 point
-
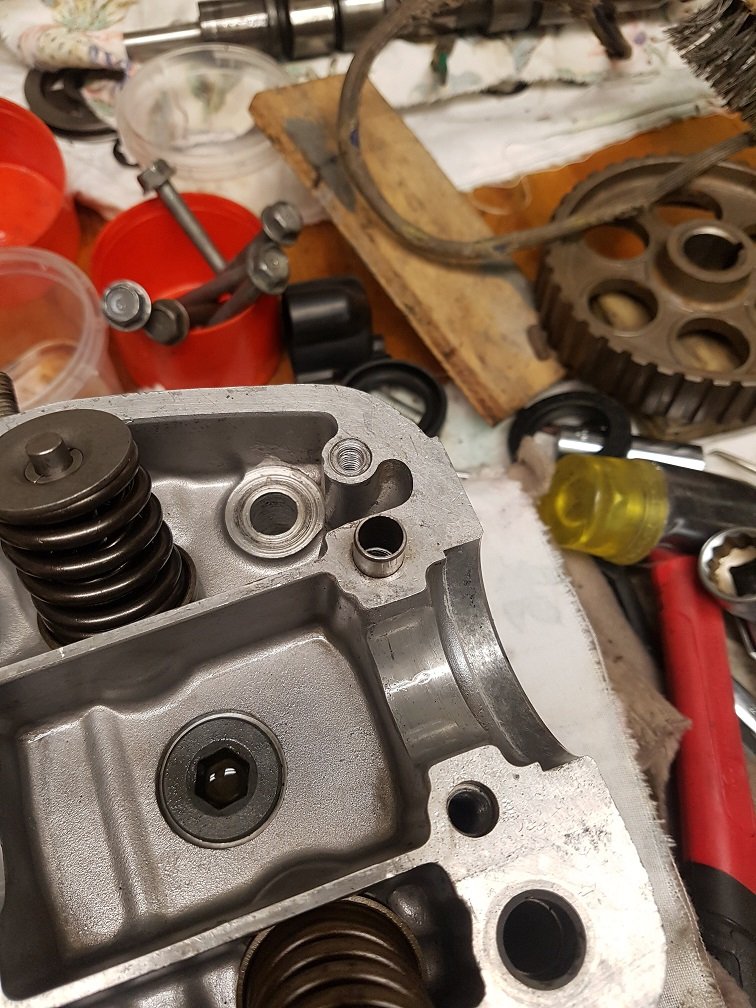
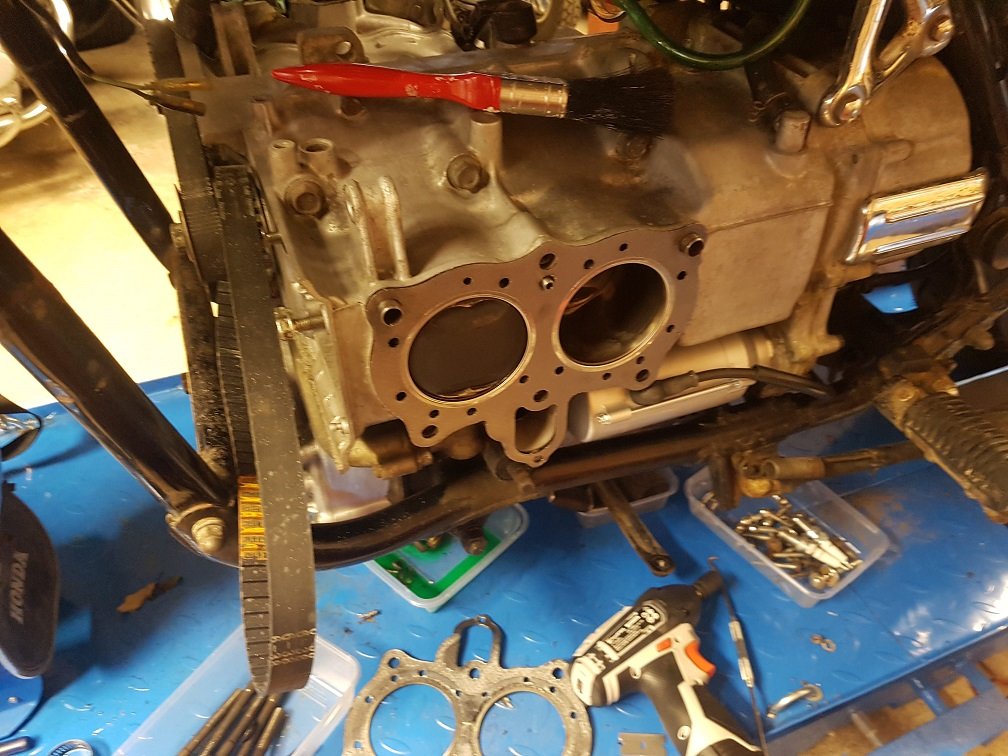
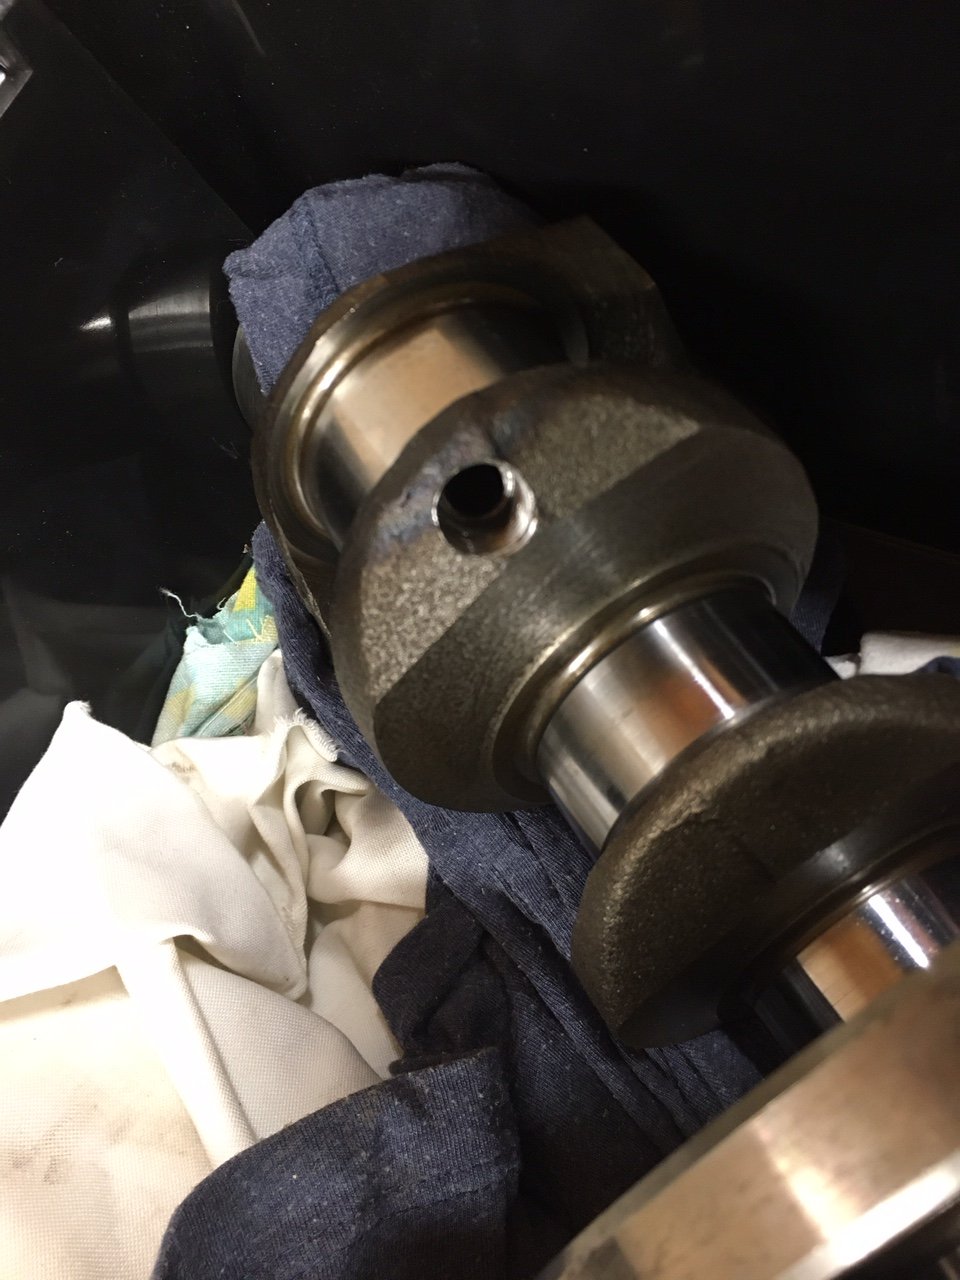
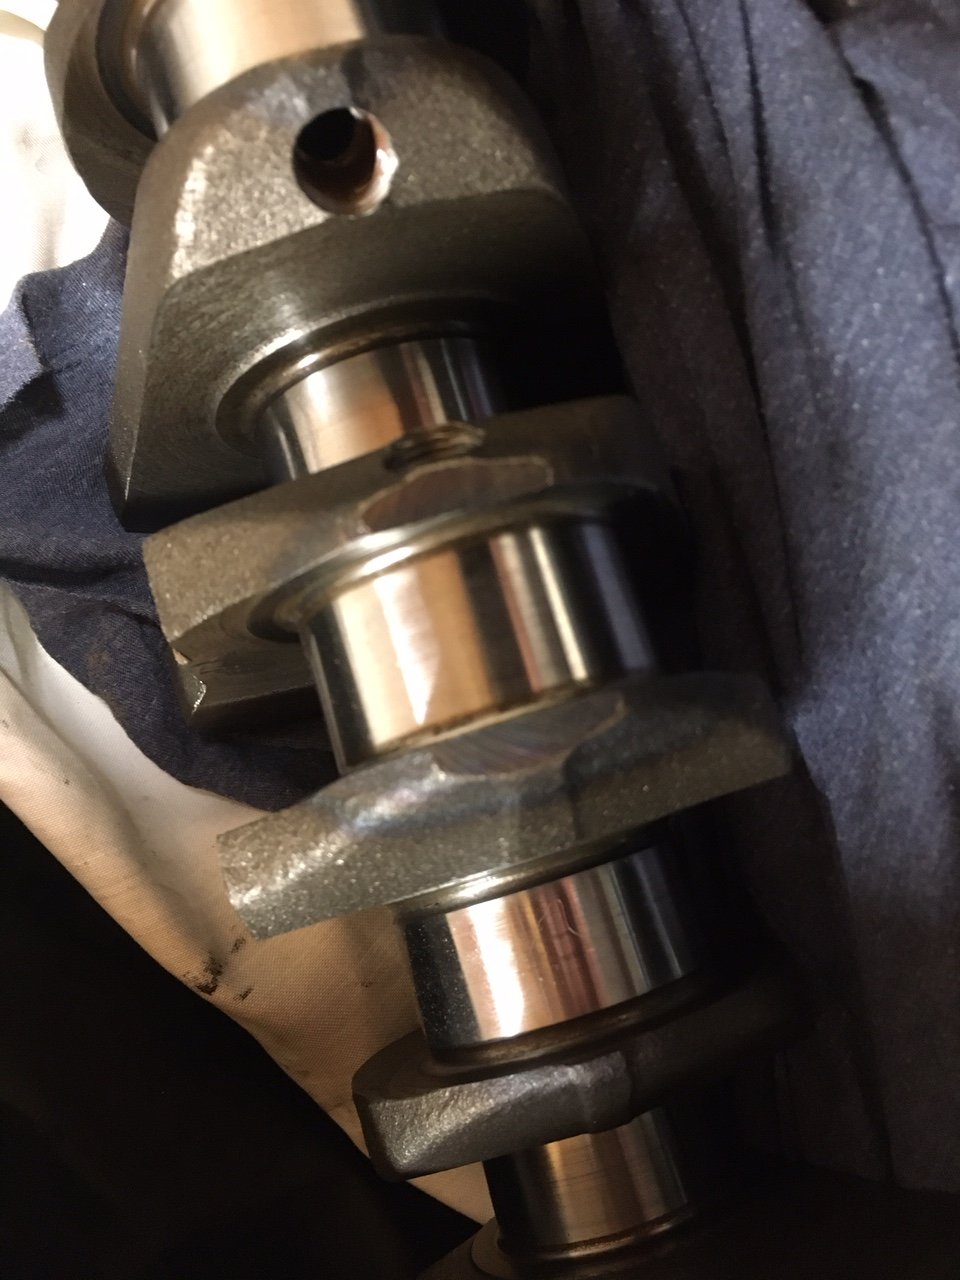
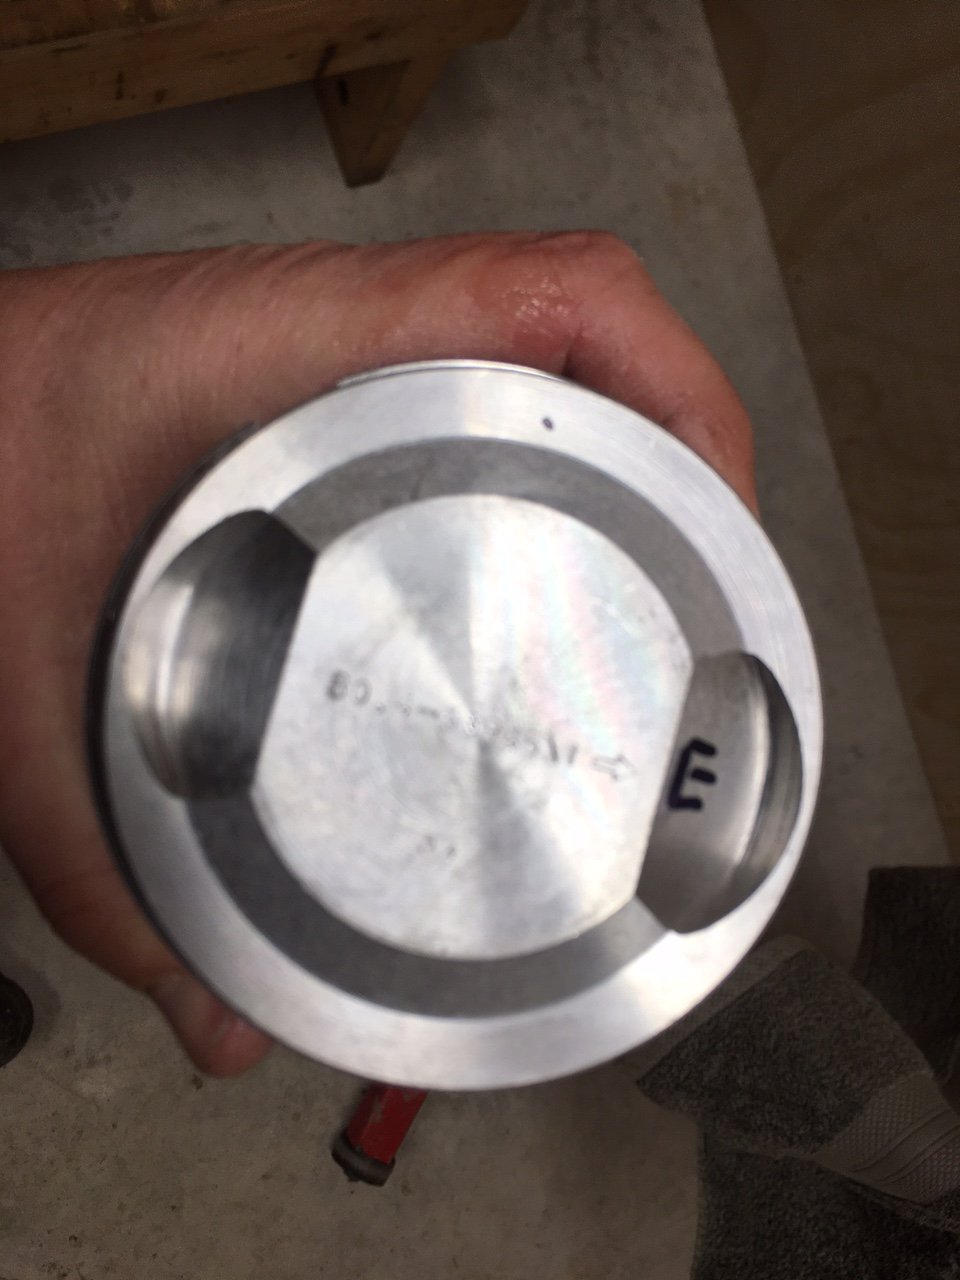
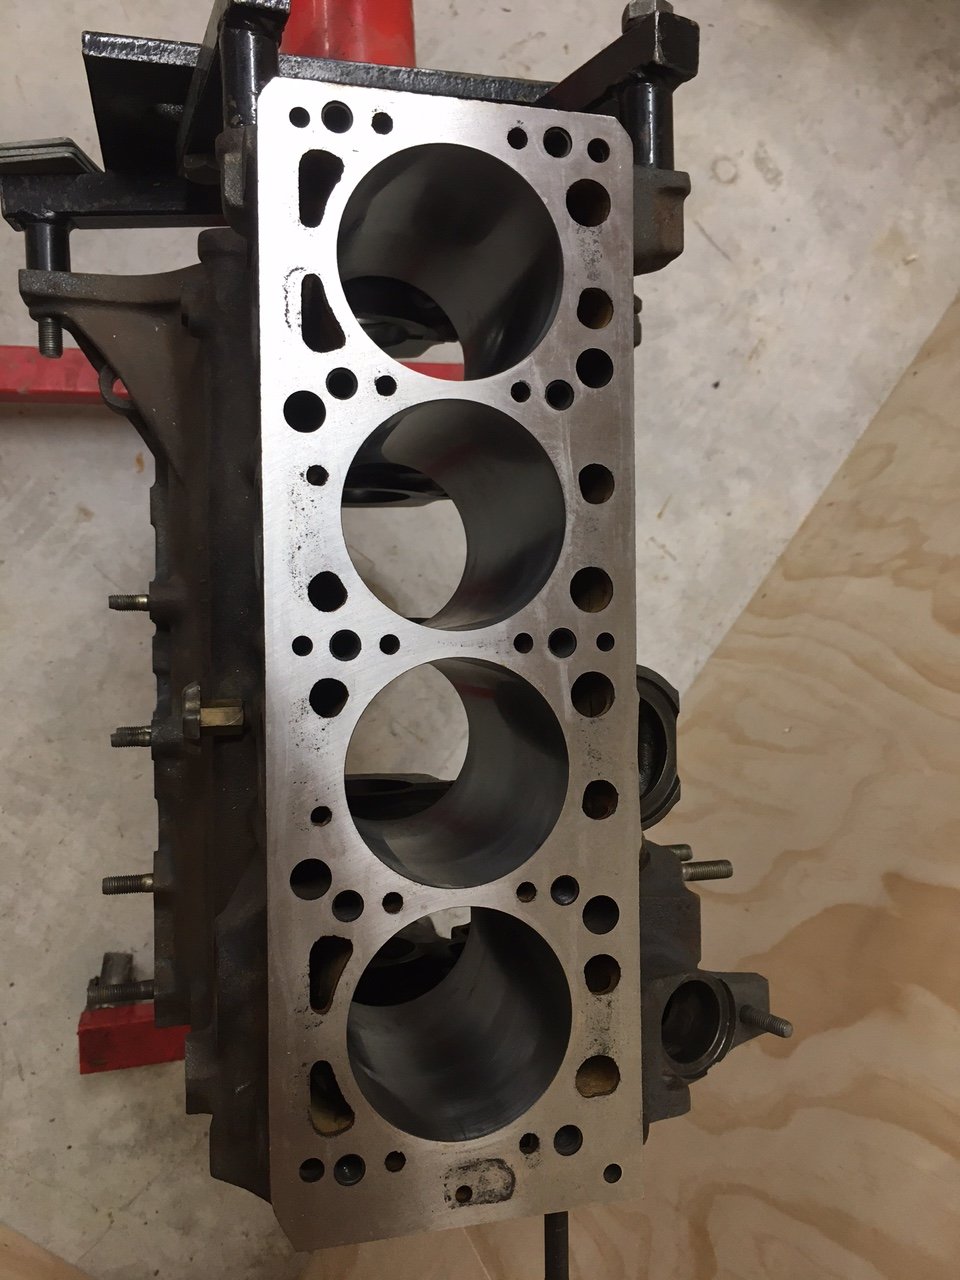
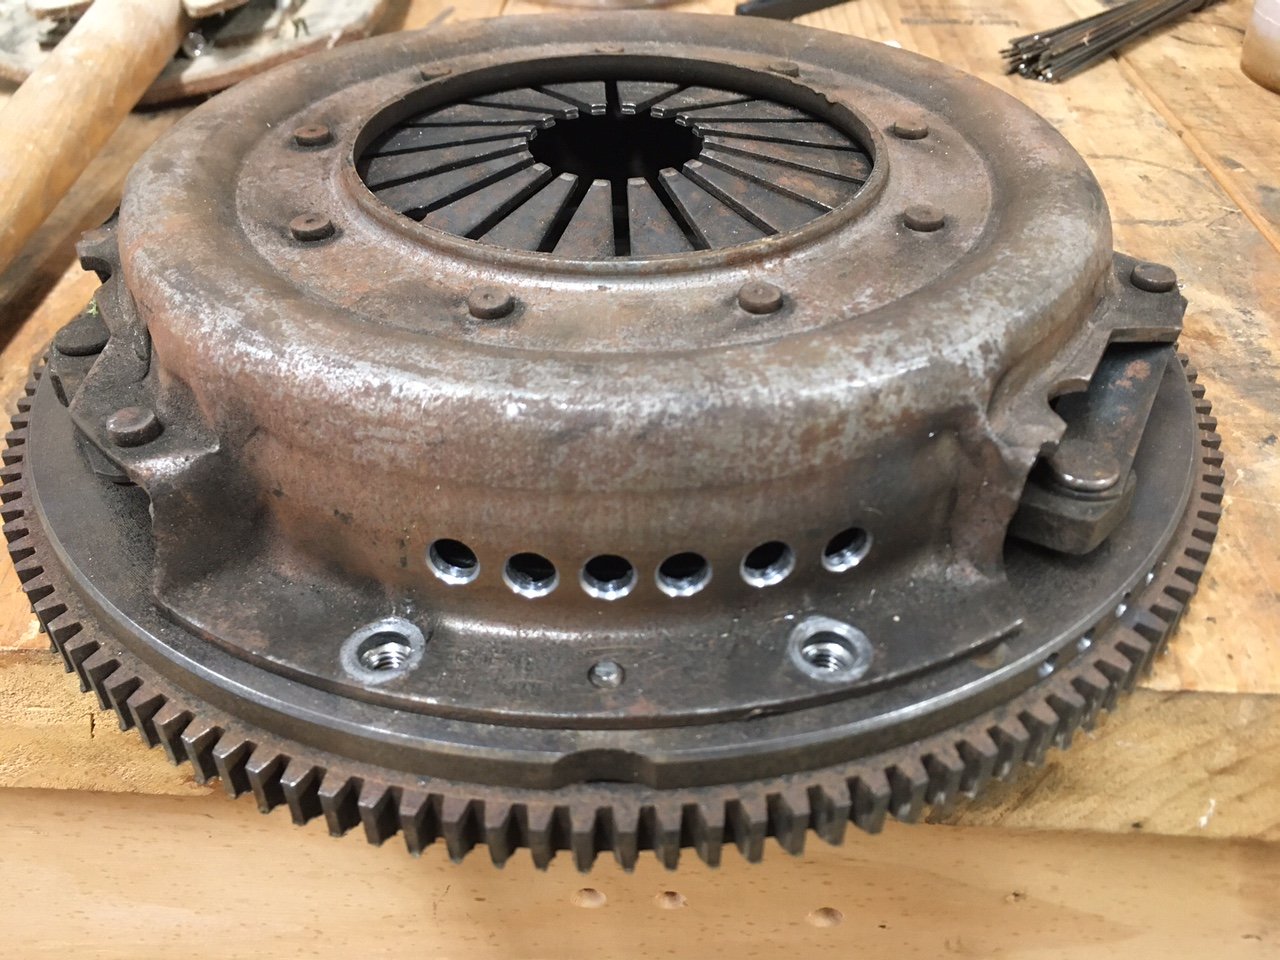
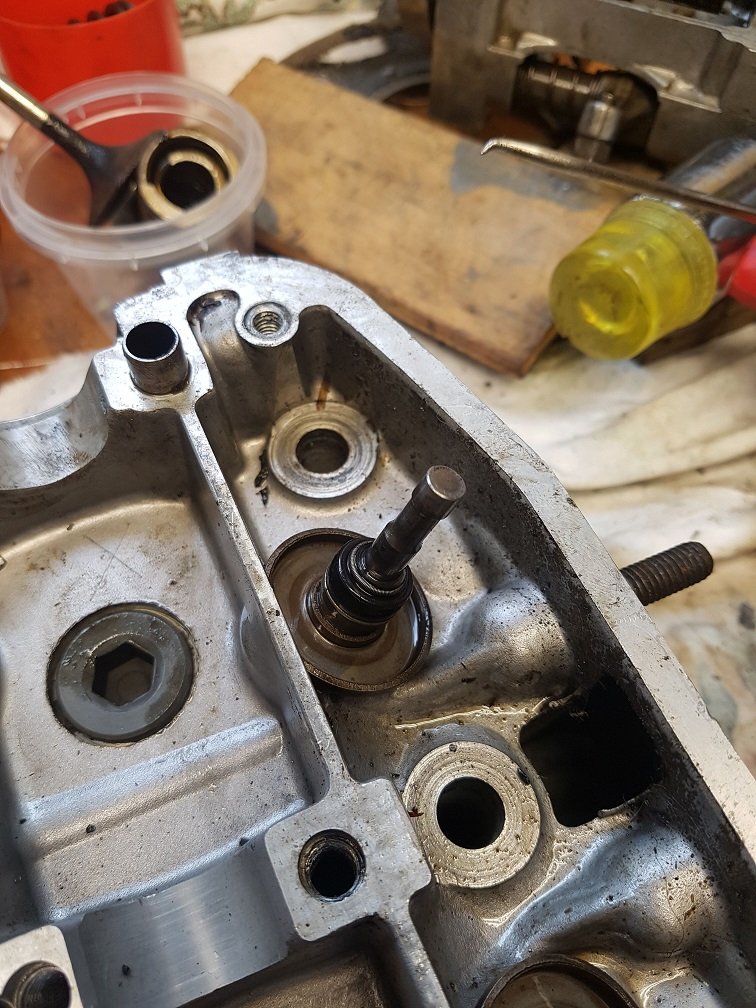
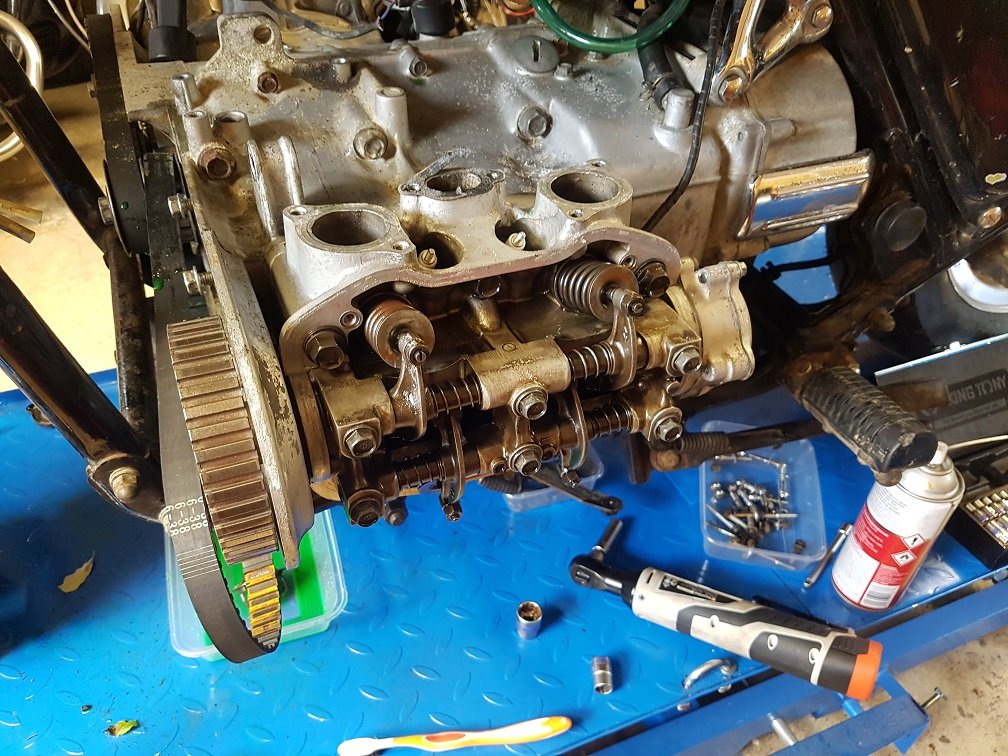
The bottom end has come back from the machine shop! There’s a bit of cleaning work for me to do, as the block didn’t get hot-tanked. The rationale for this was it would destroy the auxiliary shaft bearing which they didn’t remove because they couldn’t be bothered. They did remove the gallery plugs and gave it a good manual hose out though, and he reiterated several times how much crap was lodged in there! The deck has had a very light skim. The marks still visible can’t actually be felt by my sensitive fingers. It has been bored 0.4mm oversized. The crank has had the journals polished and also had the gallery plugs removed (full of crap also) This meant the holes had to be drilled and tapped for new modern replacement plugs. This apparently ruined his tap because the steel is so hard! Go Fiat!! The crank has also had some weight ground off to balance it. It didn’t need much apparently. Shiny piston The rods were balanced too. 6 grams between the heaviest and lightest ex factory. All spot on now. Looks like number 2 was the lightest as it has nothing missing. The flywheel and clutch cover were also balanced. The flywheel was pretty good, just 4 small holes drilled. Clutch covers aren’t that well balanced evidently because swiss cheese to get it right! I have only had time to gap the rings on number 1 so far, and they were bang on the low end of the spec range out of the box. If all the others are the same I’ll be happy as.
1 point
-
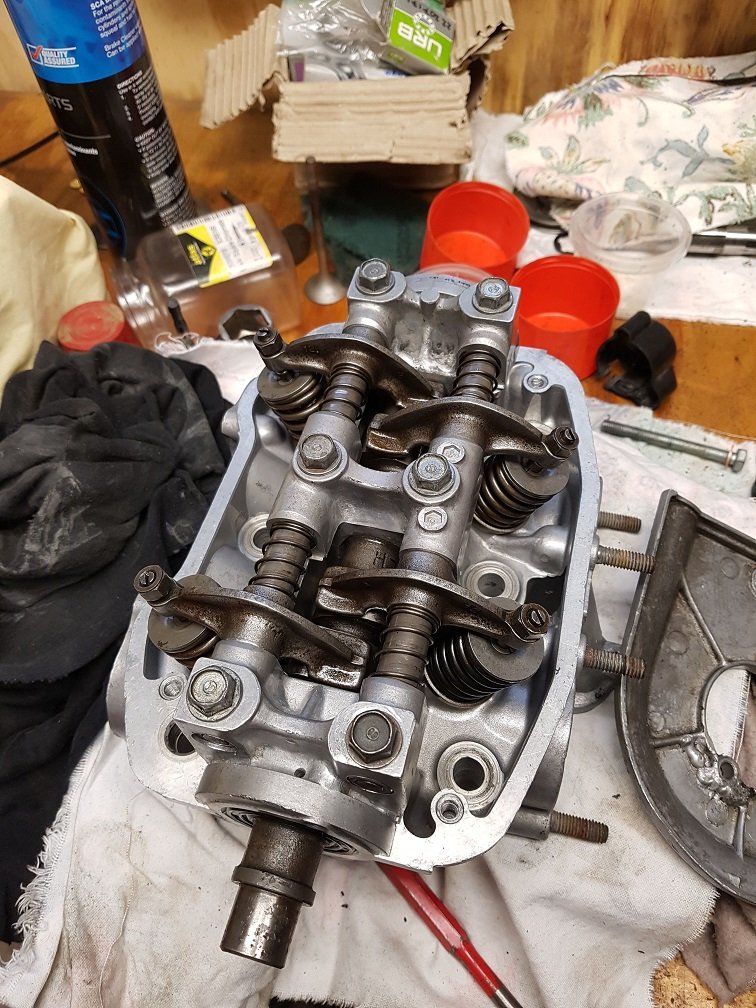
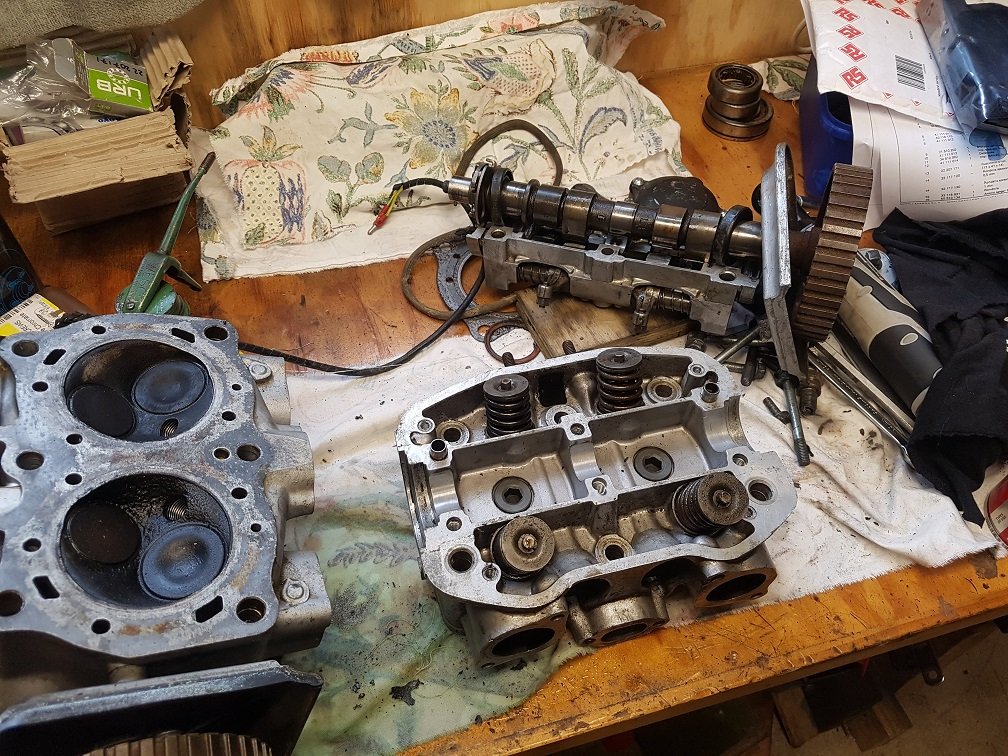
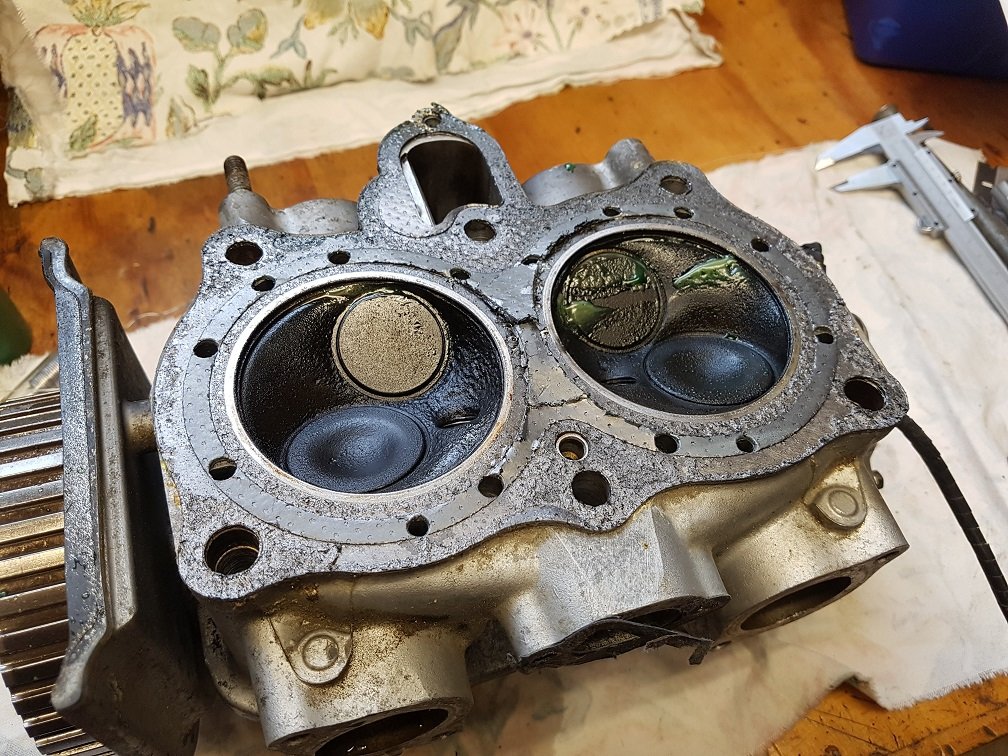
There was a spare cylinder head in all the parts with it. So decided to see if I could clean that up. The chambers looked mint, it was just filthy so i pulled it all apart to clean And this little guy was stuck. And i'm talking stuck Some hammers, drifts and some swear words later it was out. Gave the head a good wash in the sink: Found 4 good valves either from this head, or in the parts bins and lapped them in with some cutting compound. Wacked on some new valve stem seals. It was all coming up millhouse. Stripped and cleaned the rocker assembly She's looking beute I couldn't assemble it as I didn't have any cam oil seals. The top end kit didnt come with them. duuumb. Thought i'd look around on the intwerwebs and order some. Was gonna be like $15 each. Hopefully hear by end of week. No biggie. Found out they're the same as honda integra cam seals. Thought id try repco on the off chance I could pick it up then and there. Bam, 2 in stock, on clearance, 58c each. Sold. Its pretty much ready to pop back on the bike. Hopefully tonight.
1 point
-
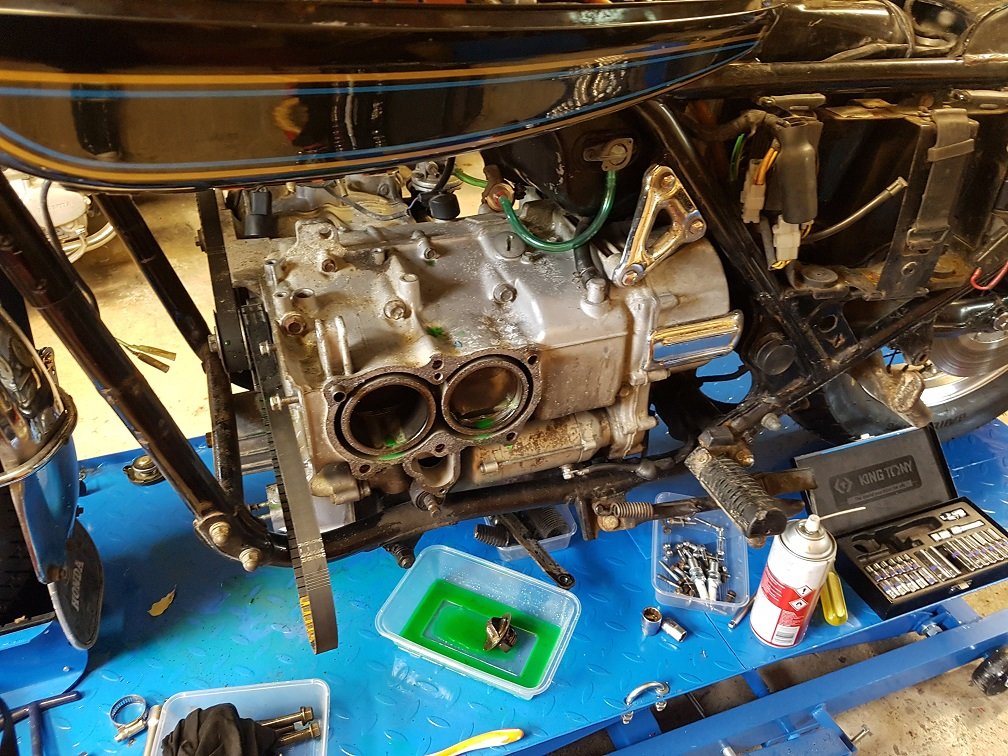
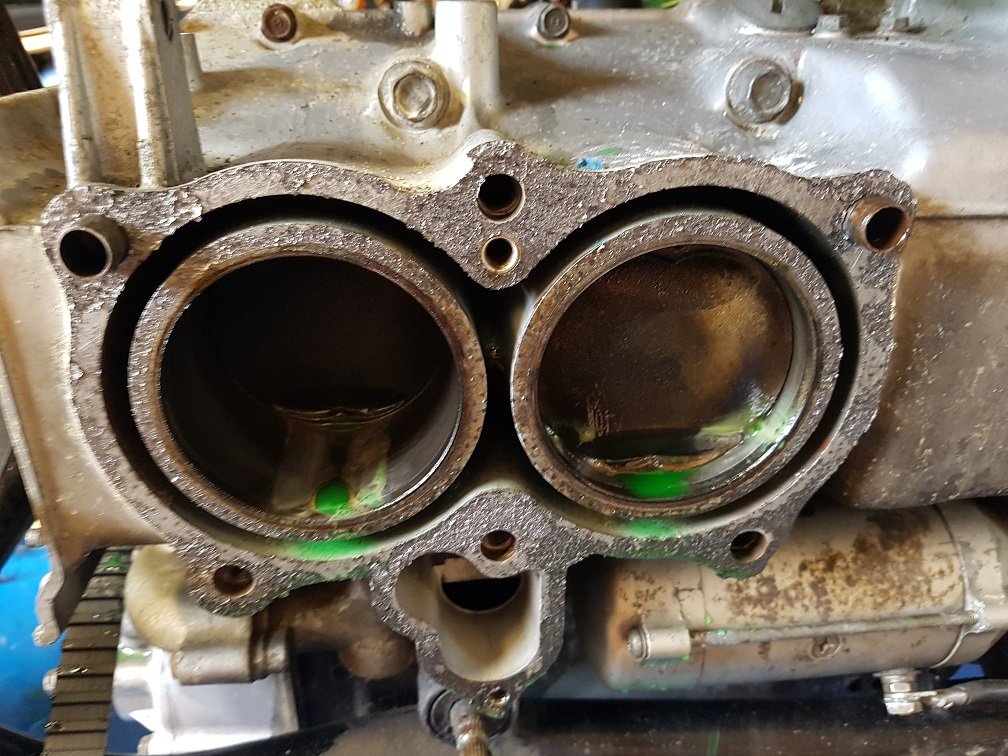
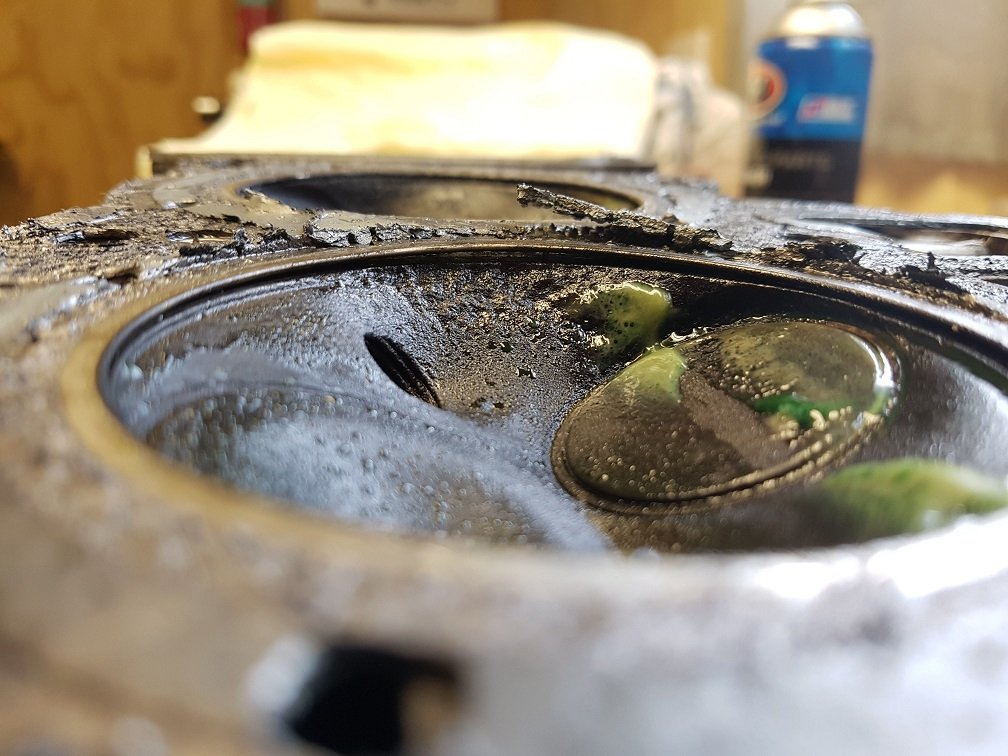
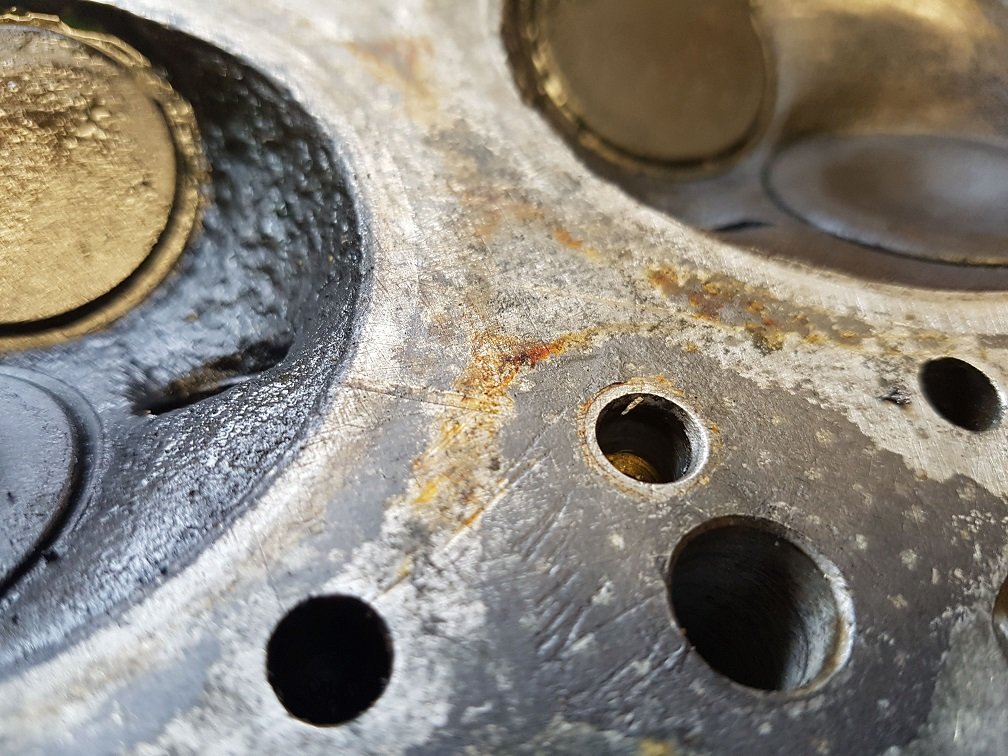
Got stuck into fixing headgasket this weekend: Have to take quite a bit off the bike to get to head removal. All pretty straight forward though. Once the head was off, you could see there has been coolant sitting in the bores (some was spilt from head removal, but there was oil/coolant sludge in both cylinders this side): Cylinder head had matching gunk No obvious signs the gasket was blown. Might have been in the middle? Could have also happened when i lifted the head off. Peeling the gasket off showed some barbaric damage from PO. Maybe this would be enough for coolant to leak into cylinder? There was also some heavy detonation or corrosion damage to both combustion chambers. This had eaten well into the sealing surface. So I suspect the had gasket may not have been able to seal properly.
1 point
-
I like the net to catch any parts when they fall off the bike1 point
-
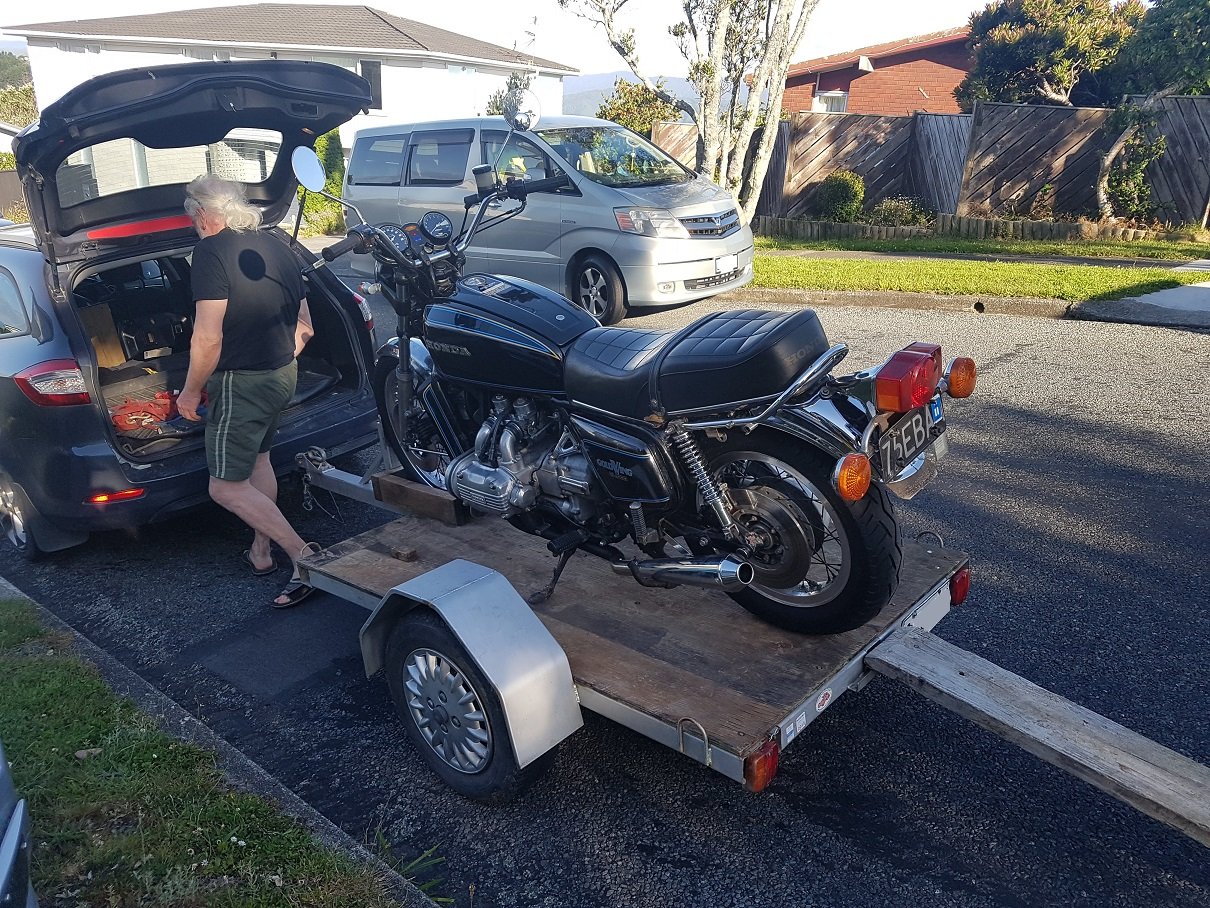
Did a big mish this last weekend. Took the old beater all the way down to Invercargill to collect this chonker. Was a purely hammer down trip. Ferrys were delayed both ways. Which made for some long days. Got to hang out with this gangsta: Collected this chonker. I can't even touch the ground! And loaded it into the ute. It just fit. A++ would trade again. So now its back in the 04, i can rip into it and get it legal. When loading it onto the ute, we noticed coolant leaking out the left rear exhaust port.... Hmm. BHG hopefully. I've got a gasket set in stock, so will rip the head off this weekend to try and resolve. Plenty to do, will update soon.
1 point


This leaderboard is set to Auckland/GMT+12:00