
Leaderboard


Popular Content
Showing content with the highest reputation on 06/28/22 in Posts
-
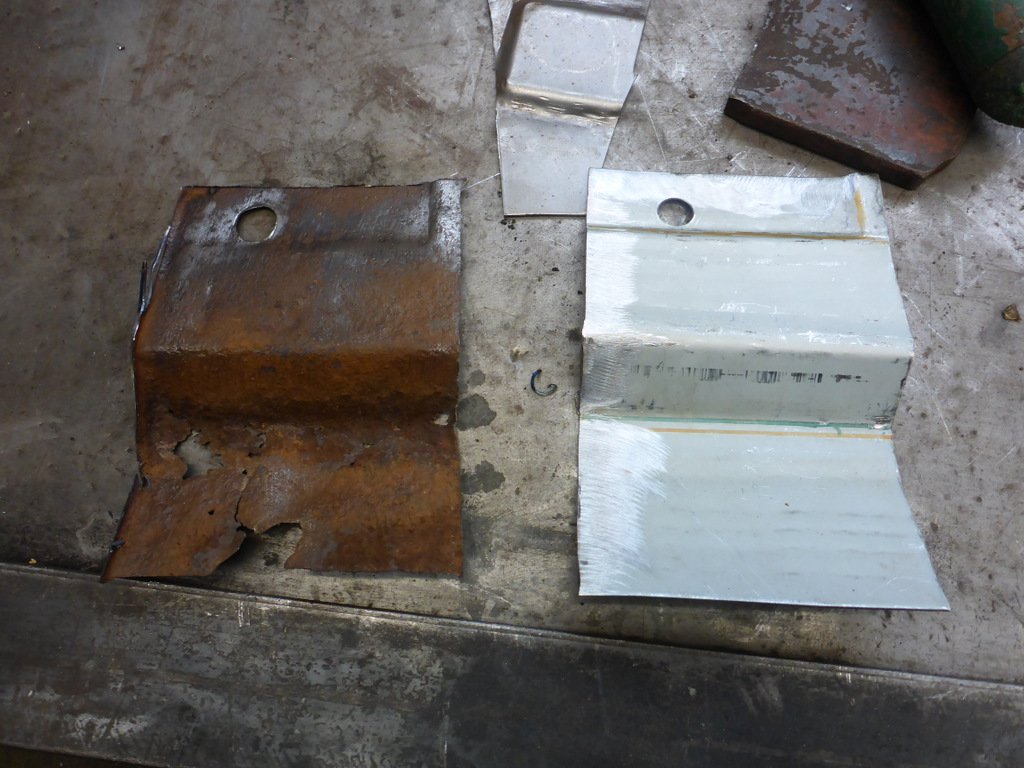
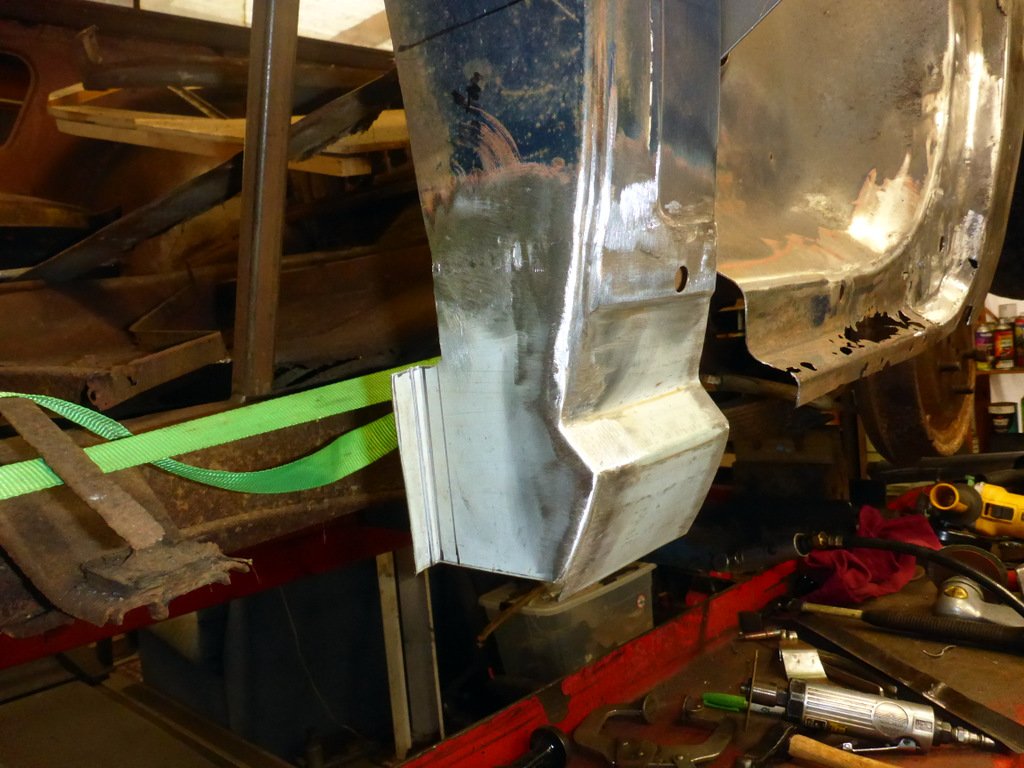
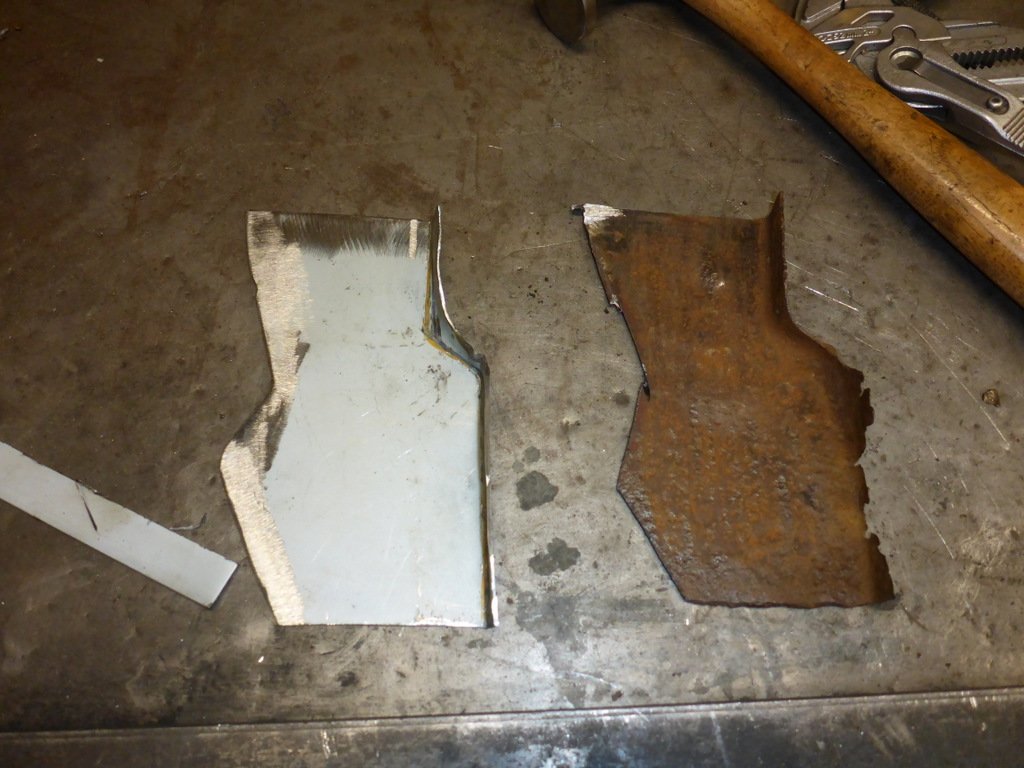
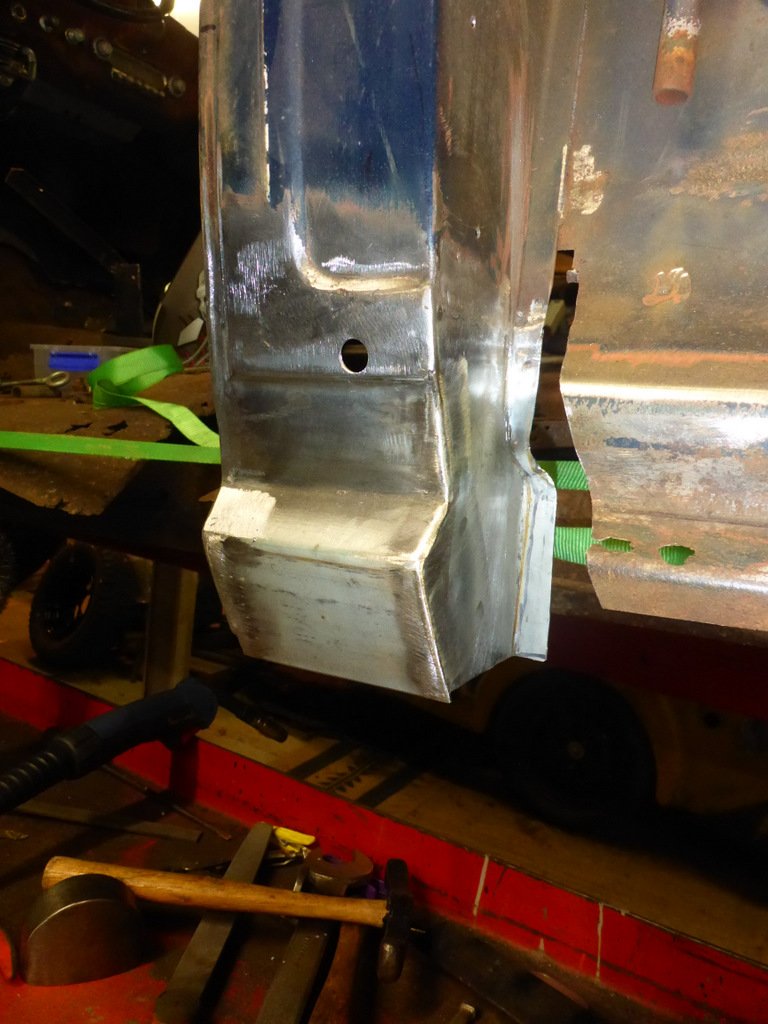
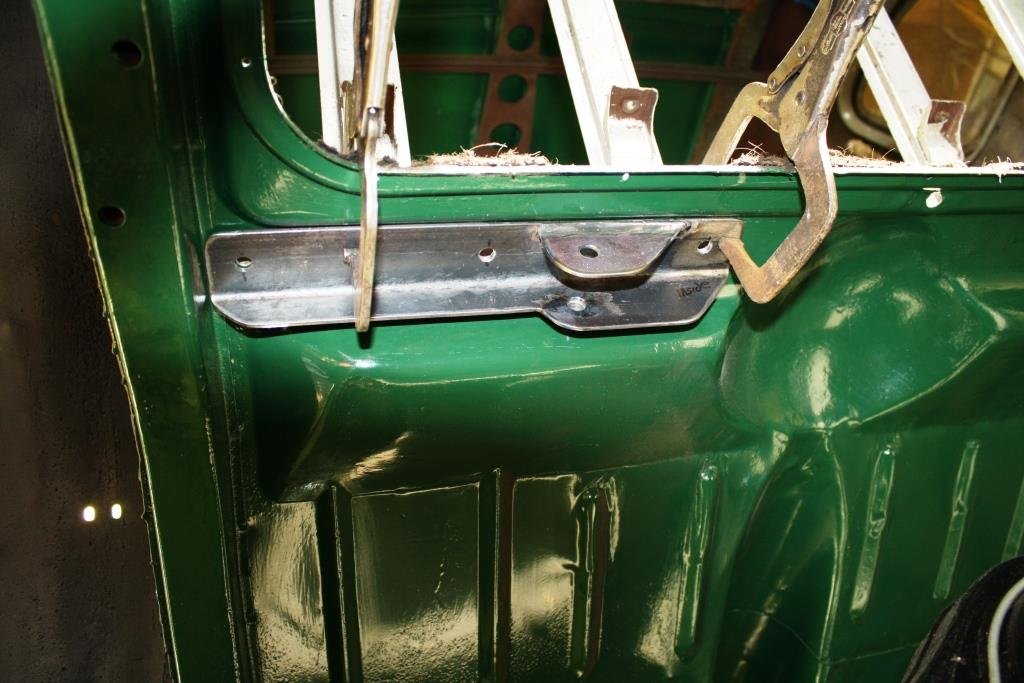
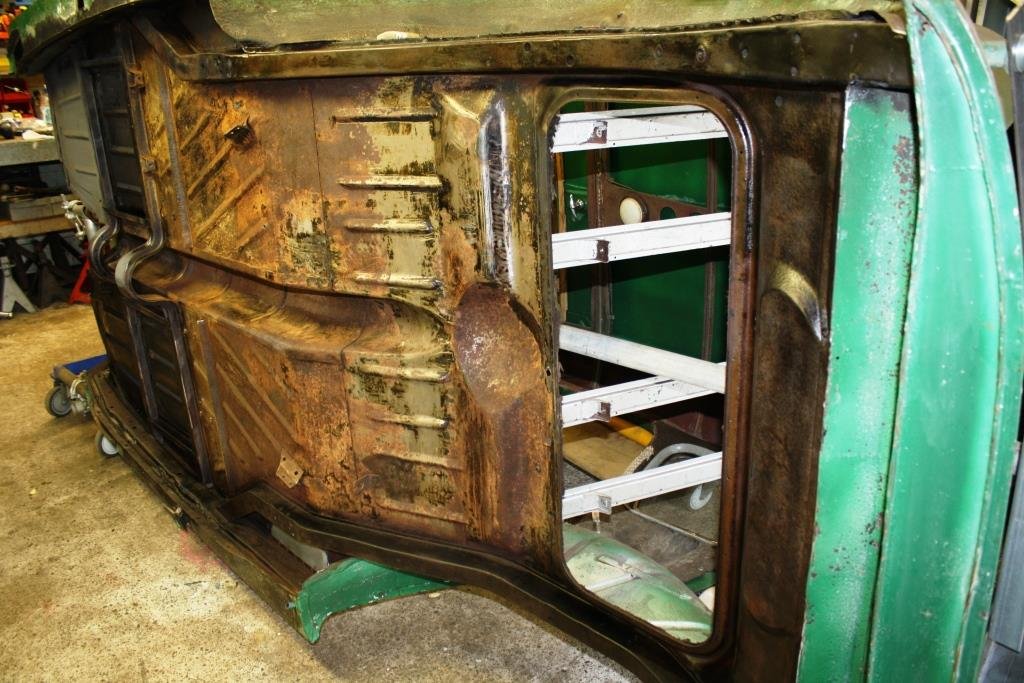
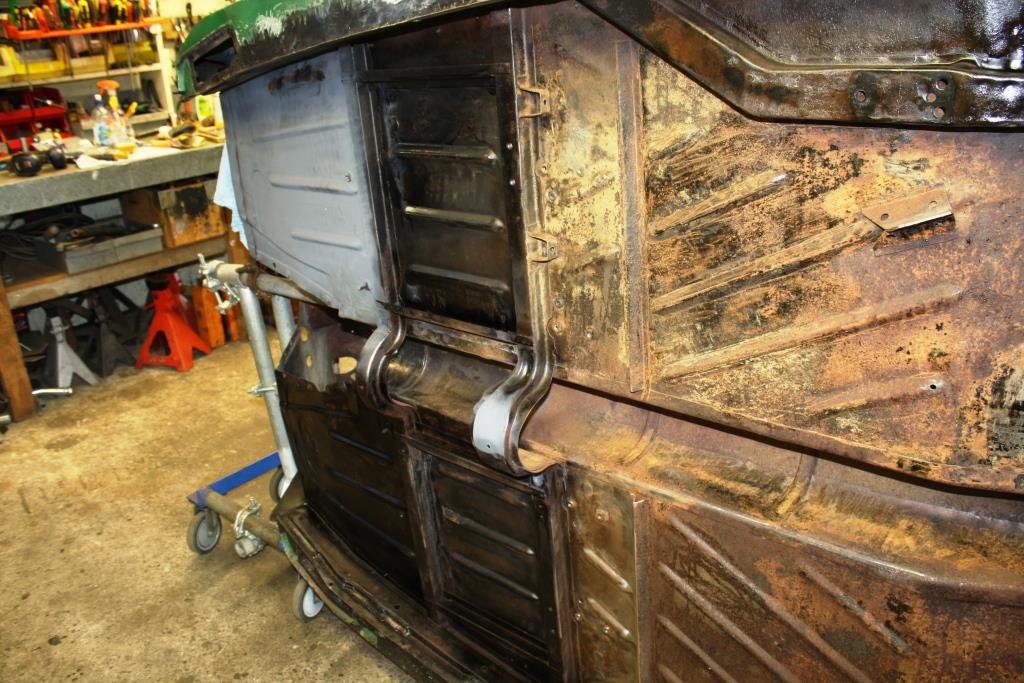
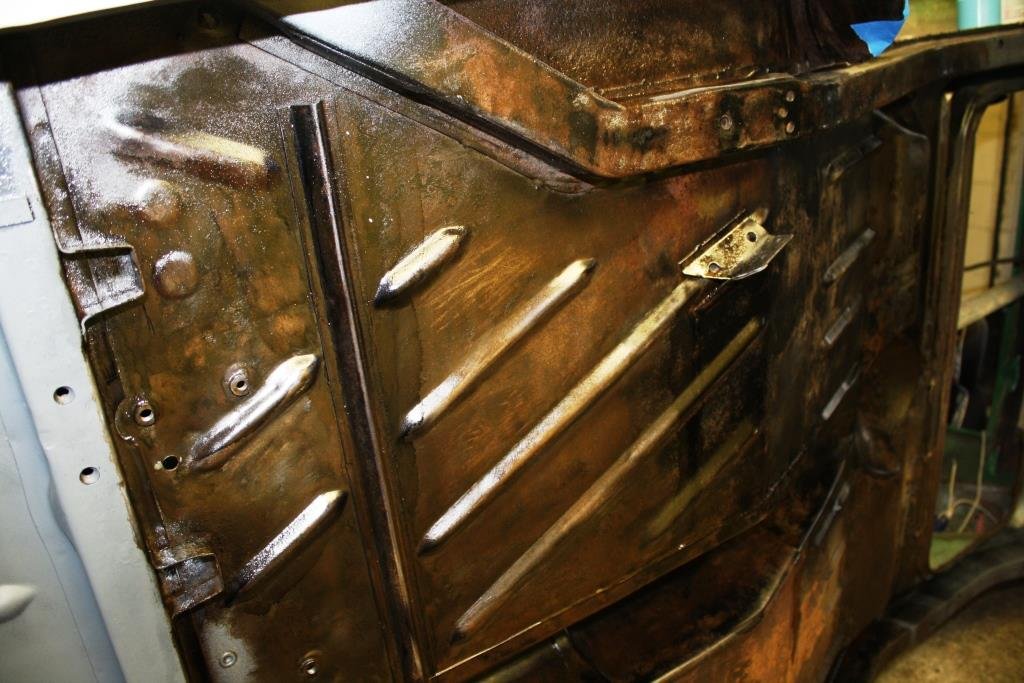
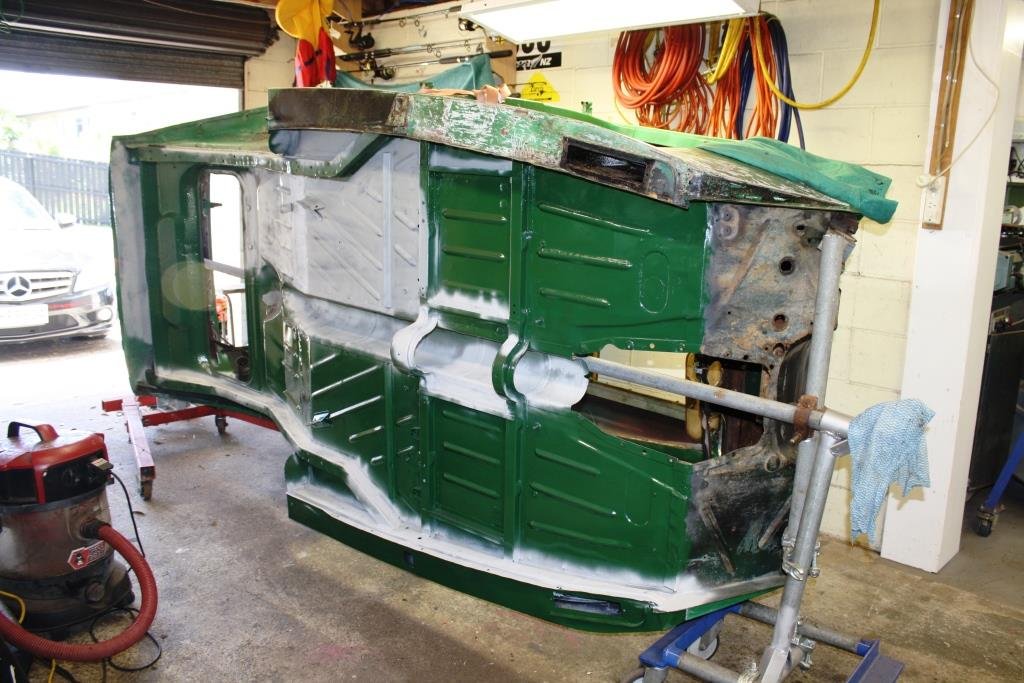
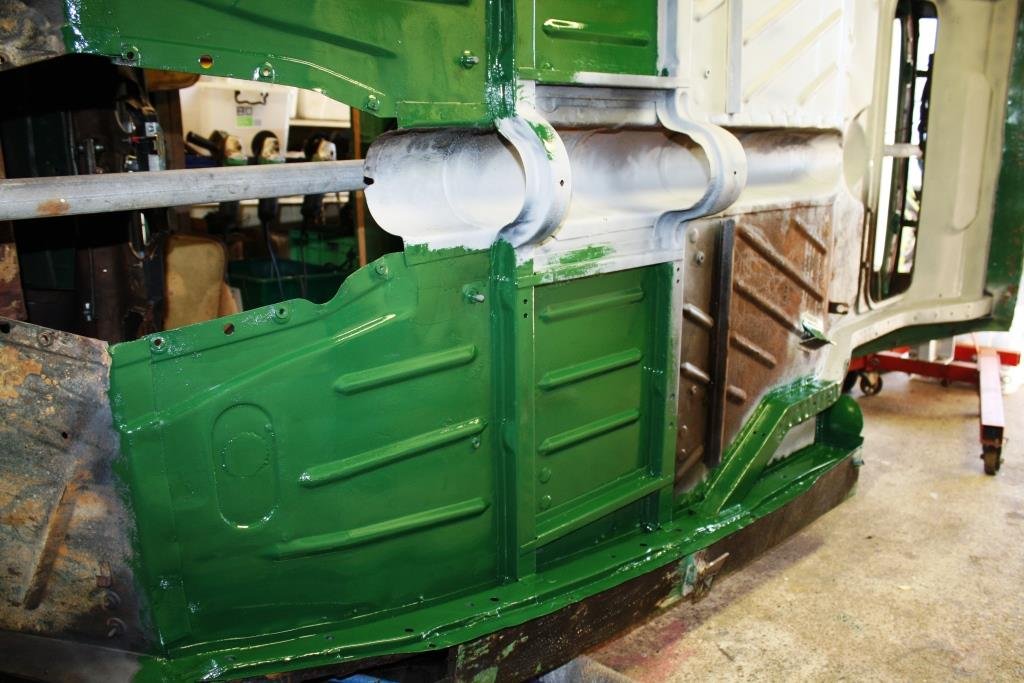
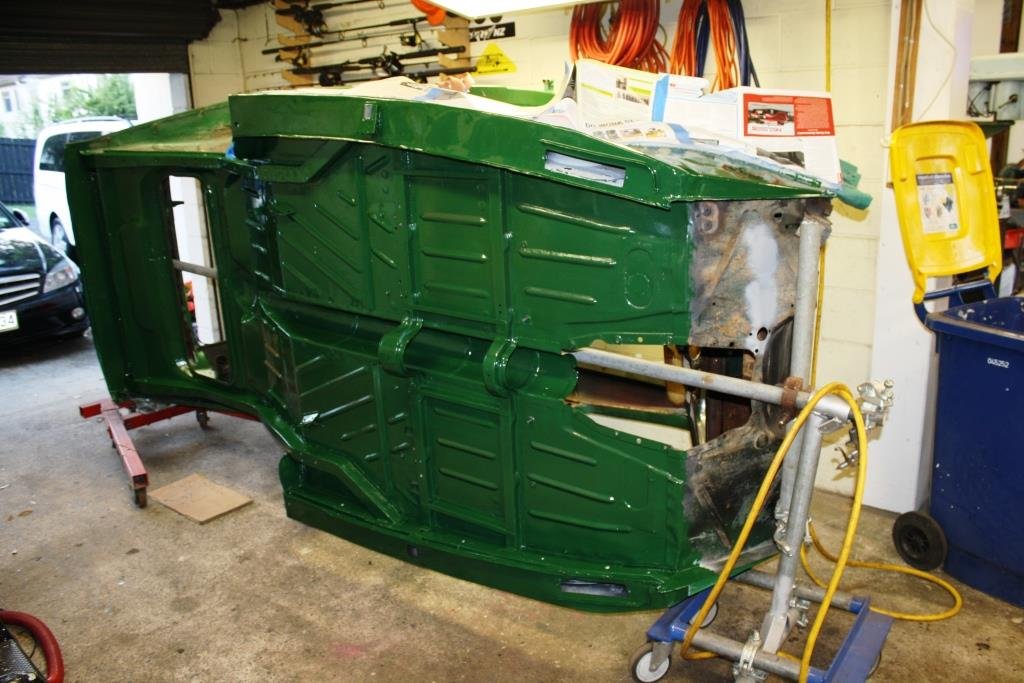
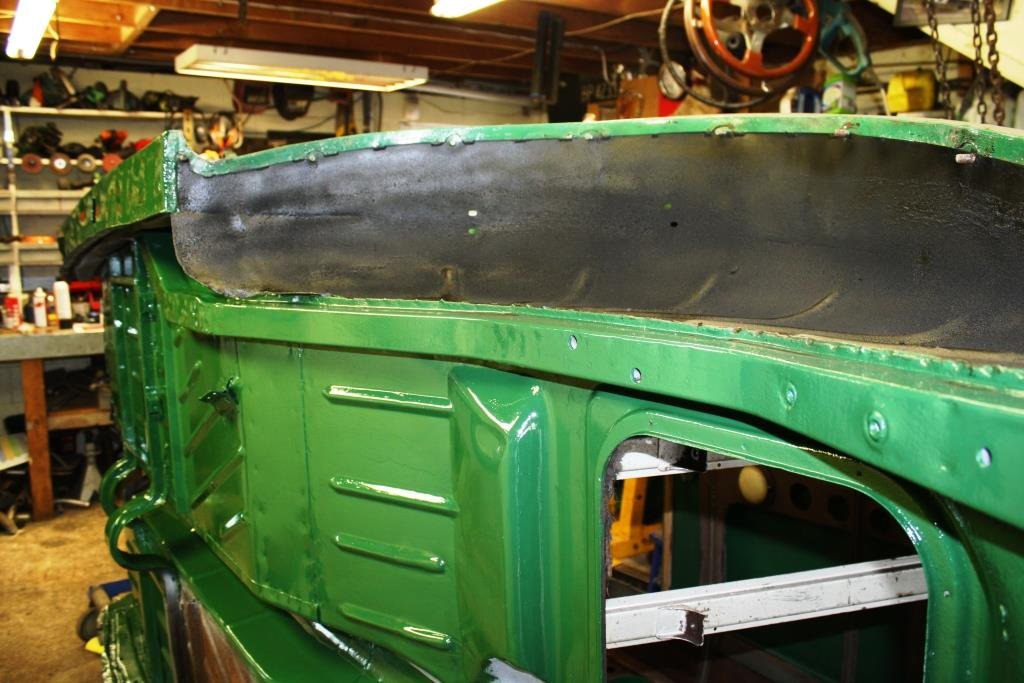
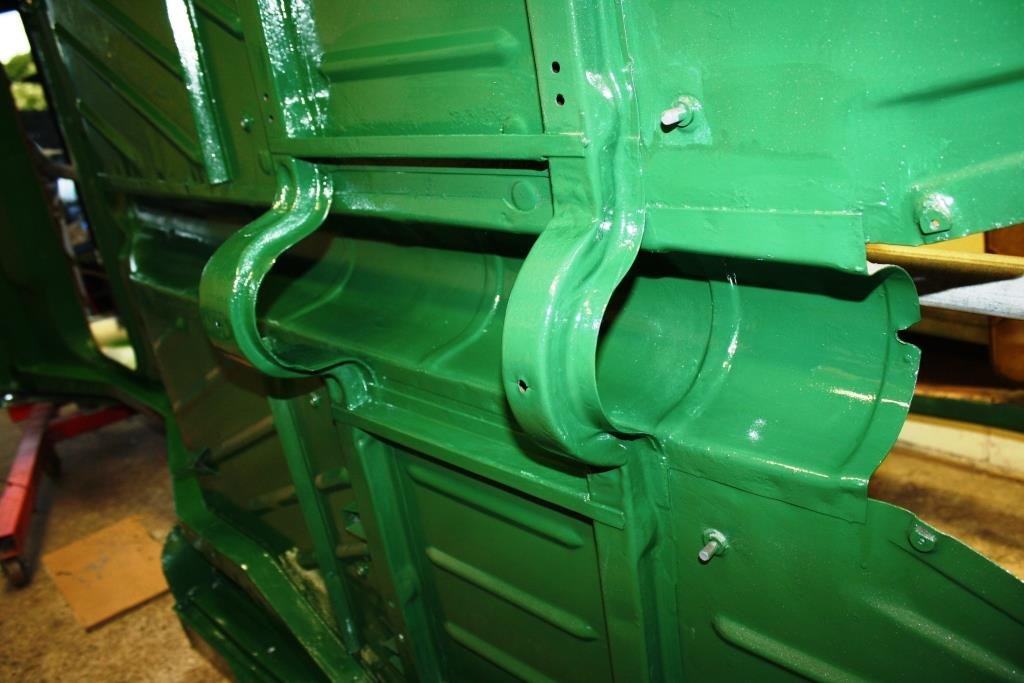
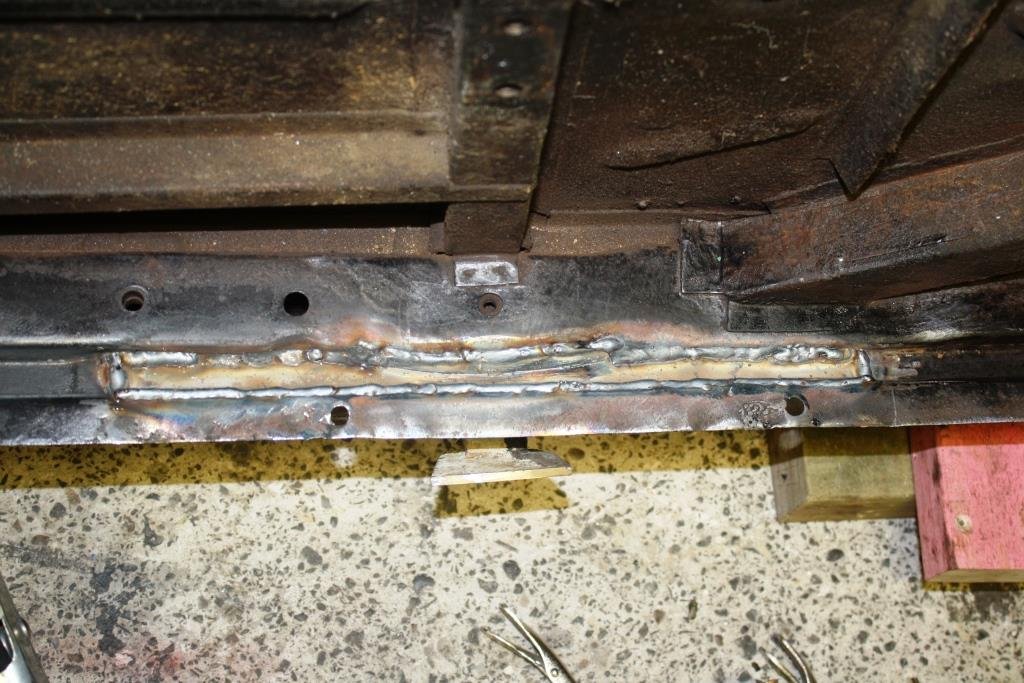
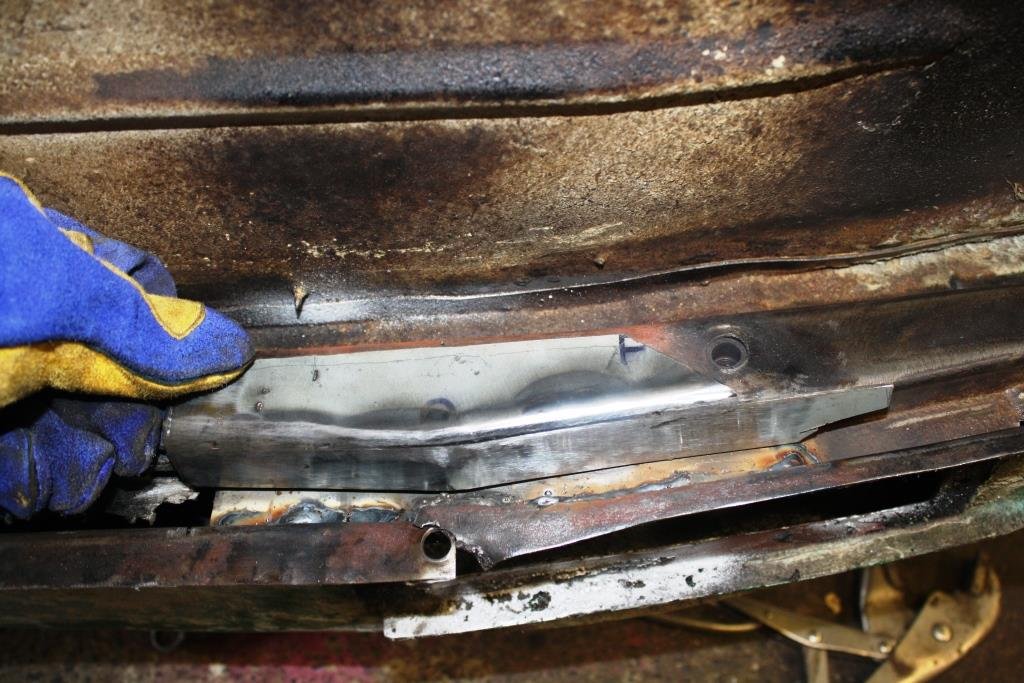
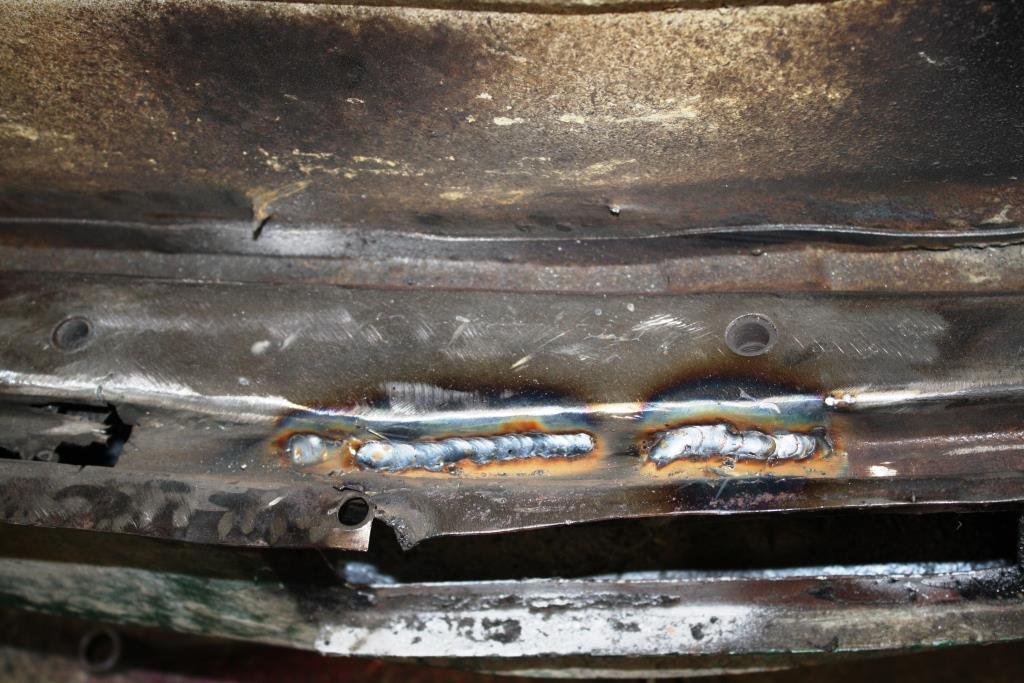
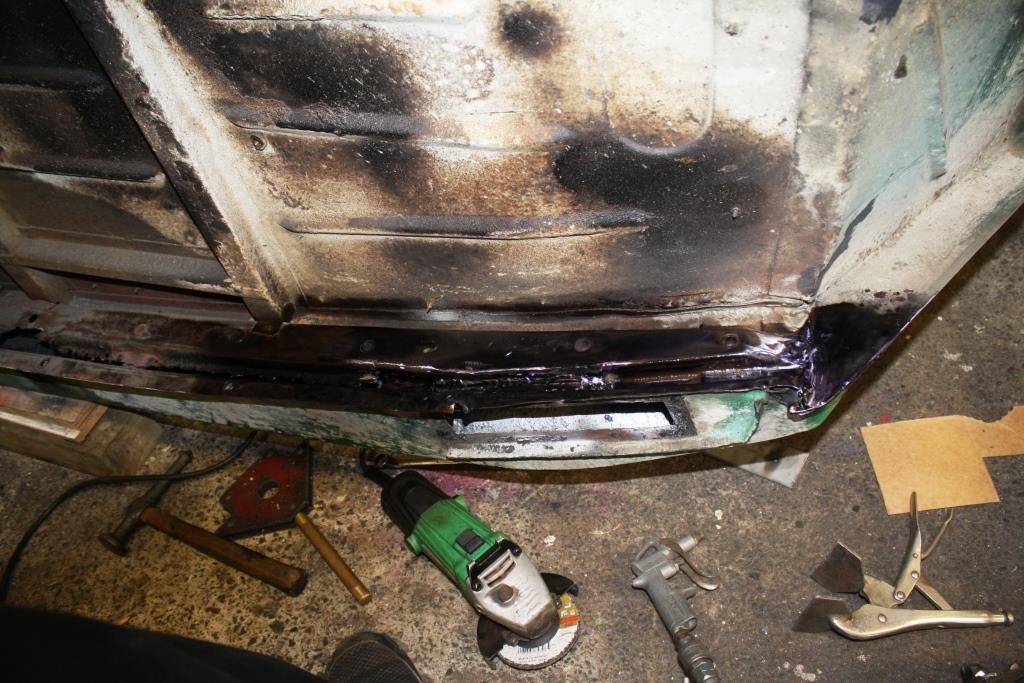
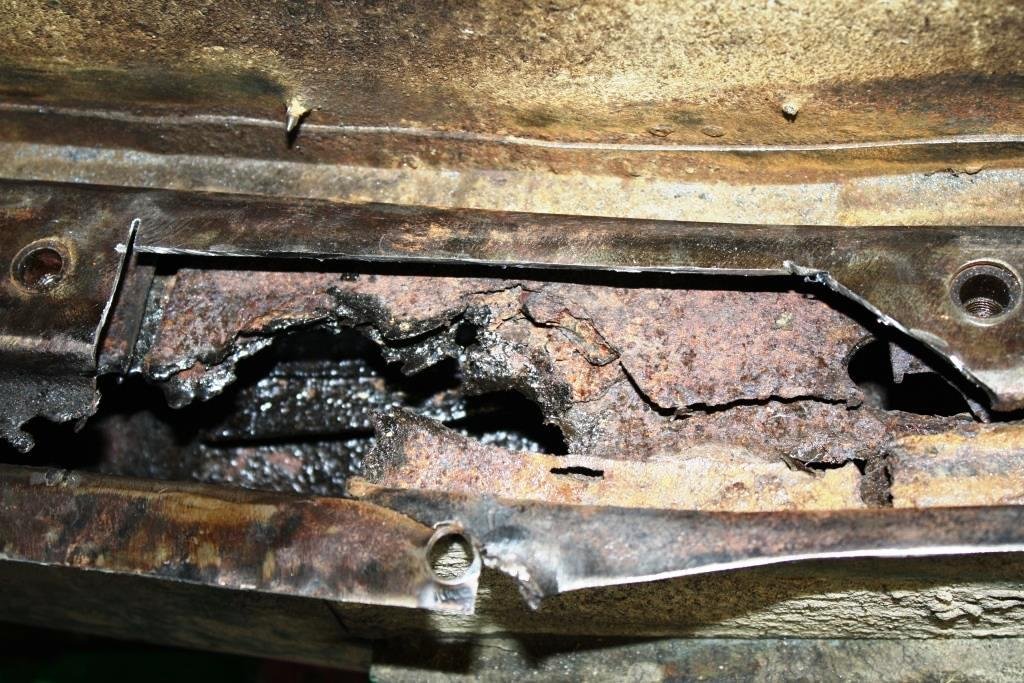
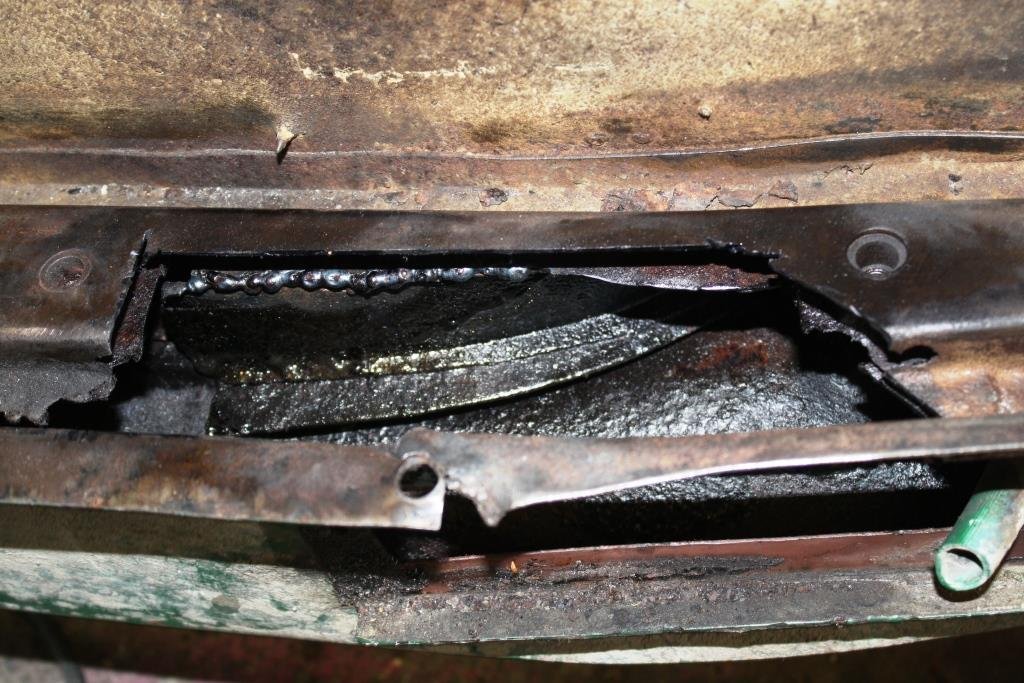
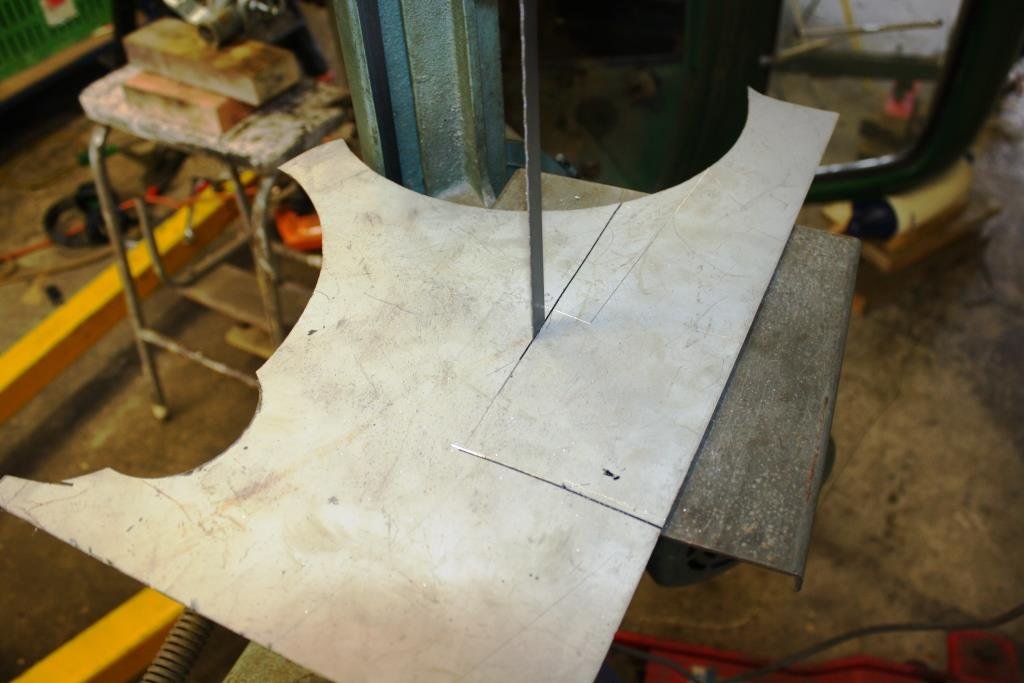
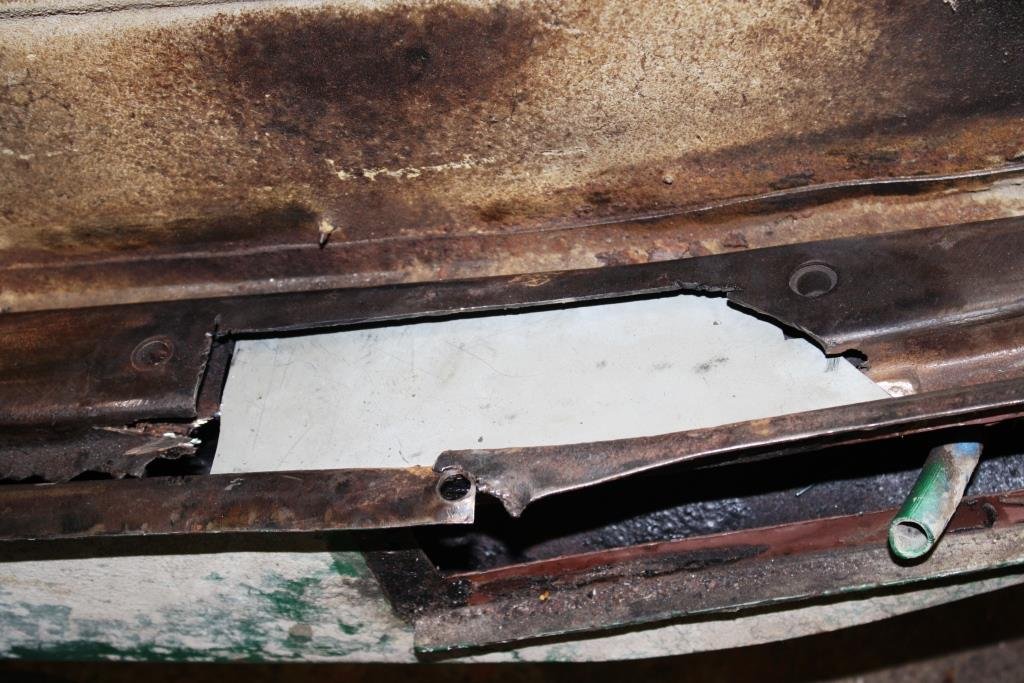
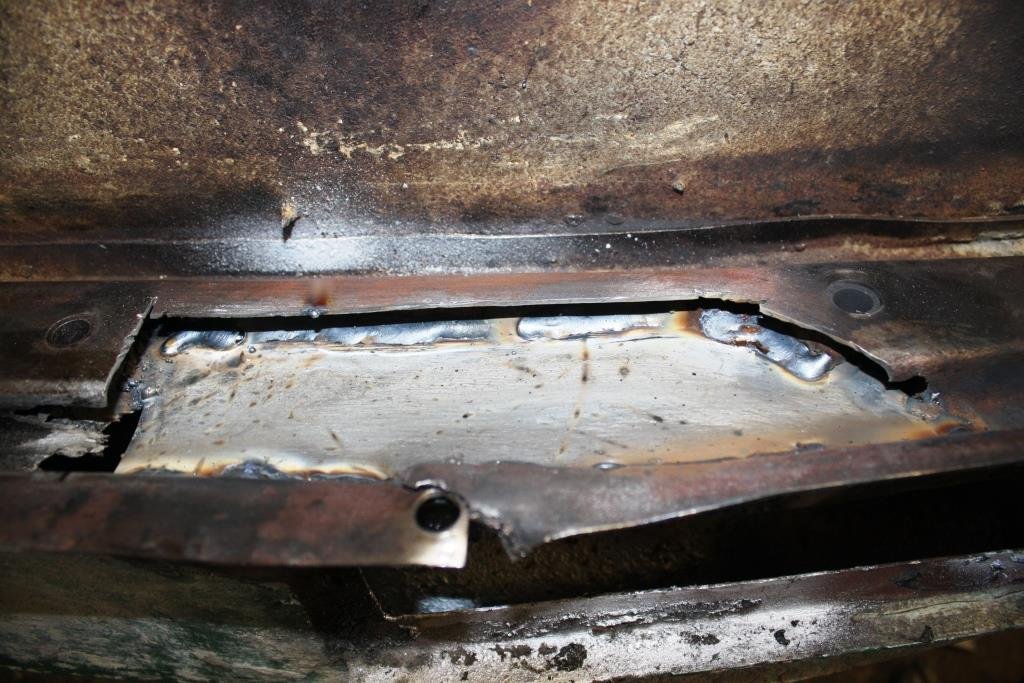
The continuing process of remaking the bottom of the B-pillar. I've been doing it in smaller pieces to keep the shape references. This area is almost all hidden when the wood and sills go on anyway.
 8 points
 -
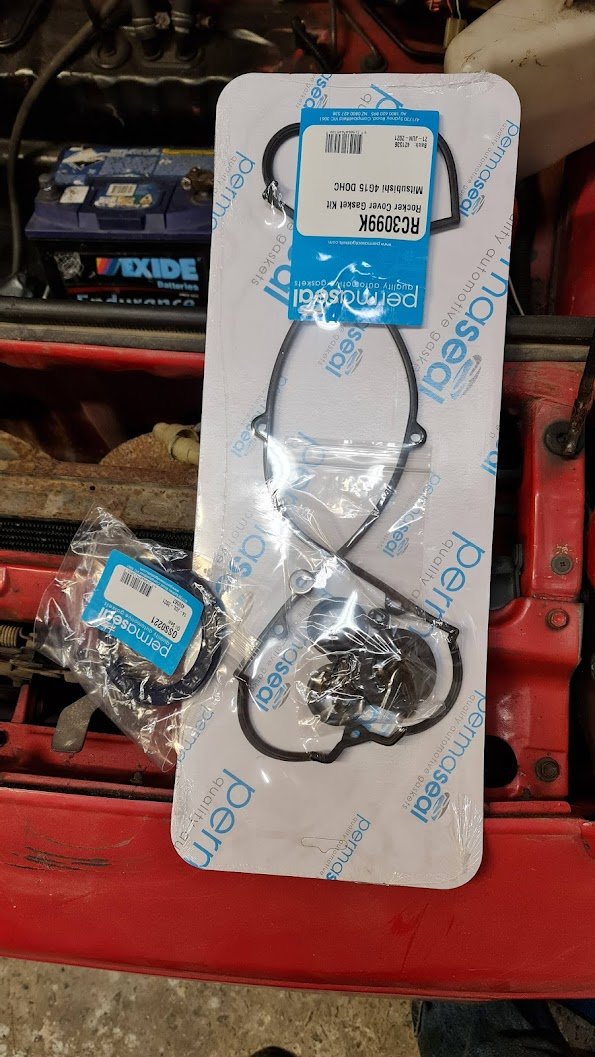
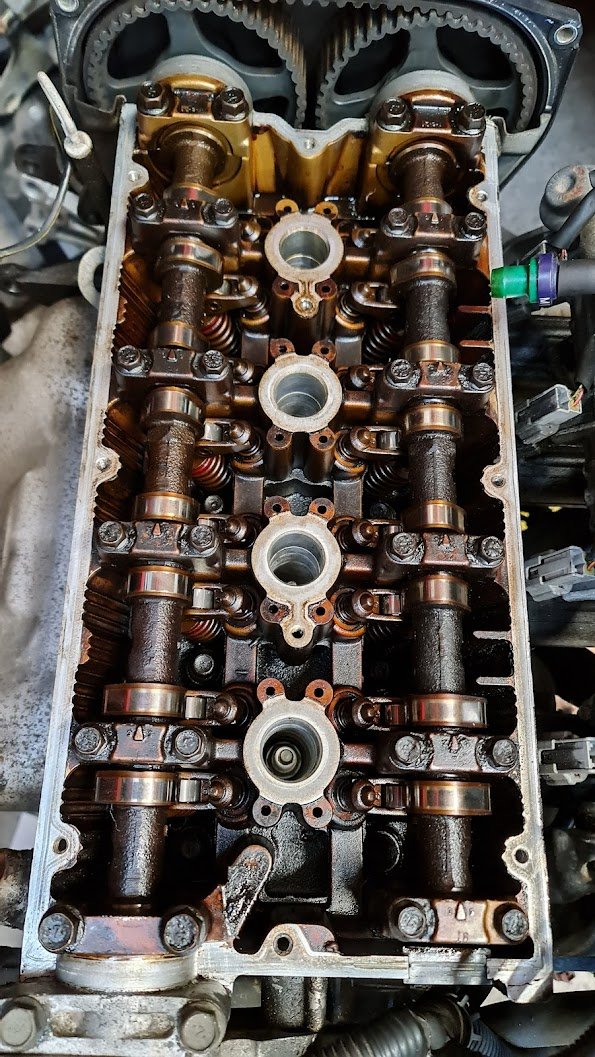
Put this back on the dyno last week to redo the boost table since last time, which was about a year ago, it was found that the little filter thing on the solenoid is quite restrictive. So it wouldn't allow enough air to be bled for more than 16psi. On the street it goes great on wastegate pressure which is 10psi. Got the call that after 20 runs it started running on 5. Big puff of blue smoke (think there might have been a noise...can't remember the exact description). Compression test showed zero compression on number 4. Leak down test is pushing air back into the intake manifold so it has to be an intake valve problem. Nothing excessive out of the oil filler hole. The spark plug does not show signs of running lean. No knocking or metallic noises. Obviously not what I'd hoped for but that's where we are. Had a big think about it and am wondering if there has been an issue with one of the intake valves since day one. It could explain the intermittent misfire which the long list of things I've tried has not resolved. i.e. something making that valve not seal sometimes and is now worse. Got it home on the trailer a few days later. It runs on 5 with no bad noises except sounding like a Subaru. So I decided to compression test number 4, and from stone cold it immediately made a decent amount of compression? Not zero. I didn't take note of how high it went but it shot up and held it after just the first few turns. OK, so I put it back together and start it up thinking maybe the theory of an intermittently sealing intake valve makes some sense now. It still ran on five, I double checked the injector/coil plugs etc. So I compression tested number 4 again and now it makes zero compression like had been reported at the dyno. The needle barely moves. OK. Interesting. So while this has all been quite disappointing to say the least, I am looking on the bright side, getting angry at it won't fix it. The bottom end is hopefully undamaged (hoping a piece of valve hasn't dropped into the bore, because it was able to make some compression at first). No bad noises. Could it be the spring is bad? The valve spring seat/keepers are loose? Worst case, something melted causing damage to both the head and bore. Middle case, damaged valve. Head comes off and rebuild it. Best case, a replacement valve spring/keepers/seat solves it without taking the head off. It'll be a while before I have time to look at it now but am keeping my fingers crossed. Still looks cool though right?
8 points
-
Yeah the lads in Thailand sell forged pistons in whatever CR you request. Up to 15:1 But they're pretty spendy. (Compared to rest of project) heh However my Dad has ordered a 4 axis cnc that will arrive probably in a few months. Pistons and/or rods might be feasible projects eventually. But start with some easier stuff while learning. Could maybe do a cnc port job as well, not as well as a 5 axis but would be cool. But gonna be a learning curve.7 points
-
So by the end of the last east cape ride this had a really horrid vibration, made more horrid by the petrol tank rattling. Last time I took it out for a ride I had a fairly solid look over it all to work out where more issues might be. I found the chain was quite loose, the cush drive sloppy, the petrol tank issue and a loose engine mount. I'm hoping the engine mount might be what was letting the vibrations out. I got a new tank rubber set from Ali, machined up a thing and set about modifying the mount: Much better! Last night I cleaned and tightened the chain, and have whipped the wheel off to inspect the cush drive. Yup that's fucked. So I need to sort that out, clean the air filter, advance the timing and then start thrashing it to work again, hopefully keeping my will to live intact.
6 points
-
Nah. I just need to buy Hayabusa pistons, Hayabusa rods, Hayabusa crank, Hayabusa block and head. Then I'll have the world's fastest 1NZ5 points
-
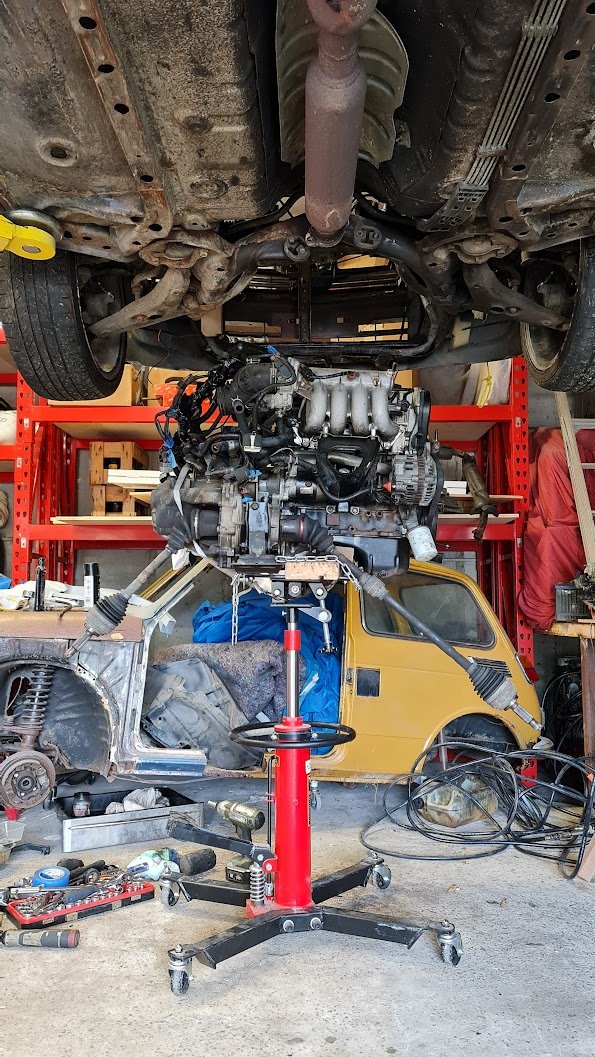
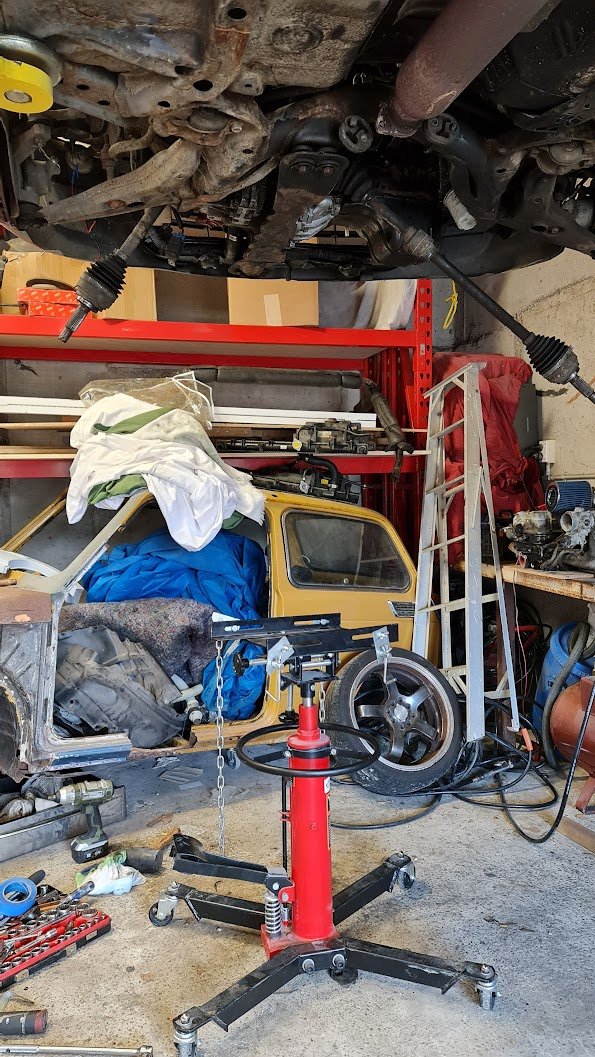
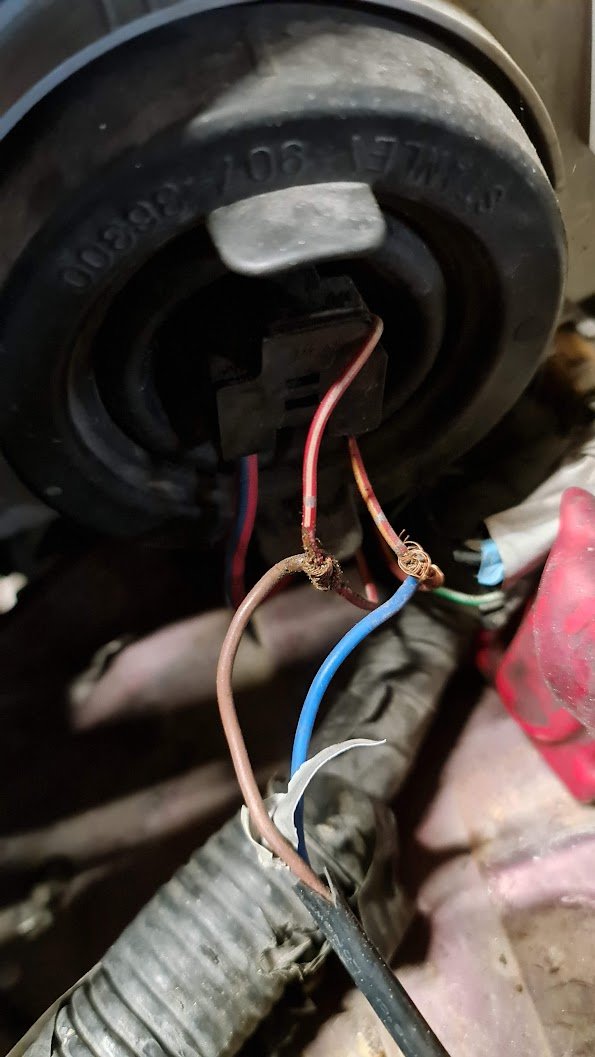
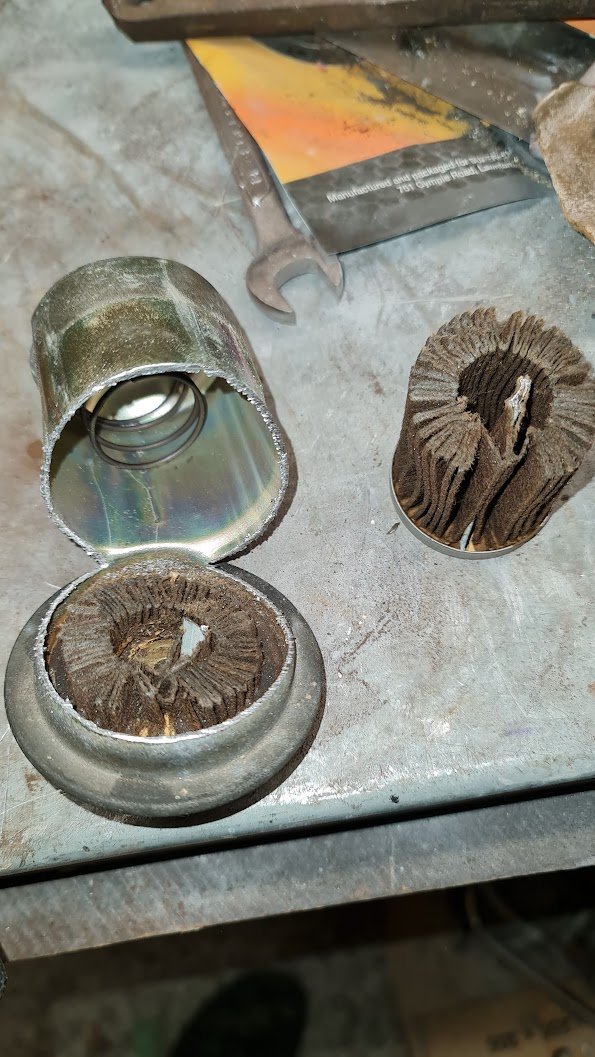
My 200sx 1jz car lost compression on the dyno last week so needed to get the 'parts lancer' off the hoist, so put the 4g15 in and got it rolling again. This combination of transmission jack (500kg rated) to position and lift the engine up in stages plus the hoist to lower the car over it works pretty well. It's in: Wiring is a bit different but have got it turning over at least and confirmed the clutch is all working. Will look at the rest later. Found some amazing twist and tape wiring in a few places: Also here is the fuel filter cut open, this is the one which I suspected might be causing fuel starvation on the mivec/parts car. Doesn't look great but not really as bad as I was expecting. Could still be blocked with tiny particles. Have now moved it out of the garage since the wiring doesn't require it to be on the hoist.
5 points
-
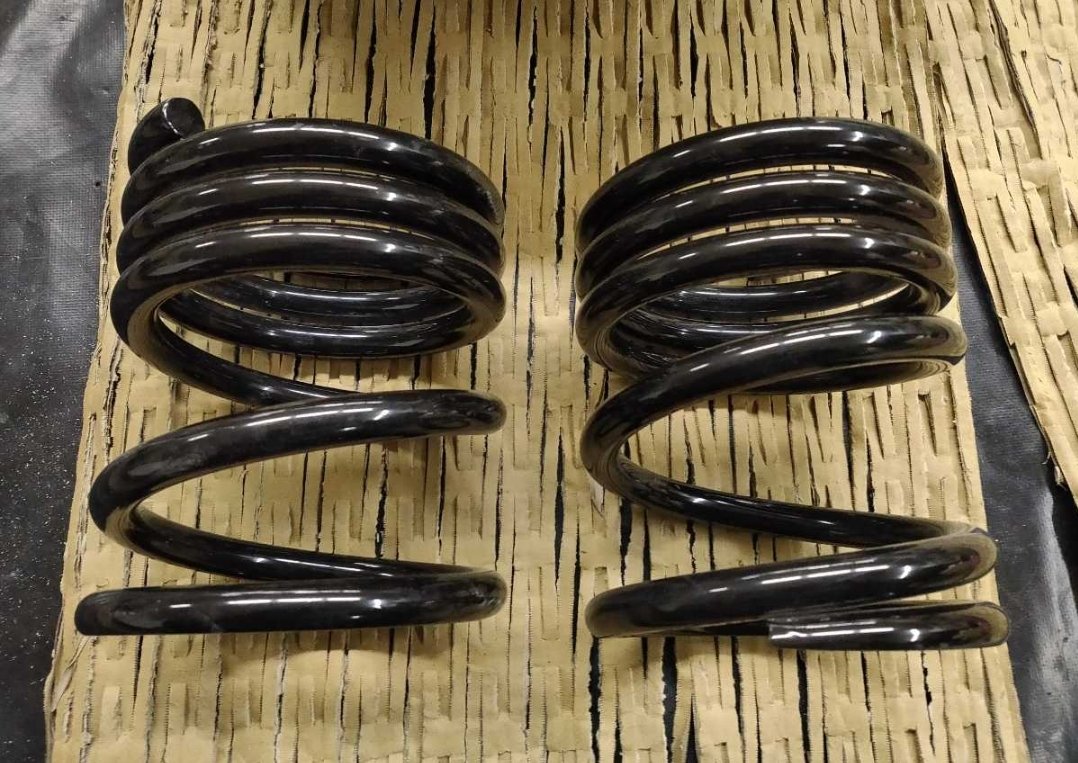
In further suspension fiddling I sourced a pair of these rear springs that are 20mm shorter than the current mx73 bc short ones and a dual spring rate.
4 points
-
When I was a kid, my Mum taught me that it was rude to take basically anything offered to us kids when we went somewhere. So we go to someone's house, and they're expecting us, so they've made some chocolate biscuits especially for us to eat. Which are the best thing ever because I'm like 8 years old. Fucking delicious! However. I'd been conditioned to say "No thank you" because doing otherwise was rude. For the person who baked something especially for us arriving, it's was disappointing that no one wanted their food. "How could kids not want delicious my biscuits?" "Are they especially bad?" "What did I do wrong?" How could my Mum not understand how mutually disappointing this situation was? It didnt make any sense to me then, and I've still no idea who profited from this situation. The people were happy to give me a biscuit, and I was happy to eat it. Surely this is the worlds simplest situation to keep everyone happy. I fucking love biscuits, and it tears me up thinking how many I missed out on, at the stage of my life when they were the most delicious. God damn. For some reason, tonight I have had a revelation that refusing willing help from people here draws parallels to this situation. I have been conditioned to feel shameful about accepting assistance that's willingly offered. Why? So for anyone who's willing to chip in a few bucks, I can promise you this: I'll spend any contributions towards a Prius motor, and maybe exhaust parts. I will not spend any contributed money on psychological counselling for my unresolved childhood trauma about missing out on biscuits. I also promise I will come to your house and eat your biscuits if you invite me over. https://givealittle.co.nz/cause/finding-a-cure-for-the-atkinson-cycle Thanks to anyone that wants to help, and by all means dont anyone feel obligated.4 points
-
Fun hands on stuff is beginning! Cheers to @- i5oogt - for sorting me a PC, unfortunately my ancient screen didn't have hdmi/dvi so the TV took over. Standby for noob problems, this is my first ever PC, fumbling through BIOS and formatting bootable USB drives somehow happened (Credit youtube/google) and we have linuxcnc loaded up, running latency tests was square in the 'not suitable' window ~1,000,000ns but for now I will ignore it, as my confidence grows i'll work through diagnosis and checking suspects off the list. Its a massive steep learning curve, but happy to have booted linux and loaded up a mock machine, most of it makes sense and the few questions that arose were easily researched and answered if the "help" tab top left couldn't assist. A few weeks back I was informed to buy a certain MPG from our dear friend Ali, in record time it arrived, decent quality and heavy in the hand, hopefully it performs as expected. The MESA boards should be on the way, might be some long nights when they turn up! All for now, stay tuned!
3 points
-
It's a bit of a feeble update today. Doesn't look like much but it took me a good while to align the rear quarter window frames with the door window frames. Gaps are almost spot on now. Just need to clean my dirty paw prints off the chrome. With this out of the way I can now install the rear quarter inside panels and then the parcel shelf and back seat.
3 points
-
At what amount on the give a little will you go for hayabusa??2 points
-
Flexfuel, diesel or methanol2 points
-
These cars are a ballache There's 2 main problems with coilovers on these 1 is the fact that the steering arms are usually a casting or a forging which in general can't be welded or heated in any way 2nd is a steering arm can't be welded so even if it wasn't cast or forged then welding would be an issue There is an info sheet on lvvta.org.nz about getting a welded casting or forging passed but I've never had anyone do it. Apparently when the info sheet came out, BC had a strut tested as per the sheet, it failed, they modified the welding procedure, failed again so they said nz is a tiny market we won't bother. Brand doesn't matter, I've seen issues with both bilstein and kw, some audis have the same design suspension and kw makes a coilover for those that the steering arm is fabricated from multiple pieces and welded together Years ago before that infosheet came out I got a couple of integras approved to be certed with cusco /tein coilovers but that wouldn't work now. The last one I did the owner found 2x stock honda shocks and had them modified to accept a bilstein insert and an adjustable platform, but it couldn't go very low It's become less of a problem as that shape honda was never really that popular2 points
-
Will be easy to get whatever piston you want made for this if you have $$ (like $1500-2000 at a guess) we will need to up the kitty moneys though lol2 points
-
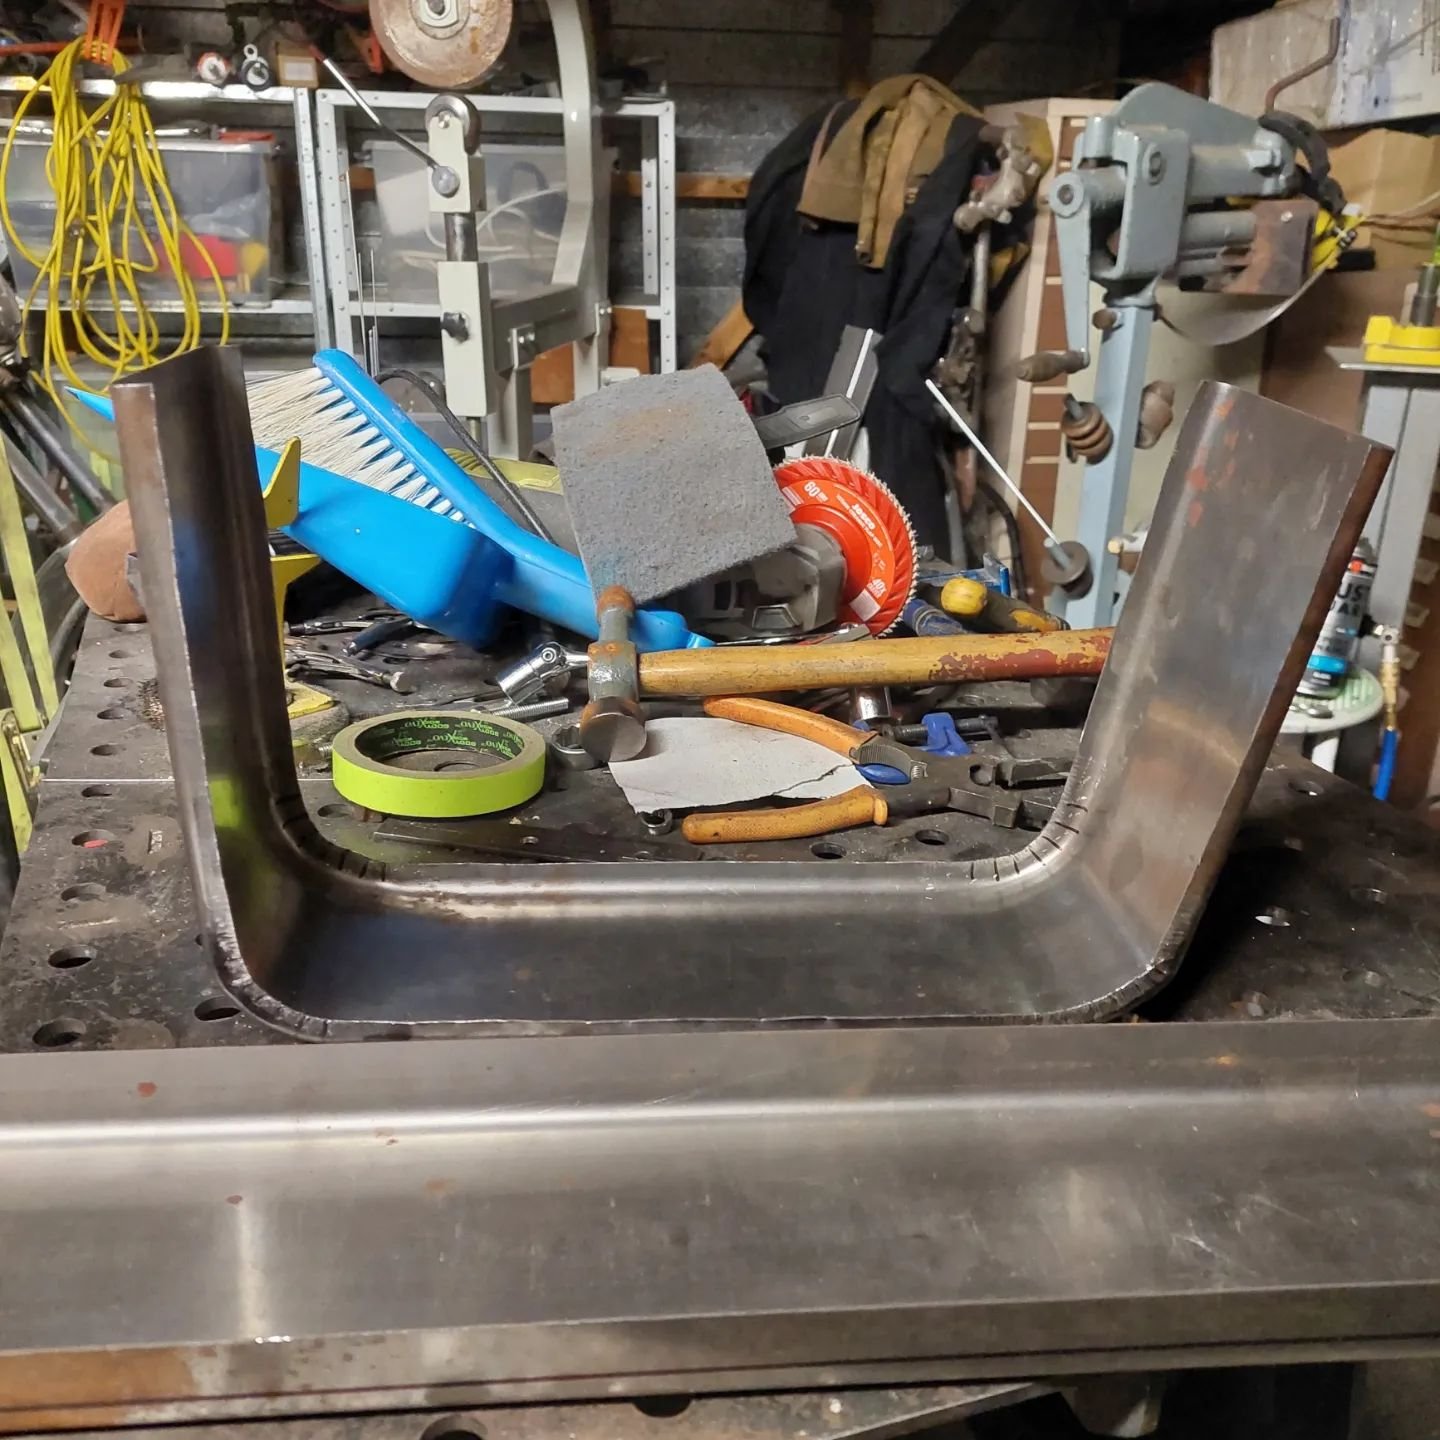
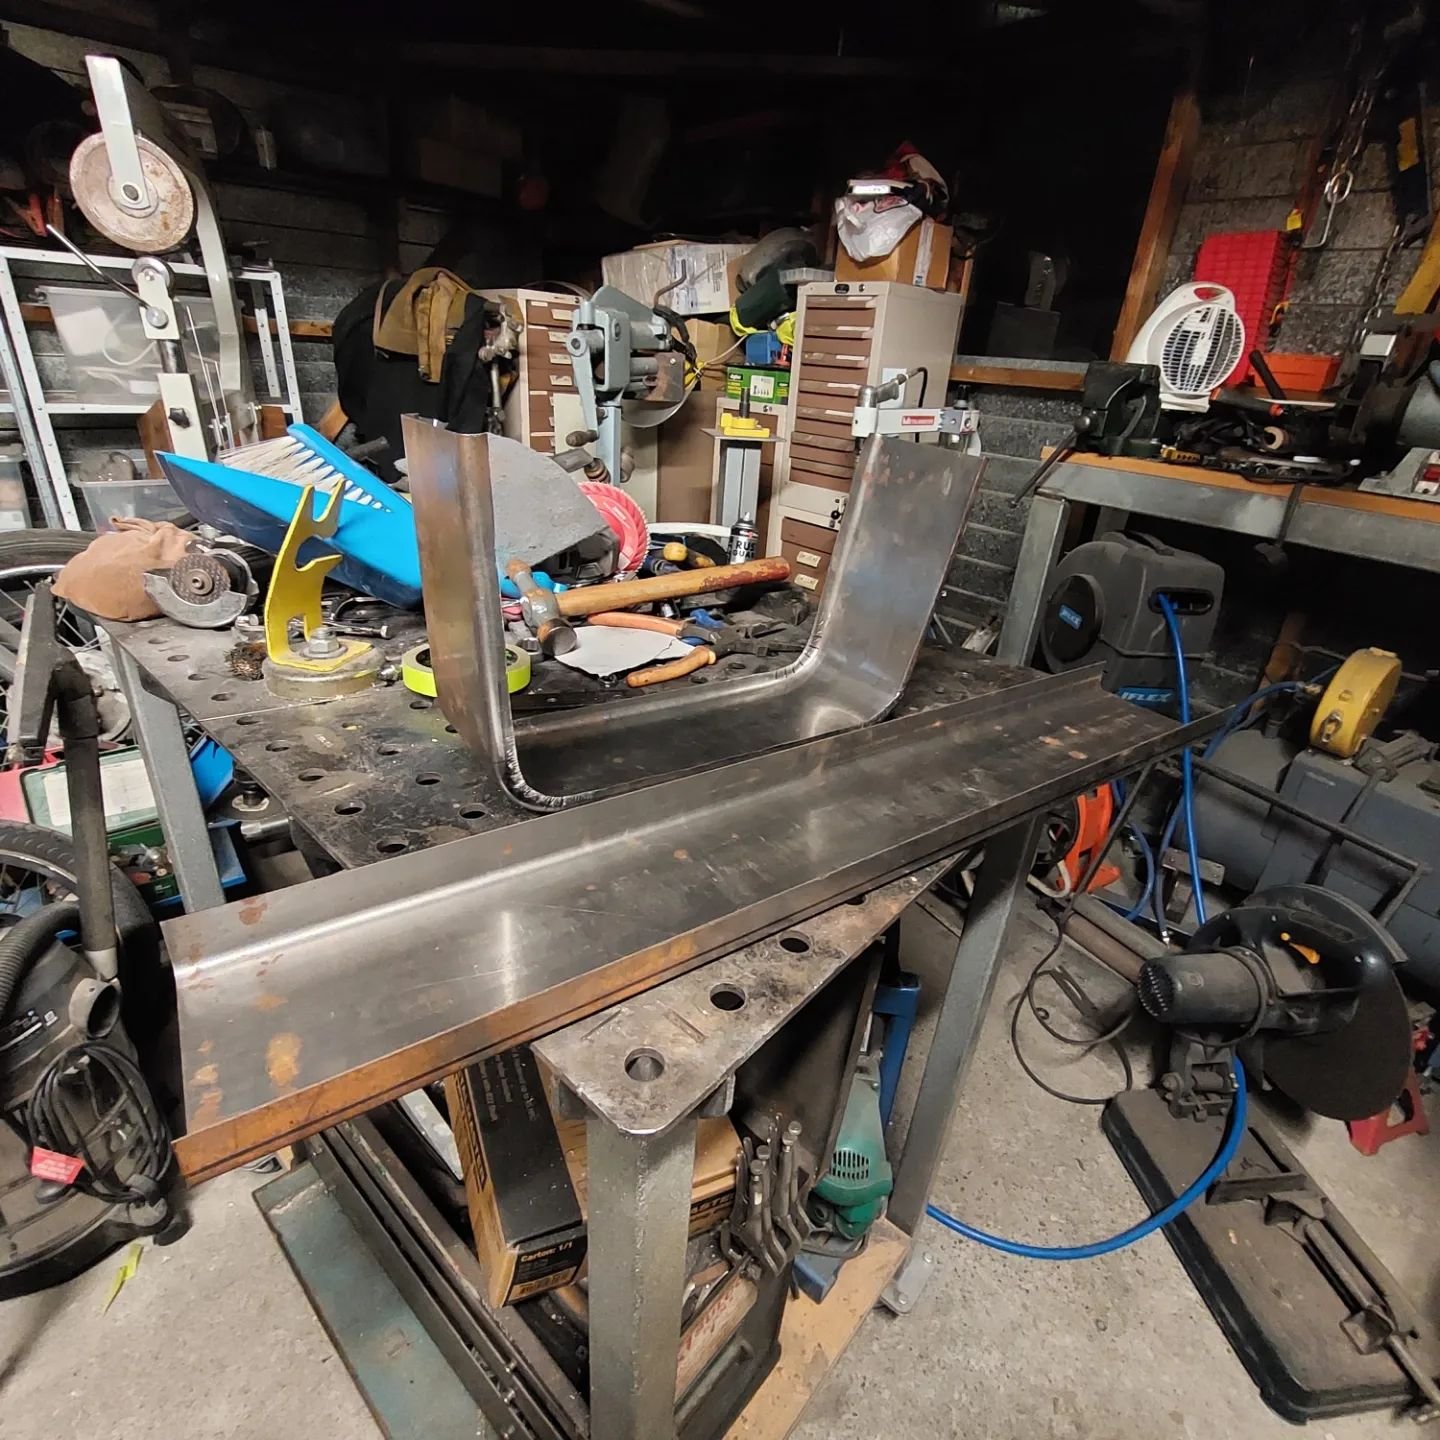
Whilst the blue panniers were a great addition theyre just too brittle and small parts kept breaking off after every ride. So I bit the bullet and decided to start making some from steel. To start with I made some channel out of 18g with a slight radius, not a breaked edge. Then I had to modify my shrinker stretcher stand as once I got to certain point it would hit the stretcher stand upright. so I moved them apart . Using the shrinker I incrementally started shrinking the sides. Shrinking one side then the other so they'd both be the same. One end is 90 and the other is just under. Next is to make the sides and get them welded in
2 points
-
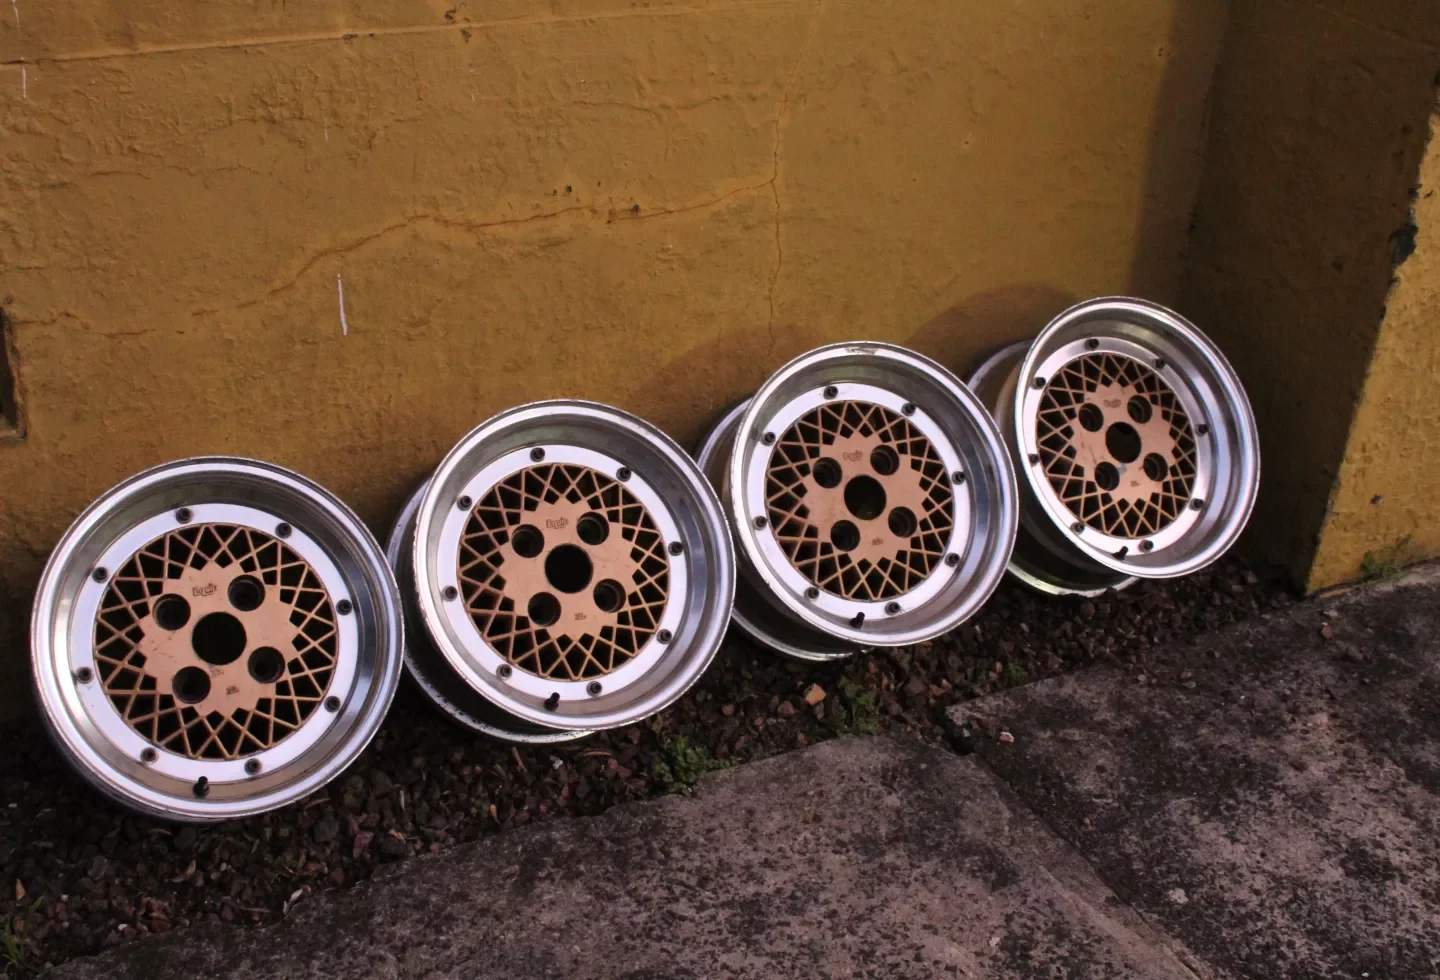
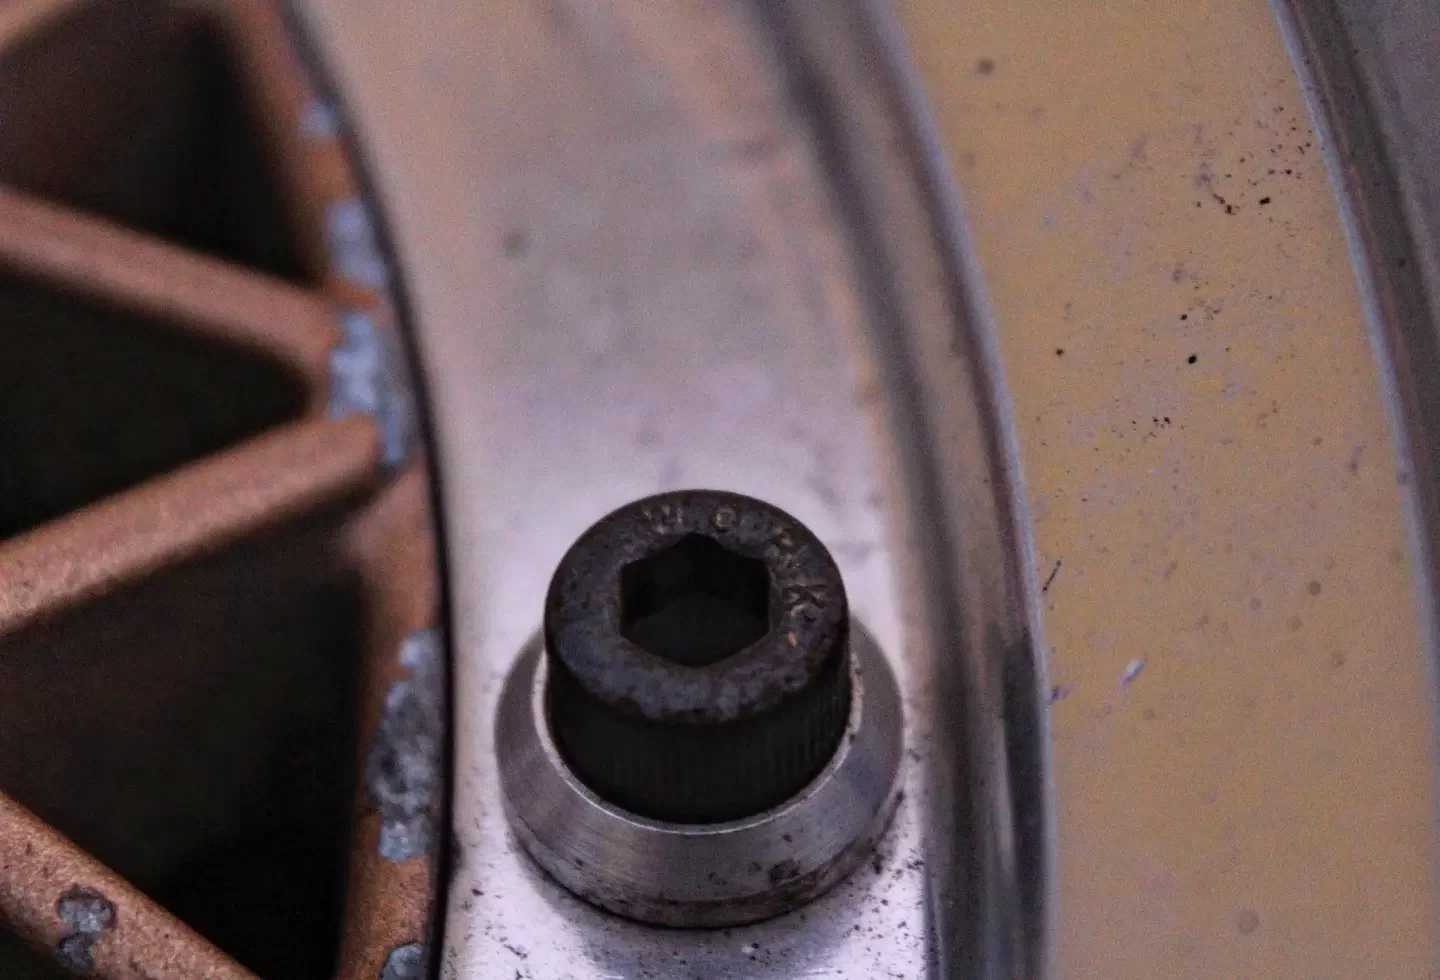
Tried them with another 14" A type wheel and they will work as long as tyre isn't bulging past the rim. Saw these pop up and grabbed them since I haven't seen them before. They are an uncommon 14" work equip mesh Each of the hex head bolts are engraved with 'work' And they have pretty cool black valve stems/caps. These will be widened to a 9/10J stagger as the potenza tr-3 were. I've managed to get a pair of 225/40 toyo t1r to try on and see how they work with the rear flares.
2 points
-
I love how the first sniff of a 1nz conversion and DaveScience is in there with the maths. I heartedly approve. #1nztheworld #morerevs2 points
-
It will have been metal fatigue that will have killed the rod. They're a pretty light rod, so the rod bolts wont have been tugged to death. I expect the endless dorting to infinity will have been enough to induce the failure.2 points
-
Some kind of air spring could work. Perhaps using a compressor driven by otherwise wasted exhaust energy? No don't do that....yet.2 points
-
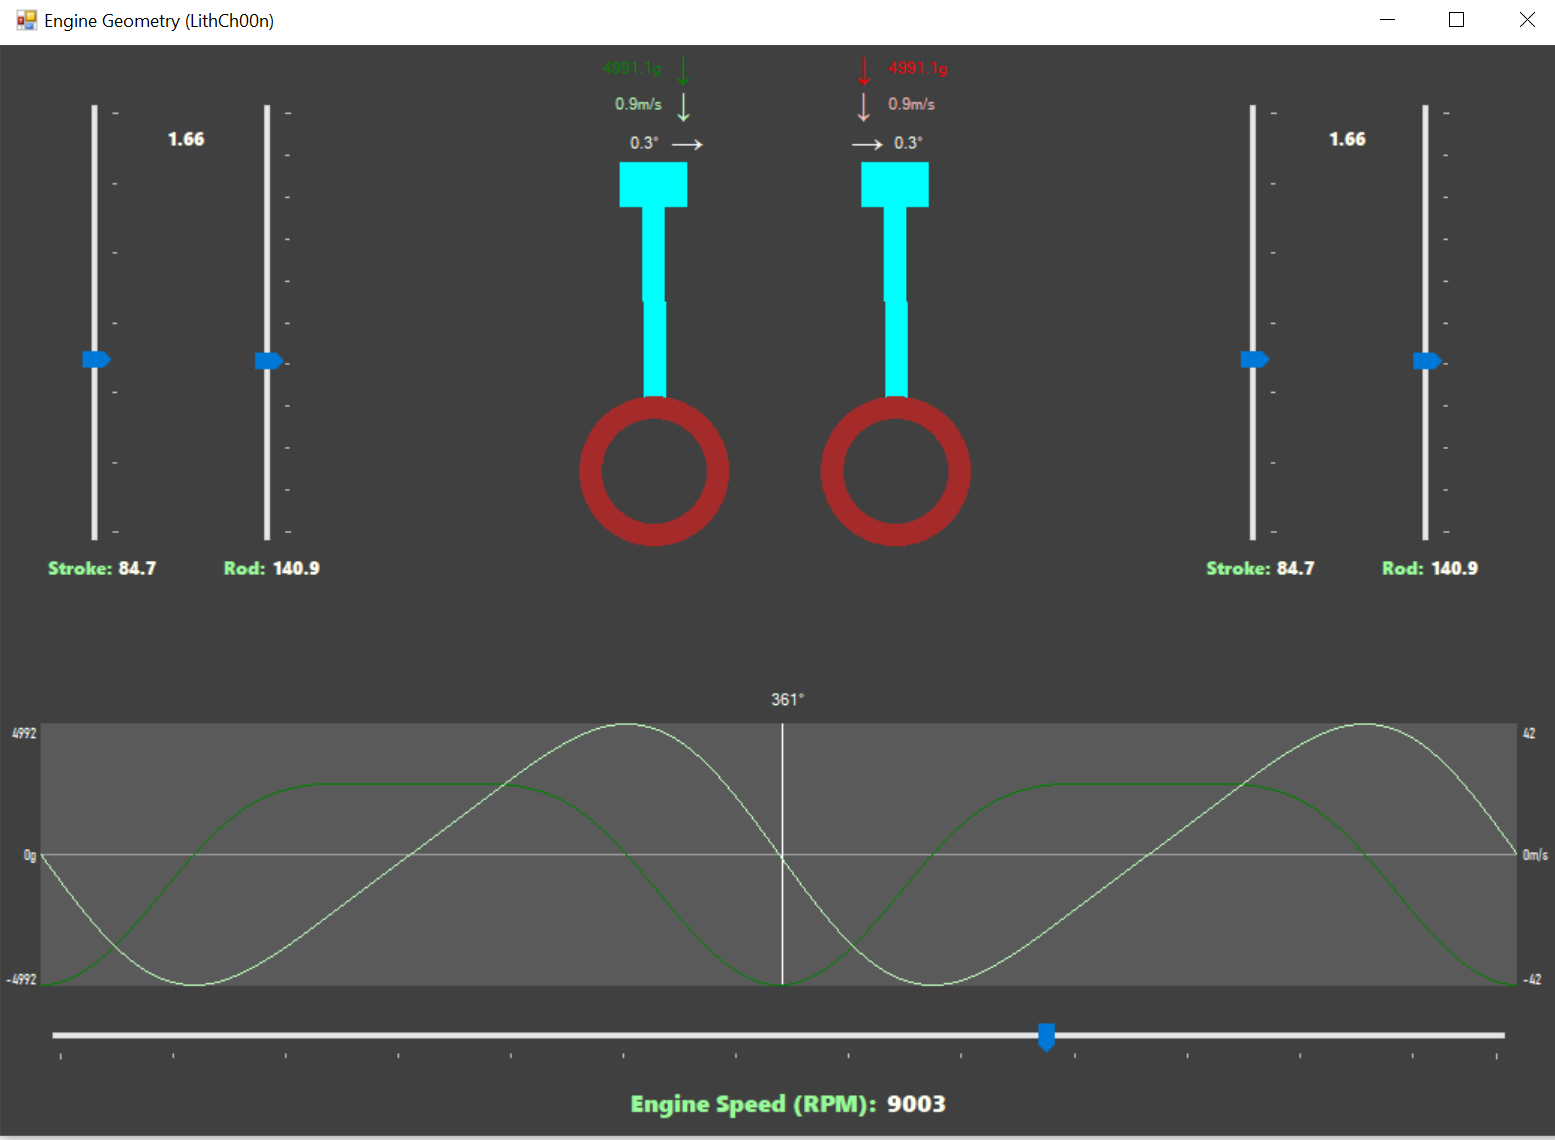
I think you could be right about that. If the piston is trying to fly apart, where the top of the piston is trying to carry on upwards, and the pin is pulling it back down. So the material strength around the pin is the weakness. Then on the exhaust stroke this force is lessened, and when the cylinder is full, on the compression stroke this force is lessened too. The engine didnt fail when it was approaching max rpm, it failed just after a gear shift where throttle got cut to zero. So the worst case scenario would be zero throttle, high vacuum, high rpm on the compression stroke. I'm not sure if these forces are on the same magnitude as each other though. However, I can indeed increase my piston return spring value. I can use e-throttle to set a minimum high rpm throttle value to something like 10% or 20%, and then use a fuel cut and/or pull zillions of ignition timing out to cut power instead. This might bring a host of its own issues, but might be a bodgey solution I guess haha. Flat shifting, interestingly enough, would also help haha. The incredibly clever @Lith made a calculator ages ago that works out forces on pistons/rods. Entering 1NZ stuff. Peak accelleration on the piston at 9000rpm is 4991G! I'm not sure what sort of numbers I was expecting, but thats bloody lots. Then the PEAK piston speed is 41.7 meters per second. Which is 8200 feet per minute. Which is zillions high when 3500fpm is the reccomended mean value.
2 points
-
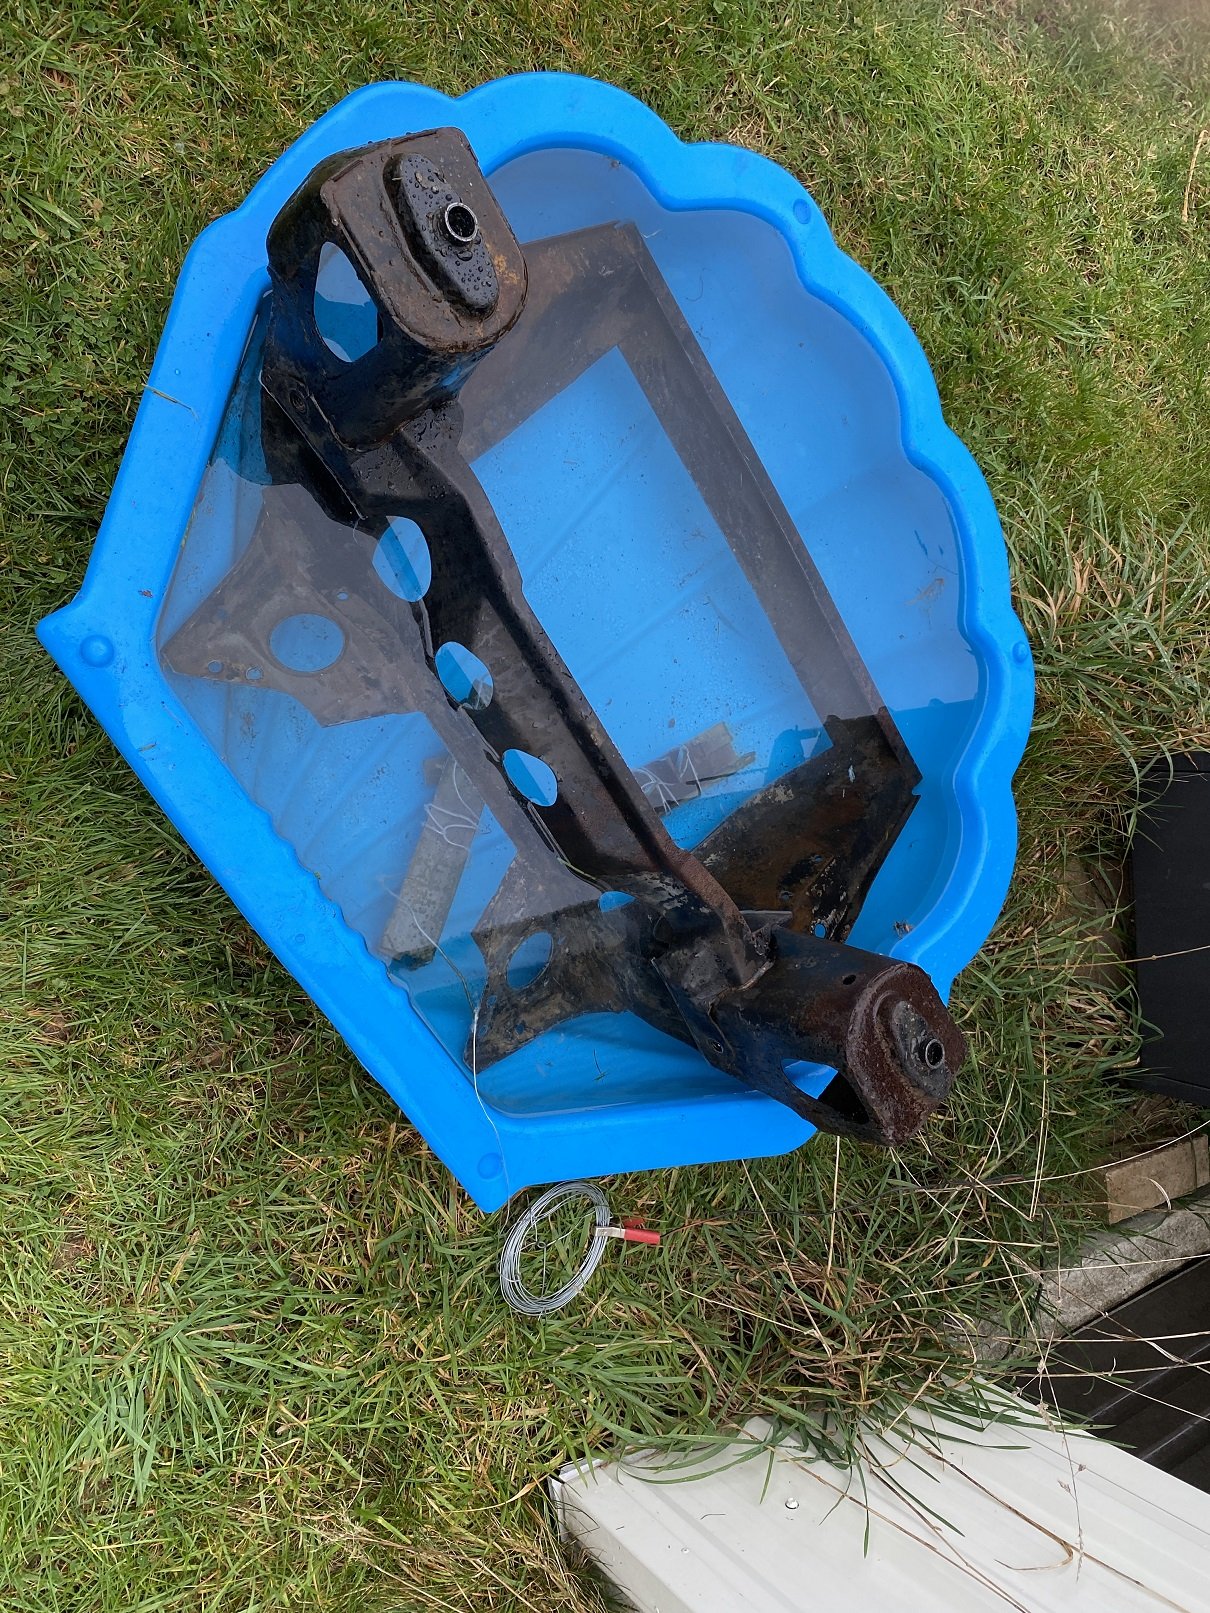
The subframe has a bit of surface rust. And some oily greasy stuff that the water blaster didn't shift. This is a bit of a no-effort experiment. I know the electrolysis will remove the rust and after a few days it may lift some of the paint(from previous experience). But I want to see if it will lift any of the oily stuff. I could do with a deeper container... but where can I get one that's as cheap as a $18 warehouse paddling pool? An IBC tank with the top cut off would be good, but I can't find anything nearby and I also don't want to spend ~$100
2 points
-
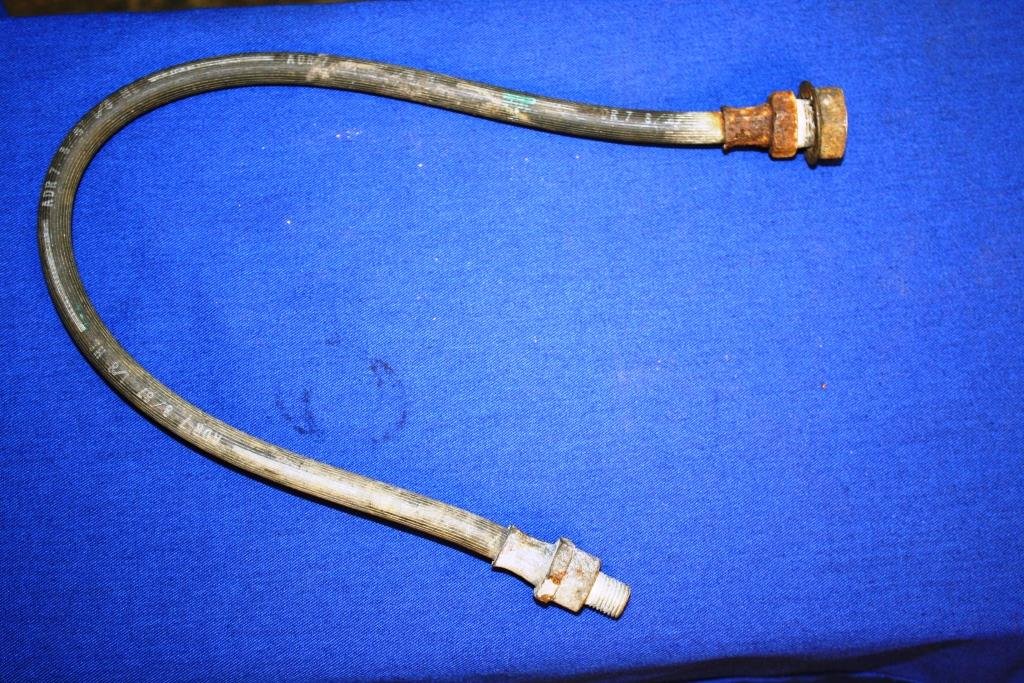
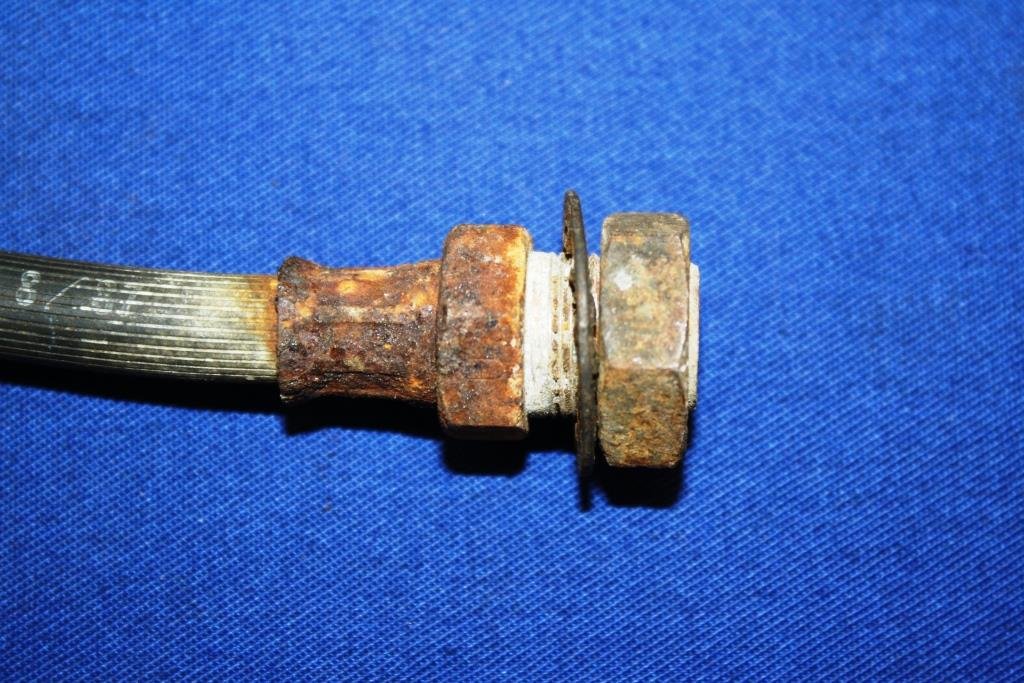
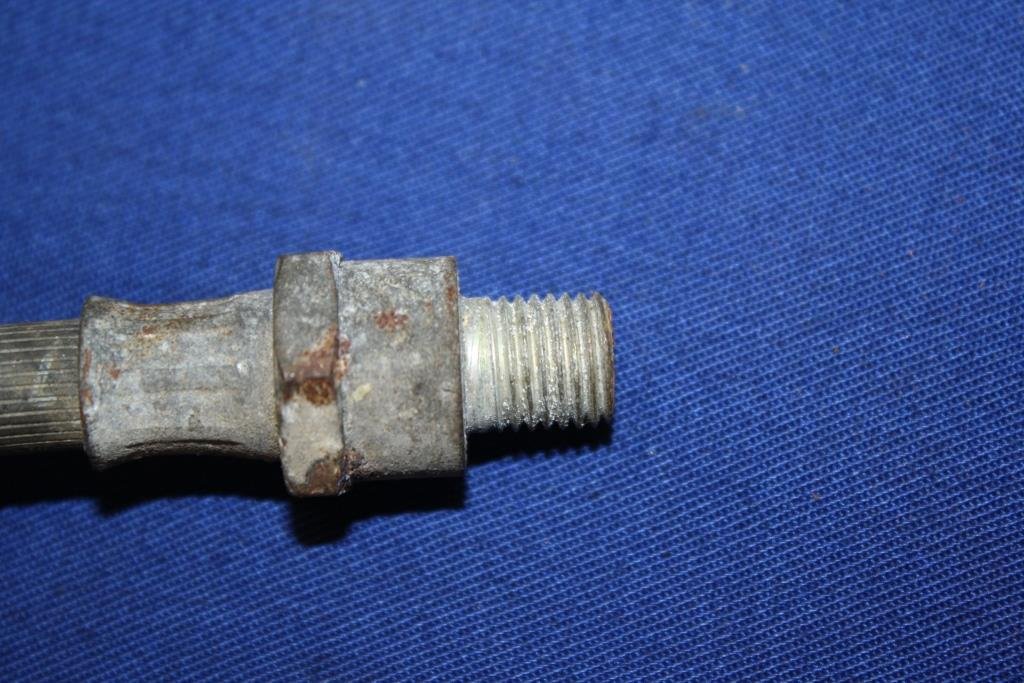
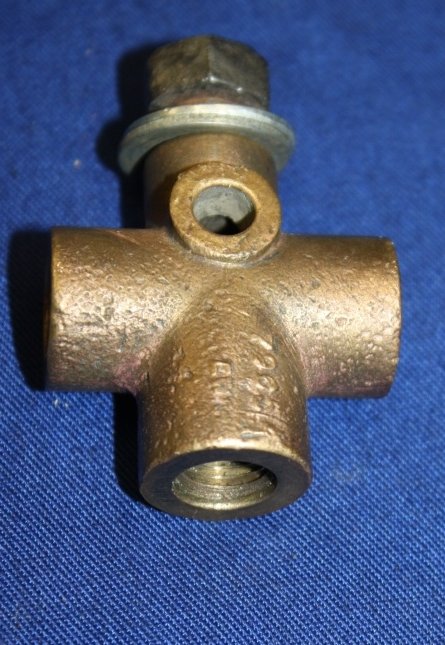
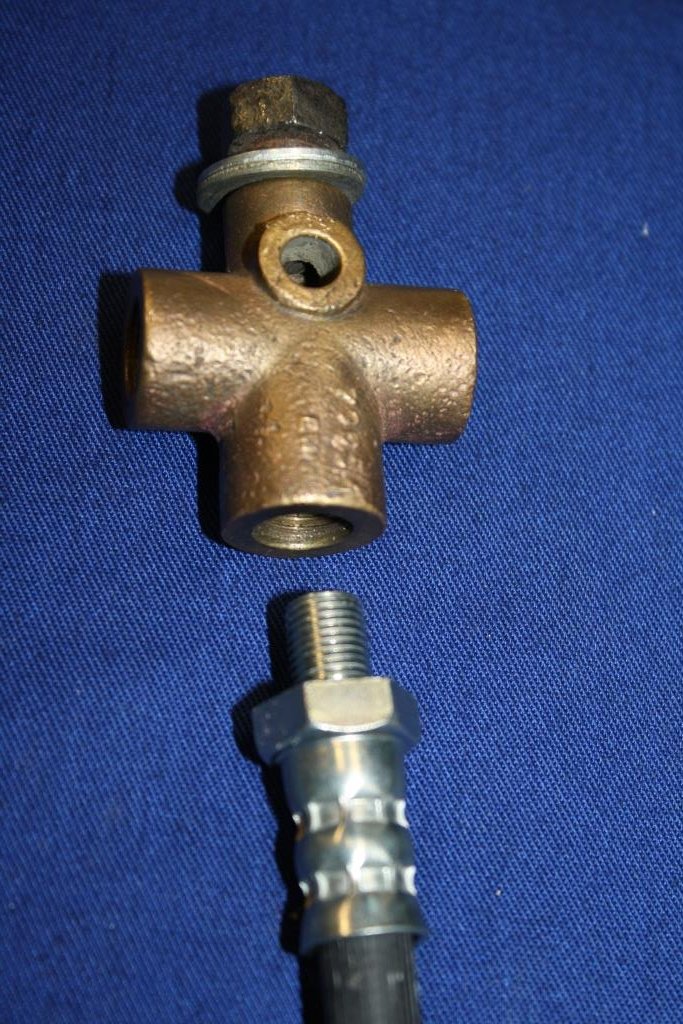
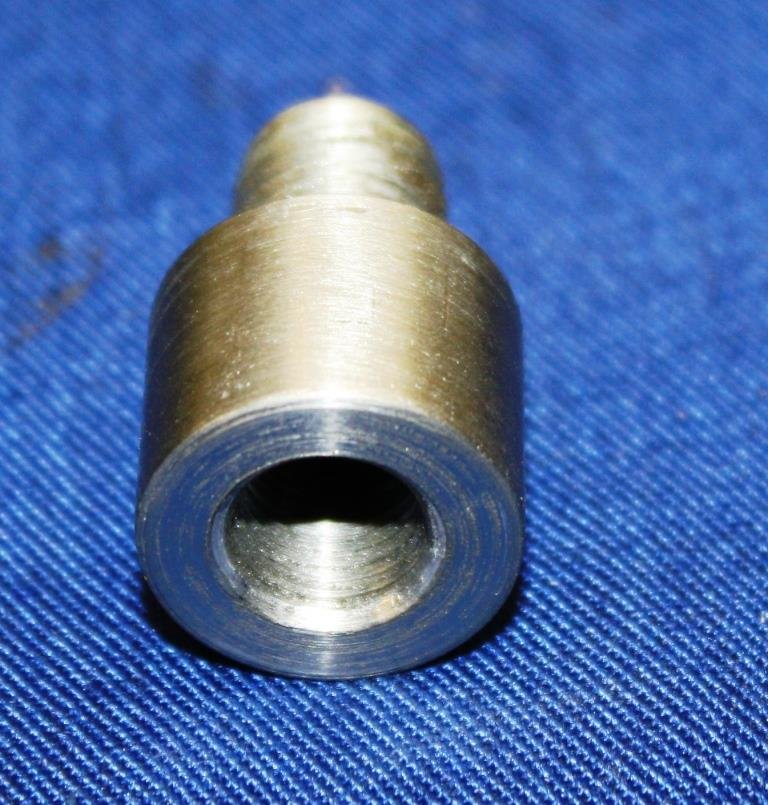
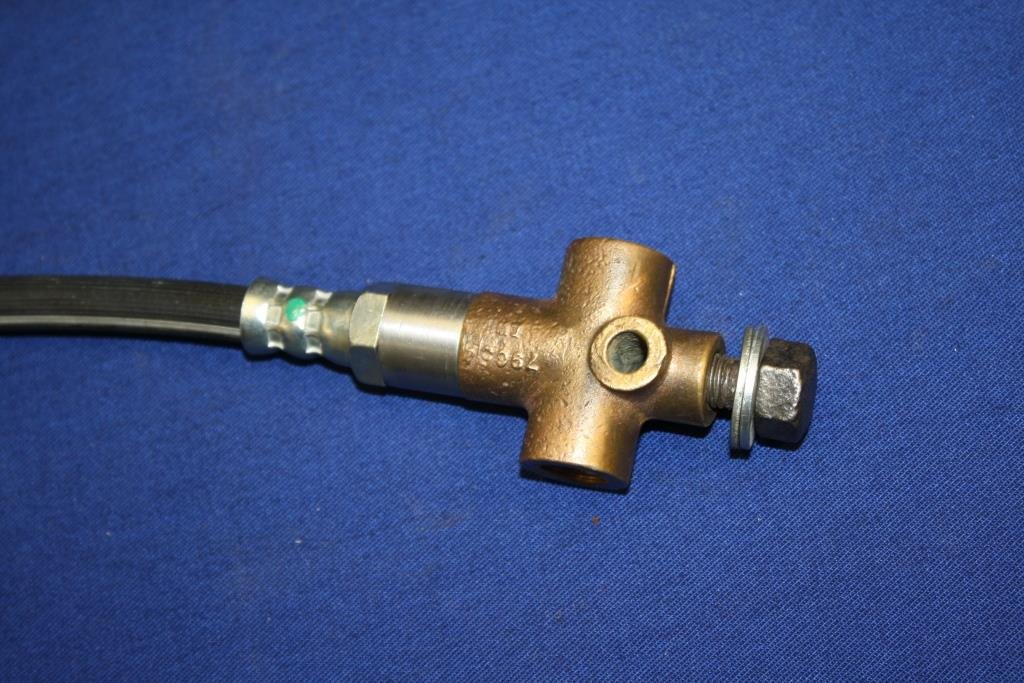
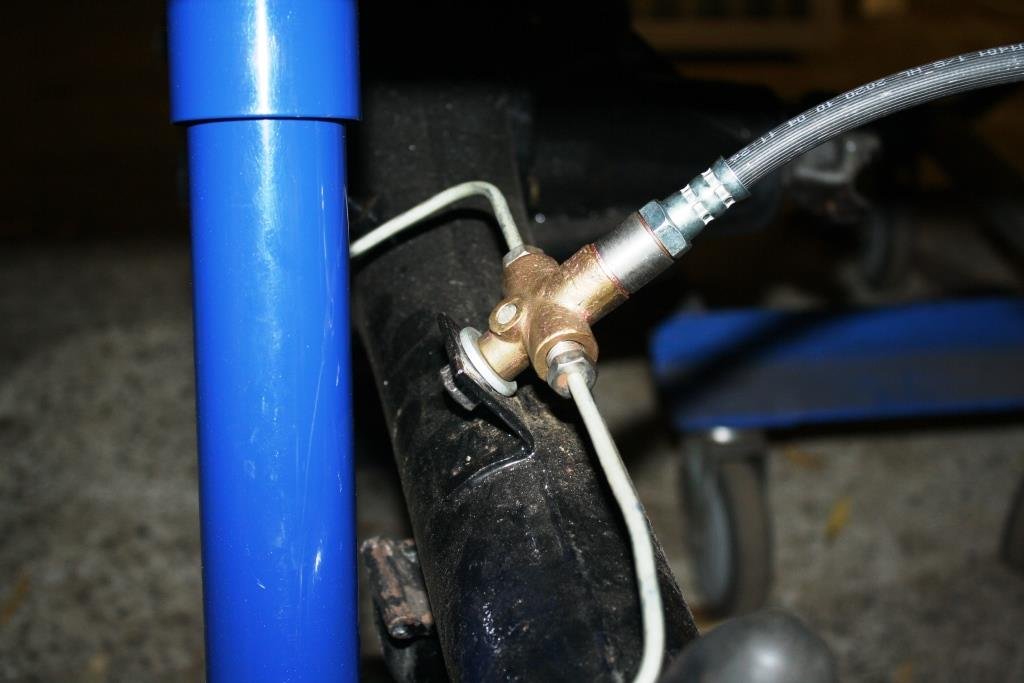
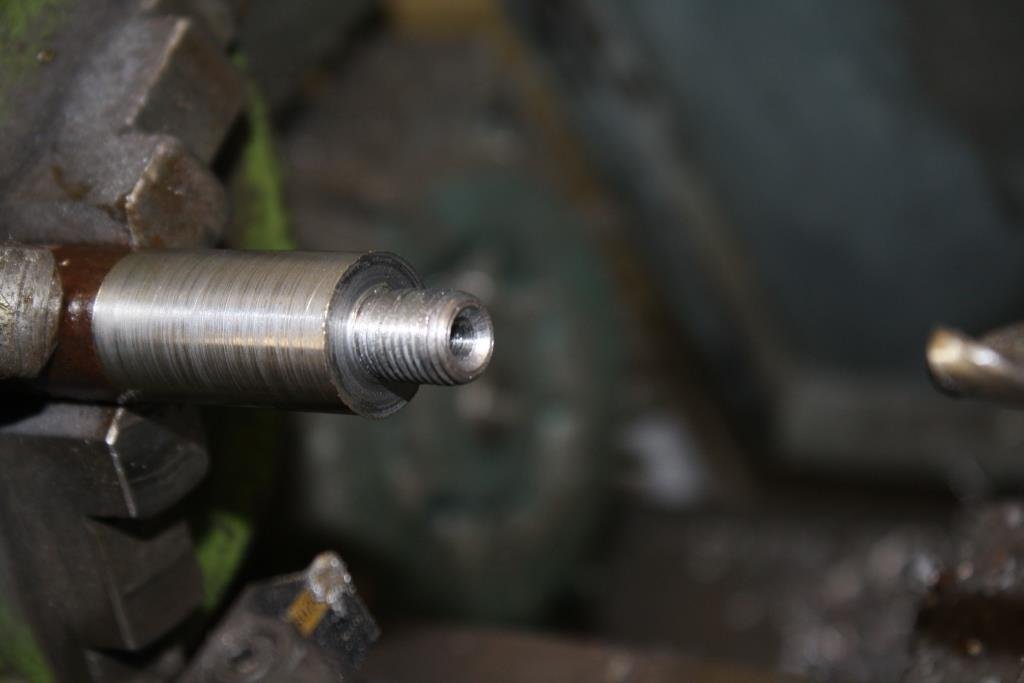
Having difficulty identifying the original rear brake hose. At the risk of sounding like a grumpy old man (yeah I know……), buying spare parts in our modern world can be a bit of a circus. Recent trip to Reppco with afore mentioned hose in hand for example. After failing miserably to identify the hose the “spare parts salesperson” ( I use that phrase with some hesitation) asks for the cars Rego. When informed it’s BP4*** their millennial face glazed over and he/she/they/it/…..etc. starts looking for a safe space to invent even more PC correct gender fluid pronouns! Rant over……… I made the call to use an HQ front hose (same as on the fronts) and hopefully still available in another 50 years time. How could I not reuse the original, glorious 70 plus year old brass 3-way plumbing fitting? Problem was I needed a male 7/16” NF 20 TPI to female 3/8 NF 24 TPI adaptor. (When it comes to brake plumbing gender diversity is a myth!). Found a piece of scrap ¾” round and fired up the faithful old Emco. Yes I know I could have just gone and bought some hardware but Rigamortice and I had a great evening sampling the new brew with Genesis blasting on the Video/Sound system and the neat and tidy result works for me. Sometimes the journey or process is just as important and rewarding as the end product.
2 points
-
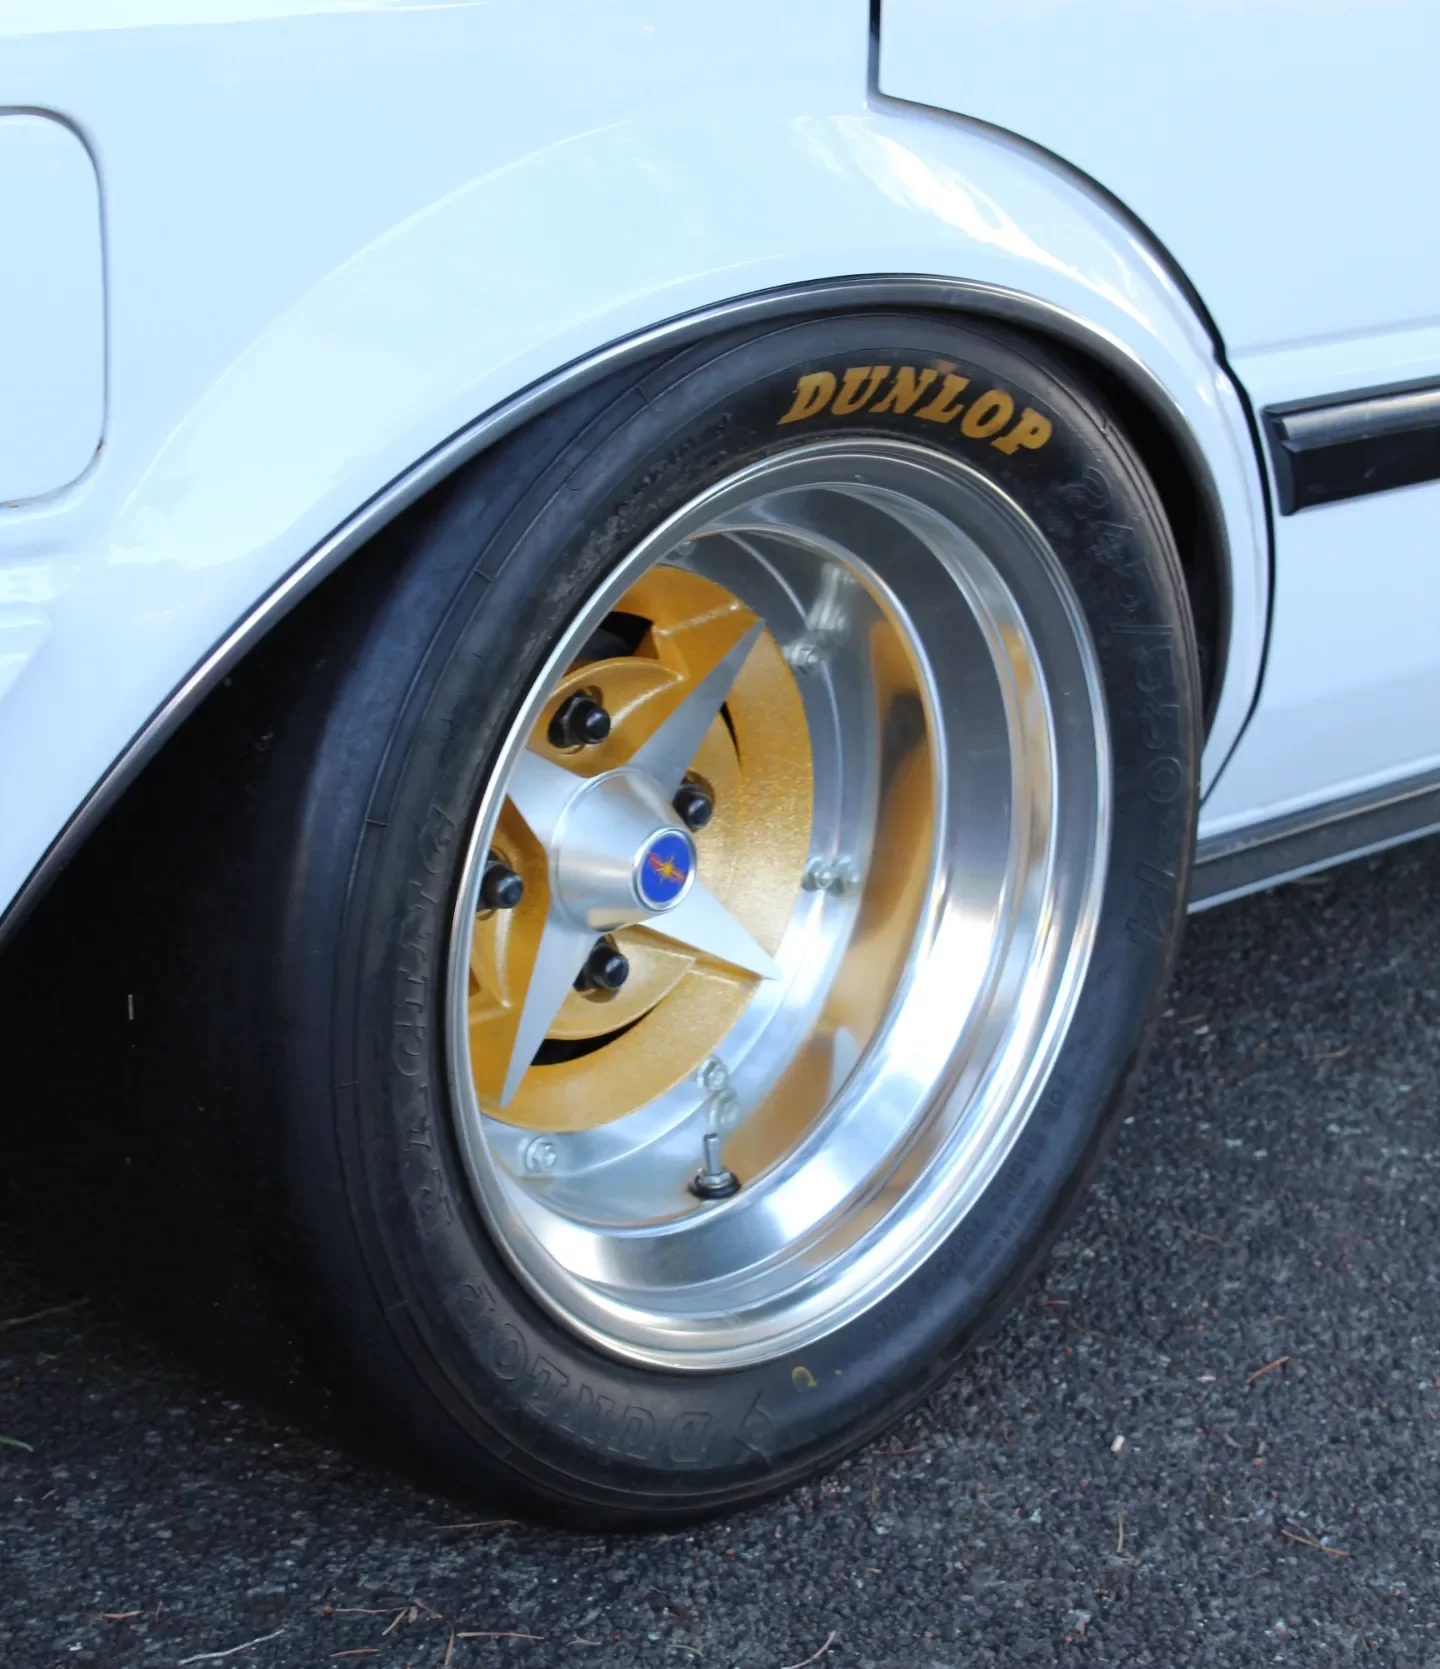
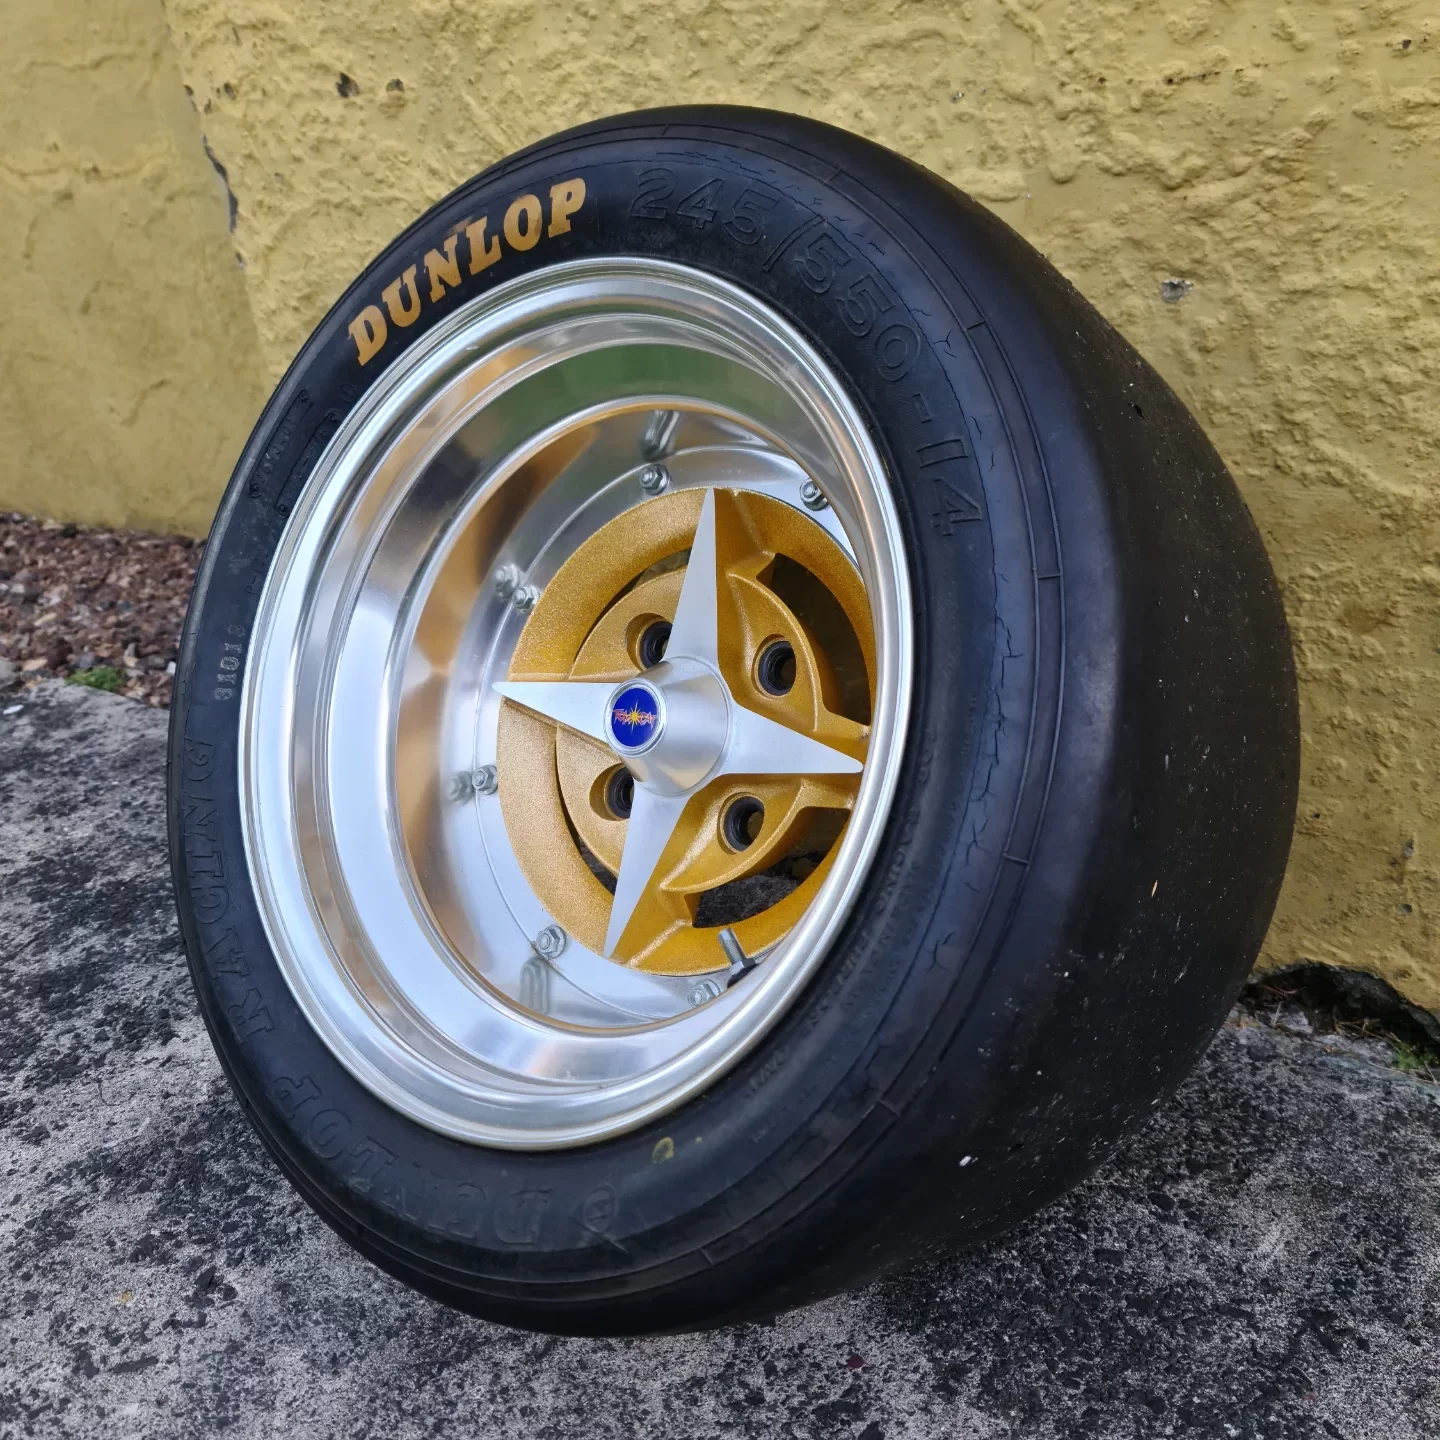
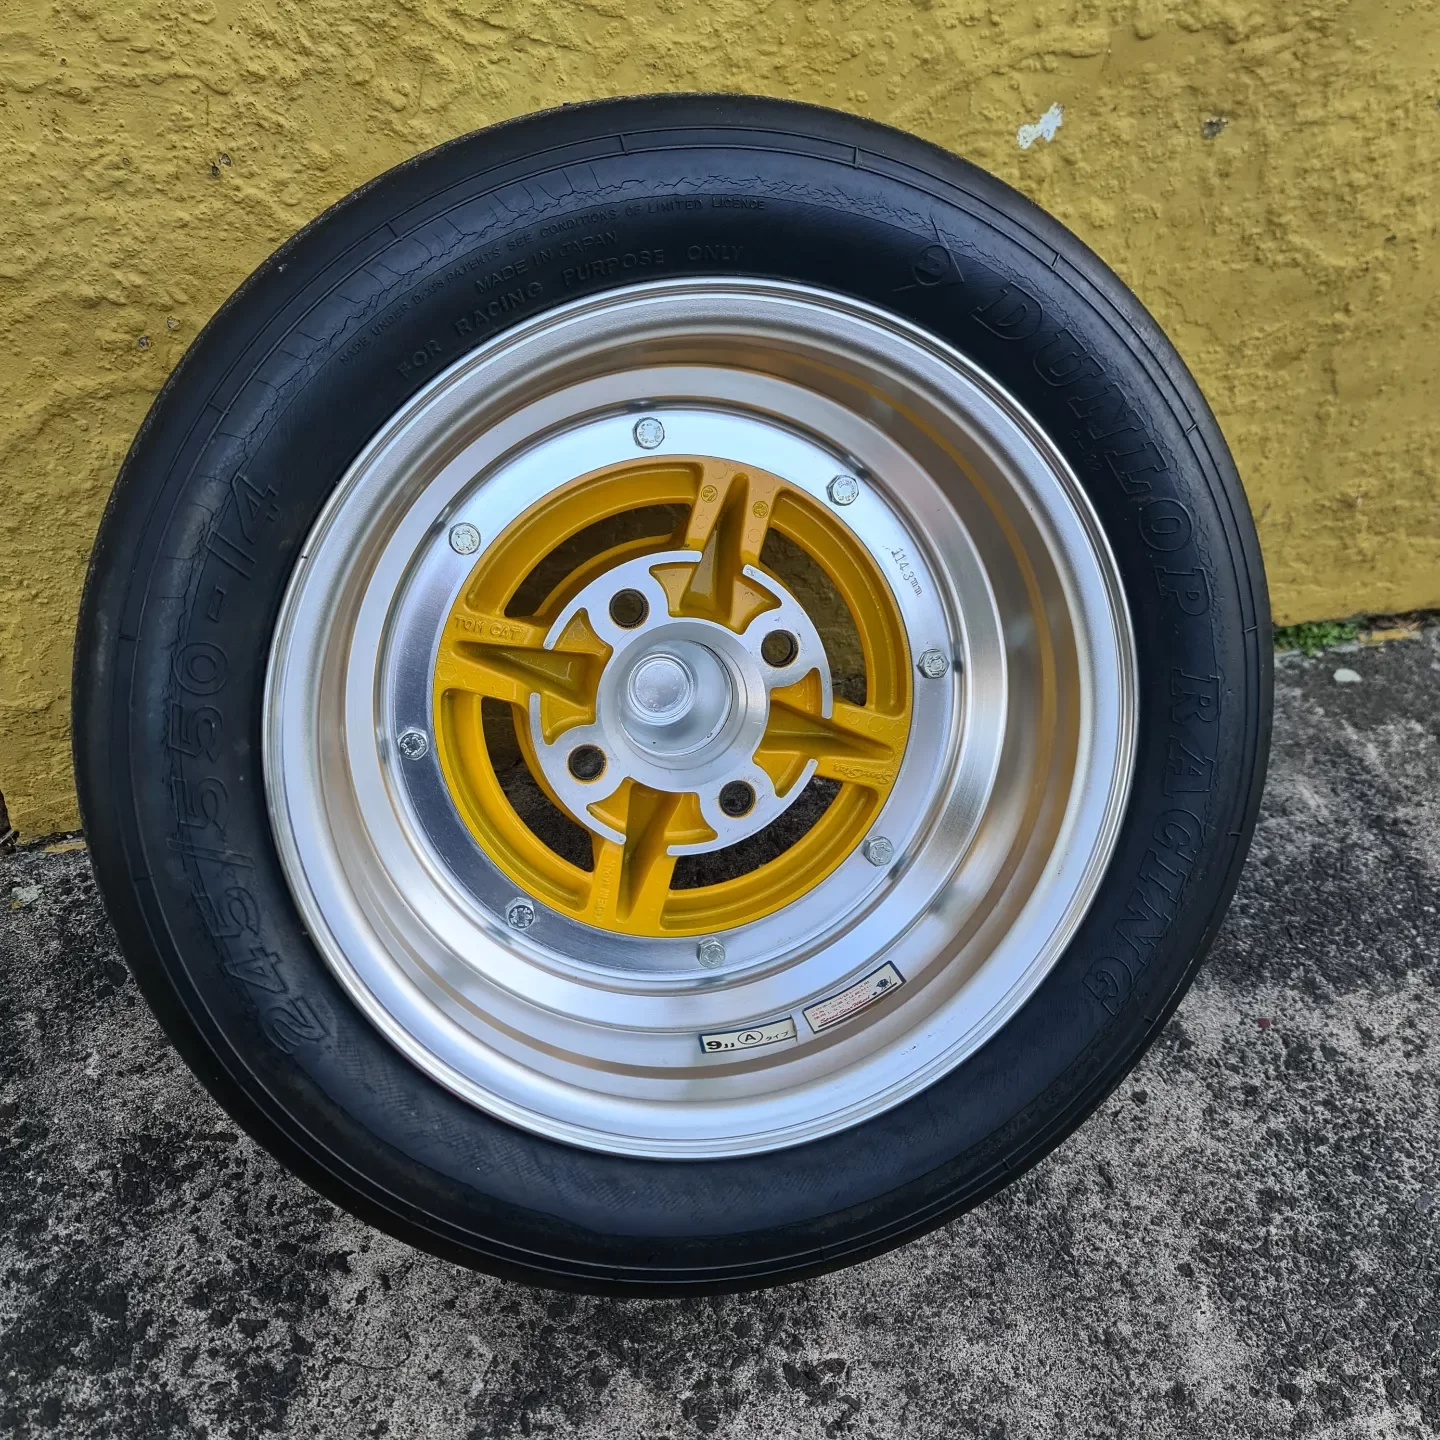
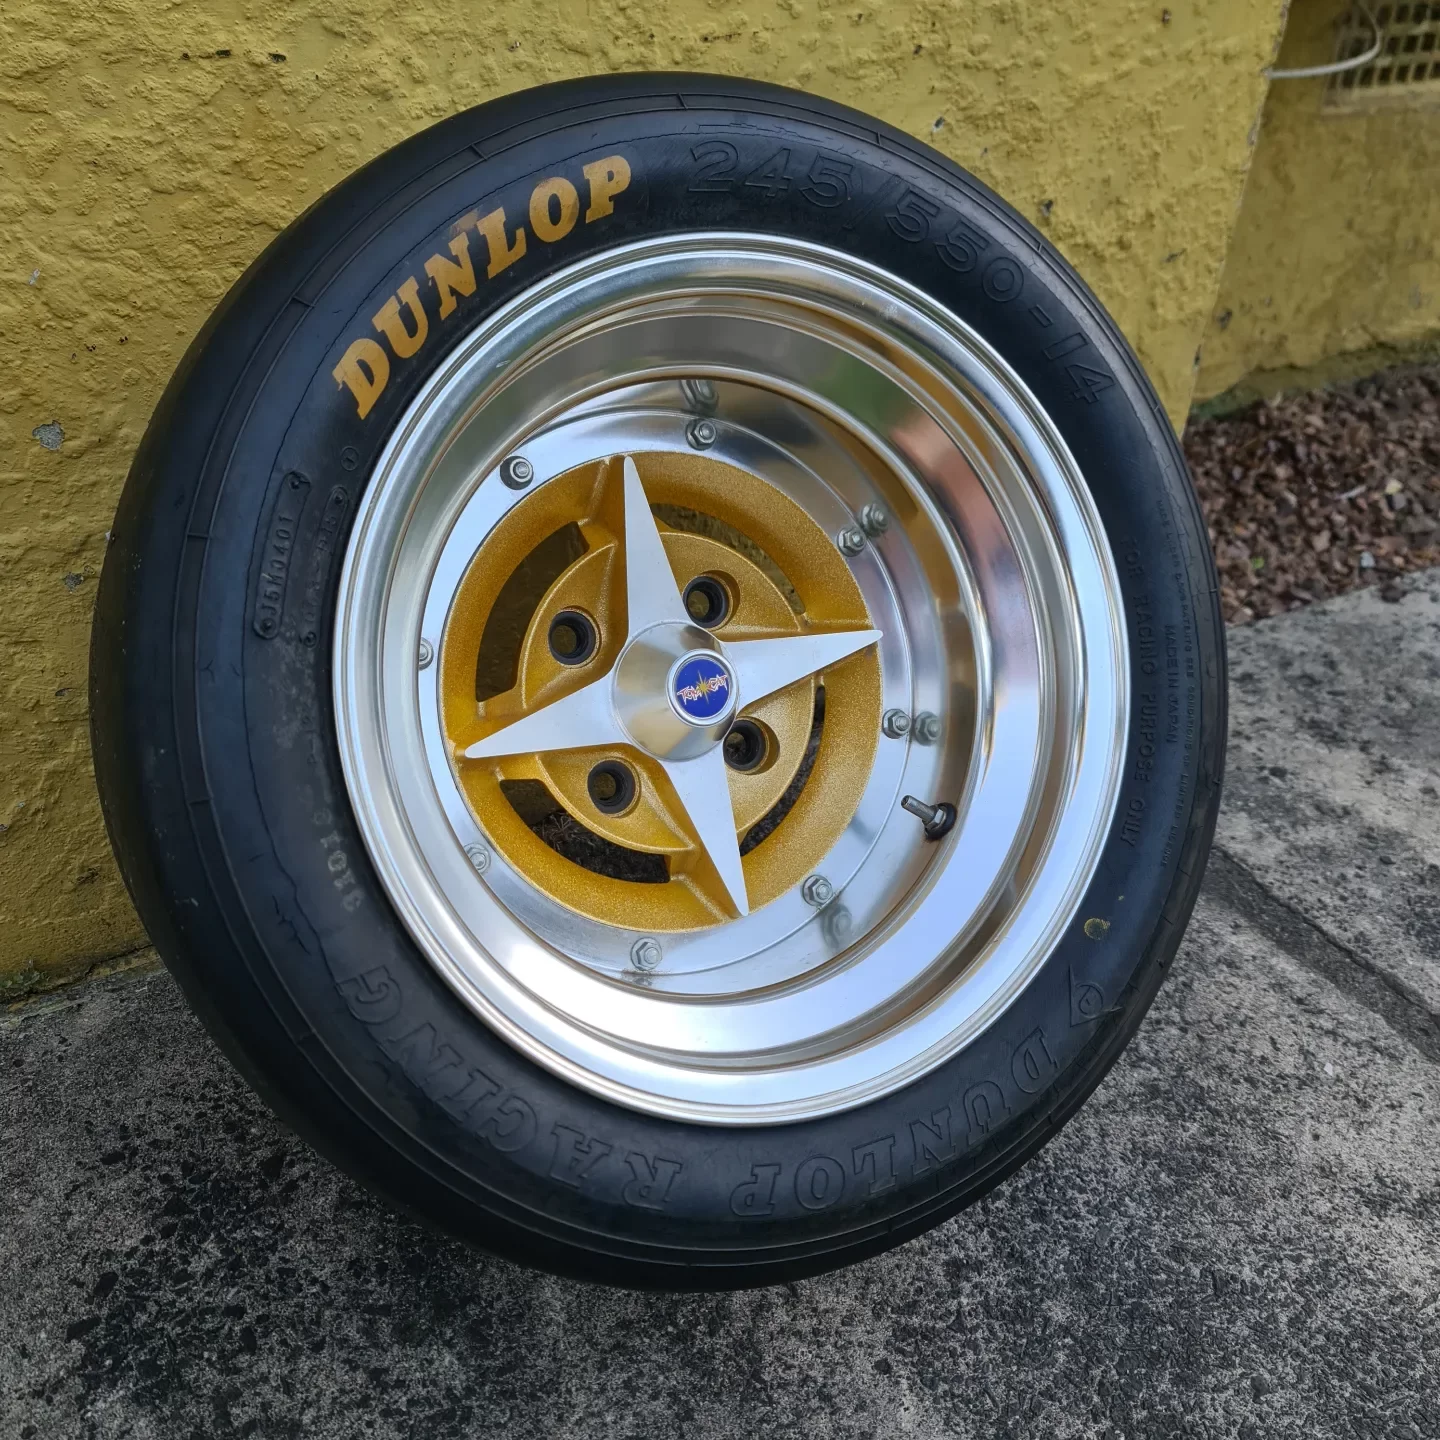
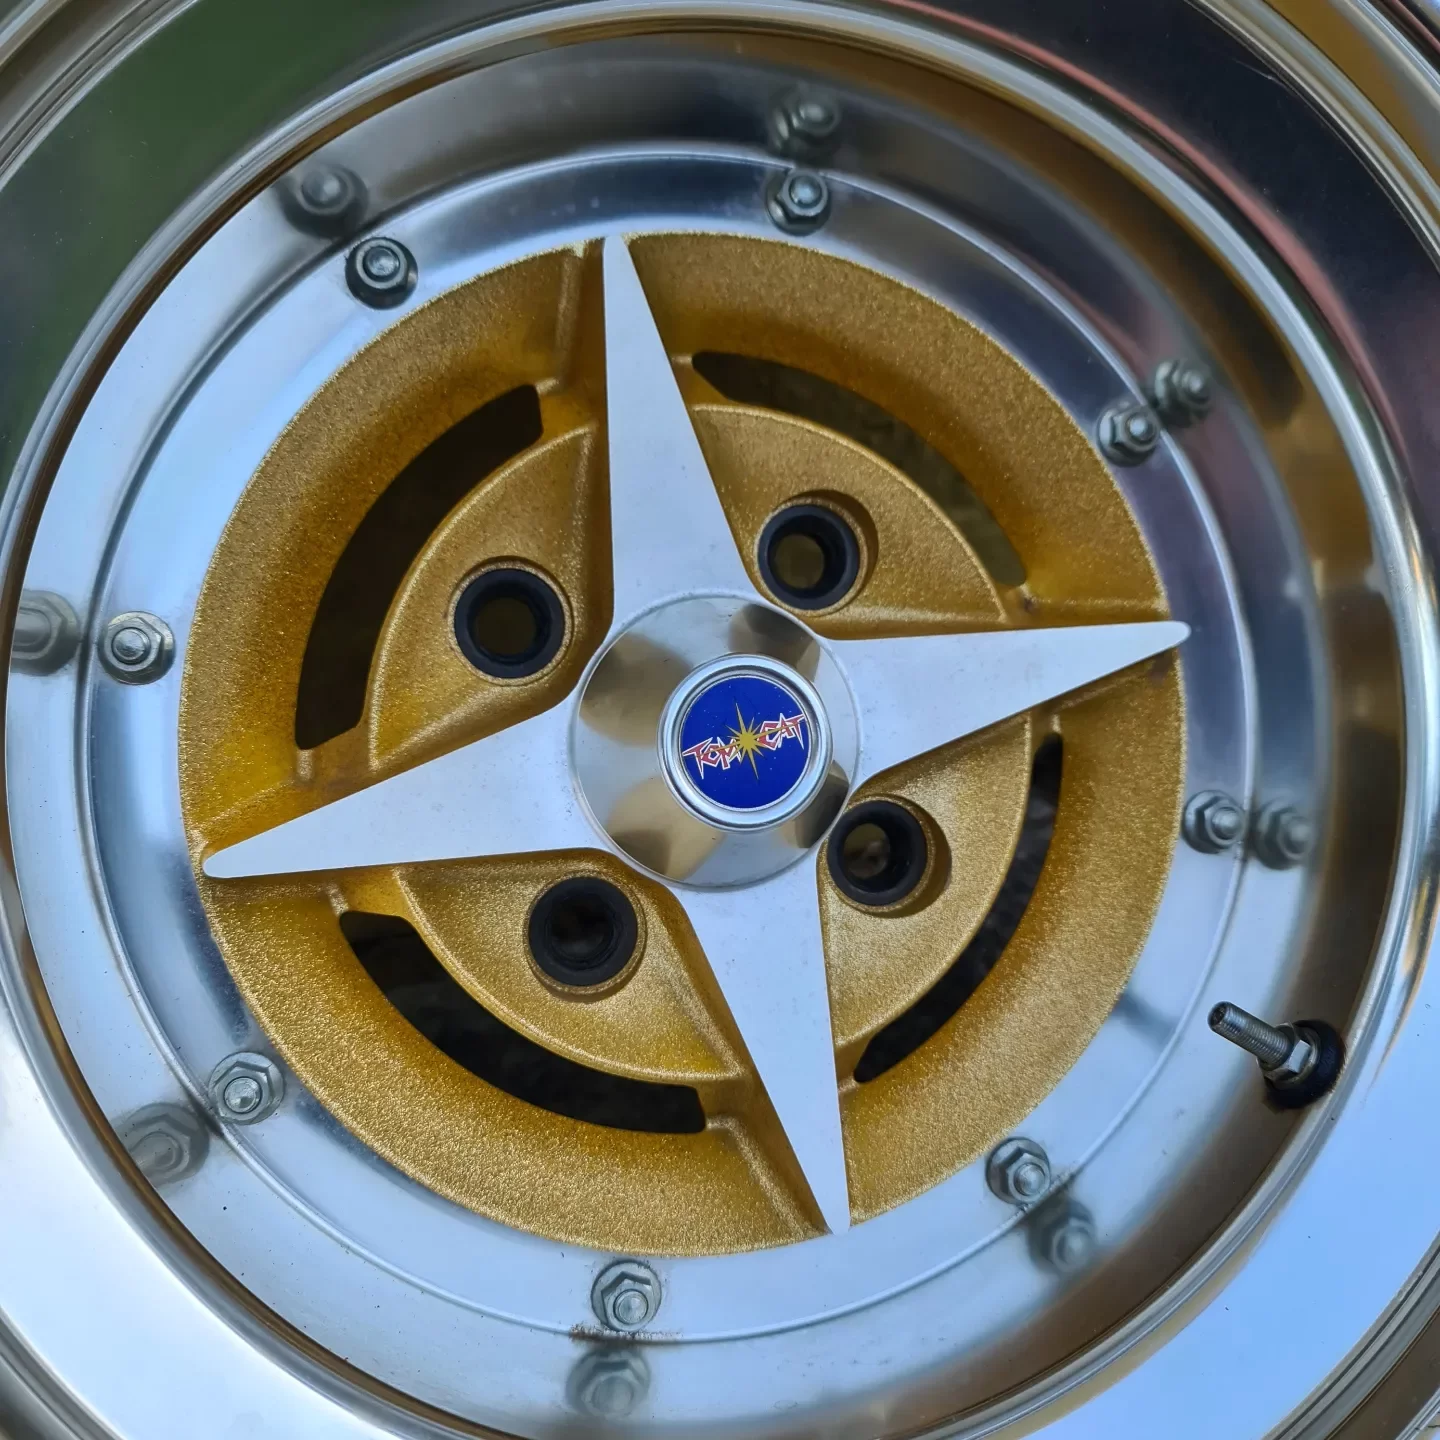
Some tom cat spam for your viewing pleasure December 1982 wheel that up until yesterday hadn't been on a vehicle as far as I can tell. This brings the collection to three wheels, the other two are with Aidan at Pine engineering currently.
2 points
-
https://www.trademe.co.nz/36590179771 point
-
1 point
-
Oh yeah so about $1000nzd, not too bad I guess. Maybe closer to 1300 after tax and shipping. But 15:1, sweet I can run it as a diesel too haha! Yeah it looks like Honda D16 motor, Suzuki vitara motor, and 4efte are possible similar options with similar pin and bore size. But people normally put the strong vitara pistons in the d16 motor and make 400hp. But the horsepower load on a cast piston is different to the rpm trying to pull the piston apart.1 point
-
I've found on proper drag tyres everything feels considerably less abusive on drive train! Wheel hop is the #1 killer I reckon. Big shock loads over and over. Don't get that so bad on squishy drag tyres1 point
-
Becaue everyone likes pics of honda stuff here's some more Grabbed some dowls from work that actually fit Borrowed the 14mm hex of the neighbor and put in the an fitting into the block so I'll actually have a chance at pcv stuff. Next time I'm at lockup I'll grab a catch can and see if it'll fit1 point
-
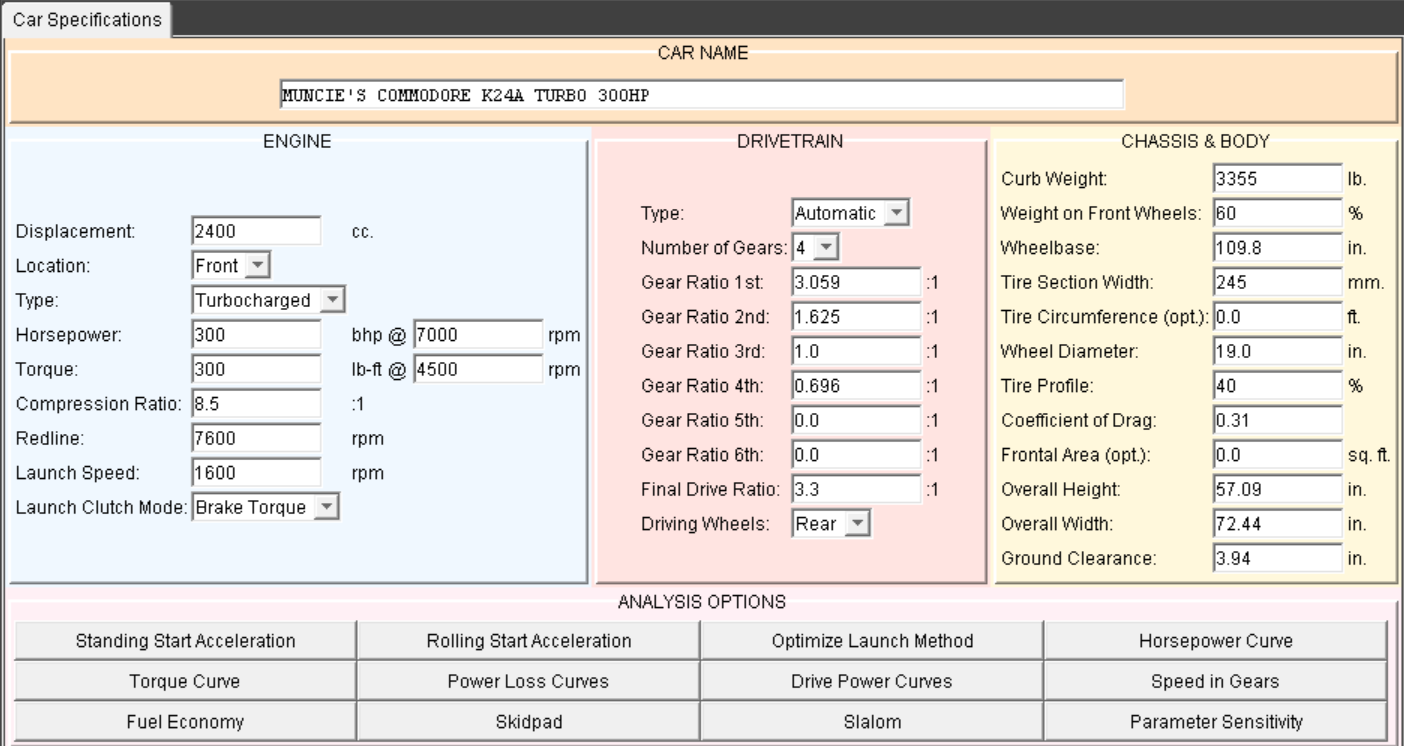
Yeah your car is literally twice as heavy as anything that suits a 1.5 litre engine hahaha. But cos it's a laugh, here we are. Alright so this is all of the above data, no weights changed but just engines swapped. Still auto trans and a 3.3 final drive. NA 1NZFE, since this is the least suitable option I'm assuming it's doorty so 160hp @ 8000rpm with 9000 limiter. Turbo 1NZFE 300hp @ 8000, 9000rpm limit NA K24A is the best standard power version, 204hp 7600 limiter Turbo K24A is 300hp @ 7000rpm 7600 limiter If you want to try any of these numbers a bit different, let me know
1 point
-
Usually just swap them out bro. I've never replaced the bearings besides on a cat skidsteer that had this oddball setup that was grease one side and oil on the other.1 point
-
I've never seen bearings in track rollers. Are those the bottom ones or the top? Most shops will swap them over/out. The only type I've seen apart are CAT and they had a big arsed pin that ran in a bigger arsed bushing. Everything floated in oil. Once one of those go it's mates need to be looked at closely. An undercarriage lives in one of the most abusive environs known to man. Dozers more than diggers but they pretty much operate all in the same way. Leaving machines in wet area's/under water is asking for trouble in the undercarriage department. Ching ching ching!1 point
-
Proud of you kid. Eat the fricken biscuits1 point
-
Lols at the comparisons being drawn between this and other high performance engines of the ilk, such as K series, A series, and Holden 6.1 point
-
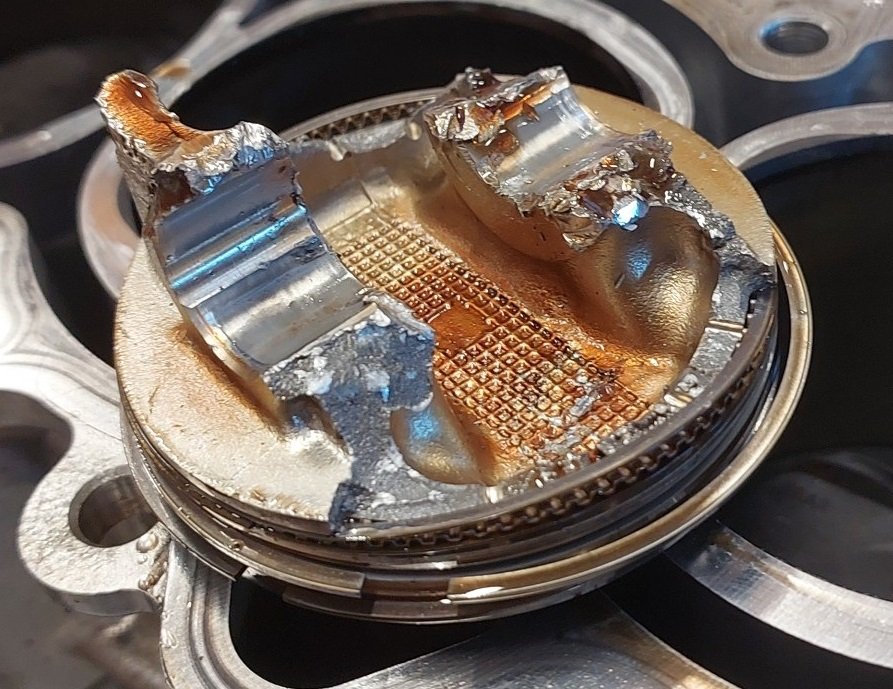
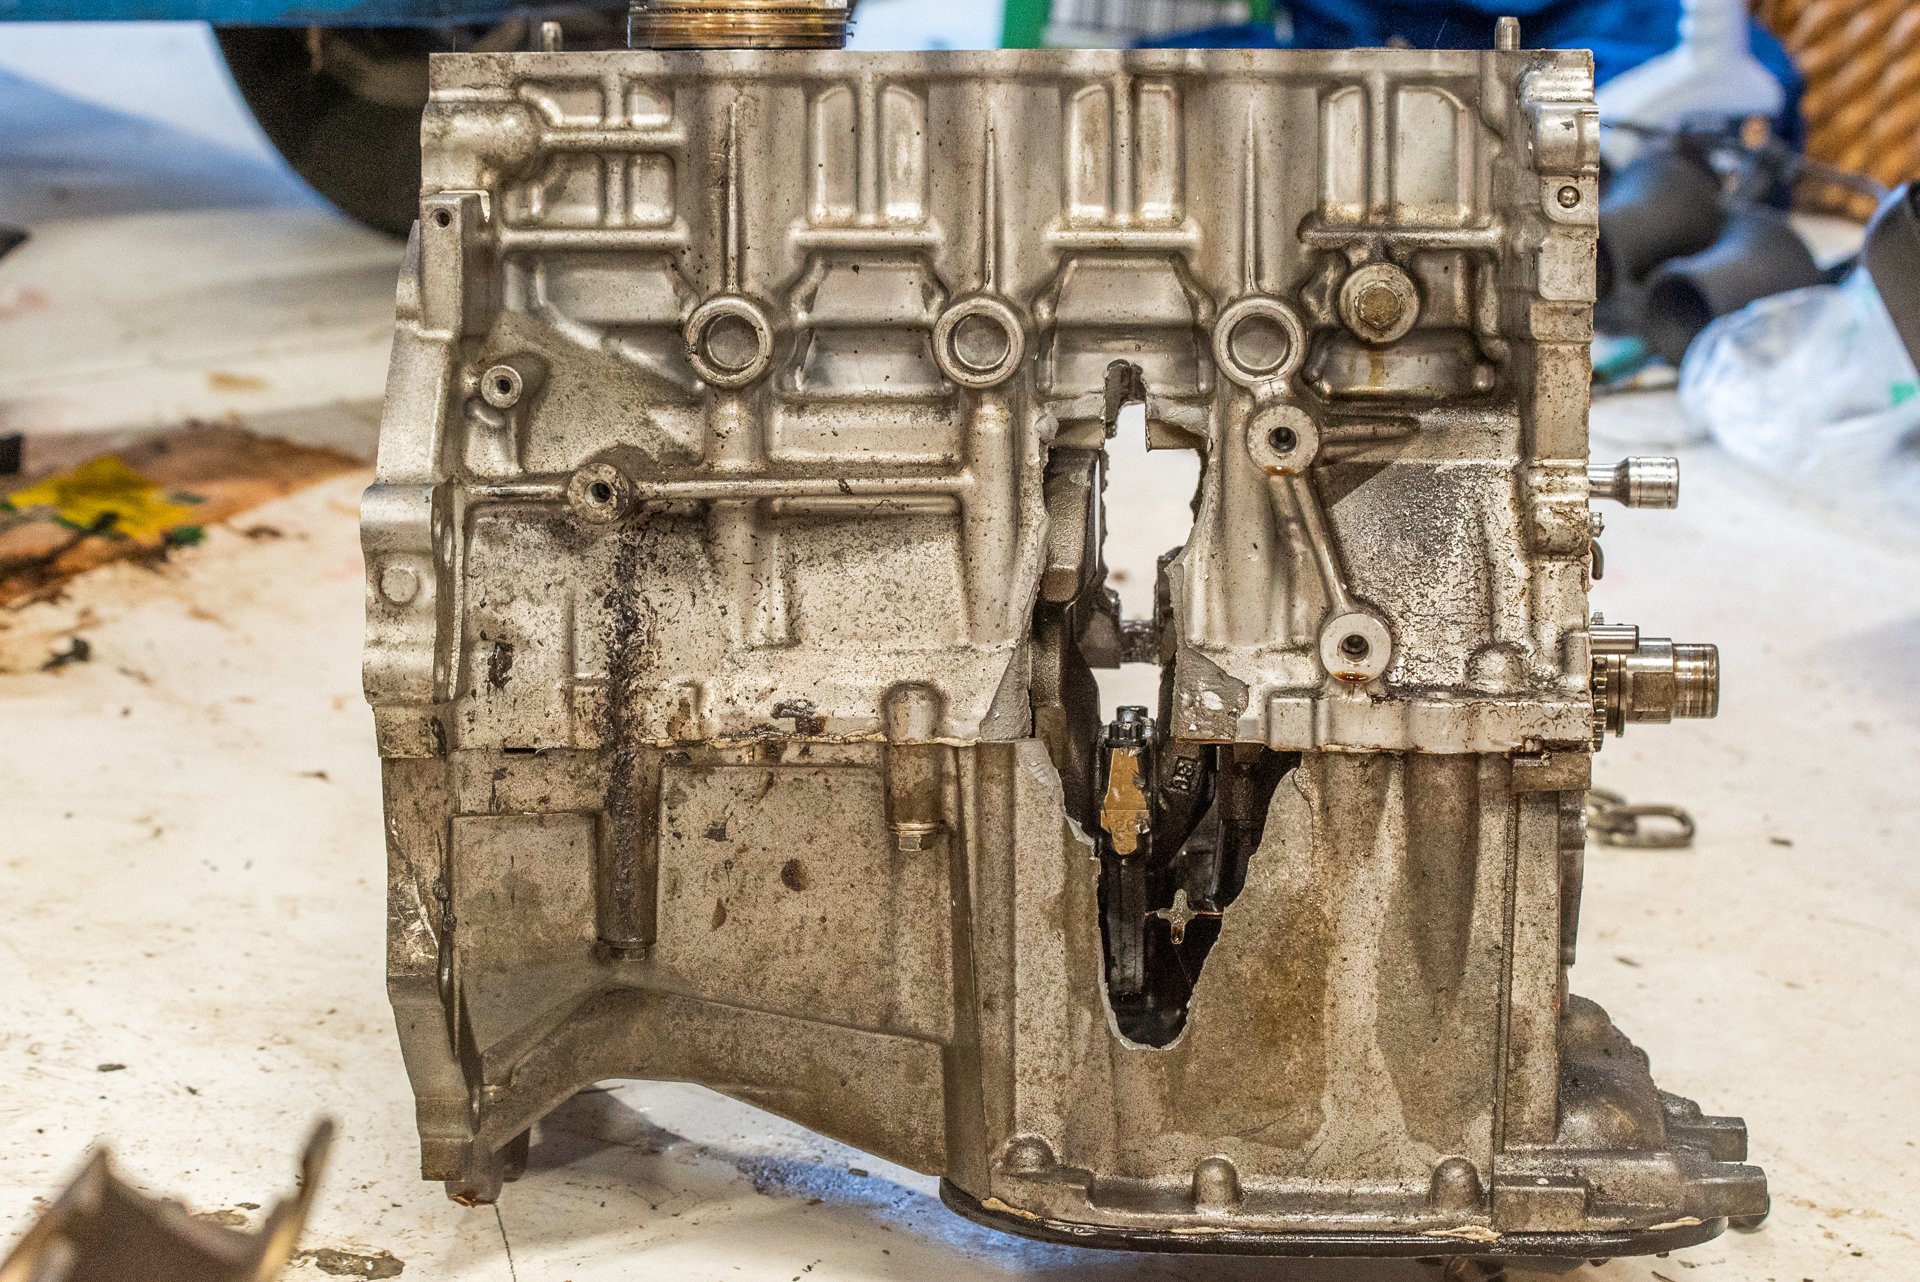
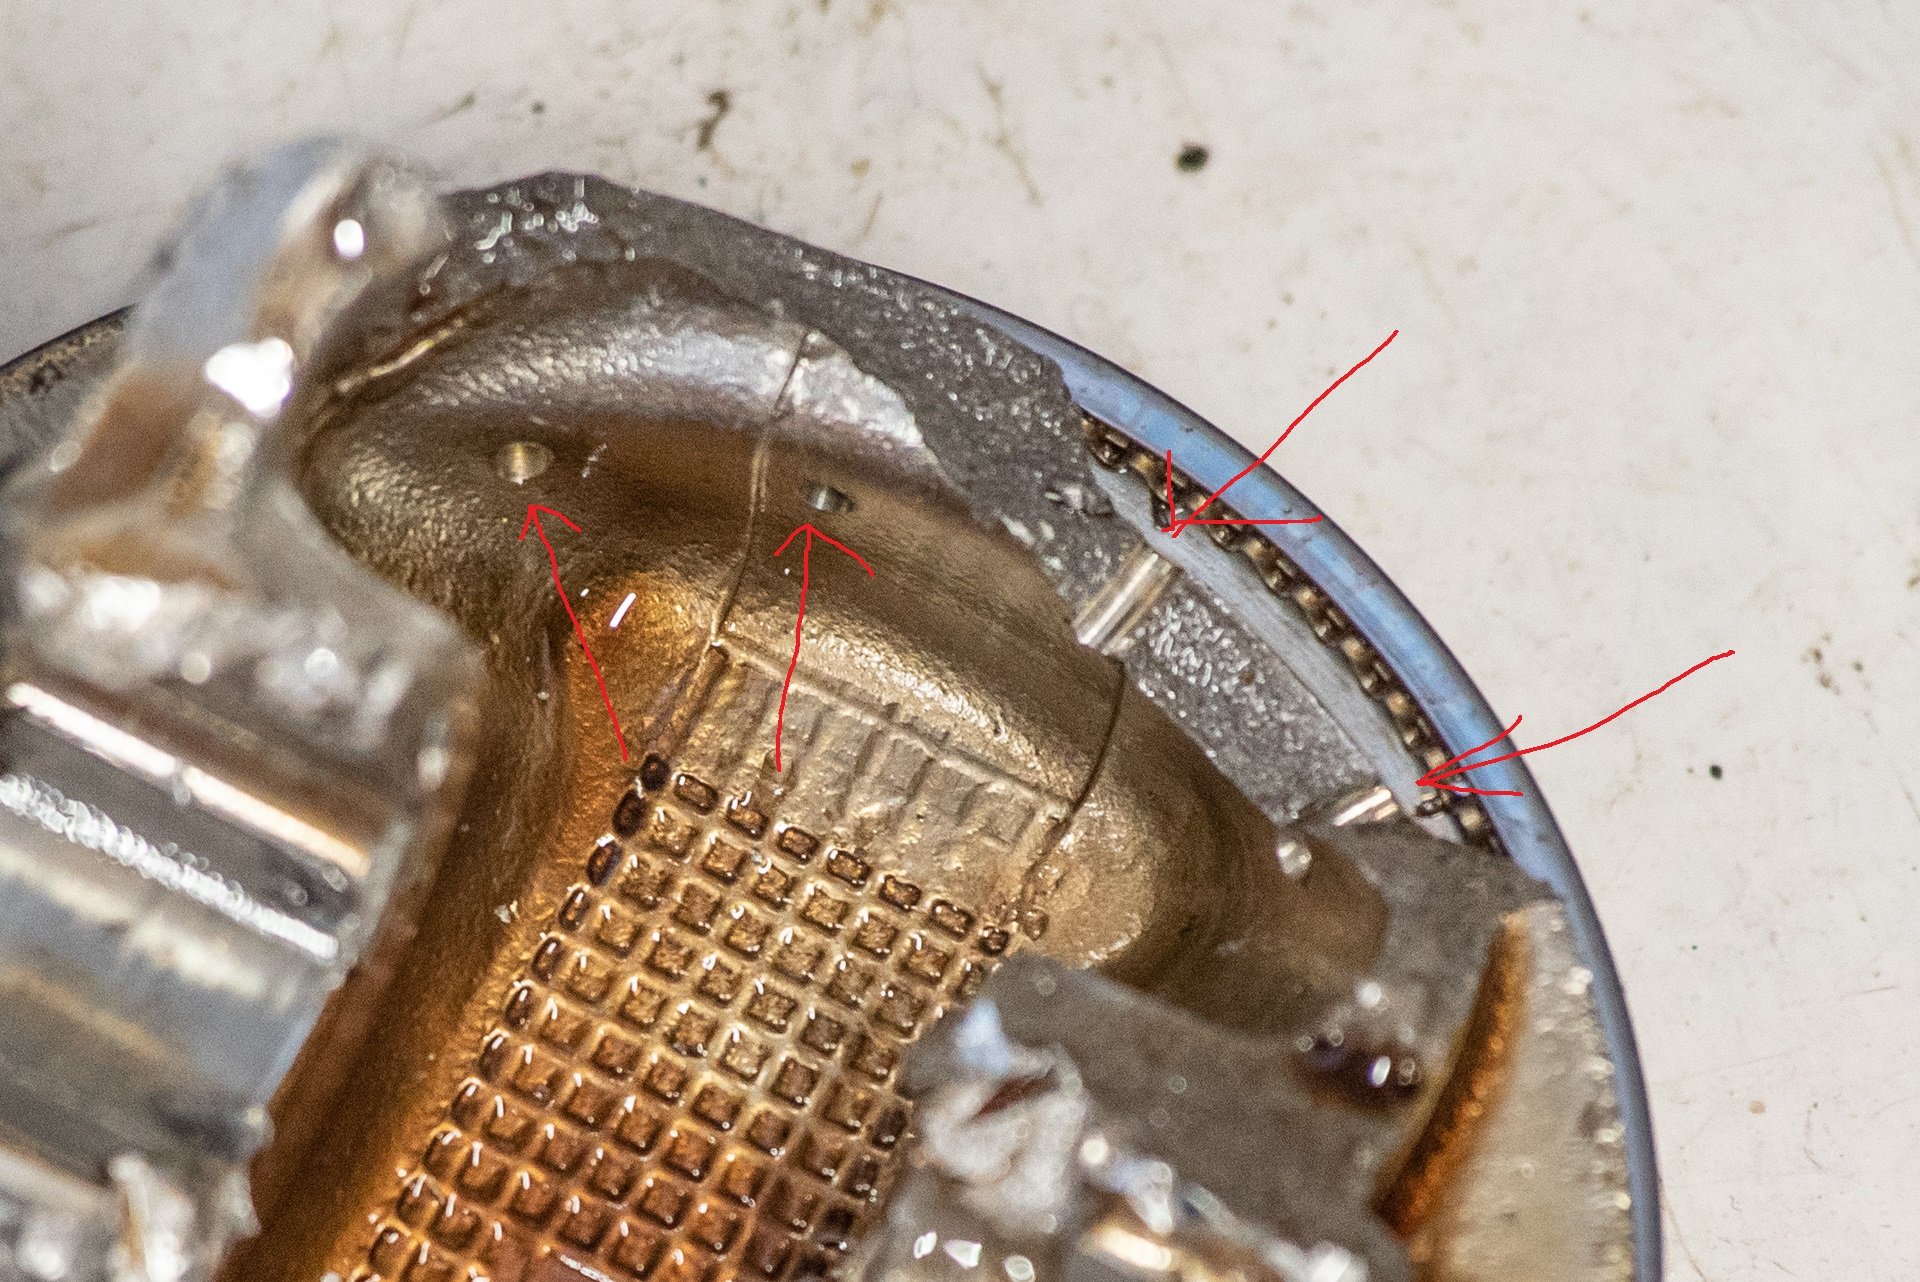
Finally had some time to get the old motor out. I was busy just dealing with the nuts and bolts of the situation, undoing things etc... It wasnt until the motor was completely out, that I had a look at the back side of the block and had a hearty chuckle So I got the motor and gearbox out, split the gearbox off. Then I wanted to get the piston and the top half of the rod out, to see if there's any evidence of how/why the rod broke. So I used an extension bar and tapped the piston up until it popped out. Well, part of it anyway... And then I laughed some more, oh man, I wasnt expecting that carnage! I cant find the wrist pin or the top of the rod anywhere. I suspect I might have to go for a long walk up the road to go find it. So one concerning thing about this, is now I'm not sure what broke first. If the rod broke and caused the damage, that's fine. Easy, just put stronger rods in. But it looks like the piston broke along the line of the oil return holes from the oil control rings: Which maybe makes me think that the piston sorta... fell in half. Then caused rod carnage. However I'm thinking this is less likely, based on the lack of damage to the cylinder head. Either way, it might be a good idea to drill some tiny chamfers on the oil holes next time for stress relief. But I'm not sure if you can get a drill anywhere near it while the piston is intact. So, hopefully the rods are the problem and not this haha. Maybe the remaining 3 pistons and rods might show some extra clues.
1 point
-
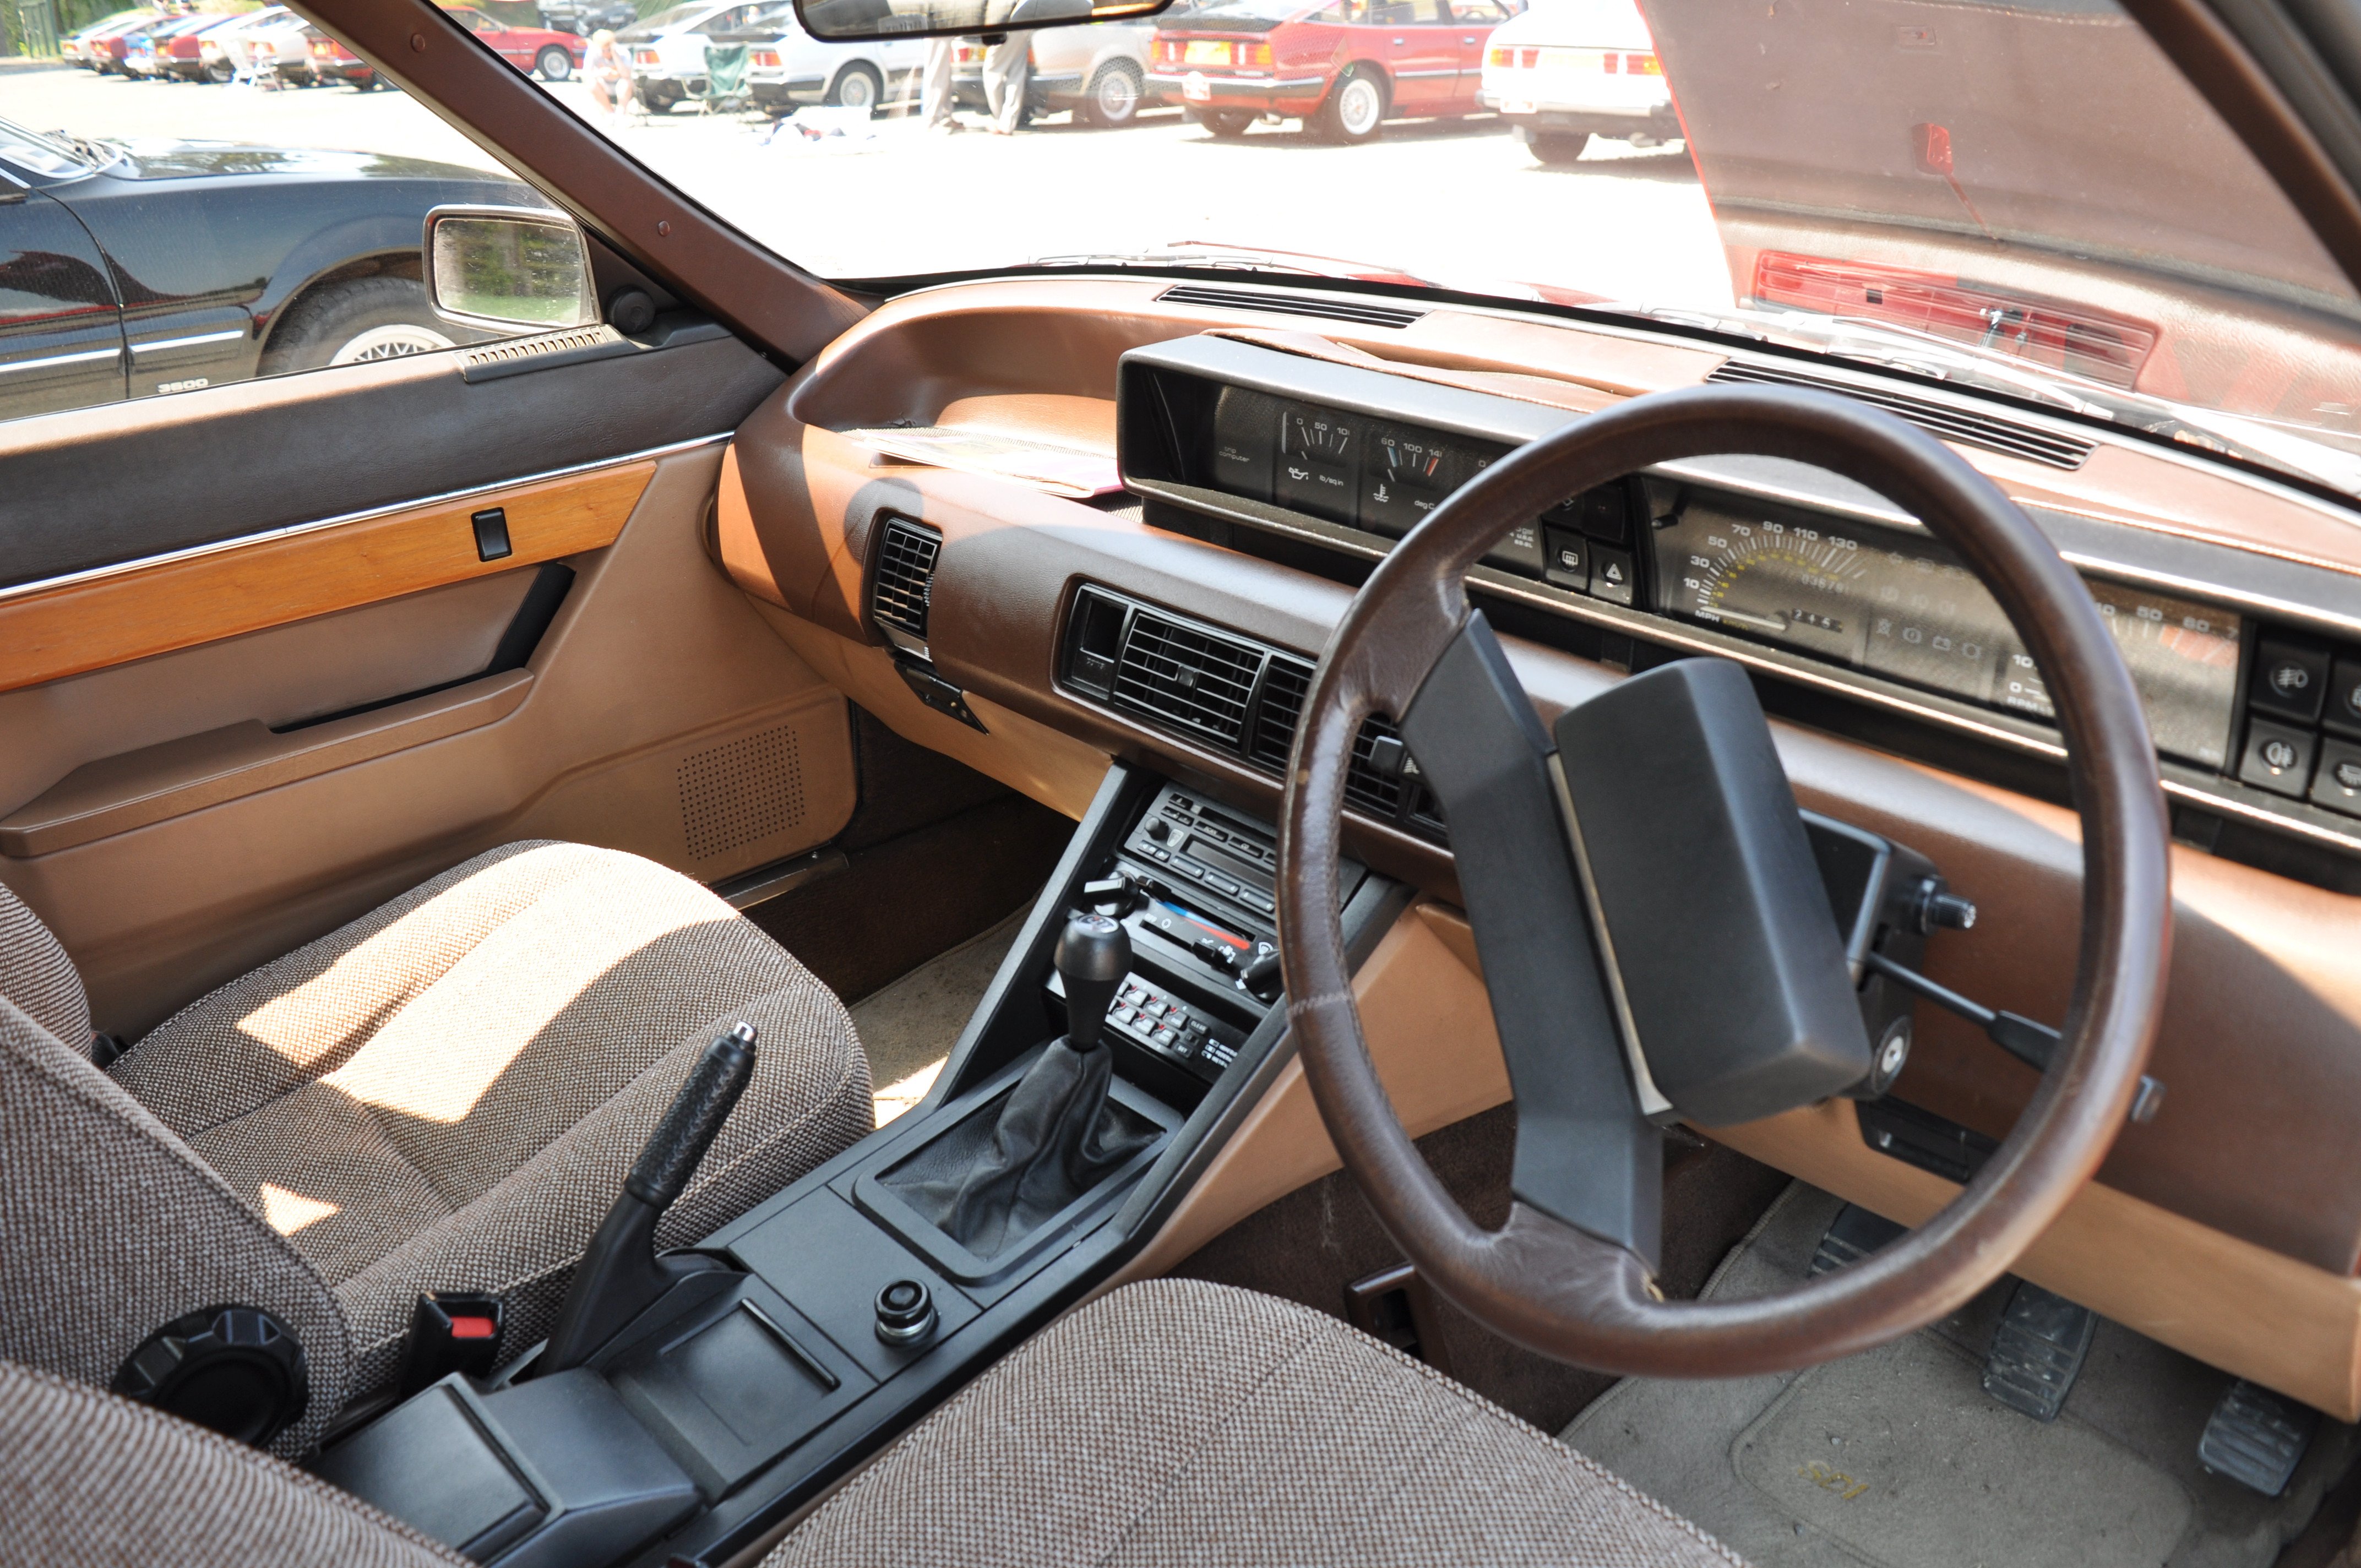
What about one with tweed seats?
1 point
-
Time to make some new top mounts. Had a play and made up theses… Looked good in place…… A bit more measuring for a “sanity check” – a vital strategy when either Rigamortice or I are involved! And we’re happy Did some painting........ Decided on joining the top clamping plates to form an additional cross member, could be useful if I end up fitting a panhard rod or a watts linkage. And once again I’m happy with the results.
1 point
-
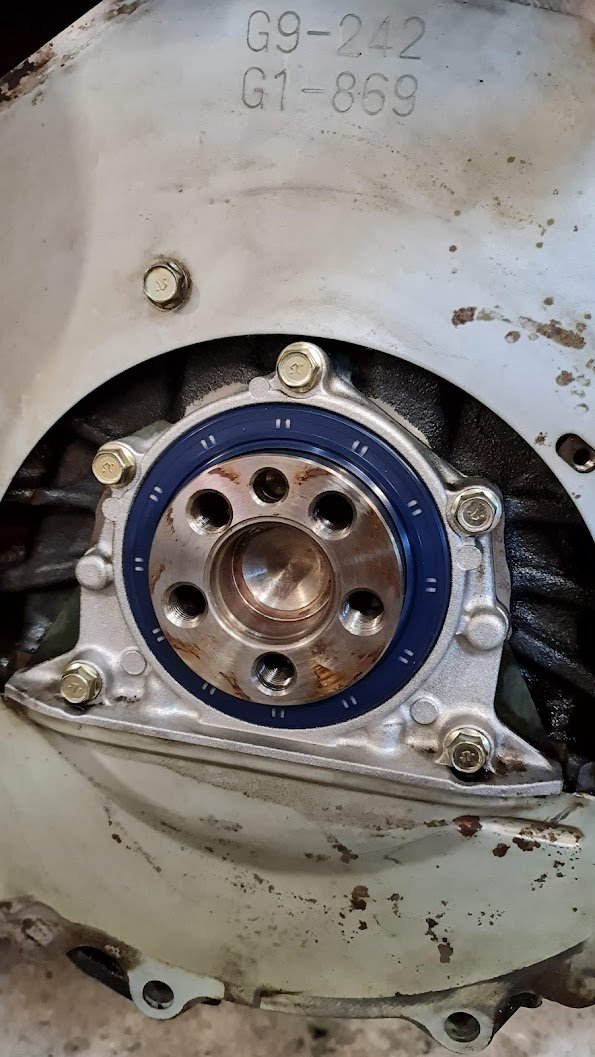
Got the gaskets and rear main seal, they only had upside down ones. Inside looks pretty good: Cleaned up the cover and fitted seals: Even replaced the oil cap seal, old one was hard and brittle: New: New rear main seal installed: Not all that exciting but this'll get the engine ready to go back in the parts car, to then be sold and fund more interesting things.
1 point
-
As mentioned in the previous update, once I noticed the engine wasn't happy, I began looking into how bad it was, hoping it was recoverable. The first thing to do was to drain the old oil and refill. According to the sticker on the windscreen, it was last changed 2 years ago and was due last year by time, not miles. I idled the engine to get some heat into the oil, and proceeded to drain it. I remember from my last SD1s that you cannot remove the oil filter with an empty sump or you risk draining the oil pump and having it lose its prime. The oil that came out was really thin for what should be a 20W50 grade. It had a slight metallic sheen, but no glitter and no chunks. It didn't smell overly like petrol, but it did have a smell to it. It was very black. I refilled the engine with the cheapest 20W50 I could get that was still a good brand. I found some Nulon on clearance; perfect. It's not what I would normally run (Penrite HPR30) but there was no point filling the engine with $80 of oil just to see if it was toast or not. $30 oil is more like it. Once the sump had oil in it again, it was just a case of spinning off the old oil filter and fitting the spare Ryco filter I had in my parts stocks. Starting the engine, and already it has made a noticeable change. The oil pressure is still scary slow to rise when cold (the light goes out, but it's many seconds to rise above 0psi on the gauge), but it's higher on the gauge now. I did notice that the idle when in gear was lower than it should be (about 400rpm). It still idled nicely, and about where Effie used it, but the lower RPM meant that the oil pressure was bottom of the gauge. I used the idle screw on the throttlebody to bring the idle up a bit. It's now about 900-1000rpm when at idle in neutral, which is higher than the book says (800rpm), but it means that when the RPM drops in gear, the RPM is still high enough (about 600rpm) that I have oil pressure. It's a bandaid masking a bigger issue, but it works. Between the idle bump and the oil change, at idle in gear, when warm, we now have about 16psi of oil pressure, which is a damn sight better than the 8-10psi before. Which is a damn sight better than what we had (no I don't know why the coolant level light is on, I might need to clean the sensors as the system is full) When revving the engine it goes up to about 30psi at 2000rpm, which is more or less in the ballpark of where it should be (I believe the book says it should be 35psi). It still clatters though. The next diagnostic task was to check the exhaust manifold. I had heard that if there is a leak from the manifold that it can sound like a clattering engine knock. Sure enough, a few of the manifold bolts were barely finger tight. I tightened that up, and it still clatters. I bought a pair of cheap exhaust gaskets and got to work, thinking that maybe the gaskets were blown. Removing the manifolds was easy enough. All the bolts came out fine since they had recently been loose already. I did note there were no locking tabs fitted to the bolts. Even the downpipe joints came undone easy enough, despite some bodging by a previous owner. Well, I guess the gaskets aren't blown then... They just aren't fitted A couple of the ports had traces of sealant on them, but that was it It was pretty obvious that it had been leaking quite badly. There were carbon traces everywhere. Using a series of wire brushes both by hand and on the drill, I cleaned up the mating faces of the heads and manifolds. I also had to do some work with the downpipe flange on the manifolds. I cleaned up the threads with a die. One of the flanges had a replacement stud on it, that had less thread. The thread stopped where the arrow is pointing, meaning the nut couldn't even reach the flange. To compensate, a previous owner had used an oversized nut as a spacer so the actual nut could still tighten down on the thread. That's not my style, so I ran a thread down the rest of the stud The RH side manifold got fitted first. A couple of zip ties through the top bolts holes on either end kept the gasket in place. The gasket was fitted with high temp sealant smeared on both sides, just to aid in sealing. The bolts were fitted with flat and spring washers, to help stop them backing out again. The other manifold needed the gasket cut in the middle. Since it's a one-piece gasket, it would interfere with the dipstick tube. It was easy enough to cut out the center piece with some tin snips, making sure to round the razor-sharp corners off a bit This was also then fitted, with new washers on the bolts and sealant on the ports. I chose to remove the downpipes so I could clean up the flanges. This turned out to be a PITA. With the manifolds fitted, and the exhaust still in place, it was a nightmare trying to get these things to fit again. The flange on the manifold isn't too bad, but the standard joint with the exhaust Y pipe uses a sealing olive and those annoying three bolt clamps to squeeze it together. In hindsight, I would refit the downpipes to the Y pipe before the manifolds, and then fit the manifold with the downpipe loosely bolted to the flange. I wish Rover just used a standard flange and gasket. As the photo above shows, there are a few oil leaks. It appears that the worst two are the valve cover gaskets, and the sump gasket. Both will be replaced when whatever happens to the engine happens. So, did that fix it? No. It still clatters, although the engine is noticeably quieter when running now. The final check I did was the spark plugs. They all look really old, are Champion, and have a weird yellow colour on the ends. Google indicates that the yellow colour is generally due to old and dirty fuel, which would make sense. I put some 98 octane in the car since it came with almost nothing in the tank, and it really woke the engine up and make it run smoother, so I don't know what the seller put in the tank to load it on the truck. I had some NGK plugs in my spares, so I swapped all the plugs out for those. I've never used Champion plugs, and the internet doesn't rate them very highly. So all in all, the engine still clatters. It might be a bit better than it was when I first got the car, more from me masking it with other things than actually fixing it, but it's still there, intermittently, mainly under acceleration now. The engine is running better than it has. It can still be a bit grumpy and I'm not sure the EFI system is quite working 100%, but it's drivable, if you wait until the oil pressure comes up when cold, and can ignore the clattering.1 point
-
This may not surprise you, but I have been bit by the Rover SD1 bug. I sold NP70/Nigel when petrol hit $2/litre for the first time ever. I was a young’un at the time and that was my only car, which I had to daily to my minimum-wage job. A 3.5L V8 probably wasn't the smartest choice. Look at it though, *swoon* I reluctantly parted with Effie when our landlord faced financial struggles and evicted us at short notice to sell up. We had nowhere to live, let alone somewhere with secure parking for two SD1s. My wife called on a friend to store Tess until we found our feet. On paper, Tess was the holy grail of SD1s. Black, manual, Vitesse. But after investing $3,000 and countless hours in her, she was back on the road (after several years being parked up with a mystery issue) and driving solidly and reliably. I didn’t bond with Tess as I had with Effie and, with no more work to do on her it was time to find her an owner that would drive and enjoy her. For my 65th car, I knew it had to be something special. I wanted another one. Ideally, a Series 2 EFI, of which according to my records, there are ten of in the country. There were none for sale, so I reached out to NP70’s current owner. I know the car has been off the road since 2018 and the owner has a large fleet so hadn’t gotten around to fixing it, but he’s not intending to sell. I tried Effie’s owner too, as we’ve kept in touch, but he’s got plans for her and knows he would regret selling. Then I recalled someone last year had posted something on Facebook about planning to export their SD1 to the UK. It would be a shame to drop another car from NZ’s limited numbers, so I reached out to see if he still had the car and was soon fizzing with the excitement of adding Lucas to the TastesLikePetrol fleet. Alas, some of you may have picked up on social media that very quickly I ascertained that there was something seriously wrong with Lucas. I’ve been conned. At this point - I could skip forward to the moral of the story. But of all 65 cars I have purchased, this is one that’s going down in infamy, so I’m going to lay the facts down. This is Lucas’ story. First impressions After several exchanges with the previous owner, I needed that car. He played hardball - he knew what he ‘had’ and that Series 2 EFI cars were rare. It was now or never. There are so few of these cars and too many of them are rotting into the ground, if I could save a fourth one and get it back on the road after over a year languishing under a ‘best intentions’ owner, I would. In addition to needing a new indicator stalk for a WOF, the one caveat he stressed was that it “wasn’t show quality”. That’s fine, he had already specified no rust, and the body and engine were otherwise solid, just in need of a good service and some "TLC". I’d seen the car under its previous ownership, circa 2016, and recalled it was a tidy example. British Car Day 2016 He sent me some potato quality photos taken from a distance, and a video of the engine starting and running when cold, also potato quality and not quite showing some bits. It seemed solid enough though, and although there was minor lifter clatter on initial start, it sounded fairly normal. We made a deal (or more like, I agreed to his price and sent the money). This is the point where he said he would “hold the money in a separate account” in case I wasn’t satisfied and wanted to return the car. Perhaps that should have been a red flag, but I took it as a positive sign. A few days later Brent’s truck pulled up (cut to ad break for Classic Towing NZ, for all your personal door-to-door automotive delivery needs *no affiliation, he's just a good guy that does a great job*) and first impressions were mixed. He said it wasn’t show quality, but I didn’t realise that he struggled so much with carparks. Both front and rear bumpers were cracked with chunks out of them. From this vantage point, something also seemed off with the fuel tank. Perhaps he had a habit of doing sweet jumps over speed bumps. The paint job is also a bit questionable - overspray everywhere and it’s lifting in places showing little prep may have gone underneath. But I guess that’s covered by not being show quality, and while a niggle, it wouldn’t affect the enjoyability of being behind the wheel again. Speaking of, the steering wheel was at its lowest height, floppy and with the positioning screw MIA. The stalks and surrounds were sitting in a plastic container on the back seat. As I was pulling the car into the garage, I was surprised that the car with “no rust” had clear rust at eye level, including a large area of bubbling on the sunroof and rust around the windscreen that will hopefully hold for a bit, but will eventually require the windscreen to come out. Can of worms You know me, I tend to dive straight into projects and this was no different. I’d only had the car a few hours and already fixed the “one issue” for a WOF - being the replacement indicator stalk (and reassembly of the steering wheel), which I’ve already posted about. In testing the indicator, I discovered I had no headlights and spent a couple of days tracing wiring diagrams and finding that part of the loom had been submerged in water at some point (also covered in the above post). I’m yet to work out where the water was getting in - but the owners manual in the glove box has been destroyed by moisture and overtaken by black mould so there’s a leak on that side somewhere. Snooping around the car and building my shopping list for the inevitable Rimmers order, I found: Three fuel leaks (fire hazard) A dented/weeping fuel tank (fire hazard & WOF issue) Washer jets don’t work (WOF issue) Doors sticking and/or not catching properly (WOF issue - at this point, I’ve been too scared to try the windows other than the drivers once, which is stuffed) Everything was finger-loose. Why does no one like doing up bolts? And this is where it gets really good/bad Following the initial work, I took the car for a gentle lap of the block - just to validate the steering column etc was all good for a Warrant. I had non-existent oil pressure. Rovers are known for low pressure (high flow, low pressure system) and the floppy gauges aren’t decimal-point accurate, but at best it was getting about 1/2 what I should be and you could tell. Less than 15PSI at idle, but hey, the lights not on, so that's something. Then I got the car up to temperature and the knocking started. Turns out it’s made the noise before (of course - cars don’t go from fine to full on metal-spoon in a saucepan by themselves) but “didn’t make the noise when loaded on to the truck”. That doesn’t mean it’s magically better, it just meant the car hadn’t come up to temperature?? But wait, that’s not all I’ve saved the best for last. Last week I noted something not right and I discovered what it was. The tired, worn-out engine was not original to the car. It wasn’t even an EFI engine (31A engine code, 9.75:1CR). It was a lower-spec (11A 9.35:1CR) engine rated at significantly less power. Now, some people legitimately don’t know what’s in their engine bay. These people typically aren’t “enthusiasts” or active club members who explicitly “know what they’ve got” and the value of a Series 2 EFI. But while I knew he knew, I had no way of proving that he knew it was not the original engine. Let's recap Exact quote: Surely it’s reasonable to assume? What he sent me Series 2 EFI A Series 2 EFI with a high compression "Vitesse" EFI engine in the car A Series 2 shell with a lower spec engine, with the EFI gear bolted onto it Just needs an indicator stalk for a WOF Just needs an indicator stalk for a WOF, and maybe a good service Needs an indicator stalk, headlights fixed, the fuel tank repaired, fuel leaks fixed, the doors to function, and maybe some rust work depending how picky the inspector is. “Any rust?” “No rust.” Light surface rust, but no bubbling Visible rust at eye-line - bubbling through the paint on the sunroof and around the windscreen. Have also found rust in the floor pan so far “Got some spares” A box of miscellaneous spares - usually includes an airbox, maybe a spare taillight, radio surround, that set of spark plugs you hadn’t got around to fitting. That sorta thing. A pile of scrap, including the original engine - as yet, not provided. Return to sender After hours of diagnosing and googling and pricing, it was clear that the car was miles away from what was described and sold to me. I don’t have space to do an engine swap at home (noting our steep driveway making manoeuvring limited when a car’s missing running gear, and remembering the Marina has dibs on half the garage). I have no money left to pour into a significant project like this. Effie had an engine rebuild before I got her - receipts for $6,000 NZD. I have a long list of jobs still to get through to get the Marina to British Car Day in February 2023. Earlier in the week, I had signalled to the seller that the car wasn’t happy and I was going to run some further diagnostics just in case it wasn’t serious but it wasn’t looking good and we might need to revisit. Remembering his original offer to hold back the money in case I wasn’t satisfied and needed to return the car. At minimum, I’d need to be compensated at least half of what I paid for the car to keep him but a) I’d still have issues with space and time, and b) let’s face it, the seller was never going to go for that. I drove the Swift up the Coast to clear my head the next day and made a call. A hard call. Lucas had to be returned. I first sent a video of the clattering engine. Then I sent a note outlining the disappointment and that I would have to return the car. I proposed that he covered return costs as the car was so drastically misrepresented - and in the meantime, I’d fixed the indicator stalk he’d spent a year "fixing", and the headlights, given it an oil change, and replaced the AWOL exhaust gaskets for him. He said if I wanted my money back, it was my problem to send it back to the Bay of Plenty. That would put me out $1,400 in transporter fees and I would have nothing to show for it. But better than being out of pocket for the full cost of the car, I suppose. I agreed and provided him with my bank details so I could start arranging return transport. “No no. Send me the car first. I’ll refund after I’ve inspected it.” Well, how about half now - as a sign of good faith, considering everything? “No. Return the car first" Okay, I’ll just get a short agreement written up for us to sign, to cover us both - you get the car, I get a full refund. “No.” You won’t sign? “Send the car first - I'm suspicious you have done something to the car" "Return the car or get lost" So apparently I found one of the dodgiest guys in the Rover community, and his behaviour was getting slipperier by the minute. Even if I returned the car to him at my cost, I had zero confidence I’d see my money back. After the total of the interactions I’ve had with him in the last month, there was no good will there. He declined, on several occasions, to sign a simple agreement to provide a full refund because, I believe, he never had any intention of providing that refund and actively dodged answering the question. I half expected him to come back with things like “Hey, this isn’t the original engine! And it makes noises when up to temperature! Oh well, thanks for the car back. I’ll just have to keep your money as compensation.” So I told him as much. He doesn’t deserve Lucas. He had a plan to export it to the UK (likely as-is. He has no time nor intention to fix it) saying he had a buyer for £12-15,000 GBP. So, you’re welcome unsuspecting British Rover-lover. You would have bought a lemon without an EFI spec engine and who knows how many more to-be-discovered issues. Karma’s a bitch. Final chapter I had no proof that he knew it didn’t have the original engine (except in hindsight I seem to recall it being mentioned in the listing when he bought it in 2018). Or, that is, until two full weeks after money had changed hands. I get this message from the seller: “By the way I still have the spares that came with the car when I bought it. They are the original 31A engine block, cylinder heads power steering pump etc that was replaced with the different engine.” Check and mate. This was the first time he had acknowledged it did not have the original engine - despite commanding such a fixed, high price. Apparently a “nut or screw went through” the original engine, so there is a reason it was taken out, and he knew all about it. For the record - this is grounds for compensation under the Contract and Commercial Law Act 2017 (which does apply to private sales, unlike the CGA). Yes, I’ve had someone look into this. The compensation entitlement would likely be greater than I had asked for. The question is whether having the car in limbo, in order to go through the motions and see him in Court is worth it is another thing. Now, I wasn’t in the market for a project - the Marina is deserving of my time and money first. But had I been told there was an SD1 with a temporary (albeit knocking) engine, so it was rolling, that would come with the original engine needing a full rebuild, maybe I would have reassessed the value and potential of the car. Maybe I wouldn’t have been able to resist. Maybe I still would have taken it on. But that’s not what he sold me, and not at the hefty price I paid for it. And they lived happily ever after When you get sold a lemon, make lemonade. It may Taste Like Petrol, but that’s kinda our signature here. Lucas is staying and he’s going to be back, better than ever. I don’t know how we’re going to get there. I still don’t have time, money, or space. I’m enquiring about offsite storage to keep him dry over winter while I sort a plan and order what I need.1 point
-
Just a small but significant update today. With all the work on the column switches completed, this meant that I could finally take the car for a quick spin around the block to see how it actually drives and if it highlights any further issues. The cold start was really good, only needing a couple of turns to come to life. I wasn't too impressed with the top end rattle though, I will need to get some new oil in there and hope it's not a sign of things to come. The oil in there will be at least a year old, if not two, and I don't know what grade. Before I could back the car out of the drive I had to raise the steering column, as all the wiring work was done with it at its lowest height. Overall the car drove really well. The weird notchy feeling in the steering seemed to clear up, so hopefully that's just from lack of use. It tracked and drove straight, without feeling too rolly polly on the suspensions, so maybe it's not completely poked. The engine pulled well, although I forgot how lazy the autos are; but that's what I like about them. The revs stay low, and it just rides that low end torque and gains speed quickly without fuss. Say what you will about automatic transmissions, especially ones from the 80s, but this old GM 3 speed shifts beautifully. The previous owner claims it was rebuilt, but I have no proof of that. The shifts are smooth and seamless, and kickdown was snappy. I didn't check the trip computer, but everything else seemed to work. The gauges all rose, the speedo and tacho worked, and all the lights worked. The low coolant light worked a little too well though, the bottle and radiator are full, but the light is still on. Will need to do some digging. The Rover SD1 has such a commanding presence on the road. I can't imagine what it's like for the average joe to see one driving around in a sea of boring beige appliances.1 point
-
The first step in getting Lucas back on the road was to address the one issue I knew of when buying the car; the lack of a working indicator stalk. The previous owner told me it was broken but didn't say how or why, so until the car arrived it was a bit of a mystery. I could see in the pre-purchase photos that the column shrouds and stalks were missing, but knew no more than that. Upon arrival, the car came with the stalks missing and the shrouds on the passengers seat. There was an icecream container in the back seat with the remnants of one switch, and what appeared to be quite a new, albeit incorrect side, indicator stalk assembly Assessing the stalks, the disassembled one was very likely the original broken one, so that's where I started. If you have been following my posts for a while you will know that I'm a big fan of fixing what I have, instead of just throwing new parts at a problem. This was no different. I could tell immediately that the high beam detent on the switch was broken, which would cause the high beam to fail to latch and stay on. The plastic piece that causes it to latch should be sticking up in the gap the arrow is pointing to. Now, I can't find it, so I may not have written about it, but I have done this job before. Not for the detent, but to fix a broken horn wire. 99.1% of the job is exactly the same, so I had an idea of what I was doing. The donor was the mint condition mirrored stalk. This is either from a different car that uses a similar switch but has the indicator on the RH side of the column, or is from a LHD. You can see that the stalk is upside when on the correct LH side and bent upwards. There were a couple of other differences too; the connector was the later "church window" style, which the car didn't use, and there was that random blue wire coming off it, which had no place to connect to. The first step is to VERY carefully remove the metal plate from the front of the switch. There are two small machine screws, and then it hooks in under two plastic tabs near the stalk. Once the plate is off you can see the gubbins that makes it all works. Be careful though, at the top and bottom are detent springs and plungers that can and will make a break for freedom. The top one should have a ball bearing under the spring, and the bottom one a plastic wedge. The white collar for cancelling the indicators just lifts out, and then so does the central mechanism that the stalk moves (the big black piece with the white arms on it). Be careful here as there is a copper roller, spring and plastic plunger in this section that will drop out. With all that removed, you are left with the rear housing and the stalk. It's interesting to note that the three long contacts for the indicators are mirrored on the opposite-handed stalk. The top holes are populated on one, and the bottom on the other. The detent needs to be released from the back casing, by carefully pulling back the piece of black plastic on the back that is holding it in place. It can take quite a bit of force to pull it out. Here it is removed and flipped upside down to show the notches it locks into fr high beam. That's the part missing from the broken one. Now its time to get serious and cut the two wires that run through the switch and into the stalk (one had purple and black, the other was purple and purple with a black trace, but it's obvious which two run to the middle of the stalk) and then the stalk can be removed. Now, I couldn't just swap the stalk over, since it was upside down and bent in the wrong direction, so I had to remove the detent piece and swap it to the existing stalk. To do this I needed to remove the little plastic block on the end. Be VERY careful with this as it is super easy to break those little round ears off and render it useless; DO NOT use those ears to support it when you drift out the shaft. I lightly held the stalk in some pliers on top of the vice, and used a punch to drift the stalk out through the block. Oh, and it helps to mark the position of the block beforehand, so you can have the stalk rotated the same (or it may not face quite forward). With the block removed, the detent piece just slides off and over the wires. Do the same to the good stalk, and swap the detent piece to the original stalk. Now line up the block with the marks you made, making sure the horn ground wire is tucked under the block and wraps over the top, and then gently tap it into place again. I gently held the stalk in the pliers, clamped in the vice and used a small hammer to tap it back into place. Congrats, you now have a good stalk, that isn't attached to anything. Give it a good clean, and let's reassemble. Reassembly is quite simply the reverse of disassembly. The only thing I had to change was to move the wiper contact over from the top hole down to the bottom hole in the central mechanism. I did give the contacts a quick clean, and lubricated everything with dielectric grease. The front plate can now be gently reinstalled, making sure it sits flush and the plungers haven't fallen out. Now flip it over, and solder the two wires back onto the harness. With the switch reassembled I could plug it in and test it. I got a bit cocky and reinstalled it first. And we have dash lights! Gosh, I love the green illumination in these cars. I was well chuffed. Until I wasn't. We had dash lights, park lights front and rear, and flash to pass, but no dip or high beams. Damn. I connected a known good bulb. No change. Tried a different headlight switch. No change. Located the dip beam relay and swapped it over with another. No change. So it was time to grab the test light and start probing around. I had traced the wiring diagram back and had an idea of where to start looking; starting with the headlight switch Lots of probing later I was led to this mess under the passengers side of the dash. Ugh. That bracket with all the relays on it should be bolted firmly to the firewall, not ziptied to a bracket. Not a good start. I traced a few wires back and ended up at that weird white relay in the foreground. Turns out it isn't a relay, it's a "diode pack" that all the power for the dip and high beams go through. And nothing was going through it. I could see some traces of corrosion on the casing, so pulled it out and removed the casing. Well shoot, that'll do it. It looks like it's been under the sea. You cant even identify the diodes on the board, it's just a mess of corrosion. I got out the can of contact cleaner, and the trusty old toothbrush and got to work, cleaning away as much of the muck as I could. I then used my multimeter to check I had continuity where needed. A couple of contacts were a bit iffy, so I have them a quick re-solder. I plugged it in, initially without the housing on it, for testing. I turned the ignition on and flicked the light switch. No change. Damn. I flicked it off and on again, and suddenly I was blinded, the test bulb was glowing brightly. I had headlights. A quick check also showed that I had high beams too. Everything was working. Headlights, park lights, tail lights, brake lights, plate lights and fog lights. I refit the housing and bolted the relays to the firewall as they should be. One of the two bolts on that bracket I swear is the worst bolt on an SD1 to get at. Cant fit a socket on it, and it's one flat at a time with an open ended spanner. Some quick jiggling of wires to refit all the column stalks, and refitting the steering wheel came next. It's starting to look more like a car now. Heck, I might finally be able to take it around the block tomorrow after work. Hype! I still need to refit the column shrouds, but that will come in due course. One other thing I noticed when I was messing around in the car, was that this sweet old Clarion radio still works perfectly, auto electric aerial and all. Awesome retro design. Shame the plastic surround was broken and someone has bodged it with bits of interlocking foam floor mat...1 point
-
The “ever lovely Mrs sr2” and I headed up North to the batch for the recent long weekend, the fishing was an improvement on the New Year. (It would be bloody hard to be worse; see the Jan 18, 22 post). On my return I was shocked to see that in my absence Rigamortice had been blatantly and deliberately emitting the nasty horrible dangerous carbon laden CO2 gas, (that our dear leader the "PC goddess of fertility and cultural sensitivity" has been repetitively warning us about).......... to the atmosphere! Still showing total faith in our “transparent” government (in these turbulent times) I was overwhelmed and riddled with guilt as to the long term effect Rigamortice’s senseless selfish act would have on climate change, (it used to be called global warming – but it didn’t get hot!). In desperation to restore our lost carbon credits and head off an imminent climate emergency I decided to “give it the Greta” and acquired an E-Vehicle. Being Oldschool (i.e. 75 oldschool years old) Rigamortice insisted that I hand in my man-card immediately………..begin the public humiliation….! Thankfully after a few medicinal Wild Turkeys, Rigamortice and I devised a cunning and fiendishly clever way of containing the evil fermenting concoction, preventing any further release of the nasty horrible climate changing CO2 gas…..What could possibly go wrong!
1 point
-
It lives! There were challenges. I hadn't bent a ring, it was the carbon deposits in the ring grooves that were making the rings tight. That meant the new rings were also tight, so I ordered a whole new piston... Which arrived and was for a different model of TS100... In the end I bent one of the old rings in half and used it as a scraper to clean out the ring grooves. Also on the east cape ride, the muffler fell off at one stage, it had chewed itself to bits to where the spring was loose. So i've fixed that up now. I took it for a ride to town today. Fuck its awful. I need to sort out the petrol tank mounts as all the rubber has worn out and the vibration and noise is horrific. How I've done two east cape rides on this bike, I have no idea. I'll get it to be fun again soon with a bit more tinkering.
1 point
-
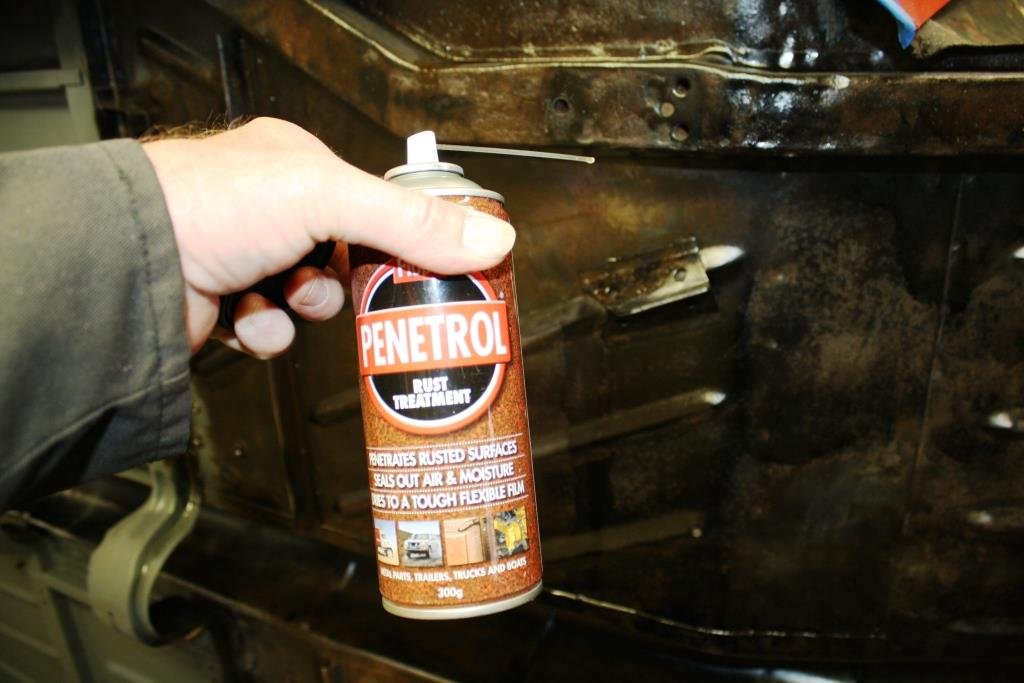
I’ve been putting this bit off for too long. Time to start scraping and wire brushing…….. And more scraping… More CRC Rust Convertor… And more…… Can’t beat Penetrol for getting into the seams. Great product with unbelievable capillary action. Etch priming and then painting with Wattyl Killrust Epoxy Enamel. Undersealing the wheel arches. More painting…. Not too shoddy for a brushed finish.
1 point
-
Started making up more repair pieces. Check the fit one more time… Tacked them in place…. And started stitching… The sun was shining so I dragged the old tart outside for a good waterblast, still couldn’t get a lot of the crud off – looks like I’ll have some scraping to do!
1 point
-
New Year came around real quick, the view from the batch is still as good as it gets. The fishing however was not all that was promised…….. 1st & only fish on New Years day went back for a 2nd chance! (The trusty crew named this one Cyclops).
1 point
-
Welded a bent strip to the capping piece….. And trimmed it to fit. Happy with the result. A quick easy patch…. And we’re making slow but steady progress.
1 point
-
The inside looked somewhat daunting… Started cutting until I found good metal and then gave it a good coat of CRC Rustkill followed by galv primer.…. With the aid of more high-tech CAD (cardboard aided design) I started cutting out the replacement panel. I have to say a metal cutting band saw is my choice for freehand cutting of sheet metal; you get none of the distortion you get when using shears. The panel fitted well so we stitched it in.
1 point
-
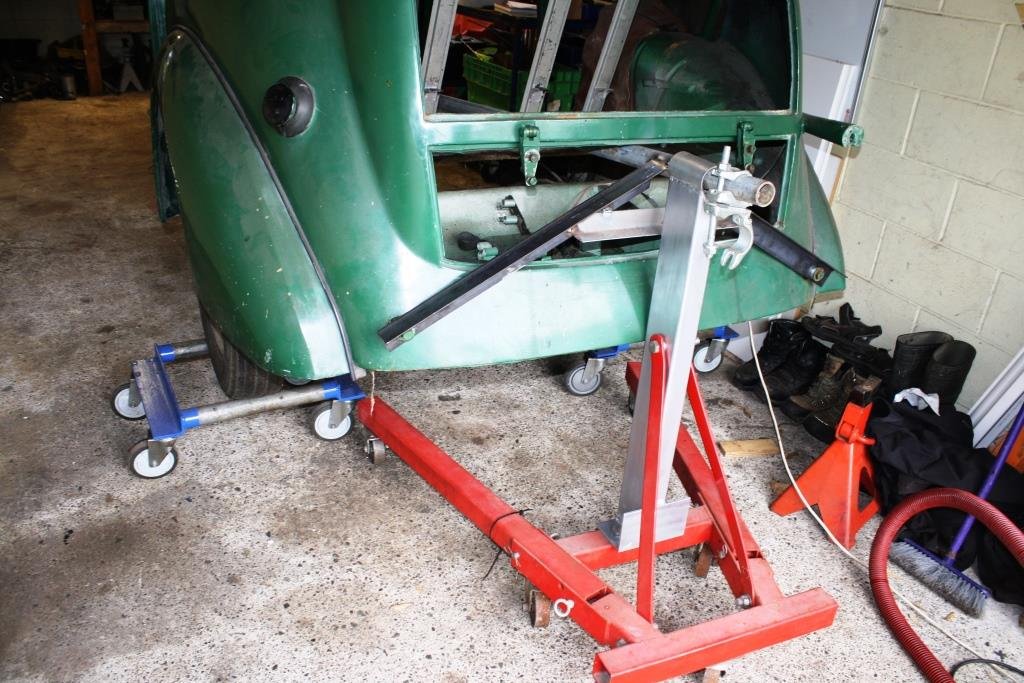
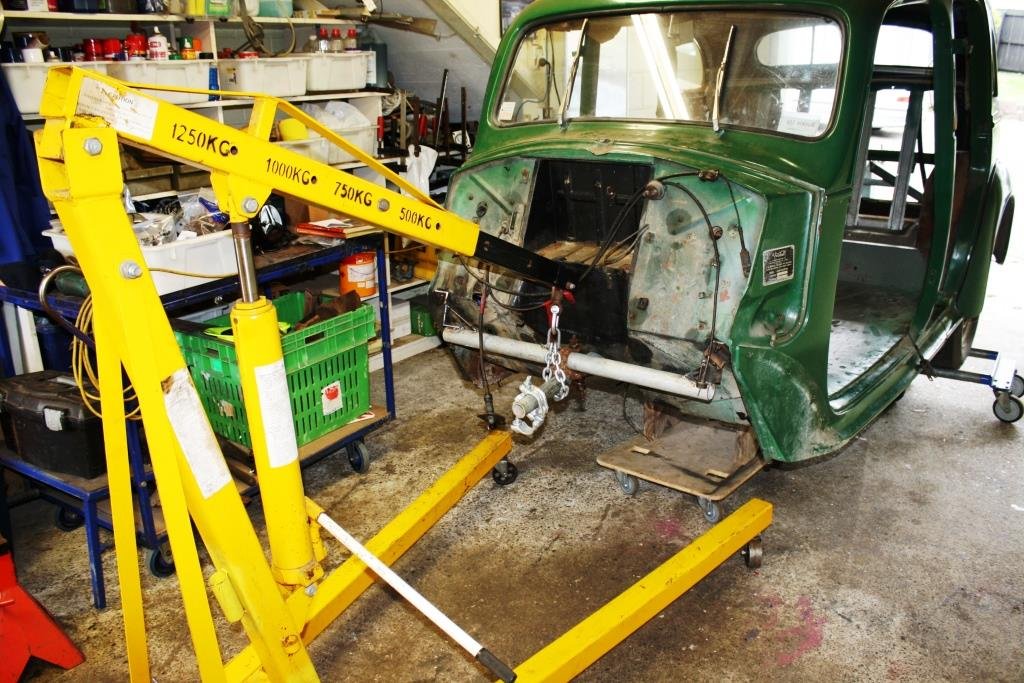
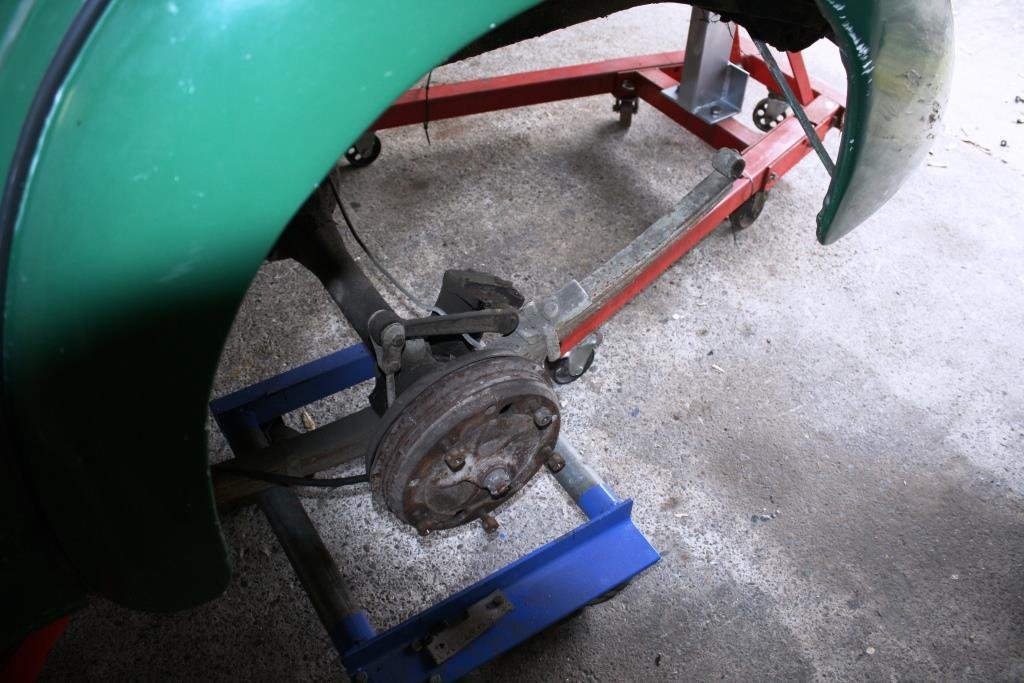
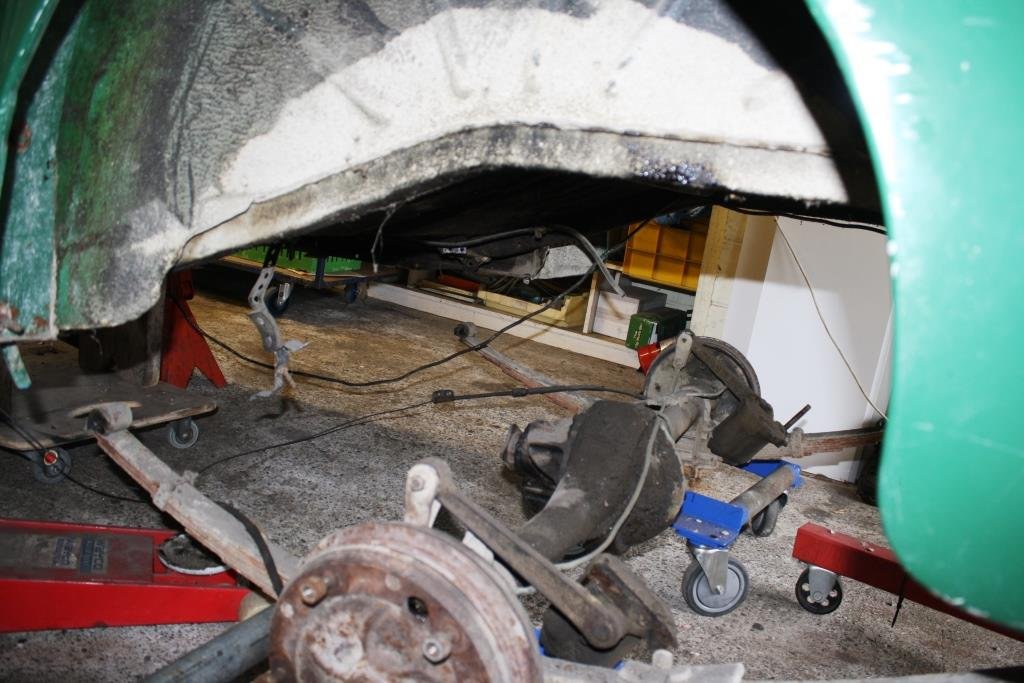
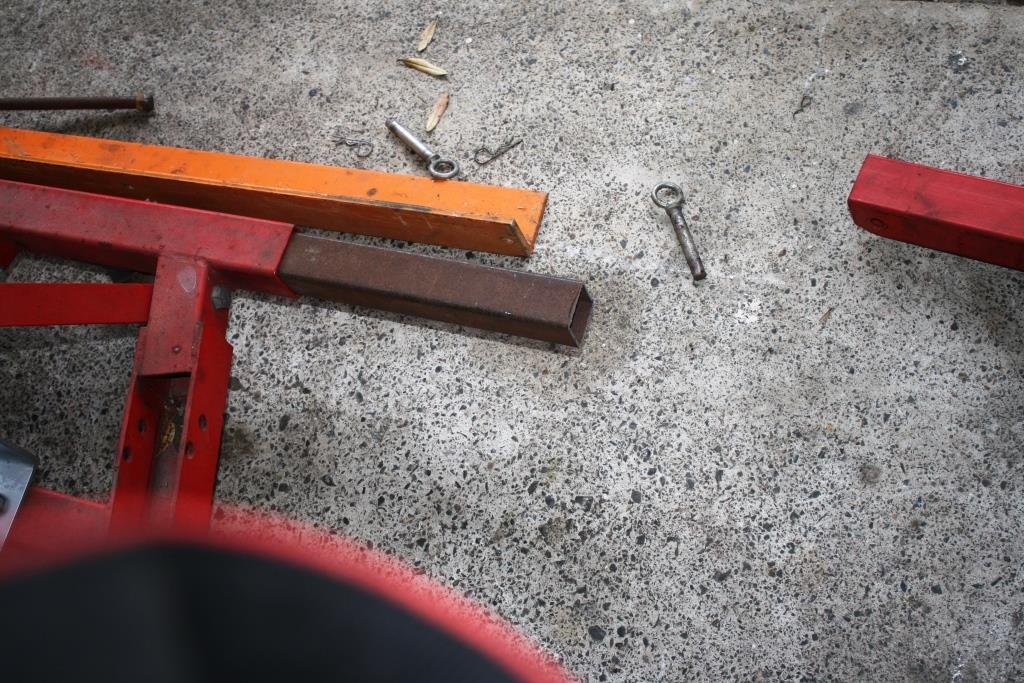
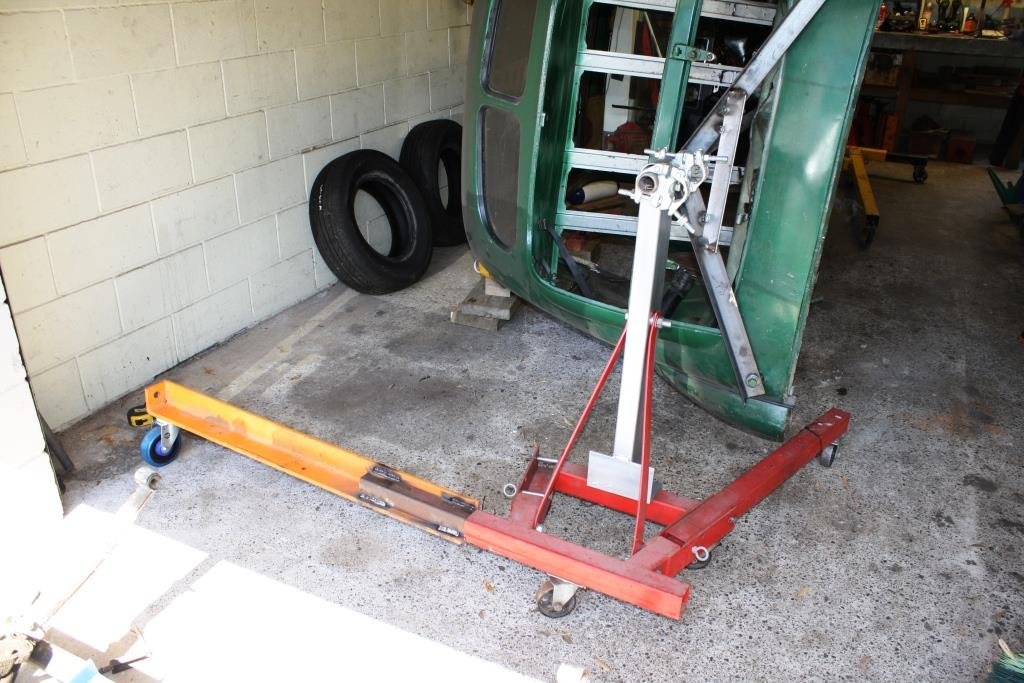
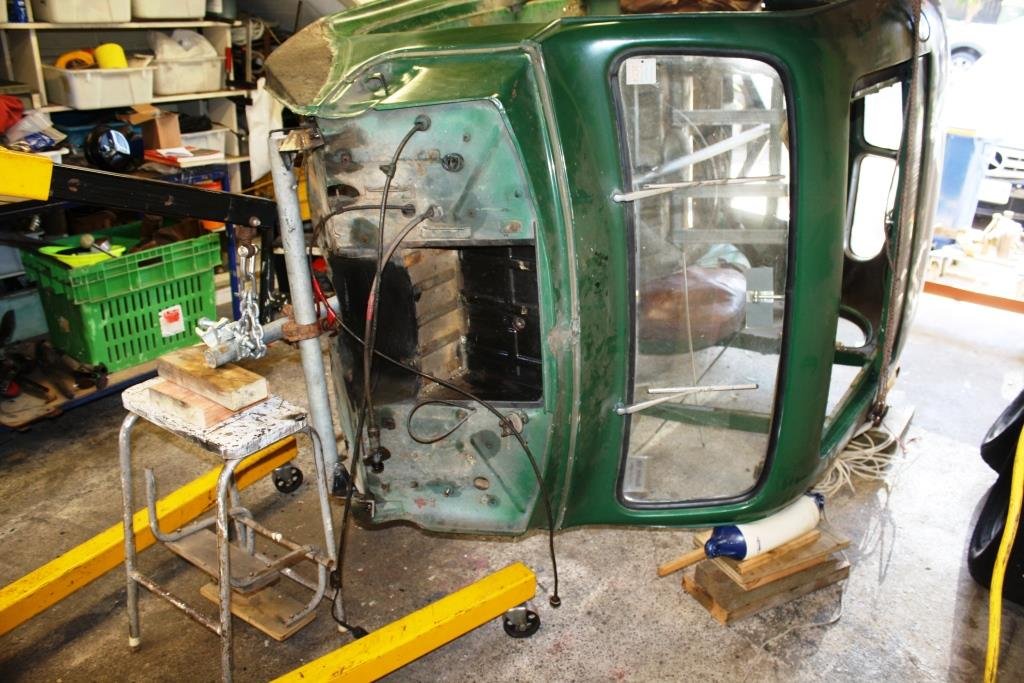
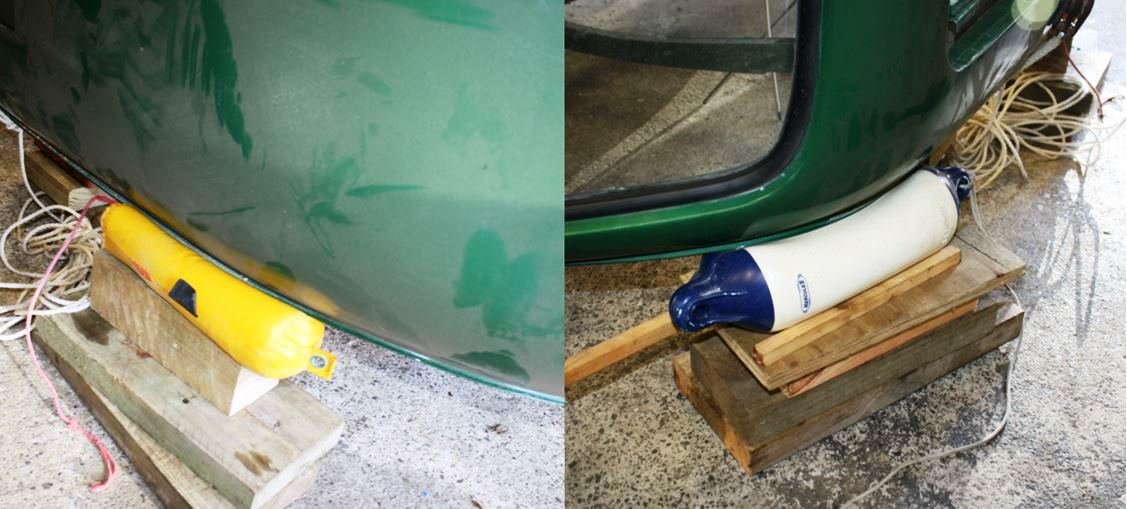
Next problem was how to support each end? It was then I started eying up my engine stand with evil intent….. Raided the scrap pile to make a new vertical upright. And the old girls big arse end was suddenly sitting pretty. I settled for using my engine crane to hold up the front of the body – a little sketchy but hey it was all I had. Time to get the old diff out, love those lever action shocks. With the rear end out everything felt a little top heavy and I was a little worried that the engine stand at the rear could tip over. Found a piece of RHS that slid into the frame… Welded it to a piece of heavy angle from the now rapidly depleting scrap heap…. Found a castor to attach to the end and … Voilà…. The old girl’s safely on her side. I knew there was a reason I’d kept those old fenders… Time to go fishing……..
1 point
-
I have 2" blocks and 3" reset leaves ftw, resetting leaves was only like $120 for both, definatly the way to go1 point


This leaderboard is set to Auckland/GMT+12:00