
Leaderboard


Popular Content
Showing content with the highest reputation on 10/21/17 in all areas
-
Woo hoo, It’s finally time to fill the big gaps in the front of the Rover. Wow its a double post day today! I haven’t spent much time working on the Rover recently, but don’t worry, it’s still here and still loved I have been trying to source a set of good fog lights for the SD1 since I got the car. I got a pair from the previous owner, originally from the car, but both had damaged lenses (one with a hole in it, and the other was properly smashed). The reflectors were also a bit average. One light had been “modified” somewhat too, so that was no good. Finding any, let alone a good pair, was damn near impossible locally but fitting them to the car was fairly important to me. Without the fog lights I was left with just a pair of big gaping holes in the front I finally sourced one good pair of fog lights…. in the motherland, Britain. Thankfully my lovely wife just happened to be in Britain last month for work, so I put two and two together, and got the lights shipped to her and she brought them back in her very overfull luggage. They may or may not have also been the reason her bags were searched by customs…. but we aren’t sure on that They were used lights (I had the option of New Old Stock/NOS ones too, but they were a lot more expensive and harder to justify), and not perfect. One had a very bad reflector. The reflector is made of steel with some super thin reflective coating on it, and over 30+ years the quality British steel has suffered badly. One of the lights that came with the car has a better, but still rusty, reflector. I carefully applied rust converter to the worst areas, but I didn’t want to risk further damage to the reflective coating. This was the reflector I chose to use. So the aim of the game was to take 4 average light units, and make two good units. The replacement lights had lenses fitted; one good and one broken, but the seller included a perfect spare NOS lens. To get the reflector units apart, and remove the lenses, there are small clips holding the stainless surround to the reflector. They’re easy to remove, either lever them out, or preferably, push the long leg down and unhook from the surround. With the clips out the whole lot just comes apart. I replaced the lenses and reflectors and built a good pair. Before fitting the lights I had to actually dig out the wiring for them on the car. I had seen the LH side wires in the past, sitting up on the under tray But the RH side ones were nowhere to be found. I did some digging, after removing some screws on the under tray I found the wires jammed up between the under tray and the front panel. I plugged a spare bulb holder into the wires and tested that it actually worked Success. The light works, but the switch needs rebuilding (like the rear fog switch it doesn’t latch). Even the dash light works The housings are easy to get into place. They have a push-pin on each side and an adjustment screw on the top. You hook one pin in, and using a small blade you push the other pin in whilst slipping the housing into place. Screw the adjuster screw in, and BAM, done. Rinse and repeat on the other side Plug the bulb in, and then the reflector housing pushes into place until it clicks in. Now to fix that switch. Off comes the dash top, and then the button pushes out the front It’s a prick to get at the wiring for the switch though. It’s the big red plug that needs two hands to undo Off comes the cap Pull off the cover and see why the switch doesn’t latch. The latching pin has come adrift thanks to the useless little plastic tab breaking off. Same as with the rear one, I used a small screwdriver heated up with a torch to melt the plastic over and secure the pin into place. Whilst there I also fully stripped and cleaned the contacts, just so I didn’t have to do it again later. They were pretty corroded. Once reassembled…. we have light! And then LIGHTS! I still need to align the lights, and also replace the bulbs with a pair that match. I’m happy already though, looks so much better with the lights in place.4 points
-
Engine came back, put er back together, looked sharp as a pin..acid bath ate all my paint off the block so hazed it again. engine guy gave me some syrupy green assembly shit to use. I found it way too sticky and I had trouble with bearing caps sticking and trying to spin so had to re start that a few times. went in beautifully, always usually a jerk to line up the box. oil pressure straight away, ran like a clock. 25 minutes at 2500 to run in the cam then went for a drive to the hills to bed it it. on the second run it started making a funny noise. Bee lined for home and it got much worse, yay. dropped the oil and it was great. Wiggled everything and it was tight. out she came. the fucking flywheel came loose. Despite being torqued to spec and loctite 10hours prior.. so stoked it’s not shot, perplexed how that happened. Also found a torn engine mount and the gearbox mount mite be poked too. then I spent 3 hours trying to get the fucking gearbox lined up, had a big ole rage and went inside.3 points
-
today i bolted it all together and set it up as best i could with a tape measure and a straight edge and then i drove it. the car is transformed. no more diving when the road has undulations and the steering is heaps lighter too. tomorrow im going to try and get the settings better but its pretty good now. im definitely calling this a win. i didn't take any pictures because im useless.2 points
-
.2 points
-
Wow, that starter gear was a pain in the gooch to get off, diy puller would just bend so I bought some m6 threaded rod to use with my bearing puller. First go pulled a nut straight off the thread but came off with a bang on the second attempt. But 2 steps forward then 2 steps back. Turns out the seal is leaky as fuck, all good, I have a replacement ready to go but it's being a real shit to get out. Any tips? Have been drilling some holes in it and screwing in a wood screw then giving it a yank but not much is happening, it's as bad as doing old fork seals so far.2 points
-
Headed back, loaded up the car. Raring to go for opening night tomorrow night!
 2 points
 -
Another crane..2 points
-
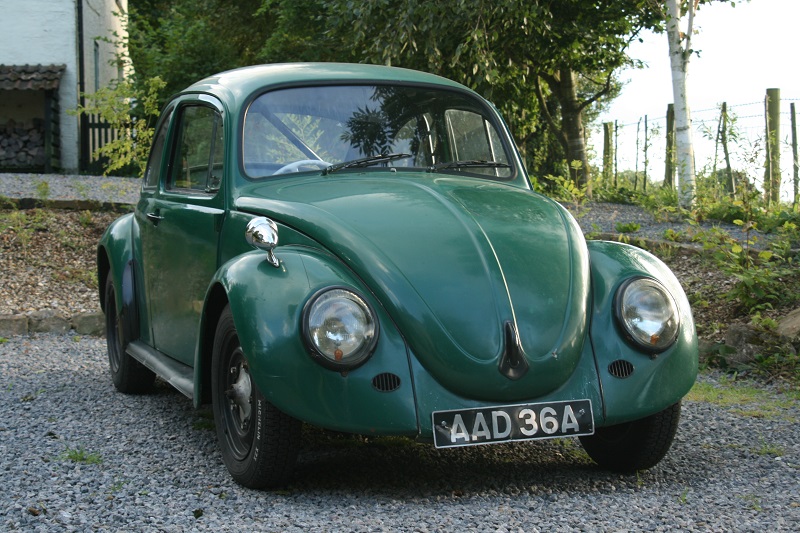
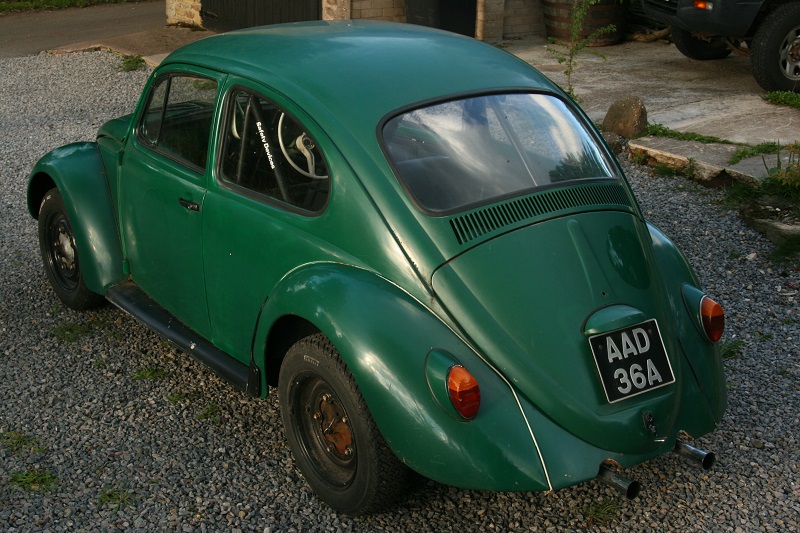
I bought a Beetle. I had a '66 when I was 16 and I thought I'd got over it but when a mate offered me this messed up but solid beauty for a good price I heard myself say " Yeah, I'll have it". It's a 1200 '62 with later panels, a six point cage, Empi seats, the worst smooth-job ever and terrible paint. Pics.
1 point
-
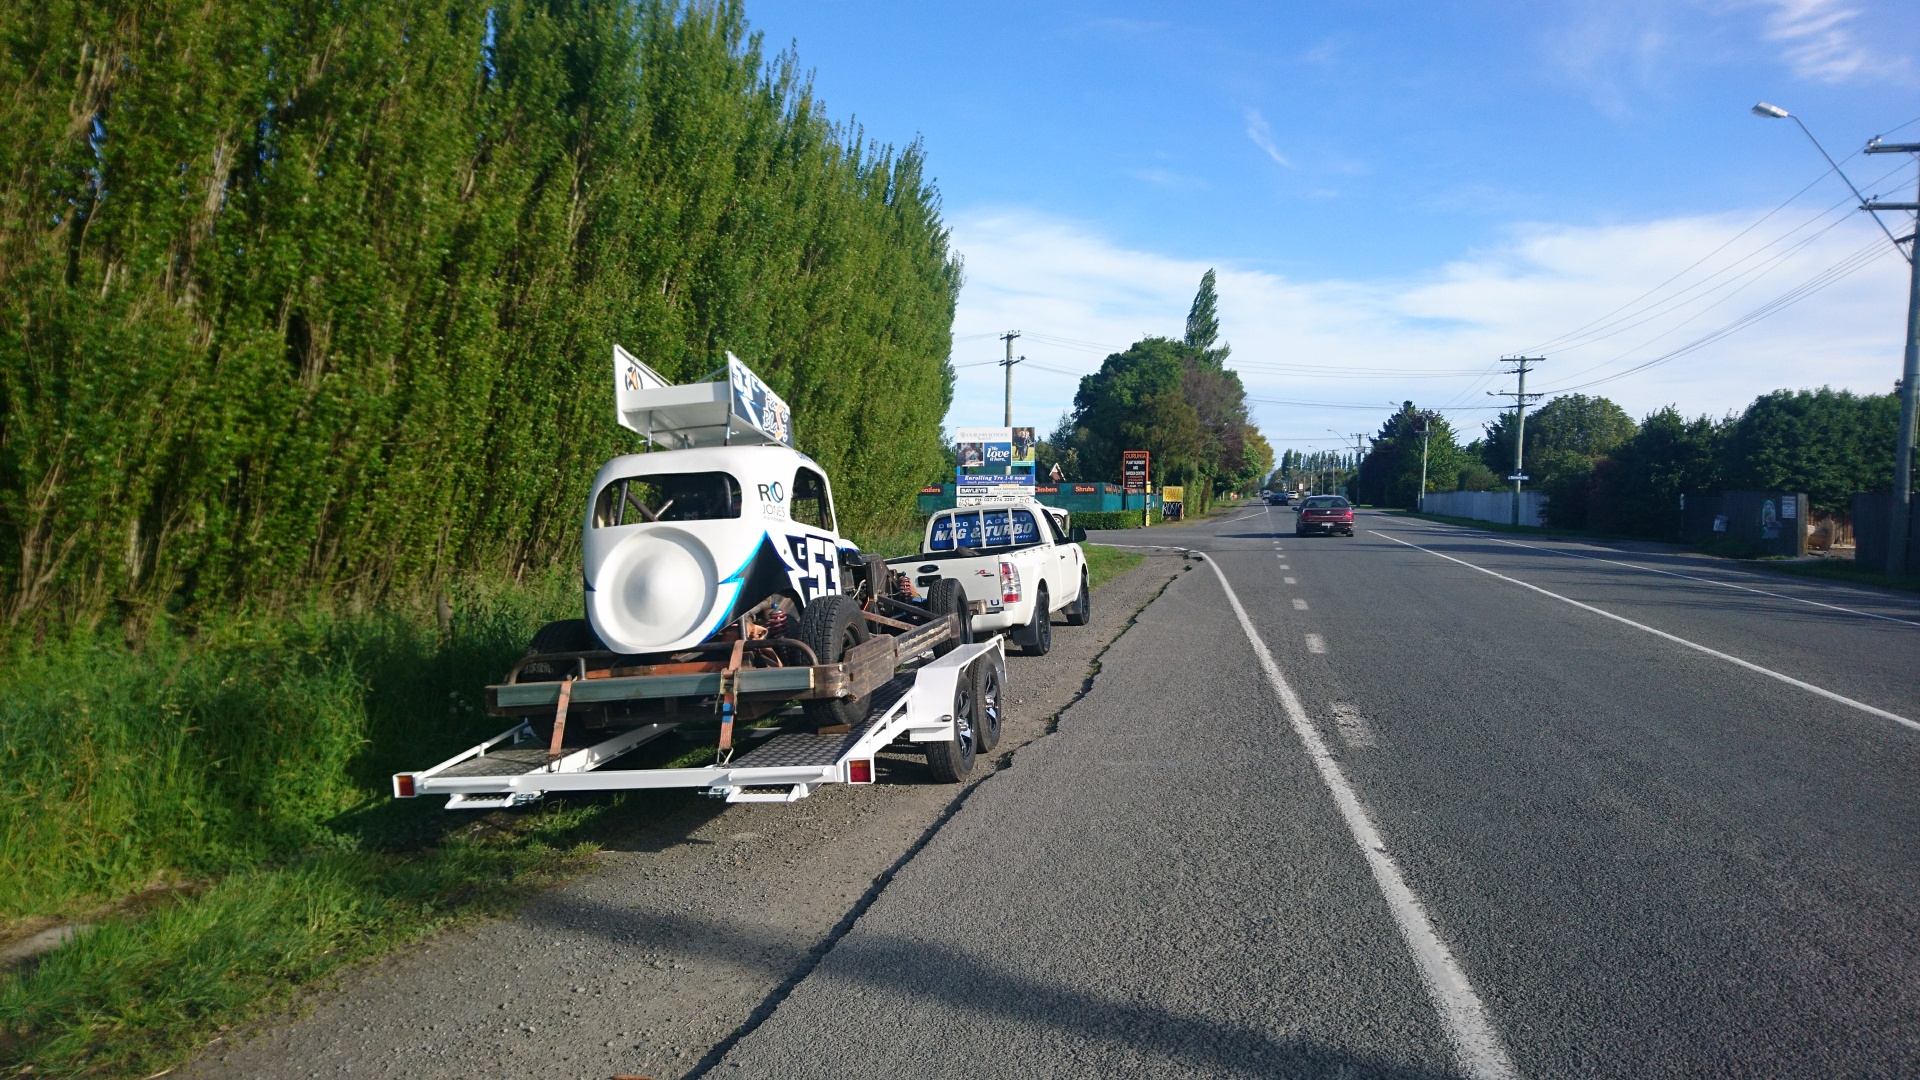
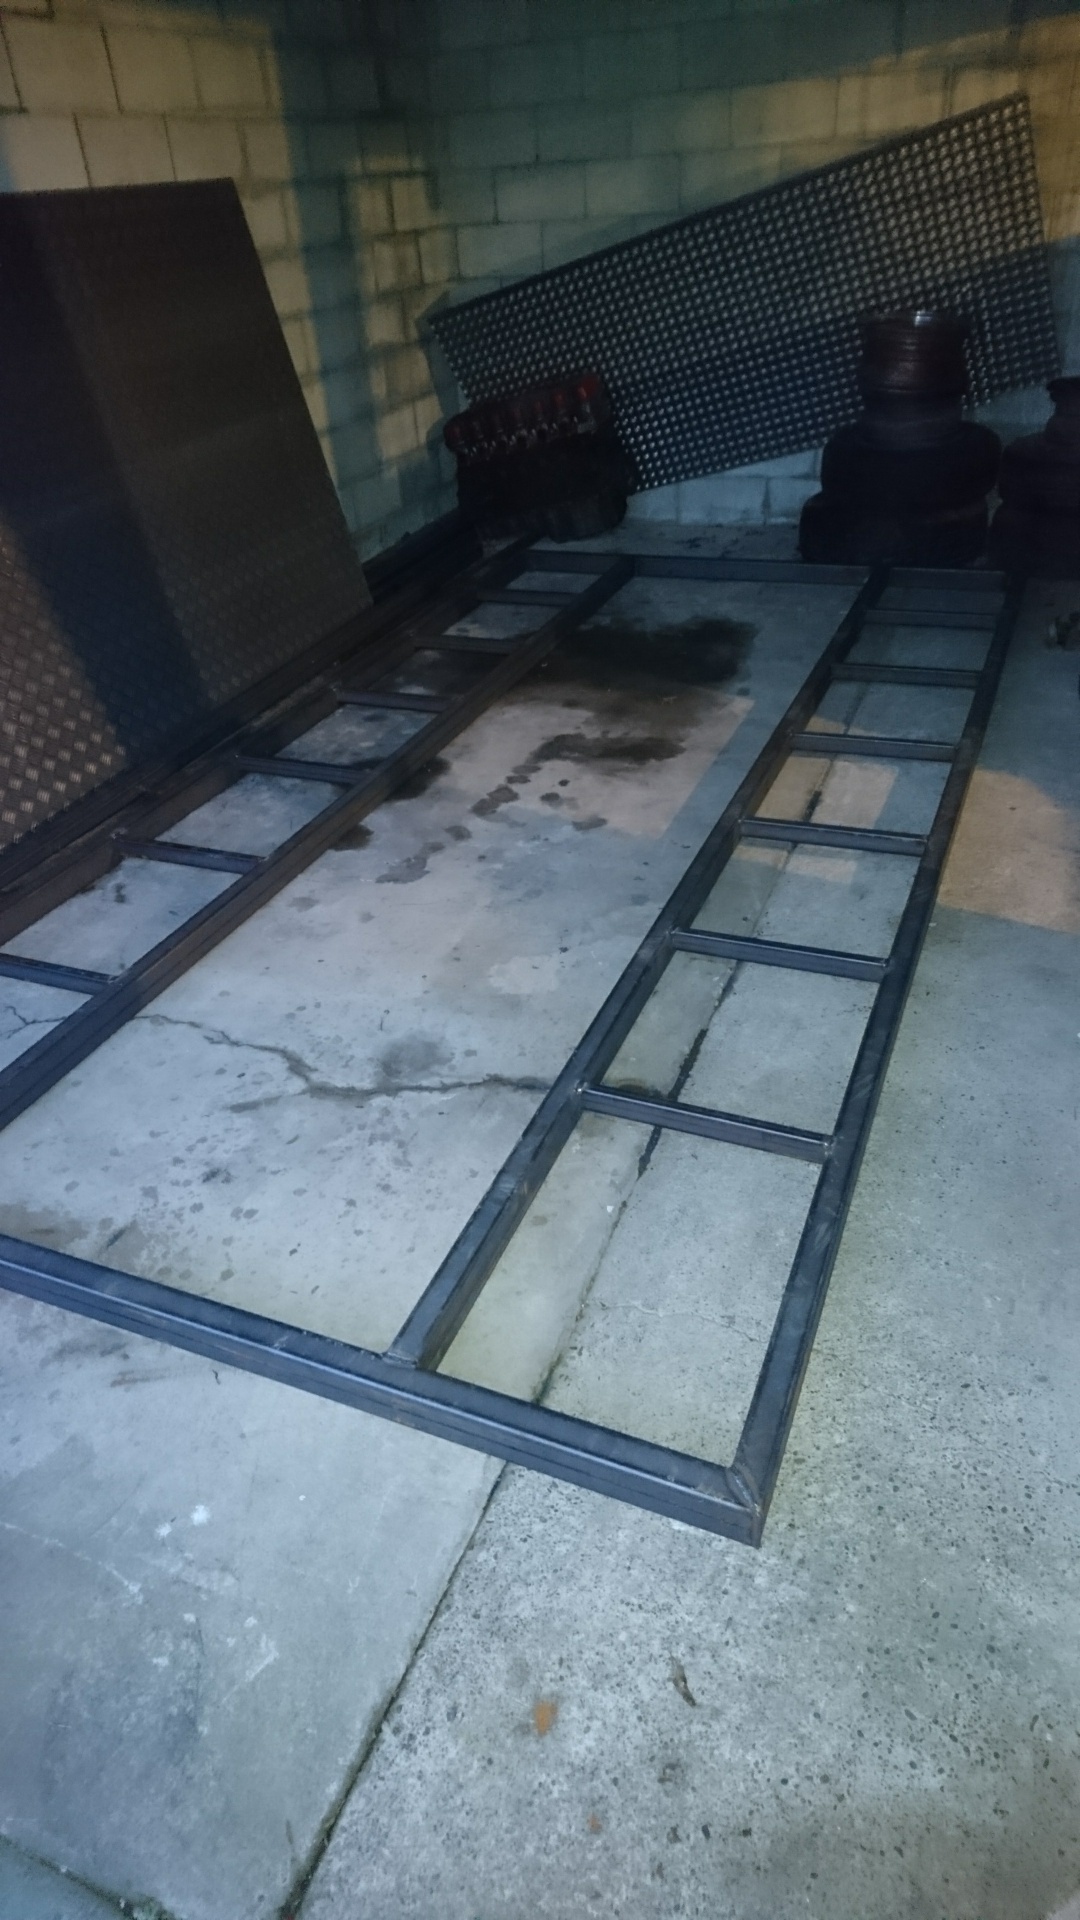
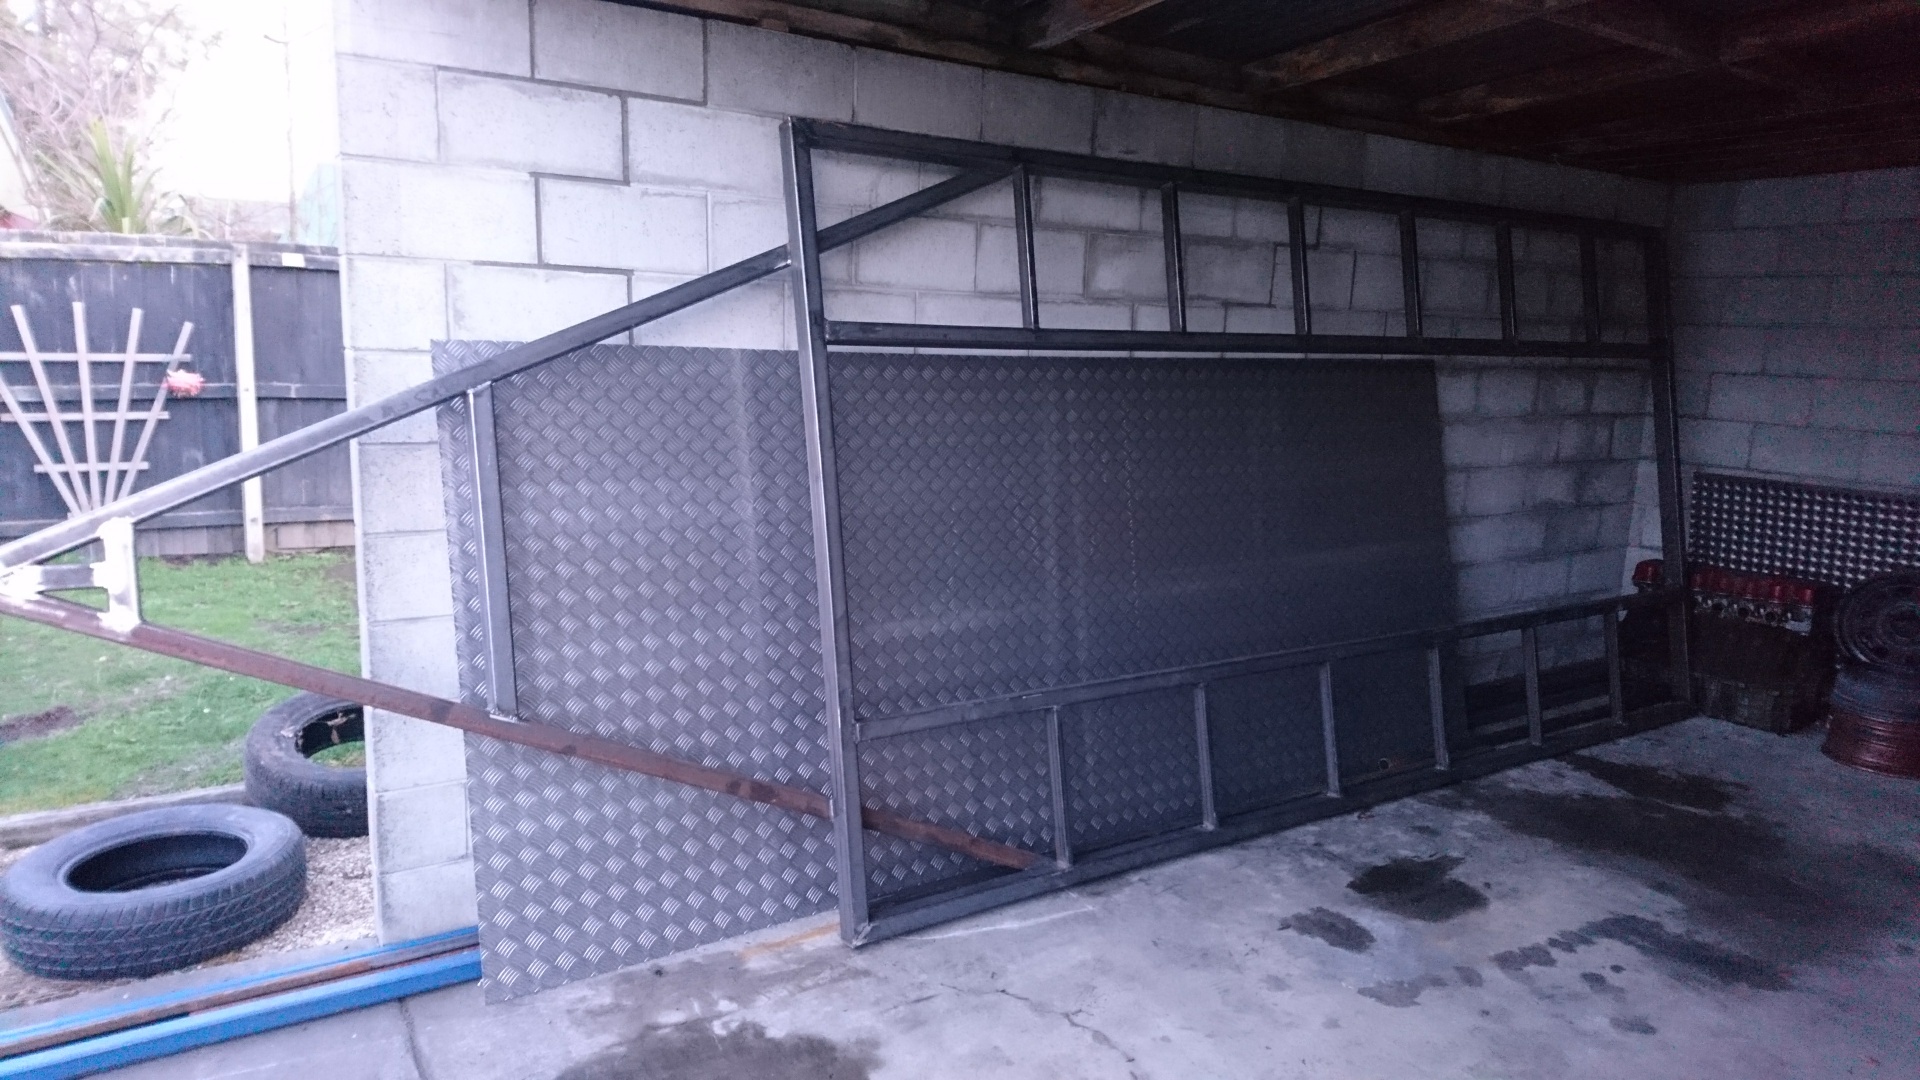
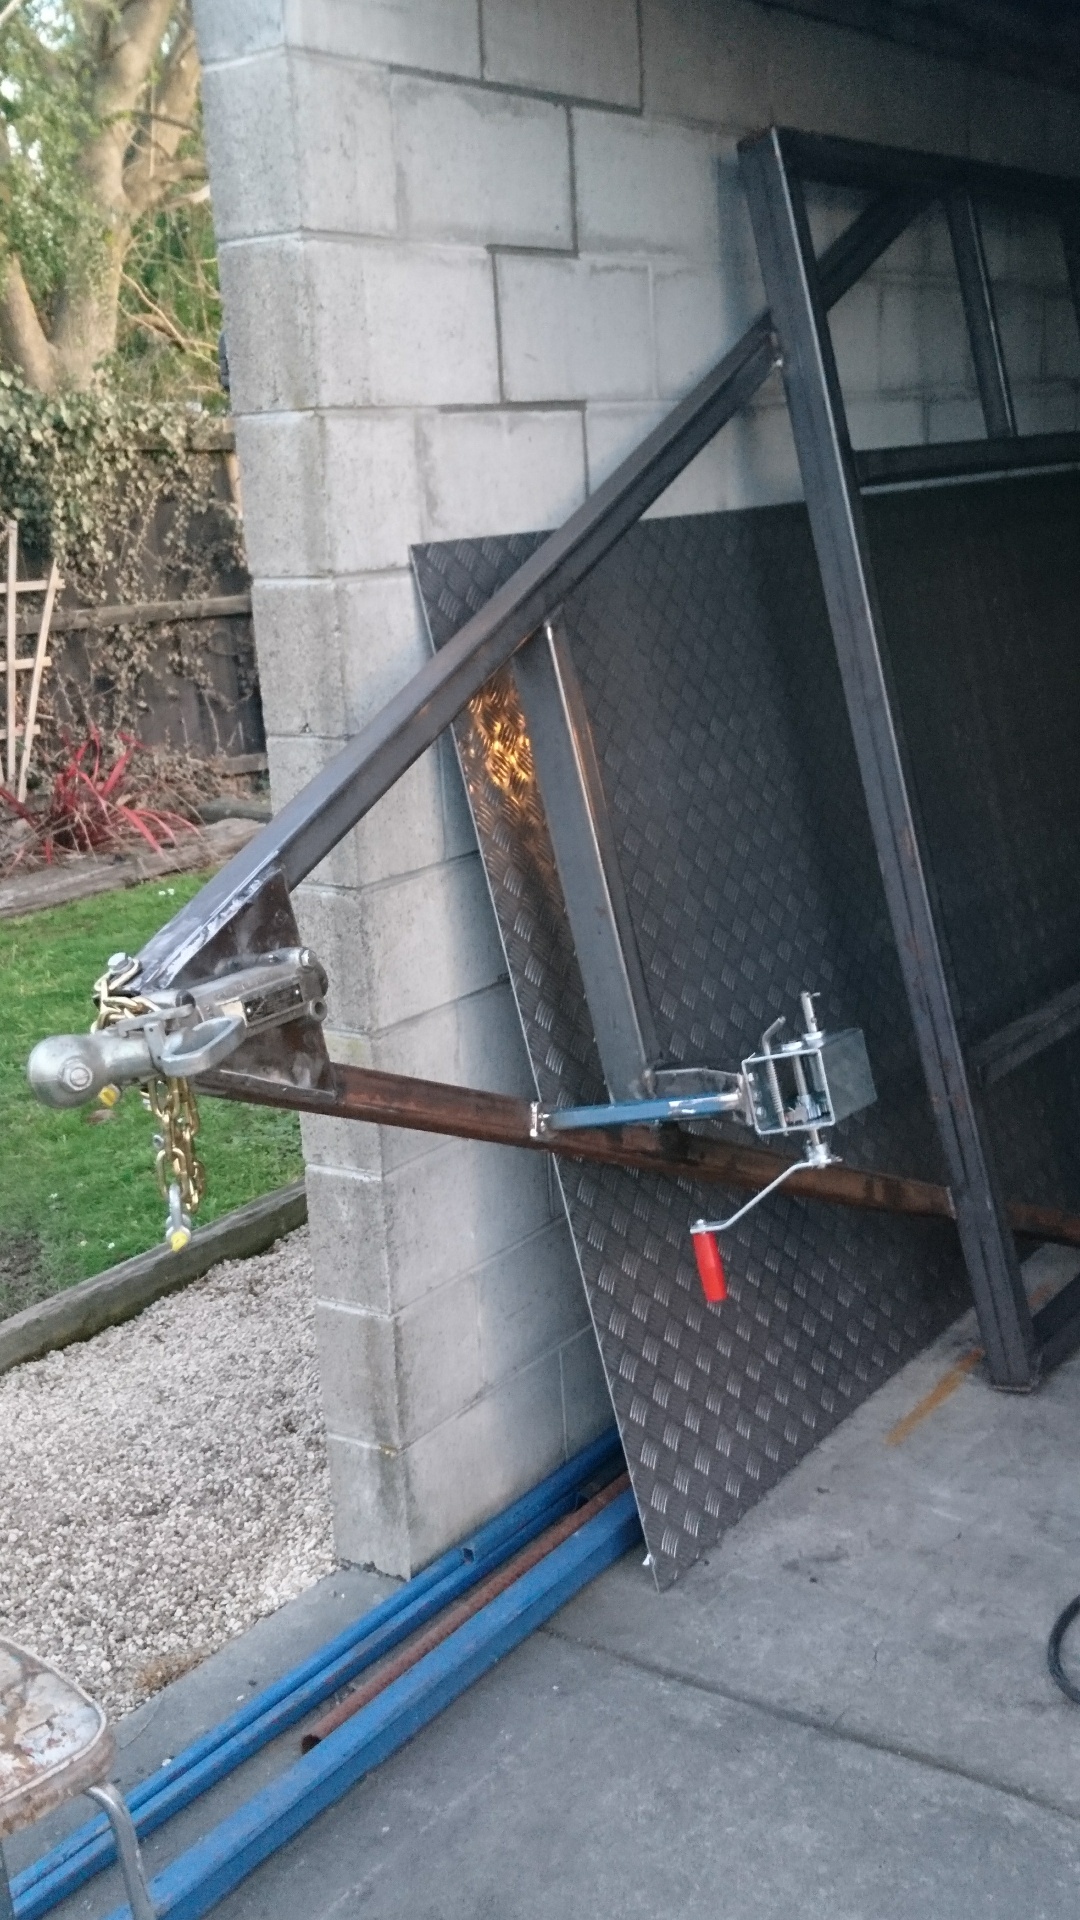
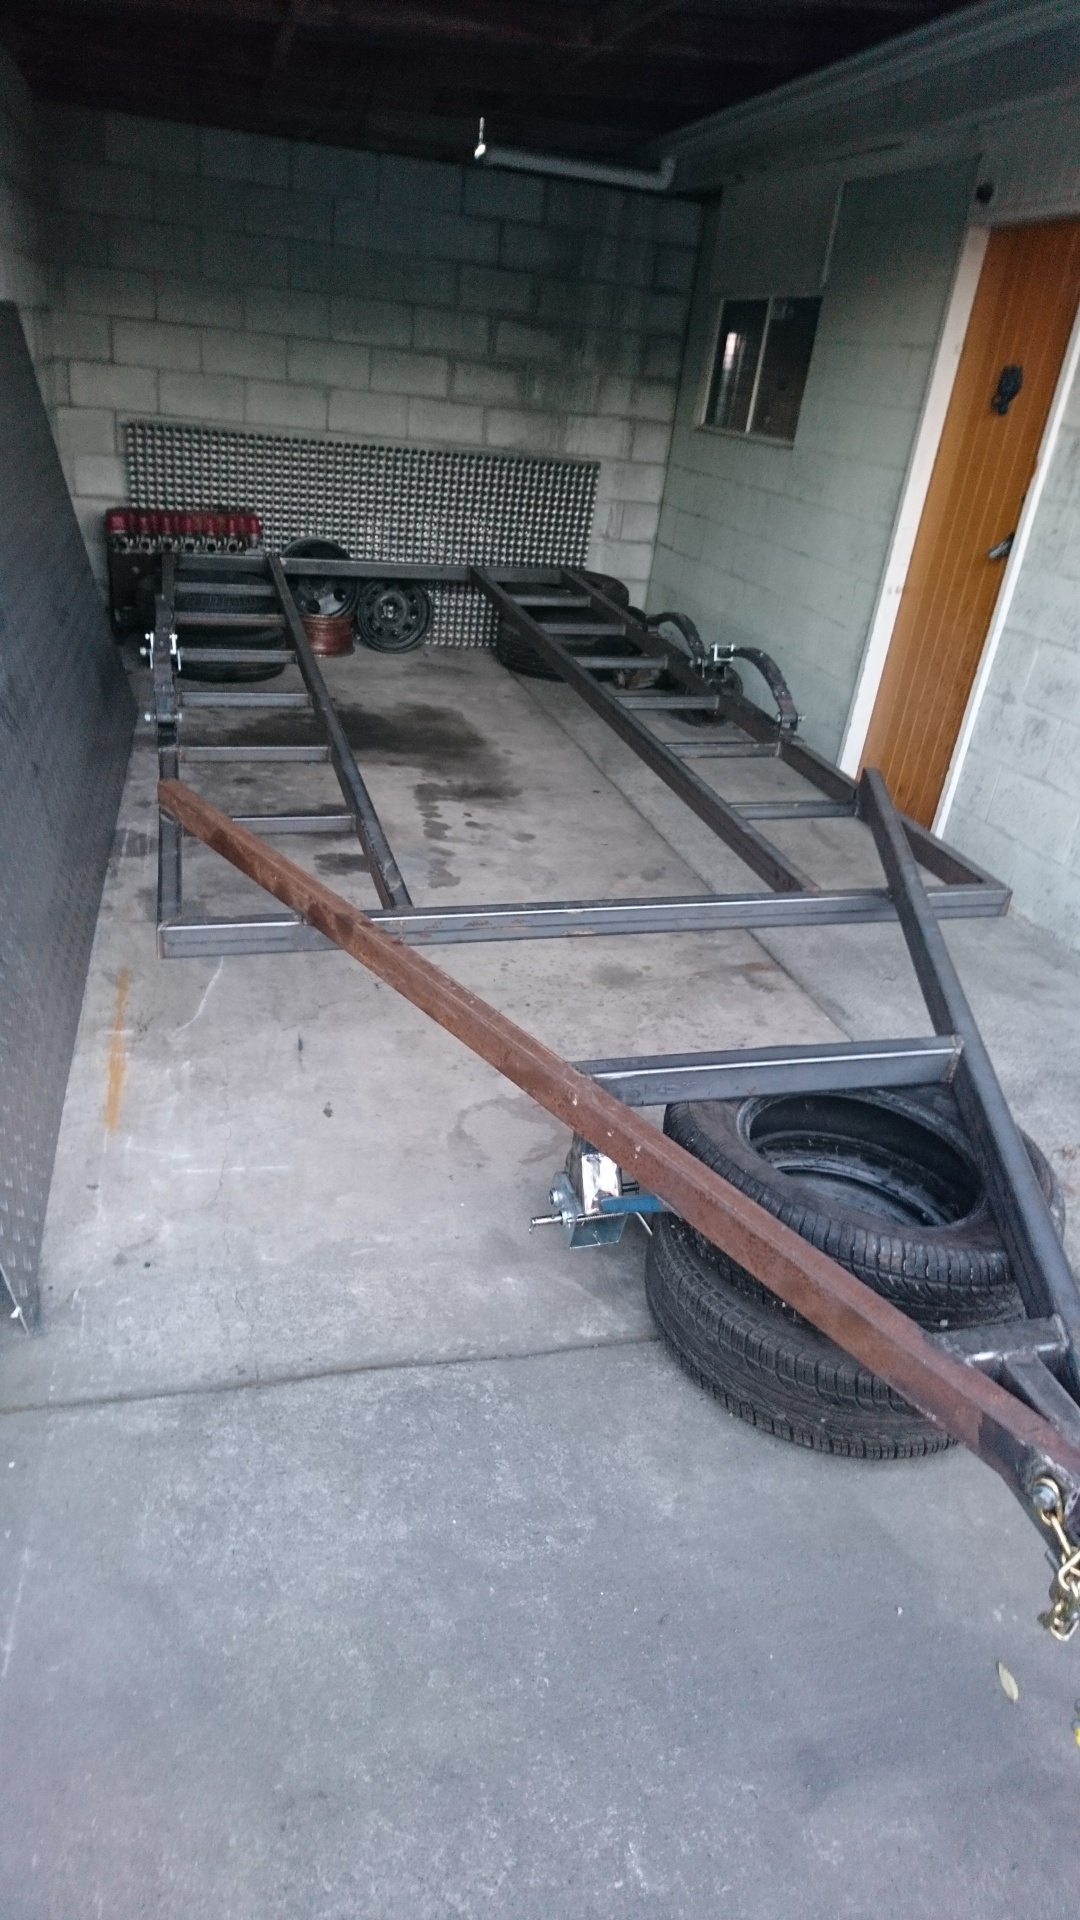
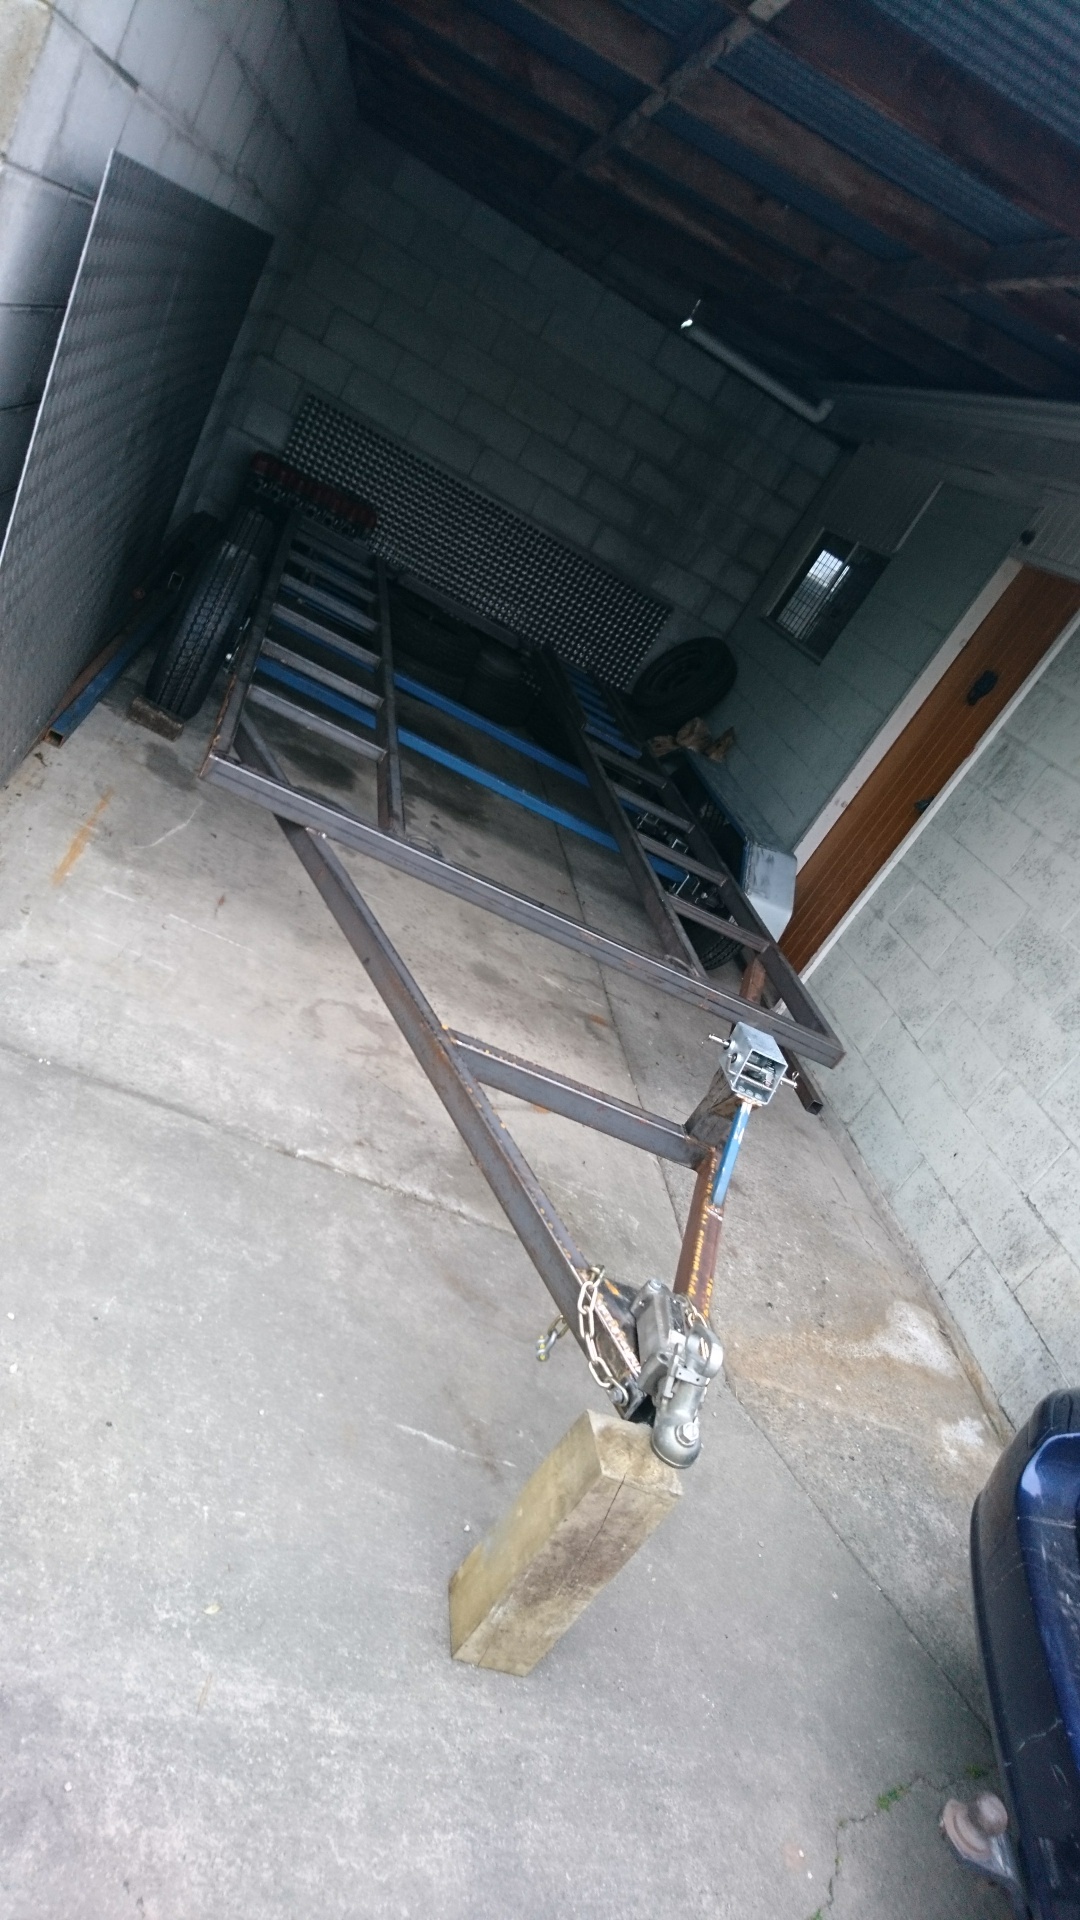
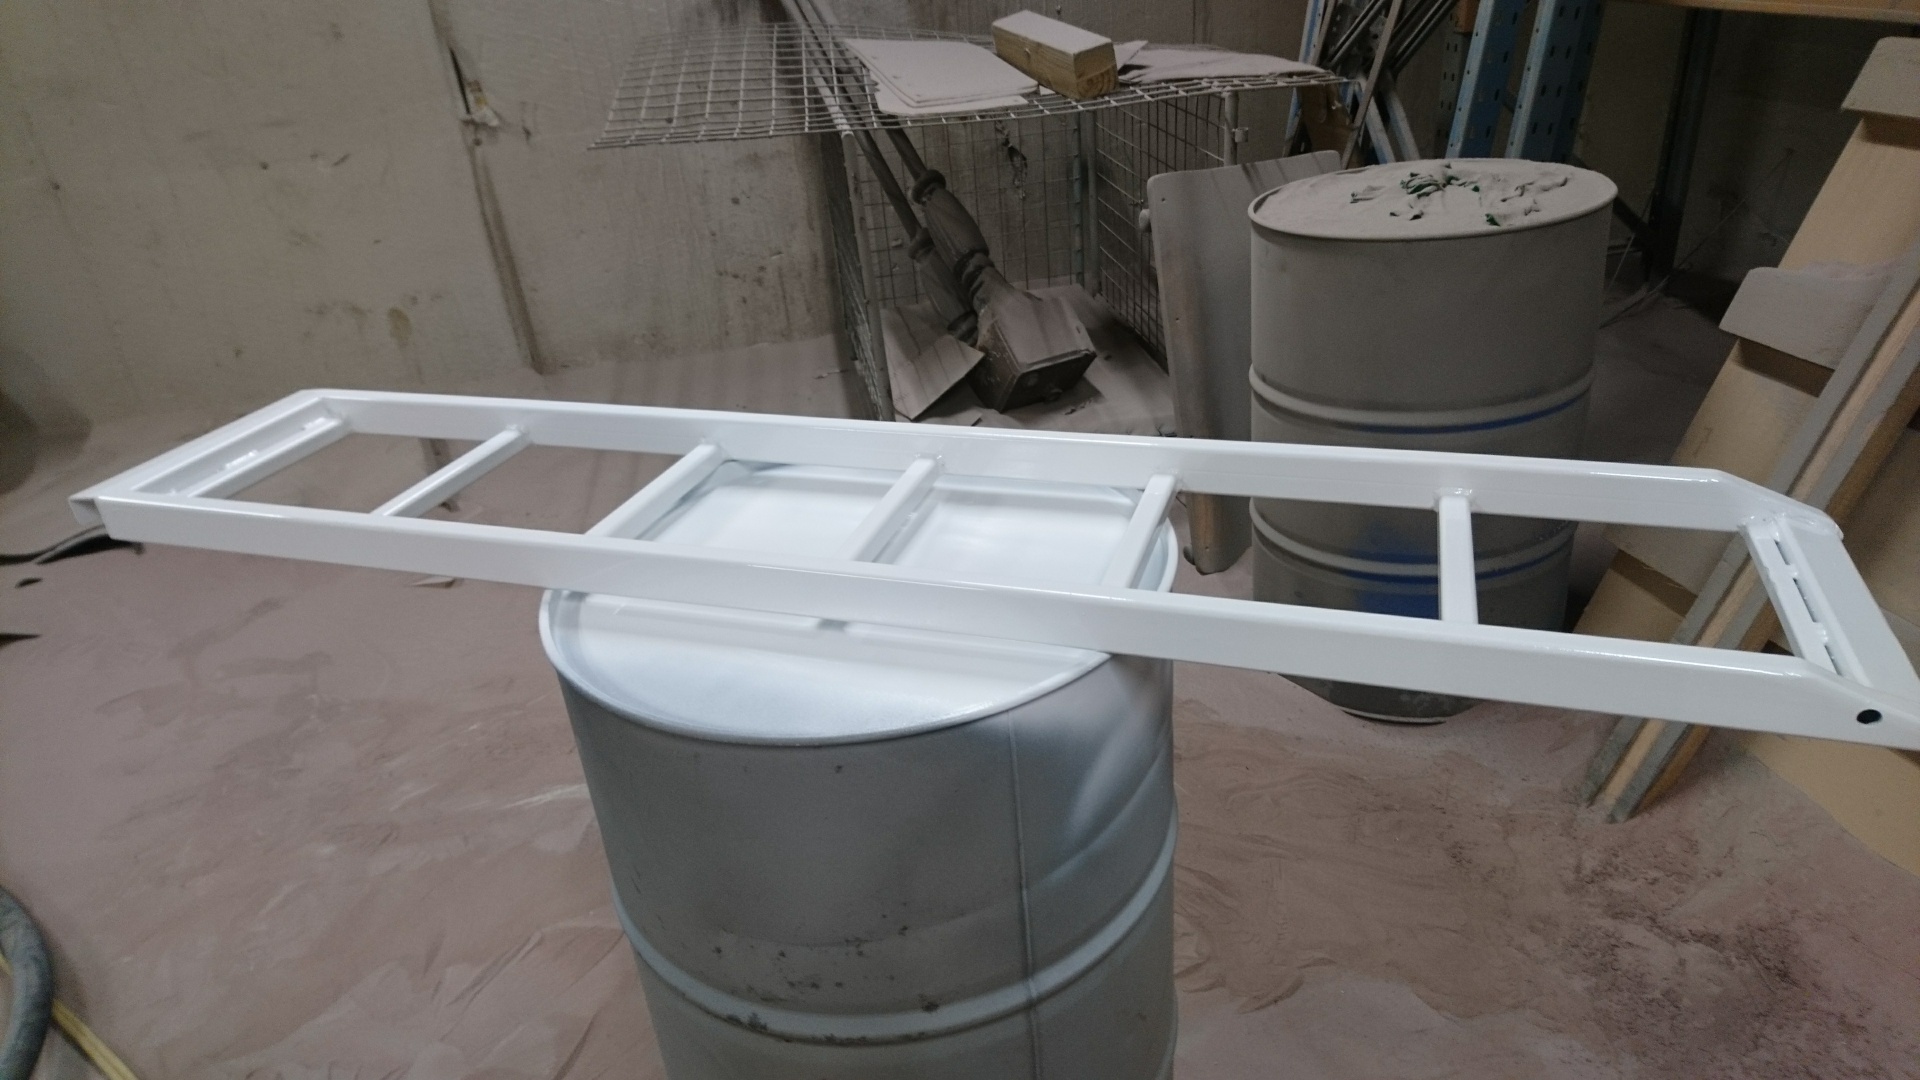
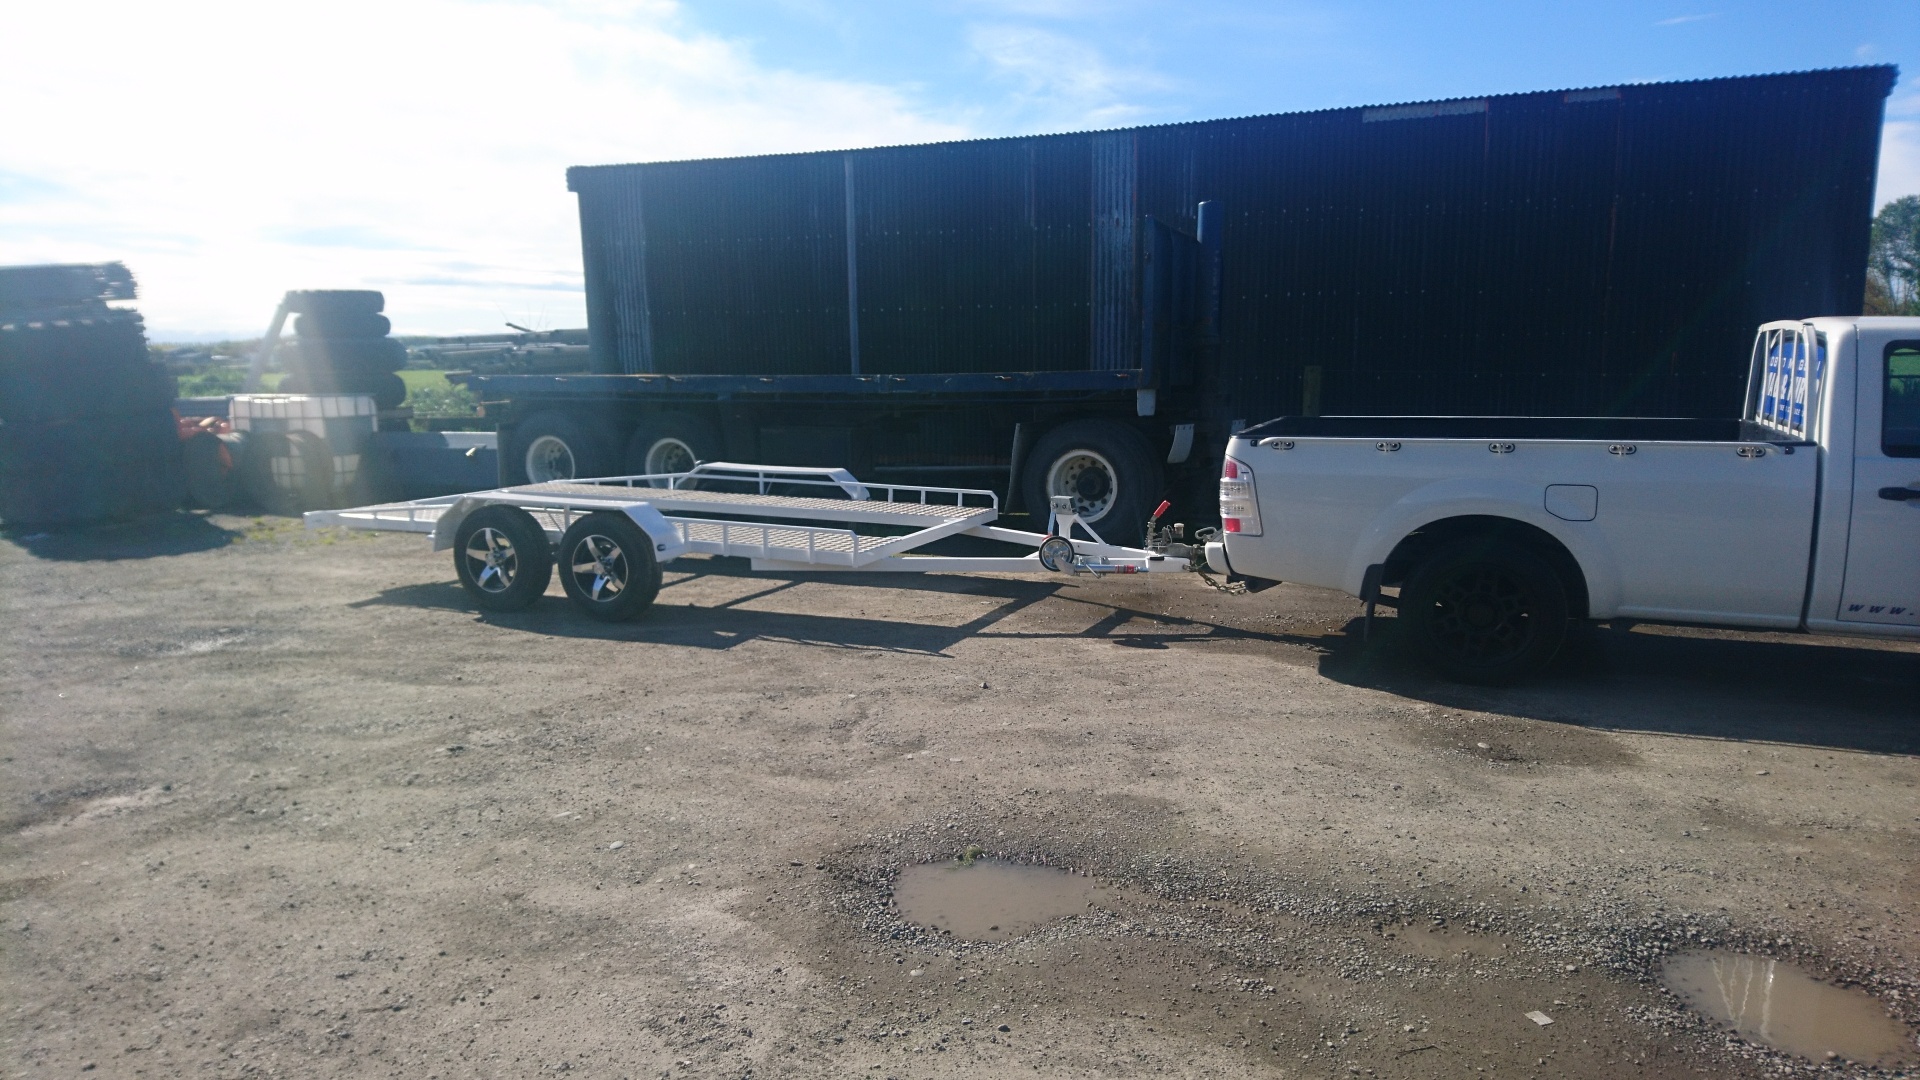
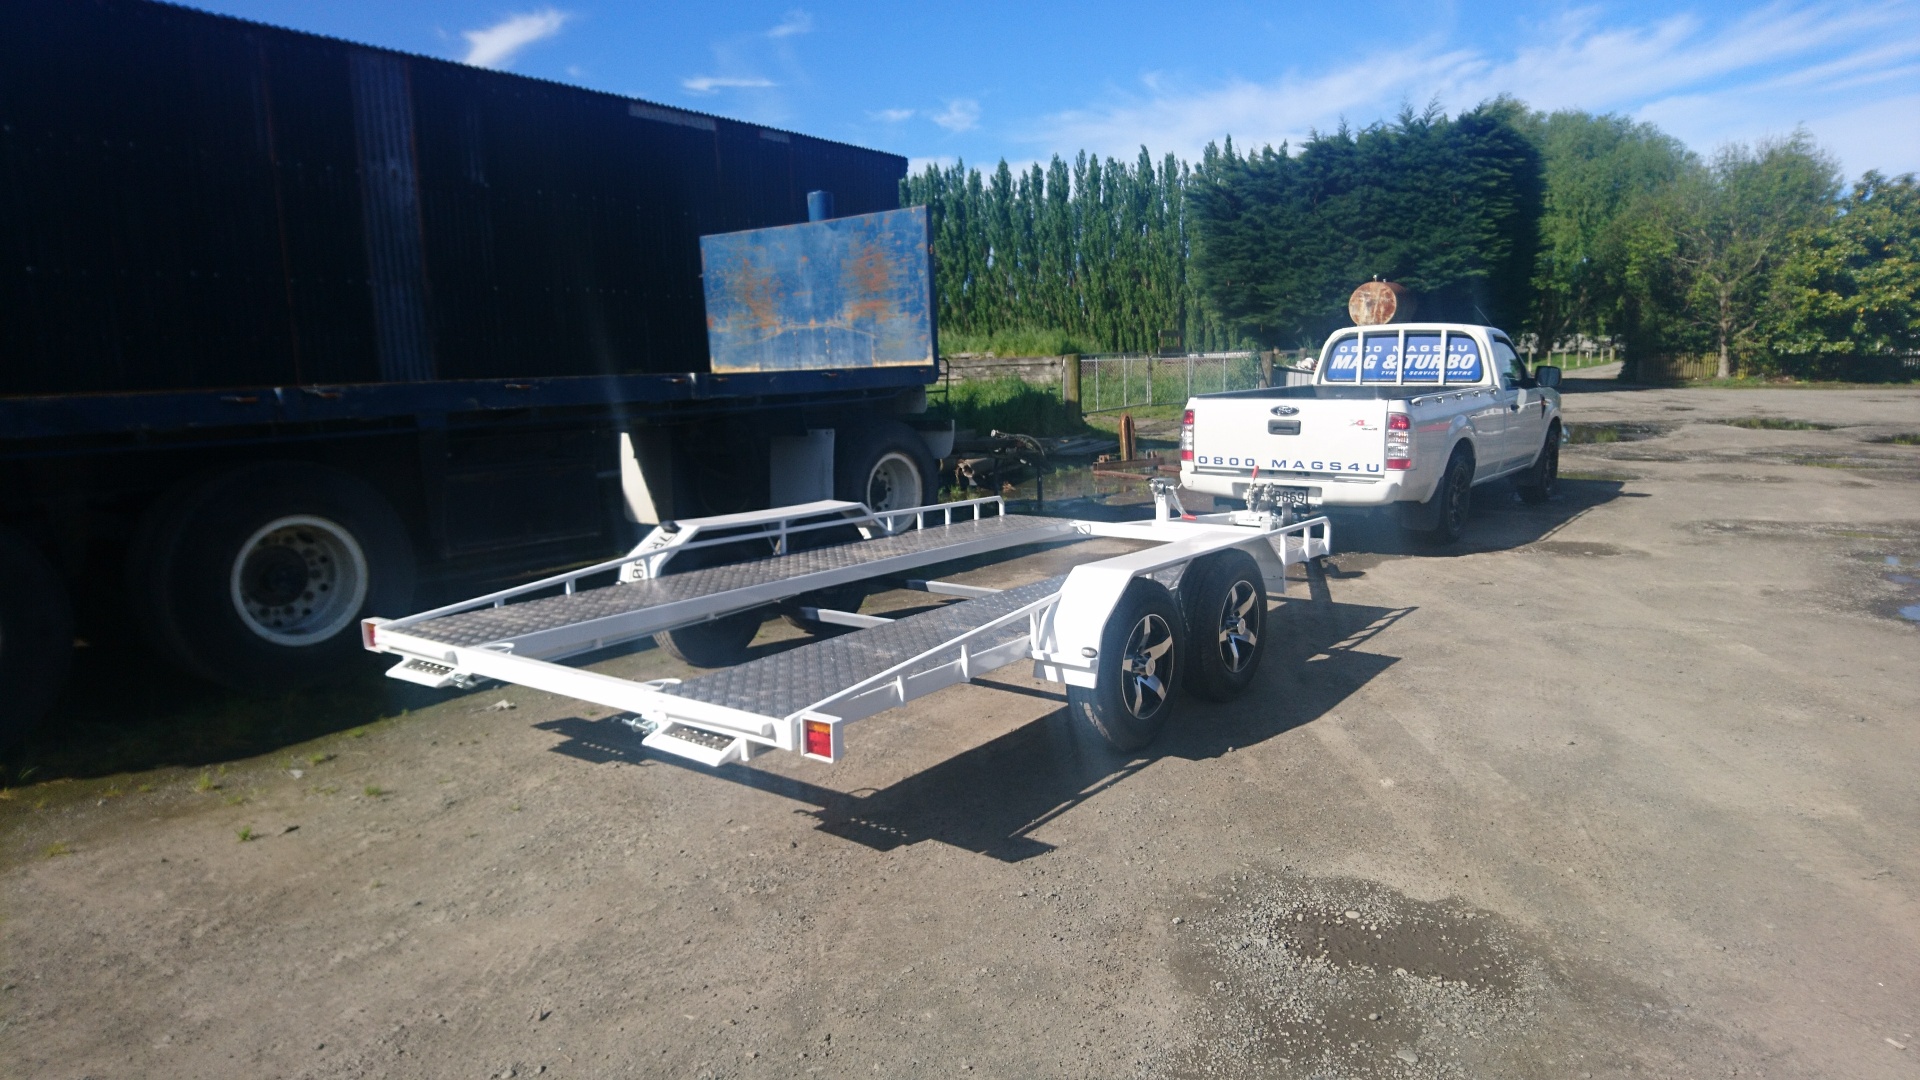
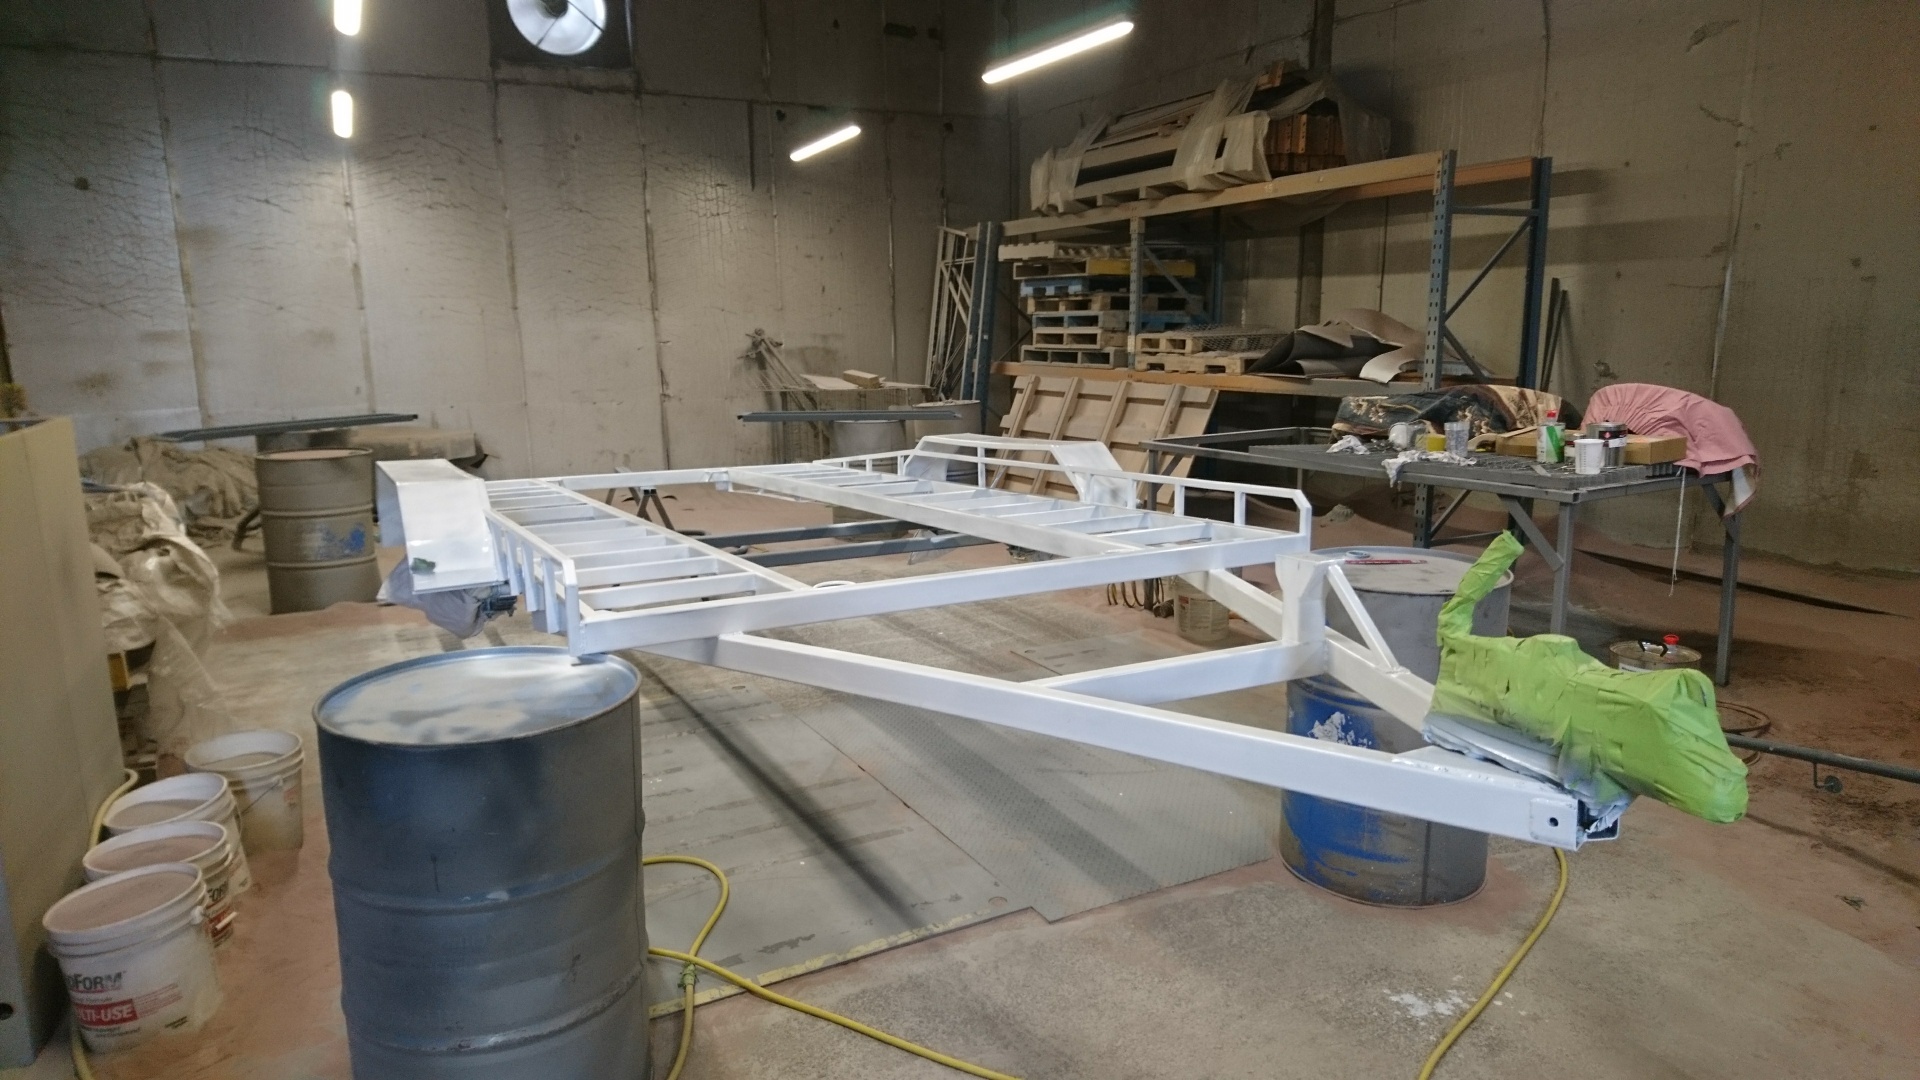
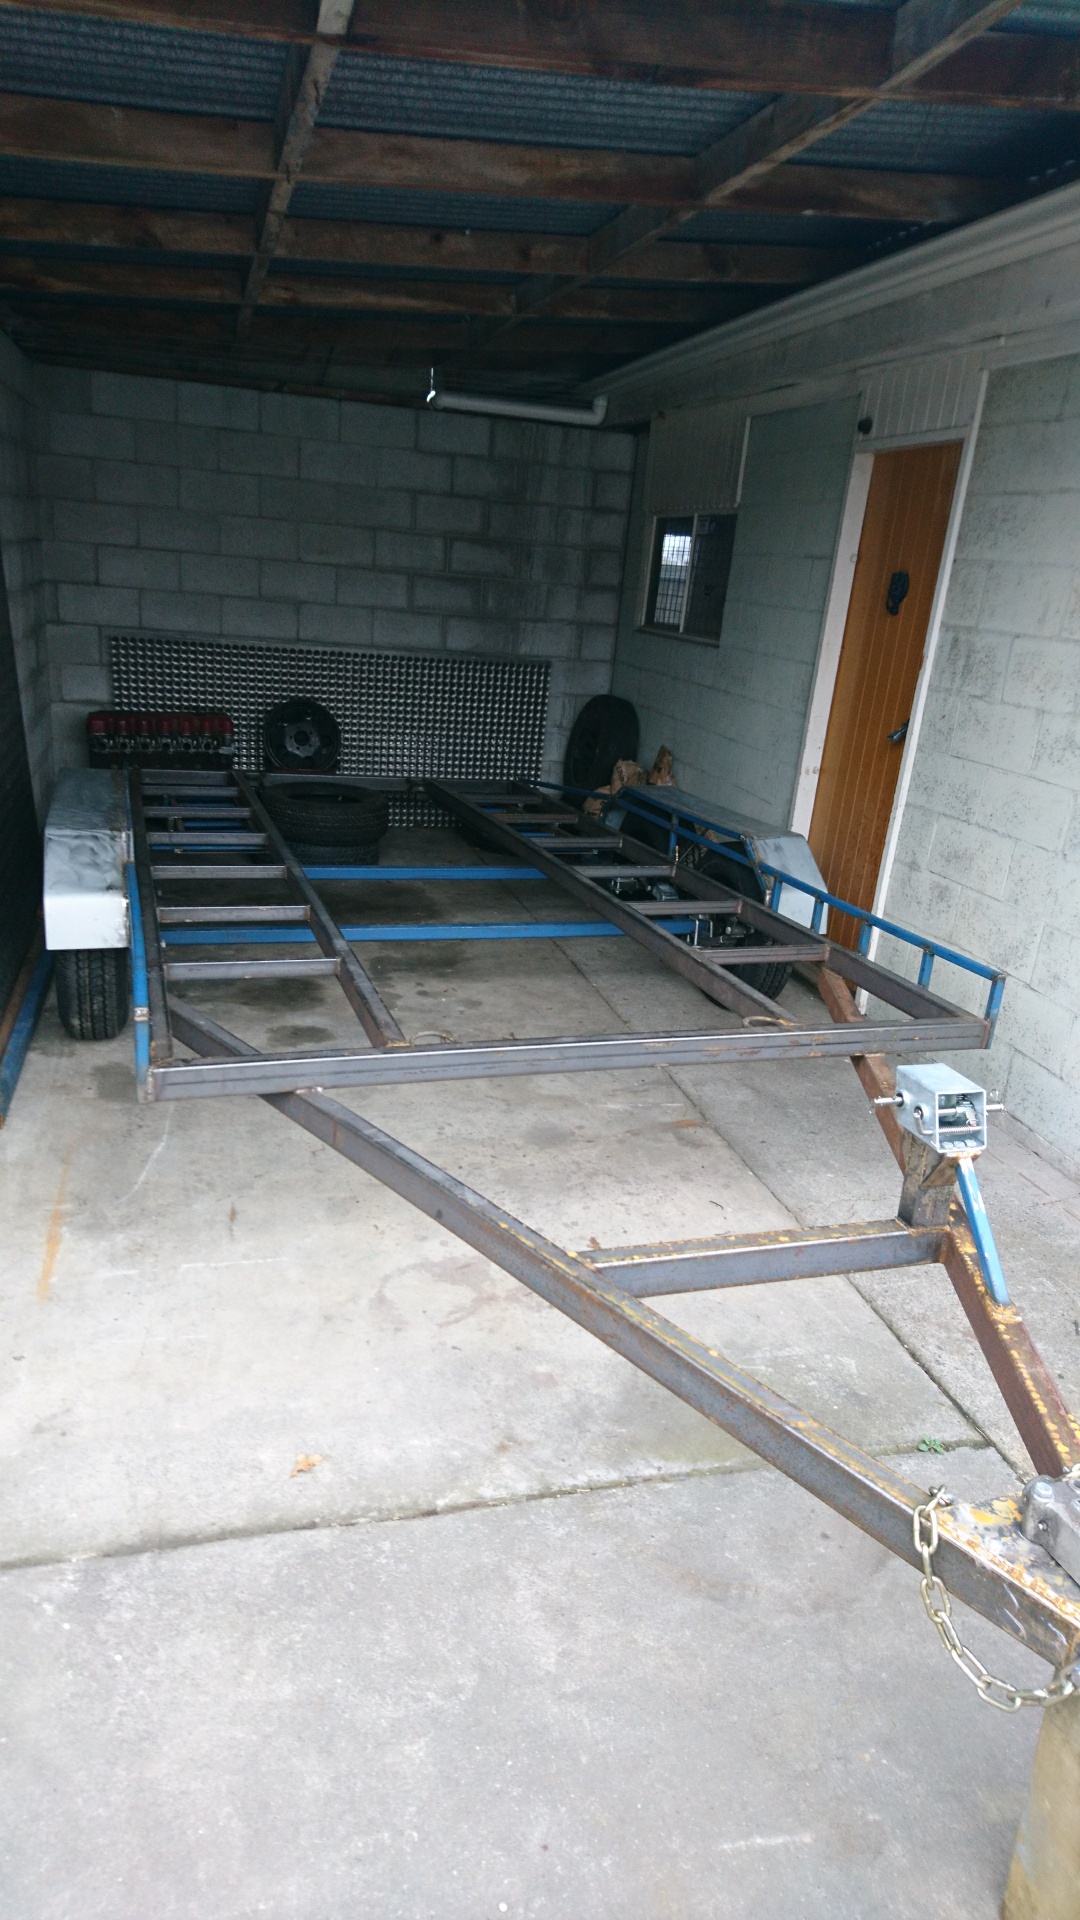
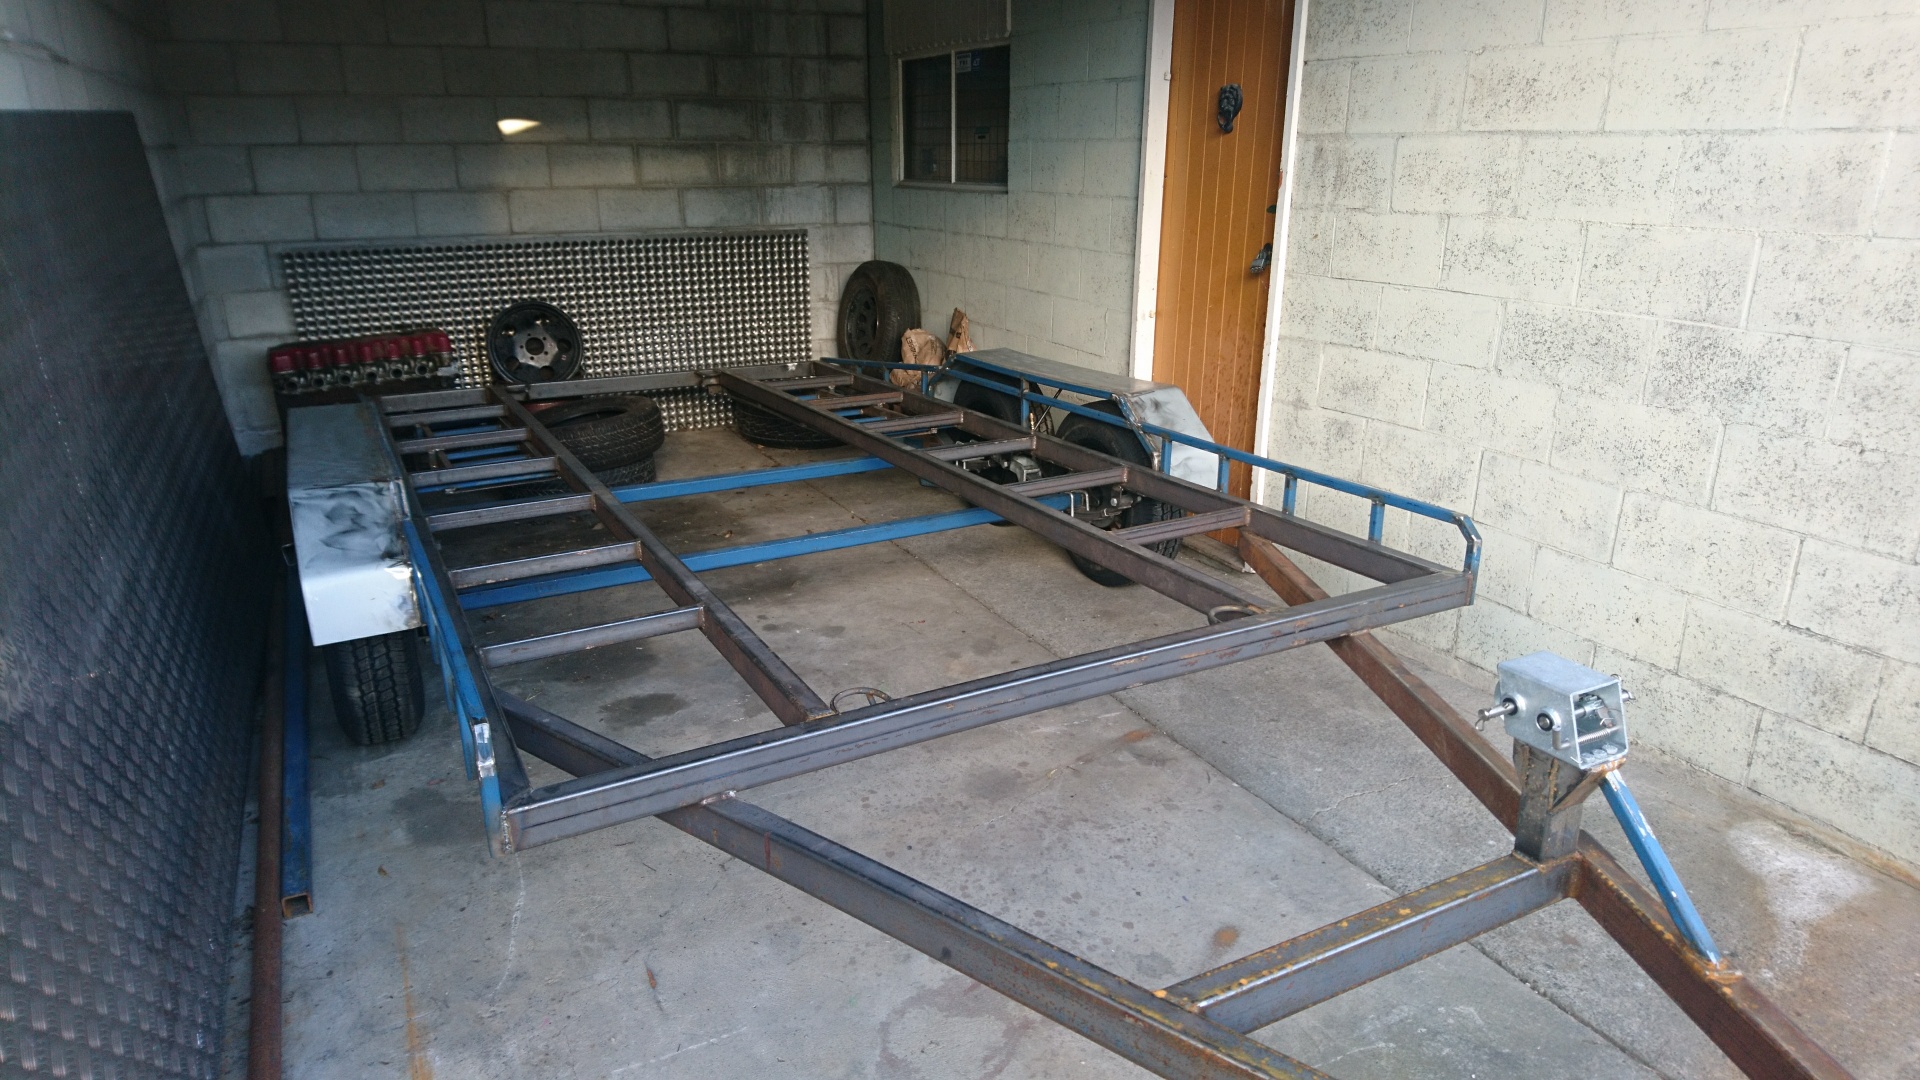
So, after a couple of years of borrowing mum's trailer for my racing, having to ask to borrow it or retrieve and fix/maintain it after being lent to randoms, I'd decided to build my own, quite similar in design to what I've used, but with a few lessons learnt. Originally was going to Hot dip Galv the trailer, but strong CBF factor for drilling holes and warping the guards, tipping it over soon put me off. Have decided it will be Sandblasted, epoxy primed then painted in 2k. This took me roughly 2 hours to have tacked together; Added Draw bar, flipped it over for storage, couple of braces for drawbar & hydraulic couping mount Offset the winch, rather than have it pull from the centre where its a pain to stand and winch - and no cars ever have the tow point dead in the centre really.. Doubler plates for the safety chains - pain in the ass welding outside with the slightest breeze 3 Ton springs installed Made the axles - braked on the front - such a ball ache calculating them with offset, clearance, dowels for the springs.
1 point
-
Last year position wasnt all bad but would be nice to be more towaeds the " action"1 point
-
Yup. It will be less than a minute walk from the house, but the house is a couple of years away. The contractors are cutting an earth driveway towards the house site in November. I should be able to 4x4 to within a minute walk to the cabin in December. That. Will. Be. Awesomeness:-)1 point
-
I borrowed a steering wheel puller and did this. Thanks Dylan for the loan if the tools. Tomorrow's job is to figure out and hopefully fix the play in the mechanism1 point
-
Well done Nominal. (Thanks) The water pump indeed was blocked off. Drilled it and now I have a fully working cooling system I think . Just need to go for a drive to be sure.1 point
-
I swapped the dash today with one that doesn't have holes all through it. while it was out I swapped the ac evaporator box for a nz new non ac duct so save a bit of space. The high pressure side of the fuel system is all good. I'm not sure if the filler tube is not properly sealed or if it was water leaking out when I filled it but I'll check that out tomorrow. I few more test drives and a final check over and its ready for the dyno. I will need to replace the rear muffler as it is still too loud ofr this old man It took a while to figure out why I couldn't pull it out even though all the bolts were removed, then I saw this. At least the screen won't leak I guess1 point
-
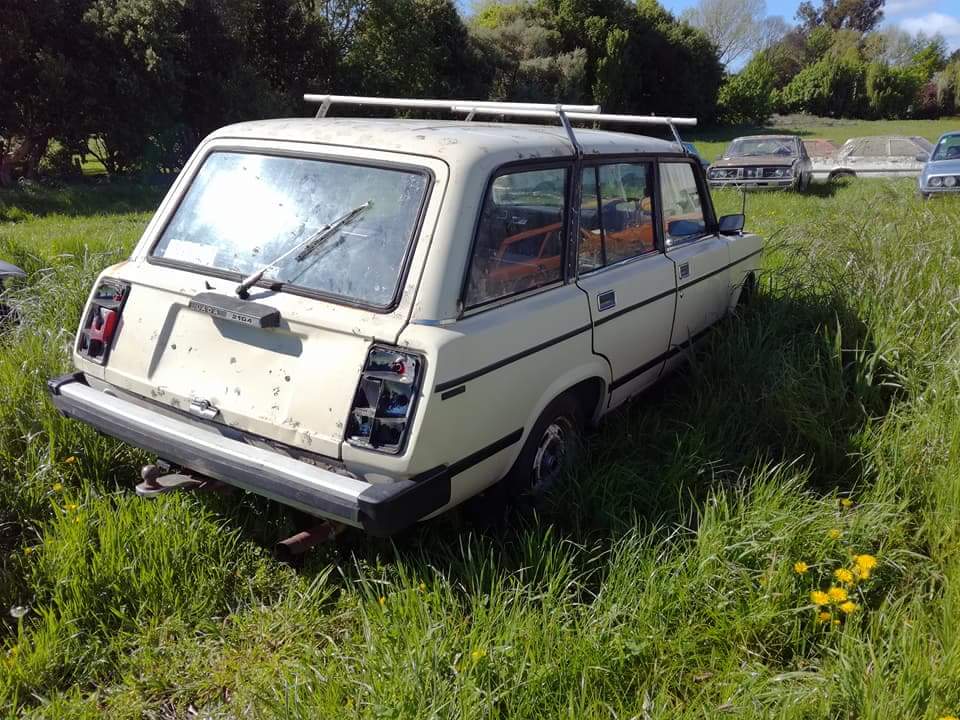
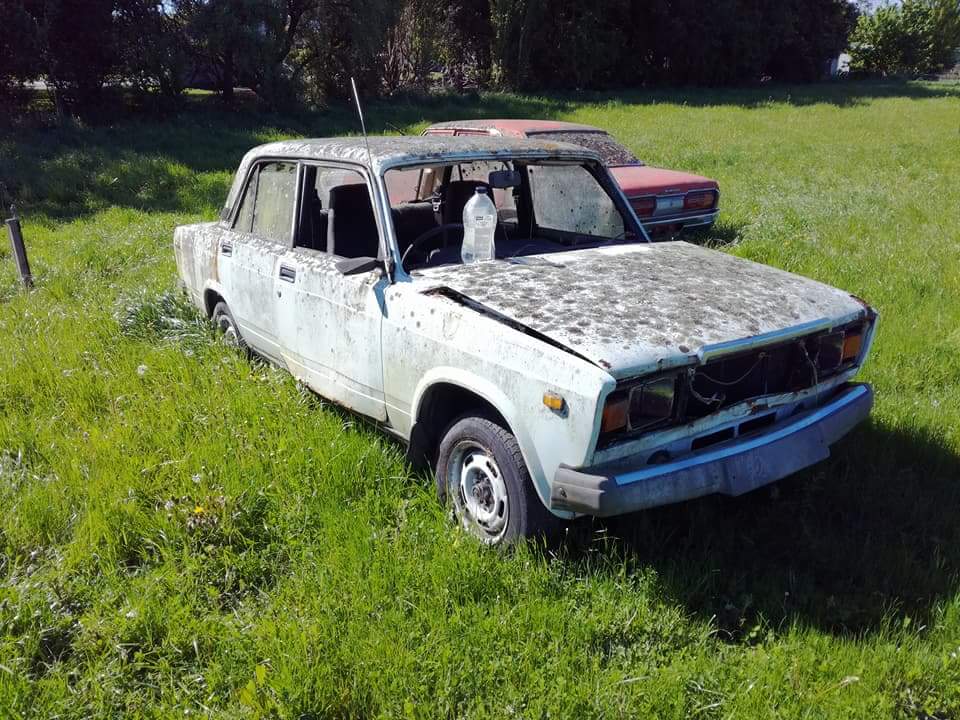
So I picked this up for the Marshland road graveyard Also got a sedan for parts Will prob just fix rust and register as is with gutless 1500 Lada engine And this I guess
1 point
-
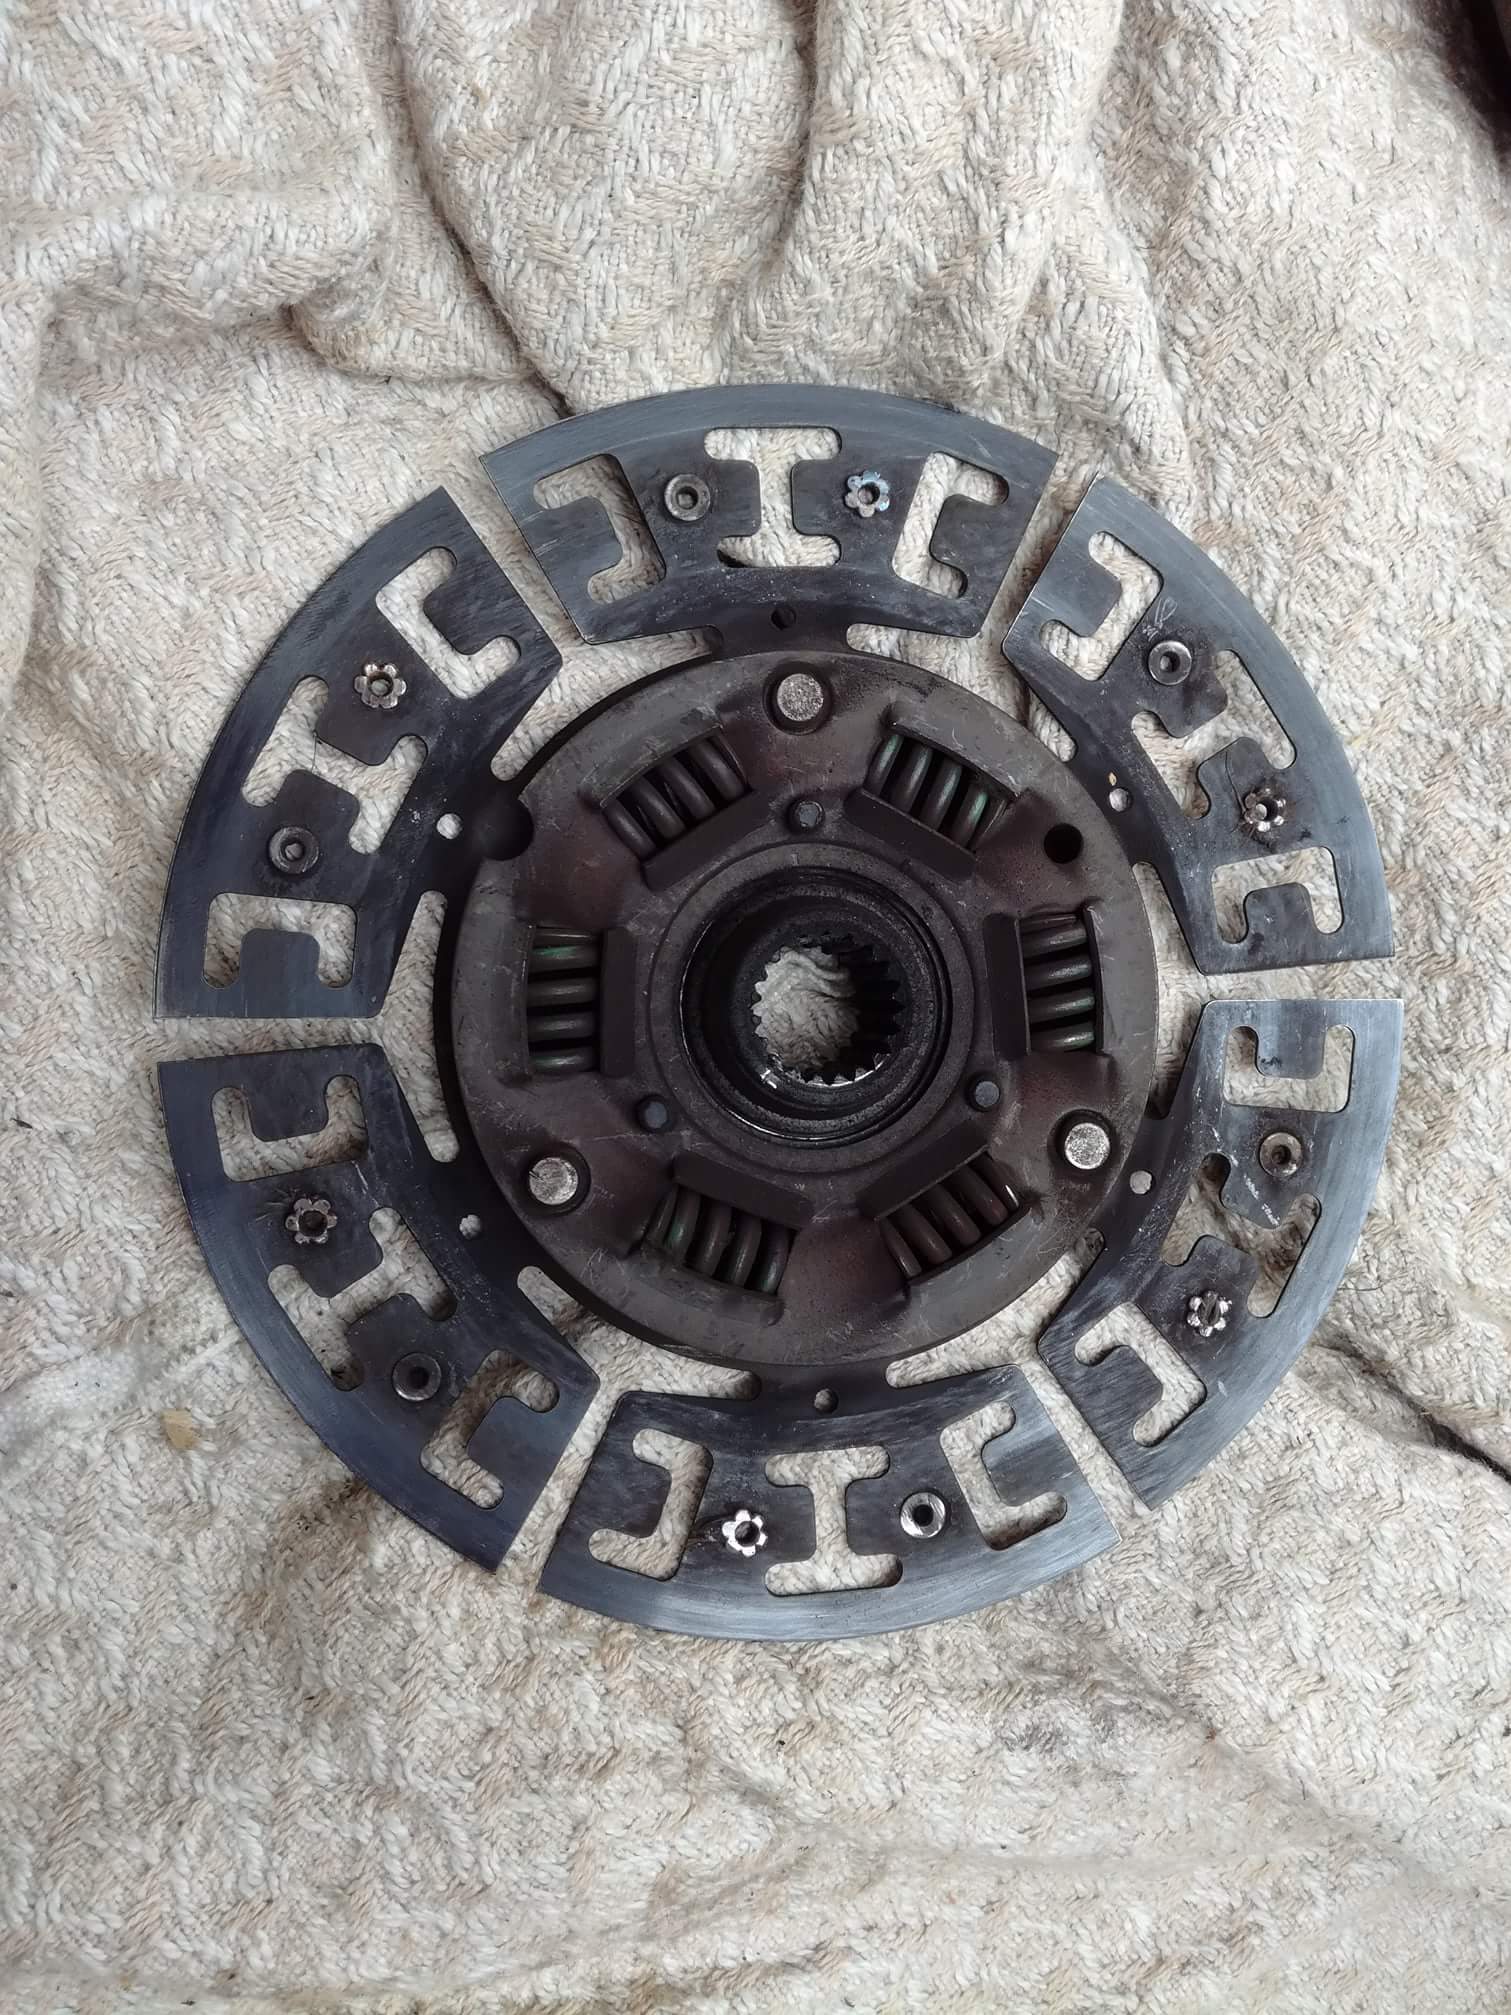
Clutch is toasted
1 point
-
Great work!1 point
-
Damn, son. That's a spicy meatball. Nicely jobbed mate. Good work.1 point
-
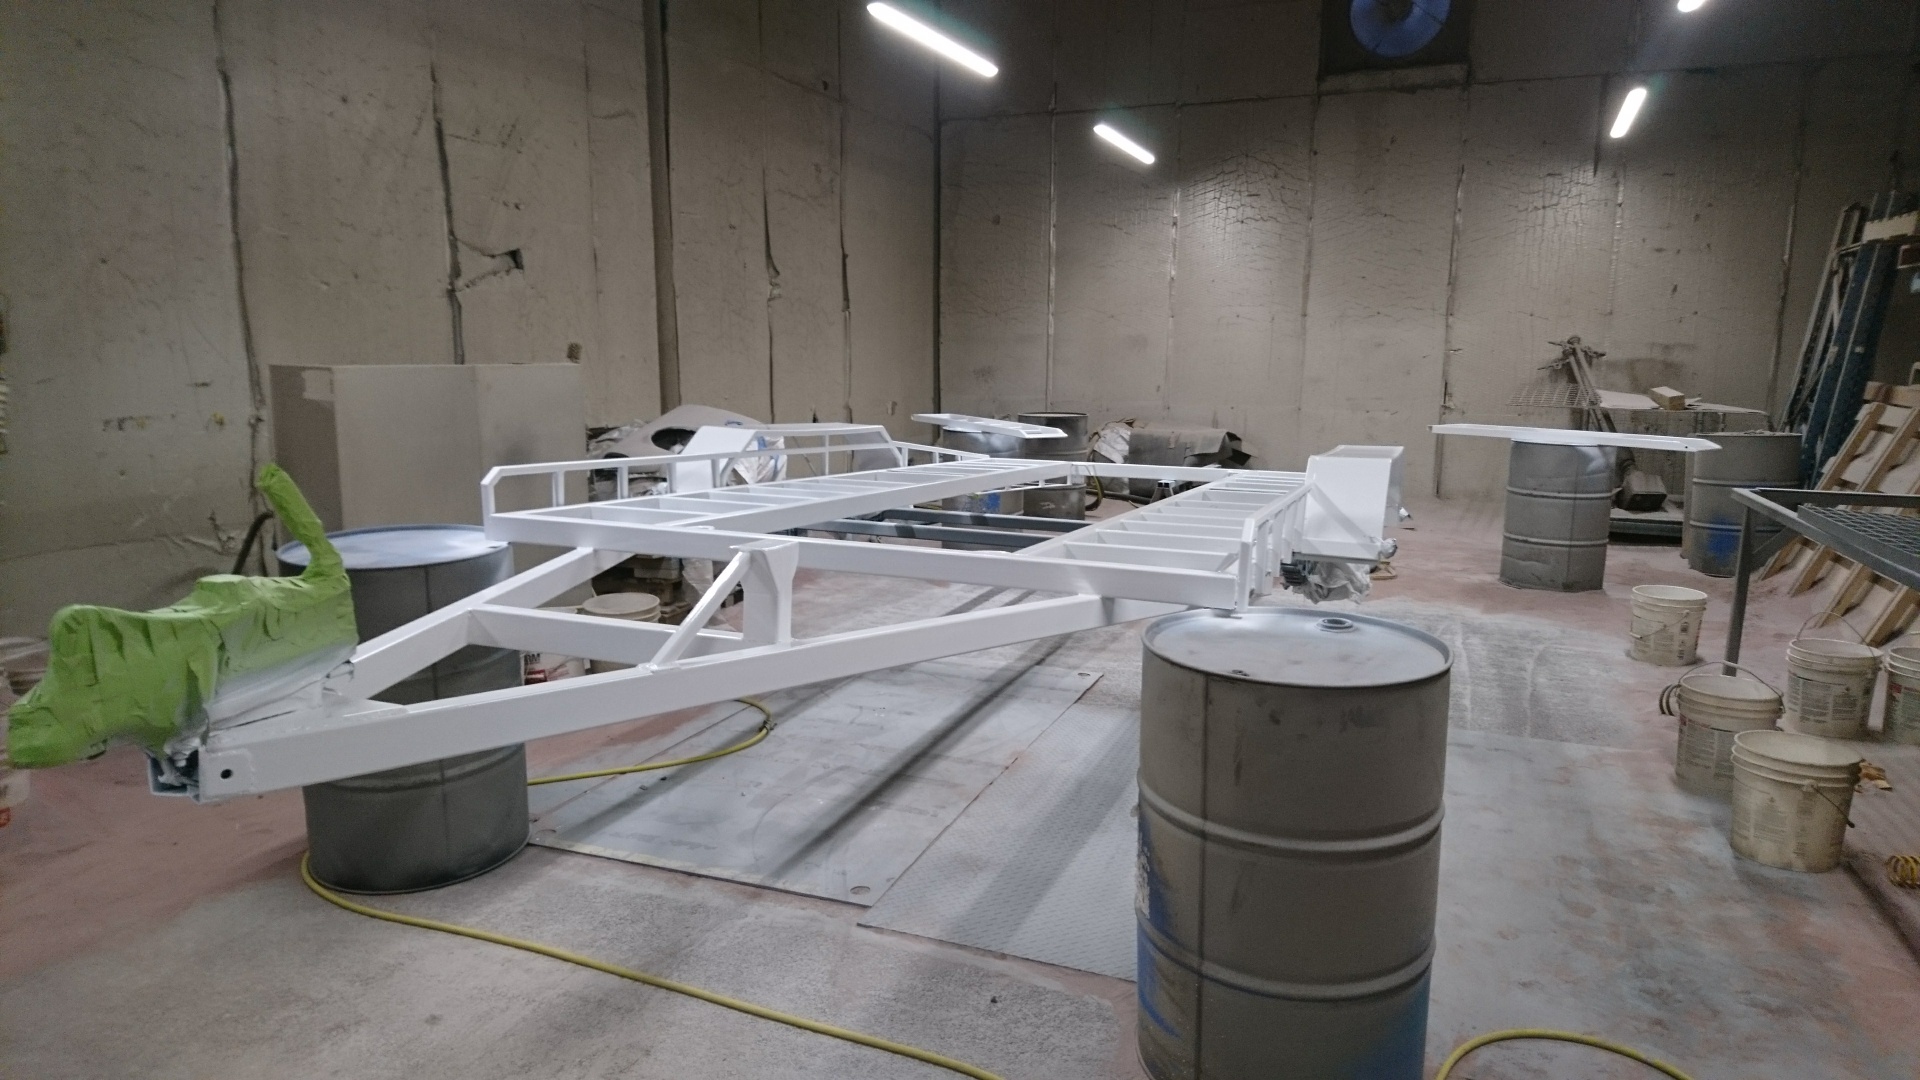
3 coats later it looked like this; After a full day piecing it back together, and prior James/Horndog kindly lent the services of his works guillotine. I then seam sealed the deck, along with blind stainless rivets both the ramps and deck... (Blaine kindly helped after a day of blasting for him)
1 point
-
Lay the first coat of 2k acrylic white on Friday night..
1 point
-
he he he.. giggle... dont worry. Its just me talking shit, in relation to that old standing joke about to Manus old chestnut of moving his house...1 point
-
How could a Kumeu be possible without a drunken me there.1 point
-
Got motivated tonight and went out to garage, Sat engine and trans in rough position and placed guard back on to see where shit will end up and if it is a feasable(spelling?)concept. My biggest worry was where the axles would be in relation to the centre of the wheel arch, as you can see it's only slightly offset from the centre line. I also wanted to see how long the trans was going to stick out the back, which it doesn't, will be well forward of the rear panel. Next will be to bring the rear subframe and suspension in and sit in the engine/boxes place and work out how far the hubs will hang out, and this will allow me to work out how far to box/flare guard. *** insert cheesy grin here ***
1 point
-
A crane with 10 propellers1 point
-
A helicopter.1 point
-
Whos going to carry the crane up the hill?1 point
-
have you ever thought about a crane?.....1 point
-
The cabin is 56 metres above the water. For the avoidance of doubt: I've been trimming and placing the rafters by myself, but I got help to carry them up to the work site. TBH I am getting a bit old to be lugging 40-60 kg lengths the entire way up there1 point
-
Yes Sunday was a good day, very little use of a AK.After the wof and reg last week, first job was to get the wheels all pointing in the same direction.me ol mates at lincon tyres sorted that out, easy, rear was pretty good, I'd lined the axles up with some old marks on the spring plates and it did feel good, but the fronts were 10mm out each side, no wonder it was so scary on the motorway.After a short test drive home, it felt much better, need to go over the kings and links again and should re pack the front bearings with more grease, but first.as we pull into our street something went thump thump thump!rut roewhen I put the rear drums back on the pan, many moons ago, I didn't actually have the torque wrench so I just leaned on the multiplier stuck the pin in and forgot about it.I think I may have over done it???the splitpin and the castle nut were still in place but the drum was lose and the back of the studs had been gnawing at the wheel cylinder.At this point I'm out of time and money, the Auckland VW Club Spring Jamboree is days away and if I have to go on three fucking wheels this car was going!So I pulled out the bits of seal and that mangled metal thing, backed off the wheel studs so they were flush with the drum, backed off the front brake shoe has most of that also seems to have rubbed off and redid the castle nut, without hulk smashing it, and so far so good.I am really regretting not replacing all the soft brake lines now, as I have a feeling this is why the rear shoe has rubbed so hard.So Sunday morning loaded up every tool I own and then some, after checking and checking the hubs, drove down to local gasser and met these guys and girls.and arrived at sunny St Heliers Bay for the cars first wee show.and I thought my car was low.project for Felix?were some really nice cars there.this was one of two corvair engined bugs there.some crazy kidone of the picks of the day for me.really really nice, so I was pretty please to get second place in the 58-67 bug class.not bad for a homemade car!So cheers to the VW club, Matt and the guys for letting/making me lead the convoy in, MichealJFox for the choise pic of me and the family leaving, kiwikombi for the new smaller Dellorto chokes and all the other nice volks I chatted to and said nice things about the ragtop on the day.Look forward to more runs and adventures, now where is that rear wheel???1 point
-
Gave the hinges a bit of a polish and made some nylon washers, it all should work well I hope. Need to find some wood for the bed now. Decided I should go back and finish mounting the front sway bar. Started by making some new mounts since the ones that came with the rubbers weren't very nice. Bolted it all down in the right place and stole the sway bar links off the rear since they need to be changed anyway. Needed to cut out the side of that gusset sorta thing on the front end that I made ages ago since the sway bar hit it when the front raises up. Another thing that my parents picked up in America was an ashtray that goes in the middle dash panel, since neither of the RHD dashes came with one. Could of used the LHD one but wanted to keep that dash complete to hang on the wall or something haha. Had to get a second hand one since they don't sell them separate from the whole dash panel, and they were never made in stainless so it will need to be painted or chromed.1 point
-
I got the old gal some new boots. Always planned on wider and 13in anyway. mate sold her van and kept the wheels so had no use for them, I’ve always liked Jilbas so once I test fit and they cleared, we struck a deal! Two were pretty grubby and brake dust starting to eat into them but they cleaned up pretty well with some truck wash, my electric toothbrush and a fine steelo pad. SSR Jilba 13x6.5 Type A. Nankang 175/50swith decent tread. Now I know how much I need to lower it, the front especially. It’s quite high at the x-member.1 point
-
My parents arrived back from America with all the bits I ordered. It was a little less exciting as I thought it would be, it's basically just a bunch of rubbers and screw/bolt sets haha. I also got them to pick up a pair of Classic Instrument gauges whilst they were over there. They were so expensive, but definitely way better looking and higher quality than most of the other types out there. Folded up a bit of sheet for the c-notch cover And also laser cut out the hinges for the back of the bed. Then decided how to make them pivot and turned up some bosses and sleeves. Need to get a better tap, a couple bolts and a some nylon washers to finish it off.1 point
-
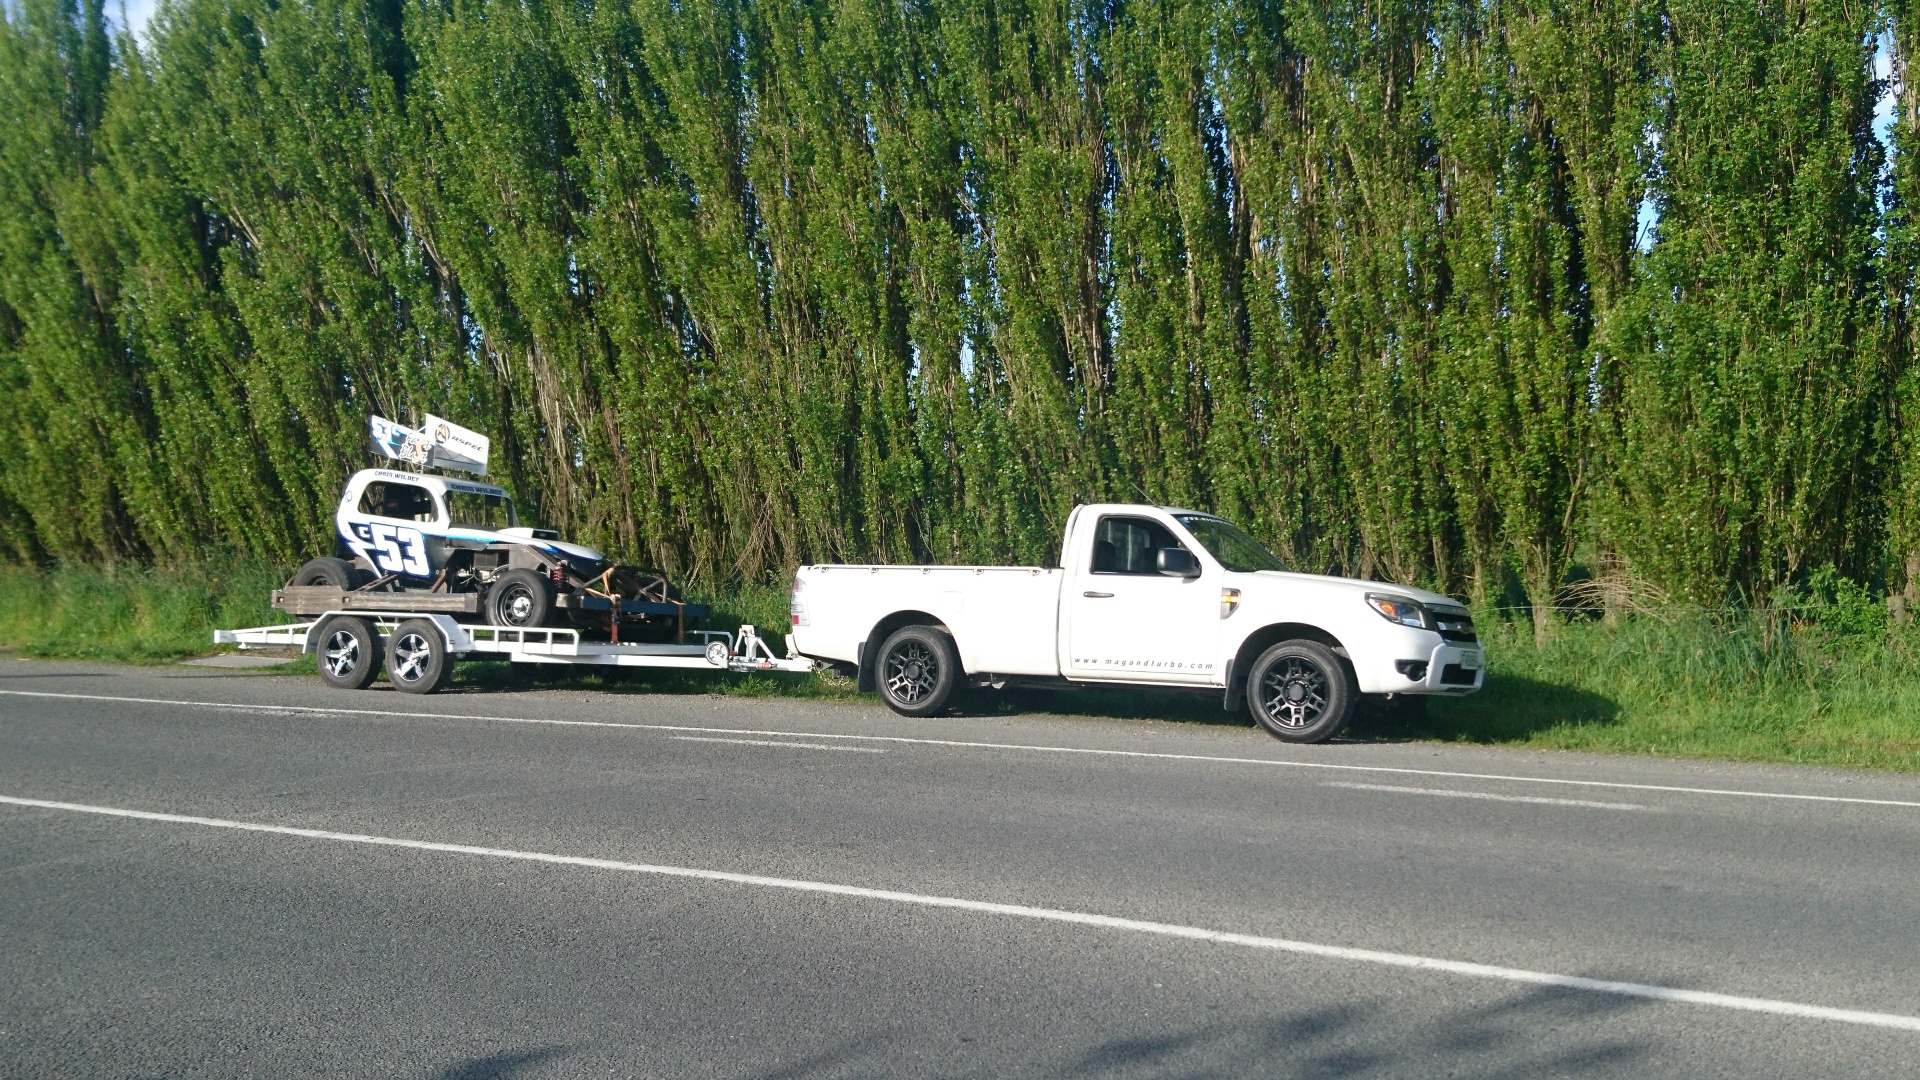
Didn't like the straight 90 deg at the end of the tie downs, support braces, so 45'd them. Flapped back the welds for a tidy finish. Sloped back the rear braces As you can see by the photo's, the guards have inch box section welded along them - two reasons strength for the guards for when people inevitably stand/sit on them, and when loading cars so the guards cannot be directly smacked. I also weld a stay underneath in the middle of them for more strength What you cant see here, is the ramps are welded up, and mounted underneath, slide in/out (forgot to take photos) - although they may not seem like it, there is almost as much work in the ramps themselves as there is the plain chassis itself
1 point
-
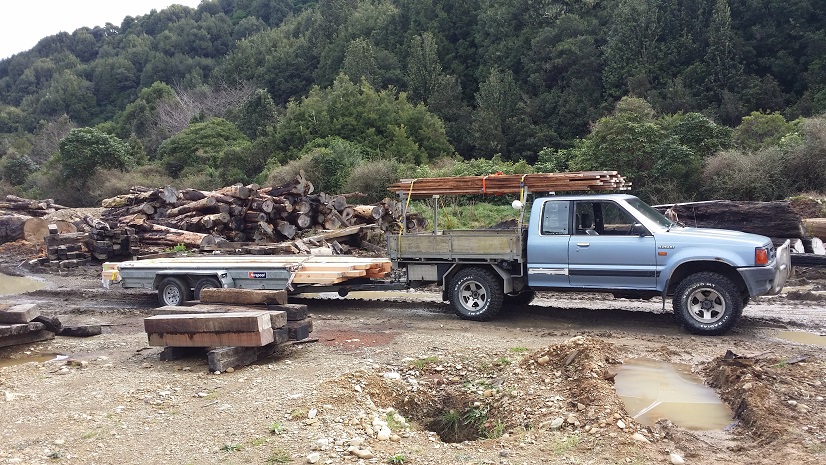
I've been collecting timber from a sawmill 'up north'. Is my ute OS? I reckon it are. It's also bloody awesome. It has self canceling indicators and power steering, but everything else you need to do yourself. The objects in the mirror are precisely their own size and I need to get out of the cab to engage the free-wheeling hubs. I love that ute. Sadly the generator died last weekend (as did a number of other things). It's a real challenge trying to keep tools dry enough to use up there, but after forking out a significant portion of the cabin budget on a replacement generator I managed to finish another frame today. I've gotten a bit better at calculating tangents... but of course there are mistakes aplenty. Sorry about blurry photo. It was almost dark
1 point
-
I'll just leave these here...
1 point
-
The plan is to chop the ends off it and make a simple Baja Bug. It's something I've always wanted to do but have never found a solid but lashed up car before. I'm not a fan off cutting up good old cars but I'm also not a fan of rusty Beetles. This is what I'll be aiming for, pretty sure it's going to be a bug eye. Aye Before I do that, I'm going to drop it, put a big motor in it, put some paint on and run around like that for a while. I've given it a service, taken the door bars and front half of the cage out coz I'm 50 and falling out of a car at the local Supermarket with your foot stuck under the seat is not big or clever. It's a piece of junk, it rattles crashes over bumps, lets the rain in and is as slow as fuck and doesn't really stop but i'm hooked. Update when my mate finds me the 2" drop spindles and 7" rims for the rear. Hang loose Bro or something.
1 point
-
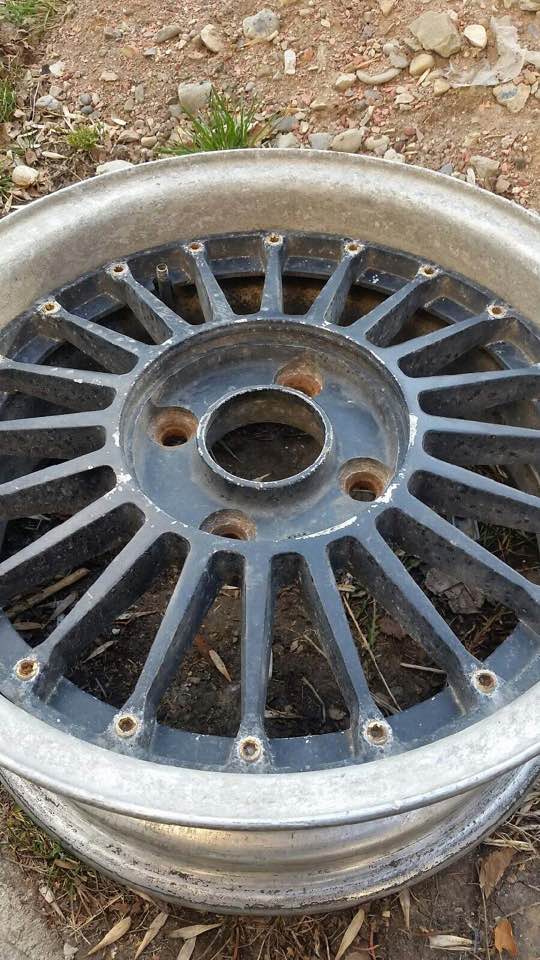
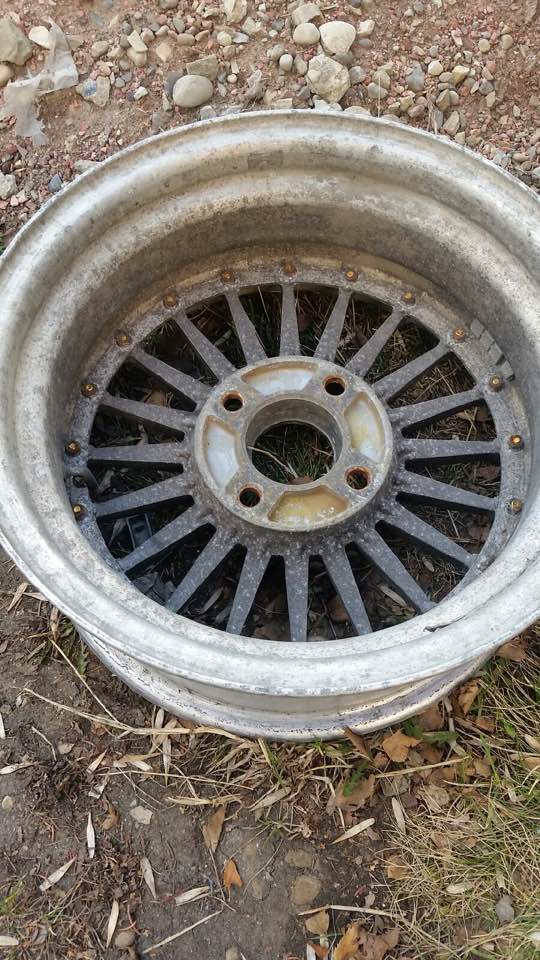
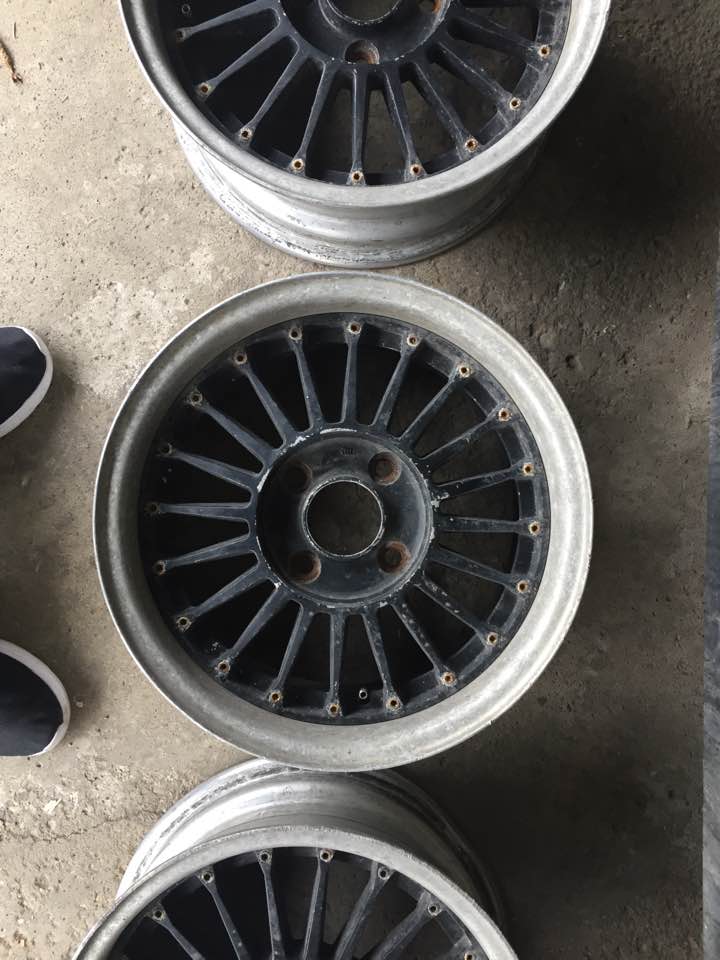
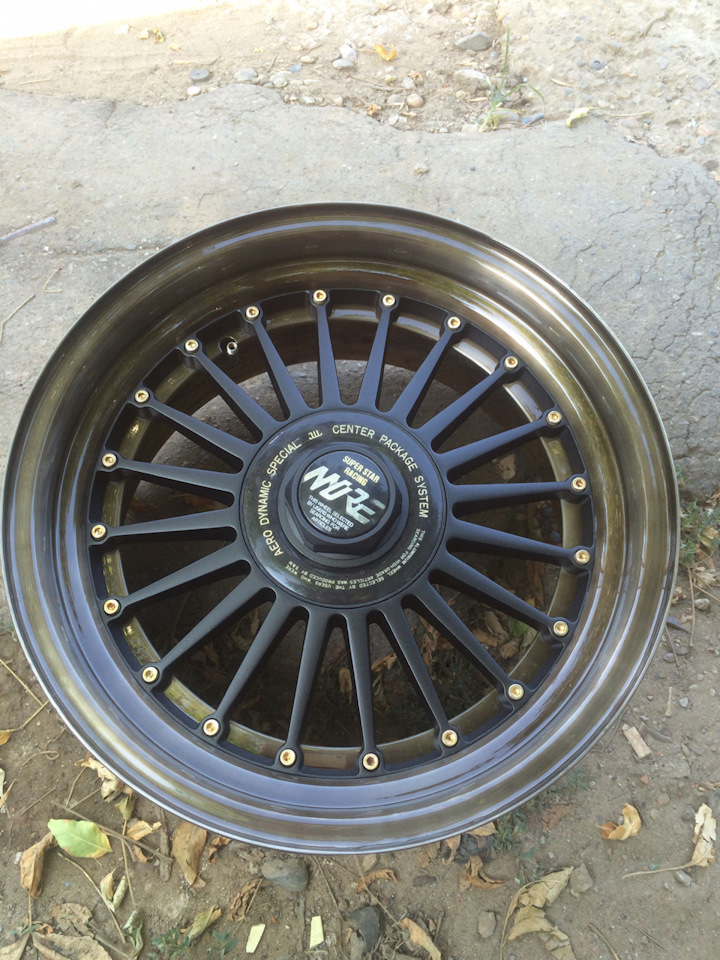
Picked up another set of wheels this week. I have no idea what brand they are, there are no markings I could find except for on the rear inner lip there is the wheel sizing specs. They are 15x6.5 ET20 2 piece. The hardware that bolts the faces to the lips on a couple of the wheels look like they were gold plated at one point. Picked them up for a really good deal, 2 wheels are mint, 1 wheel has 2 minor bits of crub rash, and the 4th wheel has rash about 1/3rd of the way around the lip and has a slight bend in the lip on the backside. Any ideas on what they are? I've rules out they are SSR's, Works, Weds, Takeshi Projects, Crimsons. They have the valve stems on the backside of the wheel face, and no bolt holes for a bolt-on center cap. EDIT: Figured out what they are after spending a few hours in the depths of the internet and getting my mate who has been selling wheels for almost 20 years and loves old Japanese wheels to take a look. They are Super Star Racing Nore Super Fins. And yes, I said Super Star Racing, which is not SSR. Super Star is now better known for their luxury branded wheels, Leon Hardiritt. I managed to figure it out from a guy who had a set for sale posted on the Honda Tech forums that he took pictures of them without the center caps and it had all the same markings as my wheels, same hardwear, and same engraved wheel measurement specs on the rear side of the barrel. Here's what they would look like in good shape and with the center caps. I'm going to strip them down, refinish the barrels, and probably either paint or powder coat the centers in gunmetal. This is kind of a cool option too... Matte black center with a bronze lip/barrel. I also picked up a mig welder, some sheet metal, and all the other good things I`ll need to start the body work. Hopefully I`ll get a chance this weekend to start on my first patch panel. I'll be posting another update tonight with my collection of new parts that came in and some interior updates.
1 point
-
1 point
-
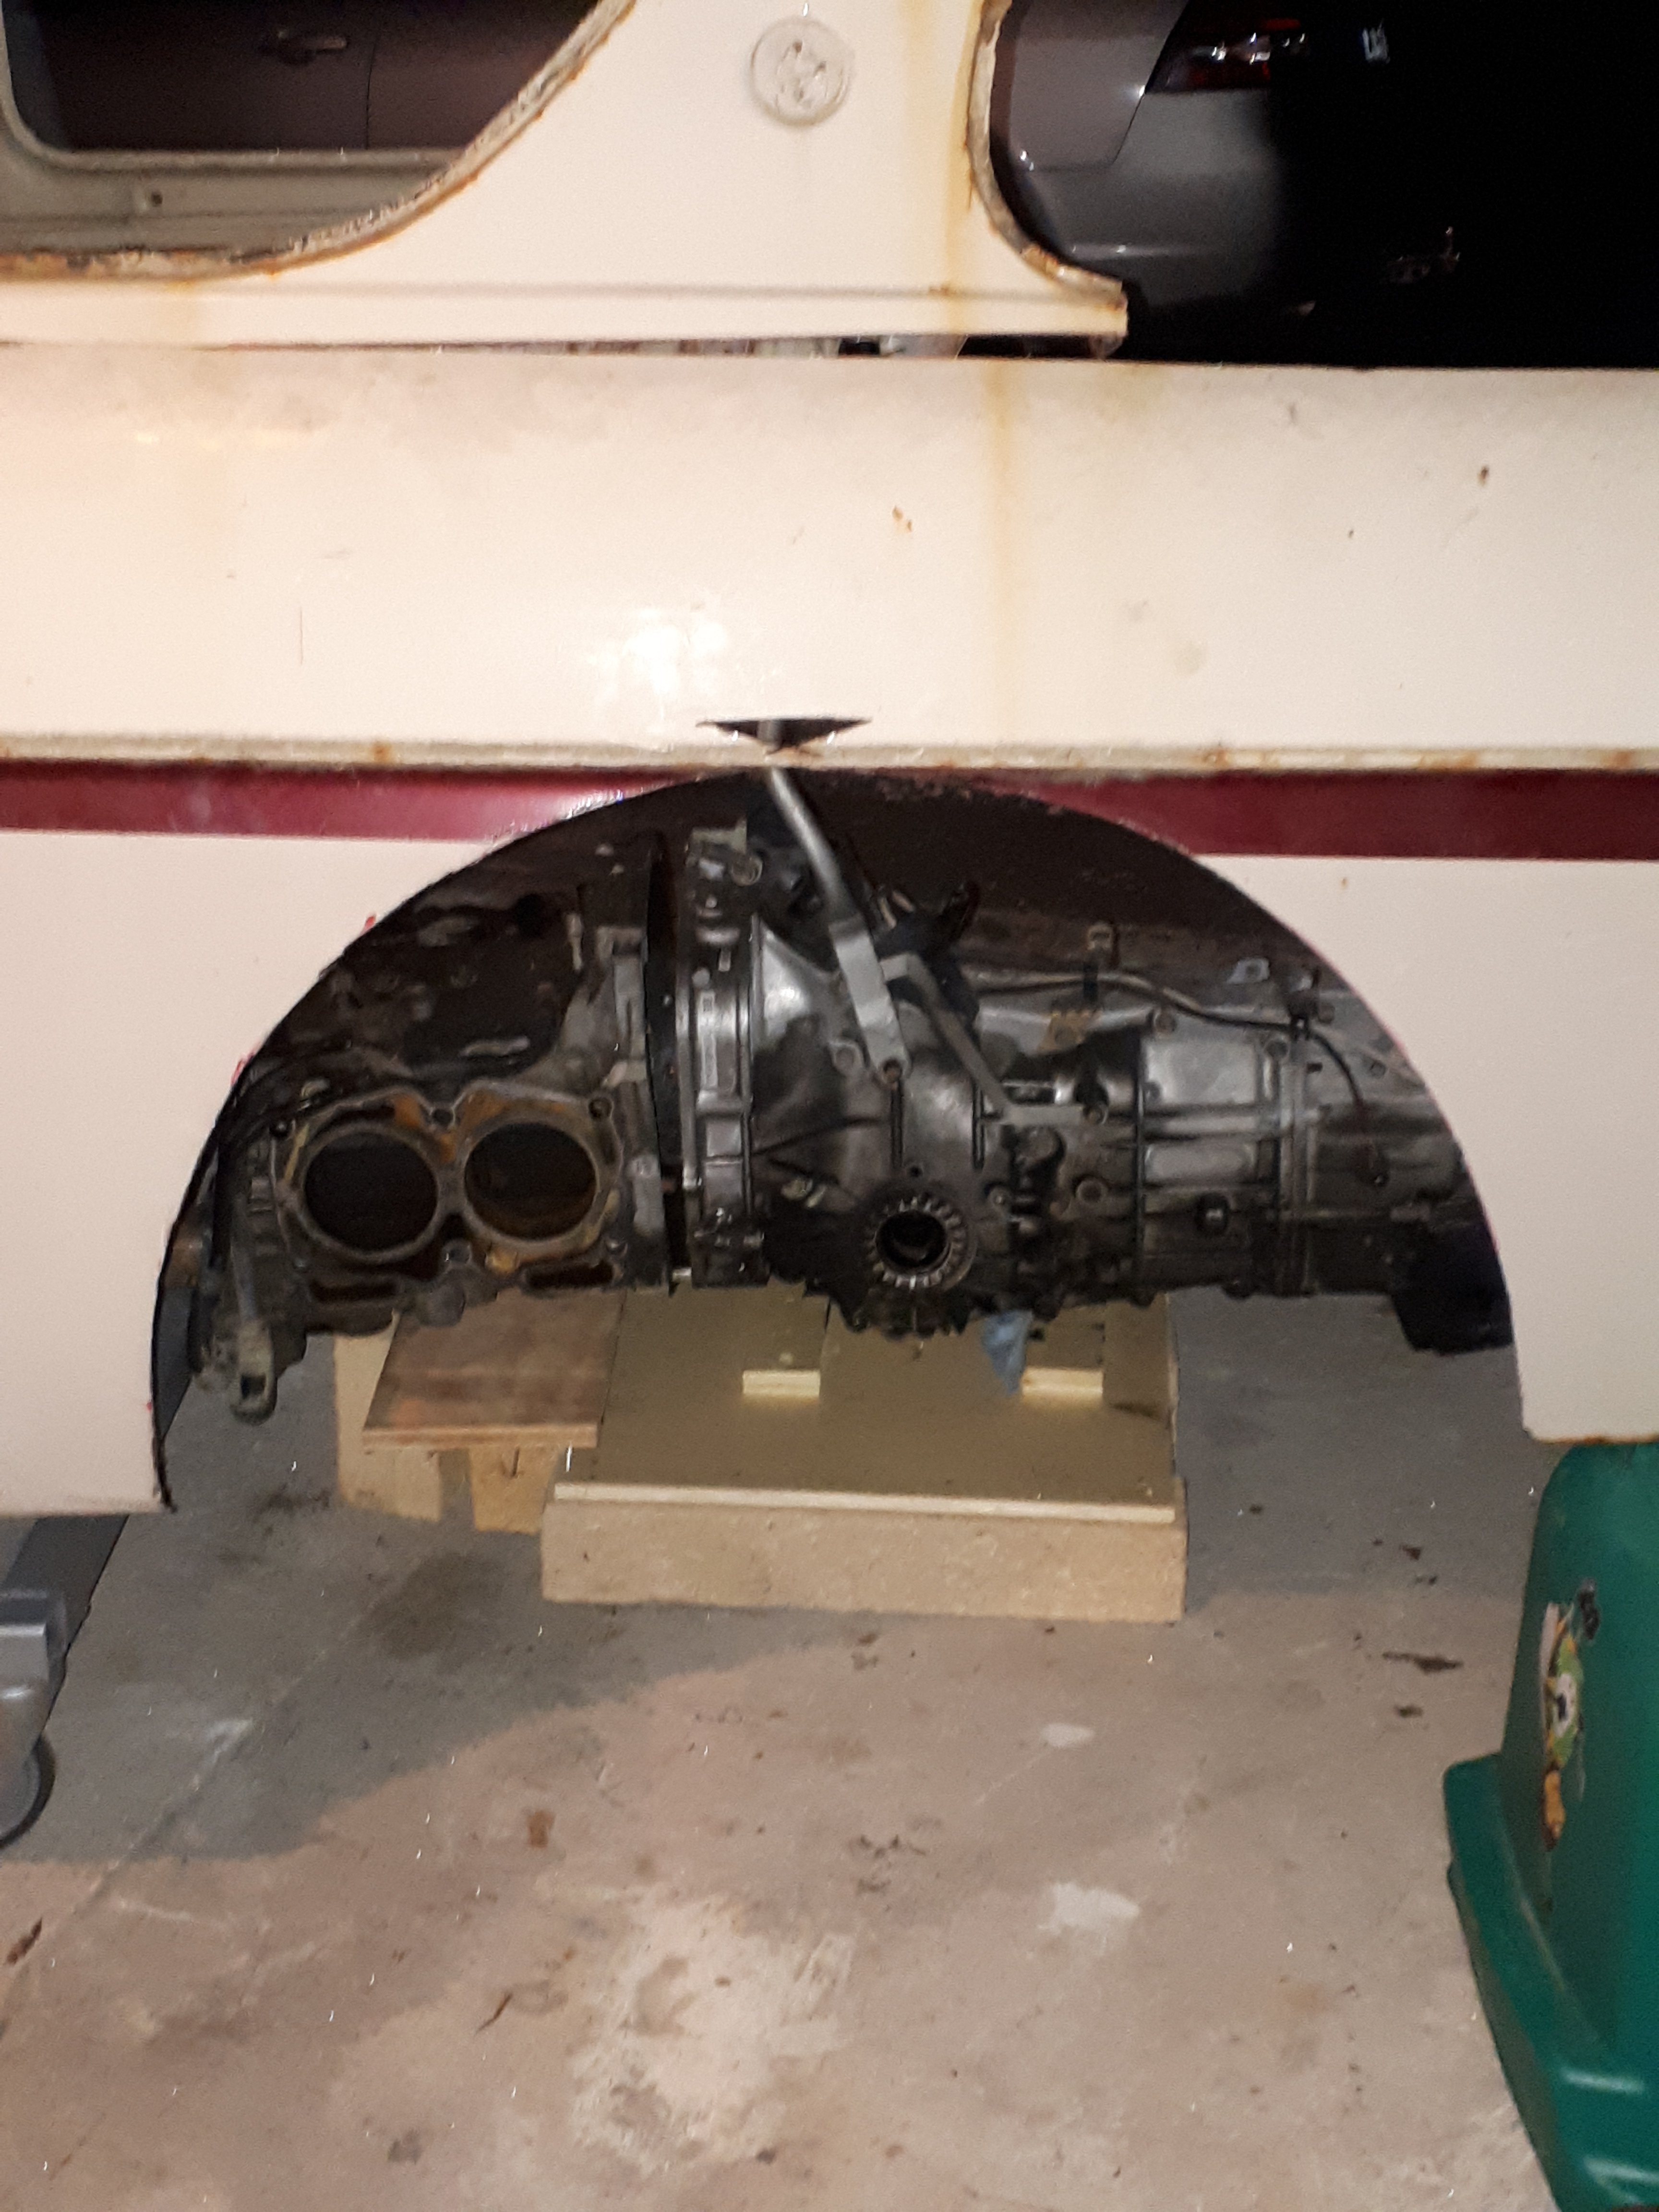
I thought i would have this going by Christmas but did absolutely nothing over the holiday period. Have got back into the swing of things now with the engine and gearbox back in place Ive removed the severely damaged dash in favour of one with only one crack in it, still keen to have that repaired at some point however ill leave it for now I have undertaken most of the wiring, this has taken me a bit longer than expected as ive tried to use the 1geu engine loom as a kind of adapter plug to the 2jzge engine loom plugs so have been slowly identifying each wire, a great tip i discovered regarding a ma61 ecu which turned out to be same on my 1geu ecu is if you pop the cover off the board is actually marked with the ecu pin out with labels that are relevant to the wilbo666 jza80 2jzge wiring diagrams, this drastically sped the process up as i was able to eliminate everything i didnt need from the plugs. You will see I've taken apart way more of the dash than i would need to, this was due to literally every piece of plastic being cracked from mistreatment, most of it i have undamaged replacements for but i feel there will be a few bits ill need to pickup or try repair in the mean time. I also noticed all of the plastic pipes for the heater have been removed and outlets taped up, not too sure what this is about but i have a spare heater and ac unit in stock so ill look at checking these out and restoring that! I thought i had struck gold with some monsoon sheilds listed on yahoo auctions japan as gx61 that were chaser specific with a small decal printed on them and came with all the clips and even the bonnet emblem which i was missing and the avante and chaser boot badges However it appears they were for a gx71 hardtop Luckily i was able to pass them on to someone locally who could use them and still use the emblem for the bonnet and the boot badges so not a complete loss Next mission has been the front bumper support. The face lift iron was rusted very badly but upon inspection the pre-face lift has the same core with a few additions of indicator brackets and a top piece spot welded on. These bits aren't too badly rusted on the toasted FL support so I've drilled the spot welds and removed them to weld on my PFL support which actually seems to be pretty good condition. Whilst all of this is going on ill fix the number plate holder tabs that always break off on these too Ill get a friend to weld this up today and then strip it all back and treat rust before painting in a flat black Ive just got the mx83 alloy radiator to mount and plumb in the engine bay, connect the electric fans, finish wiring behind glove box, reinstate dash, finish aligning headlights and fit the facelift front bumper and then off to toyota festival at hampton downs on april the 1st hopefully!1 point
-
And that's all for March. More to come in April, but this baby will take me until November or December to finish as I only have about half a day a week free, so it'll be a wee while between meaningful updates. I'd love to have the subfloor finished by May. Always May EDIT: Oh, I should probably share the view that'll be from the cabin's second deck. There will be two decks, one covered and hard up against the cabin (that'll have an outdoor kitchen), but there shall also be a second deck a few meters away with an outdoor dining table. This is what that dining table will look at. I quite like it (sorry about the horizon).1 point
-
Hi im new here, I have this Suzuki GT250 X7 ive been working on, its gone through compliance etc and is on the road as a rolling project at the moment but i will bring you up to speed on where its at. So, bought out of the Buy Sell for a few hundy, the guy was dead set it wasnt seized but it was locked solid! If anything i thought I could wreck it out worst case scenario. Got it home whipped the top end off and found that the left big end had gone and the remains of the bearing were jammed under the conrod. Before i got too much further i tried to find the cause, turns out the delivery from the oil pump was blocked.... to the left cylinder. The Cases, Barrels and head were all in fairly good condition considering, so made the call to rebuild the sucker! I think one of suzukis selling points was the 4 person seat on the X7, the pipes are not original but ill get to that later.1 point
-
After fitting the new CDI and Coil, it was time to run it, it was keen to fire but wouldnt quite get there on its own, me and a mate tried a trick he learned off Van Beek and got a big electric drill and cranked her up to some good rpm's, once it got the oil i used for the assembly spread out it fired up no worries, it was insanely loud with those stingers on so I made these mufflers for it, has a nice ring but ive been instructed already by z181200 to make it louder. They are just mild steel at this stage, removable can to replace the packing.1 point
-
At this point the Engine was in the frame ready to run, except it wouldnt! I knew i had some sort of electrical fault and with the help of an old wise Englishman discovered that my Coil and CDI were both on the way out. So jumped on Ebay and found an after market replacement for both out of England. While waiting i got stuck in to the pipes. As i said earlier they are not original, they are actually off the next model after this bike, the RG250, (although in Japan the X7 was actually the first RG250e). They had been mounted rough and were hitting parts of the frame and were quite badly dented, so I cut all the cones apart, removed the gauze baffle from inside the chamber that was stuffed anyway, fixed all the dents and welded all the cones back together, at the same time rolling them under the frame a bit more out the way, and welded a temporary stinger on while i sorted out some mufflers. I know im going to get the 2 stroke professors telling me i shouldnt be using these pipes, but after doing some research, these are pretty dam close to what i would make from scratch anyway. So im using them!1 point
-
So i sourced a whole lot of genuine parts for the crank, bearings and seals from a website in England and conrods and crank pins from Elliot at Avon City Suzuki, sent that off to HPE in town to strip and rebuild for me, as it is a press fit crankshaft i thought its best I leave it to them. While it was there they took it to next oversize and cleaned up some slight damage to to the head from the bits of bearing. The gearbox shafts and gears all seemed OK so I left them. I had semi polished the cases while i was waiting on parts, they came up good but once it was all back in the frame most of it is hidden anyway. Unfortunately I didnt take a great deal of photos of the engine assembly so dont have a lot to show. Here is the gearbox in the lower case. The cases back together waiting on Barrels The engine more or less complete, Head and Barrels painted.1 point


.thumb.jpeg.e0a4bff61111e0c8c7396950fcc94da1.jpeg)


.jpg.27415e420274596778ffef5e9c8290c7.jpg)


This leaderboard is set to Auckland/GMT+12:00