
Leaderboard


Popular Content
Showing content with the highest reputation on 03/18/17 in all areas
-
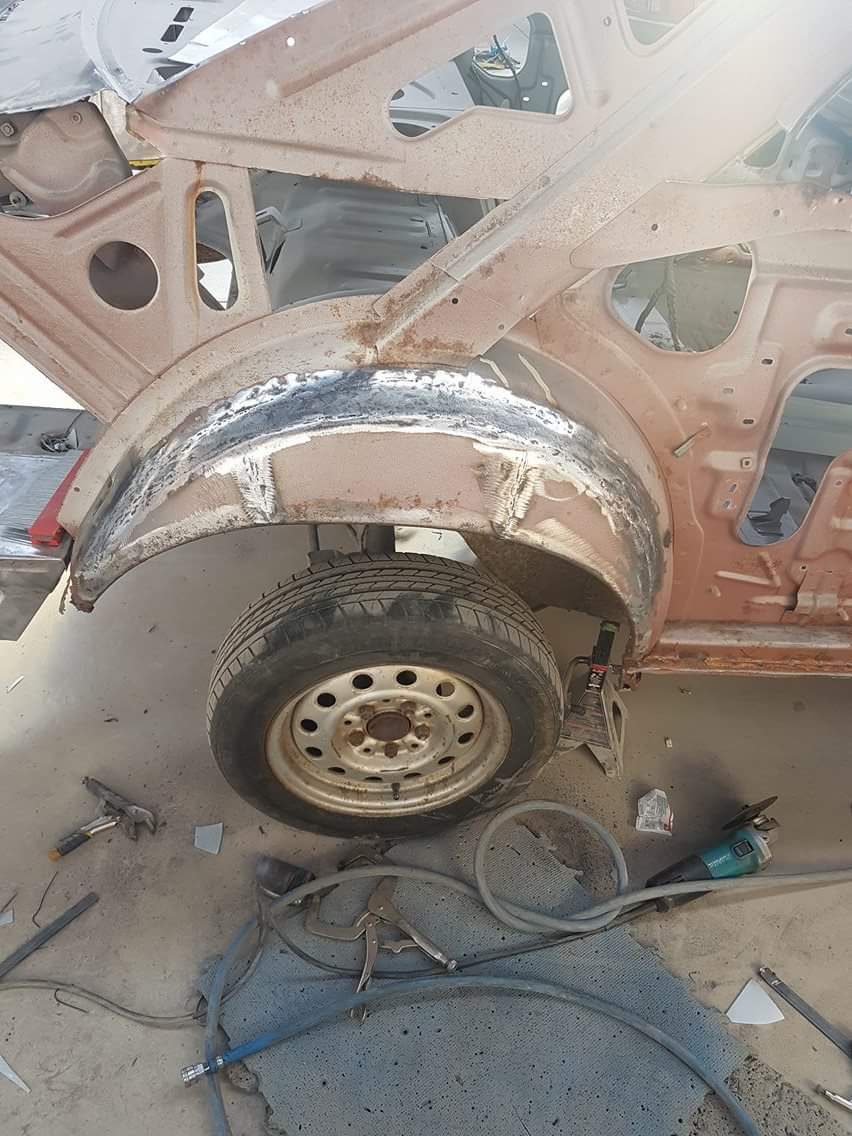
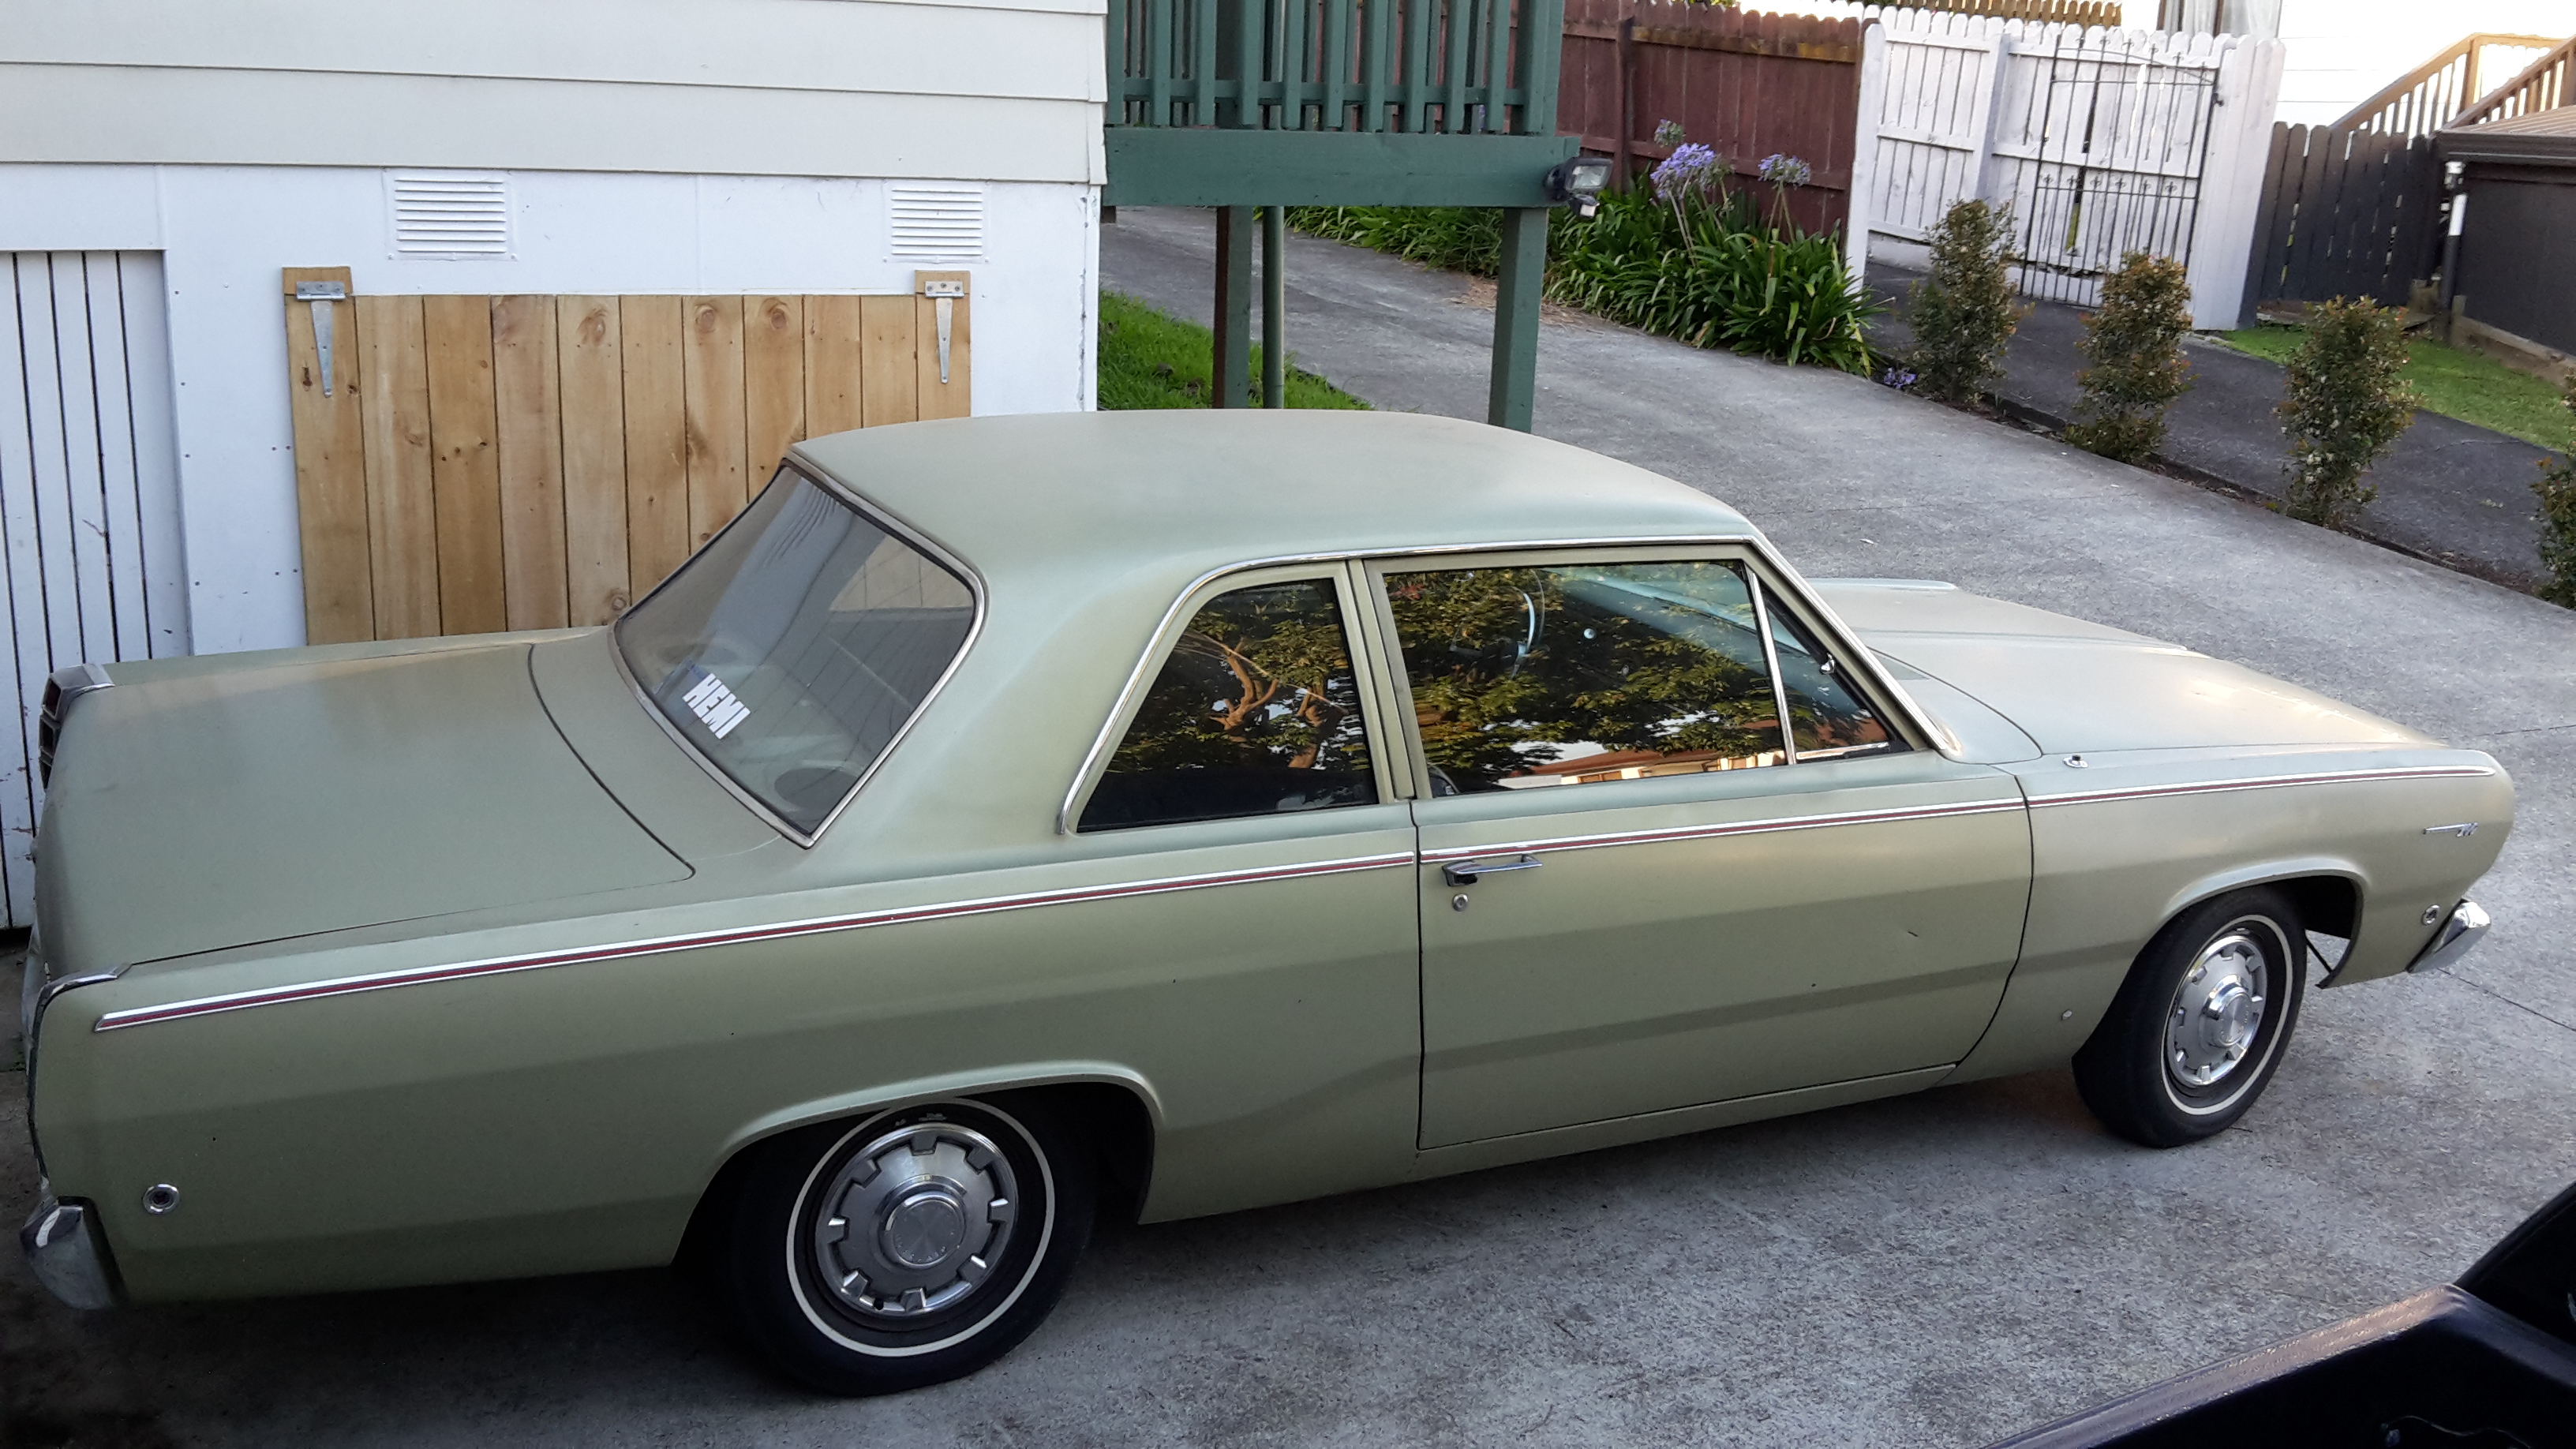
Booked this in for a WoF today. Didnt quite make it all the way. (run out of gas) Lucky i had someone who thought it was flippin hilarious driving the support vehicle Looks pretty cool even busted on the side of the road, but "get the fuel sender working" is now at the top of the list! Ive put about 30l of gas in it since i put the tank back in, and ive driven it maybe 3km, so not sure where it all went! Cruising in traffic. Goes pretty good, but i think i will get the radiator swapped out for a newer one that doesnt leak and maybe a couple of pusher fans. Dash guage reads near the top of normal when its sitting, but the mechanical one reads normal (~90degC), but thats in the lower hose. Up on the hoist. Nice to see the underside from more than a foot away! Guys were pretty happy with it. !!!WOF AQUIRED!!! After that popped around to Mr and Mrs Grants to show off, and went to Burger Fuel for lunch in it, gets lots of looks and thumbs up, and 'what is its?' Swung by the beach for a surf check on the way home No surf, so then made a start on the post-WoF list of things to sort! - Fuel sender - wheel alignment - radiator + fans - door & boot locks (no key for any of them) - more driving!10 points
-
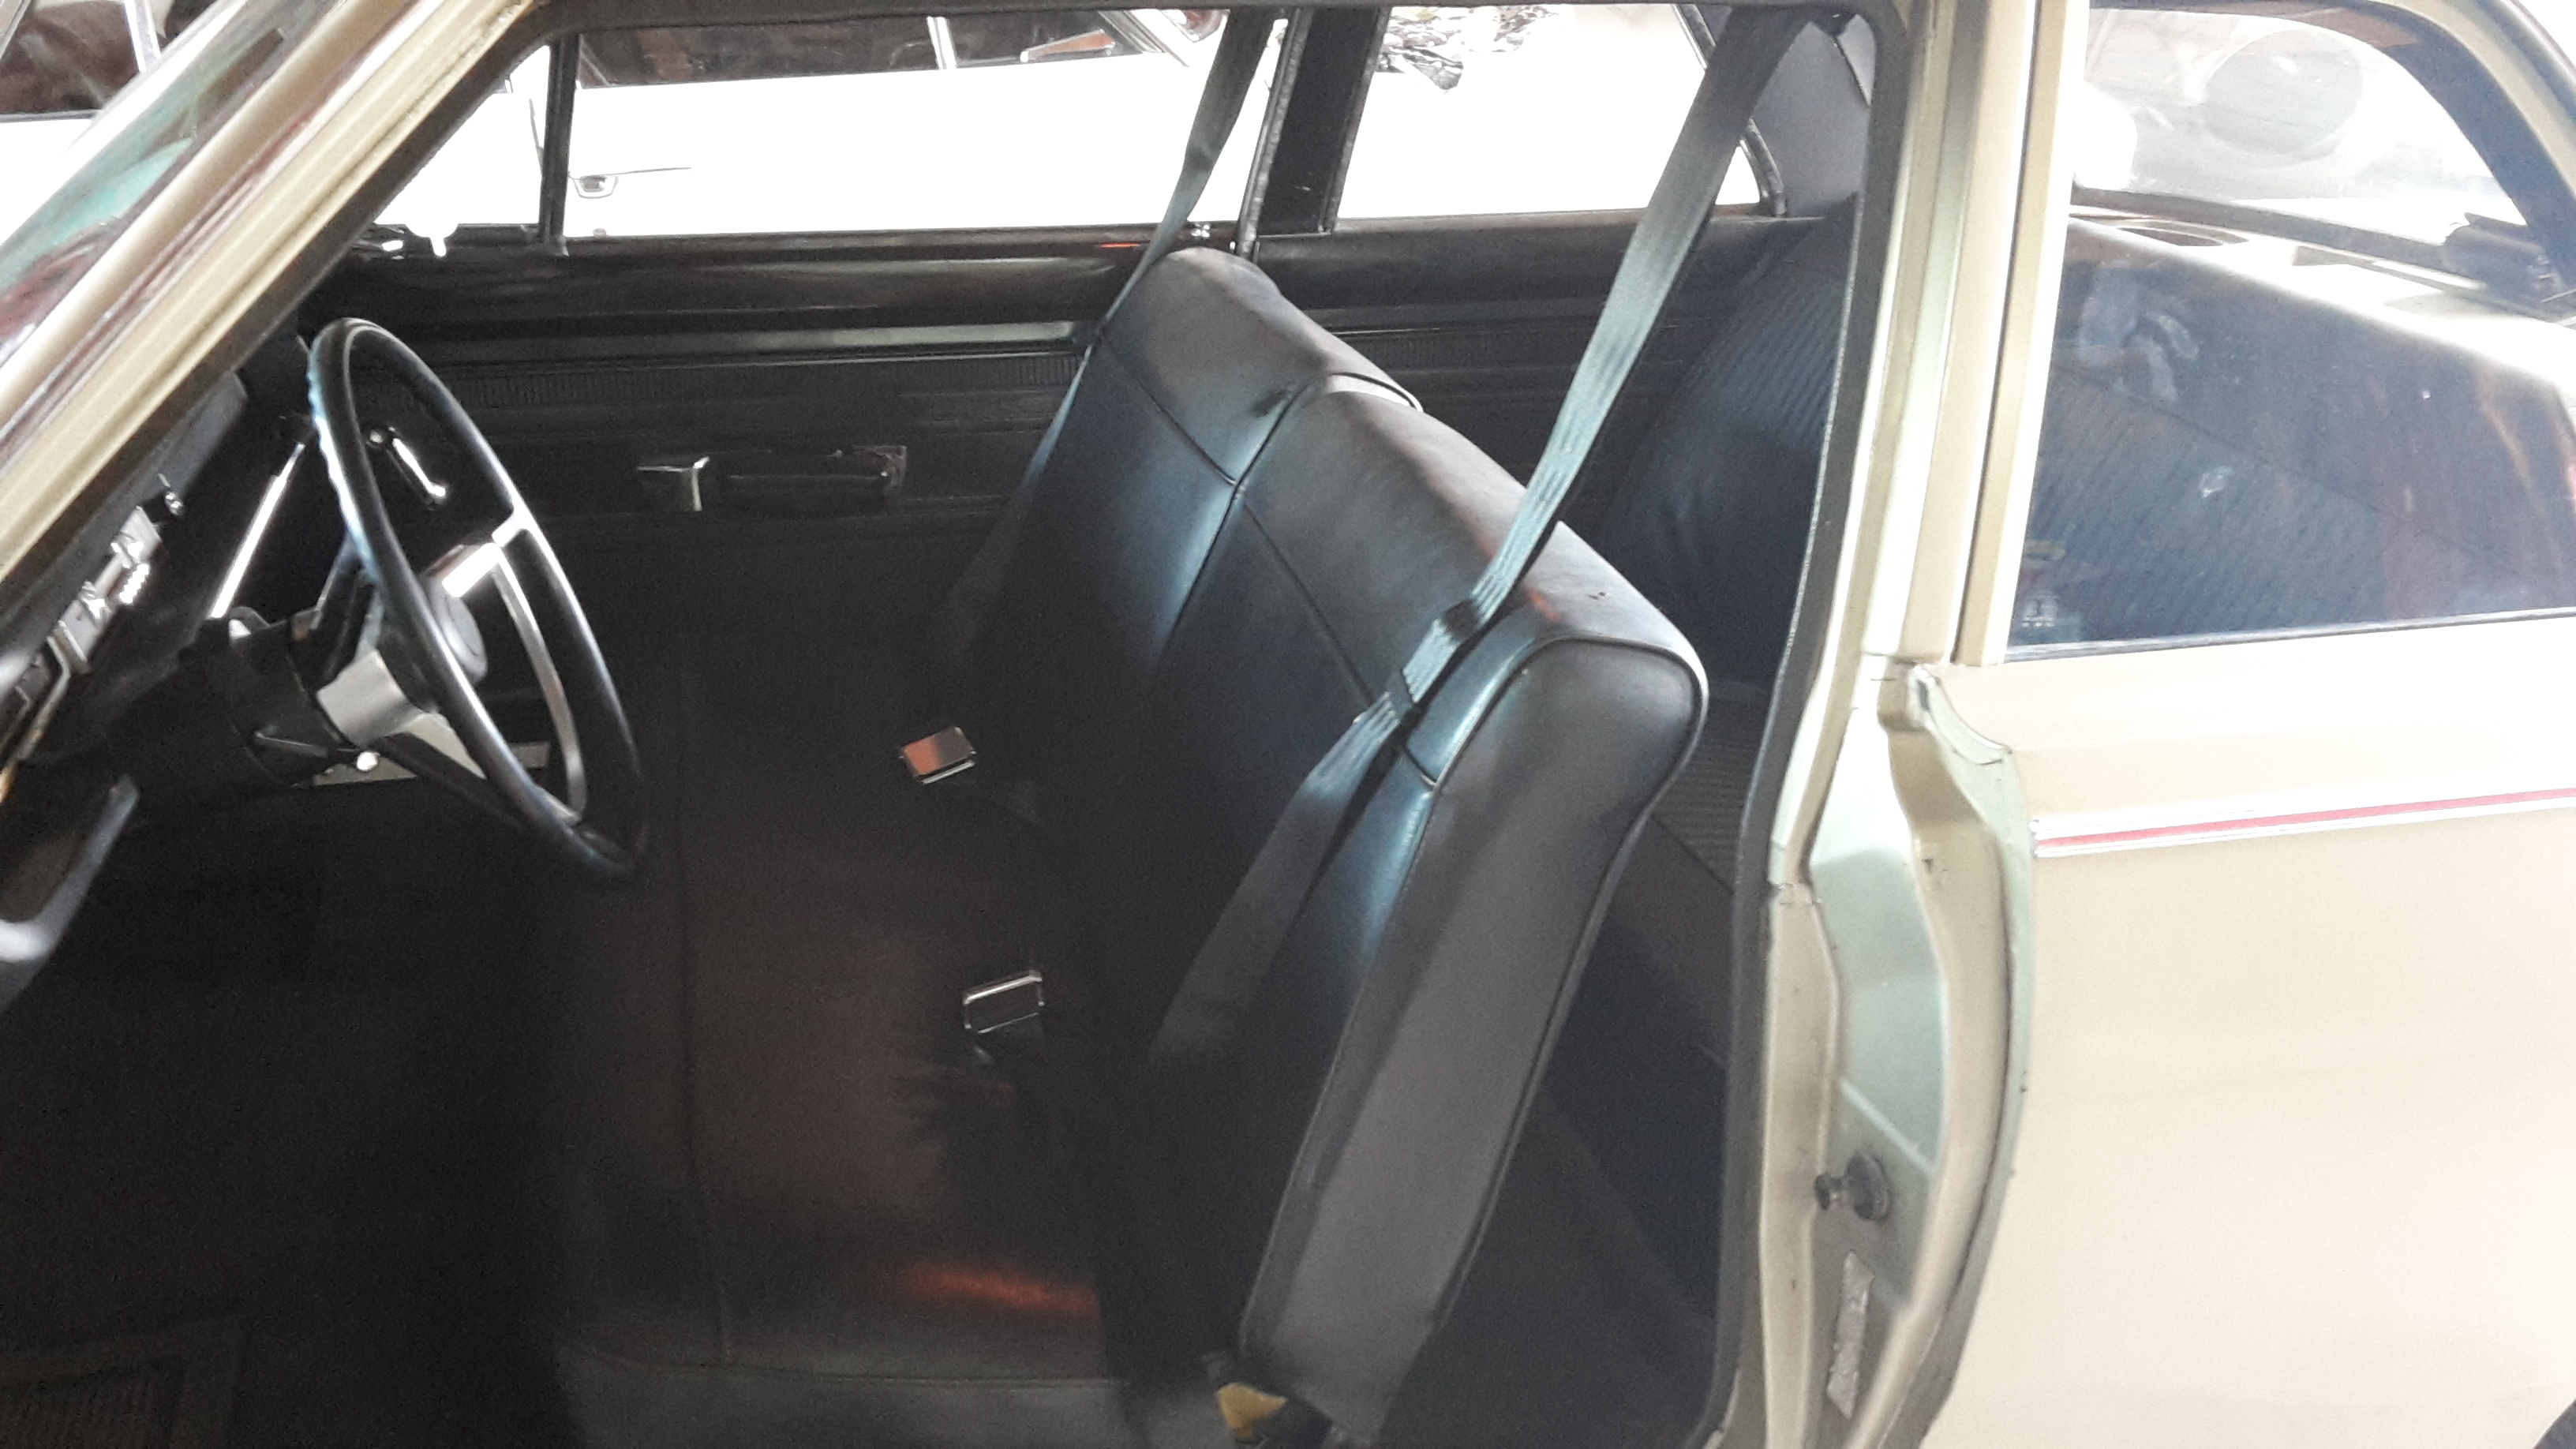
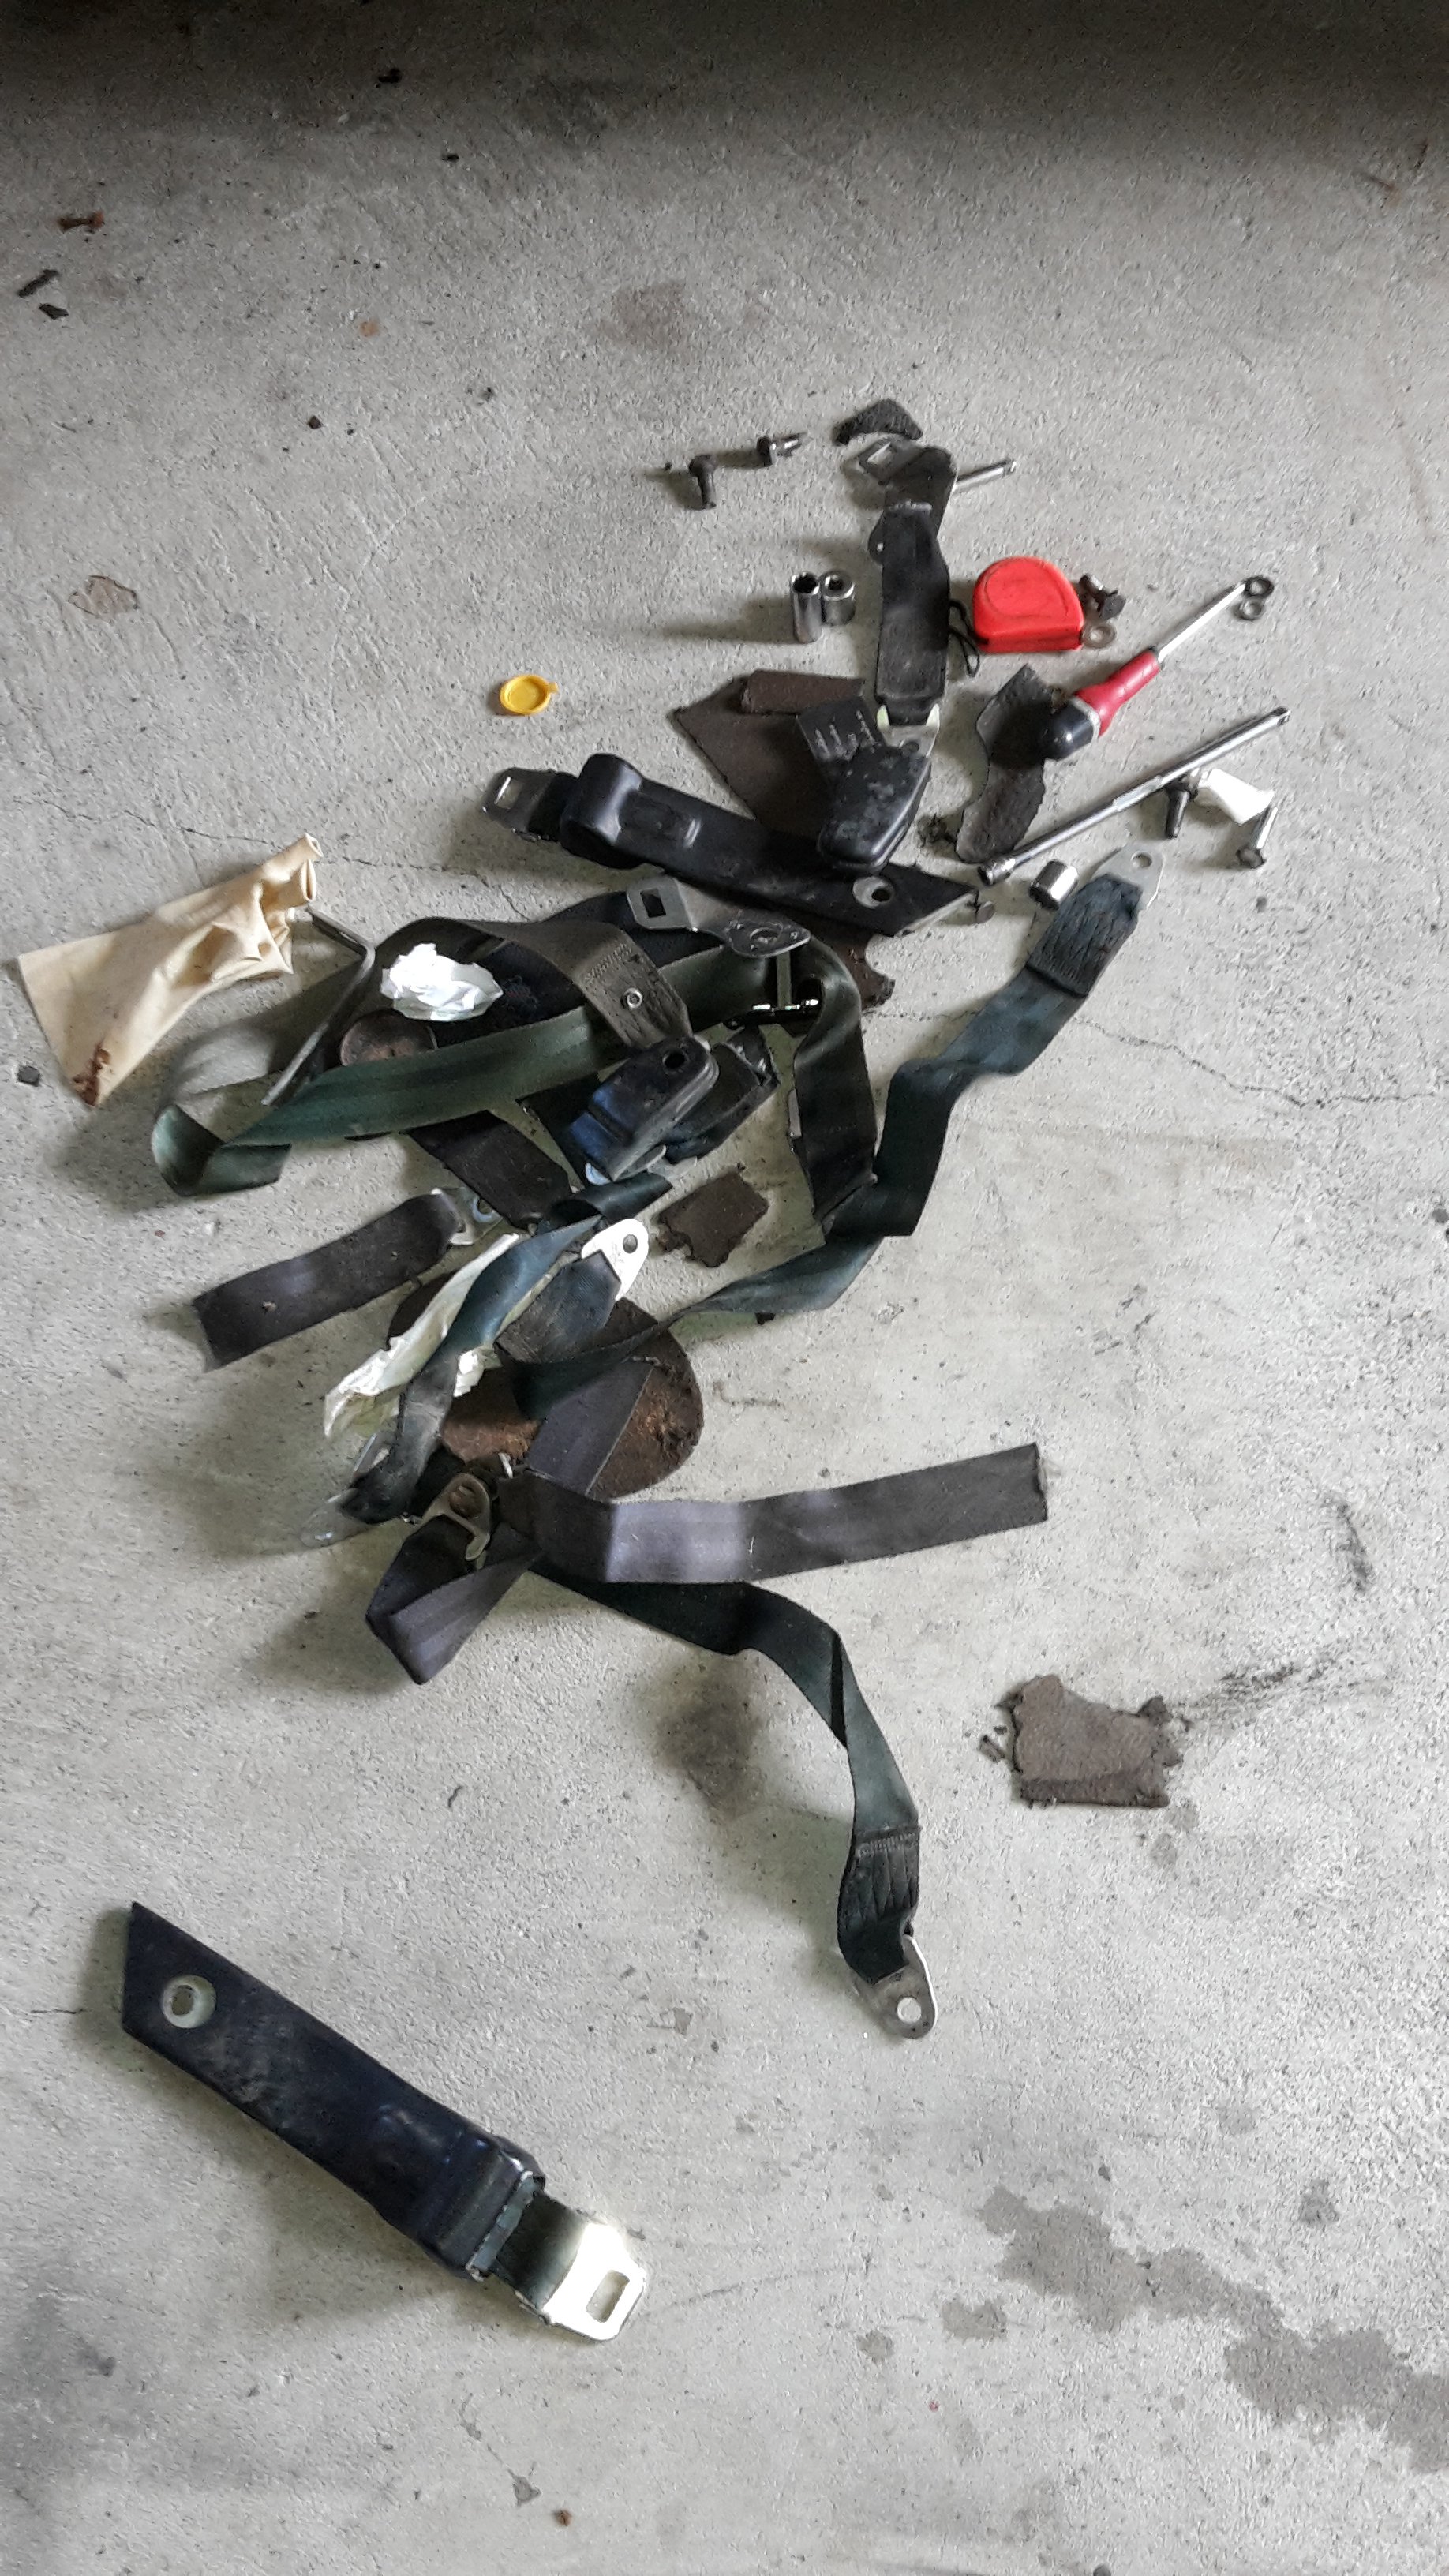
safety cletus says new seat belts are much better. In the front it had a diagonal belt, plus a lap belt so you had to put both on which was te dumb. It had no belts in the back, so I put the laps in the back, someone had cut off all the original old belts and left them bolted in for some reason. Put new lap and diagonal belts in the front, they have old style chrome leg burner buckles which look better than new plastic ones
 10 points
 -
Minitubing finished in the rear
4 points
-
Here's another rushed and average pic of my new carpet. its much darker than it looked in the auction pictures, I like it.. so I think I'll rock it as is, reminds me of my old valiant.3 points
-
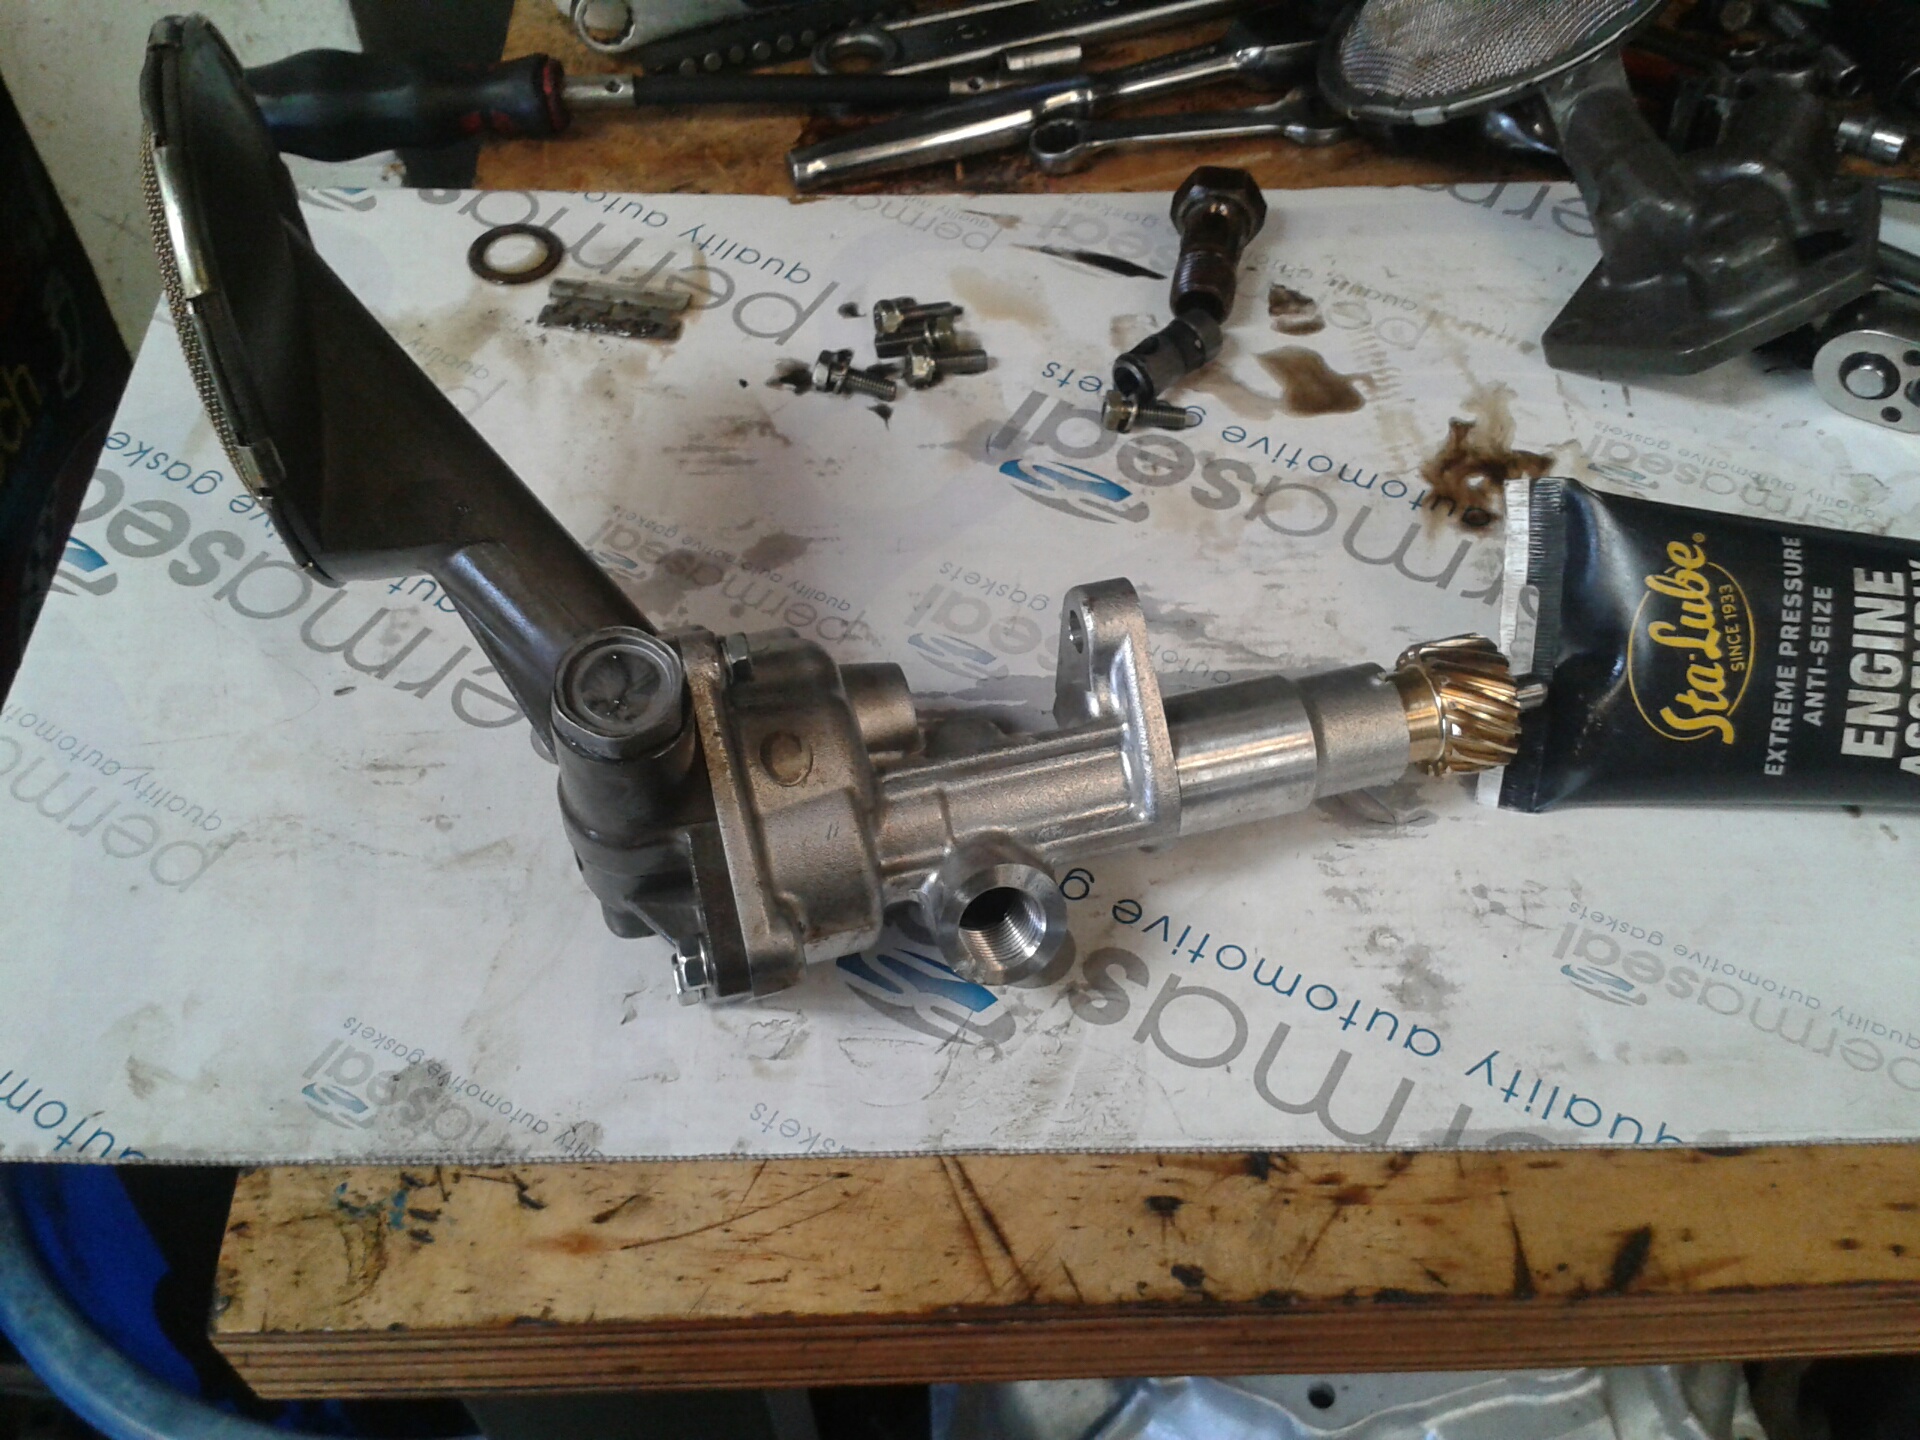
Multi pass? Edit yay a new page So work was quite today, and had arranged to have this car at work for the weekend so i could do oil pump swap and try figure out what the fuck was going on. Anyway as said, work was quite, so got it on the hoist, dropped steering bits and got the sump off and oil pump out. After alot of diagnosing between us, we compared the old pressure relief valve spring to the new one. new one was deff longer and had more tension. Concluded that this was most likely the issue and that the relief spring had lost tension over time. Magic So the sump is back on now with a new gasket, just letting that seal up over the evening and will be back here tomorrow morning with new oil and see what the deal is. tho, was thinking while its on the hoist, it might be a bit rude NOT to remove a quarter of a coil off the front springs. So that might happen haha. I'm a little bit gutted my sedan isn't ready to drive yet, as Tomorrow would have been the perfect day for building the exhaust. oh Well
3 points
-
All the red3 points
-
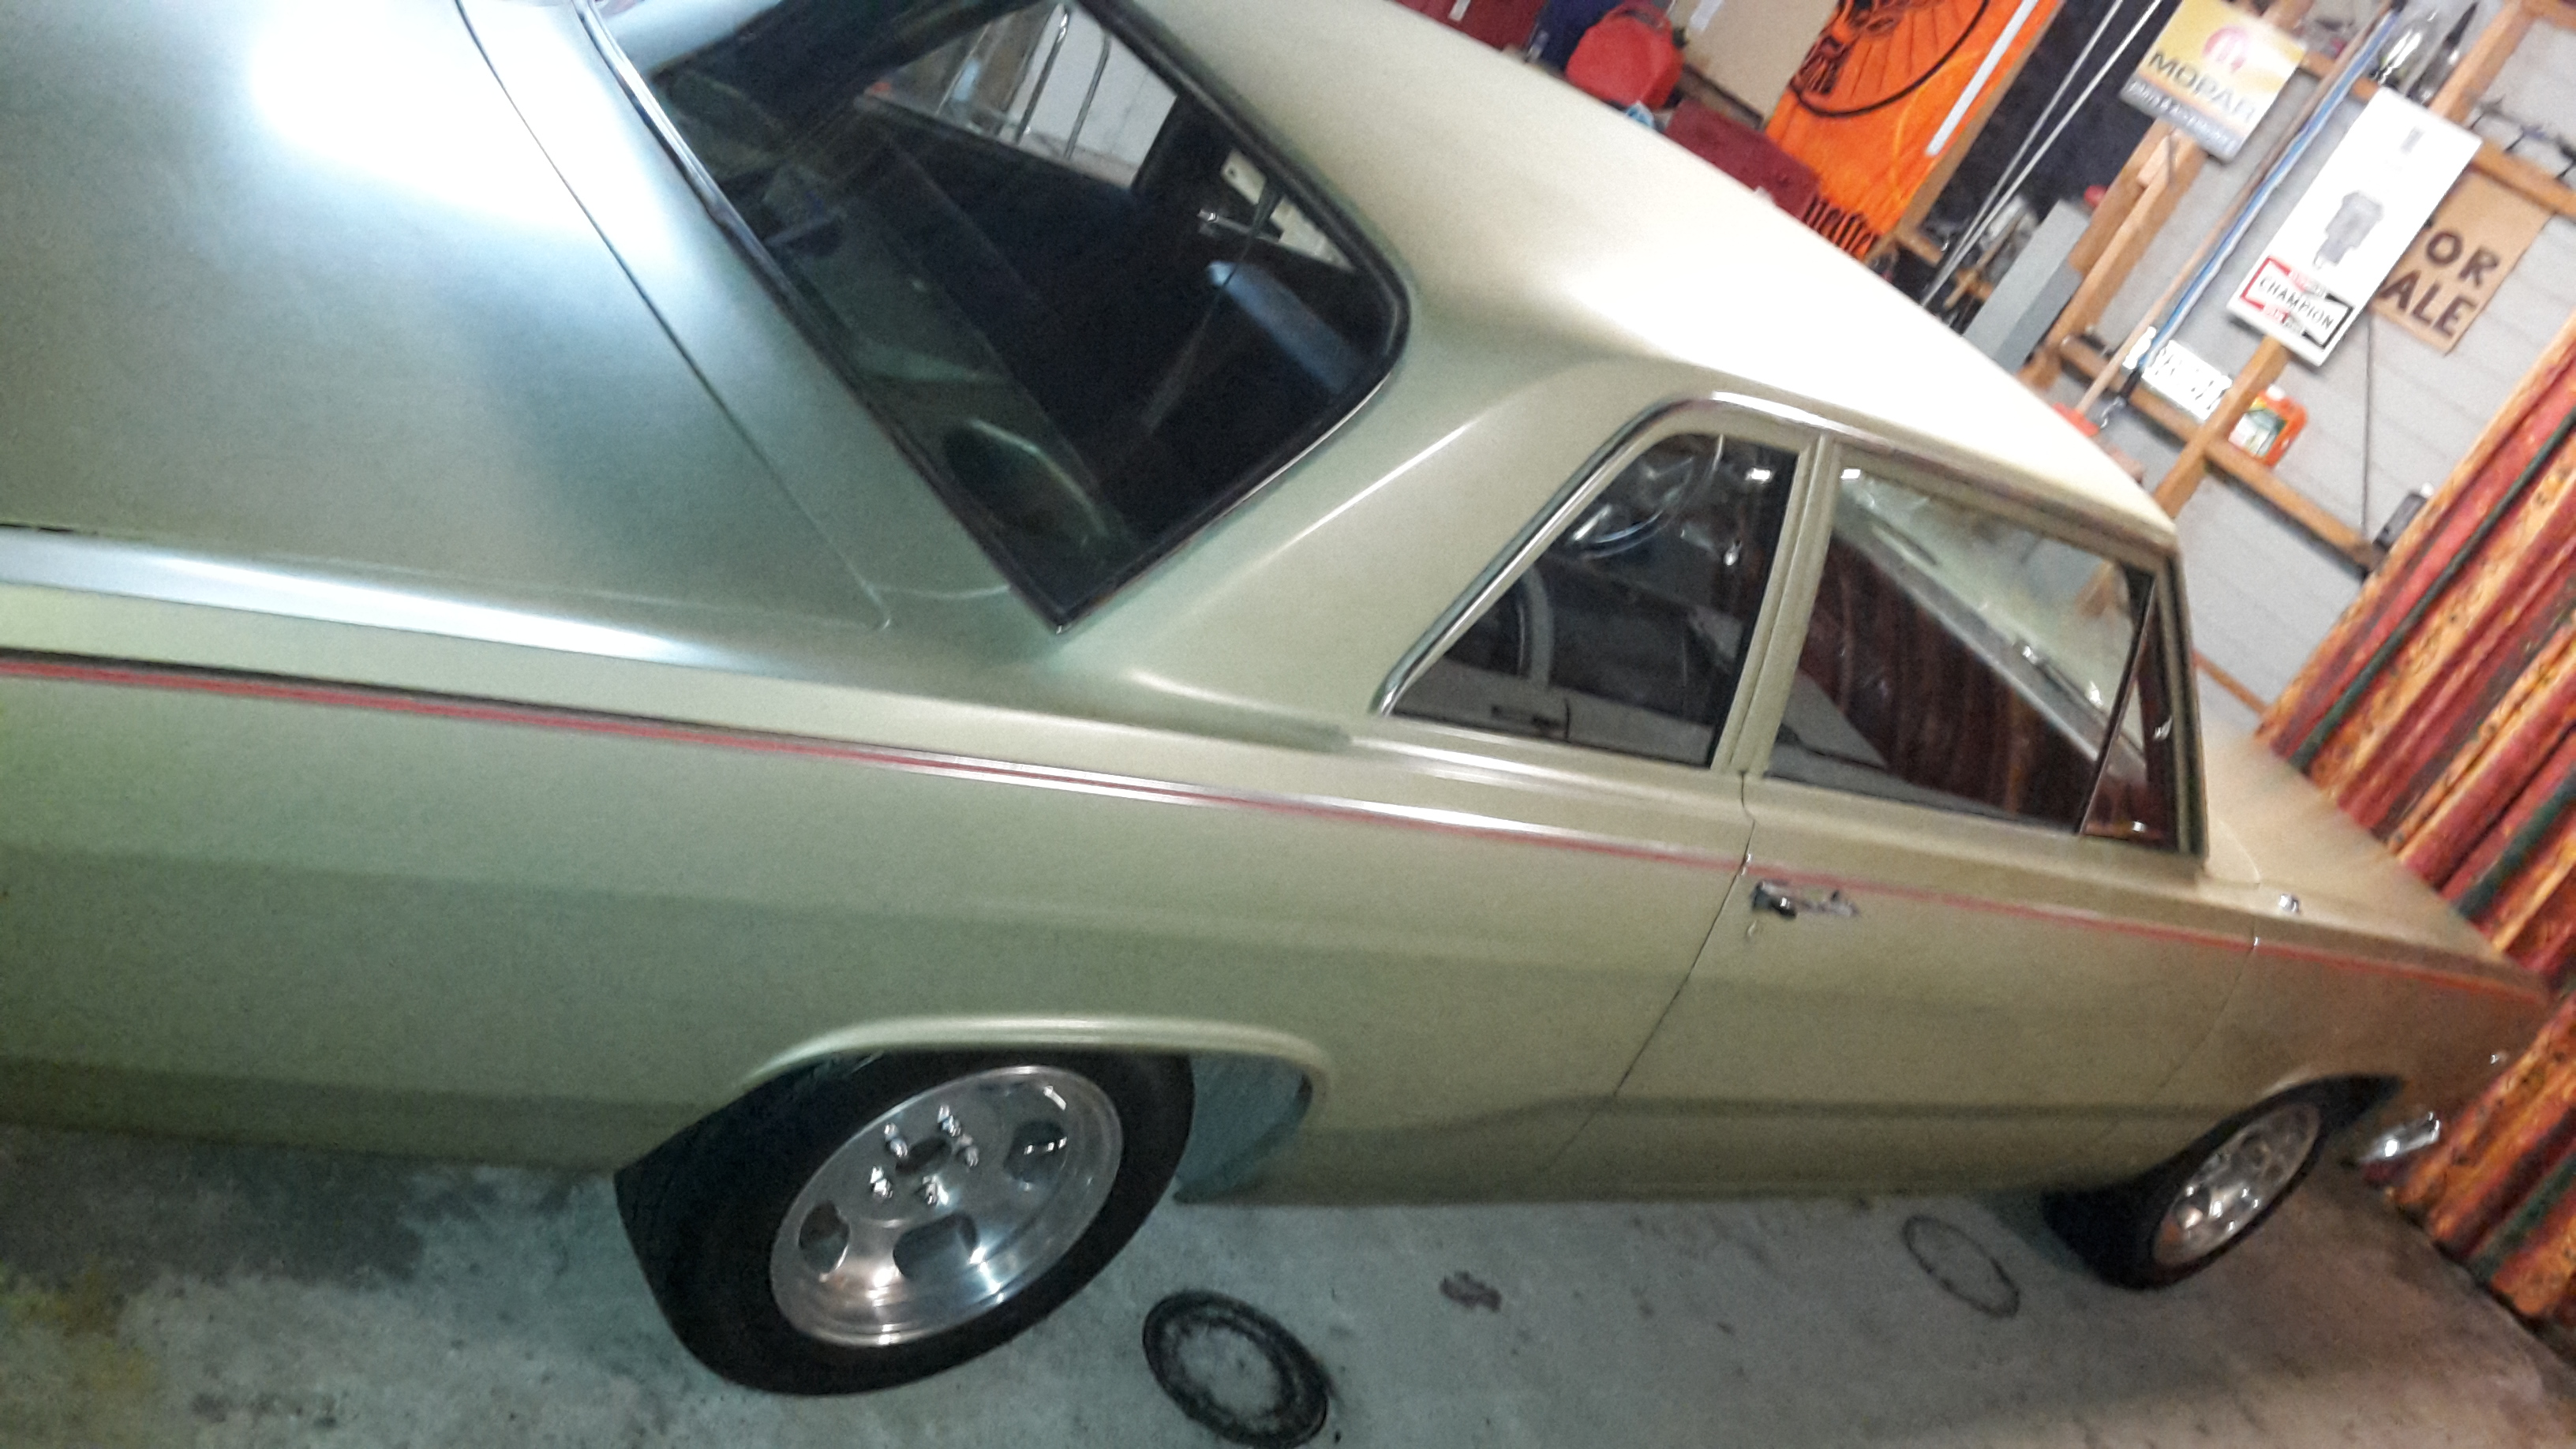
Brown car left on a trailer headed to dunedin on saturday, so spent the rest of the weekend cleaning out the garage and went and got the white one back from storage, so i could start getting this one ready for Nats. Had the radiator fixed, it had a couple of small leaks, I think the 16 pound cap probably didn't help, put a 7pound one on instead. Have ordered some new seatbelts from www.classicseatbelts.co.nz so just waiting for those to arrive. gave the brakes a once over, greased and checked the front end, and for now have borrowed the wheels off the vg, I didnt trust the tyres on a long trip. Also I thought it would be rude to not remove some of the height out of the front while it was jacked up, so I did.
3 points
-
charging/clearing mine as we speak. Should get some good footage of Dansey's Pass.2 points
-
I have my camera and gopro batteries on charge now so hopefully I remember to take them...2 points
-
So i think there are 4 cars from southland meeting in mataura at 10 and heading to alex. @matt7759, @gettinroundtuit, @kyteler and us. If i missed anyone else from southland let me know so we dont leave without you.2 points
-
we may as well go the ida valley way just cos. we will probs be there round 12:45. update the fred if you guys will be there or not!2 points
-
Hardly any wheels (of any sort). Some slightly interesting alloys but only in pairs. Lots of BMC steering wheels but nothing you'd like. I got more out the VCC shed than the swap meet stalls.2 points
-
Top link mounts made and tacked in place. Next on the list is a brace/mount off the link mount, back to the chassis rail. will bolt it through the chassis with a few decent bolts. maybe something similar on the other side also, as the factory x member bolt locations are kinda limited, since the lower links take up the space needed to build something solid off them2 points
-
also have playlist sorted for my factory tape deck. Pining!!!2 points
-
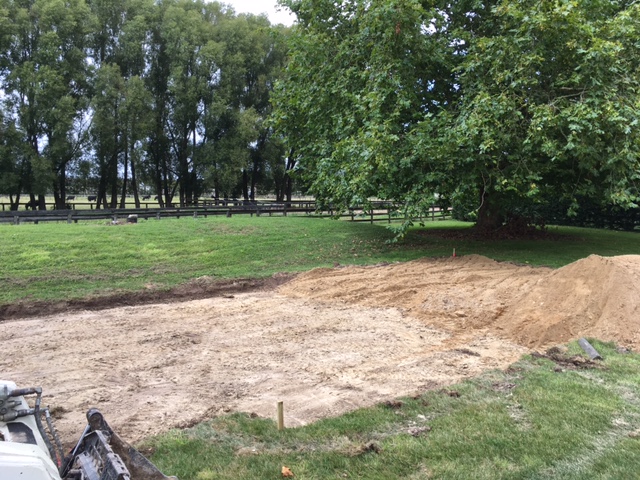
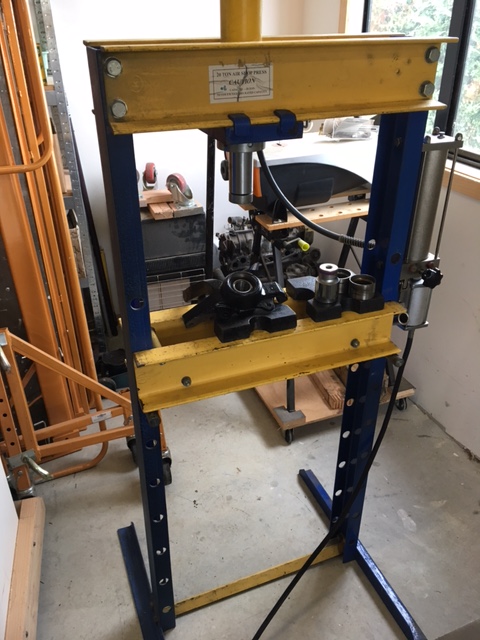
Oh - and nearly forgot to mention - we got building consent for the new shed, so I'll have a bit of extra space for the projects without cluttering the garage and tracking dirt through the house. I'll be done piece-meal as we can afford it, but I just want to the get the concrete pad down before winter...progress so far: Sand pad getting cut out...basically a double garage plus a single garage going the other way (kinda an "L" shape) and then Lisa's art room and a bathroom behind. Sandpad cut and roughly levelled...profiles put up and strings run...just waiting on some sunny weekend weather to box it up for the slab. It will be a ribraft slab - hence the pad is level and string heights quite high. In the meantime I bought a new tool for the shed - and had to store it over at Dad's place for now. 20T press. Its pretty good and has the added bonus of being local so pick-up was easy, and also having the connection for the air hose so I don't have to manually operate the jack. It works really well, and I used it put the front wheel bearings in....more about that later.
2 points
-
Discuss here:2 points
-
Also her'es a few photos because I can2 points
-
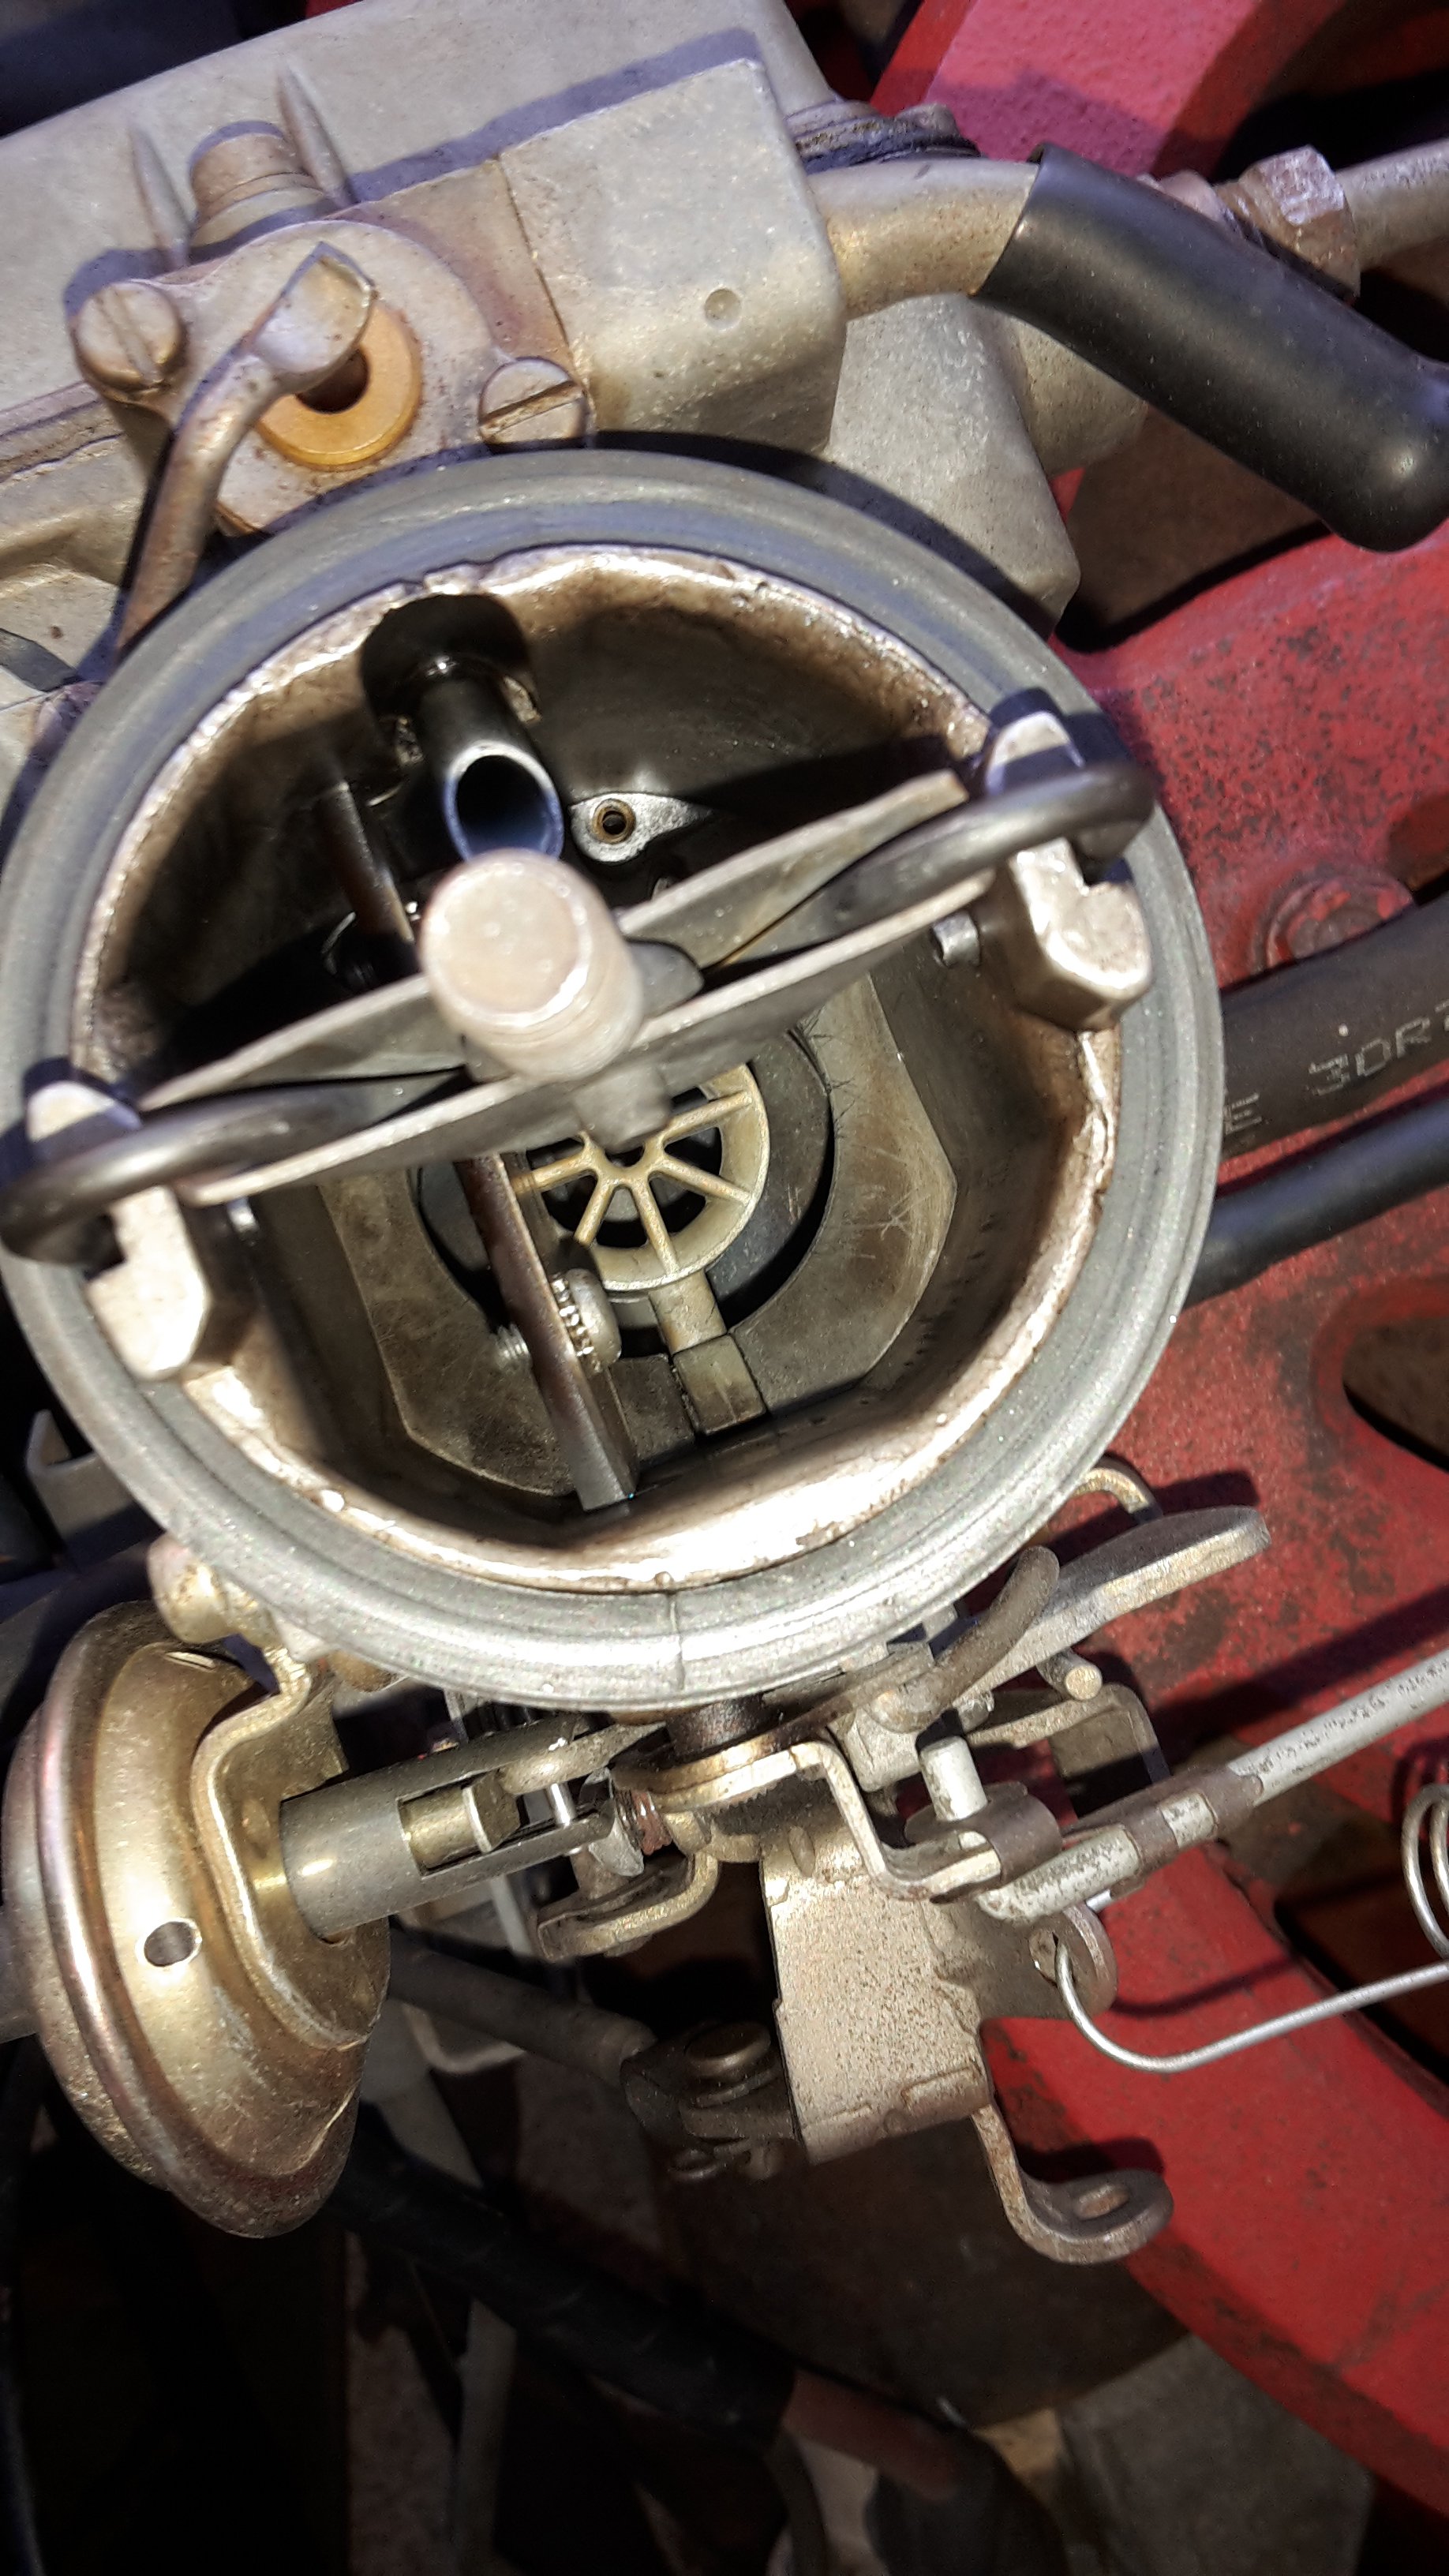
Also, look how tiny the carb is
2 points
-
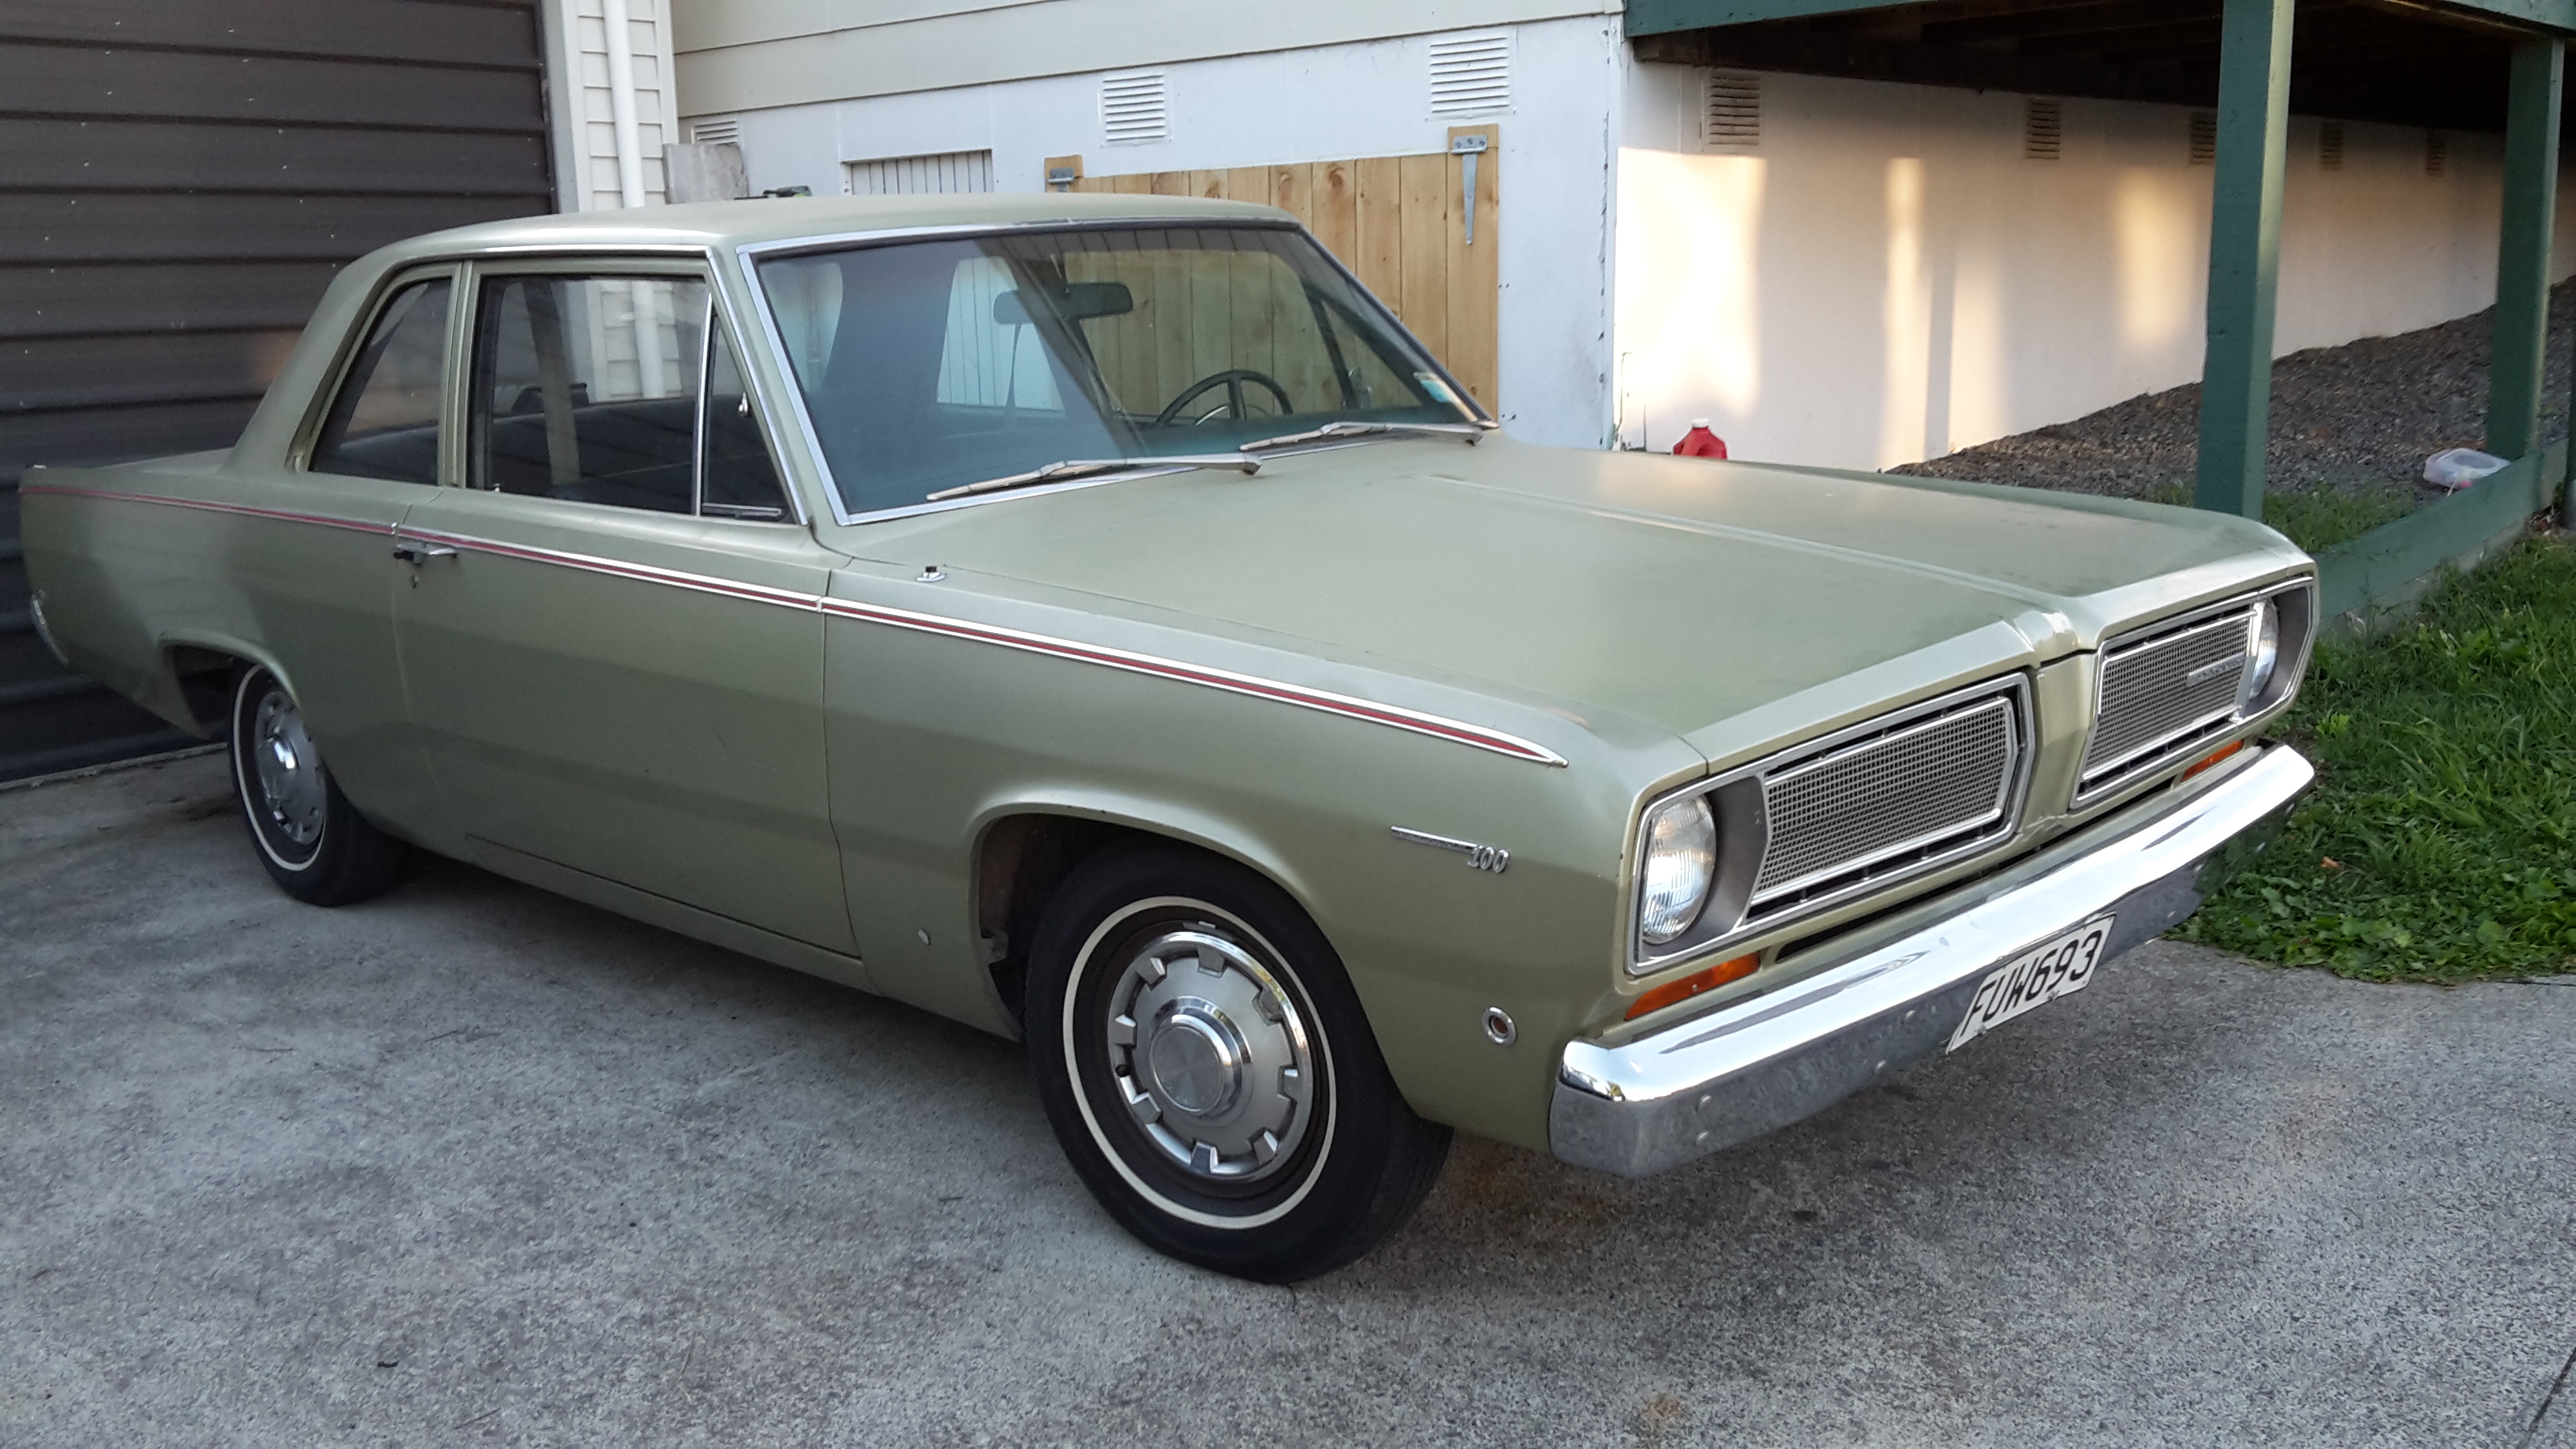
discussion Brought this home today, it's the reason for selling the hardtop. It's a 68 Plymouth Valiant, has a 'leaning tower of power' 225, auto, has power steer, 13" wheels hah, drums all round. Most of the paint is original, it has a couple of bits where it's been repaired that need touching up. I'll probably get it repainted in the same colour at some point. It belonged to a mate of mine that died in 2015. It's a bit special to me because of that, I went with him to have a look at it, had one of the sketchiest rides I've ever experienced when we went for a drive after he got out of hospital and was still on something. He always wanted to put a V8 etc in it but he ran out of time. His family kept it since but decided to sell it, and his mum rang me to give me first option on buying it. They are keen to see it get an 8 so it will get the turbo 318, 727 and 9" I was going to put in the hardtop. I'll drive it for a while till I've got everything ready then bolt it all in. Obviously this one will need a brake upgrade as well and I'll put some 15" wheels of some sort on it
1 point
-
Everyone knows the car, most have been on white-knuckled joyrides in it, and it's a stalwart of the oldschool/nzdatsun culture. Bart Simpsons supercharged 'Death trap' 1200. If this car could talk, it wouldn't, What for the crippling PTSD. Its been Molotov cocktailed, in car chases, travelled at autobahn speeds, drag raced close to 13 second passes and all manner of in-between. When Bart approached me to tidy it up for impending sale, it just so happpend to be when I was looking to sell my wagon to blow all the proceeds on my Escort. Well I've never had a car younger than me, so make a habit of having 40-50 year old daily drivers, and I needed transport in between. Rather than buying something in a pinch and not really liking it, I saw this as the perfect opportunity to grab a model I've always liked, and have another A-series car, which is generally a joy. It was cheap, I had to keep telling myself this. Came with reg and warrant, and still certed for things like a roll cage and A14. Has a rev-counter dash and coupe centre console added. Driveline has been returned to standard, go fast bits went into a race car. Suits me fine as daily driven and less to go wrong. Came with a swag of spares , and that roll cage! I got a few weeks into December and couldn't do a lot until my holidays. I cleaned the fuck out of the outside and wheeled it into the shed. Can't find the after shot of engine bay but it came up well. Didn't do a lot until coming back from Xmas, so on Boxing Day I got into it. Came with straight spare guards which weren't flared but still a bit rusty. The drivers side rear or guard was good in white but bad in yellow so.. And the gap was massive so added on to the door.1 point
-
I'm drinking beer and doing nothing car related.1 point
-
Sweet, well we'll be at Oturehua then I think. Nick can you PM me your number so I can contact you at that time if need be?1 point
-
There's a chance we'll be able to meet in Oturehua, if that's the case we'll be waiting outside the general store/pub there before 1230?1 point
-
Its a bit worrying that a lot of us are all debating which tools we need to take lol not much confidence haha1 point
-
Cheers guys, was a bloody awesome feeling driving this round on Thursday, and it's a great feeling to have something I've built get legal1 point
-
good satdee spent washing and prepping the car and rewinding tapes for tomorrow. my 10cc tape doesn't work. what a let down, was looking forward to some Dreadlock Holiday. @kiwi808 meet at BP Cromwell 11:30 ? EDIT: just saw this on FB. anyone fancy a bit of barrying over model railways before being an IRL barry1 point
-
I'll be rocking the AM mono speaker radio.1 point
-
Oh really? Ok then. Fuck ranfurly for lunch1 point
-
Good catch bro, it is indeed 7/8"-141 point
-
so good mate all the hard work done now to enjoy.1 point
-
Well done pal! This sure has come along way!1 point
-
Took advantage of good weather to get couple of coats on after work. Think I'm learning. A thin first coat to get good coverage, then a thicker mix (less reducer) laid on a couple of hrs later for a smooth coat. Noticed surface was a bit rough from blasting medium so a very light sand before second spray and it looks pretty good... Going to whiskey festival tomorrow so weekend probably rooted regards assembly... And just received bill for engine work. Inspected, disassembled, block chemically cleaned & bored, conrods honed, journals ground/polished, and assembled with new pistons, rings, main and big end bearings. $1600 all up. Not too bad I reckon...1 point
-
So the above list was remedied..........mostly, I may have missed 2 of the outer seat belt bolts, when I re-positioned the brake line to stop it rubbing on the airbag it turn out that I had moved it right into the path of the bump stop, I thought i had created enough clearance between the Tyre and the lower shock mount (I had shortened it by around 20mm when i did the rework on the shock angles) but still wasn't quite enough it turned out, And while i had stopped the bags rubbing on the diff, there still wasn't enough clearance so needed to sort that, so I: put 2 new bolts in the outer seat belt lower mounts, made a new brake line that ran onto the rear of the diff, as the original line couldn't be manipulated any more with out risk of kinking the line, as per Clint's suggestion I flapped disc'd the remaining thread that was stuck out past the lower shock mount nut, and gave the lock stops a tweak, I flapped disc'd down the weld seam on the diff and created an angled shim to sit between the top rear bag mount to roll it forward, not only did this create the clearance I needed it actually means that the bag is on a better angle when its aired out, that resulted in this: which resulted in a compliance pass, which lead to: Which mean we could get this: Pretty happy made my goal of getting the car legal for beach hop with 6 days to spare (must be an oldschool record haha), going to rack up a few miles this weekend before we drive it to Whangamata, pretty F#cking stoked to be honest, it drives great, nice and smooth, feels less boat like than it used to with the springs in it so I'm calling it a win!!1 point
-
Got bits back from blasters. $30 to get these done, shit that's worth it to save a lot of time and effort (cheers Sievwright). Saw an XA shell on a rotisserie while there too... Bit of damage from someone's previous attempts to get rivets out by the look of it... So quick blat with the welder/grinder/drill at lunchtime, and ready for paint. Will try to get some on tonight...1 point
-
Quickly took the car down for an alignment this arvo to try and work out the pulling to the left situation. Well have a look at the "before" spec below.. haha! As they didn't have a listing for hako on the system I figured Kenmeri woud probably be closest. One of the front caster arms is bent which is causing some of that issue and the toe adjust arms are a bit shit but managed to get them back in line. There is a lot of rust underneath so I'll be loading up on repair panels in this next container! Went to stop in at the compliance place on the way back but it was closed Also I think I need a GT-Kai badge.. everyone thinks it's a GT-R and are crushingly disappointed when I tell them otherwise haha Oh, so result of alignment car definitely feels like it drives a bit straighter, still pulls to the side occasionally but I think that may be as a result of my spring situation. I received a few more bits for it from Kevin san (the aussie guy previously mentioned) so one day I'll get to putting those in and see if that makes the difference.1 point
-
Hey man, it is just an end mill with the tip ground down to a pin so there is no flutes there and it acts as a guide, you buy them,they aren't cheap, but they are the right tool for the job, the one you want in this case is a 10mm pin and 13.5mm cutting diameter. Order of ops is Pilot hole of your preferred size 10mm hole all the way through 13.5 mm end mill down to say 1/2 depth Deburr and chamfer both outside and inside. I do it all in the drill press so I can use the depth stop for the endmill, (the last set I did were for a v10, so having all the holes at the same depth made it easier for mounting the injectors) and use a digital angle finder to set it up level in both directions, but if you were careful I don't see why you couldn't do it all with a cordless hand drill.1 point
-
Got a bit more done, not quite as much as I hoped as the weekend was a total fail but I am getting there All the fab is done Front welded back together So the motor can go back in now, however there is one small snag, because I can't leave things along there was something else that has been bothering me, basically the muffler hangs too low and it would be good to quieten it down a bit so a few months ago I bought these Now the exhaust is a bit of a basted to get in as it is all one piece so I chopped it and added some v-bands, this way the headers won't have to come out again Not sure if I will get the whole exhaust made this week as there are a few bits to figure out so it may end up with the old one back in for a bit longer yet, will just have to see how the week goes....1 point
-
So, been busy the last few days, got the doors, guards, boot and bonnet paneled and primed. Now I need to move on to the body. Then get it all painted and move on to the more exciting stuff. I'm on the hunt for another 4k or 3k motor. I'm going to pull down the current motor and inspect the bores, possible get away with putting a new set of rings in it, but don't have high hopes.
1 point
-
I'd wanted an Estate for quite some time but never thought I'd end up owning this particular example. That is until I saw it for sale on a Facebook Triumph page (yes such a thing exists). However it was well out of my price range so I pined over it and got about fiddling with the many other cars in my life. But a while later I found out that the engine had let go and that the price was heavily reduced. The engine issue didn't phase me, but I was still a bit worried that I couldn't afford it. After plenty of discussion between myself and the owner, I decided to drive down to Tauranga and take a look at it in person. A deal was struck and I made plans to come back that weekend and collect the car. So with the help of @Tumeke and his Dad's 2.4 petrol LWB L300, we hitched a hired trailer and set about collecting the car. IMG_8129 by Neal OnTheTree, on Flickr IMG_8132 by Neal OnTheTree, on Flickr IMG_8133 by Neal OnTheTree, on Flickr The L300 towed surprisingly well and we trundled along at a leisurely pace back to Auckland, along with a stop in Ngatea for some fuel for both the van and ourselves. IMG_8137 by Neal OnTheTree, on Flickr IMG_8139 by Neal OnTheTree, on Flickr Once in its new home, I poured a fresh four litres of oil into it, wound the engine over until it had a bit of oil pressure and fired it up. The car had a horrible knock when I went to see it because it had been run with no oil. It will run okay at idle but there is still a faint knock from time to time so it will have its engine removed to be stripped and inspected. It currently resides in my shed under a cover while I sell a lot of the other projects and parts that I have. This is the car that I've always wanted so the plan is to fix the engine, run it in for a WoF, get it road legal and start fixing it slowly while it remains regularly driven. It has suffered much neglect which is not apparent in the pictures but I am confident I can rectify this.1 point
-
I do this reasonably often at work, you just tap it with a 7/16-14 thread (which is an10) straight into the alloy and use a 10mm hole to pilot the injector holes for a 13.5mm pin guide end mill ( not all the way through of course) to make sure you get a nice surface finish for the injector orings to seal on.1 point
-
Well then, i'll be sending the Promesh wheels away soon to be re-lipped (unsure on the terminology) Most likely all the way down to pine engineering, as he seemed to know what he's talking about, and was the cheapest. I just need to decide if I want them to be any wider. They are currently 7.5 and 8", and was thinking about just pushing them out 1/2 and inch all round. At the current height, with the 195 45's tyres there's no rub, but I would also like to run 205 50's as I like the more tyre look on these cars. I guess the 1/2" extra width wont really make much difference to rub, as its not that slammed/its more the width of the tread that matters. The other thing I was thinking about, is painting the centers gold. They are currently gun metal, and don't look bad, but was wondering peoples thought on going gold. As i'm photoshop impotent, you'll have to use your imagination. Current look ^ What ya'll reckon? Also, I got a pair of center caps from murica, so I now have 5x, which I will refurbish and apply to the rims. That 80'sness, yummy. Chur or nar: //oldschool.co.nz/index.php?/topic/25550-vintage-grumbles-ae86/&page=24 Regards, VG.1 point
-
Teretonga stalwart Colin Dawson sadly died this weekend of a heart attack. He was the owner of Riverside Rentals and the pilot of a ridiculous fast V8 powered Gen. I Rx7 that I admired for many years. More recently the motor from the 7 was put into his Gen. I Chevrolet Camaro RIP Colin. You provided me personally many hours of entertainment as well as countless others, I'm sure.1 point
-
I took some quick shots this morning before work just in case anyone crashed into it1 point
-
Good day today, lots achieved and a cracker day for it. As you always do, I hoped it would spray out immaculate and I'd never have to touch it but it ended up a little peely and some shit stuck in it. So I'll have to cut and buff it, I really hate doing it but. both my repairs on the mounting areas for the cowl vents cracked when I screwed in, bit gay but not super phased. Very jazzed on the original front, looks so much better than the plastic grille. while I was waiting for it to flash off I replaced the diff pinion in the pontiac so double project win. tomorrow I'll crack into painting the pillars and doors satin black in and out then wham on the new rubbers I got from basis and hang the doors back on.1 point
-
Holy Fucken Fuck, Almost a year later and no update. People must think I just fuck around and do nothing Not true! Heres some pictures to prove otherwise.1 point
-
Lame weather and lame Motorsport on tv means a full day of work. Huge thanks to Chris born_loser for the use of his DA sander, shit started progressing far faster! loaded up the roof, finished the guard, rear and doors, started into the front guard too. Then been on some primer. Shit load better looking I feel. need to grab another tin of bog tomorrow x-)1 point
-
Both rear sills in and out. Both front caps, drivers not as bad. C pillar vent, one side only thankfully! And after about 80 hours day after day, 54 patches were chopped, made, welded and ground. marathon, but had to do it now rather than try patch it up as I'm driving it. I've got in with a tight group of 1200 owners, and they have been feeding me cheap and free spares! Fuckin awesome! Always liked the factory sedan grille more so,was amped when this showed up, bit of a scrub, paint and polish and I'm happy enough to rock it until I get a better one. Need the appropriate surrounds however. Also bits like badges, interior stuffs, brackets that have been cut or modified. Yesterday was hot, was waiting for the few layers of bed-liner to set in the roof after heat-shrinking and hammering so I can sand it easier, and I couldn't be assed sanding bog so I cleaned up and refurbished the bumpers, tail light surrounds, number plates, headlight surrounds etc. Already did the indicators and lenses before Xmas, test fit a stereo, general tidying and painting of stuff, cut a piece of underlay for the roof, seam sealed and under sealed the rear guards and spare tyre well, made a cover for the fuel tank in the boot. Broke a few of the tail-light fixed bolts, found if I snapped them off completely and drilled them out, I could fit some spare speaker mounting machine screws in there, weld them and trill off the excess. worked out really well, then wire wheeled and doused in black zinc. Common practice on this car1 point
-
Had this running ok but still had trouble with the idle once it got hot it'd sit at 2k rpm when pulling up to the traffic lights then slowly drop until the engine shut off. All the valves were set correct so I got a Gunson Colortune and Carbalancer kit to tune the carbs. Found the carbs were running way too rich as indicated by the yellow flame from the glass spark plug. I adjusted out the pilot jet adjustment removing fuel till I got a good light blue burn going. Once each side's fuel mixture was set I attached the carb balancer and adjusted them till they were in sync. After this the engine happily sat at 1,100rpm idle, thoroughly recommend these two tools for setting up carbs, runs so mint now. New shoes next, looking at Avon Road-riders Gave it a quick clean, as it stands now:1 point


.thumb.jpeg.384ff72c8d2b0ee0d34a7bdedb55bdcf.jpeg)

This leaderboard is set to Auckland/GMT+12:00