
Leaderboard


Popular Content
Showing content with the highest reputation on 02/11/16 in all areas
-
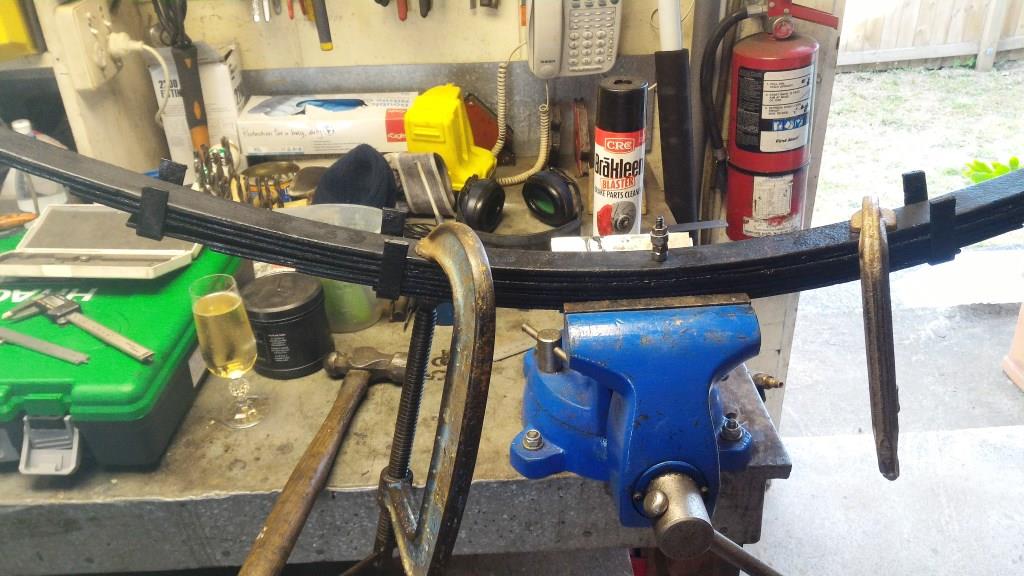
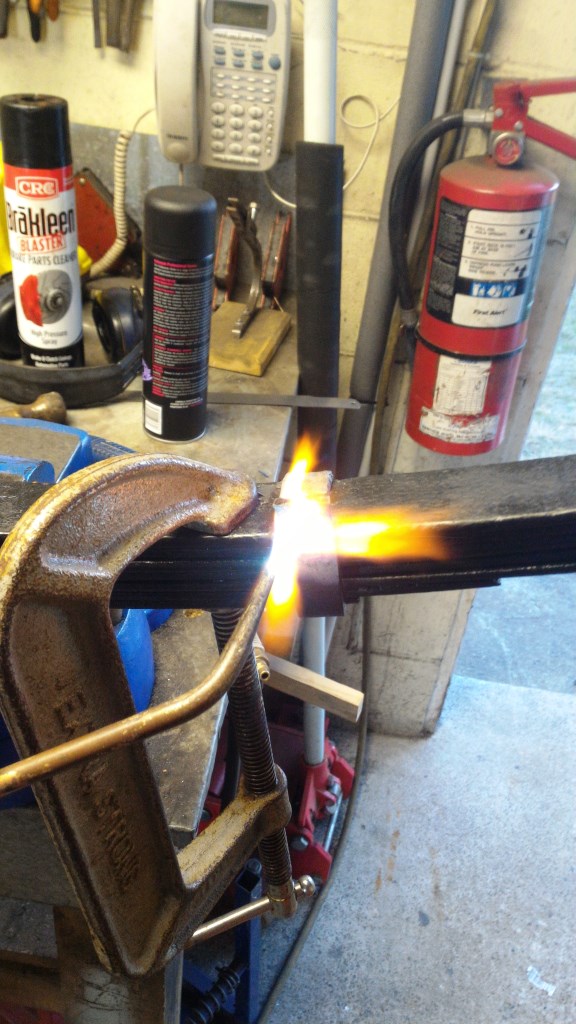
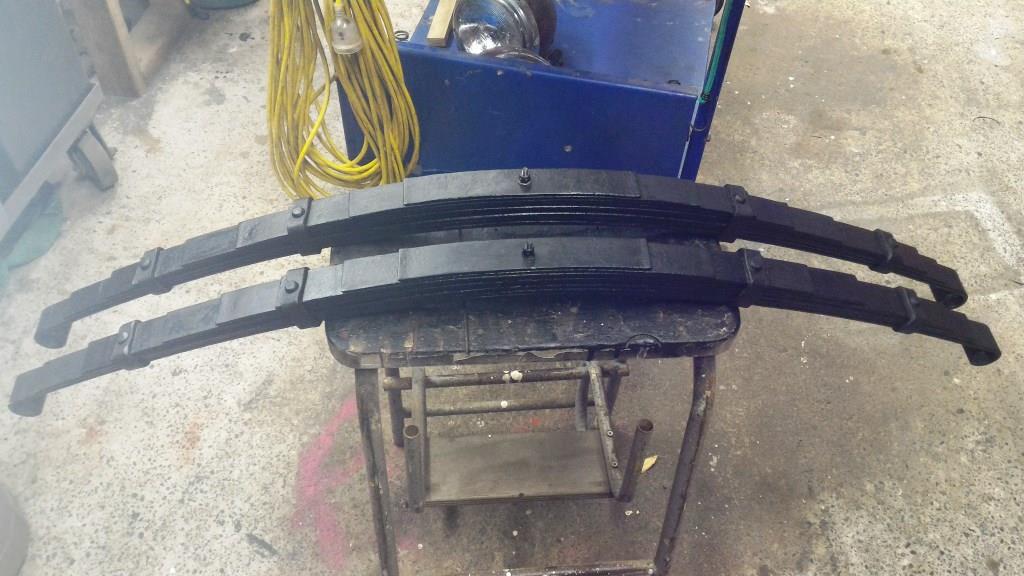
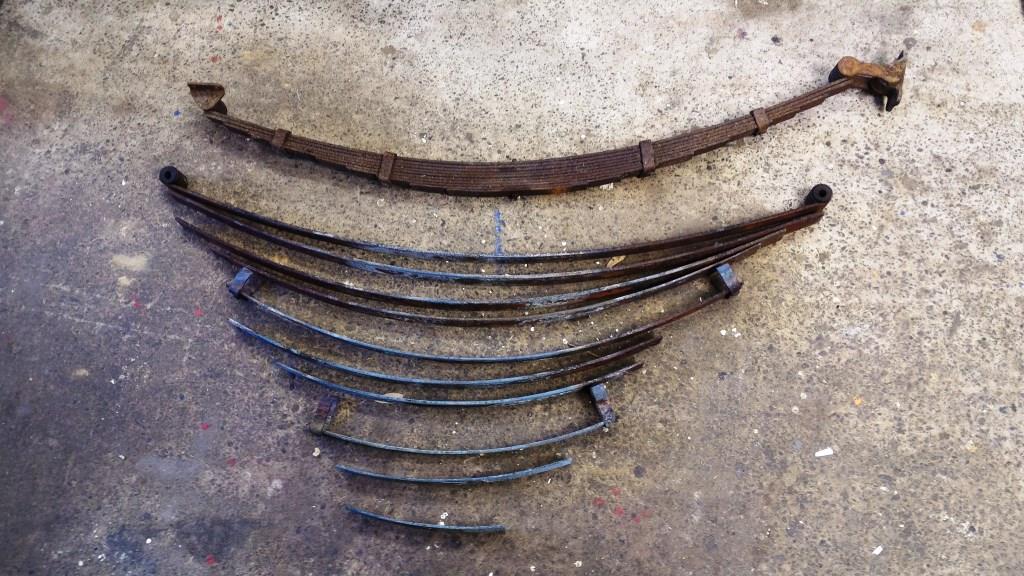
There was some wear there but fortunately I had a number of spare, similarly sized spring leafs so I cut some down to replace the worst worn. Some etch primer and they were ready for assembly. Out with the vice and G clamps again…….. A bit of heat in the right place…….. And another job is ticked off the list…..
 8 points
 -
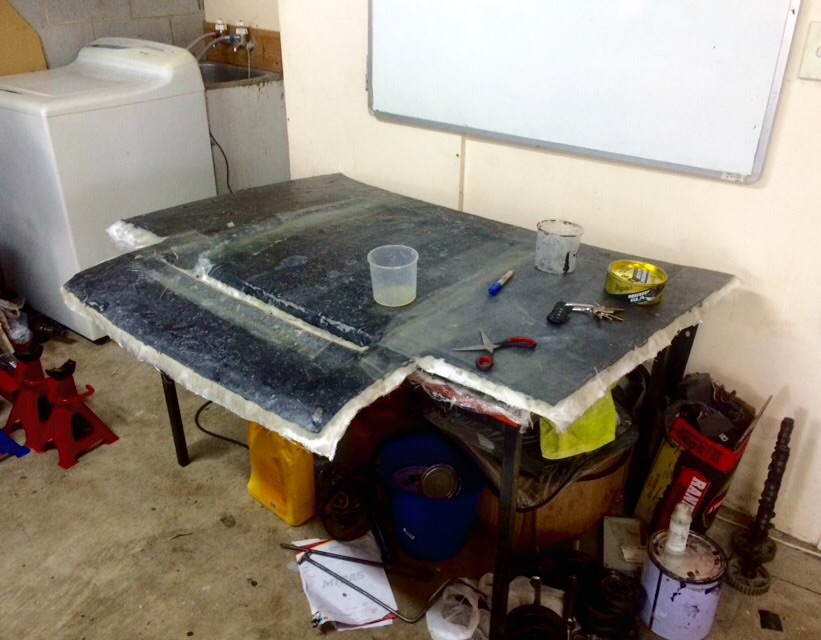
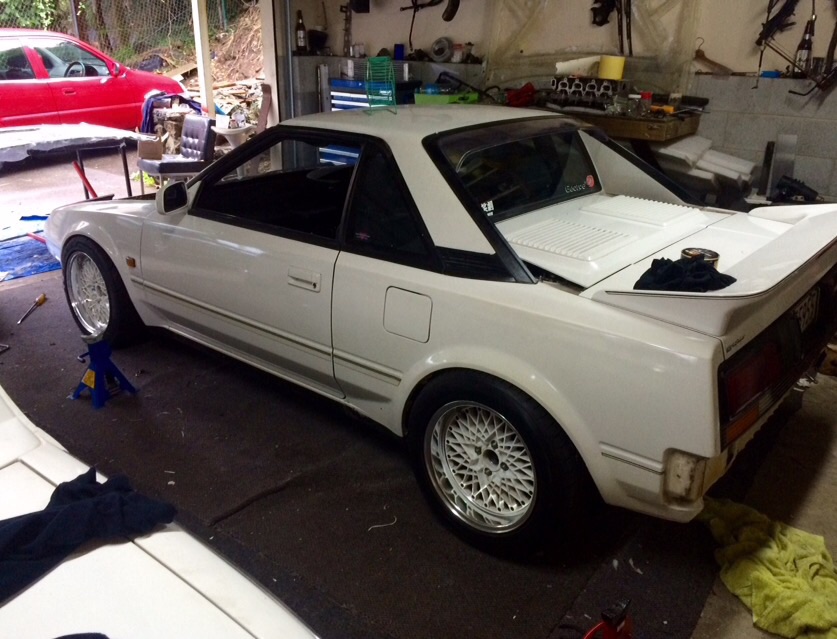
I've been doing a few bits and pieces that really don't add up to much but its all got to be done. so door latches are in and working, I'm missing a passengers door handle but its Mike to the rescue again there. what else? rear quarter window installed (only one because I'm missing a guide) and also i got the hood lining recovered and i picked that up yesterday so thats ready to go in. today i made the trim bits for the inside of the A pillar and glued them in, then i put the windscreen in. that was BY FAR the most difficult windscreen I've ever had to install, don't know why it was just a cunt. my fingers are destroyed but its in. now i can install the head lining (it sits on a secondary lip on the front windscreen rubber) and put the rear glass in too. hopefully thats not such a cunt to install…. 2016-02-10_06-26-10 by sheepers, on Flickr 2016-02-10_06-26-41 by sheepers, on Flickr 2016-02-10_06-26-55 by sheepers, on Flickr 2016-02-10_06-26-27 by sheepers, on Flickr 2016-02-10_06-27-10 by sheepers, on Flickr 2016-02-10_08-41-45 by sheepers, on Flickr8 points
-
Another Wednesday boys night has seen more progress an a slight deviation from the original plan First up got these installed This is where the deviation came into play, what you can't see is that these pedals are a hydraulic set, the cable pedal box I had been planning on using, for one reason or another just would not go in the car. So the decision was made to bite the bullet, and go with a concentric slave setup. With the engine out and the pedal box in process, the VS plastic booster and VT master cylinder was fitted, just need to get a set of single to double flare adapters from Aussie now, no pics but they would be boring any way With that done, we waterblasted the engine bay, which meant it was time for this: Pretty stoked, need to get the car up now so I can put the gearbox in and work out the measurements for the slave setup. Am actually happy that my hand was forced as I had planned to do this eventually. It will come at the cost that I'll probably end up doing the wiring myself but at least when it's done I can take pride that I did everything myself at least!! Any way, cheers for reading5 points
-
Finally made some progress. Sprayed the base color today. It's just gloss black but I've got something special that will be going over it.3 points
-
Hey guys have a paddock of maize coming off in a few weeks......if you want to let off a bit of steam and get a bit dirty message me for details .....want to keep it low key not to many people ....and please just do it the paddock and not on the road!! Paddock will be bumpy and dusty if you want we could do hire car racing to Cheers Aaron2 points
-
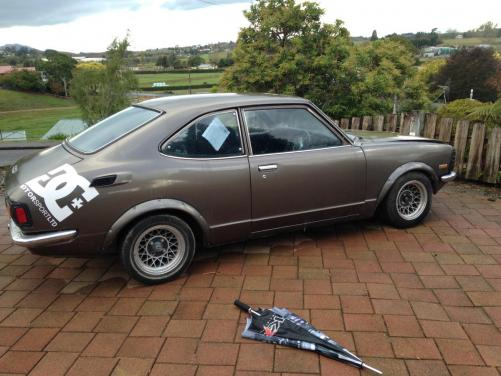
Aimees KP60?2 points
-
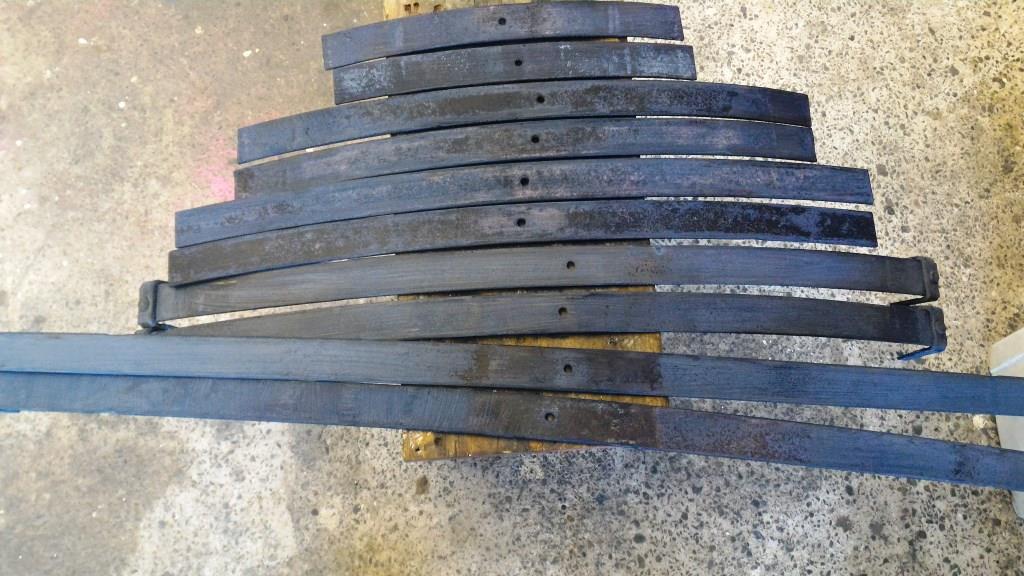
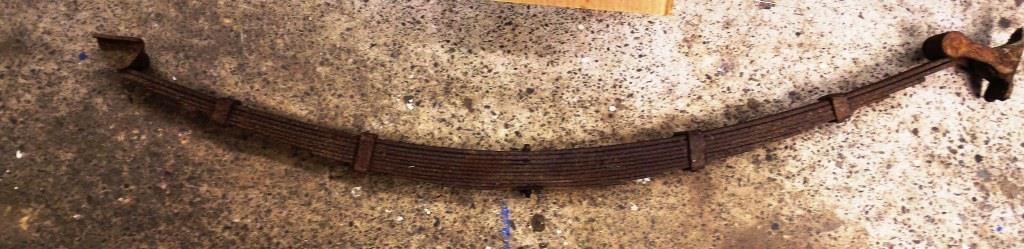
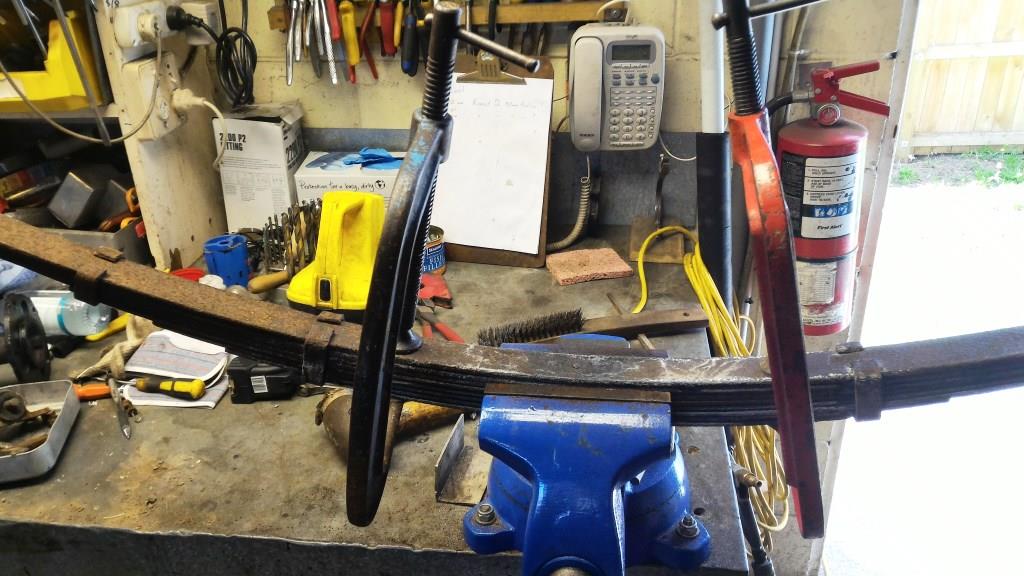
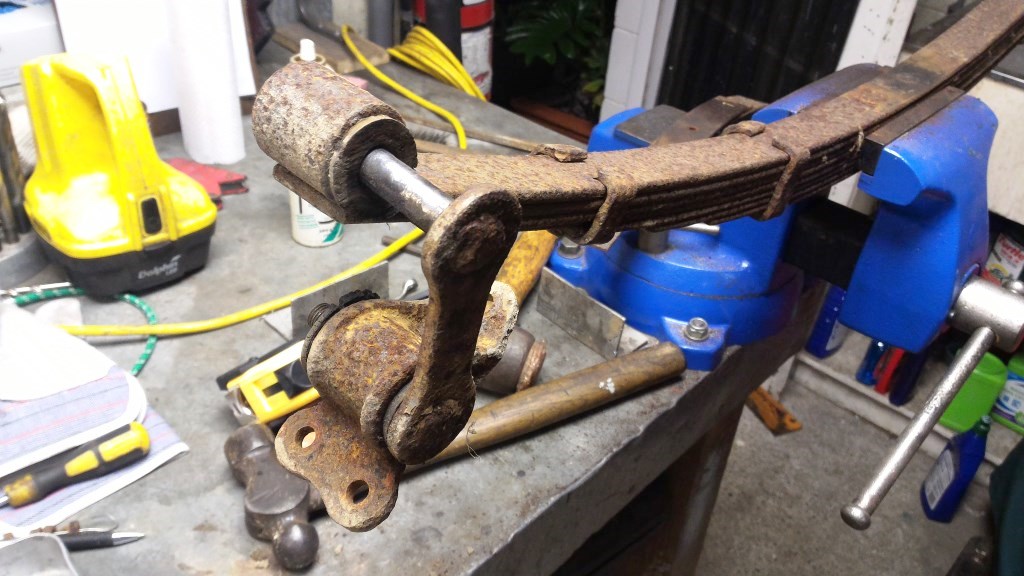
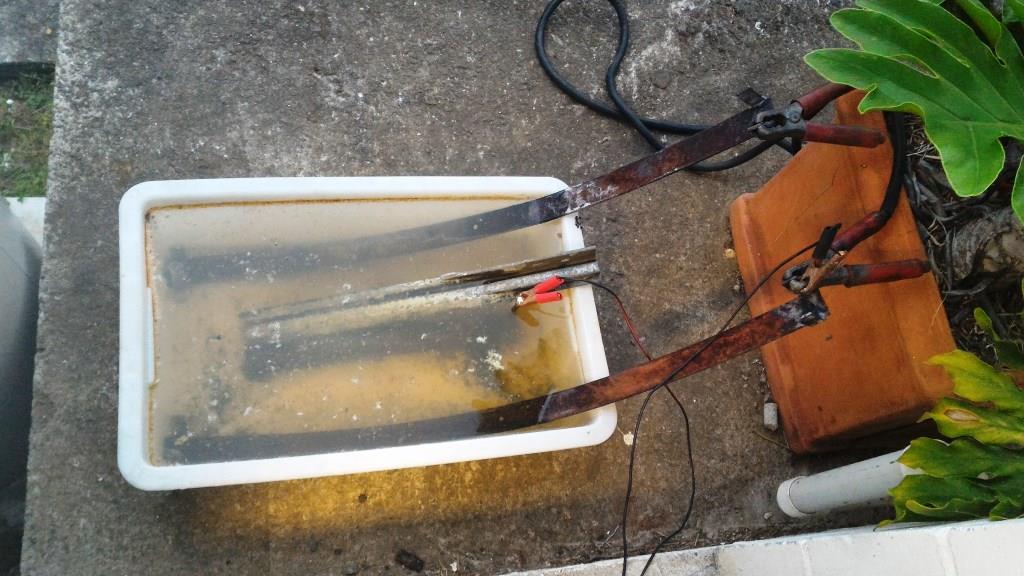
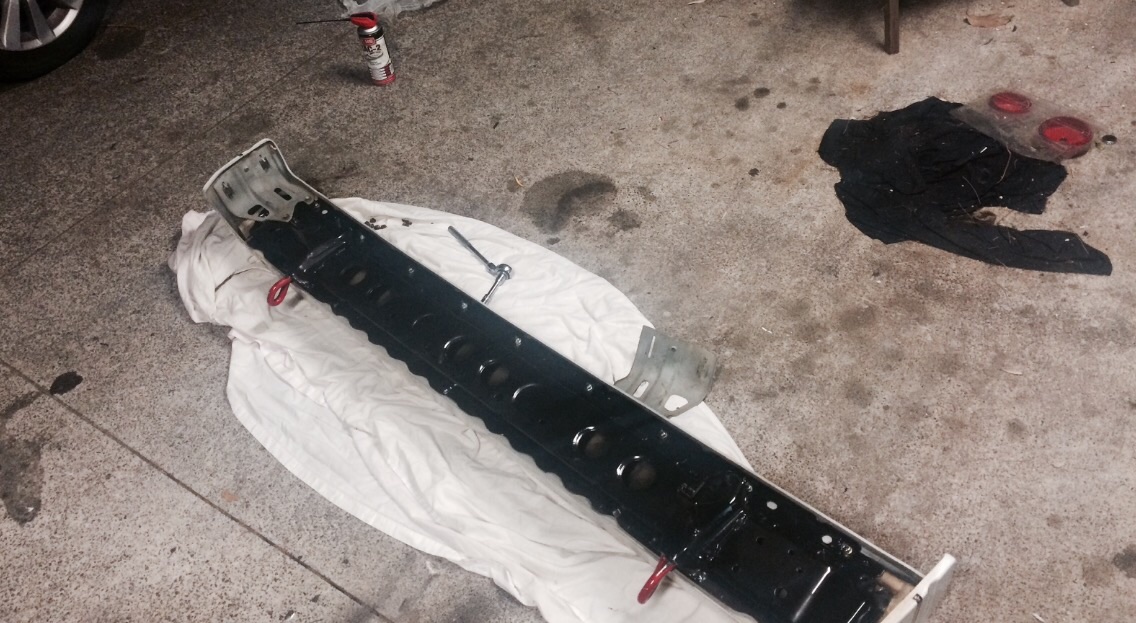
I still remember (although some 50 odd years ago as a child) my father taking me to the famous “Snell Springs” in Newmarket to have a set of springs made up for one of his many projects. As you turned into a now long gone side street off Khyber Pass rd. you saw a decrepit brick building with heat waves pouring from derelict chimney and the sound of big metal hitting big metal with a regular almost hypnotic beat. With my dear old Dad well known in the Industry (maintenance engineer at Chelsea Sugar Works and night time “management and supervision” lecturer at the then new & burgeoning “ATI”) an awe-struck kid got the full tour- in hindsight they laid it on for me thick! The sight, smell and sound of a work-blackened man with huge arms wearing a leather apron dragging strips of dull red hot steel from a forced induction coke powered forge and forming them into leaf and coil springs with a massive flywheel press, rollers, hammer and anvil stays with me still. It was a chance to have a glimpse through the gates of Hell where steel was formed, worked and hardened with heat, sweat, muscle and experience. Problem was I was stuck with a dilapidated pair of these……. …..and Snell’s were long gone. With a little care, an old strong vice and some big G clamps I managed the disassembly with fingers still intact. Next step was a week of the ‘electrolysis pickle bath” running 24/7!
2 points
-
Weekend just gone took it out again. no drama's with tyres leaking or falling off. was a good day. mate took a few pictures. mate brought his suzuki beater along (previous owner rolled it) and tried to use it as a submarine the hiway maker2 points
-
I've probably painted my nails more than you have yours, farm girl.2 points
-
today i sanded, then painted the bumpers. they came out pretty good. also it was hot in the shed today. 2016-01-24_02-38-41 by sheepers, on Flickr 2016-01-24_03-43-38 by sheepers, on Flickr 2016-01-24_03-43-46 by sheepers, on Flickr 2016-01-24_03-43-56 by sheepers, on Flickr 2016-01-24_05-16-28 by sheepers, on Flickr2 points
-
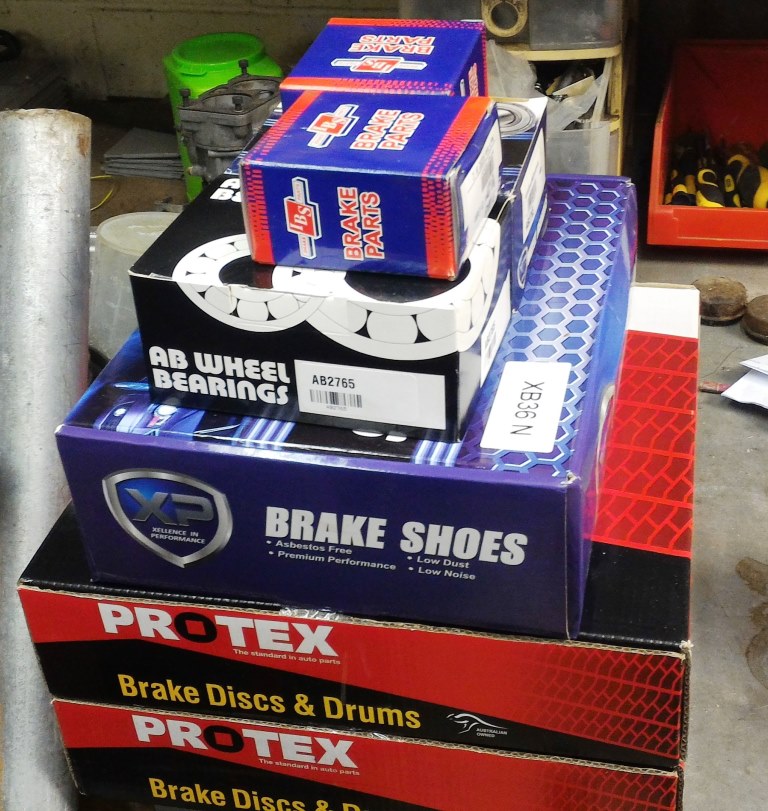
More painting……. And a stack of new parts……. Why does assembly always feel like Christmas…. Some new brake lines…….. And it’s done……
2 points
-
Sick of my good engine getting covered in so much crap. Filled the holes between chassis and body with some rubber and ali where the rubber would melt, by drop pipe etc. Along with the under tray, should stop most of the crap going on front half of engine at least. Made a heat shield. Goes here It heat soaked pretty bad when driving around slow/parked up, when 4wding/waiting for geezers having a chat and 12 lunch breaks. I had thought about mounting the radiator under the tray. but feeding it air and not mud was too much drama. plus half the problem is heat from manifold and turbo. heat wrap would turn into a big mess. so rather elaborate heat shield it is. seems to work pretty sweet so far. These things are pretty squishy at 4psi. have something on the way to sort that.2 points
-
Hey there guys and gals, My first car was a ke25 that I did a chicken wire and bog job on, and always wanted to restore it properly when I was all grown up. My dad sold it to a farmer who's kids trashed it and tipped out down a tomo I picked this up a few years ago (now that i'm all grown up) and the restoration began..... She's now fully stripped. And I've since collected a bunch of rare parts (ke25 and JDM TE27) and am waiting for the weather to improve so I can make a trip to Rototua and have the shell dipped. Plans are for a 20V Blacktop 7age with T50, Ae86 front shocks & brakes, Ae86 rear end with LSD and possibly repsol orange..... I'm pretty much a mechanical noob with limited experience so i'll do what I can and will have some pro's help along the way...... Any help from some seasoned Oldschool pro's would be much appreciated Discussion thread here //oldschool.co.nz/index.php?/topic/49950-alasdairs-1974-ke25-corolla/
1 point
-
Found our old BMX in my sister's garage this weekend. I have a wee niece now and have been looking for a new bike project so here goes. These wheels are so pooozed. Some sweet stickers I'd like to get re-done. Definitely going to re-do the two frame pads, maybe have one which has my niece's name on it. Undecided if I want to keep the same style/graphic or think of something else. Gave some of the bits a wee scrub - comes up okayish but will probably just get them re-done. I'll never forget the guys face when I got my first bike sandblasted and I gave him a whole bike's worth of nuts, washers and my chrome bits on a big wire to get dipped. Or the guys at EDL when I took in a bag of mixed nuts to get new ones... I have the majority of it now dismantled, except the pedals - that can be tomorrow's job. Will try have a go at sandblasting it this weekend all things going well.1 point
-
Day 1! 21st November 2014 Picked up this little beautie for $3200 NZD. The local mini club owner who was selling it gave me a $400 discount purely for my squeeling on arrival, I'd never seen so many mini's in my life! First thing i brought - new gear knob! Cheers Aliexpress! Got central locking for a Christmas gift with the key remotes installed! Accidentally locked the keys and remote in the car.... Took 5 people to break into my tiny car! Central locking sadly didn't get re connected after painting of the car... but hasn't been anymore lock outs since! She turned out to be suuuuuper rusty! Time for some repairs.. and a broken windscreen. "No don't take it out yourself you'll break it!" "No I promise I won't!" ...20 minutes later see my ex boyfriend post on the NZ mini facebook group that he's looking for a replacement windscreen. Damn it. Thank god for insurance! Hello kitty hanging in there during my repairs. 1 floor pan and new windscreen later... it was time to get ready for a new colour! Colour! I literally took in my nail polish and a picture to the paint shop for inspiration and walked away with this! We have some paaaaint! Need to get some better pictures in the light.. or not use my phone camera! She's feeling a little blue Picked her up some new bits in exchange for a box of bourbons hahaha. Goodbye ugly rice steering wheel that someone has friggin welded in place! More new editions? HAHA Interior battles Thought i'd get all fancy and refurbish my door cards with some vinyl and fabric. The door cards that came with my mini were horrible to say the least!! Refurbishing them didn't turn out much better. Manged to make some back ones but have given up on front and dash and thinking of getting some laser cut and then powder coated the same color as little blue! Sitting a bit crooked but will sort it out! I've fallen in love with another mini... I hope this guy doesn't mind me sharing his pics but I found this little beauty on Instagram! https://www.instagram.com/jacktubbsey/ Really want black flares now!! What I really love is the headlights! Found some tint off ebay here super cheap and now just waiting for it to arrive! Totally illegal here in New Zealand but i'm sure i'll be okay with all the cars with blacked out ones I see driving around Some treats for little blue! The sound system in her wasn't that bad when I got her but the speakers were literally put into plastic containers from the warehouse ($6.99 price tag still attached omfg) that you take your lunch in HAHA. Then covered in vinyl!! Kiwi ingenuity. Thinking of doing some colour changing led rings around the speakers like this: Will update once I've finished it! Also wanting to replace the switches inside with illuminated push button type switches. Here's some examples: First pic is a pre made one that is sold by Marcos Controls if anyones after some! Second some switches on Aliexpress I like. Just put in my new brake hose, got my new headunit & sub going. 2016: Finally got a WOF and current rego! But also feeling lazy, need to CAD up my dash and door cards to get laser cut already! Discussion Thread: //oldschool.co.nz/index.php?/topic/51794-samanthamannells-1978-mini/1 point
-
POTATO CAM UPDATE!!!!!!!!!!!!!!!!!!!!!!!!!!!! this is how the next week will go windows in tomorrow and go do wedding work my ass off for a few days remove windows put headlining in and make it look pretty put windows back in remove gear box and put new gearbox and clutch it ready for nats panic about new paint and roof racks going on.....1 point
-
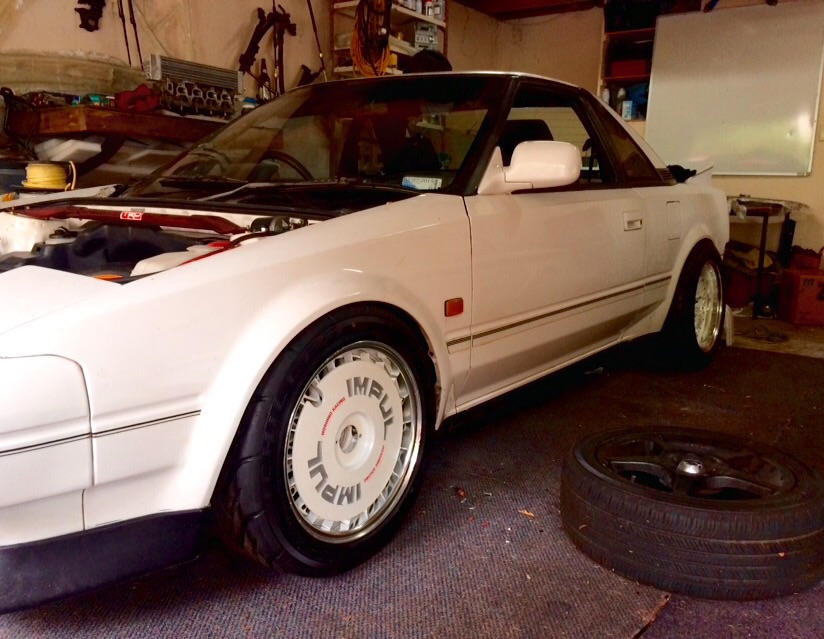
other one in. was way easier than the front one, fairly normal if anything. 2016-02-11_05-44-36 by sheepers, on Flickr1 point
-
Do they have to be original? (wheels, suspension etc) If not id put forward my Mirage1 point
-
Did more of things Hunted around a few shops in town this morning for case sealant, only thing I could really get easily was Yamabond 4 ($25) or Threebond 1211 ($90)... Then I did this Bit gummy, funnily though the other case half is spotless! Feels well made to me, no rough edges etc Big end feels perfect, no excessive play. Gave it a clean with brake cleaner, blew it out, poured 2t oil all over the bearing and spun the rod to work it in to the bearing to keep it protected from rust. Intake should benefit from having all the casting seems cleaned out of it. Tapers from 19mm at the carb to 25mm at the reed block. Plan at the moment is to not go overboard on porting the cases, just to take out all the casting marks and smooth out any sharp edges along the intake path. New C3 bearings and good quality seals from the fabulous Mr. Grumble and yeah doort. Bearings in it for reference are a 6006 and a 6204. Seals measure at 22x40x7mm and 17x27x7mm.1 point
-
So long time fuck all happening. Life/other car took all my money so not a lot has been happening to this. Buuuttttt It now moves. Haven't moved it far as it has no brakes but it does. Got my driveshaft lengthened and chucked it all in. There is a hell of a noise coming from the engine which i am praying is only lifters, I think the noise was amplified a bit by being inside the garage so will pull it out tomorrow and whip the cam covers off to have a look. Umm what else. Oh got another dash as my one wasn't coming up with the speedo, revs, fuel or temp as it is digital. I know the dash i got is good cause i saw it working but its still doing the same thing, so need to check some simple shit to see if its a fuse or earth, if not its off to a auto sparky. Painted the rear strips, only thing is they are really warped so they stick out but isn't a lot i can do about that, and all the other ones ive seen are rusted away so they will do for now. Am selling my Celica so will be using the BCs out of that in this, and have test fitted a 9j with tire on to see how much work i need to do to fit them, quite pleased to say not a lot. Am supposed to be taking this to Nats so am pushing it a bit haha Talk shit about my shit : //oldschool.co.nz/index.php?/topic/50314-beachlanders-mz12-discussion/1 point
-
Have taken this out a few times. Got the front bead lockers on for the first day. the 2nd pair hadn't arrived. plus they wont fit over the rear brakes. Tyres seem to seat on the inner bead real easy. Turns out they also fell off real easy. only about 10mins in one went flat. put more air in this time. then later in the day the one on other side fell off the bead. Inner beads were too loose and burping air, then tyres just go flat of fall off. after some googling. it seemed to be a problem with some tyres rather than the rims. but my tyres in particular didnt get mentioned. after measuring the china steels. vs the beadlocks the china spec rims were at least a few mm bigger than the bead locks. so thinking the china wheels may have stretched the tyres if thats possible.. anyway, found all sorts of dodgy fixes. but ended up giving duct tape a jam. let them down to 4psi and tried to smash them off the rims in some ruts. seemed to hold fine?! parked up on side of rut, tyre folded up past rim lip, no leaks. seemed legit, so ready to take out again Grump. Also somewhere along the way cut the bottom off the gearbox x-member for more clearance doesn't hang down too bad now1 point
-
Spokey Dokeys.1 point
-
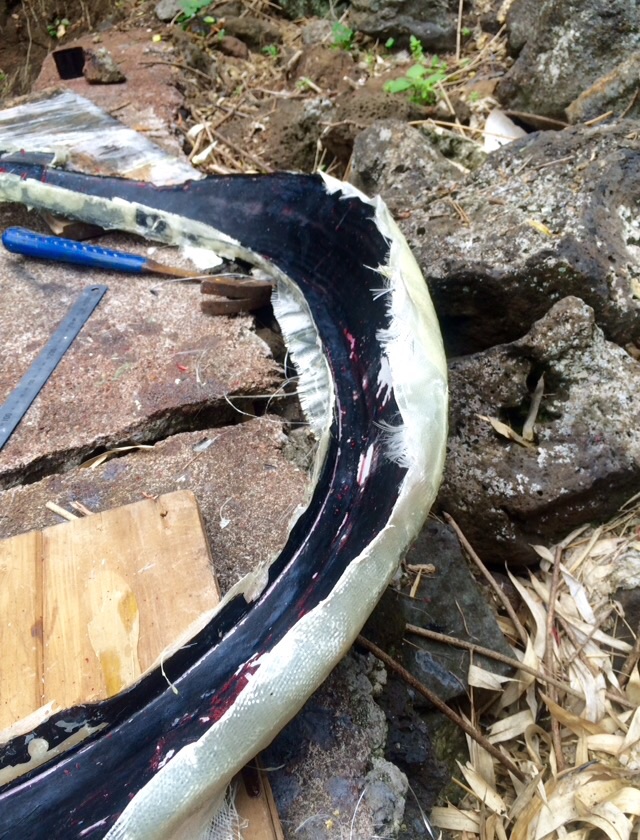
More progress on the carbon and fibre glass panels too. Mold for the MA61 front guards turn out to be more of a mosh then I thought, having to brake away the over hang off on purpose to crack the seal between them. I'll try build up the sides again and touch up the gell coat but it's a lot more rough then I would like. That and the already flaky paint on the panel has come off.. Bugger
1 point
-
Yay progress! Still at least 12 bars to cut up and weld in.1 point
-
brought this to push people who annoy me1 point
-
Gonna need a flat jack. And to do something about them pesky rear guards
1 point
-
Finished the amp today and it works. Stoked. I have a metal enclosure that I'll put it in tomorrow and see where I can hide it. Might need a small pre amp for A ipod or similar as its a bit quiet. It gets plenty loud when plugged into the computer. I will see if I can trace the AM tuner output in the factory radio and tap into that and use this amp Edit: While doing the seat cover I felt what I thought was a tissue but it was worse
1 point
-
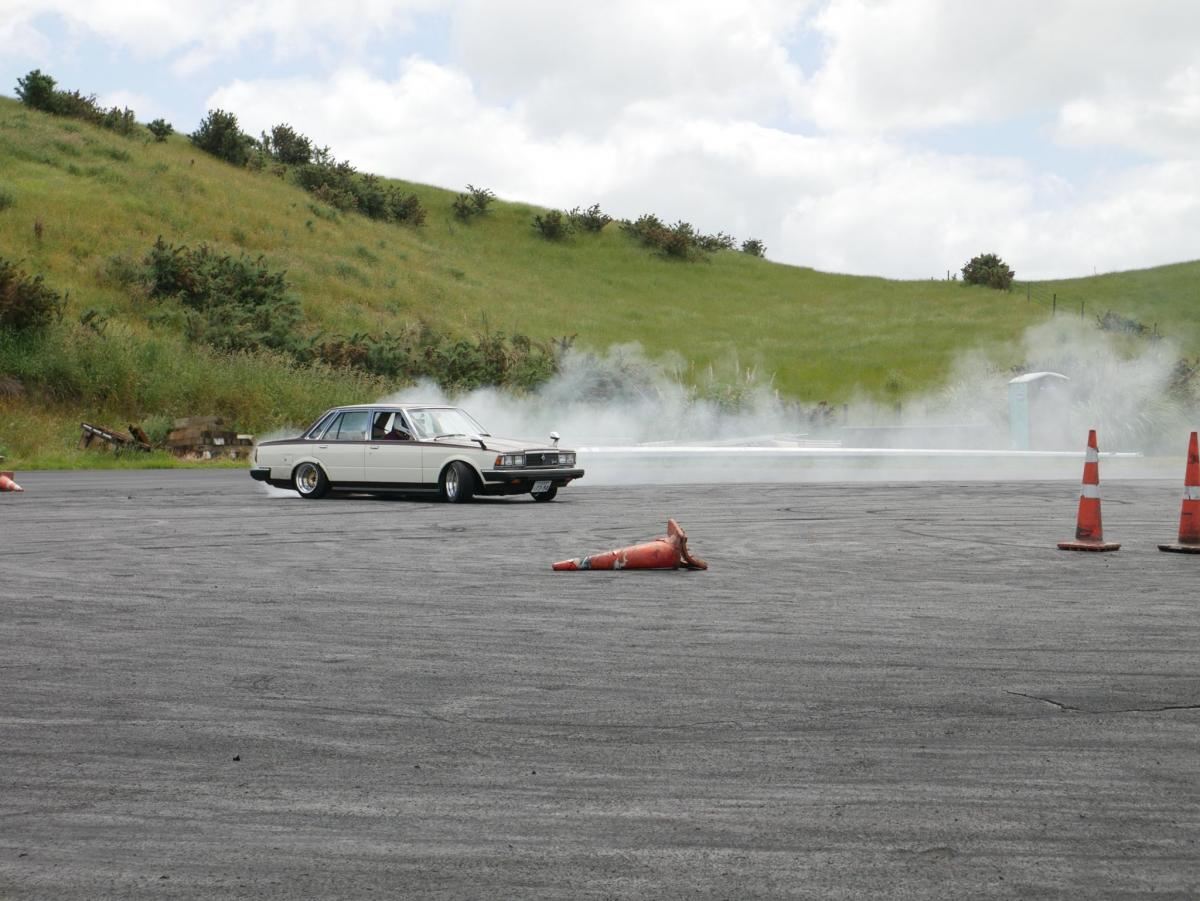
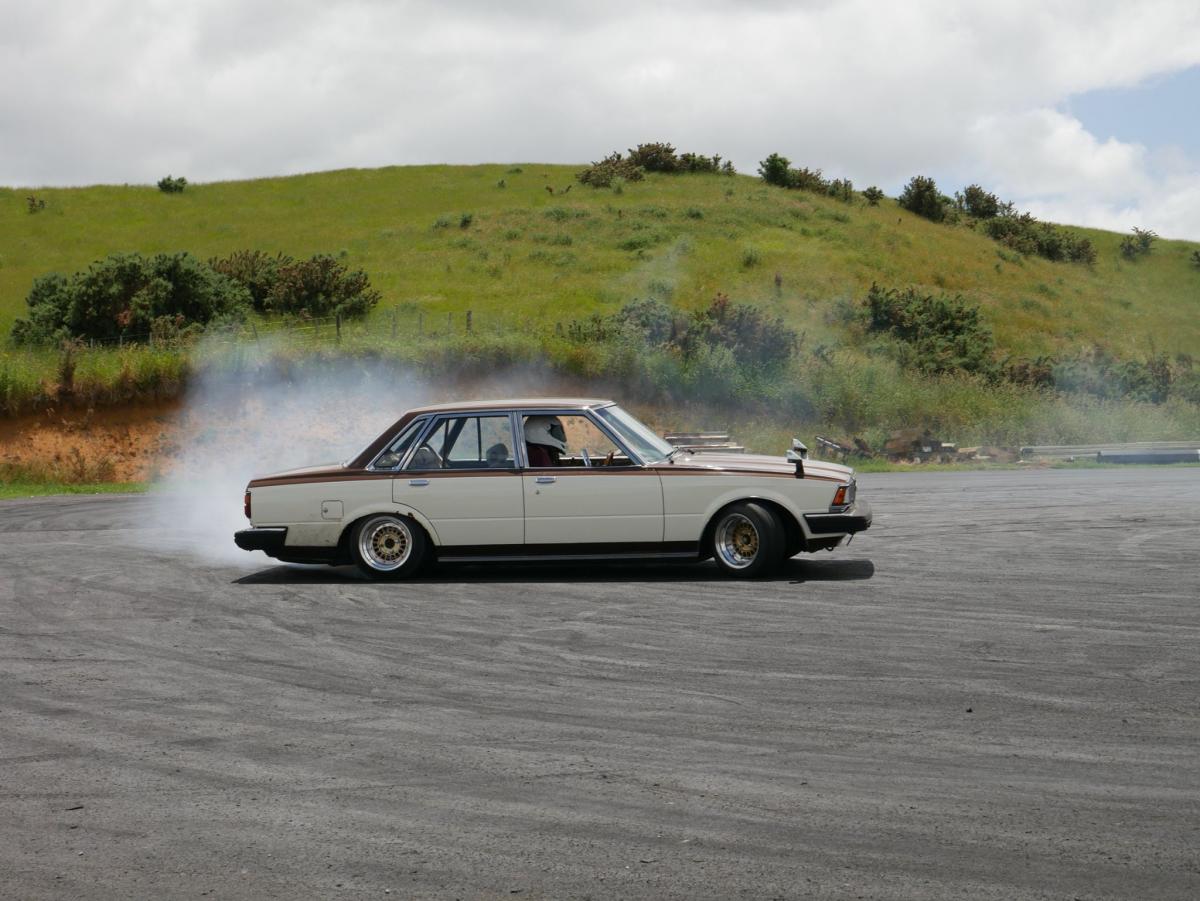
Zerclass Drift Summer Matsuri was awesome, I only picked up the tools to change wheels and had a lot of fun. I didn't really have time to sort my handbreak so went with out but still managed to get the last half of the track 3 linked in 3rd and a few manjis up the straight.It was really cool to have Levi's gx51 out on the track as well. I would have liked to have drifted on the full set of matching wheels more but had trouble getting the 165/65s to bead on the 9j rim after the first set and didnt feel too comfortable using the aerosol method at the track Here are a few of my favorite photos taken by OS member Barnaby1 point
-
more wires. the end result of which is more things work now. 2016-01-30_09-19-23 by sheepers, on Flickr 2016-01-30_09-19-32 by sheepers, on Flickr Nicks hands were just a blur with activity and he did activities that resulted in the engine starting. so it goes now. it starts and idles without having to pour a whole bunch of fuel down the intake. it also works the fuel pump relay properly off the air flow meter trigger (if the motor stops the pump stops). it has a fuel pump relay (there were no relays or fuses anywhere). and it has many things which it never had before. like adequate size power feeds to everything. some wires which make the gauges work and many other things. so now that it all works we can tidy up the loom and tidy it all away and its done.1 point
-
i got the extractors HPC coated so they would look alright. and now they do look alright. 2016-01-23_11-27-36 by sheepers, on Flickr 2016-01-23_12-16-20 by sheepers, on Flickr1 point
-
bits painted. 2016-01-19_08-00-47 by sheepers, on Flickr 2016-01-19_08-00-19 by sheepers, on Flickr1 point
-
Sanded: Primered:1 point
-
way to flash to drive through mud. or put on a shitty hilux.1 point
-
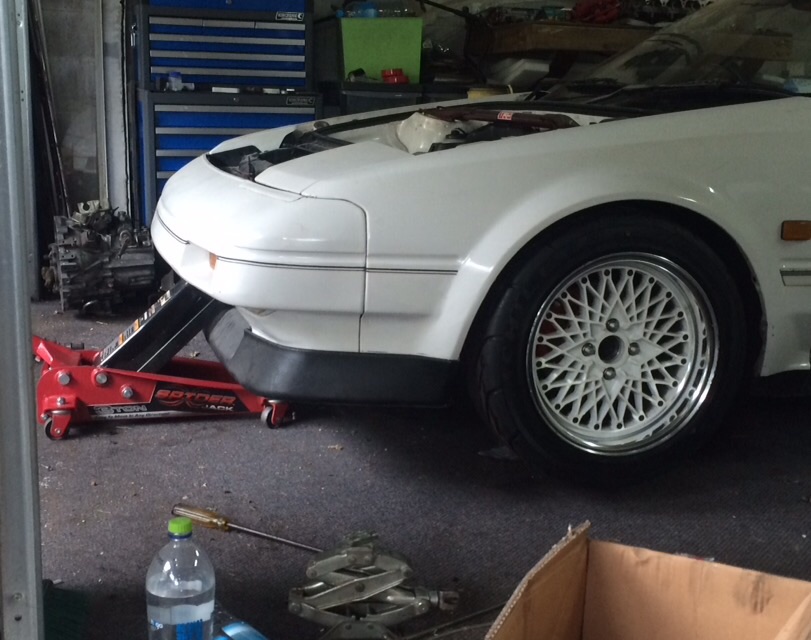
S13 BC Reds in, front now close enough to the ground. New T3 steering arms test fitted, will permanently install after my next wof. Pick up 2JZ GE set up this weekend . Can't wait to get to the track again, should feel like a racecar now.1 point
-
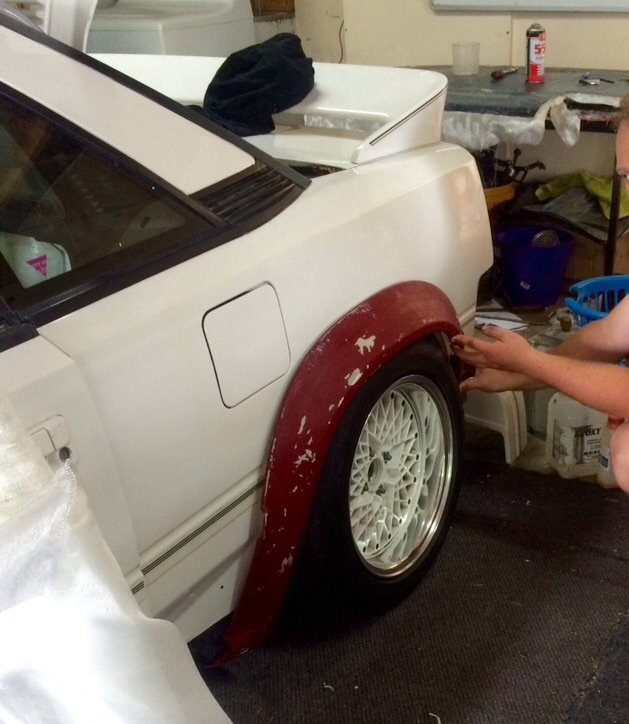
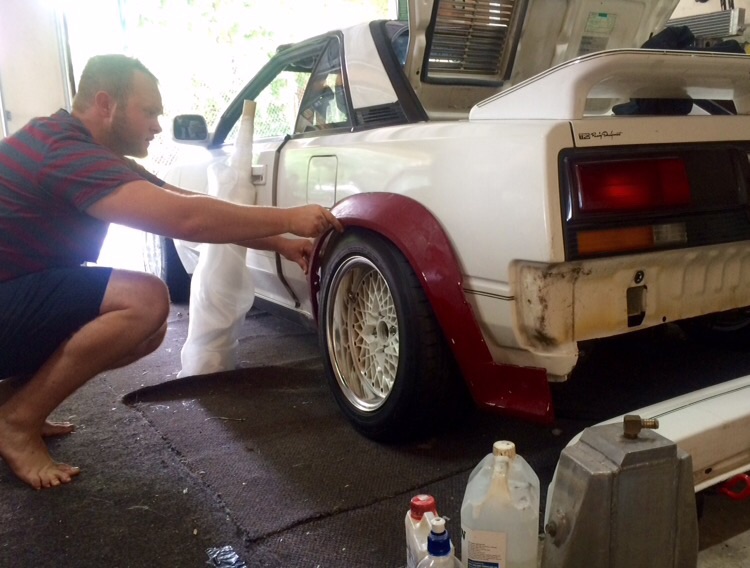
Mold for the ma61 flares are done so I can start pumping out guards witch is good Had some trouble with my rear struts. They had ceased between the main thread and the strut base that mounts to the hub so I couldn't adjust ride height. Had to pull them out, managed to get them to move with some brute force witch was very lucky!! Took everything completely off the thread (lock rings and base) and cleaned it up then hit the whole thing with this stuff called TAC-2. Comes in a CNC spray can I used it on my rear tie rods when I did them (even though their stainless they still cease) Pretty good stuff, chain lube but it's water resistant so is good for adjustable arms etc that see weather. Finished refurbishing the rear bumper iron from rust and its threads, clips, nuts. So that's ready to go back on Managed to have a good clean out of the garage and car so it's looking pretty good to start get it road going again. Sorry for low qul photos, off my phone in crapy light Also picked up a new motor for the next project You can see it next to my shelving
1 point
-
Picked up a set of sw20 E series axels pretty cheap from a bloke in Cambridge that was building a 3sgte corona Reason being that with the e58 I'll need a ae101 left and a sw20 right side. The axels aren't from an LSD model though so they might need a bit modding The LSD axels have a slightly longer spline going into the gear box on the drivers side. This I'm told is to hold into a plate inside the diff, and if I used a non LSD axel in an LSD box it wouldn't be held by the plate so no LSD function gets used. How ever, I'm told by very reliable bloke, and this surprised me, he just uses an angle grinder to cut the spline longer anouther 5mm and puts it ons lathe to take the seal seat back 5mm and it's good to go. I'm told it's cold forged so wouldn't be easy on a lathe but if it's like the selector shaft once I grind threw 2-3mm it should be soft as butter and could tidy up the seal surface on a later then Now, why don't I just buy some LSD axels??? Because you can't. No one wants to sell them and guys that are selling them in the states are selling them for +$850 Custom billit ones are 1100 I picked these up complete with CV's and stubs for 150 Winning
1 point
-
https://www.youtube.com/watch?v=dugz8rMYdw4 The noise in the second run is my lower chrome strip having un-clipped itself at the front1 point
-
Had a successful day at Meremere on the weekend, changed to 165/65/14s on the 9s which fixed all clearance issues. The car ran all day without any hiccups and was lots of fun.
1 point
-
? http://vehicleinspection.nzta.govt.nz/virms/in-service-wof-and-cof/general/tyres,-wheels-and-hubs/tyres-and-wheels1 point
-
i dont think theres a way to get a vehicle registered as a quad bike due to the legal description of what a 4 wheeled vehicle is and what equipment it must have that bloke that built a big quad out of a subaru in the early 2000s? went through all the drama of trying to do so and couldnt1 point
-
as the rules stand at the moment, c10 body on a hilux chassis would be a scratchbuilt vehicle1 point
-
Also while talking to Tom/VG about pick up, he mentioned that he had the bones of a scooter that he may sell, so a deal was made and I added this beast of a AZ50 to my collection It's got AN125 suspension front and rear, a good engine and a live rego, so once I figure out the wiring it'll be a goer. At this point the plan in my head was to put the engine/suspension/plate onto the ZZ and the ZZ front end onto Sandy's SJ, had thoughts of a simple swap taking a couple of hours max, more on this soon... Today's effort = 399.9k round trip to go pick them up Fairly lightweight trailer, Altezza still didn't like towing it uphill. Got the scoots back to Gisborne with no issues, unloaded them into the shed and even though I really wanted to go home and eat I just had to have a bit of a play. Well it turns out that my plan up there isn't going to work quite as I had imagined, as it turns out Suzuki decided to change things up a bit with the AZ50, the 2 bikes have completely different frames and engine mount locations, no chance in hell of bolting the AZ engine into the ZZ Figured in that case I might as well try to just get the ZZ going, hooked up a battery, flicked the key on, pulled the brake and pushed the starter = nothing. Fitted the kick start which ominously was in the helmet hole and tried to kick it over, nothing, no engagement, grabbed the fan and tried to turn it by hand, it locks up every turn and clunks a lot, no sign of compression and a metallic jingly rattle from the variator side...I do believe it's fucked! Also the brake disk is bent, and the front wheel has a ton of play, so might not even be able to use the front end on the SJ. The plan now = 2000 Suzuki AZ50 ZZ Frankenscooter/Aliexpress special! Think naked Honda Ruckus style like VG had started doing, but with the finest (read cheapest) LED lights, air filter, exhaust and anything else that catches my eye that Aliexpress can provide! And with me attempting to wire it all up results should be hilarious! Also as I don't have a welder there is likely going to be a LOT of cable ties and creative bolt on bits involved... Hopefully I'll be able to salvage at least some bits off of the ZZ to use on it. Check back tomorrow for progress and what I find when I start stripping the ZZ. For those of you that made it through my rambling attempt at a build thread have a gold star TL;DR? Tough.1 point
-
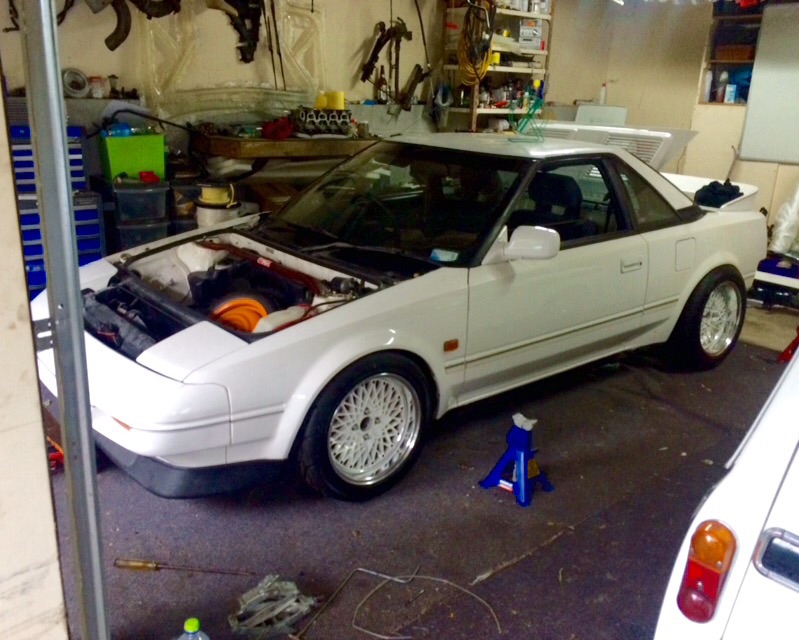
Removed red pinstripe and hornet and fitted wheels this morning. Front needs to come down in height which should happen with the engine, gearbox and coilovers being fitted, rear is at perfect height, Previous owner has done some guard work to fit the 15x8 0p wheels so not a lot is needed1 point
-
In the quest for a little more power I got my hands on a rebuilt T25 turbo. I didnt want crazy amounts of horse power, so this size turbo is just about right Picked up one of these cheap bolt on cast manifolds Exhaust fab began Wasn't a lot of space to work with Welded in a small divider to separate the turbo and waste gate to reduce turbulence Some heat proof paint and some heat wrap applied Then started to mock up the intercooler Carrying on with the rest of the turbo setup. I machined some new lower rad mounts, to space the radiator back to give me a little more room for the intercooler. Bought 2 slim 10" fans to replace the 12" one I had, made a little bracket to hold them Little bit more done with the interfooler setup and radiator mounts. I was going to try and fold something up for the upper rad mounts but decided to machine them instead. Started off with a solid bit of 32x32mm aluminum like so After about 1 1/2 hours of drawing up, tool pathing and machining in the CNC mill, the solid blocks looked like this Machined off the rest of the stock material off, gave them a quick polish and glued some rubber to the inside of them Still need to drill some holes in them to mount them properly. Intercooler sort of in with some temp brackets Fast forward and1 point
-
Decided to do a track day at Pukekohe. Was heaps of fun, car went really well with the 4.9 diff ratio, although I was at 7300-7400 RPM in 5th gear at the end of the front straight (rev limit is 7500). Was the first time I got to test out the gear stick properly and it was perfect! Suprised at how much grip it still had for street tyres too. I put a muffler on the rear for the day as I know how hard they enforce the sound limit at Puke, but still got a warning at 97dB haha. Ended up leaving the muffler on, sounded much nicer anyway. Got my mate Goob at Herbert Fab to weld up this over flow for me before the track day. Gives me a little more room for the intercooler piping in the future. Decided I was going to look over the rear end of the car again, make some improvements where I could. So I made up some new rear diff control arms using 6061-T6 grade aluminium round bar, and QA1 chromoly rod ends and machined up the spacers as well. Panhard rod not pictured here, but I used the 3/4" ($$$) rod end instead of 5/8 for the panhard. Here's some pics And the spacers to compensate for the difference in width between the factory control arm bush and rod end, and a neat fit for the bolt so they dont slop around. I went to fit these arms up, and I had to make them all different lengths to get them to fit due to the fact that somebody had made a mess of the diff swap. Decided I would cut all the brackets off my diff and re weld them back on in the factory location, how they should of been done to start with. So first step was to get a factory diff and make up a jig to get all the mounting points off. Luckily I was able to get my hands on a factory AE86 diff that hadn't been modified or bent. After measuring up the factory 86 diff, I could really see how far out the mounts were on my Hilux diff... Top control arm mounts were 25mm further apart than they should be, lower arm mounts should of been 40mm further apart... I had to make a jig that would locate from the centre of the hub so the wheel base would be as per factory, allow for the difference in overall length from hub to hub as the Hilux rear end was just a little over 20mm wider overall and have the right orientation of the housing to get the pinion angle correct. 86 Diff and jig pretty much finished here. Parallels between the RHS and the machined face for the diff head gets the orientation right. The threaded rod with the point machined on the end allows for the difference in overall length, center the diff in the jig and locates nicely into the factory center drilled hole in the end of the hub. Here is the Hilux rear end after cutting all the mounts off and paint stripping it. Started to make up some new bits and pieces, new pan hard mount and pin waiting to be welded together Sort of how it will look once together. Different length spacers to get a bit more clearance around the diff housing. New shock mounts machined and fab'd. These should be a fair bit stronger than factory, so if I want to go to a coilover setup in the rear I wont need to make any further changes to prevent the shock mount from bending or snapping off. Heres all the new brackets and mounts I had made tacked up on the diff housing. Got some more filler wire and finished welding up all the new mounts. Cleaned out all the grinding dust, masked it up and put some paint on it The Hilux diff is quite a bit bigger that the 86 gear, so with the ride height Im running I was having a small issue with clearance. The diff head was hitting where the factory 86 diff bump stop would be just at the end of the drive shaft tunnel. Forgot to take some pictures before hand, but you can see the shiny mark on the diff head Which was hitting this piece here I cut out to make room. Got about another 20-25mm of room to play with now, might be able to get a little more tweaking the adjustable arms also. I was lucky for it to be double skinned where it needed to be cut so I didnt have to weld in anything to cover up holes etc. I put some sealant on to stop water from pooling between the two skins. No picture of the painted outcome though1 point
-
Finally legal . Now rocking Facelift Chaser bumpers, Hakosuka spoiler and a small tidy exhaust tip. Got some heavy weight springs eyed up to go low down.1 point
-
Matchings idea1 point


This leaderboard is set to Auckland/GMT+12:00