
Leaderboard


Popular Content
Showing content with the highest reputation on 01/24/16 in all areas
-
11 points
-
today i sanded, then painted the bumpers. they came out pretty good. also it was hot in the shed today. 2016-01-24_02-38-41 by sheepers, on Flickr 2016-01-24_03-43-38 by sheepers, on Flickr 2016-01-24_03-43-46 by sheepers, on Flickr 2016-01-24_03-43-56 by sheepers, on Flickr 2016-01-24_05-16-28 by sheepers, on Flickr9 points
-
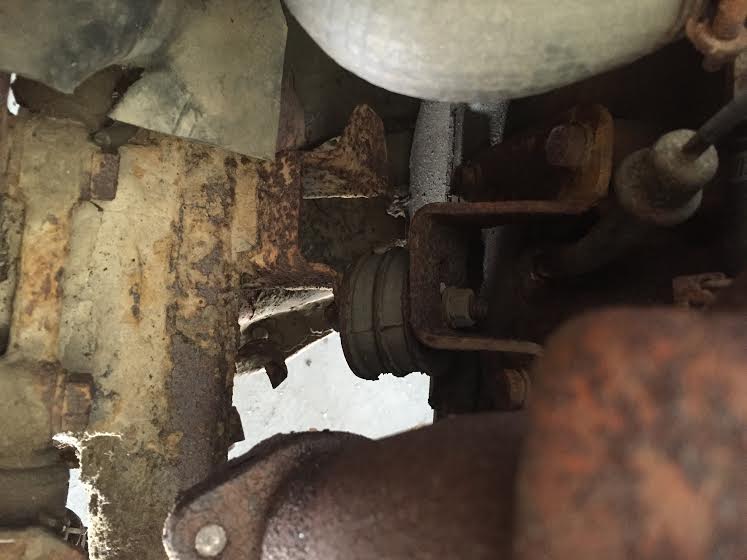
Waiting on brake bits ive got the drivers scuttle up to here All solid now - I made the scuttle from about 4 bits due to the compound curves and lack of stretcher, also remade a couple of the screen trim holders. There are a few sections in the A-Pillar too, but i didnt have a camera on hand while sorting them out. *-*-*-* Then Pistons for the rear brakes turned up For future reference package listed Triumph Dolomite, Morris Oxford/Farina (fronts) as well as the seller listeing them for FIAT 1500S/2300 etc. All new parts excepting the handbrake pads which ill sort out later (400 euros!!!), reassembled them with the rubbers kit i go before, new flexi line, bled up and fitted (* hard line joining the two halves is installed incorrectly in these pics - it crosses over with the port the bleeder is in so it doesnt rub on the rim ) And then stole the battery from the 125, fired up off a can of gas in the dash, and fairly uneventfully, drove it down the driveway, up to the end of the cul-de-sac and back into the shed like it aint no thing. No vids or anything unfortunately, but some neighbours up the road just about got themselves run over to come ask if it was a Super Minx Ill fix the roof rust first then I need to start thinking about chopping bits off the parts car to finsh this side which is the bad one.6 points
-
Discussion Thread Posted 26 August 2012 - 05:37 PM this is my new xw project, have had it for about three months, have just started stripping for a quick rebuild, not going to go too hard out on this one. will update this page with whats going on if anyone is interested???5 points
-
When out to this today - a small selection of OS cars - some familiar faces as well! 427carguys fine Italian steed IMG_6199 IMG_6210 IMG_62084 points
-
Bought some of these trumpets. Don't worry they aren't staying this colour. Hoping to pic up my throttle body flanges and the engine side tomorrow. Arrange my friend to tig them together with short radius bends. Then start on the linkages.4 points
-
Here's some details on my MK2 Escort Denim pack project. I bought it pretty rough and had some minor rust cut out and repaired. I was undecided about going turbo with it but I'm going to bite the bullet. The car will remain the same on the outside but by the time I'm finished, will hopefully be packing close to 300atw on pump fuel & octane booster. The main parts aquired so far: Pinto engine Custom stainless turbo manifold Garret ball bearing GT2560R Sierra EFI inlet manifold YB Cosworth Pistons & rods Reinz standard YB head gasket YB distributor & phase sensor Holden LS1 coil packs with relocation bracket R31 Skyline diff, handbrake assembly, tailshaft end W58 Supra box FG XR6 turbo intercooler Discussion thread here //oldschool.co.nz/index.php?/topic/51642-rhubarb77s-1980-escort-denim-pack/3 points
-
Please make expressions of interest for a casual farm based sausage fest some time in the next few months. Date to be confirmed. Could be as soon as Feb, where the days are long and hot, or some other time. Come to the sunny Eastern Bay of Plenty, 15 mins out of lovely Whakatane. Flat clean grass if you like to camp, a few beds and floor space if you prefer indoors, a shipping container if you're Manu. So yeah, cook sausages, walk around, look at wildlife I suppose, touch a tractor or two. Let us know you're thoughts and ideas for this event. EDIT: AIMING FOR EASTER WEEKEND. Stay as little or as long as you like. 25-28th March.3 points
-
No hoist (thought it may have arrived) but got a bit done. Jacked her up and removed headers (sound but need painted) drained and removed radiator and hoses, starter motor and clips/pipes/wires etc. I cleaned up a few bits, 40-odd years of gunge washed off with petrol and a brush - I'll check bearings/brushes etc and paint these before returning them. I was going to leave the trans in, but there are a few drips underneath, might be just as easy to pull them out as a unit and separate to work on. The guts are pretty much ready to come out, we'll see how things go...3 points
-
Chased a diesel leak for a while. Thought it was the hose clamp, tweaked it, got worse, new clamp and worse again, replaced rubbers off tank, leaked, turns out a steel line had chaffed through on the chassis. Also slogged out the bonnet hinge holes to try get one side sitting down better, gave all the rivets a beating and tightened it up great. Not nice but it's better! Front gaps are fairly large. Gave it a big degrease and clean under the hood. Had to whip out a front shock as the bottom bush had walked out and the shock was rubbing on arm. Easy fix. Then got a new decent Fram air-hog air cleaner and moved it out into the open with two 90 degree joiners and 10in of down pipe. I liked how tucked away and tidy it used to be but ultimately not ideal. Has made a noticeable difference in pickup and pull around town.3 points
-
so yeah, this thing got mentioned to me by a friend (seen88 on here) he told me its a kp starlet with full ae86 running gear for a vert reasonable price. I went and checked it out, and it happend to have everything that i was told, Blue top 4age, t50 box, t series rear end (unshortend sadly) adjustable front suspension, adjustable lca's adjustable caster arms, heaps of other random stuff. the story goes the guy that built it had a starlet rally car that he had but the shell was fucked, he brought this shell and slapped everything into it, then gave up? i guess... When i picked it up i was told it was running but it no longer does so i will hopefully sort that all out today! plans are -slam -paint -wheels -cert -do drifts all the bad stuff is annoying though. -yuck flared guards -Chinese fender mirrors -really bad bright yellow paint -genreal rally spec stuff that i have to rip out and redo to get legal -non matching seats (different bases to backs) I have already ripped out the monster tacho, installed my nardi and random little gear knob. I will modify my seat rails to suit my fixed back bride and i really want a tidyer interior with no screw holes in the dash.2 points
-
Posted 10 July 2015 - 06:26 AM will get some pictures of the asked for "460 porn" over the weekend, in the mean time here is some of the suspension, brakes and steering components that are going in, needed to fit the rack to see if it would clear the trans. which it will. may need to lift engine back out and fit a sump just be sure that it will also clear, still not to sure what to do with the headers, the xr-y pacemaker 4-1 will be the easiest to fit, but just don't really look right, sort of too close to the block not really taking advantage of the big notch i cut. so could be some custom 2" ones being made. Posted 12 July 2015 - 08:07 PM done a bit on the old wagon over the weekend, got the front suspension bolted in. the new towers seemed to weight, very stiff. not too sure if the shocks on these struts are adjustable. are most likely one of the first sets that RRS released. got them second hand. anyway still not sure what to do with the exhaust headers, dont really want to chop up my 1 7/8 pacemaker headers. being thinking about trying to find some BB chev ones and chop them up or even make my own. so being doing a lot of thinking/drinking and maybe this build needs to go a bit more extreme. so am off to the main workshop to get some bits. any guess's what i will come back with?? Posted 21 July 2015 - 10:48 PM have started getting the 460 ready for assembly, all cleaned, this engine was in my xw sedan and would say it had only 30 hours running max since being rebuild, so the bores are mint, is just getting new bearings. stronger con rods and flat top pistons, turbo was just a dream, now that looks good Posted 19 September 2015 - 03:52 AM Right done very little on this project for a while now, work has been full on, after dicking around trying to fit the cleveland headers past the steering rack i have decided to bite the bullet and make my own stainless headers. is going to work out about the same to make as carbon ones and have them HPC coated. so bought $250 worth of 304 bends after work on Friday. which i would say is about 1/2 of what i will need. going to have to get some new flanges cut as the ones i have are carbon and don't fit very good. will do a drawing and send over the road for laser cutting. still dragging my feet on the body work, just don't enjoy it so just do little bits then get side tracked. At least i got the starter motor problem fixed, had to get a new 2 kw adjustable position unit as ever starter i had would not clear that fucken steering rack. am hoping my sump will also clear as that is not fitted to the block yet. still not started putting the engine back together yet, but not going tunnel ram anymore just too high and harder to get a cert, plus if it gets a cert with it fitted i need it fitted ever time i go for a WOF. which is a bullshit rule here in New Zealand. got the same problem with my xf ute cert plates states 14" rims and i run 18" on it 99% of the time. so ever 6 months i convert it back to what it says on the plate then go home and change it all back again. not a big deal but just a pain. anyway wagon is getting there just very slowly. Posted 01 October 2015 - 05:32 AM been doing a bit on this project this week, fitted guards and made new mounting points at bottom near sill, fitted grill to make sure it would fit etc, got some more exhaust flanges, ordered some new mufflers, trial fitting center console and shiftier. will start on headers this weekend Posted 15 January 2016 - 06:39 PM bit of a update on this thing- back on the body work again, epoxy primed the body again then have sprayed the worst areas with evercoat feather fill, block sanding that back and is not looking too bad, looking like the roof and rear quarters will need a few more coats. plan is to try find a painter that will put the top coat on for me, if not will have a go myself. also did not have much on at work this week so played around with some fab work on my headers, flanges come up not bad, will make the collector and most likely all the exhaust right to the back, have all that fixed in place then bridge from flange down to collector, but that could change,2 points
-
Heavy interest in long days of reviving a tractor or two2 points
-
Wow. Crikey. Its been a while aint it. July was the last post. A few things have been done since then so I better get typing. First off. Come February we will have owned the land for two years and it will be 14 months since we moved out to it. Its settled in nicely and we are getting a good feel for the seasons and all the little things that happen out here when they change. Starting to get to know the locals quite well and have had lots of work coming into the workshop from just word of mouth which is awesome. Hannah is working a summer season job down at the beach front and when thats over we will be doing a flyer drop around the valley and surrounding areas to put out to people that they can get many sorts of engineering/repairs/bike repairs/advice on cats/great coffee from us* *my coffee aint that great.. In the start of spring I spent a morning going about the land taking photos. I tried to compose them as close as I could to the original photos we took as we cleared the land. Some are ever so slightly off. This was because things have changed so much that even I struggled to work out where the original photos were taken! I'm pretty happy with the resulting before and after collection so I'll put them right here. I have tried to list them from the drive way entrance and then heading down the drive to the north end of the property. The driveway entrance.. heading up the drive.. The highest point of the driveway.. I like this one.. looking down the driveway. Such a difference. Next up- one of the 5 old caravans that got taken away. This one was surrounded by lots of junk/scrap steel etc. Now just trees and some sweet old gates we saved. The mountain bike track I started heads in just around there. These next ones are looking out from about where the cabin veranda is.. Looking back towards where the cabin is now. Thats my brother duncan trying to locate where the Gravely mowers might be. We found them a few months later. and now.. Hannah wondering WTF... This next one is from the first night we stayed over to check the land out. We had pushed the driveway gorse down by throwing the van into 4wd and just driving over the top. Here down at the north end I was just laying back in the grass chilling and imagining what the area could be like. There is now a bit more parking area.. The following morning of the first night Hannah chilling in the morning sun with a coffee. We didnt really know what this area was going to be like in two years time.. This is it. you can see we kept the little Kanuka to the left. Its thriving now! The main yard was not much of a yard back then.. This is better !... Our first morning.. two years later.. I'm really glad I took so many photos before we cleared it all. Its great to look back at. Moving on to recent times. Not long before xmas this happened.. https://youtu.be/uaAHS96LGP4 We had been wanting rid of that 70 plus year old bugger for ages and its so good to see it gone. Shane (sideways sickness) and Greg (64Valiant) came round and got to see some of it heading to earth. Then we had a nice BBQ. Big thanks goes out to Shep for chopping it down. No way would I be doing that job. For starters I dont have chainsaw with a metre long bar! Nor the skill or experience. It was great fun just helping out and watching. We have many more big pine trees to come down over the next couple of years but this one was the one I wanted gone now. The view afterwards is heaps better!!!. Plus we now have a sweet as 8 metre high trunk to build a cool viewing platform on one day Before.. After.. Then for the end of the year we thought we had better crack on and finish the bathroom before my brother came over to stay. We needed the shower going for him so we got stuck in and finished it just before xmas eve. It still has some little finshing touches like light switches, extra lights, better prettier shower head, hand rail up the steps etc but its pretty much done. It works really well however I reckon we'll get a new califont for winter as the old Palomar is a bit small on heating capacity. We'll see. The compost toilet is working really well and still doesn't smell. Ive not yet even wired in the fan. Happy with that. Its taking about 3-4 months to fill a bin. Will put in a third bin soon and then start a secondary outside composting area away up under the eucalyptes just to be safe. The bathroom lights and shower pump are running off the cabin solar panel setup too and we have run wires to add a couple of outside lights to light up the pathway from the cabin to the bathroom. I just have to make some lights yet. Anyway.. some photos of the new bathroom ... We moved all the various piles of gorse and Kanuka into one place to chop too. Here you can get an idea of the amount of Gorse we cleared.. We have also started a vege garden and although a bit late its going well. Its certainly not a massive affair like our neighbours but we'll learn and it'll get bigger/better. The strawberries all going mental and its great to have 4 or 5 fresh strawberries on the cereal in the morning. Our fruit orchard trees are growing well and seem pretty happy. We'll plant heaps more this winter. The olive tree seems happy as so we'll plant more of them along the driveway. Finally Hannah spotted an old picnic table offered for free down at someones holiday home so we grabbed that. I told the owner we had been after one for ages so he was stoked it was going to be used. It looks the part and is an ideal little spot to chill. Thats it for now. I hope you enjoyed it. Im pretty damn happy with it all and now the rush is sort of over (for a bit) we have both finally been enjoying more of a summer recently of just swimming and cycling. Next big plan is the mezzanine floor in the workshop but that will be a winter thing. Then more cabins! Oh and bike tracks. Oh and spa pool. Damn...2 points
-
In a rare moment of lucidity, I realised the poor old girl lanquishing in the shed under a pile of parts and gathering dust had just celebrated her 45th birthday. She has been parked after overheating a couple of years ago and being put in the 'too hard' basket and forgotten about - apart from my girls who love playing in the 'big car' in Dad's shed. Despite having umpteen other projects on the go (plus wife/kids/work/sports) I decided I needed something else to spend time/money and to skin my knuckles on. Shit pic but it reflects the loss of dignity of the old girl being parked up and used as a bench... It is a factory 302 Fairmont, C4 with column change and fold down seat between the buckets. Had her since I was 18, and despite the mistakes of youth, I still have original 2 barrel carb, manifolds etc tucked away. Now, I could just sort the overheating issue and drive her, OR I could take the chance to pull the engine, tidy up 40+ yrs of use, and add some fun bits while I'm at it - so she can gather her skirts and keep up with the brash young tarts of today. Seeing a 2T engine hoist on sale at The Toolshed with free delivery made my mind up, so I ripped into it last night...1 point
-
Hello everbody well as you will see i have copied this over from another forum, just was not getting any feedback. plus this is a bit closer to home. being a very long project, as been through many changes over the years, just want it to be over, but have started and most of the hard work has been done, so will just keep going till done. Build Thread1 point
-
next meet is gonna be the scope classic. everyone happy for a meet up on the Saturday?1 point
-
Scotty and I have decided that we are having the meet at the groynes some time seen, you will see why when we have it1 point
-
Seat acquired and installed yesterday in the blistering sun. Have had the motorcycle throttle up and running for a couple of months but haven't taken any photos of the process. I used a cut up bmx handlebar which is bolted to the steering column and used a hole saw on the shroud and had the cable custom made by a brake shop in Mt Eden1 point
-
Interest expressed1 point
-
See y'all at 3pm!1 point
-
Posted 18 July 2014 - 09:43 AM well what project, being too many years. today it many go into primer. got to get err done. whole drive train is changing. out with to six and in with some cubes. Posted 16 February 2015 - 10:24 PM looked so good in the first photos, wish I had just done one bit at a time. the thing has been a major project. Four years and still not even in paint!! But have changed my mind on the whole driveline, suspension everthing is coming out. bit of a shame as i have poured a bit into that six. will post a vid of that running before i try to sell it. Posted 16 February 2015 - 11:07 PM have gone too far with this now to turn back, sold the diff off about 9 months ago. which is a shame cos i need it for another car. just got to put the hours in on the body to get it finished. is mostly in primer. just blocking it back as we speak. have the paint which is like the green in the pics of the xy sedan. going to paint it myself. but before that will rip out that crossflow and box for something alot bigger. be happy to get my money back for the intake,cam, roller rockers etc. not to sure if it will be manual or auto yet, the manual i have with the engine i have in mind would need a remote clutch master cylinder, which is a hassle. Posted 04 April 2015 - 09:39 PM all righty then back into this piece of shit, have 10 weeks to finish it ready for the winter drag series at fram autolite dragway in meremere auckland, can i do it? hell no err yes. not much to do- paint it, build a engine, notch the front towers, put it back together, get a cert have sold the cross flow engine, will keep the T5 as a spare for the xf ute, diff is long gone. let the work begin, UFE, on 05 Apr 2015 - 12:09 AM, said: oh this is real mate, no tv bullshit here, just me and the cat. well have been working about 4 hours a night since the last update and looks like i have gone backwards. really is the body were most of the work is still left to do, emailed a young car painter down the road from were i work to see if he was interested in painting the wagon, outlined what was wanting from him and what products were being used on the car, have not got a reply yet, could have put him off i think. he is going to paint it just does not know it yet. also emailed the company that i get my pacemaker headers from and was told 8 weeks and $1230 for a set of 2" cleveland headers. cant wait that long so looks like will be making my own. ,weather is turning to shit here for the rest of the week so may not be able to do much priming, still got to pull the crossflow out for the new owner. got a bit of cutting and welding do in the engine bay, about time for a new vid i think?? Members 170 posts 0 warning points Locationnew zealand Posted 27 April 2015 - 01:41 PM heres some pics of were the car is at the moment Posted 27 April 2015 - 02:26 PM HOLE [url=http://s1056.photobucket.com/user/guidohatzis1/media/020_zpsl3rtqro9.jpg.html][/url gone to get gas torcth. Posted 27 April 2015 - 07:49 PM bigger hole plate 90% fitted, template was no were near the correct shape, Posted 28 April 2015 - 07:25 PM just some final grinding and this side should be done for fitting, ended up cutting no were near the template, not sure if they updated their template with something better. pretty much used the whole plate, bit short in a couple of places . Posted 30 June 2015 - 09:08 PM heres a few pics of the towers welded in, plus a few of the dummy engine in place for mockup of parts etc. at the moment the engine has no sump bolted on, next step is to fit one to see if that clears the rack. my plan was to chop up a new set of pacemaker headers but they look like they may hit the rack when fitted. so if that is the case then will make my own 2" headers to suit. lots of fun not. not to sure if the ram will stay?? think it is abit much?? diff is also in, ended up going with a 3.7 tru trac.1 point
-
Posted 30 August 2012 - 11:21 AM she has got abit of rust, am having to do an inner and outer wheel arch sections on the drivers side, both sills, both bottom sections in rear guards, a few patches in the left handside rear wheel arch, and about 10-15 small to medium patches in the rest on the car. but overall not to bad, just waiting for the diff to come back from the shop. am fitting an LSD to a xy housing, should be fun. Posted 06 September 2012 - 08:20 PM some pics of the t5 gearbox for the wagon, used a single rail bellhousing, converted to hydraulic slave cylinder using the fork and pivot from the standard three speed. bit of welding and grinding was about all it took, will make the hole were the fork goes smaller to suit the original three speed fork boot, tidy up the welds by blending into the casting, a nice coat of paint and nobody will ever know what was done. am trying to find a ea-eb manual gearbox crossmember to chop up but am not having much luck, so anyone in nz has one then let me know. still waiting for the diff to come back, once the box is in the next job is to fit the new front end( xf discs callipers etc)1 point
-
So found this hiding on page 3. The bushes on the above post have all been fitted to the V8 k frame, decided against powdercoating the subframe and arms as realistically the only time it will get seen is when I roll the bloody car haha. Anyway took the family to Kumeu in this, and my wife decided it was too fumey which made her nauseous and that it was going to be her last drive in it until the V8 was installed (because that will be less fumey - tui ad right there) so while there are no pictures in this post, following posts should include photos actual work occurring on this thing, with a goal of having everything in and running by the end of April1 point
-
There's always one..1 point
-
So how much extra horsepower does the trd badge give you?1 point
-
1 point
-
Then this IMG_62111 point
-
i got the extractors HPC coated so they would look alright. and now they do look alright. 2016-01-23_11-27-36 by sheepers, on Flickr 2016-01-23_12-16-20 by sheepers, on Flickr1 point
-
Quick summary, it sat unused for several years while I was at uni (ta mum) and I got her going again when she turned 40 (cheap rego). I ran it for a while but it started randomly overheating - had radiator checked, new hoses, thermostats, water pump etc etc and with no evidence of a blown gasket/cracked head and with new kids I sort of just gave up... Bored .30 thou over Holley 600 vac sec Edelbrock RPM Air gap inlet Pacemaker headers MSD dizzy I'm thinking I'll pull the donk, remove the stuck coolant drain plugs and flush the block, and rather than dick around with the cast heads I'll chuck on some alloy heads and roller rockers. Will mean I'll lose the factory look under the bonnet but the MSD has already sort of done that. Will update when hoist arrives and I've made some progress...1 point
-
I had made a list of jobs that I needed to carry out on the Blue SD1, but I hadn't driven the car let alone worked on it for at least a month. I fired it up, fixed a fuel leak and drove it to the Oldschool Meet on Wednesday. I then spent a bit of time working on it yesterday and managed to complete a few jobs: - Cleaned the car properly (and then messed it up again by cutting wires, throwing tool around and eating my lunch and dinner in it) - Replaced the broken wiper stalk - Replaced the broken buttons on the instrument cluster - Sorted out the flickering oil pressure light (Pressure is fine, the sender was at fault) - Sorted out the red temperature light (used to illuminate at random, again a sender fault) - Fixed the buttons on the trip computer. They're pretty good now, I just push them at random for the hell of it because I'm an 80s Executive etc. Just need a car phone now. I'm putting some rear tyres on it today and possibly sorting out the horn. I removed the Air horn setup and am going back to twin electric shell horns for that low tone. Here's a shot from South Auckland Bristol with another English car: 603 by Neal OnTheTree IMG_3948 by Neal OnTheTree No more airhorns. They weighed an absolute tonne. It's a good thing I removed them though, as the car is such a lightweight performance vehicle where every kilogram helps... IMG_3951 by Neal OnTheTree Disconnected the alarm and associated wiring. I kicked the siren away in triumph but it speared off the side of my shoe and landed back in the car (sunroof was open). IMG_3953 by Neal OnTheTree IMG_3955 by Neal OnTheTree IMG_3956 by Neal OnTheTree All fixed: IMG_3958 by Neal OnTheTree1 point
-
Figured out how I can crank the engine and see the timing marks at the same time.1 point
-
Howdy, Went to the Kumeu show on Saturday for the first proper road test and she drives suuuuper smooth. Sits at 60-65mph no problem, quiet as with nice temp and oil pressure. Suspension and steering are awesome but gearbox is a bit heavy and crunches going to first or reverse sometimes. Picked up Evan on the way and tried to beat the heat. Met up with the other oldschoolers, managed a park a couple of cars away. Because nobody likes a picture-less update: Photo cred to Karljsw from the Z club. Got heaps of different folks oogling even at a more V8/American/Muzz event (more than I expected anyway). My folks also got a new pup so I thought I'd get the token "bitches love datsuns" photo: Also got time off and signed up for nats so SEE YOUS THERE AYE1 point
-
I shook V8Pete's hand. Clammy but I'll always remember the first time.1 point
-
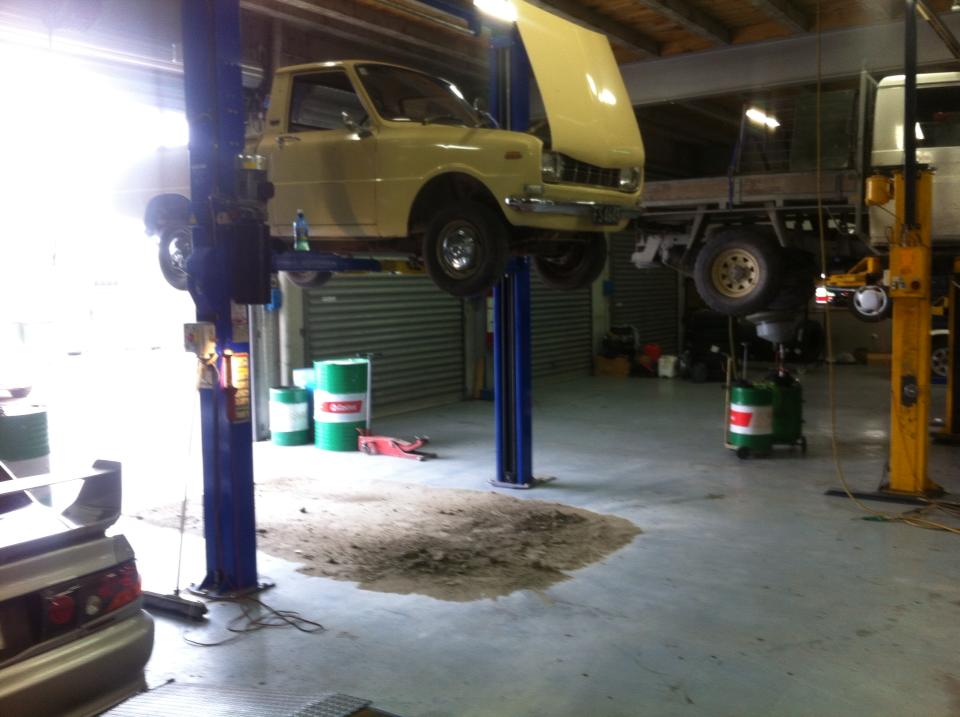
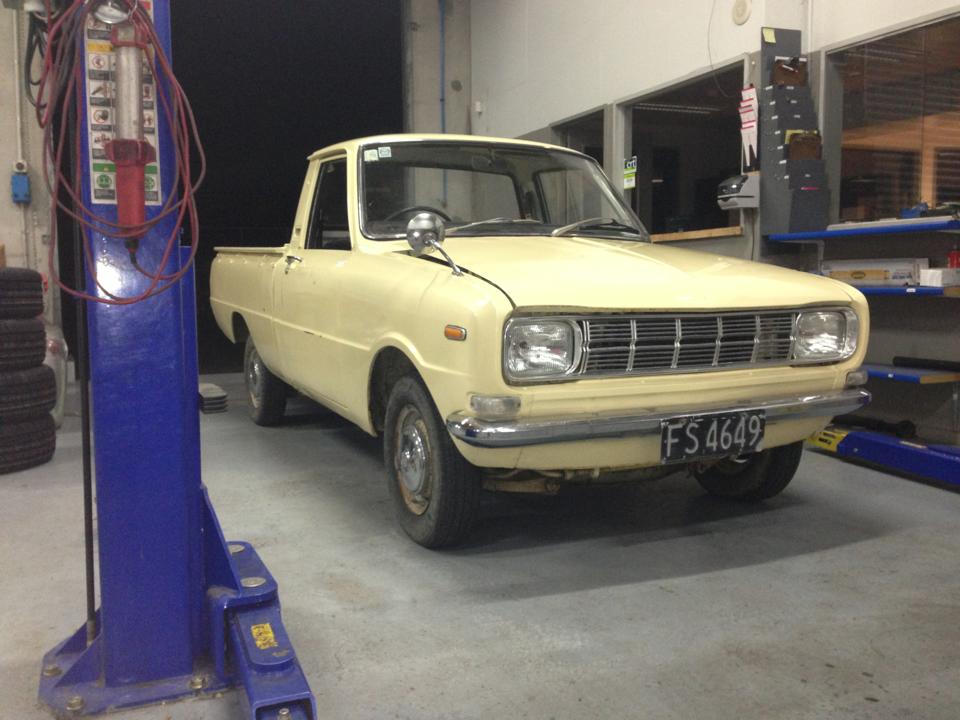
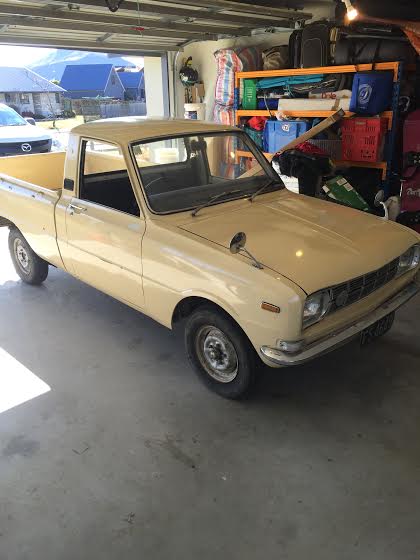
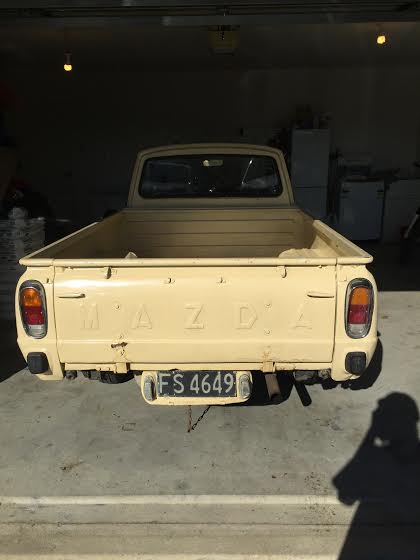
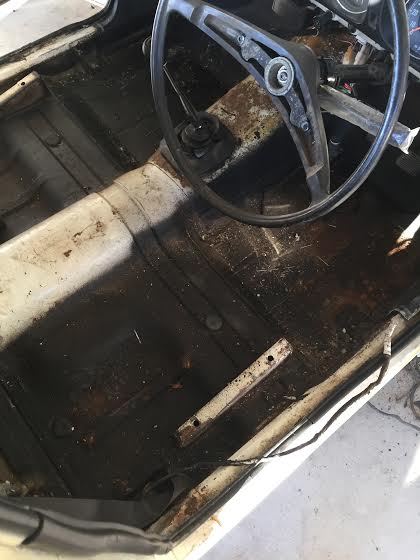
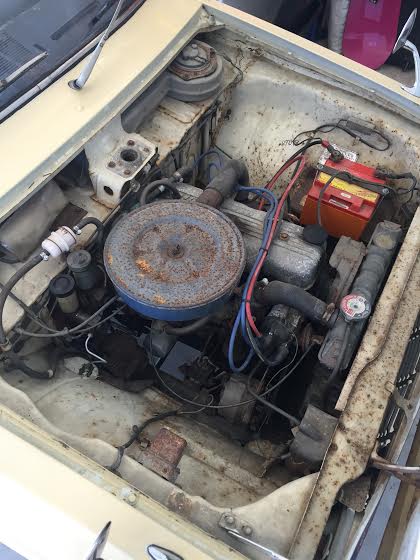
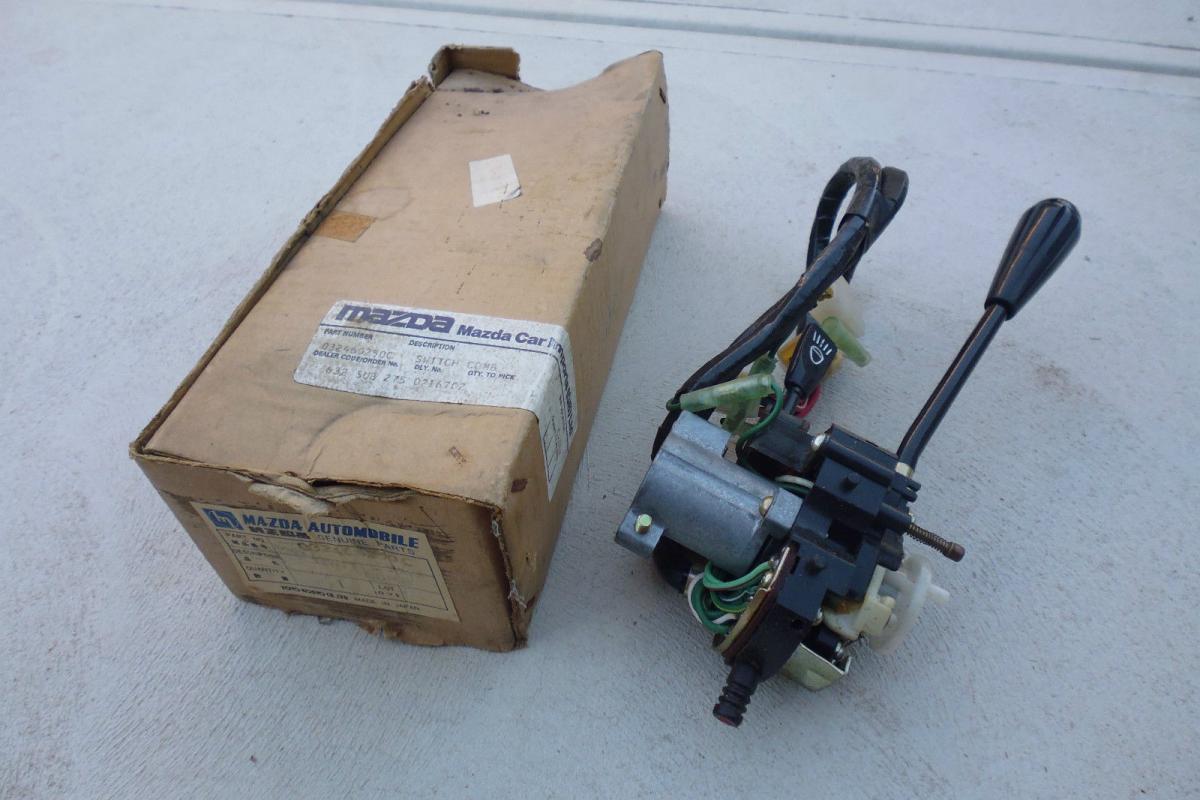
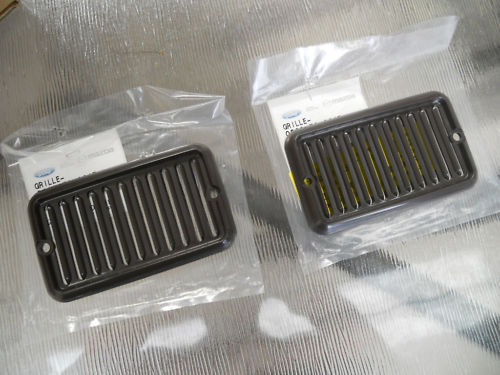
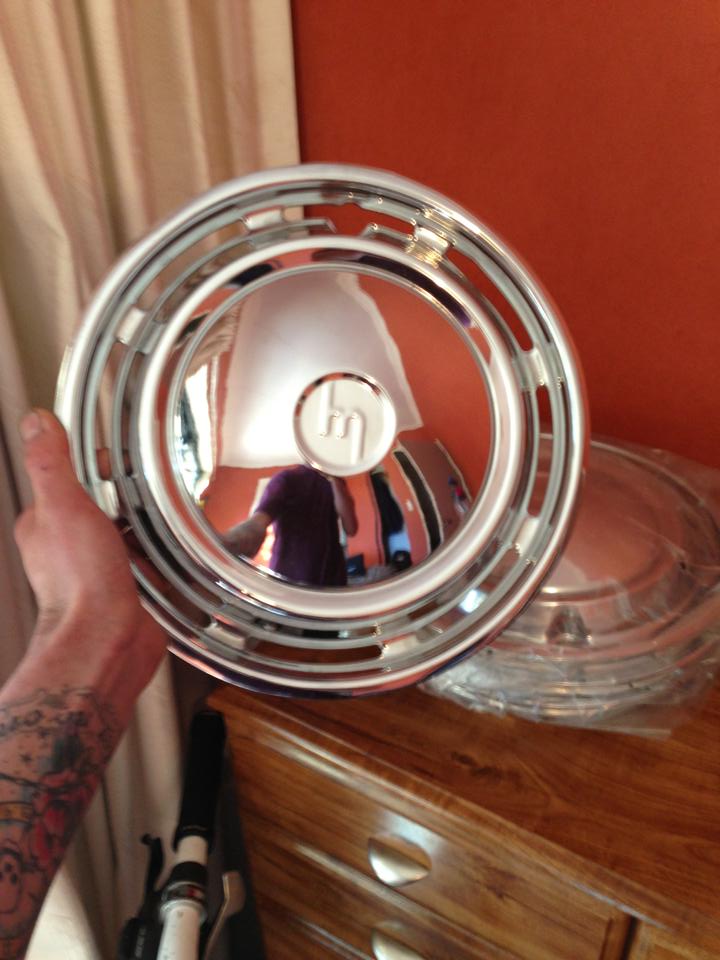
So I've been floating around these pages for a while now, Had a build thread on here of my 12a 323 wagon. Moved down to Wanaka, left the 323 in my home town of Ohakune. Long story short, the newly built 12a had a knocking rotor bearing so kinda lost all motivation with that old girl. While all this was going on i herd about a Mazda 1200 ute that was up for grabs in Queenstown. So went to check it out, turns out it came up from Stuart Island where an old fella had sitting in one of his sheds on the farm for many years, sold the farm and whatever was in the sheds came with the farm. I had to have it! So i cut a deal with the new owner of the farm and took it straight to work got it running better, cleaned out about 3 tons of dirt that was everywhere! Figured i was just going to get it going, wham a new wof on it and just use it. But time came to put on a new wof and rego had lapsed… Shit. Old owner said it was on hold but its not, Should have checked but was far too excited about this wee girl! Seeing as i need to revin the old girl now i figured id go the whole hog and go balls out full resto. Slow going but any who heres what we are all here for, Pic's!! Some of the dirt! Hard to tell but has had new floor sections put in at some stage. 323 engine and 5 speed, Will be ditching this in place of standard 1200 ASAP!! Stuart Island spec engine mounts NOS Combo switch $$$$ NOS Pillar vents Set of NOS hub caps, Not 100% on what they are off but they are badass!! Discuss://oldschool.co.nz/index.php?/topic/51587-barn-find-mazda-1200-ute/
 1 point
 -
i did a few more bits and pieces on the car today. i lengthened the lower control arms on the diff to get a bit more clearance between the driveshaft and the floor and a few other little things. then i lowered the car off the jack and realized that the car was sitting lower on one side than the other. a quick measure confirmed it was 20mm lower on the right rear. i jacked it up and took the rear wheels off and found that the right rear spring perch had unwound itself and was 20mm lower that the left side. all of a sudden all of the weird things the car had been doing made sense. when i moved the tunnel up at the back to clear the bigger diff i left lots of room so the driveshaft/diff nose would never hit the floor. but somehow a couple of months ago it did. that was really strange at the time. i couldn't understand how it had done that given how much room id made for everything. there was other stuff too, like I've been adjusting the panhard bar to stop the outside wheel from rubbing but i seemed to be moving it backwards and forwards and not getting a consistent result. it always touched on the outside. i don't know how long its been like this but given the amount of crap in the threads id say a long time, perhaps over a year. its been hitting the bump on the right side almost constantly which explains its weird feeling turning left. i also wonder if the weird experiences i had with the T1Rs weren't exasperated by this? who knows. i can't believe I've never noticed it before. once i measured it it was obviously on the piss. i guess I've been fairly focused on getting the red car done and not really paying much attention to fuck all else. anywho, its fixed now and feels like a completely different car. a better one for sure.1 point
-
Change of plans. ..... This is happening1 point
-
And a dyno run. Low boost/High Boost. And I didn't mention I messed around with an aquamist water injection system. The dyno guys tried putting straight E85 instead of water in it. Extra 20KW on the same boost! But the flow from the injector nozzle was not consistent so they suggested replacing it with a fuel injector. I'm not the best at brazing.... Making the fuel tank for E85 And an oil catch tank Baby fuel rail for the single injector.1 point
-
this one is looking back at the brake reaction rod, if you watch carefully you can see the front crossmember flexing under braking loads, and the engine moving around under braking1 point
-
Have got someone making me some new tie rods which take a factory inner tie rod end, and a commodore outer tie rod end which has the pivot point lower, which should reduce the amount of bump steer. and i went to OS drag day also, big surprise, if you do skids for ages, brake drums dont like it and get shuddery. luckily i have a spare set, put those on today. it did a 14.28 @98mph. it did have a couple of runs where it had a splutter- its either running out of fuel (it has a stock fuel pump) or the lifters are pumping up. i have an old camera that i "improved" the battery door on by bolting a bit of steel to it, which also makes quite a good mount when combined with 3 strong magnets, its interesting to video the suspension and whats going on when you drive it. Quite surprising to see the amount of movement- eg 0.37 there is 2 reasonably heavy applications of brake, you can see the caliper rotating the spindle- this is mostly movement in the brake reaction rod bushes, but the upper arm bushes move as well, and if you study it closely, you can see the whole inner guard deflecting. in this one the camera is mounted to the bumper iron looking back at the left front wheel1 point
-
Got her done over the labour weekend. When I was washing it before starting a big piece of roof lifted off, so that took a solid days worth to fix. Also popped the dents from the rear passenger door that have always been there. Picked a few scabs I shouldn't have but I'm happy with how it looks now. It was a bit of a squeeze in the garage but it was good to have cover.1 point
-
Suckle upon a picture of the car since I added the filler panel between the bumper and grille and splash guards under the headlights. Dane the good cunt hooked me up these, but only one splash guard and it was rusty. I made another one from scratch and got it fairly close. Dick job but got it together just before the rain fell and daylight ran out. Shows how bent the bumper is and still won't bring the grille into spec because it's pot metal, cracked both sides and never going to be right but fuck it.. Front much more stable and a lot less gappy now. Been too rainy since to paint in anything but black zinc. Mint16 scored me a steering bearing from eBay cause I'm too scared to online purchase. It will eradicate the 360 deg Inch of slop I have with the wheel inside the column. Will be ultra lush. Bridflu has all shifter bushes on order so to make it magical feeling. I've made my own bushes but they fuck out fairly regularly because home made. Hoping to give it a QUICK flick of black before my wedding in a month but require my flatmate (not a mate, he's a scourge) to move out this week to free up space.1 point
-
Since I'm still missing some front panels it tends to shake around a bit. Aced a few sealed beams in the time it's been alive. I was out a low and a hi when I got the Wof so he gave me the benefit of the doubt knowing I had a pile at work. So I converted to semi sealed dealies. I decided to cut costs, I'd do hibeams in semi and re-use the sealed. Then discovered the semis are a flat glass, mine were curved. So I used semis. Then a hi and an opposing low wouldn't locate into the buckets. So I delved into the parts box and found another 5 to choose from, wit associate chrome rings to suit as it all are the same... managed to sort it but running out of daylight. And one light had to sit 90 degree clocked to actually locate because the bucket was for the other side and I don't have time to mod it with hanmer cruise tomorrow. Adjusted them quickly against door and reassembled. Much more light so far. Also took my OLD pcv valve from catch can pipe and replaced with one from brake booster, and put a new one into fresh booster. Noticed the car was smoking a bit and hadn't before I did the initial swap around. Backed the brake pedal off too, as it seemed slower than usual (haha!) but more so between gears and I noticed the rotors were hotter than should be. Here's a dumb picture from stock so I don't get flack for picture less updates!1 point
-
Brake booster failed a while back, still Driveable but was hunting for something else to rebuild while driving, then discovered the warrant was out so parked it, sent booster to safe-r-brakes and she came back mint! 2 day turnaround, not badly priced. Then clean sheeted a warrant today, so much wrapt. BRING ON HANMER!1 point
-
I got paranoid with the mrs driving it so opened up the restrictor a bit more. Since I added a new, twice as thick walled turbo drain pipe at least if there's too much it will drain well. The old one may have kinked with heat.. Will return to this trial phase once I can swap cars back with her!1 point
-
Well finally getting around to putting up some pictures Here's the engine after the rattle can rebuild It's still waiting on a few bits an pieces to finish it off but it's getting there. I was also lucky enough to be given a disc brake rear end for free, just had up go to morrinsville to and take it out of the car before it went to the scrappies, managed to shoe horn it into my work car (Toyota Yaris) So will clean it up, machine the rotors, get some new pads an hoses, and give it a coat of black, would be good if I could find an LSD centre, but I think that will have to wait until after the engine is in the car.1 point
-
Must be something in the air. Wanting to whack an sc14 on my MA 2L in my b16001 point


This leaderboard is set to Auckland/GMT+12:00