
Leaderboard


Popular Content
Showing content with the highest reputation on 08/09/15 in all areas
-
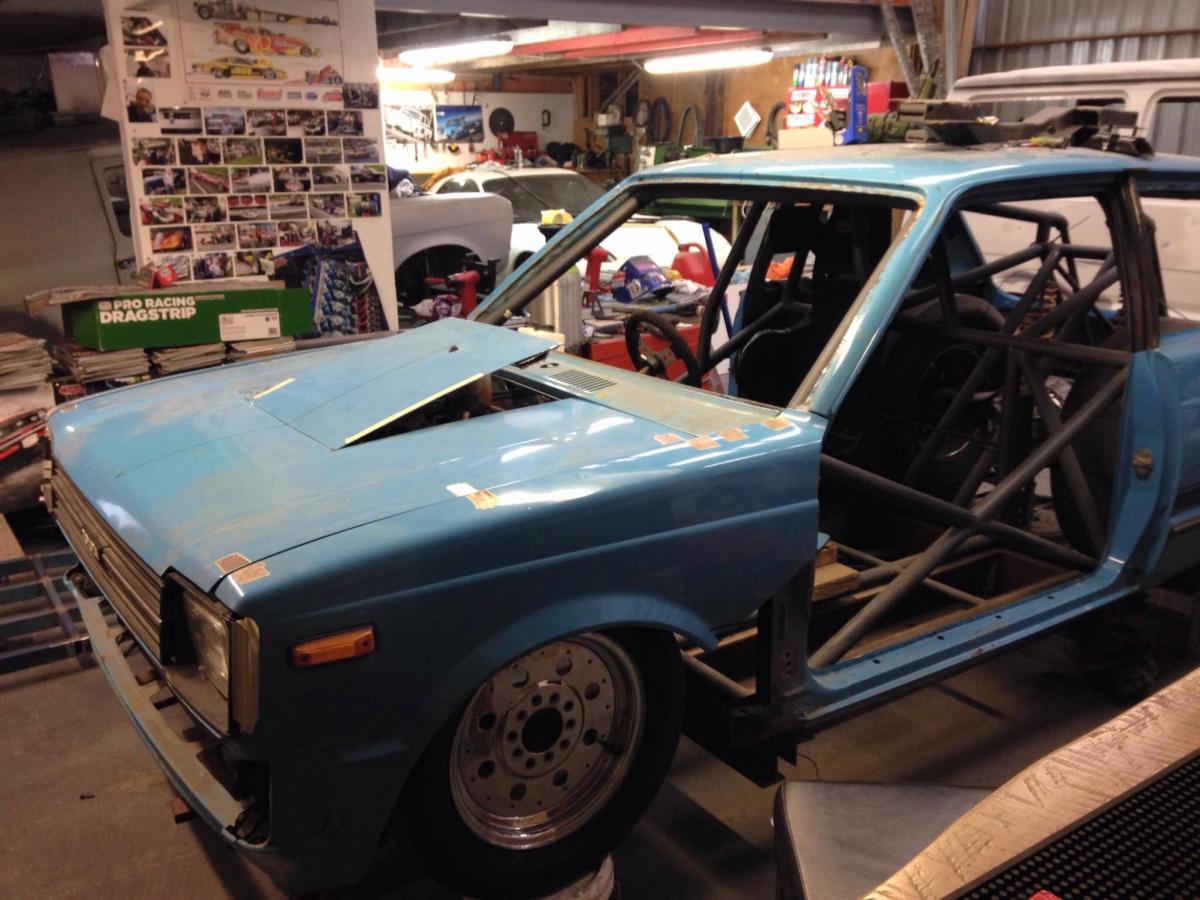
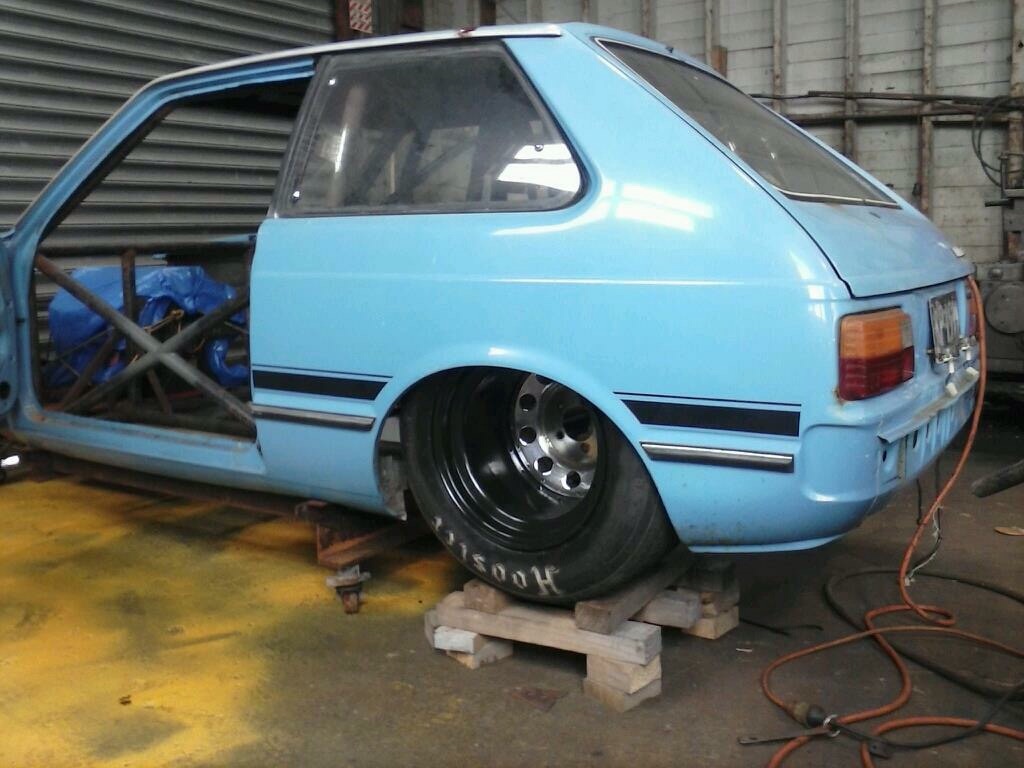
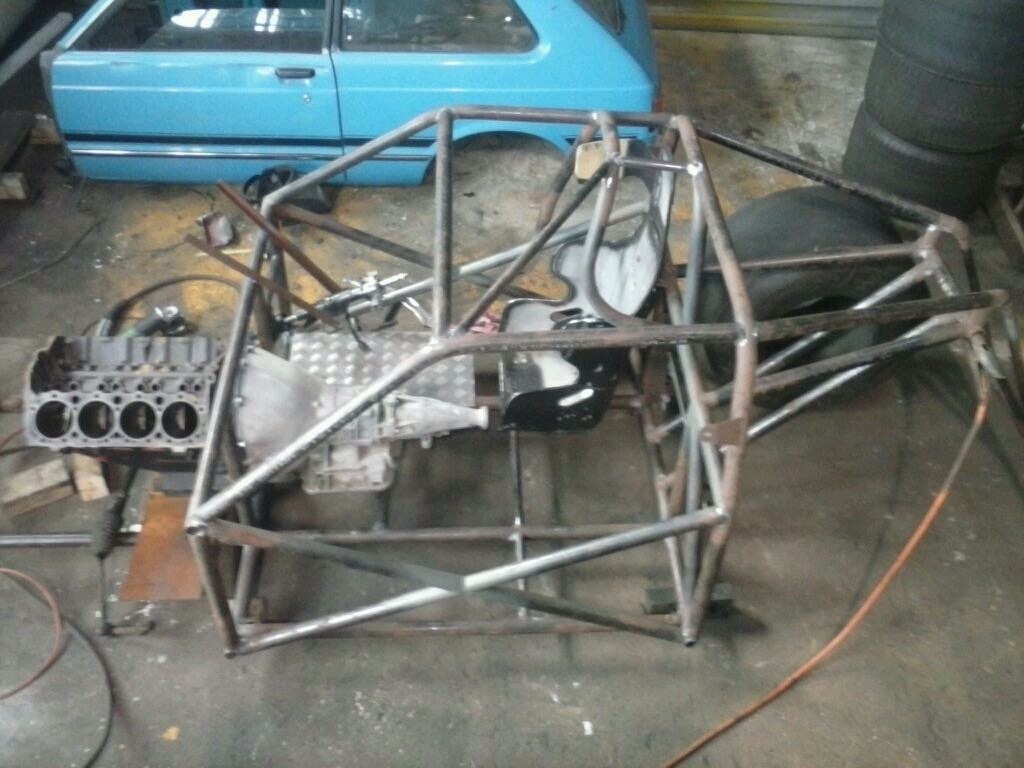
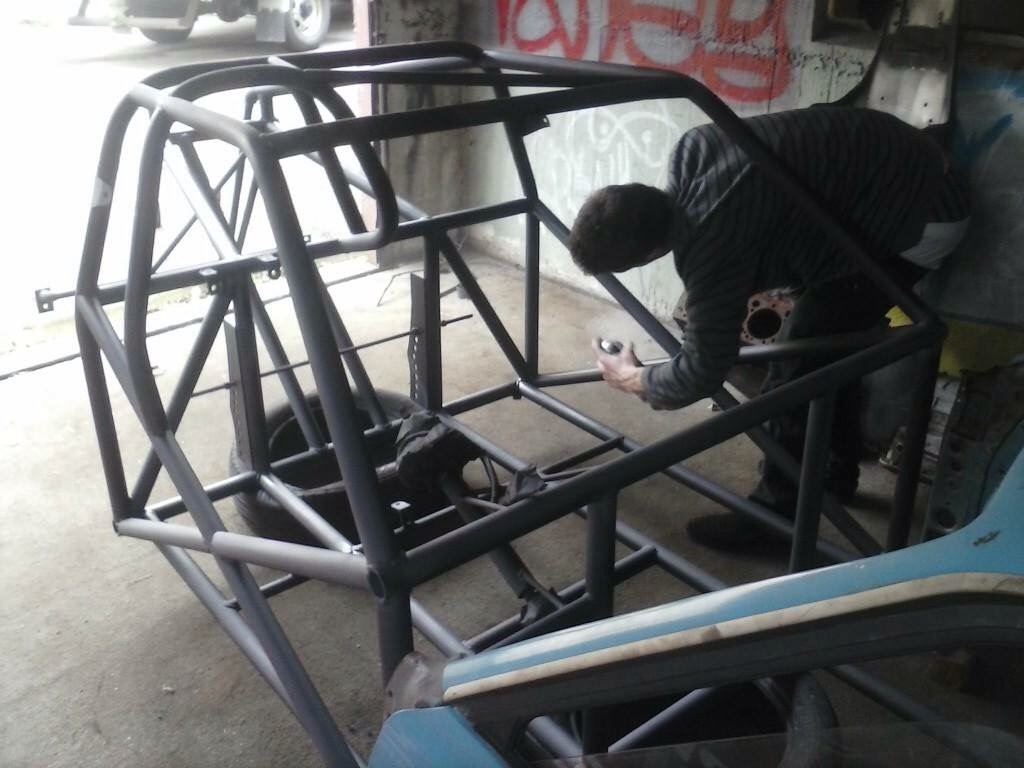
So I've finished off the fab work for the tunnel, seat mounts and fuel tank box. Really happy with how the seatmounts came out - if you know me I'm 6 ft 2 and when I sit in the driver's seat my shoulders are below the window height of the door. I made the seat mounts so they are wide enough to fit a 4009 wide head restraint seat as that is what I'll use as a drivers Seat and depending on who ends up in the Co drivers seat I have enough flexibility to put a bigger seat in if needed. Currently I have a skinny 4000 for Co drivers seat which will be fine for running in the car and getting used to driving it again. Made up sheetmetal box for fuel cell to be housed under. Made sure I made it the right size so I can fit a semi slick through the parcel tray opening so I can fit my tyres in the back, drive to a race meeting then drive home. Pretty happy with how it turned out. Made some straps for each side as it was the best way to make it fit up properly. Stitched the box in from underneath and will urethane-weld the top to seal it up. Looks like most of my floor has been replaced now.. Finished welding the tunnel into the floor. Pretty happy with how it turned out. Started to get good at welding panel steel. Had my subframes and swaybars sandblasted and yellow zinc dipped by the good old bugger at manawatu electro plating as opposed to just painting them black again. Really happy with how they came out. Got all the bolts passivated silver also for some contrast Subframe and arms assembled. Arms move freely now and don't bind up like they used to. Can't imagine how much better this is going to make the handling! So job for today is to get the chassis into the trailer so it can go back to the sandblasters tomorrow. Will get bottom of car re-sandblasted and will get them to prime + paint the underside and wheel arches. I've bought some 2k base coat white which I've had good experiences with so hoping it will be a hard paint for under the car. Plan is to have the car rolling in the next 2 weeks so I can put everything together for the move to the tron!6 points
-
So I bought my Century last year as a Christmas present to myself... Have always been into Jap Barges, owned plenty of Crowns, and two Nissan Presidents over the years. I live in Australia but it resides here in NZ for when I visit home. I had intentions of doing up a 1984 Crown wagon GS126 that I had bought earlier but realised that being back only a few times a year, makes this very very difficult, so sold it to Bogangeof ...this allows me to drag out the Century and give it some attention. The Century is immaculate with 46,000km , even the interior smells new, one is the more desirable VG45 (long wheel base model) I bought it sight unseen and flew back at Christmas to pick it up, drove it down from Auckland to the Naki, Old school 4.0 pushrod V8 means this isn't a fast car but a great cruiser and will accumulate speed without you realising, just sails along. It also generates a massive amount of interest, if you are going chuck in petrol allow for an extra 15mins to talk to strangers who will try to guess what it is, and where it's from. What I have done so far is remove the massive CRT TV and VCR, retro cool but was bulky and uncomfortable to drive with it, and left no where to put your left arm. By the way in the VCR player was a video of The Godfather...dubbed in Japanese (no lie). I also found some paperwork in the door map pouch that is in Japanese with some English, suggests that the car was used as a Municipality car In Tokyo and as recently as 2011. The leather is totally unmarked and softer and more comfortable than the leather in my Lexus '06 LS430. I also imported a 15" factory alloys set from Japan earlier this year (Alloys were fitted instead of the Hubcaps after late '91). Bought some Michelins Tyres and I reckon makes the car look much much better, and certainly handles better. I want to keep the car 100% stock, so this and tinting the windows are as much as it gets. The struts that hold up the heavy as hell bonnet and boot lid I had regassed, nothing more annoying than being hit on the head. The Air con blows cold both front and back, but it does have small issues i'm going to fix: really would like to get my hands on a wiring diagram and drop it into the Auto Electricians... There seems to be some fuse or short as: The electric quarter windows work fine only two of the actual door windows do. The dealers tried to fix the windows themselves, and butchered the left rear window motor (I'll have to get on Yahoo Japan and order some more). The interior lights don't work The digital dash trip meter don't hold memory, so everytime the car is turned off they reset The digital clock and the stereo are also out, apparently these were working fine just before the car was sent over here from Japan, so need to do some trouble shooting. The TEMS doesn't work either - no lights on the dash and it is failing to soak up corrugations resulting in a thunk everytime you hit a pothole, anyone a TEMS expert?? i'm not sure whether to bother to fix the TEMS, or just replace to normal struts (apparently not too difficult with these things) but the most important thing from my point of view is that the ride is soft and dreamy as you would expect from this luxo barge behemoth. I am also keen to buy a GZG50 V12 century, I drove one when in Japan last and they are beasts, let me know if you come across one for sale here in NZ otherwise i'm going to import one (It can sit in the garage next to the VG45 as I wait for it to be old enough to get compliance)...5 points
-
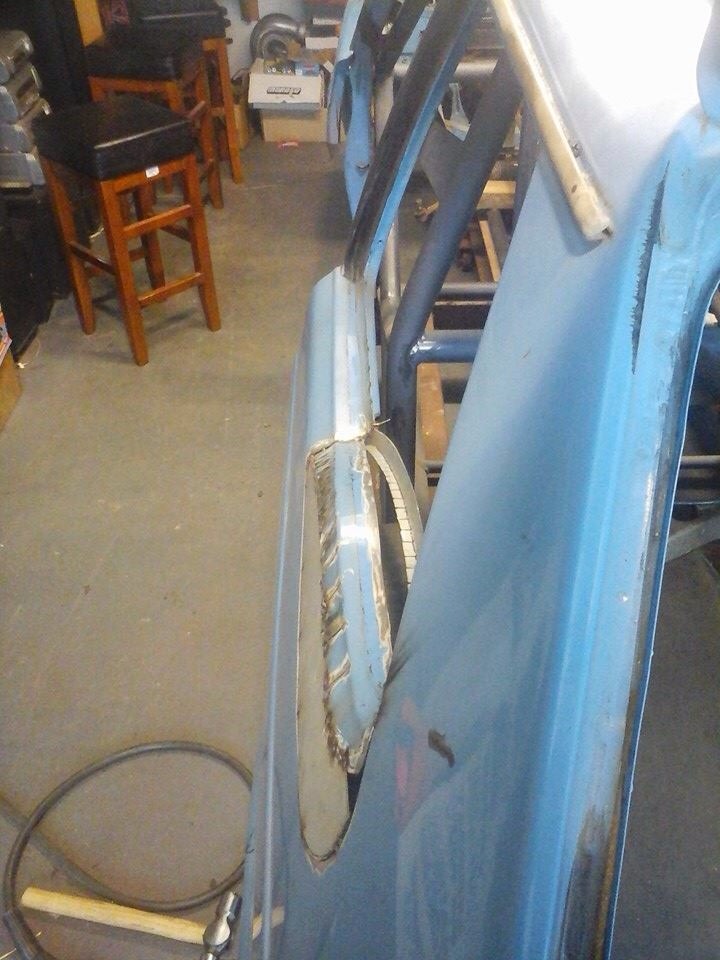
Well Ive not spent as much time working on this as I was planning this weekend just gone. In fact I did nothing to it on Saturday. This morning I woke up to snow on the mountains around us. It never really warmed up and felt like what a proper cold winter day should be like. However I managed to get enough done today worthy of an update. First off I finished the passenger side repairs. I had to put the car up on hoist so I could shift a Volvo under it. Was quite nice standing up to do these last outer skins. Since it was up in the air I repaired that hole on the inner sill which meant I was able to paint epoxy on the entire inside before welding a new skin in place. I wont grind the last welds down because well, I just cant be bothered right now as its boring grinding. I might just paint them over in primer to go along with the rest of the fancy paint job the car currently wears. I know not what could possibly be under this lumpy looking skin but it feels crunchy. I think I will leave that till later... I put the car back on its feet and shuffled it over to attack the other side. Its not as bad on the inside floorpan. Just a couple of areas that need cutting out. However the outer sill...mmmmm. Yeah pretty shot although with the squeeze test it feels like the bottom might be ok. Will find out soon. Good news- I found more money to offset the cost of the car.. So into it then. First off I cut out the rotten area around the drain. It would be easy to just weld in a square of steel and be done but I want the floors to drain as they should so I had to make a go at replicating what I cut out. Hole sawed a hole into a piece of 1mm thick steel quite a bit bigger than needed and then using a bit of pipe and a piece of round solid about the right size I formed the step in the vice. Turned out good and I was a happy chappy. I had to form one corner to suit the two channels and then cut the square to size. Welded it in and ground down the welds where the channels enter. I'll finish the floor and then cut open the sill. Oooooh I cant wait! ...its going to be like a really shit Kinder surprise isn't it.5 points
-
vid from today, taken by the bro. nothing broke other than crashing into a tree haha. it doesn't really turn so well. but seems to go places in a straight line, if you hold on for the ride.5 points
-
funny looking air guitar you have there3 points
-
Soo now I've owned the car for a few days and me and some friends have done a few things... I put my dtm og Oldschool 15x8's on \ I put my mates Thule roof racks on I bought a fender mirror... So I can see the dangerous nz kerbs and keep my rims well away3 points
-
So, Ive been hovering at the peripheries Filbee you c*nt. I thought I'd chime in with a brief history of the old girl as a bit of background for those following. As you may have guessed, I am the former owner of said Super Snipe, she is a 1965 Series 5a, the 5b being the last snipe and the end of the humber make in 1967 when sold to Chrysler. The 5b's are basically the same with every last option from the parts bin (and series 1-4 have a different roof and single carb among other features). This is approximately the 60th car I have onwned in my life, and by far and away the best (many escorts, KP starlets and a mk3 zephyr to name but a few). She is neither entirely pretty, nor fast, nor does she pull the ladies (under 30...mostly as Dyl mentioned it is a magnet for retired old men), but purchased on whim some 7 odd years ago after being curious about them and having passed up a silver series 5 with red interior, i thought bugger it. It came up repeatedly on TM and kept closing without selling, the asking price of $1200 and location gore. I ended up getting her for $1k (2009 i believe). She had not seen the light of day for 16 years and was deregistered, I brought from the 2nd owner, who had owned for those 16 years and had covered approximately 300 miles in that time (Filbs has all this documentation, the service history from new etc etc, he probably hasnt even looked at it!). The first owner purchased it new in 65 in Invercargill, and she was built on the Todd motors assembly line in Wellington, like many old things on this forum I'm sure. At the time you had to have overseas funds to purchase cars, so this generally meant you had to have proper money, and these things were proper money. Your choices were a Bentley, Rolls, Jag or one of these. Having driven Jags (cant speak for the others) these are in my eyes a better car. So this particular example sports the borg-warner DG250 series transmission option being a BW type35) without overdrive (unfortunately - however there are a few of these still around), its essentially a hybrid manual/auto and you will notice this when you drive it Dyl, she has engine braking! It also leaks like nothing else, despite having had all new external seals and about 3 trans-pan gaskets.. She also has Power steering, many cigarette lighters and map/reading lights, the picnic trays, a fuel light, much body deadening and soundproofing (1600kg!!), twin 175 strombergs, electric washers and 2-speed wipers, and the proud honour of being the first british car with twin headlights. Much of which adds up to a well-sorted luxo-barge of its day. Almost everything still works, aside from the smiths clock, which will surprise no-one. The instruments are Jager, I think same as Jag, as are many other bits and bobs throughout. She will cruise comfortably at 120 as Dylan mentioned, and the ton is no problem whatsoever, it is like a barely controllable cloud at such speed (only done once just to see).. She will not break traction though, she is not that kind of girl. So I got the old girl with 113miles on the clock from memory, and it was my daily hack for about 3 years until the trans dumped its shit all over the road one day. It was a supremely reliable daily driver, in fact after getting the thing legal when first purchased, I drove took it to 100km/h for its first time in 16 years on the way to the Coromandel from Chch, without missing a beat covering nearly 3000k in the first outing! I covered 15000 miles in my tenure, and the lsit of repairs/maintenance over that time is fairly extensive. To get her back on the road she required a fair amount of rust work; inner wheel arches, floor, inner sills, outriggers, lower quarters inner and outer, boot floor, and also part of the front valence to be remade. I did all except the front valence which I had a skilled old dude sort (I was once a panelbeater, but this bit required someone with grey hair and an english wheel). Other bits done were a rebuilt p/s ram, rebuilt booster (as per above troubles), new brake hoses, rebuilt front callipers and a few bulbs from memory. Over the ensuing years she received new rear gas shocks (landrover ones were the only thing they could find to fit), rebuilt carbs (still leaking!), front wheel bearings, and many indicator flashers.. In about 2011, the rear trans seal blew so I parked her for about 2 years. Late 2012, I pulled the motor and box, sent the box off for a reseal and pulled the pants off the motor, which still looked like the day it was built so just cleaned out the sump and oil pickup and gave the motor a coat of paint, threw new gaskets everywhere and put it all back together. Never used oil or water so I saw no need to do anything else. Before the motor and box went back in the bay was blasted and painted also. She was put back on the road in time for a mates wedding http://markharris.co.nz/wedding-paula-jay/ and then back to service she went. Had some wiring redone in the rear about that time too. In the last two years shes been in mostly regular service. The kingpins and a-arm bushes were done last year ($2k!) and early this year I picked up a parts car which had a brand new radiator, the radio, indicator stalk, full set of new seatbelts and many other small bits. Sold that for what I paid.. I also did driveshaft uni's and diff seals/gaskets this year too. Much to my partners disgust Dylan got his way, after a small amount of hounding and I relinquished ownership this year. I expect this will now be my south island car (now an Aucklander) and having covered another 700-odd miles over xmas with my 2 under-3 sons in tow, I can attest to the practicality of this car. In fact, once again this was our only car for about 2 months early this year due to someone writing off our wagon, needless to say she performed the task without fuss. Thats my waffle, Im sure I have many other facts stored away, but I know its in good hands and when circumstances allow I will probably get another rootes-group car, they are well under-rated. Look forward to the slam Filbee. Jones.3 points
-
Picked up a pair of SSR Star Sharks in Taupo thanks to kp_james for bringing them. They're 13x6's with I think +11 offset. Gave them a polish and they came up quite nice. I have another pair on there way from Japan, which should hopefully arrive soon. Will the current 175/70 tyres look alright on them? Or would it be better with some lower profile ones? Got a 4K from James as well. I am keen to rebuild it and get a bit more power out of it, but I don't really know where to start, so any suggestions on what to do? //oldschool.co.nz/index.php?/topic/48889-matts-81-kp60-starlet-discussion/3 points
-
So a bit of a team meeting was held with my brother, some mates and myself. A decision had to be made between cutting my losses, repairing what I had and hoping it didn't still go "POP", or spending some more money and upgrading the motor. We all agreed a 1UZFE was the only logical option when it came to value for money and reliablility. So a few calls were made to check on the legalities of the swap and track down a motor and trans combo. We were told it would be very easy to certify but that the office that prints the Cert. Plates would be shutting for the summer in 6 weeks so if we wanted it legal for Christmas (the reason for purchasing it in the first place) we would need to pull finger. A couple of days later my new motor and box showed up from Osaka Auto Parts, it's a 2nd Gen setup from an LS400. We tore the old diesel out the first weekend and mated the V8 up to the Prado trans and started mocking up the engine mounts. This is what we came up with. So it begins... Front of truck mostly stripped New chassis mount welded in place New engine mount ready to bolt up The two together Engine in the hole More to come...3 points
-
Thought i would update this project thread abit. is about 18 months ago now that it got painted on the road etc At that time i was still currently in high school with no job but had holiday jobs etc so i pissed around getting quotes etc and ended up with 5 grand and 6 grand quote figures and was way out of my budget and then i thought why not just do it myself with some assistant from a painter/panelbeater who had done his trade 50 odd years ago so it started with just a basic respray but quickly got out of hand At this point it seem like we had been sanding for years as we had been using wet and dry the whole time but once i had done a full strip down except the bonnet it appeared it had some minor rust in different places than my mates one so we did a few rust repairs on the roof the doors on the bottoms behind the blackplastic covers etc unfortunately i didnt get any photos while it was in primer but on arrival after work i found it was painted cheers to my old man in a big workshop with wet floors roller doors up with big extractor fan by roller door etc we ended up getting a mint finish when applying the paint but when it came to applying the clear coat my old man hadn't sprayed clear in 20 odd years we had ended up with the wrong lighting while applying and lack of experience it ended with sand and dust in the clear and runs in the clear.but i was amazed at the final product and others said aswell of the job done in a dirty old high stud workshop off the gun finish. then went and got my dashed recovered and painted because it was cracked and falling to pieces cheers to dashboard restorations out west for the mint job after about 3 or 4 months of assembly it ended up like this with a clean sheet wof also!3 points
-
Got the front locker in. but noticed something wasn't quite right with one of the hubs. the outer gear on the right is a stock toyota gear. top half of the left is a trail gear "longfield" chromemoly inner hub gear. machining looks pretty rubbish to me. has high and low points all over it. guess this would load up the outer gear weird and cause it to break? thoughts? can see it top right best. Also chopped some chrome off while it was apart. truck has always sat on the piss, as can see in this pic. i just discovered they are spose to have different springs left to right. to compensate for different height spring perches. haven't looked into it yet, but wouldn't surprise me if someone has had it apart and mixed them up.2 points
-
So I managed to score this mighty honda civic for $350! This is what I started with \2 points
-
Some progress on the knuckles, i needed to knock down the balljoint land thickness.... Had a struggle to get it mounted up rigid and square in the mill, not helped by forgetting to file down the mushroomed bits caused by splitting thr balljoints... ha got there in the end.. Machined versions of the toyota knuckles on the right vs the standard toyota on the left Top balljoint hole.. And bottom balljoint hole... now same thickness as the mx5 bottom balljoint mount.2 points
-
Repair progress update. Certifier has been in and given the welds a clean bill of health, so things have now been rustkilled and prepped for painting. A couple of tiny patches will have to be added here and there, but for the most part the rust appears to be surface only. The replacement rear quarter section comes halfway up the B-pillar and the welds in this section definitely had to be inspected. Before anyone comments on how dodgy this might appear - the factory join on the other side of the car wouldn't look much better if it were all ground back like this! The only "serious" piece of rust on the car mentioned by the dealer also cleaned up remarkably well. (This is what it looked like originally.) This section of chassis usually obscured by the side skirt (another rust-prone area) had no issues. Second shot is of the underside, again, pretty tidy with only minor surface crap to clean up and rustkill. Admittedly I am a bit worried about the quality of the factory decal, those cracks in the clearcoat don't look very good :/ Yucky shit from above the left hand tail light, gone! Cleaned up section below the tail light. The panel join here was also inspected. A patch will be added where the metal has been eaten away right at the top; again this is due to exposure to the elements and less than satisfactory sealing. Discuss: http://oldschool.co....1-sc-chit-chat/2 points
-
More pictures
 2 points
 -
Having a bit of fun with the bead blaster and polishing machine. Gauges polished, tested and back in place.
2 points
-
S2000 is way too hard for me to get hold of and supply, Same deal with rotary. Sr20 Sylvia? Honestly I love MGB's and I they are ok as a standard car, they arn't amazing but they are fun, as soon as you modify one thing everything else needs modifiying too. I suspect the Wire wheels wont stand up to too much abuse, and lets face facts if it is modified, will you use that in a car which will grind off your head when you flip it over? (maybe its just me that thinks like that, but Convertables kinda freak me out!) Since it's fully intact mecanicly why not just give the B esries a bit of help with some extractors and a cam and leave it at that? Its not like there's not enough to take care of with the body, which has the structural integrety of a potato chip at the moment. Damn Have I become sensible here?2 points
-
Tunnel being finished off. Spot welded inside mount on for max flushNess. Pretty stoked with how the seat mounts turned out seat sits so low it's literally less than 5mm between the bottom of the seat and the floor.. Laser cut some seat mounts. I've got a spare set anybody want some to suit a racetech seat?? Getting some motivation for low. Subframe are currently being sandblasted and yellow zinc coated. Also just bought some white paint so we get to paint the underside before it goes back on its wheels.. Fuck load of work to do before move to the tron in a few weeks..2 points
-
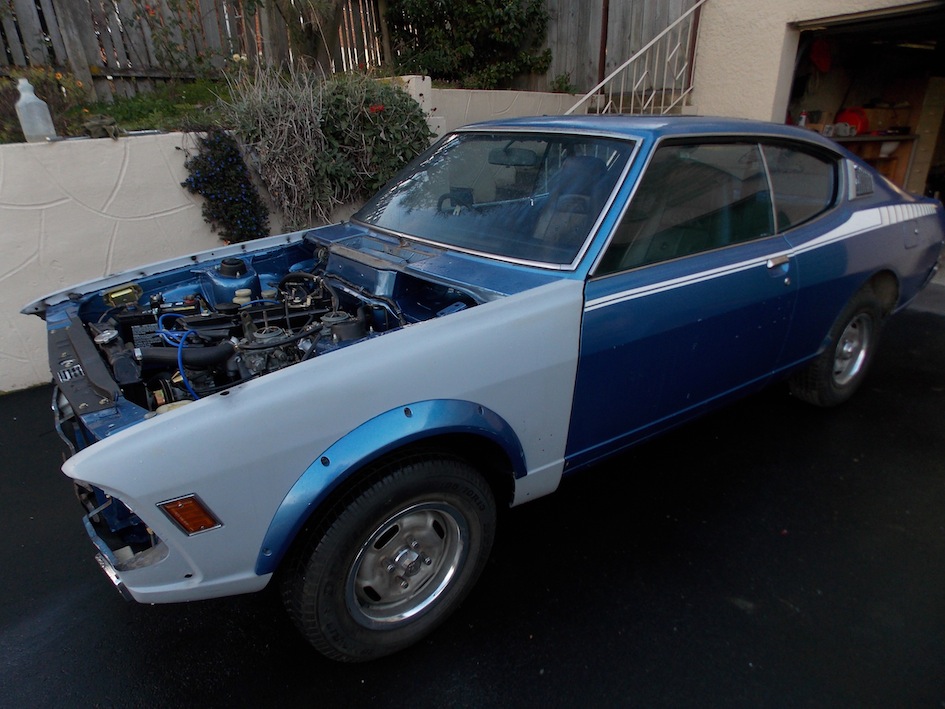
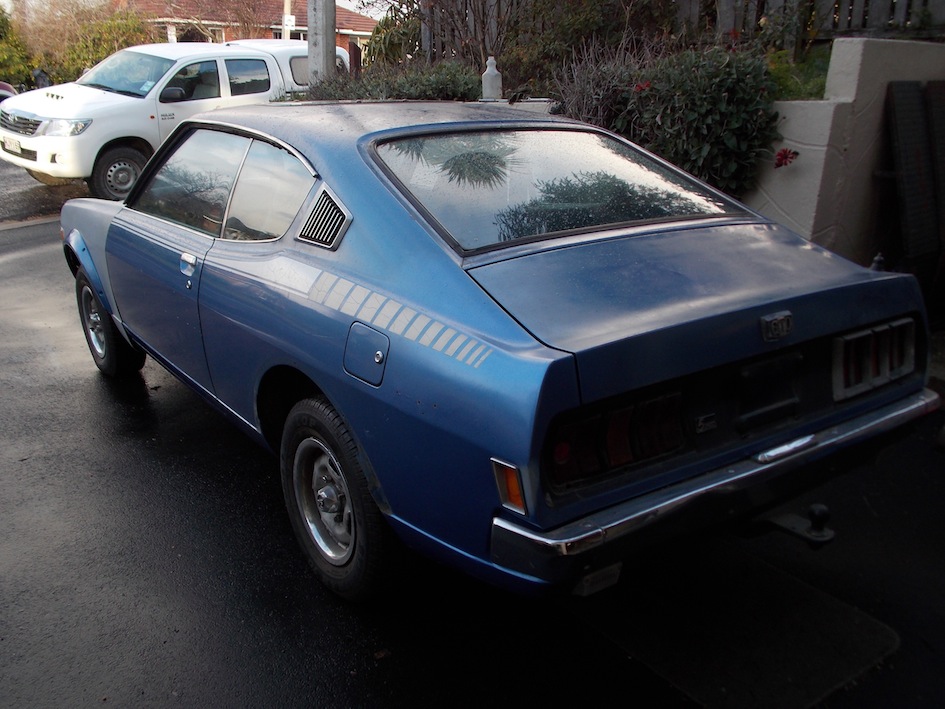
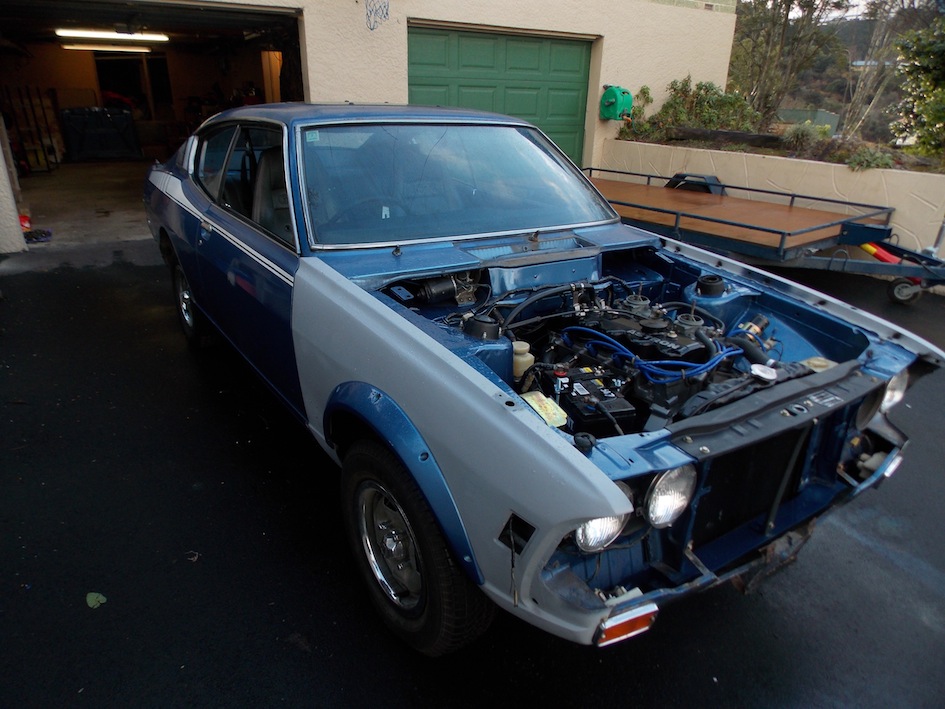
Hi guys, I have acquired a 1981 Mitsubishi Sigma Super Saloon and I'm currently building up the factory engine to try and squeeze as much as I possibly can out of it while keeping it NA. It has got the mighty 4G63a 8 Valve SOHC engine in it. Any advice or information on this engine will always be greatly appreciated, however here is my current plan: Upon removing the engine from the car and timing it in on an engine stand I found the engine to be non-interference (The stock valve motion has 10.3mm of lift and 212 degrees duration @ 1mm" and my piston to valve at TDC is almost 11mm, I double checked this by rotating the cam with pistons and TDC and they did not touch). This gives me heaps of room for modifications both to valve motion and compression ratio. The stock head runs a 43mm intake valve and 35mm exhaust valve and the stock ports flow 178 CFM and 122 CFM respectively. I have calculated the stock compression ratio to be 8.99 : 1, which matches the factory number of 9 : 1 for these engines. I am currently planing to run a custom camshaft, with 13.5mm valve lift and 256 degrees @ 1mm. This will require some machining of valve guides and retainers to be able to fit this much lift but shouldn't be too difficult. I will be porting the head to maximise CFM on the intake side with the stock 43mm valve. I then plan to run Toyota 22R exhaust valves which are 37mm diameter, same length, same stem size followed by a port of the exhaust port. The stock engine comes with an intake manifold that is just awful. When I pulled the head from my engine it was very plain to see that the inner two cylinders had been running rich while the outer cylinders had been much leaner. For this reason I have purchased a set of Yamaha YZF R1 carburetors. (If anyone has installed these on this head before and found a good way to re-route the water cooling that used to go through the inlet manifold I am all ears). Upon stripping the block I discovered a bit more wear than I had hoped for, Including a seized balance shaft which had spat out a bearing into the sump. I don't plant to run the balance shafts anyway but this does indicate that the engine has probably been run very low on oil at some point. The bores are also pretty scraped up and the crank journals will need polishing. I am going to get the block bored to run oversize 85.5mm pistons, not sure which pistons to get yet though. After this I will time the engine back in on the new camshaft, check my new valve to piston numbers and see how much material I can safely take of the block and head to increase my compression ratio. Finally I plan to make a a custom exhaust manifold. 4 into 1, 36mm primary into 2.5 inch, or there about. Feel free to let me know any thoughts people have about this project. Also, if anyone has one of these engines and would like me to check any other measurements or values, let me know and I will see what I can do.1 point
-
Something a bit different n hope admin approve althoughs this bends some of the usual criteria. Dont worry Ill post photos up once finished (Hopefully in time for Hanmer) On Monday the 3rd of August I purchased a fine older vehicle in the idea of a project for hanmer, Baring in mind I'm not a mechanic I think I've bitten off a bit much but with the time counting I've got 19Days 21hrs to go till my 9AM depature time for the best weekend of festivities known to man. List of repairs for said beast 6 Rust repairs Panel beating Prepping Painting Rear brakes Blown head gasket Complete reaasembly of the shitbox New wheels Lowered Anything else it fails legalities on. For those who care ill keep this post updated the best I can, will accept questions if people want to try guess the car.1 point
-
Build: //oldschool.co.nz/index.php?/topic/49606-blanketmans-1983-honda-civic-hatch/ Thought I would start this thread for some input Massive shoutout to phr34kr for helping me out/doing most of the work Massive shoutout to zebra dude for an awesome deal! I love this lil car!1 point
-
-We also had to fix the back of the roof as it was very rusted and cost us the WOF.1 point
-
Man I can't even make breakfast without wearing shoes.1 point
-
oh an i put a tow bar on it (easily removable, as towbars and mudflaps can GTFO) so i could tow a car back from rotorua, but I fucked it up and made it so it cant fit the type of hitch that the car trailer has, derp. didnt find that out until i went to put the trailer on at the hire place.1 point
-
Current spend is at $406. That does include a $25 wof1 point
-
I am now officially sick of working on the distributor on this. The original lucas electronic dizzy shit itself a couple of months ago. i had a spare points one that i was going to throw in it but it was a bit pooched inside after i pulled it apart, so i dismantled the lucas one to make one out of the 2. But they are different inside. So start looking for a replacement. i have a MSD flash harry one that i could put in, but would need to change all the plug lead ends, and i had a clean out and threw out the other set of plug lead ends that would have fitted. Plus i need the flash one for the good engine in the other car. In the end i reset the gap on the magnetic pickup and it worked, so i figured it was ok, and then was a good opportunity to sort out the advance curve. So i welded up the advance stops and filed them to get the right amount of advance, put it back in and away it went, ran well for a couple of weeks, until yesterday when it wouldnt go again. So, the only things i could get easily was a $700 MSD one or a selection of $120 china ones. Didnt want to spend $700, so got a billet china one with no vacuum advance, put it in, but it had a million more advances than it needed again- 40 deg all in even with setting the initial timing at 5deg, at which it sounded like a flat old turd. pulled it out again, it doesnt have any sort of adjustment but i expected that, dicked around with welding up the weights and using science and luck and my eyecrometer, now it has 36 all in and 16 initial, which it seems to like. The good thing about having to pull it apart is it doesnt seem too badly built for the price.1 point
-
fill gaps with louvered inserts and a bash bar Picked up an ECU and W58 also, just a diff to sort and everything will go in, cage to come in a month
1 point
-
also fixed now too
1 point
-
Fixed some more rust today, new rear roll pan... done
1 point
-
Exhaust finally finished. 3.5" straight pipe, twin 2.5" stainless tips for a more subtle/stock look.1 point
-
Looks good, might actually be able to make a meet!1 point
-
Well Suzuki are the cheapest I have discovered of Suzuki, Yamaha and Kawasaki. I'm getting new intake rubbers outta Japan for my GT185 and they $15 nz each. You did pick one of the rarest.1 point
-
Those are some sick looking wheels. I think I had a similar set a month ago :L1 point
-
was offset, hit top arm/balljoint/tierod end i think. i borrowed one to try on the ute when i got the shits with leaky wide steels1 point
-
Evening Everyone, Today i got up to all sorts and the pics will reflect that. I also dropped my AE86 Powersteering crossmember to Spire Fabrication in Kapiti last week to do the mod that Sheepers has done. 40mm box tubing at either end and had it cut down on the ends to fit my chassis rails. I pick that up next week so im looking forward to getting that back and bolted into the chassis. The box tubing is to help drop the JZ down a bit as it is a really tall engine and it also helps sort the suspension geometry as well. Love this bottom radiator support. The more i look the worse it is. Massive steel plate on the front and underneath there is another steel plate and heaps of bog! Brought some s14 adjustables and they pretty much bolted straight in. I will be using a full nissan front hub assembly, s14 lower control arms and rxt 4 pots so its a bit of a mongrel Also took some measurements as the 2JZ fits in the engine bay JUST and i cant run radiator fans so i am recessing the firewall to give me some more room to play with Then i pushed it outside so that i could air out the garage from all the grinding smoke etc. Man its a pig thats for sure!!! Matt1 point
-
Bogging over it is fixing, right? If so then yes Have started getting serious about my welding and will look into some better gear when I return from the states.1 point
-
Well as I thought- today dawned nice and sunny after a bit of rain overnight. But rain was due. But so sunny it was I just had to go for a bike ride rather than work on the car. Halfway up Takaka hill it turned really bloody foul and I got soaked. Should have just worked on the car... So I got an afternoons worth of work in. I welded up the top of the sill then ground it down flat. This is the most tedious bit to do. Grinding. It took almost two thirds of an entire pitch black album to get everything down neat enough to leave. Next up was rebuilding the bottom of the A pillar but before finally welding it in place I fixed this little hole so any flakes/splatter etc would drop down the A pillar and I could clean it out. I used the Dremel. I got into using these on the rx3 and they are invaluable for small repairs. I use little reinforced 40mm cutoff wheels that actually last quite well given what they do. Cheaper to buy them on line from ebay rather than at M10 etc. I use a piece of cardboard, rub it over the edges of the hole, cut out impression, trace onto steel and quick easy fill in patch for odd shaped holes. I also drilled a drain/access hole before final welding allowing clean up of burrs and swarf. Once the sill end/A pillar bottom was welded up I painted it with epoxy mastic. This area will get all sorts of crap thrown at it so will get penetrating wax sprayed in there too. I made a new wing bottom to replace the dodgy original. I wont weld it in till tomorrow once epoxy is dry. Finally tonight I cut open the very rear section of sill where there was rust holes through the outer and it was pretty good in there. Evidence of wax or something sprayed in from above near where the rear seat sides would be. But for some small holes on the inner sill end its all solid good thick steel. Much relief. I treated it and will paint it tomorrow before making a new lid. Ill repair these holes from the other side later on when car is on the hoist. By then It was only about 4 degrees in the shed, the wood burner was going in the housetruck so the decision was easy. Back at this tomorrow. I will not be enticed out on the bike again..for a while..1 point
-
Done a few trackdays and an autocross on the back track at Manfeild. Not very much has changed apart from some Toyo Proxes R888's, better brake pads and changed up the engine bay a bit. Handles so sweet around corners now, apart from one wheel spinning coming out of corners, because no LSD. An LSD is next on the list to get, once I can find a decent one for a reasonably price. Drove it up to a Taupo trackday today, it was going good until one of the front brake pads flew out going down the back straight at 180km/h. Luckily there was a long run off area, so no damage apart from some groves in the disc. We managed to get a new pad in there and drove it back home.1 point
-
Put the polished manifold on today. I tidied up the injector wiring by running it under the manifold and gave the fuel rail a quick polish. Hard to stop once you start. I also installed this cool carbon airbox I got. Quietened down the diverter valve a lot. I'll polish the ends of it later on when I get a chance. Will also do something about the throttle body which is letting everything down, I was going to paint it but got a bit impatient.1 point
-
Man if you factor in a conversion this thing will set you back many, many thousands surely. Fix the body and get it moving and see what happens1 point
-
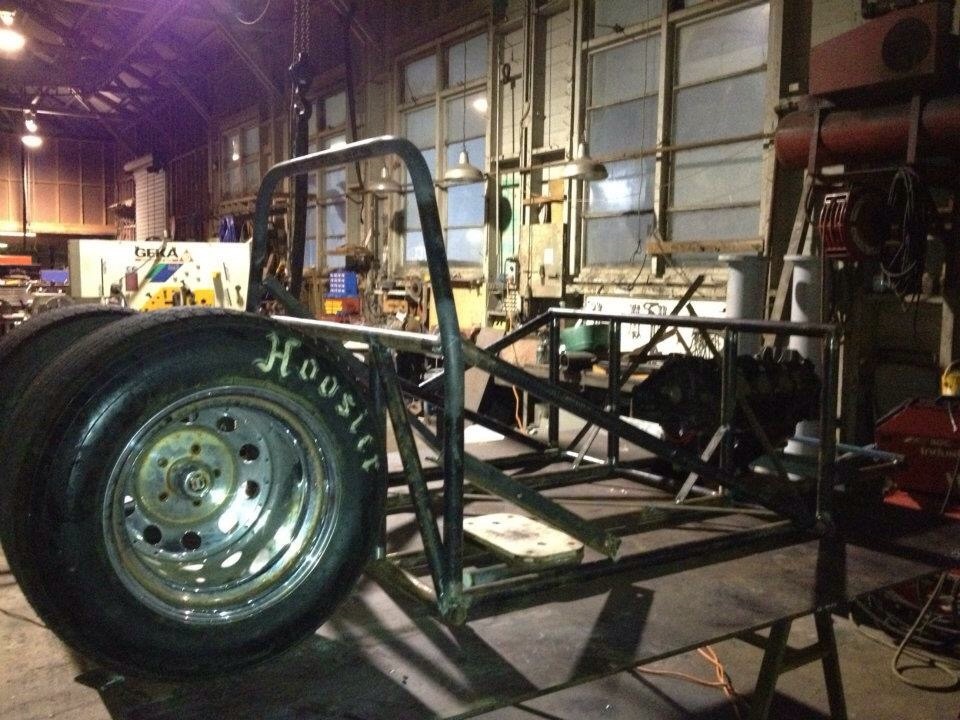
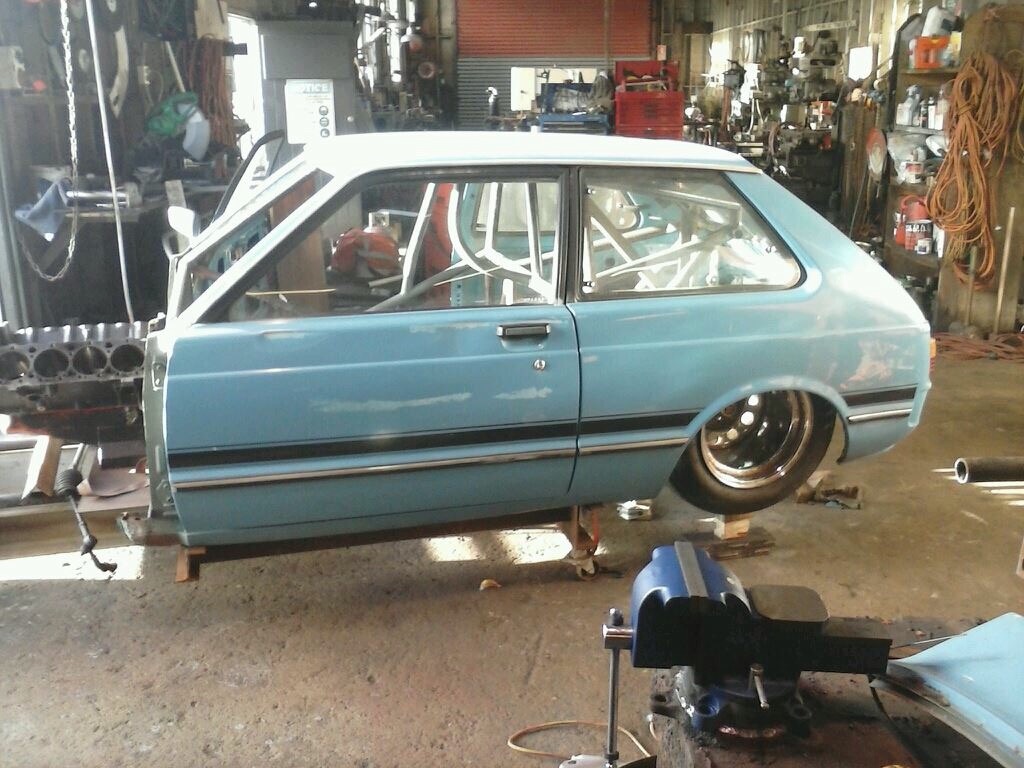
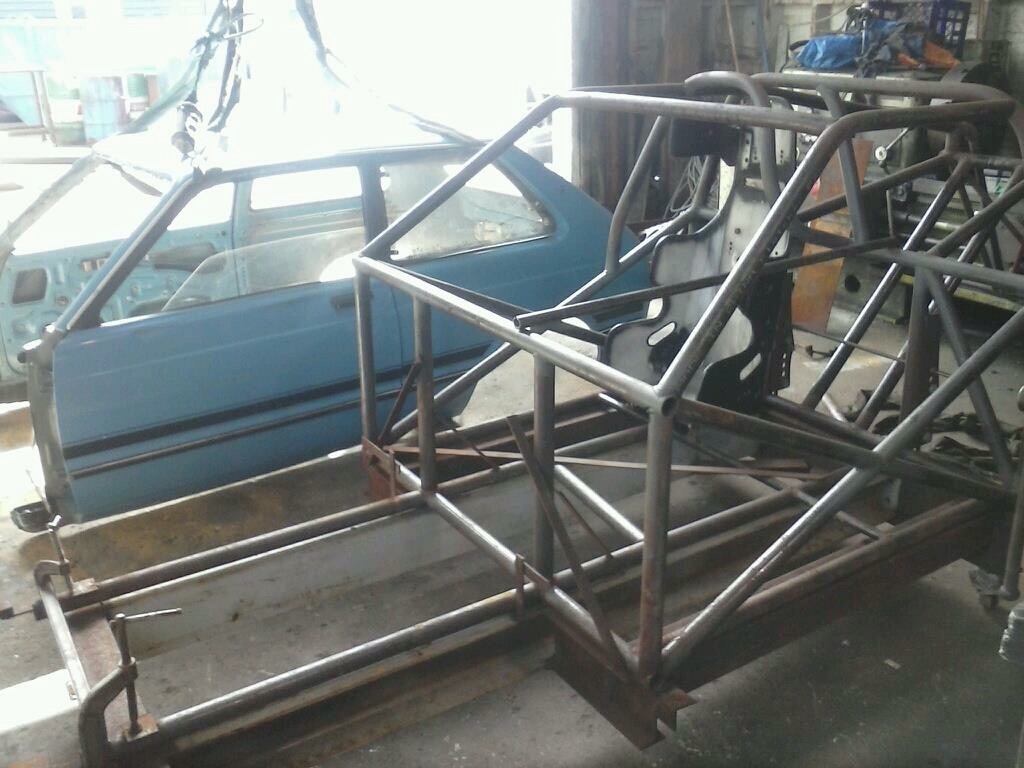
Hi , started building this around 5 years ago, originally was going to Just have a cage, hilux diff and run a mild 350 chev, but like all projects Its progressed and ideas changed so now it is a full tube chassis running A 454 chev big block turbo with a powerglide. Its got a very short 9' diff behind all of that spinning 15x15s wrapped in 31x16.5x15 slicks. The last couple of years nothing much has been done on it but i have Been working on it over the last few months so now have all the small, Tricky bits to do ha. Hopeing to have it running end of this year fingers crossed. Below is a bit of timeline pics from the build so far. Cheers for looking Chris
1 point
-
This is how its looking so far
1 point
-
1 point
-
More pics
1 point
-
Pulled the front diff apart today. auto locker out and: Eaton e-locker in its place. same deal as an air locker, but less stuff to go wrong. Auto locker will go in the back. couple more pics Stu took of the possum palace day1 point
-
FINE! you all win... been sold though, and this is what it looked like last i saw it1 point
-
Consider it yours. Ps. Some dude called Fat Albert said he's excited about meeting you and has a little" sweetner" to add to the water. Hey Hey!1 point
-
Front struts all finished up, just need some springs and weld a bit of tube under the top hat for better spring location and Wack em in
1 point


This leaderboard is set to Auckland/GMT+12:00