
Leaderboard


Popular Content
Showing content with the highest reputation on 09/21/14 in all areas
-
Being varnishing, starting to put back together now ready for Brits At The Beach. A few small jobs left to do, towbar and wiring, catches etc.5 points
-
Long time coming, but, more updates! Wheels are now fitted, I have extractors and a 12G940 cylinder head on the way, some new problems have been identified and some more little issues have been fixed. In the last month I have bought: Lumenition HT leads Battery Cooper S studs K&N filter New Lucas alternator Extractors 12G head (negotiating) Chrome trim strips Been plodding away slowly, current alternator is on its last legs so that'll be replaced tomorrow morning (y) Here's what I've been up to the last few weekends: Battery was stuffed due to a failing alternator, so out it came, and in went the new: Minispares order First up, filter, new vs. old Leads were next, discovered my dizzy cap had been loose and my no.2 plug had also loosened about 3 turns too :/ Old earth cable was removed, and replaced: Removed all my old electric fan loom: Also got the carb apart, gave it a clean and look over, replaced the oil in the dashpot with lighter genuine SU oil and drove it around for a week, until today, where the drums and wheels were finally fitted Big thanks to Glenn Lawrence for his time and the use of his workshop space. Few issues have been found, pretty much all the wheel bearings need to be done at some stage and the left rear arm has play, so will need to be kitted. CV's are also completely knackered. Anyway, pressing on with far more fun stuff New drums: One on All on! It was then off home for a good clean before a thrash over Three Mile Hill, what a difference they've made to the handling never mind the looks! Needing flares unfortunately So stoked with it5 points
-
So after buying the hi steer steering kit. I did some research, seems its made to work with a 4" lift.. Not keen. Cut the shit out of the sump, which gave just enough clearance, at full suspension compression. Then tried to fit the ifs steering box, hmm thats not gonna work. Best way around it was to drop the front spring mounts. seems to be a very common mod, for various reasons. Goes here. Mounts are dropped about 40mm. will lift the truck around 1inch i'm guessing. is a bit of a dick to get fitting nicely, as the cross member is a bit bent up4 points
-
the brown car is a 770 Regal so it has some fruity bits the standard valiant doesnt. The plan for the brown car does not include any form of anything that doesnt need to be on it to function or make it faster so some of these parts will end up on the white car. started with fitting the stainless guard trims, which are a bit different to the 4 door as the rear guards are different. nothing a cut off wheel couldnt sort though and stripped the heads. i thought i would get away with a quick clean up of the ports and throw them back together but one exhaust guide has a bit too much slop in it and one inlet valve and seat is pitted from water getting in it. so it will get a set of new valves, and new exhaust guides and hardened seats fitted quality. theres some horrible daggy casting marks in these3 points
-
So lately have been chipping away it this after losing interest earlier in the year. Got rust sorted, bought a wide band, other bits and pieces and sorting out running issues/trying to tune. Had some vacuum issues where the fuel table was reading on the second level at idle under no load. Decided to investigate and the 4 barbs underneath the manifold where i was taking the vacuum from to the MAP sensor, actually go through to before the throttle butterfly. Who knew.... Drilled new holes of vacuum on top of two, found some brass pipe at the model shop and have a vacuum chamber to sort my issue. Also bought some new 14" mk2's and tidied them up a little. Just sorting some wheel nuts at the moment. Got offered some semi slicks for a ridiculous price so would have been silly not to buy them. Am hoping to get this thing a WOF soon before Hawkesboes. _____________________________________________________________________________________ Discussion: //oldschool.co.nz/index.php?/topic/41173-flackys-at141-corona/?hl=flacky
 3 points
 -
Just so as you know. Pongaroa pub food is bad ass! (this means very good) Did it not long ago. Ring ahead so they know some dudes are turning up. Makes it all easier.2 points
-
Plug for the shroud in progress.2 points
-
2 points
-
well there's the first sketch for the OS colouring book!2 points
-
2 points
-
W T F ? limited edition chrome diff?2 points
-
heres my valiant tis travelled 103 thousand miles all original apart from repaint 12 years ago 245 and auto nearly got sea sick driving it back from matamata.......still has the original front shocks...... Discussion: //oldschool.co.nz/index.php?/topic/25725-the-cletus-mobile-vg-valiant/1 point
-
I was briefly on these forums years ago, when I had a 1977 KE35 SR but since then I have been living carless in London for the last 6 years, lurking about the forums to get my old car fix. I moved back at the start of the year, so it was time for a new old car. I got this Galant Colt GTO at the start of Feb in really good condition. It had a bit of a refresh in the 90s including respray in the original colour and the addition of louvers and a sunroof. It's my daily drive and I think that the sudden increase in usage was a bit of a shock to it's system and lots of bits and pieces that were close to giving up started to go. It was running quite hot and starting to leave a few oil drips on the driveway. So I had to sort a few seals (tailshaft, crankshaft, rocker cover gasket), a heater hose and add an electric fan. But of course fixing one thing leads to others crapping out so I then had to fix a small leak in the radiator and get the water pump reconditioned too. Also needed a new Alternator with external regulator so got that taken care of at the same time. Anyway, pics: Definitely needs more low and a few little bits and pieces like window seals could probably do with replacement but for now I'm just enjoying driving it.1 point
-
Steering box fits! The mounting kit didn't locate the steering box in the correct place for my setup. Angle grinder fixed the problem. Tig'd the plates to the chassis. Got it back on the ground, on the new wheels. starting to look a little less farmer spec \ Had to remove the wheel spacers on the rear! They went all out and used spring washers. These are all off one side Need to remove the radiator, to finish some welding and make a bracket for the ps pump. then should be able to take it for a test run1 point
-
Progress! A weekend of some garage time resulted in a pleasing portion of progress despite being side tracked for 3.5hours rebuilding the trailer. Much fussing and fettling has got the engine is back sitting on engine mounts, intake side of engine bolted back together and sprinkled with shiny new bolts. Sump now has some clearance from the steering rack although I will see if I can get a little more.1 point
-
The weather first thing in the morning was yuck so I got my Swandri out of the fridge and went to Tomisa's to eat his sausage. Brad's tail lights didn't work so failed scrutineering. I was given a warning about my fire extinguisher not having enough straps. Dave needed to get some tyres with grooves swapped onto his rims. Qualifying seemed to go on for hours so there was only time for two races before lunch but by then it'd stopped raining. Dave's car ran like a sack of dicks so he tinkered with it. I ate more sausages. Dave and I finally got our first race in at about 2 pm. The Peugeot ran lushly. It was the first time I took it on a track since 2009 and since putting in the new engine and coilovers so was pretty pleased for its first outing. Did 1:31s - two seconds slower than the Clio. Dave did 1:34s I think with the Lotus running like shit. Would trade again. We're going to have Ferrari dual sprints next year.1 point
-
perfect! thought I'd heard they had good tucker out there but wasn't too sure1 point
-
we could meet up with the wellington guys in Marsterton one time and go for a cruise out to castle point, that would be rad, i love driving that road. would be a good summer meet.1 point
-
Was a good ride! I only bought an old light to turn into a headlight for my bobber, turns out its painted brass so will look sweet polished.1 point
-
Graham aye? he's an interesting fellow that's for sure. If you guys do a cruise and the KE is going i'll definitely join!1 point
-
Nah not too far!1 point
-
Drifting from the Cs Garage x S Club day, great fun with awesome tracks, people, drivers and cars. Was testing out the new 2-way which meant more grip and angle, still a bit of fine tuning to do though. But no really any mods left to do now except power I guess...1 point
-
I'm fucking lost with that video1 point
-
Finished1 point
-
I hear my in-laws blew up yet another gear bag?1 point
-
Never mind, Markku to the rescue!1 point
-
Its got a v8 connected to the back circles. Its already fun1 point
-
Got it back last night just in time to drive to the monthly meet. Had to do a mad dash to ripco for a new dizzy cap and roto and the points where wrong as well. I thought it ran like clock work on these parts Many thanks to Azzurro for the great photo Hopefully if it doesn't rain to much over the weekend so I can get the lowering done over the weekend1 point
-
I'll have to get Lou to update this with the stereo she built as it came out really nice. Anyway, we are off to Nelson for her brothers wedding in November and this is going to be one of the bridal cars. An ongoing issue we have been having is a strong petrol smell in the boot, has anyone had experience with that? Any ideas? Or good remedies to get rid of the smell? I've replaced the breather tube (it didn't quite reach through the floor) and also replaced the filler tube as it was getting a bit old, hard and cracked. Due to the smell and its effect on our lugguage, I've decided to build a bit of a roof rack for it. I couldn't find any nice old racks when I was looking, so for $20 I bought an old basic roof rack, and then used it to go and buy some steel. Next I got some pipe and angle and made a mandrel, then with the help of Duke-Blackwood, we heated and bent the steel. I was pretty stoked with how it came out for a fairly rough first attempt at this sort of thing. And finally how it is currently Still a bit to do but I'm pretty happy with how it looks so far. I've sized it so it will fit on my anglia as well (if I ever finish it...)1 point
-
1 point
-
I spoke a little bullshit above. I do have some more shots, pics from when I was selling it.. pic dumpage have all the originals.. bugger I can't use the plates tho had some guy pestering me to sell him the rear tail light garnish, got up to about 700 this is the only bad bit of rust bar the tire well and bottom corners of the boot rubber lip, its from where they stiched the rx4 panel back on and didn't proof it.. does anybody have a rust free tire well they want to sell me? tire well some cunt put a ding in the roof just before I took it out of storage.. must have been something fairly big to make a ding like that.. mmm brown.. some dash cracks.. take note of my awesome carpets haha.. dole spec there you have it.. have to find an undercover parking spot for the 121 and then its all go..1 point
-
Don't forget the flying fox and bumper boat pool.1 point
-
Its almost been a month of, sanding, buffing and polishing, i'm beginning to worry what kind of social life I have now.. The past month has been a bit of a waiting game, one of my friends was kind enough to lend me his air powered die grinder and I went on the hunt for some cartridge sanding rolls. Quickly found nz is too cabbage in the way of port polishing kits and sourced one from muurica. That arrived today so got stuck in Some may usually stop here but I'm far from done! I used the two stages of cross buffs to give it the shiny finish, still waiting on a set of Dremel abrasive finishing buffs to get into the smaller nooks & crannies. Once thats done i'll finalize the ports with a polishing wheel for that extra bling Some more shnazzy shots As for the intake ports here is my current plan: After some research/advice/youtube I found this to method to result with good figures for the job that I am doing which is nothing serious. First of all 'raising the roof' rather than taking more away from the 'floor' of the ports is more effective so that has to be taken into account whilst carrying out the job. The 'floor' of the intake ports will be left slightly rough where as the sides and roof will be polished essentially making the short radius the long radius & the long radius the short radius to create a tumbling effect when the air enters the ports. (feel free to correct my ideas if they seem whack) Besides the head work, nothing else will be happening till the engines done and fitted. TRD Big end bearings, Main bearings & 0.8mm Headgasket are on its way from our friends in Japland. Only need to send head away to engineers, purchase cam pulleys, cambelt, High flow oil pump gear and Sam-q's rwd cooling kit then assembly can begin!! On another note, found this gem from when I did my first ever engine job at work. Moral of that story, Dont buy an holden/izusu that has oil pressure fuel injection..1 point
-
Cams and valve springs arrived today, slowly ticking off the ever growing list. Been stressing about setting up my diff with tooth pick axles, figured it will be more work getting a bigger diff plus it being heavier than my t series. Best of both = 28mm axles1 point
-
Did some autocross today. Took me a couple runs to get used to the new DCCD setup. Took quite a few more runs before i learned that massive amounts of throttle are no longer needed. Actually....i never did learn that and spent the whole day smoking the tyres and being a goon.1 point
-
Some pics of the interior and engine bay from the original TradeMe listing: And another of the interior/dash:1 point
-
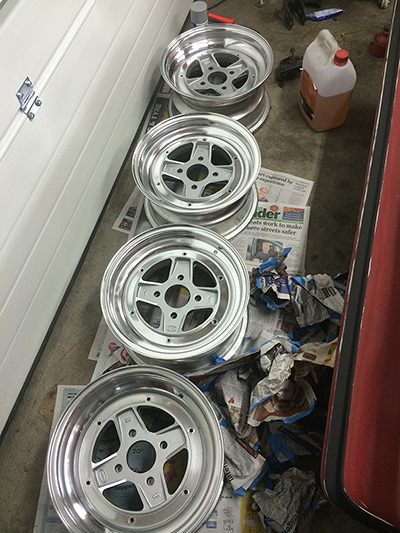
Also, when I went to pick up the car the previous owner was like "oh yeah, it came with some wheels too, they're in the boot." Wasn't expecting much but they are actually kind of cool oldschool jap 2 piece wheels (3 piece, welded?). 6-J 13 from 1977 according to the sticker on the inside by 'Uni-Pex Parts Division' Never heard of Uni-Pex before, does anyone have any info on this brand? Couldn't decide if I liked them or not so I decided to refurb them and see how they look, split them, clean up the centres, polish the lips and replace all the bolts. Here is a before and after of the first wheel: I think I like them, so will get some tyres on and get them on the car at some stage, any recommendations for tyre size? Chur. Also, discussion here: //oldschool.co.nz/index.php?/topic/38426-sr-rollas-1974-mitsi-colt-gto/1 point


.thumb.jpeg.384ff72c8d2b0ee0d34a7bdedb55bdcf.jpeg)


This leaderboard is set to Auckland/GMT+12:00