
Leaderboard


Popular Content
Showing content with the highest reputation on 08/04/14 in all areas
-
I've been looking for ages and many can confirm I'm a fussy bugger but finally found my original untouched 1600 sport. Car is in original condition so there are many little jobs to do to get it back to full glory, Ill endevour to keep you all updated, but for now check out the pics. I have also moved to Napier now so big shout to all the OS boys and girls down here give us a shout. Made the mistake of putting 91 in but quickly remedied the knocking8 points
-
Borrowed some wheels and tyres off Sambo, and 1 brake rebuild later I have a WOF, awesome.6 points
-
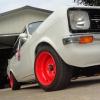
I got it sitting pretty up front, but it wouldn't turn and the arms were touching the inner guard. Real lame. Missed out on a few events over the weekend. Got some v8 hq super lows and we're back in business but it's 30mm too low. I plan to run some steelies so that will lift it a bit and will look into those urethane coil spacers that go where a factory rubber would go in a more modern car if it's still a bit boned. Polished up the interior handles, mirror bracket, painted mirror because it was aced, door cars pulled off in preparation for my 6x9 turning up 2moro. The doors have a big chrome trim that will get in the way of the speakers so will have to trim the surrounds. If it looks like a failure I'll mount in the back doors or kick panels.5 points
-
Your magnet annoys me terribly. Please post it to me so I can spend half the day trying to pluck every last bit of grinding dust off it, only to drop if on the driveway and cover it in iron sand. Sweet looking project though!5 points
-
So made some progress finally with the main chassis section all tacked together and heights checked for wheel mounting. Just need to finish the welds, find and mount a suitable castor wheel now I know how big it needs to be and sort out the push bar handle and mount. Then will be a roller and can sort paint and seat out.5 points
-
Wow. Rapid! Very rapid. Thanks to a very shitty internet connection tonight I cant put up any photos. But I can tell you all now that the 2.5 lives and sounds cool. I need to re-tune the ecu as expected but the engine started up straight away. Everything is just a bit lean on the table which is understandable. The whole swap took a lot longer than I was expecting. A few hiccups saw to that. First one was the exhaust 'Y' pipe not sliding off the down pipes as nice as usual. A bit of mild corrosion and me jamming them when trying to remove it made it a prick of a job without a hoist. Then, at about 10.30pm last night Hannah and I were still only just slinging the new engine in place. The bloody input shaft wouldnt slide in place easily as I was using a engine hoist rather than my favoured chainblock. Hard to adjust the engine angle. Finally it slide home and we called it a day. Today I had to remove the knock sensor adaptor from the 2.0litre as it was missing from the new one. Never noticed this earlier. Did it wind out easily from the alloy block where it had been covered with scum in the depths of the vee? No it bloody well didn't! I ended up taking the old block over to work and attacked it with the rattle gun. Still nothing. So attacked the block with the gas torch and finally it came loose. Its a 30mm long plug about 25mm wide with a fine thread so easy to corrode in place. Phew. So all to day it was clean and assembly time. All went ok today and finally turned the engine over to build up oil pressure with the plugs removed about 4.30. I cranked and cranked- engine spinning away fast and fine but still the light wouldnt go out!!!? Huh? weird. A bit worried...! Should I prime the pump?... hmmmm Then Hannah spotted I hadnt connected the wire to the oil switch. Ahhhhhhhh. Whoops. So yeah. It started first turn. A happy non- event there. It revs up so much quicker and harder. Fuck yeah! Gonna be fun. We couldnt really rag it too much tonight as tuning the leanness out (that'll be more fuel being burned damn it...mr scottish me, a Davidson, not happy about that...but hey) and it was raining hard enough I couldnt really see well...( lovely old pommie cars with wipers made for a desert location and a fan that more just agitates the air trying to prompt it in a polite British way to move along towards the vents if you dont mind, terribly sorry old air molecules, hope Im not upsetting you.....) But I still gave it some squirts and had a giggle. I'll post up some boring photos of engines on stands, engines on hoists and engines in bits tommorrow. For now its movie and chill time4 points
-
next meet up. Wednesday the 20th @ 7pm.... Burgerfuel Riccarton3 points
-
The 2 finished halfs. Ordered carbon fiber from ACP Composites in America, Tooling Gel coat and West Systems Epoxy resin from Fiberglass NZ2 points
-
Back on for Wednesday night. Show face and receive a free can of Fielding Draught2 points
-
haha russel's all yours2 points
-
Discussion: //oldschool.co.nz/index.php?/topic/44590-callums-notchback-ae85-levin/ Thought id make a build thread on my project. Bought it a few months back traded my AE86 Hatch for it. Factory 3AU 105xxxkms on body. Now has: Rebuilt 16v Bluetop 4age W55 Gearbox Bc Golds Full exhaust/Headers Shimmed Hilux diff I bought the car looking like this and not certed for any of the mods I drove it around like that for a few months untill i decided i should start making look the way i want it too and get it all legal. First purchase was a set of SSR Starsharks, 14x7 -2 14x7.5 -15 Bought some tyres and test fitted, Running the 7.5s on the front as they still out too much in the rear, Need too roll rear gaurds alot Found a guy too work on my car and get it too cert standard, Need to shorten my draveshaft, D-shaft hoops, lower car all round/ Roll gaurds, Whole new exhaust as the one on it now is too loud, Re-install the factory power steering set up and a general tidy up. Car is now lowered and basically sitting at cert height, guards have been rolled and look pretty good i think More pics: Almost ready for cert, Only a few more things left too do on it then should be off to the cert check next week2 points
-
Nice. These should be good for 700hp, right?2 points
-
Thought I might as well post up a build thread for my latest project. Building a hot rod push stroller for my daughter to cruise around in. Starting point was an Instep Hot Rod Pedal Car which is a reproduction of the 1950's Murray Dipside pedal car. Imported from the US and looks like this stock: And here is a sample of what I am aiming for: Wanting to add working headlights, tuck and roll seat, ghost flames, pin-striping, dashboard etc. A mate of mine is helping me with welding up the frame. Not 100% settled on final chassis layout, will just see how it all comes together as we go. There is also a body shop looking to run a 1 day course on prepping and painting motorcycle tanks including basic graphics and flames and they said I could bring the pedal car body along. Basic plan is for a simple box frame which will be powder coated. The rear wheels are smaller to get the back end nice and low while the front wheels will be held just off the ground by a swivel castor in the centre of the front end. When she gets a bit older I might try to remove the castor and change the front section to allow steering and run an electric motor to the rear wheels. Feel free to suggest improvements to the chassis design too Rough plans: Mockup: Hope to have the chassis finished off in the next few weekends and ready to cruise around by the time she can sit unsupported!1 point
-
So thought finished this bike untill yesterday QCR Dirt 2014.. Andy Gal and Chris you and the boys inspired more So this happened And hour or so later So have just plated and spigoted pipe in will fabricate a wee square to round offset transition to tidy all up..toying with idea fabricating up rear guard..what you think?? Motor work starts tomorrow1 point
-
How do you find cars like that! Oldschool Escort sport division should be a thing1 point
-
THis used to be round palmy! I would always pine over it when it zoomed pasted! Beat it a few times at the lights in my ghia1 point
-
Sorry to double post but tablets being a cunt your wagon reminds me of this car from gore1 point
-
Man thats sick shame it cant stay that height you could always raise it with taller spring then drop spindles to bring it back down that would give you clearance you need wouldnt it1 point
-
You could upload the latest stable firmware release for ms2 and go from there that way your all upto date but will mean a bit of data entry with miss matched things etc. bit of checking over the tune encase the algrothium is miles apart from what you had. good you have lots of screen shots etc you should be able to see what firmware version you were running on the top bar thing. you could do this or you could upgrade both require about the same amount of messing around but later firmware is generally better unless you were running some special release that did extra magic things then dont bother as it'll screw with you lol using the firmware upload tool is easy you may just have to send the file twice as sometimes it wont go through on the first go for some reason. and remember that jumper you have already mentioned. unplug everything apart from power to the megasquirt when doing this and dont plug in untill your happy its all set up again weird stuff can happen.1 point
-
Thats looking fucking choice. Now I want one!1 point
-
Fuck i'm slack. Paid1 point
-
I've just pulled out of Marshaling on Sunday as i know i'm not going to be able to drive... The party is for Andrea and I's secret wedding in Vegas, so i really don't think i'm going to be in a state to drive at 6:30am... So sorry guys.1 point
-
You should probably bring your Pikachu onesie for an extra layer of warmth over your clothes too.1 point
-
Lol's. Will see if the boys want to dort over to this, I need to get out of the house.1 point
-
Been plodding away at this after work and weekends when time allows.. Bent up the Shoulder plate bars, and plasma cut the 3mm plate out.. Did a small pick a part mission, got a wee suzuki alternator, swapped the pulleys over from the AU serpentine - all it needed was a small shim behind the pulley to get the right clearance, same OD/ID - and 1/4 of the size & weight! Also made this tensioner up from a EFI EB Falcon, had to make some bosses up to get the belts lining up. AU Serpentine pulley swapped over with a small shim behind as well! Sat the topolino Bonnet off the old car onto this, was a little wide, had some old holes and the scoop was on the turps, just wouldn't do.. So with some help from a school friend from years ago, I got to learn some fibreglassing - I also trimmed the body to tuck behind the rear overrider bar - rather not have the back end mangled up Eagle eyed among you may notice front bumper is on, along with "radiator hoop", supports, plate, and corner supports for the bumper. Got a fair bit more done today, but forgot to take pics/ran out of gas too.1 point
-
Diff is all back together and seems to be fine. Took it for its first drive with new mounts today and all seems well Gave it it's first wash since painting it and it looks beautiful. A few weeks ago I got a t3 intake manifold. The one on it was made horribly. It wasn't ported and made the engine idle like a bloody rota. Sounded cool. But not healthy. Put this ne on and bam. Runs like your everyday 4age. Only fucking loud! Only thing to do before cert is get fan wired up the right one. At the moment it's on when you start the car and turns off when it gets up to temp! Woo Going to take it for quick drives most nights over the next week or two to make sure it's all working safe and reliably. Cheers!1 point
-
still to do- purchase flywheel/ clutch and install install manual driveshaft which i have purchase 2nd engine with loom ecu and all sensors etc sort out fuel system-originally carb so this will take a bit of work which i dont know a lot about radiator to suit wire up make 9s fit. skid1 point
-
a w55 from an os member was then purchased an delivered via os courier as well as a jz-w bellhousing which brings me to now 2jzge sitting in its home.That hideous blue will be getting kicked off the sx80 w55 with jz-w bellhousing fitted great success, although this is a 'hack' i plan on keeping the full interior tidy and original and am reluctant to cut anything other than springs1 point
-
somewhere among all this wheel distraction i purchased a pretty bare 2jzge that has a lot of random bolts missing and sensors for $350 from trademe, i then purchased a set of the jz-x6 engine mounts that had been already watercut by a fellow os member and had my dad weld them up according to the plans i found, in order to fit the motor i had to swap from the 21r crossmember to the 1g crossmember from the blue gx60r at zebra, I also had to change the sump to a front sump.a gx61 manual conversion -minus the box-was then purchased and installed1 point
-
like everyone i wanted more dish so, i managed to locate a pair of 4x120 14x7.5 +2 superstar racing tri spokes like the a3as with centrecaps (to solve the problem of my missing one)so had them shipped and harvested them for their lips, i had the front lips split off my four and fitted two 7.5 lips to one pair and the left over rear halves to the other pair, this does make changing tyres a pain an will eventually replace with new 4" lips when they become available the result is 14x9-24 and 14x7.5 0 i then borrowed an idea from a fellow os member and made this from a hub from pickapart and a motor i got from a garage sale the end result with 185/50s1 point
-
I'm thinking I'll show my face this wednesday, been too long since I've caught with you lads. Gonna try to bring the new whip but it may be away for rust chop. Hilux still lingering.1 point
-
grabbed this mint complete 22spline T50 and moooore wheels, can't resist. 14x8 -121 point
-
wee update,motor is nearly reconded.trumpets have turned up and just got some new rims,even got to run my toyota center caps still ruff mock up "selfie" new rims.14x8 center lines with little stretch 205/551 point
-
I found this from the other week.1 point
-
MAN-SPA1 point
-
Have these too1 point
-
Figured this may come to use for someone: https://www.dropbox.com/s/ml6pmji6jt1l8d1/Hilux%20G%20series%20diff%20rebuild%20manual%20%20%282%29.pdf https://www.dropbox.com/s/63m1j9kc09yy3cn/Hilux%20G%20series%20diff%20rebuild%20manual%20page%20156.pdf1 point
-
Sweet so managed to get abit done today during smokos and lunch break Put a coat of Black Zinc just for now while i mod the frame and weld up new tabs for shit, just wanted something on it will it was bare hence the paint jobs abit rough Swing arm wasnt blasted, will just paint strip it i think, but for now its just degreased and cleaned up You can see the state that the frame is in, most of it just looks like this, textured paint look, which should be sweet once its primed and painted properly This shits abit different tho, might have to weld fill this Degreased the wheels, the rear was covered in grease....... ...Came up really good! this is with no polishing, just cleaning aswel. and through the motor in aswel Its coming along, i guess, fell like im not really getting anywhere and just going in circles, but now I just need to sort tires for ride height, while im waiting on them i can sort out tabs for the electrics and little shit that will slow me down further along Cheers1 point
-
Ive been a little quite around here lately as I have been quite busy. Thought i would show you guys something I managed to part trade a 3d printer for. I bought this little guy, a 300 x 600 x 100mm CNC router. So Ive always toyed with the idea of making a carbon fiber race seat for my BMX, and we make composite molds at work I have learnt a little in the past 7 months to design one and have a crack and making it myself. So this is the design I came up with. Single layer 3k weave, 0.28mm thick carbon fiber sheet, bonded with Epoxy resin (probably West Systems 403 or what ever we have at work) I was going to Vacuum form it, but I thought it maybe intersted to try a compression mould using a Male and a Female. Most companys dont opt for this as Mold costs are so expensive, but when you are making them yourself and its costing you PVA and MDF I thought why not (also give me a little more practice with 3 axis programming. Test Print Z Finishing after Roughing Semi Finished Male Mold. Needs sanding, surface prep Will be an interesting learning experience and if you guys are keen I can put up progress of my attempts at Carbon Fibering this (i know its not car related). However I have very grand plans that involve car components, maybe not my crown but definitely a couple of Carinas that need some love1 point
-
only problem is you get limited steering angle1 point
-
My luck has been stroked. Turns out the are fucking perfect. Super happy with the deal I got too, pretty much brand spanks, but near on $300 cheaper, ZEOW!.1 point
-
GET THIS PRINTED ON VINYL AND STICK ON BACK WINDOW1 point
-
Got a few more photos today... As you can see, she's in a pretty sad state. So this is my new cab... Only rust is a few little pin holes in the floor. The vents even open and close still!1 point
-
We have just added a touch of class to the bedroom. Nothing less than a Rembrandt. Its the nightwatch. Dad gave it to us (well it was left outside in the carport so I claimed it ) This is all for now.1 point


.thumb.jpeg.384ff72c8d2b0ee0d34a7bdedb55bdcf.jpeg)


This leaderboard is set to Auckland/GMT+12:00