
Leaderboard


Popular Content
Showing content with the highest reputation on 17/09/24 in all areas
-
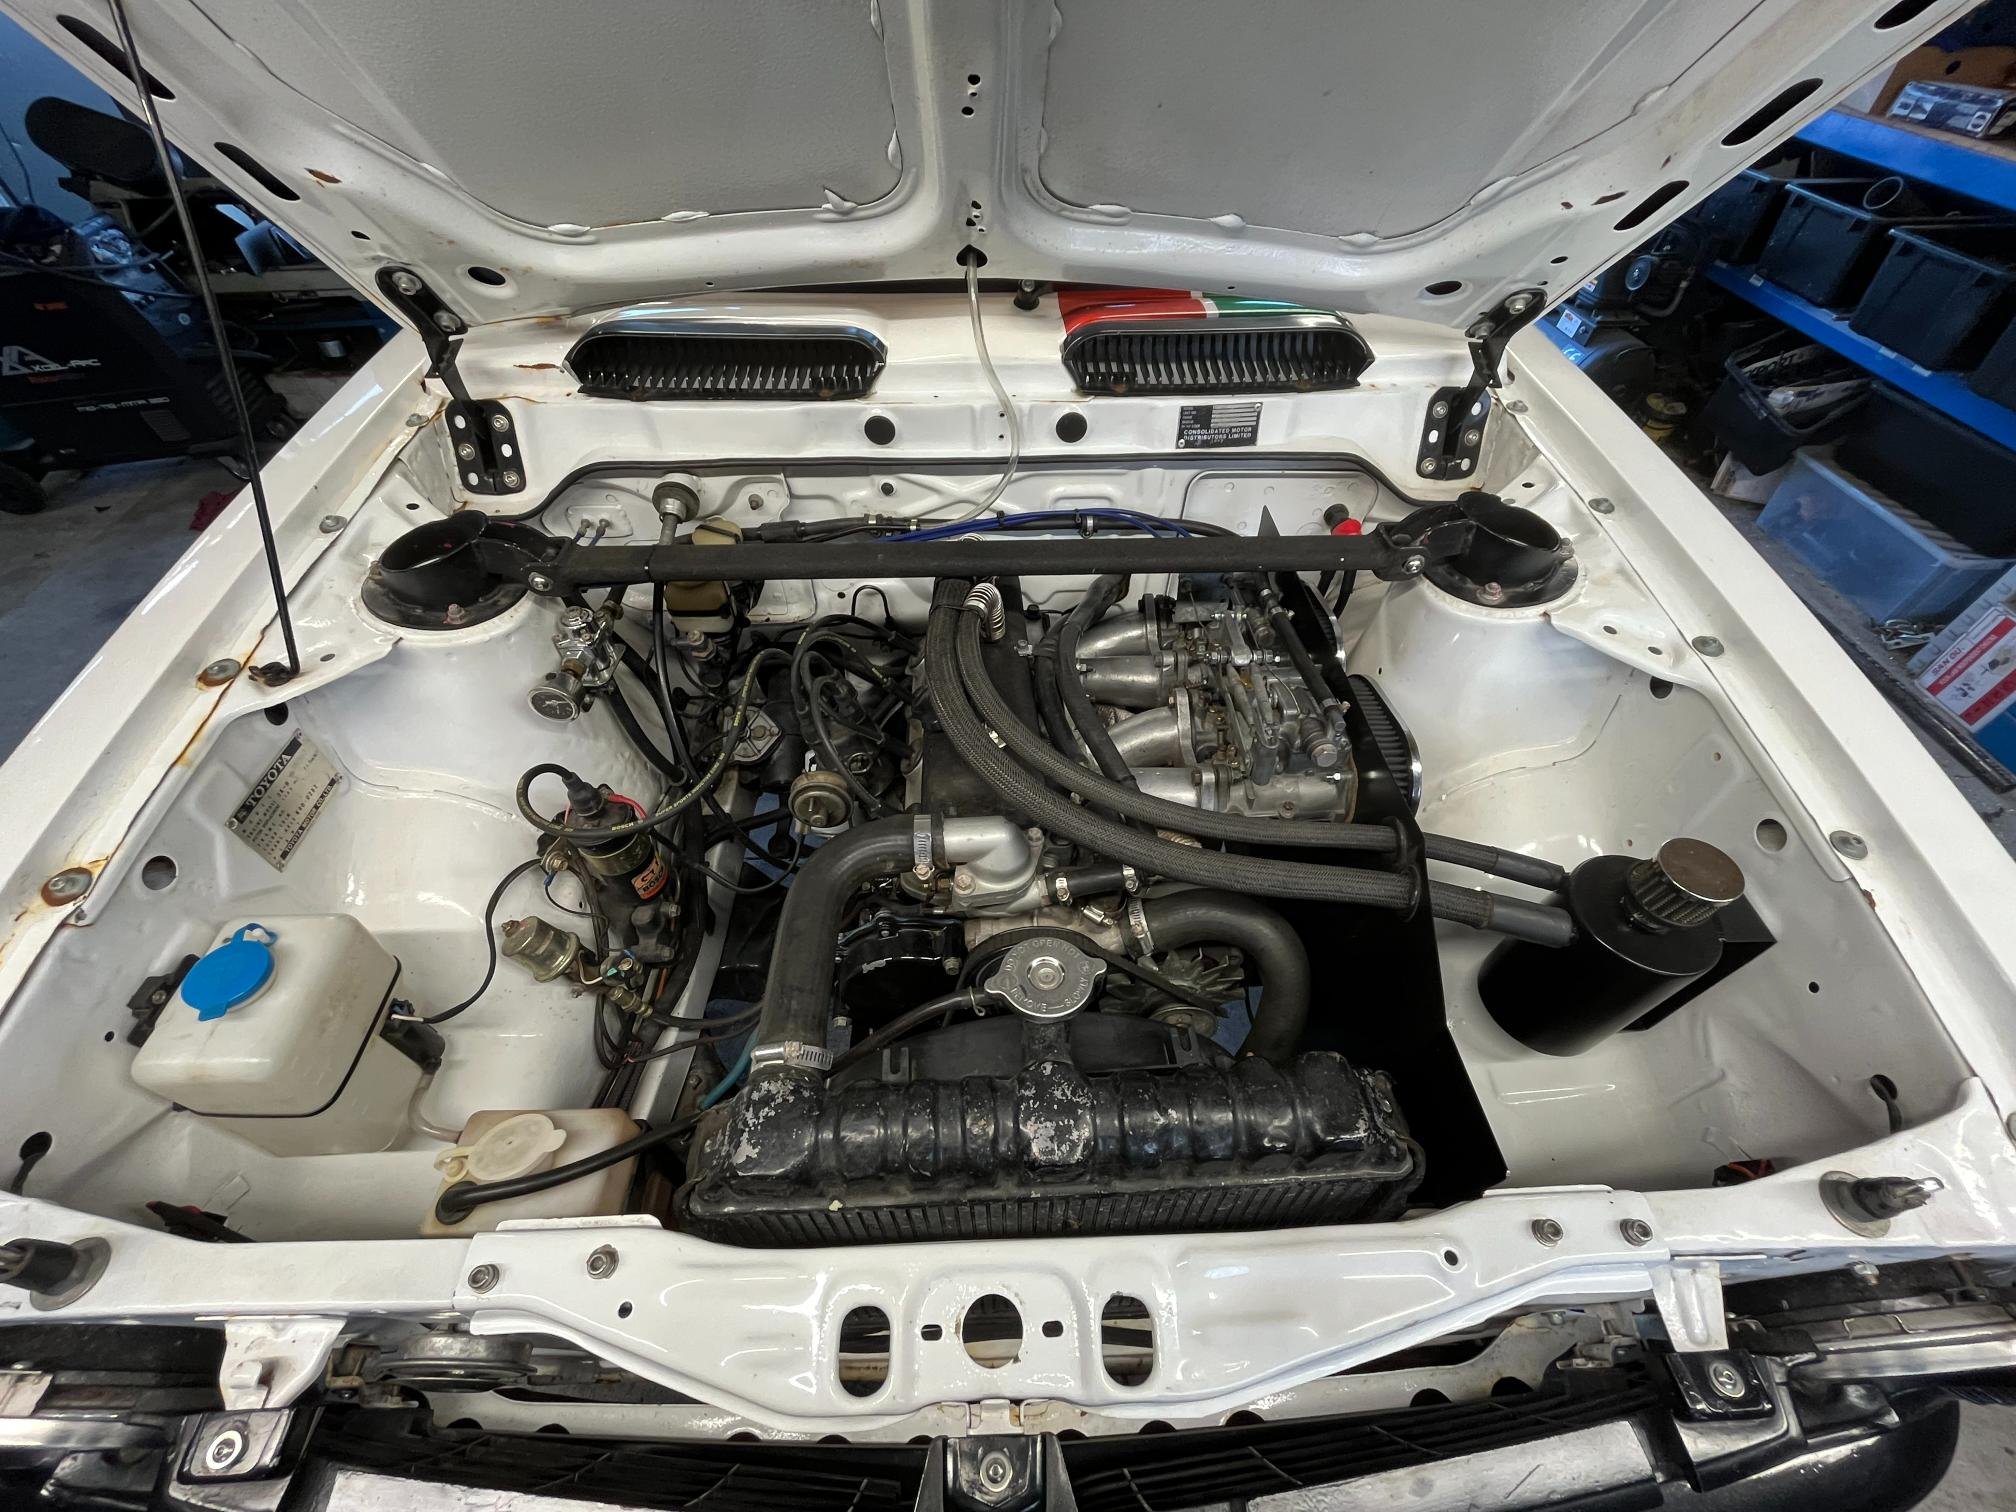
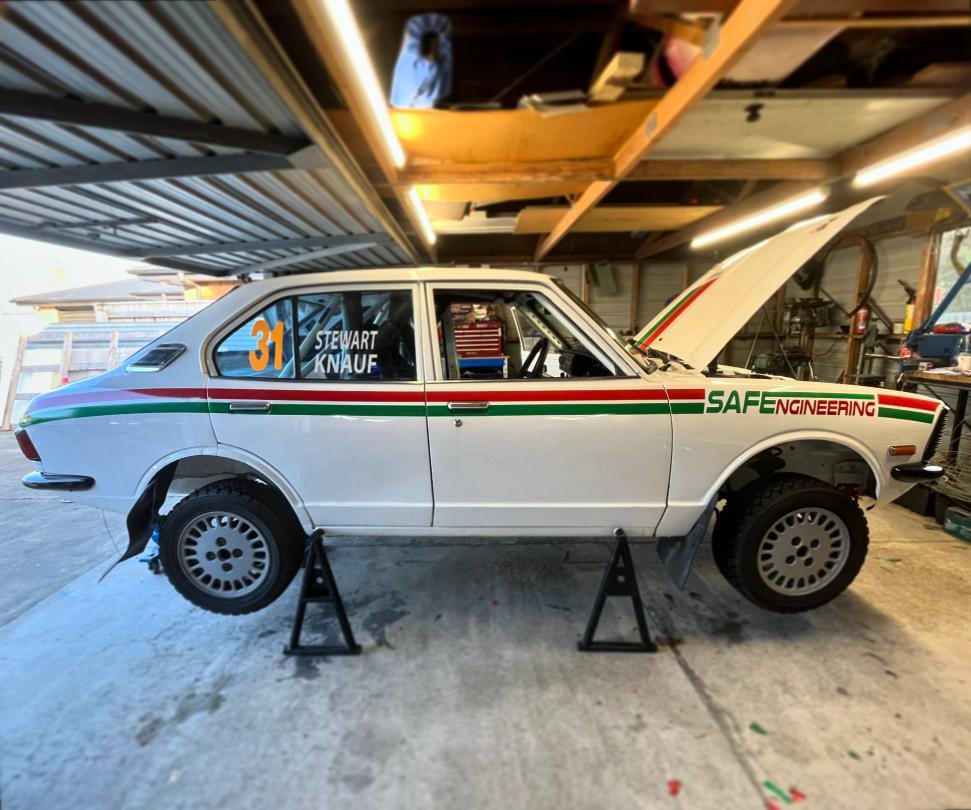
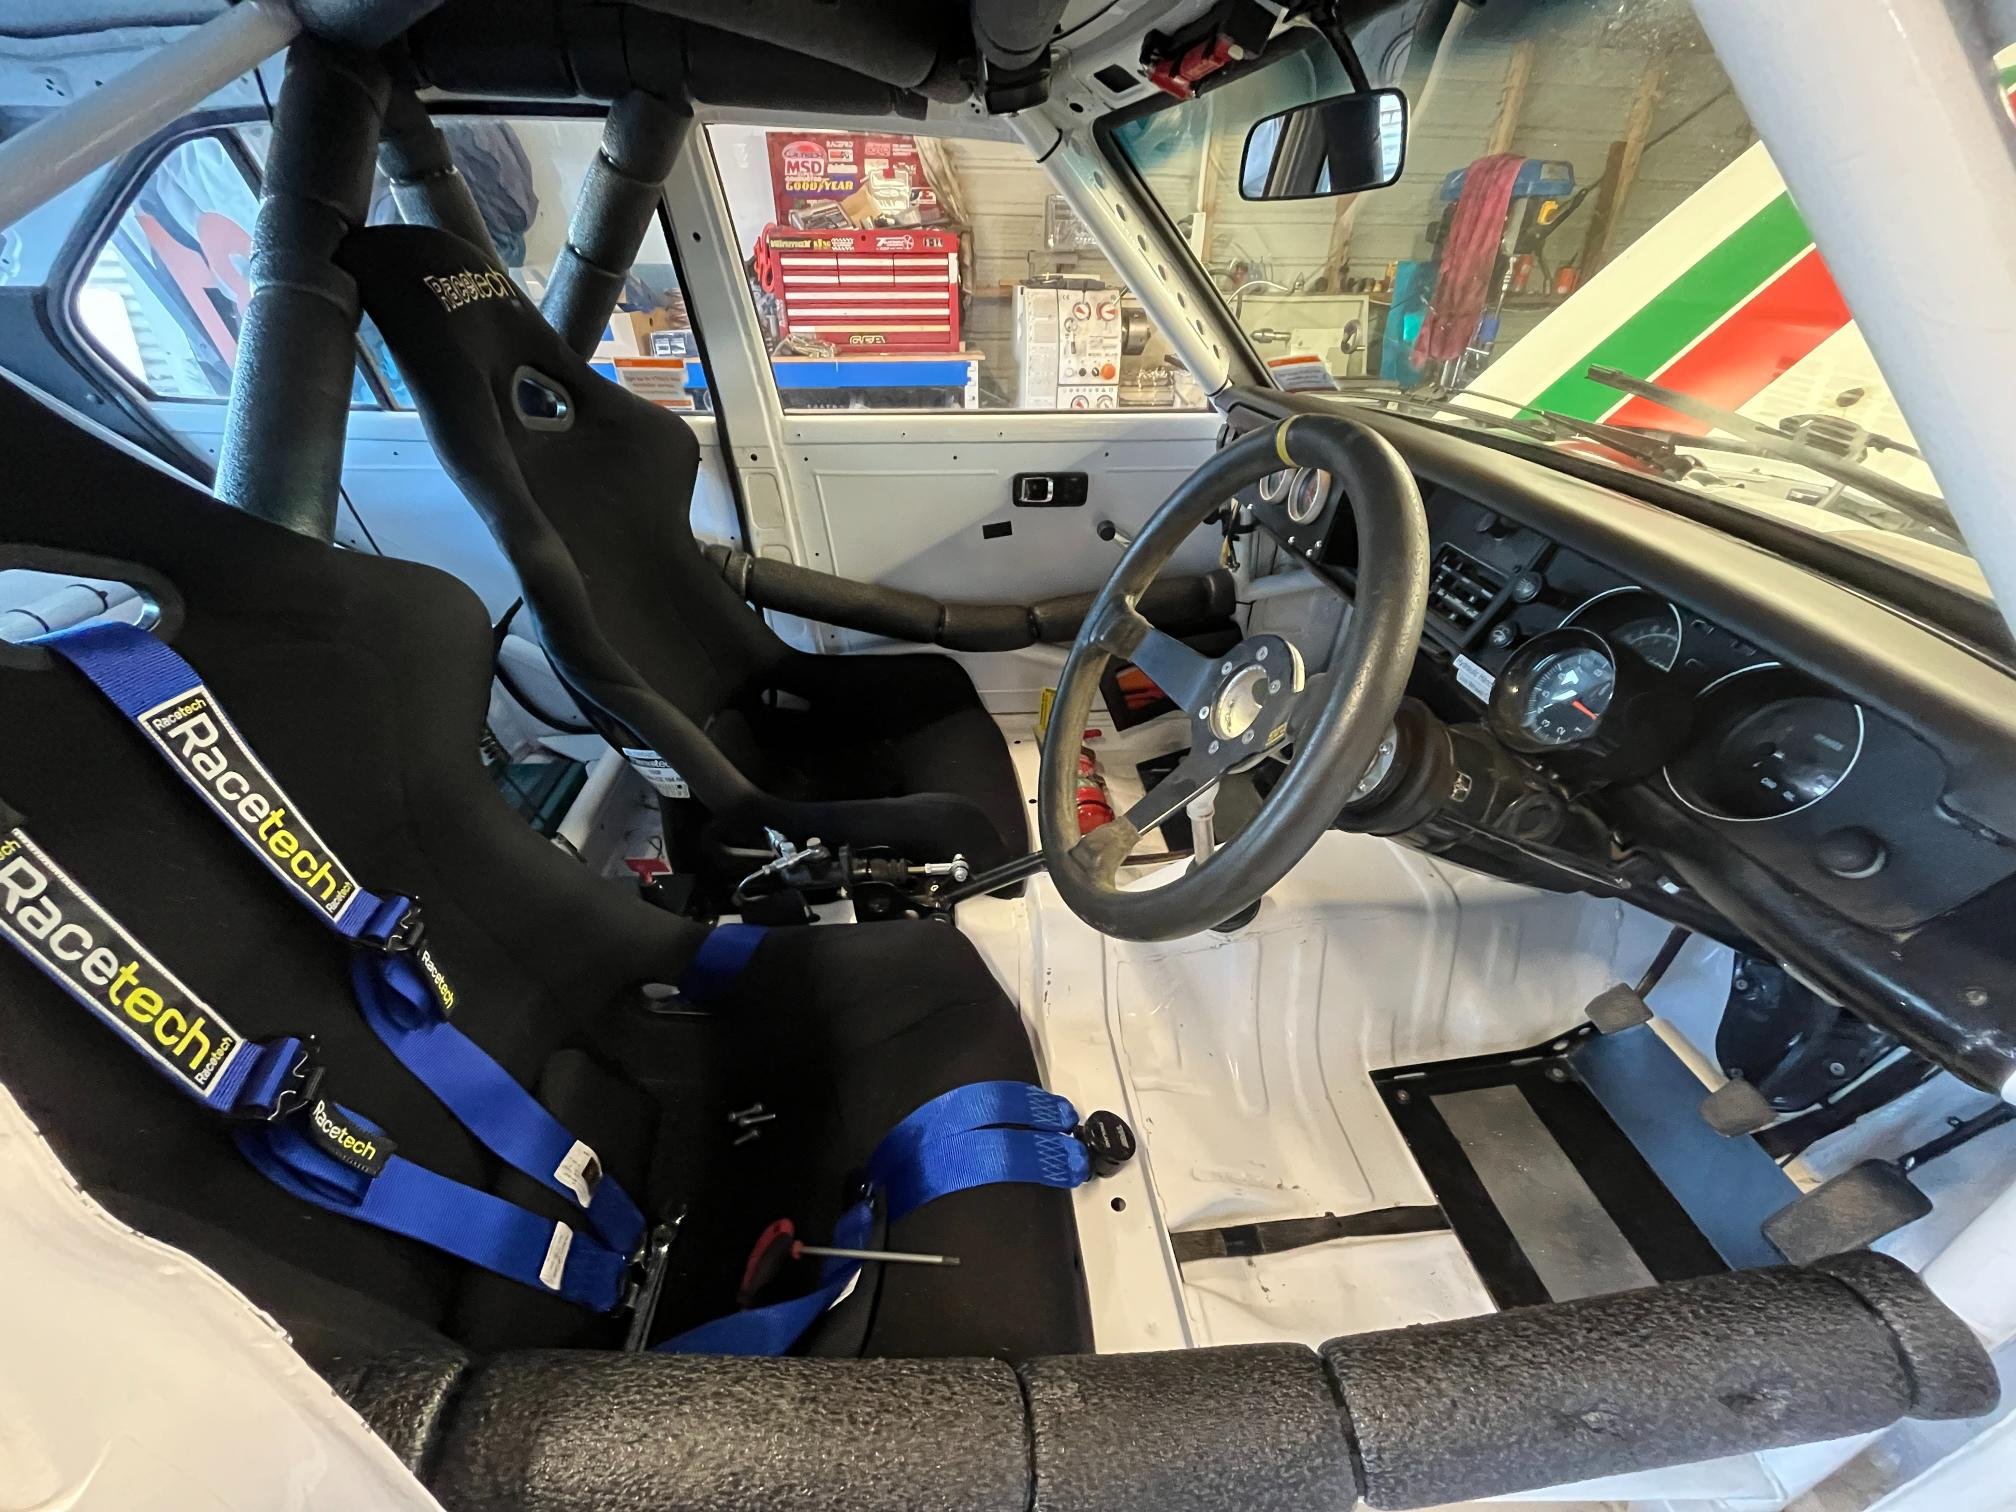
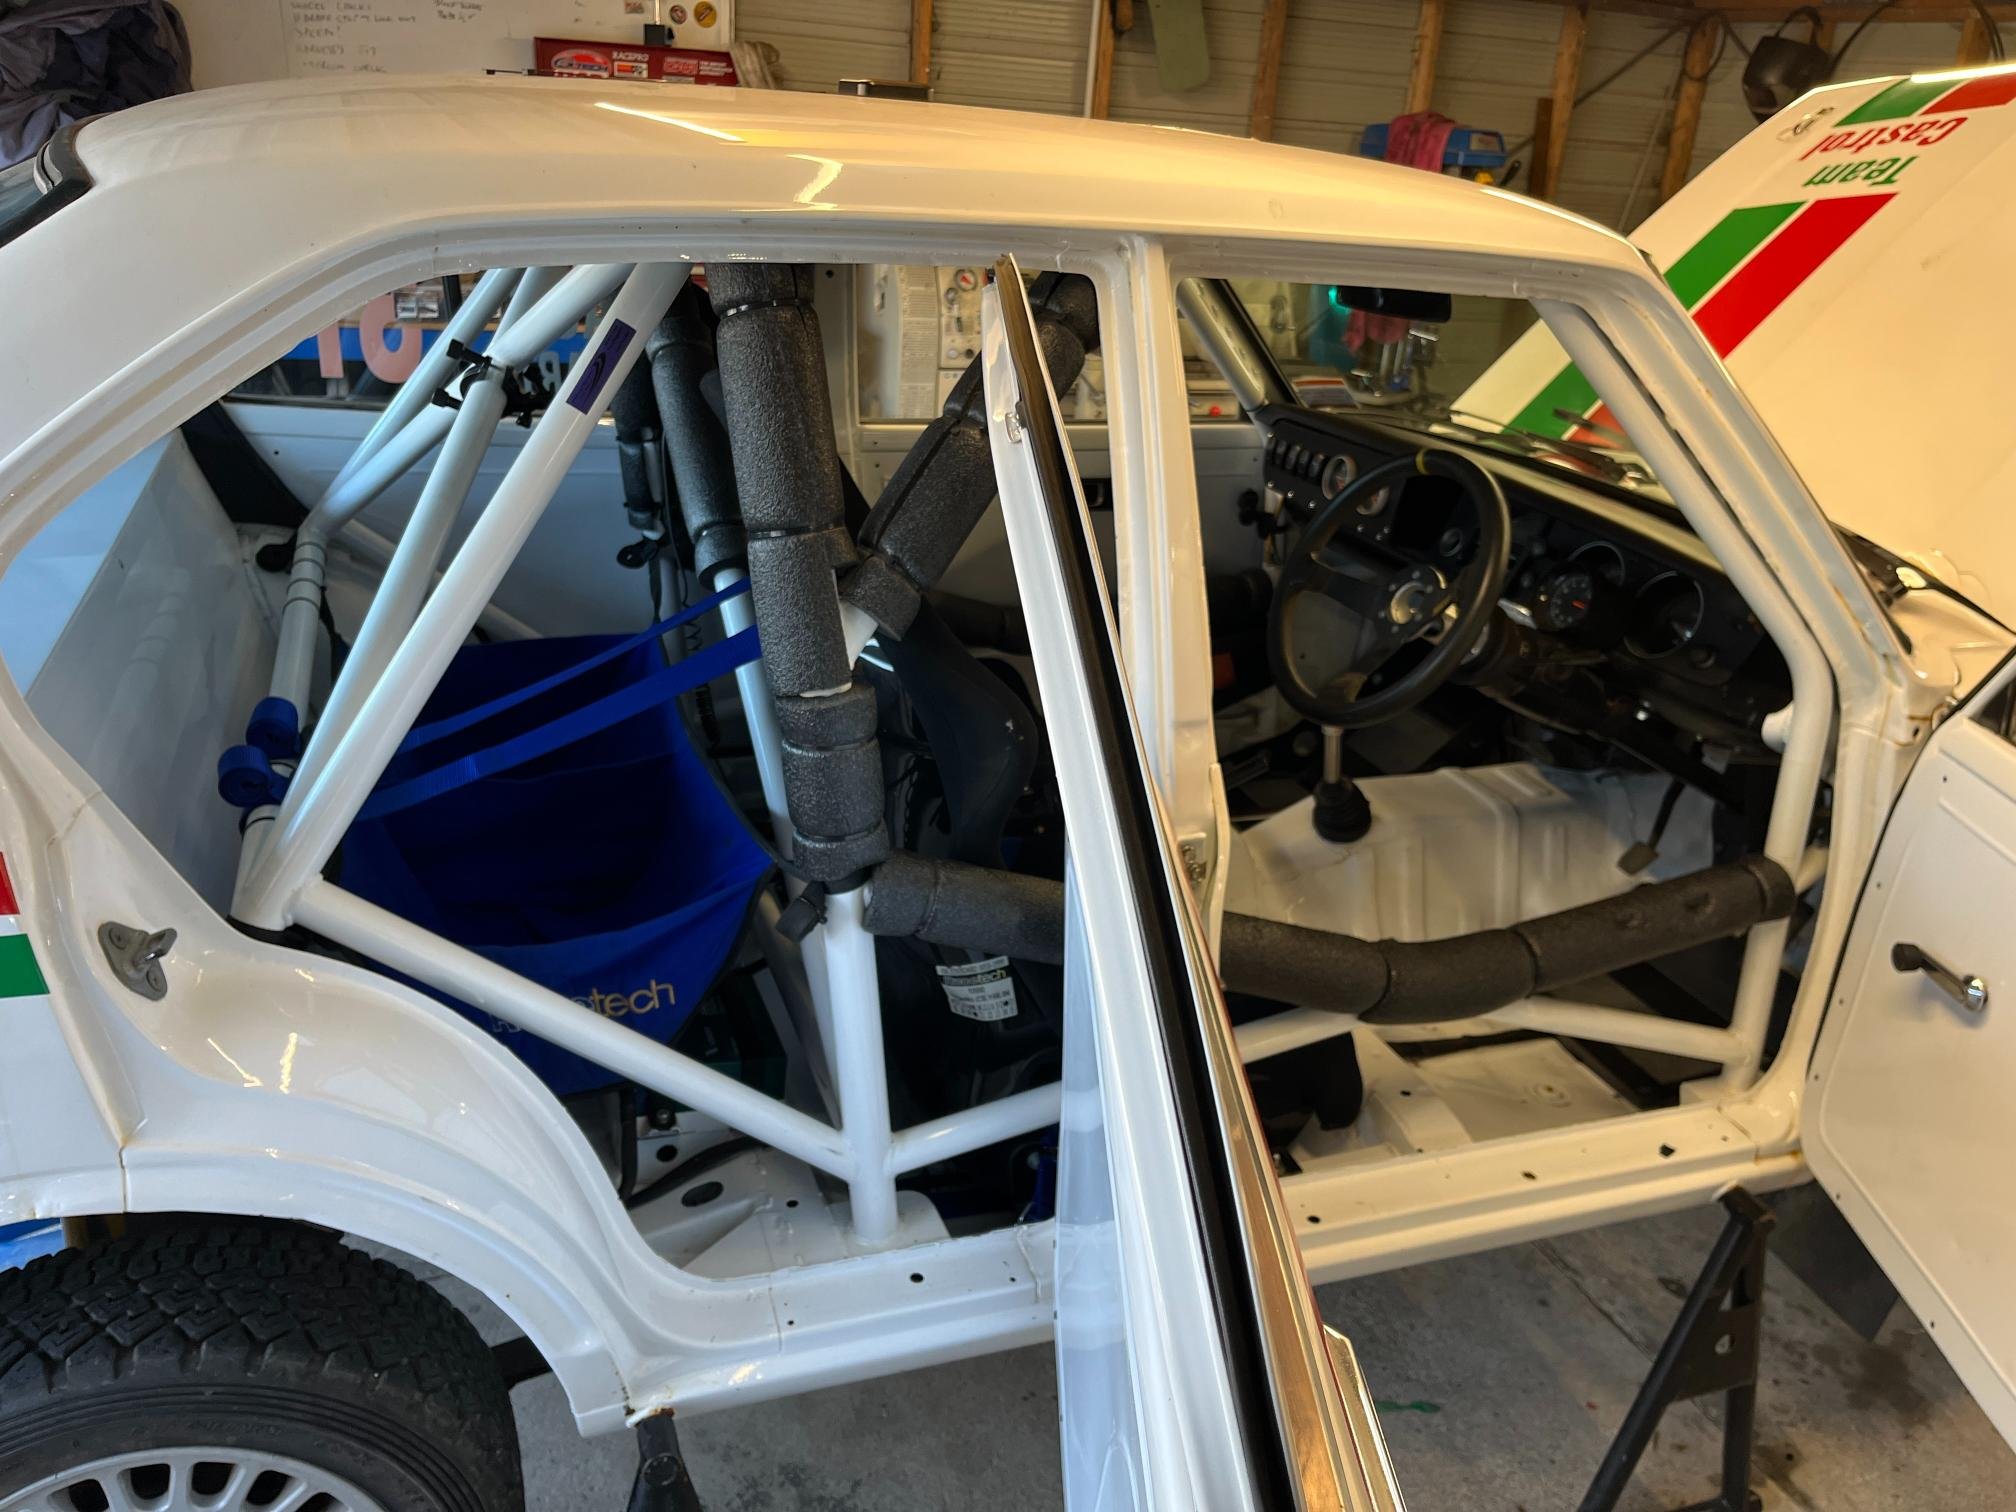
Saturday morning... Fuck 4am is early. We all got only 3-4hrs sleep. 1hr tour to the first stage out the back of Martin. SS2 was pretty dark and foggy when we started but lightened up towards the end. Lights were awesome and made a big difference. Almost got caught out 1-2kms in by a massive mud bog on the driving line that ripped steering wheel out of my hands and sent us off the road. That was our warning for keeping an eye out for mud - our wee corolla couldn't just power through that stuff like the 4wd cars.. Nick drove SS3 and settled into driving, doing a pretty good job. We had the full 80hp at this point, but we were both rusty driving on gravel. Quick service after SS3 confirmed it would be wet for the rest of the day. SS4 was cancelled. SS5 Ridge rd north just outside Taihape was steep, slippery and hard work for the corolla. We had charge light come on half way through, thinking we had spat a drive belt took it easy in parts but temp never rose. At Taihape service the @Lt Dan & @Truenotch did some digging and found a broken wire. I was convinced we were out for the day so this was a great find. We run 2x small batteries, so could have continued for a bit, but with wipers draining power we wouldn't have lasted the 120km back to fielding service (incl. approx 60kms of stages). SS6 - Peep o day 38km. First time through. I drove. I knew this road partially from doing arrow duty for last years event. But had to approach with caution still, as we don't run notes. Lots of switchbacks and hairpins, kept us on our toes. 40kms of stage was a bloody long one! Was puffing by the end thats for sure. We from this point on, we were managing the oil and water temps, using the heater and fan 100% of the time and limiting revs to below 6000rpm. After around 10kms of stage the oil pressure would drop to 30psi at full load... so we gave it 5mins rests throughout the stage whenever pressure started getting to low, until it got back up to 40psi. Engine had new bearings so had plenty of material before they spun.. Managed to catch the Masport BDA through this stage - not quite passing but got pretty close to them. Nick also caught the Holbay-powered BDA Escort on a stage - earning the Corolla a new nickname #BDAKilla. Need to keep a count on the doorcards for future yarns! Did some skids at a few spectator points. Was great seeing people out in the rain. Especially lots of young farmers on the back of their utes trolleyed at 9am in the morning. That's what its all about!! This is a example of mud being dragged onto the driving line (most other places were much worse!) - if you hit this at pace you'd be along for the ride, like skating on ice - OR be spat to the outside of the corner. Funnily enough, second time through these stages, it had cleared up a little and had bigger grooves. Kept us on our toes though. SS7 & 9 was Mcbeth 8kms just out of Kimbolton. Great spectator spot to get to. Nick did a massive scandy flick that would have been better with a few more HP.... But anyway it put a smile on our faces we weren't going to win anything so just had fun. Car was running pretty poorly at this point, struggling to get to 100km/hr on touring. No photo's or incar, but SS10 Ridge road 30kms was bloody amazing. Shorter stage than SS6/8, but similar topography which made it a great stage, with heaps of variation and an awesome downhill section at the end. Surface was quite different to other stages, so we approached it with caution. SS11 was cancelled. Was a bit gutting not to have another go at the super special - but it was far too wet we would have made a mess of the track. Corolla fitted in pretty well with other classic cars! WE BLOODY MADE IT TO THE END!!!! Amazingly, the car was still straight too. We both had a few moments of understeer or running a bit wide but managed to get away with it. We managed to get 3rd in A class (0-1400cc), and 38th overall (61 starters) just by finishing. So many cars had mechanicals or crashes. We were never going to match the pace of the other A-class cars, so our strategy was to wait for everyone else to have issues and make it to the finish - which is sometimes harder than just driving fast! A-class was made up of the following cars; Adam Fisher - 120hp 4k powered starlet Brian Terry - Kawasaki 1400cc powered rocket, sequential, MCA shocks etc Dean Astill - 2age powered starlet, Lampola dog box, MCA shocks etc Overall, massively cool event to be part of and very proud of our approach to make it to the end. Nick and I both drove well and got quicker throughout the day (even if our times didn't show it due to losing HP!). Conditions were difficult, but provided plenty of entertainment. Zestino's definitely wasn't the best tyre for the conditions, but they were cheap, consistent and got better throughout the day. Plenty of life left in them even after 191kms of tight twisty stages. Will make the next event that much cheaper at least. Brakes were diabolical. Pedal went right to the floor a few times on touring, but seemed to be OK in stage where we were hitting the brakes harder and the high level of rear-bias got it set up perfectly for the corner. New engine was pretty rubbish all day. Not convinced it was tuned too well as drivability was rubbish - bogging/nothing until 5000-7500rpm. The cam is part of it also (which we had checked out prior to this event and spec was great). But will do a regrind to bring power band down to a more drivable range. Av gas definitely saved it from serious damage throughout the day though. So a bit of research/investigation to do to improve the package before next time. Car is clean now and will soon be packed away in storage. I've got kid #2 on the way early next year, get the Levin tuned and Nick has some house reno's to do. Will see how we're placed to drag it out for Daybreaker next year - the twisty stages suited us and the car really well. Feel free to discuss and share any pics here
 18 points
 -
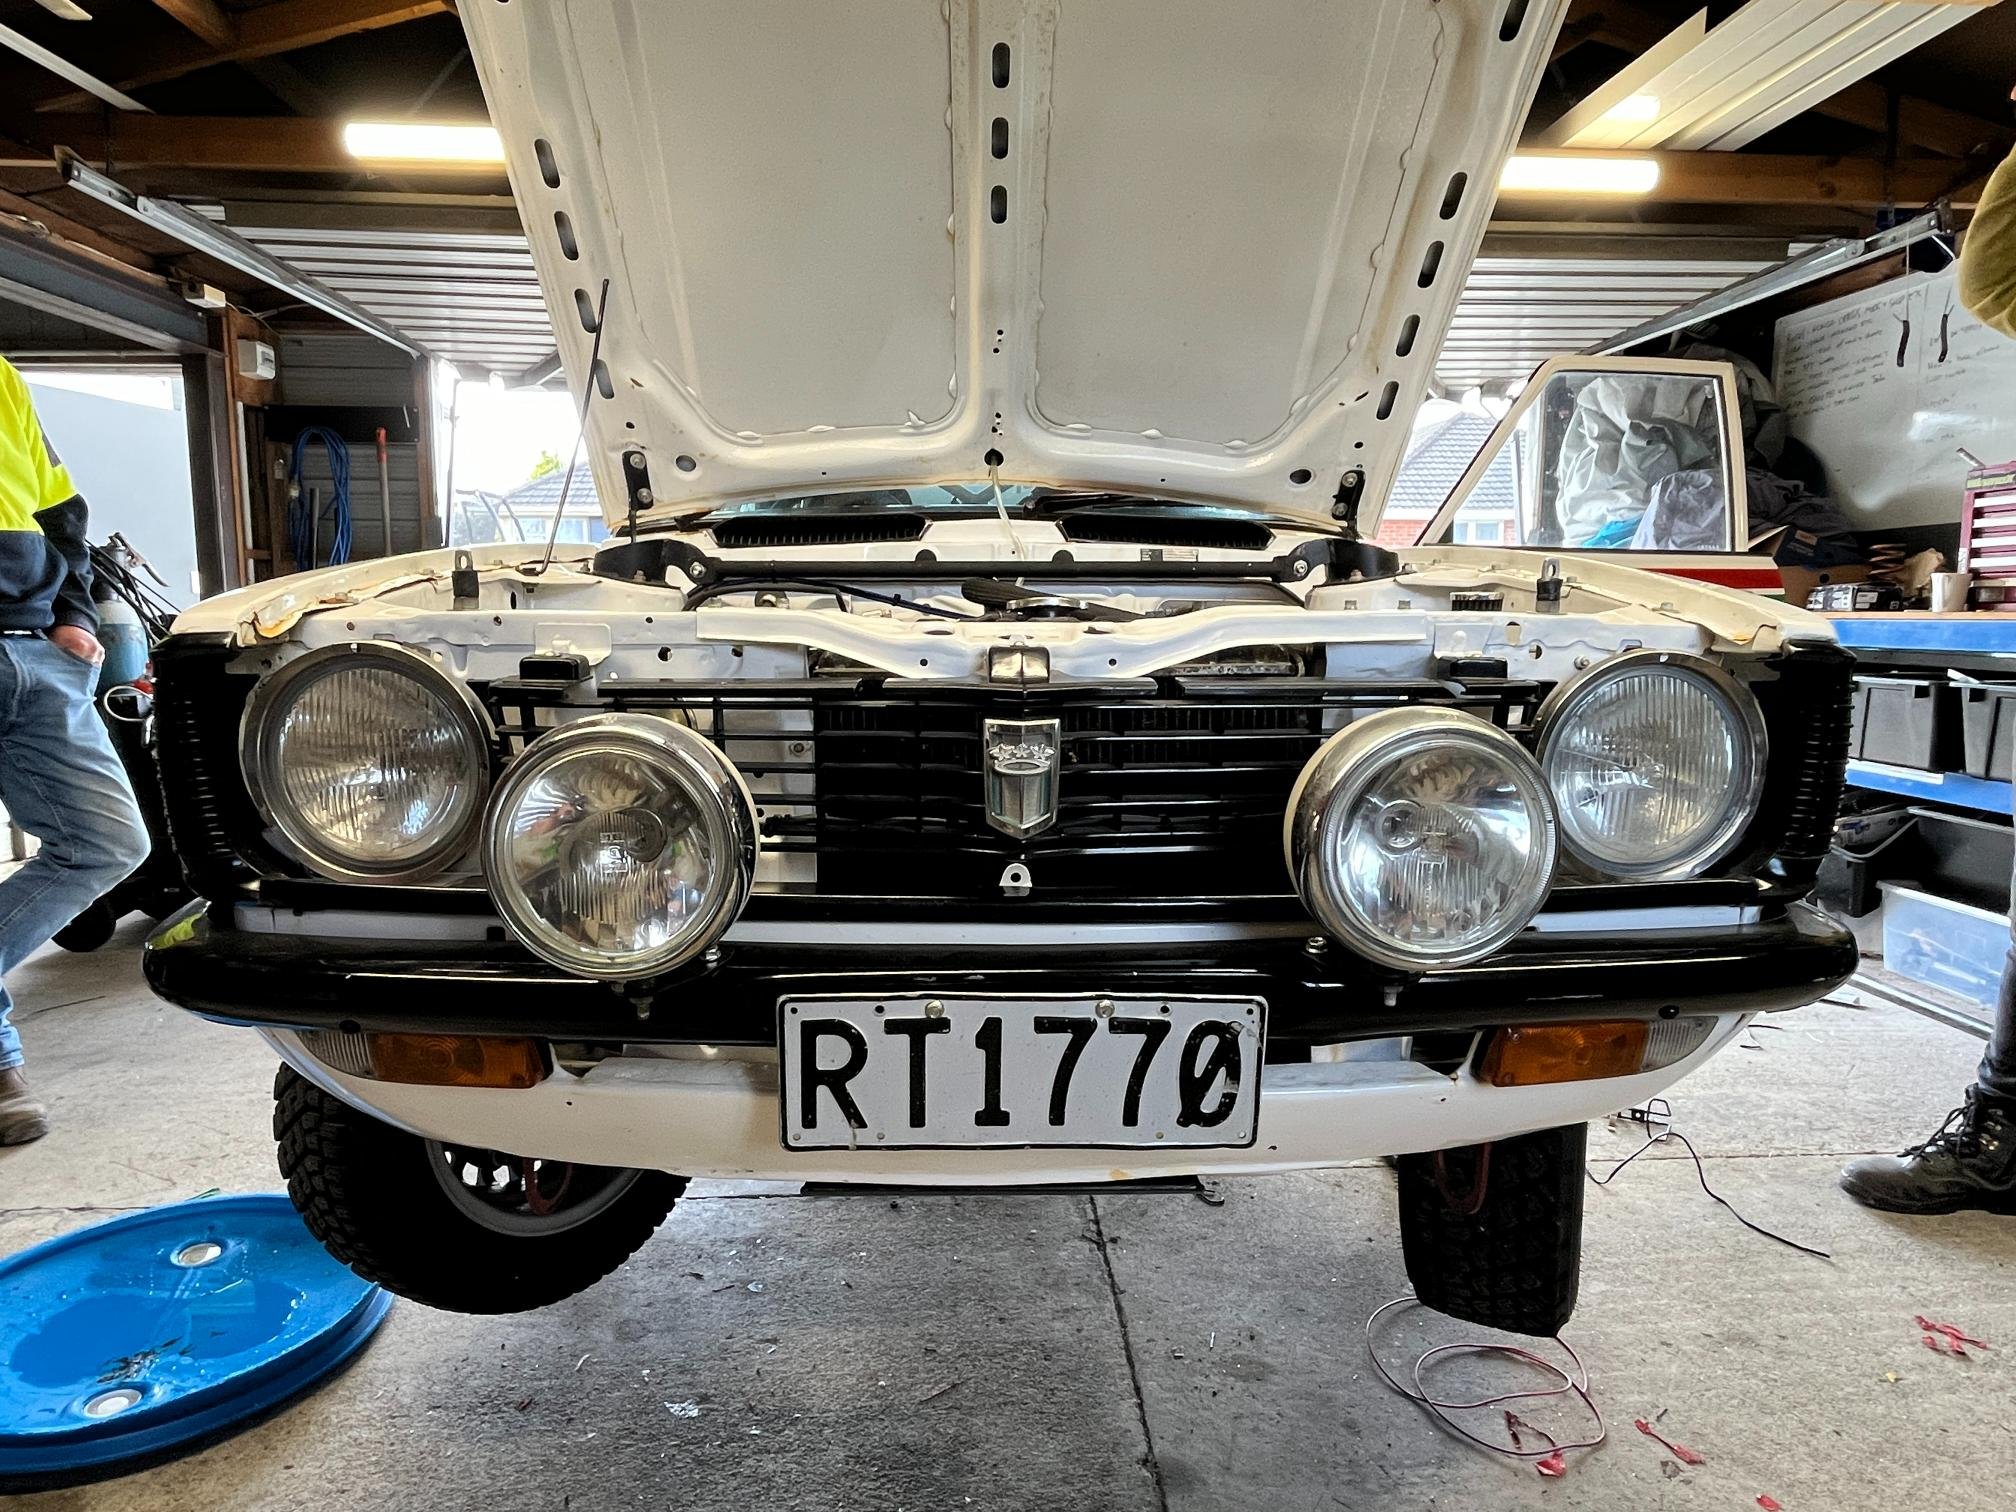
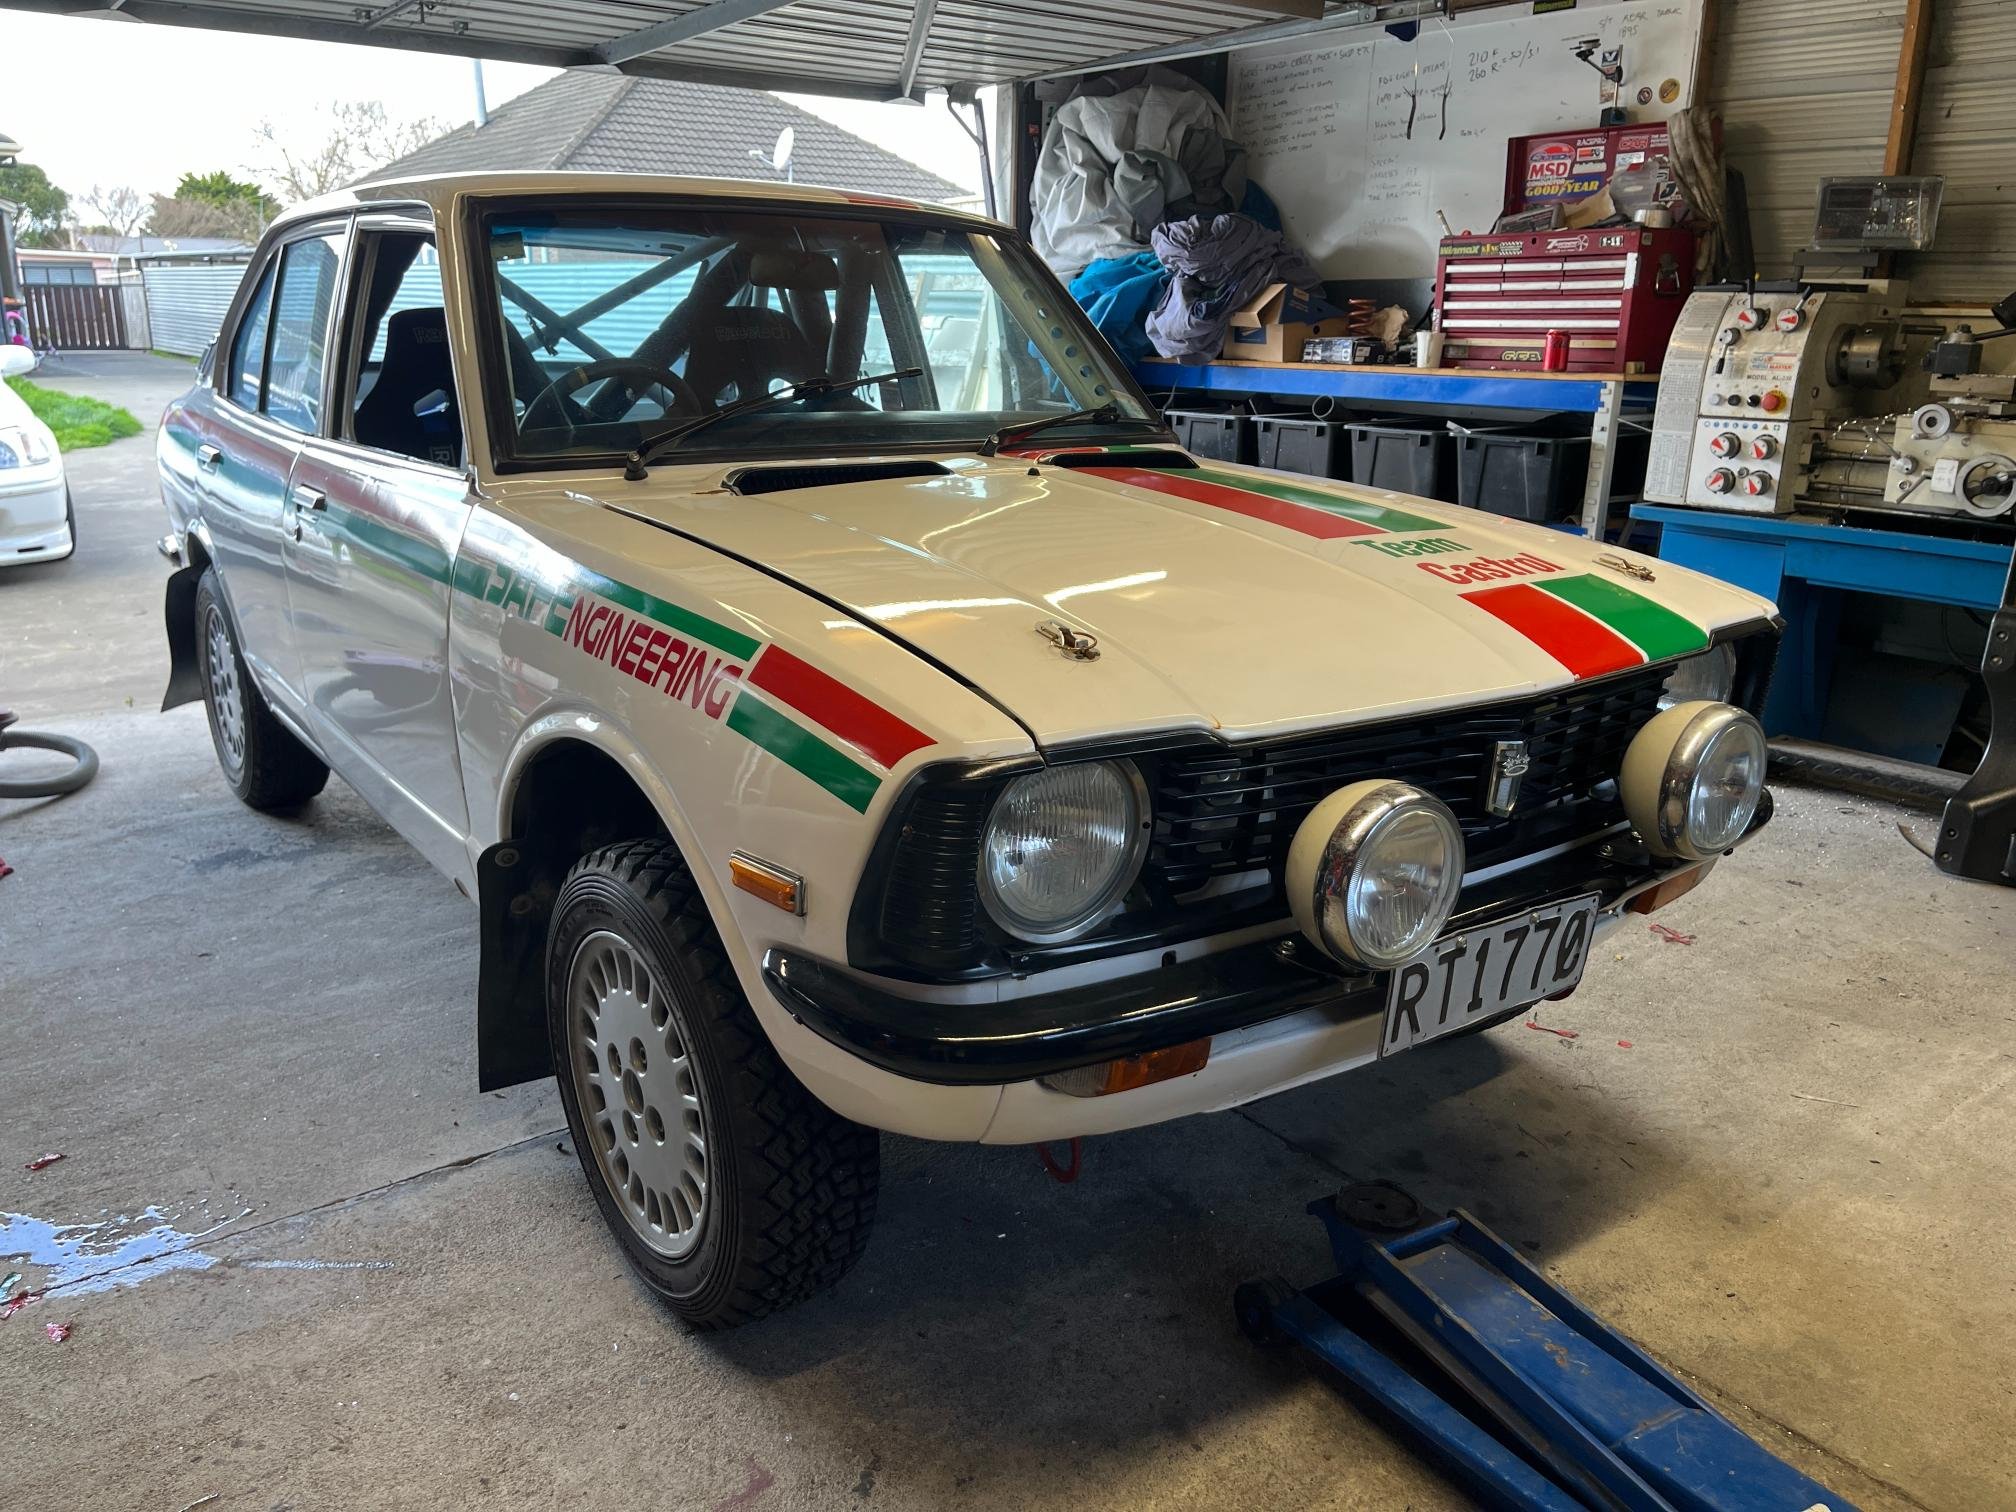
Here's a bit of a report on the adventure that was the Daybreaker rally in a 1974 Corolla.. Grab your popcorn and hold on. Car was super well prepared thanks to Nick. Still had plenty of small details to check over in the days leading up to the event, but we had done everything we could have. Looked great with the Cibie spotlight covers and rally stickers! Had the car on display with Kerry Bell's 00 4age powered Starlet out the front of Toyota NZ for the official welcome function on thursday evening. Was a cool event. Tony is one of the key organizers for this event, so no time to drive but had his car on display at TNZ. This is the car that got us into rallying - both Nick and I serviced this thing for years. For those interested, its got a Gen 2 Hayabusa engine (centrifugal supercharger 8psi making 380hp), tubular subframe, Alcon brakes, custom made 3-way shocks and all the fruit. Would embarrass most of the 4wd field in this type of event... its FAST!! Kicked off the rally with a gathering in the square. Gave away some Napa freebie bags thanks to Dorris (Nicks partner). Kids loved it. At this point, we were a little worried we'd be smoked all day by the 300+hp Holbay-engined BDA Escort in front of us... So first stage friday night was in speedway stadium. Was unsure of grip levels to expect but was pretty enjoyable to drive. Lots of sitting around waiting for us at the back of the field (seeded 55 of 61). Nick even had a nap. Had pretty good pace. We caught the Escort and our run was red-flagged so we got an assessed time. First service was busy. We had a weird fuel overflow issue we couldn't track down. Turns out the cap wasn't on correctly.
14 points
-
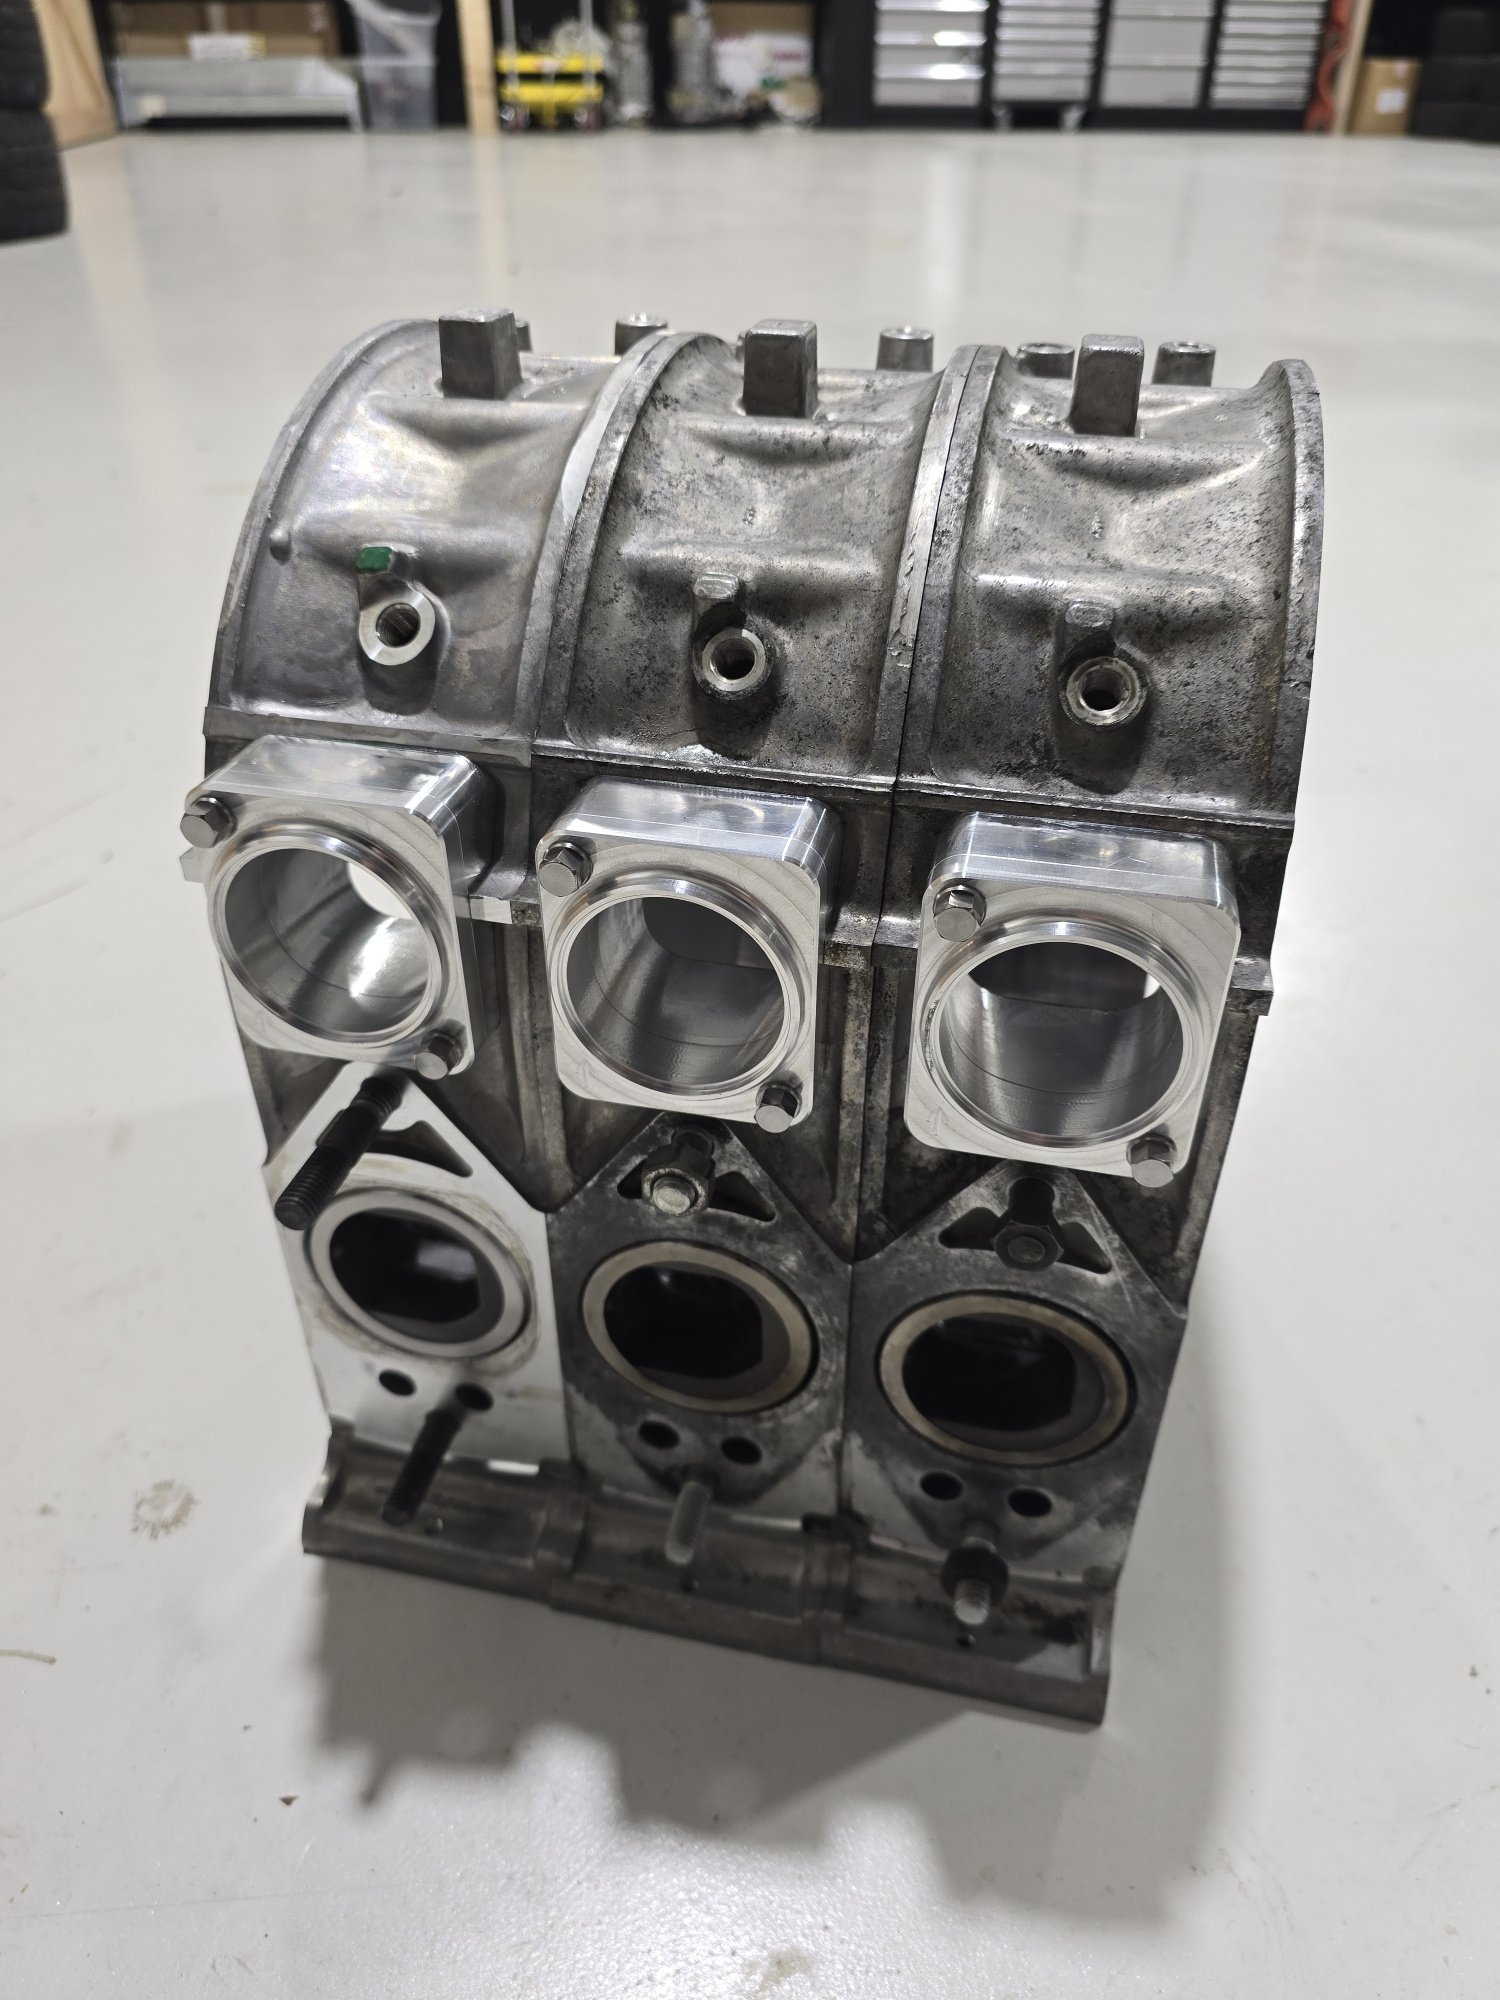
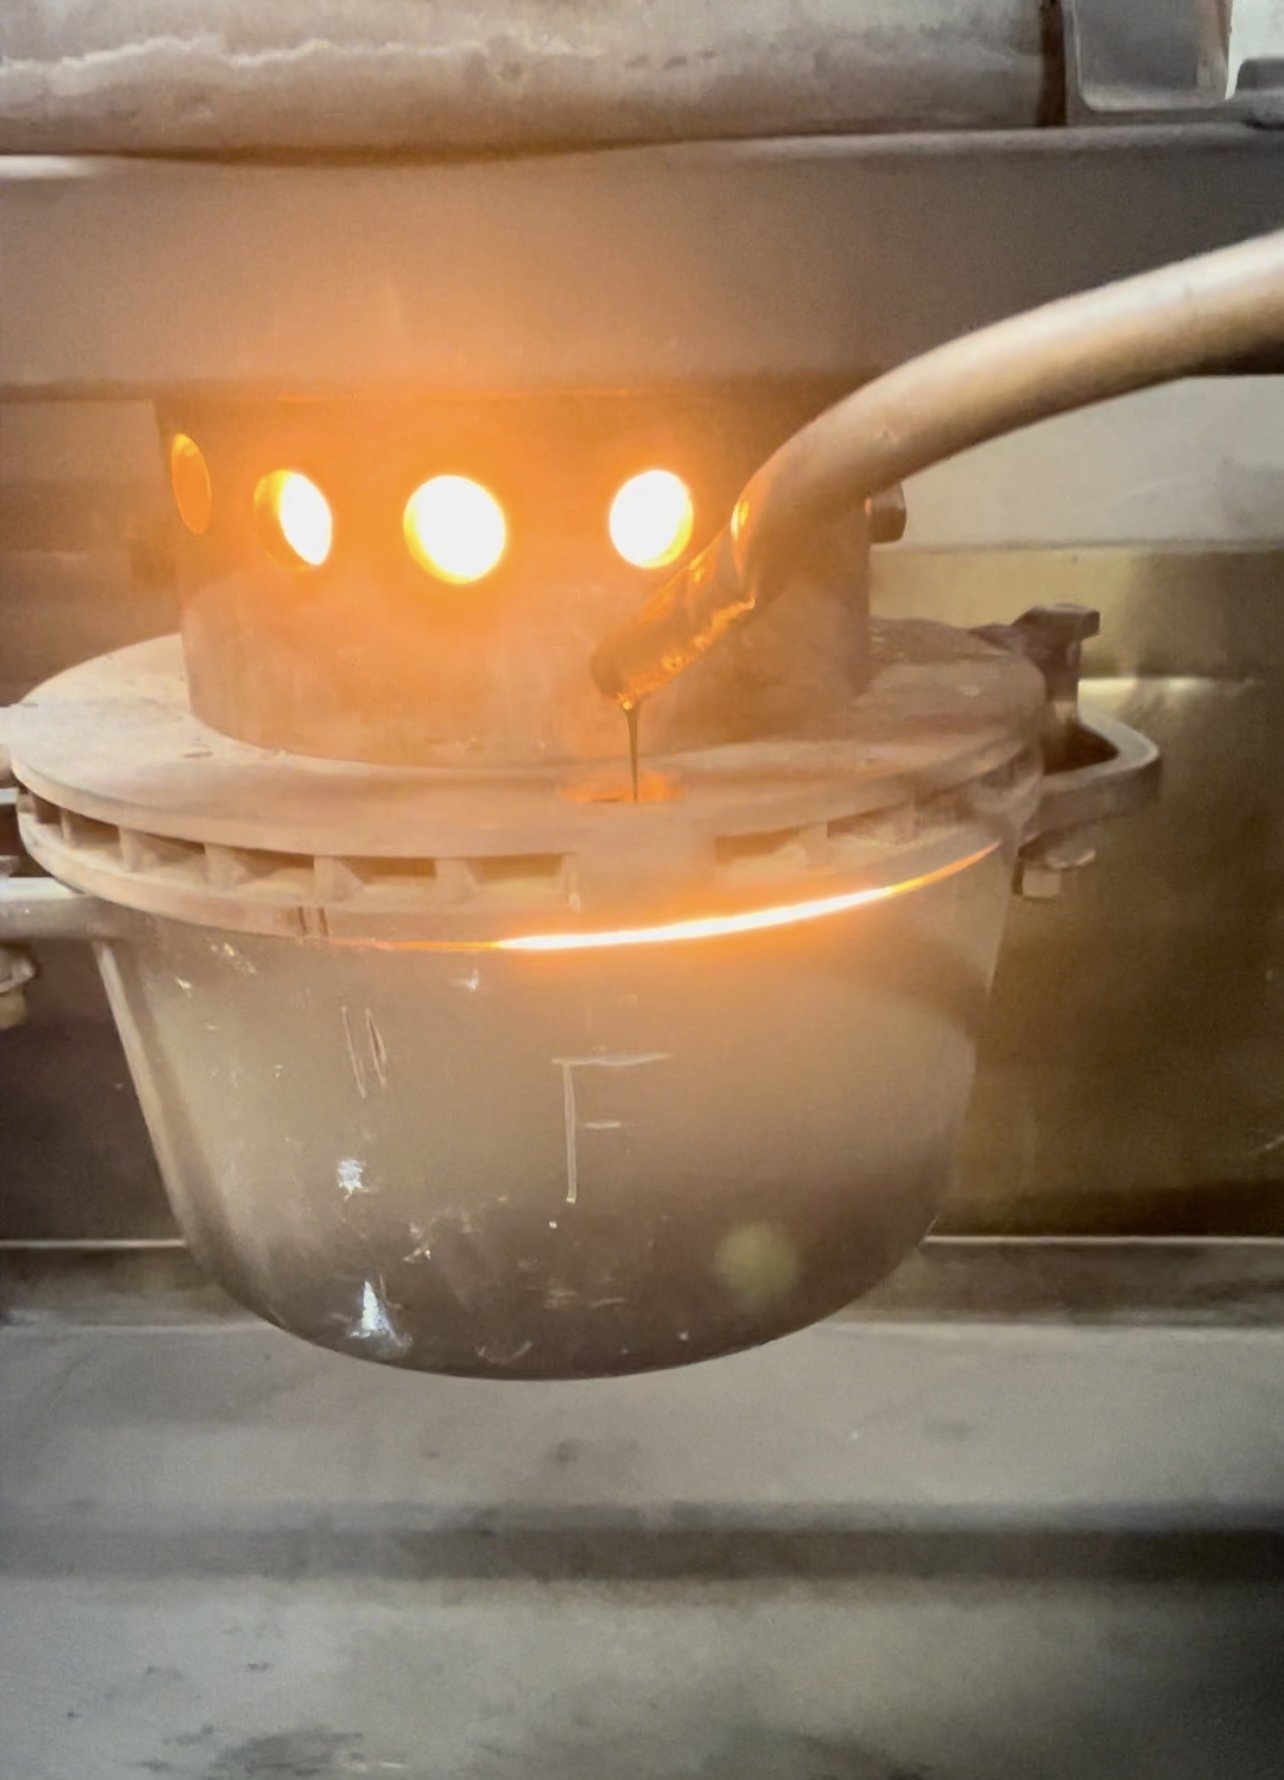
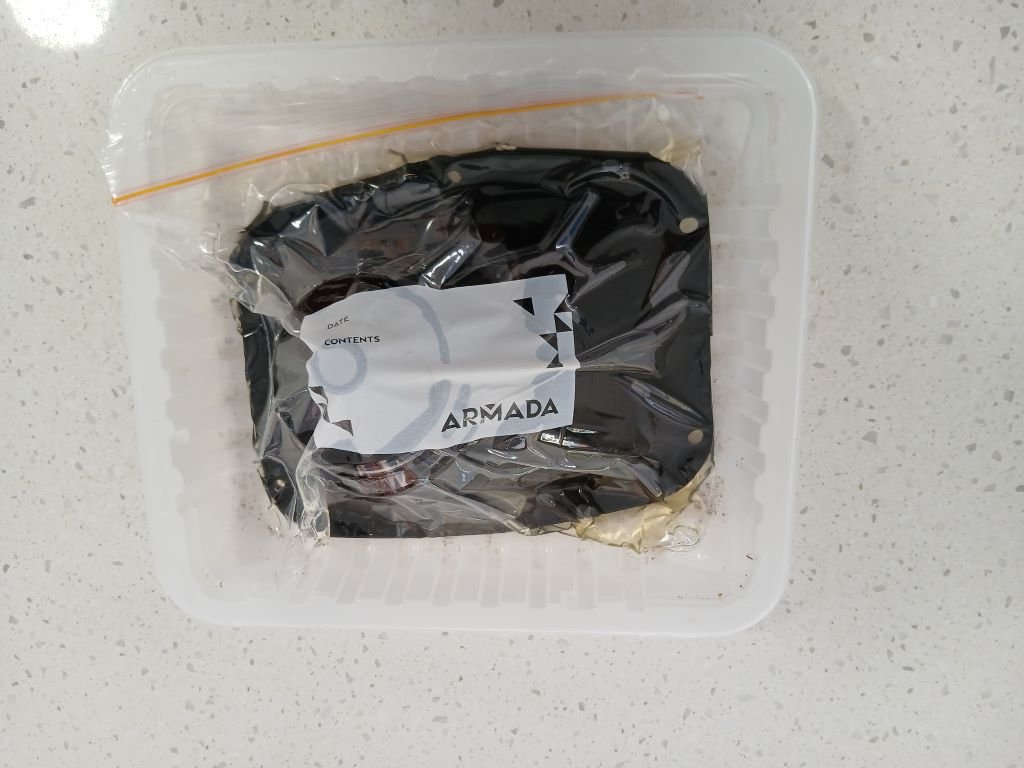
Got the housings back from Green Brothers late on Friday, CNC PP, Enlarged spark plug holes, CNC waterjackets, CNC water jacket sealing around the PP etc. Have chucked back together to go back in the car to go get the last bits of fab finished hopefully next week. Get it back in and a few other little jobs done this week before it goes.
10 points
-
It's interesting that the noise is present under both reverse and forward load. It could be as simple as a broken exhaust mount. Probably worth someone under the vehicle when it's running and in gear before you pull too much apart. In related news: I have spent weeks (off and on) trying to find a knocking exhaust over bumps in one of my Land Cruisers. I could have sworn the exhaust was hitting the gearbox. The sound was absolutely coming up from the transmission tunnel.... but strangely stopped when I cleaned the inside of the windscreen last week..... and it fell out onto the bonnet.5 points
-
Got the front end apart for make slam, will go a few mill higher as this photo is just with it sitting on the front tyre. However being that this thing is as crust as it is it snapped the front shock shaft off in the bottom so looking for another one. I also have the front tree from a honda CT laying about so maybe i look as getting some forks for those? Need a couple things spun up on the lathe which the old man is gonna sort for me, then i can more or less attach the rear wheel properly
4 points
-
Long time no update. Car has been tucked away in the shed, out for a drive here and there and the 6 monthly wof run. We've got a friend who will drive in to Datsun Nationals in Nelson for Labour weekend, so few jobs done. 3000 grit sand and polish, oil change, oh and I put my SSR MK2's on for a looksie................. image hosting websites4 points
-
After my last long wall of text I'll try to keep my updates more frequent and smaller. The throttle was a bit sticky and made gentle opening awkward. Parked the imp outside in the sunshine.. Removed the access cover.. Adjusted the throttle stop screw about a half turn in. Just enough to stop the throttle plate from sticking. You can see it here with a mirror... Then wound the idle bleed screw in and touched up the tune around the idle area on laptop from the comfort of the rear seat.. It's now much better in action and way easier to drive off. Although I'm happily getting the last bit of wear out of the old tyres and they always feel super stable and grippy when getting low, like a semi slick, they most likely wont pass another wof test. They have always worn on the outside which I found odd considering the amount of negative camber. I have always swapped them back to front regularly but they still wore as such. I thought I best check the toe angle. I'd previously done it with string. Not the best way and quite a faff. So I made these measuring jigs up.. They bolt in place like so... Making it much easier to check the toe angle very accurately.. Turns out I had set it pretty close. It was a little bit too much toe in so I adjusted it out to suit the specs and I'm happy enough now to get some new tyres soon. Another small job I should have done years ago was to make some form of face level ventilation. My imp gets quite fumy if I open a window. I had asked on the facebook Imp owners group and it looks like its an imp thing that most folks cars suffer with. You have to hermetically seal the back end up of every little hole and gap to try avoid it but its tricky and my imp is possibly worse now with the centre exit exhaust outlets. I just had to do something about it. I got this lot.. Cut a hole here in the plastic ventilation pipe the comes from the fan/pickup and heads to the heaterbox.. Pushed some alloy tube wrapped in gator tape into hole... and popped the flexi alloy ducting in place... I'll look into teeing the ducting off and run some to the passenger side as well. I need some neat little eyeball vents which I'll then fit into my new dash layout I have planned. But even this alone is a game changer. Even just driving up our driveway I could feel the flow of fresh air. Sooooooooooooooo much better. Wish I did this years ago! Final bit for this blurb. From the very first time I started the engine on the bench there has been a little random whistle. It didn't bother me at the time because I was just so happy the engine ran tbh. But now its annoying me. Its not there at idle. Only when you open the throttle a bit from idle will you get a little squeak or if driving and it goes under a moderate load it can be quite loud. Off with the access hatch again and with Hannah driving the car I tried to pin point where it was coming from... Once home I continued the search, checked all the bolts, used bluetack to seal any suspicious gaps but no luck. I've not nailed the spot but I think its around the plenum chamber or possibly something funny in the throttle body. I got annoyed, gave up and we just went for another hoon to the beach for walk.4 points
-
Ages ago a mate bought a JZA70 Supra, it was a good price, the right model, etc etc etc.... And it had this absolutely massive air brushed Conan the Barbarian on the bonnet. It was incredible, and we mocked him mercilessly well past the point of repainting the bonnet. In hindsight, what a bunch of cultureless savages we were to not appreciate the art work. For shame! I absolutely cannot wait to see some air brushing on the panel van.3 points
-
Did a little more work on this car ahead of using it for school ball duty this weekend coming. I had noticed that the left hand engine mount was looking pretty shabby, right hand was near new. Ordered a new one from rockauto and when it turned up it was quite different to what was in the car. Down the bizarre c-body rabbit hole I went, turns out the correct mount has been out of production for years (a polyurethane mount is available from one outfit at $299 USD not including shipping). The one I got was a b-body mount. Where it fits to the bottom bracket is the same, the top is different with a single large stud instead of two small ones. I just pulled the bracket off and drilled it to accept the stud - good as gold and means that the generic b body mounts will always fit. While I was fighting with the bracket mount from underneath I thought i'd do a good stocktake under the car. I just drove it up on a handy bit of terrain to get underneath, I really need a bigger trolley jack & stands for the weight of the vehicle. All the joints etc look great with the exception of the outer tie rods, which both have split boots. The underbody is fantastic and the transmission is practically brand new. Another job for the dwindling list is to change the wheelstuds on the left side of the car from left to right hand threads next time the drums are off for whatever reason, just because no one is expecting lefthand threads nowadays. I found two really good online resources for the car, mymopar.com which has field service manuals, wiring diagrams etc, and cbodiesonly.com, a forum for the foamers. There are also a-body and b-body forums under the same umbrella.3 points
-
I made a tool to to spin the oil pump shaft with the drill and got some oil pressure into the thing. Obviously the motor wasn't turning, just the oil pump. It got pressure up and went up to 60psi on the drill. Then it was like a relief valve opened and it dropped to 30psi after about 5 seconds. I turned the motor 180 degrees and tried it again and it did the same thing. No idea why it did that tbh but I'm going to get the whole motor spinning on the starter and see if it still does it. Then I guess I'll have to figure out why if it's still doing it with the whole thing turning.
3 points
-
Mounts includes the engine mounts too.2 points
-
Apart from the odd gentle clean, this thing is going to be pretty hydrophobic and won't be seeing water. Its got a dedicated space in the garage and will only be driven on nice days. It's pretty well rust-proofed around the work I've done, but yes, I'll be doing as much as I can to slow down any creeping cancer it has. I thought the door drain holes were fairly reasonable size, but I'll go back and have another look and see if I can enlarge them.2 points
-
Oh dear. At least that eliminates everything behind the output shaft.. If there's an inspection plate on the bellhousing I'd check for a loose flexplate/tourqe convertor (if the gearbox mounts seem OK)... but apart from that I am out of ideas. Best of luck Flash. Hopefully it's nothing too serious2 points
-
How are the mounts? Soggy/blown mounts can cause things to lay over/rub when in gear which transmits vibration into the car.2 points
-
Is it the front or rear that wears on the outside? You mentioned swapping them regularly so presumably it's one end? Swing axles have pretty high roll centres so it might be getting some jacking forces on cornering that's actually moving the outside wheel down / into droop on cornering rather than into bump as expected.2 points
-
I'm not gonna post what it is yet, as the car isn't yet in my control or posession... But I have got to be in a position to hit go on some parts orders quickly if the eagle takes flight. Also, not at all concerned about power. It just has to sound good2 points
-
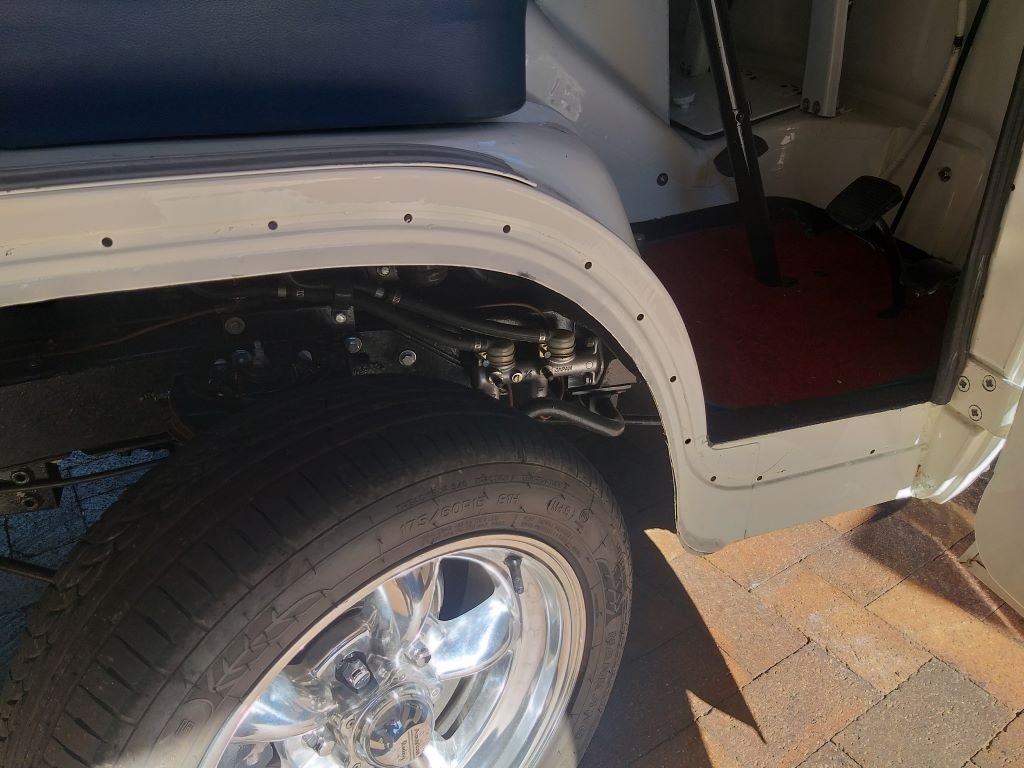
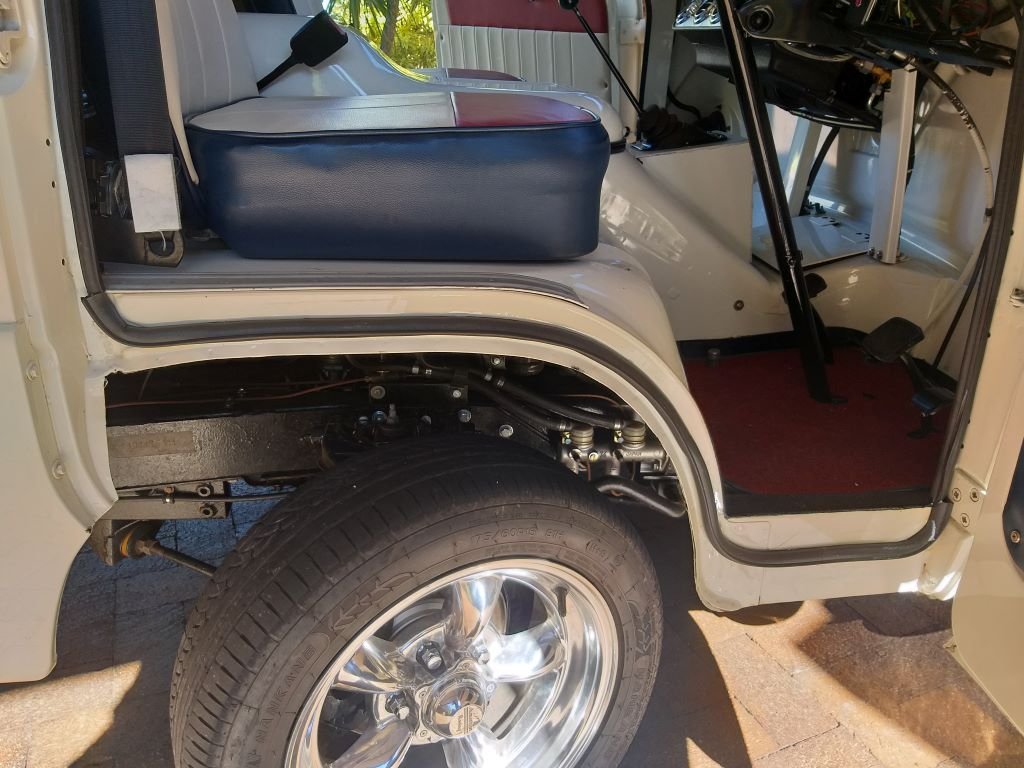
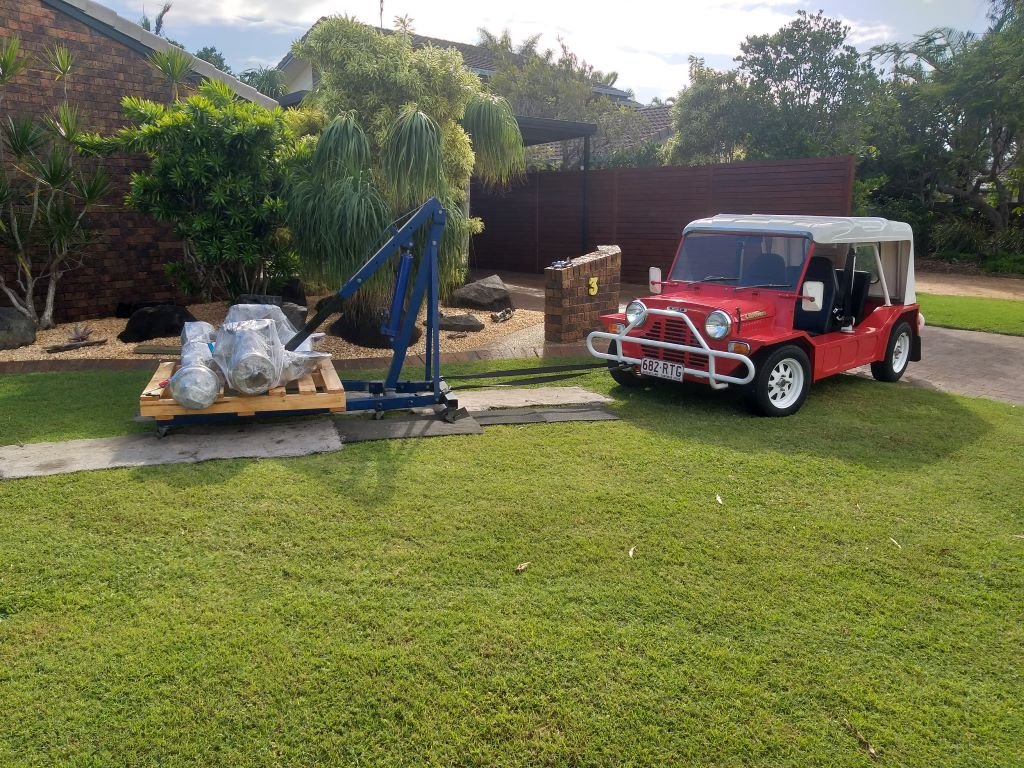
Just before morning smoko I got a message from Jeremy to say that my new a/c compressor was ready for pickup, so after a quick cuppa I saddled up the Moke and moseyed on through to his place. Returned home with this pack of goodness: Much bling:
2 points
-
It’s a vehicular-cultural trope that has almost disappeared, still the occasional wee airbrushing on well loved semi trucks. The van did once have a particularly well done brush painting of a demon woman graphically masturbating with a crucifix, while of course smoking a comically outsized blunt on the bonnet. It was fantastic, my parents made me smudge out some of the ‘finer’ details ha. I wish I had a picture, in hindsight it was a fairly confronting image2 points
-
Yeah the lower arm (cunt of a job) a little bit of panelbeating, a new tyre and a wheel alignment. Oh and the inner cv had to be pulled apart and put back together with a new circlip as that also got wrecked. The worst part of it all was having to come back to hanmer hungover and battle getting it on and then off at work haha.2 points
-
Yeah I've tried that too. Still there. @chris r has messaged me just before and said to recheck my idle bleed screw. He had exactly the same sound. Turns out I'm not the only one suffering from whistling Honda throttle bodies. Loads of threads out there around the world with the same issue. When I rest my ear against the top of the plenum lid the sound is amplified and does sound like it's coming from the tb. I'm going to have another look at this tomorrow.2 points
-
While I'm awaiting the arrival of my new a/c compressor, I thought I'd tackle another a/c related issue. My underdash unit is fed from a 30 amp fuse. If I turn the blower fan off and on using the switch on the unit everything is hunky-dory, but if I leave the blower running and switch off the ignition key, the fuse sometimes blows when I switch the ignition back on. I'm guessing that the inrush current is just too much for the blade fuse. It's bloody irritating. So a few weeks back I sourced a 30 amp auto reset circuit breaker and I decided today was the day for fitting it. Didn't fancy working upside down under the dash, so started off by unwrapping about 8 inches of wiring loom right at the fuse panel in order to free up enough slack then unbolted the whole panel and let it hang down for a closer look. Not much space left on the front of the panel to mount the circuit breaker, so I ended up fixing it to the back lip like so: Refitted the panel, reinstated the spiral bind and then put the ignition switch through a good few cycles with the blower on high. Oh, the absolute joy. And that's another item knocked off my snag list.
2 points
-
Hi, I have the solution to the whistle. Drown it out!
2 points
-
This might sound crazy but there isnt something like a lego character stuck in there?2 points
-
Like usual, it's been a while between updates, but progress has been progressing. Finally, we're reassembling the interior once and for all. I had been asked about and pondered for a while, on whether I would be sticking some sound deadener under the carpet on the new floor. I wasn't going to, but since I was here I grabbed some cheap no-name butyl stuff and got to work. The main places were the two footwells in the front The front of the tunnel under the heater The front wheel wells (where stones would hit) and finally, the rear footwells I'm not certain it will do anything, but even if it can stop the floors drumming, that's a win. It was reasonably easy to apply, although I did do it in winter so had to use a heat gun to get it and the metal warm so it would stick properly. I also grabbed a small rubber roller from the hardware store to roll it out. With my newly applied sound deadening in place, it was time to lay down some carpet underlay. I also stuck some underlay over the trans tunnel, hopefully to keep some noise and heat down. Now, it was the less fun part. The carpet. The very first part to go in was the rear bulkhead. This has to go in before the rest of the carpet since the main carpet will butt up against it. Thankfully, this was one section of carpet that still existed, even if it was some manky old faded house carpet. I carefully removed them and used them as a template on my new carpet. A little bit of jiggery pokery had the first bits of nice new carpet stuck in place Next, I did a quick test fit of the fitted carpet set. This was made by a local supplier. They had two options, UK or AU spec, but couldn't actually tell me what the difference was. I had hoped it was because the AU spec cars, like mine, have the seat rails welded to the floor, whilst the UK ones don't. The other option was that the later 025 AU spec cars have a bigger trans tunnel, which is more likely the difference, but they couldn't even confirm if that was the reason for the difference. In the end, I decided to take a punt on the UK spec carpet set as my trans tunnel is the small UK size. The test fit was promising. But before I got to work fitting it properly, I wanted to refit the rear seat as I'll need to climb into the car to do so, and would rather not be climbing on the new carpet. Since I was making the interior nice, I couldn't just refit the dirty old rear seat. I've never cleaned it in the years I have had it, and who knows how many decades it's been. With the help and advice of my wife, a bucket of hot water, rags, some Jif cream cleaner and a spinny brush on my drill, here's a quick half and half of the base This was quite satisfying as the vinyl was cleaning up really well. Its not even the same colour as before. Once it was clean, for the first time since I've owned the car I actually screwed the seat in place. The base is a bit of a pain. At the back there are two tabs which get screwed to the body And the front has these annoying hooks that go through holes in the body, and then get secured with nuts After a lot of stuffing around, I found the easiest way to fit the base was to get the hooks in place and loosely secured, by tipping the base forward. Then you tip the base down, and secure the screws at the rear. The back of the seat needed a clean next. This had some old contact adhesive running down the side Which after a lot of work, got a lot better. Not perfect, but its usable Once again, its a completely different colour to what it was There is quite a bit of sun damage to the top of the rear seat, and the vinyl just shatters when you so much as look at it, so I had to take a lot of care there. I need to find an OG tartan woollen blanket to drape over it like my old Marina. I have no idea why, but I have no photo of the rear seat completely installed, but the backrest went in easy enough. It hooks over tabs on the body, and then two screws through tabs on the bottom hold it in place. Now it was finally time to fit the carpet kit. I didn't particular enjoy this as it took something like 14 hours to do, and was not as straightforward as I had hoped for a "kit". The first problem was that there were zero holes in the carpet, which was a pain. I thought they would've pre-cut the shifter hole at least, and maybe the handbrake, but no. So to help get everything centered and aligned, I used some brown paper to make a template, and locate everything using the center bolt for the seatbelt receiver Once I was happy with the template, I transferred it to the carpet Then i started the scary bit, cutting the brand new carpet With the handbrake and bolt aligned, I made the first big I cut for the seat rail. I knew I would need to cut these four slots in the carpet, but it didn't make it any less scary A second seat rail appears I did the same on the other side, and using the same high temp ADOS glue as I used on the TVR, I carefully glued the carpet down. I didn't go too nuts, mainly sticking it down around the edges, not slathering the whole thing in glue. After that, it was time for the front half of the carpet. This was more of the same; cut a hole for the shifter, glue on the pieces that go on the wheel arches and in the footwell, and then slip the front section of the carpet into place. Oh and surprise, its a TC center console! I bought this on Facebook ages ago, the seller took my money then promptly ghosted me, after months, I thought it was lost forever but it turns out he was known to some absolute legends on a local forum, who paid him a visit and recovered the console for me. I know the car wasn't fitted with a console originally, but it wasn't fitted with carpet either, so lets just call it an upspec. The final step to fitting the car was to glue the front down, trim the door jams, and then fit the plates that clamp down the carpet The heal pad is a nice touch The biggest issue with the fitment, that you cant easily fix, is the wrinkles around the trans tunnel. This is caused by the cut and stitched sections designed to help it fit the tunnel, but its almost like my tunnel was too small and the inserts were sitting in the wrong place. No amount of tweaking was going to make it fit any better. In the end though, its 100x better than what was there before (nothing) or the house carpet it previously had, which rotted out from sitting. Its not perfect, but it's good enough for my Marina. What good is new carpet, if you don't have any front seats? I've had both seats in at some point, but for ages the passengers seat has been out of the car, and the drivers seat was only partly bolted in. Now we're going to fit them both, properly. First things first though, seatbelts. The car came with both old crusty belts, I took them out a couple of years ago, and had them rewebbed by an awesome outfit, Autosafe, who rewebbed the belts with new black webbing, cleaned up the hardware, and mixed and matched bits with some spare belts I supplied to make the best pair. Everything is properly tagged and certified, and comes with the relevant paperwork I had also sourced a pair of new old stock plastic covers for the top bolt, which has the integrated belt park. These came from the UK with the help of an awesome fellow Marina enthusiast The car came with one cover, along with a single bolt cap (missing from the new ones) I had considered the usual option of converting to retractable belts, but there is something about static belts in old cars for me. Its a novelty, even if its not practical. I gave the bolts and washers a quick cleanup and then fitted the belts And it clips nicely into the buckle With the belts installed and working nicely, it was time to clean the front seats and bolt them in. The drivers seat got the treatment first. This is in pretty average shape, with a couple of tears in the base which have been stitched together with some red twine. Before cleaning it I flipped the seat upside down and greased all the moving parts They're a very simple rail, but with the added complexity of the tilting mech for getting passengers in the back seat. This little lever is what releases the backrest The lever releases a big hook on each side The lever acts directly on it, with a rod going to the opposite side Everything got some grease on it, and is moving nicely. The actual sliding adjustment is very simple, with two independent rails, a U shaped release lever and two pins. You lift the bar at the front, it disengages the pins and the seat can slide. You release the bar, and it springs back into place, slotting into one of the notches. All of this got greased and then the seat was flipped over for cleaning. Cleaning up well I'm very impressed how well these seats clean up Its like two different seats So the base got the same treatment too. The decades old tape residue doesn't seem to want to budge, but otherwise its looking good After a coating of 303 Aerospace Protectant (all seats got this treatment, it's meant to treat and protect vinyl), it was bolted into the car Moving onto the passengers seat, it had obvious had a life at some point. The seat release bar/adjustment was very bent on one side. The left side pin wasn't even engaging with the rail Some careful percussive persuation, and it was all as it should be again This one wasn't as drastic as the drivers seat, but still changed colour quite well Which could only mean one thing, the final seat got bolted into place I kicked off my shoes, hopped in, belted myself in, and spent some time making vroom vroom noises. We're very close to WOF time now. It'll be a couple of weeks, so I'll have to book a day off work, book it in for a WOF and then I'll have a deadline for the car to be ready. I still need to do an oil change, drain the stale fuel out of the tank, fit the new wiper blades and then see why the engine top end is rattling, but thats a days work at most.2 points
-
Those of you that have been following along on my journey may have noticed that my van has an insatiable appetite for distributors. So just to refresh everyone's memory here is a brief history: Distributor 1 - a conventional points based distributor sourced off eBay for around $100 which lasted less than 50km before the shaft disintegrated. Who would ever have thought. Distributor 2 - an original Toyota points based distributor that I fitted all the eBay distributor's internals to and that lasted 440km before dying a sudden roadside death. Again no surprises there. Distributor 3 - distributor 2 fitted with Repco's finest replacement condensor which managed an incredible 87km before giving up. Distributor 4 - an aftermarket Chinese manufactured electronic distributor sourced earlier this year from a reputable Australian based supplier that managed an impressive 1106km before calling it a day. And that pretty much brings us up to date. So a little more detail about distributor 4. When I fitted it the van ran okayish, but seemed a little down on power and quite a bit heavier on fuel. I also noticed a slight hesitation at low revs which got progressively worse towards the end. Then about a month ago while out enjoying our usual Friday night burger run the van wouldn't start. A quick diagnosis and no spark at the plugs. Luckily we were close to home so I left Mrs Flash and our wee dog in the van and walked back home to fetch the Moke. Got back to the van just as the sun was setting and phoned my mate Steve the towie. Steve was attending a BBQ and I felt bad disturbing him so told him I'd make another plan. I had a towing strap with me and considered using the Moke to pull the van home, but something prompted me to give the van another go and she fired straight up. Mrs Flash climbed in the Moke while I nursed the van home. Although running the engine was behaving rather badly with a misfire and she wouldn't rev at all. We stumbled along and finally made it home. Next morning the van fired straight up and rev'ed cleanly ... WTF. Next day ... wouldn't start and again no spark at the plugs. So at that point you can imagine I'm cursing like a sailor while trying to figure out my next move. Knowing that new Toyota units are no longer available, I figured that the next best thing would be to get my hands on an original Toyota unit that I could have professionally rebuilt. Now it just so happens that I have this little puppy in my stash of parts: Looks well used and the shaft was almost completely seized on it, but it is a factory original and I figured that someone more knowledgeable than myself could bring it back to life. My first stop was the auto sparkie in town. Bruce is old school so I figured he was a good bet. Sadly he informed me that he no longer dabbles with distributors. Bugger... Back home I hopped on the Google and discovered a place called Performance Ignition Services based down in Victoria. Dropped them an email with a few photos including this candid shot of the dizzy with its pants off: Got a friendly call back from one of their technicians to confirm that they could rebuild it for me, so I popped it in a box and dropped it in the mail. And that brings us to this Friday when a parcel arrived containing one much healtheir looking factory distributor. So after removing my faulty a/c compressor in anticipation of the arrival of it's new replacement I cracked straight into the fitting of the dizzy. It fitted easily enough and the van fired straight up, but when I came to set the timing with my light I discovered that for some reason I didn't have full adjustment. Moving the distributor housing clockwise was causing something to jamb up despite there being plenty of travel left on the slotted mounting hole. WTF.... On closer inspection I discovered that the outer corner of the integrated coil pack was snagging on the hard fuel line. Pulled the dizzy out again for a closer look at the fuel line and ...... Some numpty had mounted the fuel line too high up by using the incorrect hole on the arrowed mounting tab resulting in the circled portion of the hard line being higher than it should be. That line has been like that forever, so it's funny that this didn't cause any hasstles with the aftermarket dizzy. Anyhoo, pulled off the nut, wiggled the bracket down into the correct position and reattached the nut: And now the hardline no longer clashes with the dizzy. Slapped her back in the hole, tweaked the angle till my timing light was happy and she runs like a champ again. Couldn't run it for too long as I still have the radiator out, but I'm hoping that my dizzy woes are finally over. Thanks for reading.
2 points
-
I’m all for it, provided the midget is sculling a rheineck of course. I’m out there most Fridays, probably not this Friday though as the weather looks terrible.1 point
-
It's really coming together, the carpet looks great. Do take care if the carpet in the front footwells gets wet through leaks etc, as you know the front floors are very rust prone and most of a marinas common leaks divert water into them. I'm a huge proponent of paint & oil to keep rust at bay in ancient jalopies - I ground back and por15'd my front floors and followed that up with a couple of coats of penetrol laced black alkyd paint. I've got marina rustproofing down to a bit of a science - enlarging the door drain-holes is a must, as is spraying your rustproofing of choice up in behind the headlights, at the back of the bottom of the front arches, both from the wheel side and from the inside of a-pillar. in the sills and front & rear valances, in the doors and in the panel below your rear window, in the little holes above the front shocks into that blind box each side of the engine bay - actually just everywhere, all the holes in the subframes underneath etc...1 point
-
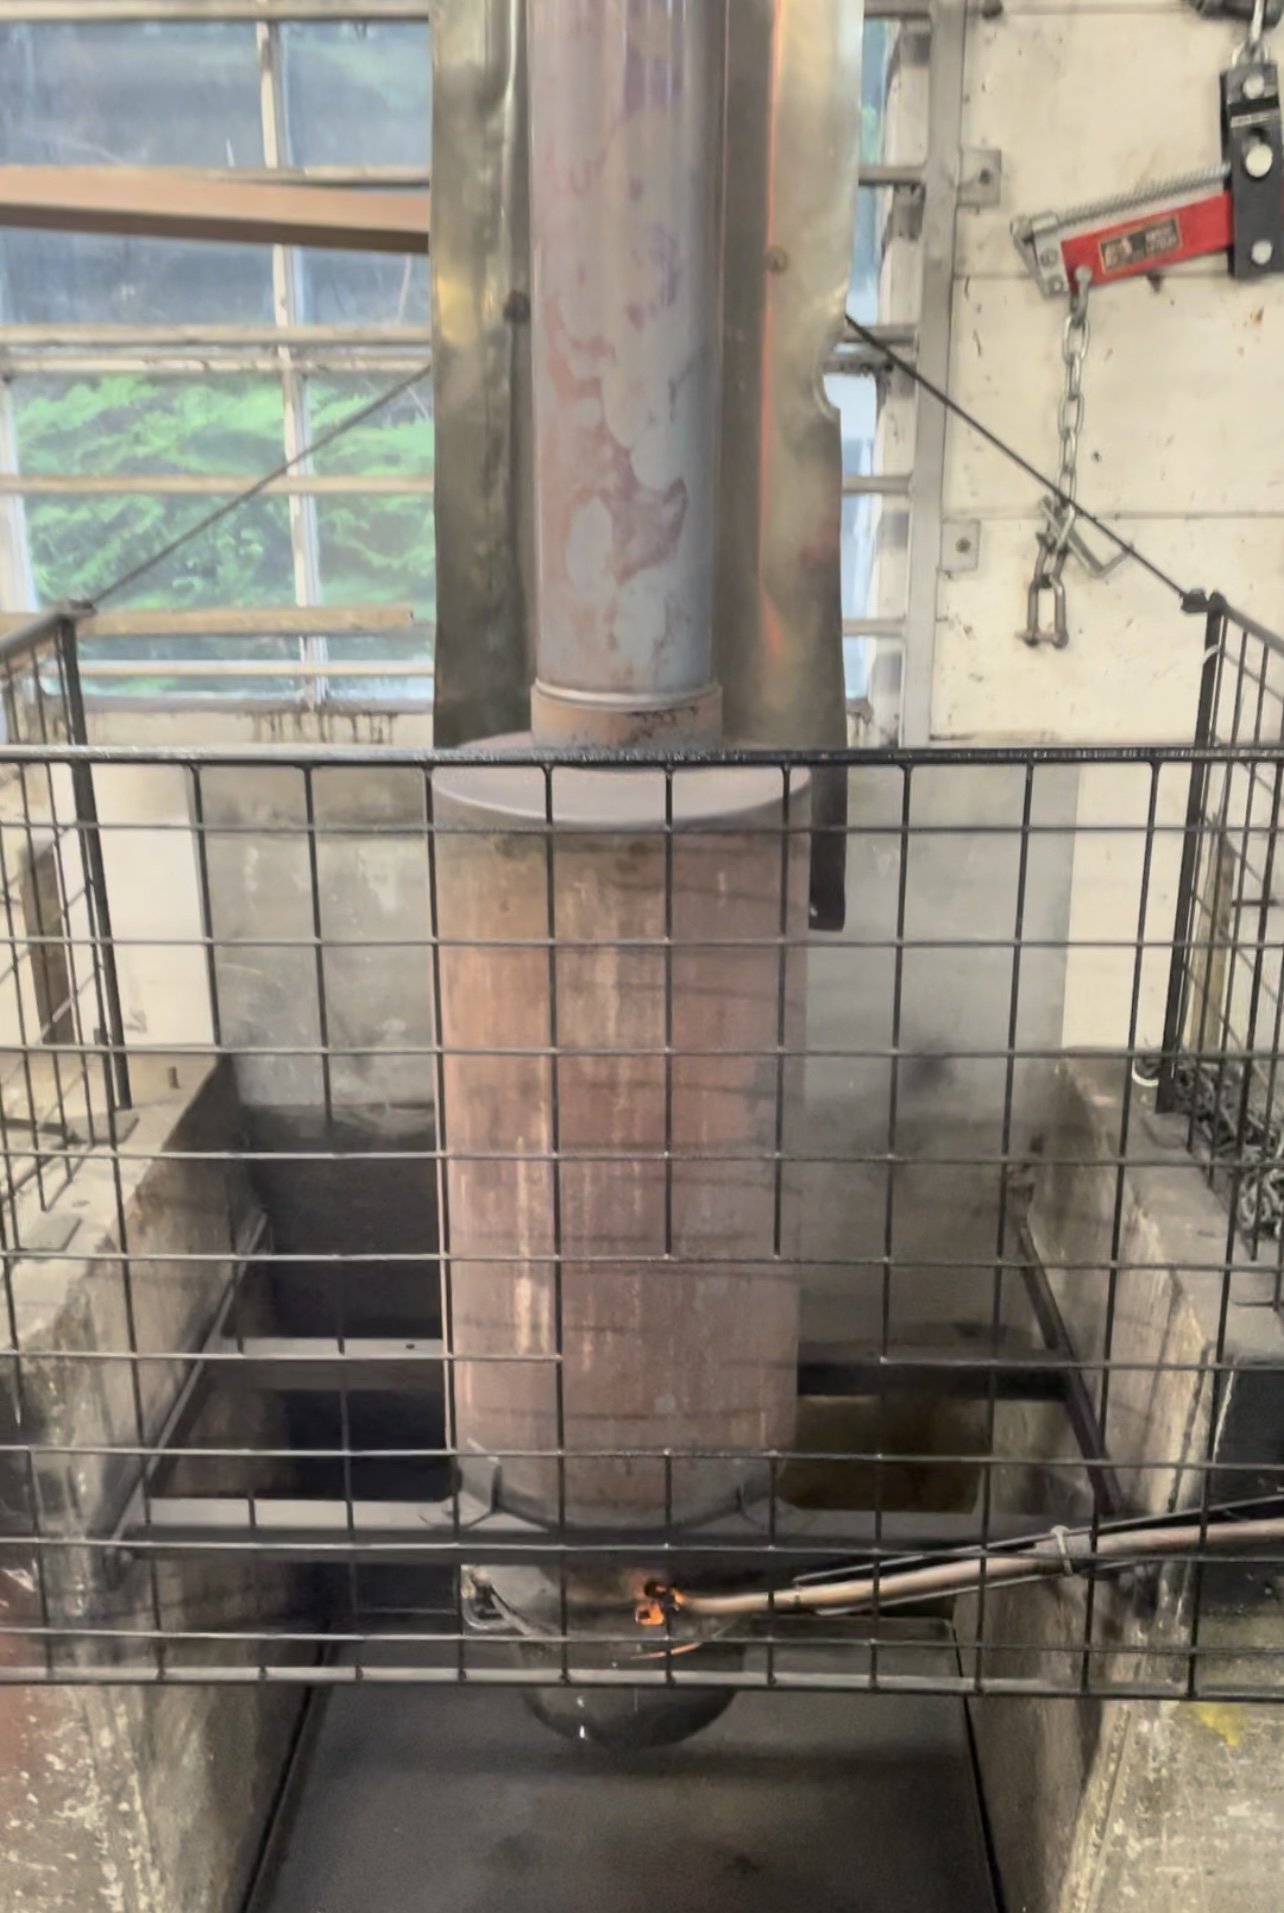
This is the oil burner at work. I didn’t build it, but it goes hard. Maybe your neck is too long and skinny?
1 point
-
I reckon a mural of @KKtrips with a midget under the Makatote Viaduct (was that the right location) would be suitable. btw when are you at railway in the K-gorge next?1 point
-
So I actually did some work on this van. I fire it up and drive it around the block every couple of months and noticed it was starting to run a bit ropey - the fuel was stale. So I drained and refilled the fuel, and thought while it's out, i'll do a couple of other backburner jobs. Replaced the steering column bushes (identical to early mini, plastic bush up top, oiled felt bush at bottom) and the rag joint. These had been on a shelf in the shed for a rather long time. I had been using morris minor seats which were a bit dilapidated, I had some marina ute seats which had mint upholstery but the frame had entirely rusted out where it contacted the floor. Turns out marina van/ute/presumably coupe lower seat frames are identical to morris minor, I just cut the tubes off the bottom of the minor seats and welded them on to the marina ones and now have great and fairly comfortable o.e seats. The vinyl is a bit stiff so will rub some vinyl stuff into them to make them pliable again hopefully. I have decided I am not really happy with my sticker-murals, next time I have a burst of marina focus I will refinish just that area on each side. I would still like murals, but real airbrushed ones. Ideas include an outsized, leather clad, buxom woman riding astride the boiler of a K class steam engine as it crests the raurimu spiral at midnight, along with a graveyard scene with a gold watched, rotten tweed clad skeletal wrist surging forth from the earth to claw at a leyland 'flying plughole' gravestone, while a hooded allegro and princess sacrifice a morris minor in the background.1 point
-
The heads are hollow so kids don't choke on them right. I bet it's just like blowing over the top of a beer bottle1 point
-
2 strokes are cool when their running but not when they seize.... 4 stroke swap time. Not the vtwin but another scooter engine be nice to have this up and running for summer.1 point
-
Today I managed to make a start on the a/c repair. First order of business was to remove the radiator to gain access to the a/c compressor and belt tensioner. The good news is that the idler pulley for the tensioner runs true and is pretty smooth. The bad news is that there is heaps of sideways play on the compressor pulley and it feels pretty rough when spinning it. So in summary I reckon my a/c guy was correct with his diagnosis. The Toyota Landruiser HZJ series use the same compressor so luckily my local a/c parts supplier has a replacement compressor on his shelf. With a bit of luck I can pick it up from him early in the new week. I'll replace the receiver/drier at the same time. While I have the radiator out I thought I'd remove the defunct power feed for the thermo fan. Some of you may recall that I ran a new feed earlier this year, but recovering the old feed meant unwrapping the wiring loom which is a helluva lot easier with the radiator out. Spent the rest of the morning removing the power lead and rewrapping the wiring harness, just to appease my OCD tendencies. And now ready for the bin:
1 point
-
Mr Maroon is gone, say hello to the Blue Turd1 point
-
That's my understanding. Flat 6s are essentially just flattened I6s, so there's no fundamental reason they'd sound different. 2v vs 4v has a difference in sound as the valve opening and closing events are more sudden in a 2v giving them a bit more 'bark'. Silencer design could well make a fair bit of difference. I get the impression the packing in silencers cancels higher-end frequencies better, so it could end up sounding a little raspier with a different design. You could just put a tin can on a string with some pebbles in it to give it that 911 'clattery' sound at idle and/or replace the end of the j-pipes with butterfly valves for an open exhaust system as and when you please...1 point
-
I have a confession to make. I feel dirty for what I have done and must come clean. I have raised my car Hear me out though. I know its a terrible thing but my hand was forced and it had to be done. So after my birthday cakes had been all eaten, mainly by me (little fatty), I decided I needed to look at the suspension. My front springs are essentially Rootes 'Monte Carlo' spec which means 195lb" and 9.5 inches long, or about an inch shorter, with one less coil than standard imp springs... But because I'd modified the spring perch on my stock dampers to make the car even lower it meant the Monte springs were not captive at full droop without the aid of retaining straps. These are fine in use in the UK and quite a common fitment on lowered Imps but they wont pass the muster here in NZ for certification when that time comes. I also had a total lack of any height adjustment without resorting to various spacers beneath the springs etc. So I started looking at various coilover kits made specifically for the Imp. There's at least three brands out there that do kits, all made in the UK and all quite expensive once freight is added into the equation. Luckily I ended up chatting to a fella called Frank in Australia who I've bought stuff from before. He imports and sells Gaz coilovers as well as loads of other Hillman based items. He had a near new front pair he was removing from one of his Imps and offered me a good deal on them. They are the 'short' dampers to suit lowered imps and he was including the appropriate 'super low Monte Carlo' springs. These are 8.6 inchs long and needed if I wanted to keep my Imp sitting nice and low. So while they were on the slow boat from Australia I started looking into the rear shocks. The stock Imp items were working ok but I knew that one was low on oil and not ideal in action. I was informed that Nissan Navara D21 front shocks were an almost straight swap so I got a shiny almost new pair from a ute at the local wreckers to try out. To my surprise they were actually considerably softer in damping than the Imp items, both in bump and rebound. Still, I had them to try so I machined up some suitable spacers to suit and the smaller Imp bolts and the top bushes.. Bolted them in place and went for a drive. Nup. I don't like. Too soft and a bit too wallowy. Passable for normal driving on smooth roads but start driving with a bit of enthusiasm and the back end starts getting a little bit flighty, especially in sharp compressions. I would have to sort something else out and started looking into ideas. Then the Gaz coilovers and super low springs turned up. Here are my standard Montes next to the super lows. The same coil count and rating but just set shorter. I wanted to test them just to be sure so things got a bit scientific.. They were rated exactly as they said on the tin. The Gaz dampers and superlow springs showed the overall length from bottom eye to the top of the spring to be very similar to my modified dampers and standard Monte springs. Things were looking promising for me to keep my Imp at the same height. So I fitted them.. I then removed my retaining straps and the arms dropped further, so releasing my springs from captivity I had to wind the collars up 15mm to hold the springs from rattling about. Oh well. I suspected I might end up in this situation. On the bright side it does mean the excessive negative camber has been removed and I also wont be smashing so many hedgehogs/other roadkill with my license plate. I went to sleep and had nightmares about my new lofty height. This morning I revisited it and replaced the absurdly thick, what look to be just generic damper top mount rubbers with my old stock Imp items. This moved the shaft fixing up 5mm so allowing the collars to be lowered the same amount. So I now have a 10mm extra ride height with room for adjustment and completely captive springs. The camber is about bang on for what is recommended on a road imp. I took it for a good drive to try them out but I'll talk more about that soon. Moving back to the rear dampers. I removed the soft Navara items and looked at my leaky unit. The shaft has a small amount of light corrosion just below the bumpstop. Although it was fine when I'd fitted the shocks, 13,000kms thereabouts of driving since has seen it lose fluid. I had a plan. They are pretty common designed double walled units. There is a gap between the outer tube and the inner tube that the piston slides up and down. As the shaft enters the damper the oil height increases from displacement. This cavity was down on fluid. I drilled a tiny hole near the top, through the outer skin and whilst extending the shaft out I added oil with a small syringe. I then tapped the hole and fitted a small machine screw and O-ring. The shock works perfectly enough now, at least until I get some replacements. Now it was time to look at the rear ride height. The new engine and gearbox is at a guess something like 20kg heavier than the Datsun setup. I'll have a better idea next time I weigh the car. Its enough that the car has sunk maybe 5 or 10mm. Not a lot but combined with the higher front it now had a distinctly nose up, bum down look that I'm not keen on. Plus I'd like the driveshafts to be a little straighter. They were heading slightly uphill to the hubs with the angle getting steeper as the rear squats under acceleration. The rear springs are standard 1" lower, slightly stiffer Monte spec. So I made some 15mm spacers. Probably only needed 10 but I can machine them down. It now sits as such. Bum slightly up. Half a tank of gas. Exactly no bags of cement thanks Barry. Hannah measured both front and rear arch heights as I sat down into the car and shut the door. Interestingly, and I think quite a good thing, is that the car drops 10mm equally front and rear. I'm going to try this new setup out before deciding if I skim my spacers down. Another important issue I really wanted to sort out was the exhaust drone. Every time we would take the car for a drive the drone was overpowering. I wanted to believe that we'd get used to it or learn to drive around the drone zone of roughly 2300rpm but it was futile. It had to be addressed. Mention of J pipes, resonator pipes or 1/4 wave resonator pipes or whatever name they might have was mooted by several people. Not just on for this car but also on other peoples threads and on the oldschool exhaust discussion thread. I read up about them and they sounded like an ideal potential solution but I really just didn't have any room to fit them between the exhaust box and the headers. But how about inside the box? Extend the inlet within, tee off from that to the outside and use an elbow to send pipes forwards. I looked through my collection of random stainless tube fittings.. Something like this?.. Hmmmm... it could work and was worth an investigation. Car on the hoist and within 5 minutes the entire exhaust box was removed. V clamps are fantastic. I removed the gazillion 6mm bolts, broke the silicone seal and removed the lid. Some measurements were made and a holes were cut as neatly as I could with the plasma cutter. I hole sawed some stainless tube that matched the inlet diameter.. Welded a slightly smaller 32mm pipe and fitted the tees into each end of the box. Pulled out the heavy length of 50mm 304 stainless bar and cut off some discs Those I machined up into stepped flanges. 4 holes drilled and tapped in them to suit and then welded onto the outlets on the box. The J pipes had the other flanges welded on via the inside.. Above the new Tee pipes within the box end expansion chambers I added a shelf of stainless perforated sheet that bolts in place and then filled the void above with more packing. This was just another way I could absorb some sound.. Lid was siliconed back in place and bolted down. Now the J pipes. I fabricated those up with the bends and made them as long as I could. There are multiple websites with ample information on how to calculate the required length depending on engine rpm, frequency, cylinder count etc etc. But they are usually dealing with exhausts that have just one main exhaust pipe to J pipe off from. My setup is like two 3 cylinder engines really with their own separate exhausts. I wasn't sure which calcs to use. But pretend I have just one exhaust feeding off both banks I was looking at a J pipe length of circa 800mm. I figured I would halve that and my finished J pipes came out at just on 405mm with the ends almost meeting the rear arch inners. I figured I can always chop them down in length so better to start as long as I can. I found some ideal stainless penny washers for the end caps.. J pipes installed... They are a bit ugly though. Although I can't see them from within the engine bay they are easily visible outside and I don't like seeing them. I have also never really liked the way the box ends don't tie in with the back corners so I had an idea to try. I carefully made these stainless guards.. There were already some useful holes I had added to the valance lip for the Datsun exhaust.. Guards/ugly pipe hiders in place... Time to try it out. I was pretty confident that there was going to be some amount of noise suppression but how much ? Upon start up we could both tell it was quieter. Took it for a drive to go pick up yet another customers rusty Hiace for work and yes - it was quieter!!! The drone was knocked right down. Its still there at certain loads but no where near as horrid. Now as per the earlier mention of a drive to try out the new front shocks. Well it was also a good chance to try out the exhaust. This time I was sans Hannah. It meant I could thrash the car to my hearts content without Hannah having to cling on for dear life. There are no grab handles in the car and the Recaros only hold you so much. I took the laptop though and used it as a chance to let the autotune see some of the more extreme areas of the fuel map. 30kms of twisty hillclimbs local to us and a good solid use of the throttle travel. Damn its fun. The exhaust is much better drone wise but I almost want a little more sound. From inside the car its still more straight six than flat six. I'd like more of the guttural, raspy Porsche flat six sound. My exhaust/engine sounds smoother. A bit of this could be because its water cooled and the Porsche 911s I like most are aircooled (and usually twice the capacity...) They are almost clattery at idle, slightly hollow. I do some have other ideas floating in my head about future exhaust designs. I know these engines can sound more 'Porschey' but I don't have as much room to play with as the bikes I have been viewing. But wow- this engine is a little gem. I'm tending to keep it in gear for much longer between corners because its so smooth at high revs whether I'm on or off the throttle. It'll be much better when I build my new dash and have a rev counter right in front, that's for sure. The gear change is getting better and better with use as the shaft bushs loosen up a bit. I have ideas for improvements too but no rush. Its a delight to drop from 3rd to 2nd, a gear change that can make or break the fun to be had in a car driven hard on hills I feel. The program managed a good amount of changes to the fuel table and its pretty good now. Start up hot or cold is great. Just a few bits to smooth out. I'm going to tweak the throttle plate stop screw and idle bleed appropriately. I think the throttle disc is a bit sticky when closed which doesn't help for light throttle action when trying to move off slowly. The rear navara shocks, as noted previously were not helping. Looking forward to the next drive now I have originals back in, complete with all their oil. The front shocks are actually about the same as what I had originally. I have set the damping to what I feel is about the same as the originals. It really doesn't require much damping in the front (unless some internet Barry has finally managed to persuade me that 3 sacks of concrete in the front really is the way to set up rear engined cars) I am going to dig out the go pro, hope the batteries are not dead and try to get some better camera angles along with better exhaust sound representation. I really want to hear what its like from outside with the new exhaust and better tune.1 point
-
Many moons have passed since my last Thames related catch up, so I guess it's time that I updated you all on the latest happenings. Over the past few months we have been driving the van heaps, but to take full advantage of the cooler months all of our spare time has been focused on getting some things done around the house and garden. The result has been no time to tinker on the van, but I have been adding a few items to my "to do" list. Now that the days are starting to warm up, it's time to start executing some automotive related activities. First major thing on the list is to deal with cabin temps and some of you who spotted my posting under the tech forum a few months back will have already heard this story, but for those who haven't here is a repeat: The short story goes as follows. On hot starts I would need to crank the engine for a good 20 to 30 seconds before the engine would fire. After eventually firing into life the engine would stumble along for a few minutes before settling down. I suspected that we were experiencing fuel vaporization and started a tech topic to gather suggestions on possible cures. As is always the case a number of wise old schoolers provided some suggested solutions which I gave due consideration. At the end of the day I took the lazy way out and have now wired the main thermo fan switch to permanent power. The result is a thermo fan that now runs independent of ignition power. Not only has this solved our fuel vaporization issue but it has also decreased the air temperature in the cabin when parked up after a long run and the strong aroma of "hot engine" inside the cabin has also gone. I'm thinking that the mighty 3Y and its mechanical fuel pump was unhappy with the coziness created by the miniscule engine box that the Thames is blessed with. This fix has been in place for a few months now and is working well so I'm going to leave well alone for now. The next major item is to sort out our a/c related issues and this is getting critical now that the weather is warming up. So when I last talked about the a/c I was experiencing excessive drag on the drive belt which was shedding rubber flakes like confetti and was needing adjusted after almost every drive. I eventually ended up removing the drive belt and we have been without a/c through the winter. I suspect I've either got an issue with the tensioner pulley or the pulley on my second hand compressor. I did ask the opinion of my a/c guy and he immediately said a/c compressor but I'm hoping this isn't the case as that is an expensive fix. Anyhoo the only way to get to the pulleys is to remove the radiator so I made a start on that today. With the wind deflector under the engine removed I started off by draining the radiator and while that was happening I took the opportunity to unbolt the gear shift cover which can only be done from underneath with the wind deflector removed. The reason I wanted to remove this is to solve another irritating issue which is a creaking sound that comes from the rubber gear shift gator which is especially bad in colder weather. The gator is an old Cortina MK1 that my mate Grant donated to the cause, but the rubber is pretty hard and I suspect that is half the problem. Did a bit of googling and a NOS rubber goes for over $300.... yikes, so I started looking up some old wive's cures and one suggestion is to soak the rubber in WD40 to soften it up. So after pulling it off I popped it in one of those zip lock sandwich bags and sprayed a whole heap of WD40 into the bag. Google says to remove as much air as possible from the bag and to then let the rubber marinade for a few days, so I was able to squeeze out quite a bit air before sealing the bag. Looks like so: Over the weekend I'll get some time on the a/c and will keep you all updated on my findings. Thanks for reading.
1 point
-
1 point
-
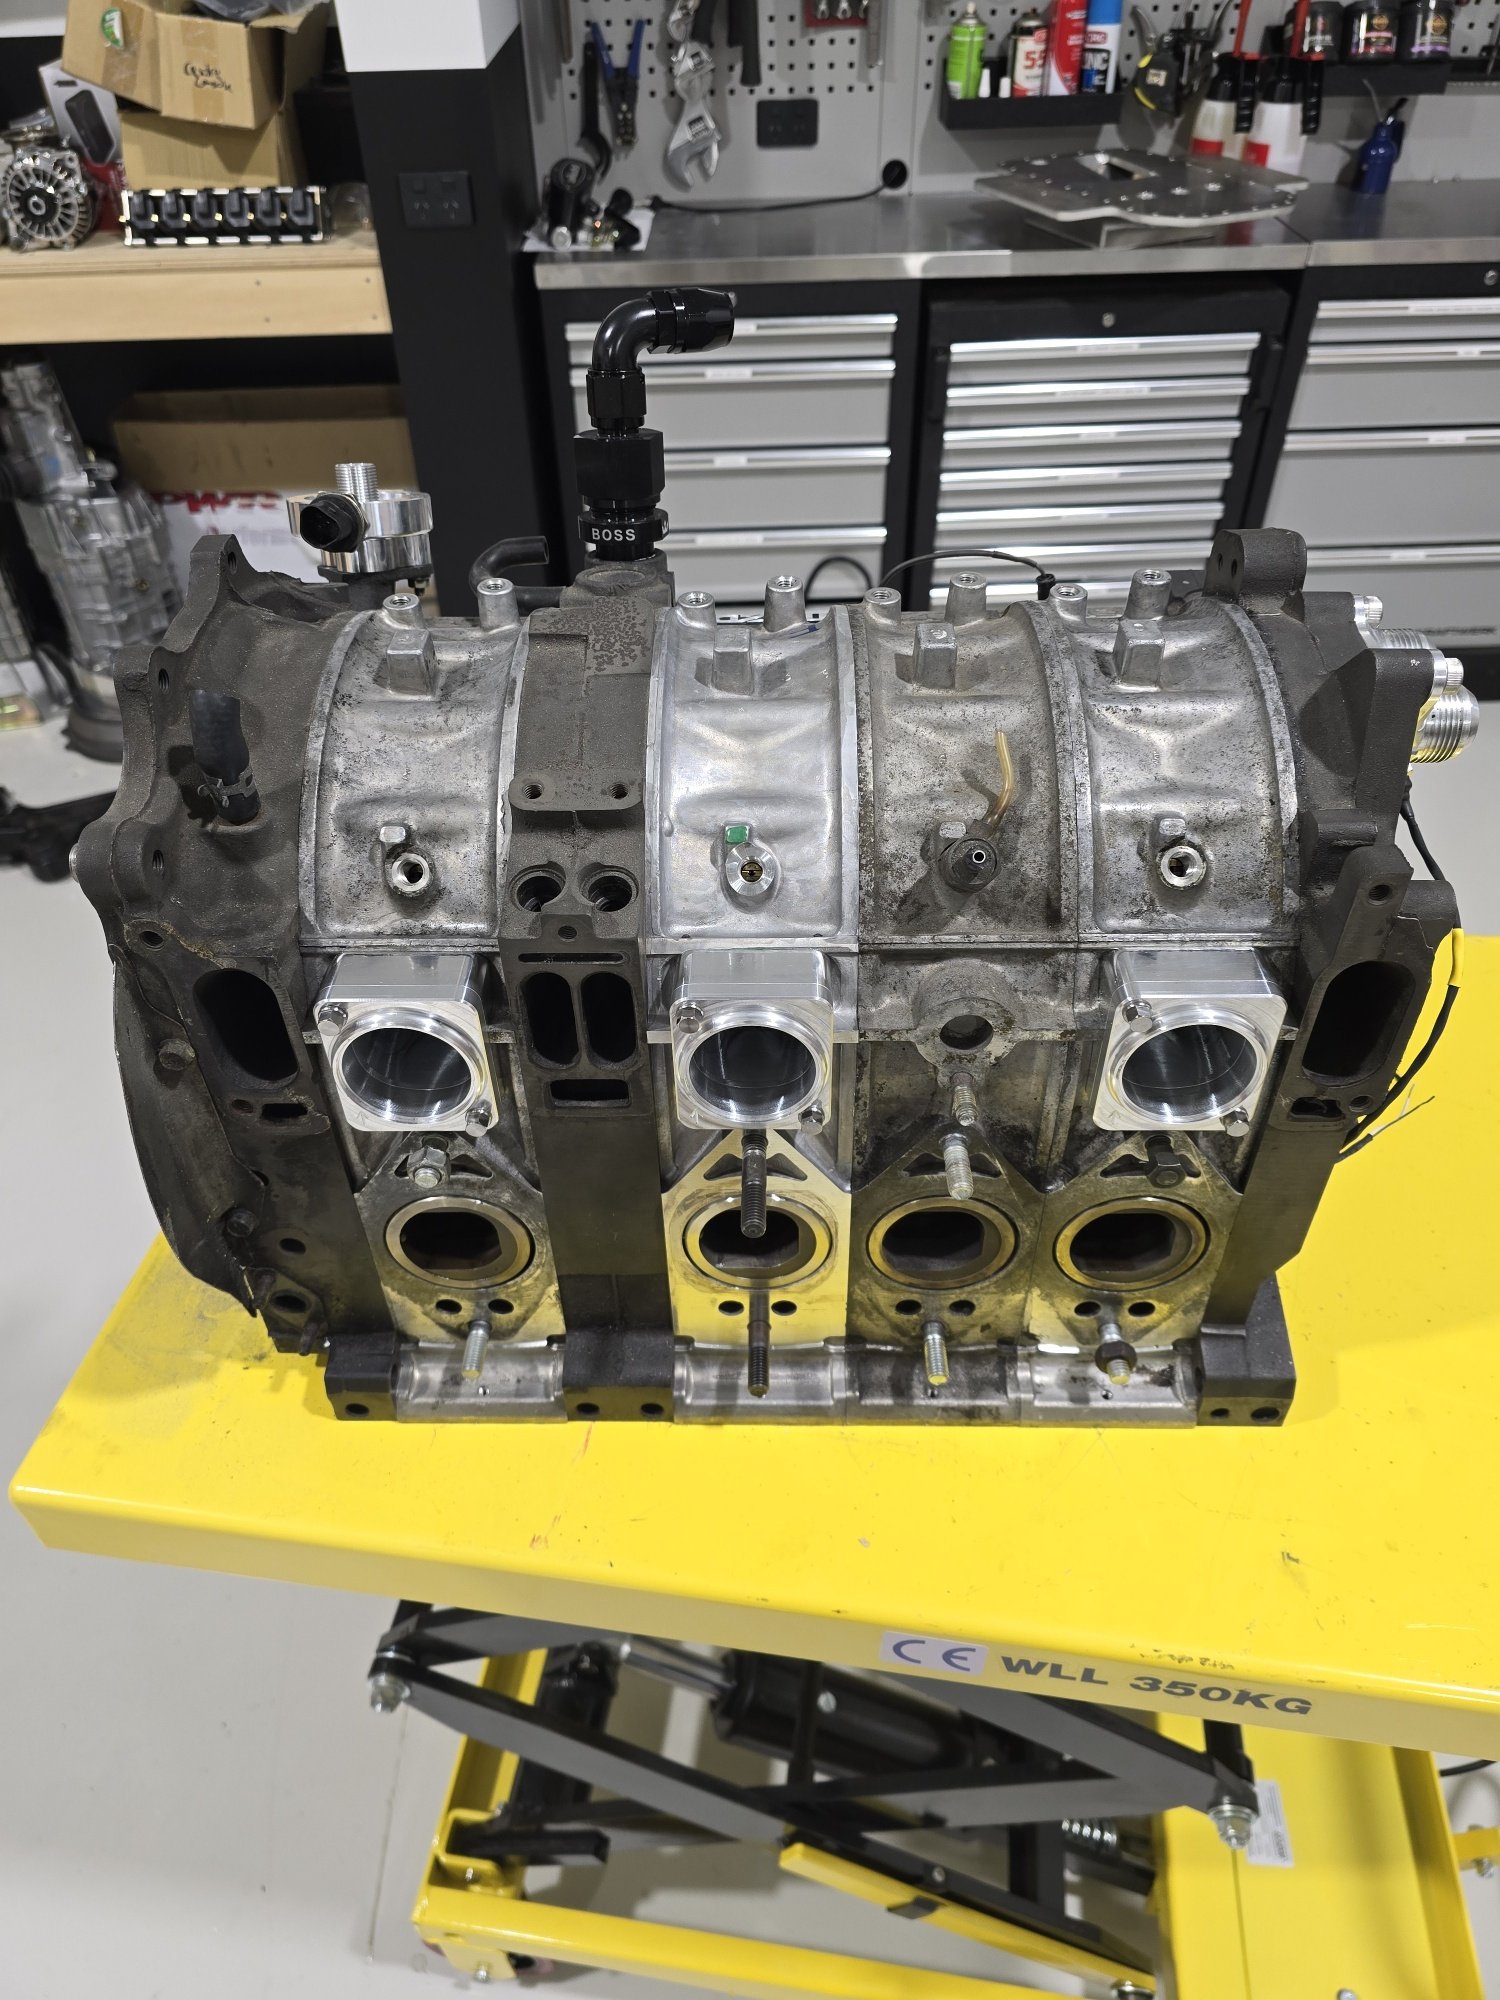
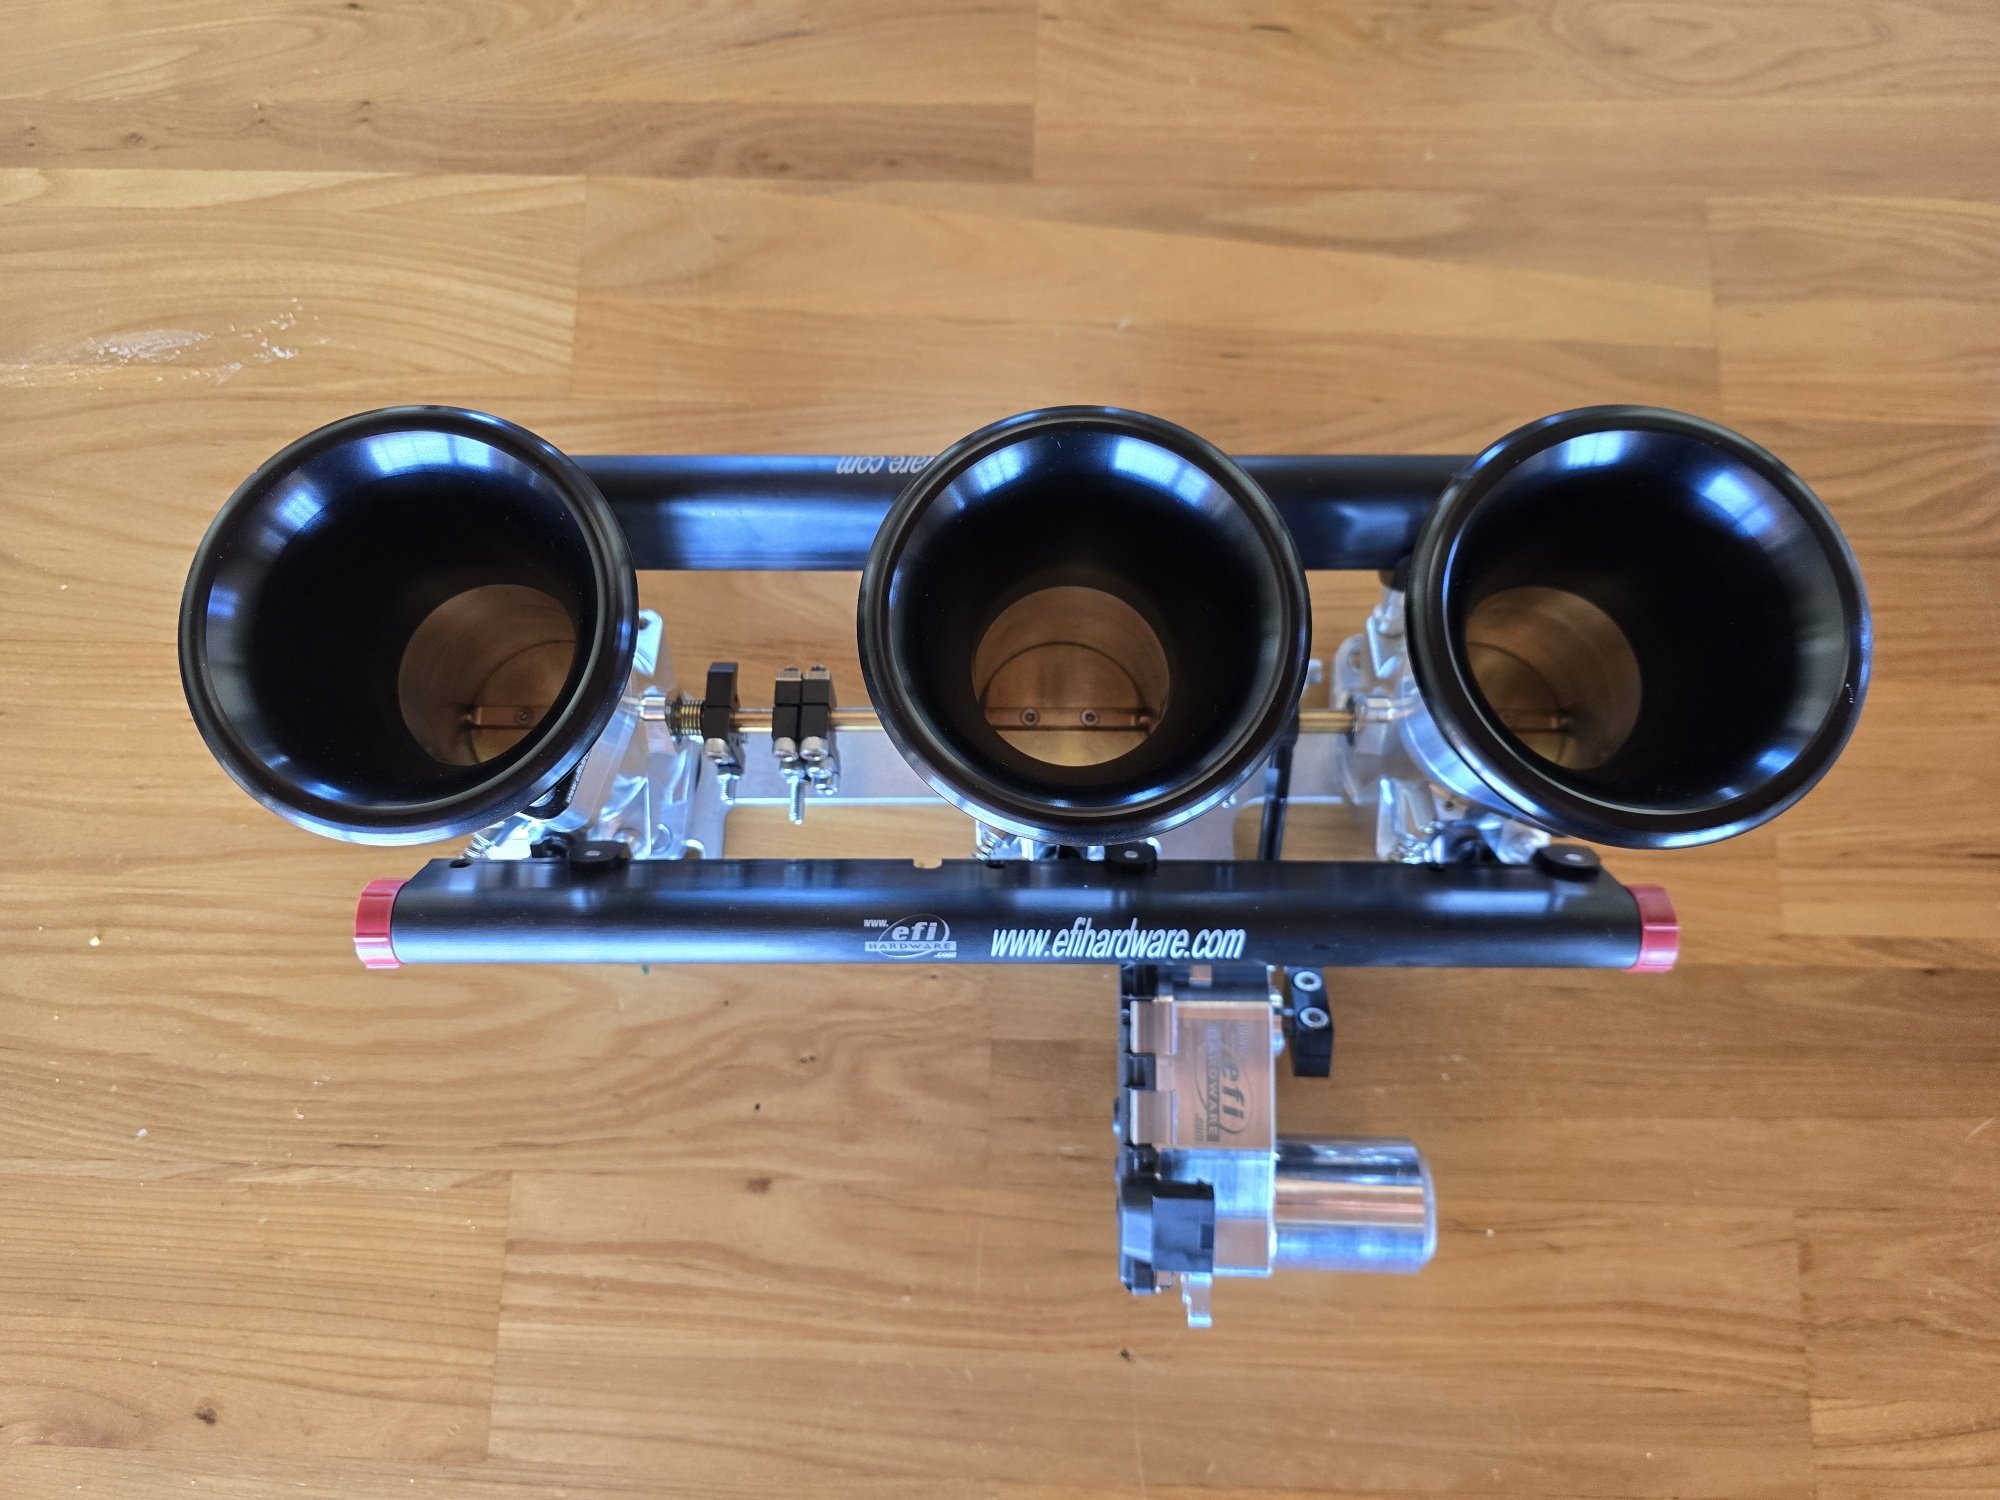
Few more bits and pieces. Picked up a EFI Hardware DBW 55mm tapered throttle body setup, have also ordered an MFR Moffat Style V2 airbox with a filter housing/intake that sits behind the front head light, so waiting for that to be delivered. Pull motor this weekend so housings can get PP'd then its off to Fab later in Sept to finish the last bits, Intake manfold, clearance the floor for diff and lowering, gearbox crossmember, pedal box etc etc. Hoping to get that all wrapped up and finish the plumbing then strip to bare shell chuck on jig and get back to painter in a couple of months time
1 point
-
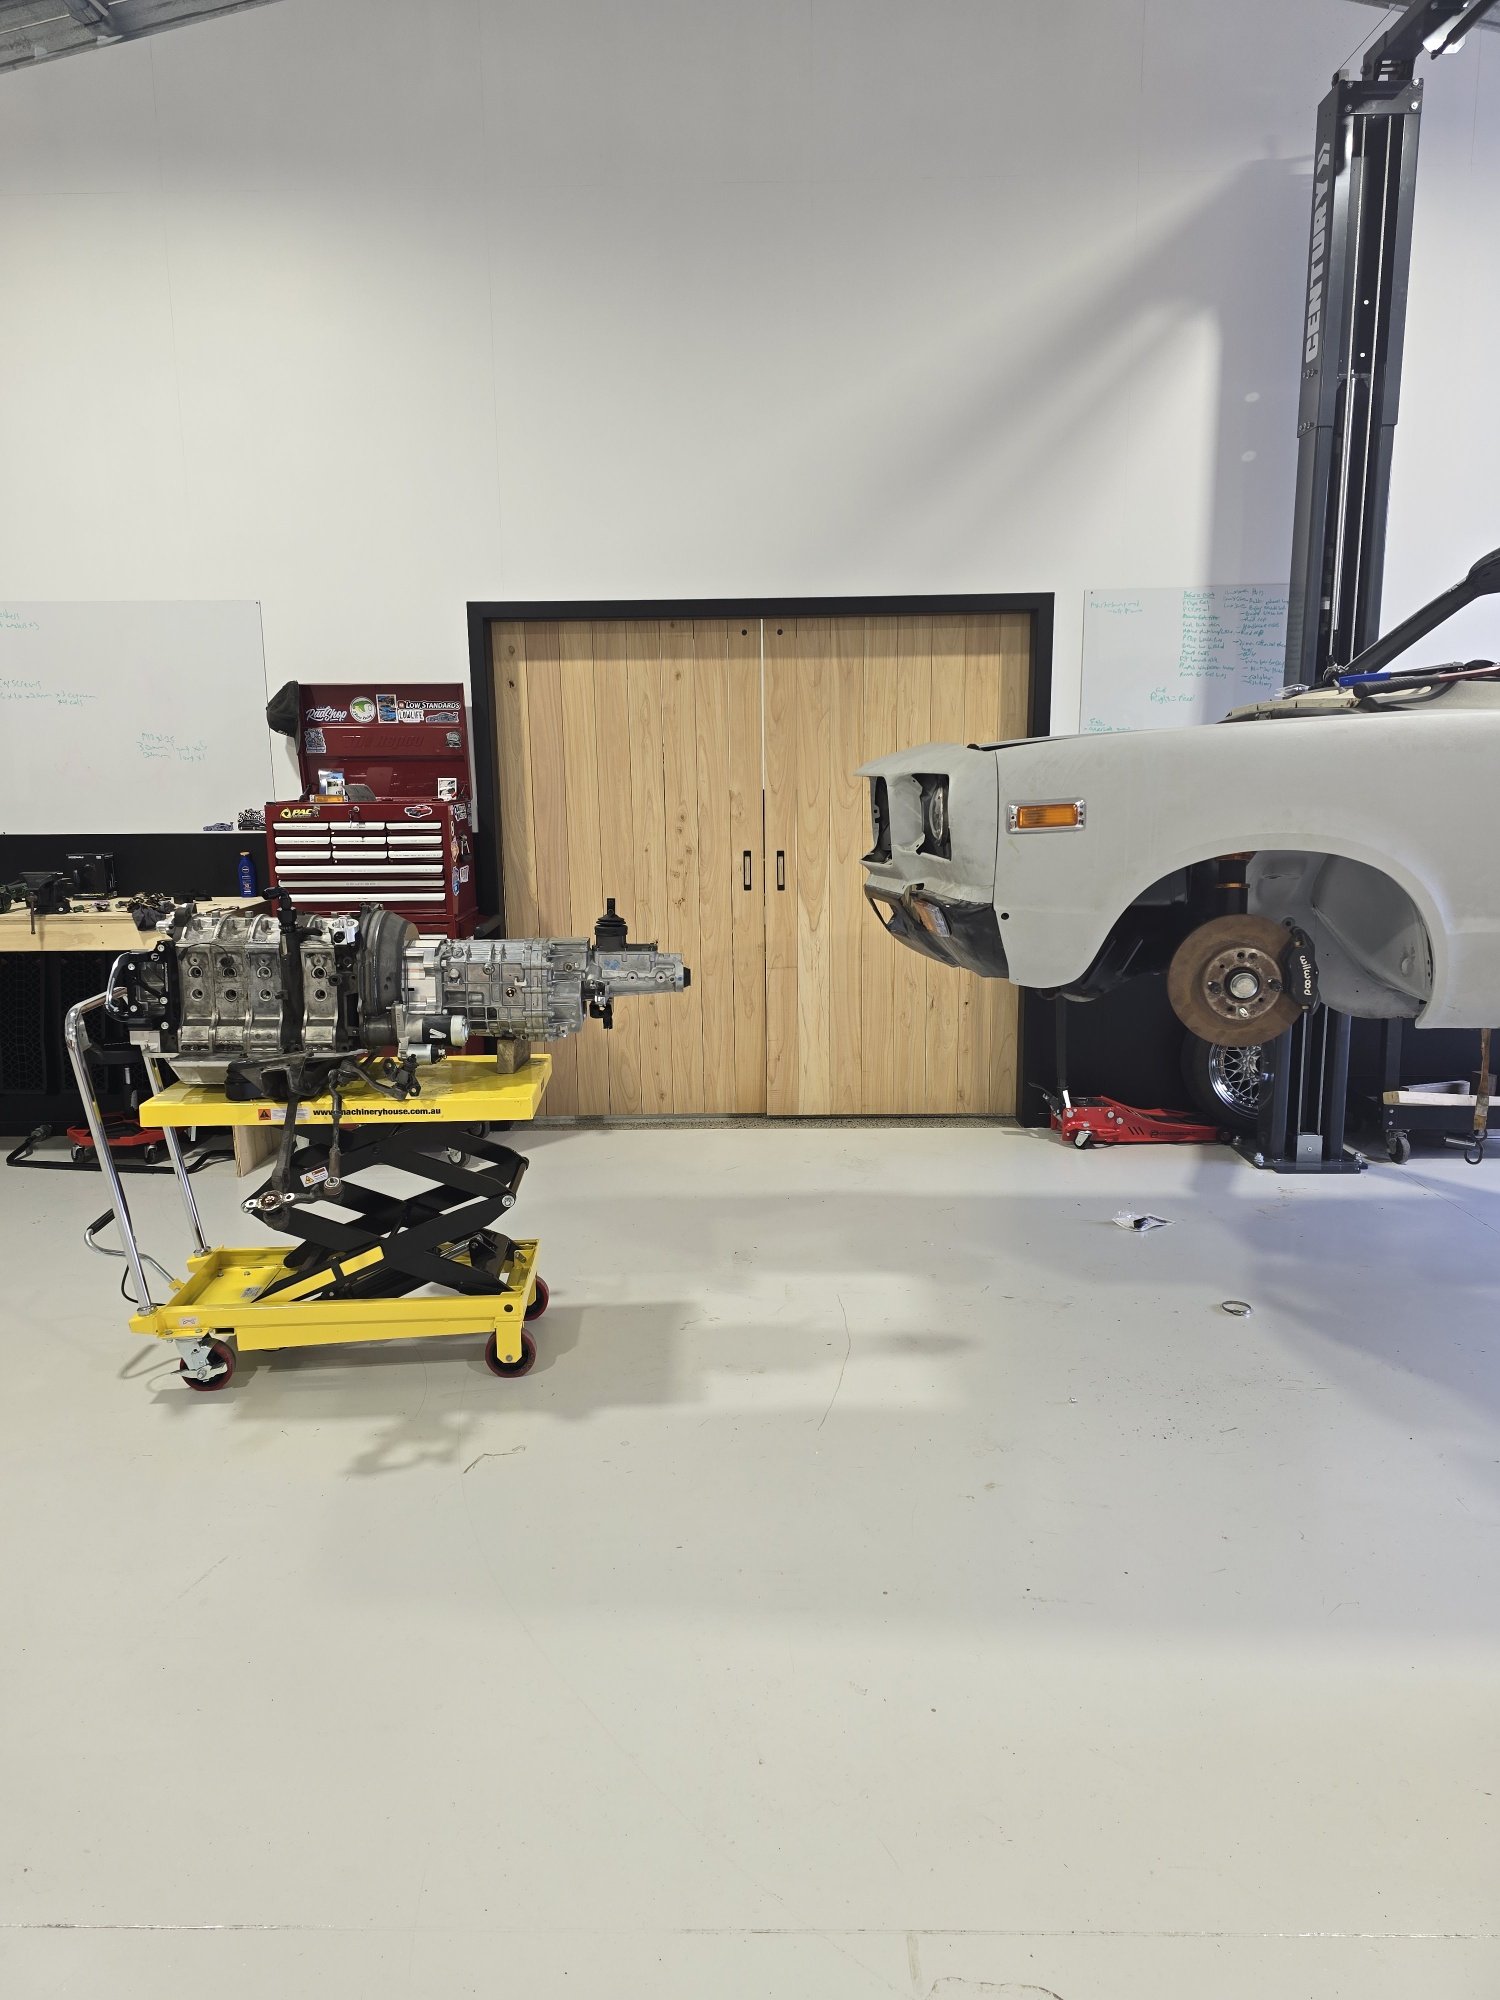
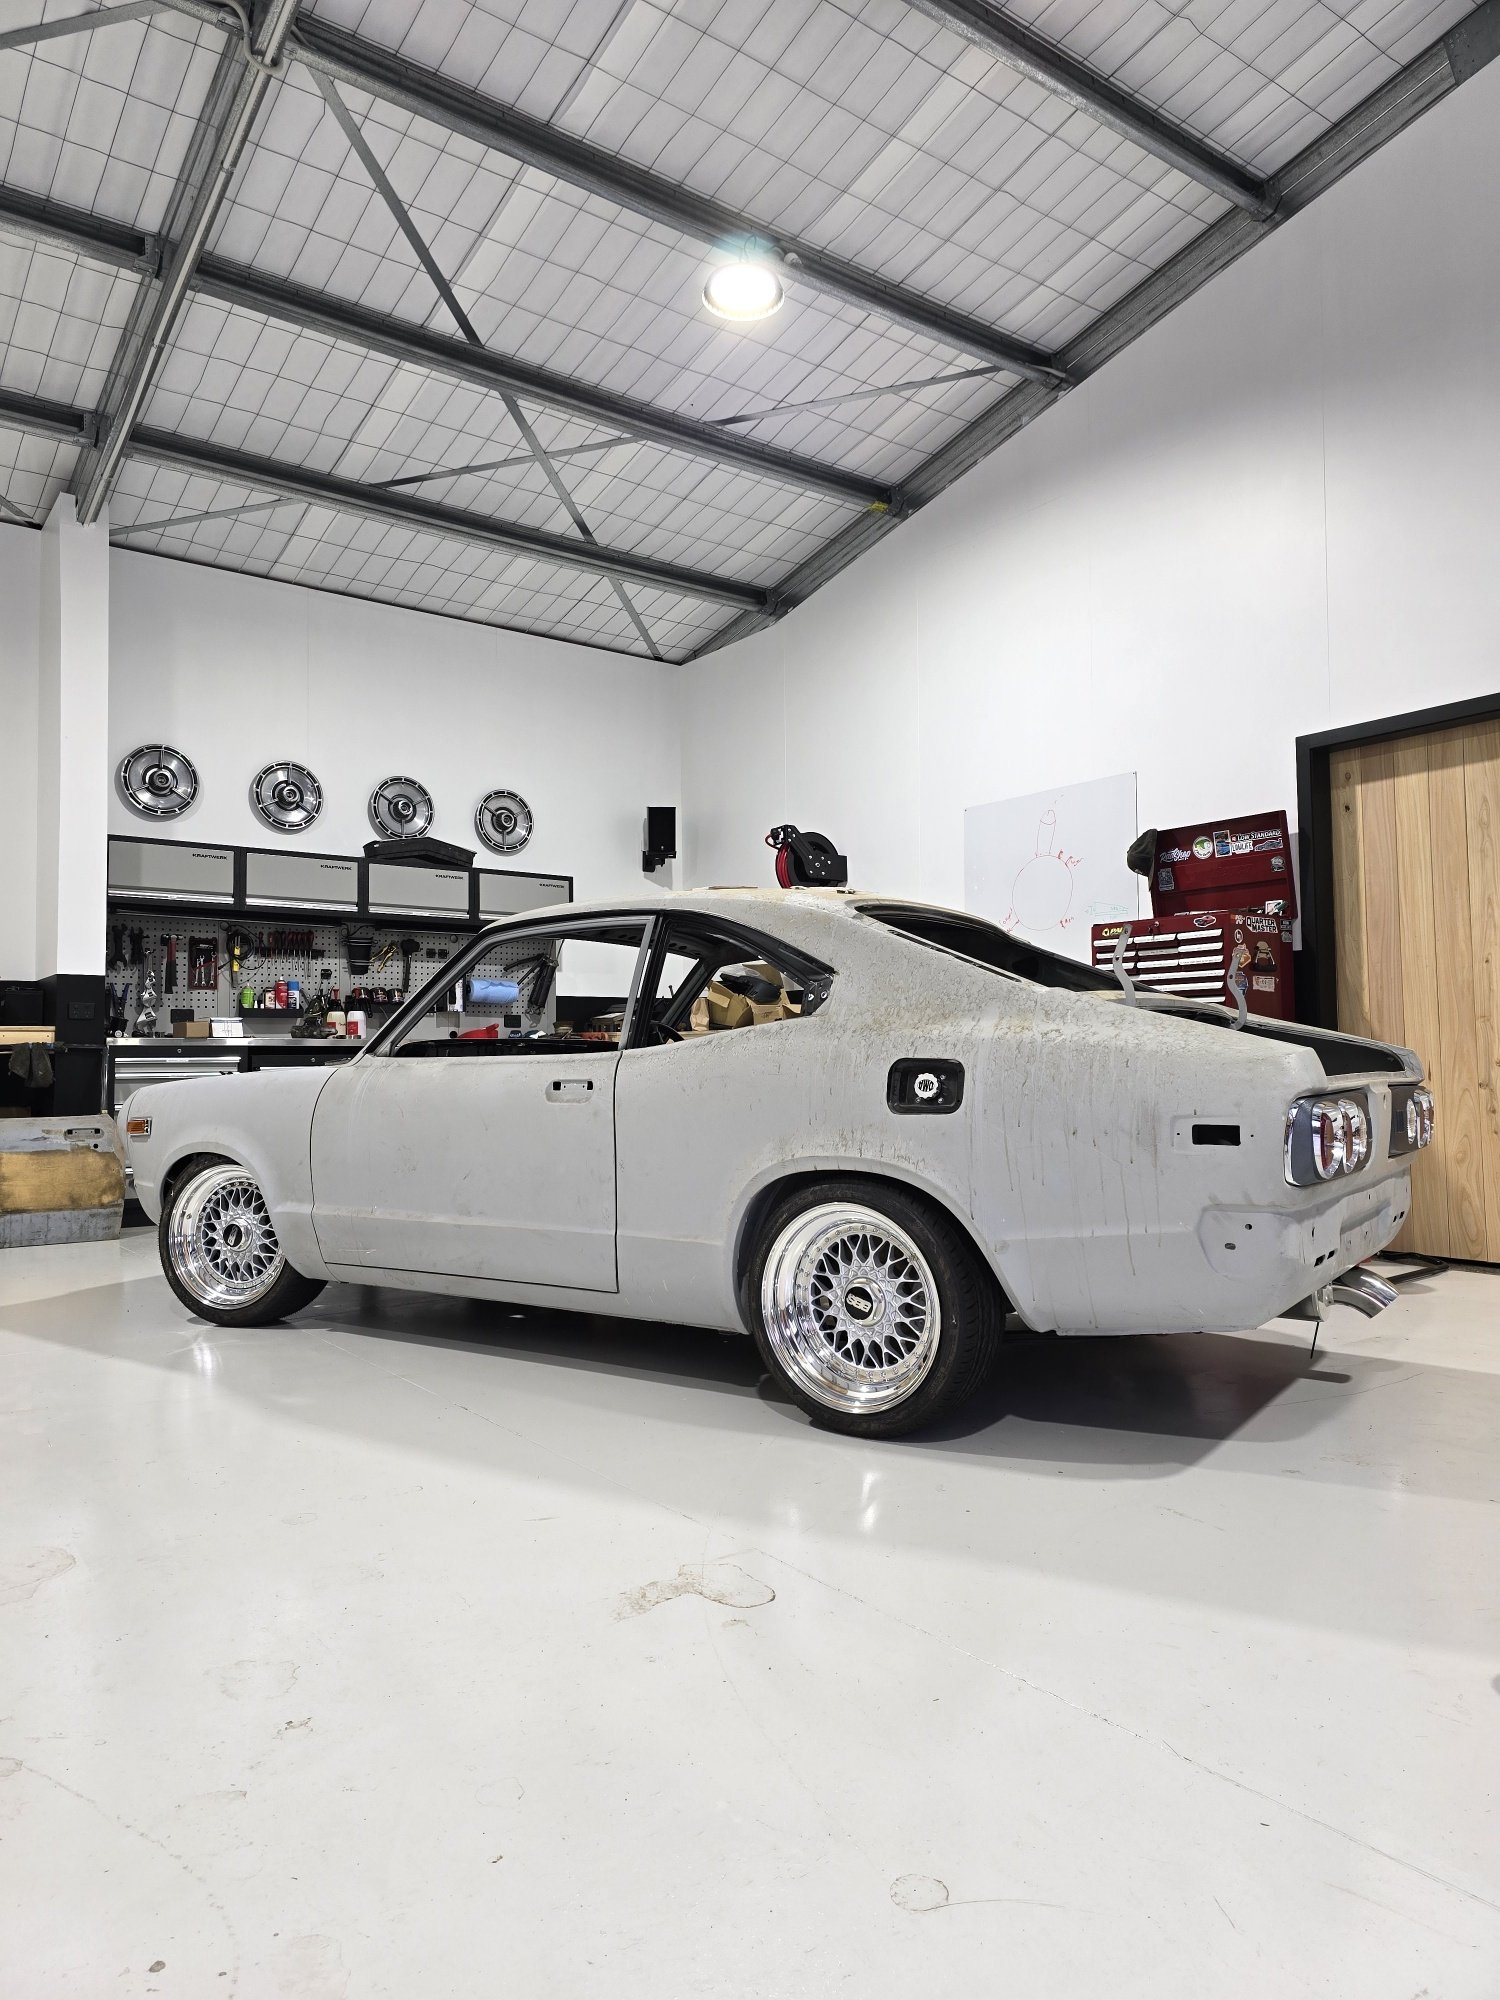
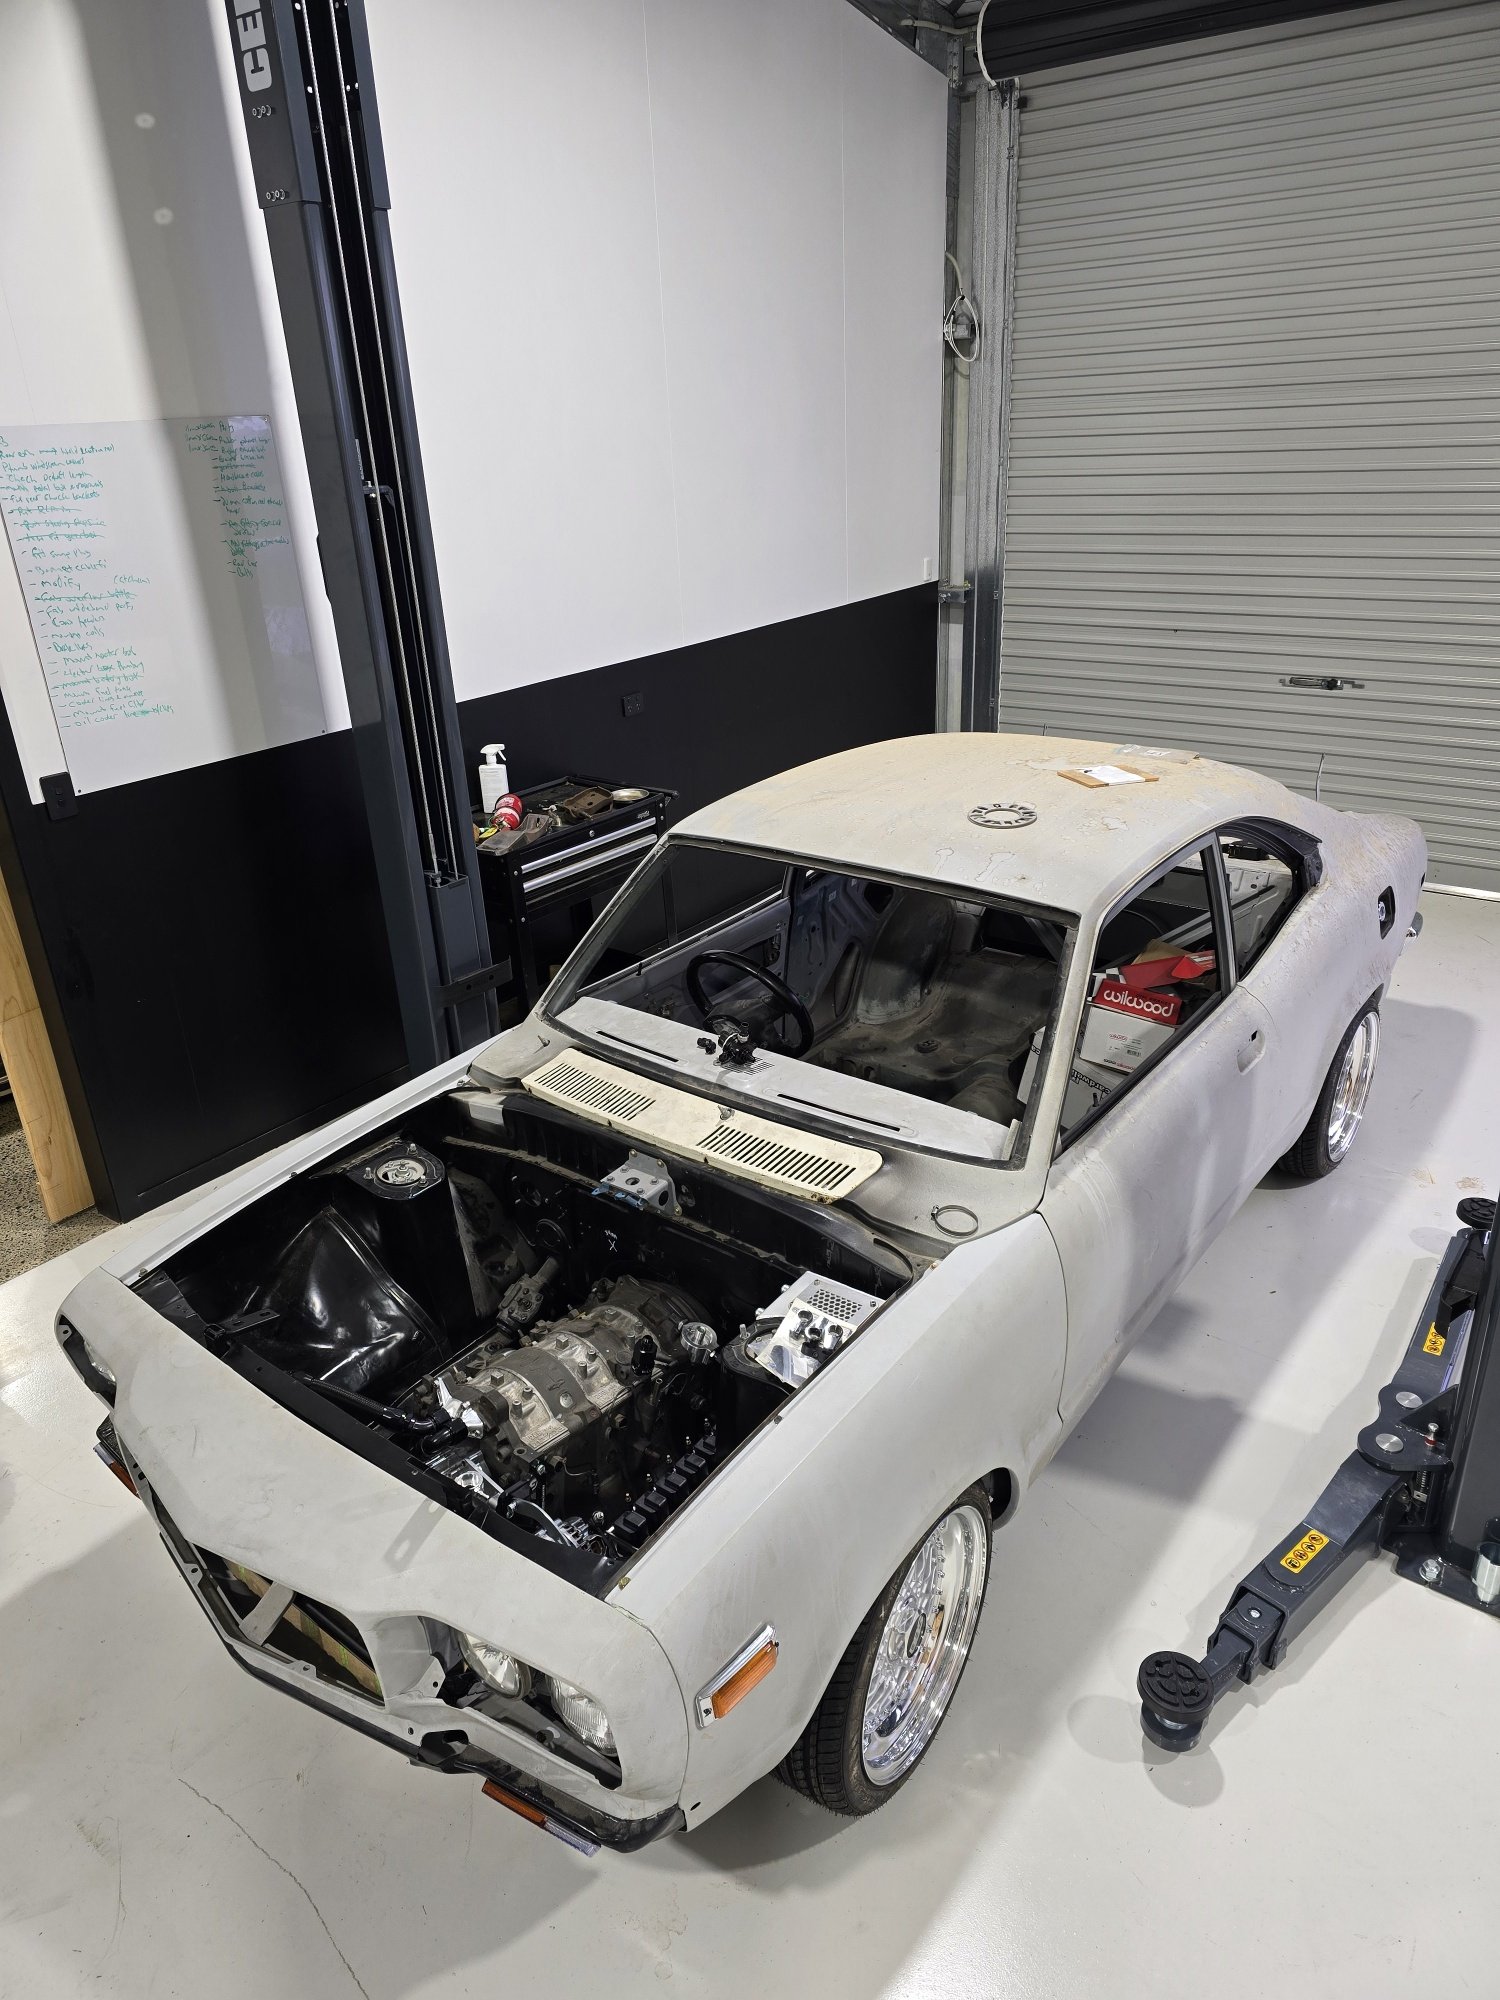
Spent the last week of late nights smashing out some more on this thing trying to get the body back to the painter. Got the wheels bolted together, sealed up and tyres on to test fit on Friday night, Stoked with how thats all come together very happy with how it looks. Rear needs the diff head clearanced for the floor and some minor trimming to fit the height. Have been going over the car front to back making a list of the final things to do to get the car back to paint. List of smaller fab stuff to get done which im in the plan of getting that booked in. Assembled the freshly chromed rear bumper and mounted up to the powder coated bumper brackets for a final test fit. Chipping away at things like mounting fuel filters, plumbing etc, making a list of parts that i still need to buy. Quite alot of progress which is good!
1 point
-
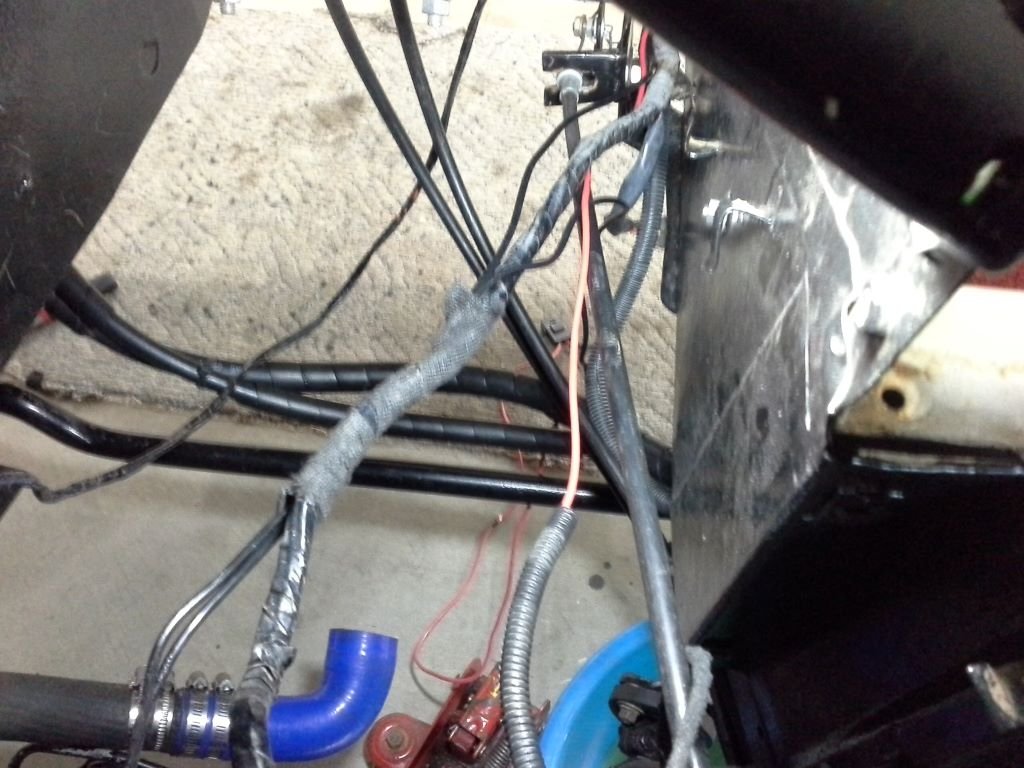
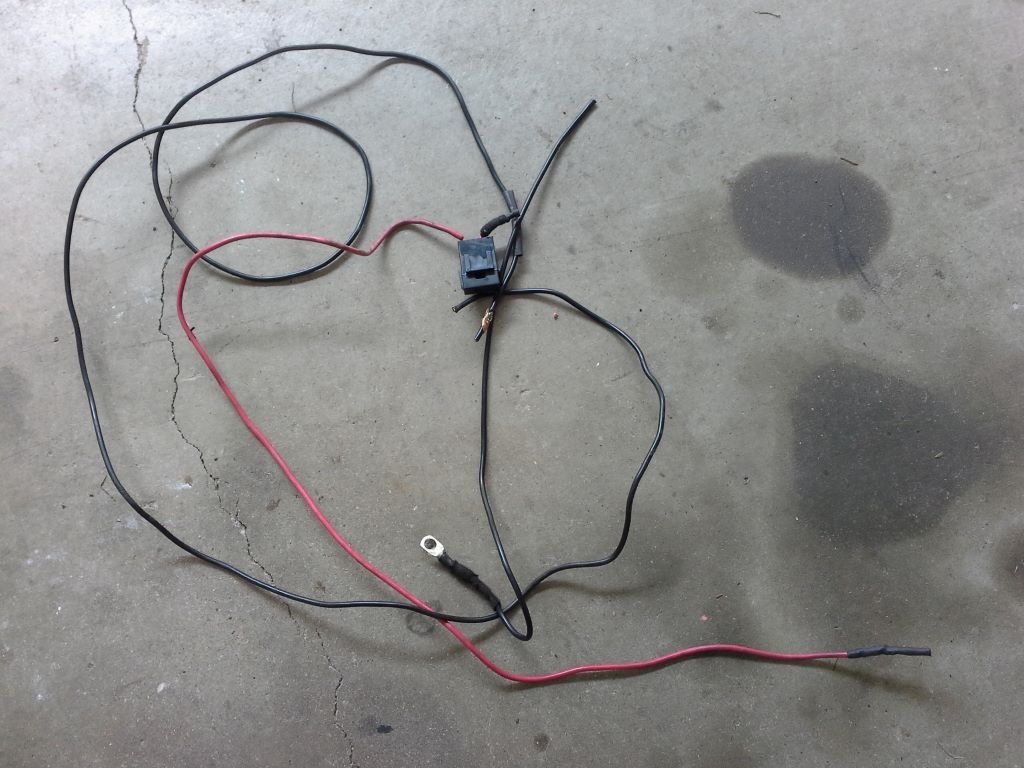
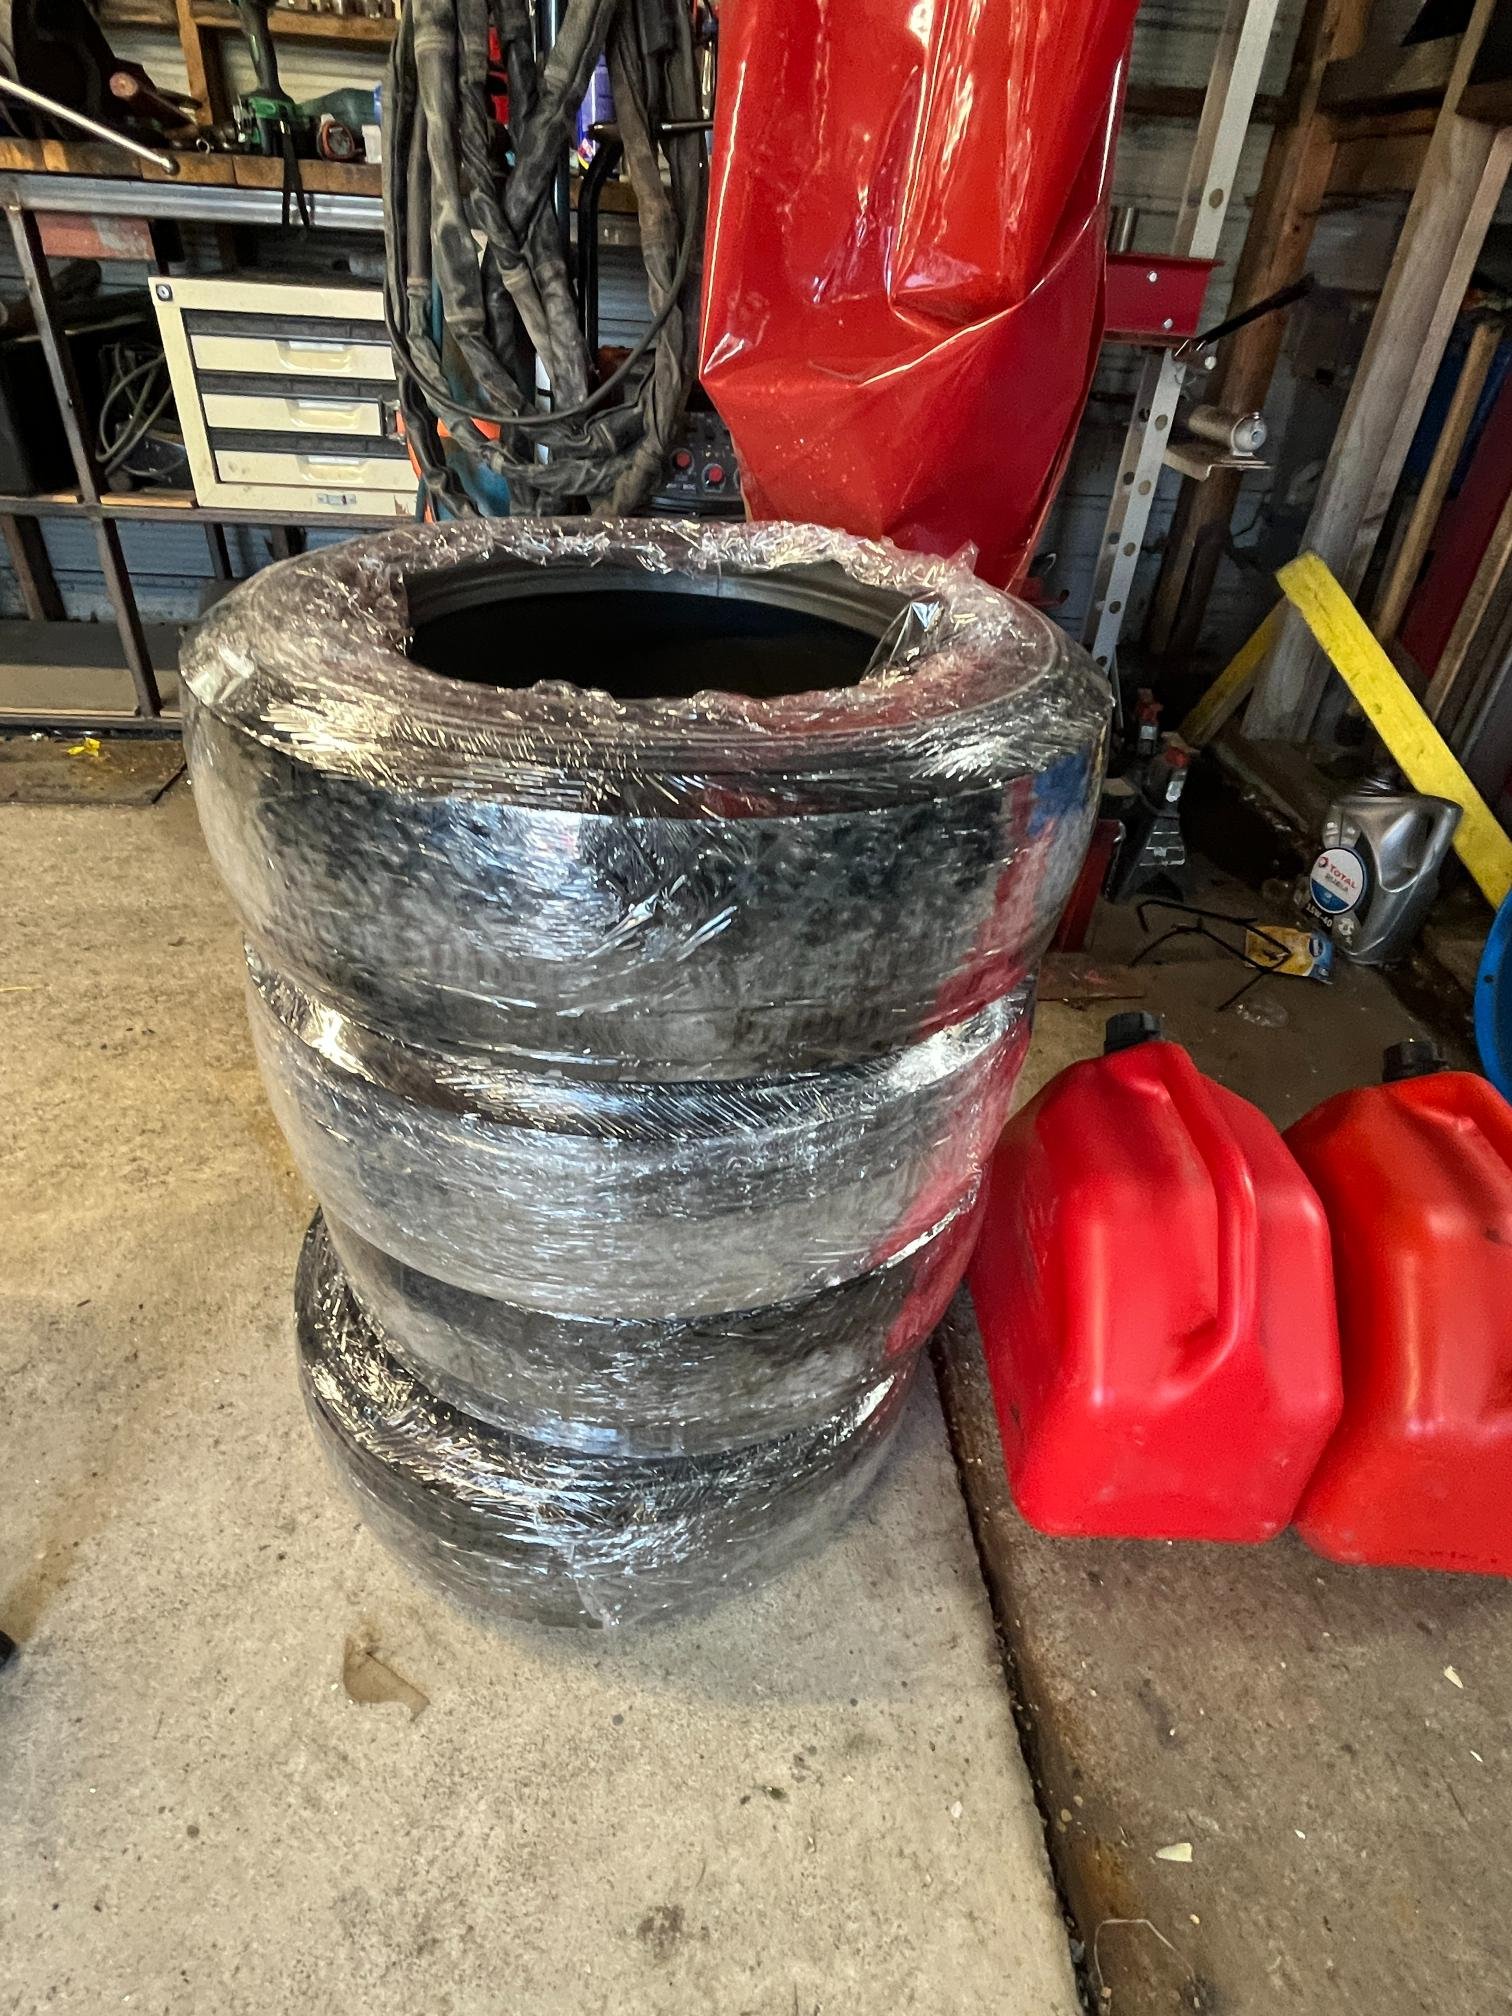
Rally prep is well underway. Spent another weekend in palmy helping Nick put the last of it together. Car is running now and off to Dyno, scrutineering and WOF shop today. Made the switch to Av gas too. There's a good chance we'll find something else that needs doing, hence why we are doing it all 3wks out.. Inside is looking tidy. Belts from Levin are in there, other set will come from Nicks civic. Helmet bag hung up, fire extinguishers replaced, first aid kit checked etc. All the small things take time. Picked up a fresh set of Zestino rally tyres. Only hard was available so have been doped to soften up a bit. Might be mediums by the time we get to the event . We got some help with them so were very affordable. Logic being new budget tyres that will last the whole rally are better than our average selection 10+yr old dunlop tyres. Gives us a few options to groove the Zestino's and mix and match what works best for the weather conditions. This is definitely a budget-conscious but maximum fun approach to rallying! We weren't too worried about lights initially as it's a 4am start for the front runners, but we'll be car 55-60 to leave with a 1hr tour to first stage. First light is around 6:30am so we've probably only got 1 stage in the dark. Plan was to just drive through cautiously. But anyway we found some old Cibie Oscar lights that someone gifted us many moons ago (maybe from OS even?) so decided why not chuck them on. Made some brackets and connected to the switch we already had. We must have thought about this back when we rebuilt the car. This years Daybreaker has a retro theme and the lights suit the period of the car perfectly. If anyone has any Cibie covers we could buy/borrow we'd be so grateful!? Would top off the look 100%
1 point
-
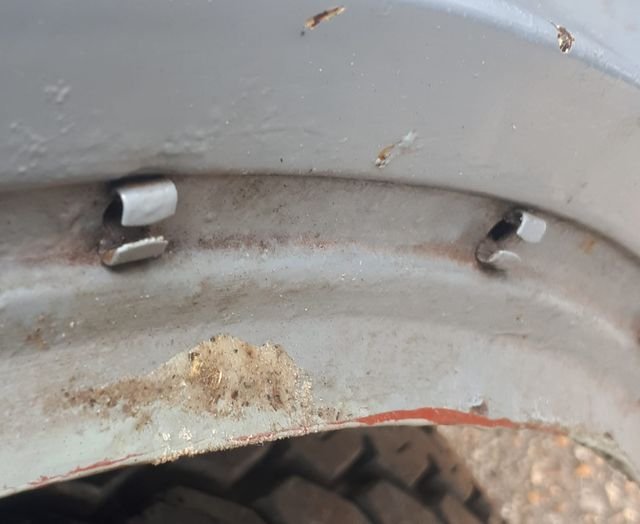
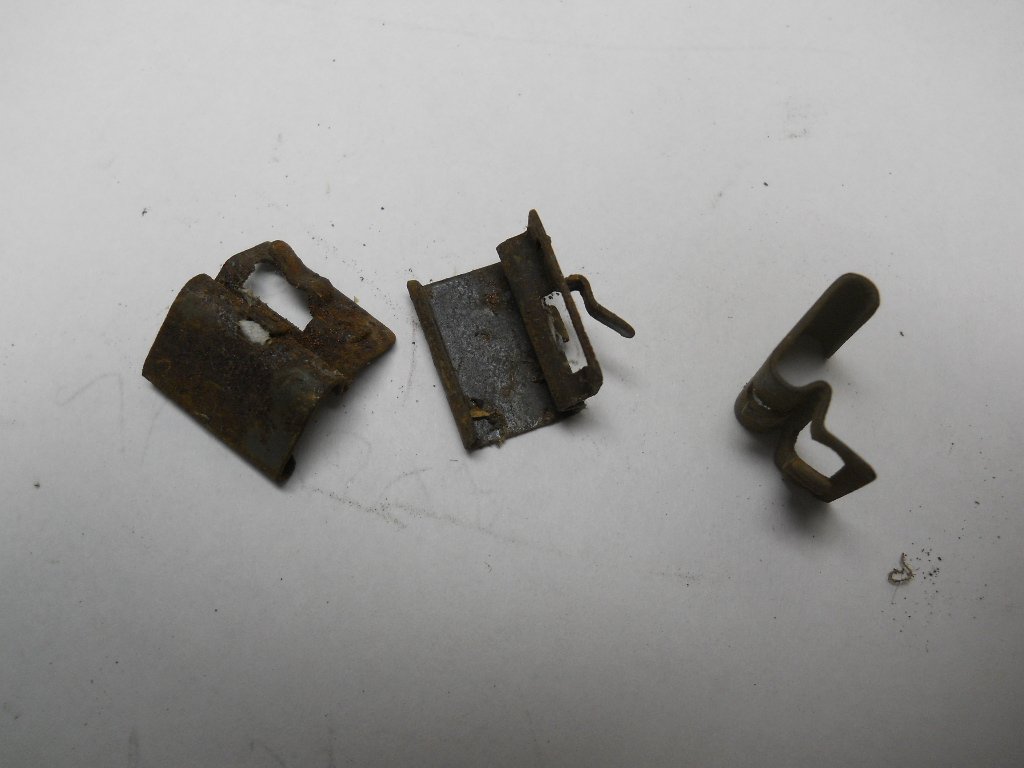
Today I tackled the next issue that was causing a drafty cabin. But first a bit of background: The factory original front door seals for a 400e look like so: And they are held in position with a bespoke metal clip that is pushed into a pressed hole in the body panel. Fixed in position without the rubber attached they look like so: And loose the clips look like so: When I bought the Thames, it came with a box of spares that included a brand-new set of repro door rubbers supplied by Sandy from the UK 400e Owner's Club. Unfortunately, the original mounting clips were missing and in chatting to Sandy he mentioned that the bespoke clips are now unobtainable with even second-hand units being as rare as the proverbial rocking horse poo. I put the word out that I was looking for some clips, but no luck. During our rainy season Mrs Flash and I were getting absolutely drenched every time we took the van out in the rain, so an urgent solution was required. Looking closely at the door surrounds I spotted a factory seam where the inner and outer body panels are joined. Looks like so: Looking at the little lip I wondered if it would be possible to source a universal side bubble pinch weld seal, so I asked Uncle Google for some help and he came up with this image: So on our next trip into town I visited Clark Rubber and they just so happened to have such a seal in stock. Grabbed enough to do one door and it worked like a charm. On the next town trip I grabbed another length for the other door and hey presto water be gone. Only problem was this bottom part where the front door extends below cabin floor level as there is no seam: So, at the time I just ignored that bit which was fine from a water ingress point of view, but now of course it's not so great for winter drafts and you would be amazed at how much cold air enters through that gap. Another plan was urgently needed so another visit to Clark Rubber and on the shelf, they had a little hollow half round section that had its own self-adhesive strip on the back. Again, I bought enough to do one door and fitted up it looks like so: At first the new rubber meant having to firmly close the door, but after a week it's settled down nicely and it's definitely sorted out the draft. Looks a bit untidy where the two seals meet, but I can live with that. We are off to town tomorrow, so I'll grab another length to finish off the passenger side door. Thanks for looking.
1 point
-
Winter has set in with a vengeance here in Queensland ... well what we call winter. Daily highs are still in the mid 20s Celsius but some mornings we are down in the single digits which is cold for us softies. Driving the Thames around first thing in the morning I've discovered that it is quite drafty. So, this week I thought I'd make a start on sorting out some of the air leaks. First up the major draft: Some of you will recall that when I converted the van from column to floor shift, I hacked a ruddy great hole in the top of the air tunnel that looked like so: After fitting the shifter, I fabricated a little cover that looked like so: And everything in the garden was lovely until one day the panel bond that I used to glue the thing together let go and the top panel came off. At first I couldn't figure out why this had happened, but after looking a bit closer at things I realised we had a problem: As can be seen in the above photo when chucking the van into reverse the little ball joint on the cable was being lifted way high and it eventually popped the lid straight off like opening a tin of paint. How did I manage to cock that up I thought .... what a rookie mistake. Anyway, first thought was to move the whole cover higher up in the tunnel, but that was an instant fail as I was already right up against the engine cover hinge: Didn't really want to end up making a completely new cover that was tall enough to solve the problem, so ended up spacing the entire shift mechanism further away from the tunnel top by chucking in some longer mounting bolts with a few custom-made spacers. Dropping the entire mechanism led to some issues with the gearstick movement which meant I could no longer select reverse as the stick was hard up against the engine lid before reverse gear was fully engaged. Out came the gearstick and after tickling it with a blow torch I was able to tweak the angle of the gearstick in my vice. Took a few goes to get to the point where I could successfully select all gears. Chucked some fresh panel bond on the lid, clamped it back in place and let it go off overnight before refitting. And that was the major cause of the cold draft sorted.
1 point
-
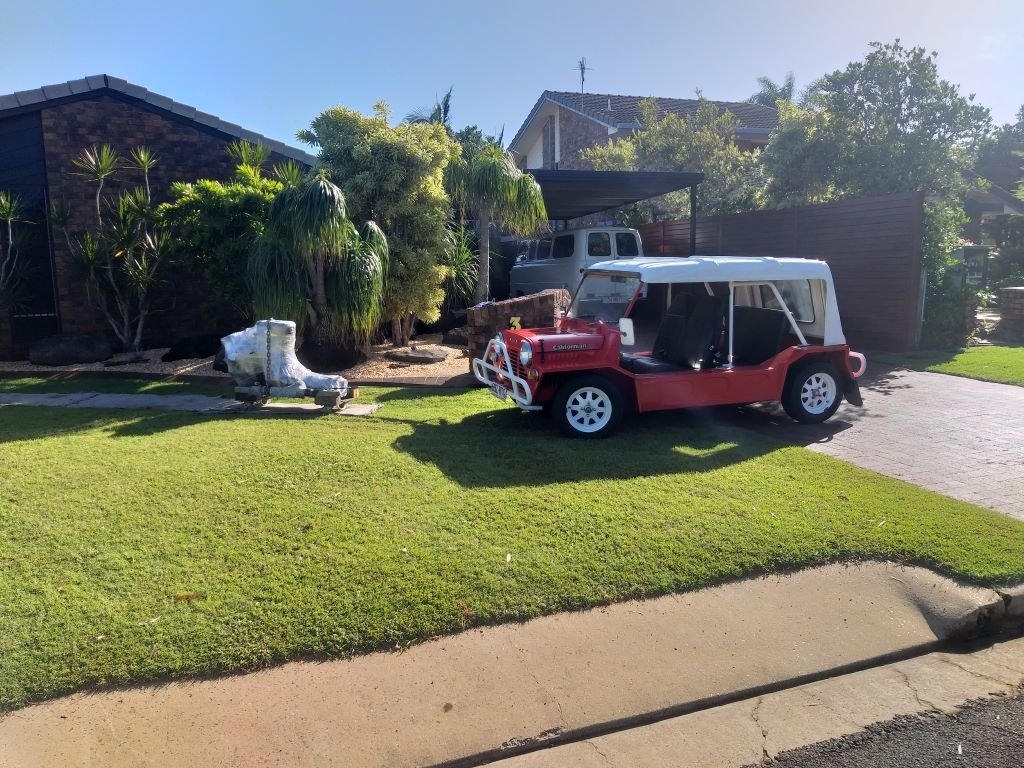
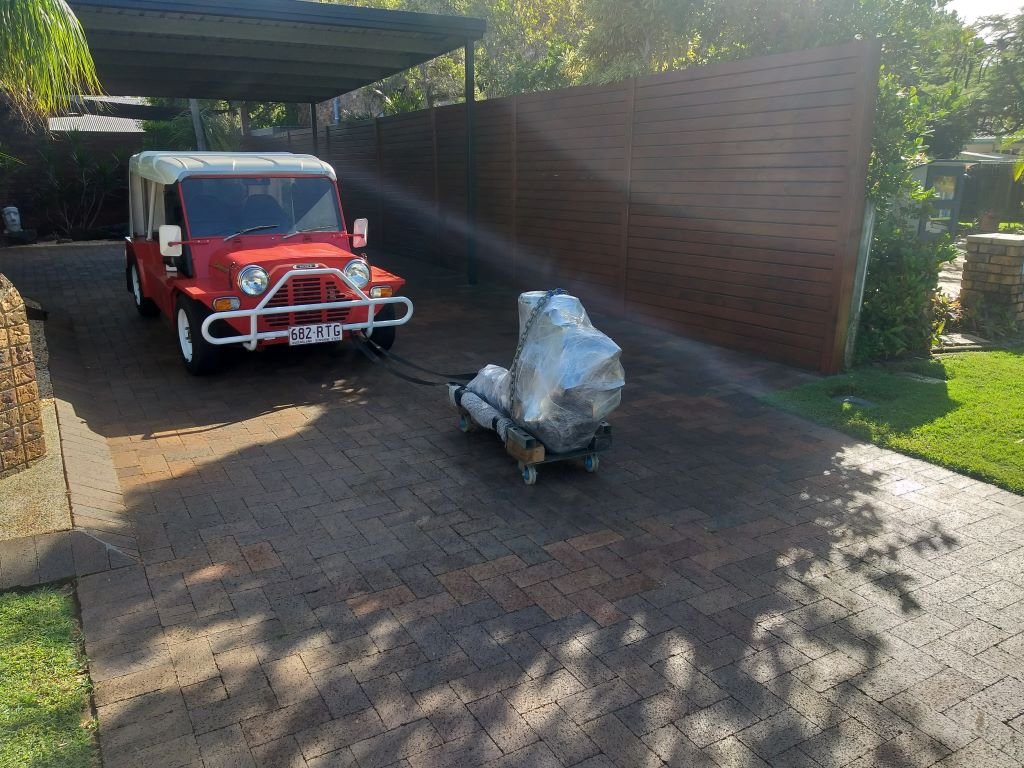
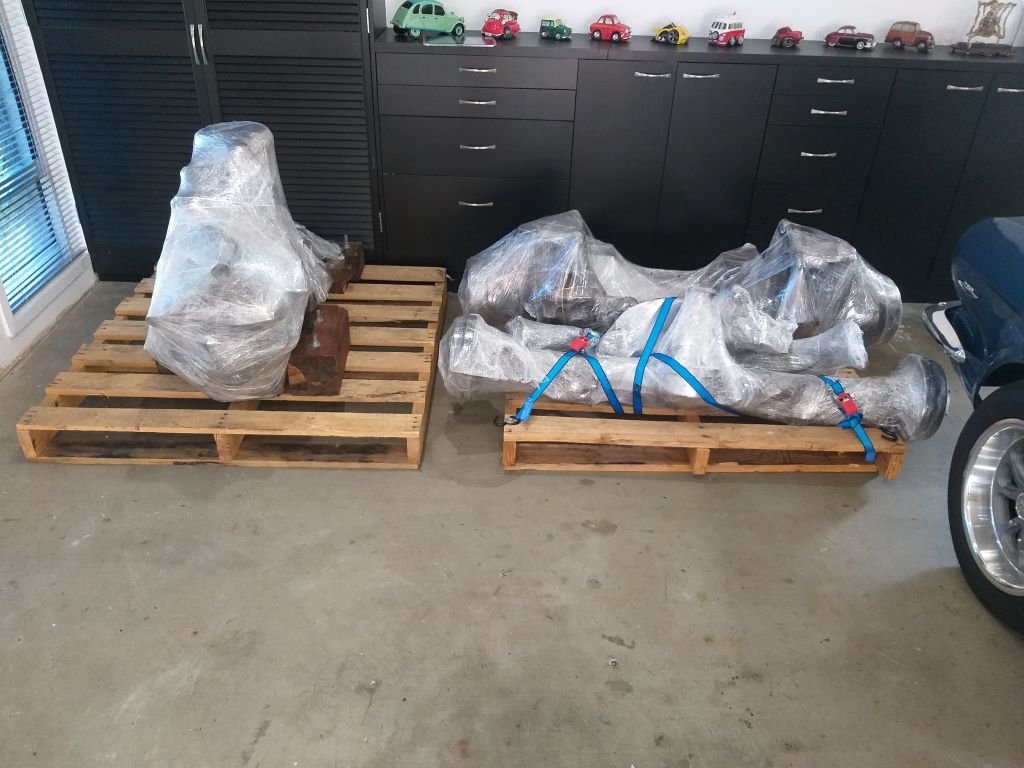
The plan was to keep the original Thames running gear in case anyone wanted to return it to factory sometime in the future. So, for the past few years it's all been languishing in my shed taking up valuable real estate and it's also been a real pain in the arse remembering to turn the engine over by hand every few months. Then earlier this year I realised that there is no way that I am ever going to return the Thames to factory and if ever I was to sell it the new owner is unlikely to do the same too. So I chucked an advert up on Gumtree and forgot about it. Had a few queries from Consul Barries as the Thames shares the same engine as a MK1 Consul, but apart from that all was quiet. And then about two weeks back I got a message from a chap based in Melbourne who is having a 1960 Thames 400e pickup restored and he was keen on my parts. A deal was struck and I spent a few days clearing enough crap out of the way to get to the parts with my engine crane. The stuff was bloody heavy and I'm not the biggest fella out there, so I had to get creative about moving the stuff around. Turned Mrs Flash's Moke into a little tractor and it worked like a charm. And that's everything cleaned, wrapped and strapped down to some old Bunnings pallets and ready to hit the road down Melbourne way.
1 point
-
Okay, so the 4th June will mark one year since I got the Thames back on the road and we have clocked up just over 2,000 km of happy travels. Time sure flys when you are having fun. With nothing really exciting to report maintenance wise, I thought I'd give the Thames a birthday by cleaning up his little nest which was looking decidedly shabby. Crammed with leftover parts, the mock up 4Y engine and other crap accumulated during the build. I've been looking past this mess for way too long so time to do something about it. Before photo: I'm a hoarder of note so the first step was to find a new home for all of this crap. Opened up the roller door on my back shed for a look see and the answer was a definite no. Yikes, I really need to sort that shed out. It looks like something out of American Pickers except there aren't any treasures, just piles of junk that I can't bear to part with. So, with that option ruled out I figured another shed was needed. Like they say a man can never have too many sheds. We bought a little kit set and after boxing up a slab I got in a mini load of concrete and Mrs Flash and I did this: And then we waited for our poor old backs to recover before we did this: And then I spent a week moving all the gardening related items from the big shed into the little shed which freed up some space. After clearing all of the crap out of the Thames nest I then built a little wall unit to store everyday things like tools, washing buckets, trolley jacks, etc. I made the wall unit out of some old timber left over from our old kitchen and then disguised my shoddy carpentry with a good few coats of satin black. Gave the walls a lick of fresh paint and it ended up looking like this: Brought out my little collection of cartoon car sculptures and a few nautical themed bits and pieces that have been packed away for years, just to give the place a bit of bling. I had to buy a set of hinges for the tall cupboard doors and a pack of 400 wood screws, but apart from that everything else was leftovers. Mrs Flash has been spending a good bit of time in her art studio this year and created a whole heap of artwork for the garage, so after freshening up the paint we were able to create a feature wall. There are still a few gaps that Mrs Flash will fill over time, but all in all I'm really chuffed with the look. Next step is to epoxy coat the floor but I need to sort out a pesky rear main seal leak on the Mustang before we do that. Needless to say, the Thames van is very happy with his new nest. Thanks for looking.
1 point
-
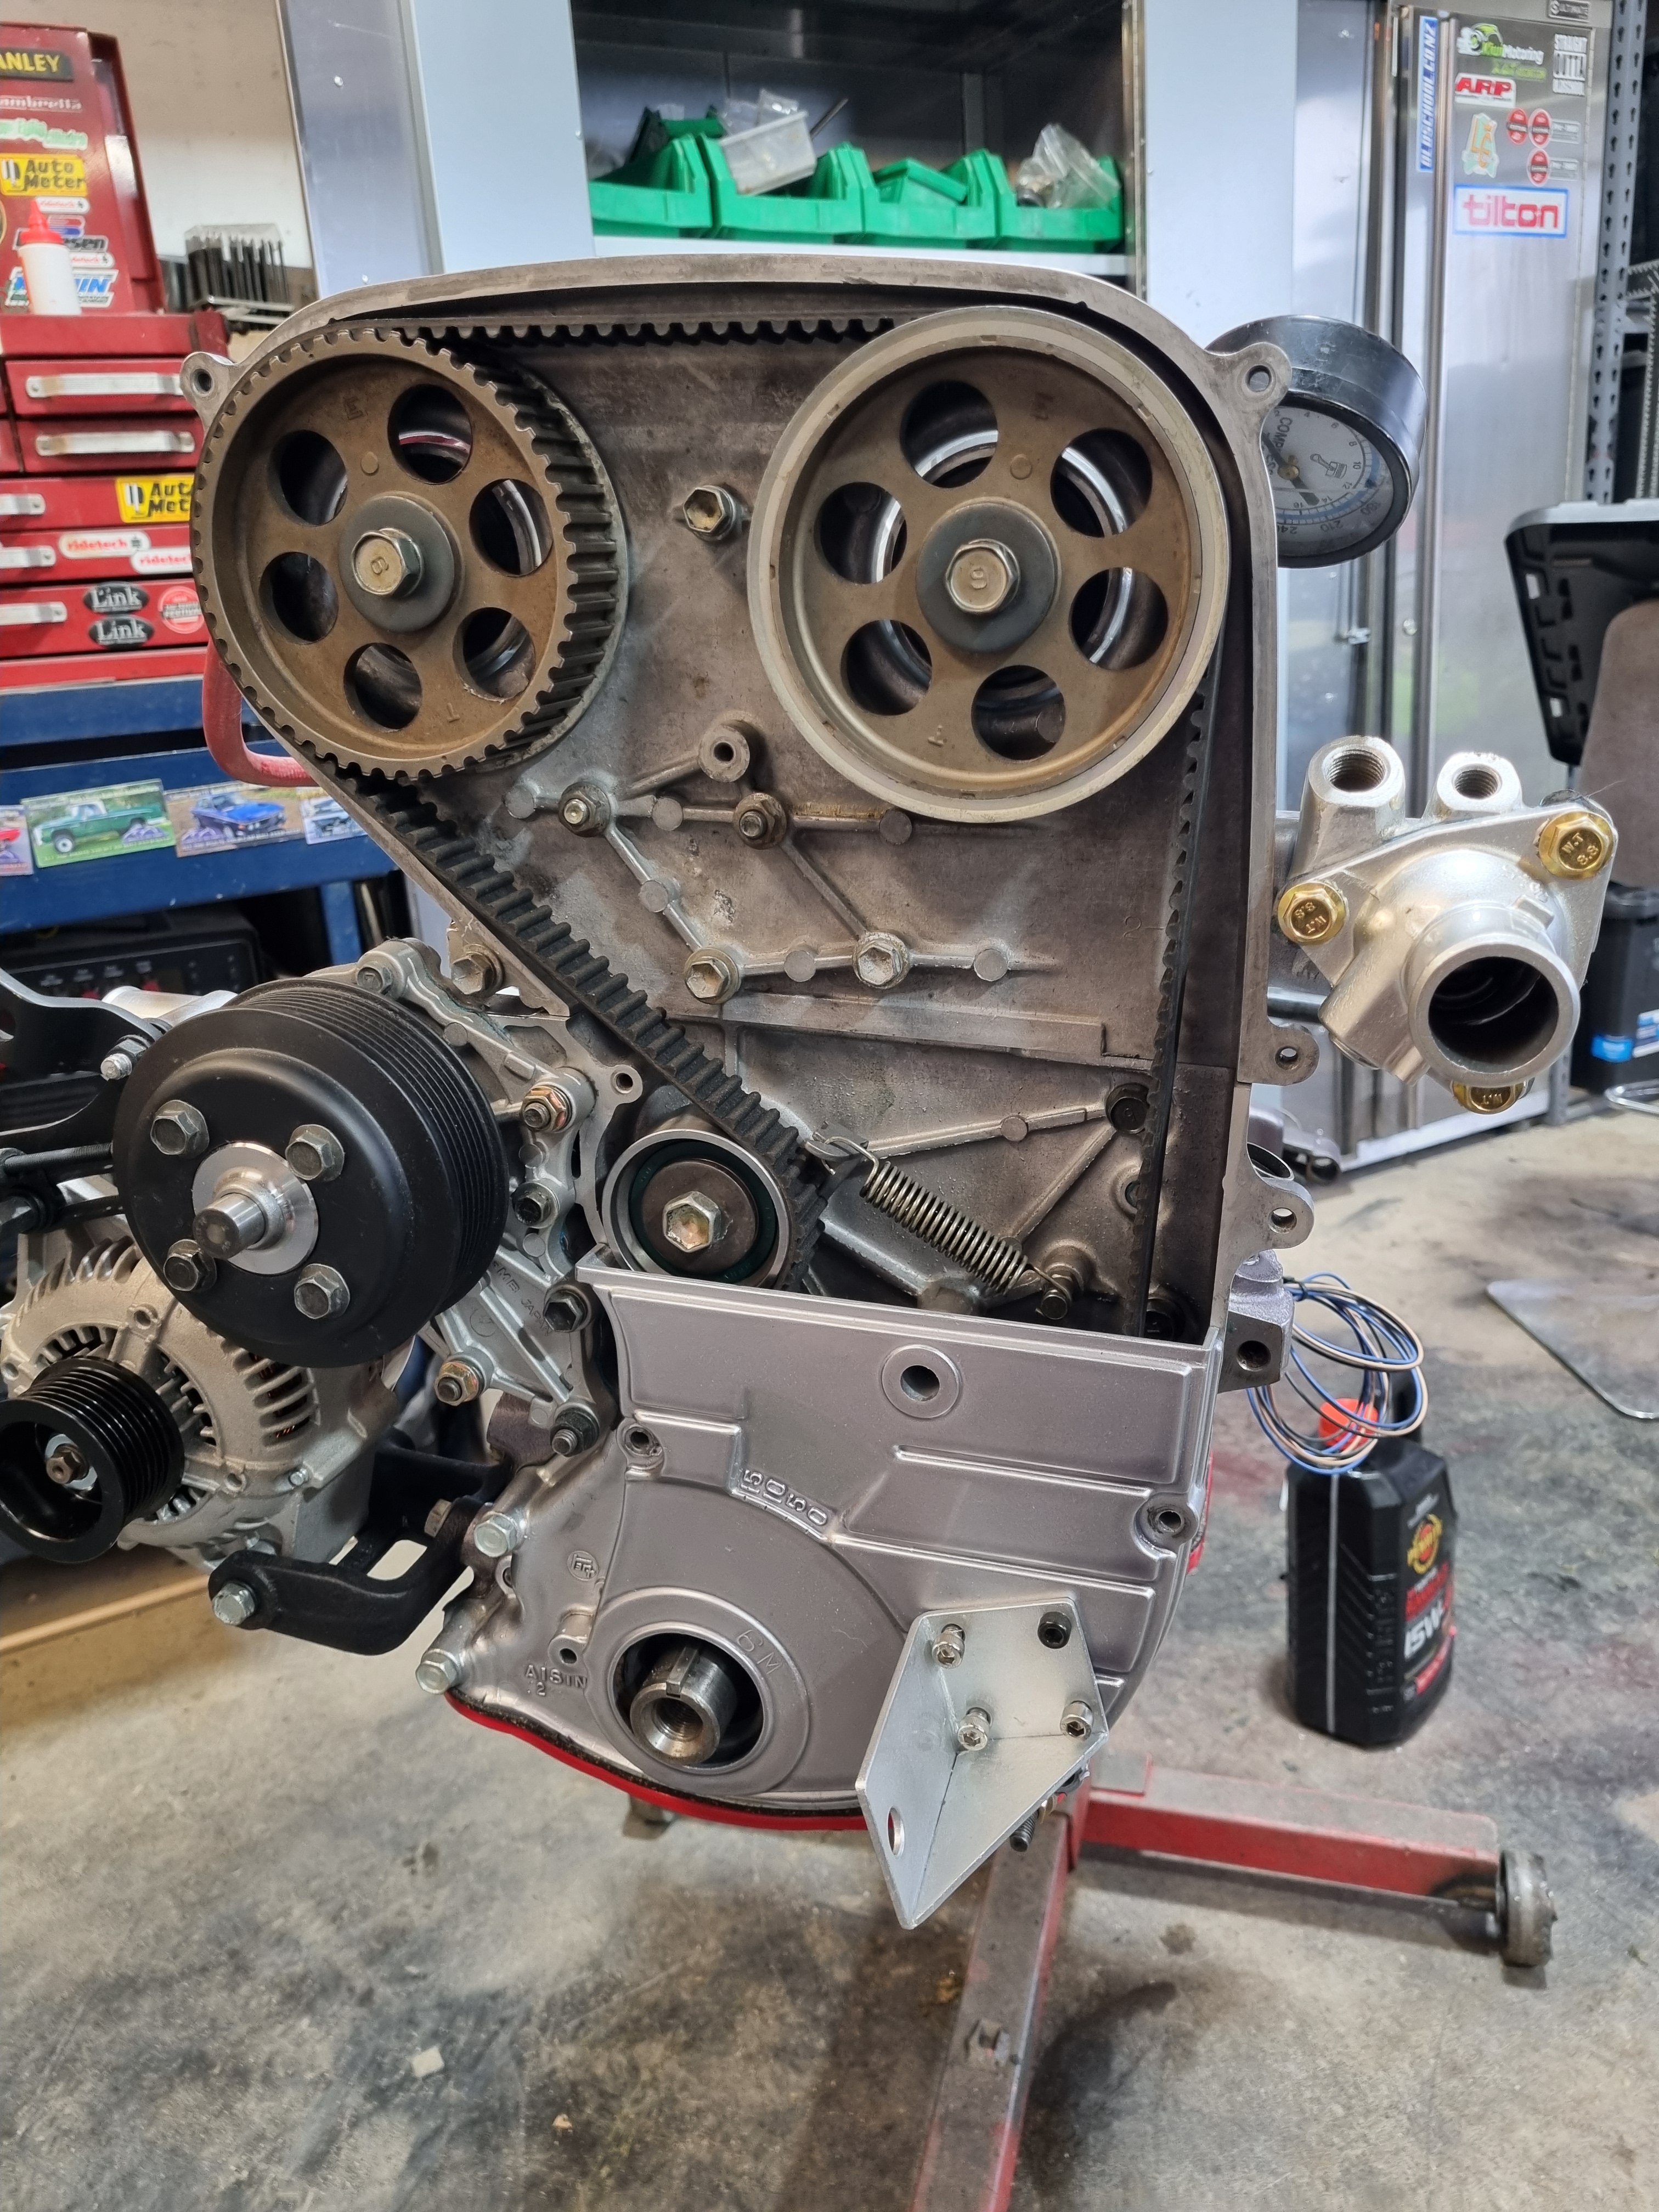
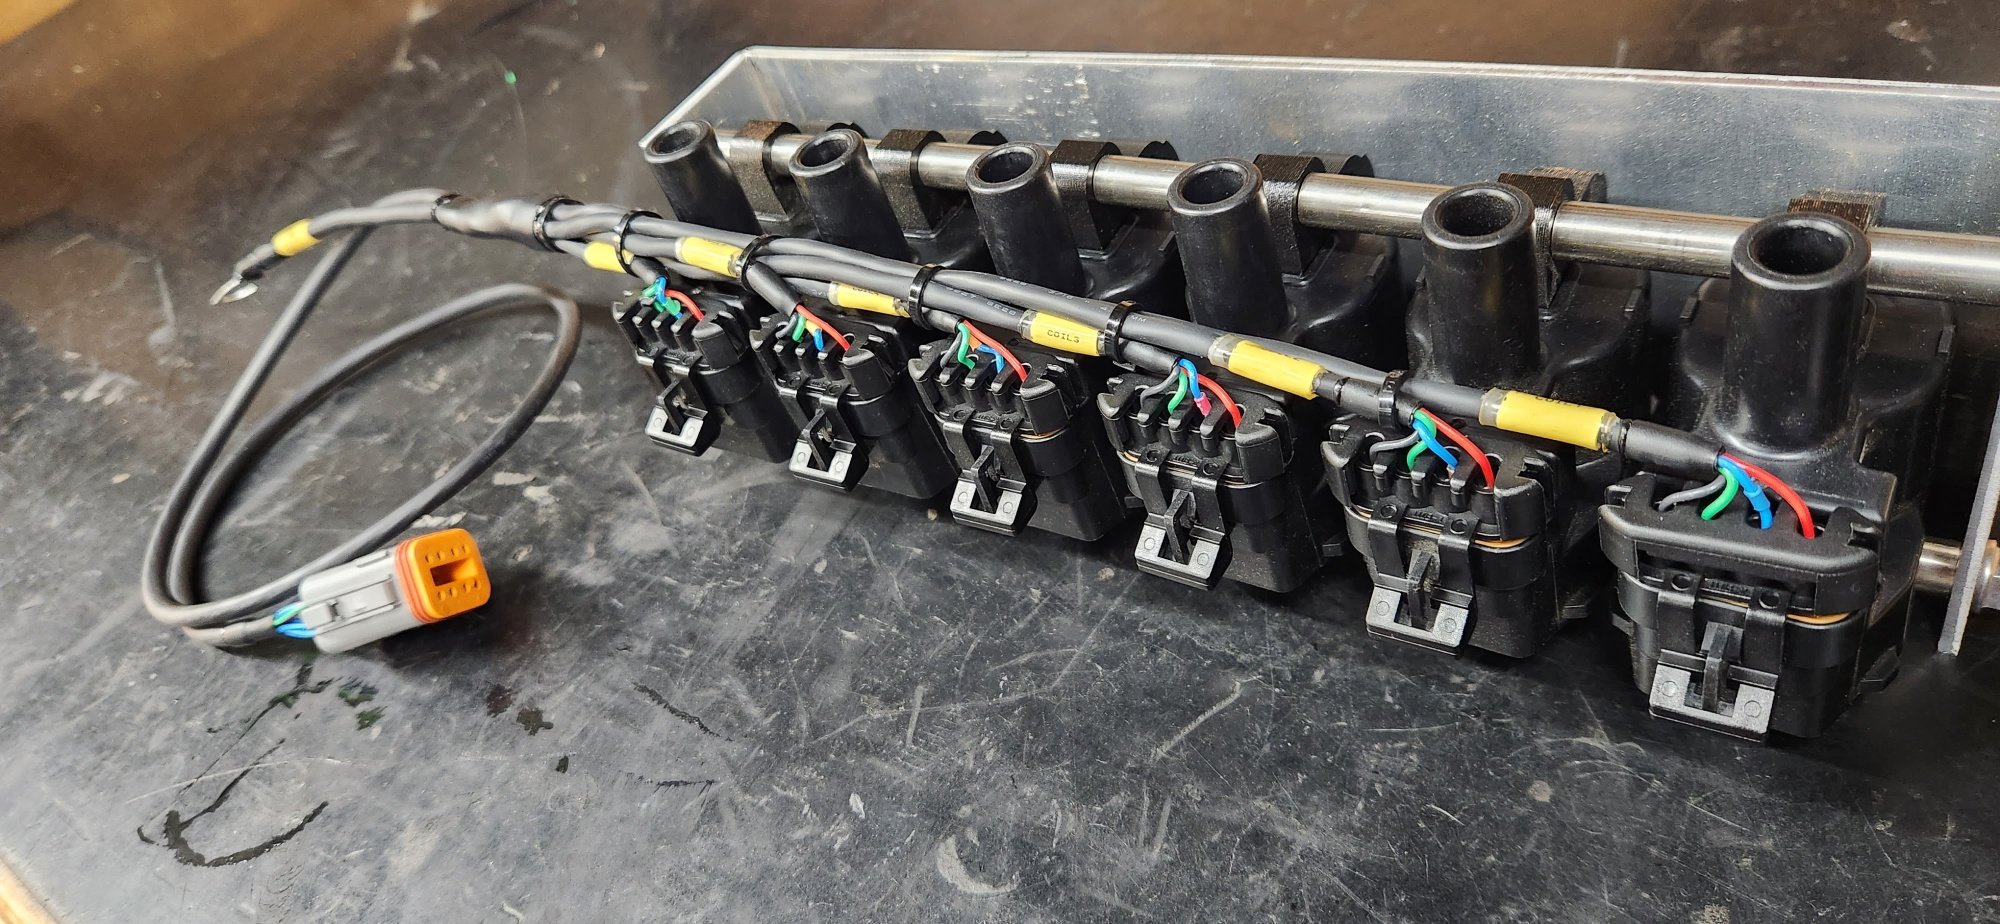
Been busy getting everything back together, got it all running again on the monsoon and run the cam in with new lifters after finding a cracked lifter face. Alot of work into building a custom cam pickup for sequential triggering built the new wiring loom for the xtreme and fitted it all up last week, made up mount for the LS coils, adaptor for the e-throttle and mount for the pedal. Off for dyno run in time and tune tomorrow
1 point
-
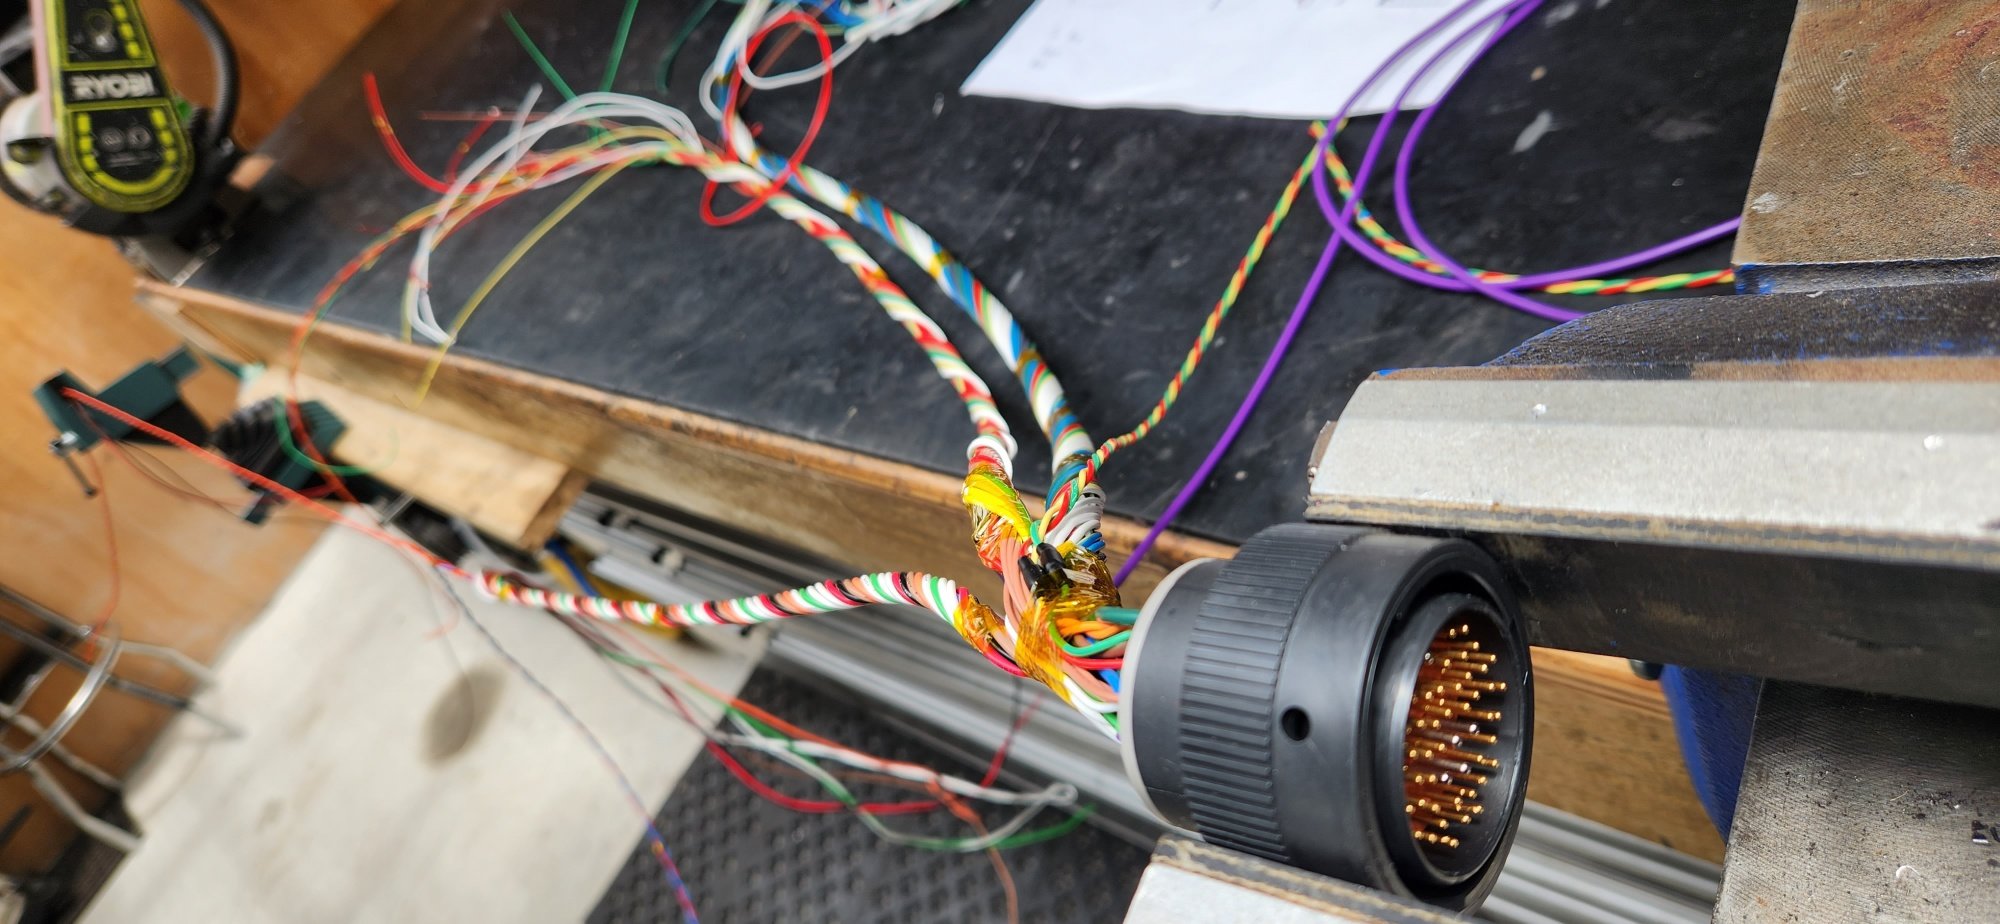
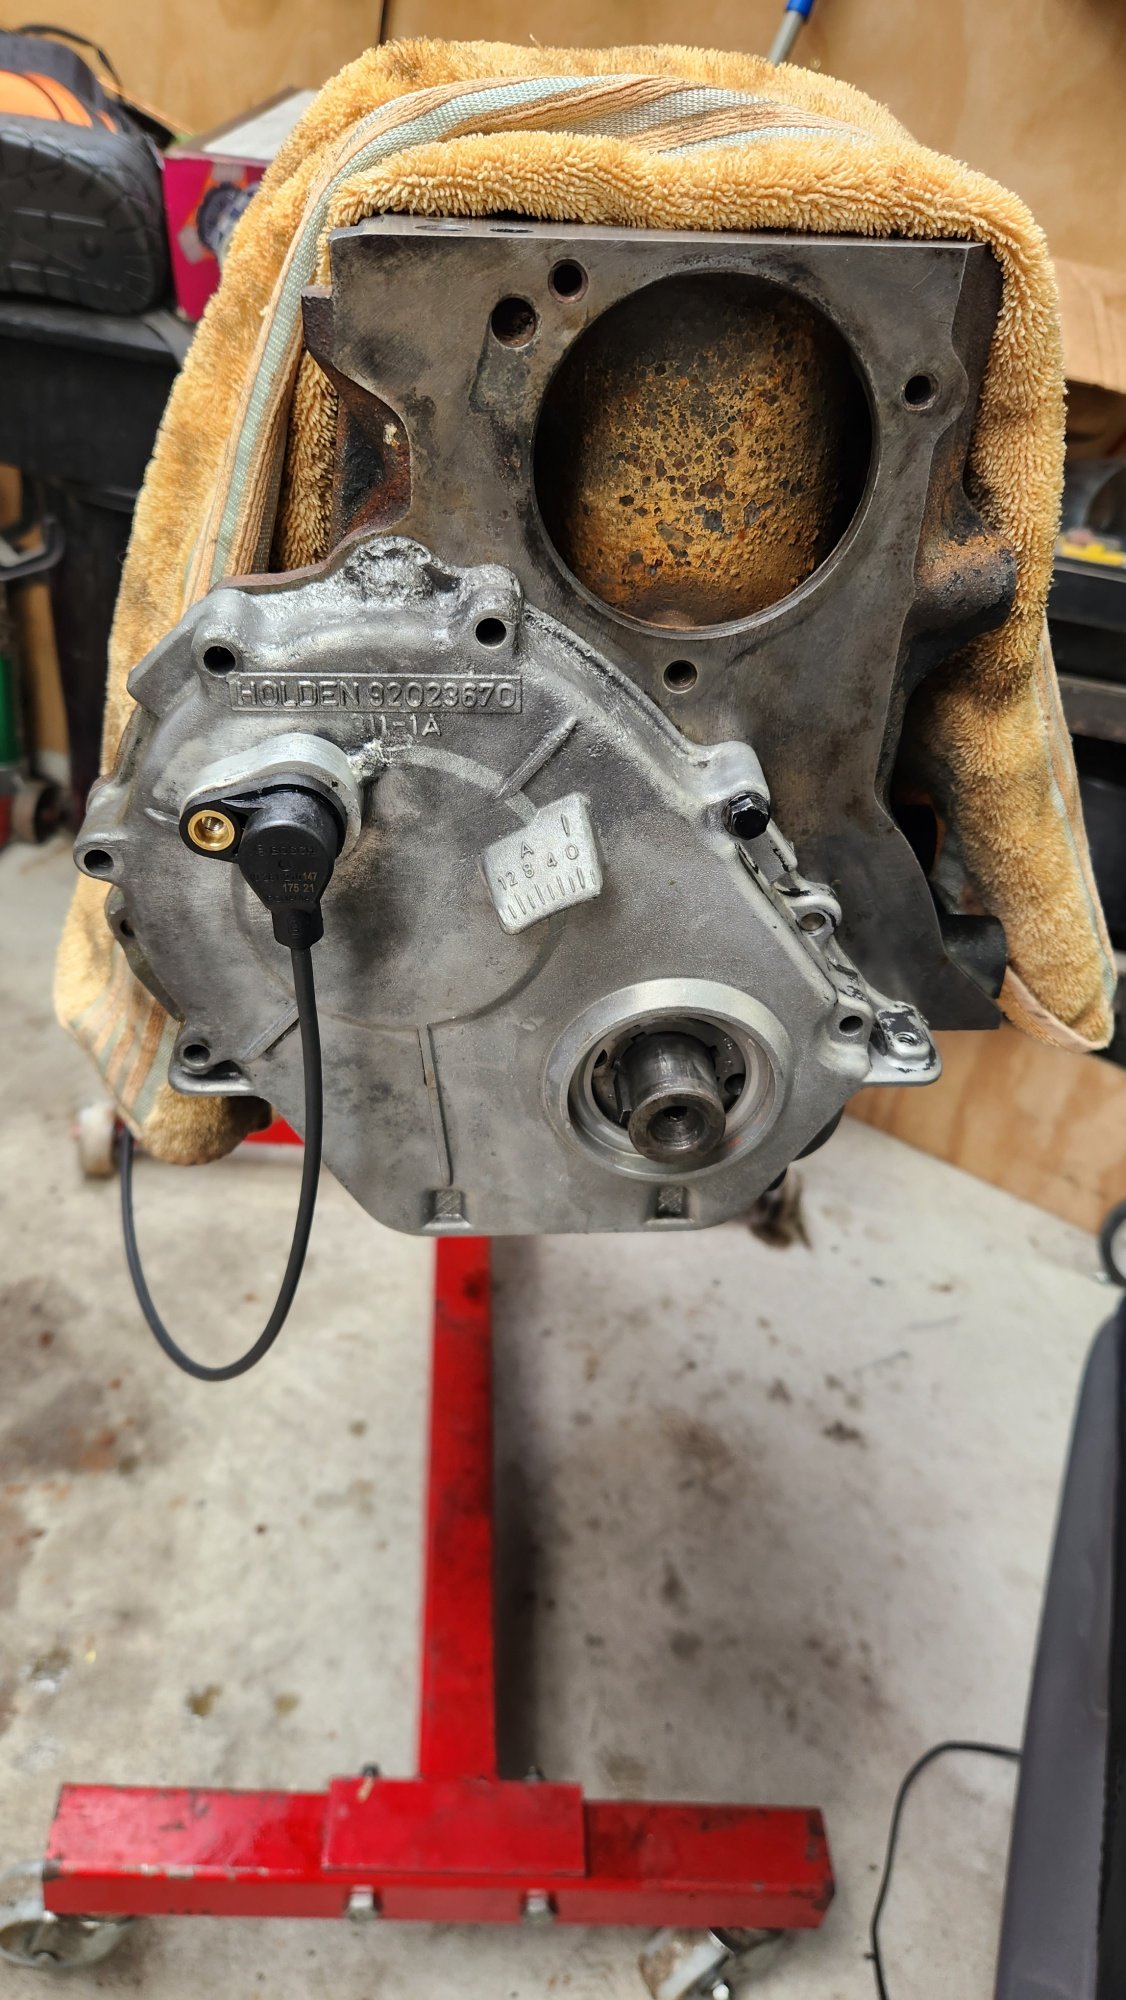
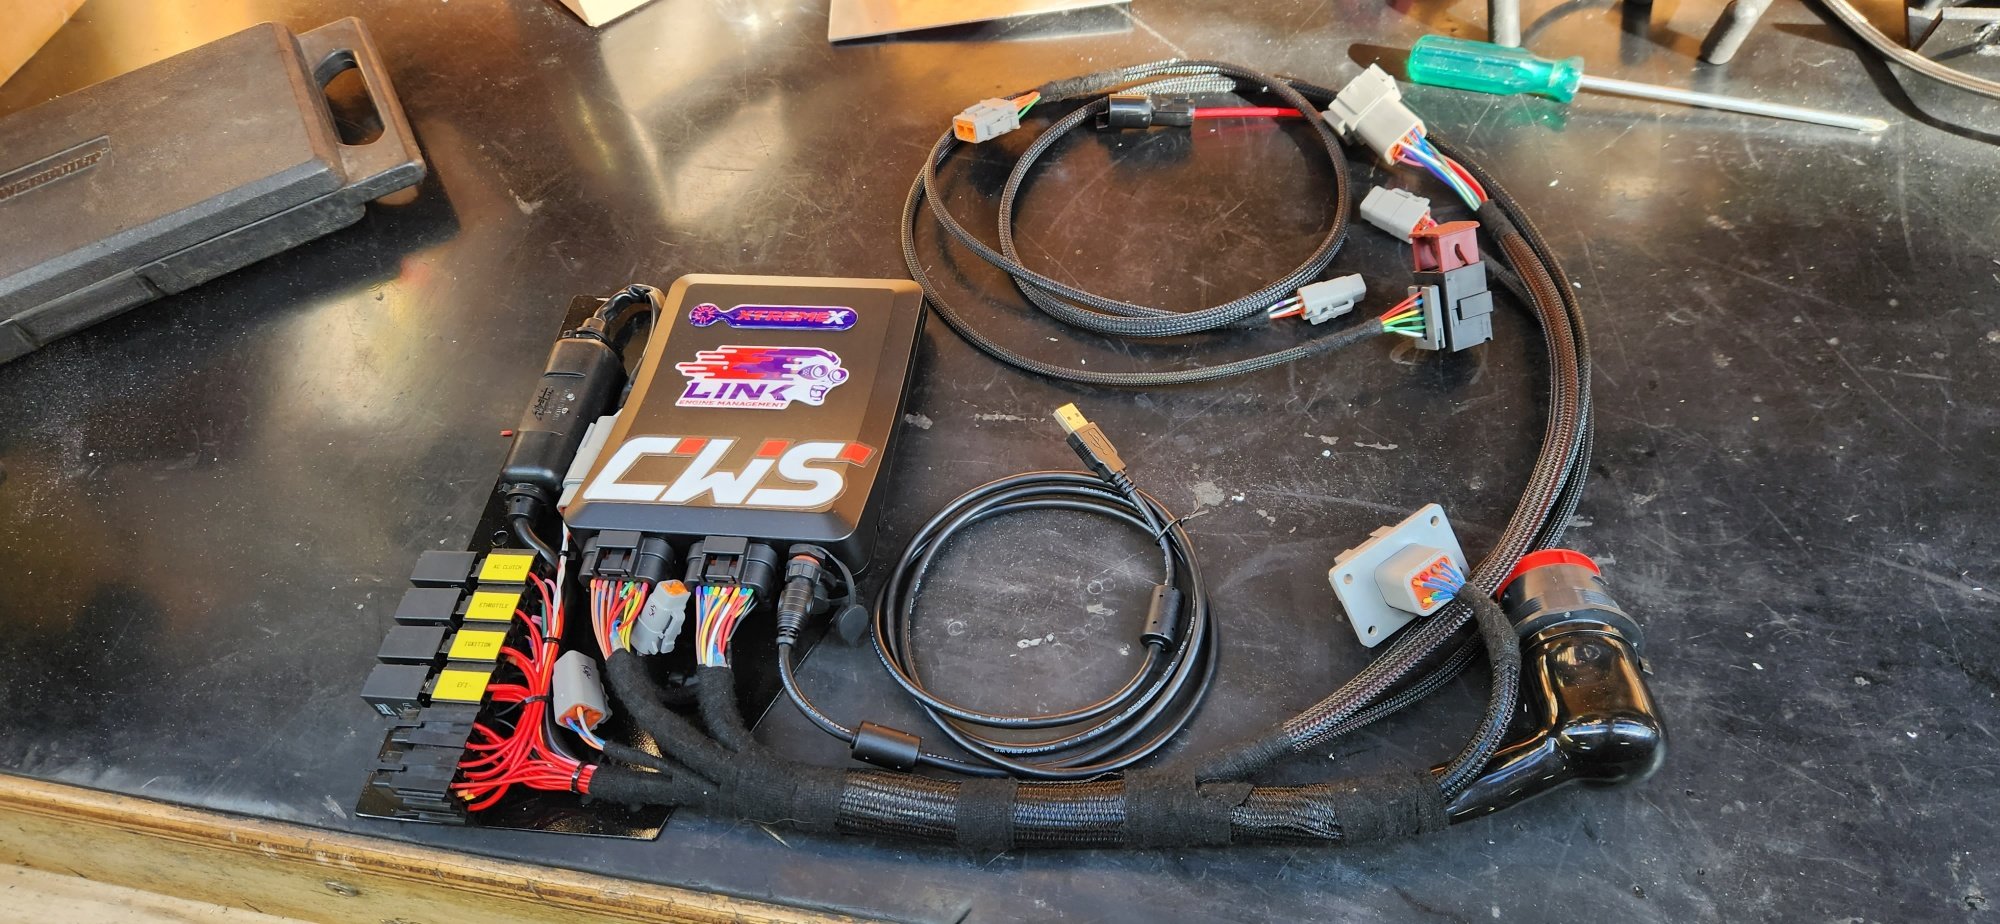
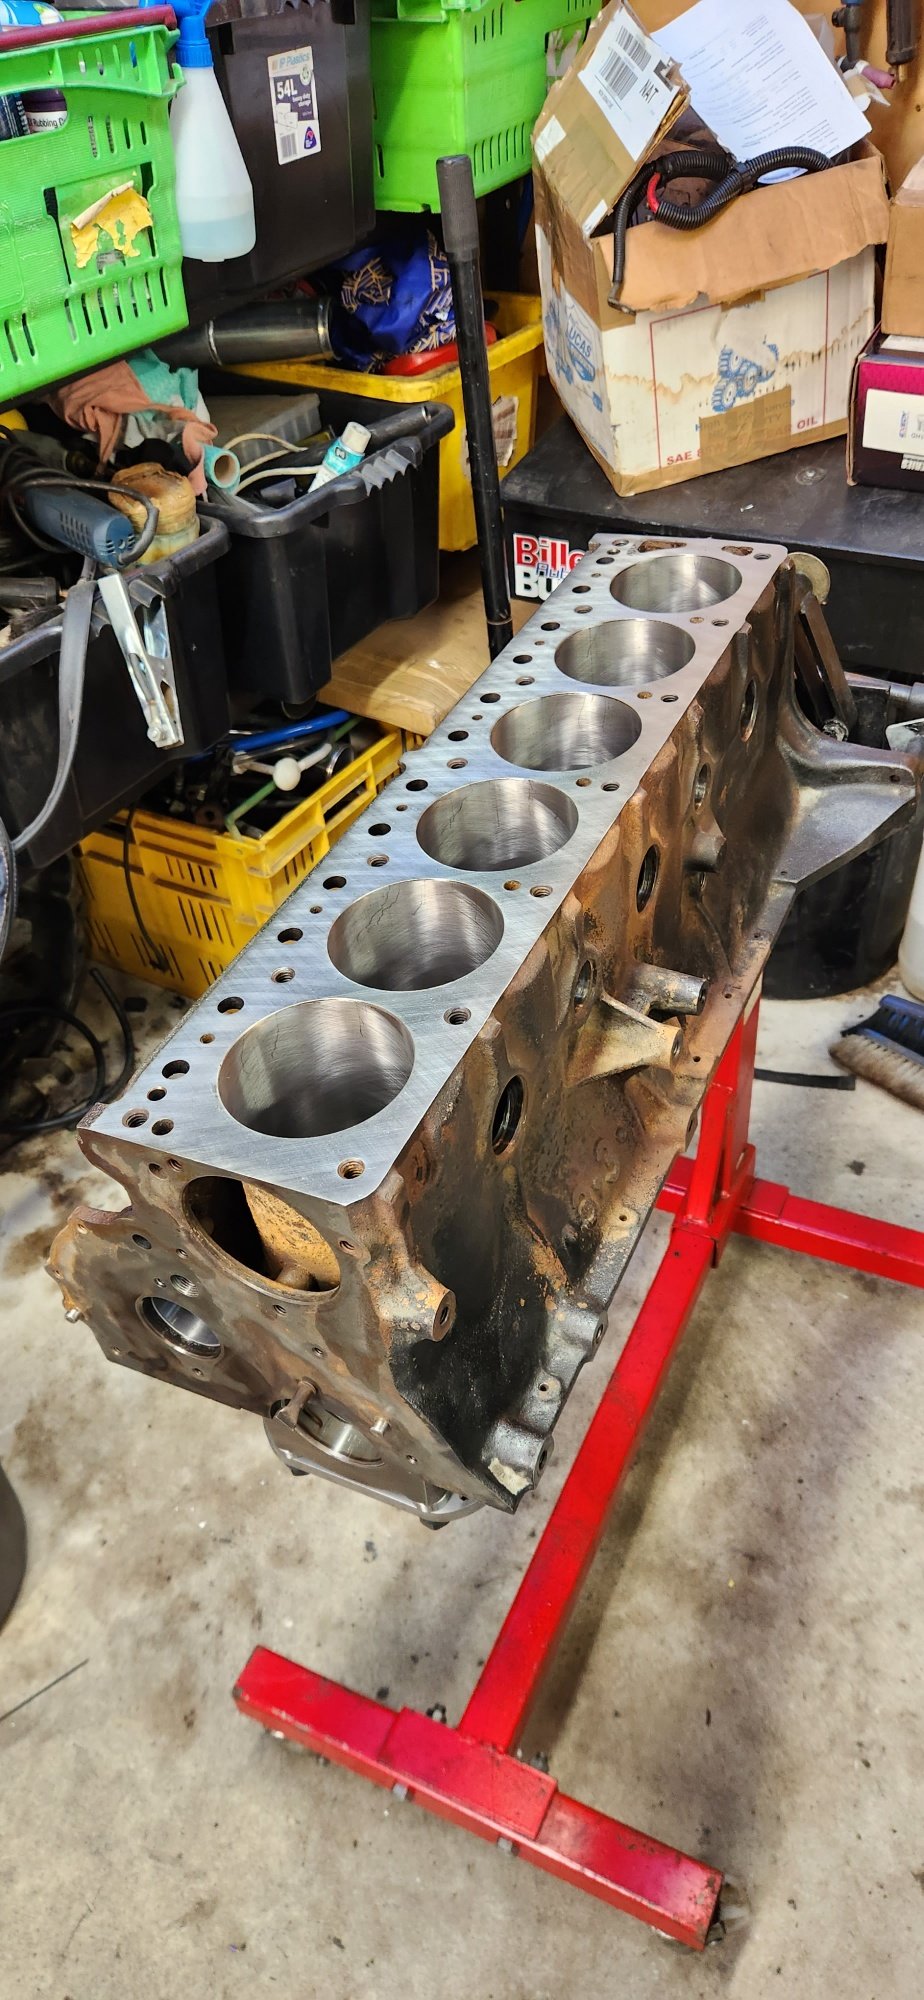
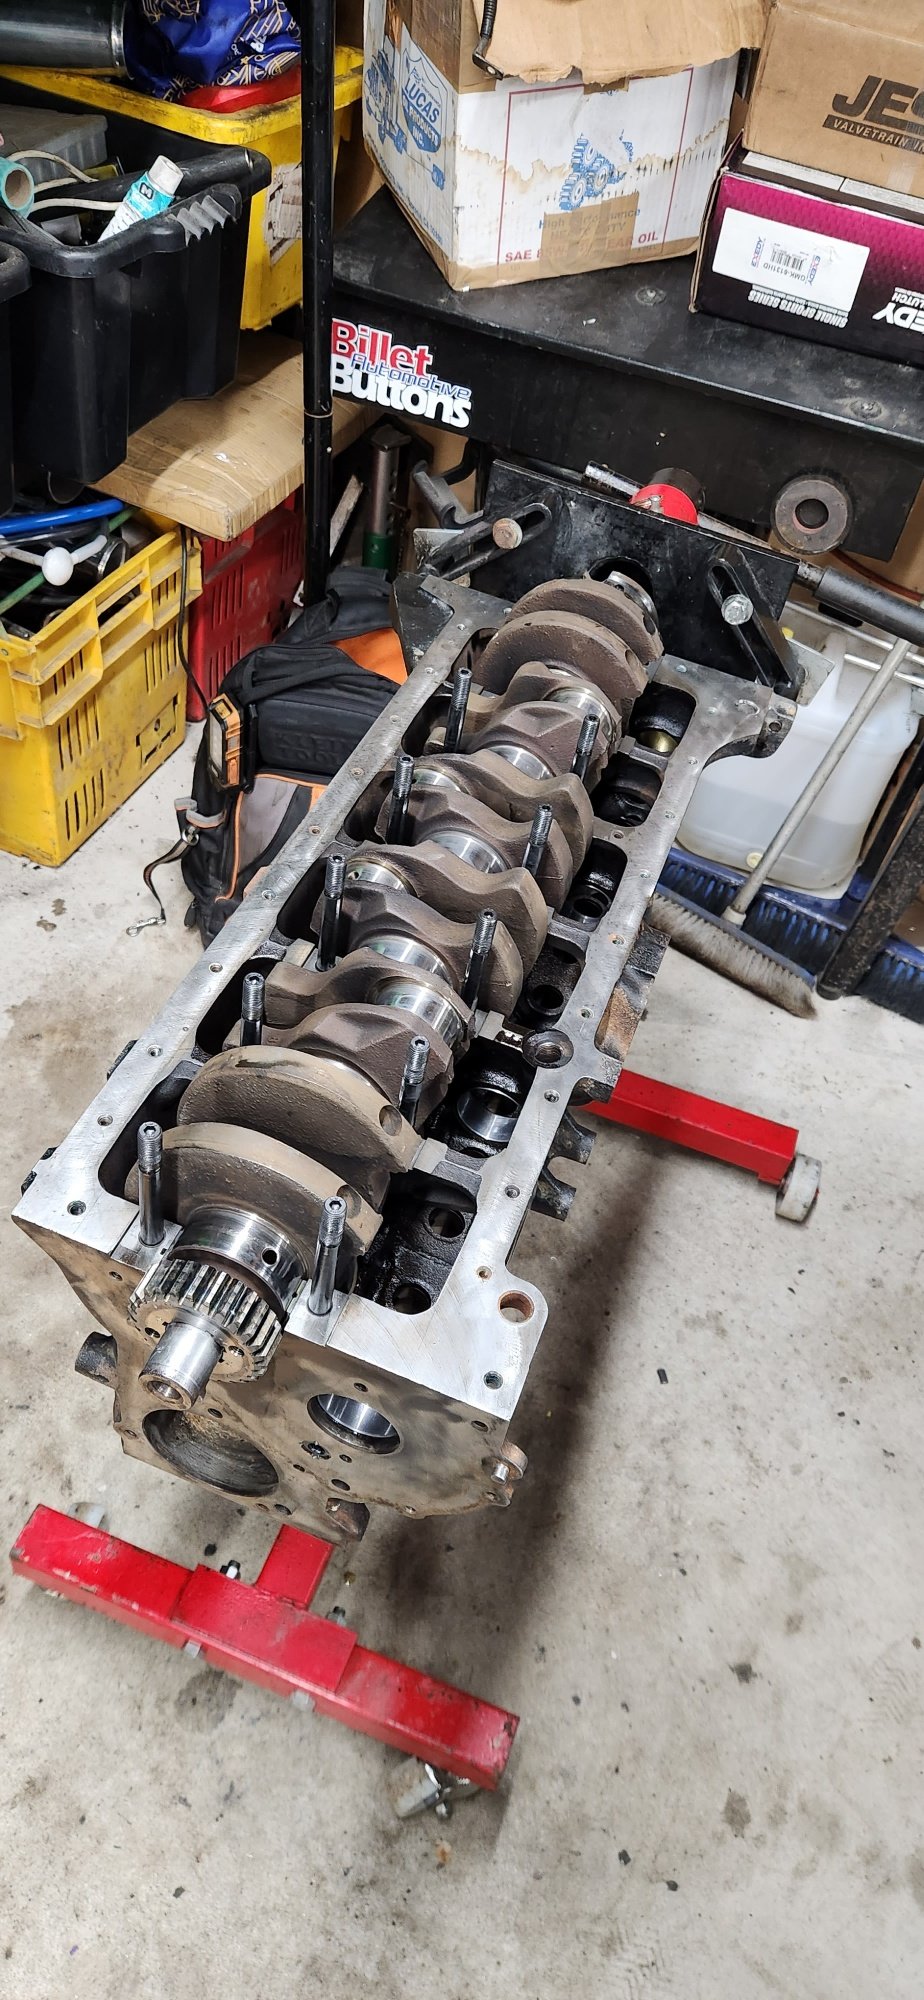
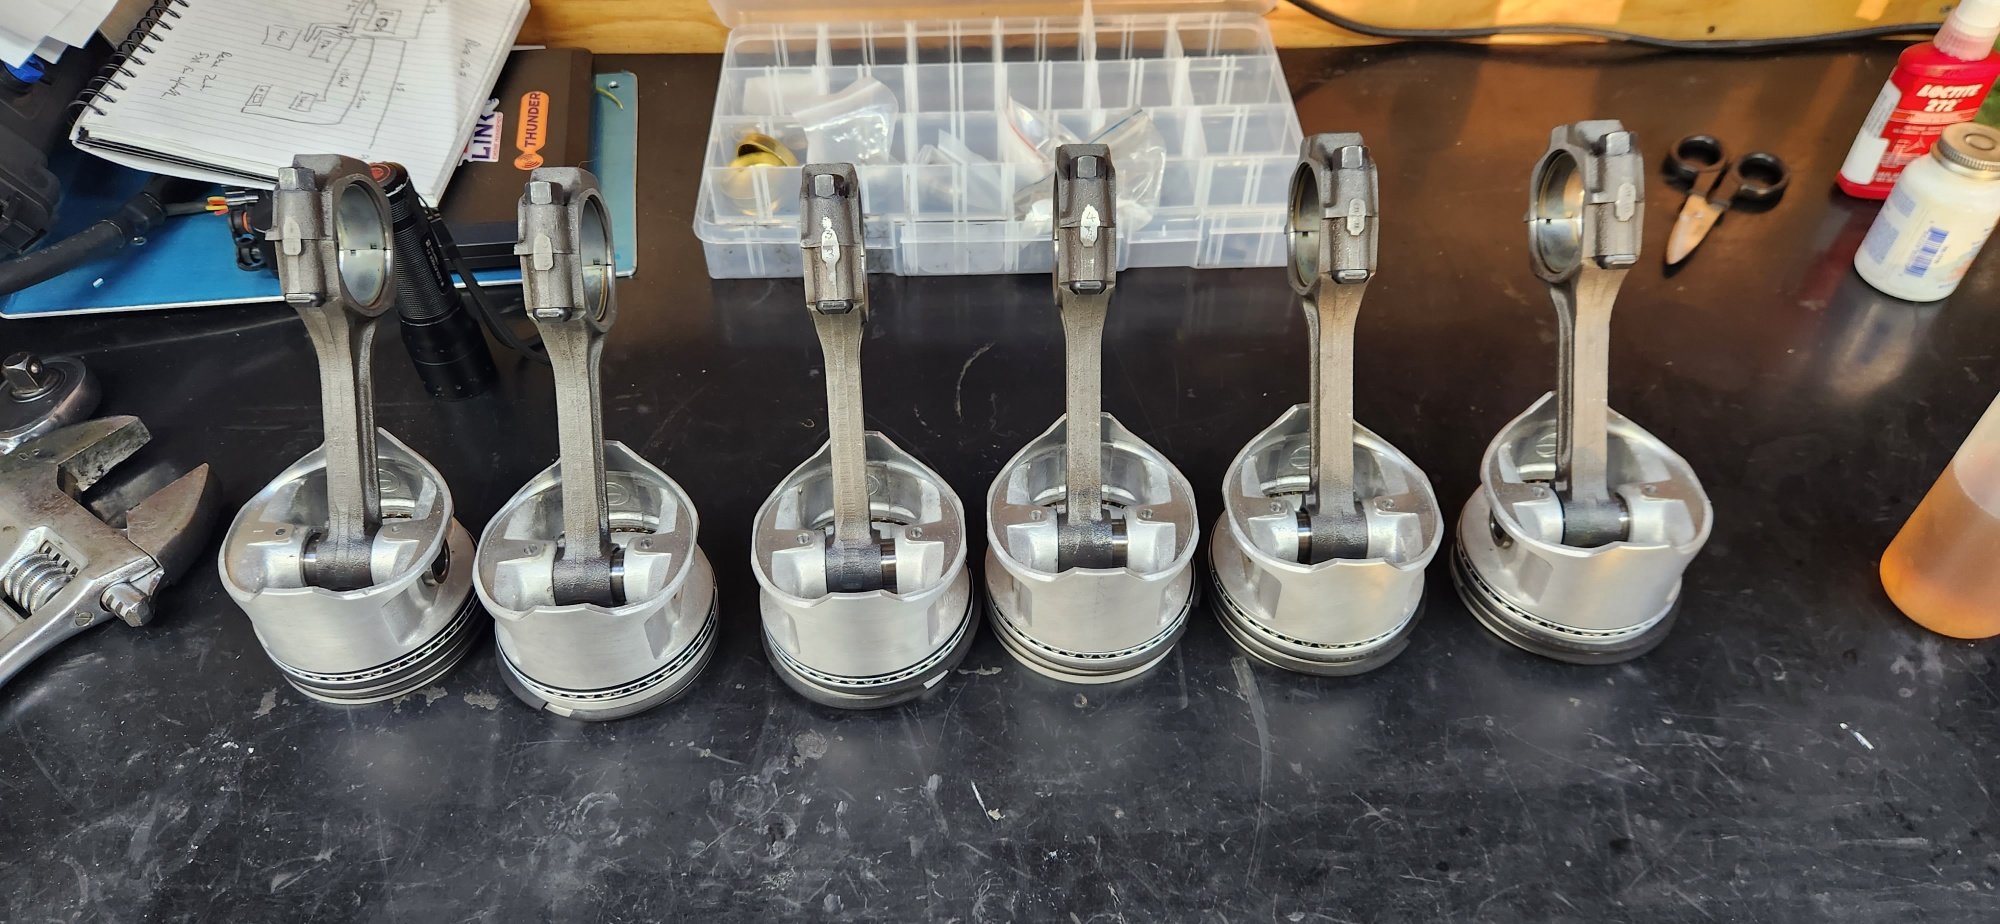
Real impressed at Marsh motorsports turn around at this time of year, only a week to have it all ready to go, bored, honed, decked, crank crack tested & polished, ring gaps and bearing clearances set and the rotating assembly all balanced Got the bottom end all assembled need to find my cam card to dial that back in. And cause I'm not busy enough already have decided to go full sequential and drive by wire throttle with a link xtreme so now onto new wiring loom build and setting up a custom cam sensor for sequential sync signal
1 point
-
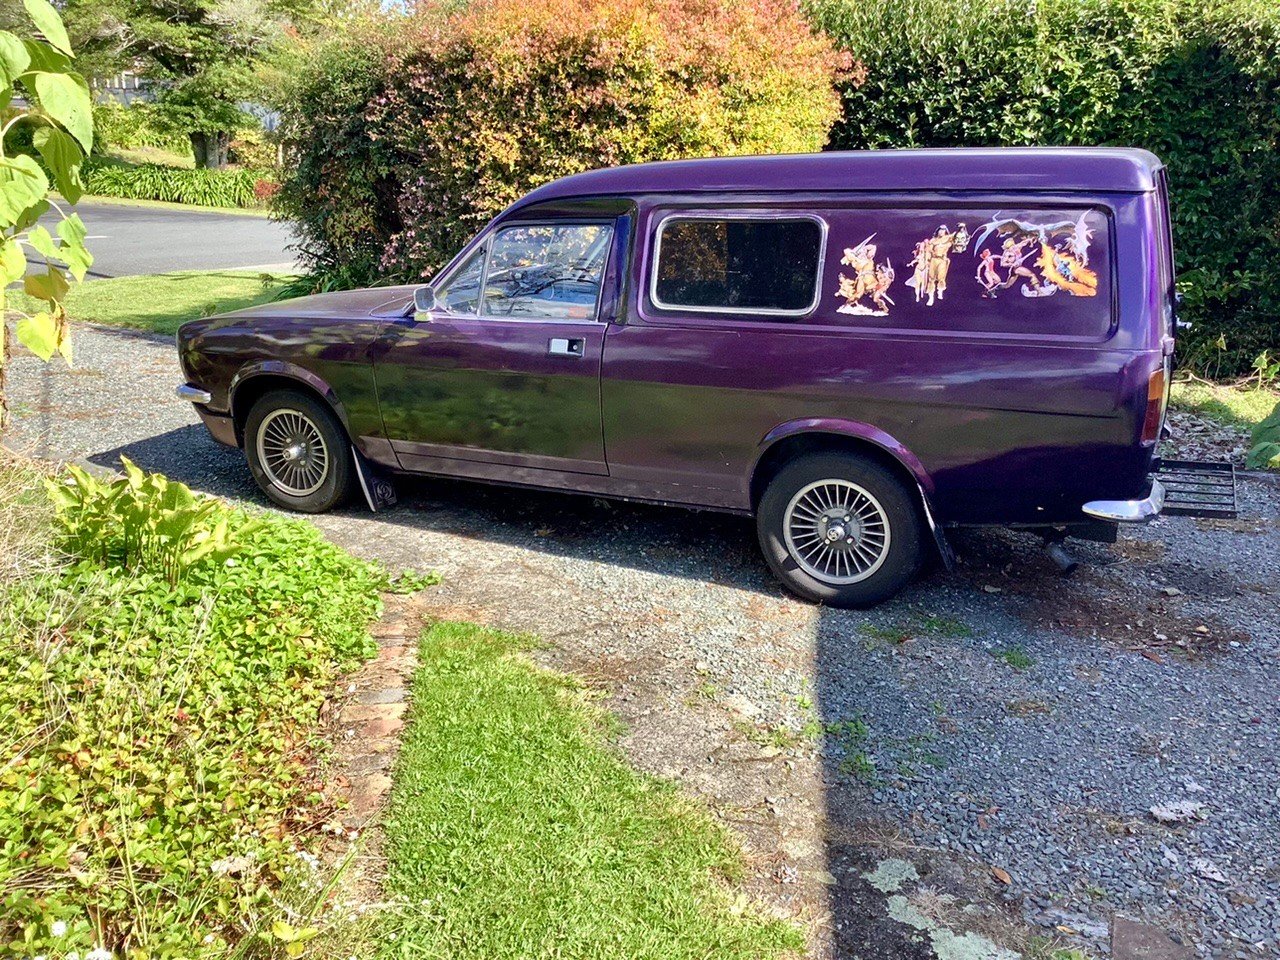
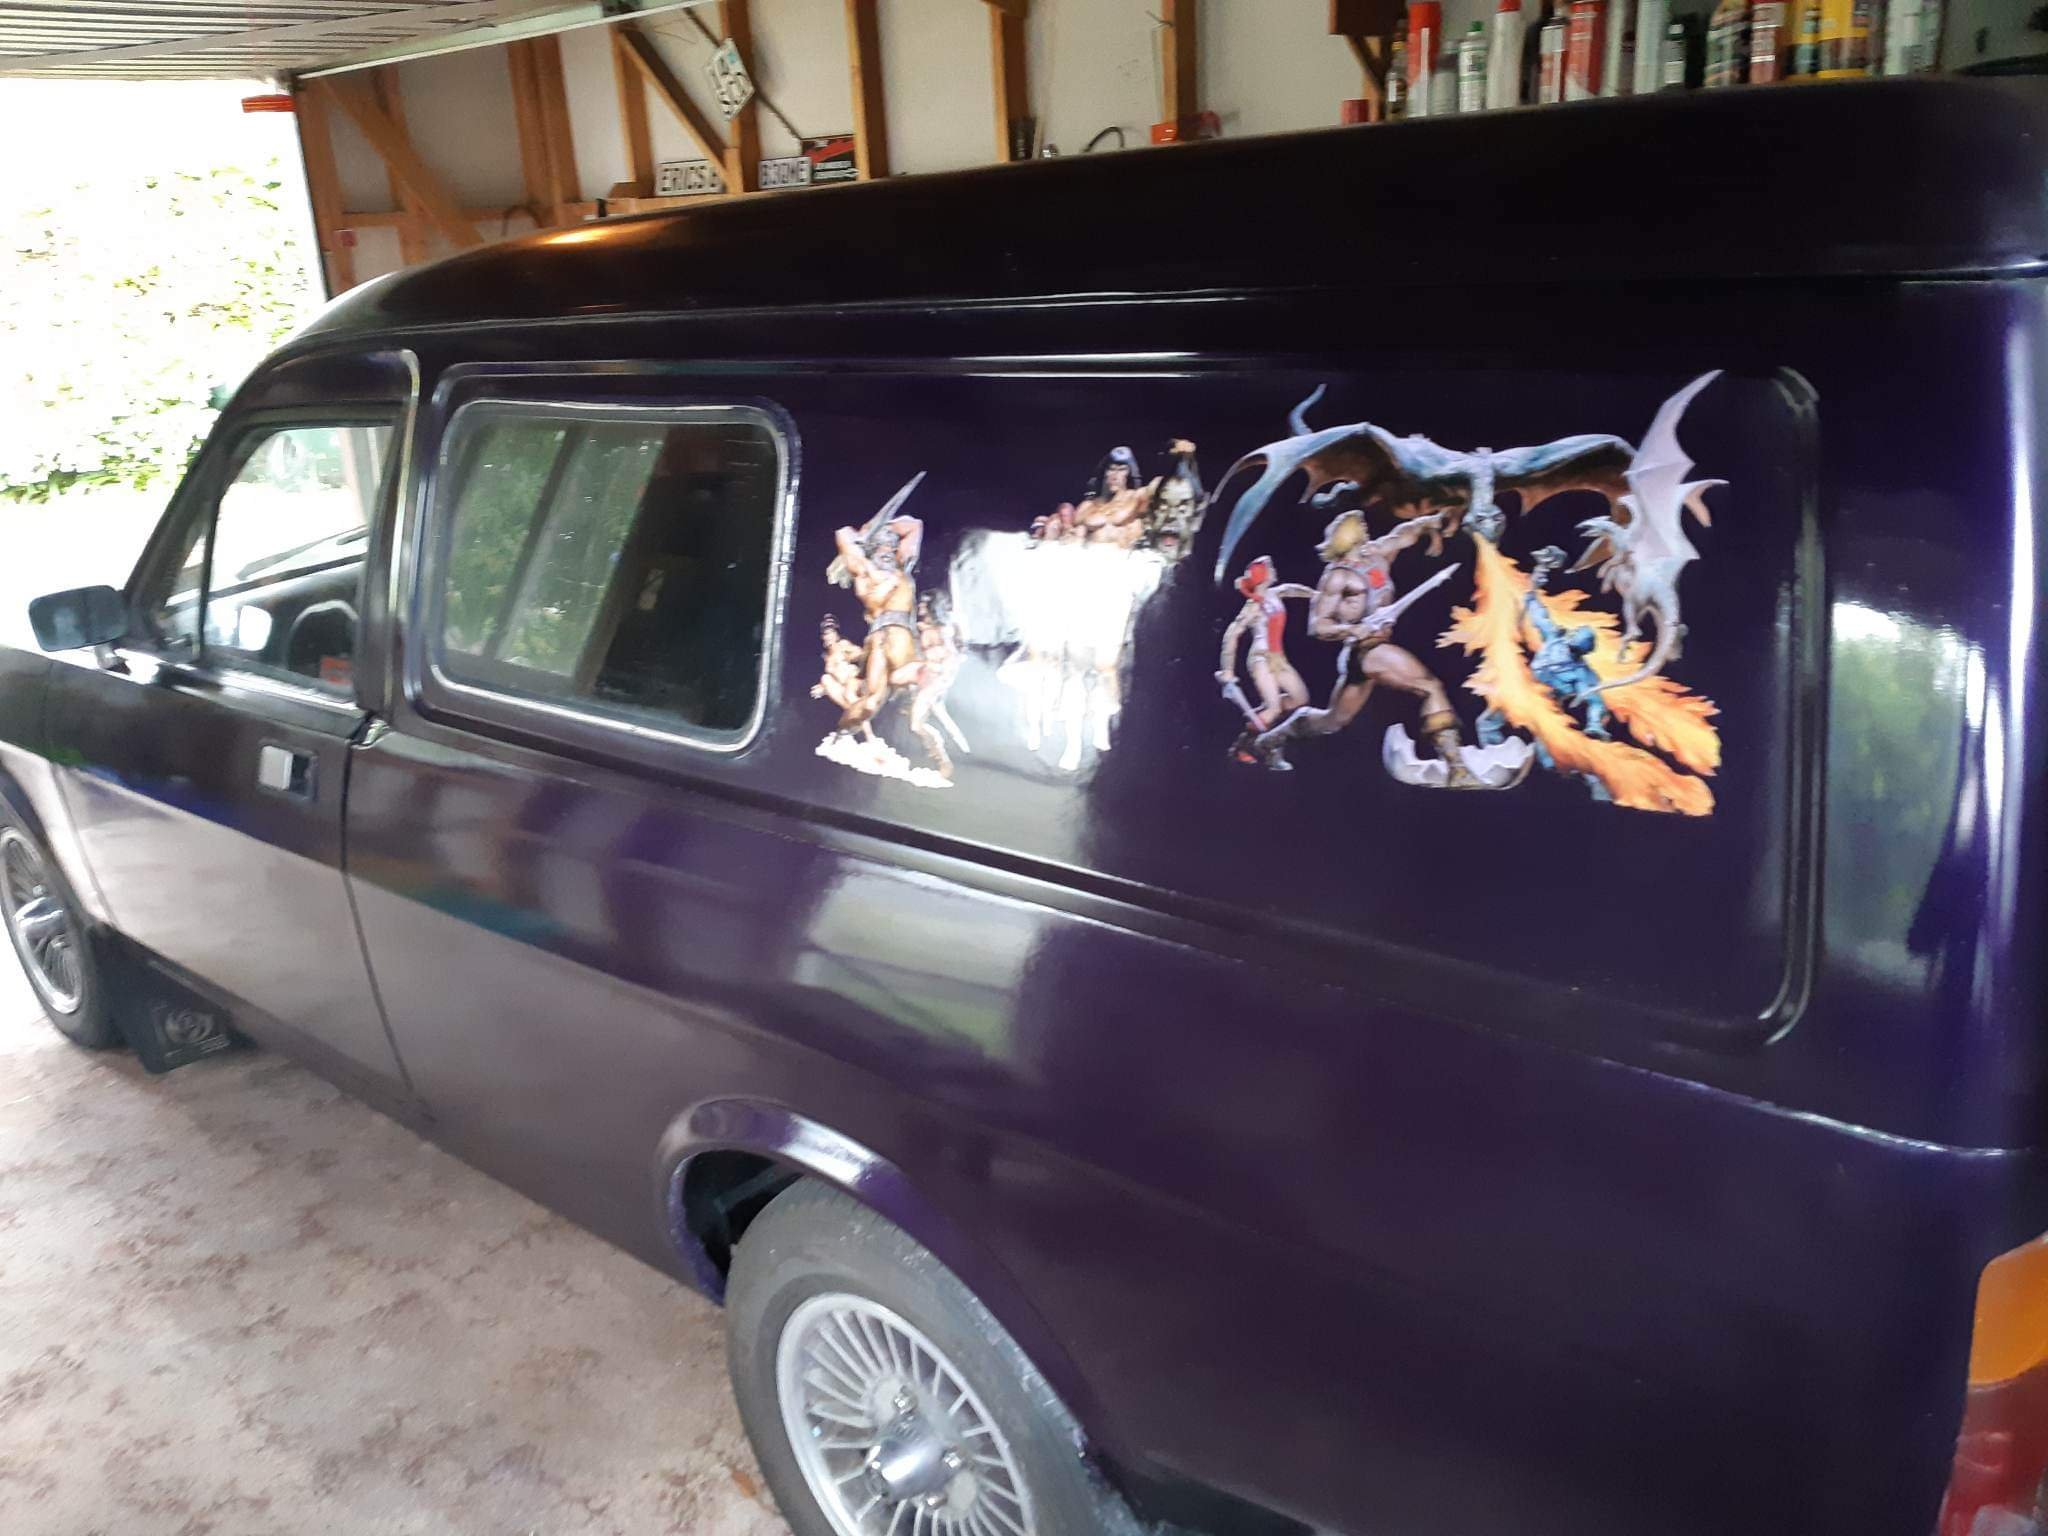
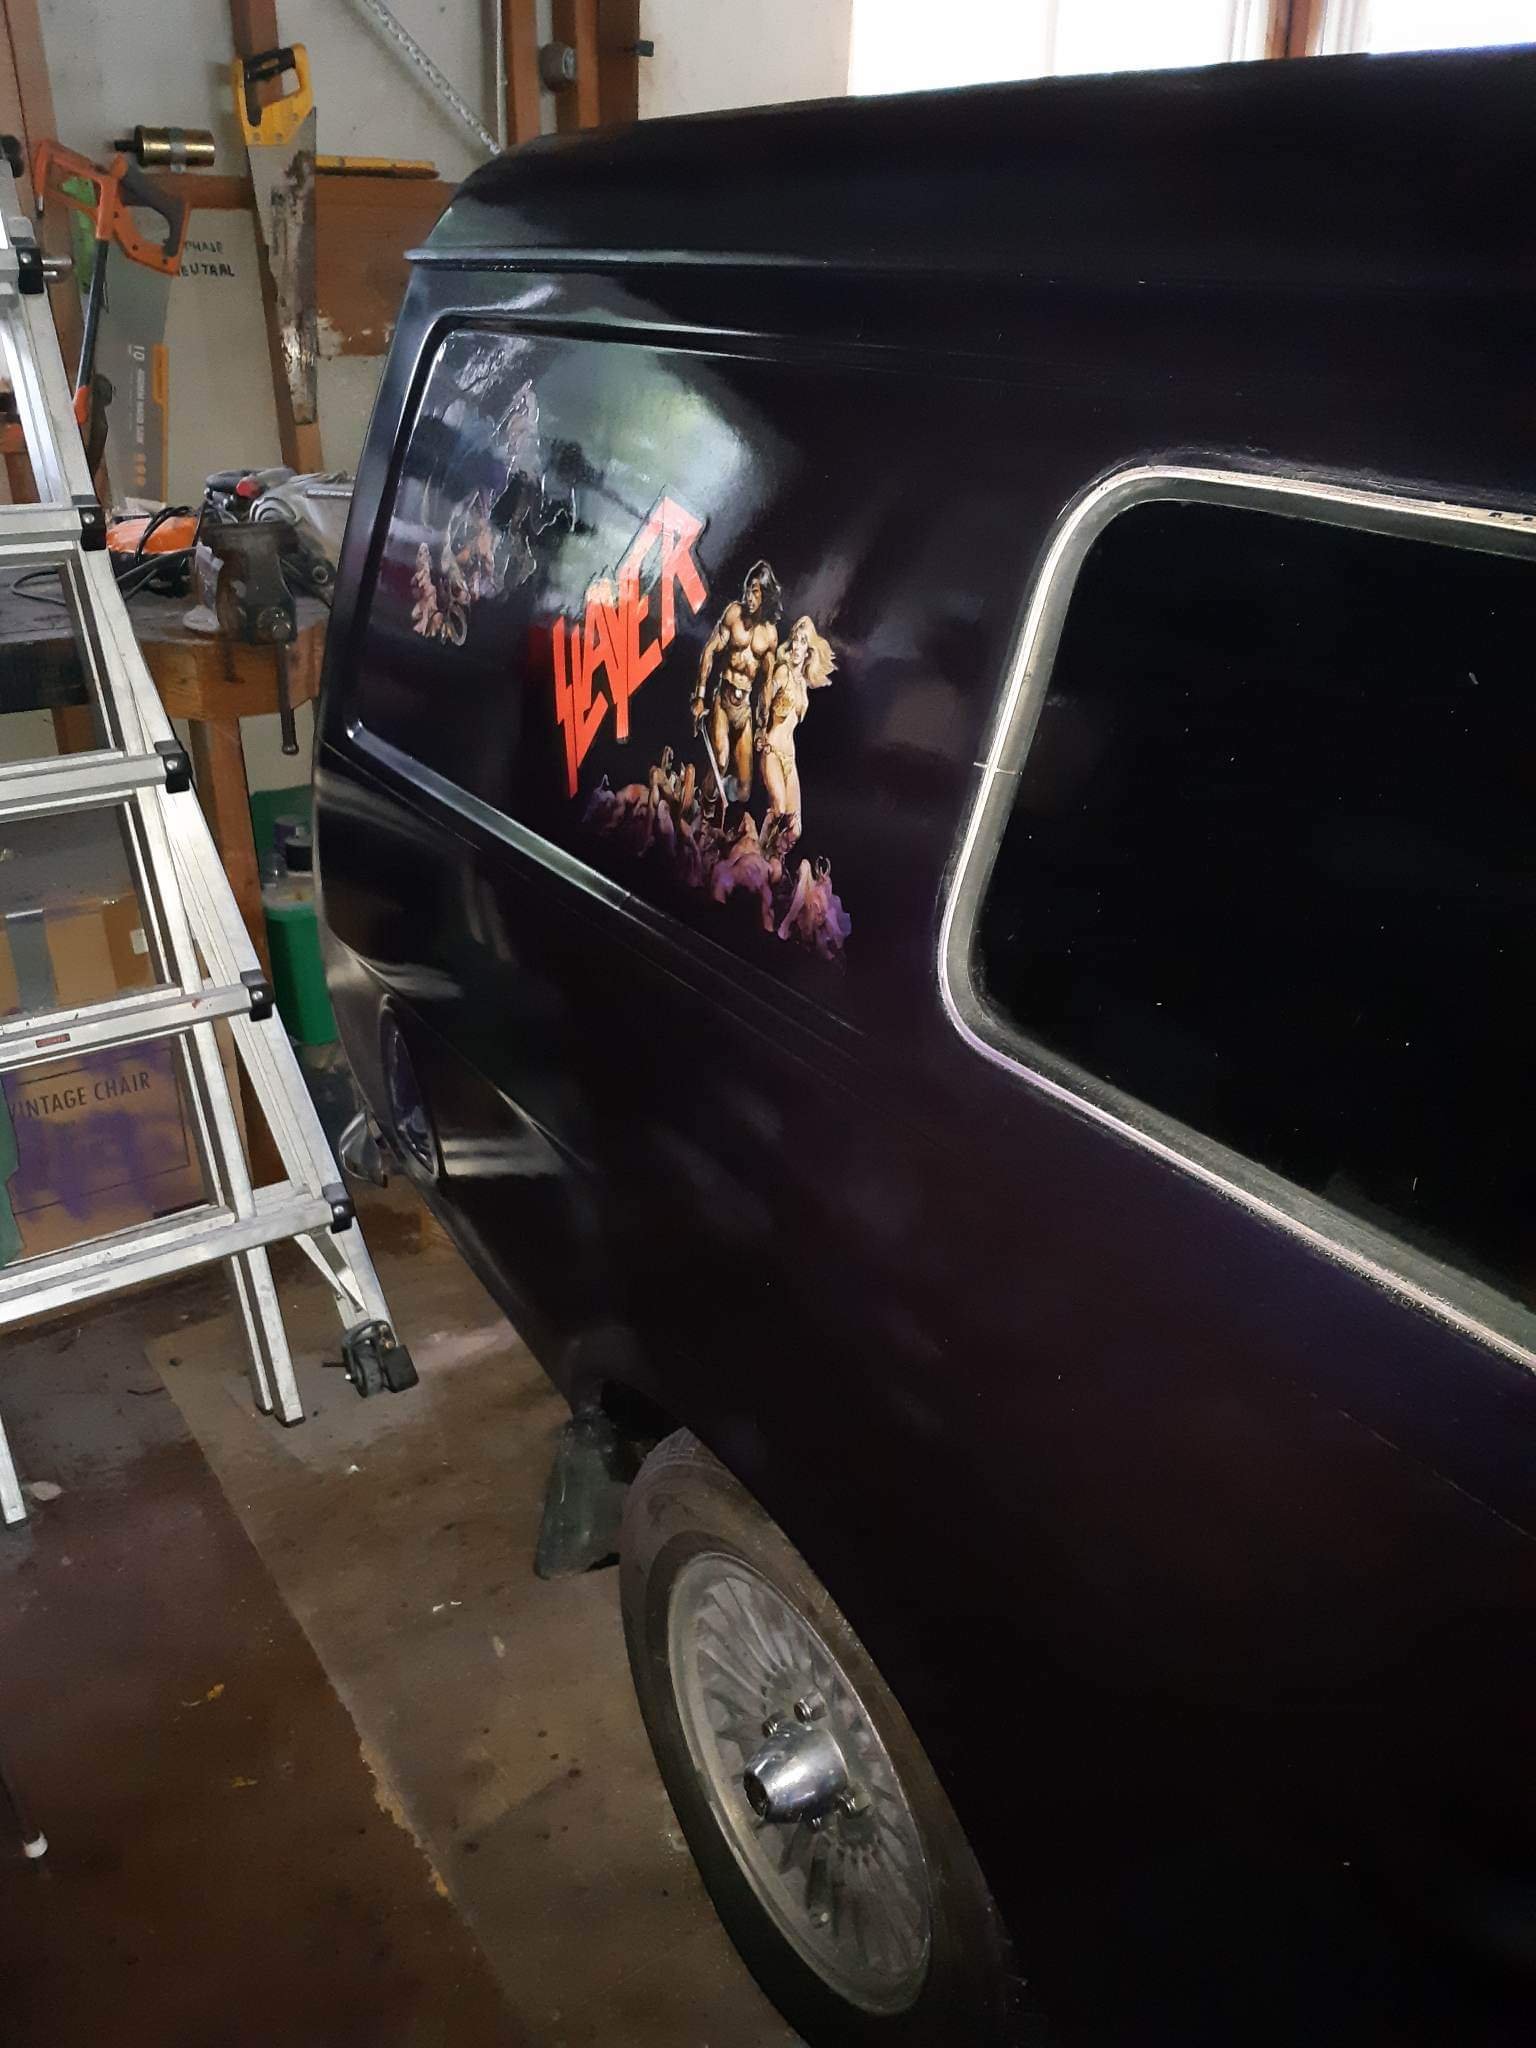
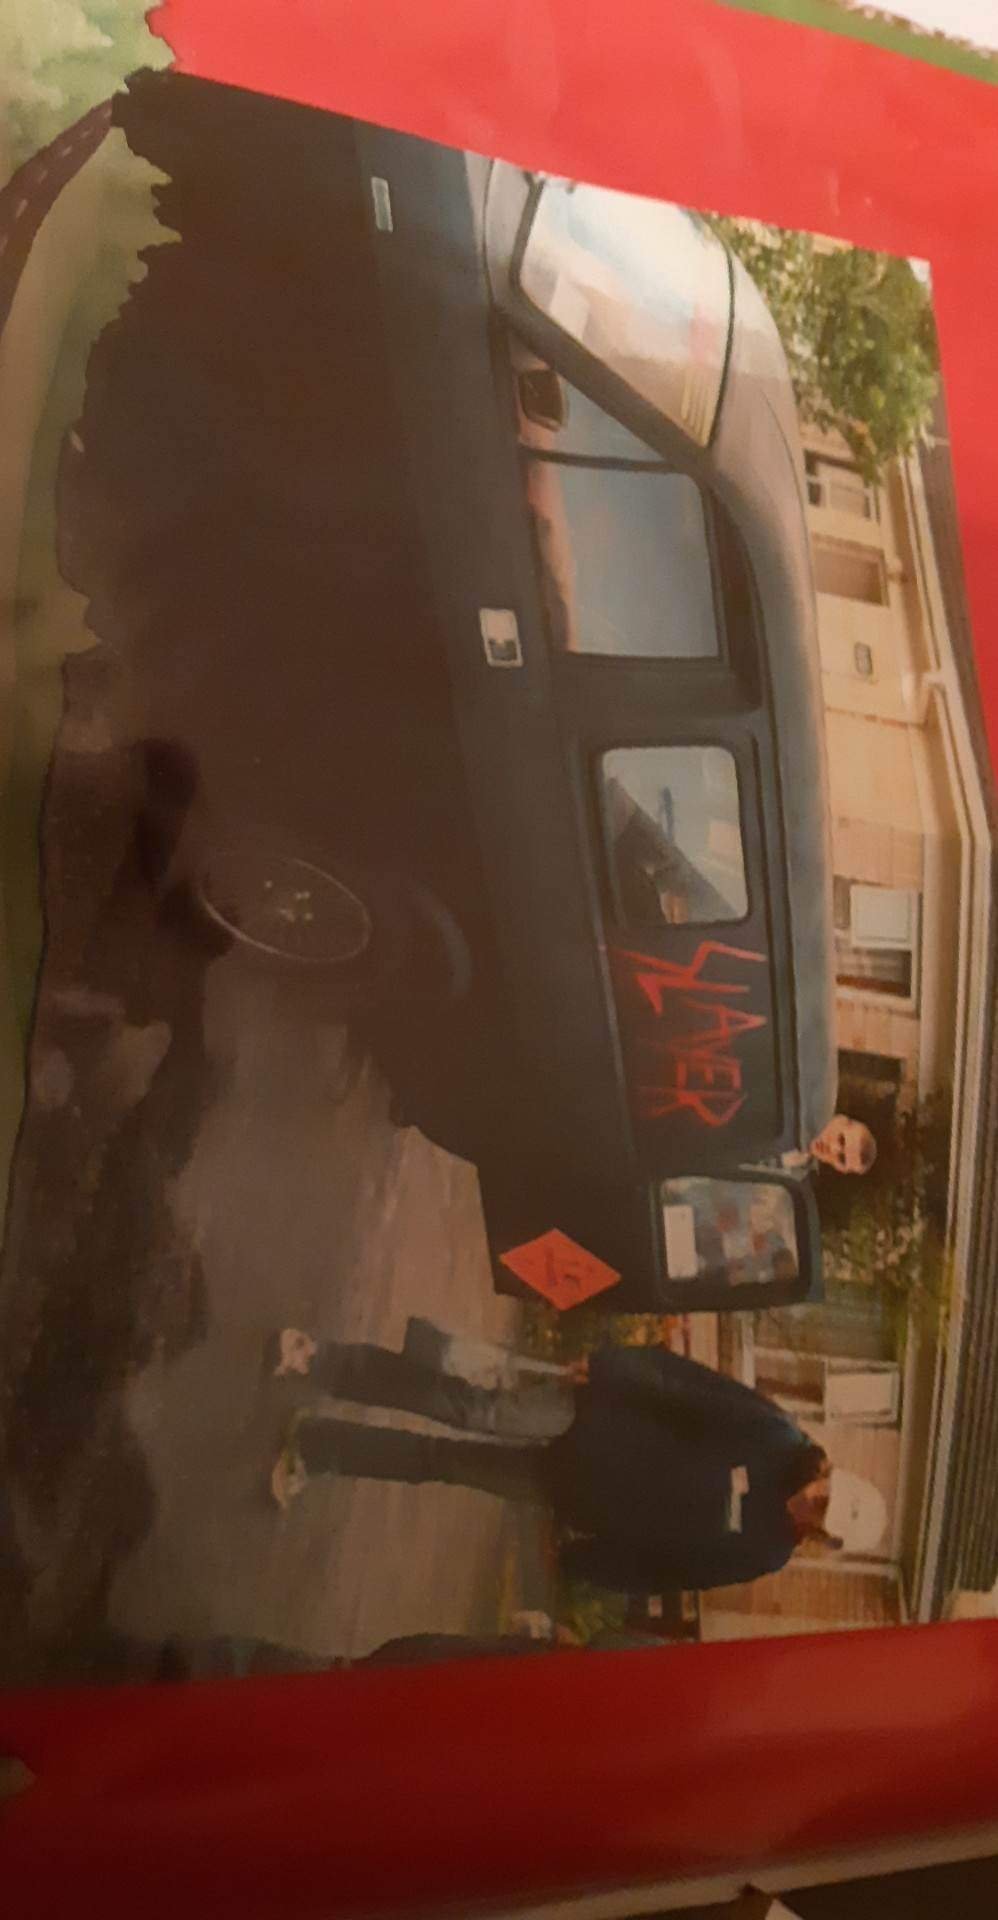
Felt cute, might delete later idk. Surely this is nz's most hilariously cool marina van
1 point
-
Added some more decals and cleared over them, I was a bit unsure about the slayer but it hearkens back to a period where this was hamiltons official "slayer van"
1 point


.jpg.e3163dcb1f467a75f7c06d0ca55a87d0.jpg)
.jpg.3a741e4ce4c796c1eccc8d96438b207b.jpg)


This leaderboard is set to Auckland/GMT+12:00