
Leaderboard


Popular Content
Showing content with the highest reputation on 03/16/24 in Posts
-
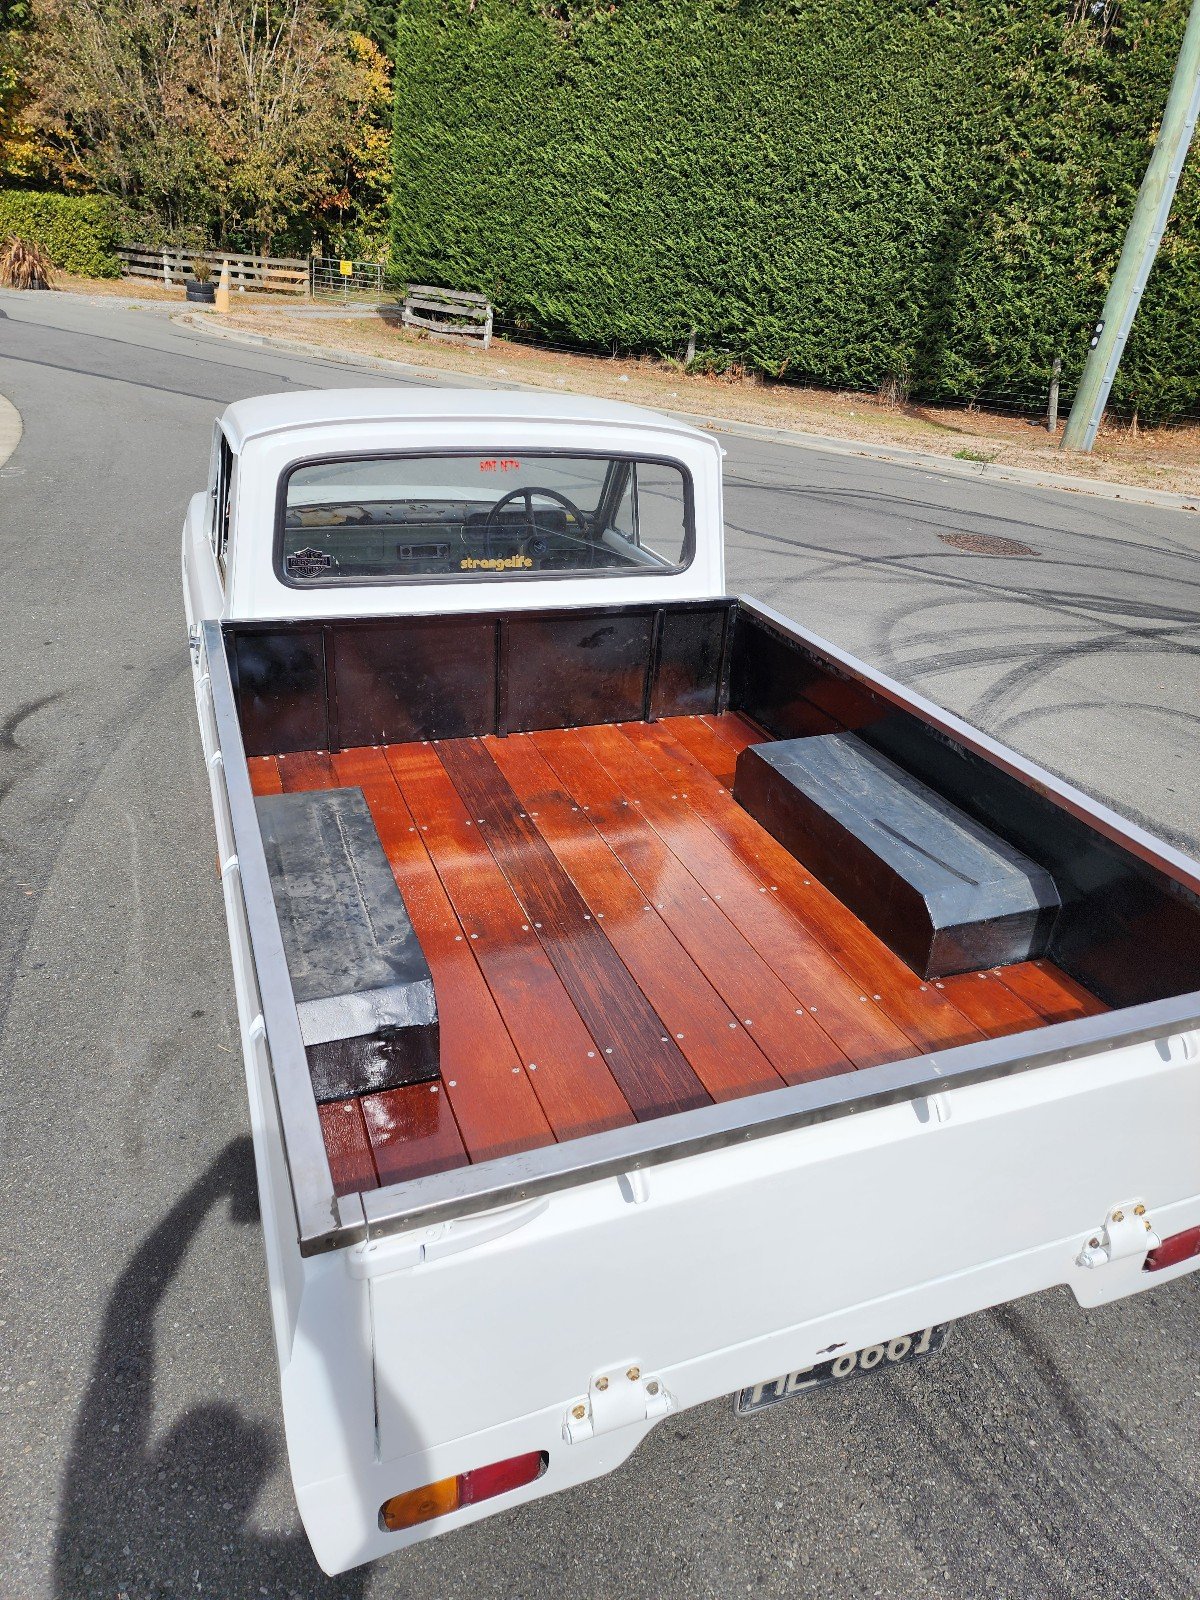
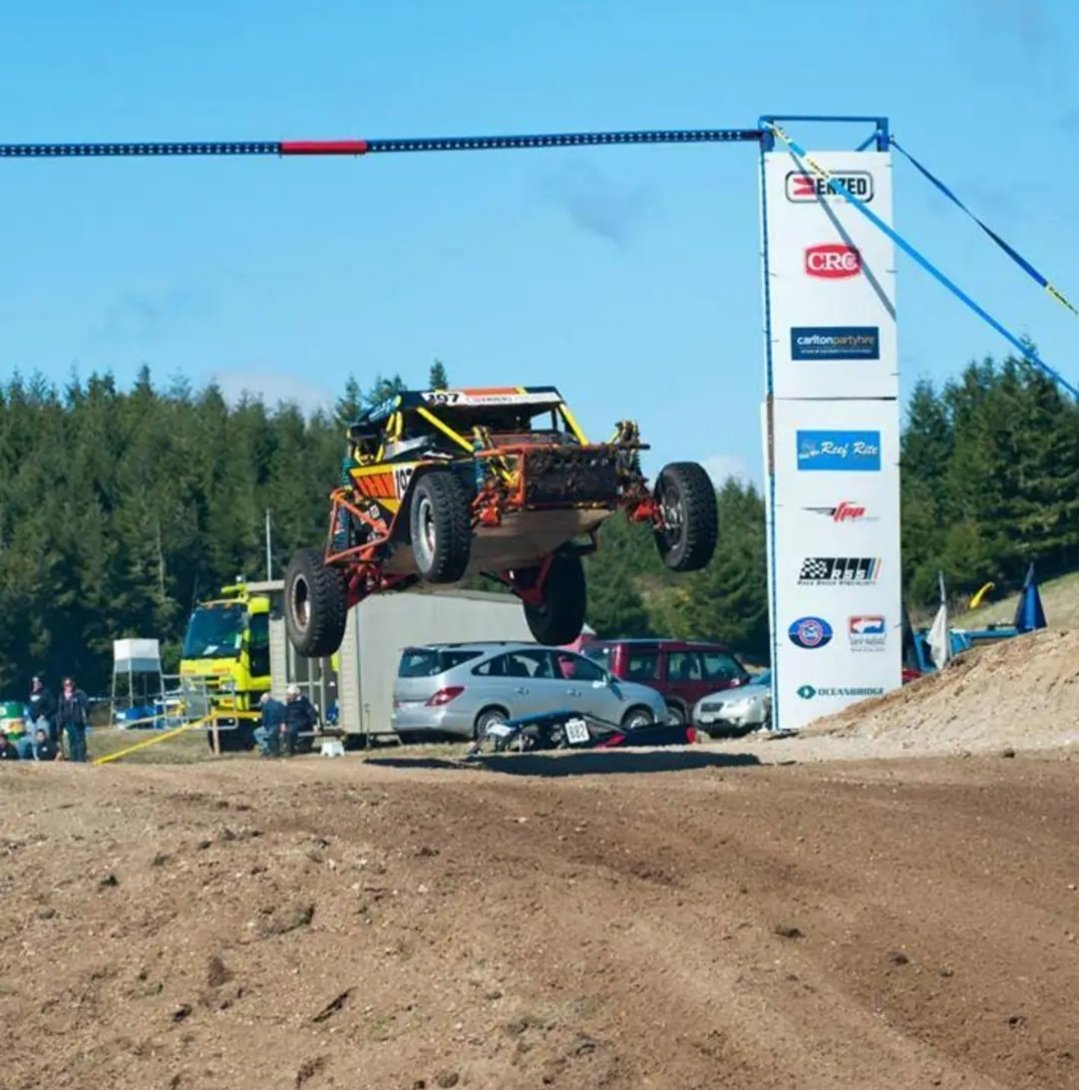
Just took this for its maiden voyage. Zero travel in the front . 50 percent of a exhaust. So bumpy and so rowdy. Love it . Still a shit load to do but darn it's a good feeling
 13 points
 -
New springs made it more consistent,although slightly slower. Different wheels and muffler off when it did the 11.35 previously 11.5@118 every pass I have turned the 2 step rev limit down slightly as it was having trouble holding on the brake which I can probably fiddle with to improve I'd like to get it down to 11.0 so it's more competitive at the night drags https://m.youtube.com/watch?v=kdfGgT2pKHw&pp=ygUMVW5kZXJjYXJ2aWV3
7 points
-
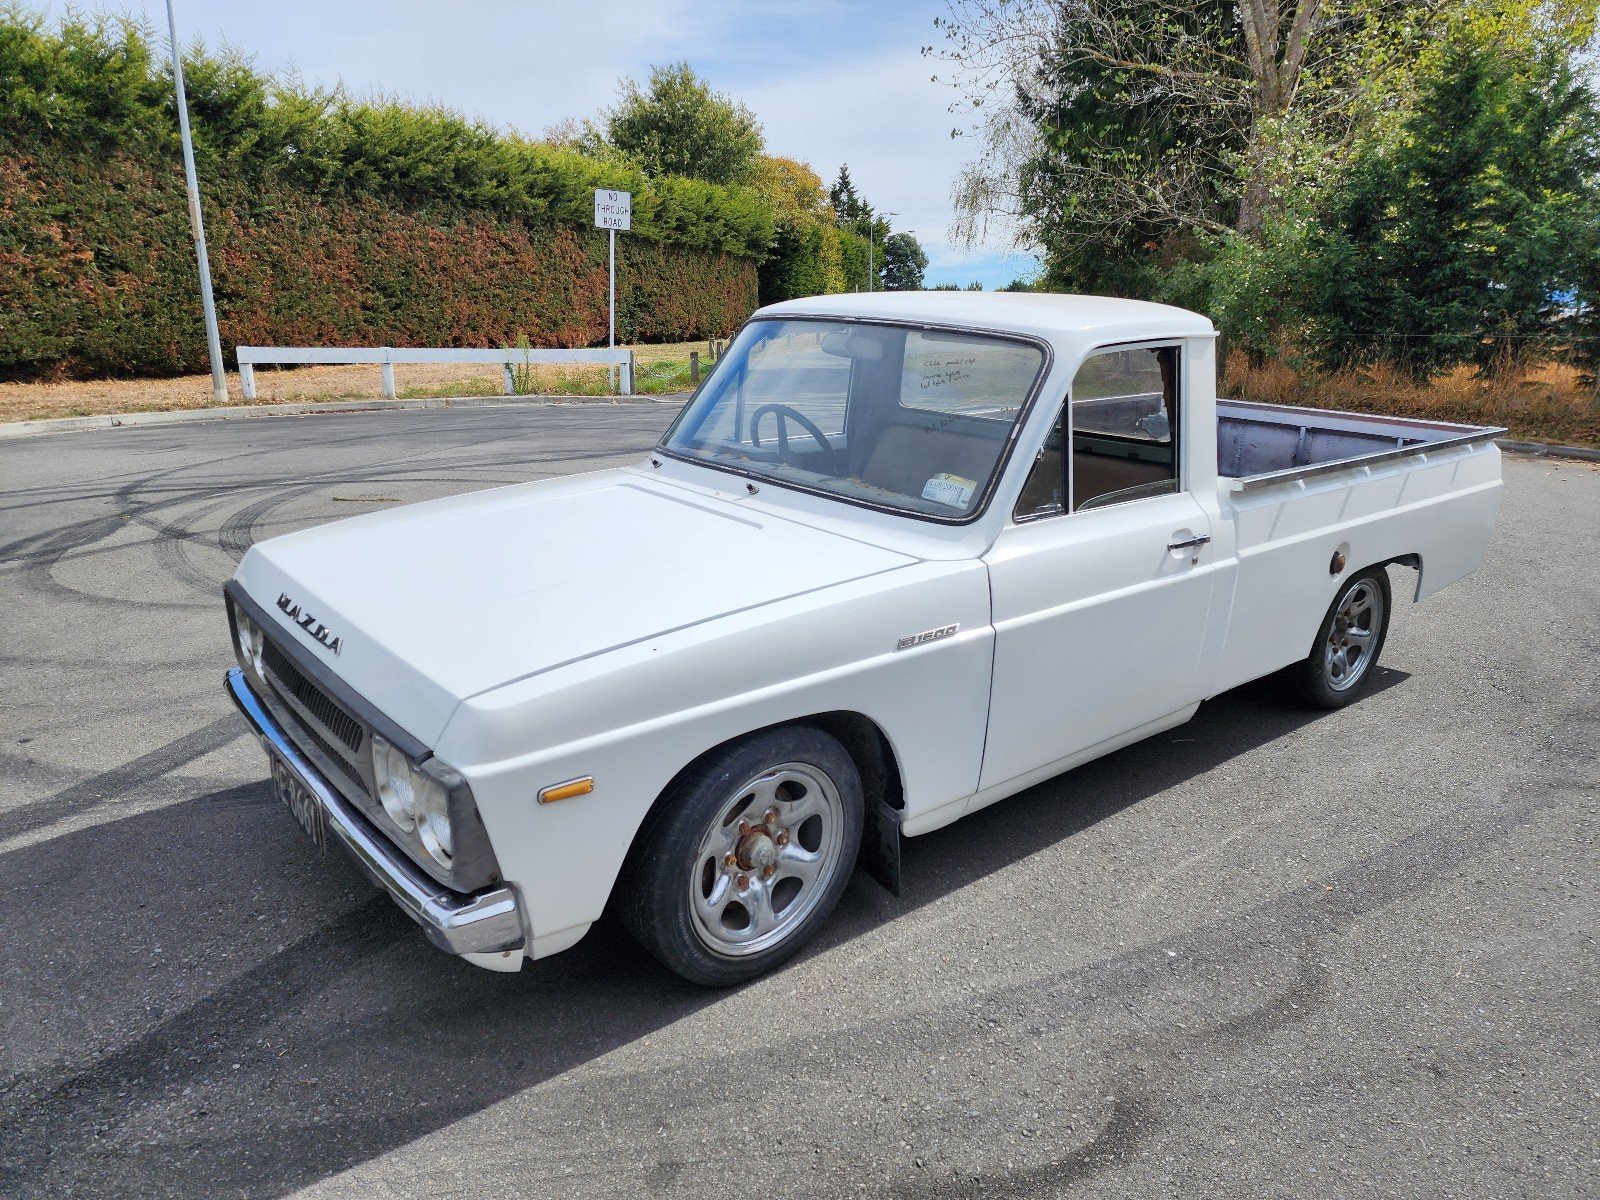
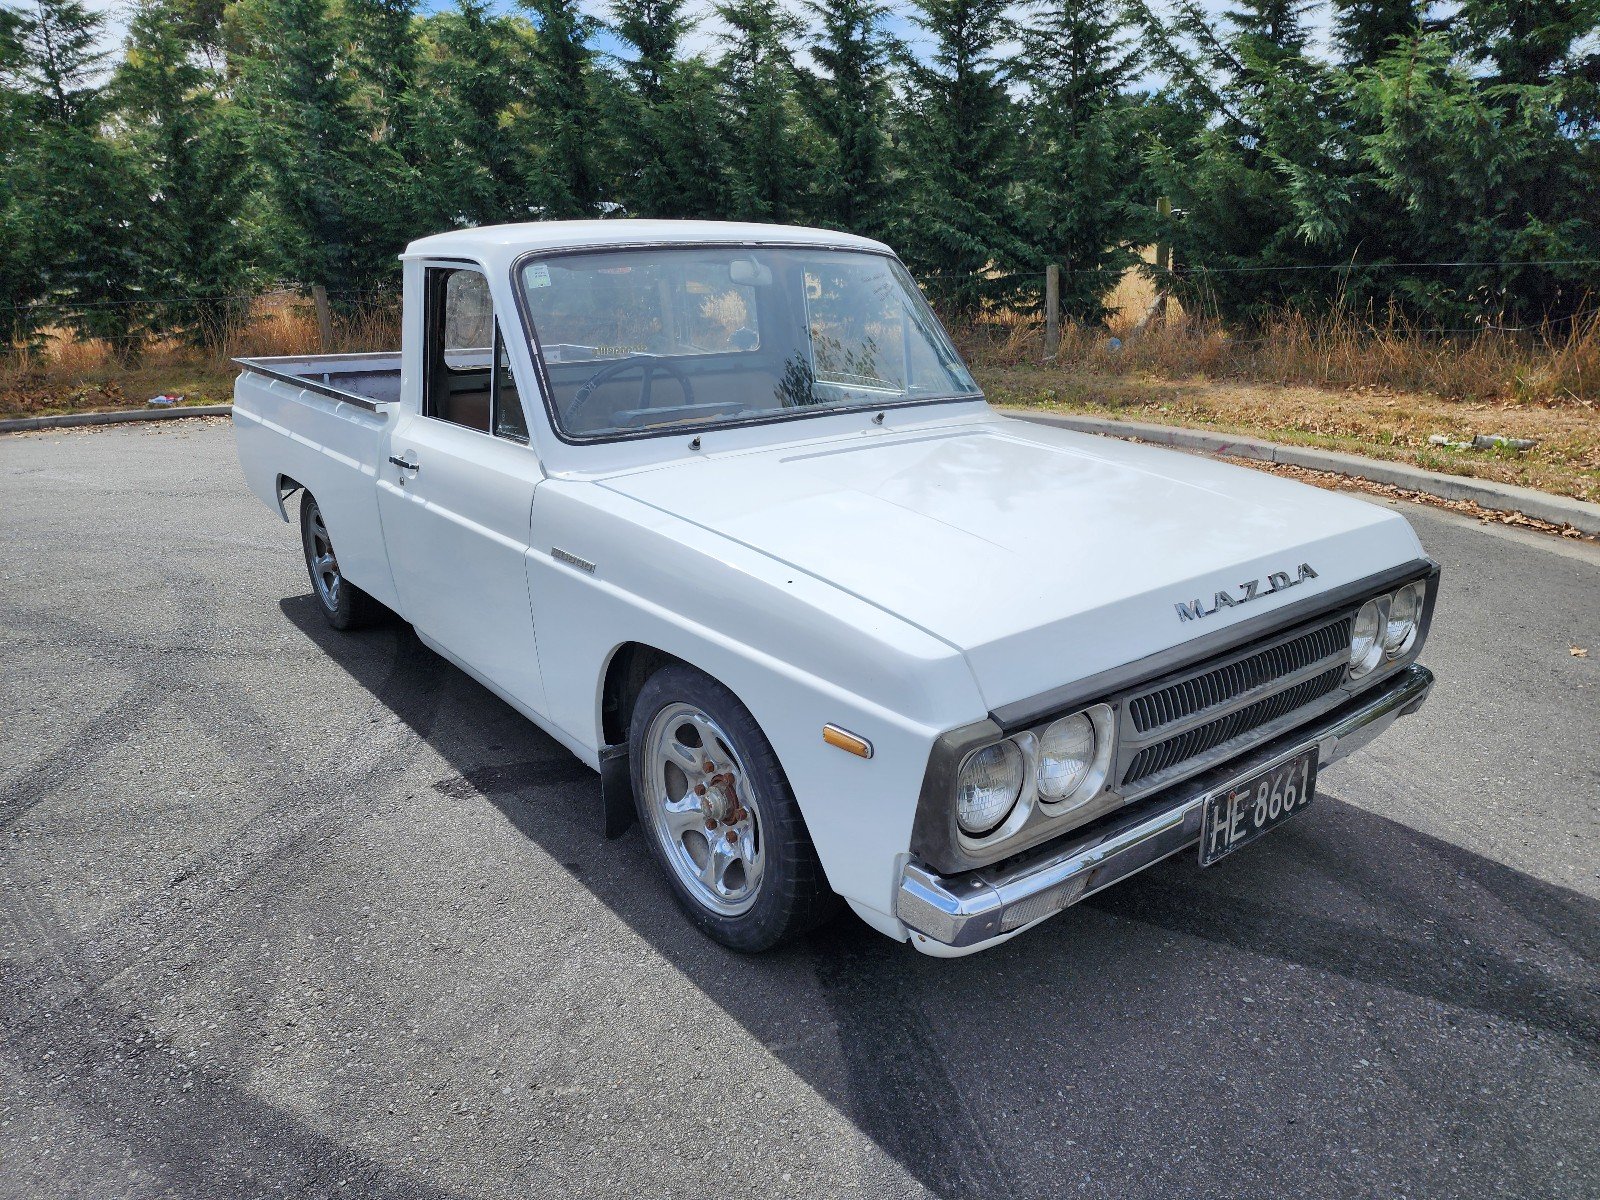
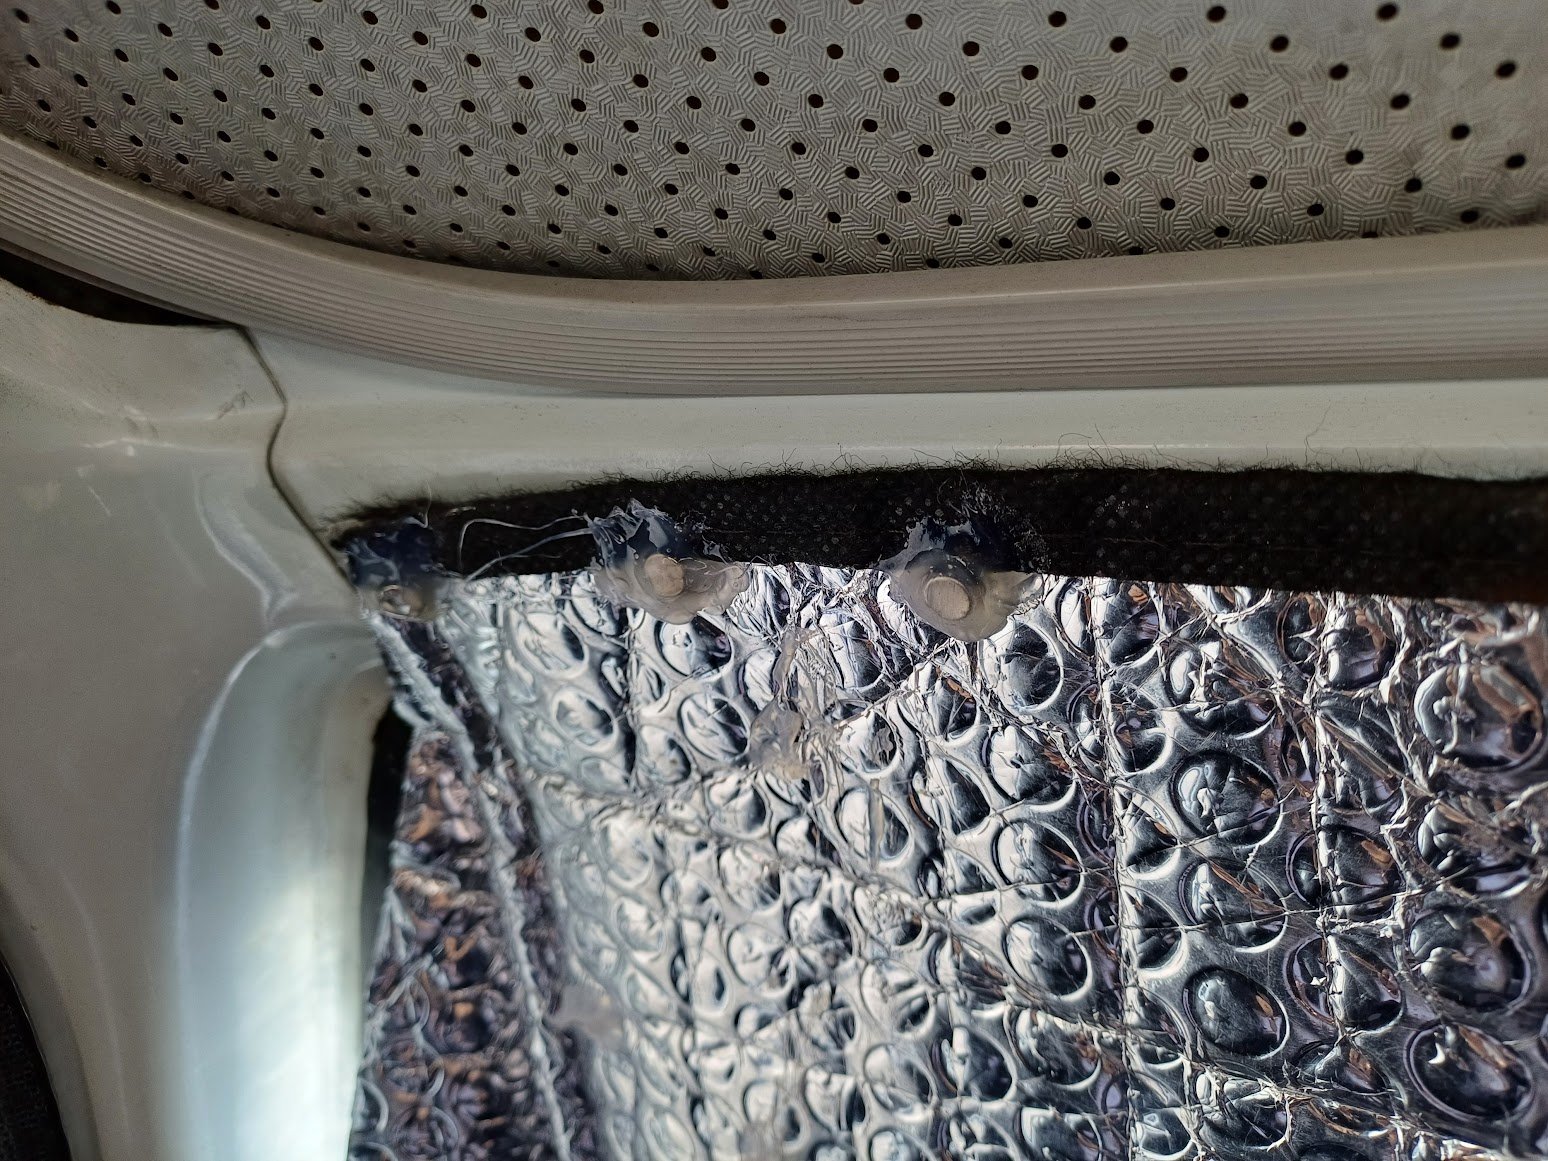
I wasn't expecting to buy another bike this week, but you know how it goes. An old man came into work and asked "How's your mates gyro going" referring to @Raizer sick rig, so obviously I'd mentioned it to him in the past. He then says he's going to sell his, so I had to go look at it. I then proceeded to fall in love. It's so hilarious. The dude I got it off was 76, and the previous owner was also an old man that got it for his import wife to use, but she never did. So it has quite a few old man spec "improvements" which include LED strip lighting riveted to the body with a crap ton of rivets. Paint "touch ups" which means badly applied rattle can paint with lots of over spray. Lots of random holes drilled in the body, every fastener they have applied is a different drive, and an oil line blocked off with a cupboard shelf support pin and copper wire. So she needs a bit of love and attention, but I was surprised to see it had aftermarket rear rims/tyres and an expansion chamber, so she might be making a few extra microwatts. Anyways, the new bike/trike is a 2001 Honda Gyro Canopy Wagon: Note method of light attachment, and modified floor mat, The lean over/hand brake lever has snapped off, so I need a new one of them. I'll also have to try clean up the windscreen, it's a bit messy. Phat tyres, rice pipe, and old man reflective decorations. The OEM lock is gone, has old man spec latch, will sort something better, Douglas racing rims, and sweet dice valve caps. 100% I'm going to redo the white lettering, Powerplant. Needs an air filter and a few mounts made for fuel pump and coil, plus a few hoses need replacing. The pipe is quite neat, I fucken love these rims/tyres TBH, It's totally getting vinyl stuck on the headlights to make JDM angry slantey eyes, The LED lights are coming off because the are horribly fitted and stick out like dogs bollocks, but I will probably refit them underneath and a more discreet manner. They have like a trillion settings too, So yeh, lots to do, but pretty excited to finally have a gyro. Regards, VG.6 points
-
some of the quick cars there was a Lexus GS-F that sounded amazing, the CT5 Blackwing (also on Michelin PS4S's) and some large overwight mild hybrid Merc/AMG thing that somehow was the second fastest vehicle all weekend
5 points
-
Gah I don't want to diagnose something I just want to fit new parts and get on with my life.4 points
-
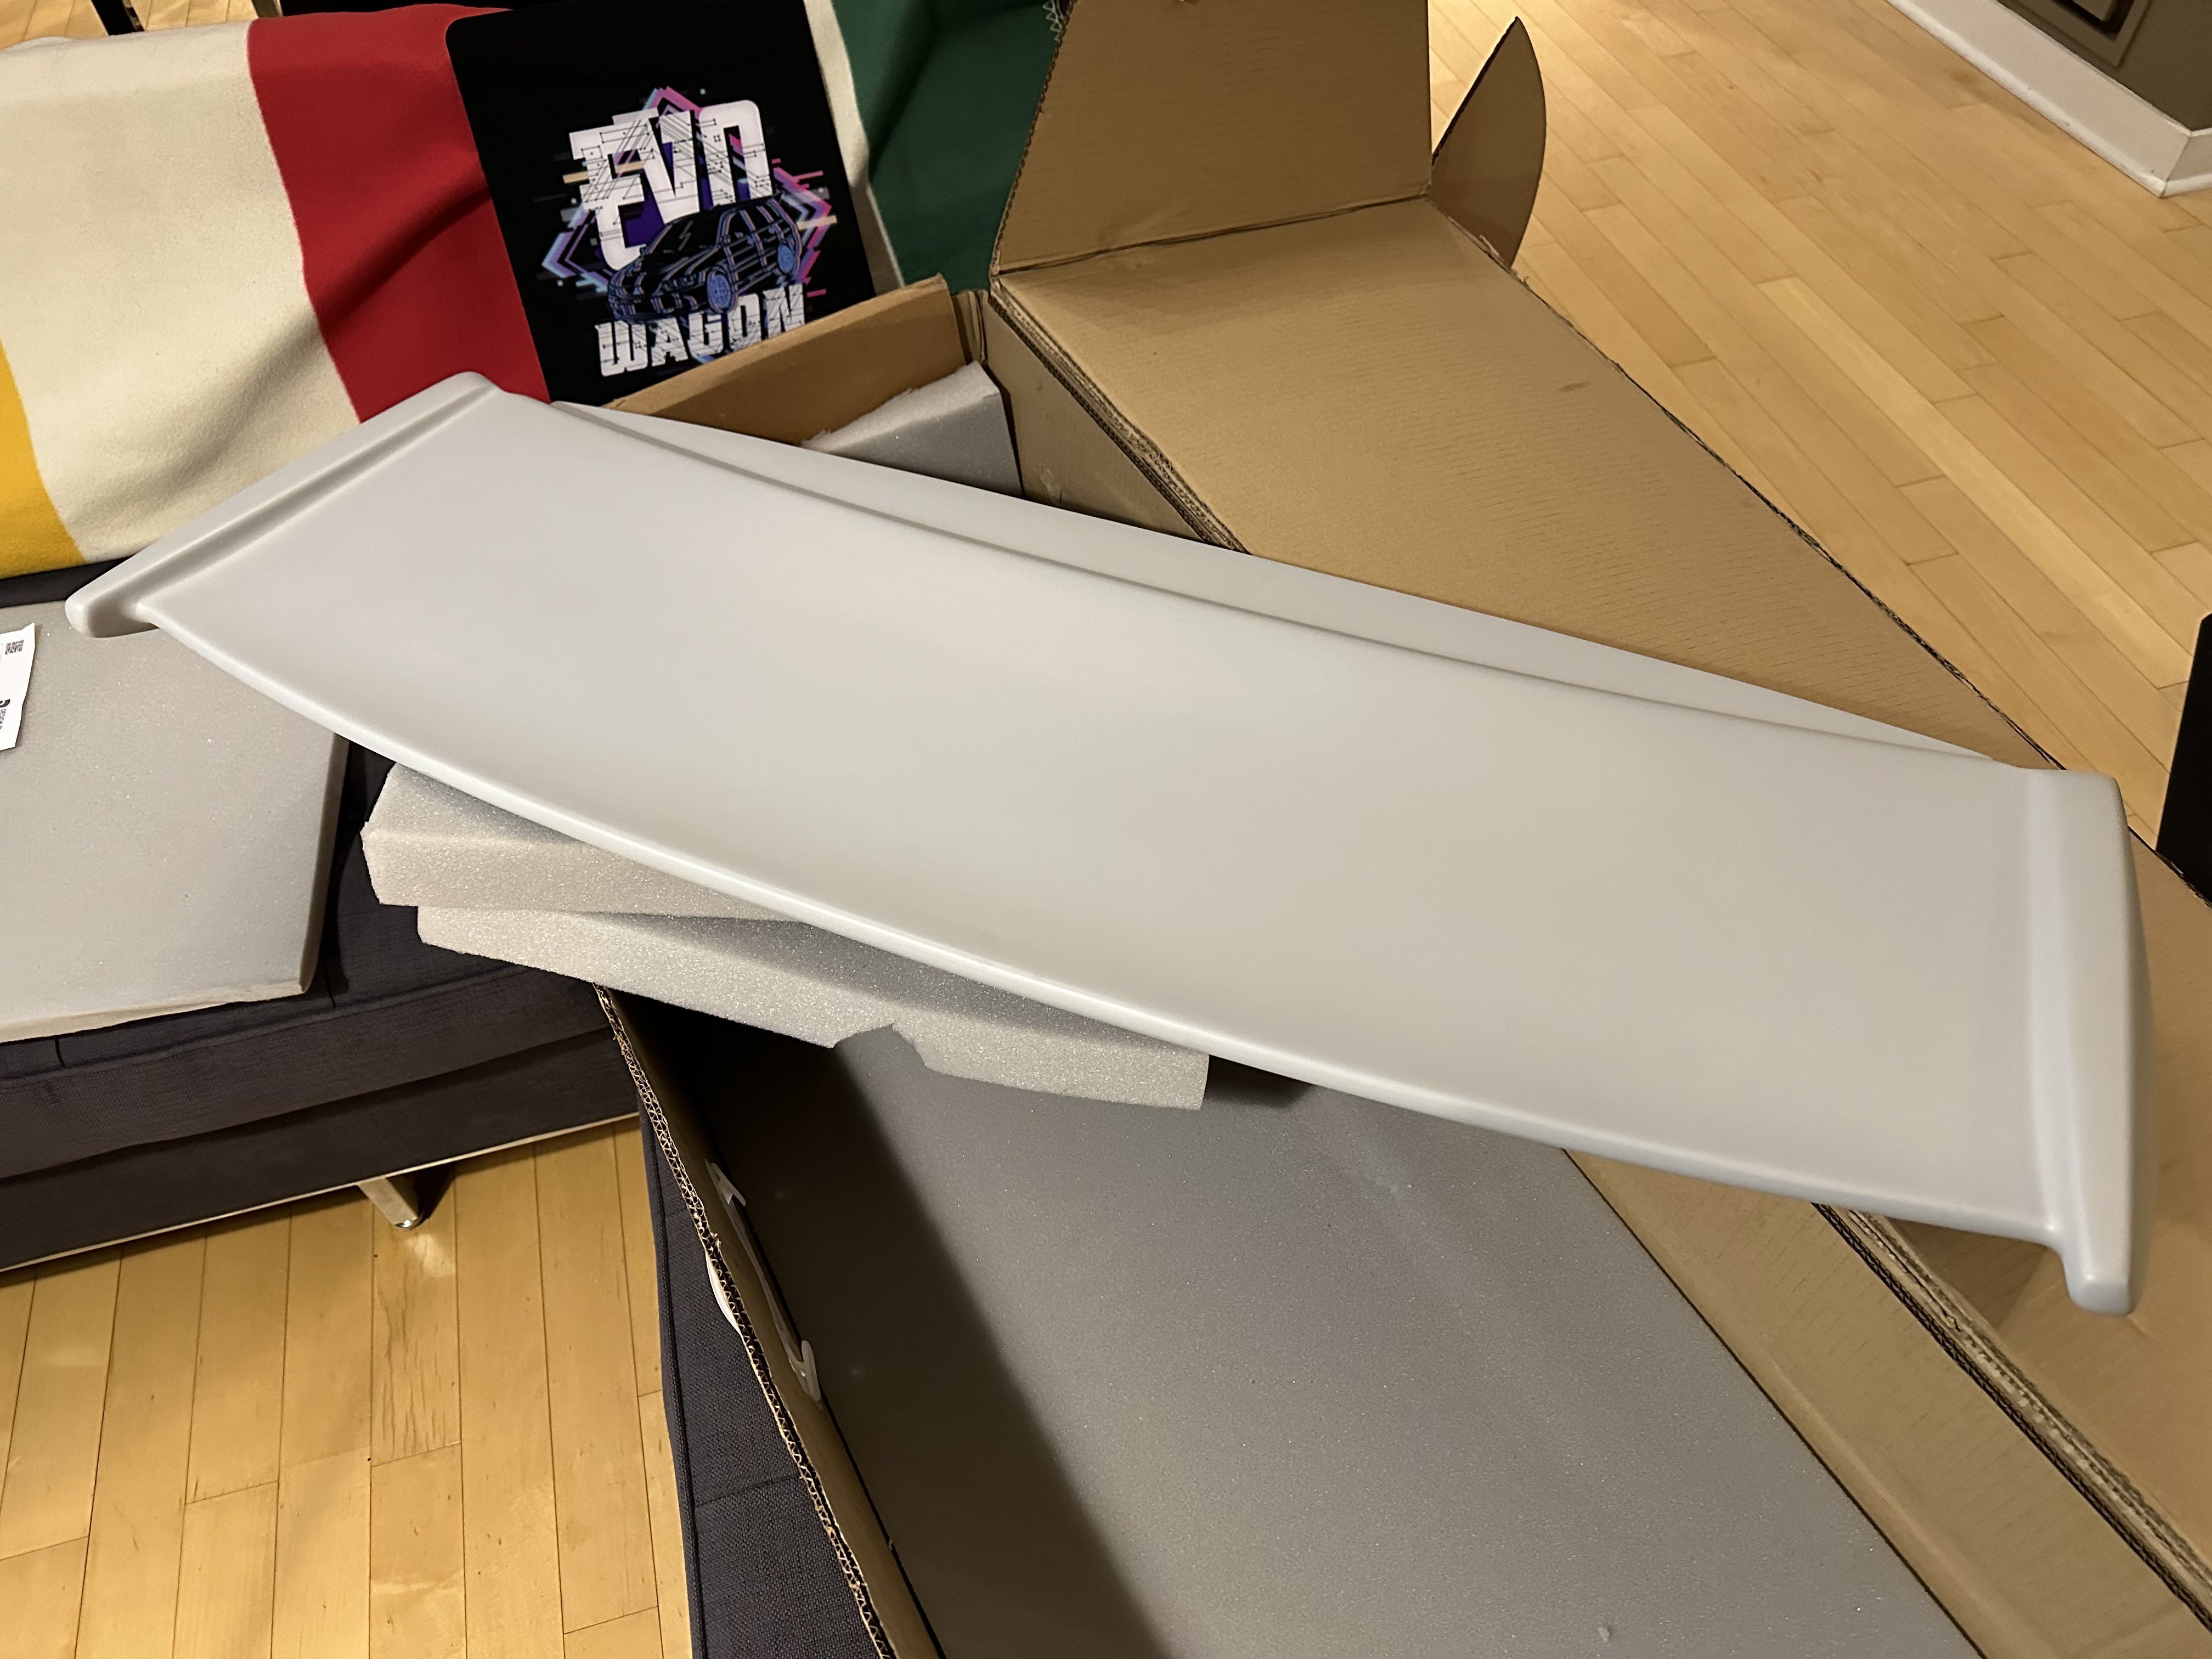
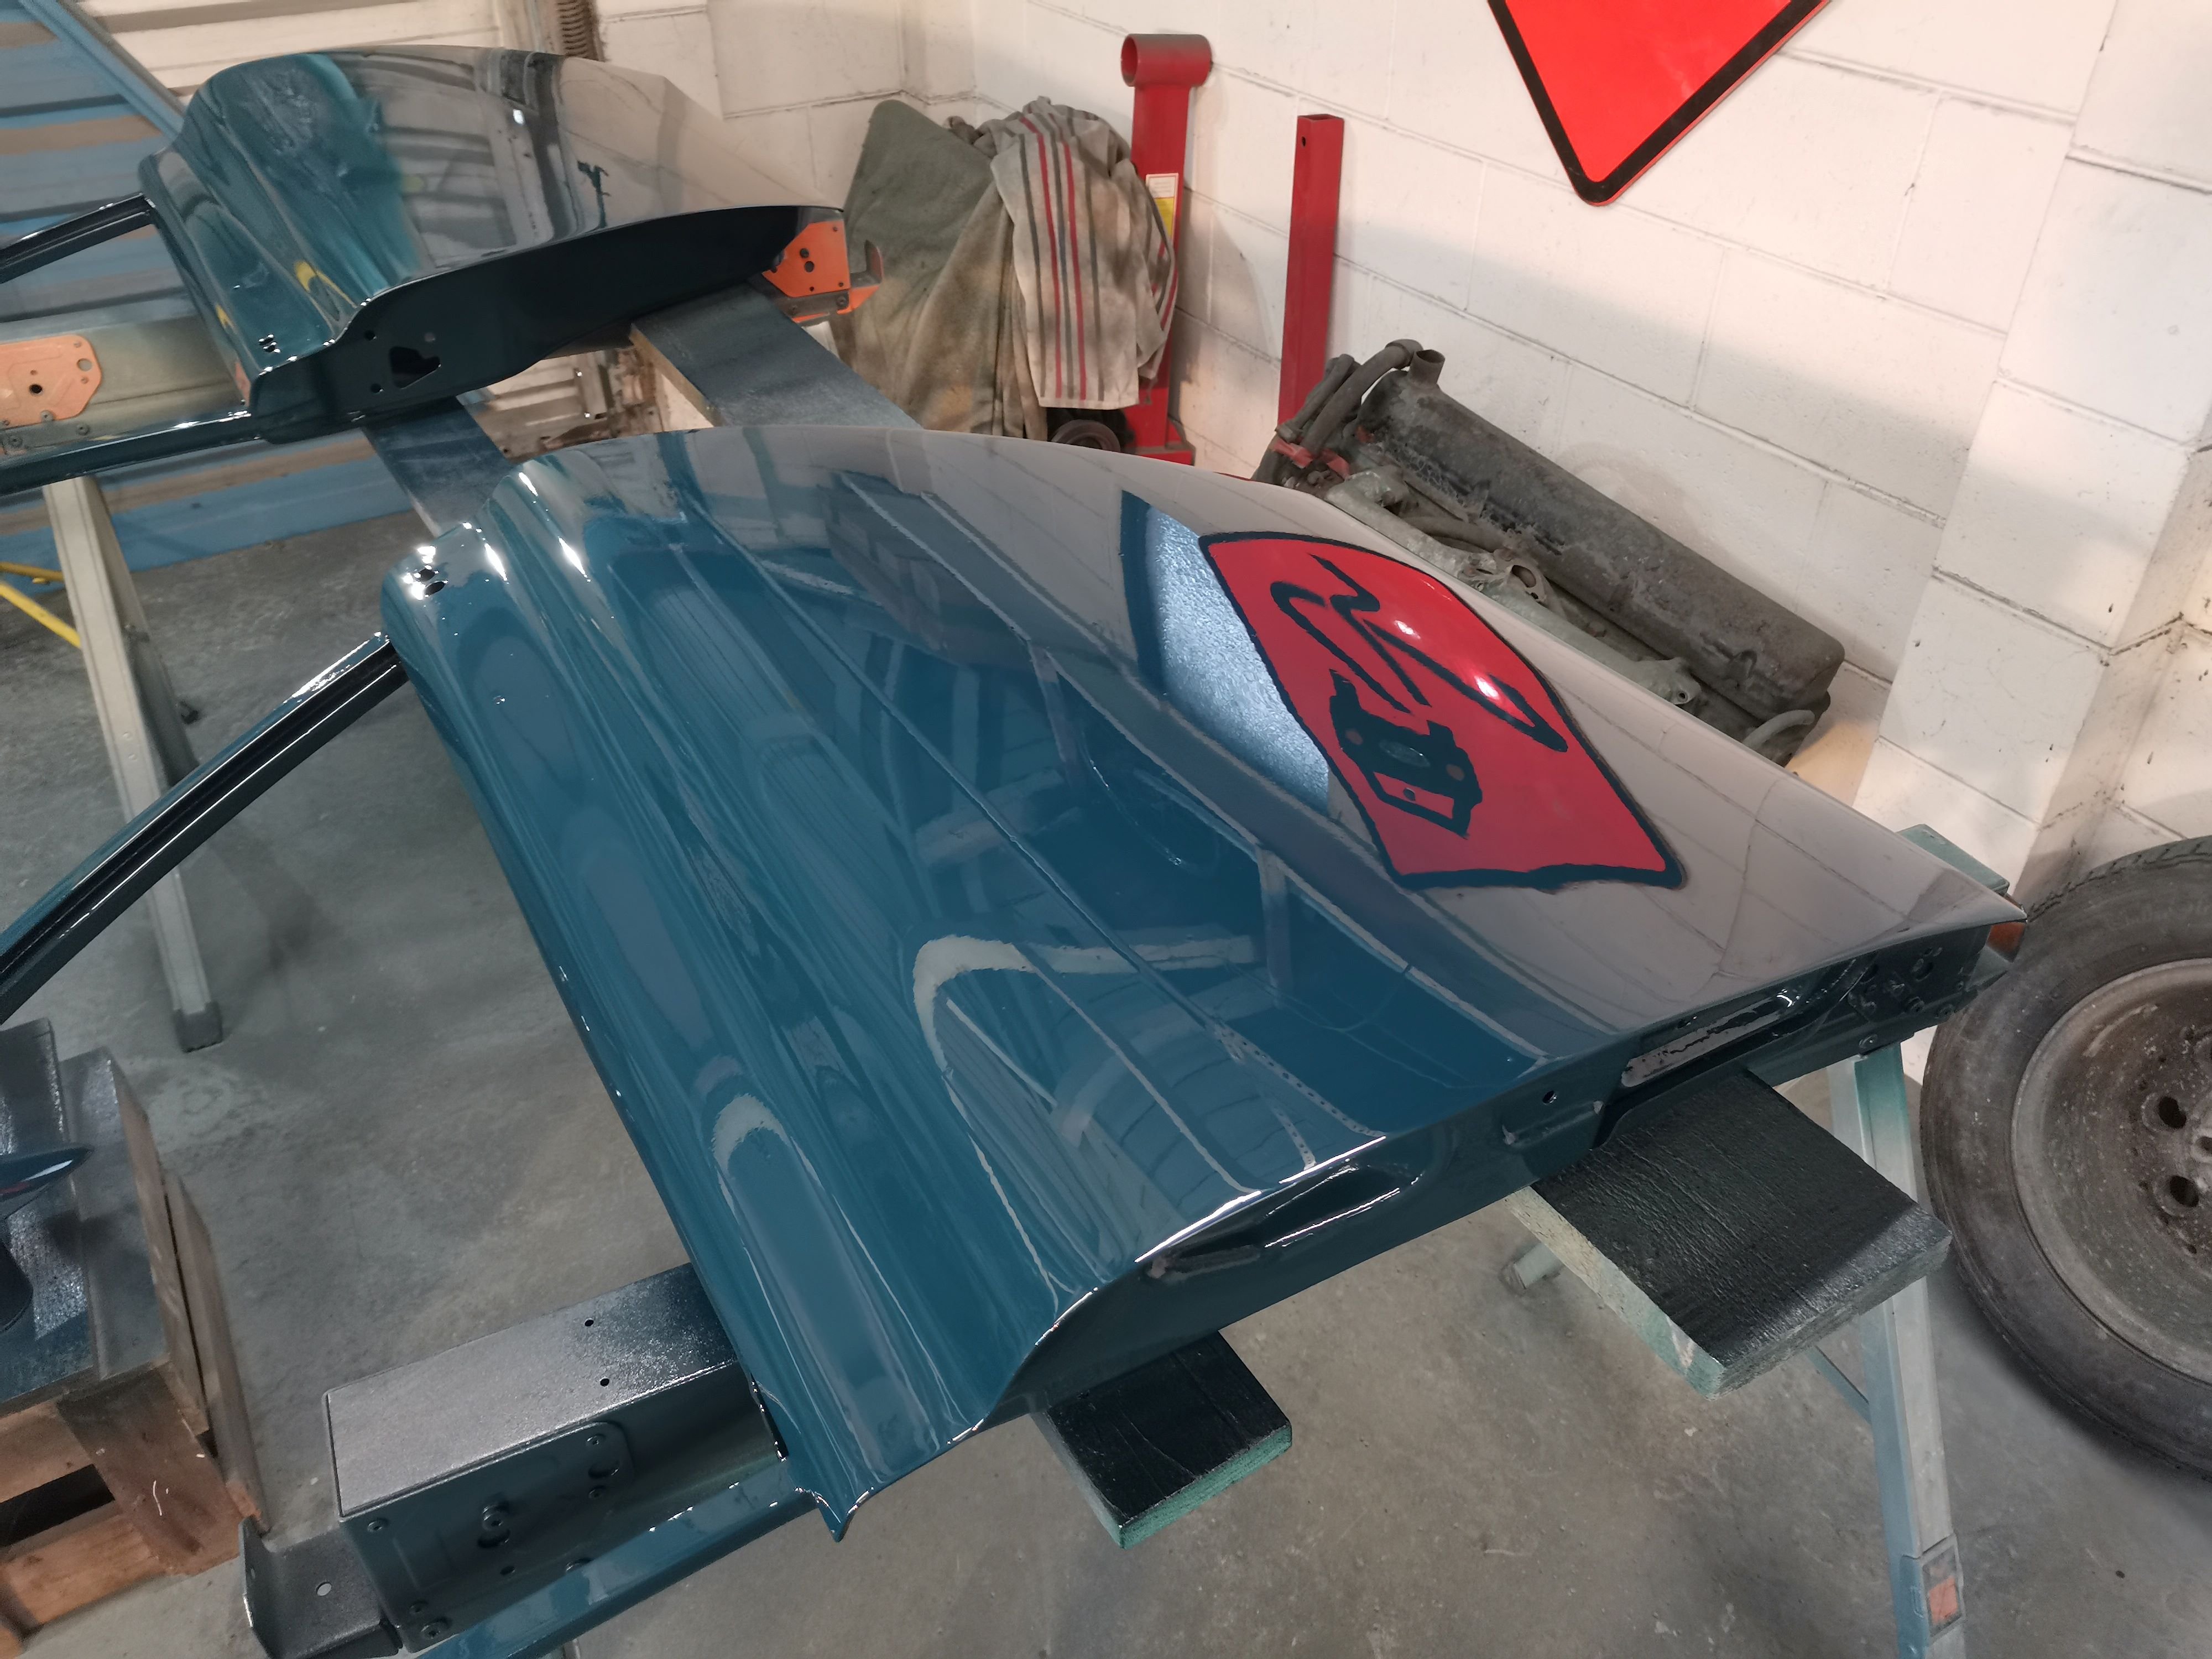
Having said that, finding a Kenstyle certainly isn't any easier and when they do pop up for sale they are too big $$$. I paid more than I wanted to for my Kenstyle in NZ, but still significantly less than the going rate because it was missing the regular Lancer wing base to make it complete. So enter in the Kenstyle replica, made in an initial small run of five units by a fellow Evo wagon owner in Sri Lanka who happens to have his own plastics manufacturing company. The replica is different in the sense that it combines the regular Lancer wagon spoiler into the Kenstyle mould, therefore negating the need to source a regular Lancer wagon spoiler, but also does away with the gap that is present between the regular spoiler and the Kenstyle wing that traps moisture and general muckyness: So here it is unpacked in its primer glory and will go on when I have some time to get it painted.
4 points
-
After some poking and prodding I decided it was play in the inner end of the tie rod, not a lot, but some... I do feel like a bit of a scumbag for reusing the steering rack boot and outer tie rod end, but they passed my inspection, it did at least get a new lock tab.3 points
-
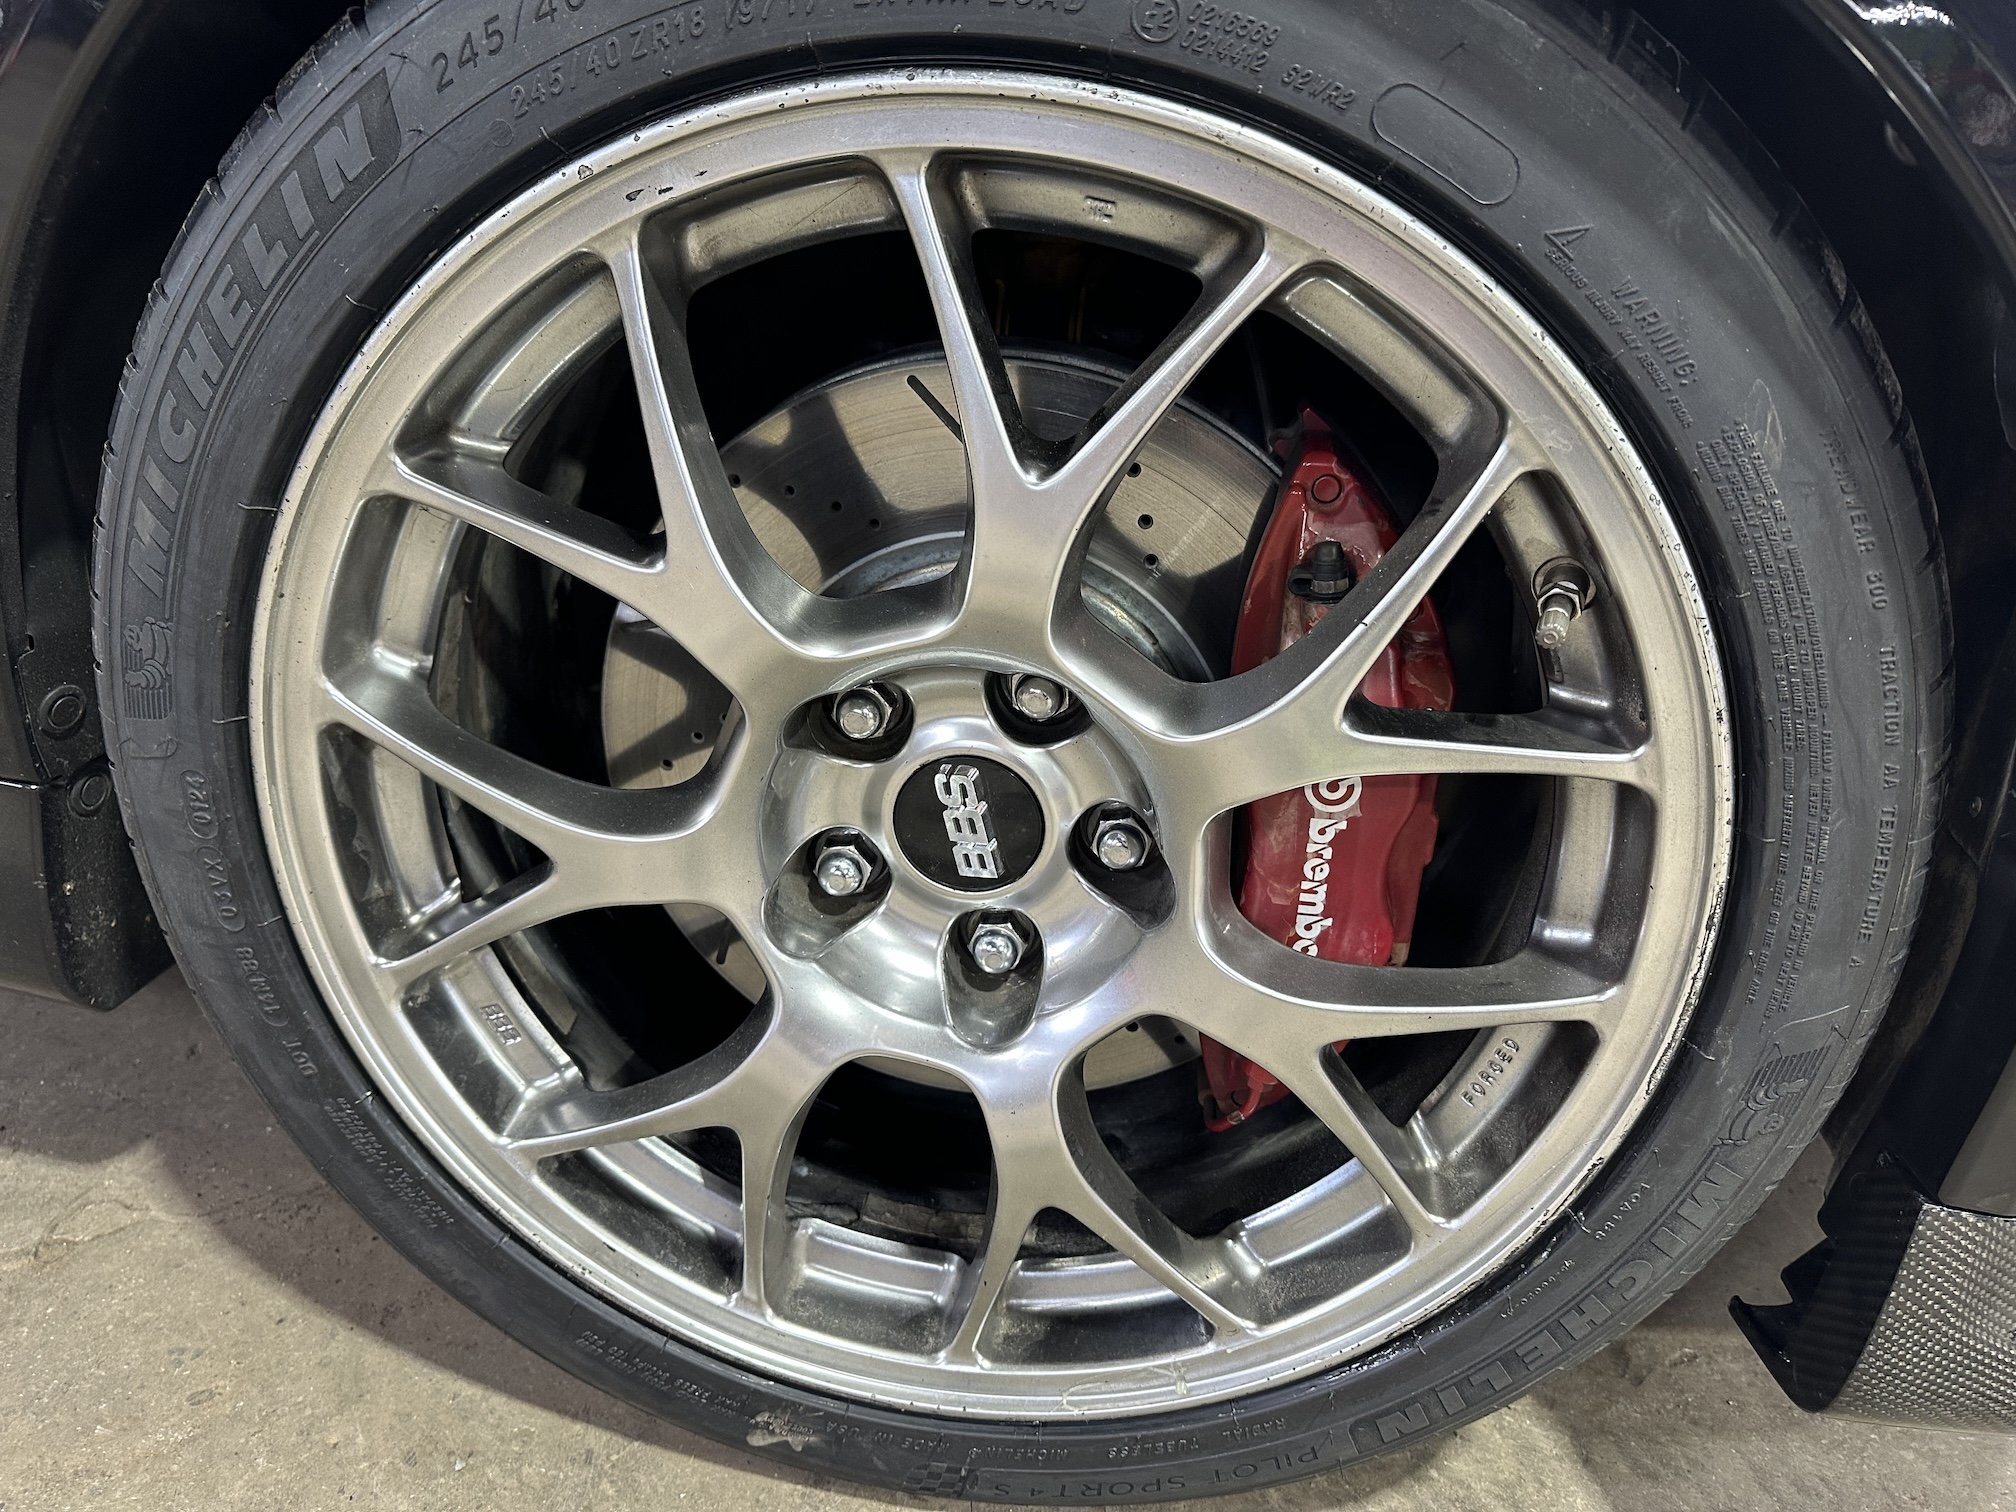
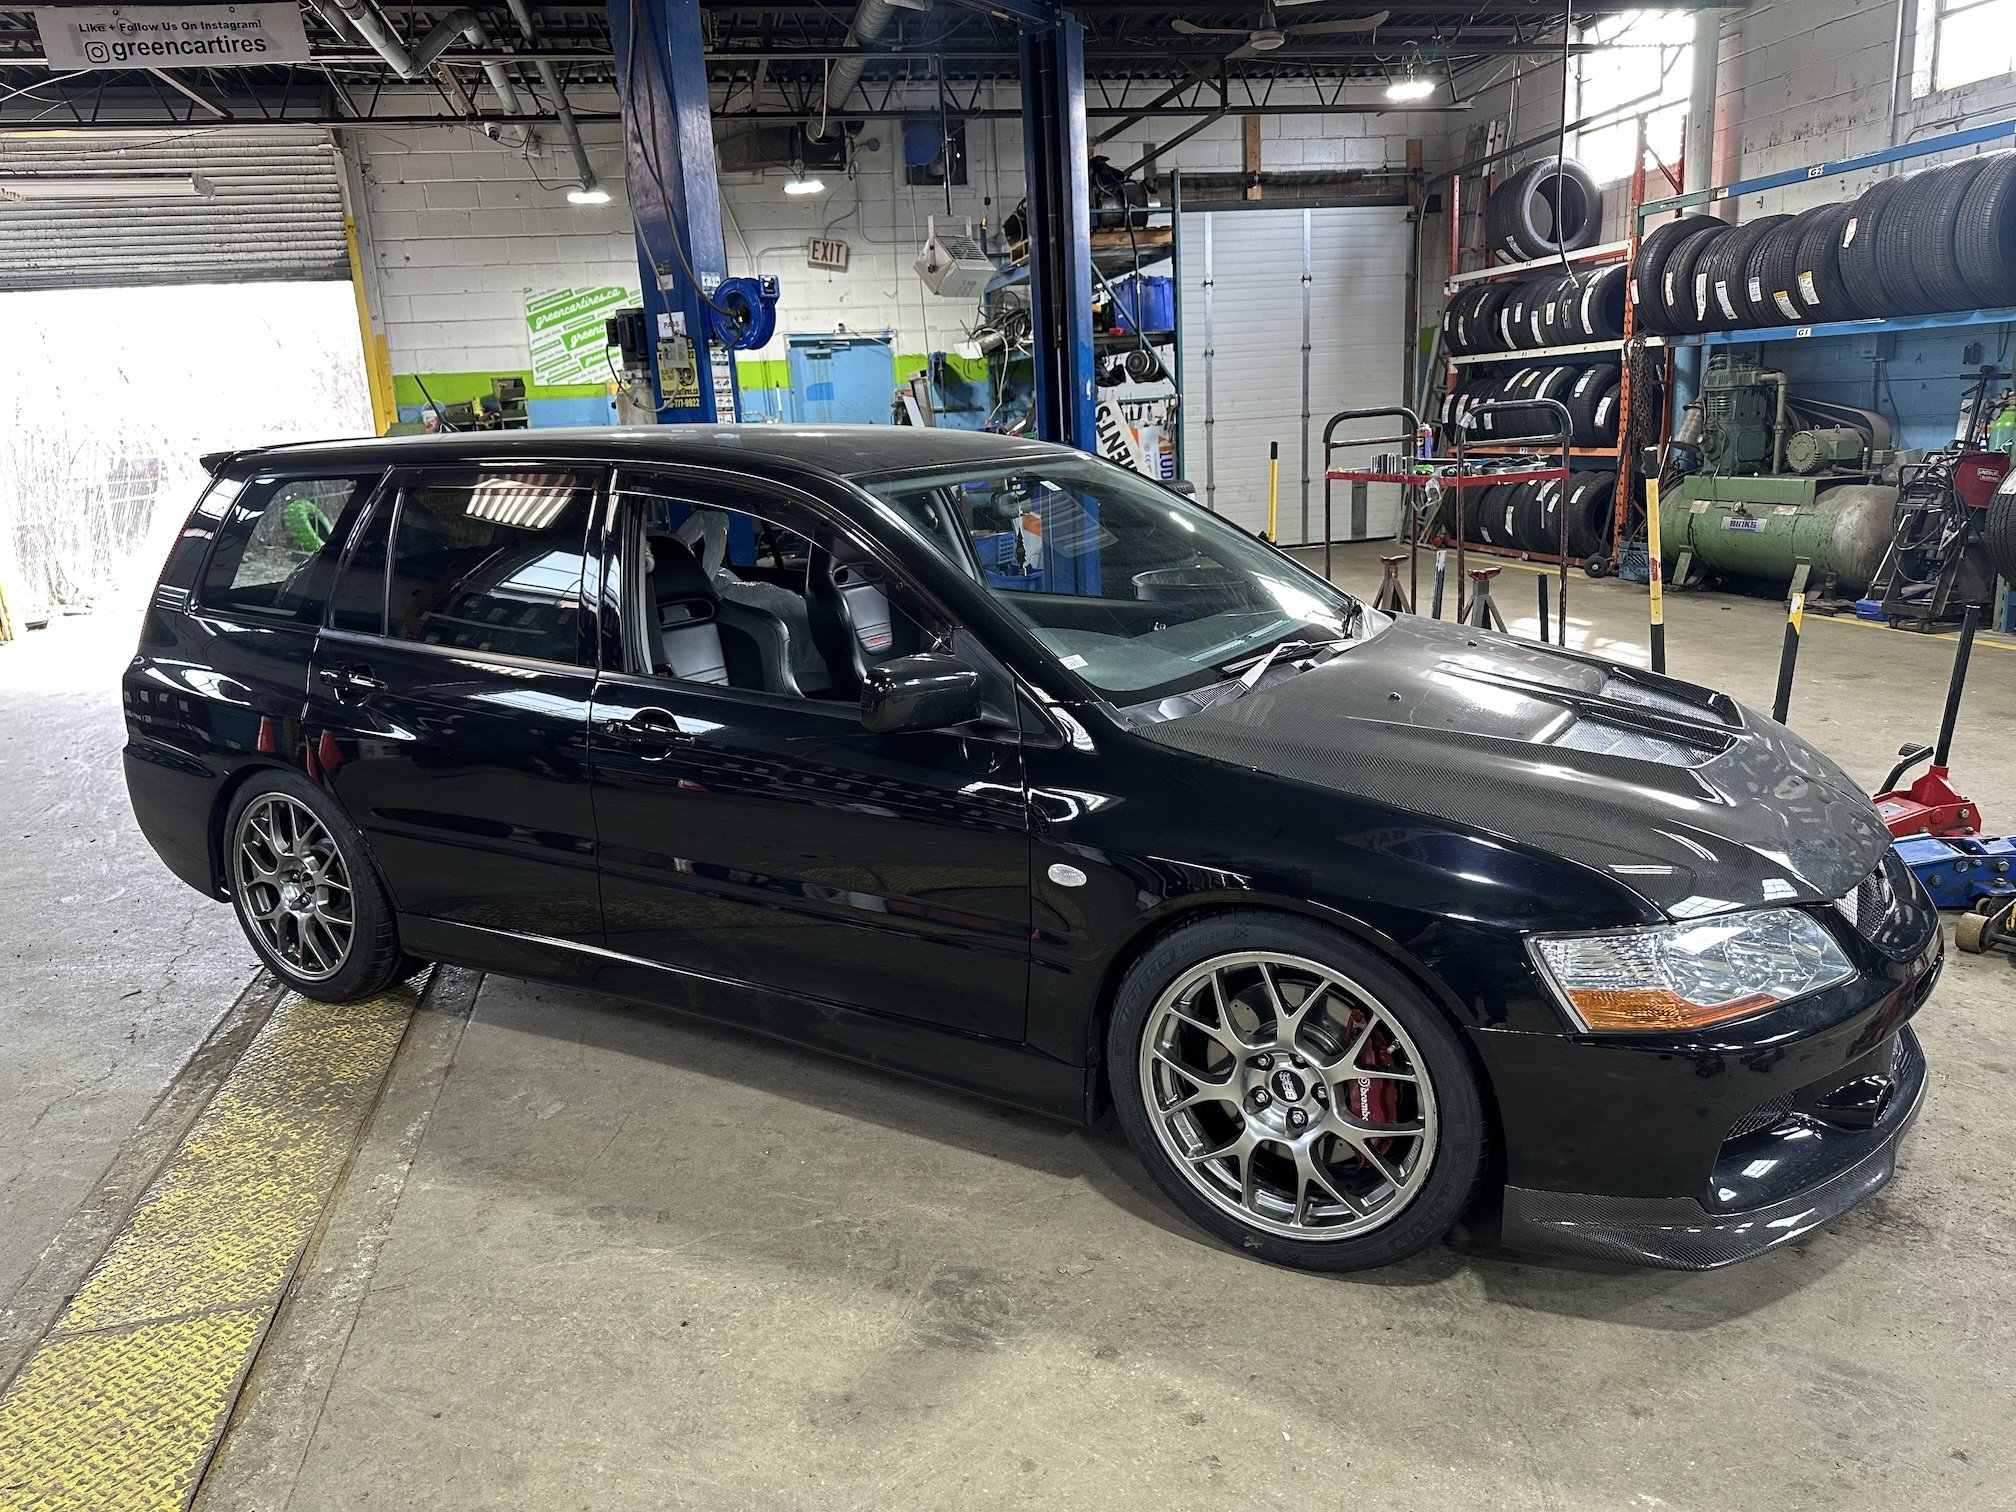
definitely more of a driver limitation than car limitation haha - I did have to drive the ~650km back to Toronto from western Michigan and didn't want to ruin the car haha. Being on all season tyres that started to feel super mushy once some heat got into them didn't help. I've since fixed that by getting a set of Michelin Pilot Sport 4S's earlier this week:
3 points
-
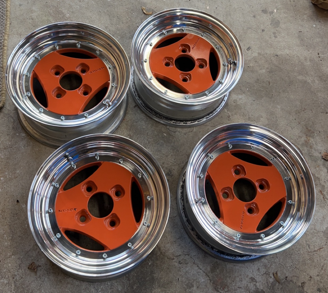
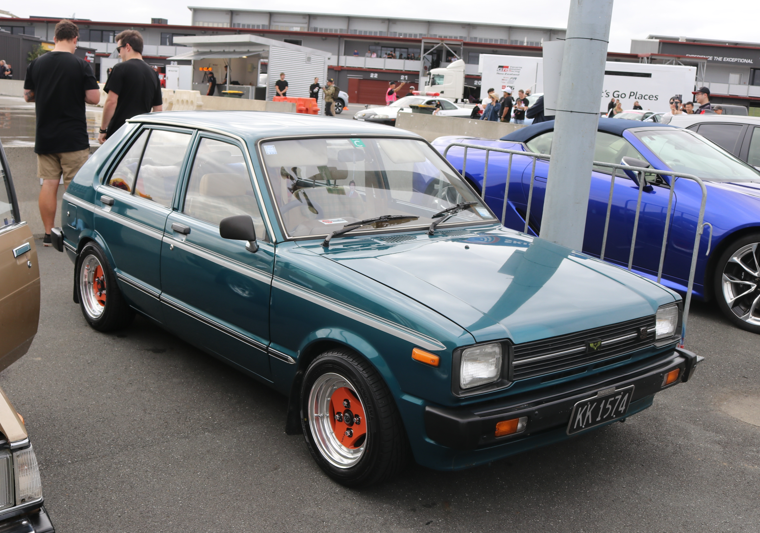
I have always loved Advan A3As and I managed to I pick up a set of 13x6s. I got the lips fixed, painted the centres and convinced the bro to polish them for me (not a member but cheers mate). Orange and blue is a sharp contrast, but it's grown on me Which brings us now back to first sentence of the previous post. I've just driven this from Wellington to Horopito to Toyota Fest at Hampton downs and back (1300 kms) with a couple of mates. There were a couple of small issues with the KP on the trip but those were quickly and easily rectified. It might be slow, but it got there ha } Have a squiz the oldschool.co.nz sticker I got over a decade ago and never used until now. That's all for now
3 points
-
how often does this happen. if i was a layman who don't know nothing about cars (pretty much true), what am i meant to do?2 points
-
On a recent trip to mexico, i got to experience this machine first hand. Hooooooo boy! Its quite jolly rapid! Not slow at all!2 points
-
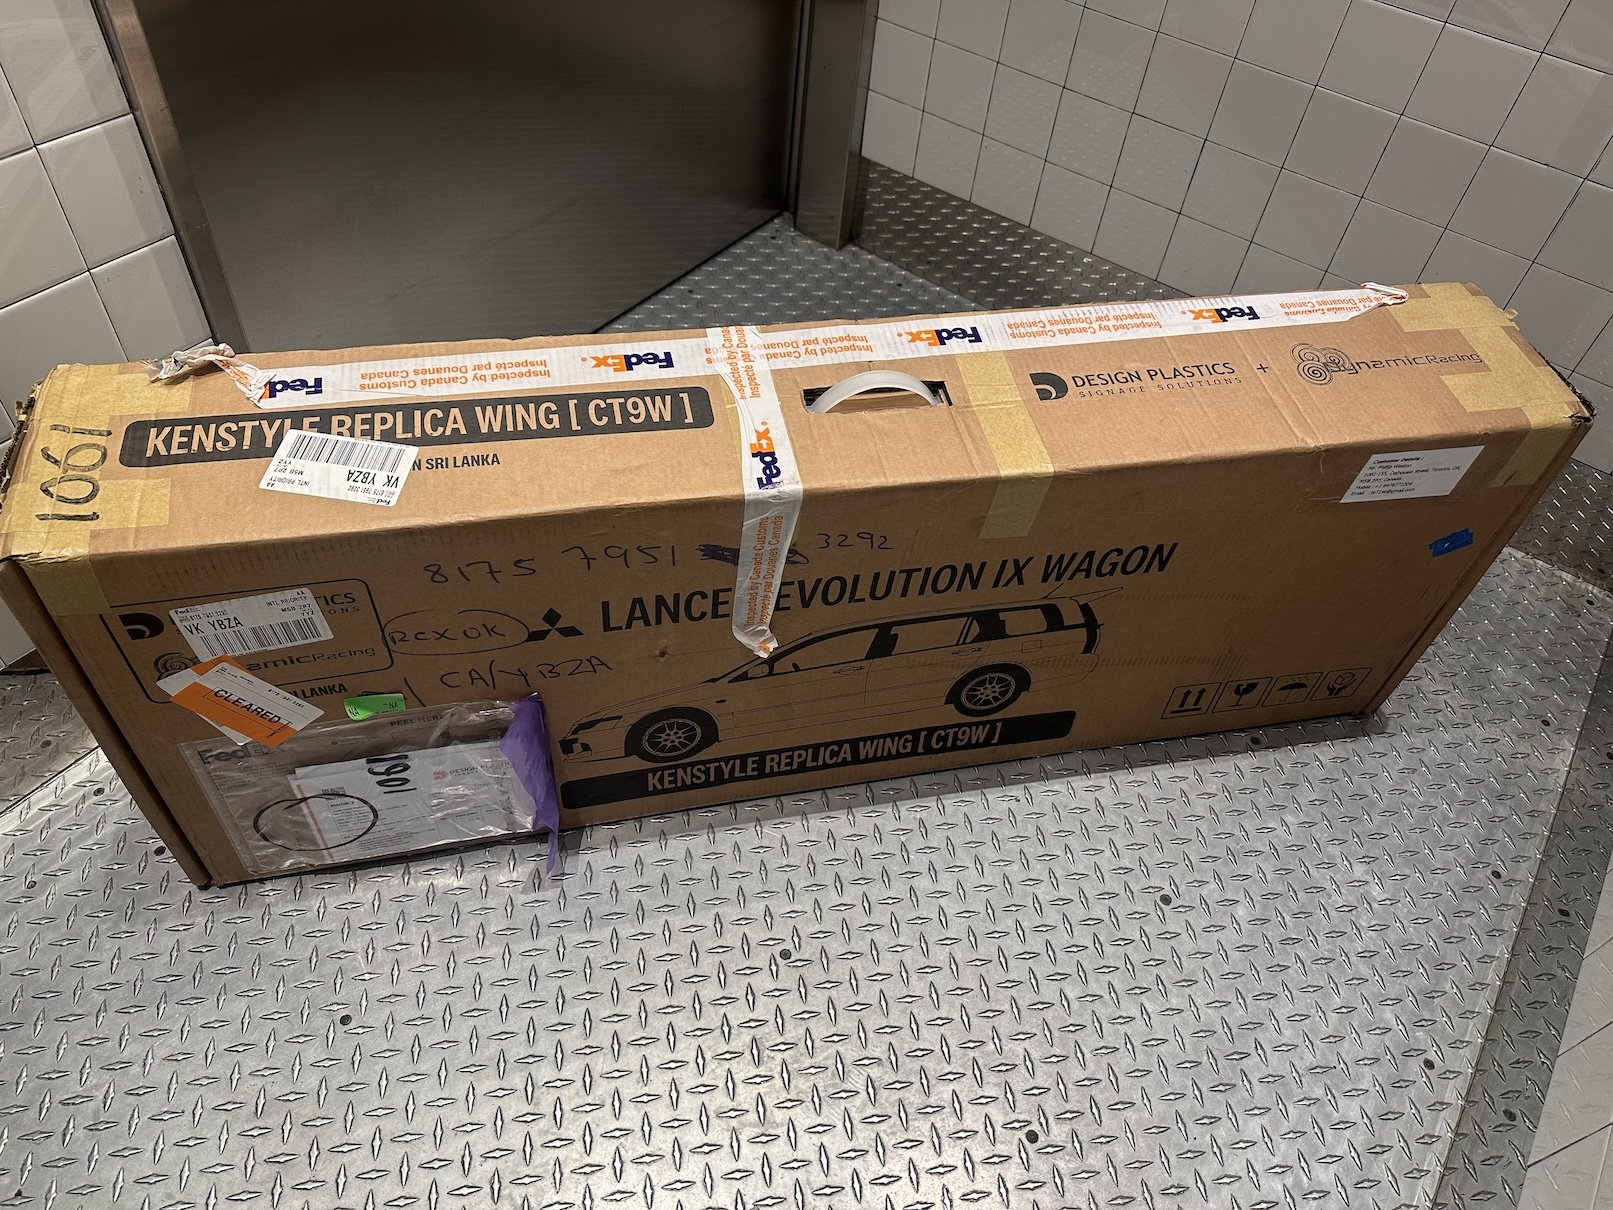
big wang arrived all the way from Sri Lanka. Canada customs definitely had a big nosey at what it is. So what is this 'Kenstyle' you may ask? It is a Japanese manufacturer of a rear spoiler that was originally destined for the Lancer Cedia in the early '00s, before the Evo Wagon was released: Out of the other wings available, such as the Ralliart which is big $$$ and hard to find and the Varis which has now been discontinued and even more harder to find The Kenstyle is by far my favourite - though it does have a caveat (as does the Ralliart) in that it requires fitting a regular Lancer wagon spoiler because they attach to the regular model spoiler rather than the larger Evo wagon spoiler. I did end up finding a genuine Kenstyle in NZ but it did not include the base model Lancer spoiler (which I have since found thanks to @Bluebird_U). I still was faced with the more serious and expensive problem of getting a rather large wang from NZ to Canada. Unlike the Ralliart CF front lip I was able to get away with cutting right in the middle at its smallest and least noticeable point, I can not do the same to the spoilers.
2 points
-
The door with the plasma cutting was pretty wonky, so ended up finding a replacement. Managed to get all of the doors paneled and into paint. A bit of dust and a couple of runs, but I'm definitely getting better with the paint gun. Now working on sandblasting the door hinges and cleaning up the boot lid, before reassembly, wet-dry sanding and a final coat. Stoked to be making some good progress again.
2 points
-
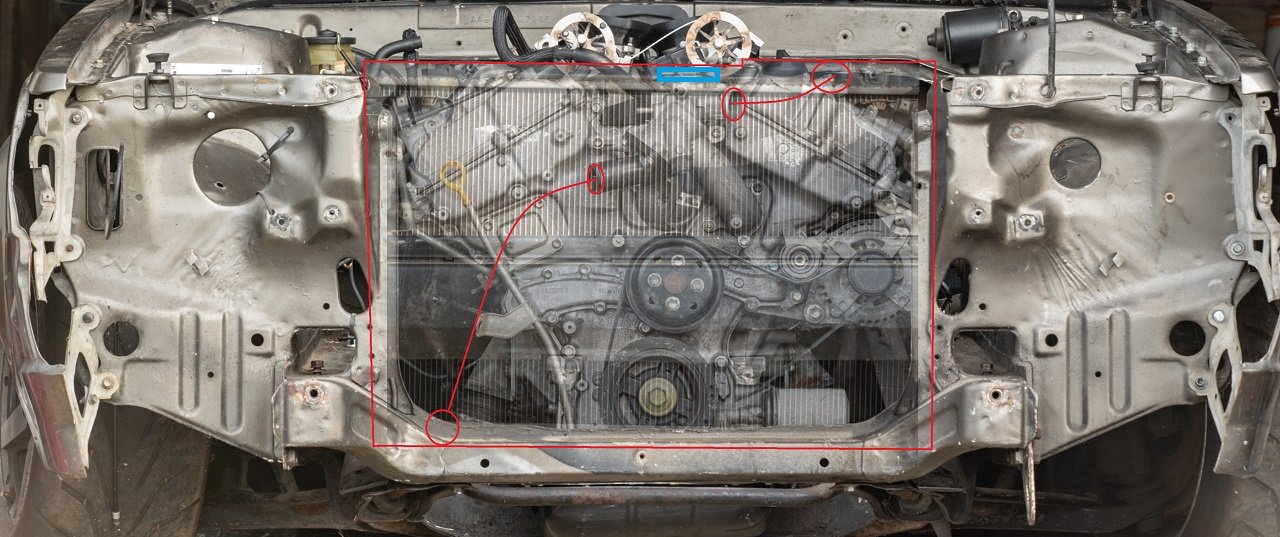
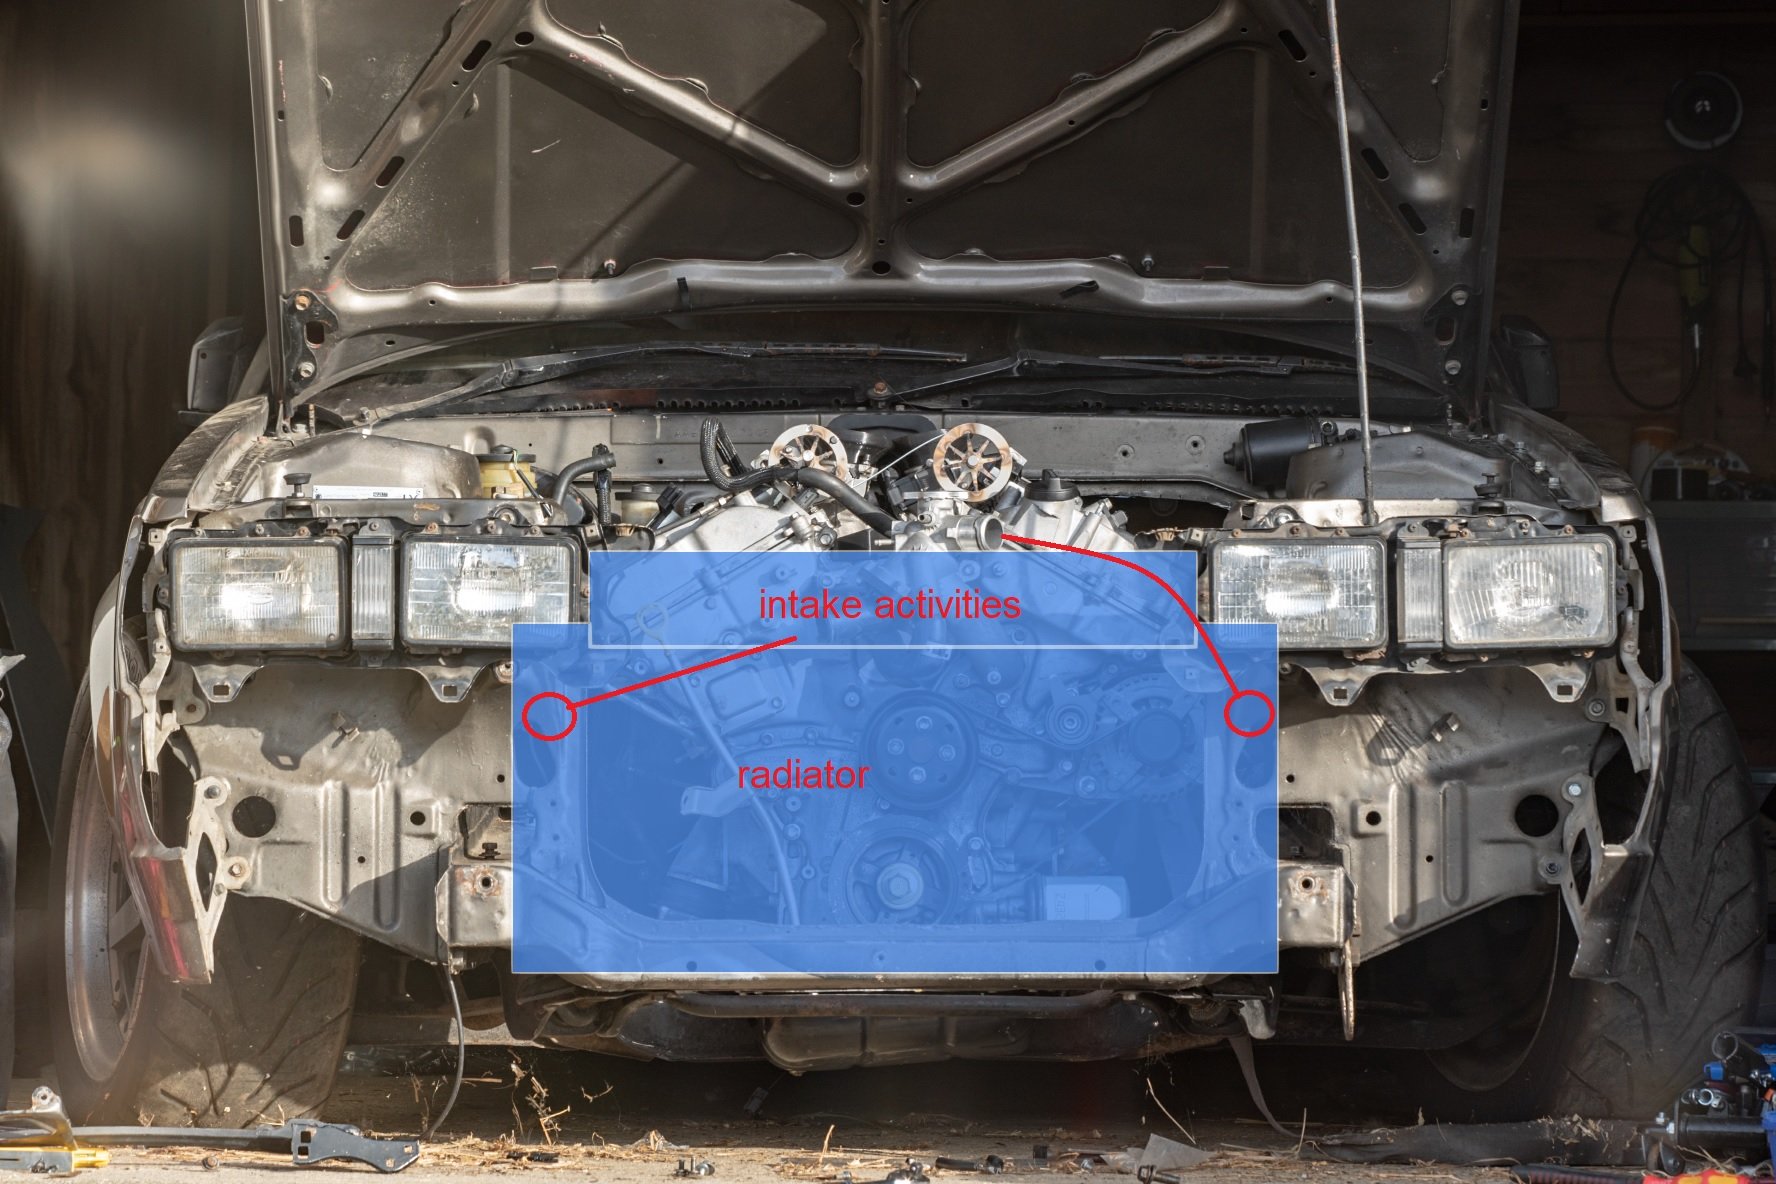
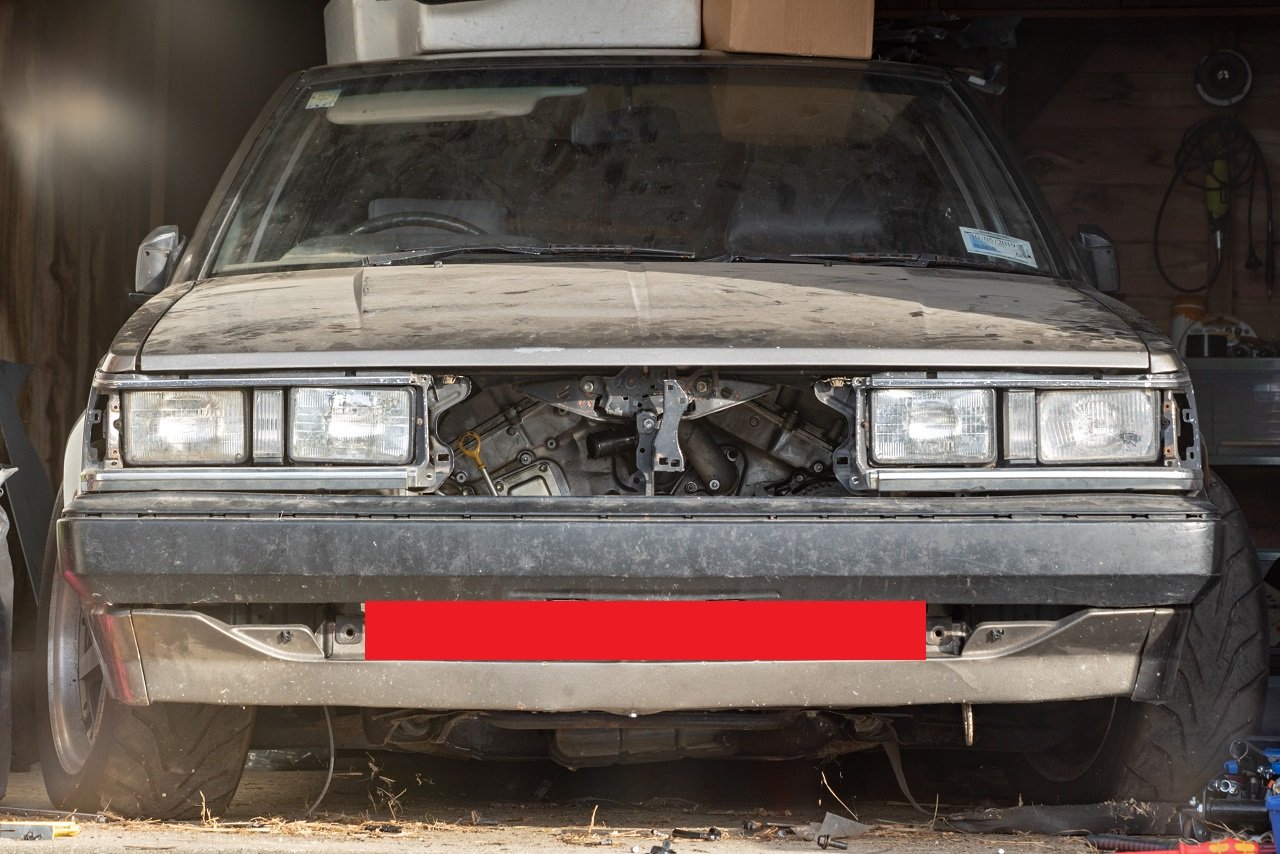
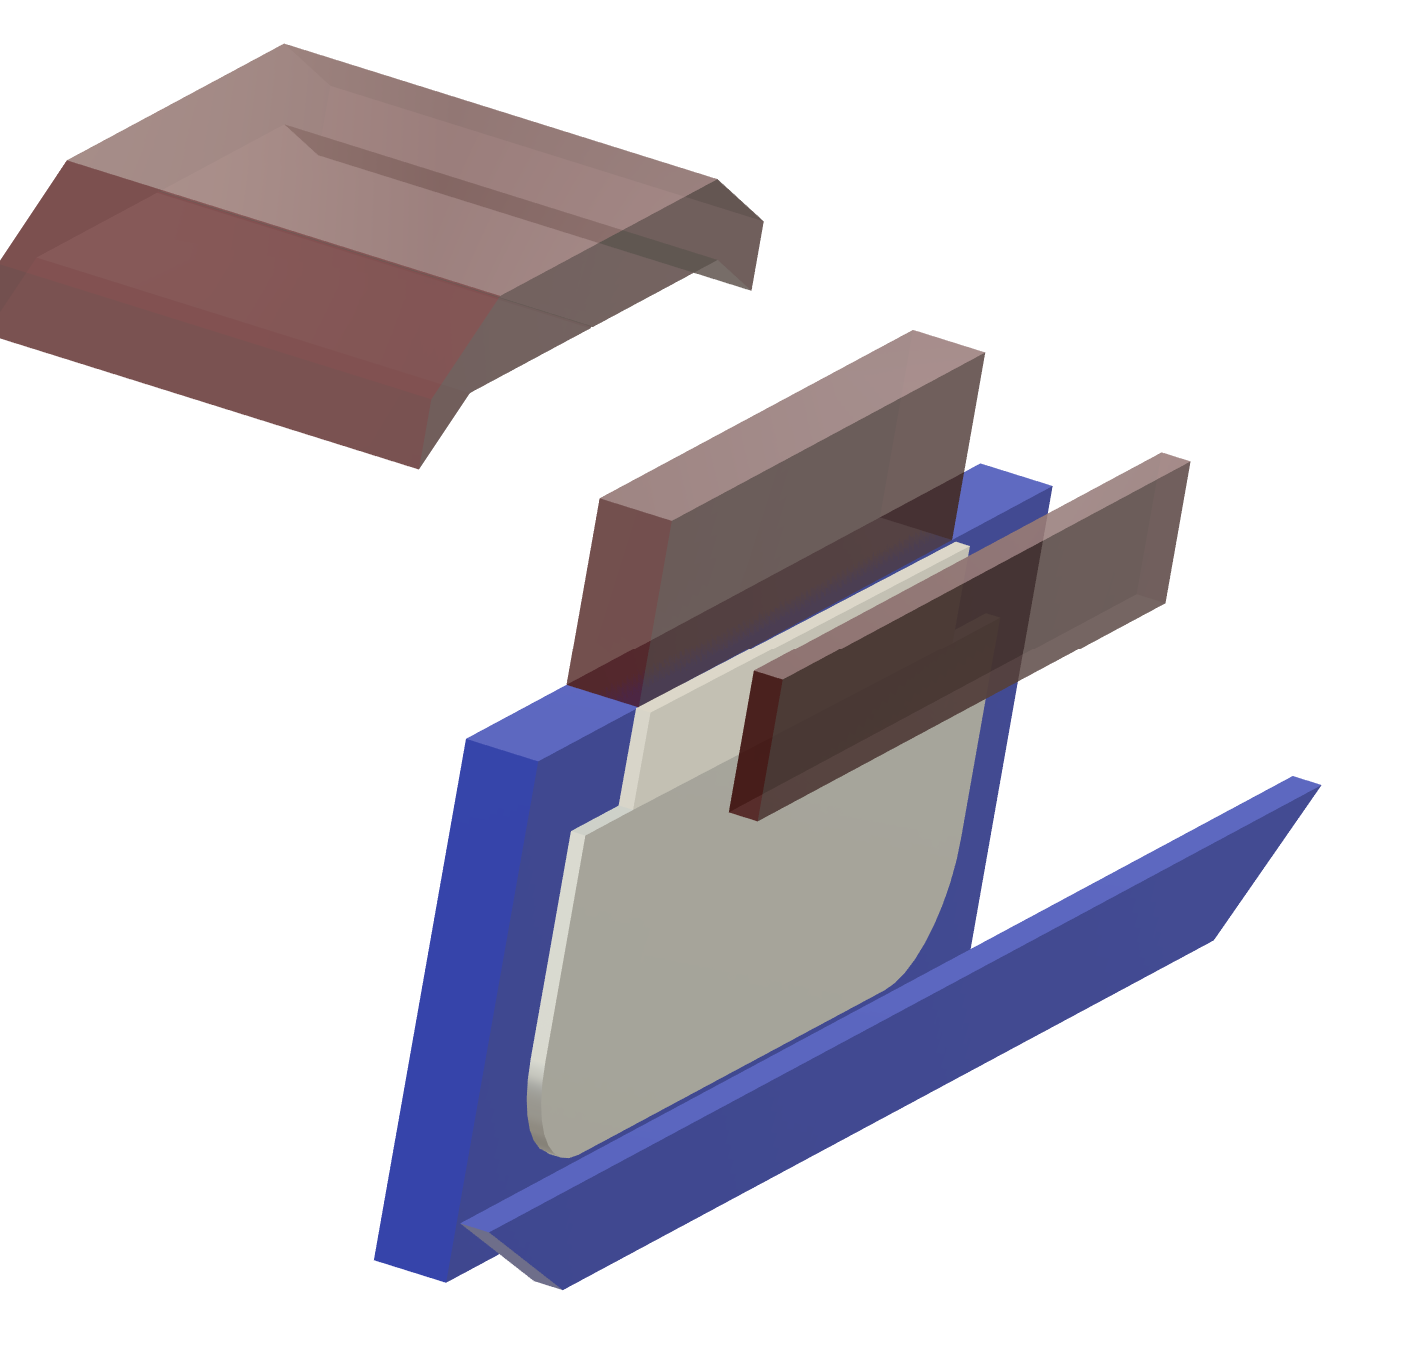
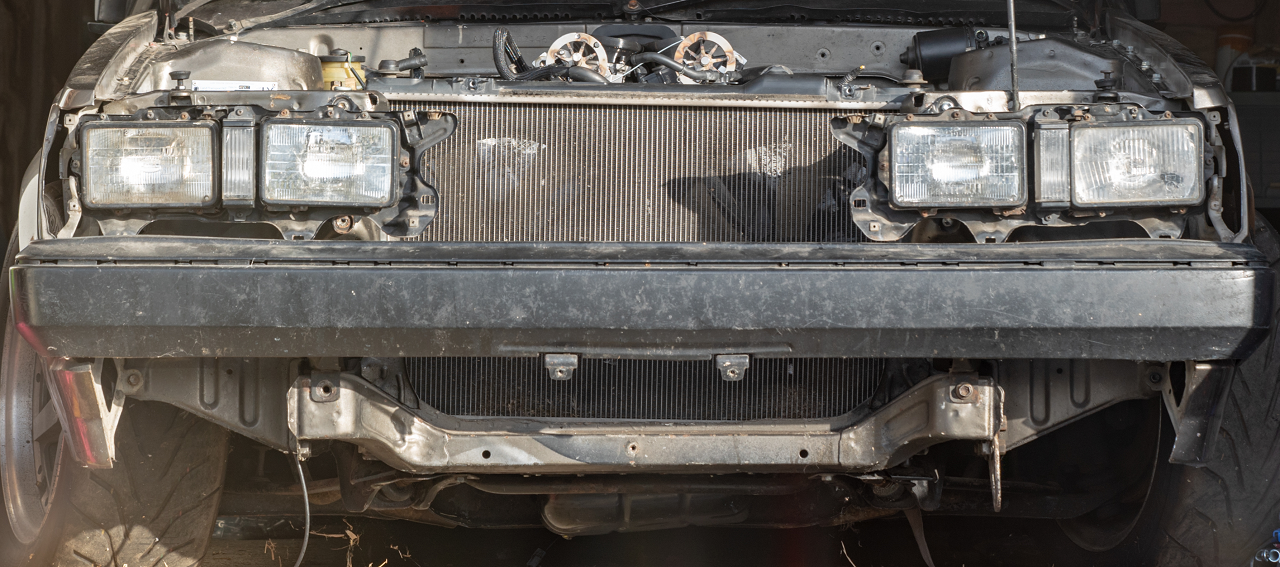
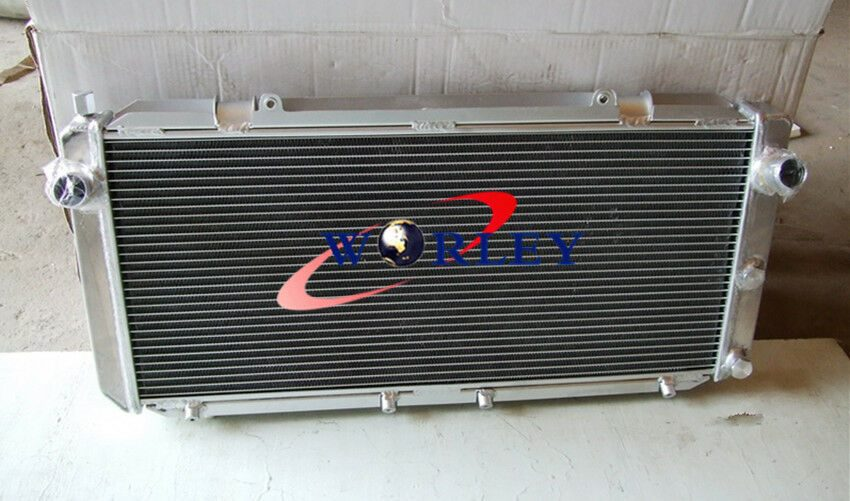
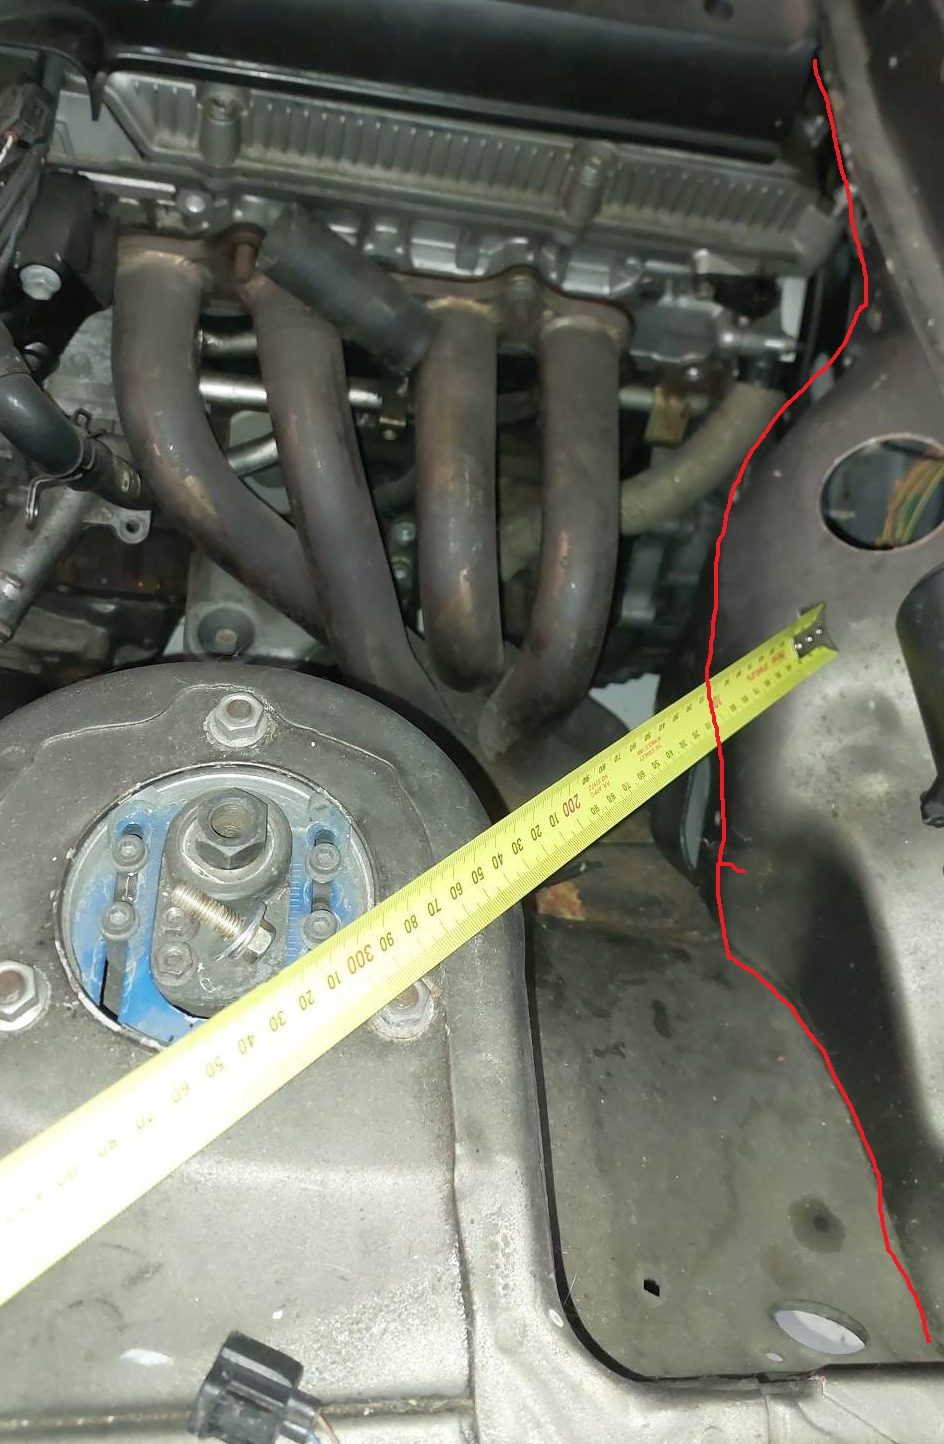
Radiator situation I've got the Mark X radiator in there currently, and although it made everything nice in a lot of ways in the back of my brain I know it's just not going to work quite right. As the top pipe sits too high. You can see it sits a little higher than the top crossmember too, and this isnt on any mounts yet. Just sitting hard against the bottom. The motor's radiator cap (in blue) sits a little lower than the radiator, and the top hose to the radiator flows uphill towards the radiator. All bad news for ever trying to bleed the air out of this thing. Another issue is that I'd love to have a front facing intake airbox that goes through to the front grill, like a lot of the BTCC type cars have. The best option I've found for a low, wide, twin core radiator that doesnt have a radiator cap (and does have an air bleed) is from an SW20 MR2. Being so much shorter, I can dedicate all of the front grill area for the intake. And they're a common upgrade item for MR2s, so cheap and plentiful. The radiator is 5mm wider than my chassis rails, but the end tanks are alloy and on the sides. So will just need a little slice and reweld to fit at the bottom. If I dedicate the top grill to doort noises, then I dont have a huge amount of frontal area for the radiator coming in from just underneath the bumper. Possibly need to remove the bonnet catch as well, but I'd prefer to keep it over having bonnet pins or whatever. This is a rough approximation of how much space I've got for each thing Red is intake stuff, blue radiator stuff, white is the open area that the radiator can get air through. So a lot of the radiator area will be fairly useless if hard mounted against the front of the car, as it wont get any air flow. so I'll try mount it as far back as I can towards the engine. All of this stuff is a bit off topic to my path towards getting the engine fired up, but I've been working on that too. Last night cut the fuel rails a bit shorter, so there's more room at the back. for the fuel dampers without hitting the body. Then also had the underside of the rails milled down so the throttle linkages dont hit the rail anymore. So that's just about all finished once I've retapped the ends and remade the AN lines to suit.
2 points
-
Axle shortening or joining, if it's just an axle, should be fine if it's done well and with a suitable weld process etc, take notes of what you do, what filler rods etc The exception to this is jag rear ends, this is because the driveshaft is the top suspension arm. These need a more specialized process because a failure would likely be way more badderer Battery- if your fuel system is modified then the CCM requirements apply, so battery has to be isolated from fuel in a non conductive box. I have had a customer with a stainless battery box who didn't want to change it, line the inside of the box with rubber sheet so it was no longer conductive between the battery and everything else2 points
-
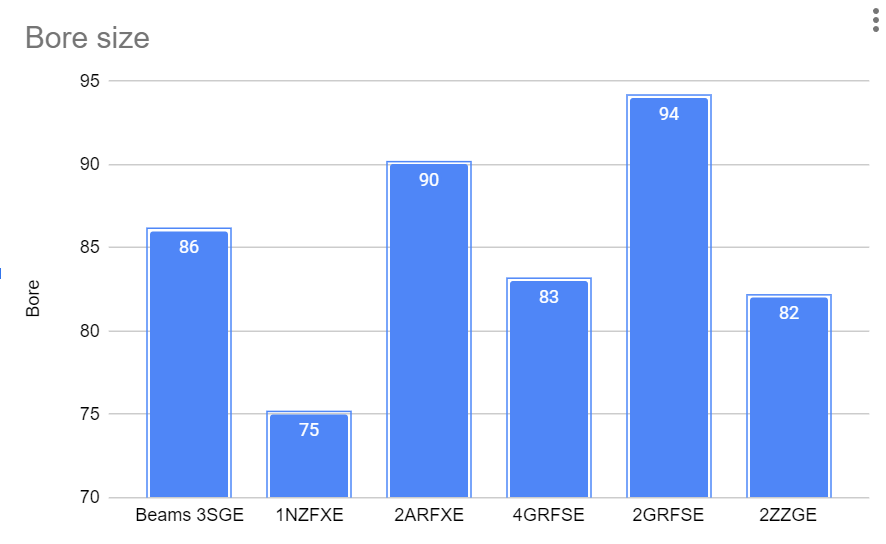
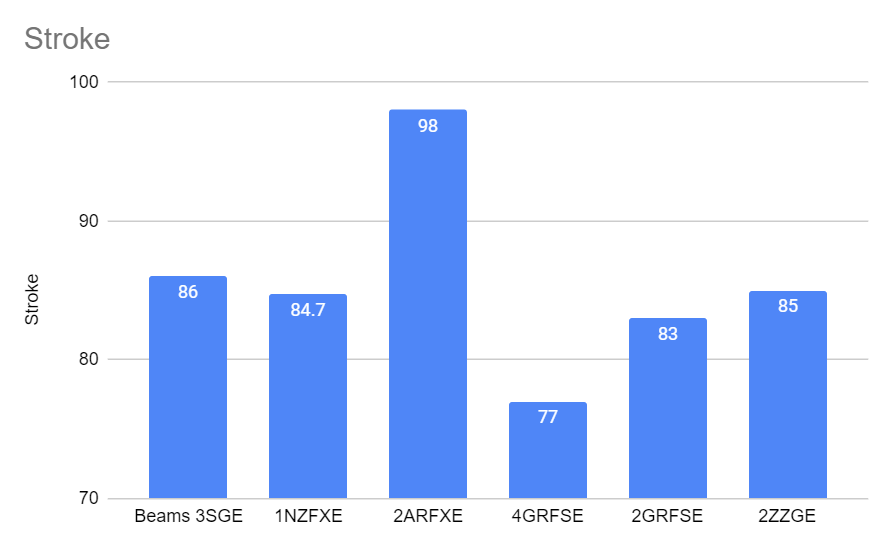
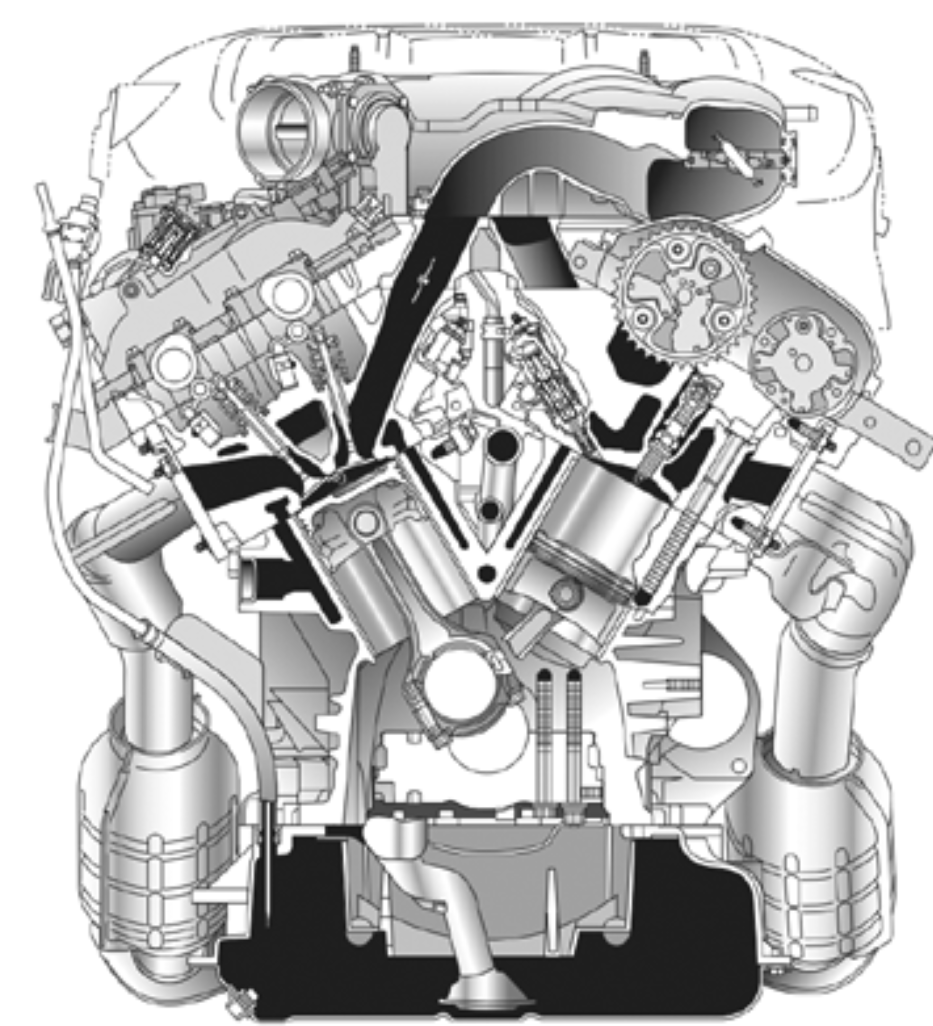
Long time no post. I've had this car for a long time, so it's not really a new project. However, it's been dormant for the last few years while I've been mulling over options for a new engine. New motor Criteria: -Capable of big rpm -less weight than beams motor -newer motor / alloy block -Be nice if it bolts to a J160 without adapter These are some of the engine options I've been going back and forth between: 1NZFXE NA Probably a bit too slow for a ~950kg rwd car... But maybe alright with a diff ratio change. Would definitely be the lightest option. Lots of room for activities with intake etc! 1NZFE+turbo This would be great because it would achieve nearly everything I want (lots of rpm, a power increase, less weight) However I do prefer NA motors for ease of working on but also tuning is more fun I think. This wont bolt up to a J160 directly, so that's a headache not present with some other options. Also the exhaust runs down the drivers side which is a bit annoying. Bike motor I am keen to do a bike motor project, but, I think this isnt the right car for it. Too big/heavy. But how cool are bike motors? Built with amazing ports, mega rpm, and sequential box that can shift near instantly. Bloody good. It just really excites me to buy a 10 second bike and turn it into a 14 second car haha. Have you considered a 2ZZ Yes, yes I have. Pluses to this are that it's lighter than a beams motor, VTEC! and built from the ground up for lots of rpm. Good power potential. Downsides - motors are hard to find, that arent either clapped out from high km, or needing to buy a whole car to get an engine. Needs a bellhousing adapter, exhaust runs down the drivers side (steering column/brake master cyl annoyances) Niteparts is currently working on fitting a 2ZZ to AE86, really excited to see how it turns out. 2ARFXE or 2ARFE This is a big late model 2.5 liter 4cyl motor that's gaining popularity for modding. The FXE version uses the same tricks as the Echo motor, however, the factory cams have some pretty decent lift and duration unlike the 1NZ. So it looks like the popular cheapish option is to use a second intake cam in the exhaust side, then you've got 270deg cams with 11mm lift. Pretty sweet. Downsides? It's a tall bugger. I'm definitely not wanting to do anything that requires cutting the bonnet. Might not fit. Also, it would be weight neutral rather than losing any weight from front of the car which was one of the goals. Since it has quite a long stroke, it probably cant rev as high as I'd like. I'm more concerned about engine sound/feel/revvyness rather than outright power. It's a good option, especially if it can bolt to a 3S bellhousing - but being rpm limited to 7500 or something. Blargh! So, yeah. Those were the options I've been considering and trying to decide between. However while browsing through Dodson's trademe site for cheap big block 4 cyl FXE engines I spotted something interesting that I'd not considered... A new challenger appears! 4GRFSE Now this is a bit of a WTF option but hear me out. The 4GR's big brother, the 2GR. Is a 3.5 liter V6 that is commonly swapped into MR2s etc, because can bolt up to a 3S bellhousing. However most of the 3.5 liter versions suit having the motor tipped over for east/west config. I think you need to buy a Lexus motor to get the RWD config motor, and uhhh yeah. Lexus tax. The 4GR is the 2.5 liter direct injection V6 from a Toyota Mark X, which is setup for FR config. It's got a rear mounted sump, which by eyeball should easily fit behind Carina crossmember. Also, they're cheap and readily available as Mark X are a fairly common car. Why not 2GR for an extra liter of displacement? Well, the 2GR makes good power but it's got a big bore, big stroke, and will be rpm limited on factory pistons to less RPM than I'm willing to settle for. The short stroke and smaller bore of the 4GR motor means pistons/rods are lighter and the mean piston speed is considerably lower at a given rpm. To be honest I've never really considered a V6 because I think a 4 cyl motor is more in keeping with the spirit of the car. But when you look at the numbers, there's no way to get an off the shelf 4cyl motor that has a big enough bore and short enough stroke for mega rpm. Even the tiny 1NZ has rpm disadvantages compared to it. Another interesting aspect, is that since this motor is DI only from factory. It doesn't have any injectors in the ports, which usually seem to result in more angle on the port. In this case the DI injectors are mounted below the intake ports, so it's got STEEP intake ports. Another good sign for high rpm. The downside is that as per every DI only engine, the intake ports clog up with shit. Solved by converting back to regular injection. Still thinking "why a V6?" (boooo) I think it's going to be possible to get a semi reliable 10k rpm from this motor. Honestly how many engines are capable of running to 10k? How good is that. If these numbers stacked up the same way with a 4cyl motor, I'd use that. But they dont. Also to remove any doubt of this motors absolute peak performance potential this son of a bitch has a modern day TVIS equivalent. shit a brick. I've come to realize from the echo that revving the absolute bejesus out of something puts a smile on your face for longer than outright power does. This motor, the bottom end at least, should be 10k rpm capable with considerably less stress on the motor than any other option from the Toyota stable that I can see. Here's some graphs, because, well, it's my thread and thats how it goes. Bore size 4GR is about middle of the range for bore size, which is a good indicator of piston weight. Keeping in mind that piston area goes up non linear to diameter, so only a few mm more can mean a considerably heavier piston. pistons will definitely be a a fair chunk lighter than 2AR or 2GR options. Stroke length 4GR has got by FAR the shortest stroke out of options. Nearly 8mm shorter stroke than a 1NZ. Considerably shorter stroke than a 2ZZ, which is a pretty good benchmark for a high rpm capable engine. God damn delicious! Compression ratio Lower than some of the options, nothing beats the 1NZ! However 12:1 is still awesome, the fact it's a non hybrid factory engine with CR that high is great. Rod length (Thats what she said) 2AR has the longest rod, but it's also got the longest stroke. Apparently the 2GR and 4GR have the same rod length, which would mean the 4GR block must be more compact. Good news for keeping the engine height down a little. Nearly 10mm longer rod than a 2ZZ. Rod/stroke ratio The highest the rod/stroke ratio number is, the straighter the rod stays when travelling up and down the bore. So less side loading on the bore. This is generally considered a good thing for high rpm, and it also changes how long the piston dwells at TDC and BDC. (higher number favorable for more rpm) An S2000 has a rod ratio of 1.82:1 Having a 1.92 rod ratio is god damn glorious for high rpm from a factory engine. Mean piston speed Rather than picking an RPM and listing the mean piston speeds, I've chosen a mean piston speed (4500 feet per second) then shown how high each motor can rev when reaching this number. The 4GR does wees over everything else. Keep in mind that I'm revving 1NZ to 9k currently, which would be same piston speed as nearly 10k with the 4GR. (4GR will have a heavier piston though to be fair) Sooooo yeah. I think a 9500-10,000rpm motor should be doable, as there are big cams available. If so, it will be friggen wild. Well, there are big cam and stiff valve spring options available for the 2GR - but I'm not yet sure if these will fit the 4GR. Looking at pictures of the head gaskets, it looks like the 4GR has the same bore spacing but just bigger gaps between cyls. I've bought a motor to test fit everything initially. It's not much of a gamble as they're reasonably cheap. I'm hoping things will all work out, but there could be some issues yet. Good thing I got some practice using a hand drill to modify engine blocks with the 1NZ. Might need these skills. Here's a few pics of the next modern Toyota FE motor I'm planning to turd polish into oblivion. I'm super excited about this! There's still a zillion reasons why it might not work out, or something doesnt fit, or blah blah blah. But if it all works how I'm hoping, it's going to be cool as hell.
1 point
-
Please keep an eye out around papakura sth auckland area only got It back on the road a couple of weeks ago :(1 point
-
Cheers, This crusty trailer isn’t far from me, but reckon I might give it a miss. Not because it has hardly any lights, but the suspension looks suss. There’s others a few hours away that have leaf springs and for not much more.1 point
-
Regards the driveshafts. I chatted to my hotrod friend, ran the two ideas I had come up with and he suggested an even neater, stronger, failsafe way to do it. But I had to get another pair of scooby shafts because I'd already chopped the ones I had down in length I won't go into details here because I'll spend enough time doing that in the build thread but I'm super happy with the results. As for fuel tank, yeah since I've added a bolt down hatch to place the pump inside is now modified so I'll look for a suitable plastic box* for the battery (it's quite small though) I can't line my alloy box because I made it to suit the battery and it's bloody snug in there. I could line the outside but it would end up messy I bet. *off Alex goes - rummaging through the Sistema range of kitchenware/fuel tank/battery boxes at the warehouse.1 point
-
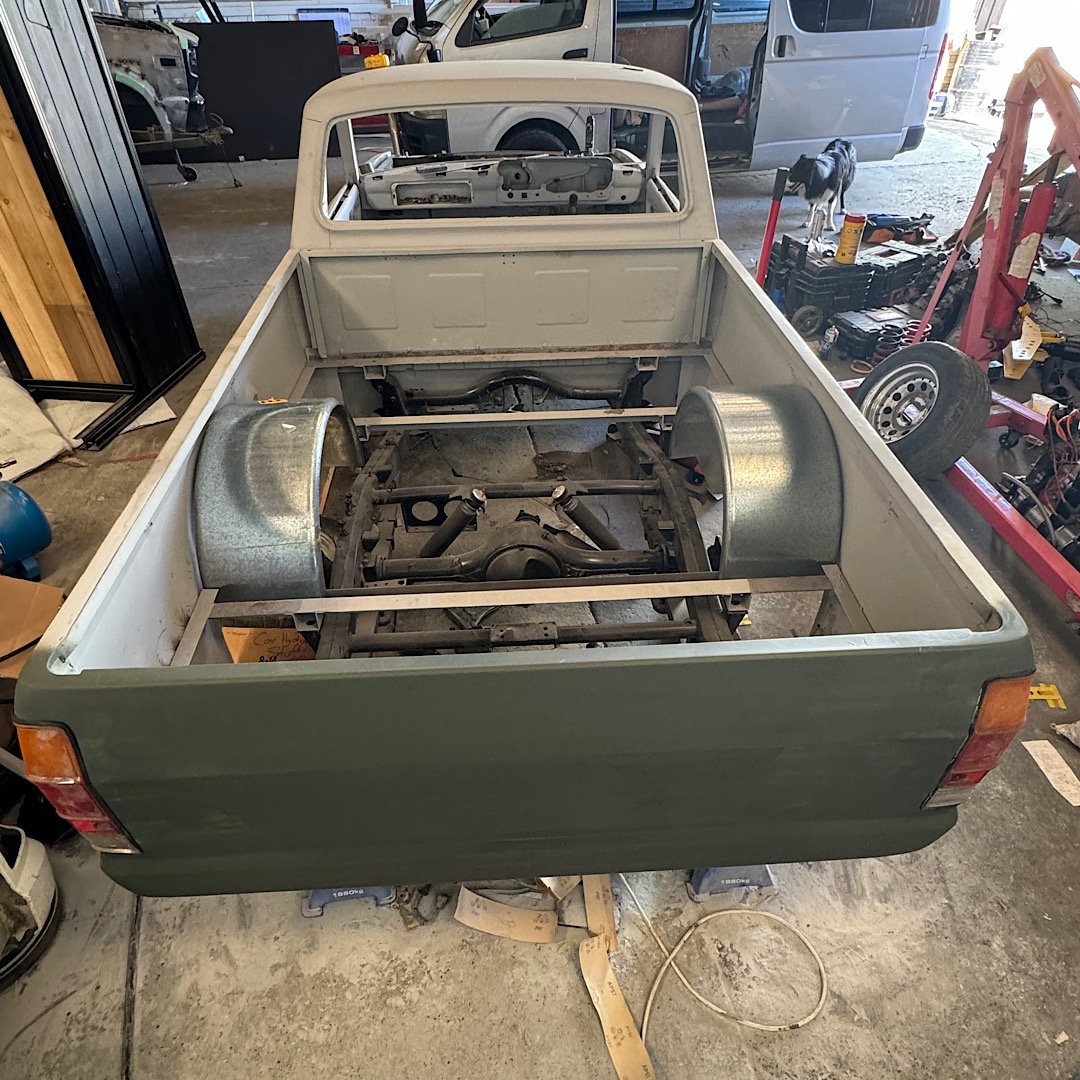
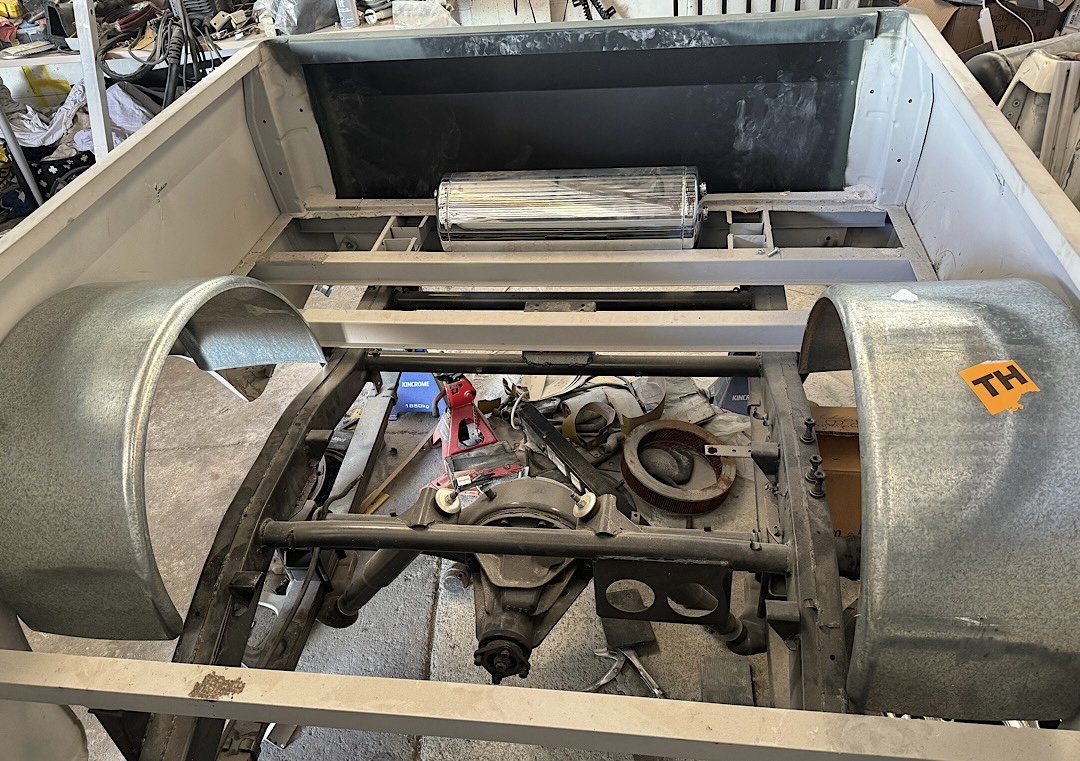
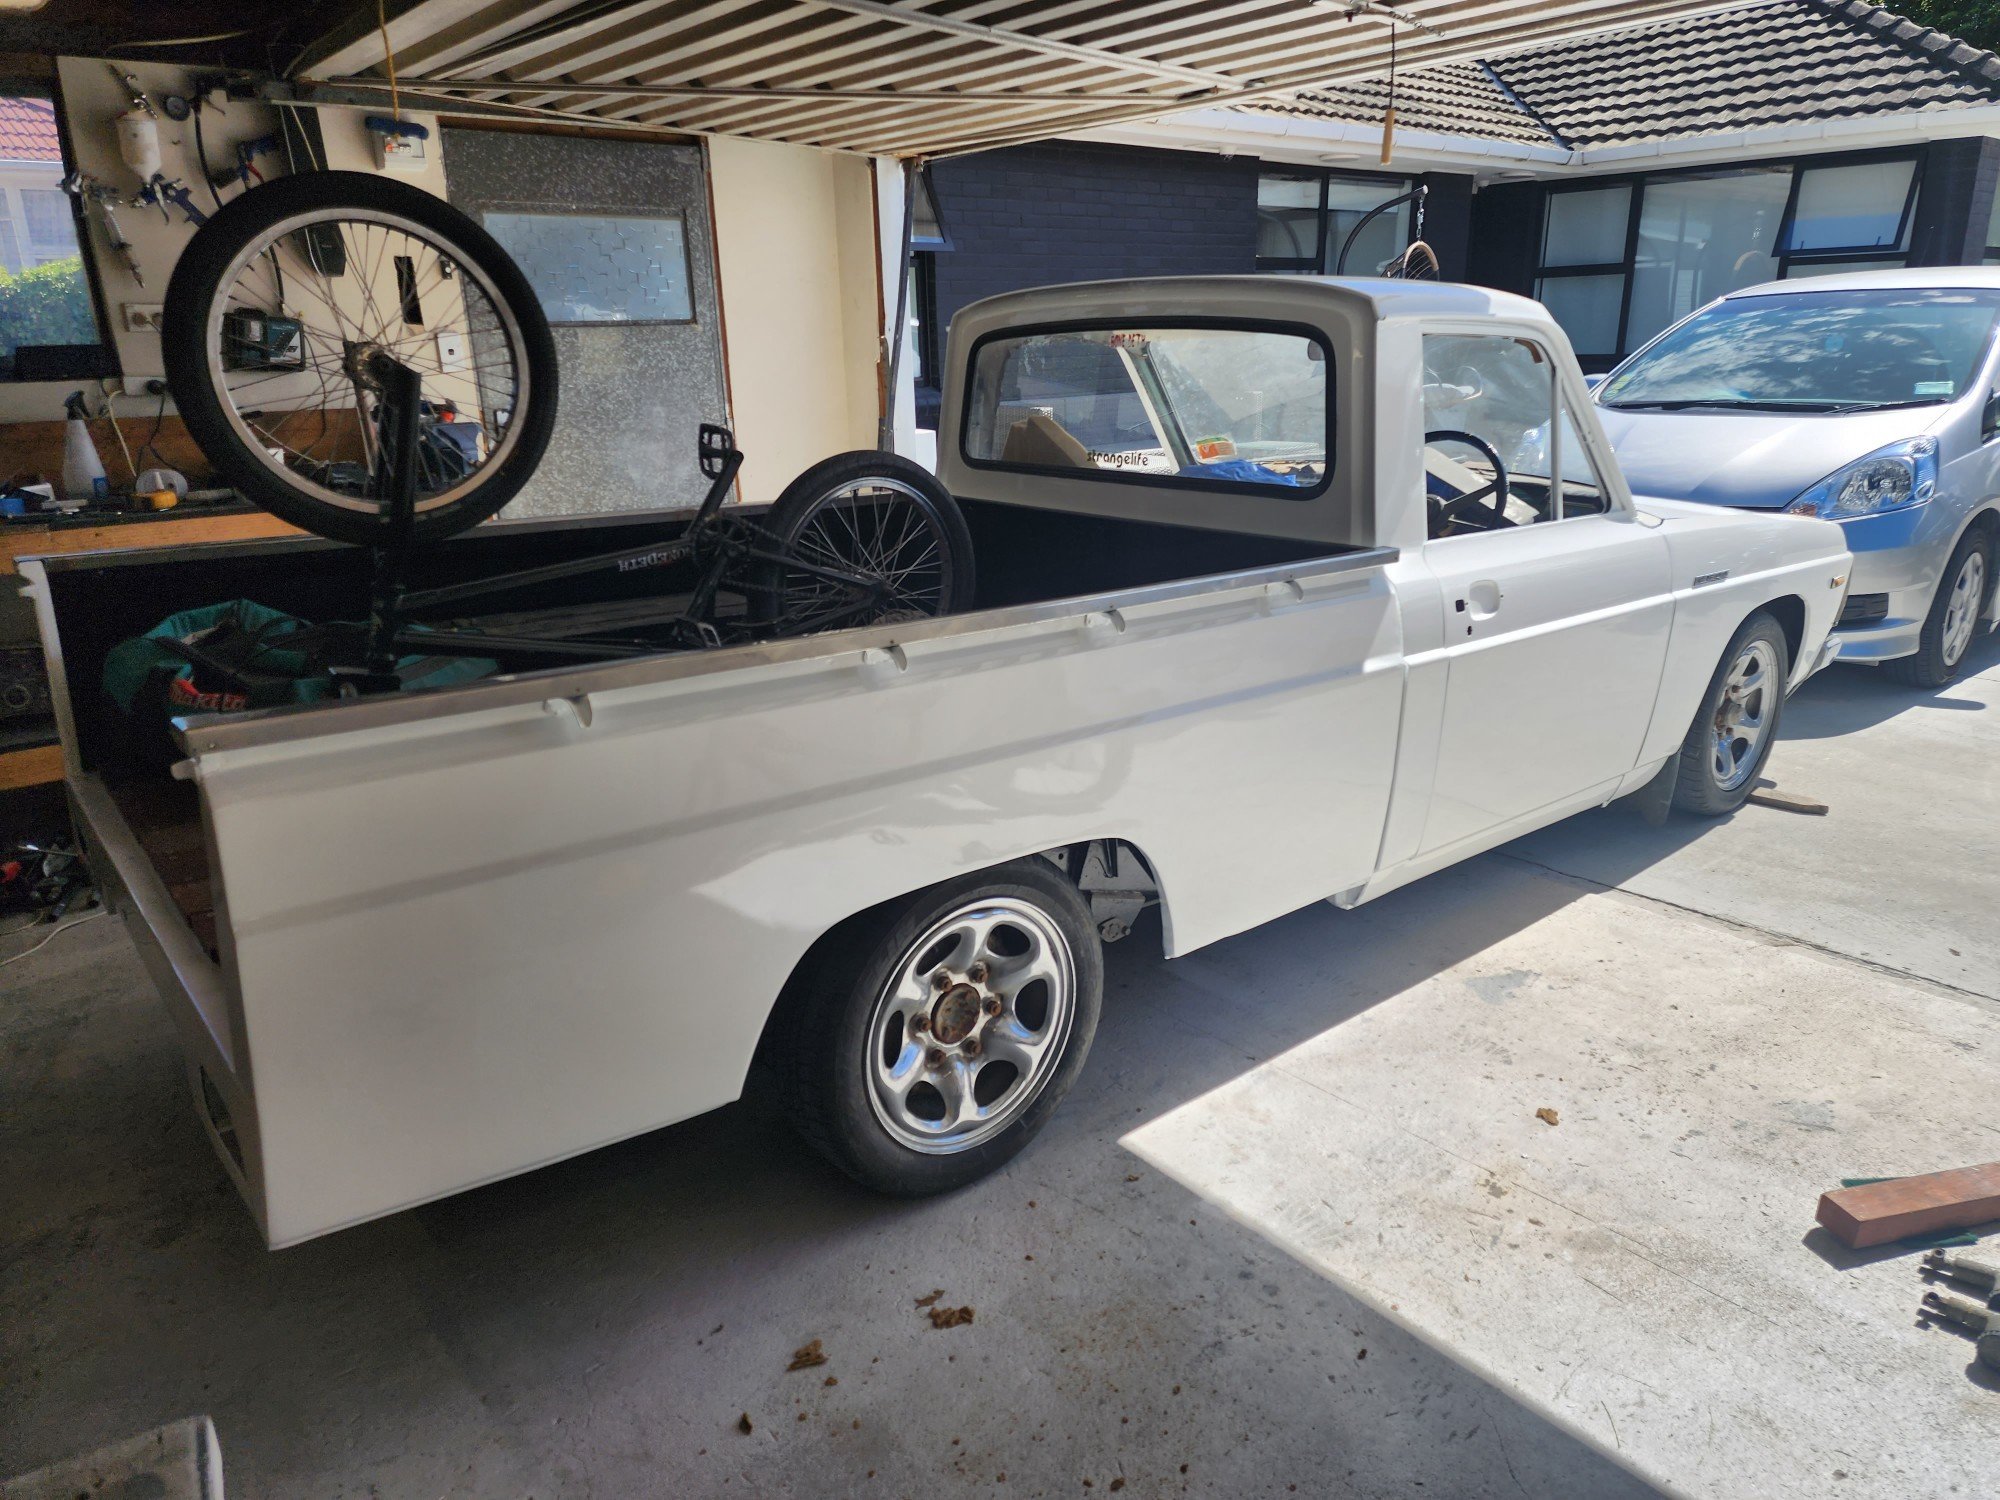
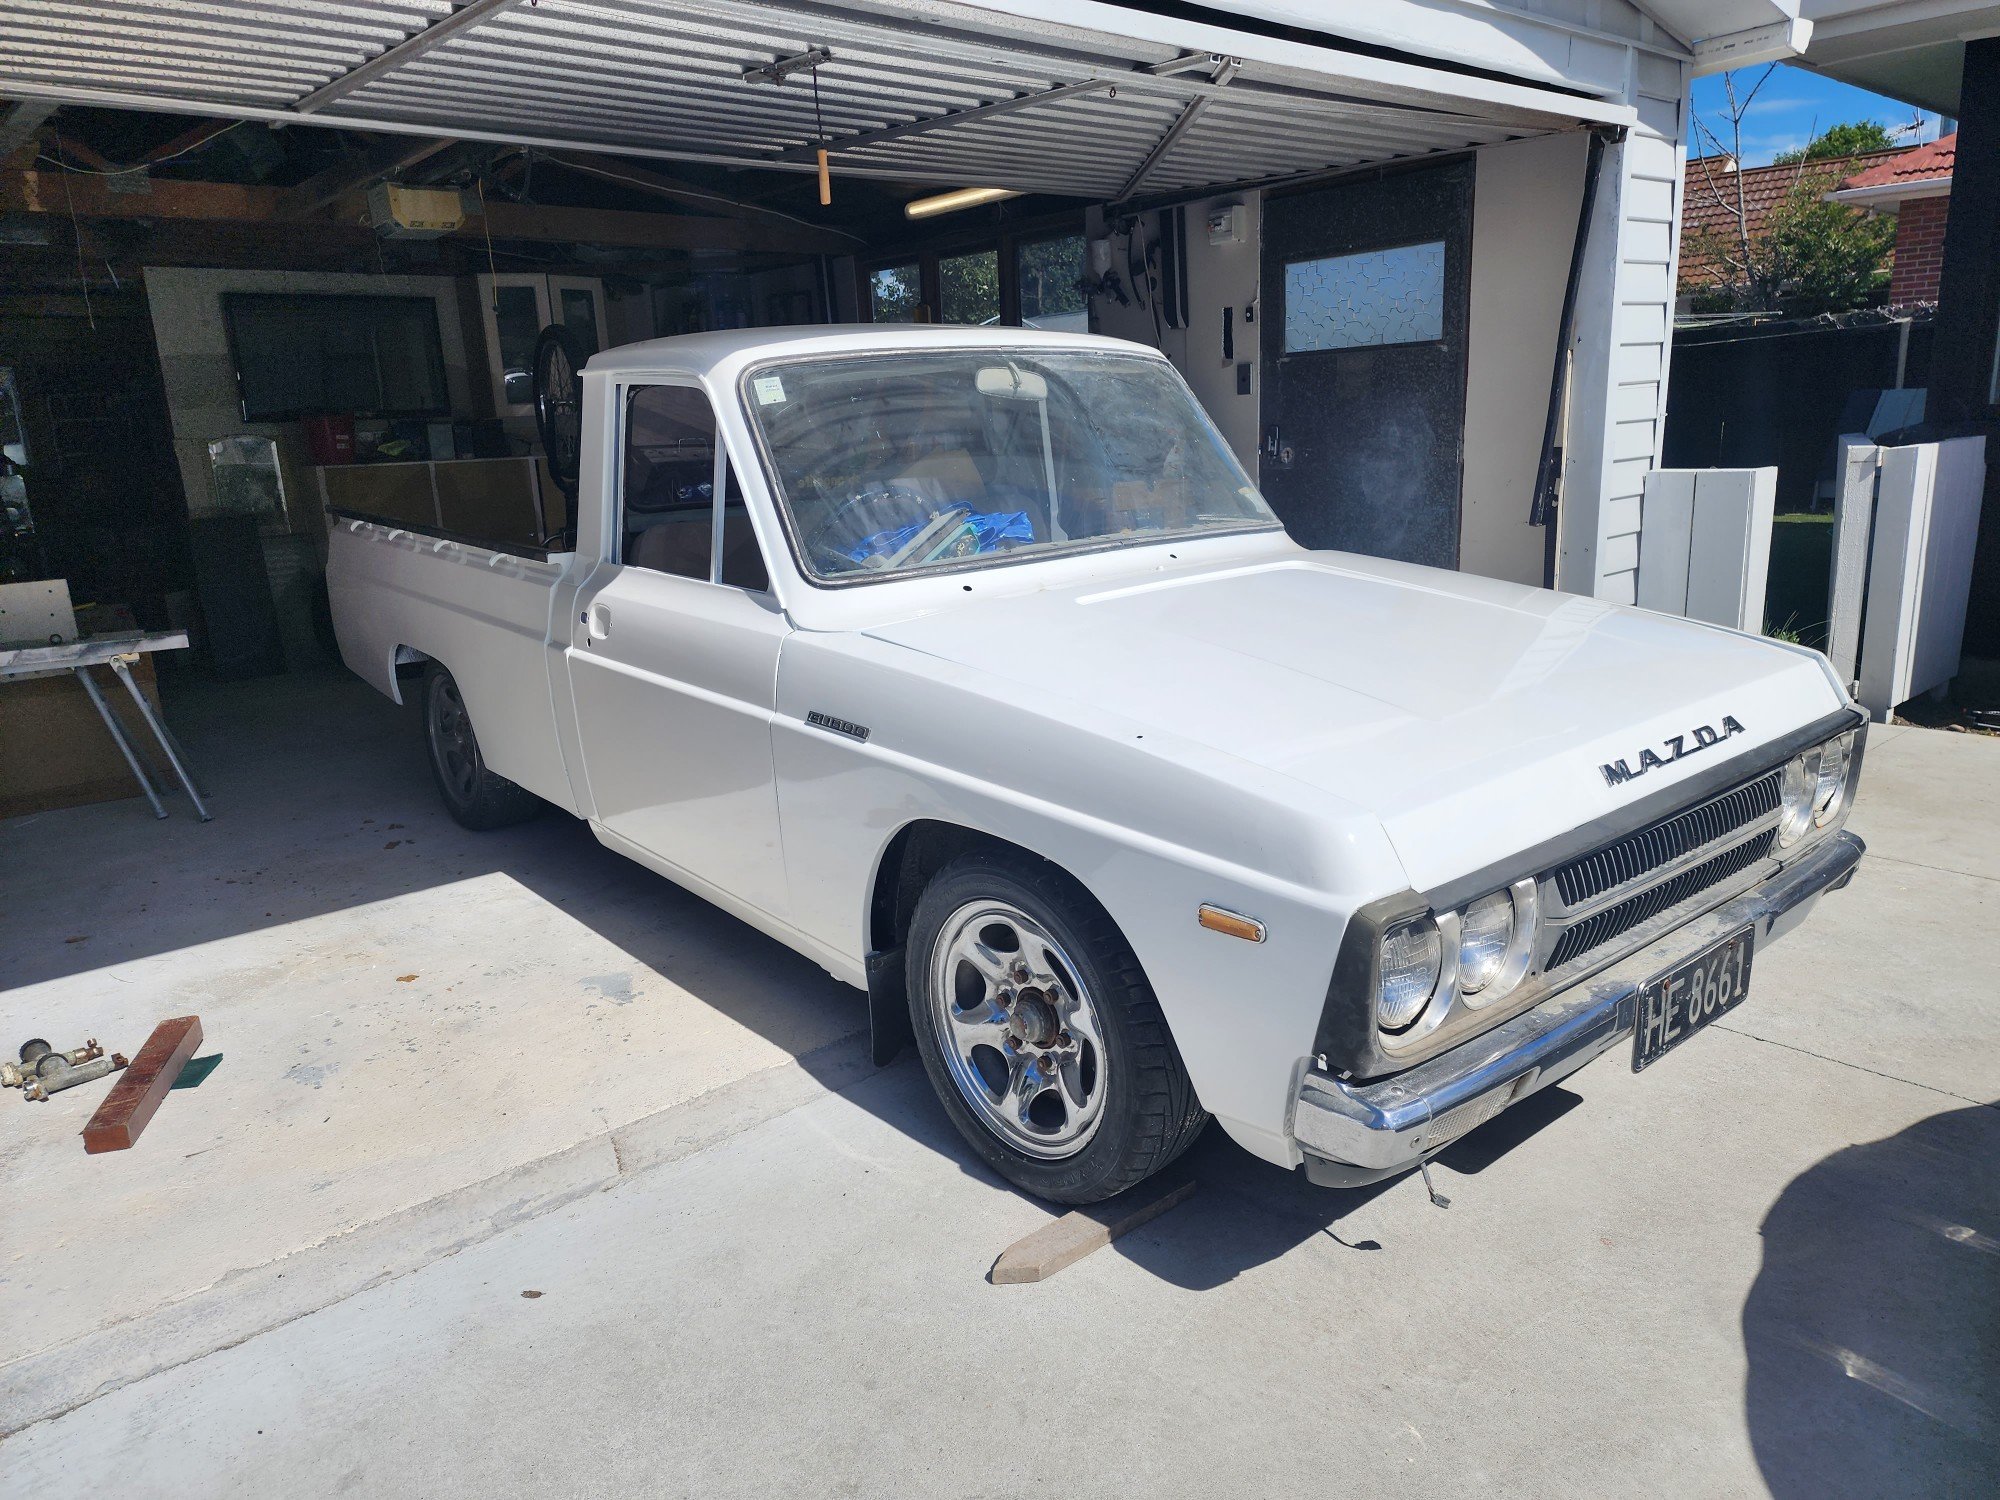
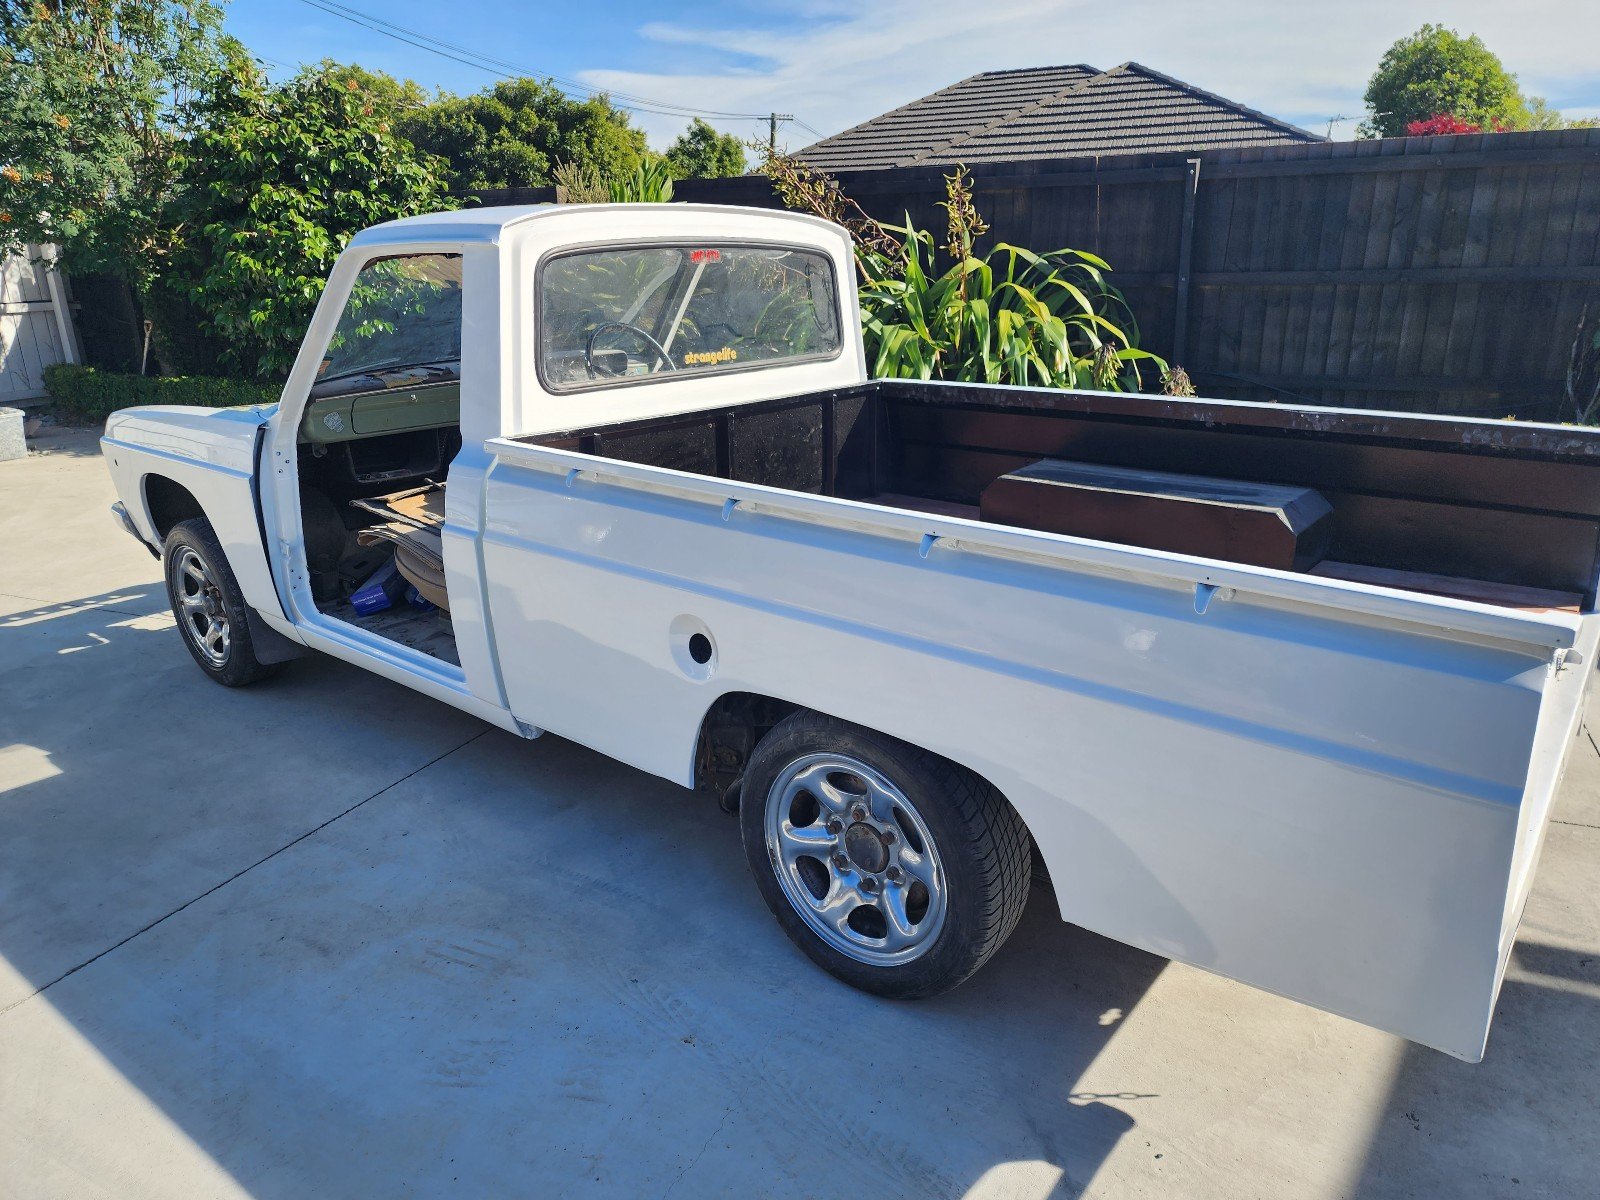
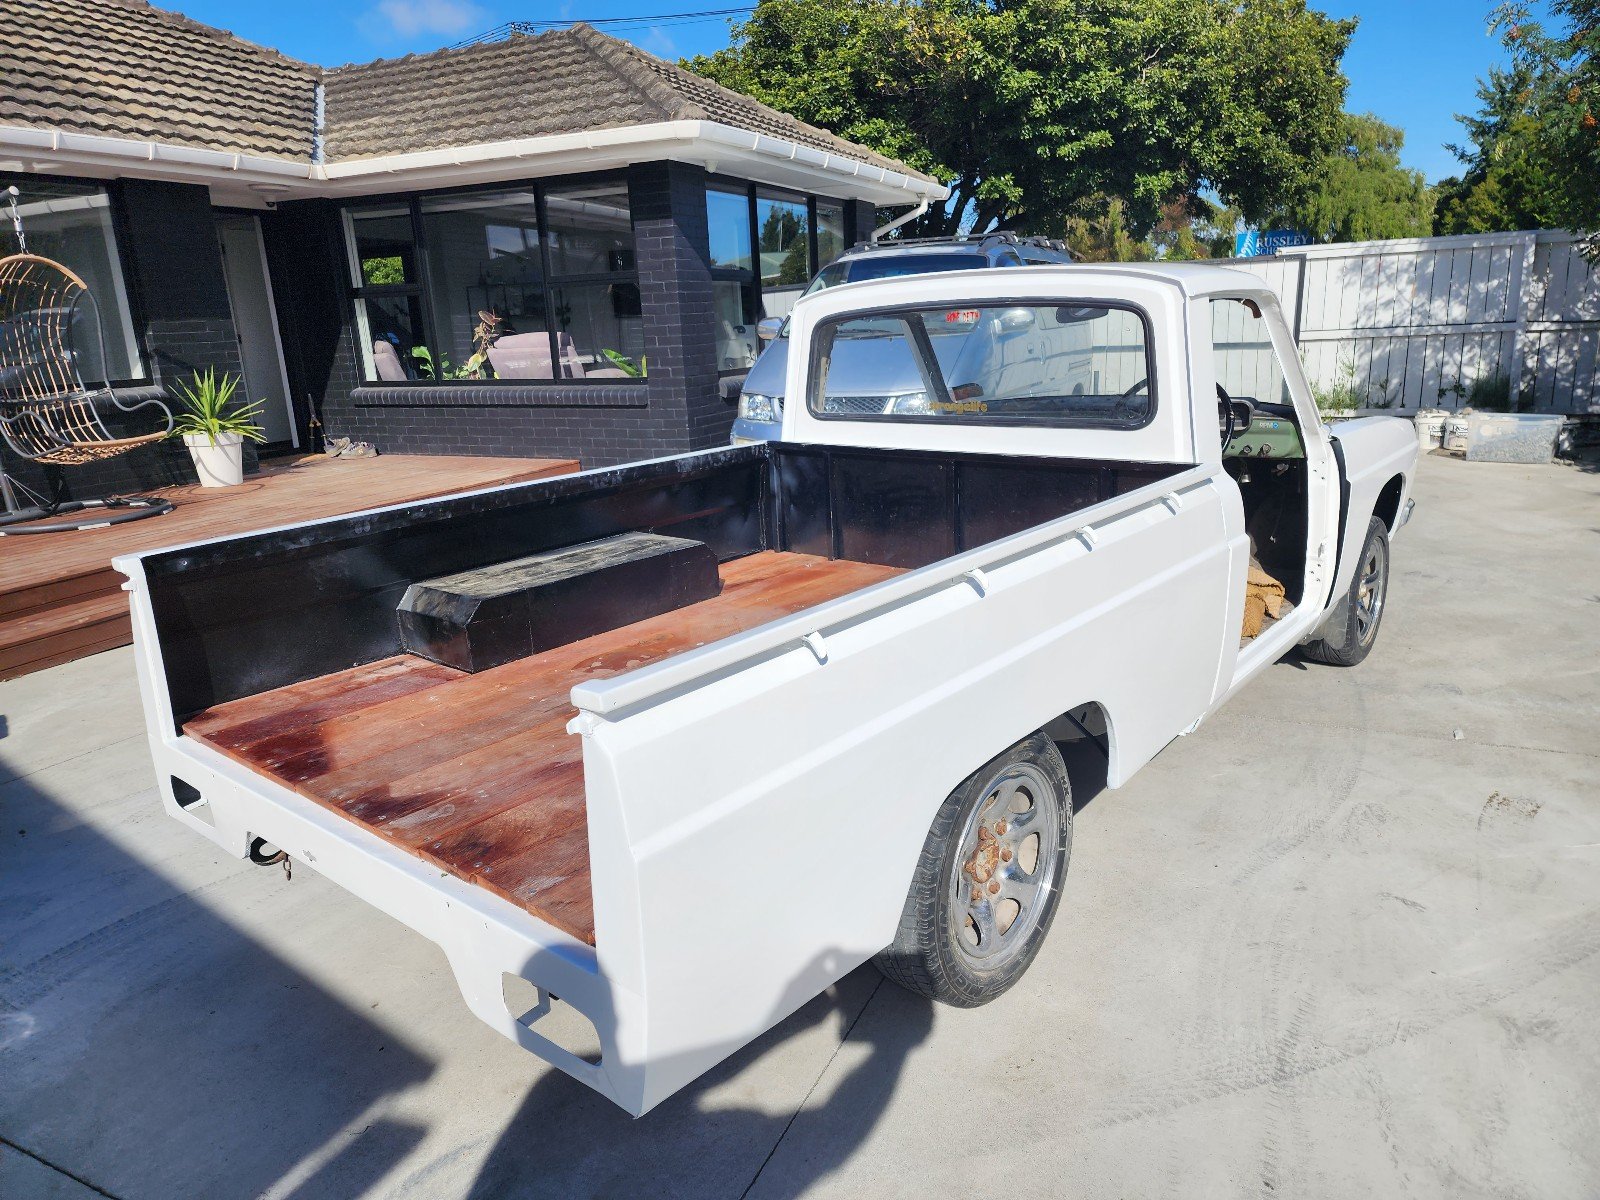
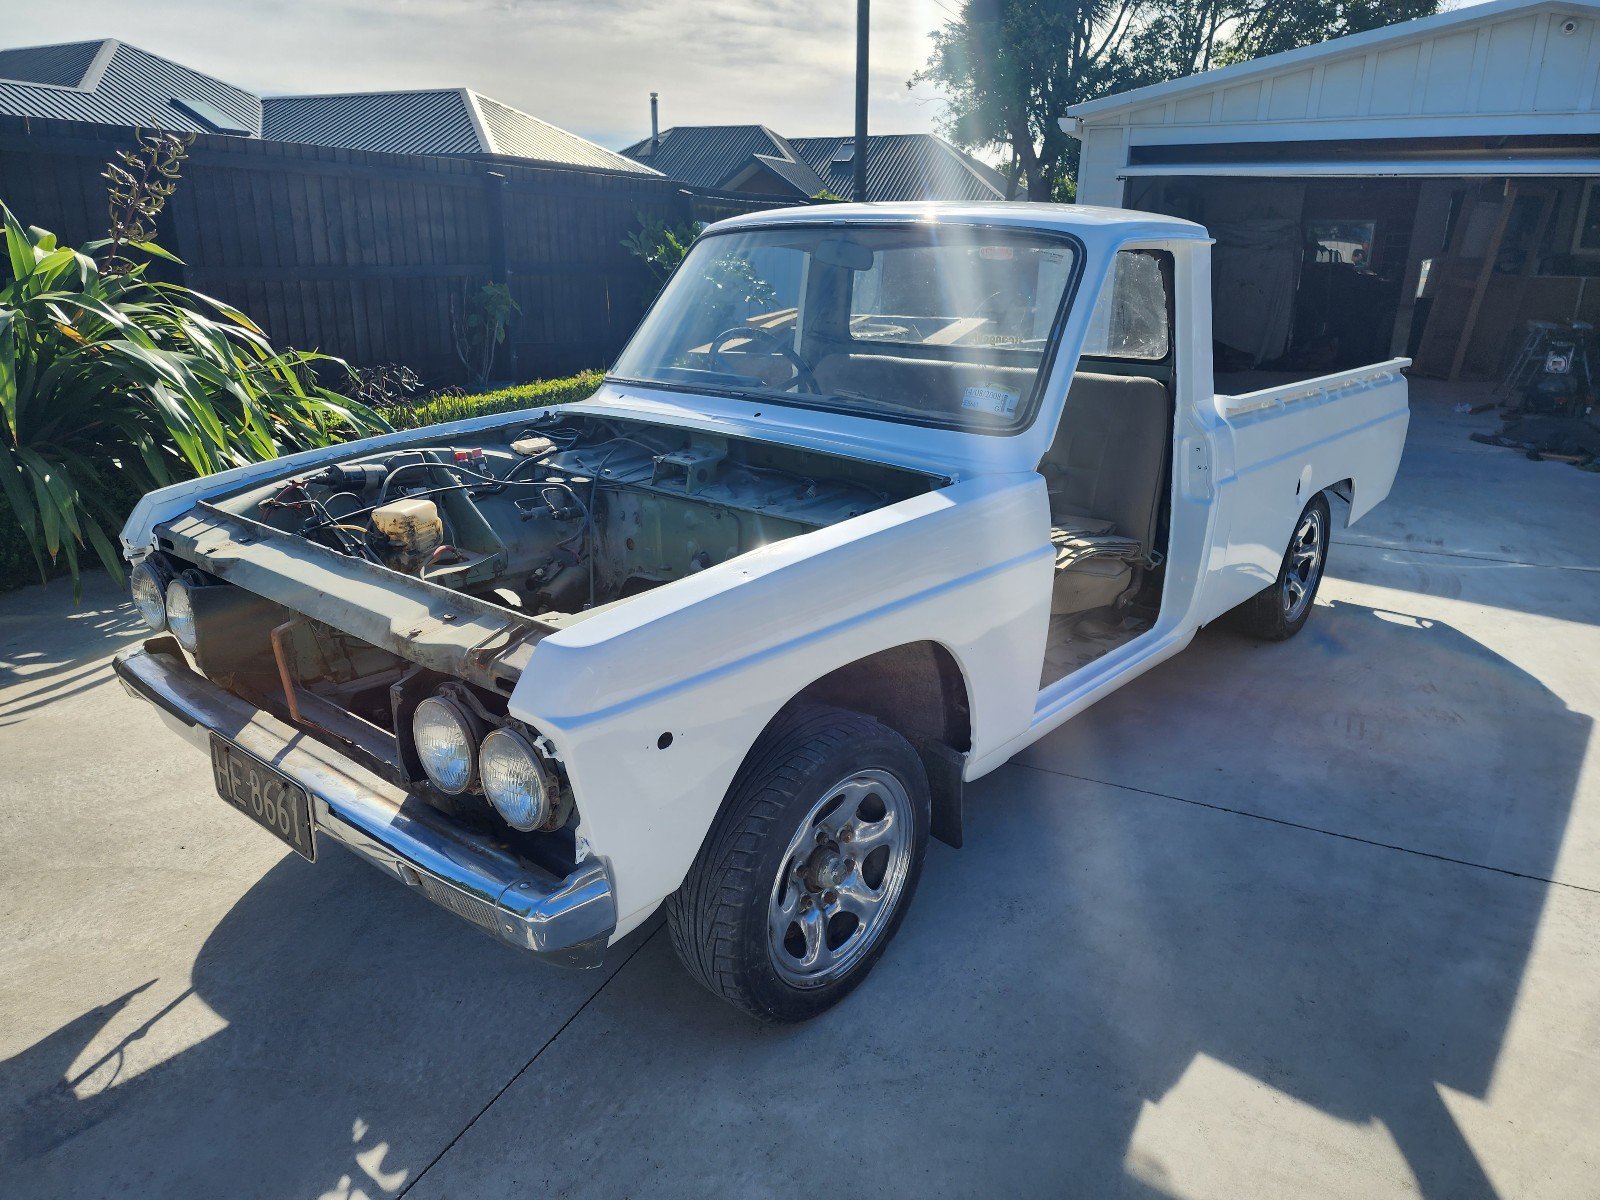
Nosecone is fully mounted, rough guards are on for mock up. this ute seems to be longer than the other ute. Probably built in a different factory as they are 4 years apart from memory.. im glad I chose to use this ute for RX3UTE, it is the same model and spec now.
1 point
-
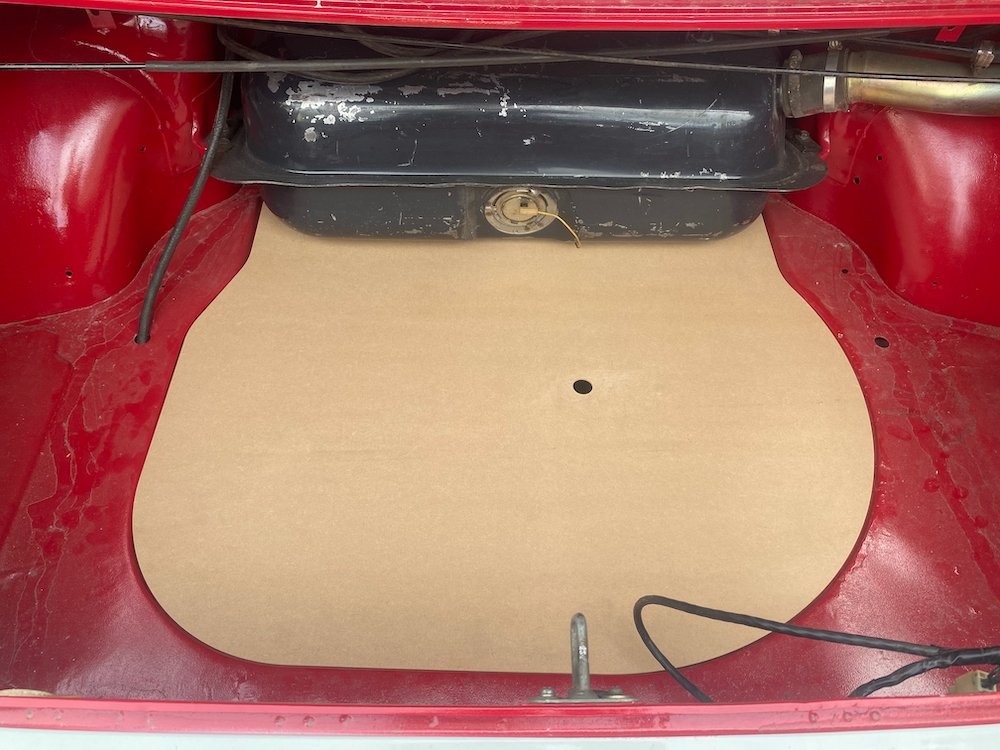
Was out in the shed again today so had a quick measure up and fed the cnc some mdf Quite happy with how much nicer the boot looks with the spare covered, motivates me a bit more to suss some carpet etc. From factory there were a few more trim panels in the boot, hopefully have a set on the way to copy, its something i've never seen before so looking forward to it!
1 point
-
I modelled and printed some door card clips which as always gives me the deepest pleasure. These worked pretty well after some tweaks. These are not exact copies and are designed so they are easier to print, but functionally they are sweet. The drivers side window winder mech was deeply wrong, the wire tension adjustment was maxed out, hacked and the maxed out again, but the wire was still as loose as fuck and while it kindof worked it made horrible grindy noises. This came from the barrel where the wire was straddling grooves cos it was so loose. It was all down in a difficult to reach place, and those mechanisms are notoriously cunty to pull out and put back. Amazing that I got a bollock into that shot as well. The passenger side was sweet and the wire connection looks like this; After a bit of thought and dicking around trying to take slack out of the wire a genius idea came to me; I routed the wire like that through both lift points, which took up enough slack that I could tension the mech properly. Another 1/4 hr of contortion with a torch, phone and screwdriver and I had the wire slipped back into its rightful track. It works perfectly again, yay!1 point
-
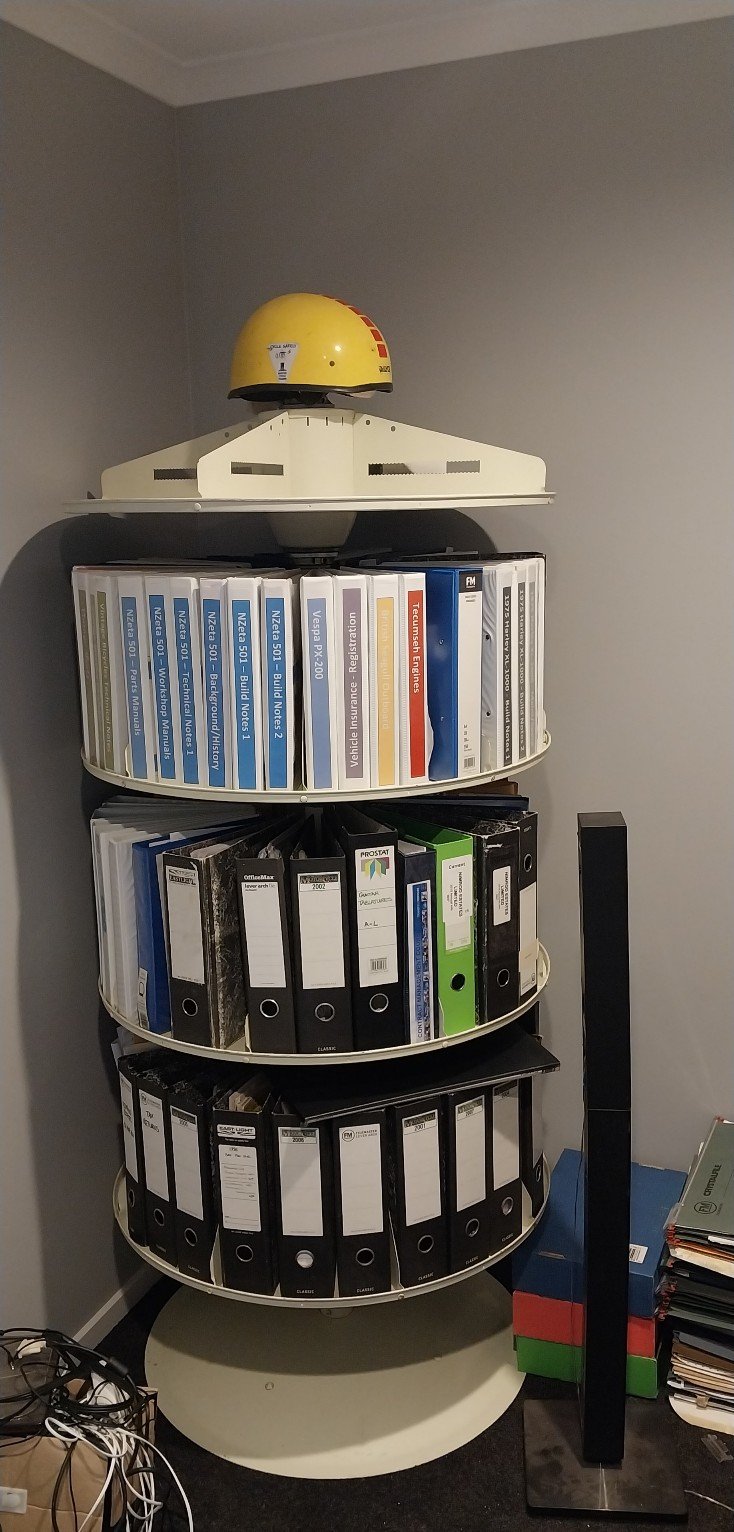
Legit thought that was bacon & egg pie... Sorting the garage/office, found an old rotating file thing at the tip shop for $20, pulled it apart, gave it a clean, greased bearings and assembled it inside. Shit it's heavy...
1 point
-
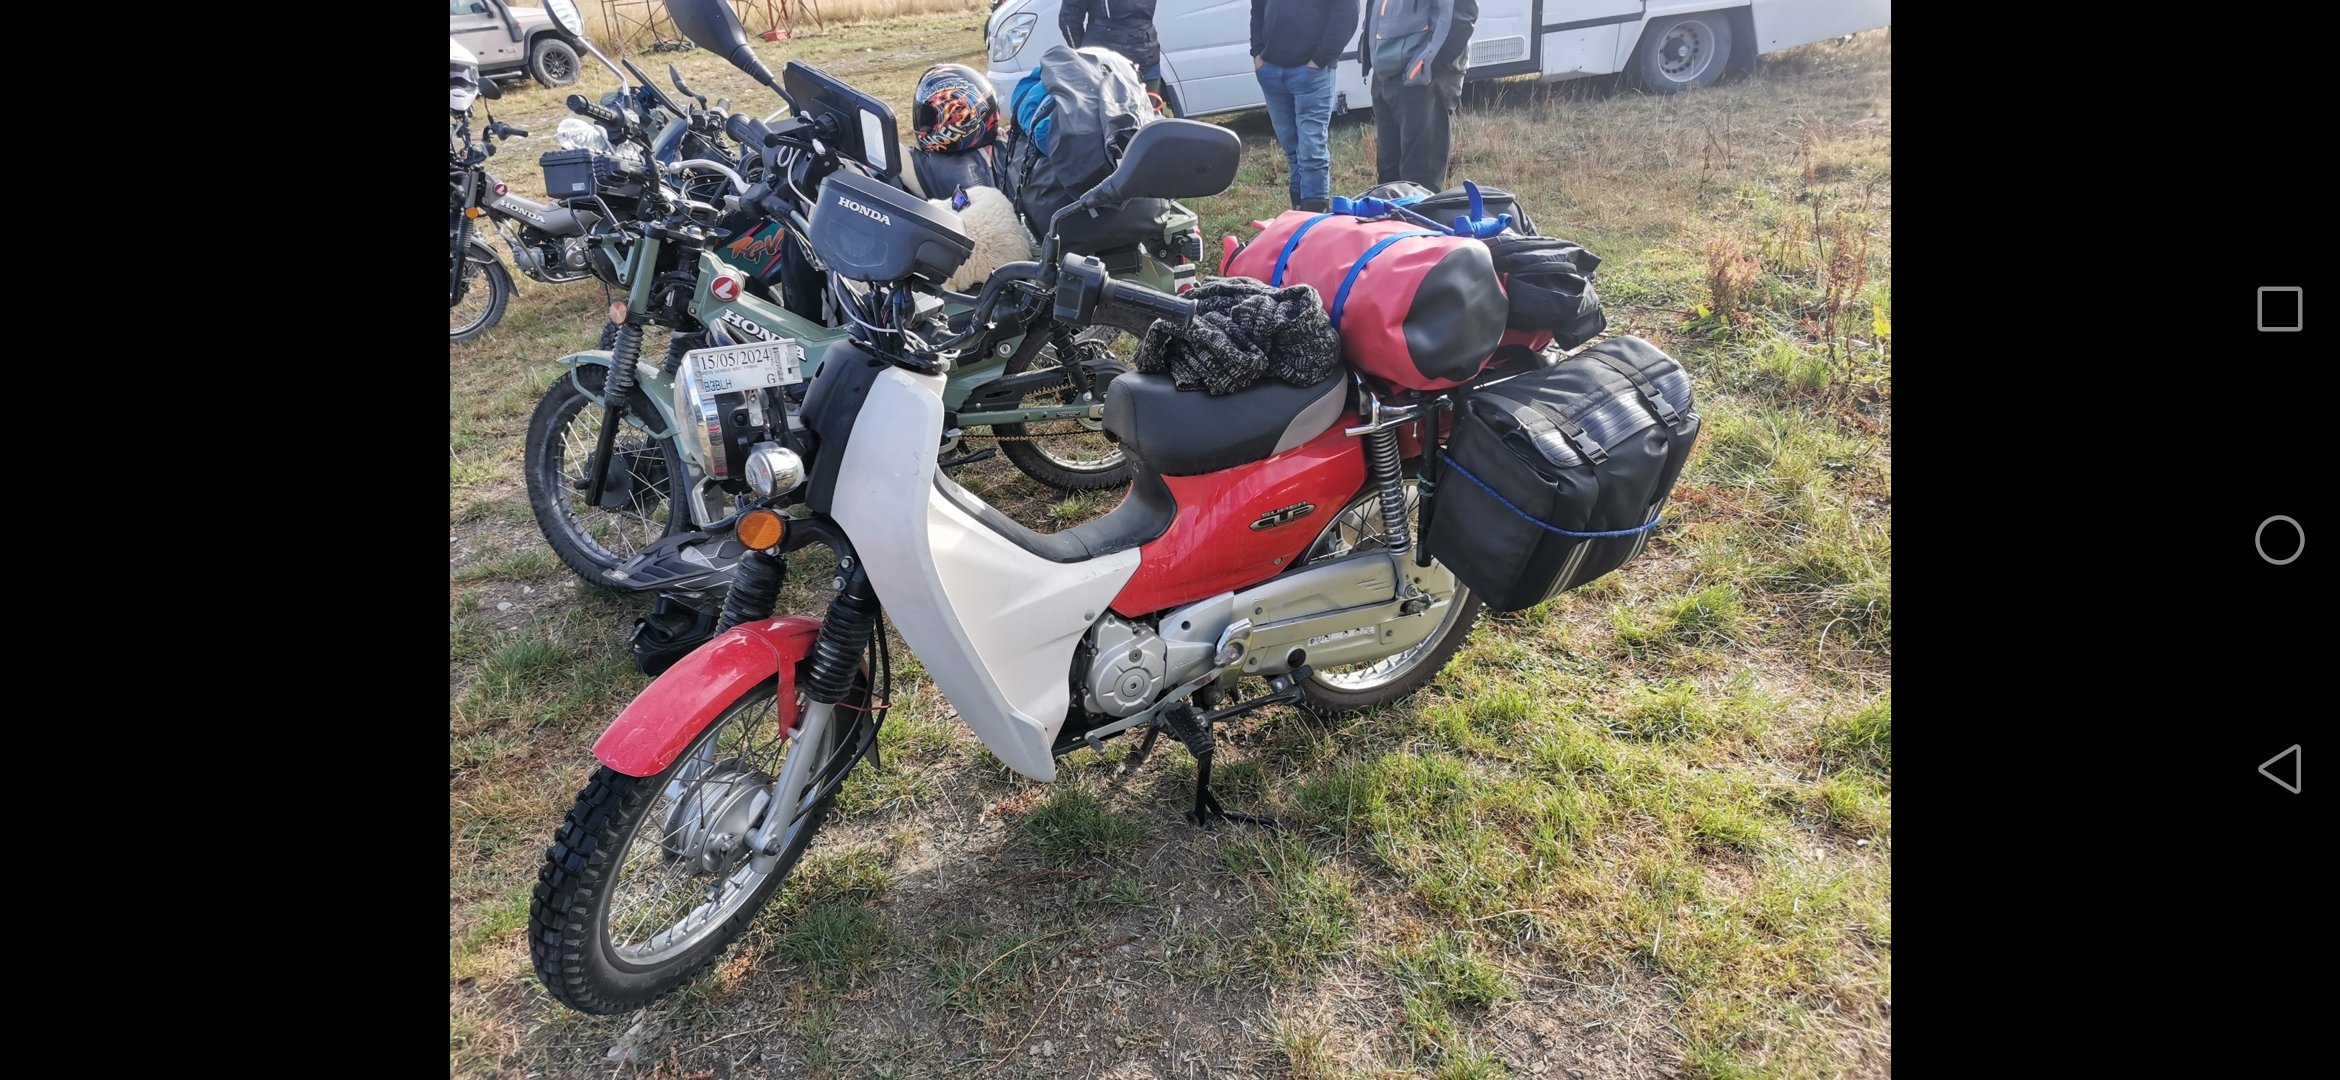
Headed out on my first moped melee this year. Really appreciated the invite @RUNAMUCK. What an awesome group of legitimate GC's. Had an absolutely amazing time and already looking forward to doing it all again next year.
1 point
-
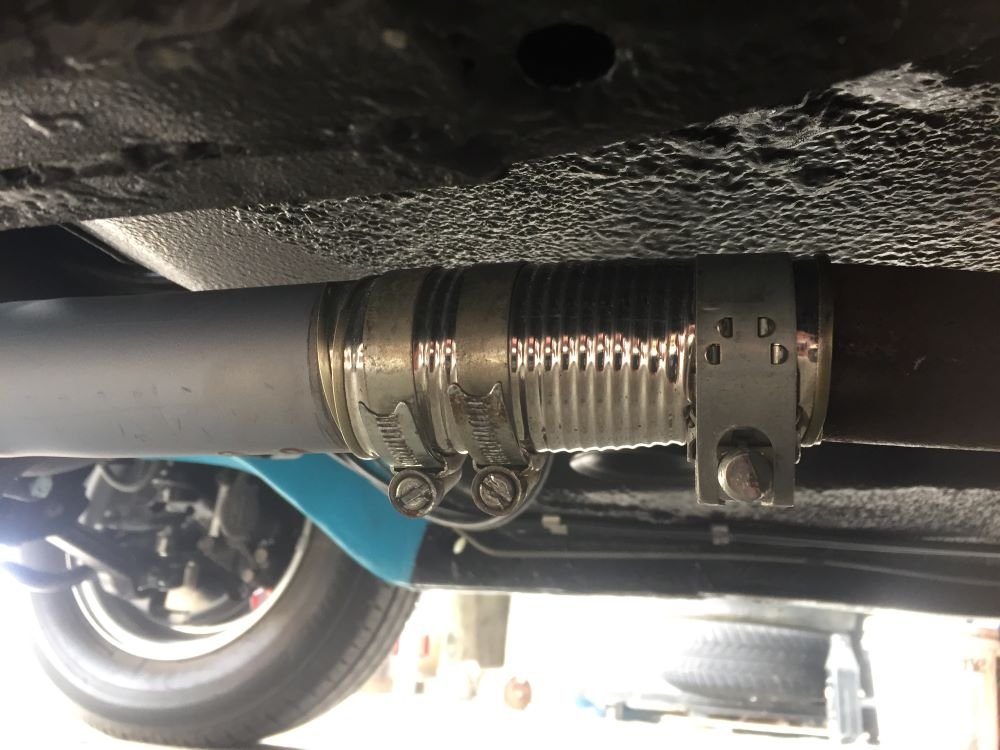
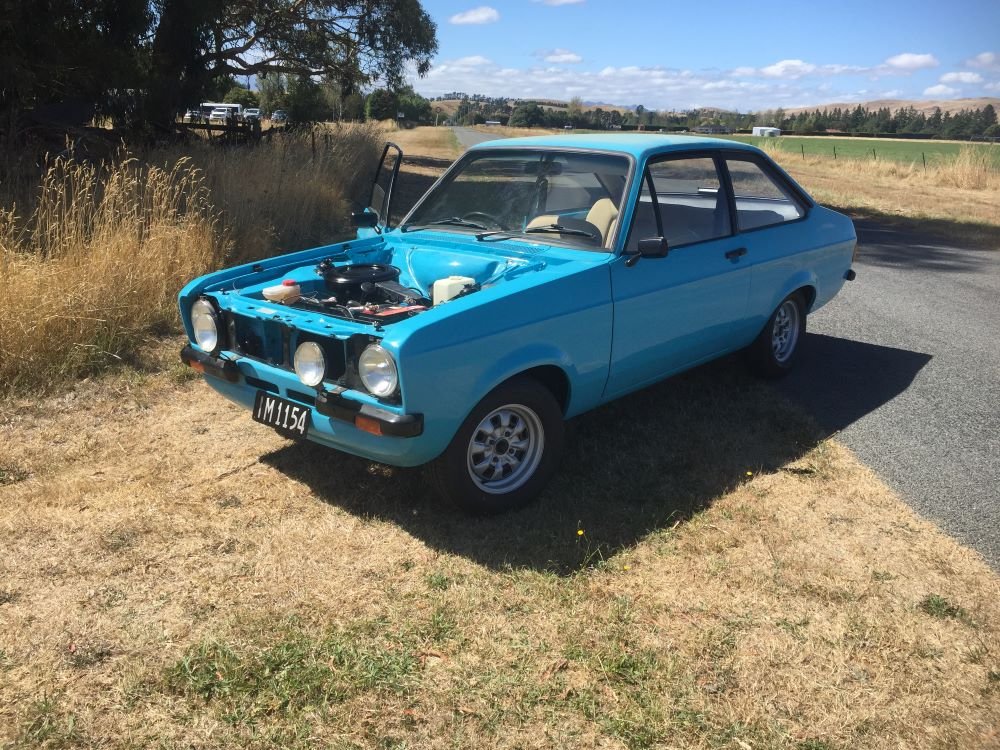
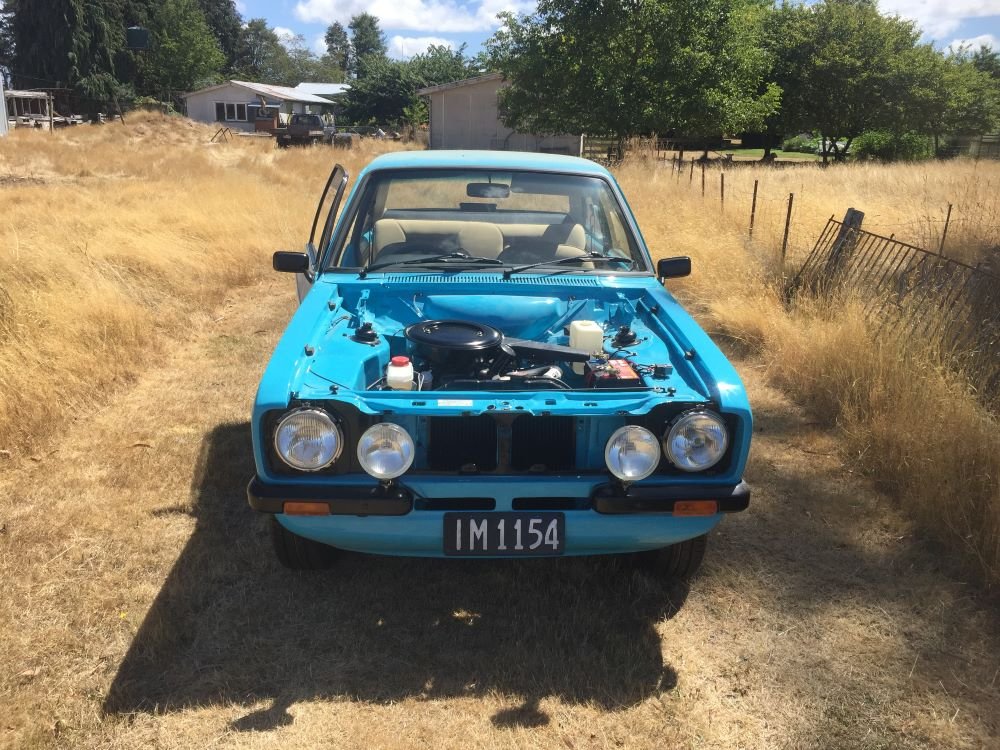
Nearly ready for first startup. Just a couple of jobs to do, one being to attach old exhaust to new headers until i'm able to get a proper system made. Don't laugh but I cut both ends out of a baked bean can, slit it down the side and with the help of some hose clamps, made a sleeve and clamped over both pipes. Should be ok for a while. Checked all fluid levels and filled radiator with hot water as mechanic suggested as been sitting for a while since build. Removed plugs and cranked motor until oil pressure light went out. Replaced plugs and turned key. Motor started straight up and sounded really good. Ran it up to temp and checked for leaks of which there were none. Time for a trip around town. Goes well but needs a tune. Brakes are good and everything else works except fuel gauge. If anyone has a suggestion of where I could get my 32/32 weber carb tuned around Christchurch could they leave a message on Project Discussion page. Cheers Project Discussion https://oldschool.co.nz/index.php?/topic/84912-petes-mk2-escort-1600-sports/page/3/#comment-2618039
1 point
-
Picked up a pair of trailer guards, aka wheel tubs from a solid GC today. just sat them in place where I think they’ll end up, or there abouts. stood back and admired the look, quite like it. still need to trim to fit snug once it’s all decided.
1 point
-
Some small car enhancements, as opposed to some small car enhancements: Prius rear-view was vibrating a little on the trapezoid mount on the windscreen. This is a toyerda. We don't need that crap. we have other crap to enjoy. I got a bit of random skanky hose, put a scallop cut in one end to nudge the mirror stem. Boom. I now have crystal clear view of the cops following me who have zero interest in the Prius I'm driving. I'd cut down an window shade for the Dai, but it's missing a sun visor to hold the passenger side, so I hot-gooed some left-over Neodymium magnets to it. Now I don't have to bother fixing the actual problem:
1 point
-
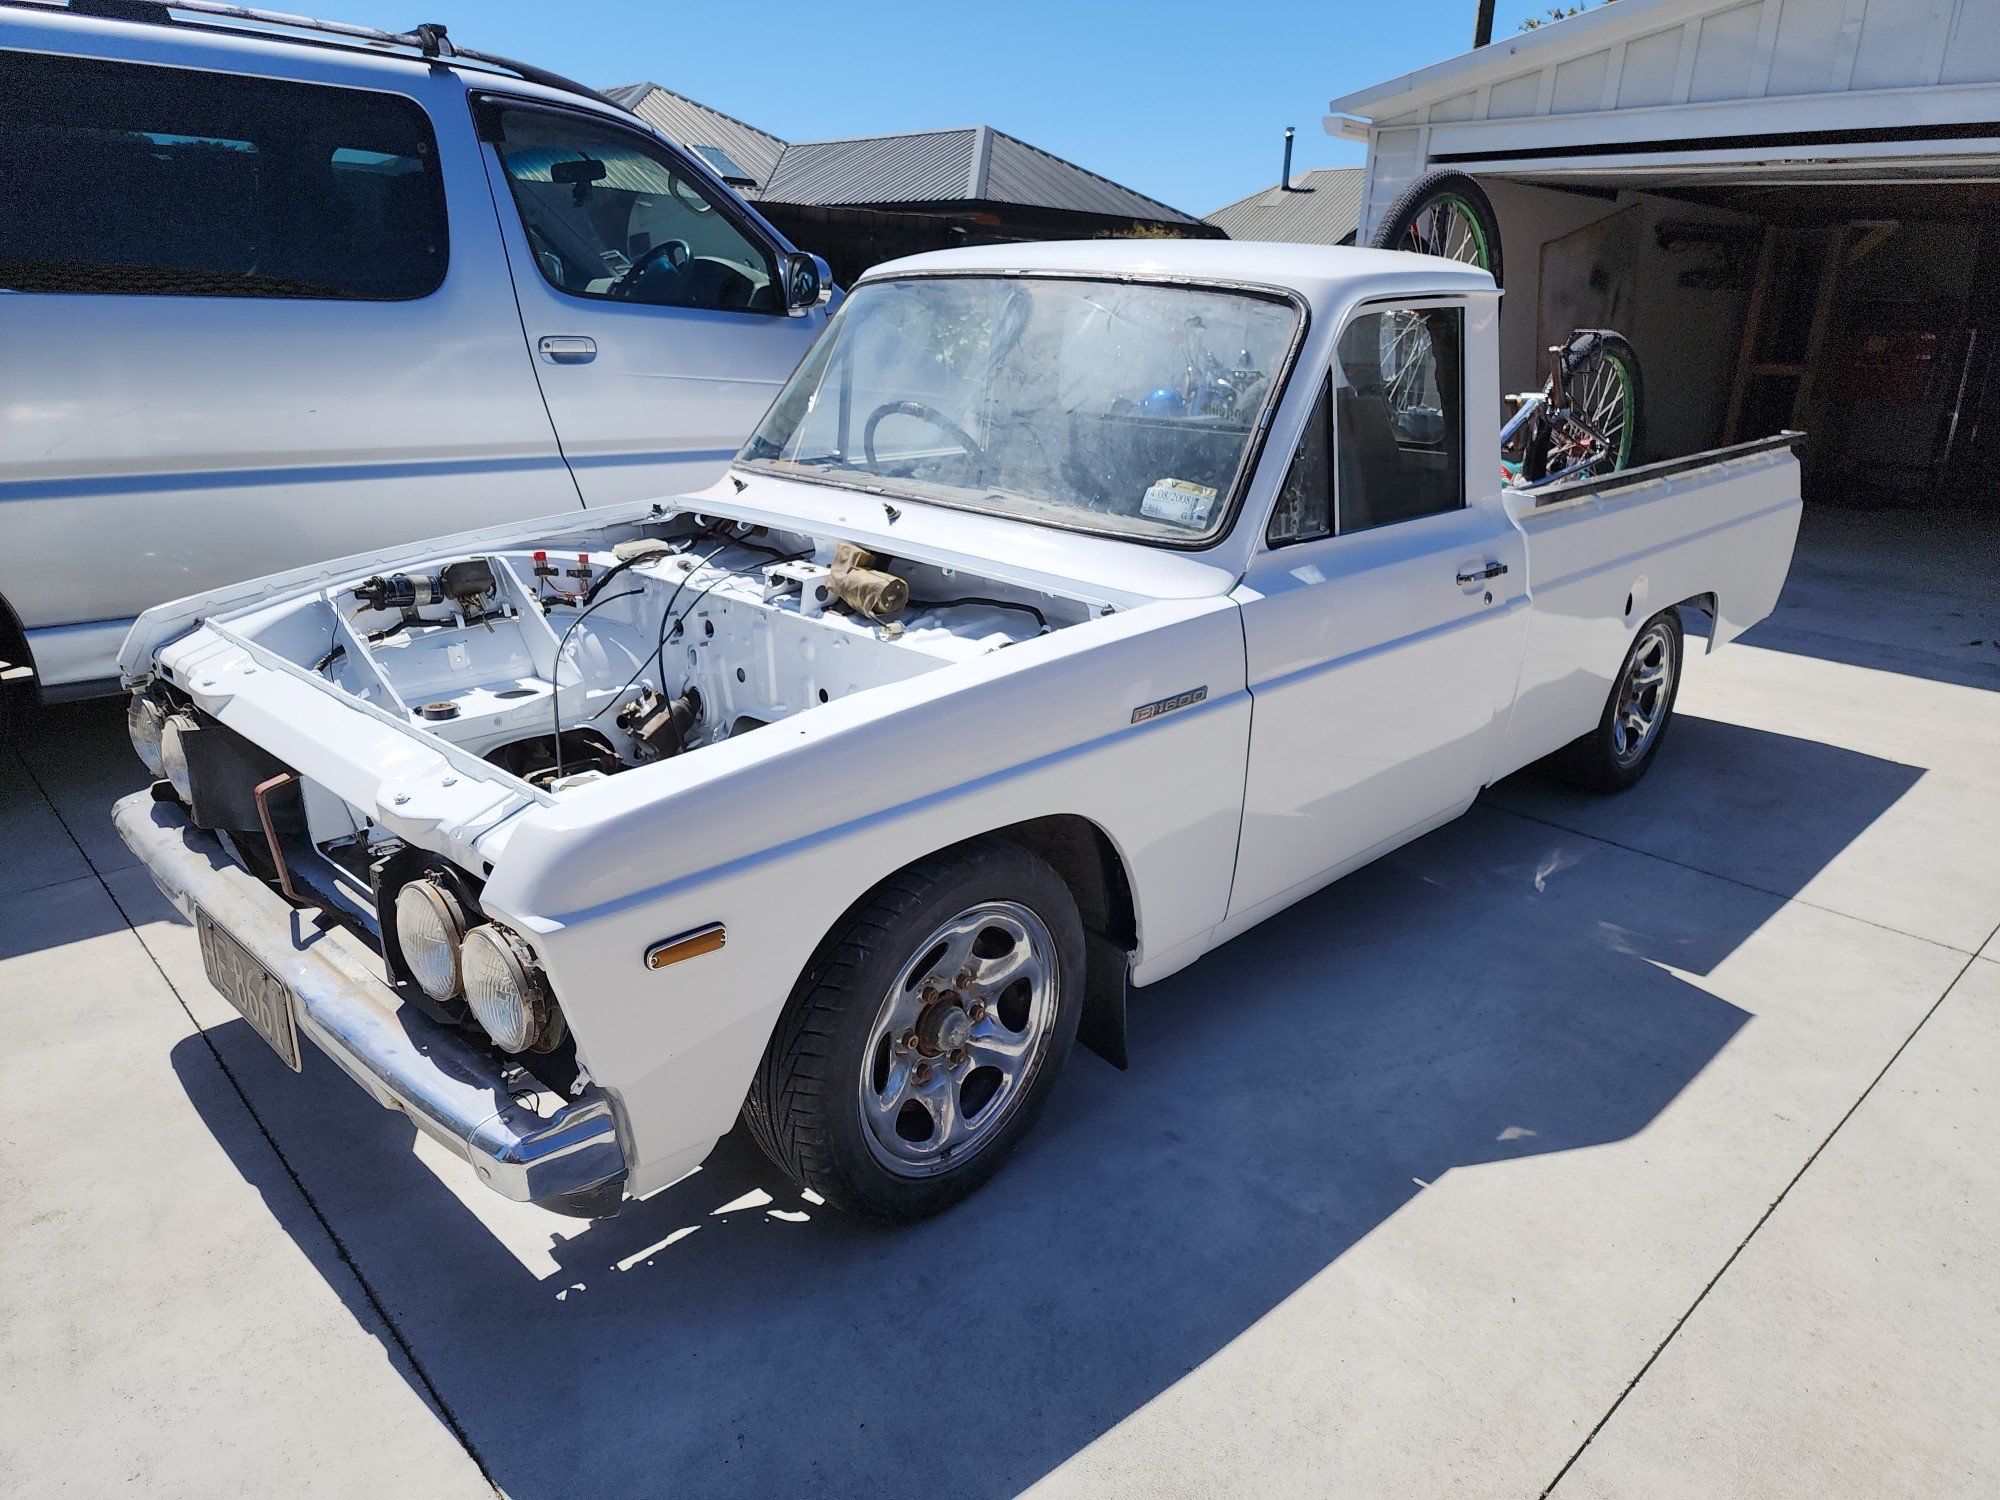
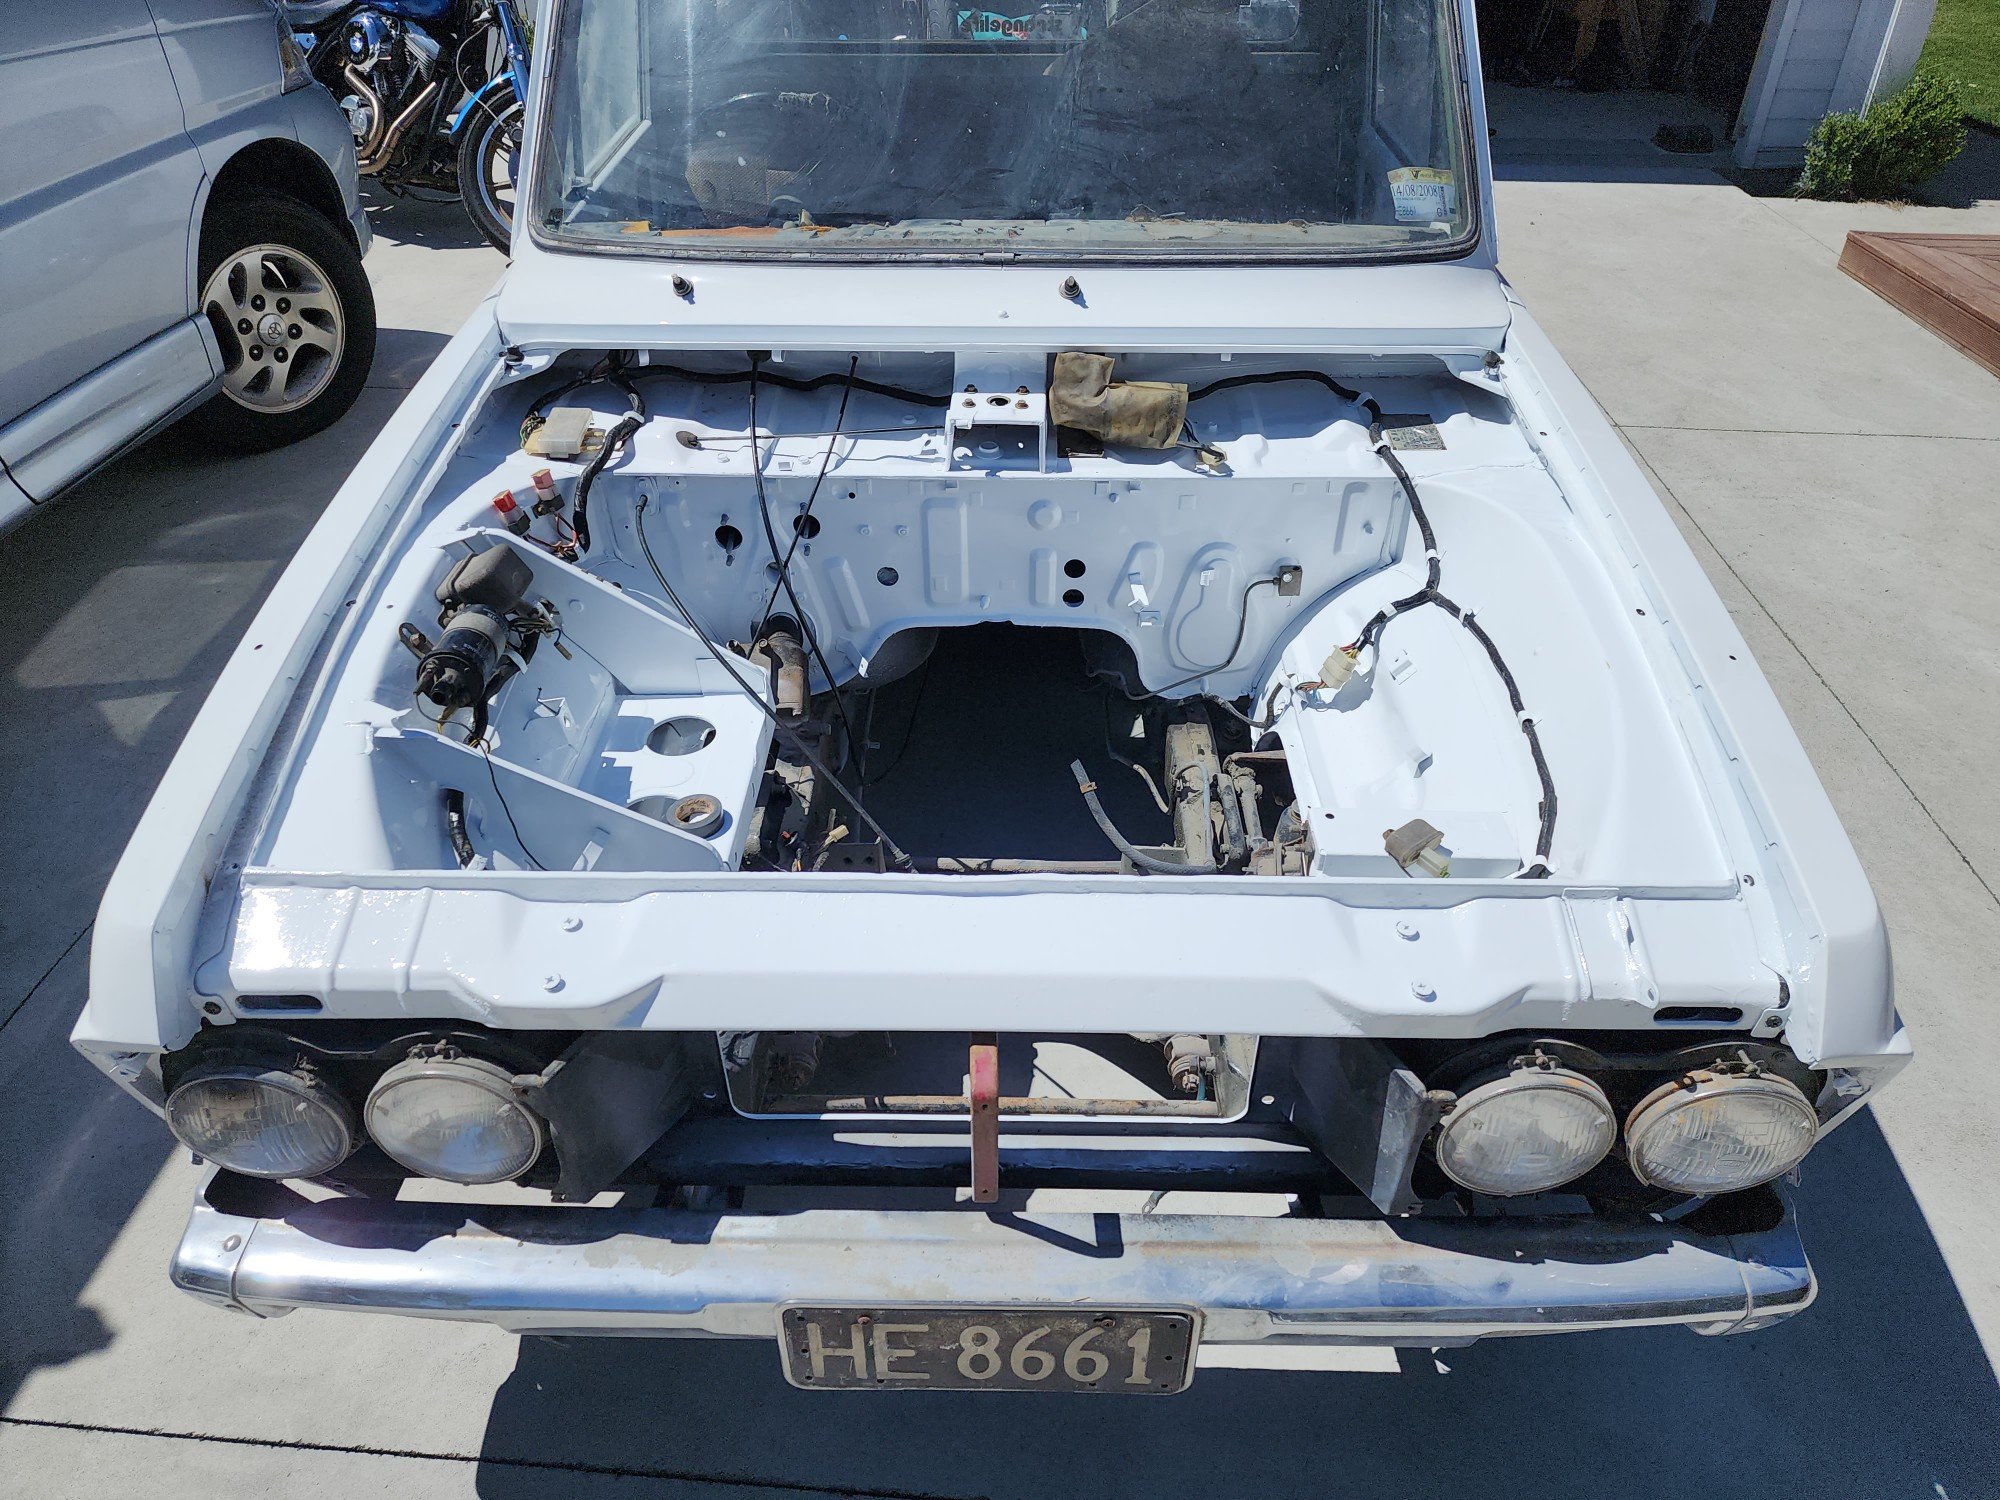
Engine bay is all painted. Have re installed loom. I've manage to get the motor unstuck so hopefully it'll be a runner. Will let the paint harden for another week or so before I try and chuck that back In there. Finally some light at the end of the tunnel. Still so much to do though. Whole brake system needs going over. Will have to try source a brake and clutch master
1 point
-
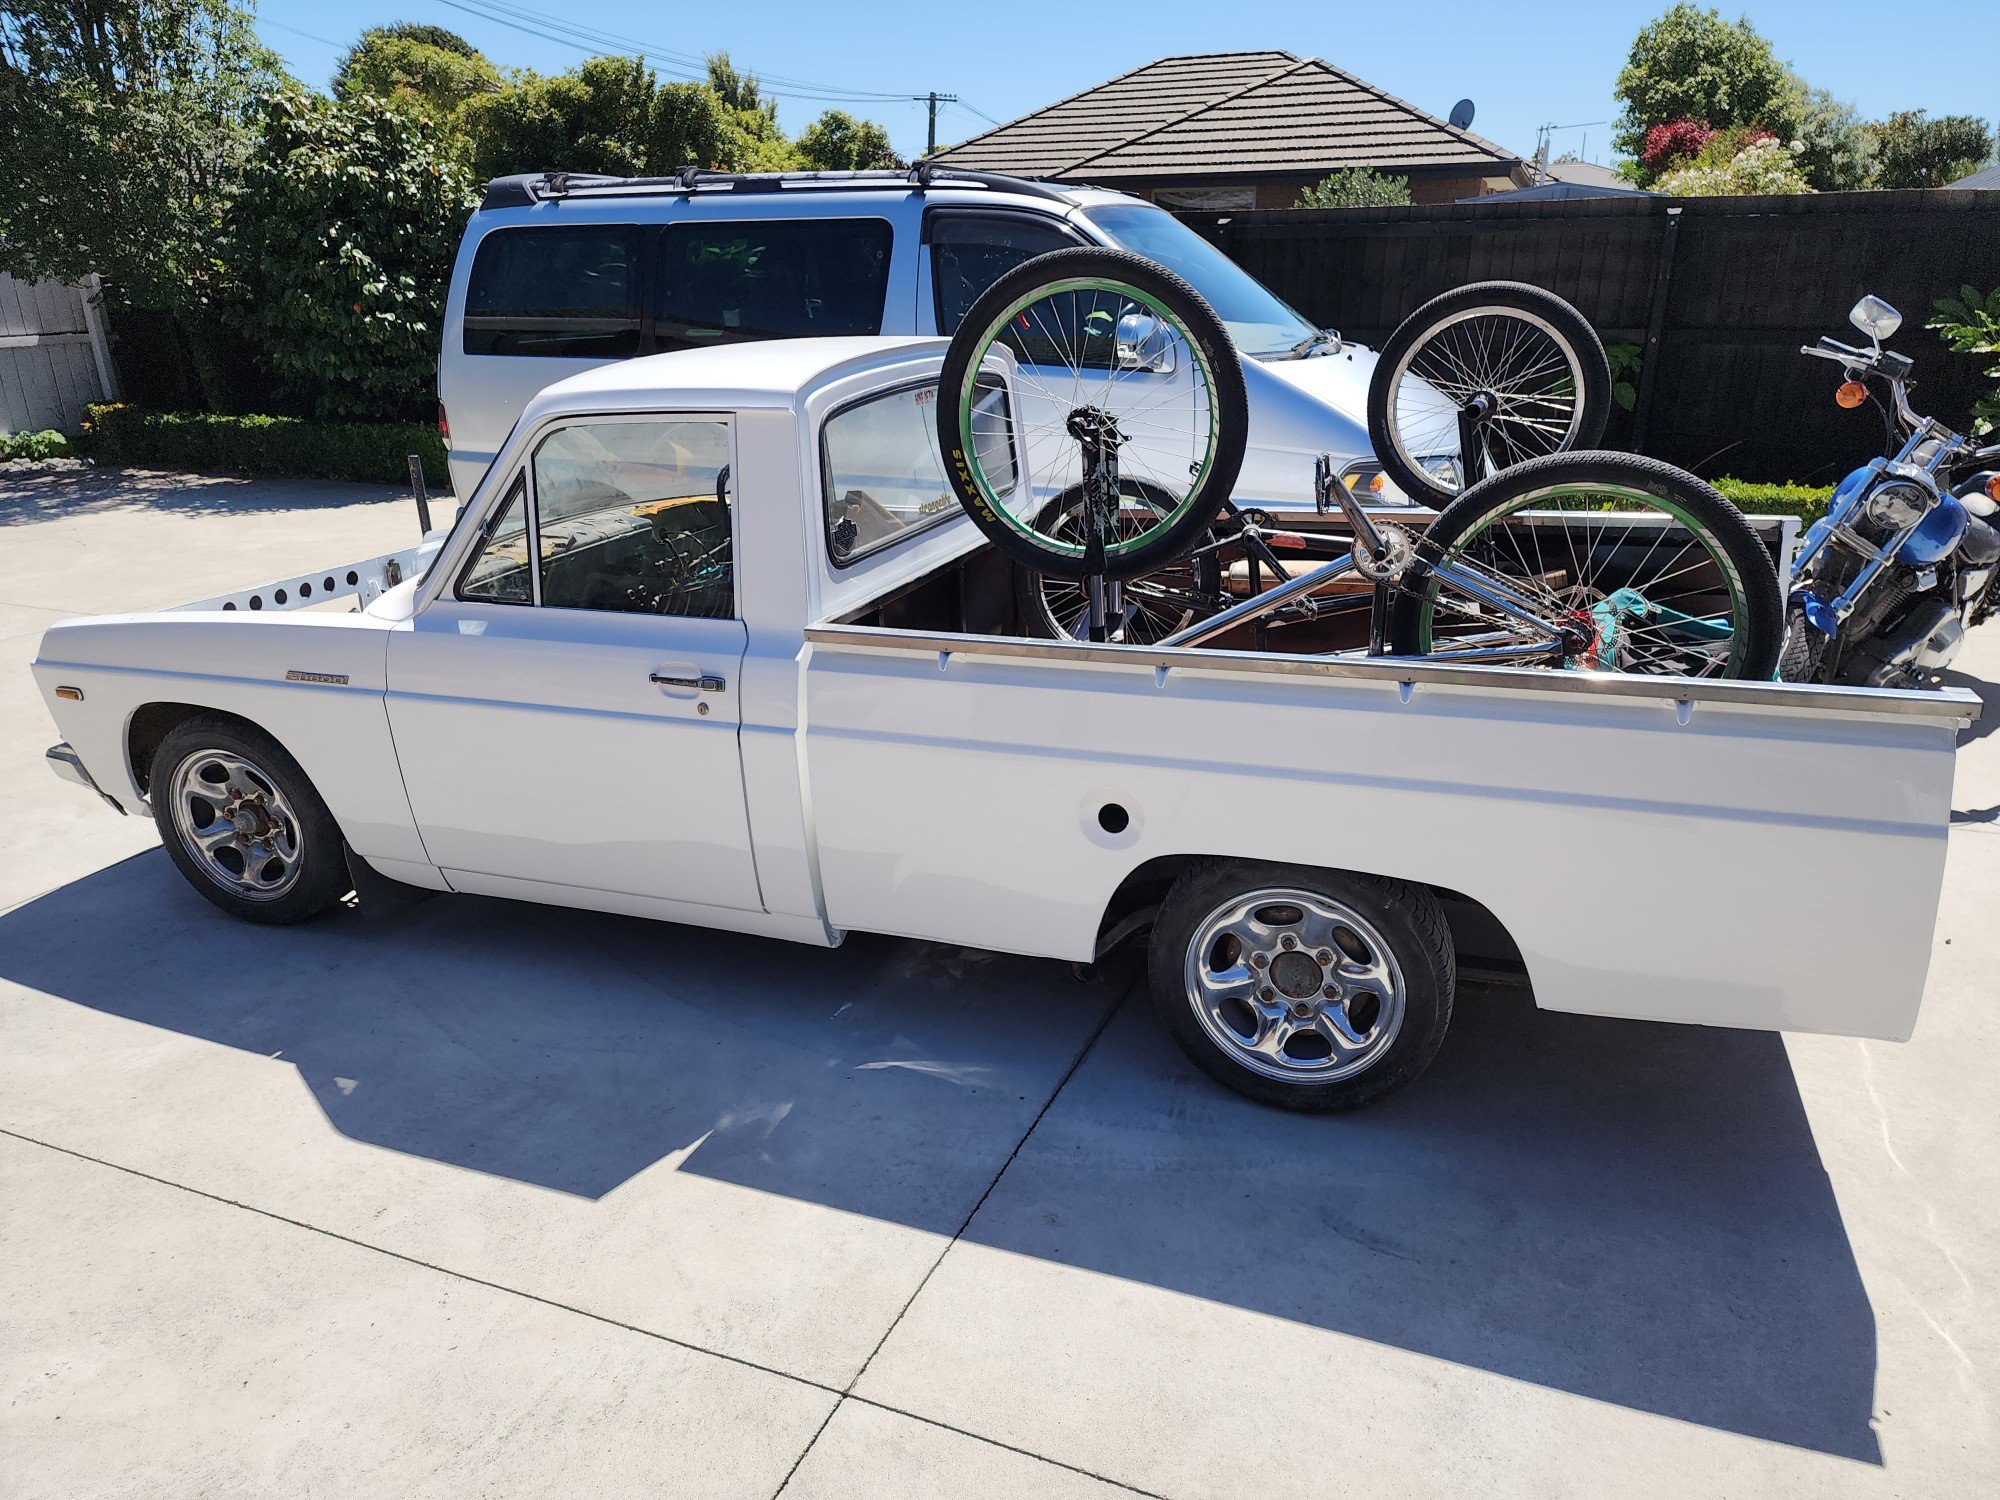
Bit more progress. Got doors and bonnet painted. Have slapped it together for some inspiration. Most panels need to come back off. Have started prep on engine bay and hope to have that painted in the coming weeks Damn it feels good to be making some progress after it sitting in the way for so long. If anyone has any leads on a 2l MA motor flick me a message
1 point
-
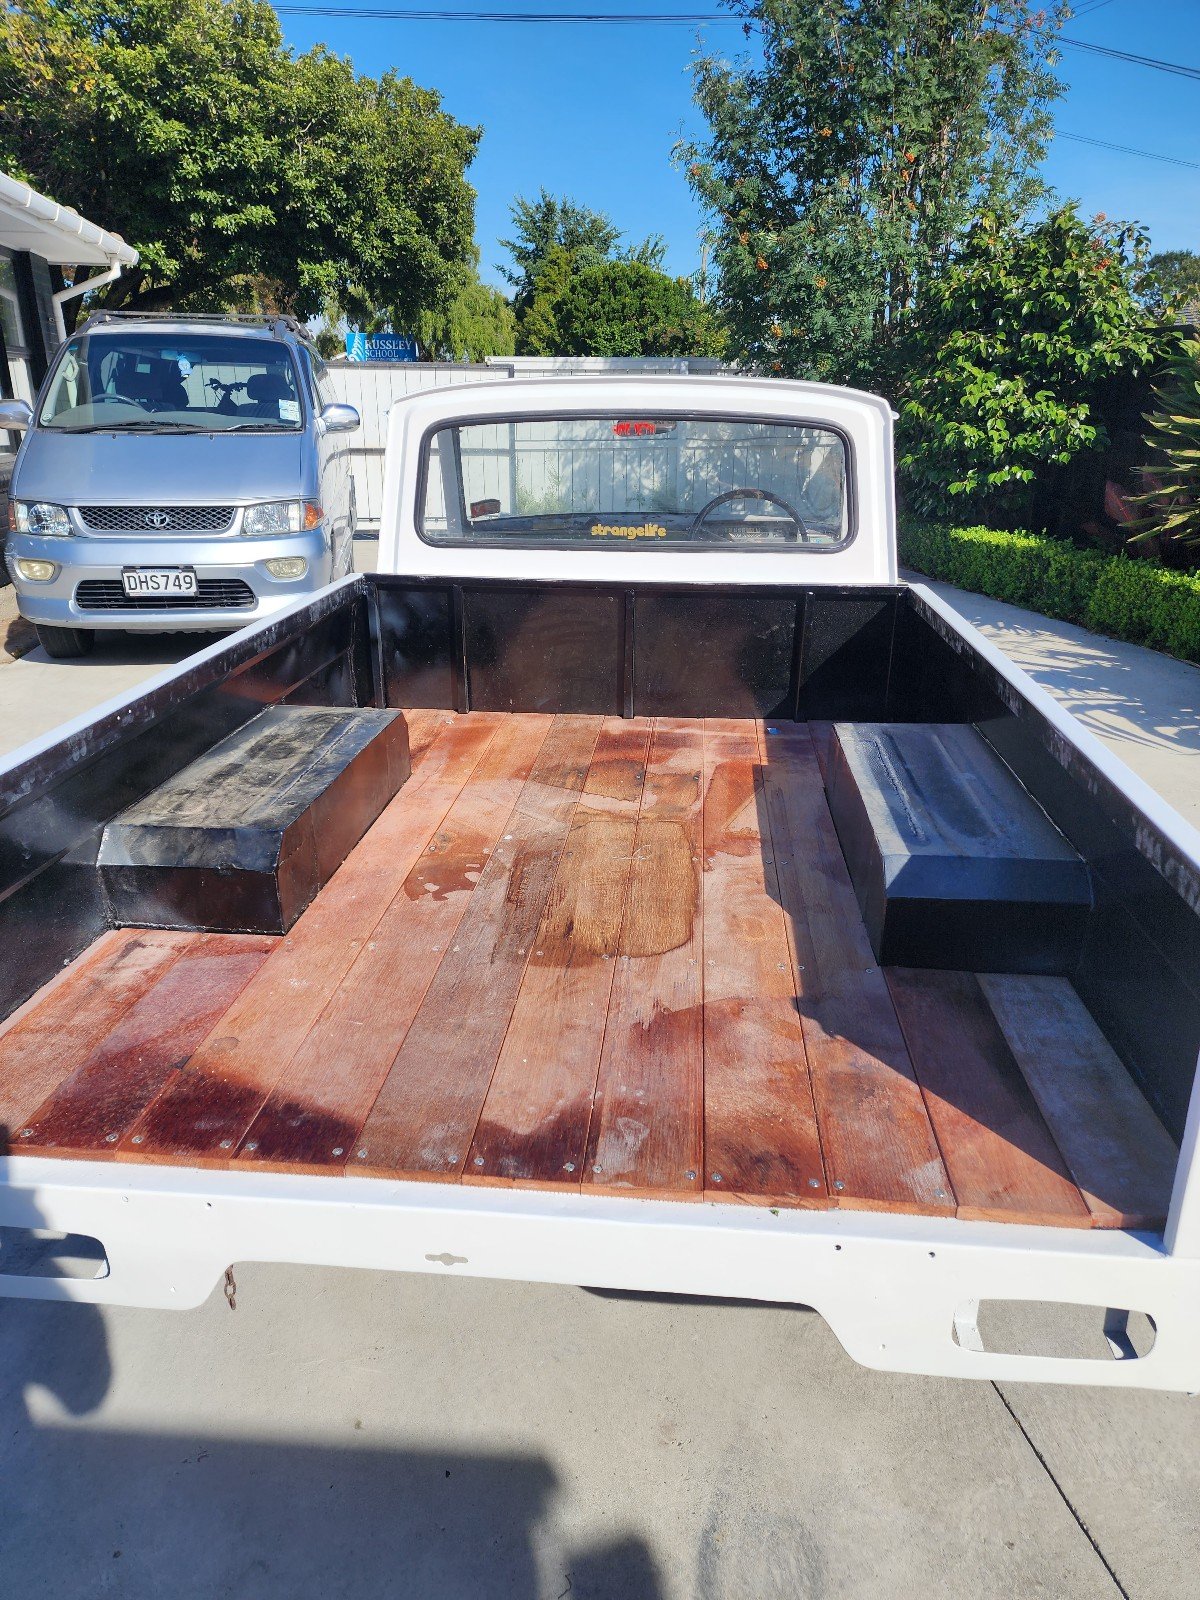
Thread dredge from a million pages back. I do still have this . Went hard over the holidays and got a few panels painted. Made a start on the deck ages ago. Still a bit to finish off.
1 point
-
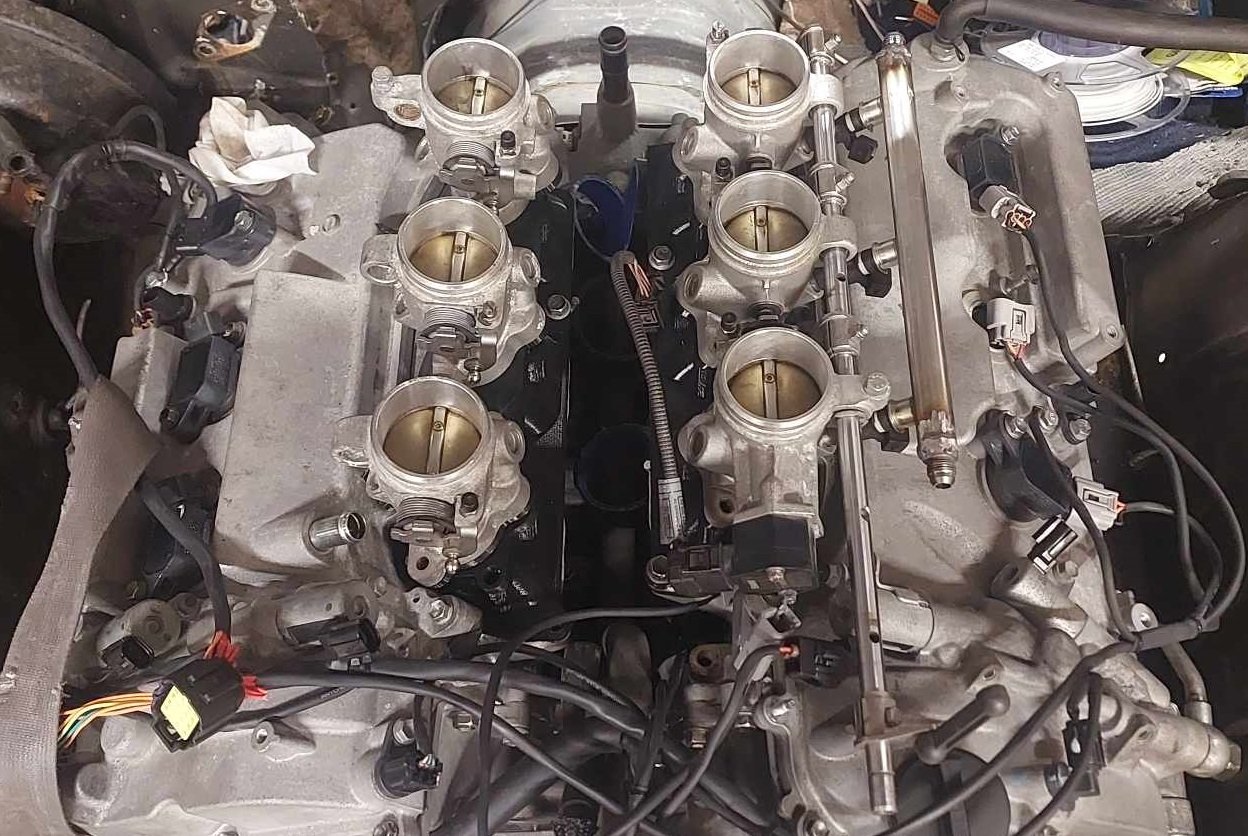
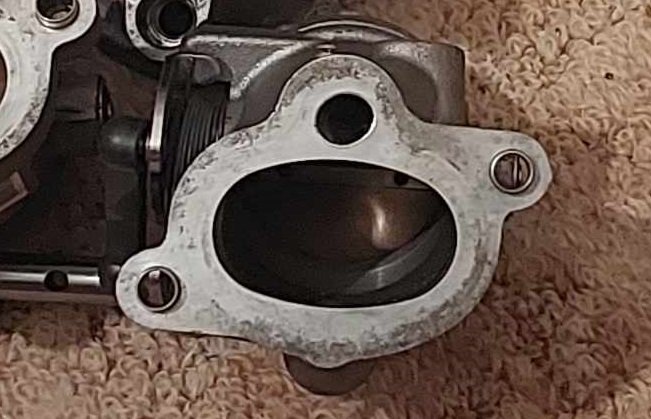
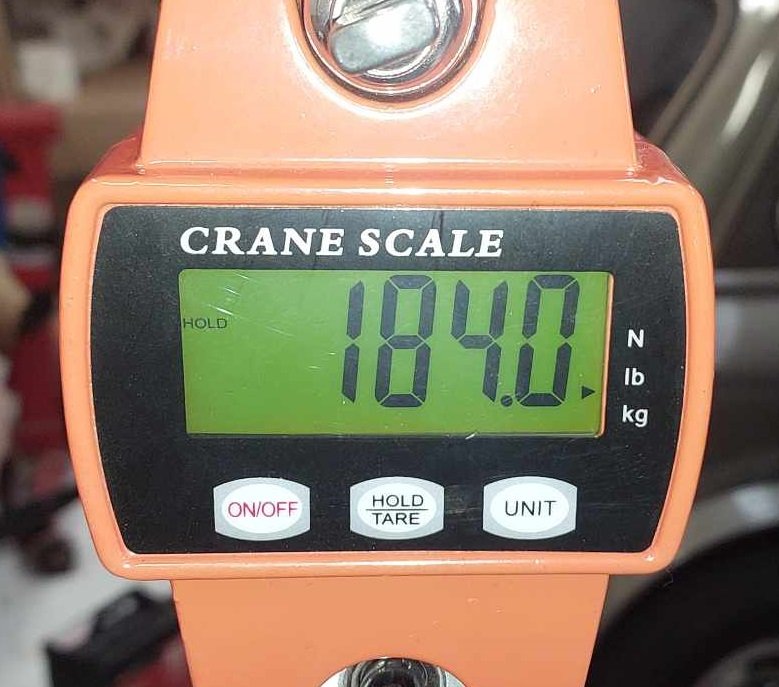
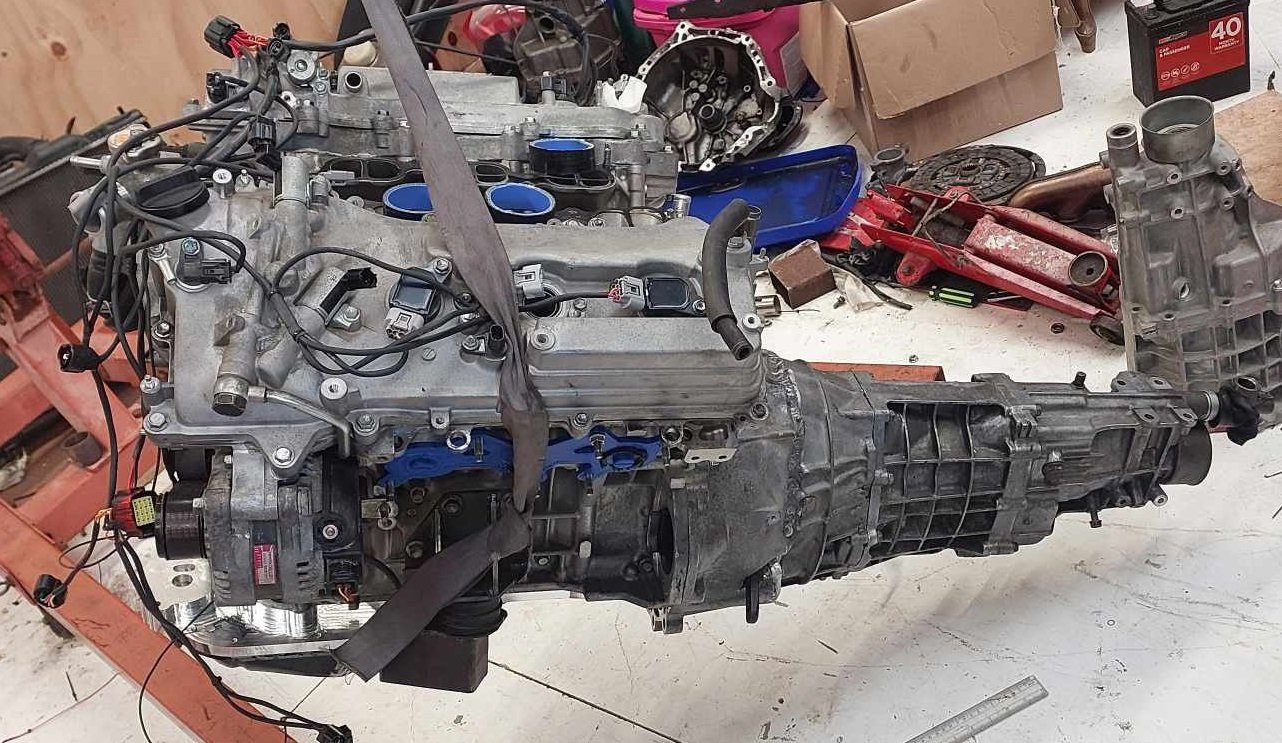
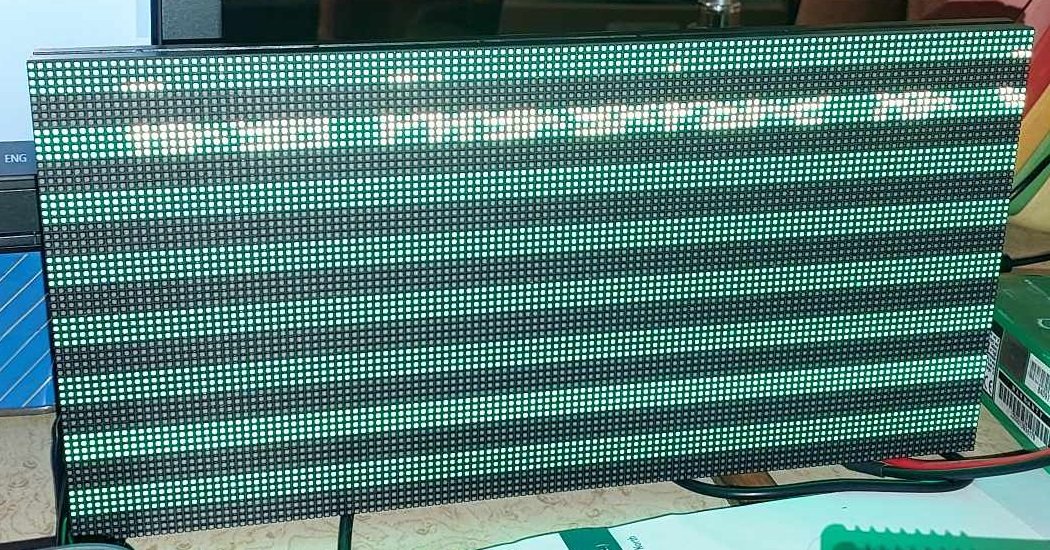
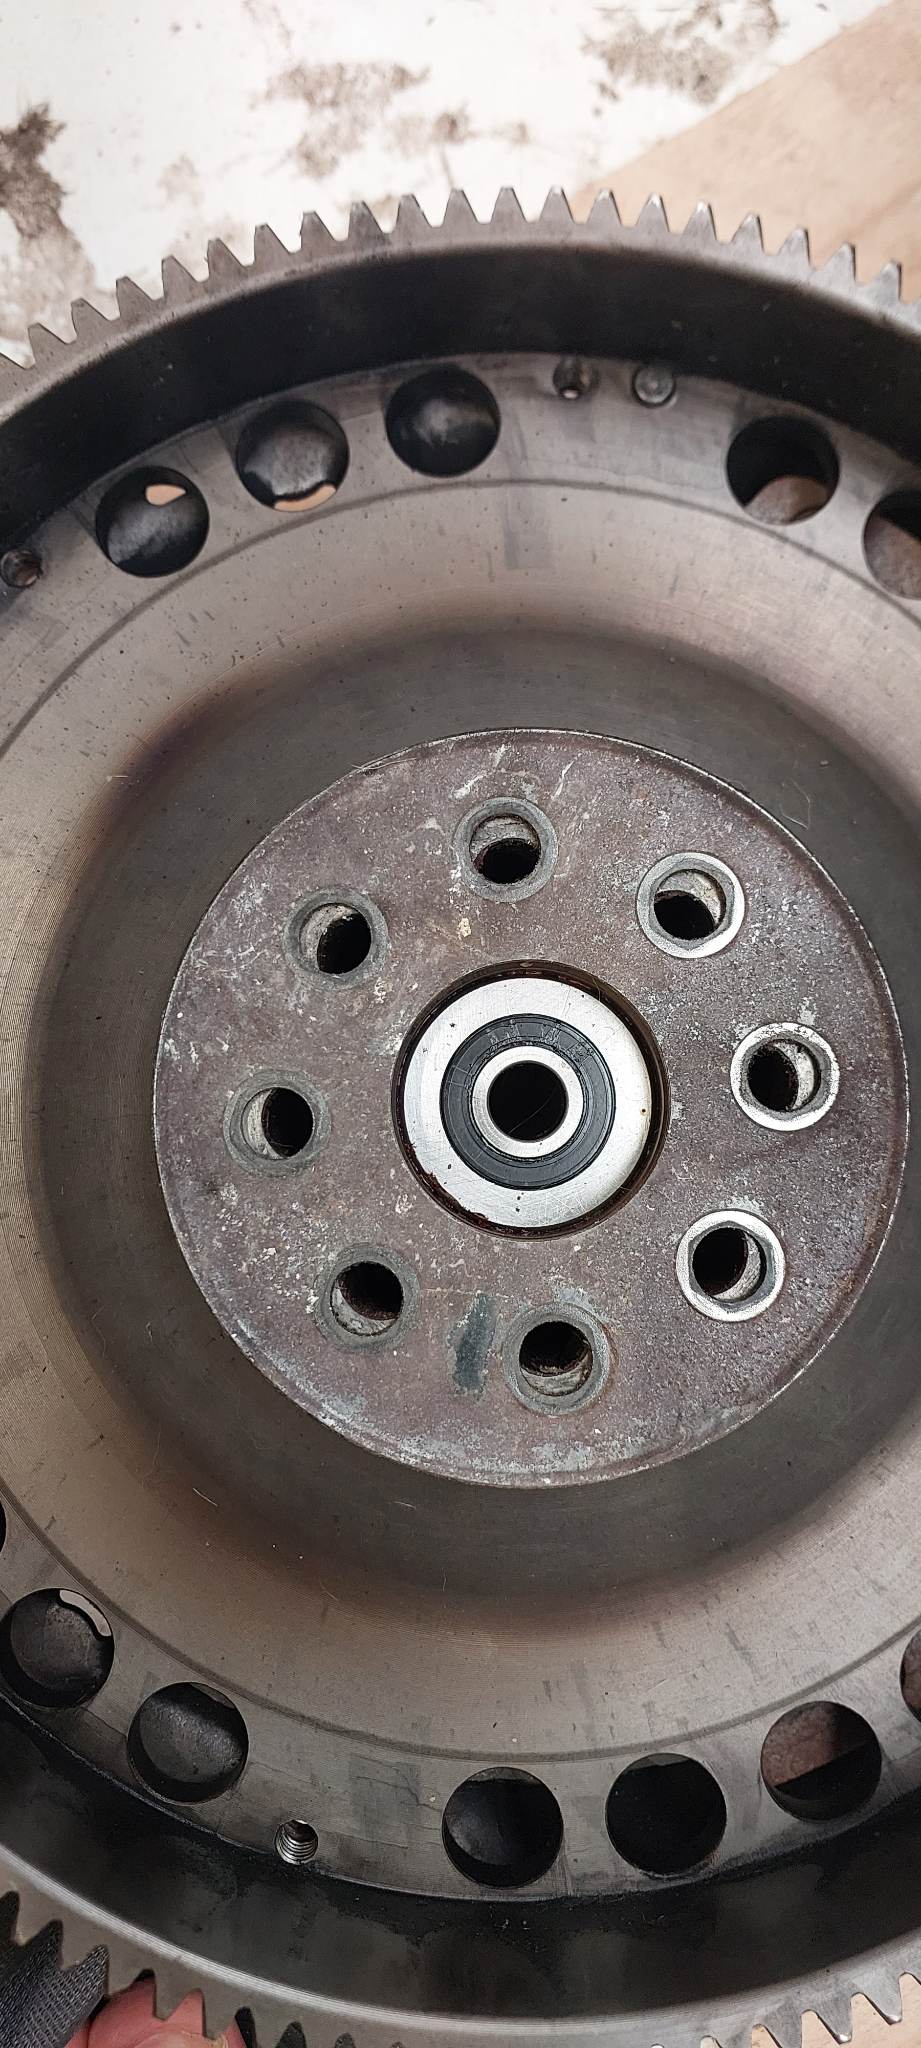
Sump Stuff I managed to get the sump finished off, in place and gooed up. Since I am not exactly sure about how much oil it can hold, and it's probably a good idea to iteratively mark the dipstick as I add 1 litre at a time. I just poured 5 litres straight in, because, fuck it. This worked out reasonably well, the high tide mark is just below top cover of the pan. The oil pump and filter will hold a bit more oil when it's turned over, and the external oil tubes that run up to the cam covers for VVTI and oil spraying the cams. Actually have non return valves in them, so hold a bit of oil up there too. Then, some amount of oil stays in constant circulation while the motor runs, more so at high rpm. So hopefully that's around a good amount. It's not weed its oil all over the floor, it's still good. Exciting! Digidash Fuckery So my replacement LED screen turned up, aannnndddd... I just cant get it to work properly. It only displays the top 4 lines, then skips 4 lines, then next 4 lines, etc. The way these work is actually really complex. I think this particular screen is incompatible with the only available library for controlling these screens, which is a real pity. This doesnt photograph well, but this looks absolutely AMAZING in person. It would be absolutely incredibly awesome as a dash. So I think I might need to buy some of the smaller screens that are supported, and daisy chain them together. As they have different chips controlling the LEDs, or some crap like that. Dunno. But it's way over my head to try and troubleshoot what's going wrong here. However, In the meantime I can still figure out how it works, and draw some graphics on it. So long as I dont mind everything can only be 4 pixels high, haha. Flywheel Stuff Dad got the ring gear machined to the right dimensions for shrinking onto the flywheel. However when skimming down the back of the flywheel, the tool ugga dugga-d itself into the part. or something. Nothing catastrophic for the part or the machine, but bloody scary apparently! Luckily he's smarter than me, and this happened only a few mm from the top, we wasnt trying to cut the whole 10mm out at once. He said once he found better tool speed and feed rate that suits the chromoly, it cut amazingly nicely. So hopefully this isnt far off, anyway. I'm excited that his mill is running. It's damn cool. Intake Stuff I swapped intake setups with @Hurmeez so now I've got the V10 throttles. This solves some problems, but adds some new ones. Firstly, it solves all of my height and fuel rail issues which is a big win. I'll now have some space up top for a nicer shape trumpet, and a sweet looking airbox. Which will also help give some rigidity to each bank of throttles by tying them together at the top. Unfortunately the factory throttle spacing is a little closer together than expected - But, these are a lot easier to space apart. I was considering just leaving it at current spacing, so I can use the fuel rails etc - But nah. It would just nag at me that I'd half assed it. So to space them out I just need to redrill some holes on the rails, to rebolt the linkages in a new position. Otherwise, if it's close enough I might be able to slot or extend the linkages to just push them across a bit. Then I'll need some new fuel rail extrusion, and drill them. But this is all easy drilling stuff that can be done no prob on a manual mill. The center to center on these throttles is 98mm, not the 107mm I was expecting. (Could old forum information be wrong?! shock horror etc) Also they have a highly oval outlet, and the throttles have a 24 degree curve. Despite have a big entry size and quite big throttle, somewhere around 50mm. They taper down to the cross sectional area of a 42mm circle at the exit. However there's enough meat around the perimeter that they could easily be ported out to the area equivilent of at least a 48mm circle no problem at all. In order to get the top of the throttles standing vertically, I need a manifold that cancels out the 24 degree angle. Here's where I am currently at for prototype shape: Since can align each throttle central over each port, all of the port shapes are now identical which is nice. The engine they are from (S65 V10) makes 500hp from 5 litres, so around 50hp per throttle. So that's equivalent to 300hp using 6 throttles. So hopefully injector size, airflow etc all plenty suitable for the application. I'll also have 4x throttles left over, so it might be interesting to see how these look against the port shape of 1NZ or something. Engine Weight @flyingbrick loaned me his scales (thanks) so I could get a ballpark weight for motor. I've not gone quite to the level of @Hyperblade's awesome post about engine weights at this stage - as I still dont have some parts to put on. However, with the motor and box put together. Engine mounts on. No starter/flywheel/manifolds. Like so: Total weight came to: 184 kg. A J160 is 38kg, putting the 4GR around 146kg. A little lighter than expected, given the service weight was listed as 165kg for engine. So this puts it at slightly heavier than a beams motor once it's fully dressed. Much heavier than a K20, and the weight of almost 2 1NZs. Ha! So I'm not gonna win any awards for worlds lightest engine, unfortunately. (Did I ever mention how great a 1NZ is? Cant remember) However I'm also relieved that it's not going to be massively different to the beams setup. The fact that the weight is further back and lower down will hopefully help offset the extra podge. For some less discouraging context - comparing to a previous generation Toyota NA 2500cc six cyl engine, the 1JZGE. This was 207kg for the engine alone. So my motor and gearbox weighs 25kg less than just an NA 1JZ. ha! Before @xsspeed mentions RB in my thread again, an RB20DET is supposedly around 245kg which I assume is with turbos etc mounted. So lots of different things going on, the most exciting thing on the to-do will be getting the flywheel in place. As once that's done, I can crank the motor over and get some oil circulating through everything. I need to assess if my tiny lithium battery is going to have enough grunt to turn the motor over, before I waste a bunch of time building my wiring etc around a battery that might not be suitable. Hopefully it's good though, as it cranked the 1NZ way faster than the regular battery did.
1 point
-
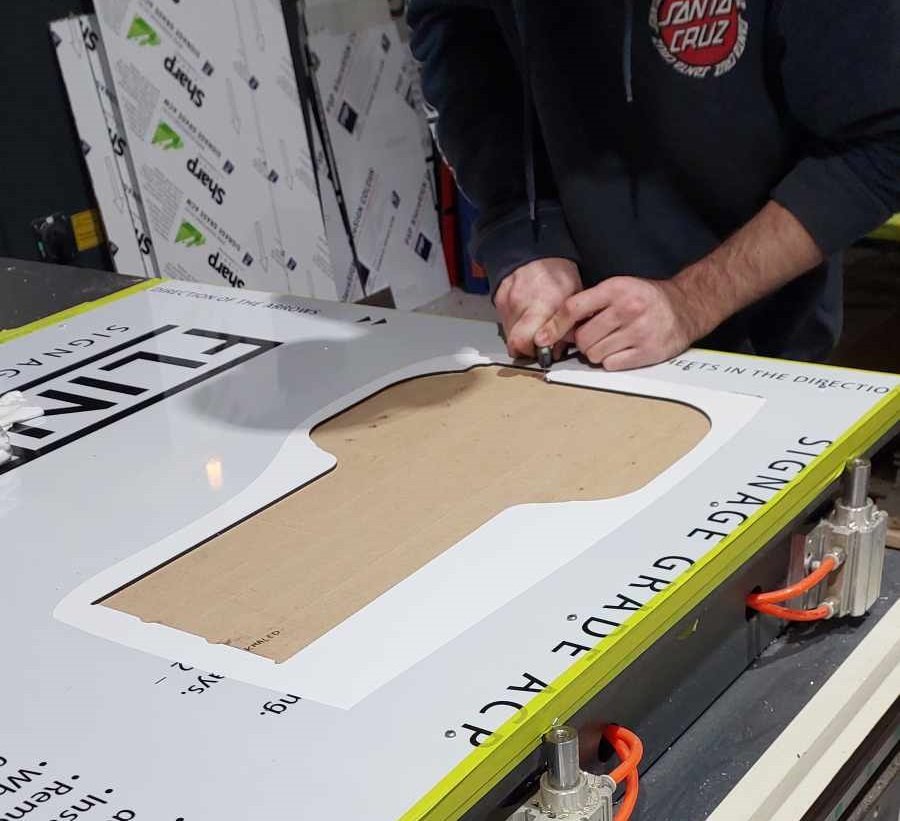
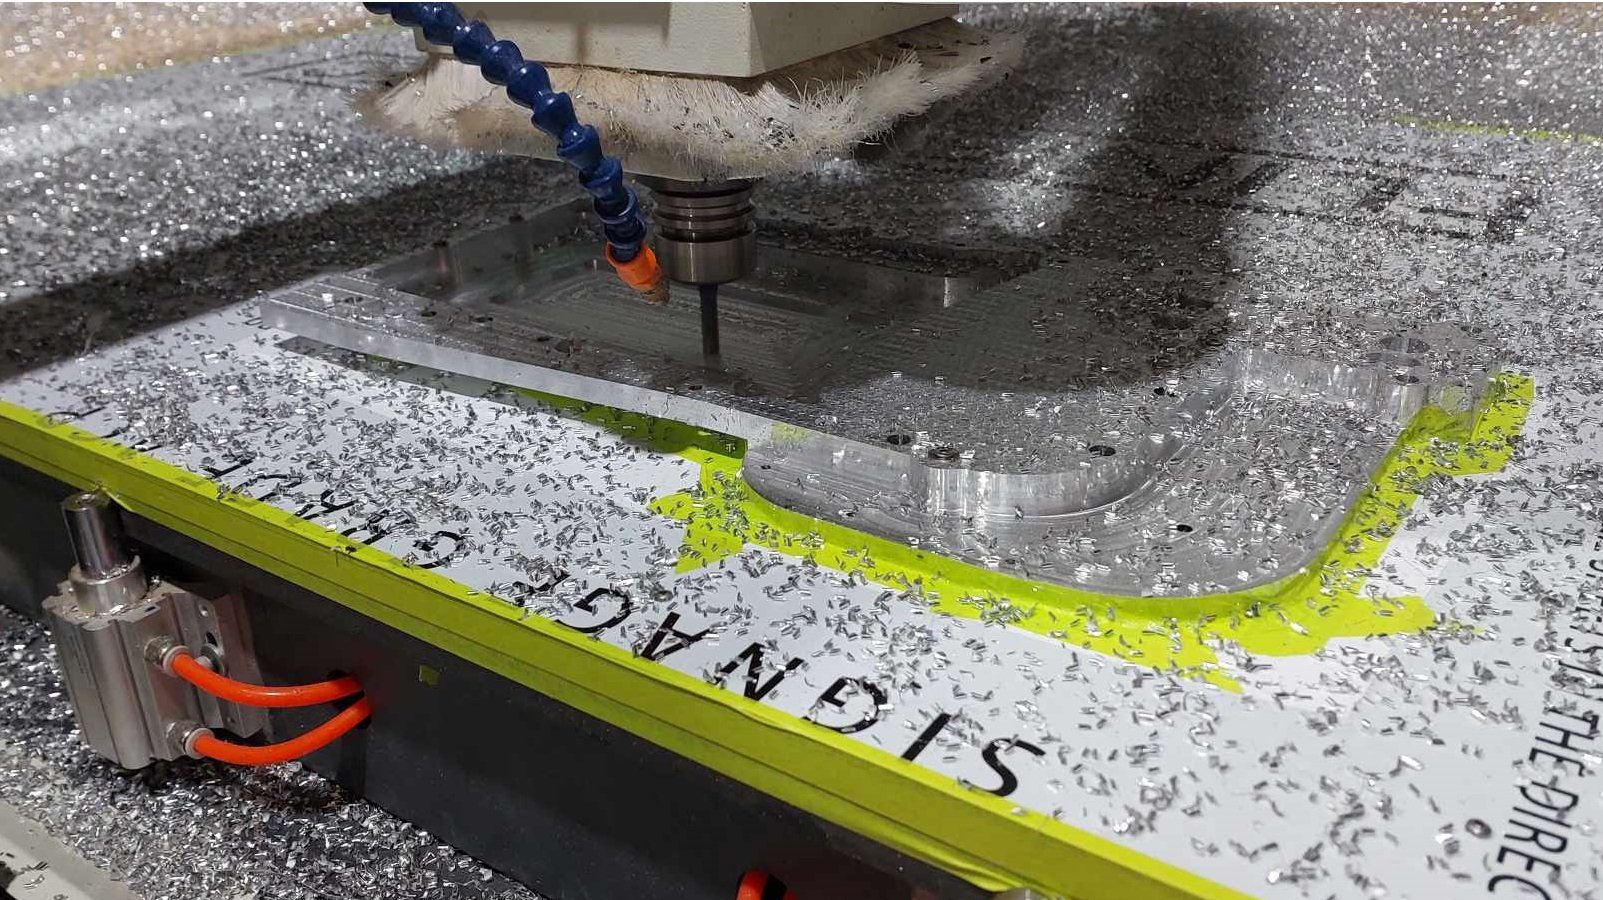
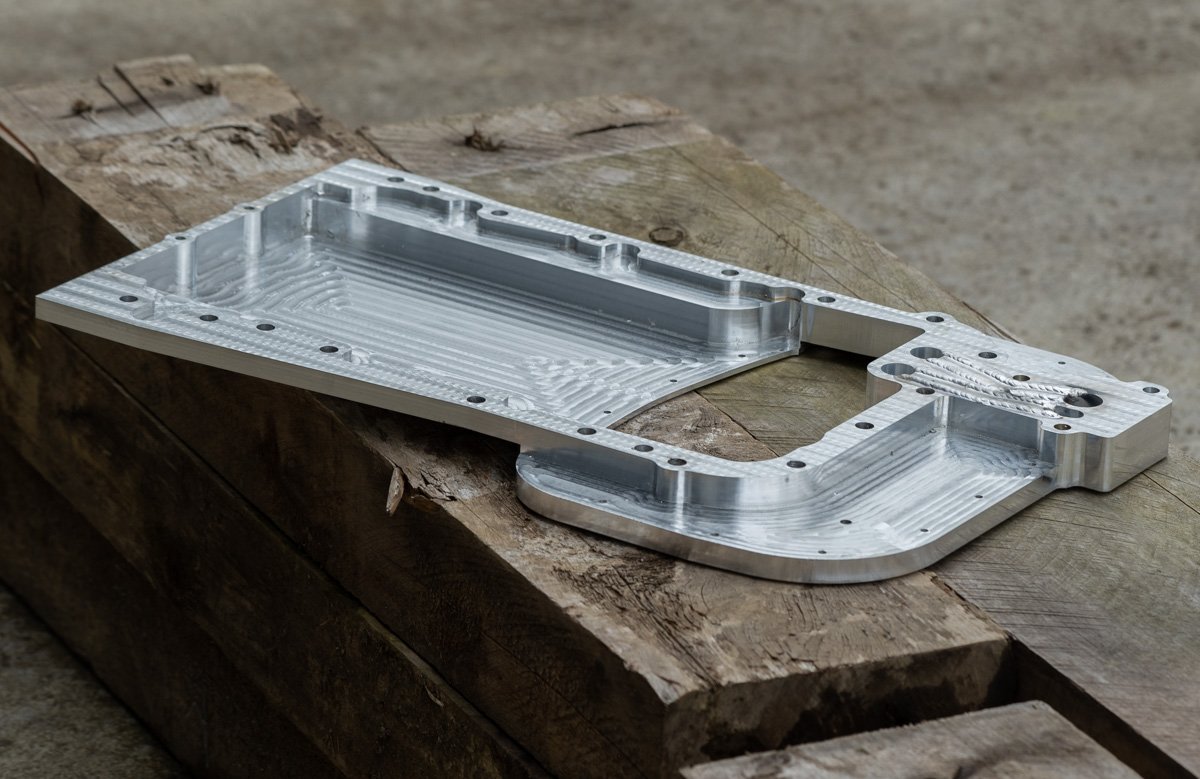
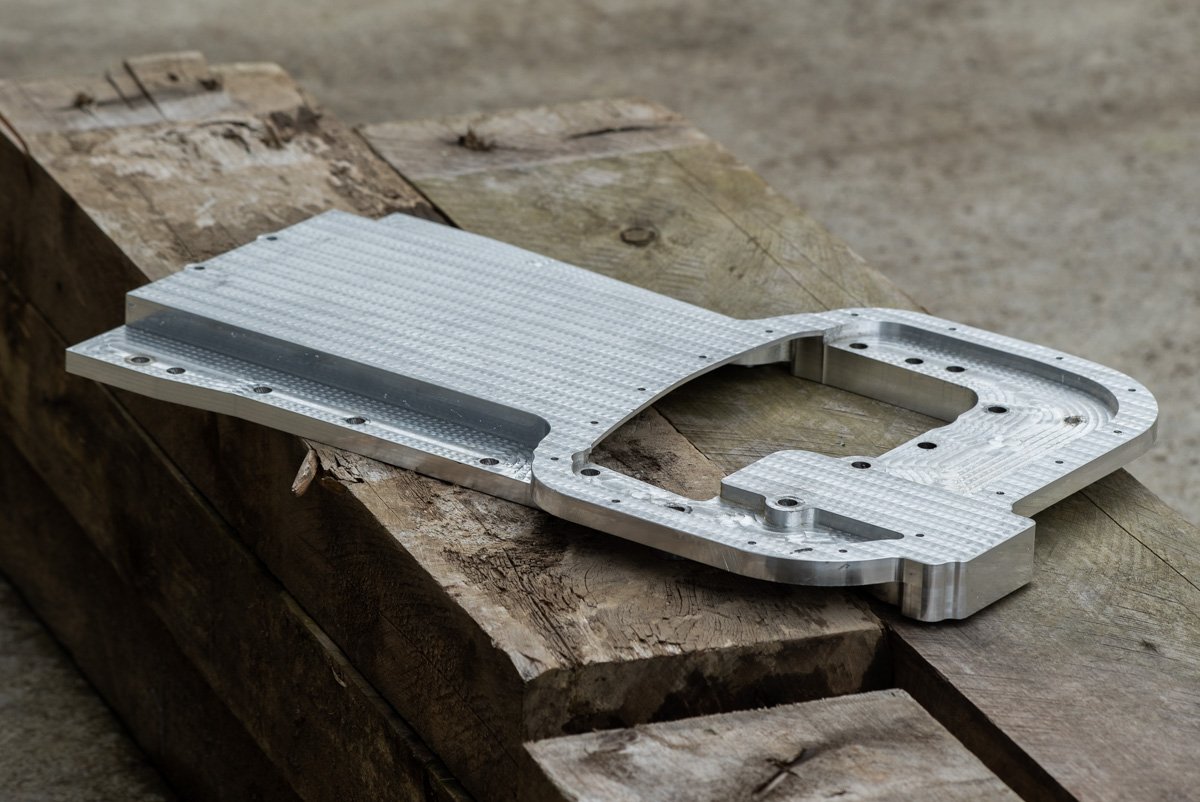
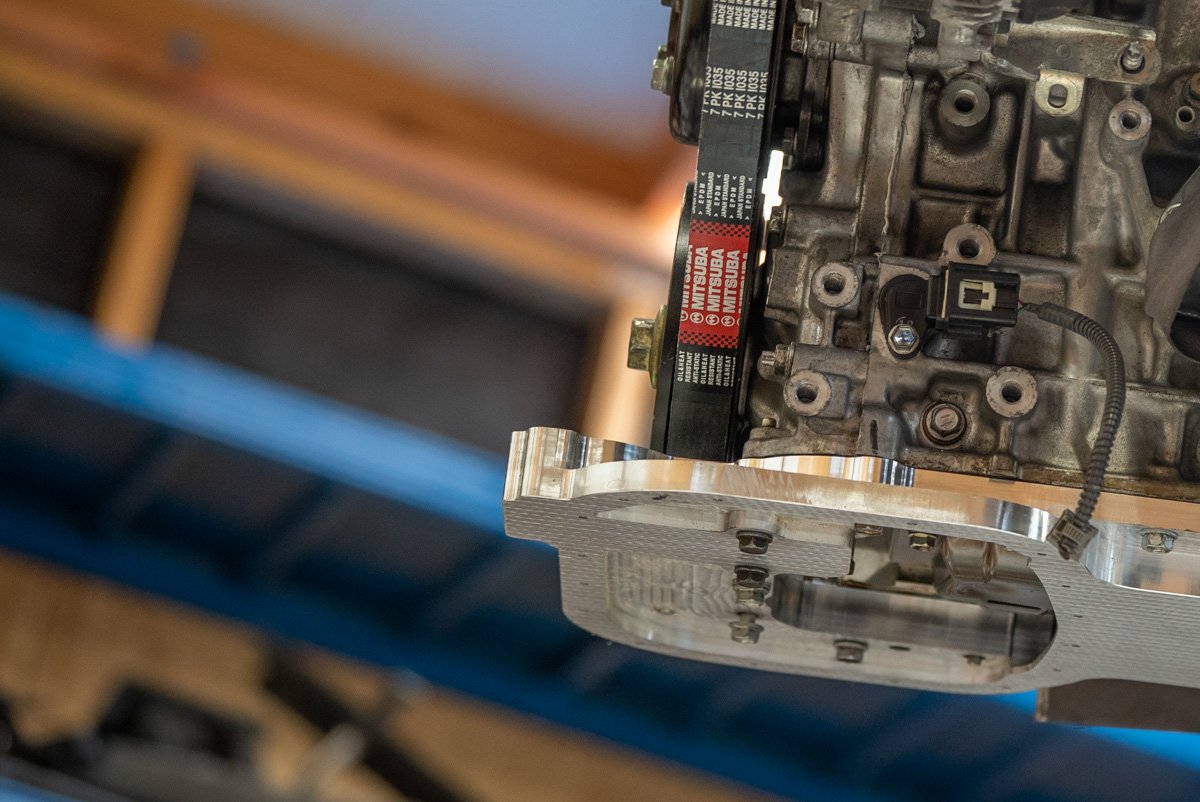
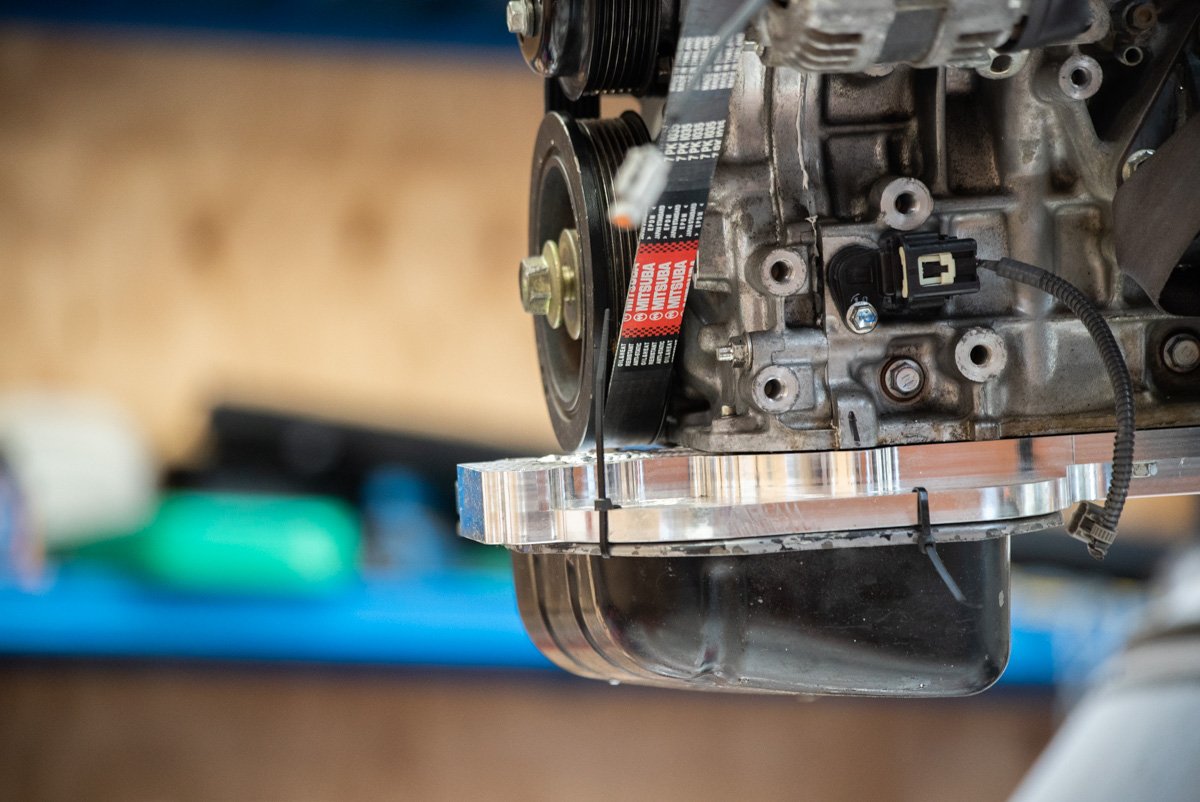
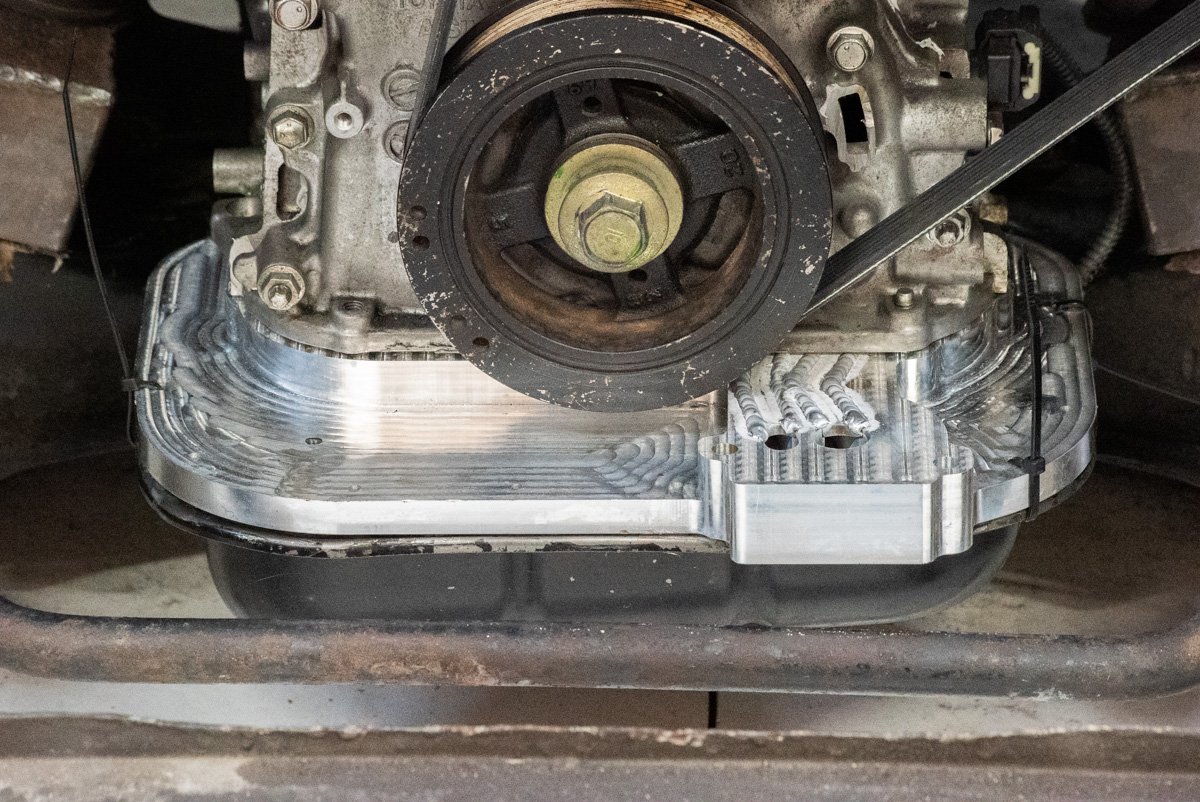
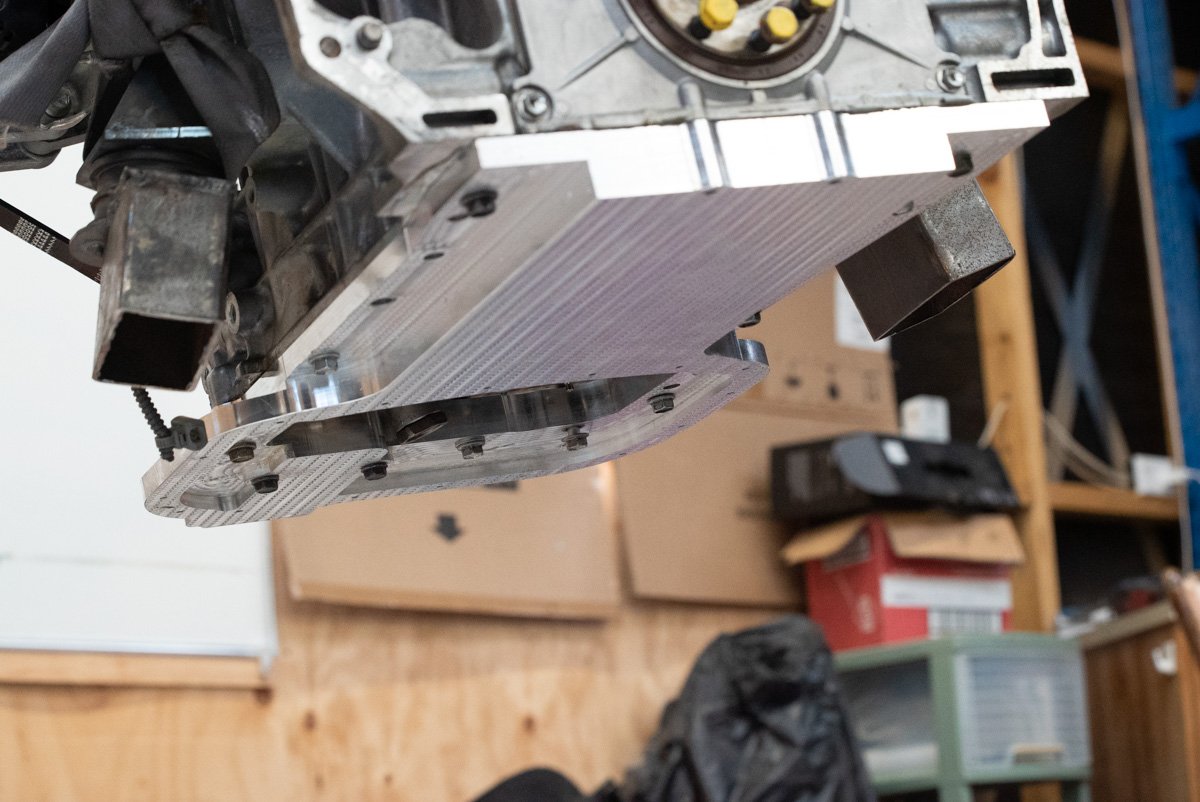
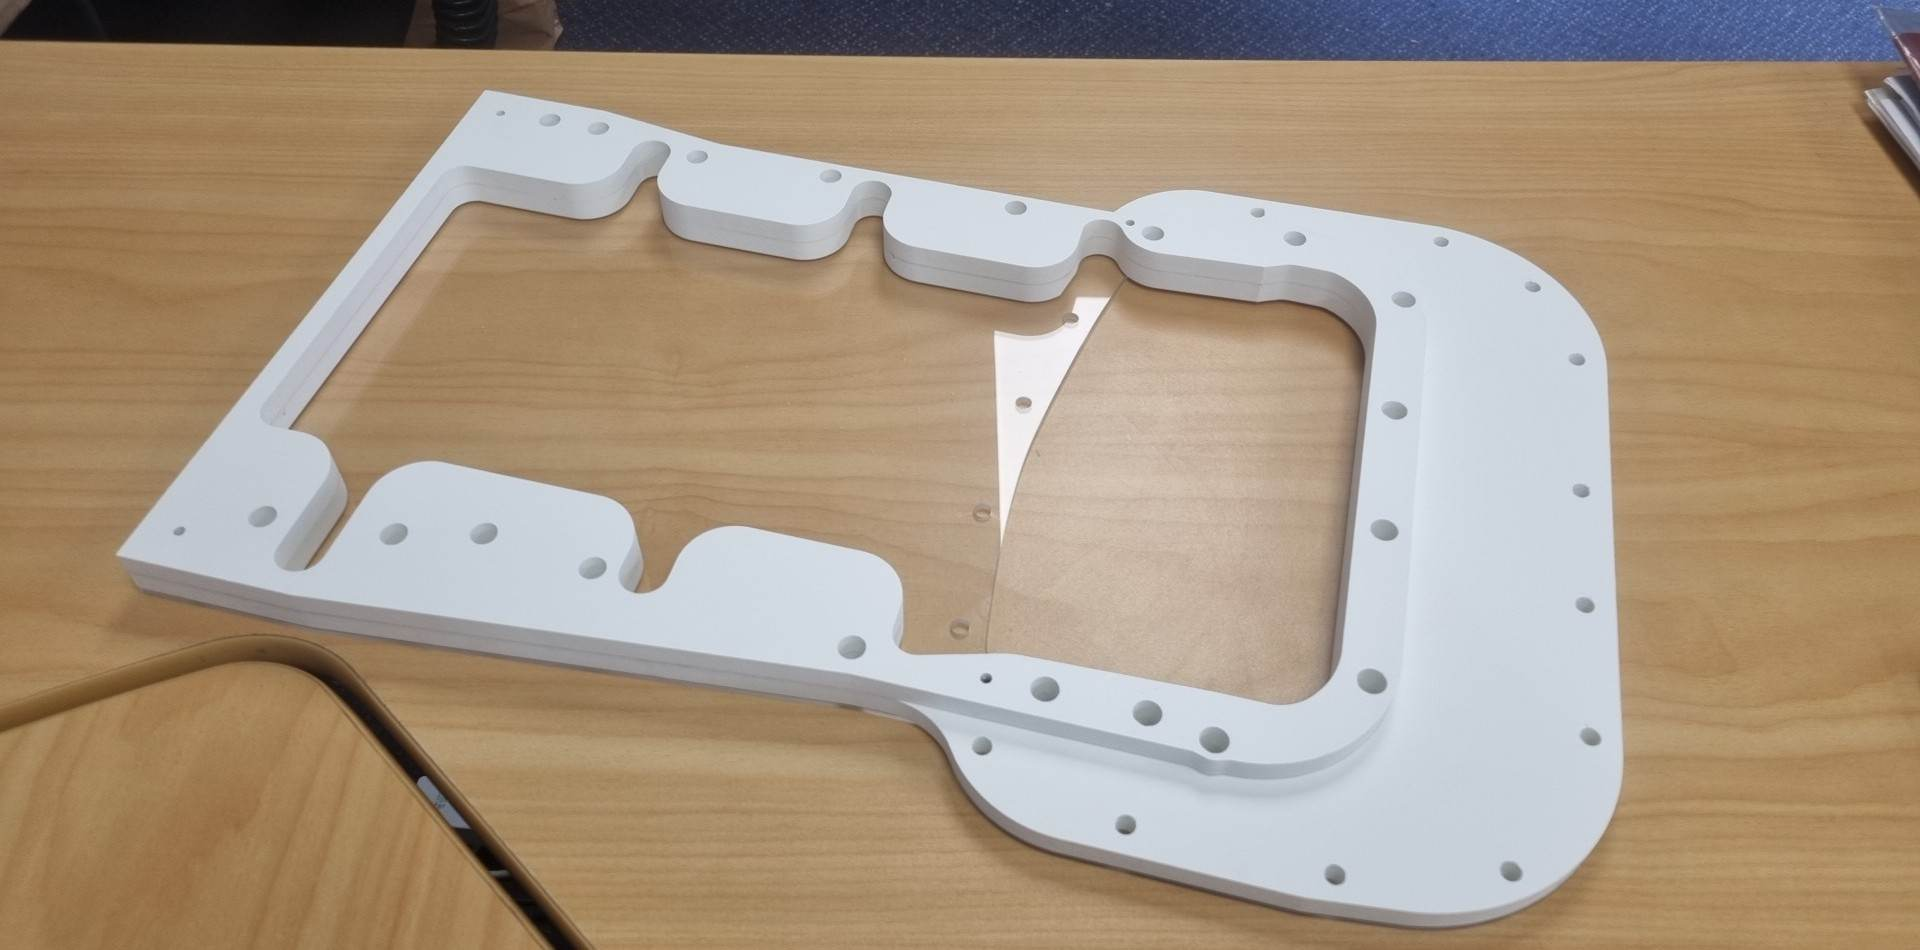
Oil pan activities! Absolute GCs @Stu and his workmate Sam found some time in their incredibly busy schedule. To spend a night programming some cutting paths and cutting a big slab of alloy down into an oil pan. I went along to watch and learn some things and it was awesome. Firstly, start out with a 22kg block of 32mm thick alloy plate. Then align this onto the bed of the router, and the it gets sorta vacuum sealed against the bed. Then one side was machined, making an absolutely hectic amount of mess. Then it was flipped over, and a a template was cut to align it onto the bed again. Making zillions of glitter carving out the other side. Then once it was all cut, we are down to around 1.8kg from 22. So there were plenty of chips for me to sweep up, haha. we needed to look at drilling the oil galleries for the filter, that I mentioned a few posts ago. Problem - the depth needed was too long for any available tooling and the height of the machines etc. So we decided to mill two slots in, and then weld a cover plate over the top. We made the slots do a bit of a zig zag, so that they would avoid one of the threaded holes for the oil filter housing. Which previously penetrated through into the oil gallery as there was no other way. Then Stu on the tig to zip it all back up: Then ready for a test fit. How good! (It still needs the welds flattened off and some threads tapped, havent done this yet) Much to my relief, it fits up great. Just zip tieing the oil pan on for now, until I can tap the holes. and back in the car... everything good! So that's one of the last remaining big tasks mostly sorted. And a big relief that it looks like everything is going to work as expected. Hugely grateful for the time spent by Stu and Sam to help get this done. I think its the most complex and coolest car related thing I've ever drawn up. Next steps are to thread a few holes for the oil pan and oil filter, flatten off the welds, and make an oil pickup. then I can fit it on for good, and fill the motor up with oil. Getting closer! Exciting.
1 point
-
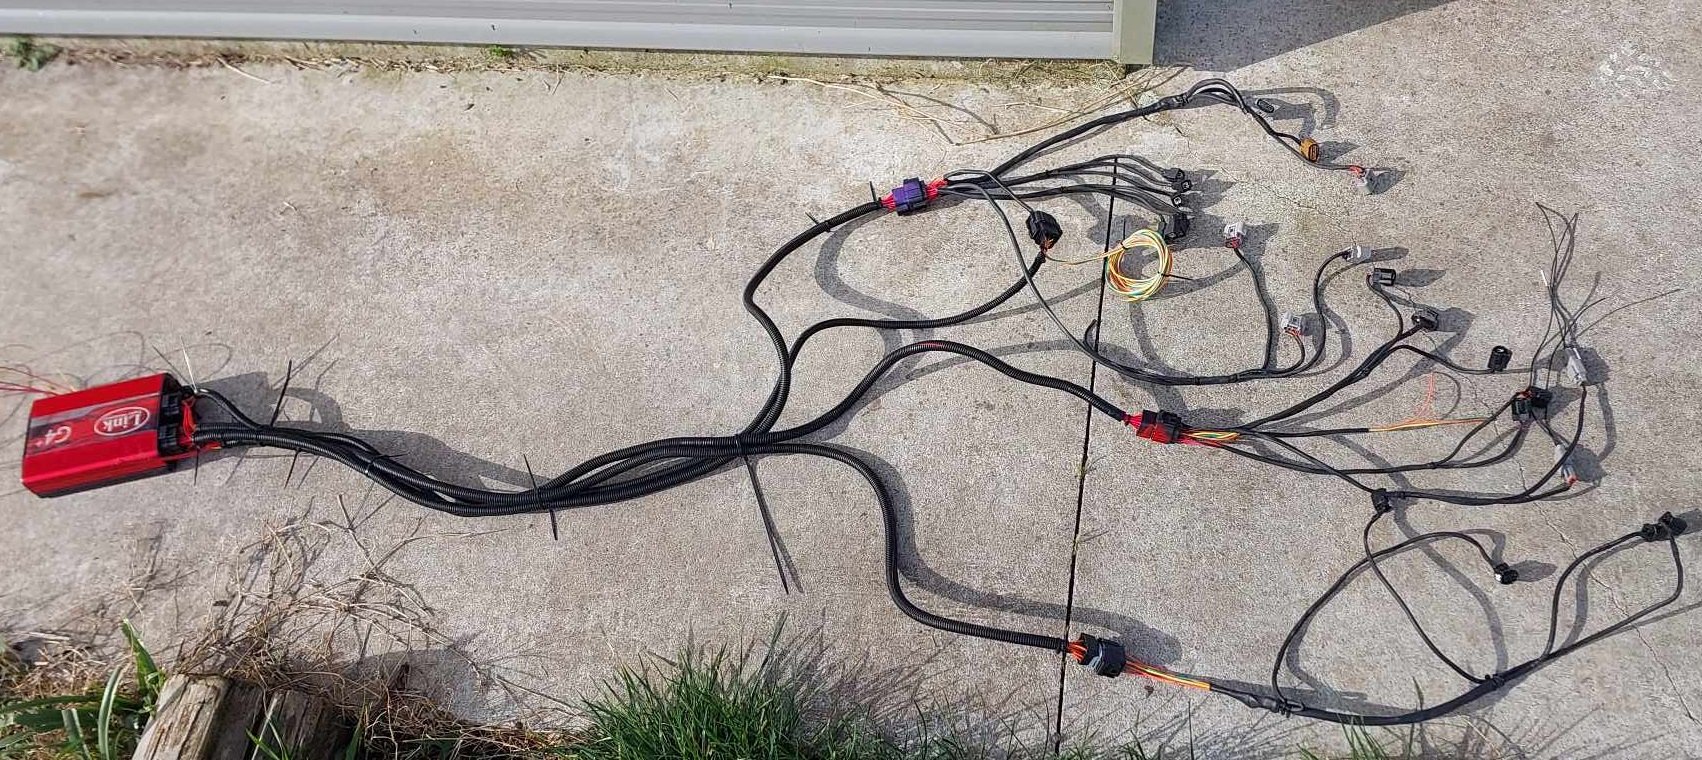
My loom is mostly finished. Will give it a few tweaks to make it look tidier but happy with how its turned out. I still need to plug it all in and verify that everything works / wired to the correct place / etc. Which takes some time. I've got two more plugs to do, that tie into the body loom and my fusebox arrangement. So I need to try remember how all of that works. I've given up on finding e-throttle plugs, so I just slotted some terminals onto the pins inside. Filled up the plugs with liquid plastic from the 3d print pen. Then heat shrink over the top, and silicone in the end. Feels nice and secure, hopefully works good. Will probably do the same with the 2nd TPS that I cant find a plug for.
1 point
-
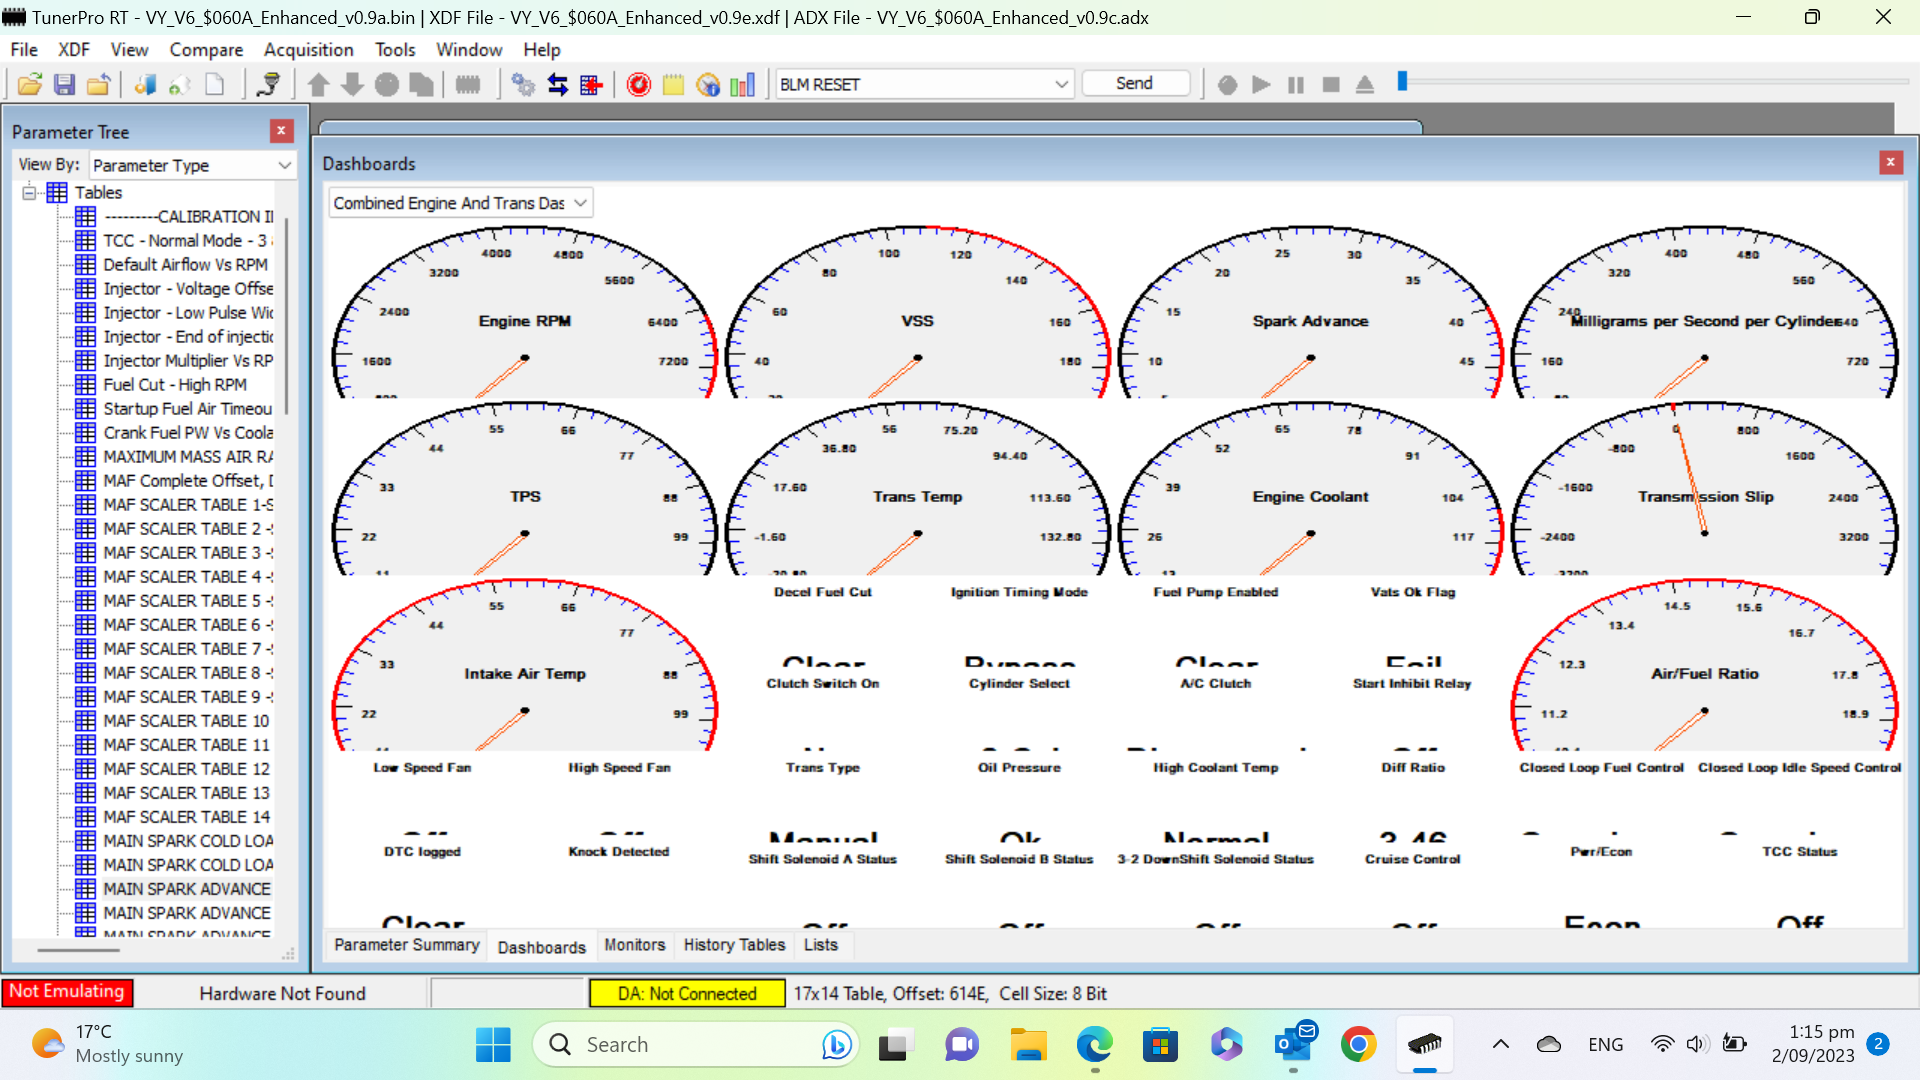
Finally Managed to get Tunerpro Talking to the car again settings were vastly different to how my previous laptop was setup, program would crash then i got coms but only Transmission information few more settings got some engine information and no trans information....... randomly checked a few more options everything fired back up all the onscreen dash became live, And it works so much better than my previous laptop everything is quick data logs nicely was a bit hit and miss before. If i wanted to run an aftermarket ECU i'd need something that can run the trans too hence i'm giving it a nudge others have with good results otherwise i'd run a Haltech R3 or something. Thank fuck for that! s
1 point
-
So this L67 im using as a dummy block has some scored bores an cracked heads the actual bottom end is in really good order. Think for proof of concept I'll pull pistons hone bores slap it back together with fresh rings ecotec heads and send it. I'm over how long it's taking, final parts count I need exhaust tubing but mufflers are here and a blow off valve thats it! That'll get it up and running. Lots of fab work to be done but im looking forward to that. Christmas holidays should get stuff happening.1 point
-
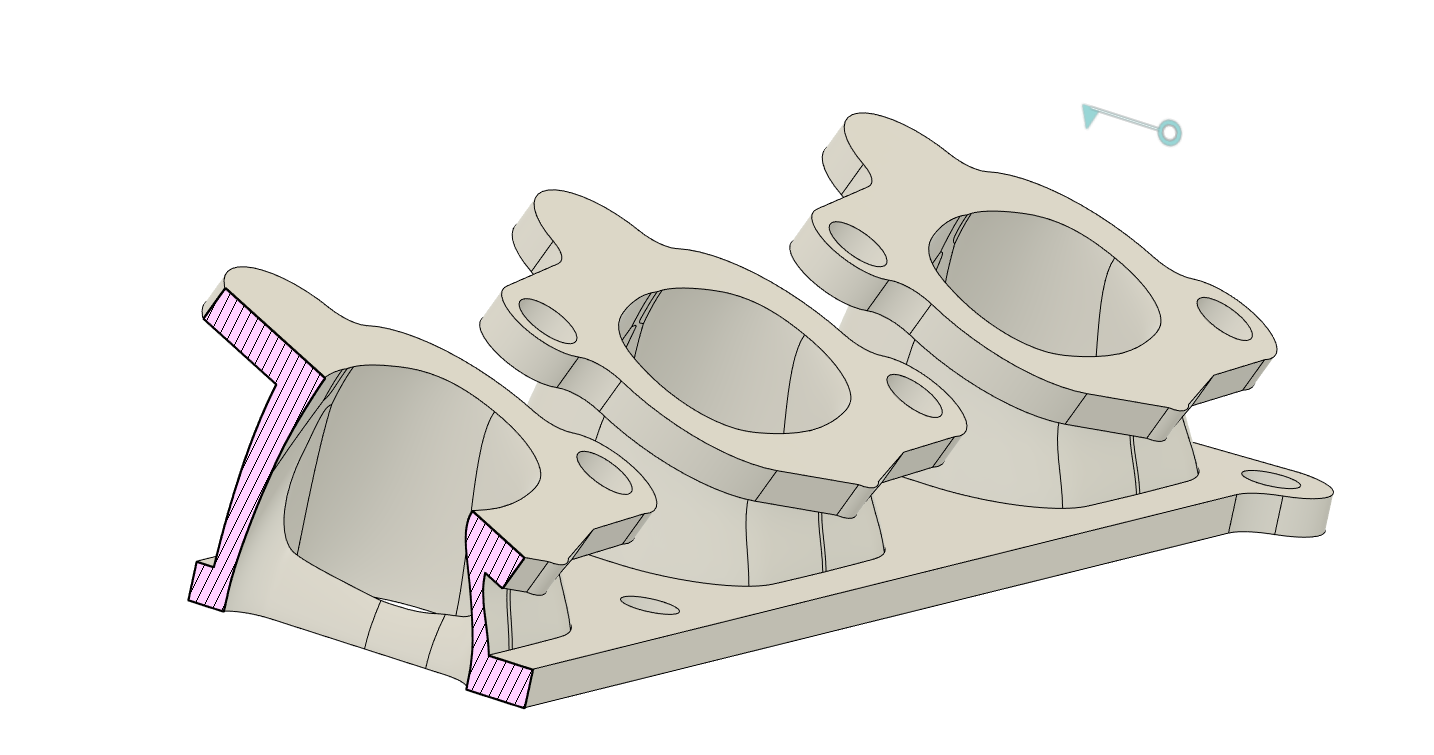
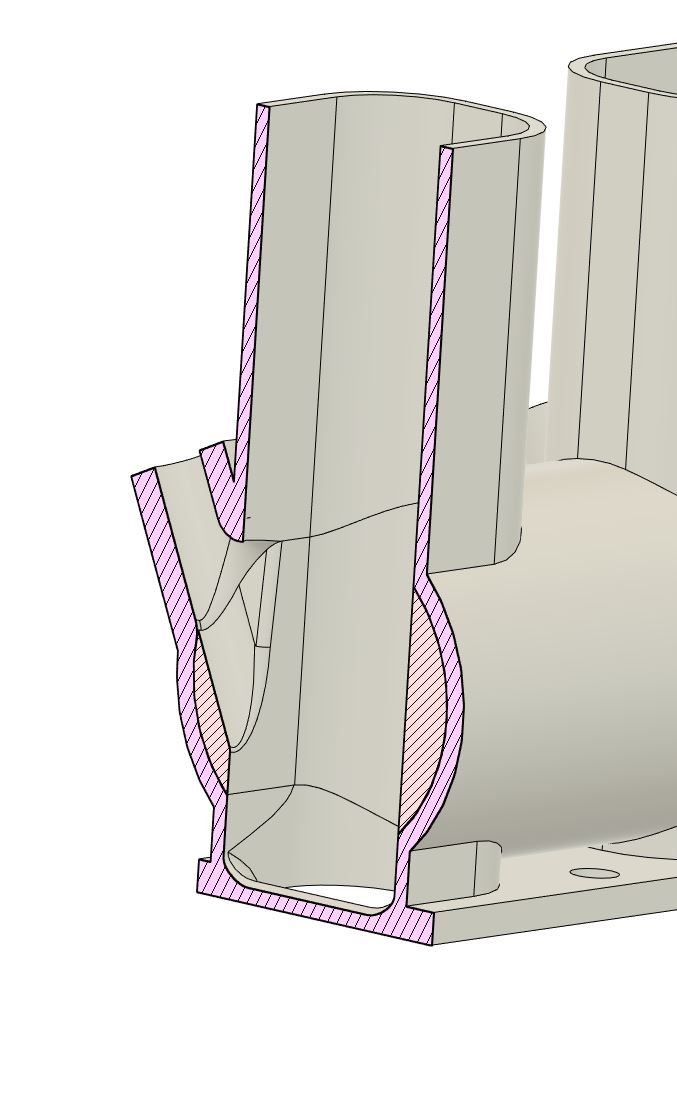
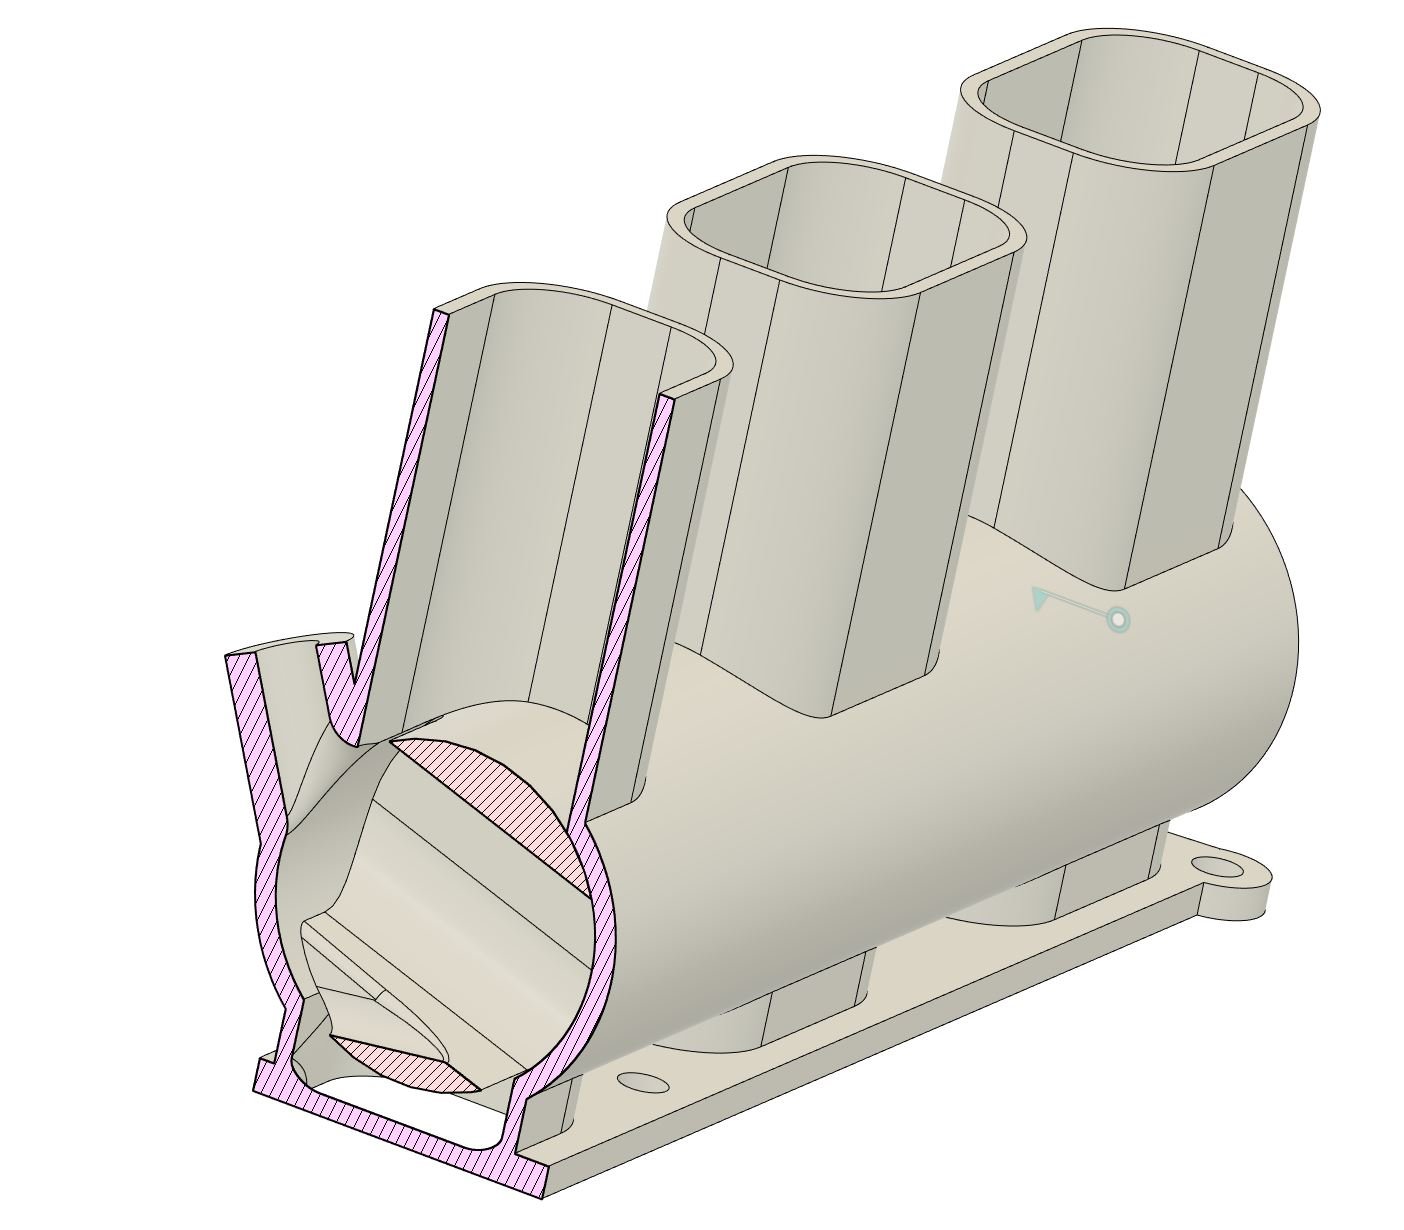
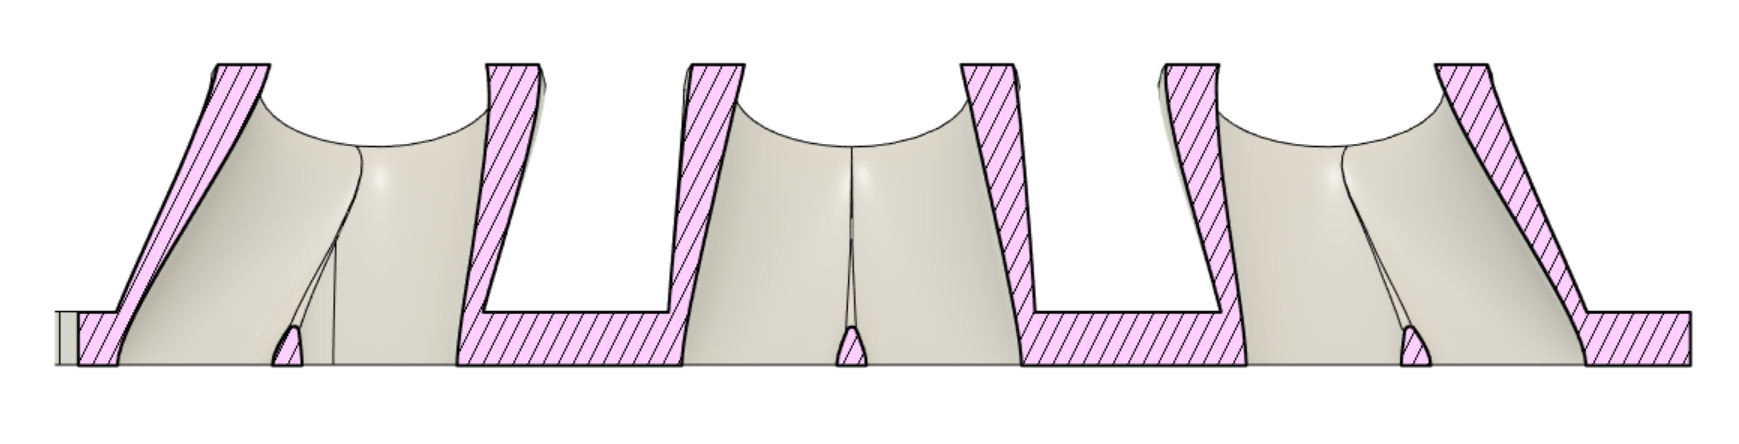
My current intake setup will get the ball rolling, but, I think throttles are probably too small. The centers are less than ideal and the fuel rail position is uncomfortably close to the bonnet. But the quality and strength of the print of the manifolds, from the 3rd party print has blown my mind! So good. One thought I've had is to get 6x tiny ethrottles and control them all individually for lolz. Otherwise, been thinking. Can you print entire throttle bodies, rather than just adapters? Well, Not really. Because the problem is that you need a super thin metal throttle plates. So that lends itself to being metal or similar only. But do you know what usually sucks to make out of metal? Barrel throttles. Barrel throttles might be entirely printable, or partially printable (either just housing or barrel) because there are no thin parts needed. The thickness of everything is liability from metal but a positive for printing. There's (I think) going to be less thermal expansion compared to aluminium and so hopefully less chance of throttle sticking. This would help with my bonnet clearance issue, as I can mount throttles further down towards the head. My current setup needs to be mounted high-ish, because otherwise the transition is disgusting. Barrel throttles can be a non circular profile no problem so you can just have them the same shape as the port all the way up. Anyway, thinking something that looks like this. Bong shaped intake, paying some homage to my West Auckland cultural heritage. Maybe I could make some trumpets out of 8% woodys cans. Another problem with barrel throttles is that at part throttle they can end up pooling fuel in the barrel section, then having a hernia on full throttle when it tips it all in. But I figure you dont actually need both sides of the barrel to seal, and these will be vertical. So injecting inside the barrel itself and having the rear half more open would probably be sweet. At part throttle like this: The barrel shape itself is still quite simple to allow for the injector. But ends up being a decently solid part without any delicate sharp edges anywhere. (Shape obviously gets more complicated to allow for bearings and TPS etc etc, but you get the idea) Probably a project for the distant future as I've got my hands well and truly full currently. But would be pretty cool, have always wanted to try a barrel throttle.
1 point
-
Did a roadie to Taupo to collect this gear off a young fella who's mum and dad talked him into buying a turbo falcon instead of turboing his commodore..... holy shit some gear here! Big ass new intercooler, stainless steam pipe manifold with a hefty T3/T4 turbo on it wastegate and all the 3" intercooler plumbing. A modified sump as well all in all really happy should speed things along project wise. Now to get the car a wof before i start fitting stuff so I can spend year getting it ready for a cert.
1 point
-
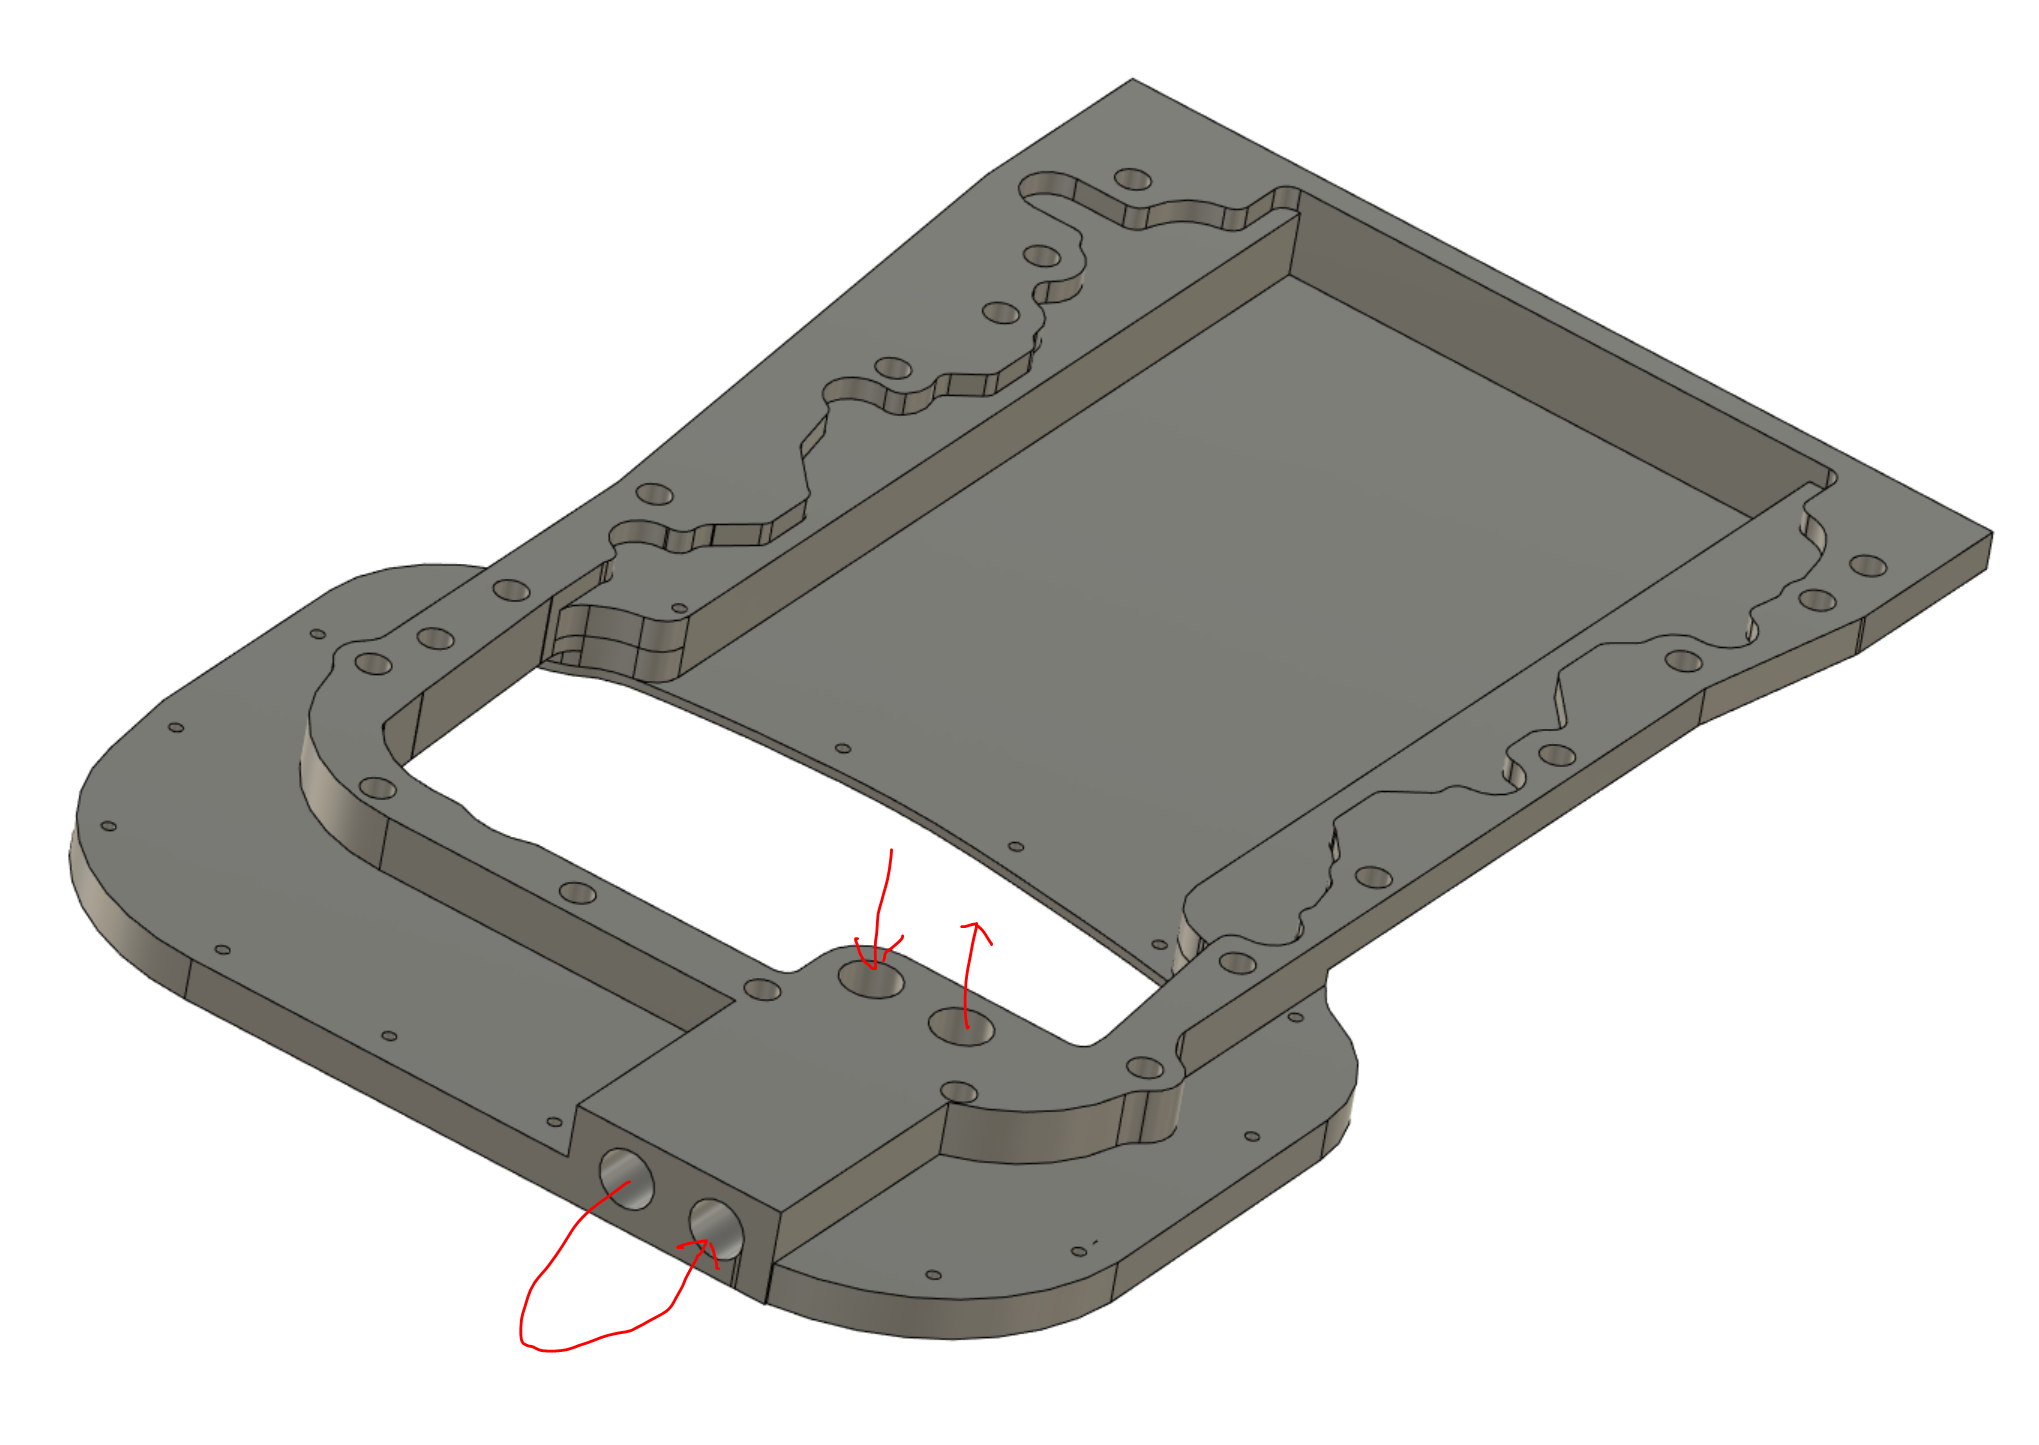
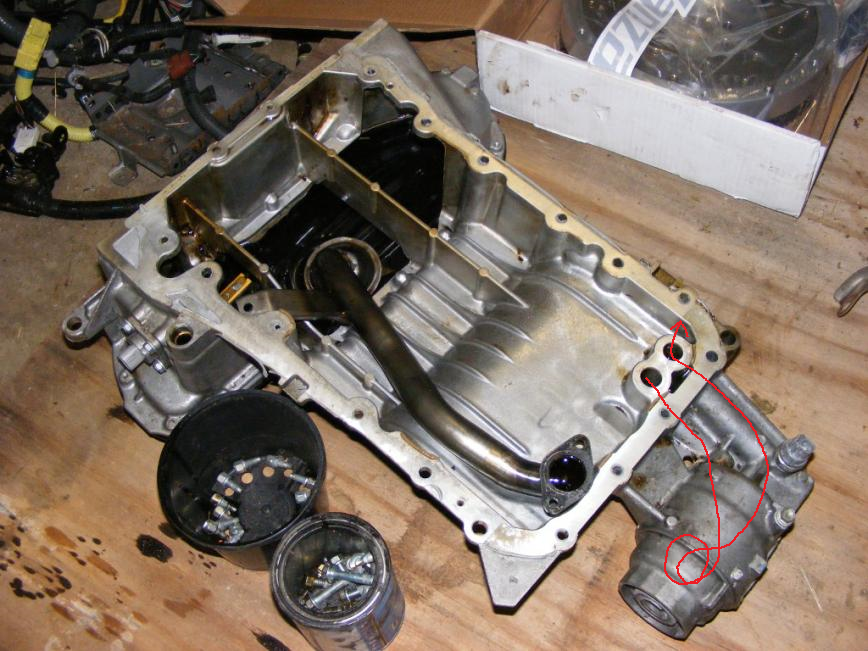
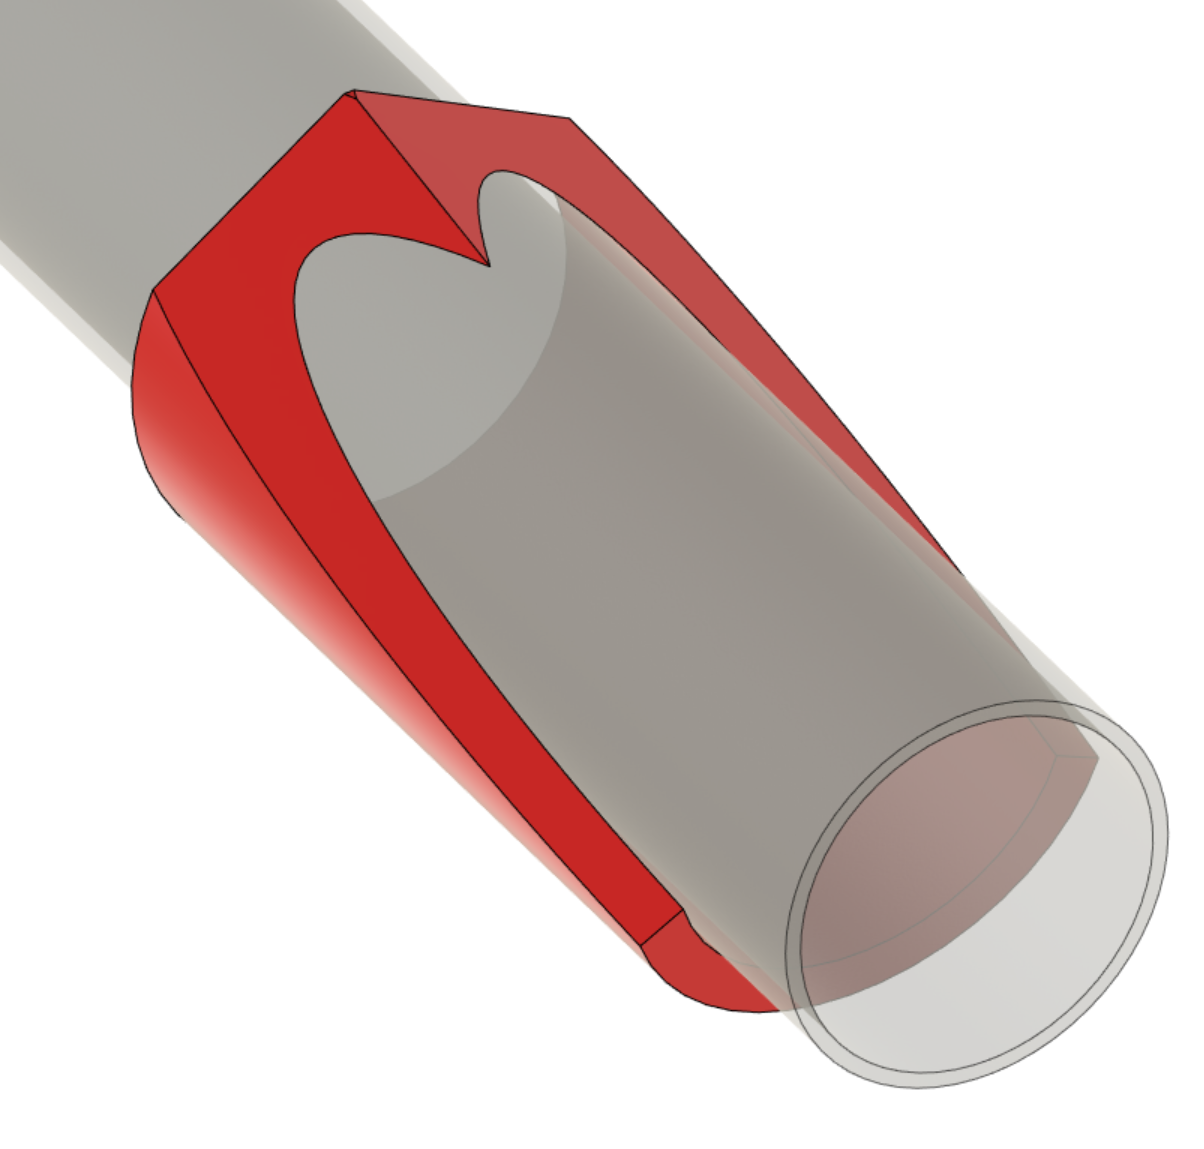
Another sidetrack - back to the sump. Looks like will try machine it entirely out of a single 32mm plate, as 25mm wasnt going to be quite enough. This might help solve my oil filter situation. On the bottom of the front timing cover is the outlet of the oil pump, which feeds down into the sump for the oil filter, then goes back into the sump, back up into the front timing cover. I've been tossing around a few ideas for how to address this, maybe running some internal AN lines or a welded in pipe that does a U turn so I can have some AN fittings come out on the top face of the pan. Then run a remote filter. However since it will all be a single piece now, maybe it can be drilled like this so it comes out the front. Or, drilled but then a plug screwed in, and other holes drilled on top so the fittings face upwards. Will need to see what sort of clearance I've got to the swaybar in this area. Poking out the front might not work. I might also not have enough clearance to the front pulley for this to work. Anyone else got any good ideas for how to address this, that I might not have thought of? Sometimes when staring at the same model for so long, there are some obvious ideas smacking you in the face that you cant see. The factory sump does it like this. EDIT: Gosh I could tap that line for the oil pressure sensor as well, like factory one does. Sweet.
1 point
-
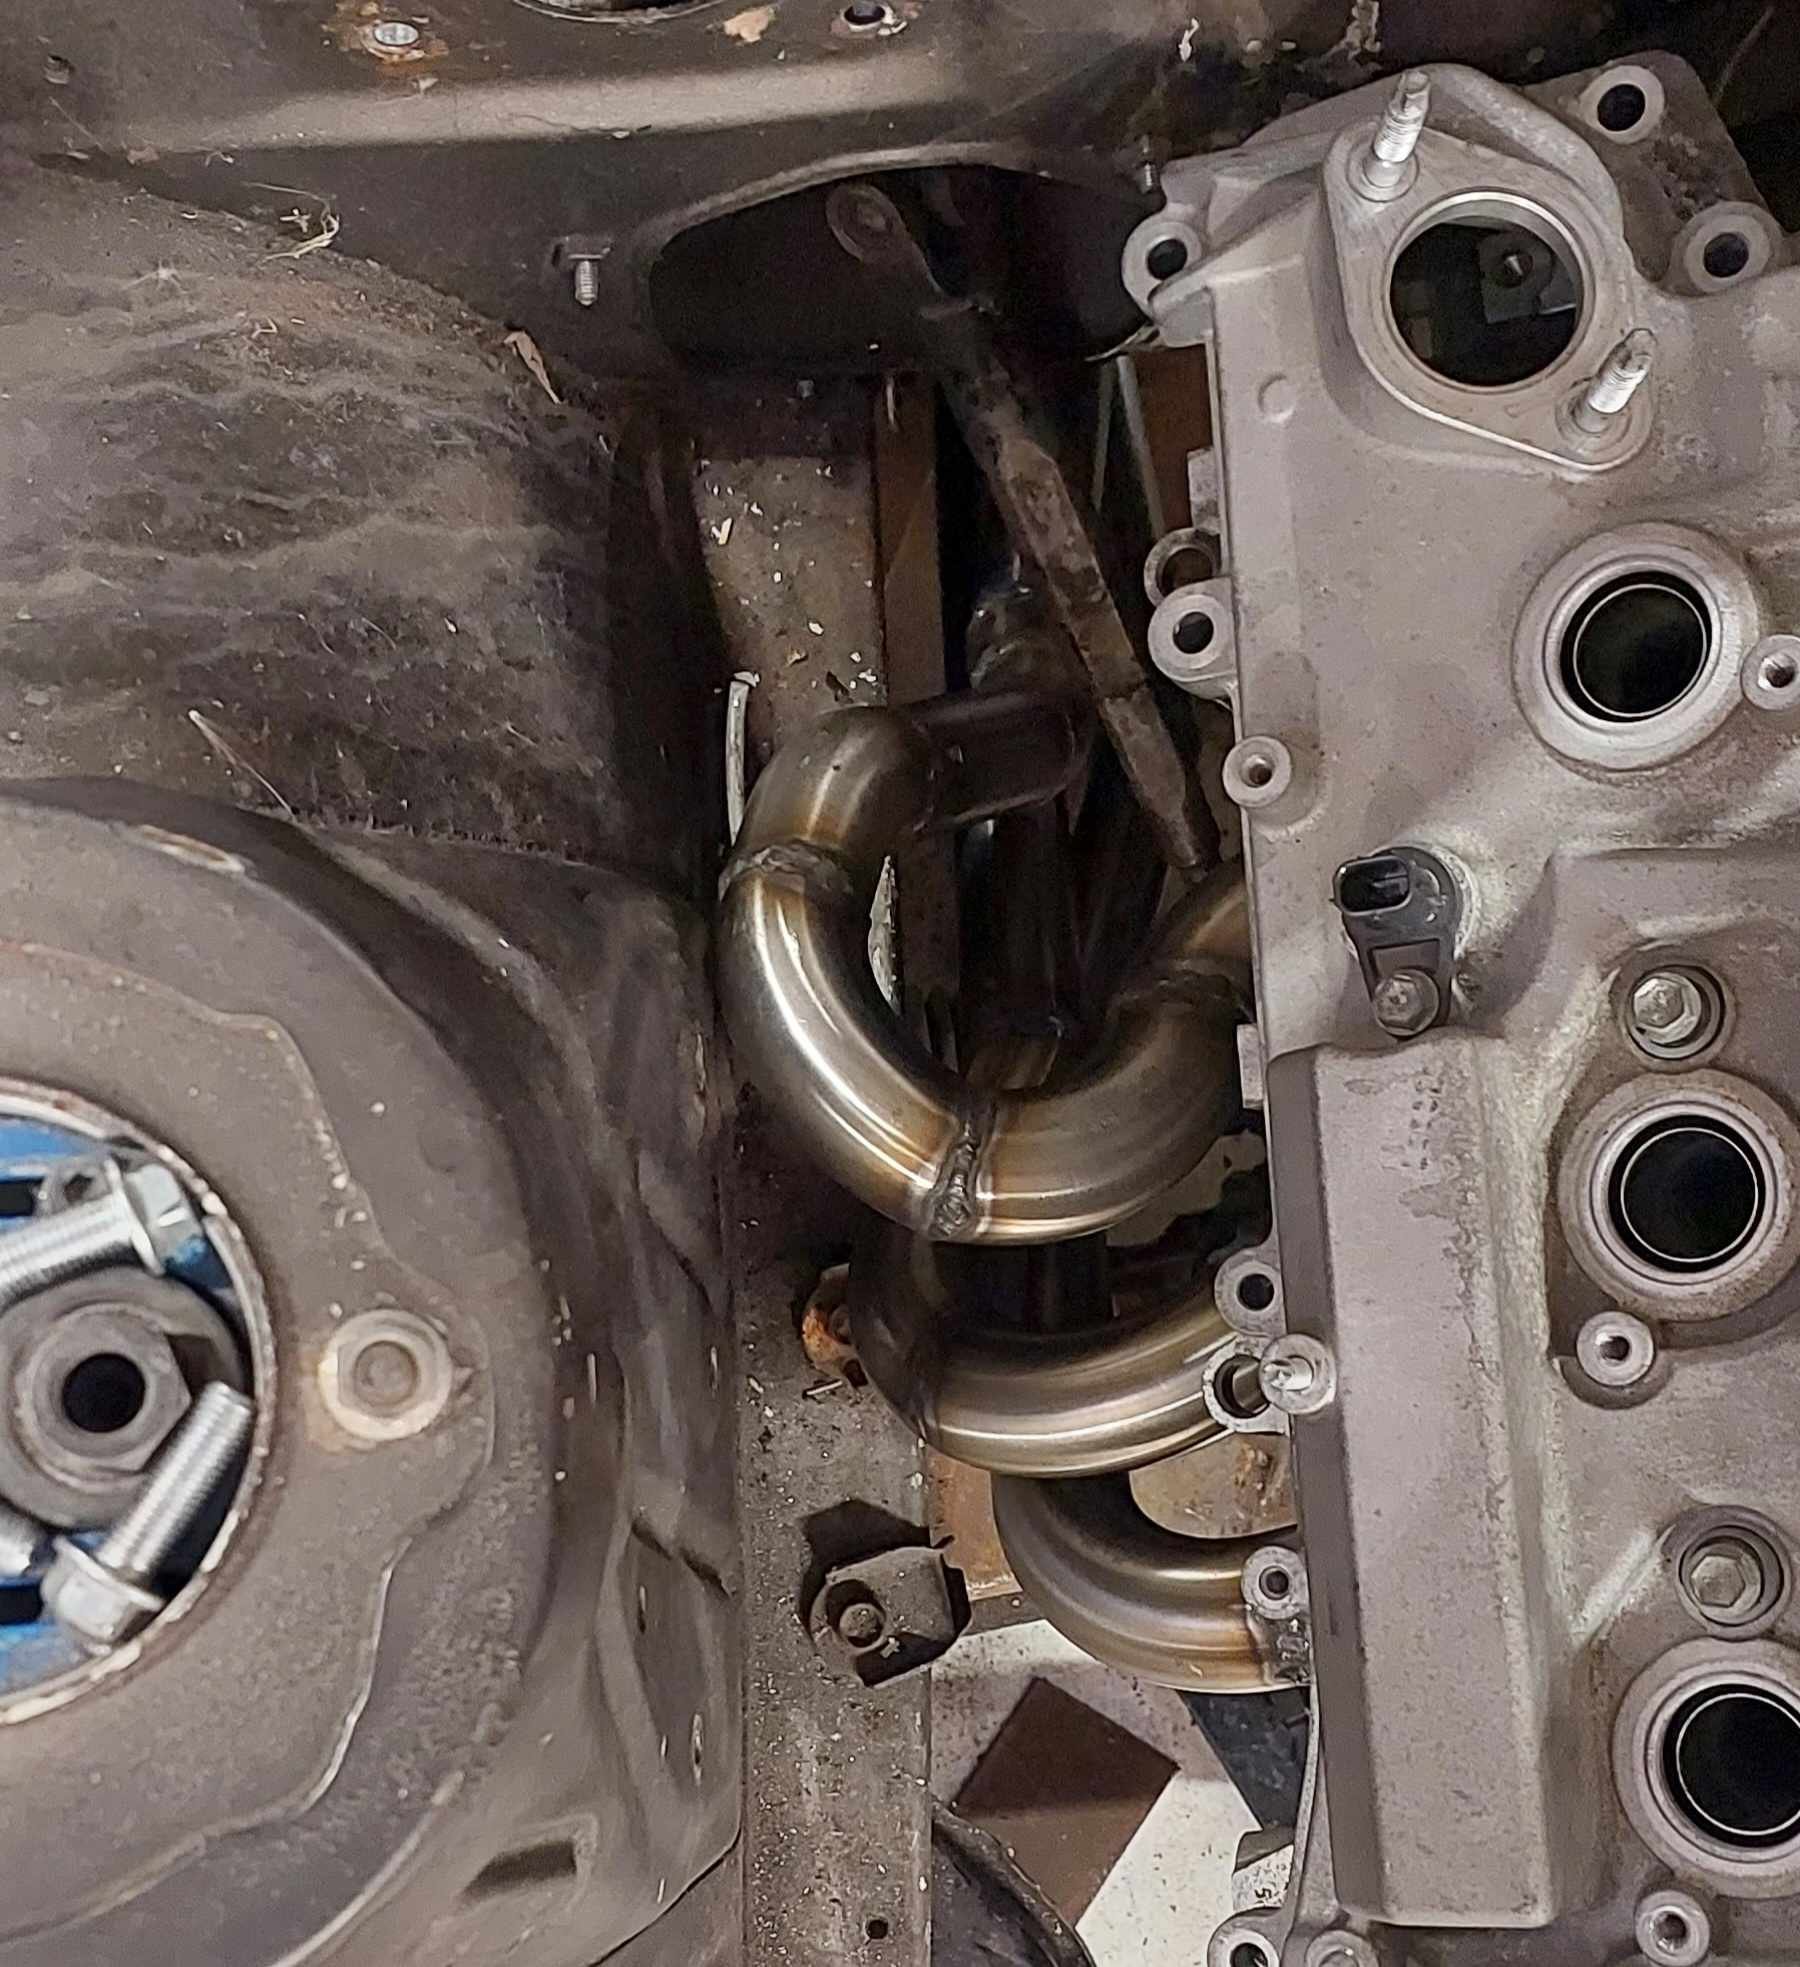
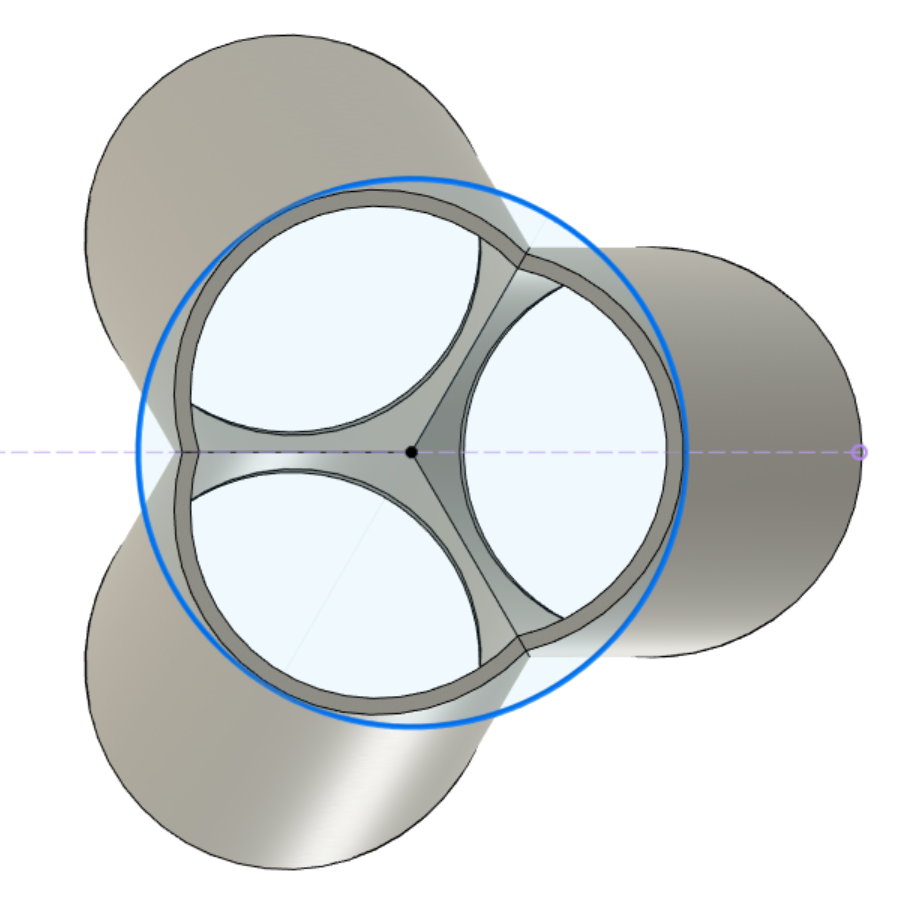
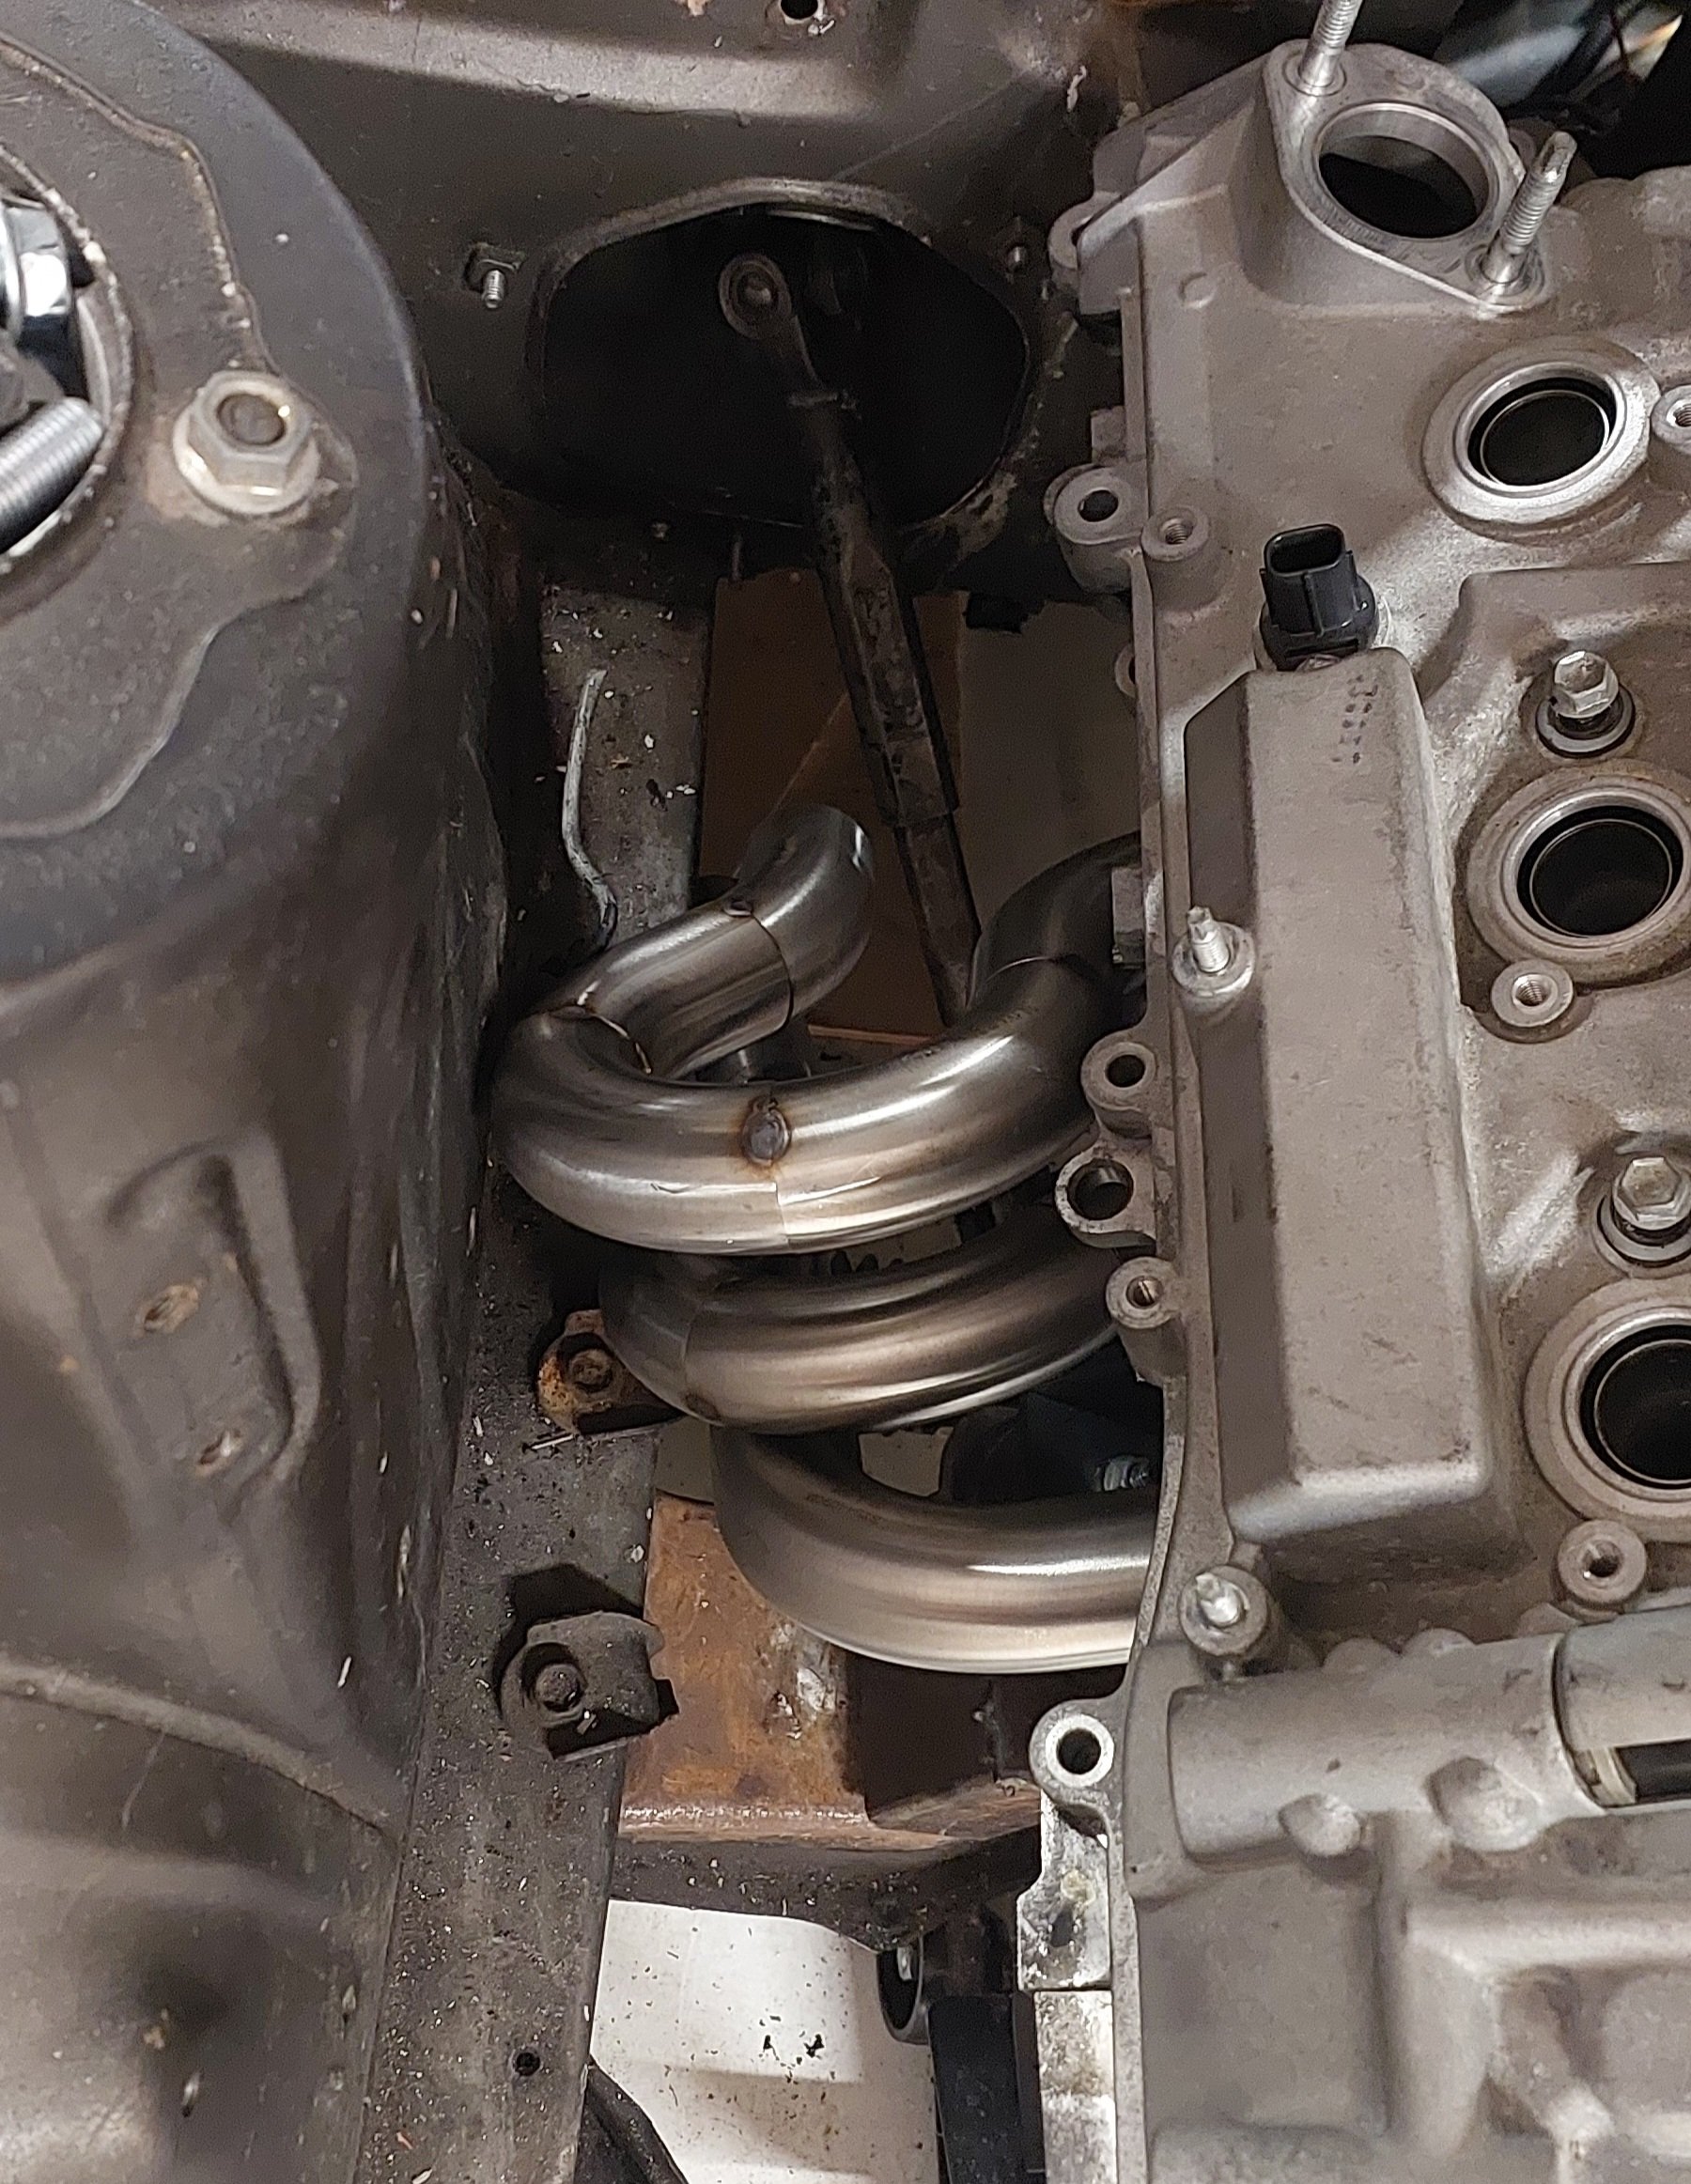
Alright sooooo. It's been a case of: tack pipes. test fit. cut pipes back off. test fit. tack pipes again. scratch head. And so on, for about 30 iterations until I've run out of bends and argon. However I've now got something that clears everything. Doing some checks on lengths, they're within about 40mm of each other. Which is about 5% variation - happy with that. However, a few problems. Firstly, I've chopped and changed everything so much that it's a bit of a mess. Partially due to being short on patience from redoing everything a lot, and not having totally flush surfaces. So welds turned out more pooey than needed. I should invest in a linisher I think. Secondly, This is all great that everything's past the steering column, and 10+ mm clearance to everything. However everything is on some tricky angles to try stuff into a collector. I havent made a collector, because it seems hard. Or I need to buy some. The only purchasable collectors that fit my budget look like baked bean tins that have been stood on. So I will try make something instead. As I think what I really need to do. Is to start the pipes from the collector, then work back towards the head from there. Welding a collector is tricky, because you end up with a bit in the middle that you cant reach to weld when it's together. One way is to cluster the pipes together tight. Then weld a little triangle piece in the middle before it goes together, on the collector and 3 pipes. Then weld the remaining perimeter to finish it. (Idea stolen from @kpr - thank you) So hopefully something like this. To choose where to slice the bottom part, I've drawn a circle the size of a 2" pipe, then just cut it shorter till it roughly matches this. I could go bigger or smaller though I guess? Currently has inside area equivilent to a 1.75" circle. My plan is to print some cutting templates like this. If I had a band saw I'd do it a little differently so the outsides are flat so it sits on the right angle on the table. Actually - yeah might do this and see if I can use bandsaw at dads. Assuming it's happy cutting stainless. Fingers crossed it works out alright. Something else to think about. As per oldschool.co.ng project tradition, 3" exhaust pipe. However - I've got two banks that need to eventually merge into a single 3" pipe. I'm not sure if there's any useful tuned stuff happening in the 2-1 part of a 6-2-1 setup. If I was trying to keep the "secondary" pipes to half the cross sectional area of a 3" pipe, then it's about 2.1" per side. I definitely want to merge all 6 pipes, because otherwise it'll sound like I've got a pair of triumph motorbikes in the engine bay rather than a 6 cyl.
1 point
-
Started pooing together a manifold. Too tight damnit. Will have to tighten the bends a bit with a few angled cuts. Also, the only way I will ever get these off or on is by lifting the motor. And all of the studs in the head need to come out or its impossible. A bit of a hassle but better than having the shitty standard log manifolds.
1 point
-
Hot out of the @StuScience(tm) laboratory we have a test sump cut out! I didnt notice at first but the bottom layer is clear sitting underneath. Exciting! I hope it all fits up nicely. If it all fits, plan is to make the top two pieces from a single piece of 20mm alloy plate. In other news my 3D printer completely shat itself, and parts to fix it are a few weeks away. So I started thinking about outsourcing some prints to get my new manifold shapes finished. Then realized there are high end powder printing machines that are fundamentally different (better) to what I can print myself. So I had a look around and fired off some quotes. Two manifolds for the 4GR came back around $250 shipped. Pretty sweet! So this is MJF powder based printing from PA12 nylon. The benefit of this is that its equally strong in all directions, unlike "normal" printing which is weak on the layer lines. Ends up with a cool textured finish like this. I'm hoping that it wont need a carbon coating in order to be strong enough, so it'll considerably cut down on my hours needed to make parts. They will be a few weeks away, but if they turn out good I'll likely get a few other bits made this same way.
1 point
-
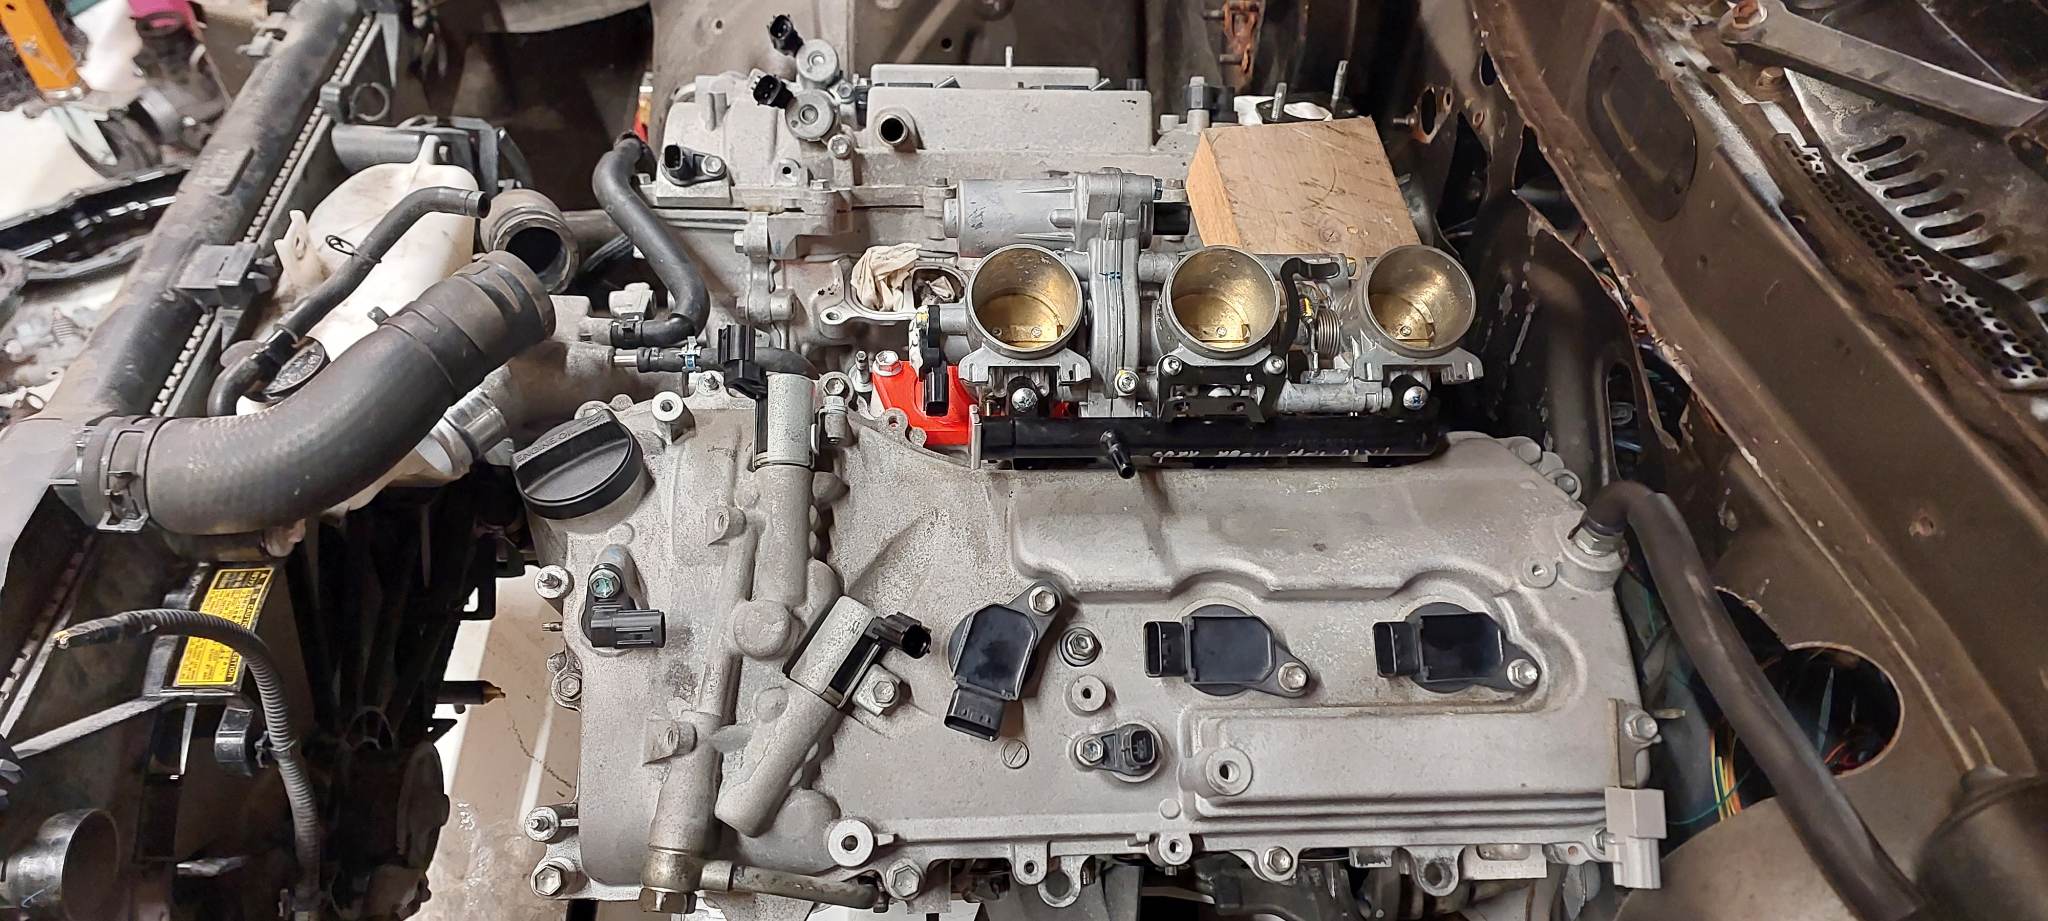
Few bits of scatterbrained progress, on everything but the sump. haha. I pick-a-parted a Mark X radiator and fan assembly, as the radiator hose sizes on this motor are real big. It's pretty big, but it clears the bonnet. Sits too high for the hoses to line up which is a bit meh. But, keeps things simple in a lot of ways I guess. Also one set of throttles turned up. Took some quick measurements then printed just one runner to test fit. Has an alriiiggghhhttt amount of clerance to the bonnet. But these throttles actually have a massive head height above the throttle plate. So I might machine them down a bunch, so I can start a curve on the runners earlier. Just printing another iteration that's about 10mm taller, and a little less angle. The throttle spacing is not quite as good as my guesstimate with the 1NZ / S1000RR throttles. Should be alright but longer term will probably try come up with something that keeps them all straight. Also, I'm glad I didnt jump the gun and buy a 2GR or 1GR or whatever flywheel. It looks like all 3 motors have different PCD on the crank. Which is good news for me, as the 4GR is closer in spacing to the 3S than the 2GR is. With a real life measure / eyeball it's probably close enough that put my chromoly flyhwheel on the CNC machine to slot the holes and it would be sweet. This would make life a bunch easier for the gearbox situation as well. As the other FWD flyhweels dont have allowance for a spigot bearing that the J160 needs. Also some random trivia, there is a 4WD Mark X. As seen at Pickapart. Unfortunately the sump is considerably less useful than my existing one, and looks like a bastard to get out. I dont know why a 4WD Mark X needs to exist, 210hp in a 1600kg+ car surely makes for a pretty sluggy driving experience. I've gone through a few more iterations of trying to simplify the sump situation but I'm not quite happy with it yet.
1 point
-
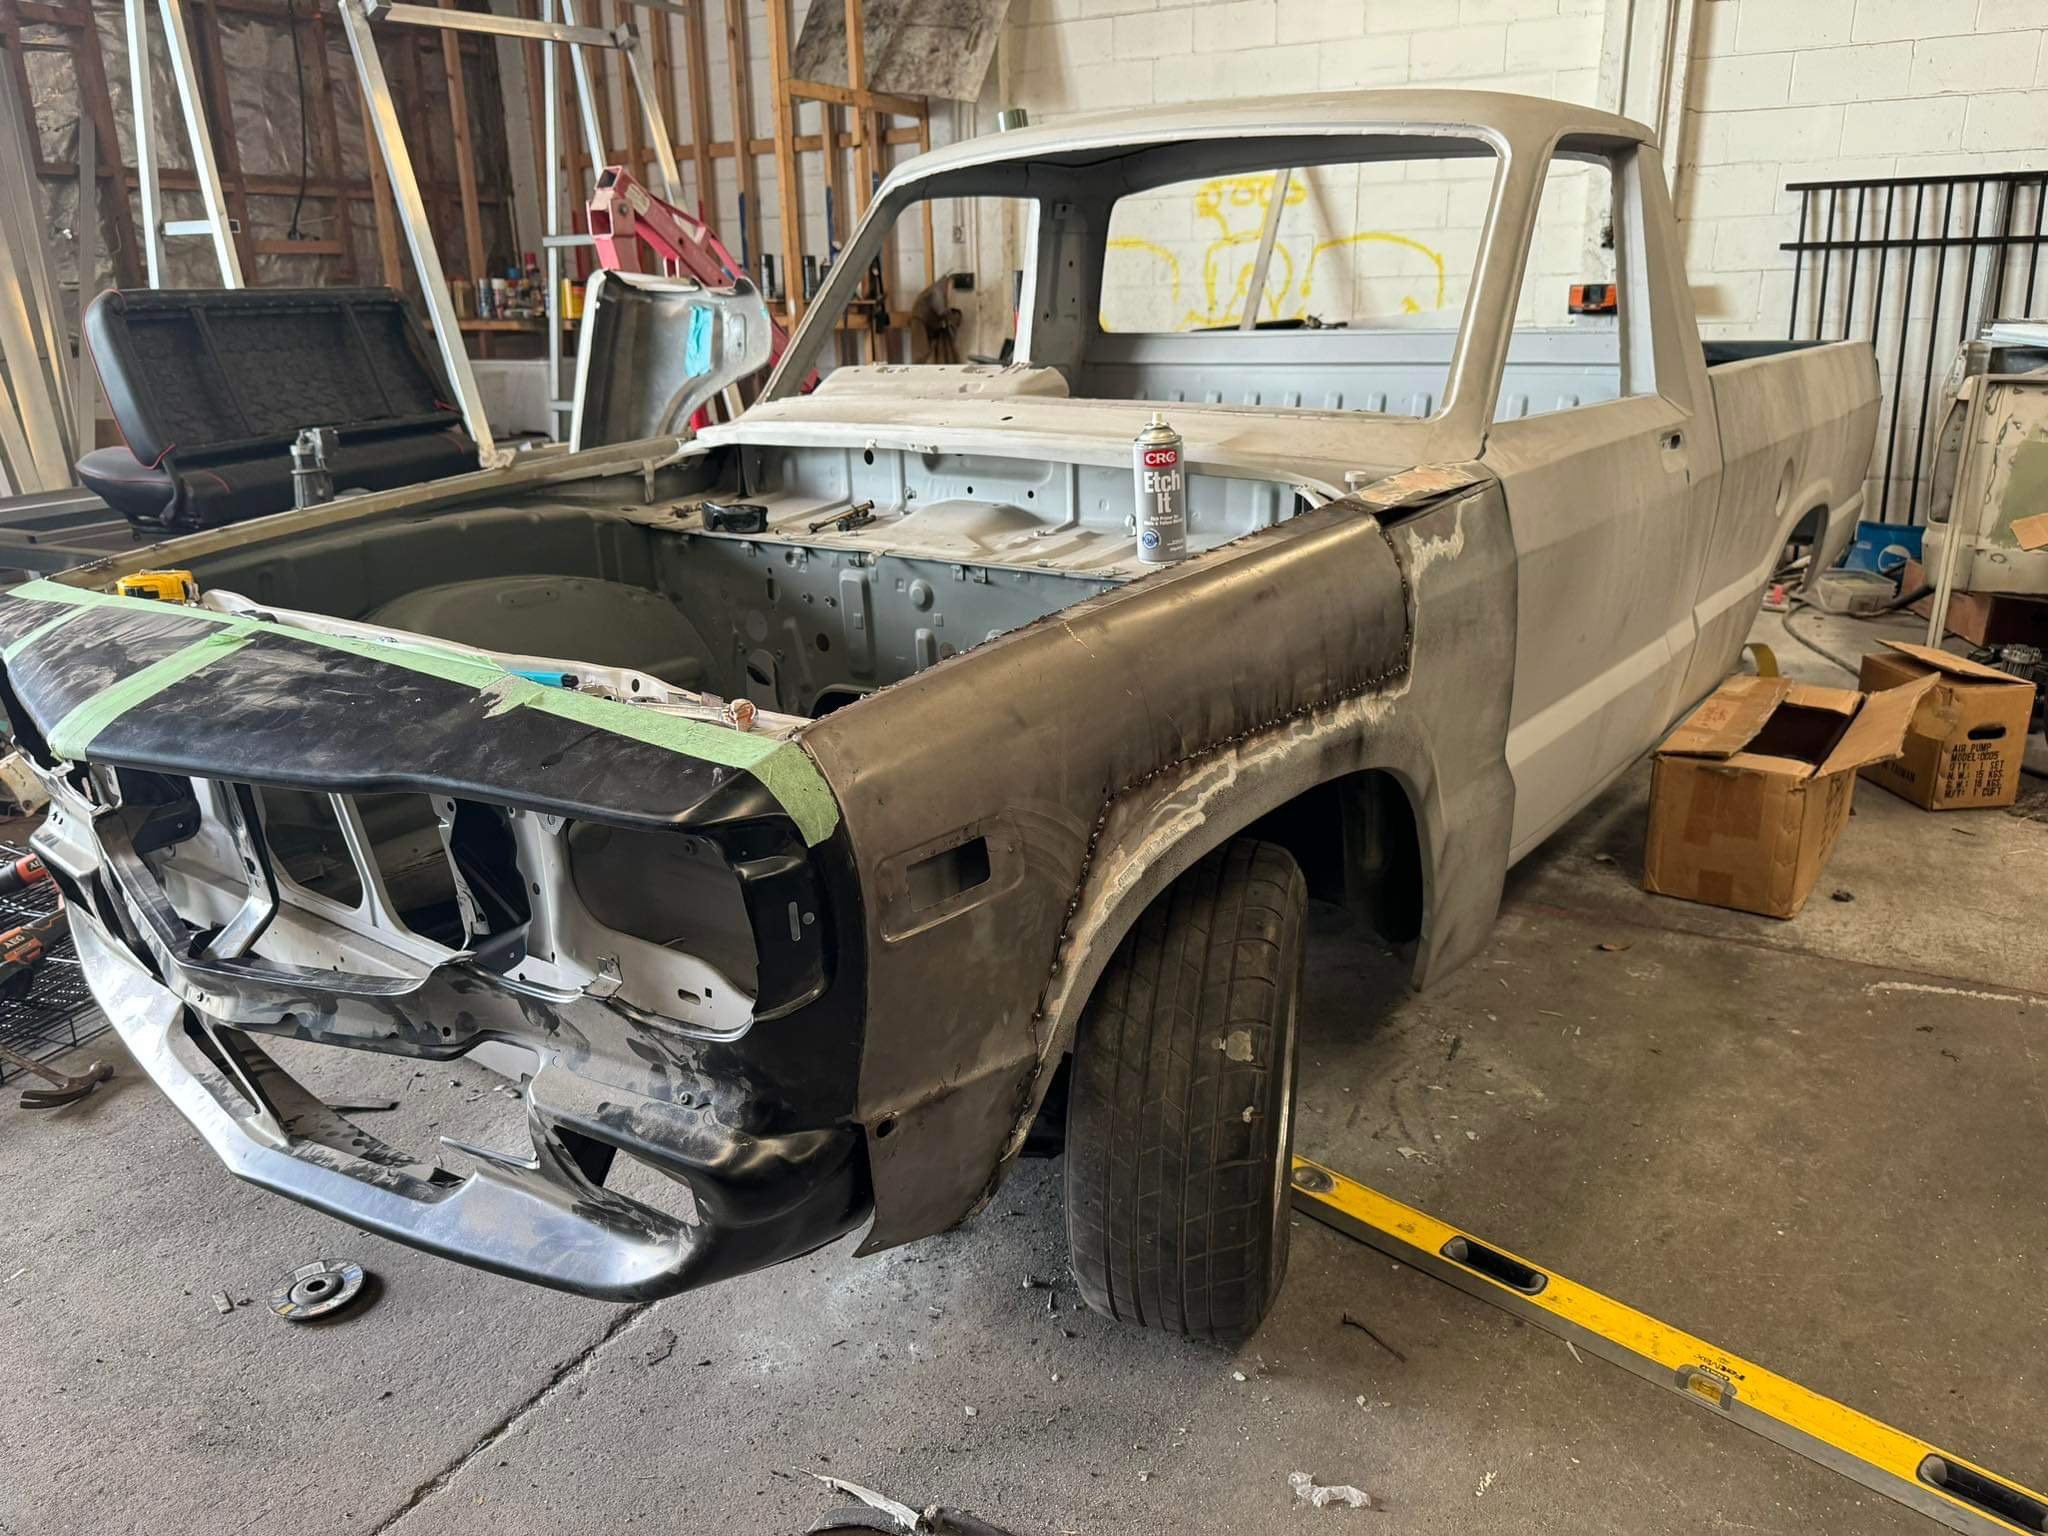
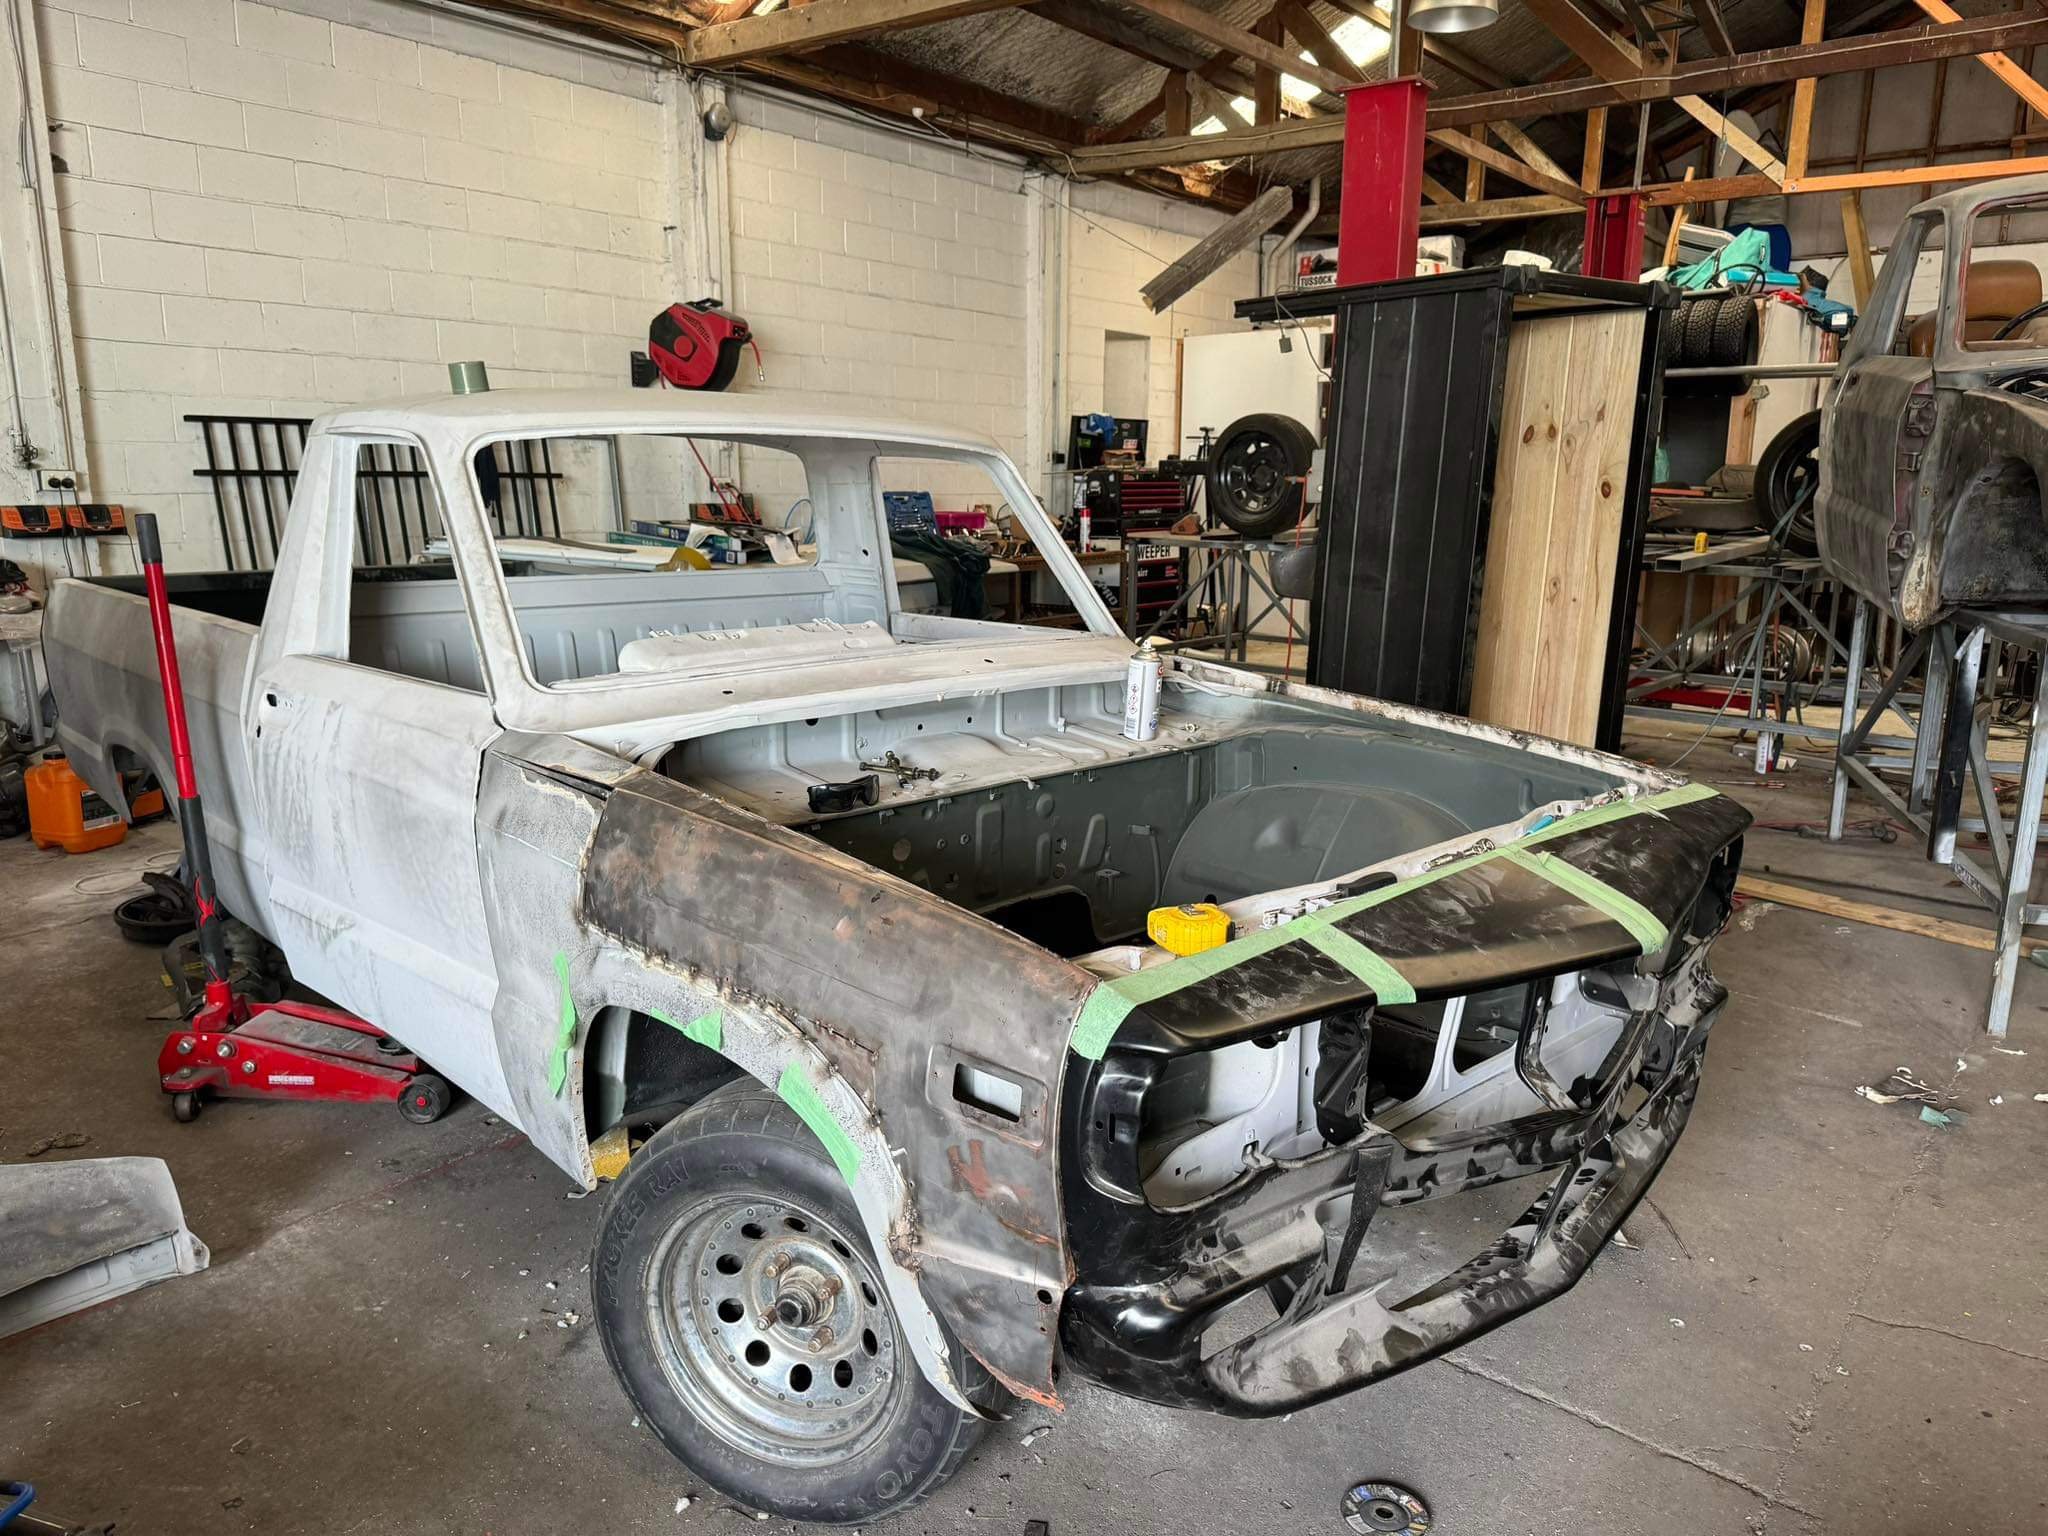
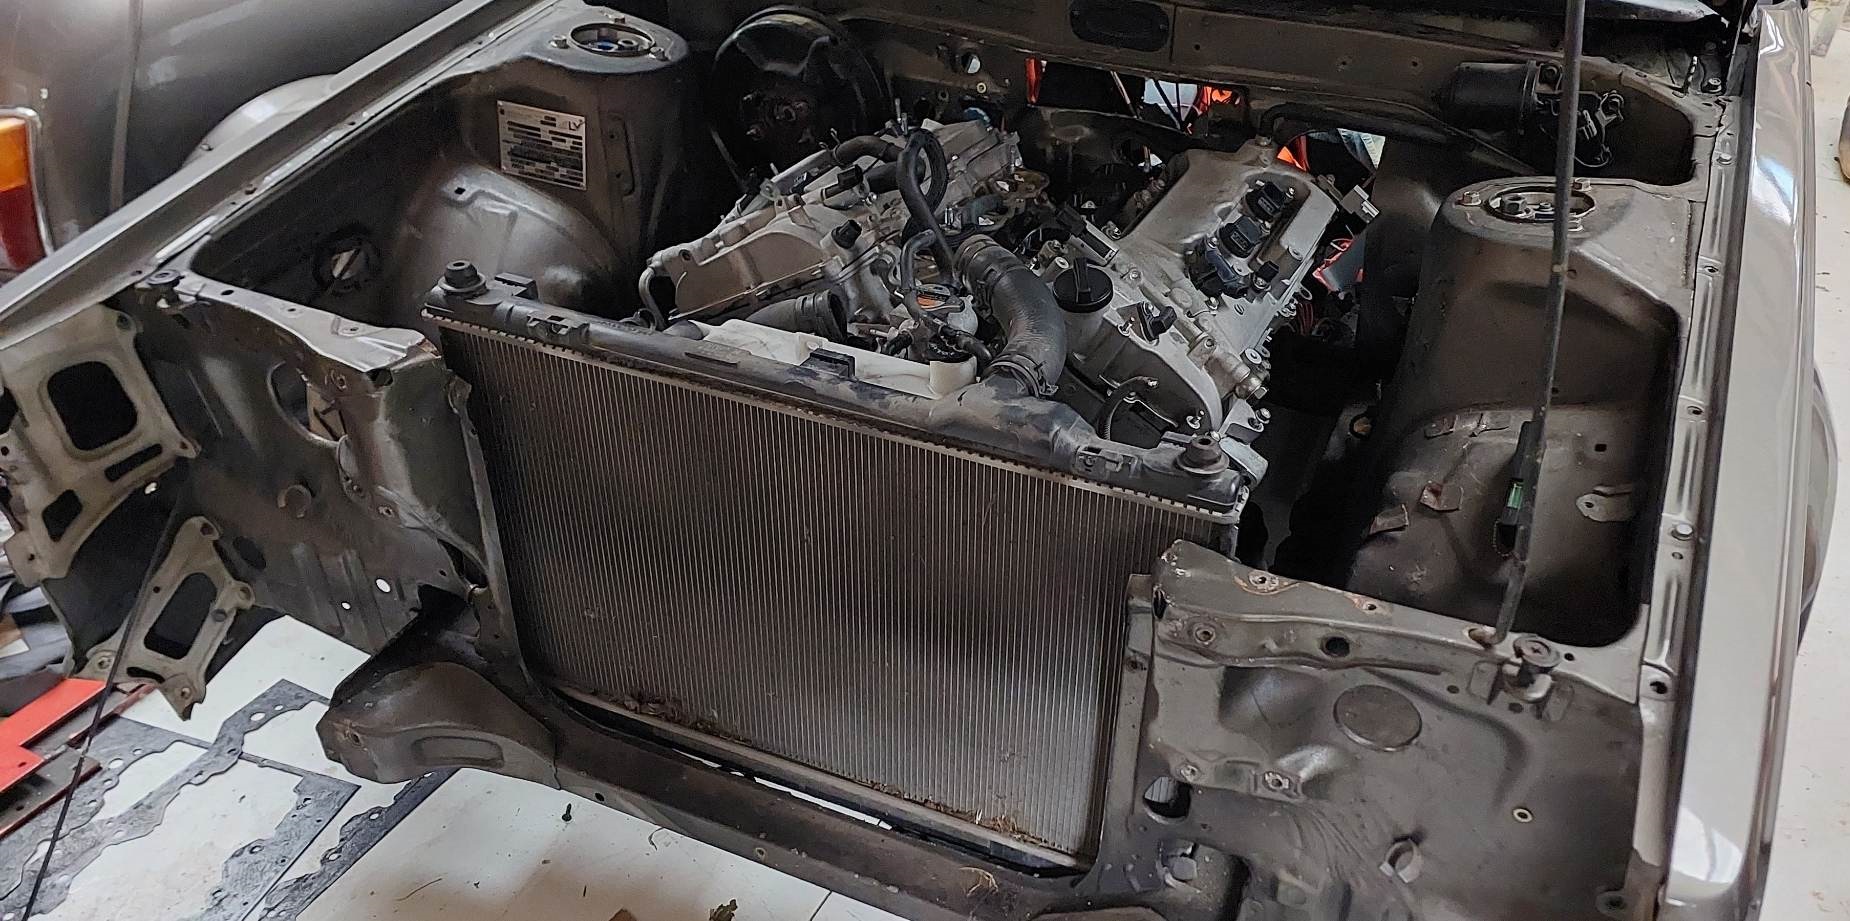
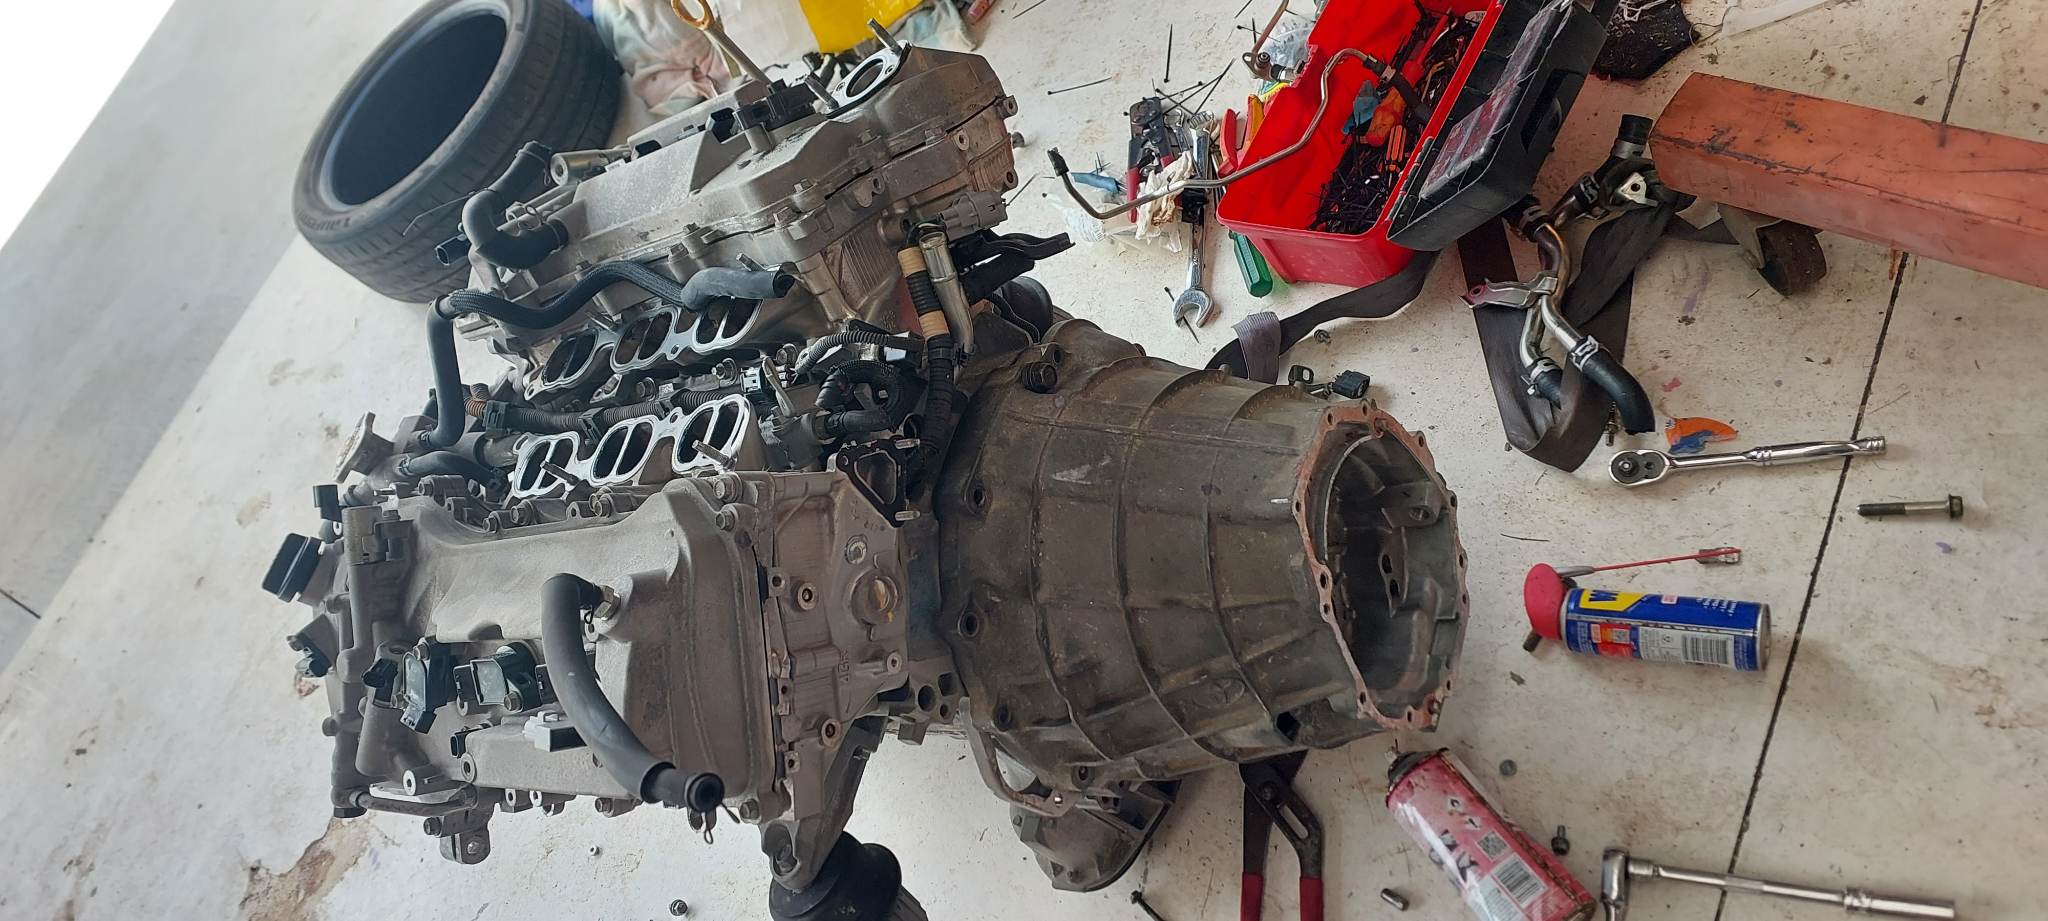
Disregarding gearbox issues for the moment. Because there's no point fretting over fitting a gearbox, if the motor wont fit anyway. I moved the car and got the old motor out, and did a test fit. Did some chop chop of the firewall after this photo to make one of the banks fit. But then with a gearbox on it's basically impossible to get the motor in because of the rear sump. It cant get past the engine mounts or the steering column, which is a pain. So I batted with it for ages, ended up cutting engine mounts off, dropping steering rack, then even dropping the crossmember to see if I could get it to fit that way. But still not working. As the gearbox wants to hit into the tapered part of the tunnel before the motor is far enough back for the oil filter thingy to clear the swaybar, and the sump to fit behind the crossmember. It just wont fit. So finished the day thinking it's probably a bit too big to work. But, after some sleep and thinking about it. I dont have an engine problem, I've got a sump problem. It's the stupid rear sump that is tripping me up, not the rest of it. So rather than chopping more tunnel and firewall I'm gonna take the sump off then see how we are looking. Chopping and changing to a front sump is probably going to be the way to go. Thankfully this motor is really designed with a front sump in mind anyway. The 2GR motor has the sump at the front, but doesnt necessarily fit this engine - and it wont necessarily clear anything anyway. This is what the sump currently looks like. Is there a Briscoes sale on sumps? Because there's about to be 50% off
1 point
-
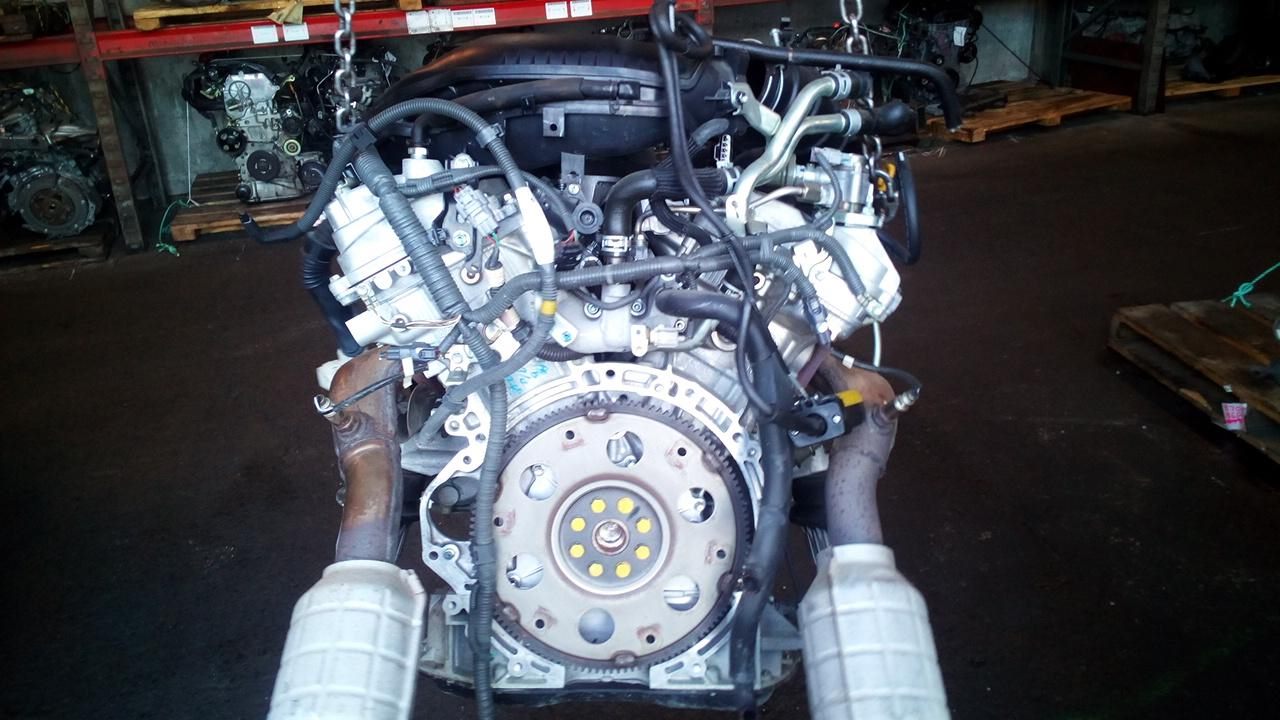
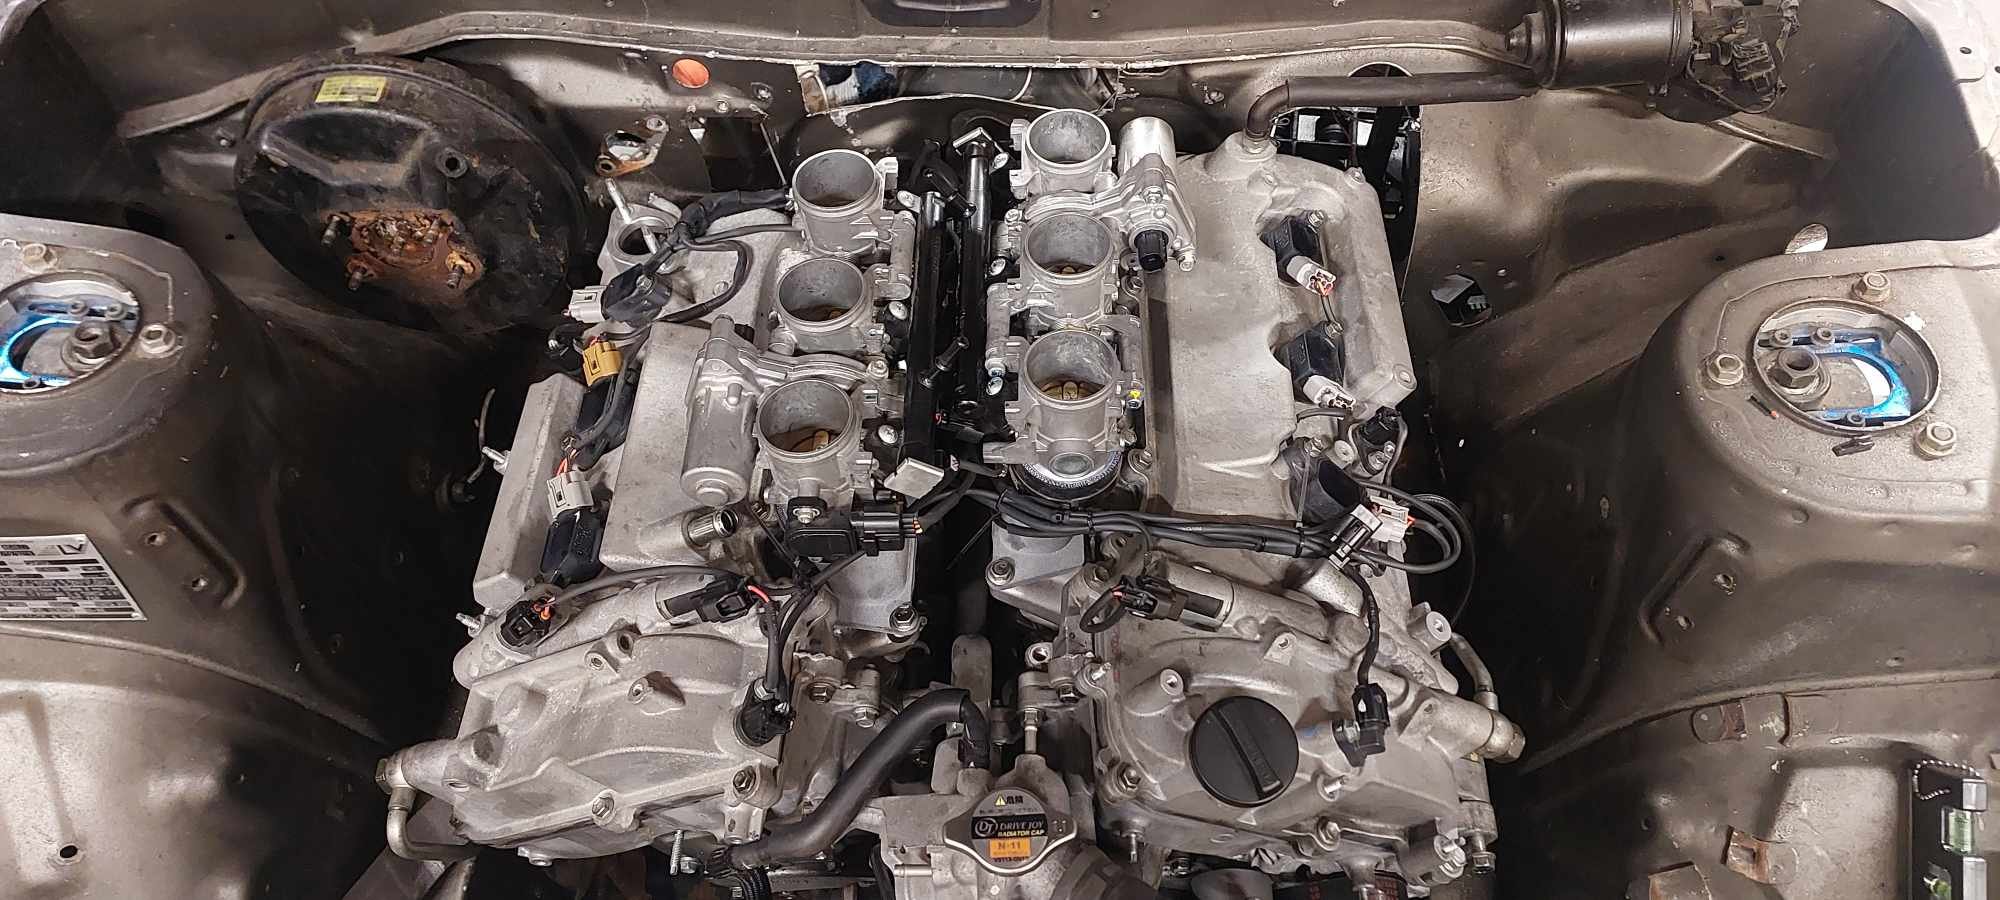
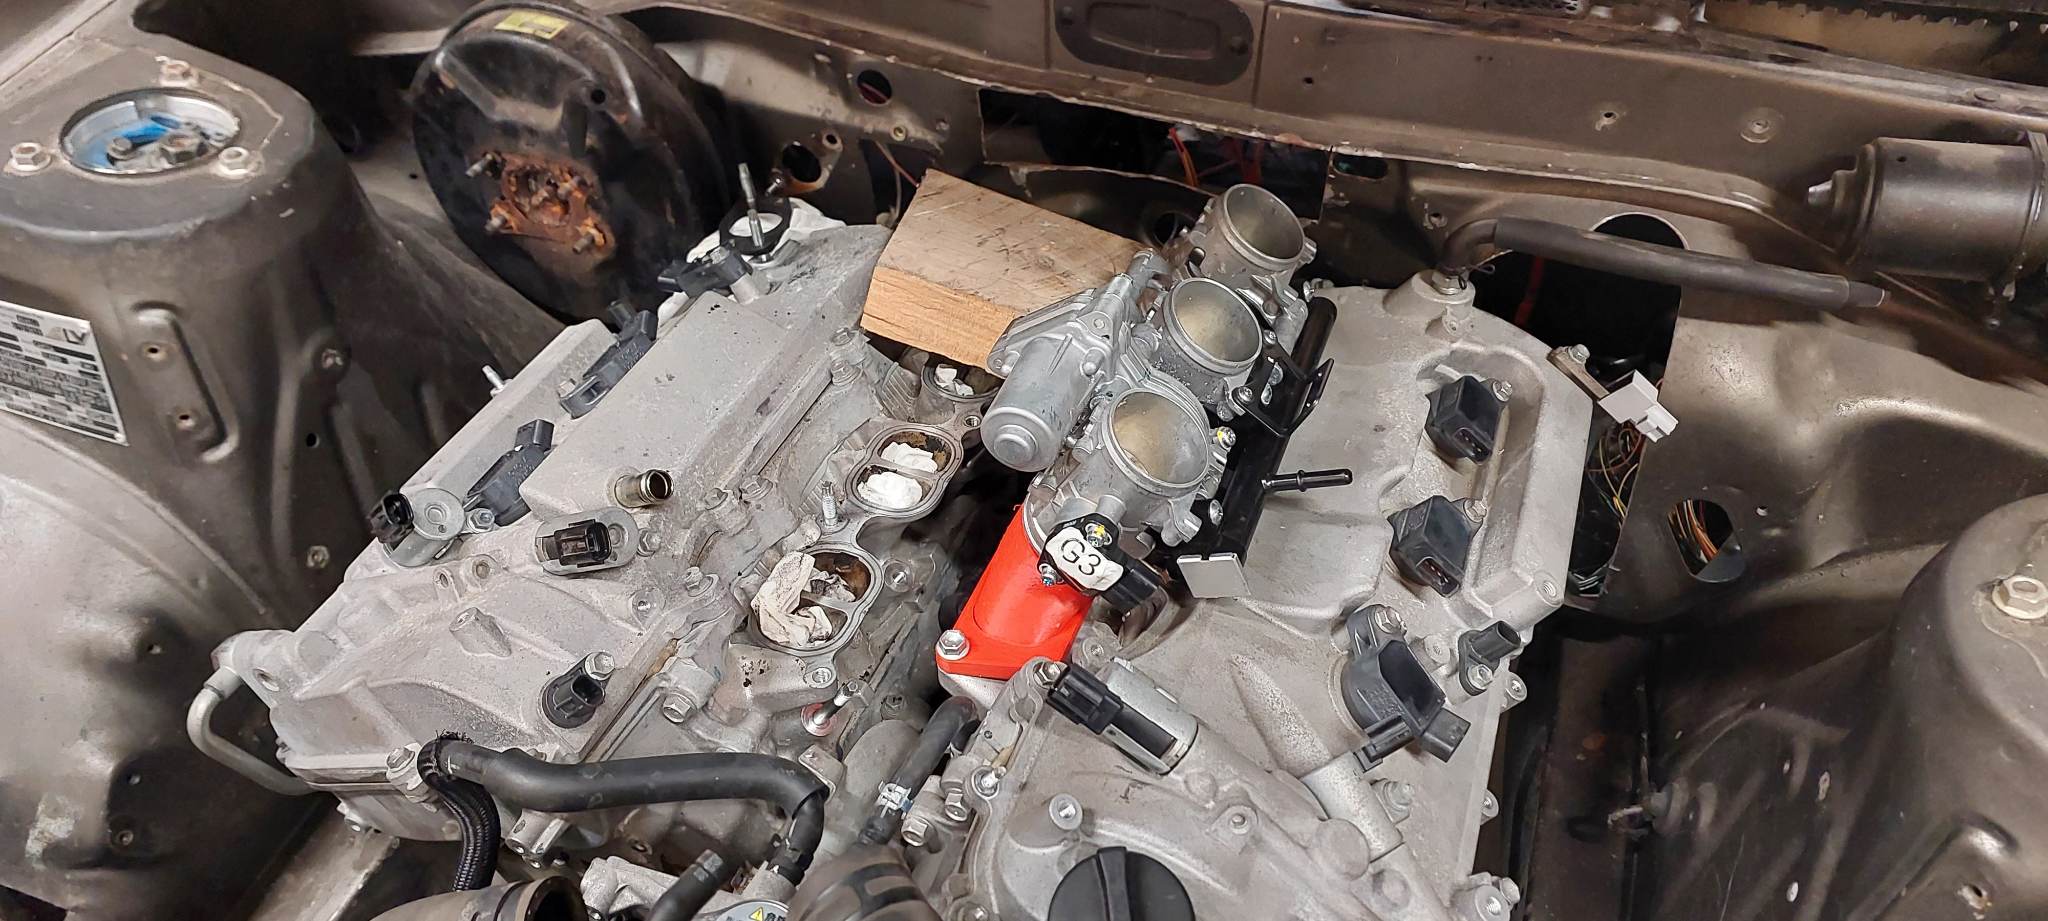
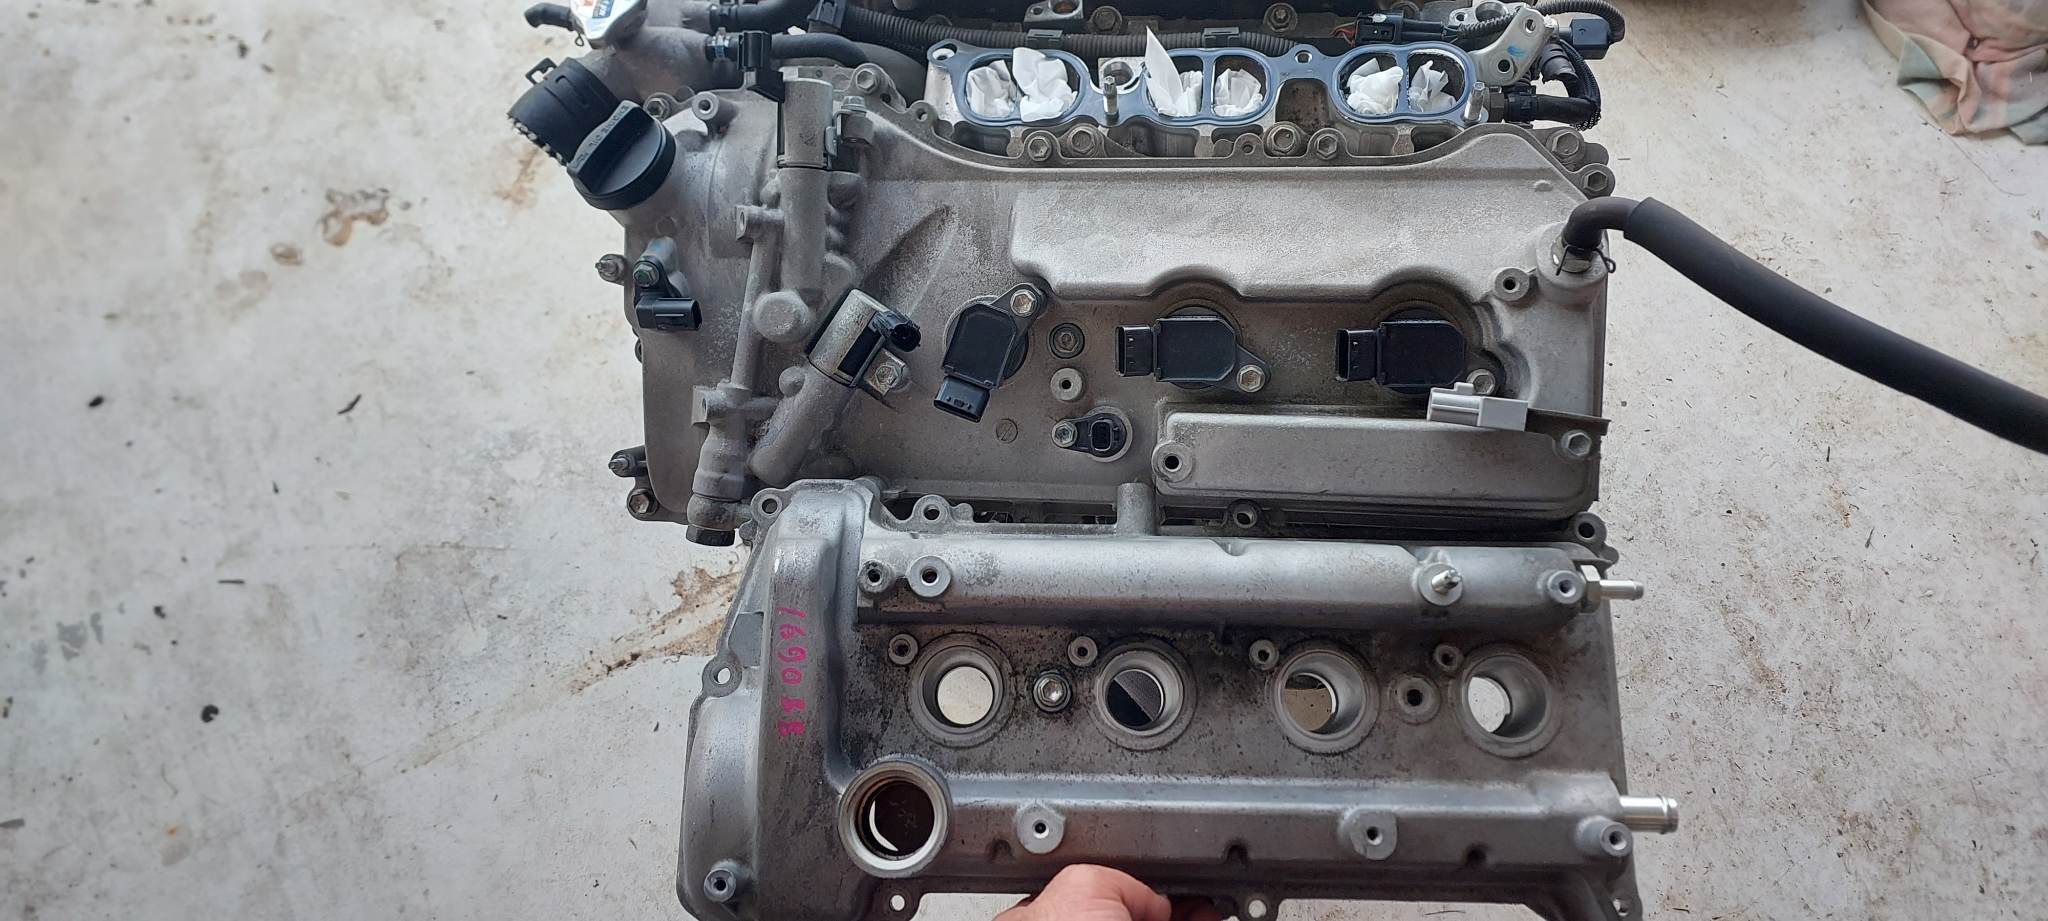
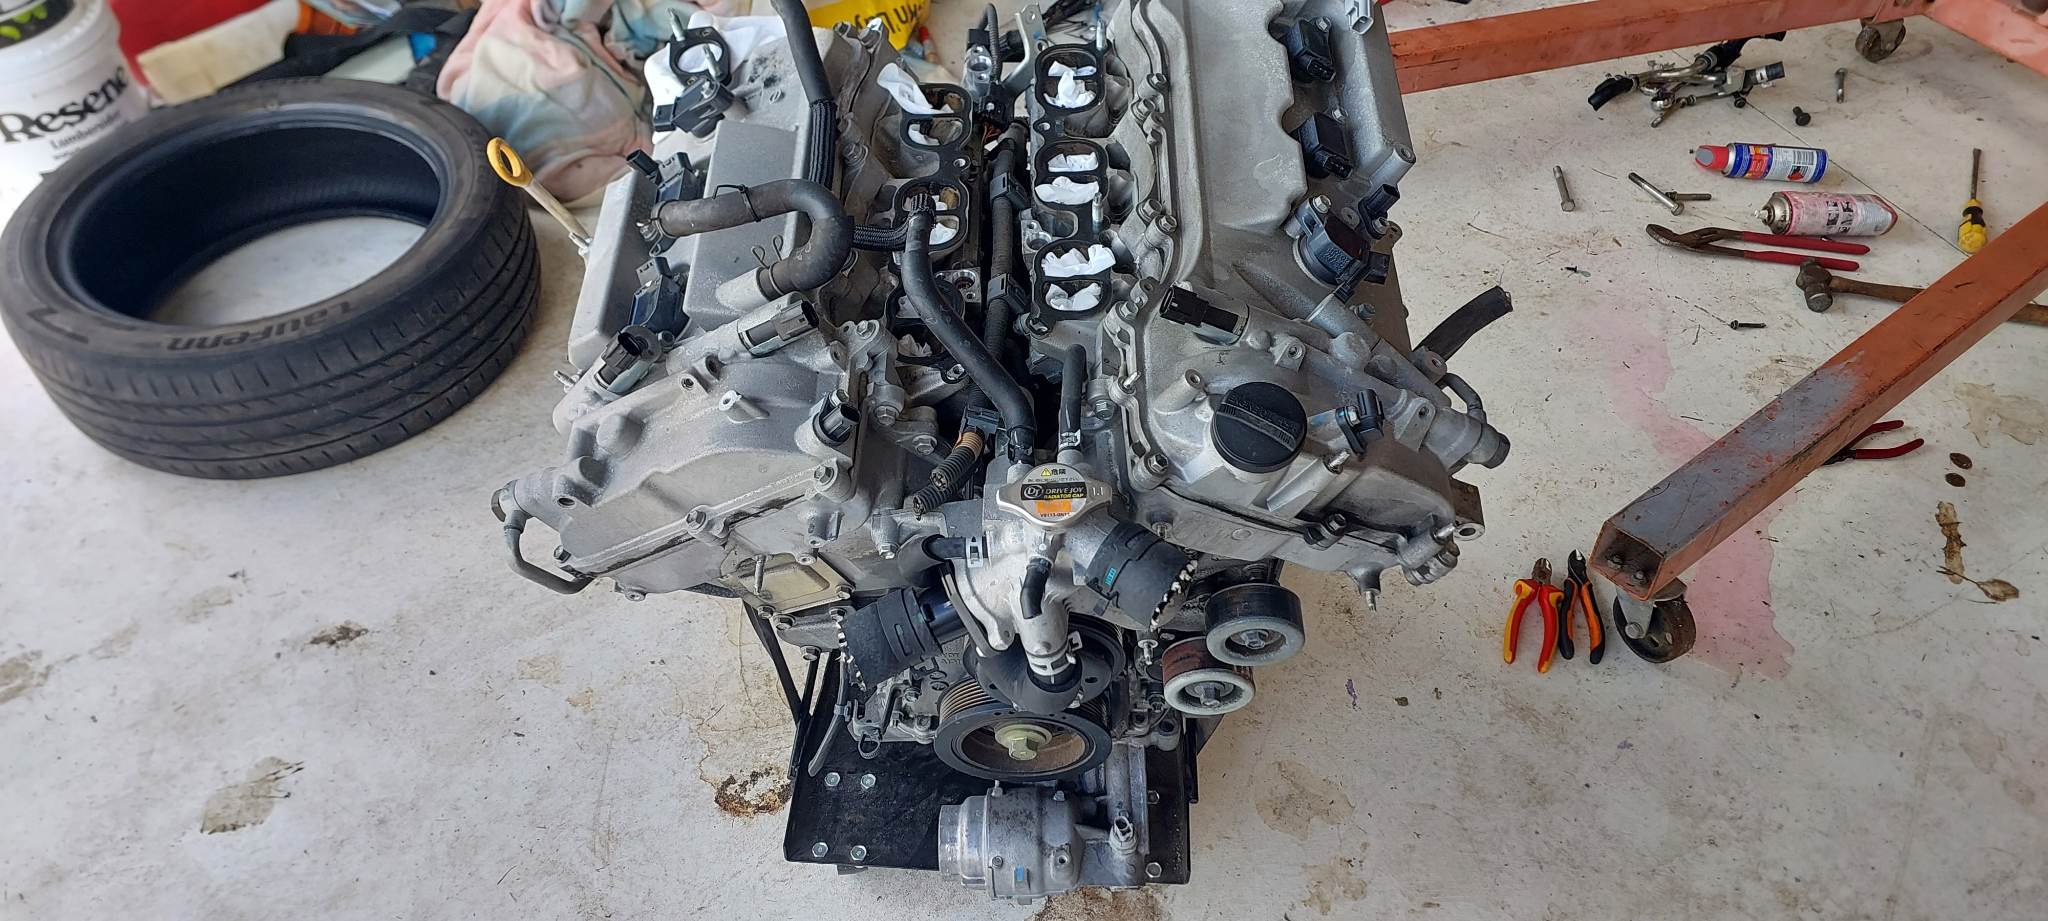
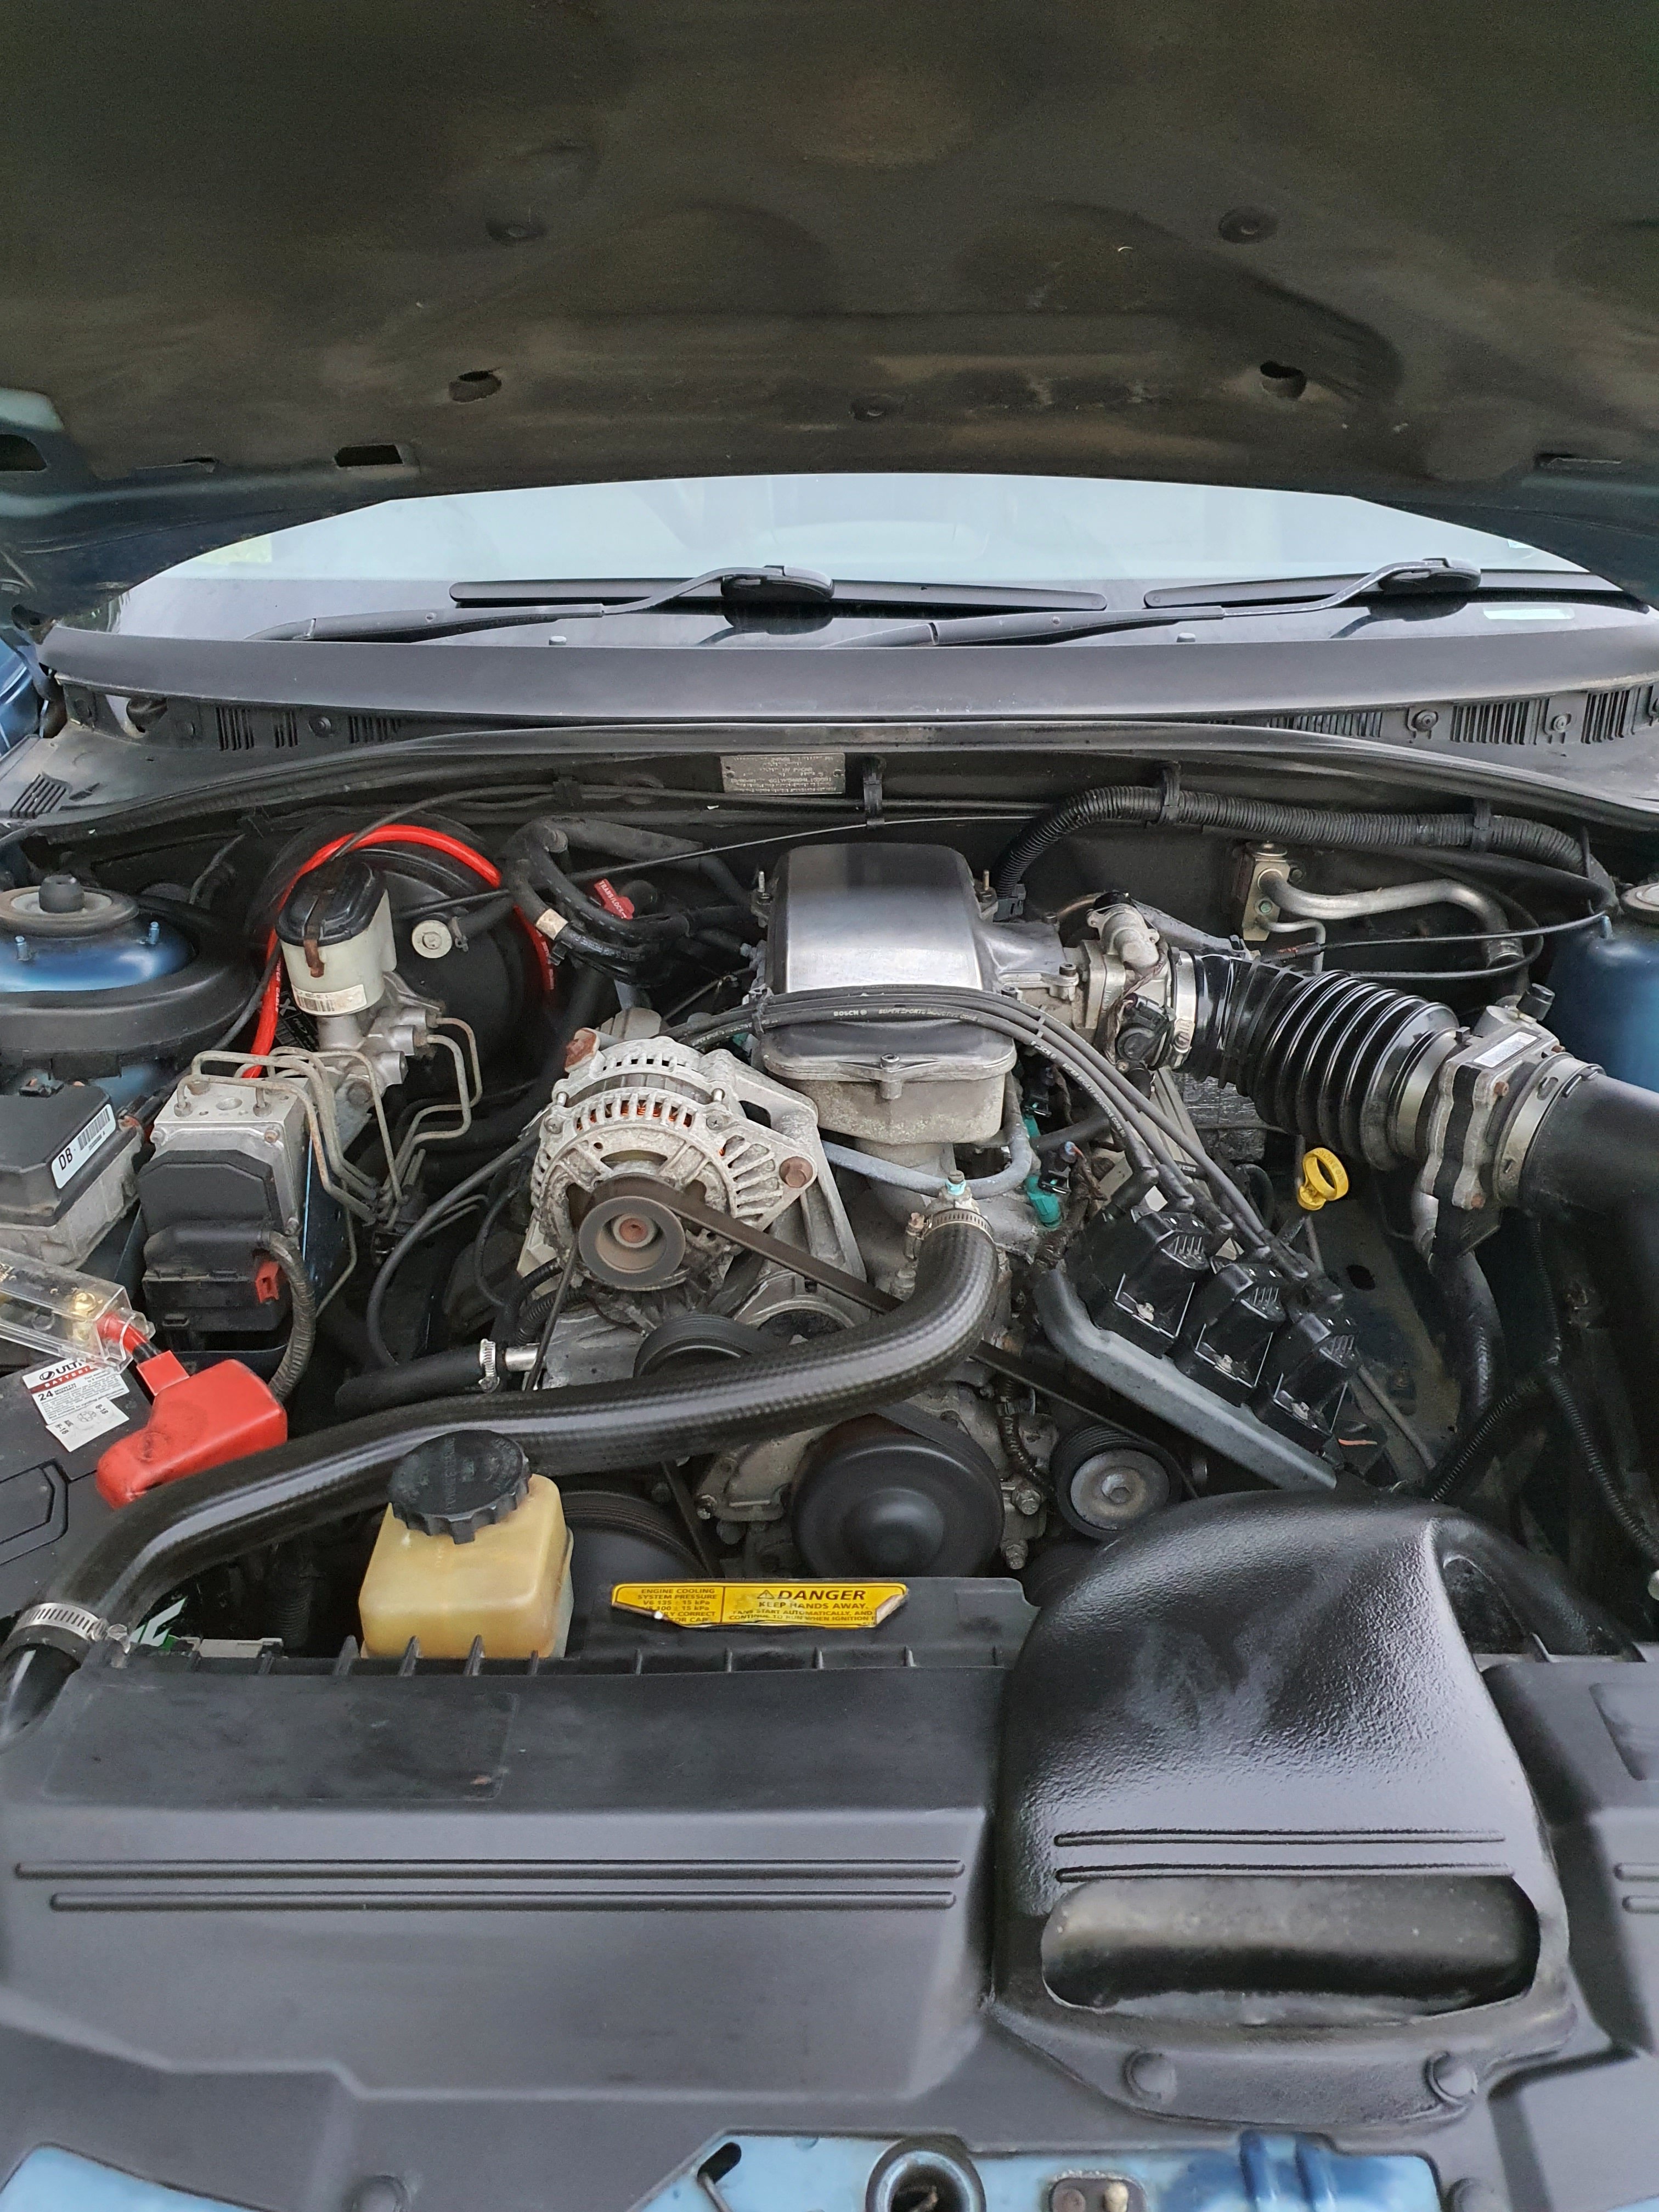
Got this home and stripped a bunch of junk off it. And jesus jibbly christ it is MONSTROUS. Here is a 1NZ cam cover compared to 4GR to show size. I thought being a V6 it would be a fair bit shorter than beams motor. But looks like it might be even longer. To be fair a lot of the front of the motor is just empty spacing holding the timing chain etc, so the centre of mass is further back than it visually appears. However there are some other issues. My engine bay tips in at the middle a bit to accomodate the motor sitting back. But it does not do this where you need to fit a Vee motor. So to get this in a position that will fit the rear sump, it looks like it'll need to choppy chop heaps of this out. Which is even more troublesome on the other side, as that's where the brake booster etc wants to live. If I try put the motor further forward instead, I dont think the rear mount sump is going to fit past the crossmember. The whole motor is just way way bigger than I was anticipating hahaha. Here's a pic of the 3S bellhousing placed up against the motor. Here's a summary of my findings The 2GR pattern must be different to 4GR. Yeah so at this stage, pretty disheartened. This thing is honestly monstrous and feels really heavy too. I dont want to have to chop a massive amount of my car out to make it fit. The difference in overall size from 2 litre beams motor, to 2.5 motor for this is insane. I guess that makes sense when considering the block size is essentially for a 3.5 litre motor instead. What to do from here? Dunno. Need some time to think about it. Not so confident it's the right choice anymore. However I think I'll at least try get it sitting in the engine bay and see how it looks. If it can physically fit okay, will perhaps try persist with solving the other issues. But I dont think I'm gonna "hand drill engine block" my way out of this one.
1 point
-
Now to find an LSD so I can skin 2 tyres at once.
1 point
-
Thought I'd give this thing half a chance of survival at drag day so gave it good going over today oil, filter steam clean and a spanner check over everything ive touched on engine....... found a missing engine mount nut and 4 loose control arm nuts. Engine bay looks like I care now.
1 point
-
Engine stand purchased last night, going to gut the L67 3.8v6 its lower k's than current engine will try find some second hand forged pistons and fit to the L67 rods and budget build a stronger engine. If no pistons can be found I'll just run stock ecotec stuff. Goin to build manifolds etc on gutted engine for ease then transfer it into car after i do bearings or find a healthy bottom end. Fuck it, it's worth a try ecotecs aren't exactly worth much. Making the stock ecu run it might be a challenge but im not springing for a stand alone ecu yet. My Uncle built this buick weapon a few years back 4.2 stroker with twin throttle body's. Made 300+ horsepower broke expensive gearboxes so he'll be a good collaboration on how to ruin a $600 car.
1 point
-
Rock auto a set of bearings and boost it tbh1 point
-
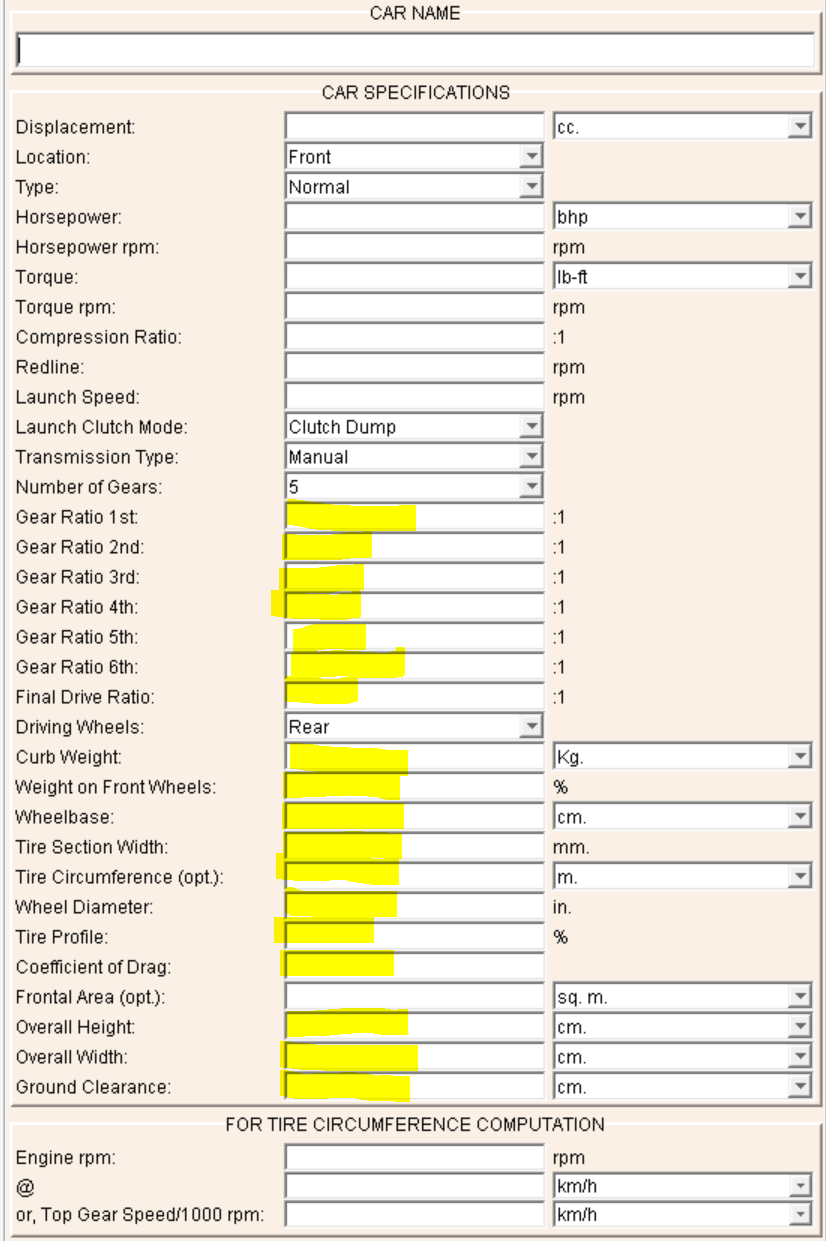
How much do these weigh? Find this information for me, and I'll send you back some dataz on predictions for how each version of the car will run With an NA K24, turbo K24, NA 1NZ, turbo 1NZ
1 point
-
I've been a busy boy, i'll have an update by the end of the week. Replacing the bushes all round (nolathane), installing GReddy's, fitting new street fins (14x7 -7)on the front, putting the old front rims on the back with appropriate tyres (225/60/14) for the cert only of course. Will be getting some Toyo T1R's shortly all around too. All going to plan should be booked in for cert next week.1 point


.thumb.jpeg.384ff72c8d2b0ee0d34a7bdedb55bdcf.jpeg)


.jpg.9298a81b37527e20991ea9282033a829.jpg)


This leaderboard is set to Auckland/GMT+12:00