
Leaderboard


Popular Content
Showing content with the highest reputation on 09/30/21 in Posts
-
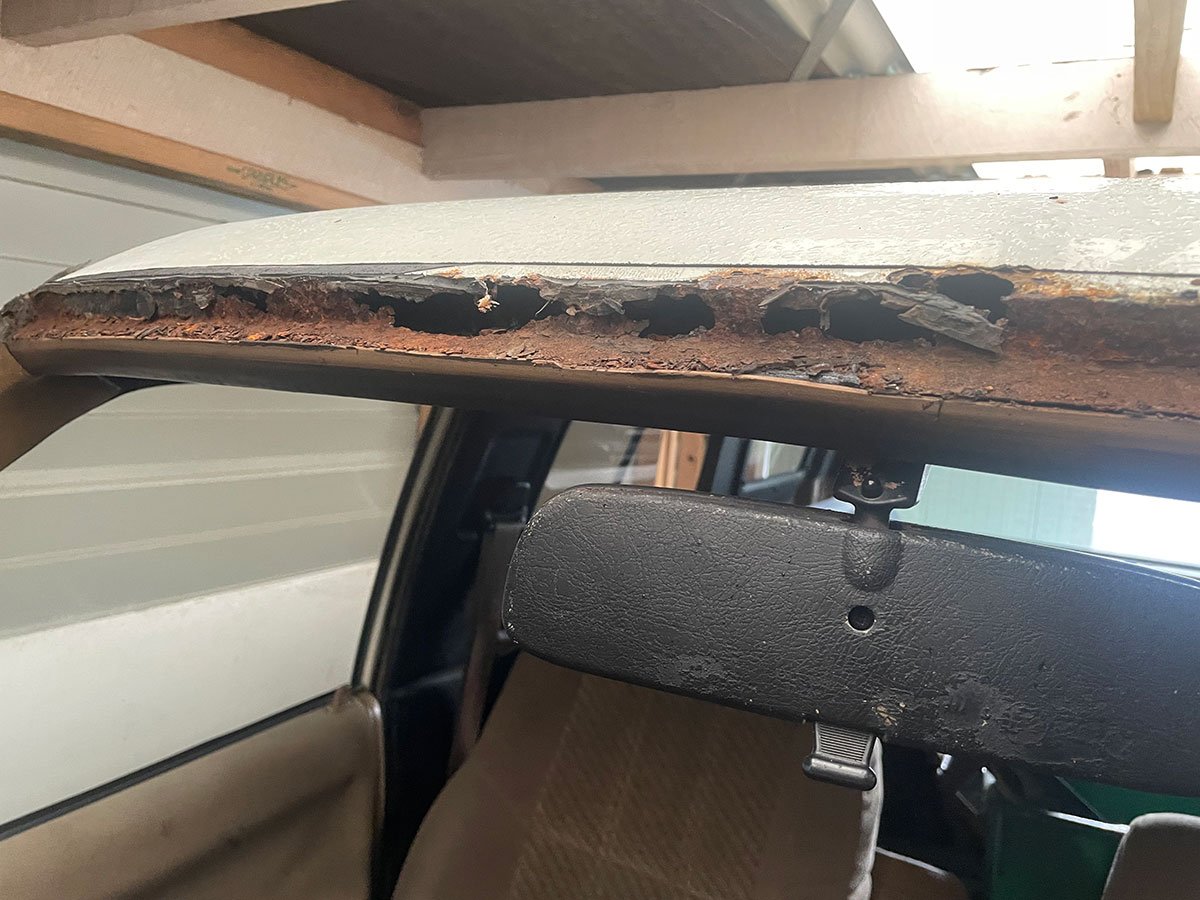
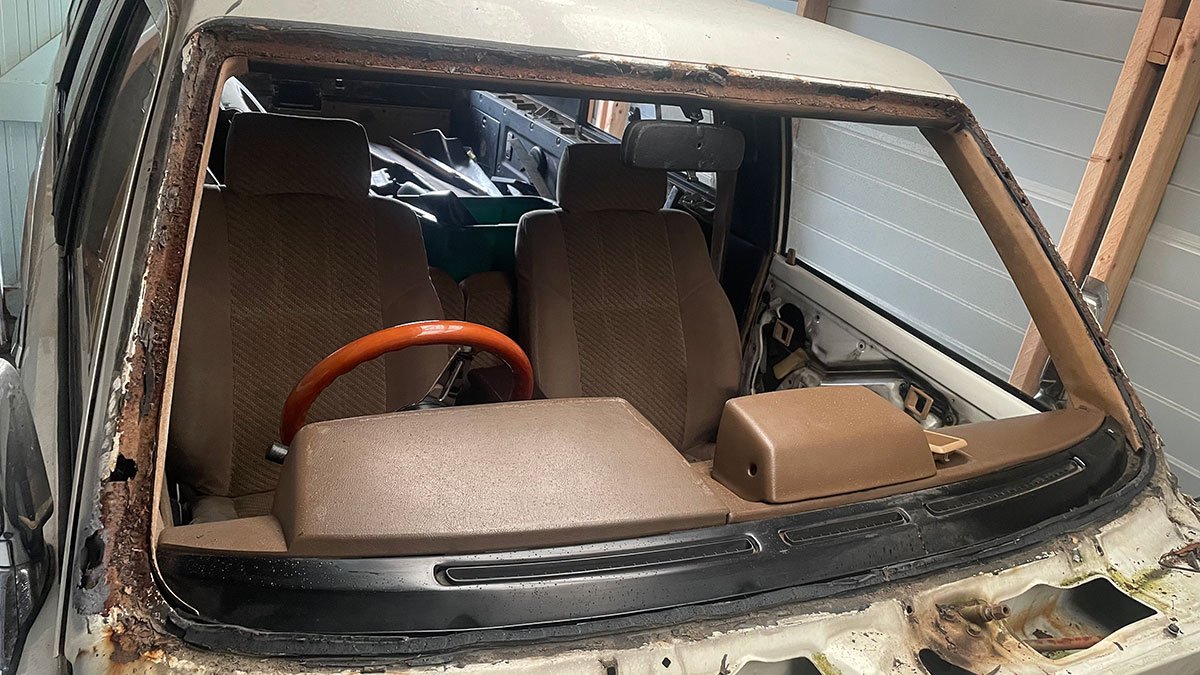
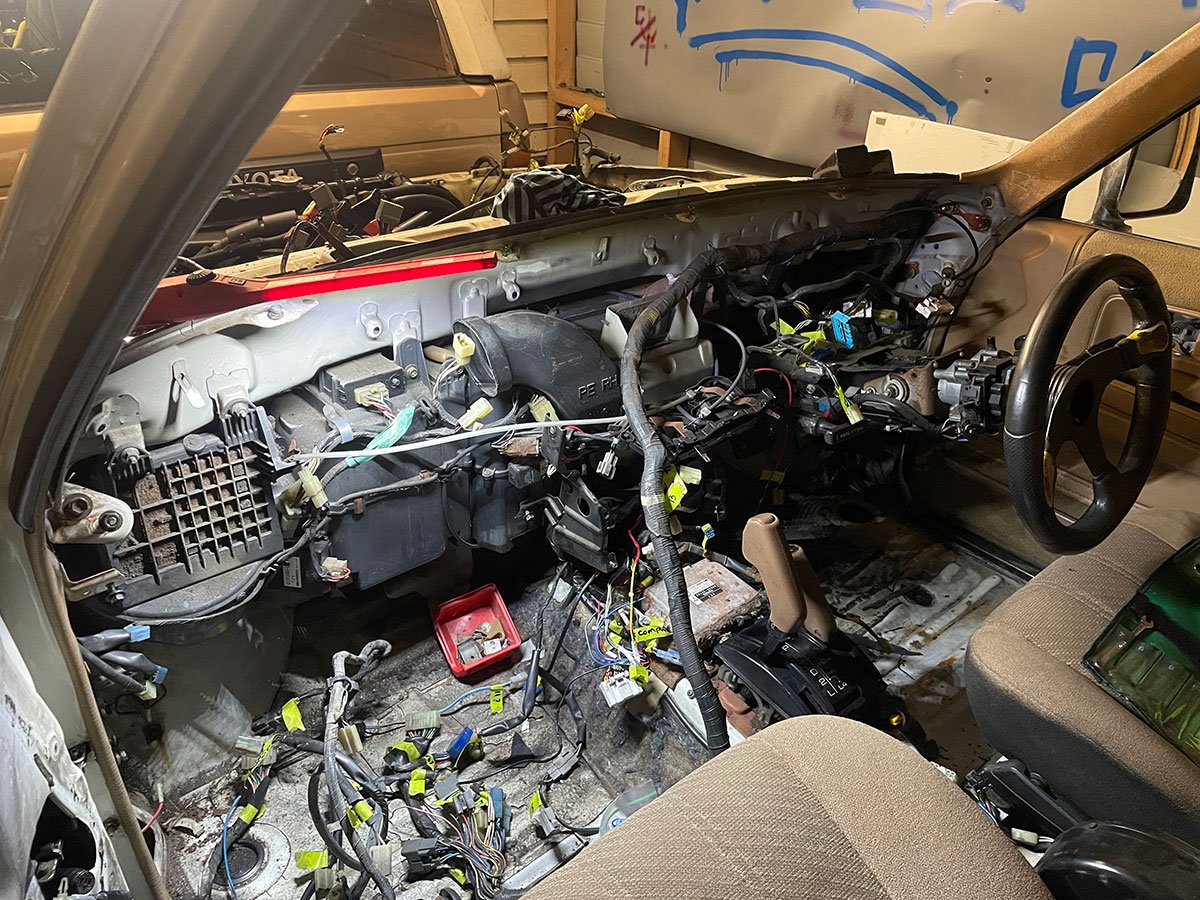
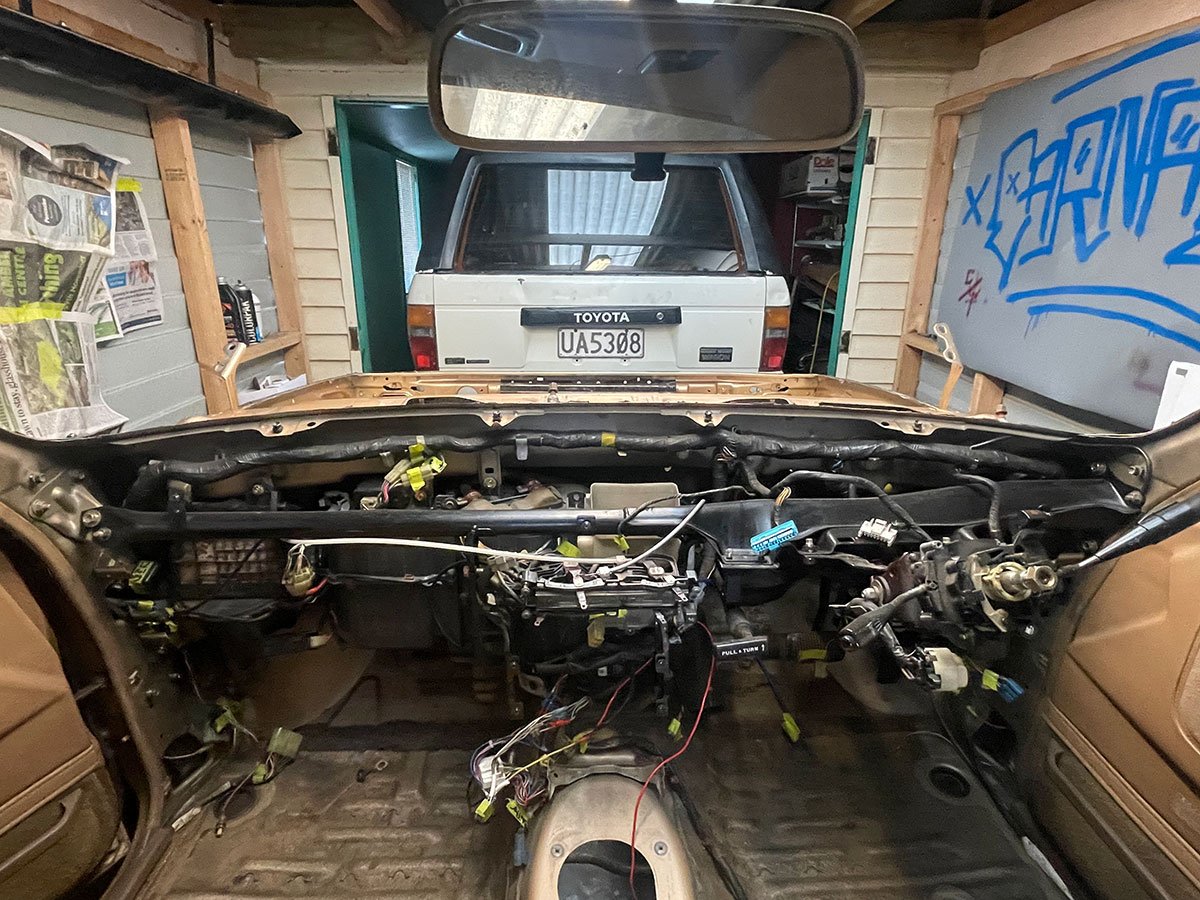
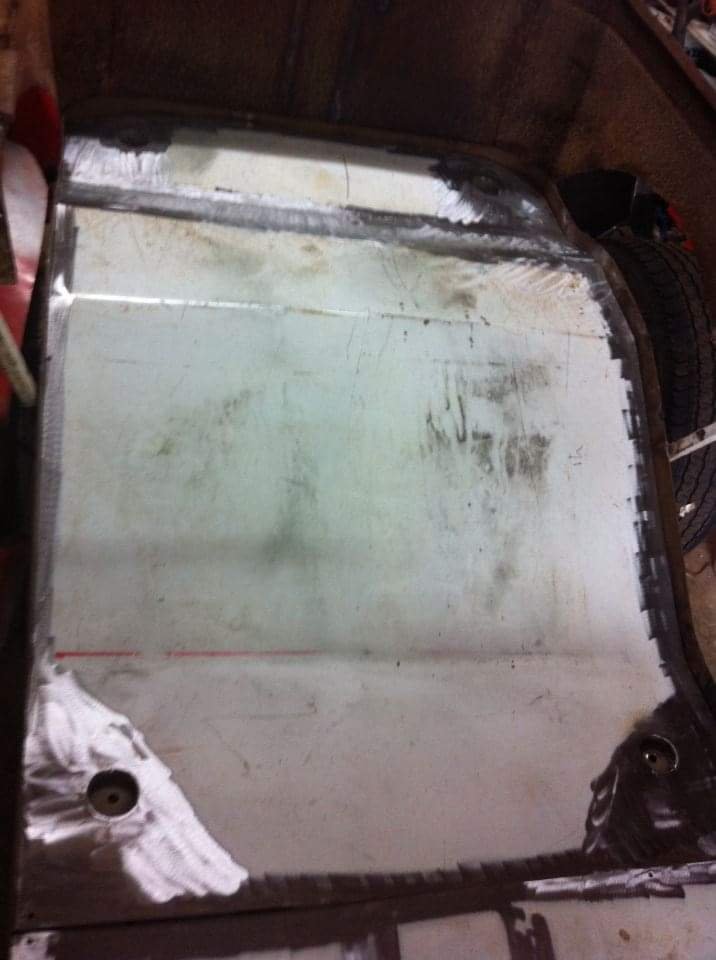
Had the front windscreen removed to make it easier to remove the loom and also because it needs to go into the gold body. She isn't pretty haha Then proceeded to remove loom and install into the gold body. Glad thats out of the way. So far there's 3 plugs that are different between the looms... The door light switches and the loom to the rear (tailgate, lights etc) nothing to major, hopefully thats all.
 9 points
 -
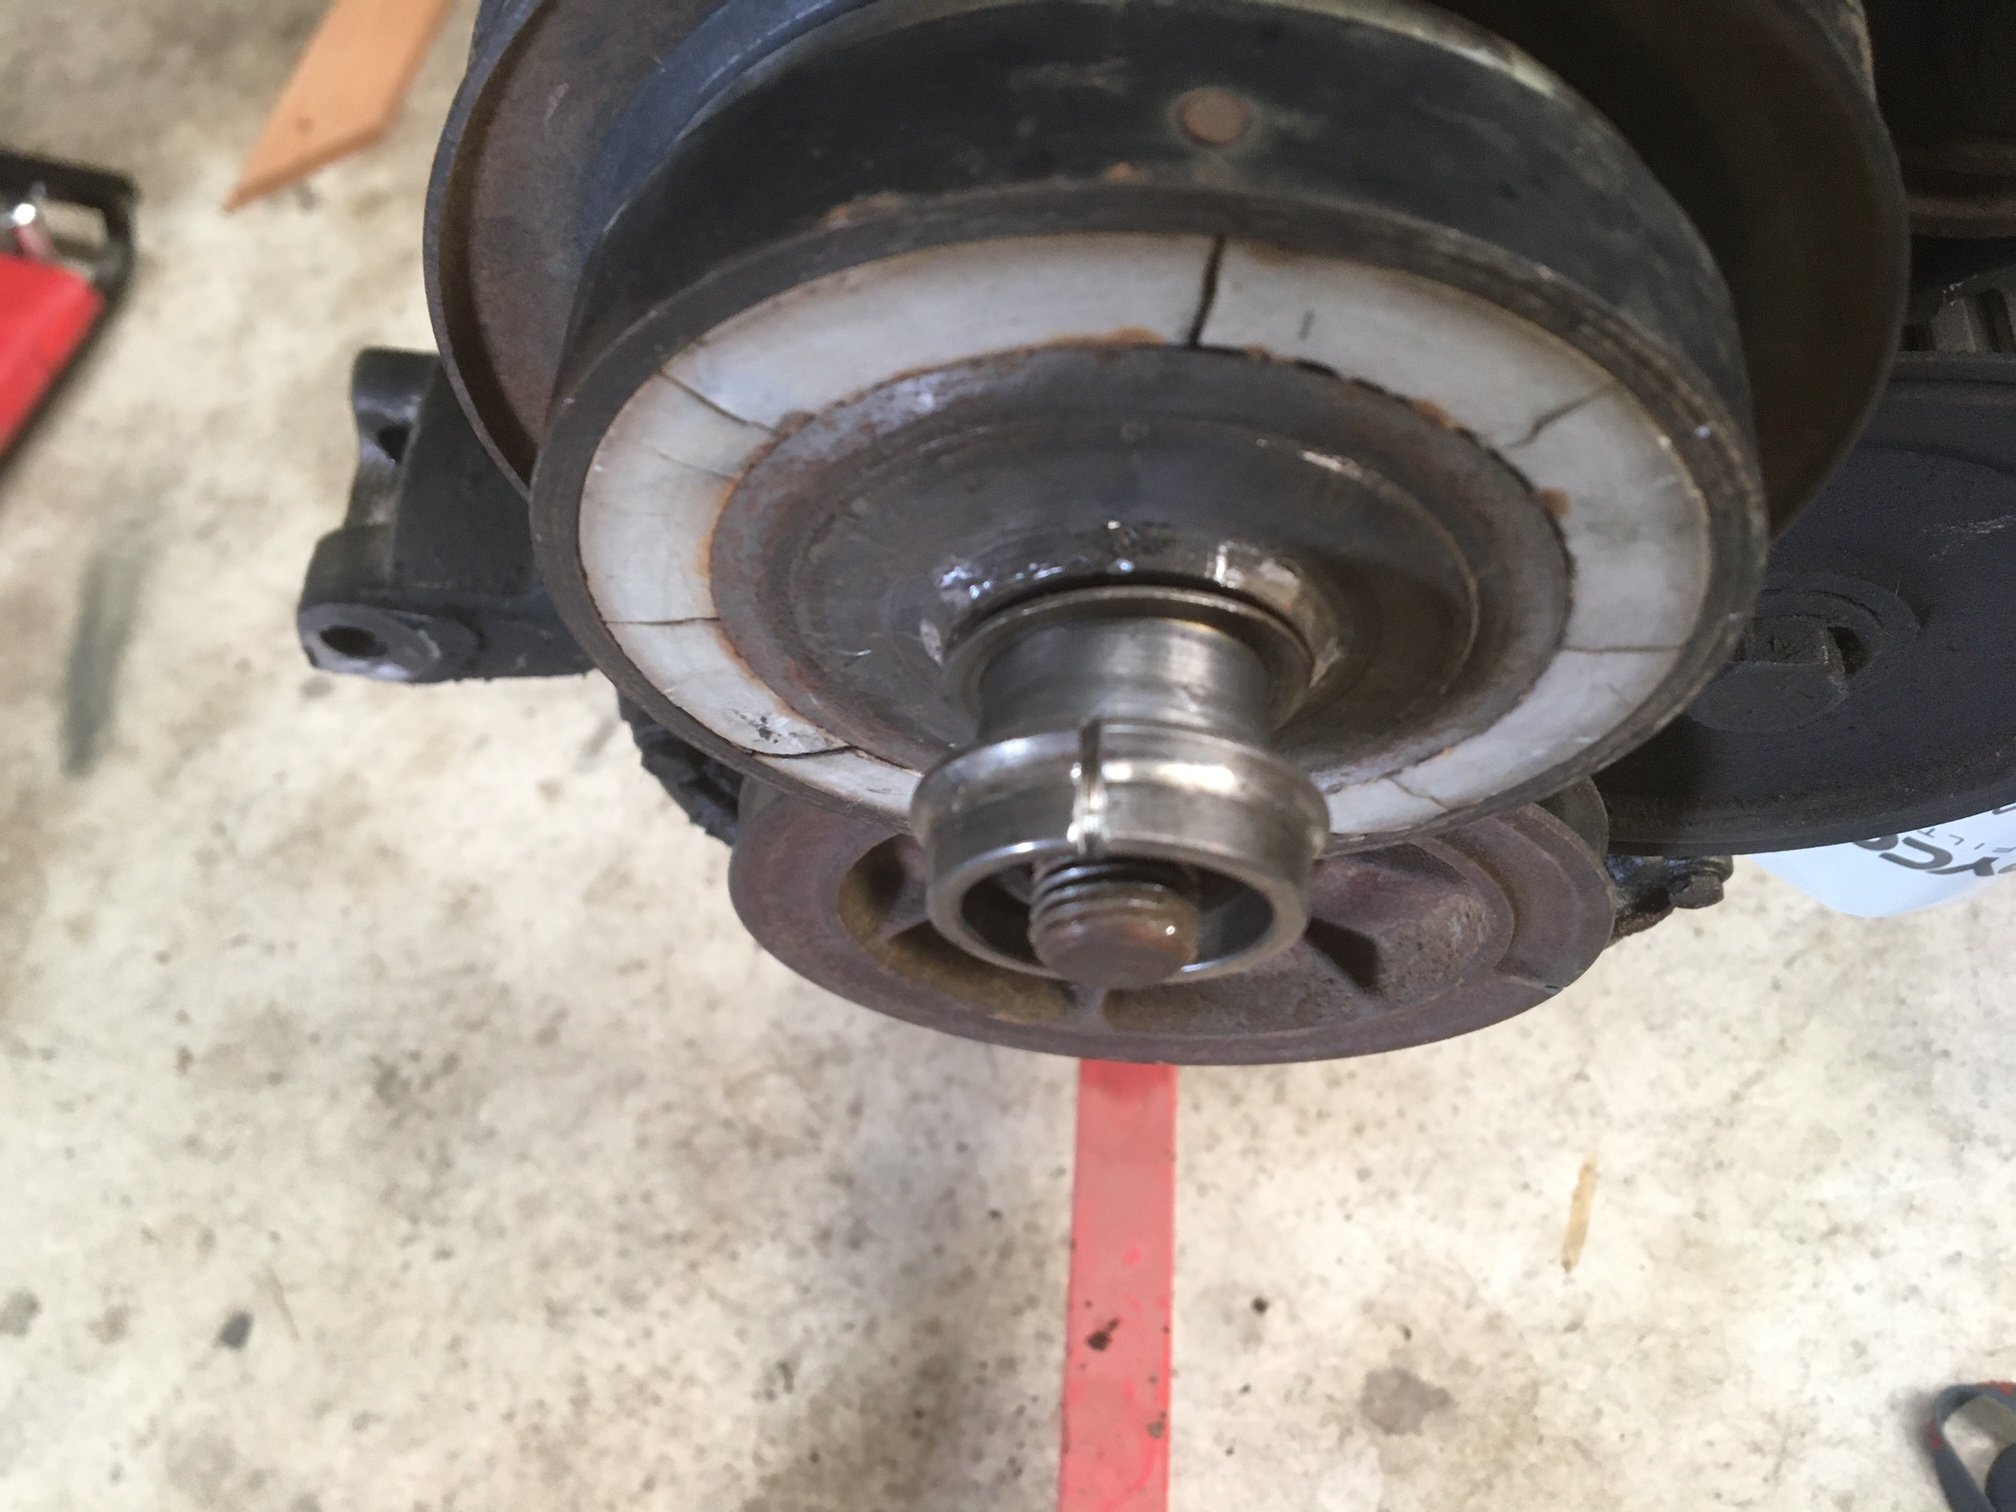
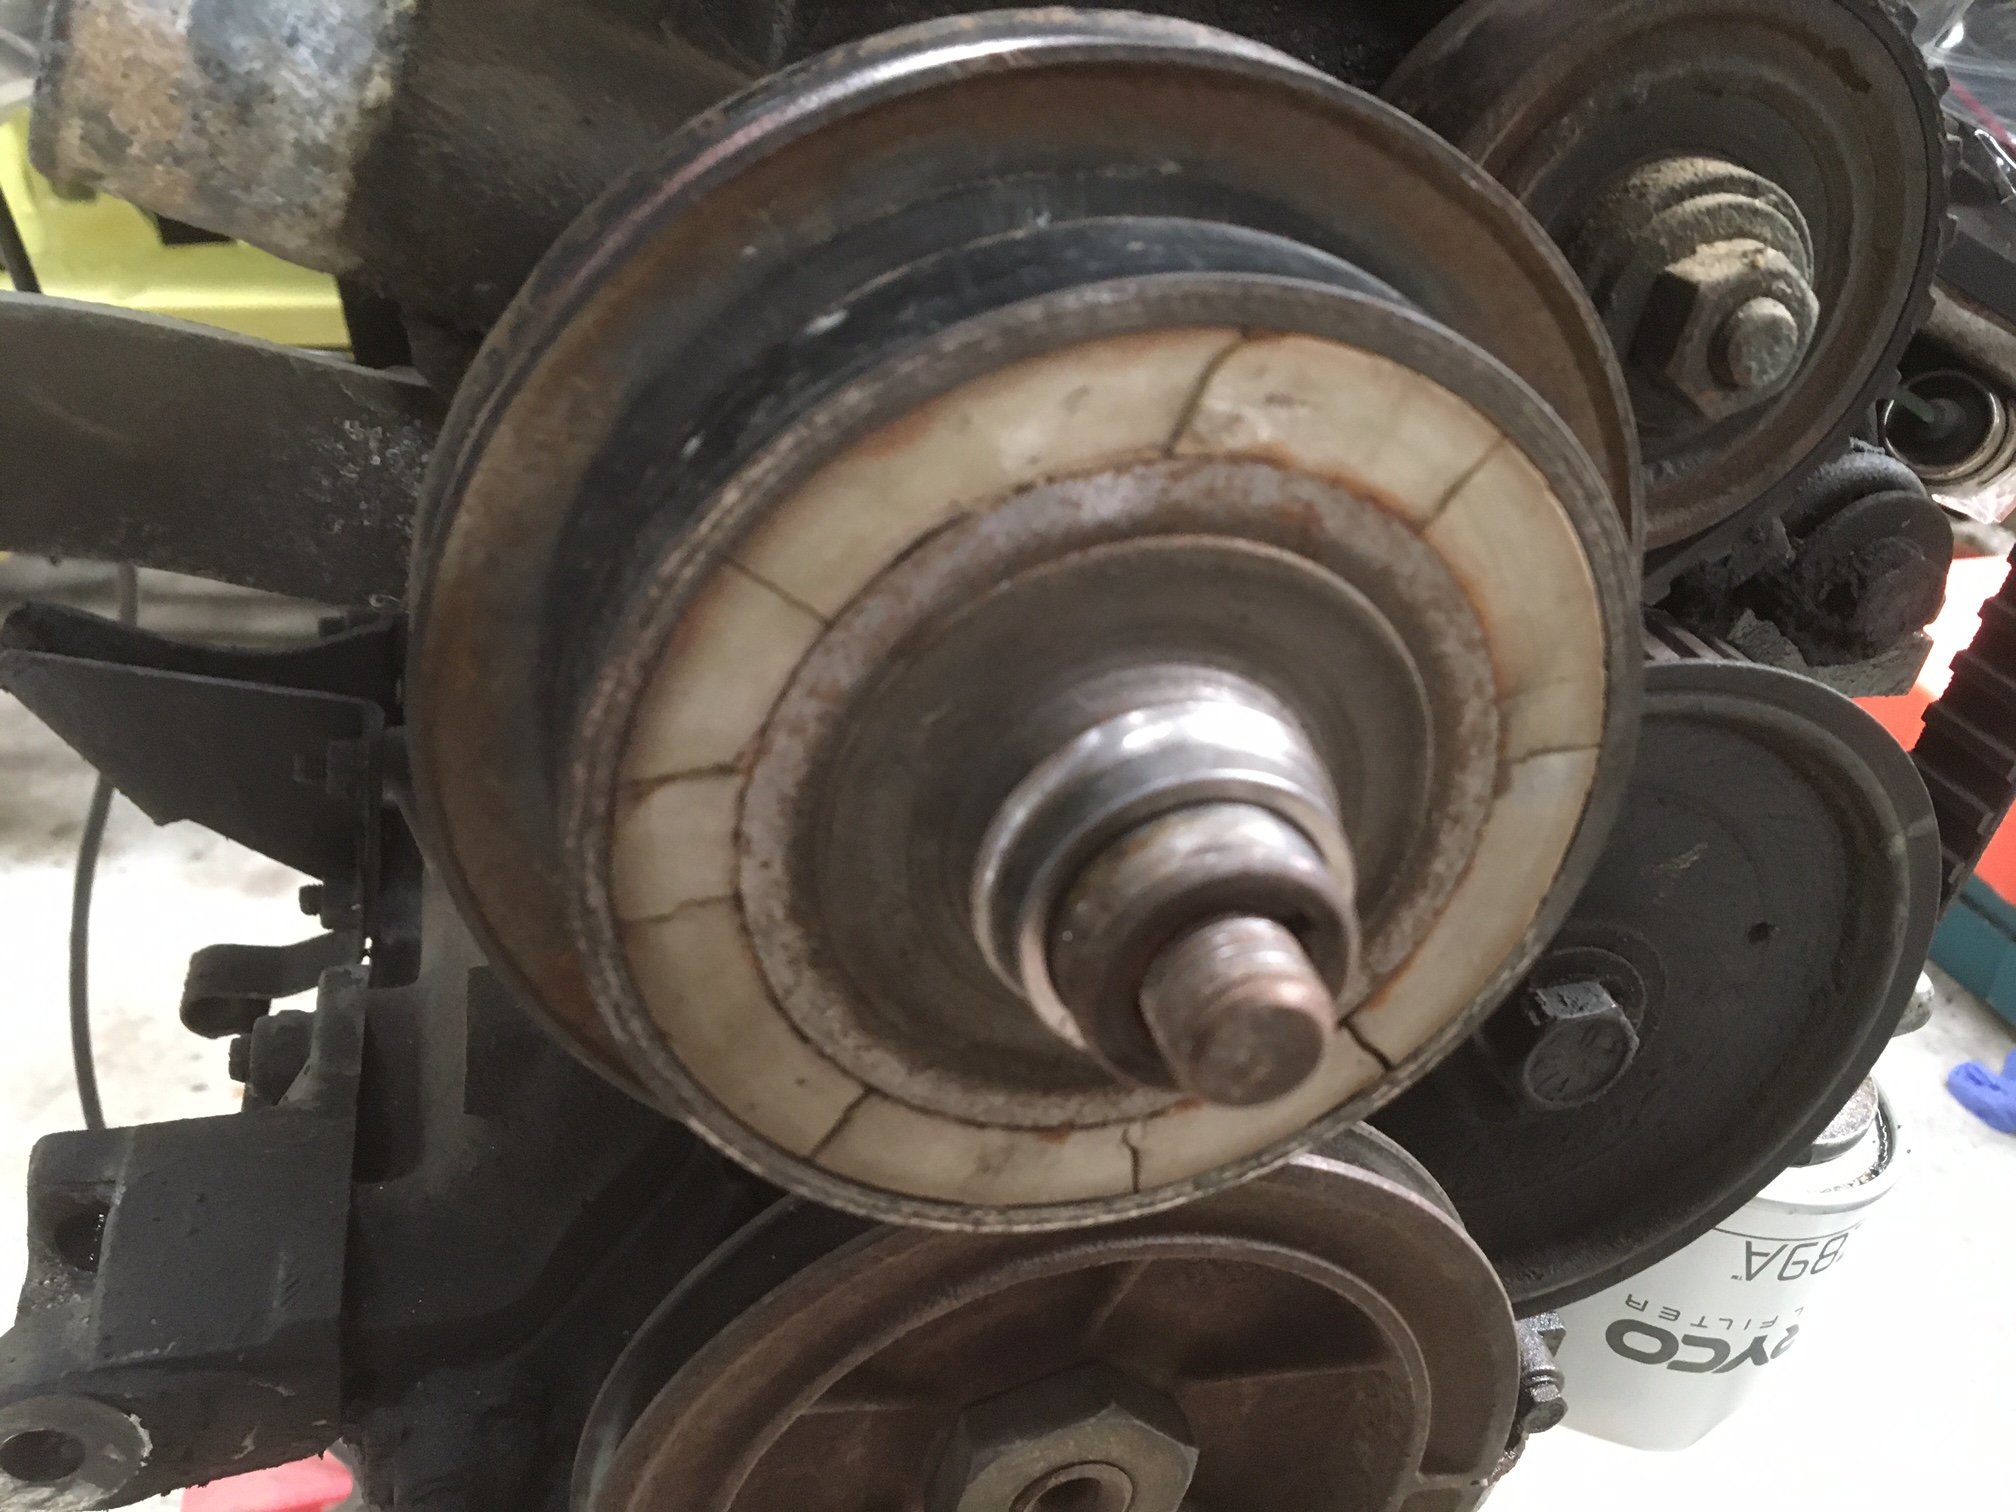
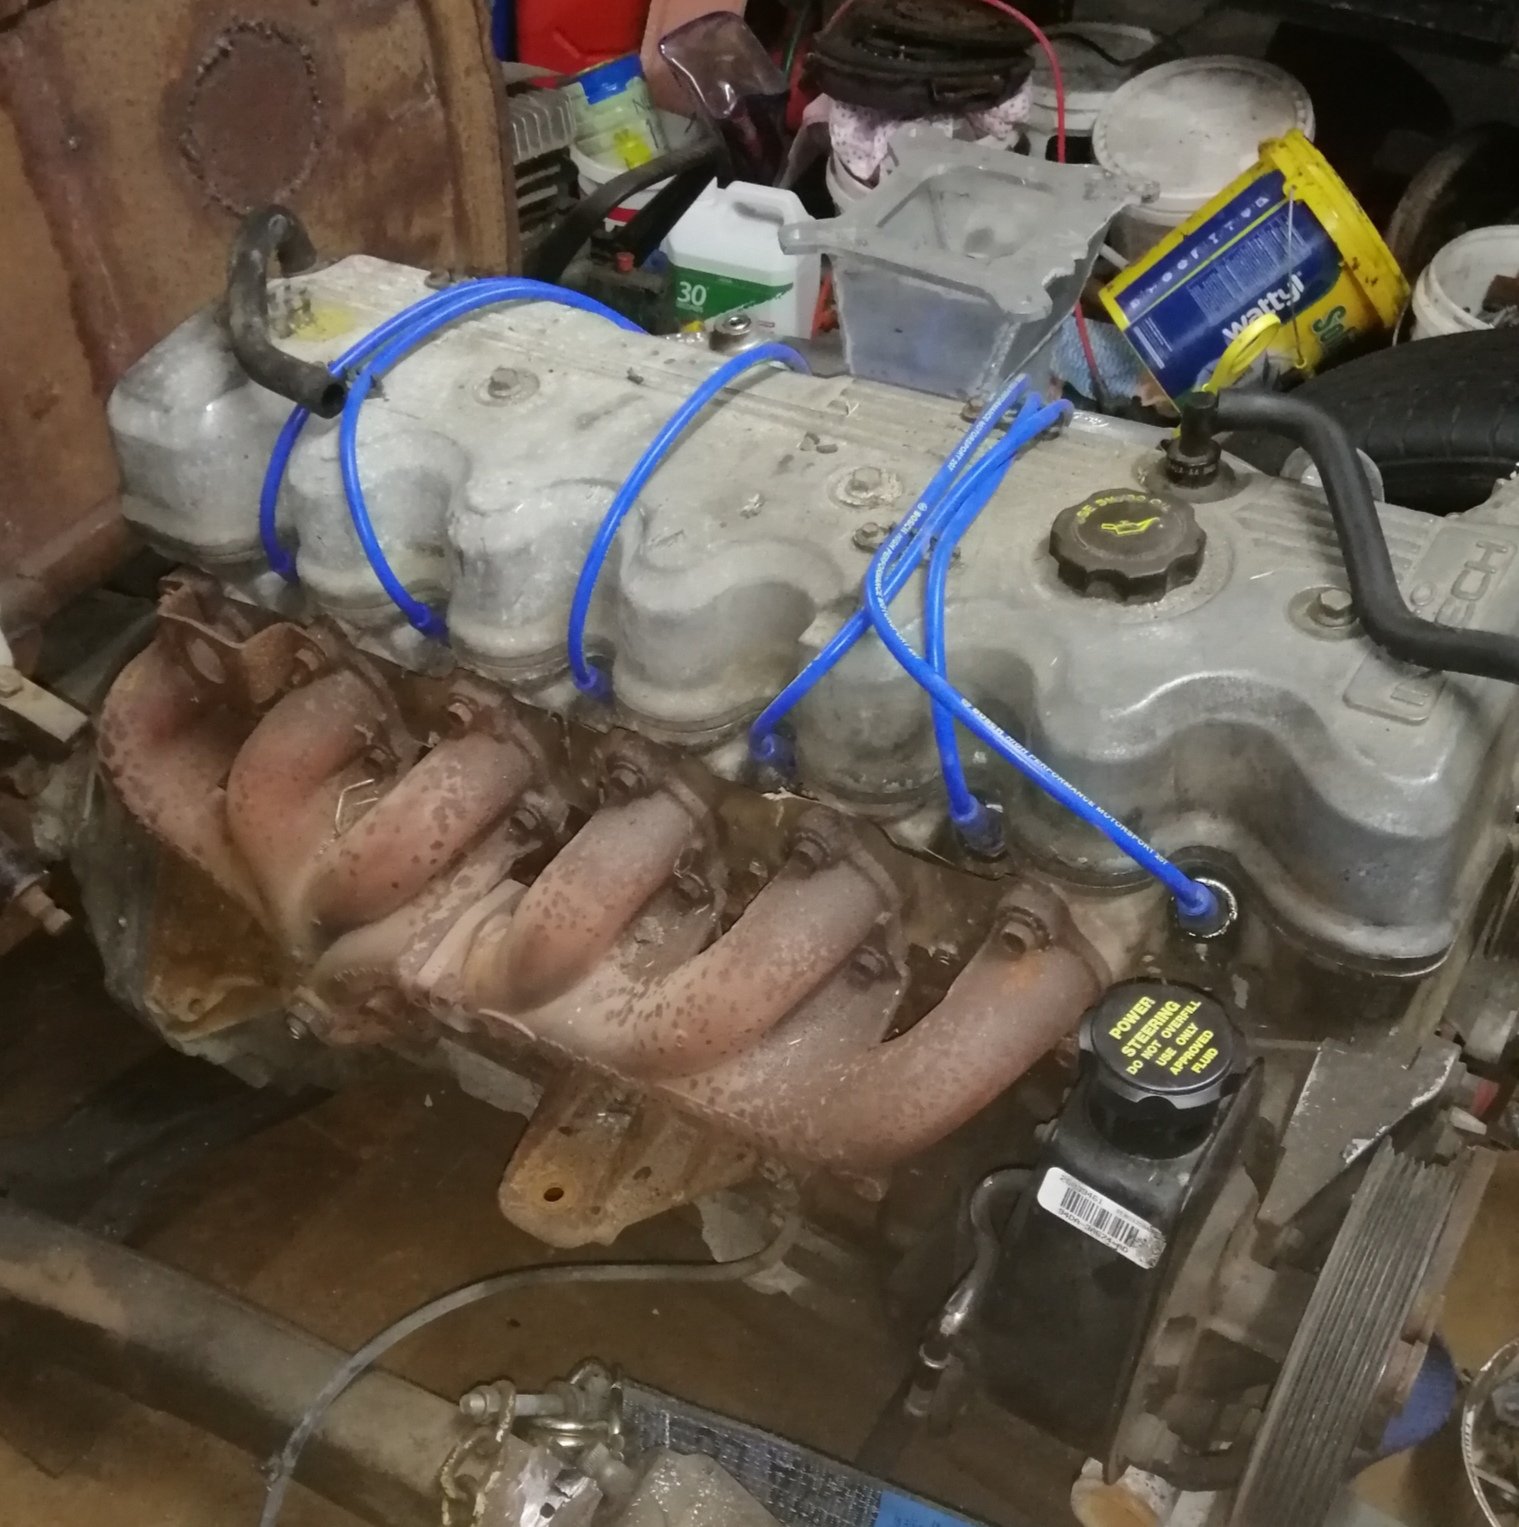
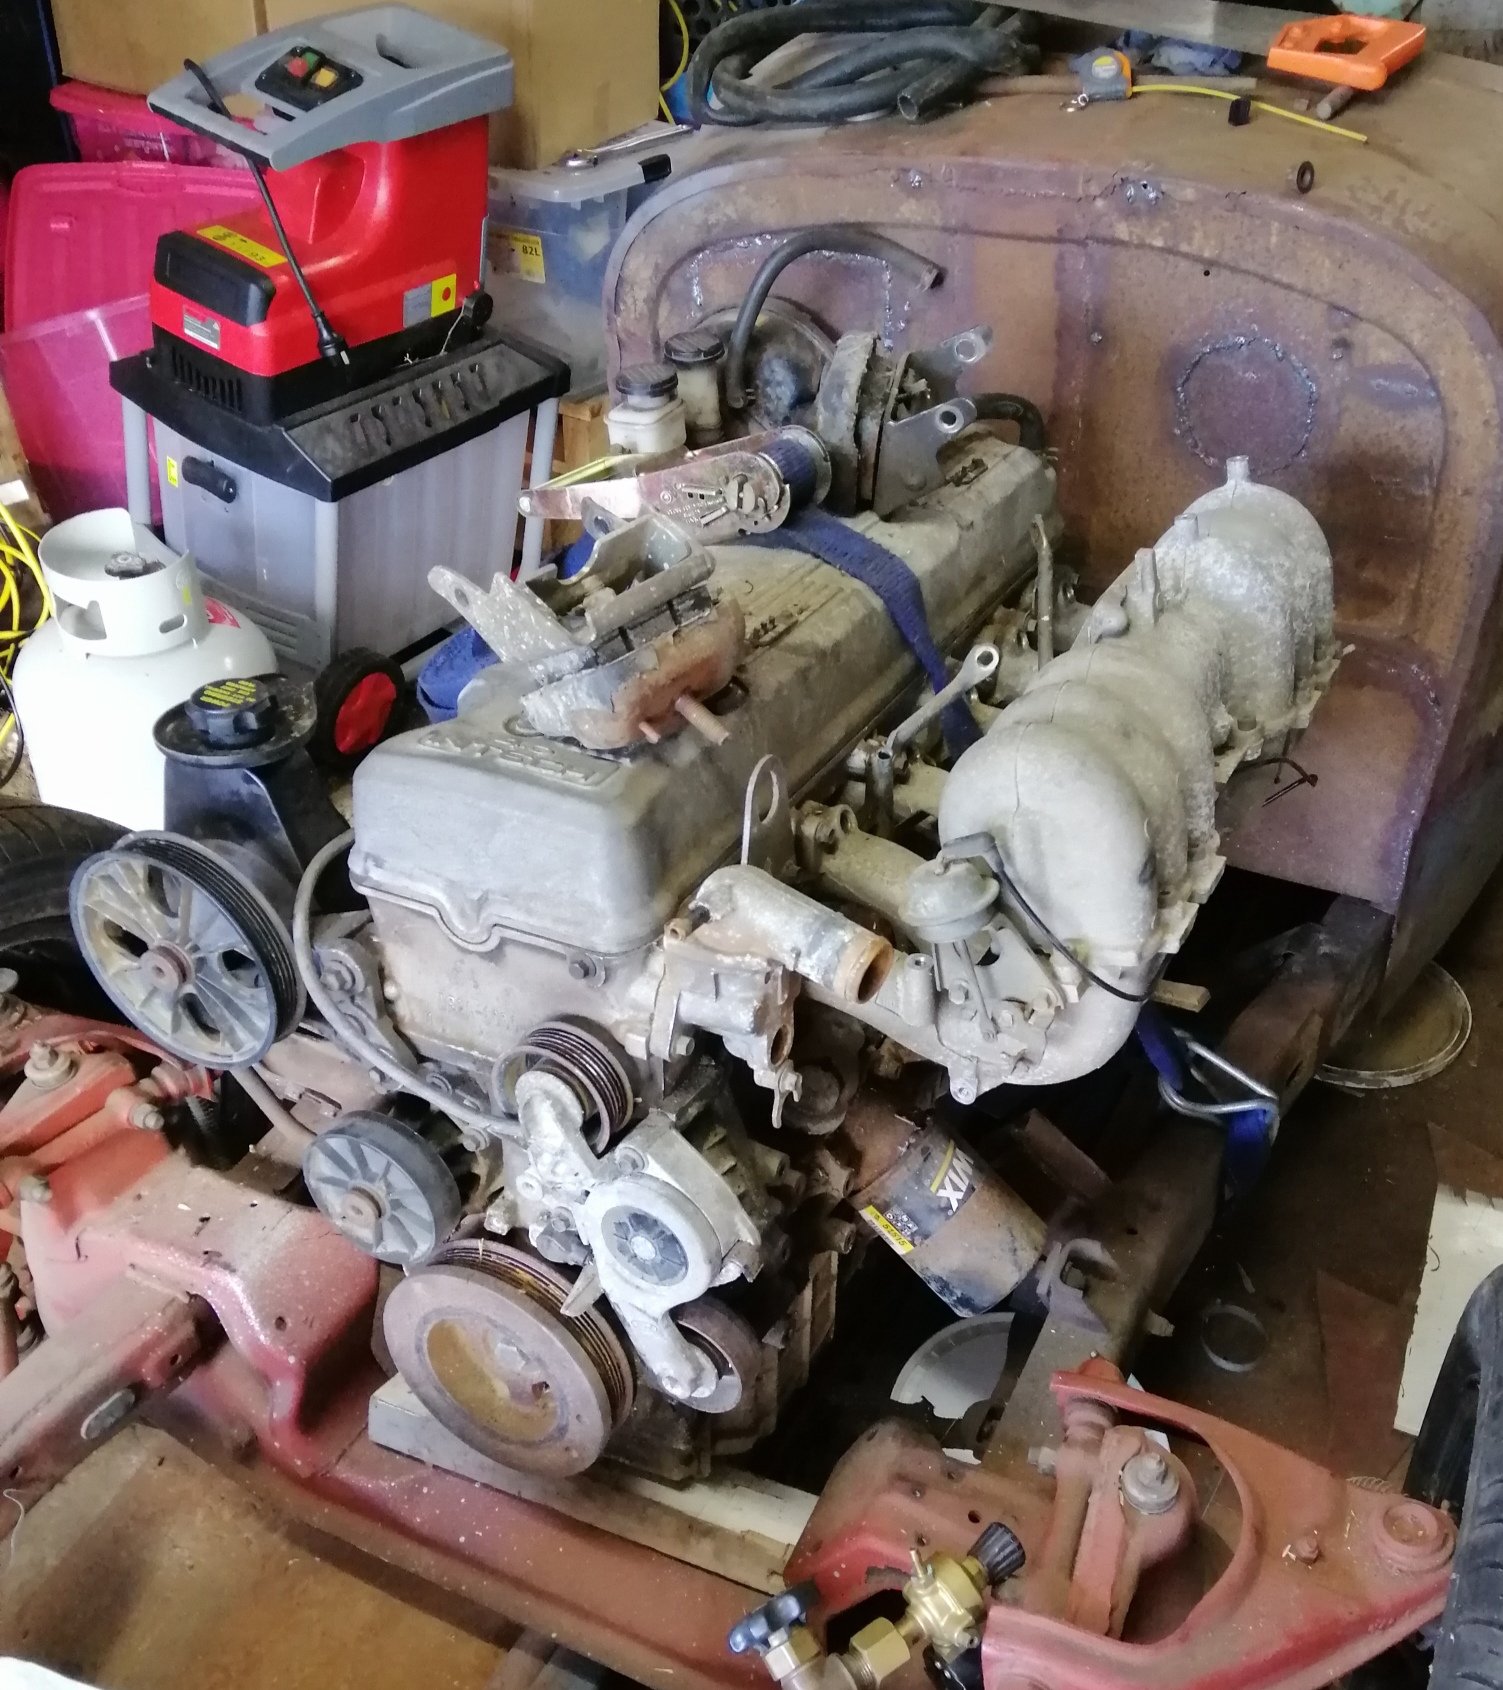
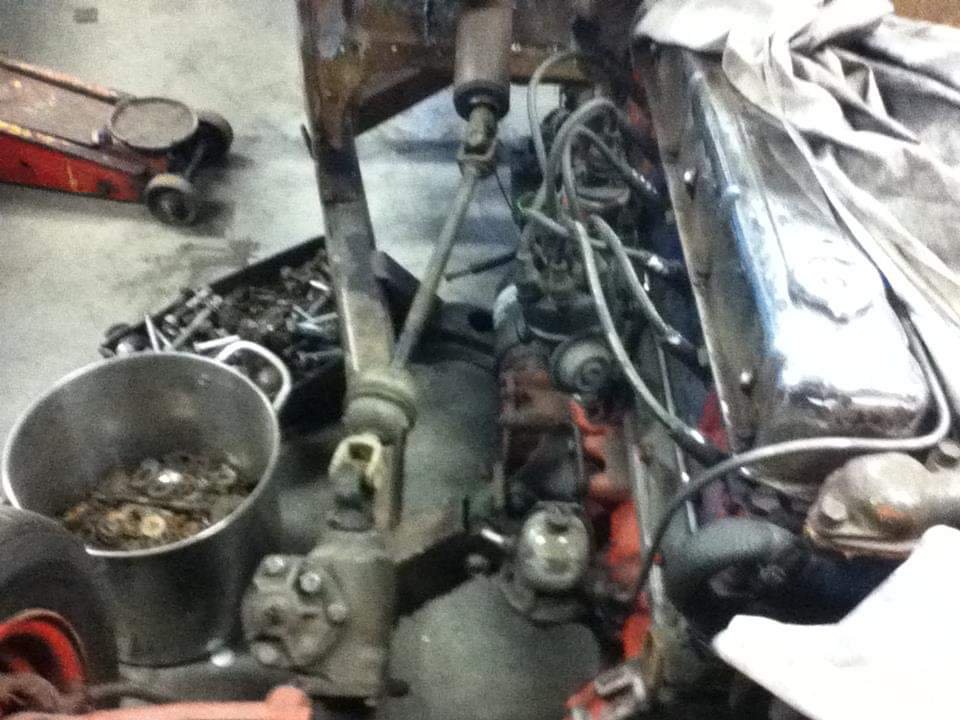
I had to cut the bearing race that was stuck to the water pump shaft. It was still hard work getting the pulley off the shaft and when it finally popped it’s obvious why. Rust! There was also something funky going on with the key. I popped the key out, cleaned the shaft and the bore of the pulley and slid it back on and what do you know…perfect alignment. The water pump feels ok, in fact it looks like a replacement, reinforced by the traces of silicone type sealer residue around the mounting face. It looks like what happened is a ham-fisted amateur, after replacing the water pump (with silicone gasket maker?!) got the key jammed on an angle which prevented the pulley from sliding all the way home and then just did the nut up gudntight anyway. This does not help the fact that the pulley itself is warped and has some crazy runout. Since the fan clutch is junk, and the pulley is riveted to the clutch I wonder if I need to get a water pump and pulley from a twin cam that doesn’t use a fan clutch like the 125. Anyway I thought it was time to clean the motor. I am planning on replacing all the seals and gaskets (not the head gasket because it’s not broken) and I hate working on filthy stuff. I can confirm being able to waterblast the engine upside down on the engine stand is great! I was shocked at how quickly the block flash rusted and also the alloy went powdery really quickly (within minutes) Clean motor:
8 points
-
Oops, forgot to load up the engine details. So moving on from the 12a idea, I managed to snag up a rebuilt AE86 4age, stock spec (GER build). Then luckily got a complete T50 box for $500 which is unheard of these days. So I have a loom with it but it's a bit frightening to look at. I used to know someone that could do a loom conversion to have it set up as a 3 wire plug and play.. Contact details lost unfortunately. From what can tell, I will require the following : Clutch slave Yoke Clutch kit Engine mounts Loom work Speedo cable I have considered running it on carbs for simplicity. The cert tags cover a 4agze and T50. Should be a smarter option than a 12a tbh.
6 points
-
Dragged Hull home from work lockup where its been since March. Collected engine/fuel tanks/fishing gear from storage lockup. Life jackets out of the caravan (at same work lockup). Only thing I can't find is the anchor and rope. Currently impatiently waiting for Savebarn to open to buy rope and a grapple anchor. Workmate has given me an old sand anchor. Ran engine up last night once I remembered how to start it. Electrical check. Battery charged. Assemble anchor setup tonight Bring on next week. Here fishy fishy5 points
-
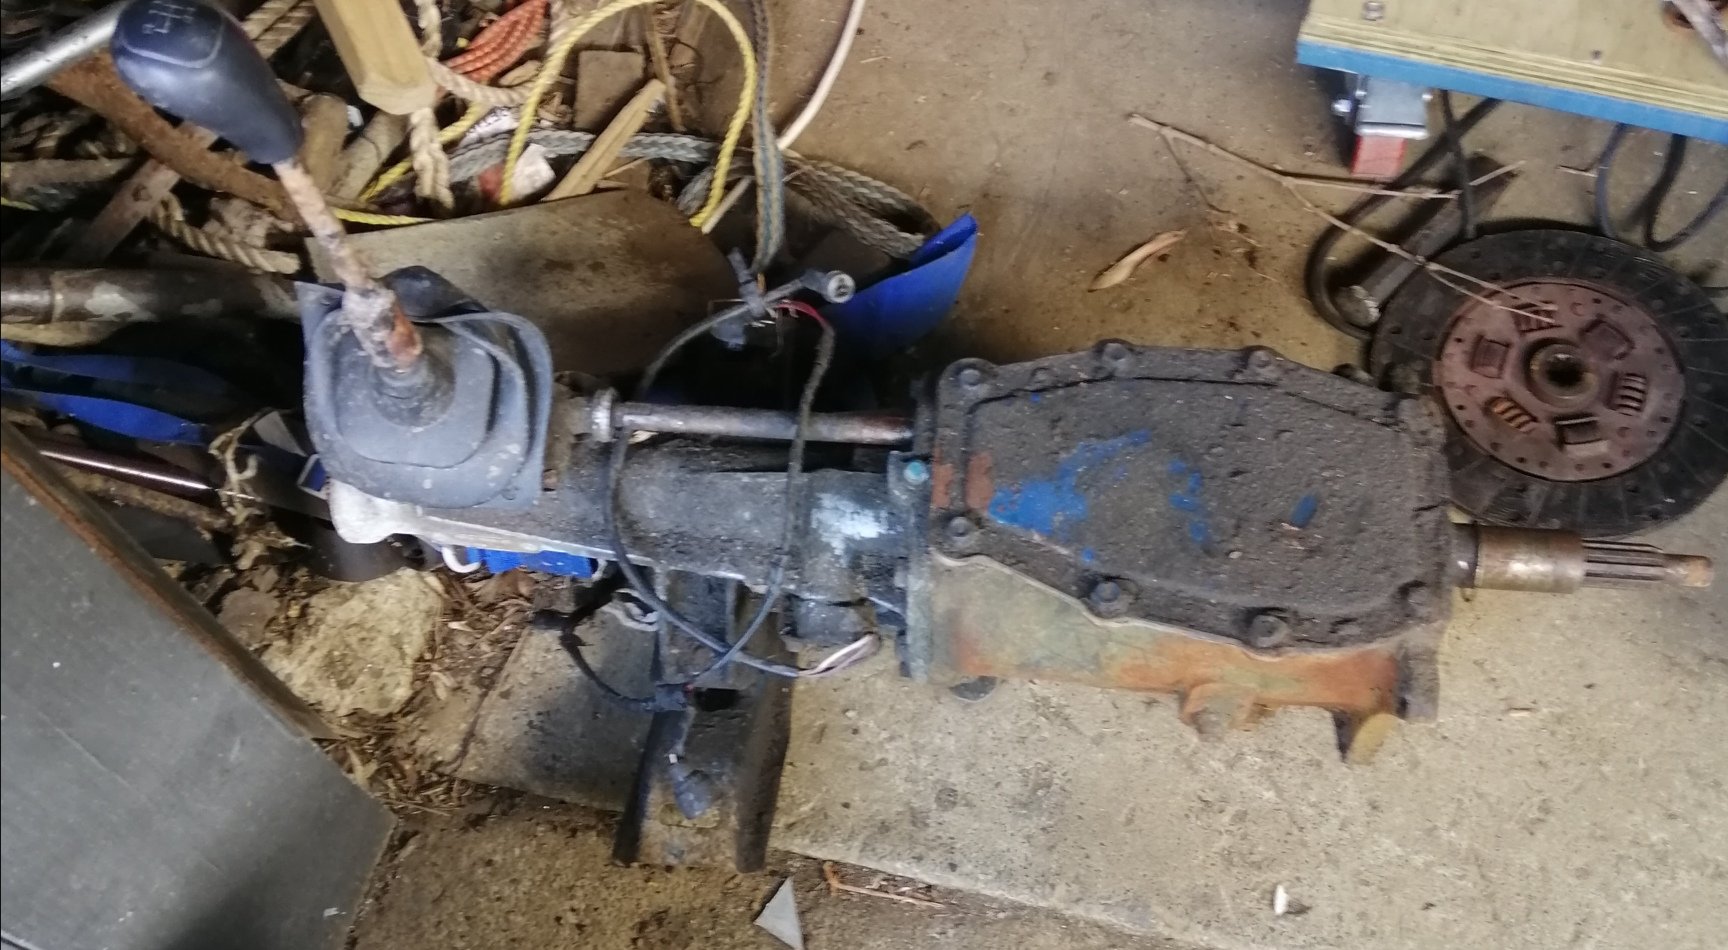
Right, the wallet hurts, but everything I need to rebuild the box is on the way (except a replacement diff, fingers crossed I don't need one). New bearings (steel cage where possible), seals, bolts, clutch, everything. Then once the box is done, I can start fixing the other issues with the car...5 points
-
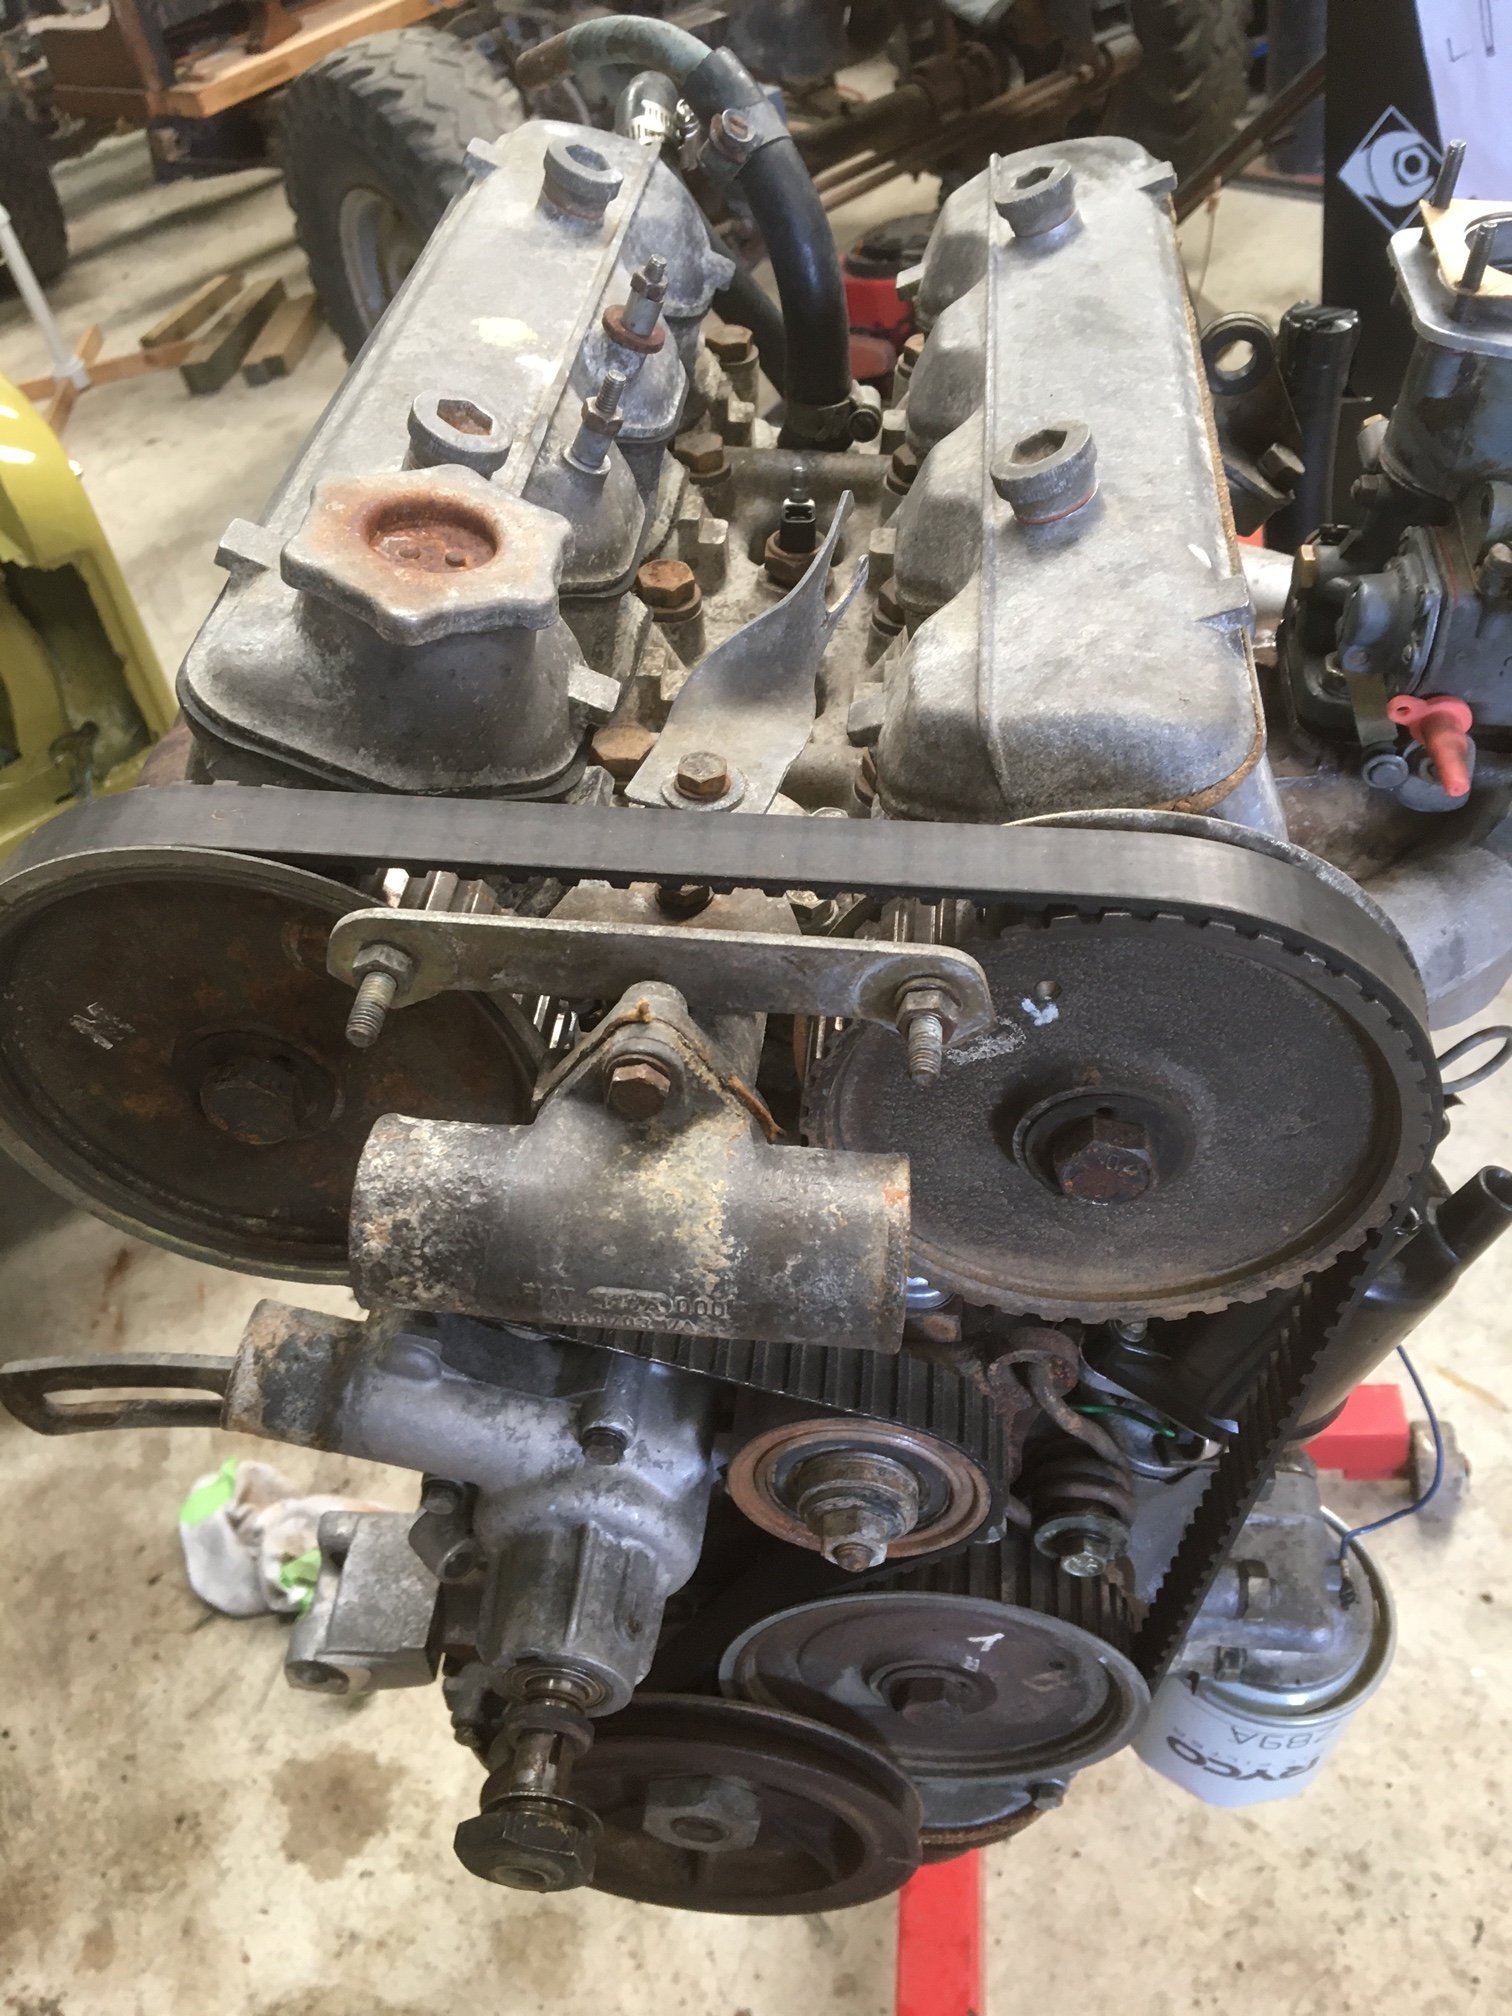
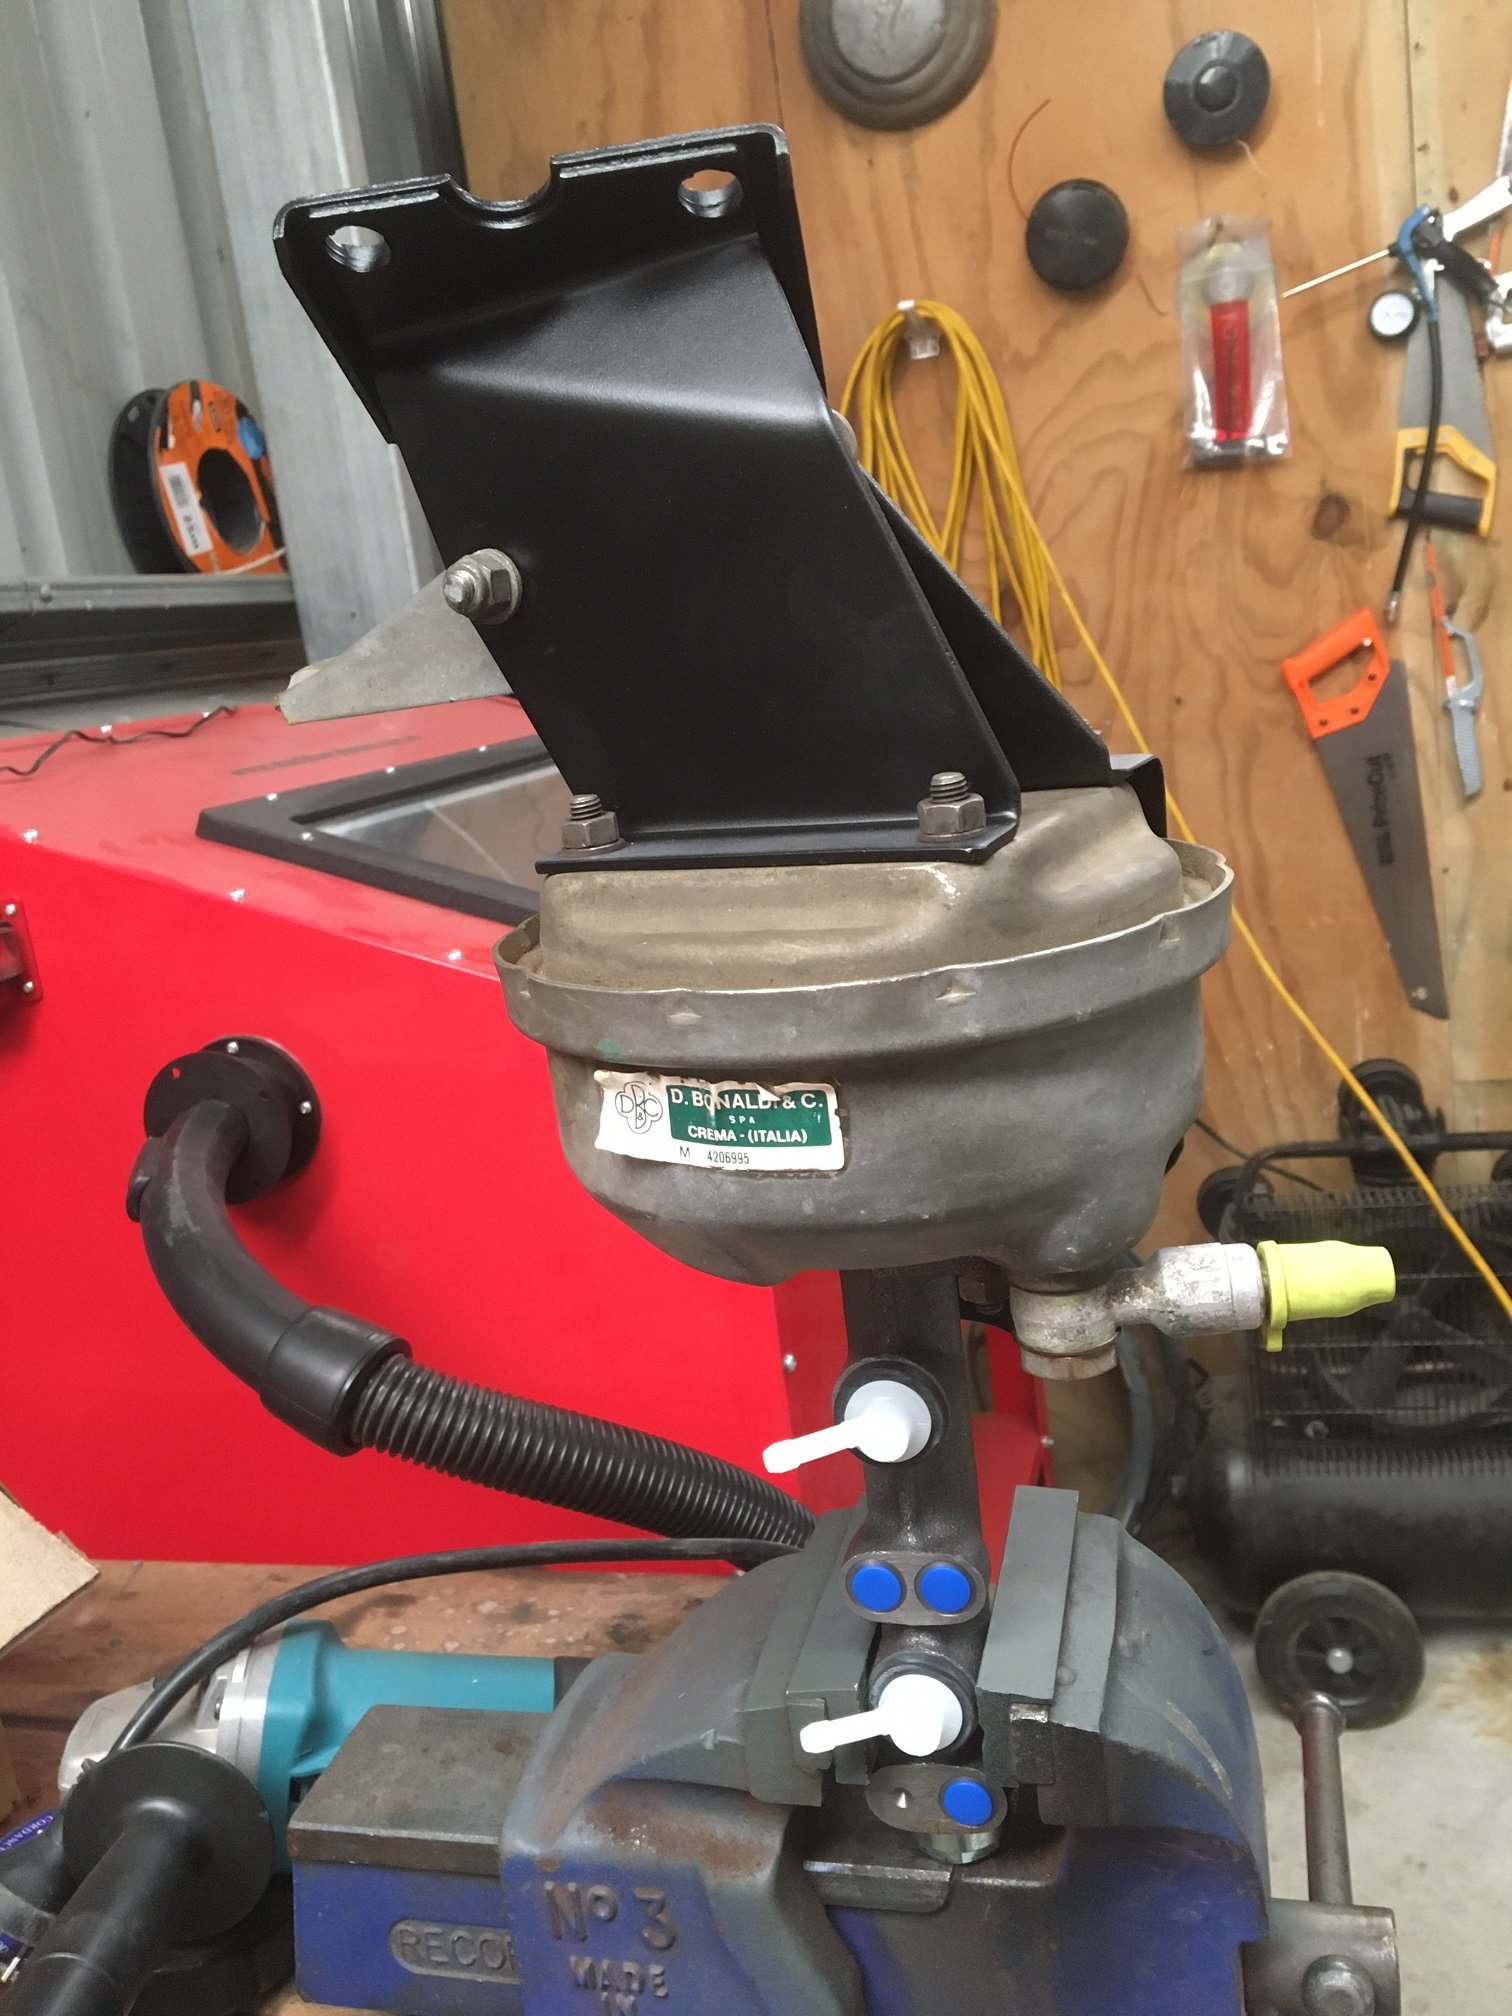
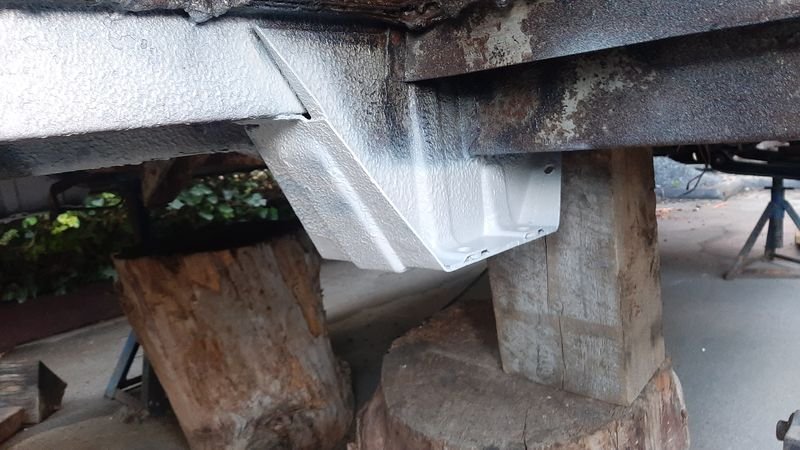
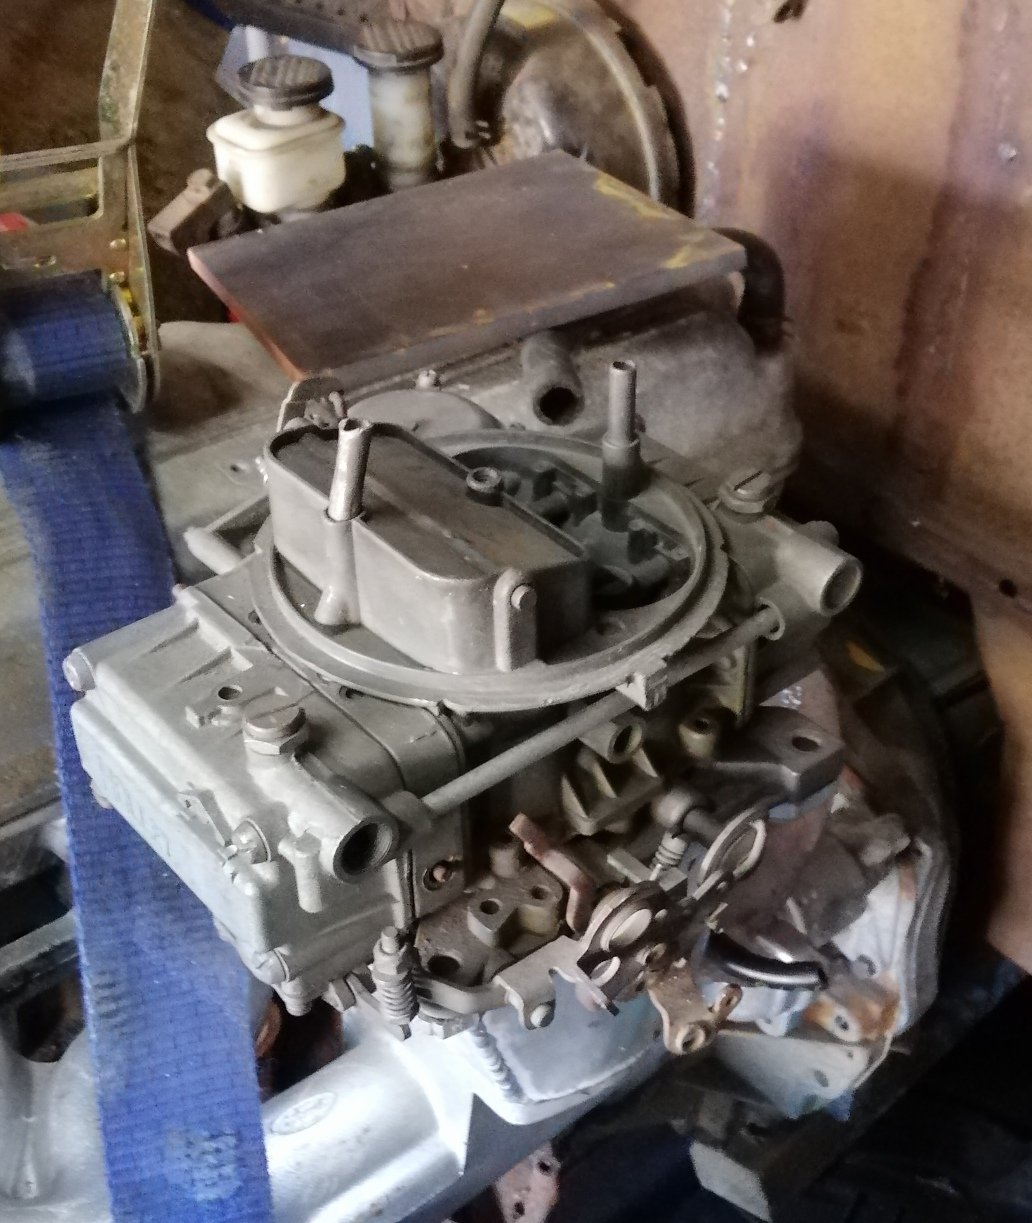
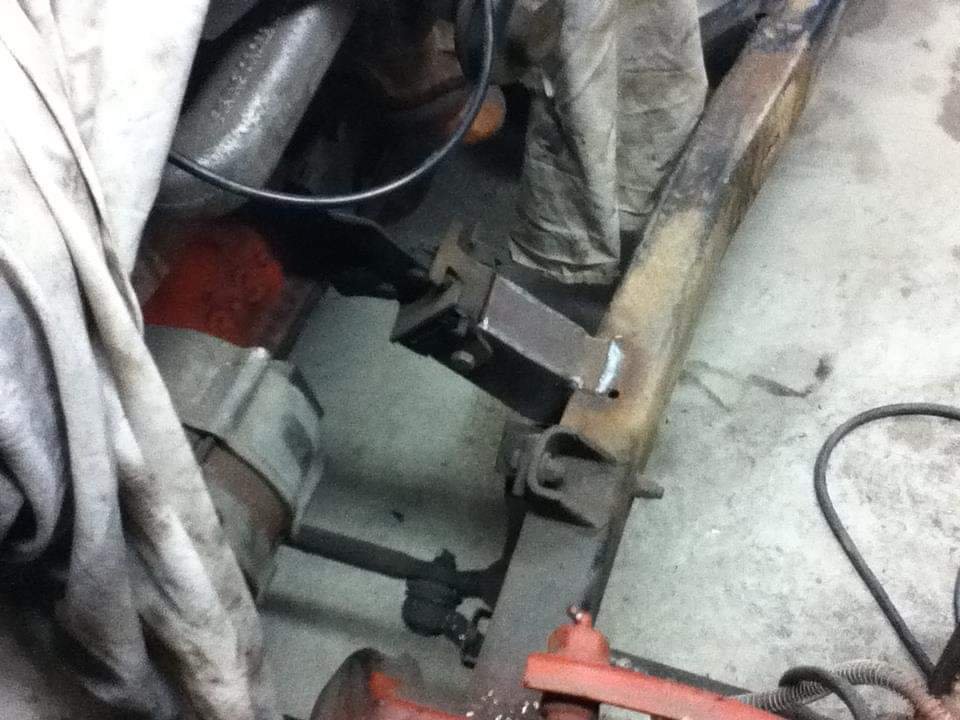
So what I actually did because I’m impatient, is mixed up some paint and brushed it on. It’s covered by the brake booster/mc bracket and it actually didn’t come out that gross. My attention now turns to the engine. I pulled the alternator off and then I wanted to pull the fan clutch off. Unfortunately, only half of it let go. Side A: Side B: I have another moderately annoying problem. The water pump pulley is bent AND it’s half a pulley width out of alignment with the crank and alternator pulleys. More will be revealed when I get the rest of that fan clutch off, I suppose. Anyway, the brake booster et al is ready to go back on the firewall when the time comes.
4 points
-
There shouldnt be any hate, that shit is cool. I have been pondering EV converting my townace ute for my next major project. Here is one i looked at a wee while ago, boy has done a super nice job.3 points
-
I've helped complete an EV in Australia and looked into it seriously in NZ. Whilst there are a few turn key companies in NZ that will help you out, you're on a hiding to nothing trying to get anything remotely cost effective out of them for the DIYer. You can look at importing from AU or USA but then you'll get stung at the border for whatever they feel like charging you that day as well as no easy warranty option. I'm still looking at another EV conversion but doing it for a vintage tractor. I can keep the volts low and use older DC forklift technology. Plus having battery weight in a tractor is good for me. To do a car in NZ either you need to look at getting a written off leaf and get chopping, or for a bespoke option with decent power and range you'll be closer to 100k than 50k.2 points
-
forgot to post these. first is R32 GTR intercooler core design. second is plazmaman core. 2021-09-28_06-56-17 by sheepers, on Flickr 2021-09-28_06-56-26 by sheepers, on Flickr2 points
-
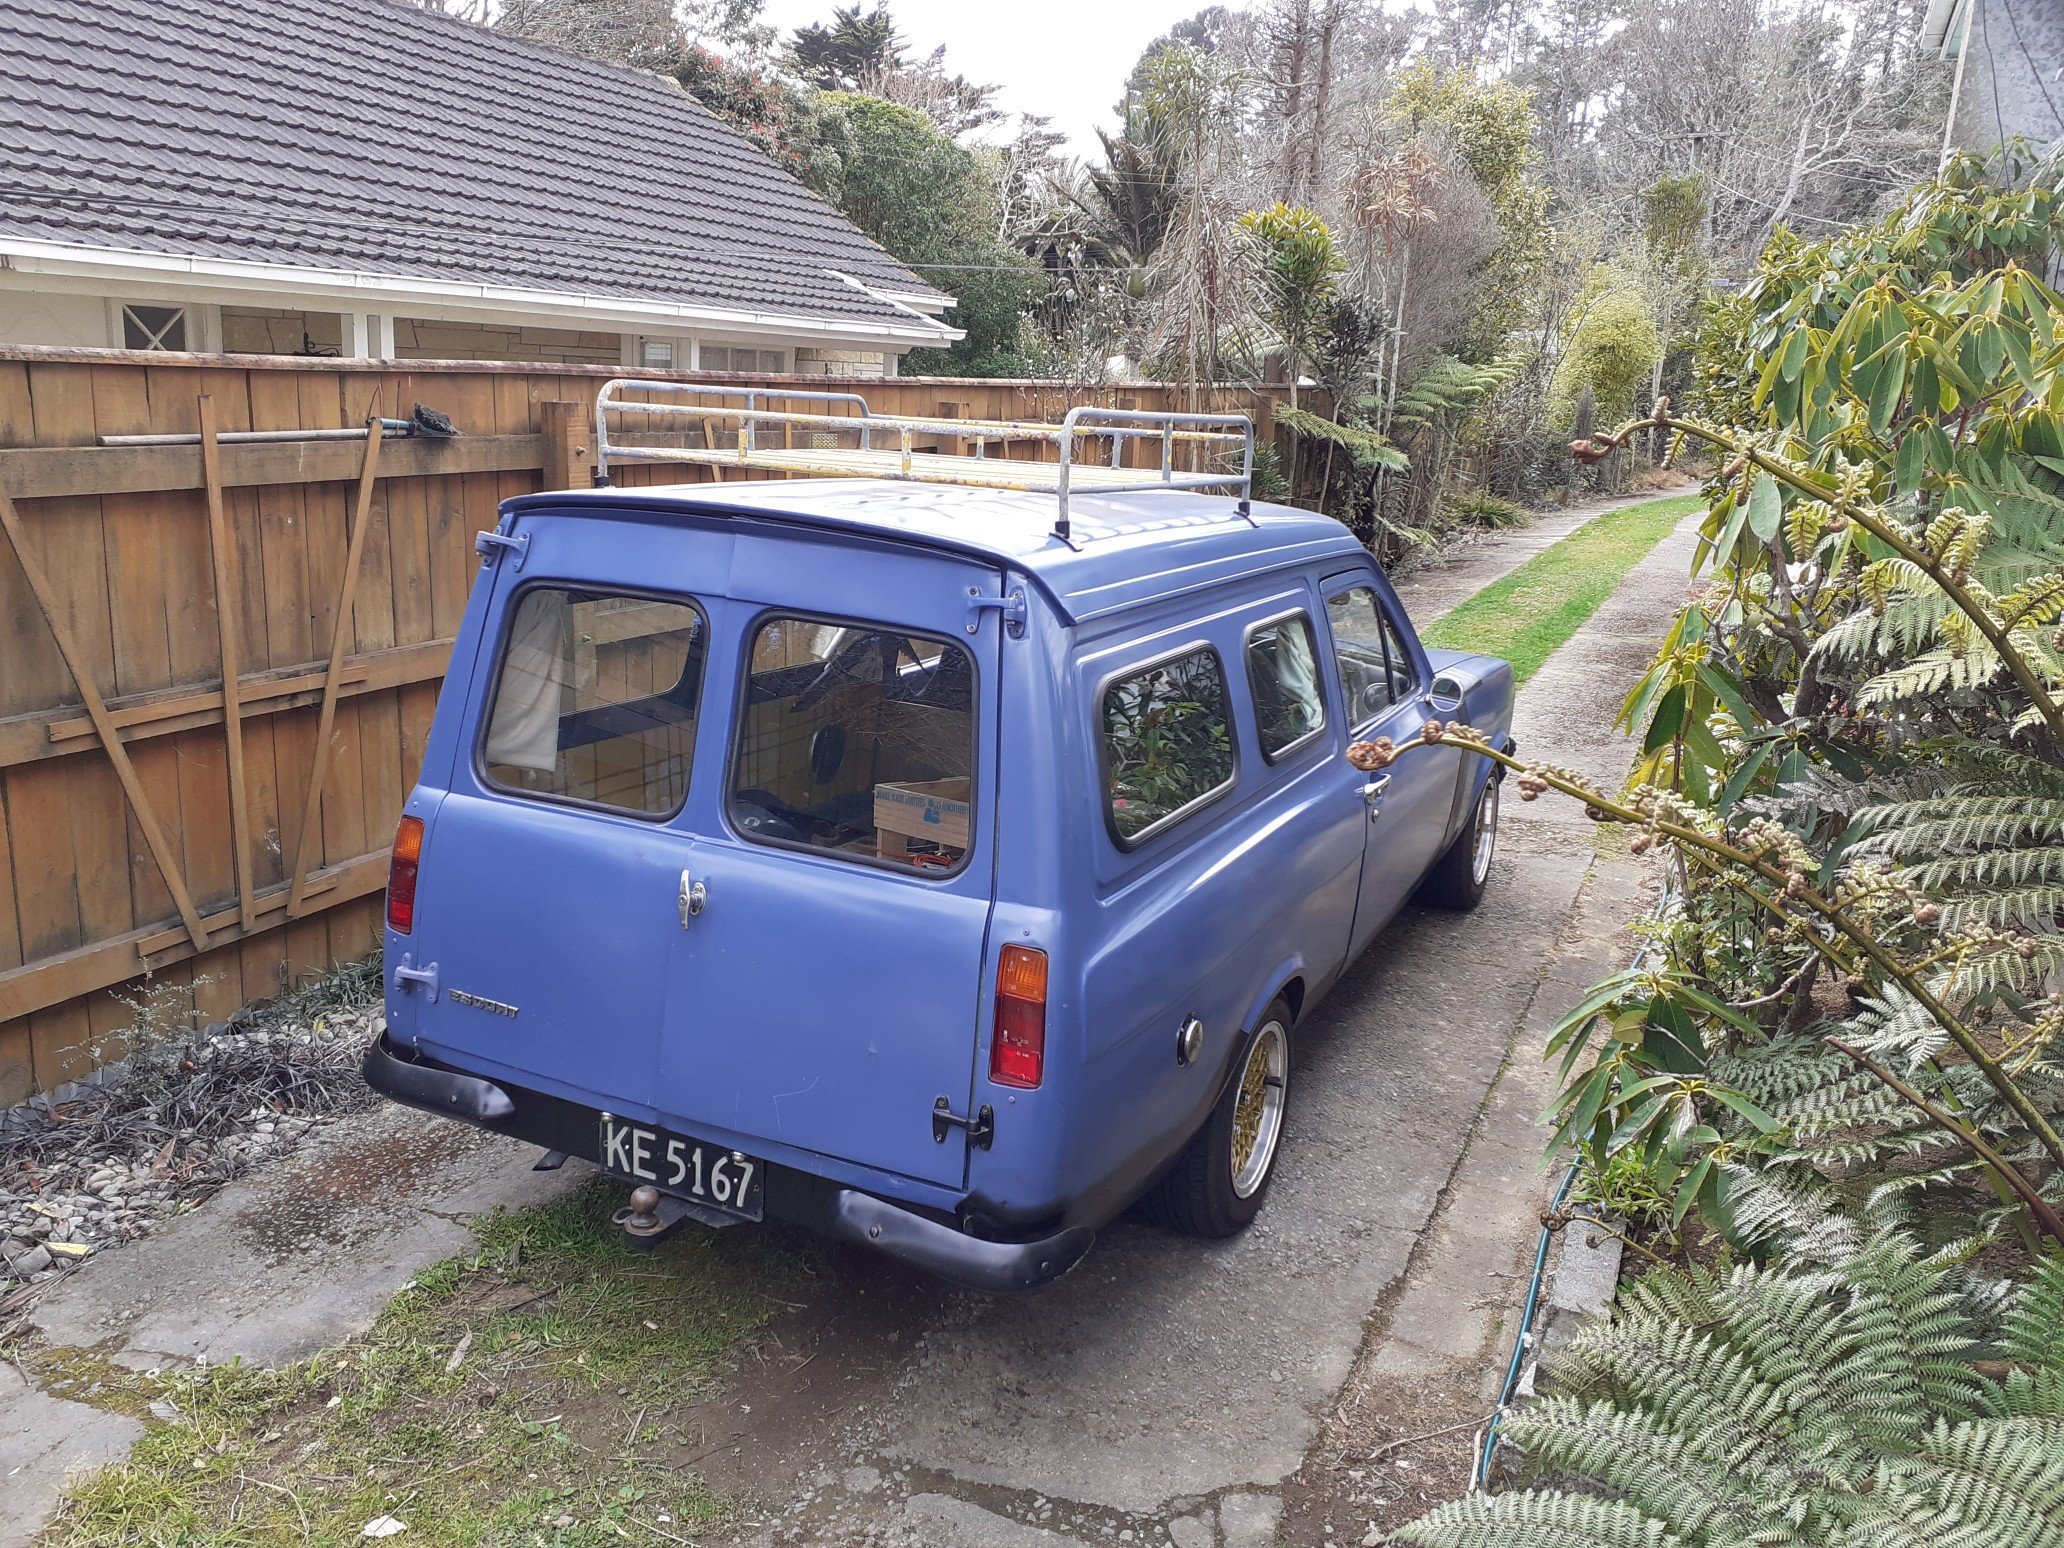
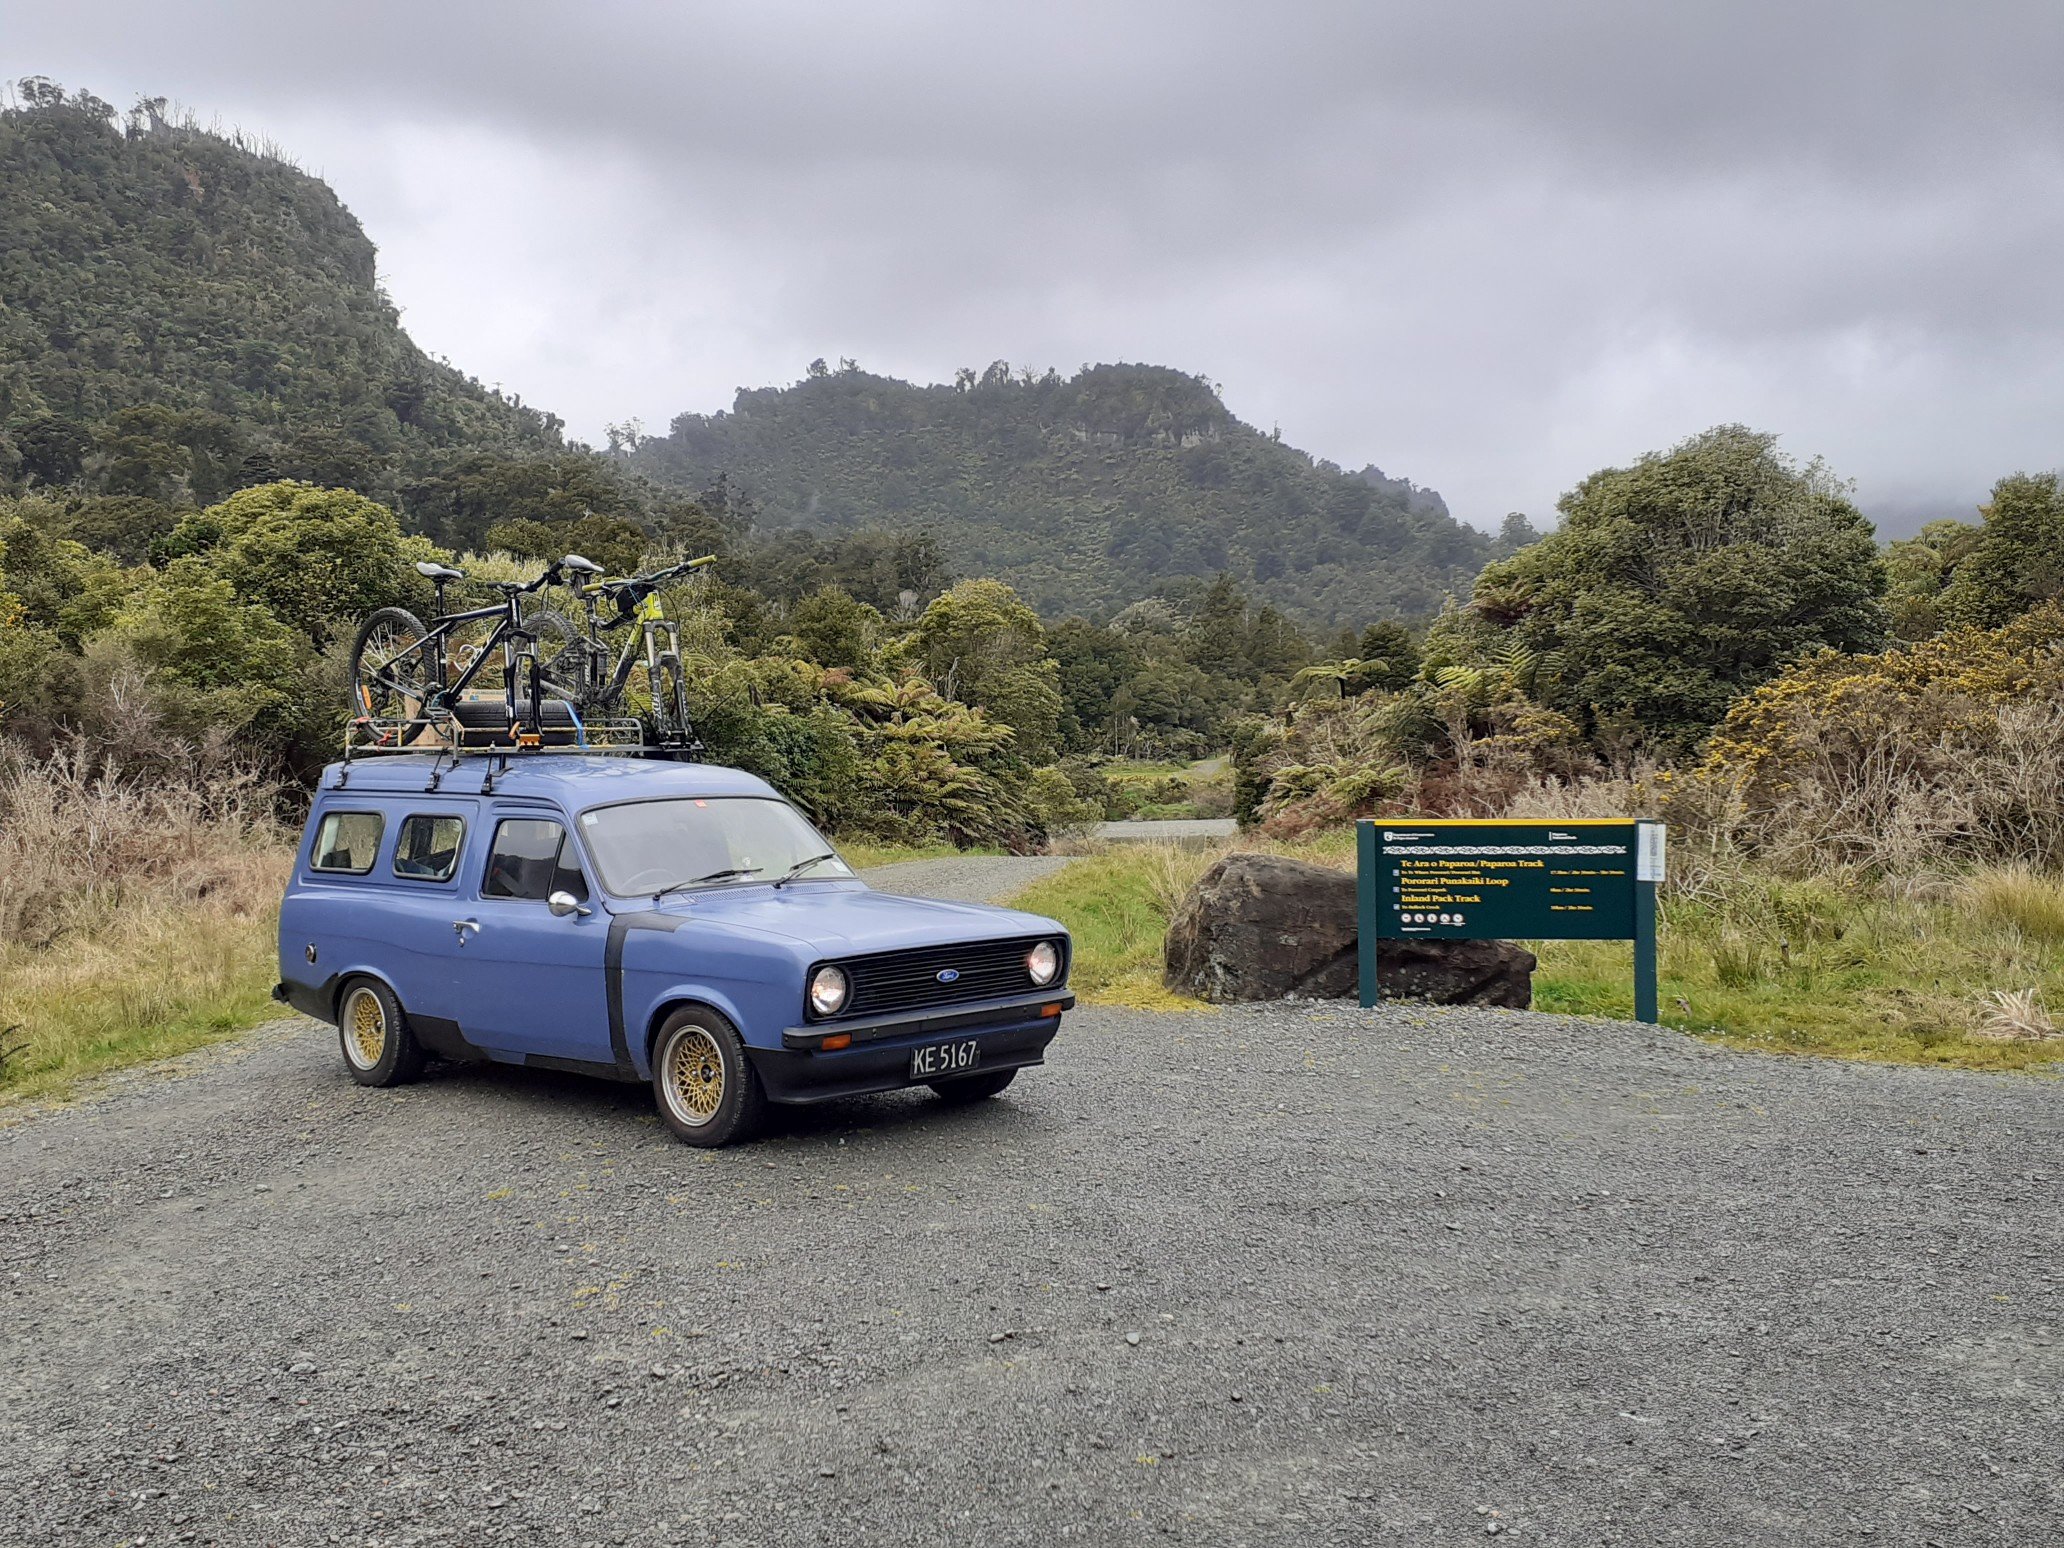
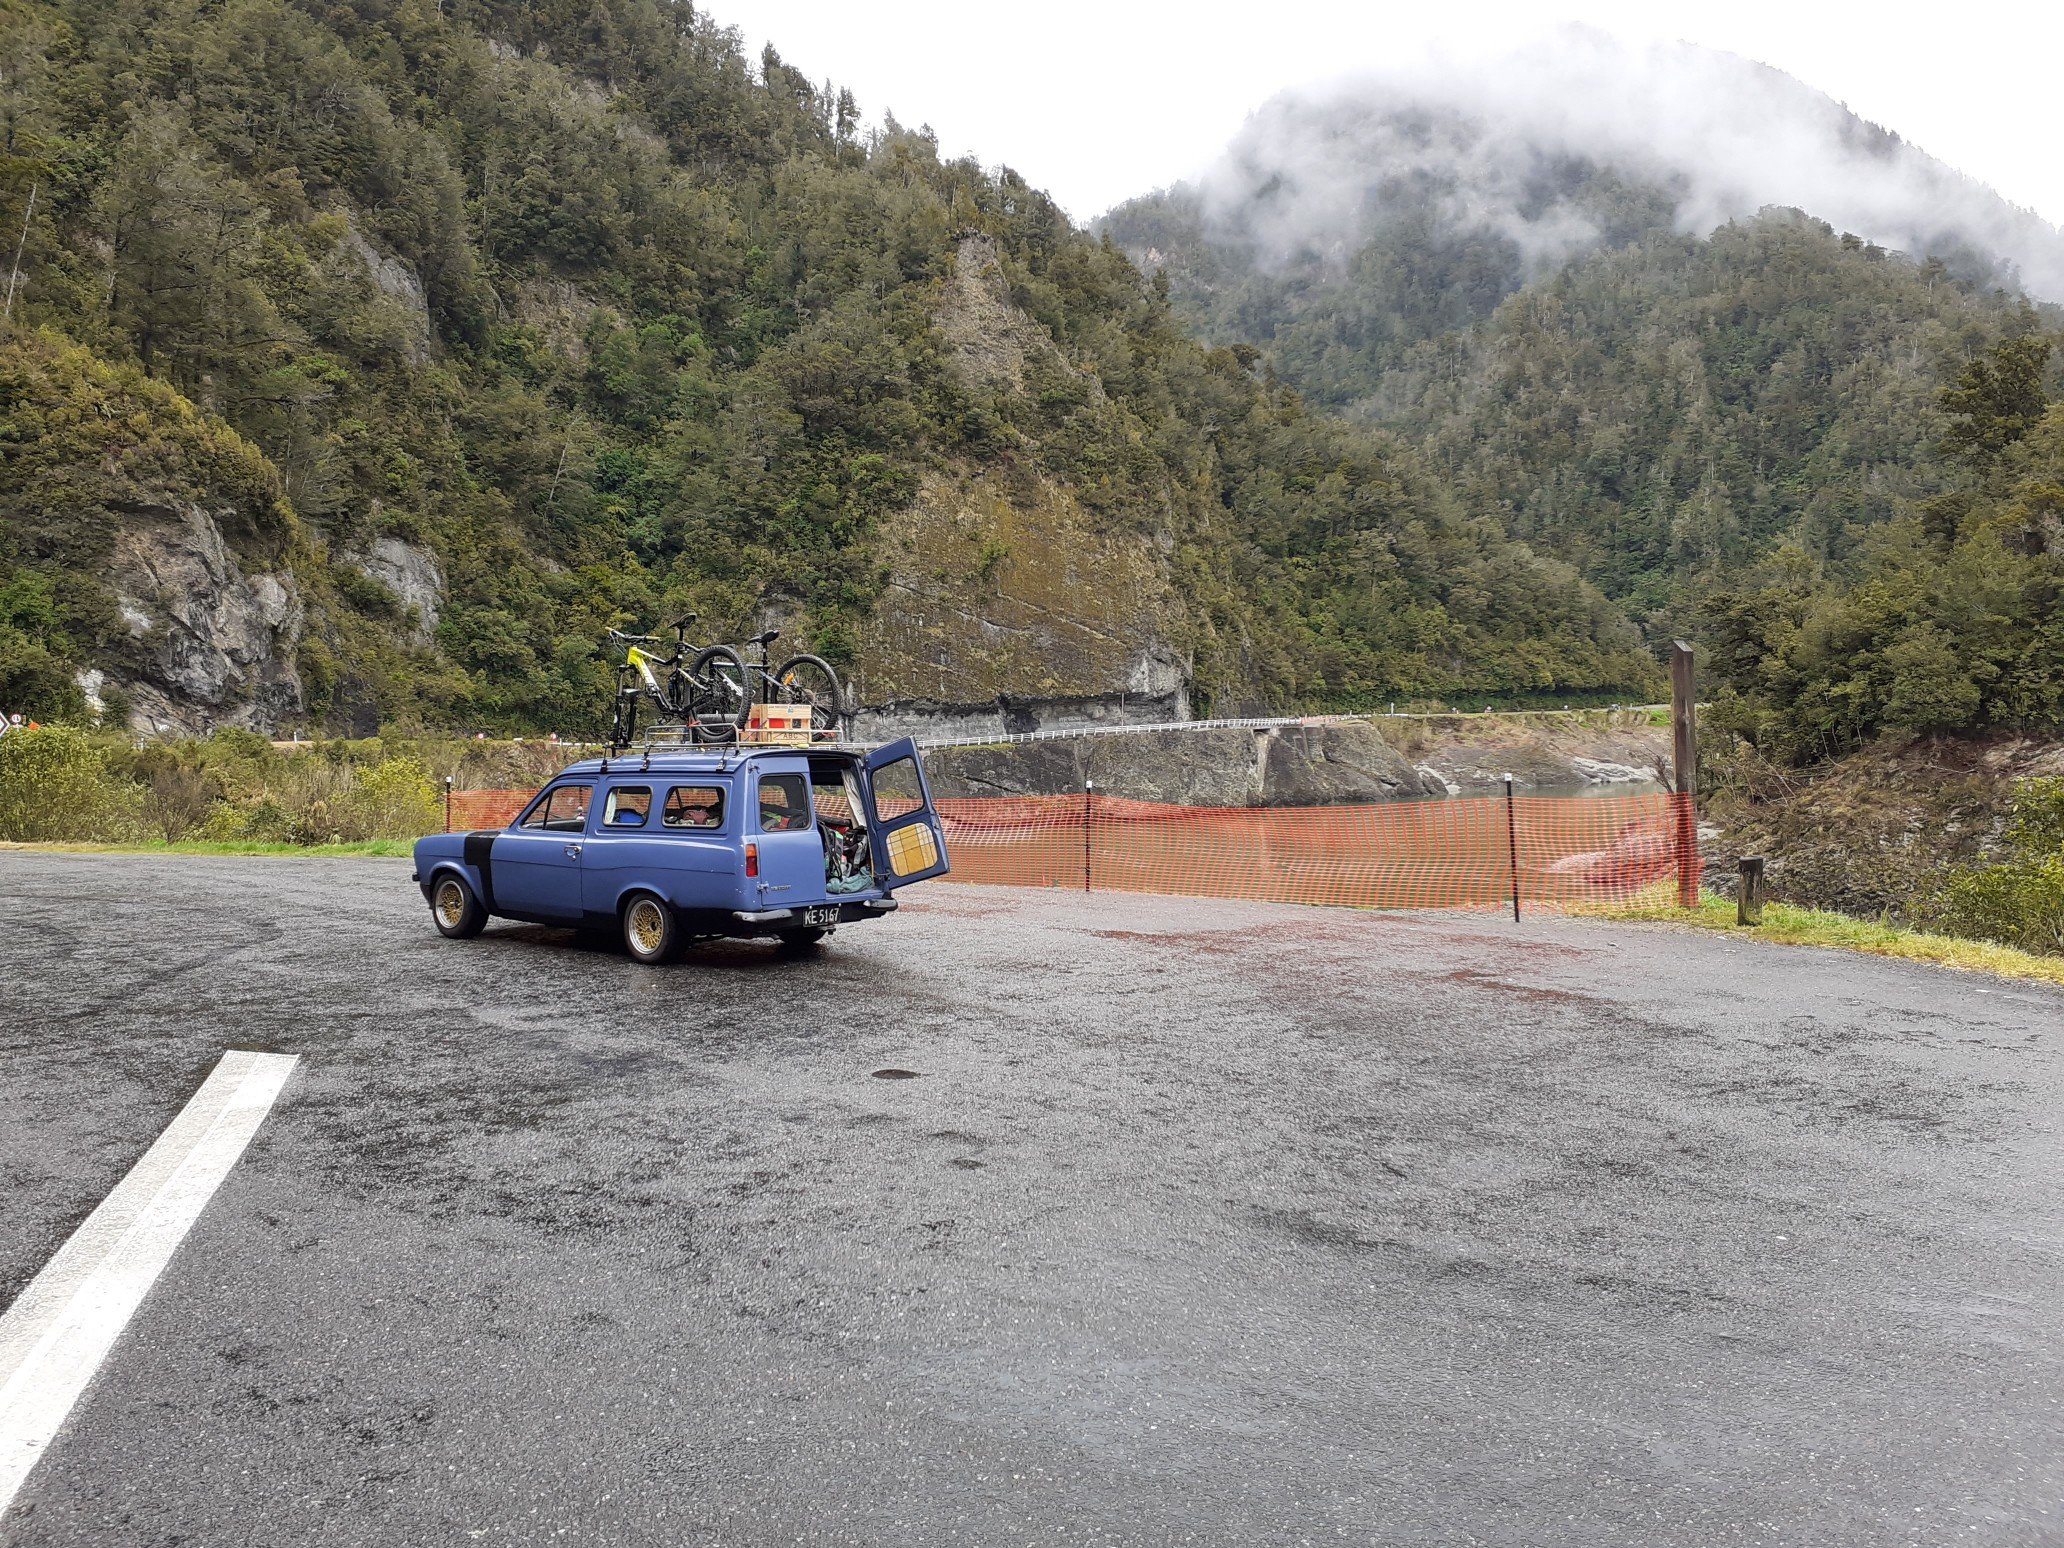
I put the bike carbs back on and ran it up to the palmy swapmeet but on the way back it developed a strange misfire/stutter at constant throttle. I checked a few things before admitting defeat and putting the standard carb on again. I took it all apart and gave it a good clean with a diy ultra sonic cleaner but the stutter was ever present but not as bad? I didn't have time to investigate it too much as I had a roadtrip booked with it down to the west coast for a bike ride. I wanted to mount my bike on the roof for a couple reasons. It would free up all the space in the back, plus it meant I wouldn't have to worry about dragging all the mud and crap in. Using a tow bar bike rack is OK but meant I would have to take the bike and rack off everything I needed to get into the rear. I couldn't find anything suitable for the roof so I was determined to make my own. A visit to grandad one day and he casually mentions his old roof rack is in his shed at home and had been for 40 odd years. A quick look in the exact spot and what do you know. Grandad had this rack years ago on his mk1 zephyr. Under all the new paint, there's the zephyr green which he painted to match. Fitted it up to to van and it was perfect. I made new feet and gutter mounts out of old folder dividers from a file cabinet (not pictured) to mount it. The rack was too short to fit my bike in so I made a front bar out of an old rusty piece of angle iron and used some tubing from an old exercycle to make a dummy axle to mount the forks too. Perfect for the parts bin van. The 1,300km west coast trip went well. The roof rack survived, even when I forgot about the bikes and took a branch off. Luckily it was at low speed and the tree was mostly dead. I lost one alternator bolt, a second came loose, front left suspension has decided to start knocking, discovered a couple of leaks under the dash and with all our gear we were riding bump stops some of the way. Success.
2 points
-
Buy 2 and put another motor in the back2 points
-
I've been researching it for ages, but like Cletus said, until the costs come down it's a bit of a pipedream - because it is pretty much a besoke job for every car it's going to stay costly unless you can find some modularity sort of thing, then costs might come down. For example EV West in the states do a lot of VW/Porsche repowers and released a bolt in SBC engine conversion last year. But still at the spendy end, and every car is going to need a bespoke battery set up. Unless we just creative commons the designs... https://www.autoblog.com/2020/10/02/ev-west-tesla-motor-conversion-chevy-ls-sbc-mount/2 points
-
Neat car but I think for conversions like that to become popular, the price of ev parts will have to come down a lot. 100kw, granted it would have heaps more torque, but a stock 4age has the same power? And it cost 30k The fact it costs less to run isn't really that much of a plus unless you do heaps of kms, as the higher initial build cost would take forever to gain back in fuel savings on a weekend only sort of car2 points
-
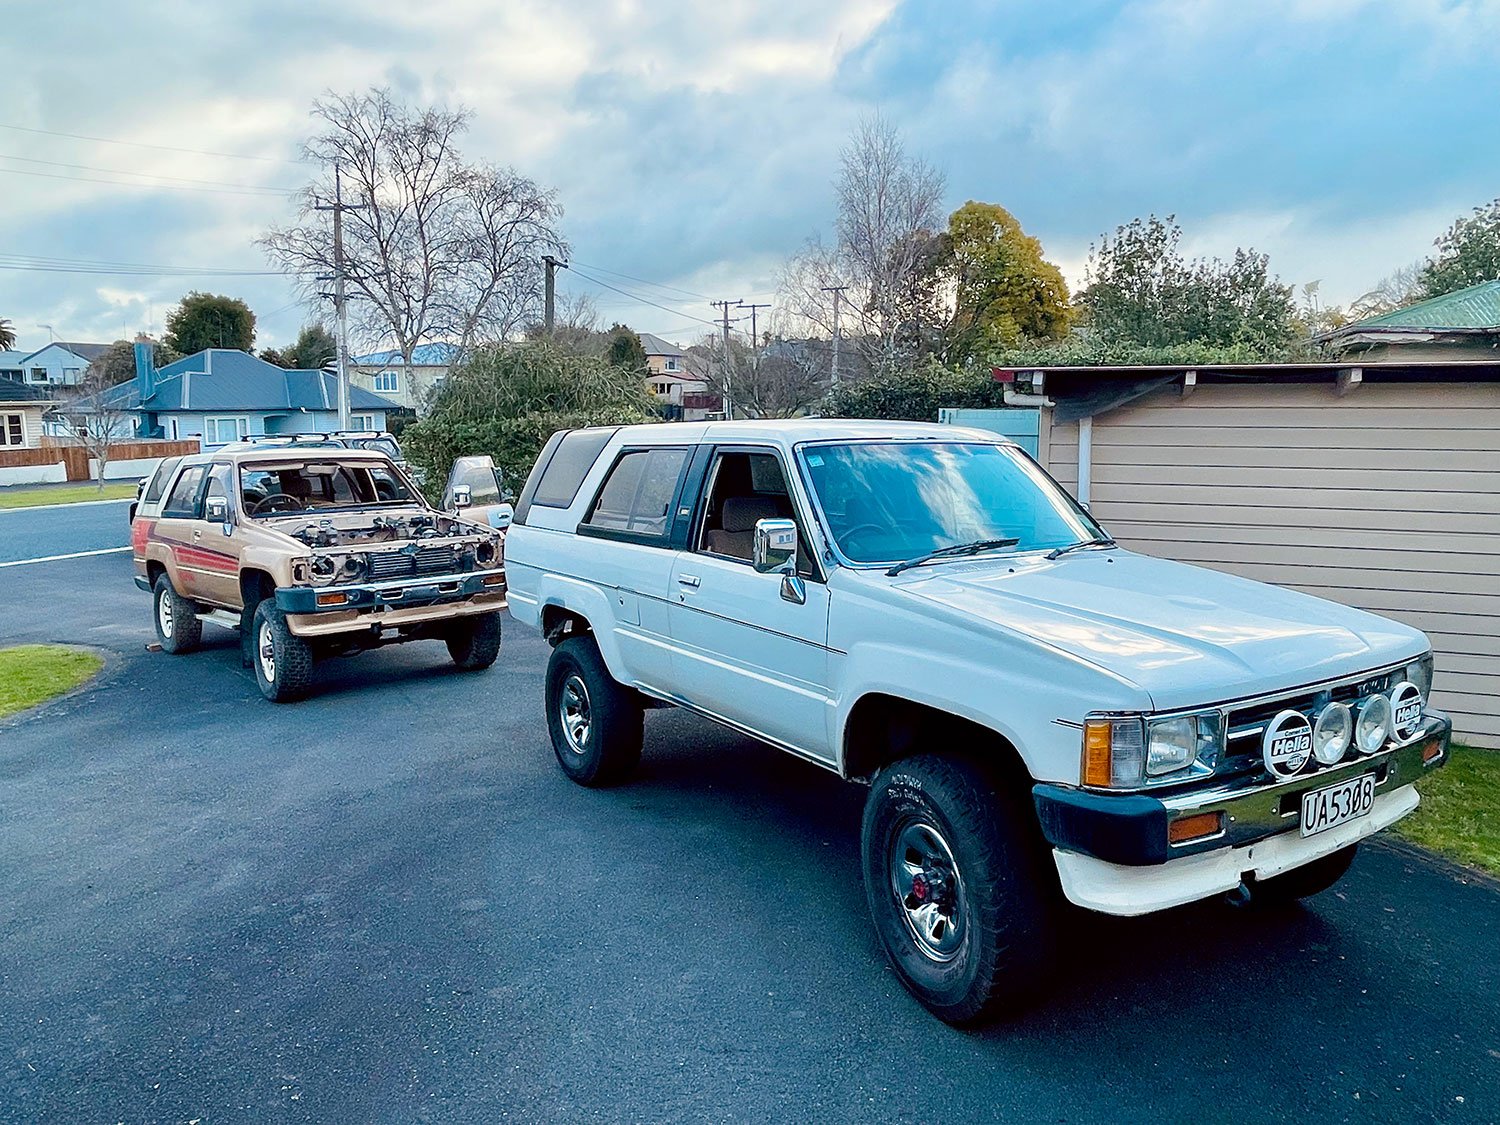
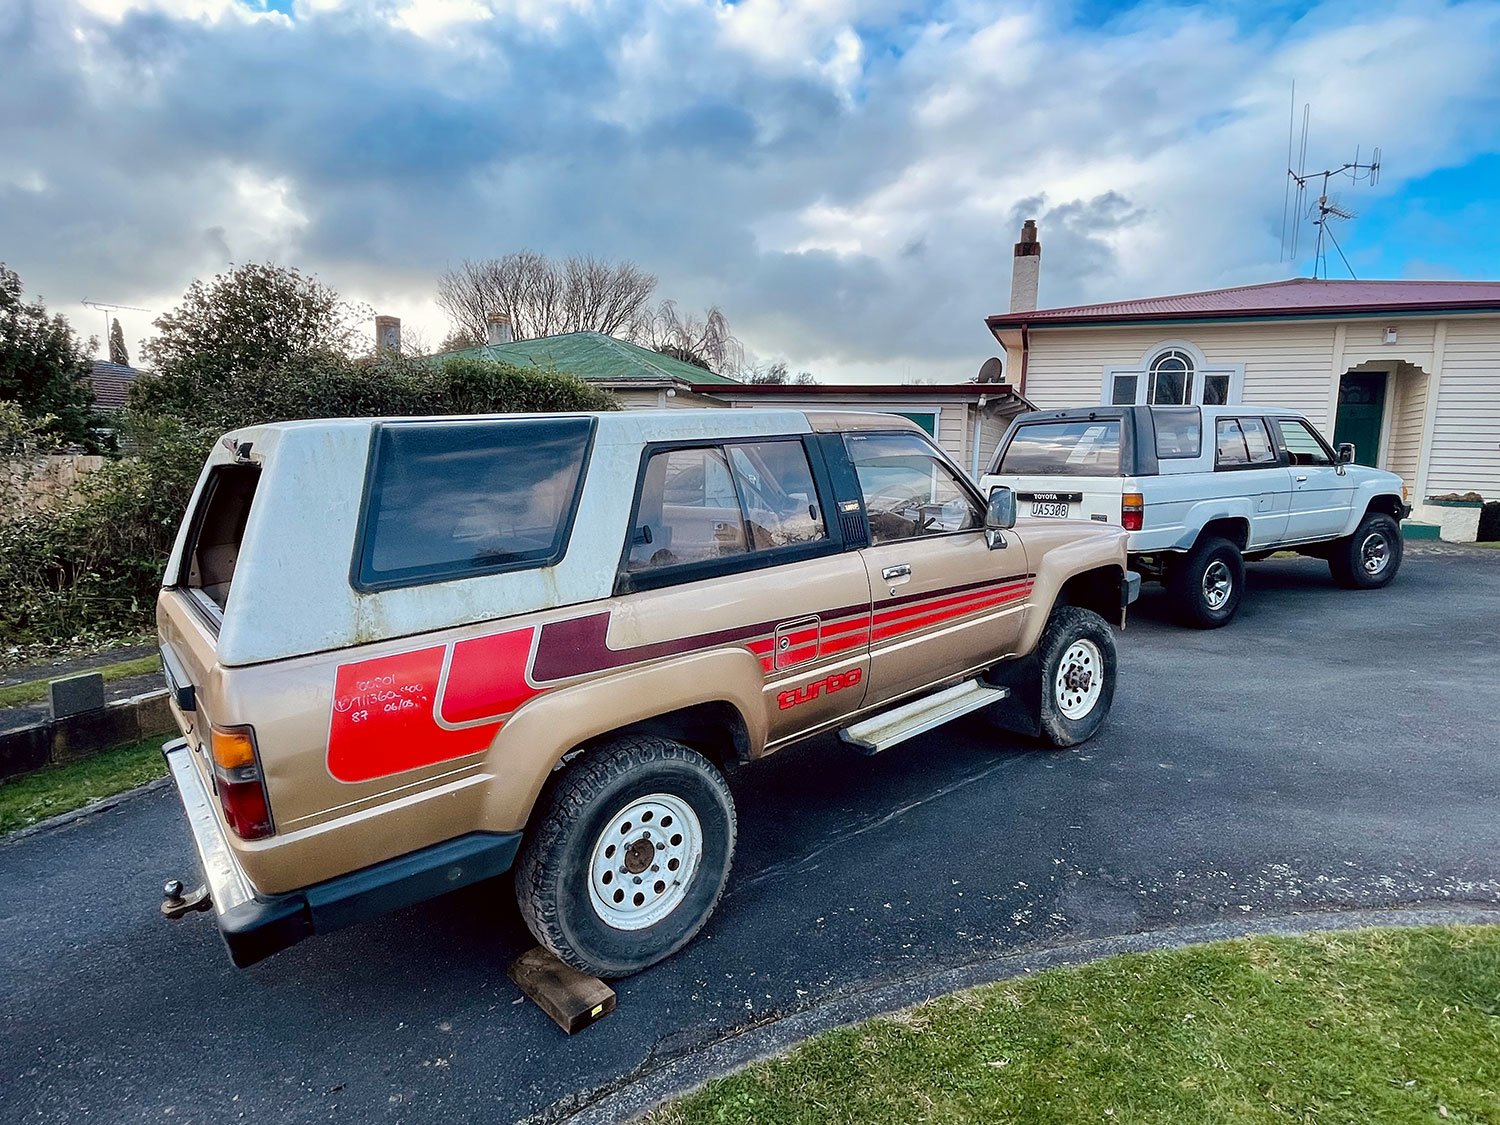
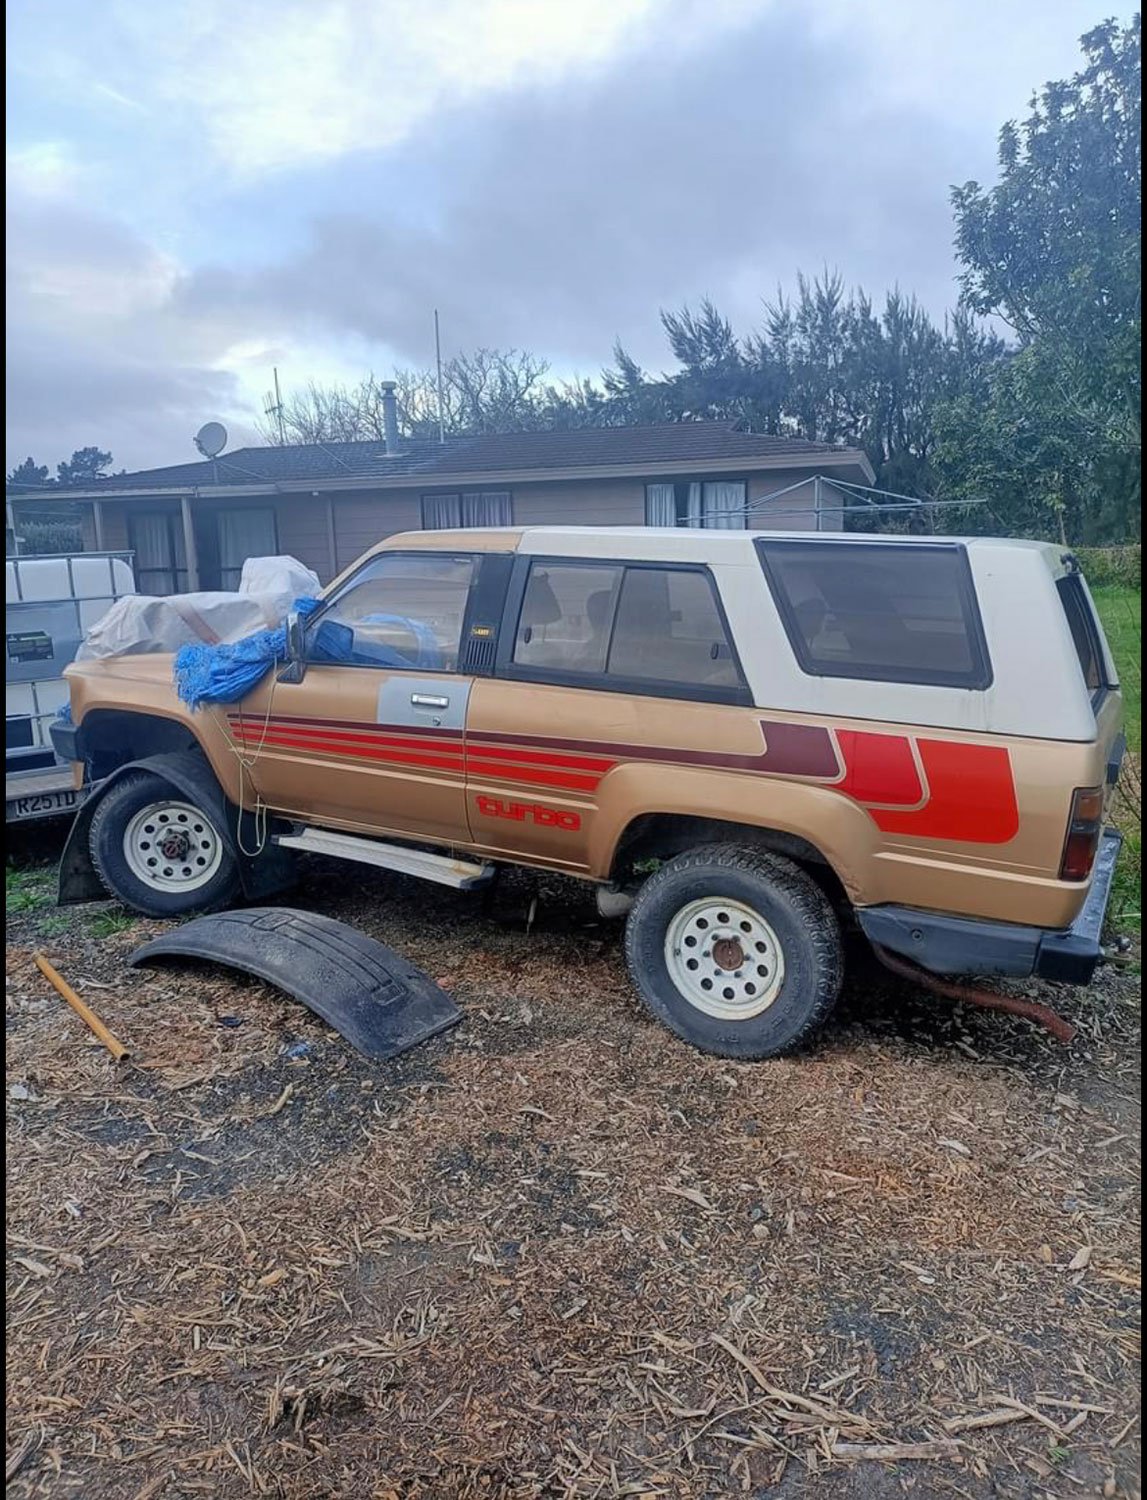
Always keeping watch on Market Place and Trademe for anything to pop up for these and came across this parts truck for a good price. Only 140 kms on the clock and solid. Story is the brakes needed rebuilding so the old boy took it to Pick-a-Part, It was mint apparently. Then the dude I bought it out of Pic-a Part after the running gear and some of the frontend had been taken. He didn't have time to do anything with it. Then along I come and swoop on it real quick. Its mint apart from whats been taken. Perfect for what I need to get mine sorted. This all happened the week before lockdown happened. Good timing really
2 points
-
If the section outlined in pen is raised to match the section the rail sits on it will work
1 point
-
Looks like it would be perfectly at home in an rx71 point
-
I have tried that and my gearbox mount was thanking me but it pushes the end of carbs back to the sheet metal between engine bay and battery (reason why I had 10mm taken off the carb manifold) I think I will push on as if it does fit, complete wiring, get it started up and make sure everything else is fine and then with a bit of luck a floor shifter van will be at pickapart or something otherwise drop the lid off somewhere that can reproduce it with the space I need to certification spec.1 point
-
Totally man, wee man is a bit small to appreciate such things at moment though. Will try for future a burger meat to talk shit though. Ignoring the fact I haven't fixed the OS whip... or got the other whip ready for cert still, shits depressing lol.1 point
-
im just as screwed as you are. my corona is living on a car trailer at my parents house and my entire life/workshop is packing into a shipping container while i try to buy a new house/bigger garage. its painful1 point
-
You're looking for Warrick Stapleton haha.
1 point
-
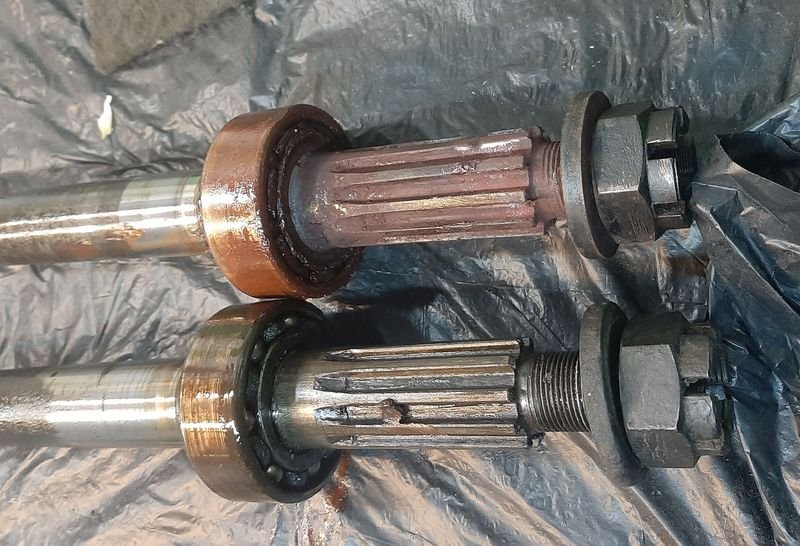
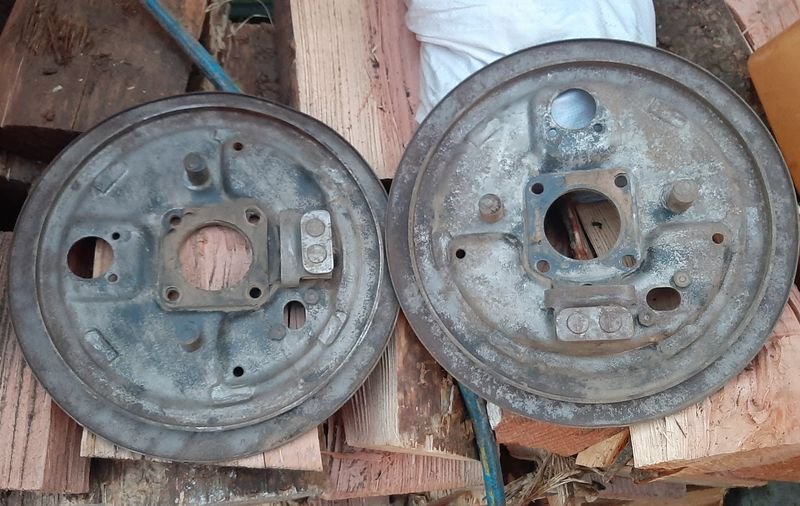
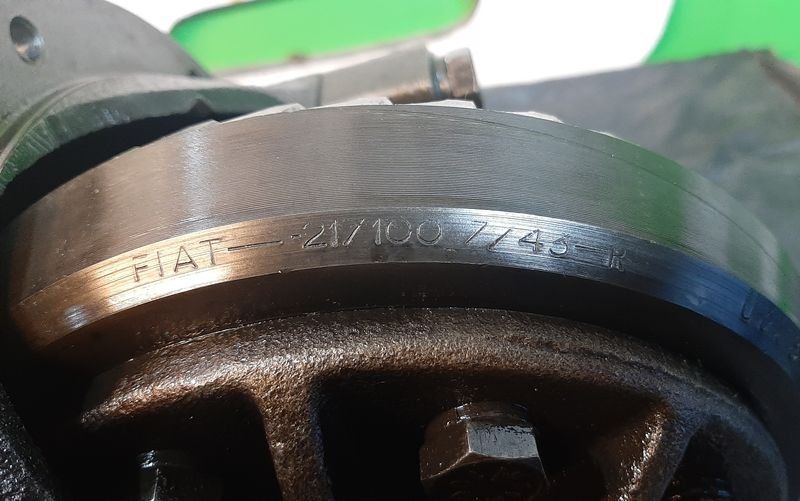
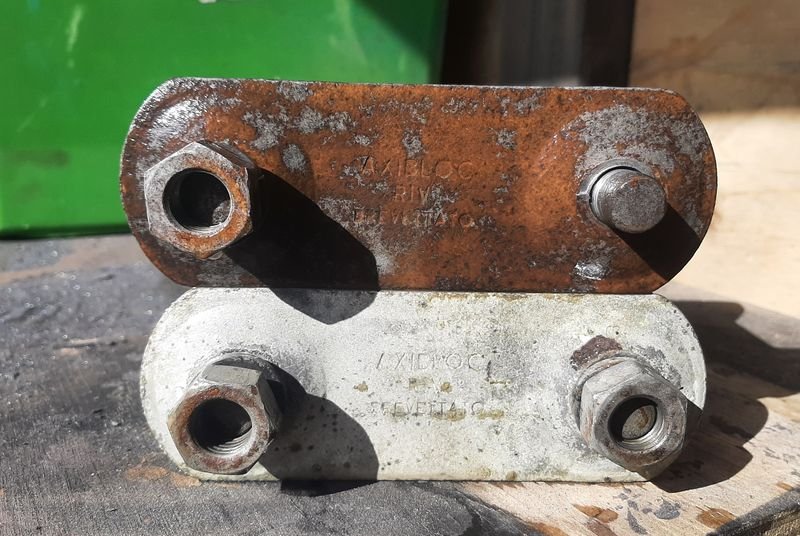
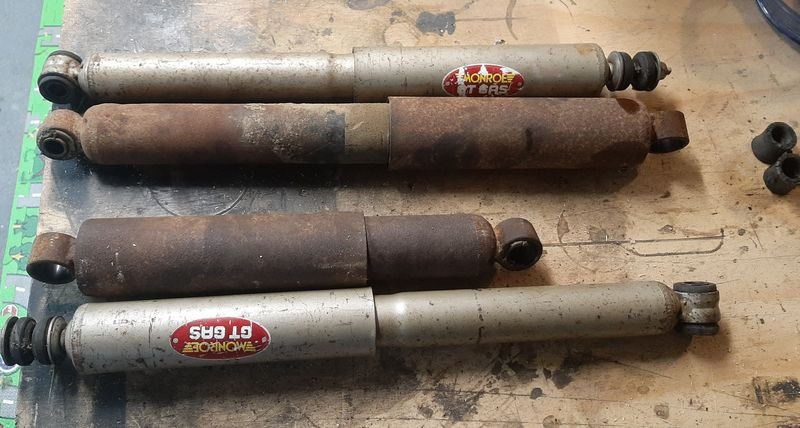
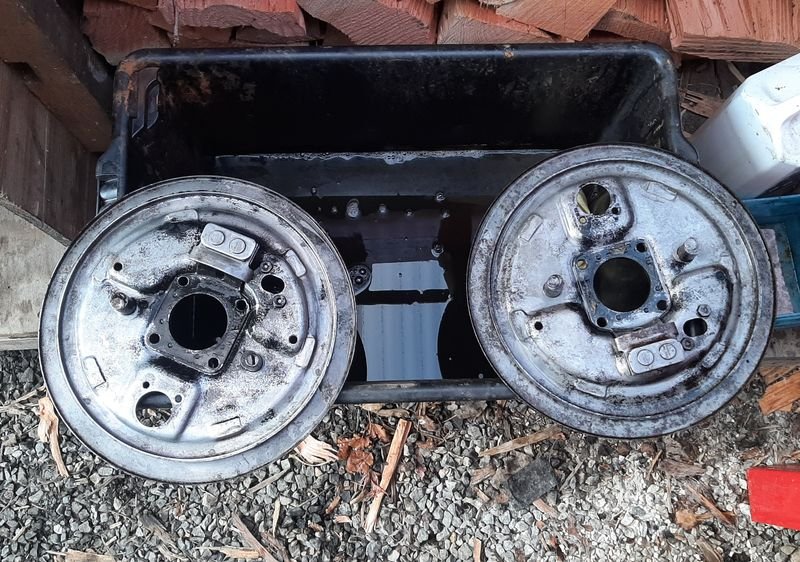
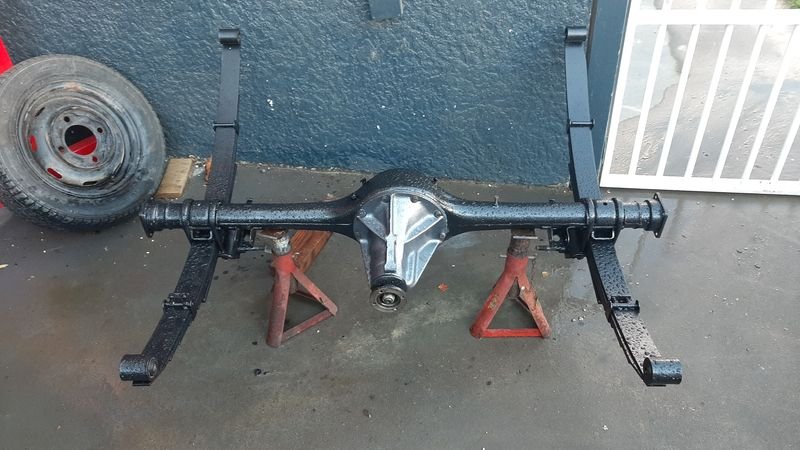
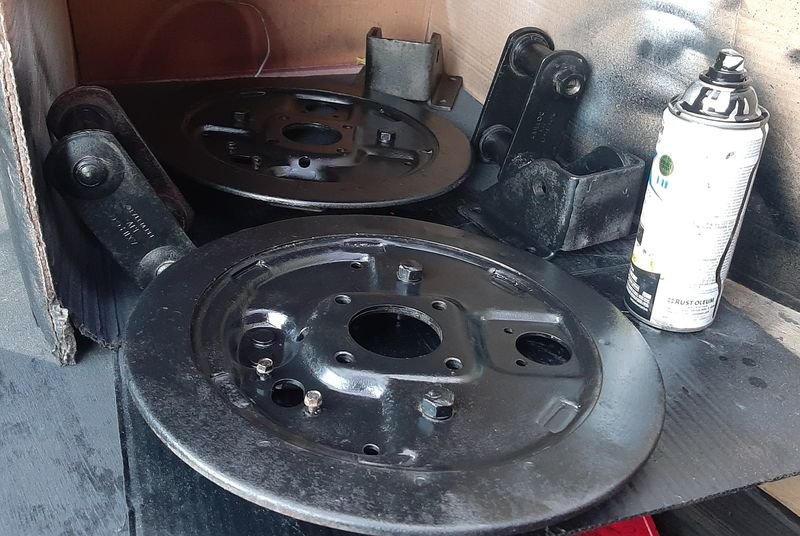
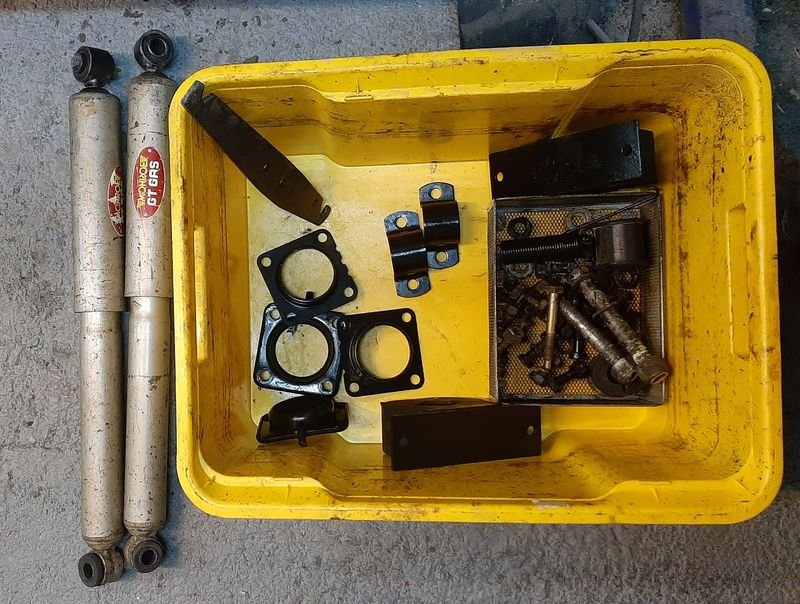
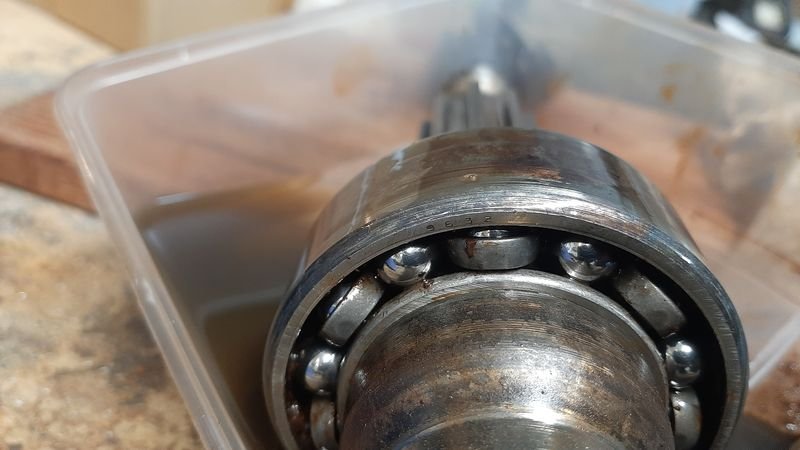
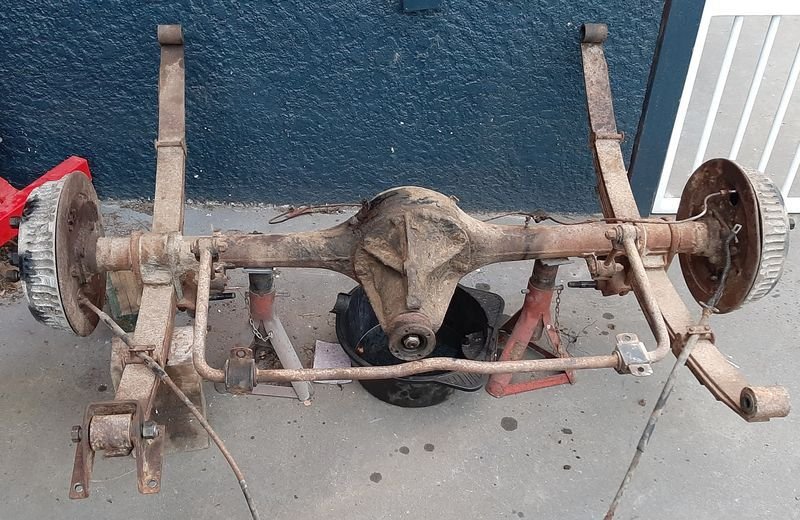
With the differential out time for a dismantle and clean up Axles removed, can you guess which side came out easy and which side was a real bastard? However, this is the rusty side after a bit of a soak in some kero. it still had a gritty feeling even after being regreased probably pits in the bearing rollers from sitting in rusty grease, i hummed and hawed because the bearings are over $100 each and its not really mission critical, but ive decided Ill replace this rusty bearing while ive got it out, and because pulling the brakes and stuff off is such a pain in the dick on the van and im thinking of future me - however, the other side feels much nicer so it can stay. For reference, this is a RIV 9632 which is 35x72x27, which cross references to a 3207 bearing. Outer axle seals are 48x62x10, but thats an uncommon size so ive ordered 2x 48x62x8, as a bonus that puts the seal on a different part of the shaft, which is part of the hub Diff head off and cleaned up and repainted. Marked the pinion nut and pinion with a punch, installed the new seal (38x70x10/13) Another odd one, but is common across the 1100-1500-2300 family so had one already Other than dirty oil the inside was really good, hardly any wear nothing busted or chipped, and there anything i wouldn't have expected on the magnet. Diff is 43/7 ratio or 1:6.14 which is i guess how they managed to have the original 38hp 1100cc powered vans, a '1 ton' load rating! The 0-60ft times will be good, hah! Brake backing plates after a soak in teh parts cleaner and a quick sand blast Evaporust Paint Just evaporust on the patented (bevettato) 'AXIBLOCK' by RIV - magic stuff. Dug some likely candidates for replacing the rear shocks out of the stash. Ive already swapped the lower eye rubbers and bushes over, but did need to swap the upper pins for the eyes off the old ones. And a nice box of clean, replaced or repaired, repainted and thread chased bits to go back on OLD GROSSNESS NEW HOTNESS I did a quick experiment, rust converter and use up some not quite right coloured spray can just to see if some colour made it look better, and yep, sure does! I want to figure out a way to knock the surface rust/hard dirt/dry grease back without taking off the factory texture coating i have a few attachments on the grinder to try, but not looking forward to the days underneath that will be needed to do even a half ass job tbh Sand blasting is probably the way, but i dont really want to have it done in the driveway (can this even happen?), and cant really move it with everything off out of the way. Any idea on cost or not to dos from those that have undeside sandblasting done before?
1 point
-
In a few years when all the first gen leafs have a 50km range they'll be worth nothing. Then all you'll need is a motor controller, bms and some big lithium cells from aliexpress and you'll have a cheap electric car.1 point
-
Torco do a mtf compatable with honda boxes that's a fair bit cheaper than the genuine fluid. I got some from 1st auto parts(ex segedins) I assume they still stock it1 point
-
Not an expert sorry, but I harbour secret thoughts of electrifying my Land Rover one day… I’m not into electric conversions for their own sake, but let’s face it, some cars aren’t about the engine so electricity can make them better. (Don’t hurt me please)1 point
-
Well, it all ground to a halt today. Was out bedding in the new brakes, car running and driving the best it has. Took off from a stop with a little vigor, comes on boost and pop, suddenly it feels like its come out of gear and free revs. I try selecting a gear again, so change. Turns out I've lost all gears, including reverse. I have also lost all the fresh new gearbox oil all over the flat bed tow trucks deck. The car can be pushed forward when in reverse and backwards when in a forward gear, so the wheels feel detached from the gearbox. No grinding, no rattling, nothing. Just no gears. At least it looked really good sitting waiting for the tow I'll need to jack the car up tomorrow and see what's given way. No result is good, as it all basically comes down to gearbox out and a rebuild. Maybe its time to get a Type B or Quaife, if that's whats gone.1 point
-
Just run a drill and tap down it. Maybe drill slightly oversize so the tap doesn't work too hard1 point
-
The last lot of work was to service the braking system as it wasn't quite right. In the test drives I have taken the car on the brakes have felt a bit off. The pedal is soft, with lots of travel and not much in the way of stopping. There is also quite a shudder when braking and the hand brake appears to only be working on one side. The plan was to replace the front pads and rotors and the rear pads, figuring the shudder is likely to be from the front, and the pads on the rear were looking old. The front rotors had some grooves in them, but no lip. I suspect the shudder was probably pad deposits from sitting, and may have gotten better with more use. The rotors were quite rusty through. Two 12mm bolts hold the caliper to the slider pins. Removing these allows the caliper to swing up and over. I was really worried about these rotor retaining screws as they all look quite chewed up, but they came out with no issue. I used a screwdriver bit in my impact wrench to undo them. A quick clean of the hub face and on went the new rotor. The old pads did look quite recent and had little wear. It's peace of mind to replace them though. The slider pins were well greased and sliding freely. I cleaned and regreased them anyway. These little plates that the pads ride on weren't in good shape though. Both were gunged up with old grease and brake dust. I've cleaned one half of this one with a wire brush. After cleaning all the plates up, giving them a coating of copper grease and refitting them to the bracket it was time to fit the pads. I would have liked some Mintex pads, but they aren't easy to get here and are really expensive. The piston in the caliper was pressed back with a clamp, and the caliper refitted. The bracket to hub bolts get torqued to 100NM, and the caliper slider bolts are 32NM. Rinse and repeat for the other side. The rears are a little more of a pain due to the handbrake cable. Mmm webs. This isn't even the worst, the other side was grosser. Lots of fly spray and vacuuming made it safe to work. The pads had plenty of meat but were old Lucas pads, maybe original to the car? I removed the handbrake cable pins because they are known for rusting up, and sure enough, mine was very stiff and rusty. I cleaned it with a wire brush and refitted it with plenty of copper grease. The slider pins on each side were stiff and covered in dry old grease. They weren't seized but didn't move freely. These were thoroughly cleaned and greased before refitting. The other side was much of the same. One of the boots on the slider pins hadn't been fitted correctly but thankfully still kept dirt out. The grease was still hard as a rock though. The boot should go right to the head of the pin Everything was cleaned and greased, and the piston in the caliper freed up and wound back in. The rear rotors aren't looking good. They have no lip but seem to be quite pitted. I might revisit these and if a few good hard stops don't clear them up, replace them. The handbrake mech on each caliper moves freely, so they should be working OK. I gave them a good coating on WD40 to help them move nicely. I bled the brakes next. I flushed the system, but I don't think I needed to. The fluid was quite clear and looked like it had been done somewhat recently (despite one of the bleed nipples being blocked and needing removal to clear it, and the two rear ones being rusty and taking a bit of force to shift). Bit of a mystery that. The bleed sequence with the Bosch ABS unit is LH FR, RH FR, LH RR, RH RR. The pedal still has a bit of travel but does feel firmer now. I still can't drive the car because the brake light switch is faulty but once I can I will do the bed-in procedure. I tried to adjust the hand brake after pumping the brakes 20 odd times as recommended, and the adjuster had been wound all the way out. I got it from bout 10 clicks down to 5-6 but I'm still not sure if it's working evenly. I really need to bed the brakes in first, and then adjust it again and see what happens. One other thing I noticed was that the rear muffler was hanging on by one hanger. Some WD40 and a bit of wiggling and I had it back in place. Hopefully this helps the placement of the muffler as it's a bit on the piss and doesn't match the cutout in the rear splitter. The whole exhaust is a bit woeful. I might need to take it in somewhere and have it fixed properly. It's been "modified" and has no mufflers except the back box. Since the car has all the wheels off anyway, now is a good time to replace the tyres. I find tyres can tell a lot about a previous owner. A high powered sports car like this, running on ditch finders on the front and mismatched old and cracking tyres on the rear.... the previous owner was an idiot. Yes, that is date coded 2008. All the tyres are the wrong size, being 185/55R15, not the turbo size of 195/55R15. I got the new rubber the other day, and I just need to book it in and have it fitted. Yokohama AD08R. Pretty serious street rubber. I'm hoping they are as good as the Hankook I had on the Corolla (which aren't available in this size). I'm looking forward to putting them through their paces. I will hopefully have the brake light switch this week, and tyres fitted next weekend. I might even try for a WOF when I get the tyres done and see what happens.1 point
-
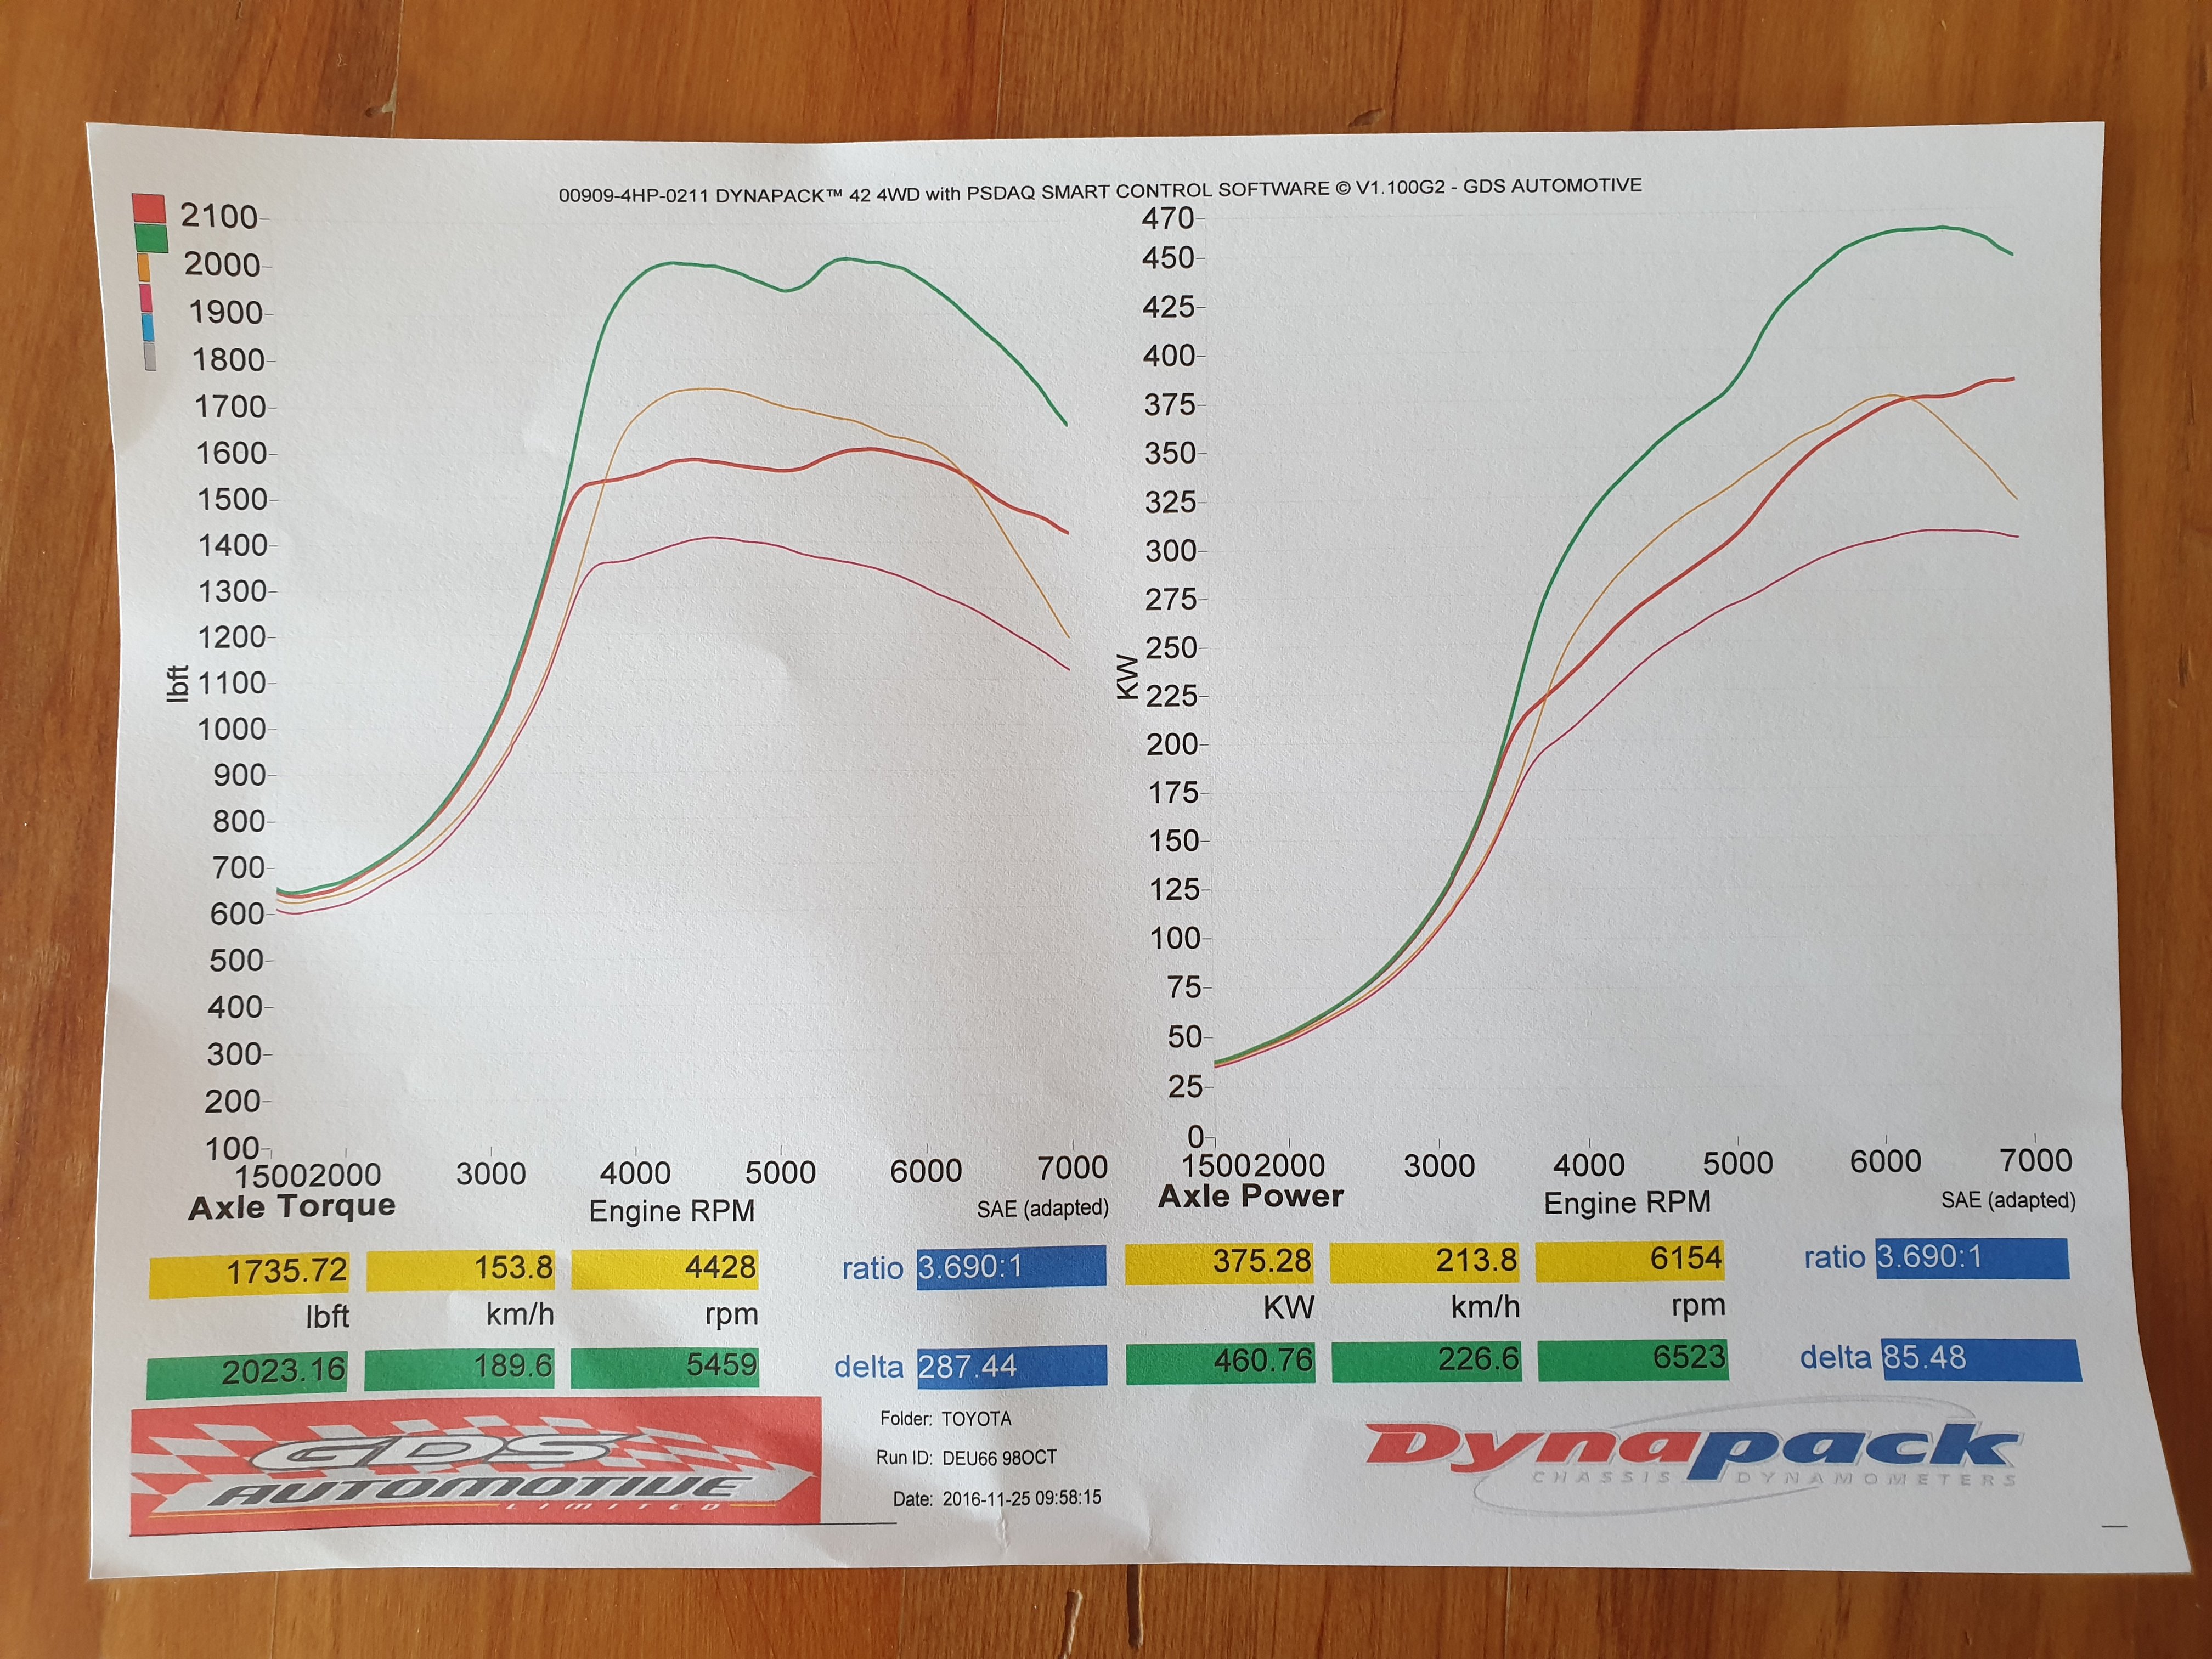
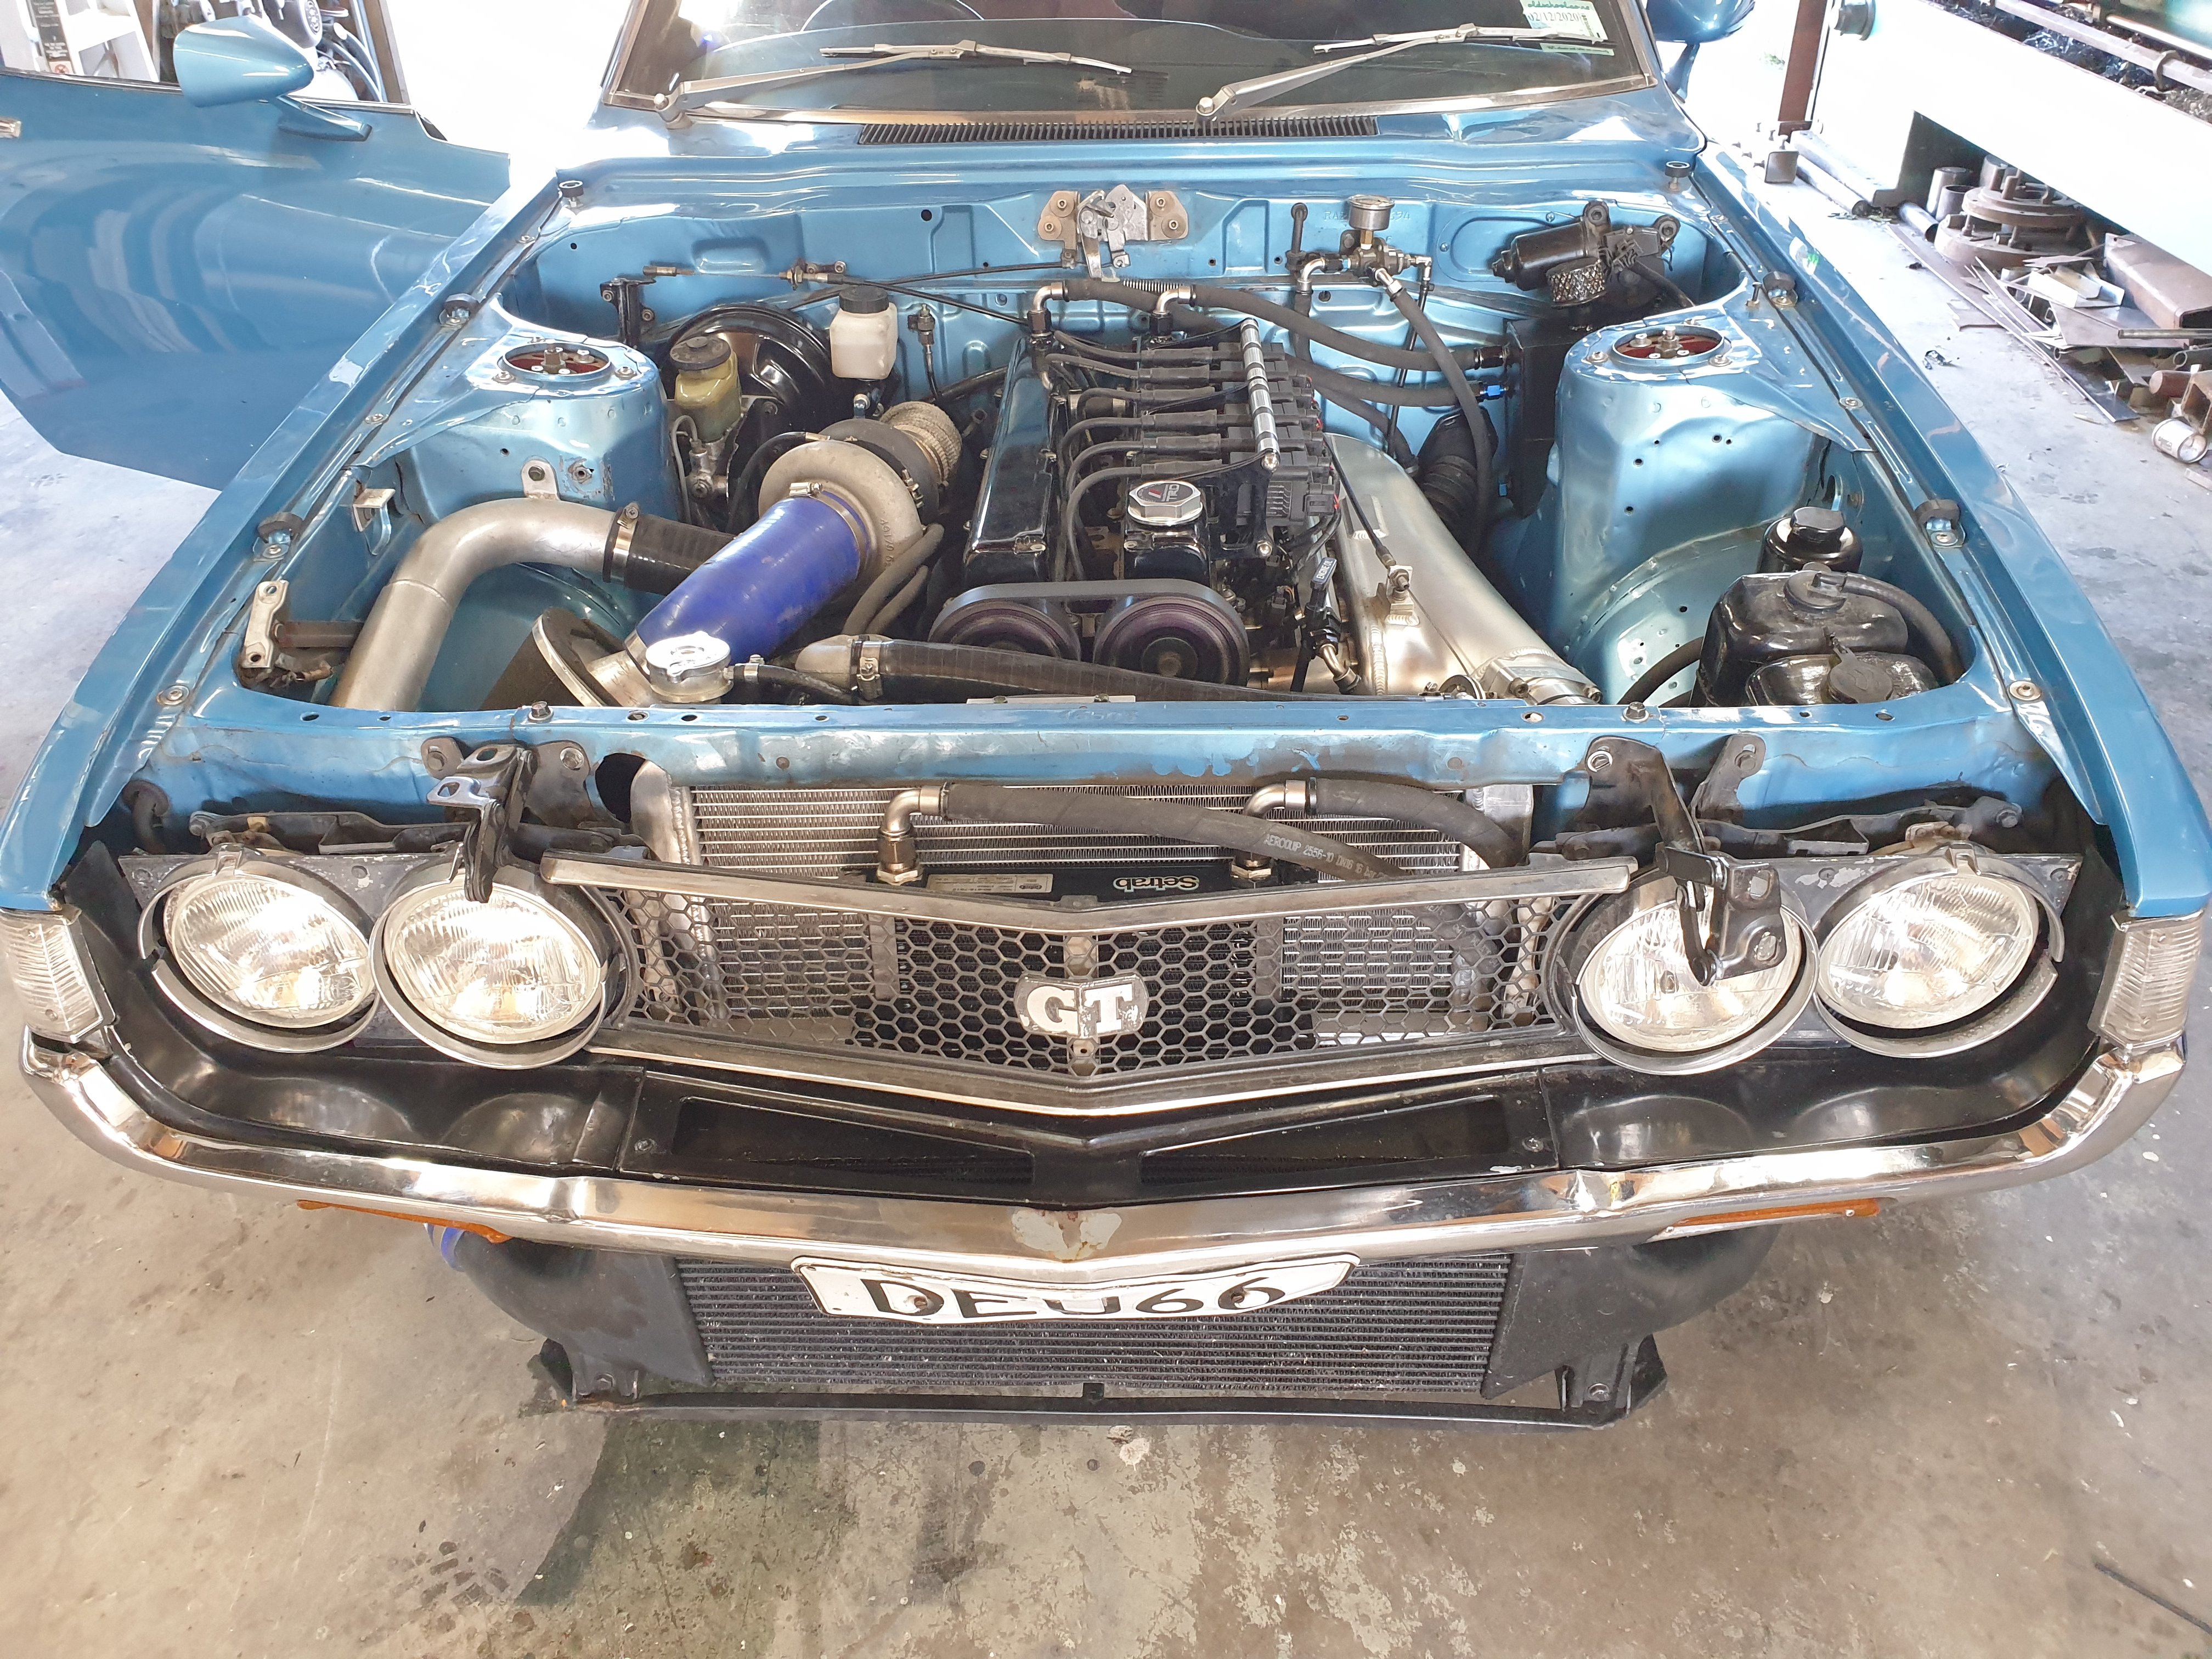
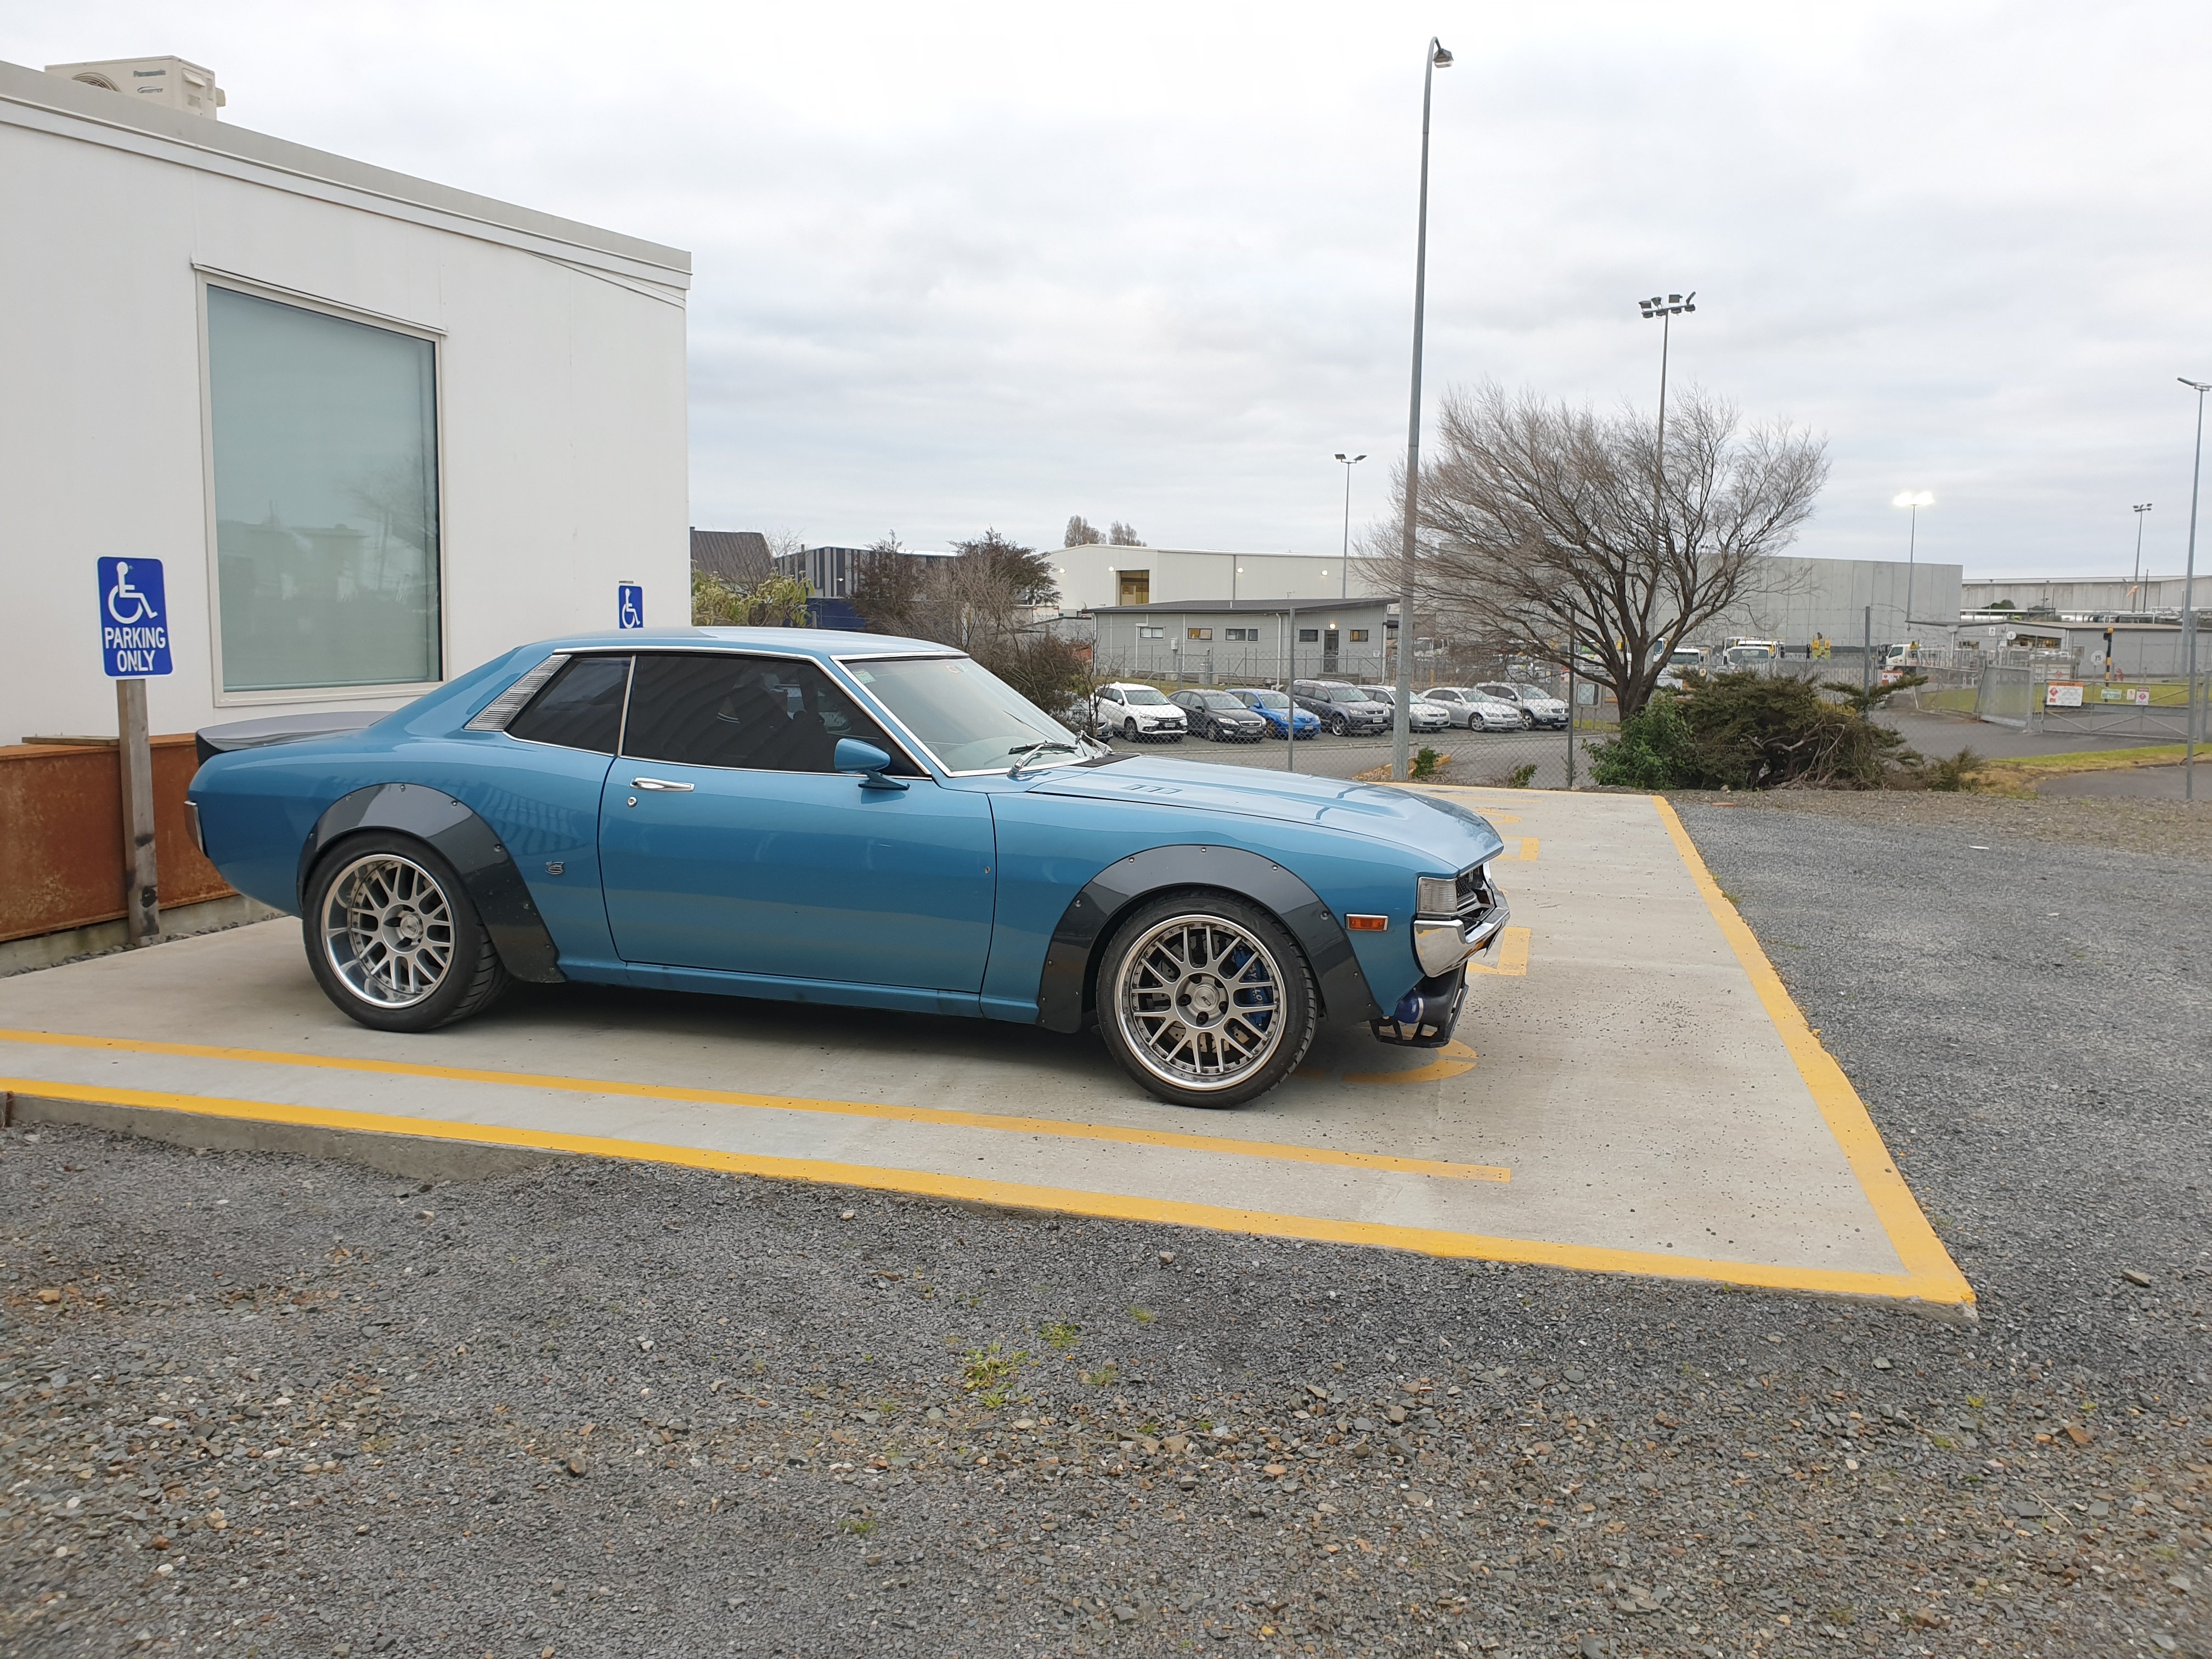
Dyno day. Glen beat on the poor old girl like a rented mule and it took it all like a champ. Only had one small issue with spark plug boots not being tight enough and it starting missing at high boost. That was easy fixed and it ended up making 460RWKW at 25psi. I still have a new intercooler to fit and then it'll get a new tune but it won't change much. If I thought it was frightening before I got a whole new level of violence to learn about. Graph shows old turbo tune and new turbo tune at both boost levels for each.
1 point
-
right so, its all back together. but first, new clutch. its a niteparts designed unit which holds heaps of torque but drives like a normal car. this thing is huge. check out the friction plate on top of the Giken twin plate unit! 20210713_184945 by sheepers, on Flickr 20210713_184938 by sheepers, on Flickr 2021-07-21_08-44-05 by sheepers, on Flickr 20210713_183646 by sheepers, on Flickr right so then i put the motor back in the car. had to mod the turbo dump pipe. also had to mod the intercooler piping by the throttle body to include a new larger blow off valve. other things done include all new pipe work to and from the turbo and all new hoses for the wastegate. im waiting on a new intercooler which should be here in a couple of weeks too. and tonight i took it for a drive round the block, so far so good. noo doortz though as it needs to be tuned with the new turbo. its booked on the dyno on the 6th of August. 2021-07-21_08-32-36 by sheepers, on Flickr 2021-07-21_08-32-14 by sheepers, on Flickr 2021-07-21_08-32-24 by sheepers, on Flickr1 point
-
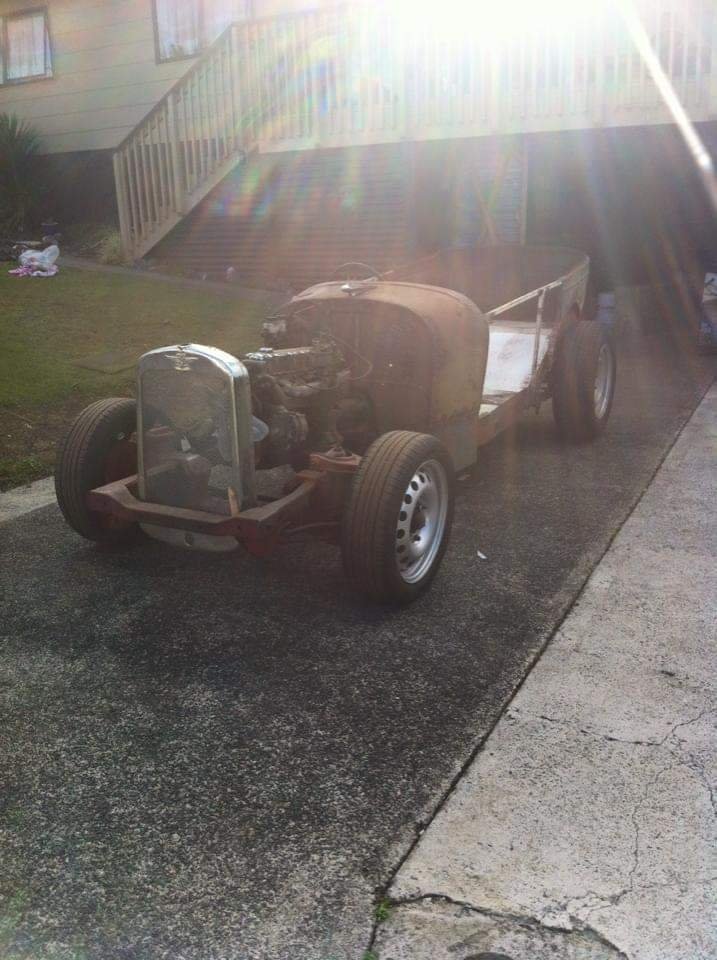
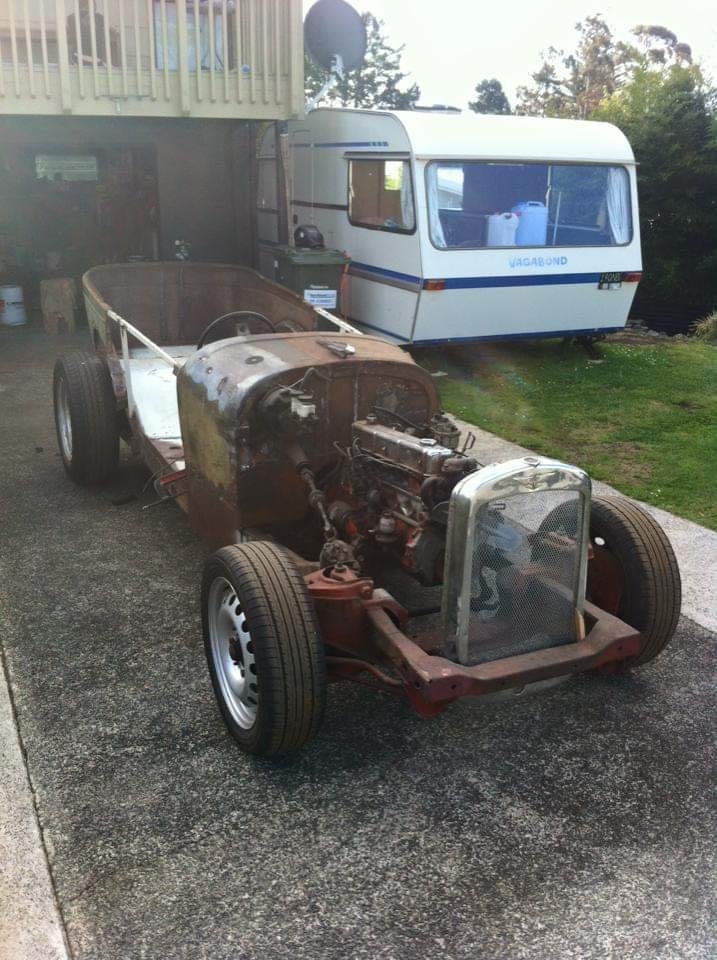
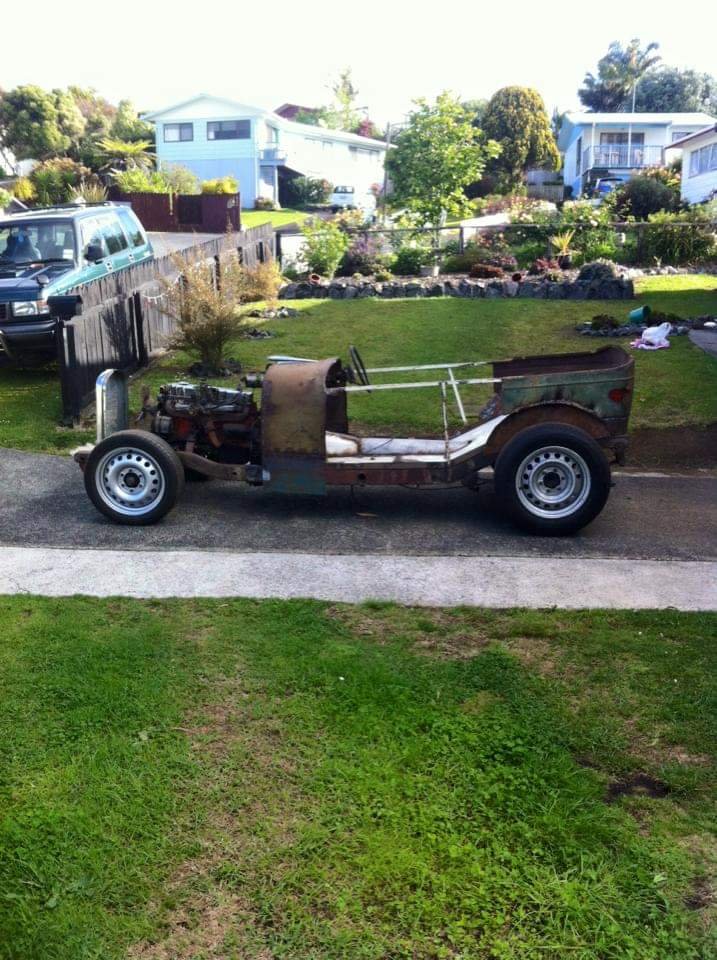
,---Edit 29/10/18--- apologies for distinct lack of pictures, photo hosting site I was using ceased existing, and a majority of pics went with it...... Well guys, after years of saying I was gonna do it, Im ACTUALLY doing it. Bought a 1922 Buick model 45 cowl for $150, its in pretty good nick for its Then got a chassis out of a 1st gen L200 Sport for $90 Cost $140 to redo the lower inner, radius rod, sway bar and sway bar link bushes. Found some shorter springs at the junkyard...freebie Rolling stock are standard Mitsi L200 4wd rims painted gloss red with 225/75/15s on the rear and 185/60/15 fronts. No V8 motorvating this...... Mighty 3.3 and trimatic cost $240out of a 79 VB Commodore, (I thought I was a Ford guy WTF????) Good ol tardme.... While Picking the engine and box up from Auckland the guy produced an ultra rare Lynx 186 manifold complete with 2 matching original 2" SU carbs and brand new filters (surface rust of course....)......Best score so far....$150!!!!!! Will take a pic soon. Reason for the six is its different, cheap to run and cost knaff all. And with a V8 in a 109" wheelbase rod it would look kinda stupid Headers and EH 179 sump and pickup to make a rear bulge pan.... $5 This weekends mish is remove the front, intermediate and deck mounts and throw the engine/box in the frame. Its a big project........1 point
-
Clutch kit didn't arrive, oh well. Pulled the stick off, pretty bloody rusty. Cleaned that up and gave it a lube, and in typical fashion the bloody e clip went flying upon reassembly. Gave it a wash this morning and a wire wheel just now. I'll paint it on the weekend
1 point
-
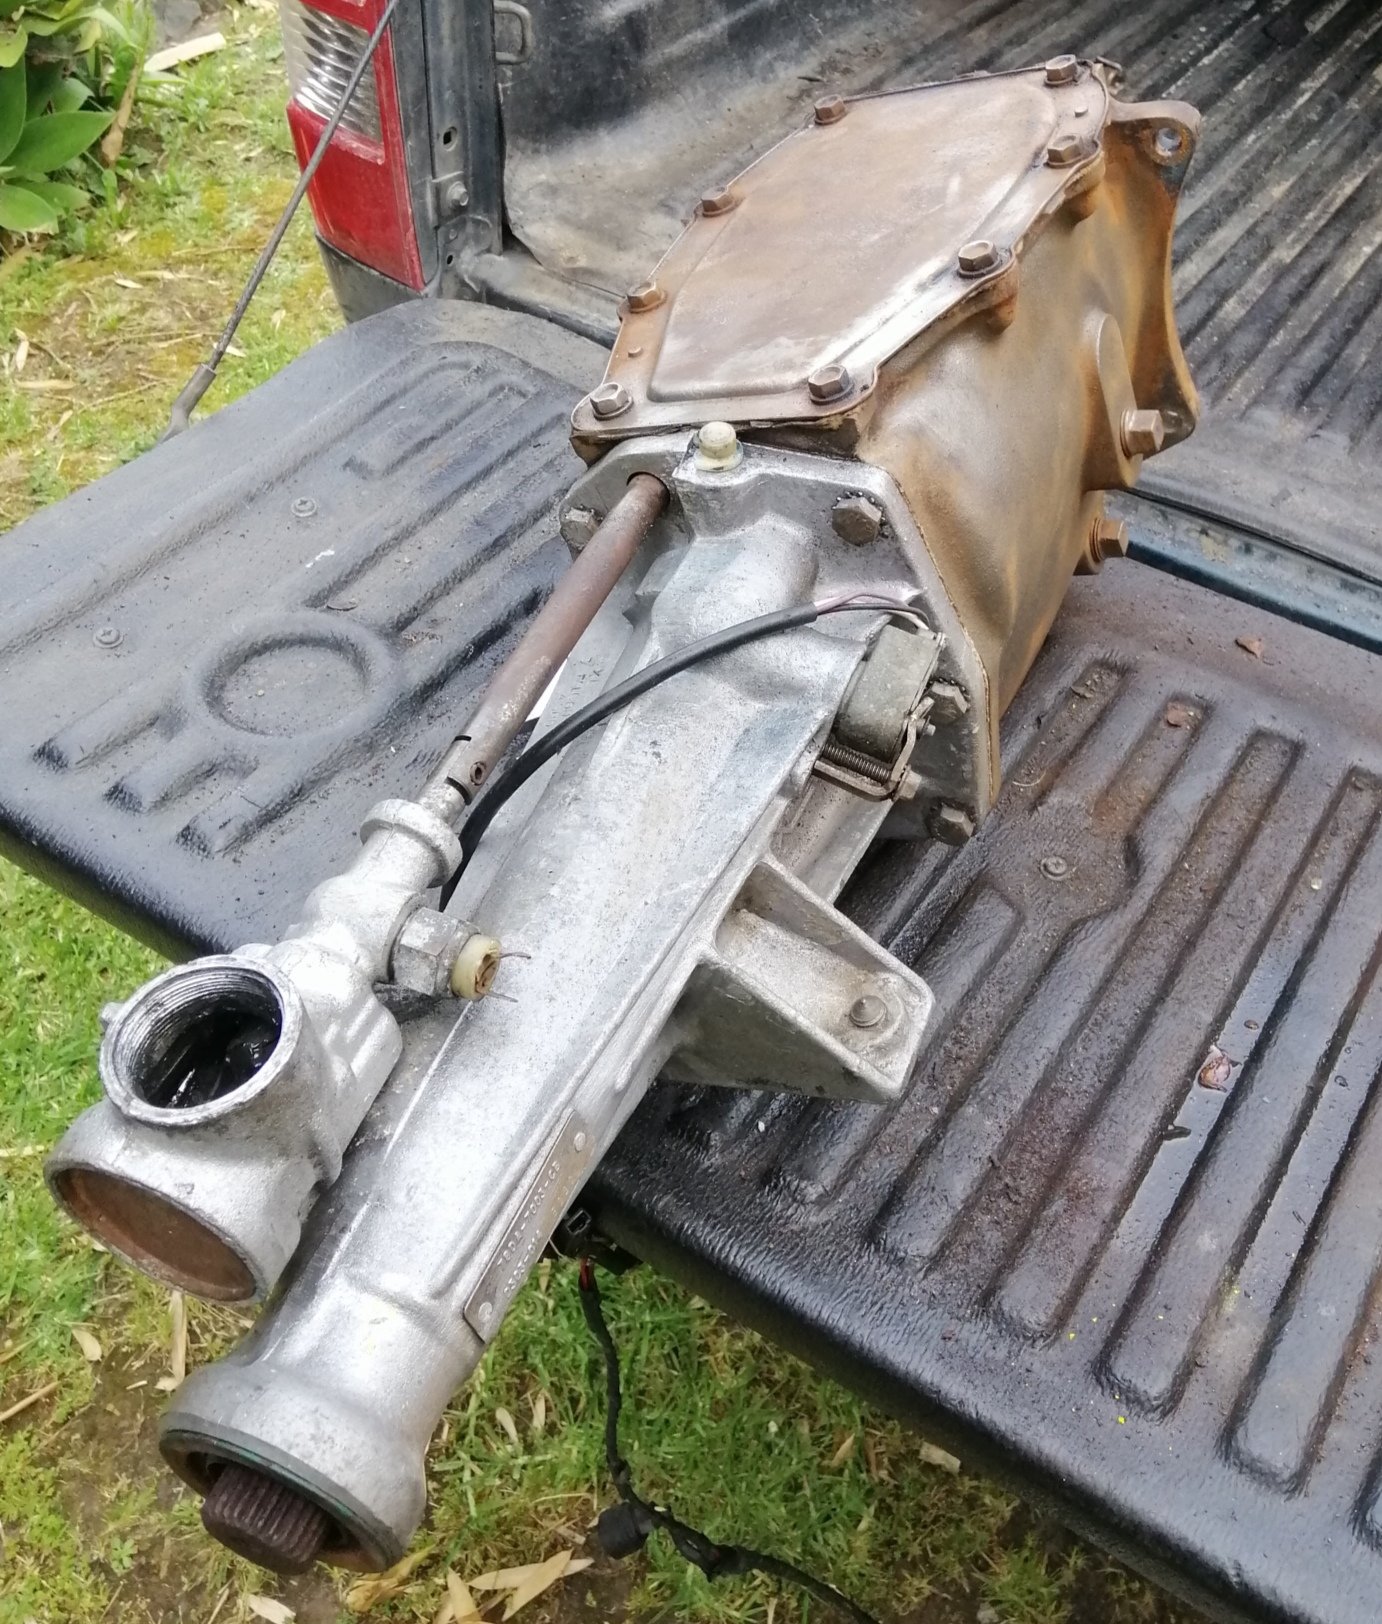
Took possession of a XD 4.1 Borg-Warner 4 speed. Unfortunately it's not the fabled close ratio box, but it's supposedly as strong as a T5. I'll order a clutch tomorrow as I have the regular 24mm input spline where as the 4 speed is 27mm. I'll also give it a thorough steam clean too, been in a speedway car for a season doesnt help in the cleanliness department.
1 point
-
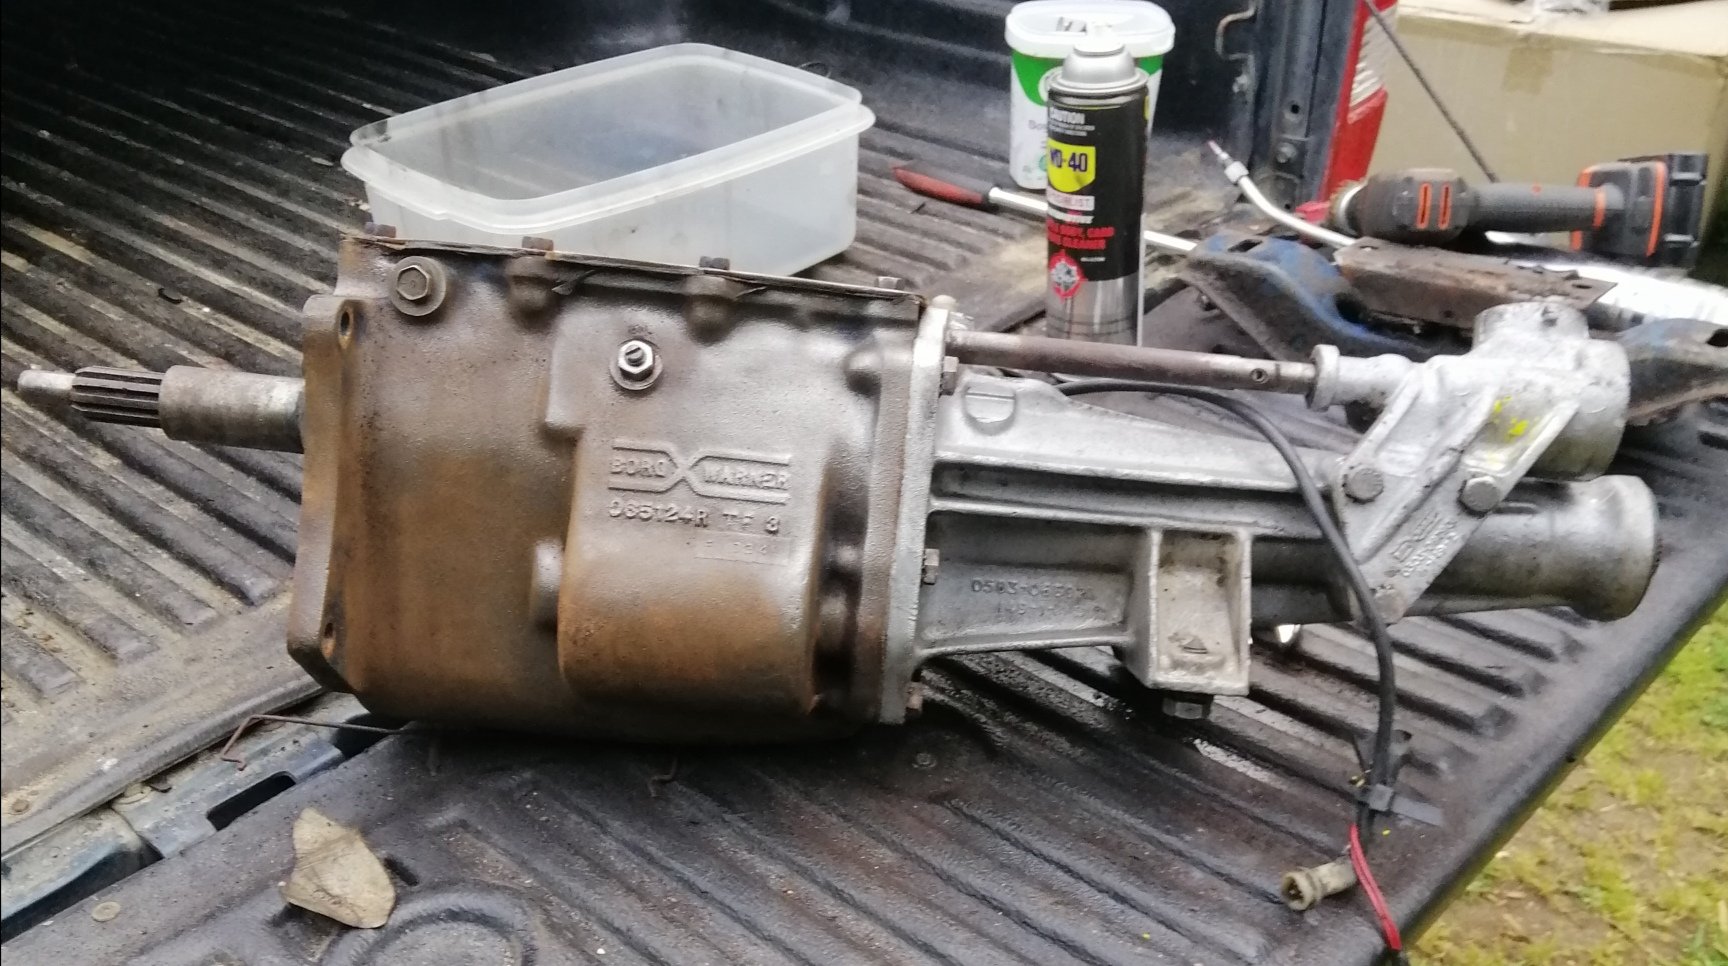
Received confirmation new gearbox is a Borg Warner single rail 4 speed, as to whether its a close or wide ratio box I will find out upon receival. Goon was supposed to deliver it to Old Boy yesterday at the track. Bah, wait another week or so.1 point
-
All back together now. Had a turbo shit off a time getting the heater hoses back on because some idiot stuffed a huge motor right in the way. New clutch (remember that, the reason we pulled it apart in the first place) is really good, it's a tiny bit grabby at take off but it's not really bedded in at all so I don't know if this will get better or worse. Also i have connected the boost control pipes around the wrong way so it's free boosting up to about 30psi. Easy fix that. I drove it to work.
1 point
-
Real quick clip. The "Yeah" is Miss 13 recording.1 point
-
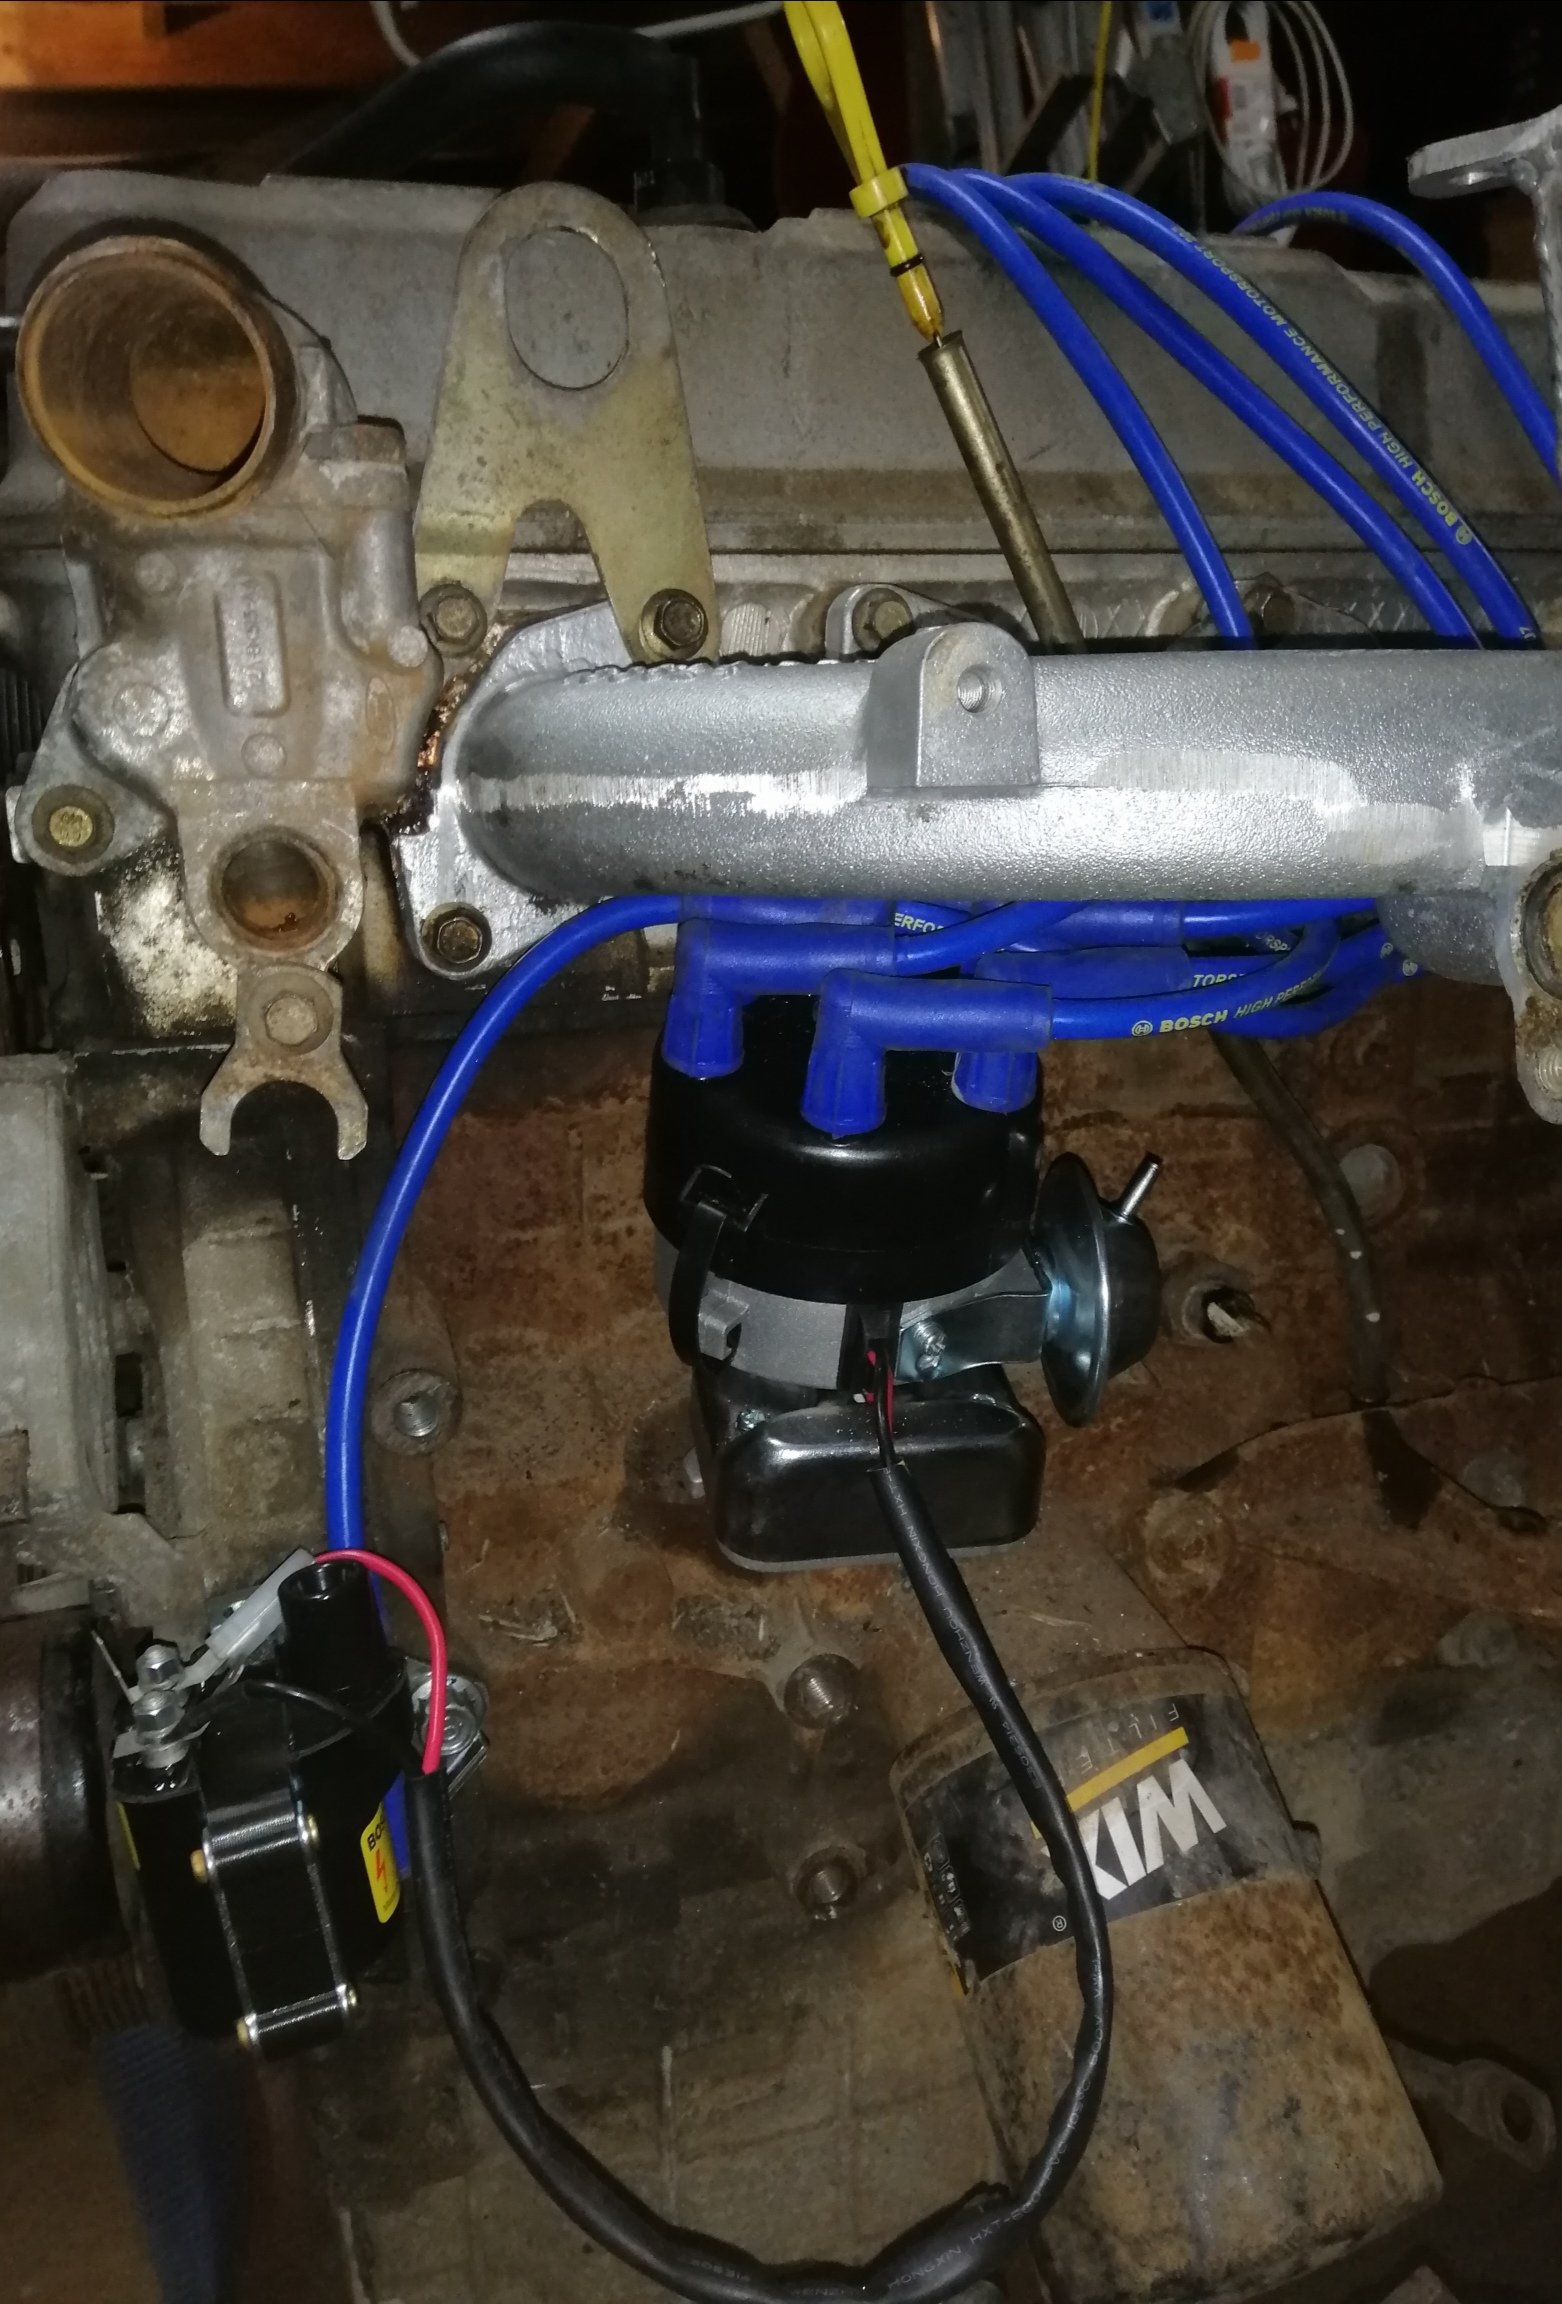
Tonight removed intake, found TDC Number 1. Removed dizzy, spun rotor around to an accessible number 1 position. Determined rotor direction plug leads into cap and fed them through holes in intake. 1,5,3,6,4,2. Mounted coil and wired dizzy to it. Tomorrow nights mission is to make some gaskets for riser and intake. Getting close. Plugged up the vacuum ports on manifold. Still waiting on banjo. Also finessed dipstick bracket to fit
1 point
-
Old mate @ruff kunt automotive aka RKA tigged it together today. Needs some minor cleaning up but I'm stoked with the result
1 point
-
It's, umm, substantially bigger. Dropped it in the hole, jumped the gun a bit. Needs to go back another 150mm, but need to remove old mounts as the oil filter fouls on them. I'll need to fit a Z700 (Cortina) oil filter for more room. Tunnel appears to have enough clearance. Much better than that other engine
1 point
-
Hopefully getting a repower very soon to something waaaay cooler, waaaay more powerful and quite a bit bigger displacement. Watch this space, gotta go pick this piece of pure awesome up...... Cue mysterious music1 point
-
Swap meet purchases today, 39-47 Hillman guards, and pair of straight Buckeye bumpers, ones missing the centre bracket. $120 the lot, stoked!
1 point
-
An update,,,,with pictures.... Clambered underneath her to mark out the floor mounts, and found the floor didn't follow the chassis properly, dammit. so chop chop Remember its done with gasless Mig so it looks horrid. Heres the plates that the body will sit on pushed her outside, pics with the new 17" wheels on it
1 point
-
Bolted sidies on for shits n giggles. foul on no6 header pipe, meh. they getting chopped anyway Ive cut n shut the back of the body And the back joins to the front, about to put a swag of bracing in and a zillion cuts out of the 25x25 box to achieve a curve for the "doors"
1 point
-
It's arrived home! Now to swap MIG to ArgoShield and into it
1 point
-
Pinched my daughters ipod to take a few pics while at Dads tonight for his birthday. Fabbed k members From behind the chassis, no thats not the driveshaft, its a piece of exhaust tube acting as a driveshaft Steering shaft incorporating all important deflection angle in event of frontal collision (part of the cert) Right side engine mount using original Holden mount Hasnt really changed much apart from old boy using it to clean his paint brush
1 point
-
Done a few quick calculations on how much the build has cost. Was pleasantly surprised that the tally of the receipts and cost of chassis, motor and box, and cowl is $1076.90. Well below budget, and majority of the money that needs spending actually spent. Total budget is $3000, including cert and reg. Call me an optimist but we reckon it will fall within our badget.1 point
-
Scored these awesome sideplates with mickey as rust spec. Also got some early Mack Truck bulldog emblems that are going to be incorporated somewhere,and about 40 5/8 ROE spanners that are going to also be used along the lines of these pics. Yay? Get fucked?
1 point
-
Last nights mission was a brainstorm and figure out night. Decided to stay with the Mitsi diff, and use a 750/15 12ply truck tyre, which by some formula counterer thingee on the enet gives us a final drive pretty close to an HQs 3.55..... Also made cardboard templates for the engine mounts that will be made out of sculpted 75x3mm flatbar. Front half of the driveshaft is almost ready to go to the engineer to be welded, Not going to balance it because it is a total of 365mm from centre of universal to yoke spline... see if old boy is keen to do some work tonight.... edit, which didnt happen....1 point
-
Went around and performed a little more hole filling with the welder, then grind off, then repeat. anyway Ive got it to the rough as I want it stage so cowl is ready to be attached to to start the rest of the tub. This is being made out of 44mmx1.6mm uncoated exhaust tubing. The exhaust guy 2 buildings down the road do all the bends, expansions for awesome deal too. Enough boring words PICTURES
1 point
-
Went around and did a couple of hours on engine, decided to use the knaffed flywheel, having issues finding another, anyhoo reattached the auto, well, tried to, issues with torque converter which mustve slipped off its spline when been shifted around the shed. Anyway managed to get it back onto its spline, (and a buttload of ATF on the floor). Got all skippy and decided to get it sitting in the chassis, albeit on strops and blocks. Sits pretty high in the chassis but needs to be to look halfway decent, and its got one huge recess, number one cylinder is BEHIND the front splindles. Front suspension didnt sag nowhere near as anticipated so will look into that once the motor is in permanent. Ill take some more pics over weekend, weather is shit up here, no good for motorcycling!!!!!1 point
-
Dads been busy so I rocked out and got the engine crane yesterday. I went around today, ripped the auto off, and removed the offensive Commodore sump and oil pump pickup (pan is at the front). Chucked the EH 149 sump and pickup (pan is at the rear) on with a new gasket. Gravy! Knocked the bungs out and put the EH dipstick in the side of the block (commodore is directly into the side of the sump) Found about a 3rd of the teeth on the flexplate are half worn through. So no engine dangling until I get another flexplate, hopefully tomorrow, Dad said a motor and box came in on saturday.....Fingers crossed. Once the motors in place and mounted, we can figure where the cowl sits, and how much it will need widening by to fit the chassis properly. Once thats sussed we can start building the body. Need to go chat to certifier and find out whether full harness belts are an option....1 point


This leaderboard is set to Auckland/GMT+12:00