
Leaderboard


Popular Content
Showing content with the highest reputation on 08/17/19 in all areas
-
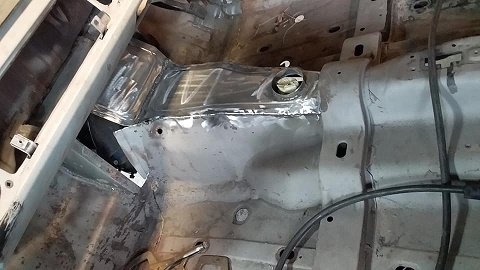
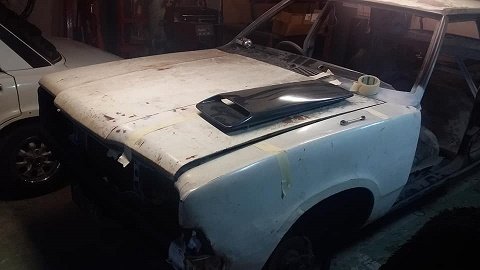
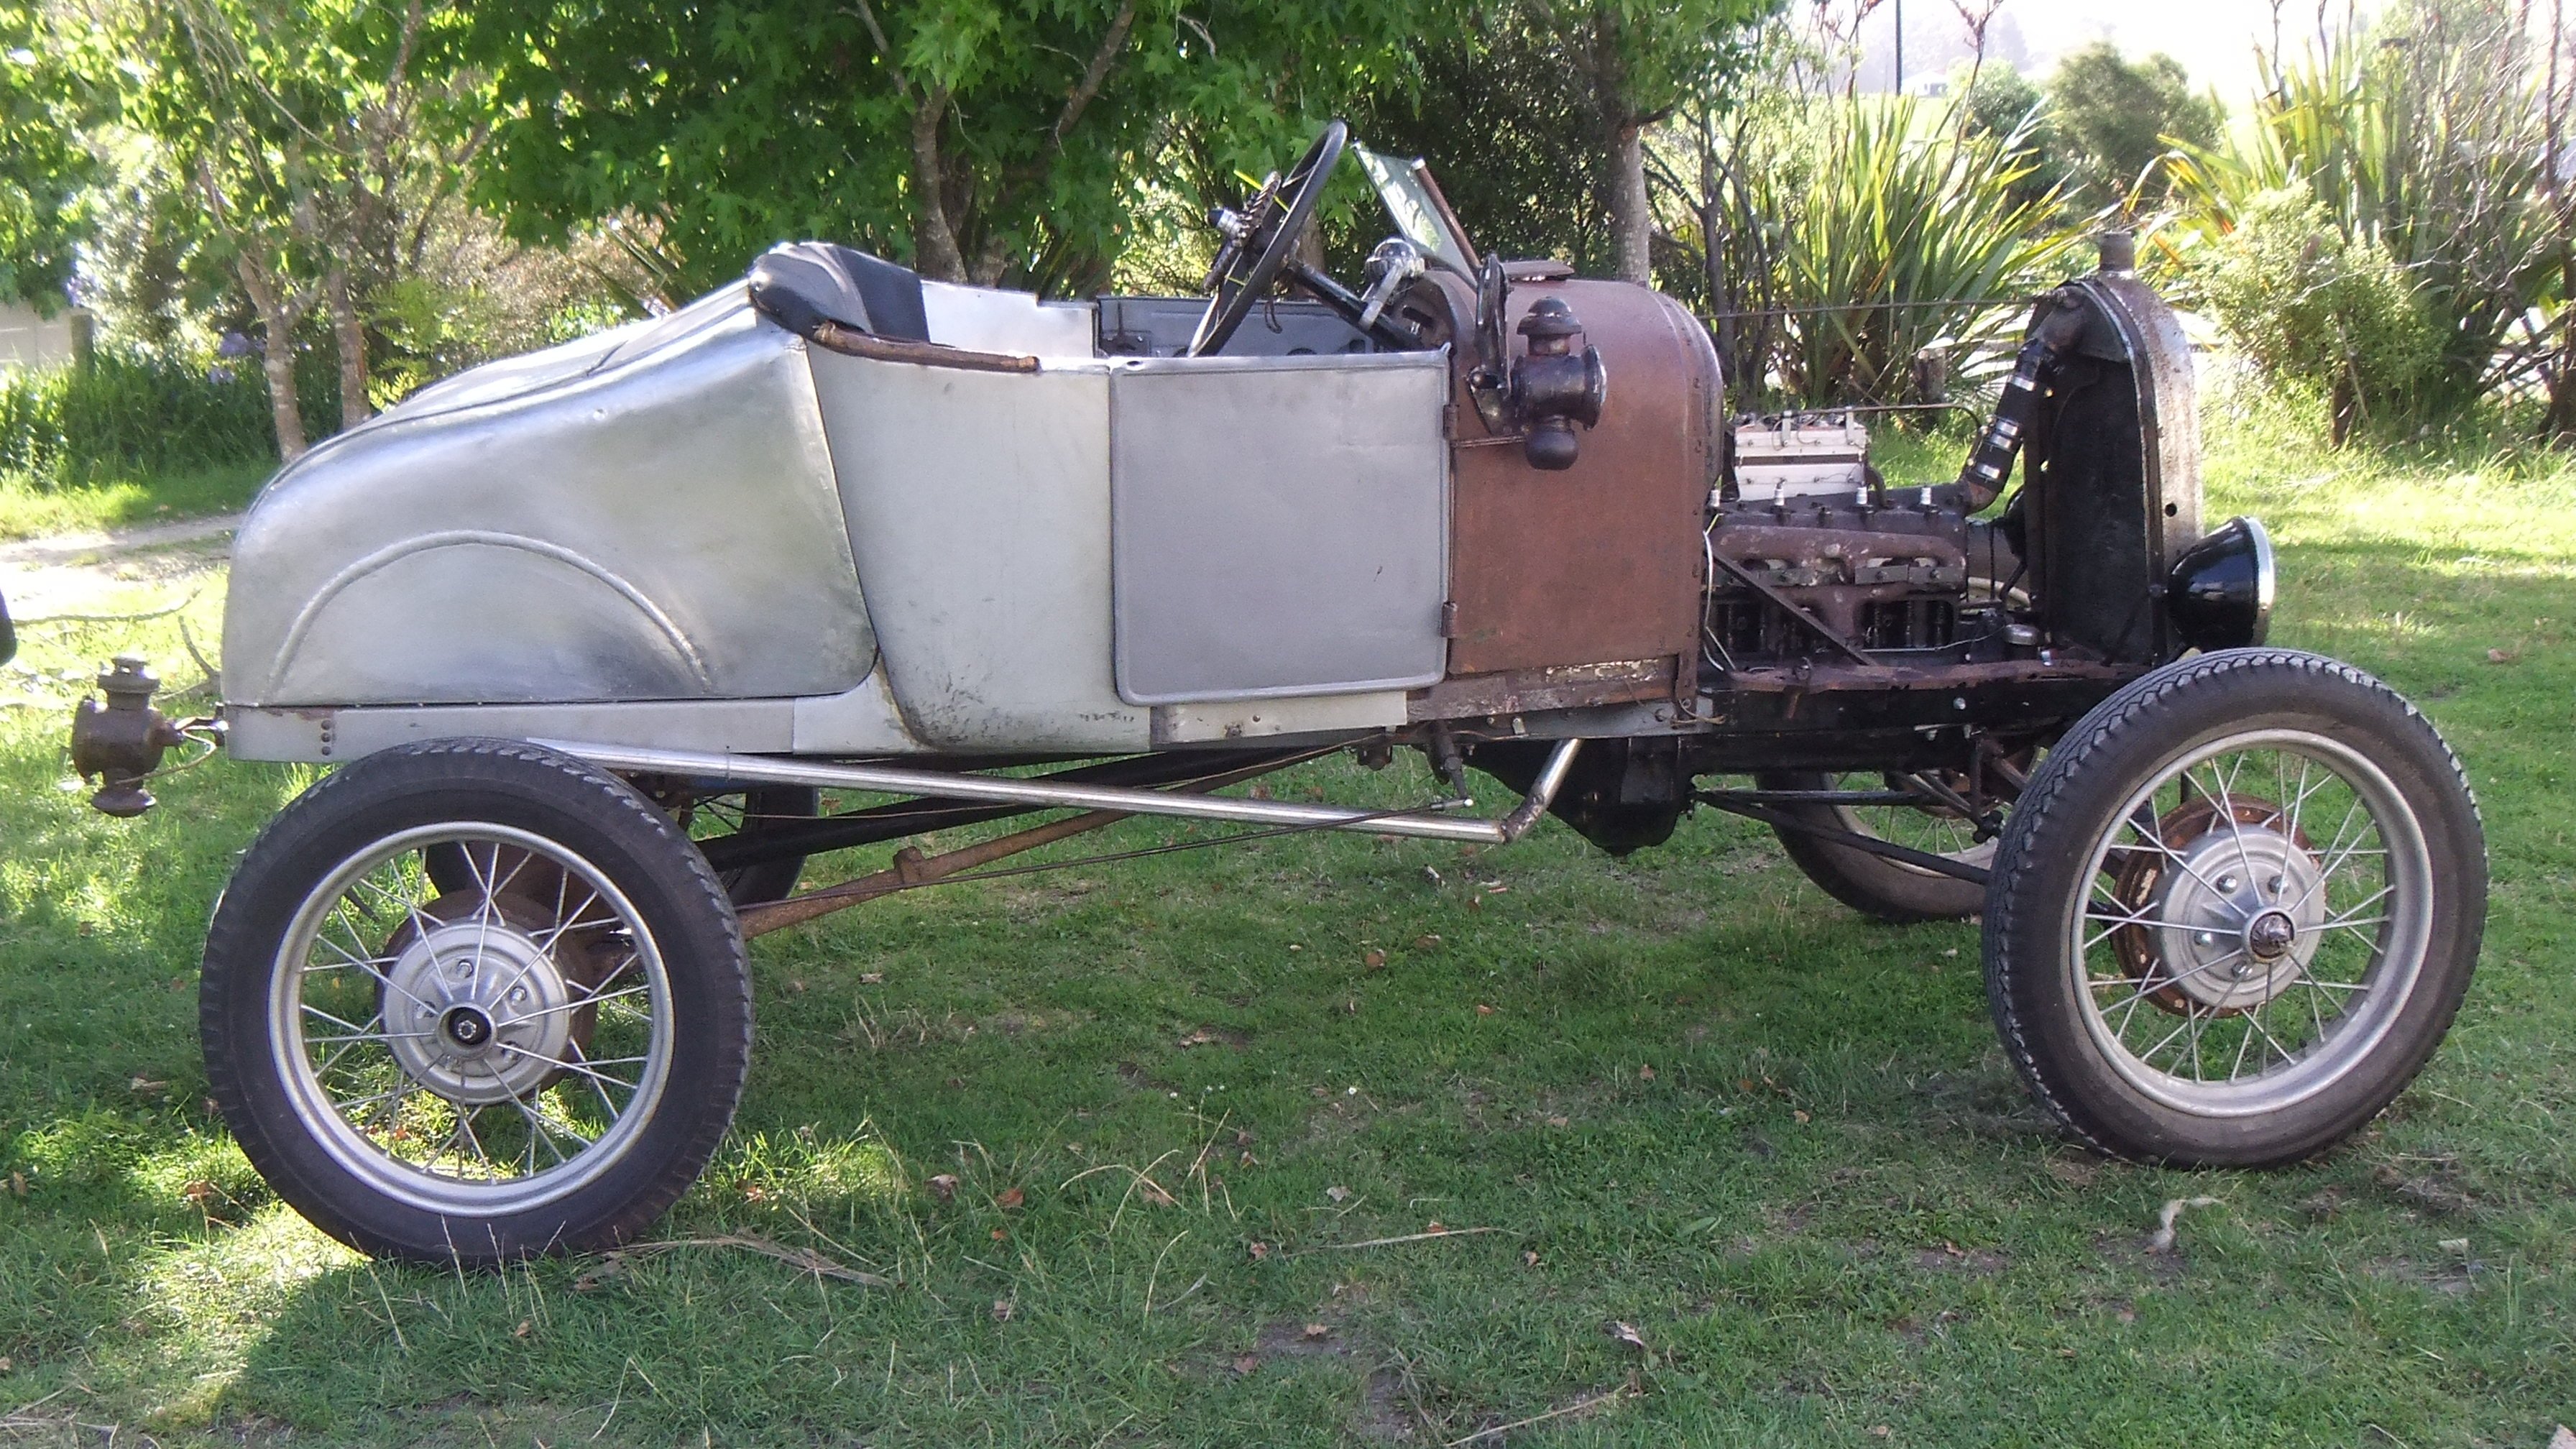
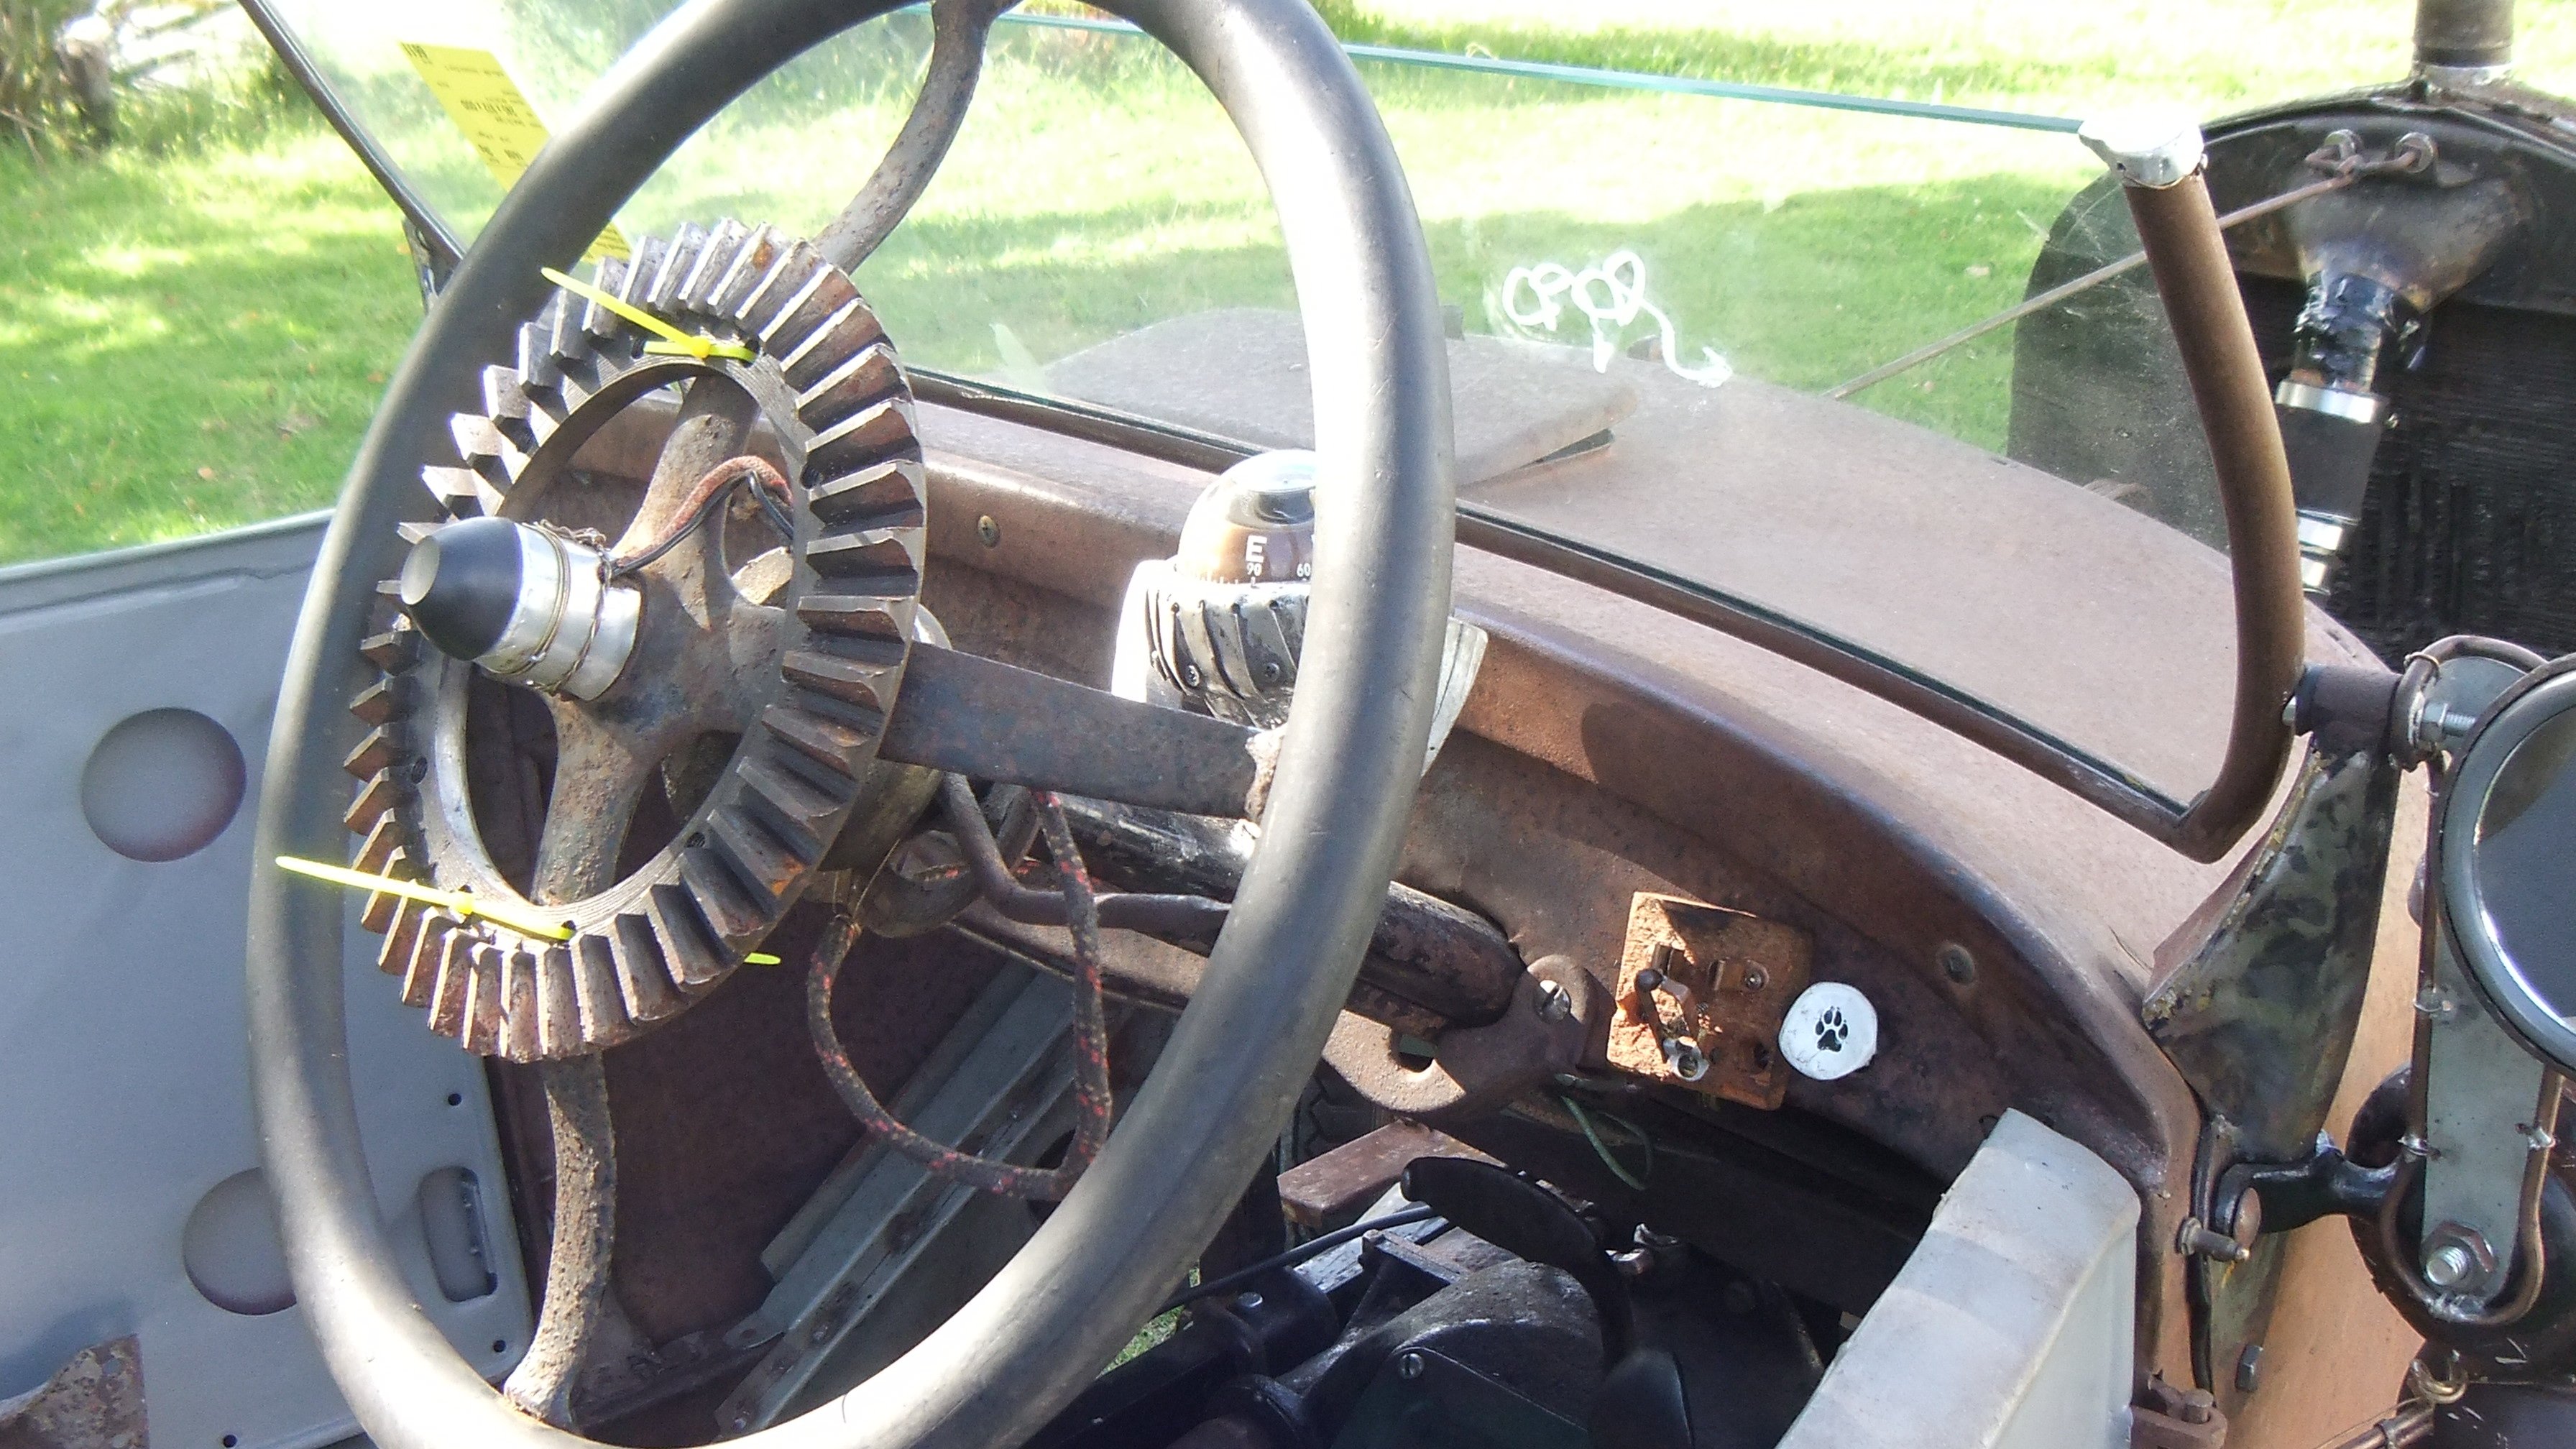
More progress was made on the old TVR today. Just small, but important things, again. I had a weird thought last night as I was falling asleep. What if the alignment is OK, but the wheel isn't on straight?! I previously mentioned that the steering wheel is way on the piss, and I thought it was the alignment, but hey, with everything else wrong with this car, could it just be the steering wheel wasn't positioned correctly at some point after being removed? This is a reasonably easy thing to check. First I marked the center top point of the steering wheel, with the wheels straight. Yeah, that doesn't look right! Next, I turned from center to either lock and counted the turns. Both sides had the same amount of turns to each lock from center, so that indicates that the steering rack is centered. Hmm. Also note in the above photo that the steering wheel bolt pattern lines up perfectly. I decided to take the wheel off and see if refitting it correctly would help, so I grabbed a hex key and started to remove the FINGER TIGHT screws from the wheel. Yes, finger tight. The leather wheel is a genuine Momo from '86. Not original to the car then, but still period correct. It's in very good condition really. Plot twist. I changed to the Momo Futura from Effie. I love this wheel, its so nice in the hand, and looks great. This is a much newer wheel, at '96, but still works. It looks sublime Moving right along, before I spend way too much time admiring my wheel, I changed the spark plugs. I whipped one out earlier to check and it was both black as anything, and the wrong heat range. Just a quick note on heat ranges. The number in the spark plug model is the heat range. The ones in the car were a BP6ES and I replaced them with BPR5ES (the R is for Resistor, to reduce electrical interference). Going to a lower number means the plug is "hotter". A hotter plug transfers heat from the plug into the head slower, meaning the plug runs hotter. A hotter plug is better for lower performance engines that rev lower and don't have forced induction. The higher heat in the plug helps to clear carbon and keep the plugs from fouling. There is a science to it all, but that's the basic premise. Love the ease of access. The old plugs came out with no issues. Very black The other bank wasn't much better, and plugs 4 and 6 were wet with fuel I had to remove the intake tubing and air filter to get to the plugs, so went the next step and also checked and cleaned the metering plate (silver bowl looking thing) The intake piping has been split before, but sealed up and had no other obvious splits, so that's good. The metering plate was nice and clean, but the throttle body was oily. I gapped all the new plugs down to the correct 0.6mm and fitted I haven't run the car yet, so it will be interesting to see if the new plugs make a difference to how it starts and runs. I have my fingers crossed. The next thing I attacked was the windscreen wiper. The original wiper arm was removed from the car before I got it, and I suspect someone had intentions to convert the arm from a pin fitting to J-hook (who knows how), as they had butchered the fitting on the end so it couldn't be used. I had to find a replacement. I knew I had a couple of arms from an SD1 in my piles of spares, so dug one out and had a look. The length was bang on, but it had a pretty solid kink in it, unlike the original one which is dead straight (come to think of it, the tailgate wiper is straight, I wonder if I have a spare still. I suspect its way too long though). Hmm, not ideal. Sure, it wipes and works, but its pretty well in the middle of the driver's vision when parked. Apparently, the original arm is a rear wiper arm from some ancient version of the Ford Festiva or similar. I could probably order one online, but I wanted a more local and readily available solution. I went to Pick-A-Part with one goal in mind; Come home with a new wiper arm. And look what I found A rear wiper arm from a MK3 (00-07) Ford Mondeo liftback. It's not perfect; if it sits as low as the above photo the wiper will hit the bonnet. This is due to the arm being slightly bigger at the spindle, and if it sits lower, it doesn't clear the cutout in the bonnet when its shut. I found this the hard way by taking some paint off the bonnet >_< Raising the arm up on the screen slightly means it clears the bonnet, but puts it at the bottom of the driver's vision Even at that height though, it's barely intrusive in the driver's vision. I'll see if I can live with it, otherwise, I'll have to visit Pick-A-Part again. Its an option though, which is more than I had. The last thing I had a go at today was the rear window. It's cloudy as heck and almost impossible to see through. I had seen on YouTube that you can sometimes polish the plastic clear using elbow grease and some Plast-X. I tried elbow grease a while back and got nowhere. Today I tried a couple of different methods. First, as a proof of concept, I used a small buffing pad on my drill to polish a small section with Plast-X. It's hard to see, but there is a slight difference. The arrow points to the line where the "before" is on the right and "after" on the left So the concept works. Now to scale it up. I was meant to sell my spare buffer ages ago, as it just wasn't as powerful as my bigger one for dealing with paint, but as it turns out, it was perfect for this work. I started on the driver's side, with Plast-X on the pad and this was the result Still pretty cloudy, but now you can see through it. You can just make out the steering wheel, but if I move over slightly, no sign of the steering wheel I worked it some more, but moved up to using Ultimate Compound. It's more abrasive than Plast-X, but seemed to take a bit more oxidation off. Polishing both sides made a big difference, clearly it was oxidised on both sides of the plastic Unfortunately as far as i can tell, the yellow sections cant be removed. It's pitted into the plastic, and nothing seems to touch it. I'll just be happy if it's clear enough to see a car behind me, as previously it wasn't. It was like having a white sheet instead of a window. And just because I can, here is a photo of one of the few times the bonnet has been down since the car rolled into the garage16 points
-
Last week I gave the garage a good tidy up, an unintended consequence was sudden burst of motivation to pull this thing out and get stuck in. The shifter will go here with the hydraulic clutch attached. I have been working on the interior. I was given some aluminium sheet a while ago and used it for the floor. I need to get some more aluminium sheet to make the tunnel and dash... I’ll have a hunt on Monday. Hopefully this motivation lasts and I finish it off! Iv had to change the pedal position significantly as he is 7 now... She wasn’t even born when I started it!10 points
-
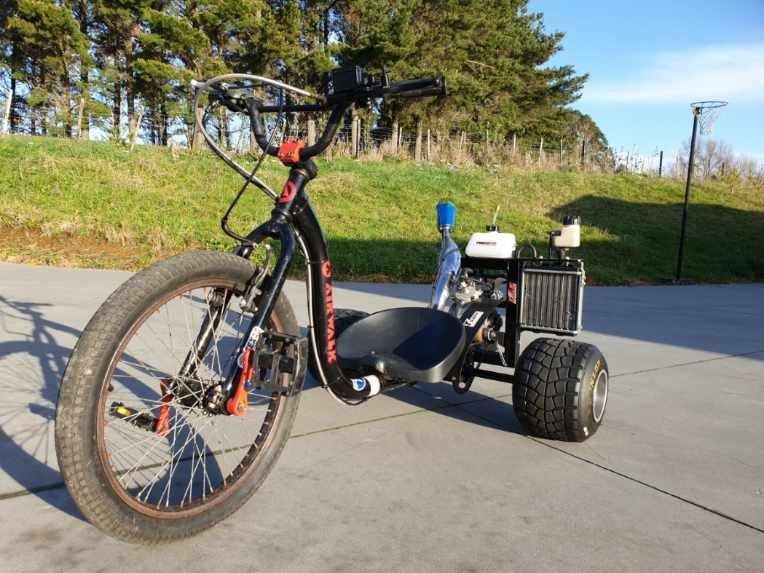
Got more power out of it with the different carburetor...way better.Also keeping the tank full helps a lot, as it was starving for fuel when low, due to side to side sloshing in the tank affecting the fuel supply.I'm pretty happy with it now. Just a sprocket swap to 78 and I'll call it done. The lower gearing will bring it to where I want it. I still haven't hit powerband yet...need long straight to get up there.5 points
-
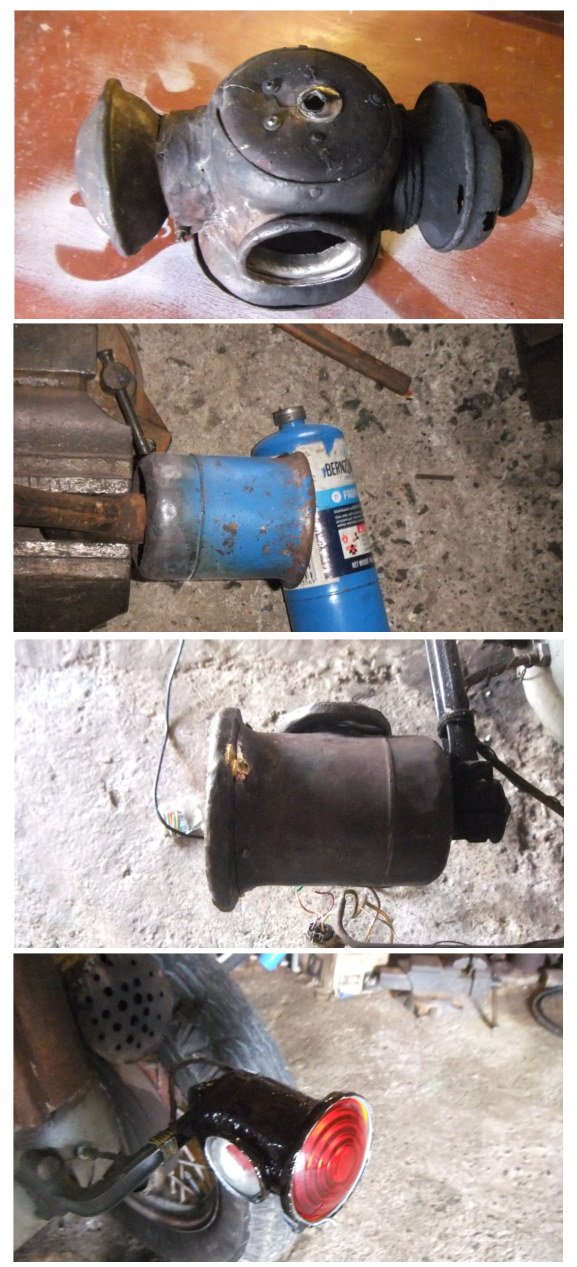
The tail lamp was suffering metal fatigue. Not surprising, given its alloy. So i made one fitted for the electric light. (re-used the old glass) That's not paint, that's indian head shellac.
 5 points
 -
Enjoying the build thread. The whole 'accidentally bought a weird British thing now fixing it' is proper OS..5 points
-
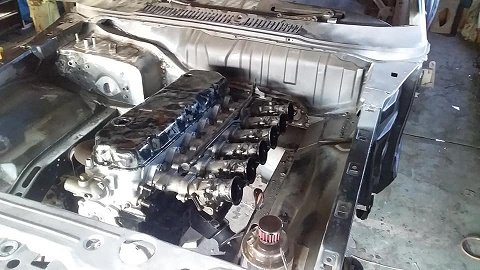
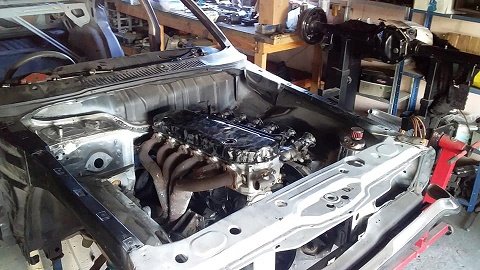
An exciting day today! first test fit of the huge engine and trans into a mostly stock body mx5. first i started by cutting the 'ears' off the frame and firewall. forgot to grab a pic but its these parts. theyll need plates welded in to re-add the strength lost. this squares up the bay and allows the engine to sit close to the firewall then in goes the engine! its SO close to fitting in unmodified. infact if i was to unbolt the subframe, id be able to fit the sump bowl past the subframe and the engine could sit down properly. however, i dont really want to have to unbolt the subframe everytime i need to pull the engine. which hopefully wont be often, except for during the build, but even thats enough for me. if i want to slide the whole lot in, ill need to cut maybe 60-100mm out of the top of the tunnel. a pretty easy job for the massive benefit of easy install! trans hits here sump just doesnt quite get over the subframe its possible the unmodified hood may even close over it all! most of the bulk ontop is the wiring loom ect what a monster5 points
-
Gave pin striping ago not too bad for a try i gess
4 points
-
Gone machine-in'...
3 points
-
When I first read your build thread, I thought sound more wounding than a pipe bomb wrapped in 12 layers of 4 inch nails. But as your thread has progressed, it's actually grown on me. You can pretend you're an early '80s playboy zipping around in your proper british sports car.........2 points
-
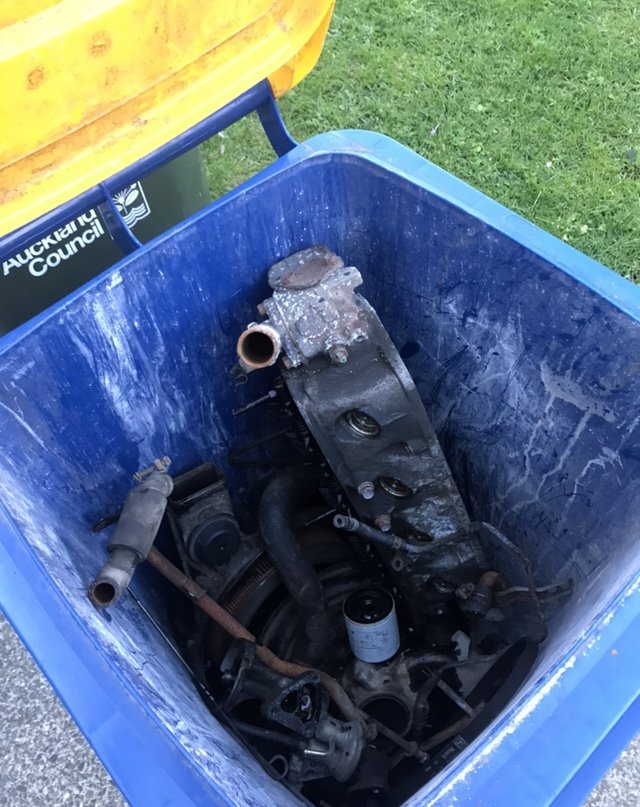
Tried another carb. No luck, given up and moving forward with motor swap. mate 4 doors down had a Crain so walked it up the rd with beers in hand this evening. 34 years and multiple beach missions the motor had pretty much welded it self to the gearbox. Couple screw drivers and a dog bar later she’s out. I’ll need to wait till next week to get rid of the block as the head and bolts ons have already filled the bin. plan.. bolt motor to box on garage floor to test clutch release before putting it in. finish engine loom and change body wiring to suit, then take it from there, hopefully get some better weather so I can deal to the frame and under body
2 points
-
hey also, here's a technical tip for those of you interested in the finer details of auto trans setup, if you want it to not leak fluid out the bottom, do up the drain plug. you got that?2 points
-
So people talked me into this, and i need the advice (clueless). Noticed the following for really old crap is small on here (sure there are forums for this but they don't need to obey NZ road regulations and those that do are esoteric to me) but there is some people into it so... So after buying piles and piles of rusty parts at swapmeets i decided i want to build a car. End goal would be something like this pictured. But i lack enough V8 parts yet and for some reason the NZTA type people make you register them as a 'replica' with stoplights, window wipers and seatbelts, stuff i don't want or I'd go buy a modern one. So how do i get around that? Register it as an original, but then i have to use original parts when getting VIN right? OK, first incarnation can look different and i change it later right? Changing it being swap body onto V8 chassis and return existing chassis to stock and resell it. (not sure if this reasoning is correct...) There, that one looks cool. Would be keen to replicate that look. Just so happens the chassis parts were cheap or free at a swapmeet last weekend because nobody wants them, body parts are expensive though. So how to lower? Because 2 feet of ground clearance apparently isn't cool these days. Think these are called Z shackles. Is this legal to do in NZ? If so i might do that. Problem is i would have to move the spring from rear crossmember to another new one installed a few inches further ahead. And rules around that? Is bolt in or riveted acceptable? Alternative is to move spring forward and put crushtube? (anticrush tube?) in radius rod and the bolt spring hanger in it. Small problem is the chassis i have has steel plates riveted inside the rails along its length, fishplating, not surprised considering how much they flexed back in the day. Is this going to need a cert or can a friendly inspector ignore/sign off as satisfactory? Then there is the front radius rods. If i lower it using the Z shackle style depicted above i would need to extend them. Then there is this bracket which does not need Z shackles or extended radius rods. This would work but i don't know if it is legal to fab one from steel (Xray testing?) or have a pair cast somewhere, although cast would be kinda awesome, what is the regulations around cast one-off parts? Or replace entirely with later model ones, with welded on brackets, i can't see this being a piece of cake to cert' though. Also wanting to move the body back about 2.25 inches to gain clearance for using studs to hold the head onto the block (and maybe aftermarket cylinder head). If it is only lowered and body moved a little i won't have to pass the 5 cycle brake test (or whatever it is) thing or anything will i? Pretty sure the 2 wheel brakes would never ever pass that. So what parts do i have so far? A rusty body with missing subrails. Is it legal to repair this with box tubing with the bottom cut out of the tubing? Or even tubing left intact? This is the only place the body brackets would be a problem if i moved the body backwards 2 inches. Fortunately this area needs repair and the bracket is riveted to the subframe and the rivets look crap, there is only one bracket, the other is missing so i can rivet it on further forwards when i install one. Would this need a repair cert' or would an inspector kindly overlook that it was moved? Don't know the regulations about this myself... This picture shows the frame rails with the bracket to the firewall. Is it acceptable to redrill the holes in the frame back 2 inches or should i use spacer blocks? New holes would be better. Also visible is the rivets for the fish plating. This is a rusty wishbone in case i had to split it, didn't want to split the one that came with the chassis, its like, 90 years old and still in good shape, this one is rusty, might have too deep pitting for a cert'? Then there is the rear ones, options include repairing or replacing with a new tube with a kink in it (for the correct geometry) and a crush tube for the spring mount. Can only guess there was water in the tube and it froze and burst? So yeah, am i on completely the wrong track here? Lost my mind? (think that happened last year) or is this a good idea? Better make a discussion thread as per forum board rules so you can tell me which is best for VIN/cert'/tell me i lost my mind and to give up already. //oldschool.co.nz/index.php?/topic/47381-rustiz-1920-26-ford-t-bucket-of-rust-discussion/1 point
-
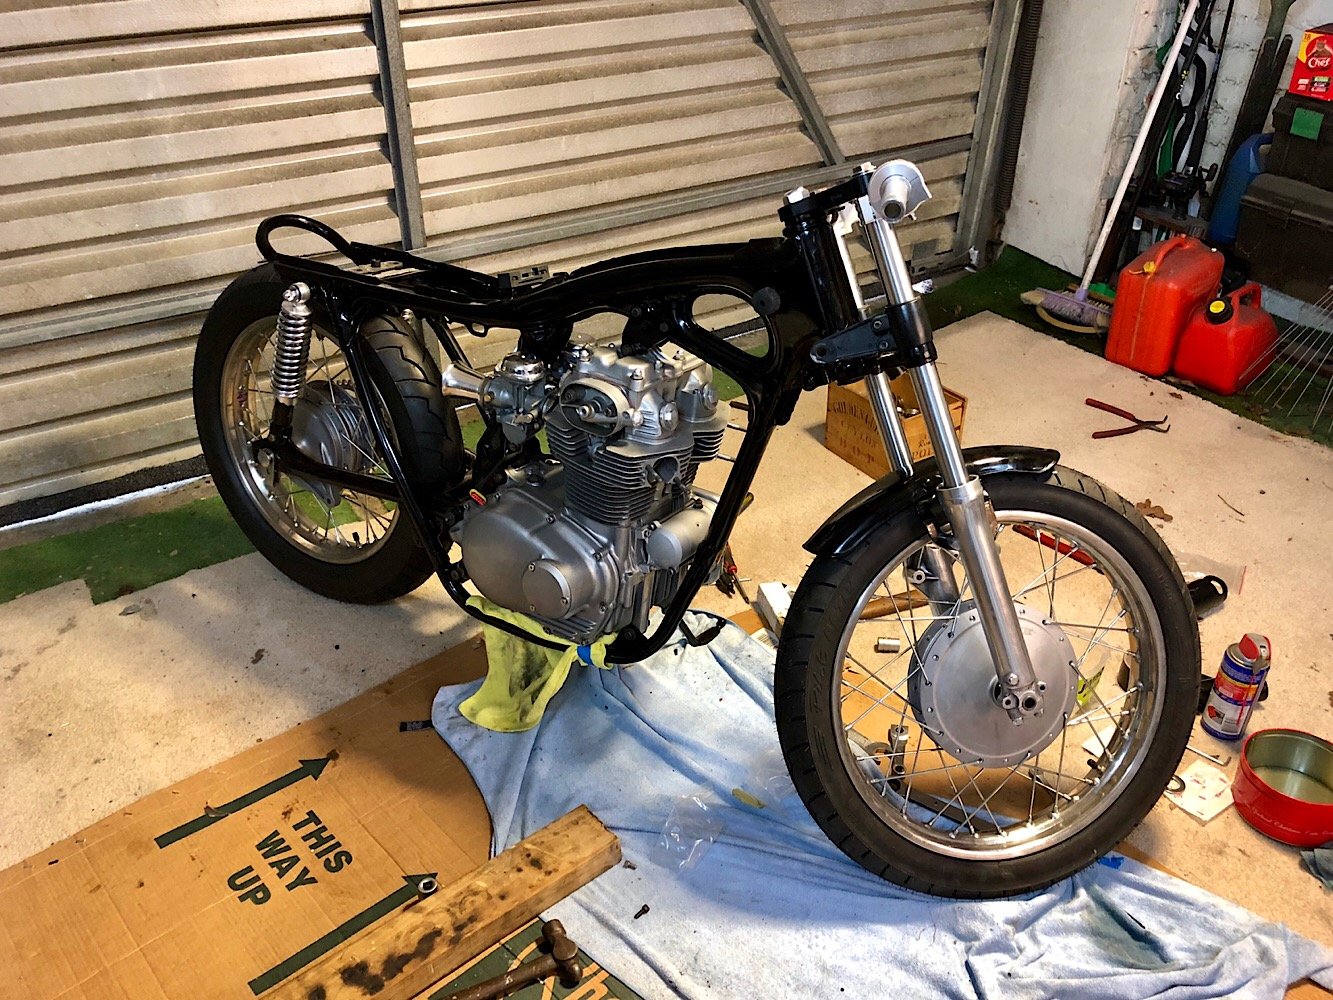
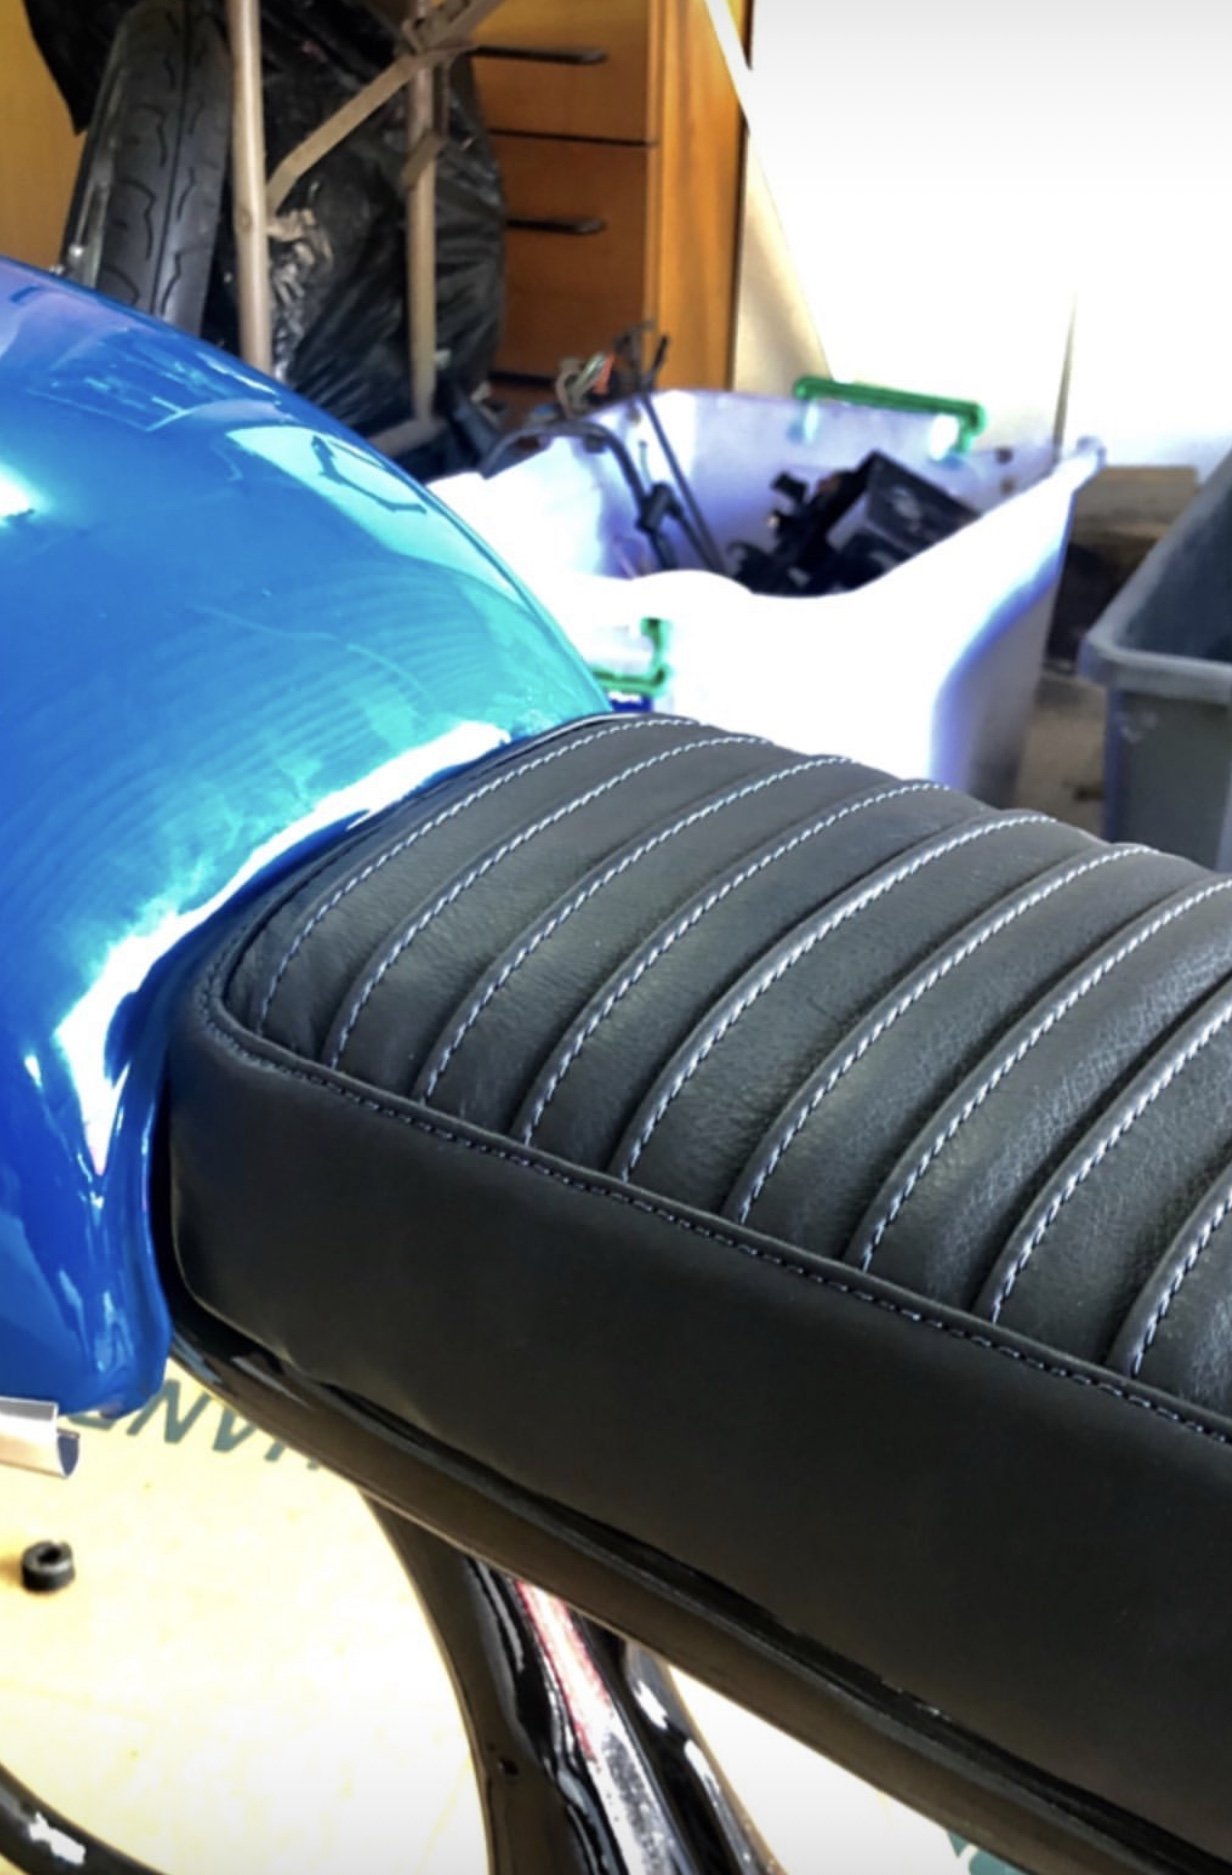
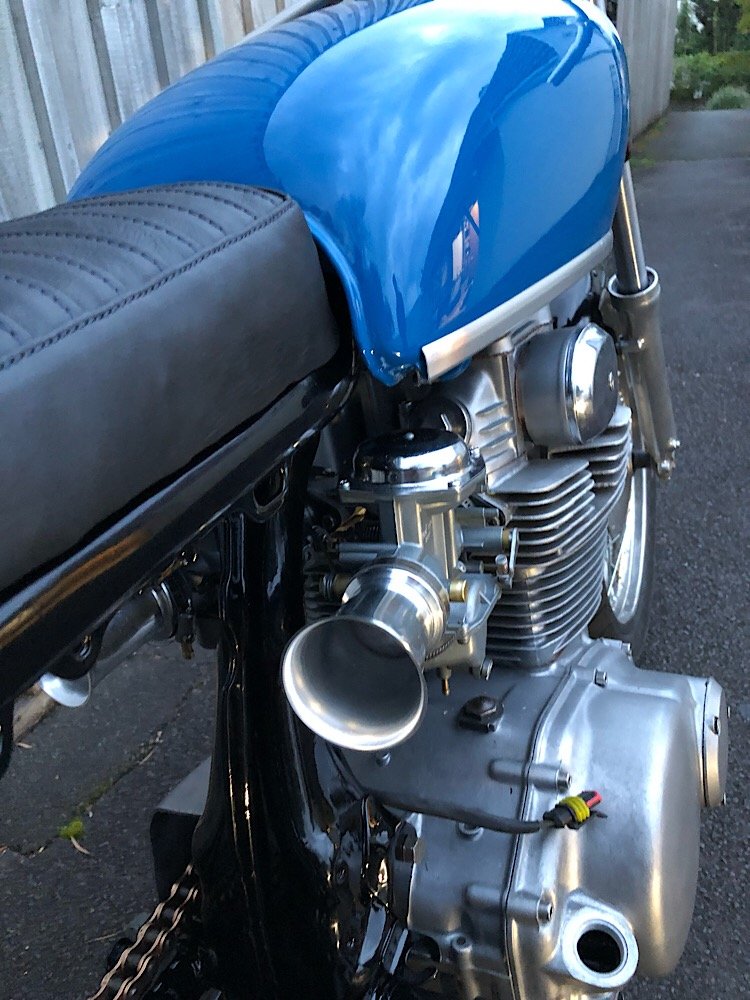
Painted the frame and got the motor back in the frame today. Lots of figuring out where all the bolts went as most of them were sitting in a bucket before buying. Front guard turned out perfect, so many hours spent to keep the rolled steel edge on the front. Stoked with how it turned out. On its feet for the first time! Placed all the pieces to see how it looks all together.. Big shout out to Eliav for doing the upholstery, leather with the dark blue stitching looks mint!
1 point
-
Reminder that the next meet is this Tuesday!1 point
-
https://gfb.com.au/products/boost-controllers/manual-boost-controllers/v2-vnt-boost-controller-reliable-and-effective-boost-control-for-vnt-vgt-turbos/ https://www.trademe.co.nz/motors/car-parts-accessories/performance/turbos/listing-2275735283.htm Now to find the same item on Ali1 point
-
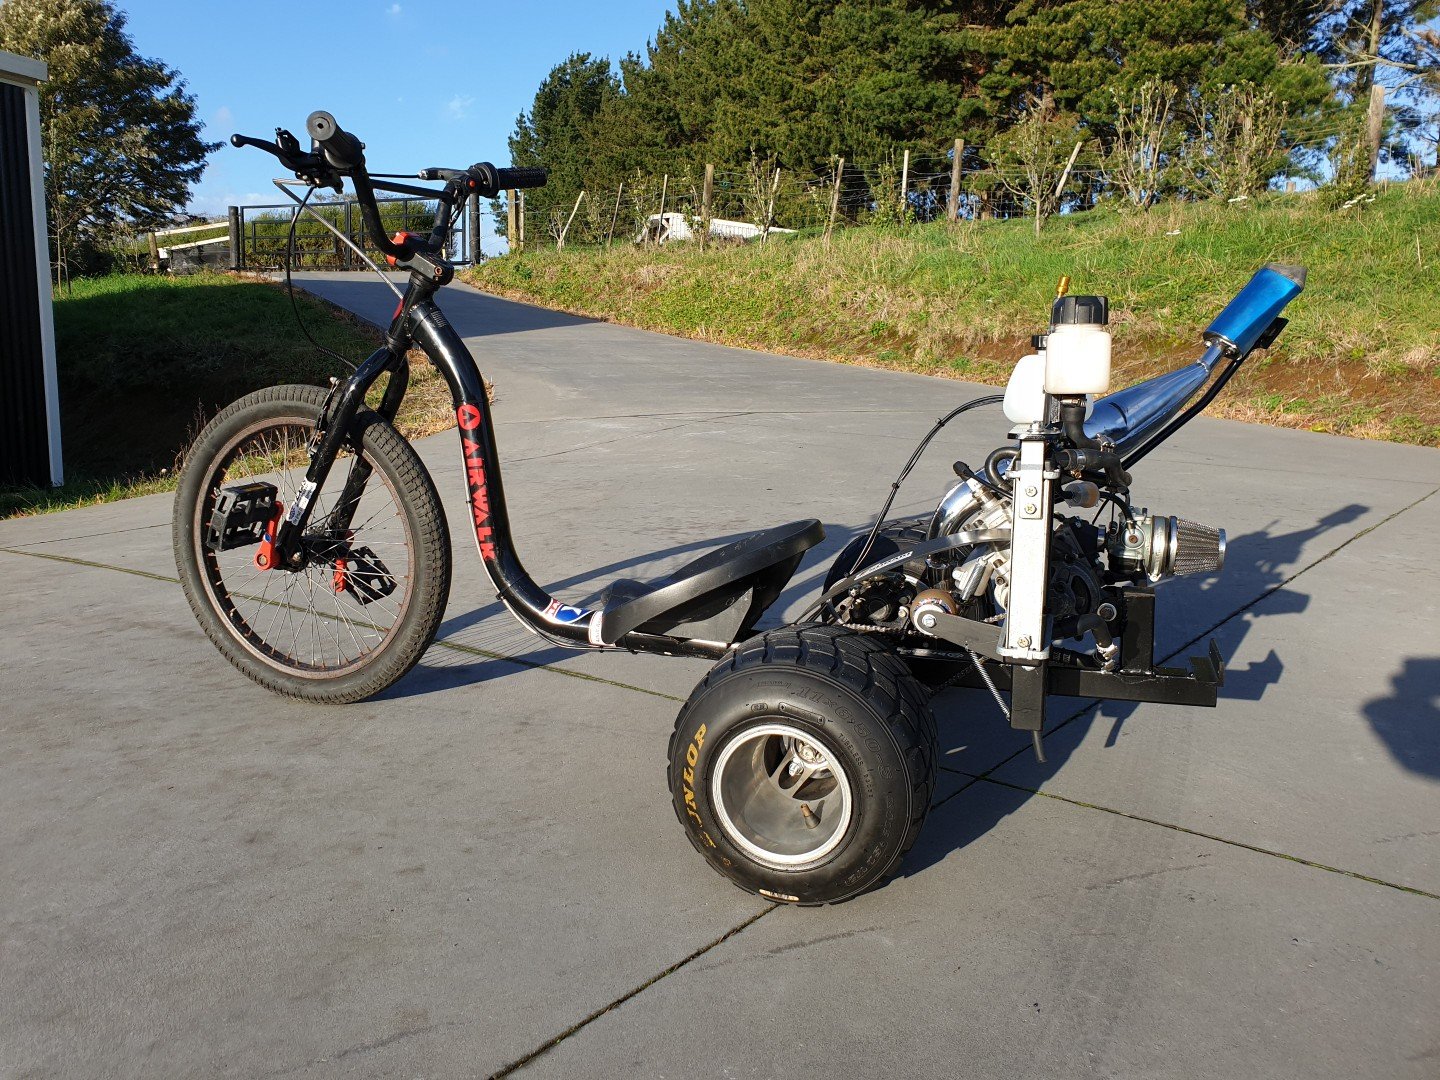
Well, it goes. But it sucks down low! To be honest its not quite what I was expecting??? I was hoping for a bit more out of it. Theres not enough room on my drive to get into power band, and that's when it should liven up. I've ordered new sprockets to change the gearing. This will certainly help. And then I'll run in somewhere with more space to hit powerband. However...it goes, it moves, it's got fuck loads of potential....1 point
-
I would scotch brite it with wax and grease at a minimum, see what happens. Or spray a patch then sand it back to test.1 point
-
I dropped the injectors off to get serviced this morning. It used to honk out a monster cloud of black when the 'Tec kicked in. So there's no harm in optimising their performance. Nice spray pattern should improve fuel economy too.1 point
-
Fuck yeah...got it sorted!!! So loud, seriously think I've damaged my hearing. Ear plugs a must!1 point
-
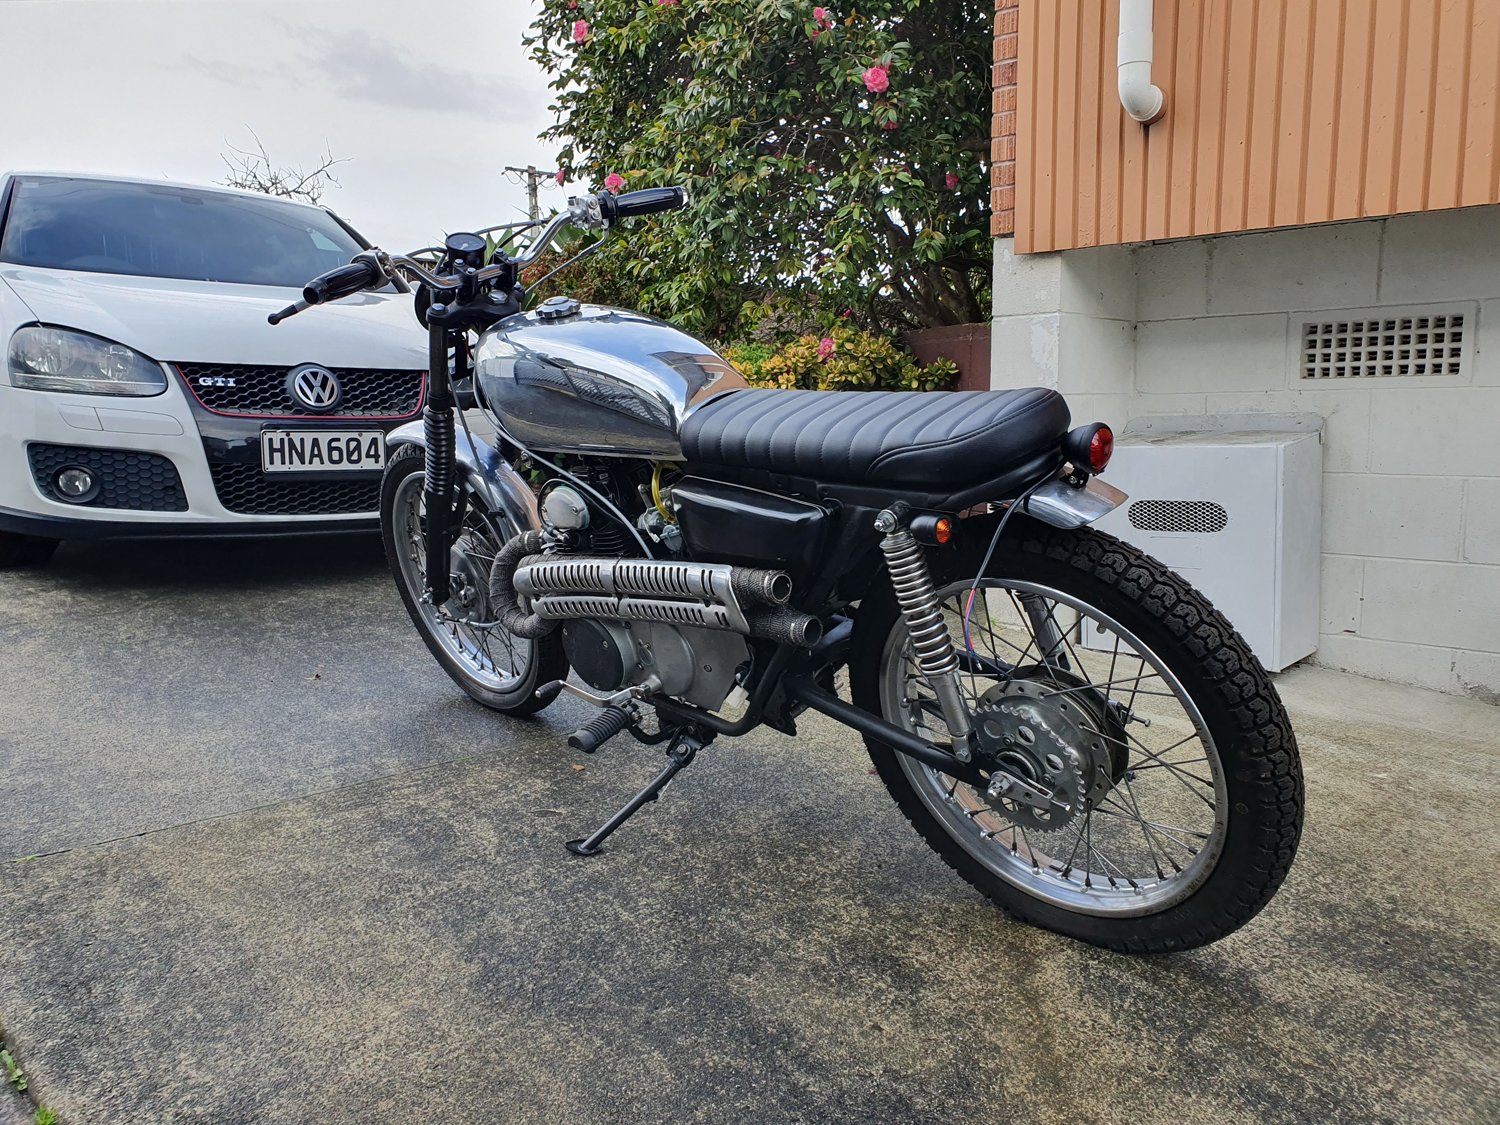
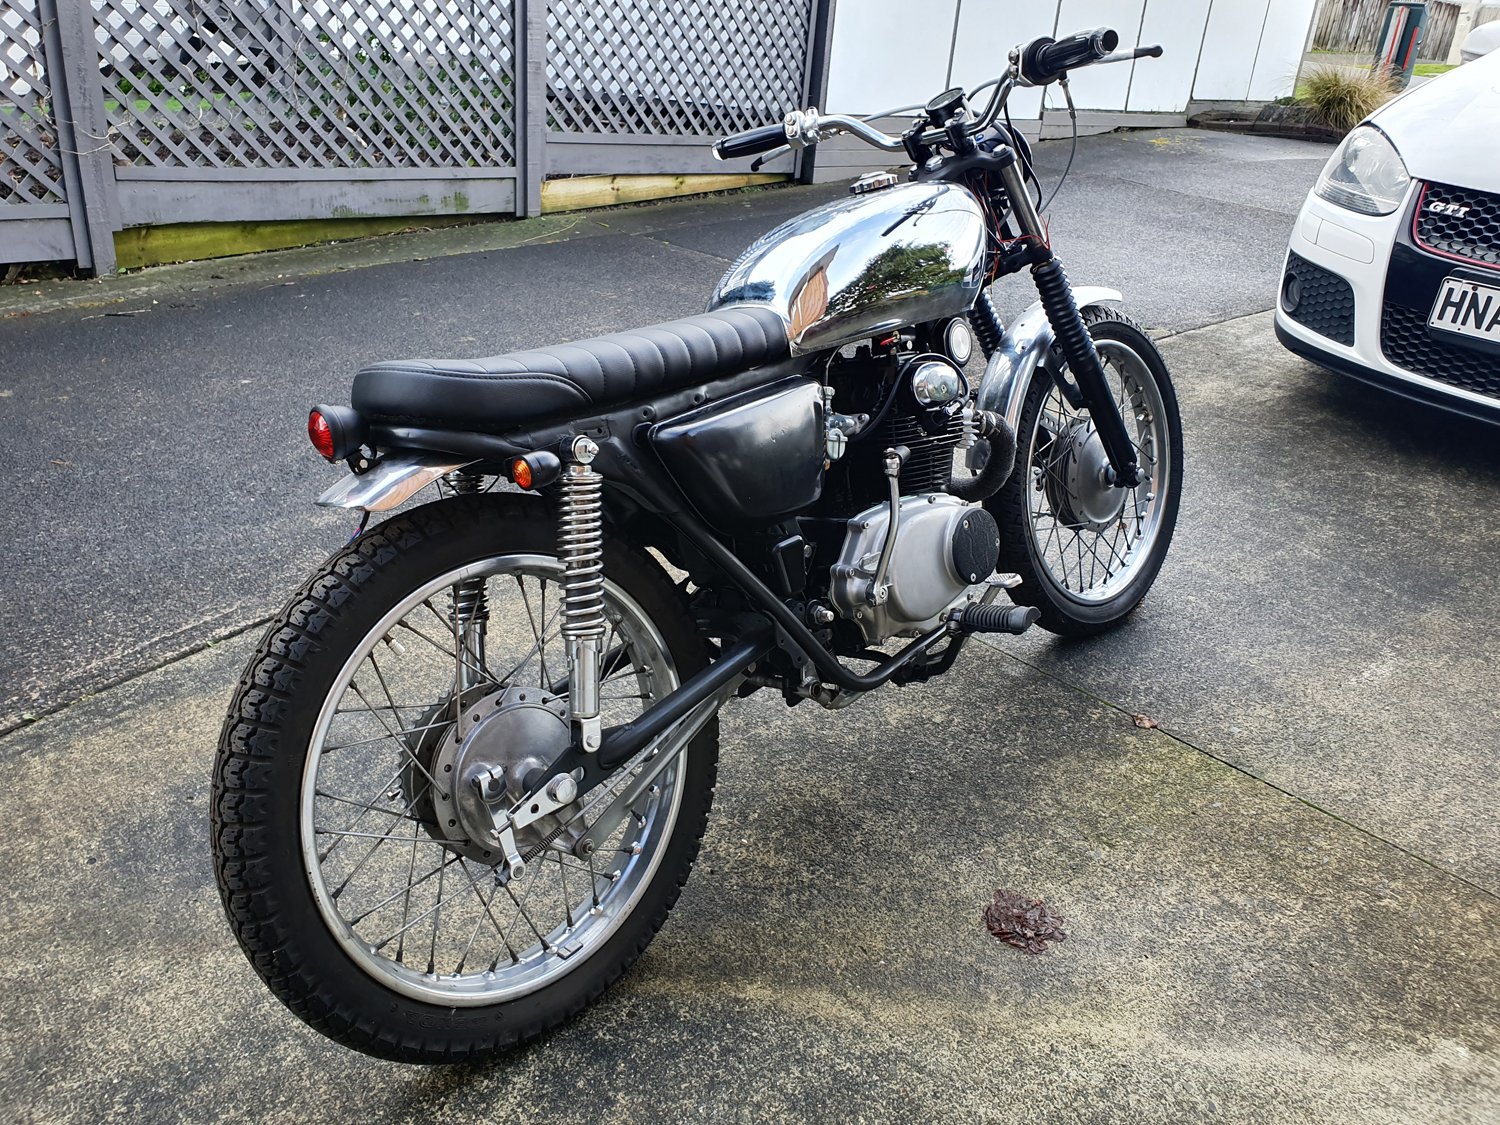
I think this bike is too far gone to get it back to a nice condition so i'm just going to make it reliable and thrash the tits off it haha.1 point
-
Wow, that's some real Barry ingenuity right there.1 point
-
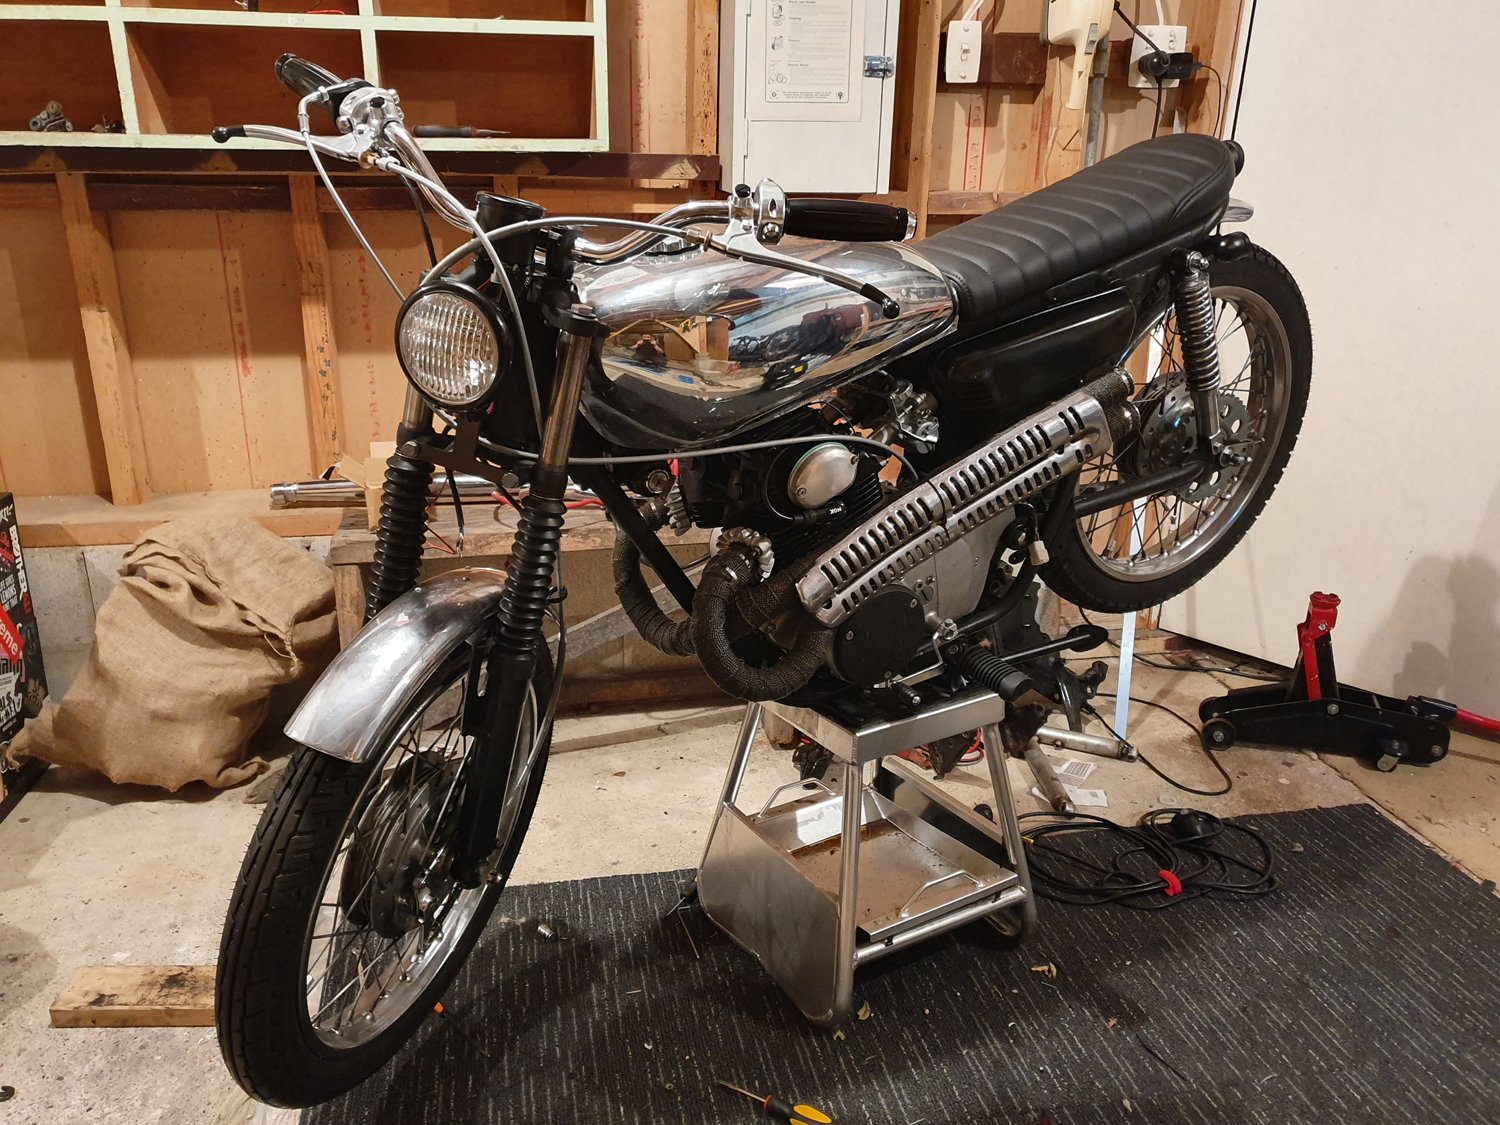
Drum roll...and finished it! Fuck yeah...stoked!!! Need to pick up fluids for it tomorrow and fire this bad boy up. 16,500rpm of 2-stroke awesome about to wake the dead!
1 point
-
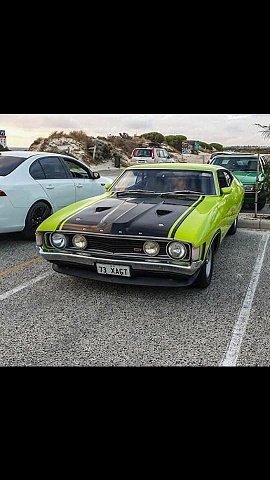
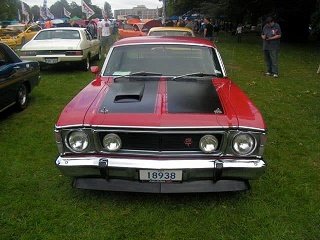
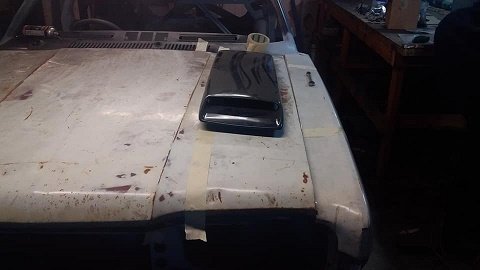
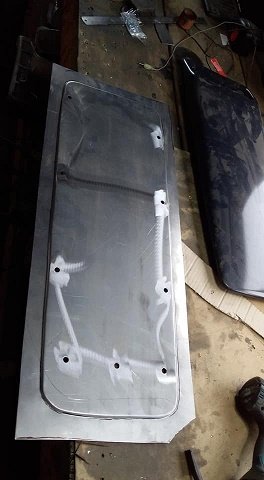
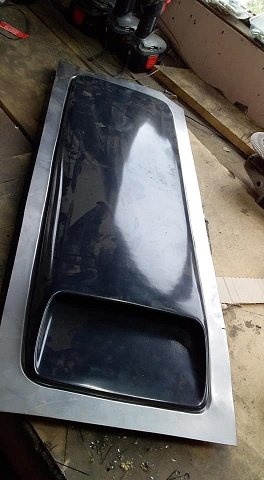
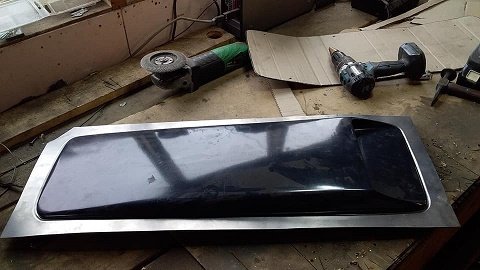
so now the motor and box are back in i can make a start on a couple of things one being the tunnel...just need to put the clutch fork and slave cylinder in on the passenger side and the starter and clutch pedal on the drivers side and i can finish it off.. and the cold air feed/air box...i want a sealed box feed air from the outside but when you one the bonnet you can see the ITBs (other wise whats the point ay lol) all so regardless of the colour i paint the car i all ways planned on painting the bonnet the same as the falcon XAGT. i looked around at bonnet scoops for ages and wasn't keen on the wrx scoop on your mums honda style ...had to be long low and slim.....so went with the falcon XWGT scoop so it looks like it will fit the plan is to have the scoop on the bonnet with the filter on the otherside of the bonnet so when you open it you can see the filter and then when closed it will seal onto the box around the trumpets. now the easiest way for me to do this is to make it all out of the car then cut a section out of the bonnet and weld the whole thing in so i made a cardboard template and cut some steel out of the sheet and bead rolled around the template flip it over and it means the scoop will be recessed into it. i did some searching on the interwebs for panel filters and it turns out i might have found the perfect one......size and price. ....so i ordered a Porsche 928 k&n panel filter 517mmx157mm and around 20mm thick. and this is the room it will take up. cheers
1 point
-
First time it's seen daylight in about 3 years. Have just discovered a leaky rear shock so I guess I have to throw some more $$ at it haha.
1 point
-
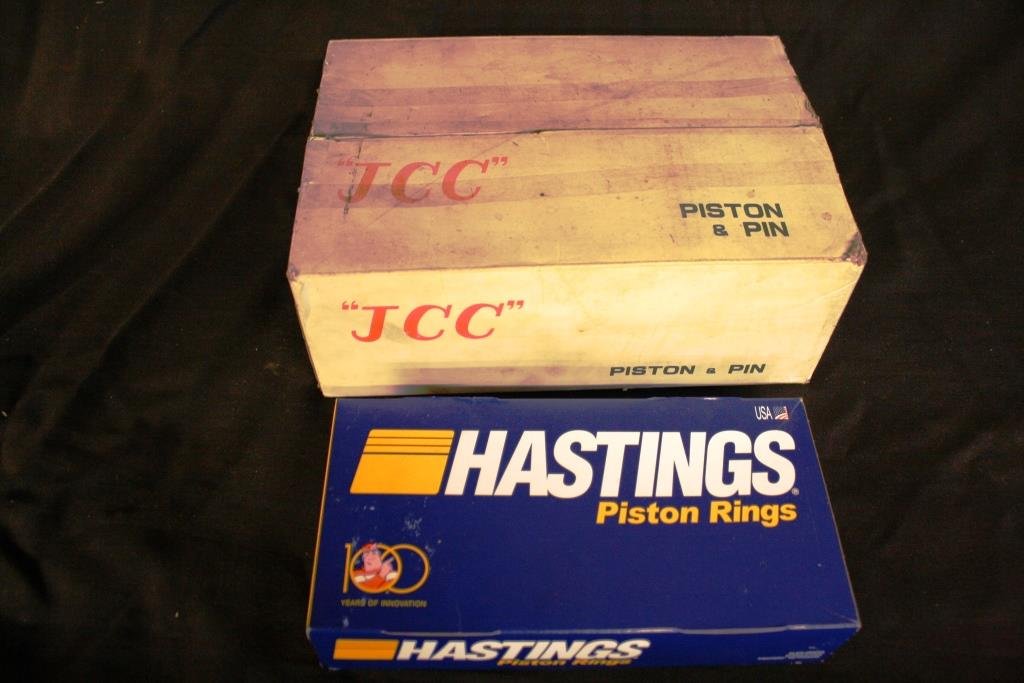
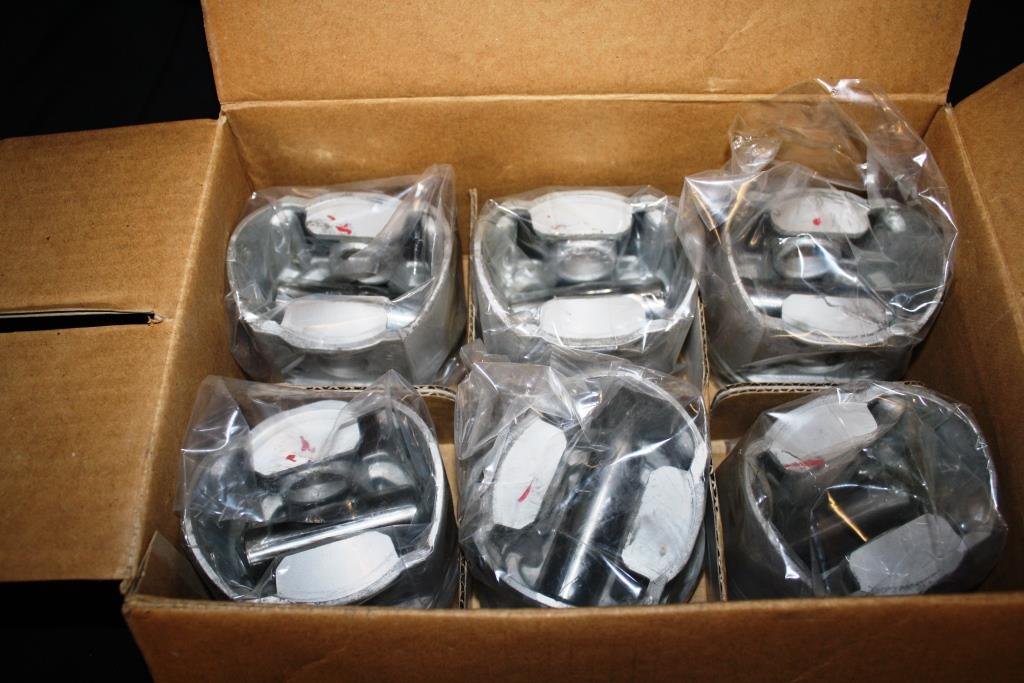
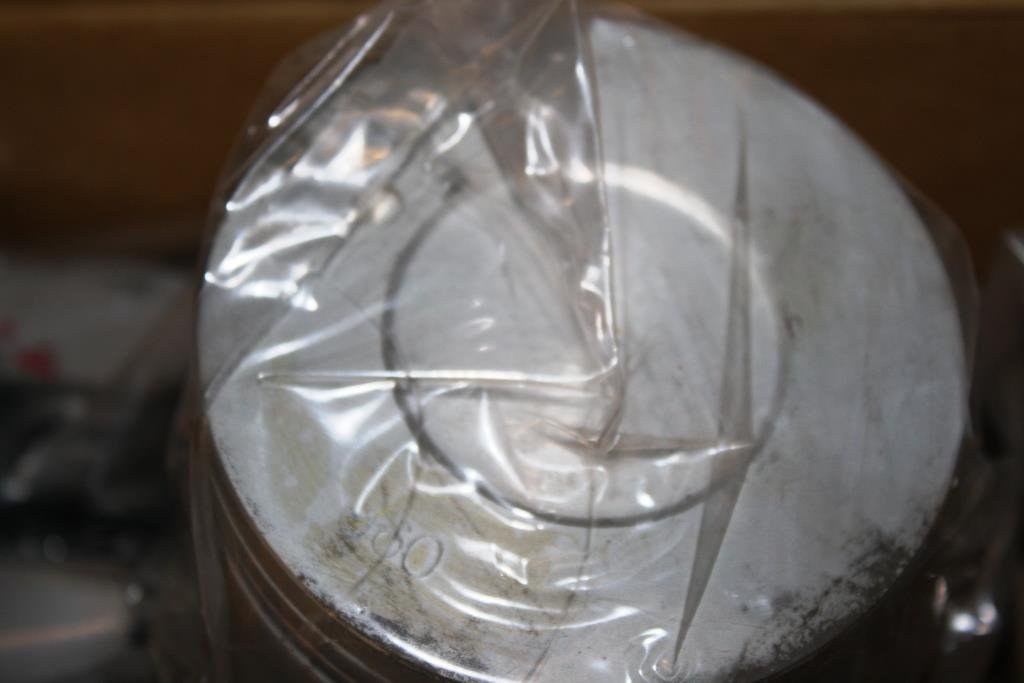
After making the call to take the block out to 60 thou oversize (hard to argue with an internal micrometer) the hunt was on for suitable pistons. Problem is these motors were designed to run on leaded 100 octane petrol (yes real lead, the stuff pre-millennial ‘real jokers’ used to have in their pencils!) and the best we can buy in our modern times is BP98. To add another problem both the head and block had probably been decked a number of times and I was now planning on pushing 208 CI displacement into a 186 head. With flat top pistons off the menu I managed to track down a set of ‘new old stock’ .060” over JCC dished pistons in Australia complete with pins and chrome moly rings. You have to love the 30 plus year old tea cup stain on the end of the box, if they could talk I'm sure these ‘new old’ spares could tell some stories.
1 point
-
Oh yeah, so this thing is pretty much done. Wiring is in place. Just need to splash out on the M-Unit to finish. I'll probably try tidy up the control cables somehow and also fit some nice exhaust tips to my cut pipes.
1 point
-
motor and box back in so i can make the tunnel ....airbox and and few other things before it goes back on rotisserie......might make some new headers as well
1 point
-
I had a lot of issues with the printer. Clogging, warping, delaminating, poor quality 10kg of material wasted and 3 weeks changing parameters but learnt a lot and got it sorted. Now I need to figure out if I can recycle this stuff!1 point
-
Outer pattern prints complete.1 point
-
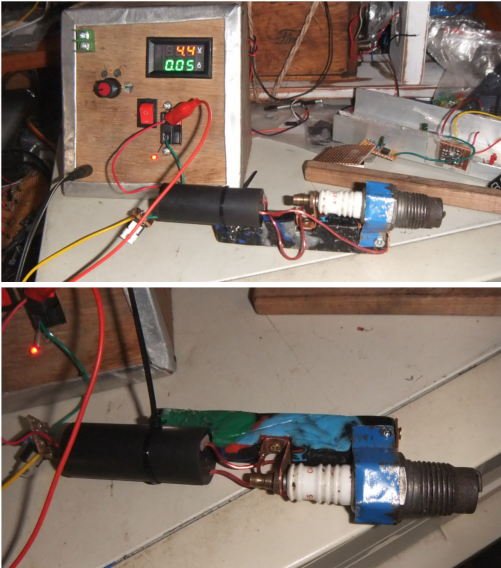
conclusion: bmw throttles make no more power. injectors in bmw throttle instead of head, no change. have revised throttle linkage setup. still not as good as the setup on the 20v throttles, but a whole lot better But have gone with this setup as it heat soaks less. both the throttles and the fuel rail are isolated from the head, with a thermal gasket and 25mm bit of plastic. should be bit more consistent, since hot air and fuel suck Also found that cylinder 1 was running a touch leaner than the rest, after checking afr per cylinder. so have added a fuel trim to add a bit more fuel on cyl 1,1 point
-
"Straight through" Holley NH carb's share many parts with the economy version carb'. Same basic thing, but the economy version had more restriction. I'd be tempted to smooth the venturi a little, as it has a rough finish, but don't want to mess it up. I'll choose to believe that rust pitting help the mixture. So i filled in some pitting around the rim of the bowl seal with an epoxy. Used white metal normally used for engine bearings to build up work throttle shafts. Drilled small holes in the broken castings and poured white metal into them to build up the areas where casting had broken off. Built up the worn nut with more white metal. First i tried to replace the bronze throttle link with chunks cut from a worn bronze bushing, that turned out to be fragile. So i riveted and soldered, with more white metal (more resilient to vibration than solder due to no lead content) copper strips. I choose to believe i have improved this carb's condition compared to when i found it.
1 point
-
New engine is alive Back on the 47mm throttles for run in as had good tune for them. trying some stuff hence wiring abortion. have wiring for multiple setups on same loom, so can swap between easy must of done something right, 150kw at wheels on the small extractors, most its ever made on same setup is 145kw, usually around 143kw. Note to self put mic further away; RIP mic and all speakers.1 point
-
Have i tried to sell you on the merits of LED lights lately? Even on high beam the amps draw is maybe... 1.2 amp? According to a century old gauge anyway... much less than the 10 amps they were previously drawing. And other people can actually see the lights now.
1 point
-
Holly crap time flies! Its been over a year since I have done an update/work on this thing. Over the last couple of months I have slowly chipped away at the body work, its pretty straight now, just a couple of minor imperfections left to bog. Yesterday I started making this pedal box out of sheet steel, I cut it out in one piece and bent it up. I'm quite pleased with how it turned out, I'v never worked with sheet before. I'v only tacked it together but haven't blown any holes in it yet.... Touch wood. I got a couple of these bad boys of Aliexpress $11 U.S. each. I'm all about Alliexpress at the moment Hopefully more updates to come soon1 point
-
By my deeds i honour him V8
1 point
-
So i heard you think recycled plastic is crap? I disagree. I am an enthusiast of it now.
0 points


This leaderboard is set to Auckland/GMT+12:00