
Leaderboard


Popular Content
Showing content with the highest reputation on 07/02/16 in all areas
-
Heaps of progress today; Weldy weldy Some 75x6 flat bar to tie in the horizontal and provide mounts for the seat frames, this size was chosen specifically because I had some in the steel rack... The passenger seatbelt stalk needed a mount that wasn't just a hole through 1.6mm steel. This is the bolted on engine cover.. the same thing was done factory on the drivers side engine cover so should be gold. Pretty much sorted interior wise. Next on the list is the bracing underneath to mount the other side of those chair brackets. This should be a nice wee lounge, I will set up some tables to go between the front and back seats on each side;4 points
-
Found the current owner through facebook and asked how it was going,hes looked after it well,all the mechanical have had a freshn up and a complete rewire on the front end.Glad to see it went to a good home.4 points
-
Design approval is all drawn up,just waiting for the LVVTA to come back with a plan.This weekend ive mounted the powersteer unit,but that wasnt without its own dramas.After abit of internet research i needed the ms112 steering column just for the end 'T' piece as the steering box is longer on the power model. Abit of a walk through for people who may want to do the conversion If your lucky enough to get a whole ms112,get the steering column,pump,steering box and lines. 1.take out the column from the ms6* .it needs to be completely stripped down,now is a good time to repack the steering bearings with grease (word of caution,the bottom bearing has about 40 small ball bearings,whack it out to hard the balls go everywhere ). 2.removing the ms112 end 'T' piece is alot easier,just undo the end circlip and pull it out 3. the two end 'T' pieces that attach to the steering box from the column.ms65 is alot longer 4.now put the end 'T' piece into the ms65 shaft.this is quite fiddly . 5.when fitting the steering unit the bottom arms need to be swaped over.the arms are on a tapered spline and will need to be pressed off,i used my works 50ton press but a small shop press should do it.also note the location were the arms were facing as the steering unit doesn't rotate 360. pretty much it,i think next time ill take photos of the process but any questions im more than happy to help. better pic for thread,a bunch of rusty crowns 2x ms65s and a crushed ms754 points
-
I needed some nails so I put together this nail reclaiming machine to salvage some from all the pallets lying around Porirua4 points
-
Technically didn't 'make' it, did paint it and assemble...............does that count hahaha.4 points
-
Have been trying a few more things with this engine. with more fairly disappointing results. / kinda boring update Firstly i brought some bigger cams, since going from the stock cams to kelford 193-b was quite a big improvement. have gone next step bigger with 193-c cams I initially installed them to the factory marks. which resulted in big loss in power everywhere. except the last 500rpm or so. ended up with the exhaust retarded 10degrees and the inlet advanced 20degrees. Which gained back most of the losses. but still slightly less power everywhere except right up top, over the smaller cams. Then I started to pull some of the car apart so could dial wheel the cams, to see if they were ground slightly off or anything. as was initially too lazy to do this. Got a bit carried away and pulled the head off and did some more port work, both on inlet and exhaust side. got my china on a copied some pictures of Hasselgren's work, who built atlantic 4age's back in the day. Back together with the cams dialed as they were, maybe some minor gains from the port work. nothing really measurable but definitely not a loss. But it turns out when i dial wheeled the cams, the inlet was way off. 20degrees retarded, which is 1 whole tooth on the cam wheel. Kelfords had managed to grind the cam 20 degrees off. So the whole time i thought it was running 20degrees advance, it was actually dialed to their recommended settings. No big drama, skipped the cambelt a tooth to regain the adjustment on the camgears. Dialed in 10degrees advance on the inlet. along with the 10retard on the exhaust cam. which just happens to be the same settings i was running the old 193-b cams at. After all that, some not bad gains through the midrange. but almost nothing up top over the smaller cams. something its restricting it making anymore peak power. ive pretty much tried everything bolt-on wise, so pointing the finger at head flow, larger valves maybe required to go any further Pink lines are old cams. Can see the rpm plot, the green (new cam) line starts to pull away slightly. plus its using more injector d/c for same fuel ratio. Indicates some gains. This is the top row of fuel map. bottom grey-ish line is old cams. top grey one is new cams. green line is different length trumpets on new cams. ignore anything below 4000rpm. Can see how gains are very minimal up top. Tbh is going the best it ever has. but not giving up just yet.. Oh and the light toda flywheel is awesome. revs so fast in lower gear now2 points
-
Give me a pm or a text, I think you've got my number, I shall spill all the beans, then when you buy one I can sell you a 4age and you can have the best of both worlds, lush fiat and maximum Toyota doort noises2 points
-
Fixed until the next thing breaks Big thank you list for all the work I 'appear' to have done to this car to date My Brother Kyle & his Partner Lisa for delivering the car in 2012 J A Davison Motor Engineer for gearbox assistance & oem part (previous owner once removed) Richard for hosting www.Avenger.co.nz Wier's for parts & spare cars Chris, Amanda, Lea, Kyle & Lucy Berkahn for painting / prepping / sanding & polishing the car over New Years Scrimy as well for lending a hand Nick @ ProTune Automotive for getting it on the road (more than once & sorting this head job out) Car & Boz for the emergency Headgasket 2 night's before Leadfoot Festival A&D Radiator Services for the re-cored Radiator Allan @ Agnew's Autos for the tappet reset on the fly on the way there Warwick for electrical Graham aka avengerparts on here for the Gaskets & assistance (10-5's Dad) Geoff aka sunbeam on here for parts, Gearbox & heater Hoses My workers for putting up with a car in a Wood-work shop once or twice over the last few years and my partner Amy who puts up with it all & I beleive enjoys the adventures and of course oldschool.co.nz for being lush2 points
-
You're in...2 points
-
Air cleaner fixing leaves a bit to to be desired esp if one of the bolts comes loose and ends up down the carby! I'm going to drill the head of each one so I can thread a piece of through so that will sort that issue
 1 point
 -
Oh yeah. I took this thing to nats a few months ago. Pics by CDL.1 point
-
I'll set it on fire for free1 point
-
Long range forecast looking good 10deg, cloud and sun 1 deg low overnight look forward to chilling by the fire1 point
-
^this indicator stuff what Bling said. I had a Marina that would die if you flashed the headlights, accompanied by smoke from the steering column shroud. Filthy dust and grease shorting it all out. You'd think having a Marina would be punishment enough *edit* Could be earths too...1 point
-
So I got given a Svord Peasant Knife It is OK but not purrfect as a folder so I decided to make a fixed blade out of it. Here is my work so far Dismantle knife Choose purple heart for handles Draw some pictures Draw some penises and cut them out Roughly shape handles I still need to give handles the final sanding Epoxy and pin blade and handles together Hit handles with danish oil Make sheath Make a second one for my son1 point
-
Have managed to source a new fuse holder, from a Celeste, to replace the melted one but don't have it yet. The car is currently with the auto sparky, hopefully I will hear from him tomorrow and the issues will all be simple ones. While the car has been going nowhere i decided to whip the side vents off and give them a bit of a tart up. They were in okay condition but look to have been repainted at some stage with some less than perfect masking and there were a couple of peely bits. after a quick sand on the worst bits: masked up: painted: back on the car I ended up getting impatient waiting for the right conditions and went ahead and painted them when it was a bit too cold, like a dick. So it took ages in front of a heater for the paint to go off and it has ended up a bit stipply (doesn't look quite as bad as the photo above IRL) and shinier than I wanted — it's a satin, should've maybe gone for full matte. Anyway, a bit of a cock up (especially after the ballache of masking them) but not the worst cock up ever. They look better than they did plus nice and clean and crisp. I can easily enough redo them when the weather is warmer with a flatter paint if they bother me.1 point
-
Starting to look knifeish1 point
-
Don't learn shit when you pay others to do it.1 point
-
I think I've managed to bodge it. I think the trick here though, is to never undo the pulley ever again, ever.1 point
-
So after a long weekend i shoulve ripped into this,i planned to but nothing happened other than pushing it outside for a wash.I have been in touch with the certifier in chch and told him that i would like to notch out the cross member,he has told me to go through the LVVTAs design approval process.So this weekend il be drawing up pictures of what i want to do and hopefully they come through and say i can do it.I have fitted the ms112 swaybar which is slightly longer than a ms65 one but it has the bend in it i need to clear the engine,also 16mm spacers needed to be made for it to line up.1 point
-
I got a bit of time to mess around doing some landscaping in the weekend. I also managed to get the basement closed in. UJ are happy TBH And there was even time to waterblast all the mud off the floor. Please forgive the poor photo. It was taken tonight under the FUCKING AWESOME lights... but the generator is now playing up so I've hauled it down to the workshop. I'll take a look at it Thursday1 point
-
I have some cool friends. One of them is pretty good at taking photos. Thanks rotahoe for these photos. U da bes. Qcr dirtmasters has taken priority last couple of weeks, time to get back into this. Need to do a couple of things and then start it up. Not sure I said but the reason hardly any exterior trims are on is that it requires a respray.1 point
-
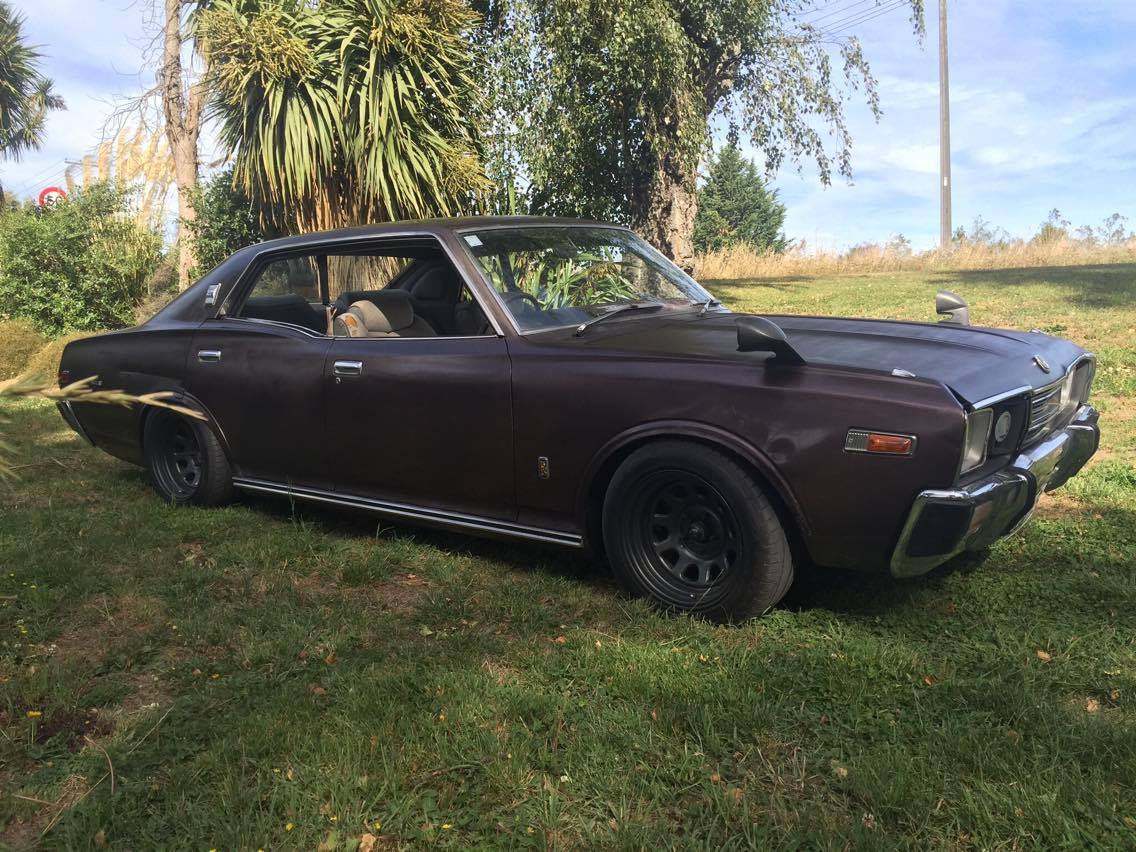
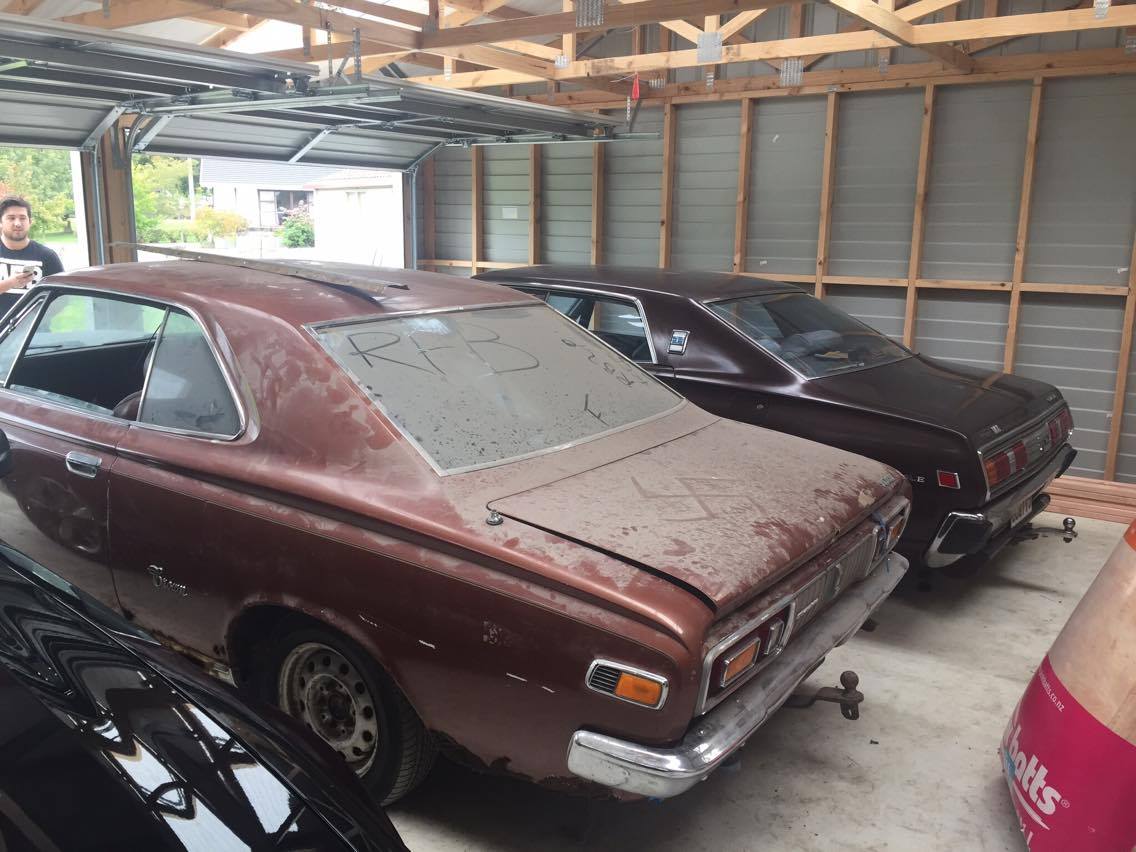
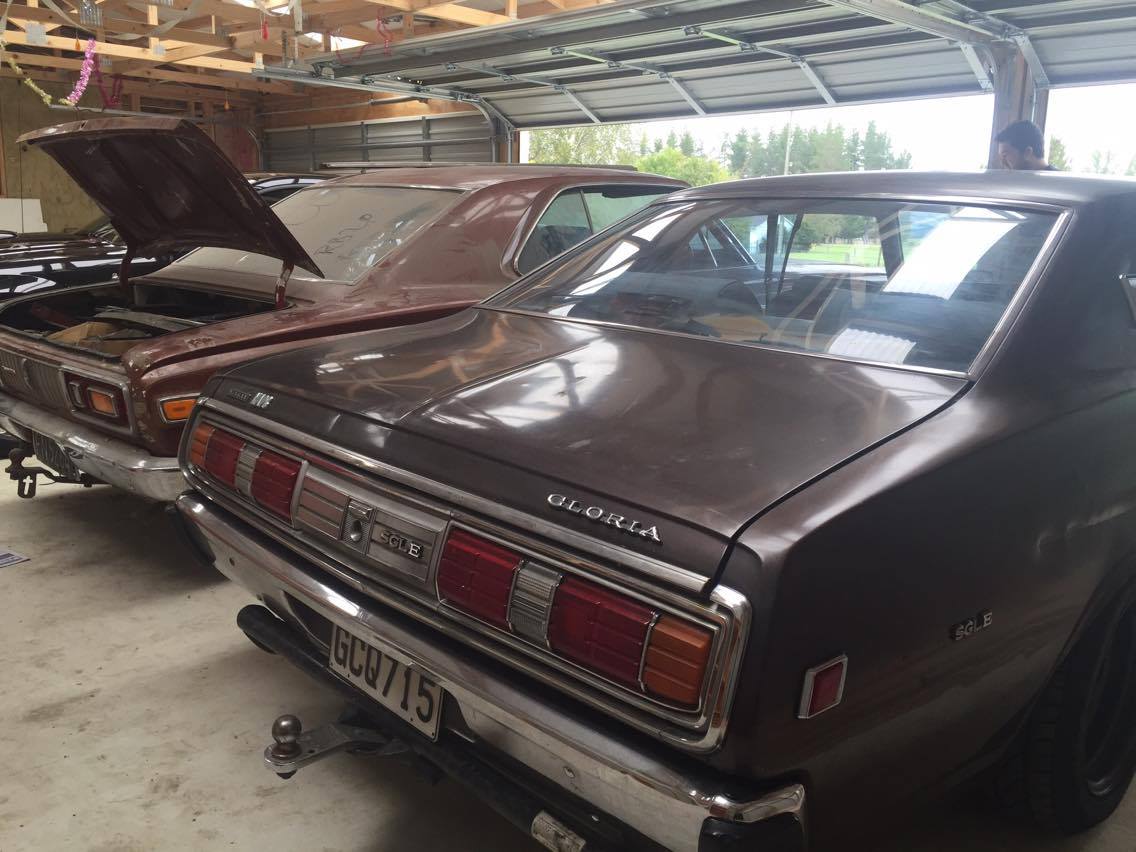
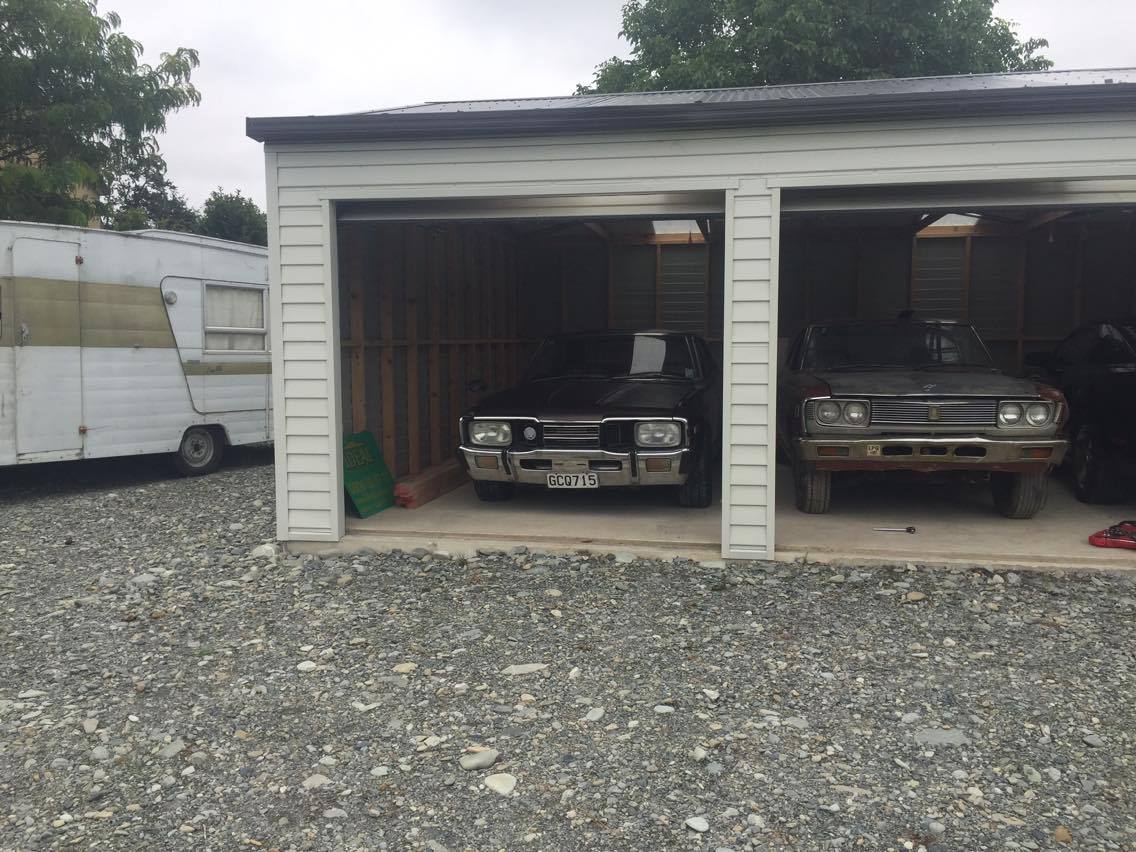
crown and Gloria about the same length
1 point
-
1 point
-
Maybe one of the last updates before it all gets chucked into storage for year while im away in Canada.i painted the rocker covers with black VHT wrinkle paint and i got the effect i wanted on the top and partially on the sides,the rest just gave a flat finish,i followed the instructions doing 3 heavy coats in a cross pattern,so now im not to sure on how to fix this,maybe put the covers on there edge? nearly there getting the retro 70's look that im after,should look sick in the bay of the crown1 point
-
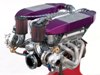
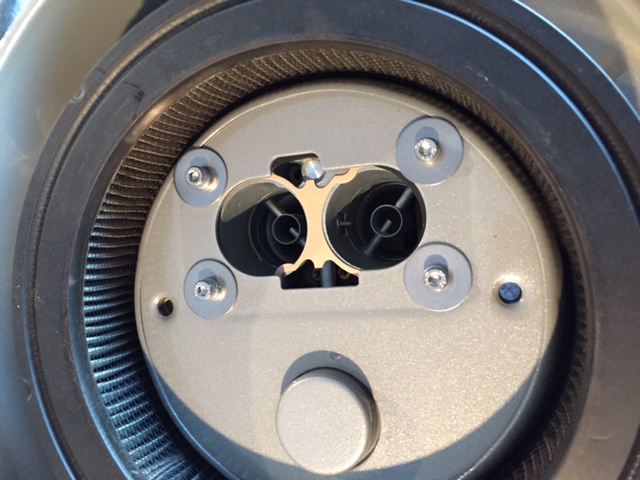
Picked up the 2jz in the weekend after sitting at the rebuilders for months on end.first thing was put it on the stand and try out the itbs and rocker covers.pretty happy with the first mockup fit.also got a new dslr camera for better pics but still trying to work out the settings so goal is to get all the parts made then put it in storage while im away in canada for a year then come back and rip into it comments/opinions/thoughts are most welcome1 point
-
A Honda B series powered Allegro has long been a guilty dream of mine. I figure if they pop the Honda motors into Minis left right and center, surely an Allegro wouldn't be that hard?1 point


This leaderboard is set to Auckland/GMT+12:00