
Leaderboard


Popular Content
Showing content with the highest reputation on 07/28/17 in all areas
-
2017-07-28_06-50-13 by sheepers, on Flickr 2017-07-28_06-50-30 by sheepers, on Flickr9 points
-
had some help last night with the windows, cost me a fare few beers but sooooooo much easier!! Was dreading the rear window, but with 3 lads applying even pressure on the out side and me pulling the cord ( I use a old piece of plastic coated washing line) it went in smooth as butter. plus some dish soap for lube.The front one was a little harder, lucky for me my car has a massive hole in the roof and I could just stand up on the seats and give the screen a good push or thump which helped alot.yeah.7 points
-
Eagers rubbed too much so had to splurge out on some brand new Yokohama A539, which are by far the best tyre I've driven on considering its still a street orientated tyre. Still look aggressive and ride super smooth and nicely. Don't take too long to warm up either and stick reaaaaaally well even in a car with a solid axle and no 4 link lol
 4 points
 -
its getting difficult to take pictures that show any progress but things are trucking along right nice. the roof is really complex with valleys joining at weird angles and the guys have been getting all that shit sorted. hats off to them because i would have taken years to figure it all out and get the valley boards in the right place. roof. so everything is on site for the roof and everything is just about ready for the roofing guys to put the tin on. i think they're going to start next week but they are a bit behind due to the rain fucking them around so they start when they start. the builders are right now doing the last bits of framing that join the new house to the shed so we probably wont have a shed roof tonight, just a tarp. yay. here is a picture of the front entrance way roof. its has 2 billion meters of timber in it for some reason. this is nearly finished then it gets ply over the top. in the background you can see hardiboard on the walls, we did that around the front of the house to reduce noise a bit. 2017-07-27_08-03-20 by sheepers, on Flickr4 points
-
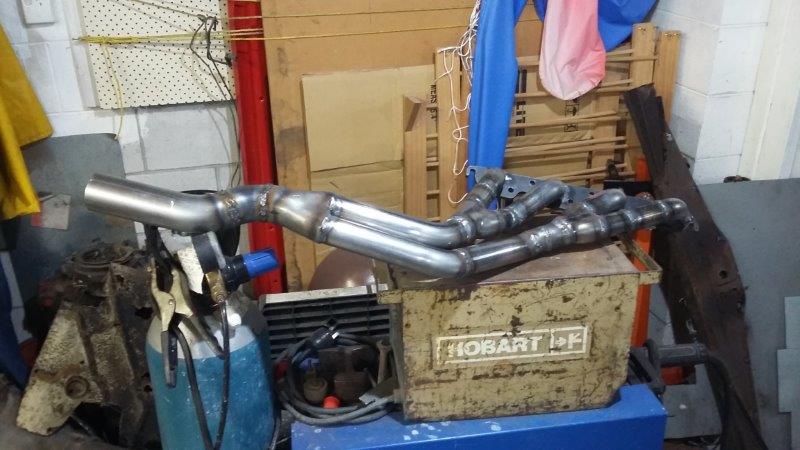
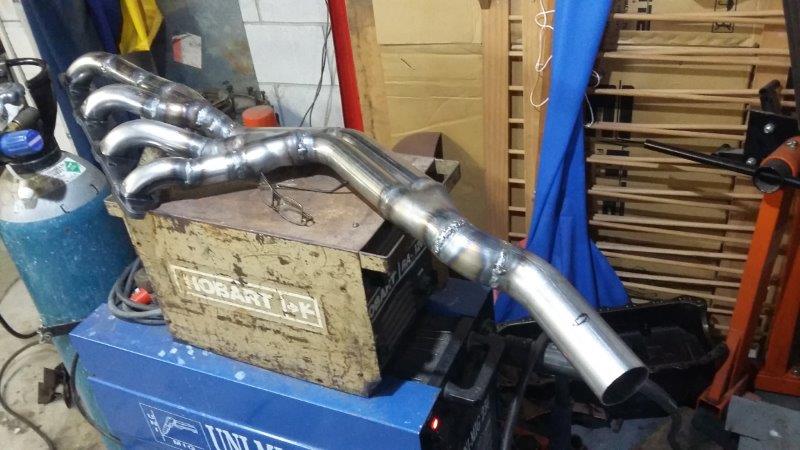
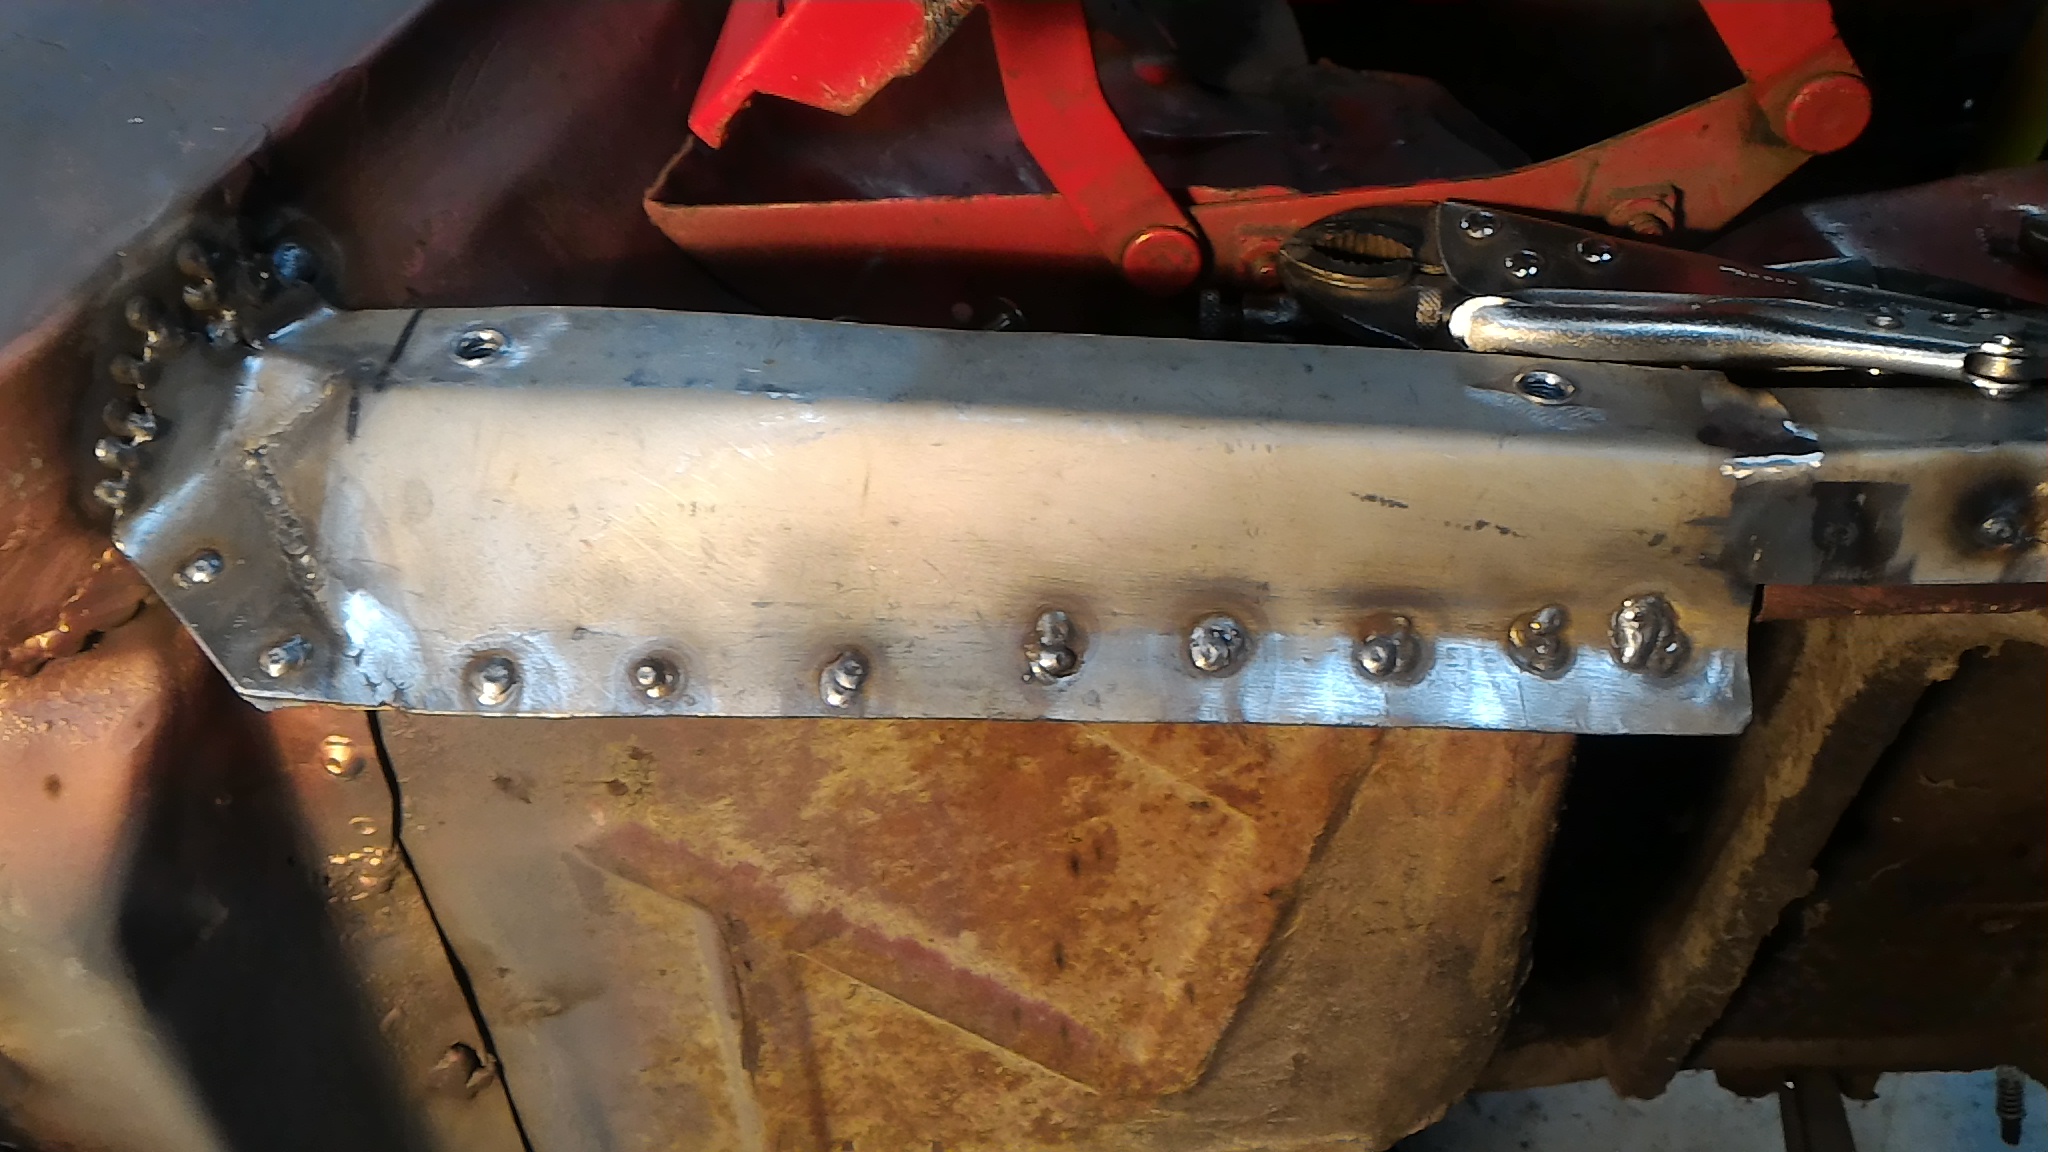
Headers are done. Drive shaft built, I had the original commodore one, and a second one that came with the diff. All that was saved was the original commodore yoke, everything else is new. The shaft is 3 inch so good for 6800 rpm or about 300mph in top gear (6800 rpm for the shaft). Should be good. New U bolts also turned up today from rare spares. I stuffed my back lifting 25kg bags of concrete in a big hurry in the rain today so I'm not climbing under the car tonight. A few photos of the drivers side. I am aware that the primary Y connections are wrong. There is not a lot of space!!!!!! The small drop in HP wont be noticed, power to weight should be similar to a current 325 kW HSV Commodore.
3 points
-
Got a wing from Japan and the joker saw on Instagram so sent me these stickers3 points
-
The dealer replaced the clutch mast in japan, left me a jdm spanner lol3 points
-
Done. Scarles, so you just know it'll go hard for what it is. Still in the sky at the moment, will drop it down tomorrow and assess what the arch sitch is.2 points
-
Blind Stupidity is the answer. And if I knew how much there was to change, not to mention rust to fix I probably wouldn't have bought it. I have built a few cars over the years. V8 conversions into HQ Holdens is a piece of cake, stand back and throw it in the hole and away you go. My Firebird was a big mechano set when I bought it, but most parts can be bought off the shelf. This is the hardest project by far because everything has to be changed to fit. My bloody mindedness also made things harder, I will have a column shift, the headers will go down beside the engine not through the inner guards.............. I have got a bit discouraged a couple of times, when I bought the car 13 years ago I could have got a really good HZ wagon for $3k and had it finished years ago. Then I think no one else will have a car like this and really there hasn't been that much money go into it. I'm so close that not finishing now is not an option.2 points
-
How about aim to be at Stoddard after 8:30am, leave at 9am. Should get us to Smales before it gets too busy, we might even be able to score some prime real estate in the top carpark for once.2 points
-
This is going to be the single greatest "why the fuck would you do that!? And if you must, why didnt you do it the sensible way using xyz part?" project and im loving it p.s. solidworks had their lawyers send an email telling me to stop using their cracked software and pay them $12,200, so i might join you in learning fusion 3602 points
-
2 points
-
I'm going to drag myself from the slums, maybe @Matteybean coming from even further South could join in?2 points
-
Dont chop it! See if the stacked boys can do plastics in a container from japland maybe?2 points
-
I just realised I havent given much of a rundown! In Sept 2016 I destroyed a gearbox at Hampton Downs, literally turned 3rd gear super smooth. December 2016 we went to oldschool drags with new gearset in W58, I did 3 runs and it got a whine, my old man did a run and she blew a oil line for the oil relocator February 2017 we bought a R151 gearbox and in March 2017 fitted it, I was going to do a Timelapse, recorded it all but forgot to do anything with it. April 2017 I bought the Altezza and started drifting in that (another thread), this went for recert and failed on a bunch of stuff one being steering too heavy - powersteering needed to be fitted. June 2017 we sourced a rack and got it rebuilt, I found some electric PS pumps as factory manual pump would not fit. Also got Traction brackets, adjustable 4 link, adjustable panhard rod and T3 caster arms July 2017 We got GSS to come and sort the lines while I mounted up things behind the guy (literally yesterday). made seat rails and fitted Bride, and 380mm Dish steering wheel with quick release, This saturday I am taking the car to Nothn Fancy Drift day at Meremere to to give it a run in and see if we fixed stuff.2 points
-
Nice project! Looking forward to see what you come up with when its time to turn them to aluminium. Took me probably 50 castings to get my process reliable so expect some setbacks. Well worth it in the end though!
2 points
-
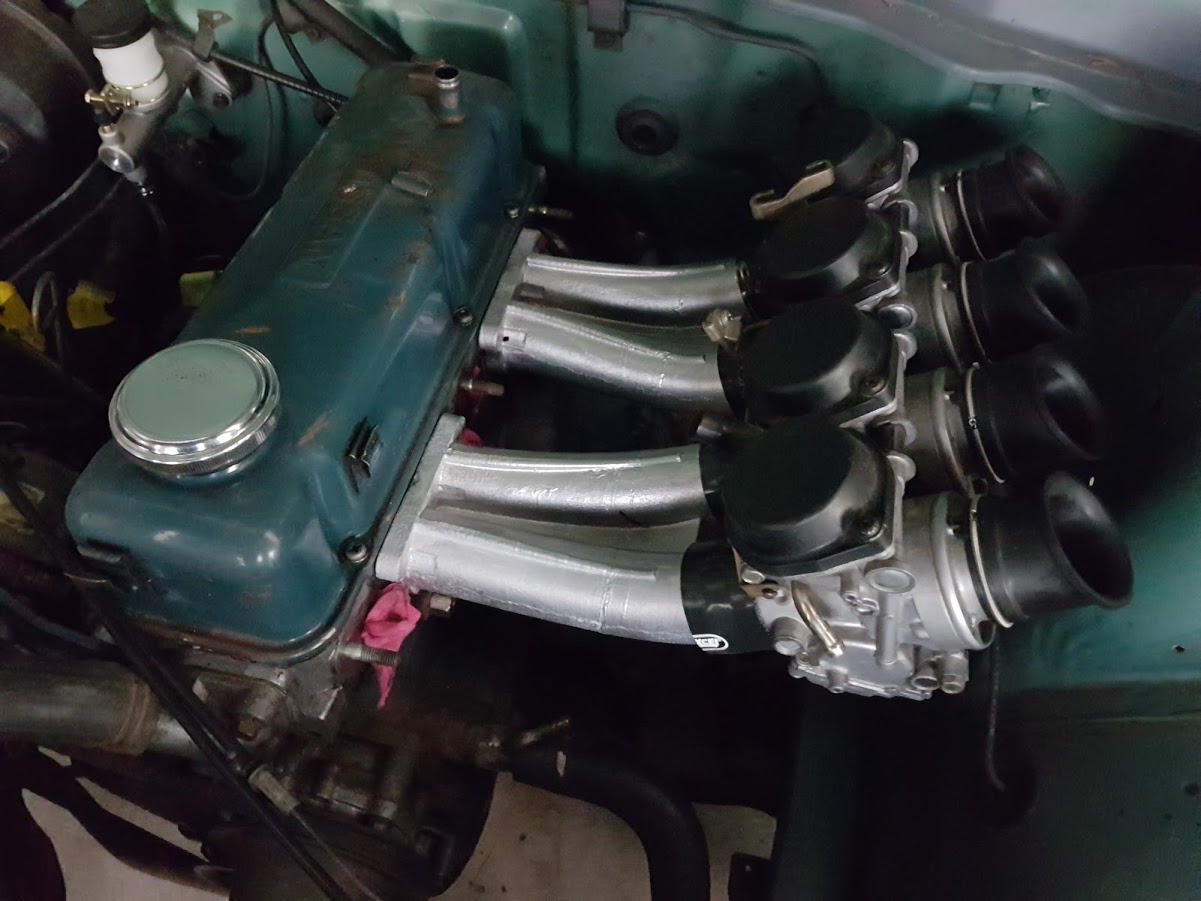
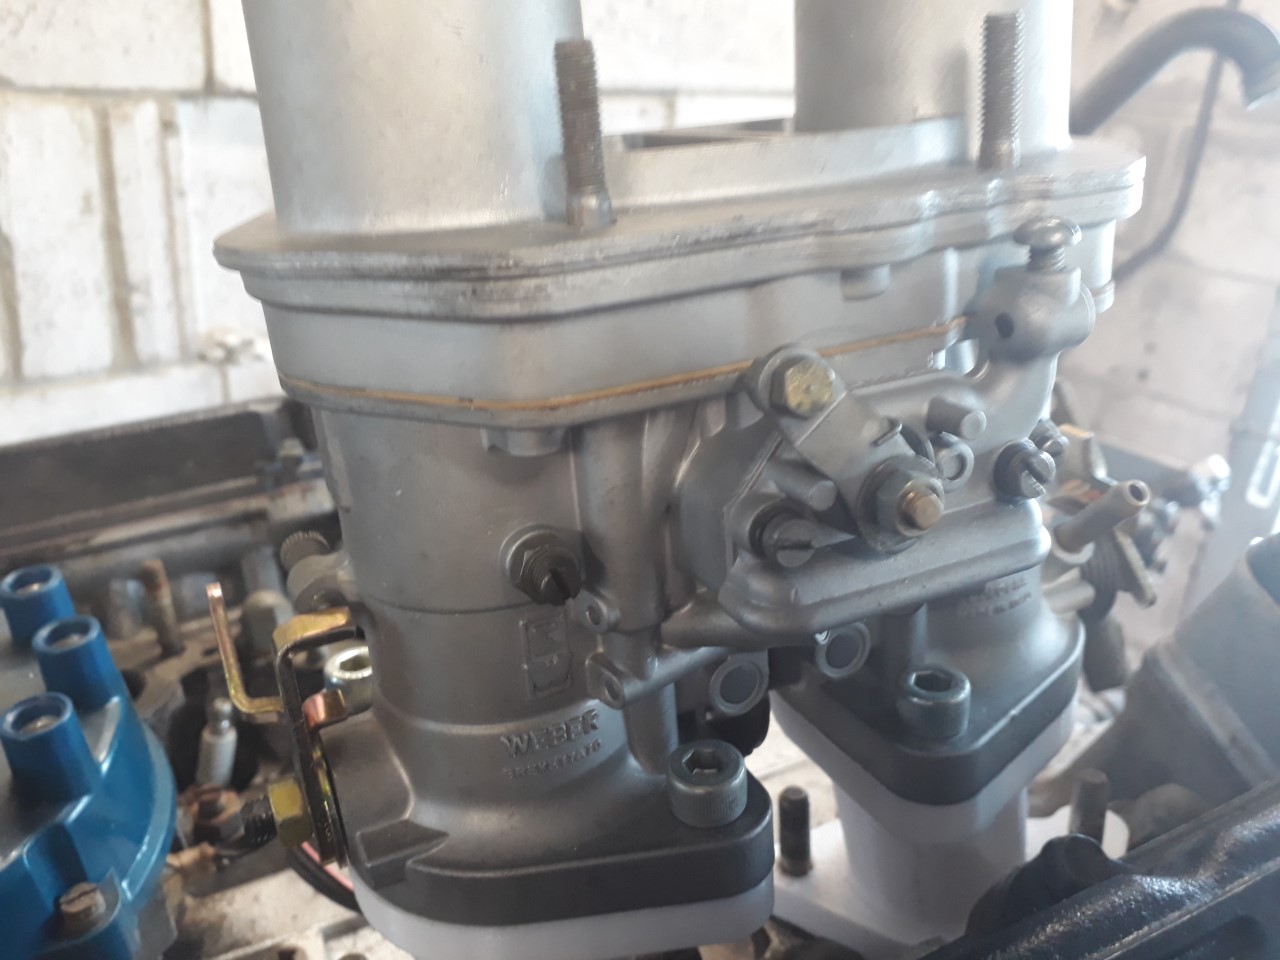
Now, Will it fit? Well, by crikey, it might just work... Of course it's all good having one side line up, the real test is when #2 is made and whether or not it will simultaneously line up. On the desk it looks plausible. And with some minor filing of the holes on the cylinder head flanges (I haven't fixed the spacing issue with the stud holes) they even fit on the head, with the ID on the intake runner being on the money with the intake port on the cylinder head. It all looks plausible, but just to be sure I drop some bolts of conveniently the right diameter through the holes to see if they line up. Magic, The butterflies open like they should and it appears the intake runner and bottom of the carb line up as they should, not bad for a rookie if I do say so myself.
2 points
-
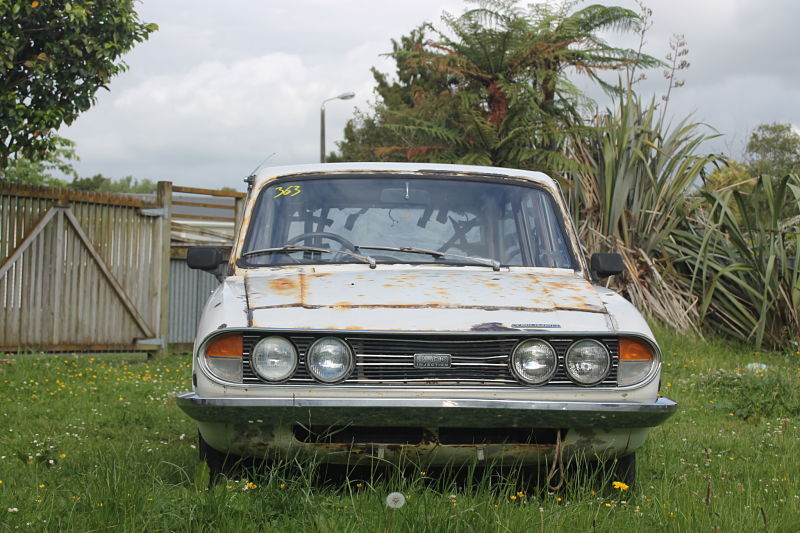
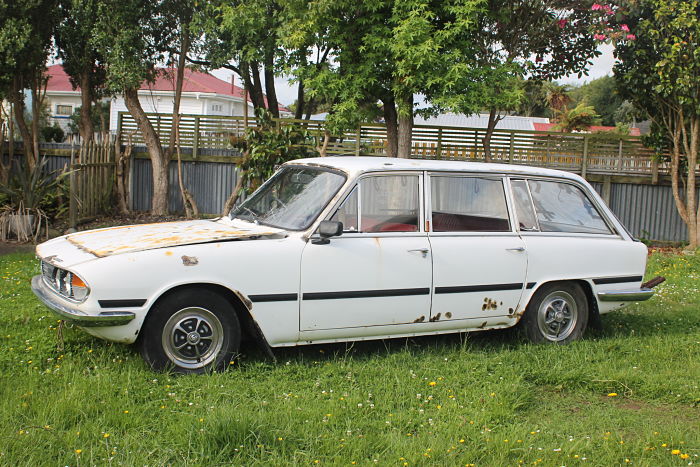
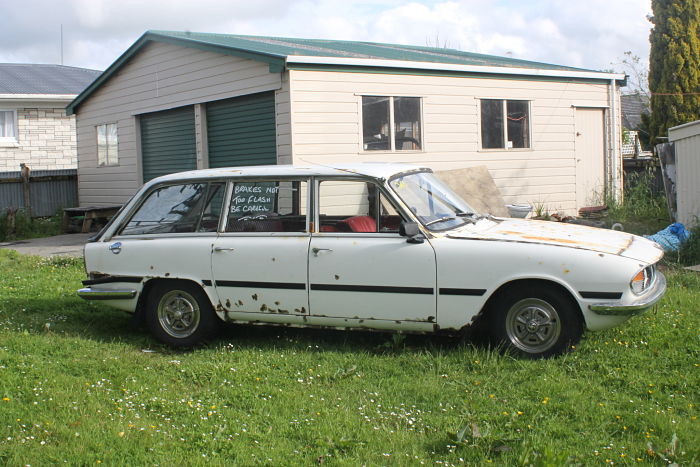
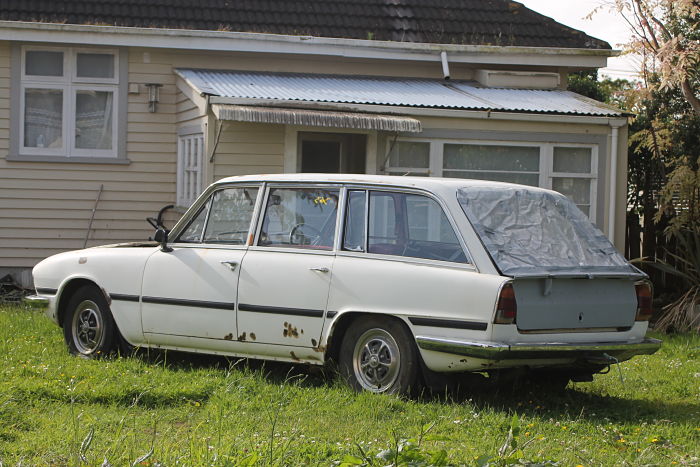
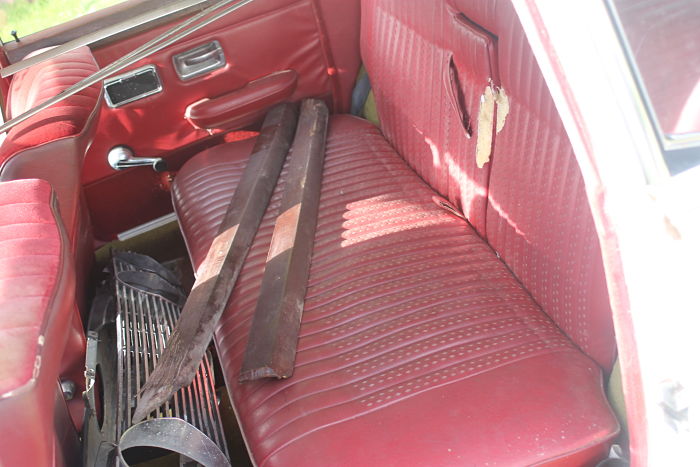
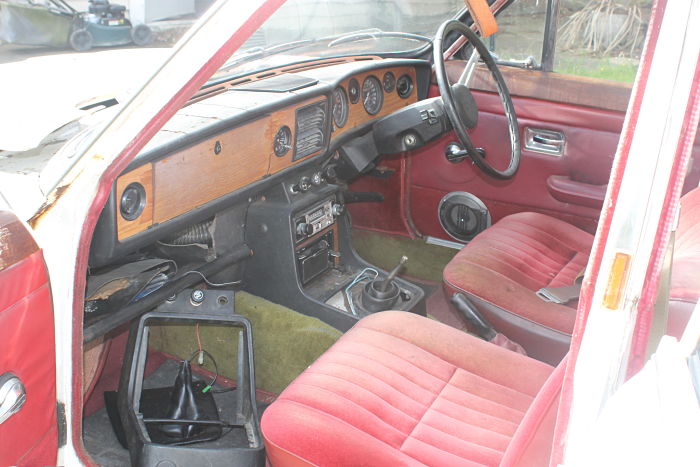
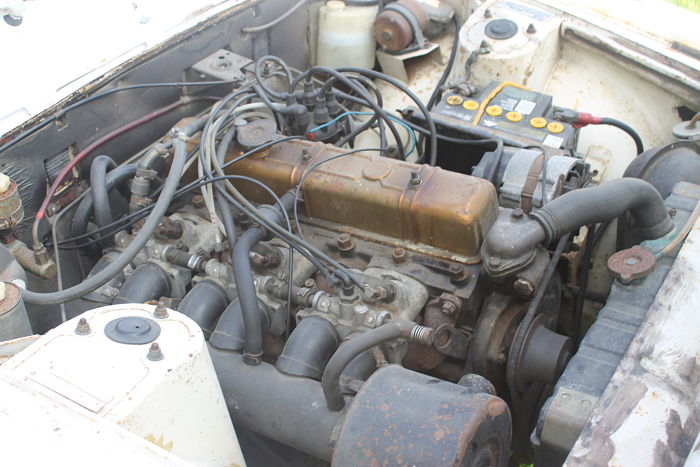
So after searching and searching i finally found my self one of these fine wagons! i had a few wanted posts out! and finally the long awaited day came! were i got a text from a guy who said he has one for sale! the car was located in the south island in bluff! which was a fair away from were i am located. we agreed on a price then i sorted a transport company to bring it over! i payed way to much for it! but it dident bother me at all! just wanted to find one so bad. so when it first arrived i was just so dam happy with it! It definitely needs some work but its all repairable! the previous owner got the tailgate repaired and did a few small jobs, but thats about it. he just said he drove it for years until it got to rough then he replaced it with a saloon one, The car got imported in 1972 so it was only registered in England for one year! anyway im just pretty excited for this one! favorite wagon i have had so far! im so so eager to have it on the road! i wanna just be doing road trips and camping missions in it already haha! so i guess at this stage i aint gonna go through all the effort and restore it! im just gonna fix all the rust and get everything working properly! just enough to get it on the road! i wont bother respraying it at this stage yet either! ill just to paint touch up nothing wrong with abit of patina! i recently purchased some nos panels too! so later down the track ill strip it down and give it the love it needs! the interior is not the best either ill probably deal with it for now, and eventually get it retrimmed to the nice tan color they come in! The car runs! but not great haha! still haven't decided what im gonna do about this, i think i might just chuck some carbs on it just to get it up and running right! i already have a pi saloon, so one unreliable cars enough for now! What should i do for wheels? i was thinking of getting some 15 inch ssr formula mesh wheels from japan? i see that Beavers old 2000 wagon had some banded steels on! that looked pretty cool! i fitted some 14x8 ssr starsharks on the other day, im not fully convinced they look great yet tho! they look too shiny for it haha! but my mind might change once the cars lowered! some hopefully by my next update this car will be on the road! but my deadline is for wagnats next year! which is ages away! i would take the Herald wagon but i think thats too small to fit a mattress in the back haha! should be good either way! Mind the long lawns haha!
1 point
-
All my old photos got deleted from hosting, so rehosted them on Imgur, My old man in the background, we built this together, all started with me having a carina shell and going back to uni so I gave it to him, he decided to put the turbo v8 in it and the rest is history. See you oldschoolers Saturday 11th December1 point
-
You could probably say that with a lot of our projects really. The manifold looks bloody good. Bet it is satisfying to see the manifold all completed1 point
-
Sweet whip man. See you at Wagnats! Please leave the note on the window about the brakes as well. It's a period correct accessory.1 point
-
The cat loves the wagons!
1 point
-
Likely because the LED light source is not in the correct position for the reflector design. Fail for: " the light beam produces an incorrect beam pattern, is not focused, or is reduced or altered"1 point
-
Too many results for Rust on OS So I'll paste this here : Was looking for the Fuel Tank thread where they did something similar1 point
-
lel, rear sticker actually but now you mention it1 point
-
Make fibreglass replacements by molding originals...? I've been tempted to try this myself, but prob better off talking to fibreglass company as I'd fuck it up and be left with nothing...1 point
-
Yeah me too. Been busy working on my vertical metres! Not sure if I'll go to Highlands for anything until after ski season. Or until the snow melts.1 point
-
The weekend after is also the 4 and rotary champs in timaru... Who's going on keen on heading over for the weekend?1 point
-
Keen! Well, ill be here and going so all about getting together.1 point
-
Got there in the end after about 3 months of set backs. In the shop for a wof thats why bonnet up lowered- -3inch in the rear on blocks and shortened Mazda 626 shocks -2inch soon to come
1 point
-
Dunno why I've not seen this before, so fucking sweet. Kudos.1 point
-
Rad. @kyteler @Toddy415 @igor @gettinroundtuit @Mazda Dave1 point
-
At the risk of sounding like a teenage girl, but OMG!has it been THAT long??!I guess so. this is a shit of a job.I did get one side window in, woo who.closer.you're next sucker!1 point
-
Hey guys and girls! I'm running an event on November 18 called the Hamilton NerdFest which will be at Zeal (Ward Lane, Hamilton CBD) between 12-4pm which will house a record fair, comic book fair, retro gaming zone, sneaker exhibition etc. Basically a bunch of us nerdy collectors will be there with a LOT of content from the 70s-00s. I think it will be a hit and I'm currenly sorting consent to block off a part of the roadway on Ward Lane What would it take to have a handful of cars park up for part of the afternoon (if the roadway consent goes through) and alternatively on Ward Street which is by the venue? I would really love to have some automobiles that reflect the 'retro' theme so just wanting to know what is required to make it happen! Cheers1 point
-
1 point
-
Meet at Stoddard Burgerboes at some point, cruise through the tunnel and over the bridge?1 point
-
Because everyone likes laughing at my misfortune, let's have another look at those big-end bearings. Yeah. The crank was also scored seven ways from Sunday, and the machinists next door were reluctant to skim it, so now it's a big ole paperweight. These were the worst ones but pretty much every single journal was rooted. We did work out the root cause of all this pain - the factory oil pump had eaten itself, apparently a common thing with the 1st gen motors. I never realized the 4A-GE also suffered from this weak point - it's a common thing to occur on the old Mazda B6Ts as well, although those tend to blow the relief valve and spring first. Lots of deep scoring against the cover: Take note of the area around the vivid mark: In the meantime, things got busy... and my wallet got empty. We acquired a donor 4A-GZE bottom end (from an AE101 this time) and Karl attempted to make a good one out of two. The end result: my block, pistons and sump + donor crank and rods = this. He also sourced a brand new oil pump from Toyota and a couple of other bits and pieces. Head has been sent for a skim, as there was a 0.004" bow in the face (eek). Toyota purists may note the AE101 4A-GZE rods are actually weaker than the preceding AW11/AE92 4A-GZE rods, but I was assured that for my application it wouldn't make a shred of difference. Different story if I was planning to go 7A and/or turbo I suppose. The first photo below should answer the age-old question of whether 1st gen 4A-GZE (AW11) blocks were 7-rib or 3-rib. Generic oil filter for the running in period. Better get more than 100,000km out of this shiny new TGP pump! Thanks to fellow oldschool member @Dell'orto I now have a SC12 from an AE101. They look very similar at first glance to the one that came off the AW11 but note the radius of each pulley face; AE101's is slightly smaller. If this translates into a slight boost increase, it won't be a bad thing I'm sure. When I next go back to the workshop I'll dig the verniers out and compare the inner diameter of each pulley, but I'm pretty confident they are different sizes, and the Toyota wizards on the internet also seem to indicate the same. This clutch also arrived. Sadly, Toyota no longer stocks a genuine clutch kit for the AW11 SC Next step is to speak to Mark at Toyota to see if I can find a suitable 1.1mm or thicker MLS head gasket before the engine can be fully reassembled. And do some more overtime in the mines to pay for all this faffing about. Discuss the colossal fail here: //oldschool.co.nz/index.php?/topic/49412-80s-kid-part-ii-eds-aw11-sc-chit-chat/1 point
-
I've fixed the first post so the pictures actually work now. I've put the radiator support panel on and started bolting everything up. I thought I probably should turn it over since its been sitting for so long. With glens help I chucked the battery cables on and it fired up with a good dose of ether. Thats probably going to be all I do on it for the next few months1 point
-
I fitted the spring today without too much drama I also replaced the sway bar bushes too. The lights turned up from aliexpress last week I mounted them today and ran out light so I'll wire them up tomorrow1 point
-
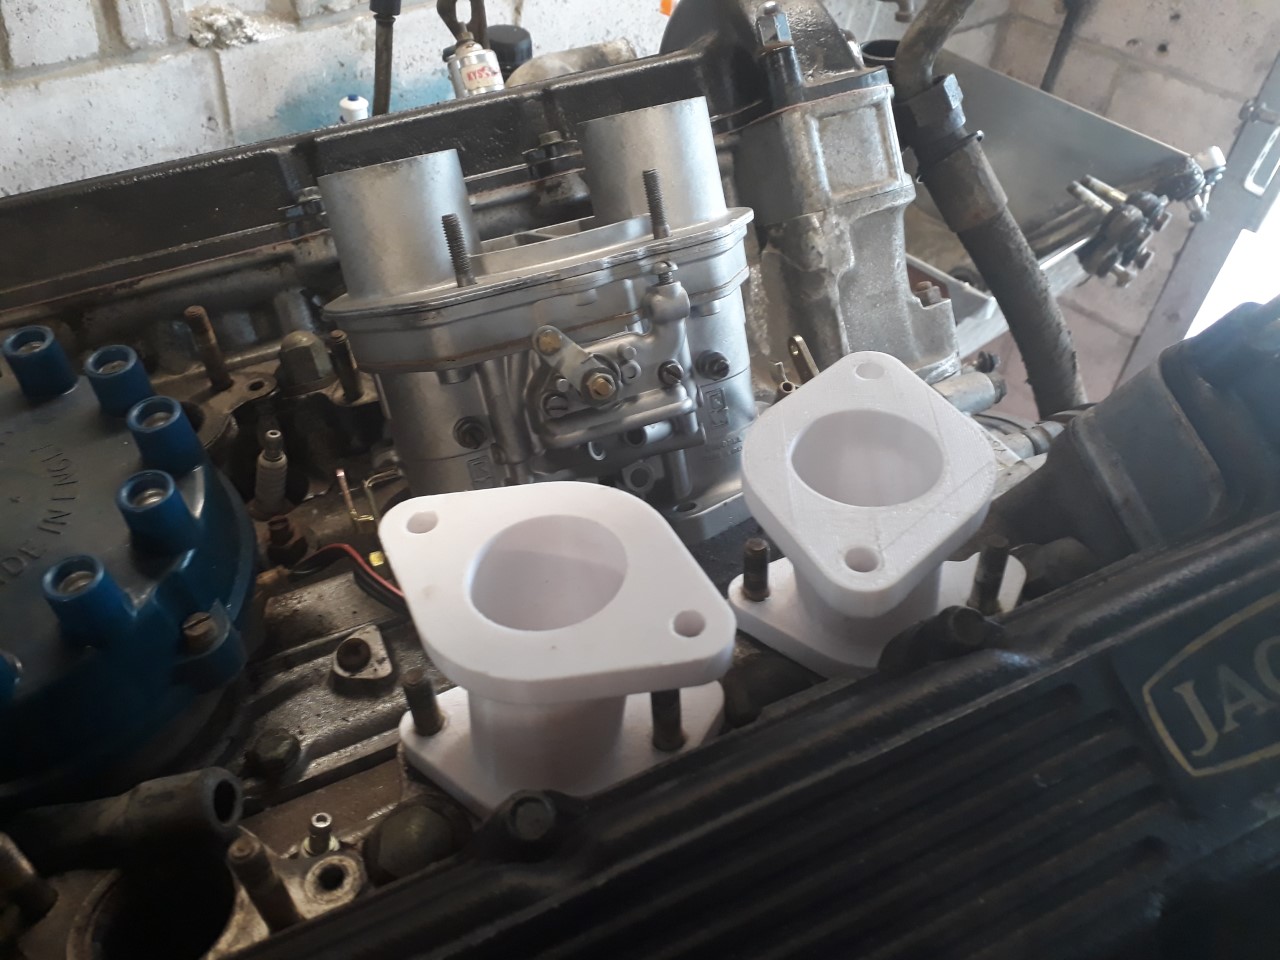
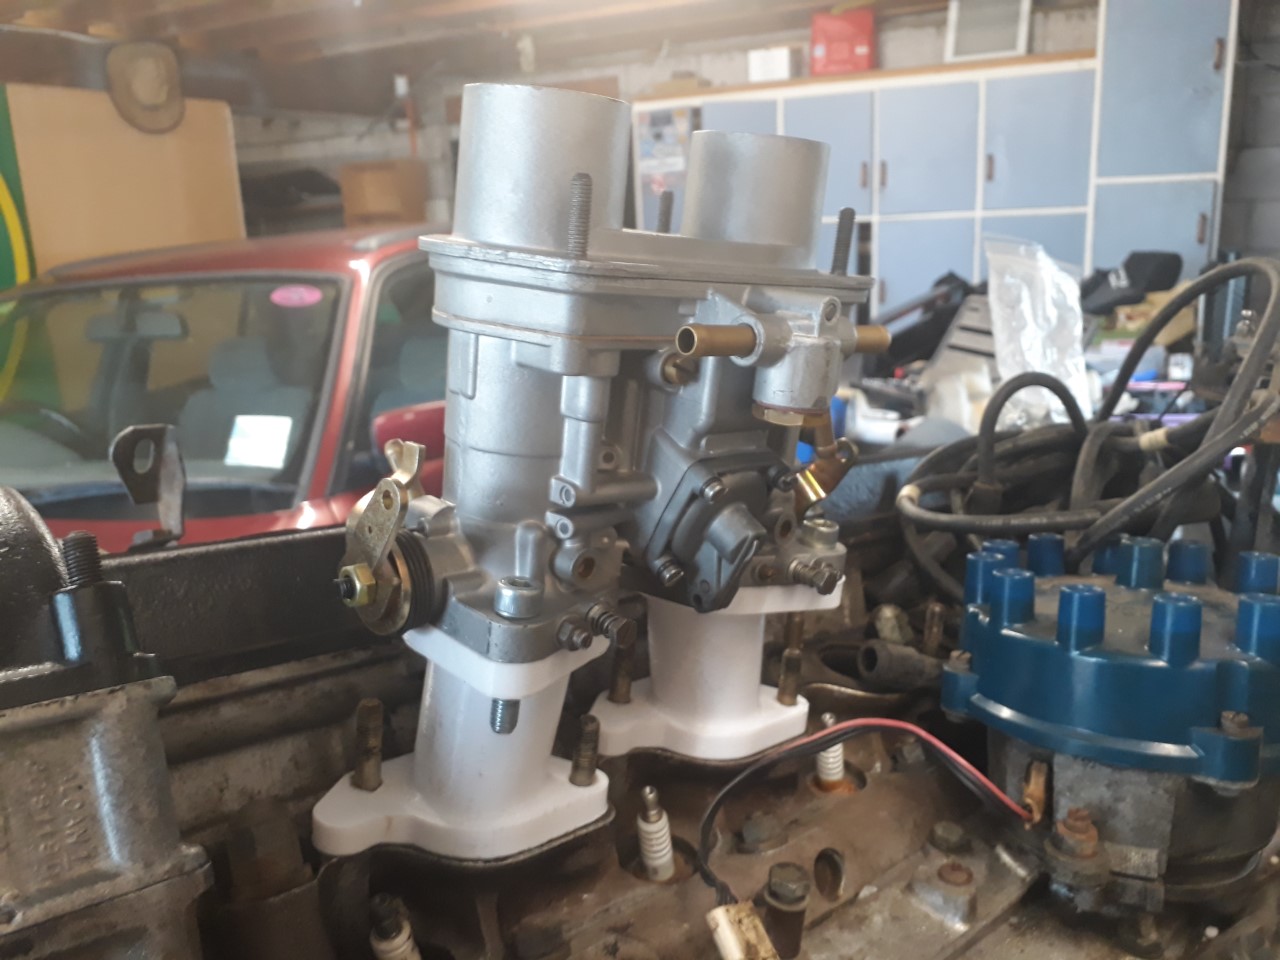
Anyway, back to CAD. When you don't know what you are doing and someone tells you that you need to 'loft' the two holes in the flanges together to make it one part and provide the intake runner, you wonder to yourself, What the fuck is a loft? Google tells you that it is the button that joins 2 shapes on 2 different planes pretty much, cool....where's that button? Found it! (there was a bit of trail and error during this bit while I worked out what the fuck was going on but got there in the end) I then managed, after a couple of hours, to turn two into six. Each one of these is different, no two are the same. Then, again thanks to Ned and his 3D printer, six digital things turned into one real life thing.
1 point
-
Overdue an update! Wasn't happy with the engine mount setup I had. The A-series to K-series mount adaptors I got came with some rubber mounts that were gradually deforming just having had the weight of the engine on them, not even put any torque through them yet. Grabbed some Landy v8 ones from ebay as they were the same depth but much more solid, see?; Next on the list was brakes. Car should have a decent amount of go, so wanted some stop to match. Plumped for the MRP kit http://www.mrpltd.co.nz/product/kp61-starlet-big-brake-kit/ rather than faff around with building something up myself, the KP has a weird system where an offset disk bolts to the back of the hub, bugger mucking about with that. Plus these are pimppppp; Old: New: Only pain with them is I specifically ordered a setup to fit behind 13" wheels and they don't fit behind my 13" wheels. The WORKs have an indented lip on the inside barrel that interferes with the caliper. Got some 25mm bolt on spacers to help with clearance, but definitely going to need some serious arch tickling with them on. Problem for future me. One job I've been putting off for ages is finishing the dash wiring. Bit the bullet today and sorted it; Now have working oil pressure warning light, charge light, and check engine light. Pleased. Hate getting my head around this sort of thing - ended up bringing in a fused common 12v IGN feed to the back of the gauge to run the new circuits through, since they use a switched earth to complete the light circuit rather than the common earth arrangement that the stock starlet dash uses. I've got a nice custom 10k RPM tacho setup coming that will also tee off of that IGN, so saved myself some work there too. Left on the to-do list in my head: -Wire in new tacho when it arrives -Finish fan switch setup (waiting on a part), fit rad and fans back in, fill with coolant -Fill and bleed brakes -Gearbox and diff oil -Fit spacers and front wheels, roll arches -Clean and refit interior -Refit front panels and fender mirrors -Check all suspension and brake bolts are tight ..think that's about it? Sweet1 point
-
It was exactly the same process here. I opted to rosette weld the back part of each one with the mig because the thicknesses were adding up here and it was very difficult to get in behind to clean the surface which the spot welder really needs to function. So I punched the holes, clamped it up, Welded it (this is the other side because I forgot to take a photo of this side) And ground it back nicely.You can also see the stitches I did to join it to the cowl. And this is the final product. I didn't bother taking a photo of the shut lines because they would just look exactly the same as all the other shut line photos I've already put up but rest assured they look good. I also finished extending the bottom flanges ready for some riv-nuts tomorrow (why do I bother saying that anymore?).
1 point
-
sky stix. 2017-07-14_01-32-02 by sheepers, on Flickr 2017-07-14_04-34-22 by sheepers, on Flickr 2017-07-14_04-34-30 by sheepers, on Flickr 2017-07-14_04-34-40 by sheepers, on Flickr1 point
-
and now for some real fun.being the incredible tightass I am, I'd only orders enough trim clips that I needed, thinking I'll just reuse the old ones. Well the old ones look like shit, very rusty shit. I also needed to clean the rust off the window scraper clips for the door glass and the metric nut only had a handfull of these in stock.So, electrolysis is my new favorite word! I was talking to the acid stripper guys about these small parts but he said the acids can take the carbon out of the spring steel and ruin them, then I remembered reading about electrolysis on OS,did some research and came up with this.dissolve some of this in water.fashion a crude metal tray to hold the small clips, optain metal bar for positive side.hook up 12volt battery charger and watch the fun begin.this was after 2 hours, didn't do a whole lot to the clips but sure cleaned up the metal tray!so I left it going all day in a quite corner at work, before/\/\and after/\/\. seemed to flash rust while drying, so I gave em a quick wire wheel and painted them last night.1 point
-
So talking to an old Barry from the VCC today and he made me an interesting offer. That If we have a meet the coincides with the Wanaka PH breakfast we can all go back to his place afterwards and he will teach us how to drive his model T truck and let us hoon it around his farm. So I have never personally driven a Model T before but I'm super keen to have a go. Anyone else interested? Again, we are thinking sometime in Spring or Summer.1 point
-
1 point
-
Long time lurker but I may be able to help here. I run drift days mostly based out of Taupo, we have done a number of days where what we have done is split the field in half and dont 1 group of drift and 1 group of grip (usually for a bunch of people who want to go play together or from a club who dont feel they will have the numbers to support a day on there own) so am happy to help out on that sort of front.1 point


This leaderboard is set to Auckland/GMT+12:00