
Leaderboard


.thumb.jpeg.384ff72c8d2b0ee0d34a7bdedb55bdcf.jpeg)

Popular Content
Showing content with the highest reputation on 08/07/14 in all areas
-
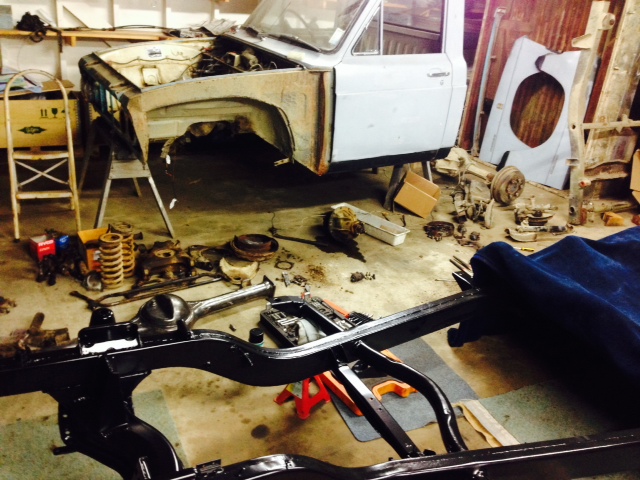
Anyway, the spring platforms ended up being a little bit off, and not allowing the spring to sit flat against each surface (top and bottom) with the spring fully uncompressed... as we overcompensated somewhat for the diff movement under compression. This resulted in not having enough droop travel when the spring seated flat when under some compression. So this evening sheepers popped around and modified the location of the platforms. Now it all sits as it should, with totally acceptable droop and compression travel. Also, other things: IMG_4533 by Richard Opie, on Flickr Bearings pressed onto axles, now! IMG_4559 by Richard Opie, on Flickr New Bilstein rear shocks, acquired! IMG_4569 by Richard Opie, on Flickr This is a TRD 2way LSD center. T code 4.3:1 ratio. Lush. IMG_4578 by Richard Opie, on Flickr Stack of goodies, new carrier bearings, new pinion bearings and a new crush tube. Diff carrier has been acid dipped and I'll paint it prior to assembly. IMG_4553 by Richard Opie, on Flickr On it's wheels for the time being... it's been a while!!! But happy with the height, and especially the room I now have to play with in the rear guards with the narrower diff.14 points
-
A workmate has asked us to make a bait launcher for him so here is some progress. t 2" ball valve! hat to take the end of the lathe off to get barrel in... Adapter from valve to barrel . More pics to come ...5 points
-
Started on the 1st stage of the rear strut tower, markin shit up and cutting shit out! Half done with grinder and half done with plasma cutter for those hard to reach spots. IMG_1322 by postlematt, on Flickr IMG_1311 by postlematt, on Flickr IMG_1320 by postlematt, on Flickr Im going to use part of the original shock towers as support/bracing then will reinforce it with some 1.6 zintec. IMG_1341 by postlematt, on Flickr Worked out the height the new towers will be set at IMG_1328 by postlematt, on Flickr IMG_1337 by postlematt, on Flickr IMG_1335 by postlematt, on Flickr Some of the left overs "weight reduction" IMG_1333 by postlematt, on Flickr stage one complete! Cheers Matt3 points
-
Done a few small bits and pieces lately. Nothing that exciting as a) it's fucking cold and have zero motivation/heaps of other stz going on lately rally car, rallying, having a girlfriend 4 hrs away and a drinking problem is succeeding excellently at emptying my bank account a couple days after each paycheck.. Oh yeah and new reyums for new daily/towcar (just thought I'd share) just need to get it tinted now.. New shed is super lush as well Bought a new racetech seat for this thing as my other seats are currently living in the rally car. Hopefully won't be forever but with the goal of going fast on backroads/doing targa eventually I thought it would be better to spend the money on safety.. Bit annoyed as it was advertised as good condition but I'd call it rough at best. Heaps of holes in fabric and is dirty as he'll. Think I'll be ringing up racetech and ordering a new cover to male this look brand new again. It's a 4000WHR (wide head restraint) and is slightly challenging to fit in the hole. Need to cut out tunnel and replace with panel for seat mounting. Just need to find some time and motivation. Mounted the heater some time ago with sweet little brackets and lots of cap screws/rivnuts Also properly mounted my gear shifter thingy with stainless cap screws and all the correct fasteners. Spent like $200 on fasteners so far so will see plenty more stainless cap screws and rivnuts as this car progresses Starting to design all the linkages and shifting mechanisms in my head but trying to hold off modeling them until I get some work done on the calf feeder as that will actually earn me money! Sorted rear brake mounting finally to the standard I wanted.. loved using my drill press.. Also bought some new trumpets. Took frigging ages to arrive from T3 and had to chase them for 2 months but got them eventually3 points
-
TONY HAWK'S PRO SKATER TACO TUESDAY2 points
-
if i had to buy a set of adj struts i would get BC gold. ive certed hundreds of sets of them and only ever seen 1 set that had a problem, and they had been caned in a race car. they usually have brake hose brackets attached in the right place as well which can make installing them much easier. D2 are bad for leaking, the new generation ones are better but still have the odd problem fortune auto seem ok but havnt done many sets of those STD brand is waaaaay too stiff for road use tein doesnt usually go very low unless you get the more expensive ones that have strut length adjustment HSD not too bad, large range of shock adjustment that goes from soft as original to quite firm i wouldnt bother buying anything second hand or any china brand you have never heard of or if it has no brand name on it anywhere bilstein is over rated IMO have had numerous issues with them tis late, thats all the info my brain will release on the matter currently2 points
-
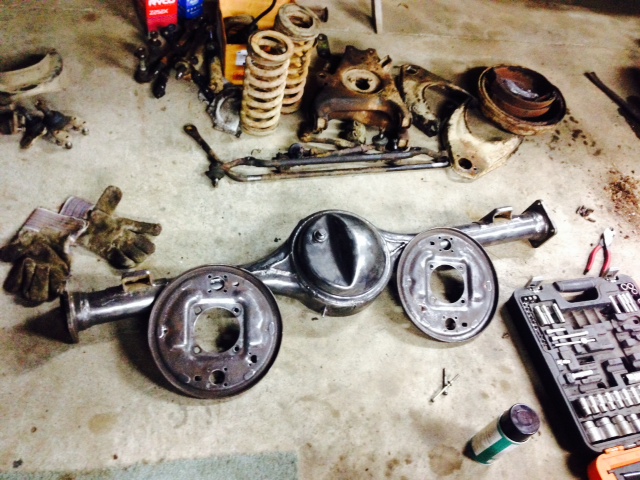
finally have stripped all the diff, leaf springs, arms, hubs ect and started to clean it all up ready for paint got the diff housing and backing plates done, thinking of painting it all in por15 black, or anyone have any other suggestions?
 2 points
 -
Yeah so not doing the manual conversion before this Not enough $$ to buy everything I need.. But will get a wof as it is with the new windscreen and maybe I'll be able to at least slam it Edit: Also really don't want to let my passengers down and want my own ride there.2 points
-
I've been looking for ages and many can confirm I'm a fussy bugger but finally found my original untouched 1600 sport. Car is in original condition so there are many little jobs to do to get it back to full glory, Ill endevour to keep you all updated, but for now check out the pics. I have also moved to Napier now so big shout to all the OS boys and girls down here give us a shout. Made the mistake of putting 91 in but quickly remedied the knocking2 points
-
So I picked up a bit of a "kit set engine" shall we call it. 711M block, A3 cam, (and a spare which is a bit bigger again but not sure what it is), some brand new 1300 pistons, still in the box and a GT head. Crank needs a grind which is no biggie but the block is already bored out to 90 thou and the pistons are 40 thou so it needs to be re sleeved. Looking at a fair few bob to do that so got some time to save. Was planning to have it in the car by nats but with the price of re sleeving the block that may be a bit of an unrealistic goal. Still though, once it's built it should be a pretty sweet engine!1 point
-
I was very keen on one of these machines, but the desire to machine aluminium was too strong and I sought out Craftsman. You definitely get what you pay for. I essentially produced 2 $2000 molds on a $3600 machine, I have made flanges for friends, mounts for speaker pods, and am lining up another mold for those Carbon trumpets. The fact you have a Z travel of 50mm with the shapeoko, this means you only have a 'true travel' of 25mm (25mm long tool in the chuck and 25mm work piece, this would mean the collet would also be touching the top of the job) The Craftsman has a advertised Z travel of 100mm, but can actually do 140mm if you remove the spoil board and mount work directly to the machine board. I am looking at replacing the bottom board with a piece of 8mm steel with threaded holes in it giving me an additional 10mm travel, which would give me 150mm, with a 75mm tool this gives me a ~75mm working depth. Which is awesome for a home machine, I know professional machines that are $30k that dont have this Z travel. However a 75mm long 6mm end mill has other problems. Really comes down to what you plan to do with it. I understand that it is a sizable cost/investment that could be something that just sits around and doesn't get used, so the shapeoko is ideal for that in the sense you dont loose out to badly and can be just a toy you play with now and again. Also note i spent an easy 7 - 8 months looking at hobby CNCs before I bought one. Humming and harring, I even made designs of a CNC I was going to make myself (went overboard and wanted the table made from granite).1 point
-
Thanks KK all sorted!! Took the drums off again and cleaned everything with brakleen wheel cylnder's look not that old. Did a test run up and down the drive and locks the rear wheels now instead of not doing anything yay. So the only other thing my wof man mentioned last time was the spare wheel not being strapped down... it's one of those spares that stands up along the rear quarter instead of flat in the boot. It's got a cover that clips over it with a dome but not quite enough apparently. Might just get some cheap narrow width strops from bunnings and tie them to the mountings that are there for something to secure the wheel in place. Once rear window seals are done wof time!1 point
-
Yeah I'll go have a word see what I can swing.1 point
-
First! I have it on good authority that Mehicali Fresh is now open where Cali Burrito used to be, so you should go in there this month and get us some phat deals going forward. Will be working late as always, but not beyond 7:30-8pm I would say.1 point
-
http://auctions.search.yahoo.co.jp/search?ei=UTF-8&p=fc3s&auccat=2084005257&slider=0&tab_ex=commerce&istatus=21 point
-
Thanks KK!! Will jack her back up this arvo and try again1 point
-
This is soo lush and awesome that you're in Napier also. Will look forward to seeing this around!1 point
-
a previous car i owned had a recored standard brass/copper thing with a core from a chev of some description, and a pickapart fan, could do skids all day and never get hot. current car has fancy afco double pass alloy radiator with an expensive davies craig elec fan and its always borderline, it gets hot on a warm day, or at the drags etc. and it weeps antifreeze somewhere the core goes into the tank next time will go back to copper and pickapart combo1 point
-
Have already emailed, so hopefully!1 point
-
The $150 alloy ones off Aliexpress work mint.1 point
-
slackers!1 point
-
LOL at you people sleeping together in little dorm rooms, sniffing farts, listening to snoring and tasting Emma's spew. I'm bringing an extension cord and a bar heater for the tent. What could possibly go wrong?1 point
-
Some photos from Sunday. Didnt end up taking many as just plain forgot. Two engines, an old army Dodge, some old British bike.. image sharing Me not very happy with the engine not sliding inplace onto the input shaft. I threatened it with a hammer (or a Hannah..) and it finally fitted in place.. photo sharing websites Next thing that has happened since I parked it up and has kept me entertained off and on for the last two days. Some of you will know about my woes from the tech thread I started. So I went to start it on Monday morning and adjust the warmup settings. But when I connected to the ecu and opened up the starting/warmup part of tunerstudio something threw its toys from the cot. Turns out that because I had updated my TS program a while back it didnt want to play ball with my older firmware on the ecu. So yesterday and today I have been sorting it all out. Luckily I am between jobs right now so have a few days off. I just managed to load the new latest code on this morning and the latest TS as well then spent the morning leearning my way around the new setup. The car started straight away but needs a bit of time to sort out the VE table. While it was running I noticed that the cam covers were leaking past the new seals (because British..) so I went back to my old work and grabbed the old mazda seals which I think work better. Maybe softer. I dont know. Time will tell. uploading pictures Very much looking forward to driving it tomorrow and seeing what the extra 50~60 ponies will be like in the hills!1 point
-
Daaaym thats bona be an effort. Question, Try push the guard out that far or bolt ons all round??1 point
-
So made some progress finally with the main chassis section all tacked together and heights checked for wheel mounting. Just need to finish the welds, find and mount a suitable castor wheel now I know how big it needs to be and sort out the push bar handle and mount. Then will be a roller and can sort paint and seat out.1 point
-
I've just pulled out of Marshaling on Sunday as i know i'm not going to be able to drive... The party is for Andrea and I's secret wedding in Vegas, so i really don't think i'm going to be in a state to drive at 6:30am... So sorry guys.1 point
-
still to do- purchase flywheel/ clutch and install install manual driveshaft which i have purchase 2nd engine with loom ecu and all sensors etc sort out fuel system-originally carb so this will take a bit of work which i dont know a lot about radiator to suit wire up make 9s fit. skid1 point
-
like everyone i wanted more dish so, i managed to locate a pair of 4x120 14x7.5 +2 superstar racing tri spokes like the a3as with centrecaps (to solve the problem of my missing one)so had them shipped and harvested them for their lips, i had the front lips split off my four and fitted two 7.5 lips to one pair and the left over rear halves to the other pair, this does make changing tyres a pain an will eventually replace with new 4" lips when they become available the result is 14x9-24 and 14x7.5 0 i then borrowed an idea from a fellow os member and made this from a hub from pickapart and a motor i got from a garage sale the end result with 185/50s1 point
-
Presents….. Excuse iphone pics. Got two all put together. 14x8.5 185/55/14 Snapchat….. lol Hairspray and lighter later…..1 point
-
http://jetandturbineowners.proboards.com/thread/53/landspeed-bike-diy-gas-turbine1 point
-
Time to get the sills sorted!1 point
-
Finally got around to lowering the wagon using dobinson springs and KYB shocks, This job really needed doing as the ride height was way to high and she handled like a boat on account of the old shocks being 100% worn out The Rears were the worst as you can see once compressed they werent come but up, and the fronts had lost most if not all the oil. there was a swimming pool of oil inside the struts when i took them out. While taking out the fronts i noticed that the lower ball joints were damaged and the boots were no longer there, so i replaced them with a new set Once the ball joints had been press fit into the control arms i was all set to put everything back together and i am really stoked with the results pretty poor picture but she sits alot lower now and handles beautifully. I want to go lower in the future but this well tide me over for the moment I also picked up a new set of wheels a couple days ago that i am really keen to fit on the car They are Momo R3's (17x7.5 5/120 17,6p) 3 peice wheels. Just have to sell the cheviot tridents to get some cash to put towards some tires, If any one is interested in the tridents please dont hesitate to ask1 point
-
ok with some new pics rear spoiler is on ,new steering wheel plus foot rest dumby motor is in plus moore trims are finished on the out side etc1 point
-
That pie eater consistently amazes me with his astounding levels of skill and awesome.1 point
-
So some things have happened again. I installed a roofrack, some pin stripes, and this weekend just gone I finally installed the 32dgv carb I had in there. Was expecting it to be a real PITA to get it running right cos the guy I bought it from reckoned it didn't run on his 1300 but with a tweak of the main jet mixtures I've got it running pretty well. Slight hesitation at low rpm but it revs out bloody nice (use to run out of puff above 4000, now it'll happily rev to 5500ish). Also idles real nice, better than the old carb! I haven't found it a problem yet not having chokes fitted to it so will see if a bit of cold weather starts to make it a problem, haha. Only thing I really need is a filter as I'm not a fan of running open carbs, anyone got an old one lying around they wanna sell? I've also just recently done a bit of an overhaul of the steering, rebuilt both inner tie rods, still have a little bit of play but enough to pass a wof so will maybe look at getting rebuild kits for the inner rods at some stage, have also replaced both outer tie rod ends, steering coupling is now urethane as are the sway bar mounts and steering rack mounts. Has made a HUGE difference to the front end, it's so much more planted and confident on the road and has made driving it so much nicer. Also wired up the rear demister and spent some time replacing wiring to the stereo and cig lighter with a new fused power feed straight from the battery, no more worrying about overloading factory wiring. She also has a tacho now which makes driving a bit easier as I know what she's doing. Had a fantastic drive down to beach hop as well, was a bit nervous as it was my first long trip in her but she ran so well, didn't miss a beat the whole day! I have a few big maintenance things I've gotta do to the daily before I sink more money into this, but once I'm back on track with that I'll be lowering it and starting to look out for a better engine, for now though I'm quite happy with how it's driving.1 point
-
http://www.stanceworks.com/forums/showthread.php?t=40785 camaro cut up and put into a minor also it lays frame1 point
-
Cause you just can't have too many old school fords.... Has a 1500 cortina engine fitted. Keen on 1500 GT parts if anyone knows of any. //oldschool.co.nz/index.php?/topic/42756-eskin8rs-1967-anglia-1500/ Discuss1 point
-
So I've done a few bits over the last few months, First thing I did was make a nice wooden dash panel to break up the blackness in there... Second thing I did was spend a looooot of time wet sanding the paintwork, I've probably spent about 100 hours all up and I'm stoked as with the finish. And the last few days I got bored, picked up a spare steering wheel from pick a part for $21 which needs recovering, I might do that at another point. So I followed cylinders thread on restoring his wooden steering wheel and got stuck into it. Sanded it all by hand so it took me in the region of 5 hours to do. And after the first coat of varnish this is how it looks... So as it stands the other day, this is how she looks. So now I'm on the lookout for the factory chrome trims that attach to the sides. I have most of a set, am after both front guards and the drivers side door to complete it if anyone has some they've got lying around. Also really need to lower it some, and do something about the slowness, but that will come later. Keen to pick up some spotlights one day, and tossing up with getting an oldschool roof rack to put on it to carry my bikes around from time to time. Will go well with my aviators and polo shirt.1 point


This leaderboard is set to Auckland/GMT+12:00