
Leaderboard


Popular Content
Showing content with the highest reputation on 01/09/23 in Posts
-
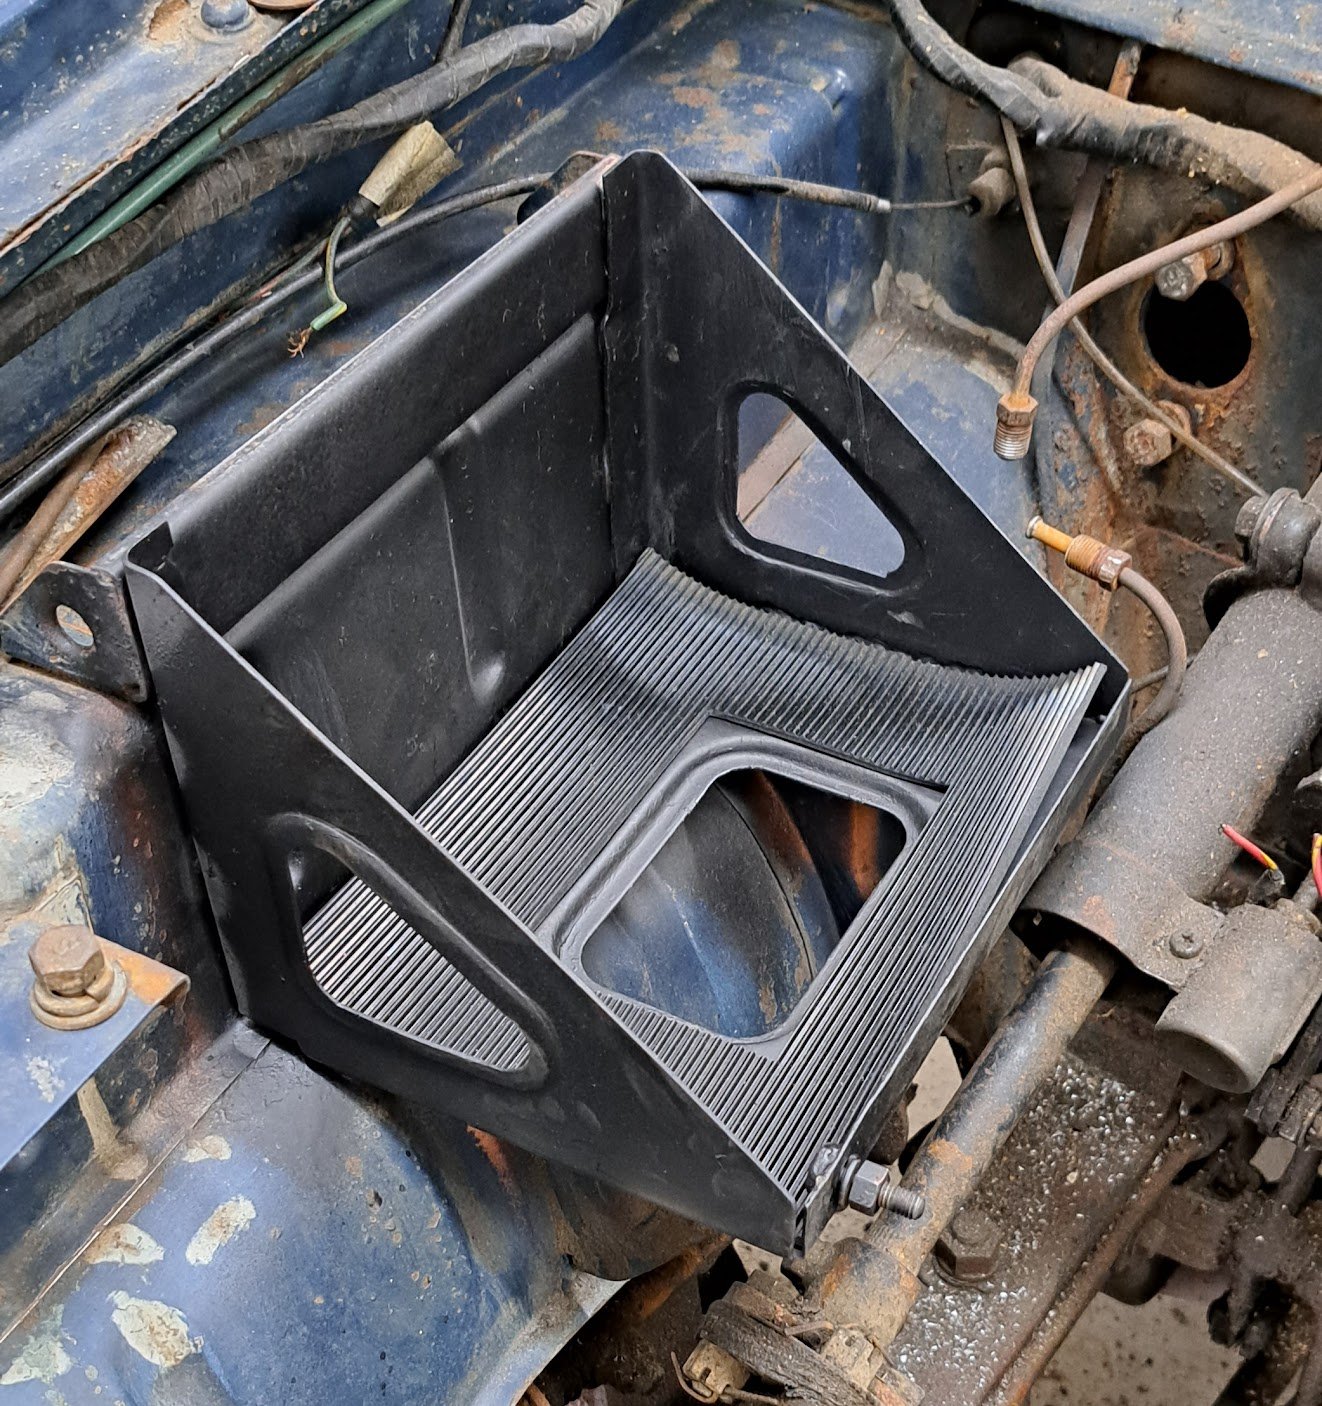
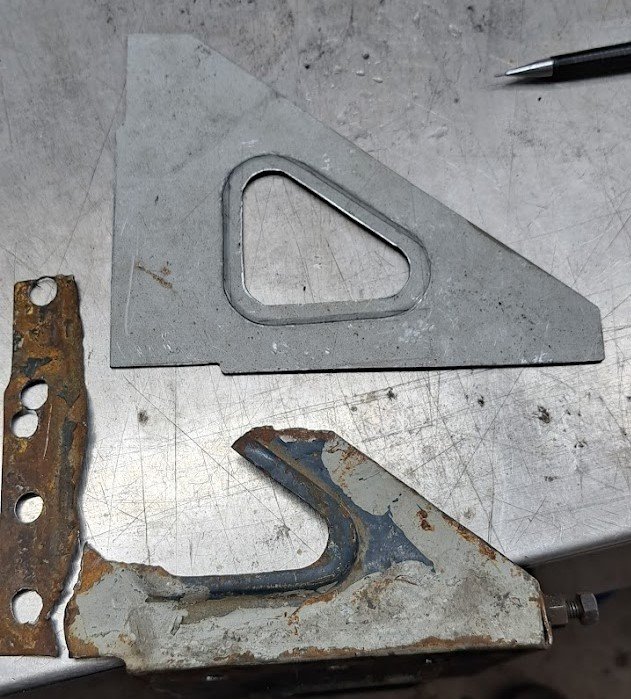
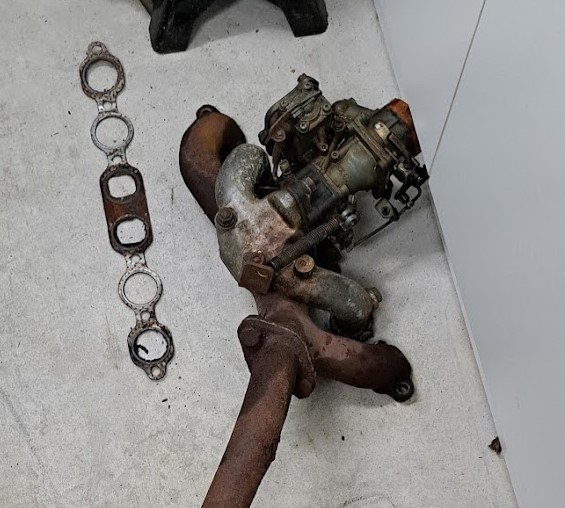
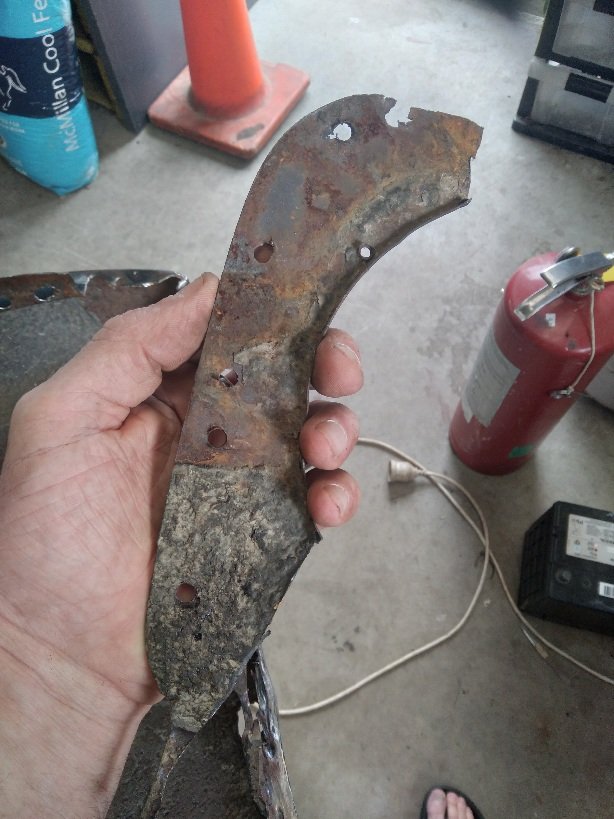
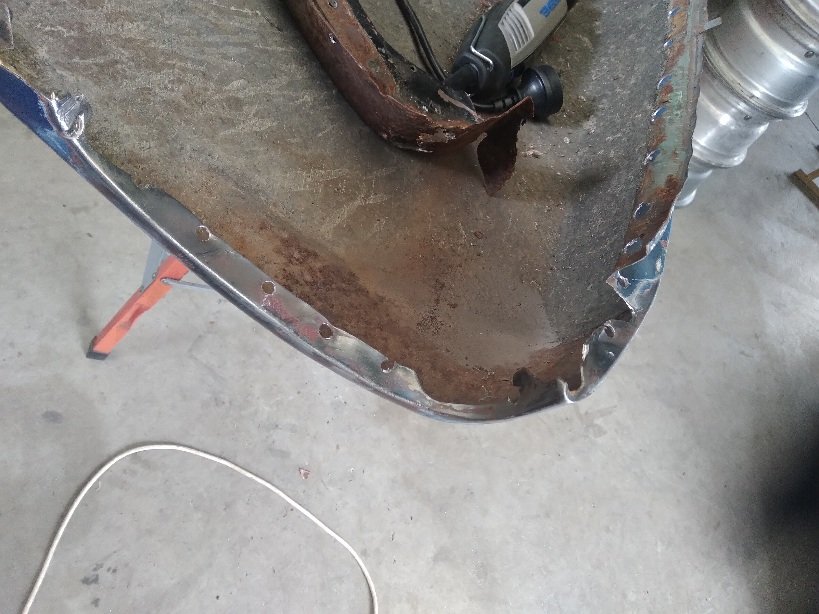
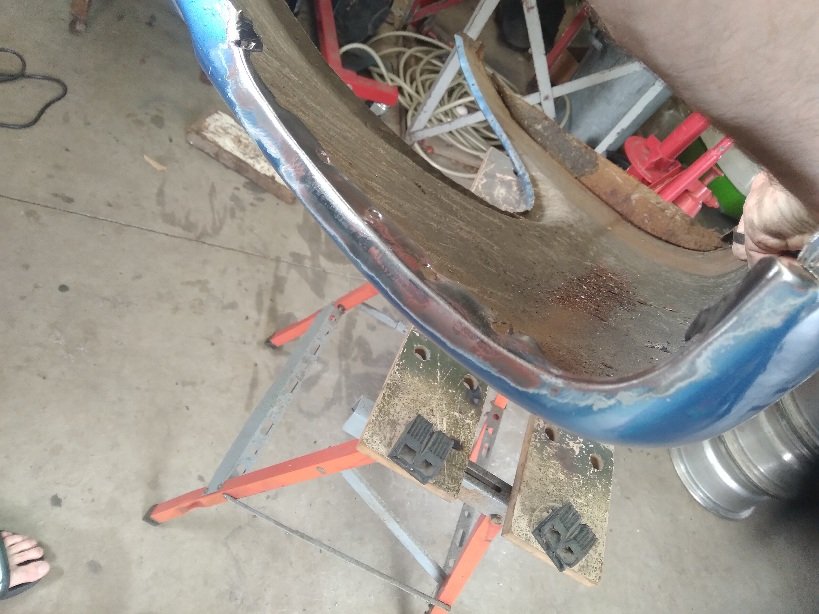
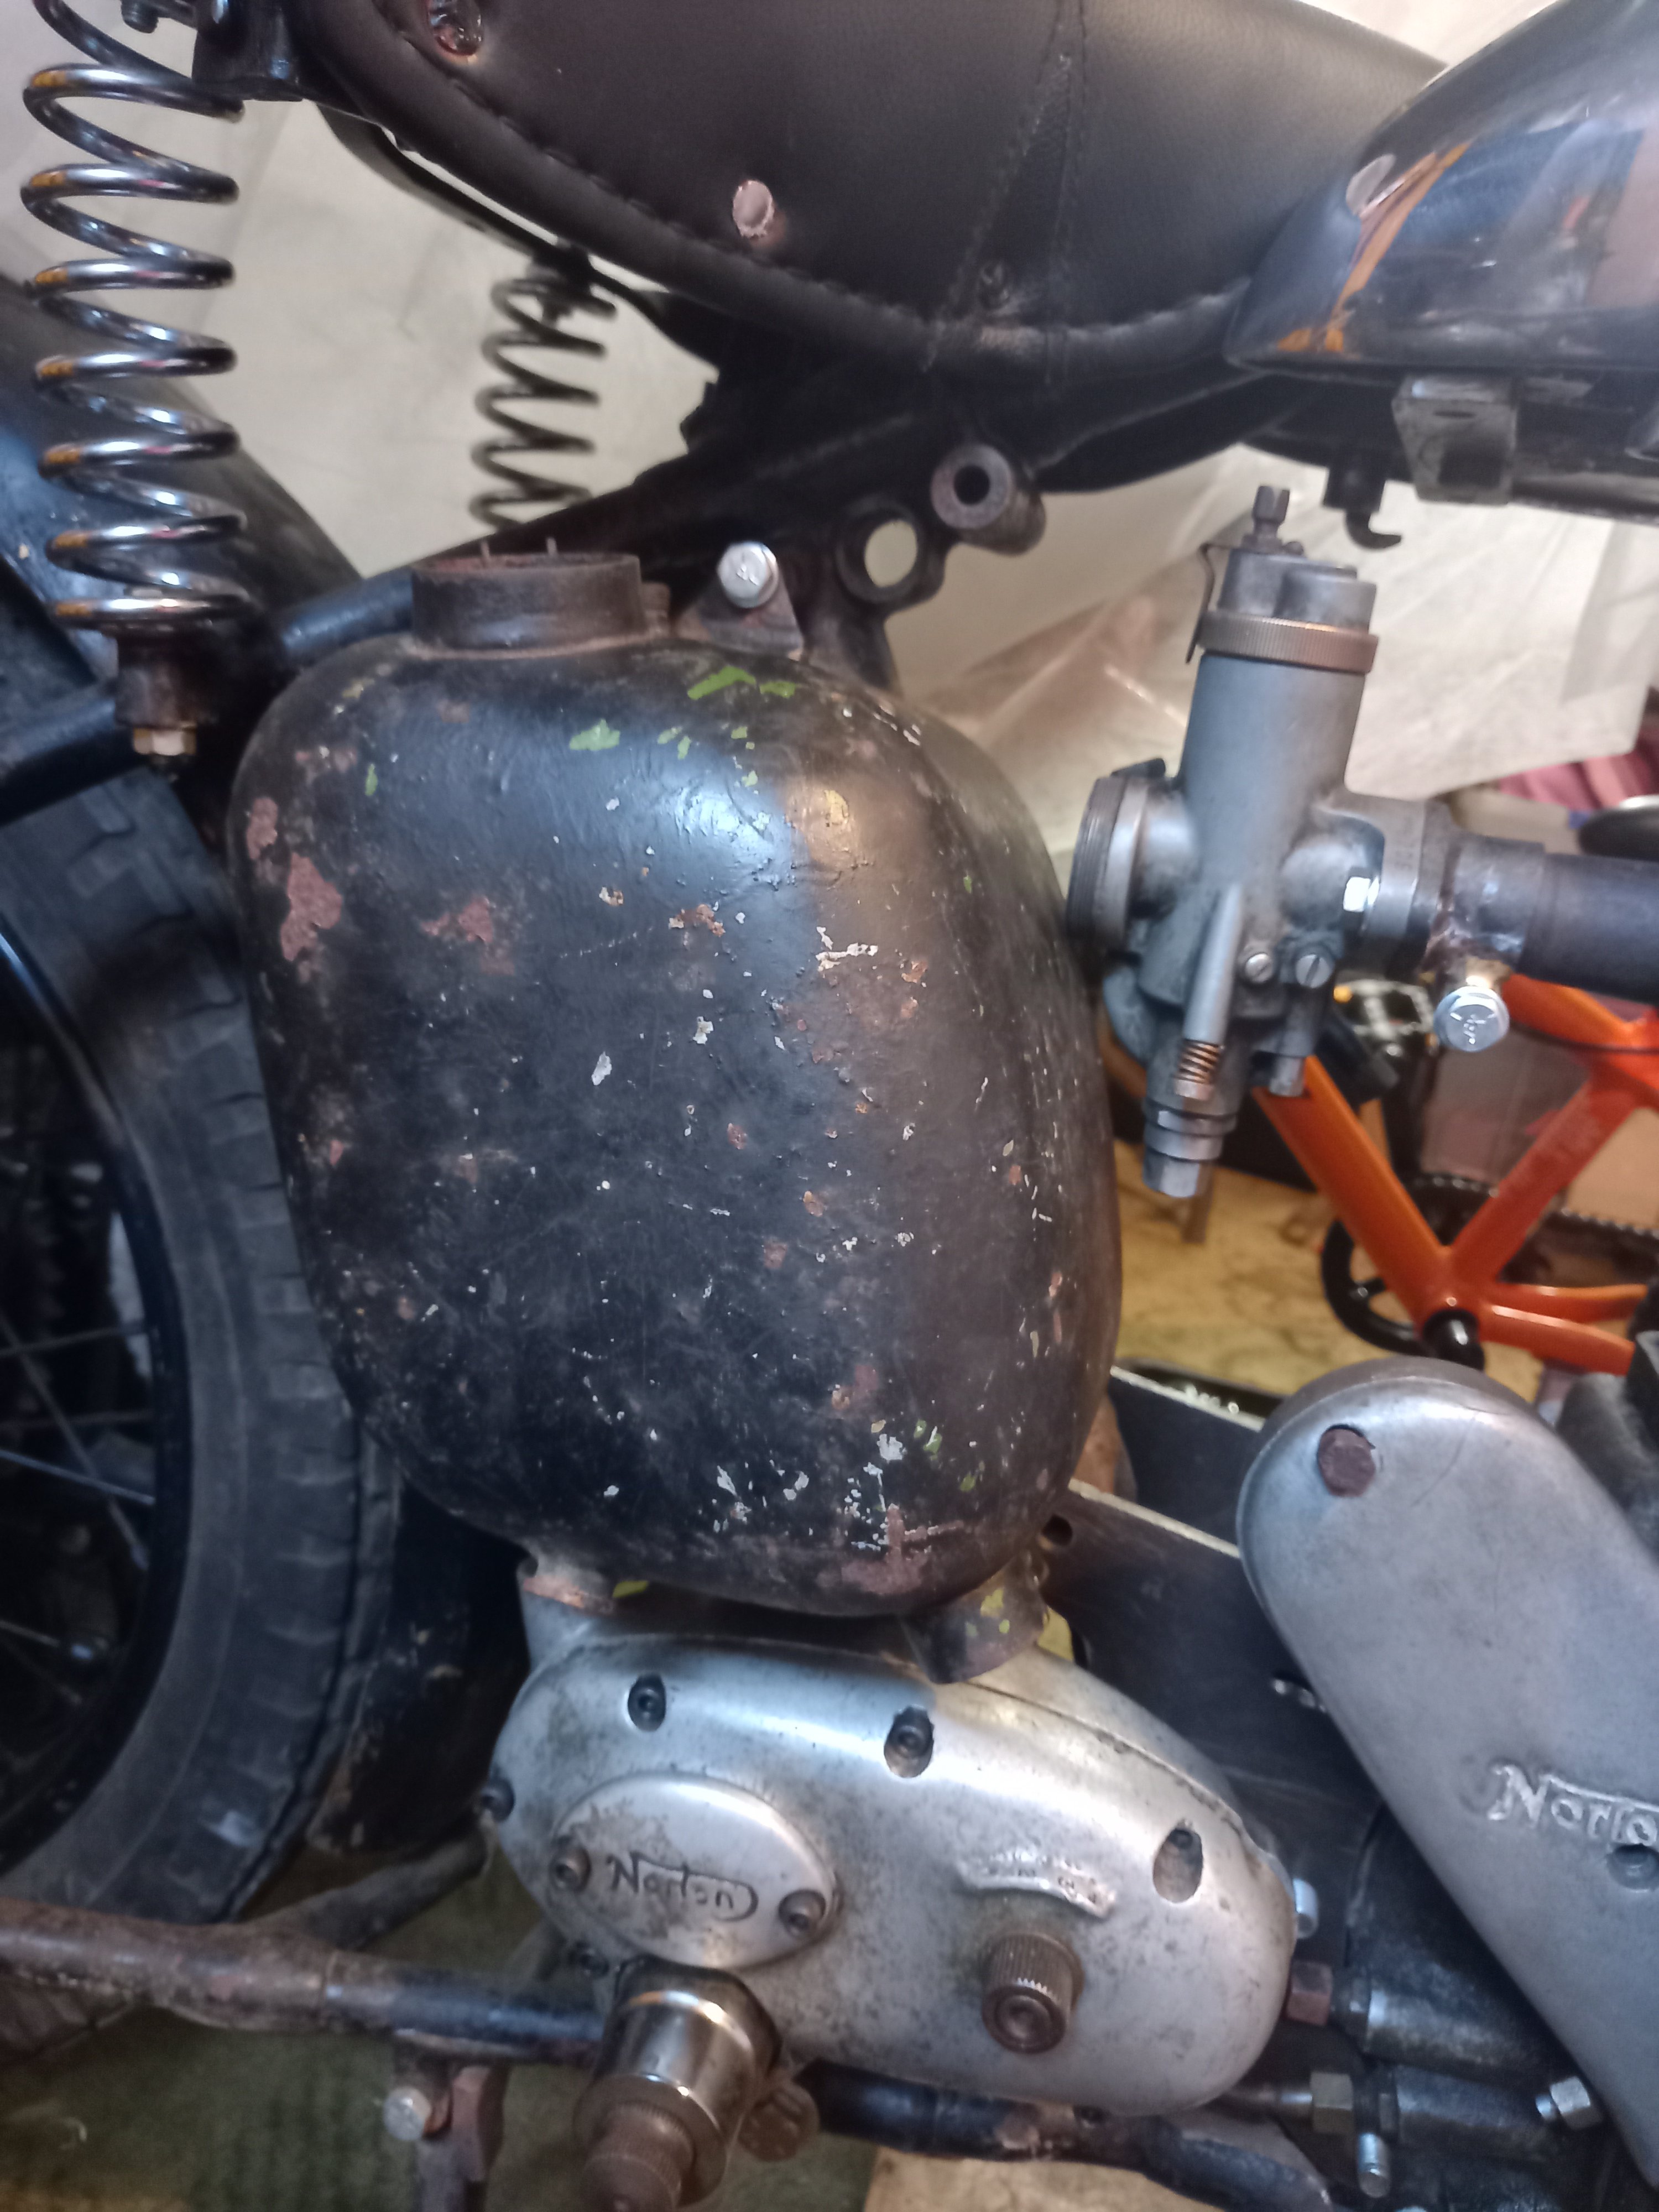
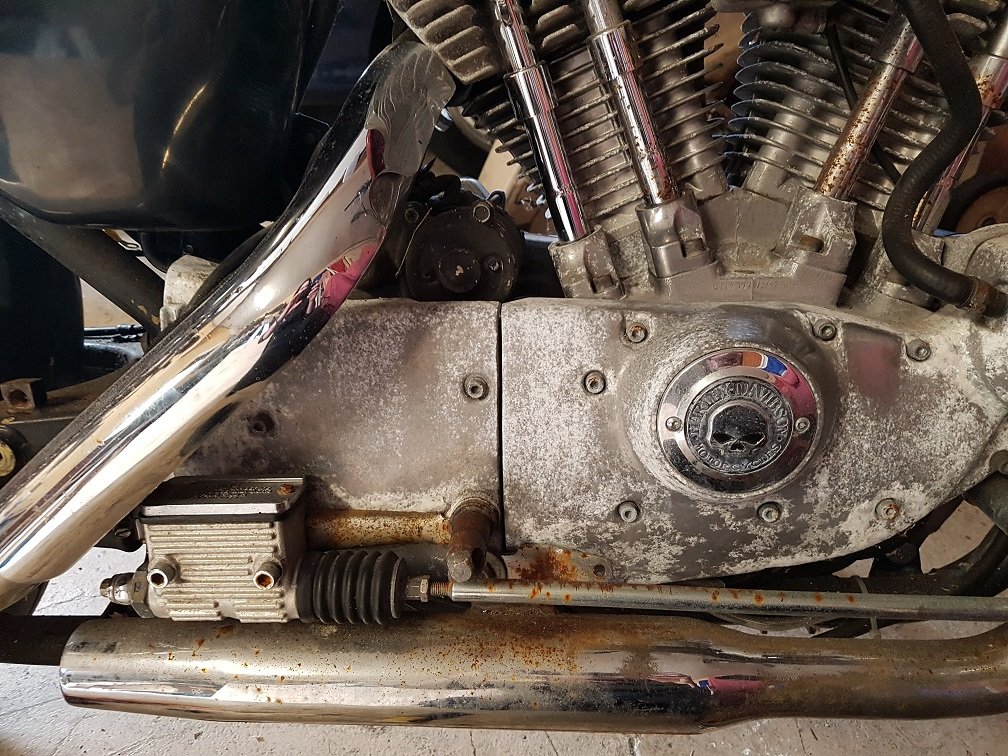
Whilst working on acquiring parts for the motor, i figured tidying up the engine bay is worth doing. Battery tray was mangled in the past to fit a std size battery So removed it Made a template from the remnants and made some new ends and glued it all back together Came out pretty good - i'll get some matched paint and colour it blue at some point Also cleaned up the exhaust/inlet manifolds and gave the carb its 1st bath in 50 years Waiting on a new pump diaphragm otherwise the carb was good condition.
 14 points
 -
Back at work for the night. Next on the list is to do the cambelt and water pump. But that's it for now.
11 points
-
Assembly begins
10 points
-
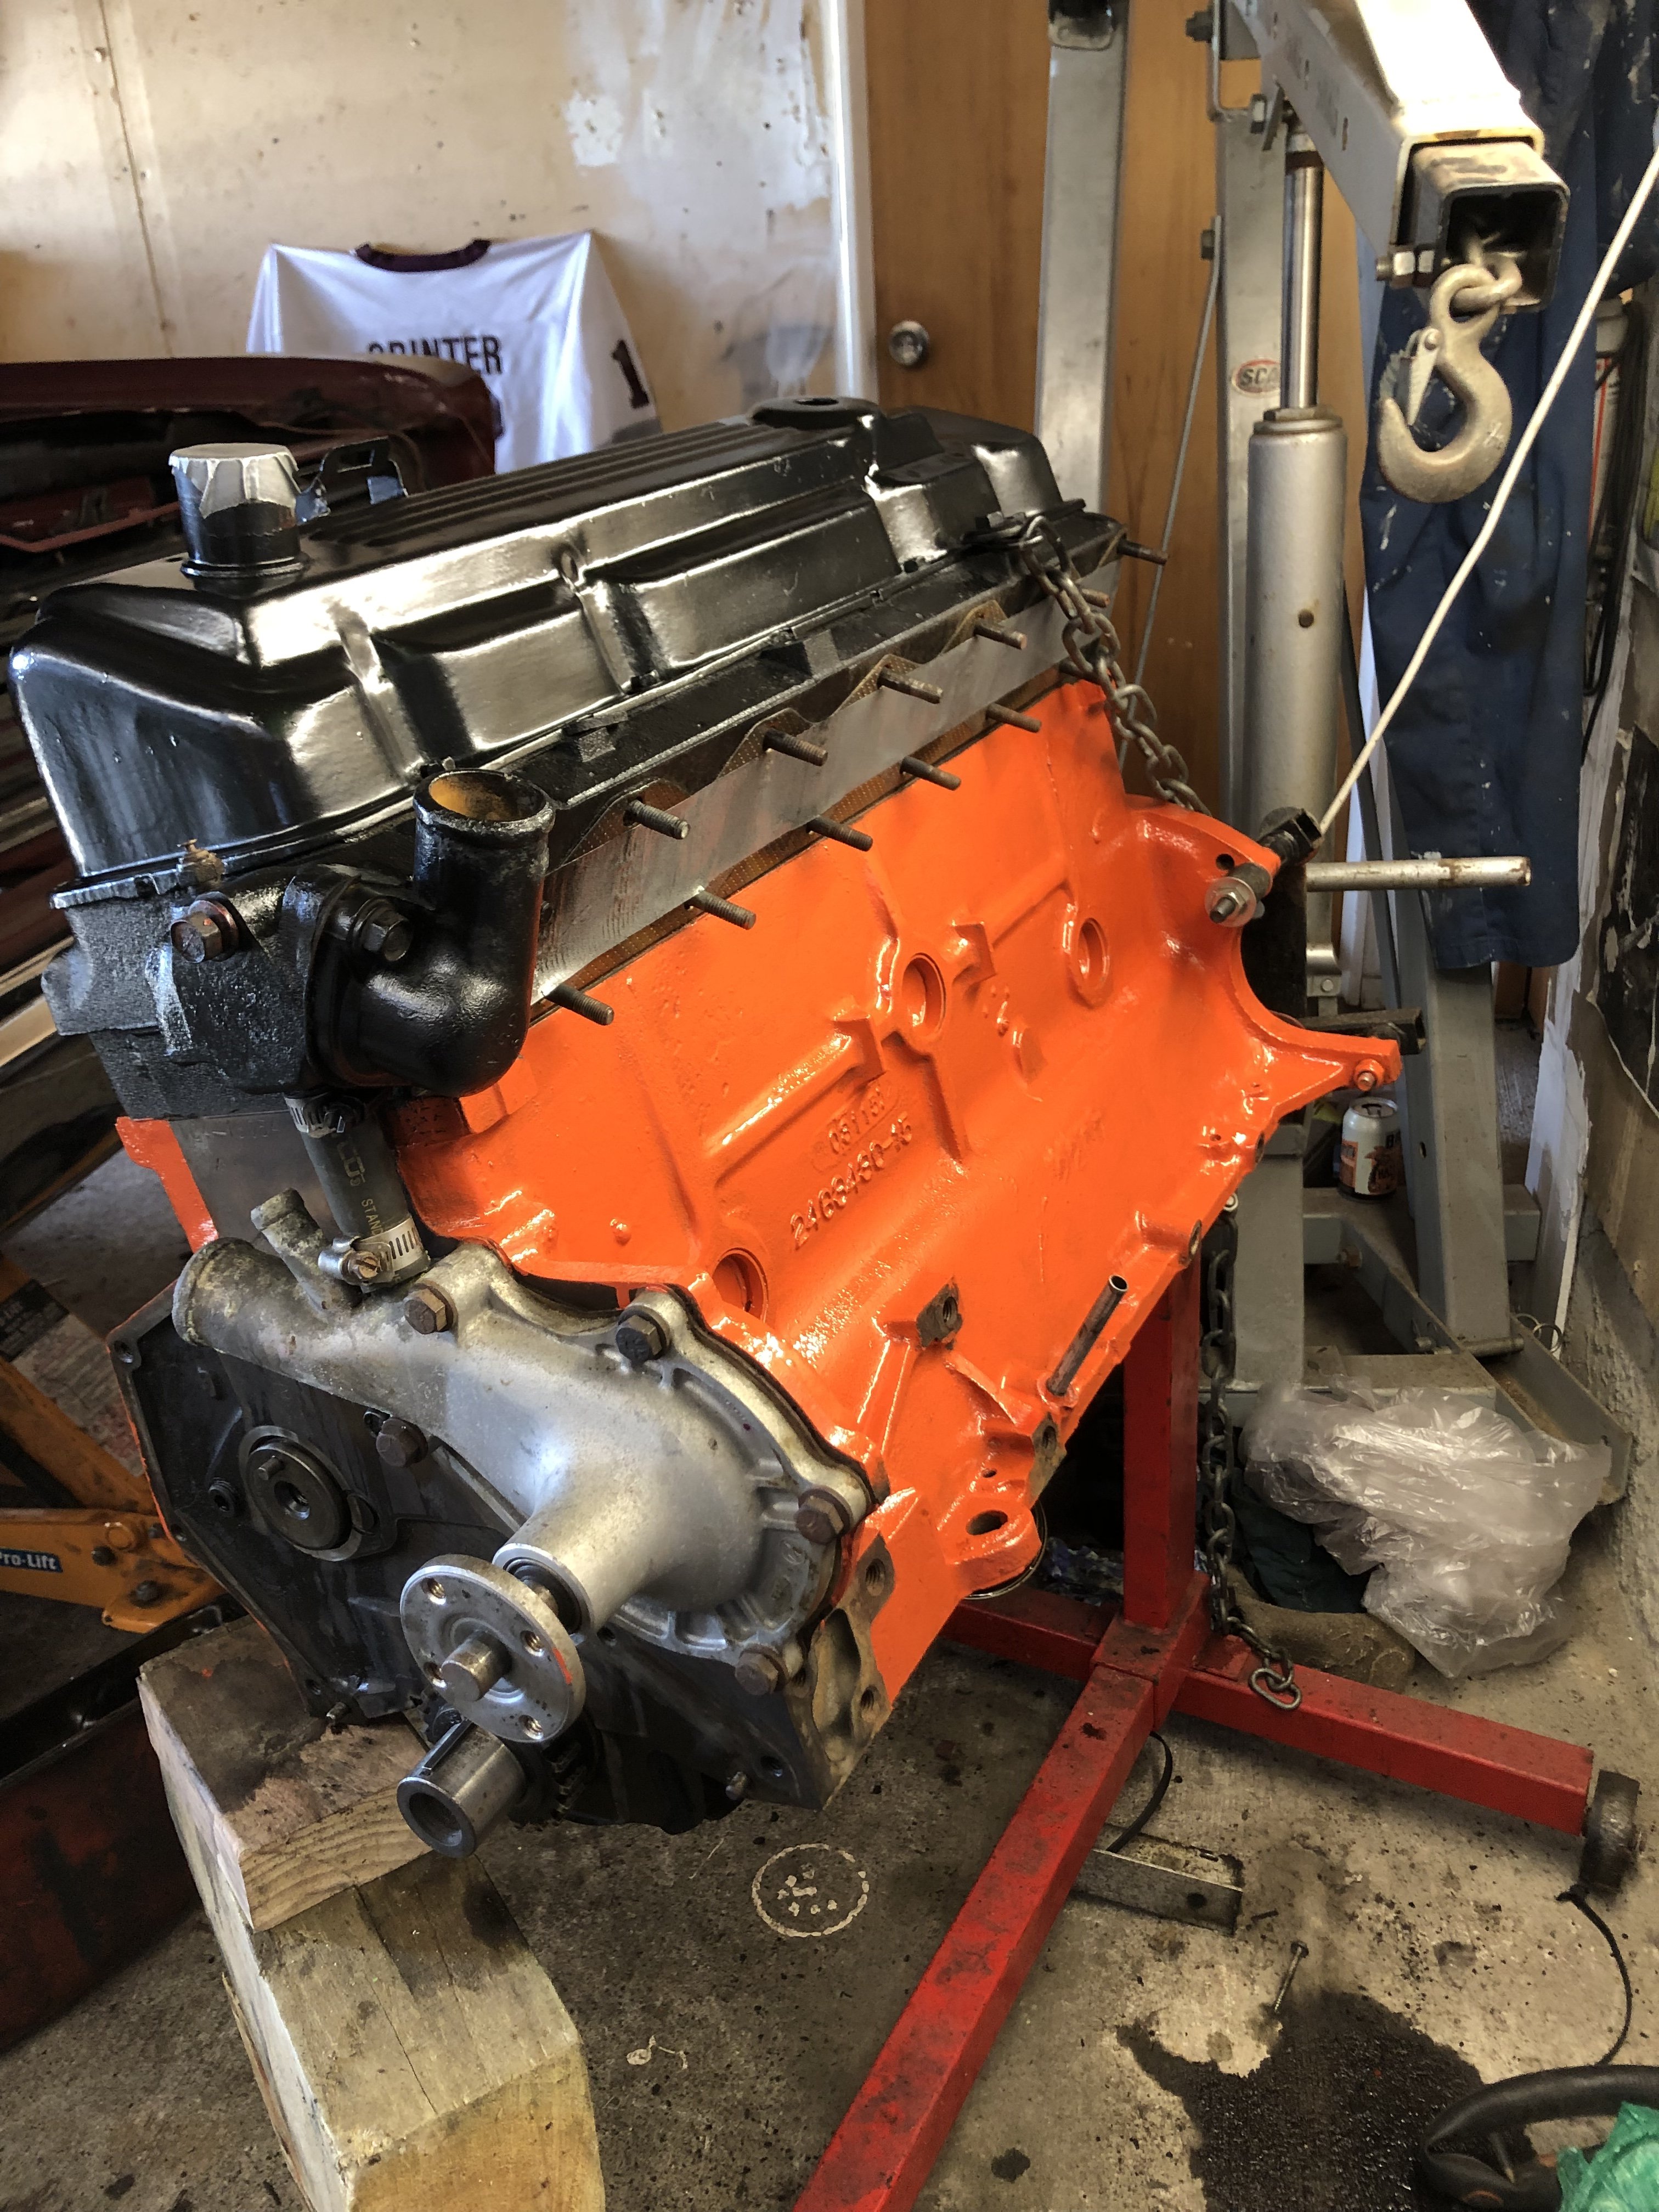
Hemi orange , think they were mostly red from factory until the later ones .. mine was weird orange before I painted it
8 points
-
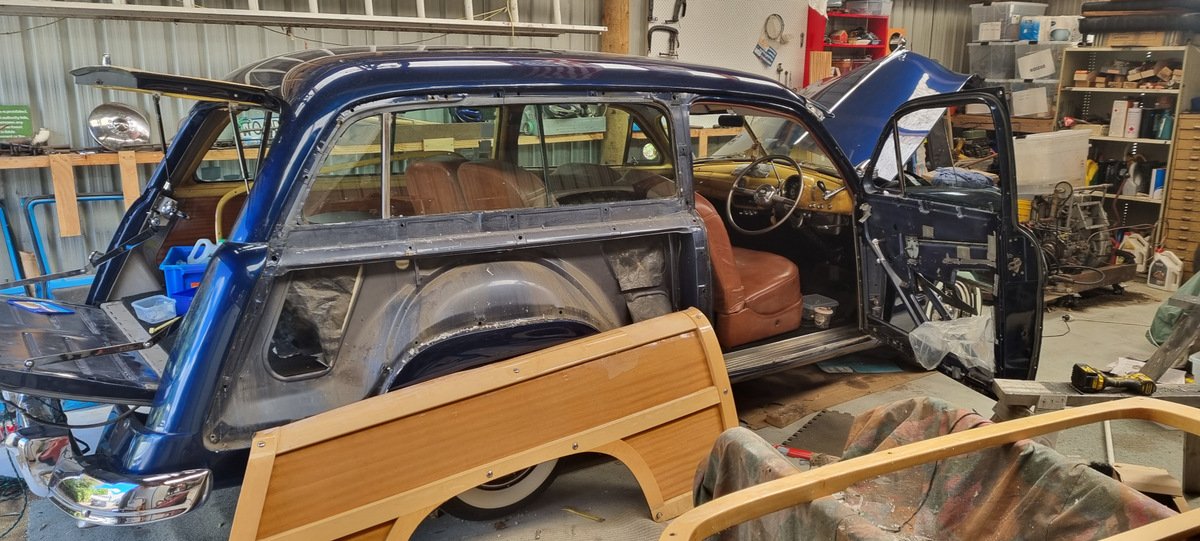
Holy bejebus, i forgot how cunty bodywork is. No large flat panels on these things. Lots of sharp lines and dents. Have finished the roof, pillars and one door on 3/4 tin of 3.5kg filler...most is now on the floor. The tailgate is in rough shape..lots of dents. No rust though.. Havent started on the guards yet. A mate was going to get onto these for me, but had been badly bitten by the black dog lately. Poor bugger. Have told myself to just coast on it, do what i can, when i can.. I picked up some keather seats for it though as the bench seat has collapsed on the drivers side, and needs some upholstery work. The seats i got are tan leather seats from a 350Z, and electric. Very comfy.. Engine bay situation: Got the radiator and coiler fitted. Need to figure out the oil line issue as the front line comes off the front cover and needs to make a sharp turn and downward, same with the cooler.. so hoping 2 x 45deg fittings will get them in the right angle. Rear line only needs to be shortened. That is all6 points
-
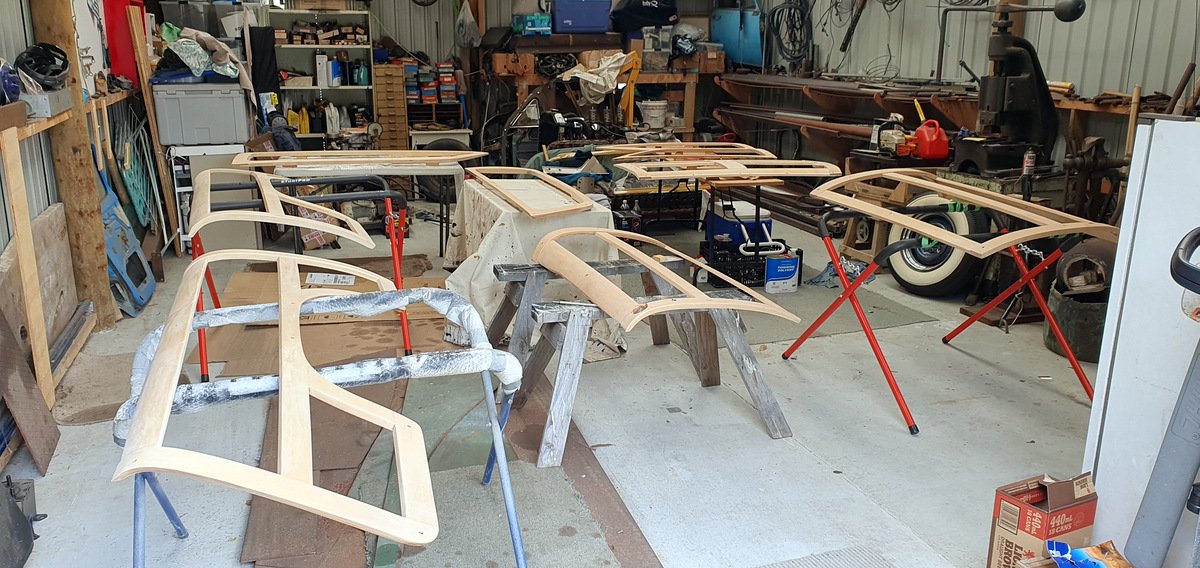
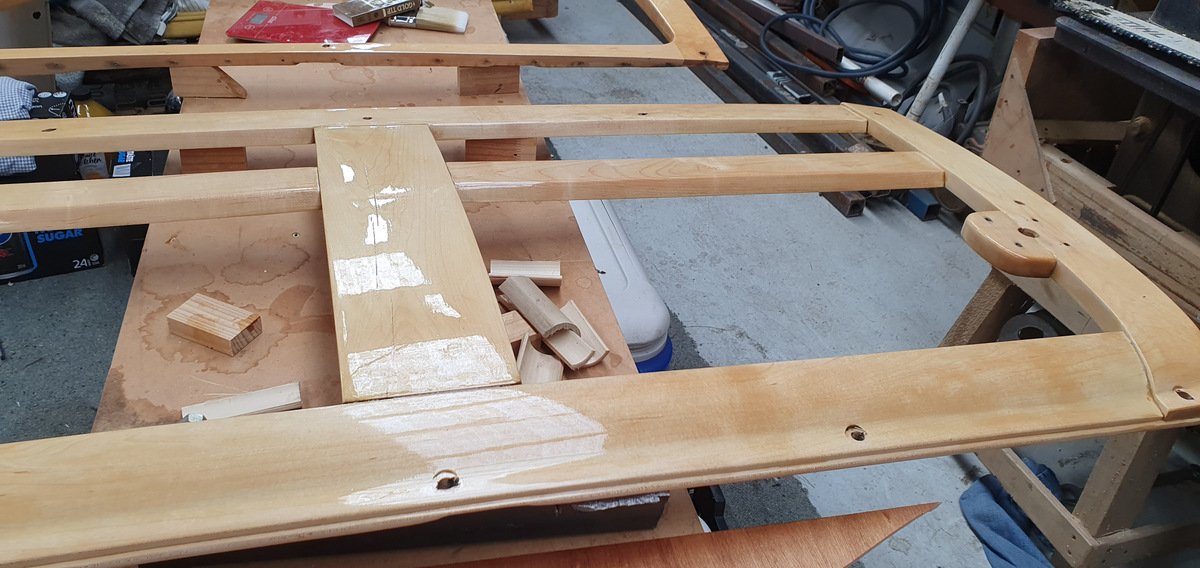
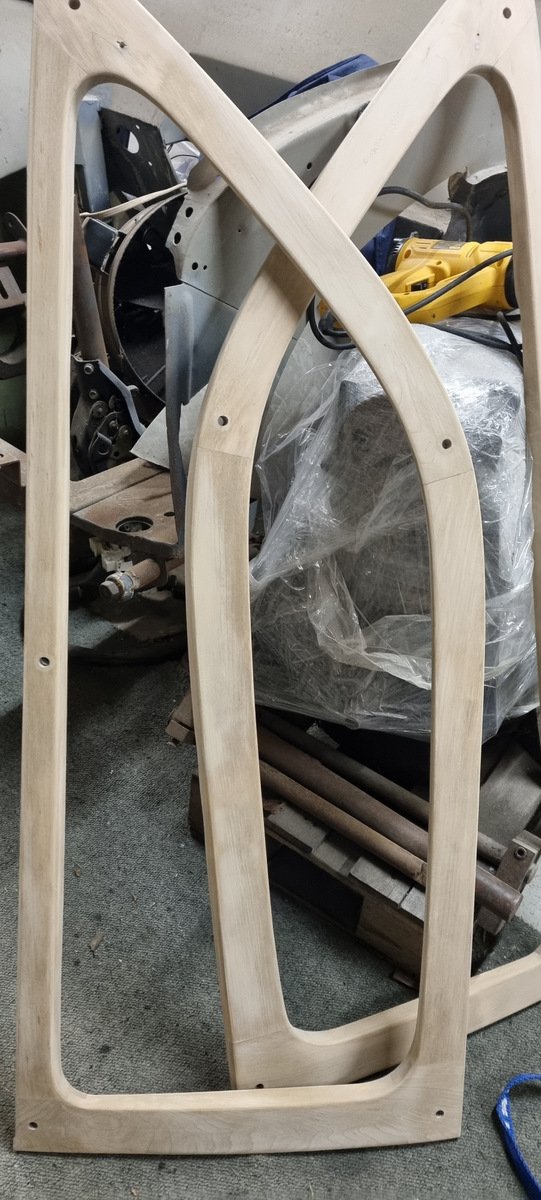
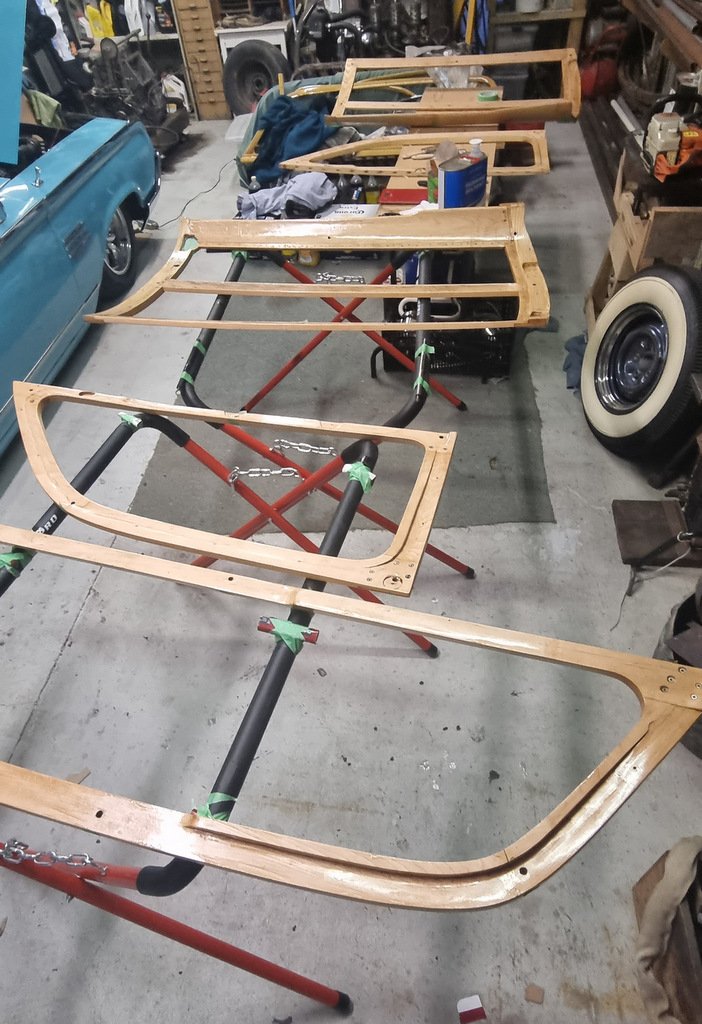
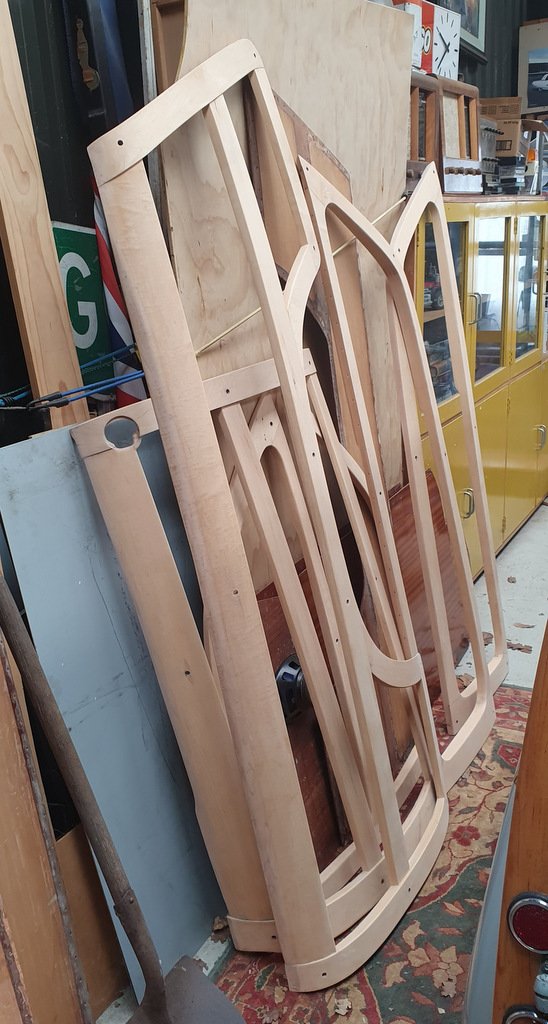
After getting back from a Chris Smith trip it was back to the bleaching / sanding regime. Finally got all the frames cleaned up, epoxy sealed, sanded again, then evicted the Mercury from the shed for the finishing process. The finish was the same as the Morris, Altex varnish. 5 coats with light sanding between, then a more thorough sand to clean up runs etc before the last coat. I'm pretty happy with the finish - mucho shiny. Just waiting on some more epoxy for the plywood pieces, hopefully get that tomorrow.
5 points
-
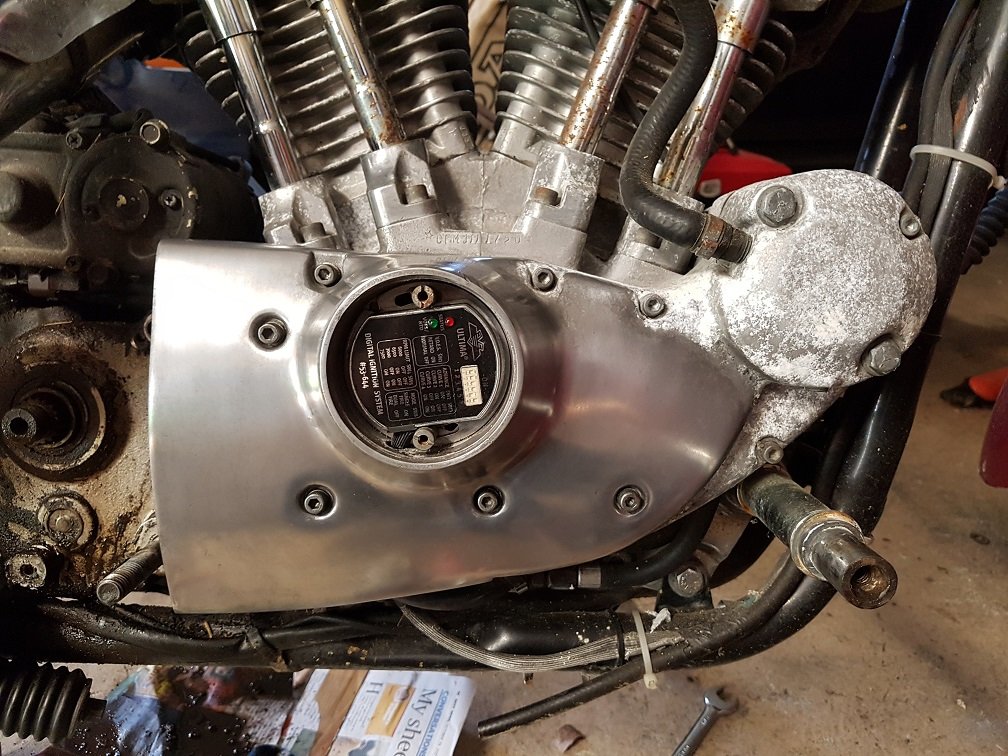
Had a thought last night about wiring the new ignition, yep no way could I get the wires through the teeny hole, so pulled cover again and drilled out. Took it in stages to avoid breaching the casting, and 7mm does the trick... Cleaned up the swarf and put cover back on loosely. Should prob check the lifters next...5 points
-
5 points
-
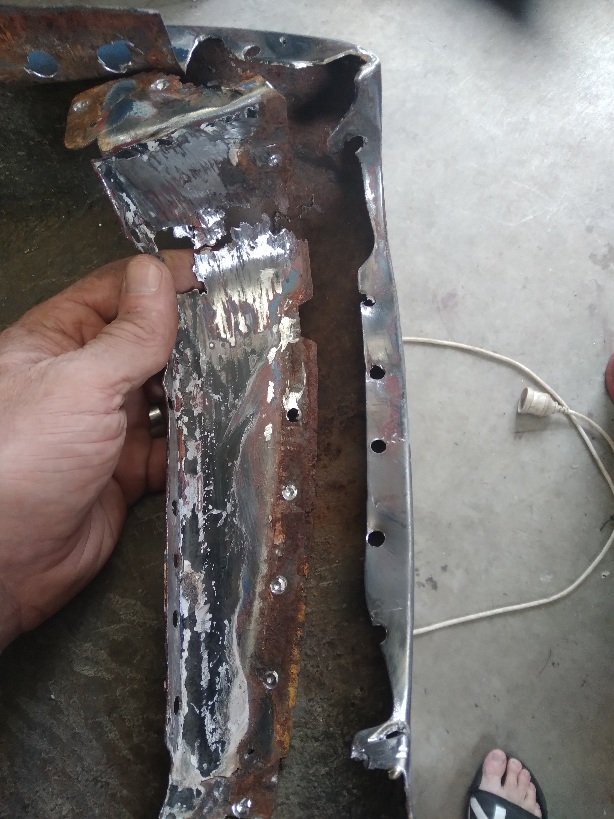
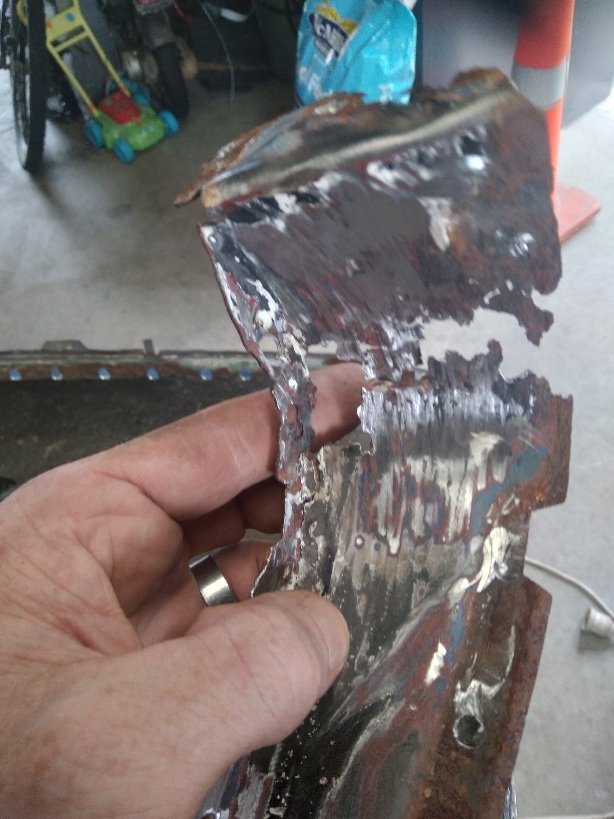
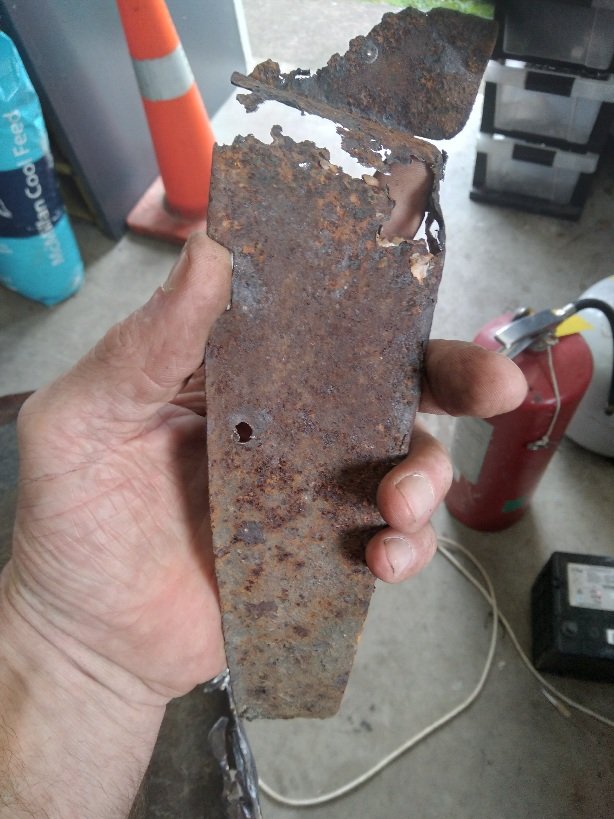
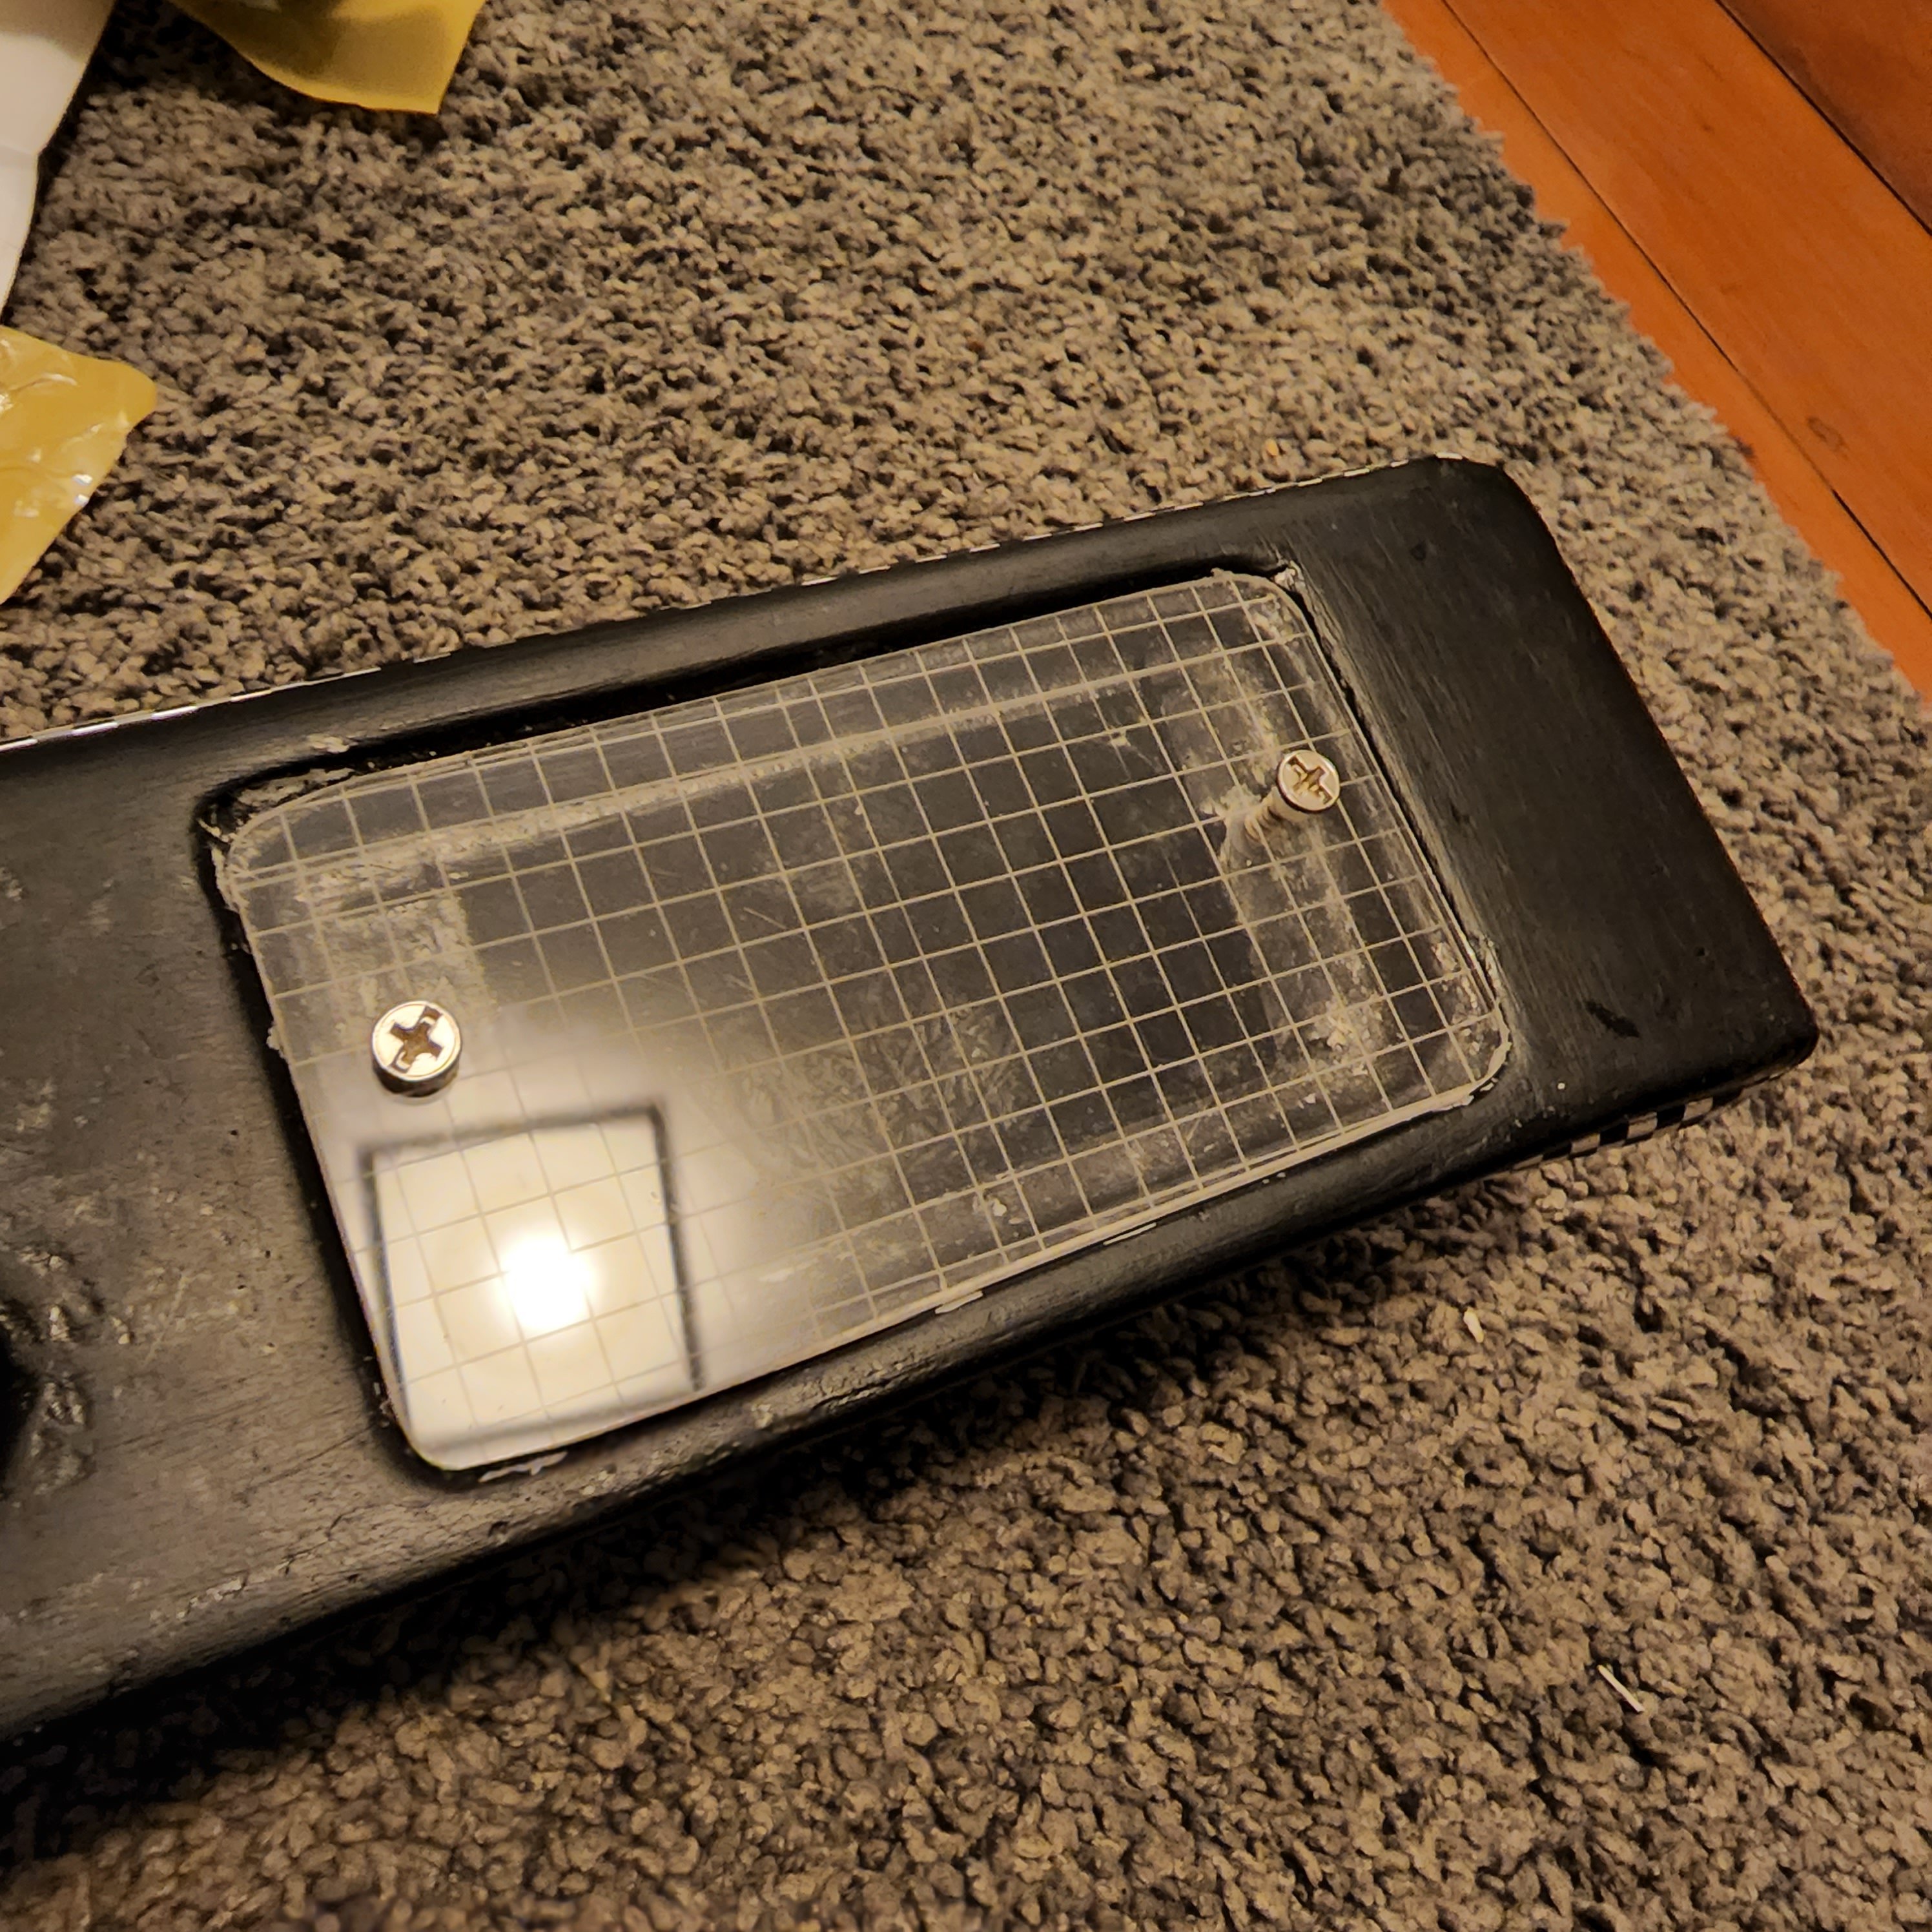
Did a little bit of work to the old girl today. I needed to remove the metal that sits around the head light at the top of the wing. Drilled out all the spot welds on the wing to free up the curved inner pannel so I can make a new one. Dave's garage on YouTube shows you step by step how to make the pannel parts. Not much of a update but worked out well , amazing what you can do with the proper tools.
4 points
-
4 points
-
4 points
-
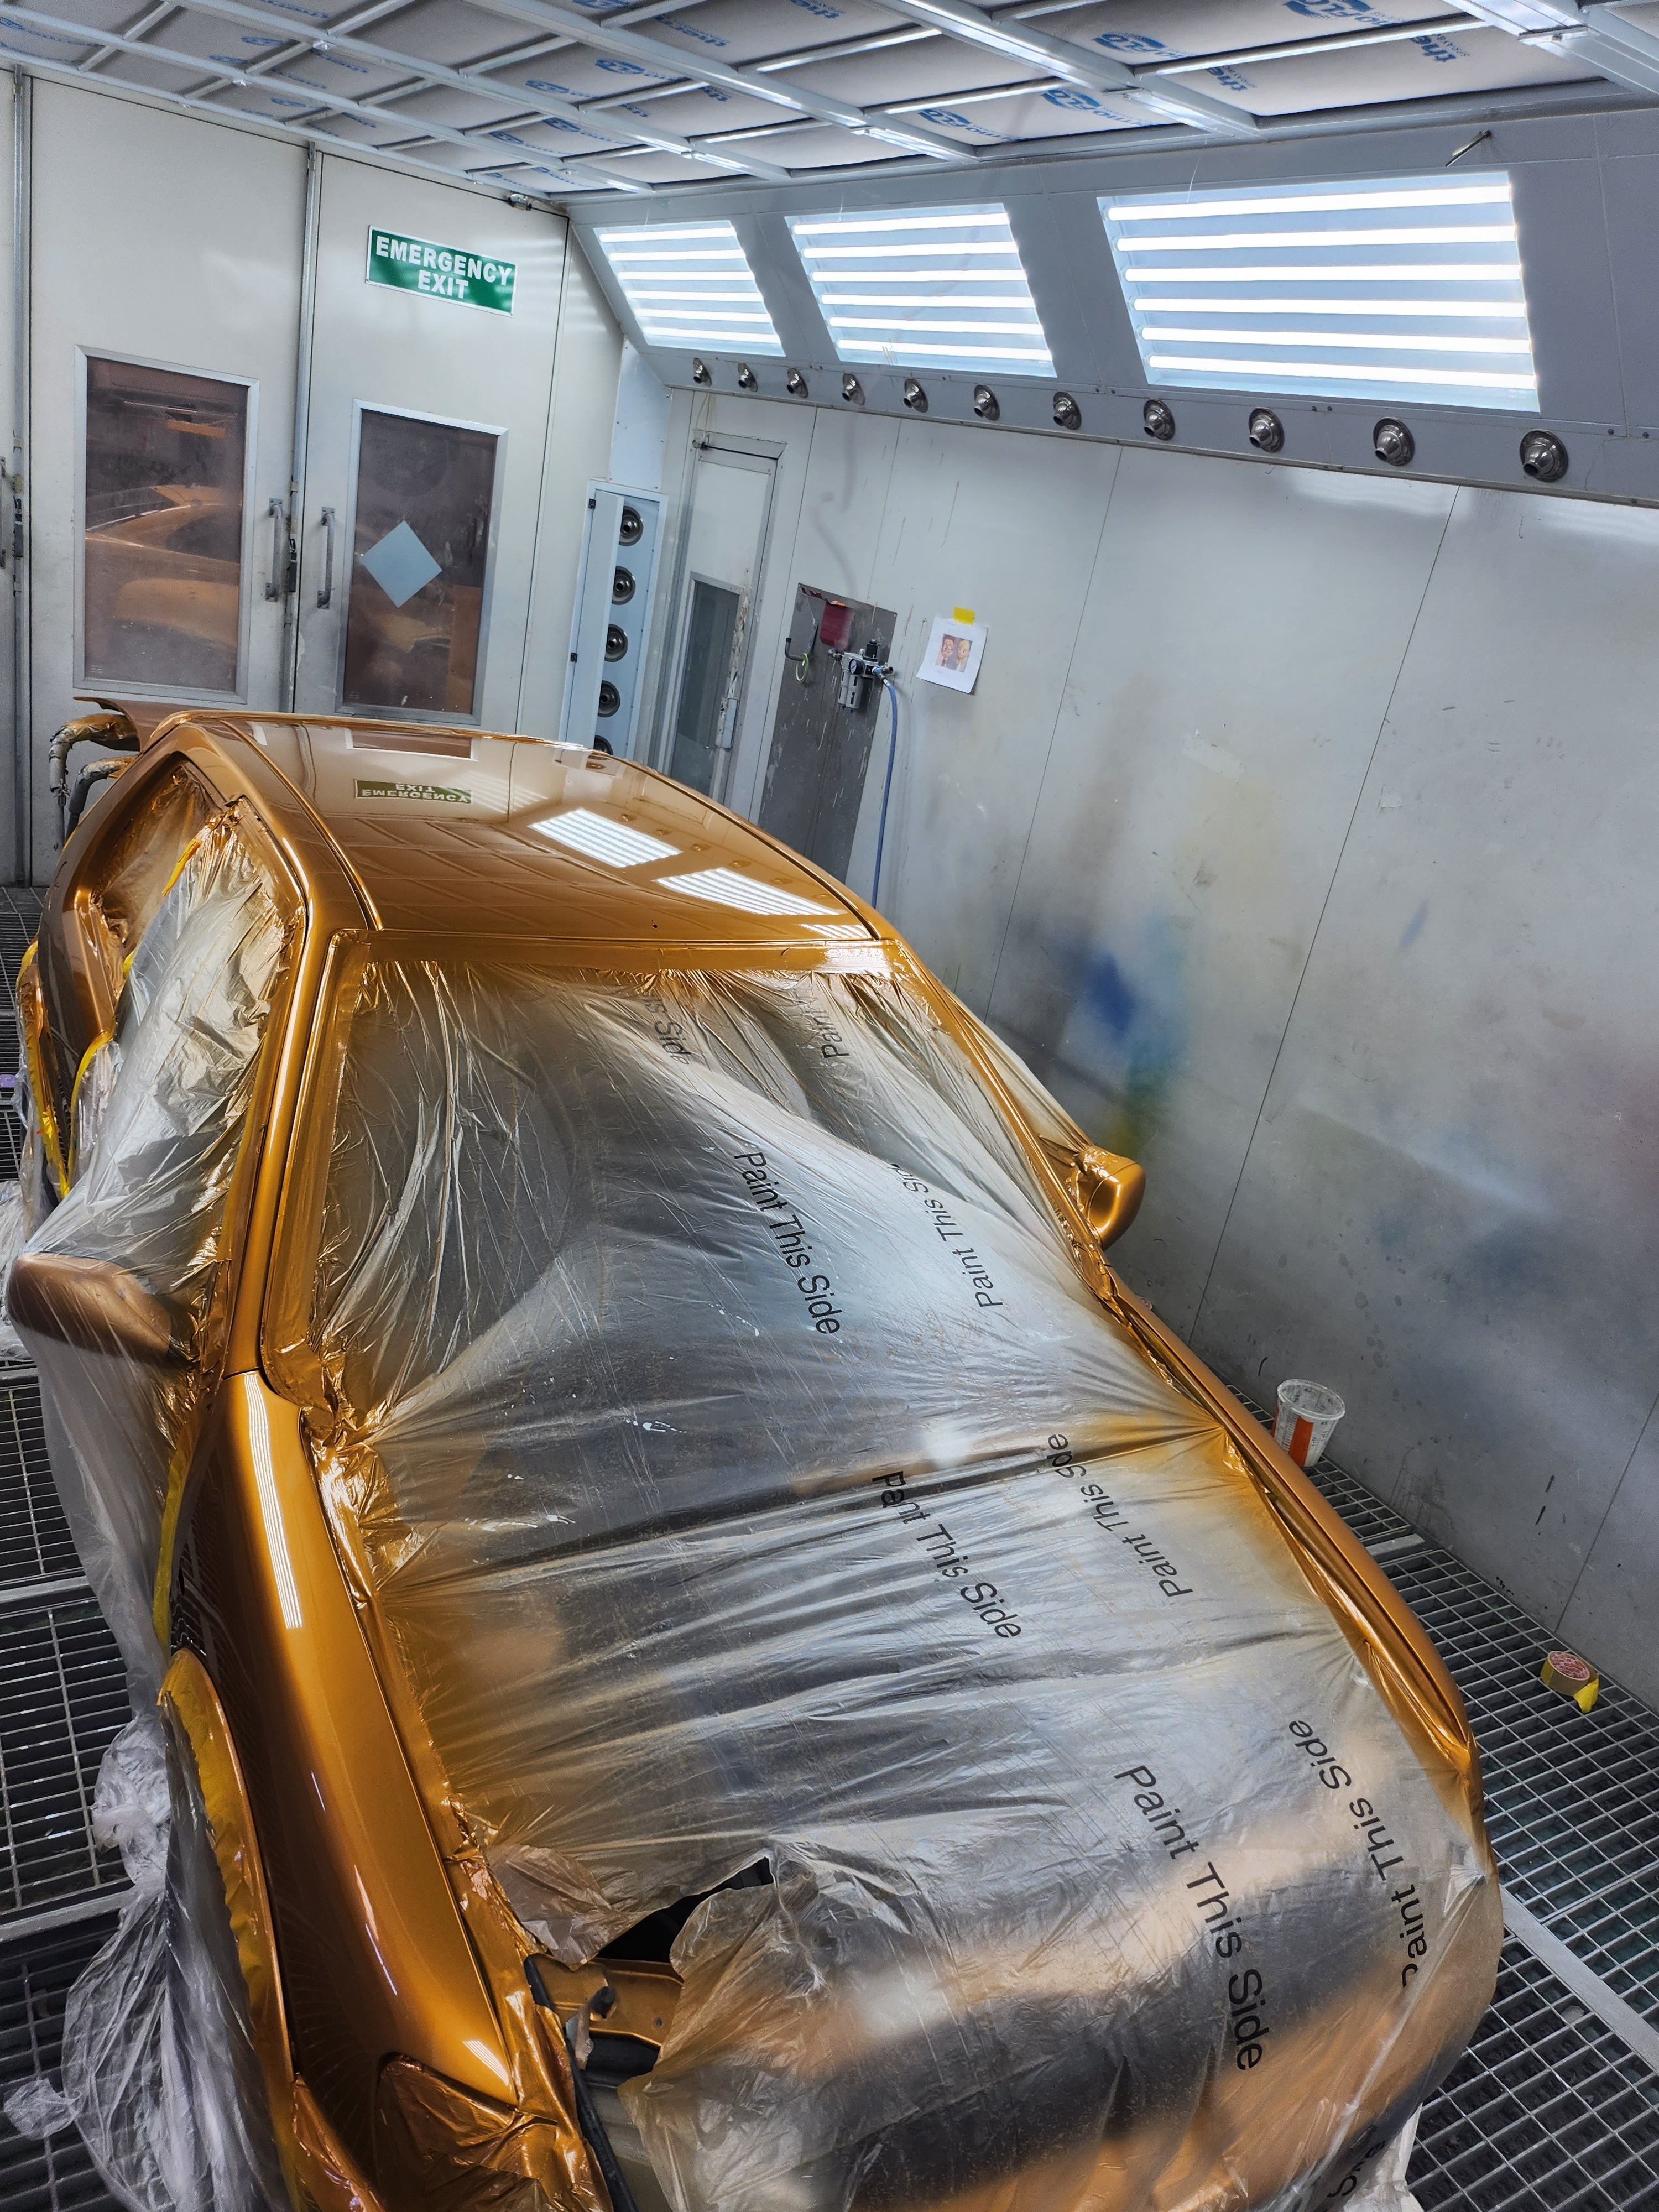
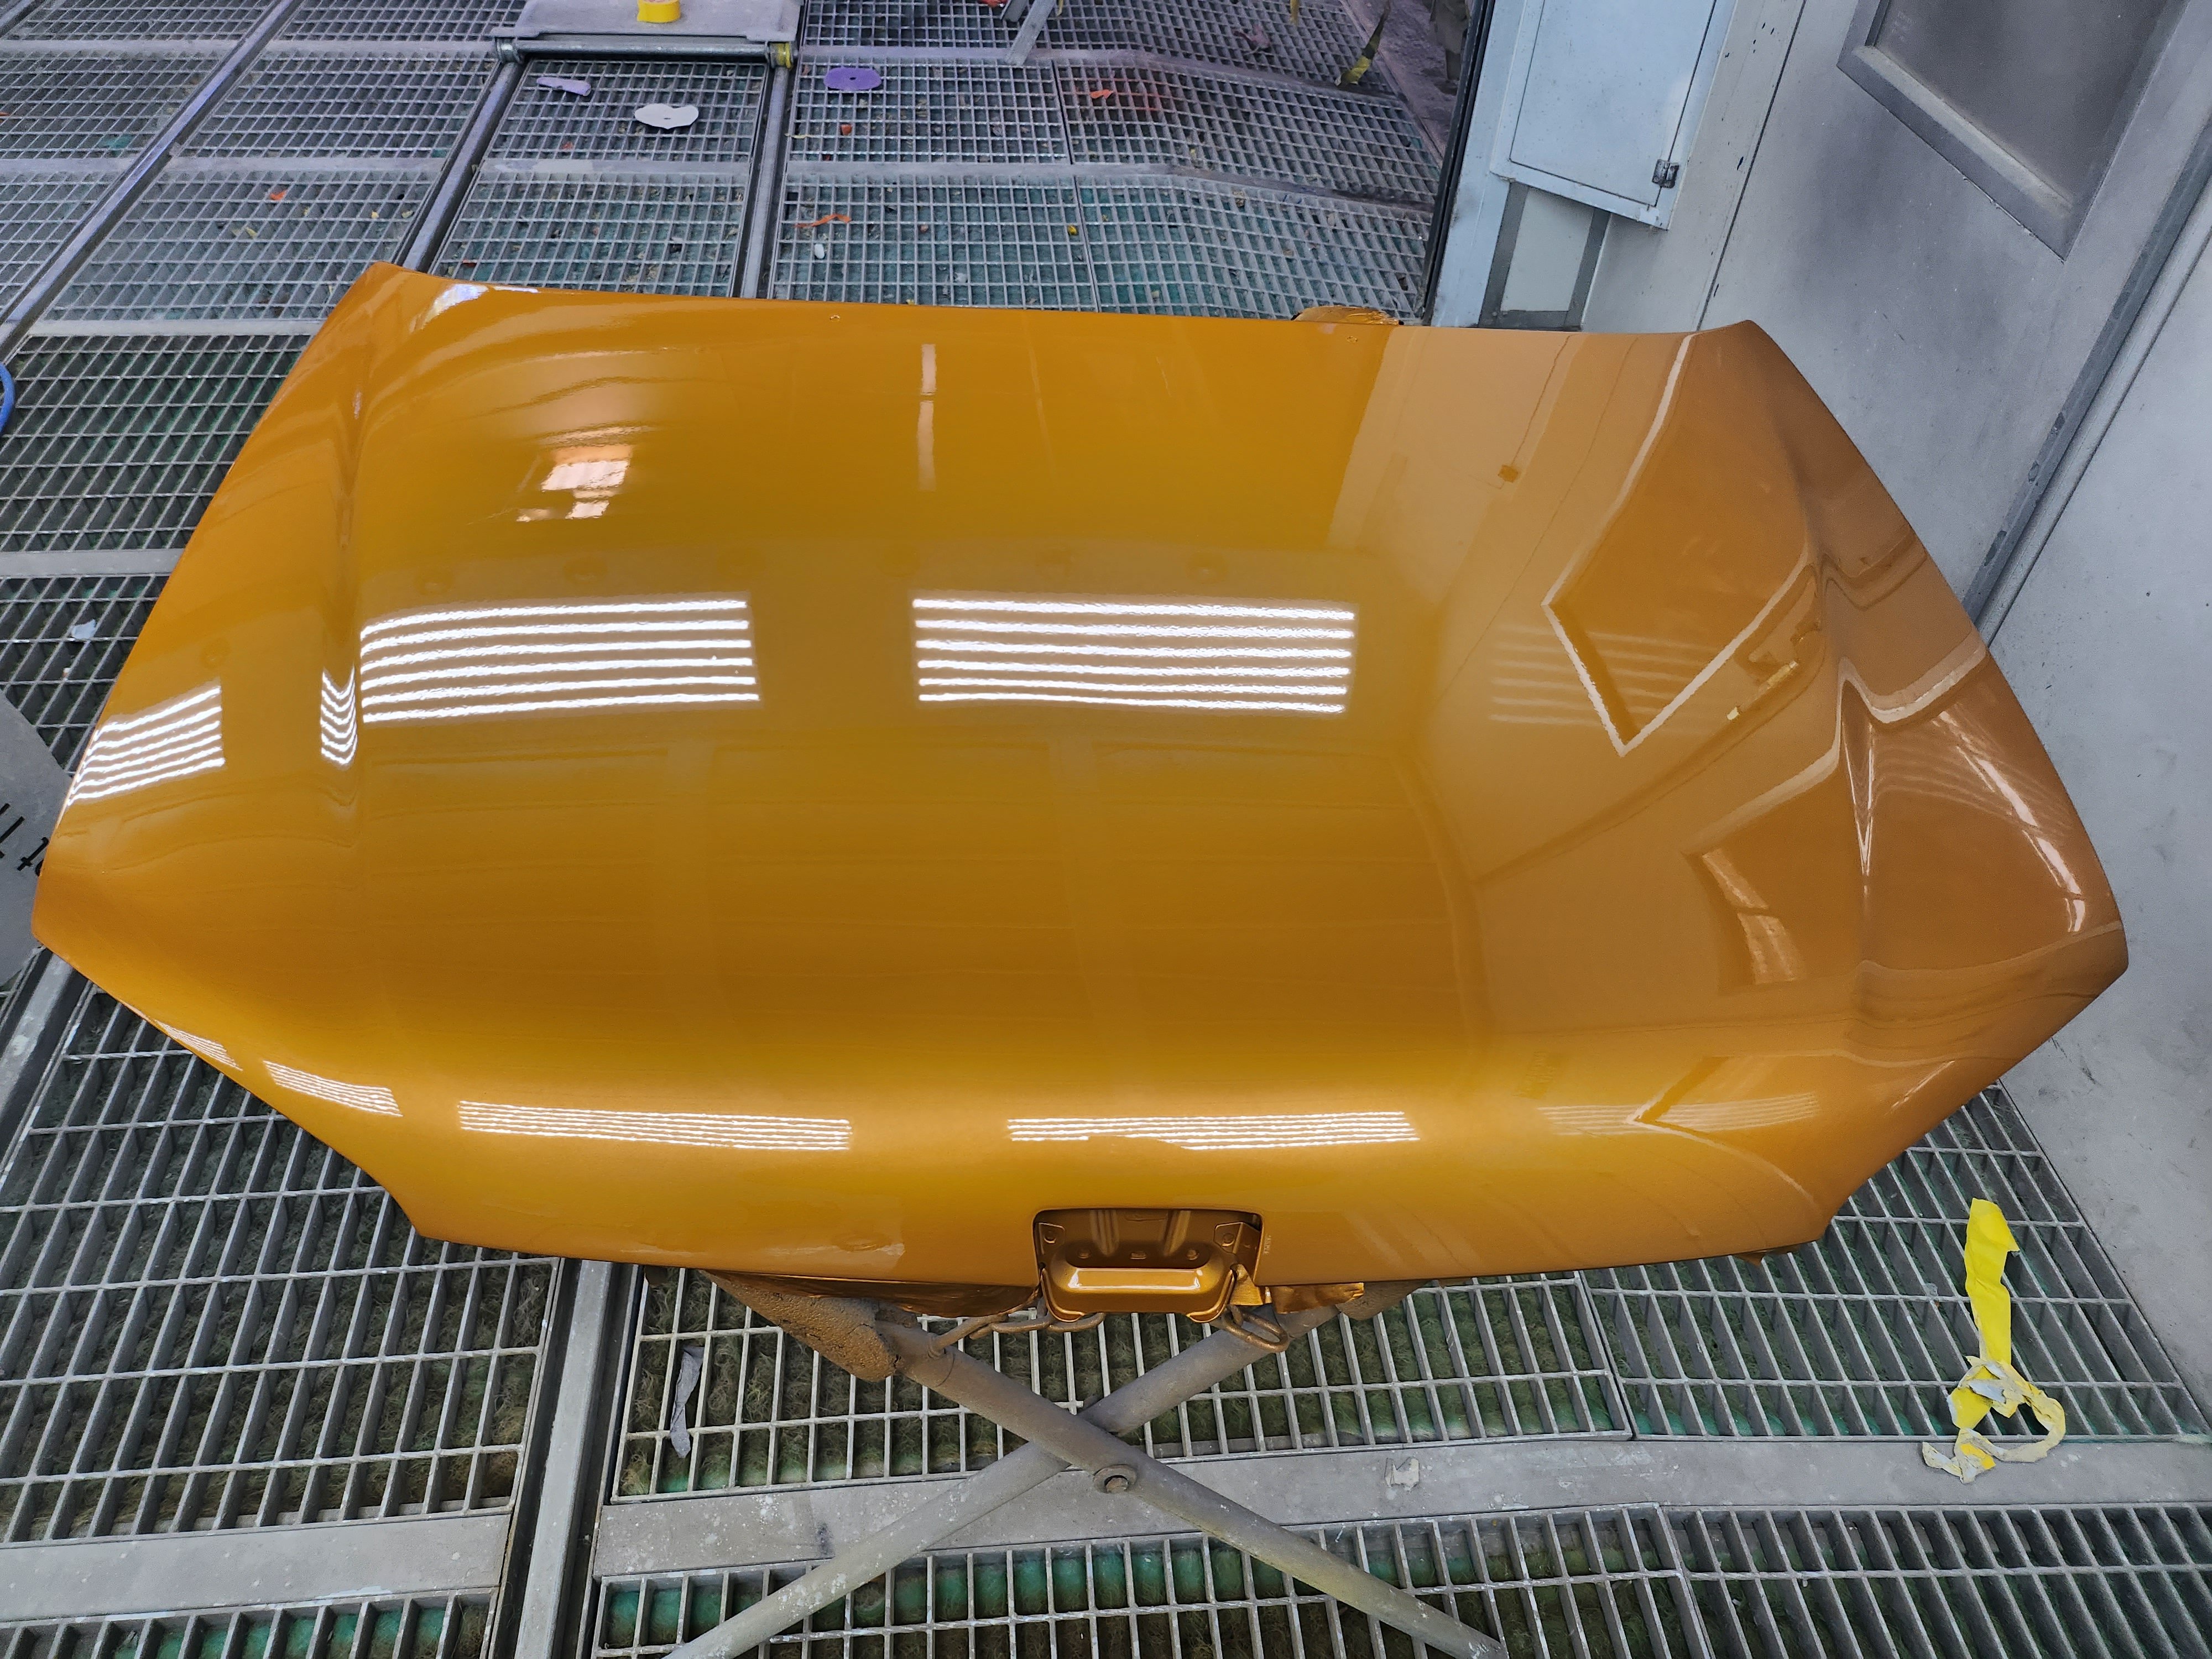
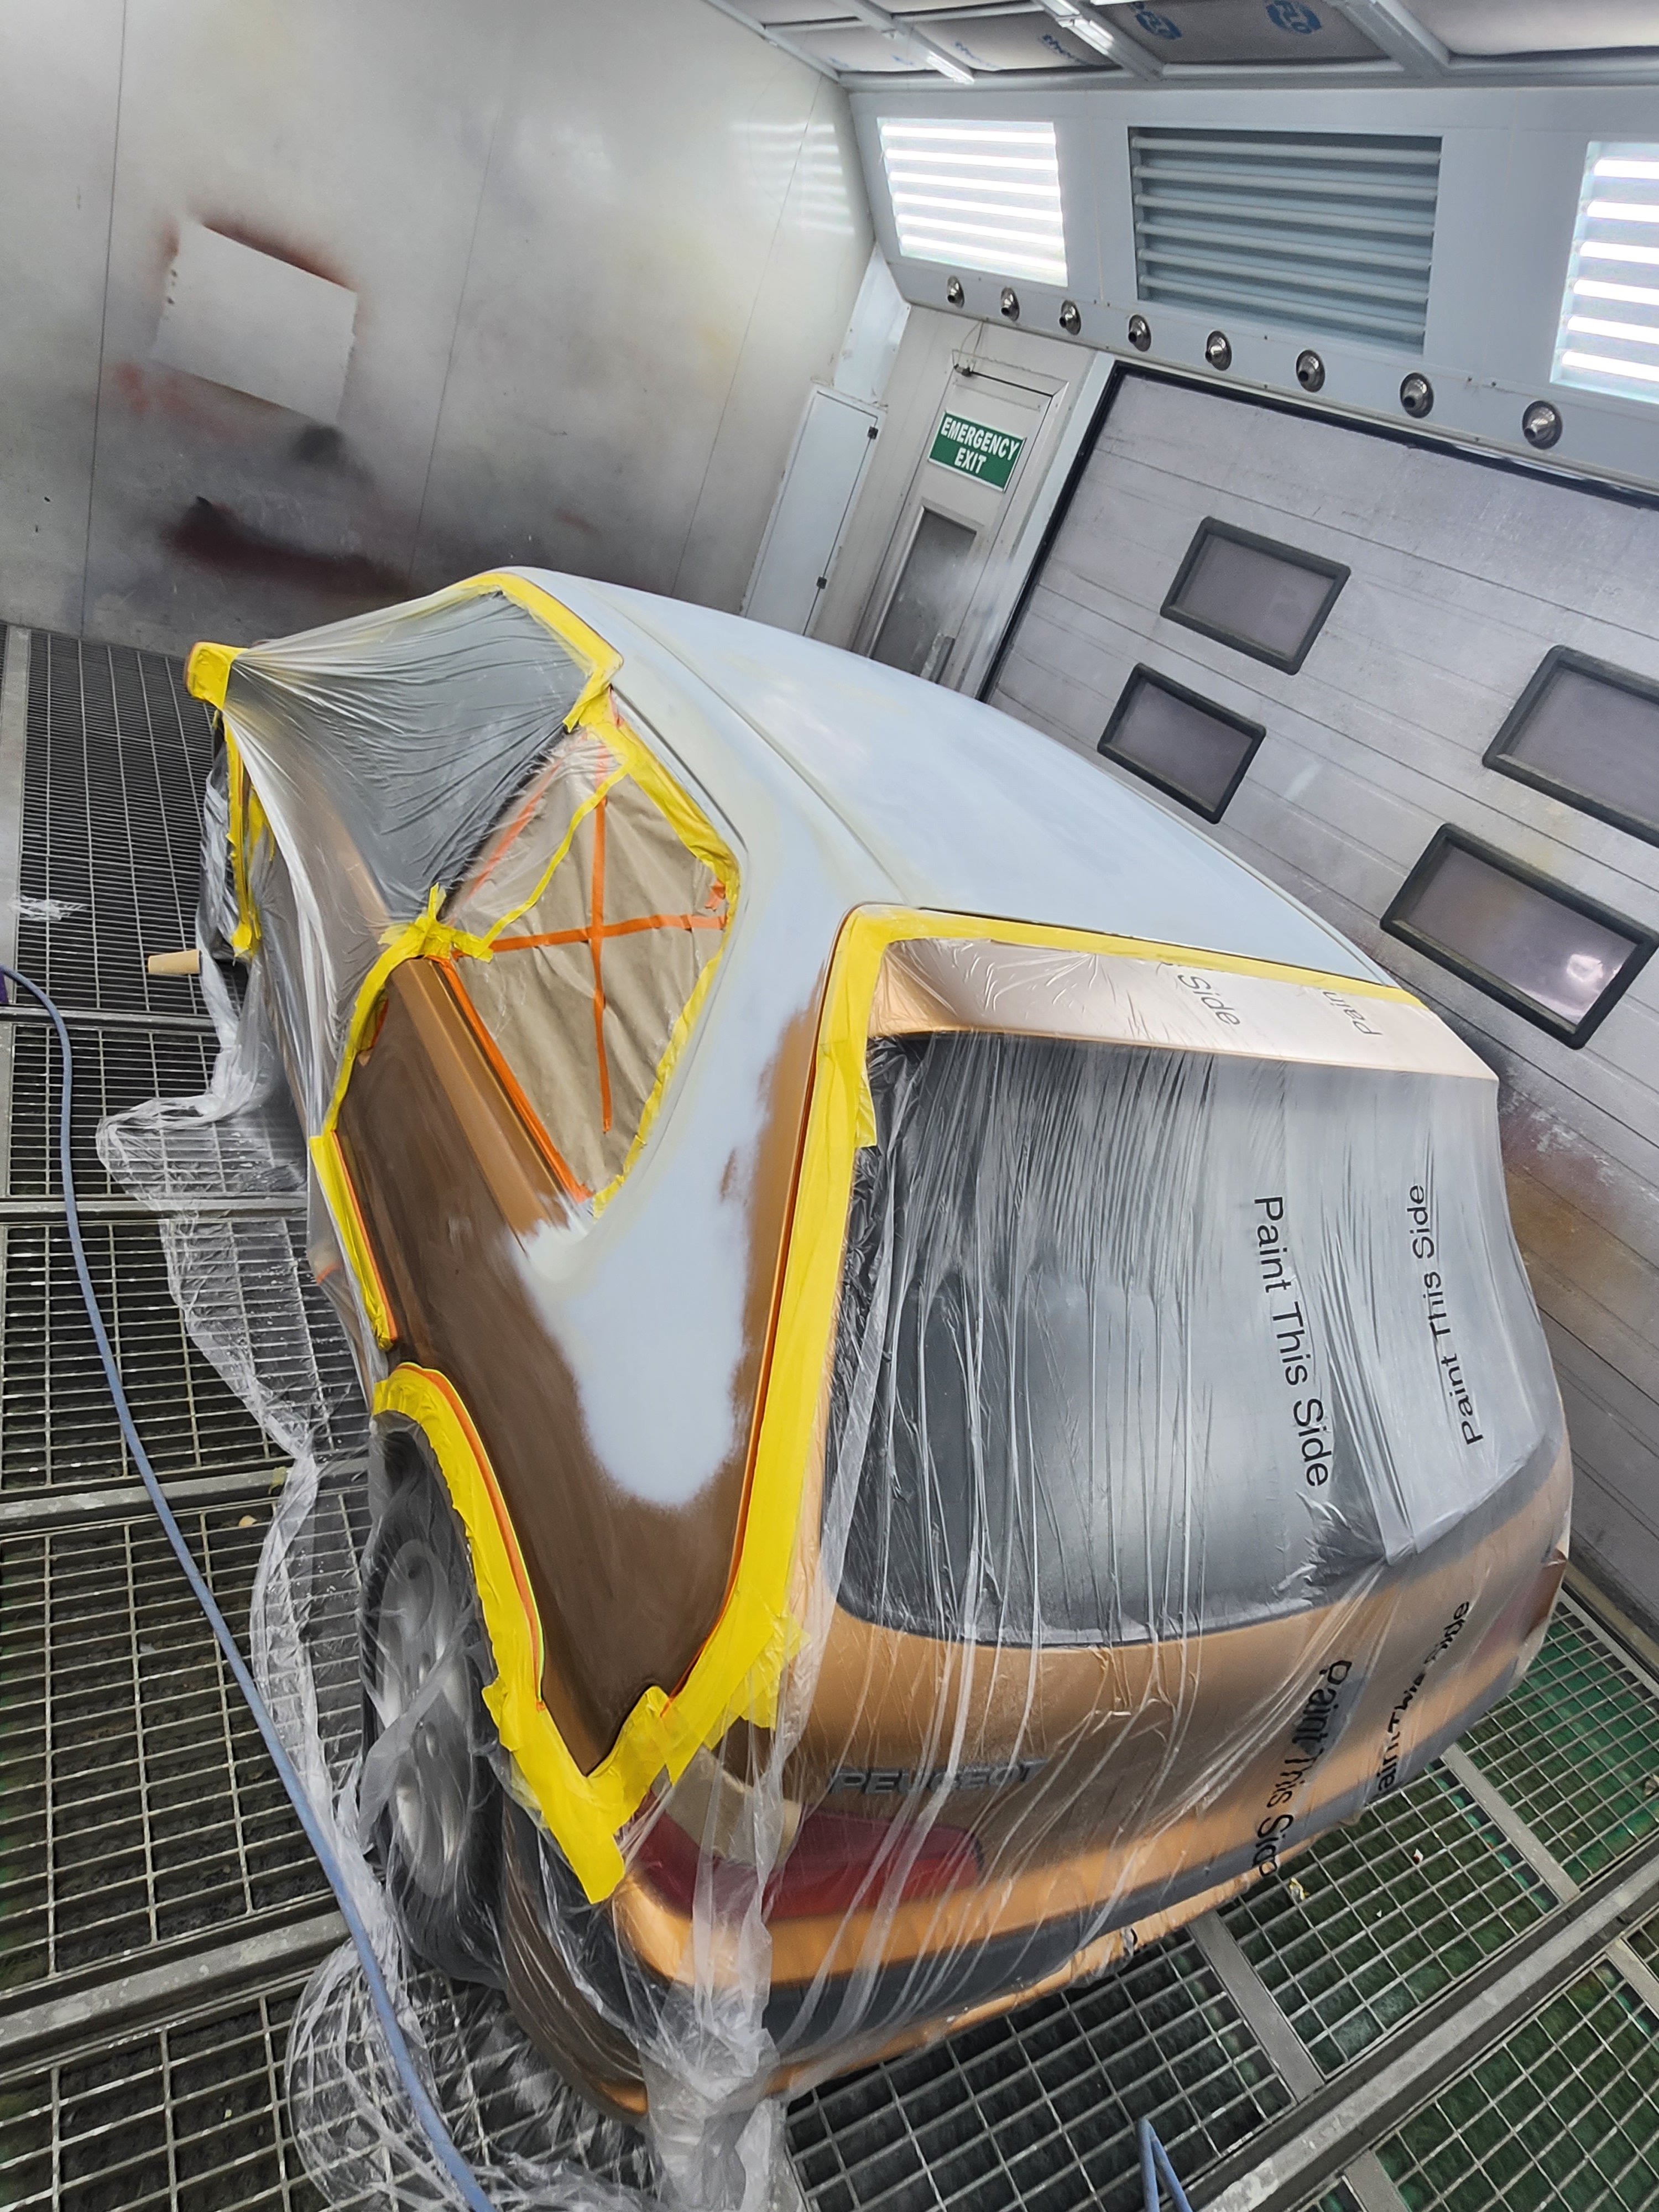
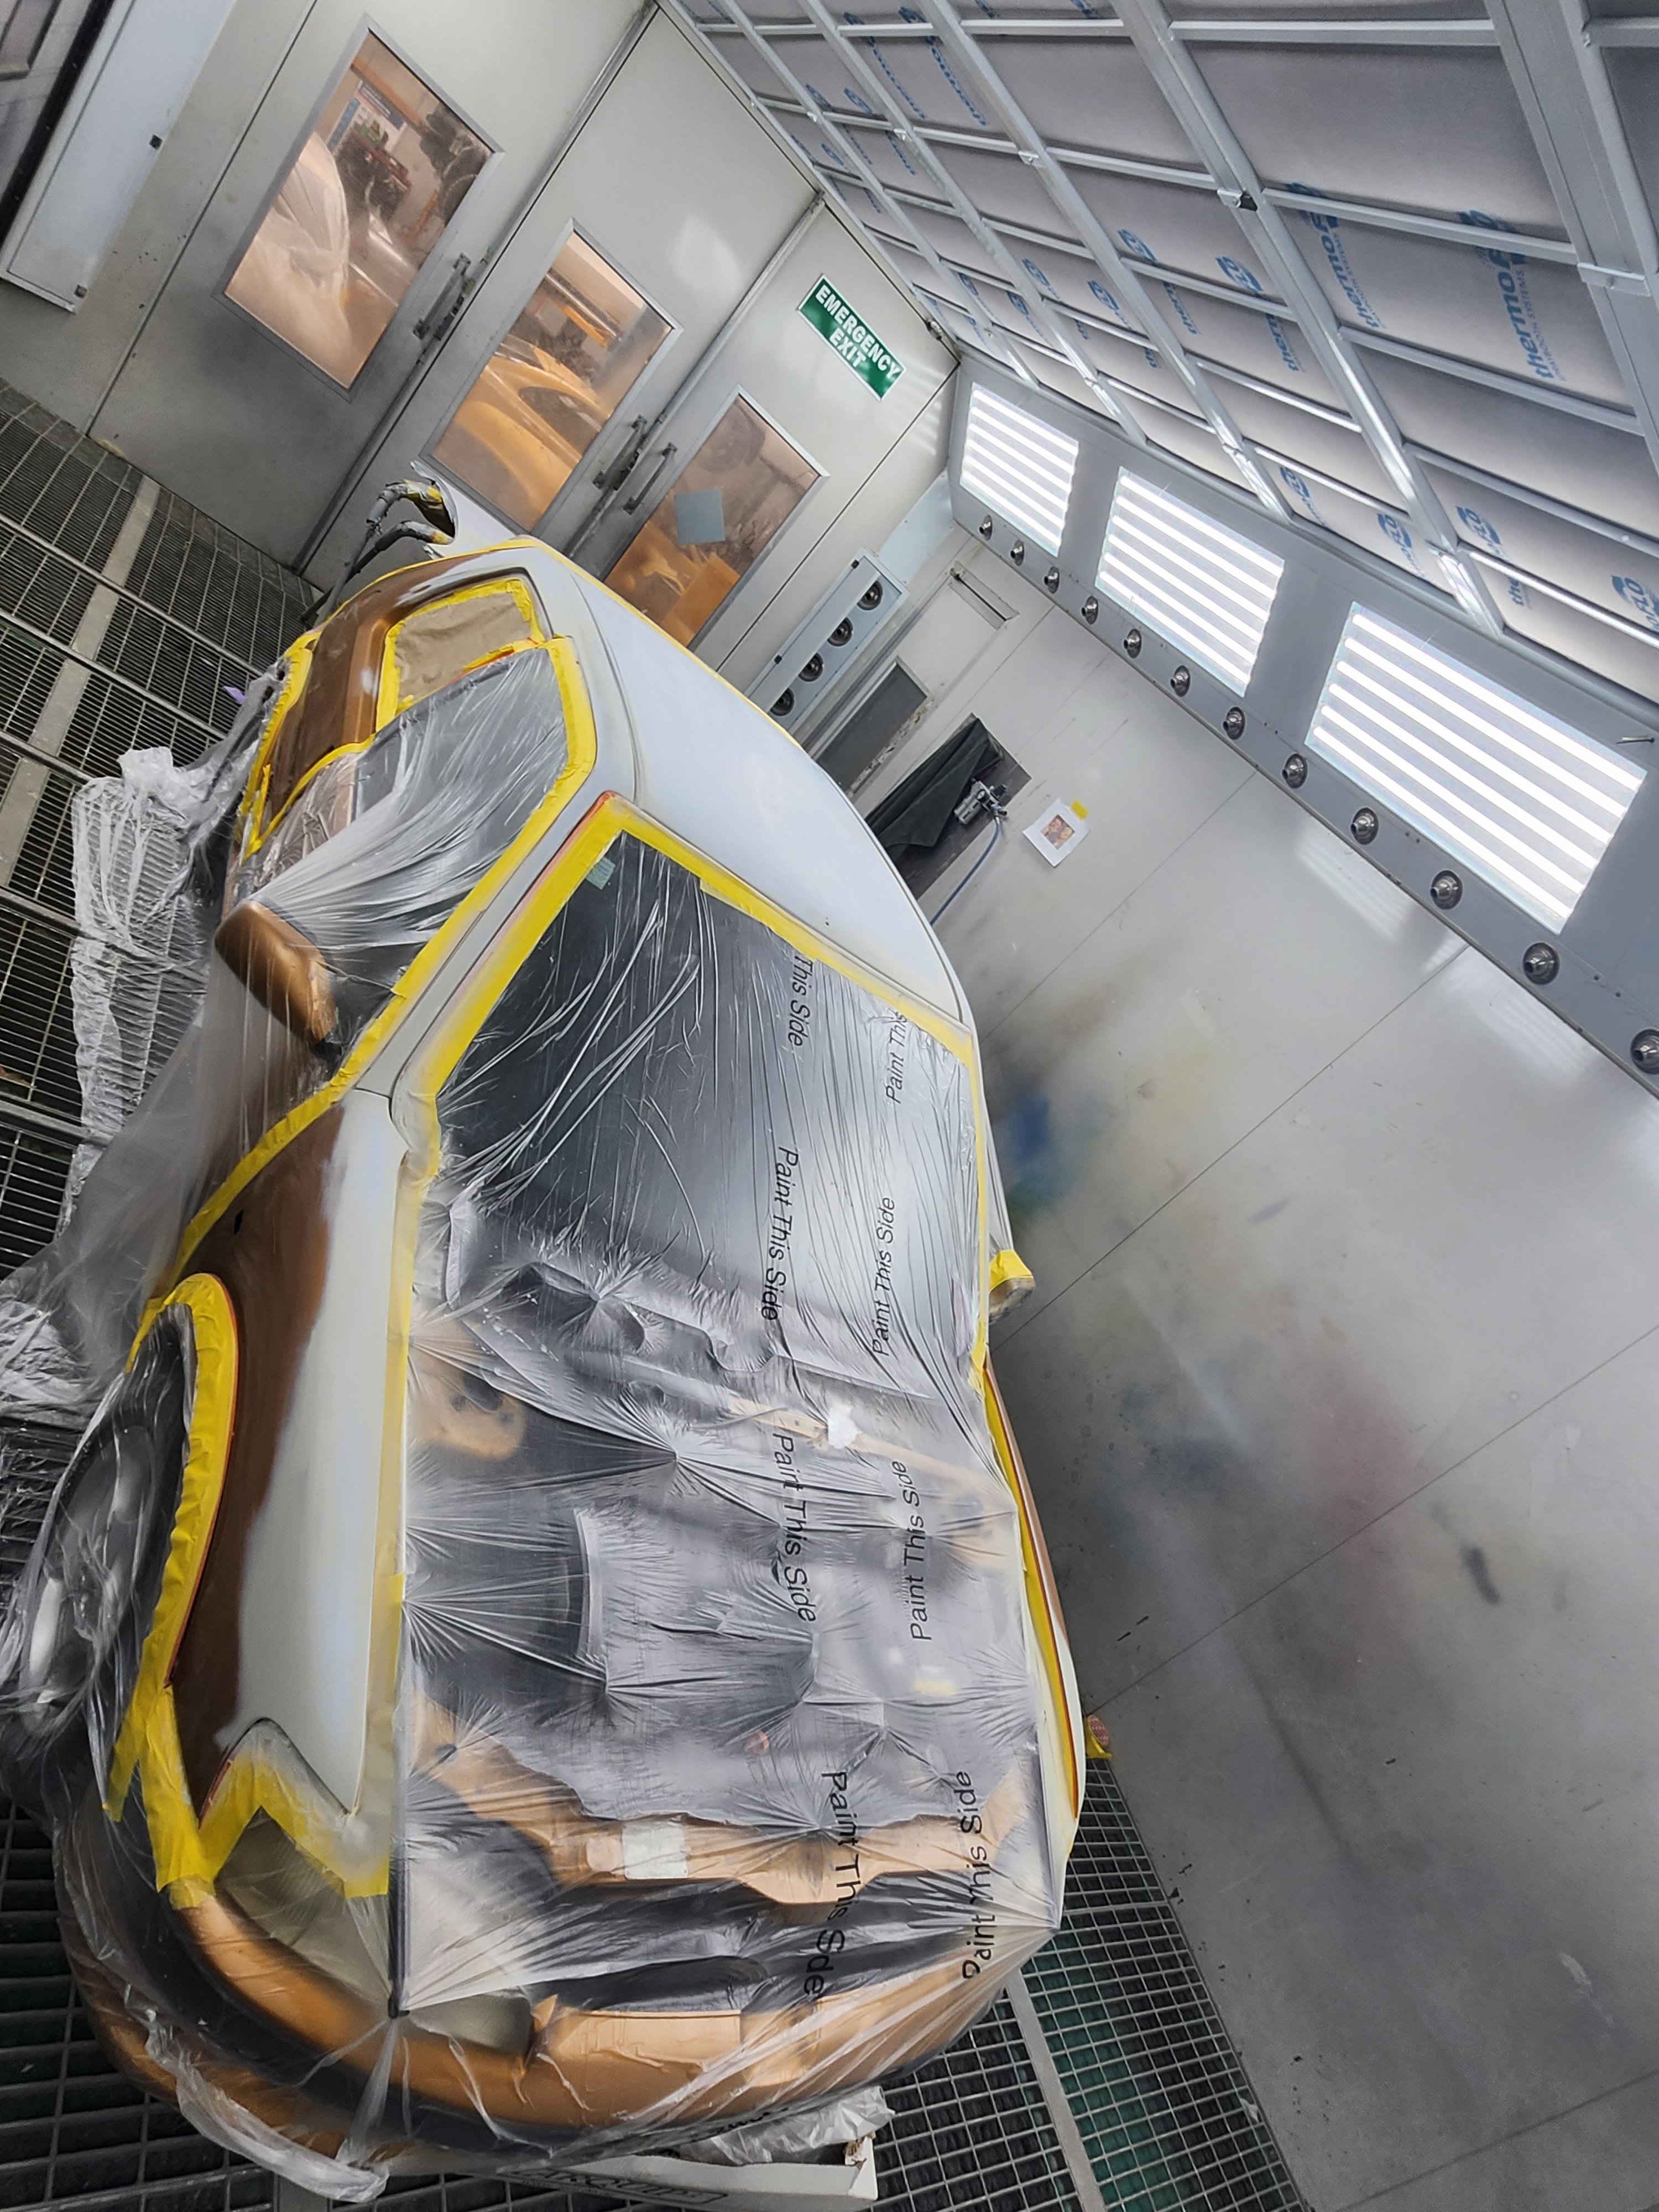
So it's just finished baking in the booth. Doors opened and time to take the masking off.
4 points
-
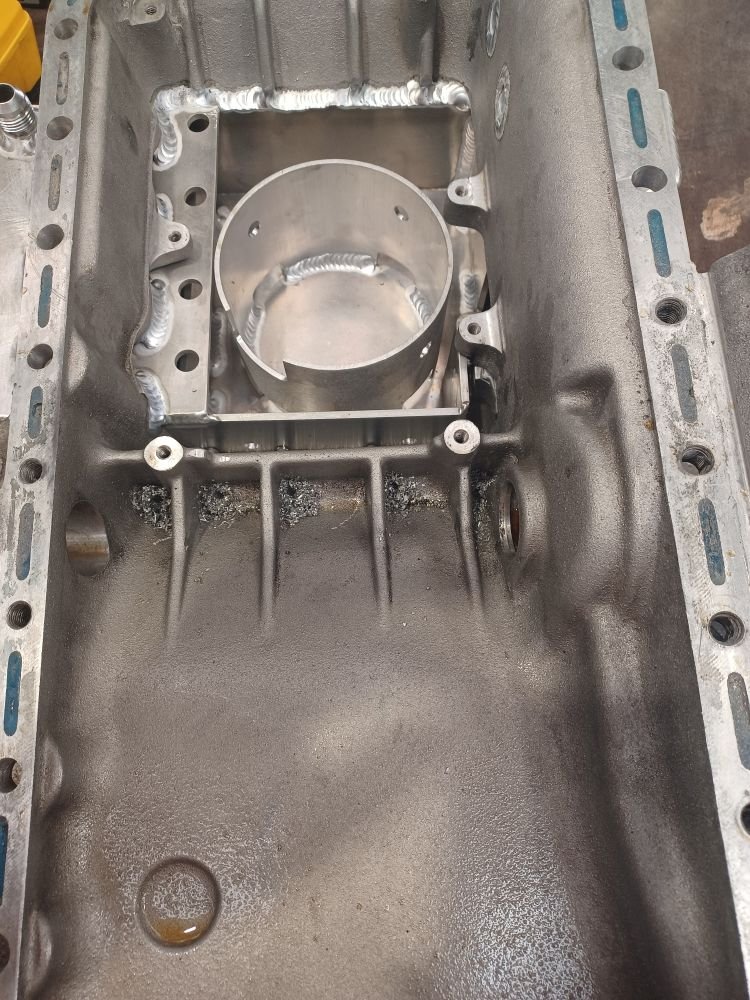
the clutch pack goes in here and the actuator pushes the pins up to clamp the plates together You can see there is a difference in height of the inner splines to the outer basket. I was stumped why the plates did not line up. I stripped the inner assembly and found the thrust washer and needle bearing clamp half washer thingys had fallen out I got it all together correctly and back into the case then put all the plates in. There needs to be the correct clearance under the main snapring otherwise it will either be locked or lazy as. I was close but not within tolerance so out with all the plates and measure them all and assemble with all the thinnest ones, but still too tight. Then i tried the thin base plate and all the thickest clutches and drive plates and it was too loose. The front plate can be ordered in a bunch of thicknesses from nissan but thats 3 weeks plus I ended up running the R33 shaft and basket in the R32 case as it was .3mm different depth and everything worked out. I had to play the thrust washer game again as it was different... But it does have a splash guard that helps stop the oil coming out around the gearstick. This was me for about 4 hours. Plates in, measure, swear, plates out, measure again, stick in different piles according to thickness, and reinstall and measure again etc. Then try with the R33 basket and shaft. Every time i got stuck, it was back over to the press to push it apart or back together, and repeat. Fortunately the shims for the front plate are within tolerance so i just need to clean it up and glue it on tonight. Progress might be slow now. Waiting on the head, and need to do some work on the wagon for wagnats
4 points
-
Offered up the 205 Speedlines... Not quite the right size tyre but I think they'll look great.
3 points
-
All my engine parts came yae ! love new engine parts
3 points
-
Yeah the plan was to do French Pass OR Kenepuru. Agree not possible to do both in a day! Best overnight options are: The Rai Valley Tavern (now called The Millers Rest) - camping only I think, will have to check. Bonus, it's also a pub! Pelorus Bridge (Kahikatea Flat) - DOC campground, but with a kitchen facility. Sweet river for a swim. Havelock Holiday Park - cabins and campsites. Probably most versatile location, and a proper little town for supplies etc. Is just another 30min down the road. This would be my pick.3 points
-
Probably need to figure out how far you want to go and what the intended use will be, and that will help decide Not just engine,but how far you want to go with steering and suspension mods to go with it. Ie if you want to stick with easy bolt on brake upgrades,then a mx5 engine for example might be a good swap,but if you want to put a turbo k24 in then you probably need to do a bit more work on handling etc.3 points
-
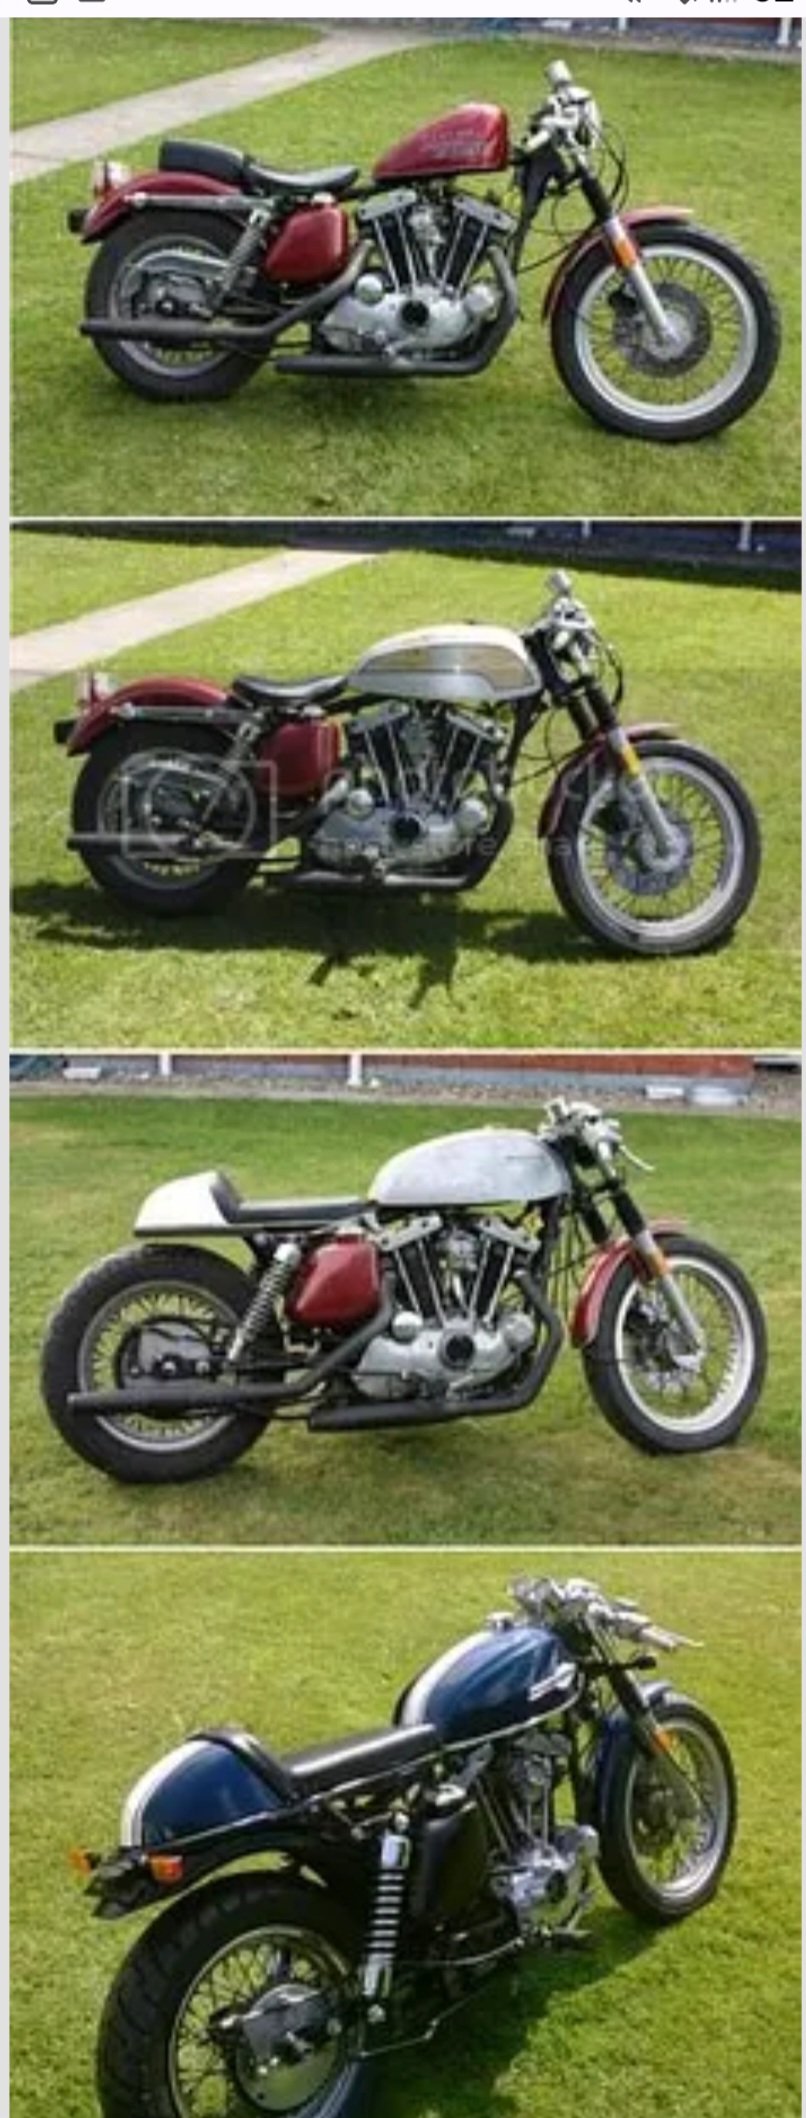
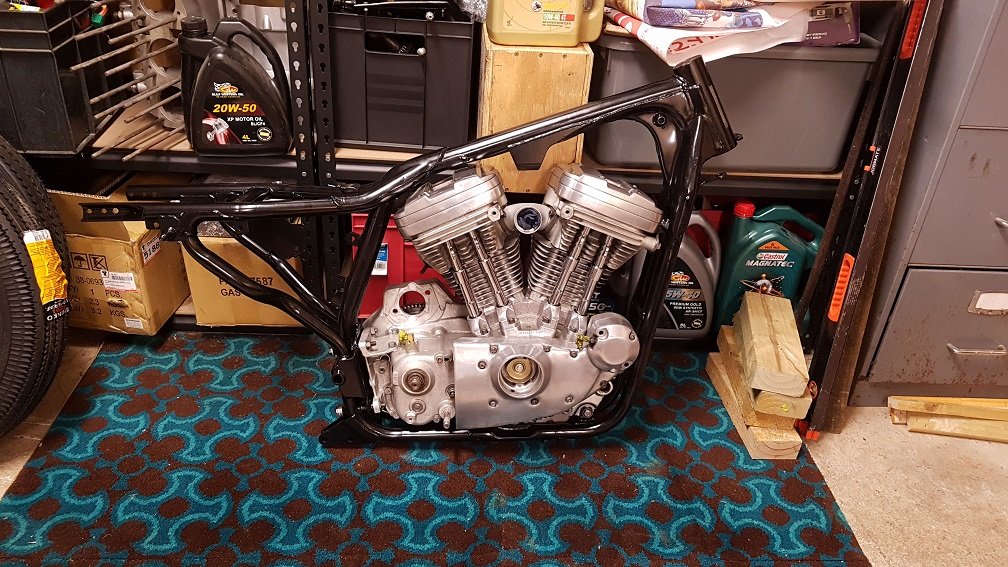
Putting the carb on an angel was a stupid idea. I realisedthe oil tank I have is a Featherbed tank with a tab welded on to fit a Gardengate frame, it dosnt fit properly and clashed with the gearbox top mount. A friend of mine is giving me an early rigid frame tank witch will look better to.
3 points
-
3 points
-
Then sorta...
2 points
-
2.0 and gearbox from NC MX5. 2.3 from Mazda6 on NC Gear box. 13b and box from an RX 8 if you can find one that's not stuffed. Be prepared for major firewall and tunnel mods. Escort front end swaps can work well and offer rack and pinion steering, better brake and strut options.2 points
-
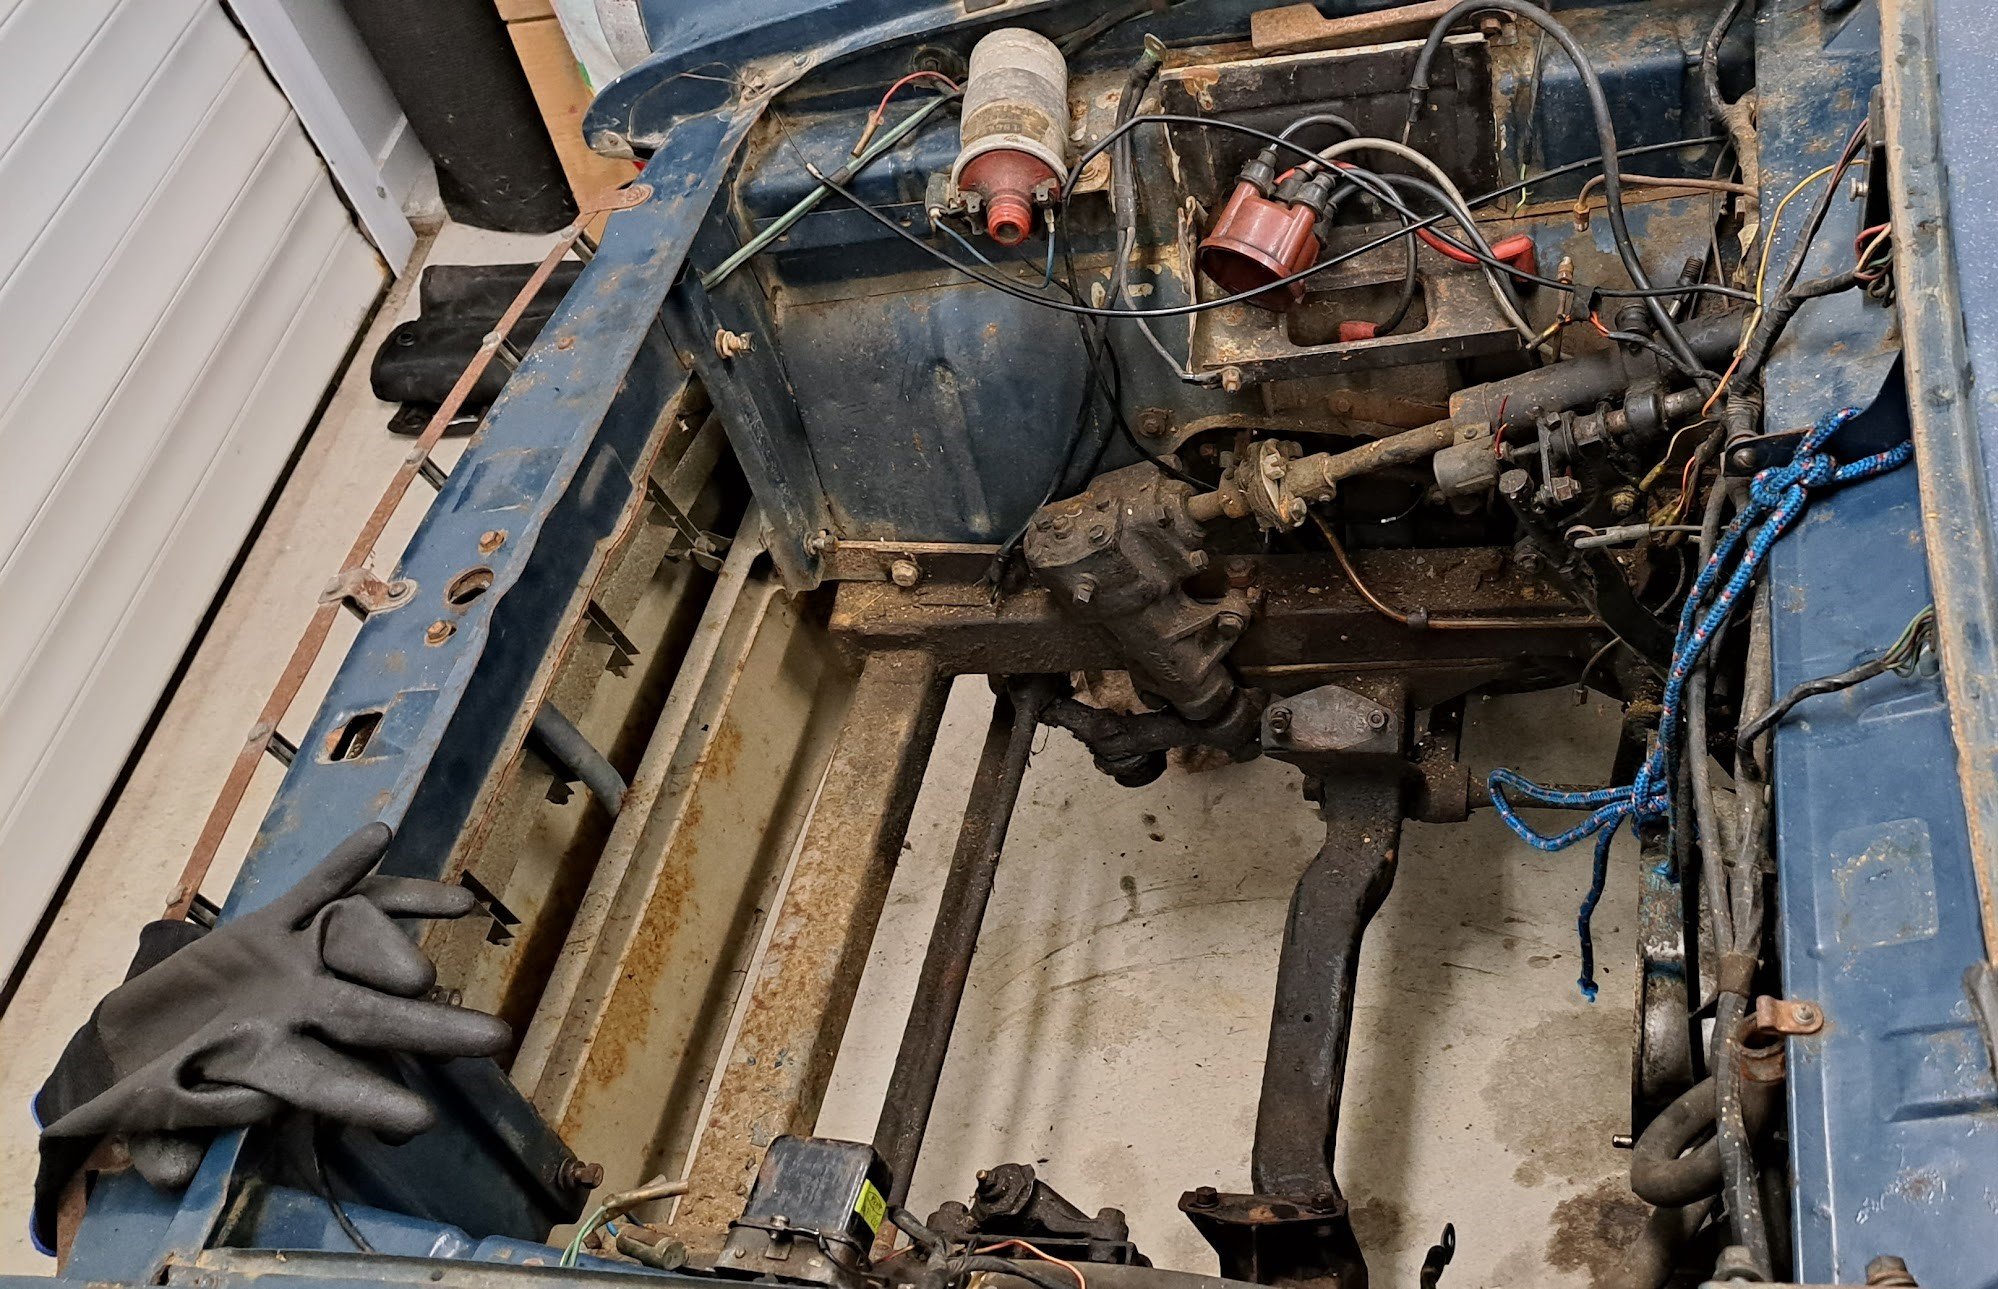
Punched a hole through the firewall for the loom. Its safely grommeted. Ecu is wired up, new fuse box and relays set. I only need to source some suitable ballast resistors for the injectors, finish wiring connection for this. Also need to get a power distribution post to connect the stock power feeds aswell as the starter cable to the battery etc. Ive refitted yhe battery tray, and will use a small drycell battery like what i used in my stockcar and rallycar. Ive even mounted the hard fuel line and return. Fuel pump will now mount under the car without a surge tank because i wont have time to make a "firewall" for the boot area.2 points
-
It’s going to be great
2 points
-
3sge beams altezza engine, fairly compact 6 speed manual rwd , can run on the factory ecu standalone, can pickup a crashed altezza fairly cheap2 points
-
2 points
-
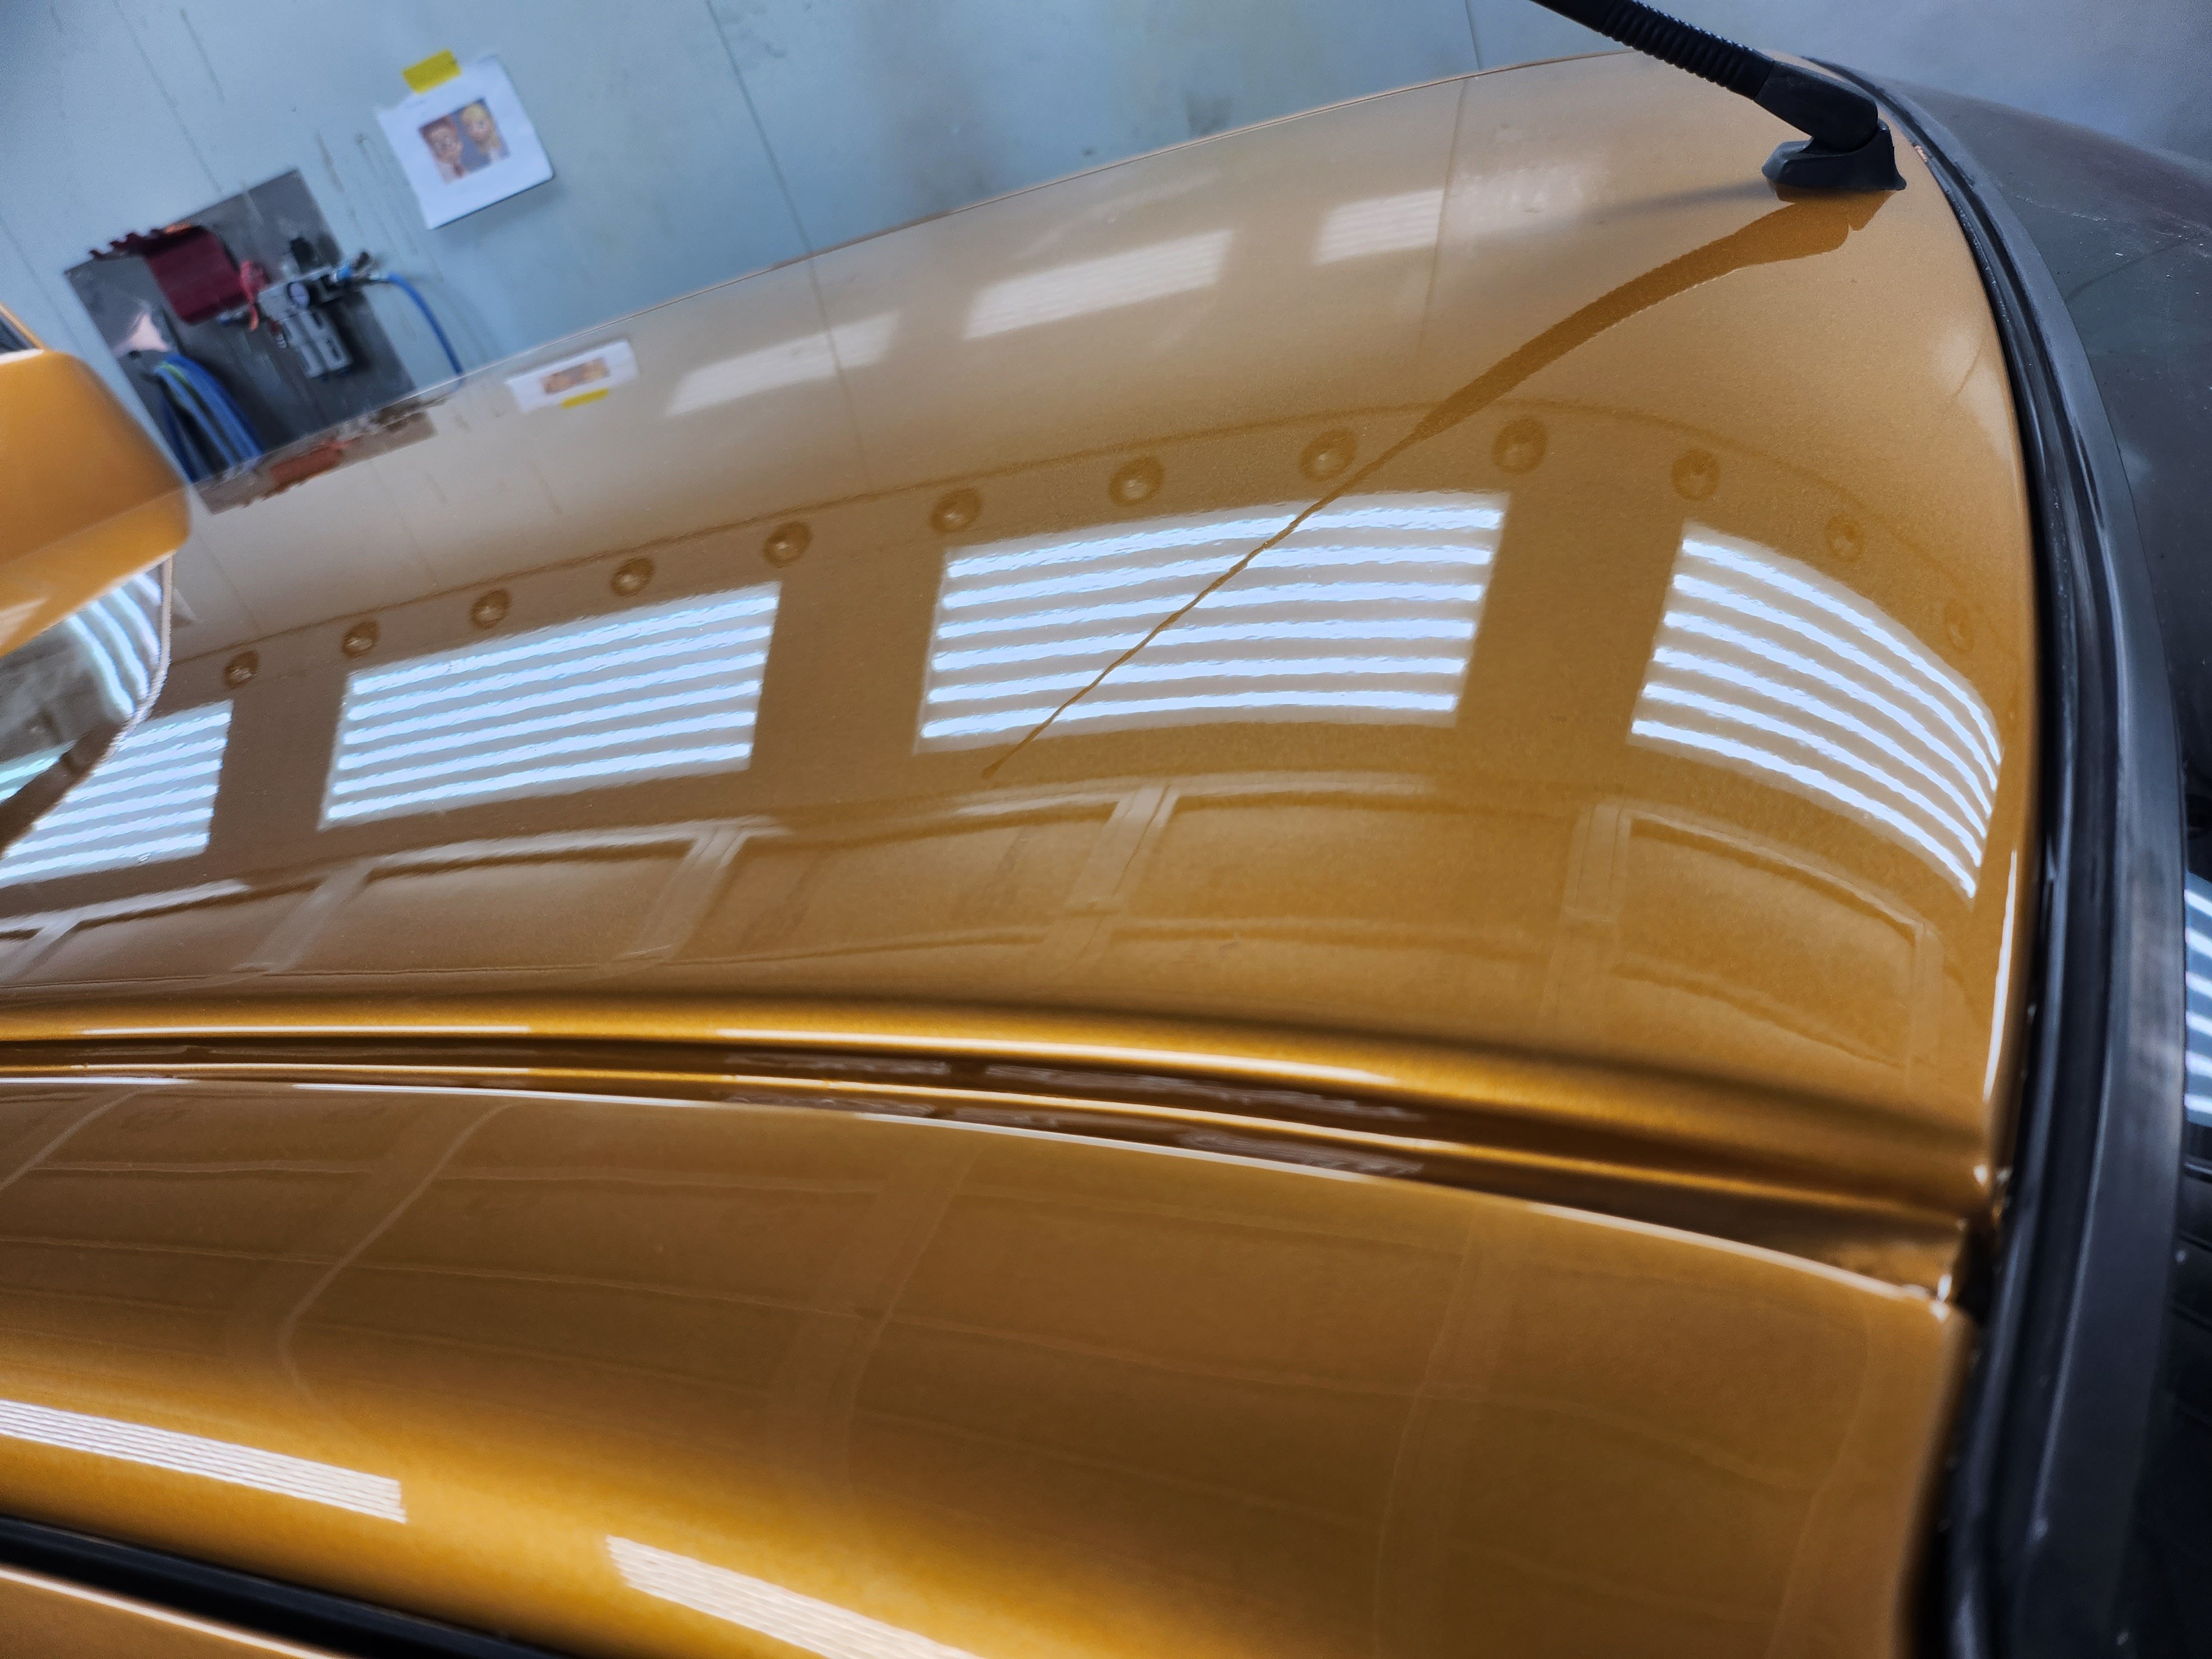
Final prepsol and it's time for some colour...
2 points
-
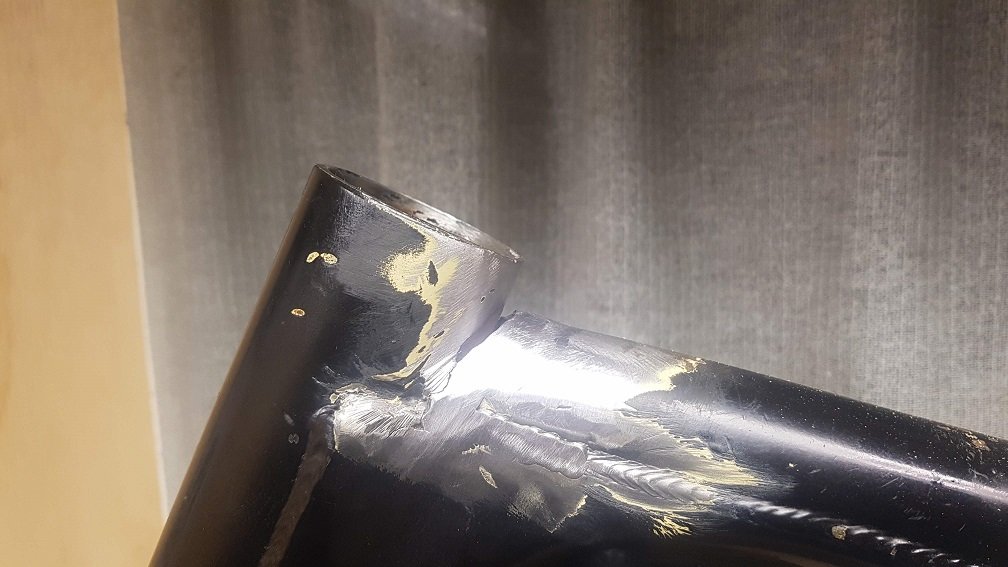
Put nut back on main shaft and can rotate engine no worries, will sort timing next. And turns out that weld is a factory Harley thing, added after drilling out an oil passage during construction. Apparently HD put out a service note stating you can discard the shims as they can fail and send bits of metal through the engine. Will look into that. Also hit the case on the buffer wheel for about 5 mins...2 points
-
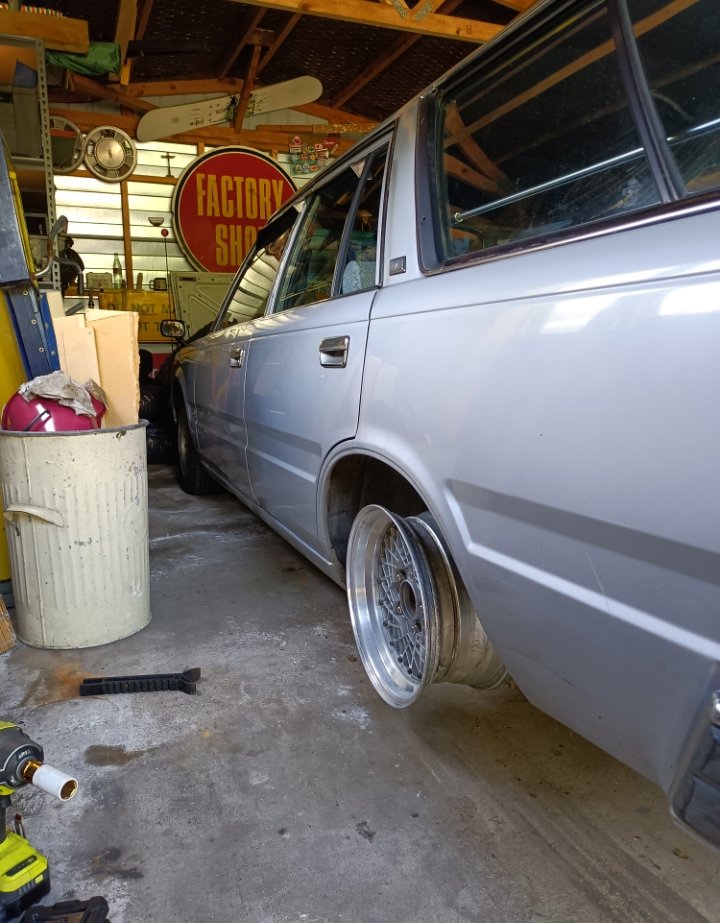
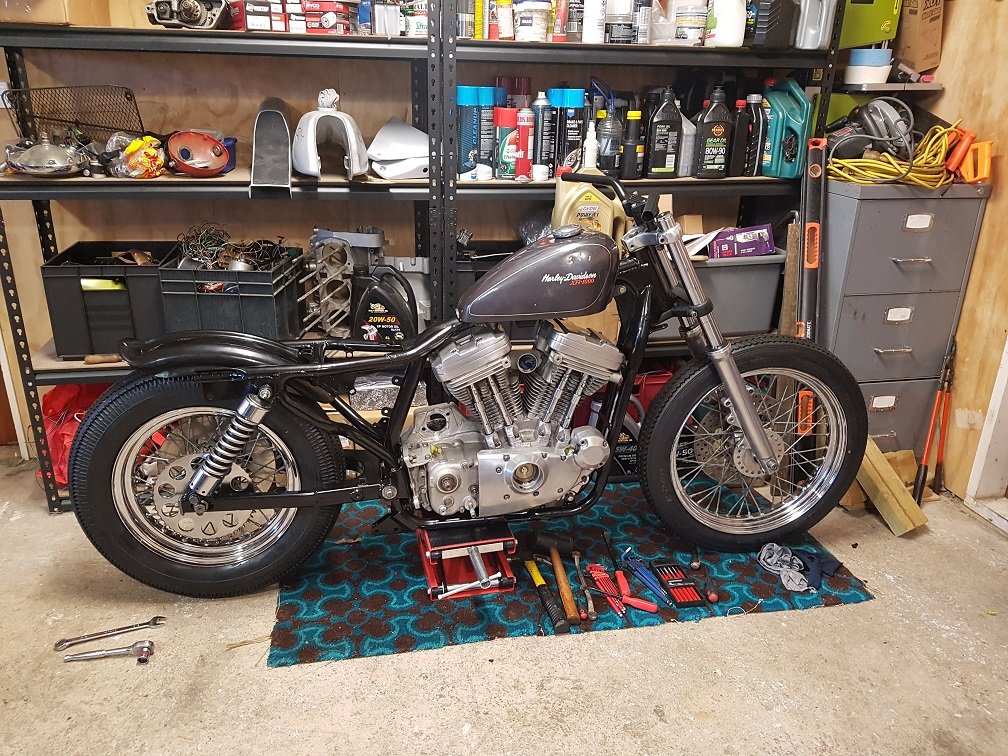
And done Highly recommend Metal Polish Co in Hamilton for polishing, I was absolutely blown away by how they came out. Quick turn around and more than happy with the price ($80/wheel). Lastly need to secure some new metal valve stems and then throw the wallet at some tyres.
2 points
-
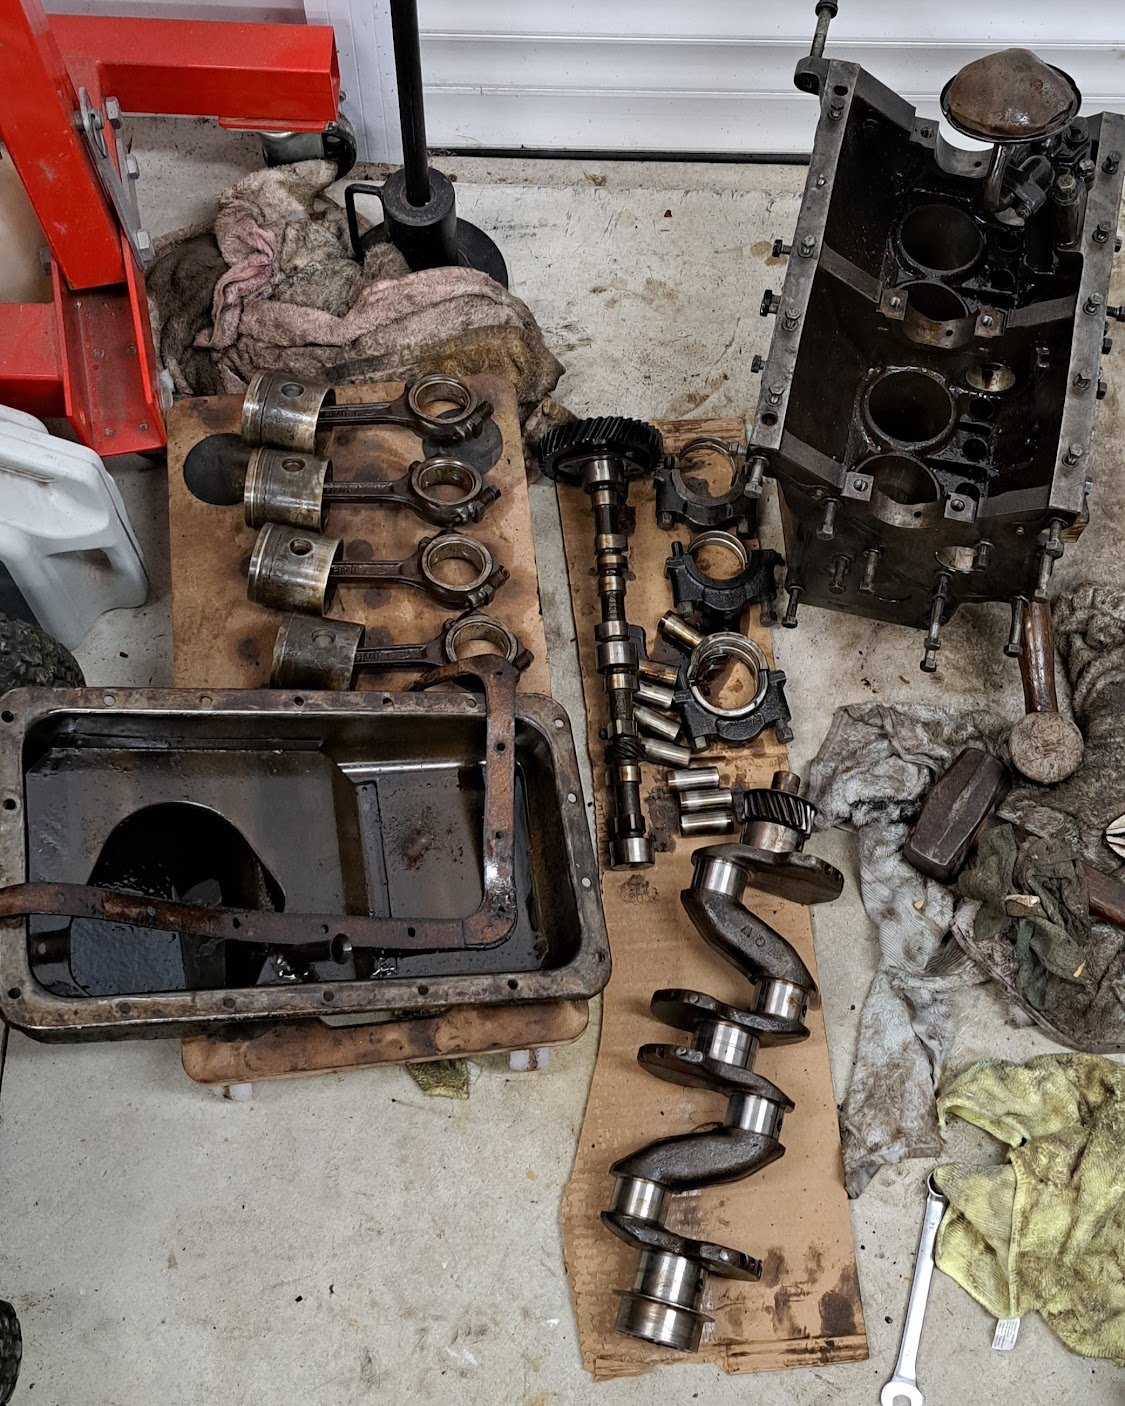
Xmas break.... too much time on my hands... No matter what i did the engine wouldn't budge so i figured it had to come out. and pulled it all apart as the pistons needed some gentle coaxing (BIG HAMMER) to get them out. Plan is to rebuild it with new pistons and bearings plus a tidy up.
2 points
-
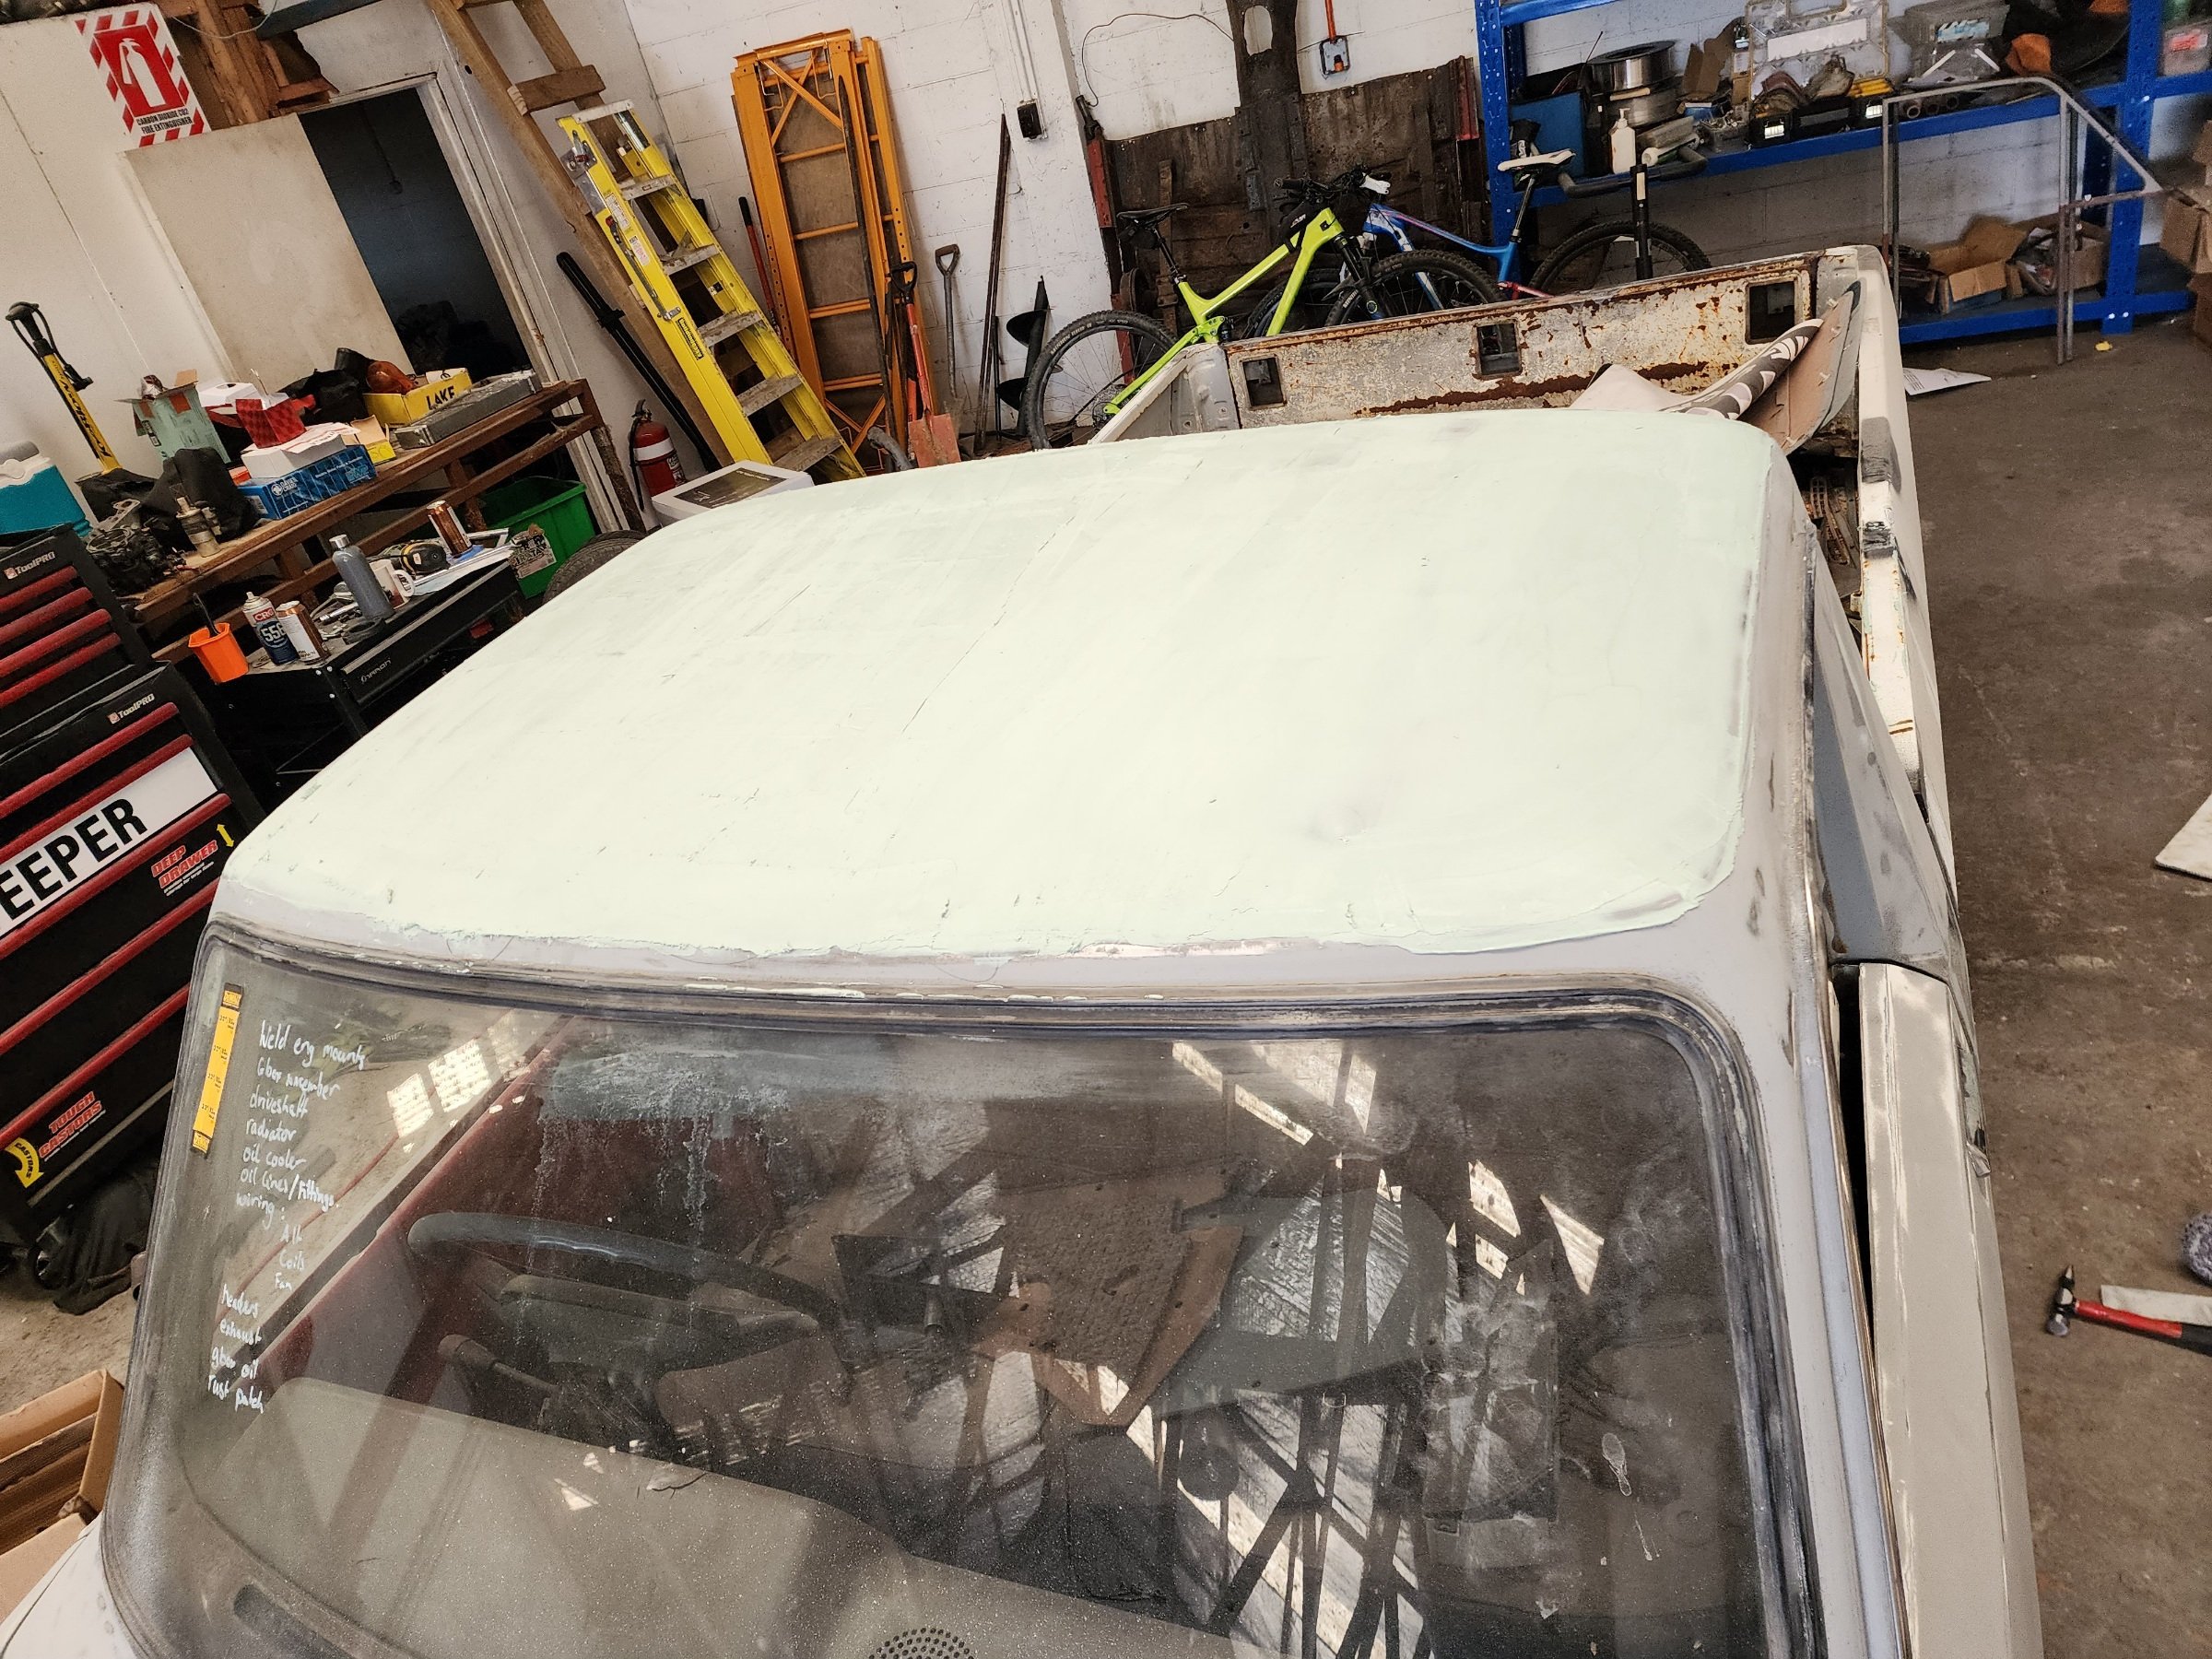
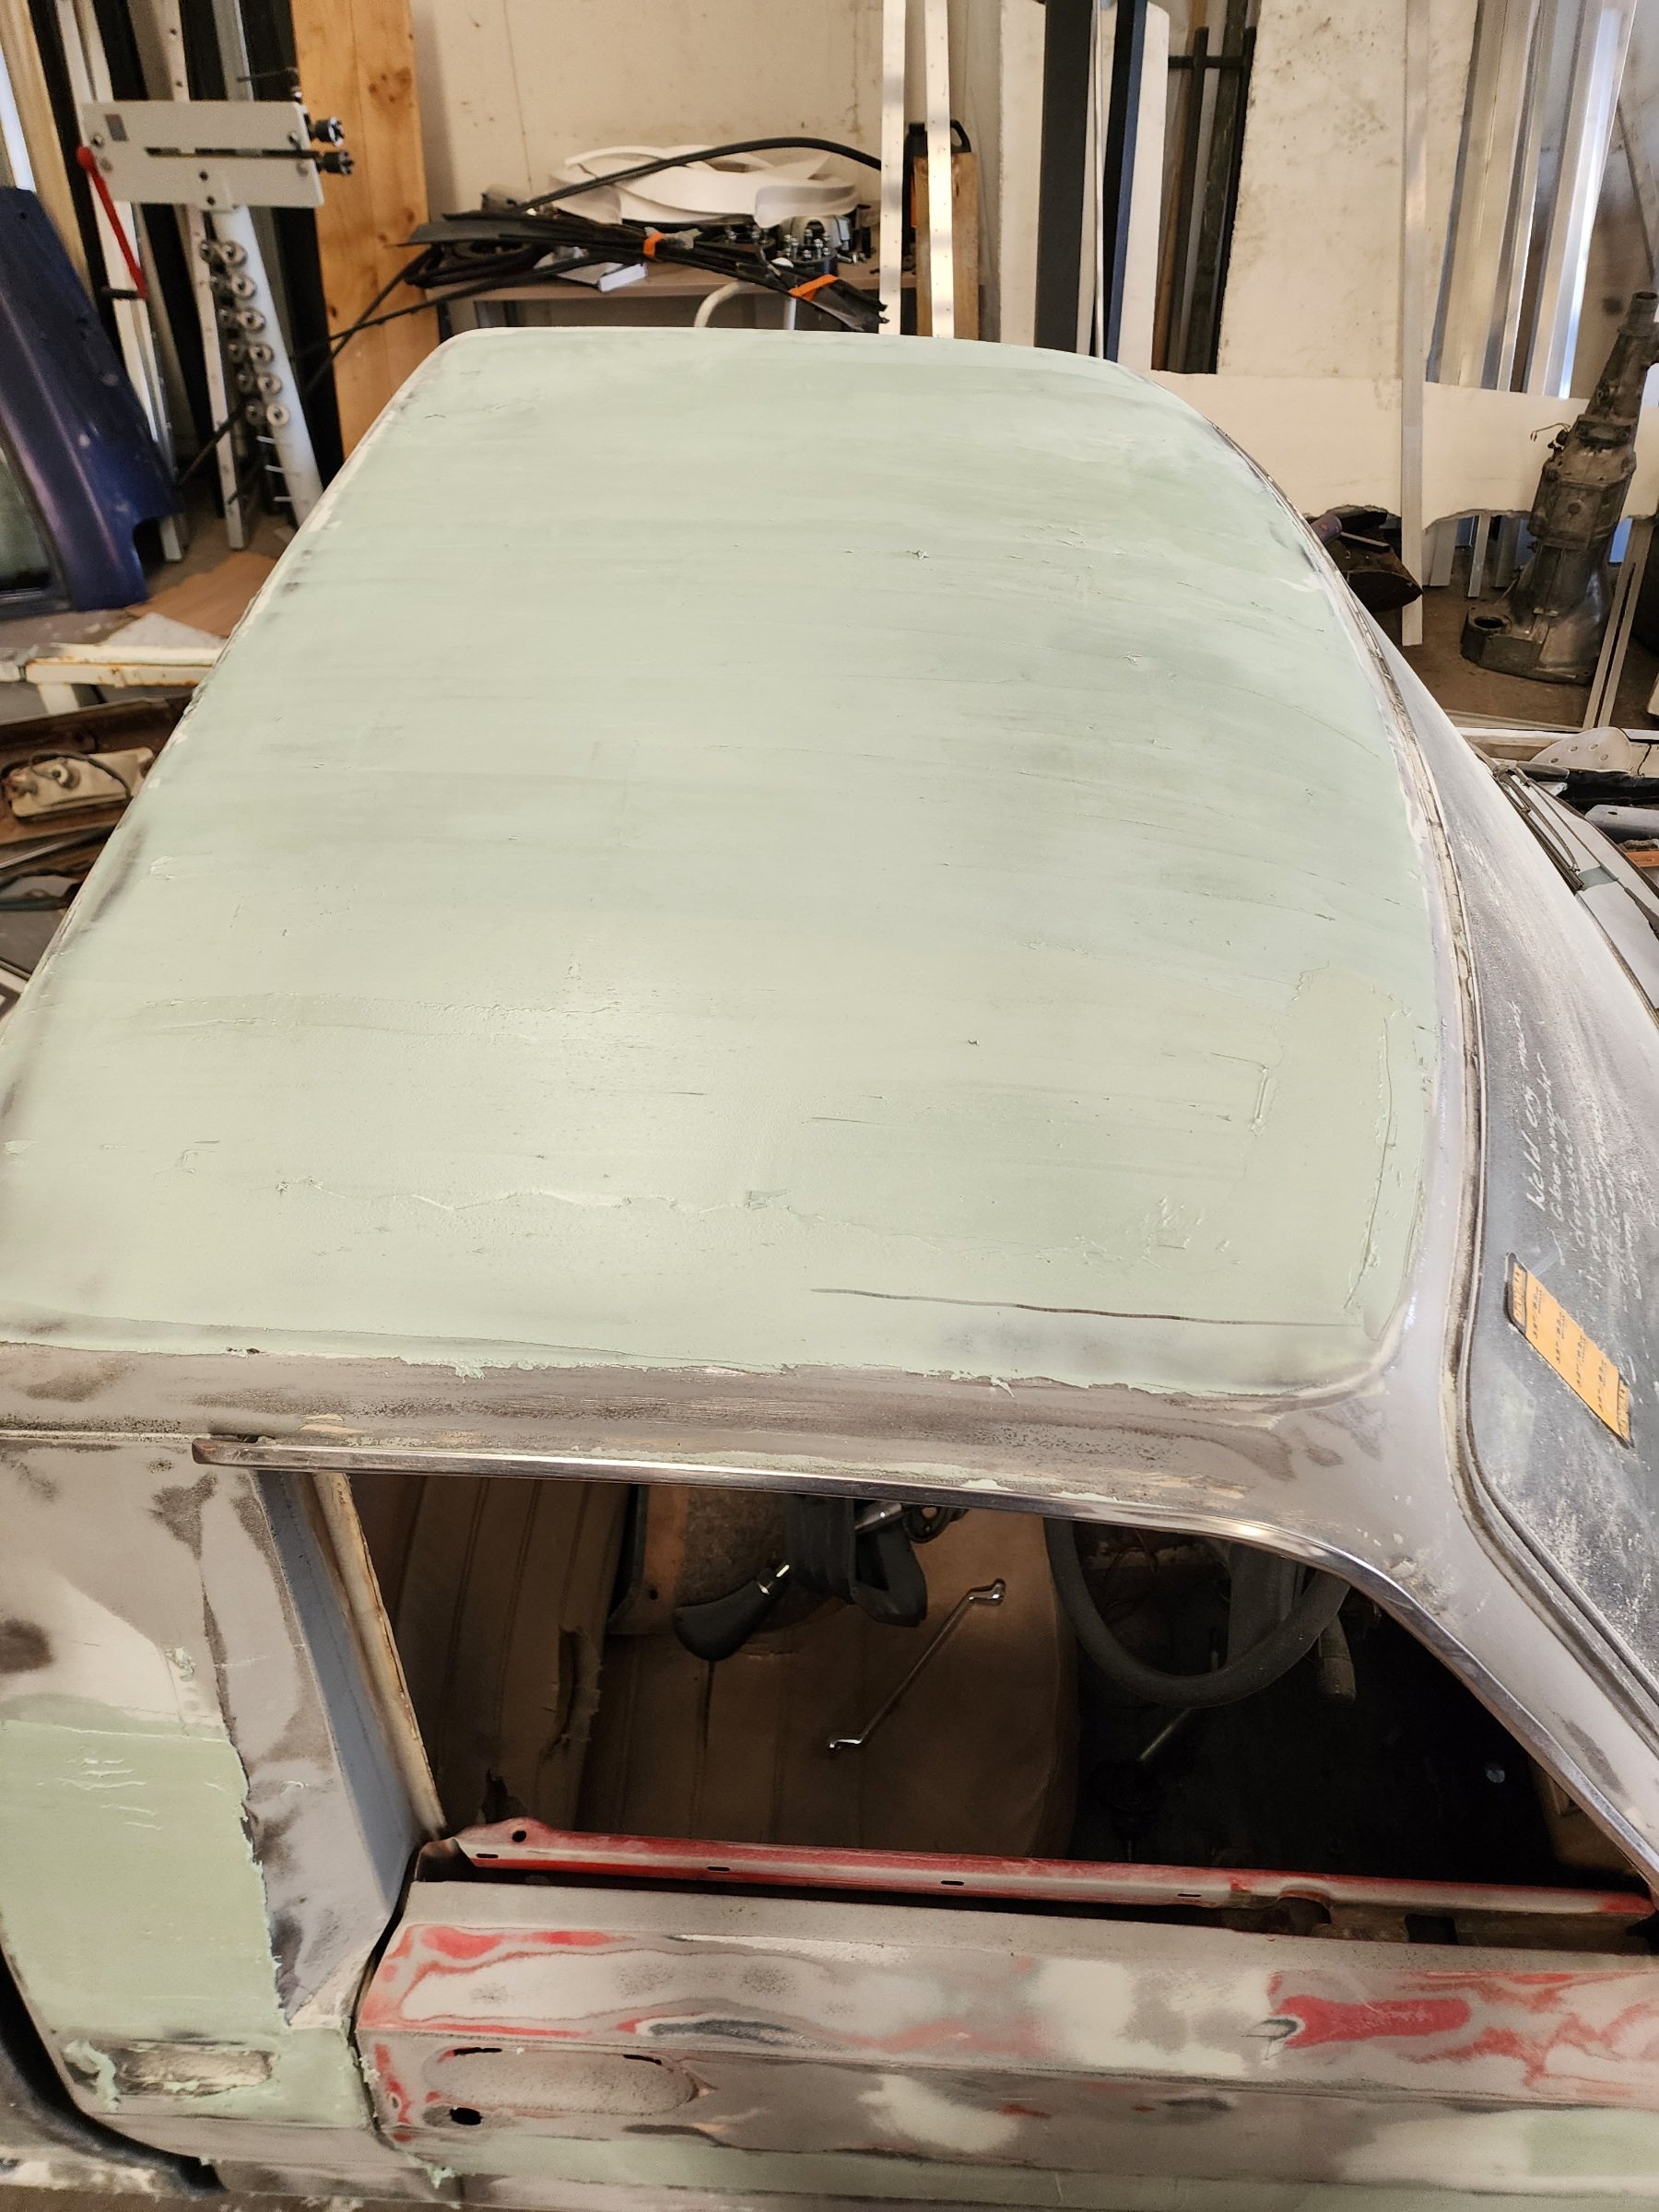
Started cutting back the shit paint/bog etc yesterday. Flooded the roof with filler today. Also hit the drivers door and both pillars. Passengers door has a nice gouge in it, but no rust. So i beat the ugly out of it, well as much as i could...its still better looking than jacinda, so thatll do. Paint stripped the top half of the tail gate and front sections of the deck. This deck is a shortened b2000 deck, so the front where its welded is gank. Itll bog out. In other news, the e-w/pump is awesome.. just need to make a mount for the pump and get some ss pipes made up. Wiring is simple even i could do it. And the bonus is that it runs the fan aswell. Ive got with an out the gate colour compared to the yellow version..i really like it on the lid in the sun..should suit it. That is all for now. Need to sort the welding of the guards so i can this paneled in aswell.
2 points
-
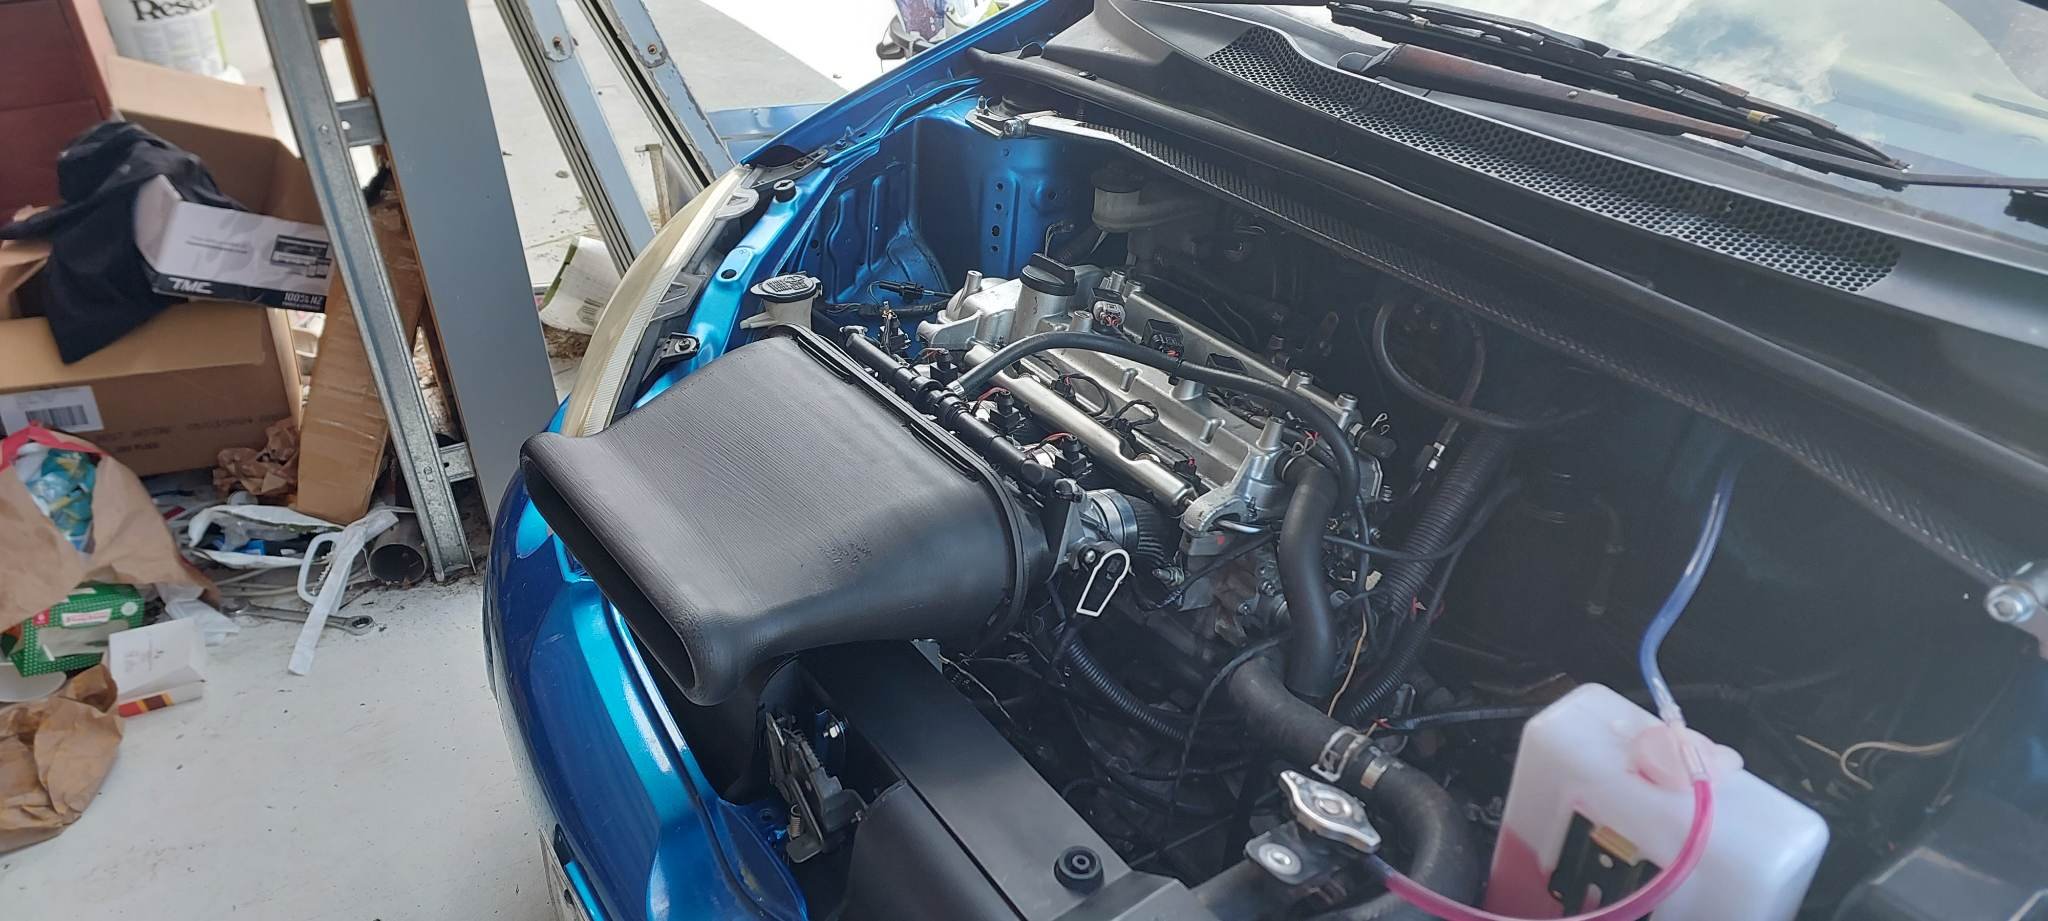
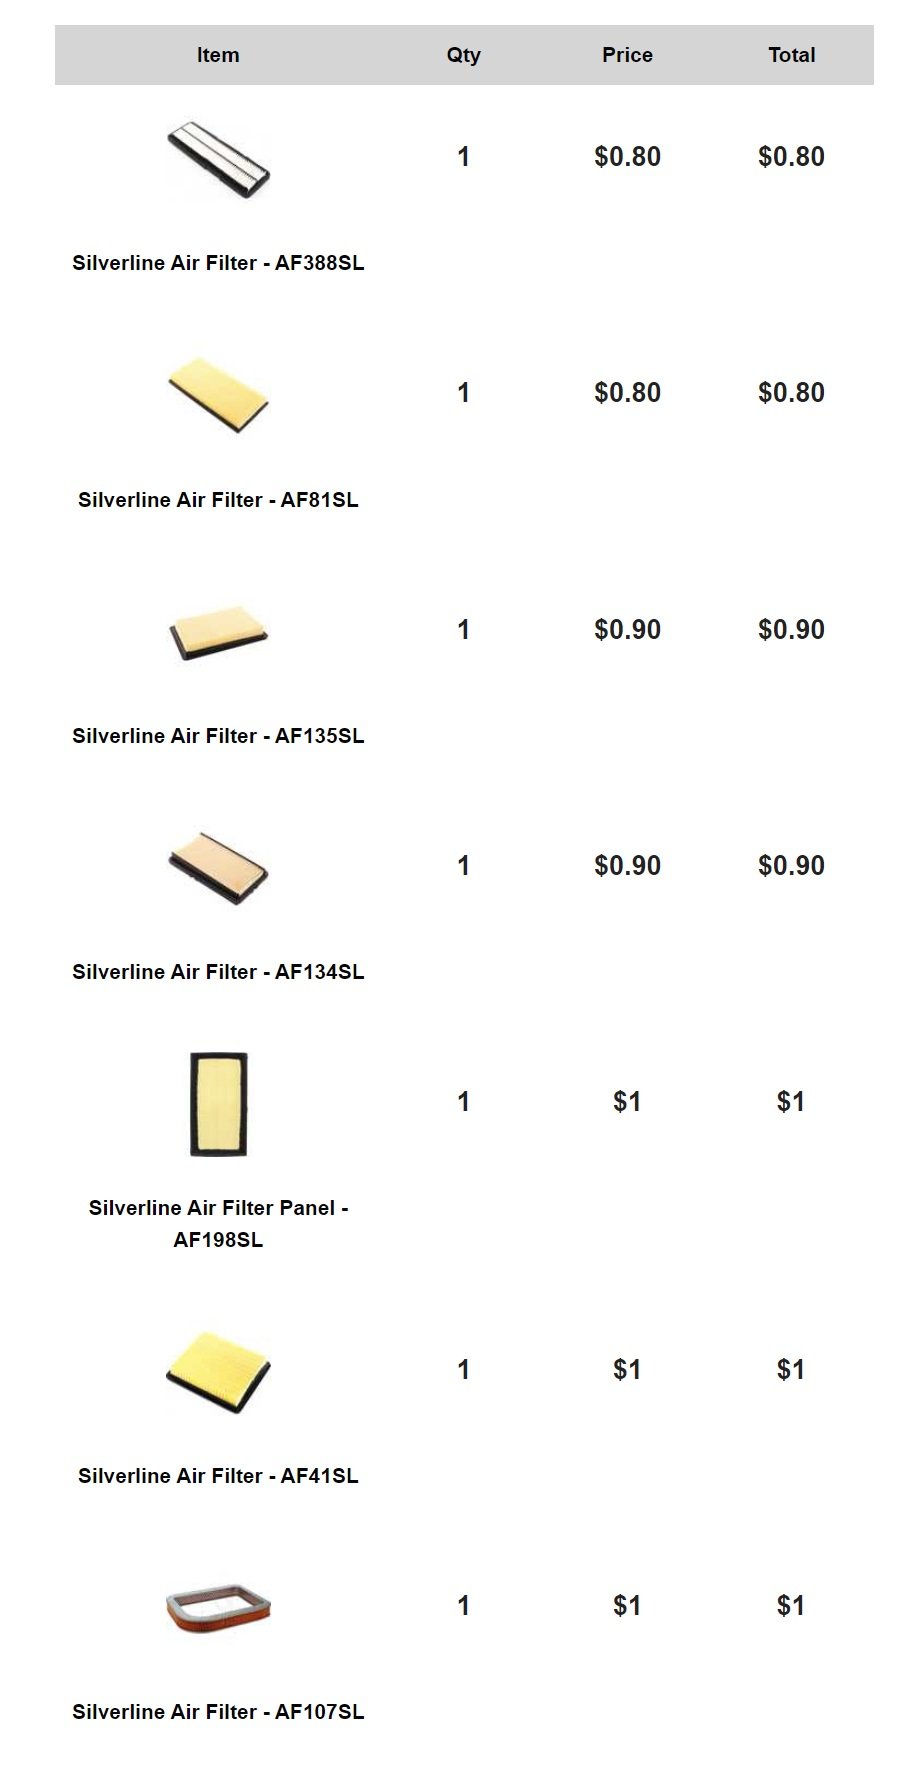
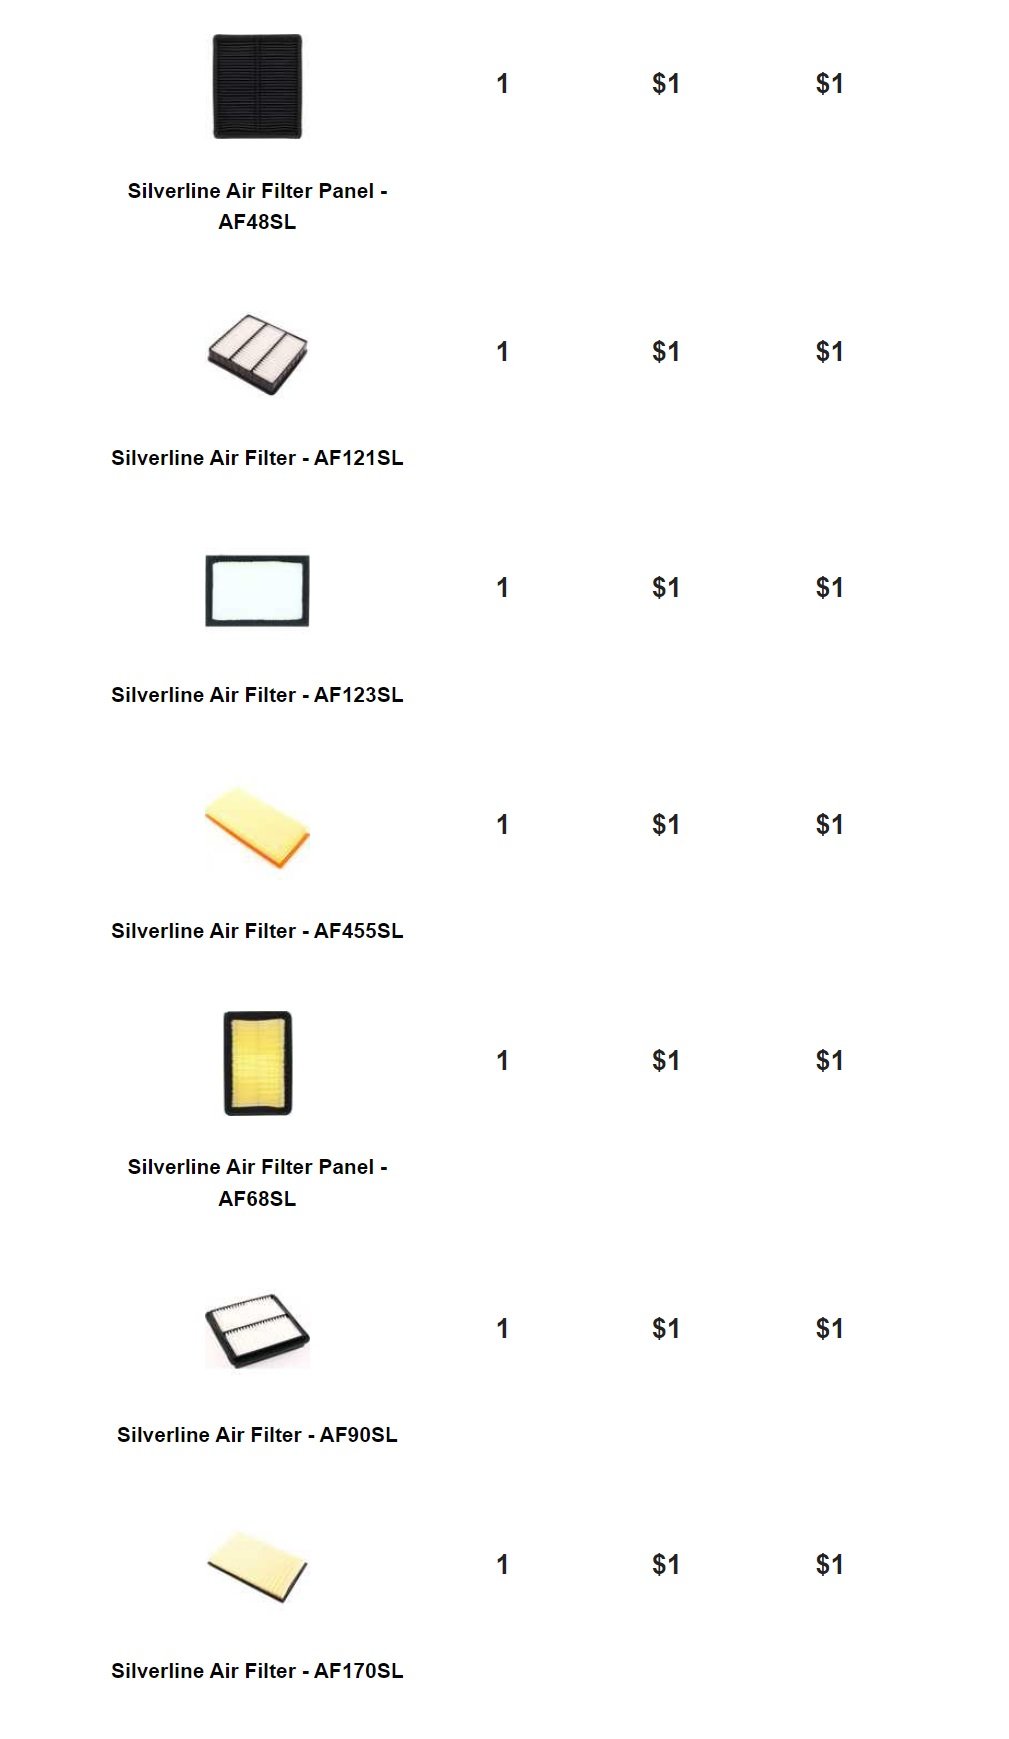
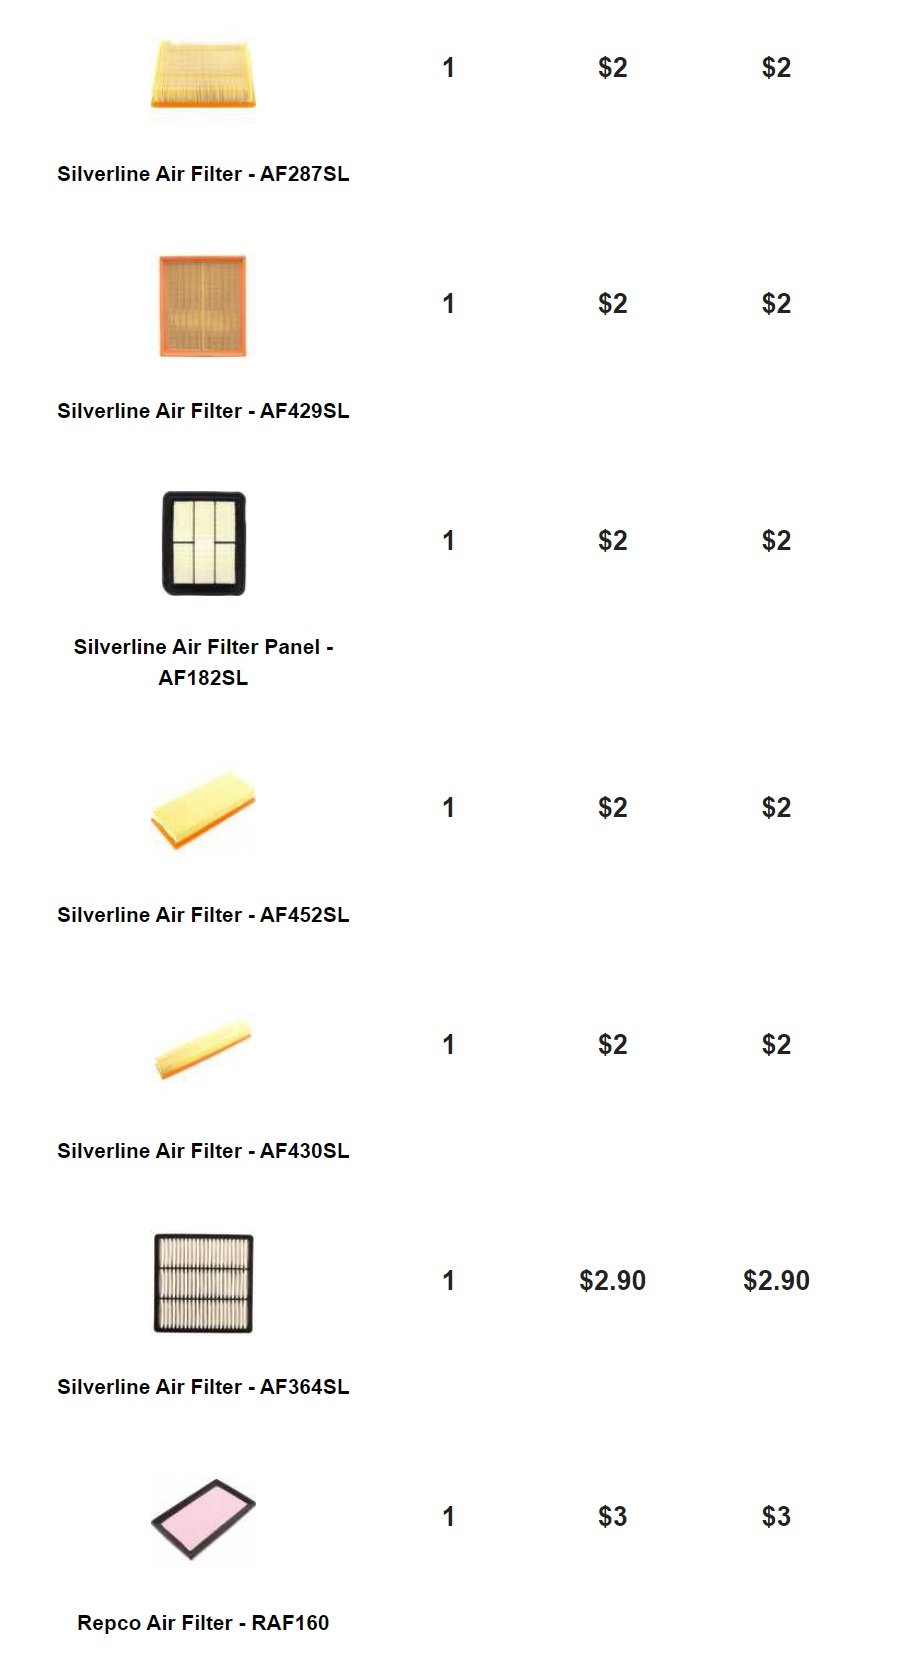
Got this all printed but as expected it's a bit silly. I dont want to drive the car with no bonnet, and I cant cut my spare one as this covers the bonnet latch. But physically seeing something there gives some inspiration anyway for how things might work. I think I'll switch back to putting the throttles closer to the head on the shorter manifold, so I've got more room for airbox activities. In aid of trying to find an air filter that will be appropriate, I've decided to brute force the problem. Some poor hungover person at Repco Morrinsville is going to really hate my click and collect order
2 points
-
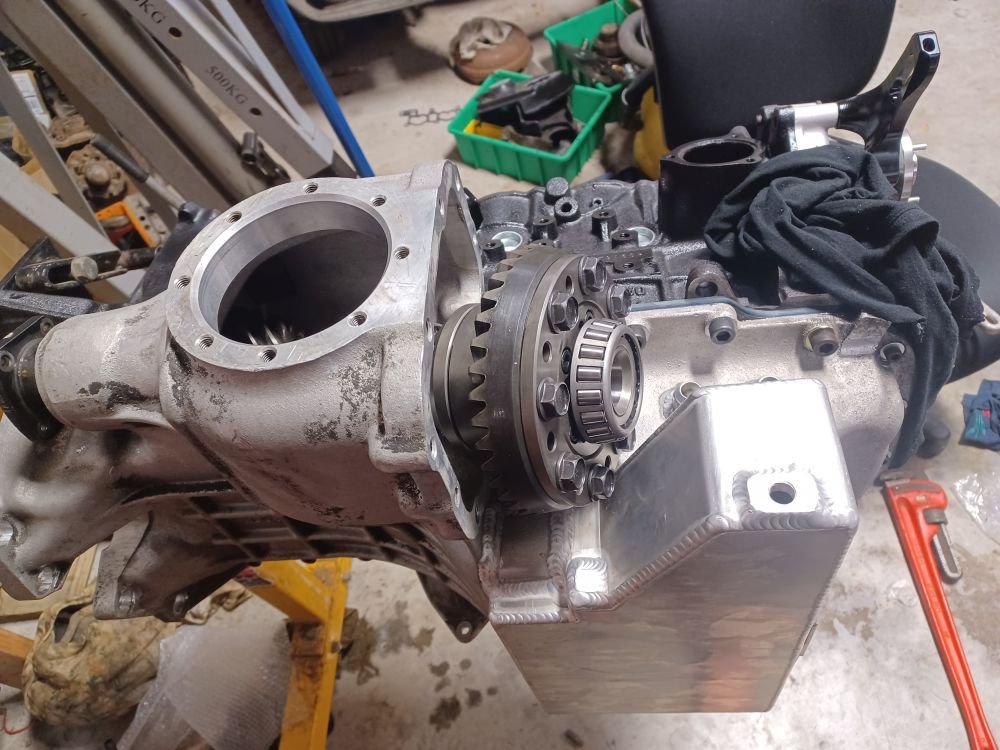
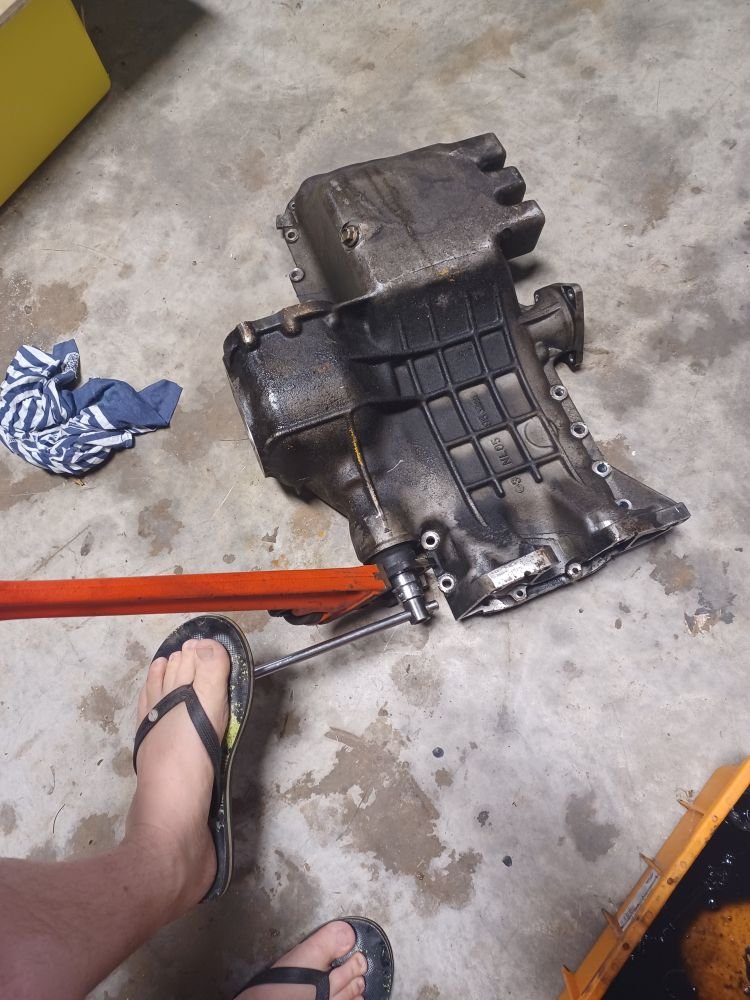
Just waiting for a mate to come round and help set up the diff. Hopefully soonish. I made a start on the transfer case as i was on a roll. The clutches are inside the shiny drum. For some reason Nissan engineers built a great transfer system, then only set it up for about 60% of its capacity. These are the plates out of the drum. You can see they only have a friction plate installed between every 2nd driven plate. Standard there is 7 frictions and 12 drive plates. Max capacity is 10 frictions, 9 driven plates, Plus the 2 end plates. I had another transfer case in stock so i robbed the plates I have changed the bearings and seals over and cleaned all the parts ready for reassembly and done a dummy fit, but have found a bit of an issue with the inner-most friction plate running off the end of the splines. I was going to run the 32 transfer case as it takes the R32 cable speedo. but have a 33 case with some minor differences that make it a bit better maybe. Just waiting to hear back from some kebab shop owners in oz who know about these things before i slap it back together. When i pulled the transfer case off the back of my gearbox, i noticed a heap of magnetic sludge in the back of the box. I have all the bearings and seals to re-kit the box, but not the synchros and they are $$ plus waiting time for japan. A brand new box is $2700nzd in japan, plus shipping plus duty which is around $4500 all up. I wonder if i can get it bought over in a container?
2 points
-
I stripped the ring gear off the stock open front diff and installed it with some new bearings onto a quaife torsen lsd. Lots of guys on the SAU forums rate it as the best mod to their GTRs. @Bistro came round for a few beers and gave me a hand to install the adapter plate and test fit the sump. Had to come off again as there was a bit of extra clearance required on some of the adapter plate bolt holes Its all on now, and i fitted all of the diff parts with new bearings and seals everywhere. I jumped ahead a bit and fitted the pinion seal before i measure the end float so that might have to come off again. Fingers crossed its ok. I got the crown wheel backlash perfect at 0.15mm. spec is .13 - .18 Pretty happy with that. Need to paint the gears next and hopefully the pinion is ok and i can seal it up. Its a prick of a thing to fit the diff in so im hoping it does not need to come back out again. The hardest part is waiting for parts. I can buy all the seals and shims i need, but they are usually 3 weeks from overseas. Once the head comes back i can fit that and do some plumbing and fit it back in the car. I might do the transfer case next. Maybe overhaul the gearbox.... Its a slippery slope
2 points
-
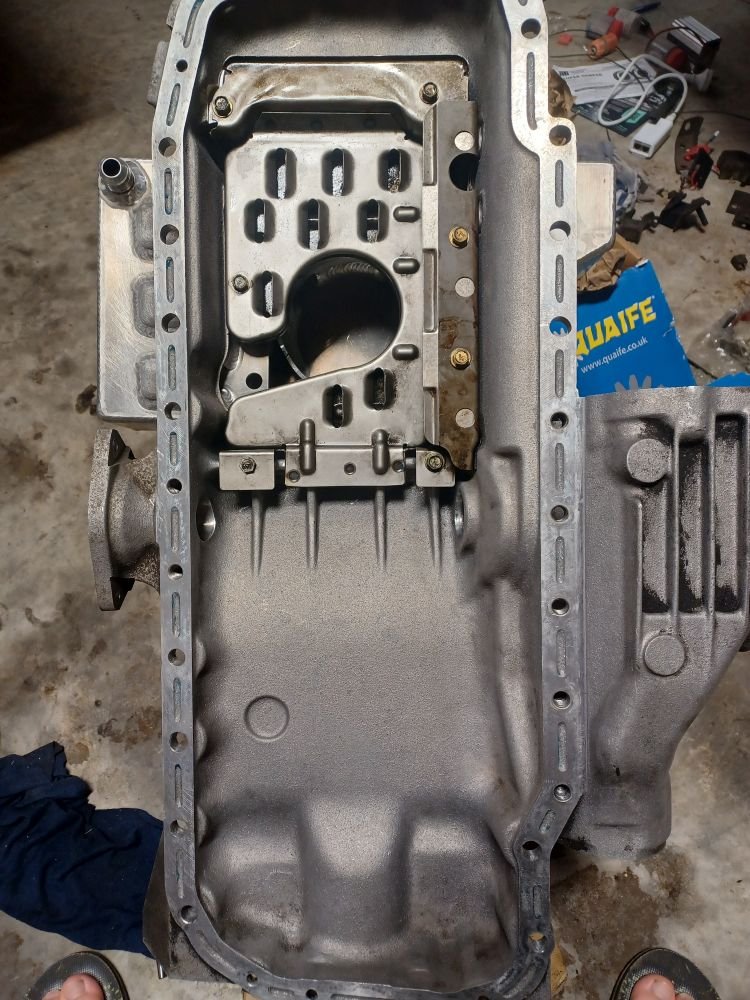
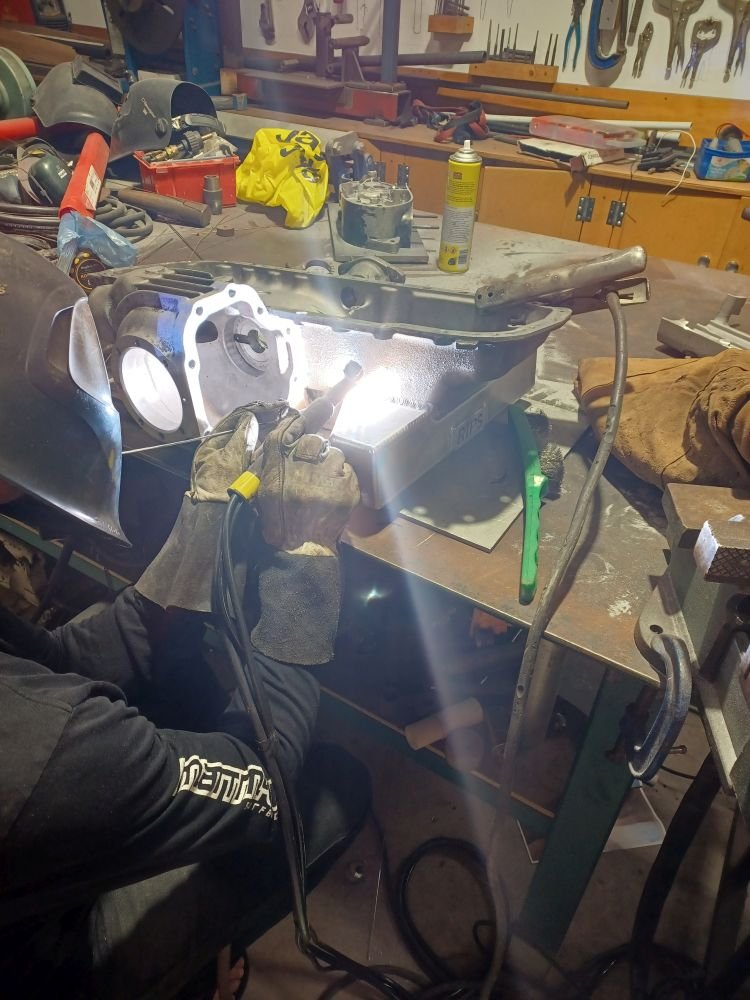
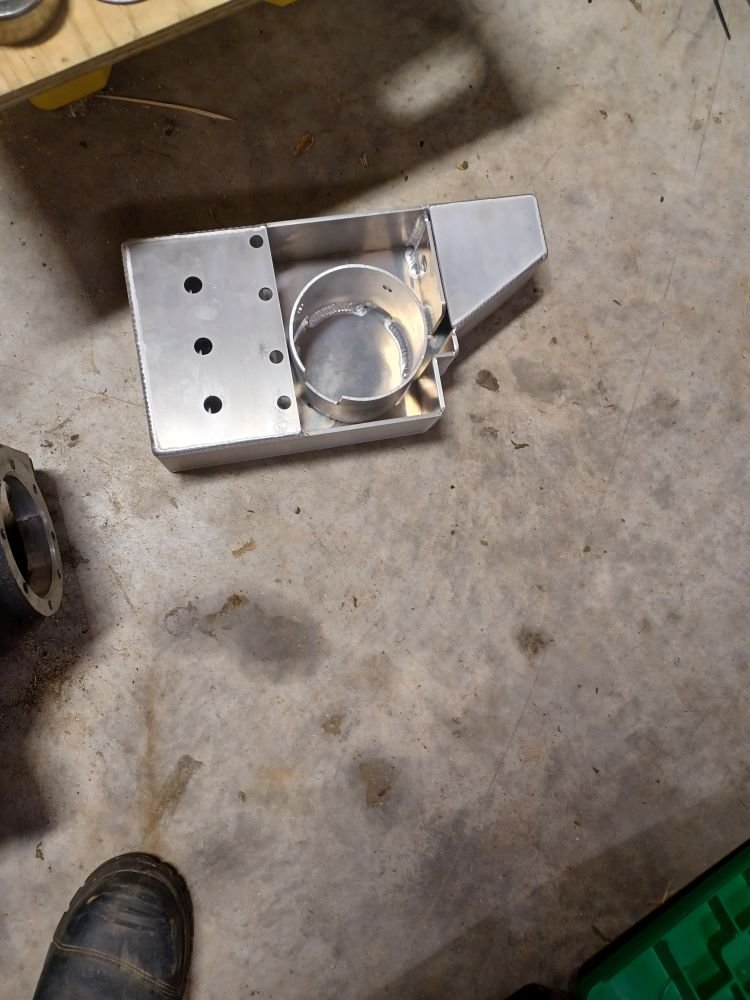
I bought a RIPS sump extension and adapter plate to modify the sump. I have my original adapter plate, but it was a bit of an amateur thing done ages ago. The rips plate has an integrated oil pickup and a few extra features that are an improvement on mine. The plate also has a double o-ring seal, which might seal better than glue especially if im going to probably have it apart a few times - hopefully not, but RB's do love a good run bearing I got a wizard to do the mods to the sump and add on the extension. He made it look so easy and did a beautiful job. also drilled out the oil return holes under the axle tube as they start at 5mm but the last bit of the holes is around 2mm which wont do much
2 points
-
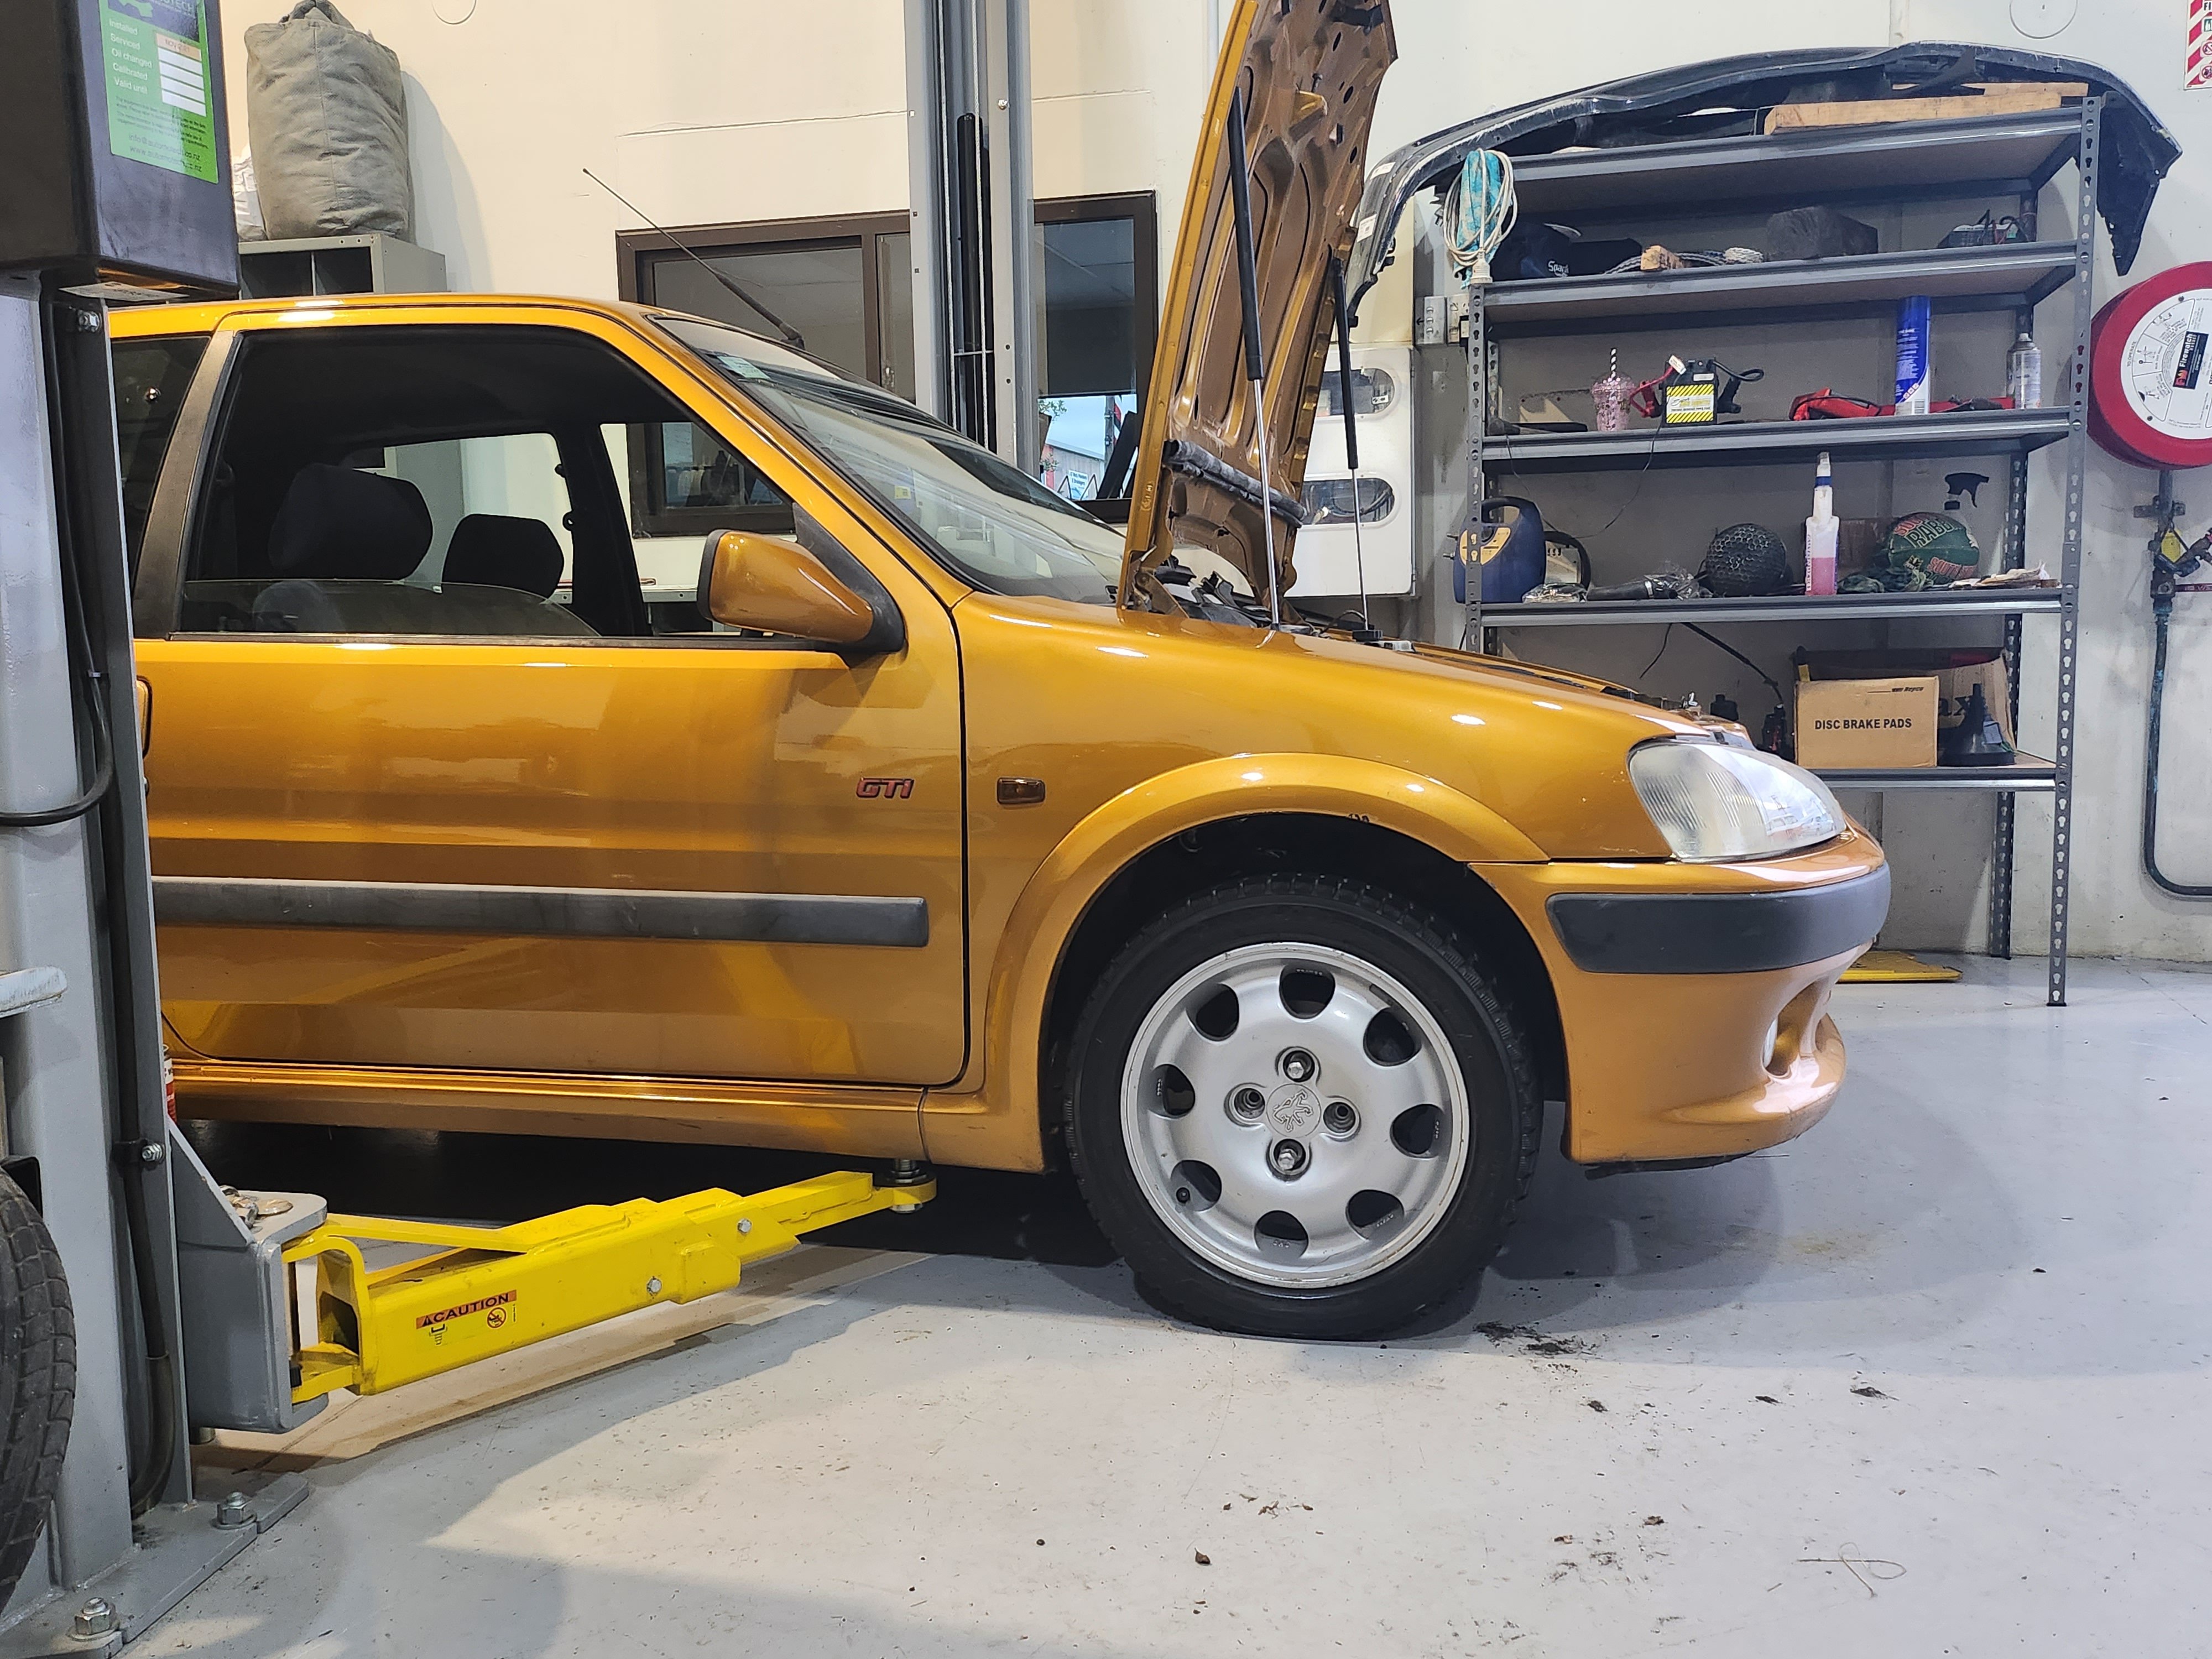
Christmas came early and its been painted - picked it up yesterday. Now the fun begins!2 points
-
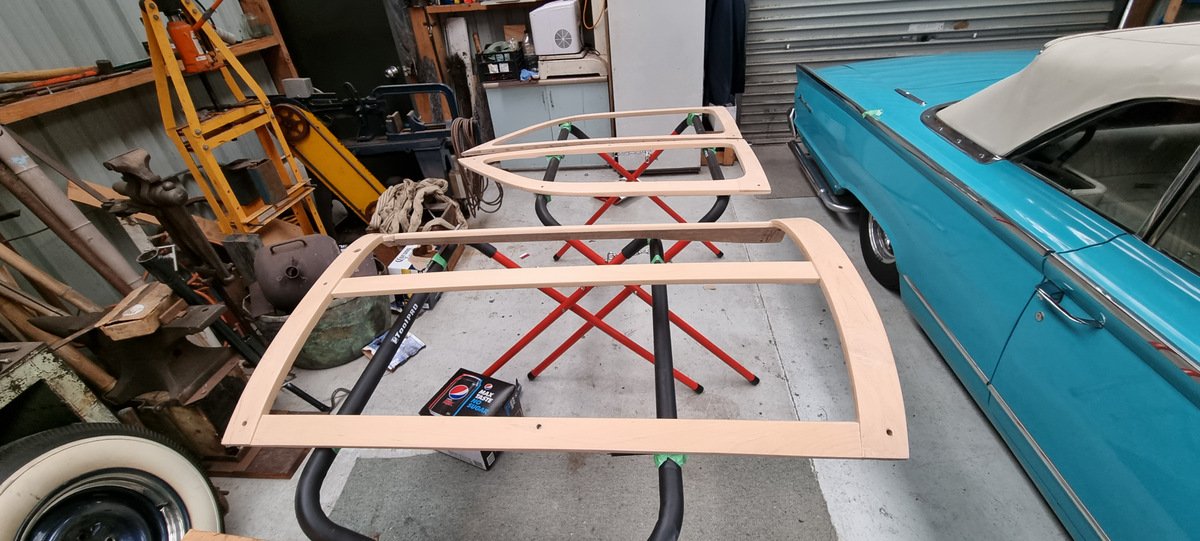
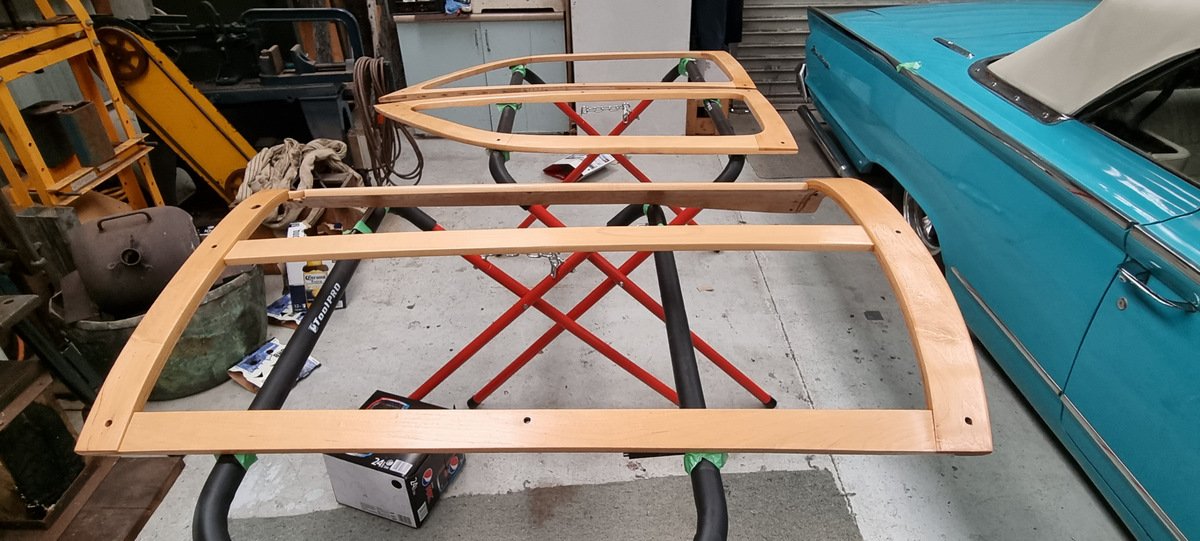
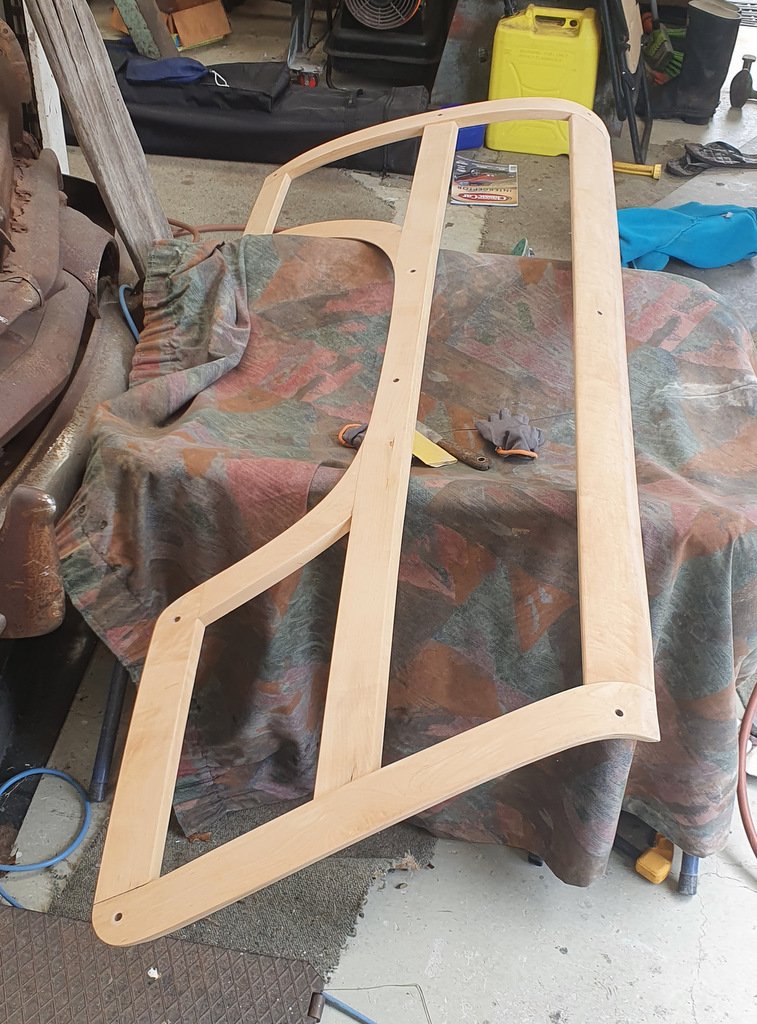
Working away on the wood refinishing. Seems to be taking longer than I thought (what a surprise). The first try with the A/B bleaching (Hydrogen Peroxide stuff) didn't go all that great, came out a bit patchy and greenish. After talking with the agent down in Invergiggle I picked up some water-based stripped and went over all the good faces with that first, then the bleach, then a round of sanding, then a scrub with Oxalic Solution, same as I used on the Morris, then more sanding. Worked out well I think. Five of the 9 pieces have been through this process and the epoxy sealer. The back sides need another coat of the sealer tomorrow then they can be sanded for the gloss varnish coats. The tailgate is all glued up, but I ran out of bleach so had to wait for another lot to arrive to do that and finish the 'final four'
2 points
-
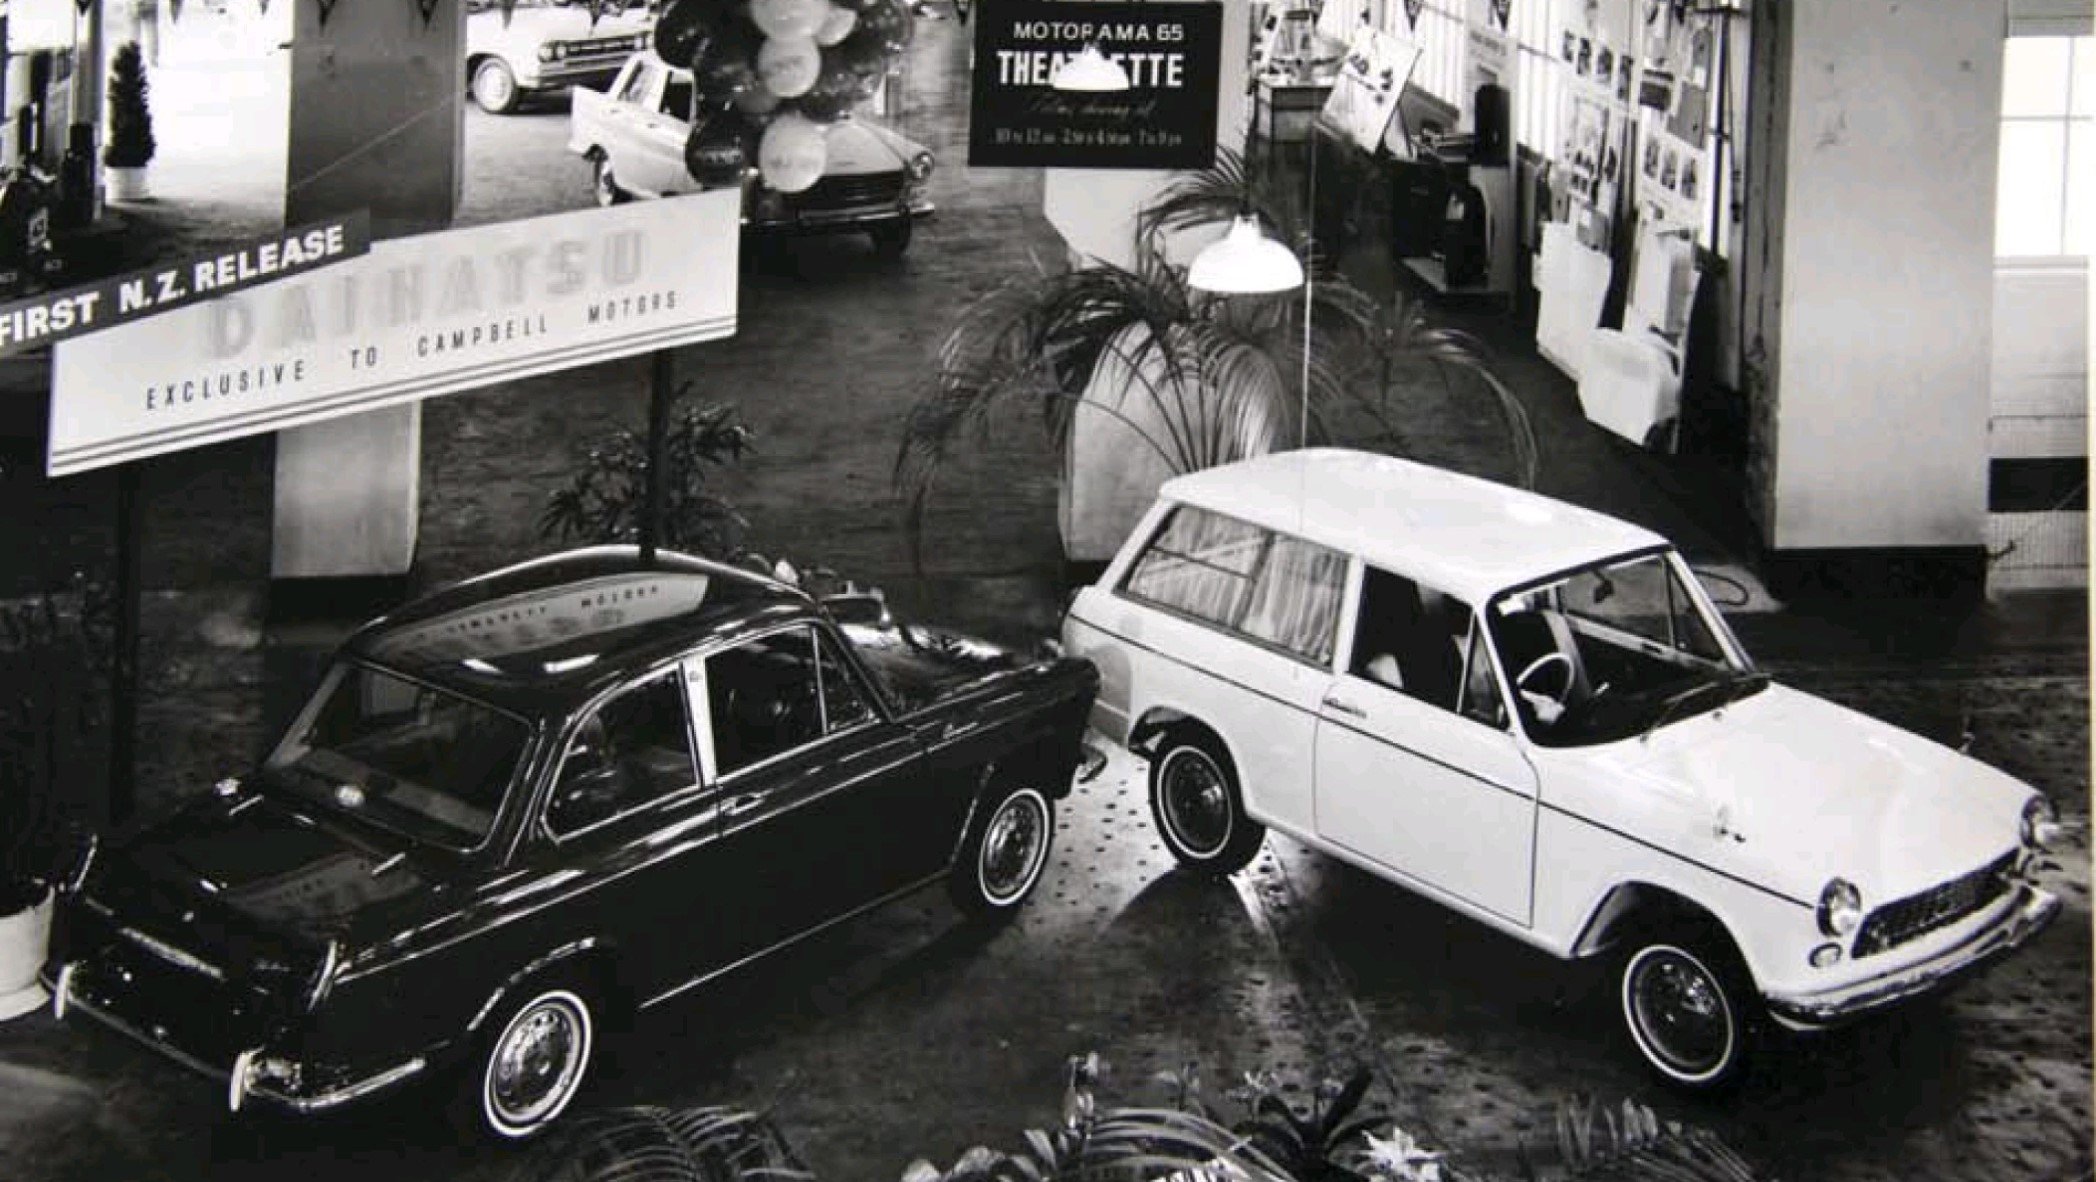
This is the actual car on the Campbells stand at the 1965 Motorama - the wagon was last seen in the 80's by the old owner of mine. Possibly these two were the only ones sold here.
2 points
-
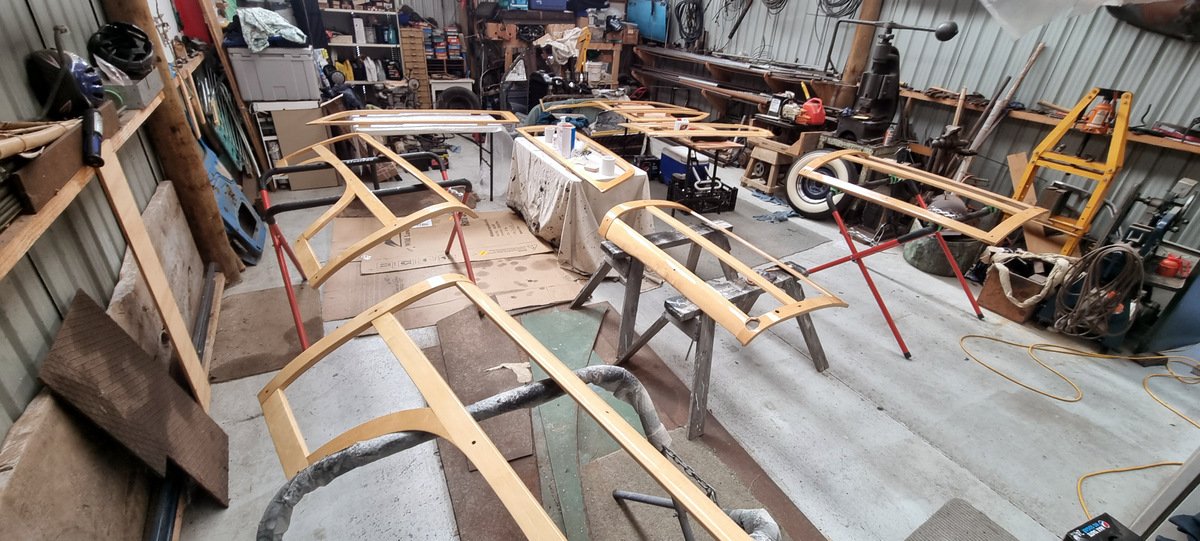
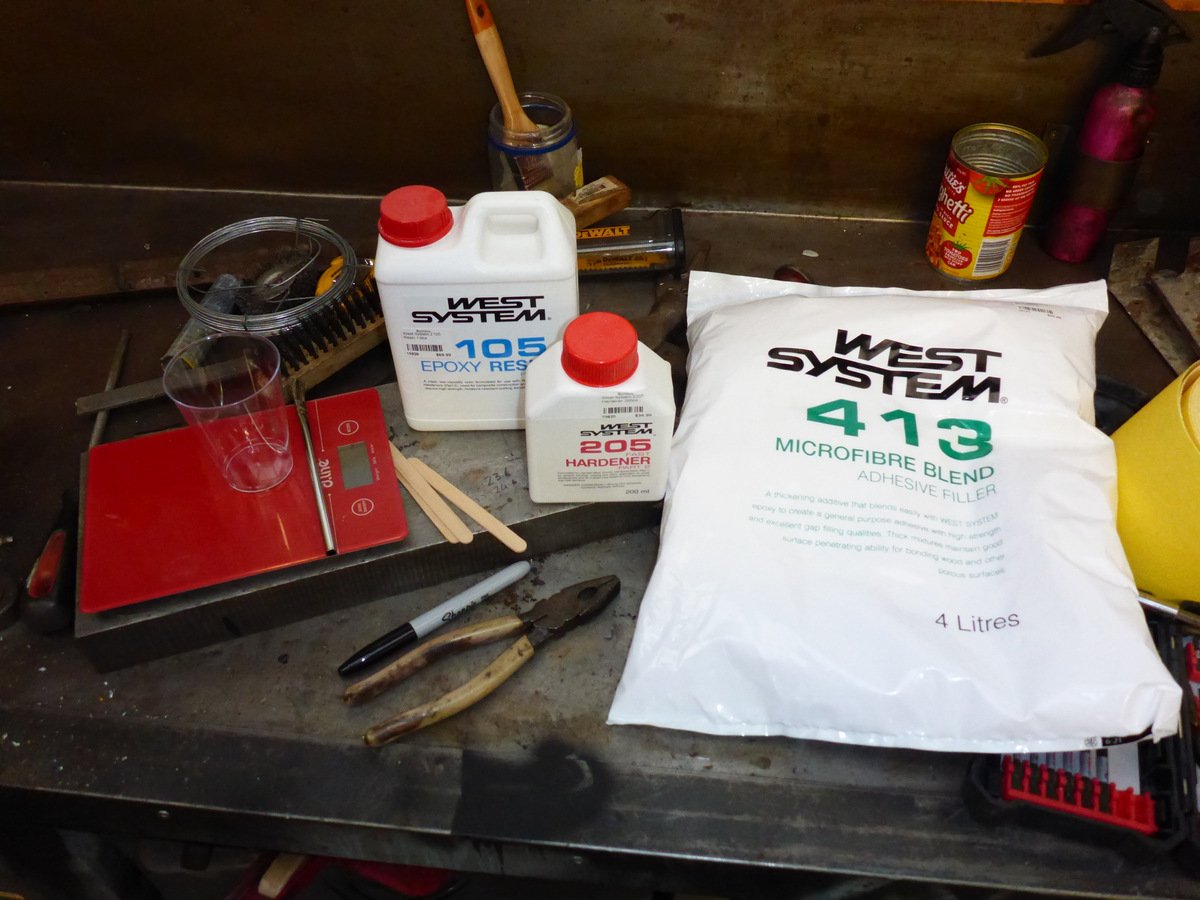
Sanding and cleanup round two completed. Next step on these is bleaching, I found what I wanted to do that (Rustins wood bleach) but it took me a couple of days to call the importer / distributor in the work hours of 09:00 - 15:30 GMR Imports NZ|Disposable Latex & Nitrile Gloves|Superplus|Rustins In the meantime I've started repairing the split joints in the tailgate. I'm not sure why so many have come apart, I did tweak a bit getting it off the car, but it also seems they weren't bonded very well. I don't want the whole thing to come apart at once so I've had a go at bonding the biggest one first. Cleaned up the joint and removed the old product. Used some clear tape to hopefully stop the epoxy spreading too much. Big gaps are preferred for this approach to give the epoxy some space. A visit to Burnsco for some West System epoxy and filler. The filler thickens the epoxy so it doesn't run out of the joint.
2 points
-
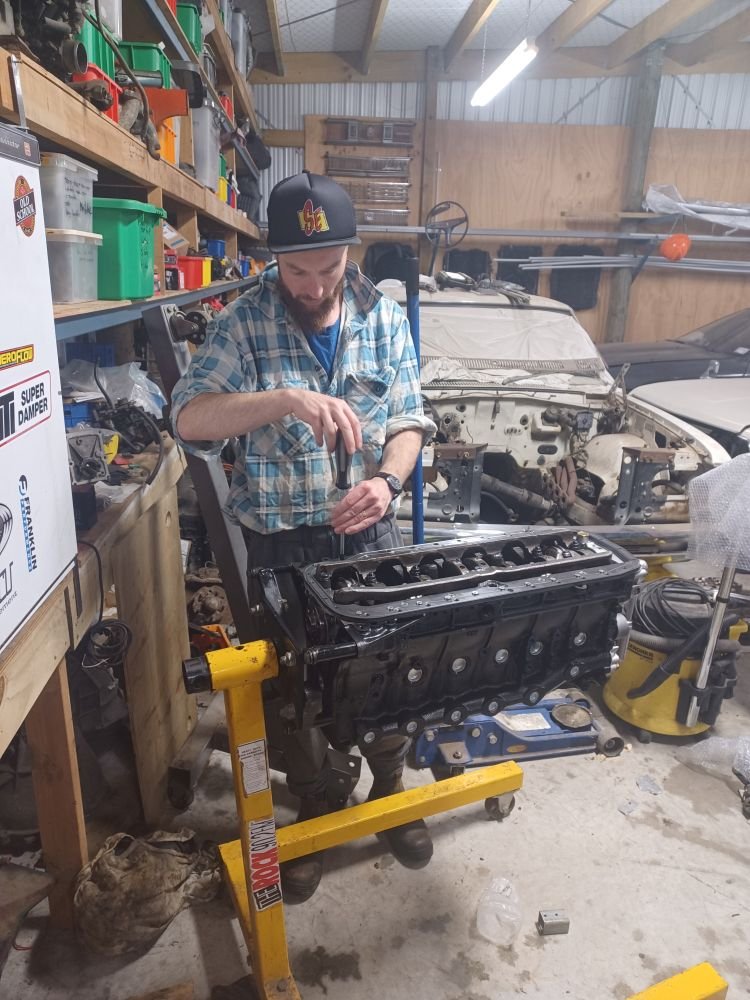
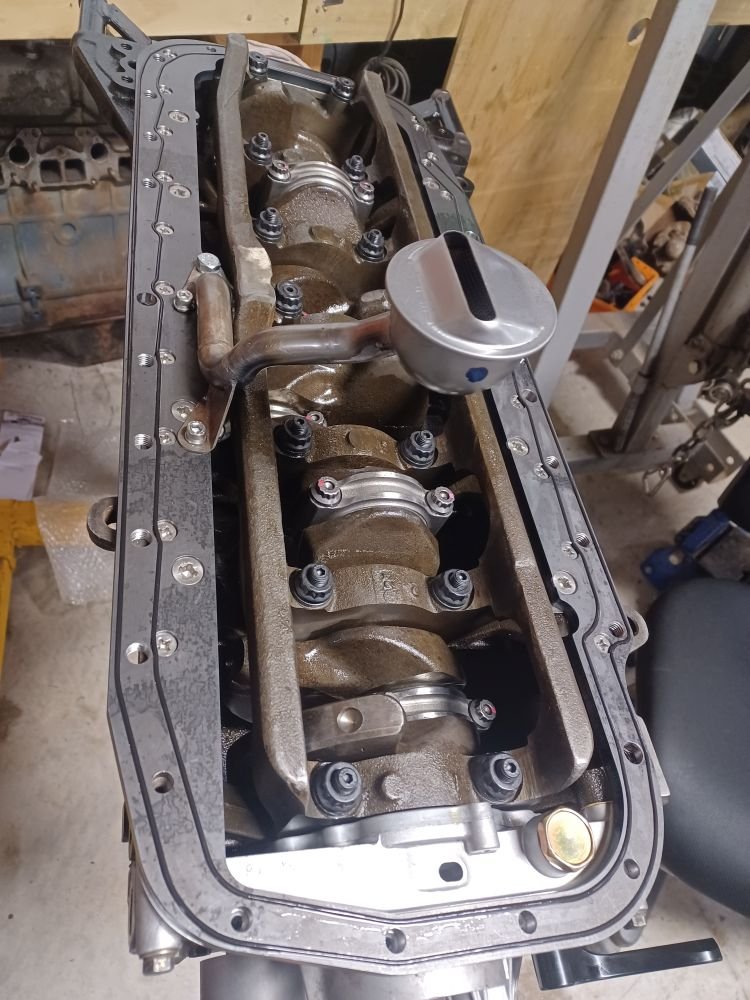
Pulled the cams to check condition and clean things up, all looked in pretty good condition... They're labelled P cams, which I think are stock for a '75, and are a decent all-round cam...? Checked the timing breather valve as per manual, just because I could see everything, then had a go at lining up the cam gears, starting with the pinion gear mark at around the 11 o'clock position... And had a bit of trouble getting things to line up perfectly, cams 1,2,3 were no problem, but number 4 didn't appear to line up correctly. Tried shifting it one tooth over from here, but that looked worse... But turning the engine slightly showed the marks lining up better... Can see why people get frustrated... I used a bit of loctite on the intermediate gear bushing that had popped out of the cover, fitted new shaft seal and gasket and loosely buttoned up the cover... I re-installed the shims as I was confident where they came from, they all looked in great shape, and I had no issues previously. The manual said to install a fibre washer in front of the intermediate (idler) gear, but I tried that and the cover would not sit flush, so removed it (there was none in there before). Hopefully this side is done now...1 point
-
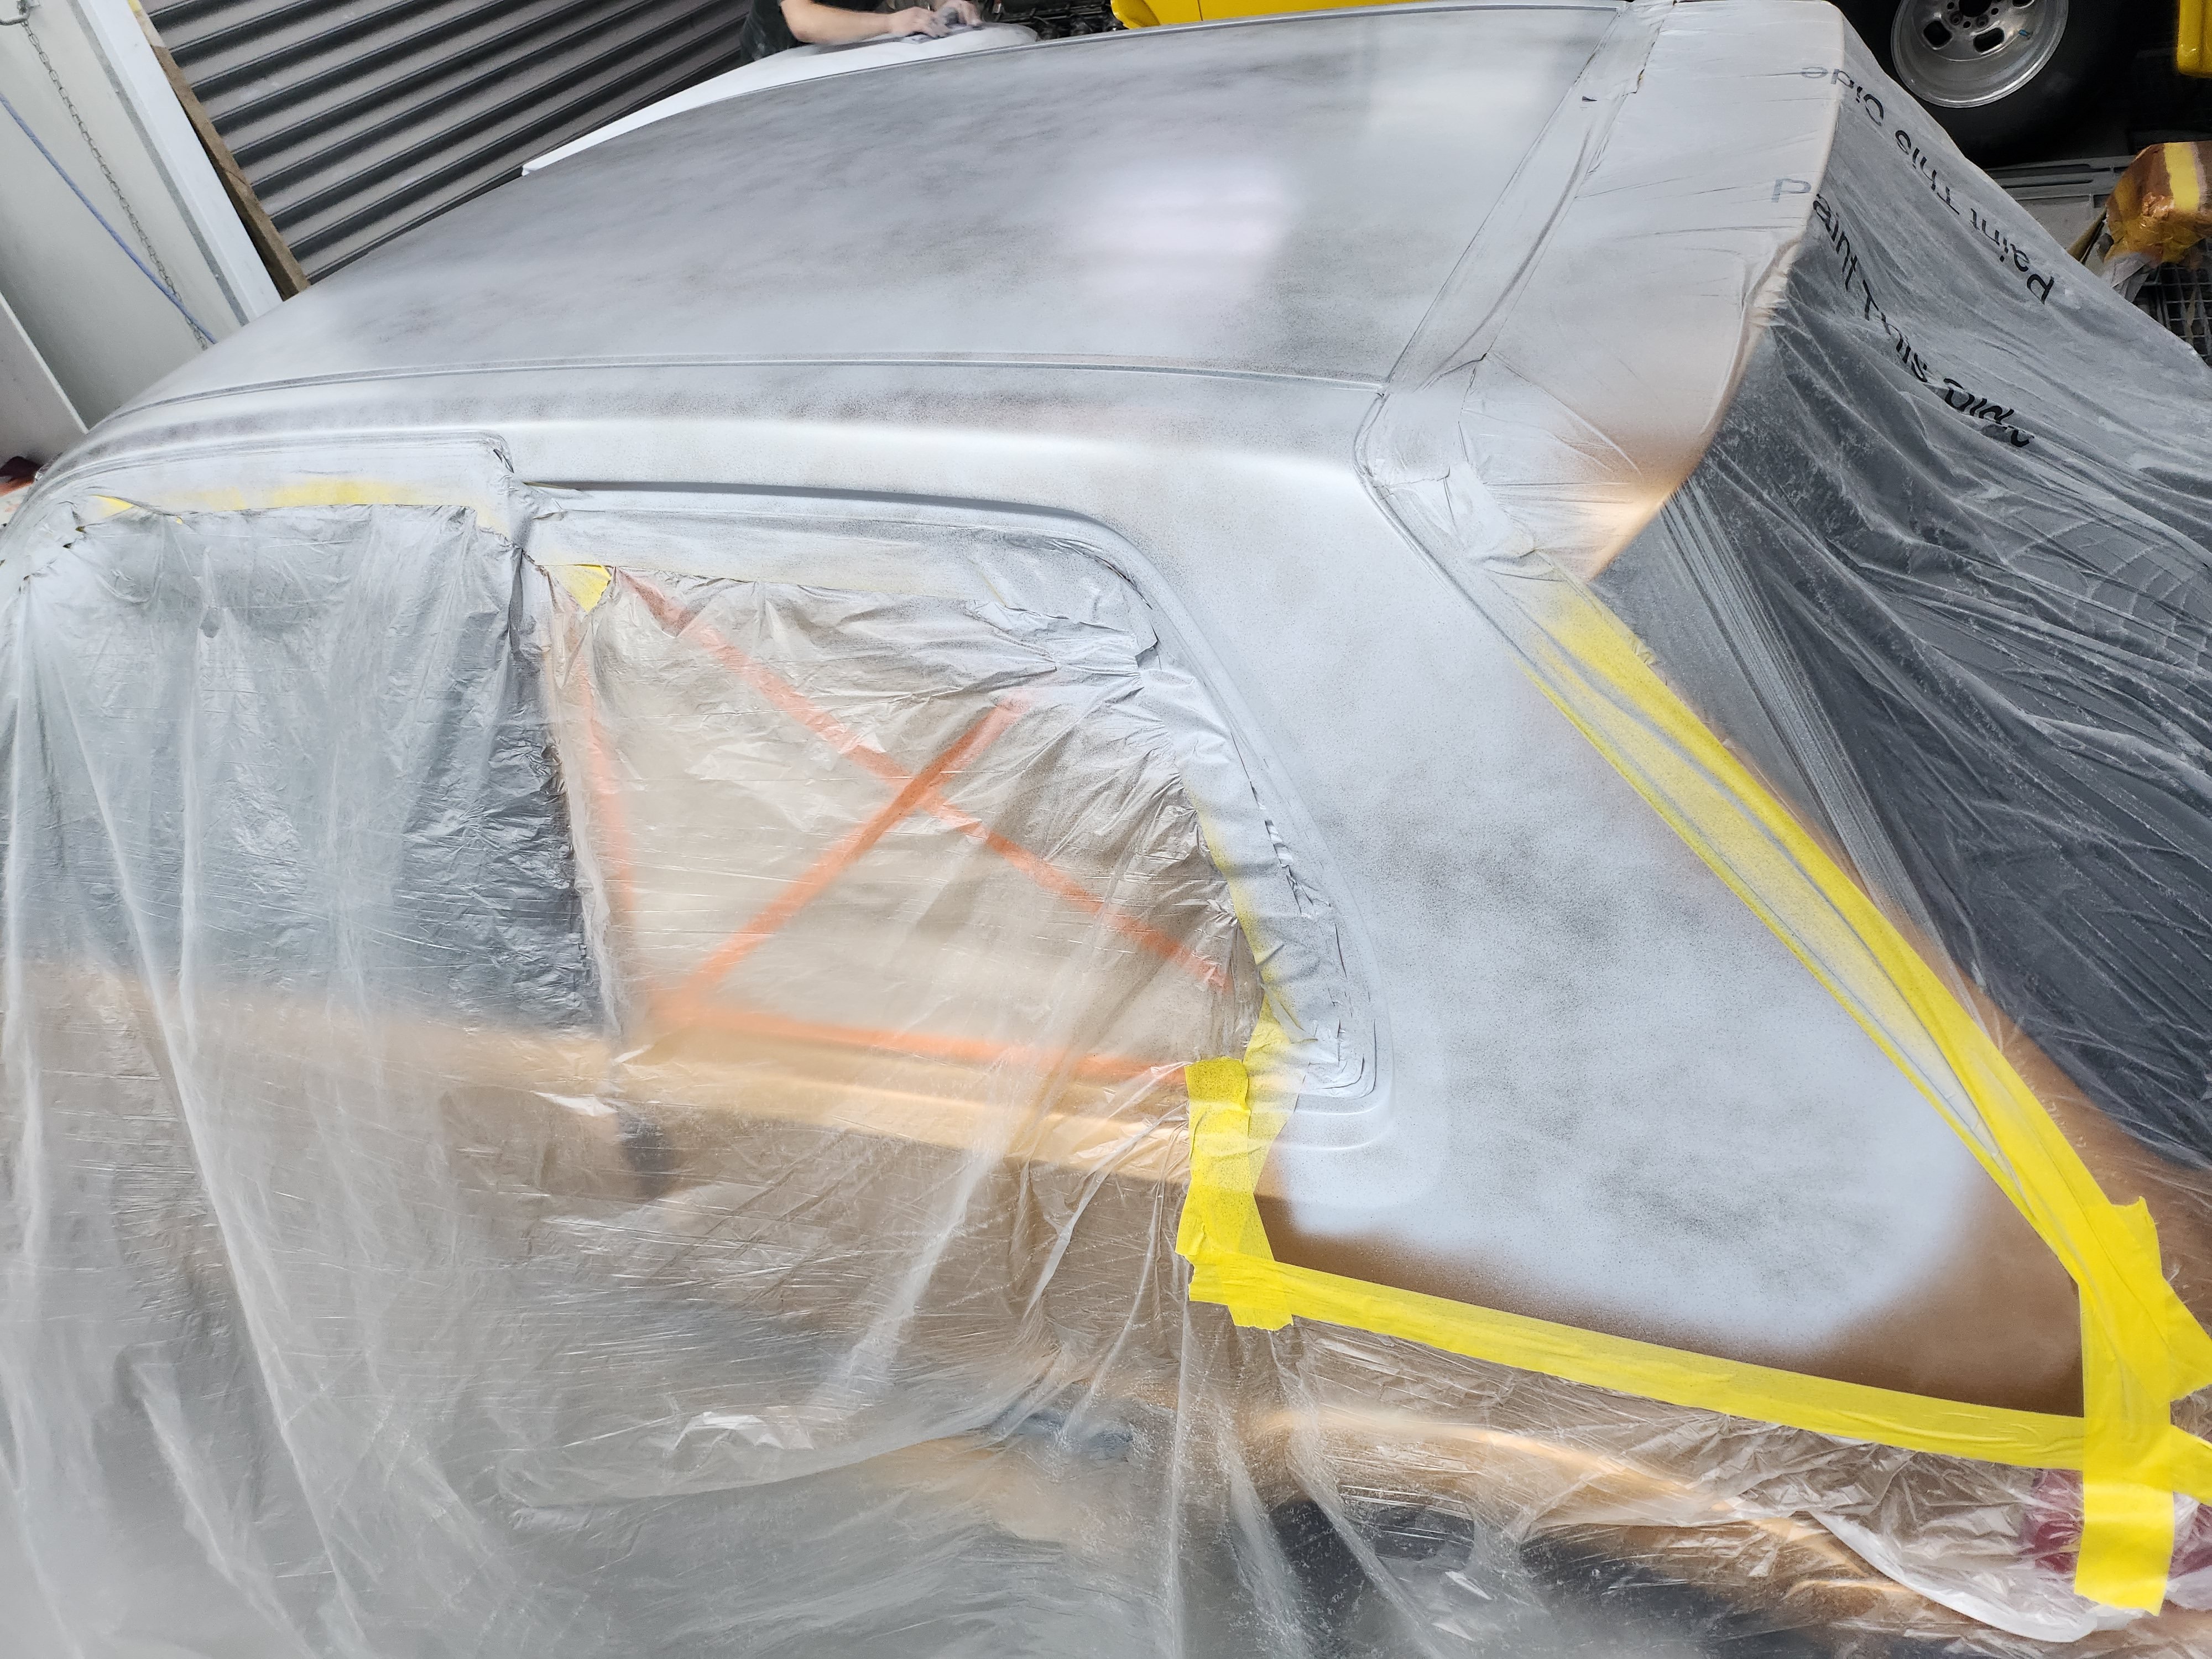
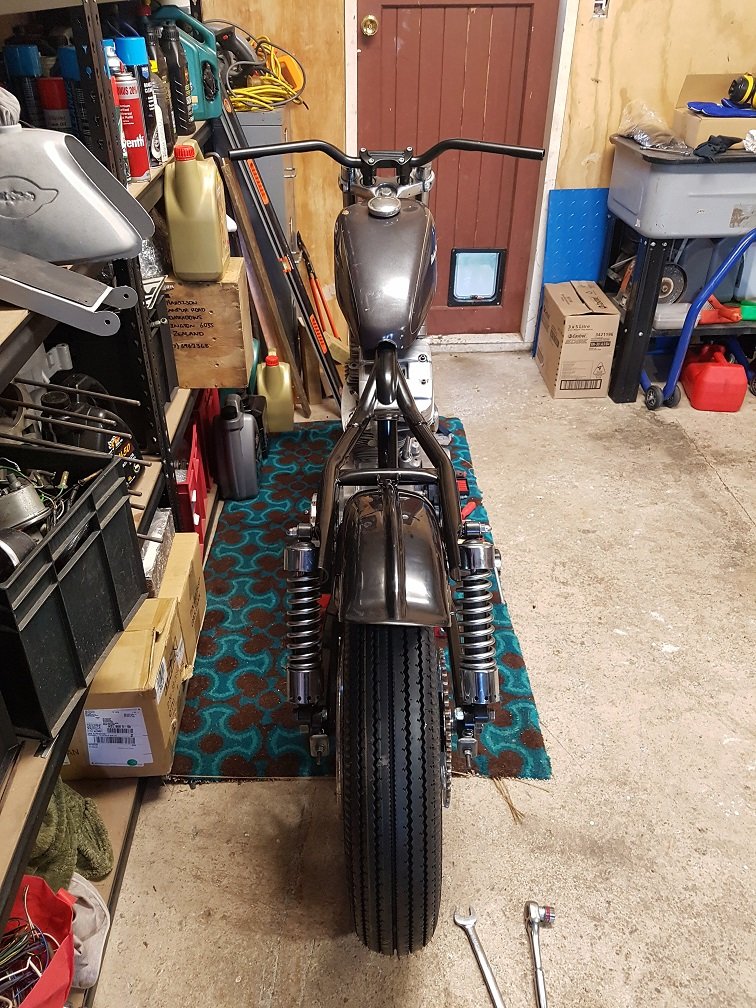
Hopefully this will be painted tomorrow...
1 point
-
So, a story. Near the start of this thread I mentioned how I'd found a solution for getting drive to the wheels which encouraged me to carry on with the project. Well, I had been in contact with the company and all was looking good until I finally tried to order the unit and found out that due to a materials shortage they were no longer available and no eta on when they would be again. Bums. Anyway, I wanted to carry on so started down the path of having one custom made, this was looking good until I tried sourcing the gearset. I wanted a certain size, ratio and strength but couldn't get much help from local companies so I parked it for a bit. Then out of the blue I get an email from the first company saying they had a customer who was trying to sell their unit AND they were in Australia so maybe I could save some clams on shipping. So I fire off an email, the guy is a good sort, had a project but now wants to move the parts on. Things are looking promising, the diff is unused, price is two thirds of retail and I happen to be visiting his town over New Years. So a deal was done and I bought this back on the plane with me today. Other than the extra shaft it's all Mini internals so should have some options with ratios and an LSD if needed.1 point
-
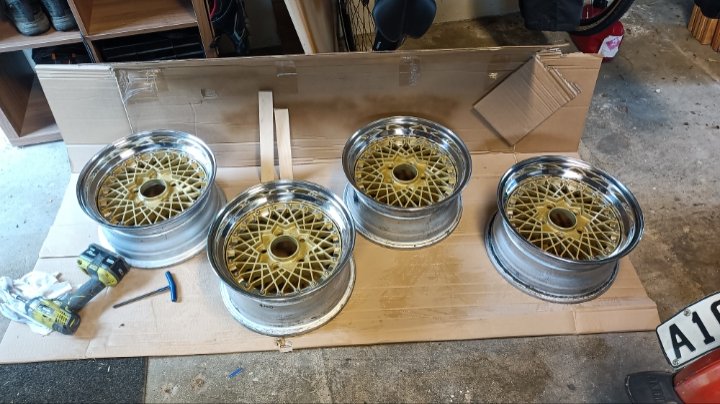
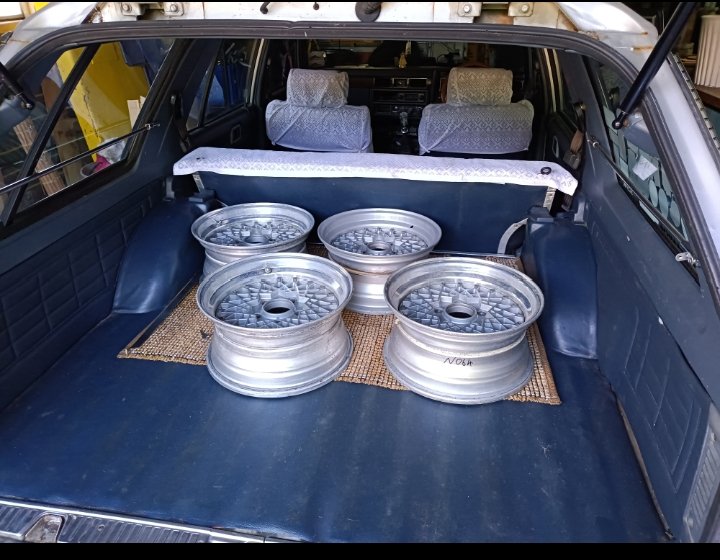
Santa arrived early. Just need to paint them gold to keep @kyteler happy
1 point
-
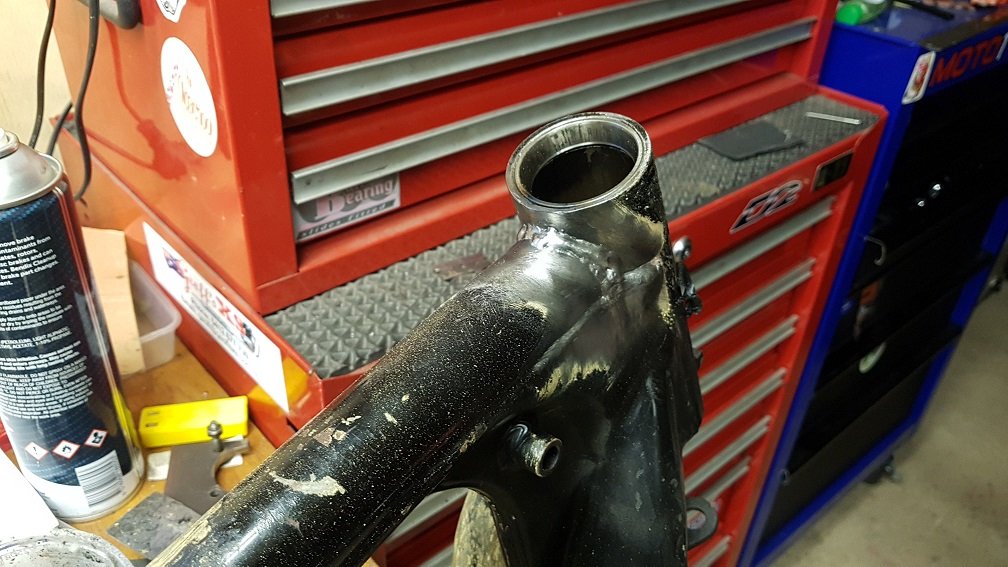
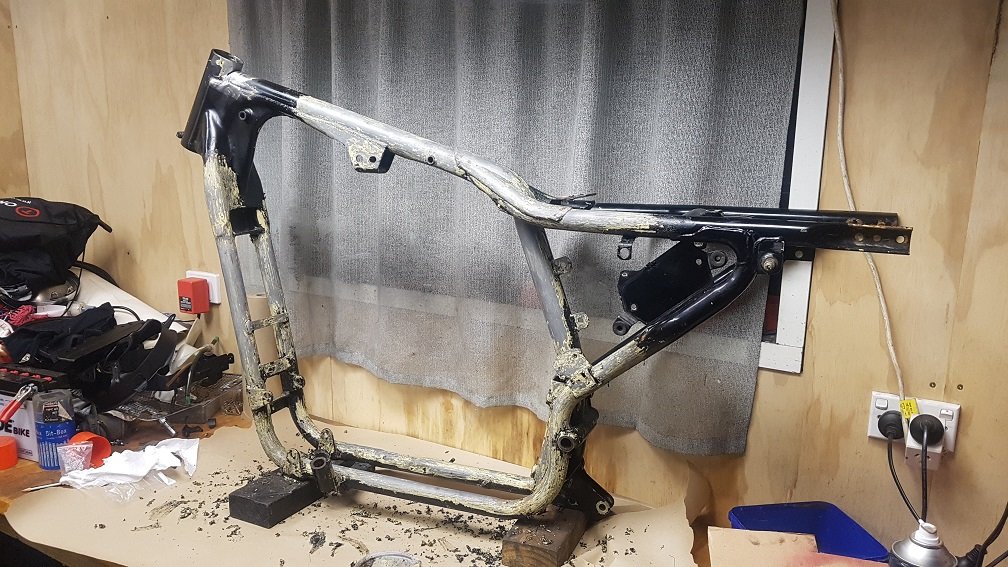
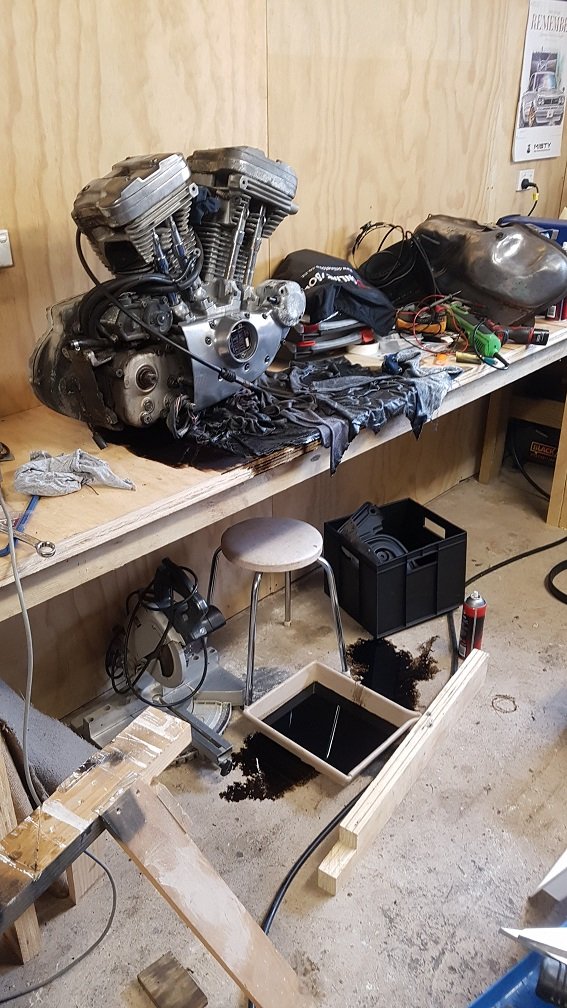
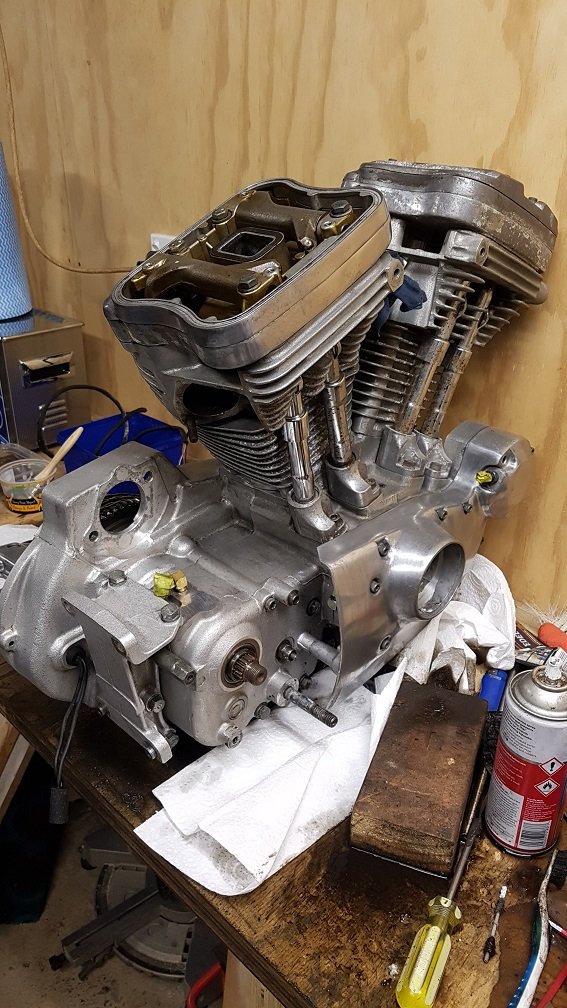
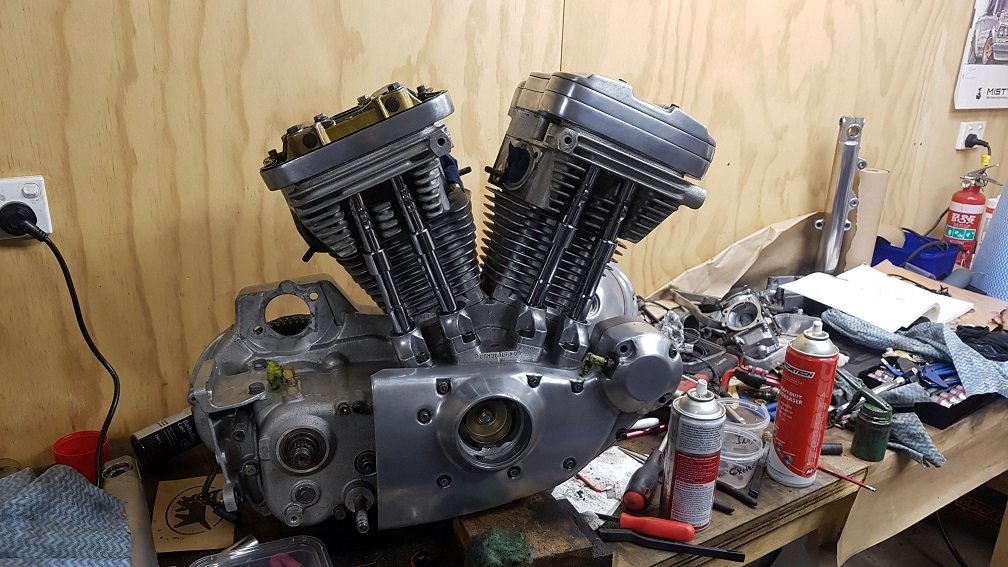
First step was to see what I'd bought and start cleaning it up. It was responding well to some 400 grit and some autosol. Before: After a test patch: It certainly had potential.... Next issue was the frame. It had some goobied up weld on the headstock. So i ground this back and re-welded it. Looked much better: I then proceeded to strip the frame by hand: I got this far then rage quit as it was absolout misery. Dropped it at blasters to be blasted and powdercoated. While that was happening i put the motor on the bench to give a propper cleanup with new gaskets etc. It had wet-sumped and proceeded to go wees on my bench overnight: Was really fun to clean it up and add new seals: Got the frame back from powdercoaters and put the engine in. Looks like brand new! Started to reassemble it whilst trying to not make it look super gross. Got some short rear shocks from a dyna, and some cuttiez in the front g. Also popped some new shinkos onto the cleaned up rims: Love how narrow it is. Ali express rear guard. This is where it currently stands. As soon as my ironhead is off the table i'll get full force back into this. On the home stretch now. Have a whole heap of new bits to go on it. Plan is just to have something cool and reliable as a backup bike or one mates can ride when they're in town. Will hopefully come back with updates in next few weeks. Motivation is high at the moment.
1 point
-
Making progress on the front end primer on - still have to sort left inner guard
1 point
-
One side apart now
1 point
-
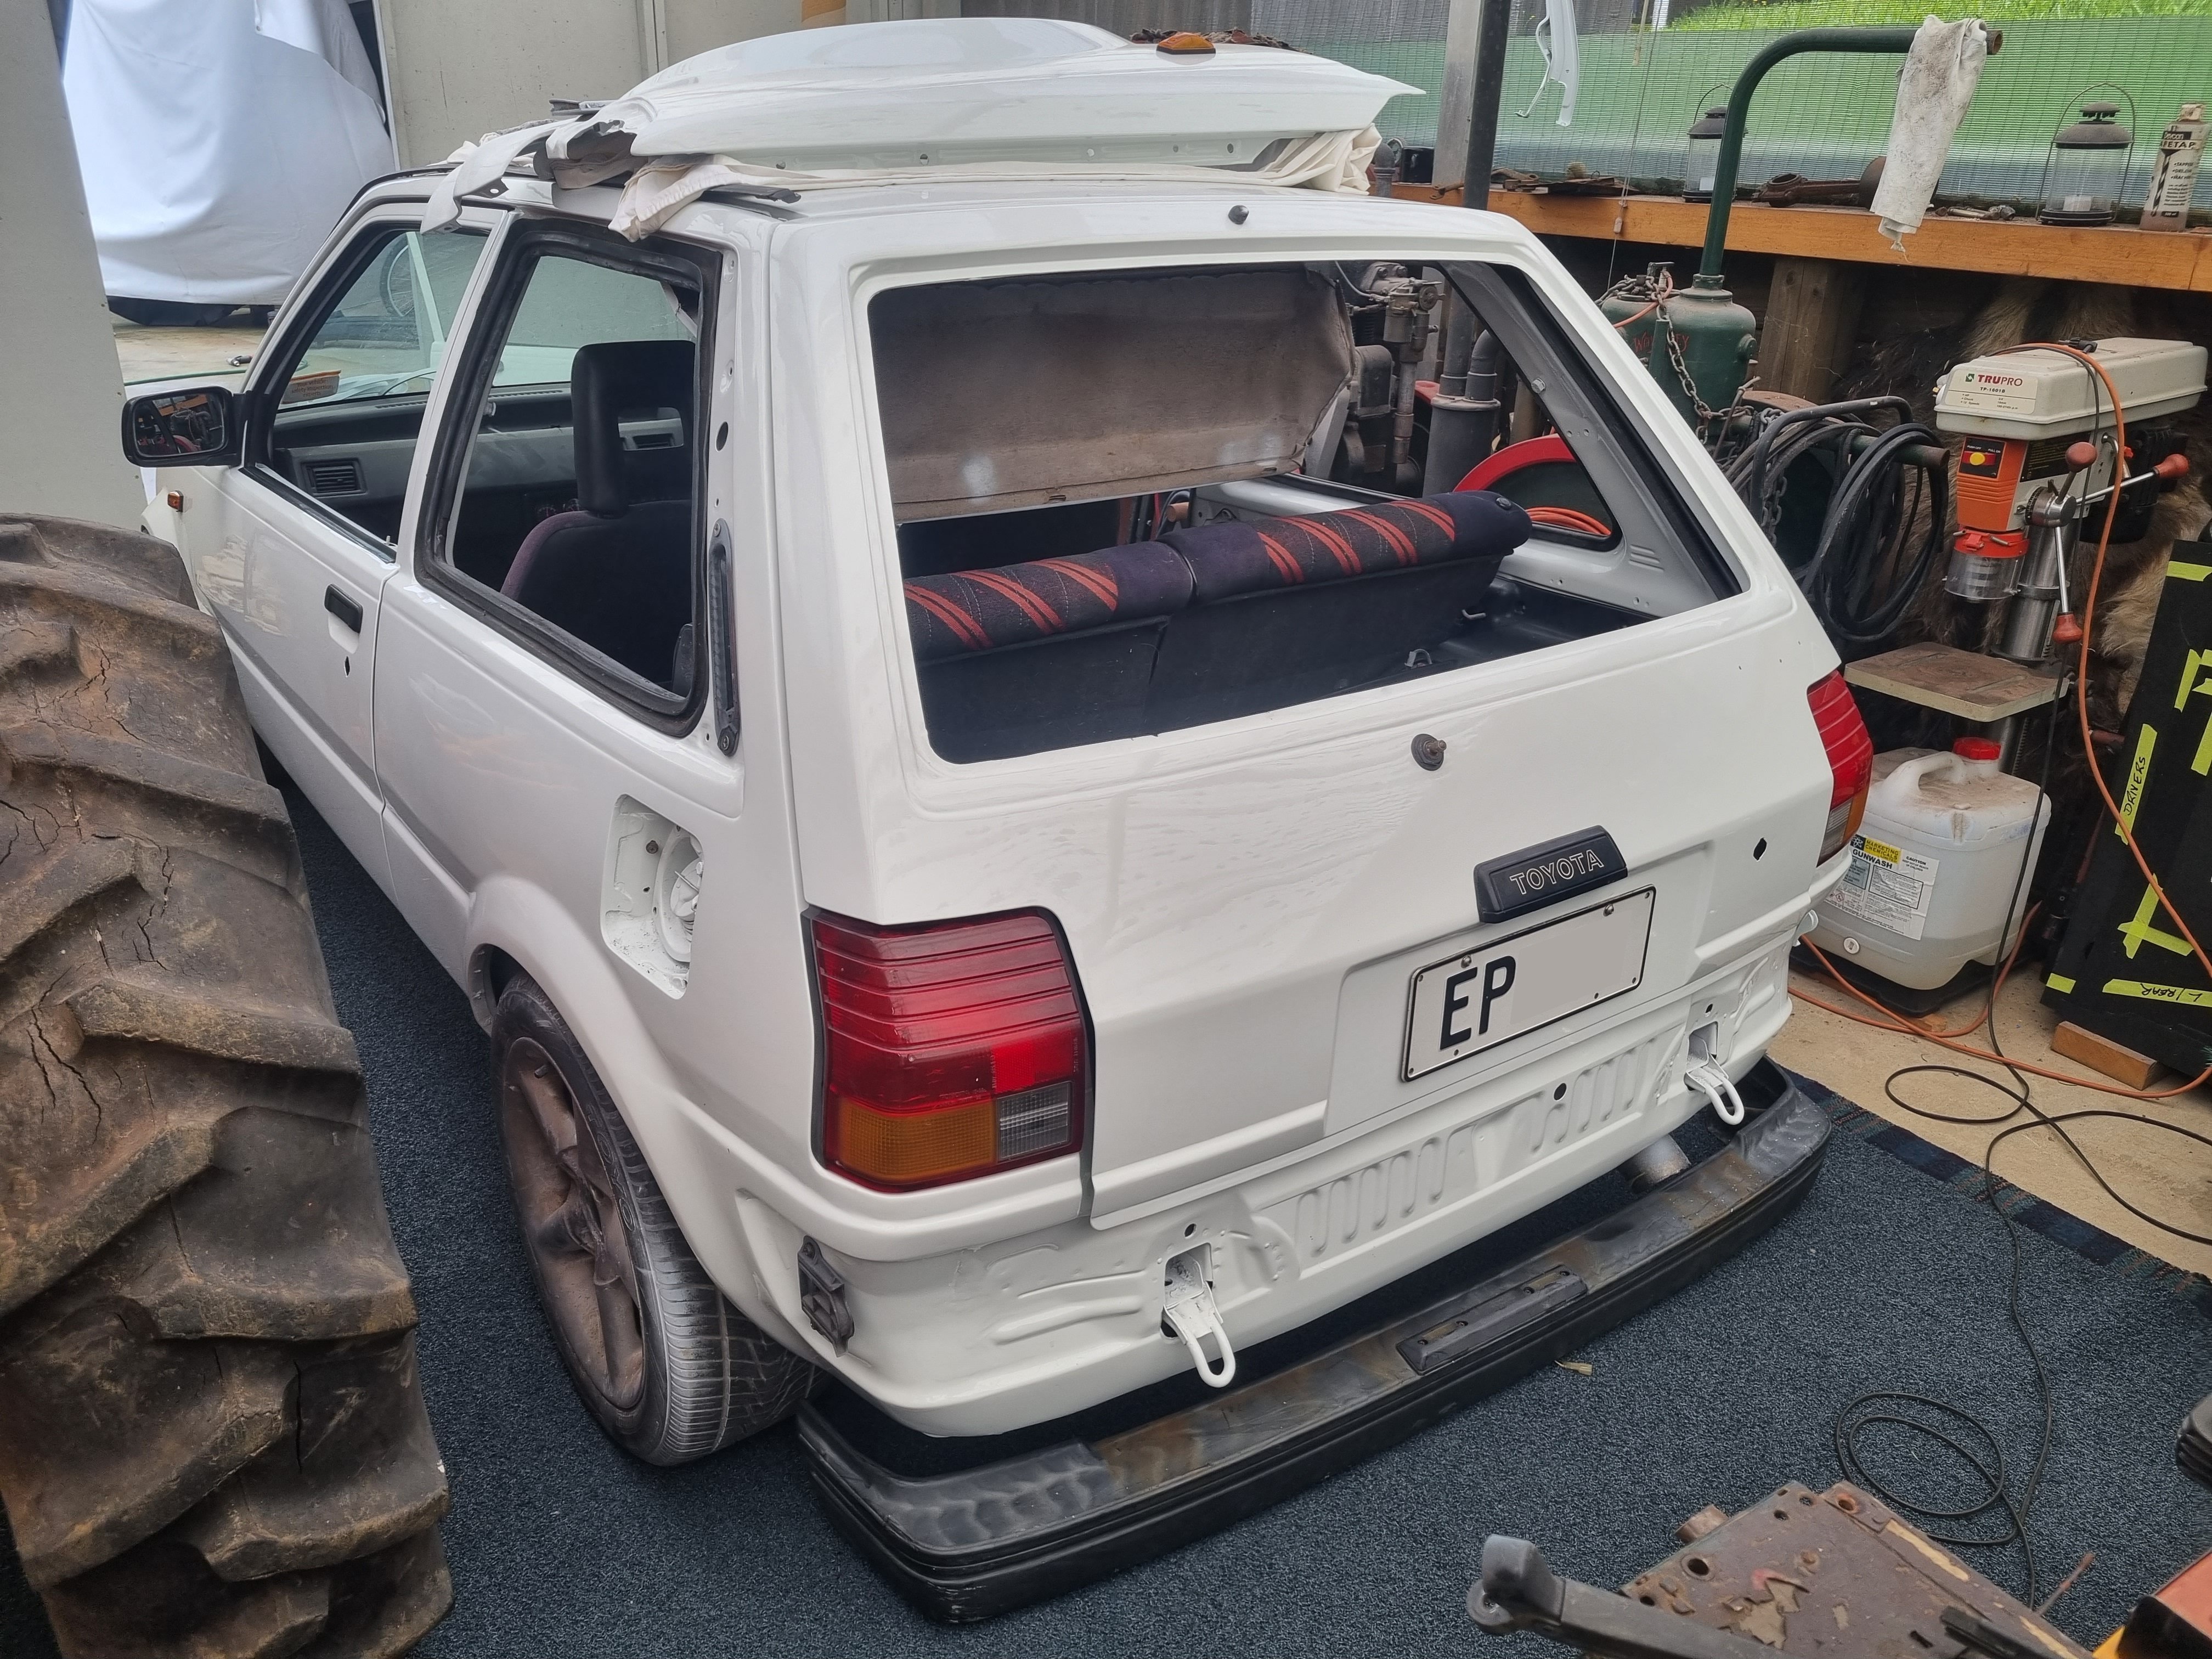
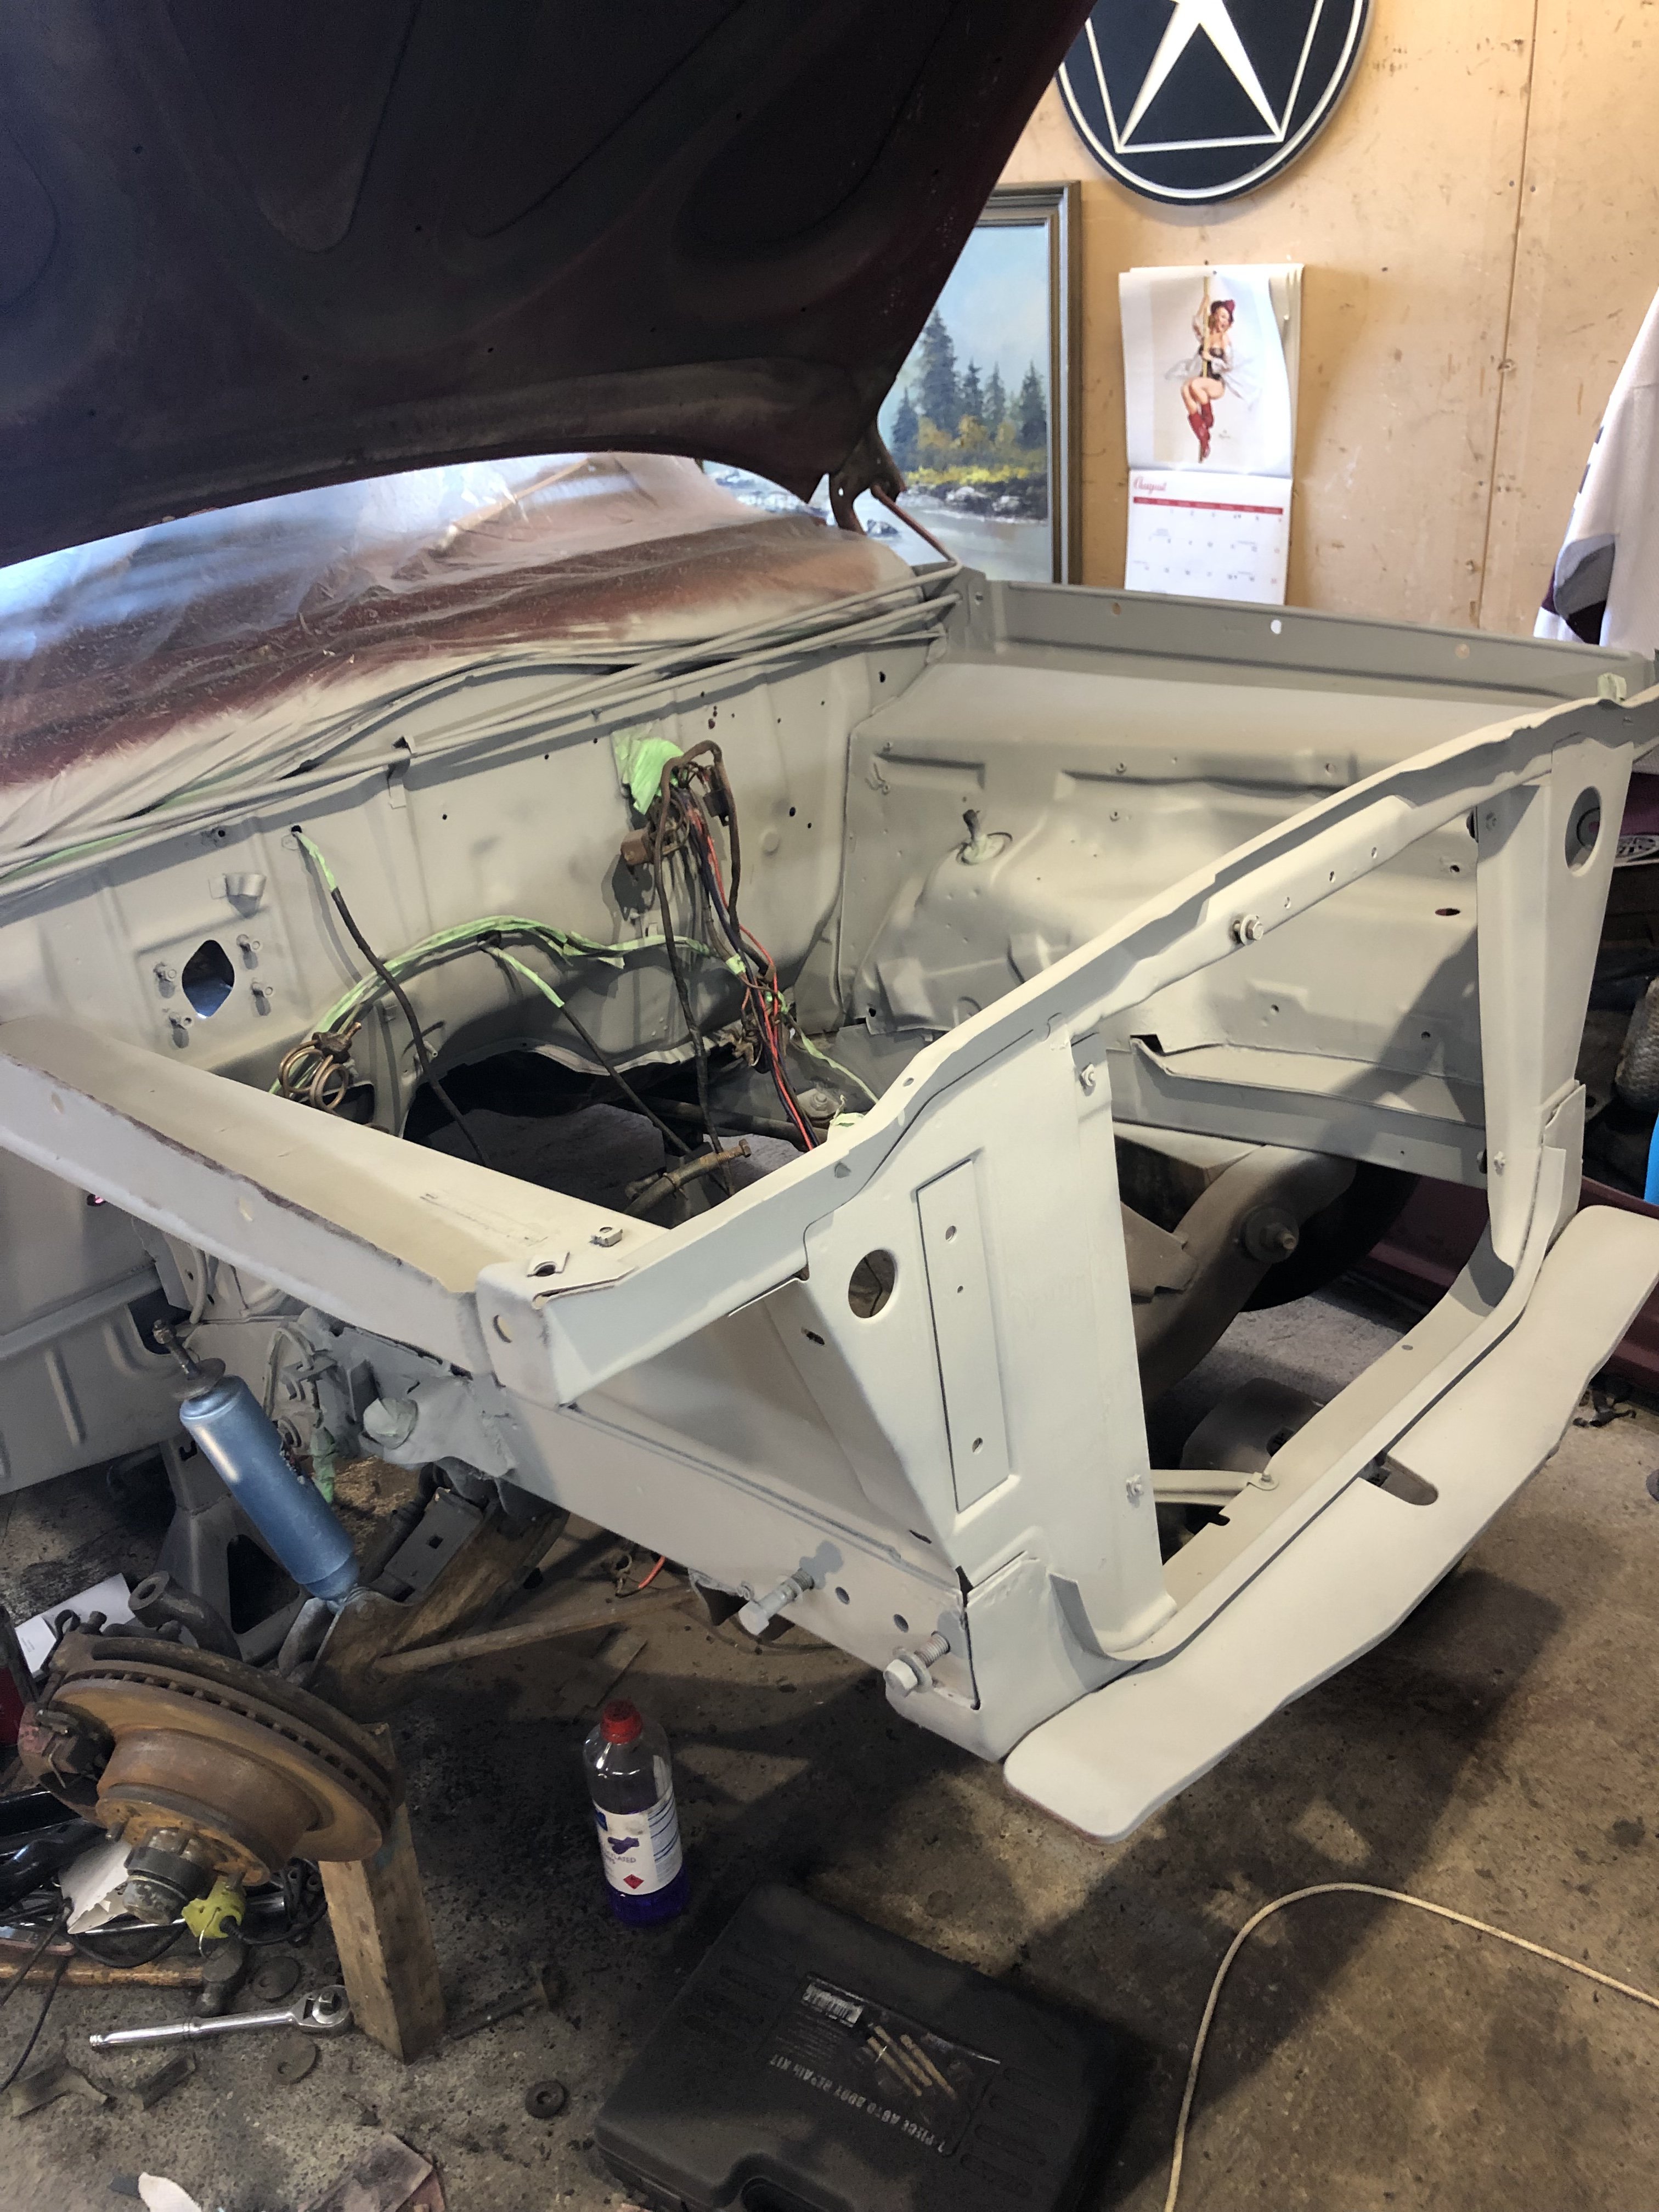
Have I mentioned I don't particularly like bodywork? Engine bay partially stripped and etch primed: Then two layers of Toyota 038 in the bay (looks a bit weird in the photos but is lush in real life), plus the rest of the car in high fill: I've also prepped all the exposed interior panels, refurbished and painted the brake booster, wiper motor and engine mounts. More to follow.1 point
-
1 point
-
Some Gucci pipe work.
1 point
-
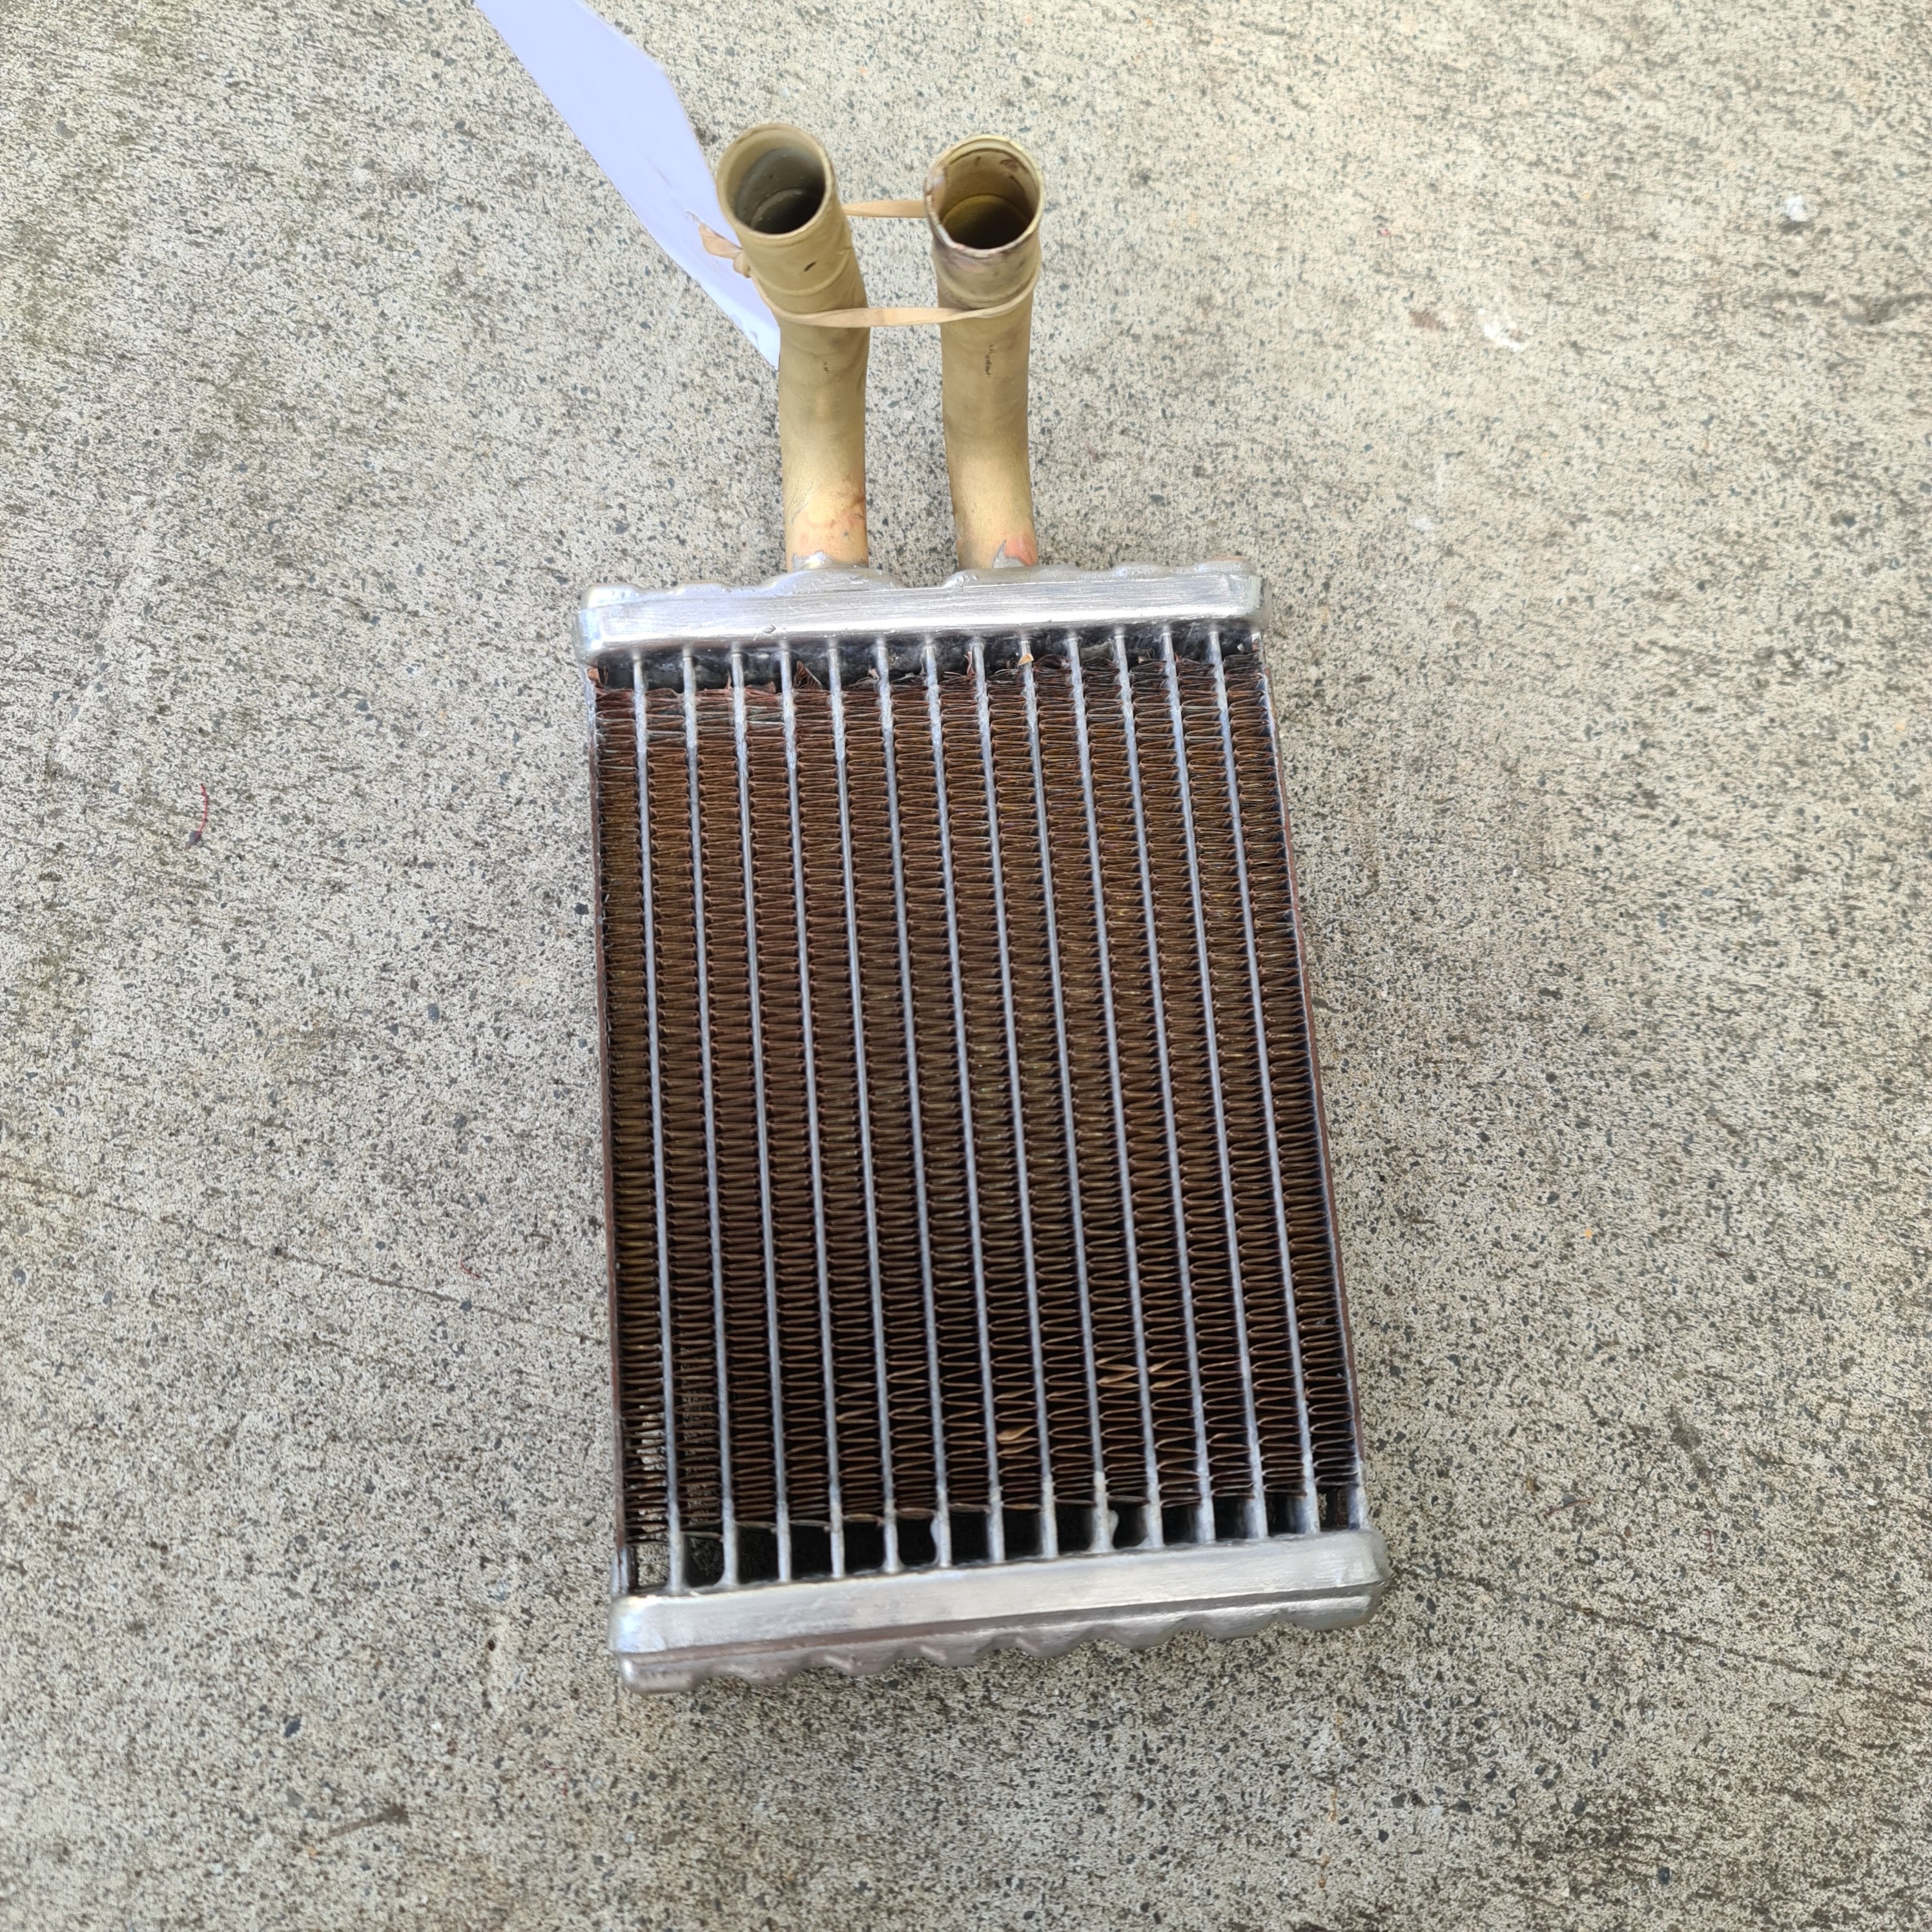
Have been making good progress on the wiring. I feel like each time I do it I learn from my mistakes and take a bit more care and make it look more factory Just collected the re-cored heater core from Auckland radiators after spending about twice as much as I wanted but it was one of those not keen to take the dash out again moments Hoping to receive $430 worth of warm toes in winter.
1 point
-
A few hours rigging up some wiring this afternoon and I was able to get it fired up. Hyperpak was a breeze to wire up and just jigged up something temp for fuel pump. Hoping to spend the next couple days finalizing the wiring with the proper relays with an electric fan provision also.1 point


This leaderboard is set to Auckland/GMT+12:00