
Leaderboard


.thumb.png.b2aee08688778d18bdc7b3e3c1852d9c.png)

Popular Content
Showing content with the highest reputation on 08/09/14 in all areas
-
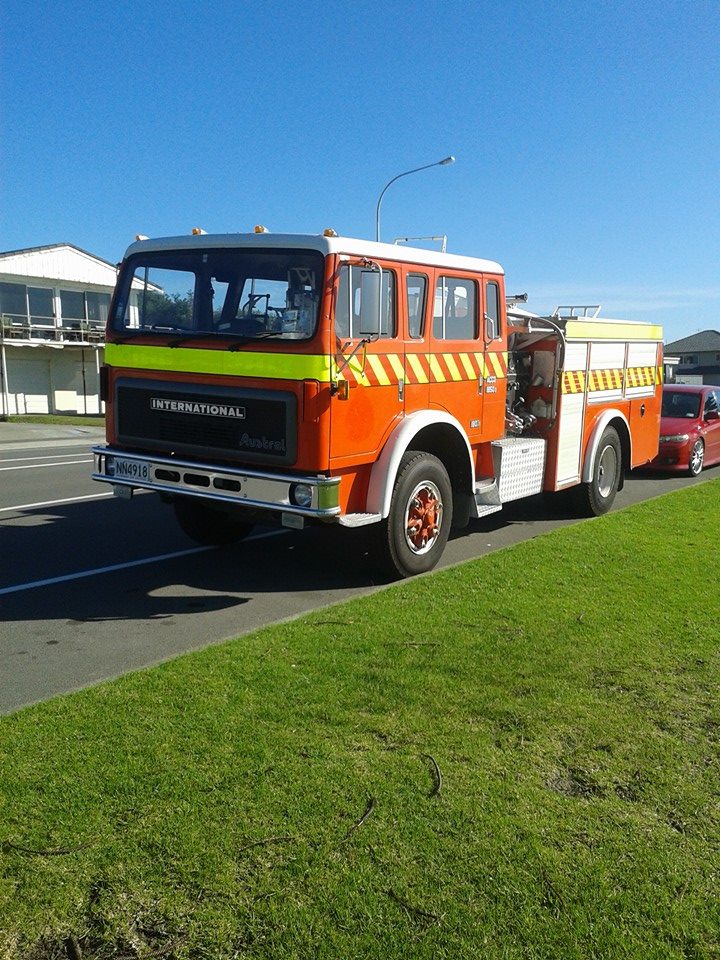
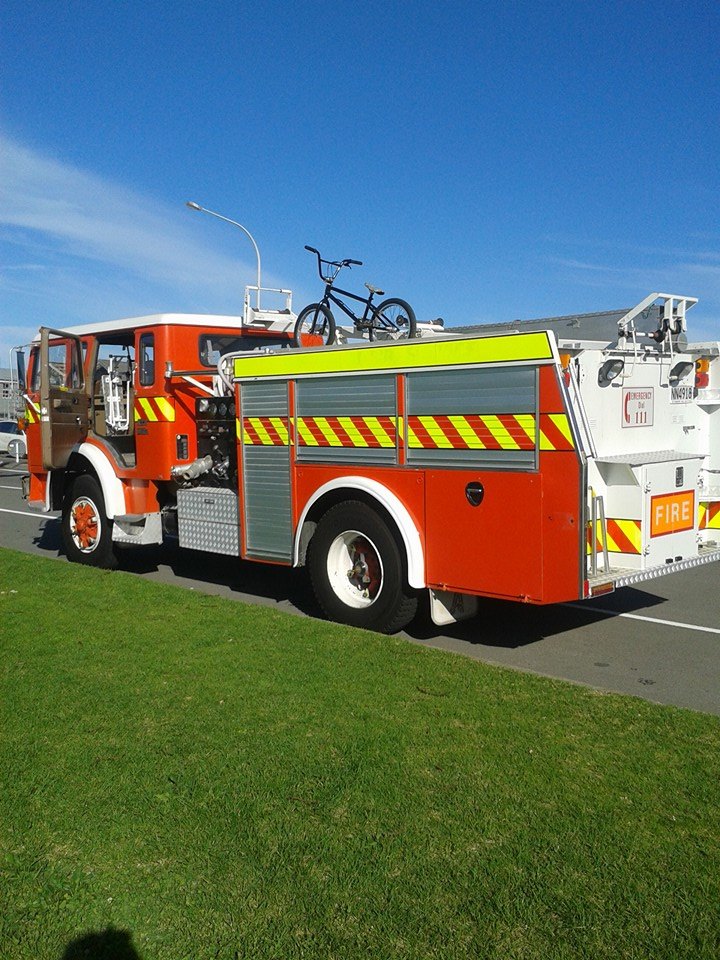
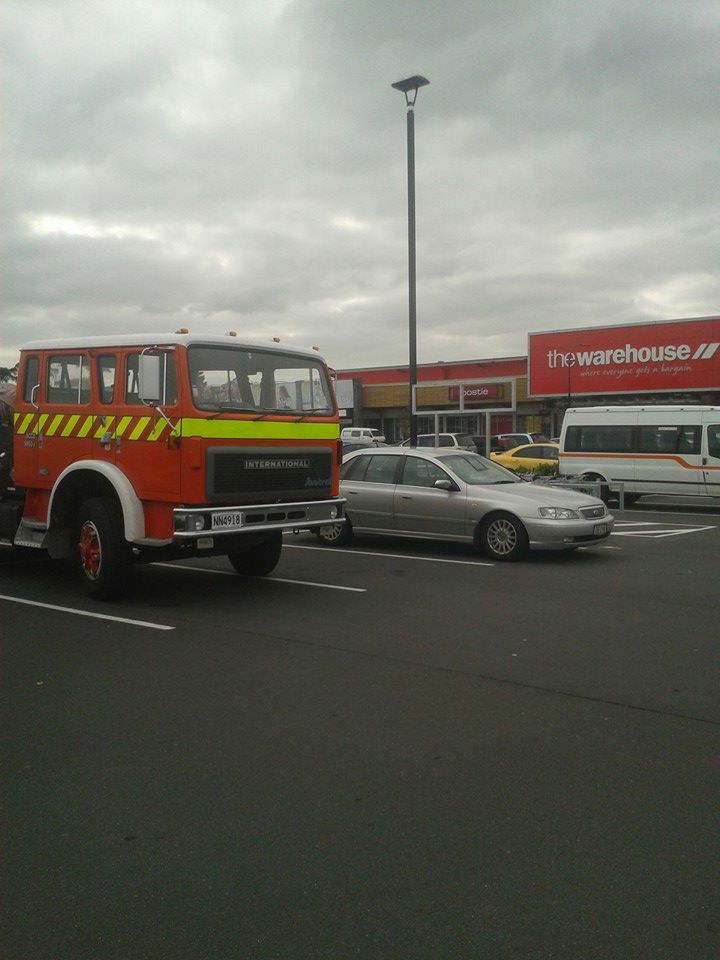
So as some of you know I used to be all about rotaries and mazdas, however sometime towards the start of the year I sprouted a chest hair and decided to ditch the childish triangle in favour of manly pistons and black smoke!! I also own a demolition company so decided it would be great as a crew truck, dust control, hosing down protesting hippies and associated pumping. Ive been looking for one of these for about 3 years, 99% of them are rusty and the commonly fitted 555 cummins V8s have electrolysis issues and corrode the bores if not looked after. So when i came across this one i was surprised to see its fitted with a Perkins Inline turbo diesel and Eaton 6 speed syncro gearbox (being a later model aussie assembled Inter/Acco) and the body is the best condition I've ever seen, a range of stickers around the cab indicate treatment with about 3 different kinds of rust protectant. It still fitted with all the pump gear and hoses, has the drafting lines for sucking water from rivers etc and is a fully functional fire appliance. I was originally planning on painting it black in the style of the american S.W.A.T team trucks, but the reception of the public and realisation of how freakin expensive/difficult it would be to paint a firetruck gloss black has prompted me to keep it red and just paint my other vehicles to match. So the future plans?? In the short term it will be tinted and sign written with my company details in the same font and style as the original fire service graphics. Next will be things like twin exhausts up the back of the cab and a decent down pipe off the turbo. Im going to attempt to find some red lights and the siren setup just because I'm sick of people asking if it has them, though i have fitted a train horn to it to aid in running red lights and scaring the crap out of pedestrians. In the long term I'm going to look at removing the artillery hubs and replacing them with newer multi studs and fitting front and rear Super Singles plus more as i think of it. Parking like a bawse...
 9 points
 -
Yeah need to book ferry. Thought I had transferred enough money yesterday until I found out its 440 big dollars haha. So early next week. But I think the list is... Big bearded valve buddy and the motley crew Kicker and co Me and niki Pbrains3 points
-
How about Varrostoen v3s? they do 4-studs as well.2 points
-
and the question on everyones mind is.... what beer did you drink?1 point
-
//oldschool.co.nz/index.php?/topic/44675-bombsquads-88-international-firetruck-maximumhose/#entry1370496 ^ link to thread. bugger making this other projects. the design dates back to forever ago so it's o/s as fook. AWESOME machine man! These thigns are badass!!!! is it on 11R22.5 Tyres? what's the road speed like? s-cam brakes or is it on that weird eaton stopmaster expander stz? Keep the artillarys, man! Will look oddball as piss on 10 studders! I'll ask a chap I know if he still has altered offset artillary fronts that he was looking to flick recently. (i think they're for super singles (11.75" i think) but he went to 0 offset 8.75/standard width). badass! IMO single stack, and an air intake stack behind the cab to match would be the go. so jealous!!!!!!! edit: txtd the wheels chap and he's sold them. I know of another joker that may have some so will keep my eye out for him in popping past work in the next week or two.1 point
-
I can't believe you own an actual fire truck..... Rolling to get groceries in that is just so damn funny. Would make a meaaaan camper.1 point
-
I wish you were coming too Yowzer. I was looking forward to getting otp, and yarning bout turb deez stz.1 point
-
so got to do an hour or two of work on this today. started out like this ripped all that shit out, saved about 30kg out of there, left all the loom in, i really dont know what wiring i need to keep or chuck out so it can all stay there for now. then i chucked the dash back in, need to get some interior screws so i can attach all the little bits of dash and trim around the place And i got a cheap shitty bride seat and chucked that in (not mounted in this pic). I also brought a pair of mk1's to put on it, should look good, hopefully i win another pair i am looking at getting. I really need to get somthing to take all the nasty matte black off the car and make it look nice again. img]https://farm4.staticflickr.com/3839/14864818772_59098f0112_c.jpg[/img] i have a nice steering wheel on its way too So, The total i have spent on this car so far. $300 - rolling body $200 - bolt in cage $60 - bride seat $50 - steering wheel $600 - engine and box $free - replacement bumper and guards. $200 - mk1's Total - $1410 not too bad, i think i can bring the total cost to $2500 with everything finished and nice1 point
-
Anyone from Auckland heading down and able to take a Honda C50 in pieces to Hanmer for Willdat? I can deliver it to you.1 point
-
Fuuuuuck. I wanna go so bad.1 point
-
Nearly all ready to go for tomorrow - new boots are on..... Got the correct rear panel badge on now as well1 point
-
Ferry booked! Whoop whoop!1 point
-
Might pop out on the Sunday in the 808.1 point
-
So this turned up from Japan, 4 days after paying for it, arrived at work.. PF60 ZZ/R LSD (43 Tooth for the record) Plan is to use the Crown wheel currently fitted to the "Piazza" diff thats fitted in the wagon.. When I have some time off I'll pull the axles and see if I can actually swap them in or not.. Discussion: viewtopic.php?f=18&t=154341 point
-
Added some low! Probably needs more.....1 point
-
Got hq super lows in it now. It's super low alright.1 point
-
So this happened this morning on the way to work... adult image hosting Yep- I am truly fucked off. It was a young fella who had no idea about the two second rule and was not looking out at an intersection. Ran right into the back of me. Luckily he has insurance but its not something I wanted to happen ever. His car, a pug 306, looks way way worse- the whole front end is smashed. Next week it will get assessed and then repaired. Will need to get bumper straightened and re-chromed. Ive never seen a mint Viva rear bumper going spare. yeah.. pissed off. Not a happy chappy. Why the fuck do people tailgate. Its not gonna get them there any quicker.1 point
-
I hear its a dark dark slippery slide once you start making things out of carbon....1 point
-
The $150 alloy ones off Aliexpress work mint.1 point
-
I do like the whole 'heaps to learn' aspect of MS. Quite satisfying (when it goes right...)1 point
-
Cheers man. Its never had a problem starting on the default prime pulse and cranking curve. Probably because as engines go its pretty standard really So it started first go on new setup and as I guessed it was very lean. This time however I just adjusted the warmup enrichment (I've learned a lot from the first time we started on MS over a year ago) I used auto tune to sort out the just above idle areas and then set it so it cant change anything below 800 rpm. I'll take it for a good drive tomorrow and auto tune it then I can fine tune it. So far so good though. Main thing is - I have not buggered the ECU!!! Cheers for all your help and advice. Ive still much to learn...1 point
-
Discussion: //oldschool.co.nz/index.php?/topic/44590-callums-notchback-ae85-levin/ Thought id make a build thread on my project. Bought it a few months back traded my AE86 Hatch for it. Factory 3AU 105xxxkms on body. Now has: Rebuilt 16v Bluetop 4age W55 Gearbox Bc Golds Full exhaust/Headers Shimmed Hilux diff I bought the car looking like this and not certed for any of the mods I drove it around like that for a few months untill i decided i should start making look the way i want it too and get it all legal. First purchase was a set of SSR Starsharks, 14x7 -2 14x7.5 -15 Bought some tyres and test fitted, Running the 7.5s on the front as they still out too much in the rear, Need too roll rear gaurds alot Found a guy too work on my car and get it too cert standard, Need to shorten my draveshaft, D-shaft hoops, lower car all round/ Roll gaurds, Whole new exhaust as the one on it now is too loud, Re-install the factory power steering set up and a general tidy up. Car is now lowered and basically sitting at cert height, guards have been rolled and look pretty good i think More pics: Almost ready for cert, Only a few more things left too do on it then should be off to the cert check next week1 point
-
pp arrived! looks sweet, needs new seals nd a sump. any 13b sumps out there? started stripping bits almost got everything out just diff to come out tonight1 point
-
10mins worth of work, could still do with a bit of shaping but very easy to do, just cut the top off with a 1mm blade then twisted wire brush on grinder then flap disc.. couldn't be easier cheers fellaz.. just need to add custom dirt..1 point
-
Just use a crane to lift a crane to lift a crane to lift a crane to lift your place in to position:1 point
-
So tonight I decided to just go out for a drive. I only just got back 1/2 hour or so ago. I wanted to check out some routes for the nats plus meet the previous property owner who is leaving us some stuff behind on our land so it all tied in nicely. I was not sure how the Viva was going to be on our freshly scrub cut drive way as its not been used much last two years and needs smoothing down. But it was fine and I was all happy to have the Viva out on the land for the first time. Driveway is about 350m long with bush along the sides. Car looked cool in its soon to be new surroundings I thought. Car went so well- its been a while since I have been out for a night time country blast. Fuel gauge still reads a bit high- I thought I had it sussed. I had somehow bent the needle on the fuel gauge while mucking about modifying it. I checked all the wiring, removed the variable resistor, shortened and fitted heavier wire for less resistance and still no better. So I tried a spare old manky fuel gauge and it worked spot on. I compared the two and the old one had a needle that stopped further back with the power off. I looked at the base of the needle on the one fitted and i could just make out a tiny bend/crease. So I bent it back and then fitted it. Took some photos on my phone, sadly a bit poor quality in the low light.1 point


This leaderboard is set to Auckland/GMT+12:00