
Leaderboard


Popular Content
Showing content with the highest reputation on 12/29/16 in all areas
-
All reged wofed and certed! Secondtune with vvti turned on. Made 6hp more but moved all the previous power to instant. Time to start using and abusing10 points
-
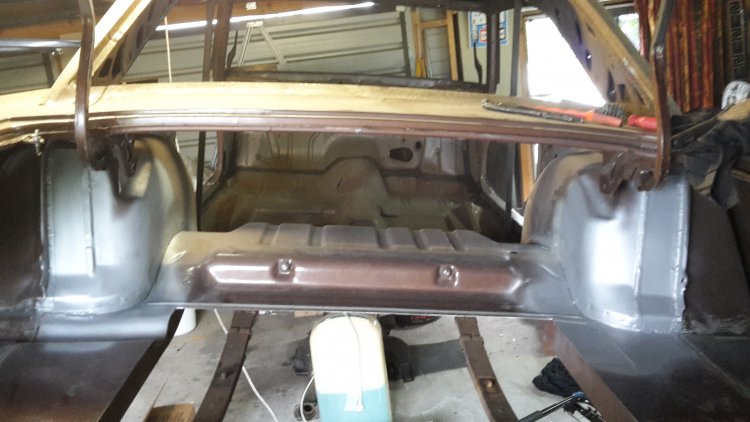
Done some more fings, finished the back side of the tubs and cut off extra un needed brackets in the boot.
 7 points
 -
I post things that are interesting to me. Feel free to add me to your ignore list.6 points
-
Got out to the garage today for a few hours, did rear quarter and started on the back. pretty straight so far. not sanding to far back once metals showing as I only have p60 pads and don't want to thin it too much, will get the last bits of old paint off with 120 before priming no rust holes, several small dings but only minor4 points
-
Haven't done a whole lot besides plan, or try to at least. Im pretty lost as to how I want to do things, but I'm meeting up with the guy who's got my old sedan so I can measure it up and discuss buying next week. I picked up the guards that came with it today, bolted them on for a look, but they're pretty rough. Hoping the sedan ones are usable, I know one was good and one had a big dent but was rust free, but still way better than the ones I've got. I'm also pulling out the diff and planning on chopping the front of the ute chassis off, will put it on casters so I can store it in the side of my carport while I sort out the sedan chassis, replace all the steering bits, bushes etc, and set the motor up in it. Once I decide on a motor. This post is worthless without pics!!! update tomorrow with mockup slam on wheels pics. Only got shitty 18's at the moment, but should give an idea of what I want height wise cheers Matt4 points
-
Merry Xmas! The latest Stacked/Moonlight container arrived just in time for the festive season, and so did my shiny new AW11 Recaro seat rails. When Xmas morning dawned bright and early I busied myself in the shed, and eventually ended up with this: Not many people realize that you can swap the centre fabrics around on just about any Recaro L-series seat as long as the bases match - I cobbled these together from a pair of good Lancer GSR LX-B seats that I bought off Dirk about six or seven years ago, and a pair of munted BF Familia Infini LS-Bs that still had relatively good centres. It's a pretty time consuming process if you're being careful to re-attach all the hog rings and trying not to rip or damage anything. Thinking back to when I originally assembled them it probably took a good hour and a half per side. As you can see, the effort was worth it. They're surprisingly comfortable, have just the right amount of firmness in the padding, and are much more supportive than the factory AW11 seats. Plus as an added bonus - the eye-watering red stripes are totally '80s spec and stay in line with the character of the car. Next I'll probably have to give them a good scrub to make the red fabric really pop against the blue exterior. N.B. if anyone is wondering what the Recaro LX and LS guff is all about, I direct your attention to the following image: Discuss: http://oldschool.co....1-sc-chit-chat/3 points
-
Bellett I recently purchased to replace my aw11 i sold bought unseen on trademe, bit of a risk but pretty happy with the result, runs and drives well, had a wof 2011, reg on hold bad points -Doors -Guards -3x small bits of rust to weld patches in, boot shut, top of one sill and passenger floorpan, overall not bad though -wayyy too high -paint to do -either find better doors and guards or repair current ones -strip paint to bare metal, started already -paint, will do myself, thinking gulf blue or similar at this stage, maybe black bonnet -low -interior re-trim -misc trim bits, seals etc -in future g161z from holden/isuzu gemini but current g150 will stay for a while Delivery Interior, all gauges work, some bits to remove, wheel to be re-done after removing front trim bits, started stripping paint after this ass shot worst rust to repair (apart from FL guard, and its not even a bit hole More bog than guard paint has 2-3 layers so a lot of places look way worse in photos, rear arches are mint, nothing under carpets except for small hole Inspiration colour I am thinking2 points
-
I've been chasing a crown ute since I moved to Aussie 5.5 years ago, I actually checked out a real tidy one the first week I got here but it was in Bundaberg, I was headed to Perth, and the motor was fucked, so I couldn't drive it. Seen a few come up for sale over the years but nothing local, and the few ones I knew of that were local were all either fairly rusty or there's one that's absolutely mint, with a UZ swap, but way out of my price range even if he would sell Then there was this one. I actually lived with it for about a year in a house share situation, where the house owners son had a bunch of old Toyotas on the property. This was body off chassis and set up on a rotisserie, but that's as far as it got. I talked to him about buying it at one point, but he wanted stupid money because it was pretty clean body wise, and it was an M powered chassis, which are way harder to find than the R ones in ute form Fast forward a few years and it's up on gumtree for a grand, so I whip around to check it out. It's been out in the weather for the last 3 years after he had to move it when his parents knocked the house down, the rotisserie ends are still bolted to it, and they're plonked on top of the chassis, with straps holding it on. There's a bunch of extra surface rust, but the only holes I can find are a couple in the sills. It's missing a driveline but I'm not worried about that. All the body parts come with, there's a good tailgate, rear lights and rear bumper. Everything else I can get from a sedan if they're fucked so I'm pretty happy I've got a shitload of work ahead of me, and I'm really struggling with deciding what exactly I want to do with it, but IVE GOT A CROWN UTE!!!! Gumtree pic, it's been at least 5 years since I first saw it, and it has never been this assembled in that time When I went to check it out I knew it!!! Poor Ken Clint has got a hoist, and didn't want to give up his rotisserie ends so he got the body sitting back on the chassis before I picked it up Hi my name is Matt and I'm a crownoholic And at home next to the girlfriends Celica Initial thoughts are sedan chassis (get rid of the leaf rear end), MS112 diff and front brakes (already have the diff), maybe 17" widened steelies, maybe 18" billets (but I fucking hate polishing wheels), tidy up the body and paint it, maybe bags, probably 3RZ turbo, but it's all up in the air at this point This is a fucking massive project, it's going to take years, and a lot of $, and there will be a LOT of questions and upskilling. Lucky you guys are awesome and know what you're doing when it comes to old rustbuckets! Cheers Matt1 point
-
You should do a burn out in your fizza to show how mad you are.1 point
-
Somewhere on all this I miss out the part where I bought this from Napier & sold this 80's Chrysler Avenger to a Local mate around 2012-2013 (also updated & edited some lost links, pic's & vids for the new forum software over the past 3 pages) When I owned a Hon-duh Accord (Jesus drove one dontcha know) for a short but fun period of time (sold it the day I picked this car up in the image above) They turned it Orange, not just any old Orange : its feckin' ORANGE!!! (some say my car is Orange : I enjoy a game of "wind em up" & say it's Red) which some will connect with Then not long after it turned turtle RIP 2013 in other boring Avenger news, temp gauge did a dance today & had been running cold so threw the thermostat I had bought in, ordered spare housing & top pipe from Ross ready for next years Leadfoot 2017 adventure "just in case" dreaming of moving the High Beam light and installing a Alternator warning light and a CD player that can eject, and a Aerial that can receive Frequency Modulated Stations discuss :1 point
-
Bent it a bit driving into a marsupial last night.1 point
-
Can you change your thread title when you actually decide to make it faster, so I know when to check your thread again, because these updates are boring as fuck Roman Dayfe...1 point
-
i might have some in whangarei if you can make it back this far1 point
-
You reminded me. Found my Acuspark ignition conversion for mine yesterday. So fitting it now. Note of reference. Unless yours is different. Get some longer mounting screws. The points ones are too short for the exciter mount...... Everything but that size atm all the way upto 1.5" thread... lol. May have to raid one of my rc cars.... lol ** if you got the ignition coil with it be careful. The stud ontop is just a hollow weak thread. Young fella next door was assisting and it snapped off while being tightened with a 1/4" set. Wasn't over tightened either as he ain't that strong. Being only 7 lol. Best cars to learn on are old cars. He cant do squat on his mums Kia lol.1 point
-
Yeah bowl I will be around. Flick me a txt. Go for a dort1 point
-
i wasn't looking for one i just happened across it on eBay whilst looking for a turbo encabulator thanks for the offer though thought it may have been of interest on here..1 point
-
well i will start off with the fact that i took a week or so away from the project. Didn’t want to walk in the garage or acknowledge the existence of the motor or trans. Using the ol if i dont see it then it never happened reasoning. All this was brought about by the rather unpleasant sound of cast aluminium cracking. Now if you have never had that distinct displeasure of hearing this then im jelouse. So the story goes i was having a great ol time. tunes blaring, woodstocks sunk and it seemed like the best time to mate up the trans to the engine. Pop some fluid in the torque converter & slip it on hearing the clunks as it fitted on snugly. Place the newly worked trans on a trolly jack and position it. Easy i think and start tightening it up. CRACK!!! I freeze as heart skips a beat. Trans bellhousing around one of the bolt holes has a crack. I didnt swear or curse. just stared at it in shock. laid down my tools. Stood up. collected my tools and put them away then exited the garage to find a beverage. My dearest who was helping balance and hold stuff had the sense to not say a word as i went about these duties in silence. So guessing the dowls didn’t line up as well as i thought. Not the end of the world. Can be TIGed back up. Just frustrating, annoying and plain old Grrrrr…… This was done a few weeks ago. I have taken a lesson from our cat. that being ignoring it. So its still in the same place i left it – that being middle of garage and even though i walk around it i have chosen not to look at it. This method seems to work well for the cat. “I ignore your existence and you reward me with temptations” So I have moved on from that debacle to the ignition system. I dont like the HEI nailhead distributors. Big and ugly. dont look old school for my tastes. I had two old GM Delco distributors. Media blasted, reconditioned to make one good & smooth operating with no end play. New cap and rotor along with a paint job and its looking better than new. Will use the other as an oil primer once i get to the fluids phase. Ripped out the old points and condenser and have put in a Pertronix Ignitor II electronic ignition unit. So should never need to worry about that side of things again. Although i have kept the old parts to keep in the cars tool box just encase the new electronic ignition ever plays up. The conversion is all done inside the distributor so i can always swap back with no issues. Also got the Pertronix Flame Thrower II coil. Its like 45k Volts so way more than i need i guess but i decided to get the coil made to work with the new electronic ignition. Black of course ( i really cant help my self) yet the thing is going to be covered by the finned metal coil cover anyways. For leads i went with Taylors ThunderVolt 8.2MM custom wire kit. things run at 40ohms so will carry the spark to problems. Nice and black so wont be an eyesore under the hood. The lengths of wire are ubber long whats good i guess. I sure did have alot of left over wire after cutting to length & crimping all the terminals up. Only down side with the kit is that it dosnt come with a crimper. But have a MSD one so that wasnt a biggie. The wires will be out of sight mostly due to the finned spark plug covers. Also the old Nailheads have the dissy at the back behind the intake so the duel carbs and airfilter will hide it all whats great. tested my leads and ALL had 39ohms or lower resistance. think the lowest was near 37ohms. Alot of people seemed to recommend the old AC Delco R45S sparkplugs to work for Nailheads. So i went for those. The R45S are a tad longer than the normal ones. And thats basically it for the ignition side at the moment. As for the car it self. I need to get in contact with Flockie to talk over the plan of attack i guess. With luck he has had a good ol poke about underneath and came up with a few ideas. Im chaffing at the bitt to finally get things going. Patience has never been one of my strong points – a trait i believe i picked up from my father then compounded by working in ICT where everything progresses fast if not instantaneous. Constantly telling my self slow down (or i may break something like a transmission…)1 point
-
Working away on the tailgate. Pretty fiddly stuff. Have finished repairing the inner braces and the 'inside' structure at both corners. Started with the channel for the seal. I'm doing this in pieces to suit my folder (i.e. bench vise and angle iron). It needs to be curved to match the tailgate opening. Taking the rest of the day off to go to the beach (even though its cold and damp, the beer will be good)1 point
-
You get to keep the Borgy 351 point
-
This did make my build page blow up again today haha. Im so glad Im hiding behind it. 1.5 million views in a week is outta control. This generation will get bored with it in a few months then back to JZ LS erthang.1 point
-
Took the AW11 on another roadtrip to do some late winter/early spring snowboarding at Turoa and to explore the Central Plateau area. Slacker.Cam and myself had already done a bit of recon work during the OS Nats scavenger hunt, and I'd mentally filed away a list of places to come back and check out when I next had the opportunity. As luck would have it, the weather played ball (for the most part). On the way down I stopped at my usual rest area on Waipapa Road for a couple of snaps. This is kind of a ritual for me, almost every car I own has been photographed here at some point. For reference: AW11 #2 and AW11 #5 Then after a lush trip up the mountain to do some snowboarding I hit the road again for a full day of exploring. The conditions were nearly perfect and traffic was unusually light for a Friday, which meant I made good time between each destination. First photo stop, the Rangipo power station and Poutu intake. There's not a lot to see at the power station, just a weathered old concrete sign and tunnel entrance built into the side of the hill, with a locked gate that you can peer through into a creepy, dimly lit tunnel which leads underground. It's almost completely silent here, with only the occasional sounds of gunfire and explosions from the army training nearby to interrupt the peace and quiet. Tomstament mentioned to me later that Rangipo is entirely remote controlled from Tokaanu power station. Backtrack up the road to the intake and you can drive across the structure to the other side of the Tongariro river, where they sometimes launch whitewater rafts (I did this a few years ago, and it was choice). Then it was back onto the Desert Road for some amazing views of the Tongariro National Park area. When I'd set out from Taupo earlier in the day it was clouded over, miserable and gloomy, but one of the Desert Road webcams indicated that conditions were nearly perfect on the Central Plateau, so I crossed my fingers and hoped that it would stay that way. The further south I drove from Taupo the more obvious it became that I'd lucked out. One of the scavenger hunt stops for Nats was "underneath a power pylon", or something like that. Thanks to this earlier excursion I already knew to make a beeline straight for the Tukino skifield access road. Wew lad, the vista I found when I finally got there makes me appreciate this little country we live in that much more. I'd hoped to be able to travel a bit further up the access road but recent snowmelt and rainfall made it almost impossible to traverse past a certain point without 4WD and a bit more ground clearance, so I called it quits at that point. After a late lunch in Waiouru I checked the time and calculated that I should be able to carry on to Taihape and at least make it some of the way down the Gentle Annie road before having to turn around and be back in Taupo by dinnertime. So I made sure the tyre pressures were still good, bought a bottle of water to stay hydrated, and carried on my merry way south. The kilometres flew by and soon I was at the turnoff just outside Taihape: Old barrys will tell you that the Gentle Annie is a shadow of its former self now that it's completely sealed - but that just makes it perfectly engineered for a tiny low-slung mid-engine sports car. Over hills and through valleys the road meandered once I'd passed through the small hamlet of Moawhango, and I rolled the windows down to listen to that glorious sound of that supercharger with the engine wound out in 3rd gear. After a series of corners through light forest and a small gorge, the hills opened up again and in the valley below there flowed the Rangitikei. The road dropped sharply to the valley floor and at the bottom I came across the old Springvale suspension bridge that once served as the river's crossing point, alongside the modern concrete structure which replaced it. At this point I figured it was time to retrace my steps back to Taupo, so reluctantly I swung the AW11 around and headed back the way I came. Definitely have to revisit this part of the country again once I've obtained some better tyres, sharpened up the handling slightly, and fitted the extractors for a little more oomph. The plan will be to leave Taupo early, traverse the Gentle Annie, have lunch in Napier, then set off back to Taupo again on the regular state highway (which, in itself, is a pretty fun drive in the right car). Apart from a bit of wind and cabin noise which is to be expected from a car of this sort, I really have no gripes about the AW11. Pretty stoked really. It's definitely my best go-to car for roadtrips (provided the conditions aren't totally shitty) and it has nearly the right amount of power to keep things entertaining. With the previously mentioned tweaks I reckon it'll keep returning a great smiles-to-miles ratio for years to come. Cool story bro. Full photo album: https://flic.kr/s/aHskCWNzhA Discuss: http://oldschool.co....1-sc-chit-chat/1 point
-
done diddley1 point
-
Thanks to the efforts of Slacker.Cam and the Jackson Factory (sounds like a cheesy movie...) the OEM Toyota roof racks have been securely fitted in time for OS Nats 2016. Cam turned up some small spacers for the rear section mounting points on the lathe and found a bunch of appropriate fasteners, while over the weekend I grabbed some felt padding for the front section. Nice and safe... but I don't think I'll be ambitious enough to tie anything to the racks just yet. Went for a quick dort out to Parau in the fading light and managed to grab a few shots before dusk. Look past all the small blemishes of being a thirty year old car, and the old wedge does clean up well for photos I must admit. More photos: https://flic.kr/s/aHskikS3t3 Looks real sicko spec now, haha. More photos: https://flic.kr/s/aHskikS3t3 After Nats the plan is to continue tidying up little bits and pieces on the side, while I focus my efforts on the Skylines. One annoyance I'm hoping to get sorted is to restore all of the exterior side trims to their original black colour. Discuss: http://oldschool.co....1-sc-chit-chat/1 point
-
So a few years ago someone beat me to these hideously rare factory AW11 roof racks which were attached to a wreck at Pick a Part. Since then I've been half-heartedly looking for another set, but not really holding my breath that I would ever find any. Imagine my surprise when a set appeared for sale on Yahoo late last year! As always, I enlisted the services of Moonlight Racing/Stacked - and managed to win the auction for what I thought was a pretty fair price. One container ride later... The front section could do with some padding under the rack feet so I don't scratch the fuck out of the roof, and I need to find (or make) some spacers for the bolts that hold the rear section to the C-pillars; I'm not 100% confident they'll stay attached without working loose, and I really don't want to break the plastic C-pillar trims either. I'm already eyeing up a Thule universal snowboard carrier for it, but man they are expensive. You just gotta love how quirky/dumb it looks. Discuss: http://oldschool.co....1-sc-chit-chat/1 point
-
Car is officially now worthless. Time to scrap it or trade in for an Audi S4. Discuss: http://oldschool.co....1-sc-chit-chat/1 point
-
riteo pic dump of the car getting painted would like to here some opinions //oldschool.co.nz/index.php?/topic/36351-toy-mota-1971-toyota-ms65-crown/ shot1 point


.thumb.jpeg.f619b2b09d6205c0ecd09f9f2fed36f0.jpeg)


This leaderboard is set to Auckland/GMT+12:00