
Leaderboard


Popular Content
Showing content with the highest reputation on 12/30/15 in all areas
-
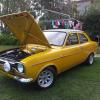
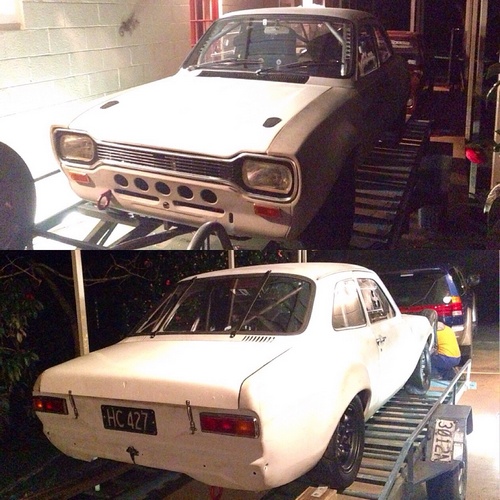
Discussion thread //oldschool.co.nz/index.php?/topic/51310-rhubarb77s-1970-escort-coupe/ Here's a few recent pics of my Escort that I've owned for the last 5 or so years. I'm the second owner so most of the body and interior is untouched except the RS front end, some gauges, new carpet etc. I first took interest in Escorts growing up in Central Otago. I think my first car, bought for $100 was a MK1 four door with house paint all over it. Lots of gravel roads = lots of great memories So now, 20 years on I have this escort. It took a long time to find the right car as I didn't want to do any bodywork. The current engine, 2.0L Pinto was professionally built at an Escort performance shop here in Queensland. It pushed out 150rwhp on the rollers and runs a 14.5sec 1/4 mile with standard diff and standard Sierra 5 speed. A few weeks ago I stumbled across a custom Pinto turbo exhaust manifold when I was buying some escort spares. So that's kicked off a whole new chapter. I've crunched the numbers for the turbo route and it looks expensive. So my MK2 Escort project will have to go and the 150HP motor is up for sale. Going turbo with the car is going to change it. A lot. Fuel injection, big diff, big brakes etc. I'm in two minds about going ahead with it really as the car is so well balanced & very original. That's partly why I started the thread, to get some opinions about it so please place a vote in the discussion thread. Cheers Turbo project- T28 ball bearing Turbo on custom stainless manifold, Sierra EFI inlet manifold, YB pistons, YB rods, YB distributor, Holden LS1 coils, Toyota Supra W55 gearbox with adaptor bellhousing. Shopping list is still huge.13 points
-
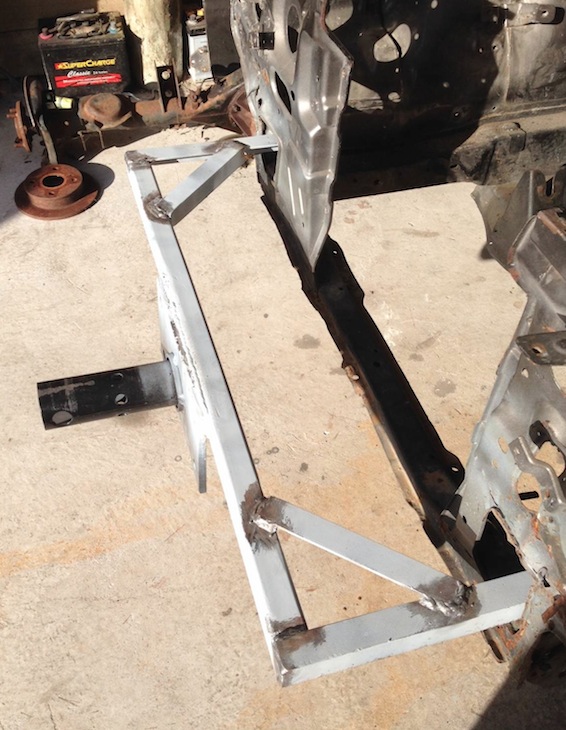
Have got someone making me some new tie rods which take a factory inner tie rod end, and a commodore outer tie rod end which has the pivot point lower, which should reduce the amount of bump steer. and i went to OS drag day also, big surprise, if you do skids for ages, brake drums dont like it and get shuddery. luckily i have a spare set, put those on today. it did a 14.28 @98mph. it did have a couple of runs where it had a splutter- its either running out of fuel (it has a stock fuel pump) or the lifters are pumping up. i have an old camera that i "improved" the battery door on by bolting a bit of steel to it, which also makes quite a good mount when combined with 3 strong magnets, its interesting to video the suspension and whats going on when you drive it. Quite surprising to see the amount of movement- eg 0.37 there is 2 reasonably heavy applications of brake, you can see the caliper rotating the spindle- this is mostly movement in the brake reaction rod bushes, but the upper arm bushes move as well, and if you study it closely, you can see the whole inner guard deflecting. in this one the camera is mounted to the bumper iron looking back at the left front wheel13 points
-
im not sure how much longer i can keep this up. 2015-12-30_03-19-36 by sheepers, on Flickr 2015-12-30_03-18-51 by sheepers, on Flickr 2015-12-30_03-18-37 by sheepers, on Flickr8 points
-
i have used them, best to set your gun on low/1, give it some nungas nungas , then set your torque wrench on like 80 nm, check it and wind it up till you find where its actually torqueing the nut to. and adjust your rattle gun setting to the best position. I did find when I went to a much better quality rattle gun I had to dumb it down to the lowest setting to get the right torque i went away from using them in the end because for my own peace of mind knowing that you torqued the nuts up helped me to sleep at night. especially on them long as days were your doing 14 jobs and you cant get of to dream land cause you cant remember if you did up the nuts on the last rush wheel bearing job. thankfully that has never happened to me, but as i said peace of mind knowing its right was worth the extra 2 mins . I do things the same way every time , so if I haven't put the torque wrench back in the draw I know I haven't torqued the nuts, its a good system, same goes for sump plugs, and brake caliper bolts, all ways put the spanner on the drainer, or ring end on the hub, if the spanner is on the drainer/hub then the plug/bolts aren't tight. I may be a little ocd but I have never left wheel nuts loose or fucked an engine cause the plug fell out . my 2 cents , got a little of topic sorry6 points
-
Well I am off to Motunau for new years. I was going to take the Anglia but it is not charging. The alternator provides 14.4 V for the first 5 min of running then stops charging. So the work wagon will be towing the teardrop up. It has the spearfishing gear, shotgun, .22 and AK fitted so should be sweet for a fun evening.6 points
-
Putting a cortina back together isn't as easy as i thought it might be. It's been a month since It came home and its been a battle in almost every respect. It dosent help that my search for perfection gets in the way, making sure every lil bit is cleaned and in mint working order or brand new looking. I know at the end of the day I will sit back with a giant smirk on my face bathing in the glory that is my cortina but even I know I have gone quite insane. Anyway for the fickle few who enjoy my update here she goes. 1.Today I finished my under dash wiring. I have installed some fuses for stereo and need one for main power feed. 2. I have made my rear parcel tray and back seat cover upholstered it my self.looks good. super happy. 3. Put engine in and installed battery and new coil + electronic ignition. Just have to install alternator and sort out radiator and fuel lines. Thanks peps that will do for now.6 points
-
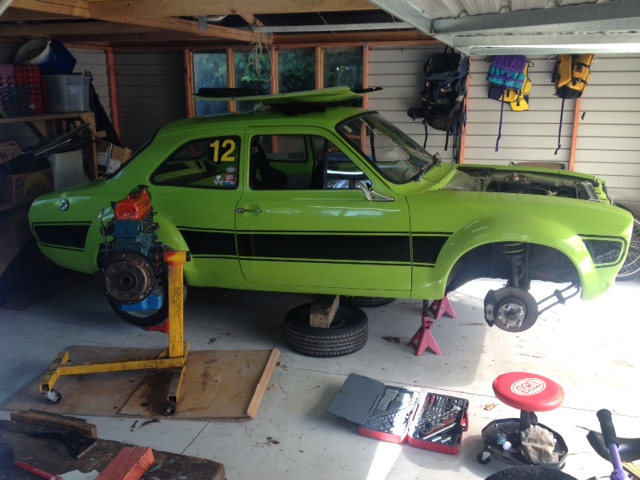
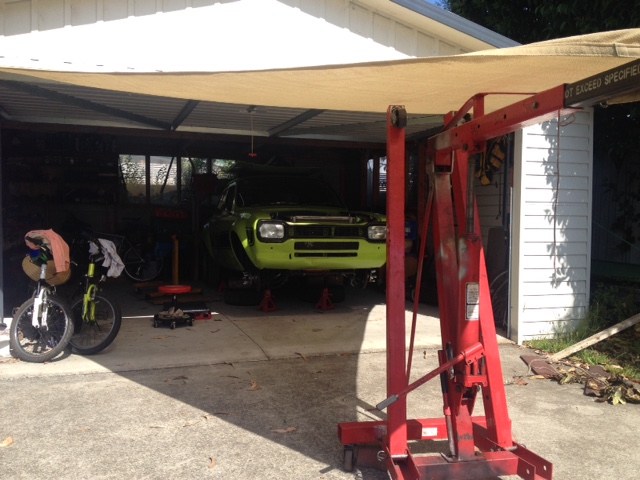
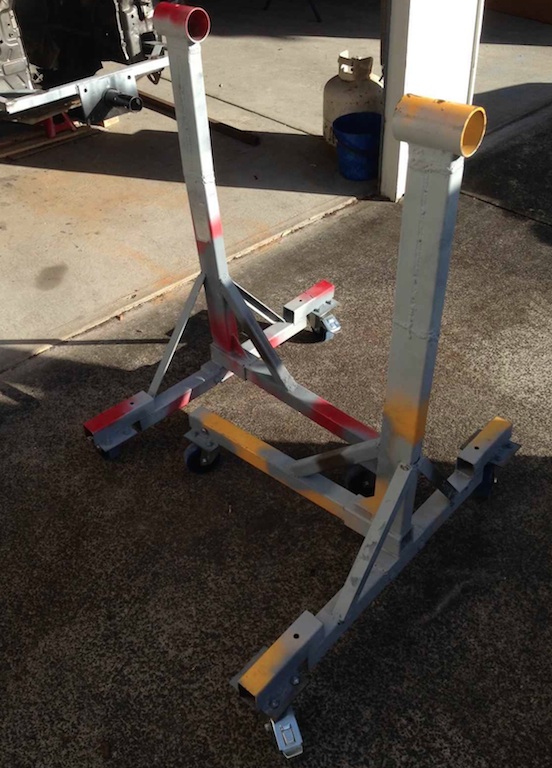
Hmmm, been a while so thought I had better prove I turned a spanner on the car... Approved summer use of engine crane
 4 points
 -
Thanks for the comments and compliments guys. It is a great car and the poll results are overwhelmingly in favour of leaving the car the way it is. Thanks for the votes. Brockzila the MK2 coupe is a 1980 2.0GL Denim pack. Not sure if I want to cut this one up either. But if I sell it who knows what would happen to it? It was a bit rough when I first got it. The interior is shagged. I've had a bit of rust cut out & repaired but overall it's a pretty solid car.3 points
-
I have started fiber glassing the body, it is a lot harder than I thought it would be to go around edges... The first batch had quite a few air bubbles near the 90 degree bends in the cloth, I cut them out once dry and tried again.... I think I have it sorted now though.3 points
-
rear suspension, from the back of the car looking back at the spring/diff and another one of the front3 points
-
Jig complete and rake dialled back to 40 degrees. Thoughts?2 points
-
After a play this afternoon, the engine bay went from this To this guards and front back on, just need to sand and paint the bullbars and do a quick service and it will be ready for re-reg . Oh, and cut the rest of the paint to match the guards.2 points
-
I love your home vids! How old are your upper arm bushes? I'm amazed how much free castor you get under braking. Also, how hard does it hook up with the rear leaves so flat? And I thought that blocks had to be boxed in at the ends? I couldn't quite see the inner guard deflection you spoke of. Might have to watch those vids more. pretty riveting viewing.2 points
-
I say big turbo. It stopped being an original car the minute the Pinto went in, so just go the whole hog and turbo the bejesus out of it.2 points
-
Shit those videos show how much of a hiding factory suspension gets. Might spend a bit more time on my Cedric's going over all the front end!2 points
-
Hi You could possiably have one of the niceest period modified cars in the country. Please do not take it any further, as you said it took along time to find. You have a mk2 project?? Keep the mk1 as is and drive it. And turbo the mk2 .2 points
-
this one is looking back at the brake reaction rod, if you watch carefully you can see the front crossmember flexing under braking loads, and the engine moving around under braking2 points
-
things went well and now its beer o'clock. 2015-12-29_03-58-30 by sheepers, on Flickr 2015-12-29_03-58-40 by sheepers, on Flickr 2015-12-29_03-58-52 by sheepers, on Flickr 2015-12-29_04-13-24 by sheepers, on Flickr 2015-12-29_04-13-39 by sheepers, on Flickr2 points
-
today was a good day, now it goes again. neighbors may have been wondering WTF i was doing with it sitting in the driveway for 20 minutes at 2000rpm. fired up first crank, runs well and seems quite responsive. took it for a tutu round the block a couple of times. needs a few finishing touches, set timing etc etc, put the bonnet back on, couple of small exhaust leaks. it will need a quieter exhaust, curently has 2 straight thru mufflers (3'') so ill probably put a 2 1/2 triple pass muff right at the back2 points
-
got the block back, ended up with a bit more doing to it than originally planned. block tanked, bored, decked, rods resized, crank bead blasted and journals polished, all balanced. state of play at the end of today= also, this happened. photography was done by Richard/Snoozin, jolly good show old chap.2 points
-
Well, the bug bit again. I guess you could also call this thread "I lost my marbles and imported another shitty old car from Japan! Ask me (almost) anything!" Originally I wasn't planning on buying another AW11 for a couple of years... if at all. After owning five of them over the course of the last ten years and getting sick of repairing botch jobs on hacked-up local examples I firmly told myself not to bother anymore unless it was a truly tidy one, which meant most likely having to import one from Japan. Then a series of fortunate events including a career change, the sale of my Mazdaspeed Axela to a family member earlier this year (which freed up garage space and capital), and a strong dollar to yen ratio at the time all led me to engage Ewan from Stacked to check out a few nice looking AW11s on my behalf. Yeah, I'll admit that six months after selling my last AW11 the itch inevitably came back, so I'd been keeping a surreptitious eye on the car sites over in Japan for the last year to see what the market was like! After a few hits and misses I settled on a midnight blue hardtop from a yard near Tokyo called Marumi Auto which had low kms, very little rust, one careful owner, and had been quite well looked after. It wasn't cheap, and blue was never my first choice of colour (I was angling for either a Sherwood tone, white/grey, or white/gold example this time), but for the price nothing in NZ came close in terms of quality and condition, and after owning my last one the colour eventually grew on me. By some stroke of luck, this particular one had been specced with the much more aesthetically pleasing black interior instead of the default eye-watering blue that 99% of the midnight blue cars had! It arrived at Stacked's yard in Osaka around mid-May, having made its way across the country from Tokyo on a transporter, and Ewan made arrangements to load it on a RORO carrier departing in late May. Around the end of June the export certificate and some other documentation arrived, followed by a notification from Stacked's NZ based customs brokers in Tauranga that the car would be arriving on 11th July. The AW11 then spent the next week and a half on the wharf while Customs, MPI, MAF, and Land Transport NZ all poked around and carried out their various inspections in the name of bureaucracy. I was heartened by the fact that during the border check the car wasn't flagged for rust issues nor underbody damage! Then, finally, once all the Is were dotted, Ts crossed, and palms greased in the form of invoices paid, the car left the wharf on a transporter headed to North Shore Compliance and spent a few days there before I drove it a short distance up the road to the panelbeater where it now currently sits, and will undergo further inspection to pass a Repair Cert. Compliance revealed that the left rear quarter had been subject to a minor impact in the past (20 years ago or thereabouts), and because you could still buy replacement TGP panels at the time the entire section had simply been replaced. There are no marks to indicate the chassis had to undergo straightening, there isn't any cancer creeping in around the seams, and all the spot welds look good - but there are a couple of areas where surface rust has started bubbling (the join around the left hand tail light, for example) that will need to be cleaned up once the repair certifier completes his check. I've had very limited time to spend foaming over the car because of other commitments, so it was a nice surprise today to discover that it already sports a set of incredibly rare TRD lowering springs. I'd bid on some in Japan as the car was making its way over here and just barely lost the auction, so had been feeling a bit despondent about ever finding another set. So where to from here? I'm not all that interested in making the AW11 stupidly fast, but will eventually perform a few judicious tasks such as sprucing up the suspension further, now that I know it has TRD springs (some good Bilstein struts and a rear swaybar would be nice), adding a LSD, fitting a set of extractors I did manage to win ex-Japan, transplanting a few bolt-on bits I'd hung onto after selling the first '80S KID, and tidying up all of the little interior and exterior blemishes I come across. May even pull my Buddyclub P-1s out of storage, paint them a nice shade of bronze, and fit them to the car, and also hit up Yahoo Japan for any oddball accessories such as driving lights and roofracks that might pop up. Still undecided whether I want to go for a full period-1980s look similar to what I'm planning to do with squid (my Skyline sedan) but overall I'm hoping for a nice "clean-slate" build - not concourse spec but tastefully tidy and done up without a hundred things wrong or fucked with! Stay tuned for more. Discuss: //oldschool.co.nz/index.php?/topic/49412-80s-kid-part-ii-eds-aw11-sc-chit-chat/1 point
-
Credit to Rumrum for the idea So I was considering getting a spa, but they're so damn expensive And I'm so damn cheap So I made this Then started on the heating Scored a flue from the Father-in-law and made a choke for it And welded the flue to the drum...uh firebox Old gas bottle for the water, spacers welded to the sides to keep it in the middle And mounted Rebar fire grate Hooked up So it turns out gas bottles have a coating on the inside, which flakes off and fills my tub with crap. The top pipe had some holes in it so I welded them shut. But the weld in the inside caught some of the crap and blocked the pipe OH CRAP! I noticed the lower pipe was getting a bit warm, the top pipe was fucking hot, and the hot water had stopped going into the tub. so woops put the fire out quick. Cleared the block and god damn the water was hot! Also it's not so good at heating. So, I'm going to scrap the bottle and back to the drawing board. So far the cost, about $30ish ha1 point
-
1 point
-
got the 14" wheels blasted and painted and some new semi slicks wrapped on them Hampton Downs Bound
1 point
-
Never used them, don't see any need to start. I always tighten by hand and then torque wrench....1 point
-
Need to tidy up the slightly patchy sealant but she's in!1 point
-
Wow, beautiful car! Keep it na and driving I reckon. If you are going to turbo and efi it then use a more modern dohc turbo powerplant. Just my opinion. Love it though!1 point
-
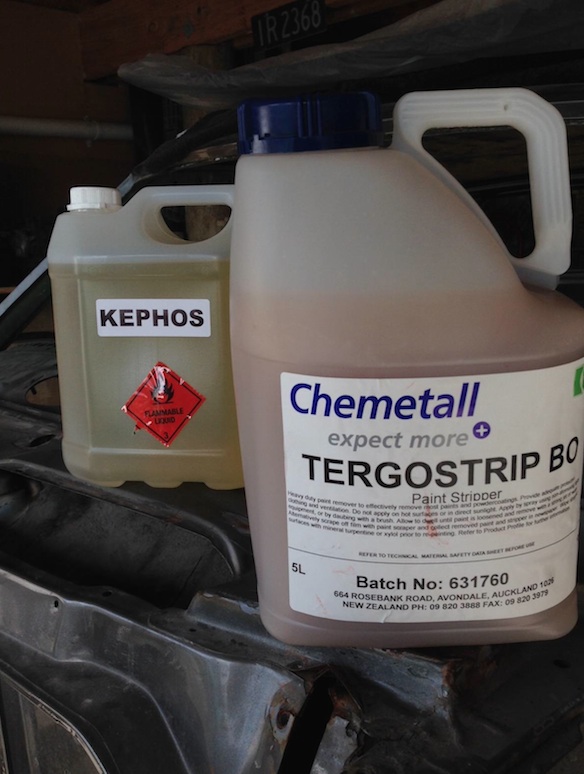
Catch up update...... Finished the Rotisserie - stands had bigger castors mounted & more supports added. (also had to heighten them a bit more as I stuffed up my measurements) EURON8 came and cast his professional eye over my welds to put my noobie nerves at rest............all good!! Just need a few of my Samoan brothers to come over and I'll have the shell up on the spit!! And after much "ummmming and ahhhhing" I have bought some paint stripper to save some $$ and get a bunch done myself first discuss here http://oldschool.co....4-ke25-corolla/
1 point
-
what fletch said. talk to a fridgy guy for the copper. http://www.refspecs.co.nz/product_info.php?cPath=82_84&products_id=5931 point
-
The initial cert inspection went well , I have a list of 30 things to rectify. I've got myself a fair few jobs to get through now , nothing major though so Im very happy Last minute jobs before the first event Motorsport scrutineer has signed off the log book so we are good to go
1 point
-
Will this make it to burgerfuel?1 point
-
Interesting, you have 2 now? i rode in a holden powered one today & suddenly think it'd be a good thing to own.1 point
-
Car is officially now worthless. Time to scrap it or trade in for an Audi S4. Discuss: http://oldschool.co....1-sc-chit-chat/1 point
-
Shit yarn #2. Factory AW11 boot mat. Apparently these are rare, and foamers foam over them. Gonna hit it with some Jif and Simple Green then it should be mint, mayte. Discuss: http://oldschool.co....1-sc-chit-chat/1 point
-
I'm just going to throw another suggestion out there. HBI Engineering in Chch make up/rebuild tie rod ends etc, they make up new tapers and balls for them. You could contact them and get a new longer ball and taper made up to space it down again. it would save you drilling out the steering arms, buying rose joints and so on.1 point
-
In more exciting valiant front steering geometry news in just now- changing the idler actually made the bump steer problem worse, 25mm now with the idler in the right place. Which means the outer tie rod ends need to be moved down. Which also means the caster is not a problem. I put a 14mm spacer under the tie rod ends and checked it again and got 9mm over the full travel of the suspension. So now I need to make some new heim joint steering arms1 point
-
Bought me some sweet white steelies, puhuhuhuhu. Oh hold up a sec... If you're confused, just Google "Bridgestone Super RAP". Discuss: http://oldschool.co....1-sc-chit-chat/1 point
-
Obligatory service time. Now that I've clocked up a few hundred km I've noticed the occasional misfire and general lack of oomph below 3000rpm, especially when loading it up in the lower gears. This is usually where you discover certain things about the previous owner(s); for example the bloke who owned this particular AW11 wasn't much of a stickler for replacing ignition-related components, even though he seemed to change the oil and coolant regularly (and the paper air filter that I replaced with a K&N was fairly new). First indication of this was the state of the spark plugs. Honourable previous-owner-san, what even is this?! From the way the bodies and electrodes look it's probably about time they were replaced even if they are considered "long-life" iridiums. I suppose it didn't help that when the car underwent fumigation and steam cleaning in NZ the spark plug valley filled up with water - as you'll notice a few photos down, the cover is missing - John did mention it was running like a bag of shit when it was first dropped off to compliance, but he managed to clean it out. A new set of iridium plugs has now been fitted, you can just see the box in the background. Should I be worried about the shit on the threads? Second indication that the dude was behind in his servicing schedule, off came the dizzy cap and uhhhhh... Let's compare old versus new. It would seem this is the original dizzy cap, as the two top posts (for cylinders 3 and 4) were worn down almost beyond the point of recognition (yes they are a slightly different design from the Bosch replacement). Hmmm, guess that could explain the misfire under load! The last few photos demonstrate how much of a pain in the arse it is to work on a mid-engined car sometimes. My worklight blew up, so I had to use the desk lamp from my soldering station instead. Not visible in the shot: the old rim I was using as a stepladder... To reach the dizzy cap you have to fold your upper body around the drivers' side C-pillar and lean right over the engine. (If this were a front-engined AE82 FX-GT or even an AE86, access would be trivial.) There's just barely enough room to get a small ratchet in between the firewall and dizzy cap to tighten up the bolts. Someone with larger hands is gonna have a bad time. You also have to be careful not to snap off the plug on the very right, or it's game over. All done... I just need to track down a 4A-GZE valley cover now. To the previous owner's credit, he did replace the ignition leads with those chunky SplitFire things. Or perhaps it was the dealer he sold it to who fitted them? Nearly at that magical 100,000km milestone. Good news, the misfire is gone, and there's a lot more pull from down low. I need to bleed the clutch next, those who have driven the car all remark it feels a bit spongy from lack of use. Discuss: http://oldschool.co....1-sc-chit-chat/1 point
-
Being a ricer faggot. Sometimes it's justifiable! Discuss: http://oldschool.co....1-sc-chit-chat/1 point
-
fin. Discuss: http://oldschool.co....1-sc-chit-chat/1 point
-
New lower crossmember has been fabbed from scratch, welded into place, and liberally coated with underseal/rustkill/Brunox. Parts of the front have also been tidied up with a lick of paint. The certifier visited this morning to complete his final inspection of the crossmember repair; but in typical tradesman fashion he won't be back until tomorrow to write up the actual paperwork for it The new front bumper supports also arrived courtesy of our man Mark at Manawatu Toyota. One of them will be affixed to the vehicle, and the other one goes into storage because you never know when it'll come in handy, right? Then I have to pull flnger this weekend to re-assemble the front, and the car will head back to compliance early next week... for what one hopes will be the last time. It ain't over until it's over! Dat TGP sticker. This one's in slightly better condition than the one which came off the car! Discuss: http://oldschool.co....1-sc-chit-chat/1 point
-
New bumper support ordered from Toyota, cheers Mark! I ended up buying two in the end because stocks are running low. Now I can emulate those foamers who throw brand new parts into the attic and forget all about them for 30 years. (Then some other guy comes along, buys it all for cheap in an estate sale and posts about it on Facebook.) P/N 52021 in the above image. You can also see the dumb foam insert (i.e. water trap) that's sandwiched between the bumper support and bumper cover. Also dug around in the shed and found all of the spare refurbished retaining rails (P/N 52521, 52522, 52525, 52535, 52536) left over from when I did the rustwork on the last AW11 and sent a heap of things away for blasting and re-coating. Knew those would come in handy one day... Discuss: http://oldschool.co....1-sc-chit-chat/1 point
-
This is what happens when you open Pandora's Box. CH-WOP-WOPPPPP. The front bumper support, she is toast. To be honest, I was expecting to see something like this, so it wasn't that big a surprise... front bumper supports on AW11s are hideous water traps, no two ways about it, and I would have been an even bigger idiot if I'd pulled the front apart to fix the crossmember but neglected to check behind the bumper. Again, compare with the one from the previous AW11 - which, as mentioned previously, wasn't all that rusty elsewhere. But at least that satisfies my curiosity, and it shouldn't come back to bite me in the arse further down the track. Guess I'll be getting hold of Mark from Toyota on Monday. Elsewise, the rest of the front is now off, so work can start on the crossmember. Discuss: http://oldschool.co....1-sc-chit-chat/1 point
-
Received word from Rob at the panel shop earlier that the sandblasters completed their work yesterday and the certifier had paid yet another visit to survey the damage. Some choice words were exchanged between Rob and Dale (certifier) about why this wasn't picked up in the initial inspection, apparently there have been a few upheavals and slippage of standards at the compliance centre due to the company changing hands - which is unfortunate as they were a good crowd to deal with initially. Popped down on my break to have a look: Eek. Fortunately the rot is only confined to the bottom of the crossmember; elsewhere the steel appears good, and is consistent with the car being exposed to the elements over the years and more than likely striking road debris on more than a few occasions. The least painful recommendation was to cut out the affected piece, make up a new one, and slot it into place followed by a liberal coating of Brunox/underseal, so the signal has been given to git 'er done. Tomorrow morning I will go in and (carefully) deconstruct the front of the car so work can be started. Discuss: http://oldschool.co....1-sc-chit-chat/1 point
-
Nearly forgot... I scored an AW/AE/KP long boss kit from Richy at this month's Burgerboes, which now gives me the option of fitting an aftermarket steering wheel to the New Kid. Cheers dude! And after wanting a Twos R Us engine cover gas prop kit for ages, buying one for the previous car, and being quietly impressed by its simple yet functional design it became a mandatory upgrade for the new AW11. Also in the same shipment: a K&N drop-in filtercharger (on special) and TGP key blank (cheap). Discuss: http://oldschool.co....1-sc-chit-chat/1 point
-
Repair progress update. Certifier has been in and given the welds a clean bill of health, so things have now been rustkilled and prepped for painting. A couple of tiny patches will have to be added here and there, but for the most part the rust appears to be surface only. The replacement rear quarter section comes halfway up the B-pillar and the welds in this section definitely had to be inspected. Before anyone comments on how dodgy this might appear - the factory join on the other side of the car wouldn't look much better if it were all ground back like this! The only "serious" piece of rust on the car mentioned by the dealer also cleaned up remarkably well. (This is what it looked like originally.) This section of chassis usually obscured by the side skirt (another rust-prone area) had no issues. Second shot is of the underside, again, pretty tidy with only minor surface crap to clean up and rustkill. Admittedly I am a bit worried about the quality of the factory decal, those cracks in the clearcoat don't look very good :/ Yucky shit from above the left hand tail light, gone! Cleaned up section below the tail light. The panel join here was also inspected. A patch will be added where the metal has been eaten away right at the top; again this is due to exposure to the elements and less than satisfactory sealing. Discuss: http://oldschool.co....1-sc-chit-chat/1 point
-
Turns out the suspected rust hole in the C-pillar vent wasn't actually a rust hole, but instead a patch of grime-encrusted flaking clearcoat. Quite relieved actually. The clearcoat will need to be removed then reapplied in that area, ahead of the final repair cert inspection. My opinion of the car's quality has improved considerably from my initial assessment. Discuss: //oldschool.co.nz/index.php?/topic/49412-80s-kid-part-ii-eds-aw11-sc-chit-chat/1 point
-
While I remember, I would also like to thank Ewan and the lads from Stacked, Anna from Bay Customs Tauranga, North Shore Compliance, Rob's Body Shop, and John (S124AB on the forums) from Auto Kiwi for all their help so far. The AW11 is the first car I've imported "blind"; without being able to rely on my old contacts who have all now retired or left the industry. Special mention goes to John, who in true OSGC spirit has been working tirelessly of his own initiative behind the scenes ever since the car left the wharf to ensure the process has been far less daunting than it could have been. Kudos! Discuss: //oldschool.co.nz/index.php?/topic/49412-80s-kid-part-ii-eds-aw11-sc-chit-chat/1 point
-
got the heads back and put the rest of the engine back together.1 point
-
So now we have a house with a bigger garage, ive got this at home. Stripped the interior out today as it was FULL of rat poos, old rubbish from the 80s, pictures of jeebus, pencils and 2c coins, and a rug with a tiger on it. floor looked good from underneath, and even better on top, its like a new one, sweet!1 point


This leaderboard is set to Auckland/GMT+12:00