
Leaderboard


Popular Content
Showing content with the highest reputation on 21/05/20 in all areas
-
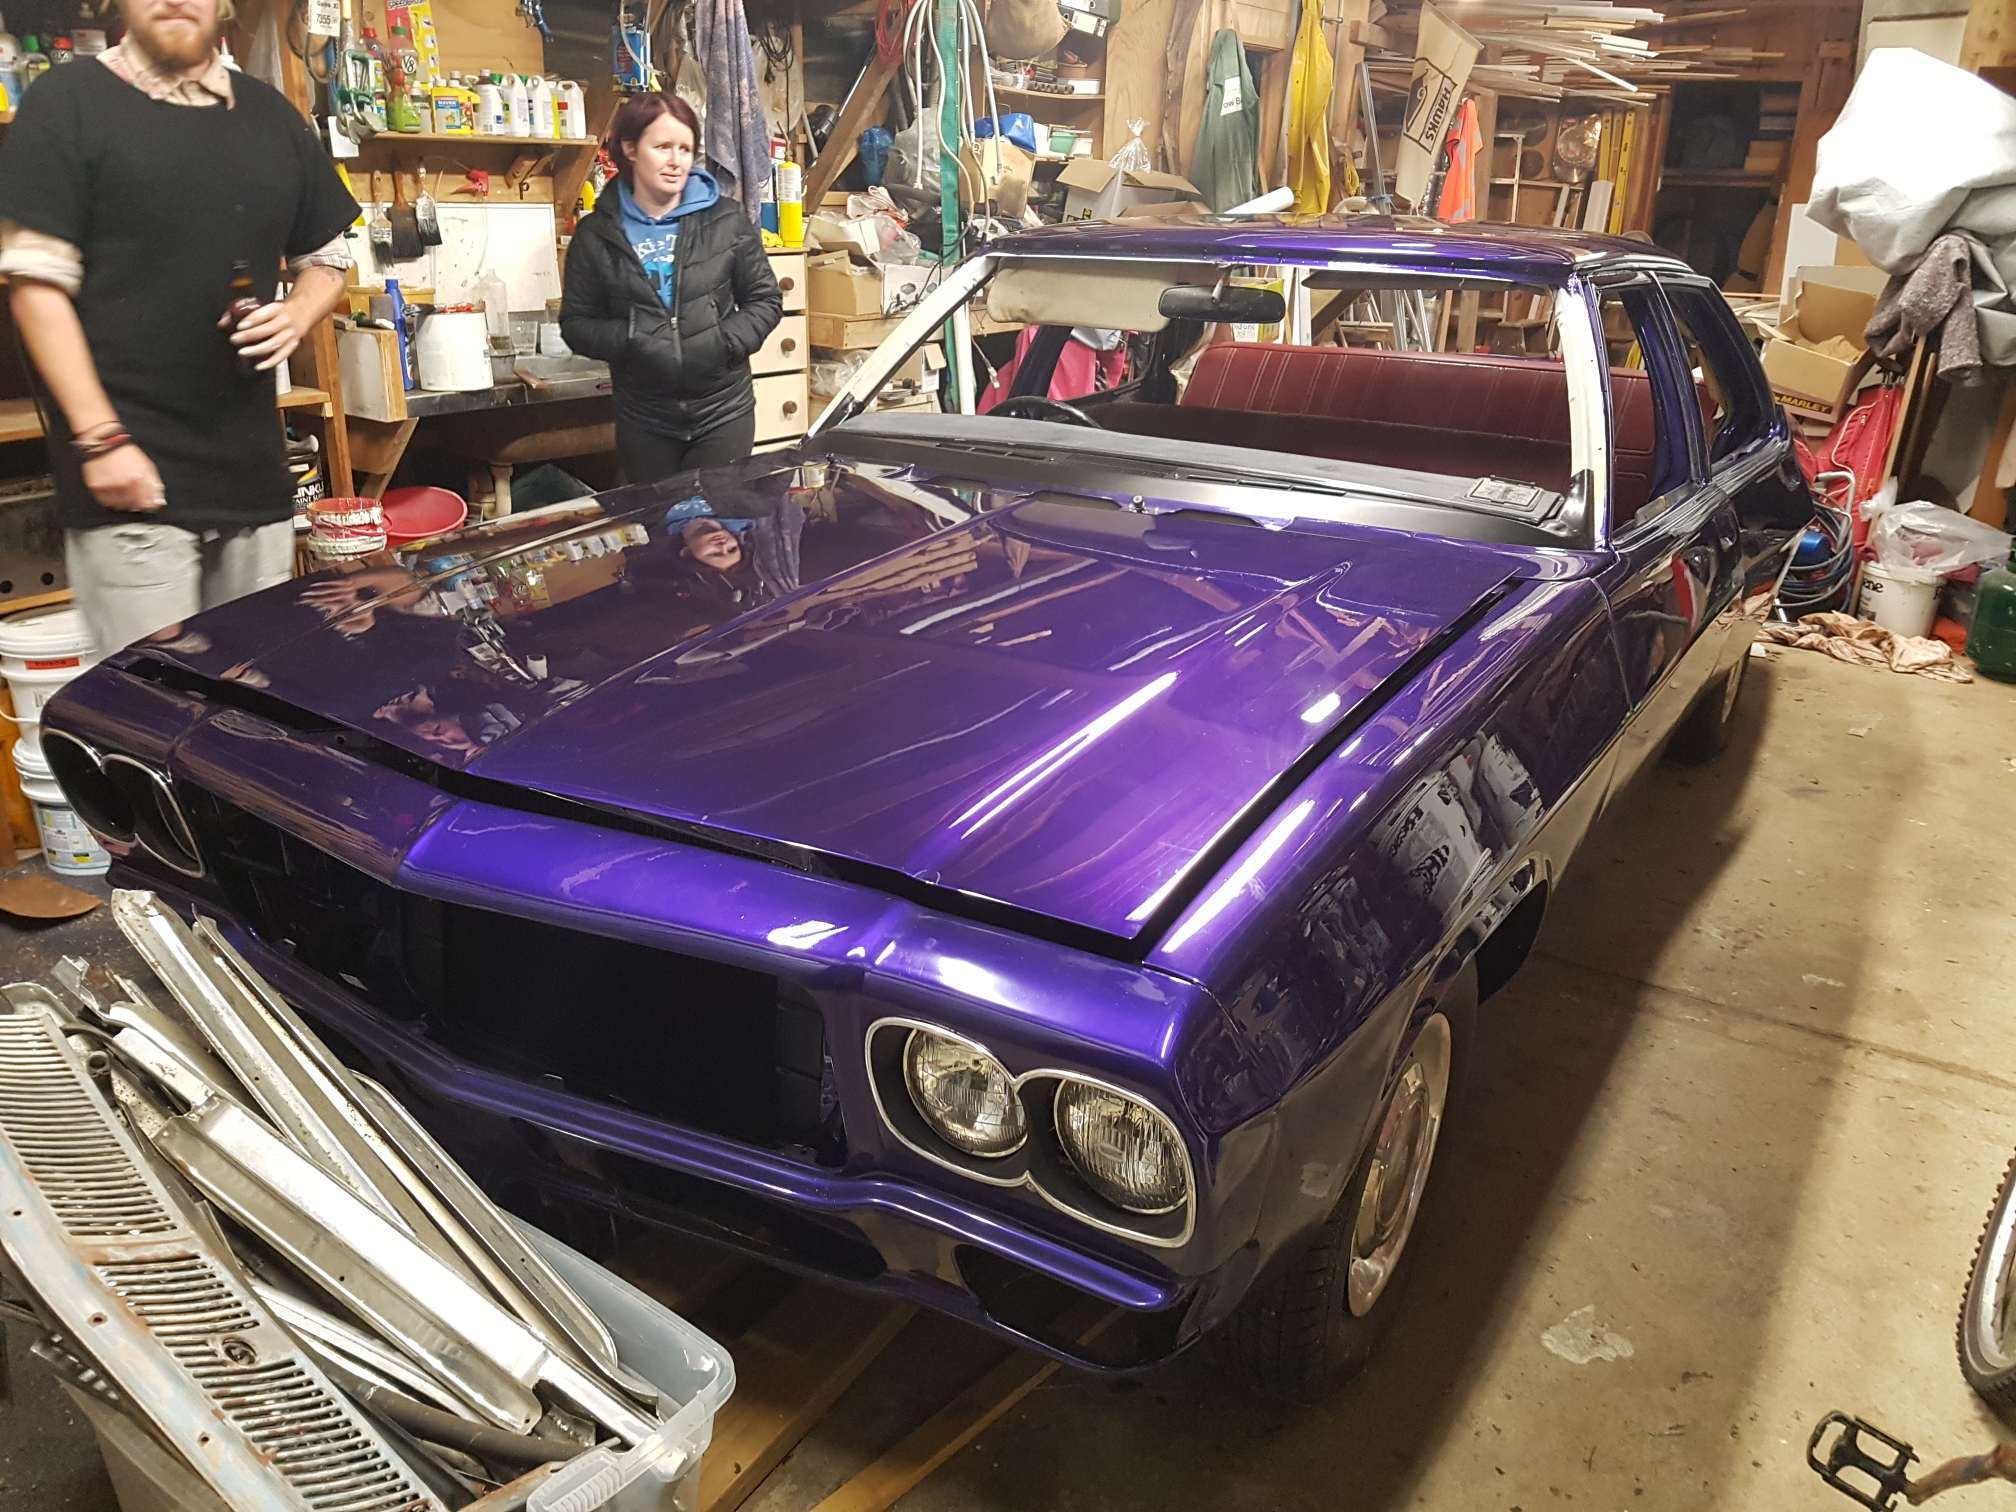
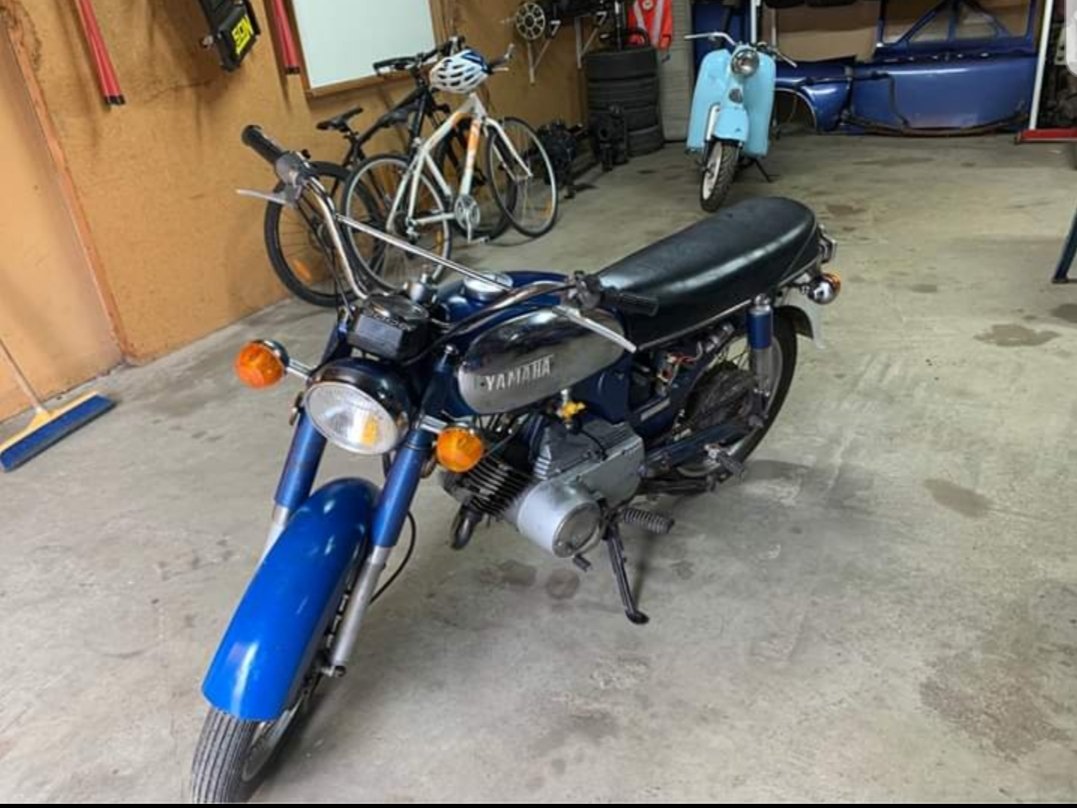
i left this thing sitting in the corner whilst i painted the engine bay on the crown. now thats done i dredged up some enthusiasm from somewhere and got back into this thing. couple of weeks ago i drew up a fan shroud and got it cut and folded. yesterday i got it to fit (had to massage a scallop into it to to clear the radiator hose) and put it all back together. today i drove 450Ks in it up and down the morotways of acukland. was a beautiful day with clear free running tarmac the whole day. quite enjoyed it tbh. temps were fine but i never got into any type of traffic really to test it, i was just sitting on the hundy for hours at a time. when i got home i sat at the lights and it seemed to be coping but ill do more traffic based testing over the next few days. its worth noting that the ambient temps are at least 10 degrees lower than they were last time i drove it so youd think it would be better. anyway after today the engine seems happier to rev and feels a bit more free. ill put another 500 odd Ks on it and see what happens next. also took it through a carwash in bombay (water restrictions in auckland have shut down all car washing both private and public) because it was fucking filthy as you can see. 2020-05-20_05-20-08 by sheepers, on Flickr 2020-05-20_05-20-00 by sheepers, on Flickr 2020-05-21_03-43-38 by sheepers, on Flickr23 points
-
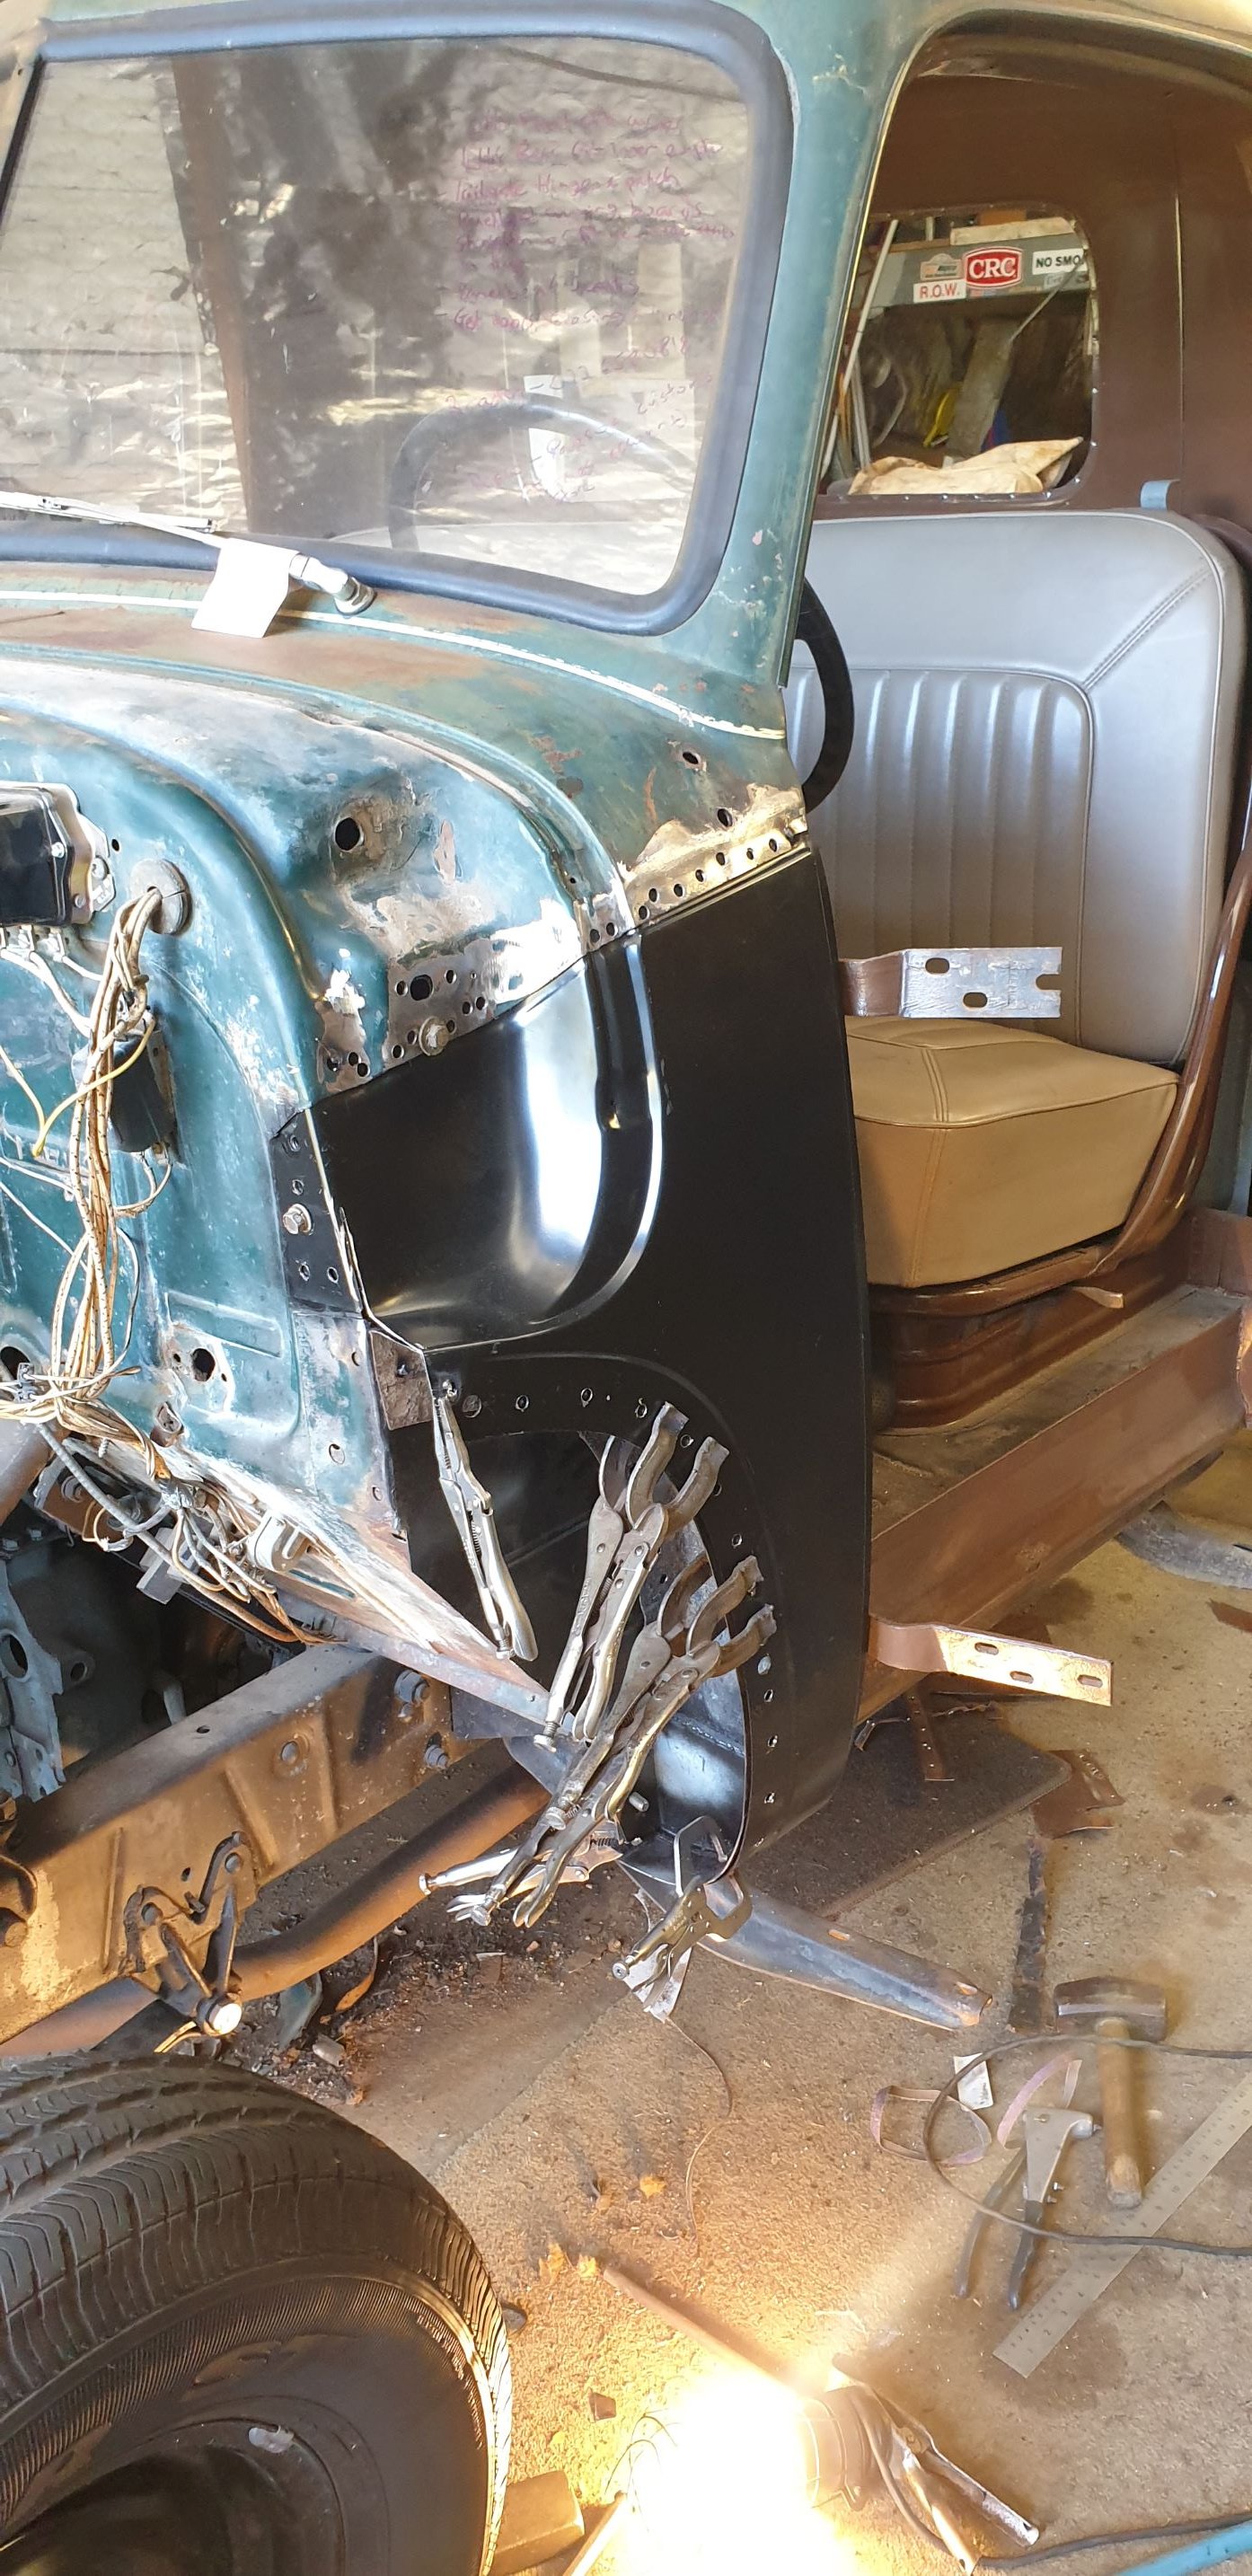
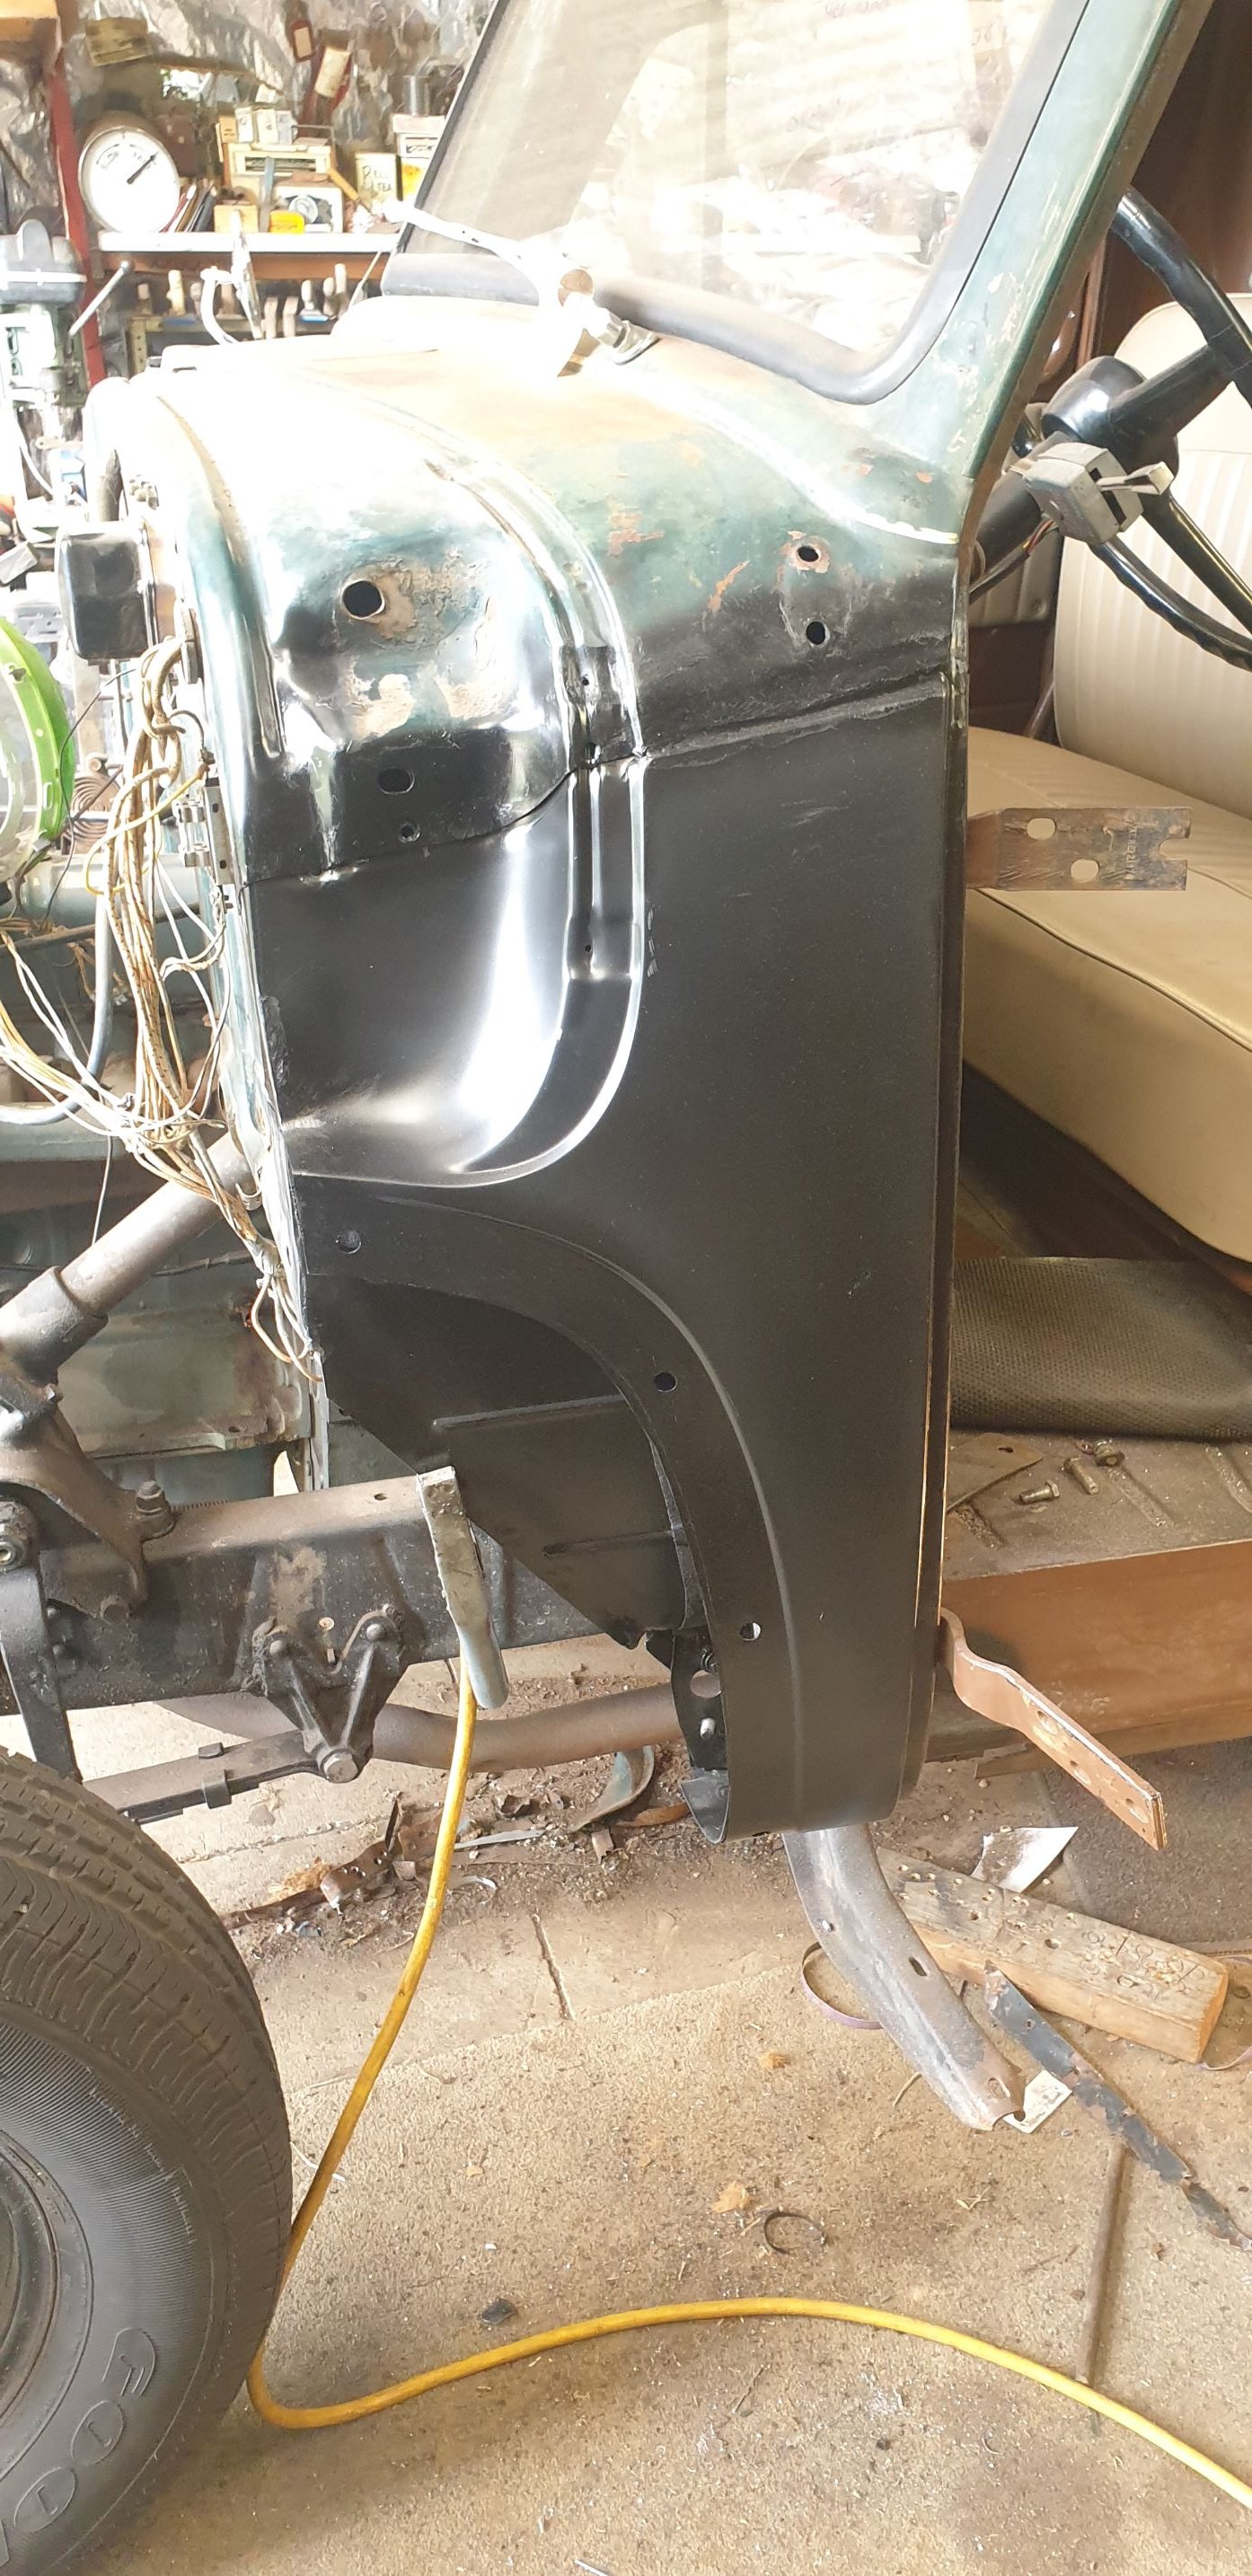
Both back sections of the floor done. Has an exhaust tunnel through it to suit a duel 2" system, should be able to tuck it right up above the chassis rails. Sills and chassis rails are now the lowest point in the middle section of the car. Made a rear strut brace to strengthen the upper shock mounts and to accommodate the extra load of coilovers. Made the exhaust tunnel through the front foot well too. Notched out the crossmember above the diff for clearance. Made a mount for a Wilwood pedal box, need to figure out where to put the reservoirs and move the accelerator pedal over a little. Raised the spare wheel well up 60mm to fit a larger fuel tank. Was a good chance to also drill out the spot welds on that centre mount and tidy up the rust that was forming in between.12 points
-
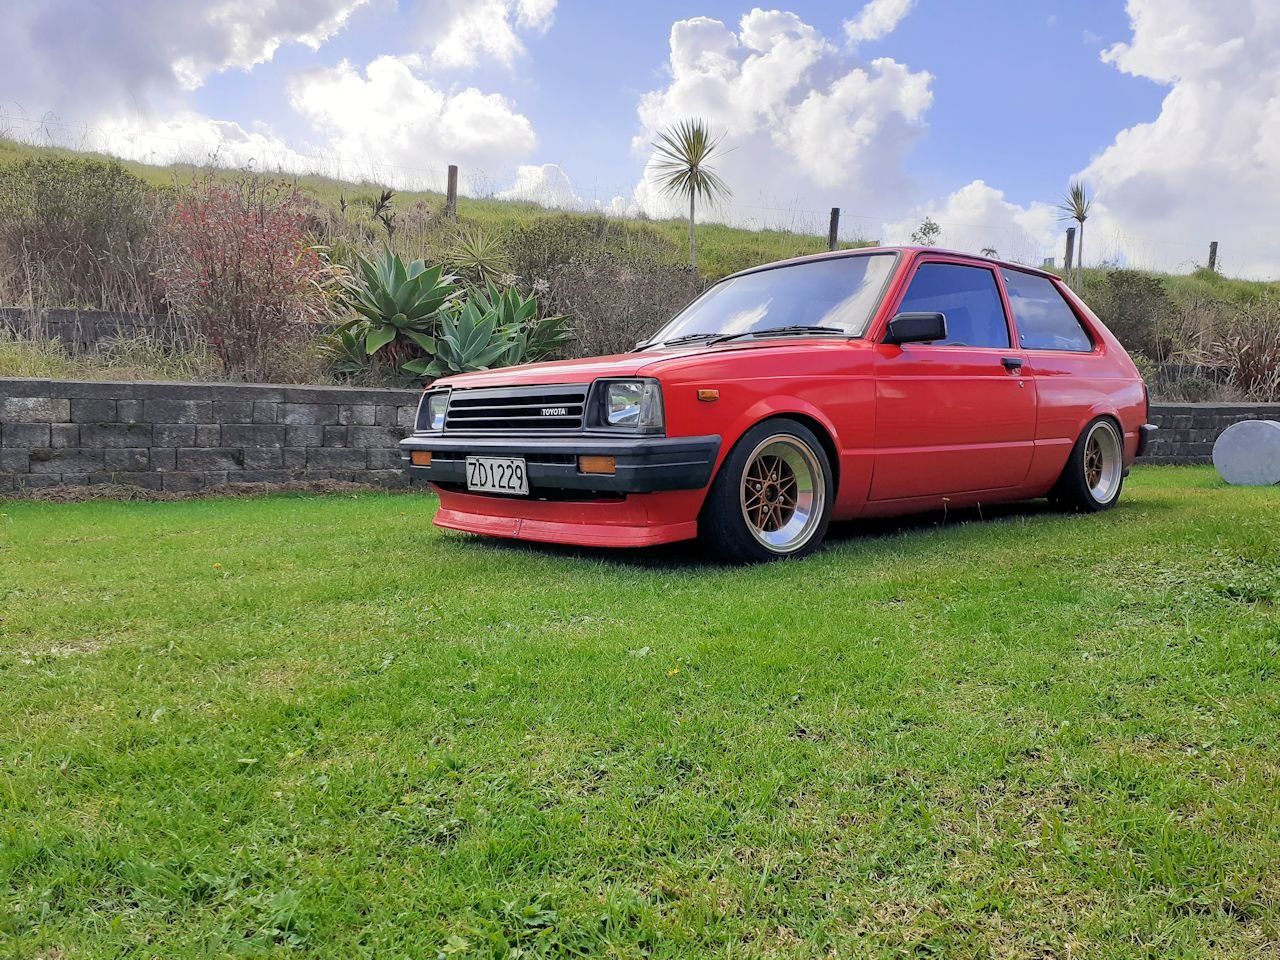
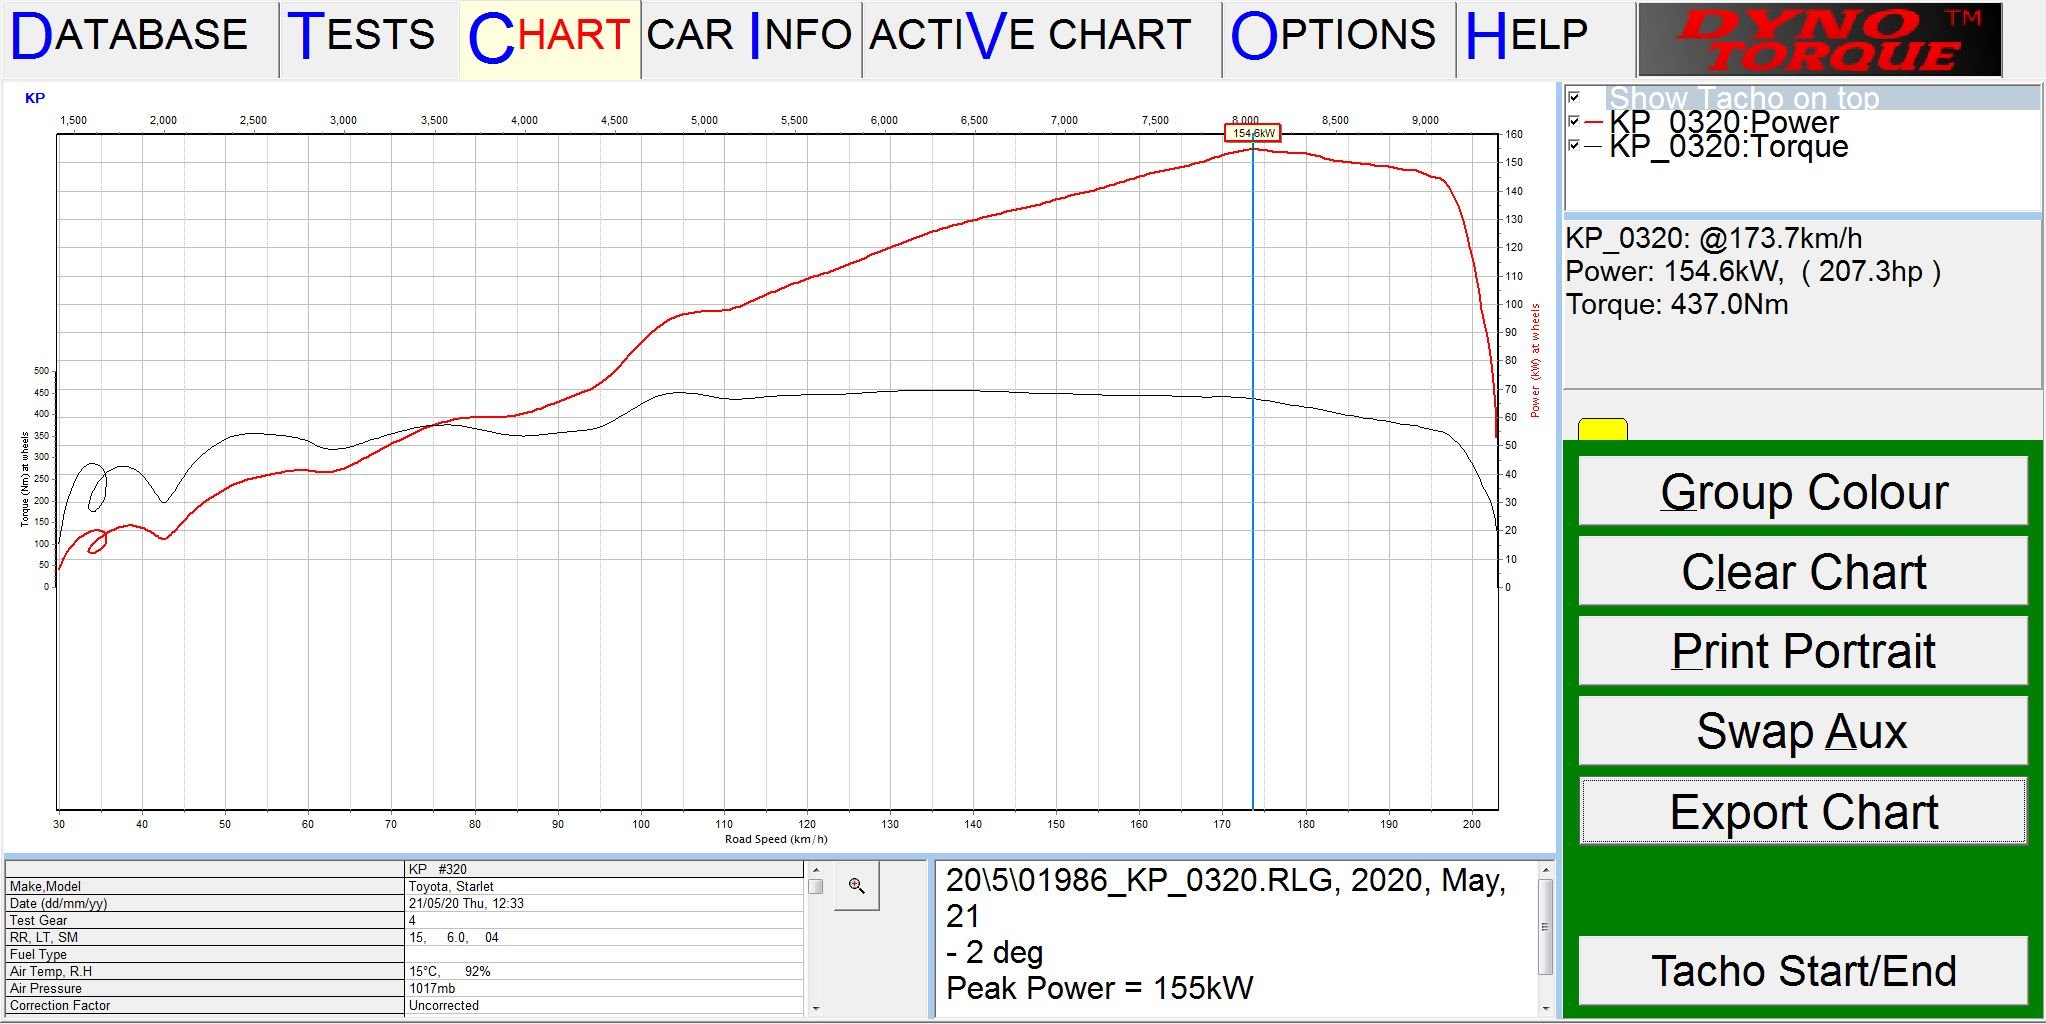
Been daily driving this junk. Its amazingly horrible Likes the cold. 154kw at wheels, uncorrected 15 deg c
 12 points
 -
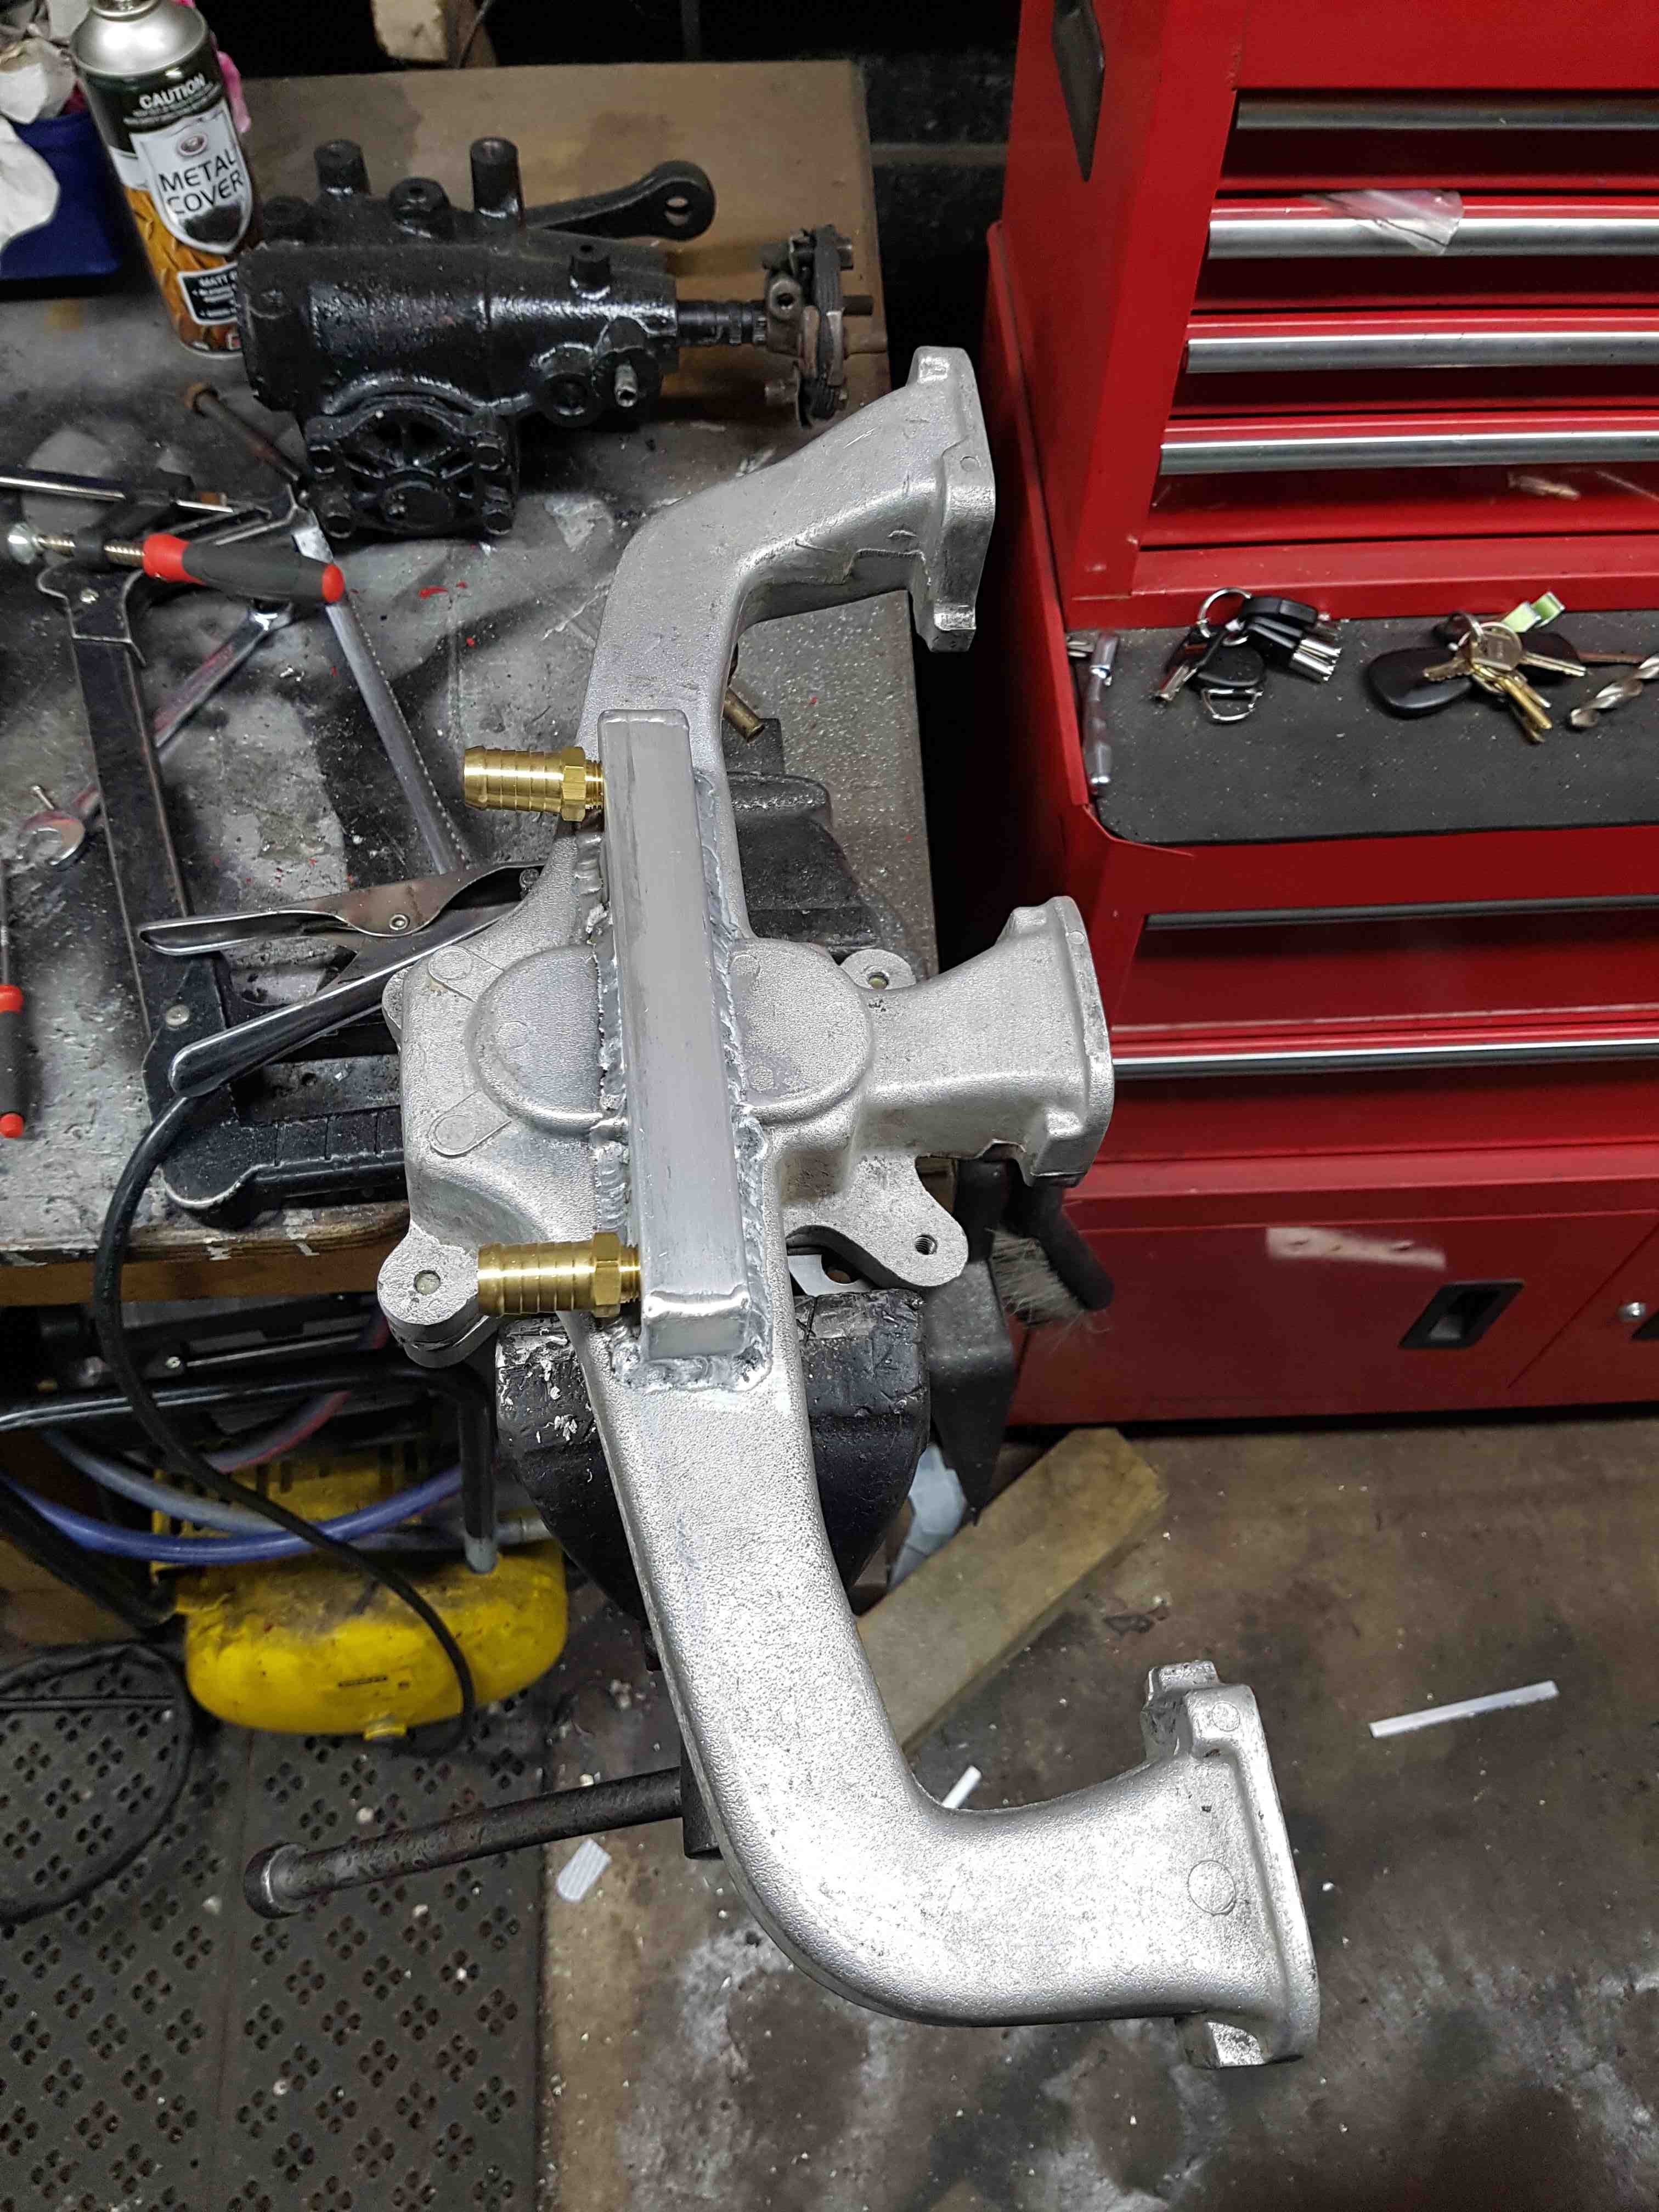
Collected the manifold today. Measured up and the runners are a fair bit bigger. Should flow less badly than stock11 points
-
got my tank back from paint today and couldn't resist sitting it on with the subframe and seat to have a glimpse of what its going to be like. got me pining to get it all together11 points
-
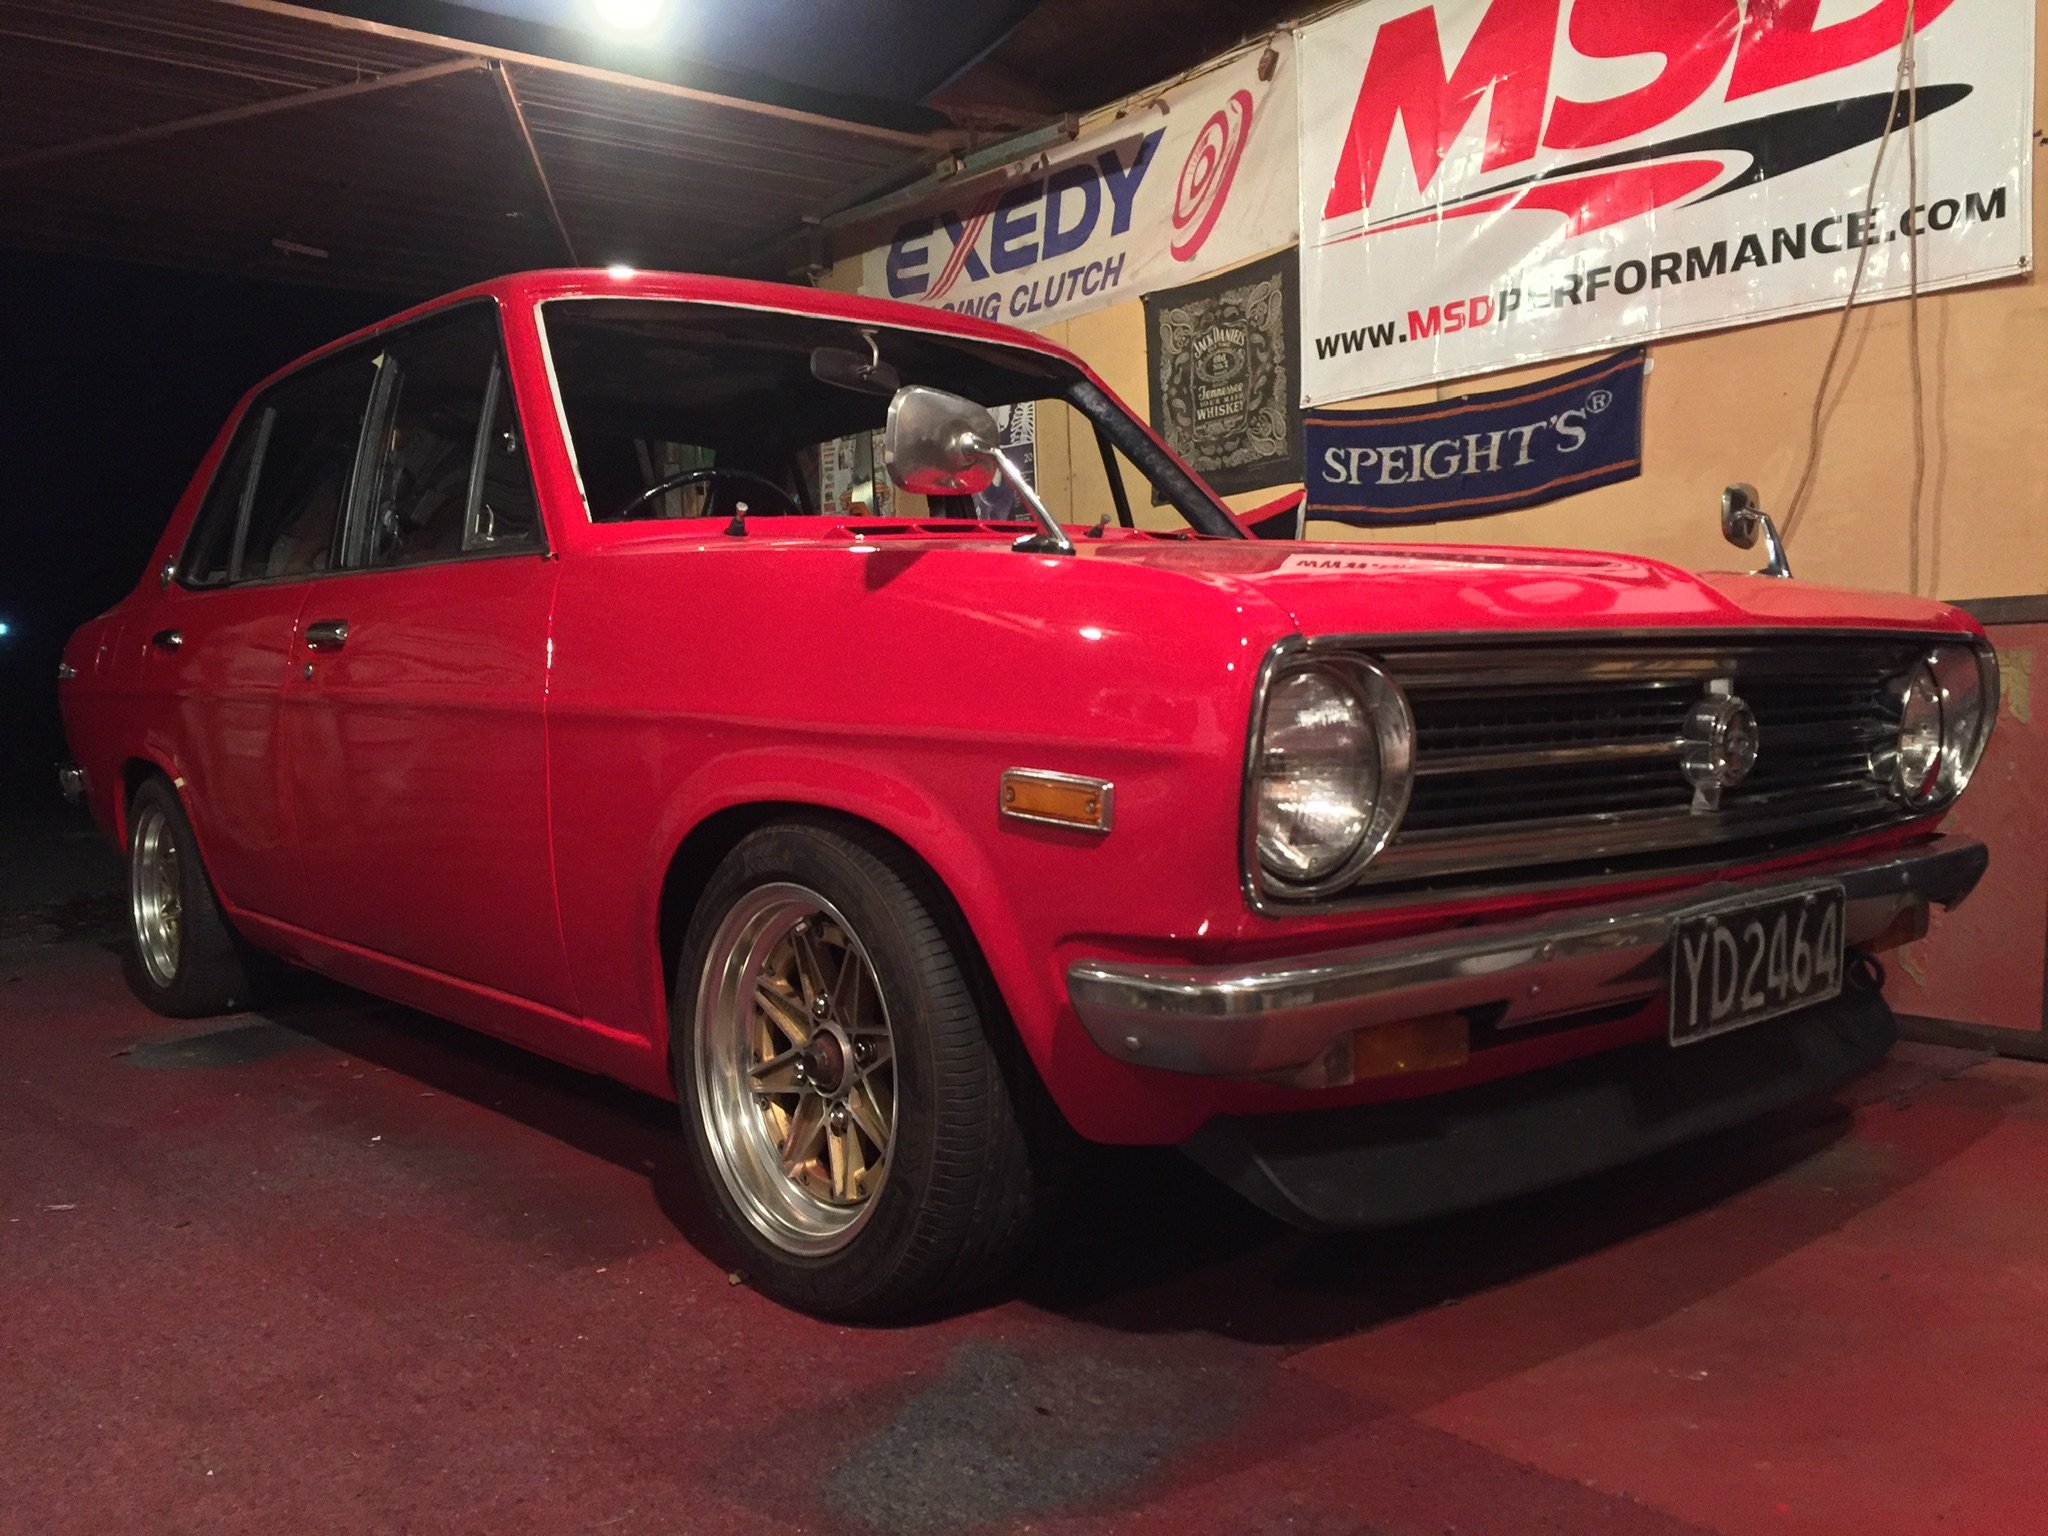
Seals arrived from Canada, can’t wait to Chuck the screens in and go for a drive!
10 points
-
the pot belly black paint dont work. 2020-05-19_06-08-42 by sheepers, on Flickr8 points
-
Bout time I put up a post for the on going evolution of this build, a few years ago discussed with the mrs what car she wanted to build and she wanted an hq, we put it on the 5 year plan... 3 months later im working out on site at one of contacts powerstations and got talking cars, got wind of an un finished project a mate of the site fitter had sitting in a shed, que a few calls and some $$ changing hands it came home with us, its been evolving ever since, initially we spent 8 weeks and plenty of $$ getting it back to roadworthy with the 202 and 3 on the tree, since then its had my 327 chev and a fully built th700 fitted, then i picked up a vz ss ls1 cheap so makes sense to ls swap it since i run CWS specialising in wiring them, so out came the 327 and in went the ls1 mid lockdown 4 weeks later iv just fired it up, will endeavour to post up more pics of the project build but heres a few of various stages from when we 1st brought it in pieces to how it is now with the LS1
7 points
-
7 points
-
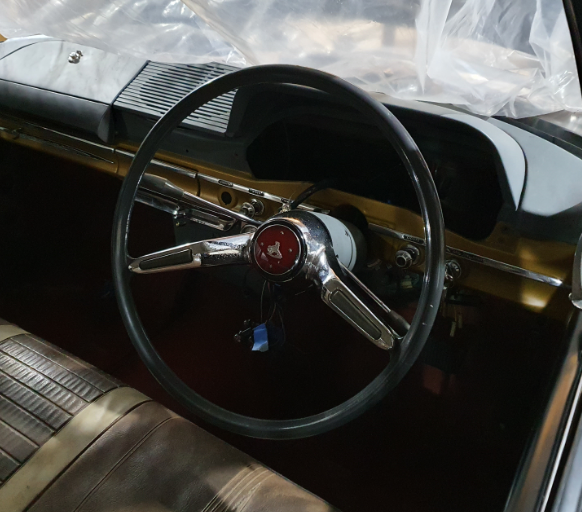
One side of the exhaust is all together, will get some black paint before final fitting Front Pipe Tail pipe in mid build Finished tail pipe L Lots of time spent putting all the bits together. The second side should be much faster as there is more space around the tank and because we have an idea where the pipe will go. I haven't decided if I'm going to run a cross over pipe, probably see how loud it is, also if it sounds funny. All the other Holden V8's I have had were dual exhaust with a balance pipe. The other thing I finished was the Steering wheel and adapting the ring off the LC Torana steering wheel to the EJ Wheel. Both wheels have the same spline and depth so that was a good start. I had to grind off part of the center of the wheel to get the plastic ring to fit. Then made up a spacer to hold the ring off the bottom of the wheel. I didn't take photos because grinding with a power file looked like a hungry rat had been busy. The self cancelling worked perfectly, but no circuit through to the horn. After dicking around, pulling stuff apart I found the wires under the dashboard hadn't been connected. A couple of connectors and all tests out OK. Still have to buy a horn to make noise. The guy with the Hillman Imp van is booked to do the Windscreen and rear window next week. I'm going to chase Robinson's Instruments for my fuel sender and the auto sparkie for teh alternator tomorrow. Also going to order the drive box for the speedo, the Dakota Digital one has a lot of good reviews. Just weighting for the Visa card to roll to get the bill in to next month. Here's a photo of the steering wheel
7 points
-
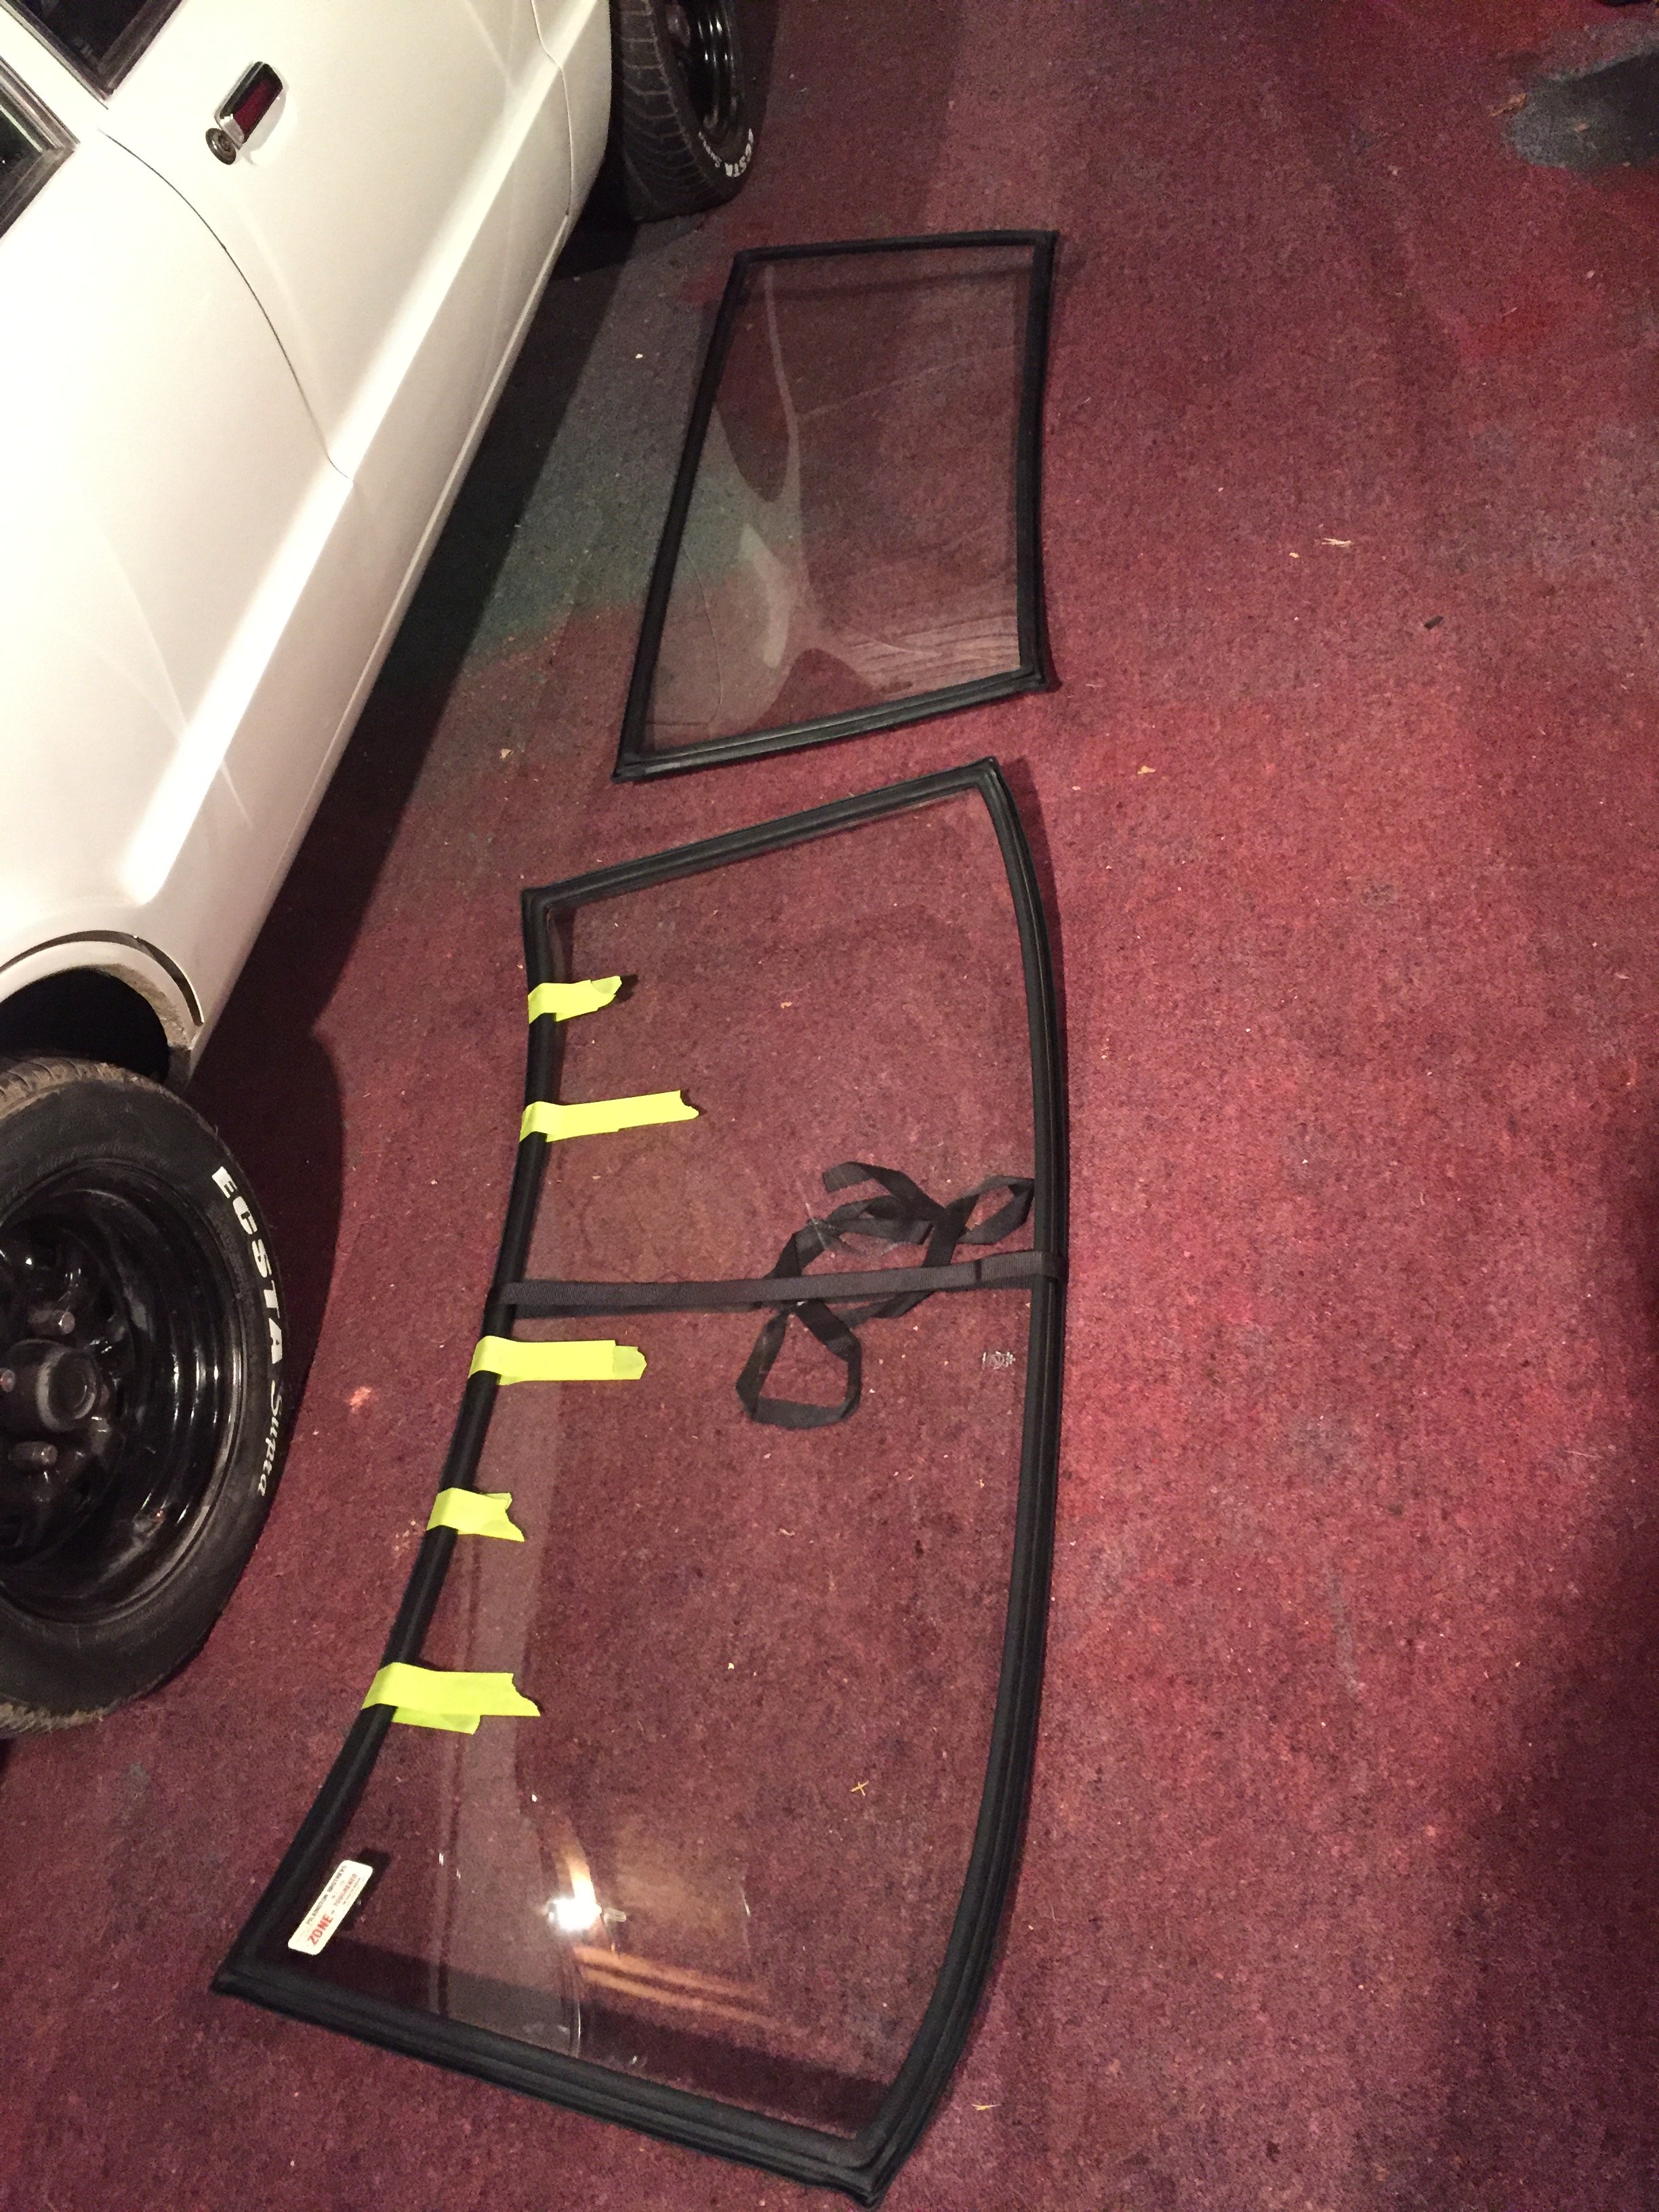
Not sure I mentioned I have a NOS front screen from the defunct geraldine Nissan dealer? I got a B210 one too and sold that to recover cost. Still in the brown paper wrapping! the rear screen I have always had spare, but it’s much better than the old scratched one in the car.
6 points
-
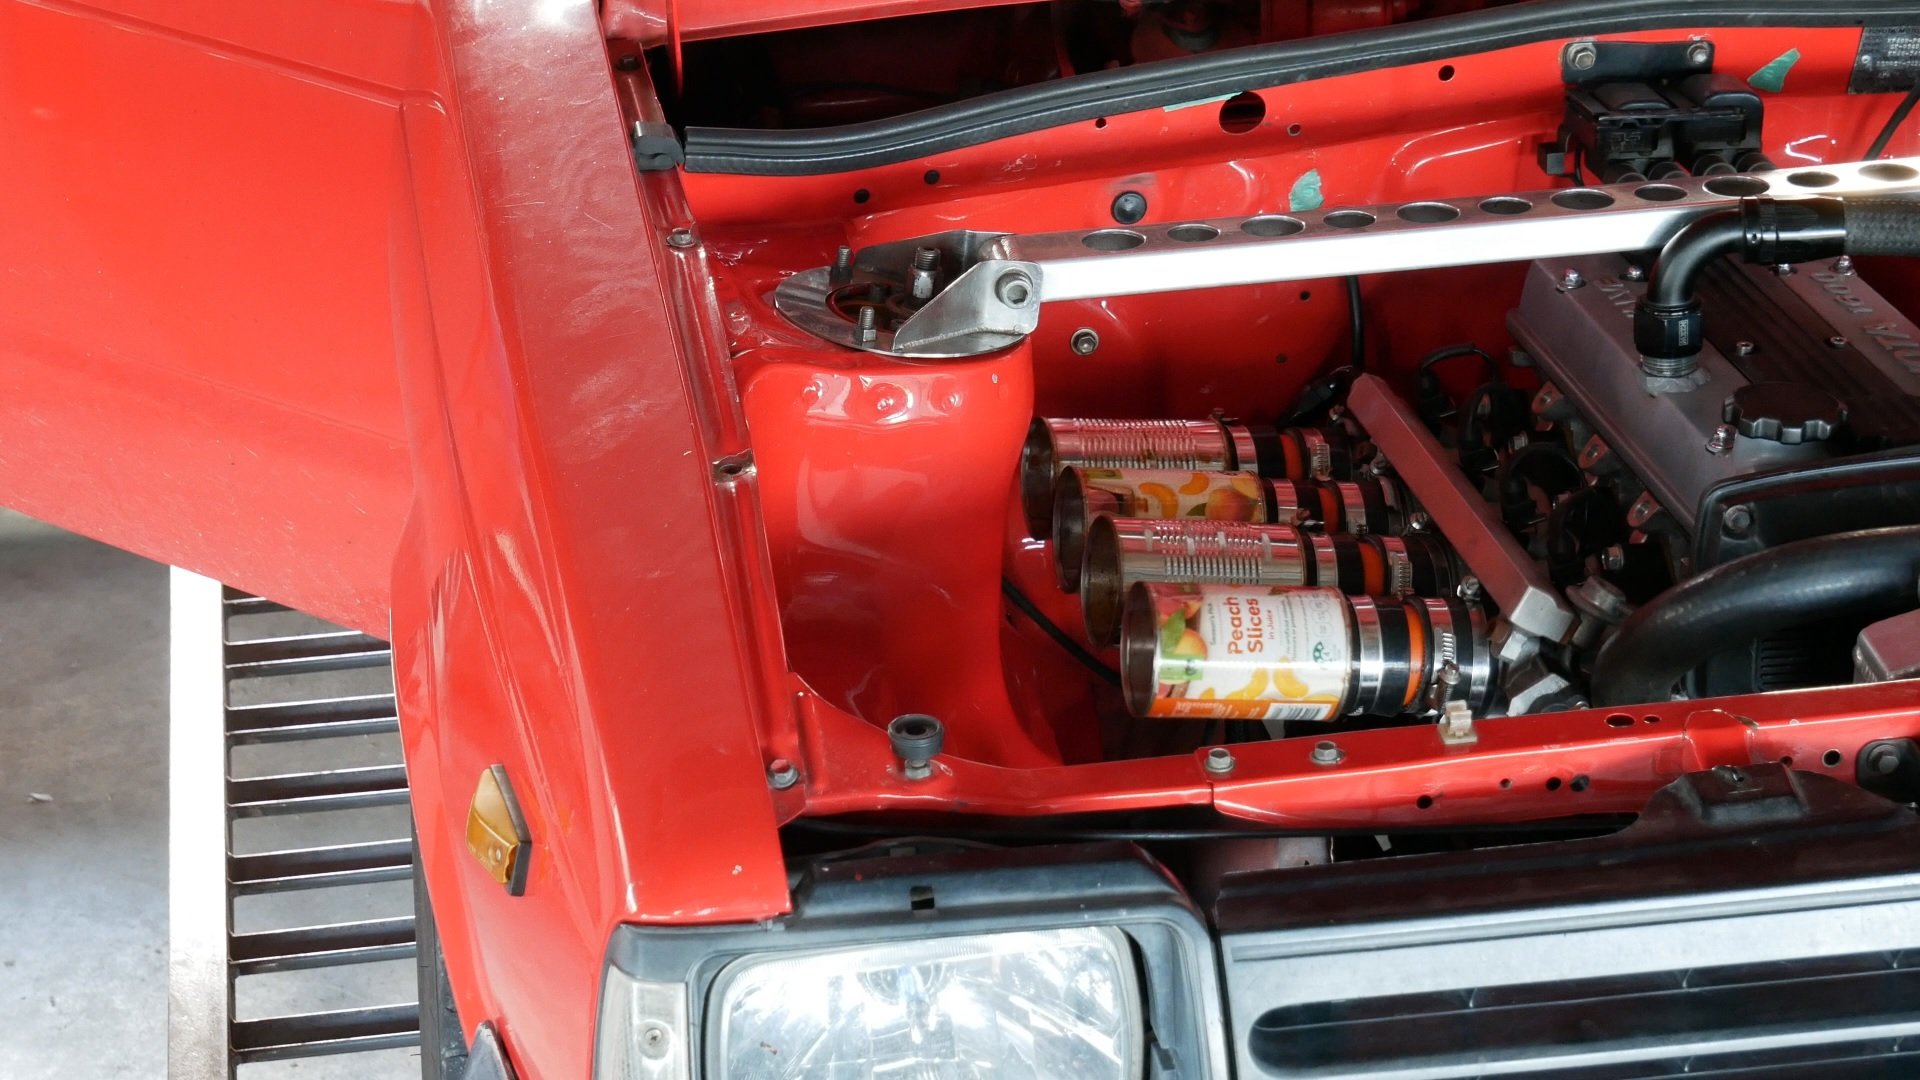
done most of the testing over the last 2 days. going to take awhile to put all the info together. found some interesting stuff. the peaches didn't do as bad as you would think haha
6 points
-
New speedo cable, wiper blades and now shes ready to go for a vin. Off in the morning. Also just got this today, bit of a drawing got done for the mrs xmas present haha turned up a bit late but shows the sorta look we going for this long term. Yarn away
4 points
-
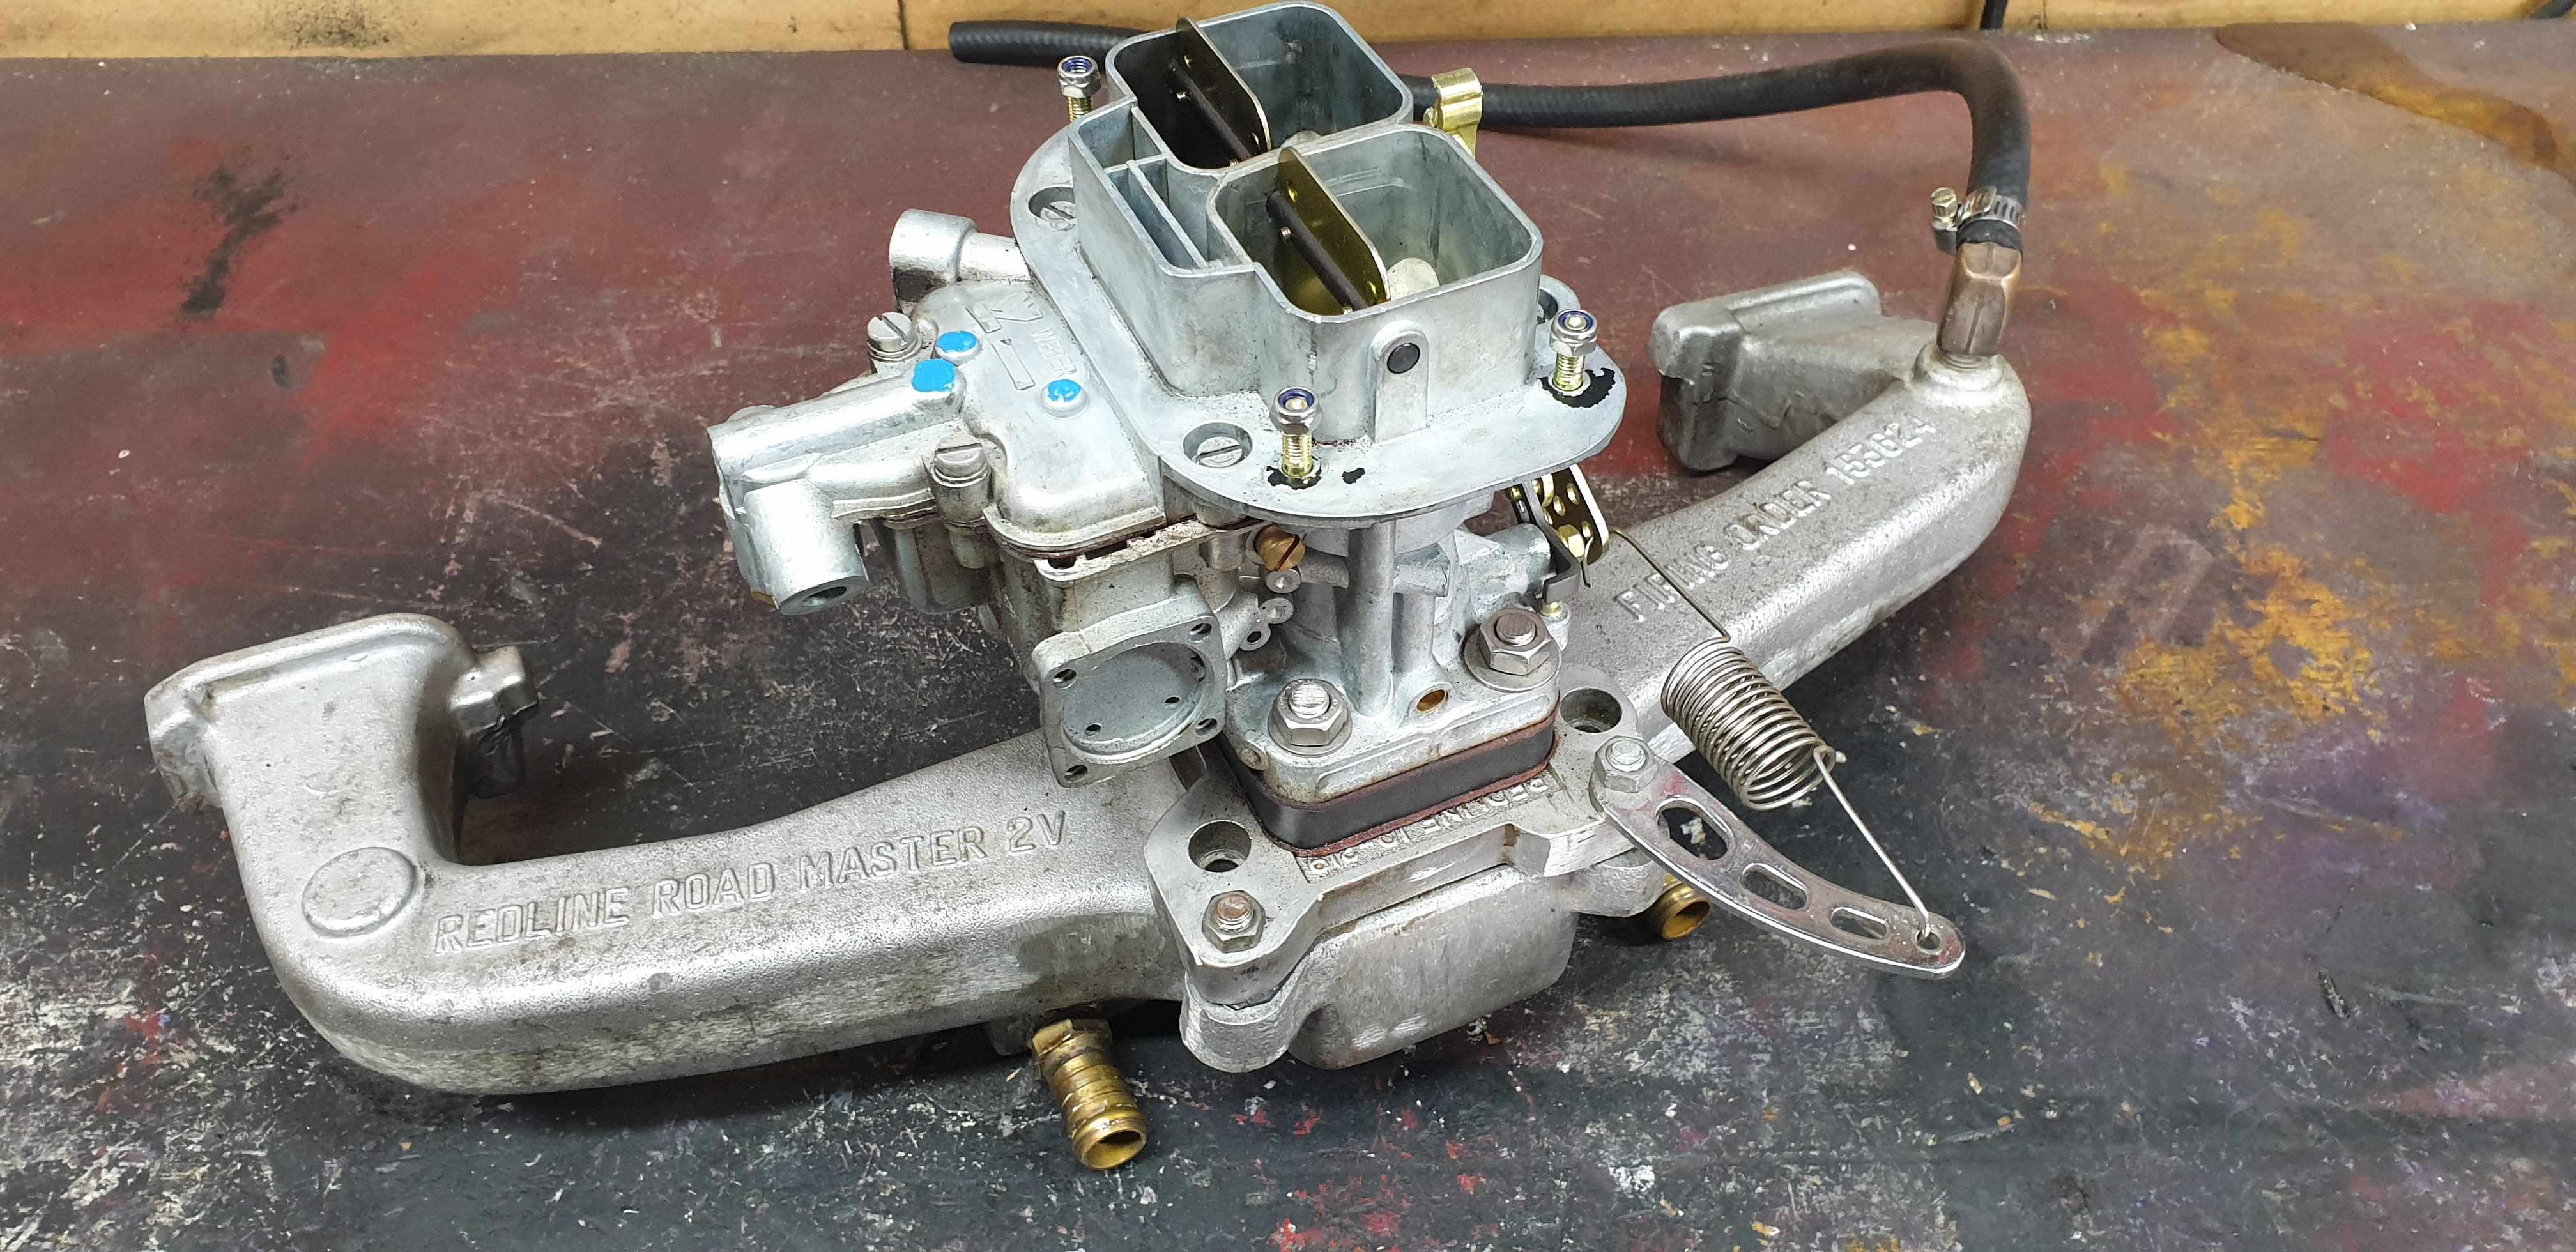
Pics of the water heating and 32/36 on a redrilled hollley adapter
3 points
-
been hanging out waiting for some stuff to arrive. frame and wheels and a few other little bits came back from powder coat. turned out so good couple little bits of pitting but once the motors in you won't see those also got my seat back from lewis what is amazing couldn't recommend him enough. also some moto gadget barend and pin indicators came in got a modern motorcycle speedo and tail light but haven't got photos, currently the carbs are getting vapour blasted and im waiting on a top end gasket and seal kit for the motor to come in so I can rebuild that and paint it and then I can start putting the bike together, and make the last few parts for it, exhaust, battery box etc3 points
-
Not much happening with this, got it legal and drove it around a bit over christmas break. Had a few new wheel days Put the streets on for a change Finally fixed a front guard, to replace the one that had an incident with the wall at hampton downs about 5 years ago. pretty good for a spray can job Got another pair of 14x7 03's from old mate @Dudley . Finished polishing them, and some antique gold. after digging out the other pair i'd been hording, they needed same treatment. guard slightly different colour, but will do for now /forever. maybe in another 5 years will fix the bonnet Back to the OG look from 10 years ago except for 7's instead of 6.5's3 points
-
Brought this tonight. Everything works runs prety good Fairly tydy shes a jem soooo plains are.. 1.Some fresh fuel 2.give a good clean polish crome 3. Have taken for a quick ride went well. But give a good run and see whats the go 4. I have a tail light lense so will chuck that on too
2 points
-
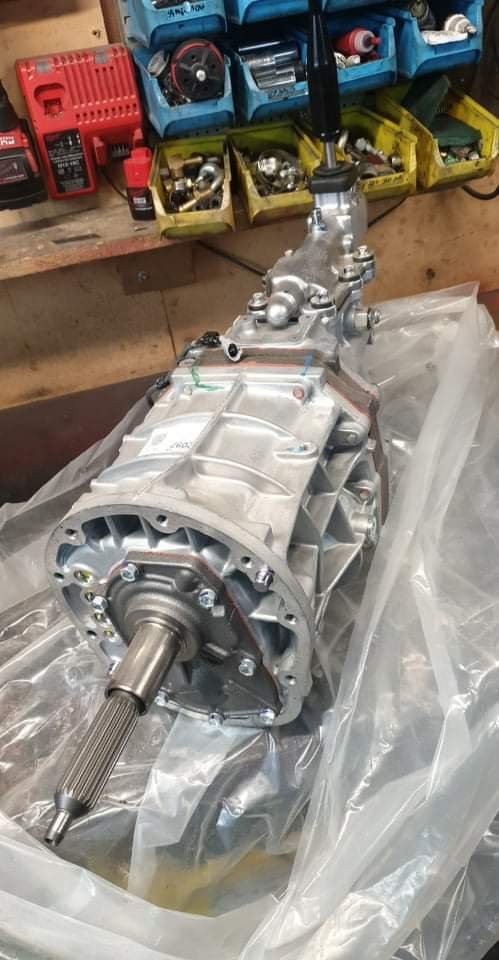
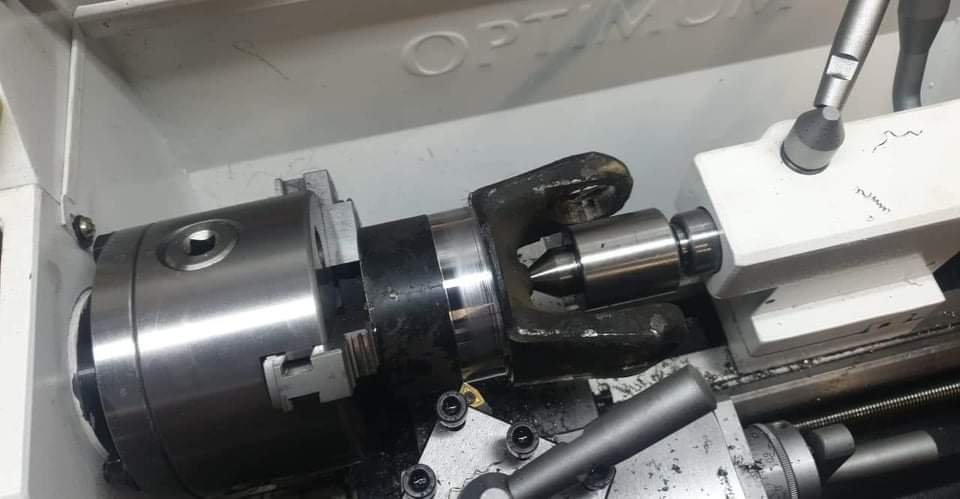
Post drag day have been daily driving to work, broken another 2 t5 gearboxes one blew a 3rd syncro the other sounded like an angry chipmunk so now running on a Frankenstein box made from 3 parts boxes, iv decided to splash out and get a jzx110 r154, waiting for my billet adaptor to gm bellhousing to arrive from the states and will be getting it fitted up and the clutch modified again, bonus is shifter in the right spot and cube speed short shifter off the shelf but need to make a new longer halfshaft, cue the i need a lathe for ....things talk with the Mrs (too late its already ordered) (also the you need another gearbox why?) haha
2 points
-
The cams make it lovely driving anything under 30kph, and the gearing makes it a delight to drive over 80kph2 points
-
Daily driving vibratey sparten interior old cars is the way of the future2 points
-
Look, I hate to be the one to have to point this out but.... Rotary. Your welcome.2 points
-
Glued the last piece down and chopped out the speaker hole. I'll borrow a sewing machine for the final covering or layer. It won't be less bright than this one2 points
-
Picked up a seal kit and new pistons for the calipers. Once the new front hoses arrive I'll give the calipers a birthday. It gets a bit touchy on the first few stops and the brakes aren't as good as they used to be. Rear stuff is all new (3?years ago) so I'm picking it'll be a sticky caliper2 points
-
Airbrush rota art is awesome. Please replicate. Cool having a bit of the history with the car. Makes for better sharns when out and about! /sidesharn #lingor When I sold my last Moggy Minor, I was the 4 owner, but it had only been owned by 3 old ladies prior. (Cool story bro) It then changed hands a few times and popped up at a car show in Auckland. I was like “oh cool, my old Moggy!” But the new owner was very scathing of this remark and corrected me by saying it had only had 3 old ladies owners before him. I played along for a bit before getting my phone out and showing him the car in my garage sandwiched between a couple of Mazda’s. He was a little sheepish after that. Twat. Disclaimer: this has to be one of my best/worst side sharns that is completely irrelevant to thread. Sorry/not sorry.2 points
-
I've found a Cain manifold locally for not a bad price I'll go collect it this week. My searching for 2 barrels that aren't hollys hasn't been successful so far. Also I don't like fucking around with jets and emulsion tubes etc etc I figured a tbi setup will be moderately less shit than a carb and heaps easier to tune. Ages ago a got a black injected 202 dizzy for a steal. I got a couple of spare hei modules for my old chevy van off aliexpress because cheap and spares. They provide a nice tach output and coil ignitor in one. I barried up a quick test tonight as a proof of concept and it does work with the 202 pickup. I didn't get a tach output but also don't have a 4 pin plug so couldn't probe stuff https://i.imgur.com/lF946ez.gifv2 points
-
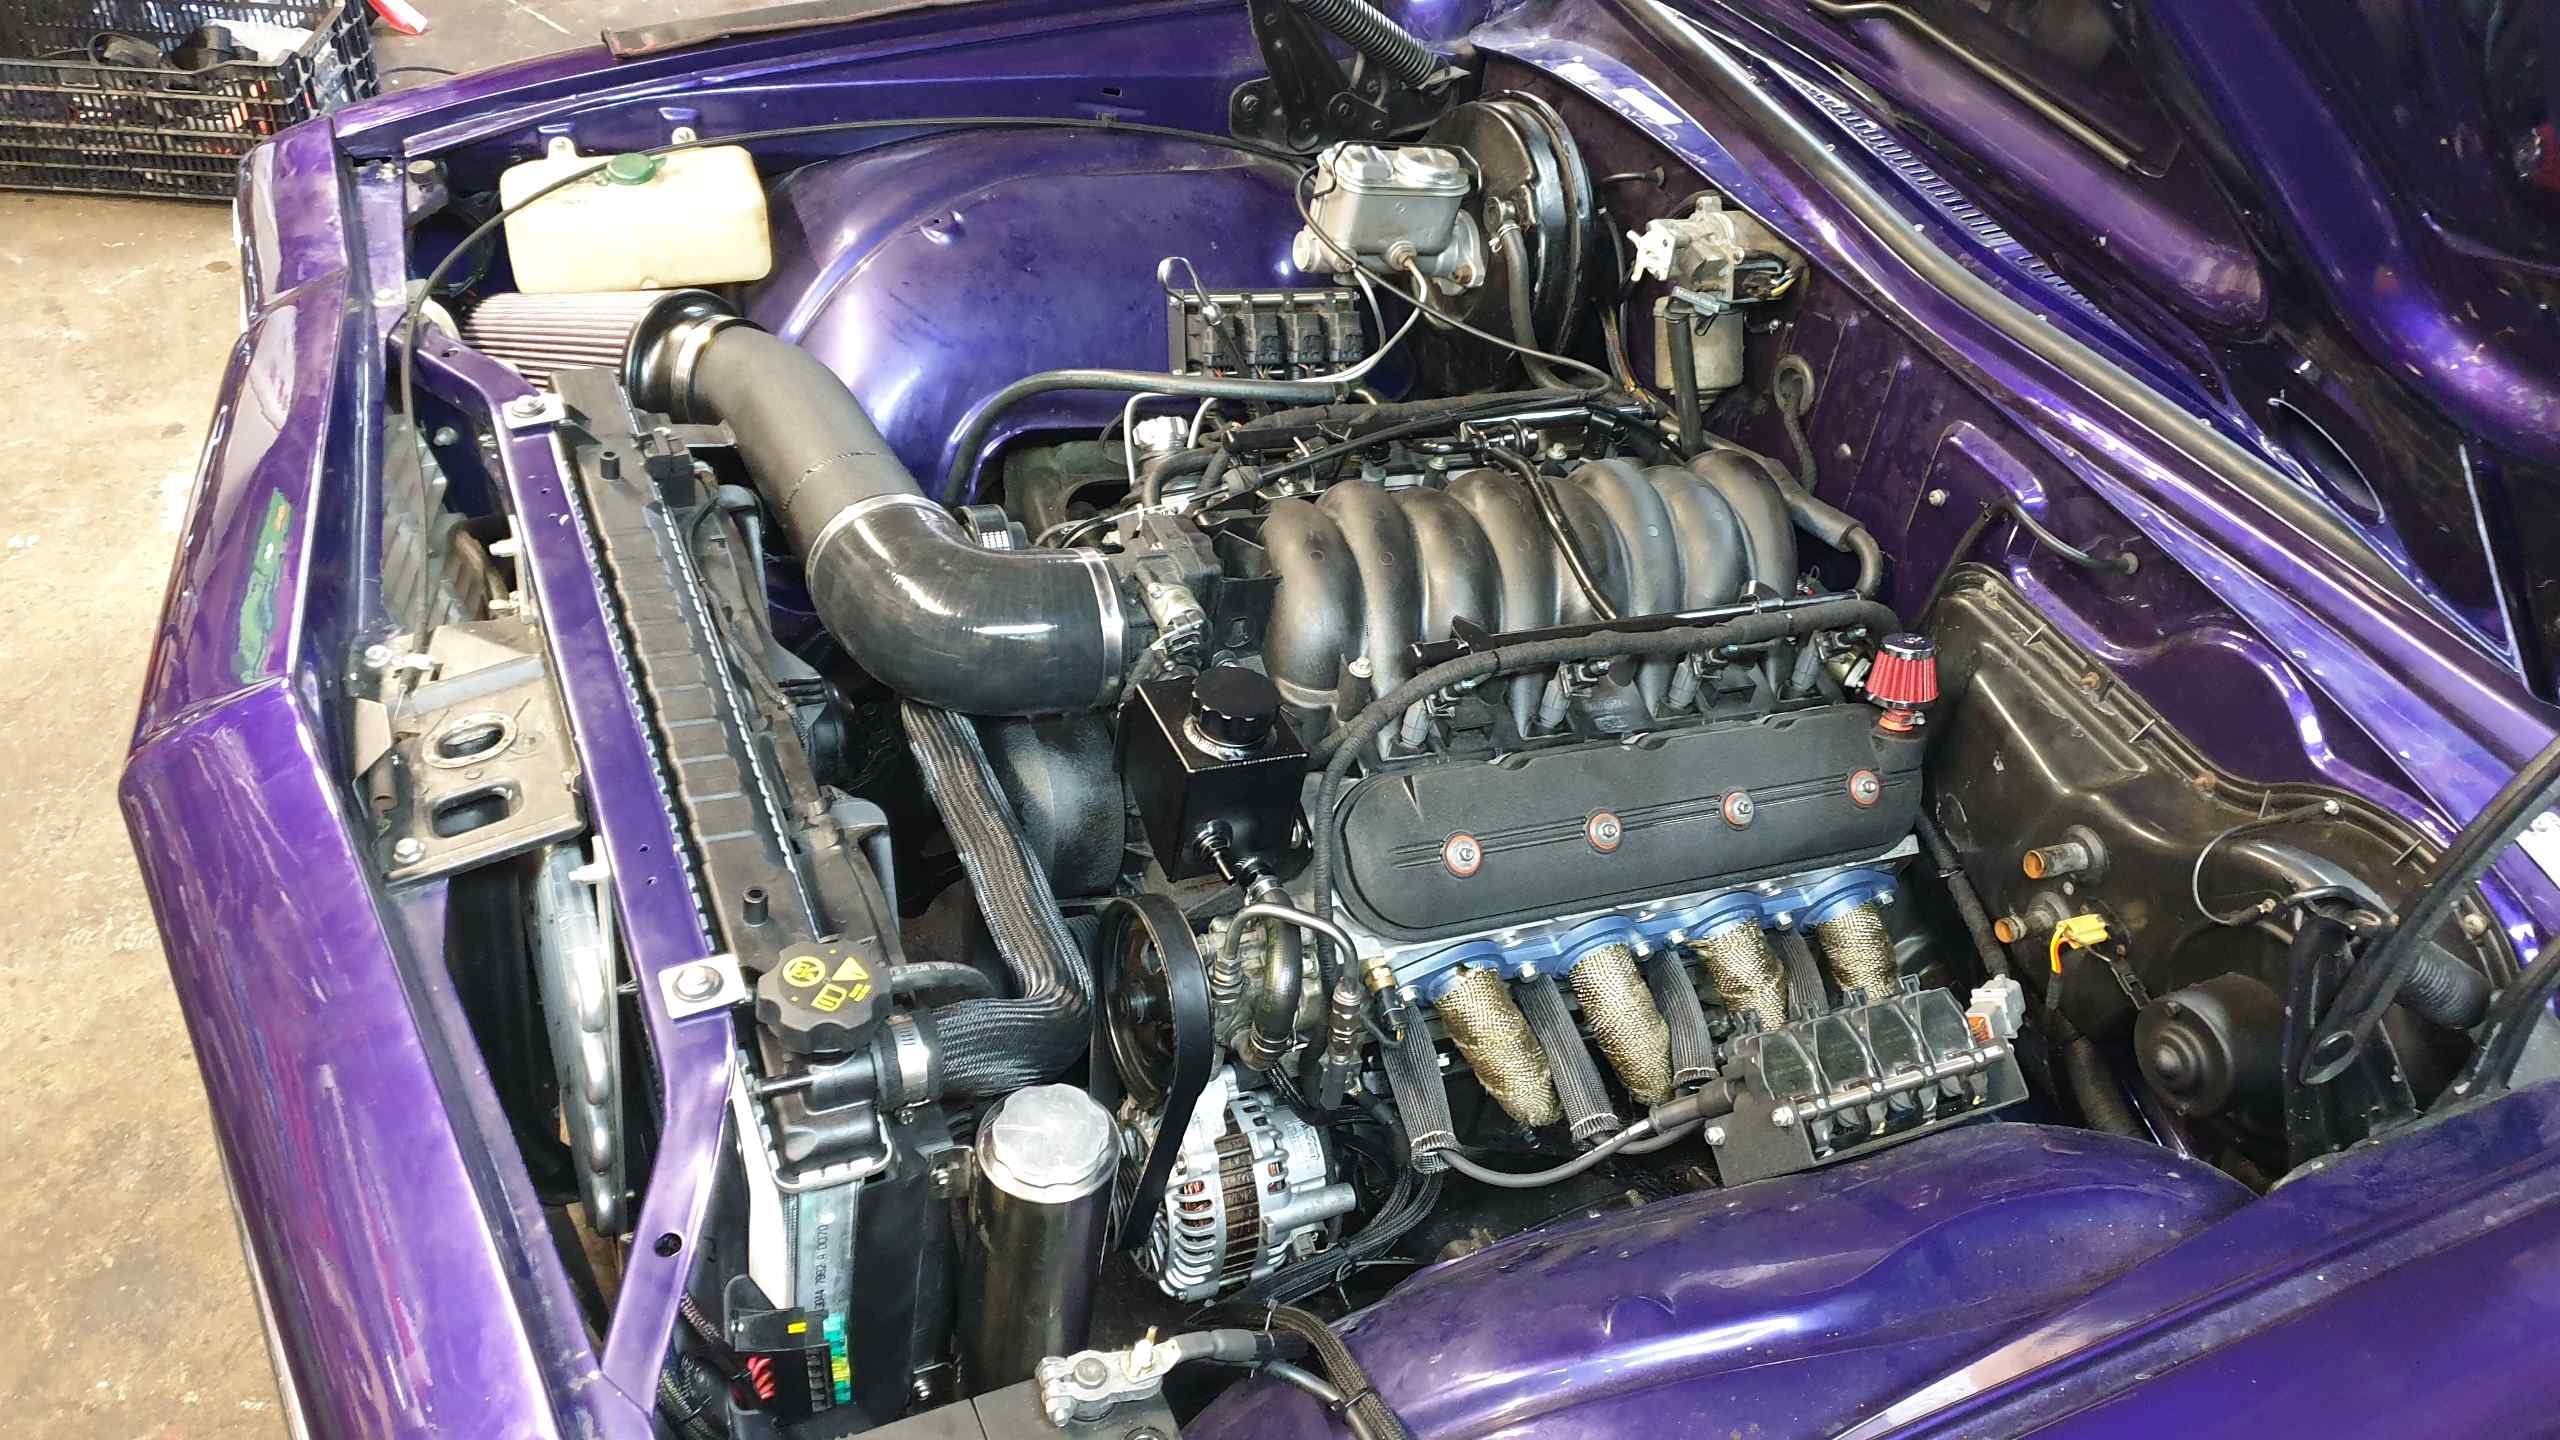
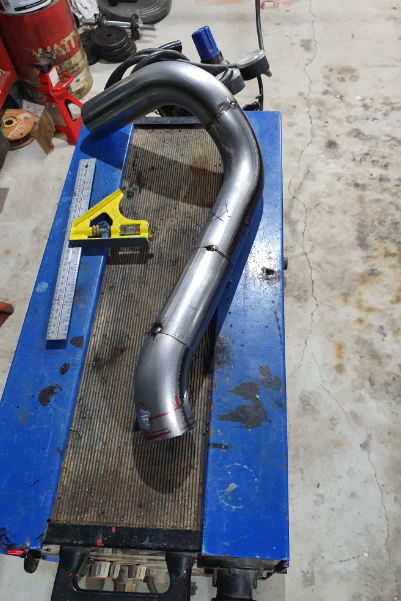
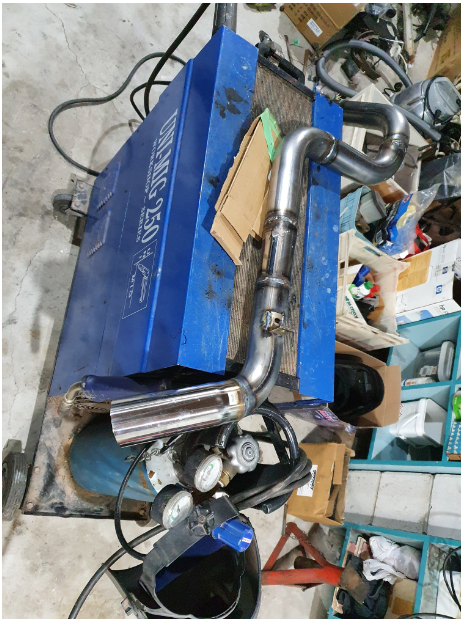
finished the zorst and put it all back together. still got a couple of little things to do. im going to redo the battery terminal wiring and make a new battery bracket. also going to upgrade the coil. 2020-05-17_03-30-48 by sheepers, on Flickr 2020-05-17_03-30-56 by sheepers, on Flickr 2020-05-17_03-31-05 by sheepers, on Flickr2 points
-
Just needed a bulb. Too easy2 points
-
in today's installment of I'm a tightarse and a Barry 1x $20 clearance muffler. 3" inlet and twin 2.5" outlet. Thats not going to work with the 2.25" piping chop the ends off you don't need chop a piece of plate the right size and hot metal glue it wang the 2.5" end over the 3" taper bit and weld that up too. accidentally do a okay looking weld bit of flap disc and paint love and its as good as new!2 points
-
Had some yarns with henry at Auckland cams yesterday. We debated if we went for a stage 2.5 or three and ended up on 3. Should have a bit of a noticeable idle and wake it up a bit more everywhere else Picked up this lot today Let the 202 turd polishing begin. I'll slowly collect parts and will pull the motor and give it a refresh in the the future. My goal is to have it 'feel' faster than my worn out sohc honda motor with 300 thousand km on it. Maybe even break through the 20 sec 1/4 mile mark. I'll keep a eye out for a weber to replace the stock stromberg. I'd like to keep it as stock looking as possible in the bay Cam specs2 points
-
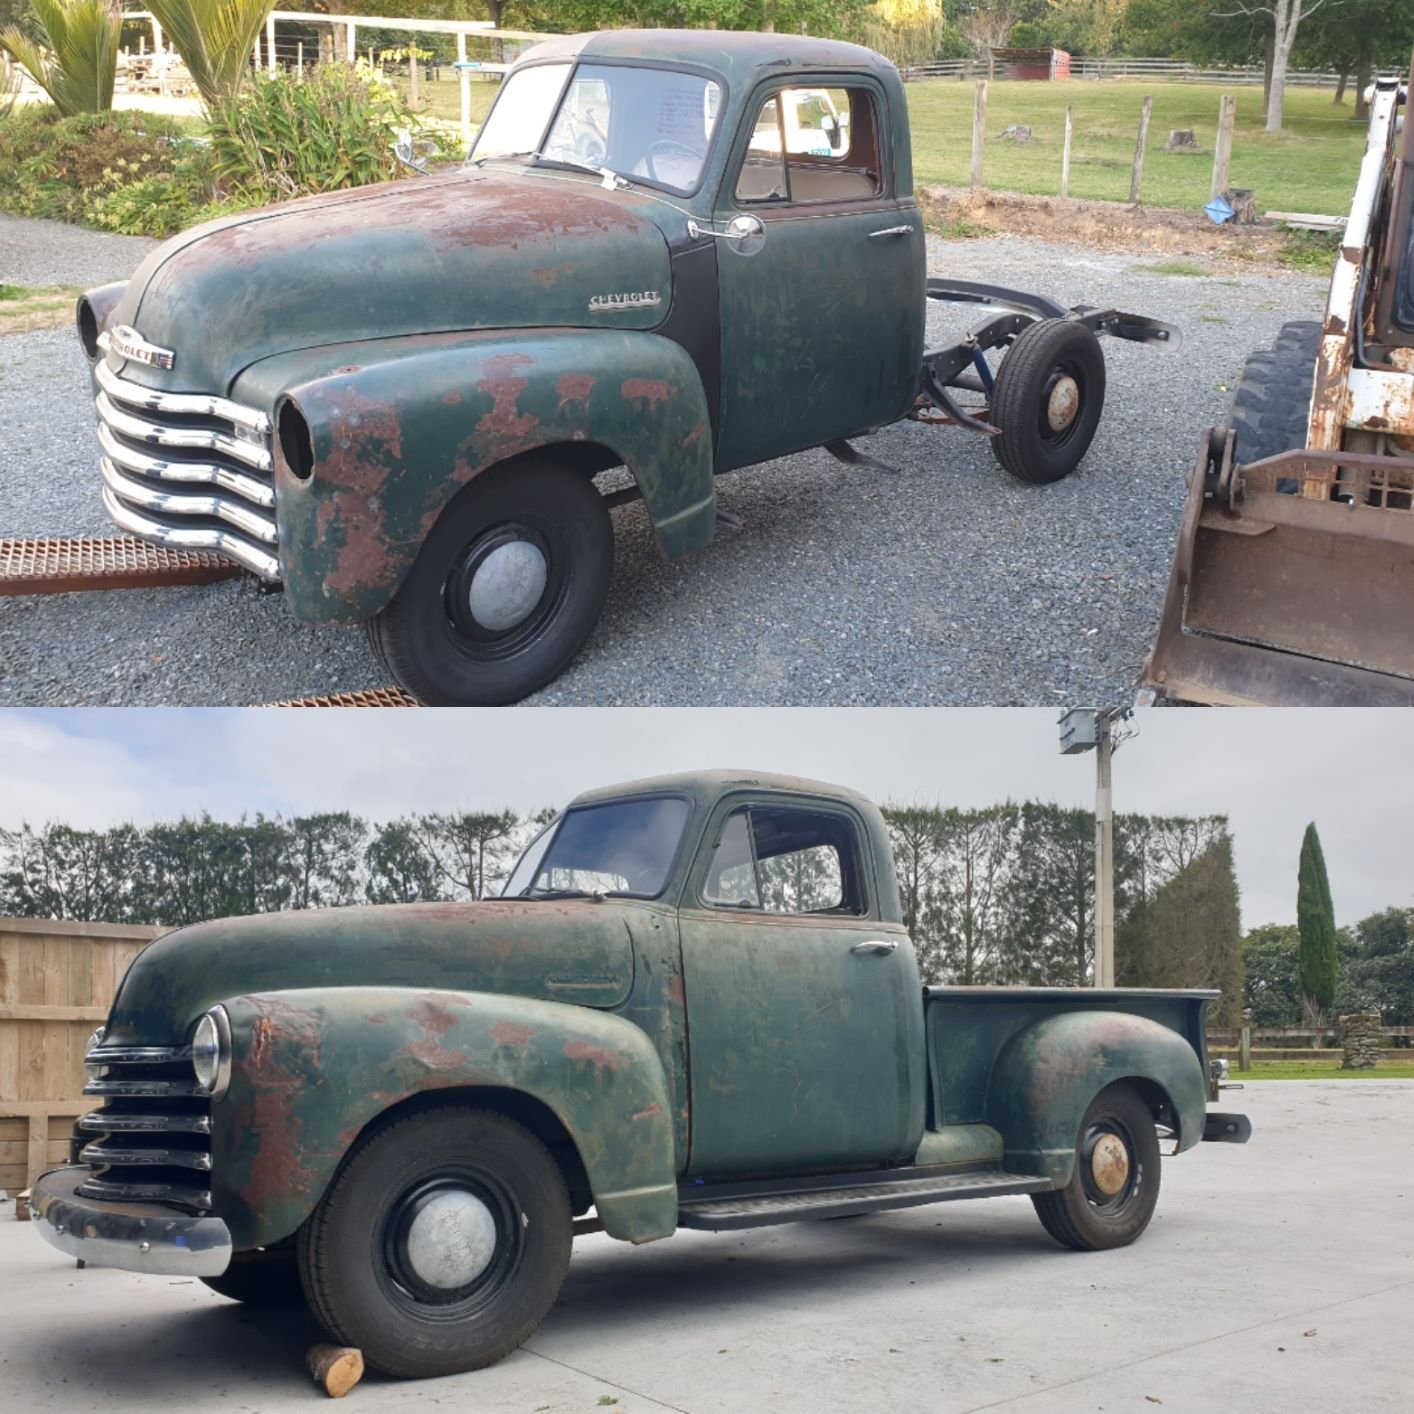
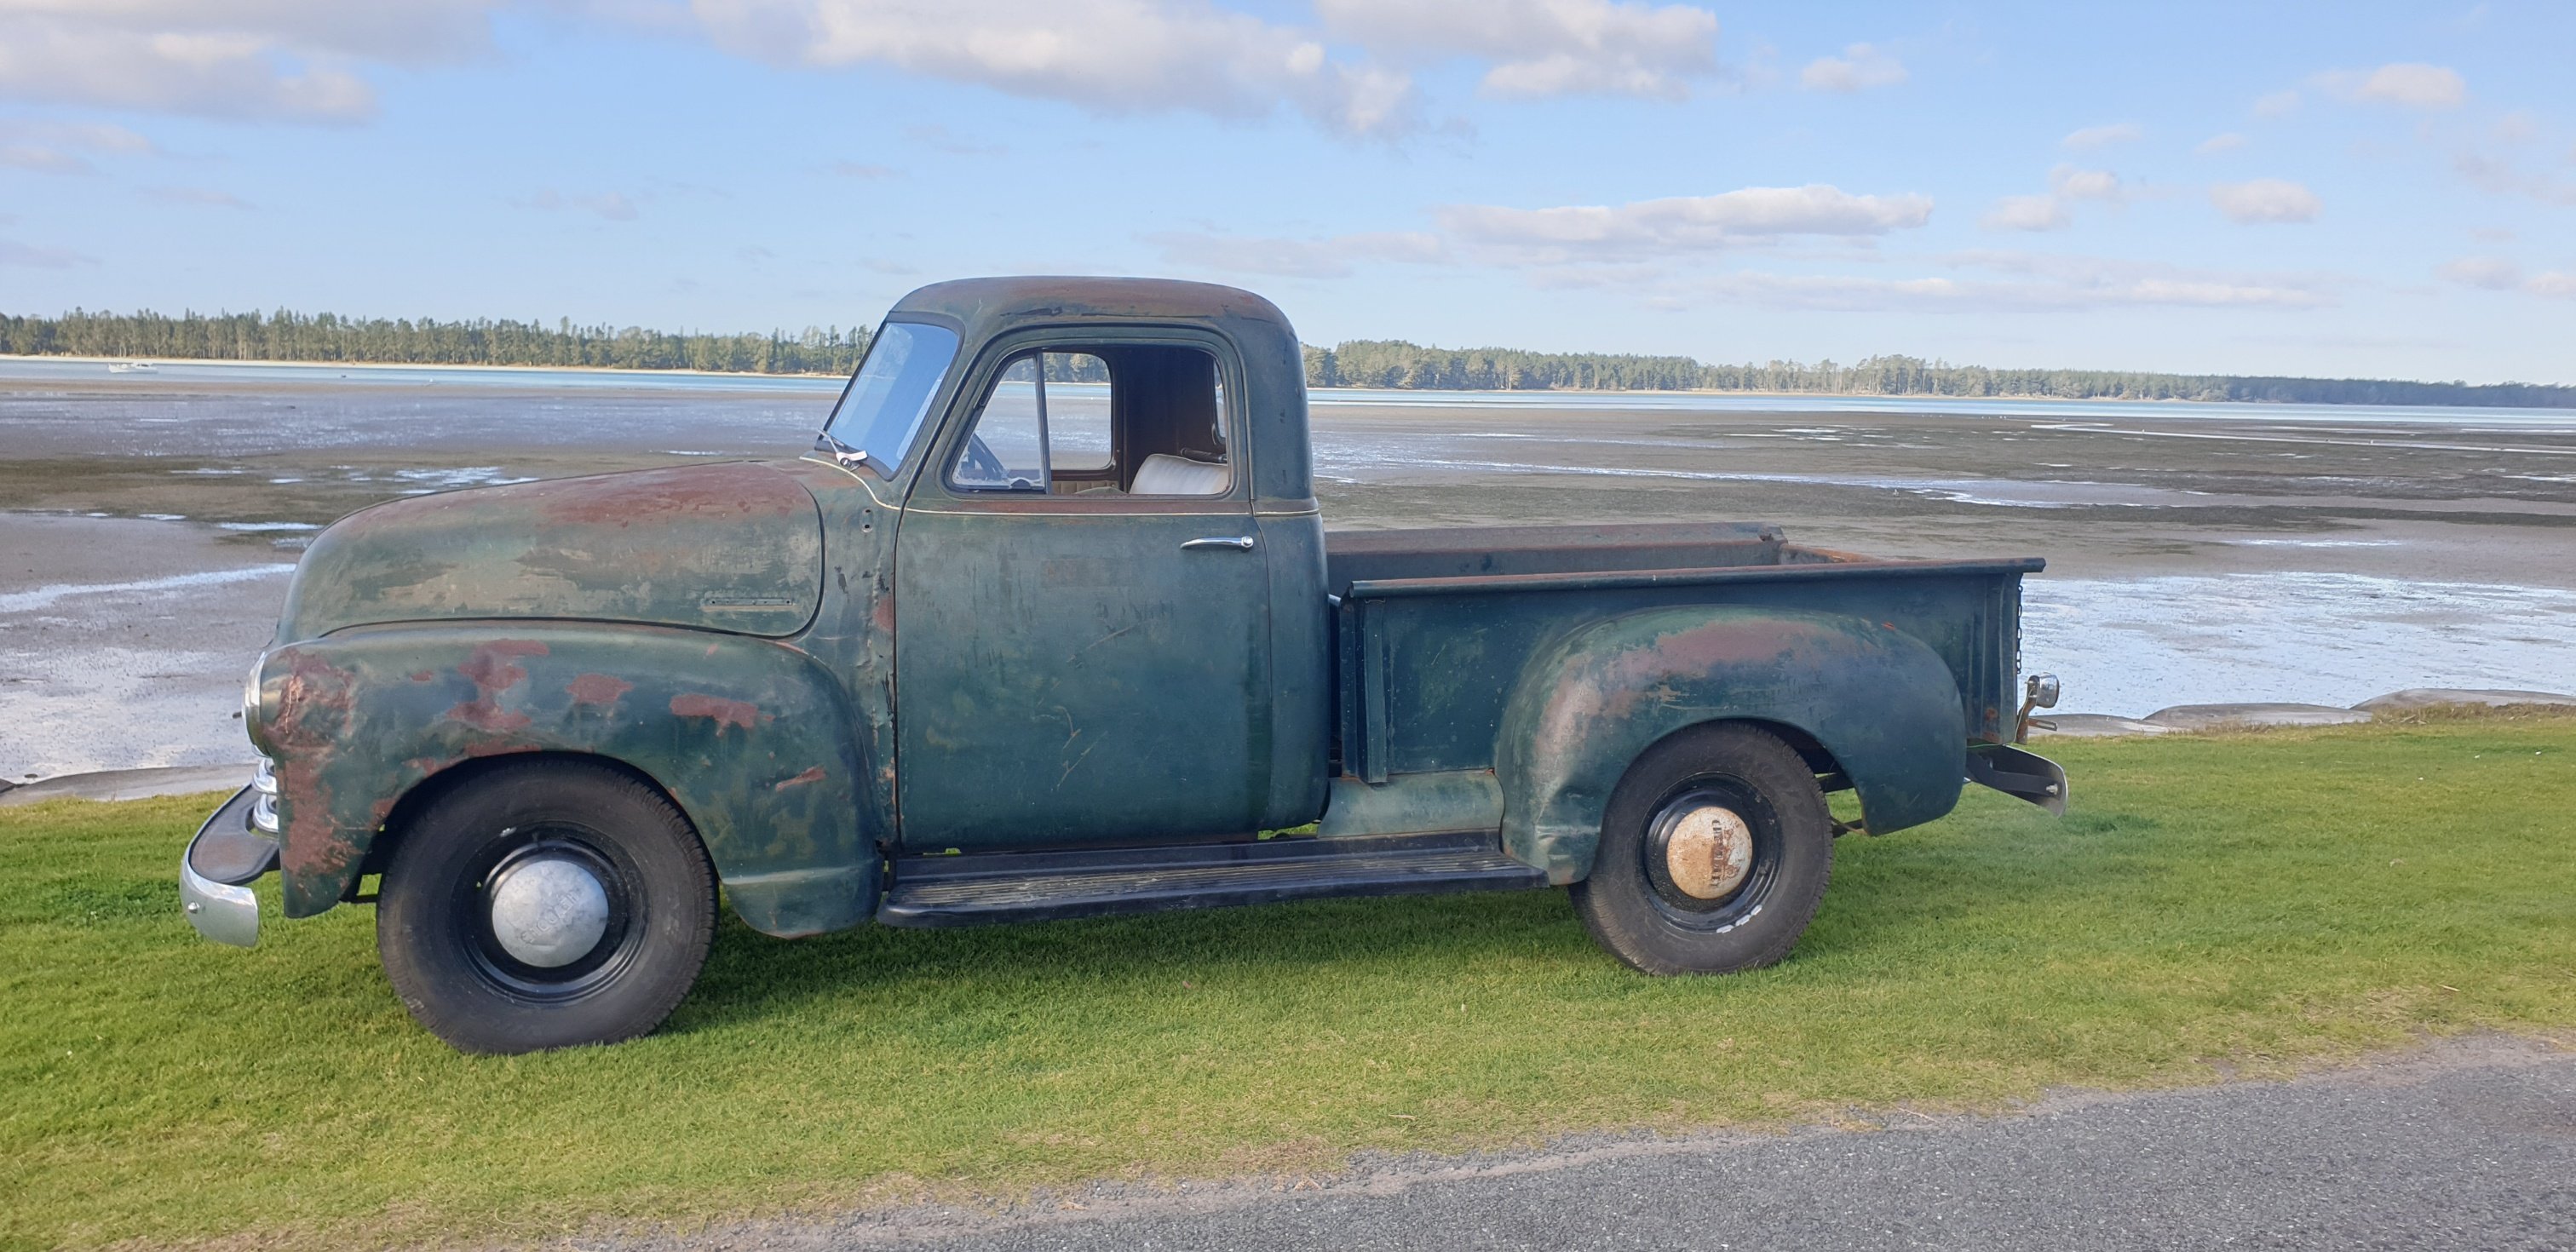
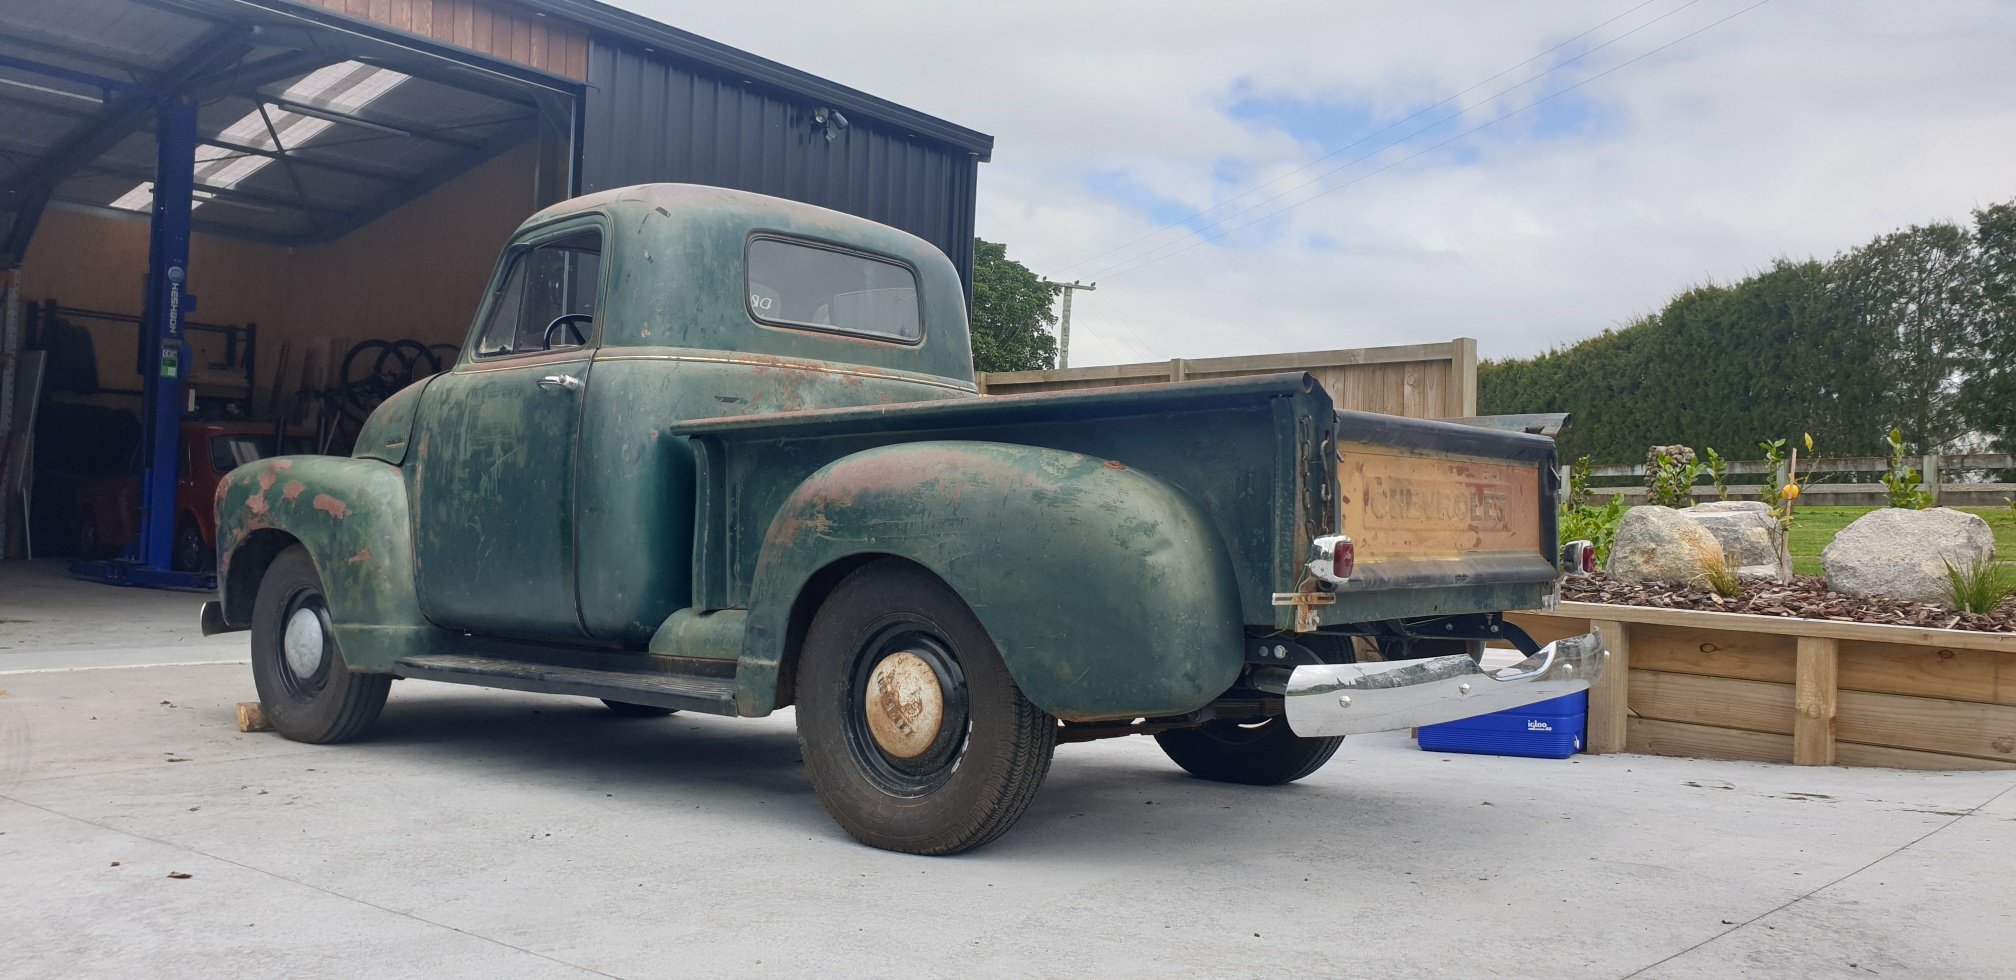
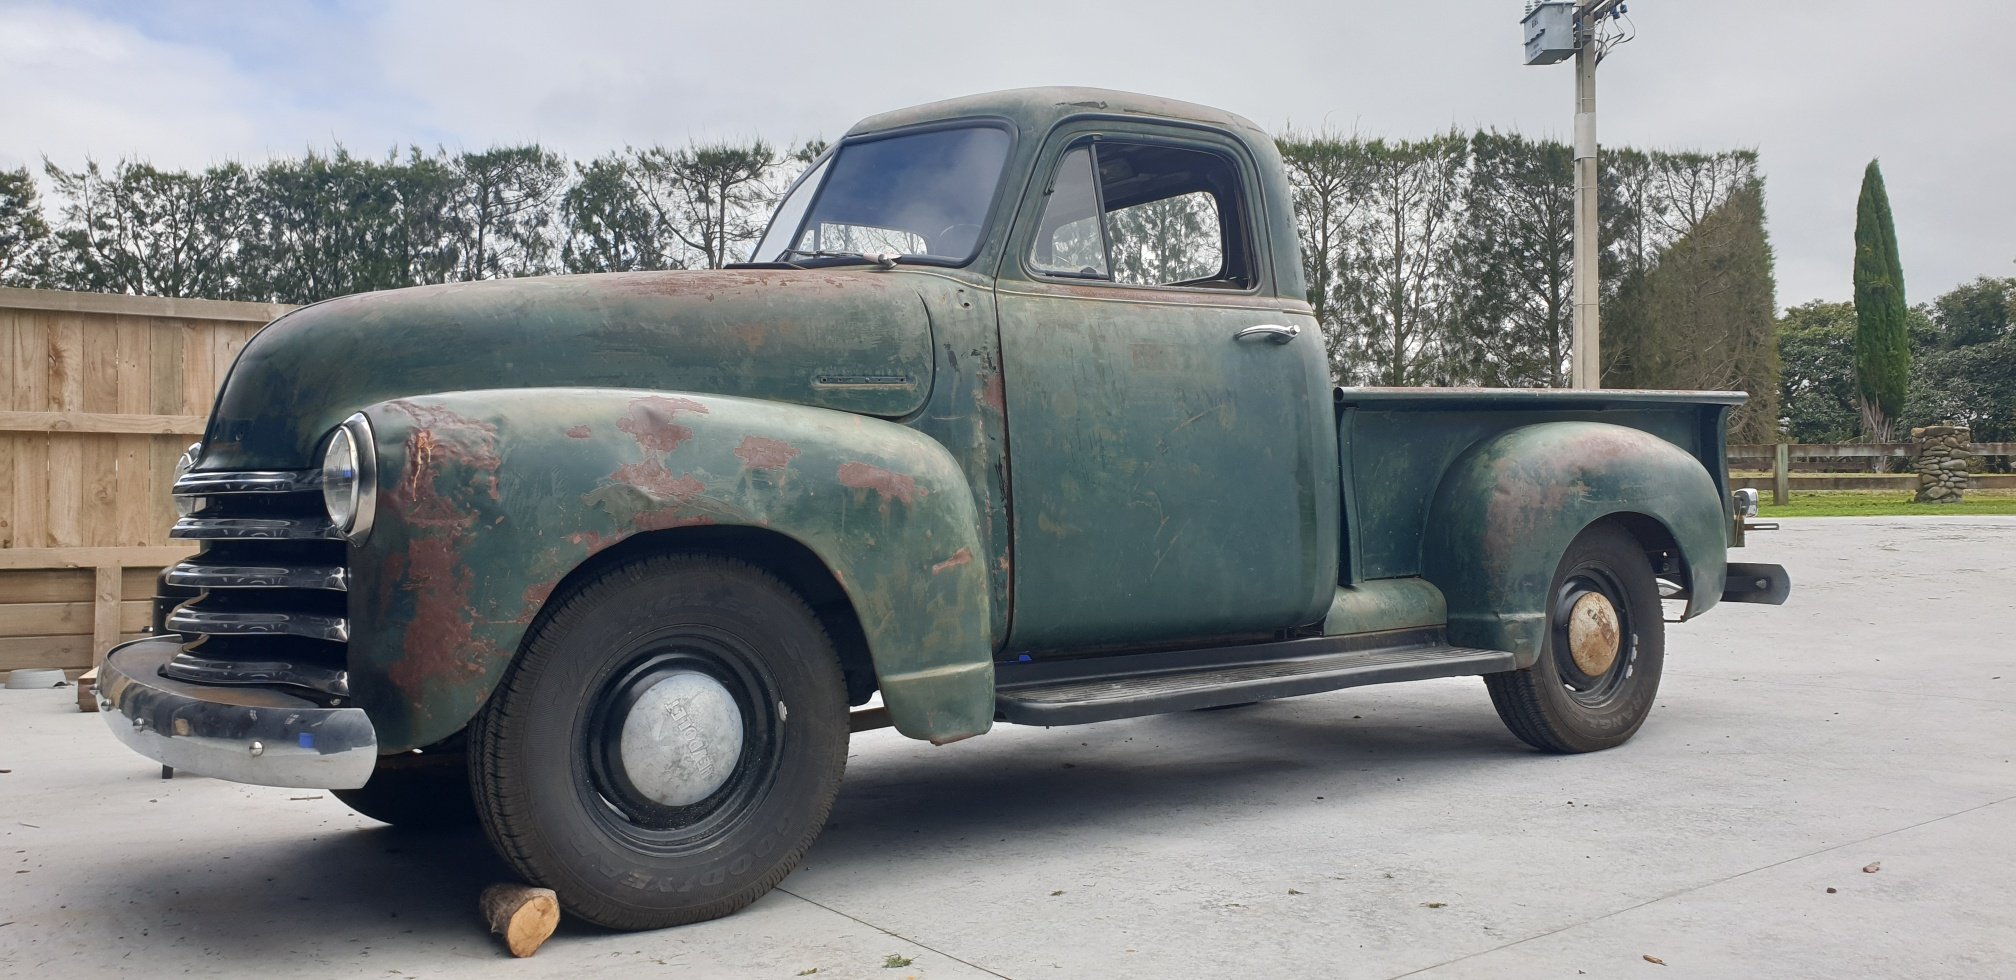
I had a thread up a while ago but its gone. I got it off my great aunty, Her partner bought it new and made the tray for it. He used it as his builders vehicle for years and after he died it went in the garage and did the odd tip run. They put some covering on the door cards which has gone a bit dumb bit I'll leave it as it'll do more damage than its worth to take them off. I just about sucked the seat up my bum on a couple of corners on the drive home. Anything close to the recommended retail speed on corners was at the limit of the tyres The day I got it home No options ticked here, it had a radio blank and a cigarette lighter blank, and just a you have cooked the engine light instead of a temp gauge I've taken the tray off and given it a cleanup/under seal. I'll need to do it again later. It didn't want to go up the drive without doing skids, 20 year old commercial tires are a bit shit in the wet. I pulled the bench out and rangid in some speakers with only the finest mdf and cable ties I had1 point
-
Definitely wasn’t expecting yellow! Looks sweet!1 point
-
I ordered some super cheap foam backed stuff two weeks ago and the couriers finally delivered it. Made a start on the first wrap, there are a few cuts that aren't perfect but this is just the first layer. When I get my hands on a sewing machine it'll look less bad Will pop out and grab some more glue shortly to do the last side the material didnt like the nails in the deck but again it'll be covered1 point
-
Sanded and re polished the copper pipe work today. About 4 hours work there. I was lazy and only did the visible side too1 point
-
Got the timber deck put together on the weekend. Jarrah timber deck with new deck strips all painted up. Stoked with how its come out. One step closer to going for a VIN.
1 point
-
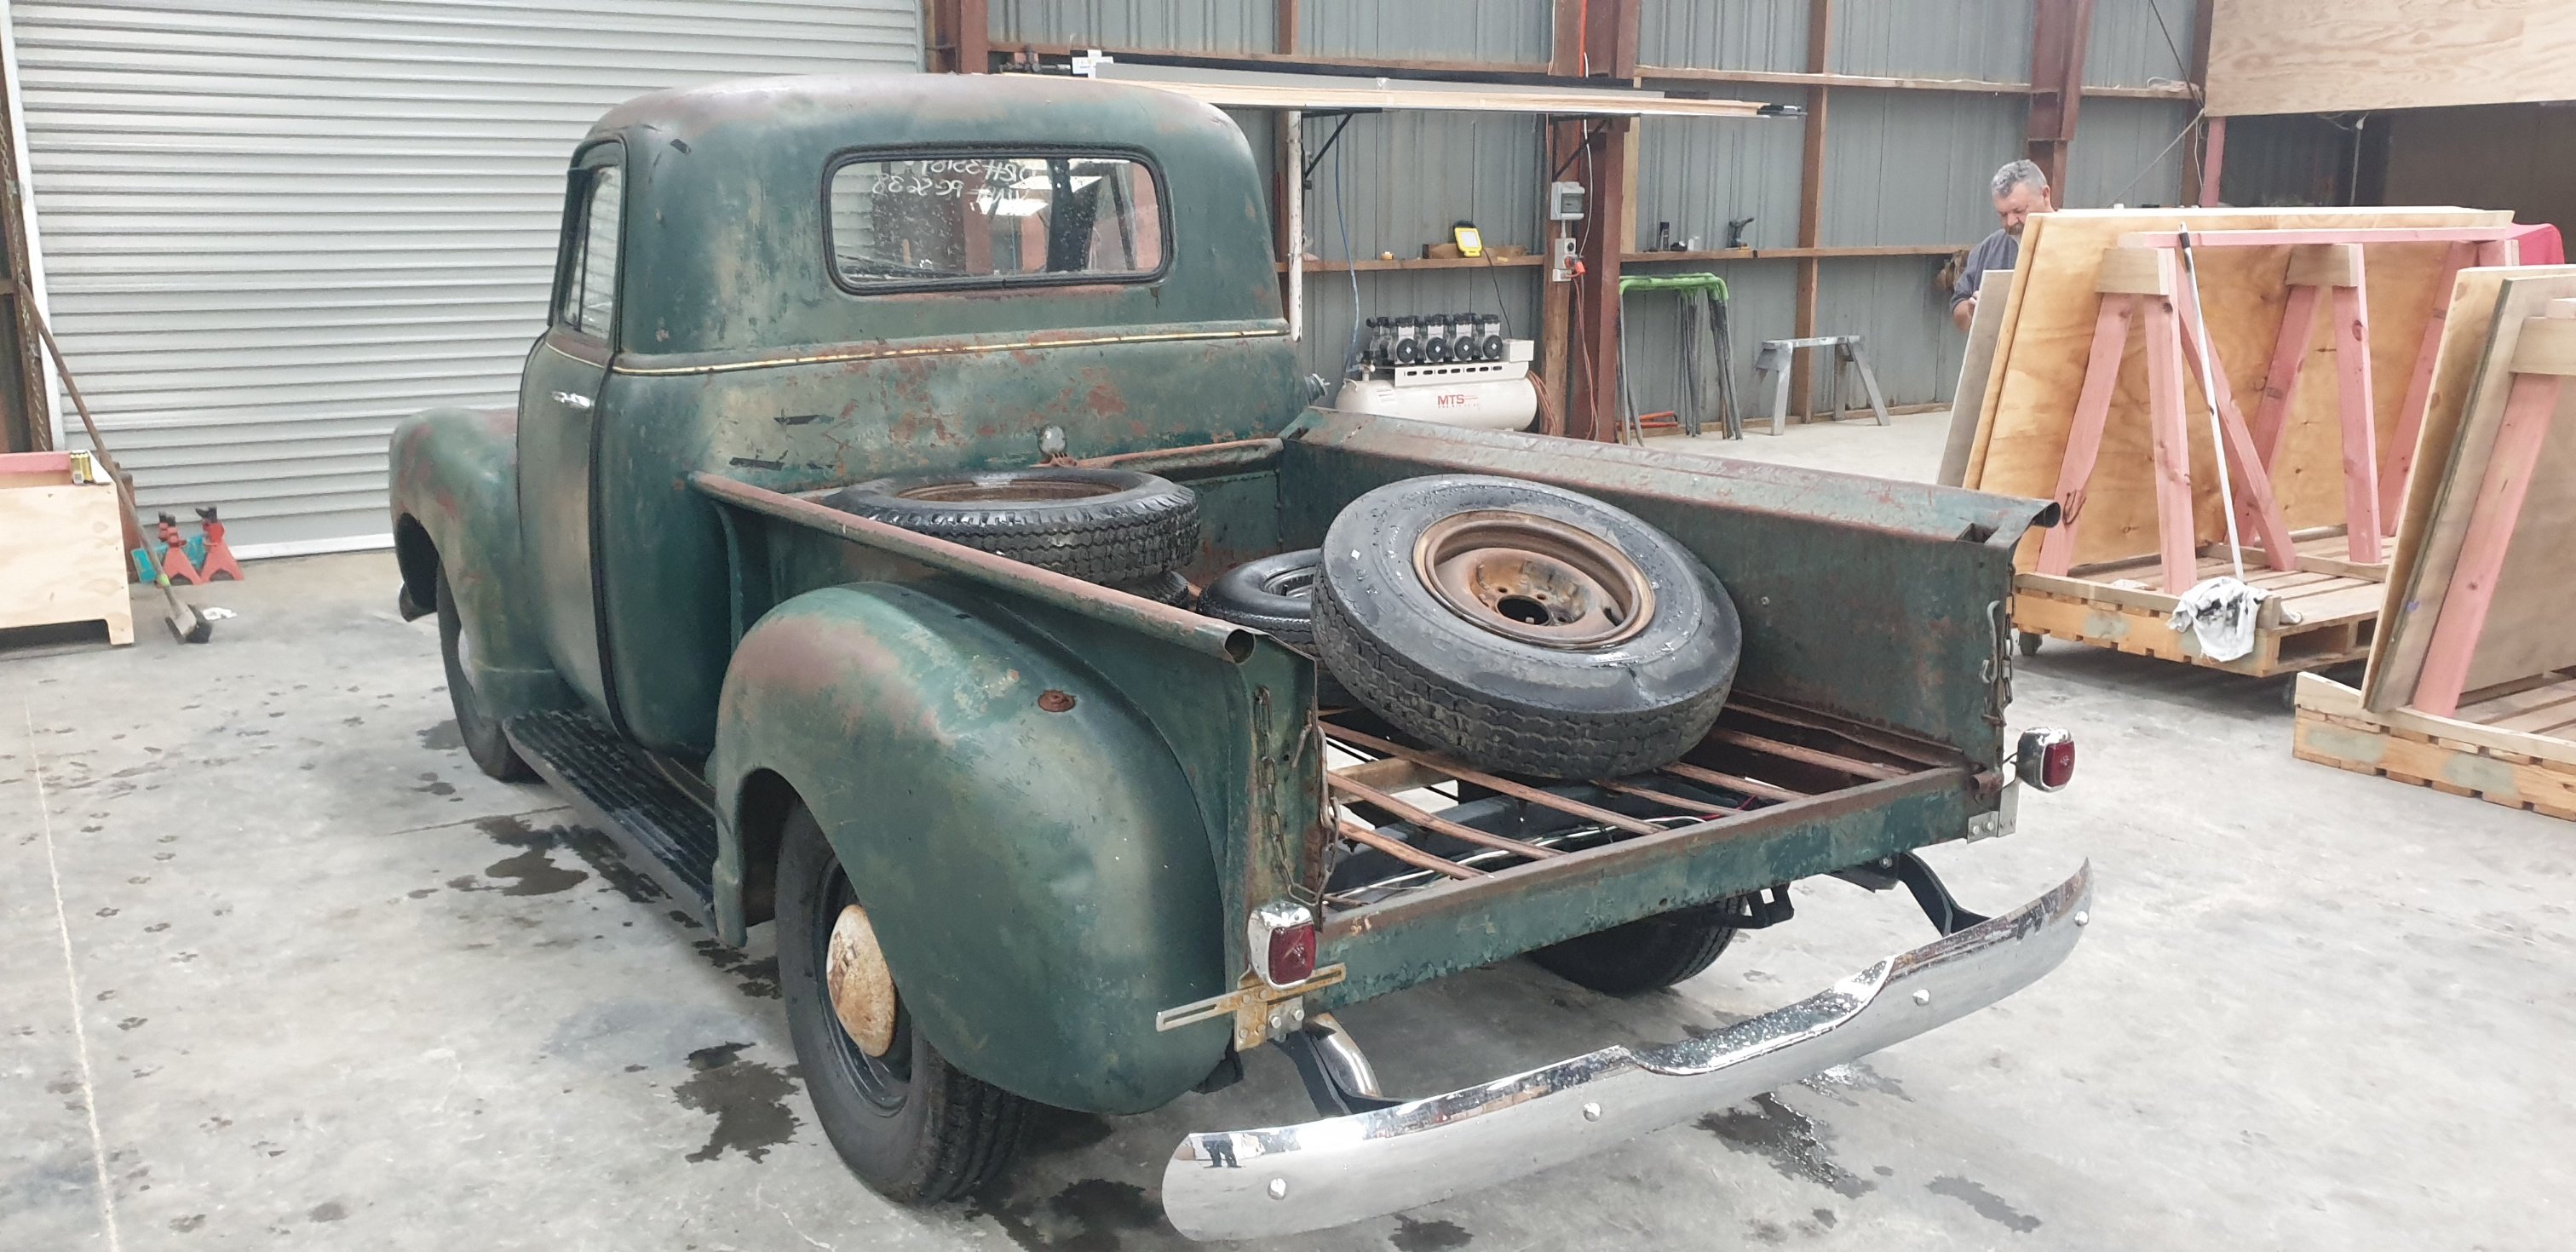
Had a mate come round one night and we cleaned up and unsealed the underneath of the tray and cab, inner guards etc. Painted the bed strips satin black ready to put the timber in for the final time. Also got some tyres test fit on the artilleries with the new hub caps and whitewalls. Looking forward to getting these on!
1 point
-
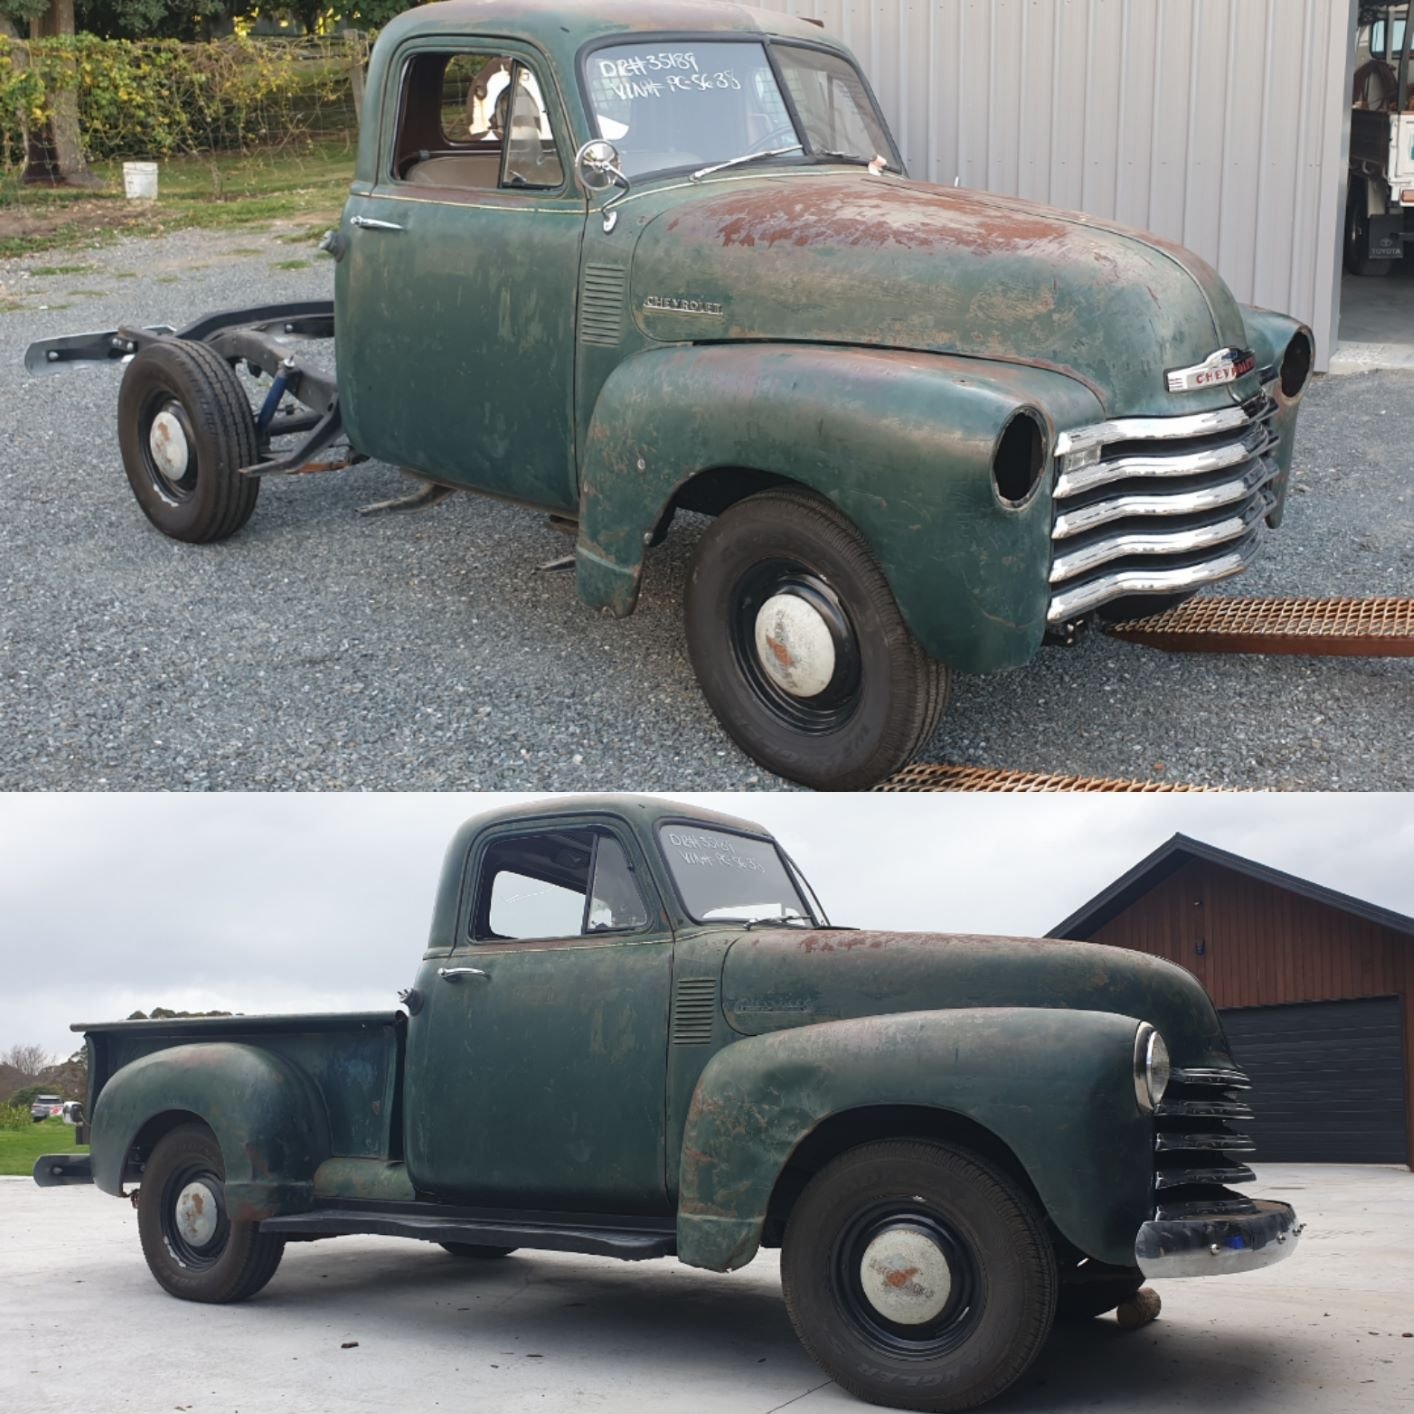
Next up picked up the cab and chassis and took it over to EZE Auto Electrics in Tga who did my Impala. Tidied up what wiring was needing to be replaced, wired up front indicators, horn, lights to RHD spec, finished the 12V conversion , wired up the old siren etc. Got ignition hooked up (was on a switch) so its running and starting off the key and ready for a VIN. While the panelbeater continued on the tray. Couple of before and afters showing how much straighter the cab and front end is now!
1 point
-
Next up was get stuck into the rust. Managed to find a skilled older tradesman who was keen to tackle it. And also keen to let me come and help him which was awesome. Learnt a heap of new skills and was epic watching him hammer and dolly out the dents. The front drivers side door had swung round and stoved in the corner of the cab as well as bent the door at some point. The yanks must of tried to bang the dent out from behind via piercing holes in the inner guard to put a bar or something through to hammer dent out from the inside (unsuccesfully) it ended up leaving a heap of holes for water to get in which in turn rusted the bottom of the inner and outer cab corner out. The rear cab corner also needed replacing on the same side, outer only. Had a bit of rust around one tail gate hinge to fix as well. Apart from that she was solid as , floors and doors and guards are good as! Next up was get stuck into the rust. Managed to find a skilled older tradesman who was keen to tackle it. And also keen to let me come and help him which was awesome. Learnt a heap of new skills and was epic watching him hammer and dolly out the dents. The front drivers side door had swung round and stoved in the corner of the cab as well as bent the door at some point. The yanks must of tried to bang the dent out from behind via piercing holes in the inner guard to put a bar or something through to hammer dent out from the inside (unsuccesfully) it ended up leaving a heap of holes for water to get in which in turn rusted the bottom of the inner and outer cab corner out. The rear cab corner also needed replacing on the same side, outer only. Had a bit of rust around one tail gate hinge to fix as well. Apart from that she was solid as , floors and doors and guards are good as!
1 point
-
Nearly forgot took it for its first drive to the end of the road before we pulled it apart after a tow start down the drive. Couple of final photos before it got pulled down
1 point
-
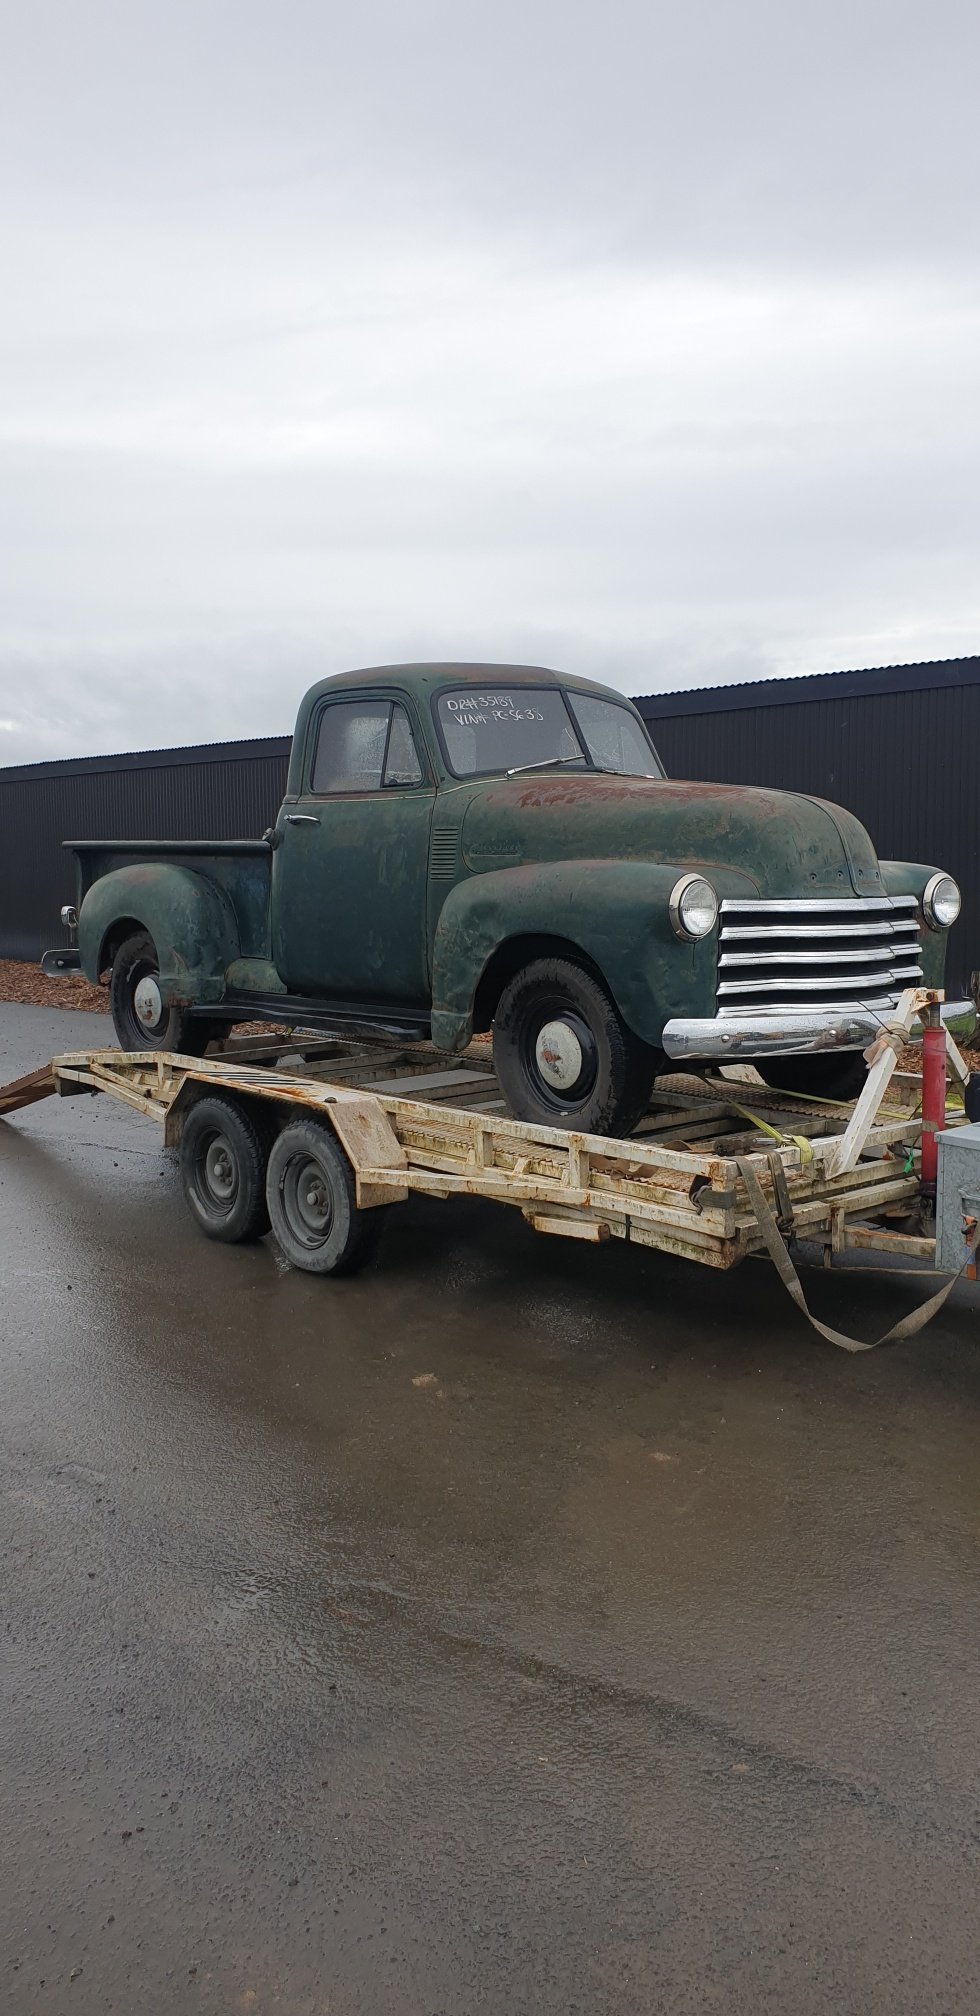
Couple more pics of whe n we bought it. Managed to drive it on the trailer which was ideal after a push start. Got it home and test fit the tailgate.
1 point
-
Still got this. Still no wof. Did a scrap run the other week(month) I forgot how slow the 202 was, its getting smokey and fumey and is due for a refresh. Instead of pulling it out I'll assemble the mighty 253 and put that in eventually one day. I figure it'll be just as slow but v8 noises will make up for it. I'm toying the idea of injecting the 253. Looking at either a Holly quadrajet injection thing or doing a low buck megasquirt build. Keeping the carb is probably smarter with the amount I drive it but efi is so much nicer to live with. If anyone had a v8 m20 four speed for sale or knows where I can get one for not moonbeams let me know1 point
-
The cam was toast so I got it reground. Towing/4wd spec m8. I sold the extra heads and Pistons that came with the hoard with the intention of getting new valve springs but bills happened. I figured since the 202 sounded horrible the old barry trick of draining the oil and filling the sump with diesel couldn't hurt it. I ran it for about 15 minutes and drained it. Both the oil and diesel were super dirty when it came out so it was full of crap. New filter and fresh oil and it's heaps quieter now which I'm happy with. Of course I disposed of the oil/diesel mix in the appropriate manner1 point
-
Nothing like not being able to sleep and getting frustrated in the garage because you keep fucking things up due to being tired.... I then realized I forgot some parts Getting better... Thought I'd check the valve stem seal o rings... They are all pinched. cunts of things and back apart again. Any tips on not fucking the orings? or does anyone have a less wobbly valve spring tool? Nest question is assembling the roller rockers in the correct orientation. I can't find any destructions with the parts and a 2 minute google isnt helpful I'll take the cam(s) into the cam guy on the way past tomorrow and see what he says1 point
-
Everyone loves a bit of head, specially when the passages have been opened up cams and spare bellhousing/flywheel/clutch it is actually a towing cam m8 This lot should sort out the noisy lifter1 point
-
Because everyone loves maintenance shots here is the new water pump and rad hoses Since the van wont be ready for anything I wan to take it to I thought i'd barry up the next best thing. Enter the finest pallet wood and old sign I just need to make a "door" and a shield against the cab in case it gets windy/rainy1 point
-
Perfect vehicle for a morning's barrying1 point
-
Success1 point
-
Took the old girl in for a wof. Only needed the diff brake lines replaced. The tappets are getting worse so I'll replace them and the cam at some point to two days later the mechanic still has not replaced said diff brake lines... I Did say I needed it ready tonight. I ran the gauntlet as I had to pick some stuff up and get ready for the scooter ride. I needed some tie town points for the scoots and general stuff so really splashed out. @piazzanoobs gantry is fucking awesome She'll be right m8. perfect for a trip to waikato and back... They promised me it'll be ready tomorrow morning so heres hoping nothing else goes wrong1 point
-
I've replaced the rocker and side plate gaskets and given the carb a brake clean rebuild. I've got that electronic dizzy to install once I find the ht leads. Does anyone have a spare waterneck I can have/buy? Mine is a tad fucked
1 point
-
I finally put the front back on. Somehow I've lost the headlights so I grabbed some semi sealed h4 inserts. Chucked the time yesterday I'll have to align them this weekend.1 point


This leaderboard is set to Auckland/GMT+12:00