
Leaderboard


Popular Content
Showing content with the highest reputation on 08/03/14 in all areas
-
Wow. Rapid! Very rapid. Thanks to a very shitty internet connection tonight I cant put up any photos. But I can tell you all now that the 2.5 lives and sounds cool. I need to re-tune the ecu as expected but the engine started up straight away. Everything is just a bit lean on the table which is understandable. The whole swap took a lot longer than I was expecting. A few hiccups saw to that. First one was the exhaust 'Y' pipe not sliding off the down pipes as nice as usual. A bit of mild corrosion and me jamming them when trying to remove it made it a prick of a job without a hoist. Then, at about 10.30pm last night Hannah and I were still only just slinging the new engine in place. The bloody input shaft wouldnt slide in place easily as I was using a engine hoist rather than my favoured chainblock. Hard to adjust the engine angle. Finally it slide home and we called it a day. Today I had to remove the knock sensor adaptor from the 2.0litre as it was missing from the new one. Never noticed this earlier. Did it wind out easily from the alloy block where it had been covered with scum in the depths of the vee? No it bloody well didn't! I ended up taking the old block over to work and attacked it with the rattle gun. Still nothing. So attacked the block with the gas torch and finally it came loose. Its a 30mm long plug about 25mm wide with a fine thread so easy to corrode in place. Phew. So all to day it was clean and assembly time. All went ok today and finally turned the engine over to build up oil pressure with the plugs removed about 4.30. I cranked and cranked- engine spinning away fast and fine but still the light wouldnt go out!!!? Huh? weird. A bit worried...! Should I prime the pump?... hmmmm Then Hannah spotted I hadnt connected the wire to the oil switch. Ahhhhhhhh. Whoops. So yeah. It started first turn. A happy non- event there. It revs up so much quicker and harder. Fuck yeah! Gonna be fun. We couldnt really rag it too much tonight as tuning the leanness out (that'll be more fuel being burned damn it...mr scottish me, a Davidson, not happy about that...but hey) and it was raining hard enough I couldnt really see well...( lovely old pommie cars with wipers made for a desert location and a fan that more just agitates the air trying to prompt it in a polite British way to move along towards the vents if you dont mind, terribly sorry old air molecules, hope Im not upsetting you.....) But I still gave it some squirts and had a giggle. I'll post up some boring photos of engines on stands, engines on hoists and engines in bits tommorrow. For now its movie and chill time5 points
-
I found this from the other week.4 points
-
wee update,motor is nearly reconded.trumpets have turned up and just got some new rims,even got to run my toyota center caps still ruff mock up "selfie" new rims.14x8 center lines with little stretch 205/553 points
-
Discussion: //oldschool.co.nz/index.php?/topic/44590-callums-notchback-ae85-levin/ Thought id make a build thread on my project. Bought it a few months back traded my AE86 Hatch for it. Factory 3AU 105xxxkms on body. Now has: Rebuilt 16v Bluetop 4age W55 Gearbox Bc Golds Full exhaust/Headers Shimmed Hilux diff I bought the car looking like this and not certed for any of the mods I drove it around like that for a few months untill i decided i should start making look the way i want it too and get it all legal. First purchase was a set of SSR Starsharks, 14x7 -2 14x7.5 -15 Bought some tyres and test fitted, Running the 7.5s on the front as they still out too much in the rear, Need too roll rear gaurds alot Found a guy too work on my car and get it too cert standard, Need to shorten my draveshaft, D-shaft hoops, lower car all round/ Roll gaurds, Whole new exhaust as the one on it now is too loud, Re-install the factory power steering set up and a general tidy up. Car is now lowered and basically sitting at cert height, guards have been rolled and look pretty good i think More pics: Almost ready for cert, Only a few more things left too do on it then should be off to the cert check next week2 points
-
grabbed this mint complete 22spline T50 and moooore wheels, can't resist. 14x8 -122 points
-
Nice. These should be good for 700hp, right?2 points
-
Right so i haven't given up on this car, although i should have - someone shoot me if i get another project that is so rusty and made of wafer thin sheet metal that when cleaned back resembles a golf ball finish . Every part of this project has been 1 step forward and 5 steps back so frustrating and draining. Dave has put a massive amount of time into the 280 and its looking great - so big thanks to him. PS....he fucken hates this car i'm sure. Okay enough crying here is where we are at: The tailgate is fixed, the bonnet is fixed, the hole car is straight and has had its first coat of high solids filler primer (with the exception of the underside of the bonnet and hatch which will get done in the next few days). I have bought some extractors off TM and the old exhaust system except the manifold has been removed. the dash has been removed and restored - cost a bomb but looks trick, oh yes and then the front screen had to come out and some more rust was repaired no surprises there lol. Currently the underside of the floor has been buffed back and is ready for some rail reconstruction thanks to some tard forklifting the car in its past. Then rust inhibitor and under seal - oh and found a couple of minor spots of rust to fix (wow what a surprise you may say). once thats done ill fit the extractors (fix a knackered thread in the cylinder head) and build an new exhaust system. I won't touch the trans tunnel and rear floor above the diff area until im ready to hook out the motor and box at some point in the future and utilise the stroker crank i bought for it . The new filler prime will need blocking, a another few coats and then a final block and then top coat. Hopefully it will be painted within the next 4 to 6 weeks. during the next month i will get the seats recovered and order the carpet sets and under-felt shit. Next its the floor inside to clean up and treat/paint and also the rear inner guards to under-seal.2 points
-
long time no update! Well this does still exist. That is if you consider being parked at the top of my driveway not moving for months at a time much of an existence. So I sold the LSD head i had a while back as some guy really really wanted it for his celeste. Being 8 bolt and very rare he offered me a stupid amount of money for it. Luckily i had lined up a 10 bolt LSD diff head and housing so being a sweet upgrade opportunity i went and sold it. This should have worked out great as the brakes and axles etc will just swap over. BUT when my new diff showed up it was only a dam 8 bolt!! Cant really complain as i brought it for a fraction of what i sold the other for , but still! fuck. So since i couldn't really be fucked with it after all that that LSD sat on the floor of my garage for ages, untill just last weekend when i decided to chuck it in this car, blow the cobwebs off it and entered in a local motorkhana. Gotta say, for a NA this thing gets loose with an LSD, i spun out lots but the car went awesome. I didn't get any record times at all but shit it was fun. As you can see by the stupid grin on my face2 points
-
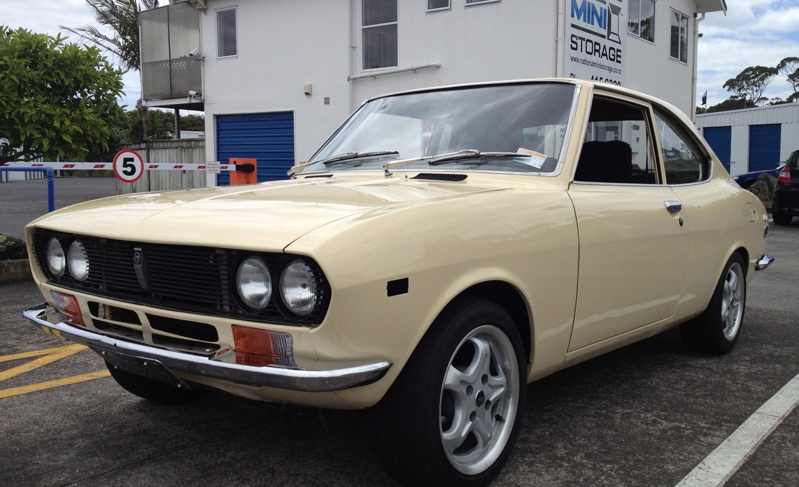
Not a major build. Just getting my rx2 coupe ready for Classic Trials later in the year. Discussion Thread //oldschool.co.nz/index.php?/topic/43873-popwills-rx-2-of-awesomeness/
 1 point
 -
Have owned this for around a year, have very slowly been atempting 2jzge conversion. All information/parts i have aquired for the build have been through oldschool except the wheels. this was when i first purchased it1 point
-
Discuss: //oldschool.co.nz/index.php?/topic/44585-brads-1987-toyota-carina/ Hey OS, picked this up a few months back now. 3A-U 4speed, pretty mint condition. nothing really changed, just been tidying her up, driving the shit out of it and collecting parts Plans: 4age t50 slam dooooort. Few pics of when I bought it; Shitty phone pics.1 point
-
Entires & Payments list updated. Still a few people unpaid. (only 4 of the unpaid have arranged late payment)1 point
-
Not yet unfortunately. Ive just moved out and havent had the spare money for tires. Should have them on in a week or 2 really keen to fit them.1 point
-
We will bushfire your hair off bigfoot1 point
-
still to do- purchase flywheel/ clutch and install install manual driveshaft which i have purchase 2nd engine with loom ecu and all sensors etc sort out fuel system-originally carb so this will take a bit of work which i dont know a lot about radiator to suit wire up make 9s fit. skid1 point
-
next i had the diff welded and set about killing the 21r before removal1 point
-
1 point
-
they are a mangus pump you can even get a 5 stage which i sold to a guy in christchurch for his escort that he is building with a beams1 point
-
Looks like we are planning to come along Got a bit of work to do between now and then though, car is as it rolled into the trailer at the end of whittakers in November. We are going to use it as a shakedown for Hampton Downs in October1 point
-
Grabbed these off ta63-1uzze(Dan) a while ago, & chucked them in, along with kyb hilux shocks. Not enough low ! Waiting for all my wheels to turn up, then I can decide (once tyres are changed etc). Will probably grab some T3 camber plates & rca's from USA at some point. Cleaned up the engine bay a tiny bit & painted that hideous white dinner plate! Much better Added the front trim/indicators, just need to fix up the chrome grille. (Looks bit funny at the moment) Few goodies from JP turned up such as monsoons, TS-X10's, Hoshino G5's, Jaf badge & tsurikawa. for 'dem 80's feeelz.1 point
-
Today the Viva gets it 2 litre heart replaced with this.. image hosting over 2mb I was hoping to have it all complete with cambelt attached so I could just swap the flywheel/sump and sling it in. But the cooling outlet casting cant be swapped with belt and back plate in place. I'll just have to make another modified casting in the future so I can have another engine just waiting complete. What for? I dont know... but just having a v6 sitting in the stand in the corner of the workshop would be nice. So earlier in the week I replaced the missing bit of alloy from under the oil pedestal. The previous owner had ground it away for something to do with a dry sump setup this engine had when it was in his Fraser lotus 7 replica. I carefully filed a new peice of alloy and then drilled, tapped the old web stub and bolted new piece to it. Then sealed any gaps with JB Weld. jpg images Thank you JB Weld for you have saved the day again. Such good epoxy- best I have ever used. Takes a full day or two to set super rock hard.. and tough but then files so nicely. free image hosting The engine block then found its way back onto the bench in warm housetruck (bench now sports engine spec marks on bench) and I fitted new bearings. The old ones looked almost new but with tiny scratches from I figure some alloy shavings when he ground away that web. image sharing At work I machined up a 3mm shim for the oil pump regulator. Its well known mod for these engines and very similar to what I did with the 12A rotary pump. This will help up the oil pressure. image hosting over 10mb Back into the shed yesterday. I have finished most of the work on the bedford cf so took friday off and played with engine bits. Heads back on but not till I had to make a bloody trip into town for two tiny O rings! The full gasket set I got from the states was missing these vital little buggers which seal the feeds to the heads. But I got to rag the Viva about town, the last time with a 2 litre. Heads on and time to clean all the followers out. Most were pretty sticky and had plenty of gunk build up. Only way to do it properly- screw that lifter clean stuff. No way it would have clean followers as well has stripping them. Quite satisfying. One big cup of coffee and two hours later I was getting pretty quick at doing them by number 24. 20mb image hosting The mucky crap. This was crystal clear thinners before... images hosting Cams back in place and then sling engine into back of van. Wasnt as quick and easy as that though.... I asked the neighbour (old bearded man in jandles) to help me lift it and we carried it by hanging from a big steel bar. He slipped backwards on the wet bricks outside shed and as the engine dropped towards him he did the best slow mo backwards cart roll finishing off by smacking his head on the Viva bumper. 9.8 from the Russian judge. It was then that I realised he was pretty drunk. Fun times. Today we will be using a mates large shed to keep us covered while we swap the engines across. Hannah has made cake for the occasion. So it will be a good day!...1 point
-
Looking good boy. Mummas real proud.1 point
-
Sweet so managed to get abit done today during smokos and lunch break Put a coat of Black Zinc just for now while i mod the frame and weld up new tabs for shit, just wanted something on it will it was bare hence the paint jobs abit rough Swing arm wasnt blasted, will just paint strip it i think, but for now its just degreased and cleaned up You can see the state that the frame is in, most of it just looks like this, textured paint look, which should be sweet once its primed and painted properly This shits abit different tho, might have to weld fill this Degreased the wheels, the rear was covered in grease....... ...Came up really good! this is with no polishing, just cleaning aswel. and through the motor in aswel Its coming along, i guess, fell like im not really getting anywhere and just going in circles, but now I just need to sort tires for ride height, while im waiting on them i can sort out tabs for the electrics and little shit that will slow me down further along Cheers1 point
-
Pic Update!!! Wheels are 16x10 and 16x111 point
-
I have a suitcase thing, yeah. It's not huge but it's not tiny, I have nothing else to use that isn't a small useless case so it will have to do. Should be plenty of room for it in the 'burbs anyway. Probably similar in size to one of the two you brought with on the nats south to north adventure.1 point
-
hehe was driving along in the snglia last night down lineside road 100kmh and the engine goes from BROOOOOOM to BROOOOOM BROOOOOOM FUCKING BRRRROOOOOOMMM!! Turns out the zorst decided to seperate from the extractors1 point
-
So today i went about Solving the height of the front... sky high stance Not alot of space at the hall to do much work. Although the did end up having a grinder and cutting discs to use. I brought a pair of standard front springs from a 330 of brocky and loped off 2 coils only to find it wasn't quite my cup of tea. So the coils went back to the shed to lop off one more. I ended up swapping the springs in a big empty car park got a couple looks but now where to do it at the hall... Springs all in looking pretty good maybe the rear needs a little more low but im really happy. Springs are just captiveprobably could lop of another half coil and still be captive so im happy with the height now. Big thanks to felix your stuff you lent me was much appreciated couldn't have done it without it. Cheers So thats how she sits now. Iv just ordered a multispark setup from the us so that'l be next probably.1 point
-
1 point
-
Next up, I began repearing rust, which popped up along side the roof lines the not so rusty looking shell was hiding some dark secrets, all the shit that comes with owning Toyotas though! Also saw this picture which got me thinking.....1 point
-
Update time. For the last couple of years I have been intending to make a new instrument layout. I love the look of the original Viva strip speedo but not having a rev counter in view is annoying. I have to look off down towards the tunnel to see what revsI'mdoing and this does not make for relaxed fast driving. I had nowhere else to mount a rev counter without touching the dash. The speedo also reads 15% too high and was not going to be super easy to fix. So for ages I have wanted to fix all these areas. Initially I was going to order some posh aftermarket gauges but they all seemed to expensive or not quite what I wanted. So I thought I'll make some. Sometime last year I went to the wreckers and bought a early 90's Toyota celica instrument cluster and the required electronic speedo pickup. These pickups have exactly the same thread size as the Mazda gearboxes. Which is nice. I took the lot home and stripped the cluster down till I had a speedo by itself sitting in front of me. I tried a few different combinations of wiring up with a spare battery until I had a setup that worked. The pickup only requires three wires- 12volt feed, earth and a signal wire. Same goes for the speedo head. For a 6 cylinder rev counter I still had the cluster left over from the Mazda Eunos we split ages ago when first embarking on the V6 route. I was not sure what sort of signal it would need- ie a simple pulse from one coil or a different signal from the ECU. I just had to try it. Luckily it was an older style and worked a treat. So I now had my required main gauges. I swapped the needle off the toyota rev counter onto the mazda one and the fonts almost look the same. All these bits then sat about in a shoe box till last week. So last week I though I best get it sorted before the oldschool nats [] There is a particular sort of look I wanted. A touch modern with an art deco/steam punk style. Sort of. So last week I bought some thick walled alloy stock and machined out some housings for speedo, revs, temp and fuel gauges. I set the gubbins/faces into these sandwiching some 2.5mm lexan spaced apart by thin strips of alloy. Then Saturday I made a new instrument binnacle out of thin steel. This was tricky as the Viva item is molded into a complex shape. Complex enough to make fabricating the steel item more time consuming than I thought it might be. I didnt want to vinyl cover it so it had to be a good neat fit to be just painted. Then over the last few nights I have been wiring and setting it all up. I cut a suitable multi pin plug from car the wreckers and cut the old viva plug off. I clambered under the car, disconnected the speedo cable and mounted the new sender. Ran some shielded wire, left over from the Eunos, and routed it into the cabin via the tunnel. Then assembly time. It all took a bit longer than I thought it might (doesn't it always..) and I had to stop and rethink a few things. There is not a lot of room in the Viva dash area and the Toyota speedo is quite big. Initially I was going to have seperatly mounted warning lights but then went a neater way (well I think) by using some cool little screw in 12v LEDs that Jaycar sell. These I mounted into the speedo face. I made the fuel and temp gauge faces from thin modellers plastic which I painted. But this went messy. In a panic I found an old excercise book that had a cover in thicker black plastic. Forgot to take photo though. The painter at work painted the back plate and binacle in Durapox black. Nice and hard wearing. I got up early and finished wiring it up this morning before work thinking it would all be plug and play. Sadly a few things played up. I ended up not getting it working till just before lunchtime today. First problem was it constantly blowing a fuse. I worked out that the problem was the temp gauge casing was live and shorting out when screwed into place. Traced it back and insulated the gauge face inside the housing.. Then the ignition light needed another bulb in the circuit as wattage drawn by the LED wasn't enough to excite the alternator into action.. I think... anyway I added another bulb in parallel and that started working. Eventually I got it all sorted and drove to work. But the speedo was not working!!!curse word But then about 2kms from work the speedo needle 'pinged' into life. Cool. So out with the GPS and I tested the speedo. It reads just under 10% too fast. So better than the old one and I can try to locate a particular Jaycar kit I can then calibrate it. Having the rev counter in place is great! Its so much better to see whats happening with the revs when fanging the car about. I am not 100% totally happy with the look yet. It works really well but the font on the gauges is just not quite right. Maybe its just me as Its quite a different thing to be staring at. I think I need to add some silver around the binnacle or do something to make it look a little more original/older/retro. Any ideas welcome. Otherwise I'm happy and it was fun building it.1 point
-
mmmmmmmm work equip 01s my favorite so far1 point


This leaderboard is set to Auckland/GMT+12:00